Getting Started Guide Python
getting_started_guide_python
User Manual:
Open the PDF directly: View PDF ![]() .
.
Page Count: 82

citrix.com 2
1.
2.
NITRO API
The NetScaler NITRO protocol allows you to configure and monitor the NetScaler appliance programmatically by using
Representational State Transfer (REST) interfaces. Therefore, NITRO applications can be developed in any
programming language. Additionally, for applications that must be developed in Java or .NET or Python, NITRO APIs
are exposed through relevant libraries that are packaged as separate Software Development Kits (SDKs).
Important
- XML API are deprecated from NetScaler 10.5 onwards.
- Until specified otherwise, this NITRO documentation applies to NetScaler versions 11.0 and 10.5.
To use NITRO, you must have a basic understanding of the NetScaler appliance and you must make sure that the client
application has the following:
Access to a NetScaler appliance, version 9.2 or later.
To use REST interfaces, you must have a system to generate HTTP or HTTPS requests (payload in
JSON format) to the NetScaler appliance. You can use any programming language or tool.
For Java clients, you must have a system where Java Development Kit (JDK) 1.5 or later is available.
The JDK can be downloaded from
.
For .NET clients, you must have a system with .NET framework 3.5 or later installed. The .NET
framework can be downloaded from .
The Python SDK is available from NetScaler 10.5 onwards. For Python clients, you must have a system
with Python 2.7 or above version and the Requests library (available in <NITRO_SDK_HOME>/lib)
installed. The NITRO library must be installed on the client path. For installation instructions, read
the <NITRO_SDK_HOME>/README.txt file.
Obtaining the NITRO Package
The NITRO package is available as a tar file on the page of the NetScaler appliance's configuration utility.
Downloads
You must download and un-tar the file to a folder on your local system. This folder contains the NITRO libraries in the lib
subfolder. The libraries must be added to the client application classpath to access NITRO functionality.
Note: The REST package contains only documentation for using the REST interfaces.
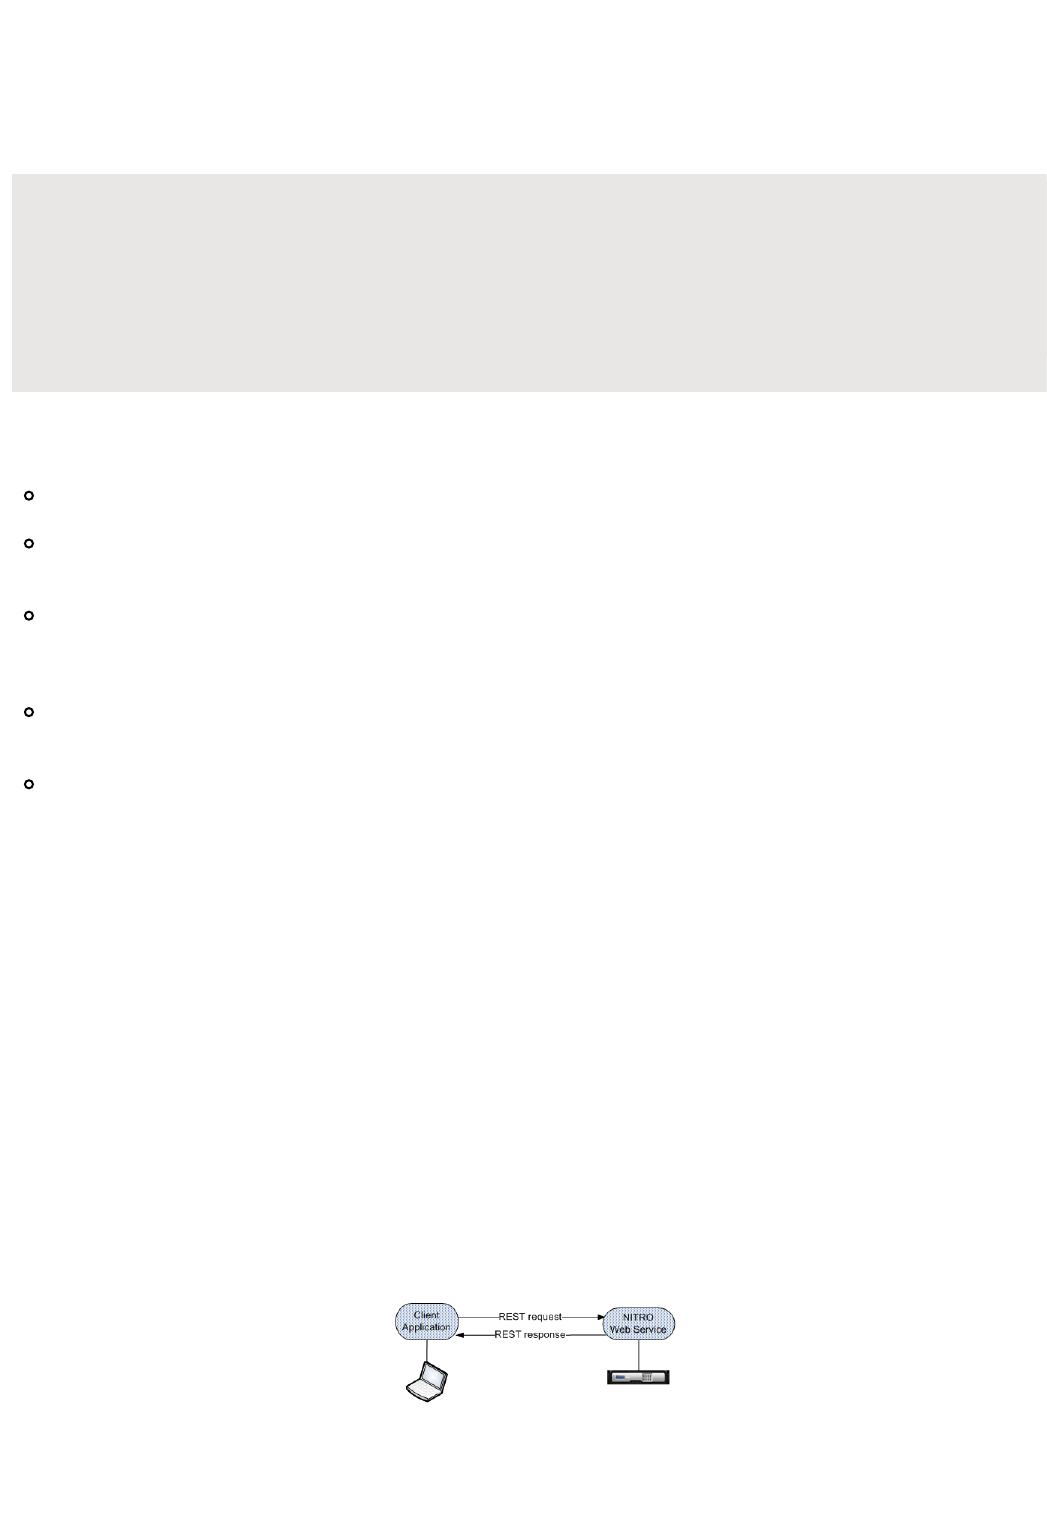
How NITRO Works
The NITRO infrastructure consists of a client application and the NITRO Web service running on a NetScaler appliance.
The communication between the client application and the NITRO web service is based on REST architecture using
HTTP or HTTPS.
As shown in the above figure, a NITRO request is executed as follows:
The client application sends REST request message to the NITRO web service. When using the SDKs, an API call is
translated into the appropriate REST request message.
http://www.oracle.com/technetwork/java/javase/downloads/index.html
http://www.microsoft.com/downloads/en/default.aspx

citrix.com 3
2.
3. The web service processes the REST request message.
The NITRO web service returns the corresponding REST response message to the client application. When using the
SDKs, the REST response message is translated into the appropriate response for the API call.
To minimize traffic on the NetScaler network, you retrieve the whole state of a resource from the server, make
modifications to the state of the resource locally, and then upload it back to the server in one network transaction. For
example, to update a load balancing virtual server, you must retrieve the object, update the properties, and then upload
the changed object in a single transaction.
Note: Local operations on a resource (changing its properties) do not affect its state on the server until the state of the
object is explicitly uploaded.
NITRO APIs are synchronous in nature. This means that the client application waits for a response from the NITRO web
service before executing another NITRO API.

citrix.com 4
REST Web Services
REST (REpresentational State Transfer) is an architectural style based on simple HTTP requests and responses
between the client and the server. REST is used to query or change the state of objects on the server side. In REST,
the server side is modeled as a set of entities where each entity is identified by a unique URL.
The general format for NITRO URLs is as follows:
For configurations. http://<netscaler-ip-address>/nitro/v1/config/<resource-type>
For retrieving statistics. http://<netscaler-ip-address>/nitro/v1/stat/<resource-type>
For example, for a load balancing virtual server, <resource-type> can be replaced by lbvserver.
Important
From NetScaler 10.1 version onwards, the following Content-Type is supported:
Content-Type:application/vnd.com.citrix.netscaler.<resource-type>+json.
However, content types such as "application/x-www-form-urlencoded" that were supported in NetScaler 9.3 and
earlier versions can also be used. You must make sure that the payload is the same as used in earlier versions.
The payloads provided in this documentation are applicable only for the "application/vnd.com.citrix.netscaler.
<resource-type>+json" Content-Type.
Some points to remember:
In addition to the CRUD operations (Create, Read, Update, and Delete), resources (such as lbvserver) can
support other operations or actions. These operations use the HTTP POST method, with the URL specifying
.the operation to be performed and the request body specifying the parameters for that operation
All NITRO operations are logged in the file on the NetScaler appliance./var/log/nitro.log
For more information on the REST objects and the usage, see the documentation provided in the
<NITRO_SDK_HOME>/index.html file.

citrix.com 5
Connecting to the NetScaler Appliance
The first step towards using NITRO is to establish a session with the NetScaler appliance and then authenticate the
session by using the NetScaler administrator's credentials. You must specify the username and password in the login
object. The session ID that is created must be specified in the request header of all further operations in the session.
Note:
You must have a user account on the appliance to log on to it. The configuration operations that you can
perform are limited by the administrative roles assigned to your account.
To ensure secure communication, use the HTTPS protocol in NITRO requests.
Instead of creating a NITRO session, you can logon to the NetScaler appliance while performing individual
operations. To do this, you must specify the username and password in the of the NITRO request header
request as follows:
X-NITRO-USER:<username>
X-NITRO-PASS:<password>
Content-Type:application/vnd.com.citrix.netscaler.lbvserver+json
For example, to connect and create a session with a NetScaler appliance with NSIP address 10.102.29.60 by using the HTTP
protocol:
Request:
HTTP Method
POST
URL http://10.102.29.60/nitro/v1/config/login
Request Headers
Content-Type:application/vnd.com.citrix.netscaler.login+json
Request Payload
{
"login":
{
"username":"<username>",
"password":"<password>"
}
}
Response:
HTTP Status Code on Success
200 OK
HTTP Status Code on Failure
4xx <string> (for general HTTP errors) or 5xx <string> (for NetScaler-specific errors). The response
payload provides details of the error.
Response Header
Set-Cookie:
NITRO_AUTH_TOKEN=<tokenvalue>;
path=/nitro/v1
Modifying the Session Timeout
You can modify the timeout period by specifying a new timeout period (in seconds) in the object. For example, to login
modify the timeout period to 60 minutes:

citrix.com 6
{
"login":
{
"username":"<username>",
"password":"<password>",
"timeout":"3600"
}
}
Some points to note with regards to session timeout for NetScaler 10.5 and later versions:
When restricted timeout param is enabled, NITRO, by default, uses the timeout value that is configured for
the logged in user. You can customize this value but it must be limited to the value specified for the user. If
no value is specified for the user, the default timeout value of 15 minutes is used.
When restricted timeout param is not enabled, NITRO uses the default value of 30 minutes as session
timeout.

citrix.com 7
Enabling NetScaler Features and Modes
Some NetScaler features and modes are disabled by default and therefore must be enabled before they can be
configured. To enable a NetScaler feature or mode, specify the action as "enable" in the URL query string, and in the
request payload, specify the feature or mode to be enabled.
For example, to enable the load balancing and content switching features:
Request:
HTTP Method
POST
URL http://<netscaler-ip-address>/nitro/v1/config/nsfeature?action=enable
Request Headers
Cookie:NITRO_AUTH_TOKEN=<tokenvalue>
Content-Type:application/vnd.com.citrix.netscaler.nsfeature+json
Request Payload
{
"nsfeature":
{
"feature":
[
"LB",
"CS"
]
}
}
Response:
HTTP Status Code on Success
200 OK
HTTP Status Code on Failure
4xx <string> (for general HTTP errors) or 5xx <string> (for NetScaler-specific errors). The response
payload provides details of the error.
For example, to enable the L2 and fast ramp modes:
Request:
HTTP Method
POST
URL http://<netscaler-ip-address>/nitro/v1/config/nsmode?action=enable
Request Headers
Cookie:NITRO_AUTH_TOKEN=<tokenvalue>
Content-Type:application/vnd.com.citrix.netscaler.nsmode+json
Request Payload
{
"nsmode":
{
"mode":
[
"L2",
"FR"
]
}
}

citrix.com 8
Response:
HTTP Status Code on Success
200 OK
HTTP Status Code on Failure
4xx <string> (for general HTTP errors) or 5xx <string> (for NetScaler-specific errors). The response
payload provides details of the error.
Note: To disable a feature or mode, in the URL query string, specify the action as "disable".

citrix.com 9
Saving NetScaler Configurations
To make sure that the configurations persist on rebooting the appliance, you must save the NetScaler configurations. To
save the configurations, specify the action as "save" in the URL query string.
To save the configurations:
Request:
HTTP Method
POST
URL http://<netscaler-ip-address>/nitro/v1/config/nsconfig?action=save
Request Headers
Cookie:NITRO_AUTH_TOKEN=<tokenvalue>
Content-Type:application/vnd.com.citrix.netscaler.nsconfig+json
Request Payload
{
"nsconfig":
{}
}
Response:
HTTP Status Code on Success
200 OK
HTTP Status Code on Failure
4xx <string> (for general HTTP errors) or 5xx <string> (for NetScaler-specific errors). The response
payload provides details of the error.

citrix.com 10
General API Usage
A NetScaler appliance has multiple features, and each feature has multiple resources. Each NetScaler resource,
depending on the operation to be performed on it, has a unique URL associated with it. URLs for configuration
operations have the following format:
http://<netscaler-ip-address>/nitro/v1/config/<resource_type>/<resource_name>.
For example, to access the lbvserver named MyFirstLbVServer on a NetScaler with IP 10.102.29.60, the URL is:
http://10.102.29.60/nitro/v1/config/lbvserver/MyFirstLbVServer.
This section explains, in general, the different types of operations that can be performed on the NetScaler appliance by
using NITRO API.
Before going into the details of these operations, you must be aware of the following functionality:
You can use the "action" query parameter in the URL to perform operations such as save, enable, disable,
and kill sessions.
You can use the "attrs", "filter", "args", "count" and other query parameters when retrieving NetScaler
resources. For more information, see .
You can perform bulk operations and thus minimize network traffic. To perform a bulk operation, specify the
required parameters in the same request payload. You can also control the behavior of a bulk operation in
case of failure of some operations. To do this, in the request header, specify the appropriate value for the X-
NITRO-ONERROR parameter. For more information, see .
NetScaler NITRO clearly shows the errors so that corrective actions can be taken. For more information, see
.
Retrieving Details of NetScaler Resources
Performing Bulk Operations
Error Handling

citrix.com 11
Adding a NetScaler Resource
To create a new resource (for example, an lbvserver) on the appliance, specify the resource name and other related
arguments in the specific resource object.
For example, to create an load balancing virtual server named MyFirstLbVServer:
Request:
HTTP Method
POST
URL http://<netscaler-ip-address>/nitro/v1/config/lbvserver
Request Headers
Cookie:NITRO_AUTH_TOKEN=<tokenvalue>
Content-Type:application/vnd.com.citrix.netscaler.lbvserver+json
Request Payload
{
"lbvserver":
{
"name":"MyFirstLbVServer",
"servicetype":"http"
}
}
Response:
HTTP Status Code on Success
200 Created
HTTP Status Code on Failure
4xx <string> (for general HTTP errors) or 5xx <string> (for NetScaler-specific errors). The response
payload provides details of the error.

citrix.com 12
Enabling a NetScaler Resource
To enable a resource on the NetScaler appliance, specify the action as "enable" in the URL query string, and in the
request payload, specify the resource to be enabled.
For example, to enable a load balancing virtual server named MyFirstLbVServer:
Request:
HTTP Method
POST
URL http://<netscaler-ip-address>/nitro/v1/config/lbvserver?action=enable
Request Headers
Cookie:NITRO_AUTH_TOKEN=<tokenvalue>
Content-Type:application/vnd.com.citrix.netscaler.lbvserver+json
Request Payload
{
"lbvserver":
{
"name":"MyFirstLbVServer"
}
}
Response:
HTTP Status Code on Success
200 OK
HTTP Status Code on Failure
4xx <string> (for general HTTP errors) or 5xx <string> (for NetScaler-specific errors). The response
payload provides details of the error.
Note: To disable a resource, in the URL query string, specify the action as "disable".

citrix.com 13
Getting the Count of NetScaler Resources
To get a count of a specific resource type, in the URL specify the count query parameter as "yes".
For example, to get a count of all the load balancing virtual servers:
Request:
HTTP Method
GET
URL http://<netscaler-ip-address>/nitro/v1/config/lbvserver?count=yes
Request Headers
Cookie:NITRO_AUTH_TOKEN=<tokenvalue>
Accept:application/vnd.com.citrix.netscaler.lbvserver+json
Response:
HTTP Status Code on Success
200 OK
HTTP Status Code on Failure
4xx <string> (for general HTTP errors) or 5xx <string> (for NetScaler-specific errors). The response
payload provides details of the error.
Response Header
Content-Type:application/vnd.com.citrix.netscaler.lbvserver+json
Response Payload
{
"lbvserver":
[
{
"__count": 4
}
]
}

citrix.com 14
Retrieving Details of NetScaler Resources
NITRO provides multiple approaches using which you can retrieve resources and their relevant details. The following
table explains each of these approaches with the required URL.
Note: A sample format of the request and response is provided below the table.
Retrieving all
details of all
resources of
a specific
type
In the URL, specify the type of resource for which you want to retrieve the details.
For example, to retrieve all details of load balancing virtual servers available on a NetScaler
appliance.
http://<netscaler-ip-address>/nitro/v1/config/lbvserver
Retrieving all
details of a
specific
resource
In the URL, specify the name of resource for which you want to retrieve the details.
For example, to retrieve all details of a load balancing virtual server named MyFirstLbVServer:
http://<netscaler-ip-address>/nitro/v1/config/lbvserver/MyFirstLbVServer
Retrieving
summary or
detailed view
of resources
In the URL, use the " " query parameter to specify whether you want to view the summary view
(mandatory parameters) or detail (all parameters).
For example, to view the mandatory parameters for all load balancing virtual servers:
http://<netscaler-ip-address>/nitro/v1/config/lbvserver?view=summary
Note: By default, the retrieved results are displayed in detail view (?view=detail).
Retrieving all
details of
resources
that have
multiple
unique
identifiers
In the URL, specify the type of resource and use the " " query parameter to specify the args
unique attributes and the values for those attributes.
For example, to get the application firewall profiles that have unique identifiers "name" and
"starturl" as appfw1 and aa respectively.
http://<netscaler-ip-address>/nitro/v1/config/appfwprofile?args=name:appfw1,starturl:aa
Retrieving
specific
details of all
resources of
a specific
type
In the URL, specify the type of the resource and use the " " query parameter to specify the attrs
resource details that you want to retrieve.
For example, to retrieve the "name" and "lbmethod" of all load balancing virtual servers:
http://<netscaler-ip-address>/nitro/v1/config/lbvserver?attrs=name,lbmethod
Retrieving
specific
details of a
specific
resource
In the URL, specify the type and name of the resource and use the " " query parameter to attrs
specify the resource details that you want to retrieve.
For example, to retrieve the "name" and "lbmethod" of a load balancing virtual server named
"MyFirstLbVServer":
http://<netscaler-ip-address>/nitro/v1/config/lbvserver/MyFirstLbVServer?attrs=name,
lbmethod
Filtering the
retrieved
resources
In the URL, specify the type of resource and use the " " query parameter to specify the filter
attribute(s) and the value(s) of the attributes. The resources fetched will be filtered based on
the filter criteria.
Note: The filter query parameter supports the use of PCRE regular expressions.
For example, to filter the load balancing virtual servers where the "lbmethod" is
ROUNDROBIN.
http://<netscaler-ip-address>/nitro/v1/config/lbvserver?filter=lbmethod:ROUNDROBIN

citrix.com 15
Retrieving
resources in
paginated
manner
If the request is likely to result in a large number of resources, you can divide the results into
pages and retrieve them page by page (paginated). For example, if you are retrieving all the
53 load balancing virtual servers of a NetScaler appliance, instead of retrieving all 53 in one
response, you can configure the results to be divided into 6 pages each having 10 results.
In the URL, specify the name of the resource and use the following query parameters:
" " - The page number to be displayed.pageno
" " - The number of resources to be displayed in each page.pagesize
For example, to retrieve the load balancing virtual servers in a paginated form, first get a
count (using the "count" query parameter shown in below row) of the load balancing virtual
servers. Then, accordingly specify the number of results for each page and then specify the
page number to be displayed.
http://<netscaler-ip-address>/nitro/v1/config/lbvserver?pagesize=10&pageno=3
For example, to retrieve only the name and load balancing method of all load balancing virtual servers on a NetScaler:
Request:
HTTP Method
GET
URL http://<netscaler-ip-address>/nitro/v1/config/lbvserver?attrs=name,lbmethod
Request Headers
Cookie:NITRO_AUTH_TOKEN=<tokenvalue>
Accept:application/vnd.com.citrix.netscaler.lbvserver_list+json
Note: If the operation returns a list of objects, the Accept header does not require the resource type to
be appended by "_list".
Response:
HTTP Status Code on Success
200 OK
HTTP Status Code on Failure
4xx <string> (for general HTTP errors) or 5xx <string> (for NetScaler-specific errors). The response
payload provides details of the error.
Response Header
Content-Type:application/vnd.com.citrix.netscaler.lbvserver_list+json
Note: For a single object, the Content-Type header does not require the resource type to be
appended by "_list".
Response Payload
{
lbvserver:
{
name: "test",
lbmethod: "LEASTCONNECTION"
}
{
name: "test1",
lbmethod: "LEASTCONNECTION"
}
}

citrix.com 16
Retrieving Statistics of NetScaler Resources
The NetScaler appliance collects statistics about the usage of its features and the corresponding resources. NITRO can
retrieve these statistics.
To get statistics of a feature, the URL format must be: http://<netscaler-ip-
.address>/nitro/v1/stat/<feature_name>
To get statistics of a resource, the URL format must be: http://<netscaler-ip-
.address>/nitro/v1/stat/<resource_type>/<resource_name>
To get statistics of the services and service groups that are bound to a load balancing virtual server, the
URL format must be: http://<netscaler-ip-address>/nitro/v1/stat/lbvserver/<name>?statbindings=yes.
For example, to get the statistics of a load balancing virtual server named MyFirstLbVServer:
Request:
HTTP Method
GET
URL http://<netscaler-ip-address>/nitro/v1/stat/lbvserver/MyFirstLbVServer
Request Headers
Cookie:NITRO_AUTH_TOKEN=<tokenvalue>
Accept:application/vnd.com.citrix.netscaler.lbvserver+json
Response:
HTTP Status Code on Success
200 OK
HTTP Status Code on Failure
4xx <string> (for general HTTP errors) or 5xx <string> (for NetScaler-specific errors). The response
payload provides details of the error.
Response Header
Content-Type:application/vnd.com.citrix.netscaler.lbvserver+json
Response Payload
{
"lbvserver":
[
{
"name":"MyFirstLbVServer",
"establishedconn":0,
"vslbhealth":0,
"primaryipaddress":"0.0.0.0",
...
}
]
}
Note: Not all NetScaler features and resources have statistic objects associated with them.

citrix.com 17
Resetting Properties of a NetScaler Resource
To unset the value of an attribute of a NetScaler object or reset it to its default value (similar to the "unset" NetScaler
CLI commands), specify the action as "unset" in the URL query string, and in the request payload, specify the value of
the attributes to be unset as "true" (boolean).
For example, to unset the load balancing method and the comments attributes of a load balancer virtual server named
MyFirstLbVServer:
Request:
HTTP Method
POST
URL http://<netscaler-ip-address>/nitro/v1/config/lbvserver?action=unset
Request Headers
Cookie:NITRO_AUTH_TOKEN=<tokenvalue>
Content-Type:application/vnd.com.citrix.netscaler.lbvserver+json
Request Payload
{
"lbvserver":
{
"name":"MyFirstLbVServer",
"lbmethod":"true",
"comment":"true"
}
}
Response:
HTTP Status Code on Success
200 OK
HTTP Status Code on Failure
4xx <string> (for general HTTP errors) or 5xx <string> (for NetScaler-specific errors). The response
payload provides details of the error.

citrix.com 18
Renaming a NetScaler Resource
To change the name of an existing resource, specify the action as "rename" in the URL query string, and in the request
payload, specify the existing name and the new name.
For example, to change the name of a load balancing virtual server from MyFirstLbVServer to MyServer:
Request:
HTTP Method
POST
URL http://<netscaler-ip-address>/nitro/v1/config/lbvserver?action=rename
Request Headers
Cookie:NITRO_AUTH_TOKEN=<tokenvalue>
Content-Type:application/vnd.com.citrix.netscaler.lbvserver+json
Request Payload
{
"lbvserver":
{
"name":"MyFirstLbVServer",
"newname":"MyServer"
}
}
Response:
HTTP Status Code on Success
200 OK
HTTP Status Code on Failure
4xx <string> (for general HTTP errors) or 5xx <string> (for NetScaler-specific errors). The response
payload provides details of the error.

citrix.com 19
Updating a NetScaler Resource
To update the details of an existing resource on the NetScaler appliance, specify the name of the resource in the URL,
and in the request payload,within the specific resource object, specify the name and the updated details of the resource.
For example, to change the load balancing method to ROUNDROBIN and update the comment property for a load
balancing virtual server named MyFirstLbVServer:
Request:
HTTP Method
PUT
URL http://<netscaler-ip-address>/nitro/v1/config/lbvserver/MyFirstLbVServer
Request Headers
Cookie:NITRO_AUTH_TOKEN=<tokenvalue>
Content-Type:application/vnd.com.citrix.netscaler.lbvserver+json
Request Payload
{
"lbvserver":
{
"name":"MyFirstLbVServer",
"lbmethod":"ROUNDROBIN",
"comment":"Updated comments"
}
}
Response:
HTTP Status Code on Success
200 OK
HTTP Status Code on Failure
4xx <string> (for general HTTP errors) or 5xx <string> (for NetScaler-specific errors). The response
payload provides details of the error.

citrix.com 20
Binding NetScaler Resources
NetScaler resources form relationships with each other through the process of binding. This is how services are
associated with a load balancing virtual server, or how policies are bound to a load balancing virtual server. Each
binding relationship is represented by its own object. A binding resource has properties representing the name of each
NetScaler resource in the binding relationship. It can also have other properties related to that relationship (for example,
the weight of the binding between an lbvserver resource and a service resource).
Read through the following examples to get a better understanding of the bind and unbind operation.
Example 1: To bind a service named "svc_prod" to a load balancing virtual server named "MyFirstLbVServer" and specify a
weight for the binding:
Request:
HTTP Method
POST
URL http://<netscaler-ip-address>/nitro/v1/config/lbvserver_service_binding
Request Headers
Cookie:NITRO_AUTH_TOKEN=<tokenvalue>
Content-Type:application/vnd.com.citrix.netscaler.lbvserver_service_binding+json
Request Payload
{
"lbvserver_service_binding":
{
"servicename":"svc_prod",
"weight":"20",
"name":"MyFirstLbVServer"
}
}
Response:
HTTP Status Code on Success
201 Created
HTTP Status Code on Failure
4xx <string> (for general HTTP errors) or 5xx <string> (for NetScaler-specific errors). The response
payload provides details of the error.
Example 2: To bind a policy to a policy label:
Request:
HTTP Method
POST
URL http://<netscaler-ip-address>/nitro/v1/config/authenticationpolicylabel_authenticationpolicy_binding
Request Headers
Cookie:NITRO_AUTH_TOKEN=<tokenvalue>
Content-Type:application/vnd.com.citrix.netscaler.authenticationpolicylabel_authenticationpolicy_binding
Request Payload
{
"authenticationpolicylabel_authenticationpolicy_binding":
{
"policyname":"p1",
"priority":"100",
"gotopriorityexpression":"END",
"labelname":"pl1"

citrix.com 21
}
}
Response:
HTTP Status Code on Success
201 Created
HTTP Status Code on Failure
4xx <string> (for general HTTP errors) or 5xx <string> (for NetScaler-specific errors). The response
payload provides details of the error.
To unbind a resource, use the DELETE method and specify an "args" query string parameter in the URL that contains
the attribute name and value in the relationship resource that designates the secondary resource.
For example, to unbind the service "svc_prod" from the load balancing virtual server "MyFirstLbVServer":
Request:
HTTP Method
DELETE
URL http://<netscaler-ip-address>/nitro/v1/config/lbvserver_service_binding/MyFirstLbVServer?
args=servicename:svc_prod
Request Header
Cookie:NITRO_AUTH_TOKEN=<tokenvalue>
Response:
HTTP Status Code on Success
200 OK
HTTP Status Code on Failure
4xx <string> (for general HTTP errors) or 5xx <string> (for NetScaler-specific errors). The response
payload provides details of the error.

citrix.com 22
Globally Binding NetScaler Resources
Some NetScaler resources can be bound globally to affect the whole system. For example, if a compression policy is
bound to an load balancing virtual server, the policy affects only the traffic on that virtual server. However, if bound
globally, it can affect any traffic on the NetScaler appliance regardless of the virtual server that handles the traffic.
The names of NITRO resources that can be used to bind resources globally have the pattern
. For example, the object <featurename>global_<resourcetype>_binding aaaglobal_aaapreauthenticationpolicy_binding
is used to bind preauthentication policies globally.
For example, to bind the policy named preautpol1 globally at priority 200:
Request:
HTTP Method
POST
URL http://<netscaler-ip-address>/nitro/v1/config/aaaglobal_aaapreauthenticationpolicy_binding/preautpol1
Request Headers
Cookie:NITRO_AUTH_TOKEN=<tokenvalue>
Content-Type:application/vnd.com.citrix.netscaler.aaaglobal_aaapreauthenticationpolicy_binding+json
Request Payload
{
"aaaglobal_aaapreauthenticationpolicy_binding":
{
"policy":"preautpol1",
"priority":"200"
}
}
Response:
HTTP Status Code on Success
200 OK
HTTP Status Code on Failure
4xx <string> (for general HTTP errors) or 5xx <string> (for NetScaler-specific errors). The response
payload provides details of the error.
To unbind a global resource, in the URL use the query parameter to specify the resource to be unbound.args
For example, to unbind the policy named preautpol1:
Request:
HTTP Method
DELETE
URL http://<netscaler-ip-address>/nitro/v1/config/aaaglobal_aaapreauthenticationpolicy_binding?
args=policy:preautpol1
Request Header
Cookie:NITRO_AUTH_TOKEN=<tokenvalue>
Response:
HTTP Status Code on Success
200 OK
HTTP Status Code on Failure
4xx <string> (for general HTTP errors) or 5xx <string> (for NetScaler-specific errors). The response
payload provides details of the error.

citrix.com 23
Deleting a NetScaler Resource
To delete a NetScaler resource, specify the resource name in the URL.
For example, to delete a load balancing virtual server named MyFirstLbVServer:
Request:
HTTP Method
DELETE
URL http://<netscaler-ip-address>/nitro/v1/config/lbvserver/MyFirstLbVServer
Request Header
Cookie:NITRO_AUTH_TOKEN=<tokenvalue>
Response:
HTTP Status Code on Success
200 OK
HTTP Status Code on Failure
4xx <string> (for general HTTP errors) or 5xx <string> (for NetScaler-specific errors). The response
payload provides details of the error.

citrix.com 24
Performing Bulk Operations
You can create and update multiple resources simultaneously and thus minimize network traffic. For example, you can
add multiple load balancing virtual servers in the same operation. To perform a bulk operation, specify the required
parameters in the same request payload.
To account for the failure of some operations within the bulk operation, NITRO allows you to configure one of the following
behaviors:
Exit. When the first error is encountered, the execution stops. The NITRO operations that were executed
before the error are committed. This is the default behavior.
Rollback. When the first error is encountered, the execution stops. The NITRO operations that were
executed before the error are rolled back. Rollback is only supported for add and bind NITRO operations.
Continue. All the NITRO operations in the list are executed even if some operations fail.
You must specify the behavior of the bulk operation in the request header using the X-NITRO-ONERROR parameter.
For example, to add two load balancing virtual servers in one operation, and continue even if one of the add operation fails:
Request:
HTTP Method
POST
URL http://<netscaler-ip-address>/nitro/v1/config/lbvserver
Request Headers
Cookie:NITRO_AUTH_TOKEN=<tokenvalue>
Content-Type:application/vnd.com.citrix.netscaler.lbvserver_list+json
X-NITRO-ONERROR:continue
Request Payload
{
"lbvserver":
[
{
"name":"new_lbvserver1",
"servicetype":"http"
},
{
"name":"new_lbvserver2",
"servicetype":"http"
}
]
}
Response:
HTTP Status Code on Success
201 Created for the add operation and 200 OK for the update operation.
HTTP Status Code on Failure
207 Multi Status with error details in the response payload. For more information, see Error Handling.

citrix.com 25
Performing File Operations
NetScaler operations such as configuring SSL certificates requires the input files to be available locally on the NetScaler
appliance. NITRO allows you to perform file operations such as , , ,
and of types: txt, cert, req, xml, lic, and key.
Note:
File size must be less than or equal to 2 MB.
Use the "BASE64" value for the fileencoding attribute in the request payload. This is the only valid encoding
currently supported.
The filelocation path must be URL encoded. For example, if the path is , encode the / and use /nsconfig/ssl
the file location as %2Fnsconfig%2Fssl.
When uploading a file, make sure that each directory of the file path has the 755 (read, write, execute)
permission. For example, to upload a file to the "/nsconfig/ssl/" directory, the following directories must have
the 755 permission:
flash (because the "/nsconfig" folder is actually a link to "/flash/nsconfig/" directory)
nsconfig
ssl
Uploading a File
To upload a file to the NetScaler, specify a name for the file, the location where the file must be created on the
NetScaler, and the content of the file.
For example, to upload a file named in the directory:cert1.crt /nsconfig/ssl/
Request:
HTTP Method
POST
URL http://<netscaler-ip-address>/nitro/v1/config/systemfile
Request Headers
Cookie:NITRO_AUTH_TOKEN=<tokenvalue>
Content-Type:application/vnd.com.citrix.netscaler.systemfile+json
Request Payload
{
"systemfile":
{
"filename": "cert1.crt",
"filelocation": "/nsconfig/ssl/",
"filecontent":"VGhpcyBpcyBteSBmaWxl",
"fileencoding": "BASE64"
}
}
Response:
HTTP Status Code on Success
200 OK
HTTP Status Code on Failure
4xx <string> (for general HTTP errors) or 5xx <string> (for NetScaler-specific errors). The response
payload provides details of the error.
Retrieving the Files
To retrieve the files from a specific NetScaler directory, specify the directory path in the URL.
For example, to retrieve the files from the directory./nsconfig/ssl
uploading files retrieving files retrieving file content
deleting files

citrix.com 26
Request:
HTTP Method
GET
URL http://<netscaler-ip-address>/nitro/v1/config/systemfile?args=filelocation:%2Fnsconfig%2Fssl
Request Header
Cookie:NITRO_AUTH_TOKEN=<tokenvalue>
Accept:application/vnd.com.citrix.netscaler.systemfile_list+json
Response:
HTTP Status Code on Success
200 OK
HTTP Status Code on Failure
4xx <string> (for general HTTP errors) or 5xx <string> (for NetScaler-specific errors). The response
payload provides details of the error.
Response Header
Content-Type:application/vnd.com.citrix.netscaler.systemfile_list+json
Response Payload
{
"systemfile":
[
{
"filename": "ns-root.key",
"filelocation": "/nsconfig/ssl",
"fileaccesstime": "Tue Jan 14 19:27:01 2014",
"filemodifiedtime": "Tue Nov 5 17:16:00 2013"
},
{
"filename": "ns-root.req",
"filelocation": "/nsconfig/ssl",
"fileaccesstime": "Tue Jan 14 19:27:01 2014",
"filemodifiedtime": "Tue Nov 5 17:16:00 2013"
}
]
}
Retrieving Contents of a Specific File
To retrieve the contents of a file, specify the filename and its directory path in the URL.
For example, to retrieve the contents of the file from the directory.ns-root.key /nsconfig/ssl
Request:
HTTP Method
GET
URL http://<netscaler-ip-address>/nitro/v1/config/systemfile/ns-root.key?args=filelocation:%2Fnsconfig%
2Fssl
Request Header
Cookie:NITRO_AUTH_TOKEN=<tokenvalue>

citrix.com 27
Accept:application/vnd.com.citrix.netscaler.systemfile+json
Response:
HTTP Status Code on Success
200 OK
HTTP Status Code on Failure
4xx <string> (for general HTTP errors) or 5xx <string> (for NetScaler-specific errors). The response
payload provides details of the error.
Response Header
Content-Type:application/vnd.com.citrix.netscaler.systemfile+json
Response Payload
{
"systemfile":
[
{
"filename": "ns-root.key",
"filelocation": "/nsconfig/ssl",
"filecontent": "LS0tLS1CRUdJTiBSU0EgUFJJVkFU0tLQo=",
"fileencoding": "BASE64",
"fileaccesstime": "Tue Jan 14 19:27:01 2014",
"filemodifiedtime": "Tue Nov 5 17:16:00 2013"
}
]
}
Deleting a File
To delete a file from the NetScaler appliance, specify the filename and the directory path in the URL.
For example, to delete the file from the directory.ns-root.key /nsconfig/ssl
Request:
HTTP Method
DELETE
URL https://<netscaler-ip-address>/nitro/v1/config/systemfile/ns-root.key?args=filelocation:%2Fnsconfig%
2Fssl
Request Header
Cookie:NITRO_AUTH_TOKEN=<tokenvalue>
Response:
HTTP Status Code on Success
200 OK
HTTP Status Code on Failure
4xx <string> (for general HTTP errors) or 5xx <string> (for NetScaler-specific errors). The response
payload provides details of the error.

citrix.com 28
Killing a System Session
A NetScaler administrator can kill any system session by specifying the action as "kill" in the URL query string and by
specifying the required system session ID in the request payload.
For example, to kill a system session that has ID as 311:
Request:
HTTP Method
POST
URL http://<netscaler-ip-address>/nitro/v1/config/systemsession?action=kill
Request Headers
Cookie:NITRO_AUTH_TOKEN=<tokenvalue>
Content-Type:application/vnd.com.citrix.netscaler.systemsession+json
Request Payload
{
"systemsession":
{
"sid":"311"
}
}
Response:
HTTP Status Code on Success
200 OK
HTTP Status Code on Failure
4xx <string> (for general HTTP errors) or 5xx <string> (for NetScaler-specific errors). The response
payload provides details of the error.

citrix.com 29
Disconnecting from the NetScaler Appliance
Before disconnecting (logging out) from the NetScaler appliance, make sure that you have saved the NetScaler
configurations.
To logout of the NetScaler appliance:
Request:
HTTP Method
POST
URL http://<netscaler-ip-address>/nitro/v1/config/logout
Request Headers
Cookie:NITRO_AUTH_TOKEN=<tokenvalue>
Content-Type:application/vnd.com.citrix.netscaler.logout+json
Request Payload
{
"logout":{}
}
Response:
HTTP Status Code on Success
200 OK
HTTP Status Code on Failure
4xx <string> (for general HTTP errors) or 5xx <string> (for NetScaler-specific errors). The response
payload provides details of the error.

citrix.com 30
Usage Scenarios
In this section, we provide NITRO API specific to certain resources and scenarios. We will be adding more scenarios in future
updates to this documentation.

citrix.com 31
Configuring a NetScaler Cluster
You can use NITRO to add or create and manage a NetScaler cluster.
Cluster Instance Operations
All operations on a cluster instance must be performed on the object.clusterinstance
For example, to create a cluster instance with ID 1, connect to the NetScaler appliance that you are first adding to the
cluster:
Request:
HTTP Method
POST
URL http://<netscaler-ip-address>/nitro/v1/config/clusterinstance
Request Headers
Cookie:NITRO_AUTH_TOKEN=<tokenvalue>
Content-Type:application/vnd.com.citrix.netscaler.clusterinstance+json
Request Payload
{
"clusterinstance":
{
"clid":1,
"preemption":"ENABLED"
}
}
Response:
HTTP Status Code on Success
201 Created
HTTP Status Code on Failure
4xx <string> (for general HTTP errors) or 5xx <string> (for NetScaler-specific errors). The response
payload provides details of the error.
Cluster Node Operations
All operations on a cluster node must be performed on the object.clusternode
For example, to add a NetScaler appliance with NSIP address 10.102.29.60 to the cluster:
Request:
HTTP Method
POST
URL http://<netscaler-ip-address>/nitro/v1/config/clusternode
Request Headers
Cookie:NITRO_AUTH_TOKEN=<tokenvalue>
Content-Type:application/vnd.com.citrix.netscaler.clusternode+json
Request Payload
{
"clusternode":
{
"nodeid":1,
"ipaddress":"10.102.29.60",
"state":"ACTIVE",

citrix.com 32
"backplane":"1/1/2"
}
}
Response:
HTTP Status Code on Success
201 Created
HTTP Status Code on Failure
4xx <string> (for general HTTP errors) or 5xx <string> (for NetScaler-specific errors). The response
payload provides details of the error.
Add a Cluster IP Address
To define a cluster IP address, specify the required parameters in the object.nsip
For example, to configure a cluster IP address:
Request:
HTTP Method
POST
URL http://<netscaler-ip-address>/nitro/v1/config/nsip
Request Headers
Cookie:NITRO_AUTH_TOKEN=<tokenvalue>
Content-Type:application/vnd.com.citrix.netscaler.nsip+json
Request Payload
{
"nsip":
{
"ipaddress":"10.102.29.61",
"netmask":"255.255.255.255",
"type":"CLIP"
}
}
Response:
HTTP Status Code on Success
201 Created
HTTP Status Code on Failure
4xx <string> (for general HTTP errors) or 5xx <string> (for NetScaler-specific errors). The response
payload provides details of the error.
Add a Spotted IP Address
To configure an IP address as spotted, specify the required parameters in the object. This configuration must be nsip
done on the cluster IP address.
For example, to configure a spotted SNIP address on a node with ID 1:
Request:
HTTP Method
POST
URL http://<cluster-ip-address>/nitro/v1/config/nsip
Request Headers
Cookie:NITRO_AUTH_TOKEN=<tokenvalue>
Content-Type:application/vnd.com.citrix.netscaler.nsip+json

citrix.com 33
1.
Request Payload
{
"nsip":
{
"ipaddress":"10.102.29.77",
"netmask":"255.255.255.0",
"type":"SNIP",
"ownernode":1
}
}
Response:
HTTP Status Code on Success
201 Created
HTTP Status Code on Failure
4xx <string> (for general HTTP errors) or 5xx <string> (for NetScaler-specific errors). The response
payload provides details of the error.
Join NetScaler Appliance to Cluster
To join an appliance to a cluster, specify the required parameters in the object.cluster
For example, to join a NetScaler appliance to a cluster:
Request:
HTTP Method
POST
URL http://<netscaler-ip-address>/nitro/v1/config/cluster
Request Headers
Cookie:NITRO_AUTH_TOKEN=<tokenvalue>
Content-Type:application/vnd.com.citrix.netscaler.cluster+json
Request Payload
{
"cluster":
{
"clip":"10.102.29.61",
"password":"verysecret"
}
}
Response:
HTTP Status Code on Success
200 OK
HTTP Status Code on Failure
4xx <string> (for general HTTP errors) or 5xx <string> (for NetScaler-specific errors). The response
payload provides details of the error.
Linkset Operations
To configure a linkset, do the following:
Create a linkset by specifying the required parameters in the object.linkset
For example, to add a linkset LS/1:
Request:
HTTP Method
POST

citrix.com 34
1.
2.
URL http://<cluster-ip-address>/nitro/v1/config/linkset
Request Headers
Cookie:NITRO_AUTH_TOKEN=<tokenvalue>
Content-Type:application/vnd.com.citrix.netscaler.linkset+json
Request Payload
{
"linkset":
{
"id":"LS/1"
}
}
Response:
HTTP Status Code on Success
201 Created
HTTP Status Code on Failure
4xx <string> (for general HTTP errors) or 5xx <string> (for NetScaler-specific errors). The
response payload provides details of the error.
Bind the required interfaces to the linkset by specifying the interfaces in the object.linkset_interface_binding
For example, to bind interfaces 1/1/2 and 2/1/2 to linkset LS/1:
Request:
HTTP Method
PUT
URL http://<cluster-ip-address>/nitro/v1/config/linkset_interface_binding/LS%2F1?action=bind
Note: The linkset name (LS/1), must be URL encoded as LS%2F1.
Request Headers
Cookie:NITRO_AUTH_TOKEN=<tokenvalue>
Content-Type:application/vnd.com.citrix.netscaler.linkset_interface_binding+json
Request Payload
{
"linkset_interface_binding":
{
"id":"LS/1",
"ifnum":"1/1/2 2/1/2"
}
}
Response:
HTTP Status Code on Success
200 OK
HTTP Status Code on Failure
4xx <string> (for general HTTP errors) or 5xx <string> (for NetScaler-specific errors). The
response payload provides details of the error.

citrix.com 35
1.
2.
Configuring Admin Partitions
To create an admin partition, you must perform a set of operations on the default partition. To understand this
procedure, let us consider a company that has two departments each of which has an application that requires the
NetScaler functionality. The NetScaler admin wants to have a different partition for each department so that there is
isolation of users and configurations. The NetScaler admin must do the following (the sample shows configurations only
for a single admin partition):
Note: For detailed information and best practices, see .
Create a partition and allocate the required resources to that partition.
Request:
HTTP Method
POST
URL http://<netscaler-ip-address>/nitro/v1/config/nspartition
Request Headers
Cookie:NITRO_AUTH_TOKEN=<tokenvalue>
Content-Type:application/vnd.com.citrix.netscaler.nspartition+json
Request Payload
{
"nspartition":
{
"partitionname":"partition-dept1",
"maxbandwidth":"10240",
"minbandwidth":"10240",
"maxconn":"1024",
"maxmemlimit":"10"
}
}
Response:
HTTP Status Code on Success
200 Created
HTTP Status Code on Failure
4xx <string> (for general HTTP errors) or 5xx <string> (for NetScaler-specific errors). The
response payload provides details of the error.
Associate the appropriate users with the partition.
Request:
HTTP Method
PUT
URL http://<netscaler-ip-address>/nitro/v1/config/systemuser_nspartition_binding/user1
Request Headers
Cookie:NITRO_AUTH_TOKEN=<tokenvalue>
Content-Type:application/vnd.com.citrix.netscaler.systemuser_nspartition_binding+json
Request Payload
{
"systemuser_nspartition_binding":
{
"username":"user1",
Admin Partitions

citrix.com 36
2.
3.
4.
"partitionname":"partition-dept1"
}
}
Response:
HTTP Status Code on Success
200 OK
HTTP Status Code on Failure
4xx <string> (for general HTTP errors) or 5xx <string> (for NetScaler-specific errors). The
response payload provides details of the error.
Associate an appropriate command policy to the admin partition user.
Request:
HTTP Method
PUT
URL http://<netscaler-ip-address>/nitro/v1/config/systemuser_systemcmdpolicy_binding/user1
Request Headers
Cookie:NITRO_AUTH_TOKEN=<tokenvalue>
Content-Type:application/vnd.com.citrix.netscaler.systemuser_systemcmdpolicy_binding+json
Request Payload
{
"systemuser_systemcmdpolicy_binding":
{
"username":"user1",
"policyname":"partition-admin",
"priority":"1"
}
}
Response:
HTTP Status Code on Success
200 OK
HTTP Status Code on Failure
4xx <string> (for general HTTP errors) or 5xx <string> (for NetScaler-specific errors). The
response payload provides details of the error.
Specify the VLANs or bridgegroups to be associated with the partition. This step ensures network isolation of the
traffic. Traffic received on the interfaces of the VLAN or bridgegroup is isolated from the traffic of other partitions.
Request:
HTTP Method
PUT
URL http://<netscaler-ip-address>/nitro/v1/config/nspartition_vlan_binding/partition-dept1
Request Headers
Cookie:NITRO_AUTH_TOKEN=<tokenvalue>
Content-Type:application/vnd.com.citrix.netscaler.nspartition_vlan_binding+json
Request Payload
{
"nspartition_vlan_binding":
{
"partitionname":"partition-dept1",
"vlan":"2"

citrix.com 37
4.
5.
6.
7.
}
}
Response:
HTTP Status Code on Success
200 OK
HTTP Status Code on Failure
4xx <string> (for general HTTP errors) or 5xx <string> (for NetScaler-specific errors). The
response payload provides details of the error.
Save the configurations.
Request:
HTTP Method
POST
URL http://<netscaler-ip-address>/nitro/v1/config/nsconfig?action=save
Request Headers
Cookie:NITRO_AUTH_TOKEN=<tokenvalue>
Content-Type:application/vnd.com.citrix.netscaler.nsconfig+json
Request Payload
{
"nsconfig":
{
}
}
Response:
HTTP Status Code on Success
200 OK
HTTP Status Code on Failure
4xx <string> (for general HTTP errors) or 5xx <string> (for NetScaler-specific errors). The
response payload provides details of the error.
The admin partition is created.
Now, to configure this admin partition, you must logout of the default partition and logon again. You are automatically
taken to the admin partition to which you were first bound and once there you can configure the NetScaler.
Note: If you want to configure another admin partition, perform the switch operation given in the next step before
performing this step.
[Optional] If you are associated with multiple admin partitions, you can switch to the required partition.
Request:
HTTP Method
POST
URL http://<netscaler-ip-address>/nitro/v1/config/nspartition?action=Switch
Request Headers
Cookie:NITRO_AUTH_TOKEN=<tokenvalue>
Content-Type:application/vnd.com.citrix.netscaler.nspartition+json
Request Payload
{
"nspartition":
{

citrix.com 38
7.
8.
"partitionname":"partition-dept2"
}
}
Response:
HTTP Status Code on Success
200 OK
HTTP Status Code on Failure
4xx <string> (for general HTTP errors) or 5xx <string> (for NetScaler-specific errors). The
response payload provides details of the error.
View the partitions that are available on the NetScaler appliance. If a user is associated with more than one partition,
the response payload includes the "partitiontype" attribute the value of which indicates the partition to which the user
is currently logged on.
Request:
HTTP Method
GET
URL http://<netscaler-ip-address>/nitro/v1/config/nspartition
Request Headers
Cookie:NITRO_AUTH_TOKEN=<tokenvalue>
Accept:application/vnd.com.citrix.netscaler.nspartition+json
Response:
HTTP Status Code on Success
200 OK
HTTP Status Code on Failure
4xx <string> (for general HTTP errors) or 5xx <string> (for NetScaler-specific errors). The
response payload provides details of the error.
Response Header
Content-Type:application/vnd.com.citrix.netscaler.nspartition+json
Response Payload
{
"nspartition":
{
"partitionname":"partition-dept1",
"partitionid": "2",
"partitiontype": "Current Partition",
"maxbandwidth":"10240",
"minbandwidth":"10240",
"maxconn":"1024",
"maxmemlimit":"10"
}
}

citrix.com 39
Managing AppExpert Applications
To export an AppExpert application, specify the parameters needed for the export operation in the apptemplateinfo
object. Optionally, you can specify basic information about the AppExpert application template, such as the author of the
configuration, a summary of the template functionality, and the template version number, in the template_info
object. This information is stored as part of the template file that is created.
For example, to export an AppExpert application named MyApp1:
Request:
HTTP Method
POST
URL http://<netscaler-ip-address>/nitro/v1/config/apptemplateinfo?action=export
Request Headers
Cookie:NITRO_AUTH_TOKEN=<tokenvalue>
Content-Type:application/vnd.com.citrix.netscaler.apptemplateinfo+json
Request Payload
{
"apptemplateinfo":
{
"appname":"MyApp1",
"apptemplatefilename":"BizAp.xml",
"template_info":
{
"templateversion_major":"2",
"templateversion_minor":"1",
"author":"XYZ",
"introduction":"Intro",
"summary":"Summary"
}
}
}
Response:
HTTP Status Code on Success
200 OK
HTTP Status Code on Failure
4xx <string> (for general HTTP errors) or 5xx <string> (for NetScaler-specific errors). The response
payload provides details of the error.
To import an AppExpert application, specify the parameters needed for the import operation in the apptemplateinfo
object.
For example, to import an AppExpert application named MyApp1:
Request:
HTTP Method
POST
URL http://<netscaler-ip-address>/nitro/v1/config/apptemplateinfo?action=import
Request Headers
Cookie:NITRO_AUTH_TOKEN=<tokenvalue>
Content-Type:application/vnd.com.citrix.netscaler.apptemplateinfo+json
Request Payload
{
"apptemplateinfo":

citrix.com 40
{
"apptemplatefilename":"BizAp.xml",
"deploymentfilename":"BizAp_deployment.xml",
"appname":"MyApp1"
}
}
Response:
HTTP Status Code on Success
200 OK
HTTP Status Code on Failure
4xx <string> (for general HTTP errors) or 5xx <string> (for NetScaler-specific errors). The response
payload provides details of the error.
To import an AppExpert application by specifying different deployment settings:
Request:
HTTP Method
POST
URL http://<netscaler-ip-address>/nitro/v1/config/apptemplateinfo?action=import
Request Headers
Cookie:NITRO_AUTH_TOKEN=<tokenvalue>
Content-Type:application/vnd.com.citrix.netscaler.apptemplateinfo+json
Request Payload
{
"apptemplateinfo":
{
"apptemplatefilename":"BizAp.xml",
"appname":"Myapp2",
"deploymentinfo":
{
"appendpoint":
[
{
"ipv46":"11.2.3.8",
"port":80,
"servicetype":"HTTP"
}
],
"service":
[
{
"ip":"12.3.3.15",
"port":80,
"servicetype":"SSL"
},
{
"ip":"14.5.5.16",
"port":443,
"servicetype":"SSL"
}
]
}
}
}
Response:
HTTP Status Code on Success

citrix.com 41
200 OK
HTTP Status Code on Failure
4xx <string> (for general HTTP errors) or 5xx <string> (for NetScaler-specific errors). The response
payload provides details of the error.

citrix.com 42
Error Handling
In case of a failed request, NITRO provides the required information through the HTTP status code and in the response
header and response payload.
Error in a Single Resource Operation
Error in a Bulk Operations
Warnings
Error in a Single Resource Operation
The response of a single erroneous operation is as follows:
HTTP Status Code
4xx <string> (for general HTTP errors) or 5xx <string> (for NetScaler-specific errors)
Response Header
Content-Type:application/vnd.com.citrix.netscaler.error+json
Response Payload
{
errorcode: <Error code>
message: "<Error message>"
severity: "ERROR"
}
Error in a Bulk Operation
When there is a failure in one of the bulk operations, the response payload gives a combination of success and failure
(depends on the value set for X-NITRO-ONERROR in the request header).
HTTP Status Code
207 Multi Status
Response Header
Content-Type:application/vnd.com.citrix.netscaler.error_list+json
Response Payload when X-NITRO-ONERROR is set to continue
When the first operation fails, the request is not terminated. The response payload shows the error details of the failed
operation and the success status of the other operations.
{
"errorcode": 1243,
"message": "Bulk operation failed",
"severity": "ERROR",
"response":
[
{
"errorcode": 273,
"message": "Resource already exists",
"severity": "ERROR"
},
{
"errorcode": 0,
"message": "Done",
"severity": "NONE"
}
]
}
Response Payload when X-NITRO-ONERROR is set to exit
When the first operation fails, the request is terminated. The response payload only shows the error details of the
failed operation.
{
"errorcode": 1243,
"message": "Bulk operation failed",
"severity": "ERROR",
"response":
[

citrix.com 43
{
"errorcode": 273,
"message": "Resource already exists",
"severity": "ERROR"
}
]
}
Warnings in NITRO Operations
Warnings can be captured by specifying the "warning" query parameter as "yes" when performing any NITRO operation.
For example, to get warnings while connecting to the NetScaler appliance, the URL is as follows:
http://<netscaler-ip-address>/nitro/v1/config/login?warning=yes
If there are any warnings, the response is as follows:
HTTP Status Code
209 X-NITRO-WARNING
Response Header
Content-Type:application/vnd.com.citrix.netscaler.warning+json
Response Payload
{
errorcode: <Code>
message: "<Message>"
severity: "WARNING"
}

citrix.com 44
Java, .NET, and Python API
This section provides basic information for using the Java, .NET, and Python SDKs that are provided for the NITRO API.
The API are categorized on their scope and purpose.
Important
- All NITRO operations are logged in the /var/log/nitro.log file on the appliance.
- Executable samples are available in the directory.<NITRO_SDK_HOME>/sample

citrix.com 45
1.
2.
3.
4.
5.
6.
7.
8.
Tutorial: Create Your First NITRO Application
After completing this tutorial, you will understand and be able to use NITRO to log in to the appliance, create a load
balancing virtual server, retrieve details of an lbvserver, delete an lbvserver, save the configurations on the appliance,
and log out of the appliance.
Using Java API to Create your First NITRO Application
Using .NET API to Create your First NITRO Application
Note
Before you begin, make sure that you have the latest NITRO SDK and that the client application satisfies the
prerequisites for using the NITRO SDK.
All NITRO exceptions are captured by the class. For a more com.citrix.netscaler.nitro.exception.nitro_exception
detailed description, see .
The executable code for the sample is available in the <NITRO_SDK_HOME>/sample/ directory.
Using Java API to Create your First NITRO Application
Copy the libraries from folder to the project classpath.<NITRO_SDK_HOME>/lib
Create a new class and name it .
MyFirstNitroApplication
Create an instance of class. This instance is used to com.citrix.netscaler.nitro.service.nitro_service
perform all operations on the appliance:
nitro_service ns_session = new nitro_service("10.102.29.170","HTTP");
This code establishes a connection with an appliance that has IP address 10.102.29.170 and uses the HTTP protocol.
Replace 10.102.29.170 with the IP address of the NetScaler appliance that you have access to.
Use the instance to log in to the appliance using your credentials:nitro_service
ns_session.login("admin","verysecret");
This code logs into the appliance, with user name as and password as . Replace the credentials admin verysecret
with your login credentials.
Enable the load balancing feature:
String[] features_to_be_enabled = {"lb"};
ns_session.enable_features(features_to_be_enabled);
This code first sets the features to be enabled in an array and then enables the LB feature.
Create an instance of the class. You will com.citrix.netscaler.nitro.resource.config.lb.lbvserver
use this instance to perform operations on the lbvserver.
lbvserver new_lbvserver_obj = new lbvserver();
Use the instance to create a new lbvserver:lbvserver
new_lbvserver_obj.set_name("MyFirstLbVServer");
new_lbvserver_obj.set_ipv46("10.102.29.88");
new_lbvserver_obj.set_servicetype("HTTP");
new_lbvserver_obj.set_port(88);
new_lbvserver_obj.set_lbmethod("ROUNDROBIN");
lbvserver.add(ns_session,new_lbvserver_obj);
This code first sets the attributes (name, IP address, service type, port, and load balancing method) of the lbvserver
locally and then adds it to the appliance by using the corresponding method.add()
Retrieve the details of the lbvserver you have created:
new_lbvserver_obj = lbvserver.get(ns_session,new_lbvserver_obj.get_name());
System.out.println("Name : " +new_lbvserver_obj.get_name() +"\n" +"Protocol : " +new_lbvserver_obj.get_servicetype());
Using Java API to Create your First NITRO Application
Using .NET API to Create your First NITRO Application
Exception Handling

citrix.com 46
8.
9.
10.
11.
1.
2.
3.
4.
5.
6.
7.
8.
9.
10.
11.
This code first retrieves the details of the lbvserver as an object from the NetScaler, extracts the required attributes
(name and service type) from the object, and displays the results.
Delete the lbvserver you created in the above steps:
lbvserver.delete(ns_session, new_lbvserver_obj.get_name());
Save the configurations:
ns_session.save_config();
Log out of the appliance:
ns_session.logout();
Using .NET API to Create your First NITRO Application
Copy the libraries from folder to the project classpath.<NITRO_SDK_HOME>/lib
Create a new class and name it .
MyFirstNitroApplication
Create an instance of class. This instance is used to com.citrix.netscaler.nitro.service.nitro_service
perform all operations on the appliance:
nitro_service ns_session = new nitro_service("10.102.29.170", "http");
This code establishes a connection with an appliance that has IP address 10.102.29.170 and uses the HTTP protocol.
Replace 10.102.29.170 with the IP address of the NetScaler appliance that you have access to.
Use the instance to log in to the appliance using your credentials:nitro_service
ns_session.login("admin","verysecret");
This code logs into the appliance, with user name as and password as . Replace the credentials admin verysecret
with your login credentials.
Enable the load balancing feature:
String[] features_to_be_enabled = {"lb"};
ns_session.enable_features(features_to_be_enabled);
This code enables load balancing on the appliance.
Create an instance of the class. You will com.citrix.netscaler.nitro.resource.config.lb.lbvserver
use this instance to perform operations on the lbvserver.
lbvserver new_lbvserver_obj = new lbvserver();
Use the instance to create a new lbvserver:lbvserver
new_lbvserver_obj.name = "MyFirstLbVServer";
new_lbvserver_obj.ipv46 = "10.102.29.88";
new_lbvserver_obj.servicetype = "HTTP";
new_lbvserver_obj.port = 80;
new_lbvserver_obj.lbmethod = "ROUNDROBIN";
lbvserver.add(ns_session,new_lbvserver_obj);
This code first sets the attributes (name, IP address, service type, port, and load balancing method) of the lbvserver
locally and then adds it to the appliance by using the corresponding method.add()
Retrieve the details of the lbvserver you have created:
lbvserver new_lbvserver_obj1 = lbvserver.get(ns_session,new_lbvserver_obj.name);
System.Console.Out.WriteLine("Name : " +new_lbvserver_obj1.name +"\n" +"Protocol : " +new_lbvserver_obj1.servicetype);
This code first retrieves the details of the lbvserver as an object from the NetScaler, extracts the required attributes
(name and service type) from the object, and displays the results.
Delete the lbvserver you created in the above steps:
lbvserver.delete(ns_session, new_lbvserver_obj.name);
Save the configurations:
ns_session.save_config();
Log out of the appliance:
ns_session.logout();

citrix.com 47
1.
2.
3.
4.
Tutorial: Create a NetScaler Cluster
This tutorial gives you the step-by-step process to create a NetScaler cluster. After completing this tutorial you will be
able to create a two-node NetScaler cluster. To add more appliances to the cluster you must repeat the procedure that
adds and joins the node to the cluster.
Using Java API to Create a Cluster
Using .NET API to Create a Cluster
Note
The executable code for the sample is available in the directory.<NITRO_SDK_HOME>/sample/
Using Java API to Create a Cluster
Copy the libraries from folder to the project classpath.<NITRO_SDK_HOME>/lib
Create a new class and name it .CreateCluster
Log on to one of the appliances that you want to add to the cluster and create a cluster:
//Connect to the first appliance that you want to add to the cluster
nitro_service nonClipSession0 = new nitro_service(nsipAddress0,protocol);
nonClipSession0.login(uName,password);
//Create a cluster instance
clusterinstance newClusterInstance = new clusterinstance();
newClusterInstance.set_clid(1);
clusterinstance.add(nonClipSession0,newClusterInstance);
//Add the appliance to the cluster
clusternode ClusterNode0 = new clusternode();
ClusterNode0.set_nodeid(0);
ClusterNode0.set_ipaddress(nsipAddress0);
ClusterNode0.set_state("ACTIVE");
ClusterNode0.set_backplane("0/1/1");
clusternode.add(nonClipSession0,ClusterNode0);
//Add the cluster IP address
nsip newNSIPAddress = new nsip();
newNSIPAddress.set_ipaddress(clipAddress);
newNSIPAddress.set_netmask("255.255.255.255");
newNSIPAddress.set_type("CLIP");
nsip.add(nonClipSession0,newNSIPAddress);
//Enable the cluster instance
clusterinstance.enable(nonClipSession0, newClusterInstance);
//Save the configurations
nonClipSession0.save_config();
//Warm reboot the appliance
nonClipSession0.reboot(true);
The cluster is created and the first node is added to the cluster. This node becomes the initial configuration
coordinator of the cluster.
Log on to the cluster IP address to add other appliances to the cluster:
//Connect to the cluster IP address
nitro_service clipSession = new nitro_service(clipAddress,protocol);
clipSession.login(uName,password);
//Add the node to the cluster
clusternode ClusterNode1 = new clusternode();
ClusterNode1.set_nodeid(1);
Using Java API to Create a Cluster
Using .NET API to Create a Cluster

citrix.com 48
4.
5.
6.
1.
2.
3.
ClusterNode1.set_ipaddress(nsipAddress1);
ClusterNode1.set_state("ACTIVE");
ClusterNode1.set_backplane("1/1/1");
clusternode.add(clipSession,ClusterNode1);
//Save the configurations
clipSession.save_config();
Log on to the appliance that you added in the previous step and join it to the cluster:
//Connect to the node that you have just added to the cluster
nitro_service nonClipSession1 = new nitro_service(nsipAddress1,protocol);
nonClipSession1.login(uName,password);
//Join the node to the cluster
cluster newCluster = new cluster();
newCluster.set_clip(clipAddress);
newCluster.set_password(password);
cluster.join(nonClipSession1,newCluster);
//Save the configurations
nonClipSession1.save_config();
//Warm reboot the appliance
nonClipSession1.reboot(true);
The second node is now a part of the cluster.
Verify the details of the cluster by logging on to the cluster IP address
//Retrieving the cluster node details
Long id = new Long(1);
clusternode node= clusternode.get(clipSession, id);
System.out.println("Node ID: "+ node.get_nodeid() + " | Admin state: " + node.get_state() + " | Backplane interface: "+ node.get_backplane());
//Retrieving the cluster instance details
Long id1 = new Long(1);
clusterinstance instance= clusterinstance.get(clipSession, id1);
System.out.println("Cluster instance ID: "+ instance.get_clid() + " | Operational state: " +instance.get_operationalstate());
Using .NET API to Create a Cluster
Copy the libraries from folder to the project classpath.<NITRO_SDK_HOME>/lib
Create a new class and name it .CreateCluster
Log on to one of the appliances that you want to add to the cluster and create a cluster:
//Connect to the first appliance that you want to add to the cluster
nitro_service nonClipSession0 = new nitro_service(nsipAddress0,protocol);
nonClipSession0.login(uName,password);
//Create a cluster instance
clusterinstance newClusterInstance = new clusterinstance();
newClusterInstance.clid = 1;
clusterinstance.add(nonClipSession0,newClusterInstance);
//Add the appliance to the cluster
clusternode ClusterNode0 = new clusternode();
ClusterNode0.nodeid = 0;
ClusterNode0.ipaddress = nsipAddress0;
ClusterNode0.state = "ACTIVE";
ClusterNode0.backplane = "0/1/1";
clusternode.add(nonClipSession0,ClusterNode0);
//Add the cluster IP address
nsip newNSIPAddress = new nsip();
newNSIPAddress.ipaddress = clipAddress;
newNSIPAddress.netmask = "255.255.255.255";
newNSIPAddress.type = "CLIP";
nsip.add(nonClipSession0,newNSIPAddress);
//Enable the cluster instance
clusterinstance.enable(nonClipSession0, newClusterInstance);

citrix.com 49
3.
4.
5.
6.
//Save the configurations
nonClipSession0.save_config();
//Warm reboot the appliance
nonClipSession0.reboot(true);
The cluster is created and the first node is added to the cluster. This node becomes the initial configuration
coordinator of the cluster.
Log on to the cluster IP address to add other appliances to the cluster:
//Connect to the cluster IP address
nitro_service clipSession = new nitro_service(clipAddress,protocol);
clipSession.login(uName,password);
//Add the node to the cluster
clusternode ClusterNode1 = new clusternode();
ClusterNode1.nodeid = 1;
ClusterNode1.ipaddress = nsipAddress1;
ClusterNode1.state = "ACTIVE";
ClusterNode1.backplane = "1/1/1";
clusternode.add(clipSession,ClusterNode1);
//Save the configurations
clipSession.save_config();
Log on to the appliance that you added in the previous step and join it to the cluster:
//Connect to the node that you have just added to the cluster
nitro_service nonClipSession1 = new nitro_service(nsipAddress1,protocol);
nonClipSession1.login(uName,password);
//Join the node to the cluster
cluster newCluster = new cluster();
newCluster.clip = clipAddress;
newCluster.password = password;
cluster.join(nonClipSession1,newCluster);
//Save the configurations
nonClipSession1.save_config();
//Warm reboot the appliance
nonClipSession1.reboot(true);
The second node is now a part of the cluster.
Verify the details of the cluster by logging on to the cluster IP address
//Retrieving the cluster node details
uint id = 1;
clusternode node= clusternode.get(clipSession, id);
System.Console.Out.WriteLine("Node ID: " + node.nodeid + " | Admin state: " + node.state + " | Backplane interface: " + node.backplane);
//Retrieving the cluster instance details
uint id1 = 1;
clusterinstance instance= clusterinstance.get(clipSession, id1);
System.Console.Out.WriteLine("Cluster instance ID: "+ instance.clid + " | Operational state: " +instance.operationalstate);

citrix.com 50
Connecting to the NetScaler Appliance
The first step towards using NITRO is to establish a session with the NetScaler appliance and then authenticate the
session by using the NetScaler administrator's credentials.
You must create an object of the class by specifying the NetScaler IP com.citrix.netscaler.nitro.service.nitro_service
(NSIP) address and the protocol to connect to the appliance (HTTP or HTTPS). You then use this object and log on to
the appliance by specifying the user name and the password of the NetScaler administrator.
Note:
For the python SDK, the package path is of the form nssrc.com.citrix.netscaler...
You must have a user account on that appliance. The configuration operations that you perform are limited
by the administrative roles assigned to your account.
The following sample code establishes a session with a NetScaler appliance with IP address 10.102.29.60 by using the
HTTPS protocol and also sets a session timeout period (in seconds) of 60 minutes.
Java - Sample code to establish session
//Specify the NetScaler appliance IP address and protocol
nitro_service ns_session = new nitro_service("10.102.29.60","https");
//Specify the login credentials
ns_session.login("admin","verysecret",3600);
.NET - Sample code to establish session
//Specify the NetScaler appliance IP address and protocol
nitro_service ns_session = new nitro_service("10.102.29.60","https");
//Specify the login credentials
ns_session.login("admin","verysecret",3600);
Python - Sample code to establish session
#Specify the NetScaler appliance IP address and protocol
ns_session = nitro_service("10.102.29.60","https")
#Specify the login credentials
ns_session.login("admin","verysecret",3600)
Disable SSL Checks
When using HTTPS, you must make sure that the root CA is added to the truststore. By default, NITRO validates the
SSL certificate and verifies the hostname. Disable these validations as shown in the following sample codes.
Java - Sample code for disabling SSL checks
ns_session.set_certvalidation(false);
ns_session.set_hostnameverification(false);
.NET - Sample code for disabling SSL checks
ns_session.certvalidation = false;
ns_session.hostnameverification = false;
Python - Sample code for disabling SSL checks

citrix.com 51
ns_session.certvalidation = false
ns_session.hostnameverification = false
Some points to note with regards to session timeout for NetScaler 10.5 and later versions:
When restricted timeout param is enabled, NITRO, by default, uses the timeout value that is configured for
the logged in user. You can customize this value but it must be limited to the value specified for the user. If
no value is specified for the user, the default timeout value of 15 minutes is used.
When restricted timeout param is not enabled, NITRO uses the default value of 30 minutes as session
timeout.

citrix.com 52
General API Usage
NetScaler resources are organized into a set of packages or namespaces. Each package or namespace corresponds to
a NetScaler feature. For example, all load-balancing related resources, such as load balancing virtual server, load
balancing group, and load balancing monitor are available in .com.citrix.netscaler.nitro.resource.config.lb
Note: For the python SDK, the package path is of the form .nssrc.com.citrix.netscaler.....
Similarly, all application firewall related resources, such as application firewall policy and application firewall archive are
available in .com.citrix.netscaler.nitro.resource.config.appfw
Each NetScaler resource is represented by a class. For example, the class that represents a load balancing virtual
server is called (in ). The state of a resource is represented by
lbvserver com.citrix.netscaler.nitro.resource.config.lb
properties of a class. You can get and set the properties of the class.
Note: The setter and getter properties are always executed locally on the client. They do not involve any network
interaction with the NITRO web service. All properties have basic simple types: integer, long, boolean, and string.

citrix.com 53
Adding a NetScaler Resource
To create a new resource, instantiate the resource class, configure the resource by setting its properties locally, and
then upload the new resource instance to the NetScaler appliance.
The following sample code creates a load balancing virtual server.
Java - Sample code to add a NetScaler resource
//Create an instance of the lbvserver class
lbvserver new_lbvserver_obj = new lbvserver();
//Set the properties of the resource locally
new_lbvserver_obj.set_name("MyFirstLbVServer");
new_lbvserver_obj.set_ipv46("10.102.29.88");
new_lbvserver_obj.set_port(88);
new_lbvserver_obj.set_servicetype("HTTP");
new_lbvserver_obj.set_lbmethod("ROUNDROBIN");
//Upload the resource to NetScaler
lbvserver.add(ns_session,new_lbvserver_obj);
.NET - Sample code to add a NetScaler resource
//Create an instance of the lbvserver class
lbvserver new_lbvserver_obj = new lbvserver();
//Set the properties of the resource locally
new_lbvserver_obj.name = "MyFirstLbVServer";
new_lbvserver_obj.ipv46 = "10.102.29.88";
new_lbvserver_obj.port = 88;
new_lbvserver_obj.servicetype = "HTTP";
new_lbvserver_obj.lbmethod = "ROUNDROBIN";
//Upload the resource to NetScaler
lbvserver.add(ns_session,new_lbvserver_obj);
Python - Sample code to add a NetScaler resource
#Create an instance of the lbvserver class
new_lbvserver_obj = lbvserver()
#Set the properties of the resource locally
new_lbvserver_obj.name = "MyFirstLbVServer"
new_lbvserver_obj.ipv46 = "10.102.29.88"
new_lbvserver_obj.port = 88
new_lbvserver_obj.servicetype = "HTTP"
new_lbvserver_obj.lbmethod = "ROUNDROBIN"
#Upload the resource to NetScaler
lbvserver.add(ns_session, new_lbvserver_obj)

citrix.com 54
Enabling a NetScaler Resource
To enable a resource, invoke the method and to disable, invoke the method.
enable() disable()
The following sample code enables a load balancing virtual server named "lb_vip".
Java - Sample code to enable a NetScaler resource
lbvserver obj = new lbvserver();
obj.set_name("lb_vip");
lbvserver.enable(ns_session, obj);
.NET - Sample code to enable a NetScaler resource
lbvserver obj = new lbvserver();
obj.name = "lb_vip";
lbvserver.enable(ns_session, obj);
Python - Sample code to enable a NetScaler resource
obj = lbvserver()
obj.name = "lb_vip"
lbvserver.enable(ns_session, obj)

citrix.com 55
Retrieving Properties of NetScaler Resources
To retrieve the properties of a resource, you retrieve the resource object from the NetScaler appliance. Once the object
is retrieved, you can extract the required properties of the resource locally, without further network traffic.
The following sample code retrieves the details of a load balancing virtual server.
Java - Sample code to get details of resource
//Retrieve the resource object from the NetScaler
new_lbvserver_obj = lbvserver.get(ns_session,"MyFirstLbVServer");
//Extract the properties of the resource from the object locally
System.out.println(new_lbvserver_obj.get_name());
System.out.println(new_lbvserver_obj.get_servicetype());
.NET - Sample code to get details of resource
//Retrieve the resource object from the NetScaler
new_lbvserver_obj = lbvserver.get(ns_session,"MyFirstLbVServer");
//Extract the properties of the resource from the object locally
Console.WriteLine(new_lbvserver_obj.name);
Console.WriteLine(new_lbvserver_obj.servicetype);
Python - Sample code to get details of resource
#Retrieve the resource object from the NetScaler
new_lbvserver_obj = lbvserver.get(ns_session,"MyFirstLbVServer")
#Extract the properties of the resource from the object locally
print(new_lbvserver_obj.name)
print(new_lbvserver_obj.servicetype)
Filtering Results
You can also retrieve resources by specifying a filter on the value of their properties by using the com.citrix.netscaler.
class.nitro.util.filtervalue
For example, you can retrieve all the load balancing virtual servers that have their port set to 80 and servicetype to
HTTP.
Java - Sample code to get filtered results
filtervalue[] filter = new filtervalue[2];
filter[0] = new filtervalue("port","80");
filter[1] = new filtervalue("servicetype","HTTP");
lbvserver[] result = lbvserver.get_filtered(ns_session,filter);
.NET - Sample code to get filtered results
filtervalue[] filter = new filtervalue[2];
filter[0] = new filtervalue("port","80");
filter[1] = new filtervalue("servicetype","HTTP");
lbvserver[] result = lbvserver.get_filtered(ns_session,filter);
Python - Sample code to get filtered results
filter_params = []
filter_params = [ filtervalue() for _ in range(2)]

citrix.com 56
filter_params[0] = filtervalue("servicetype","HTTP")
filter_params[1] = filtervalue("port","80")
result = lbvserver.get_filtered(ns_session1, filter_params)

citrix.com 57
Retrieving Statistics of NetScaler Resources
The NetScaler appliance collects statistics about the usage of its features and the corresponding resources. You can
retrieve these statistics by using NITRO API. The statistics APIs are available in different packages from the
configuration APIs.
For example, the API to retrieve statistics of the load balancing virtual server are available in com.citrix.netscaler.nitro.
.resource.stat.lb
Note:
For the python SDK, the package path is of the form .nssrc.com.citrix.netscaler.....
Not all NetScaler features and resources have statistic objects associated with them.
The following sample code retrieves the statistics of a load balancing virtual server and displays some of the statistics
returned.
Java - Sample code to get feature statistics
lbvserver_stats stats = lbvserver_stats.get(ns_session,"MyFirstLbVServer");
System.out.println(stats.get_curclntconnections());
System.out.println(stats.get_deferredreqrate());
.NET - Sample code to get feature statistics
lbvserver_stats stats = lbvserver_stats.get(ns_session,"MyFirstLbVServer");
Console.WriteLine(stats.curclntconnections);
Console.WriteLine(stats.deferredreqrate);
Python - Sample code to get feature statistics
stats = lbvserver_stats.get(ns_session,"MyFirstLbVServer")
print(stats.curclntconnections)
print(stats.deferredreqrate)

citrix.com 58
Resetting Properties of a NetScaler Resource
To unset the value that is set to a parameter, invoke the method on the resource class, by passing the name of
unset()
the resource and the parameters to be unset. If the parameter has a default value, the value is reset to that value.
The following sample code unsets the load balancing method and the comments of a load balancing virtual server
named "lb_123".
Java - Sample code to reset properties
lbvserver lb1 = new lbvserver();
lb1.set_name("lb_123");
String args[] = {"comment", "lbmethod"};
lbvserver.unset(ns_session, lb1, args);
.NET - Sample code to reset properties
lbvserver obj = new lbvserver();
obj.name = "lb_123";
String[] args = { "lbmethod","comment" };
lbvserver.unset(ns_session, lb1, args);
Python - Sample code to reset properties
lb1 = lbvserver()
lb1.name = "lb_123"
args = ["comment", "lbmethod"]
lbvserver.unset(nitroService, lb1, args)

citrix.com 59
Updating a NetScaler Resource
To update the properties of a resource, instantiate the resource class, specify the name of the resource to be updated,
configure the resource by updating its properties locally, and then upload the updated resource instance to the
NetScaler appliance.
Note: Some properties in some NetScaler resources are not allowed to be modified after creation. The port number or
the service type (protocol) of a load balancing virtual server or a service, are examples of such properties. Even though
the update method appears to succeed, these properties retain their original values on the appliance.
The following sample code updates the service type and load balancing method of a load balancing virtual server.
Java - Sample code to update a NetScaler resource
//Create an instance of the lbvserver class
lbvserver update_lb = new lbvserver();
//Specify the name of the lbvserver to be updated
update_lb.set_name("MyFirstLbVServer");
//Specify the updated service type and lb method
update_lb.set_servicetype("https");
update_lb.set_lbmethod("LEASTRESPONSETIME");
//Upload the resource to NetScaler
lbvserver.update(ns_session,update_lb);
.NET - Sample code to update a NetScaler resource
//Create an instance of the lbvserver class
lbvserver update_lb = new lbvserver();
//Specify the name of the lbvserver to be updated
update_lb.name = "MyFirstLbVServer";
//Specify the updated service type and lb method
update_lb.servicetype = "https";
update_lb.lbmethod = "LEASTRESPONSETIME";
//Upload the resource to NetScaler
lbvserver.update(ns_session, update_lb);
Python - Sample code to update a NetScaler resource
#Create an instance of the lbvserver class
update_lb = lbvserver()
#Specify the name of the lbvserver to be updated
update_lb.name = "MyFirstLbVServer"
#Specify the updated service type and lb method
update_lb.servicetype = "https"
update_lb.lbmethod = "LEASTRESPONSETIME"
#Upload the resource to the NetScaler
lbvserver.update(ns_session, update_lb)

citrix.com 60
Binding NetScaler Resources
NetScaler resources form relationships with each other through the process of binding. This is how services are
associated with a load balancing virtual server (by binding them to it), or how various policies are bound to a load
balancing virtual server. Each binding relationship is represented in NITRO by its own class.
To bind one NetScaler resource to another, you must instantiate the appropriate binding class (for example, to bind a
service to a load balancing virtual server, you must instantiate the class) and add it to the
lbvserver_service_binding
NetScaler configuration (by using the static method on this class).
add()
Binding classes have a property representing the name of each resource in the binding relationship. They can also have
other properties related to that relationship (for example, the weight of the binding between a load balancing virtual
server and a service).
The following sample code binds a service to a load balancing virtual server, by specifying a certain weight for the
binding.
Java - Sample code for binding
lbvserver_service_binding bindObj = new lbvserver_service_binding();
bindObj.set_name("MyFirstLbVServer");
bindObj.set_servicename("svc_prod");
bindObj.set_weight(20);
lbvserver_service_binding.add(ns_session,bindObj);
.NET - Sample code for binding
lbvserver_service_binding bindObj = new lbvserver_service_binding();
bindObj.name = "MyFirstLbVServer";
bindObj.servicename = "svc_prod";
bindObj.weight = 20;
lbvserver_service_binding.add(ns_session,bindObj);
Python - Sample code for binding
bindObj = lbvserver_service_binding()
bindObj.name = "MyFirstLbVServer"
bindObj.servicename = "svc_prod"
bindObj.weight = 20
lbvserver_service_binding.add(ns_session, bindObj)
Unbinding Resources
To unbind a resource from another, invoke the method from the resource binding class, by passing the name of
delete()
the two resources.
The following code sample unbinds a service from a server.
Java - Sample Code for unbinding
lbvserver_service_binding bindObj = new lbvserver_service_binding();
bindObj.set_name("MyFirstLbVServer");
bindObj.set_servicename("svc_prod");
lbvserver_service_binding.delete(ns_session,bindObj);
.NET - Sample code for unbinding
lbvserver_service_binding bindObj = new lbvserver_service_binding();
bindObj.name("MyFirstLbVServer");
bindObj.servicename("svc_prod");
lbvserver_service_binding.delete(ns_session,bindObj);

citrix.com 61
Python - Sample code for unbinding
bindObj = lbvserver_service_binding()
bindObj.name = "MyFirstLbVServer"
bindObj.servicename = "svc_prod"
lbvserver_service_binding.delete(ns_session, bindObj)

citrix.com 62
Globally Binding NetScaler Resources
Some NetScaler resources can be bound globally to affect the whole system. For example, a compression policy can be
bound to an load balancing virtual server, in which case the policy affects only the traffic on that load balancing virtual
server. However, if bound globally, it can affect any traffic on the appliance, regardless of which virtual servers handle
the traffic.
Some NITRO classes can be used to bind resources globally. These classes have names that follow the following
pattern: .
<featurename>global_<resourcetype>_binding
For example, the class is used to bind preauthentication policies globally.
aaaglobal_preauthenticationpolicy_binding
The following sample code creates a preauthentication action and a preauthentication policy that uses that action, and
then binds the policy globally at priority 200.
Java - Sample code
aaapreauthenticationaction preauth_act1;
aaapreauthenticationpolicy preauth_pol1;
aaaglobal_aaapreauthenticationpolicy_binding glob_binding;
preauth_act1 = new aaapreauthenticationaction();
preauth_act1.set_name("preauth_act1");
preauth_act1.set_preauthenticationaction("ALLOW");
aaapreauthenticationaction.add(ns_session,preauth_act1);
preauth_pol1 = new aaapreauthenticationpolicy();
preauth_pol1.set_name("preauth_pol1");
preauth_pol1.set_rule("CLIENT.APPLICATION.PROCESS(antivirus.exe) EXISTS");
preauth_pol1.set_reqaction("preauth_act1");
aaapreauthenticationpolicy.add(ns_session,preauth_pol1);
glob_binding = new aaaglobal_aaapreauthenticationpolicy_binding();
glob_binding.set_policy("preauth_pol1");
glob_binding.set_priority(200);
aaaglobal_aaapreauthenticationpolicy_binding.add(ns_session,glob_binding);
.NET - Sample code
aaapreauthenticationaction preauth_act1;
aaapreauthenticationpolicy preauth_pol1;
aaaglobal_aaapreauthenticationpolicy_binding glob_binding;
preauth_act1 = new aaapreauthenticationaction();
preauth_act1.name = "preauth_act1";
preauth_act1.preauthenticationaction = "ALLOW";
aaapreauthenticationaction.add(ns_session, preauth_act1);
preauth_pol1 = new aaapreauthenticationpolicy();
preauth_pol1.name = "preauth_pol1";
preauth_pol1.rule = "CLIENT.APPLICATION.PROCESS(antivirus.exe) EXISTS";
preauth_pol1.reqaction = "preauth_act1";
aaapreauthenticationpolicy.add(ns_session, preauth_pol1);
glob_binding = new aaaglobal_aaapreauthenticationpolicy_binding();
glob_binding.policy = "preauth_pol1";
glob_binding.priority = 200;
aaaglobal_aaapreauthenticationpolicy_binding.add(ns_session,glob_binding);
Python - Sample code
preauth_act1 = aaapreauthenticationaction()
preauth_act1.name = "preauth_act1"
preauth_act1.preauthenticationaction = "ALLOW"
aaapreauthenticationaction.add(ns_session, preauth_act1)
preauth_pol1 = aaapreauthenticationpolicy()
preauth_pol1.name = "preauth_pol1"
preauth_pol1.rule = "CLIENT.APPLICATION.PROCESS(antivirus.exe) EXISTS"

citrix.com 63
preauth_pol1.reqaction = "preauth_act1"
aaapreauthenticationpolicy.add(ns_session, preauth_pol1)
glob_binding = aaaglobal_aaapreauthenticationpolicy_binding()
glob_binding.policy = "preauth_pol1"
glob_binding.priority = 200
aaaglobal_aaapreauthenticationpolicy_binding.add(ns_session, glob_binding)

citrix.com 64
Deleting a NetScaler Resource
To delete an existing resource, invoke the static method on the resource class, by passing the name of the
delete()
resource.
The following sample code deletes a load balancing virtual server with name "MyFirstLbVServer".
Java - Sample code to delete a NetScaler resource
lbvserver remove_lb = new lbvserver();
remove_lb.set_name("MyFirstLbVServer");
lbvserver.delete(ns_session, remove_lb);
.NET - Sample code to delete a NetScaler resource
lbvserver remove_lb = new lbvserver();
remove_lb.name("MyFirstLbVServer");
lbvserver.delete(ns_session, remove_lb);
Python - Sample code to delete a NetScaler resource
remove_lb = lbvserver()
remove_lb.name = "MyFirstLbVServer"
lbvserver.delete(ns_session, remove_lb)

citrix.com 65
Performing Bulk Operations
You can create, retrieve, update, and delete multiple resources simultaneously and thus minimize network traffic. For
example, you can add multiple load balancing virtual servers in the same operation. To perform a bulk operation, you
instantiate an array of the resource class, configure the properties of all the instances locally, and then upload all the
instances to the NetScaler with one command.
Specifying the Bulk Operation Behavior on the NetScaler
To account for the failure of some operations within the bulk operation, NITRO allows you to configure one of the
following behaviors while establishing a connection with the appliance.
Exit. When the first error is encountered, the execution stops. The commands that were executed before the
error are committed.
Rollback. When the first error is encountered, the execution stops. The commands that were executed
before the error are rolled back. Rollback is only supported for add and bind commands.
Continue. All the commands in the list are executed even if some commands fail.
Java - Sample code to specify bulk operation behavior
nitro_service ns_session = new nitro_service("10.102.29.60","http");
ns_session.set_onerror(OnerrorEnum.CONTINUE);
ns_session.login("admin","verysecret");
.NET - Sample code to specify bulk operation behavior
nitro_service ns_session = new nitro_service("10.102.29.60","http");
ns_session.onerror = OnerrorEnum.CONTINUE;
ns_session.login("admin","verysecret");
Python - Sample code to specify bulk operation behavior
ns_session = nitro_service("10.102.29.60","http")
ns_session.onerror = OnerrorEnum.CONTINUE
ns_session.login("admin","verysecret")
Bulk Operations
The following sample code creates two load balancing virtual servers.
Java - Sample code for bulk creation
//Create an array of lbvserver instances
lbvserver[] lbs = new lbvserver[2];
//Specify properties of the first lbvserver
lbs[0] = new lbvserver();
lbs[0].set_name("lbvserv1");
lbs[0].set_servicetype("http");
lbs[0].set_ipv46("10.70.136.5");
lbs[0].set_port(80);
//Specify properties of the second lbvserver
lbs[1] = new lbvserver();
lbs[1].set_name("lbvserv2");
lbs[1].set_servicetype("https");
lbs[1].set_ipv46("10.70.136.5");
lbs[1].set_port(443);
//Upload the properties of the two lbvservers to the NetScaler
lbvserver.add(ns_session,lbs);

citrix.com 66
.NET - Sample code for bulk creation
//Create an array of lbvserver instances
lbvserver[] lbs = new lbvserver[2];
//Specify details of first lbvserver
lbs[0] = new lbvserver();
lbs[0].name = "lbvserv1";
lbs[0].servicetype = "http";
lbs[0].ipv46 = "10.70.136.5";
lbs[0].port = 80;
//Specify details of second lbvserver
lbs[1] = new lbvserver();
lbs[1].name = "lbvserv2";
lbs[1].servicetype = "https";
lbs[1].ipv46 = "10.70.136.5";
lbs[1].port = 443;
//upload the details of the lbvservers to the NITRO server
lbvserver.add(ns_session,lbs);
Python - Sample code for bulk creation
#Create an array of lbvserver instances
lbs = lbvserver[2]
#Specify properties of the first lbvserver
lbs[0] = lbvserver()
lbs[0].name = "lbvserv1"
lbs[0].servicetype = "http"
lbs[0].ipv46 = "10.70.136.5"
lbs[0].port = 80
#Specify properties of the second lbvserver
lbs[1] = lbvserver()
lbs[1].name = "lbvserv2"
lbs[1].servicetype = "https"
lbs[1].ipv46 = "10.70.136.5"
lbs[1].port = 443
#Upload the properties of the two lbvservers to the NetScaler
lbvserver.add(ns_session, lbs)

citrix.com 67
Usage Scenarios
In this section, we provide NITRO API specific to certain resources and scenarios. We will be adding more scenarios in
future updates to this documentation.

citrix.com 68
Configuring a NetScaler Cluster
For managing clusters, you can add or remove a cluster instance or an individual node and perform a few other
instance or node operations such as viewing instance or node properties. You can also configure the cluster IP address.
Other cluster-management tasks include joining a NetScaler appliance to the cluster and configuring a linkset. For
detailed information and best practices, see .
Note: For the python SDK, the package path is of the form .nssrc.com.citrix.netscaler.....
Cluster Instance Operations
The class provides APIs to manage a cluster instance.com.citrix.netscaler.nitro.resource.config.cluster.clusterinstance
The following sample code creates a cluster instance with ID 1.
Java - Sample code to create a cluster instance
clusterinstance new_cl_inst_obj = new clusterinstance();
//Set the properties of the cluster instance locally
new_cl_inst_obj.set_clid(1);
new_cl_inst_obj.set_preemption("ENABLED");
//Upload the cluster instance
clusterinstance.add(ns_session,new_cl_inst_obj);
.NET - Sample code to create a cluster instance
clusterinstance new_cl_inst_obj = new clusterinstance();
//Set the properties of the cluster instance locally
new_cl_inst_obj.clid = 1;
new_cl_inst_obj.preemption = "ENABLED";
//Upload the cluster instance
clusterinstance.add(ns_session,new_cl_inst_obj);
Python - Sample code to create a cluster instance
new_cl_inst_obj = clusterinstance()
#Set the properties of the cluster instance locally
new_cl_inst_obj.clid = 1
#Upload the cluster instance
clusterinstance.add(ns_session, new_cl_inst_obj)
Cluster Node Operations
The class provides APIs to manage cluster nodes.com.citrix.netscaler.nitro.resource.config.cluster.clusternode
The following sample code adds a cluster node with NSIP address 10.102.29.60.
Java - Sample code to add a cluster node
clusternode new_cl_node_obj = new clusternode();
//Set the properties of the cluster node locally
new_cl_node_obj.set_nodeid(0);
new_cl_node_obj.set_ipaddress("10.102.29.60");
new_cl_node_obj.set_state("ACTIVE");
new_cl_node_obj.set_backplane("0/1/1");
//Upload the cluster node
clusternode.add(ns_session,new_cl_node_obj);
Clustering

citrix.com 69
.NET - Sample code to add a cluster node
clusternode new_cl_node_obj = new clusternode();
//Set the properties of the cluster node locally
new_cl_node_obj.nodeid = 0;
new_cl_node_obj.ipaddress = "10.102.29.60";
new_cl_node_obj.state = "ACTIVE";
new_cl_node_obj.backplane = "0/1/1";
//Upload the cluster node
clusternode.add(ns_session,new_cl_node_obj);
Python - Sample code to add a cluster node
new_cl_node_obj = clusternode()
#Set the properties of the cluster node locally
new_cl_node_obj.nodeid = 0
new_cl_node_obj.ipaddress = "10.102.29.60"
new_cl_node_obj.state = "ACTIVE"
new_cl_node_obj.backplane = "0/1/1"
#Upload the cluster node
clusternode.add(ns_session, new_cl_node_obj)
Add a Cluster IP Address
The class provides the API to configure an IP address. To com.citrix.netscaler.nitro.resource.config.ns.nsip add()
configure the IP address as a cluster IP address, you must specify the type as CLIP.
The following sample code configures a cluster IP address on NetScaler appliance with IP address 10.102.29.60.
Java - Sample code to add a cluster IP address
nsip new_nsip_obj = new nsip();
//Set the properties locally
new_nsip_obj.set_ipaddress("10.102.29.61");
new_nsip_obj.set_netmask("255.255.255.255");
new_nsip_obj.set_type("CLIP");
//Upload the cluster node
nsip.add(ns_session,new_nsip_obj);
.NET - Sample code to add a cluster IP address
nsip new_nsip_obj = new nsip();
//Set the properties locally
new_nsip_obj.ipaddress = "10.102.29.61";
new_nsip_obj.netmask = "255.255.255.255";
new_nsip_obj.type = "CLIP";
//Upload the cluster node
nsip.add(ns_session,new_nsip_obj);
Python - Sample code to add a cluster IP address
new_nsip_obj = nsip()
#Set the properties locally
new_nsip_obj.ipaddress = "10.102.29.61"
new_nsip_obj.netmask = "255.255.255.255"
new_nsip_obj.type = "CLIP"
#Upload the cluster node
nsip.add(ns_session, new_nsip_obj)

citrix.com 70
Add a Spotted IP Address
The class provides the API to configure an IP address. To com.citrix.netscaler.nitro.resource.config.ns.nsip add()
configure the IP address as spotted, you must specify the ID of the node that must own the IP address. This
configuration must be done on the cluster IP address.
The following sample code configures a spotted SNIP address on a node with ID 1.
Java - Sample code to configure a spotted IP address
nsip new_nsip_obj = new nsip();
//Set the properties locally
new_nsip_obj.set_ipaddress("10.102.29.77");
new_nsip_obj.set_netmask("255.255.255.0");
new_nsip_obj.set_type("SNIP");
new_nsip_obj.set_ownernode(1);
//Upload the cluster node
nsip.add(ns_session,new_nsip_obj);
.NET - Sample code to configure a spotted IP address
nsip new_nsip_obj = new nsip();
//Set the properties locally
new_nsip_obj.ipaddress = "10.102.29.77";
new_nsip_obj.netmask = "255.255.255.0";
new_nsip_obj.type = "SNIP";
new_nsip_obj.ownernode = 1;
//Upload the cluster node
nsip.add(ns_session,new_nsip_obj);
Python - Sample code to configure a spotted IP address
#Add a spotted IP address
new_nsip_obj = nsip()
#Set the properties locally
new_nsip_obj.ipaddress = "10.102.29.77"
new_nsip_obj.netmask = "255.255.255.0"
new_nsip_obj.type = "SNIP"
new_nsip_obj.ownernode = 1
#Upload the cluster node
nsip.add(ns_session, new_nsip_obj)
Join NetScaler Appliance to Cluster
The class provides the API to join a NetScaler appliance com.citrix.netscaler.nitro.resource.config.cluster.cluster join()
to the cluster. You must specify the cluster IP address and the nsroot password of the configuration coordinator.
The following sample code joins a NetScaler appliance to a cluster.
Java - Sample code to join an appliance to a cluster
cluster new_cl_obj = new cluster();
//Set the properties of the cluster locally
new_cl_obj.set_clip("10.102.29.61");
new_cl_obj.set_password("verysecret");
//Upload the cluster
cluster.add(ns_session,new_cl_obj);
.NET - Sample code to join an appliance to a cluster

citrix.com 71
1.
2.
cluster new_cl_obj = new cluster();
//Set the properties of the cluster locally
new_cl_obj.clip = "10.102.29.61";
new_cl_obj.password = "verysecret";
//Upload the cluster node
cluster.add(ns_session,new_cl_node_obj);
Python - Sample code to join an appliance to a cluster
new_cl_obj = cluster()
#Set the properties of the cluster locally
new_cl_obj.clip = "10.102.29.61"
new_cl_obj.password = "verysecret"
#Upload the cluster
cluster.add(ns_session, new_cl_obj)
Linkset Operations
The class provides the APIs to manage linksets.com.citrix.netscaler.nitro.resource.config.network.linkset
To configure a linkset, do the following:
Add a linkset by invoking the method of the class.
add() linkset
Bind the interfaces to the linkset using the method of the class.
add() linkset_interface_binding
The following sample code creates a linkset LS/1 and bind interfaces 1/1/2 and 2/1/2 to it.
Java - Sample code to configure linksets
linkset new_linkset_obj = new linkset();
new_linkset_obj.set_id("LS/1");
linkset.add(ns_session,new_linkset_obj);
//Bind the interfaces to the linkset
linkset_interface_binding new_linkif_obj = new linkset_interface_binding();
new_linkif_obj.set_id("LS/1");
new_linkif_obj.set_ifnum("1/1/2 2/1/2");
linkset_interface_binding.add(ns_session,new_linkif_obj);
.NET - Sample code to configure linksets
linkset new_linkset_obj = new linkset();
new_linkset_obj.id = "LS/1";
linkset.add(ns_session,new_linkset_obj);
//Bind the interfaces to the linkset
linkset_interface_binding new_linkif_obj = new linkset_interface_binding();
new_linkif_obj.id = "LS/1";
new_linkif_obj.ifnum = "1/1/2 2/1/2";
linkset_interface_binding.add(ns_session,new_linkif_obj);
Python - Sample code to configure linksets
#Create a new linkset
new_linkset_obj = linkset()
new_linkset_obj.id = "LS/1"
linkset.add(ns_session, new_linkset_obj)
#Bind the interfaces to the linkset
new_linkif_obj = linkset_interface_binding()

citrix.com 72
new_linkif_obj.id = "LS/1"
new_linkif_obj.ifnum = "1/1/2 2/1/2"
linkset_interface_binding.add(ns_session, new_linkif_obj)

citrix.com 73
Configuring Admin Partitions
To create an admin partition, you must perform a set of operations on the default partition. To understand this
procedure, let us consider a company that has two departments each of which has an application that requires the
NetScaler functionality. The NetScaler admin wants to have a different partition for each department so that there is
isolation of users and configurations. The NetScaler admin must do the following (the sample shows configurations only
for a single admin partition):
Note: For detailed information and best practices, see .
Creating an Admin Partition
While creating an admin partition, you must also specify the system resources that must be allocated to that partition.
The following sample code creates an admin partition named "partition-dept1".
Java - Sample code to create an admin partition
nspartition nspartitionObject = new nspartition();
nspartitionObject.set_partitionname("partition-dept1");
nspartitionObject.set_maxbandwidth(10240);
nspartitionObject.set_maxconn(1024);
nspartitionObject.set_maxmemlimit(10);
nspartitionObject.set_minbandwidth(1240);
base_response result = nspartition.add(nitroService, nspartitionObject);
.NET - Sample code to create an admin partition
nspartition nspartitionObject = new nspartition();
nspartitionObject.partitionname = "partition-dept1";
nspartitionObject.maxbandwidth = 10240;
nspartitionObject.maxconn = 1024;
nspartitionObject.maxmemlimit = 10;
nspartitionObject.minbandwidth = 1240;
base_response result = nspartition.add(nitroService, nspartitionObject);
Python - Sample code to create an admin partition
nspartitionObject = nspartition()
nspartitionObject.partitionname = "partition-dept1"
nspartitionObject.maxbandwidth = 10240
nspartitionObject.maxconn = 1024
nspartitionObject.maxmemlimit = 10
nspartitionObject.minbandwidth = 1240
result = nspartition.add(nitroService, nspartitionObject)
Associating Users with Partitions
Associate the appropriate users with the partition.
The following sample code associates "user1" to a partition named "partition-dept1".
Java - Sample code for associating user with partition
systemuser_nspartition_binding systemuser_nspartition_binding_object = new
systemuser_nspartition_binding();
systemuser_nspartition_binding_object.set_partitionname("partition-dept1");
systemuser_nspartition_binding_object.set_username("user1");
base_response result = systemuser_nspartition_binding.add(nitroService,
systemuser_nspartition_binding_object);
.NET - Sample code for associating user with partition
Admin Partitions

citrix.com 74
systemuser_nspartition_binding systemuser_nspartition_binding_object = new
systemuser_nspartition_binding();
systemuser_nspartition_binding_object.partitionname = "partition-dept1";
systemuser_nspartition_binding_object.username = "user1";
base_response result = systemuser_nspartition_binding.add(nitroService,
systemuser_nspartition_binding_object);
Python - Sample code for associating user with partition
systemuser_nspartition_binding_object = systemuser_nspartition_binding()
systemuser_nspartition_binding_object.partitionname = "partition-dept1"
systemuser_nspartition_binding_object.username = "user1"
result = systemuser_nspartition_binding.add(nitroService,
systemuser_nspartition_binding_object)
Specifying Command Policy for Partition Users
Associate an appropriate command policy to the admin partition user.
The following sample code associates the command policy "partition-admin" to "user1".
Java - Sample code to specify command policy for partition user
systemuser_systemcmdpolicy_binding binding_object = new
systemuser_systemcmdpolicy_binding();
binding_object.set_username("user1");
binding_object.set_policyname("partition-admin");
binding_object.set_priority(1);
base_response result = systemuser_systemcmdpolicy_binding.add(nitroService,
binding_object);
.NET - Sample code to specify command policy for partition user
systemuser_systemcmdpolicy_binding binding_object = new
systemuser_systemcmdpolicy_binding();
binding_object.username = "user1";
binding_object.policyname = "partition-admin";
binding_object.priority = 1;
base_response result = systemuser_systemcmdpolicy_binding.add(nitroService,
binding_object);
Python - Sample code to specify command policy for partition user
binding_object = systemuser_systemcmdpolicy_binding()
binding_object.username = "user1"
binding_object.policyname = "partition-admin"
binding_object.priority = 1
result = systemuser_systemcmdpolicy_binding.add(nitroService,binding_object)
Specifying the Admin Partition VLAN or Bridgegroup
Specify the VLANs or bridgegroups to be associated with the partition. This step ensures network isolation of the traffic.
Traffic received on the interfaces of the VLAN or bridgegroup is isolated from the traffic of other partitions.
The following sample code specifies a VLAN for an admin partition.
Java - Sample Code to specify the VLAN
nspartition_vlan_binding nspartition_vlan_binding_object = new
nspartition_vlan_binding();
nspartition_vlan_binding_object.set_vlan(2);
nspartition_vlan_binding_object.set_partitionname("partition-dept1");
base_response result = nspartition_vlan_binding.add(nitroService,
nspartition_vlan_binding_object);

citrix.com 75
.NET - Sample code to specify the VLAN
nspartition_vlan_binding nspartition_vlan_binding_object = new
nspartition_vlan_binding();
nspartition_vlan_binding_object.vlan = 2;
nspartition_vlan_binding_object.partitionname = "partition-dept1";
base_response result = nspartition_vlan_binding.add(nitroService,
nspartition_vlan_binding_object);
Python - Sample code to specify the VLAN
nspartition_vlan_binding_object = nspartition_vlan_binding()
nspartition_vlan_binding_object.vlan = 2
nspartition_vlan_binding_object.partitionname = "partition-dept1"
result = nspartition_vlan_binding.add(nitroService,
nspartition_vlan_binding_object)
Switching Partitions
If you are associated with multiple admin partitions, you can switch to the required partition.
The following sample code switches from current partition to a partition named "partition-dept2".
Java - Sample code to switch partitions
nspartition nspartitionObject = new nspartition();
vnspartitionObject.set_partitionname("partition-dept2");
base_response result = nspartition.Switch(nitroService, nspartitionObject);
.NET - Sample code to switch partitions
nspartition nspartitionObject = new nspartition();
nspartitionObject.partitionname = "partition-dept2";
base_response result = nspartition.Switch(nitroService, nspartitionObject);
Python - Sample code to switch partitions
nspartitionObject = nspartition()
nspartitionObject.partitionname = "partition-dept2"
result = nspartition.Switch(nitroService, nspartitionObject)

citrix.com 76
1.
2.
3.
1.
2.
3.
Managing AppExpert Applications
Exporting an AppExpert Application
To export an AppExpert application, you must do the following:
Instantiate the class.com.citrix.netscaler.nitro.resource.config.app.application
For the python SDK, the package path is of the form .
Note: nssrc.com.citrix.netscaler.....
Configure the properties of the AppExpert locally.
Export the AppExpert application.
The following samples export an AppExpert application named "MyApp1".
JAVA - SAMPLE CODE TO EXPORT AN APPEXPERT APPLICATION
application myapp = new application();
myapp.set_appname("MyApp1");
myapp.set_apptemplatefilename("myapp_template");
application.export(ns_session,myapp);
.NET - SAMPLE CODE TO EXPORT AN APPEXPERT APPLICATION
application myapp = new application();
myapp.appname = "MyApp1";
myapp.apptemplatefilename = "myapp_template";
application.export(ns_session,myapp);
python - SAMPLE CODE TO EXPORT AN APPEXPERT APPLICATION
myapp = application()
myapp.appname = "MyApp1"
myapp.apptemplatefilename = "myapp_template"
application.export(ns_session, myapp)
Importing an AppExpert Application
To import an AppExpert application, you must do the following:
Instantiate the class.com.citrix.netscaler.nitro.resource.config.app.application
For the python SDK, the package path is of the form .
Note: nssrc.com.citrix.netscaler.....
Configure the properties of the AppExpert locally.
Import the AppExpert application.
The following samples import an AppExpert application named "MyApp1".
Java - Sample code to import an AppExpert application
application myapp = new application();
myapp.set_appname("MyApp1");
myapp.set_apptemplatefilename("myapp_template");
application.Import(ns_session,myapp);
.NET - SAMPLE CODE TO IMPORT AN APPEXPERT APPLICATION
application myapp = new application();
myapp.appname = "MyApp1";
myapp.apptemplatefilename = "myapp_template";
application.Import(ns_session,myapp);

citrix.com 77
Python - SAMPLE CODE TO IMPORT AN APPEXPERT APPLICATION
myapp = application()
myapp.appname = "MyApp1"
myapp.apptemplatefilename = "myapp_template"
application.Import(ns_session, myapp)

citrix.com 78
Exception Handling
The status of a NITRO request is captured in the com.citrix.netscaler.nitro.exception.nitro_exception
class. This class provides the following details of the exception:
Session ID. The session in which the exception occurred.
Severity. The severity of the exception: error or warning. By default, only errors are captured. To capture
warnings, you must set the warning flag to true, while connecting to the appliance.
Error code. The status of the NITRO request. An error code of 0 indicates that the NITRO request is
successful. A non-zero error code indicates an error in processing the NITRO request.
Error message. Provides a brief description of the exception.
For a list of error codes, see the file available in the folder.errorlisting.html <NITRO_SDK_HOME>/doc/api_reference
citrix.com 79
NITRO Changes Across NetScaler Releases
NetScaler has introduced some changes in the NITRO API since the NetScaler 9.3 release. This could raise some
compatibility issues for the following users:
Users migrating from NetScaler 9.3 to 10.1
Users migrating from NetScaler 9.3 to 10.5
Note
There are no changes introduced since the NetScaler 10.1 release. Therefore, you should not face any
compatibility issues when migrating from NetScaler 10.1 to 10.5.
Unless otherwise specified, these changes are applicable to both REST and SDKs.
These NITRO changes from 9.3 to 10.1 or 10.5 are categorized as follows:
Resources Removed
APIs Removed
Return Type Changed
Attribute Type Changed
Attributes Removed
SDK Specific Changes
Resources Removed
Resource Replace with... Comments
lbmonitor_lbmetrictable_binding lbmonitor_metric_binding Â
APIs Removed
Resource API Comments
vserver GET Perform the GET operation on specific virtual server types such as lb/cr/cs.
filterpolicy POST with
"action=unset" This API is removed as unsetting the attributes('action') of a policy makes it
invalid.
auditsyslogpolicy POST with
"action=unset" This API is removed as unsetting the attributes('action') of a policy makes it
invalid.
auditnslogpolicy POST with
"action=unset" This API is removed as unsetting the attributes('action') of a policy makes it
invalid.
authorizationpolicy POST with
"action=unset" This API is removed as unsetting the attributes('action') of a policy makes it
invalid.
Return Type Changed
Resource API Comments
snmpengineid GET Return type changed to an array.
nshostname GET Return type changed to an array.
Attribute Type Changed
Resource Attribute Comments
appfwpolicy_lbvserver_binding activepolicy Data type changed from Boolean to Integer.
Resources Removed
APIs Removed
Return Type Changed
Attribute Type Changed
Attributes Removed
SDK Specific Changes

citrix.com 80
appfwpolicy_appfwglobal_binding activepolicy Data type changed from Boolean to Integer.
vlan portbitmap Data type changed from uint to ulong.
vlan tagbitmap Data type changed from uint to ulong.
Attributes Removed
Resource Attribute Replace with... Comments
policypatset_pattern_binding indextype - NA - This attribute is moved to 'policypatset'
resource as this attribute is applicable at
patset level.
system_stats powersupply1failure powersupply1status Change is applicable from NetScaler 9.3
(65.8).
system_stats powersupply2failure powersupply2status Change is applicable from NetScaler 9.3
(65.8).
server_servicegroup_binding servicetype svctype Â
server_service_binding servicetype svctype Â
crvserver hits - NA - Hits are calculated per policy binding hence
moved this parameter to binding resources.
crvserver dstvsvr destinationvserver Â
crvserver destvserver domain Â
crvserver dnsvserver dnsvservername Â
appflowpolicylabel type policylabeltype Â
sslcipher ciphgrpals ciphergroupname This change is applicable for
sslcipher_*_binding resources also.
csvserver_cspolicy_binding targetvserver targetlbvserver Â
csvserver_cspolicy_binding targetvserver targetlbvserver Â
rewriteaction allow_unsafe_pi1,
allow_unsafe_pi bypassSafetyCheck Â
SDK Specific Changes
Class Method Replace with... Comments
Routerbgp - NA - - NA - This class is removed as all router
configurations are deprecated in 9.2.
dnsptrrec get(dnsptrrec obj,
nitro_service session) get(nitro_service session, String
reversedomain) Â
dnsaddrec get(dnsaddrec obj,
nitro_service session) get(nitro_service session, String
hostname) Â
dnsnsrec get(dnsnsrec obj,
nitro_service session) get(nitro_service session, String
domain) Â
snmpengineid unset(nitro_service
session, String[] args) unset(nitro_service session,
snmpengineid resource, String[]
args)
Â
arp arp.get(nitro_service
session, String ipaddress) arp.get(nitro_service session, arp
resource) Â
nsip get(nitro_service session,
String ipaddress) get(nitro_service client, nsip
resource) Â
nsip6 get(nitro_service session,
String ipv6address) get(nitro_service session, nsip6
resource) Â
dnsmxrec dnsmxrec.get(dnsmxrec
obj, nitro_service session) dnsmxrec[] get(nitro_service
service, dnsmxrec_args args) Â

citrix.com 81
Unsupported NetScaler Operations
The topic lists the NetScaler operations that cannot be performed by using NITRO API.
Note
These operations can be performed on the NetScaler CLI or the GUI.
install API
diff API on nsconfig resource (supported from NetScaler 10.5 onwards)
UI-internal APIs (update, unset, and get)
show ns info
shutdown
Application firewall API
importwsdl
importcustom
importxmlschema
importxmlerrorpage
importhtmlerrorpage
rmcustom
rmxmlschema
rmxmlerrorpage
rmhtmlerrorpage
CLI-specific API
ping/ping6
traceroute/traceroute6
start nstrace/stop nstrace/show nstrace
scp
configaudit
show defaults
show permission
batch
source

citrix.com 82
© 1999-2015 Citrix Systems, Inc. All Rights Reserved.
