GlobalProtect Administrator's Guide Admin
User Manual:
Open the PDF directly: View PDF ![]() .
.
Page Count: 254 [warning: Documents this large are best viewed by clicking the View PDF Link!]
- Table of Contents
- GlobalProtect Overview
- Get Started
- Authentication
- About GlobalProtect User Authentication
- Set Up External Authentication
- Set Up Client Certificate Authentication
- Set Up Two-Factor Authentication
- Set Up Authentication for strongSwan Ubuntu and CentOS Clients
- Configure GlobalProtect to Facilitate Multi-Factor Authentication Notifications
- Enable Delivery of GlobalProtect Client VSAs to a RADIUS Server
- Enable Group Mapping
- GlobalProtect Gateways
- GlobalProtect Portals
- GlobalProtect Clients
- Deploy the GlobalProtect Client Software
- Deploy Agent Settings Transparently
- Customizable Agent Settings
- Deploy Agent Settings to Windows Clients
- Deploy Agent Settings in the Windows Registry
- Deploy Agent Settings from Msiexec
- Deploy Scripts Using the Windows Registry
- Windows OS Batch Script Examples
- Deploy Scripts Using Msiexec
- SSO Wrapping for Third-Party Credential Providers on Windows Clients
- Enable SSO Wrapping for Third-Party Credentials with the Windows Registry
- Enable SSO Wrapping for Third-Party Credentials with the Windows Installer
- Deploy Agent Settings to Mac Clients
- GlobalProtect Clientless VPN
- Mobile Endpoint Management
- Mobile Endpoint Management Overview
- Set Up a Mobile Endpoint Management System
- Manage the GlobalProtect App Using AirWatch
- Manage the GlobalProtect App Using a Third-Party MDM
- Host Information
- GlobalProtect Quick Configs
- Remote Access VPN (Authentication Profile)
- Remote Access VPN (Certificate Profile)
- Remote Access VPN with Two-Factor Authentication
- Always On VPN Configuration
- Remote Access VPN with Pre-Logon
- GlobalProtect Multiple Gateway Configuration
- GlobalProtect for Internal HIP Checking and User-Based Access
- Mixed Internal and External Gateway Configuration
- GlobalProtect Architecture
- GlobalProtect Cryptography
- About GlobalProtect Cipher Selection
- Cipher Exchange Between the GlobalProtect Agent and Gateway
- GlobalProtect Cryptography References
- Reference: GlobalProtect Agent Cryptographic Functions
- TLS Cipher Suites Supported by GlobalProtect Agents
- Reference: TLS Ciphers Supported by GlobalProtect Agents on Mac Endpoints
- Reference: TLS Ciphers Supported by GlobalProtect Agents on Windows 7 Endpoints
- Reference: TLS Ciphers Supported by GlobalProtect Agents on Android 6.0.1 Endpoints
- Reference: TLS Ciphers Supported by GlobalProtect Agents on iOS 10.2.1 Endpoints
- Reference: TLS Ciphers Supported by GlobalProtect Agents on Chromebooks
- Ciphers Used to Set Up IPSec Tunnels
- SSL APIs

GlobalProtect Administrator's Guide
8.0
paloaltonetworks.com/documentation

2 GLOBALPROTECT ADMINISTRATOR'S GUIDE |
Contact Information
Corporate Headquarters:
Palo Alto Networks
3000 Tannery Way
Santa Clara, CA 95054
www.paloaltonetworks.com/company/contact-support
About the Documentation
• For the most recent version of this guide or for access to related documentation, visit the Technical
Documentation portal www.paloaltonetworks.com/documentation.
• To search for a specific topic, go to our search page www.paloaltonetworks.com/documentation/
document-search.html.
• Have feedback or questions for us? Leave a comment on any page in the portal, or write to us at
documentation@paloaltonetworks.com.
Copyright
Palo Alto Networks, Inc.
www.paloaltonetworks.com
© 2017-2017 Palo Alto Networks, Inc. Palo Alto Networks is a registered trademark of Palo
Alto Networks. A list of our trademarks can be found at www.paloaltonetworks.com/company/
trademarks.html. All other marks mentioned herein may be trademarks of their respective companies.
Last Revised
November 10, 2017

TABLE OF CONTENTS iii
Table of Contents
GlobalProtect Overview.................................................................................... 7
About the GlobalProtect Components.................................................................................................. 9
GlobalProtect Portal.......................................................................................................................9
GlobalProtect Gateways............................................................................................................... 9
GlobalProtect Client.......................................................................................................................9
What Client OS Versions are Supported with GlobalProtect?...................................................... 11
About GlobalProtect Licenses............................................................................................................... 12
Get Started......................................................................................................... 13
Create Interfaces and Zones for GlobalProtect................................................................................ 15
Enable SSL Between GlobalProtect Components.............................................................................17
About GlobalProtect Certificate Deployment.......................................................................17
GlobalProtect Certificate Best Practices................................................................................ 17
Deploy Server Certificates to the GlobalProtect Components.........................................20
Authentication................................................................................................... 25
About GlobalProtect User Authentication..........................................................................................27
Supported GlobalProtect Authentication Methods............................................................. 27
How Does the Agent or App Know What Credentials to Supply?.................................. 29
How Does the Agent Know Which Certificate to Supply?................................................30
Set Up External Authentication.............................................................................................................31
Set Up LDAP Authentication.................................................................................................... 31
Set Up SAML Authentication....................................................................................................33
Set Up Kerberos Authentication.............................................................................................. 34
Set Up RADIUS or TACACS+ Authentication.......................................................................35
Set Up Client Certificate Authentication............................................................................................ 38
Deploy Shared Client Certificates for Authentication........................................................ 38
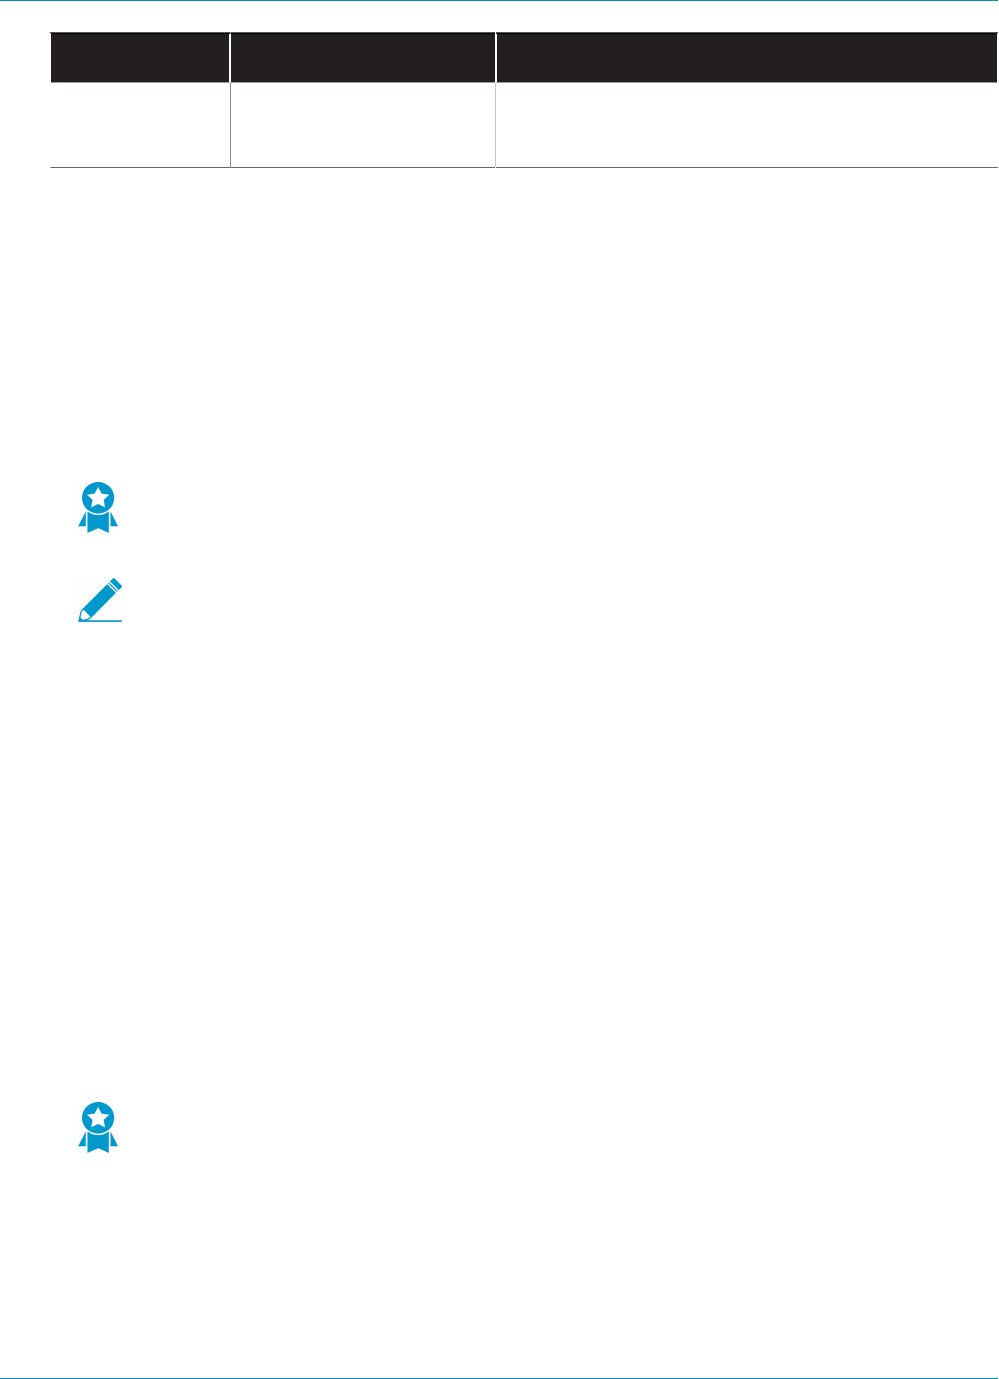
Deploy Machine Certificates for Authentication................................................................. 38
Deploy User-Specific Client Certificates for Authentication.............................................42
Set Up Two-Factor Authentication...................................................................................................... 45
Enable Two-Factor Authentication Using Certificate and Authentication
Profiles.............................................................................................................................................45
Enable Two-Factor Authentication Using One-Time Passwords (OTPs)........................ 47
Enable Two-Factor Authentication Using Smart Cards...................................................... 50
Set Up Authentication for strongSwan Ubuntu and CentOS Clients...........................................53
Enable Authentication Using a Certificate Profile................................................................53
Enable Authentication Using an Authentication Profile..................................................... 55
Enable Authentication Using Two-Factor Authentication................................................. 57
Configure GlobalProtect to Facilitate Multi-Factor Authentication Notifications.................... 59
Enable Delivery of GlobalProtect Client VSAs to a RADIUS Server............................................ 62
Enable Group Mapping............................................................................................................................63
GlobalProtect Gateways................................................................................. 65
GlobalProtect Gateways Overview...................................................................................................... 67
GlobalProtect Gateway Concepts.........................................................................................................68
Types of Gateways...................................................................................................................... 68
Gateway Priority in a Multiple Gateway Configuration......................................................68

iv TABLE OF CONTENTS
GlobalProtect MIB Support....................................................................................................... 69
Prerequisite Tasks for Configuring the GlobalProtect Gateway................................................... 71
Configure a GlobalProtect Gateway.................................................................................................... 72
GlobalProtect Portals.......................................................................................79
GlobalProtect Portal Overview............................................................................................................. 81
Prerequisite Tasks for Configuring the GlobalProtect Portal.........................................................82
Set Up Access to the GlobalProtect Portal........................................................................................83
Define the GlobalProtect Client Authentication Configurations...................................................85
Define the GlobalProtect Agent Configurations.................................................................. 86
Customize the GlobalProtect Agent........................................................................................91
Customize the GlobalProtect Portal Login, Welcome, and Help Pages.......................... 99
GlobalProtect Clients................................................................................... 101
Deploy the GlobalProtect Client Software...................................................................................... 103
Deploy the GlobalProtect Agent Software......................................................................... 103
Download and Install the GlobalProtect Mobile App....................................................... 109
Download and Install the GlobalProtect App for Chrome OS........................................111
Deploy Agent Settings Transparently............................................................................................... 115
Customizable Agent Settings..................................................................................................115
Deploy Agent Settings to Windows Clients........................................................................122
Deploy Agent Settings to Mac Clients................................................................................. 131
GlobalProtect Clientless VPN......................................................................135
Clientless VPN Overview..................................................................................................................... 137
Supported Technologies....................................................................................................................... 139
Configure Clientless VPN.....................................................................................................................140
Troubleshoot Clientless VPN...............................................................................................................145
Mobile Endpoint Management................................................................... 149
Mobile Endpoint Management Overview........................................................................................ 151
Set Up a Mobile Endpoint Management System........................................................................... 152
Manage the GlobalProtect App Using AirWatch........................................................................... 153
Deploy the GlobalProtect Mobile App Using AirWatch.................................................. 153
Configure the GlobalProtect App for iOS Using AirWatch............................................. 154
Configure the GlobalProtect App for Android Using AirWatch..................................... 157
Configure the GlobalProtect App for Windows 10 UWP Using AirWatch..................161
Manage the GlobalProtect App Using a Third-Party MDM.........................................................164
Configure the GlobalProtect App for iOS........................................................................... 164
Configure the GlobalProtect App for Android................................................................... 168
Host Information............................................................................................ 171
About Host Information........................................................................................................................173
What Data Does the GlobalProtect Agent Collect?..........................................................173
How Does the Gateway Use the Host Information to Enforce Policy?........................175
How Do Users Know if Their Systems are Compliant?....................................................176
How Do I Get Visibility into the State of the End Clients?............................................. 176
Configure HIP-Based Policy Enforcement....................................................................................... 177
Collect Application and Process Data From Clients...................................................................... 184
Block Device Access..............................................................................................................................190

TABLE OF CONTENTS v
Configure Windows User-ID Agent to Collect Host Information.............................................. 192
MDM Integration Overview....................................................................................................192
Information Collected............................................................................................................... 192
System Requirements............................................................................................................... 194
Configure GlobalProtect to Retrieve Host Information................................................... 194
Troubleshoot the MDM Integration Service.......................................................................197
GlobalProtect Quick Configs....................................................................... 199
Remote Access VPN (Authentication Profile)................................................................................. 201
Remote Access VPN (Certificate Profile)......................................................................................... 204
Remote Access VPN with Two-Factor Authentication.................................................................207
Always On VPN Configuration........................................................................................................... 211
Remote Access VPN with Pre-Logon................................................................................................212
GlobalProtect Multiple Gateway Configuration..............................................................................218
GlobalProtect for Internal HIP Checking and User-Based Access............................................. 221
Mixed Internal and External Gateway Configuration.................................................................... 225
GlobalProtect Architecture.......................................................................... 231
GlobalProtect Reference Architecture Topology........................................................................... 233
GlobalProtect Portal..................................................................................................................233
GlobalProtect Gateways...........................................................................................................233
GlobalProtect Reference Architecture Features.............................................................................235
End User Experience.................................................................................................................235
Management and Logging....................................................................................................... 235
Monitoring and High Availability........................................................................................... 236
GlobalProtect Reference Architecture Configurations..................................................................237
Gateway Configuration.............................................................................................................237
Portal Configuration..................................................................................................................237
Policy Configurations................................................................................................................ 237
GlobalProtect Cryptography........................................................................239
About GlobalProtect Cipher Selection..............................................................................................241
Cipher Exchange Between the GlobalProtect Agent and Gateway........................................... 242
GlobalProtect Cryptography References..........................................................................................244
Reference: GlobalProtect Agent Cryptographic Functions............................................. 244
TLS Cipher Suites Supported by GlobalProtect Agents................................................... 245
Ciphers Used to Set Up IPSec Tunnels............................................................................................ 251
SSL APIs.................................................................................................................................................... 253

vi TABLE OF CONTENTS

7
GlobalProtect Overview
Whether checking email from home or updating corporate documents from the airport,
the majority of today's employees work outside the physical corporate boundaries. This
increased workforce mobility brings increased productivity and flexibility while simultaneously
introducing significant security risks. Every time users leave the building with their laptops
or mobile devices they are bypassing the corporate firewall and associated policies that
are designed to protect both the user and the network. GlobalProtect™ solves the security
challenges introduced by roaming users by extending the same next-generation firewall-based
policies that are enforced within the physical perimeter to all users, no matter where they are
located.
The following sections provide conceptual information about the Palo Alto Networks
GlobalProtect offering and describe the components of GlobalProtect and the various
deployment scenarios:
> About the GlobalProtect Components
> What Client OS Versions are Supported with GlobalProtect?
> What Features Does GlobalProtect Support?
> About GlobalProtect Licenses

8 GLOBALPROTECT ADMINISTRATOR'S GUIDE | GlobalProtect Overview
© 2017 Palo Alto Networks, Inc.

GLOBALPROTECT ADMINISTRATOR'S GUIDE | GlobalProtect Overview 9
© 2017 Palo Alto Networks, Inc.
About the GlobalProtect Components
GlobalProtect provides a complete infrastructure for managing your mobile workforce to enable secure
access for all your users, regardless of what devices they are using or where they are located. This
infrastructure includes the following components:
•GlobalProtect Portal
•GlobalProtect Gateways
•GlobalProtect Client
GlobalProtect Portal
The GlobalProtect portal provides the management functions for your GlobalProtect infrastructure. Every
client system that participates in the GlobalProtect network receives configuration information from
the portal, including information about available gateways as well as any client certificates that may be
required to connect to the GlobalProtect gateway(s). In addition, the portal controls the behavior and
distribution of the GlobalProtect agent software to both Mac and Windows laptops. (On mobile devices, the
GlobalProtect app is distributed through the Apple App Store for iOS devices or through Google Play for
Android devices.) If you are using the Host Information Profile (HIP) feature, the portal also defines what
information to collect from the host, including any custom information you require. You Set Up Access to
the GlobalProtect Portal on an interface on any Palo Alto Networks next-generation firewall.
GlobalProtect Gateways
GlobalProtect gateways provide security enforcement for traffic from GlobalProtect agents/apps.
Additionally, if the HIP feature is enabled, the gateway generates a HIP report from the raw host data the
clients submit and can use this information in policy enforcement. You can configure different Types of
Gateways to provide security enforcement and/or virtual private network (VPN) access for your remote
users, or to apply security policy for access to internal resources.
You Configure a GlobalProtect Gateway on an interface on any Palo Alto Networks next-generation
firewall. You can run both a gateway and a portal on the same firewall, or you can have multiple, distributed
gateways throughout your enterprise.
GlobalProtect Client
The GlobalProtect client software runs on end user systems and enables access to your network resources
via the GlobalProtect portals and gateways you have deployed. There are two types of GlobalProtect
clients:
•The GlobalProtect Agent—Runs on Windows and Mac OS systems and is deployed from the
GlobalProtect portal. You configure the behavior of the agent—for example, which tabs the users can
see, whether or not users can uninstall the agent—in the client configuration(s) you define on the portal.
See Define the GlobalProtect Agent Configurations, Customize the GlobalProtect Agent, and Deploy the
GlobalProtect Agent Software for details.
•The GlobalProtect App—Runs on iOS, Android, Windows UWP, and Chromebook devices. Users must
obtain the GlobalProtect app from the Apple App Store (for iOS), Google Play (for Android), Microsoft
Store (for Windows UWP), or Chrome Web Store (for Chromebook).
See What Client OS Versions are Supported with GlobalProtect? for more details.
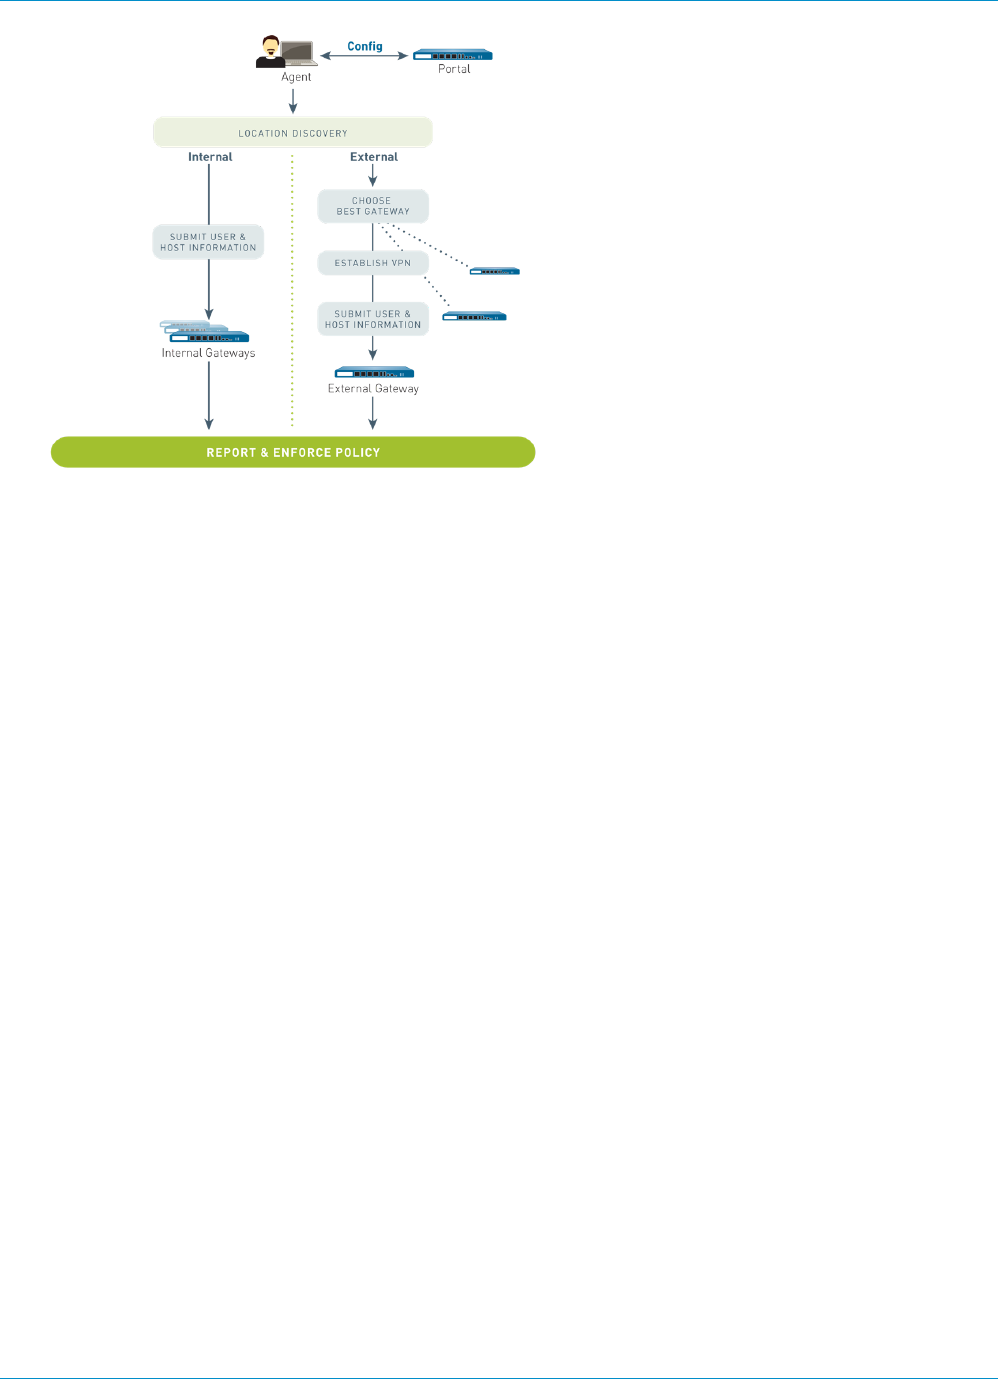
The following diagram illustrates how the GlobalProtect portals, gateways, and agents/apps work together
to enable secure access for all your users, regardless of what devices they are using or where they are
located.
10 GLOBALPROTECT ADMINISTRATOR'S GUIDE | GlobalProtect Overview
© 2017 Palo Alto Networks, Inc.

GLOBALPROTECT ADMINISTRATOR'S GUIDE | GlobalProtect Overview 11
© 2017 Palo Alto Networks, Inc.
What Client OS Versions are Supported with
GlobalProtect?
Palo Alto Networks supports the GlobalProtect app (also referred to as the GlobalProtect agent) on
common desktop, laptop, and mobile devices. We recommend that you configure GlobalProtect on firewalls
running PAN-OS 6.1 or a later release and that you install only supported releases of the GlobalProtect
app on endpoints. The minimum GlobalProtect app release varies by operating system; to determine the
minimum GlobalProtect app release for a specific operating system, refer to the following topics in the Palo
Alto Networks® Compatibility Matrix:
•Where Can I Install the GlobalProtect App?
•What X-Auth IPSec Clients are Supported?
Older versions of the GlobalProtect app (releases 1.0 through 2.1) are still supported on the operating
systems and PAN-OS releases with which they were released. For minimum PAN-OS release support for
GlobalProtect app 2.1 and older releases, refer to the GlobalProtect agent (app) release notes for your
specific release on the Software Updates site.
12 GLOBALPROTECT ADMINISTRATOR'S GUIDE | GlobalProtect Overview
About GlobalProtect Licenses
If you simply want to use GlobalProtect to provide a secure, remote access or virtual private network (VPN)
solution via single or multiple internal/external gateways, you do not need any GlobalProtect licenses.
However, to use some of the more advanced features (such as HIP checks and associated content updates,
support for the GlobalProtect mobile app, or IPv6 support) you need to purchase an annual GlobalProtect
subscription. This license must be installed on each firewall running a gateway(s) that:
• Performs HIP checks
• Supports the GlobalProtect app on mobile devices
• Provides IPv6 connections
For GlobalProtect Clientless VPN, this feature also requires you to install a GlobalProtect subscription on
the firewall that hosts the Clientless VPN from the GlobalProtect portal. You also need the GlobalProtect
Clientless VPN dynamic updates to use this feature.
Feature Subscription Required?
Single, external gateway (Windows and Mac)
Single or multiple internal gateways
Multiple external gateways
HIP Checks
Mobile app for iOS endpoints, Android endpoints, Chromebooks, and
Windows 10 UWP endpoints
IPv6 support
Clientless VPN
See Activate Licenses for information on installing licenses on the firewall.

13
Get Started
For GlobalProtect™ to work, you must set up the infrastructure that allows all of the
components to communicate. At a basic level, this means setting up the interfaces and zones
to which the GlobalProtect end users connect to access the portal and the gateways to
the network. Because the GlobalProtect components communicate over secure channels,
you must acquire and deploy the required SSL certificates to the various components. The
following sections guide you through the steps to set up the GlobalProtect infrastructure:
> Create Interfaces and Zones for GlobalProtect on page 15
> Enable SSL Between GlobalProtect Components on page 17

14 GLOBALPROTECT ADMINISTRATOR'S GUIDE | Get Started
© 2017 Palo Alto Networks, Inc.

GLOBALPROTECT ADMINISTRATOR'S GUIDE | Get Started 15
© 2017 Palo Alto Networks, Inc.
Create Interfaces and Zones for GlobalProtect
You must configure the following interfaces and zones for your GlobalProtect infrastructure:
•GlobalProtect portal—Requires a Layer 3 or loopback interface for the GlobalProtect clients’ connection.
If the portal and gateway are on the same firewall, they can use the same interface. The portal must be
in a zone that is accessible from outside your network, for example: DMZ.
•GlobalProtect gateways—The interface and zone requirements for the gateway depend on whether the
gateway you are configuring is external or internal, as follows:
•External gateways—Requires a Layer 3 or loopback interface and a logical tunnel interface for the client
to establish a VPN tunnel. The Layer 3/loopback interface must be in an external zone, such as DMZ.
A tunnel interface can be in the same zone as the interface connecting to your internal resources (for
example trust). For added security and better visibility, you can create a separate zone, such as corp-
vpn. If you create a separate zone for your tunnel interface, you must create security policies that enable
traffic to flow between the VPN zone and the trust zone.
•Internal gateways—Requires a Layer 3 or loopback interface in your trust zone. You can also create a
tunnel interface for access to your internal gateways, but this is not required.
For tips on how to use a loopback interface to provide access to GlobalProtect on different
ports and addresses, refer to Can GlobalProtect Portal Page be Configured to be Accessed
on any Port?
For more information about portals and gateways, see About the GlobalProtect Components.
STEP 1 | Configure a Layer 3 interface for each portal and/or gateway you plan to deploy.
If the gateway and portal are on the same firewall, you can use a single interface for both.
As a best practice use static IP addresses for the portal and gateway.
Do not attach an interface management profile that allows HTTP, HTTPS, Telnet, or
SSH on the interface where you have configured a GlobalProtect portal or gateway
because this enables access to your management interface from the Internet. Follow
the Best Practices for Securing Administrative Access to ensure that you are securing
administrative access to your firewalls in a way that will prevent successful attacks.
1. Select Network > Interfaces > Ethernet or Network > Interfaces > Loopback and then select the
interface you want to configure for GlobalProtect. In this example, we are configuring ethernet1/1 as
the portal interface.
2. (Ethernet only) Select Layer3 from the Interface Type drop-down.
3. On the Config tab, select the zone to which the portal or gateway interface belongs as follows:
• Place portals and external gateways in an untrust zone for access by hosts outside your network,
such as l3-untrust.
• Place internal gateways in an internal zone, such as l3-trust.
• If you have not yet created the zone, select New Zone from the Security Zone drop-down. In the
Zone dialog, define a Name for the new zone and then click OK.
4. In the Virtual Router drop-down, select default.
5. Assign an IP address to the interface:

16 GLOBALPROTECT ADMINISTRATOR'S GUIDE | Get Started
© 2017 Palo Alto Networks, Inc.
• For an IPv4 address, select IPv4 and Add the IP address and network mask to assign to the
interface, for example 203.0.11.100/24.
• For an IPv6 address, select IPv6, Enable IPv6 on the interface, and Add the IP address and
network mask to assign to the interface, for example 2001:1890:12f2:11::10.1.8.160/80.
6. To save the interface configuration, click OK.
STEP 2 | On the firewall(s) hosting GlobalProtect gateway(s), configure the logical tunnel interface that
will terminate VPN tunnels established by the GlobalProtect agents.
IP addresses are not required on the tunnel interface unless you require dynamic
routing. In addition, assigning an IP address to the tunnel interface can be useful for
troubleshooting connectivity issues.
Be sure to enable User-ID in the zone where the VPN tunnels terminate.
1. Select Network > Interfaces > Tunnel and click Add.
2. In the Interface Name field, specify a numeric suffix, such as .2.
3. On the Config tab, expand the Security Zone drop-down to define the zone as follows:
• To use your trust zone as the termination point for the tunnel, select the zone from the drop-
down.
• (Recommended) To create a separate zone for VPN tunnel termination, click New Zone. In
the Zone dialog, define a Name for new zone (for example, corp-vpn), select the Enable User
Identification check box, and then click OK.
4. In the Virtual Router drop-down, select None.
5. Assign an IP address to the interface:
• For an IPv4 address, select IPv4 and Add the IP address and network mask to assign to the
interface, for example 203.0.11.100/24.
• For an IPv6 address, select IPv6, Enable IPv6 on the interface, and Add the IP address and
network mask to assign to the interface, for example 2001:1890:12f2:11::10.1.8.160/80.
6. To save the interface configuration, click OK.
STEP 3 | If you created a separate zone for tunnel termination of VPN connections, create a security
policy to enable traffic flow between the VPN zone and your trust zone.
For example, the following policy rule enables traffic between the corp-vpn zone and the l3-trust zone.
STEP 4 | Save the configuration.

GLOBALPROTECT ADMINISTRATOR'S GUIDE | Get Started 17
© 2017 Palo Alto Networks, Inc.
Enable SSL Between GlobalProtect
Components
All interaction between the GlobalProtect components occurs over an SSL/TLS connection. Therefore, you
must generate and/or install the required certificates before configuring each component so that you can
reference the appropriate certificate(s) in the configurations. The following sections describe the supported
methods of certificate deployment, descriptions and best practice guidelines for the various GlobalProtect
certificates, and provide instructions for generating and deploying the required certificates:
•About GlobalProtect Certificate Deployment on page 17
•GlobalProtect Certificate Best Practices on page 17
•Deploy Server Certificates to the GlobalProtect Components on page 20
About GlobalProtect Certificate Deployment
There are three basic approaches to Deploy Server Certificates to the GlobalProtect Components on page
20:
•(Recommended) Combination of third-party certificates and self-signed certificates—Because the
end clients will be accessing the portal prior to GlobalProtect configuration, the client must trust the
certificate to establish an HTTPS connection.
•Enterprise Certificate Authority—If you already have your own enterprise CA, you can use this internal
CA to issue certificates for each of the GlobalProtect components and then import them onto the
firewalls hosting your portal and gateway(s). In this case, you must also ensure that the end user
systems/mobile devices trust the root CA certificate used to issue the certificates for the GlobalProtect
services to which they must connect.
•Self-Signed Certificates—You can generate a self-signed CA certificate on the portal and use it to issue
certificates for all of the GlobalProtect components. However, this solution is less secure than the other
options and is therefore not recommended. If you do choose this option, end users will see a certificate
error the first time they connect to the portal. To prevent this, you can deploy the self-signed root CA
certificate to all end user systems manually or using some sort of centralized deployment, such as an
Active Directory Group Policy Object (GPO).
GlobalProtect Certificate Best Practices
The following table summarizes the SSL/TLS certificates you will need, depending on which features you
plan to use:
Certificate Usage Issuing Process/Best Practices
CA certificate Used to sign certificates
issued to the GlobalProtect
components.
If you plan to use self-signed certificates, a best
practice is to generate a CA certificate on the portal
and then use that certificate to issue the required
GlobalProtect certificates.
Portal server
certificate
Enables GlobalProtect
agents and apps to
establish an HTTPS
connection with the portal.
• This certificate is identified in an SSL/TLS service
profile. You assign the portal server certificate by
selecting its associated service profile in a portal
configuration.
• Use a certificate from a well-known, third-party
CA. This is the most secure option and ensures

18 GLOBALPROTECT ADMINISTRATOR'S GUIDE | Get Started
© 2017 Palo Alto Networks, Inc.
Certificate Usage Issuing Process/Best Practices
that the user endpoints can establish a trust
relationship with the portal and without requiring
you to deploy the root CA certificate.
• If you do not use a well-known, public CA, you
should export the root CA certificate that was
used to generate the portal server certificate to
all endpoints that run the GlobalProtect agent or
application. Exporting this certificate prevents the
end users from seeing certificate warnings during
the initial portal login.
• The Common Name (CN) and, if applicable, the
Subject Alternative Name (SAN) fields of the
certificate must match the IP address or FQDN of
the interface that hosts the portal.
• In general, a portal must have its own server
certificate. However, if you are deploying a single
gateway and portal on the same interface for basic
VPN access, you must use the same certificate for
both the gateway and the portal.
• If you configure a gateway and portal on the
same interface, we also recommend that you use
the same certificate profile and SSL/TLS service
profile for both the gateway and portal. If they do
not use the same certificate profile and SSL/TLS
service profile, the gateway configuration takes
precedence over the portal configuration during
the SSL handshake.
Gateway server
certificate
Enables GlobalProtect
agents and apps to
establish an HTTPS
connection with the
gateway.
• This certificate is identified in an SSL/TLS service
profile. You assign the portal server certificate by
selecting its associated service profile in a gateway
configuration.
• Generate a CA certificate on the portal and
use that CA certificate to generate all gateway
certificates.
• The CN and, if applicable, the SAN fields of the
certificate must match the FQDN or IP address
of the interface where you plan to configure the
gateway.
• The portal distributes the gateway root CA
certificates to agents in the client configuration, so
the gateway certificates do not need to be issued
by a public CA.
• In general, each gateway must have its own server
certificate. However, if you are deploying a single
gateway and portal on the same interface for
basic VPN access, you must use a single server
certificate for both components.As a best practice,
use a certificate that a public CA signed.
• If you configure a gateway and portal on the
same interface, we also recommend that you use
the same certificate profile and SSL/TLS service

GLOBALPROTECT ADMINISTRATOR'S GUIDE | Get Started 19
© 2017 Palo Alto Networks, Inc.
Certificate Usage Issuing Process/Best Practices
profile for both the gateway and portal. If they do
not use the same certificate profile and SSL/TLS
service profile, the gateway configuration takes
precedence over the portal configuration during
the SSL handshake.
(Optional) Client
certificate
Used to enable mutual
authentication in
establishing an HTTPS
session between the
GlobalProtect agents
and the gateways/portal.
This ensures that only
devices with valid client
certificates are able to
authenticate and connect
to the network.
• For simplified deployment of client certificates,
configure the portal to deploy the client certificate
to the agents upon successful login using either of
the following methods:
• Use a single client certificate across all
GlobalProtect agents that receive the same
configuration. You assign the Local client
certificate by uploading the certificate to
the portal and selecting it in a portal agent
configuration.
• Use simple certificate enrollment protocol
(SCEP) to enable the GlobalProtect portal
to deploy unique client certificates to your
GlobalProtect agents. You enable this by
configuring a SCEP profile and then selecting
that profile in a portal agent configuration.
• Use one of the following supported digest
algorithms when you generate client certificates
for GlobalProtect endpoints: sha1, sha256, or
sha384. Sha512 is not supported with client
certificates.
• You can use other mechanisms to deploy unique
client certificates to each client system for use in
authenticating the end user.
• Consider testing your configuration without
the client certificate first, and then add the
client certificate after you are sure that all other
configuration settings are correct.
(Optional)
Machine
certificates
A machine certificate is
a client certificate that
is issued to a device.
Each machine certificate
identifies the device in the
subject field (for example,
CN=laptop1.example.com)
instead of a user. The
certificate ensures that
only trusted endpoints can
connect to gateways or the
portal.
Machine certificates are
required for users whose
connect method is pre-
logon, which enables
• Use one of the following supported digest
algorithms when you generate client certificates
for GlobalProtect endpoints: sha1, sha256, or
sha384. Sha512 is not supported with client
certificates.
• If you plan to use the pre-logon feature, use
your own PKI infrastructure to deploy machine
certificates to each client system prior to enabling
GlobalProtect access. This approach is important
for ensuring security.
For more information, see Remote Access VPN
with Pre-Logon.
20 GLOBALPROTECT ADMINISTRATOR'S GUIDE | Get Started
© 2017 Palo Alto Networks, Inc.
Certificate Usage Issuing Process/Best Practices
GlobalProtect to establish
a VPN tunnel before the
user logs in.
Table: GlobalProtect Certificate Requirements
For details about the types of keys for secure communication between the GlobalProtect endpoint and the
portals and gateways, see Reference: GlobalProtect Agent Cryptographic Functions.
Deploy Server Certificates to the GlobalProtect Components
The following table shows the best practice steps for deploying SSL/TLS certificates to the GlobalProtect
components:
•Import a server certificate from a well-known, third-party CA.
Use a server certificate from a well-known, third-party CA for the GlobalProtect portal.
This practice ensures that the end users are able to establish an HTTPS connection
without seeing warnings about untrusted certificates.
The CN and, if applicable, the SAN fields of the certificate must match the FQDN or IP
address of the interface where you plan to configure the portal or the device check-in
interface on a third-party mobile endpoint management system. Wildcard matches are
supported.
Before you import a certificate, make sure the certificate and key files are accessible from your
management system and that you have the passphrase to decrypt the private key.
1. Select Device > Certificate Management > Certificates > Device Certificates.
2. Click Import.
3. Use the Local certificate type (the default).
4. Enter a Certificate Name.
5. Enter the path and name to the Certificate File received from the CA, or Browse to find the file.
6. Select Encrypted Private Key and Certificate (PKCS12) as the File Format.
7. Enter the path and name to the PKCS#12 file in the Key File field or Browse to find it.
8. Enter and re-enter the Passphrase that was used to encrypt the private key and then click OK to
import the certificate and key.
•Create the root CA certificate for issuing self-signed certificates for the GlobalProtect
components.
Create the Root CA certificate on the portal and use it to issue server certificates for the
gateways and, optionally, for clients.
Before deploying self-signed certificates, you must create the root CA certificate that signs the
certificates for the GlobalProtect components:
1. Select Device > Certificate Management > Certificates > Device Certificates and then click
Generate.
2. Use the Local certificate type (the default).
3. Enter a Certificate Name, such as GlobalProtect_CA. The certificate name cannot contain spaces.

GLOBALPROTECT ADMINISTRATOR'S GUIDE | Get Started 21
© 2017 Palo Alto Networks, Inc.
4. Do not select a value in the Signed By field. (Without a selection for Signed By, the certificate is self-
signed.)
5. Select the Certificate Authority check box.
6. Click OK to generate the certificate.
•Use the root CA on the portal to generate a self-signed server certificate.
Generate server certificates for each gateway you plan to deploy and optionally for the
management interface of the third-party mobile endpoint management system (if this
interface is where the gateways retrieve HIP reports).
In the gateway server certificates, the values in the CN and SAN fields must be identical.
If the values differ, the GlobalProtect agent detects the mismatch and does not trust
the certificate. Self-signed certificates contain a SAN field only if you add a Host Name
attribute.
As an alternative method, you can Use Simple Certificate Enrollment Protocol (SCEP) to request a server
certificate from your enterprise CA.
1. Select Device > Certificate Management > Certificates > Device Certificates and then click
Generate.
2. Use the Local certificate type (the default).
3. Enter a Certificate Name. This name cannot contain spaces.
4. In the Common Name field, enter the FQDN (recommended) or IP address of the interface where
you plan to configure the gateway.
5. In the Signed By field, select the GlobalProtect_CA you created.
6. In the Certificate Attributes section, Add and define the attributes that uniquely identify the gateway.
Keep in mind that if you add a Host Name attribute (which populates the SAN field of the certificate),
it must be the same as the value you defined for the Common Name.
7. Configure cryptographic settings for the server certificate including encryption Algorithm, key length
(Number of Bits), Digest algorithm and Expiration (days).
8. Click OK to generate the certificate.
•Use Simple Certificate Enrollment Protocol (SCEP) to request a server certificate from your
enterprise CA.
Configure separate SCEP profiles for each portal and gateway you plan to deploy. Then
use the specific SCEP profile to generate the server certificate for each GlobalProtect
component.
In portal and gateway server certificates, the value of the CN field must include the FQDN
(recommended) or IP address of the interface where you plan to configure the portal or
gateway and must be identical to the SAN field.
To comply with the U.S. Federal Information Processing Standard (FIPS), you must also
enable mutual SSL authentication between the SCEP server and the GlobalProtect portal.
(FIPS-CC operation is indicated on the firewall login page and in its status bar.)
After you commit the configuration, the portal attempts to request a CA certificate using the settings in
the SCEP profile. If successful, the firewall hosting the portal saves the CA certificate and displays it in
the list of Device Certificates.
1. Configure a SCEP Profile for each GlobalProtect portal or gateway:

22 GLOBALPROTECT ADMINISTRATOR'S GUIDE | Get Started
© 2017 Palo Alto Networks, Inc.
1. Enter a Name that identifies the SCEP profile and the component to which you deploy the server
certificate. If this profile is for a firewall with multiple virtual systems capability, select a virtual
system or Shared as the Location where the profile is available.
2. (Optional) Configure a SCEP Challenge-response mechanism between the PKI and portal for
each certificate request. Use either a Fixed challenge password which you obtain from the SCEP
server or a Dynamic password where the portal-client submits a username and OTP of your
choice to the SCEP Server. For a Dynamic SCEP challenge, this can be the credentials of the PKI
administrator.
3. Configure the Server URL that the portal uses to reach the SCEP server in the PKI (for example,
http://10.200.101.1/certsrv/mscep/).
4. Enter a string (up to 255 characters in length) in the CA-IDENT Name field to identify the SCEP
server.
5. Enter the Subject name to use in the certificates generated by the SCEP server. The subject must
include a common name (CN) key in the format CN=<value> where <value> is the FQDN or IP
address of the portal or gateway.
6. Select the Subject Alternative Name Type. To enter the email name in a certificate’s subject or
Subject Alternative Name extension, select RFC 822 Name. You can also enter the DNS Name
to use to evaluate certificates, or the Uniform Resource Identifier to identify the resource from
which the client will obtain the certificate.
7. Configure additional cryptographic settings including the key length (Number of Bits), and Digest
algorithm for the certificate signing request.
8. Configure the permitted uses of the certificate, either for signing (Use as digital signature) or
encryption (Use for key encipherment).
9. To ensure that the portal is connecting to the correct SCEP server, enter the CA Certificate
Fingerprint. Obtain this fingerprint from the SCEP server interface in the Thumbprint field.
10.Enable mutual SSL authentication between the SCEP server and the GlobalProtect portal.
11.Click OK and then Commit the configuration.
2. Select Device > Certificate Management > Certificates > Device Certificates and then click
Generate.
3. Enter a Certificate Name. This name cannot contain spaces.
4. Select the SCEP Profile to use to automate the process of issuing a server certificate that is signed
by the enterprise CA to a portal or gateway, and then click OK to generate the certificate. The
GlobalProtect portal uses the settings in the SCEP profile to submit a CSR to your enterprise PKI.
•Assign the server certificate you imported or generated to an SSL/TLS service profile.
1. Select Device > Certificate Management > SSL/TLS Service Profile and click Add.
2. Enter a Name to identify the profile and select the server Certificate you imported or generated.
3. Define the range of SSL/TLS versions (Min Version to Max Version) for communication between
GlobalProtect components.
To provide the strongest security, set the Min Version to TLSv1.2.
4. Click OK to save the SSL/TLS service profile.
5. Commit the changes.
•Deploy the self-signed server certificates.
• Export the self-signed server certificates issued by the root CA on the portal and
import them onto the gateways.
• Be sure to issue a unique server certificate for each gateway.

GLOBALPROTECT ADMINISTRATOR'S GUIDE | Get Started 23
© 2017 Palo Alto Networks, Inc.
• If specifying self-signed certificates, you must distribute the Root CA certificate to the
end clients in the portal client configurations.
Export the certificate from the portal:
1. Select Device > Certificate Management > Certificates > Device Certificates.
2. Select the gateway certificate you want to deploy and click Export.
3. In the File Format drop-down, select Encrypted Private Key and Certificate (PKCS12).
4. Enter (and re-enter) a Passphrase to encrypt the private key.
5. Click OK to download the PKCS12 file to a location of your choice.
Import the certificate on the gateway:
1. Select Device > Certificate Management > Certificates > Device Certificates.
2. Click Import.
3. Enter a Certificate Name.
4. Browse to find and select the Certificate File you downloaded in the previous step.
5. In the File Format drop-down, select Encrypted Private Key and Certificate (PKCS12).
6. Enter (and re-enter) the Passphrase you used to encrypt the private key when you exported it from
the portal.
7. Click OK to import the certificate and key.
8. Commit the changes to the gateway.

24 GLOBALPROTECT ADMINISTRATOR'S GUIDE | Get Started

25
Authentication
The GlobalProtect™ portal and gateway must authenticate the end-user before it allows access
to GlobalProtect resources. You must configure authentication mechanisms before continuing
with the portal and gateway setup. The following sections detail the supported authentication
mechanisms and how to configure them:
> About GlobalProtect User Authentication
> Set Up External Authentication
> Set Up Client Certificate Authentication
> Set Up Two-Factor Authentication
> Set Up Authentication for strongSwan Ubuntu and CentOS Clients
> Configure GlobalProtect to Facilitate Multi-Factor Authentication Notifications
> Enable Delivery of GlobalProtect Client VSAs to a RADIUS Server
> Enable Group Mapping

26 GLOBALPROTECT ADMINISTRATOR'S GUIDE | Authentication
© 2017 Palo Alto Networks, Inc.

GLOBALPROTECT ADMINISTRATOR'S GUIDE | Authentication 27
© 2017 Palo Alto Networks, Inc.
About GlobalProtect User Authentication
The first time a GlobalProtect client connects to the portal, the user is prompted to authenticate to
the portal. If authentication succeeds, the GlobalProtect portal sends the GlobalProtect configuration,
which includes the list of gateways to which the agent can connect, and optionally a client certificate for
connecting to the gateways. After successfully downloading and caching the configuration, the client
attempts to connect to one of the gateways specified in the configuration. Because these components
provide access to your network resources and settings, they also require the end user to authenticate.
The appropriate level of security required on the portal and gateways varies with the sensitivity of the
resources that the gateway protects. GlobalProtect provides a flexible authentication framework that allows
you to choose the authentication profile and certificate profile that are appropriate to each component.
•Supported GlobalProtect Authentication Methods
•How Does the Agent or App Know What Credentials to Supply?
•How Does the Agent Know Which Certificate to Supply?
Supported GlobalProtect Authentication Methods
The following topics describe the authentication methods that GlobalProtect supports and provide usage
guidelines for each method.
•Local Authentication on page 27
•External Authentication on page 27
•Client Certificate Authentication on page 27
•Two-Factor Authentication on page 28
•Multi-Factor Authentication for Non-Browser-Based Applications on page 29
Local Authentication
Both the user account credentials and the authentication mechanisms are local to the firewall. This
authentication mechanism is not scalable because it requires an account for every GlobalProtect user and is,
therefore, advisable for only very small deployments.
External Authentication
The user authentication functions are performed by an external LDAP, Kerberos, TACACS+, SAML, or
RADIUS service (including support for two-factor, token-based authentication mechanisms, such as one-
time password (OTP) authentication). To enable external authentication:
• Create a server profile with settings for access to the external authentication service.
• Create an authentication profile that refers to the server profile.
• Specify client authentication in the portal and gateway configurations and optionally specify the OS of
the endpoint that will use these settings.
You can use different authentication profiles for each GlobalProtect component. See Set Up External
Authentication on page 31 for instructions. See Remote Access VPN (Authentication Profile) on page
201 for an example configuration.
Client Certificate Authentication
For enhanced security, you can configure the portal or gateway to use a client certificate to obtain the
username and authenticate the user before granting access to the system.

28 GLOBALPROTECT ADMINISTRATOR'S GUIDE | Authentication
© 2017 Palo Alto Networks, Inc.
• To authenticate the user, one of the certificate fields, such as the Subject Name field, must identify the
username.
• To authenticate the endpoint, the Subject field of the certificate must identify the device type instead of
the username. (With the pre-logon connect methods, the portal or gateway authenticates the endpoint
before the user logs in.)
For an agent configuration profile that specifies client certificates, each user receives a client certificate.
The mechanism for providing the certificates determines whether a certificate is unique to each client or the
same for all clients under that agent configuration:
• To deploy client certificates that are unique to each user and device, use SCEP. When a user first logs
in, the portal requests a certificate from the enterprise’s PKI. The portal obtains a unique certificate and
deploys it to the client.
• To deploy the same client certificate to all users that receive an agent configuration, deploy a certificate
that is Local to the firewall.
Use an optional certificate profile to verify the client certificate that a client presents with a connection
request. The certificate profile specifies the contents of the username and user domain fields; lists CA
certificates; criteria for blocking a session; and offers ways to determine the revocation status of CA
certificates. Because the certificate is part of the authentication of the endpoint or user for a new session,
you must pre-deploy certificates used in certificate profiles to the endpoints before the users’ initial portal
login.
The certificate profile specifies which certificate field contains the username. If the certificate profile
specifies Subject in the Username Field, the certificate presented by the client must contain a common-
name for the client to connect. If the certificate profile specifies a Subject-Alt with an Email or Principal
Name as the Username Field, the certificate from the client must contain the corresponding fields, which
will be used as the username when the GlobalProtect agent authenticates to the portal or gateway.
GlobalProtect also supports authentication by common access cards (CACs) and smart cards, which rely on
a certificate profile. With these cards, the certificate profile must contain the root CA certificate that issued
the certificate to the smart card or CAC.
If you specify client certificate authentication, you should not configure a client certificate in the portal
configuration because the client system provides it when the user connects. For an example of how to
configure client certificate authentication, see Remote Access VPN (Certificate Profile) on page 204.
Two-Factor Authentication
With two-factor authentication, the portal or gateway uses two mechanisms to authenticate a user, such as
a one-time password in addition to AD login credentials. You can enable two-factor authentication on the
portal and gateways by configuring a certificate profile and an authentication profile and adding them both
to the portal and/or gateway configuration.
You can configure the portal and gateways to use the same authentication methods or use different
methods. Regardless, with two-factor authentication, the client must successfully authenticate by the two
mechanisms that the component demands before it grants access.
If the certificate profile specifies a Username Field from which GlobalProtect can obtain a username, the
external authentication service automatically uses the username to authenticate the user to the external
authentication service specified in the authentication profile. For example, if the Username Field in the
certificate profile is set to Subject, the value in the common-name field of the certificate is used as the
username when the authentication server tries to authenticate the user. If you do not want to force users
to authenticate with a username from the certificate, make sure the certificate profile is set to None for the
Username Field. See Remote Access VPN with Two-Factor Authentication on page 207 for an example
configuration.

GLOBALPROTECT ADMINISTRATOR'S GUIDE | Authentication 29
© 2017 Palo Alto Networks, Inc.
Multi-Factor Authentication for Non-Browser-Based Applications
(Windows and Mac endpoints only) For sensitive, non-browser-based network resources (for example,
financial applications or software development applications) that may require additional authentication,
GlobalProtect clients can now notify and prompt the user to perform the timely, multi-factor authentication
needed to access these resources.
How Does the Agent or App Know What Credentials to Supply?
By default, the GlobalProtect agent attempts to use the same login credentials for the gateway that it used
for portal login. In the simplest case, where the gateway and the portal use the same authentication profile
and/or certificate profile, the agent will connect to the gateway transparently.
On a per-agent configuration basis, you can also customize which GlobalProtect portal and gateways—
internal, external, or manual only—require different credentials (such as unique OTPs). This enables the
GlobalProtect portal or gateway to prompt for the unique OTP without first prompting for the credentials
specified in the authentication profile.
There are two options for modifying the default agent authentication behavior so that authentication is
both stronger and faster:
•Cookie Authentication on the Portal or Gateway on page 29
•Credential Forwarding to Some or All Gateways on page 29
Cookie Authentication on the Portal or Gateway
Cookie authentication simplifies the authentication process for end users because they will no longer
be required to log in to both the portal and the gateway in succession or enter multiple OTPs for
authenticating to each. This improves the user experience by minimizing the number of times that users
must enter credentials. In addition, cookies enable use of a temporary password to re-enable VPN access
after the user’s password expires.
You can configure cookie authentication settings independently for the portal and for individual gateways,
(for example, you can impose a shorter cookie lifetime on gateways that protect sensitive resources).
After the portal or gateways deploy an authentication cookie to the endpoint, the portal and gateways
both rely on the same cookie to authenticate the user. When the agent presents the cookie, the portal
or gateway evaluates whether the cookie is valid based on the configured cookie lifetime. If the cookie
expires, GlobalProtect automatically prompts the user to authenticate with the portal or gateway. When
authentication is successful, the portal or gateway issues the replacement authentication cookie to the
endpoint and the validity period starts over.
Consider the following example where you configure the cookie lifetime for the portal—which does not
protect sensitive information—as 15 days, but configure the cookie lifetime for gateways—which do protect
sensitive information—as 24 hours. When the user first authenticates with the portal, the portal issues the
authentication cookie. If after five days, the user attempted to connect to the portal, the authentication
cookie would still be valid. However, if after five days the user attempted to connect to the gateway, the
gateway would evaluate the cookie lifetime and determine it expired (5 days > 24 hours). The agent would
then automatically prompt the user to authenticate with the gateway and, on successful authentication,
receive a replacement authentication cookie. The new authentication cookie would then be valid for
another 15 days on the portal and another 24 hours on the gateways.
For an example of how to use this option, see Set Up Two-Factor Authentication on page 45.
Credential Forwarding to Some or All Gateways
With two-factor authentication, you can specify the portal and/or types of gateways (internal, external,
or manual only) that prompt for their own set of credentials. This option speeds up the authentication
process when the portal and the gateway require different credentials (either different OTPs or different

30 GLOBALPROTECT ADMINISTRATOR'S GUIDE | Authentication
© 2017 Palo Alto Networks, Inc.
login credentials entirely). For each portal or gateway that you select, the agent will not forward credentials,
allowing you to customize the security for different GlobalProtect components. For example, you can have
the same security on your portals and internal gateways, while requiring a second factor OTP or a different
password for access to those gateways that provide access to your most sensitive resources.
For an example of how to use this option, see Set Up Two-Factor Authentication on page 45.
How Does the Agent Know Which Certificate to Supply?
When you configure GlobalProtect to use client certificates for authentication on Mac or Windows
endpoints, GlobalProtect must present a valid client certificate to authenticate with the portal and/or
gateways.
For a client certificate to be valid, it must meet the following four requirements:
• Issued by the certificate authority (CA) you defined in the Certificate Profile of your portal and gateway
configurations.
• Specifies the client authentication purpose, which the certificate administrator specifies when creating
the certificate.
• Located in the certificate store as configured in the GlobalProtect portal agent configuration. By default,
the GlobalProtect agent first looks for a valid certificate in the user store and, if none exists, then looks
in the machine store. Because the user store takes precedence, if the GlobalProtect agent locates a
certificate in the user store, it will not look in the machine store. To force the GlobalProtect agent to
look for certificates in only one certificate store, configure the Client Certificate Store Lookup option in
the appropriate GlobalProtect portal agent configuration.
• Match any additional purpose specified in the GlobalProtect portal agent configuration. To specify
an additional purpose, you must identify the object identifier (OID) for the certificate and configure
the Extended Key Usage OID value in the appropriate GlobalProtect portal agent configuration. An
OID is a numeric value that identifies the application or service for which to use a certificate and that
is automatically attached to a certificate when it is created by a certificate authority (CA). For more
information on specifying a common or custom OID, see Certificate Selection by OID.
When only one client certificate meets the requirements above, the agent automatically selects and
uses that client certificate for authentication. However, when multiple client certificates meet the these
requirements, GlobalProtect prompts the user to select the client certificate from a list of valid client
certificates on the endpoint. While GlobalProtect requires users to select the client certificate only when
they first connect, users might not know which certificate to select. In this case, we recommend you to
narrow the list of available client certificates by certificate purpose (as indicated by the OID) and certificate
store. For more information on these and other settings you can configure to customize your agent, see
Customize the GlobalProtect Agent.

GLOBALPROTECT ADMINISTRATOR'S GUIDE | Authentication 31
© 2017 Palo Alto Networks, Inc.
Set Up External Authentication
The following workflows describe how to set up the GlobalProtect portal and gateways to use an external
authentication service. The supported authentication services are LDAP, Kerberos, RADIUS, SAML, or
TACACS+.
These workflows also describe how to create an optional authentication profile that a portal or gateway can
use to identify the external authentication service. This step is optional for external authentication because
the authentication profile also can specify the local authentication database or None.
GlobalProtect also supports local authentication. To use local authentication, create a local
user database (Device > Local User Database) that contains the users and groups to which
you want to allow VPN access and then refer to that database in the authentication profile.
For more information, see Supported GlobalProtect Authentication Methods on page 27 or watch a video.
The options for setting up external authentication include:
•Set Up LDAP Authentication on page 31
•Set Up SAML Authentication on page 33
•Set Up Kerberos Authentication on page 34
•Set Up RADIUS or TACACS+ Authentication on page 35
Set Up LDAP Authentication
LDAP is often used by organizations as a central repository for user information and as an authentication
service. It can also be used to store the role information for application users.
STEP 1 | Create a server profile.
The server profile identifies the external authentication service and instructs the firewall how to connect
to that authentication service and access the authentication credentials for your users.
When you use LDAP to connect to Active Directory (AD), you must create a separate
LDAP server profile for every AD domain.
1. Select Device > Server Profiles and select the LDAP profile.
2. Click Add and enter a Profile Name, such as GP-User-Auth.
3. If this profile is for a firewall with multiple virtual systems capability, select a virtual system or Shared
as the Location where the profile is available.
4. Select the Type of LDAP server.
5. Click Add in the Servers section and then enter the necessary information for connecting to the
authentication server, including the server Name, IP address or FQDN of the Server, and Port.
6. Specify settings to enable the authentication service to authenticate the firewall. Enter the Bind DN
and Password.
7. If you want the device to use SSL or TLS for a more secure connection with the directory server,
select the Require SSL/TLS secured connection check box (selected by default). The protocol that
the device uses depends on the server Port:
• 389 (default)—TLS (Specifically, the device uses the StartTLS operation, which upgrades the initial
plaintext connection to TLS.)
• 636—SSL
• Any other port—The device first attempts to use TLS. If the directory server doesn’t support TLS,
the device falls back to SSL.

32 GLOBALPROTECT ADMINISTRATOR'S GUIDE | Authentication
© 2017 Palo Alto Networks, Inc.
8. For additional security, select the Verify Server Certificate for SSL sessions check box so that
the device verifies the certificate that the directory server presents for SSL/TLS connections. To
enable verification, you also have to select the Require SSL/TLS secured connection check box. For
verification to succeed, the certificate must meet one of the following conditions:
• It is in the list of device certificates: Device > Certificate Management > Certificates > Device
Certificates. Import the certificate into the device, if necessary.
• The certificate signer is in the list of trusted certificate authorities: Device > Certificate
Management > Certificates > Default Trusted Certificate Authorities.
9. Click OK to save the server profile.
STEP 2 | (Optional) Create an authentication profile.
The authentication profile specifies the server profile for the portal or gateways to use when they
authenticate users. On a portal or gateway, you can assign one or more authentication profiles in one
or more client authentication profiles. For descriptions of how an authentication profile within a client
authentication profile supports granular user authentication, see Configure a GlobalProtect Gateway and
Set Up Access to the GlobalProtect Portal.
To enable users to connect and change their own expired passwords without
administrative intervention, consider using a pre-logon connect method. See Remote
Access VPN with Pre-Logon for details.
If users allow their passwords to expire, you may assign a temporary LDAP password to
enable them to log in to the VPN. In this case, the temporary password may be used to
authenticate to the portal, but the gateway login may fail because the same temporary
password cannot be re-used. To prevent this, enable an authentication override in the
portal configuration (Network > GlobalProtect > Portal) to enable the agent to use a
cookie to authenticate to the portal and use the temporary password to authenticate the
gateway.
1. Select Device > Authentication Profile and Add a new profile.
2. Enter a Name for the profile and then select LDAP as the authentication Type.
3. Select the LDAP authentication Server Profile that you created in 1 from the drop-down.
4. Enter sAMAccountName as the Login Attribute.
5. Set the Password Expiry Warning to specify the number of days before password expiration that
users will be notified. By default, users will be notified seven days prior to password expiration (range
is 1-255). Because users must change their passwords before the end of the expiration period, make
sure you provide a notification period that is adequate for your user base to ensure continued access
to the VPN. To use this feature, you must specify one of the following types of LDAP servers in your
LDAP server profile: active-directory, e-directory, or sun.
Users cannot access the VPN if their passwords expire unless you enable pre-logon.
6. Configure an optional custom expiry message to include additional instructions, such as help desk
contact information or a link to a password portal where users can change their passwords (see
Customize the GlobalProtect Agent).
7. Specify the domain name and username format. The device combines the User Domain and
Username Modifier values to modify the domain/username string that a user enters during login. The
device uses the modified string for authentication and uses the User Domain value for User-ID group
mapping. Modifying user input is useful when the authentication service requires domain/username
strings in a particular format and you don’t want to rely on users to correctly enter the domain. You
can select from the following options:
• To send only the unmodified user input, leave the User Domain blank (the default) and set the
Username Modifier to the variable %USERINPUT% (the default).

GLOBALPROTECT ADMINISTRATOR'S GUIDE | Authentication 33
© 2017 Palo Alto Networks, Inc.
• To prepend a domain to the user input, enter a User Domain and set the Username Modifier to
%USERDOMAIN%\%USERINPUT%.
• To append a domain to the user input, enter a User Domain and set the Username Modifier to
%USERINPUT%@%USERDOMAIN%.
If the Username Modifier includes the %USERDOMAIN% variable, the User Domain
value replaces any domain string that the user enters. If the User Domain is blank, that
means the device removes any user-entered domain string.
8. Select the Advanced tab.
9. In the Allow List, Add and then select the users and groups that are allowed to authenticate with this
profile. Selecting the predefined all option allows every user to authenticate. By default, the list has
no entries, which means no users can authenticate.
10.Click OK.
STEP 3 | Commit the configuration.
Click Commit.
Set Up SAML Authentication
Security Assertion Markup Language (SAML) is an XML-based, open-standard data format for exchanging
authentication and authorization data between parties, in particular, between an identity provider (IdP) and
a service provider. SAML is a product of the OASIS Security Services Technical Committee.
STEP 1 | Create a server profile.
The server profile identifies the external authentication service and instructs the firewall how to connect
to that authentication service and access the authentication credentials for your users.
1. Select Device > Server Profiles and select the SAML Identity Provider profile.
2. Click Add and enter a Profile Name, such as GP-User-Auth.
3. If this profile is for a firewall with multiple virtual systems capability, select a virtual system or Shared
as the Location where the profile is available.
4. Import the IdP metadata file. Refer to SAML 2.0 Authentication for details.
Alternatively, if the IdP doesn’t provide a metadata file, Add the server profile and then
enter the connection and registration information.
5. Click OK to save the server profile.
STEP 2 | (Optional) Create an authentication profile.
The authentication profile specifies the server profile for the portal or gateways to use when they
authenticate users. On a portal or gateway, you can assign one or more authentication profiles in one
or more client authentication profiles. For descriptions of how an authentication profile within a client
authentication profile supports granular user authentication, see Configure a GlobalProtect Gateway and
Set Up Access to the GlobalProtect Portal.
SAML authentication does not support the pre-logon connect method that enables users
to connect and change their own expired passwords without administrative intervention
(Remote Access VPN with Pre-Logon).
1. Select Device > Authentication Profile and Add a new profile.
2. Enter a Name for the profile and then select SAML as the authentication Type.
3. Select the SAML authentication Server Profile that you created in 1 from the drop-down.

34 GLOBALPROTECT ADMINISTRATOR'S GUIDE | Authentication
© 2017 Palo Alto Networks, Inc.
4. Select the following to configure certificate authentication between the firewall and the SAML
identity provider. Refer to SAML 2.0 Authentication for details.
• The Request Signing Certificate that the firewall uses to sign messages it sends to the IdP.
• The Certificate Profile that the firewall uses to validate the Identity Provider Certificate.
5. Specify the username and admin role formats.
• Specify the Username Attribute and User Group Attribute.
Unlike other types of external authentication, there is no User Domain attribute in the
authentication profiles for SAML.
• (Optional) If you will use this profile to authenticate administrative accounts that you manage in
the IdP identity store, specify the Admin Role Attribute and Access Domain Attribute also.
6. Select the Advanced tab.
7. In the Allow List, Add and then select the users and groups that are allowed to authenticate with this
profile. Selecting the predefined all option allows every user to authenticate. By default, the list has
no entries, which means no users can authenticate.
Make sure the username in the Allow List matches the username returned from the SAML IdP server.
8. Click OK.
STEP 3 | Commit the configuration.
Click Commit.
Set Up Kerberos Authentication
Kerberos is a computer network authentication protocol that works on the basis of tickets to allow nodes
communicating over a non-secure network to prove their identity to one another in a secure manner.
STEP 1 | Create a server profile.
The server profile identifies the external authentication service and instructs the firewall how to connect
to that authentication service and access the authentication credentials for your users.
1. Select Device > Server Profiles and select the Kerberos profile.
2. Click Add and enter a Profile Name, such as GP-User-Auth.
3. If this profile is for a firewall with multiple virtual systems capability, select a virtual system or Shared
as the Location where the profile is available.
4. Click Add in the Servers section and then enter the necessary information for connecting to the
authentication server, including the server Name, IP address or FQDN of the Server, and Port.
5. Click OK to save the server profile.
STEP 2 | (Optional) Create an authentication profile.
The authentication profile specifies the server profile for the portal or gateways to use when they
authenticate users. On a portal or gateway, you can assign one or more authentication profiles in one
or more client authentication profiles. For descriptions of how an authentication profile within a client
authentication profile supports granular user authentication, see Configure a GlobalProtect Gateway and
Set Up Access to the GlobalProtect Portal.
To enable users to connect and change their own expired passwords without
administrative intervention, consider using a pre-logon connect method. See Remote
Access VPN with Pre-Logon for details.

GLOBALPROTECT ADMINISTRATOR'S GUIDE | Authentication 35
© 2017 Palo Alto Networks, Inc.
1. Select Device > Authentication Profile and Add a new profile.
2. Enter a Name for the profile and then select Kerberos as the authentication Type.
3. Select the Kerberos authentication Server Profile that you created in 1 from the drop-down.
4. Specify the domain name and username format. The device combines the User Domain and
Username Modifier values to modify the domain/username string that a user enters during login. The
device uses the modified string for authentication and uses the User Domain value for User-ID group
mapping. Modifying user input is useful when the authentication service requires domain/username
strings in a particular format and you don’t want to rely on users to correctly enter the domain. You
can select from the following options:
• To send only the unmodified user input, leave the User Domain blank (the default) and set the
Username Modifier to the variable %USERINPUT% (the default).
• To prepend a domain to the user input, enter a User Domain and set the Username Modifier to
%USERDOMAIN%\%USERINPUT%.
• To append a domain to the user input, enter a User Domain and set the Username Modifier to
%USERINPUT%@%USERDOMAIN%.
If the Username Modifier includes the %USERDOMAIN% variable, the User Domain
value replaces any domain string that the user enters. If the User Domain is blank, that
means the device removes any user-entered domain string.
5. Configure Kerberos single sign-on (SSO) if your network supports it:
• Enter the Kerberos Realm (up to 127 characters). This is the hostname portion of the user
login name. For example, the user account name user@EXAMPLE.LOCAL has the realm
EXAMPLE.LOCAL.
• Specify a Kerberos Keytab file: click the Import link, Browse to the keytab file, and click OK.
During authentication, the endpoint first tries to use the keytab to establish SSO. If it succeeds,
and the user attempting access is in the Allow List, authentication succeeds immediately.
Otherwise, the authentication process falls back to manual (username/password) authentication
of the specified Type. The Type doesn’t have to be Kerberos. To change this behavior so that
users can authenticate only using Kerberos, set Use Default Authentication on Kerberos
Authentication Failure to No in a GlobalProtect portal agent configuration.
6. Select the Advanced tab.
7. In the Allow List, Add and then select the users and groups that are allowed to authenticate with this
profile. Selecting the predefined all option allows every user to authenticate. By default, the list has
no entries, which means no users can authenticate.
STEP 3 | Save your changes and commit the configuration.
Click OK, and then Commit.
Set Up RADIUS or TACACS+ Authentication
RADIUS is a client/server protocol and software that enables remote access servers to communicate with
a central server to authenticate dial-in users and authorize their access to the requested system or service.
TACACS+ is a well-established authentication protocol common to UNIX networks that allows a remote
access server to forward a user's logon password to an authentication server to determine whether access
can be allowed to a given system.
STEP 1 | Create a server profile.
The server profile identifies the external authentication service and instructs the firewall how to connect
to that authentication service and access the authentication credentials for your users.

36 GLOBALPROTECT ADMINISTRATOR'S GUIDE | Authentication
© 2017 Palo Alto Networks, Inc.
If you want to Enable Delivery of GlobalProtect Client VSAs to a RADIUS Server, you must
create a RADIUS server profile.
1. Select Device > Server Profiles and select the type of profile (RADIUS or TACACS+).
2. Click Add and enter a Profile Name, such as GP-User-Auth.
3. If this profile is for a firewall with multiple virtual systems capability, select a virtual system or Shared
as the Location where the profile is available.
4. Configure the following Server Settings. These settings to all servers you include in the profile.
•Timeout (sec)—The number of seconds before a server connection request times out due to lack
of response from the authentication server.
•Authentication Protocol—Select the protocol to use for connections to the authentication server.
Choices are CHAP, PAP, or Auto.
• (RADIUS only) Retries—The number of times the firewall trys connecting to the authentication
server before dropping the request.
• (TACACS+ only) Use single connection for all authentication to allow all TACACS+ authentication
requests to occur over a single TCP session rather than separate sessions for each request.
5. Click Add in the Servers section and then enter the necessary information for connecting to the
authentication server, including the server Name, IP address or FQDN of the Server, and Port.
6. Specify settings to enable the authentication service to authenticate the firewall. Enter the shared
Secret when adding the server entry.
7. Click OK to save the server profile.
STEP 2 | (Optional) Create an authentication profile.
The authentication profile specifies the server profile for the portal or gateways to use when they
authenticate users. On a portal or gateway, you can assign one or more authentication profiles in one
or more client authentication profiles. For descriptions of how an authentication profile within a client
authentication profile supports granular user authentication, see Configure a GlobalProtect Gateway and
Set Up Access to the GlobalProtect Portal.
To enable users to connect and change their own expired passwords without
administrative intervention, consider using a pre-logon connect method. See Remote
Access VPN with Pre-Logon for details.
1. Select Device > Authentication Profile and Add a new profile.
2. Enter a Name for the profile and then select the authentication Type (RADIUS or TACACS+).
3. Select the RADIUS or TACACS+ authentication Server Profile. that you created in 1 from the drop-
down.
4. (RADIUS only) Enable Retrieve user group from RADIUS if you want to include this information in
the authentication profile.
5. Specify the domain name and username format. The device combines the User Domain and
Username Modifier values to modify the domain/username string that a user enters during login. The
device uses the modified string for authentication and uses the User Domain value for User-ID group
mapping. Modifying user input is useful when the authentication service requires domain/username
strings in a particular format and you don’t want to rely on users to correctly enter the domain. You
can select from the following options:
• To send only the unmodified user input, leave the User Domain blank (the default) and set the
Username Modifier to the variable %USERINPUT% (the default).
• To prepend a domain to the user input, enter a User Domain and set the Username Modifier to
%USERDOMAIN%\%USERINPUT%.

GLOBALPROTECT ADMINISTRATOR'S GUIDE | Authentication 37
© 2017 Palo Alto Networks, Inc.
• To append a domain to the user input, enter a User Domain and set the Username Modifier to
%USERINPUT%@%USERDOMAIN%.
If the Username Modifier includes the %USERDOMAIN% variable, the User Domain
value replaces any domain string that the user enters. If the User Domain is blank, that
means the device removes any user-entered domain string.
6. Select the Advanced tab.
7. In the Allow List, Add and then select the users and groups that are allowed to authenticate with this
profile. Selecting the predefined all option allows every user to authenticate. By default, the list has
no entries, which means no users can authenticate.
8. Click OK.
STEP 3 | Commit the configuration.
Click Commit.

38 GLOBALPROTECT ADMINISTRATOR'S GUIDE | Authentication
© 2017 Palo Alto Networks, Inc.
Set Up Client Certificate Authentication
With the optional client certificate authentication, the agent/app presents a client certificate along with its
connection request to the GlobalProtect portal or gateway. The portal or gateway can use either a shared or
unique client certificate to validate that the user or device belongs to your organization.
The methods for deploying client certificates depend on the security requirements for your organization:
•Deploy Shared Client Certificates for Authentication on page 38
•Deploy Machine Certificates for Authentication on page 38
•Deploy User-Specific Client Certificates for Authentication on page 42
Deploy Shared Client Certificates for Authentication
To confirm that an endpoint user belongs to your organization, you can use the same client certificate for
all endpoints or generate separate certificates to deploy with a particular agent configuration. Use this
workflow to issue self-signed client certificates for this purpose and deploy them from the portal.
STEP 1 | Generate a certificate to deploy to multiple GlobalProtect clients.
1. Create the root CA certificate for issuing self-signed certificates for the GlobalProtect components.
2. Select Device > Certificate Management > Certificates > Device Certificates and then click
Generate.
3. Use the Local certificate type (the default).
4. Enter a Certificate Name. This name cannot contain spaces.
5. In the Common Name field enter a name to identify this certificate as an agent certificate, for
example GP_Windows_clients. Because this same certificate will be deployed to all agents using the
same configuration, it does not need to uniquely identify a specific user or endpoint.
6. In the Signed By field, select your root CA.
7. Select an OCSP Responder to verify the revocation status of certificates.
8. Click OK to generate the certificate.
STEP 2 | Set Up Two-Factor Authentication.
Configure authentication settings in a GlobalProtect portal agent configuration to enable the portal
to transparently deploy the client certificate that is Local to the firewall to clients that receive the
configuration.
Deploy Machine Certificates for Authentication
To confirm that the endpoint belongs to your organization, use your own public-key infrastructure (PKI)
to issue and distribute machine certificates to each endpoint (recommended) or generate a self-signed
machine certificate for export. With the pre-logon connect methods, a machine certificate is required and
must be installed on the endpoint before GlobalProtect components will grant access.
To confirm that the endpoint belongs to your organization, you must also configure an authentication
profile to authenticate the user. See Two-Factor Authentication.
Use the following workflow to create the client certificate and manually deploy it to an endpoint. For more
information, see About GlobalProtect User Authentication. For an example configuration, see Remote
Access VPN (Certificate Profile).
STEP 1 | Issue client certificates to GlobalProtect clients and endpoints.

GLOBALPROTECT ADMINISTRATOR'S GUIDE | Authentication 39
© 2017 Palo Alto Networks, Inc.
This enables the GlobalProtect portal and gateways to validate that the device belongs to your
organization.
1. Create the root CA certificate for issuing self-signed certificates for the GlobalProtect components.
2. Select Device > Certificate Management > Certificates > Device Certificates and then click
Generate.
3. Enter a Certificate Name. The certificate name cannot contain any spaces.
4. Configure cryptographic settings for the certificate including the encryption Algorithm, key length
(Number of Bits), Digest algorithm (use sha1, sha256, or sha384; sha512 is not supported with client
certificates), and Expiration (in days) for the certificate.
If the firewall is in FIPS-CC mode and the key generation algorithm is RSA, the RSA keys must be
2,048 bits or 3072 bits.
5. In the Certificate Attributes section, Add and define the attributes that uniquely identify the
GlobalProtect clients as belonging to your organization. Keep in mind that if you add a Host Name
attribute (which populates the SAN field of the certificate), it must be the same as the value you
defined for the Common Name.
6. In the Signed By field, select your root CA.
7. Select an OCSP Responder to verify the revocation status of certificates.
8. (Optional) In the Certificate Attributes section, click Add and define the attributes to identify
the GlobalProtect clients as belonging to your organization if required as part of your security
requirements.
9. Click OK to generate the certificate.
STEP 2 | Install certificates in the personal certificate store on the endpoints.
If you are using unique user certificates or machine certificates, you must install each certificate in the
personal certificate store on the endpoint prior to the first portal or gateway connection. Install machine
certificates to the Local Computer certificate store on Windows and in the System Keychain on Mac OS.
Install user certificates to the Current User certificate store on Windows and in the Keychain on Mac
OS.
For example, to install a certificate on a Windows system using the Microsoft Management Console:
1. From the command prompt, enter mmc to launch the console.
2. Select File > Add/Remove Snap-in.
3. Select Certificates, click Add and then select one of the following, depending on what type of
certificate you are importing:
•Computer account—Select this option if you are importing a machine certificate.
•My user account—Select this option if you are importing a user certificate.
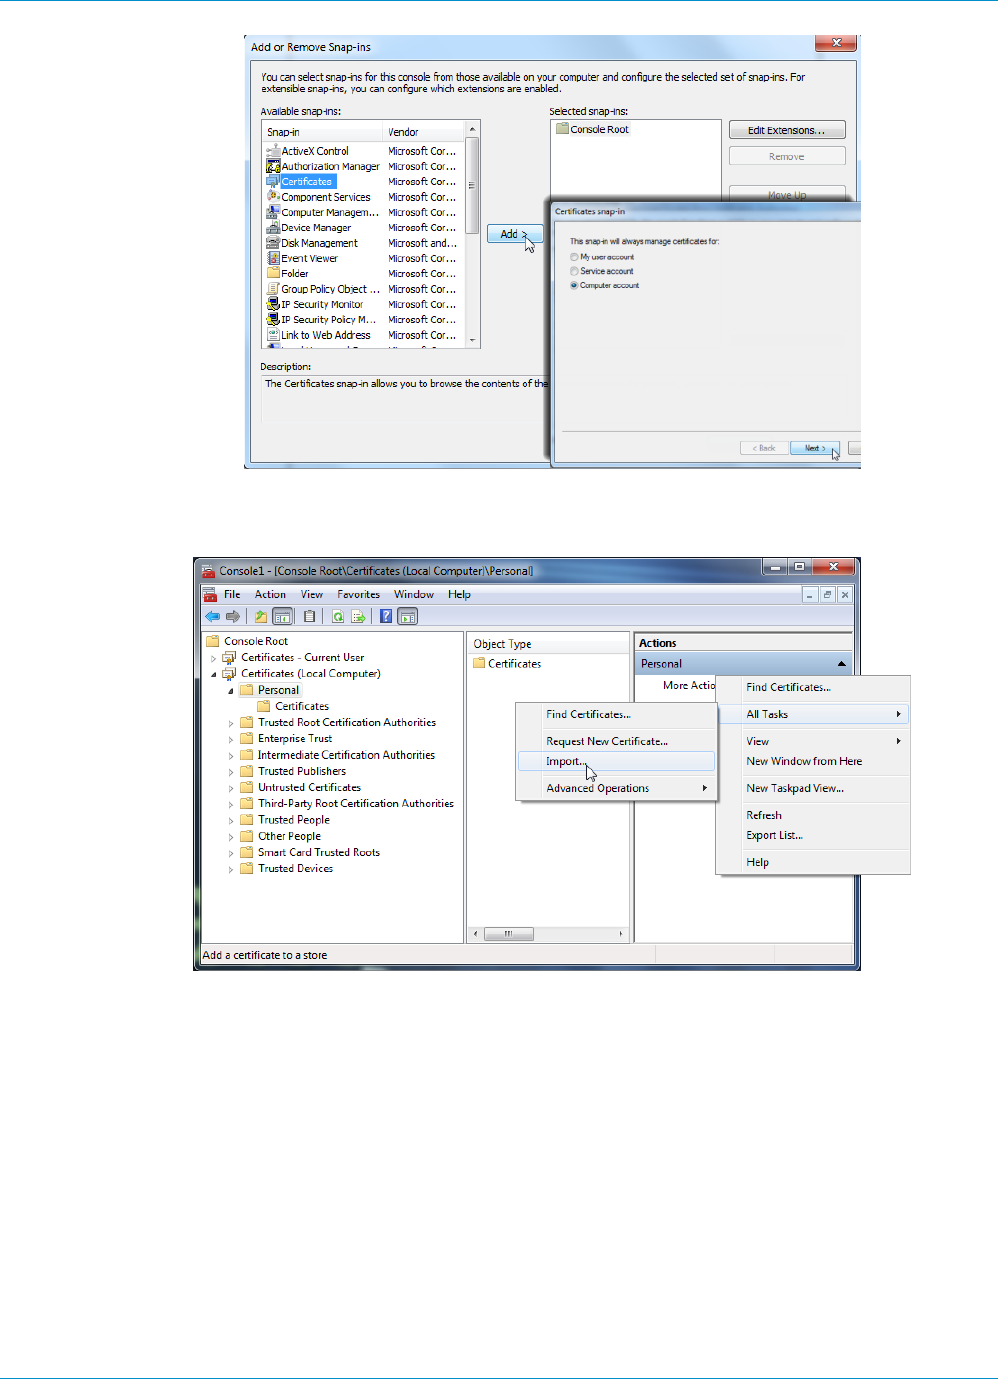
40 GLOBALPROTECT ADMINISTRATOR'S GUIDE | Authentication
© 2017 Palo Alto Networks, Inc.
4. Expand Certificates and select Personal and then in the Actions column select Personal > More
Actions > All Tasks > Import and follow the steps in the Certificate Import Wizard to import the
PKCS file you got from the CA.
5. Browse to the .p12 certificate file to import (select Personal Information Exchange as the file type to
browse for) and enter the Password that you used to encrypt the private key. Select Personal as the
Certificate store.
STEP 3 | Verify that the certificate has been added to the personal certificate store.
Navigate to the personal certificate store:
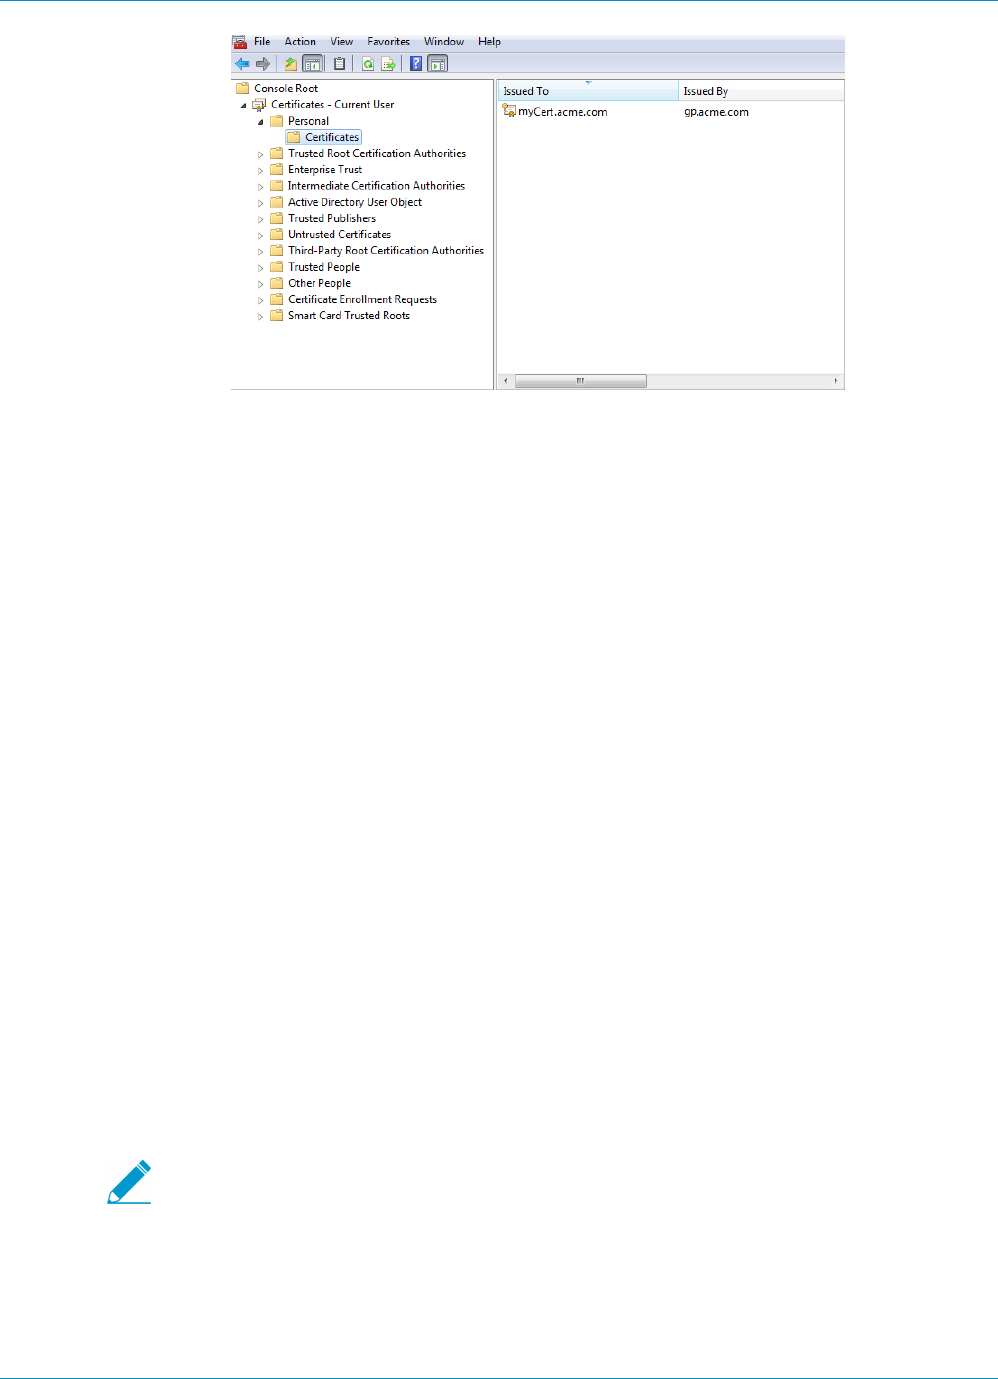
GLOBALPROTECT ADMINISTRATOR'S GUIDE | Authentication 41
© 2017 Palo Alto Networks, Inc.
STEP 4 | Import the root CA certificate used to issue the client certificates onto the firewall.
This step is required only if an external CA issued the client certificates, such as a public CA or an
enterprise PKI CA. If you are using self-signed certificates, the root CA is already trusted by the portal
and gateways.
1. Download the root CA certificate used to issue the client certificates (Base64 format).
2. Import the root CA certificate from the CA that generated the client certificates onto the firewall:
1. Select Device > Certificate Management > Certificates > Device Certificates and click Import.
2. Use the Local certificate type (the default).
3. Enter a Certificate Name that identifies the certificate as your client CA certificate.
4. Browse to the Certificate File you downloaded from the CA.
5. Select Base64 Encoded Certificate (PEM) as the File Format and then click OK.
6. Select the certificate you just imported on the Device Certificates tab to open it.
7. Select Trusted Root CA and then click OK.
STEP 5 | Create a client certificate profile.
1. Select Device > Certificates > Certificate Management > Certificate Profile, click Add, and enter a
profile Name.
2. Select a value for the Username Field to specify which field in the certificate will contain the user’s
identity information.
If you plan to configure the portal or gateways to authenticate users with certificates only, you must
specify the Username Field. This enables GlobalProtect to associate a username with the certificate.
If you plan to set up the portal or gateway for two-factor authentication, you can leave the default
value of None, or, to add an additional layer of security, specify a username. If you specify a
username, your external authentication service verifies that the username in the client certificate
matches the username requesting authentication. This ensures that the user is the one to which the
certificate was issued.
Users cannot change the username that is included in the certificate.
3. In the CA Certificates field, click Add, select the Trusted Root CA certificate you imported in 4 and
then click OK.
STEP 6 | Save the configuration.
Click Commit.

42 GLOBALPROTECT ADMINISTRATOR'S GUIDE | Authentication
© 2017 Palo Alto Networks, Inc.
Deploy User-Specific Client Certificates for Authentication
To authenticate individual users, you must issue a unique client certificate to each GlobalProtect user and
deploy the client certificate to the endpoints prior to enabling GlobalProtect. To automate the generation
and deployment of user-specific client certificates, you can configure your GlobalProtect portal to act as a
Simple Certificate Enrollment Protocol (SCEP) client to a SCEP server in your enterprise PKI.
SCEP operation is dynamic in that the enterprise PKI generates a user-specific certificate when the portal
requests it and sends the certificate to the portal. The portal then transparently deploys the certificate
to the client. When a user requests access, the agent or app can then present the client certificate to
authenticate with the portal or gateway.
The GlobalProtect portal or gateway uses identifying information about the device and user to evaluate
whether to permit access to the user. GlobalProtect blocks access if the host ID is on a device block list or if
the session matches any blocking options specified in a certificate profile. If client authentication fails due to
an invalid SCEP-based client certificate, the GlobalProtect client tries to authenticate with the portal per the
settings in the authentication profile and retrieve the certificate. If the client cannot retrieve the certificate
from the portal, the device is not able to connect.
STEP 1 | Create a SCEP profile.
1. Select Device > Certificate Management > SCEP and then Add a new profile.
2. Enter a Name to identify the SCEP profile.
3. If this profile is for a firewall with multiple virtual systems capability, select a virtual system or Shared
as the Location where the profile is available.
STEP 2 | (Optional) To make the SCEP-based certificate generation more secure, configure a SCEP
challenge-response mechanism between the PKI and portal for each certificate request.
After you configure this mechanism, its operation is invisible, and no further input from you is necessary.
To comply with the U.S. Federal Information Processing Standard (FIPS), use a Dynamic SCEP challenge
and specify a Server URL that uses HTTPS (see 7).
Select one of the following options:
•None—(Default) The SCEP server does not challenge the portal before it issues a certificate.
•Fixed—Obtain the enrollment challenge password from the SCEP server in the PKI infrastructure and
then enter the password into the Password field.
•Dynamic—Enter a username and password of your choice (possibly the credentials of the PKI
administrator) and the SCEP Server URL where the portal-client submits these credentials. The
uses the credentials to authenticate with the SCEP server which transparently generates an OTP
password for the portal upon each certificate request. (You can see this OTP change after a screen
refresh in The enrollment challenge password is field after each certificate request.) The
PKI transparently passes each new password to the portal, which then uses the password for its
certificate request.
STEP 3 | Specify the settings for the connection between the SCEP server and the portal to enable the
portal to request and receive client certificates.
You can include additional information about the client device or user by specifying tokens in the
Subject name of the certificate.
In the Subject field of the CSR to the SCEP server, the portal includes the token value as CN and Host-
ID as SerialNumber. The host ID varies by device type: GUID (Windows) MAC address of the interface
(Mac), Android ID (Android devices), UDID (iOS devices), or a unique name that GlobalProtect assigns
(Chrome).

GLOBALPROTECT ADMINISTRATOR'S GUIDE | Authentication 43
© 2017 Palo Alto Networks, Inc.
1. Configure the Server URL that the portal uses to reach the SCEP server in the PKI (for example,
http://10.200.101.1/certsrv/mscep/).
2. Enter a string (up to 255 characters in length) in the CA-IDENT Name field to identify the SCEP
server.
3. Enter the Subject name to use in the certificates generated by the SCEP server. The subject must be
a distinguished name in the <attribute>=<value> format and must include a common name (CN)
attribute (CN=<token>). The CN supports the following dynamic tokens:
•$USERNAME—Use this token to enable the portal to request certificates for a specific user. To
use this variable, you must also Enable Group Mapping. The username entered by the user must
match the name in the user-group mapping table.
•$EMAILADDRESS—Use this token to request certificates associated with a specific email address.
To use this variable, you must also Enable Group Mapping and configure the Mail Attributes in the
Mail Domains section of the Server Profile. If GlobalProtect cannot identify an email address for
the user, it generates a unique ID and populates the CN with that value.
•$HOSTID—To request certificates for the device only, specify the host ID token. When a user
attempts to log in to the portal, the endpoint sends identifying information that includes its host
ID value.
When the GlobalProtect portal pushes the SCEP settings to the agent, the CN portion of the subject
name is replaced with the actual value (username, host ID, or email address) of the certificate owner
(for example, O=acme,CN=johndoe).
4. Select the Subject Alternative Name Type:
•RFC 822 Name—Enter the email name in a certificate’s subject or Subject Alternative Name
extension.
•DNS Name—Enter the DNS name used to evaluate certificates.
•Uniform Resource Identifier—Enter the name of the resource from which the client will obtain the
certificate.
•None—Do not specify attributes for the certificate.
STEP 4 | (Optional) Configure cryptographic settings for the certificate.
• Select the key length (Number of Bits) for the certificate.
If the firewall is in FIPS-CC mode and the key generation algorithm is RSA. The RSA keys must be
2,048 bits or larger.
• Select the Digest for CSR which indicates the digest algorithm for the certificate signing request
(CSR): sha1, sha256, or sha384.
Sha512 is not supported as a digest algorithm for client certificates on GlobalProtect
endpoints.
STEP 5 | (Optional) Configure the permitted uses of the certificate, either for signing or encryption.
• To use this certificate for signing, select the Use as digital signature check box. This enables the
endpoint use the private key in the certificate to validate a digital signature.
• To use this certificate for encryption, select the Use for key encipherment check box. This enables
the client use the private key in the certificate to encrypt data exchanged over the HTTPS connection
established with the certificates issued by the SCEP server.
STEP 6 | (Optional) To ensure that the portal is connecting to the correct SCEP server, enter the
CA Certificate Fingerprint. Obtain this fingerprint from the SCEP server interface in the
Thumbprint field.

44 GLOBALPROTECT ADMINISTRATOR'S GUIDE | Authentication
© 2017 Palo Alto Networks, Inc.
1. Enter the URL for the SCEP server’s administrative UI (for example, http://<hostname or IP>/
CertSrv/mscep_admin/).
2. Copy the thumbprint and enter it in the CA Certificate Fingerprint field.
STEP 7 | Enable mutual SSL authentication between the SCEP server and the GlobalProtect portal. This
is required to comply with the U.S. Federal Information Processing Standard (FIPS).
FIPS-CC operation is indicated on the firewall login page and in its status bar.
Select the SCEP server’s root CA Certificate. Optionally, you can enable mutual SSL authentication
between the SCEP server and the GlobalProtect portal by selecting a Client Certificate.
STEP 8 | Save and commit the configuration.
1. Click OK to save the settings and close the SCEP configuration.
2. Commit the configuration.
The portal attempts to request a CA certificate using the settings in the SCEP profile and saves it
to the firewall hosting the portal. If successful, the CA certificate is shown in Device > Certificate
Management > Certificates.
STEP 9 | (Optional) If after saving the SCEP profile, the portal fails to obtain the certificate, you can
manually generate a certificate signing request (CSR) from the portal.
1. Select Device > Certificate Management > Certificates > Device Certificates and then click
Generate.
2. Enter a Certificate Name. This name cannot contain spaces.
3. Select the SCEP Profile to use to submit a CSR to your enterprise PKI.
4. Click OK to submit the request and generate the certificate.
STEP 10 | Set Up Two-Factor Authentication.
Assign the SCEP profile a GlobalProtect portal agent configuration to enable the portal to transparently
request and deploy client certificates to clients that receive the configuration.

GLOBALPROTECT ADMINISTRATOR'S GUIDE | Authentication 45
© 2017 Palo Alto Networks, Inc.
Set Up Two-Factor Authentication
If you require strong authentication to protect sensitive assets or to comply with regulatory requirements,
such as PCI, SOX, or HIPAA, configure GlobalProtect to use an authentication service that uses a two-factor
authentication scheme. A two-factor authentication scheme requires two things: something the end user
knows (such as a PIN or password) and something the end user has (a hardware or software token/OTP,
smart card, or certificate). You can also enable two-factor authentication using a combination of external
authentication services, and client and certificate profiles.
The following topics provide examples for how to set up two-factor authentication on GlobalProtect:
•Enable Two-Factor Authentication Using Certificate and Authentication Profiles on page 45
•Enable Two-Factor Authentication Using One-Time Passwords (OTPs) on page 47
•Enable Two-Factor Authentication Using Smart Cards on page 50
Enable Two-Factor Authentication Using Certificate and
Authentication Profiles
The following workflow describes how to configure GlobalProtect client authentication requiring the
user to authenticate both to a certificate profile and an authentication profile. The user must successfully
authenticate using both methods in order to connect to the portal/gateway. For more details on this
configuration, see Remote Access VPN with Two-Factor Authentication.
STEP 1 | Create an authentication server profile.
The authentication server profile determines how the firewall connects to an external authentication
service and retrieves the authentication credentials for your users.
If you are using LDAP to connect to Active Directory (AD), you must create a separate
LDAP server profile for every AD domain.
1. Select Device > Server Profiles and a profile type (LDAP, Kerberos, RADIUS, or TACACS+).
2. Add a new server profile.
3. Enter a Profile Name for the profile, such as GP-User-Auth.
4. (LDAP only) Select the Type of LDAP server (active-directory, e-directory, sun, or other).
5. Click Add in the Servers list section and then enter the required information for connections to the
authentication service, including the server Name, IP address or FQDN of the Server, and Port.
6. (RADIUS, TACACS+, and LDAP only) Specify settings to enable the firewall to authenticate to the
authentication service as follows:
• RADIUS and TACACS+—Enter the shared Secret when adding the server entry.
• LDAP—Enter the Bind DN and Password.
7. (LDAP only) If you want the endpoint to use SSL or TLS for a more secure connection with the
directory server, select the Require SSL/TLS secured connection check box (selected by default). The
protocol that the device uses depends on the server Port in the Server list:
• 389 (default)—TLS (specifically, the device uses the StartTLS operation to upgrade the initial
plaintext connection to TLS).
• 636—SSL.
• Any other port—The device first attempts to use TLS. If the directory server does not support TLS,
the device uses SSL.
8. (LDAP only) For additional security, select the Verify Server Certificate for SSL sessions check box so
that the endpoint verifies the certificate that the directory server presents for SSL/TLS connections.

46 GLOBALPROTECT ADMINISTRATOR'S GUIDE | Authentication
© 2017 Palo Alto Networks, Inc.
To enable verification, you also must select the Require SSL/TLS secured connection check box. For
verification to succeed, one of the following conditions must be true:
• The certificate is in the list of device certificates: Device > Certificate Management >
Certificates > Device Certificates. Import the certificate into the endpoint if necessary.
• The certificate signer is in the list of trusted certificate authorities: Device > Certificate
Management > Certificates > Default Trusted Certificate Authorities.
9. Click OK to save the server profile.
STEP 2 | Create an authentication profile that identifies the service for authenticating users. (You later
have the option of assigning the profile on the portal and on gateways.)
1. Select Device > Authentication Profile and Add a new profile.
2. Enter a Name for the profile.
3. Select the Location.
4. Select the Type of Authentication (LDAP, Kerberos, RADIUS, or TACACS+).
5. Select the Server Profile you created in 1.
6. (LDAP only) Enter sAMAccountName as the Login Attribute.
7. Click OK to save the authentication profile.
STEP 3 | Create a client certificate profile that the portal uses to authenticate the client certificates that
come from user devices.
When you configure two-factor authentication to use client certificates, the external
authentication service uses the username value to authenticate the user, if specified, in
the client certificate. This ensures that the user who is logging is in is actually the user to
whom the certificate was issued.
1. Select Device > Certificates > Certificate Management > Certificate Profile and click Add and enter
a profile Name.
2. Select a value for the Username Field:
• If you intend for the client certificate to authenticate individual users, select the certificate field
that identifies the user.
• If you are deploying the client certificate from the portal, leave this field set to None.
• If you are setting up a certificate profile for use with a pre-logon connect method, leave the field
set to None.
3. In the CA Certificates area, click Add and then:
1. Select the CA certificate, either a trusted root CA certificate or the CA certificate from a SCEP
server. (If necessary, import the certificate).
2. (Optional) Enter the Default OCSP URL.
3. (Optional) Select a certificate for OCSP Verify CA.
4. (Optional) Select options that specify when to block the user’s requested session:
1. Status of certificate is unknown.
2. GlobalProtect component does not retrieve certificate status within the number of seconds in
Certificate Status Timeout.
3. Serial number attribute in the subject of a client certificate does not match the host ID that the
GlobalProtect agent reports for the client endpoint.
5. Click OK.
STEP 4 | (Optional) Issue client certificates to GlobalProtect clients and endpoints.

GLOBALPROTECT ADMINISTRATOR'S GUIDE | Authentication 47
© 2017 Palo Alto Networks, Inc.
To transparently deploy client certificates, configure your portal to distribute a shared client certificate
to your endpoints or configure the portal to use SCEP to request and deploy unique client certificates
for each user.
1. Use your enterprise PKI or a public CA to issue a client certificate to each GlobalProtect user.
2. For the pre-logon connect methods, install certificates in the personal certificate store on the client
systems.
STEP 5 | Save the GlobalProtect configuration.
Click Commit.
Enable Two-Factor Authentication Using One-Time Passwords
(OTPs)
Use this workflow to configure two-factor authentication using one-time passwords (OTPs) on the portal
and gateways. When a user requests access, the portal or gateway prompts the user to enter an OTP. The
authentication service sends the OTP as a token to the user’s RSA device.
Setting up a two-factor authentication scheme is similar to setting up other types of authentication and
requires you to configure:
• A server profile (usually for a RADIUS service for two-factor authentication) assigned to an
authentication profile.
• A client authentication profile that includes the authentication profile for the service that these
components use.
By default, the agent supplies the same credentials it used to log in to the portal and to the gateway. In the
case of OTP authentication, this behavior will cause the authentication to initially fail on the gateway and,
because of the delay this causes in prompting the user for a login, the user’s OTP may expire. To prevent
this, you must configure the portals and gateways that prompt for the OTP instead of using the same
credentials on a per-agent configuration basis.
You can also reduce the frequency in which users are prompted for OTPs by configuring an authentication
override. This enables the portals and gateways to generate and accept a secure encrypted cookie to
authenticate the user for a specified amount of time. The portals and/or gateways will not require a new
OTP until the cookie expires thus reducing the number of times users must provide an OTP.
STEP 1 | After you have configured the back-end RADIUS service to generate tokens for the OTPs and
ensured users have any necessary devices (such as a hardware token), set up a RADIUS server
to interact with the firewall.
For specific instructions, refer to the documentation for your RADIUS server. In most cases, you
need to set up an authentication agent and a client configuration on the RADIUS server to enable
communication between the firewall and the RADIUS server. You also define the shared secret to use
for encrypting sessions between the firewall and the RADIUS server.
STEP 2 | On each firewall that hosts the gateways and/or portal, create a RADIUS server profile. (For a
small deployment, one firewall can host the portal and gateways.)
1. Select Device > Server Profiles > RADIUS.
2. Add a new profile.
3. Enter a Name for this RADIUS profile.
4. In the Servers area, Add a RADIUS instance and enter:
• A descriptive Name to identify this RADIUS server

48 GLOBALPROTECT ADMINISTRATOR'S GUIDE | Authentication
© 2017 Palo Alto Networks, Inc.
• The RADIUS Server IP address
• The shared Secret for encrypting sessions between the firewall and the RADIUS server
• The Port number on which the RADIUS server listens for authentication requests (default 1812)
5. Click OK to save the profile.
STEP 3 | Create an authentication profile.
1. Select Device > Authentication Profile.
2. Add a new profile.
3. Enter a Name for the profile. The name cannot contain spaces.
4. Select RADIUS as the Type of authentication service.
5. Select the Server Profile you created for accessing your RADIUS server.
6. Enter the User Domain name. The firewall uses this value for matching authenticating users against
Allow List entries and for User-ID group mapping.
7. Select a Username Modifier to modify the username/domain format expected by the RADIUS server.
8. Click OK to save the authentication profile.
STEP 4 | Assign the authentication profile to the GlobalProtect gateway(s) and/or portal.
You can configure multiple Client Authentication configurations for the portal and gateways. For each
Client Authentication configuration you can specify the authentication profile to apply to endpoints of a
specific OS.
This step describes only how to add the authentication profile to the gateway or portal configuration.
For additional details on setting up these components, see GlobalProtect Gateways and GlobalProtect
Portals.
1. Select Network > GlobalProtect > Gateways and an existing gateway configuration by name (or Add
one). If you are adding a new gateway, specify its name, location, and network parameters.
2. On the Authentication tab, select an SSL/TLS service profile or Add a new profile.
3. Add a Client Authentication configuration and enter its Name.
4. Select the endpoint OS to which this configuration applies.
5. Select the Authentication Profile you created in Create an authentication profile.
6. (Optional) Enter a custom authentication message.
7. To add additional Client Authentication configurations, repeat steps c through f.
8. Click OK to save the configuration.
9. To add other gateways, repeat steps b through h.
10.To assign the authentication profile to the portal, select Network > GlobalProtect > Portals and
repeat steps b through h.
STEP 5 | (Optional) Configure the portal or gateways to prompt for a username and password or only
a password each time the user logs in. Saving the password is not supported with two-factor
authentication using OTPs because the user must enter a dynamic password each time they log
in.
This step describes only how to configure the password setting in a portal agent configuration. For
additional details, see Customize the GlobalProtect Agent.
1. Select Network > GlobalProtect > Portals and select an existing portal configuration.
2. Select Agent.
3. Select an existing agent configuration or Add one.
4. Set Save User Credentials to Save Username Only or No. This setting enables GlobalProtect to
prompt for dynamic passwords for each component you select in the following step.
5. Click OK twice to save the configuration.

GLOBALPROTECT ADMINISTRATOR'S GUIDE | Authentication 49
© 2017 Palo Alto Networks, Inc.
STEP 6 | Select the GlobalProtect components—portal and types of gateways—that prompt for dynamic
passwords, such as OTPs, instead of using saved credentials.
1. Select Network > GlobalProtect > Portals and select an existing portal configuration.
2. Select Agent.
3. Select an existing agent configuration or Add one.
4. Select the Authentication tab, and then select the Components that Require Dynamic Passwords
(Two-Factor Authentication). When selected, the portal and/or types of gateways prompt for OTPs.
5. Click OK twice to save the configuration.
STEP 7 | If single sign-on (SSO) is enabled, disable it. The agent configuration specifies RADIUS as the
authentication service so Kerberos SSO is not supported.
This step describes only how to disable SSO. For more details, see Define the GlobalProtect Agent
Configurations.
1. Select Network > GlobalProtect > Portals and select the portal configuration.
2. Select Agent and then select the agent configuration (or Add one).
3. Select the App tab.
4. Set Use Single Sign-on to No.
5. Click OK twice to save the configuration.
STEP 8 | (Optional) To minimize the number of times a user must provide credentials, configure an
authentication override.
By default, the portal or gateways authenticate the user with an authentication profile and optional
certificate profile. With authentication override, the portal or gateway authenticates the user with an
encrypted cookie that it has deployed to the endpoint. While the cookie is valid, the user can log in
without entering regular credentials or an OTP. For more information, see Cookie Authentication on the
Portal or Gateway.
If you need to immediately block access to a device whose cookie has not yet expired
(for example, if the device is lost or stolen), you can Block Device Access by adding the
device to a block list.
For more details, see GlobalProtect Gateways and GlobalProtect Portals.
1. Select Network > GlobalProtect > Gateways or Portals and select the configuration (or Add one).
2. Select Agent > Client Settings (on the gateway) or Agent (on the portal) and then select the
configuration (or Add one).
3. In the Authentication Override area, configure the following:
•Generate cookie for authentication override—Enable the portal or gateway to generate
encrypted, endpoint-specific cookies. After users successfully authenticate, the portal or gateway
issue the authentication cookie to the endpoint.
•Accept cookie for authentication override—Select the check box to instruct the portal or gateway
to authenticate the user through a valid, encrypted cookie. When the endpoint presents a valid
cookie, the portal or gateway verifies that the cookie was encrypted by the portal or gateway,
decrypts the cookie, and then authenticates the user.
•Cookie Lifetime—Specify the hours, days, or weeks that the cookie is valid. Typical lifetime is 24
hours for gateways—which protect sensitive information—or 15 days for the portal. The range for
hours is 1–72; for weeks, 1–52; and for days, 1–365. After the cookie expires on either the portal
or gateway (whichever occurs first), the portal or gateway prompts the user to authenticate and
subsequently encrypts a new cookie to send to the endpoint.
•Certificate to Encrypt/Decrypt Cookie—Select the RSA certificate to use to encrypt and decrypt
the cookie. You must use the same certificate on the portal and gateways.

50 GLOBALPROTECT ADMINISTRATOR'S GUIDE | Authentication
© 2017 Palo Alto Networks, Inc.
As a best practice, configure the RSA certificate to use the strongest digest
algorithm that your network supports.
The portal and gateways use the RSA encrypt padding scheme PKCS#1 V1.5 to generate the
cookie (using the public key of the certificate) and decrypt the cookie (using the private key of the
certificate).
4. Click OK twice to save the configuration.
STEP 9 | Commit the configuration.
Click Commit.
STEP 10 | Verify the configuration.
The gateway and portal must be configured before you take his step. For details on setting up these
components, see GlobalProtect Gateways and GlobalProtect Portals.
From an endpoint running the GlobalProtect agent, try to connect to a gateway or portal on which you
enabled OTP authentication. You should see two prompts similar to the following:
The first prompt requests a PIN (either a user- or system-generated PIN):
The second prompt requests your token or OTP:
Enable Two-Factor Authentication Using Smart Cards
If you want to enable your end users to authenticate using a smart card or common access card (CAC), you
must import the Root CA certificate that issued the certificates contained on the end user CAC or smart

GLOBALPROTECT ADMINISTRATOR'S GUIDE | Authentication 51
© 2017 Palo Alto Networks, Inc.
cards onto the portal and gateway. You can then create a certificate profile that includes that Root CA and
apply it to your portal and/or gateway configurations to enable use of the smart card in the authentication
process.
STEP 1 | Set up your smart card infrastructure.
This procedure assumes that you have deployed smart cards and smart card readers to your end users.
For specific instructions, refer to the documentation for the user authentication provider software.
In most cases, setting up the smart card infrastructure involves the generating of certificates for end
users and for the participating servers, which are the GlobalProtect portal and gateway(s) in this use
case.
STEP 2 | Import the Root CA certificate that issued the client certificates contained on the end user
smart cards.
Make sure the certificate is accessible from your management system and then complete the following
steps:
1. Select Device > Certificate Management > Certificates > Device Certificates.
2. Click Import and enter a Certificate Name.
3. Enter the path and name to the Certificate File received from the CA, or Browse to find the file.
4. Select Base64 Encoded Certificate (PEM) as the File Format and then click OK to import the
certificate.
STEP 3 | Create the certificate profile on each portal/gateway on which you plan to use CAC or smart
card authentication.
For details on other certificate profile fields, such as whether to use CRL or OCSP, refer
to the online help.
1. Select Device > Certificate Management > Certificate Profile and click Add and enter a profile
Name.
2. In the Username field, select the certificate field that PAN-OS uses to match the IP address for User-
ID, either Subject to use a common name, Subject Alt: Email to use an email address, or Subject Alt:
Principal Name to use the Principal Name.
3. In the CA Certificates field, click Add, select the trusted root CA Certificate you imported in 2 and
then click OK.
4. Click OK to save the certificate profile.
STEP 4 | Assign the certificate profile to the gateway(s) or portal. This section describes only how to add
the certificate profile to the gateway or portal configuration. For details on setting up these
components, see GlobalProtect Gateways and GlobalProtect Portals.
1. Select Network > GlobalProtect > Gateways or Portals and select the configuration (or Add a new
one).
2. On the Authentication tab, select the Certificate Profile you just created.
3. Click OK to save the configuration.
STEP 5 | Save the configuration.
Click Commit.
STEP 6 | Verify the configuration.

52 GLOBALPROTECT ADMINISTRATOR'S GUIDE | Authentication
© 2017 Palo Alto Networks, Inc.
From a client system running the GlobalProtect agent, try to connect to a gateway or portal on which
you set up smart card-enabled authentication. When prompted, insert your smart card and verify that
you can successfully authenticate to GlobalProtect.

GLOBALPROTECT ADMINISTRATOR'S GUIDE | Authentication 53
© 2017 Palo Alto Networks, Inc.
Set Up Authentication for strongSwan Ubuntu
and CentOS Clients
To extend GlobalProtect VPN remote access support to strongSwan Ubuntu and CentOS clients, set up
authentication for the strongSwan clients.
To view the minimum GlobalProtect release version that supports strongSwan on Ubuntu
Linux and CentOS, see What Client OS Versions are Supported with GlobalProtect? on page
11.
To connect to the GlobalProtect gateway, the user must successfully authenticate. The following workflows
show examples of how to enable authentication for strongSwan clients. For complete information about
strongSwan, see the strongSwan wiki.
•Enable Authentication Using a Certificate Profile on page 53
•Enable Authentication Using an Authentication Profile on page 55
•Enable Authentication Using Two-Factor Authentication on page 57
Enable Authentication Using a Certificate Profile
The following workflow shows how to enable authentication for strongSwan clients using a certificate
profile.
STEP 1 | Configure an IPSec tunnel for the GlobalProtect gateway for communicating with a
strongSwan client.
1. Select Network > GlobalProtect > Gateways and then select the gateway name.
2. Select the Certificate Profile you want to use for authentication in the Authentication tab.
3. Select Agent > Tunnel Settings and specify the following settings to set up a tunnel:
• Select the check box to Enable X-Auth Support.
• If a Group Name and Group Password are already configured, remove them.
• Click OK to save the settings.
STEP 2 | Verify that the default connection settings in the conn %default section of the IPSec tunnel
configuration file (ipsec.conf) are correctly defined for the strongSwan client.
The ipsec.conf file is usually found in the /etc folder.
The configurations in this procedure are tested and verified for the following releases:
• Ubuntu 14.0.4 with strongSwan 5.1.2 and CentOS 6.5 with strongSwan 5.1.3 for PAN-
OS 6.1.
• Ubuntu 14.0.4 with strongSwan 5.2.1 for PAN-OS 7.0.
The configurations in this procedure can be used for reference if you are using a different
version of strongSwan. Refer to the strongSwan wiki for more information.
Modify the following settings in the conn %default section of the ipsec.conf file to these
recommended settings.
ikelifetime=20m
reauth=yes

54 GLOBALPROTECT ADMINISTRATOR'S GUIDE | Authentication
© 2017 Palo Alto Networks, Inc.
rekey=yes
keylife=10m
rekeymargin=3m
rekeyfuzz=0%
keyingtries=1
type=tunnel
STEP 3 | Modify the strongSwan client’s IPSec configuration file (ipsec.conf) and the IPSec password
file (ipsec.secrets) to use recommended settings.
The ipsec.secrets file is usually found in the /etc folder.
Use the strongSwan client username as the certificate’s common name.
Modify the following items in the ipsec.conf file to these recommended settings.
conn <connection name>
keyexchange=ikev1
authby=rsasig
ike=aes-sha1-modp1024,aes256
left=<strongSwan/Linux-client-IP-address>
leftcert=<client certificate with the strongSwan client username used as the
certificate’s common name>
leftsourceip=%config
leftauth2=xauth
right=<GlobalProtect-Gateway-IP-address>
rightid=“CN=<Subject-name-of-gateway-certificate>”
rightsubnet=0.0.0.0/0
auto=add
Modify the following items in the ipsec.conf file to these recommended settings.
:RSA
<private key file> “<passphrase if used>”
STEP 4 | Start strongSwan IPSec services and connect to the IPSec tunnel that you want the
strongSwan client to use when authenticating to the GlobalProtect gateway.
Use the config <name> variable to name the tunnel configuration.
• Ubuntu clients:
ipsec start
ipsec up <name>
• CentOS clients:
strongSwan start
strongswan up <name>
STEP 5 | Verify that the tunnel is set up correctly and the VPN connection is established to both the
strongSwan client and the GlobalProtect gateway.
1. Verify the detailed status information on a specific connection (by naming the connection) or verify
the status information for all connections from the strongSwan client:
• Ubuntu clients:
GLOBALPROTECT ADMINISTRATOR'S GUIDE | Authentication 55
© 2017 Palo Alto Networks, Inc.
ipsec statusall [<connection name>]
• CentOS clients:
strongswan statusall [<connection name>]
2. Select Network > GlobalProtect > Gateways. Then, in the Info column, select Remote Users for the
gateway configured for the connection to the strongSwan client. The strongSwan client should be
listed under Current Users.
Enable Authentication Using an Authentication Profile
The following workflow shows how to enable authentication for strongSwan clients using an authentication
profile. The authentication profile specifies which server profile to use when authenticating strongSwan
clients.
STEP 1 | Set up the IPSec tunnel that the GlobalProtect gateway will use for communicating with a
strongSwan client.
1. Select Network > GlobalProtect > Gateways and select the gateway name.
2. Select the Authentication Profile you want to use in the Authentication tab.
3. Select Agent > Tunnel Settings and specify the following settings to set up a tunnel:
• Select the check box to Enable X-Auth Support.
• Enter a Group Name and Group Password if they are not already configured.
• Click OK to save these tunnel settings.
STEP 2 | Verify that the default connection settings in the conn %default section of the IPSec tunnel
configuration file (ipsec.conf) are correctly defined for the strongSwan client.
The ipsec.conf file is usually found in the /etc folder.
The configurations in this procedure are tested and verified for the following releases:
• Ubuntu 14.0.4 with strongSwan 5.1.2 and CentOS 6.5 with strongSwan 5.1.3 for PAN-
OS 6.1.
• Ubuntu 14.0.4 with strongSwan 5.2.1 for PAN-OS 7.0.
The configurations in this procedure can be used for reference if you are using a different
version of strongSwan. Refer to the strongSwan wiki for more information.
In the conn %default section of the ipsec.conf file, configure the following recommended settings:
ikelifetime=20m
reauth=yes
rekey=yes
keylife=10m
rekeymargin=3m
rekeyfuzz=0%
keyingtries=1
type=tunnel
STEP 3 | Modify the strongSwan client’s IPSec configuration file (ipsec.conf) and the IPSec password
file (ipsec.secrets) to use recommended settings.
The ipsec.secrets file is usually found in the /etc folder.

56 GLOBALPROTECT ADMINISTRATOR'S GUIDE | Authentication
© 2017 Palo Alto Networks, Inc.
Use the strongSwan client username as the certificate’s common name.
Configure the following recommended settings in the ipsec.conf file:
conn <connection name>
keyexchange=ikev1
ikelifetime=1440m
keylife=60m
aggressive=yes
ike=aes-sha1-modp1024,aes256
esp=aes-sha1
xauth=client
left=<strongSwan/Linux-client-IP-address>
leftid=@#<hex of Group Name configured in the GlobalProtect gateway>
leftsourceip=%modeconfig
leftauth=psk
rightauth=psk
leftauth2=xauth
right=<gateway-IP-address>
rightsubnet=0.0.0.0/0
xauth_identity=<LDAP username>
auto=add
Configure the following recommended settings in the ipsec.secrets file:
: PSK <Group Password configured in the gateway>
<username> : XAUTH “<user password>”
STEP 4 | Start strongSwan IPSec services and connect to the IPSec tunnel that you want the
strongSwan client to use when authenticating to the GlobalProtect gateway.
• Ubuntu clients:
ipsec start
ipsec up <name>
• CentOS clients:
strongSwan start
strongswan up <name>
STEP 5 | Verify that the tunnel is set up correctly and the VPN connection is established to both the
strongSwan client and the GlobalProtect gateway.
1. Verify the detailed status information on a specific connection (by naming the connection) or verify
the status information for all connections from the strongSwan client:
• Ubuntu clients:
ipsec statusall [<connection name>]
• CentOS clients:
strongswan statusall [<connection name>]
GLOBALPROTECT ADMINISTRATOR'S GUIDE | Authentication 57
© 2017 Palo Alto Networks, Inc.
2. Select Network > GlobalProtect > Gateways. Then, in the Info column, select Remote Users for the
gateway configured for the connection to the strongSwan client. The strongSwan client should be
listed under Current Users.
Enable Authentication Using Two-Factor Authentication
With two-factor authentication, the strongSwan client needs to successfully authenticate using both a
certificate profile and an authentication profile to connect to the GlobalProtect gateway. The following
workflow shows how to enable authentication for strongSwan clients using two-factor authentication.
STEP 1 | Set up the IPSec tunnel that the GlobalProtect gateway will use for communicating with a
strongSwan client.
1. Select Network > GlobalProtect > Gateways and select the gateway name.
2. Select the Certificate Profile and Authentication Profile you want to use in the Authentication tab.
3. Select Agent > Tunnel Settings and specify the following settings to set up a tunnel:
• Select the check box to Enable X-Auth Support.
• If a Group Name and Group Password are already configured, remove them.
• Click OK to save these tunnel settings.
STEP 2 | Verify that the default connection settings in the conn %default section of the IPSec tunnel
configuration file (ipsec.conf) are correctly defined for the strongSwan client.
The ipsec.conf file usually resides in the /etc folder.
The configurations in this procedure are tested and verified for the following releases:
• Ubuntu 14.0.4 with strongSwan 5.1.2 and CentOS 6.5 with strongSwan 5.1.3 for PAN-
OS 6.1.
• Ubuntu 14.0.4 with strongSwan 5.2.1 for PAN-OS 7.0.
Use the configurations in this procedure as a reference if you are using a different version
of strongSwan. Refer to the strongSwan wiki for more information.
Configure the following recommended settings in the ipsec.conf file:
ikelifetime=20m
reauth=yes
rekey=yes
keylife=10m
rekeymargin=3m
rekeyfuzz=0%
keyingtries=1
type=tunnel
STEP 3 | Modify the strongSwan client’s IPSec configuration file (ipsec.conf) and the IPSec password
file (ipsec.secrets) to use recommended settings.
The ipsec.secrets file is usually found in the /etc folder.
Use the strongSwan client username as the certificate’s common name.
Configure the following recommended settings in the ipsec.conf file:
conn <connection name>
keyexchange=ikev1
authby=xauthrsasig

58 GLOBALPROTECT ADMINISTRATOR'S GUIDE | Authentication
© 2017 Palo Alto Networks, Inc.
ike=aes-sha1-modp1024
esp=aes-sha1
xauth=client
left=<strongSwan/Linux-client-IP-address>
leftcert=<client-certificate-without-password>
leftsourceip=%config
right=<GlobalProtect-gateway-IP-address>
rightid=%anyCN=<Subject-name-of-gateway-cert>”
rightsubnet=0.0.0.0/0
leftauth2=xauth
xauth_identity=<LDAP username>
auto=add
Configure the following recommended settings in the ipsec.secrets file:
<username> :XAUTH “<user password>”
::RSA <private key file> “<passphrase if used>”
STEP 4 | Start strongSwan IPSec services and connect to the IPSec tunnel that you want the
strongSwan client to use when authenticating to the GlobalProtect gateway.
• Ubuntu clients:
ipsec start
ipsec up <name>
• CentOS clients:
strongSwan start
strongswan up <name>
STEP 5 | Verify that the tunnel is setup correctly and the VPN connection is established to both the
strongSwan client and the GlobalProtect gateway.
1. Verify the detailed status information on a specific connection (by naming the connection) or verify
the status information for all connections from the strongSwan client:
• Ubuntu clients:
ipsec statusall [<connection name>]
• CentOS clients:
strongswan statusall [<connection name>]
2. Select Network > GlobalProtect > Gateways. Then, in the Info column, select Remote Users for the
gateway configured for the connection to the strongSwan client. The strongSwan client should be
listed under Current Users.
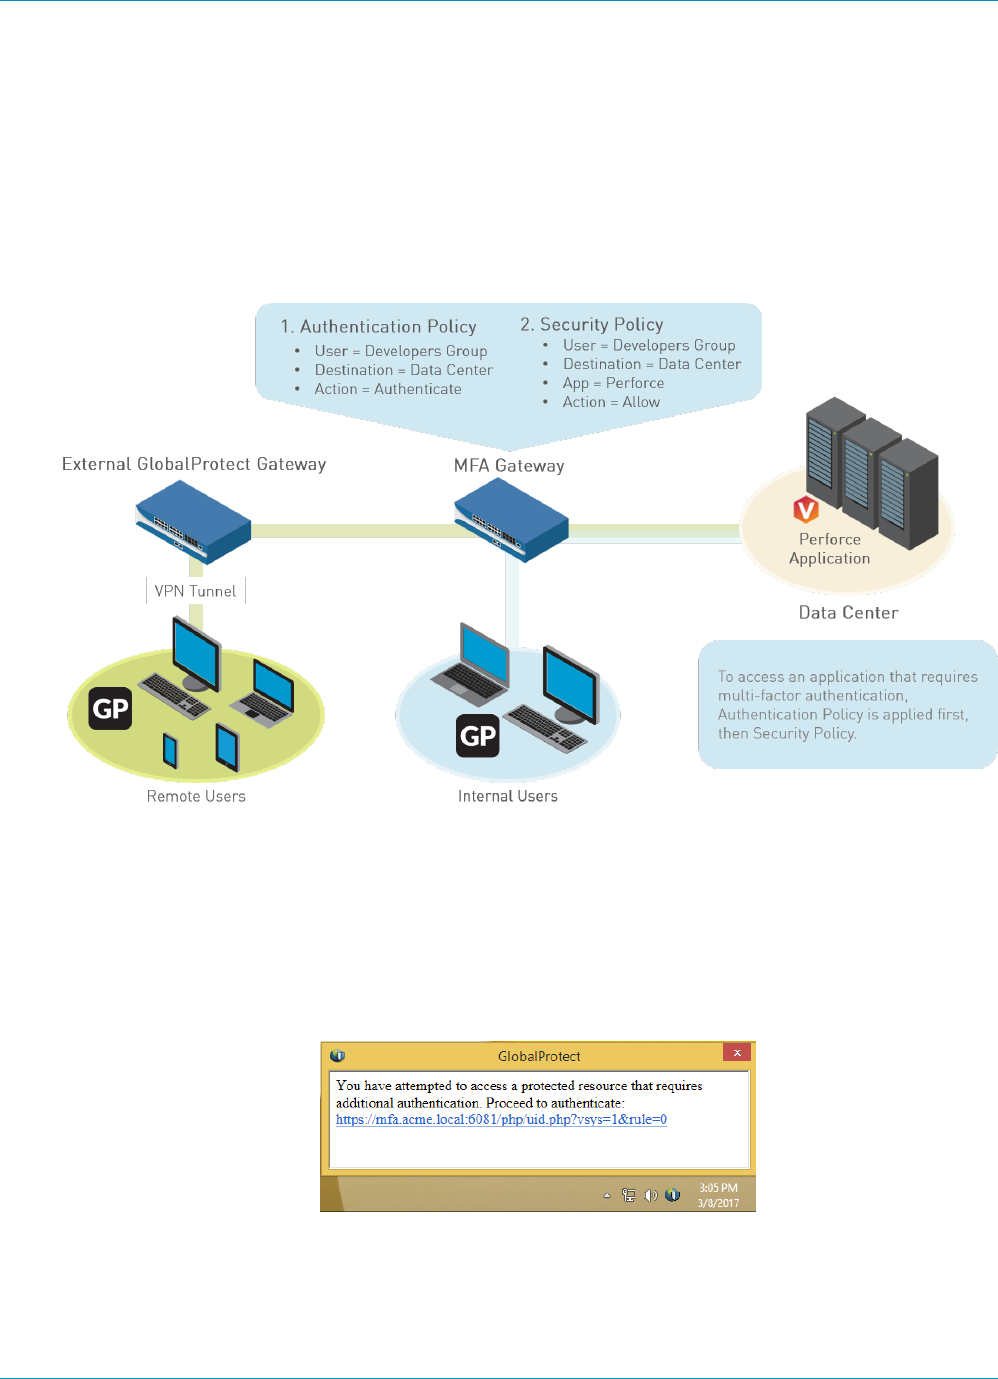
GLOBALPROTECT ADMINISTRATOR'S GUIDE | Authentication 59
© 2017 Palo Alto Networks, Inc.
Configure GlobalProtect to Facilitate Multi-
Factor Authentication Notifications
To protect critical applications and stop attackers from using stolen credentials to conduct lateral
movement throughout your network, you can configure policy-based multi-factor authentication (MFA).
This ensures that each user responds to multiple authentication challenges of different types (factors)
before they can access highly sensitive services and applications.
If a user session matches the Authentication policy, the type of application or service determines the user
experience for notifications about the authentication challenge:
• (Windows or Mac endpoints only) Non-browser-based applications—To facilitate MFA notifications
for non-HTTP applications (such as Perforce) on Windows or Mac endpoints, a GlobalProtect client is
required. When a session matches an Authentication policy rule, the firewall sends a UDP notification
to the GlobalProtect client with an embedded URL link to the Authentication Portal page. The
GlobalProtect client then displays this message as a pop up notification to the user.
•Browser-based applications—Browser-based applications do not require GlobalProtect to display
notification messages to the user. When the firewall identifies a session as web-browsing traffic (based
on App-ID), the firewall automatically presents the user with Authentication Portal page (previously
called the Captive Portal page) specified in the Authentication policy rule. For more information, see
Configure Multi-Factor Authentication.

60 GLOBALPROTECT ADMINISTRATOR'S GUIDE | Authentication
© 2017 Palo Alto Networks, Inc.
To configure GlobalProtect to display MFA notifications for non-browser-based applications, use the
following workflow:
STEP 1 | Before you configure GlobalProtect, configure multi-factor authentication on the firewall.
If you are using two-factor authentication with GlobalProtect to authenticate to the
gateway or portal, a RADIUS server profile is required. If you are using GlobalProtect
to notify the user about an authentication policy match (UDP message), a Multi Factor
Authentication server profile is sufficient.
To use multi-factor authentication for protecting sensitive resources, the easiest solution is to integrate
the firewall with an MFA vendor that is already established in your network. When your MFA structure
is ready, you can start configuring the components of your authentication policy. For more information,
refer to Configure Multi-Factor Authentication.
• Enable Captive Portal to record authentication timestamps and update user mappings.
• Create server profiles that define how the firewall will connect to the services that authenticate
users.
• Assign the server profiles to an Authentication profile which specifies authentication parameters.
• Configure a Security policy rule that allows users to access the resources that require authentication.
STEP 2 | (External gateways only) For GlobalProtect to support multi-factor authentication on external
gateways, you must Configure a response page for the ingress tunnel interface on the firewall:
1. Select Device > Response Pages > MFA Login Page.
2. Select and then Export the Predefined template to a location of your choice.
3. On your client system, use an HTML editor to customize the downloaded response page and save it
with a unique filename.
4. Return to the MFA Login Page dialog on the firewall, Import your customized page, Browse to select
the Import File, select the Destination (virtual system or shared location), click OK, and click Close.
STEP 3 | (External gateways only) Enable Response Pages as a permitted service on the Interface Mgmt
profile:
1. Select Network > Network Profiles > Interface Mgmt and then select the profile.
2. In the Permitted Services area, select Response Pages and click OK.
STEP 4 | (External gateways only) Attach the Interface Mgmt profile to a tunnel interface:
1. Select Network > Interfaces > Tunnel, and the tunnel interface on which you want to use the
response page.
2. Select Advanced, and then select the Interface Mgmt profile you configured in the previous step as
the Management Profile.
STEP 5 | (External gateways only) Enable User Identification on the Zone associated with the tunnel
interface (Network > Zones > <tunnel-zone).
STEP 6 | Configure GlobalProtect clients to support multi-factor authentication notifications for non-
browser-based applications.
1. Select Network > GlobalProtect > Portals and select a portal configuration (or Add one).
2. Select Agent and then select an existing agent configuration or Add one.
3. In the App tab, specify the following:
• Set Enable Inbound Authentication Prompts from MFA Gateways to Yes. To support multi-
factor authentication (MFA), a GlobalProtect client must receive and acknowledge UDP prompts
that are inbound from the gateway. Select Yes to enable a GlobalProtect client to receive and

GLOBALPROTECT ADMINISTRATOR'S GUIDE | Authentication 61
© 2017 Palo Alto Networks, Inc.
acknowledge the prompt. By default, the value is set to No meaning GlobalProtect will block UDP
prompts from the gateway.
• In Network Port for Inbound Authentication Prompts (UDP), specify the port number a
GlobalProtect client uses to receive inbound authentication prompts from MFA gateways. The
default port is 4501. To change the port, specify a number from 1 to 65535.
• In Trusted MFA Gateways, specify the list of authentication gateways a GlobalProtect client will
trust for multi-factor authentication. When a GlobalProtect client receives a UDP message on the
specified network port, GlobalProtect displays an authentication message only if the UDP prompt
comes from a trusted gateway.
• Configure the Default Message for Inbound Authentication Prompts. When users try to access a
resource that requires additional authentication, GlobalProtect receives a UDP packet containing
the inbound authentication prompt and displays this message. The UDP packet also contains the
URL for the Authentication Portal page you specified in Configure Multi-Factor Authentication.
GlobalProtect automatically appends the URL to the message. For example, to display the
notification shown in the beginning of this topic enter the following message:
You have attempted to access a protected resource that requires
additional authentication. Proceed to authenticate at:
4. Save the agent configuration (click OK twice), and then Commit your changes.
62 GLOBALPROTECT ADMINISTRATOR'S GUIDE | Authentication
© 2017 Palo Alto Networks, Inc.
Enable Delivery of GlobalProtect Client VSAs
to a RADIUS Server
When communicating with GlobalProtect portals or gateways, GlobalProtect clients send information
that includes the client IP address, operating system (OS), hostname, user domain, and GlobalProtect
agent/app version. You can enable the firewall to send this information as Vendor-Specific Attributes
(VSAs) to a RADIUS server during authentication (by default, the firewall does not send the VSAs).
RADIUS administrators can then perform administrative tasks based on those VSAs. For example, RADIUS
administrators might use the client OS attribute to define a policy that mandates regular password
authentication for Microsoft Windows users and one-time password (OTP) authentication for Google
Android users.
The following are prerequisites for this procedure:
• Import the Palo Alto Networks RADIUSdictionary into your RADIUS server.
• Configure a RADIUS server profile and assign it to an authentication profile: see Set Up External
Authentication.
• Assign the authentication profile to a GlobalProtect portal or gateway: see Set Up Access to the
GlobalProtect Portal or Configure a GlobalProtect Gateway.
STEP 1 | Log in to the firewall CLI.
STEP 2 | Enter the command for each VSA you want to send.
username@hostname> set authentication radius-vsa-on client-source-ip
username@hostname> set authentication radius-vsa-on client-os
username@hostname> set authentication radius-vsa-on client-hostname
username@hostname> set authentication radius-vsa-on user-domain
username@hostname> set authentication radius-vsa-on client-gp-version
If you later want to stop the firewall from sending particular VSAs, run the same
commands but use the radius-vsa-off option instead of radius-vsa-on.

GLOBALPROTECT ADMINISTRATOR'S GUIDE | Authentication 63
© 2017 Palo Alto Networks, Inc.
Enable Group Mapping
Because the agent or app running on your end-user systems requires the user to successfully authenticate
before being granted access to GlobalProtect, the identity of each GlobalProtect user is known. However,
if you want to be able to define GlobalProtect configurations and/or security policies based ongroup
membership, the firewall must retrieve the list of groups and the corresponding list of members from your
directory server. This is known as group mapping.
To enable this functionality, you must create an LDAP server profile that instructs the firewall how to
connect and authenticate to the directory server and how to search the directory for the user and group
information. After the firewall connects to the LDAP server and retrieves the group mappings, you can
select groups when you define the agent configurations and security policies. The firewall supports a variety
of LDAP directory servers, including Microsoft Active Directory (AD), Novell eDirectory, and Sun ONE
Directory Server.
Use the following procedure to connect to your LDAP directory to enable the firewall to retrieve user-to-
group mapping information:
STEP 1 | Create an LDAP Server Profile that specifies how to connect to the directory servers to which
the firewall should connect to obtain group mapping information.
1. Select Device > Server Profiles > LDAP and click Add.
2. Enter a Profile Name to identify the server profile.
3. If this profile is for a firewall with multiple virtual systems capability, select a virtual system or Shared
as the Location where the profile is available.
4. For each LDAP server (up to four), Add and enter a Name (to identify the server), server IP address
(LDAP Server field), and server Port (default 389).
5. Select the server Type from the drop-down: active-directory, e-directory, sun, or other.
6. If you want the device to use SSL or TLS for a more secure connection with the directory server,
select the Require SSL/TLS secured connection check box (it is selected by default). The protocol
that the device uses depends on the server Port:
• 389 (default)—TLS (Specifically, the device uses the StartTLS operation, which upgrades the initial
plaintext connection to TLS.)
• 636—SSL
• Any other port—The device first attempts to use TLS. If the directory server doesn’t support TLS,
the device falls back to SSL.
7. For additional security, you can select the Verify Server Certificate for SSL sessions check box (it is
cleared by default) so that the device verifies the certificate that the directory server presents for
SSL/TLS connections. To enable verification, you also have to select the Require SSL/TLS secured
connection check box. For verification to succeed, the certificate must meet one of the following
conditions:
• It is in the list of device certificates: Device > Certificate Management > Certificates > Device
Certificates. Import the certificate into the device, if necessary.
• The certificate signer is in the list of trusted certificate authorities: Device > Certificate
Management > Certificates > Default Trusted Certificate Authorities.
8. Click OK.
STEP 2 | Add the LDAP server profile to the User-ID Group Mapping configuration.
1. Select Device > User Identification > Group Mapping Settings and click Add.
2. Enter a Name for the configuration.
3. Select the Server Profile you just created.

64 GLOBALPROTECT ADMINISTRATOR'S GUIDE | Authentication
4. Make sure the Enabled check box is selected.
STEP 3 | (Optional) Limit which groups can be selected in policy rules.
By default, if you don’t specify groups, all groups are available in policy rules.
1. Add existing groups from the directory service:
1. Select the Group Include List tab.
2. In the Available Groups list, select the groups you want to appear in policy rules and click the Add
icon .
2. If you want to base policy rules on user attributes that don’t match existing user groups, create
custom groups based on LDAP filters:
1. Select the Custom Group tab and click Add.
2. Enter a group Name that is unique in the group mapping configuration for the current firewall or
virtual system. If the Name has the same value as the Distinguished Name (DN) of an existing AD
group domain, the firewall uses the custom group in all references to that name (for example, in
policies and logs).
3. Specify an LDAP Filter of up to 2,048 UTF-8 characters, then click OK. The firewall doesn’t
validate LDAP filters.
To optimize LDAP searches and minimize the performance impact on the LDAP
directory server, use indexed attributes and reduce the search scope to include the
user and group objects that you require for policy or visibility. Alternatively, you can
create custom groups based on LDAP filters.
STEP 4 | Commit your changes.
Click OK and Commit.


66 GLOBALPROTECT ADMINISTRATOR'S GUIDE | GlobalProtect Gateways
© 2017 Palo Alto Networks, Inc.

GLOBALPROTECT ADMINISTRATOR'S GUIDE | GlobalProtect Gateways 67
© 2017 Palo Alto Networks, Inc.
GlobalProtect Gateways Overview
Because the GlobalProtect™ configuration that the portal delivers to the agents includes the list of
gateways the client can connect to, it is a good idea to configure the gateways before configuring the
portal.
The GlobalProtect Gateways can be configured to provide two main functions:
• Enforce security policy for the GlobalProtect agents and apps that connect to it. You can also enable HIP
collection on the gateway for enhanced security policy granularity. For more information on enabling
HIP checks, see Host Information.
• Provide virtual private network (VPN) access to your internal network. VPN access is provided through
an IPSec or SSL tunnel between the client and a tunnel interface on the gateway firewall.
You can also configure GlobalProtect gateways on VM-Series firewalls deployed in the
AWS cloud. By deploying the VM-Series firewall in the AWS cloud you can quickly and
easily deploy GlobalProtect gateways in any region without the expense or IT logistics
that are typically required to set up this infrastructure using your own resources. For
details, see Use Case: VM-Series Firewalls as GlobalProtect Gateways in AWS.

68 GLOBALPROTECT ADMINISTRATOR'S GUIDE | GlobalProtect Gateways
© 2017 Palo Alto Networks, Inc.
GlobalProtect Gateway Concepts
These sections provide information about gateway connection priority in a multiple gateway configuration
and MIB support for GlobalProtect gateways.
•Types of Gateways on page 68
•Gateway Priority in a Multiple Gateway Configuration on page 68
•GlobalProtect MIB Support on page 69
Types of Gateways
GlobalProtect gateways provide security enforcement for traffic from GlobalProtect agents/apps.
Additionally, if the HIP feature is enabled, the gateway generates a HIP report from the raw host data the
clients submit and can use this information in policy enforcement.
You Configure a GlobalProtect Gateway on an interface on any Palo Alto Networks next-generation
firewall. You can run both a gateway and a portal on the same firewall, or you can have multiple, distributed
gateways throughout your enterprise.
You can configure any of the following types of gateways:
•Internal—An internal gateway is an interface on the internal network configured as a GlobalProtect
gateway for applying security policy for access to internal resources. When used in conjunction with
User-ID and/or HIP checks, an internal gateway can be used to provide a secure, accurate method of
identifying and controlling traffic by user and/or device state. Internal gateways are useful in sensitive
environments where authenticated access to critical resources is required. You can configure an internal
gateway in either tunnel mode or non-tunnel mode. An agent connects to the internal gateway after
performing internal host detection to determine the location of the endpoint.
•External gateway (auto discovery)—An external gateway resides outside of the corporate network
and provides security enforcement and/or virtual private network (VPN) access for your remote
users. The agent automatically connects to the external gateway depending on the priority you assign
to the gateway, source region, and the response time (see Gateway Priority in a Multiple Gateway
Configuration). When you configure an external gateway in the GlobalProtect portal agent configuration,
auto discovery is the default. See Define the GlobalProtect Agent Configurations.
•External gateway (manual)—A manual external gateway also resides outside of the corporate network
and provides security enforcement and/or VPN access for your remote users. The difference between
the auto-discovery external gateway and the manual external gateway is that the GlobalProtect agent
only connects to a manual external gateway when the user initiates a connection. You can also configure
different authentication requirements for manual external gateways. To configure a manual gateway,
you must identify the gateway as Manual in the GlobalProtect portal agent configuration. See Define the
GlobalProtect Agent Configurations.
Gateway Priority in a Multiple Gateway Configuration
To enable secure access for your mobile workforce no matter where they are located, you can strategically
deploy additional Palo Alto Networks next-generation firewalls and configure them as GlobalProtect
gateways. To determine the preferred gateway to which your agents connect, add the gateways to a portal
agent configuration and assign each gateway a connection priority. See Define the GlobalProtect Agent
Configurations on page 86.
If a GlobalProtect portal agent configuration contains more than one gateway, the agent will attempt
to communicate with all gateways listed in its agent configuration. The agent will then use priority and
response time as to determine the gateway to which to connect. With GlobalProtect agent 4.0.2 and earlier
releases, the agent connects to a lower priority gateway only if the response time for the higher priority
gateway is greater than the average response time across all gateways.
GLOBALPROTECT ADMINISTRATOR'S GUIDE | GlobalProtect Gateways 69
© 2017 Palo Alto Networks, Inc.
For example, consider the following response times for gw1 and gw2:
Name Priority Response Time
gw1 Highest 80 ms
gw2 High 25 ms
The agent determines that the response time for the gateway with the highest priority (higher number) is
greater than the average response time for both gateways (52.5 ms) and, as a result, connects to gw2. In
this example, the agent did not connect to gw1 even though it had a higher priority because a response time
of 80 ms was higher than the average for both.
Now consider the following response times for gw1, gw2, and a third gateway, gw3:
Name Priority Response Time
gw1 Highest 30 ms
gw2 High 25 ms
gw3 Medium 50 ms
In this example, the average response time for all gateways is 35 ms. The agent would then evaluate which
gateways responded faster than the average response time and see that gw1 and gw2 both had faster
response times. The agent would then connect to whichever gateway had the highest priority. In this
example, the agent connects to gw1 because gw1 has the highest priority of all the gateways with response
times below the average.
In addition to gateway priority, you add one or more source regions to an external gateway configuration,
GlobalProtect recognizes the device region and only allows uses to connect to gateways that are configured
for that region. For gateway choices, source region is considered first, then gateway priority.
In GlobalProtect agent 4.0.3 and later releases, the GlobalProtect agent prioritizes the gateways assigned
highest, high, and medium priority ahead of gateways assigned a low or lowest priority regardless of
response time. The GlobalProtect agent then appends any gateways assigned a low or lowest priority to the
list of gateways. This ensures that the agent first attempts to connect to the gateways that you configure
with a higher priority.
GlobalProtect MIB Support
Palo Alto Networks devices support standard and enterprise management information bases (MIBs)
that enable you to monitor the device’s physical state, utilization statistics, traps, and other useful
information. Most MIBs use object groups to describe characteristics of the device using the Simple
Network Management Protocol (SNMP) Framework. You must load these MIBs into your SNMP manager to
monitor the objects (device statistics and traps) that are defined in the MIBs (for details, see Use an SNMP
Manager to Explore MIBs and Objects in the PAN-OS 8.0 Administrator’s Guide).
The PAN-COMMON-MIB—which is included with the enterprise MIBs—uses the panGlobalProtect object
group. The following table describes the objects that make up the panGlobalProtect object group.

70 GLOBALPROTECT ADMINISTRATOR'S GUIDE | GlobalProtect Gateways
© 2017 Palo Alto Networks, Inc.
Object Description
panGPGWUtilizationPct Utilization (as a percentage) of the GlobalProtect gateway
panGPGWUtilizationMaxTunnels Maximum number of tunnels allowed
panGPGWUtilizationActiveTunnelsNumber of active tunnels
Use these SNMP objects to monitor utilization of GlobalProtect gateways and make changes as needed.
For example, if the number of active tunnels reaches 80% or is higher than the maximum number of tunnels
allowed, you should consider adding additional gateways.

GLOBALPROTECT ADMINISTRATOR'S GUIDE | GlobalProtect Gateways 71
© 2017 Palo Alto Networks, Inc.
Prerequisite Tasks for Configuring the
GlobalProtect Gateway
Before you can configure the GlobalProtect gateway, you must have completed the following tasks:
Created the interfaces (and zones) for the interface where you plan to configure each gateway. For
gateways that require tunnel connections you must configure both the physical interface and the virtual
tunnel interface. See Create Interfaces and Zones for GlobalProtect on page 15.
Set up the gateway server certificates and SSL/TLS service profile required for the GlobalProtect agent
to establish an SSL connection with the gateway. See Enable SSL Between GlobalProtect Components
on page 17.
Defined the authentication profiles and/or certificate profiles that will be used to authenticate
GlobalProtect users. See Authentication on page 25.
72 GLOBALPROTECT ADMINISTRATOR'S GUIDE | GlobalProtect Gateways
© 2017 Palo Alto Networks, Inc.
Configure a GlobalProtect Gateway
After you have completed the prerequisite tasks, configure the GlobalProtect Gateways:
STEP 1 | Add a gateway.
1. Select Network > GlobalProtect > Gateways and click Add.
2. In the General screen, enter a Name for the gateway. The gateway name should have no spaces
and, as a best practice, should include the location or other descriptive information to help users and
administrators identify the gateway.
3. (Optional) Select the virtual system to which this gateway belongs from the Location field.
STEP 2 | Specify the network information that enables clients to connect to the gateway.
If you haven’t created the network interface for the gateway, see Create Interfaces and Zones for
GlobalProtect for instructions.
Do not attach an interface management profile that allows HTTP, HTTPS, Telnet, or
SSH on the interface where you have configured a GlobalProtect portal or gateway
because this enables access to your management interface from the Internet. Follow
the Best Practices for Securing Administrative Access to ensure that you are securing
administrative access to your firewalls in a way that will prevent successful attacks.
1. Select the Interface that clients will use for communication with the gateway.
2. Specify the IP Address Type and IP address for the gateway web service:
• The IP address type can be IPv4 (for IPv4 traffic only), IPv6 (for IPv6 traffic only, or IPv4 and IPv6.
Use IPv4 and IPv6 if your network supports dual stack configurations, where IPv4 and IPv6 run at
the same time.
• The IP address must be compatible with the IP address type. For example, 172.16.1/0 for IPv4
addresses or 21DA:D3:0:2F3B for IPv6 addresses. For dual stack configurations, enter both an
IPv4 and IPv6 address.
3. Click OK to save changes.
STEP 3 | Specify how the gateway authenticates users.
If you haven’t created an SSL/TLS service profile for the gateway, see Deploy Server Certificates to the
GlobalProtect Components.
If you haven’t set up the authentication profiles or certificate profiles, see Authentication for
instructions.
Select Authentication and then configure any of the following:
• To secure communication between the gateway and the agents, select the SSL/TLS Service Profile
for the gateway.
To provide the strongest security, set the Min Version of the SSL/TLS service profile to
TLSv1.2.
• To authenticate users with a local user database or an external authentication service, such as LDAP,
Kerberos, TACACS+, SAML, or RADIUS (including OTP), Add a Client Authentication configuration
with the following settings:
• Enter a Name to identify the client authentication configuration.

GLOBALPROTECT ADMINISTRATOR'S GUIDE | GlobalProtect Gateways 73
© 2017 Palo Alto Networks, Inc.
• Identify the type of client to which this configuration applies. By default, the configuration applies
to Any client, but you can customize the type of endpoint by OS (Android, Chrome, iOS, Mac,
Windows, or WindowsUWP) or by third-party IPSec VPN clients (X-Auth).
• Select or add an Authentication Profile to authenticate an endpoint seeking access to the
gateway.
• Enter an Authentication Message to help end users understand which credentials to use
when logging in. The message can be up to 100 characters in length (default is Enter login
credentials).
• To authenticate users based on a client certificate or a smart card/CAC, select the corresponding
Certificate Profile.
• To use two-factor authentication, select both an authentication profile and a certificate profile. Keep
in mind that the user must successfully authenticate using both methods to be granted access.
STEP 4 | Enable tunneling and configure the tunnel parameters.
The tunnel parameters are required if you are setting up an external gateway. If you are configuring an
internal gateway, they are optional.
If you want to force use of SSL-VPN tunnel mode, clear the Enable IPSec check box. By
default, SSL-VPN will only be used if the endpoint fails to establish an IPSec tunnel.
Extended authentication (X-Auth) is only supported on IPSec tunnels.
If you Enable X-Auth Support, GlobalProtect IPSec Crypto profiles are not applicable.
For more information on supported cryptographic algorithms, see Reference:
GlobalProtect Agent Cryptographic Functions.
1. On the GlobalProtect Gateway Configuration dialog, select Agent > Tunnel Settings.
2. Select the Tunnel Mode check box to enable tunneling.
3. Select the Tunnel Interface you defined in 2 in Create Interfaces and Zones for GlobalProtect.
4. (Optional) Specify Max User for the maximum number of users that can access the gateway at the
same time for authentication, HIP updates, and GlobalProtect agent updates (range varies based on
the platform and is displayed when the field is empty).
5. Select a GlobalProtect IPSec Crypto profile to secure the VPN tunnels between GlobalProtect agents
and gateways. The default profile uses AES-128-CBC encryption and sha1 authentication.
You can also create a new IPSec crypto profile. To create a new profile, select New GlobalProtect
IPSec Crypto in the same drop-down and configure the following:
1. Enter a Name to identify the profile.
2. Add the Authentication and Encryption algorithms that the VPN peers can use to negotiate the
keys for securing the data in the tunnel:
•Encryption—If you are not certain of what the VPN peers support, you can add multiple
encryption algorithms in top-to-bottom order of most-to-least secure, as follows: aes-256-
gcm, aes-128-gcm, aes-128-cbc. The peers negotiate the strongest algorithm to establish the
tunnel.
•Authentication—Select the authentication algorithm (sha1) to provide data integrity and
authenticity protection. Although the authentication algorithm is required for the profile, this
setting only applies to the AES-CBC cipher (aes-128-cbc). If you use an AES-GCM encryption
algorithm (aes-256-gcm or aes-128-gcm), the setting is ignored because these ciphers natively
provide ESP integrity protection.

74 GLOBALPROTECT ADMINISTRATOR'S GUIDE | GlobalProtect Gateways
© 2017 Palo Alto Networks, Inc.
3. Click OK to save the profile.
6. (Optional) Select Enable X-Auth Support if any endpoint needs to connect to the gateway by using
a third-party VPN (for example, a VPNC client running on Linux). If you enable X-Auth, you must
provide the Group name and Group Password if the endpoint requires it. By default, the user is not
required to re-authenticate if the key used to establish the IPSec tunnel expires. To require users to
re-authenticate, clear the option to Skip Auth on IKE Rekey.
Although X-Auth access is supported on iOS and Android endpoints, it provides limited
GlobalProtect functionality on these endpoints. Instead, use the GlobalProtect app for
simplified access to all the security features that GlobalProtect provides on iOS and
Android endpoints. The GlobalProtect app for iOS is available at the Apple App Store.
The GlobalProtect app for Android is available at Google Play.
STEP 5 | (Optional) Modify the default timeout settings for endpoints.
On the GlobalProtect Gateway Configuration dialog, select Agent > Timeout Settings and then
configure the following settings:
• Modify the maximum Login Lifetime for a single gateway login session. The default login lifetime is
30 days—during the lifetime, the user stays logged in as long as the gateway receives a HIP check
from the endpoint within the Inactivity Logout period. After this time, the login session automatically
logs out.
• Modify the amount of time after which an inactive session is automatically logged out. The default
Inactivity Logout period is 3 hours. A user is logged out of GlobalProtect if the gateway does not
receive a HIP check from the endpoint during the configured amount of time.
• Modify the number of minutes after which idle users are logged out of GlobalProtect. The
default period for Disconnect on Idle is 180 minutes. Users are logged out of GlobalProtect if the
GlobalProtect agent has not routed traffic through the VPN tunnel in the configured amount of time.
This setting applies to GlobalProtect agents that use the on-demand connect method only.
STEP 6 | (Optional) Configure authentication override settings to enable the gateway to generate and
accept secure, encrypted cookies to authenticate the user. This capability allows the user to
provide login credentials only once during a specified period of time (for example, every 24
hours).
By default, a gateway authenticates the user with an authentication profile and optional certificate
profile. When authentication override is enabled, GlobalProtect caches the result of a successful login
and uses the cookie to authenticate the user instead of prompting the user for credentials. For more
information, see Cookie Authentication on the Portal or Gateway. If client certificates are required, the
endpoint must also provide a valid certificate to be granted access.
In the event that you need to immediately block access to a device whose cookie has not
yet expired (for example, if the device is lost or stolen), you can immediately Block Device
Access by adding the device to a block list.
1. On the GlobalProtect Gateway Configuration dialog, select Agent > Client Settings.
2. Add a new agent configuration or select an existing configuration.
3. Enter a Name to identify the agent configuration.
4. Configure the following settings in the Authentication Override section:
•Generate cookie for authentication override—Enable the gateway to generate encrypted,
endpoint-specific cookies and issue the authentication cookies to the endpoint.
•Accept cookie for authentication override—Enable the gateway to authenticate users with a valid,
encrypted cookie. When the agent presents a valid cookie, the gateway verifies that the cookie
was encrypted by the portal or gateway, decrypts the cookie, and then authenticates the user.

GLOBALPROTECT ADMINISTRATOR'S GUIDE | GlobalProtect Gateways 75
© 2017 Palo Alto Networks, Inc.
•Cookie Lifetime—Specify the hours, days, or weeks that the cookie is valid. Default is 24 hours.
The range for hours is 1–72; for weeks, 1–52; and for days, 1–365. After the cookie expires, the
user must enter login credentials, and the gateway subsequently encrypts a new cookie to send to
the agent. This value can be the same as or different from the Cookie Lifetime you configure for
the portal.
•Certificate to Encrypt/Decrypt Cookie—Select the RSA certificate to use to encrypt and decrypt
the cookie. You must use the same certificate on the portal and gateways.
As a best practice, configure the RSA certificate to use the strongest digest
algorithm that your network supports.
The portal and gateways use the RSA encrypt padding scheme PKCS#1 V1.5 to generate the
cookie (using the public key of the certificate) and decrypt the cookie (using the private key of the
certificate).
STEP 7 | Configure the user or user group and the endpoint OS to which the agent configuration
applies.
The gateway uses the user/user group settings you specify to determine which configuration to deliver
to the GlobalProtect agents that connect. Therefore, if you have multiple configurations, you must make
sure to order them properly. As soon as the gateway finds a match, it will deliver the configuration.
Therefore, more specific configurations must precede more general ones. See 10 for instructions on
ordering the list of agent configurations.
Network settings are not required in internal gateway configurations in non-tunnel mode,
because agents use the network settings assigned to the physical network adapter.
In a gateway agent configuration, select the User/User Group tab and configure the following settings:
• To deliver this configuration to agents or apps running on specific operating system, Add the OS
(Android, Chrome, iOS, Mac, Windows, or WindowsUWP) to which this configuration applies. Or
leave the value in this section set to Any to deploy the configuration based on user/group only.
• To restrict this configuration to a specific user and/or group, click Add in the User/User Group
section of the window and then select the user or group you want to receive this configuration from
the drop-down. Repeat this step for each user/group you want to add.
Before you can restrict the configuration to specific groups, you must map users to
groups as described in Enable Group Mapping.
• To restrict the configuration to users who have not yet logged in to their systems, select pre-logon
from the User/User Group drop-down.
• To apply the configuration to any user regardless of login status (both pre-logon and logged in users),
select any from the User/User Group drop-down.
STEP 8 | (Tunnel Mode only) Configure the ip pools available to assign to the virtual network adapter on
the endpoint when an agent establishes a tunnel with the gateway.
IP pools and split tunnel settings are not required in internal gateway configurations in
non-tunnel mode because agents use the network settings assigned to the physical
network adapter.
You can optionally use address objects—which allow you to group specific source or
destination addresses—when configuring gateway IP address pools or access routes.

76 GLOBALPROTECT ADMINISTRATOR'S GUIDE | GlobalProtect Gateways
© 2017 Palo Alto Networks, Inc.
In a gateway agent configuration, select Agent > IP Pools and configure any of the following settings and
then click OK:
• To specify the authentication server IP address pool to assign addresses to endpoints that require
static IP addresses, select the Retrieve Framed-IP-Address attribute from authentication server
check box and then Add the subnet or IP address range to use to assign to remote users in the
Authentication Server IP Pool area. When the tunnel is established, an interface is created on the
remote user’s computer with an address in the subnet or IP range that matches the Framed-IP
attribute of the authentication server.
The authentication server IP address pool must be large enough to support all
concurrent connections. IP address assignment is static and is retained after the user
disconnects.
• To specify the IP Pool to use to assign IP addresses, click Add and then specify the IP address range
or address object to use. You can configure IPv6 or IPv4 addresses. As a best practice, use a different
range of IP addresses from those assigned to endpoints that are physically connected to your LAN to
ensure proper routing back to the gateway.
STEP 9 | (Tunnel Mode only) Configure the split tunnel settings to assign to the virtual network adapter
on the endpoint when an agent establishes a tunnel with the gateway.
When configuring the access routes, keep in mind the following:
• More specific access routes take precedence over less specific routes.
• Avoid specifying the same access route as both an include and exclude access route as this leads to a
misconfiguration.
To route only some traffic—likely traffic destined for your LAN—to GlobalProtect, specify the destination
subnets or address object (of type IP Netmask) that must be included or excluded from the tunnel. In
this case, traffic that is not destined for a specified access route will be routed through the endpoint’s
physical adapter rather than through the virtual adapter (the tunnel).
In a gateway agent configuration, select Agent > Split Tunnel and configure any of the following settings
and then click OK:
• To disable split tunneling including direct access to local networks on Windows and Mac OS systems,
enable No direct access to local network. In this case, users cannot send traffic to proxies or local
resources while connected to GlobalProtect.
• To define what destination subnets to route through the tunnel click Add in the Access Route area
and then enter the routes as follows:
• (Optional) In the Includes area, Add the destination subnets or address object (of type IP
Netmask) to route only some traffic—likely traffic destined for your LAN—to GlobalProtect. These
are the routes the gateway pushes to the remote users’ endpoint and thereby determines what
traffic the users’ endpoint can send through the VPN connection. You can include IPv6 or IPv4
subnets.
The number of access routes the firewall supports varies by PAN-OS release version:
• PAN-OS 8.0.0 and PAN-OS 8.0.1—Up to 100 include access routes, and, with GlobalProtect
agent 4.0.2 or a later release, up to 200 include access routes
• PAN-OS 8.0.2—Up to 100 include access routes and, with GlobalProtect agent 4.0.2 or a later
release, up to 1000 include access routes
• (Optional) In the Excludes area, Add the destination subnets or address object (of type IP
Netmask) that you want the client to exclude. These routes will be sent through the endpoint’s
physical adapter rather than through the virtual adapter (the tunnel). Excluded routes should

GLOBALPROTECT ADMINISTRATOR'S GUIDE | GlobalProtect Gateways 77
© 2017 Palo Alto Networks, Inc.
be more specific than the included routes; otherwise, you may exclude more traffic than you
intended. You can exclude IPv6 or IPv4 subnets. The firewall supports up to 100 exclude access
routes, or with GlobalProtect agent 4.0.0 or a later release, up to 200 exclude access routes.
Excluding routes is not supported on Android. Only IPv4 routes are supported on
Chrome.
STEP 10 | Arrange the gateway agent configurations so that the proper configuration is deployed to
each agent.
When an agent connects, the gateway will compare the source information in the packet against the
agent configurations you have defined. As with security rule evaluation, the gateway looks for a match
starting from the top of the list. When it finds a match, it delivers the corresponding configuration to the
agent or app.
• To move a gateway configuration up on the list of configurations, select the configuration and click
Move Up.
• To move a gateway configuration down on the list of configurations, select the configuration and
click Move Down.
STEP 11 | (Tunnel Mode only) Specify the network configuration settings for the endpoints.
Network settings are not required in internal gateway configurations in non-tunnel mode
because in this case agents use the network settings assigned to the physical network
adapter.
In a GlobalProtect Gateway Configuration, select the Agent > Network Services tab and configure the
settings for endpoints in one of the following ways:
• If the firewall has an interface that is configured as a DHCP client, set the Inheritance Source to
that interface and the GlobalProtect agent will be assigned the same settings received by the DHCP
client. You can also Inherit DNS Suffixes from the inheritance source.
• Manually assign the DNS server(s) and suffix, and WINS servers by completing the corresponding
fields.
STEP 12 | (Optional) Define the notification messages end users will see when a security rule with a
host information profile (HIP) is enforced.
This step only applies if you have created host information profiles and added them to your security
policies. For details on configuring the HIP feature and for more detailed information about creating HIP
notification messages, see Host Information.
In a GlobalProtect Gateway Configuration, select the Agent > HIP Notification tab and Add a new HIP
Notification configuration:
1. From the Host Information drop-down, select the HIP object or profile to which this message applies.
2. Select Match Message or Not Match Message and then Enable notifications, depending on whether
you want to display the message when the corresponding HIP profile is matched in policy or when it
is not matched. In some cases, you might want to create messages for both a match and a non-match,
depending on the objects on which you are matching and what your objectives are for the policy.
For the Match Message, you can also enable the option to Include Mobile App List to indicate what
applications can trigger the HIP match.
3. Select whether you want to display the message as a System Tray Balloon or as a Pop Up Message.
4. Enter and format the text of your message in the Template text box and then click OK.
5. Repeat these steps for each message you want to define.
STEP 13 | Save the gateway configuration.

78 GLOBALPROTECT ADMINISTRATOR'S GUIDE | GlobalProtect Gateways
1. Click OK to save the settings and close the GlobalProtect Gateway Configuration dialog.
2. Commit the changes.

79
GlobalProtect Portals
> GlobalProtect Portal Overview on page 81
> Prerequisite Tasks for Configuring the GlobalProtect Portal on page 82
> Set Up Access to the GlobalProtect Portal on page 83
> Define the GlobalProtect Agent Configurations on page 86
> Customize the GlobalProtect Agent on page 91
> Customize the GlobalProtect Portal Login, Welcome, and Help Pages on page 99
> GlobalProtect Clientless VPN on page 135

80 GLOBALPROTECT ADMINISTRATOR'S GUIDE | GlobalProtect Portals
© 2017 Palo Alto Networks, Inc.

GLOBALPROTECT ADMINISTRATOR'S GUIDE | GlobalProtect Portals 81
© 2017 Palo Alto Networks, Inc.
GlobalProtect Portal Overview
The GlobalProtect Portal provides the management functions for your GlobalProtect infrastructure. Every
endpoint that participates in the GlobalProtect network receives configuration information from the portal,
including information about available gateways as well as any client certificates that may be required to
connect to the gateways. In addition, the portal controls the behavior and distribution of the GlobalProtect
agent software to both Mac and Windows laptops.
The portal does not distribute the GlobalProtect app for use on mobile devices. To get the
GlobalProtect app for mobile devices, end users must download it from the store for their
device: App Store for iOS, Google Play for Android, Chrome Web Store for Chromebooks, or
Microsoft Store for Windows 10 UWP. However, the agent configurations that get deployed
to mobile app users does control the gateway(s) to which the mobile devices have access.
For more details on supported versions, see What Client OS Versions are Supported with
GlobalProtect?
In addition to distributing GlobalProtect client software, you can configure the GlobalProtect portal
to provide secure remote access to common enterprise web applications that use HTML, HTML5, and
Javascript technologies. Users have the advantage of secure access from SSL-enabled web browsers
without installing GlobalProtect client software. This is useful when you need to enable partner or
contractor access to applications, and to safely enable unmanaged assets, including personal devices. Refer
to GlobalProtect Clientless VPN.

82 GLOBALPROTECT ADMINISTRATOR'S GUIDE | GlobalProtect Portals
© 2017 Palo Alto Networks, Inc.
Prerequisite Tasks for Configuring the
GlobalProtect Portal
Before you can configure the GlobalProtect portal, you must complete the following tasks:
Create the interfaces (and zones) for the firewall interface where you plan to configure the portal. See
Create Interfaces and Zones for GlobalProtect.
Set up the portal server certificate, gateway server certificate, SSL/TLS service profiles, and, optionally,
any client certificates to deploy to end users to enable SSL/TLS connections for the GlobalProtect™
services. See Enable SSL Between GlobalProtect Components.
Define the optional authentication profiles and certificate profiles that the portal can use to authenticate
GlobalProtect users. See Authentication.
Configure a GlobalProtect Gateway and understand Gateway Priority in a Multiple Gateway
Configuration.
GLOBALPROTECT ADMINISTRATOR'S GUIDE | GlobalProtect Portals 83
© 2017 Palo Alto Networks, Inc.
Set Up Access to the GlobalProtect Portal
After you have completed the Prerequisite Tasks for Configuring the GlobalProtect Portal, configure the
GlobalProtect portal as follows:
STEP 1 | Add the portal.
1. Select Network > GlobalProtect > Portals and click Add.
2. On the General page, enter a Name for the portal. The name cannot contain spaces.
3. (Optional) Select the virtual system to which this portal belongs from the Location field.
STEP 2 | Specify network settings to enable agents to communicate with the portal.
If you have not yet created the network interface for the portal, see Create Interfaces and Zones for
GlobalProtect for instructions. If you have not yet created an SSL/TLS service profile for the portal, see
Deploy Server Certificates to the GlobalProtect Components.
Do not attach an interface management profile that allows HTTP, HTTPS, Telnet, or
SSH on the interface where you have configured a GlobalProtect portal or gateway
because this enables access to your management interface from the Internet. Follow
the Best Practices for Securing Administrative Access to ensure that you are securing
administrative access to your firewalls in a way that will prevent successful attacks.
1. Select the Interface.
2. Specify the IP Address Type and IP address for the portal web service:
• The IP address type can be IPv4 (for IPv4 traffic only), IPv6 (for IPv6 traffic only, or IPv4 and IPv6.
Use IPv4 and IPv6 if your network supports dual stack configurations, where IPv4 and IPv6 run at
the same time.
• The IP address must be compatible with the IP address type. For example, 172.16.1/0 for IPv4
addresses or 21DA:D3:0:2F3B for IPv6 addresses. For dual stack configurations, enter both an
IPv4 and IPv6 address.
3. Select an SSL/TLS Service Profile.
STEP 3 | Disable the login page entirely or choose your own login page or help page. Although optional,
a custom login or help page lets you decide on the look and content of the pages. See
Customize the GlobalProtect Portal Login, Welcome, and Help Pages.
• Choose a Portal Login Page for user access to the portal or import a new one, or Disable access to
the GlobalProtect portal login page from a web browser.
• Choose a App Help Page to assist the user with GlobalProtect or import a new one.
STEP 4 | Specify how the portal authenticates the users.
If you have not yet created a server certificate for the portal and issued gateway certificates, see Deploy
Server Certificates to the GlobalProtect Components.
On the GlobalProtect Portal Configuration dialog, select Authentication, and then configure any of the
following:
• To secure communication between the portal and the agents, select the SSL/TLS Service Profile you
configured for the portal.
• To authenticate users using a local user database or an external authentication service, such as
LDAP, Kerberos, TACACS+, SAML, or RADIUS (including OTP), Define the GlobalProtect Client
Authentication Configurations.

84 GLOBALPROTECT ADMINISTRATOR'S GUIDE | GlobalProtect Portals
© 2017 Palo Alto Networks, Inc.
STEP 5 | Save the portal configuration.
1. Click OK to save the settings and close the GlobalProtect Portal Configuration dialog.
2. Commit the changes.

GLOBALPROTECT ADMINISTRATOR'S GUIDE | GlobalProtect Portals 85
© 2017 Palo Alto Networks, Inc.
Define the GlobalProtect Client Authentication
Configurations
Each GlobalProtect client authentication configuration specifies the settings that enable the user to
authenticate with the GlobalProtect portal. You can customize the settings for each OS or you can
configure the settings to apply to all devices. For example, you can configure Android users to use
RADIUS authentication and Windows users to use LDAP authentication. You can also customize the client
authentication for users who access the portal from a web browser (to download the GlobalProtect agent)
or for third-party IPSec VPN (X-Auth) access to GlobalProtect gateways.
STEP 1 | Set Up Access to the GlobalProtect Portal on page 83.
1. Select Network > GlobalProtect > Portals.
2. Select the portal configuration to which you are adding the client configuration and then select the
Authentication tab.
STEP 2 | Specify how the portal authenticates the users.
You can configure the GlobalProtect portal to authenticate users using a local user database or an
external authentication service, such as LDAP, Kerberos, TACACS+, SAML, or RADIUS (including OTP).
If you have not yet set up the authentication profiles and/or certificate profiles, see Authentication on
page 25 for instructions.
In the Client Authentication area, Add a new configuration with the following settings:
• Enter a Name to identify the client authentication configuration.
• Specify the endpoints to which to deploy this configuration. By default, the configuration applies
to all endpoints. Otherwise, you can apply the configuration to endpoints running a specific OS
(Android, Chrome, iOS, Mac, Windows, or WindowsUWP) or to endpoints that access the portal
from a web Browser with the intent of downloading the GlobalProtect agent or to create a new client
authentication specifically for GlobalProtect Clientless VPN on page 135.
• Select or add an Authentication Profile for authenticating an endpoint that tries to access the
gateway.
• Enter an Authentication Message to help end users understand which credentials to use
when logging in. The message can be up to 100 characters in length (default is Enter login
credentials).
STEP 3 | Arrange the client authentication configurations with OS-specific configurations at the top of
the list, and configurations that apply to Any OS at the bottom of the list. As with security rule
evaluation, the portal looks for a match starting from the top of the list. When it finds a match,
it delivers the corresponding configuration to the agent or app.
• To move a client authentication configuration up on the list of configurations, select the configuration
and click Move Up.
• To move a client authentication configuration down on the list of configurations, select the
configuration and click Move Down.
STEP 4 | (Optional) To enable two-factor authentication using an authentication profile and a certificate
profile, configure both in this portal configuration.
Keep in mind the portal must authenticate the client by using both methods before the user can gain
access.

86 GLOBALPROTECT ADMINISTRATOR'S GUIDE | GlobalProtect Portals
© 2017 Palo Alto Networks, Inc.
Select the corresponding Certificate Profile to authenticate users based on a client certificate or smart
card.
The Common Name (CN) and, if applicable, the Subject Alternative Name (SAN) fields
of the certificate must exactly match the IP address or FQDN of the interface where you
configure the portal or HTTPS connections to the portal will fail.
STEP 5 | Save the portal configuration.
1. Click OK to save the settings and close the GlobalProtect Portal Configuration dialog.
2. Commit the changes.
Define the GlobalProtect Agent Configurations
After a GlobalProtect user connects to the portal and is authenticated by the GlobalProtect portal, the
portal sends the agent configuration to the agent or app, based on the settings you defined. If you have
different roles for users or groups that need specific configurations, you can create a separate agent
configuration for each user type or user group. The portal uses the OS of the endpoint and the username
or group name to determine the agent configuration to deploy. As with other security rule evaluations, the
portal starts to search for a match at the top of the list. When it finds a match, the portal sends the right
configuration to the agent or app.
The configuration can include the following:
• A list of gateways to which the client can connect.
• Among the external gateways, any gateway that the user can manually select for the session.
• The root CA certificate required to enable the agent or app to establish an SSL connection with the
GlobalProtect gateway(s).
• The root CA certificate for SSL forward proxy decryption.
• The client certificate that the endpoint should present to the gateway when it connects. This
configuration is required only if mutual authentication between the client and the portal or gateway is
required.
• A secure encrypted cookie that the endpoint should present to the portal or gateway when it connects.
The cookie is included only if you enable the portal to generate one.
• The settings the endpoint uses to determine whether it is connected to the local network or to an
external network.
• Settings for the behavior of the agent or app, such as what the end users can see in their display,
whether they can save their GlobalProtect password, and whether they are prompted to upgrade their
software.
If the portal is down or unreachable, the agent will use the cached version of its agent
configuration from its last successful portal connection to obtain settings, including the
gateway(s) to which the agent can connect, what root CA certificate(s) to use to establish
secure communication with the gateway(s), and what connect method to use.
Use the following procedure to create an agent configuration.
STEP 1 | Add one or more trusted root CA certificates to the portal agent configuration to enable the
GlobalProtect client to verify the identity of the portal and gateways.
The portal deploys the certificate in a certificate file which is read only by GlobalProtect.
1. Select Network > GlobalProtect > Portals.

GLOBALPROTECT ADMINISTRATOR'S GUIDE | GlobalProtect Portals 87
© 2017 Palo Alto Networks, Inc.
2. Select the portal configuration to which you are adding the agent configuration and then select the
Agent tab.
3. In the Trusted Root CA field, Add and then select the CA certificate that was used to issue the
gateway and/or portal server certificates.
The web interface presents a list of CA certificates that are imported on the firewall serving as the
GlobalProtect portal. The web interface also excludes end-entity certificates, sometimes referred
to as leaf certificates, from the list of certificates you can select. You can also Import a new CA
certificate.
Use the following best practices when creating and adding certificates:
• Use the same certificate issuer to issue certificates for all of your gateways.
• Add the entire certificate chain (trusted root CA and intermediate CA certificates) to
the portal agent configuration.
4. (Optional) Deploy additional CA certificates for purposes other than GlobalProtect (for example, SSL
forward proxy decryption).
This option enables you to use the portal to deploy certificates to the endpoint and the agent to
install them in the local root certificate store. This can be useful if you do not have another method
for distributing these server certificates or prefer to use the portal for certificate distribution.
For SSL forward proxy decryption, you specify the forward trust certificate the firewall uses (on
Windows and Mac endpoints only) to terminate the HTTPS connection, inspect the traffic for policy
compliance, and re-establish the HTTPS connection to forward the encrypted traffic.
1. Add the certificate as described in the previous step.
2. To the right of the certificate, select Install in Local Root Certificate Store.
The portal automatically sends the certificate when the user logs in to the portal and installs it in
the client's local store thus eliminating the need for you to install the certificate manually.
STEP 2 | Add an agent configuration.
The agent configuration specifies the GlobalProtect configuration settings to deploy to the connecting
agents/apps. You must define at least one agent configuration.
1. In the Agent area, Add a new configuration.
2. Enter a Name to identify the configuration. If you plan to create multiple configurations, make sure
the name you define for each is descriptive enough to allow you to distinguish them.
STEP 3 | (Optional) Configure settings to specify how users with this configuration will authenticate
with the portal.
If the gateway is to authenticate the clients by using a client certificate, you must select the source that
distributes the certificate.
On the Authentication tab, configure any of the following authentication settings:
• To enable users to authenticate with the portal using client certificates, select the Client Certificate
source (SCEP, Local, or None) that distributes the certificate and its private key to an endpoint. If you
use an internal CA to distribute certificates to clients, select None (default). To enable the portal to
generate and send a machine certificate to the agent for storage in the local certificate store and use
the certificate for portal and gateway authentication, select SCEP and the associated SCEP profile.
These certificates are device-specific and can only be used on the endpoint to which it was issued. To
use the same certificate for all endpoints, select a certificate that is Local to the portal. With None,
the portal does not push a certificate to the client, but you can use can other ways to get a certificate
to the client’s endpoint.
• Specify whether to Save User Credentials. Select Yes to save the username and password (default),
Save Username Only to save only the username, or No to never save credentials.

88 GLOBALPROTECT ADMINISTRATOR'S GUIDE | GlobalProtect Portals
© 2017 Palo Alto Networks, Inc.
If you configure the portal or gateways to prompt for a dynamic password such as a one-time
password (OTP), the user must enter a new password at each login. In this case, the GlobalProtect
agent/app ignores the selection to save both the username and password, if specified, and saves
only the username. For more information, see Enable Two-Factor Authentication Using One-Time
Passwords (OTPs).
STEP 4 | If the GlobalProtect endpoint does not require tunnel connections when it is on the internal
network, configure internal host detection.
1. On the Internal tab, select the Internal Host Detection check box.
2. Enter the IP Address of a host that can be reached from the internal network only. You can configure
IPv4 or IPv6 addressing for Internal Host Detection. The IP address you specify must be compatible
with the IP address type. For example, 172.16.1.0 for IPv4 or 21DA:D3:0:2F3b for IPv6.
3. Enter the DNS Hostname for the IP address you entered. Clients that try to connect to GlobalProtect
attempt to do a reverse DNS lookup on the specified address. If the lookup fails, the client
determines that it is on the external network and then initiates a tunnel connection to a gateway on
its list of external gateways.
STEP 5 | Set up access to a third-party mobile endpoint management system.
This step is required if the mobile devices using this configuration will be managed by a third-party
mobile endpoint management system. All devices will initially connect to the portal and, if a third-party
mobile endpoint management system is configured on the corresponding portal agent configuration, the
device will be redirected to it for enrollment.
1. Enter the IP address or FQDN of the device check-in interface associated with your mobile endpoint
management system. The value you enter here must exactly match the value of the server certificate
associated with the device check-in interface. You can specify an IPv6 or IPv4 address.
2. Specify the Enrollment Port on which the mobile endpoint management system will be listening
for enrollment requests. This value must match the value set on the mobile endpoint management
system (default=443).
STEP 6 | Configure the user or user group and the endpoint OS to which the agent configuration
applies.
The portal uses the user/user group settings you specify to determine which configuration to deliver
to the GlobalProtect agents that connect. Therefore, if you have multiple configurations, you must
make sure to order them properly. As soon as the portal finds a match, it will deliver the configuration.
Therefore, more specific configurations must precede more general ones. See 12 for instructions on
ordering the list of agent configurations.
Select the User/User Group tab and then specify any users, user groups, and/or operating systems to
which this configuration should apply:
• To deliver this configuration to agents or apps running on specific operating system, Add the OS
(Android, Chrome, iOS, Mac, Windows, or WindowsUWP) to which this configuration applies. Or
leave the value in this section set to Any to deploy the configuration based on user/group only.
• To restrict this configuration to a specific user and/or group, click Add in the User/User Group
section of the window and then select the user or group you want to receive this configuration from
the drop-down. Repeat this step for each user/group you want to add.
Before you can restrict the configuration to specific groups, you must map users to groups
as described in Enable Group Mapping.
• To restrict the configuration to users who have not yet logged in to their systems, select pre-logon
from the User/User Group drop-down.

GLOBALPROTECT ADMINISTRATOR'S GUIDE | GlobalProtect Portals 89
© 2017 Palo Alto Networks, Inc.
• To apply the configuration to any user regardless of login status (both pre-logon and logged in users),
select any from the User/User Group drop-down.
STEP 7 | Specify the external gateways to which users with this configuration can connect.
Consider the following best practices when you configure the gateways:
• If you are adding both internal and external gateways to the same configuration,
make sure to enable Internal Host Detection. See 4 in Define the GlobalProtect Agent
Configurations for instructions.
• To learn more about how a GlobalProtect client determines the gateway to which it
should connect, see Gateway Priority in a Multiple Gateway Configuration.
1. Click Add on the External tab.
2. Enter a descriptive Name for the gateway. The name you enter here should match the name you
defined when you configured the gateway and should be descriptive enough for users to know the
location of the gateway they are connected to.
3. Enter the FQDN or IP address of the interface where the gateway is configured in the Address field.
You can configure an IPv4 or IPv6 address. The address you specify must exactly match the Common
Name (CN) in the gateway server certificate.
4. Add one or more Source Regions for the gateway, or select Any to make the gateway available to
all regions. When users connect, GlobalProtect recognizes the device region and only allows uses
to connect to gateways that are configured for that region. For gateway choices, source region is
considered first, then gateway priority.
5. Set the Priority of the gateway by clicking in the field and selecting a value:
• If you have only one external gateway, you can leave the value set to Highest (the default).
• If you have multiple external gateways, you can modify the priority values (ranging from Highest
to Lowest) to indicate a preference for the specific user group to which this configuration applies.
For example, if you prefer that the user group connects to a local gateway you would set the
priority higher than that of more geographically distant gateways. The priority value is then used
to weight the agent’s gateway selection algorithm.
• If you do not want agents to automatically establish tunnel connections with the gateway, select
Manual only. This setting is useful in testing environments.
6. Select the Manual check box if you want to allow users to be able to manually switch to the gateway.
STEP 8 | Specify the internal gateways to which users with this configuration can connect.
Make sure you do not use on-demand as the connect method if your configuration
includes internal gateways.
1. On the Internal tab, click Add in the Internal Gateways section.
2. Enter a descriptive Name for the gateway. The name you enter here should match the name you
defined when you configured the gateway and should be descriptive enough for users to know the
location of the gateway they are connected to.
3. Enter the FQDN or IP address of the interface where the gateway is configured in the Address field.
You can configure an IPv4 or IPv6 address. The address you specify must exactly match the Common
Name (CN) in the gateway server certificate.
4. (Optional) Add one or more Source Addresses to the gateway configuration. The source address can
be an IP subnet or range. It can also be a predefined address. GlobalProtect supports both IPv6 and
IPv4 addresses. When users connect, GlobalProtect recognizes the source address of the device and
only allows users to connect to gateways that are configured for that address.
5. Click OK to save your changes.

90 GLOBALPROTECT ADMINISTRATOR'S GUIDE | GlobalProtect Portals
© 2017 Palo Alto Networks, Inc.
6. (Optional) Add a DHCP Option 43 Code to the gateway configuration. You can include one or more
sub-option codes associated with the vendor-specific information (Option 43) that the DHCP server
has been configured to offer the client. For example, you might have a sub-option code 100 that is
associated with an IP address of 192.168.3.1.
When a user connects, the GlobalProtect portal sends the list of option codes in the portal
configuration to the GlobalProtect agent and the agent selects gateways indicated by the options.
When both the source address and DHCP options are configured, the list of available gateways
presented to the client is based on the combination (union) of the two configurations.
DHCP options are supported on Windows and Mac endpoints only. DHCP options
cannot be used to select gateways that use IPv6 addressing.
7. (Optional) Select Internal Host Detection to allow the GlobalProtect agent to determine if it is inside
the enterprise network. When the user attempts to log in, the agent does a reverse DNS lookup of
the internal Hostname to the specified IP Address.
The host serves as a reference point that is reachable if the endpoint is inside the enterprise network.
If the agent finds the host, the endpoint is inside the network and the agent connects to an internal
gateway; if the agent fails to find the internal host, the endpoint is outside the network and the agent
establishes a tunnel to one of the external gateways.
You can configure IPv4 or IPv6 addressing for Internal Host Detection. The IP address you specify
must be compatible with the IP address type. For example, 172.16.1.0 for IPv4 or 21DA:D3:0:2F3b
for IPv6.
STEP 9 | Customize the behavior of the GlobalProtect agent for users with this configuration.
Select the App tab and then modify the agent settings as desired. For more details about each option,
see Customize the GlobalProtect Agent.
STEP 10 | (Optional) Define any custom host information profile (HIP) data that you want the agent to
collect and/or exclude HIP categories from collection.
This step only applies if you plan to use the HIP feature and there is information you want to collect
that cannot be collected using the standard HIP objects or if there is HIP information that you are not
interested in collecting. See Host Information for details on setting up and using the HIP feature.
1. Select Data Collection and enable the GlobalProtect agent to Collect HIP Data.
2. Select Exclude Categories to exclude specific categories and/or vendors, applications, or versions
within a category. For more details, see 3 in Configure HIP-Based Policy Enforcement.
3. Select Custom Checks to define any custom data you want to collect from hosts running this agent
configuration, and add the category and vendor. For more details, see 2 in Host Information.
STEP 11 | Save the agent configuration.
1. Click OK to save the settings and close the Configs dialog.
2. If you want to add another agent configuration, repeat 2 through 11.
STEP 12 | Arrange the agent configurations so that the proper configuration is deployed to each agent.
When an agent connects, the portal will compare the source information in the packet against the agent
configurations you have defined. As with security rule evaluation, the portal looks for a match starting
from the top of the list. When it finds a match, it delivers the corresponding configuration to the agent
or app.
• To move an agent configuration up on the list of configurations, select the configuration and click
Move Up.

GLOBALPROTECT ADMINISTRATOR'S GUIDE | GlobalProtect Portals 91
© 2017 Palo Alto Networks, Inc.
• To move an agent configuration down on the list of configurations, select the configuration and click
Move Down.
STEP 13 | Save the portal configuration.
1. Click OK to save the settings and close the GlobalProtect Portal Configuration dialog.
2. Commit the changes.
Customize the GlobalProtect Agent
The portal agent configuration allows you to customize how your end users interact with the GlobalProtect
agents installed on their systems or the GlobalProtect app installed on their mobile devices. You can
define different agent settings for the different GlobalProtect agent configurations you create. For more
information on GlobalProtect client requirements, see What Client OS Versions are Supported with
GlobalProtect?
You can customize the display and behavior of the agent. For example, you can specify the following:
• What menus and views users can access.
• Whether users can disable the agent (applies to the user-logon connect method only).
• Whether to display a welcome page upon successful login. You can also configure whether or not the
user can dismiss the welcome page and you can create custom welcome and help pages that explain
how to use GlobalProtect within your environment. See Customize the GlobalProtect Portal Login,
Welcome, and Help Pages.
• Whether agent upgrades occur automatically or whether users are prompted to upgrade.
• Prompt users if multi-factor authentication is needed to access sensitive network resources.
You can also define agent settings directly from the Windows registry or the global Mac
plist. For Windows clients you can also define agent settings directly from the Windows
installer (Msiexec). Settings defined in the portal agent configurations in the web interface
take precedence over settings defined in the Windows registry/Msiexec or the Mac plist. For
more details, see Deploy Agent Settings Transparently.
Additional options that are available through the Windows command line (Msiexec) or Windows registry
only, enable you to (for more information, see Customizable Agent Settings):
• Specify whether the agent should prompt the end user for credentials if Windows SSO fails.
• Specify the default portal IP address (or hostname).
• Enable GlobalProtect to initiate a VPN connection before the user logs into the endpoint.
• Deploy scripts that run before or after GlobalProtect establishes a VPN connection or after
GlobalProtect disconnects the VPN connection.
• Enable the GlobalProtect agent to wrap third-party credentials on the Windows client, allowing for SSO
when using a third-party credential provider.
Use the following procedure to customize the GlobalProtect agent.
STEP 1 | Select the Agent tab in the agent configuration you want to customize.
You can also configure most settings that are on the App tab from a group policy by
adding settings to the Windows registry/Mac plist. On Windows systems, you can also
set them using the Msiexec utility on the command line during the agent installation.
However, settings defined in the web interface or the CLI take precedence over registry/
plist settings. See Deploy Agent Settings Transparently for details.

92 GLOBALPROTECT ADMINISTRATOR'S GUIDE | GlobalProtect Portals
© 2017 Palo Alto Networks, Inc.
1. Select Network > GlobalProtect > Portals and select the portal configuration for which you want to
add an agent configuration (or Add a new configuration).
2. Select the Agent tab and select the configuration you want to modify (or Add a new configuration).
3. Select the App tab.
The App Configurations area displays the options with default values that you can customize for each
agent configuration. When you change the default behavior, the web interface changes the color
from gray to the default text color.
STEP 2 | Specify the Connect Method that an agent or app uses for its GlobalProtect connection.
Use the Pre-logon (Always On), Pre-logon then On-demand, or User-log on (Always
On) connect method to access the network using an internal gateway.
In the App Configurations area, configure any of the following options:
• Select a Connect Method:
•User-logon (Always On)—The GlobalProtect agent automatically connects to the portal as soon as
the user logs in to the endpoint (or domain). When used in conjunction with SSO (Windows users
only), GlobalProtect login is transparent to the end user.
On iOS endpoints, this setting prevents one-time password (OTP) applications from
working because GlobalProtect forces all traffic to go through the tunnel.
•Pre-logon (Always On)—Authenticates the user and establishes a VPN tunnel to the GlobalProtect
gateway before the user logs in to the client. This option requires that you use an external PKI
solution to pre-deploy a machine certificate to each endpoint that receives this configuration. See
Remote Access VPN with Pre-Logon for details about pre-logon.
•On-demand (Manual user initiated connection)—Users will have to manually launch the agent to
connect to GlobalProtect. Use this connect method for external gateways only.
•Pre-logon then On-demand—Similar to the Pre-logon (Always On) connect method, this connect
method (which requires Content Release version 590-3397 or later) enables the GlobalProtect agent
to authenticate the user and establish a VPN tunnel to the GlobalProtect gateway before the user
logs in to the client. Unlike the pre-logon connection method, after the user logs in to the client,
users must manually launch the agent to connect to GlobalProtect if the connection is terminated for
any reason. The benefit of this option is that you can allow a user to specify a new password after
password expiration or a user forgets their password but still require the user to manually initiate the
connection after the user logs in.
STEP 3 | Specify whether to enforce GlobalProtect connections for network access.
To enforce GlobalProtect for network access, we recommend that you enable this feature
only for users that connect in User-logon or Pre-logon modes. Users that connect in
On-demand mode may not be able to establish a connection within the permitted grace
periods.
In the App Configurations area, configure any of the following options:
• To force all network traffic to traverse a GlobalProtect tunnel, set Enforce GlobalProtect Connection
for Network Access to Yes. By default, GlobalProtect is not required for network access meaning
users can still access the internet if GlobalProtect is disabled or disconnected. To provide instructions
to users before traffic is blocked, configure a Traffic Blocking Notification Message and optionally
specify when to display the message (Traffic Blocking Notification Delay).

GLOBALPROTECT ADMINISTRATOR'S GUIDE | GlobalProtect Portals 93
© 2017 Palo Alto Networks, Inc.
When Enforce GlobalProtect Connection for Network Access is enabled, you
may want to consider allowing users to disable the GlobalProtect agent with a
passcode. The Enforce GlobalProtect Connection for Network Access feature
enhances the network security by requiring a GlobalProtect VPN connection for
network access. On rare occasions, devices may fail to connect to the VPN and
require remote administrative login for troubleshooting. By disabling the GlobalProtect
agent (for Windows or Mac) using the passcode provided by the administrator during
the troubleshooting session, you can allow administrators to connect to your device
remotely.
• To permit traffic required to establish a connection with a captive portal, specify a Captive Portal
Exception Timeout. The user must authenticate with the portal before the timeout expires. To
provide additional instructions, configure a Captive Portal Detection Message.
These features require Content Release version 607-3486 or later.
STEP 4 | Specify additional GlobalProtect connection settings.
With single sign-on (SSO) enabled (the default), the GlobalProtect agent uses the
user’s Windows login credentials to automatically authenticate to and connect to the
GlobalProtect portal and gateway. GlobalProtect with SSO enabled also allows for the
GlobalProtect agent to wrap third-party credentials to ensure that Windows users can
authenticate and connect, even when a third-party credential provider is being used to
wrap the Windows login credentials.
In the App Configurations area, configure any of the following options:
• (Windows only) Set Use Single Sign-On to No to disallow GlobalProtect to use the Windows login
credentials to automatically authenticate the user upon login to Active Directory.
• Enter the Maximum Internal Gateway Connection Attempts to specify the number of times the
GlobalProtect agent should retry the connection to an internal gateway after the first attempt fails
(range is 0-100; 4 or 5 is recommended; default is 0, which means the GlobalProtect agent does
not retry the connection). By increasing the value, you enable the agent to connect to an internal
gateway that is temporarily down or unreachable during the first connection attempt but comes back
up before the specified number of retries are exhausted. Increasing the value also ensures that the
internal gateway receives the most up-to-date user and host information.
• Enter the GlobalProtect App Config Refresh Interval (hours) to specify the number of hours the
GlobalProtect portal waits before it initiates the next refresh of a client’s configuration (range is
1-168; default is 24).
• Specify whether to Retain Connection on Smart Card Removal. By default, the option is set to Yes,
meaning GlobalProtect retains the tunnel when a user removes a smart card containing a client
certificate. To terminate the tunnel, set this option to No. The decision on whether to retain the
connection depends on your security requirements.
This feature requires Content Release version 590-3397 or a later version.
• Configure an Automatic Restoration of VPN Connection Timeout to specify the action GlobalProtect
takes when the tunnel is disconnected by entering a timeout value in minutes from 0 to 180; default
is 30. A value of 0 disables this feature so that GlobalProtect does not attempt to reconnect after
the tunnel is disconnected. When you specify a value of 1-180 minutes, GlobalProtect attempts to
reestablish the tunnel connection if the tunnel is down for a period of time which does not exceed
the timeout value you specify here. For example, with a timeout value of 30 minutes, GlobalProtect
does not attempt to reconnect if the tunnel is disconnected for 45 minutes. However, if the tunnel is

94 GLOBALPROTECT ADMINISTRATOR'S GUIDE | GlobalProtect Portals
© 2017 Palo Alto Networks, Inc.
disconnected for 15 minutes, GlobalProtect attempts to reconnect because the number of minutes
has not exceeded the timeout value.
When you enable Automatic Restoration of VPN Connection Timeout, you can also adjust the
amount of time in seconds GlobalProtect waits between attempts to restore the connection by
configuring the Wait Time Between VPN Connection Restore Attempts. Range is 1 to 60 seconds;
the default is 5.
With Always-On VPN, if a user switches from an external network to an internal
network before the timeout value expires, GlobalProtect does not perform network
discovery. As a result, GlobalProtect restores the connection to the last known
external gateway. To trigger internal host detection, the user must select Rediscover
Network from the GlobalProtect console.
STEP 5 | Configure the menus and UI views that are available to users who have this agent
configuration.
Configure any or all of the following options:
• If you want users to be able to see only basic status information within the application, set Enable
Advanced View to No. By default, the advanced view is enabled. It allows users to see detailed
statistical, host, and troubleshooting information and to perform certain tasks, such as changing their
password.
• If you want hide the GlobalProtect agent on end-user systems, set Display GlobalProtect Icon
to No. When the icon is hidden, users cannot perform other tasks such as changing passwords,
rediscovering the network, resubmitting host information, viewing troubleshooting information,
or performing an on-demand connection. However, HIP notification messages, login prompts, and
certificate dialogs will still display as necessary for interacting with the end user.
• To prevent users from performing a network rediscovery, set the Enable Rediscover Network Option
to No. When you disable the option, it is grayed out in the GlobalProtect menu.
• To prevent users from manually resubmitting HIP data to the gateway, set Enable Resubmit
Host Profile Option to No. This option is enabled by default, and is useful in cases where HIP-
based security policy prevents users from accessing resources because it allows the user to fix the
compliance issue on the computer and then resubmit the HIP.
• (Windows only) To allow GlobalProtect to display notifications in the notification area (system tray),
set Show System Tray Notifications to Yes.
• To create a custom message to display to users when their password is about to expire configure the
Custom Password Expiration Message (LDAP Authentication Only). The maximum message length is
200 characters.
STEP 6 | Define what the end users with this configuration can do in their client.
• Set Allow User to Change Portal Address to No to disable the Portal field on the Home tab in the
GlobalProtect agent. Because the user will then be unable to specify a portal to which to connect,
you must supply the default portal address in the Windows registry (HKEY_LOCAL_MACHINE
\SOFTWARE\Palo Alto Networks\GlobalProtect\PanSetup with key Portal) or the Mac
plist (/Library/Preferences/com.paloaltonetworks.GlobalProtect.settings.plist
with key Portal under dictionary PanSetup). For more information, see Deploy Agent Settings
Transparently.
• To prevent users from dismissing the welcome page, set Allow User to Dismiss Welcome Page to No.
Otherwise, when set to Yes, the user can dismiss the welcome page and prevent GlobalProtect from
displaying the page after subsequent logins.
STEP 7 | Specify whether users can disable the GlobalProtect agent.
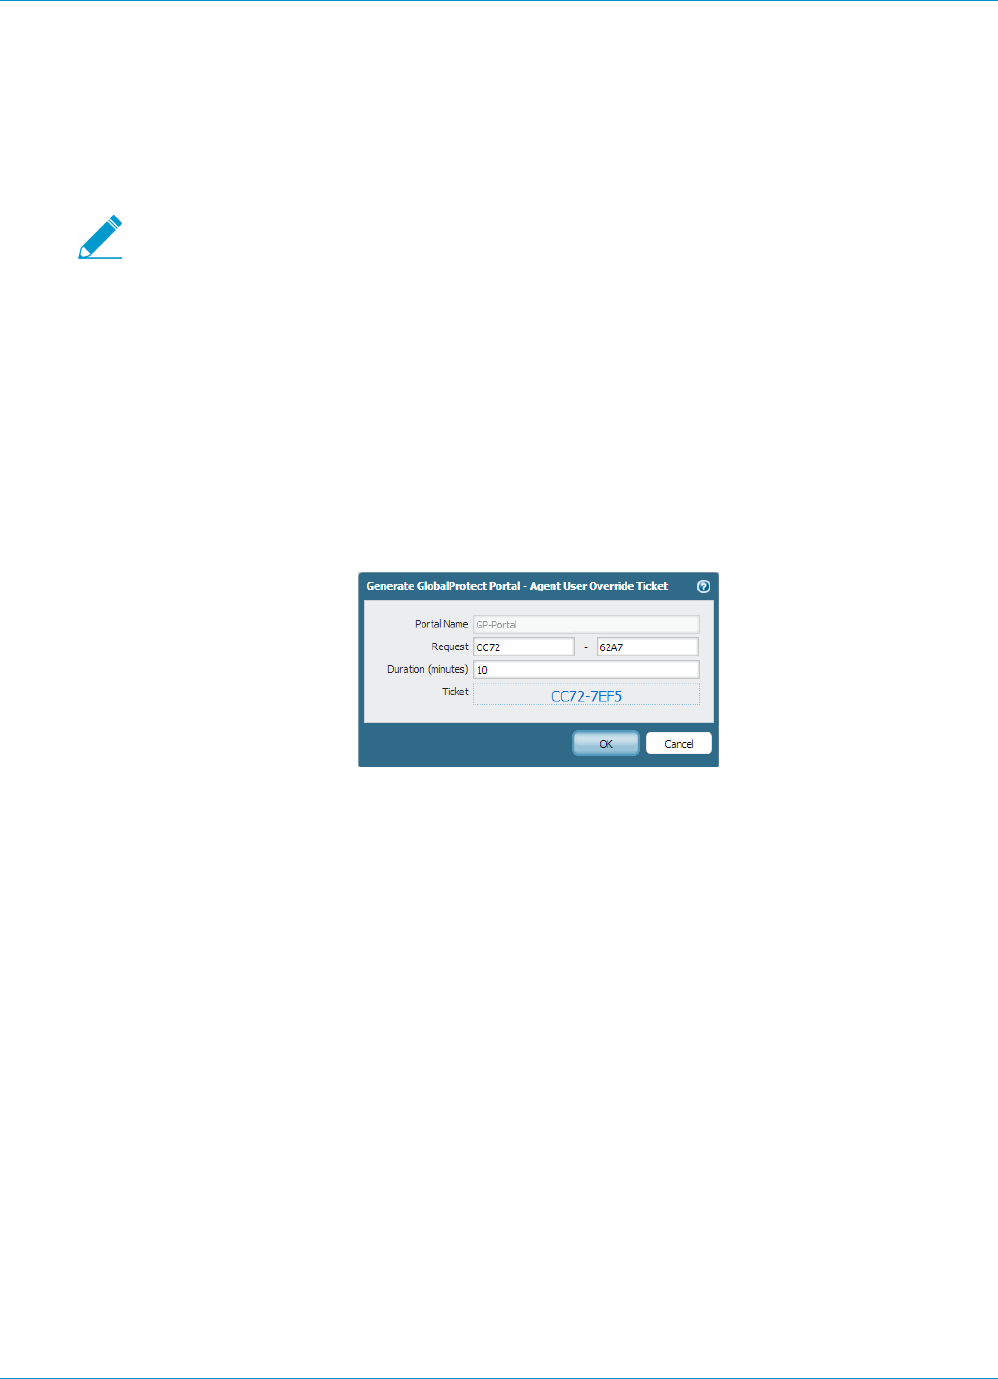
GLOBALPROTECT ADMINISTRATOR'S GUIDE | GlobalProtect Portals 95
© 2017 Palo Alto Networks, Inc.
The Allow User to Disable GlobalProtect option applies to agent configurations that have the Connect
Method set to User-Logon (Always On). In user-logon mode, the agent or app automatically connects to
GlobalProtect as soon as the user logs in to the endpoint. This mode is sometimes referred to as “always
on,” which is why the user must override this behavior to disable GlobalProtect client.
By default, this option is set to Allow which permits users to disable GlobalProtect without providing a
comment, passcode, or ticket number.
If the agent icon is not visible, users are not able to disable the GlobalProtect client. See
5 for details.
• To prevent users with the user-logon connect method from disabling GlobalProtect, set Allow User
to Disable GlobalProtect to Disallow.
• To allow users to disable GlobalProtect if they provide a passcode, set Allow User to Disable
GlobalProtect to Allow with Passcode. Then, in the Disable GlobalProtect App area, enter (and
confirm) the Passcode that the end users must supply.
• To allow users to disconnect if they provide a ticket, set Allow User to Disable GlobalProtect to
Allow with Ticket. With this option, the disconnect action triggers the agent to generate a Request
Number. The end user must then communicate the Request Number to the administrator. The
administrator then clicks Generate Ticket on the Network > GlobalProtect > Portals page and enters
the request number from the user to generate the ticket. The administrator then provides the ticket
to the end user, who enters it into the Disable GlobalProtect dialog to enable the agent to disconnect.
• To limit the number of times users can disable the GlobalProtect client, enter a value in the Max
Times User Can Disable field in the Disable GlobalProtect App area. A value of 0 (the default)
indicates that users are not limited in the number of times they can disable the client.
• To restrict how long the user may be disconnected, enter a value (in minutes) in the User Can Disable
Timeout (min) field in the Disable GlobalProtect App area. A value of 0 (the default) means that there
is no restriction on how long the user can keep the client disabled.
STEP 8 | Configure the certificate settings and behavior for the users that receive this configuration.
•Client Certificate Store Lookup—Select which store the agent should use to look up client
certificates. User certificates are stored in the Current User certificate store on Windows and in the
Personal Keychain on Mac OS. Machine certificates are stored in the Local Computer certificate
store on Windows and in the System Keychain on Mac OS. By default, the agent looks for User and
machine certificates in both places.
•SCEP Certificate Renewal Period (days)—With SCEP, the portal can request a new client certificate
before the certificate expires. This time before the certificate expires is the optional SCEP certificate
renewal period. During a configurable number of days before a client certificate expires, the portal
can request a new certificate from the SCEP server in your enterprise PKI (range is 0-30; default is 7).
A value of 0 means the portal does not automatically renew the client certificate when it refreshes
the agent configuration.
For an agent or app to obtain the new certificate during the renewal period, the user must log in to
the GlobalProtect client. For example, if a client certificate has a lifespan of 90 days, the certificate
renewal period is 7 days, and the user logs in during the final 7 days of the certificate lifespan, the

96 GLOBALPROTECT ADMINISTRATOR'S GUIDE | GlobalProtect Portals
© 2017 Palo Alto Networks, Inc.
portal acquires a new certificate and deploys it along with a fresh agent configuration. For more
information, see Deploy User-Specific Client Certificates for Authentication.
•Extended Key Usage OID for Client Certificate (Windows and Mac endpoints only)—Use this option
only if you enabled client authentication, expect multiple client certificates to be present on the
endpoint, and have identified a secondary purpose by which you can filter the client certificates.
This option enables you to specify a secondary purpose for a client certificate using the associated
object identifier (OID). For example, to display only client certificates which also have a purpose of
Server Authentication, enter the OID 1.3.6.1.5.5.7.3.1. When the GlobalProtect agent finds only
one client certificate which matches the secondary purpose, GlobalProtect automatically selects and
authenticates using that certificate. Otherwise, GlobalProtect prompts the user to select the client
certificate from the filtered list of client certificates which match the criteria. For more information
including a list of common certificate purposes and OIDs, see the PAN-OS 7.1 New Feature’sGuide.
• If you do not want the agent to establish a connection with the portal when the portal certificate is
not valid, set Allow User to Continue with Invalid Portal Server Certificate to No. Keep in mind that
the portal provides the agent configuration only; it does not provide network access and therefore
security to the portal is less critical than security to the gateway. However, if you have deployed a
trusted server certificate for the portal, deselecting this option can help prevent man-in-the-middle
(MITM) attacks.
STEP 9 | Specify whether users receive login prompts when multi-factor authentication is required to
access sensitive network resources.
For internal gateway connections, sensitive network resources (for example, financial applications
or software development applications) may require additional authentication. You can configure
GlobalProtect clients to display the authentication prompts required to access these resources. Refer to
Configure GlobalProtect to Facilitate Multi-Factor Authentication Notifications for more information.
• Set Enable Inbound Authentication Prompts from MFA Gateways to Yes. To support multi-factor
authentication (MFA), a GlobalProtect client must receive and acknowledge UDP prompts that are
inbound from the gateway. Select Yes to enable a GlobalProtect client to receive and acknowledge
the prompt. By default, the value is set to No meaning GlobalProtect will block UDP prompts from
the gateway.
• In Network Port for Inbound Authentication Prompts (UDP), specify the port number a
GlobalProtect client uses to receive inbound authentication prompts from MFA gateways. The
default port is 4501. To change the port, specify a number from 1 to 65535.
• In Trusted MFA Gateways, specify the list of authentication gateways a GlobalProtect client will trust
for multi-factor authentication. When a GlobalProtect client receives a UDP message on the specified
network port, GlobalProtect displays an authentication message only if the UDP prompt comes from
a trusted gateway.
• Configure the Inbound Authentication Message (for example: You have attempted to access
a protected resource that requires additional authentication. Proceed to
authenticate at). When users try to access a resource that requires additional authentication,
GlobalProtect receives an inbound authentication prompt and displays this message. GlobalProtect
automatically appends the URL for the Authentication Portal page you specify when you configure
multi-factor authentication to the inbound authentication message.
STEP 10 | (Windows only) Configure settings for Windows-based endpoints that receive this
configuration.
•Resolve All FQDNs Using DNS Servers Assigned by the Tunnel (Windows Only)— Configure the
DNS resolution preferences for the GlobalProtect tunnel. Select No to allow Windows endpoints to
send DNS queries to the DNS server set on the physical adapter if the initial query to the DNS server
configured on the gateway is not resolved. This option retains the native Windows behavior to query
all DNS servers on all adapters recursively but can result in long wait times to resolve some DNS
queries. Select Yes (default) to allow Windows endpoints to resolve all DNS queries with the DNS

GLOBALPROTECT ADMINISTRATOR'S GUIDE | GlobalProtect Portals 97
© 2017 Palo Alto Networks, Inc.
servers you configure on the gateway instead of allowing the endpoint to send some DNS queries to
the DNS servers set on the physical adapter.
This features requires Content Release version 731 or later and is available for
GlobalProtect agent 4.0.3 and later.
To configure DNS settings for GlobalProtect agent 4.0.2 and earlier releases, use the Update DNS
Settings at Connect option.
•Update DNS Settings at Connect—Select Yes to enable the Windows endpoint to resolve all DNS
queries with the DNS servers you configure for the gateway instead of the DNS servers set for the
physical adapter on the endpoint. When you enable this option, GlobalProtect strictly enforces the
gateway DNS settings and overrides the static settings for all physical adapters. This is useful when
a Windows endpoint fails to resolve a DNS query sent to the DNS server configured on the physical
adapter instead of on the GlobalProtect tunnel adapter. Select No (the default) to allow Windows
endpoints to send DNS queries to the DNS server set on the physical adapter if the initial query to
the DNS server configured on the gateway is not resolved. This option retains the native Windows
behavior to query all DNS servers on all adapters recursively but can result in long wait times to
resolve some DNS queries.
This feature is deprecated in 4.0.3 and later releases. To configure DNS resolution
settings for GlobalProtect agent 4.0.3 and later releases, use the Resolve All FQDNs
Using DNS Servers Assigned by the Tunnel (Windows Only) option.
•Send HIP Report Immediately if Windows Security Center (WSC) State Changes—Select No to
prevent the GlobalProtect agent from sending HIP data when the status of the Windows Security
Center (WSC) changes. Select Yes (default) to immediately send HIP data when the status of the
WSC changes.
•Detect Proxy for Each Connection—Select No to auto-detect the proxy for the portal connection
and use that proxy for subsequent connections. Select Yes (default) to auto-detect the proxy at every
connection.
•Clear Single Sign-On Credentials on Logout—Select No to keep single sign-on credentials when the
user logs out. Select Yes (default) to clear them and force the user to enter credentials upon the next
login.
•Use Default Authentication on Kerberos Authentication Failure—Select No to use only Kerberos
authentication. Select Yes (default) to retry using the default authentication method after
authentication using Kerberos fails.
STEP 11 | If your endpoints frequently experience latency or slowness when connecting to the
GlobalProtect portal or gateways, consider adjusting the portal and TCP timeout values.
To allow more time for your endpoints to connect to or receive data from the portal or gateway,
increase the timeout values, as needed. Keep in mind that increasing the values can result in longer wait
times if the GlobalProtect agent is unable to establish the connection. In contrast, decreasing the values
can prevent the GlobalProtect agent from establishing a connection when the portal or gateway does
not respond before the timeout expires.
Configure values for any of the following options:
•Portal Connection Timeout (sec)—The number of seconds (between 1 and 600) before a connection
request to the portal times out due to no response from the portal. When your firewall is running
Applications and Threats content versions earlier than 777-4484, the default is 30. Starting with
content version 777-4484, the default is 5.
•TCP Connection Timeout (sec)—The number of seconds (between 1 and 600) before a TCP
connection request times out due to unresponsiveness from either end of the connection. When your
firewall is running Applications and Threats content versions earlier than 777-4484, the default is 60.
Starting with content version 777-4484, the default is 5.

98 GLOBALPROTECT ADMINISTRATOR'S GUIDE | GlobalProtect Portals
© 2017 Palo Alto Networks, Inc.
•TCP Receive Timeout (sec)—The number of seconds before a TCP connection times out due to the
absence of some partial response of a TCP request (range is 1-600; default is 30).
STEP 12 | Specify whether remote desktop connections are permitted over existing VPN tunnels
by specifying the User Switch Tunnel Rename Timeout. When a new user connects to a
Windows machine using Remote Desktop Protocol (RDP), the gateway reassigns the VPN
tunnel to the new user. The gateway can then enforce security policies on the new user.
Allowing remote desktop connections over VPN tunnels can be useful in situations where an IT
administrator needs to access a remote end-user system using RDP.
By default, the User Switch Tunnel Rename Timeout field is set to 0 meaning the GlobalProtect gateway
terminates the connection if a new user authenticates over the VPN tunnel. To modify this behavior,
configure a timeout value from 1 to 600 seconds. If the new user does not log in to the gateway before
the timeout value expires, the GlobalProtect gateway terminates the VPN tunnel assigned to the first
user.
Changing the User Switch Tunnel Rename Timeout value only affects the RDP tunnel
and does not rename a pre-logon tunnel when configured.
STEP 13 | Specify how GlobalProtect agent upgrades occur.
If you want to control when users can upgrade, you can customize the agent upgrade on a per-
configuration basis. For example, if you want to test a release on a small group of users before deploying
it to your entire user base, you can create a configuration that applies to users in your IT group only, thus
allowing them to upgrade and test and disable upgrade in all other user/group configurations. Then, after
you have thoroughly tested the new version, you can modify the agent configurations for the rest of
your users to allow the upgrade.
By default, the Allow User to Upgrade GlobalProtect App field is set to prompt the end user to upgrade.
To modify this behavior, select one of the following options:
•Allow Transparently—Upgrades occur automatically without interaction with the user. Upgrades can
occur when the user is working remotely or connected from within the corporate network.
•Internal—Upgrades occur automatically without interaction with the user, provided the user is
connected from within the corporate network. This setting is recommended to prevent slow
upgrades in low-bandwidth situations. When a user connects outside the corporate network, the
upgrade is postponed and re-activated later when the user connects from within the corporate
network. You must configure internal gateways and internal host detection to use this option.
• To prevent agent upgrades, select Disallow.
• To allow end users to initiate agent upgrades, select Allow Manually. In this case, the user would
select the Check Version option in the agent to determine if there is a new agent version and then
upgrade if desired. Note that this option will not work if the GlobalProtect agent is hidden from the
user. See 5 for details on the Display GlobalProtect Icon option.
Upgrades for Allow Transparently and Internal occur only if the GlobalProtect software
version on the portal is more recent than the GlobalProtect software version on the
endpoint. For example, a GlobalProtect 3.1.3 agent connecting to a GlobalProtect 3.1.1
portal is not upgraded.
STEP 14 | Specify whether to display a welcome page upon successful login.
A welcome page can be a useful way to direct users to internal resources that they can only access when
connected to GlobalProtect, such as your Intranet or other internal servers.
By default, the only indication that the agent has successfully connected to GlobalProtect is a balloon
message that displays in the system tray/menubar.

GLOBALPROTECT ADMINISTRATOR'S GUIDE | GlobalProtect Portals 99
© 2017 Palo Alto Networks, Inc.
To display a welcome page after a successful login select factory-default from the Welcome Page
drop-down on the right. GlobalProtect displays the welcome page in the default browser on Windows,
Mac, and Chromebook endpoints, or within the GlobalProtect app on mobile devices. You can also
select a custom welcome page that provides information specific to your users, or to a specific group
of users (based on which portal configuration gets deployed). For details on creating custom pages, see
Customize the GlobalProtect Portal Login, Welcome, and Help Pages.
STEP 15 | Save the agent configuration settings.
1. If you are done creating agent configurations, click OK to close the Configs dialog. Otherwise, for
instructions on completing the agent configurations, return to Define the GlobalProtect Agent
Configurations.
2. If you are done configuring the portal, click OK to close the GlobalProtect Portal Configuration
dialog.
3. When you finish the portal configuration, Commit the changes.
Customize the GlobalProtect Portal Login, Welcome, and Help
Pages
GlobalProtect provides default login, welcome, and/or help pages. However, you can create your own
custom pages with your corporate branding, acceptable use policies, and links to your internal resources.
You can alternatively disable browser access to the portal login page in order to prevent
unauthorized attempts to authenticate to the GlobalProtect portal (configure the Portal Login
Page > Disable option from Network > GlobalProtect > Portals > <portal_config > General).
With the portal login page disabled, you can instead use a software distribution tool, such as
Microsoft’s System Center Configuration Manager (SCCM), to allow your users to download
and install the GlobalProtect agent.
STEP 1 | Export the default portal login, welcome, or help page.
1. Select Device > Response Pages.
2. Select the link for the type of GlobalProtect portal page.
3. Select the Default predefined page and click Export.
STEP 2 | Edit the exported page.
1. Use the HTML text editor of your choice to edit the page.
2. If you want to edit the logo image that is displayed, host the new logo image on a web server that is
accessible from the remote GlobalProtect clients. For example, edit the following line in the HTML to
point to the new logo image:
<img src="http://cdn.slidesharecdn.com/ Acme-logo-96x96.jpg?1382722588"/>
3. Save the edited page with a new filename. Make sure that the page retains its UTF-8 encoding.
STEP 3 | Import the new page(s).
1. Select Device > Response Pages.
2. Select the link for the type of GlobalProtect portal page.
3. Click Import and then enter the path and filename in the Import File field or Browse to locate the file.
4. (Optional) Select the virtual system on which this page will be used from the Destination drop-down
or select shared (default) to make it available to all virtual systems.
5. Click OK to import the file.
STEP 4 | Configure the portal to use the new page(s).
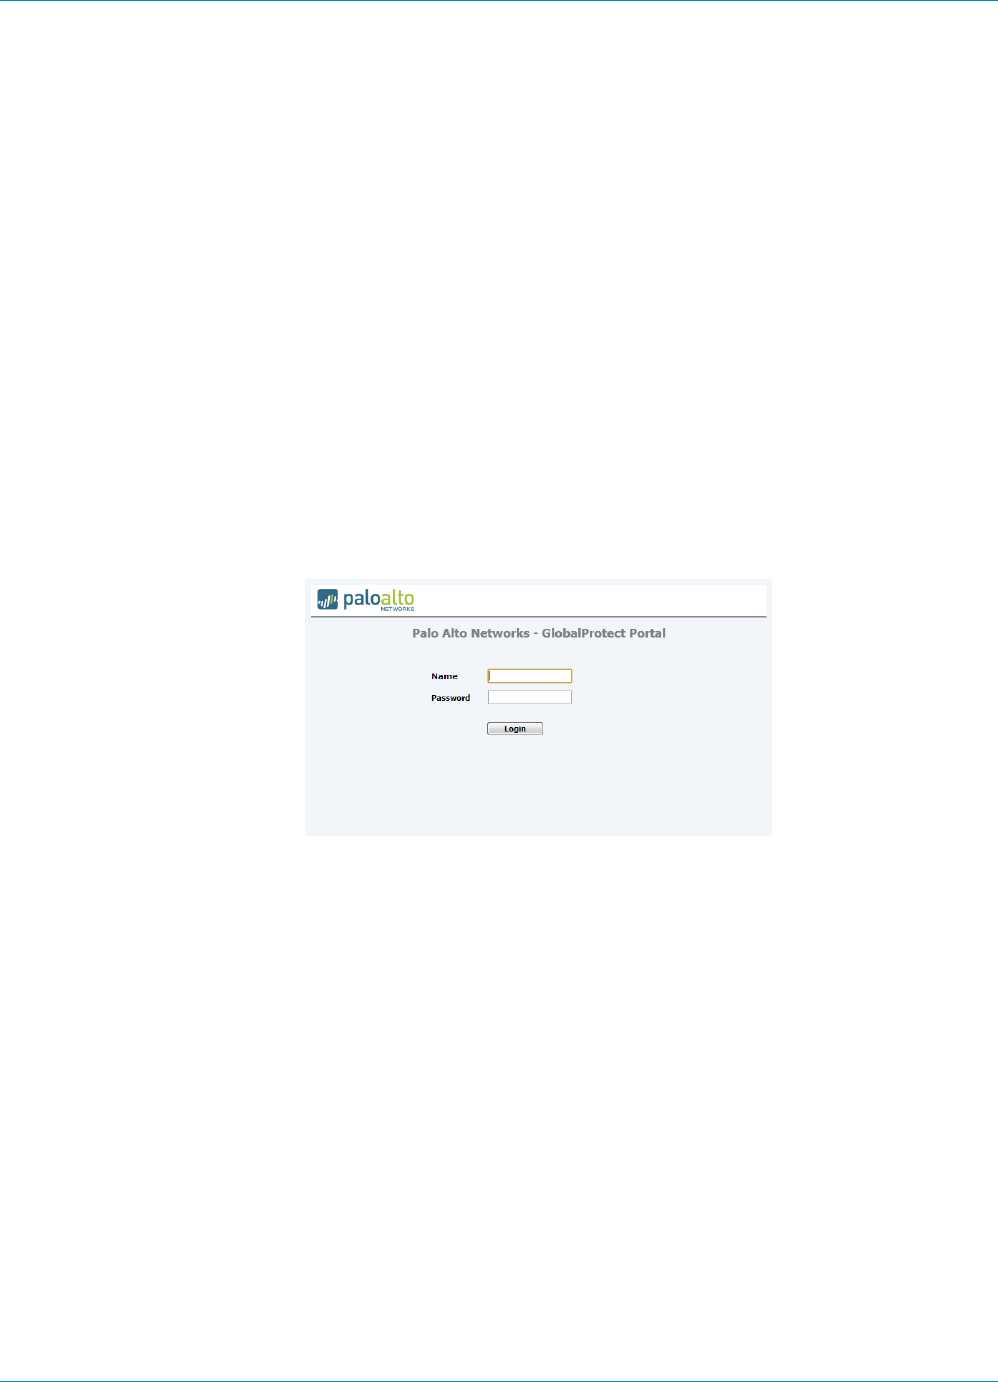
100 GLOBALPROTECT ADMINISTRATOR'S GUIDE | GlobalProtect Portals
•Portal Login Page and App Help Page:
1. Select Network > GlobalProtect > Portals and select the portal to which you want to add the login
page.
2. On the General tab, select the new page from the relevant drop-down in the Appearance area.
•Custom Welcome Page:
3. Select Network > GlobalProtect > Portals and select the portal to which you want to add the login
page.
4. On the Agent tab, select the agent configuration to which you want to add the welcome page.
5. Select the App tab, and select the new page from the Welcome Page drop-down.
6. Click OK to save the agent configuration.
STEP 5 | Save the portal configuration.
Click OK and then Commit your changes.
STEP 6 | Verify that the new page displays.
•Test the login page—Open a browser, go to the URL for your portal (be sure you do not add
the :4443 port number to the end of the URL or you will be directed to the web interface for the
firewall). For example, enter https://myportal rather than https://myportal:4443.
The new portal login page will display.
•Test the help page—Right-click the GlobalProtect icon in the notification area (system tray), and
select Help. The new help page will display.
•Test the welcome page—Right-click the GlobalProtect icon in the notification area (system tray), and
select Welcome Page. The new welcome page will display.


102 GLOBALPROTECT ADMINISTRATOR'S GUIDE | GlobalProtect Clients
© 2017 Palo Alto Networks, Inc.

GLOBALPROTECT ADMINISTRATOR'S GUIDE | GlobalProtect Clients 103
© 2017 Palo Alto Networks, Inc.
Deploy the GlobalProtect Client Software
In order to connect to GlobalProtect™, an end host must be running GlobalProtect client software. The
software deployment method depends on the type of client as follows:
•Mac OS and Microsoft Windows endpoints—Require the GlobalProtect agent software, which is
distributed by the GlobalProtect portal. To enable the software for distribution, you must download the
version you want the hosts in your network to use to the firewall hosting your GlobalProtect portal and
then activate the software for download. For instructions on how to download and activate the agent
software on the firewall, see Deploy the GlobalProtect Agent Software.
•Windows 10 phone and Windows 10 UWP endpoints—Require the GlobalProtect app. As with other
mobile device apps, the end user must download the GlobalProtect app from the Microsoft Store. For
instructions on how to download and test the GlobalProtect app installation, see Download and Install
the GlobalProtect Mobile App.
•iOS and Android endpoints—Require the GlobalProtect app. As with other mobile device apps, the end
user must download the GlobalProtect app either from the Apple AppStore (iOS devices) or from Google
Play (Android devices). For instructions on how to download and test the GlobalProtect app installation,
see Download and Install the GlobalProtect Mobile App.
•Chromebooks—Require the GlobalProtect app for Chrome OS. Similar to the download process for
mobile device apps, the end user can download the GlobalProtect app from the Chrome Web Store. You
can also deploy the app to a managed Chromebook using the Chromebook Management Console. For
instructions on how to download and test the GlobalProtect app installation, Download and Install the
GlobalProtect App for Chrome OS.
For more details, see What Client OS Versions are Supported with GlobalProtect?
As an alternative to deploying GlobalProtect client software, you can configure the
GlobalProtect portal to provide secure remote access to common enterprise web
applications that use HTML, HTML5, and Javascript technologies. Users have the advantage
of secure access from SSL-enabled web browsers without installing GlobalProtect client
software. Refer to GlobalProtect Clientless VPN.
Deploy the GlobalProtect Agent Software
There are several ways to deploy the GlobalProtect agent software:
•Directly from the portal—Download the agent software to the firewall hosting the portal and activate
it so that end users can install the updates when they connect to the portal. This option provides
flexibility in that it allows you to control how and when end users receive updates based on the agent
configuration settings you define for each user, group, and/or operating system. However, if you have
a large number of agents that require updates, it could put extra load on your portal. See Host Agent
Updates on the Portal for instructions.
•From a web server—If you have a large number of hosts that will need to upgrade the agent
simultaneously, consider hosting the agent updates on a web server to reduce the load on the firewall.
See Host Agent Updates on a Web Server for instructions.
•Transparently from the command line—For Windows clients, you can automatically deploy agent
settings in the Windows Installer (Msiexec). However, to upgrade to a later agent version using Msiexec,
you must first uninstall the existing agent. In addition, Msiexec allows for deployment of agent settings
directly on the endpoints by setting values in the Windows registry or Mac plist. See Deploy Agent
Settings Transparently.
•Using group policy rules—In Active Directory environments, the GlobalProtect Agent can also be
distributed to end users, using active directory group policy. AD Group policies allow modification
of Windows host computer settings and software automatically. Refer to the article at http://

104 GLOBALPROTECT ADMINISTRATOR'S GUIDE | GlobalProtect Clients
© 2017 Palo Alto Networks, Inc.
support.microsoft.com/kb/816102 for more information on how to use Group Policy to automatically
distribute programs to host computers or users.
•From a mobile endpoint management system—If you use an mobile management system such as an
MDM or EMM to manage your mobile devices, you can use the system to deploy and configure the
GlobalProtect app. See Mobile Endpoint Management.
Host Agent Updates on the Portal
The simplest way to deploy the GlobalProtect agent software is to download the new agent installation
package to the firewall that is hosting your portal and then activate the software for download to the agents
connecting to the portal. To do this automatically, the firewall must have a service route that enables it to
access the Palo Alto Networks Update Server. If the firewall does not have access to the Internet, you can
manually download the agent software package from the Palo Alto Networks Software Updates support
site using an Internet-connected computer and then manually upload it to the firewall.
You must have a valid Palo Alto Networks account to log in to and download software
from the Software Updates page. If you cannot log in and need assistance, go to https://
www.paloaltonetworks.com/support/tabs/overview.html.)
You define how the agent software updates are deployed in the agent configurations you define on the
portal—whether they happen automatically when the agent connects to the portal, whether the user is
prompted to upgrade the agent, or whether the end user can manually check for and download a new agent
version. For details on creating an agent configuration, see Define the GlobalProtect Agent Configurations
on page 86.
STEP 1 | Launch the web interface on the firewall hosting the GlobalProtect portal and go to the
GlobalProtect Client page.
Select Device > GlobalProtect Client.
STEP 2 | Check for new agent software images.
• If the firewall has access to the Update Server, click Check Now to check for the latest updates. If the
value in the Action column is Download it indicates that an update is available.
• If the firewall does not have access to the Update Server, go to the Palo Alto Networks Software
Updates support site and Download the file to your computer. Then go back to the firewall to
manually Upload the file.
You must have a valid Palo Alto Networks account to log in to and download software
from the Software Updates page. If you cannot log in and need assistance, go to: https://
www.paloaltonetworks.com/support/tabs/overview.html)
STEP 3 | Download the agent software image.
If your firewall does not have Internet access from the management port, you can
download the agent update from the Palo Alto Networks Support Site: (https://
www.paloaltonetworks.com/support/tabs/overview.html).
You can then manually Upload the update to your firewall and then activate Activate From File.
Locate the agent version you want and then click Download. When the download completes, the value
in the Action column changes to Activate.

GLOBALPROTECT ADMINISTRATOR'S GUIDE | GlobalProtect Clients 105
© 2017 Palo Alto Networks, Inc.
If you manually uploaded the agent software as detailed in 2 on page 104, the Action
column will not update. Continue to the next step for instructions on activating an image
that was manually uploaded.
STEP 4 | Activate the agent software image so that end users can download it from the portal.
Only one version of agent software image can be activated at a time. If you activate a
new version, but have some agents that require a previously activated version, you will
have to activate the required version again to enable it for download.
• If you downloaded the image automatically from the Update Server, click Activate.
• If you manually uploaded the image to the firewall, click Activate From File and then select the
GlobalProtect Client File you uploaded from the drop-down. Click OK to activate the selected image.
You may need to refresh the screen before the version displays as Currently Activated.
Host Agent Updates on a Web Server
If you have a large number of endpoints that will need to install and/or update the GlobalProtect agent
software, consider hosting the GlobalProtect agent software images on an external web server. This helps
reduce the load on the firewall when users connect to download the agent. To use this feature, the firewall
hosting the portal must be running PAN-OS 4.1.7 or a later release.
STEP 1 | Download the version of the GlobalProtect agent that you plan to host on the web server to
the firewall and activate it.
Follow the steps for downloading and activating the agent software on the firewall as described in Host
Agent Updates on the Portal.
STEP 2 | Download the GlobalProtect agent image you want to host on your web server.
You should download the same image that you activated on the portal.
From a browser, go to the Palo Alto Networks Software Updates site and Download the file to your
computer.
STEP 3 | Publish the files to your web server.
Upload the image file(s) to your web server.
STEP 4 | Redirect the end users to the web server.
On the firewall hosting the portal, log in to the CLI and enter the following operational mode commands:
> set global-protect redirect on
> set global-protect redirect location <path>
where <path> is the path is the URL to the folder hosting the image, for example https://acme/GP.
STEP 5 | Test the redirect.
1. Launch your web browser and go to the following URL:
https://<portal address or name>
For example, https://gp.acme.com.
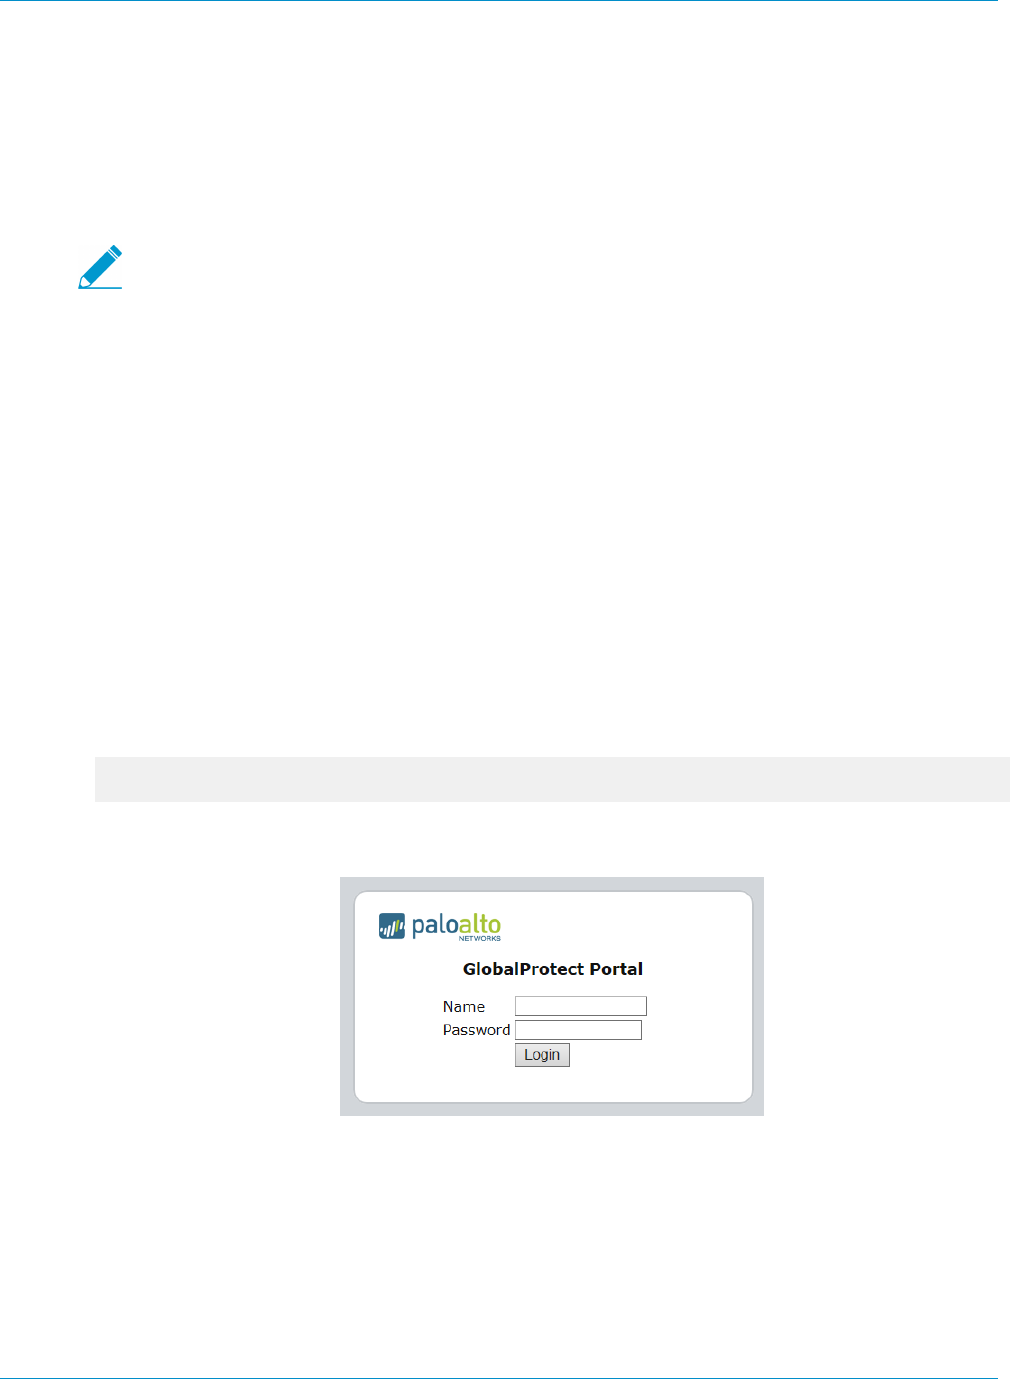
106 GLOBALPROTECT ADMINISTRATOR'S GUIDE | GlobalProtect Clients
© 2017 Palo Alto Networks, Inc.
2. On the portal login page, enter your user Name and Password and then click Login. After successful
login, the portal should redirect you to the download.
Test the Agent Installation
Use the following procedure to test the agent installation.
STEP 1 | Create an agent configuration for testing the agent installation.
When initially installing the GlobalProtect agent software on the endpoint, the end user
must be logged in to the system using an account that has administrative privileges.
Subsequent agent software updates do not require administrative privileges.
As a best practice, create an agent configuration that is limited to a small group of users, such as
administrators in the IT department responsible for administering the firewall:
1. Select Network > GlobalProtect > Portals and select the portal configuration to edit.
2. Select the Agent tab and either select an existing configuration or Add a new configuration to deploy
to the test users/group.
3. On the User/User Group tab, click Add in the User/User Group section, select the user or group who
will be testing the agent, and then click OK.
4. On the Agent tab, make sure Agent Upgrade is set to prompt and then click OK to save the
configuration.
5. (Optional) Select the agent configuration you just created/modified and click Move Up so that it is
before any more generic configurations you have created.
6. Commit the changes.
STEP 2 | Log in to the GlobalProtect portal.
1. Launch your web browser and go to the following URL:
https://<portal address or name>
For example, https://gp.acme.com.
2. On the portal login page, enter your user Name and Password and then click Login.
STEP 3 | Navigate to the agent download page.
In most cases, you will see an agent download page when you log in to the portal. Use this page to
download the latest agent software package.
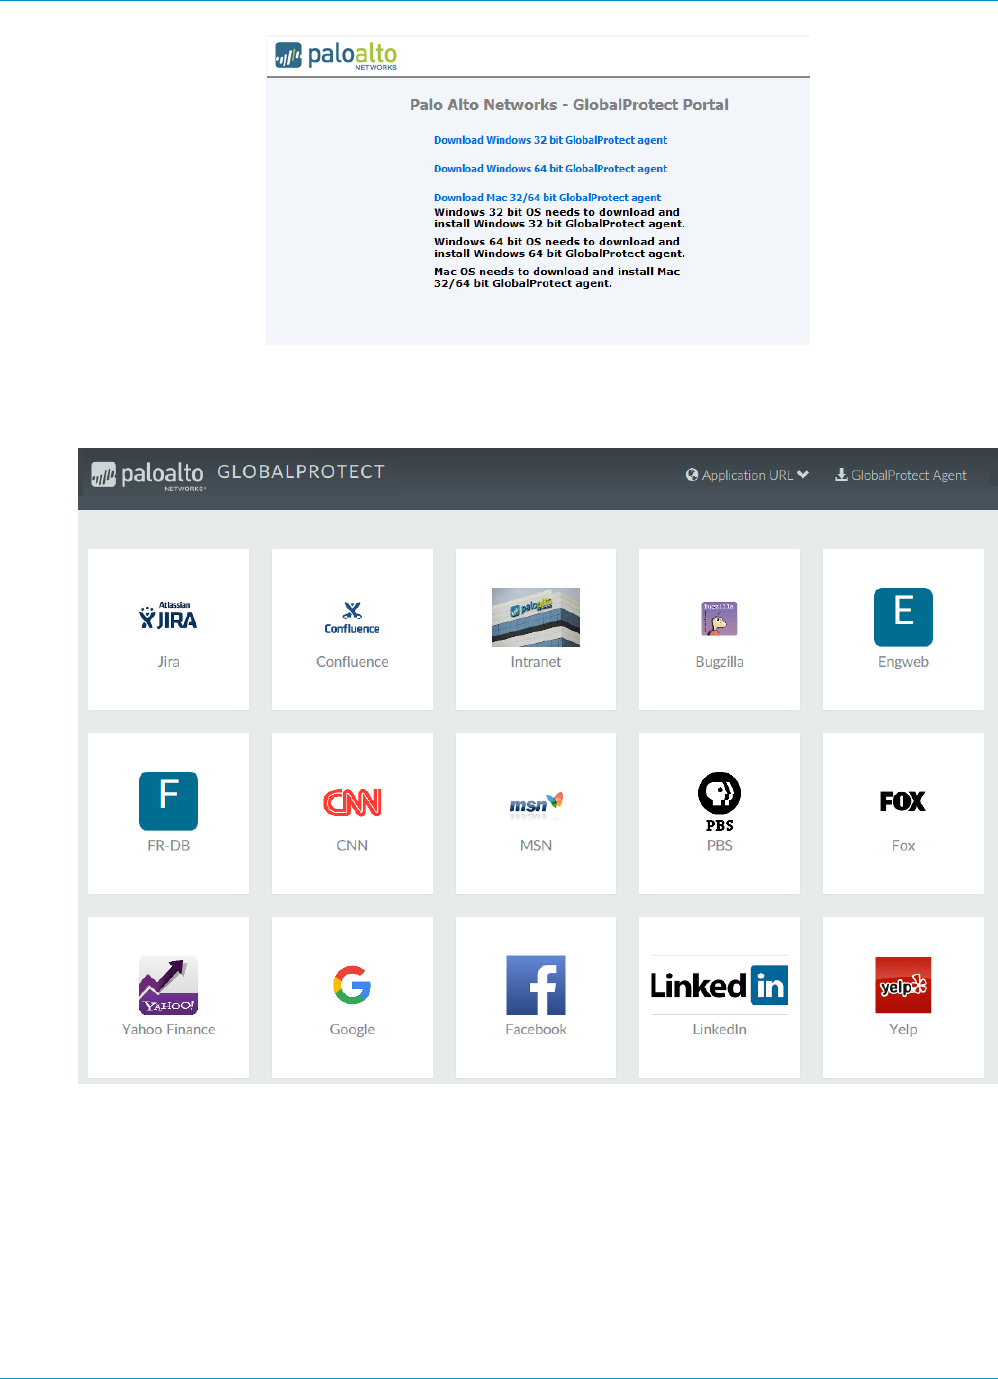
GLOBALPROTECT ADMINISTRATOR'S GUIDE | GlobalProtect Clients 107
© 2017 Palo Alto Networks, Inc.
If you have enabled GlobalProtect Clientless VPN access, you will see an applications page (instead
of the agent download page) when you log in to the portal. Select GlobalProtect Agent to open the
download page.
STEP 4 | Download the agent.
1. Click the link that corresponds to the operating system you are running on your computer to begin
the download.

108 GLOBALPROTECT ADMINISTRATOR'S GUIDE | GlobalProtect Clients
© 2017 Palo Alto Networks, Inc.
2. When prompted to run or save the software, click Run.
3. When prompted, click Run to launch the GlobalProtect Setup Wizard.
When initially installing the GlobalProtect agent software on the endpoint, the end user
must be logged in to the system using an account that has administrative privileges.
Subsequent agent software updates do not require administrative privileges.
STEP 5 | Complete the GlobalProtect agent setup.
1. From the GlobalProtect Setup Wizard, click Next.
2. Click Next to accept the default installation folder
(C:\Program Files\Palo Alto Networks\GlobalProtect) or Browse to choose a new
location and then click Next twice.
3. After the installation successfully completes, click Close. The GlobalProtect agent will automatically
start.
STEP 6 | Log in to GlobalProtect.
Enter the FQDN or IP address of the Portal and Connect. If prompted, enter your Username and
Password and Connect. If authentication is successful, the agent will connect to GlobalProtect. Use
the agent to access resources on the corporate network as well as external resources, as defined in the
corresponding security polices.
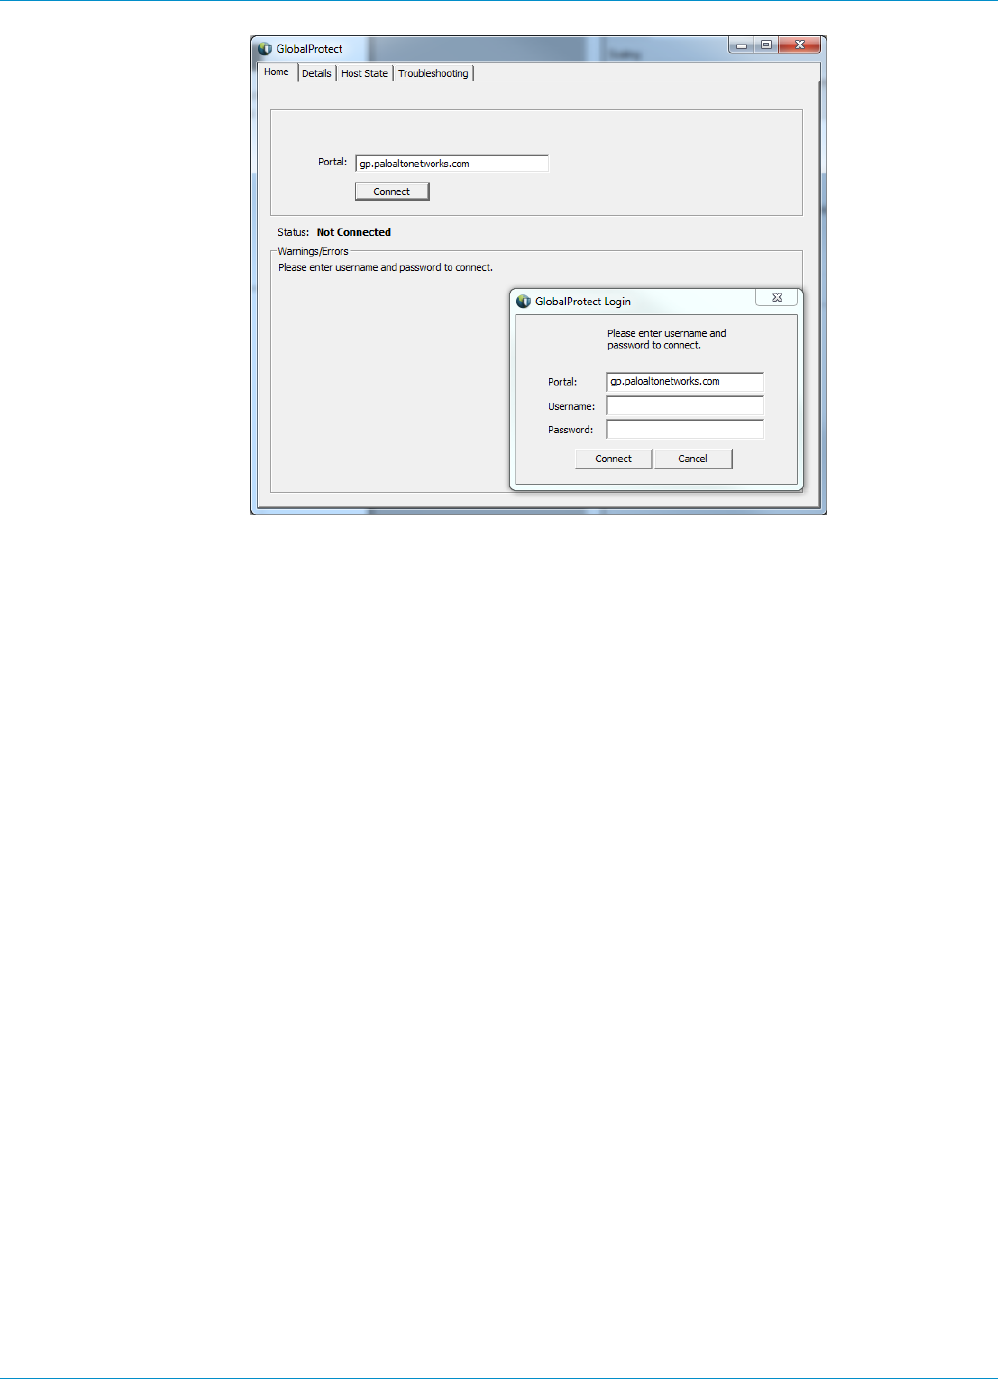
GLOBALPROTECT ADMINISTRATOR'S GUIDE | GlobalProtect Clients 109
© 2017 Palo Alto Networks, Inc.
To deploy the agent to end users, create agent configurations for the user groups for which you
want to enable access and set the Agent Upgrade settings appropriately and then communicate the
portal address. See Define the GlobalProtect Agent Configurations for details on setting up agent
configurations.
Download and Install the GlobalProtect Mobile App
The GlobalProtect app provides a simple way to extend the enterprise security policies out to mobile
devices. As with other remote hosts running the GlobalProtect agent, the mobile app provides secure
access to your corporate network over an IPSec or SSL VPN tunnel. The app will automatically connect
to the gateway that is closest to the end user’s current location. In addition, traffic to and from the mobile
device is automatically subject to the same security policy enforcement as other hosts on your corporate
network. Like the GlobalProtect agent, the app collects information about the host configuration and can
use this information for enhanced HIP-based security policy enforcement.
There are two primary methods for installing the GlobalProtect app: You can deploy the app from your
third-party MDM and transparently push the app to your managed devices; or, you can install the app
directly from the official store for your device:
• iOS endpoints—App Store
• Android endpoints—Google Play
• Windows 10 phones and Windows 10 UWP endpoints—Microsoft Store
• Chromebooks—For details on installing the GlobalProtect app for Chrome OS, see Download and Install
the GlobalProtect App for Chrome OS.
This workflow describes how to install the GlobalProtect app directly on the mobile device. For instructions
on how to deploy the GlobalProtect app from AirWatch, see Deploy the GlobalProtect Mobile App Using
AirWatch.
STEP 1 | Create an agent configuration for testing the app installation.
As a best practice, create an agent configuration that is limited to a small group of users, such as
administrators in the IT department responsible for administering the firewall:
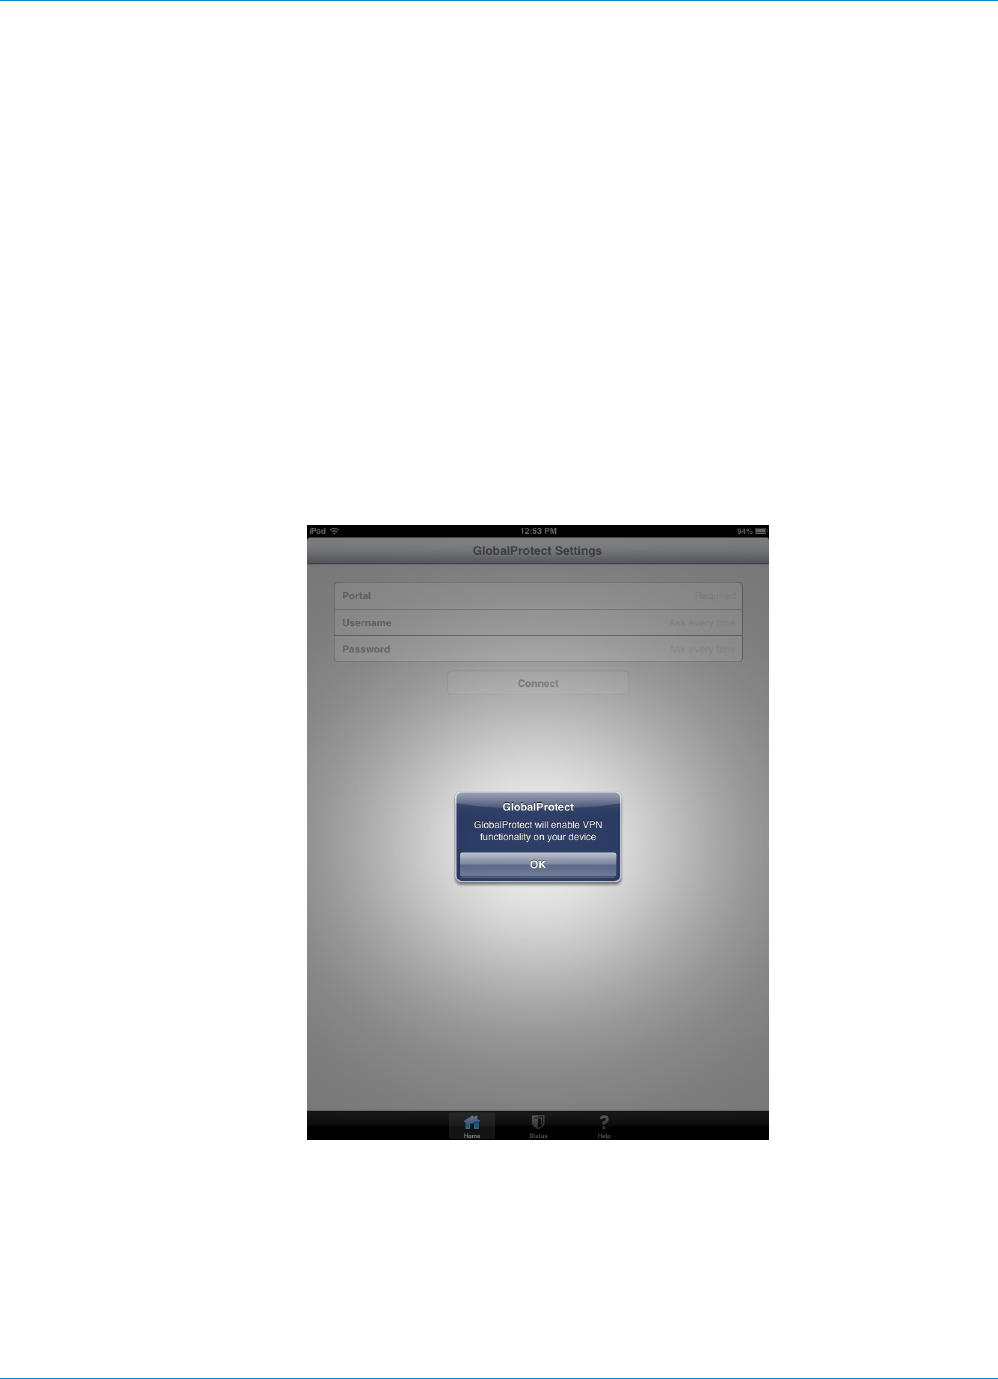
110 GLOBALPROTECT ADMINISTRATOR'S GUIDE | GlobalProtect Clients
© 2017 Palo Alto Networks, Inc.
1. Select Network > GlobalProtect > Portals and select the portal configuration to edit.
2. Select the Agent tab and either select an existing configuration or Add a new configuration to deploy
to the test users/group.
3. On the User/User Group tab, click Add in the User/User Group section and then select the user or
group who will be testing the agent.
4. In the OS section, select the app you are testing (iOS, Android, or WindowsUWP).
5. (Optional) Select the agent configuration you just created/modified and click Move Up so that it is
before any more generic configurations you have created.
6. Commit the changes.
STEP 2 | From the mobile device, follow the prompts to download and install the app.
• On Android devices, search for the app on Google Play.
• On iOS devices, search for the app at the App Store.
• On Windows 10 UWP devices, search for the app at the Microsoft Store.
STEP 3 | Launch the app.
When successfully installed, the GlobalProtect app icon displays on the device’s Home screen. To launch
the app, tap the icon. When prompted to enable GlobalProtect VPN functionality, tap OK.
STEP 4 | Connect to the portal.
1. When prompted, enter the Portal name or address, Username, and Password. The portal name must
be an FQDN and it should not include the https:// at the beginning.
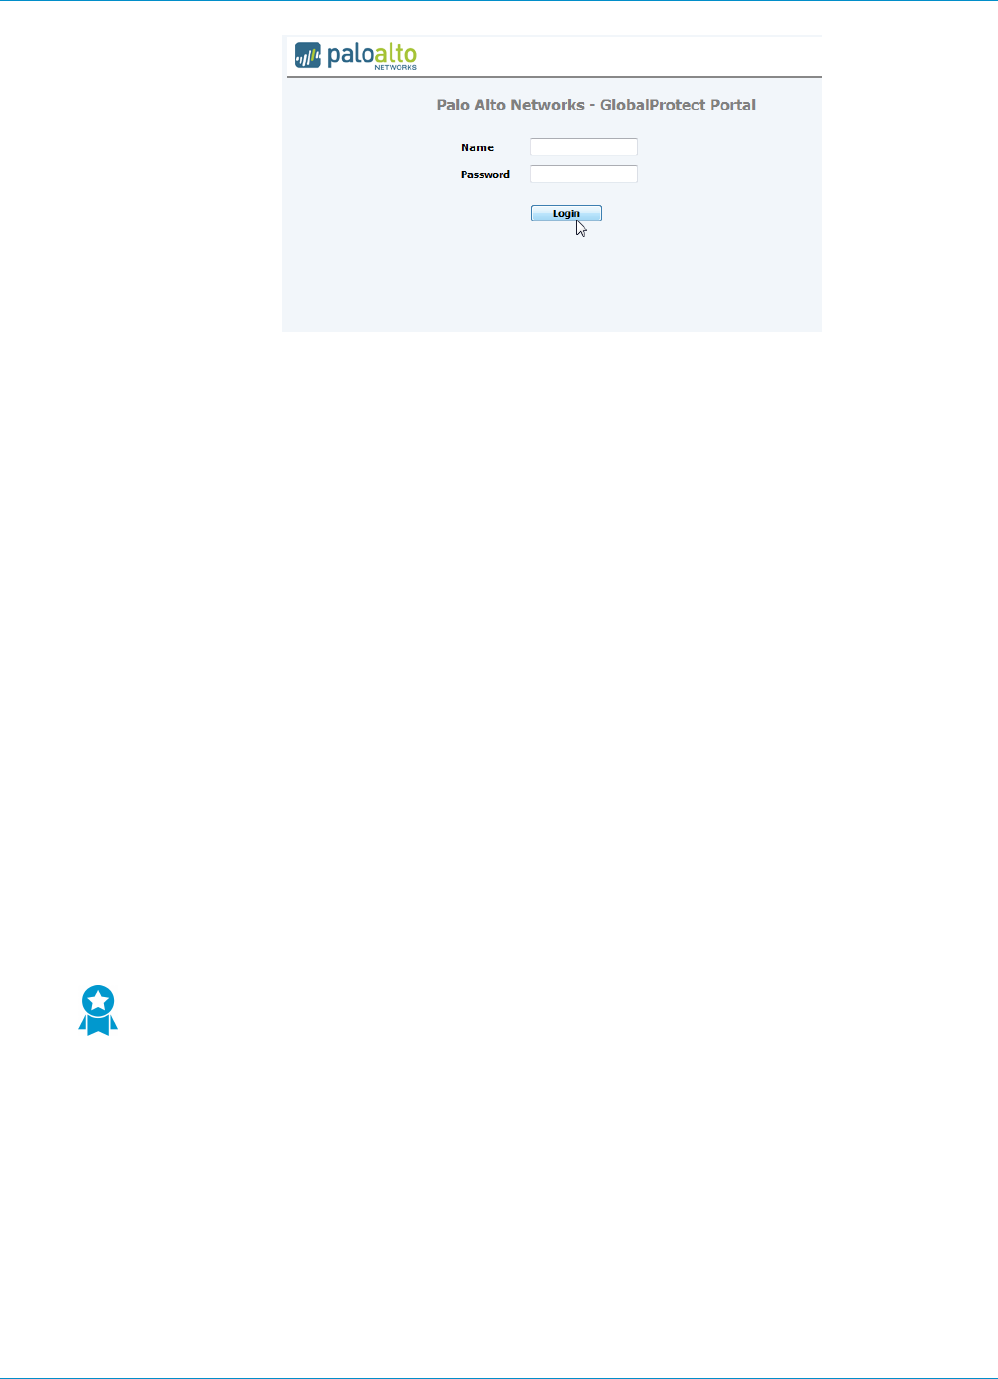
GLOBALPROTECT ADMINISTRATOR'S GUIDE | GlobalProtect Clients 111
© 2017 Palo Alto Networks, Inc.
2. Tap Connect and verify that the app successfully establishes a VPN connection to GlobalProtect.
If a third-party mobile endpoint management system is configured, the app will prompt you to enroll.
Download and Install the GlobalProtect App for Chrome OS
The GlobalProtect app for Chrome OS provides a simple way to extend the enterprise security policies out
to Chromebooks. As with other remote hosts running the GlobalProtect agent, the app provides secure
access to your corporate network over an IPSec or SSL VPN tunnel. After the user initiates a connection,
the app will connect to the gateway that is closest to the end user’s current location. In addition, traffic
to and from the Chromebook is automatically subject to the same security policy enforcement as other
hosts on your corporate network. Like the GlobalProtect agent, the app collects information about the host
configuration and can use this information for enhanced HIP-based security policy enforcement.
Use the following procedures to install and test the GlobalProtect app for Chrome OS.
•Install the GlobalProtect App from the Chrome Web Store on page 111
•Deploy the GlobalProtect App Using the Chromebook Management Console on page 112
•Test the GlobalProtect app for Chrome OS on page 113
Install the GlobalProtect App from the Chrome Web Store
You can install the GlobalProtect app on a Chromebook by downloading the app from the Chrome Web
Store. As an alternative you can Deploy the GlobalProtect App Using the Chromebook Management
Console on page 112.
STEP 1 | Create an agent configuration for testing the app installation.
As a best practice, create an agent configuration that is limited to a small group of users,
such as administrators in the IT department and who responsible for administering the
firewall.
1. Select Network > GlobalProtect > Portals and select the portal configuration to edit.
2. Select the Agent tab and either select an existing configuration or Add a new configuration to deploy
to the test users/group.
3. On the User/User Group tab, click Add in the User/User Group section and then select the user or
group that will test the agent.
4. In the OS area, select the app you are testing (Chrome) and click OK.
5. (Optional) Select the agent configuration you just created or modified and click Move Up so that it is
before any more generic configurations you have created.
6. Commit the changes.

112 GLOBALPROTECT ADMINISTRATOR'S GUIDE | GlobalProtect Clients
© 2017 Palo Alto Networks, Inc.
STEP 2 | Install the GlobalProtect app for Chrome OS.
You can also force-install the app on managed Chromebooks using the Chromebook Management
Console. See Deploy the GlobalProtect App Using the Chromebook Management Console on page
112.
1. From the Chromebook, search for the app in the Chrome Web Store or go directly to the
GlobalProtect app page.
2. Click Add to Chrome and then follow the prompts to download and install the app.
STEP 3 | Launch the app.
When successfully installed, the Chrome App Launcher displays the GlobalProtect app icon in the list of
apps. To launch the app, click the icon.
STEP 4 | Configure the portal.
1. When prompted, enter the IP address or FQDN of the Portal. The portal should not include the
https:// at the beginning.
2. Click Add Connection to add the GlobalProtect VPN configuration.
The app displays the home screen after it adds the VPN configuration to the Internet connection
settings of your Chromebook but does not initiate a connection.
STEP 5 | Test the connection.
Test the GlobalProtect app for Chrome OS on page 113
Deploy the GlobalProtect App Using the Chromebook Management
Console
The Chromebook Management Console enables you to manage Chromebook settings and apps from a
central, web-based location. From the console, you can deploy the GlobalProtect app to Chromebooks and
customize VPN settings.
Use the following workflow to manage policies and settings for the GlobalProtect app for Chrome OS:
STEP 1 | View the user settings for the GlobalProtect app.
1. From the Chromebook Management Console, select Device management > Chrome management >
App management.
The console displays the list of apps configured in all organization (org) units in your domain and
displays the status of each app. Click an app Status to display the org units to which that status is
applied.
2. Select the GlobalProtect app and then select User settings.
If the app is not present, SEARCH for GlobalProtect in the Chrome Web Store.
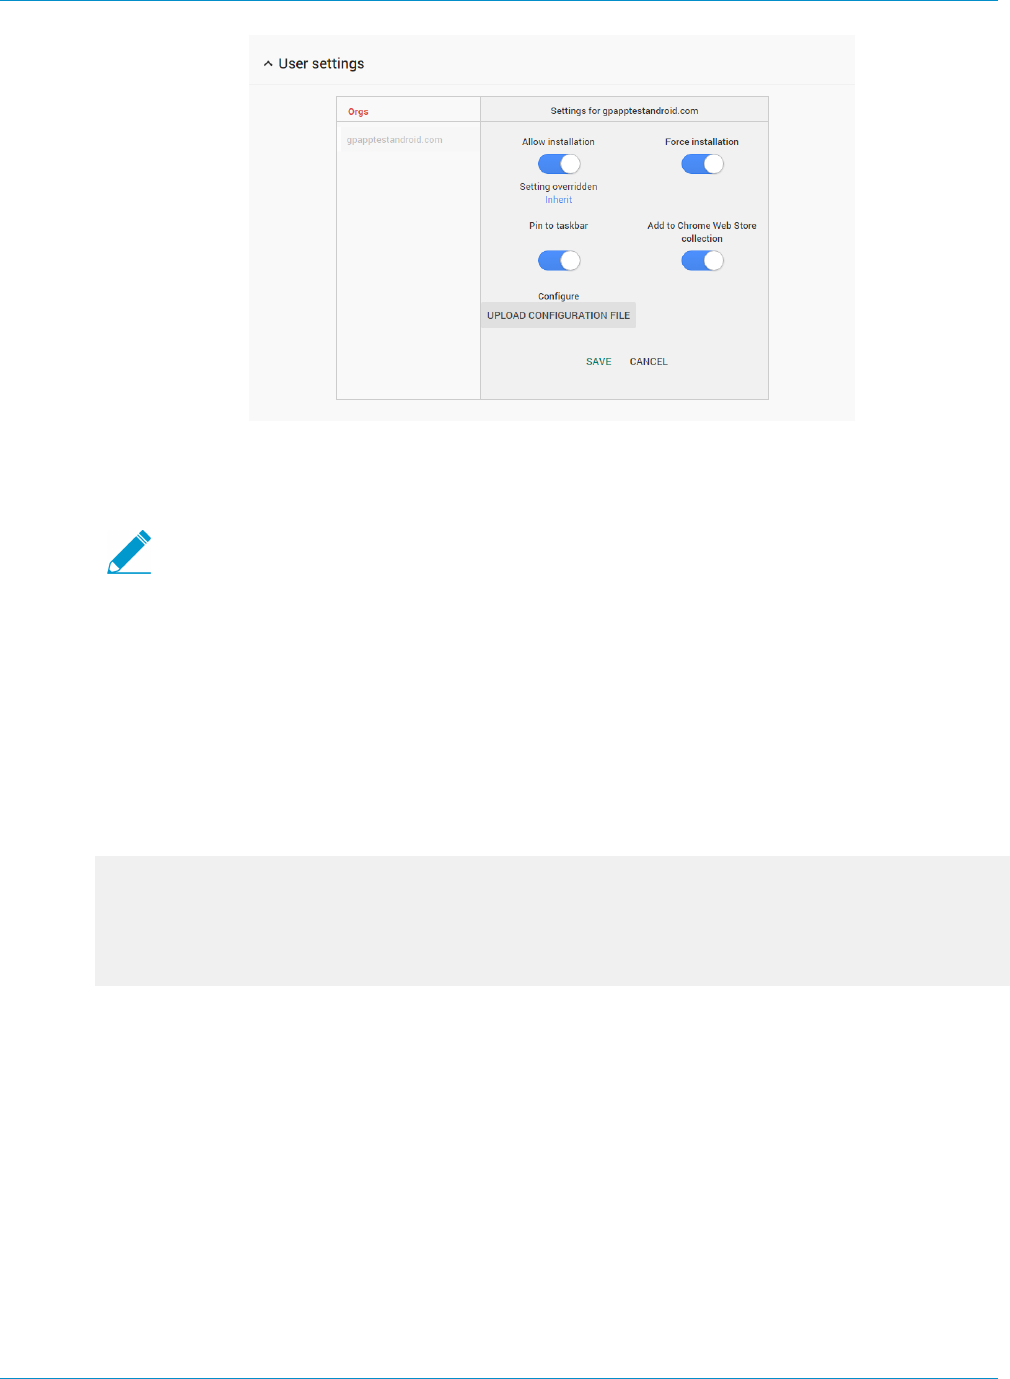
GLOBALPROTECT ADMINISTRATOR'S GUIDE | GlobalProtect Clients 113
© 2017 Palo Alto Networks, Inc.
STEP 2 | Configure policies and settings for everyone in an org unit.
1. Select the org unit where you want to configure settings and configure any of the following options:
Selecting the top-level org unit applies settings to everyone in that unit; selecting a
child org unit applies settings only to users within that child org unit.
•Allow installation—Allow users install this app from the Chrome Web Store. By default, an org
unit inherits the settings of its parent organization. To override the default settings, select Inherit,
which toggles the Override setting.
•Force installation—Install this app automatically and prevents users from removing it.
•Pin to taskbar—If the app is installed, pin the app to the taskbar (in Chrome OS only).
•Add to Chrome Web Store collection—Recommend this app to your users in the Chrome Web
Store.
2. If you have not already done so, create a text file in JSON format that uses the following syntax and
includes the FQDN or IP address of your GlobalProtect portal:
{
"PortalAddress": {
"Value": "192.0.2.191"
}
}
3. On the User settings page, select UPLOAD CONFIGURATION FILE and then Browse to the
GlobalProtect settings file.
4. SAVE your changes. Settings typically take effect within minutes, but it might take up to an hour to
propagate through your organization.
STEP 3 | Test the connection.
After Chrome Management Console successfully deploys the app, Test the GlobalProtect app for
Chrome OS
Test the GlobalProtect app for Chrome OS
Use the GlobalProtect app to view status and other information about the app or to collect logs, or reset
the VPN connection settings. After you install and configure the app, it is not necessary to open the app to
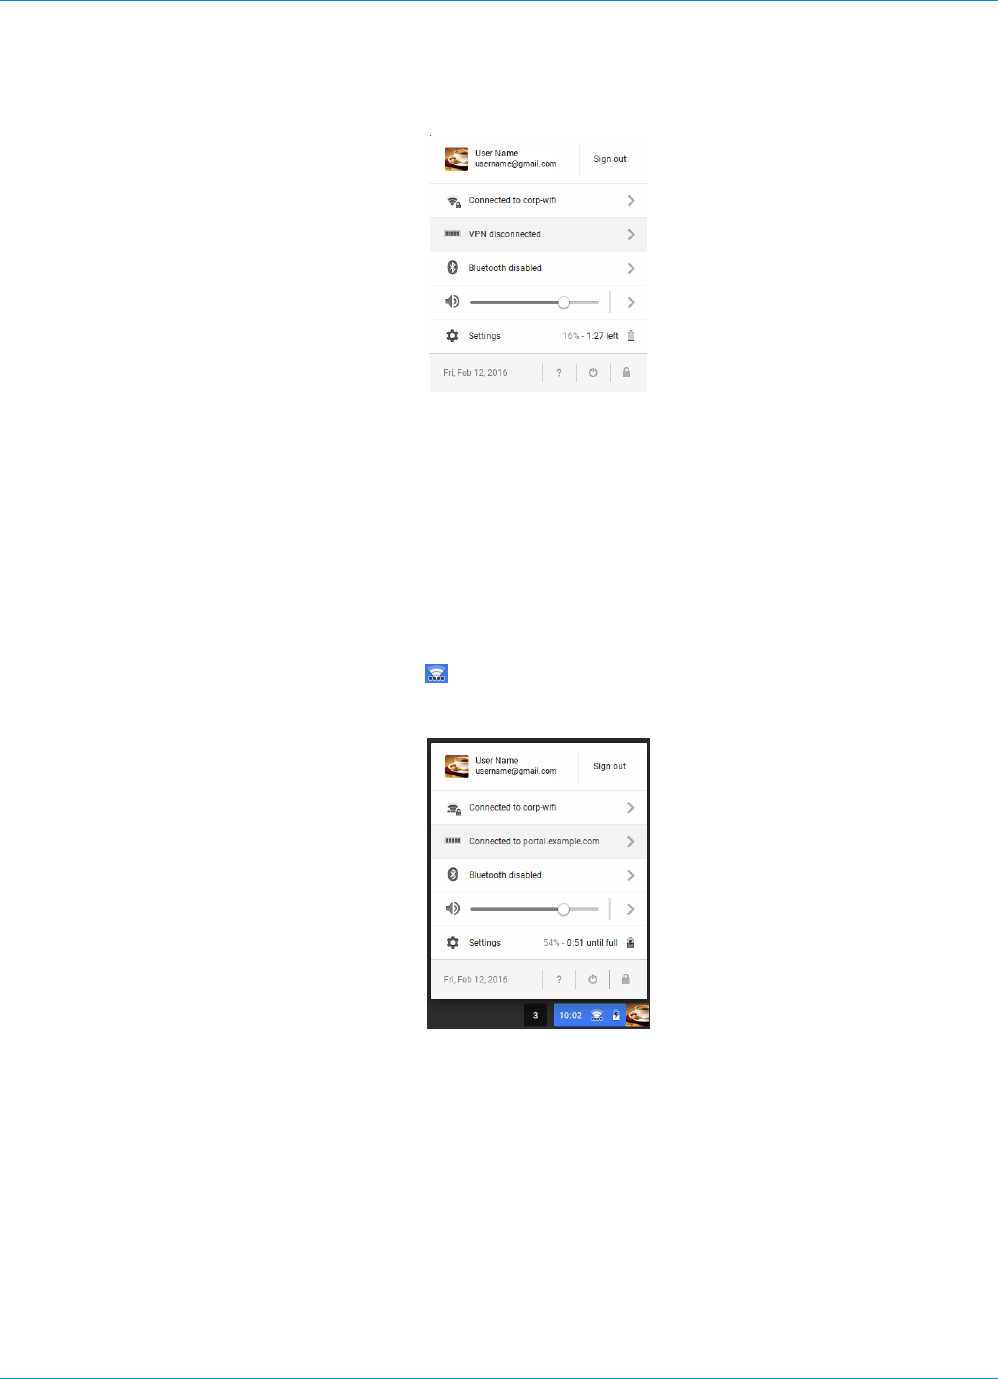
114 GLOBALPROTECT ADMINISTRATOR'S GUIDE | GlobalProtect Clients
© 2017 Palo Alto Networks, Inc.
establish a VPN connection. Instead, you can connect by selecting the portal from the VPN settings on the
Chromebook.
STEP 1 | Log in to GlobalProtect.
1. Click the status area at the bottom right corner of the Chromebook.
2. Select VPN disconnected and then select the portal that you entered when configuring the
GlobalProtect VPN settings.
To view VPN settings before connecting, select the portal from Settings > Private network, and then
click Connect.
3. Enter the Username and Password for the portal and click Connect. Repeat this step to enter the
Username and Password for the gateway. If authentication is successful, GlobalProtect connects you
to your corporate network. If enabled, the GlobalProtect welcome page will display.
STEP 2 | View the connection status. When the app is connected, the status area displays the VPN icon
along the bottom of the Wi-Fi icon ( ).
• To view the portal to which you are connected, click the status area.
• To view additional information about the connection including the gateway to which you are
connected, launch the GlobalProtect app. The main page displays connection information and (if
applicable) any errors or warnings.

GLOBALPROTECT ADMINISTRATOR'S GUIDE | GlobalProtect Clients 115
© 2017 Palo Alto Networks, Inc.
Deploy Agent Settings Transparently
As an alternative to deploying agent settings from the portal configuration, you can define them directly
from the Windows registry or global Mac plist or—on Windows clients only—using the Windows Installer
(Msiexec). The benefit is that it enables deployment of GlobalProtect agent settings to endpoints prior to
their first connection to the GlobalProtect portal.
Settings defined in the portal configuration always override settings defined in the Windows registry or
Mac plist. So if you define settings in the registry or plist, but the portal configuration specifies different
settings, the settings the agent receives from the portal will override the settings defined on the client.
This override also applies to login-related settings, such as whether to connect on-demand, whether to
use single sign-on (SSO), and whether the agent can connect if the portal certificate is invalid. Therefore,
you should avoid conflicting settings. In addition, the portal configuration is cached on the endpoint and
that cached configuration is be used anytime the GlobalProtect agent is restarted or the client machine is
rebooted.
The following sections describe the customizable agent settings available and how to deploy these settings
transparently to Windows and Mac clients:
•Customizable Agent Settings on page 115
•Deploy Agent Settings to Windows Clients on page 122
•Deploy Agent Settings to Mac Clients on page 131
In addition to using Windows registry and Mac plist to deploy GlobalProtect agent settings,
you can enable the GlobalProtect agent to collect specific Windows registry or Mac plist
information from clients, including data on applications installed on the clients, processes
running on the clients, and attributes or properties of those applications and processes. You
can then monitor the data and add it to a security rule as matching criteria. Device traffic that
matches registry settings you have defined can be enforced according to the security rule.
Additionally, you can set up custom checks to Collect Application and Process Data From
Clients on page 184.
Customizable Agent Settings
In addition to pre-deploying the portal address, you can also define the agent configuration
settings. To Deploy Agent Settings to Windows Clients you define keys in the Windows registry
(HKEY_LOCAL_MACHINE\SOFTWARE\Palo Alto Networks\GlobalProtect), or, to Deploy Agent
Settings to Mac Clients you define entries in the PanSetup dictionary of the Mac plist (/Library/
Preferences/com.paloaltonetworks.GlobalProtect.settings.plist). On Windows clients
only, you can also use the Windows Installer to Deploy Agent Settings from Msiexec.
The following topics describe each customizable agent setting. Settings defined in the GlobalProtect portal
agent configuration take precedence over settings defined in the Windows registry or the Mac plist.
Some settings do not have a corresponding portal configuration settings on the web
interface, and must be configured using Windows registry or Msiexec. These additional
settings include: can-prompt-user-credential, wrap-cp-guid, and filter-non-
gpcp.
•Agent Display Options
•User Behavior Options
•Agent Behavior Options
•Script Deployment Options

116 GLOBALPROTECT ADMINISTRATOR'S GUIDE | GlobalProtect Clients
© 2017 Palo Alto Networks, Inc.
Agent Display Options
The following table lists the options that you can configure in the Windows registry and Mac plist to
customize the display of the GlobalProtect agent.
Table 1: Table: Customizable Agent Settings
Portal Agent Configuration Windows Registry/ Mac Plist Msiexec Parameter Default
Enable Advanced View enable-advanced-view
yes | no
ENABLEADVANCEDVIEW=”yes
| no”
yes
Display GlobalProtect Icon show-agent-icon yes
| no
SHOWAGENTICON=”yes |
no”
yes
Enable Rediscover
Network Option
rediscover-network
yes | no
REDISCOVERNETWORK=”yes
| no”
yes
Enable Resubmit Host
Profile Option
resubmit-host-info
yes | no
RESUBMITHOSTINFO=”yes |
no”
yes
Show System Tray
Notifications
show-system-tray-
notifications yes |
no
SHOWSYSTEMTRAYNOTIFIC
ATIONS=”yes | no”
yes
User Behavior Options
The following table lists the options that you can configure in the Windows registry and Mac plist to
customize how the user can interact with the GlobalProtect agent.
Table 2: Table: Customizable User Behavior Options
Portal Agent
Configuration
Windows Registry/ Mac Plist Msiexec Parameter Default
Allow User to
Change Portal
Address
can-change-portal yes |
no
CANCHANGEPORTAL=”yes |
no”
yes
Allow User to
Dismiss Welcome
Page
enable-hide-welcome-page
yes | no
ENABLEHIDEWELCOMEPAGE=
”yes | no”
yes
Allow User to
Continue with
Invalid Portal
Server Certificate
can-continue-if-portal-
cert-invalid yes | no
CANCONTINUEIFPORTALCERT
INVALID= ”yes | no”
yes
Allow User
to Disable
GlobalProtect App
disable-allowed yes | no DISABLEALLOWED="yes | no" no

GLOBALPROTECT ADMINISTRATOR'S GUIDE | GlobalProtect Clients 117
© 2017 Palo Alto Networks, Inc.
Portal Agent
Configuration
Windows Registry/ Mac Plist Msiexec Parameter Default
Save User
Credentials
Specify a 0
to prevent
GlobalProtect
from saving
credentials, a
1 to save both
username and
password, or a
2 to save the
username only.
save-user-credentials 0 |
1 | 2
SAVEUSERCREDENTIALS 0 | 1
| 2
n/a
Not in portal
The Allow
user to save
password setting
is deprecated in
the web interface
in PAN-OS 7.1
and later releases
but is configurable
from the Windows
registry and
Mac plist. Any
value specified
in the Save User
Credentials field
overwrites a value
specified here.
can-save-password yes |
no
CANSAVEPASSWORD=”yes |
no”
yes
Agent Behavior Options
The following table lists the options that you can configure in the Windows registry and Mac plist to
customize the behavior of the GlobalProtect agent.
Table 3: Table: Customizable Agent Behavior Options
Portal Agent
Configuration
Windows Registry/ Mac Plist Msiexec Parameter Default
Connect Method connect-method on-
demand | pre-logon |
user-logon
CONNECTMETHOD=”on-demand |
pre-logon | user-logon”
user-
logon
GlobalProtect
App Config
refresh-config-interval
<hours>
REFRESHCONFIGINTERVAL=
”<hours>”
24

118 GLOBALPROTECT ADMINISTRATOR'S GUIDE | GlobalProtect Clients
© 2017 Palo Alto Networks, Inc.
Portal Agent
Configuration
Windows Registry/ Mac Plist Msiexec Parameter Default
Refresh Interval
(hours)
Update DNS
Settings at
Connect
(Windows Only)
flushdns yes | no FLUSHDNS=”yes | no” no
Send HIP Report
Immediately if
Windows Security
Center (WSC)
State Changes
(Windows Only)
wscautodetect yes | no WSCAUTODETECT=”yes | no” no
Detect Proxy for
Each Connection
(Windows Only)
ProxyMultipleAuto
Detection yes | no
ProxyMultipleAuto
Detection=”yes | no”
no
Clear Single Sign-
On Credentials on
Logout (Windows
Only)
LogoutRemoveSSO yes |
no
LogoutRemoveSSO=”yes | no” yes
Use Default
Authentication
on Kerberos
Authentication
Failure (Windows
Only)
krb-auth-fail-fallback
yes | no
KRBAUTHFAILFALLBACK= ”yes
| no”
no
Custom Password
Expiration
Message (LDAP
Authentication
Only)
PasswordExpiryMessage
<message>
PasswordExpiryMessage
“<message>”
Portal Connection
Timeout (sec)
PortalTimeout
<portaltimeout>
PORTALTIMEOUT=
”<portaltimeout>”
30
TCP Connection
Timeout (sec)
ConnectTimeout
<connecttimeout>
CONNECTTIMEOUT=
”<connecttimeout>”
60
TCP Receive
Timeout (sec)
ReceiveTimeout
<receivetimeout>
RECEIVETIMEOUT=
”<receivetimeout>”
30
Client Certificate
Store Lookup
certificate-store-
lookup user | machine
| user and machine |
invalid
CERTIFICATESTORELOOKUP=
"user | machine | user and
machine | invalid"
user
and
machine

GLOBALPROTECT ADMINISTRATOR'S GUIDE | GlobalProtect Clients 119
© 2017 Palo Alto Networks, Inc.
Portal Agent
Configuration
Windows Registry/ Mac Plist Msiexec Parameter Default
SCEP Certificate
Renewal Period
(days)
scep-certificate-
renewal-period
<renewalPeriod>
n/a 7
Maximum
Internal Gateway
Connection
Attempts
max-internal-gateway-
connection-attempts
<maxValue>
MIGCA="<maxValue>" 0
Extended Key
Usage OID for
Client Certificate
ext-key-usage-oid-for-
client-cert <oidValue>
EXTCERTOID=”<oidValue>”n/a
User Switch
Tunnel Rename
Timeout (sec)
user-switch-tunnel-
rename-timeout
<renameTimeout>
n/a 0
Use Single Sign-
On
(Windows Only)
use-sso yes | no USESSO="yes | no" yes
Not in portal
This setting
specifies the
default portal
IP address (or
hostname).
portal <IPaddress>PORTAL="<IPaddress>"n/a
Not in portal
This setting
enables
GlobalProtect
to initiate a VPN
tunnel before a
user logs in to
the device and
connects to the
GlobalProtect
portal.
prelogon 1 PRELOGON="1" 1
Windows only/
Not in portal
This setting
is used in
conjunction
with single sign-
on (SSO) and
indicates whether
or not to prompt
can-prompt-user-
credential yes | no
CANPROMPTUSERCREDENTIAL=
”yes | no”
yes

120 GLOBALPROTECT ADMINISTRATOR'S GUIDE | GlobalProtect Clients
© 2017 Palo Alto Networks, Inc.
Portal Agent
Configuration
Windows Registry/ Mac Plist Msiexec Parameter Default
the user for
credentials if SSO
fails.
Windows only/
Not in portal
This setting
filters the third-
party credential
provider’s
tile from the
Windows login
page so that
only the native
Windows tile is
displayed.*
wrap-cp-guid {third
party credential
provider guid}
WRAPCPGUID=”{guid_value]”
FILTERNONGPCP=”yes | no”
no
Windows only/
Not in portal
This setting is an
additional option
for the setting
wrap-cp-guid, and
allows the third-
party credential
provider tile to be
displayed on the
Windows login
page, in addition
to the native
Windows logon
tile.*
filter-non-gpcp no n/a n/a
*For detailed steps to enable these settings using the Windows registry or Windows Installer (Msiexec), see
SSO Wrapping for Third-Party Credential Providers on Windows Clients.
Script Deployment Options
The following table displays options that enable GlobalProtect to initiate scripts before and after
establishing a VPN tunnel and before disconnecting a VPN tunnel. Because these options are not available
in the portal, you must define the values for the relevant key—either pre-vpn-connect, post-vpn-connect,
or pre-vpn-disconnect—from the Windows registry or Mac plist. For detailed steps to deploy scripts, see
Deploy Scripts Using the Windows Registry, Deploy Scripts Using Msiexec, or Deploy Scripts Using the Mac
Plist.
Table: Customizable Script Deployment Options

GLOBALPROTECT ADMINISTRATOR'S GUIDE | GlobalProtect Clients 121
© 2017 Palo Alto Networks, Inc.
Portal Agent Configuration Windows Registry/ Mac Plist Msiexec Parameter Default
Execute the script
specified in the command
setting (including any
parameters passed to the
script).
Environmental
variables
are
supported.
Specify the
full path in
commands.
command <parameter1>
<parameter2> [...]
Windows example:
command %userprofile
%\vpn_script.bat c:
test_user
Mac example:
command $HOME/
vpn_script.sh /
Users/test_user
test_user
PREVPNCONNECTCOMMAND=
”<parameter1>
<parameter2> [...]”
POSTVPNCONNECTCOMMAND=
”<parameter1>
<parameter2> [...]”
PREVPNDISCONNECTCOMMAND=
”<parameter1>
<parameter2> [...]”
n/a
(Optional) Specify the
privileges under which
the command(s) can run
(default is user: if you do
not specify the context,
the command runs as the
current active user).
context admin | user PREVPNCONNECTCONTEXT=
”admin | user”
POSTVPNCONNECTCONTEXT=
”admin | user”
PREVPNDISCONNECTCONTEXT=
”admin | user”
user
(Optional) Specify the
number of seconds the
GlobalProtect client
waits for the command to
execute (range is 0-120).
If the command does
not complete before
the timeout, the client
proceeds to establish or
disconnect from the VPN
tunnel. A value of 0 (the
default) means the client
will not wait to execute the
command.
Not
supported
for post-
vpn-
connect.
timeout <value>
Example:
timeout 60
PREVPNCONNECTTIMEOUT=
”<value>”
POSTVPNCONNECTTIMEOUT=
”<value>”
PREVPNDISCONNECTTIMEOUT=
”<value>”
0
(Optional) Specify the
full path of a file used
in a command. The
GlobalProtect client will
verify the integrity of the
file by checking it against
file <path_file>PREVPNCONNECTFILE=
”<path_file>”
POSTVPNCONNECTFILE=
”<path_file>”
PREVPNDISCONNECTFILE=
”<path_file>”
n/a

122 GLOBALPROTECT ADMINISTRATOR'S GUIDE | GlobalProtect Clients
© 2017 Palo Alto Networks, Inc.
Portal Agent Configuration Windows Registry/ Mac Plist Msiexec Parameter Default
the value specified in the
checksum key.
Environmental
variables
are
supported.
(Optional) Specify the
sha256 checksum of
the file referred to
in the file key. If the
checksum is specified,
the GlobalProtect
client executes the
command(s) only if the
checksum generated by
the GlobalProtect client
matches the checksum
value specified here.
checksum <value>PREVPNCONNECTCHECKSUM=
”<value>”
POSTVPNCONNECTCHECKSUM=
”<value>”
PREVPNDISCONNECTCHECKSUM
=”<value>”
n/a
(Optional) Specify an error
message to inform the
user that the command(s)
cannot execute or if the
command(s) exited with a
non-zero return code.
The
message
must be
1,024 or
fewer ANSI
characters.
error-msg <message>
Example:
error-msg Failed
executing pre-vpn-
connect action!
PREVPNCONNECTERRORMSG=
”<message>”
POSTVPNCONNECTERRORMSG=
”<message>”
PREVPNDISCONNECTERRORMSG
=”<message>”
n/a
Deploy Agent Settings to Windows Clients
Use Windows registry or the Windows Installer (Msiexec) to deploy the GlobalProtect agent and settings to
Windows clients transparently.
•Deploy Agent Settings in the Windows Registry
•Deploy Agent Settings from Msiexec
•Deploy Scripts Using the Windows Registry
•Windows OS Batch Script Examples
•Deploy Scripts Using Msiexec
•SSO Wrapping for Third-Party Credential Providers on Windows Clients
•Enable SSO Wrapping for Third-Party Credentials with the Windows Registry
•Enable SSO Wrapping for Third-Party Credentials with the Windows Installer

GLOBALPROTECT ADMINISTRATOR'S GUIDE | GlobalProtect Clients 123
© 2017 Palo Alto Networks, Inc.
Deploy Agent Settings in the Windows Registry
You can enable deployment of GlobalProtect agent settings to Windows clients prior to their first
connection to the GlobalProtect portal by using the Windows registry. Use the options described in the
following table to begin using the Windows registry to customize agent settings for Windows clients.
In addition to using Windows registry to deploy GlobalProtect agent settings, you can enable
the GlobalProtect agent to collect specific Windows registry information from Windows
clients. You can then monitor the data and add it to a security rule as matching criteria.
Device traffic that matches registry settings you have defined can be enforced according
to the security rule. Additionally, you can set up custom checks to Collect Application and
Process Data From Clients.
•Locate the GlobalProtect agent customization settings in the Windows registry.
Open the Windows registry (enter regedit at the command prompt) and go to:
HKEY_LOCAL_MACHINE\SOFTWARE\Palo Alto Networks\GlobalProtect\Settings\
•Set the portal name.
If you do not want the user to manually enter the portal address even for the first connection, you can
pre-deploy the portal address through the Windows registry: (HKEY_LOCAL_MACHINE\SOFTWARE
\Palo Alto Networks\GlobalProtect\PanSetup with key Portal).
•Deploy various settings to the Windows client from the Windows registry, including
configuring the connect method for the GlobalProtect agent and enabling single sign-on (SSO).
View Customizable Agent Settings for a full list of the commands and values you can set up using the
Windows registry.
•Enable the GlobalProtect agent to wrap third-party credentials on the Windows client, allowing
for SSO when using a third-party credential provider.
Enable SSO Wrapping for Third-Party Credentials with the Windows Registry.

124 GLOBALPROTECT ADMINISTRATOR'S GUIDE | GlobalProtect Clients
© 2017 Palo Alto Networks, Inc.
Deploy Agent Settings from Msiexec
On Windows endpoints, you have the option to deploy the agent and the settings automatically from the
Windows Installer (Msiexec) by using the following syntax:
msiexec.exe /i GlobalProtect.msi <SETTING>="<value>"
Msiexec is an executable program that installs or configures a product from the command
line. On systems running Microsoft Windows XP or a later OS, the maximum length of the
string that you can use at the command prompt is 8,191 characters.
Msiexec Example Description
msiexec.exe /i GlobalProtect.msi
/quiet PORTAL=”portal.acme.com”
Install GlobalProtect in quiet mode (no user
interaction) and configure the portal address.
msiexec.exe /i GlobalProtect.msi
CANCONTINUEIFPORTALCERTINVALID=”no”
Install GlobalProtect with the option to prevent
users from connecting to the portal if the
certificate is not valid.
For a complete list of settings and the corresponding default values, see Customizable Agent Settings.
To set up the GlobalProtect agent to wrap third-party credentials on a Windows client from
Msiexec, see Enable SSO Wrapping for Third-Party Credentials with the Windows Installer.
Deploy Scripts Using the Windows Registry
You can enable deployment of custom scripts to Windows endpoints using the Windows registry.
You can configure the GlobalProtect agent to initiate and run a script for any or all of the following events:
before and after establishing the tunnel, and before disconnecting the tunnel. To run the script at a
particular event, reference the batch script from a command registry entry for that event.
Depending on the configuration settings, the GlobalProtect agent can run a script before and after the
agent establishes a VPN tunnel with the gateway, and before the agent disconnects from the VPN tunnel.
Use the following workflow to get started using the Windows registry to customize agent settings for
Windows clients.
The registry settings that enable you to deploy scripts are supported in GlobalProtect clients
running GlobalProtect agent 2.3 and later releases.
STEP 1 | Open the Windows registry, and locate the GlobalProtect agent customization settings.
Open the Windows registry (enter regedit in the command prompt) and go to the location of the key
depending on when you want to execute scripts (pre/post connect or pre disconnect):
HKEY_LOCAL_MACHINE\SOFTWARE\Palo Alto Networks\GlobalProtect\Settings\pre-
vpn-connect
HKEY_LOCAL_MACHINE\SOFTWARE\Palo Alto Networks\GlobalProtect\Settings\post-
vpn-connect
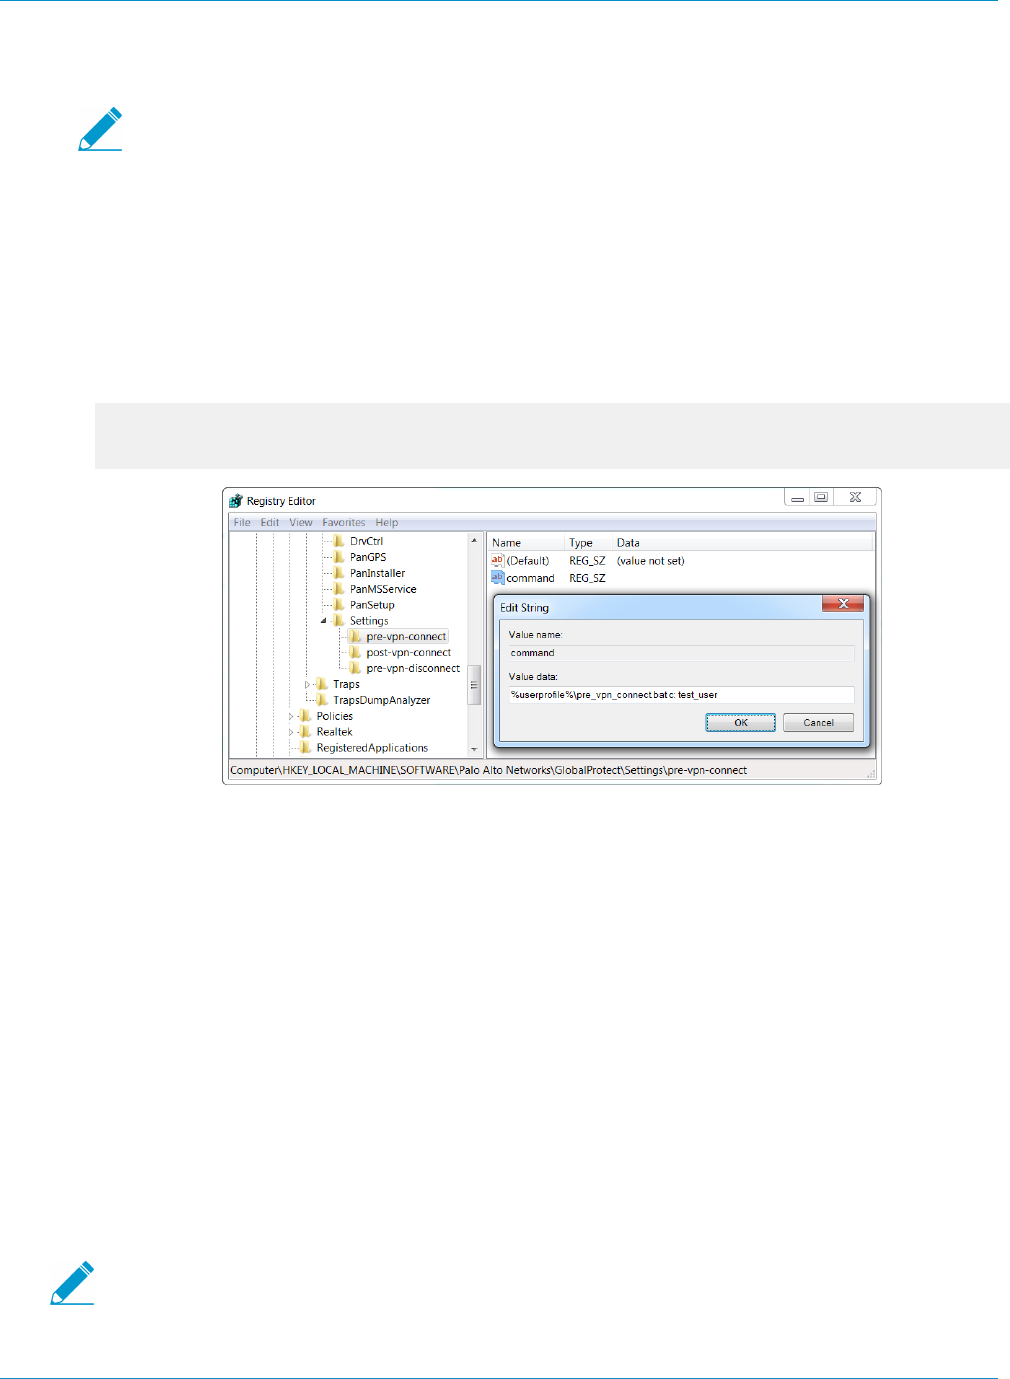
GLOBALPROTECT ADMINISTRATOR'S GUIDE | GlobalProtect Clients 125
© 2017 Palo Alto Networks, Inc.
HKEY_LOCAL_MACHINE\SOFTWARE\Palo Alto Networks\GlobalProtect\Settings\pre-
vpn-disconnect
If the key does not exist within the Settings key, create it (right-click Settings and select
New > Key).
STEP 2 | Enable the GlobalProtect agent to run scripts by creating a new String Value named command.
The batch file specified here should contain the specific script (including any parameters passed to the
script) that you want run on the device. For examples, see Windows OS Batch Script Examples.
1. If the command string does not already exist, create it (right-click the pre-vpn-connect, post-
vpn-connect, or pre-vpn-disconnect key, select New > String Value, and name it command).
2. Right click command and select Modify.
3. Enter the commands or script that the GlobalProtect agent should run. For example:
%userprofile%\pre_vpn_connect.bat c:
test_user
STEP 3 | (Optional) Add additional registry entries as needed for each command.
Create or modify registry strings and their corresponding values, including context, timeout, file,
checksum, or error-msg. For additional information, see Customizable Agent Settings.
Windows OS Batch Script Examples
You can configure the GlobalProtect agent to initiate and run a script for any or all of the following events:
before and after establishing the tunnel, and before disconnecting the tunnel. To run the script at a
particular event, reference the batch script from a command registry entry for that event. The following
examples show scripts you can run on Windows systems at pre-connect, post-connect, and pre-disconnect
events:
Example: Exclude Traffic from the VPN Tunnel on Windows Endpoints
To exclude traffic from the VPN tunnel after establishing the VPN connection, reference the following
script from a command registry entry for a post-vpn-connect event. This enables you to selectively exclude
routes and to send all other traffic through the VPN tunnel.
As a best practice, delete any exclude network routes that were previously added before
adding the new exclude routes. In most cases, when a user moves between networks
(such as when switching between Wi-Fi and a local network) the old network routes are

126 GLOBALPROTECT ADMINISTRATOR'S GUIDE | GlobalProtect Clients
© 2017 Palo Alto Networks, Inc.
automatically deleted. In the event that the old network routes persist, following this best
practice ensures that traffic destined for the exclude routes will go through the gateway of the
new network instead of the gateway of the old network.
For a script that you can copy and paste, go here.
@echo off
REM Run this script (route_exclude) post-vpn-connect.
REM Add exclude routes. This allows traffic to these
network and hosts to go directly and not use the tunnel.
REM Syntax: route_exclude <network1> <mask1> <network2>
<mask2> ...<networkN> <maskN>
REM Example-1: route_exclude 10.0.0.0 255.0.0.0
REM Example-2: route_exclude 10.0.0.0 255.0.0.0 192.168.17.0
255.255.255.0
REM Example-3: route_exclude 10.0.0.0 255.0.0.0 192.168.17.0
255.255.255.0 192.168.24.25 255.255.255.255
REM Initialize 'DefaultGateway'
set "DefaultGateway="
REM Use the route print command and find the DefaultGateway
on the endpoint
@For /f "tokens=3" %%* in (
'route.exe print ^|findstr "\<0.0.0.0\>"'
) Do if not defined DefaultGateway Set "DefaultGateway=%%*"
REM Use the route add command to add the exclude routes
:add_route
if "%1" =="" goto end
route delete %1
route add %1 mask %2 %DefaultGateway%
shift
shift
goto add_route
:end
Example: Mount a Network Share on Windows Endpoints
To mount a network share after establishing a VPN connection, reference the following script from a
command registry entry for a post-vpn-connect event:
@echo off
REM Mount filer1 to Z: drive
net use Z: \\filer1.mycompany.local\share /user:mycompany\user1
Deploy Scripts Using Msiexec
On Windows clients, you can use the Windows Installer (Msiexec) to deploy the agent, agent settings, and
scripts that the agent will run automatically (see Customizable Agent Settings). To do so, use the following
syntax:
msiexec.exe /i GlobalProtect.msi <SETTING>="<value>"

GLOBALPROTECT ADMINISTRATOR'S GUIDE | GlobalProtect Clients 127
© 2017 Palo Alto Networks, Inc.
Msiexec is an executable program that installs or configures a product from a command line.
On systems running Microsoft Windows XP or a later release, the maximum length of the
string that you can use at the command prompt is 8,191 characters.
This limitation applies to the command line, individual environment variables (such as the
USERPROFILE variable) that are inherited by other processes, and all environment variable
expansions. If you run batch files from the command line, this limitation also applies to batch
file processing.
For example, to deploy scripts that run at specific connect or disconnect events, you can use syntax similar
to the following examples:
Example: Use Msiexec to Deploy Scripts that Run Before a Connect Event
For a script that you can copy and paste, go here.
msiexec.exe /i GlobalProtect.msi
PREVPNCONNECTCOMMAND="%userprofile%\pre_vpn_connect.bat c: test_user"
PREVPNCONNECTCONTEXT="user"
PREVPNCONNECTTIMEOUT="60"
PREVPNCONNECTFILE="C:\Users\test_user\pre_vpn_connect.bat"
PREVPNCONNECTCHECKSUM="a48ad33695a44de887bba8f2f3174fd8fb01a46a19e3ec9078b011
8647ccf599"
PREVPNCONNECTERRORMSG="Failed executing pre-vpn-connect action."
For a complete list of settings and the corresponding default values, see Customizable Agent Settings. Or,
for examples of batch scripts, see Windows OS Batch Script Examples.
Example: Use Msiexec to Deploy Scripts that Run at Pre-Connect, Post-Connect, and Pre-
Disconnect Events
For a script that you can copy and paste, go here.
msiexec.exe /i GlobalProtect.msi
PREVPNCONNECTCOMMAND="%userprofile%\pre_vpn_connect.bat c: test_user"
PREVPNCONNECTCONTEXT="user"
PREVPNCONNECTTIMEOUT="60"
PREVPNCONNECTFILE="C:\Users\test_user\pre_vpn_connect.bat"
PREVPNCONNECTCHECKSUM="a48ad33695a44de887bba8f2f3174fd8fb01a46a19e3ec9078b011
8647ccf599"
PREVPNCONNECTERRORMSG="Failed executing pre-vpn-connect action."
POSTVPNCONNECTCOMMAND="c:\users\test_user\post_vpn_connect.bat c: test_user"
POSTVPNCONNECTCONTEXT="admin"
POSTVPNCONNECTFILE="%userprofile%\post_vpn_connect.bat"
POSTVPNCONNECTCHECKSUM="b48ad33695a44de887bba8f2f3174fd8fb01a46a19e3ec9078b011
8647ccf598"
POSTVPNCONNECTERRORMSG="Failed executing post-vpn-connect action."
PREVPNDISCONNECTCOMMAND="%userprofile%\pre_vpn_disconnect.bat c: test_user"
PREVPNDISCONNECTCONTEXT="admin"
PREVPNDISCONNECTTIMEOUT="0"
PREVPNDISCONNECTFILE="C:\Users\test_user\pre_vpn_disconnect.bat"
PREVPNDISCONNECTCHECKSUM="c48ad33695a44de887bba8f2f3174fd8fb01a46a19e3ec9078b0
118647ccf597"

128 GLOBALPROTECT ADMINISTRATOR'S GUIDE | GlobalProtect Clients
© 2017 Palo Alto Networks, Inc.
PREVPNDISCONNECTERRORMSG="Failed executing pre-vpn-disconnect action."
For a complete list of settings and the corresponding default values, see Customizable Agent Settings. Or,
for examples of batch scripts, see Windows OS Batch Script Examples.
SSO Wrapping for Third-Party Credential Providers on Windows Clients
On Windows 7 and Windows Vista clients, the GlobalProtect agent utilizes the Microsoft credential
provider framework to support single sign-on (SSO). With SSO, the GlobalProtect credential provider wraps
the Windows native credential provider, which enables GlobalProtect to use Windows login credentials to
automatically authenticate and connect to the GlobalProtect portal and gateway.
In some scenarios when other third-party credential providers also exist on the client, the GlobalProtect
credential provider is unable to gather a user's Windows login credentials and, as a result, GlobalProtect
fails to automatically connect to the GlobalProtect portal and gateway. If SSO fails, you can identify the
third-party credential provider and then configure the GlobalProtect agent to wrap those third-party
credentials, which enables users to successfully authenticate to Windows, GlobalProtect, and the third-
party credential provider—all in a single step—using only their Windows login credentials when they log in
to their Windows system.
Optionally, you can configure Windows to display separate login tiles: one for each third-party credential
provider and another for the native Windows login. This is useful when a third-party credential provider
adds additional functionality in the login tile that does not apply to GlobalProtect.
Use the Windows registry or the Windows Installer (Msiexec) to allow GlobalProtect to wrap third-party
credentials:
•Enable SSO Wrapping for Third-Party Credentials with the Windows Registry on page 128
•Enable SSO Wrapping for Third-Party Credentials with the Windows Installer on page 130
GlobalProtect SSO wrapping for third-party credential providers (CPs) is dependent
on the third-party CP settings and, in some cases, GlobalProtect SSO wrapping might
not work correctly if the third-party CP implementation does not allow GlobalProtect to
successfully wrap their CP.
Enable SSO Wrapping for Third-Party Credentials with the Windows
Registry
Use the following steps in the Windows registry to enable SSO to wrap third-party credentials on Windows
7 and Windows Vista clients.
STEP 1 | Open the Windows registry and locate the globally unique identifier (GUID) for the third-party
credential provider that you want to wrap.
1. From the command prompt, enter the command regedit to open the Windows registry.
2. Locate currently installed credential providers at the following location:
HKEY_LOCAL_MACHINE\SOFTWARE\Microsoft\Windows\ CurrentVersion
\Authentication\Credential Providers.
3. Copy the GUID key for the credential provider that you want to wrap (including the curly brackets—
{ and } —on either end of the GUID):
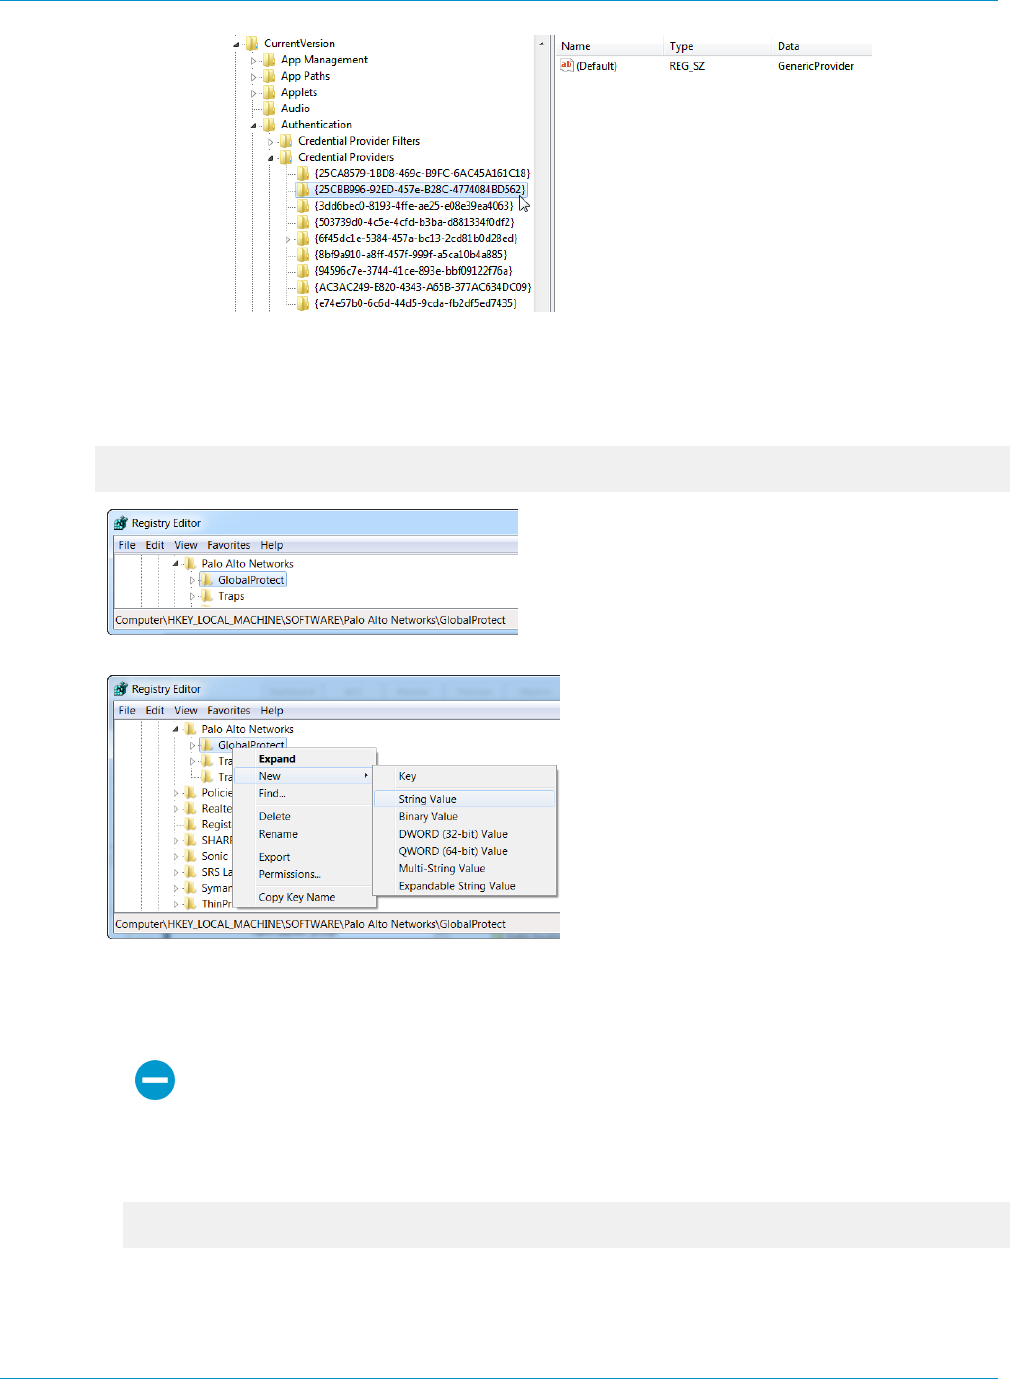
GLOBALPROTECT ADMINISTRATOR'S GUIDE | GlobalProtect Clients 129
© 2017 Palo Alto Networks, Inc.
STEP 2 | Enable SSO wrapping for third-party credential providers by adding the setting wrap-cp-guid
to the GlobalProtect registry.
1. Go to the following Windows registry location:
HKEY_LOCAL_MACHINE\SOFTWARE\Palo Alto Networks\ GlobalProtect:
2. Add a new String Value:
3. Enter values for the String Value:
•Name: wrap-cp-guid
•Value data: {<third-party credential provider GUID>}
For the Value data field, the GUID value that you enter must be enclosed with curly
brackets: { and }.
The following is an example of what a third-party credential provider GUID in the Value data field
might look like:
{A1DA9BCC-9720-4921-8373-A8EC5D48450F}
For the new String Value, wrap-cp-guid is displayed as the String Value’s Name and the GUID is
displayed as the Data.
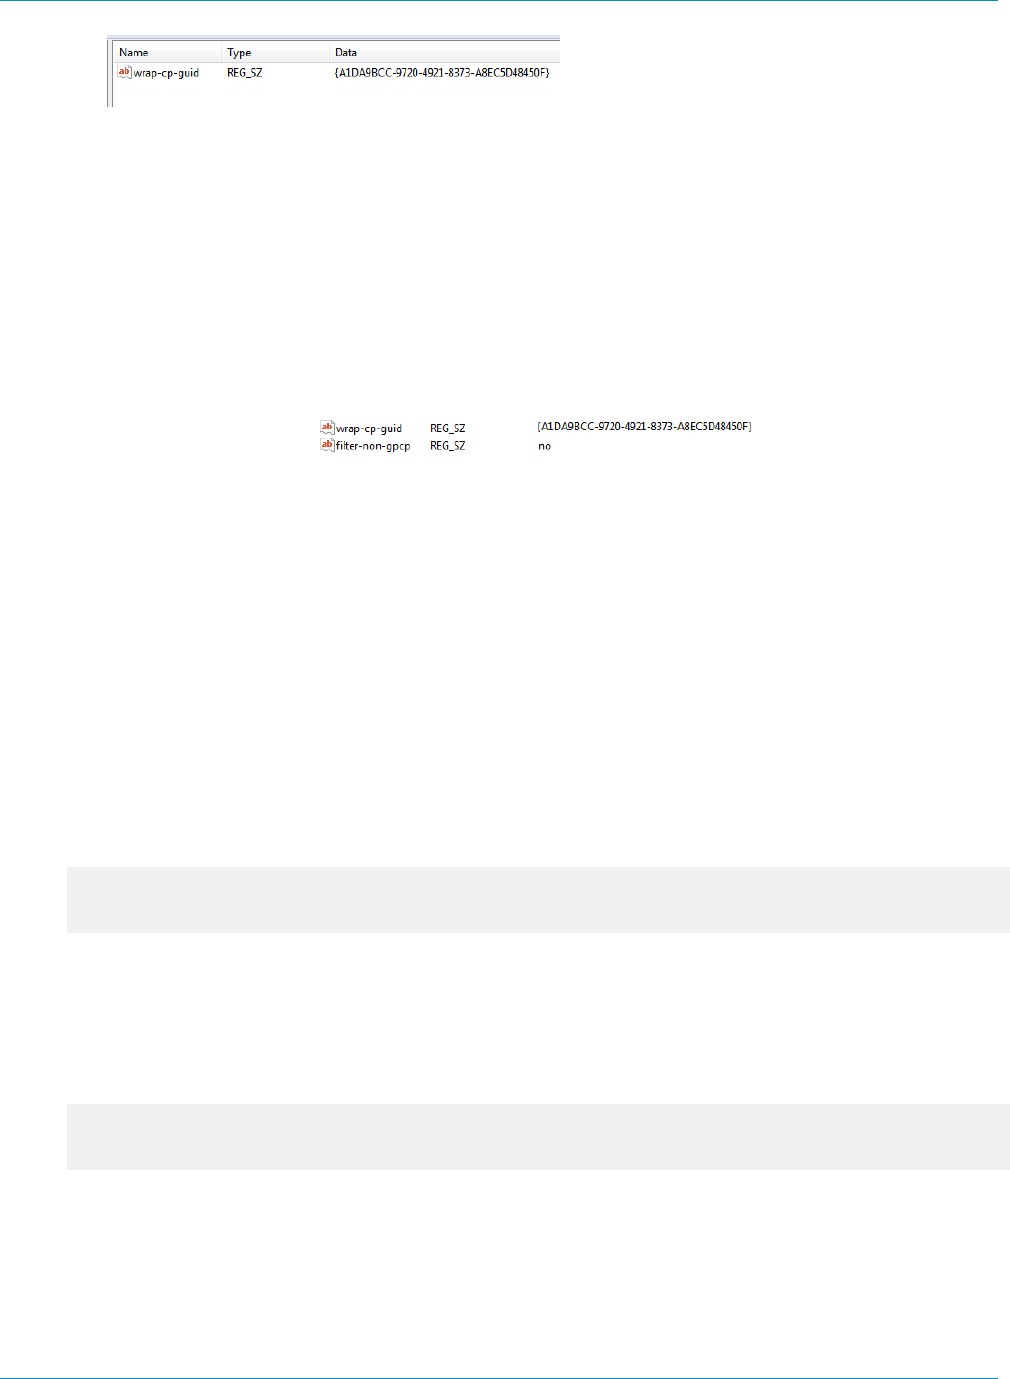
130 GLOBALPROTECT ADMINISTRATOR'S GUIDE | GlobalProtect Clients
© 2017 Palo Alto Networks, Inc.
STEP 3 | Next Steps:
• You can configure SSO wrapping for third-party credential providers successfully by completing steps
1 and 2. With this setup, the native Windows logon tile is displayed to users. Users click the tile and
log in to the system with their Windows credentials and that single login authenticates the users to
Windows, GlobalProtect, and the third-party credential provider.
• (Optional) If you want to display two tiles to users at login, the native Windows tile and the tile for
the third-party credential provider, continue to 4.
STEP 4 | (Optional) Allow the third-party credential provider tile to be displayed to users at login.
Add a second String Value with the Name filter-non-gpcp and enter no for the string’s Value data:
With this string value added to the GlobalProtect settings, two login options are presented to users
when logging in to their Windows system: the native Windows tile and the third-party credential
provider’s tile.
Enable SSO Wrapping for Third-Party Credentials with the Windows
Installer
Use the following options in the Windows Installer (Msiexec) to enable SSO to wrap third-party credential
providers on Windows 7 and Windows Vista clients.
•Wrap third-party credentials and display the native tile to users at login. Users click the tile and
log in to the system with their native Windows credentials and that single login authenticates
users to Windows, GlobalProtect, and the third-party credential provider.
Use the following syntax from the Windows Installer (Msiexec):
msiexec.exe /i GlobalProtect.msi WRAPCPGUID=”{guid_value}”
FILTERNONGPCP=”yes”
In the syntax above, the FILTERNONGPCP parameter simplifies authentication for the user by filtering
the option to log in to the system using the third-party credentials.
•If you would like users to have the option to log in with the third-party credentials, use the
following syntax from the Msiexec:
msiexec.exe /i GlobalProtect.msi WRAPCPGUID=”{guid_value}”
FILTERNONGPCP=”no”
In the syntax above, the FILTERNONGPCP parameter is set to “no”, which filters out the third-party
credential provider’s logon tile so that only the native tile displays. In this case, both the native Windows
tile and the third-party credential provider tile is displayed to users when logging in to the Windows
system.

GLOBALPROTECT ADMINISTRATOR'S GUIDE | GlobalProtect Clients 131
© 2017 Palo Alto Networks, Inc.
Deploy Agent Settings to Mac Clients
Use the Mac global plist (property list) file to set GlobalProtect agent customization settings for or to deploy
scripts to Mac endpoints.
•Deploy Agent Settings in the Mac Plist
•Deploy Scripts Using the Mac Plist
•Mac OS Script Examples
Deploy Agent Settings in the Mac Plist
You can set the GlobalProtect agent customization settings in the Mac global plist (Property list) file. This
enables deployment of GlobalProtect agent settings to Mac endpoints prior to their first connection to the
GlobalProtect portal.
On Mac systems, plist files are either located in /Library/Preferences or in ~/Library/
Preferences. The tilde ( ~ ) symbol indicates that the location is in the current user's home folder. The
GlobalProtect agent on a Mac client first checks for the GlobalProtect plist settings. If the plist does not
exist at that location, the GlobalProtect agent searches for plist settings in ~/Library/Preferences.
In addition to using the Mac plist to deploy GlobalProtect agent settings, you can enable
the GlobalProtect agent to collect specific Mac plist information from clients. You can
then monitor the data and add it to a security rule as matching criteria. Device traffic that
matches registry settings you have defined can be enforced according to the security rule.
Additionally, you can set up custom checks to Collect Application and Process Data From
Clients.
•Open the GlobalProtect plist file and locate the GlobalProtect agent customization settings.
Use Xcode or an alternate plist editor to open the plist file:
/Library/Preferences/com.paloaltonetworks.GlobalProtect.settings.plist
Then go to:
/Palo Alto Networks/GlobalProtect/Settings
If the Settings dictionary does not exist, create it. Then add each key to the Settings dictionary as a
string.
•Set the portal name.
If you don’t want the user to manually enter the portal address even for the first connection, you can
pre-deploy the portal address through the Mac plist. Under the PanSetup dictionary, configure an entry
for Portal.
•Deploy various settings to the Mac client from the Mac plist, including configuring the connect
method for the GlobalProtect agent.
View Customizable Agent Settings for a full list of the keys and values that you can configure using the
Mac plist.
Deploy Scripts Using the Mac Plist
When a user connects to the GlobalProtect gateway for the first time, the GlobalProtect agent downloads a
configuration file and stores agent settings in a GlobalProtect Mac property file (plist). In addition to making
132 GLOBALPROTECT ADMINISTRATOR'S GUIDE | GlobalProtect Clients
© 2017 Palo Alto Networks, Inc.
changes to the agent settings, you use the Mac plist to deploy scripts at any or all of the following events:
before and after establishing the tunnel, and before disconnecting the tunnel. Use the following workflow
to get started using the Mac plist to deploy scripts to Mac endpoints.
The Mac plist settings that enable you to deploy scripts are supported in GlobalProtect
clients running GlobalProtect agent 2.3 and later releases.
STEP 1 | (Clients running Mac OS X 10.9 or a later OS) Flush the settings cache. This prevents the OS
from using the cached preferences after making changes to the plist.
To clear the default preferences cache, run the killall cfprefsd command from a Mac terminal.
STEP 2 | Open the GlobalProtect plist file, and locate or create the GlobalProtect dictionary associated
with the connect or disconnect event. The dictionary under which you will add the settings will
determine when the GlobalProtect agent runs the script(s).
Use Xcode or an alternate plist editor to open the plist file (/Library/Preferences/
com.paloaltonetworks.GlobalProtect.settings.plist) and go to the location of the
dictionary:
•/Palo Alto Networks/GlobalProtect/Settings/pre-vpn-connect
•/Palo Alto Networks/GlobalProtect/Settings/post-vpn-connect
•/Palo Alto Networks/GlobalProtect/Settings/pre-vpn-disconnect
If Settings dictionary does not exist, create it. Then, in Settings, create a new
dictionary for the event or events at which you want to run scripts.
STEP 3 | Enable the GlobalProtect agent to run scripts by creating a new String named command.
The value specified here should reference the shell script (and the parameters to pass to the script) that
you want run on your devices. See Mac OS Script Examples on page 133.
If the command string does not already exist, add it to the dictionary and specify the script and
parameters in the Value field, for example:
$HOME\pre_vpn_connect.sh
/Users/username username
Environmental variables are supported.
As a best practice, specify the full path in commands.
STEP 4 | (Optional) Add additional settings related to the command, including administrator privileges, a
timeout value for the script, checksum value for the batch file, and an error message to display
if the command fails to execute successfully.
Create or modify additional strings in the plist (context, timeout, file, checksum, and/or error-
msg) and enter their corresponding values. For additional information, see Customizable Agent Settings
on page 115.
STEP 5 | Save the changes to the plist file.
Save the plist.
GLOBALPROTECT ADMINISTRATOR'S GUIDE | GlobalProtect Clients 133
© 2017 Palo Alto Networks, Inc.
Mac OS Script Examples
You can configure the GlobalProtect agent to initiate and run a script for any or all of the following events:
before and after establishing the tunnel, and before disconnecting the tunnel. To run the script at a
particular event, reference the shell script from a command plist entry for that event. The following topics
show examples of scripts that you can run at pre-connect, post-connect and pre-disconnect events:
Example: Terminate All Established SSH Sessions on Mac Endpoints
To force termination of all established SSH sessions before setting up the VPN tunnel, reference the
following script from a command plist entry for a pre-vpn-connect event. Similarly, you can re-establish
the sessions after establishing the GlobalProtect VPN tunnel by using a script that you reference from the
command plist entry for a post-vpn-connect event. This can be useful if you want to force all SSH traffic to
traverse the GlobalProtect VPN tunnel.
#!bin/bash
# Identify all SSH sessions and force kill them
ps | grep ssh | grep -v grep | awk '{ print $1 }' | xargs
kill -9
Example: Mount a Network Share on Mac Endpoints
To mount a network share after establishing a VPN connection, reference the following script from a
command plist entry for a post-vpn-connect event:
For a script that you can copy and paste, go here.
#!/bin/bash
mkdir $1
mount -t smbfs //username:password@10.101.2.17/shares/Departments/Engineering/
SW_eng/username/folder
$1
sleep 1

134 GLOBALPROTECT ADMINISTRATOR'S GUIDE | GlobalProtect Clients

135
GlobalProtect Clientless VPN
GlobalProtect Clientless VPN provides secure remote access to common enterprise web
applications. Users have the advantage of secure access from SSL-enabled web browsers
without installing GlobalProtect client software. This is useful when you need to enable partner
or contractor access to applications, and to safely enable unmanaged assets, including personal
devices. You can configure the GlobalProtect portal landing page to provide access to web
applications based on users and user groups and also allow single-sign on to SAML-enabled
applications. The following topics provide information on how to configure and troubleshoot
Clientless VPN.
> Clientless VPN Overview
> Supported Technologies
> Configure Clientless VPN
> Troubleshoot Clientless VPN

136 GLOBALPROTECT ADMINISTRATOR'S GUIDE | GlobalProtect Clientless VPN
© 2017 Palo Alto Networks, Inc.
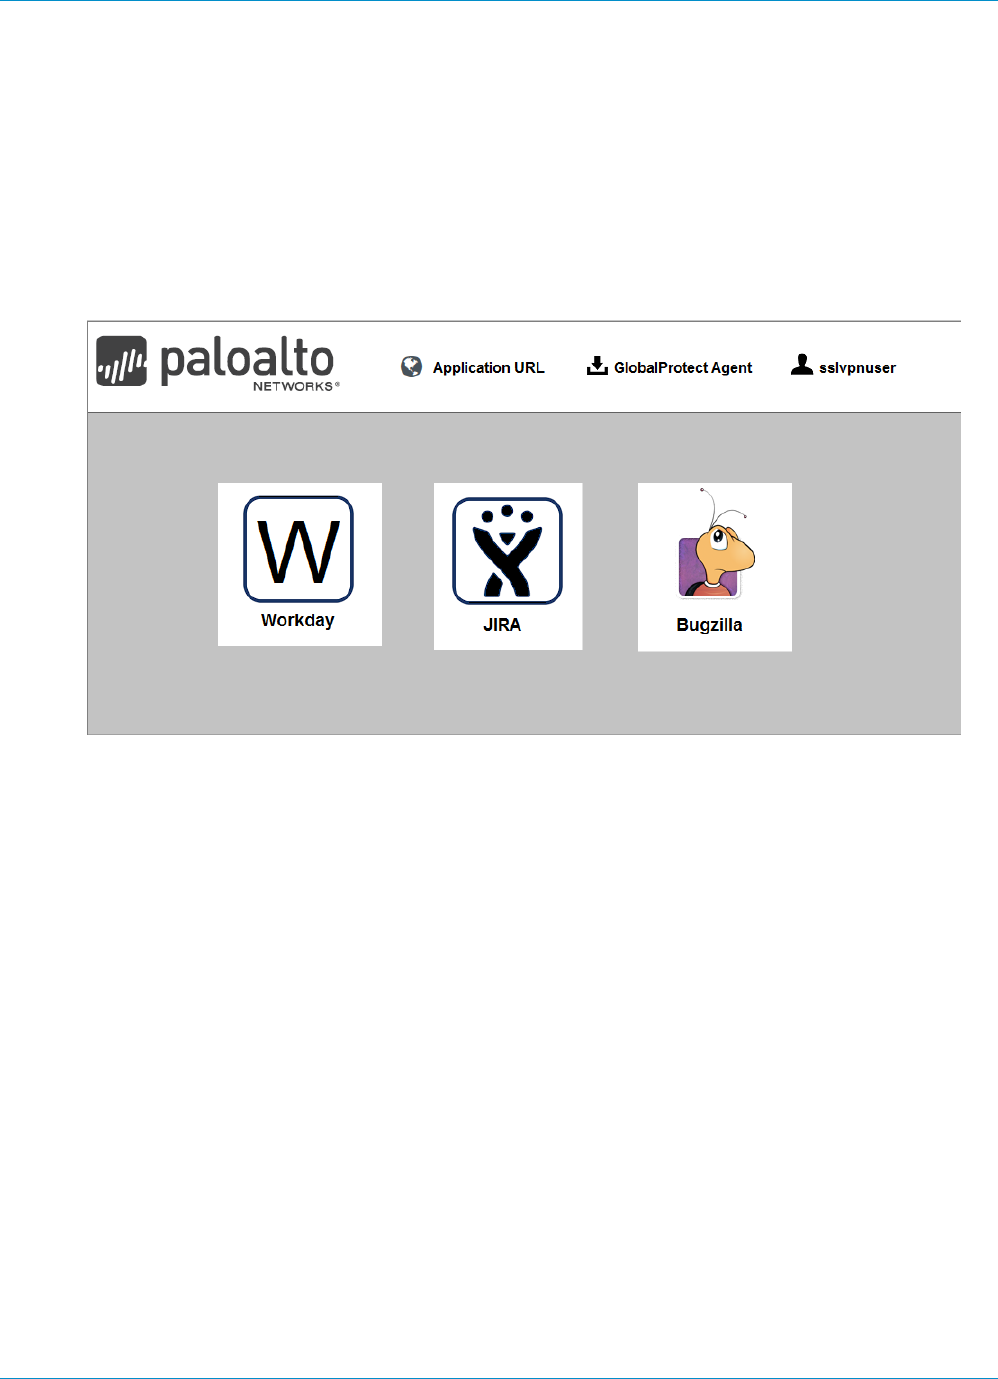
GLOBALPROTECT ADMINISTRATOR'S GUIDE | GlobalProtect Clientless VPN 137
© 2017 Palo Alto Networks, Inc.
Clientless VPN Overview
When you configure Clientless VPN, remote users can log in to the GlobalProtect portal using a web
browser and launch the web applications you publish for the user. Based on users or user groups, you
can allow users to access a set of applications that you make available to them, or allow them to access
additional corporate applications by entering a custom application URL.
After logging in to the portal, users see a published applications page with a list of web applications they can
launch. (You can use the default applications landing page on the GlobalProtect portal or create a custom
landing page for your enterprise.)
Figure 1: Applications Landing Page for Clientless VPN
Because this page replaces the default portal landing page, it includes a link to the GlobalProtect agent
download page. If configured, users can also select Application URL and enter URLs to launch additional,
unpublished corporate web applications.
When you configure only one web application (and disable access to unpublished applications), instead
of taking the user to the published applications page, the application will launch automatically as soon as
the user logs in. If you do not configure GlobalProtect Clientless VPN, users will see the agent software
download page when they log in to the portal.
When you configure GlobalProtect Clientless VPN, you need security policies to allow traffic from
GlobalProtect endpoints to the security zone associated with the GlobalProtect portal that hosts the
published applications landing page and security policies to allow user-based traffic from the GlobalProtect
portal zone to the security zone where the published application servers are hosted. The security policies
you define control which users have permission to use each published application.
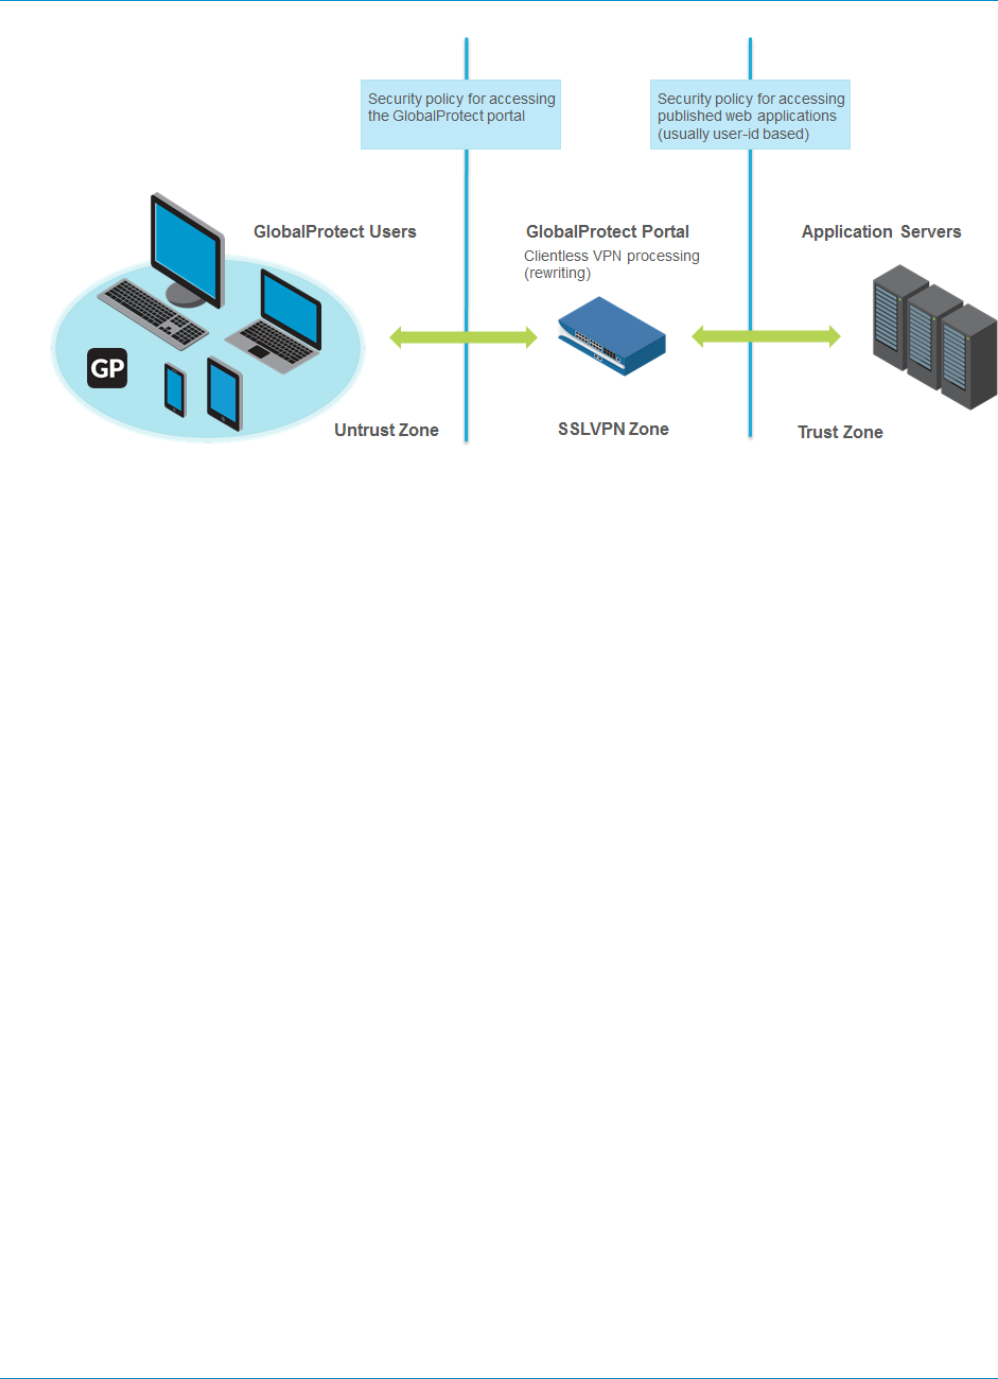
138 GLOBALPROTECT ADMINISTRATOR'S GUIDE | GlobalProtect Clientless VPN
© 2017 Palo Alto Networks, Inc.
Figure 2: Zones and Security Policy for Clientless VPN

GLOBALPROTECT ADMINISTRATOR'S GUIDE | GlobalProtect Clientless VPN 139
© 2017 Palo Alto Networks, Inc.
Supported Technologies
You can configure the GlobalProtect portal to provide secure remote access to common enterprise web
applications. For best results, make sure you throughly test your Clientless VPN applications in a controlled
environment before deploying them or making them available to a large number of users.
Technology Supported Version
Web application
technologies
• HTML
• HTML5
• HTML5-Web-Sockets
• Javascript
• Remote desktop protocol (RDP), VNC, or SSH through third-party HTML
middleware applications—Examples of third-party middleware applications
that use supported web technologies include:
• HOBLink WebTerm—Uses HTML5
• VMware Horizon, vSphere, vCenter—Uses HTML5
• Apache Guacamole—Uses HTML5
• Adobe Flash—With Clientless VPN, browsers can display flash content or
files like Microsoft Word documents or Adobe PDFs; however, Clientless
VPN cannot rewrite HTML content links inside the content to route the
links through the tunnel.
Other technologies (such as Microsoft Silverlight or XML/XSLT) are not
supported.
Operating systems • Windows
• Mac
• iOS
• Android
• Chrome
• Linux
Supported browsers • Chrome
• Internet Explorer
• Safari
• Firefox
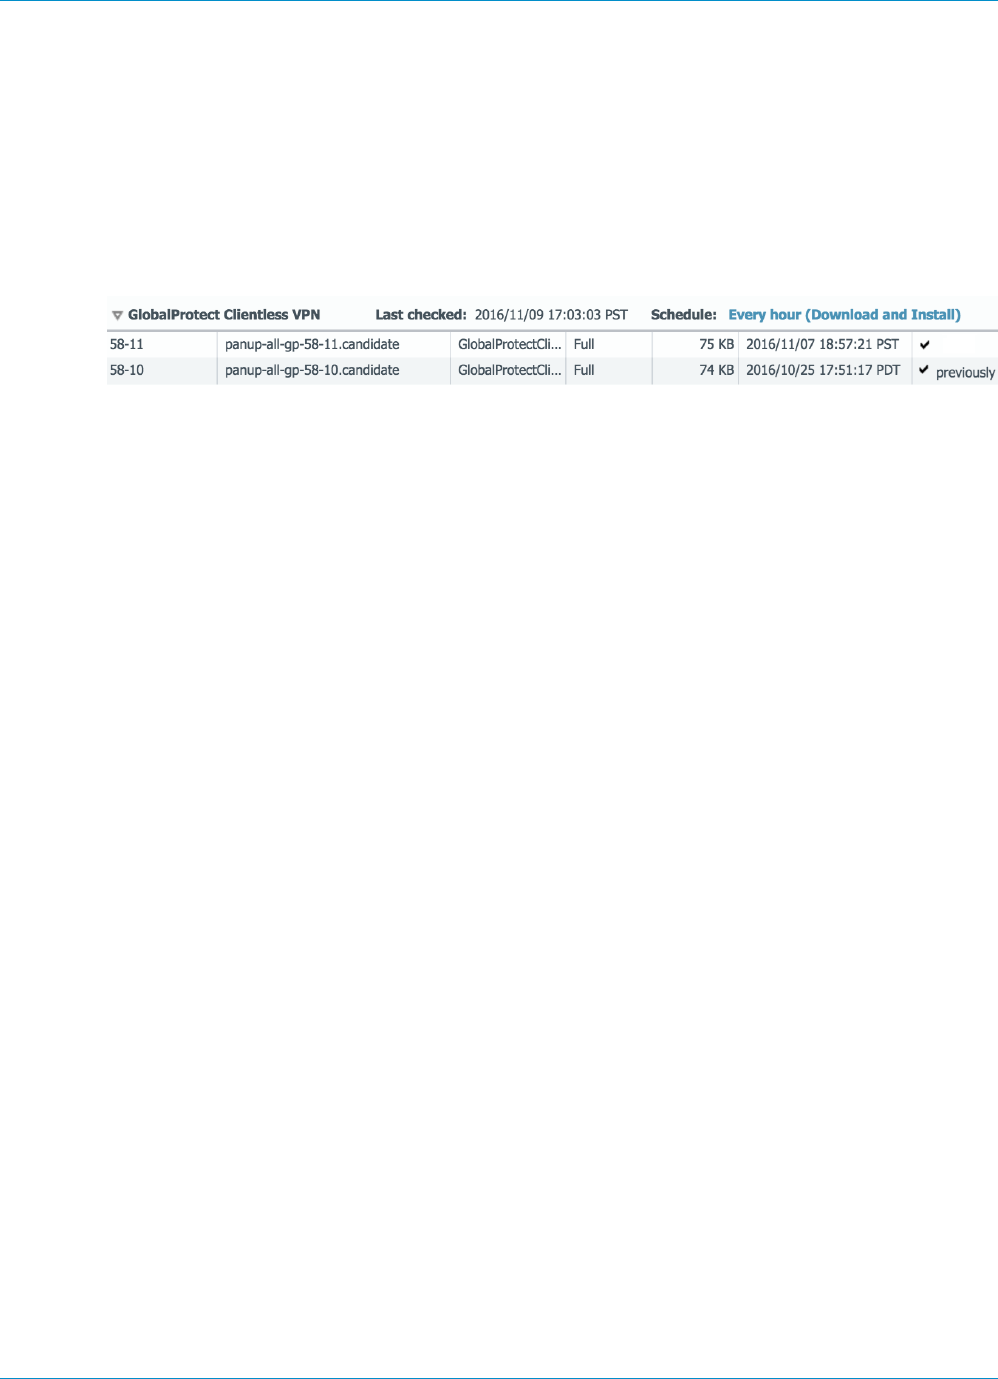
140 GLOBALPROTECT ADMINISTRATOR'S GUIDE | GlobalProtect Clientless VPN
© 2017 Palo Alto Networks, Inc.
Configure Clientless VPN
To configure GlobalProtect Clientless VPN:
STEP 1 | Before you begin:
• Install a GlobalProtect subscription on the firewall that hosts the Clientless VPN from the
GlobalProtect portal. Refer to Active Licenses and Subscriptions.
• Install the GlobalProtect Clientless VPN dynamic update (see Install Content and Software Updates).
• As a best practice, configure a separate FQDN for the GlobalProtect portal that hosts Clientless VPN.
Do not use the same FQDN as the PAN-OS Web Interface.
• Host the GlobalProtect portal on the standard SSL port (TCP port 443). Non-standard ports are not
supported.
STEP 2 | Configure the applications that are available using GlobalProtect Clientless VPN. The
GlobalProtect portal displays these applications on the landing page that users see when they
log in (the applications landing page).
1. Select Network > GlobalProtect > Clientless Apps and Add one or more applications. For each
application, specify the following:
•Name—A descriptive name for the application (up to 31 characters). The name is case-sensitive
and must be unique. Use only letters, numbers, spaces, hyphens, and underscores.
•Location (for a firewall that is in multiple virtual system mode)—the virtual system (vsys) where
the Clientless VPN applications are available. For a firewall that is not in multi-vsys mode, the
Location field does not appear.
•Application Home URL—The URL where the web application is located (up to 4095 characters).
•Application Description (Optional)—A brief description of the application (up to 255 characters).
•Application Icon (Optional)—An icon to identify the application on the published application page.
You can browse to upload the icon.
2. Click OK.
STEP 3 | (Optional). Create groups to manage sets of web applications.
Clientless App Groups are useful if you want to manage multiple collections of applications and provide
access based on user groups. For example, financial applications for the G&A team or developer
applications for the Engineering team.
1. Select Network > GlobalProtect > Clientless App Groups. Add a new Clientless VPN application
group and specify the following:
•Name—A descriptive name for the application group (up to 31 characters). The name is case-
sensitive and must be unique. Use only letters, numbers, spaces, hyphens, and underscores.
•Location (for a firewall that is in multiple virtual system mode)—the virtual system (vsys) where
the Clientless VPN application group is available. For a firewall that is not in multi-vsys mode, the
Location field does not appear.
2. In the Applications area, Add applications to the group. You can select from the list of existing
Clientless VPN applications or define a New Clientless App.
3. Click OK.

GLOBALPROTECT ADMINISTRATOR'S GUIDE | GlobalProtect Clientless VPN 141
© 2017 Palo Alto Networks, Inc.
STEP 4 | Configure the GlobalProtect portal to provide the Clientless VPN service.
1. Select Network > GlobalProtect > Portal and select an existing portal configuration or Add a new
portal. Refer to Set Up Access to the GlobalProtect Portal.
2. In the Authentication tab, you can:
• (Optional) Create a new client authentication specifically for Clientless VPN. In this case, choose
Browser as the OS for Client Authentication.
• Use an existing client authentication.
3. In Clientless > General, select Clientless VPN to enable the portal service and configure the
following:
• Specify a Hostname (IP address or fully-qualified domain name) for the GlobalProtect portal that
hosts the applications landing page. This hostname is used for rewriting application URLs. (For
more information on URL rewriting, refer to 8).
If you use Network Address Translation (NAT) to provide access to the GlobalProtect
portal, the IP address or FQDN you enter must match (or resolve to) the NAT IP
address for the GlobalProtect portal (the public IP address). Because users cannot
access the GlobalProtect portal on a custom port, the pre-NAT port must also be TCP
port 443.
• Specify a Security Zone. This zone is used as a source zone for the traffic between the firewall and
the applications. Security rules defined from this zone to the application zone determine which
applications can be accessed.
• Select a DNS Proxy server or configure a New DNS Proxy. GlobalProtect will use this proxy to
resolve application names. Refer to DNS Proxy Object.
•Login Lifetime—Specify the maximum hours or minutes that a Clientless VPN session is valid. The
typical session time is 3 hours. The range for hours is 1-24; the range for minutes is 60-1440.
After the session expires, users must re-authenticate and start a new Clientless VPN session.
•Inactivity Timeout—Specify the number of hours or minutes that a Clientless VPN session can
remain idle. The typical inactivity timeout is 30 minutes. The range for hours is 1-24; the range for
minutes is 5 to 1440. If there is no user activity during the specified amount of time, users must
re-authenticate and start a new Clientless VPN session.
•Max User—Specify the maximum number of users who can be logged into the portal at the
same time. If no value is specified, then endpoint capacity is assumed. If the endpoint capacity is
unknown, then a capacity of 50 users is assumed. When the maximum number of users is reached,
additional Clientless VPN users cannot log in to the portal.
STEP 5 | Map users and user groups to applications.
This mapping controls which applications users or user groups can launch from a GlobalProtect
Clientless VPN session.
The GlobalProtect portal uses the user/user group settings that you specify to determine which
configuration to deliver to the GlobalProtect Clientless VPN user that connects. If you have multiple
configurations, make sure they are ordered properly and map to all of the required applications, as the
portal looks for a configuration match starting from the top of the list. As soon as the portal finds a
match, it delivers the configuration to the GlobalProtect Clientless VPN user.
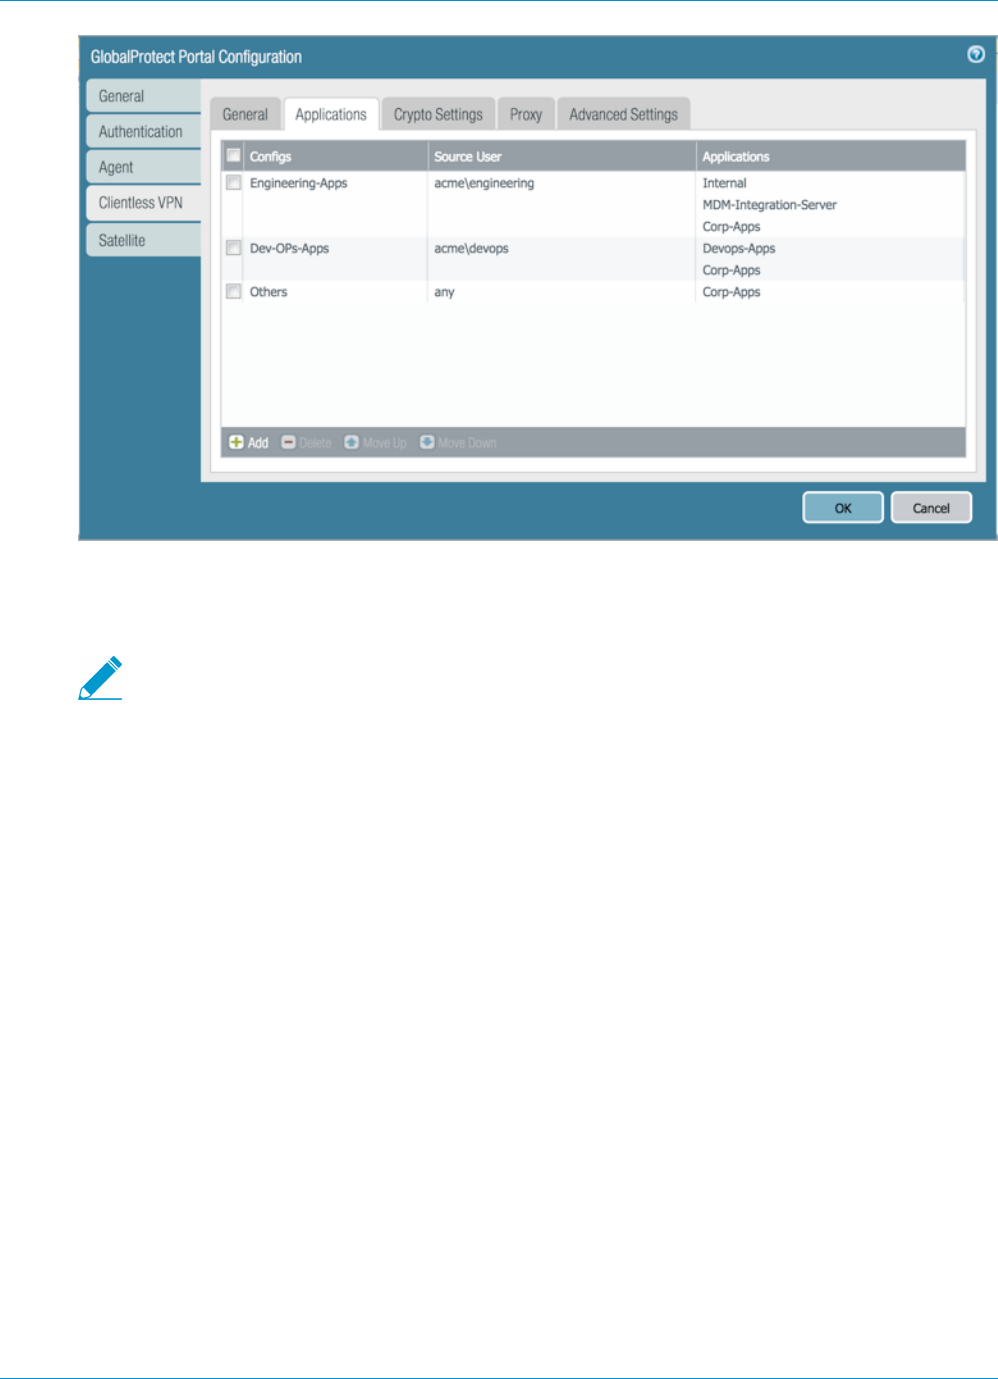
142 GLOBALPROTECT ADMINISTRATOR'S GUIDE | GlobalProtect Clientless VPN
© 2017 Palo Alto Networks, Inc.
Publishing an application to a user/user group or allowing them to launch unpublished applications does
not imply that they can access those applications. Controlling access to applications (published or not) is
done using security policies.
You must configure group mapping (Device > User Identification > Group Mapping
Settings) before you can select the groups.
1. In the Applications tab, Add an Applications to User Mapping to match users with published
applications.
•Name—Enter a name for the mapping (up to 31 characters). The name is case-sensitive and must
be unique. Use only letters, numbers, spaces, hyphens, and underscores.
•Display application URL address bar—Select this option to display an application URL address bar
from which users can launch applications that are not published on the applications landing page.
When enabled, users can click the Application URL link on the page and specify a URL.
2. Specify the Source Users. You can Add individual users or user groups to which the current
application configuration applies. These users have permission to launch the configured applications
using a GlobalProtect Clientless VPN. In addition to users and groups, you can specify when these
settings apply to the users or groups:
•any—The application configuration applies to all users (no need to Add users or user groups).
•select—The application configuration applies only to users and user groups you Add to this list.
3. Add individual applications or application groups to the mapping. The Source Users you included in
the configuration can use GlobalProtect Clientless VPN to link to the applications you add.
STEP 6 | Specify the security settings for a Clientless VPN session.
1. In the Crypto Settings tab, specify the authentication and encryption algorithms for the SSL sessions
between the firewall and the published applications.
•Protocol Versions—Select the required minimum and maximum TLS/SSL versions. The higher
the TLS version, the more secure the connection. Choices include SSLv3, TLSv1.0, TLSv1.1, or
TLSv1.2.

GLOBALPROTECT ADMINISTRATOR'S GUIDE | GlobalProtect Clientless VPN 143
© 2017 Palo Alto Networks, Inc.
•Key Exchange Algorithms—Select the supported algorithm types for key exchange. Choices are:
RSA, Diffie-Hellman (DHE), or Elliptic Curve Ephemeral Diffie-Hellman (ECDHE).
•Encryption Algorithms—Select the supported encryption algorithms. AES128 or higher is
recommended.
•Authentication Algorithms—Select the supported authentication algorithms. Choices are: MD5,
SHA1, SHA256, or SHA384. SHA256 or higher is recommended.
2. Select the action to take when the following issues occur with a server certificate presented by an
application:
•Block sessions with expired certificate—If the server certificate has expired, block access to the
application.
•Block sessions with untrusted issuers—If the server certificate is issued from an untrusted
certificate authority, block access to the application.
•Block sessions with unknown certificate status—If the OCSP or CRL service returns a certificate
revocation status of unknown, block access to the application.
•Block sessions on certificate status check timeout—If the certificate status check times out
before receiving a response from any certificate status service, block access to the application.
STEP 7 | (Optional) Specify one or more proxy server configurations to access the applications.
Only basic authentication to the proxy is supported (username and password).
If users need to reach the applications through a proxy server, specify a Proxy Server. You can add
multiple proxy server configurations, one for each set of domains.
•Name—A label (up to 31 characters) to identify the proxy server configuration. The name is case-
sensitive and must be unique. Use only letters, numbers, spaces, hyphens, and underscores.
•Domains—Add the domains served by the proxy server. You can use a wild card character (*) at the
beginning of the domain name to indicate multiple domains.
•Use Proxy—Select to assign a proxy server to provide access to the domains.
•Server—Specify the IP address or host name of the proxy server.
•Port—Specify a port for communication with the proxy server.
•User and Password—Specify the User and Password credentials needed to log in to the proxy server.
Specify the password again for verification.
STEP 8 | (Optional) Specify any special treatment for application domains.
The Clientless VPN acts as a reverse proxy and modifies web pages returned by the published web
applications. It rewrites all URLs and presents a rewritten page to remote users such that when they
access any of those URLs, the requests go through GlobalProtect portal.
In some cases, the application may have pages that do not need to be accessed through the portal (for
example, the application may include a stock ticker from yahoo.finance.com). You can exclude these
pages.
In the Advanced Settings tab, Add domain names, host names, or IP addresses to the Rewrite Exclude
Domain List. These domains are excluded from rewrite rules and cannot be rewritten.
Paths are not supported in host and domain names. The wildcard character (*) for host names and
domain names can only appear at the beginning of the name (for example, *.etrade.com).
STEP 9 | Save the portal configuration.
1. Click OK twice.
2. Commit your changes.
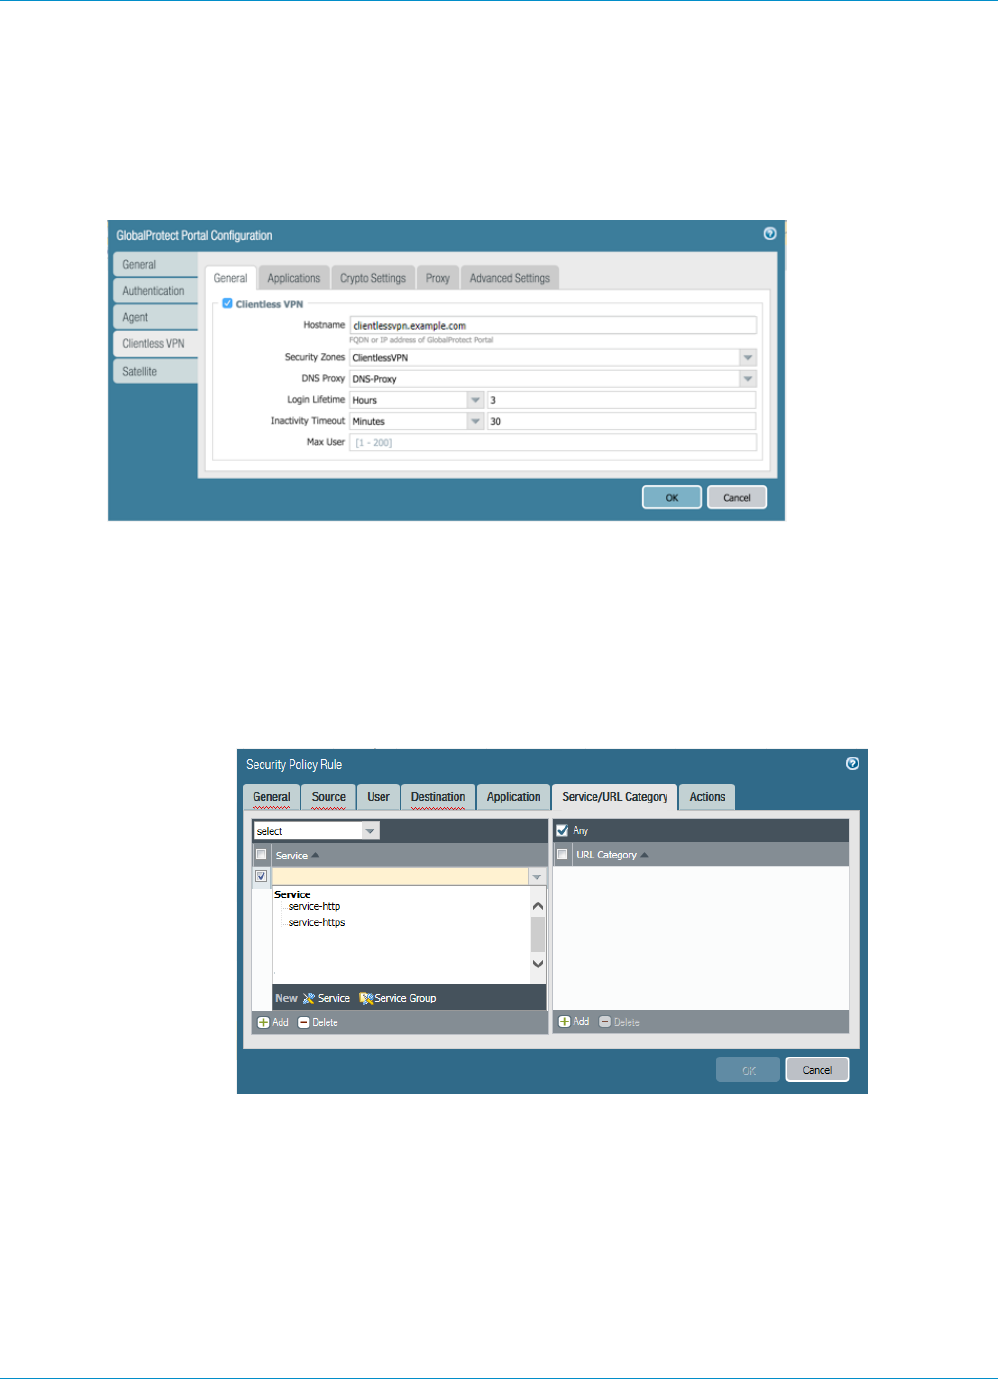
144 GLOBALPROTECT ADMINISTRATOR'S GUIDE | GlobalProtect Clientless VPN
© 2017 Palo Alto Networks, Inc.
STEP 10 | Configure a Security policy rule to enable users to access the published applications.
You need security policies for the following:
• Make the GlobalProtect portal which hosts Clientless VPN reachable from the Internet. This is traffic
from Untrust or Internet Zone to the zone where you host the Clientless VPN portal.
• Allow Clientless VPN users to reach the Internet. This is traffic from the Clientless VPN zone to the
Untrust or Internet Zone.
• Allow Clientless VPN users to reach corporate resources. This is traffic from the Clientless VPN zone
to the Trust or Corp Zone. The security policies you define control which users have permission to
use each published application. For the security zone where the published application servers are
hosted, make sure Enable User Identification is set in order to create user-based rules for accessing
published applications.
By default Service/URL in Security Policy Rule is set application-default. Clientless VPN will not
work for HTTPS sites with this default setting. Change Service/URL to include both service-http and
service-https.
• When you configure a proxy server to access Clientless VPN applications, make sure you include the
proxy IP address and port in the security policy definition. When applications are accessed through a
proxy server, only security policies defined for the proxy IP address and port are applied.

GLOBALPROTECT ADMINISTRATOR'S GUIDE | GlobalProtect Clientless VPN 145
© 2017 Palo Alto Networks, Inc.
Troubleshoot Clientless VPN
Because this feature involves dynamic re-writing of HTML applications, the HTML content for some
applications may not re-write correctly and break the application. If issues occur, use the commands in the
following table to help you identify the likely cause:
Table 4: Table: Rewrite Engine Statistics
Action Command
CLI Commands
List the version of
Clientless VPN dynamic
content being used
You can also view the
dynamic update version
from the Device >
Dynamic Updates >
GlobalProtect
Clientless VPN.
pancpe@cagp> show system setting ssl-decrypt memory
proxy uses shared allocator
SSL certificate cache:
Current Entries: 1
Allocated 1, Freed 0
Current CRE (61-62) : 3456 KB (Actual 3343
KB)
Last CRE (60-47) : 3328 KB (Actual 3283
KB)
In this example, the current dynamic update is version 61-62, and the last
installed dynamic update is version 60-47.
List active (current)
users of Clientless VPN pancpe@cagp> show global-protect-portal current-user
portal GPClientlessPortal filter-user all-users
GlobalProtect Portal : GPClientlessPortal
Vsys-Id : 1
User : paloaltonetworks.com
\johndoe
Session-id :
1SU2vrPIDfdopGf-7gahMTCiX8PuL0S0
Client-IP : 5.5.5.5
Inactivity Timeout : 1800
Seconds before inactivity timeout : 1750
Login Lifetime : 10800
Seconds before login lifetime : 10748
Total number of user sessions: 1
Show DNS resolution
results
This can be useful to
determine if there are
DNS issues. If there is
a DNS issue, you will
notice querying against
an FQDN that was not
pancpe@cagp> show system setting ssl-decrypt dns-cache
Total DNS cache entries: 89
Site IP Expire(secs)
Interface
bugzilla.panw.local 10.0.2.15 querying
0
www.google.com 216.58.216.4 Expired
0

146 GLOBALPROTECT ADMINISTRATOR'S GUIDE | GlobalProtect Clientless VPN
© 2017 Palo Alto Networks, Inc.
Action Command
resolvable in the CLI
output.
stats.g.doubleclick.net 74.125.199.154 Expired
0
Show all Clientless
VPN user sessions and
cookies stored
pancpe@cagp> show
system setting ssl-decrypt gp-cookie-cache
User: johndoe, Session-id:
1SU2vrPIDfdopGf-7gahMTCiX8PuL0S0,
Client-ip: 199.167.55.50
Show rewrite-stats
This is useful to identify
the health of the
Clientless VPN rewrite
engine.
Refer to Table: Rewrite
Engine Statistics for
information on rewrite
statistics and their
meaning or purpose.
pancpe@cagp> show system setting ssl-decrypt rewrite-
stats
Rewrite Statistics
initiate_connection : 11938
setup_connection : 11909
session_notify_mismatch : 1
reuse_connection : 37
file_end : 4719
packet : 174257
packet_mismatch_session : 1
peer_queue_update_rcvd : 167305
peer_queue_update_sent : 167305
peer_queue_update_rcvd_failure: 66
setup_connection_r : 11910
packet_mismatch_session_r : 22
pkt_no_dest : 23
cookie_suspend : 2826
cookie_resume : 2826
decompress : 26
decompress_freed : 26
dns_resolve_timeout : 27
stop_openend_response : 43
received_fin_for_pending_req : 26
Destination Statistics
To mp : 4015
To site : 12018
To dp : 17276
Return Codes Statistics
ABORT : 18
RESET : 30
PROTOCOL_UNSUPPORTED : 7
DEST_UNKNOWN : 10
CODE_DONE : 52656
DATA_GONE : 120359
SWITCH_PARSER : 48
INSERT_PARSER : 591
SUSPEND : 2826
Total Rewrite Bytes : 611111955
Total Rewrite Useconds : 6902825
Total Rewrite Calls : 176545
Debug Commands
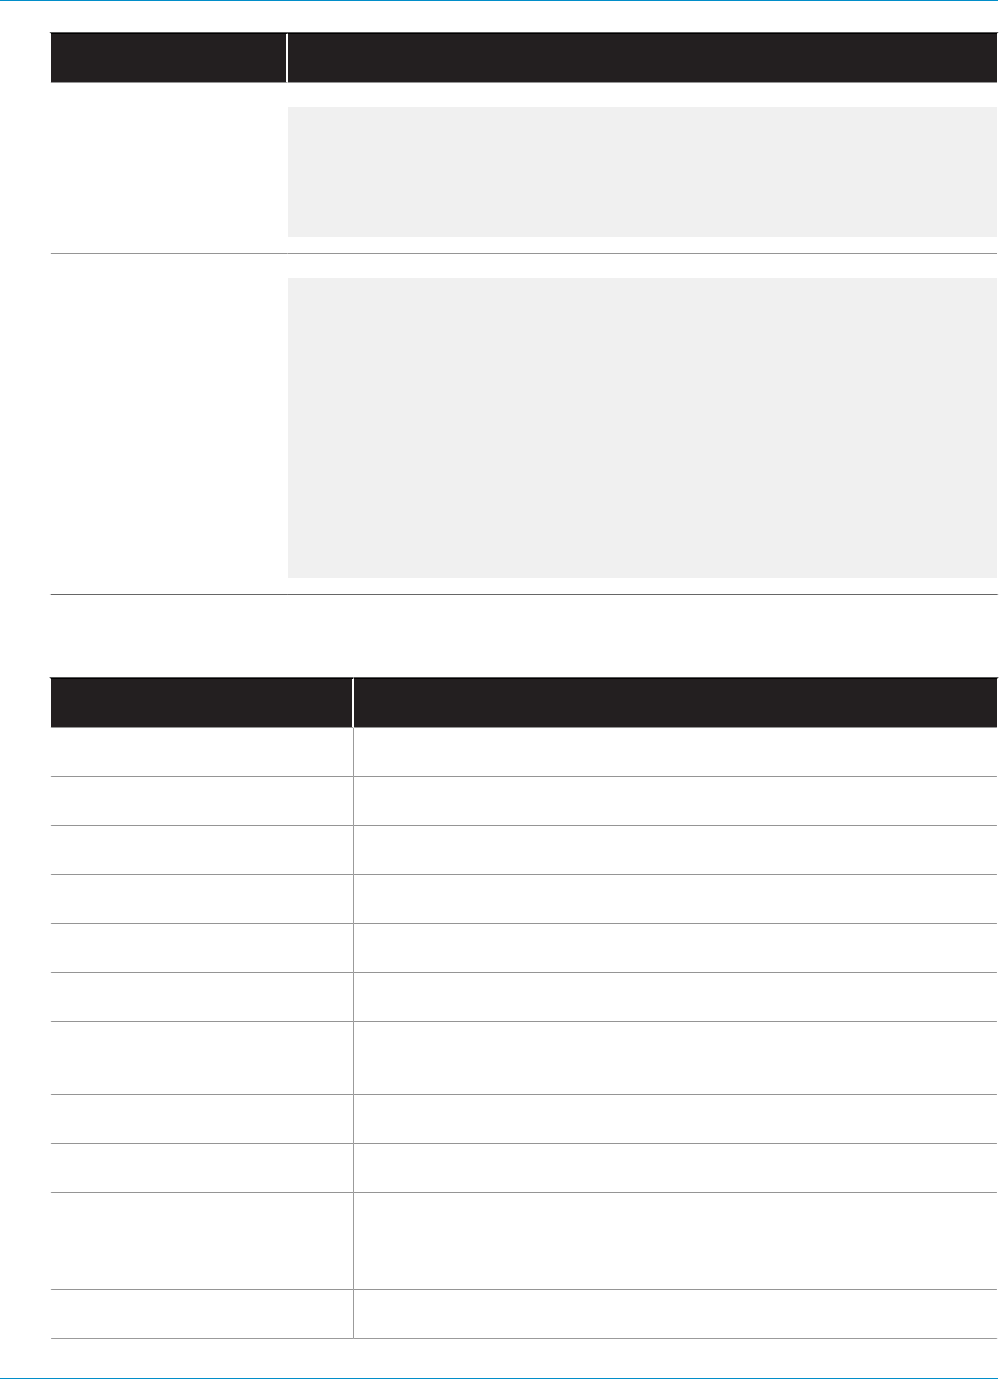
GLOBALPROTECT ADMINISTRATOR'S GUIDE | GlobalProtect Clientless VPN 147
© 2017 Palo Alto Networks, Inc.
Action Command
Enable debug logs on
the firewall running
Clientless VPN Portal
debug dataplane packet-diag set log feature ssl all
debug dataplane packet-diag set log feature misc all
debug dataplane packet-diag set log feature proxy all
debug dataplane packet-diag set log feature flow basic
debug dataplane packet-diag set log on
Enable packet capture
on the firewall running
Clientless VPN Portal
debug dataplane packet-diag set capture username <portal-
username>
debug dataplane packet-diag set capture stage clientless-
vpn-client file clss_client1.pcap
debug dataplane packet-diag set capture stage clientless-
vpn-server file clss_server1.pcap
debug dataplane packet-diag set capture stage firewall
file clss_fw1.pcap
debug dataplane packet-diag set capture stage receive
file clss_rx1.pcap
debug dataplane packet-diag set capture stage transmit
file clss_tx1.pcap
debug dataplane packet-diag set capture on
Table 5: Table: Rewrite Engine Statistics
Statistic Description
initiate_connection_failure Connection initiation failed to back-end host
setup_connection_failure Connection setup failed
setup_connection_duplicate Duplicate peer session exists
session_notify_mismatch Mostly invalid session
packet_mismatch_session Failed to find right session for incoming packet
peer_queue_update_rcvd_failure Session was invalid when packet update received by peer
peer_queue_update_sent_failure Failed to send packet updates to peer or failed to send packet queue
length updates to peer
exceed_pkt_queue_limit Too many packets queued
proxy_connection_failure Proxy connection failed
setup_connection_r Installing the peer session to the application server. This value
should match the values for initiate_connection and
setup_connection.
setup_connection_duplicate_r Duplicate sessions already in proxy

148 GLOBALPROTECT ADMINISTRATOR'S GUIDE | GlobalProtect Clientless VPN
Statistic Description
setup_connection_failure_r Failed to set up the peer session
session_notify_mismatch_r Peer session not found
packet_mismatch_session_r Peer session not found when trying to get the packet
exceed_pkt_queue_limit_r Too many packets held
unknown_dest Failed to find destination host
pkt_no_dest No destination for this packet
cookie_suspend Suspended session to fetch cookies
cookie_resume Received response from MP with updated cookies. This value
generally matches the value of cookie_suspend.
decompress_failure Failed to decompress
memory_alloc_failure Failed to allocate memory
wait_for_dns_resolve Suspended session to resolve DNS requests
dns_resolve_reschedule Rescheduled DNS query due to no response (retry before timeout)
dns_resolve_timeout DNS query timeout
setup_site_conn_failure Failed to setup connection to site (proxy, DNS)
site_dns_invalid DNS resolve failed
multiple_multipart Multi-part content-type processed
site_from_referer Received the back-end host from referrer. This can indicate failed
rewrite links from flash or other content which Clientless VPN does
not rewrite.
received_fin_for_pending_req Received FIN from server for pending request from client
unmatched_http_state Unexpected HTTP content. This can indicate an issue parsing the http
headers or body.

149
Mobile Endpoint Management
> Mobile Endpoint Management Overview on page 151
> Set Up a Mobile Endpoint Management System on page 152
> Deploy the GlobalProtect Mobile App Using AirWatch on page 153
> Manage the GlobalProtect App Using AirWatch on page 153
> Manage the GlobalProtect App Using a Third-Party MDM on page 164
> Configure Windows User-ID Agent to Collect Host Information on page 192

150 GLOBALPROTECT ADMINISTRATOR'S GUIDE | Mobile Endpoint Management
© 2017 Palo Alto Networks, Inc.
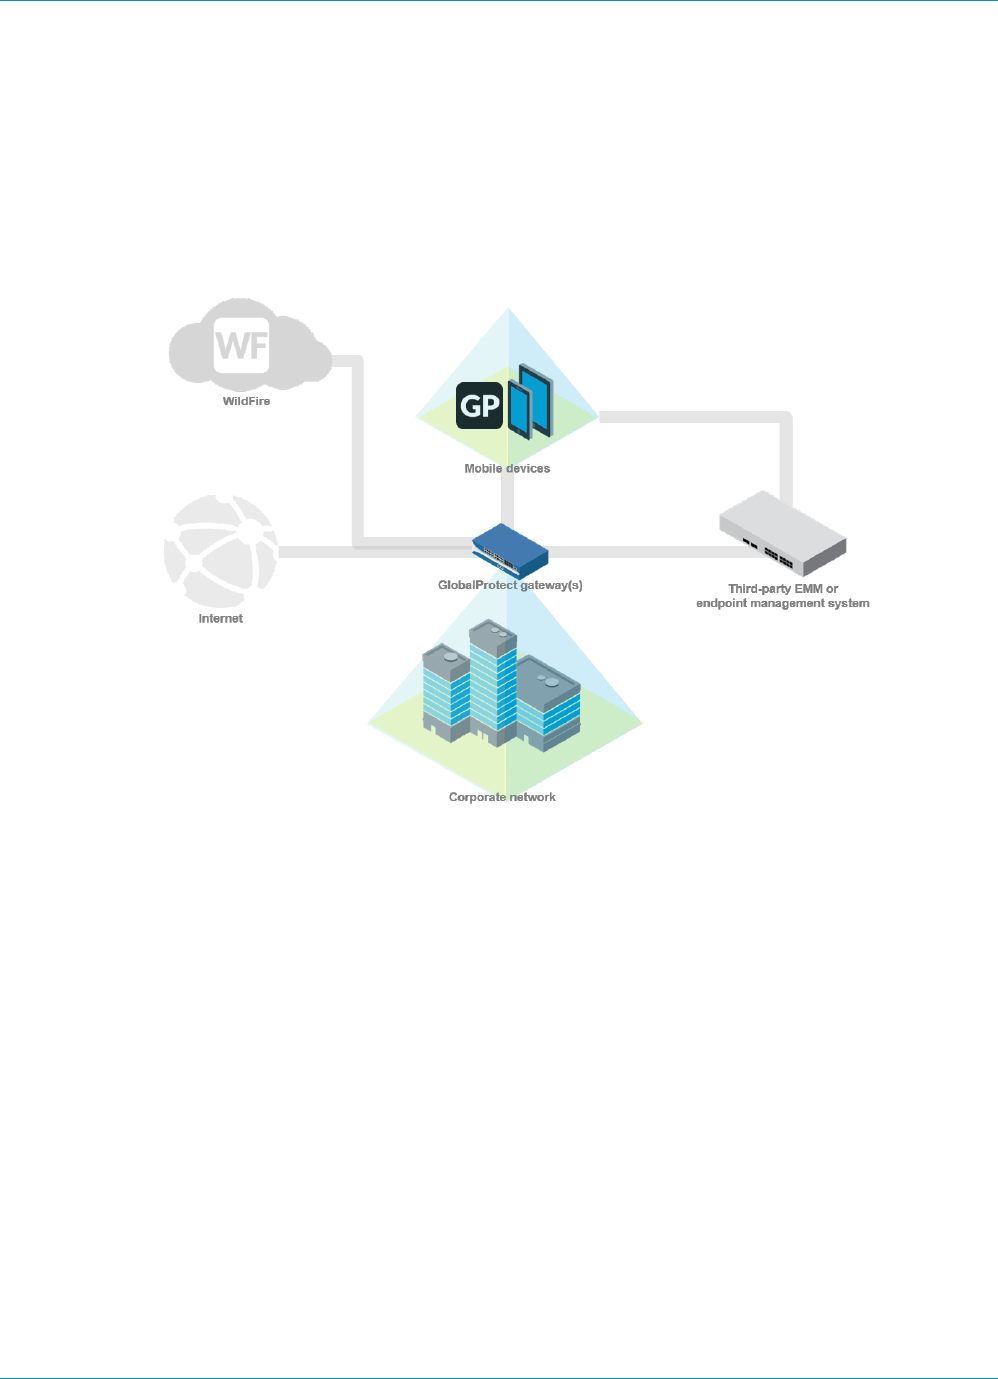
GLOBALPROTECT ADMINISTRATOR'S GUIDE | Mobile Endpoint Management 151
© 2017 Palo Alto Networks, Inc.
Mobile Endpoint Management Overview
As mobile endpoints become more powerful, end users increasingly rely on them to perform business tasks.
However, these same endpoints that access your corporate network also connect to the internet without
protection against threats and vulnerabilities. By using a third-party mobile endpoint management system
—such as a mobile device management (MDM) or enterprise mobility management (EMM) system—you can
easily manage both company-provisioned and employee-owned devices (such as in a BYOD environment).
A mobile endpoint management system simplifies the administration of mobile endpoints by enabling you to
automatically deploy your corporate account configuration and VPN settings to compliant endpoints. You
can also use your mobile endpoint management system for remediation of security breaches by interacting
with an endpoint that has been compromised. This protects both corporate data as well as personal end
user data. For example, if an end user loses an endpoint, you can remotely lock the endpoint from the
mobile endpoint management system or even wipe the endpoint (either completely or selectively).
In addition to the account provisioning and remote device management functions that a mobile endpoint
management system can provide, when integrated with your existing GlobalProtect™ VPN infrastructure,
you use host information that the endpoint reports to enforce security policies for access to apps through
the GlobalProtect gateway. You can also use the monitoring tools that are built into the Palo Alto next-
generation firewall to monitor mobile endpoint traffic.

152 GLOBALPROTECT ADMINISTRATOR'S GUIDE | Mobile Endpoint Management
© 2017 Palo Alto Networks, Inc.
Set Up a Mobile Endpoint Management
System
To set up a mobile endpoint management system, use the following workflow:
STEP 1 | Set up the GlobalProtect Infrastructure.
1. Create Interfaces and Zones for GlobalProtect on page 15.
2. Enable SSL Between GlobalProtect Components on page 17.
3. Set up GlobalProtect User Authentication. Refer to About GlobalProtect User Authentication on page
27.
4. Enable Group Mapping on page 63.
5. Configure a GlobalProtect Gateway on page 72.
6. Activate Licenses for each firewall running a gateway(s) that supports the GlobalProtect app on
mobile endpoints.
7. Set Up Access to the GlobalProtect Portal on page 83.
STEP 2 | Set up the mobile endpoint management system and decide whether to support only
corporate-issued endpoints or both corporate-issued and personal endpoints.
See the instructions for your mobile endpoint management system, mobile device management (MDM)
system, or enterprise mobility management (EMM) system.
STEP 3 | Obtain the GlobalProtect app for mobile endpoints.
• App store—Download and Install the GlobalProtect Mobile App on page 109
• AirWatch—Deploy the GlobalProtect Mobile App Using AirWatch on page 153
• Other third-party mobile endpoint management system—See the instructions from your vendor on
how to deploy apps to managed endpoints.
STEP 4 | Configure VPN settings for the GlobalProtect app.
•Manage the GlobalProtect App Using AirWatch on page 153
•Manage the GlobalProtect App Using a Third-Party MDM on page 164
STEP 5 | Configure polices that target mobile endpoints using host information.
Configure HIP-Based Policy Enforcement on page 177 for managed endpoints.

GLOBALPROTECT ADMINISTRATOR'S GUIDE | Mobile Endpoint Management 153
© 2017 Palo Alto Networks, Inc.
Manage the GlobalProtect App Using
AirWatch
•Deploy the GlobalProtect Mobile App Using AirWatch on page 153
•Configure the GlobalProtect App for iOS Using AirWatch on page 154
•Configure the GlobalProtect App for Android Using AirWatch on page 157
•Configure the GlobalProtect App for Windows 10 UWP Using AirWatch on page 161
Deploy the GlobalProtect Mobile App Using AirWatch
The GlobalProtect app provides a simple way to extend the enterprise security policies out to mobile
endpoints. As with other remote hosts running the GlobalProtect agent, the mobile app provides secure
access to your corporate network over an IPSec or SSL VPN tunnel. The app connects to the gateway
that is closest to the end user’s current location. In addition, traffic to and from the mobile endpoint is
automatically subject to the same security policy enforcement as other hosts on your corporate network.
Like the GlobalProtect agent, the app collects information about the host configuration and can use this
information for enhanced HIP-based security policy enforcement.
There are two primary methods for installing the GlobalProtect app: You can you can install the app directly
from the app store for your endpoint (see Download and Install the GlobalProtect Mobile App on page
109); or, deploy the app from a third-party mobile endpoint management system (such as AirWatch) and
transparently push the app to your managed endpoints.
With AirWatch, you can deploy the GlobalProtect app to managed endpoints that have enrolled with
AirWatch. Endpoints running iOS or Android must download the AirWatch agent to enroll with the
AirWatch EDM. Windows 10 endpoints do not require the AirWatch agent but require you to configure
enrollment on the endpoint. After you deploy the app, configure and deploy a VPN profile to set up the
GlobalProtect app for the end user automatically.
STEP 1 | Before you begin, ensure that the endpoints to which you want to deploy the GlobalProtect
app are enrolled with AirWatch:
•Android and iOS—Download the AirWatch agent and following the prompts to enroll.
•Windows Phone and Windows 10 UWP—Configure the Windows 10 UWP endpoint to enroll with
AirWatch (from the endpoint, select Settings > Accounts > Work access > Connect).
STEP 2 | From AirWatch, select Apps & Books > Public > Add Application.
STEP 3 | Select the organization group by which this app will be managed.
STEP 4 | Select the Platform, either Apple iOS, Android, or Windows Phone.
STEP 5 | Search for the app in the app store for the endpoint or enter the URL of the GlobalProtect app
page:
•Apple iOS—https://itunes.apple.com/us/app/globalprotect/id592489989?mt=8&uo=4
•Android—https://play.google.com/store/apps/details?id=com.paloaltonetworks.globalprotect
•Windows Phone—https://www.microsoft.com/store/apps/9NBLGGH6BZL3
STEP 6 | Click Next. If you chose to search for the app the app store for the endpoint, you must also
Select the app from a list of search results.

154 GLOBALPROTECT ADMINISTRATOR'S GUIDE | Mobile Endpoint Management
© 2017 Palo Alto Networks, Inc.
If you chose to search for the GlobalProtect app for Android and did not see the app in
the list, contact your Android for Work administrator to add GlobalProtect to the list of
approved company apps.
STEP 7 | On the Assignment tab, select Assigned Smart Groups that will have access to this app.
STEP 8 | On the Deployment tab, select the Push Mode, either Auto or On Demand.
STEP 9 | Select Save & Publish to push the App Catalog to the endpoints in the Smart Groups you
assigned in the Assignment section.
STEP 10 | Next steps:
•Configure the GlobalProtect App for iOS Using AirWatch on page 154
•Configure the GlobalProtect App for Android Using AirWatch on page 157
•Configure the GlobalProtect App for Windows 10 UWP Using AirWatch on page 161
Configure the GlobalProtect App for iOS Using AirWatch
AirWatch is an Enterprise Mobility Management Platform that enables you to manage mobile endpoints,
from a central console. The GlobalProtect app provides a secure connection between AirWatch managed
mobile endpoints and the firewall at either the device or application level. Using GlobalProtect as the secure
connection allows consistent inspection of traffic and enforcement of network security policy for threat
prevention on the mobile endpoint.
•Configure a Device-Level VPN Configuration for iOS Devices Using AirWatch on page 154
•Configure a Per-App VPN Configuration for iOS Devices Using AirWatch on page 155
Configure a Device-Level VPN Configuration for iOS Devices Using
AirWatch
You can easily enable access to internal resources from your managed mobile endpoints by configuring VPN
access using AirWatch. In a device-level VPN configuration, you route all of the traffic that matches the
access routes configured on the GlobalProtect gateway through the GlobalProtect VPN.
STEP 1 | Download the GlobalProtect app for iOS.
•Deploy the GlobalProtect Mobile App Using AirWatch on page 153.
• Download the GlobalProtect app directly from the App Store.
STEP 2 | From the AirWatch console, modify or add a new Apple iOS profile.
1. Navigate to Devices > Profiles > List View.
2. Select an existing profile to add the VPN configuration to it or add a new one (select Add > Apple
iOS).
3. Configure General profile settings:
•Description—A brief description of the profile that indicates its purpose.
•Deployment—Determines if the profile will be automatically removed upon unenrollment, either
Managed (the profile is removed) or Manual (the profile remains installed until removed by the end
user).
•Assignment Type—Determines how the profile is deployed to endpoints. Select Auto to deploy the
profile to all endpoints automatically, Optional to enable the end user to install the profile from the
Self-Service Portal (SSP) or to manually deploy the profile to individual endpoints, or Compliance to
deploy the profile when an end user violates a compliance policy applicable to the endpoint.

GLOBALPROTECT ADMINISTRATOR'S GUIDE | Mobile Endpoint Management 155
© 2017 Palo Alto Networks, Inc.
•Managed By—The Organization Group with administrative access to the profile.
•Assigned Smart Group—The Smart Group to which you want the device profile added. Includes an
option to create a new Smart Group which can be configured with specs for minimum OS, device
models, ownership categories, organization groups and more.
•Allow Removal—Determines whether or not the profile can be removed by the endpoint's end user.
Select Always to enable the end user to manually remove the profile at any time, Never to prevent
the end user from removing the profile from the endpoint, or With Authorization to enable the end
user to remove the profile with the authorization of the administrator. Choosing With Authorization
adds a required Password.
•Exclusions—If Yes is selected, a new field Excluded Smart Groups displays, enabling you to select
those Smart Groups you wish to exclude from the assignment of this device profile.
STEP 3 | To configure the VPN settings, select VPN and then click Configure.
STEP 4 | Configure connection information, including:
•Connection Name—Enter the name of the connection name to be displayed.
•Connection Type—Select Palo Alto Networks GlobalProtect as the network connection method.
•Server—Enter the hostname or IP address of the GlobalProtect portal to which to connect.
•Account—Enter the username of the VPN account or click add ( “+” ) to view supported lookup values
you can insert.
•Authentication—Choose the method to authenticate end users. Follow the related prompts to enter a
Password or upload an Identity Certificate to use to authenticate users; Or, if you selected Password
+ Certificate, follow the related prompts for both.
STEP 5 | Save & Publish your changes.
Configure a Per-App VPN Configuration for iOS Devices Using AirWatch
You can easily enable access to internal resources from your managed mobile endpoints by configuring
GlobalProtect VPN access using AirWatch. In a per-app VPN configuration, you can specify which managed
apps on the endpoint can send traffic through the GlobalProtect VPN tunnel. Unmanaged apps will
continue to connect directly to the Internet instead of through the GlobalProtect VPN tunnel.
STEP 1 | Download the GlobalProtect app for iOS:
•Deploy the GlobalProtect Mobile App Using AirWatch on page 153.
• Download the GlobalProtect app directly from the App Store.
STEP 2 | From the AirWatch console, modify or add a new Apple iOS profile:
1. Navigate to Devices > Profiles > List View.
2. Select an existing profile to add the VPN configuration to it or add a new one (select Add > Apple
iOS).
STEP 3 | Configure General profile settings:
•Description—A brief description of the profile that indicates its purpose.
•Deployment—Determines if the profile will be automatically removed upon unenrollment, either
Managed (the profile is removed) or Manual (the profile remains installed until removed by the end
user).
•Assignment Type—Determines how the profile is deployed to endpoints. Select Auto to deploy the
profile to all endpoints automatically, Optional to enable the end user to install the profile from the
Self-Service Portal (SSP) or to manually deploy the profile to individual endpoints, or Compliance to
deploy the profile when an end user violates a compliance policy applicable to the endpoint.

156 GLOBALPROTECT ADMINISTRATOR'S GUIDE | Mobile Endpoint Management
© 2017 Palo Alto Networks, Inc.
•Managed By—The Organization Group with administrative access to the profile.
•Assigned Smart Group—The Smart Group to which you want the device profile added. Includes an
option to create a new Smart Group which can be configured with specs for minimum OS, device
models, ownership categories, organization groups and more.
•Allow Removal—Determines whether or not the profile can be removed by the endpoint's end user.
Select Always to enable the end user to manually remove the profile at any time, Never to prevent
the end user from removing the profile from the endpoint, or With Authorization to enable the end
user to remove the profile with the authorization of the administrator. Choosing With Authorization
adds a required Password.
•Exclusions—If Yes is selected, a new field Excluded Smart Groups displays, enabling you to select
those Smart Groups you wish to exclude from the assignment of this device profile.
STEP 4 | To configure the per-app VPN settings in the Apple iOS profile, select VPN and then click
Configure.
STEP 5 | Configure connection information, including:
•Connection Name—Enter the name of the connection name to be displayed.
•Connection Type—Select Palo Alto Networks GlobalProtect as the network connection method.
•Server—Enter the hostname or IP address of the GlobalProtect portal to which to connect.
•Account—Enter the username of the VPN account or click add ( “+” ) to view supported lookup values
that you can insert.
•Send All Traffic—Select this check box to force all traffic through the specified network.
•Disconnect on Idle—Allow the VPN to auto-disconnect after a specific amount of time.
• Enable Per App VPN to route all of the traffic for a managed app traffic through the GlobalProtect
VPN.
•Connect Automatically—Select this check box to allow the VPN to connect automatically to chosen
Safari Domains.
STEP 6 | Configure the authentication method to use to authenticate users. For per-app VPN, you must
use certificate-based authentication. Select User Authentication: Certificate, and then follow
the prompts to upload an Identity Certificate to use for authentication.
STEP 7 | Select either Manual or Auto Proxy type and enter the specific information needed.
STEP 8 | Click Save & Publish.
STEP 9 | Configure per-app VPN settings for a new managed app, or modify the settings for an existing
managed apps.
After configuring the settings for the app and enabling per-app VPN, you can publish the app to a group
of users and enable the app to send traffic through the GlobalProtect VPN tunnel.
1. On the main page, select Apps & Books > Public.
2. To add a new app, select Add Application. Or, to modify the settings of an existing app, locate the
GlobalProtect app in the list of Public apps and then select the edit icon in the actions menu next
to the row.
3. Select the organization group by which this app will be managed.
4. Select Apple iOS as the Platform.
5. Select your preferred method for locating the app, either by searching the App Store (by Name),
or specifying a URL for the app in the App Store (for example, to add the Box app, enter https://
itunes.apple.com/us/app/box-for-iphone-and-ipad/id290853822?mt=8&uo=4), and then click Next.
If you choose to search the App Store, you must Select the app from the list of search results.
6. On the Assignment tab, select Assigned Smart Groups that will have access to this app.

GLOBALPROTECT ADMINISTRATOR'S GUIDE | Mobile Endpoint Management 157
© 2017 Palo Alto Networks, Inc.
7. On the Deployment tab, select the Push Mode, either Auto or On Demand.
8. Select Use VPN and then select the Apple iOS profile that you created earlier in this workflow.
Only profiles that have per-app VPN enabled are available from the drop-down.
1. Select Save & Publish to push the App Catalog to the endpoints in the Smart Groups you assigned in
the Assignment section.
Configure the GlobalProtect App for Android Using AirWatch
You can use the GlobalProtect App for Android with AirWatch agent 6.0 and later releases. The AirWatch
agent interfaces with AirWatch to manage Android endpoints. Using the GlobalProtect app for Android as
the secure connection between the endpoint and the firewall allows consistent inspection of traffic and
enforcement of network security policy for threat prevention. The GlobalProtect app can provide a secure
connection at either the device or application level.
•Configure a Device-Level VPN Configuration for Android Devices Using AirWatch on page 157
•Configure a Per-App VPN Configuration for Android Devices Using AirWatch on page 158
•Enable App Scan Integration with WildFire on page 160
Configure a Device-Level VPN Configuration for Android Devices Using
AirWatch
You can easily enable access to internal resources from your managed Android mobile endpoints by
configuring VPN access using AirWatch. In a device-level VPN configuration, you route all of the traffic that
matches the access routes configured on the GlobalProtect gateway through the GlobalProtect VPN.
STEP 1 | Download the GlobalProtect app for Android:
•Deploy the GlobalProtect Mobile App Using AirWatch on page 153.
• Download the GlobalProtect app directly from Google Play.
STEP 2 | From the AirWatch console, modify or add a new Android profile.
1. Navigate to Devices > Profiles > List View.
2. Select an existing profile to which to add the VPN configuration or add a new one (select Add > Add
Profile).
3. Select Android as the platform and Device as the configuration type.
STEP 3 | Configure General profile settings:
•Name—Provide a meaningful name for this configuration.
•Version—This field is auto-populated with the latest version number of the configuration profile.
•Description—A brief description of the profile that indicates its purpose.
• Profile Scope—Scope for this profile, either Production, Staging, or Both.
•Assignment Type—Determines how the profile is deployed to endpoints. Select Auto to deploy the
profile to all endpoints automatically, Optional to enable the end user to install the profile from the
Self-Service Portal (SSP) or to manually deploy the profile to individual endpoints, or Compliance to
deploy the profile when an end user violates a compliance policy applicable to the endpoint.
•Managed By—The Organization Group with administrative access to the profile.
•Assigned Smart Group—The Smart Group to which you want the device profile added. Includes an
option to create a new Smart Group which can be configured with specs for minimum OS, device
models, ownership categories, organization groups and more.

158 GLOBALPROTECT ADMINISTRATOR'S GUIDE | Mobile Endpoint Management
© 2017 Palo Alto Networks, Inc.
•Allow Removal—Determines whether or not the profile can be removed by the endpoint's end user.
Select Always to enable the end user to manually remove the profile at any time, Never to prevent
the end user from removing the profile from the endpoint, or With Authorization to enable the end
user to remove the profile with the authorization of the administrator. Choosing With Authorization
adds a required Password.
•Exclusions—If Yes is selected, a new field Excluded Smart Groups displays, enabling you to select
those Smart Groups you wish to exclude from the assignment of this device profile.
STEP 4 | Save and Publish this profile to the assigned Smart Groups.
STEP 5 | To configure the VPN settings, select VPN and then click Configure.
STEP 6 | Configure Connection Info, including:
•Connection Type—Select GlobalProtect as the network connection method.
•Connection Name—Enter the name of the connection name that the endpoint will display.
•Server—Enter the hostname or IP address of the GlobalProtect portal to which to connect.
STEP 7 | Configure Authentication information:
1. Choose the method to authenticate end users: Password or Certificate.
2. Enter the Username of the VPN account or click add ( “+” ) to view supported lookup values that you
can insert.
3. Enter a Password or upload an Identity Certificate that GlobalProtect will use to authenticate users.
STEP 8 | Save & Publish this profile to the assigned Smart Groups.
Configure a Per-App VPN Configuration for Android Devices Using
AirWatch
You can easily enable access to internal resources from your managed mobile endpoints by configuring
GlobalProtect VPN access using AirWatch. In a per-app VPN configuration, you can specify which managed
apps on the endpoint can send traffic through the GlobalProtect VPN tunnel. Unmanaged apps will
continue to connect directly to the Internet instead of through the GlobalProtect VPN tunnel.
STEP 1 | Download the GlobalProtect app for Android:
•Deploy the GlobalProtect Mobile App Using AirWatch on page 153.
• Download the GlobalProtect app directly from Google Play.
STEP 2 | From the AirWatch console, modify or add a new Android profile.
1. Navigate to Devices > Profiles > List View.
2. Select an existing profile to which to add the VPN configuration or add a new one (select Add > Add
Profile).
3. Select Android as the platform and Device as the configuration type.
STEP 3 | Configure General profile settings:
•Name—Provide a meaningful name for this configuration.
•Version—This field is auto-populated with the latest version number of the configuration profile.
•Description—A brief description of the profile that indicates its purpose.
• Profile Scope—Scope for this profile, either Production, Staging, or Both.
•Assignment Type—Determines how the profile is deployed to endpoints. Select Auto to deploy the
profile to all endpoints automatically, Optional to enable the end user to install the profile from the

GLOBALPROTECT ADMINISTRATOR'S GUIDE | Mobile Endpoint Management 159
© 2017 Palo Alto Networks, Inc.
Self-Service Portal (SSP) or to manually deploy the profile to individual endpoints, or Compliance to
deploy the profile when an end user violates a compliance policy applicable to the endpoint.
•Managed By—The Organization Group with administrative access to the profile.
•Assigned Smart Group—The Smart Group to which you want the device profile added. Includes an
option to create a new Smart Group which can be configured with specs for minimum OS, device
models, ownership categories, organization groups and more.
•Allow Removal—Determines whether or not the profile can be removed by the endpoint's end user.
Select Always to enable the end user to manually remove the profile at any time, Never to prevent
the end user from removing the profile from the endpoint, or With Authorization to enable the end
user to remove the profile with the authorization of the administrator. Choosing With Authorization
adds a required Password.
•Exclusions—When you select Yes, the AirWatch console displays an Excluded Smart Groups field
which you can use to select those Smart Groups you wish to exclude from the assignment of this
device profile.
STEP 4 | Save and Publish this profile to the assigned Smart Groups.
STEP 5 | To configure the VPN settings:
1. Select VPN and then click Configure.
2. Configure Connection Info, including:
•Connection Type—Select GlobalProtect as the network connection method.
•Connection Name—Enter the name of the connection name that the endpoint will display.
•Server—Enter the hostname or IP address of the GlobalProtect portal to which to connect.
• Enable Per App VPN to route all of the traffic for a managed app traffic through the GlobalProtect
VPN.
1. Select the authentication method to use to authenticate users. For per-app VPN, you must use
certificate-based authentication. Select User Authentication: Certificate, and then follow the
prompts to upload an Identity Certificate to use for authentication.
2. Save & Publish this profile to the assigned Smart Groups.
STEP 6 | Configure per-app VPN settings for a new managed app, or modify the settings for an existing
managed apps:
1. On the main page, select Apps & Books > Applications > List View > Public.
2. To add a new app, select Add Application. Or, to modify the settings of an existing app, locate the
app in the list of Public apps and then select the edit icon in the actions menu next to the row.
3. Select the organization group by which this app will be managed.
4. Select Android as the Platform.
5. Select your preferred method for locating the app, either by specifying a URL or importing the app
from the app store (Google Play). To search by URL, you must also enter the Google Play Store URL
for the app (for example, to search for the Box app by URL, enter https://play.google.com/store/
apps/details?id=com.box.android).
6. Click Next. If you chose to import the app from Google Play in the previous step, you must Select
the app from the list of approved company apps. If you do not see the app in the list, contact your
Android for Work administrator to approve the app.
7. On the Assignment tab, select Assigned Smart Groups that will have access to this app.
8. On the Deployment tab, select the Push Mode, either Auto or On Demand.
9. Select Use VPN and then select the Android profile that you created earlier in this workflow.
Only profiles that have per-app VPN enabled are available from the drop-down.

160 GLOBALPROTECT ADMINISTRATOR'S GUIDE | Mobile Endpoint Management
© 2017 Palo Alto Networks, Inc.
1. Save & Publish the configuration to the assigned Smart Groups.
STEP 7 | Configure Authentication information:
1. Choose the method to authenticate end users: Password or Certificate.
2. Enter the Username of the VPN account or click add ( “+” ) to view supported lookup values that you
can insert.
3. Enter a Password or upload an Identity Certificate that GlobalProtect will use to authenticate users.
STEP 8 | Save & Publish this profile to the assigned Smart Groups.
Enable App Scan Integration with WildFire
By enabling App Scan in AirWatch, you can leverage WildFire threat intelligence about apps to detect
malware on Android endpoints. When enabled, the AirWatch agent sends the list of apps that are installed
on the Android endpoint to AirWatch. This occurs during enrollment and subsequently on any device
check-in. AirWatch then periodically queries WildFire for verdicts and can take compliance action on the
endpoint based on the verdict.
STEP 1 | Before you begin, obtain a WildFire API key. If you do not already have an API key, contact
Support.
STEP 2 | From AirWatch, select Groups & Settings > All Settings > Apps > App Scan > Third Party
Integration.
STEP 3 | Select Current Setting: Override.
STEP 4 | Select Enable Third Party App Scan Analysis to enable communication between AirWatch and
WildFire.
STEP 5 | Choose Palo Alto Networks WildFire from the Choose App Scan Vendor drop-down.
STEP 6 | Enter your WildFire API key.
STEP 7 | Click Test Connection to ensure that AirWatch can communicate with WildFire. If the test is
not successful, verify connectivity to the Internet, re-enter the API key, and then try again.
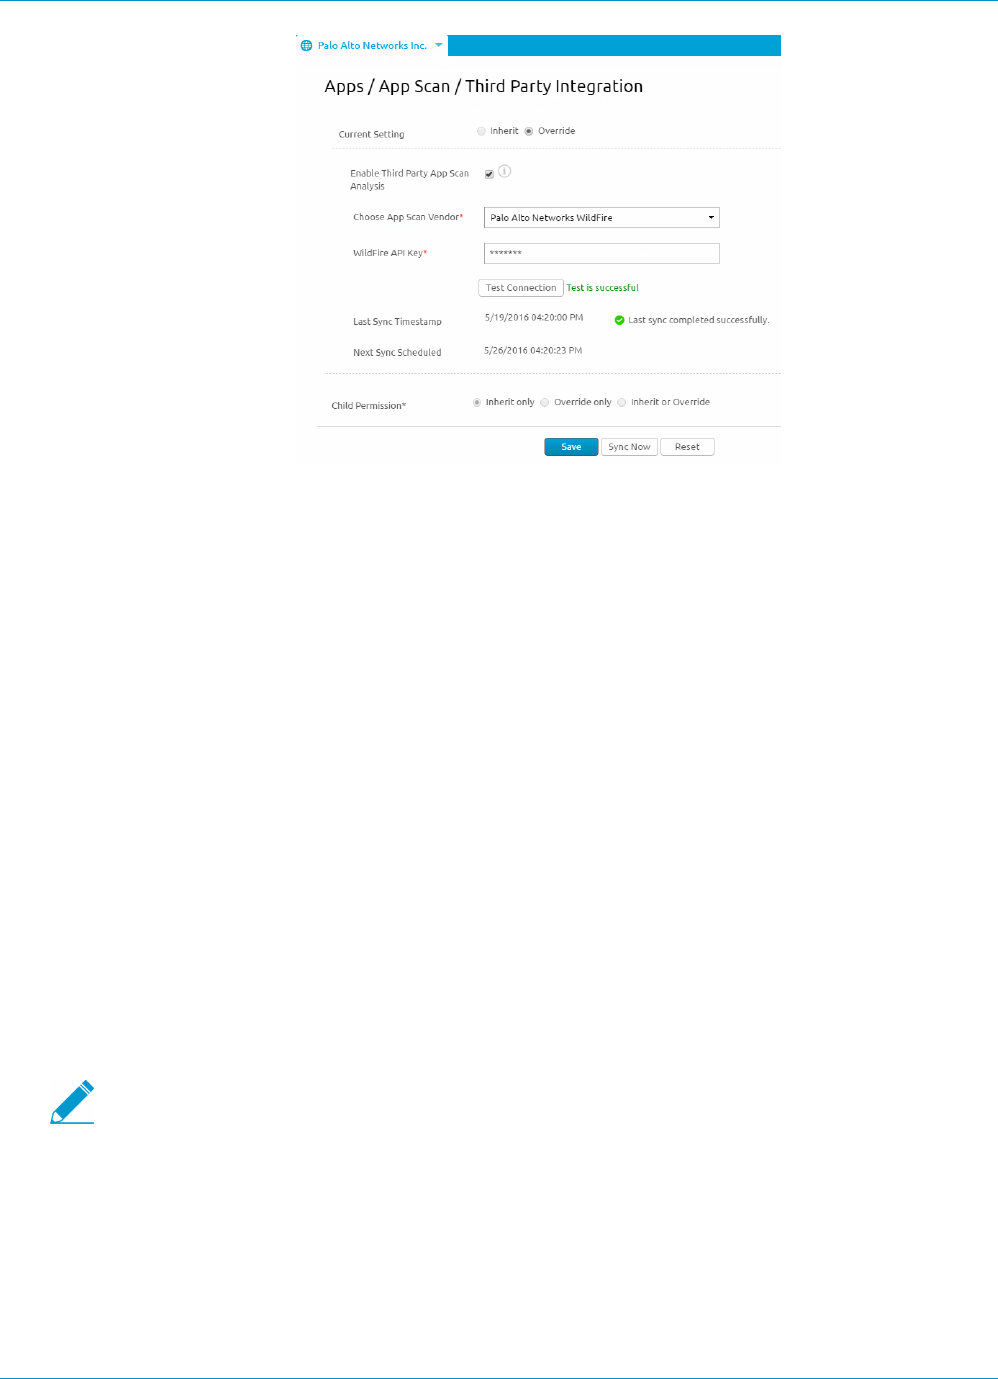
GLOBALPROTECT ADMINISTRATOR'S GUIDE | Mobile Endpoint Management 161
© 2017 Palo Alto Networks, Inc.
STEP 8 | Save your changes. AirWatch schedules a synchronization task to communicate with WildFire
to obtain the latest verdicts for application hashes and runs the task at regular intervals. Click
Sync Now to initiate a manual sync with WildFire.
Configure the GlobalProtect App for Windows 10 UWP Using
AirWatch
Using the GlobalProtect app for Windows10UWP as the secure connection between the endpoint and
the firewall allows consistent inspection of traffic and enforcement of network security policy for threat
prevention.
The GlobalProtect app for Windows 10 UWP supports the following configurations using AirWatch:
•Per-App VPN—Specifies which managed apps on the endpoint can send traffic through the secure
tunnel. Unmanaged apps will continue to connect directly to the Internet instead of through the secure
connection.
•Device-Level VPN—Sends all traffic that matches specific filters (such as port and IP address) through
the VPN irrespective of app. Device-level VPN configurations also support the ability to force the secure
connection to be Always On. For even tighter security requirements, you can enable the VPN Lockdown
option which both forces the secure connection to always be on and connected and disables network
access when the app is not connected. This configuration is similar to the Enforce GlobalProtect for
Network Access option that you would typically configure in a GlobalProtect portal configuration.
Because AirWatch does not yet list GlobalProtect as an official connection provider for
Windows endpoints, you must select an alternate VPN provider, edit the settings for the
GlobalProtect app, and import the configuration back into the VPN profile as described in the
following workflow.
STEP 1 | Download the GlobalProtect app for Windows 10 UWP:
•Deploy the GlobalProtect Mobile App Using AirWatch.
• Download the GlobalProtect app directly from the Microsoft Store.
STEP 2 | From the AirWatch console, add a new Windows 10 UWP profile:

162 GLOBALPROTECT ADMINISTRATOR'S GUIDE | Mobile Endpoint Management
© 2017 Palo Alto Networks, Inc.
1. Navigate to Devices > Profiles > List View.
2. Select Add > Add Profile.
3. Select Windows as the platform and Windows Phone as the configuration type.
4. Configure General profile settings such as a meaningful Name for this configuration and a brief
Description of the profile that indicates its purpose.
5. Save and Publish this profile to the assigned Smart Groups.
STEP 3 | To configure the VPN connection settings, select VPN and then click Configure.
STEP 4 | Select Configure Connection Info, including:
•Connection Name—Enter the name of the connection name that the endpoint will display.
•Connection Type—Select an alternate provider (do not select IKEv2, L2TP, PPTP, or Automatic as
these do not have the associated vendor settings required for the GlobalProtect VPN profile).
You must select the alternate vendor because AirWatch does not yet list GlobalProtect
as an official connection provider for Windows endpoints.
•Server—Enter the hostname or IP address of the GlobalProtect portal to which to connect.
STEP 5 | Configure the authentication settings for the VPN connection:
1. Select the Authentication Type to choose the method to authenticate end users.
2. To permit GlobalProtect to save user credentials, enable Remember Credentials in the Policies area.
STEP 6 | Configure VPN traffic rules to apply device wide or on a per-app basis:
•Add New Per-App VPN Rule—Specify rules for specific legacy apps (typically .exe files) or modern
apps (typically downloaded from the Microsoft Store) that determine whether to automatically
establish the VPN connection when the app is launched and whether to send app traffic through
the VPN. You can also configure specific traffic filters to route only app traffic through the VPN if it
matches match criteria such as IP address and port.
•Add New Device-Wide VPN Rule—Specify routing filters to send traffic matching a specific route
through the VPN. These rules are not bound by application and are evaluated across the endpoint. If
the traffic matches the match criteria, it is routed through the VPN.
STEP 7 | (Device-level VPN only) If desired, configure your preference of Always-On connection:
1. To maintain the VPN connection always, enable either of the following options:
•Always On—Force the secure connection to be always on.
•VPN Lockdown—Force the secure connection to be always on and connected, and disable
the network access when the app is not connected. The VPN Lockdown option in AirWatch is
similar to the Enforce GlobalProtect for Network Access option that you would configure in a
GlobalProtect portal configuration.
2. Specify Trusted Network addresses if you want GlobalProtect to connect only when it detects a
trusted network connection.
3. Save & Publish your changes.
STEP 8 | To adapt the configuration for GlobalProtect, edit the VPN profile in XML.
To minimize additional edits in the raw XML, review the settings in your VPN profile
before you export the configuration. If you need to change a setting after you export the
VPN profile, you can make the changes in the raw XML or, you can update the setting in
the VPN profile and perform this step again.

GLOBALPROTECT ADMINISTRATOR'S GUIDE | Mobile Endpoint Management 163
© 2017 Palo Alto Networks, Inc.
1. In the Devices > Profiles > List View, select the radio button next to the new profile you added in the
previous steps, and then select </>XML at the top of the table. AirWatch opens the XML view of the
profile.
2. Export the profile and then open it in a text editor of your choice.
3. Edit the following settings for GlobalProtect:
• In the LoclURI element that specifies the PluginPackageFamilyName, change the element to:
<LocURI>./Vendor/MSFT/VPNv2/PaloAltoNetworks/PluginProfile/
PluginPackageFamilyName</LocURI>
• In the Data element that follows, change the value to:
<Data>PaloAltoNetworks.GlobalProtect_rn9aeerfb38dg</Data>
1. Save your changes to the exported profile.
2. Return to AirWatch and the Devices > Profiles > List View.
3. Create (select Add > Add Profile > Windows > Windows Phone) and name a new profile.
4. Select Custom Settings > Configure, and then copy and paste the edited configuration.
5. Save & Publish your changes.
STEP 9 | Clean up the original profile: Select the original profile from the Devices > Profiles > List View,
select More Actions > Deactivate. AirWatch moves the profile to the Inactive list.
STEP 10 | Test the configuration.
164 GLOBALPROTECT ADMINISTRATOR'S GUIDE | Mobile Endpoint Management
© 2017 Palo Alto Networks, Inc.
Manage the GlobalProtect App Using a Third-
Party MDM
You can use any third-party mobile device management system, such as a mobile device management
(MDM) system, that manages an Android or iOS mobile endpoint to deploy and configure the GlobalProtect
app.
• Manage the GlobalProtect App for iOS Using a Third-Party MDM System
•Configure the GlobalProtect App for iOS on page 164
•Example: GlobalProtect iOS App Device-Level VPN Configuration on page 165
•Example: GlobalProtect iOS App App-Level VPN Configuration on page 166
• Manage the GlobalProtect App for Android Using a Third-Party MDM System
•Configure the GlobalProtect App for Android on page 168
•Example: Set VPN Configuration on page 169
•Example: Remove VPN Configuration on page 169
Configure the GlobalProtect App for iOS
While a third-party MDM system allows you to push configuration settings that allow access to your
corporate resources and provides a mechanism for enforcing device restrictions, it does not secure the
connection between the mobile endpoint and services it connects to. To enable the client to establish
secure tunnel connections, you must enable VPN support on the endpoint.
The following table describes typical settings that you can configure using your third-party MDM system.
Setting Description Value
Connection Type Type of connection enabled by the
policy.
Custom SSL
Identifier Identifier for the custom SSL VPN
in reverse DNS format.
com.paloaltonetworks.
GlobalProtect.vpnplugin
Server Host name or IP address of the
GlobalProtect portal.
<hostname or IP address>
For example:
gp.paloaltonetworks.com
Account User account for authenticating the
connection.
<username>
User Authentication Authentication type for the
connection.
Certificate | Password
Credential (Certificate User Authentication
only) Credential for authenticating
the connection.
<credential>
For example: clientcredial.p12

GLOBALPROTECT ADMINISTRATOR'S GUIDE | Mobile Endpoint Management 165
© 2017 Palo Alto Networks, Inc.
Setting Description Value
Enable VPN On
Demand
(Optional) Domain and hostname
that will establish the connection
and the on-demand action:
• Always establish a connection
• Never establish a connection
• Establish a connection if needed
<domain and hostname and the
on-demand action>
For example:
gp.acme.com; Never establish
Example: GlobalProtect iOS App Device-Level VPN Configuration
The following example shows the XML configuration containing a VPN payload that you can use to verify
the device-level VPN configuration of the GlobalProtect app for iOS.
<?xml version="1.0"
encoding="UTF-8"?>
<!DOCTYPE plist PUBLIC "-//Apple//DTD PLIST 1.0//EN" "http://www.apple.com/
DTDs/PropertyList-1.0.dtd">
<plist version="1.0">
<dict>
<key>PayloadContent</key>
<array>
<dict>
<key>PayloadDescription</key>
<string>Configures VPN settings, including authentication.</string>
<key>PayloadDisplayName</key>
<string>VPN (Sample Device Level VPN)</string>
<key>PayloadIdentifier</key>
<string>Sample Device Level VPN.vpn</string>
<key>PayloadOrganization</key>
<string>Palo Alto Networks</string>
<key>PayloadType</key>
<string>com.apple.vpn.managed</string>
<key>PayloadVersion</key>
<integer>1</integer>
<key>PayloadUUID</key>
<string>5436fc94-205f-7c59-0000-011d</string>
<key>UserDefinedName</key>
<string>Sample Device Level VPN</string>
<key>Proxies</key>
<dict/>
<key>VPNType</key>
<string>VPN</string>
<key>VPNSubType</key>
<string>com.paloaltonetworks.GlobalProtect.vpnplugin</string>
<key>IPv4</key>
<dict>
<key>OverridePrimary</key>
<integer>0</integer>
</dict>
<key>VPN</key>
<dict>
<key>RemoteAddress</key>
<string>cademogp.paloaltonetworks.com</string>
<key>AuthName</key>
<string></string>
<key>DisconnectOnIdle</key>

166 GLOBALPROTECT ADMINISTRATOR'S GUIDE | Mobile Endpoint Management
© 2017 Palo Alto Networks, Inc.
<integer>0</integer>
<key>OnDemandEnabled</key>
<integer>1</integer>
<key>OnDemandRules</key>
<array>
<dict>
<key>Action</key>
<string>Connect</string>
</dict>
</array>
<key>AuthenticationMethod</key>
<string>Password</string>
</dict>
<key>VendorConfig</key>
<dict>
<key>AllowPortalProfile</key>
<integer>0</integer>
<key>FromAspen</key>
<integer>1</integer>
</dict>
</dict>
</array>
<key>PayloadDisplayName</key>
<string>Sample Device Level VPN</string>
<key>PayloadOrganization</key>
<string>Palo Alto Networks</string>
<key>PayloadDescription</key>
<string>Profile Description</string>
<key>PayloadIdentifier</key>
<string>Sample Device Level VPN</string>
<key>PayloadType</key>
<string>Configuration</string>
<key>PayloadVersion</key>
<integer>1</integer>
<key>PayloadUUID</key>
<string>5436fc94-205f-7c59-0000-011c</string>
<key>PayloadRemovalDisallowed</key>
<false/>
</dict>
</plist>
Example: GlobalProtect iOS App App-Level VPN Configuration
The following example shows the XML configuration containing a VPN payload that you can use to verify
the app-level VPN configuration of the GlobalProtect app for iOS.
<?xml version="1.0"
encoding="UTF-8"?>
<!DOCTYPE plist PUBLIC "-//Apple//DTD PLIST 1.0//EN" "http://www.apple.com/
DTDs/PropertyList-1.0.dtd">
<plist version="1.0">
<dict>
<key>PayloadContent</key>
<array>
<dict>
<key>PayloadDescription</key>
<string>Configures VPN settings, including authentication.</string>
<key>PayloadDisplayName</key>
<string>VPN (Sample App Level VPN)</string>
<key>PayloadIdentifier</key>

GLOBALPROTECT ADMINISTRATOR'S GUIDE | Mobile Endpoint Management 167
© 2017 Palo Alto Networks, Inc.
<string>Sample App Level VPN.vpn</string>
<key>PayloadOrganization</key>
<string>Palo Alto Networks</string>
<key>PayloadType</key>
<string>com.apple.vpn.managed.applayer</string>
<key>PayloadVersion</key>
<integer>1</integer>
<key>VPNUUID</key>
<string>cGFuU2FtcGxlIEFwcCBMZXZlbCBWUE52cG5TYW1wbGUgQXBwIExldmVsIFZQTg==</
string>
<key>SafariDomains</key>
<array>
<string>*.paloaltonetworks.com</string>
</array>
<key>PayloadUUID</key>
<string>54370008-205f-7c59-0000-01a1</string>
<key>UserDefinedName</key>
<string>Sample App Level VPN</string>
<key>Proxies</key>
<dict/>
<key>VPNType</key>
<string>VPN</string>
<key>VPNSubType</key>
<string>com.paloaltonetworks.GlobalProtect.vpnplugin</string>
<key>IPv4</key>
<dict>
<key>OverridePrimary</key>
<integer>0</integer>
</dict>
<key>VPN</key>
<dict>
<key>RemoteAddress</key>
<string>cademogp.paloaltonetworks.com</string>
<key>AuthName</key>
<string></string>
<key>OnDemandMatchAppEnabled</key>
<integer>1</integer>
<key>OnDemandEnabled</key>
<integer>1</integer>
<key>DisconnectOnIdle</key>
<integer>0</integer>
<key>AuthenticationMethod</key>
<string>Password</string>
</dict>
<key>VendorConfig</key>
<dict>
<key>OnlyAppLevel</key>
<integer>1</integer>
<key>AllowPortalProfile</key>
<integer>0</integer>
<key>FromAspen</key>
<integer>1</integer>
</dict>
</dict>
</array>
<key>PayloadDisplayName</key>
<string>Sample App Level VPN</string>
<key>PayloadOrganization</key>
<string>Palo Alto Networks</string>
<key>PayloadDescription</key>
<string>Profile Description</string>
<key>PayloadIdentifier</key>

168 GLOBALPROTECT ADMINISTRATOR'S GUIDE | Mobile Endpoint Management
© 2017 Palo Alto Networks, Inc.
<string>Sample App Level VPN</string>
<key>PayloadType</key>
<string>Configuration</string>
<key>PayloadVersion</key>
<integer>1</integer>
<key>PayloadUUID</key>
<string>5436fc94-205f-7c59-0000-011c</string>
<key>PayloadRemovalDisallowed</key>
<false/>
</dict>
</plist>
Configure the GlobalProtect App for Android
You can deploy and configure the GlobalProtect app on Android For Work devices from any third-party
mobile device management (MDM) system supporting Android For Work App data restrictions.
On Android devices, traffic is routed through the VPN tunnel according to the access routes configured on
the GlobalProtect gateway. From your third-party MDM that manages Android for Work devices, you can
further refine the traffic that is routed though the VPN tunnel.
In an environment where the device is corporately owned, the device owner manages the entire device
including all the apps installed on that device. By default, all installed apps can send traffic through the VPN
tunnel according to the access routes defined on the gateway.
In a bring-your-own-device (BYOD) environment, the device is not corporately owned and uses a Work
Profile to separate business and personal apps. By default only managed apps in the Work Profile can send
traffic through the VPN tunnel according to the access routes defined on the gateway. Apps installed on the
personal side of the device can not send traffic through the VPN tunnel set by the managed GlobalProtect
app installed in the Work Profile.
To route traffic from an even smaller set of apps, you can enable Per-App VPN so that GlobalProtect only
routes traffic from specific managed apps. For Per-App VPN, you can whitelist or blacklist specific managed
apps from having their traffic routed through the VPN tunnel.
As part of the VPN configuration, you can also specify how the user connects to the VPN. When you
configure the VPN connection method as user-logon, the GlobalProtect app will establish a connection
automatically. When you configure the VPN connection method as on-demand, users can initiate a
connection manually when attempting to connect to the VPN remotely.
The VPN connect method defined in the MDM takes precedence over the connect method
defined in the GlobalProtect portal configuration.
Removing the VPN configuration automatically restores the GlobalProtect app to the original configuration
settings.
To configure the GlobalProtect app for Android, configure the following Android App Restrictions.
Key Value Type Example
portal String 10.1.8.190
username String john
password String Passwd!234

GLOBALPROTECT ADMINISTRATOR'S GUIDE | Mobile Endpoint Management 169
© 2017 Palo Alto Networks, Inc.
Key Value Type Example
certificate String (in
Base64)
DAFDSaweEWQ23wDSAFD….
client_certificate_passphrase String PA$$W0RD$123
app_list* String whiltelist | blacklist:
com.google.calendar; com.android.email;
com.android.chrome
connect_method String user-logon | on-demand
remove_vpn_config_via_
restriction
Boolean true | false
*The app_list key specifies the configuration for Per-App VPN. Begin the string with either the whitelist
or blacklist, and follow it with an array of app names separated by semicolon. The whitelist specifies the
apps that will use the VPN tunnel for network communication. The network traffic for any other app that is
not in the whitelist or expressly listed in the blacklist will not go through the VPN tunnel.
Example: Set VPN Configuration
private static String RESTRICTION_PORTAL
= "portal";
private static String RESTRICTION_USERNAME = "username";
private static String RESTRICTION_PASSWORD = "password";
private static String RESTRICTION_CONNECT_METHOD = "connect_method";
private static String RESTRICTION_CLIENT_CERTIFICATE
= "client_certificate";
private static String RESTRICTION_CLIENT_CERTIFICATE_PASSPHRASE
= "client_certificate_passphrase";
private static String RESTRICTION_APP_LIST = "app_list";
private static String RESTRICTION_REMOVE_CONFIG =
"remove_vpn_config_via_restriction";
Bundle config = new Bundle();
config.putString(RESTRICTION_PORTAL, "192.168.1.1");
config.putString(RESTRICTION_USERNAME, "john");
config.putString(RESTRICTION_PASSWORD, "Passwd!234");
config.putString(RESTRICTION_CONNECT_METHOD, "user-logon");
config.putString(RESTRICTION_CLIENT_CERTIFICATE, "DAFDSaweEWQ23wDSAFD….");
config.putString(RESTRICTION_CLIENT_CERTIFICATE_PASSPHRASE,
"PA$$W0RD$123");
config.putString(RESTRICTION_APP_LIST,
"whitelist:com.android.chrome;com.android.calendar");
DevicePolicyManager dpm = (DevicePolicyManager)
getSystemService(Context.DEVICE_POLICY_SERVICE);
dpm.setApplicationRestrictions(EnforcerDeviceAdminReceiver.getComponentName(this),
"com.paloaltonetworks.globalprotect", config);
Example: Remove VPN Configuration
Bundle config = new Bundle();

170 GLOBALPROTECT ADMINISTRATOR'S GUIDE | Mobile Endpoint Management
config.putBoolean(RESTRICTION_REMOVE_CONFIG, true );
DevicePolicyManager dpm = (DevicePolicyManager)
getSystemService(Context.DEVICE_POLICY_SERVICE);
dpm.setApplicationRestrictions(EnforcerDeviceAdminReceiver.
getComponentName(this),"com.paloaltonetworks.globalprotect",
config);

171
Host Information
Although you may have stringent security at your corporate network border, your network
is really only as secure as the end devices that are accessing it. With today’s workforce
becoming more and more mobile, often requiring access to corporate resources from a variety
of locations—airports, coffee shops, hotels—and from a variety of devices—both company-
provisioned and personal—you must logically extend your network’s security out to your
endpoints to ensure comprehensive and consistent security enforcement. The GlobalProtect™
Host Information Profile (HIP) feature enables you to collect information about the security
status of your end hosts—such as whether they have the latest security patches and antivirus
definitions installed, whether they have disk encryption enabled, whether the device is
jailbroken or rooted (mobile devices only), or whether it is running specific software you
require within your organization, including custom applications—and base the decision as to
whether to allow or deny access to a specific host based on adherence to the host policies you
define.
The following topics provide information about the use of host information in policy
enforcement. It includes the following sections:
> About Host Information on page 173
> Configure HIP-Based Policy Enforcement on page 177
> Collect Application and Process Data From Clients on page 184
> Block Device Access on page 190
> Configure Windows User-ID Agent to Collect Host Information on page 192

172 GLOBALPROTECT ADMINISTRATOR'S GUIDE | Host Information
© 2017 Palo Alto Networks, Inc.

GLOBALPROTECT ADMINISTRATOR'S GUIDE | Host Information 173
© 2017 Palo Alto Networks, Inc.
About Host Information
One of the jobs of the GlobalProtect agent is to collect information about the host it is running on. The
agent then submits this host information to the GlobalProtect gateway upon successfully connecting. The
gateway matches this raw host information submitted by the agent against any HIP objects and HIP profiles
you have defined. If it finds a match, it generates an entry in the HIP Match log. Additionally, if it finds a HIP
profile match in a policy rule, it enforces the corresponding security policy.
Using host information profiles for policy enforcement enables granular security that ensures that the
remote hosts accessing your critical resources are adequately maintained and in adherence with your
security standards before they are allowed access to your network resources. For example, before allowing
access to your most sensitive data systems, you might want to ensure that the hosts accessing the data
have encryption enabled on their hard drives. You can enforce this policy by creating a security rule that
only allows access to the application if the client system has encryption enabled. In addition, for clients that
are not in compliance with this rule, you could create a notification message that alerts users as to why they
have been denied access and links them to the file share where they can access the installation program for
the missing encryption software (of course, to allow the user to access that file share you would have to
create a corresponding security rule allowing access to the particular share for hosts with that specific HIP
profile match).
•What Data Does the GlobalProtect Agent Collect? on page 173
•How Does the Gateway Use the Host Information to Enforce Policy? on page 175
•How Do Users Know if Their Systems are Compliant? on page 176
•How Do I Get Visibility into the State of the End Clients? on page 176
What Data Does the GlobalProtect Agent Collect?
By default, the GlobalProtect agent collects vendor-specific data about the end user security packages that
are running on the computer (as compiled by the OPSWAT global partnership program) and reports this
data to the GlobalProtect gateway for use in policy enforcement.
Because security software must continually evolve to ensure end user protection, your GlobalProtect
gateway licenses also enable you to get dynamic updates for the GlobalProtect data file with the latest
patch and software versions available for each package.
While the agent collects a comprehensive amount of data about the host it is running on, you may have
additional software that you require your end-users to run in order to connect to your network or to access
certain resources. In this case, you can define custom checks that instruct the agent to collect specific
registry information (on Windows clients), preference list (plist) information (on Mac OS clients), or to
collect information about whether or not specific services are running on the host.
The agent collects data about the following categories of information by default, to help to identify the
security state of the host:
Table 6: Table: Data Collection Categories
Category Data Collected
General Information about the host itself, including the hostname, logon
domain, operating system, client version, and, for Windows systems,
the domain to which the machine belongs.
For Windows clients’ domain, the GlobalProtect
agent collects the domain defined for

174 GLOBALPROTECT ADMINISTRATOR'S GUIDE | Host Information
© 2017 Palo Alto Networks, Inc.
Category Data Collected
ComputerNameDnsDomain, which is the DNS
domain assigned to the local computer or the cluster
associated with the local computer. This data is what is
displayed for the Windows clients’ Domain in the HIP
Match log details (Monitor > HIP Match).
Patch Management Information about any patch management software that is enabled
and/or installed on the host and whether there are any missing
patches.
Firewall Information about any client firewalls that are installed and/or enabled
on the host.
Antivirus Information about any antivirus software that is enabled and/or
installed on the host, whether or not real-time protection is enabled,
the virus definition version, last scan time, the vendor and product
name.
GlobalProtect uses OPSWAT technology to detect and assess third-
party security applications on the endpoint. By integrating with the
OPSWAT OESIS framework, GlobalProtect enables you to assess the
compliance state of the endpoint. For example, you can define HIP
objects and HIP profiles that verify the presence of a specific version
of Antivirus software from a specific vendor on the endpoint and also
ensure that it has the latest virus definition files.
Anti-Spyware Information about any anti-spyware software that is enabled and/or
installed on the host, whether or not real-time protection is enabled,
the virus definition version, last scan time, the vendor and product
name.
Disk Backup Information about whether disk backup software is installed, the last
backup time, and the vendor and product name of the software.
Disk Encryption Information about whether disk encryption software is installed, which
drives and/or paths are configured for encryption, and the vendor and
product name of the software.
Data Loss Prevention Information about whether data loss prevention (DLP) software
is installed and/or enabled for the prevention sensitive corporate
information from leaving the corporate network or from being stored
on a potentially insecure device. This information is only collected from
Windows clients.
Mobile Devices Information about the mobile device, including the device name,
logon domain, operating system, app version, and the mobile device
network information to which the device is connected. In addition,
GlobalProtect collects whether the device is rooted or jailbroken.
To collect mobile device attributes and utilize them
in HIP enforcement policies, GlobalProtect requires

GLOBALPROTECT ADMINISTRATOR'S GUIDE | Host Information 175
© 2017 Palo Alto Networks, Inc.
Category Data Collected
an MDM server. GlobalProtect currently supports HIP
integration with the AirWatch MDM server.
For devices managed by AirWatch, host information collected by the
GlobalProtect app can be supplemented with additional information
collected from the AirWatch service. Refer to Configure Windows
User-ID Agent to Collect Host Information for a list of attributes that
can be retrieved from AirWatch.
You can exclude certain categories of information from being collected on certain hosts (to save CPU cycles
and improve client response time). To do this, you create a client configuration on the portal excluding the
categories you are not interested in. For example, if you do not plan to create policy based on whether or
not client systems run disk backup software, you can exclude that category and the agent will not collect
any information about disk backup.
You can also choose to exclude collecting information from personal devices in order to allow for user
privacy. This can include excluding device location and a list of apps installed on the device that are not
managed by a third-party mobile device manager.
How Does the Gateway Use the Host Information to Enforce
Policy?
While the agent gets the information about what information to collect from the client configuration
downloaded from the portal, you define which host attributes you are interested in monitoring and/or using
for policy enforcement by creating HIP objects and HIP profiles on the gateway(s):
•HIP Objects—Provide the matching criteria to filter out the host information you are interested in using
to enforce policy from the raw data reported by the agent. For example, while the raw host data may
include information about several antivirus packages that are installed on the client you may only be
interested in one particular application that you require within your organization. In this case, you would
create a HIP object to match the specific application you are interested in enforcing.
The best way to determine what HIP objects you need is to determine how you will use the host
information you collect to enforce policy. Keep in mind that the HIP objects themselves are merely
building blocks that allow you to create the HIP profiles that are used in your security policies.
Therefore, you may want to keep your objects simple, matching on one thing, such as the presence of
a particular type of required software, membership in a specific domain, or the presence of a specific
client OS. By doing this, you will have the flexibility to create a very granular (and very powerful) HIP-
augmented policy.
•HIP Profiles—A collection of HIP objects that are to be evaluated together, either for monitoring or
for security policy enforcement. When you create your HIP profiles, you can combine the HIP objects
you previously created (as well as other HIP profiles) using Boolean logic such that when a traffic flow
is evaluated against the resulting HIP profile it will either match or not match. If there is a match, the
corresponding policy rule will be enforced; if there is not a match, the flow will be evaluated against the
next rule, as with any other policy matching criteria.
Unlike a traffic log—which only creates a log entry if there is a policy match—the HIP Match log generates
an entry whenever the raw data submitted by an agent matches a HIP object and/or a HIP profile you
have defined. This makes the HIP Match log a good resource for monitoring the state of the hosts on your
network over time—before attaching your HIP profiles to security policies—in order to help you determine
exactly what policies you believe need enforcement. See Configure HIP-Based Policy Enforcement on page
177 for details on how to create HIP objects and HIP profiles and use them as policy match criteria.

176 GLOBALPROTECT ADMINISTRATOR'S GUIDE | Host Information
© 2017 Palo Alto Networks, Inc.
How Do Users Know if Their Systems are Compliant?
By default, end users are not given any information about policy decisions that were made as a result of
enforcement of a HIP-enabled security rule. However, you can enable this functionality by defining HIP
notification messages to display when a particular HIP profile is matched and/or not matched.
The decision as to when to display a message (that is, whether to display it when the user’s configuration
matches a HIP profile in the policy or when it doesn’t match it), depends largely on your policy and what a
HIP match (or non-match) means for the user. That is, does a match mean they are granted full access to
your network resources? Or does it mean they have limited access due to a non-compliance issue?
For example, consider the following scenarios:
• You create a HIP profile that matches if the required corporate antivirus and anti-spyware software
packages are not installed. In this case, you might want to create a HIP notification message for users
who match the HIP profile telling them that they need to install the software (and, optionally, providing a
link to the file share where they can access the installer for the corresponding software).
• You create a HIP profile that matches if those same applications are installed, you might want to create
the message for users who do not match the profile, and direct them to the location of the install
package.
See Configure HIP-Based Policy Enforcement on page 177 for details on how to create HIP objects and
HIP profiles and use in defining HIP notification messages.
How Do I Get Visibility into the State of the End Clients?
Whenever an end host connects to GlobalProtect, the agent presents its HIP data to the gateway. The
gateway then uses this data to determine which HIP objects and/or HIP profiles the host matches. For each
match, it generates a HIP Match log entry. Unlike a traffic log—which only creates a log entry if there is a
policy match—the HIP Match log generates an entry whenever the raw data submitted by an agent matches
a HIP object and/or a HIP profile you have defined. This makes the HIP Match log a good resource for
monitoring the state of the hosts on your network over time—before attaching your HIP profiles to security
policies—in order to help you determine exactly what policies you believe need enforcement.
Because a HIP Match log is only generated when the host state matches a HIP object you have created,
for full visibility in to host state you may need to create multiple HIP objects to log HIP matches for hosts
that are in compliance with a particular state (for security policy enforcement purposes) as well as hosts
that are non-compliant (for visibility). For example, suppose you want to prevent a host that does not have
Antivirus software installed from connecting to the network. In this case you would create a HIP object that
matches hosts that have a particular Antivirus software installed. By including this object in a HIP profile
and attaching it to the security policy rule that allows access from your VPN zone, you can ensure that only
hosts that are protected with antivirus software can connect.
However, in this case you would not be able to see in the HIP Match log which particular hosts are not
in compliance with this requirement. If you wanted to also see a log for hosts that do not have Antivirus
software installed so that you can follow up with the users, you can also create a HIP object that matches
the condition where the Antivirus software is not installed. Because this object is only needed for logging
purposes, you do not need to add it to a HIP profile or attach it to a security policy rule.
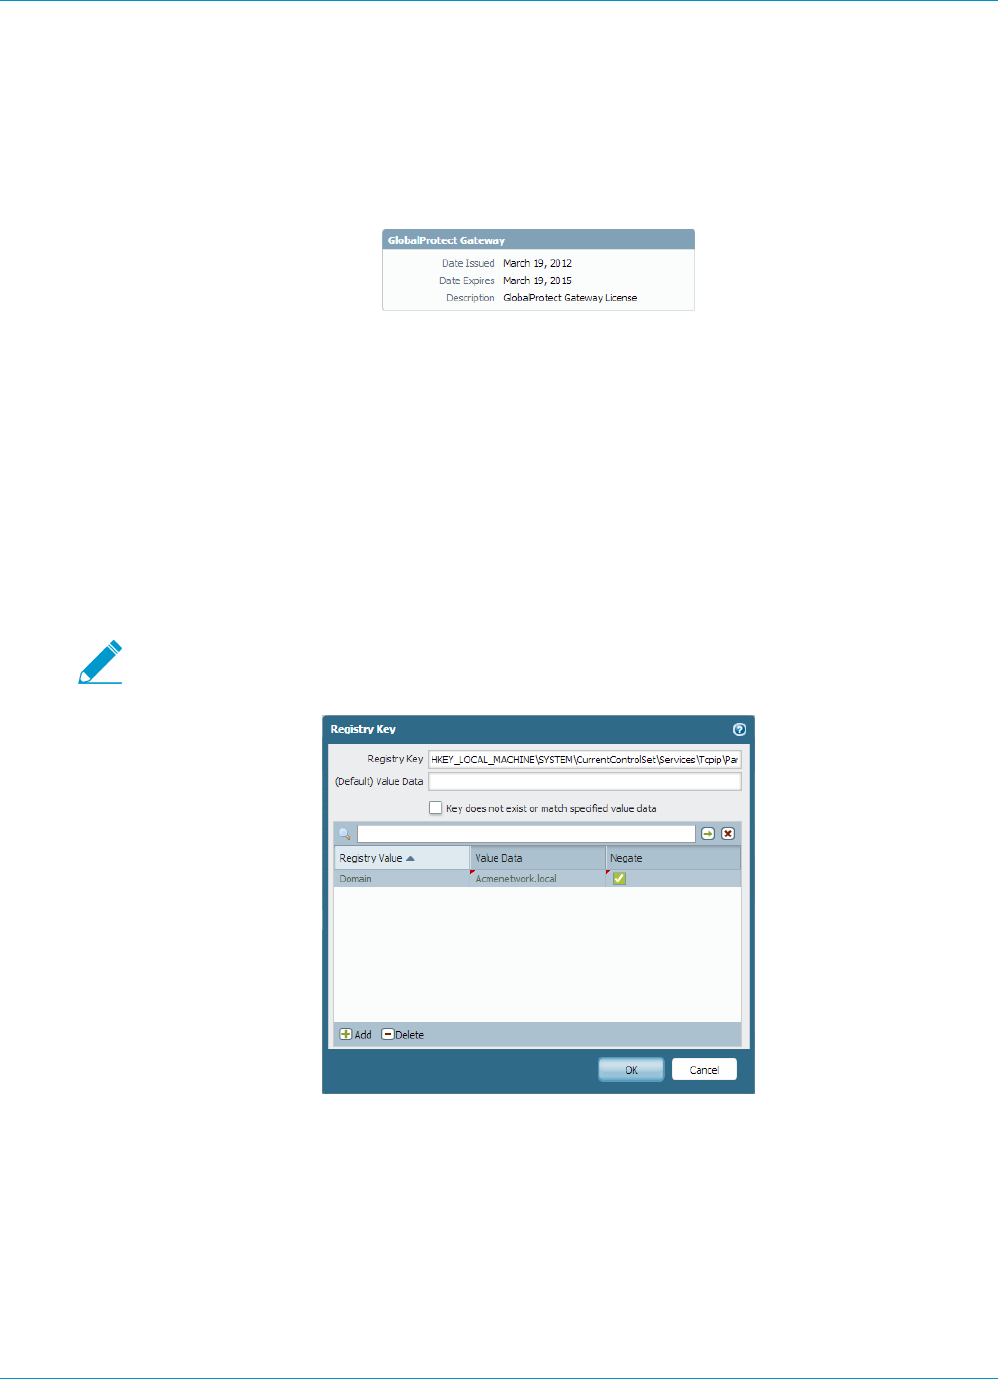
GLOBALPROTECT ADMINISTRATOR'S GUIDE | Host Information 177
© 2017 Palo Alto Networks, Inc.
Configure HIP-Based Policy Enforcement
To enable the use of host information in policy enforcement you must complete the following steps. For
more information on the HIP feature, see About Host Information.
STEP 1 | Verify proper licensing for HIP checks.
To use the HIP feature, you must have purchased and installed a GlobalProtect subscription license
on each gateway that will perform HIP checks. To verify the status of your licenses on each portal and
gateway, select Device > Licenses.
Contact your Palo Alto Networks Sales Engineer or Reseller if you do not have the required licenses. For
more information on licensing, see About GlobalProtect Licenses.
STEP 2 | (Optional) Define any custom host information that you want the agent to collect. For example,
if you have any required applications that are not included in the Vendor and/or Product lists
for creating HIP objects, you could create a custom check that will allow you to determine
whether that application is installed (has a corresponding registry or plist key) or is running (has
a corresponding running process).
2 and 3 assume that you have already created a Portal Configuration. If you have not yet
configured your portal, see Set Up Access to the GlobalProtect Portal for instructions.
1. On the firewall that is hosting your GlobalProtect portal, select Network > GlobalProtect > Portals.
2. Select your portal configuration to open the GlobalProtect Portal dialog.
3. Select the Agent tab and then select the agent configuration to which you want to add a custom HIP
check, or click Add to create a new agent configuration.
4. Select the Data Collection tab.
5. Enable the option to Collect HIP Data.
6. Select Custom Checks and define the data you want to collect from hosts running this agent
configuration as follows:

178 GLOBALPROTECT ADMINISTRATOR'S GUIDE | Host Information
© 2017 Palo Alto Networks, Inc.
•To collect information about specific registry keys: On the Windows tab, Add the name of
a Registry Key for which to collect data in the Registry Key area. Optionally, to restrict data
collection to a specific Registry Value, Add and then define the specific Registry Value or values.
Click OK to save the settings.
•To collect information about running processes: Select the appropriate tab (Windows or Mac)
and then Add a process to the Process List. Enter the name of the process that you want the
agent to collect information about.
•To collect information about specific property lists: On the Mac tab, click Add in the Plist section.
Enter the Plist for which to collect data. Optionally, click Add to restrict the data collection to
specific Key values. Click OK to save the settings.
7. If this is a new client configuration, complete the rest of the configuration as desired. For instructions,
see Define the GlobalProtect Agent Configurations.
8. Click OK to save the client configuration.
9. Commit the changes.
STEP 3 | (Optional) Exclude categories from collection.
1. On the firewall that is hosting your GlobalProtect portal, select Network > GlobalProtect > Portals.
2. Select your portal configuration to open the GlobalProtect Portal dialog.
3. On the Agent tab, select the Agent configuration from which to exclude categories, or Add a new
one.
4. Select Data Collection, and then verify that Collect HIP Data is enabled.
5. On the Exclude Categories tab, click Add. The Edit Exclude Category dialog displays.
6. Select the Category you want to exclude from the drop-down list.
7. (Optional) If you want to exclude specific vendors and/or products from collection within the
selected category rather than excluding the entire category, click Add. You can then select the
Vendor to exclude from the drop-down on the Edit Vendor dialog and, optionally, click Add to
exclude specific products from that vendor. When you are done defining that vendor, click OK. You
can add multiple vendors and products to the exclude list.
8. Repeat Step f and Step g for each category you want to exclude.
9. If this is a new client configuration, complete the rest of the configuration as desired. For more
information on defining client configurations, see Define the GlobalProtect Agent Configurations.
10.Click OK to save the client configuration.
11.Commit the changes.
STEP 4 | Create the HIP objects to filter the raw host data collected by the agents.
The best way to determine what HIP objects you need is to determine how you will use the host
information you collect to enforce policy. Keep in mind that the HIP objects themselves are merely
building blocks that allow you to create the HIP profiles that are used in your security policies.
Therefore, you may want to keep your objects simple, matching on one thing, such as the presence of
a particular type of required software, membership in a specific domain, or the presence of a specific
client OS. By doing this, you will have the flexibility to create a very granular (and very powerful) HIP-
augmented policy.
For details on a specific HIP category or field, refer to the online help.
1. On the gateway (or on Panorama if you plan to share the HIP objects among multiple gateways),
select Objects > GlobalProtect > HIP Objects and click Add.
2. On the General tab, enter a Name for the object.
3. Select the tab that corresponds to the category of host information you are interested in matching
against and select the check box to enable the object to match against the category. For example,
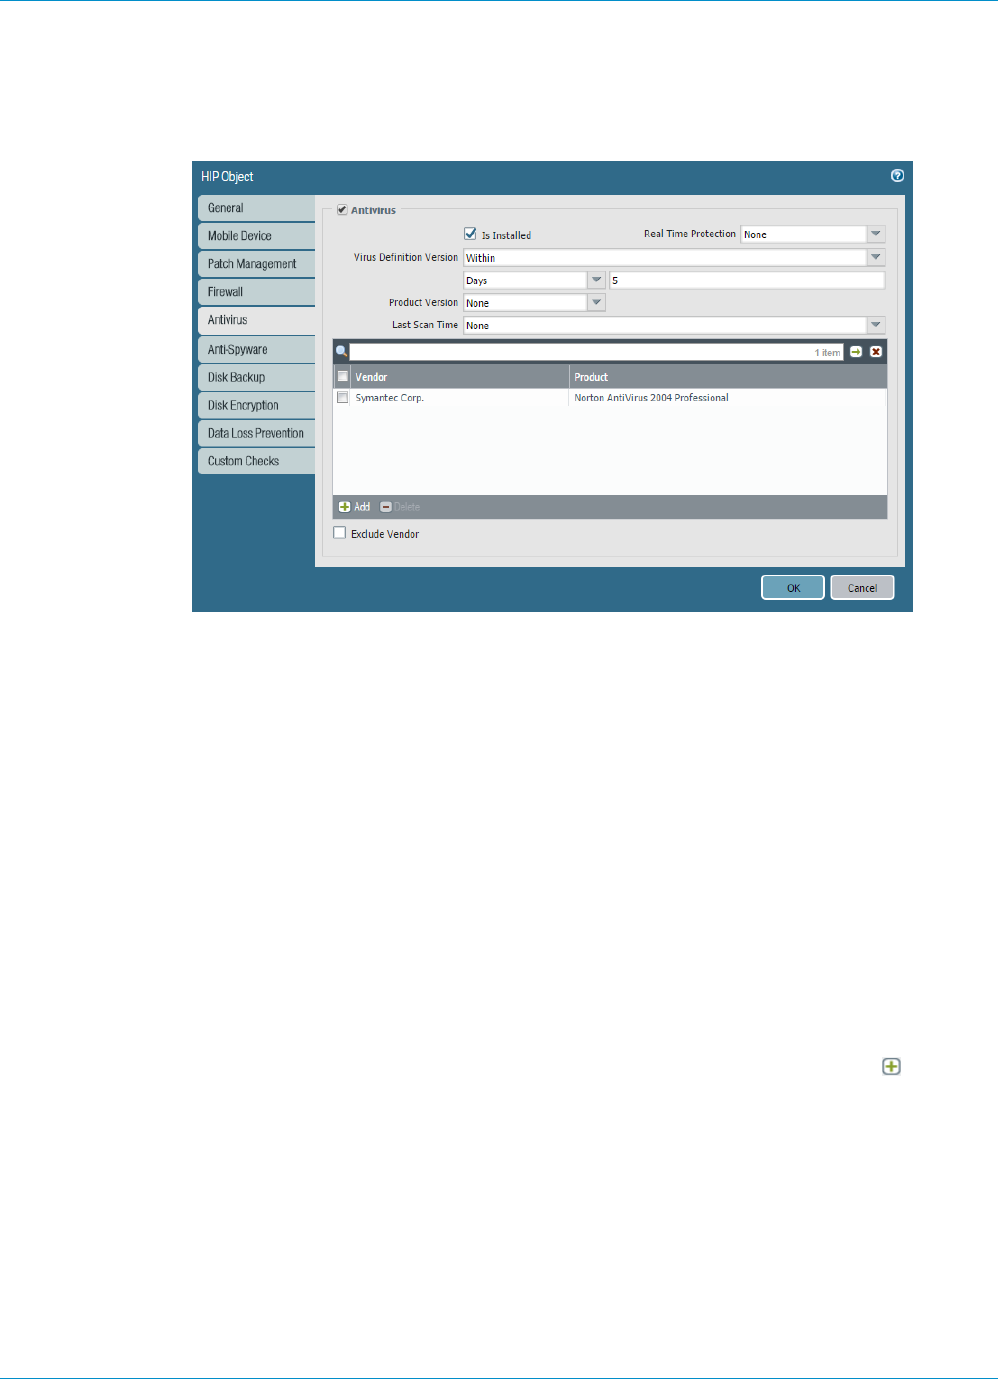
GLOBALPROTECT ADMINISTRATOR'S GUIDE | Host Information 179
© 2017 Palo Alto Networks, Inc.
to create an object that looks for information about Antivirus software, select the Antivirus tab and
then select the Antivirus check box to enable the corresponding fields. Complete the fields to define
the desired matching criteria. For example, the following screenshot shows how to create an object
that will match if the Symantec Norton AntiVirus 2004 Professional application is installed, has Real
Time Protection enabled, and has virus definitions that have been updated within the last 5 days.
Repeat this step for each category you want to match against in this object. For more information,
see Table: Data Collection Categories.
4. Click OK to save the HIP object.
5. Repeat these steps to create each additional HIP object you require.
6. Commit the changes.
STEP 5 | Create the HIP profiles that you plan to use in your policies.
When you create your HIP profiles, you can combine the HIP objects you previously created (as well as
other HIP profiles) using Boolean logic such that when a traffic flow is evaluated against the resulting
HIP profile it will either match or not match. If there is a match, the corresponding policy rule will be
enforced; if there is not a match, the flow will be evaluated against the next rule, as with any other policy
matching criteria.
1. On the gateway (or on Panorama if you plan to share the HIP profiles among multiple gateways),
select Objects > GlobalProtect > HIP Profiles and click Add.
2. Enter a descriptive Name for the profile and optionally a Description.
3. Click Add Match Criteria to open the HIP Objects/Profiles Builder.
4. Select the first HIP object or profile you want to use as match criteria and then click add to move
it over to the Match text box on the HIP Profile dialog. Keep in mind that if you want the HIP profile
to evaluate the object as a match only when the criteria in the object is not true for a flow, select the
NOT check box before adding the object.
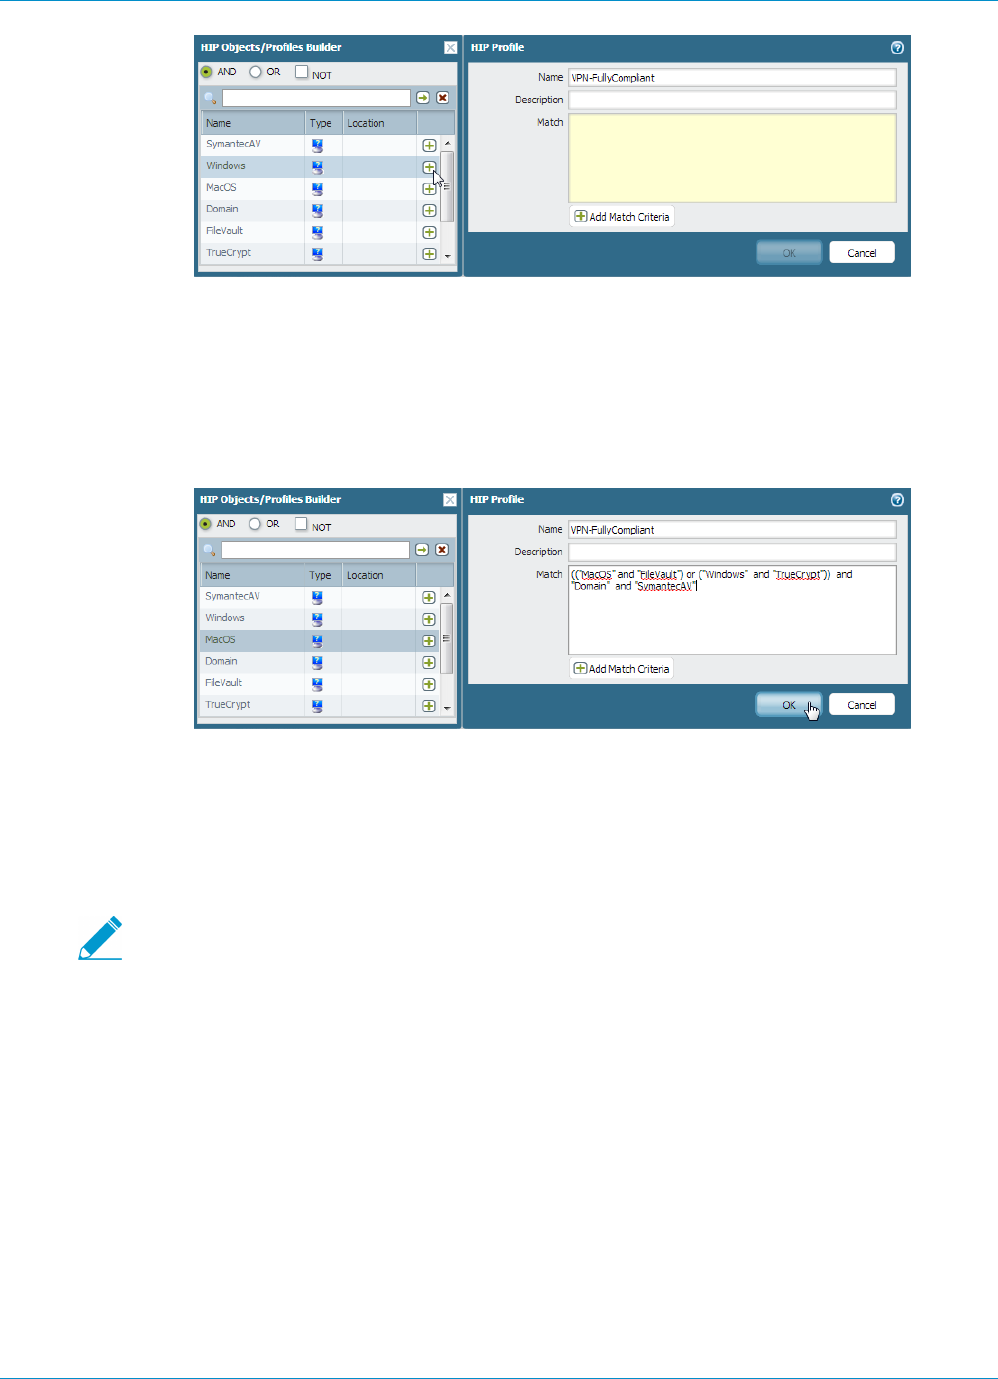
180 GLOBALPROTECT ADMINISTRATOR'S GUIDE | Host Information
© 2017 Palo Alto Networks, Inc.
5. Continue adding match criteria as appropriate for the profile you are building, making sure to select
the appropriate Boolean operator radio button (AND or OR) between each addition (and, again, using
the NOT check box when appropriate).
6. If you are creating a complex Boolean expression, you must manually add the parenthesis in the
proper places in the Match text box to ensure that the HIP profile is evaluated using the logic you
intend. For example, the following HIP profile will match traffic from a host that has either FileVault
disk encryption (for Mac OS systems) or TrueCrypt disk encryption (for Windows systems) and also
belongs to the required Domain, and has a Symantec antivirus client installed:
7. When you are done adding match criteria, click OK to save the profile.
8. Repeat these steps to create each additional HIP profile you require.
9. Commit the changes.
STEP 6 | Verify that the HIP objects and HIP profiles you created are matching your GlobalProtect client
traffic as expected.
Consider monitoring HIP objects and profiles as a means to monitor the security state and
activity of your host endpoints. By monitoring the host information over time you will be
better able to understand where your security and compliance issues are and you can
use this information to guide you in creating useful policy. For more details, see How Do I
Get Visibility into the State of the End Clients?
On the gateway(s) that your GlobalProtect users are connecting to, select Monitor > Logs > HIP Match.
This log shows all of the matches the gateway identified when evaluating the raw HIP data reported
by the agents against the defined HIP objects and HIP profiles. Unlike other logs, a HIP match does not
require a security policy match in order to be logged.
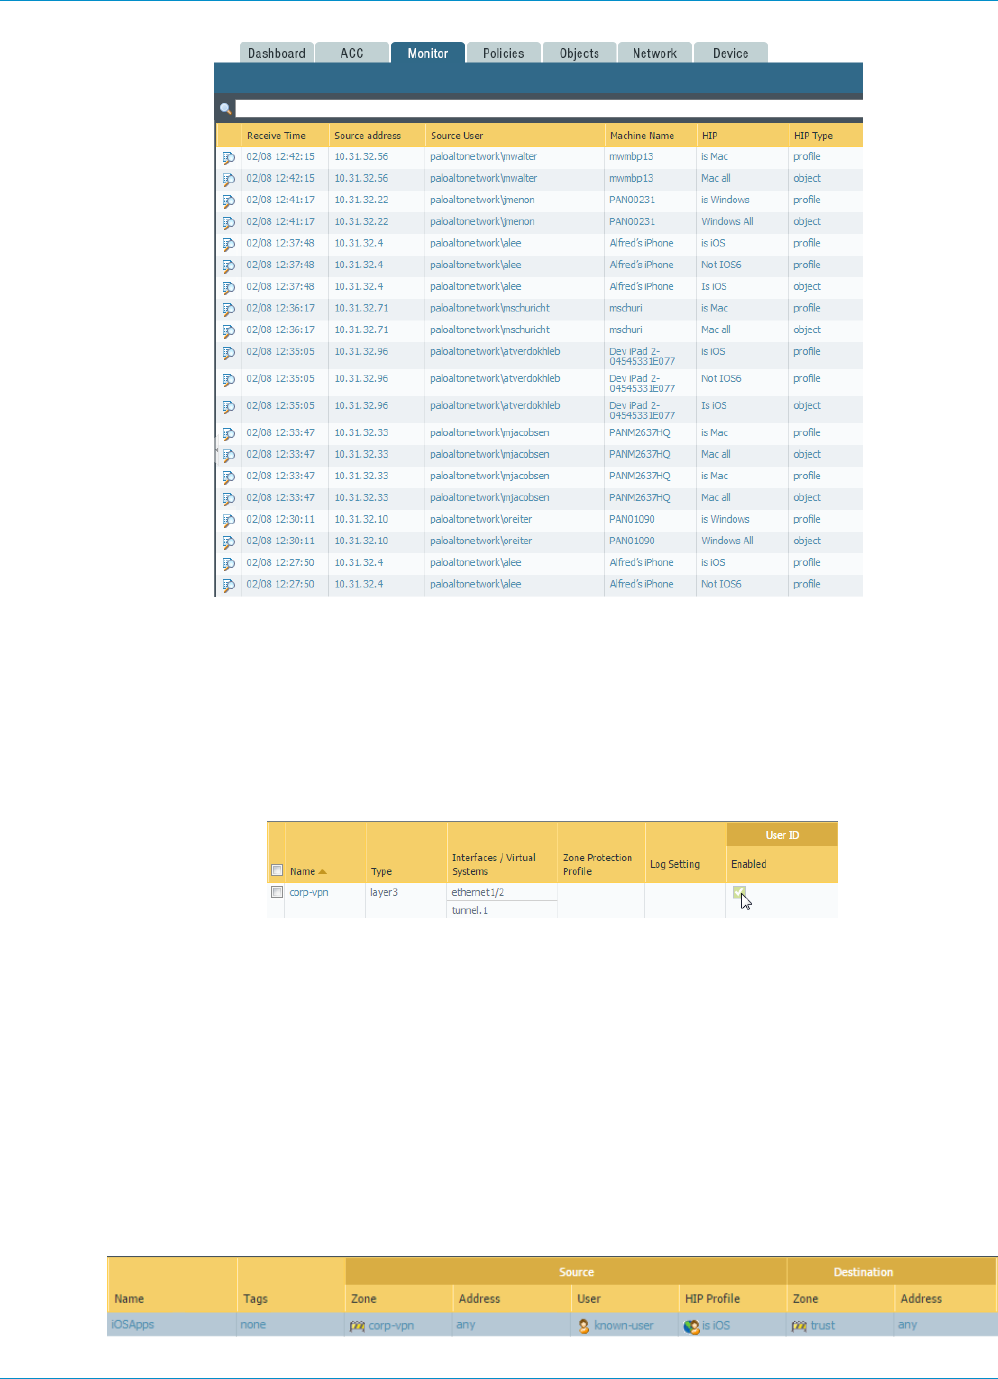
GLOBALPROTECT ADMINISTRATOR'S GUIDE | Host Information 181
© 2017 Palo Alto Networks, Inc.
STEP 7 | Enable User-ID on the source zones that contain the GlobalProtect users that will be sending
requests that require HIP-based access controls. You must enable User-ID even if you don’t
plan on using the user identification feature or the firewall will not generate any HIP Match
logs entries.
1. Select Network > Zones.
2. Click on the Name of the zone in which you want to enable User-ID to open the Zone dialog.
3. Enable User ID by selecting the Enabled check box and then click OK.
STEP 8 | Create the HIP-enabled security rules on your gateway(s).
As a best practice, you should create your security rules and test that they match the expected flows
based on the source and destination criteria as expected before adding your HIP profiles. By doing this
you will also be better able to determine the proper placement of the HIP-enabled rules within the
policy.
1. Select Policies > Security and select the rule to which you want to add a HIP profile.
2. On the Source tab, make sure the Source Zone is a zone for which you enabled User-ID in 7.
3. On the User tab, click Add in the HIP Profiles section and select the HIP profile(s) you want to add to
the rule (you can add up to 63 HIP profiles to a rule).
4. Click OK to save the rule.
5. Commit the changes.

182 GLOBALPROTECT ADMINISTRATOR'S GUIDE | Host Information
© 2017 Palo Alto Networks, Inc.
STEP 9 | Define the notification messages end users will see when a security rule with a HIP profile is
enforced.
The decision as to when to display a message (that is, whether to display it when the user’s configuration
matches a HIP profile in the policy or when it doesn’t match it), depends largely on your policy and what
a HIP match (or non-match) means for the user. That is, does a match mean they are granted full access
to your network resources? Or does it mean they have limited access due to a non-compliance issue?
For example, suppose you create a HIP profile that matches if the required corporate antivirus and anti-
spyware software packages are not installed. In this case, you might want to create a HIP notification
message for users who match the HIP profile telling them that they need to install the software.
Alternatively, if your HIP profile matched if those same applications are installed, you might want to
create the message for users who do not match the profile.
1. On the firewall that is hosting your GlobalProtect gateway(s), select Network > GlobalProtect >
Gateways.
2. Select a previously-defined gateway configuration to open the GlobalProtect Gateway dialog.
3. Select Client Configuration > HIP Notification and then click Add.
4. Select the HIP Profile this message applies to from the drop-down.
5. Select Match Message or Not Match Message, depending on whether you want to display the
message when the corresponding HIP profile is matched in policy or when it is not matched. In some
cases you might want to create messages for both a match and a non-match, depending on what
objects you are matching on and what your objectives are for the policy. For the Match Message,
you can also enable the option to Include matched application list in message to indicate what
applications triggered the HIP match.
6. Select the Enable check box and select whether you want to display the message as a Pop Up
Message or as a System Tray Balloon.
7. Enter the text of your message in the Template text box and then click OK. The text box provides
both a WYSIWYG view of the text and an HTML source view, which you can toggle between using
the Source Edit icon. The toolbar also provides many options for formatting your text and for
creating hyperlinks to external documents, for example to link users directly to the download URL
for a required software program.
8. Repeat this procedure for each message you want to define.
9. Commit the changes.

GLOBALPROTECT ADMINISTRATOR'S GUIDE | Host Information 183
© 2017 Palo Alto Networks, Inc.
STEP 10 | Verify that your HIP profiles are working as expected.
You can monitor what traffic is hitting your HIP-enabled policies using the Traffic log as follows:
1. From the gateway, select Monitor > Logs > Traffic.
2. Filter the log to display only traffic that matches the rule that has the HIP profile you are interested in
monitoring attached. For example, to search for traffic that matches a security rule named “iOS Apps”
you would enter ( rule eq 'iOS Apps' ) in the filter text box as follows:

184 GLOBALPROTECT ADMINISTRATOR'S GUIDE | Host Information
© 2017 Palo Alto Networks, Inc.
Collect Application and Process Data From
Clients
The Windows Registry and Mac Plist can be used to configure and store settings and options for
Windows and Mac operating systems, respectively. You can create a custom check that will allow you
to determine whether an application is installed (has a corresponding registry or plist key) or is running
(has a corresponding running process) on a Windows or Mac client. Enabling custom checks instructs the
GlobalProtect agent to collect specific registry information (Registry Keys and Registry Key Values from
Windows clients), preference list (plist) information (plist and plist keys from Mac OS clients). The data that
you define to be collected in a custom check is included in the raw host information data collected by the
GlobalProtect agent and then submitted to the GlobalProtect gateway when the agent connects.
To monitor the data collected with custom checks you can create a HIP object. You can then add the HIP
object to a HIP profile to use the collected data to match to device traffic and enforce security rules. The
gateway can use the HIP object (which matches to the data defined in the custom check) to filter the raw
host information submitted by the agent. When the gateway matches the client data to a HIP object, a HIP
Match log entry is generated for the data. A HIP profile allows the gateway to also match the collected data
to a security rule. If the HIP profile is used as criteria for a security policy rule, the gateway will enforce that
security rule on the matching traffic.
Use the following task to enable custom checks to collect data from Windows and Mac clients. This task
includes the optional steps to create a HIP object and HIP profile for a custom check, if you would like to
use client data as matching criteria for a security policy to monitor, identify, and act on traffic.
For more information on defining agent settings directly from the Windows registry or the
global Mac plist, see Deploy Agent Settings Transparently.
STEP 1 | Enable the GlobalProtect agent to collect Windows Registry information from Windows
clients or Plist information from Mac clients. The type of information collected can include
whether or not an application is installed on the client, or specific attributes or properties of
that application.
This step enables the agent to report data on the applications and client settings. (5 and 6 will show you
how to monitor and use the reported data to identify or take action on certain device traffic).
Collect data from a Windows client:
1. Select Network > GlobalProtect > Portals and then select the portal configuration you want to
modify or Add a new one.
2. Select the Agent tab and then select the Agent configuration you want to modify or Add a new one.
3. Select Data Collection, and then verify that Collect HIP Data is enabled.
4. Select Custom Checks > Windows.
5. Add the Registry Key that you want to collect information about. If you want to restrict data
collection to a value contained within that Registry Key, add the corresponding Registry Value.

GLOBALPROTECT ADMINISTRATOR'S GUIDE | Host Information 185
© 2017 Palo Alto Networks, Inc.
Collect data from a Mac client:
1. Select Network > GlobalProtect > Portals and then select the portal configuration you want to
modify or Add a new one.
2. Select the Agent tab and then select the Agent configuration you want to modify or Add a new one.
3. Select Data Collection, and then verify that Collect HIP Data is enabled.
4. Select Custom Checks > Mac.
5. Add the Plist that you want to collect information about and the corresponding Plist Key to
determine if the application is installed:
For example, Add the Plist com.apple.screensaver and the Key askForPassword to collect
information on whether a password is required to wake the Mac client after the screen saver begins:
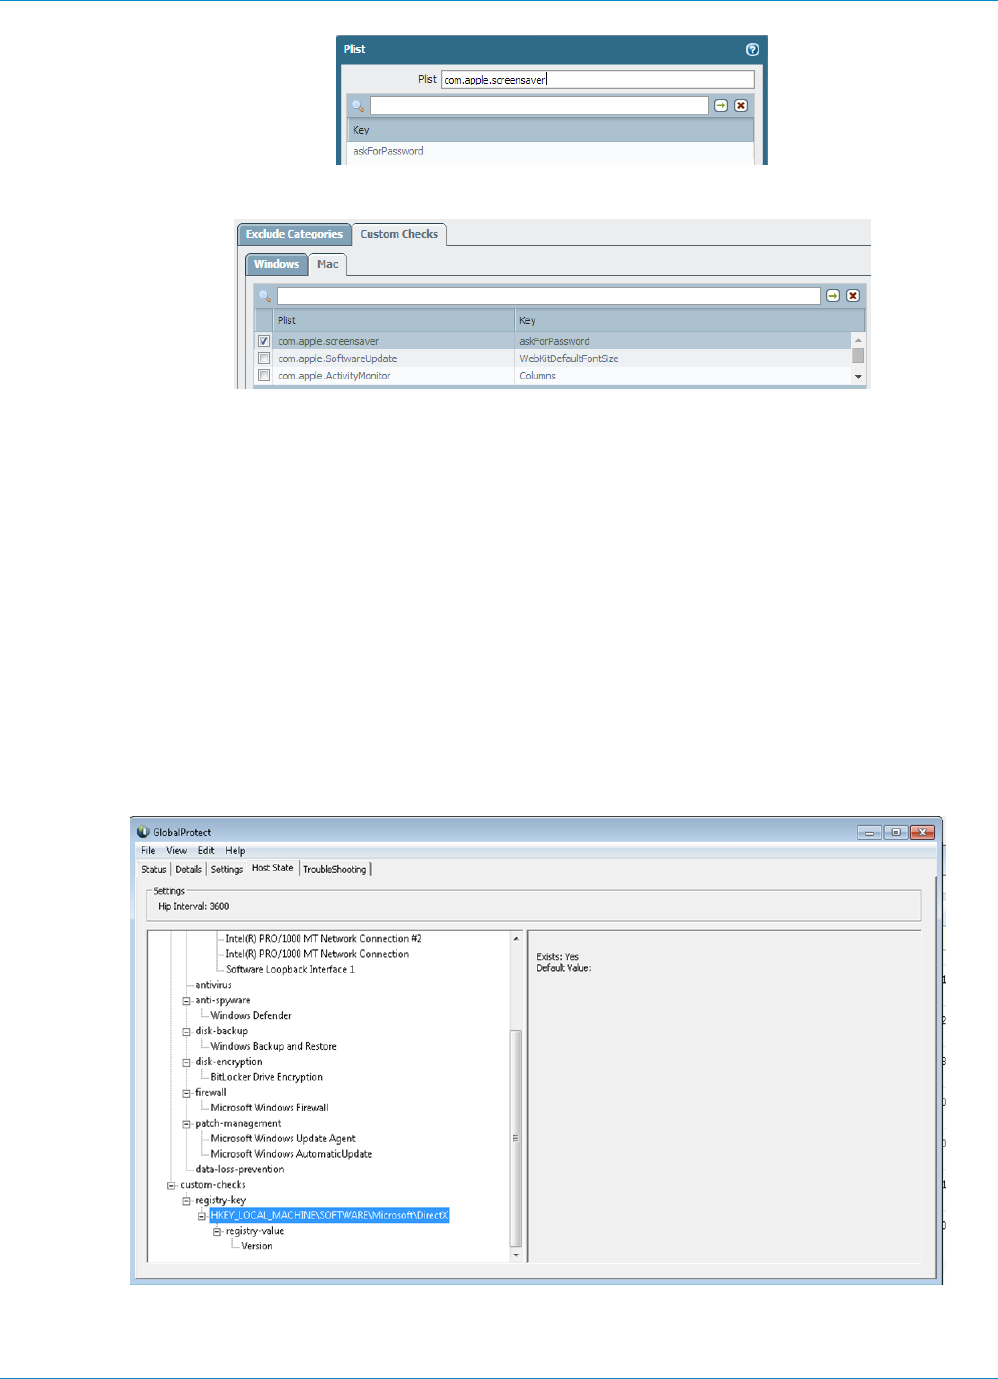
186 GLOBALPROTECT ADMINISTRATOR'S GUIDE | Host Information
© 2017 Palo Alto Networks, Inc.
Confirm that the Plist and Key are added to the Mac custom checks:
STEP 2 | (Optional) Check if a specific process is running on the client.
1. Continue from 1 on the Custom Checks tab (Network > GlobalProtect > Portals > <portal-config >
Agent > <agent-config > Data Collection) and select the Windows tab or Mac tab.
2. Add the name of the process that you want to collect information about to the Process List.
STEP 3 | Save the custom check.
Click OK and Commit the changes.
STEP 4 | Verify that the GlobalProtect agent is collecting the data defined in the custom check from the
client.
For Windows clients:
On the Windows client, double-click the GlobalProtect icon on the task bar and click the Host State
tab to view the information that the GlobalProtect agent is collecting from the Mac client. Under the
custom-checks dropdown, verify that the data that you defined for collection in 7 is displayed:
For Mac clients:
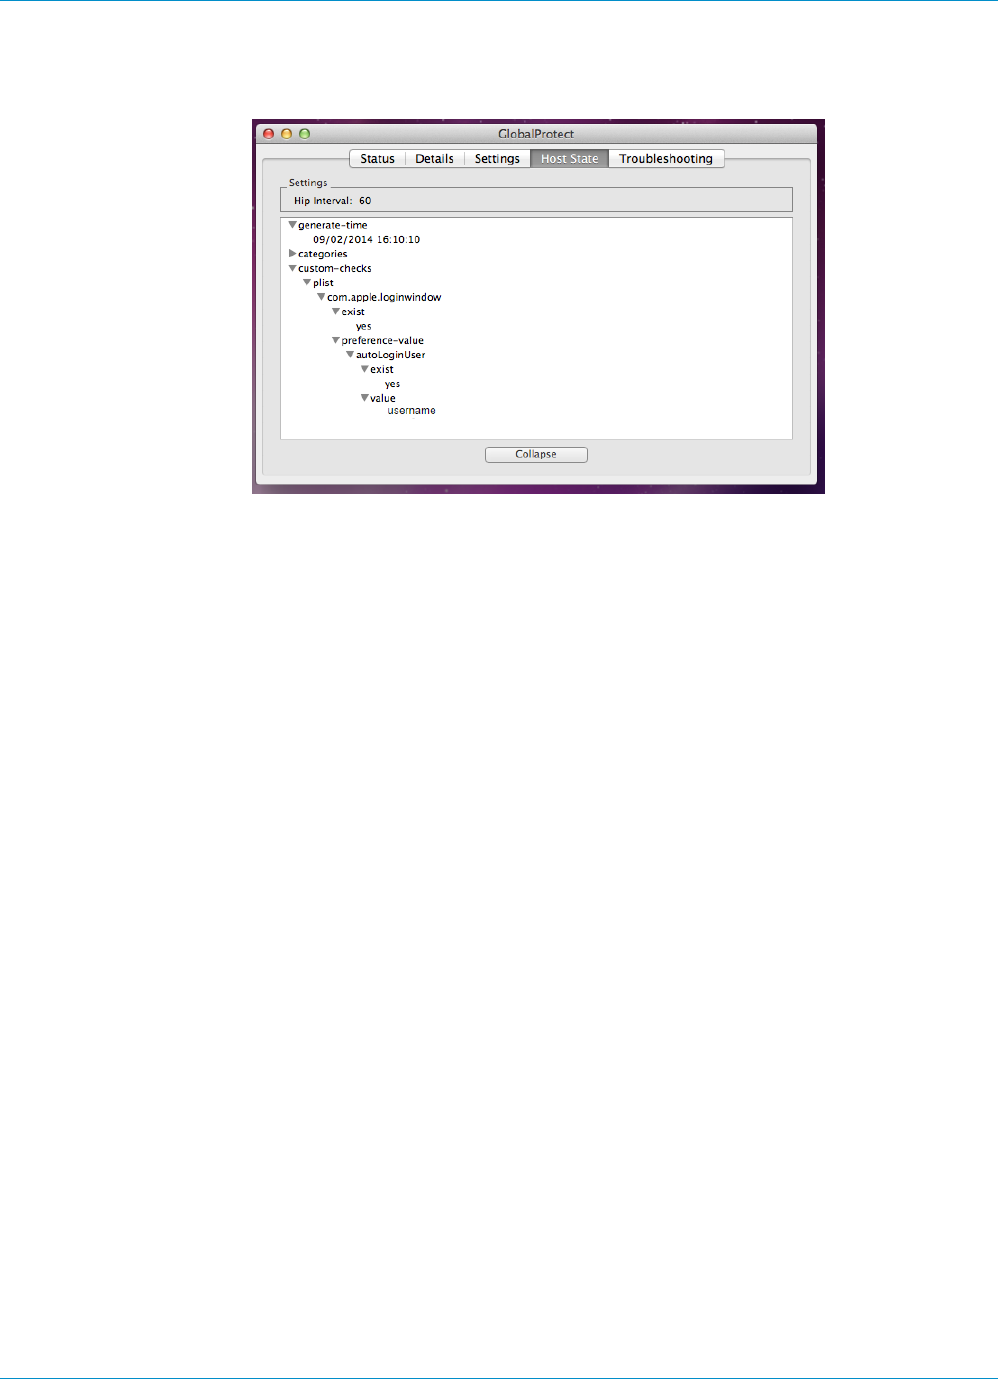
GLOBALPROTECT ADMINISTRATOR'S GUIDE | Host Information 187
© 2017 Palo Alto Networks, Inc.
On the Mac client, click the GlobalProtect icon on the Menu bar, click Advanced View, and click Host
State to view the information that the GlobalProtect agent is collecting for the Mac client. Under the
custom-checks dropdown, verify that the data you defined for collection in 7 is displayed:
STEP 5 | (Optional) Create a HIP Object to match to a Registry Key (Windows) or Plist (Mac). This can
allow you to filter the raw host information collected from the GlobalProtect agent in order to
monitor the data for the custom check.
With a HIP object defined for the custom check data, the gateway will match the raw data submitted
from the agent to the HIP object and a HIP Match log entry is generated for the data (Monitor > HIP
Match).
For Windows and Mac clients:
1. Select Objects > GlobalProtect > HIP Objects and Add a HIP Object.
2. Select and enable Custom Checks.
For Windows clients only:
1. To check Windows clients for a specific registry key, select Registry Key and Add the registry to
match on. To only identify clients that do not have the specified registry key, select Key does not
exist or match the specified value data.
2. To match on specific values within the Registry key, click Add and then enter the registry value and
value data. To identify clients that explicitly do not have the specified value or value data, select the
Negate check box.
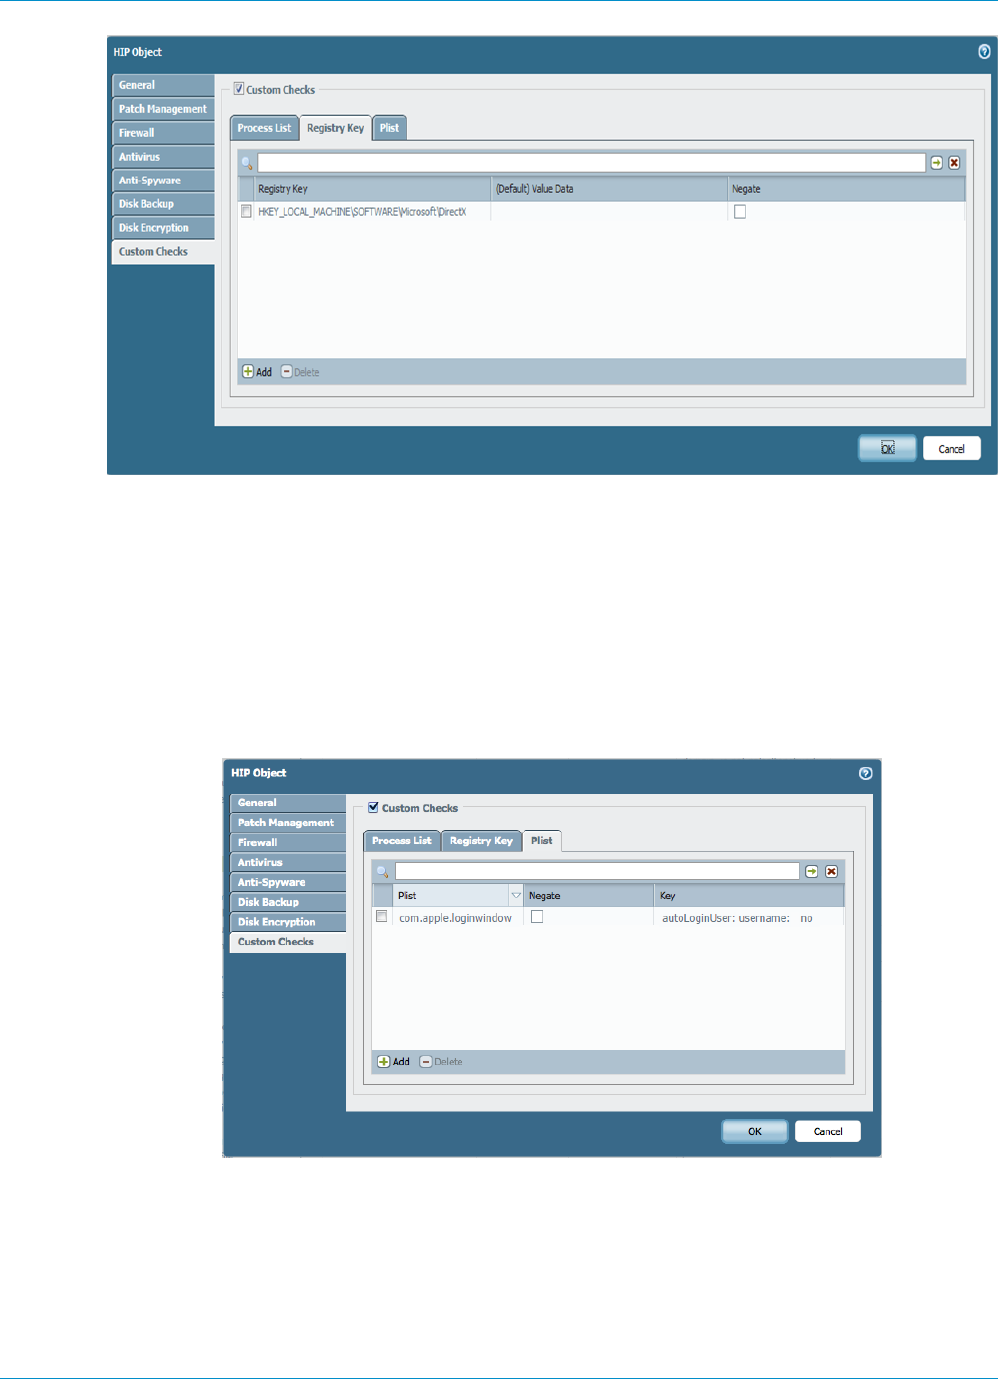
188 GLOBALPROTECT ADMINISTRATOR'S GUIDE | Host Information
© 2017 Palo Alto Networks, Inc.
3. Click OK to save the HIP object. You can Commit to view the data in the HIP Match logs at the next
device check-in or continue to 6.
For Mac clients only:
1. Select the Plist tab and Add and enter the name of the Plist for which you want to check Mac clients.
(If instead, you want to match Mac clients that do not have the specified Plist, continue by selecting
Plist does not exist).
2. (Optional) You can match traffic to a specific key-value pair within the Plist by entering the Key and
the corresponding Value to match. (Alternatively, if you want to identify clients that do not have a
specific Key and Value, you can continue by selecting Negate after adding populating the Key and
Value fields).
3. Click OK to save the HIP object. You can Commit to view the data in the HIP Match logs at the next
device check-in or continue to 6.
STEP 6 | (Optional) Create a HIP profile to allow the HIP object you created in 5 to be evaluated against
traffic.
The HIP profile can be added to a security policy as an additional check for traffic matching that policy.
When the traffic is matched to the HIP profile, the security policy rule will be enforced on the traffic.
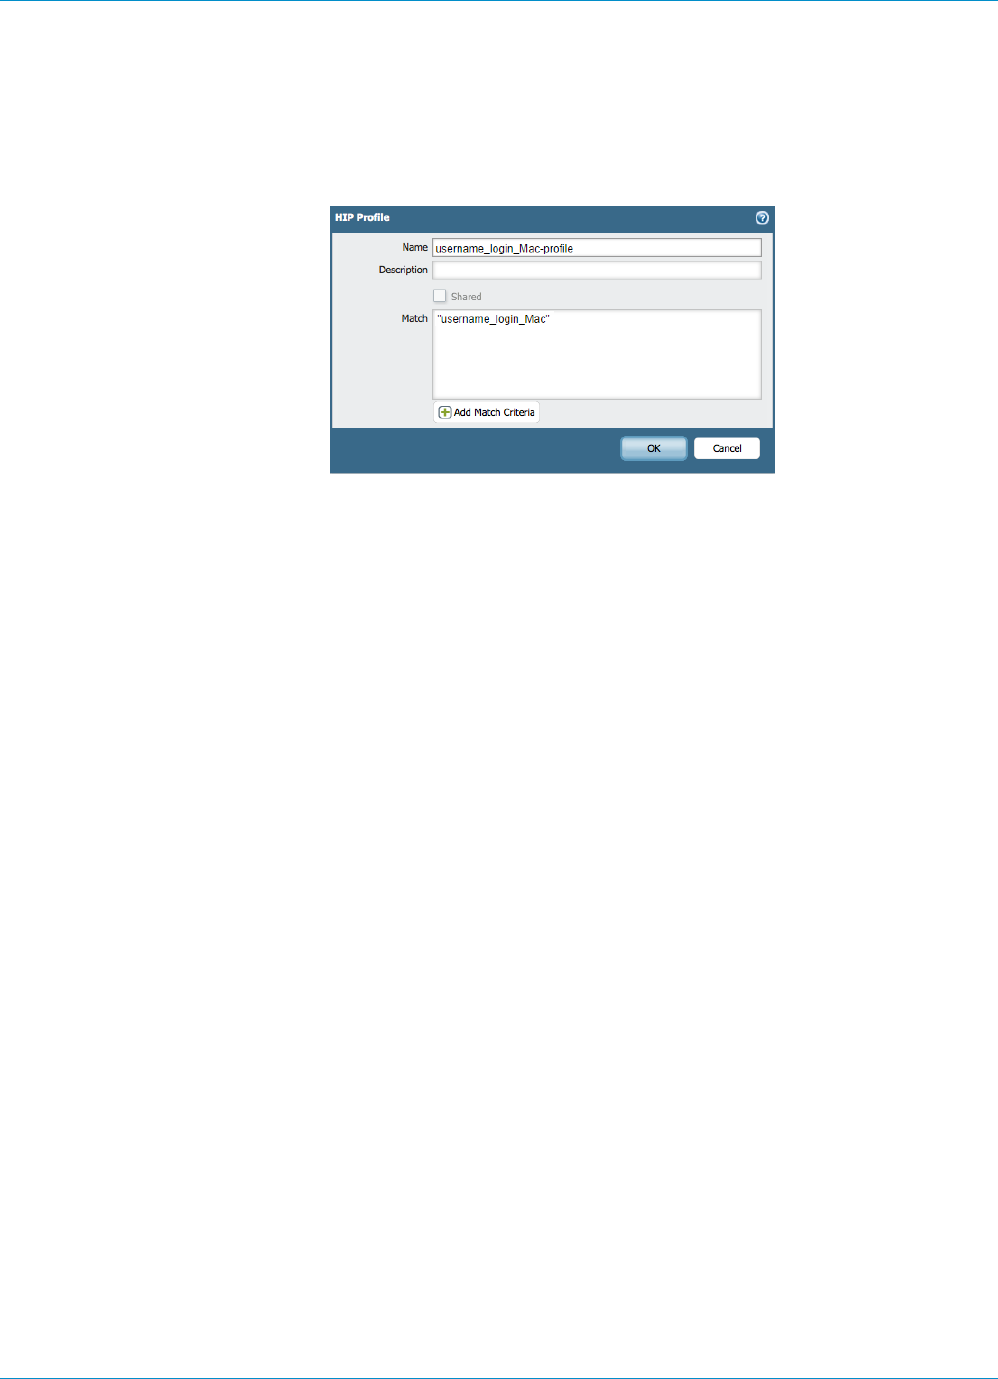
GLOBALPROTECT ADMINISTRATOR'S GUIDE | Host Information 189
© 2017 Palo Alto Networks, Inc.
For more details on creating a HIP profiles, see Configure HIP-Based Policy Enforcement.
1. Select Objects > GlobalProtect > HIP Profile.
2. Click Add Match Criteria to open the HIP Objects/Profiles Builder.
3. Select the HIP object you want to use as match criteria and then move it over to the Match box on
the HIP Profile dialog.
4. When you have finished adding the objects to the new HIP profile, click OK and Commit.
STEP 7 | Add the HIP profile to a security policy so that the data collected with the custom check can be
used to match to and act on traffic.
Select Policies > Security, and Add or modify a security policy. Go to the User tab to add a HIP profile to
the policy. For more details on security policies components and using security policies to match to and
act on traffic, see Security Policy.
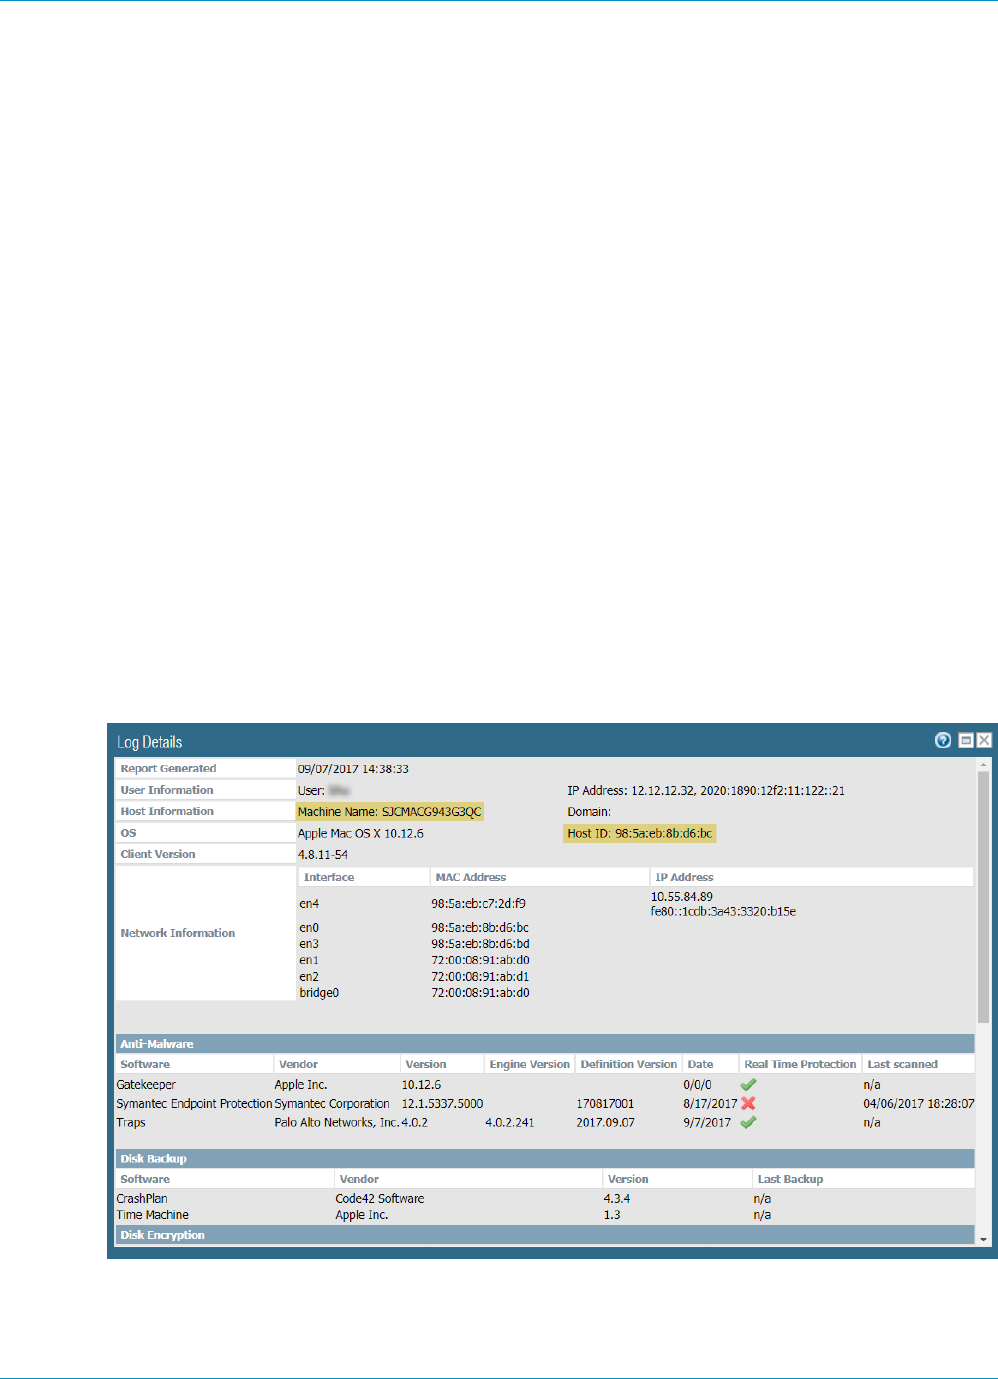
190 GLOBALPROTECT ADMINISTRATOR'S GUIDE | Host Information
© 2017 Palo Alto Networks, Inc.
Block Device Access
In the event that a user loses a device that provides GlobalProtect access to your network, that device is
stolen, or a user leaves your organization, you can block the device from gaining access to the network by
placing the device in a block list.
A block list is local to a logical network location (vsys, 1 for example) and can contain a maximum of 1,000
devices per location. Therefore, you can create separate device block lists for each location hosting a
GlobalProtect deployments.
STEP 1 | Identify the host ID for the endpoints you want to block.
The host ID is a unique ID that GlobalProtect assigns to identify the host. The host ID value varies by
device type:
• Windows—Machine GUID stored in the Windows registry (HKEY_Local_Machine\Software
\Microsoft\Cryptography\MachineGuid)
• macOS—MAC address of the first built-in physical network interface
• Android—Android ID
• iOS—UDID
• Chrome—GlobalProtect assigned unique alphanumeric string with length of 32 characters
If you do not know the host ID, you can correlate the user-ID to the host ID in the HIP Match logs:
1. Select Monitor > Logs > HIP Match.
2. Filter the HIP match logs for the source user associated with the device.
3. Open the HIP match log and identify the host ID under OS > Host ID and optionally the hostname
under Host Information > Machine Name.
STEP 2 | Create a device block list.

GLOBALPROTECT ADMINISTRATOR'S GUIDE | Host Information 191
© 2017 Palo Alto Networks, Inc.
You cannot use Panorama templates to push a device block list to firewalls.
1. Select Network > GlobalProtect > Device Block List and Add a device block list.
2. Enter a descriptive Name for the list.
3. For a firewall with more than one virtual system (vsys), select the Location (vsys or Shared) where the
profile is available.
STEP 3 | Add a device to a block list.
1. Add devices. Enter the host ID (required) and hostname (optional) for a device you need to block.
2. Add additional devices, if needed.
3. Click OK to save and activate the block list.
The device list does not require a commit and is immediately active.
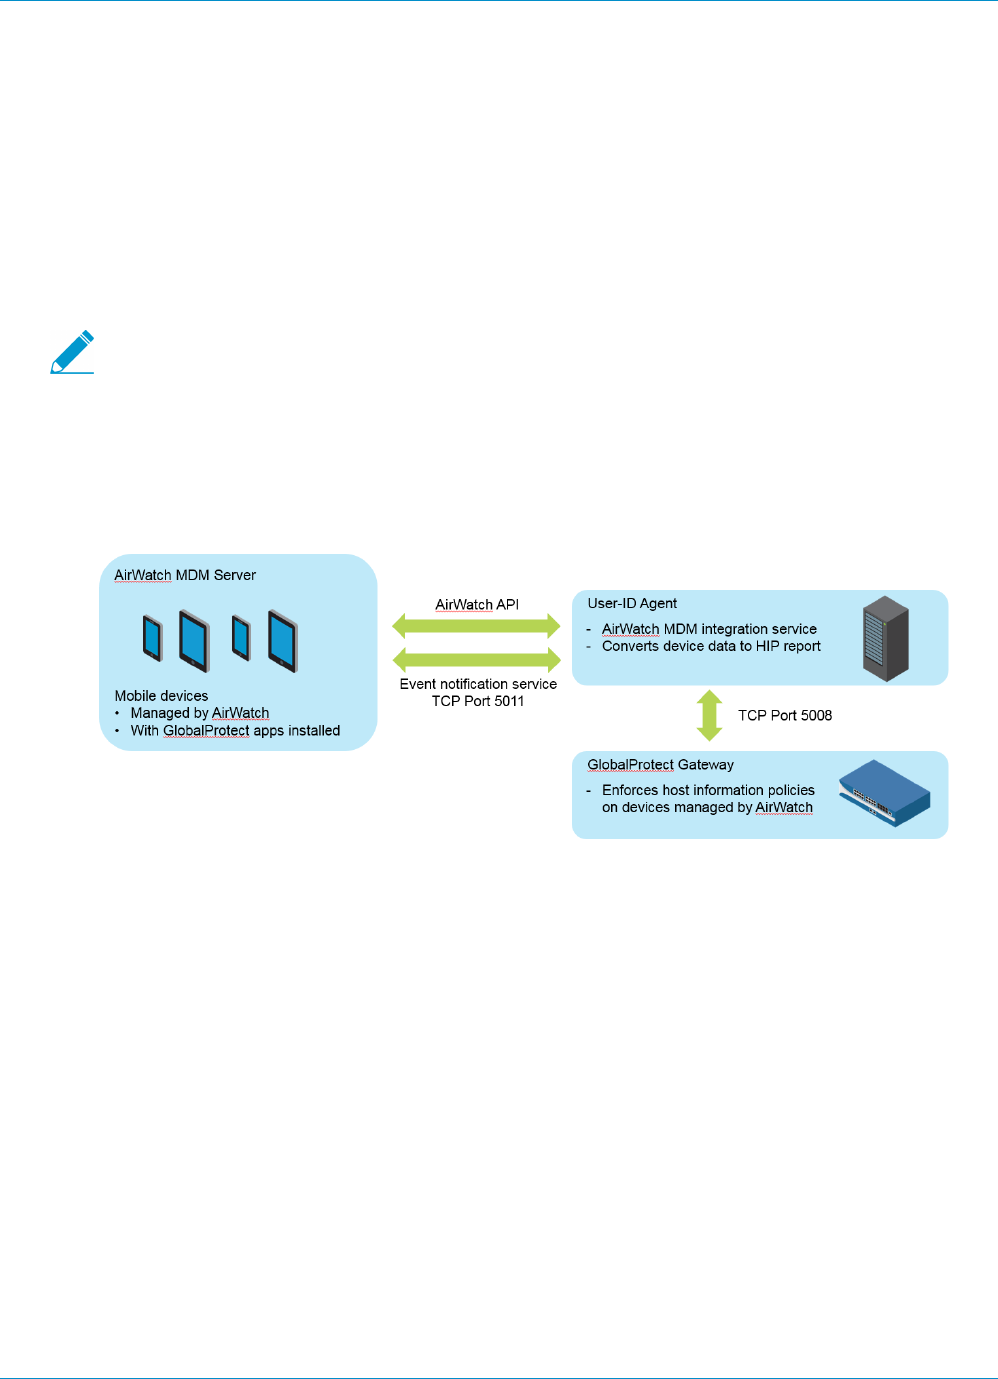
192 GLOBALPROTECT ADMINISTRATOR'S GUIDE | Host Information
© 2017 Palo Alto Networks, Inc.
Configure Windows User-ID Agent to Collect
Host Information
The Windows-based User-ID agent has been extended to support a new AirWatch MDM integration
service. This service enables GlobalProtect to use the host information collected by the service to enforce
HIP-based policies on devices managed by AirWatch. Running as part of the Windows-based User-ID agent,
the AirWatch MDM integration service uses the AirWatch API to collect information from mobile devices
that are managed by VMware AirWatch and translate this data into host information.
For Android devices managed by AirWatch, this feature supports Android for Work devices,
but it does not support other types of Android devices.
•MDM Integration Overview on page 192
•Information Collected on page 192
•System Requirements on page 194
•Configure GlobalProtect to Retrieve Host Information on page 194
•Troubleshoot the MDM Integration Service on page 197
MDM Integration Overview
MDM integration service included with the Windows-based User-ID agent does a full HIP query to the
AirWatch MDM server to get the complete host information for a device. GlobalProtect apps on the
devices also send HIP information to the gateway and the gateway merges HIP information from the
GlobalProtect apps and the MDM integration service. When a mobile device running the GlobalProtect app
is connected to a GlobalProtect gateway, GlobalProtect can apply security policies with host information
profiles.
You configure the MDM integration service to fetch AirWatch device information at regular intervals and
push this information to GlobalProtect gateways. In addition, the service can monitor AirWatch event
notifications and fetch updated device information when AirWatch events occur (for example, device
enrollment, device wipe, and compliance changes).
Information Collected
The following table shows how information collected from devices managed by AirWatch are translated
into HIP report attributes. The mapping is done automatically.

GLOBALPROTECT ADMINISTRATOR'S GUIDE | Host Information 193
© 2017 Palo Alto Networks, Inc.
AirWatch Attributes HIP Report Attributes
Device Information
SerialNumber serial-number
MacAddress wifimac
Imei IMEI
OperatingSystem version
Model model
DeviceFriendlyName devname
IsSupervised supervised
Udid (Unique Device Identifier) udid
UserName user
LastEnrolledOn enroll-time
Platform os
EnrollmentStatus managed-by-mdm
LastSeen last-checkin-time
ComplianceStatus
(User-ID agent 8.0.3 and later)
Compliant
NonCompliant
NotAvailable
Ownership
(User-ID agent 8.0.3 and later)
E—Employee Owned
C—Corporate-Dedicated
S—Corporate-Shared
Security Information
DataProtectionEnabled disk-encrypted
IsPasscodePresent passcode-set
IsPasscodeCompliant passcode-compliant
Network Information
DataRoamingEnabled data-roaming
GPS Coordinates

194 GLOBALPROTECT ADMINISTRATOR'S GUIDE | Host Information
© 2017 Palo Alto Networks, Inc.
AirWatch Attributes HIP Report Attributes
Latitude latitude
Longitude longitude
SampleTime last-location-time
Application Details
ApplicationName appname
Version version
ApplicationIndentifier package
System Requirements
AirWatch MDM integration service requires the following software:
Software Minimum Supported Version
User-ID Agent 8.0.1
PAN-OS 7.0
GlobalProtect App for
Android
4.0
GlobalProtect App for iOS 4.0.1
AirWatch Server 8.4.7.0
Windows Server 2008 and 2012
2016 with User-ID Agent 8.0.4 and PAN-OS 8.0.4 8.0.4
Configure GlobalProtect to Retrieve Host Information
Follow these instructions to configure GlobalProtect to retrieve host information from devices managed by
AirWatch.
STEP 1 | Install and configure the Windows-based User-ID agent. The User-ID agent must be
in a location that enables secure connections to the VMware AirWatch Mobile Device
Management (MDM) system.
For more information, see Install the User-ID Agent. The AirWatch MDM integration service is included
with the PAN-OS Windows-based User-ID agent.
STEP 2 | Configure SSL authentication between the Windows-based User-ID agent and the
GlobalProtect gateway.

GLOBALPROTECT ADMINISTRATOR'S GUIDE | Host Information 195
© 2017 Palo Alto Networks, Inc.
When you configure SSL authentication, make sure:
• The server certificate configured on the Windows-based User-ID Agent has the same Common Name
(CN) as the hostname/IP address of the User-ID Agent host.
• The server certificate is trusted by the firewall (included in the trusted CA list in the MDM
configuration on the firewall).
• The root certificate authority (CA) certificate of the MDM client certificate configured on the firewall
must be imported into Windows trust store of the Windows server.
1. Obtain a server certificate and private key for authentication between the Windows-based User-ID
agent and the GlobalProtect gateway. The certificate bundle must be in PEM format that contains a
PEM certificate, full certificate chain, and private key.
2. Open the Windows-based User-ID agent and select Server Certificate.
3. Add the server certificate.
•Browse to the certificate file and Open the file to upload the certificate to the Windows-based User-
ID agent.
• Enter a Private Key Password for the certificate.
• Click OK.
The agent verifies the certificate is valid and stores the encryption password of the private key in the
host machine’s Windows credential store.
If installation is successful, detailed information about the certificate (including common name,
expiration date, and issuer) appears on the Server Certificate tab.
1. Restart the Windows-based User-ID agent.
STEP 3 | Configure the MDM integration service on the Windows-based User-ID agent.
1. Select MDM Integration in the Windows-based User-ID agent.
2. In Gateway Connection TCP Port, specify a port for TCP communications. The Windows-based User-
ID agent listens at this port for all MDM-related messages. The default port is 5008. To change the
port, specify a number from 1 to 65535.
3. On the Setup tab, click Edit.
4. Choose AirWatch for the MDM Vendor.
STEP 4 | Specify the MDM Event Notification settings to monitor and collect AirWatch events (for
example, device enrollment, device wipe, and compliance changes). When an event occurs, the
MDM integration service fetches the updated device information from the AirWatch API and
pushes this information to all configured GlobalProtect gateways.
For MDM Event Notification, make sure the values you enter here are also configured
in the AirWatch console under Groups & Settings > All Settings > System > Advanced >
API > Event Notifications.
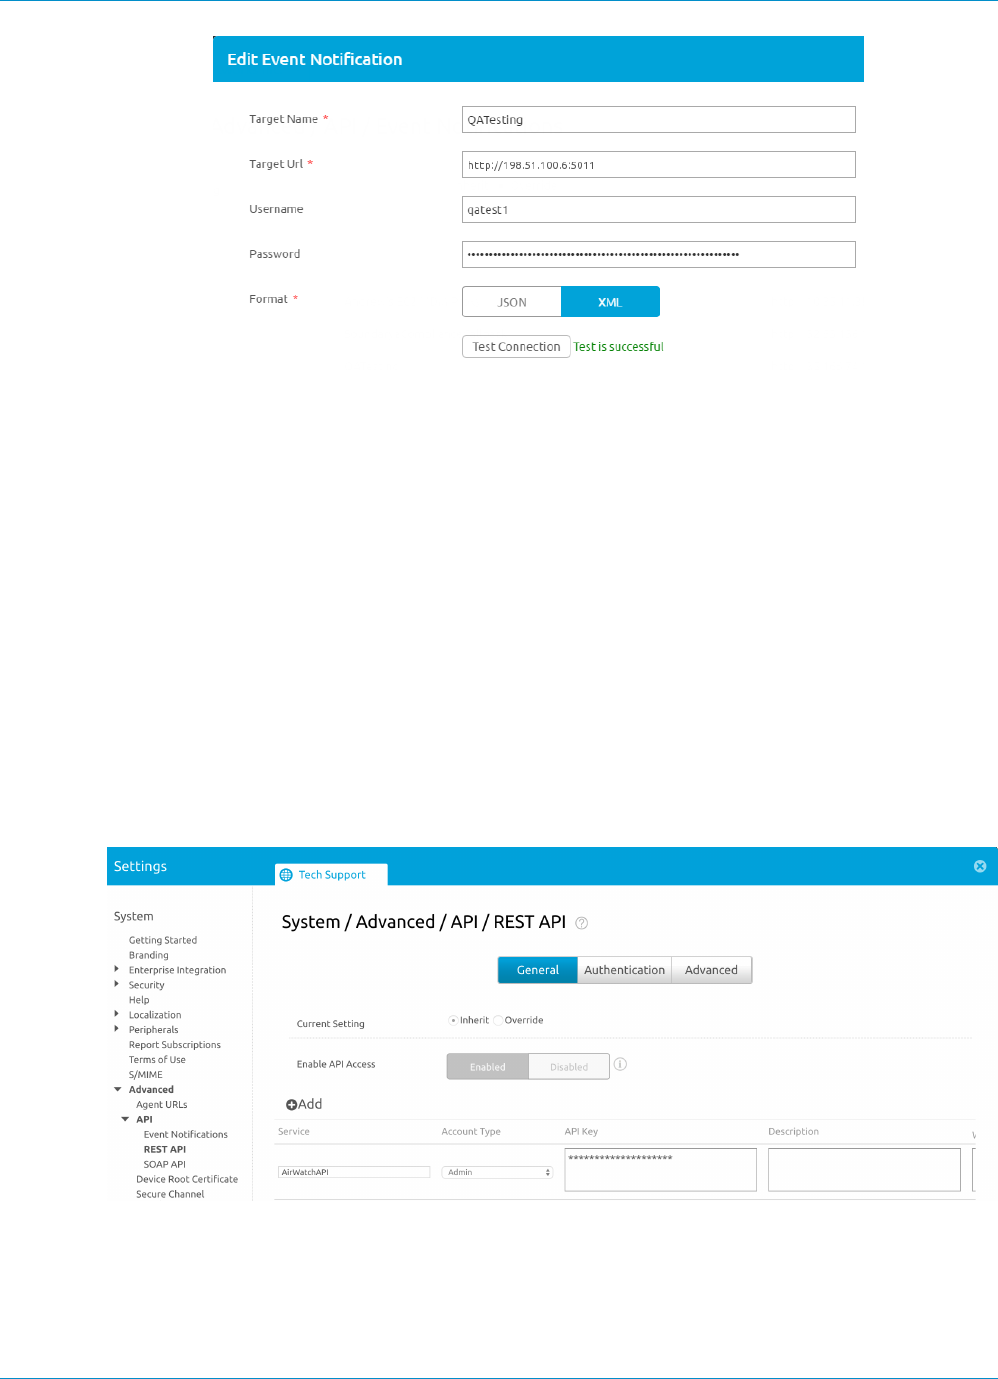
196 GLOBALPROTECT ADMINISTRATOR'S GUIDE | Host Information
© 2017 Palo Alto Networks, Inc.
• Set the TCP Port for communicating with the event notification service. Use this format: http://
<external_hostname>/<ip_address>:<port> where <ip-address> is the IP address for the
MDM integration service. The default port is 5011. To change the port, specify a number from 1 to
65535.
• For event notification, enter the Username and Password credentials needed to authenticate
incoming requests.
• Enter the Permitted IP addresses to access MDM events. This is a comma-separated list of IP
addresses from where MDM events are posted. For example, the IP address of the AirWatch server.
Contact your AirWatch Support team for guidance on which IP addresses to specify.
STEP 5 | Add MDM API Authentication settings to connect with the AirWatch API.
• Enter the Server Address of the AirWatch MDM server to which the Windows-based User-ID agent
will connect. For example, api.awmdm.com.
• Enter the Username and Password credentials needed to access the AirWatch MDM API.
• Enter the Tenant Code.This is a unique hexadecimal code number required to access the AirWatch
MDM API. On the AirWatch console, you can find the tenant code at System > Advanced > API >
REST API > API Key.
• Enter the Mobile Device State Retrieval Interval. This setting controls how often host information
is retrieved from devices managed by AirWatch. The default is 30 minutes. To change the interval,
specify a number from 1 to 600.
STEP 6 | Commit your changes.

GLOBALPROTECT ADMINISTRATOR'S GUIDE | Host Information 197
© 2017 Palo Alto Networks, Inc.
STEP 7 | Click Test Connection to make sure the Windows-based User-ID agent can connect to the
AirWatch API.
STEP 8 | Configure the GlobalProtect gateway to communicate with the MDM integration service to
retrieve the HIP reports for the devices managed by AirWatch.
1. In the PAN-OS web interface, select Network > GlobalProtect > MDM.
2. Add the following information about the MDM integration service.
•Name—Enter a name for the MDM integration service (up to 31 characters). The name is case-
sensitive and must be unique. Use only letters, numbers, spaces, hyphens, and underscores.
• (Optional) Select the virtual system to which the gateway belongs.
•Server—Enter the IP address or FQDN of the interface on the Airwatch MDM integration service
where the gateway connects to retrieve HIP reports. Ensure that you have a service route to this
interface.
•Connection Port—Enter the connection port where the MDM integration service listens for HIP
report requests. The default port is 5008. To change the port, specify a number from 1 to 65535.
•Client Certificate—Choose the client certificate for the gateway to present to the MDM integration
service when it establishes an HTTPS connection. You can choose a client certificate from the drop
down, or import a new client certificate. The Certificate Purpose must indicate that it is a client
authentication certificate.
The root certificate authority (CA) certificate of the client certificate must be imported into
the Windows trust store of the Windows server where the User-ID Agent is installed.
1. Add the root CA certificate associated with the server certificate installed on the MDM integration
service host. You need both the root CA certificate and the server certificate to establish a secure
connection between the gateway and the MDM integration service. You can choose a root CA
certificate from the drop down, or Import a new certificate.
2. Click OK.
3. Commit your changes.
STEP 9 | Check your connection to make sure AirWatch device data is transferred to GlobalProtect.
1. Open the Windows-based User-ID agent and select MDM Integration > Mobile Devices. You should
see a list of unique device IDs and user names for all the devices managed by AirWatch.
2. (Optional) You can Filter the list to find a specific Mobile Device.
3. (Optional). Select a device in the list of device IDs and click Retrieve Device State to extract
the latest information about the device and see how it maps to host information profiles on the
GlobalProtect gateway.
Troubleshoot the MDM Integration Service
Follow these instructions if you have trouble with event notifications or trouble authenticating to the
AirWatch REST API.
•Event notifications from the AirWatch MDM server are not received by the MDM integration
service.
1. Set the Debug option (in the File menu) to Debug or Verbose.
2. Go the User-ID agent installation folder on the Windows server and open the MaDebug file. Look for
messages similar to the following:
The address x.x.x.x
is not in the permitted ip list for event notifications.

198 GLOBALPROTECT ADMINISTRATOR'S GUIDE | Host Information
3. Add this IP address as a Permitted IP address (MDM Integration > Setup > Permitted IP).
•Authentication to the Airwatch REST API is unsuccessful.
Make sure that:
• The credentials used for the MDM integration service to authenticate to the AirWatch MDM service
are valid.
• The user account used to access the Airwatch REST API has API access permissions and read-only
permissions (at minimum) to data for the mobile devices and users managed by AirWatch.
• The Tenant Code (API key) is correctly associated with the user account. Remove all unused API
keys.

199
GlobalProtect Quick Configs
The following sections provide step-by-step instructions for configuring some common
GlobalProtect™ deployments:
> Remote Access VPN (Authentication Profile)
> Remote Access VPN (Certificate Profile)
> Remote Access VPN with Two-Factor Authentication
> Always On VPN Configuration
> Remote Access VPN with Pre-Logon
> GlobalProtect Multiple Gateway Configuration
> GlobalProtect for Internal HIP Checking and User-Based Access
> Mixed Internal and External Gateway Configuration
> Live KB: Active Directory Password Changes

200 GLOBALPROTECT ADMINISTRATOR'S GUIDE | GlobalProtect Quick Configs
© 2017 Palo Alto Networks, Inc.

GLOBALPROTECT ADMINISTRATOR'S GUIDE | GlobalProtect Quick Configs 201
© 2017 Palo Alto Networks, Inc.
Remote Access VPN (Authentication Profile)
In the GlobalProtect VPN for Remote Access, the GlobalProtect portal and gateway are configured
on ethernet1/2, so this is the physical interface where GlobalProtect clients connect. After a client
connects and the portal and gateway authenticates it, the client establishes a VPN tunnel from its virtual
adapter, which has been assigned an address in the IP address pool associated with the gateway tunnel.2
configuration—10.31.32.3-10.31.32.118 in this example. Because GlobalProtect VPN tunnels terminate in
a separate corp-vpn zone, you have visibility into the VPN traffic as well as the ability to customize security
policy for remote users.
Watch the video.
Figure 3: GlobalProtect VPN for Remote Access
The following procedure provides the configuration steps for this example. You can also watch the video.
STEP 1 | Create Interfaces and Zones for GlobalProtect.
Use the default virtual router for all interface configurations to avoid having to create inter-
zone routing.
• Select Network > Interfaces > Ethernet and configure ethernet1/2 as a Layer 3 Ethernet interface
with IP address 203.0.113.1 and assign it to the l3-untrust zone and the default virtual router.
• Create a DNS “A” record that maps IP address 203.0.113.1 to gp.acme.com.
• Select Network > Interfaces > Tunnel and add the tunnel.2 interface and add it to a new zone called
corp-vpn. Assign it to the default virtual router.
• Enable User Identification on the corp-vpn zone.
STEP 2 | Create security policy to enable traffic flow between the corp-vpn zone and the l3-trust zone
to enable access to your internal resources.
1. Select Policies > Security and then Add a new rule.
2. For this example, you would define the rule with the following settings:
• Name—VPN Access
• Source Zone—corp-vpn
• Destination Zone—l3-trust
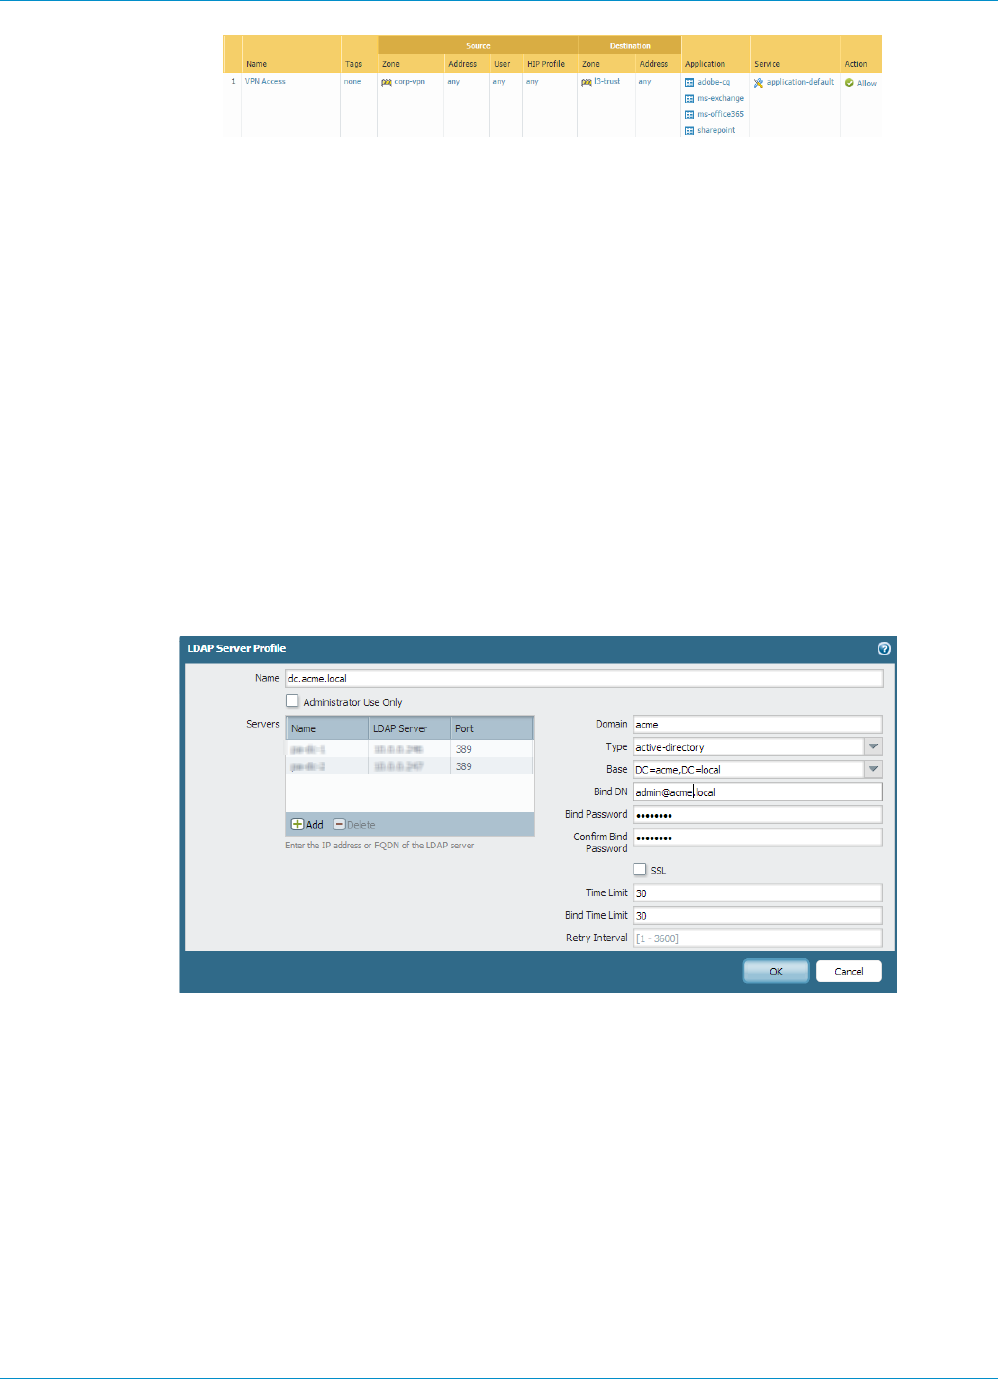
202 GLOBALPROTECT ADMINISTRATOR'S GUIDE | GlobalProtect Quick Configs
© 2017 Palo Alto Networks, Inc.
STEP 3 | Obtain a server certificate for the interface hosting the GlobalProtect portal and gateway using
one of the following methods:
• (Recommended) Import a server certificate from a well-known, third-party CA.
•Use the root CA on the portal to generate a self-signed server certificate.
Select Device > Certificate Management > Certificates to manage certificates as follows:
• Obtain a server certificate. Because the portal and gateway are on the same interface, the same
server certificate can be used for both components.
• The CN of the certificate must match the FQDN, gp.acme.com.
• To enable clients to connect to the portal without receiving certificate errors, use a server certificate
from a public CA.
STEP 4 | Create a server profile.
The server profile instructs the firewall how to connect to the authentication service. Supported
methods are Local, RADIUS, Kerberos, SAML, and LDAP authentication. This example shows an LDAP
authentication profile for authenticating users against the Active Directory.
Create the server profile for connecting to the LDAP server (Device > Server Profiles > LDAP).
STEP 5 | (Optional) Create an authentication profile.
Attach the server profile to an authentication profile (Device > Authentication Profile).
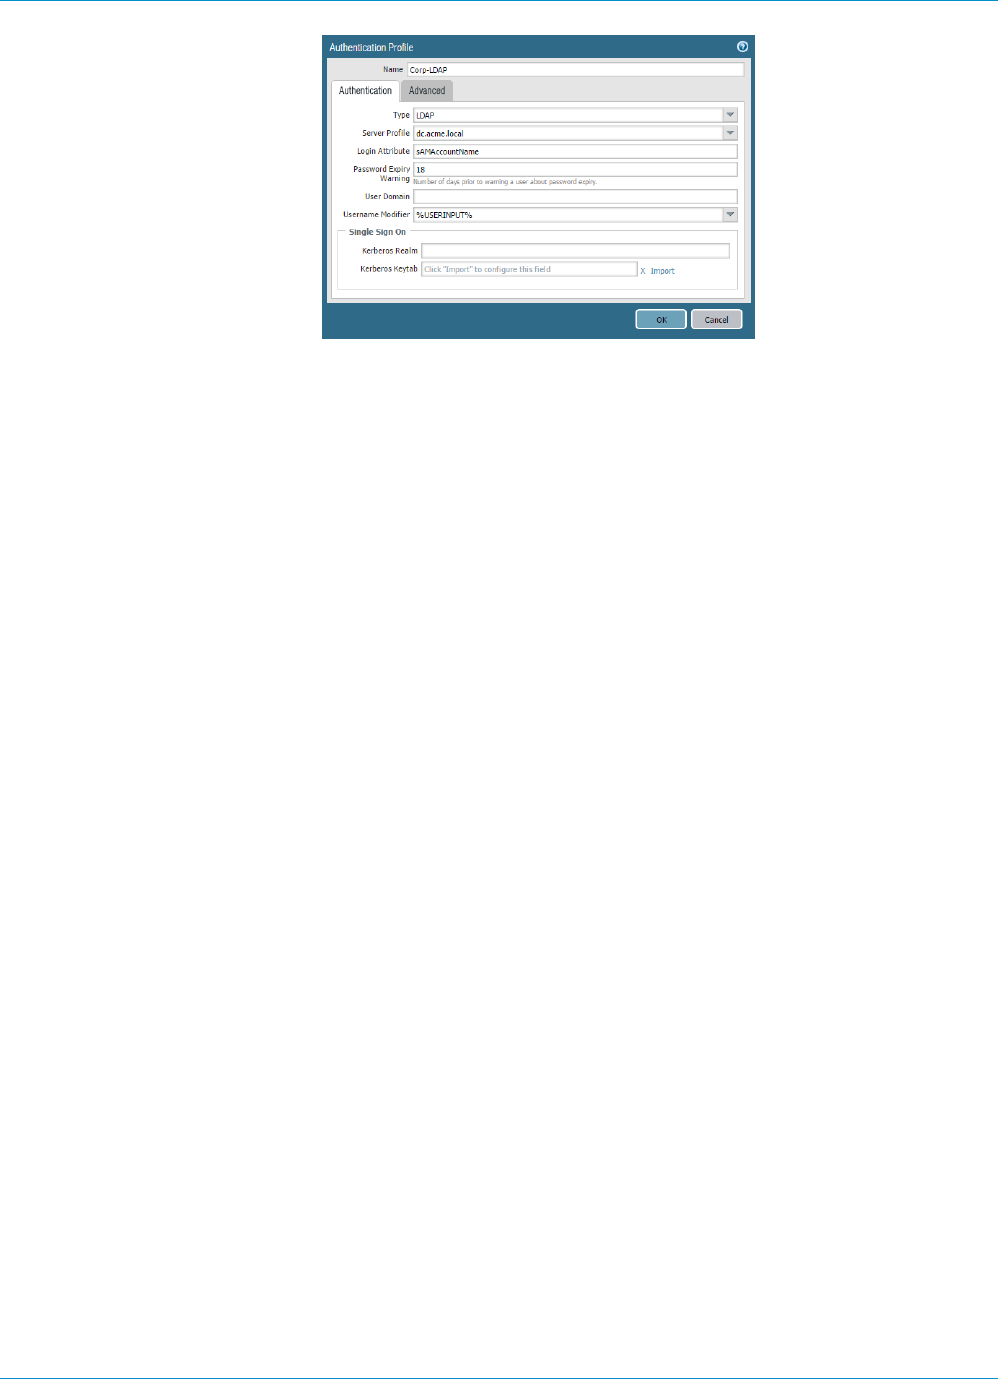
GLOBALPROTECT ADMINISTRATOR'S GUIDE | GlobalProtect Quick Configs 203
© 2017 Palo Alto Networks, Inc.
STEP 6 | Configure a GlobalProtect Gateway.
Select Network > GlobalProtect > Gateways and add the following configuration:
Interface—ethernet1/2
IP Address—203.0.113.1
Server Certificate—GP-server-cert.pem issued by GoDaddy
Authentication Profile—Corp-LDAP
Tunnel Interface—tunnel.2
IP Pool—10.31.32.3 - 10.31.32.118
STEP 7 | Configure the GlobalProtect Portals.
Select Network > GlobalProtect > Portals and add the following configuration:
1. Set Up Access to the GlobalProtect Portal. This example uses the following settings:
Interface—ethernet1/2
IP Address—203.0.113.1
Server Certificate—GP-server-cert.pem issued by GoDaddy
Authentication Profile—Corp-LDAP
2. Define the GlobalProtect Client Authentication Configurations using the following settings:
Connect Method—On-demand (Manual user initiated connection)
External Gateway Address—gp.acme.com
STEP 8 | Deploy the GlobalProtect Agent Software.
Select Device > GlobalProtect Client.
In this example, use the procedure to Host Agent Updates on the Portal.
STEP 9 | (Optional) Enable use of the GlobalProtect mobile app.
Purchase and install a GlobalProtect subscription (Device > Licenses) to enable use of the app.
STEP 10 | Save the GlobalProtect configuration.
Click Commit.

204 GLOBALPROTECT ADMINISTRATOR'S GUIDE | GlobalProtect Quick Configs
© 2017 Palo Alto Networks, Inc.
Remote Access VPN (Certificate Profile)
With certificate authentication, the client must present a valid client certificate that identifies the user
to the GlobalProtect portal or gateway. In addition to the certificate itself, the portal or gateway can use
a certificate profile to determine whether the client that sent the certificate is the client to which the
certificate was issued.
When a client certificate is the only means of authentication, the certificate that the client presents must
contain the username in one of the certificate fields; typically the username corresponds to the common
name (CN) in the Subject field of the certificate.
Upon successful authentication, the GlobalProtect agent establishes a VPN tunnel with the gateway and
is assigned an IP address from the IP pool in the gateway’s tunnel configuration. To support user-based
policy enforcement on sessions from the corp-vpn zone, the username from the certificate is mapped to the
IP address that the gateway assigned. Also, if a security policy requires a domain name in addition to user
name, the specified domain value in the certificate profile is appended to the username.
Figure 4: GlobalProtect Client Certificate Authentication Configuration
This quick configuration uses the same topology as GlobalProtect VPN for Remote Access. The only
configuration difference is that instead of authenticating users against an external authentication server,
this configuration uses client certificate authentication only.
STEP 1 | Create Interfaces and Zones for GlobalProtect.
Use the default virtual router for all interface configurations to avoid having to create inter-
zone routing.
• Select Network > Interfaces > Ethernet and configure ethernet1/2 as a Layer 3 Ethernet interface
with IP address 203.0.113.1 and assign it to the l3-untrust security zone and the default virtual
router.
• Create a DNS “A” record that maps IP address 203.0.113.1 to gp.acme.com.
• Select Network > Interfaces > Tunnel.
• Add tunnel.2 interface to a new zone called corp-vpn. Assign the interface to the default virtual
router.
• Enable User Identification on the corp-vpn zone.

GLOBALPROTECT ADMINISTRATOR'S GUIDE | GlobalProtect Quick Configs 205
© 2017 Palo Alto Networks, Inc.
STEP 2 | Create security policy to enable traffic flow between the corp-vpn zone and the l3-trust zone
to enable access to your internal resources.
1. Select Policies > Security and then Add a new rule.
2. For this example, you would define the rule with the following settings:
• Name—VPN Access
• Source Zone—corp-vpn
• Destination Zone—l3-trust
STEP 3 | Obtain a server certificate for the interface hosting the GlobalProtect portal and gateway using
one of the following methods:
• (Recommended) Import a server certificate from a well-known, third-party CA.
•Use the root CA on the portal to generate a self-signed server certificate.
Select Device > Certificate Management > Certificates to manage certificates as follows:
• Obtain a server certificate. Because the portal and gateway are on the same interface, the same
server certificate can be used for both components.
• The CN of the certificate must match the FQDN, gp.acme.com.
• To enable clients to connect to the portal without receiving certificate errors, use a server certificate
from a public CA.
STEP 4 | Issue client certificates to GlobalProtect clients and endpoints.
1. Use your enterprise PKI or a public CA to issue a unique client certificate to each GlobalProtect user.
2. Install certificates in the personal certificate store on the endpoints.
STEP 5 | Create a client certificate profile.
1. Select Device > Certificate Management > Certificate Profile, click Add and enter a profile Name
such as GP-client-cert.
2. Select Subject from the Username Field drop-down.
3. Click Add in the CA Certificates section, select the CA Certificate that issued the client certificates,
and click OK twice.
STEP 6 | Configure a GlobalProtect Gateway.
See the topology diagram shown in GlobalProtect VPN for Remote Access.
Select Network > GlobalProtect > Gateways and add the following configuration:
Interface—ethernet1/2
IP Address—203.0.113.1
Server Certificate—GP-server-cert.pem issued by GoDaddy
Certificate Profile—GP-client-cert
Tunnel Interface—tunnel.2
IP Pool—10.31.32.3 - 10.31.32.118
STEP 7 | Configure the GlobalProtect Portals.

206 GLOBALPROTECT ADMINISTRATOR'S GUIDE | GlobalProtect Quick Configs
© 2017 Palo Alto Networks, Inc.
Select Network > GlobalProtect > Portals and add the following configuration:
1. Set Up Access to the GlobalProtect Portal:
Interface—ethernet1/2
IP Address—203.0.113.1
Server Certificate—GP-server-cert.pem issued by GoDaddy
Certificate Profile—GP-client-cert
2. Define the GlobalProtect Agent Configurations:
Connect Method—On-demand (Manual user initiated connection)
External Gateway Address—gp.acme.com
STEP 8 | Deploy the GlobalProtect Agent Software.
Select Device > GlobalProtect Client.
In this example, use the procedure to Host Agent Updates on the Portal.
STEP 9 | (Optional) Enable use of the GlobalProtect mobile app.
Purchase and install a GlobalProtect subscription (Device > Licenses) to enable use of the app.
STEP 10 | Save the GlobalProtect configuration.
Click Commit.
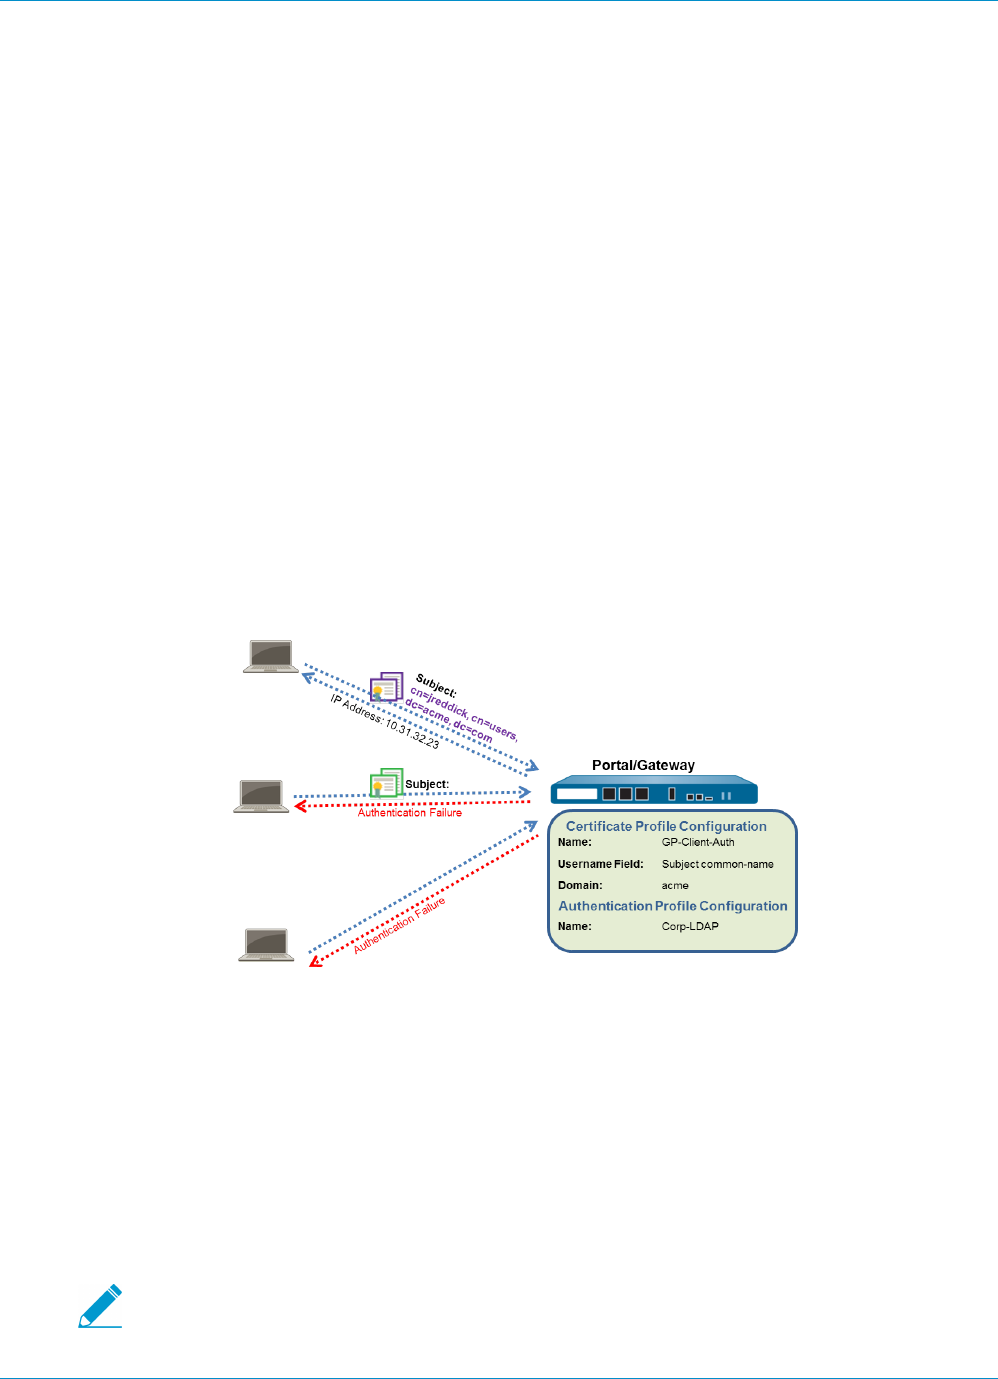
GLOBALPROTECT ADMINISTRATOR'S GUIDE | GlobalProtect Quick Configs 207
© 2017 Palo Alto Networks, Inc.
Remote Access VPN with Two-Factor
Authentication
If you configure a GlobalProtect portal or gateway with an authentication profile and a certificate profile
(which together can provide two-factor authentication), the end user must succeed at authentication
through both profiles before gaining access. For portal authentication, this means that certificates must
be pre-deployed to the end clients before their initial portal connection. Additionally, the client certificate
presented by a client must match what is defined in the certificate profile.
• If the certificate profile does not specify a username field (that is, the Username Field it is set to
None), the client certificate does not need to have a username. In this case, the client must provide the
username when authenticating against the authentication profile.
• If the certificate profile specifies a username field, the certificate that the client presents must contain
a username in the corresponding field. For example, if the certificate profile specifies that the username
field is Subject, the certificate presented by the client must contain a value in the common-name field,
or else the authentication fails. In addition, when the username field is required, the value from the
username field of the certificate is automatically populated as the username when the user attempts
to enter credentials for authenticating to the authentication profile. If you do not want force users to
authenticate with a username from the certificate, do not specify a username field in the certificate
profile.
This quick configuration uses the same topology as GlobalProtect VPN for Remote Access. However, in this
configuration the clients must authenticate against a certificate profile and an authentication profile. For
more details on a specific type of two-factor authentication, see the following topics:
•Enable Two-Factor Authentication Using Certificate and Authentication Profiles
•Enable Two-Factor Authentication Using One-Time Passwords (OTPs)
•Enable Two-Factor Authentication Using Smart Cards
Use the following procedure to configure VPN Remote Access with Two-Factor Authentication.
STEP 1 | Create Interfaces and Zones for GlobalProtect.
Use the default virtual router for all interface configurations to avoid having to create inter-
zone routing.
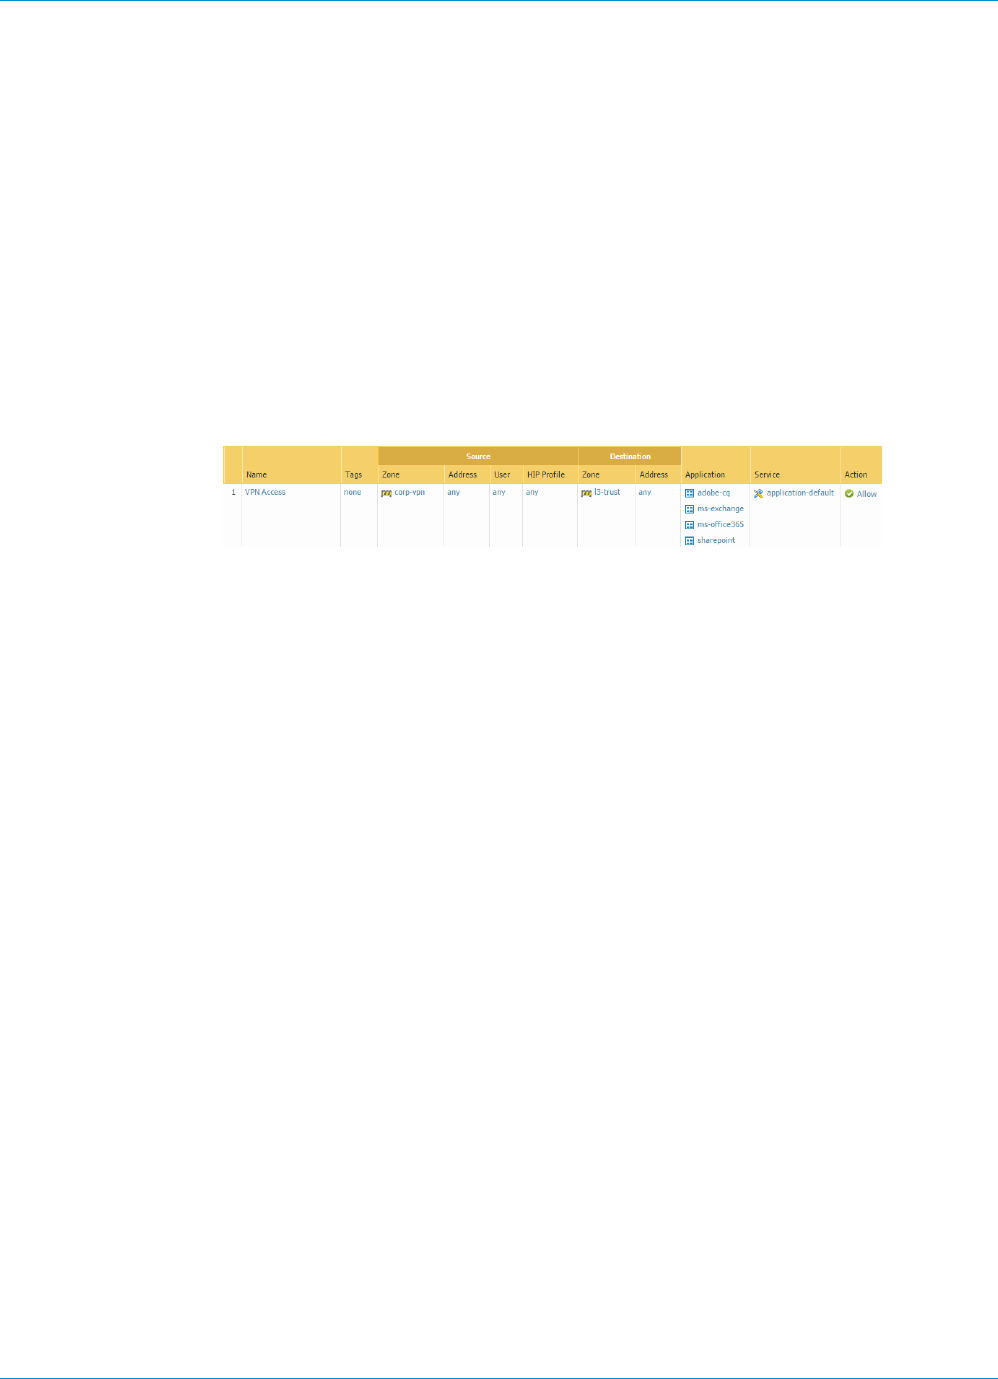
208 GLOBALPROTECT ADMINISTRATOR'S GUIDE | GlobalProtect Quick Configs
© 2017 Palo Alto Networks, Inc.
• Select Network > Interfaces > Ethernet and configure ethernet1/2 as a Layer 3 Ethernet interface
with IP address 203.0.113.1 and assign it to the l3-untrust security zone and the default virtual
router.
• Create a DNS “A” record that maps IP address 203.0.113.1 to gp.acme.com.
• Select Network > Interfaces > Tunnel and add the tunnel.2 interface and add it to a new zone called
corp-vpn. Assign it to the default virtual router.
• Enable User Identification on the corp-vpn zone.
STEP 2 | Create security policy to enable traffic flow between the corp-vpn zone and the l3-trust zone
to enable access to your internal resources.
1. Select Policies > Security and then click Add to add a new rule.
2. For this example, you would define the rule with the following settings:
• Name—VPN Access
• Source Zone—corp-vpn
• Destination Zone—l3-trust
STEP 3 | Obtain a server certificate for the interface hosting the GlobalProtect portal and gateway using
one of the following methods:
• (Recommended) Import a server certificate from a well-known, third-party CA.
•Use the root CA on the portal to generate a self-signed server certificate.
Select Device > Certificate Management > Certificates to manage certificates as follows:
• Obtain a server certificate. Because the portal and gateway are on the same interface, the same
server certificate can be used for both components.
• The CN of the certificate must match the FQDN, gp.acme.com.
• To enable clients to connect to the portal without receiving certificate errors, use a server certificate
from a public CA.
STEP 4 | Issue client certificates to GlobalProtect clients and endpoints.
1. Use your enterprise PKI or a public CA to issue a unique client certificate to each GlobalProtect user.
2. Install certificates in the personal certificate store on the endpoints.
STEP 5 | Create a client certificate profile.
1. Select Device > Certificate Management > Certificate Profile, Add and enter a profile Name such as
GP-client-cert.
2. Specify where to get the username that will be used to authenticate the end user:
•From user—If you want the end user to supply a username when authenticating to the service
specified in the authentication profile, select None as the Username Field.
•From certificate—If you want to extract the username from the certificate, select Subject as the
Username Field. If you use this option, the CN contained in the certificate will automatically
populated the username field when the user is prompted to login to the portal/gateway and the
user will be required to log in using that username.
3. In the CA Certificates section, Add and then select the CA Certificate that issued the client
certificates, and click OK twice.

GLOBALPROTECT ADMINISTRATOR'S GUIDE | GlobalProtect Quick Configs 209
© 2017 Palo Alto Networks, Inc.
STEP 6 | Create a server profile.
The server profile instructs the firewall how to connect to the authentication service. Local, RADIUS,
Kerberos, SAML, and LDAP authentication methods are supported. This example shows an LDAP
authentication profile for authenticating users against the Active Directory.
Create the server profile for connecting to the LDAP server (Device > Server Profiles > LDAP).
STEP 7 | (Optional) Create an authentication profile.
Attach the server profile to an authentication profile (Device > Authentication Profile).
STEP 8 | Configure a GlobalProtect Gateway.
See the topology diagram shown in GlobalProtect VPN for Remote Access.
Select Network > GlobalProtect > Gateways and add the following configuration:
Interface—ethernet1/2
IP Address—203.0.113.1
Server Certificate—GP-server-cert.pem issued by GoDaddy
Certificate Profile—GP-client-cert
Authentication Profile—Corp-LDAP
Tunnel Interface—tunnel.2
IP Pool—10.31.32.3 - 10.31.32.118

210 GLOBALPROTECT ADMINISTRATOR'S GUIDE | GlobalProtect Quick Configs
© 2017 Palo Alto Networks, Inc.
STEP 9 | Configure the GlobalProtect Portals.
Select Network > GlobalProtect > Portals and add the following configuration:
1. Set Up Access to the GlobalProtect Portal:
Interface—ethernet1/2
IP Address—203.0.113.1
Server Certificate—GP-server-cert.pem issued by GoDaddy
Certificate Profile—GP-client-cert
Authentication Profile—Corp-LDAP
2. Define the GlobalProtect Agent Configurations:
Connect Method—On-demand (Manual user initiated connection)
External Gateway Address—gp.acme.com
STEP 10 | Deploy the GlobalProtect Agent Software.
Select Device > GlobalProtect Client.
In this example, use the procedure to Host Agent Updates on the Portal.
STEP 11 | (Optional) Deploy Agent Settings Transparently.
As an alternative to deploying agent settings from the portal configuration, you can define settings
directly from the Windows registry or global MAC plist. Examples of settings that you can deploy include
specifying the portal IP address or enabling GlobalProtect to initiate a VPN tunnel before a user logs in
to the device and connects to the GlobalProtect portal. On Windows clients only, you can also configure
settings using the MSIEXEC installer. For additional information, see Customizable Agent Settings.
STEP 12 | (Optional) Enable use of the GlobalProtect mobile app.
Purchase and install a GlobalProtect subscription (Device > Licenses) to enable use of the app.
STEP 13 | Save the GlobalProtect configuration.
Click Commit.
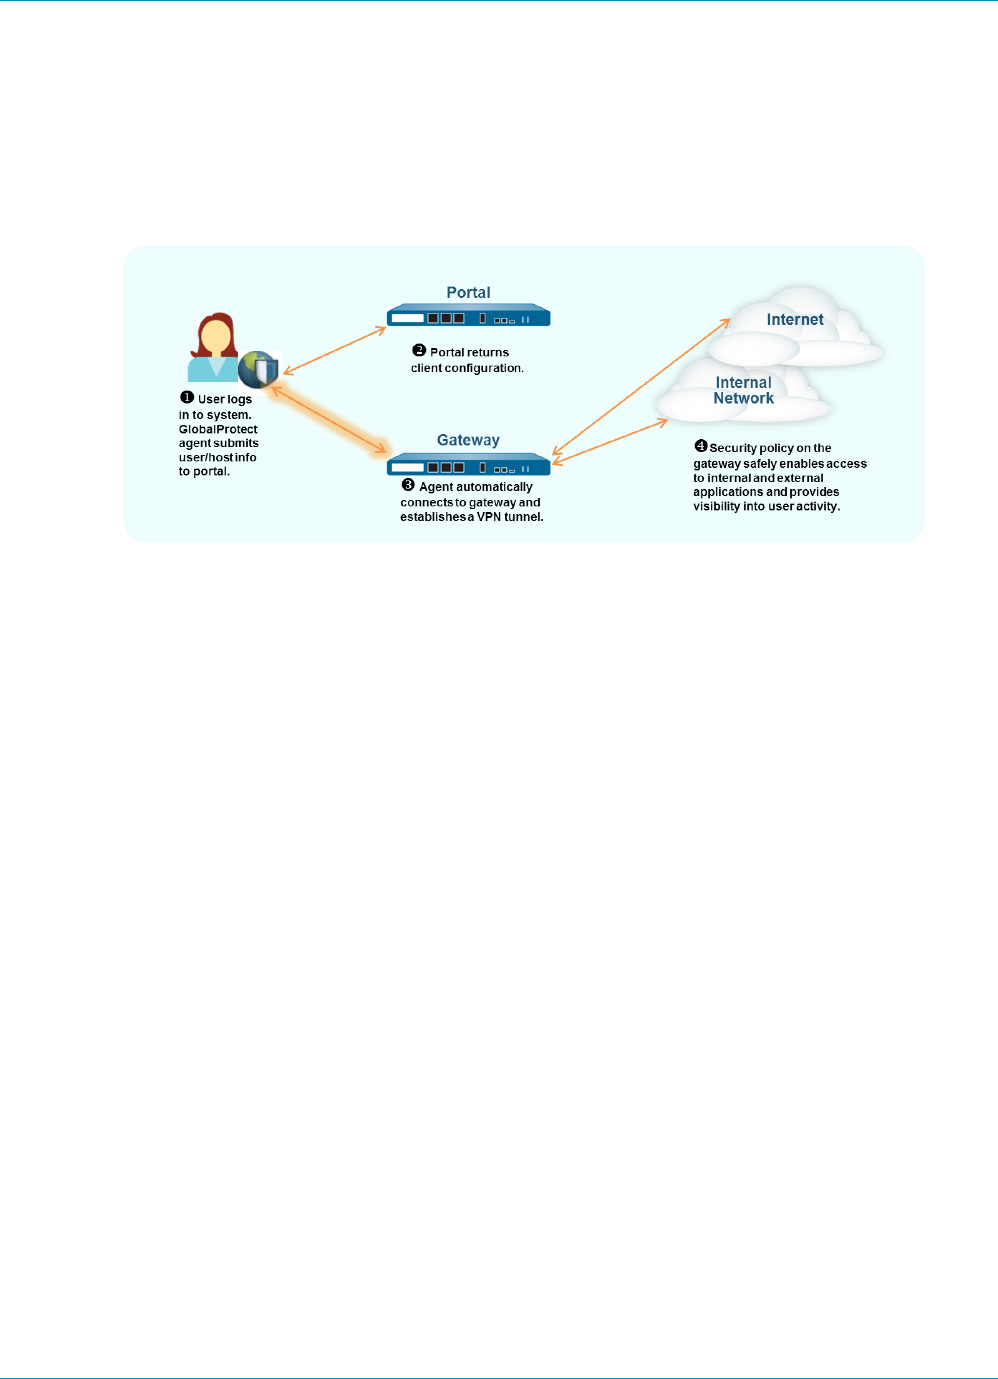
GLOBALPROTECT ADMINISTRATOR'S GUIDE | GlobalProtect Quick Configs 211
© 2017 Palo Alto Networks, Inc.
Always On VPN Configuration
In an “always on” GlobalProtect configuration, the agent connects to the GlobalProtect portal upon user
logon to submit user and host information and receive the client configuration. It then automatically
establishes the VPN tunnel to the gateway specified in the client configuration delivered by the portal
without end user intervention as shown in the following illustration.
To switch any of the previous remote access VPN configurations to an always-on configuration, you simply
change the connect method:
•Remote Access VPN (Authentication Profile) on page 201
•Remote Access VPN (Certificate Profile) on page 204
•Remote Access VPN with Two-Factor Authentication on page 207
Use the following procedure to switch to an Always On configuration.
STEP 1 | Select Network > GlobalProtect > Portals and select the portal configuration to open it.
STEP 2 | Select the Agent tab and then select the agent configuration you want to modify.
STEP 3 | Select the App tab.
STEP 4 | Select User-logon (Always On) as the Connect Method. Repeat this step for each agent
configuration.
STEP 5 | Click OK twice to save the agent configuration and the portal configuration and then Commit
your changes.

212 GLOBALPROTECT ADMINISTRATOR'S GUIDE | GlobalProtect Quick Configs
© 2017 Palo Alto Networks, Inc.
Remote Access VPN with Pre-Logon
Pre-logon is a connect method that establishes a VPN tunnel before a user logs in. The purpose of pre-
logon is to authenticate the endpoint (not the user) and then enable domain scripts and other tasks of your
choice to run as soon as the endpoint powers on. A machine certificate enables the endpoint to have the
VPN tunnel to the gateway. A common practice for IT personnel is to install the machine certificate while
staging the endpoint for the user.
A pre-logon VPN tunnel has no username association because the user has not logged in. Therefore, to
let the endpoint have access to resources in the trust zone, you must create security policies that match
the pre-logon user. These policies should allow access to only the basic services for starting up the system,
such as DHCP, DNS, Active Directory (for example, to change an expired password), antivirus, or operating
system update services.
After the gateway authenticates a Windows user, the VPN tunnel is reassigned to that user (the IP address
mapping on the firewall changes from the pre-logon endpoint to the authenticated user).
Mac systems behave differently from Windows systems with pre-logon. With Mac OS, the
tunnel created for pre-logon is torn down and a new tunnel created when the user logs in.
When a client requests a new connection, the portal authenticates the client by using an authentication
profile. The portal can also use an optional certificate profile that validates the client certificate (if the
configuration includes a client certificate). In this case, the client certificate must identify the user.
After authentication, the portal determines if the client’s configuration is current. If the portal’s
configuration for the agent has changed, it pushes an updated configuration to the endpoint.
If the configuration on the portal or a gateway includes cookie-based authentication for the client, the
portal or gateway installs an encrypted cookie on the client. Subsequently, the portal or gateway uses the
cookie to authenticate users and for refreshing the client’s configuration. Also, if an agent configuration
profile includes the pre-logon connect method in addition to cookie-authentication, the GlobalProtect
components can use the cookie for pre-logon.
If users never log into a device (for example, a headless device) or a pre-logon connection is required on
a system that a user has not previously logged into, you can let the endpoint initiate a pre-logon tunnel
without first connecting to the portal to download the pre-logon configuration. To do this, you must
override the default behavior by creating entries in the Windows registry or Mac plist.
The GlobalProtect endpoint will then connect to the portal specified in the configuration and authenticate
the endpoint by using its machine certificate (as specified in a certificate profile configured on the gateway)
and establish the VPN tunnel.
When the end user subsequently logs in to the machine and if single sign-on (SSO) is enabled in the client
configuration, the username and password are captured while the user logs in and used to authenticate
to the gateway and so that the tunnel can be renamed (Windows). If SSO is not enabled in the client
configuration or of SSO is not supported on the client system (for example, it is a Mac OS system) the users’
credentials must be stored in the agent (that is, the Save User Credentials option must be set to Yes). After
successful authentication to the gateway the tunnel will be renamed (Windows) or rebuilt (Mac) and user-
and group-based policy can be enforced.
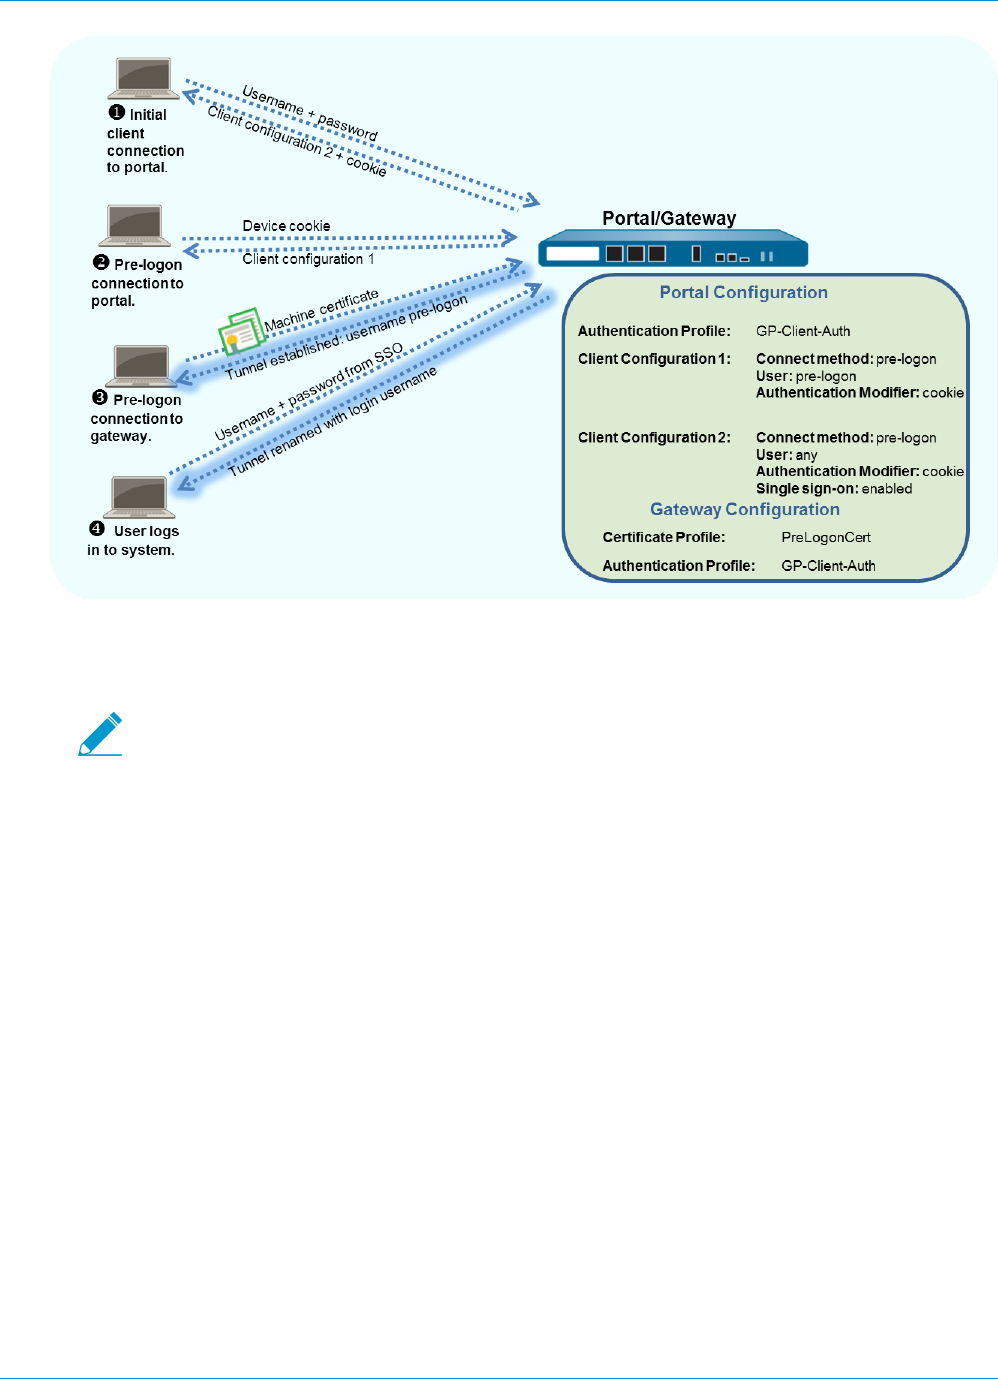
GLOBALPROTECT ADMINISTRATOR'S GUIDE | GlobalProtect Quick Configs 213
© 2017 Palo Alto Networks, Inc.
This example uses the GlobalProtect topology shown in GlobalProtect VPN for Remote Access.
STEP 1 | Create Interfaces and Zones for GlobalProtect.
Use the default virtual router for all interface configurations to avoid having to create inter-
zone routing.
• For this example, select Network > Interfaces > Ethernet and then:
• Select ethernet1/2.
• For its interface type, select Layer 3.
•Assign interface to: default virtual router, default virtual system, and l3-untrust security zone.
• Select IPv4 and Add.
• Select the address 203.0.113.1 (or the object that maps 203.0.113.1) or add a New Address to
create a new object and address mapping. (Leave the address type as Static.)
• Create a DNS “A” record that maps IP address 203.0.113.1 to gp.acme.com.
• Select Network > Interfaces > Tunnel.
•Add a tunnel.2 interface to a new zone called corp-vpn. Assign it to the default virtual router.
• Enable User Identification on the corp-vpn zone.
STEP 2 | Create the security policy rules.
This configuration requires the following policies (Policies > Security):
1. Create a rule that enables pre-logon user access to basic services that are required for the computer
to come up, such as authentication services, DNS, DHCP, and Microsoft Updates.
2. Create a rule to deny pre-logon user access to all other destinations and applications.
3. Create any additional rules to enable access to specific destinations and applications for specific
users or user groups. Follow the Best Practice Internet Gateway Security Policy recommendations for
creating these rules.

214 GLOBALPROTECT ADMINISTRATOR'S GUIDE | GlobalProtect Quick Configs
© 2017 Palo Alto Networks, Inc.
STEP 3 | Use one of the following methods to obtain a server certificate for the interface that is hosts
the GlobalProtect portal and gateway:
• (Recommended) Import a server certificate from a well-known, third-party CA.
•Use the root CA on the portal to generate a self-signed server certificate.
Select Device > Certificate Management > Certificates to manage certificates with the following criteria:
• Obtain a server certificate. Because the portal and gateway are on the same interface, the same
server certificate can be used for both components.
• The CN of the certificate must match the FQDN, gp.acme.com.
• To enable clients to connect to the portal without receiving certificate errors, use a server certificate
from a public CA.
STEP 4 | Generate a machine certificate for each client system that will connect to GlobalProtect and
import them into the personal certificate store on each machine.
Although you could generate self-signed certificates for each client system, as a best practice, use your
own public-key infrastructure (PKI) to issue and distribute certificates to your clients.
1. Issue client certificates to GlobalProtect clients and endpoints.
2. Install certificates in the personal certificate store on the endpoints. (Local Computer store on
Windows or System Keychain on Mac OS)
STEP 5 | Import the trusted root CA certificate from the CA that issued the machine certificates onto
the portal and gateway(s).
You do not have to import the private key.
1. Download the CA certificate in Base64 format.
2. Import the certificate onto each firewall that hosts a portal or gateway, as follows:
1. Select Device > Certificate Management > Certificates > Device Certificates and click Import.
2. Enter a Certificate Name that identifies the certificate as your client CA certificate.
3. Browse to the Certificate File you downloaded from the CA.
4. Select Base64 Encoded Certificate (PEM) as the File Format and then click OK.
5. Select the certificate you just imported on the Device Certificates tab to open it.
6. Select Trusted Root CA and then click OK.
STEP 6 | On each firewall that hosts a GlobalProtect gateway, create a certificate profile to identify the
CA certificate for validating the machine certificates.
Optionally, if you plan to use client certificate authentication to authenticate users when they log
in to the system, make sure that the CA certificate that issues the client certificates is referenced in
the certificate profile in addition to the CA certificate that issued the machine certificates if they are
different.
1. Select Device > Certificates > Certificate Management > Certificate Profile.
2. Click Add and enter a Name to uniquely identify the profile, such as PreLogonCert.
3. Set Username Field to None.
4. (Optional) If you will also use client certificate authentication to authenticate users upon login, add
the CA certificate that issued the client certificates if it is different from the one that issued the
machine certificates.
5. In the CA Certificates field, click Add, select the Trusted Root CA certificate you imported in 5 and
then click OK.

GLOBALPROTECT ADMINISTRATOR'S GUIDE | GlobalProtect Quick Configs 215
© 2017 Palo Alto Networks, Inc.
6. Click OK to save the profile.
STEP 7 | Configure a GlobalProtect Gateway.
See the topology diagram shown in GlobalProtect VPN for Remote Access.
Although you must create a certificate profile for pre-logon access to the gateway, you can use either
client certificate authentication or authentication profile-based authentication for logged in users. In this
example, the same LDAP profile is used that is used to authenticate users to the portal.
1. Select Network > GlobalProtect > Gateways and add the following configuration:
Interface—ethernet1/2
IP Address—203.0.113.1
Server Certificate—GP-server-cert.pem issued by GoDaddy
Certificate Profile—PreLogonCert
Authentication Profile—Corp-LDAP
Tunnel Interface—tunnel.2
IP Pool—10.31.32.3 - 10.31.32.118
2. Commit the gateway configuration.
STEP 8 | Configure the GlobalProtect Portals.
Configure Device details (networking parameters, the authentication service profile, and the certificate
for the authentication server).
Select Network > GlobalProtect > Portals and specify the following configuration:
Set Up Access to the GlobalProtect Portal:
Interface—ethernet1/2
IP Address—203.0.113.1
Server Certificate—GP-server-cert.pem issued by GoDaddy
Certificate Profile—None
Authentication Profile—Corp-LDAP
STEP 9 | Define the GlobalProtect Agent Configurations for pre-logon users and for logged in users.
Use a single agent configuration if you want pre-logon users to access the same gateways before and
after they log in.
Otherwise, to direct pre-logon users to different gateways before and after they log in, create two agent
configuration profiles. In this first agent configuration’s User/User Group, select the pre-logon filter.
With pre-logon, the portal first authenticates the endpoint, not the user, to set up a VPN (even though
the pre-logon parameter is associated with users). Subsequently, the portal authenticates the user when
he or she logs in.
After the portal authenticates the user, it deploys the second agent configuration. In this case, User/
User Group is any.
As a best practice, enable SSO in the second agent configuration so that the correct
username is immediately reported to the gateway when the user logs in to the endpoint. If
SSO is not enabled, the saved username in the Agent settings panel is used.
Select Agent and specify one of the following configurations:

216 GLOBALPROTECT ADMINISTRATOR'S GUIDE | GlobalProtect Quick Configs
© 2017 Palo Alto Networks, Inc.
• Use the same gateway before and after pre-logon users log in:
Use single sign-on—enabled
Connect Method—pre-logon
External Gateway Address—gp1.acme.com
User/User Group—any
Authentication Override—Cookie authentication for transparently authenticating users and for
configuration refresh
• Use separate gateways for pre-logon users before and after they log in:
First Agent Configuration:
Connect Method—pre-logon
External Gateway Address—gp1.acme.com
User/User Group—pre-logon
Authentication Override—Cookie authentication for transparently authenticating users and for
configuration refresh
Second Agent Configuration:
Use single sign-on—enabled
Connect Method—pre-logon
External Gateway Address—gp2.acme.com
User/User Group—any
Authentication Override—Cookie authentication for transparently authenticating users and for
configuration refresh
Make sure the pre-logon client configuration is first in the list of configurations. If it is not, select it and
click Move Up.
STEP 10 | Save the GlobalProtect configuration.
Click Commit.
STEP 11 | (Optional) If users will never log into a device (for example, a headless device) or a pre-logon
connection is required on a system that a user has not previously logged into, create the
Prelogon registry entry on the client system.
You must also pre-deploy additional agent settings such as the default portal IP address
and connect method.
For more information about registry settings, see Deploy Agent Settings Transparently.
1. Locate the GlobalProtect settings in the registry:
HKEY_LOCAL_MACHINE\SOFTWARE\Palo Alto Networks\GlobalProtect\PanSetup
2. Create a DWORD named Prelogon with a value of 1 in the Value data field and Hexadecimal as the
Base. This setting enables GlobalProtect to initiate a VPN connection before the user logs into the
laptop.
3. Create a String Value named Portal that specifies the IP address or hostname of the default portal
for the GlobalProtect client.

GLOBALPROTECT ADMINISTRATOR'S GUIDE | GlobalProtect Quick Configs 217
© 2017 Palo Alto Networks, Inc.
4. Create a String Value named connect-method with a value of pre-logon in the Value data field.
This setting enables GlobalProtect to initiate a VPN tunnel before a user logs in to the device and
connects to the GlobalProtect portal.
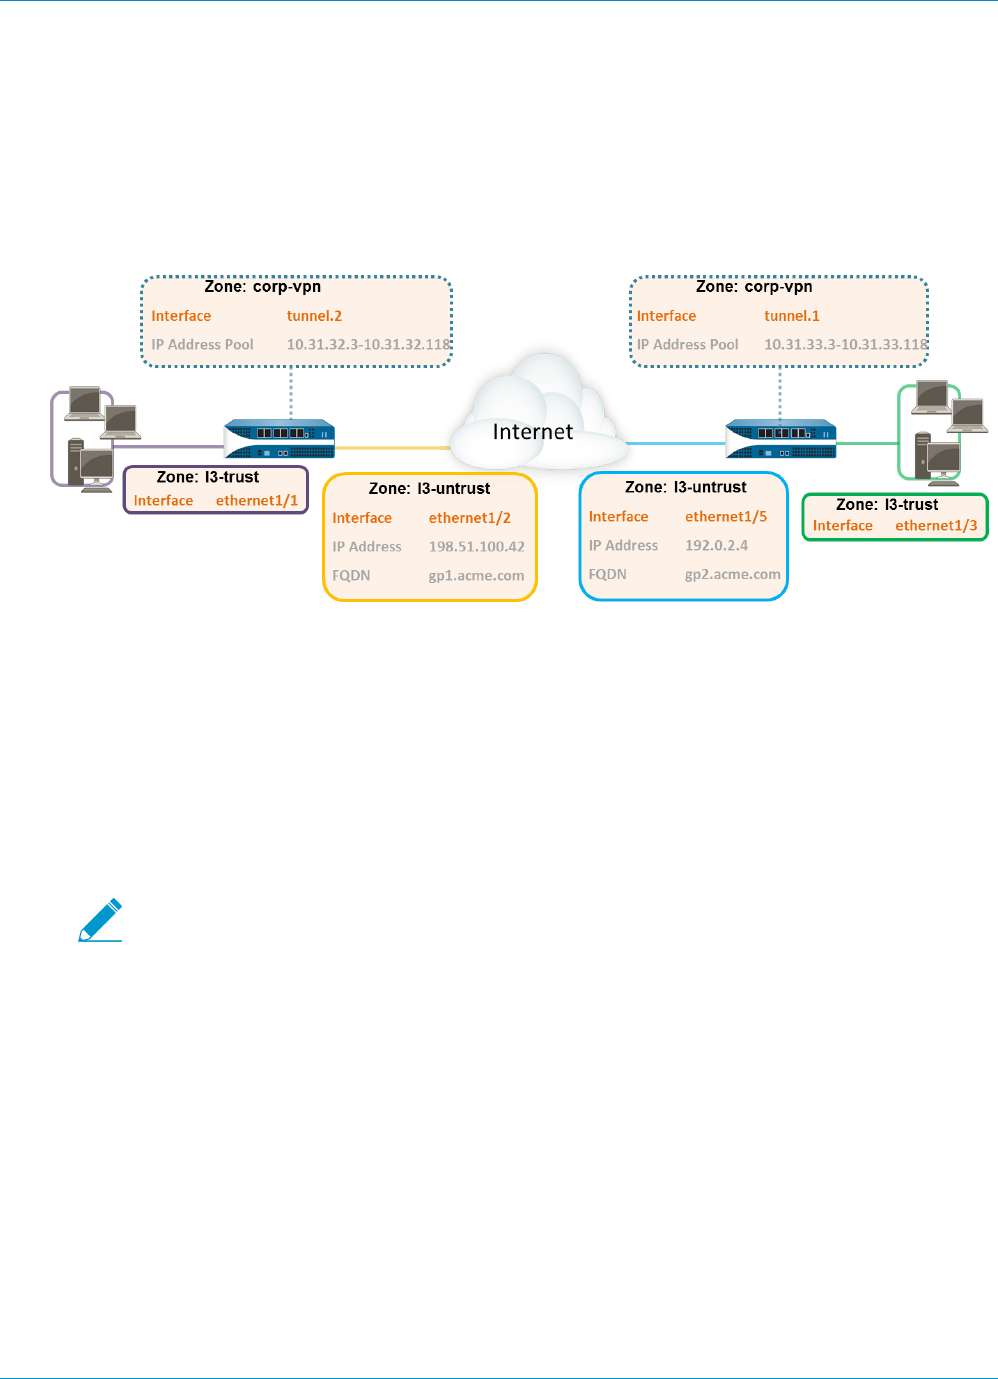
218 GLOBALPROTECT ADMINISTRATOR'S GUIDE | GlobalProtect Quick Configs
© 2017 Palo Alto Networks, Inc.
GlobalProtect Multiple Gateway Configuration
In GlobalProtect Multiple Gateway Topology, a second external gateway has been added to the
configuration. Multiple gateways are supported in all of the preceding example configurations. Additional
steps include configuring a second firewall as a GlobalProtect gateway. In addition, when configuring the
client configurations to be deployed by the portal you can decide whether to allow access to all gateways,
or specify different gateways for different configurations.
Figure 5: GlobalProtect Multiple Gateway Topology
If a client configuration contains more than one gateway, the agent will attempt to connect to all gateways
listed in its client configuration. The agent will then use priority and response time as to determine the
gateway to which to connect. The agent connects to a lower priority gateway only if the response time
for the higher priority gateway is greater than the average response time across all gateways. For more
information, see Gateway Priority in a Multiple Gateway Configuration.
STEP 1 | Create Interfaces and Zones for GlobalProtect.
In this configuration, you must set up interfaces on each firewall hosting a gateway.
Use the default virtual router for all interface configurations to avoid having to create inter-
zone routing.
On the firewall hosting the portal/gateway (gw1):
• Select Network > Interfaces > Ethernet and configure ethernet1/2 as a Layer 3 Ethernet interface
with IP address 198.51.100.42 and assign it to the l3-untrust security zone and the default virtual
router.
• Create a DNS “A” record that maps IP address 198.51.100.42 to gp1.acme.com.
• Select Network > Interfaces > Tunnel and add the tunnel.2 interface and add it to a new zone called
corp-vpn. Assign it to the default virtual router.
• Enable User Identification on the corp-vpn zone.
On the firewall hosting the second gateway (gw2):
• Select Network > Interfaces > Ethernet and configure ethernet1/5 as a Layer 3 Ethernet interface
with IP address 192.0.2.4 and assign it to the l3-untrust security zone and the default virtual
router.
• Create a DNS “A” record that maps IP address 192.0.2.4 to gp2.acme.com.
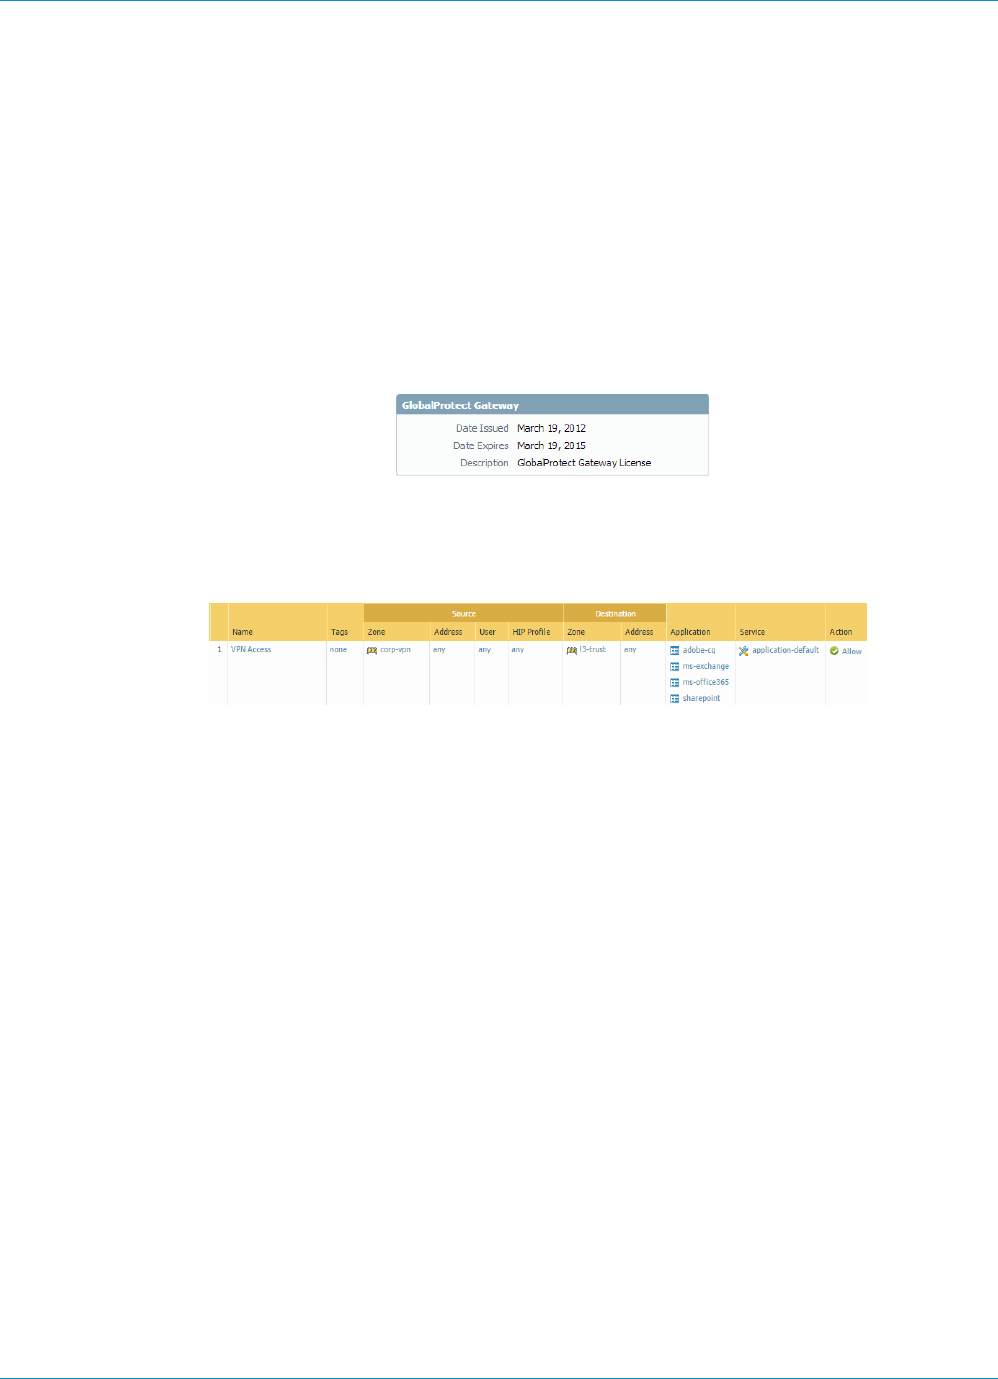
GLOBALPROTECT ADMINISTRATOR'S GUIDE | GlobalProtect Quick Configs 219
© 2017 Palo Alto Networks, Inc.
• Select Network > Interfaces > Tunnel and add the tunnel.1 interface and add it to a new zone called
corp-vpn. Assign it to the default virtual router.
• Enable User Identification on the corp-vpn zone.
STEP 2 | Purchase and install a GlobalProtect subscription on each gateway if you have users who
will be using the GlobalProtect app on their mobile devices or if you plan to use HIP-enabled
security policy.
After you purchase the GlobalProtect subscription and receive your activation code, install the license on
the firewall hosting the portal as follows:
1. Select Device > Licenses.
2. Select Activate feature using authorization code.
3. When prompted, enter the Authorization Code and then click OK.
4. Verify that the license was successfully activated.
STEP 3 | On each firewall hosting a GlobalProtect gateway, create security policy.
This configuration requires policy rules to enable traffic flow between the corp-vpn zone and the l3-trust
zone to enable access to your internal resources (Policies > Security).
STEP 4 | Obtain server certificates for the interfaces hosting your GlobalProtect portal and each of your
GlobalProtect gateways using the following recommendations:
• (On the firewall hosting the portal or portal/gateway) Import a server certificate from a well-known,
third-party CA.
• (On a firewall hosting only a gateway) Use the root CA on the portal to generate a self-signed server
certificate.
On each firewall hosting a portal/gateway or gateway, select Device > Certificate Management >
Certificates to manage certificates as follows:
• Obtain a server certificate for the portal/gw1. Because the portal and the gateway are on the same
interface you must use the same server certificate. The CN of the certificate must match the FQDN,
gp1.acme.com. To enable clients to connect to the portal without receiving certificate errors, use a
server certificate from a public CA.
• Obtain a server certificate for the interface hosting gw2. Because this interface hosts a gateway only
you can use a self-signed certificate. The CN of the certificate must match the FQDN, gp2.acme.com.
STEP 5 | Define how you will authenticate users to the portal and the gateways.
You can use any combination of certificate profiles and/or authentication profiles as necessary to
ensure the security for your portal and gateways. Portals and individual gateways can also use different
authentication schemes. See the following sections for step-by-step instructions:
•Set Up External Authentication (authentication profile)
•Set Up Client Certificate Authentication (certificate profile)
•Set Up Two-Factor Authentication (token- or OTP-based)

220 GLOBALPROTECT ADMINISTRATOR'S GUIDE | GlobalProtect Quick Configs
© 2017 Palo Alto Networks, Inc.
You will then need to reference the certificate profile and/or authentication profiles you defined in the
portal and gateway configurations you define.
STEP 6 | Configure the gateways.
This example shows the configuration for gp1 and gp2 shown in GlobalProtect Multiple Gateway
Topology. (See Configure a GlobalProtect Gateway for step-by-step instructions on creating the gateway
configurations.)
On the firewall hosting gp1, select Network > GlobalProtect > Gateways and configure the gateway
settings as follows:
Interface—ethernet1/2
IP Address—198.51.100.42
Server Certificate—GP1-server-cert.pem issued by GoDaddy
Tunnel Interface—tunnel.2
IP Pool—10.31.32.3 - 10.31.32.118
On the firewall hosting gp2, select Network > GlobalProtect > Gateways and configure the gateway
settings as follows:
Interface—ethernet1/2
IP Address—192.0.2.4
Server Certificate—self-signed certificate, GP2-server-cert.pem
Tunnel Interface—tunnel.1
IP Pool—10.31.33.3 - 10.31.33.118
STEP 7 | Configure the GlobalProtect Portals.
Select Network > GlobalProtect > Portals and add the following configuration:
1. Set Up Access to the GlobalProtect Portal:
Interface—ethernet1/2
IP Address—198.51.100.42
Server Certificate—GP1-server-cert.pem issued by GoDaddy
2. Define the GlobalProtect Agent Configurations:
The number of client configurations you create depends on your specific access requirements,
including whether you require user/group-based policy and/or HIP-enabled policy enforcement.
STEP 8 | Deploy the GlobalProtect Agent Software.
Select Device > GlobalProtect Client.
In this example, use the procedure to Host Agent Updates on the Portal.
STEP 9 | Save the GlobalProtect configuration.
Click Commit on the firewall hosting the portal and the gateway(s).
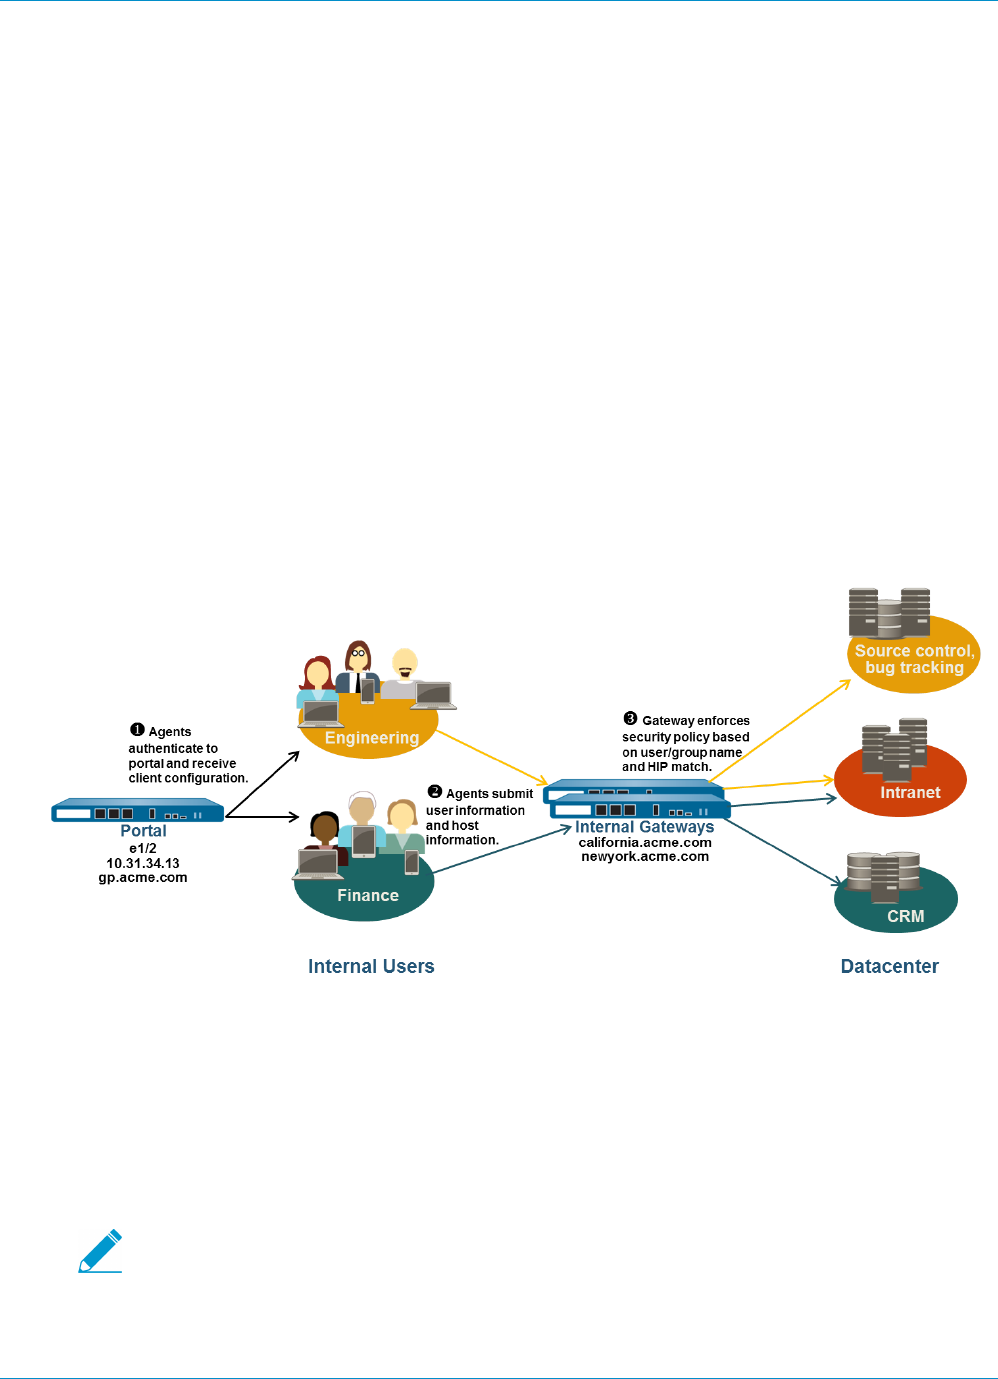
GLOBALPROTECT ADMINISTRATOR'S GUIDE | GlobalProtect Quick Configs 221
© 2017 Palo Alto Networks, Inc.
GlobalProtect for Internal HIP Checking and
User-Based Access
When used in conjunction with User-ID and/or HIP checks, an internal gateway can be used to provide a
secure, accurate method of identifying and controlling traffic by user and/or device state, replacing other
network access control (NAC) services. Internal gateways are useful in sensitive environments where
authenticated access to critical resources is required.
In a configuration with only internal gateways, all clients must be configured with user-logon; on-demand
mode is not supported. In addition, it is recommended that you configure all client configurations to use
single sign-on (SSO). Additionally, because internal hosts do not need to establish a tunnel connection with
the gateway, the IP address of the physical network adapter on the client system is used.
In this quick config, internal gateways are used to enforce group based policies that allow users in the
Engineering group access to the internal source control and bug databases and users in the Finance group
to the CRM applications. All authenticated users have access to internal web resources. In addition, HIP
profiles configured on the gateway check each host to ensure compliance with internal maintenance
requirements, such as whether the latest security patches and antivirus definitions are installed, whether
disk encryption is enabled, or whether the required software is installed.
Figure 6: GlobalProtect Internal Gateway Configuration
Use the following procedure to quickly configure a GlobalProtect internal gateway.
STEP 1 | Create Interfaces and Zones for GlobalProtect.
In this configuration, you must set up interfaces on each firewall hosting a portal and/or a gateway.
Because this configuration uses internal gateways only, you must configure the portal and gateways on
interfaces on the internal network.
Use the default virtual router for all interface configurations to avoid having to create inter-
zone routing.
On each firewall hosting a portal/gateway:

222 GLOBALPROTECT ADMINISTRATOR'S GUIDE | GlobalProtect Quick Configs
© 2017 Palo Alto Networks, Inc.
1. Select an Ethernet port to host the portal/gateway and then configure a Layer3 interface with an IP
address in the l3-trust security zone. (Network > Interfaces > Ethernet).
2. Enable User Identification on the l3-trust zone.
STEP 2 | Purchase and install a GlobalProtect subscription for each firewall hosting an internal gateway
if you have users who will be using the GlobalProtect app on their mobile devices or if you plan
to use HIP-enabled security policy.
After you purchase the GlobalProtect subscriptions and receive your activation code, install the
GlobalProtect subscriptions on the firewalls hosting your gateways as follows:
1. Select Device > Licenses.
2. Select Activate feature using authorization code.
3. When prompted, enter the Authorization Code and then click OK.
4. Verify that the license was successfully activated.
Contact your Palo Alto Networks Sales Engineer or Reseller if you do not have the required licenses. For
more information on licensing, see About GlobalProtect Licenses.
STEP 3 | Obtain server certificates for the GlobalProtect portal and each GlobalProtect gateway.
In order to connect to the portal for the first time, the end clients must trust the root CA certificate used
to issue the portal server certificate. You can either use a self-signed certificate on the portal and deploy
the root CA certificate to the end clients before the first portal connection, or obtain a server certificate
for the portal from a trusted CA.
You can use self-signed certificates on the gateways.
The recommended workflow is as follows:
1. On the firewall hosting the portal:
1. Import a server certificate from a well-known, third-party CA.
2. Create the root CA certificate for issuing self-signed certificates for the GlobalProtect
components.
3. Use the root CA on the portal to generate a self-signed server certificate. Repeat this step for
each gateway.
2. On each firewall hosting an internal gateway: Deploy the self-signed server certificates.
STEP 4 | Define how you will authenticate users to the portal and the gateways.
You can use any combination of certificate profiles and/or authentication profiles as necessary to
ensure the security for your portal and gateways. Portals and individual gateways can also use different
authentication schemes. See the following sections for step-by-step instructions:
•Set Up External Authentication (authentication profile)
•Set Up Client Certificate Authentication (certificate profile)
•Set Up Two-Factor Authentication (token- or OTP-based)
You will then need to reference the certificate profile and/or authentication profiles you defined in the
portal and gateway configurations you define.
STEP 5 | Create the HIP profiles you will need to enforce security policy on gateway access.
See Host Information for more information on HIP matching.
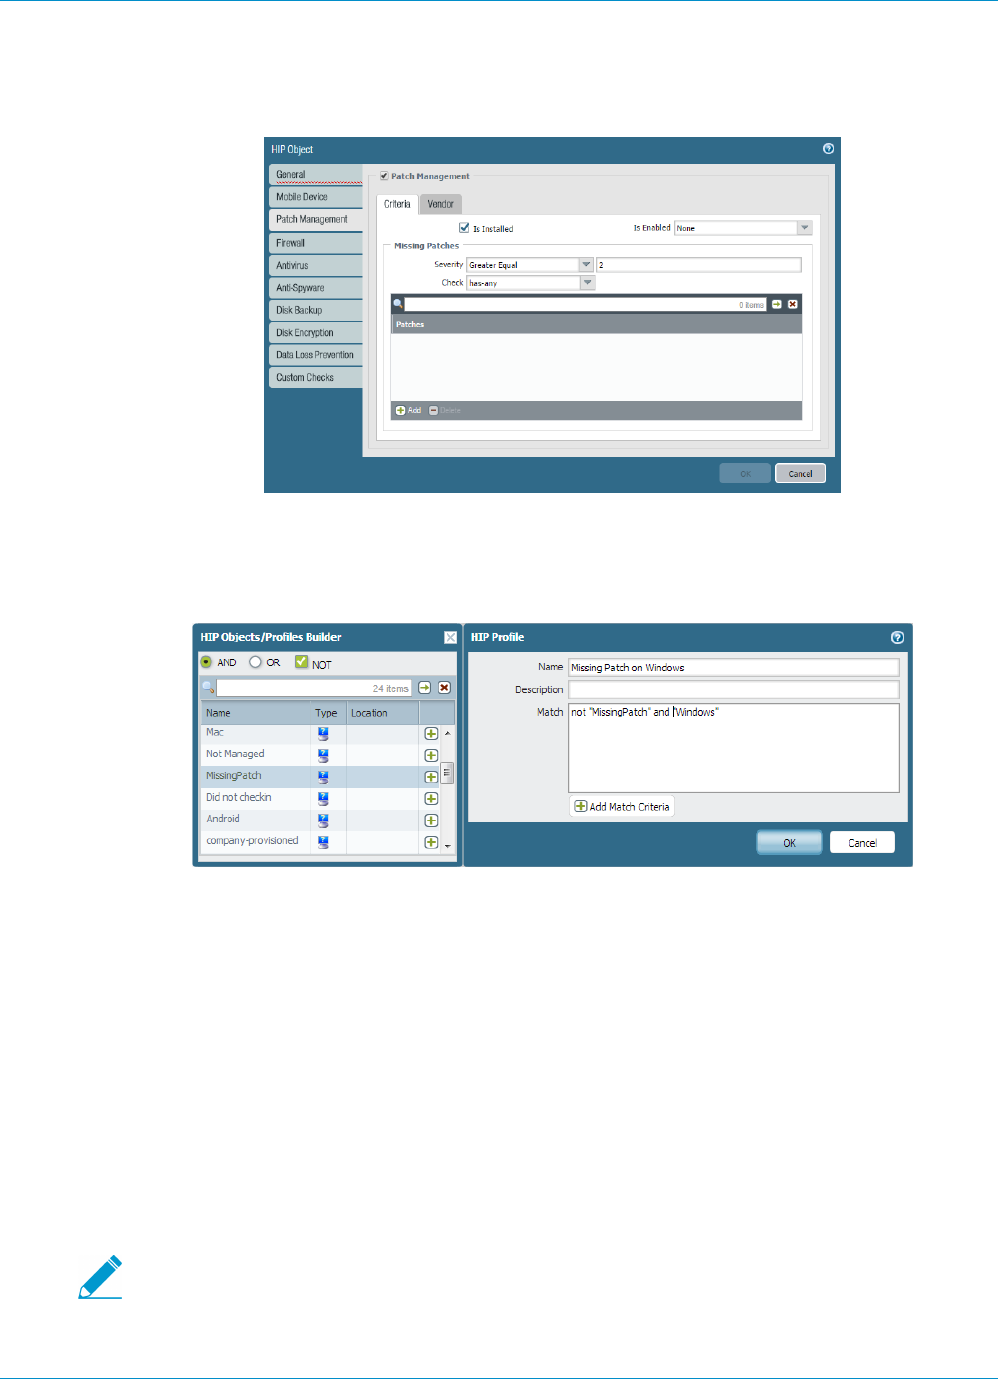
GLOBALPROTECT ADMINISTRATOR'S GUIDE | GlobalProtect Quick Configs 223
© 2017 Palo Alto Networks, Inc.
1. Create the HIP objects to filter the raw host data collected by the agents. For example, if you are
interested in preventing users that are not up to date with required patches, you might create a HIP
object to match on whether the patch management software is installed and that all patches with a
given severity are up to date.
2. Create the HIP profiles that you plan to use in your policies.
For example, if you want to ensure that only Windows users with up-to-date patches can access your
internal applications, you might attach the following HIP profile that will match hosts that do NOT
have a missing patch:
STEP 6 | Configure the internal gateways.
Select Network > GlobalProtect > Gateways and add the following settings:
•Interface
•IP Address
•Server Certificate
•Authentication Profile and/or Configuration Profile
Notice that it is not necessary to configure the client configuration settings in the gateway
configurations (unless you want to set up HIP notifications) because tunnel connections are not
required. See Configure a GlobalProtect Gateway for step-by-step instructions on creating the gateway
configurations.
STEP 7 | Configure the GlobalProtect Portals.
Although all of the previous configurations could use a Connect Method of User-logon
(Always On) or On-demand (Manual user initiated connection), an internal gateway
configuration must always be on and therefore requires a Connect Method of User-logon
(Always On).
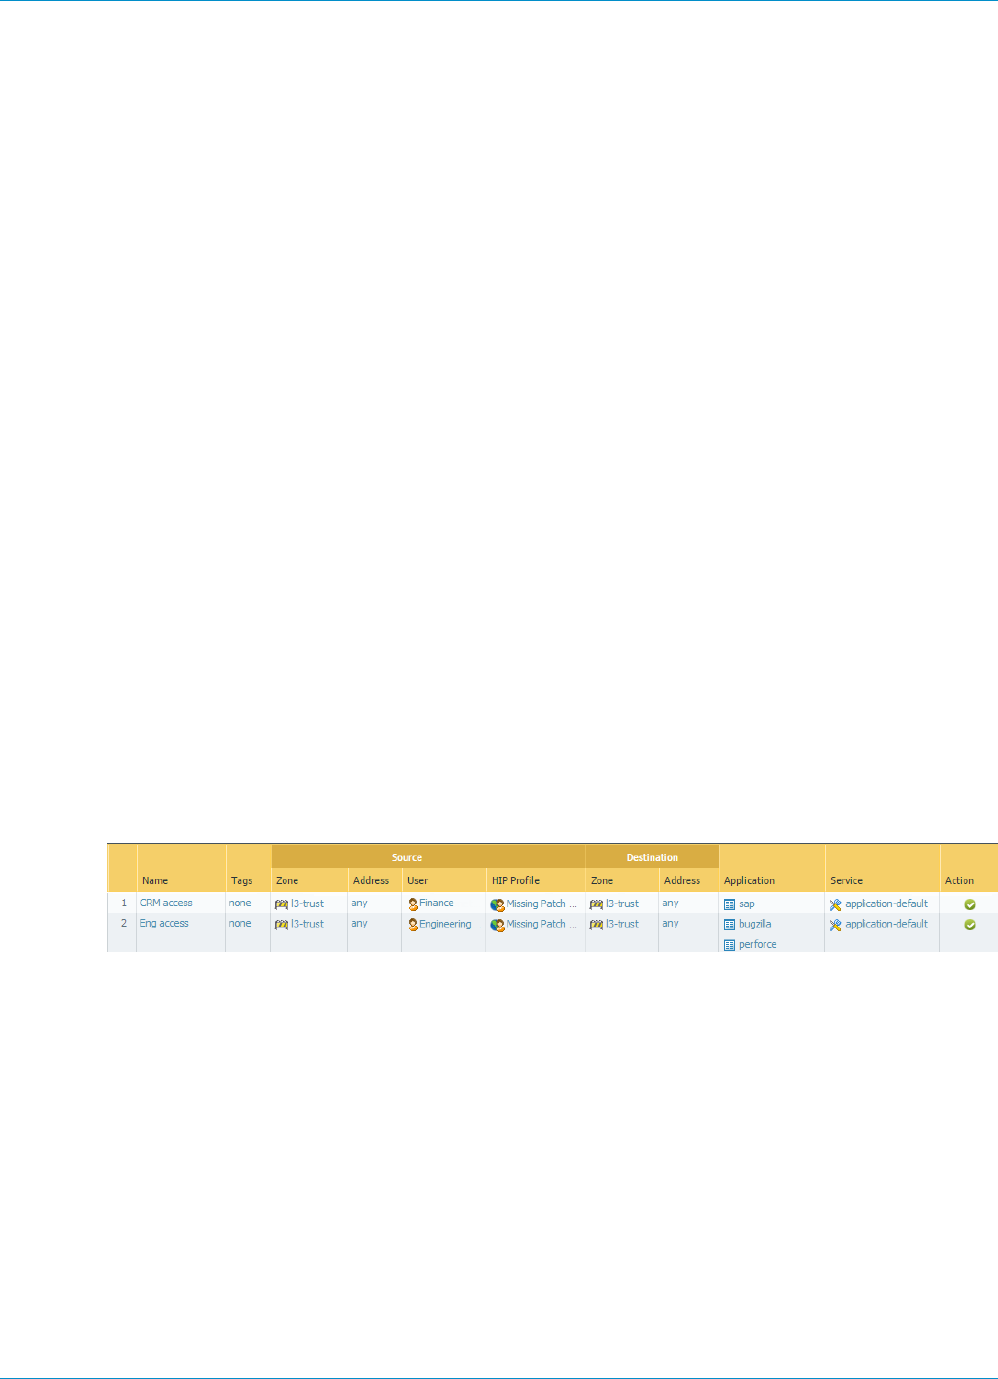
224 GLOBALPROTECT ADMINISTRATOR'S GUIDE | GlobalProtect Quick Configs
© 2017 Palo Alto Networks, Inc.
Select Network > GlobalProtect > Portals and add the following configuration:
1. Set Up Access to the GlobalProtect Portal:
Interface—ethernet1/2
IP Address—10.31.34.13
Server Certificate—GP-server-cert.pem issued by GoDaddy with CN=gp.acme.com
2. Define the GlobalProtect Client Authentication Configurations:
Use single sign-on—enabled
Connect Method—User-logon (Always On)
Internal Gateway Address—california.acme.com, newyork.acme.com
User/User Group—any
3. Commit the portal configuration.
STEP 8 | Deploy the GlobalProtect Agent Software.
Select Device > GlobalProtect Client.
In this example, use the procedure to Host Agent Updates on the Portal.
STEP 9 | Create the HIP-enabled and/or user/group-based security rules on your gateway(s).
Add the following security rules for this example:
1. Select Policies > Security and click Add.
2. On the Source tab, set the Source Zone to l3-trust.
3. On the User tab, add the HIP profile and user/group to match.
• Click Add in the HIP Profiles section and select the HIP profile MissingPatch.
• Click Add in the Source User section and select the group (Finance or Engineering depending on
which rule you are creating).
4. Click OK to save the rule.
5. Commit the gateway configuration.
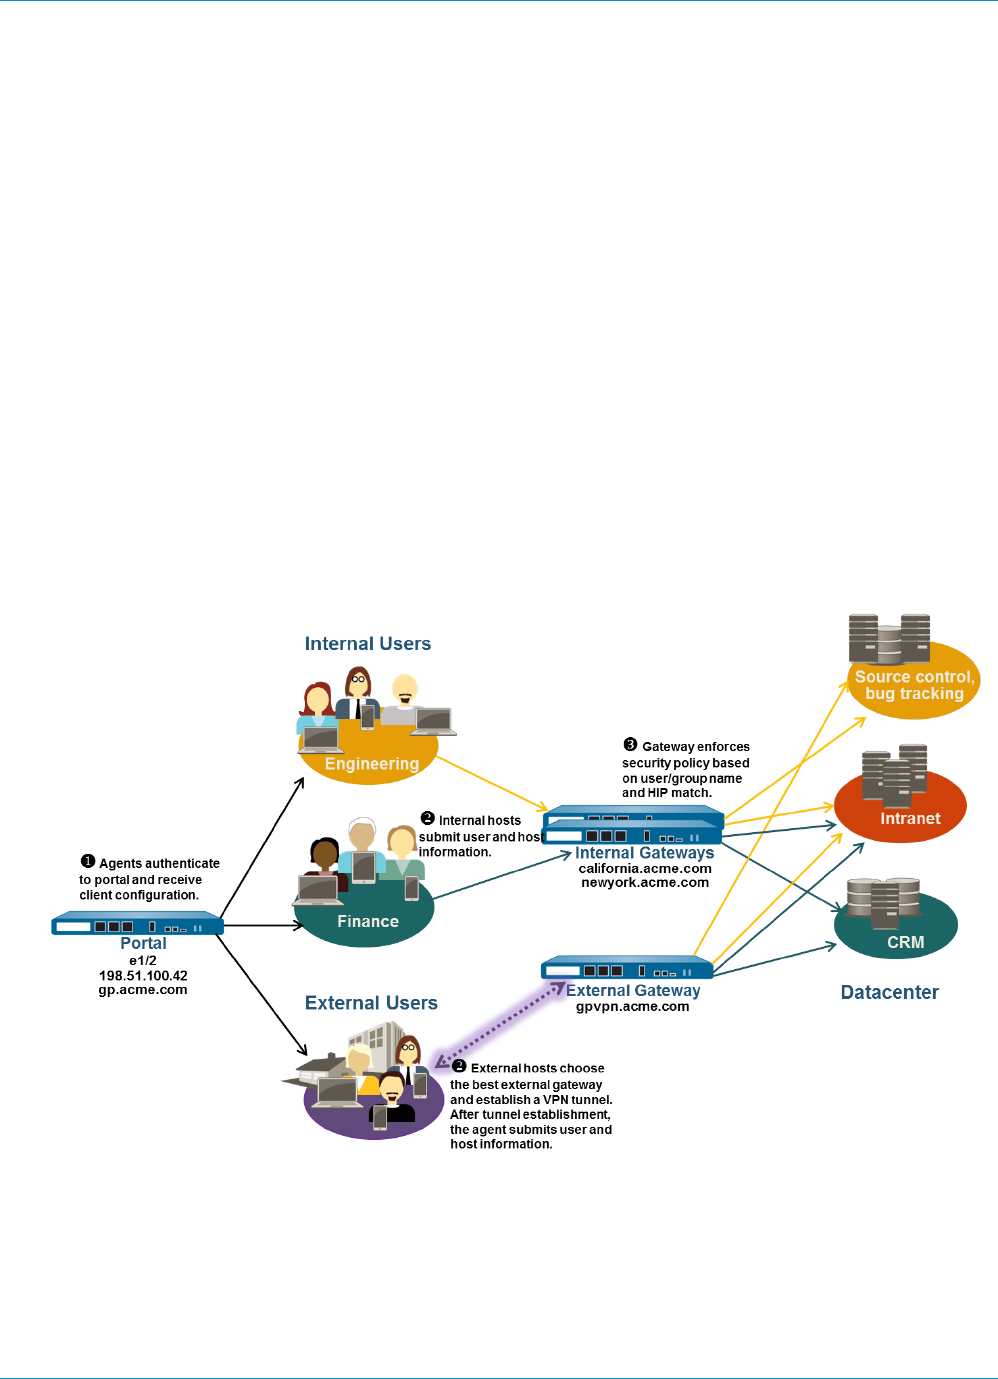
GLOBALPROTECT ADMINISTRATOR'S GUIDE | GlobalProtect Quick Configs 225
© 2017 Palo Alto Networks, Inc.
Mixed Internal and External Gateway
Configuration
In a GlobalProtect mixed internal and external gateway configuration, you configure separate gateways
for VPN access and for access to your sensitive internal resources. With this configuration, agents
perform internal host detection to determine if they are on the internal or external network. If the agent
determines it is on the external network, it will attempt to connect to the external gateways listed in its
client configuration and it will establish a VPN (tunnel) connection with the gateway with the highest
priority and the shortest response time.
Because security policies are defined separately on each gateway, you have granular control over which
resources your external and internal users have access to. In addition, you also have granular control over
which gateways users have access to by configuring the portal to deploy different client configurations
based on user/group membership or based on HIP profile matching.
In this example, the portals and all three gateways (one external and two internal) are deployed on separate
firewalls. The external gateway at gpvpn.acme.com provides remote VPN access to the corporate network
while the internal gateways provide granular access to sensitive datacenter resources based on group
membership. In addition, HIP checks are used to ensure that hosts accessing the datacenter are up-to-date
on security patches.
Figure 7: GlobalProtect Deployment with Internal and External Gateways
Use the following procedure to quickly configure a mix of internal and external GlobalProtect gateways.
STEP 1 | Create Interfaces and Zones for GlobalProtect.
In this configuration, you must set up interfaces on the firewall hosting a portal and each firewall hosting
a gateway.

226 GLOBALPROTECT ADMINISTRATOR'S GUIDE | GlobalProtect Quick Configs
© 2017 Palo Alto Networks, Inc.
Use the default virtual router for all interface configurations to avoid having to create inter-
zone routing.
On the firewall hosting the portal gateway (gp.acme.com):
• Select Network > Interfaces > Ethernet and configure ethernet1/2 as a Layer 3 Ethernet interface
with IP address 198.51.100.42 and assign it to the l3-untrust security zone and the default virtual
router.
• Create a DNS “A” record that maps IP address 198.51.100.42 to gp.acme.com.
• Select Network > Interfaces > Tunnel and add the tunnel.2 interface and add it to a new zone called
corp-vpn. Assign it to the default virtual router.
• Enable User Identification on the corp-vpn zone.
On the firewall hosting the external gateway (gpvpn.acme.com):
• Select Network > Interfaces > Ethernet and configure ethernet1/5 as a Layer 3 Ethernet interface
with IP address 192.0.2.4 and assign it to the l3-untrust security zone and the default virtual
router.
• Create a DNS “A” record that maps IP address 192.0.2.4 to gpvpn.acme.com.
• Select Network > Interfaces > Tunnel and add the tunnel.3 interface and add it to a new zone called
corp-vpn. Assign it to the default virtual router.
• Enable User Identification on the corp-vpn zone.
On the firewall hosting the internal gateways (california.acme.com and newyork.acme.com):
• Select Network > Interfaces > Ethernet and configure Layer 3 Ethernet interface with IP addresses
on the internal network and assign them to the l3-trust security zone and the default virtual router.
• Create a DNS “A” record that maps the internal IP addresses california.acme.com and
newyork.acme.com.
• Enable User Identification on the l3-trust zone.
STEP 2 | Purchase and install a GlobalProtect subscription for each firewall hosting a gateway (internal
and external) if you have users who will be using the GlobalProtect app on their mobile devices
or if you plan to use HIP-enabled security policy.
After you purchase the GlobalProtect subscriptions and receive your activation code, install the
GlobalProtect subscriptions on the firewalls hosting your gateways as follows:
1. Select Device > Licenses.
2. Select Activate feature using authorization code.
3. When prompted, enter the Authorization Code and then click OK.
4. Verify that the license and subscriptions were successfully activated.
Contact your Palo Alto Networks Sales Engineer or Reseller if you do not have the required licenses. For
more information on licensing, see About GlobalProtect Licenses.
STEP 3 | Obtain server certificates for the GlobalProtect portal and each GlobalProtect gateway.
In order to connect to the portal for the first time, the end clients must trust the root CA certificate used
to issue the portal server certificate.
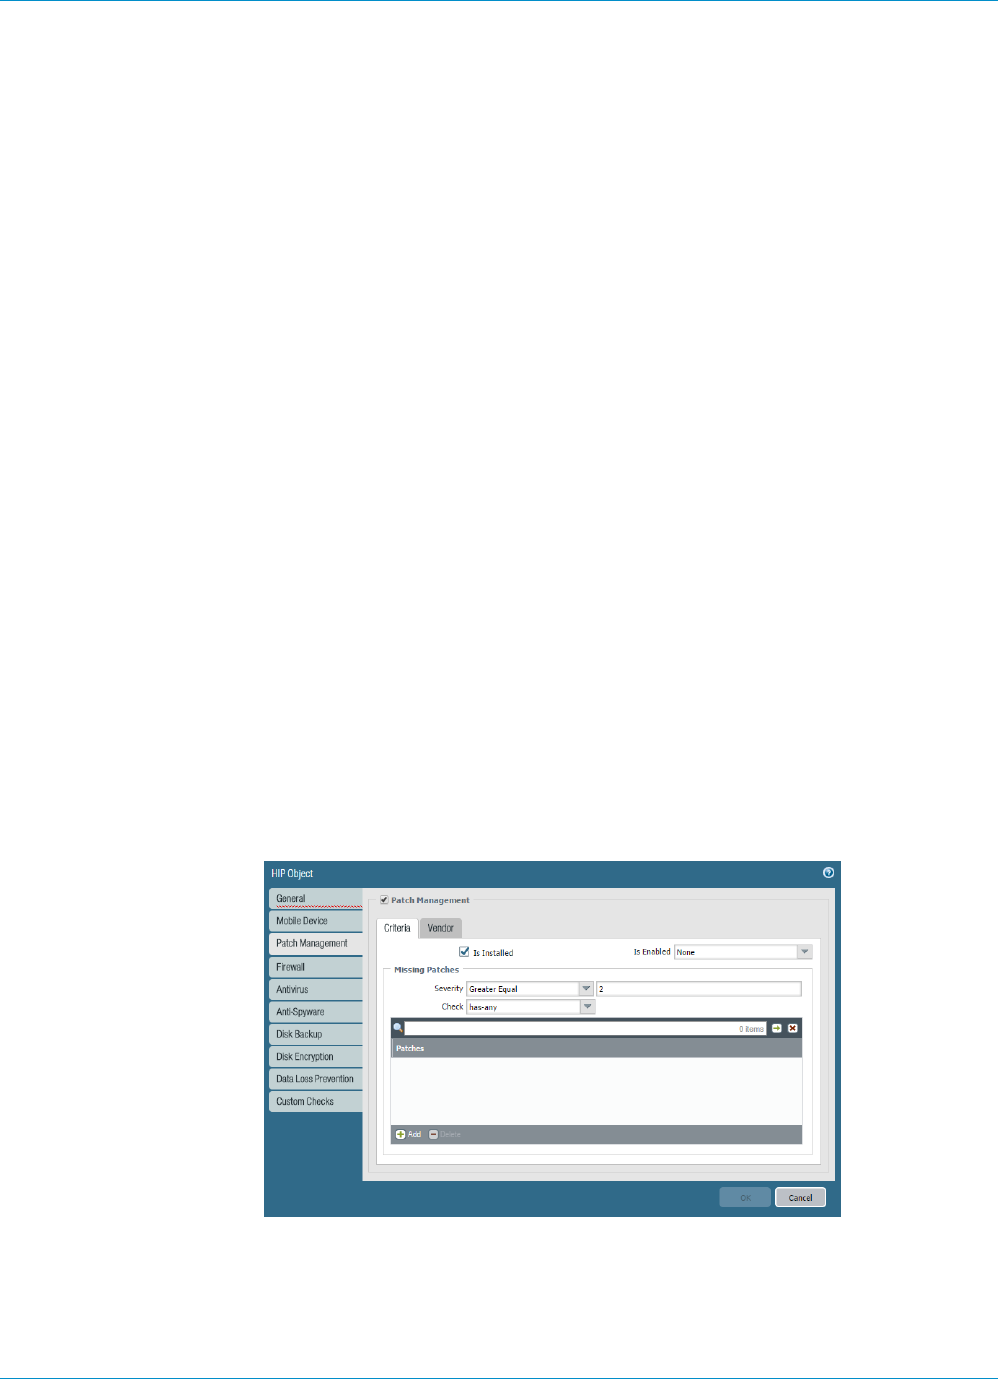
GLOBALPROTECT ADMINISTRATOR'S GUIDE | GlobalProtect Quick Configs 227
© 2017 Palo Alto Networks, Inc.
You can use self-signed certificates on the gateways and deploy the root CA certificate to the agents
in the client configuration. The best practice is to generate all of the certificates on firewall hosting the
portal and deploy them to the gateways.
The recommended workflow is as follows:
1. On the firewall hosting the portal:
1. Import a server certificate from a well-known, third-party CA.
2. Create the root CA certificate for issuing self-signed certificates for the GlobalProtect
components.
3. Use the root CA on the portal to generate a self-signed server certificate. Repeat this step for
each gateway.
2. On each firewall hosting an internal gateway:
•Deploy the self-signed server certificates.
STEP 4 | Define how you will authenticate users to the portal and the gateways.
You can use any combination of certificate profiles and/or authentication profiles as necessary to
ensure the security for your portal and gateways. Portals and individual gateways can also use different
authentication schemes. See the following sections for step-by-step instructions:
•Set Up External Authentication (authentication profile)
•Set Up Client Certificate Authentication (certificate profile)
•Set Up Two-Factor Authentication (token- or OTP-based)
You will then need to reference the certificate profile and/or authentication profiles you defined in the
portal and gateway configurations you define.
STEP 5 | Create the HIP profiles you will need to enforce security policy on gateway access.
See Host Information for more information on HIP matching.
1. Create the HIP objects to filter the raw host data collected by the agents. For example, if you are
interested in preventing users that are not up to date with required patches, you might create a HIP
object to match on whether the patch management software is installed and that all patches with a
given severity are up to date.
2. Create the HIP profiles that you plan to use in your policies.
For example, if you want to ensure that only Windows users with up-to-date patches can access your
internal applications, you might attach the following HIP profile that will match hosts that do NOT
have a missing patch:
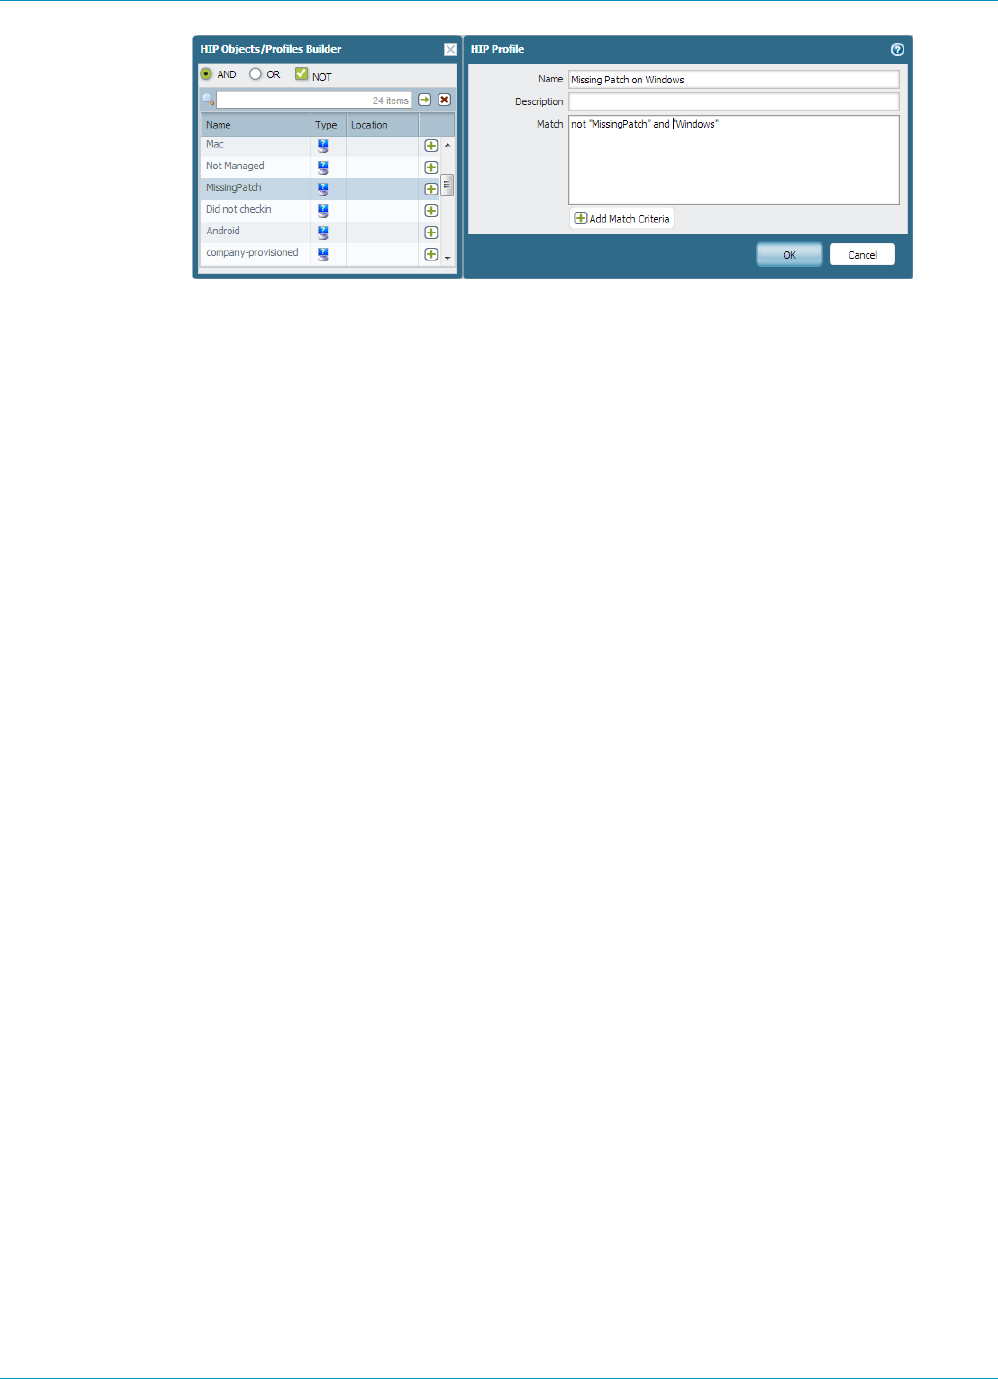
228 GLOBALPROTECT ADMINISTRATOR'S GUIDE | GlobalProtect Quick Configs
© 2017 Palo Alto Networks, Inc.
STEP 6 | Configure the internal gateways.
Select Network > GlobalProtect > Gateways and add the following settings:
•Interface
•IP Address
•Server Certificate
•Authentication Profile and/or Configuration Profile
Notice that it is not necessary to configure the client configuration settings in the gateway
configurations (unless you want to set up HIP notifications) because tunnel connections are not
required. See Configure a GlobalProtect Gateway for step-by-step instructions on creating the gateway
configurations.
STEP 7 | Configure the GlobalProtect Portals.
Although this example shows how to create a single client configuration to be deployed to all agents,
you could choose to create separate configurations for different uses and then deploy them based
on user/group name and/or the operating system the agent/app is running on (Android, iOS, Mac, or
Windows).
Select Network > GlobalProtect > Portals and add the following configuration:
1. Set Up Access to the GlobalProtect Portal:
Interface—ethernet1/2
IP Address—10.31.34.13
Server Certificate—GP-server-cert.pem issued by GoDaddy with CN=gp.acme.com
2. Define the GlobalProtect Client Authentication Configurations:
Internal Host Detection—enabled
Use single sign-on—enabled
Connect Method—User-logon (Always On)
External Gateway Address—gpvpn.acme.com
Internal Gateway Address—california.acme.com, newyork.acme.com
User/User Group—any
3. Commit the portal configuration.
STEP 8 | Deploy the GlobalProtect Agent Software.
Select Device > GlobalProtect Client.
In this example, use the procedure to Host Agent Updates on the Portal.
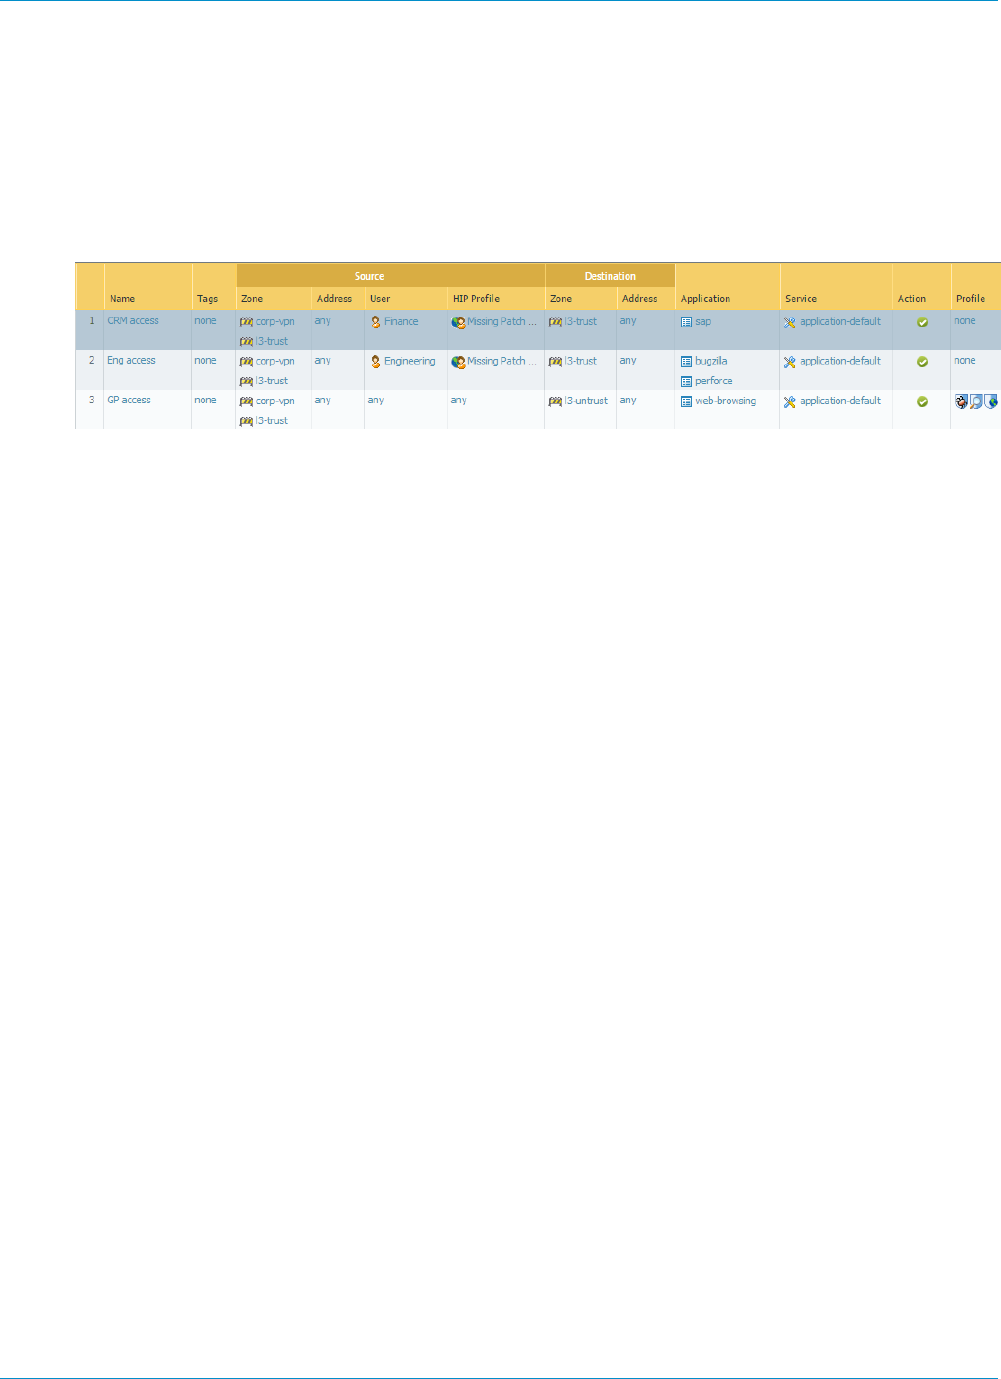
GLOBALPROTECT ADMINISTRATOR'S GUIDE | GlobalProtect Quick Configs 229
© 2017 Palo Alto Networks, Inc.
STEP 9 | Create security policy rules on each gateway to safely enable access to applications for your
VPN users.
• Create security policy (Policies > Security) to enable traffic flow between the corp-vpn zone and the
l3-trust zone.
• Create HIP-enabled and user/group-based policy rules to enable granular access to your internal
datacenter resources.
• For visibility, create rules that allow all of your users web-browsing access to the l3-untrust zone,
using the default security profiles to protect you from known threats.
STEP 10 | Save the GlobalProtect configuration.
Click Commit on the portal and all gateways.

230 GLOBALPROTECT ADMINISTRATOR'S GUIDE | GlobalProtect Quick Configs

231
GlobalProtect Architecture
This section outlines an example reference architecture for deploying GlobalProtect™ which
secures internet traffic and provides secure access to corporate resources.
The reference architecture and guidelines described in this section provide a common
deployment scenario. Before adopting this architecture, identify your corporate security,
infrastructure manageability, and end user experience requirements and deploy GlobalProtect
based on those requirements.
Although the requirements may be different for each enterprise, you can leverage the common
principles and design considerations outlined in this document along with best practice
configuration guidelines to meet your enterprise security needs.
> GlobalProtect Reference Architecture Topology on page 233
> GlobalProtect Reference Architecture Features on page 235
> GlobalProtect Reference Architecture Configurations on page 237

232 GLOBALPROTECT ADMINISTRATOR'S GUIDE | GlobalProtect Architecture
© 2017 Palo Alto Networks, Inc.
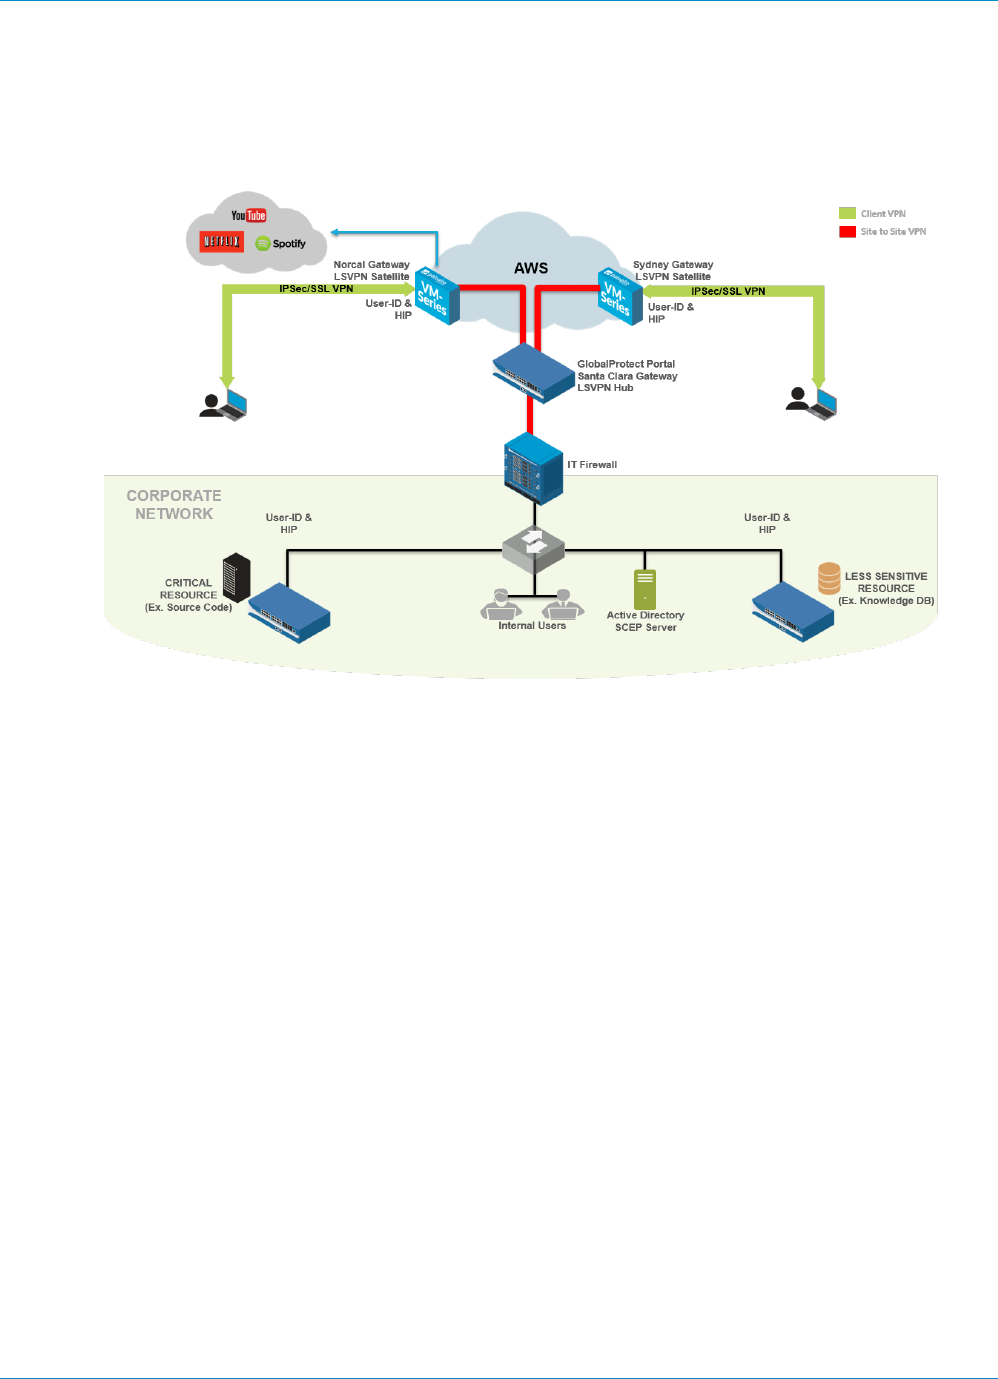
GLOBALPROTECT ADMINISTRATOR'S GUIDE | GlobalProtect Architecture 233
© 2017 Palo Alto Networks, Inc.
GlobalProtect Reference Architecture
Topology
•GlobalProtect Portal on page 233
•GlobalProtect Gateways on page 233
GlobalProtect Portal
In this topology, a PA-3020 in the co-location space functions as a GlobalProtect portal.
Employees and contractors can authenticate to the portal using two-factor authentication (2FA) consisting
of Active Directory (AD) credentials and a one-time password (OTP). The portal deploys GlobalProtect
client configurations based on user and group membership and operating system.
By configuring a separate portal client configuration that applies to a small group or set of pilot users, you
can test features before rolling them out to a wider user base. Any client configuration containing new
features—such as the Enforce GlobalProtect or Simple Certificate Enrollment Protocol (SCEP) features
which were made available with PAN-OS 7.1 and content updates that followed—is enabled in the pilot
configuration first and validated by those pilot users, before it is made available to other users.
The GlobalProtect portal also pushes configurations to GlobalProtect satellites. This configuration includes
the GlobalProtect gateways to which satellites can connect and establish a site-to-site tunnel.
GlobalProtect Gateways
The PA-3020 in the co-location space (mentioned previously) also doubles as a GlobalProtect gateway
(the Santa Clara Gateway). 10 additional gateways are deployed in Amazon Web Services (AWS) and the
Microsoft Azure public cloud. The regions or POP locations where these AWS and Azure gateways are
deployed are based on the distribution of employees across the globe.
•Santa Clara Gateway—Employees and contractors can authenticate to the Santa Clara Gateway
(PA-3020 in the co-location space) using 2FA. This gateway requires users to provide their Active

234 GLOBALPROTECT ADMINISTRATOR'S GUIDE | GlobalProtect Architecture
© 2017 Palo Alto Networks, Inc.
Directory credentials and their OTP. Because this gateway protects sensitive resources, it is configured
as a manual-only gateway. As a result, users do not connect to this gateway automatically and must
manually choose to connect to this gateway. For example, when users connect to AWS-Norcal, which
is not a manual-only gateway, some sensitive internal resources are not accessible. The user must then
manually switch to and authenticate with the Santa Clara Gateway to access these resources.
In addition, the Santa Clara Gateway is configured as a Large Scale VPN (LSVPN) tunnel termination
point for all satellite connections from gateways in AWS and Azure. The Santa Clara Gateway is
also configured to set up an Internet Protocol Security (IPSec) tunnel to the IT firewall in corporate
headquarters. This is the tunnel that provides access to resources in the corporate headquarters.
•Gateways in Amazon Web Services and Microsoft Azure—This gateway requires 2FA: a client certificate
and Active Directory credentials. The GlobalProtect portal distributes the client certificate that is
required to authenticate with these gateways using the GlobalProtect SCEP feature.
These gateways in the public cloud also act as GlobalProtect satellites. They communicate with the
GlobalProtect portal, download the satellite configuration, and establish a site-to-site tunnel with the
Santa Clara Gateway. GlobalProtect satellites initially authenticate using serial number, and subsequently
authenticate using certificates.
•Gateways Inside Corporate Headquarters—Within the corporate headquarters, three firewalls function
as GlobalProtect gateways. These are internal gateways and do not require endpoints to set up a
tunnel. Users authenticate to these gateways using their Active Directory credentials. These internal
gateways use GlobalProtect to identify the User-ID and to collect Host Information Profile (HIP) from
the endpoints.
To make the end user experience as seamless as possible, you can configure these
internal gateways to authenticate users using certificates provisioned by SCEP or using
Kerberos service tickets.

GLOBALPROTECT ADMINISTRATOR'S GUIDE | GlobalProtect Architecture 235
© 2017 Palo Alto Networks, Inc.
GlobalProtect Reference Architecture Features
•End User Experience on page 235
•Management and Logging on page 235
•Monitoring and High Availability on page 236
End User Experience
End users who are remote (not inside the corporate network) connect to one of the gateways in AWS
or Azure. When you configure the GlobalProtect portal client configuration, assign equal priority to the
gateways. With this configuration, the gateway to which users connect depends on the SSL response time
of each gateway measured on the endpoint during the tunnel set-up time.
For example, a user in Australia would typically connect to the AWS-Sydney Gateway. Once the user
is connected to AWS-Sydney, GlobalProtect client tunnels all traffic from the endpoint to the AWS-
Sydney firewall for inspection. GlobalProtect sends traffic to public internet sites directly via the AWS-
Sydney Gateway and tunnels traffic to corporate resources through a site-to-site tunnel between the
AWS-Sydney Gateway and the Santa Clara Gateway, and then through an IPSec site-to-site tunnel to the
corporate headquarters. This architecture is designed to reduce any latency the user may experience when
accessing the internet. If the AWS-Sydney Gateway (or any gateway closer to Sydney) was unreachable, the
GlobalProtect client would back-haul the internet traffic to the firewall in the corporate headquarters and
cause latency issues.
Active directory servers reside inside the corporate network. When remote end users authenticate, the
GlobalProtect client sends authentication requests through the site-to-site tunnel in AWS/Azure to the
Santa Clara Gateway. The gateway then forwards the request through an IPSec site-to-site tunnel to the
Active Directory Server in corporate headquarters.
To reduce the time it takes for remote user authentication and tunnel set up, consider
replicating the Active Directory Server and making it available in AWS.
End users inside the corporate network authenticate to the three internal gateways immediately after they
log in; The GlobalProtect client sends the HIP report to these internal gateways. When users are inside the
office on the corporate network, they must meet the User-ID and HIP requirements to access any resource
at work.
Management and Logging
In this deployment, you can manage and configure all firewalls from Panorama, which is deployed in the co-
location space.
To provide consistent security, all firewalls in AWS and Azure use the same security policies and
configurations. To simplify configuration of the gateways, Panorama also uses one device group and one
template. In this deployment, all gateways forward all logs to Panorama. This enables you to monitor
network traffic or troubleshoot issues from a central location instead of requiring you to log in to each
firewall.
When software updates are required, you can use Panorama to deploy the software updates to all firewalls.
Panorama first upgrades one or two firewalls and verifies whether the upgrade was successful before
updating the remaining firewalls.

236 GLOBALPROTECT ADMINISTRATOR'S GUIDE | GlobalProtect Architecture
© 2017 Palo Alto Networks, Inc.
Monitoring and High Availability
To monitor the firewalls in this deployment, you can use Nagios, an open-source server, network, and log
monitoring software. Configure Nagios to periodically verify the response from the portal and the gateways'
pre-login page and send an alert if the response does not match the expectations. You can also configure
GlobalProtect Simple Network Management Protocol (SNMP) Management Information Base (MIB) objects
to monitor gateway usage.
In this deployment there is only one instance of the GlobalProtect portal. If the portal becomes unavailable,
new users (who have never connected to the portal before) will not be able to connect to GlobalProtect.
However, existing users can use the cached portal client configuration to connect to one of the gateways.
Multiple virtual machine (VM) firewalls in AWS configured as GlobalProtect gateways provide gateway
redundancy. Therefore, configuring gateways as a high availability (HA) pair is not required.

GLOBALPROTECT ADMINISTRATOR'S GUIDE | GlobalProtect Architecture 237
© 2017 Palo Alto Networks, Inc.
GlobalProtect Reference Architecture
Configurations
To align your deployment with the reference architecture, review the following configuration checklists.
•Gateway Configuration on page 237
•Portal Configuration on page 237
•Policy Configurations on page 237
Gateway Configuration
Disable split tunneling. To do this, ensure there are no Access Routes specified in Agent > Client
Settings > Split Tunnel settings. See Configure a GlobalProtect Gateway on page 72.
Enable No direct access to local network in Agent > Client Settings > Split Tunnel. See Configure a
GlobalProtect Gateway on page 72.
Enable the gateway to Accept cookie for authentication override. See Configure a GlobalProtect
Gateway on page 72.
Portal Configuration
Configure the Connect Method as Always-on (User logon). See Customize the GlobalProtect Agent.
Set Use Single Sign-On (Windows only) to Yes. See Customize the GlobalProtect Agent.
Configure the portal to Save User Credentials (set the value to Yes). See Define the GlobalProtect Agent
Configurations.
Enable the portal to Accept cookie for authentication override. See Define the GlobalProtect Agent
Configurations.
Configure the Cookie Lifetime as 20 hours. See Define the GlobalProtect Agent Configurations.
Enforce GlobalProtect for network access. See Customize the GlobalProtect Agent.
When Enforce GlobalProtect for Network Access is enabled, allow users to disable the GlobalProtect
agent with a passcode. See Customize the GlobalProtect Agent.
Configure Internal Host Detection. See Define the GlobalProtect Agent Configurations.
Enable the Collect HIP Data option in Data Collection. See Define the GlobalProtect Agent
Configurations.
Distribute and install the SSL Forward Proxy CA certificate used for SSL Decryption. See Define the
GlobalProtect Agent Configurations.
Policy Configurations
Configure all firewalls to use security policies and profiles based on the Best Practice Internet Gateway
Security Policy. In this reference deployment, this includes the Santa Clara Gateway in the co-location
space and gateways in the AWS/Azure public cloud.
Enable SSL Decryption on all gateways in AWS and Azure.
Configure Policy-Based Forwarding rules for all gateways in AWS to forward traffic to certain websites
through the Santa Clara Gateway. This ensures that sites like www.stubhub.com and www.lowes.com
that block traffic from AWS IP address ranges are still accessible when users connect to gateways in
AWS.

238 GLOBALPROTECT ADMINISTRATOR'S GUIDE | GlobalProtect Architecture


240 GLOBALPROTECT ADMINISTRATOR'S GUIDE | GlobalProtect Cryptography
© 2017 Palo Alto Networks, Inc.

GLOBALPROTECT ADMINISTRATOR'S GUIDE | GlobalProtect Cryptography 241
© 2017 Palo Alto Networks, Inc.
About GlobalProtect Cipher Selection
GlobalProtect supports both IPSec and SSL tunnel modes. GlobalProtect also supports the ability to enable
and require the GlobalProtect agent to always attempt to set up IPSec tunnel first before falling back
to SSL tunnel. With an IPSec tunnel, the GlobalProtect agent uses SSL/TLS to exchange encryption and
authentication algorithms and the keys. The selection of cipher suite that GlobalProtect uses to secure the
SSL/TLS tunnel depend on:
•SSL/TLS versions accepted by the gateway—The GlobalProtect portal and gateways can restrict the
list of cipher suites available for the client using SSL/TLS profiles. On the firewall, you create the SSL/
TLS profile by specifying the certificate and the allowed protocol versions and associate that to the
GlobalProtect portal and gateway.
•Algorithm of the server certificate of the gateway—The operating system of the endpoint determines
what cipher suites the GlobalProtect agent includes in its Client Hello message. As long as the
GlobalProtect agent includes the cipher suite that gateway prefers to use, the gateway will select that
cipher suite for the SSL session. The order of cipher suites within the Client Hello message does not
affect the cipher suite selection: The gateway selects the cipher suite based on the SSL/TLS service
profile and the algorithm of the gateway server certificate and its preferred list. You select the service
profile from the GlobalProtect gateway authentication configuration.
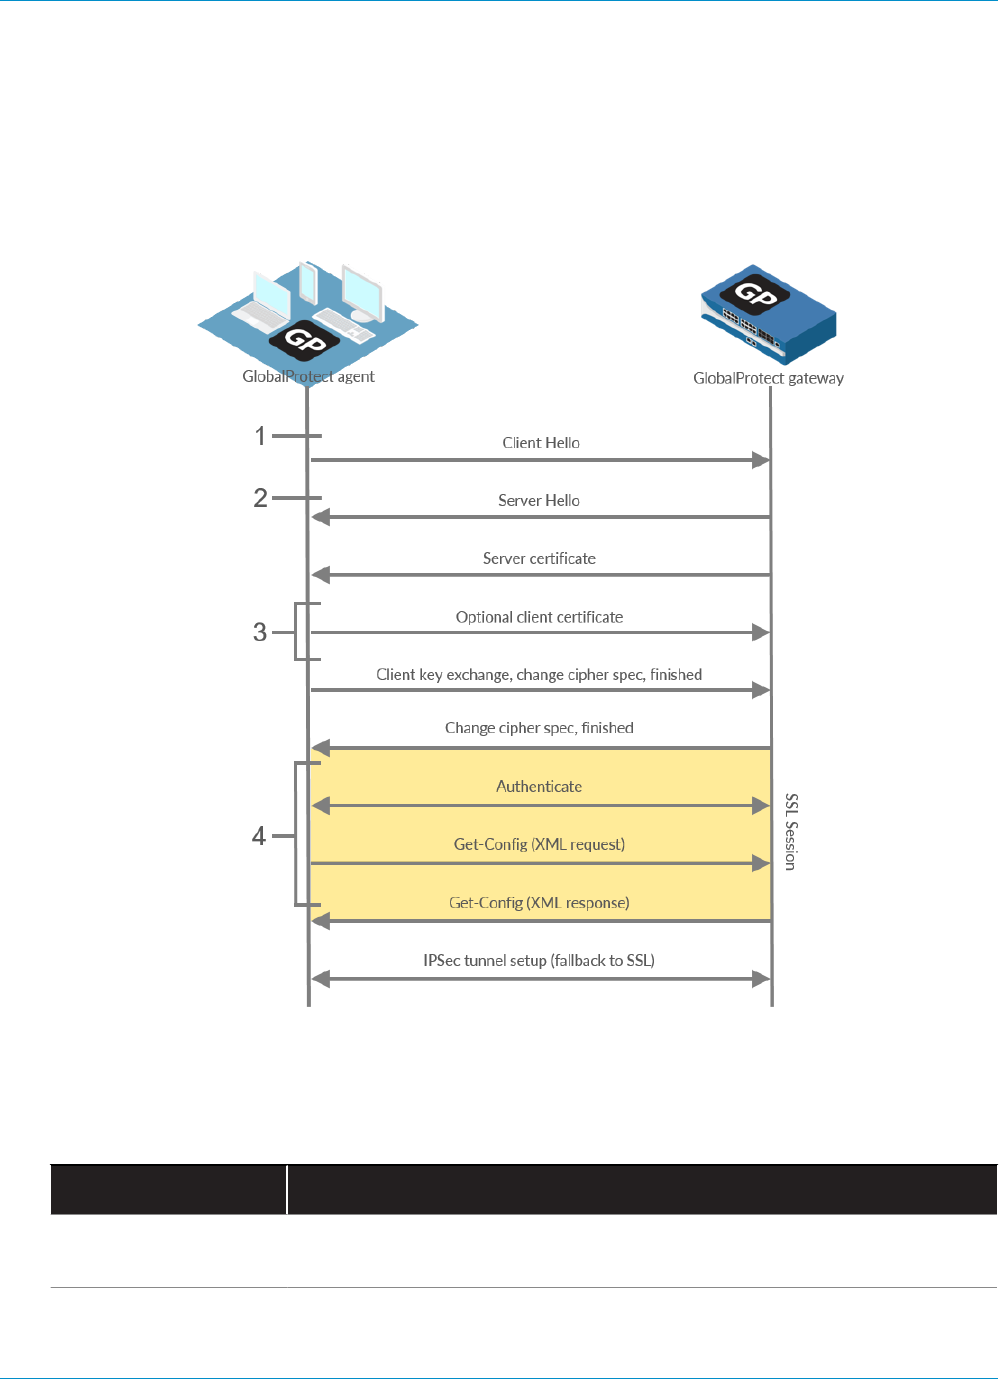
242 GLOBALPROTECT ADMINISTRATOR'S GUIDE | GlobalProtect Cryptography
© 2017 Palo Alto Networks, Inc.
Cipher Exchange Between the GlobalProtect
Agent and Gateway
The following figure displays the exchange of ciphers between GlobalProtect gateways and GlobalProtect
agents when creating the VPN tunnel.
Figure 8: Cipher Exchange Between the Agent and the Gateway
The following table describes these stages in more detail.
Table 7: Cipher Exchange Between the Agent and Gateway
Communication Stage Description
1. Client Hello The agent proposes a list of cipher suites depending on the OS of the
endpoint.
2. Server Hello The gateway selects the cipher suite proposed by the agent. When selecting
the ciphers to set up the tunnel, the gateway ignores both the number and

GLOBALPROTECT ADMINISTRATOR'S GUIDE | GlobalProtect Cryptography 243
© 2017 Palo Alto Networks, Inc.
Communication Stage Description
order of cipher suites proposed by the agent and instead relies on the SSL/
TLS versions and algorithm of the gateway server certificate and its preferred
list (as described in About GlobalProtect Cipher Selection).
3. Optional Client
Certificate
The gateway can optionally request a client certificate from the agent to use
to trust the identity of the user or endpoint.
4. SSL Session After setting up the SSL/TLS session, the agent authenticates with the
gateway and requests the gateway configuration (Get-Config-Request).
To request the configuration, the agent proposes the encryption and
authentication algorithms and other settings such as preferred IP address for
the tunnel interface. The gateway responds to the request and selects the
encryption and authentication algorithm to use based on the configuration of
the GlobalProtect IPSec Crypto Profile (Get-Config-Response).
The following table displays an example of the cipher exchange between an agent on a Mac endpoint and
the gateway.
Table 8: Example: Cipher Exchange for Mac Endpoints
Communication Stage Example: Mac Endpoints
1. Client Hello TLS 1.2
37 Cipher Suites (Reference: TLS Ciphers Supported by GlobalProtect Agents
on Mac Endpoints)
2. Server Hello • When GlobalProtect uses an ECDSA certificate and TLS 1.2 is accepted,
the SSL session uses ECDSA-AES256-CBC-SHA.
• When GlobalProtect uses an RSA certificate and TLS 1.2 is accepted, the
SSL session uses RSA-AES256-CBC-SHA256.
3. Optional Client
Certificate
Client certificates signed with ECDSA or RSA and using SHA1, SHA256, or
SHA384
4. SSL Session • SSL Session uses ECDSA-AES256-CBC-SHA or RSA-AES256-CBC-
SHA256
• Get-Config-Request
• Encryption—AES-256-GCM, AES-128-GCM, AES-128-CBC
• Authentication—SHA1 and OS type, Preferred IP address etc
• Get-Config-Response
• Client to server, and server to client SPIs, encryption keys, and
authentication keys
• Tunnel type, ports, split tunnel mode, IP, and DNS etc

244 GLOBALPROTECT ADMINISTRATOR'S GUIDE | GlobalProtect Cryptography
© 2017 Palo Alto Networks, Inc.
GlobalProtect Cryptography References
•Reference: GlobalProtect Agent Cryptographic Functions
•TLS Cipher Suites Supported by GlobalProtect Agents
•TLS Cipher Suites Supported by GlobalProtect Gateways in PAN-OS 8.0
Reference: GlobalProtect Agent Cryptographic Functions
The GlobalProtect agent uses the OpenSSL library 1.0.1h to establish secure communication with the
GlobalProtect portal and GlobalProtect gateways. The following table lists each GlobalProtect agent
function that requires a cryptographic function and the cryptographic keys the GlobalProtect agent uses:
Crypto Function Key Usage
Winhttp (Windows) and
NSURLConnection (MAC)
aes256-sha
Dynamic key negotiated
between the GlobalProtect
agent and the GlobalProtect
portal and/or gateway for
establishing the HTTPS
connection.
Used to establish the HTTPS
connection between the
GlobalProtect agent and the
GlobalProtect portal and
GlobalProtect gateway for
authentication.
OpenSSL
aes256-sha
Dynamic key negotiated
between the GlobalProtect
agent and the GlobalProtect
gateway during the SSL
handshake.
Used to establish the SSL
connection between the
GlobalProtect agent and the
GlobalProtect gateway for
HIP report submission, SSL
tunnel negotiation, and network
discovery.
IPSec encryption and
authentication
aes-128-sha1, aes-128-cbc,
aes-128-gcm, and aes-256-
gcm
The session key sent from the
GlobalProtect gateway.
Used to establish the IPSec tunnel
between the GlobalProtect agent
and the GlobalProtect gateway.
Use the strongest algorithm
supported by your network (AES-
GCM is recommended).
To provide data integrity and
authenticity protection, the
aes-128-cbc cipher requires the
sha1 authentication algorithm.
Because AES-GCM encryption
algorithms (aes-128-gcm and
aes-256-gcm) natively provide
ESP integrity protection, the sha1
authentication algorithm is ignored
for these ciphers even though it is
required during configuration.

GLOBALPROTECT ADMINISTRATOR'S GUIDE | GlobalProtect Cryptography 245
© 2017 Palo Alto Networks, Inc.
TLS Cipher Suites Supported by GlobalProtect Agents
The following tables provide examples of TLS ciphers supported on GlobalProtect agents installed on
various endpoint operating systems. The lists are not exhaustive for all supported OSs.
•Reference: TLS Ciphers Supported by GlobalProtect Agents on Mac Endpoints
•Reference: TLS Ciphers Supported by GlobalProtect Agents on Windows 7 Endpoints
•Reference: TLS Ciphers Supported by GlobalProtect Agents on Android 6.0.1 Endpoints
•Reference: TLS Ciphers Supported by GlobalProtect Agents on iOS 10.2.1 Endpoints
•Reference: TLS Ciphers Supported by GlobalProtect Agents on Chromebooks
Reference: TLS Ciphers Supported by GlobalProtect Agents on Mac
Endpoints
TLS Ciphers Supported by GlobalProtect Agents on Mac Endpoints
TLS_EMPTY_RENEGOTIATION_INFO_SCSV
(0x00ff)
TLS_ECDHE_ECDSA_WITH_AES_256_CBC_
SHA384 (0xc024)
TLS_ECDHE_ECDSA_WITH_AES_128_CBC_
SHA256 (0xc023)
TLS_ECDHE_ECDSA_WITH_AES_256_CBC_SHA
(0xc00a)
TLS_ECDHE_ECDSA_WITH_AES_128_CBC_SHA
(0xc009)
TLS_ECDHE_ECDSA_WITH_3DES_EDE_CBC_SHA
(0xc008)
TLS_ECDHE_RSA_WITH_AES_256_CBC_SHA384
(0xc028)
TLS_ECDHE_RSA_WITH_AES_128_CBC_SHA256
(0xc027)
TLS_ECDHE_RSA_WITH_AES_256_CBC_SHA
(0xc014)
TLS_ECDHE_RSA_WITH_AES_128_CBC_SHA
(0xc013)
TLS_ECDHE_RSA_WITH_3DES_EDE_CBC_SHA
(0xc012)
TLS_ECDH_ECDSA_WITH_AES_256_CBC_SHA384
(0xc026)
TLS_ECDH_ECDSA_WITH_AES_128_CBC_SHA256
(0xc025)
TLS_ECDH_ECDSA_WITH_AES_256_CBC_SHA
(0xc005)
TLS_ECDH_ECDSA_WITH_AES_128_CBC_SHA
(0xc004)
TLS_ECDH_RSA_WITH_AES_256_CBC_SHA384
(0xc02a)
TLS_ECDH_RSA_WITH_AES_128_CBC_SHA256
(0xc029)
TLS_ECDH_RSA_WITH_AES_256_CBC_SHA
(0xc00f)
TLS_ECDH_RSA_WITH_AES_128_CBC_SHA
(0xc00e)
TLS_ECDH_RSA_WITH_3DES_EDE_CBC_SHA
(0xc00d)
TLS_DHE_RSA_WITH_AES_256_CBC_SHA256
(0x006b)
TLS_DHE_RSA_WITH_AES_128_CBC_SHA256
(0x0067)
TLS_DHE_RSA_WITH_AES_256_CBC_SHA
(0x0039)
TLS_DHE_RSA_WITH_AES_128_CBC_SHA
(0x0033)
TLS_DHE_RSA_WITH_3DES_EDE_CBC_SHA
(0x0016)
TLS_RSA_WITH_AES_256_CBC_SHA256 (0x003d)
TLS_RSA_WITH_AES_128_CBC_SHA256 (0x003c)
TLS_RSA_WITH_AES_256_CBC_SHA (0x0035)
TLS_RSA_WITH_AES_128_CBC_SHA (0x002f)
TLS_RSA_WITH_3DES_EDE_CBC_SHA (0x000a)
TLS_ECDHE_ECDSA_WITH_RC4_128_SHA
(0xc007)
TLS_ECDHE_RSA_WITH_RC4_128_SHA (0xc011)

246 GLOBALPROTECT ADMINISTRATOR'S GUIDE | GlobalProtect Cryptography
© 2017 Palo Alto Networks, Inc.
TLS Ciphers Supported by GlobalProtect Agents on Mac Endpoints
TLS_ECDH_ECDSA_WITH_3DES_EDE_CBC_SHA
(0xc003)
TLS_ECDH_ECDSA_WITH_RC4_128_SHA
(0xc002)
TLS_ECDH_RSA_WITH_RC4_128_SHA (0xc00c)
TLS_RSA_WITH_RC4_128_SHA (0x0005)
TLS_RSA_WITH_RC4_128_MD5 (0x0004)
Reference: TLS Ciphers Supported by GlobalProtect Agents on Windows 7
Endpoints
TLS Ciphers Supported by GlobalProtect Agents on Windows 7 Endpoints
TLS_EMPTY_RENEGOTIATION_INFO_SCSV
(0x00ff)
TLS_ECDHE_ECDSA_WITH_AES_256_GCM_
SHA384 (0xc02c)
TLS_ECDHE_ECDSA_WITH_AES_128_GCM_
SHA256 (0xc02b)
TLS_ECDHE_ECDSA_WITH_AES_256_CBC_
SHA384 (0xc024)
TLS_ECDHE_ECDSA_WITH_AES_128_CBC_
SHA256 (0xc023)
TLS_ECDHE_ECDSA_WITH_AES_256_CBC_SHA
(0xc00a)
TLS_ECDHE_ECDSA_WITH_AES_128_CBC_SHA
(0xc009)
TLS_ECDHE_RSA_WITH_AES_256_GCM_SHA384
(0xc030)
TLS_ECDHE_RSA_WITH_AES_128_GCM_SHA256
(0xc02f)
TLS_ECDHE_RSA_WITH_AES_256_CBC_SHA384
(0xc028)
TLS_ECDHE_RSA_WITH_AES_128_CBC_SHA256
(0xc027)
TLS_ECDHE_RSA_WITH_AES_256_CBC_SHA
(0xc014)
TLS_ECDHE_RSA_WITH_AES_128_CBC_SHA
(0xc013)
TLS_RSA_WITH_AES_256_GCM_SHA384
(0x009d)
TLS_RSA_WITH_AES_128_GCM_SHA256
(0x009c)
TLS_RSA_WITH_AES_256_CBC_SHA256 (0x003d)
TLS_RSA_WITH_AES_128_CBC_SHA256 (0x003c)
TLS_RSA_WITH_AES_256_CBC_SHA (0x0035)
TLS_RSA_WITH_AES_128_CBC_SHA (0x002f)
Reference: TLS Ciphers Supported by GlobalProtect Agents on Android
6.0.1 Endpoints
The GlobalProtect agent for Android 6.0.1 supports 20 cipher suites.
TLS Ciphers Supported by GlobalProtect Agents on Android 6.0.1 Endpoints
TLS_ECDHE_ECDSA_WITH_AES_128_GCM_
SHA256 (0xc02b)
TLS_ECDHE_ECDSA_WITH_AES_256_GCM_
SHA384 (0xc02c)
TLS_ECDHE_RSA_WITH_AES_256_CBC_SHA
(0xc014)
TLS_DHE_RSA_WITH_AES_128_CBC_SHA
(0x0033)

GLOBALPROTECT ADMINISTRATOR'S GUIDE | GlobalProtect Cryptography 247
© 2017 Palo Alto Networks, Inc.
TLS Ciphers Supported by GlobalProtect Agents on Android 6.0.1 Endpoints
TLS_ECDHE_RSA_WITH_AES_128_GCM_SHA256
(0xc02f)
TLS_ECDHE_RSA_WITH_AES_256_GCM_SHA384
(0xc030)
TLS_DHE_RSA_WITH_AES_128_GCM_SHA256
(0x009e)
TLS_DHE_RSA_WITH_AES_256_GCM_SHA384
(0x009f)
TLS_ECDHE_ECDSA_WITH_AES_128_CBC_SHA
(0xc009)
TLS_ECDHE_ECDSA_WITH_AES_256_CBC_SHA
(0xc00a)
TLS_ECDHE_RSA_WITH_AES_128_CBC_SHA
(0xc013)
TLS_DHE_RSA_WITH_AES_256_CBC_SHA
(0x0039)
TLS_ECDHE_ECDSA_WITH_RC4_128_SHA
(0xc007)
TLS_ECDHE_RSA_WITH_RC4_128_SHA (0xc011)
TLS_RSA_WITH_AES_128_GCM_SHA256
(0x009c)
TLS_RSA_WITH_AES_256_GCM_SHA384
(0x009d)
TLS_RSA_WITH_AES_128_CBC_SHA (0x002f)
TLS_RSA_WITH_AES_256_CBC_SHA (0x0035)
TLS_RSA_WITH_RC4_128_SHA (0x0005)
TLS_EMPTY_RENEGOTIATION_INFO_SCSV
(0x00ff)
Reference: TLS Ciphers Supported by GlobalProtect Agents on iOS 10.2.1
Endpoints
The GlobalProtect app for iOS 10.2.1 supports 19 cipher suites.
TLS Ciphers Supported by GlobalProtect Agents on iOS 10.2.1 Endpoints
TLS_EMPTY_RENEGOTIATION_INFO_SCSV
(0x00ff)
TLS_ECDHE_ECDSA_WITH_AES_256_GCM_
SHA384 (0xc02c)
TLS_ECDHE_ECDSA_WITH_AES_128_GCM_
SHA256 (0xc02b)
TLS_ECDHE_ECDSA_WITH_AES_256_CBC_
SHA384 (0xc024)
TLS_ECDHE_ECDSA_WITH_AES_128_CBC_
SHA256 (0xc023)
TLS_ECDHE_ECDSA_WITH_AES_256_CBC_SHA
(0xc00a)
TLS_ECDHE_ECDSA_WITH_AES_128_CBC_SHA
(0xc009)
TLS_ECDHE_RSA_WITH_AES_256_GCM_SHA384
(0xc030)
TLS_ECDHE_RSA_WITH_AES_128_GCM_SHA256
(0xc02f)
TLS_ECDHE_RSA_WITH_AES_256_CBC_SHA384
(0xc028)
TLS_ECDHE_RSA_WITH_AES_128_CBC_SHA256
(0xc027)
TLS_ECDHE_RSA_WITH_AES_256_CBC_SHA
(0xc014)
TLS_ECDHE_RSA_WITH_AES_128_CBC_SHA
(0xc013)
TLS_RSA_WITH_AES_256_GCM_SHA384
(0x009d)
TLS_RSA_WITH_AES_128_GCM_SHA256
(0x009c)
TLS_RSA_WITH_AES_256_CBC_SHA256 (0x003d)
TLS_RSA_WITH_AES_128_CBC_SHA256 (0x003c)
TLS_RSA_WITH_AES_256_CBC_SHA (0x0035)
TLS_RSA_WITH_AES_128_CBC_SHA (0x002f)

248 GLOBALPROTECT ADMINISTRATOR'S GUIDE | GlobalProtect Cryptography
© 2017 Palo Alto Networks, Inc.
Reference: TLS Ciphers Supported by GlobalProtect Agents on
Chromebooks
The GlobalProtect app for Chrome OS 55.0.2883 supports 91 cipher suites.
TLS Ciphers Supported by GlobalProtect Agents on Chromebooks (Chrome OS 55.0.2883)
TLS_ECDHE_RSA_WITH_AES_256_GCM_SHA384
(0xc030)
TLS_ECDHE_ECDSA_WITH_AES_256_GCM_
SHA384 (0xc02c)
TLS_ECDHE_RSA_WITH_AES_256_CBC_SHA384
(0xc028)
TLS_ECDHE_ECDSA_WITH_AES_256_CBC_
SHA384 (0xc024)
TLS_ECDHE_RSA_WITH_AES_256_CBC_SHA
(0xc014)
TLS_ECDHE_ECDSA_WITH_AES_256_CBC_SHA
(0xc00a)
TLS_DH_DSS_WITH_AES_256_GCM_SHA384
(0x00a5)
TLS_DHE_DSS_WITH_AES_256_GCM_SHA384
(0x00a3)
TLS_DH_RSA_WITH_AES_256_GCM_SHA384
(0x00a1)
TLS_DHE_RSA_WITH_AES_256_GCM_SHA384
(0x009f)
TLS_DHE_RSA_WITH_AES_256_CBC_SHA256
(0x006b)
TLS_DHE_DSS_WITH_AES_256_CBC_SHA256
(0x006a)
TLS_DH_RSA_WITH_AES_256_CBC_SHA256
(0x0069)
TLS_DH_DSS_WITH_AES_256_CBC_SHA256
(0x0068)
TLS_DHE_RSA_WITH_AES_256_CBC_SHA
(0x0039)
TLS_DHE_DSS_WITH_AES_256_CBC_SHA
(0x0038)
TLS_DH_RSA_WITH_AES_256_CBC_SHA
(0x0037)
TLS_DH_DSS_WITH_AES_256_CBC_SHA
(0x0036)
TLS_DHE_RSA_WITH_CAMELLIA_256_CBC_SHA
(0x0088)
TLS_DH_DSS_WITH_CAMELLIA_256_CBC_SHA
(0x0085)
TLS_ECDH_RSA_WITH_AES_256_GCM_SHA384
(0xc032)
TLS_ECDH_ECDSA_WITH_AES_256_GCM_SHA384
(0xc02e)
TLS_ECDH_RSA_WITH_AES_256_CBC_SHA384
(0xc02a)
TLS_ECDH_ECDSA_WITH_AES_256_CBC_SHA384
(0xc026)
TLS_ECDH_RSA_WITH_AES_256_CBC_SHA
(0xc00f)
TLS_ECDH_ECDSA_WITH_AES_256_CBC_SHA
(0xc005)
TLS_RSA_WITH_AES_256_GCM_SHA384
(0x009d)
TLS_RSA_WITH_AES_256_CBC_SHA256 (0x003d)
TLS_RSA_WITH_AES_256_CBC_SHA (0x0035)
TLS_RSA_WITH_CAMELLIA_256_CBC_SHA
(0x0084)
TLS_ECDHE_RSA_WITH_AES_128_GCM_SHA256
(0xc02f)
TLS_ECDHE_ECDSA_WITH_AES_128_GCM_SHA256
(0xc02b)
TLS_ECDHE_RSA_WITH_AES_128_CBC_SHA256
(0xc027)
TLS_ECDHE_ECDSA_WITH_AES_128_CBC_SHA256
(0xc023)
TLS_ECDHE_RSA_WITH_AES_128_CBC_SHA
(0xc013)
TLS_ECDHE_ECDSA_WITH_AES_128_CBC_SHA
(0xc009)
TLS_DH_DSS_WITH_AES_128_GCM_SHA256
(0x00a4)
TLS_DHE_DSS_WITH_AES_128_GCM_SHA256
(0x00a2)

GLOBALPROTECT ADMINISTRATOR'S GUIDE | GlobalProtect Cryptography 249
© 2017 Palo Alto Networks, Inc.
TLS Ciphers Supported by GlobalProtect Agents on Chromebooks (Chrome OS 55.0.2883)
TLS_DHE_DSS_WITH_CAMELLIA_256_CBC_SHA
(0x0087)
TLS_DH_RSA_WITH_CAMELLIA_256_CBC_SHA
(0x0086)
TLS_DH_RSA_WITH_AES_128_GCM_SHA256
(0x00a0)
TLS_DHE_RSA_WITH_AES_128_GCM_SHA256
(0x009e)
TLS_DHE_RSA_WITH_AES_128_CBC_SHA256
(0x0067)
TLS_DHE_DSS_WITH_AES_128_CBC_SHA256
(0x0040)
TLS_DH_RSA_WITH_AES_128_CBC_SHA256
(0x003f)
TLS_DH_DSS_WITH_AES_128_CBC_SHA256
(0x003e)
TLS_DHE_RSA_WITH_AES_128_CBC_SHA
(0x0033)
TLS_DHE_DSS_WITH_AES_128_CBC_SHA
(0x0032)
TLS_DH_RSA_WITH_AES_128_CBC_SHA
(0x0031)
TLS_DH_DSS_WITH_AES_128_CBC_SHA
(0x0030)
TLS_DHE_RSA_WITH_SEED_CBC_SHA (0x009a)
TLS_DHE_DSS_WITH_SEED_CBC_SHA (0x0099)
TLS_DH_RSA_WITH_SEED_CBC_SHA (0x0098)
TLS_DH_DSS_WITH_SEED_CBC_SHA (0x0097)
TLS_DHE_RSA_WITH_CAMELLIA_128_CBC_SHA
(0x0045)
TLS_DHE_DSS_WITH_CAMELLIA_128_CBC_SHA
(0x0044)
TLS_DH_RSA_WITH_CAMELLIA_128_CBC_SHA
(0x0043)
TLS_DH_DSS_WITH_CAMELLIA_128_CBC_SHA
(0x0042)
TLS_ECDH_RSA_WITH_AES_128_GCM_SHA256
(0xc031)
TLS_ECDH_ECDSA_WITH_AES_128_GCM_SHA256
(0xc02d)
TLS_ECDH_RSA_WITH_AES_128_CBC_SHA256
(0xc029)
TLS_ECDH_ECDSA_WITH_AES_128_CBC_SHA256
(0xc025)
TLS_RSA_WITH_AES_128_CBC_SHA256 (0x003c)
TLS_RSA_WITH_AES_128_CBC_SHA (0x002f)
TLS_RSA_WITH_SEED_CBC_SHA (0x0096)
TLS_RSA_WITH_CAMELLIA_128_CBC_SHA
(0x0041)
TLS_RSA_WITH_IDEA_CBC_SHA (0x0007)
TLS_ECDHE_RSA_WITH_RC4_128_SHA (0xc011)
TLS_ECDHE_ECDSA_WITH_RC4_128_SHA
(0xc007)
TLS_ECDH_RSA_WITH_RC4_128_SHA (0xc00c)
TLS_ECDH_ECDSA_WITH_RC4_128_SHA
(0xc002)
TLS_RSA_WITH_RC4_128_SHA (0x0005)
TLS_RSA_WITH_RC4_128_MD5 (0x0004)
TLS_ECDHE_RSA_WITH_3DES_EDE_CBC_SHA
(0xc012)
TLS_ECDHE_ECDSA_WITH_3DES_EDE_CBC_SHA
(0xc008)
TLS_DHE_RSA_WITH_3DES_EDE_CBC_SHA
(0x0016)
TLS_DHE_DSS_WITH_3DES_EDE_CBC_SHA
(0x0013)
TLS_DH_RSA_WITH_3DES_EDE_CBC_SHA
(0x0010)
TLS_DH_DSS_WITH_3DES_EDE_CBC_SHA
(0x000d)
TLS_ECDH_RSA_WITH_3DES_EDE_CBC_SHA
(0xc00d)
TLS_ECDH_ECDSA_WITH_3DES_EDE_CBC_SHA
(0xc003)
TLS_RSA_WITH_3DES_EDE_CBC_SHA (0x000a)
TLS_DHE_RSA_WITH_DES_CBC_SHA (0x0015)
TLS_DHE_DSS_WITH_DES_CBC_SHA (0x0012)
TLS_DH_RSA_WITH_DES_CBC_SHA (0x000f)
TLS_DH_DSS_WITH_DES_CBC_SHA (0x000c)

250 GLOBALPROTECT ADMINISTRATOR'S GUIDE | GlobalProtect Cryptography
© 2017 Palo Alto Networks, Inc.
TLS Ciphers Supported by GlobalProtect Agents on Chromebooks (Chrome OS 55.0.2883)
TLS_ECDH_RSA_WITH_AES_128_CBC_SHA
(0xc00e)
TLS_ECDH_ECDSA_WITH_AES_128_CBC_SHA
(0xc004)
TLS_RSA_WITH_AES_128_GCM_SHA256
(0x009c)
TLS_RSA_WITH_DES_CBC_SHA (0x0009)
TLS_EMPTY_RENEGOTIATION_INFO_SCSV
(0x00ff)
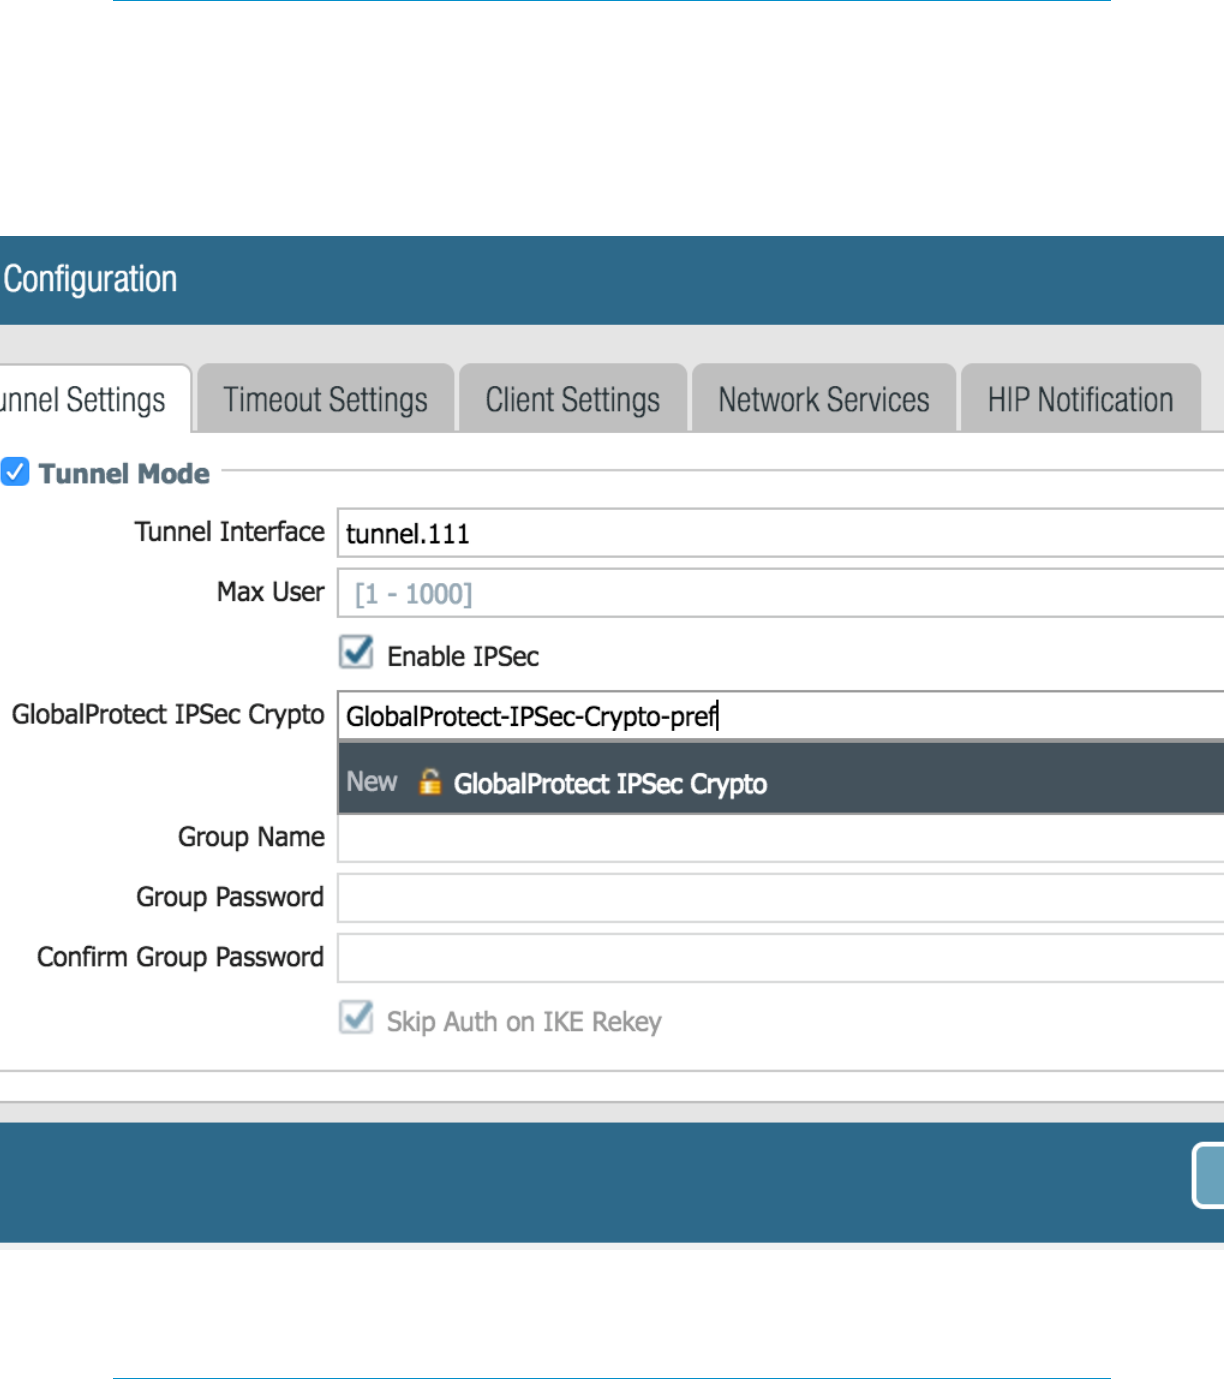
GLOBALPROTECT ADMINISTRATOR'S GUIDE | GlobalProtect Cryptography 251
© 2017 Palo Alto Networks, Inc.
Ciphers Used to Set Up IPSec Tunnels
GlobalProtect can restrict and/or set preferential order for what encryption and authentication algorithm
the GlobalProtect agent can use for the IPSec tunnel. The algorithms and preferences are defined in
the GlobalProtect IPSec Crypto Profile that you configure when you set up the tunnel settings of the
GlobalProtect gateway.
When the GlobalProtect agent sets up an SSL session with GlobalProtect gateway. The cipher suite used
for this SSL session is governed by the SSL/TLS profile configured on the gateway and the type of algorithm

252 GLOBALPROTECT ADMINISTRATOR'S GUIDE | GlobalProtect Cryptography
© 2017 Palo Alto Networks, Inc.
used by the gateway certificate. After the SSL session is established, the GlobalProtect agent initiates a VPN
tunnel setup by requesting the configuration over SSL.
Using the same SSL session, the GlobalProtect gateway responds with the encryption and authentication
algorithms, keys, and SPIs the agent should use to set up the IPSec tunnel.
AES-GCM is recommended for more secure requirements. To provide data integrity and
authenticity protection, the aes-128-cbc cipher requires the SHA1 authentication algorithm.
Because AES-GCM encryption algorithms (aes-128-gcm and aes-256-gcm) natively provide
ESP integrity protection, the SHA1 authentication algorithm is ignored for these ciphers even
though it is required during configuration.
The GlobalProtect IPSec Crypto Profile that you configured on the gateway determines the encryption and
authentication algorithm used to set up the IPSec tunnel. The GlobalProtect gateway responds with the first
matching encryption algorithm listed in the IPSec Crypto Profile that matches the agent’s proposal.
The GlobalProtect agent then attempts to set up a tunnel based on the response from the gateway.

GLOBALPROTECT ADMINISTRATOR'S GUIDE | GlobalProtect Cryptography 253
© 2017 Palo Alto Networks, Inc.
SSL APIs
GlobalProtect agent uses both OpenSSL and native system APIs for doing the SSL Handshake. Operations
such as the GlobalProtect gateway latency measurement—used by GlobalProtect to select the best gateway
—gateway logout, and sending the HIP check message and report are all performed over an SSL session that
is set up using OpenSSL library. While operations like gateway pre-login, login and get-config are all done
over the SSL session that is set up using the native system API.

254 GLOBALPROTECT ADMINISTRATOR'S GUIDE | GlobalProtect Cryptography
