AWS IoT Greengrass Developer Guide
User Manual:
Open the PDF directly: View PDF ![]() .
.
Page Count: 432 [warning: Documents this large are best viewed by clicking the View PDF Link!]
- AWS IoT Greengrass
- Table of Contents
- What Is AWS IoT Greengrass?
- AWS IoT Greengrass Core Software
- AWS IoT Greengrass Groups
- Devices in AWS IoT Greengrass
- SDKs
- Supported Platforms and Requirements
- AWS IoT Greengrass Downloads
- We Want to Hear from You
- Configure the AWS IoT Greengrass Core
- Getting Started with AWS IoT Greengrass
- Requirements
- Create an AWS Account
- Module 1: Environment Setup for Greengrass
- Module 2: Installing the Greengrass Core Software
- Module 3 (Part 1): Lambda Functions on AWS IoT Greengrass
- Module 3 (Part 2): Lambda Functions on AWS IoT Greengrass
- Module 4: Interacting with Devices in an AWS IoT Greengrass Group
- Module 5: Interacting with Device Shadows
- Module 6: Accessing Other AWS Services
- Module 7: Simulating Hardware Security Integration
- OTA Updates of AWS IoT Greengrass Core Software
- Reset Deployments
- Create Bulk Deployments For Groups
- Run Lambda Functions on the AWS IoT Greengrass Core
- SDKs for Greengrass Lambda Functions
- Reference Lambda Functions by Alias or Version
- Controlling Execution of Greengrass Lambda Functions by Using Group-Specific Configuration
- Communication Flows for Greengrass Lambda Functions
- Lifecycle Configuration for Greengrass Lambda Functions
- Lambda Executables
- Running AWS IoT Greengrass in a Docker Container
- Prerequisites
- Step 1: Get the AWS IoT Greengrass Container Image from Amazon ECR
- Step 2: Create and Configure the Greengrass Group and Core
- Step 3: Run AWS IoT Greengrass Locally
- Step 4: Configure "No container" Containerization for the Greengrass Group
- Step 5: Deploy Lambda Functions to the AWS IoT Greengrass Docker Container
- Step 6: (Optional) Deploy Devices that Interact with Greengrass Running in the Docker Container
- Stopping the AWS IoT Greengrass Docker Container
- Troubleshooting AWS IoT Greengrass in a Docker Container
- Access Local Resources with Lambda Functions
- Supported Resource Types
- Requirements
- Group Owner File Access Permission
- How to Configure Local Resource Access Using the AWS Command Line Interface
- How to Configure Local Resource Access Using the AWS Management Console
- Prerequisites
- Step 1: Create a Lambda Function Deployment Package
- Step 2: Create and Publish a Lambda Function
- Step 3: Add the Lambda Function to the Greengrass Group
- Step 4: Add a Local Resource to the Greengrass Group
- Step 5: Add Subscriptions to the Greengrass Group
- Step 6: Deploy the AWS IoT Greengrass Group
- Test Local Resource Access
- Perform Machine Learning Inference
- How AWS IoT Greengrass ML Inference Works
- Machine Learning Resources
- Requirements
- Runtimes and Precompiled Framework Libraries for ML Inference
- How to Configure Machine Learning Inference Using the AWS Management Console
- Prerequisites
- Step 1: Configure the Raspberry Pi
- Step 2: Install the MXNet Framework
- Step 3: Create an MXNet Model Package
- Step 4: Create and Publish a Lambda Function
- Step 5: Add the Lambda Function to the Greengrass Group
- Step 6: Add Resources to the Greengrass Group
- Step 7: Add a Subscription to the Greengrass Group
- Step 8: Deploy the Greengrass Group
- Test the Inference App
- Next Steps
- Configuring an NVIDIA Jetson TX2
- How to Configure Optimized Machine Learning Inference Using the AWS Management Console
- Prerequisites
- Step 1: Configure the Raspberry Pi
- Step 2: Install the Amazon SageMaker Neo deep learning runtime
- Step 3: Create an Inference Lambda Function
- Step 4: Add the Lambda Function to the Greengrass Group
- Step 5: Add Amazon SageMaker Neo Optimized Model Resource to the Greengrass Group
- Step 6: Add Your Camera Device Resource to the Greengrass Group
- Step 7: Add Subscriptions to the Greengrass Group
- Step 8: Deploy the Greengrass Group
- Test the Inference Example
- Configuring an Intel Atom
- Configuring an NVIDIA Jetson TX2
- Troubleshooting AWS IoT Greengrass ML Inference
- Next Steps
- Deploy Secrets to the AWS IoT Greengrass Core
- Secrets Encryption
- Requirements
- Specify the Private Key for Secret Encryption
- Allow AWS IoT Greengrass to Get Secret Values
- See Also
- Working with Secret Resources
- How To Create a Secret Resource (Console)
- Prerequisites
- Step 1: Create a Secrets Manager Secret
- Step 2: Add a Secret Resource to a Greengrass Group
- Step 3: Create a Lambda Function Deployment Package
- Step 4: Create a Lambda Function
- Step 5: Add the Lambda Function to the Greengrass Group
- Step 6: Attach the Secret Resource to the Lambda Function
- Step 7: Add Subscriptions to the Greengrass Group
- Step 8: Deploy the Greengrass Group
- Test the Function
- See Also
- Integrate with Services and Protocols Using Greengrass Connectors
- Requirements
- Using AWS IoT Greengrass Connectors
- Configuration Parameters
- Inputs and Outputs
- Logging
- AWS-Provided Greengrass Connectors
- Getting Started with Greengrass Connectors (Console)
- Prerequisites
- Step 1: Create a Secrets Manager Secret
- Step 2: Add a Secret Resource to a Greengrass Group
- Step 3: Add a Connector to the Greengrass Group
- Step 4: Create a Lambda Function Deployment Package
- Step 5: Create a Lambda Function in the AWS Lambda Console
- Step 6: Add a Lambda Function to the Greengrass Group
- Step 7: Add Subscriptions to the Greengrass Group
- Step 8: Deploy the Greengrass Group
- Test the Solution
- See Also
- Getting Started with Greengrass Connectors (CLI)
- Prerequisites
- Step 1: Create a Secrets Manager Secret
- Step 2: Create a Resource Definition and Version
- Step 3: Create a Connector Definition and Version
- Step 4: Create a Lambda Function Deployment Package
- Step 5: Create a Lambda Function
- Step 6: Create a Function Definition and Version
- Step 7: Create a Subscription Definition and Version
- Step 8: Create a Group Version
- Step 9: Create a Deployment
- Test the Solution
- See Also
- Greengrass Discovery RESTful API
- Use Greengrass OPC-UA to Communicate with Industrial Equipment
- AWS IoT Greengrass Security
- Configuring Greengrass Security
- Device Connection Workflow
- Greengrass Messaging Workflow
- MQTT Core Server Certificate Rotation
- AWS IoT Greengrass Cipher Suites
- Hardware Security Integration
- Requirements
- Hardware Security Configuration for an AWS IoT Greengrass Core
- Provisioning Practices for AWS IoT Greengrass Hardware Security
- Supported Cipher Suites for Hardware Security Integration
- Configure Support for Over-the-Air Updates
- Backward Compatibility with Earlier Versions of the AWS IoT Greengrass Core Software
- Hardware Without PKCS#11 Support
- See Also
- Monitoring with AWS IoT Greengrass Logs
- AWS IoT Device Tester for AWS IoT Greengrass User Guide
- Prerequisites
- Download the Latest Version of AWS IoT Device Tester for AWS IoT Greengrass
- Create and Configure an AWS Account
- Install the AWS Command Line Interface (CLI)
- Configure the AWS IoT Greengrass Service Role
- Verify AWS IoT Greengrass Dependencies on the Device Under Test
- Configure the AWS IoT Greengrass Software
- Configure Your Host Computer to Access Your Device Under Test
- Root Access
- Setting Configuration to Run the AWS IoT Greengrass Qualification Suite
- Testing Infrastructure
- Test Organization
- Troubleshooting
- Permissions Policy Template
- Test Group Descriptions
- Prerequisites
- Troubleshooting AWS IoT Greengrass
- Document History for AWS IoT Greengrass

AWS IoT Greengrass
Developer Guide

AWS IoT Greengrass Developer Guide
AWS IoT Greengrass: Developer Guide
Copyright © 2019 Amazon Web Services, Inc. and/or its affiliates. All rights reserved.
Amazon's trademarks and trade dress may not be used in connection with any product or service that is not Amazon's, in any manner
that is likely to cause confusion among customers, or in any manner that disparages or discredits Amazon. All other trademarks not
owned by Amazon are the property of their respective owners, who may or may not be affiliated with, connected to, or sponsored by
Amazon.

AWS IoT Greengrass Developer Guide
Table of Contents
What Is AWS IoT Greengrass? .............................................................................................................. 1
AWS IoT Greengrass Core Software .............................................................................................. 2
AWS IoT Greengrass Core Versions ....................................................................................... 2
AWS IoT Greengrass Groups ........................................................................................................ 5
Devices in AWS IoT Greengrass .................................................................................................... 6
SDKs ......................................................................................................................................... 7
Supported Platforms and Requirements ...................................................................................... 14
AWS IoT Greengrass Downloads ................................................................................................. 19
AWS IoT Greengrass Core Software .................................................................................... 19
AWS IoT Greengrass Core SDK Software .............................................................................. 19
AWS IoT Greengrass Docker Software ................................................................................. 20
AWS IoT Greengrass ML SDK Software ................................................................................ 20
We Want to Hear from You ....................................................................................................... 20
AWS IoT Greengrass Core .......................................................................................................... 20
AWS IoT Greengrass Core Configuration File ........................................................................ 21
Endpoints Must Match the Certificate Type .......................................................................... 32
Connect on Port 443 or Through a Network Proxy ............................................................... 32
Write Directory ................................................................................................................ 35
MQTT Message Queue ...................................................................................................... 37
Activate Automatic IP Detection ......................................................................................... 40
Start Greengrass on System Boot ....................................................................................... 42
See Also .......................................................................................................................... 43
Getting Started with AWS IoT Greengrass ........................................................................................... 44
Requirements ........................................................................................................................... 44
Create an AWS Account ............................................................................................................. 45
Module 1: Environment Setup for Greengrass .............................................................................. 45
Setting Up a Raspberry Pi ................................................................................................. 45
Setting Up an Amazon EC2 Instance ................................................................................... 50
Setting Up Other Devices .................................................................................................. 54
Module 2: Installing the Greengrass Core Software ....................................................................... 55
Configure AWS IoT Greengrass on AWS IoT ......................................................................... 56
Start AWS IoT Greengrass on the Core Device ...................................................................... 61
Module 3 (Part 1): Lambda Functions on AWS IoT Greengrass ........................................................ 63
Create and Package a Lambda Function .............................................................................. 64
Configure the Lambda Function for AWS IoT Greengrass ....................................................... 70
Deploy Cloud Configurations to a Core Device ..................................................................... 75
Verify the Lambda Function Is Running on the Device ........................................................... 76
Module 3 (Part 2): Lambda Functions on AWS IoT Greengrass ........................................................ 79
Create and Package the Lambda Function ........................................................................... 79
Configure Long-Lived Lambda Functions for AWS IoT Greengrass ........................................... 81
Test Long-Lived Lambda Functions ..................................................................................... 82
Test On-Demand Lambda Functions ................................................................................... 87
Module 4: Interacting with Devices in an AWS IoT Greengrass Group ............................................... 91
Create AWS IoT Devices in an AWS IoT Greengrass Group ...................................................... 91
Configure Subscriptions .................................................................................................... 95
Install the AWS IoT Device SDK for Python .......................................................................... 96
Test Communications ...................................................................................................... 101
Module 5: Interacting with Device Shadows ............................................................................... 104
Configure Devices and Subscriptions ................................................................................. 105
Download Required Files ................................................................................................. 108
Test Communications (Device Syncs Disabled) .................................................................... 109
Test Communications (Device Syncs Enabled) ..................................................................... 112
Module 6: Accessing Other AWS Services ................................................................................... 114
Configure IAM Roles ....................................................................................................... 115
iii

AWS IoT Greengrass Developer Guide
Create and Configure the Lambda Function ....................................................................... 116
Configure Subscriptions ................................................................................................... 121
Test Communications ...................................................................................................... 122
Module 7: Simulating Hardware Security Integration ................................................................... 124
Install SoftHSM .............................................................................................................. 125
Configure SoftHSM ......................................................................................................... 125
Import the Private Key .................................................................................................... 126
Configure the Greengrass Core ......................................................................................... 126
Test the Configuration .................................................................................................... 128
See Also ........................................................................................................................ 128
OTA Updates of AWS IoT Greengrass Core Software ........................................................................... 129
Greengrass OTA Agent ............................................................................................................ 130
Integration with Init systems .................................................................................................... 132
OTA Self-Update with Managed Respawn .......................................................................... 133
AWS IoT Greengrass Core Update with Managed Respawn ................................................... 133
OTA Agent Self-Update ........................................................................................................... 133
Greengrass Core Software Update ............................................................................................ 134
Reset Deployments ......................................................................................................................... 135
Create Bulk Deployments For Groups ................................................................................................ 137
Prerequisites .......................................................................................................................... 137
Create and Upload the Bulk Deployment Input File ..................................................................... 137
Create and Configure an IAM Execution Role .............................................................................. 139
Allow Your Execution Role Access to Your S3 Bucket ................................................................... 140
Deploy the Groups .................................................................................................................. 141
Test the Deployment .............................................................................................................. 143
Troubleshooting Bulk Deployments ........................................................................................... 144
Troubleshoot input file errors ........................................................................................... 144
Check for concurrent bulk deployments ............................................................................ 145
Check ErrorDetails .......................................................................................................... 145
Check the AWS IoT Greengrass Core Log ........................................................................... 145
Additional Resources .............................................................................................................. 146
Run Local Lambda Functions ........................................................................................................... 147
SDKs ..................................................................................................................................... 147
Migrating Cloud-Based Lambda Functions ......................................................................... 149
Function Aliases and Versions .................................................................................................. 149
Controlling Greengrass Lambda Function Execution .................................................................... 150
Running a Lambda Function as Root ................................................................................. 152
Considerations When Choosing Lambda Function Containerization ........................................ 153
Setting Default Containerization for Lambda Functions in a Group ........................................ 155
Communication Flows ............................................................................................................. 155
Communication Using MQTT Messages ............................................................................. 155
Other Communication Flows ............................................................................................ 156
Lifecycle Configuration ............................................................................................................ 156
Lambda Executables ............................................................................................................... 157
Create a Lambda Executable ............................................................................................ 158
Run AWS IoT Greengrass in a Docker Container .......................................................................... 159
Prerequisites .................................................................................................................. 159
Get the AWS IoT Greengrass Container Image from Amazon ECR .......................................... 160
Create and Configure the Greengrass Group and Core ......................................................... 162
Run AWS IoT Greengrass Locally ...................................................................................... 162
Configure "No container" Containerization for the Group ..................................................... 165
Deploy Lambda Functions to the Docker Container ............................................................. 165
(Optional) Deploy Devices that Interact with Greengrass in the Docker Container ..................... 166
Stopping the AWS IoT Greengrass Docker Container ........................................................... 166
Troubleshooting AWS IoT Greengrass in a Docker Container ................................................. 166
Access Local Resources with Lambda Functions .................................................................................. 169
Supported Resource Types ....................................................................................................... 169
iv

AWS IoT Greengrass Developer Guide
Requirements ......................................................................................................................... 170
Volume Resources Under the /proc Directory ..................................................................... 170
Group Owner File Access Permission ......................................................................................... 170
See Also ........................................................................................................................ 171
Using the CLI ......................................................................................................................... 171
Create Local Resources .................................................................................................... 171
Create the Greengrass Function ........................................................................................ 172
Add the Lambda Function to the Group ............................................................................ 173
Troubleshooting ............................................................................................................. 175
Using the Console .................................................................................................................. 175
Prerequisites .................................................................................................................. 176
Create a Lambda Function Deployment Package ................................................................. 176
Create and Publish a Lambda Function ............................................................................. 180
Add the Lambda Function to the Group ............................................................................ 183
Add a Local Resource to the Group ................................................................................... 186
Add Subscriptions to the Group ....................................................................................... 188
Deploy the Group ........................................................................................................... 190
Test Local Resource Access .............................................................................................. 191
Perform Machine Learning Inference ................................................................................................. 195
How AWS IoT Greengrass ML Inference Works ............................................................................ 195
Machine Learning Resources .................................................................................................... 195
Supported Model Sources ................................................................................................ 196
Requirements ......................................................................................................................... 198
Runtimes and Precompiled Framework Libraries for ML Inference ................................................. 198
Amazon SageMaker Neo deep learning runtime .................................................................. 198
MXNet Versioning ........................................................................................................... 198
MXNet on Raspberry Pi ................................................................................................... 199
TensorFlow Model-Serving Limitations on Raspberry Pi ....................................................... 199
How to Configure Machine Learning Inference ........................................................................... 199
Prerequisites .................................................................................................................. 200
Configure the Raspberry Pi .............................................................................................. 200
Install the MXNet Framework ........................................................................................... 201
Create a Model Package .................................................................................................. 203
Create and Publish a Lambda Function ............................................................................. 203
Add the Lambda Function to the Group ............................................................................ 208
Add Resources to the Group ............................................................................................ 210
Add a Subscription to the Group ...................................................................................... 214
Deploy the Group ........................................................................................................... 215
Test the App .................................................................................................................. 216
Next Steps ..................................................................................................................... 220
Configuring an NVIDIA Jetson TX2 .................................................................................... 220
How to Configure Optimized Machine Learning Inference ............................................................ 220
Prerequisites .................................................................................................................. 200
Configure the Raspberry Pi .............................................................................................. 221
Install the Neo deep learning runtime ............................................................................... 222
Create an Inference Lambda Function ............................................................................... 224
Add the Lambda Function to the Group ............................................................................ 228
Add Neo Optimized Model Resource to the Group .............................................................. 229
Add Your Camera Device Resource to the Group ................................................................. 230
Add Subscriptions to the Group ....................................................................................... 233
Deploy the Group ........................................................................................................... 234
Test the Example ............................................................................................................ 216
Configuring an Intel Atom ............................................................................................... 238
Configuring an NVIDIA Jetson TX2 .................................................................................... 239
Troubleshooting AWS IoT Greengrass ML Inference ............................................................. 218
Next Steps ..................................................................................................................... 242
Deploy Secrets to the Core .............................................................................................................. 243
v

AWS IoT Greengrass Developer Guide
Secrets Encryption .................................................................................................................. 244
Requirements ......................................................................................................................... 244
Specify the Private Key for Secret Encryption ............................................................................. 245
Allow AWS IoT Greengrass to Get Secret Values ......................................................................... 246
See Also ................................................................................................................................ 247
Work with Secret Resources ..................................................................................................... 247
Creating and Managing Secrets ........................................................................................ 247
Using Local Secrets ......................................................................................................... 250
How To Create a Secret Resource (Console) ................................................................................ 252
Prerequisites .................................................................................................................. 253
Create a Secrets Manager Secret ...................................................................................... 253
Add a Secret Resource to a Group .................................................................................... 254
Create a Lambda Function Deployment Package ................................................................. 255
Create a Lambda Function ............................................................................................... 258
Add the Function to the Group ........................................................................................ 260
Attach the Secret Resource to the Function ....................................................................... 261
Add Subscriptions to the Group ....................................................................................... 261
Deploy the Group ........................................................................................................... 262
Test the Function ........................................................................................................... 263
See Also ........................................................................................................................ 265
Integrate with Services and Protocols Using Connectors ...................................................................... 266
Requirements ......................................................................................................................... 267
Using AWS IoT Greengrass Connectors ...................................................................................... 267
Configuration Parameters ........................................................................................................ 269
Parameters Used to Access Group Resources ...................................................................... 269
Updating Connector Parameters ....................................................................................... 269
Inputs and Outputs ................................................................................................................ 270
Input Topics ................................................................................................................... 270
Logging ................................................................................................................................. 270
AWS-Provided Greengrass Connectors ....................................................................................... 271
CloudWatch Metrics ........................................................................................................ 271
Device Defender ............................................................................................................. 277
Image Classification ........................................................................................................ 280
Kinesis Firehose .............................................................................................................. 290
Modbus-RTU Protocol Adapter ......................................................................................... 294
Raspberry Pi GPIO .......................................................................................................... 303
Serial Stream ................................................................................................................. 308
ServiceNow MetricBase Integration ................................................................................... 314
SNS .............................................................................................................................. 320
Splunk Integration .......................................................................................................... 324
Twilio Notifications ......................................................................................................... 328
Get Started with Connectors (Console) ...................................................................................... 335
.................................................................................................................................... 335
Prerequisites .................................................................................................................. 336
Create a Secrets Manager Secret ...................................................................................... 336
Add a Secret Resource to a Group .................................................................................... 337
Add a Connector to the Group ......................................................................................... 338
Create a Lambda Function Deployment Package ................................................................. 339
Create a Lambda Function ............................................................................................... 342
Add a Function to the Group ........................................................................................... 344
Add Subscriptions to the Group ....................................................................................... 344
Deploy the Group ........................................................................................................... 345
Test the Solution ............................................................................................................ 346
See Also ........................................................................................................................ 348
Get Started with Connectors (CLI) ............................................................................................ 348
.................................................................................................................................... 348
Prerequisites .................................................................................................................. 350
vi

AWS IoT Greengrass Developer Guide
Create a Secrets Manager Secret ...................................................................................... 350
Create a Resource Definition and Version ........................................................................... 351
Create a Connector Definition and Version ......................................................................... 351
Create a Lambda Function Deployment Package ................................................................. 352
Create a Lambda Function ............................................................................................... 355
Create a Function Definition and Version ........................................................................... 356
Create a Subscription Definition and Version ...................................................................... 357
Create a Group Version ................................................................................................... 358
Create a Deployment ...................................................................................................... 359
Test the Solution ............................................................................................................ 360
See Also ........................................................................................................................ 362
Greengrass Discovery RESTful API ..................................................................................................... 363
Request ................................................................................................................................. 363
Response ............................................................................................................................... 363
Authorization ......................................................................................................................... 363
Example Discover Response Documents ..................................................................................... 364
Greengrass OPC-UA ........................................................................................................................ 366
Architectural Overview ............................................................................................................ 366
Set Up a Test OPC-UA Server ................................................................................................... 367
Make sure your Greengrass Group is ready ................................................................................. 367
Use Greengrass OPC-UA to Interact with your OPC-UA Server ...................................................... 368
Verify that your Lambda function is receiving OPC-UA Publishes and posting them onto Greengrass ... 370
Next Steps ............................................................................................................................. 370
AWS IoT Greengrass Security ........................................................................................................... 371
Configuring Greengrass Security ............................................................................................... 372
Minimal AWS IoT Policy for the AWS IoT Greengrass Core Device .......................................... 372
Device Connection Workflow .................................................................................................... 374
Greengrass Messaging Workflow .............................................................................................. 375
MQTT Core Server Certificate Rotation ...................................................................................... 375
AWS IoT Greengrass Cipher Suites ............................................................................................ 375
Hardware Security .................................................................................................................. 376
Requirements ................................................................................................................. 377
Hardware Security Configuration ...................................................................................... 377
Provisioning Practices .................................................................................................... 380
Supported Cipher Suites .................................................................................................. 382
Configure OTA Updates ................................................................................................... 382
Backward Compatibility ................................................................................................... 383
Hardware Without PKCS#11 Support ................................................................................ 384
See Also ........................................................................................................................ 384
Monitoring ..................................................................................................................................... 385
CloudWatch Logs .................................................................................................................... 385
File System Logs .................................................................................................................... 385
Default Logging Configuration ................................................................................................. 386
Configure Logging for AWS IoT Greengrass ................................................................................ 386
Configure Logging (Console) ............................................................................................ 387
Configure Logging (API) .................................................................................................. 387
Configuration Example .................................................................................................... 388
Logging Limitations ................................................................................................................ 389
Transactions per Second .................................................................................................. 389
Memory ......................................................................................................................... 389
Clock Skew .................................................................................................................... 389
Disk Usage ..................................................................................................................... 389
Log Loss ........................................................................................................................ 390
Logging AWS IoT Greengrass API Calls with AWS CloudTrail ......................................................... 390
AWS IoT Greengrass Information in CloudTrail ................................................................... 390
Understanding AWS IoT Greengrass Log File Entries ............................................................ 391
CloudTrail Logs ...................................................................................................................... 393
vii

AWS IoT Greengrass Developer Guide
AWS IoT Device Tester for AWS IoT Greengrass User Guide ................................................................. 394
Prerequisites .......................................................................................................................... 394
Download the Latest Version of AWS IoT Device Tester for AWS IoT Greengrass ....................... 394
Create and Configure an AWS Account .............................................................................. 394
Install the AWS Command Line Interface (CLI) .................................................................... 395
Configure the AWS IoT Greengrass Service Role ................................................................. 395
Verify AWS IoT Greengrass Dependencies on the Device Under Test ...................................... 396
Configure the AWS IoT Greengrass Software ...................................................................... 396
Configure Your Host Computer to Access Your Device Under Test .......................................... 397
Root Access ................................................................................................................... 398
Setting Configuration to Run the AWS IoT Greengrass Qualification Suite ...................................... 398
Configure Your AWS Credentials ....................................................................................... 398
Configuring AWS Credentials with a Credentials File ............................................................ 399
Device Configuration ....................................................................................................... 400
Running the Test Suite .................................................................................................... 401
Results and Logs ............................................................................................................ 402
Testing Infrastructure .............................................................................................................. 404
Test Organization ................................................................................................................... 404
Troubleshooting ..................................................................................................................... 405
Troubleshooting Device Configuration ............................................................................... 405
Permissions Policy Template .................................................................................................... 407
Test Group Descriptions .......................................................................................................... 408
Troubleshooting ............................................................................................................................. 410
............................................................................................................................................ 410
Troubleshooting with Logs ....................................................................................................... 415
Troubleshooting Storage Issues ................................................................................................ 418
Troubleshooting Messages ....................................................................................................... 418
Troubleshooting Shadow Synchronization Timeout Issues ............................................................ 419
Document History .......................................................................................................................... 423
Earlier Updates ....................................................................................................................... 424
viii
AWS IoT Greengrass Developer Guide
What Is AWS IoT Greengrass?
AWS IoT Greengrass is software that extends cloud capabilities to local devices. This enables devices to
collect and analyze data closer to the source of information, react autonomously to local events, and
communicate securely with each other on local networks. AWS IoT Greengrass developers can use AWS
Lambda functions and prebuilt connectors (p. 266) to create serverless applications that are deployed
to devices for local execution.
The following diagram shows the basic architecture of AWS IoT Greengrass.
AWS IoT Greengrass makes it possible for customers to build IoT devices and application logic.
Specifically, AWS IoT Greengrass provides cloud-based management of application logic that runs on
devices. Locally deployed Lambda functions and connectors are triggered by local events, messages from
the cloud, or other sources.
In AWS IoT Greengrass, devices securely communicate on a local network and exchange messages
with each other without having to connect to the cloud. AWS IoT Greengrass provides a local pub/sub
message manager that can intelligently buffer messages if connectivity is lost so that inbound and
outbound messages to the cloud are preserved.
AWS IoT Greengrass protects user data:
• Through the secure authentication and authorization of devices.
• Through secure connectivity in the local network.
• Between local devices and the cloud.
Device security credentials function in a group until they are revoked, even if connectivity to the cloud is
disrupted, so that the devices can continue to securely communicate locally.
AWS IoT Greengrass provides secure, over-the-air software updates of Lambda functions.
AWS IoT Greengrass consists of:
• Software distributions
• AWS IoT Greengrass core software
• AWS IoT Greengrass core SDK
• Cloud service
• AWS IoT Greengrass API
1

AWS IoT Greengrass Developer Guide
AWS IoT Greengrass Core Software
• Features
• Lambda runtime
• Shadows implementation
• Message manager
• Group management
• Discovery service
• Over-the-air update agent
• Local resource access
• Machine learning inference
• Local secrets manager
AWS IoT Greengrass Core Software
The AWS IoT Greengrass core software provides the following functionality:
• Deployment and local execution of connectors and Lambda functions.
• Secure, encrypted storage of local secrets and controlled access by connectors and Lambda functions.
• MQTT messaging over the local network between devices, connectors, and Lambda functions using
managed subscriptions.
• MQTT messaging between AWS IoT and devices, connectors, and Lambda functions using managed
subscriptions.
• Secure connections between devices and the cloud using device authentication and authorization.
• Local shadow synchronization of devices. Shadows can be configured to sync with the cloud.
• Controlled access to local device and volume resources.
• Deployment of cloud-trained machine learning models for running local inference.
• Automatic IP address detection that enables devices to discover the Greengrass core device.
• Central deployment of new or updated group configuration. After the configuration data is
downloaded, the core device is restarted automatically.
• Secure, over-the-air software updates of user-defined Lambda functions.
AWS IoT Greengrass core instances are configured through AWS IoT Greengrass APIs that create and
update AWS IoT Greengrass group definitions stored in the cloud.
AWS IoT Greengrass Core Versions
The following tabs describe what's new and changed in AWS IoT Greengrass core software versions.
GGC v1.7.0
Current version.
New features:
• Greengrass connectors provide built-in integration with local infrastructure, device protocols,
AWS, and other cloud services. For more information, see Integrate with Services and Protocols
Using Connectors (p. 266).
• AWS IoT Greengrass extends AWS Secrets Manager to core devices, which makes your passwords,
tokens, and other secrets available to connectors and Lambda functions. Secrets are encrypted in
transit and at rest. For more information, see Deploy Secrets to the Core (p. 243).
2

AWS IoT Greengrass Developer Guide
AWS IoT Greengrass Core Versions
• Support for a hardware root of trust security option. For more information, see the section called
“Hardware Security” (p. 376).
• Isolation and permission settings that allow Lambda functions to run without Greengrass
containers and to use the permissions of a specified user and group. For more information, see the
section called “Controlling Greengrass Lambda Function Execution” (p. 150).
• You can run AWS IoT Greengrass in a Docker container (on Windows, macOS, or Linux) by
configuring your Greengrass group to run with no containerization. For more information, see the
section called “Run AWS IoT Greengrass in a Docker Container” (p. 159).
• MQTT messaging on port 443 with Application Layer Protocol Negotiation (ALPN) or connection
through a network proxy. For more information, see the section called “Connect on Port 443 or
Through a Network Proxy” (p. 32).
• The Amazon SageMaker Neo deep learning runtime, which supports machine learning models
that have been optimized by the Amazon SageMaker Neo deep learning compiler. For information
about the Neo deep learning runtime, see the section called “Runtimes and Precompiled
Framework Libraries for ML Inference” (p. 198).
• Support for Raspbian Stretch (2018-06-27) on Raspberry Pi core devices.
Bug fixes and improvements:
• General performance improvements and bug fixes.
In addition, the following features are available with this release:
• The AWS IoT Device Tester for AWS IoT Greengrass, which you can use to verify that your
CPU architecture, kernel configuration, and drivers work with AWS IoT Greengrass. For more
information, see AWS IoT Device Tester for AWS IoT Greengrass User Guide (p. 394).
• The AWS IoT Greengrass Core Software, AWS IoT Greengrass Core SDK, and AWS IoT Greengrass
Machine Learning SDK packages are available for dowload through Amazon CloudFront. For more
information, see the section called “AWS IoT Greengrass Downloads” (p. 19).
GGC v1.6.0
New features:
• Lambda executables that run binary code on the Greengrass core. Use the new AWS IoT
Greengrass Core SDK for C to write Lambda executables in C and C++. For more information, see
the section called “Lambda Executables” (p. 157).
• Optional local storage message cache that can persist across restarts. You can configure the
storage settings for MQTT messages that are queued for processing. For more information, see the
section called “MQTT Message Queue” (p. 37).
• Configurable maximum reconnect retry interval for when the core device is disconnected. For
more information, see the mqttMaxConnectionRetryInterval property in the section called
“AWS IoT Greengrass Core Configuration File” (p. 21).
• Local resource access to the host /proc directory. For more information, see Access Local Resources
with Lambda Functions (p. 169).
• Configurable write directory. The AWS IoT Greengrass core software can be deployed to read-only
and read-write locations. For more information, see the section called “Write Directory” (p. 35).
Bug fixes and improvements:
• Performance improvement for publishing messages in the Greengrass core and between devices
and the core.
3

AWS IoT Greengrass Developer Guide
AWS IoT Greengrass Core Versions
• Reduced the compute resources required to process logs generated by user-defined Lambda
functions.
GGC v1.5.0
New features:
• AWS IoT Greengrass Machine Learning (ML) Inference is generally available. You can perform ML
inference locally on AWS IoT Greengrass devices using models that are built and trained in the
cloud. For more information, see Perform Machine Learning Inference (p. 195).
• Greengrass Lambda functions now support binary data as input payload, in addition to JSON. To
use this feature, you must upgrade to AWS IoT Greengrass Core SDK version 1.1.0, which you can
download from the Software page in the AWS IoT console.
Bug fixes and improvements:
• Reduced the overall memory footprint.
• Performance improvements for sending messages to the cloud.
• Performance and stability improvements for the download agent, Device Certificate Manager, and
OTA update agent.
• Minor bug fixes.
GGC v1.3.0
New features:
• Over-the-air (OTA) update agent capable of handling cloud-deployed, Greengrass update jobs.
The agent is found under the new /greengrass/ota directory. For more information, see OTA
Updates of AWS IoT Greengrass Core Software (p. 129).
• Local resource access feature allows Greengrass Lambda functions to access local resources, such
as peripheral devices and volumes. For more information, see Access Local Resources with Lambda
Functions (p. 169).
GGC v1.1.0
New features:
• Deployed AWS IoT Greengrass groups can be reset by deleting Lambda functions, subscriptions,
and configurations. For more information, see Reset Deployments (p. 135).
• Support for Node.js 6.10 and Java 8 Lambda runtimes, in addition to Python 2.7.
To migrate from the previous version of the AWS IoT Greengrass core:
• Copy certificates from the /greengrass/configuration/certs folder to /greengrass/
certs.
• Copy /greengrass/configuration/config.json to /greengrass/config/config.json.
• Run /greengrass/ggc/core/greengrassd instead of /greengrass/greengrassd.
• Deploy the group to the new core.
GGC v1.0.0
Initial version.
4
AWS IoT Greengrass Developer Guide
AWS IoT Greengrass Groups
AWS IoT Greengrass Groups
An AWS IoT Greengrass group is a collection of settings and components, such as an AWS IoT Greengrass
core, devices, and subscriptions. Groups are used to define a scope of interaction. For example, a group
might represent one floor of a building, one truck, or an entire mining site. The following diagram shows
the components that can make up an Greengrass group.
In the preceding diagram:
A: AWS IoT Greengrass group definition
A collection of information about the AWS IoT Greengrass group.
B: AWS IoT Greengrass group settings
These include:
• AWS IoT Greengrass group role.
• Certification authority and local connection configuration.
• AWS IoT Greengrass core connectivity information.
• Default Lambda runtime environment. For more information, see the section called “Setting
Default Containerization for Lambda Functions in a Group” (p. 155).
• CloudWatch and local logs configuration. For more information, see Monitoring (p. 385).
C: AWS IoT Greengrass core
The AWS IoT thing that represents the AWS IoT Greengrass core. For more information, see the
section called “AWS IoT Greengrass Core” (p. 20).
D: Lambda function definition
A list of Lambda functions that run locally on the core, with associated configuration data. For more
information, see Run Local Lambda Functions (p. 147).
E: Subscription definition
A list of subscriptions that enable communication using MQTT messages. A subscription defines:
5

AWS IoT Greengrass Developer Guide
Devices in AWS IoT Greengrass
• A message source and message target. These can be devices, Lambda functions, connectors, AWS
IoT, and the local shadow service
• A subject, which is an MQTT topic or topic filter that's used to filter message data.
For more information, see the section called “Greengrass Messaging Workflow” (p. 375).
F: Connector definition
A list of connectors that run locally on the core, with associated configuration data. For more
information, see Integrate with Services and Protocols Using Connectors (p. 266).
G: Device definition
A list of AWS IoT things (devices) that are members of the AWS IoT Greengrass group, with
associated configuration data. For more information, see the section called “Devices in AWS IoT
Greengrass” (p. 6).
H: Resource definition
A list of local resources, machine learning resources, and secret resources on the AWS IoT Greengrass
core, with associated configuration data. For more information, see Access Local Resources with
Lambda Functions (p. 169), Perform Machine Learning Inference (p. 195), and Deploy Secrets to the
Core (p. 243).
When deployed, the AWS IoT Greengrass group definition, Lambda functions, connectors, resources, and
subscription table are copied to an AWS IoT Greengrass core device.
Devices in AWS IoT Greengrass
There are two types of devices:
AWS IoT Greengrass cores
A Greengrass core is an AWS IoT device that runs the AWS IoT Greengrass core software, which
enables it to communicate directly with the AWS IoT and AWS IoT Greengrass cloud services. A core
has its own certificate used for authenticating with AWS IoT. It has a device shadow and exists in the
AWS IoT device registry. AWS IoT Greengrass cores run a local Lambda runtime, a deployment agent,
and an IP address tracker that sends IP address information to the AWS IoT Greengrass cloud service
to allow Greengrass devices to automatically discover their group and core connection information.
For more information, see the section called “AWS IoT Greengrass Core” (p. 20).
AWS IoT devices connected to a Greengrass core
These Greengrass devices are added to a Greengrass group and run Amazon FreeRTOS or have the
AWS IoT Device SDK installed. For more information, see AWS IoT Greengrass Discovery Library in
the Amazon FreeRTOS User Guide or AWS IoT SDKs in the AWS IoT Developer Guide.
Greengrass devices connect to an AWS IoT Greengrass core. They can also be configured to
communicate with Lambda functions, connectors, and other devices in the group, and with AWS IoT
or the local shadow service. If the core device loses connectivity to the cloud, devices can continue
to communicate over the local network. Devices can vary in size, from smaller microcontroller-based
devices to large appliances.
The following table shows how these device types are related.
6

AWS IoT Greengrass Developer Guide
SDKs
The AWS IoT Greengrass core device stores certificates in two locations:
• Core device certificate in /greengrass/certs - The core device certificate is named hash.cert.pem (for
example, 86c84488a5.cert.pem). This certificate is used to authenticate the core when connecting
to the AWS IoT and AWS IoT Greengrass services.
• MQTT core server certificate in /greengrass-root/ggc/var/state/server - The MQTT core server
certificate is named server.crt. This certificate is used for mutual authentication between the local
MQTT service (that's on the Greengrass core) and Greengrass devices before messages are exchanged.
SDKs
The following AWS-provided SDKs are used to work with AWS IoT Greengrass:
GGC 1.7.0
AWS SDK
Use the AWS SDK to build applications that interact with any AWS service, including Amazon
S3, Amazon DynamoDB, AWS IoT, AWS IoT Greengrass, and more. In the context of AWS IoT
Greengrass, you can use the AWS SDK in deployed Lambda functions to make direct calls to any
AWS service. For more information, see AWS SDKs (p. 148).
7

AWS IoT Greengrass Developer Guide
SDKs
AWS IoT Device SDK
The AWS IoT Device SDK helps devices connect to AWS IoT or AWS IoT Greengrass services.
Devices must know which AWS IoT Greengrass group they belong to and the IP address of the
AWS IoT Greengrass core that they should connect to.
Although you can use any of the AWS IoT Device SDK platforms to connect to an AWS
IoT Greengrass core, only the C++ and Python SDKs provide AWS IoT Greengrass-specific
functionality, such as access to the AWS IoT Greengrass Discovery Service and AWS IoT
Greengrass core root CA downloads. For more information, see AWS IoT Device SDK.
AWS IoT Greengrass Core SDK
The AWS IoT Greengrass Core SDK enables Lambda functions to interact with the Greengrass
core, publish messages to AWS IoT, interact with the local shadow service, invoke other
deployed Lambda functions, and access secret resources. This SDK is used by Lambda functions
that run on an AWS IoT Greengrass core. For more information, see AWS IoT Greengrass Core
SDK (p. 147).
AWS IoT Greengrass Machine Learning SDK
The AWS IoT Greengrass Machine Learning SDK enables Lambda functions to consume machine
learning models that are deployed to the Greengrass core as machine learning resources. This
SDK is used by Lambda functions that run on an AWS IoT Greengrass core and interact with
a local inference service. For more information, see AWS IoT Greengrass Machine Learning
SDK (p. 148).
GGC 1.6.0
AWS SDKs
Using the AWS SDKs, you can build applications that work with any AWS service, including
Amazon S3, Amazon DynamoDB, AWS IoT, AWS IoT Greengrass, and more. In the context of
AWS IoT Greengrass, you can use the AWS SDK in deployed Lambda functions to make direct
calls to any AWS service. For more information, see the section called “SDKs” (p. 147).
AWS IoT Device SDKs
The AWS IoT Device SDKs helps devices connect to AWS IoT or AWS IoT Greengrass services.
Devices must know which AWS IoT Greengrass group they belong to and the IP address of the
AWS IoT Greengrass core that they should connect to.
Although you can use any of the AWS IoT Device SDKs to connect to an AWS IoT Greengrass
core, only the C++ and Python Device SDKs provide AWS IoT Greengrass-specific functionality,
such as access to the AWS IoT Greengrass Discovery Service and AWS IoT Greengrass core root
CA downloads. For more information, see AWS IoT Device SDK.
AWS IoT Greengrass Core SDK
The AWS IoT Greengrass Core SDK enables Lambda functions to interact with the AWS IoT
Greengrass core on which they run in order to publish messages, interact with the local Device
Shadow service, or invoke other deployed Lambda functions. This SDK is used exclusively for
writing Lambda functions running in the Lambda runtime on an AWS IoT Greengrass core. For
more information, see the section called “SDKs” (p. 147).
GGC v1.5.0
AWS SDKs
Using the AWS SDKs, you can build applications that work with any AWS service, including
Amazon S3, Amazon DynamoDB, AWS IoT, AWS IoT Greengrass, and more. In the context of
8

AWS IoT Greengrass Developer Guide
SDKs
AWS IoT Greengrass, you can use the AWS SDK inside deployed Lambda functions to make
direct calls to any AWS service.
AWS IoT Device SDKs
The AWS IoT Device SDKs helps devices connect to AWS IoT or AWS IoT Greengrass services.
Devices must know which AWS IoT Greengrass group they belong to and the IP address of the
AWS IoT Greengrass core that they should connect to.
Although you can use any of the AWS IoT Device SDKs to connect to an AWS IoT Greengrass
core, only the C++ and Python Device SDKs provide AWS IoT Greengrass-specific functionality,
such as access to the AWS IoT Greengrass Discovery Service and AWS IoT Greengrass core root
CA downloads. For more information, see AWS IoT Device SDK.
AWS IoT Greengrass Core SDK
The AWS IoT Greengrass Core SDK enables Lambda functions to interact with the AWS IoT
Greengrass core on which they run in order to publish messages, interact with the local Device
Shadow service, or invoke other deployed Lambda functions. This SDK is used exclusively for
writing Lambda functions running in the Lambda runtime on an AWS IoT Greengrass core.
Lambda functions running on an AWS IoT Greengrass core can interact with AWS cloud services
directly using the AWS SDK. The AWS IoT Greengrass Core SDK and the AWS SDK are contained
in different packages, so you can use both packages simultaneously. You can download the AWS
IoT Greengrass Core SDK from the Software page of the AWS IoT console.
The AWS IoT Greengrass Core SDK follows the AWS SDK programming model. It allows you to
easily port Lambda functions developed for the cloud to Lambda functions that run on an AWS
IoT Greengrass core. For example, using the AWS SDK, the following Lambda function publishes
a message to the topic "/some/topic" in the cloud:
import boto3
client = boto3.client('iot-data')
response = client.publish(
topic = "/some/topic",
qos = 0,
payload = "Some payload".encode()
)
To port this Lambda function for execution on an AWS IoT Greengrass core, replace the import
boto3 statement with the import greengrasssdk, as shown in the following snippet:
Note
The AWS IoT Greengrass Core SDK only supports sending MQTT messages with QoS =
0.
import greengrasssdk
client = greengrasssdk.client('iot-data')
response = client.publish(
topic='/some/topic',
qos=0,
payload='some payload'.encode()
)
This allows you to test your Lambda functions in the cloud and migrate them to AWS IoT
Greengrass with minimal effort.
Note
The AWS SDK is natively part of the environment of a Lambda function that runs in the
AWS cloud. If you want to use boto3 in a Lambda function that's deployed to an AWS IoT
9

AWS IoT Greengrass Developer Guide
SDKs
Greengrass core, make sure to include the AWS SDK in your package. In addition, if you use
both the AWS IoT Greengrass Core SDK and the AWS SDK in the same package, make sure
that your Lambda functions use the correct namespaces. For more information about how
to create your deployment package, see:
•Creating a Deployment Package (Python)
•Creating a Deployment Package (Node.js)
•Creating a Deployment Package (Java)
GGC v1.3.0
AWS SDKs
Using the AWS SDKs, you can build applications that work with any AWS service, including
Amazon S3, Amazon DynamoDB, AWS IoT, AWS IoT Greengrass, and more. In the context of
AWS IoT Greengrass, you can use the AWS SDK inside deployed Lambda functions to make
direct calls to any AWS service.
AWS IoT Device SDKs
The AWS IoT Device SDKs helps devices connect to AWS IoT or AWS IoT Greengrass services.
Devices must know which AWS IoT Greengrass group they belong to and the IP address of the
AWS IoT Greengrass core that they should connect to.
Although you can use any of the AWS IoT Device SDKs to connect to an AWS IoT Greengrass
core, only the C++ and Python Device SDKs provide AWS IoT Greengrass-specific functionality,
such as access to the AWS IoT Greengrass Discovery Service and AWS IoT Greengrass core root
CA downloads. For more information, see AWS IoT Device SDK.
AWS IoT Greengrass Core SDK
The AWS IoT Greengrass Core SDK enables Lambda functions to interact with the AWS IoT
Greengrass core on which they run in order to publish messages, interact with the local Device
Shadow service, or invoke other deployed Lambda functions. This SDK is used exclusively for
writing Lambda functions running in the Lambda runtime on an AWS IoT Greengrass core.
Lambda functions running on an AWS IoT Greengrass core can interact with AWS cloud services
directly using the AWS SDK. The AWS IoT Greengrass Core SDK and the AWS SDK are contained
in different packages, so you can use both packages simultaneously. You can download the AWS
IoT Greengrass Core SDK from the Software page of the AWS IoT console.
The AWS IoT Greengrass Core SDK follows the AWS SDK programming model. It allows you to
easily port Lambda functions developed for the cloud to Lambda functions that run on an AWS
IoT Greengrass core. For example, using the AWS SDK, the following Lambda function publishes
a message to the topic "/some/topic" in the cloud:
import boto3
client = boto3.client('iot-data')
response = client.publish(
topic = "/some/topic",
qos = 0,
payload = "Some payload".encode()
)
To port this Lambda function for execution on an AWS IoT Greengrass core, replace the import
boto3 statement with the import greengrasssdk, as shown in the following snippet:
Note
The AWS IoT Greengrass Core SDK only supports sending MQTT messages with QoS =
0.
10

AWS IoT Greengrass Developer Guide
SDKs
import greengrasssdk
client = greengrasssdk.client('iot-data')
response = client.publish(
topic='/some/topic',
qos=0,
payload='some payload'.encode()
)
This allows you to test your Lambda functions in the cloud and migrate them to AWS IoT
Greengrass with minimal effort.
Note
The AWS SDK is natively part of the environment of a Lambda function that runs in the
AWS cloud. If you want to use boto3 in a Lambda function that's deployed to an AWS IoT
Greengrass core, make sure to include the AWS SDK in your package. In addition, if you use
both the AWS IoT Greengrass Core SDK and the AWS SDK in the same package, make sure
that your Lambda functions use the correct namespaces. For more information about how
to create your deployment package, see:
•Creating a Deployment Package (Python)
•Creating a Deployment Package (Node.js)
•Creating a Deployment Package (Java)
GGC v1.1.0
AWS SDKs
Using the AWS SDKs, you can build applications that work with any AWS service, including
Amazon S3, Amazon DynamoDB, AWS IoT, AWS IoT Greengrass, and more. In the context of
AWS IoT Greengrass, you can use the AWS SDK inside deployed Lambda functions to make
direct calls to any AWS service.
AWS IoT Device SDKs
The AWS IoT Device SDKs helps devices connect to AWS IoT or AWS IoT Greengrass services.
Devices must know which AWS IoT Greengrass group they belong to and the IP address of the
AWS IoT Greengrass core that they should connect to.
Although you can use any of the AWS IoT Device SDKs to connect to an AWS IoT Greengrass
core, only the C++ and Python Device SDKs provide AWS IoT Greengrass-specific functionality,
such as access to the AWS IoT Greengrass Discovery Service and AWS IoT Greengrass core root
CA downloads. For more information, see AWS IoT Device SDK.
AWS IoT Greengrass Core SDK
The AWS IoT Greengrass Core SDK enables Lambda functions to interact with the AWS IoT
Greengrass core on which they run in order to publish messages, interact with the local Device
Shadow service, or invoke other deployed Lambda functions. This SDK is used exclusively for
writing Lambda functions running in the Lambda runtime on an AWS IoT Greengrass core.
Lambda functions running on an AWS IoT Greengrass core can interact with AWS cloud services
directly using the AWS SDK. The AWS IoT Greengrass Core SDK and the AWS SDK are contained
in different packages, so you can use both packages simultaneously. You can download the AWS
IoT Greengrass Core SDK from the Software page of the AWS IoT console.
The AWS IoT Greengrass Core SDK follows the AWS SDK programming model. It allows you to
easily port Lambda functions developed for the cloud to Lambda functions that run on an AWS
11

AWS IoT Greengrass Developer Guide
SDKs
IoT Greengrass core. For example, using the AWS SDK, the following Lambda function publishes
a message to the topic "/some/topic" in the cloud:
import boto3
client = boto3.client('iot-data')
response = client.publish(
topic = "/some/topic",
qos = 0,
payload = "Some payload".encode()
)
To port this Lambda function for execution on an AWS IoT Greengrass core, replace the import
boto3 statement with the import greengrasssdk, as shown in the following snippet:
Note
The AWS IoT Greengrass Core SDK only supports sending MQTT messages with QoS =
0.
import greengrasssdk
client = greengrasssdk.client('iot-data')
response = client.publish(
topic='/some/topic',
qos=0,
payload='some payload'.encode()
)
This allows you to test your Lambda functions in the cloud and migrate them to AWS IoT
Greengrass with minimal effort.
Note
The AWS SDK is natively part of the environment of a Lambda function that runs in the
AWS cloud. If you want to use boto3 in a Lambda function that's deployed to an AWS IoT
Greengrass core, make sure to include the AWS SDK in your package. In addition, if you use
both the AWS IoT Greengrass Core SDK and the AWS SDK in the same package, make sure
that your Lambda functions use the correct namespaces. For more information about how
to create your deployment package, see:
•Creating a Deployment Package (Python)
•Creating a Deployment Package (Node.js)
•Creating a Deployment Package (Java)
GGC v1.0.0
AWS SDKs
Using the AWS SDKs, you can build applications that work with any AWS service, including
Amazon S3, Amazon DynamoDB, AWS IoT, AWS IoT Greengrass, and more. In the context of
AWS IoT Greengrass, you can use the AWS SDK inside deployed Lambda functions to make
direct calls to any AWS service.
AWS IoT Device SDKs
The AWS IoT Device SDKs helps devices connect to AWS IoT or AWS IoT Greengrass services.
Devices must know which AWS IoT Greengrass group they belong to and the IP address of the
AWS IoT Greengrass core that they should connect to.
12

AWS IoT Greengrass Developer Guide
SDKs
Although you can use any of the AWS IoT Device SDKs to connect to an AWS IoT Greengrass
core, only the C++ and Python Device SDKs provide AWS IoT Greengrass-specific functionality,
such as access to the AWS IoT Greengrass Discovery Service and AWS IoT Greengrass core root
CA downloads. For more information, see AWS IoT Device SDK.
AWS IoT Greengrass Core SDK
The AWS IoT Greengrass Core SDK enables Lambda functions to interact with the AWS IoT
Greengrass core on which they run in order to publish messages, interact with the local Device
Shadow service, or invoke other deployed Lambda functions. This SDK is used exclusively for
writing Lambda functions running in the Lambda runtime on an AWS IoT Greengrass core.
Lambda functions running on an AWS IoT Greengrass core can interact with AWS cloud services
directly using the AWS SDK. The AWS IoT Greengrass Core SDK and the AWS SDK are contained
in different packages, so you can use both packages simultaneously. You can download the AWS
IoT Greengrass Core SDK from the Software page of the AWS IoT console.
The AWS IoT Greengrass Core SDK follows the AWS SDK programming model. It allows you to
easily port Lambda functions developed for the cloud to Lambda functions that run on an AWS
IoT Greengrass core. For example, using the AWS SDK, the following Lambda function publishes
a message to the topic "/some/topic" in the cloud:
import boto3
client = boto3.client('iot-data')
response = client.publish(
topic = "/some/topic",
qos = 0,
payload = "Some payload".encode()
)
To port this Lambda function for execution on an AWS IoT Greengrass core, replace the import
boto3 statement with the import greengrasssdk, as shown in the following snippet:
Note
The AWS IoT Greengrass Core SDK only supports sending MQTT messages with QoS =
0.
import greengrasssdk
client = greengrasssdk.client('iot-data')
response = client.publish(
topic='/some/topic',
qos=0,
payload='some payload'.encode()
)
This allows you to test your Lambda functions in the cloud and migrate them to AWS IoT
Greengrass with minimal effort.
Note
The AWS SDK is natively part of the environment of a Lambda function that runs in the
AWS cloud. If you want to use boto3 in a Lambda function that's deployed to an AWS IoT
Greengrass core, make sure to include the AWS SDK in your package. In addition, if you use
both the AWS IoT Greengrass Core SDK and the AWS SDK in the same package, make sure
that your Lambda functions use the correct namespaces. For more information about how
to create your deployment package, see:
•Creating a Deployment Package (Python)
13

AWS IoT Greengrass Developer Guide
Supported Platforms and Requirements
Supported Platforms and Requirements
The AWS IoT Greengrass core software is supported on the platforms listed here, and requires a few
dependencies.
Note
You can download the core software from the Software page in the AWS IoT Core console or
from the AWS IoT Greengrass Core Software (p. 19) downloads.
GGC v1.7.0
• Supported platforms:
• Architecture: ARMv7l; OS: Linux; Distribution: Raspbian Stretch, 2018-06-29. While several
versions may work with AWS IoT Greengrass, we recommend this as it is the officially supported
distribution.
• Architecture: x86_64; OS: Linux; Distribution: Amazon Linux (amzn-ami-
hvm-2016.09.1.20170119-x86_64-ebs), Ubuntu 14.04 – 16.04
• Architecture: ARMv8 (AArch64); OS: Linux; Distribution: Arch Linux
• Windows, macOS, and Linux platforms can run AWS IoT Greengrass in a Docker container.
For more information, see the section called “Run AWS IoT Greengrass in a Docker
Container” (p. 159).
• The following items are required:
• Minimum 128 MB RAM allocated to the AWS IoT Greengrass core device.
• Linux kernel version 4.4 or greater: while several versions may work with AWS IoT Greengrass,
for optimal security and performance, we recommend version 4.4 or greater.
•Glibc library version 2.14 or greater.
• The /var/run directory must be present on the device.
• AWS IoT Greengrass requires hardlink and softlink protection to be enabled on the device.
Without this, AWS IoT Greengrass can only be run in insecure mode, using the -i flag.
• The ggc_user and ggc_group user and group must be present on the device.
• The following Linux kernel configurations must be enabled on the device:
• Namespace: CONFIG_IPC_NS, CONFIG_UTS_NS, CONFIG_USER_NS, CONFIG_PID_NS
• CGroups: CONFIG_CGROUP_DEVICE, CONFIG_CGROUPS, CONFIG_MEMCG
• Others: CONFIG_POSIX_MQUEUE, CONFIG_OVERLAY_FS,
CONFIG_HAVE_ARCH_SECCOMP_FILTER, CONFIG_SECCOMP_FILTER, CONFIG_KEYS,
CONFIG_SECCOMP
•/dev/stdin, /dev/stdout, and /dev/stderr must be enabled.
• The Linux kernel must support cgroups.
• The memory cgroup must be enabled and mounted to allow AWS IoT Greengrass to set the
memory limit for Lambda functions.
• The root certificate for Amazon S3 and AWS IoT must be present in the system trust store.
• The following items may be optional:
• The devices cgroup must be enabled and mounted if Lambda functions with Local Resource
Access (LRA) (p. 169) are used to open files on the AWS IoT Greengrass core device.
•Python version 2.7 is required if Python Lambda functions are used. If so, ensure that it's added
to your PATH environment variable.
•NodeJS version 6.10 or greater is required if Node.JS Lambda functions are used. If so, ensure
that it's added to your PATH environment variable.
•Java version 8 or greater is required if Java Lambda functions are used. If so, ensure that it's
added to your PATH environment variable.
14

AWS IoT Greengrass Developer Guide
Supported Platforms and Requirements
• The following commands are required for Greengrass OTA Agent (p. 130): wget, realpath,
tar, readlink, basename, dirname, pidof, df, grep, and umount.
GGC v1.6.0
• Supported platforms:
• Architecture: ARMv7l; OS: Linux; Distribution: Raspbian Jessie, 2017-03-02
Note
You can choose to use Raspbian Stretch instead of Jessie. Using Stretch will require
additional memory set-up. For more information, see this step (p. 50).
• Architecture: x86_64; OS: Linux; Distribution: Amazon Linux (amzn-ami-
hvm-2016.09.1.20170119-x86_64-ebs)
• Architecture: x86_64; OS: Linux; Distribution: Ubuntu 14.04 – 16.04
• Architecture: ARMv8 (AArch64); OS: Linux; Distribution: Ubuntu 14.04 – 16.04 (Annapurna
Alpine V2)
• The following items are required:
• Minimum 128 MB RAM allocated to the AWS IoT Greengrass core device.
• Linux kernel version 4.4 or greater: while several versions may work with AWS IoT Greengrass,
for optimal security and performance, we recommend version 4.4 or greater.
•Glibc library version 2.14 or greater.
• The /var/run directory must be present on the device.
• AWS IoT Greengrass requires hardlink and softlink protection to be enabled on the device.
Without this, AWS IoT Greengrass can only be run in insecure mode, using the -i flag.
• The ggc_user and ggc_group user and group must be present on the device.
• The following Linux kernel configurations must be enabled on the device:
• Namespace: CONFIG_IPC_NS, CONFIG_UTS_NS, CONFIG_USER_NS, CONFIG_PID_NS
• CGroups: CONFIG_CGROUP_DEVICE, CONFIG_CGROUPS, CONFIG_MEMCG
• Others: CONFIG_POSIX_MQUEUE, CONFIG_OVERLAY_FS,
CONFIG_HAVE_ARCH_SECCOMP_FILTER, CONFIG_SECCOMP_FILTER, CONFIG_KEYS,
CONFIG_SECCOMP
•/dev/stdin, /dev/stdout, and /dev/stderr must be enabled.
• The Linux kernel must support cgroups.
• The memory cgroup must be enabled and mounted to allow AWS IoT Greengrass to set the
memory limit for Lambda functions.
• The root certificate for Amazon S3 and AWS IoT must be present in the system trust store.
• The following items may be optional:
• The devices cgroup must be enabled and mounted if Lambda functions with Local Resource
Access (LRA) (p. 169) are used to open files on the AWS IoT Greengrass core device.
•Python version 2.7 is required if Python Lambda functions are used. If so, ensure that it's added
to your PATH environment variable.
•NodeJS version 6.10 or greater is required if Node.JS Lambda functions are used. If so, ensure
that it's added to your PATH environment variable.
•Java version 8 or greater is required if Java Lambda functions are used. If so, ensure that it's
added to your PATH environment variable.
•OpenSSL 1.01 or greater is required for Greengrass OTA Agent (p. 130) as well as the following
commands: wget, realpath, tar, readlink, basename, dirname, pidof, df, grep, and
umount.
15

AWS IoT Greengrass Developer Guide
Supported Platforms and Requirements
GGC v1.5.0
• Supported platforms:
• Architecture: ARMv7l; OS: Linux; Distribution: Raspbian Jessie, 2017-03-02
Note
You can choose to use Raspbian Stretch instead of Jessie. Using Stretch will require
additional memory set-up. For more information, see this step (p. 50).
• Architecture: x86_64; OS: Linux; Distribution: Amazon Linux (amzn-ami-
hvm-2016.09.1.20170119-x86_64-ebs)
• Architecture: x86_64; OS: Linux; Distribution: Ubuntu 14.04 – 16.04
• Architecture: ARMv8 (AArch64); OS: Linux; Distribution: Ubuntu 14.04 – 16.04 (Annapurna
Alpine V2)
• The following items are required:
• Minimum 128 MB RAM allocated to the AWS IoT Greengrass core device.
• Linux kernel version 4.4 or greater: while several versions may work with AWS IoT Greengrass,
for optimal security and performance, we recommend version 4.4 or greater.
•Glibc library version 2.14 or greater.
• The /var/run directory must be present on the device.
• AWS IoT Greengrass requires hardlink and softlink protection to be enabled on the device.
Without this, AWS IoT Greengrass can only be run in insecure mode, using the -i flag.
• The ggc_user and ggc_group user and group must be present on the device.
• The following Linux kernel configurations must be enabled on the device:
• Namespace: CONFIG_IPC_NS, CONFIG_UTS_NS, CONFIG_USER_NS, CONFIG_PID_NS
• CGroups: CONFIG_CGROUP_DEVICE, CONFIG_CGROUPS, CONFIG_MEMCG
• Others: CONFIG_POSIX_MQUEUE, CONFIG_OVERLAY_FS,
CONFIG_HAVE_ARCH_SECCOMP_FILTER, CONFIG_SECCOMP_FILTER, CONFIG_KEYS,
CONFIG_SECCOMP
•/dev/stdin, /dev/stdout, and /dev/stderr must be enabled.
• The Linux kernel must support cgroups.
• The memory cgroup must be enabled and mounted to allow AWS IoT Greengrass to set the
memory limit for Lambda functions.
• The root certificate for Amazon S3 and AWS IoT must be present in the system trust store.
• The following items may be optional:
• The devices cgroup must be enabled and mounted if Lambda functions with Local Resource
Access (LRA) (p. 169) are used to open files on the AWS IoT Greengrass core device.
•Python version 2.7 is required if Python Lambda functions are used. If so, ensure that it's added
to your PATH environment variable.
•NodeJS version 6.10 or greater is required if Node.JS Lambda functions are used. If so, ensure
that it's added to your PATH environment variable.
•Java version 8 or greater is required if Java Lambda functions are used. If so, ensure that it's
added to your PATH environment variable.
•OpenSSL 1.01 or greater is required for Greengrass OTA Agent (p. 130) as well as the following
commands: wget, realpath, tar, readlink, basename, dirname, pidof, df, grep, and
umount.
GGC v1.3.0
• Supported platforms:
• Architecture: ARMv7l; OS: Linux; Distribution: Raspbian Jessie, 2017-03-02
16

AWS IoT Greengrass Developer Guide
Supported Platforms and Requirements
• Architecture: x86_64; OS: Linux; Distribution: Amazon Linux (amzn-ami-
hvm-2016.09.1.20170119-x86_64-ebs)
• Architecture: x86_64; OS: Linux; Distribution: Ubuntu 14.04 – 16.04
• Architecture: ARMv8 (AArch64); OS: Linux; Distribution: Ubuntu 14.04 – 16.04 (Annapurna
Alpine V2)
• The following items are required:
• Minimum 128 MB RAM allocated to the AWS IoT Greengrass core device.
• Linux kernel version 4.4 or later. Although several versions might work with AWS IoT Greengrass,
for optimal security and performance, we recommend version 4.4 or later.
•Glibc library version 2.14 or later.
• The /var/run directory must be present on the device.
• AWS IoT Greengrass requires hardlink and softlink protection to be enabled on the device.
Without this, AWS IoT Greengrass can only be run in insecure mode, using the -i flag.
• The ggc_user and ggc_group user and group must be present on the device.
• The following Linux kernel configurations must be enabled on the device:
• Namespace: CONFIG_IPC_NS, CONFIG_UTS_NS, CONFIG_USER_NS, CONFIG_PID_NS
• CGroups: CONFIG_CGROUP_DEVICE, CONFIG_CGROUPS, CONFIG_MEMCG
• Others: CONFIG_POSIX_MQUEUE, CONFIG_OVERLAY_FS,
CONFIG_HAVE_ARCH_SECCOMP_FILTER, CONFIG_SECCOMP_FILTER, CONFIG_KEYS,
CONFIG_SECCOMP
• The sqlite3 package is required for AWS IoT device shadows. Make sure it’s added to your
PATH environment variable.
•/dev/stdin, /dev/stdout, and /dev/stderr must be enabled.
• The Linux kernel must support cgroups.
• The memory cgroup must be enabled and mounted to allow AWS IoT Greengrass to set the
memory limit for Lambda functions.
• The root certificate for Amazon S3 and AWS IoT must be present in the system trust store.
• The following items might be optional:
• The devices cgroup must be enabled and mounted if Lambda functions with local resource
access (LRA) (p. 169) are used to open files on the AWS IoT Greengrass core device.
•Python version 2.7 is required if Python Lambda functions are used. If so, make sure that it's
added to your PATH environment variable.
•Node.js version 6.10 or later is required if Node.js Lambda functions are used. If so, make sure
that it's added to your PATH environment variable.
•Java version 8 or later is required if Java Lambda functions are used. If so, make sure that it's
added to your PATH environment variable.
•OpenSSL 1.01 or later is required for Greengrass OTA Agent (p. 130) as are the following
commands: wget, realpath, tar, readlink, basename, dirname, pidof, df, grep, and
umount.
GGC v1.1.0
• Supported platforms:
• Architecture: ARMv7l; OS: Linux; Distribution: Raspbian Jessie, 2017-03-02
• Architecture: x86_64; OS: Linux; Distribution: Amazon Linux (amzn-ami-
hvm-2016.09.1.20170119-x86_64-ebs)
• Architecture: x86_64; OS: Linux; Distribution: Ubuntu 14.04 – 16.04
• Architecture: ARMv8 (AArch64); OS: Linux; Distribution: Ubuntu 14.04 – 16.04 (Annapurna
Alpine V2) 17

AWS IoT Greengrass Developer Guide
Supported Platforms and Requirements
• The following items are required:
• Minimum 128 MB RAM allocated to the AWS IoT Greengrass core device.
• Linux kernel version 4.4 or later. Although several versions might work with AWS IoT Greengrass,
for optimal security and performance, we recommend version 4.4 or later.
•Glibc library version 2.14 or later.
• The /var/run directory must be present on the device.
• AWS IoT Greengrass requires hardlink and softlink protection to be enabled on the device.
Without this, AWS IoT Greengrass can only be run in insecure mode, using the -i flag.
• The ggc_user and ggc_group user and group must be present on the device.
• The following Linux kernel configurations must be enabled on the device:
• Namespace: CONFIG_IPC_NS, CONFIG_UTS_NS, CONFIG_USER_NS, CONFIG_PID_NS
• CGroups: CONFIG_CGROUP_DEVICE, CONFIG_CGROUPS, CONFIG_MEMCG
• Others: CONFIG_POSIX_MQUEUE, CONFIG_OVERLAY_FS,
CONFIG_HAVE_ARCH_SECCOMP_FILTER, CONFIG_SECCOMP_FILTER, CONFIG_KEYS,
CONFIG_SECCOMP
• The sqlite3 package is required for AWS IoT device shadows. Make sure it’s added to your
PATH environment variable.
•/dev/stdin, /dev/stdout, and /dev/stderr must be enabled.
• The Linux kernel must support cgroups.
• The memory cgroup must be enabled and mounted to allow AWS IoT Greengrass to set the
memory limit for Lambda functions.
• The root certificate for Amazon S3 and AWS IoT must be present in the system trust store.
• The following items might be optional:
•Python version 2.7 is required if Python Lambda functions are used. If so, make sure that it's
added to your PATH environment variable.
•Node.js version 6.10 or later is required if Node.js Lambda functions are used. If so, make sure
that it's added to your PATH environment variable.
•Java version 8 or later is required if Java Lambda functions are used. If so, make sure that it's
added to your PATH environment variable.
GGC v1.0.0
• Supported platforms:
• Architecture: ARMv7l; OS: Linux; Distribution: Raspbian Jessie, 2017-03-02
• Architecture: x86_64; OS: Linux; Distribution: Amazon Linux (amzn-ami-
hvm-2016.09.1.20170119-x86_64-ebs)
• Architecture: x86_64; OS: Linux; Distribution: Ubuntu 14.04 – 16.04
• Architecture: ARMv8 (AArch64); OS: Linux; Distribution: Ubuntu 14.04 – 16.04 (Annapurna
Alpine V2)
• The following items are required:
• Minimum 128 MB RAM allocated to the AWS IoT Greengrass core device.
• Linux kernel version 4.4 or later. Although several versions might work with AWS IoT Greengrass,
for optimal security and performance, we recommend version 4.4 or later.
•Glibc library version 2.14 or later.
• The /var/run directory must be present on the device.
• AWS IoT Greengrass requires hardlink and softlink protection to be enabled on the device.
Without this, AWS IoT Greengrass can only be run in insecure mode, using the -i flag.
• The ggc_user and ggc_group user and group must be present on the device.
• The following Linux kernel configurations must be enabled on the device:
18

AWS IoT Greengrass Developer Guide
AWS IoT Greengrass Downloads
• Namespace: CONFIG_IPC_NS, CONFIG_UTS_NS, CONFIG_USER_NS, CONFIG_PID_NS
• CGroups: CONFIG_CGROUP_DEVICE, CONFIG_CGROUPS, CONFIG_MEMCG
• Others: CONFIG_POSIX_MQUEUE, CONFIG_OVERLAY_FS,
CONFIG_HAVE_ARCH_SECCOMP_FILTER, CONFIG_SECCOMP_FILTER, CONFIG_KEYS,
CONFIG_SECCOMP
• The sqlite3 package is required for AWS IoT device shadows. Make sure it’s added to your
PATH environment variable.
•/dev/stdin, /dev/stdout, and /dev/stderr must be enabled.
• The Linux kernel must support cgroups.
• The memory cgroup must be enabled and mounted to allow AWS IoT Greengrass to set the
memory limit for Lambda functions.
• The root certificate for Amazon S3 and AWS IoT must be present in the system trust store.
• The following items might be optional:
•Python version 2.7 is required if Python Lambda functions are used. If so, make sure that it's
added to your PATH environment variable.
AWS IoT Greengrass Downloads
You can use the following information to locate and download software for use with AWS IoT
Greengrass.
AWS IoT Greengrass Core Software
AWS IoT Greengrass Software extends AWS functionality onto a AWS IoT Greengrass core device,
enabling local Devices to act locally on the data they generate.
v1.7.0
•Architecture: AArch64, OS: Linux.
•Architecture: ARMv7l, OS: Linux.
•Architecture: x86_64; OS: Linux.
v1.6.0
•Architecture: AArch64; OS: Linux.
•Architecture: ARMv7l; OS: Linux.
•Architecture: x86_64; OS: Linux.
•Architecture: x86_64; OS: Ubuntu.
AWS IoT Greengrass Core SDK Software
The AWS IoT Greengrass Core SDK (p. 147) enables Lambda functions to interact with the AWS IoT
Greengrass core on which they run.
v1.3.0
•Java 8.
•Node JS 6.10.
19

AWS IoT Greengrass Developer Guide
AWS IoT Greengrass Docker Software
•Python 2.7.
v1.2.0
•Java 8.
•Node JS 6.10.
•Python 2.7.
AWS IoT Greengrass Docker Software
The AWS IoT Greengrass Docker Software download enables you to run AWS IoT Greengrass in a Docker
container. Instructions are provided in the Docker file.
v1.7.0
•Docker v1.7.0.
AWS IoT Greengrass ML SDK Software
The AWS IoT Greengrass Machine Learning SDK (p. 148) enables the Lambda functions you author to
consume the machine learning model available on the device.
v1.0.0
•Python 2.7.
We Want to Hear from You
We welcome your feedback. To contact us, visit the AWS IoT Greengrass Forum.
Configure the AWS IoT Greengrass Core
An AWS IoT Greengrass core is an AWS IoT thing (device). Like other AWS IoT devices, a core exists in the
registry, has a device shadow, and uses a device certificate to authenticate with AWS IoT. The core device
runs the AWS IoT Greengrass core software, which enables it to manage local processes for Greengrass
groups, such as communication, shadow sync, and token exchange.
The AWS IoT Greengrass core software provides the following functionality:
• Deployment and local execution of connectors and Lambda functions.
• Secure, encrypted storage of local secrets and controlled access by connectors and Lambda functions.
• MQTT messaging over the local network between devices, connectors, and Lambda functions using
managed subscriptions.
• MQTT messaging between AWS IoT and devices, connectors, and Lambda functions using managed
subscriptions.
• Secure connections between devices and the cloud using device authentication and authorization.
• Local shadow synchronization of devices. Shadows can be configured to sync with the cloud.
• Controlled access to local device and volume resources.
• Deployment of cloud-trained machine learning models for running local inference.
20

AWS IoT Greengrass Developer Guide
AWS IoT Greengrass Core Configuration File
• Automatic IP address detection that enables devices to discover the Greengrass core device.
• Central deployment of new or updated group configuration. After the configuration data is
downloaded, the core device is restarted automatically.
• Secure, over-the-air software updates of user-defined Lambda functions.
AWS IoT Greengrass Core Configuration File
The configuration file for the AWS IoT Greengrass core software is the config.json file, which is
located in the /greengrass-root/config directory.
Note
greengrass-root represents the path where the AWS IoT Greengrass core software is
installed on your device. If you installed the software by following the Getting Started (p. 44)
tutorial, then this is the /greengrass directory.
If you use the Easy group creation option from the AWS IoT Greengrass console, then the
config.json file is deployed to the core device in a working state.
You can review the contents of this file by running the following command:
cat /greengrass-root/config/config.json
The following is an example config.json file.
GGC v1.7.0
This is the config.json file that's generated when the Greengrass group and core are created with
the Easy group creation option in the AWS IoT Greengrass console.
{
"coreThing" : {
"caPath" : "root.ca.pem",
"certPath" : "hash.cert.pem",
"keyPath" : "hash.private.key",
"thingArn" : "arn:aws:iot:region:account-id:thing/core-thing-name",
"iotHost" : "host-prefix-ats.iot.region.amazonaws.com",
"ggHost" : "greengrass-ats.iot.region.amazonaws.com",
"keepAlive" : 600
},
"runtime" : {
"cgroup" : {
"useSystemd" : "yes"
}
},
"managedRespawn" : false,
"crypto" : {
"principals" : {
"SecretsManager" : {
"privateKeyPath" : "file:///greengrass/certs/hash.private.key"
},
"IoTCertificate" : {
"privateKeyPath" : "file:///greengrass/certs/hash.private.key",
"certificatePath" : "file:///greengrass/certs/hash.cert.pem"
}
},
"caPath" : "file:///greengrass/certs/root.ca.pem"
}
}
The config.json file supports the following properties:
21

AWS IoT Greengrass Developer Guide
AWS IoT Greengrass Core Configuration File
coreThing
Field Description Notes
caPath The path to the AWS IoT
root CA relative to the
/greengrass-root/certs
directory.
For backward compatibility
with versions prior to 1.7.0.
This property is ignored when
the crypto is present.
Note
Make sure that your
endpoints correspond
to your certificate
type (p. 32).
certPath The path to the core device
certificate relative to the
/greengrass-root/certs
directory.
For backward compatibility
with versions prior to 1.7.0.
This property is ignored when
the crypto is present.
keyPath The path to the core private
key relative to /greengrass-
root/certs directory.
For backward compatibility
with versions prior to 1.7.0.
This property is ignored when
the crypto is present.
thingArn The Amazon Resource Name
(ARN) of the AWS IoT thing
that represents the AWS IoT
Greengrass core device.
Find this for your core in the
AWS IoT Greengrass console
under Cores, or by running
the aws greengrass list-
core-definitions CLI
command.
iotHost Your AWS IoT endpoint. Find this in the AWS IoT Core
console under Settings, or
by running the aws iot
describe-endpoint --
endpoint-type iot:Data-
ATS CLI command.
This assumes that you're using
an Amazon Trust Services
(ATS) endpoint. For more
information, see the Server
Authentication in AWS IoT Core
documentation.
Note
Make sure that your
endpoints correspond
to your certificate
type (p. 32).
ggHost Your AWS IoT Greengrass
endpoint.
This is your iotHost
endpoint with the host prefix
replaced by greengrass (for
example, greengrass-
ats.iot.region.amazonaws.com).
Use the same region as
iotHost.
22

AWS IoT Greengrass Developer Guide
AWS IoT Greengrass Core Configuration File
Field Description Notes
Note
Make sure that your
endpoints correspond
to your certificate
type (p. 32).
iotMqttPort Optional. The port number to
use for MQTT communication
with AWS IoT.
Valid values are 8883 or 443.
The default value is 8883. For
more information, Connect on
Port 443 or Through a Network
Proxy (p. 32).
keepAlive Optional. The MQTT
KeepAlive period, in seconds.
The default value is 600.
networkProxy Optional. An object that
defines a proxy server to
connect to.
This can be an HTTP or
HTTPS proxy. For more
information, Connect on Port
443 or Through a Network
Proxy (p. 32).
runtime
Field Description Notes
cgroup
useSystemd Indicates whether your device
uses systemd.
Valid values are
yes or no. Run the
check_ggc_dependencies
script in Module 1 (p. 45)
to see if your device uses
systemd.
crypto
The crypto object is added in v1.7.0. It introduces properties that support private key storage on a
hardware security module (HSM) through PKCS#11 and local secret storage. For more information,
see the section called “Hardware Security” (p. 376) and Deploy Secrets to the Core (p. 243).
Configurations for private key storage on HSMs or in the file system are supported.
Field Description Notes
caPath The absolute path to the AWS
IoT root CA.
Must be a file URI of the form:
file:///absolute/path/
to/file.
Note
Make sure that your
endpoints correspond
to your certificate
type (p. 32).
PKCS11
23

AWS IoT Greengrass Developer Guide
AWS IoT Greengrass Core Configuration File
Field Description Notes
OpenSSLEngine Optional. The absolute path to
the OpenSSL engine .so file
to enable PKCS#11 support on
OpenSSL. This is used by the
Greengrass OTA update agent.
Must be a path to a file on the
file system.
P11Provider The absolute path to the
PKCS#11 implementation's
libdl-loadable library.
Must be a path to a file on the
file system.
slotLabel The slot label that's used to
identify the hardware module.
Must conform to PKCS#11
label specifications.
slotUserPin The user pin that's used to
authenticate the Greengrass
core to the module.
Must have sufficient
permissions to perform C_Sign
with the configured private
keys.
principals
IoTCertificate The certificate and private key that the core uses to make
requests to AWS IoT.
IoTCertificate
.privateKeyPath
The path to the core private
key.
For file system storage, must
be a file URI of the form:
file:///absolute/path/
to/file.
For HSM storage, must be an
RFC 7512 PKCS#11 path that
specifies the object label.
IoTCertificate
.certificatePath
The absolute path to the core
device certificate.
Must be a file URI of the form:
file:///absolute/path/
to/file.
MQTTServerCertificate Optional. The private key that the core uses in combination with
the certificate to act as an MQTT server or gateway.
24

AWS IoT Greengrass Developer Guide
AWS IoT Greengrass Core Configuration File
Field Description Notes
MQTTServerCertificate
.privateKeyPath
The path to the local MQTT
server private key.
Use this value to specify your
own private key for the local
MQTT server.
For file system storage, must
be a file URI of the form:
file:///absolute/path/
to/file.
For HSM storage, must be an
RFC 7512 PKCS#11 path that
specifies the object label.
If this property is omitted, AWS
IoT Greengrass rotates the key
based your rotation settings.
If specified, the customer is
responsible for rotating the
key.
SecretsManager The private key that secures the data key used for encryption.
For more information, see Deploy Secrets to the Core (p. 243).
SecretsManager
.privateKeyPath
The path to the local secrets
manager private key.
For file system storage, must
be a file URI of the form:
file:///absolute/path/
to/file.
For HSM storage, must be an
RFC 7512 PKCS#11 path that
specifies the object label. The
private key must be generated
using the PKCS#1 v1.5 padding
mechanism.
The following configuration properties are also supported:
Field Description Notes
mqttMaxConnectionRetryIntervalOptional. The maximum
interval (in seconds) between
MQTT connection retries if the
connection is dropped.
Specify this value as an
unsigned integer. The default is
60.
managedRespawn Optional. Indicates that the
OTA agent needs to run
custom code before an update.
Valid values are true or
false. For more information,
see OTA Updates of AWS
IoT Greengrass Core
Software (p. 129).
writeDirectory Optional. The write directory
where AWS IoT Greengrass
creates all read-write
resources.
For more information, see
Configure a Write Directory for
AWS IoT Greengrass (p. 35).
25
AWS IoT Greengrass Developer Guide
AWS IoT Greengrass Core Configuration File
GGC v1.6.0
{
"coreThing": {
"caPath": "root-ca-pem",
"certPath": "cloud-pem-crt",
"keyPath": "cloud-pem-key",
"thingArn": "arn:aws:iot:region:account-id:thing/core-thing-name",
"iotHost": "host-prefix.iot.region.amazonaws.com",
"ggHost": "greengrass.iot.region.amazonaws.com",
"keepAlive": 600,
"mqttMaxConnectionRetryInterval": 60
},
"runtime": {
"cgroup": {
"useSystemd": "yes|no"
}
},
"managedRespawn": true,
"writeDirectory": "/write-directory"
}
Note
If you use the Easy group creation option from the AWS IoT Greengrass console, then
the config.json file is deployed to the core device in a working state that specifies the
default configuration.
The config.json file supports the following properties:
Field Description Notes
caPath The path to the AWS IoT
root CA relative to the
/greengrass-root/certs
directory.
Save the file under
/greengrass-root/certs.
certPath The path to the AWS IoT
Greengrass core certificate
relative to the /greengrass-
root/certs directory.
Save the file under
/greengrass-root/certs.
keyPath The path to the AWS IoT
Greengrass core private key
relative to /greengrass-
root/certs directory.
Save the file under
/greengrass-root/certs.
thingArn The Amazon Resource Name
(ARN) of the AWS IoT thing
that represents the AWS IoT
Greengrass core device.
You can find this for your core
in the AWS IoT Greengrass
console under Cores, or by
running the aws greengrass
list-core-definitions CLI
command.
iotHost Your AWS IoT endpoint. Find this in the AWS IoT Core
console under Settings, or
by running the aws iot
describe-endpoint CLI
command.
26

AWS IoT Greengrass Developer Guide
AWS IoT Greengrass Core Configuration File
Field Description Notes
ggHost Your AWS IoT Greengrass
endpoint.
This value uses the format
greengrass.iot.region.amazonaws.com.
Use the same region as
iotHost.
keepAlive The MQTT KeepAlive period,
in seconds.
This is an optional value. The
default is 600.
mqttMaxConnectionRetryIntervalThe maximum interval (in
seconds) between MQTT
connection retries if the
connection is dropped.
Specify this value as an
unsigned integer. This is an
optional value. The default is
60.
useSystemd Indicates whether your device
uses systemd.
Valid values are
yes or no. Run the
check_ggc_dependencies
script in Module 1 (p. 45)
to see if your device uses
systemd.
managedRespawn An optional over-the-air (OTA)
updates feature, this indicates
that the OTA agent needs to
run custom code before an
update.
Valid values are true or
false. For more information,
see OTA Updates of AWS
IoT Greengrass Core
Software (p. 129).
writeDirectory The write directory where AWS
IoT Greengrass creates all read-
write resources.
This is an optional value.
For more information, see
Configure a Write Directory for
AWS IoT Greengrass (p. 35).
GGC v1.5.0
{
"coreThing": {
"caPath": "root-ca-pem",
"certPath": "cloud-pem-crt",
"keyPath": "cloud-pem-key",
"thingArn": "arn:aws:iot:region:account-id:thing/core-thing-name",
"iotHost": "host-prefix.iot.region.amazonaws.com",
"ggHost": "greengrass.iot.region.amazonaws.com",
"keepAlive": 600
},
"runtime": {
"cgroup": {
"useSystemd": "yes|no"
}
},
"managedRespawn": true
}
The config.json file exists in /greengrass-root/config and contains the following
parameters:
27

AWS IoT Greengrass Developer Guide
AWS IoT Greengrass Core Configuration File
Field Description Notes
caPath The path to the AWS IoT
root CA relative to the
/greengrass-root/certs
folder.
Save the file under the
/greengrass-root/certs
folder.
certPath The path to the AWS IoT
Greengrass core certificate
relative to the /greengrass-
root/certs folder.
Save the file under the
/greengrass-root/certs
folder.
keyPath The path to the AWS IoT
Greengrass core private key
relative to /greengrass-
root/certs folder.
Save the file under the
/greengrass-root/certs
folder.
thingArn The Amazon Resource Name
(ARN) of the AWS IoT thing
that represents the AWS IoT
Greengrass core.
Find this for your core in
the AWS IoT Greengrass
console under Cores, or by
running the aws greengrass
list-core-definitions
command.
iotHost Your AWS IoT endpoint. Find this in the AWS IoT Core
console under Settings, or
by running the aws iot
describe-endpoint
command.
ggHost Your AWS IoT Greengrass
endpoint.
This value uses the format
greengrass.iot.region.amazonaws.com.
Use the same region as
iotHost.
keepAlive The MQTT KeepAlive period,
in seconds.
This is an optional value. The
default value is 600 seconds.
useSystemd Indicates whether your device
uses systemd.
Values are yes or no. Use the
dependency script in Module
1 (p. 45) to see if your
device uses systemd.
managedRespawn An optional over-the-air (OTA)
updates feature, this indicates
that the OTA agent needs to
run custom code before an
update.
For more information,
see OTA Updates of AWS
IoT Greengrass Core
Software (p. 129).
GGC v1.3.0
{
"coreThing": {
"caPath": "root-ca-pem",
"certPath": "cloud-pem-crt",
"keyPath": "cloud-pem-key",
"thingArn": "arn:aws:iot:region:account-id:thing/core-thing-name",
"iotHost": "host-prefix.iot.region.amazonaws.com",
28
AWS IoT Greengrass Developer Guide
AWS IoT Greengrass Core Configuration File
"ggHost": "greengrass.iot.region.amazonaws.com",
"keepAlive": 600
},
"runtime": {
"cgroup": {
"useSystemd": "yes|no"
}
},
"managedRespawn": true
}
The config.json file exists in /greengrass-root/config and contains the following
parameters:
Field Description Notes
caPath The path to the AWS IoT
root CA relative to the
/greengrass-root/certs
folder.
Save the file under the
/greengrass-root/certs
folder.
certPath The path to the AWS IoT
Greengrass core certificate
relative to the /greengrass-
root/certs folder.
Save the file under the
/greengrass-root/certs
folder.
keyPath The path to the AWS IoT
Greengrass core private key
relative to /greengrass-
root/certs folder.
Save the file under the
/greengrass-root/certs
folder.
thingArn The Amazon Resource Name
(ARN) of the AWS IoT thing
that represents the AWS IoT
Greengrass core.
You can find this value in the
AWS IoT Greengrass console
under the definition for your
AWS IoT thing.
iotHost Your AWS IoT endpoint. You can find this value in the
AWS IoT Core console under
Settings.
ggHost Your AWS IoT Greengrass
endpoint.
You can find this value in the
AWS IoT Core console under
Settings with greengrass.
prepended.
keepAlive The MQTT KeepAlive period,
in seconds.
This is an optional value. The
default value is 600 seconds.
useSystemd A binary flag, if your device
uses systemd.
Values are yes or no. Use the
dependency script in Module
1 (p. 45) to see if your
device uses systemd.
managedRespawn An optional over-the-air (OTA)
updates feature, this indicates
that the OTA agent needs to
run custom code before an
update.
For more information,
see OTA Updates of AWS
IoT Greengrass Core
Software (p. 129).
29

AWS IoT Greengrass Developer Guide
AWS IoT Greengrass Core Configuration File
GGC v1.1.0
{
"coreThing": {
"caPath": "root-ca-pem",
"certPath": "cloud-pem-crt",
"keyPath": "cloud-pem-key",
"thingArn": "arn:aws:iot:region:account-id:thing/core-thing-name",
"iotHost": "host-prefix.iot.region.amazonaws.com",
"ggHost": "greengrass.iot.region.amazonaws.com",
"keepAlive": 600
},
"runtime": {
"cgroup": {
"useSystemd": "yes|no"
}
}
}
The config.json file exists in /greengrass-root/config and contains the following
parameters:
Field Description Notes
caPath The path to the AWS IoT
root CA relative to the
/greengrass-root/certs
folder.
Save the file under the
/greengrass-root/certs
folder.
certPath The path to the AWS IoT
Greengrass core certificate
relative to the /greengrass-
root/certs folder.
Save the file under the
/greengrass-root/certs
folder.
keyPath The path to the AWS IoT
Greengrass core private key
relative to the /greengrass-
root/certs folder.
Save the file under the
/greengrass-root/certs
folder.
thingArn The Amazon Resource Name
(ARN) of the AWS IoT thing
that represents the AWS IoT
Greengrass core.
You can find this value in the
AWS IoT Greengrass console
under the definition for your
AWS IoT thing.
iotHost Your AWS IoT endpoint. You can find this value in the
AWS IoT Core console under
Settings.
ggHost Your AWS IoT Greengrass
endpoint.
You can find this value in the
AWS IoT Core console under
Settings with greengrass.
prepended.
keepAlive The MQTT KeepAlive period,
in seconds.
This is an optional value. The
default value is 600 seconds.
useSystemd A binary flag, if your device
uses systemd.
Values are yes or no. Use the
dependency script in Module
1 (p. 45) to see if your
device uses systemd.
30
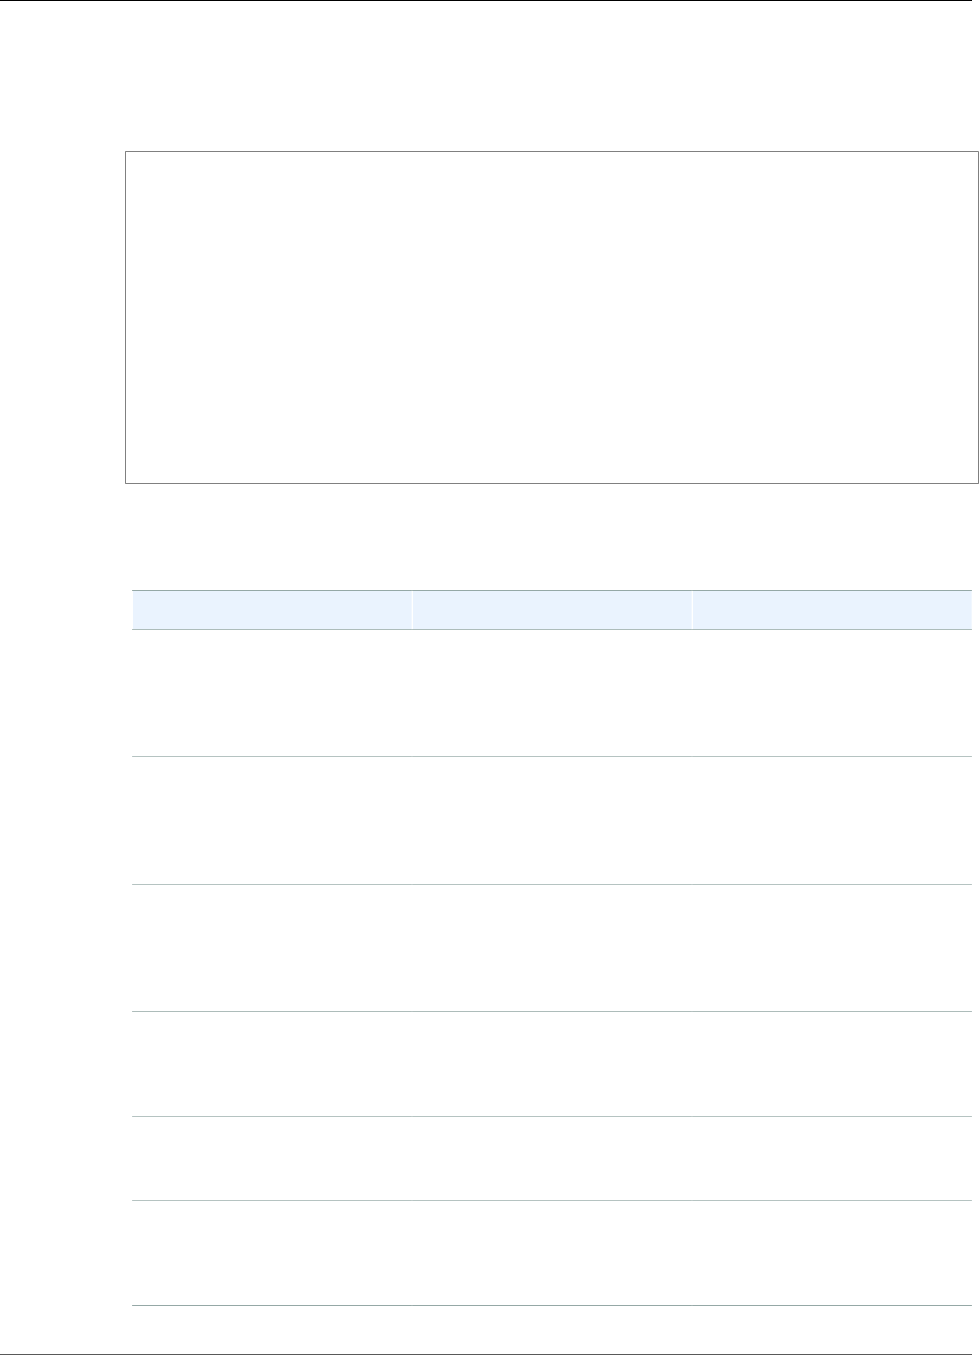
AWS IoT Greengrass Developer Guide
AWS IoT Greengrass Core Configuration File
GGC v1.0.0
In AWS IoT Greengrass Core v1.0.0, config.json is deployed to greengrass-root/
configuration.
{
"coreThing": {
"caPath": "root-ca-pem",
"certPath": "cloud-pem-crt",
"keyPath": "cloud-pem-key",
"thingArn": "arn:aws:iot:region:account-id:thing/core-thing-name",
"iotHost": "host-prefix.iot.region.amazonaws.com",
"ggHost": "greengrass.iot.region.amazonaws.com",
"keepAlive": 600
},
"runtime": {
"cgroup": {
"useSystemd": "yes|no"
}
}
}
The config.json file exists in /greengrass-root/configuration and contains the following
parameters:
Field Description Notes
caPath The path to the AWS IoT
root CA relative to the
/greengrass-root/
configuration/certs
folder.
Save the file under the
/greengrass-root/
configuration/certs
folder.
certPath The path to the AWS IoT
Greengrass core certificate
relative to the /greengrass-
root/configuration/
certs folder.
Save the file under the
/greengrass-root/
configuration/certs
folder.
keyPath The path to the AWS IoT
Greengrass core private key
relative to the /greengrass-
root/configuration/
certs folder.
Save the file under the
/greengrass-root/
configuration/certs
folder.
thingArn The Amazon Resource Name
(ARN) of the AWS IoT thing
that represents the AWS IoT
Greengrass core.
You can find this value in the
AWS IoT Greengrass console
under the definition for your
AWS IoT hing.
iotHost Your AWS IoT endpoint. You can find this value in the
AWS IoT Core console under
Settings.
ggHost Your AWS IoT Greengrass
endpoint.
You can find this value in the
AWS IoT Core console under
Settings with greengrass.
prepended.
31

AWS IoT Greengrass Developer Guide
Endpoints Must Match the Certificate Type
Field Description Notes
keepAlive The MQTT KeepAlive period,
in seconds.
This is an optional value. The
default value is 600 seconds.
useSystemd A binary flag if your device
uses systemd.
Values are yes or no. Use the
dependency script in Module
1 (p. 45) to see if your
device uses systemd.
Endpoints Must Match the Certificate Type
Your AWS IoT and AWS IoT Greengrass endpoints must correspond to the certificate type of your
root CA. For example, if you're using an Amazon Trust Services (ATS) certificate (preferred), the
coreThing.iotHost and coreThing.ggHost properties must include the ats segment (for example,
abcde1234uwxyz-ats.iot.us-west-2.amazonaws.com).
If you're using a legacy endpoint, either create an ATS endpoint and download an appropriate certificate
(preferred) or make sure that your endpoints correspond to your certificate. For more information, see
the Server Authentication in AWS IoT Core documentation.
You can find your AWS IoT endpoint in the AWS IoT Core console under Settings, or by running the aws
iot describe-endpoint CLI command with the appropriate --endpoint-type parameter. For
example:
• To return an ATS signed data endpoint, run aws iot describe-endpoint --endpoint-type
iot:Data-ATS.
• To return a VeriSign signed data endpoint (legacy), run aws iot describe-endpoint --
endpoint-type iot:Data.
Your AWS IoT Greengrass endpoint is your iotHost endpoint with the host prefix replaced by greengrass
(for example, greengrass-ats.iot.region.amazonaws.com). This uses the same region as
iotHost.
If your endpoints and certificate do not match, authentication attempts between AWS IoT and AWS IoT
Greengrass fail.
Connect on Port 443 or Through a Network Proxy
This feature is available for AWS IoT Greengrass Core v1.7.0 only.
AWS IoT Greengrass communicates with AWS IoT using the MQTT messaging protocol with TLS client
authentication. By convention, MQTT over TLS uses port 8883. However, as a security measure, restrictive
environments might limit inbound and outbound traffic to a small range of TCP ports. For example, a
corporate firewall might open port 443 for HTTPS traffic, but close other ports that are used for less
common protocols, such as port 8883 for MQTT traffic. Other restrictive environments might require all
traffic to go through an HTTP proxy before connecting to the internet.
To enable communication in these scenarios, AWS IoT Greengrass allows the following configurations:
•MQTT with TLS client authentication on port 443. If your network allows connections to port 443,
you can configure the core to use port 443 for MQTT traffic instead of the default port 8883. This can
be a direct connection to port 443 or a connection through a network proxy server.
32

AWS IoT Greengrass Developer Guide
Connect on Port 443 or Through a Network Proxy
AWS IoT Greengrass uses the Application Layer Protocol Network (ALPN) TLS extension to enable this
connection. As with the default configuration, MQTT over TLS on port 443 uses certificate-based client
authentication.
•Connection through a network proxy. You can configure a network proxy server to act as an
intermediary for connecting to the AWS IoT Greengrass core. Only basic authentication and HTTP and
HTTPS proxies are supported.
The proxy configuration is passed to user-defined Lambda functions through the http_proxy,
https_proxy, and no_proxy environment variables. If a function specifies these variables, AWS IoT
Greengrass doesn't override them.
To Configure MQTT on Port 443
This procedure allows the core to use port 443 for MQTT messaging. When using this configuration, AWS
IoT Greengrass specifies the x-amzn-mqtt-ca header in the TLS handshake, which is expected by AWS
IoT. For more information, see Protocols in the AWS IoT Developer Guide.
1. Run the following command to stop the AWS IoT Greengrass daemon:
cd /greengrass-root/ggc/core/
sudo ./greengrassd stop
2. Open greengrass-root/config/config.json for editing as the su user.
3. In the coreThing object, add the iotMqttPort property and set the value to 443, as shown in the
following example.
{
"coreThing" : {
"caPath" : "root.ca.pem",
"certPath" : "12345abcde.cert.pem",
"keyPath" : "12345abcde.private.key",
"thingArn" : "arn:aws:iot:us-west-2:123456789012:thing/core-thing-name",
"iotHost" : "abcd123456wxyz-ats.iot.us-west-2.amazonaws.com",
"iotMqttPort" : 443,
"ggHost" : "greengrass-ats.iot.us-west-2.amazonaws.com",
"keepAlive" : 600
},
...
}
4. Start the daemon.
cd /greengrass-root/ggc/core/
sudo ./greengrassd start
To Configure a Network Proxy
This procedure allows AWS IoT Greengrass to connect to the internet through an HTTP or HTTPS
network proxy.
1. Run the following command to stop the AWS IoT Greengrass daemon:
cd /greengrass-root/ggc/core/
sudo ./greengrassd stop
33
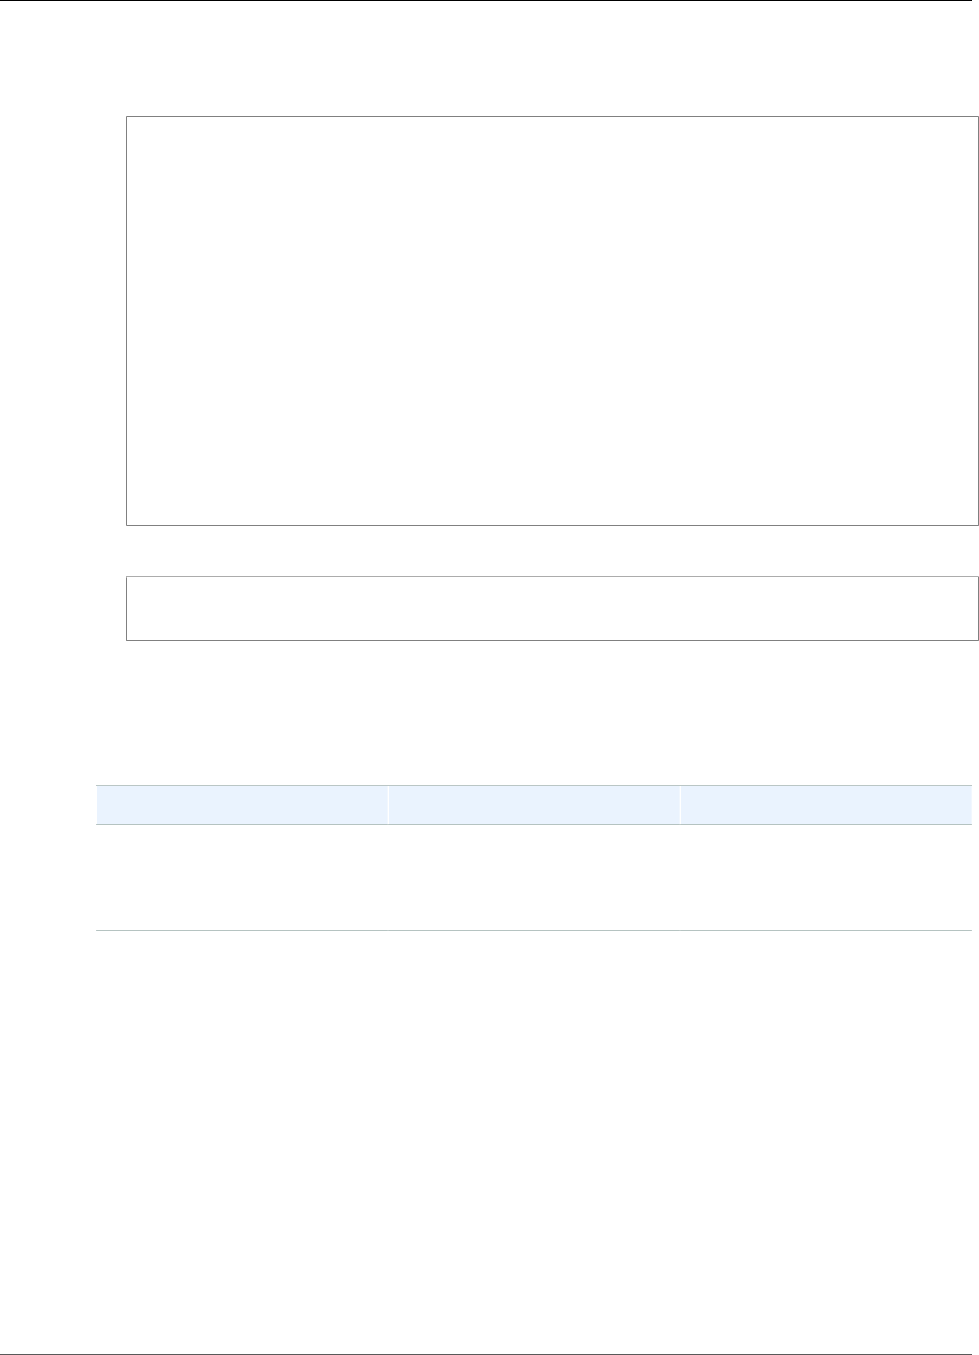
AWS IoT Greengrass Developer Guide
Connect on Port 443 or Through a Network Proxy
2. Open greengrass-root/config/config.json for editing as the su user.
3. In the coreThing object, add the networkProxy object, as shown in the following example.
{
"coreThing" : {
"caPath" : "root.ca.pem",
"certPath" : "12345abcde.cert.pem",
"keyPath" : "12345abcde.private.key",
"thingArn" : "arn:aws:iot:us-west-2:123456789012:thing/core-thing-name",
"iotHost" : "abcd123456wxyz-ats.iot.us-west-2.amazonaws.com",
"ggHost" : "greengrass-ats.iot.us-west-2.amazonaws.com",
"keepAlive" : 600,
"networkProxy": {
"noProxyAddresses" : "http://128.12.34.56,www.mywebsite.com",
"proxy" : {
"url" : "https://my-proxy-server:1100",
"username" : "Mary_Major",
"password" : "pass@word1357"
}
}
},
...
}
4. Start the daemon.
cd /greengrass-root/ggc/core/
sudo ./greengrassd start
Use the networkProxy object to specify information about the network proxy. This object has the
following properties.
networkProxy object
Field Description
noProxyAddresses Optional. A comma-separated
list of IP addresses or host
names that are exempt from the
proxy.
proxy The proxy to connect to. A proxy
has the following properties.
•url. The URL of the
proxy server, in the
format scheme://
userinfo@host:port.
•scheme. The scheme. Must
be http or https.
•userinfo. Optional. The
user name and password
information. If specified, the
username and password
fields are ignored.
•host. The host name or IP
address of the proxy server.
34

AWS IoT Greengrass Developer Guide
Write Directory
Field Description
•port. Optional. The port
number. If not specified, the
following default values are
used:
•http: 80
•https: 443
•username. Optional. The user
name to use to authenticate
to the proxy server.
•password. Optional.
The password to use to
authenticate to the proxy
server.
Configure a Write Directory for AWS IoT Greengrass
This feature is available for AWS IoT Greengrass Core v1.6.0 and later.
By default, the AWS IoT Greengrass core software is deployed under a single root directory where AWS
IoT Greengrass performs all read and write operations. However, you can configure AWS IoT Greengrass
to use a separate directory for all write operations, including creating directories and files. In this case,
AWS IoT Greengrass uses two top-level directories:
• The greengrass-root directory, which you can leave as read-write or optionally make read-only.
This contains the AWS IoT Greengrass core software and other critical components that should remain
immutable during runtime, such as certificates and config.json.
• The specified write directory. This contains writable content, such as logs, state information, and
deployed user-defined Lambda functions.
This configuration results in the following directory structure.
Greengrass root directory
greengrass-root/
|-- certs/
| |-- root.ca.pem
| |-- hash.cert.pem
| |-- hash.private.key
| |-- hash.public.key
|-- config/
| |-- config.json
|-- ggc/
| |-- packages/
| |-- package-version/
| |-- bin/
| |-- daemon
| |-- greengrassd
| |-- lambda/
| |-- LICENSE/
| |-- release_notes_package-version.html
| |-- runtime/
| |-- java8/
| |-- nodejs6.10/
| |-- python2.7/
35

AWS IoT Greengrass Developer Guide
Write Directory
| |-- core/
Write Directory
write-directory/
|-- packages/
| |-- package-version/
| |-- ggc_root/
| |-- rootfs_nosys/
| |-- rootfs_sys/
| |-- var/
|-- deployment/
| |-- group/
| |-- group.json
| |-- lambda/
| |-- mlmodel/
|-- var/
| |-- log/
| |-- state/
To Configure a Write Directory
1. Run the following command to stop the AWS IoT Greengrass daemon:
cd /greengrass-root/ggc/core/
sudo ./greengrassd stop
2. Open greengrass-root/config/config.json for editing as the su user.
3. Add writeDirectory as a parameter and specify the path to the target directory, as shown in the
following example.
{
"coreThing": {
"caPath": "root-CA.pem",
"certPath": "hash.pem.crt",
...
},
...
"writeDirectory" : "/write-directory"
}
Note
You can update the writeDirectory setting as often as you want. After the setting is
updated, AWS IoT Greengrass uses the newly specified write directory at the next start, but
doesn't migrate content from the previous write directory.
4. Now that your write directory is configured, you can optionally make the greengrass-
root directory read-only. For instructions, see To Make the Greengrass Root Directory Read-
Only (p. 37).
Otherwise, start the AWS IoT Greengrass daemon:
cd /greengrass-root/ggc/core/
sudo ./greengrassd start
36
AWS IoT Greengrass Developer Guide
MQTT Message Queue
To Make the Greengrass Root Directory Read-Only
1. Grant required access to the AWS IoT Greengrass:
Note
This step is required only if you want to make the Greengrass root directory read-only. The
write directory must be configured before you begin this procedure.
a. Give read and write permissions to the config.json owner.
sudo chmod 0600 /greengrass-root/config/config.json
b. Make ggc_user the owner of the certs and system Lambda directories.
sudo chown -R ggc_user:ggc_group /greengrass-root/certs/
sudo chown -R ggc_user:ggc_group /greengrass-root/ggc/packages/1.7.0/lambda/
2. Make the greengrass-root directory read-only by using your preferred mechanism.
Note
One way to make the greengrass-root directory read-only is to mount the directory
as read-only. However, to apply over-the-air (OTA) updates to core software in a
mounted directory, the directory must first be unmounted, and then remounted after the
update. You can add these umount and mount operations to the ota_pre_update and
ota_post_update scripts. For more information about OTA updates, see the section called
“Greengrass OTA Agent” (p. 130) and the section called “AWS IoT Greengrass Core Update
with Managed Respawn” (p. 133).
3. Start the daemon.
cd /greengrass-root/ggc/core/
sudo ./greengrassd start
If the permissions from step 1 aren't set correctly, then the daemon won't start.
MQTT Message Queue
MQTT messages that are destined for cloud targets are queued to await processing. Queued messages
are processed in first in first out (FIFO) order. After a message is processed and published to the cloud,
the message is removed from the queue. AWS IoT Greengrass manages the queue by using a system-
defined GGCloudSpooler Lambda function.
Configure the MQTT Message Queue
This feature is available for AWS IoT Greengrass Core v1.6.0 and later.
You can configure AWS IoT Greengrass to store unprocessed messages in memory or in a local storage
cache. Unlike in-memory storage, the local storage cache has the ability to persist across core restarts
(for example, after a group deployment or a device reboot), so AWS IoT Greengrass can continue to
process the messages. You can also configure the storage size.
Note
Versions 1.5.0 and earlier use in-memory storage with a queue size of 2.5 MB. You cannot
configure storage settings for earlier versions.
The following environment variables for the GGCloudSpooler Lambda function are used to define
storage settings.
•GG_CONFIG_STORAGE_TYPE. The location of the message queue. The following are valid values:
37

AWS IoT Greengrass Developer Guide
MQTT Message Queue
•FileSystem. Store unprocessed messages in the local storage cache. When the core restarts,
queued messages are retained for processing. Messages are removed after they are processed.
•Memory (default). Store unprocessed messages in memory. When the core restarts, queued
messages are lost.
This option is optimized for devices with restricted hardware capabilities. When using this
configuration, we recommend that you deploy groups or restart the device when the service
disruption is the lowest.
•GG_CONFIG_MAX_SIZE_BYTES. The storage size, in bytes. This value can be any non-negative integer
greater than or equal to 262144 (256 KB); a smaller size prevents the AWS IoT Greengrass core
software from starting. The default size is 2.5 MB. When the size limit is reached, the oldest queued
messages are replaced by new messages.
To Cache Messages in Local Storage
To configure AWS IoT Greengrass to cache messages to the file system so they persist across core
restarts, you create a function definition version where the GGCloudSpooler function specifies the
FileSystem storage type. You must use the AWS IoT Greengrass API to configure the local storage
cache. You can't do this in the console.
The following procedure uses the create-function-definition-version CLI command to
configure the spooler to save queued messages to the file system. It also configures a 2.6 MB queue size.
Note
This procedure assumes that you're updating the configuration of the latest group version of an
existing group.
1. Get the IDs of the target Greengrass group and group version.
aws greengrass list-groups
Note
The list-groups command only returns 50 groups at a time. If you have more than 50
groups, specify the max-results option with the desired number of results (such as 100) to
find your group:
aws greengrass list-groups --max-results 100
2. Copy the Id and LatestVersion properties of your target group from the output.
3. Get the latest group version.
• Replace group-id with the Id that you copied.
• Replace latest-group-version-id with the LatestVersion that you copied.
aws greengrass get-group-version \
--group-id group-id \
--group-version-id latest-group-version-id
4. From the Definition object in the output, copy the CoreDefinitionVersionArn and the ARNs
of all other group components except FunctionDefinitionVersionArn. You use these values
when you create a new group version.
5. From the FunctionDefinitionVersionArn in the output, copy the ID of the function definition.
The ID is the GUID that follows the functions segment in the ARN.
38

AWS IoT Greengrass Developer Guide
MQTT Message Queue
Note
You can optionally create a function definition by running the create-function-
definition command, and then copy the ID from the output.
6. Add a function definition version to the function definition.
• Replace function-definition-id with the Id that you copied for the function definition.
• Replace arbitrary-function-id with a name for the function, such as spooler-function.
• Add any Lambda functions that you want to include in this version to the functions array. You
can use the get-function-definition-version command to get the Greengrass Lambda
functions from an existing function definition version.
Warning
Make sure that you specify a value for GG_CONFIG_MAX_SIZE_BYTES that's greater than
or equal to 262144. A smaller size prevents the AWS IoT Greengrass core software from
starting.
aws greengrass create-function-definition-version \
--function-definition-id function-definition-id \
--functions '[{"FunctionArn":
"arn:aws:lambda:::function:GGCloudSpooler:1","FunctionConfiguration": {"Environment":
{"Variables":
{"GG_CONFIG_MAX_SIZE_BYTES":"2621440","GG_CONFIG_STORAGE_TYPE":"FileSystem"}},"Executable":
"spooler","MemorySize": 32768,"Pinned": true,"Timeout": 3},"Id": "arbitrary-function-
id"}]'
7. Copy the Arn of the function definition version from the output.
8. Create a group version that contains the system-defined Lambda function.
• Replace group-id with the Id for the group.
• Replace core-definition-version-arn with the CoreDefinitionVersionArn that you
copied from the latest group version.
• Replace function-definition-version-arn with the Arn that you copied for the new
function definition version.
• Replace the ARNs for other group components (for example,
SubscriptionDefinitionVersionArn or DeviceDefinitionVersionArn) that you copied
from the latest group version.
• Remove any unused parameters. For example, remove the --resource-definition-version-
arn if your group version doesn't contain any resources.
aws greengrass create-group-version \
--group-id group-id \
--core-definition-version-arn core-definition-version-arn \
--function-definition-version-arn function-definition-version-arn \
--device-definition-version-arn device-definition-version-arn \
--logger-definition-version-arn logger-definition-version-arn \
--resource-definition-version-arn resource-definition-version-arn \
--subscription-definition-version-arn subscription-definition-version-arn
9. Copy the Version from the output. This is the ID of the new group version.
10. Deploy the group.
• Replace group-id with the Id that you copied for the group.
• Replace group-version-id with the Version that you copied for the new group version.
39
AWS IoT Greengrass Developer Guide
Activate Automatic IP Detection
aws greengrass create-deployment \
--group-id group-id \
--group-version-id group-version-id \
--deployment-type NewDeployment
To update the storage settings, you use the AWS IoT Greengrass API to create a new function definition
version that contains the GGCloudSpooler function with the updated configuration. Then add the
function definition version to a new group version (along with your other group components) and deploy
the group version. If you want to restore the default configuration, you can create a function definition
version that doesn't include the GGCloudSpooler function.
This system-defined Lambda function isn't visible in the console. However, after the function is added to
the latest group version, it's included in deployments that you make from the console (unless you use the
API to replace or remove it).
Activate Automatic IP Detection
You can configure AWS IoT Greengrass to enable automatic discovery of your AWS IoT Greengrass core
using the IPDetector system lambda function. This feature can also be enabled by choosing Automatic
detection when deploying your group from the console for the first time, or from the group settings
page in the console at any time.
The following procedure uses the create-function-definition-version CLI command to
configure automatic discovery of the Greengrass core.
Note
This procedure assumes that you're updating the configuration of the latest group version of an
existing group.
1. Get the IDs of the target Greengrass group and group version.
aws greengrass list-groups
Note
The list-groups command only returns 50 groups at a time. If you have more than 50
groups, specify the max-results option with the desired number of results (such as 100) to
find your group:
aws greengrass list-groups --max-results 100
2. Copy the Id and LatestVersion properties of your target group from the output.
3. Get the latest group version.
• Replace group-id with the Id that you copied.
• Replace latest-group-version-id with the LatestVersion that you copied.
aws greengrass get-group-version \
--group-id group-id \
--group-version-id latest-group-version-id
4. From the Definition object in the output, copy the CoreDefinitionVersionArn and the ARNs
of all other group components except FunctionDefinitionVersionArn. You use these values
when you create a new group version.
40

AWS IoT Greengrass Developer Guide
Activate Automatic IP Detection
5. From the FunctionDefinitionVersionArn in the output, copy the ID of the function definition
and the function definition version:
arn:aws:greengrass:region:account-id:/greengrass/groups/function-definition-id/
versions/function-definition-version-id
Note
You can optionally create a function definition by running the create-function-
definition command, and then copy the ID from the output.
6. Use the get-function-definition-version command to get the current definition state.
Use the function-definition-id you copied for the function definiton. For example,
4d941bc7-92a1-4f45-8d64-EXAMPLEf76c3.
aws greengrass get-function-definition-version
--function-definition-id function-definition-id
--function-definition-version-id function-definition-version-id
Make a note of the listed function configurations. You will need to include these when creating a
new function definition version in order to prevent loss of your current definition settings.
7. Add a function definition version to the function definition.
• Replace function-definition-id with the Id that you copied for the function definition. For
example, 4d941bc7-92a1-4f45-8d64-EXAMPLEf76c3.
• Replace arbitrary-function-id with a name for the function, such as auto-detection-
function.
• Add all Lambda functions that you want to include in this version to the functions array, such as
any listed in the previous step.
aws greengrass create-function-definition-version \
--function-definition-id function-definition-id \
--functions
'[{"FunctionArn":"arn:aws:lambda:::function:GGIPDetector:1","Id":"arbitrary-function-
id","FunctionConfiguration":{"Pinned":true,"MemorySize":32768,"Timeout":3}}]'\
--region us-west-2
8. Copy the Arn of the function definition version from the output.
9. Create a group version that contains the system-defined Lambda function.
• Replace group-id with the Id for the group.
• Replace core-definition-version-arn with the CoreDefinitionVersionArn that you
copied from the latest group version.
• Replace function-definition-version-arn with the Arn that you copied for the new
function definition version.
• Replace the ARNs for other group components (for example,
SubscriptionDefinitionVersionArn or DeviceDefinitionVersionArn) that you copied
from the latest group version.
• Remove any unused parameters. For example, remove the --resource-definition-version-
arn if your group version doesn't contain any resources.
aws greengrass create-group-version \
41

AWS IoT Greengrass Developer Guide
Start Greengrass on System Boot
--group-id group-id \
--core-definition-version-arn core-definition-version-arn \
--function-definition-version-arn function-definition-version-arn \
--device-definition-version-arn device-definition-version-arn \
--logger-definition-version-arn logger-definition-version-arn \
--resource-definition-version-arn resource-definition-version-arn \
--subscription-definition-version-arn subscription-definition-version-arn
10. Copy the Version from the output. This is the ID of the new group version.
11. Deploy the group.
• Replace group-id with the Id that you copied for the group.
• Replace group-version-id with the Version that you copied for the new group version.
aws greengrass create-deployment \
--group-id group-id \
--group-version-id group-version-id \
--deployment-type NewDeployment
If you want to manually input the IP address of your AWS IoT Greengrass core, you can complete this
tutorial with a different function definition that does not include the IPDetector function. This will
prevent the detection function from locating and automatically inputting your AWS IoT Greengrass core
IP address.
This system-defined Lambda function isn't visible in the Lambda console. After the function is added to
the latest group version, it's included in deployments that you make from the console (unless you use the
API to replace or remove it).
Configure the Init System to Start the Greengrass
Daemon
It's a good practice to set up your init system to start the Greengrass daemon during boot, especially
when managing large fleets of devices.
There are different types of init system, such as initd, systemd, and SystemV, and they use similar
configuration parameters. The following example is a service file for systemd. The Type parameter is
set to forking because greengrassd (which is used to start Greengrass) forks the Greengrass daemon
process, and the Restart parameter is set to on-failure to direct systemd to restart Greengrass if
Greengrass enters a failed state.
Note
To see if your device uses systemd, run the check_ggc_dependencies script as described
in Module 1 (p. 45). Then to use systemd, make sure that the useSystemd parameter in
config.json (p. 21) is set to yes.
[Unit]
Description=Greengrass Daemon
[Service]
Type=forking
PIDFile=/var/run/greengrassd.pid
Restart=on-failure
ExecStart=/greengrass/ggc/core/greengrassd start
ExecReload=/greengrass/ggc/core/greengrassd restart
ExecStop=/greengrass/ggc/core/greengrassd stop
[Install]
42


AWS IoT Greengrass Developer Guide
Requirements
Getting Started with AWS IoT
Greengrass
This tutorial includes six modules, each designed to show you AWS IoT Greengrass basics and help you
get started in as few steps as possible. This tutorial covers:
• The AWS IoT Greengrass programming model.
• Fundamental concepts, such as AWS IoT Greengrass cores, groups, and subscriptions.
• The deployment process for running AWS Lambda functions at the edge.
Requirements
To complete this tutorial, you need the following:
• A Mac, Windows PC, or UNIX-like system.
• An Amazon Web Services (AWS) account. If you don’t have one, see the section called “Create an AWS
Account” (p. 45).
• The use of an AWS Region that supports AWS IoT Greengrass. For the list of supported regions for
AWS IoT Greengrass, see AWS Regions and Endpoints in the AWS General Reference.
Important
Make a note of your AWS Region to ensure that it is consistently used throughout this tutorial.
Inadvertently switching regions during the tutorial can create problems. The last exercise in
this tutorial assumes you are using the US East (N. Virgina) Region.
• A Raspberry Pi 3 Model B with a 8 GB microSD card, or an Amazon EC2 instance. Because AWS IoT
Greengrass is intended to be used with physical hardware, we recommend that you use a Raspberry Pi.
The architecture of your Pi must be armv7l or later.
Note
Run the following command to get the model of your Rasberry Pi:
cat /proc/cpuinfo
Near the bottom of the listing, make a note of the value of the Revision attribute and then
consult the Which Pi have I got? table. For example, if the value of Revision is a02082, the
table shows the Pi is a 3 Model B.
Run the following command to determine the architecture of your Raspberry Pi:
uname -m
The result must be greater than or equal to armv71.
• Basic familiarity with Python 2.7.
Although this tutorial focuses on running AWS IoT Greengrass on a Raspberry Pi or an Amazon
EC2 instance, other platforms are supported. For more information, see Supported Platforms and
Requirements (p. 14).
44

AWS IoT Greengrass Developer Guide
Create an AWS Account
Create an AWS Account
If you don't have an AWS account, follow these steps:
1. Open the AWS home page, and choose Create an AWS Account.
Note
If you've signed in to AWS recently, you might see Sign In to the Console instead.
2. Follow the online instructions. Part of the sign-up procedure involves receiving a phone call and
entering a PIN using your phone keypad.
Important
Before you begin, make sure that your account has administrative privileges.
Module 1: Environment Setup for Greengrass
This module shows you how to get an out-of-the-box Raspberry Pi, Amazon EC2 instance, or other device
ready to be used by AWS IoT Greengrass.
Important
Use the Filter View drop-down list in the upper-right corner of this webpage to choose your
platform.
This module should take less than 30 minutes to complete.
Setting Up a Raspberry Pi
If you are setting up a Raspberry Pi for the first time, you must follow all of these steps. Otherwise, you
can skip to step 9. However, we recommend that you re-image your Raspberry Pi with the operating
system as recommended in step 2.
1. Download and install an SD card formatter such as SD Memory Card Formatter or PiBakery. Insert
the SD card into your computer. Start the program and choose the drive where you have inserted
your SD card. You can perform a quick format of the SD card.
2. Download the Raspbian Stretch operating system as a .zip file.
3. Using an SD card-writing tool (such as Etcher), follow the tool's instructions to flash the downloaded
zip file onto the SD card. Because the operating system image is large, this step might take some
time. Eject your SD card from your computer, and insert the microSD card into your Raspberry Pi.
4. For the first boot, we recommend that you connect the Raspberry Pi to a monitor (through HDMI),
a keyboard, and a mouse. Next, connect your Pi to a micro USB power source and the Raspbian
operating system should start up.
5. You might want to configure the Pi's keyboard layout before you continue. To do so, choose the
Raspberry icon in the upper-right, choose Preferences and then choose Mouse and Keyboard
Settings. Next, on the Keyboard tab, choose Keyboard Layout, and then choose an appropriate
keyboard variant.
6. Next, connect your Raspberry Pi to the internet through a Wi-Fi network or an Ethernet cable.
Note
Connect your Raspberry Pi to the same network that your computer is connected to, and be
sure that both your computer and Raspberry Pi have internet access before you continue. If
you're in a work environment or behind a firewall, you might need to connect your Pi and
your computer to the guest network to get both devices on the same network. However,
this approach might disconnect your computer from local network resources, such as your
45
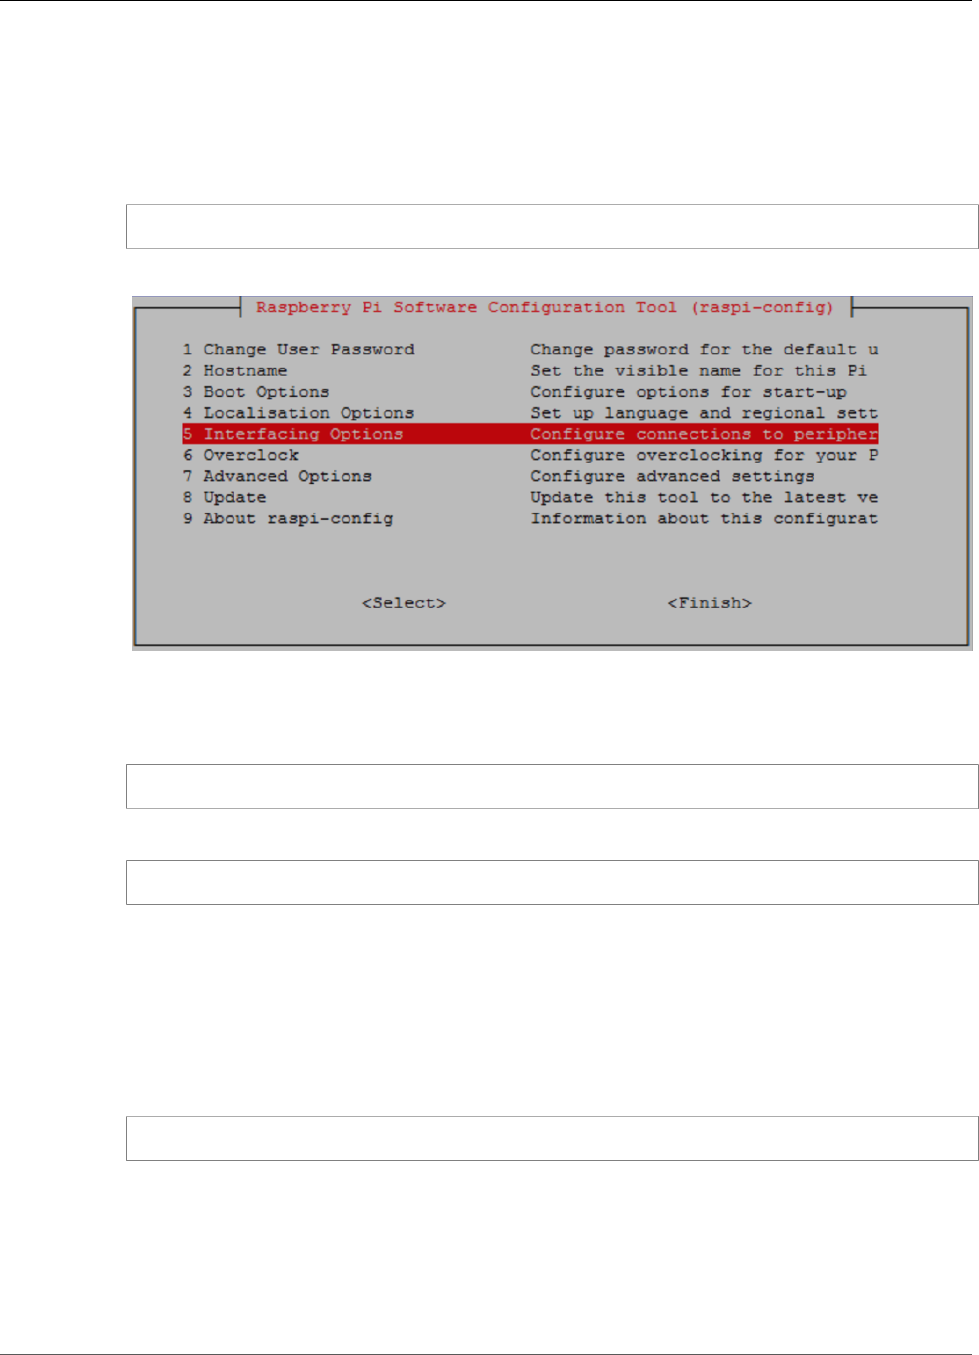
AWS IoT Greengrass Developer Guide
Setting Up a Raspberry Pi
intranet. One solution is to connect the Pi to the guest Wi-Fi network and to connect your
computer to the guest Wi-Fi network and your local network through an Ethernet cable. In
this configuration, your computer should be able to connect to the Raspberry Pi through
the guest Wi-Fi network and your local network resources through the Ethernet cable.
7. You must set up SSH on your Pi to remotely connect to it. On your Raspberry Pi, open a terminal
window and run the following command:
sudo raspi-config
You should see the following:
Scroll down and choose Interfacing Options and then choose P2 SSH. When prompted, choose Yes.
(Use the Tab key followed by Enter). SSH should now be enabled. Choose OK. Use the Tab key to
choose Finish and then press Enter. Lastly, reboot your Pi by running the following command:
sudo reboot
8. On your Raspberry Pi, run the following command in the terminal:
hostname -I
This returns the IP address of your Raspberry Pi.
Note
For the following, if you receive an ECDSA key fingerprint message (Are you sure you
want to continue connecting (yes/no)?), enter yes. The default password for the
Raspberry Pi is raspberry.
If you are using macOS, open a terminal window and enter the following:
ssh pi@IP-address
IP-address is the IP address of your Raspberry Pi that you obtained by using the hostname -I
command.
If you are using Windows, you need to install and configure PuTTY. Expand Connection, choose
Data, and make sure that Prompt is selected:
46
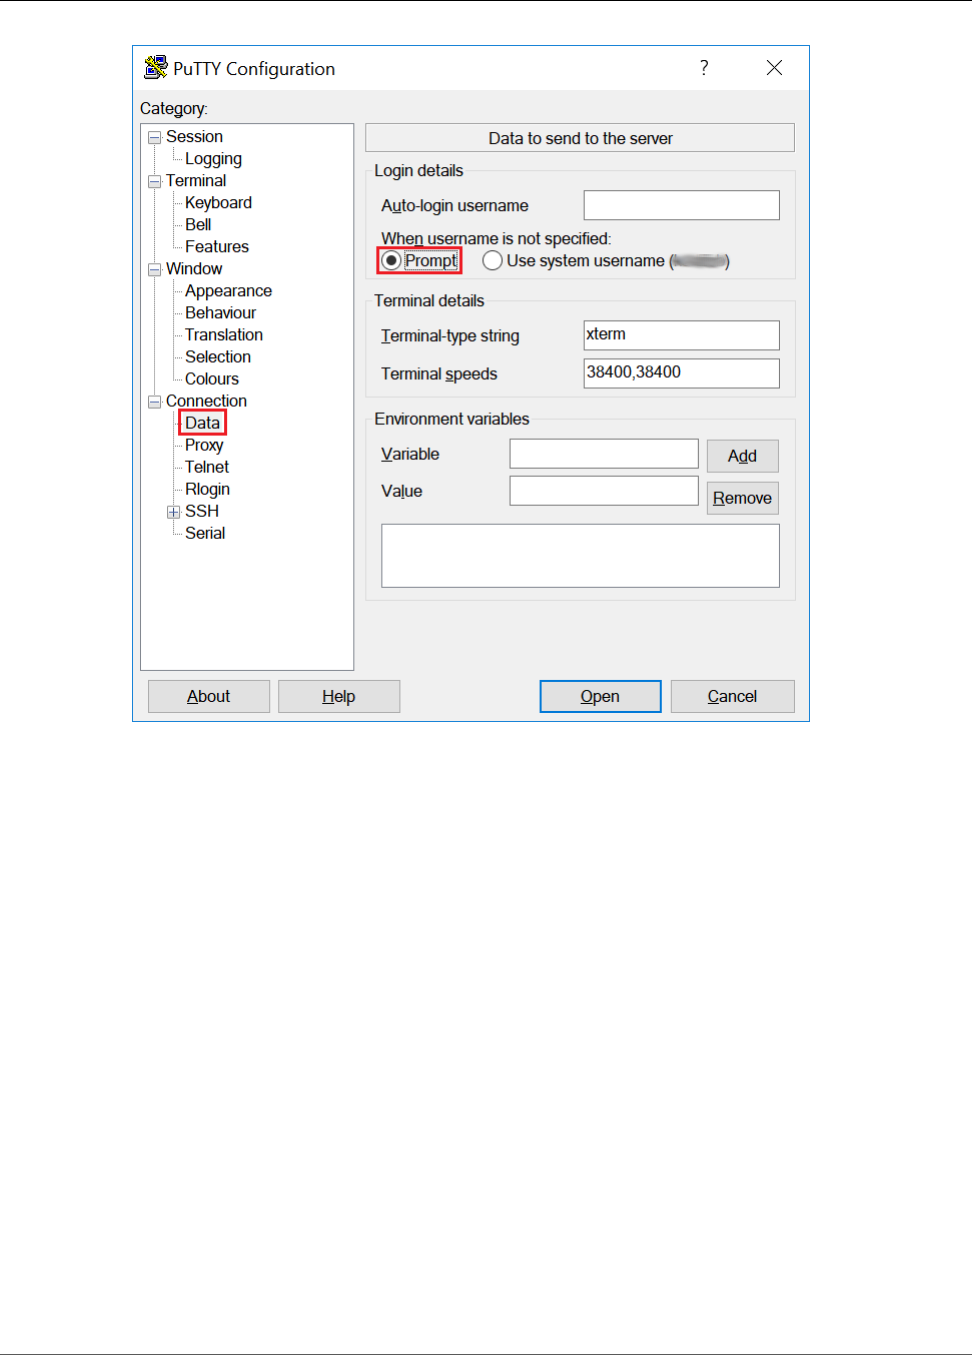
AWS IoT Greengrass Developer Guide
Setting Up a Raspberry Pi
Next, choose Session, enter the IP address of the Raspberry Pi, and then choose Open using default
settings.
47
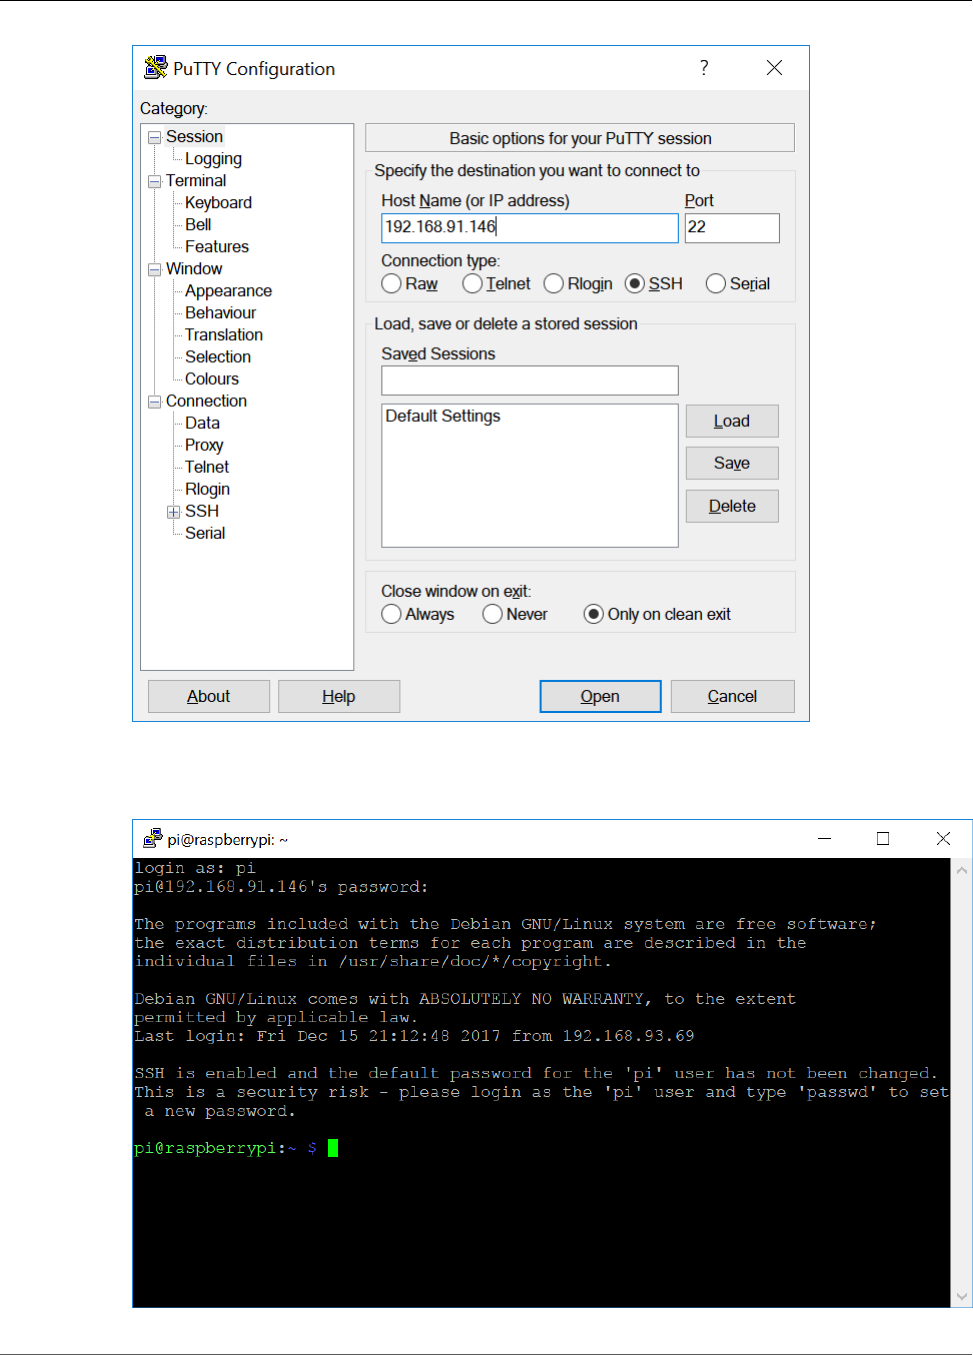
AWS IoT Greengrass Developer Guide
Setting Up a Raspberry Pi
If a PuTTY security alert is displayed, choose Yes.
The default Raspberry Pi login and password are pi and raspberry, respectively.
48
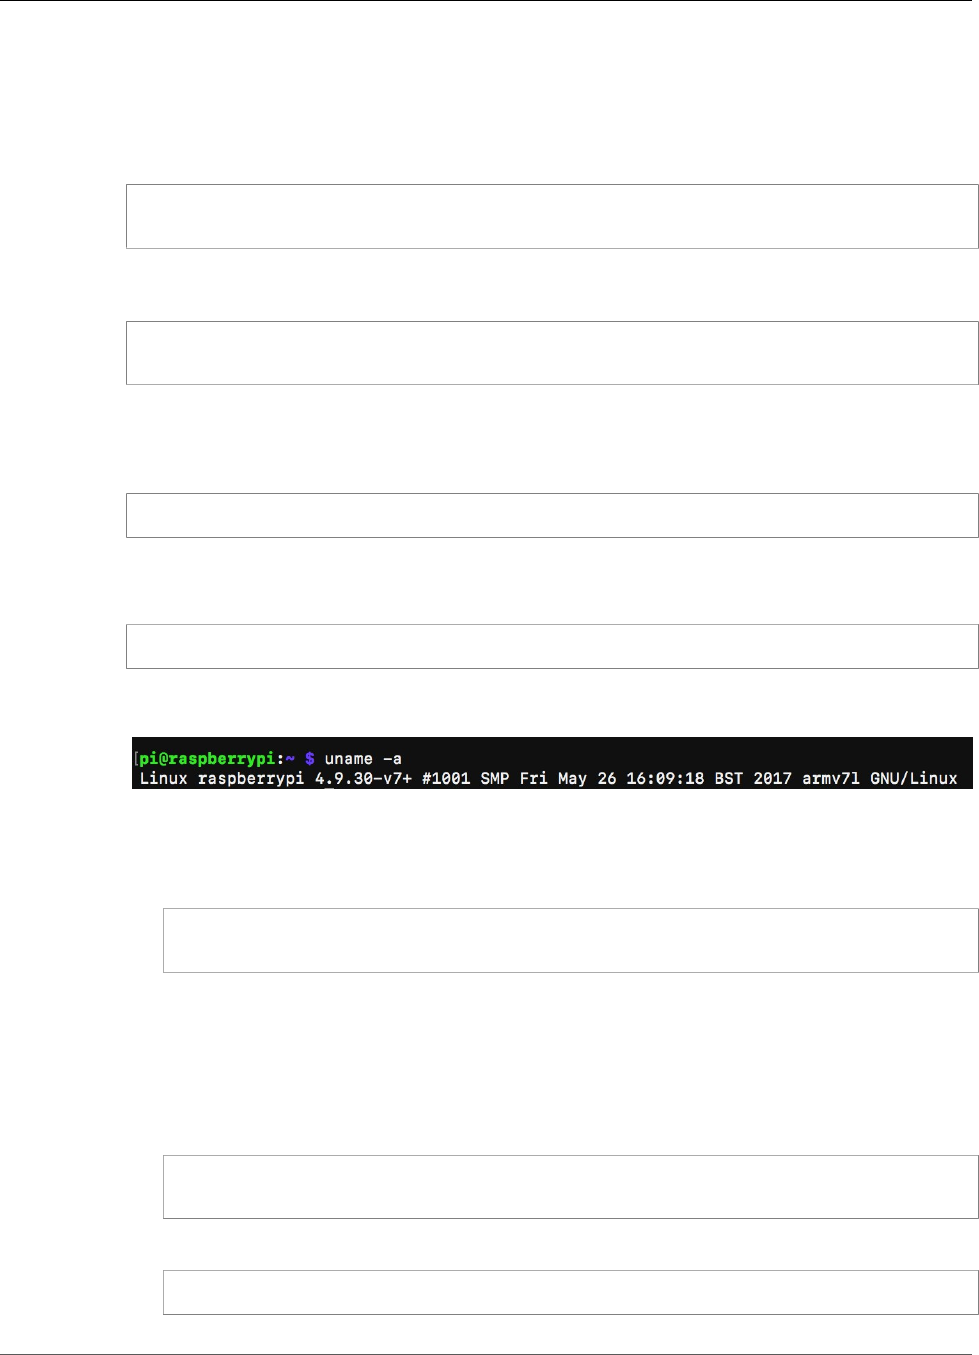
AWS IoT Greengrass Developer Guide
Setting Up a Raspberry Pi
Note
If your computer is connected to a remote network using VPN, you might have difficulty
connecting from the computer to the Raspberry Pi using SSH.
9. You are now ready to set up the Raspberry Pi for AWS IoT Greengrass. First, run the following
commands from a local Raspberry Pi terminal window or an SSH terminal window:
sudo adduser --system ggc_user
sudo addgroup --system ggc_group
10. If you are running Raspbian Jessie, run the following commands to update the Linux kernel version
of your Raspberry Pi.
sudo apt-get install rpi-update
sudo rpi-update b81a11258fc911170b40a0b09bbd63c84bc5ad59
Although several kernel versions might work with AWS IoT Greengrass, for the best security and
performance, we recommend that you use the kernel version indicated in step 2. To activate the new
firmware, reboot your Raspberry Pi:
sudo reboot
After about a minute, reconnect to the Raspberry Pi using SSH. Next, run the following command to
ensure you have the correct kernel version:
uname -a
You should receive output similar to the following. In this example, the Linux Raspberry Pi version
information is 4.9.30:
11. To improve security on the Pi device, enable hardlink and softlink protection on the operating
system at start up.
a. Navigate to the 98-rpi.conf file.
cd /etc/sysctl.d
ls
Note
If you don't see the 98-rpi.conf file, follow the instructions in the README.sysctl
file.
b. Use a text editor (such as Leafpad, GNU nano, or vi) to add the following two lines to the end
of the file. You might need to use the sudo command to edit as root (for example, sudo nano
98-rpi.conf).
fs.protected_hardlinks = 1
fs.protected_symlinks = 1
c. Reboot the Pi.
sudo reboot
49

AWS IoT Greengrass Developer Guide
Setting Up an Amazon EC2 Instance
After about a minute, connect to the Pi using SSH and then run the following command to
confirm the change:
sudo sysctl -a 2> /dev/null | grep fs.protected
You should see fs.protected_hardlinks = 1 and fs.protected_symlinks = 1.
12. Edit your command line boot file to enable and mount memory cgroups. This allows AWS IoT
Greengrass to set the memory limit for Lambda functions. Without this, the Greengrass daemon is
unable to run.
a. Navigate to your boot directory.
cd /boot/
b. Use a text editor to open cmdline.txt. Add the following line to the end of the file.
cgroup_enable=memory cgroup_memory=1
c. Now reboot the Pi.
sudo reboot
Your Raspberry Pi should now be ready for AWS IoT Greengrass.
13. To make sure that you have all required dependencies, download and run the Greengrass
dependency checker from the AWS IoT Greengrass Samples repository on GitHub. These commands
unzip and run the dependency checker script in the Downloads directory.
cd /home/pi/Downloads
wget https://github.com/aws-samples/aws-greengrass-samples/raw/master/greengrass-
dependency-checker-GGCv1.7.0.zip
unzip greengrass-dependency-checker-GGCv1.7.0.zip
cd greengrass-dependency-checker-GGCv1.7.0
sudo modprobe configs
sudo ./check_ggc_dependencies | more
Where more appears, press the Spacebar key to display another screen of text.
Important
This tutorial uses the AWS IoT Device SDK for Python. The check_ggc_dependencies
script might produce warnings about the missing optional Node v6.10 and Java 8
prerequisites. You can ignore these warnings.
For information about the modprobe command, run man modprobe in the terminal.
Your Raspberry Pi configuration is complete. Continue to the section called “Module 2: Installing the
Greengrass Core Software” (p. 55).
Setting Up an Amazon EC2 Instance
1. Sign in to the AWS Management Console and launch an Amazon EC2 instance using an Amazon
Linux AMI. For information about Amazon EC2 instances, see the Amazon EC2 Getting Started Guide.
2. After your Amazon EC2 instance is running, enable port 8883 to allow incoming MQTT
communications so that other devices can connect with the AWS IoT Greengrass core.
50
AWS IoT Greengrass Developer Guide
Setting Up an Amazon EC2 Instance
a. In the navigation pane of the Amazon EC2 console, choose Security Groups.
b. Select the security group for the instance that you just launched, and then choose the Inbound
tab.
51
AWS IoT Greengrass Developer Guide
Setting Up an Amazon EC2 Instance
c. Choose Edit.
To enable port 8883, you add a custom TCP rule to the security group. For more information,
see Adding Rules to a Security Group in the Amazon EC2 User Guide for Linux Instances.
d. On the Edit inbound rules page, choose Add Rule, enter the following settings, and then
choose Save.
• For Type, choose Custom TCP Rule.
• For Port Range, enter 8883.
• For Source, choose Anywhere.
• For Description, enter MQTT Communications.
3. Connect to your Amazon EC2 instance.
a. In the navigation pane, choose Instances, choose your instance, and then choose Connect.
b. Follow the instructions on the Connect To Your Instance page to connect to your instance by
using SSH and your private key file.
52
AWS IoT Greengrass Developer Guide
Setting Up an Amazon EC2 Instance
You can use PuTTY for Windows or Terminal for macOS. For more information, see Connect to Your
Linux Instance in the Amazon EC2 User Guide for Linux Instances.
4. After you are connected to your Amazon EC2 instance, create user ggc_user and group
ggc_group:
sudo adduser --system ggc_user
sudo groupadd --system ggc_group
5. To improve security on the device, enable hardlink and softlink protection on the operating system
at start up.
a. Navigate to the 00-defaults.conf file.
cd /etc/sysctl.d
ls
b. Using your favorite text editor (Leafpad, GNU nano, or vi), add the following two lines to the
end of the 00-defaults.conf file. You might need to change permissions (using the chmod
command) to write to the file, or use the sudo command to edit as root (for example, sudo
nano 00-defaults.conf).
fs.protected_hardlinks = 1
fs.protected_symlinks = 1
c. Reboot the Amazon EC2 instance.
53
AWS IoT Greengrass Developer Guide
Setting Up Other Devices
sudo reboot
After a few minutes, connect to your instance using SSH and then run the following command
to confirm the change.
sudo sysctl -a | grep fs.protected
You should see that hardlinks and softlinks are set to 1.
6. Extract and run the following script to mount Linux control groups (cgroups). This is an AWS IoT
Greengrass dependency.
curl https://raw.githubusercontent.com/tianon/cgroupfs-
mount/951c38ee8d802330454bdede20d85ec1c0f8d312/cgroupfs-mount > cgroupfs-mount.sh
chmod +x cgroupfs-mount.sh
sudo bash ./cgroupfs-mount.sh
Your Amazon EC2 instance should now be ready for AWS IoT Greengrass.
7. To make sure that you have all required dependencies, download and run the Greengrass
dependency checker from the AWS IoT Greengrass Samples repository on GitHub. These commands
unzip and run the dependency checker script in the current directory.
wget https://github.com/aws-samples/aws-greengrass-samples/raw/master/greengrass-
dependency-checker-GGCv1.7.0.zip
unzip greengrass-dependency-checker-GGCv1.7.0.zip
cd greengrass-dependency-checker-GGCv1.7.0
sudo ./check_ggc_dependencies | more
Important
This tutorial uses the AWS IoT Device SDK for Python. The check_ggc_dependencies
script might produce warnings about the missing optional Node v6.10 and Java 8
prerequisites. You can ignore these warnings.
Your Amazon EC2 instance configuration is complete. Continue to the section called “Module 2: Installing
the Greengrass Core Software” (p. 55).
Setting Up Other Devices
If you're new to AWS IoT Greengrass, we recommend that you use a Raspberry Pi or an Amazon EC2
instance as your core device, and follow the setup steps in the corresponding section. To use a different
platform, follow the steps in this section. For information about supported device platforms, see
Greengrass Core Platform Compatibility.
1. If your core device is an NVIDIA Jetson TX2, you must first flash the firmware with the JetPack 3.3
installer. If you're configuring a different device, skip to step 2.
Note
The JetPack installer version that you use is based on your target CUDA Toolkit version.
The following instructions use JetPack 3.3 and CUDA Toolkit 9.0 because the TensorFlow
v1.10.1 and MXNet v1.2.1 binaries (that AWS IoT Greengrass provides for machine
learning inference on a Jetson TX2) are compiled against this version of CUDA. For more
information, see Perform Machine Learning Inference (p. 195).
a. On a physical desktop that is running Ubuntu 16.04 or later, flash the firmware with the JetPack
3.3 installer, as described in Download and Install JetPack (3.3) in the NVIDIA documentation.
54
AWS IoT Greengrass Developer Guide
Module 2: Installing the Greengrass Core Software
Follow the instructions in the installer to install all the packages and dependencies on the
Jetson board, which must be connected to the desktop with a Micro-B cable.
b. Reboot your board in normal mode, and connect a display to the board.
Note
When you use SSH to connect to the Jetson board, use the default user name (nvidia)
and the default password (nvidia).
2. Run the following commands to create user ggc_user and group ggc_group.
sudo adduser --system ggc_user
sudo addgroup --system ggc_group
3. To make sure that you have all required dependencies, download and run the Greengrass
dependency checker from the AWS IoT Greengrass Samples repository on GitHub. These commands
unzip and run the dependency checker script in the current directory.
wget https://github.com/aws-samples/aws-greengrass-samples/raw/master/greengrass-
dependency-checker-GGCv1.7.0.zip
unzip greengrass-dependency-checker-GGCv1.7.0.zip
cd greengrass-dependency-checker-GGCv1.7.0
sudo ./check_ggc_dependencies | more
Note
The check_ggc_dependencies script runs on AWS IoT Greengrass supported platforms
and requires the following Linux system commands: printf, uname, cat, ls, head, find,
zcat, awk, sed, sysctl, wc, cut, sort, expr, grep, test, dirname, readlink, xargs,
strings, uniq.
For more information, see the dependency checker's Readme.
4. Install all required dependencies on your device, as indicated by the dependency checker output. For
missing kernel-level dependencies, you might have to recompile your kernel. For mounting Linux
control groups (cgroups), you can run the cgroupfs-mount script.
If no errors appear in the output, AWS IoT Greengrass should be able to run successfully on your
device.
Important
This tutorial uses the AWS IoT Device SDK for Python. The check_ggc_dependencies
script might produce warnings about the missing optional Node v6.10 and Java 8
prerequisites. You can ignore these warnings.
For the list of AWS IoT Greengrass requirements and dependencies, see Supported Platforms and
Requirements (p. 14).
Module 2: Installing the Greengrass Core Software
This module shows you how to install the AWS IoT Greengrass core software on your device. You can
download the core software from the Software page in the AWS IoT Core console or from the AWS IoT
Greengrass Core Software (p. 19) downloads. This procedure uses the console. It includes steps to create
a group that uses the core.
The AWS IoT Greengrass core software provides the following functionality:
• Deployment and local execution of connectors and Lambda functions.
• Secure, encrypted storage of local secrets and controlled access by connectors and Lambda functions.
55

AWS IoT Greengrass Developer Guide
Configure AWS IoT Greengrass on AWS IoT
• MQTT messaging over the local network between devices, connectors, and Lambda functions using
managed subscriptions.
• MQTT messaging between AWS IoT and devices, connectors, and Lambda functions using managed
subscriptions.
• Secure connections between devices and the cloud using device authentication and authorization.
• Local shadow synchronization of devices. Shadows can be configured to sync with the cloud.
• Controlled access to local device and volume resources.
• Deployment of cloud-trained machine learning models for running local inference.
• Automatic IP address detection that enables devices to discover the Greengrass core device.
• Central deployment of new or updated group configuration. After the configuration data is
downloaded, the core device is restarted automatically.
• Secure, over-the-air software updates of user-defined Lambda functions.
Before you begin, make sure that you have completed Module 1 (p. 45).
This module should take less than 30 minutes to complete.
Configure AWS IoT Greengrass on AWS IoT
1. Sign in to the AWS Management Console on your computer and open the AWS IoT Core console. If
this is the first time opening this console, choose Get started.
2. Choose Greengrass.
56
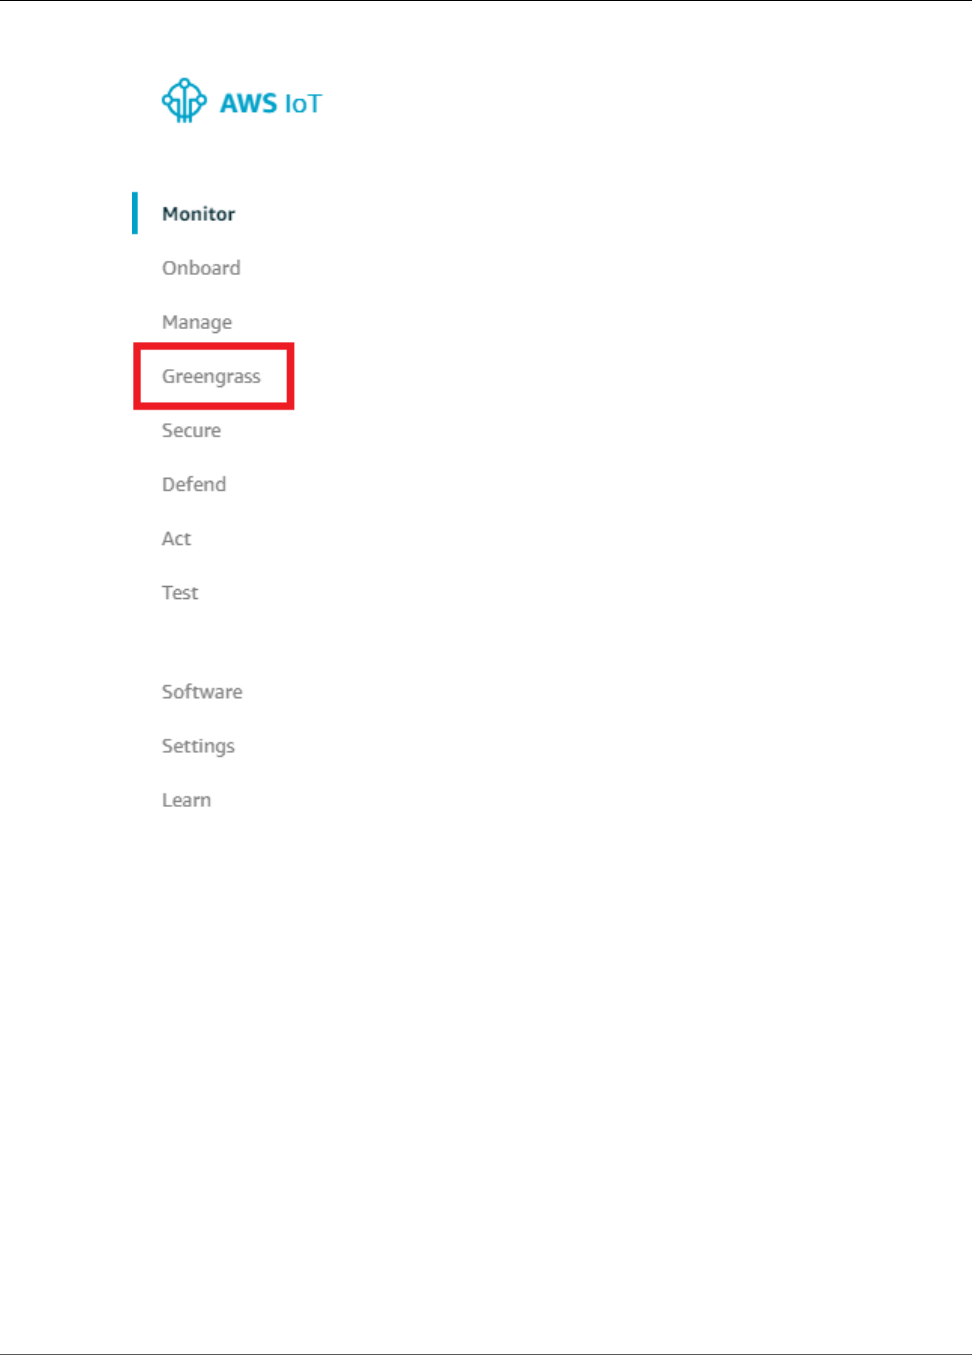
AWS IoT Greengrass Developer Guide
Configure AWS IoT Greengrass on AWS IoT
3. On the Welcome to AWS IoT Greengrass page, choose Create a Group.
An AWS IoT Greengrass group (p. 5) contains settings and other information about its components,
such as devices, Lambda functions, and connectors. A group defines how its components can interact
with each other.
Tip
For an example that uses the AWS IoT Greengrass API to create and deploy a group, see the
gg_group_setup package from GitHub.
4. On the Set up your Greengrass group page, choose Use easy creation.
Each group requires an AWS IoT Greengrass core (p. 20), which manages local processes. A core
needs a certificate that allows it to access AWS IoT and an AWS IoT policy that allows it to perform
AWS IoT and AWS IoT Greengrass actions. This step creates and provisions a core for the new group.
57

AWS IoT Greengrass Developer Guide
Configure AWS IoT Greengrass on AWS IoT
5. Enter a name for your group (for example, MyFirstGroup), and then choose Next.
6. Use the default name for the AWS IoT Greengrass core, and then choose Next.
58
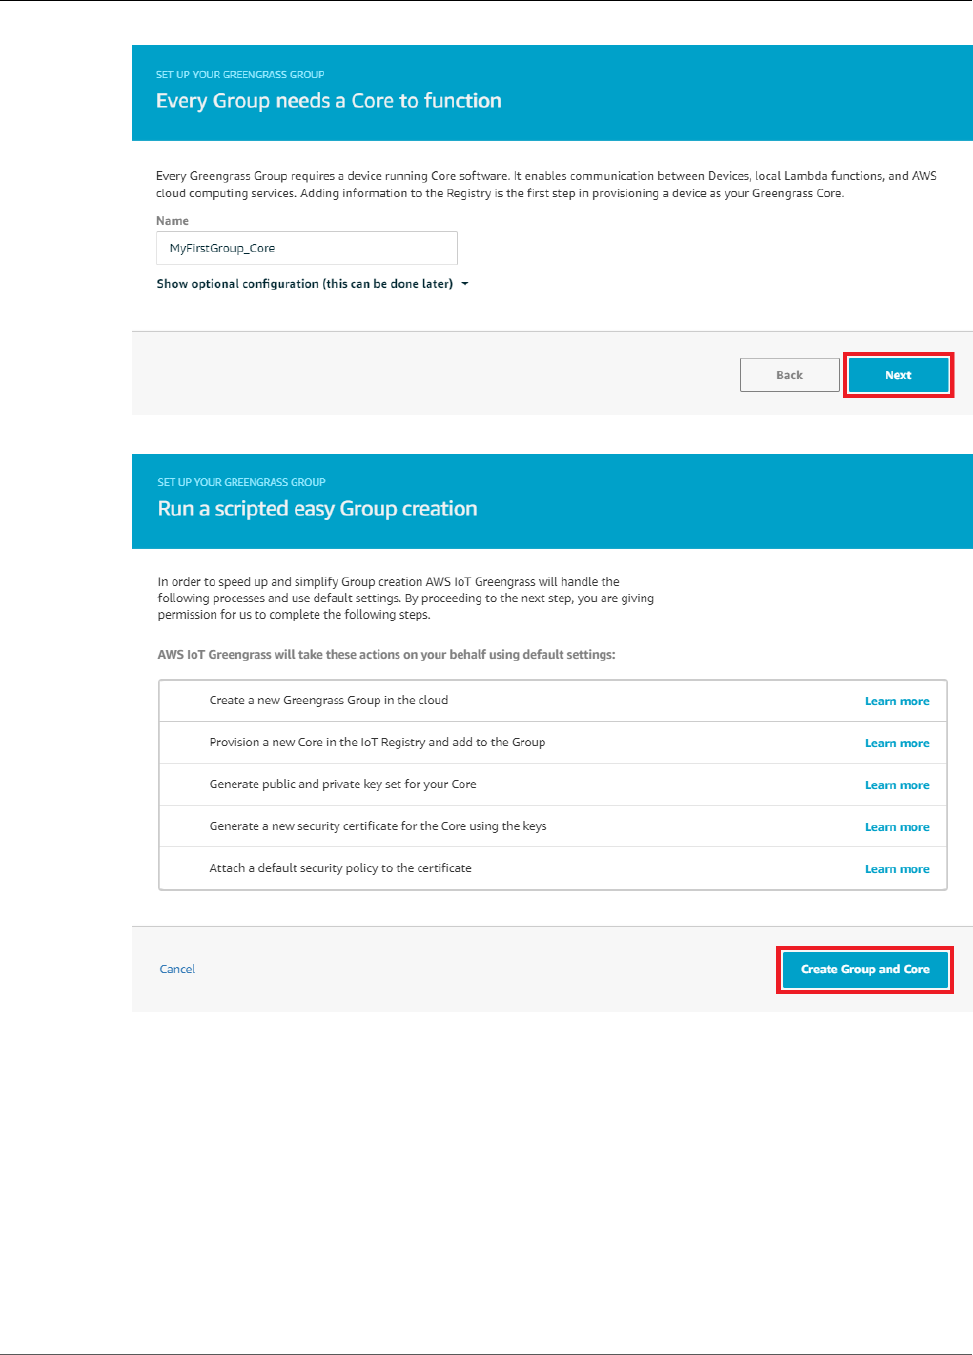
AWS IoT Greengrass Developer Guide
Configure AWS IoT Greengrass on AWS IoT
7. On the Run a scripted easy Group creation page, choose Create Group and Core.
AWS IoT creates an AWS IoT Greengrass group with default security policies and configuration files
for you to load onto your device.
8. On the confirmation page, download your core's security resources and the AWS IoT Greengrass core
software:
Note
You can alternatively download the core software from the AWS IoT Greengrass Core
Software (p. 19) downloads.
a. Under Download and store your Core's security resources, choose Download these resources
as a tar.gz to download the required security resources for your AWS IoT Greengrass core.
59
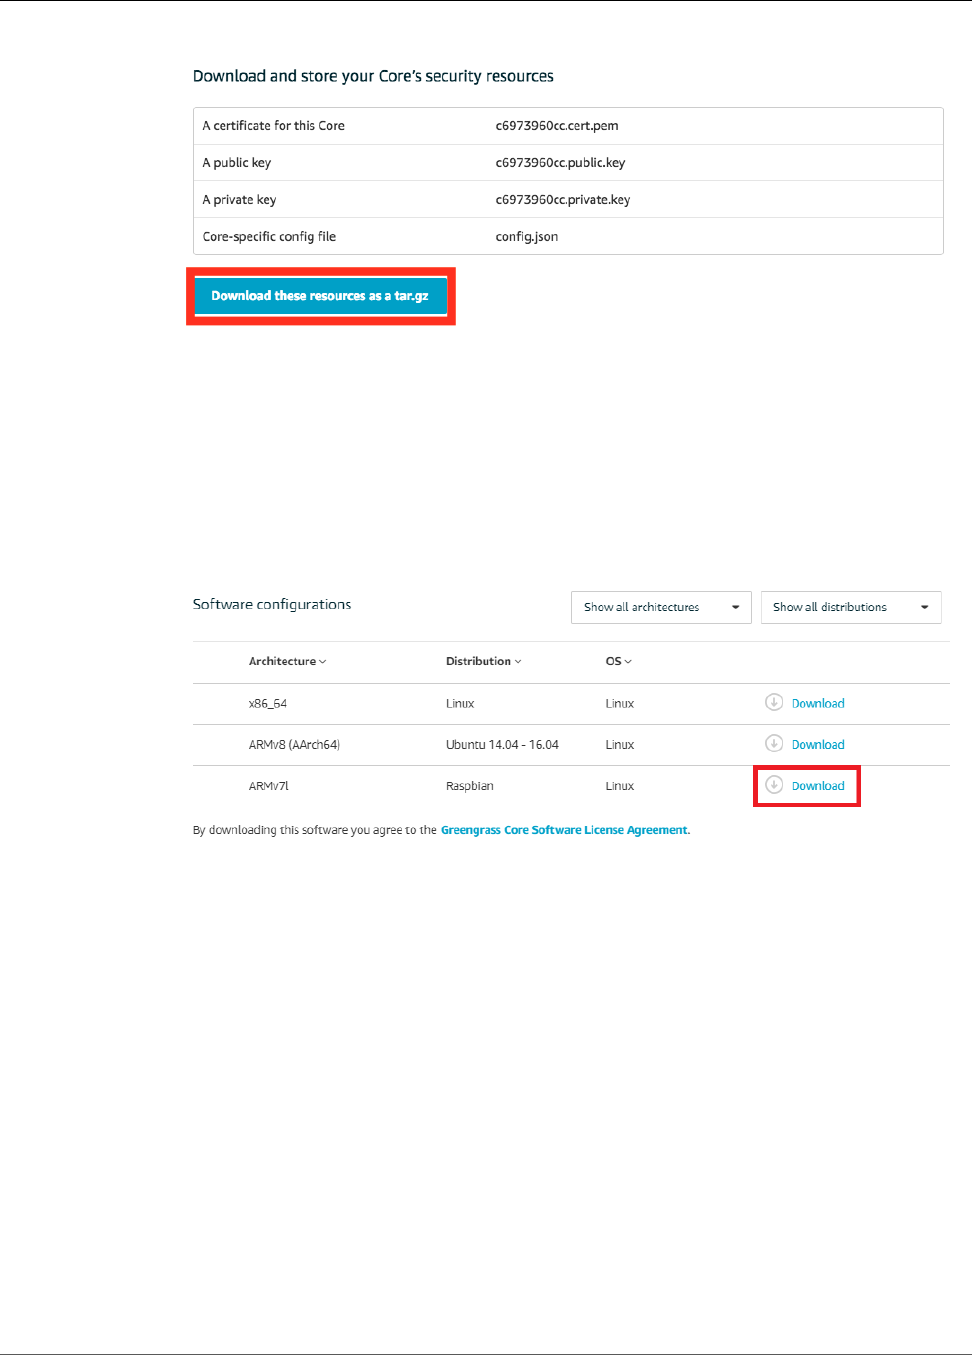
AWS IoT Greengrass Developer Guide
Configure AWS IoT Greengrass on AWS IoT
b. Under Software configurations, choose the CPU architecture and distribution (and operating
system, if necessary) that best describes your core device. For example:
• For Raspberry Pi, download the ARMv7l for Raspbian package.
• For an Amazon EC2 instance, download the x86_64 for Linux package.
• For NVIDIA Jetson TX2, download the ARMv8 (AArch64) for Ubuntu package.
• For Intel Atom, download the x86_64 for Linux package.
Important
Download both the security resources and core software before you choose Finish.
9. After you have downloaded the security resources and the AWS IoT Greengrass Core software,
choose Finish.
The group configuration page is displayed in the console:
60
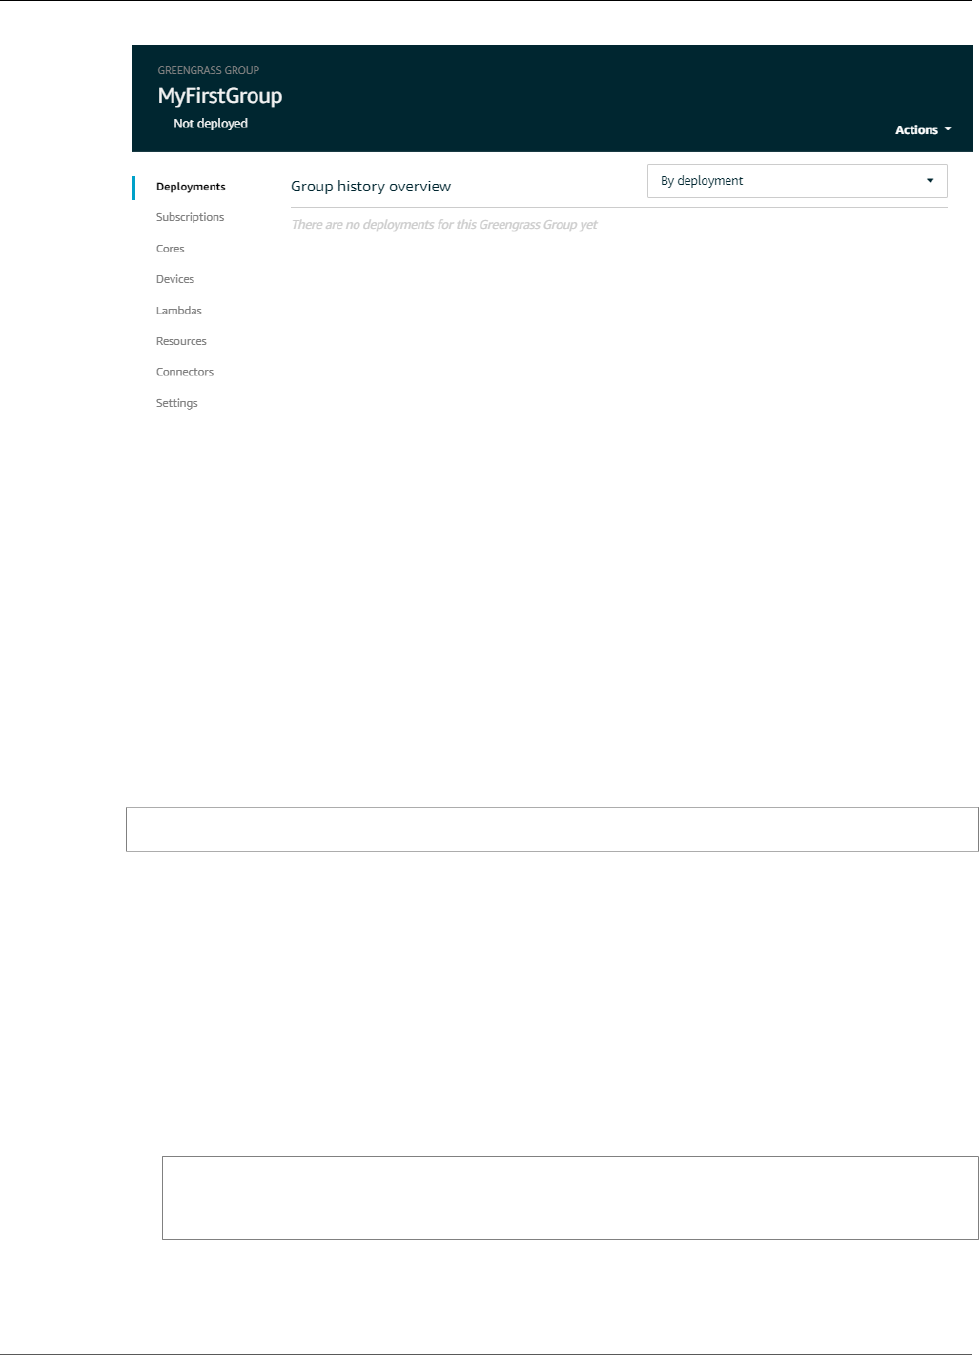
AWS IoT Greengrass Developer Guide
Start AWS IoT Greengrass on the Core Device
Start AWS IoT Greengrass on the Core Device
In the previous step (p. 59), you downloaded two files to your computer:
•greengrass-OS-architecture-1.7.0.tar.gz. This compressed file contains the AWS IoT
Greengrass core software that runs on the core device.
•hash-setup.tar.gz. This compressed file contains security certificates that enable secure
communications between AWS IoT and the config.json file that contains configuration information
specific to your AWS IoT Greengrass core and the AWS IoT endpoint.
1. If you don't recall the IP address of your AWS IoT Greengrass core device, open a terminal on the
AWS IoT Greengrass core device and run the following command:
hostname -I
2. Transfer the two compressed files from your computer to the AWS IoT Greengrass core device. For
steps that show how to transfer files, choose your operating system:
Note
For a Raspberry Pi, the default user name is pi and the default password is raspberry.
For an NVIDIA Jetson TX2, the default user name is nvidia and the default password is
nvidia.
Windows
To transfer the compressed files from your computer to a Raspberry Pi AWS IoT Greengrass
core device, use a tool such as WinSCP or the PuTTY pscp command. To use the pscp command,
open a Command Prompt window on your computer and run the following:
cd path-to-downloaded-files
pscp -pw Pi-password greengrass-OS-architecture-1.7.0.tar.gz pi@IP-address:/home/pi
pscp -pw Pi-password hash-setup.tar.gz pi@IP-address:/home/pi
For example:
61

AWS IoT Greengrass Developer Guide
Start AWS IoT Greengrass on the Core Device
macOS
To transfer the compressed files from your Mac to a Raspberry Pi AWS IoT Greengrass core
device, open a Terminal window on your computer and run the following commands. The path-
to-downloaded-files is typically ~/Downloads.
Note
You might be prompted for two passwords. If so, the first password is for the Mac's
sudo command and the second is the password for the Raspberry Pi.
cd path-to-downloaded-files
sudo scp greengrass-OS-architecture-1.7.0.tar.gz pi@IP-address:/home/pi
sudo scp hash-setup.tar.gz pi@IP-address:/home/pi
UNIX-like system
To transfer the compressed files from your computer to a Raspberry Pi AWS IoT Greengrass core
device, open a terminal window on your computer and run the following commands:
cd path-to-downloaded-files
sudo scp greengrass-OS-architecture-1.7.0.tar.gz pi@IP-address:/home/pi
sudo scp hash-setup.tar.gz pi@IP-address:/home/pi
Raspberry Pi web browser
If you used the Raspberry Pi's web browser to download the compressed files, the files should
be in the Pi's ~/Downloads folder (for example, /home/pi/Downloads). Otherwise, the
compressed files should be in the Pi's ~ folder (for example, /home/pi).
3. Open a terminal on the AWS IoT Greengrass core device and navigate to the folder that contains the
compressed files (for example, cd /home/pi).
cd path-to-compressed-files
4. Decompress the AWS IoT Greengrass core software and the security resources.
• The first command creates the /greengrass directory in the root folder of the AWS IoT
Greengrass core device (through the -C / argument).
• The second command copies the certificates into the /greengrass/certs folder and the
config.json (p. 21) file into the /greengrass/config folder (through the -C /greengrass
argument).
sudo tar -xzvf greengrass-OS-architecture-1.7.0.tar.gz -C /
sudo tar -xzvf hash-setup.tar.gz -C /greengrass
5. Review the documentation on Server Authentication in AWS IoT Core and choose the appropriate CA
certificate. Certificates enable your device to communicate with AWS IoT using the MQTT messaging
protocol over TLS.
62
AWS IoT Greengrass Developer Guide
Module 3 (Part 1): Lambda
Functions on AWS IoT Greengrass
Make sure that the AWS IoT Greengrass core device is connected to the internet, and then
run the following commands to copy the root CA certificate to your device. This example uses
AmazonRootCA1.pem.
cd /greengrass/certs/
sudo wget -O root.ca.pem https://www.amazontrust.com/repository/AmazonRootCA1.pem
Note
The wget -O parameter is the capital letter O.
Run the following command to confirm that the root.ca.pem file is not empty:
cat root.ca.pem
If the root.ca.pem file is empty, check the wget URL and try again.
6. Start AWS IoT Greengrass on your core device.
cd /greengrass/ggc/core/
sudo ./greengrassd start
You should see a Greengrass successfully started message. Make a note of the PID.
Note
To set up your core device to start AWS IoT Greengrass on system boot, see the section
called “Start Greengrass on System Boot” (p. 42).
You can run the following command to confirm that the AWS IoT Greengrass core software
(daemon) is functioning. Replace PID-number with your PID:
ps aux | grep PID-number
You should see an entry for the PID with a path to the running Greengrass daemon (for example,
/greengrass/ggc/packages/1.7.0/bin/daemon). If you run into issues starting AWS IoT
Greengrass, see Troubleshooting (p. 410).
Module 3 (Part 1): Lambda Functions on AWS IoT
Greengrass
This module shows you how to configure a Lambda function and deploy it to your AWS IoT Greengrass
core device. It contains information about MQTT messaging, subscriptions, deployments on AWS IoT
Greengrass, and Lambda function configurations.
Part 1 of this module shows you how to deploy a Lambda function on the AWS IoT Greengrass core that
sends Hello World messages to the AWS IoT Greengrass cloud. Part 2 (p. 79) covers the differences
between on-demand and long-lived Lambda functions running on the AWS IoT Greengrass core.
Before you begin, make sure that you have completed Module 1 (p. 45) and Module 2 (p. 55) and
have a running AWS IoT Greengrass core device.
Module 3 (Part 1) (p. 63) and Module 3 (Part 2) (p. 79) should take approximately 30 minutes each
to complete.
63
AWS IoT Greengrass Developer Guide
Create and Package a Lambda Function
Create and Package a Lambda Function
For a Python Lambda function to run on an AWS IoT Greengrass core, it must be packaged with the
greengrasssdk folder from the Python AWS IoT Greengrass Core SDK. In the this section, you:
• Download the Python AWS IoT Greengrass Core SDK to your computer (not the AWS IoT Greengrass
core device). You can download the SDK from the Software page in the AWS IoT Core console or from
the AWS IoT Greengrass Core SDK (p. 19) downloads. This procedure uses the console.
• Decompress the downloaded SDK file.
• Obtain the Python Lambda function (named greengrassHelloWorld.py) from the decompressed
SDK.
• Create a Lambda function deployment package named hello_world_python_lambda.zip that
contains greengrassHelloWorld.py and the greengrasssdk folder.
• Use the Lambda console to upload the hello_world_python_lambda.zip package.
• Use the AWS IoT Core console to transfer the package to the AWS IoT Greengrass core device (during
group deployment).
1. In the AWS IoT Core console, choose Software.
64
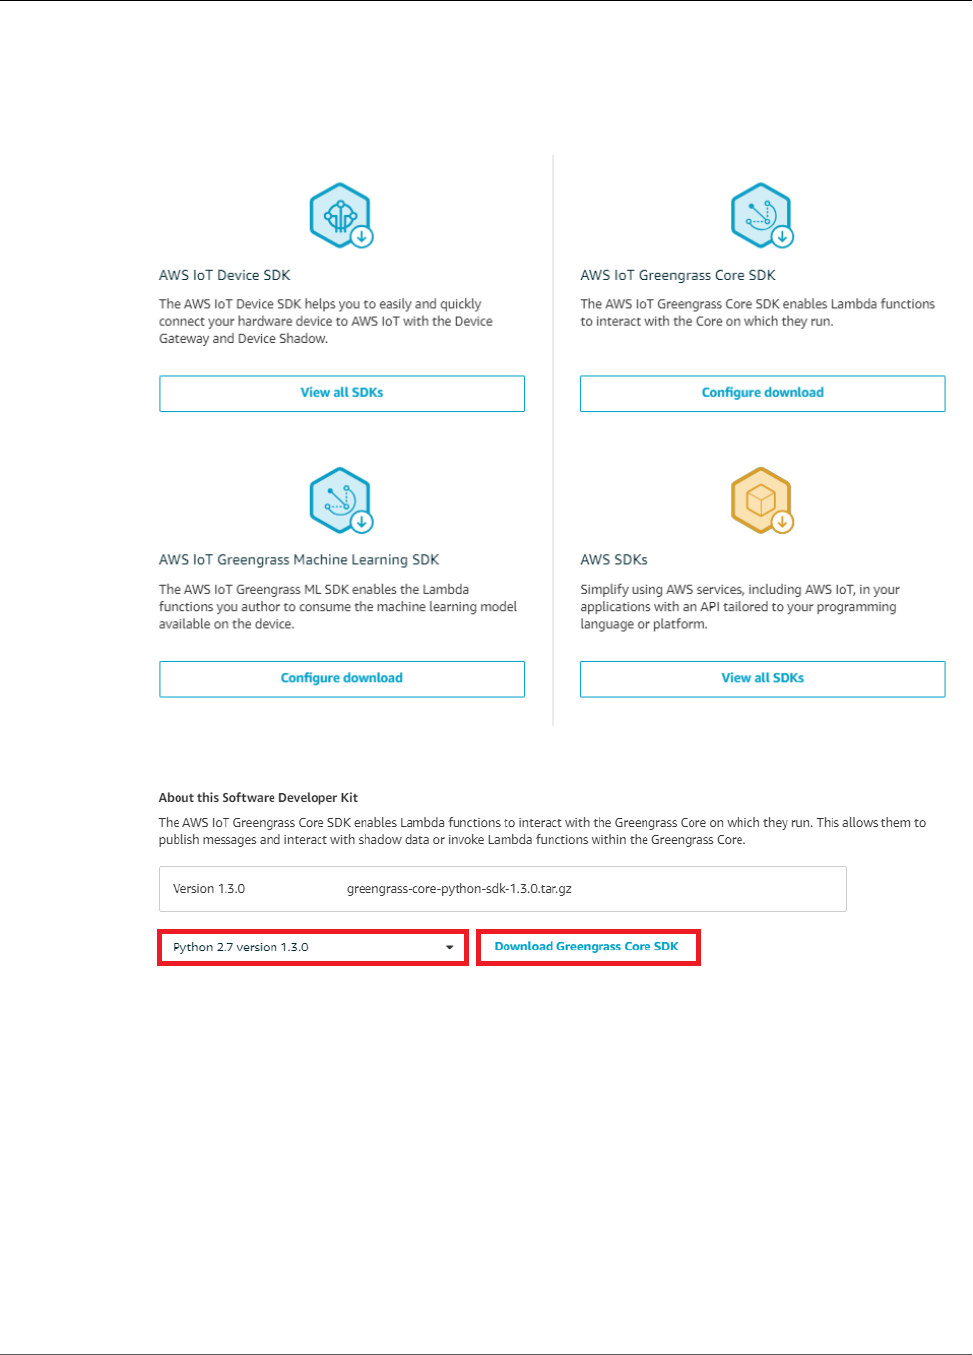
AWS IoT Greengrass Developer Guide
Create and Package a Lambda Function
2. Under SDKs, for AWS IoT Greengrass Core SDK, choose Configure download.
Note
You can download the SDK from the Software page in the console or from the AWS IoT
Greengrass Core SDK (p. 19) downloads. This procedure uses the console.
3. Choose Python 2.7 version 1.3.0, and then choose Download Greengrass Core SDK.
4. Decompress the downloaded greengrass-core-python-sdk-1.3.0.tar.gz file so you can get
the Lambda function code and the SDK. For instructions, choose the tab that corresponds to your
operating system.
Windows
Use a tool for decompressing .tar.gz files on Windows such as 7-Zip, WinZip, or similar. For
example, the following steps use 7-Zip.
1. After you install 7-Zip, use Windows File Explorer (Windows logo key + E) to navigate to
greengrass-core-python-sdk-1.3.0.tar.gz, right-click the file, choose 7-Zip, and
then choose Extract Here. This creates the greengrass-core-python-sdk-1.3.0.tar
file.
65

AWS IoT Greengrass Developer Guide
Create and Package a Lambda Function
2. Right-click the greengrass-core-python-sdk-1.3.0.tar file, choose 7-Zip, and then
choose Extract Here. This creates the aws_greengrass_core_sdk folder.
3. Expand the aws_greengrass_core_sdk and sdk folders, and then unzip
python_sdk_1_3_0.zip.
macOS
1. Using Finder, navigate to the greengrass-core-python-sdk-1.3.0.tar.gz file and
double-click it. This creates the aws_greengrass_core_sdk folder.
2. Expand the aws_greengrass_core_sdk and sdk folders, and then unzip
python_sdk_1_3_0.zip.
UNIX-like system
1. Open a terminal window and navigate to the directory that contains the greengrass-core-
python-sdk-1.3.0.tar.gz file.
2. Run the following command to decompress the file:
tar -xzf greengrass-core-python-sdk-1.3.0.tar.gz
This creates the aws_greengrass_core_sdk directory.
3. Unzip the python_sdk_1_3_0.zip file.
cd aws_greengrass_core_sdk/sdk
sudo unzip python_sdk_1_3_0.zip
The Lambda function in this module uses:
• The greengrassHelloWorld.py file in examples\HelloWorld. This is your Lambda function
code.
• The greengrasssdk folder in sdk\python_sdk_1_3_0. This is the SDK.
The following code is from greengrassHelloWorld.py. (To save space, all code comments have
been removed.) Note that every five seconds, the function publishes one of two possible messages
to the hello/world topic.
import greengrasssdk
import platform
from threading import Timer
import time
client = greengrasssdk.client('iot-data')
my_platform = platform.platform()
def greengrass_hello_world_run():
if not my_platform:
client.publish(topic='hello/world', payload='Hello world! Sent from Greengrass
Core.')
else:
client.publish(topic='hello/world', payload='Hello world! Sent from Greengrass
Core running on platform: {}'.format(my_platform))
Timer(5, greengrass_hello_world_run).start()
greengrass_hello_world_run()
66
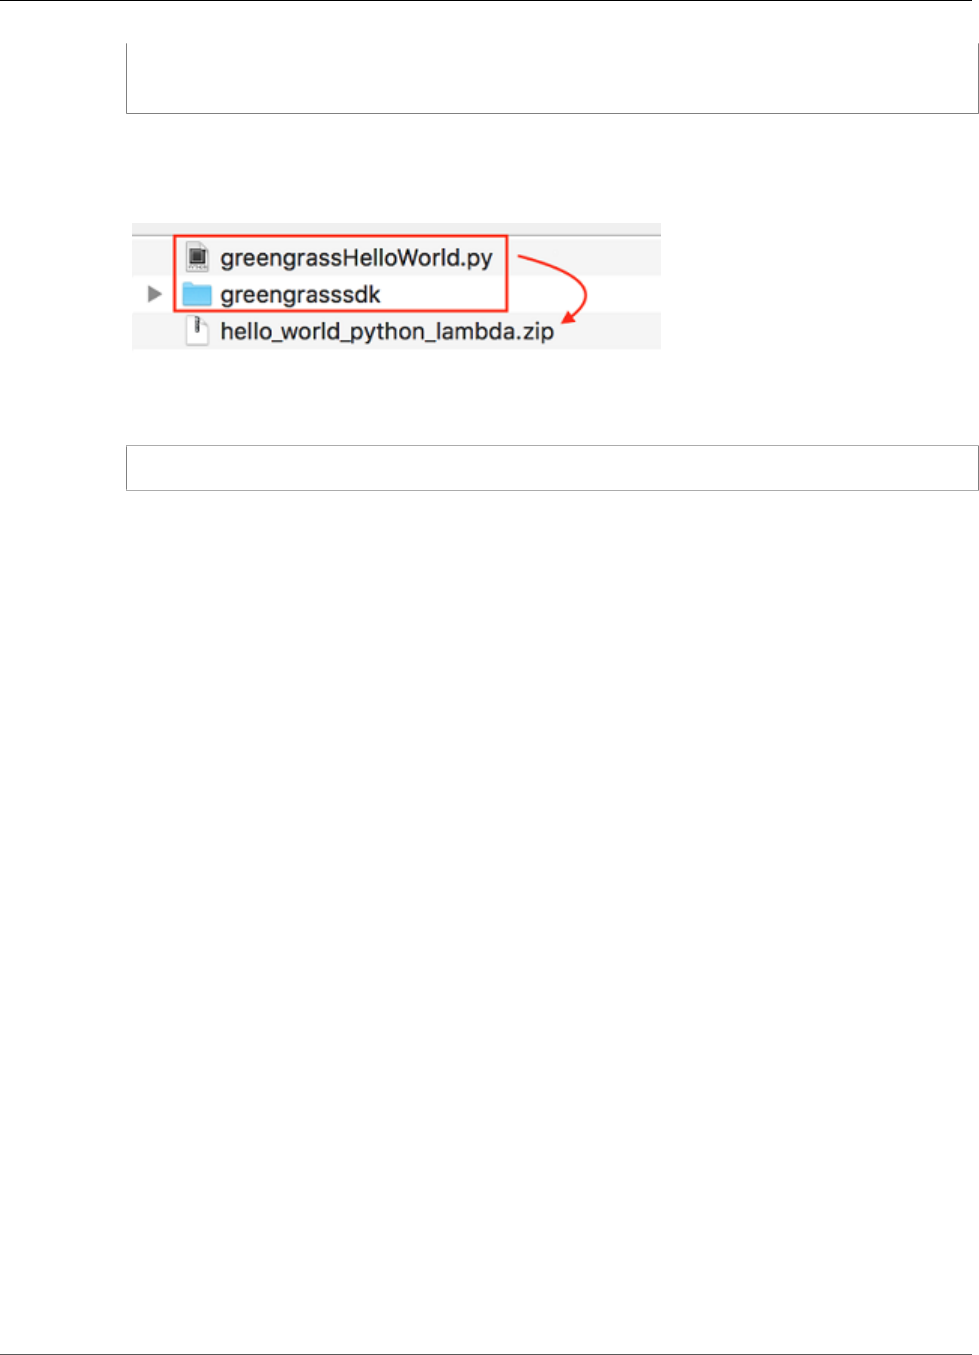
AWS IoT Greengrass Developer Guide
Create and Package a Lambda Function
def function_handler(event, context):
return
5. Copy greengrasssdk to the HelloWorld folder that contains greengrassHelloWorld.py.
6. To create the Lambda function deployment package, save the greengrassHelloWorld.py file and
the greengrasssdk folder to a compressed .zip file named hello_world_python_lambda.zip.
The .py file and SDK folder must be in the root of the directory.
For UNIX-like systems (including the Mac terminal), you can use the following command to package
the file and folder:
sudo zip -r hello_world_python_lambda.zip greengrasssdk greengrassHelloWorld.py
Note
Depending on your distribution, you might need to install zip first (for example, by running
sudo apt-get install zip). The installation command for your distribution might be
different.
Now you're ready to create your Lambda function and upload the deployment package.
7. Open the Lambda console and choose Create function.
8. Choose Author from scratch.
9. Name your function Greengrass_HelloWorld, and set the remaining fields as follows:
• For Runtime, choose Python 2.7.
• For Role, choose Create new role from one or more templates.
• For Role name, enter a unique name for the role. (This role isn't used by AWS IoT Greengrass.)
Choose Create function.
67
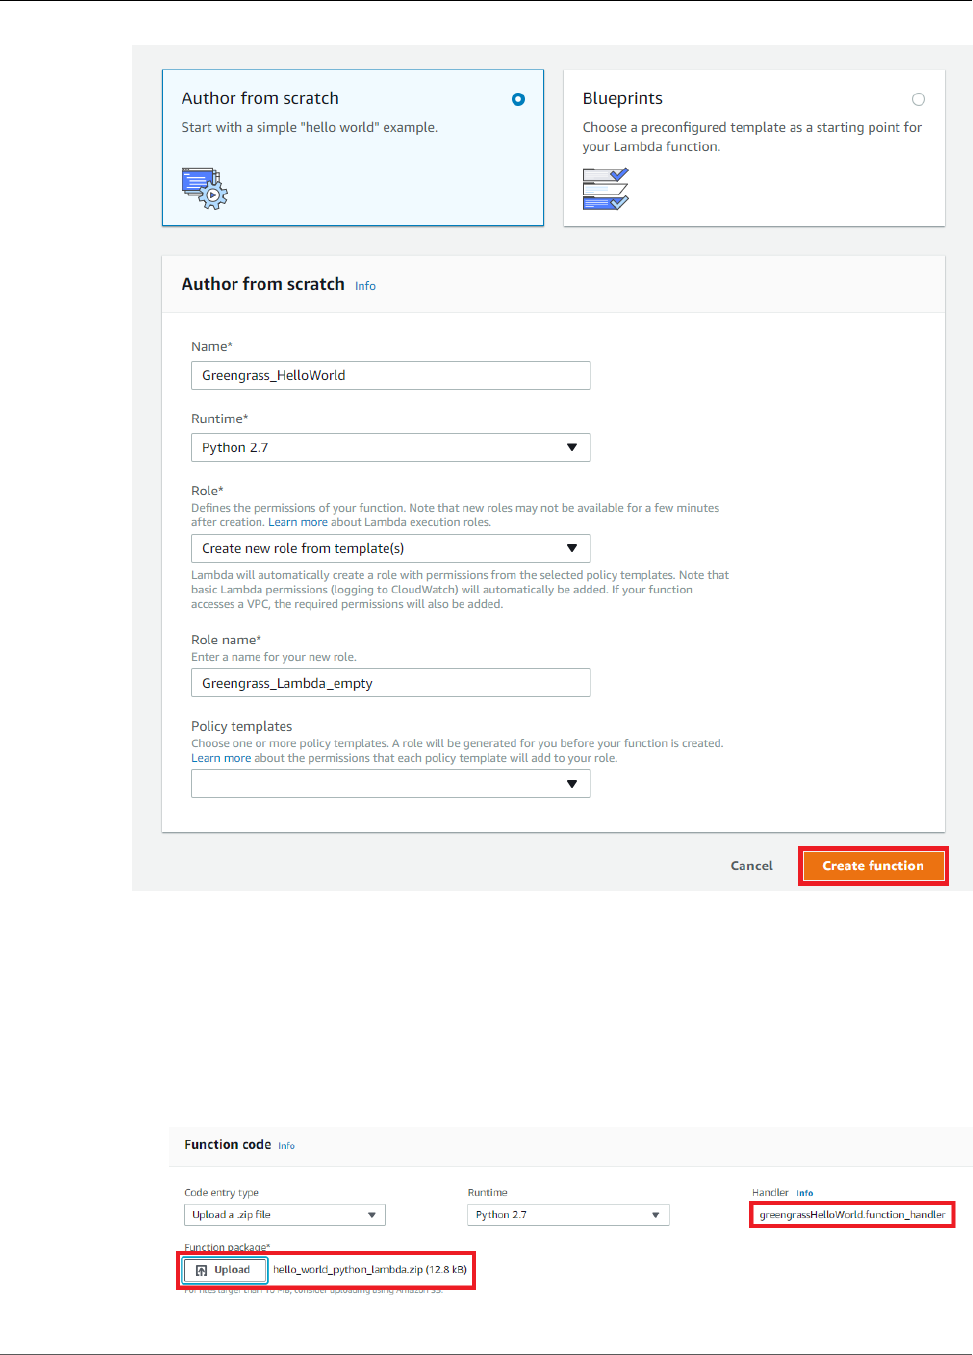
AWS IoT Greengrass Developer Guide
Create and Package a Lambda Function
10. Upload your Lambda function deployment package:
a. On the Configuration tab, under Function code, set the following fields:
• For Code entry type, choose Upload a .zip file.
• For Runtime, choose Python 2.7.
• For Handler, enter greengrassHelloWorld.function_handler
b. Choose Upload, and then choose hello_world_python_lambda.zip. (The size of your
hello_world_python_lambda.zip file might be different from what's shown here.)
68
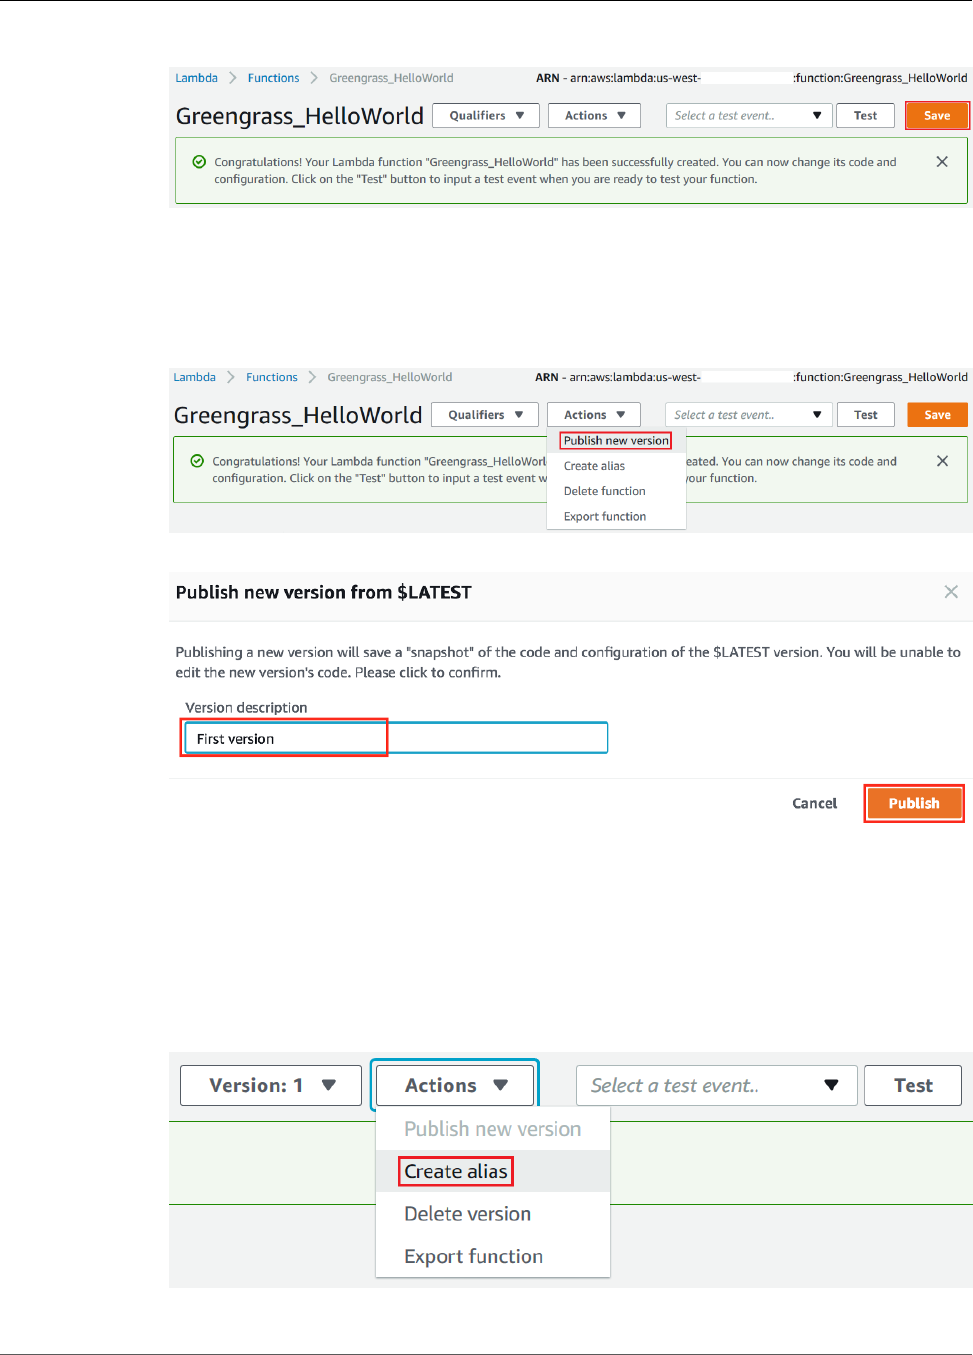
AWS IoT Greengrass Developer Guide
Create and Package a Lambda Function
c. Choose Save.
Tip
To see your uploaded code, from Code entry type, choose Edit code inline.
11.
Publish the Lambda function:
a. From Actions, choose Publish new version.
b. For Version description, enter First version, and then choose Publish.
12.
Create an alias for the Lambda function version:
Note
Greengrass groups can reference a Lambda function by alias (recommended) or by version.
Using an alias makes it easier to manage code updates because you don't have to change
your subscription table or group definition when the function code is updated. Instead, you
just point the alias to the new function version.
a. From Actions, choose Create alias.
69
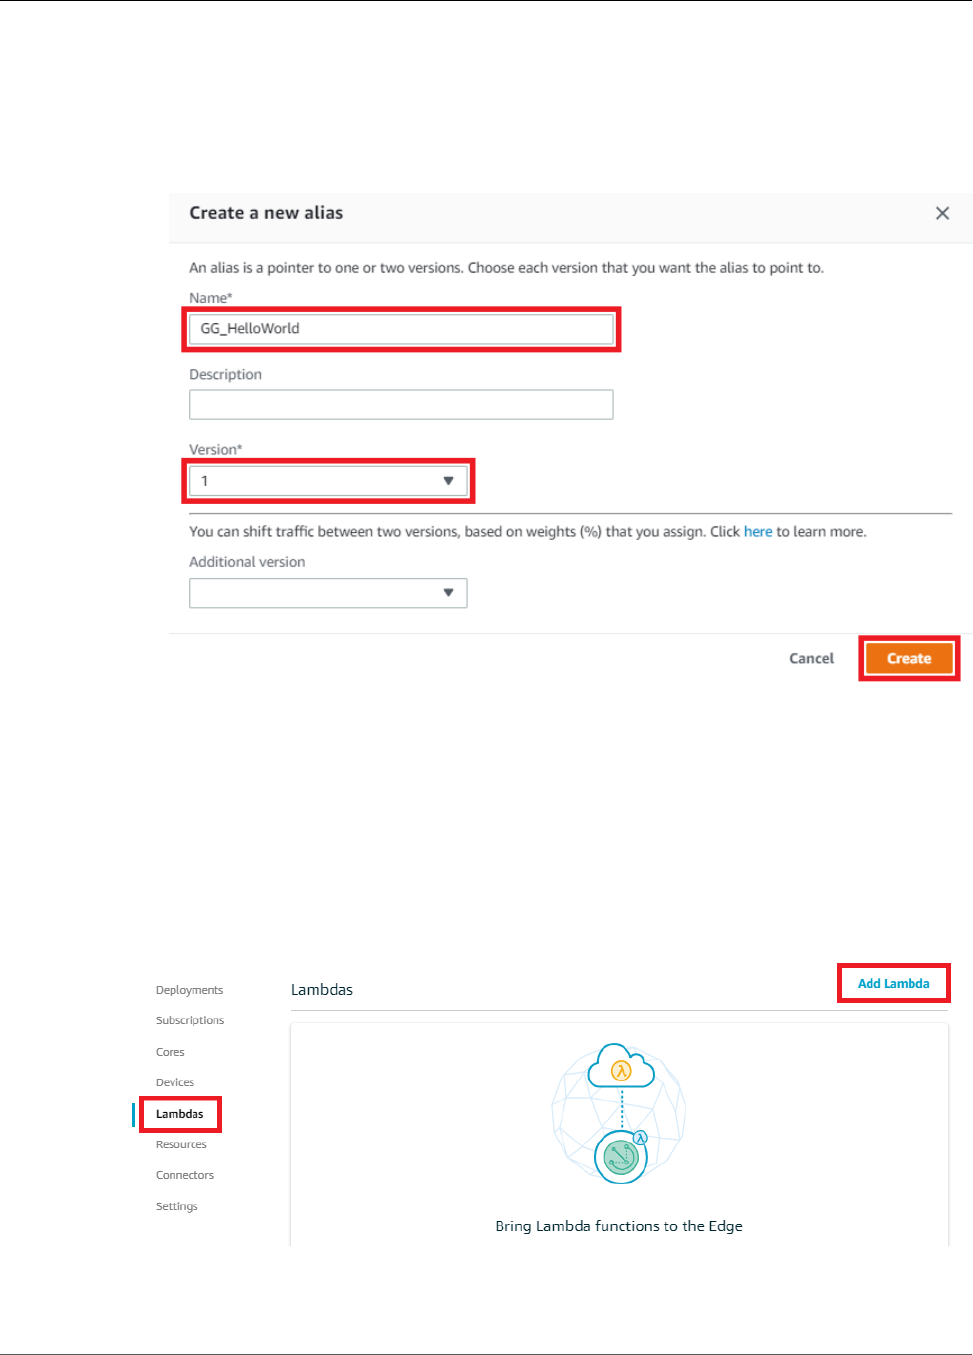
AWS IoT Greengrass Developer Guide
Configure the Lambda Function for AWS IoT Greengrass
b. Name the alias GG_HelloWorld, set the version to 1 (which corresponds to the version that you
just published), and then choose Create.
Note
AWS IoT Greengrass doesn't support Lambda aliases for $LATEST versions.
Configure the Lambda Function for AWS IoT
Greengrass
You are now ready to configure your Lambda function for AWS IoT Greengrass.
1. In the AWS IoT Core console, under Greengrass, choose Groups, and then choose the group that you
created in Module 2 (p. 55).
2. On the group configuration page, choose Lambdas, and then choose Add Lambda.
3. Choose Use existing Lambda.
70
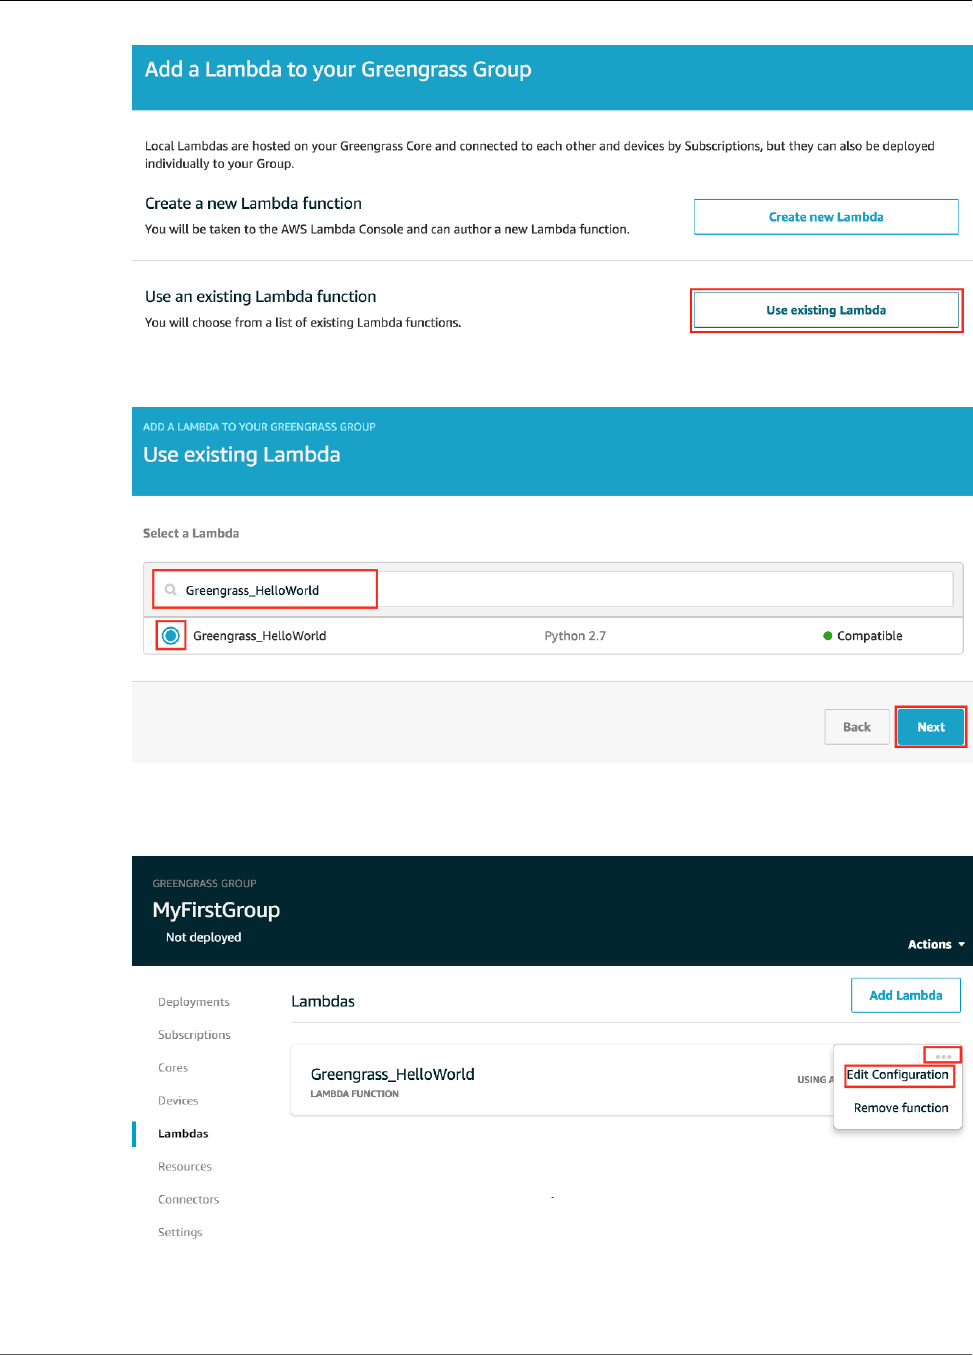
AWS IoT Greengrass Developer Guide
Configure the Lambda Function for AWS IoT Greengrass
4. Search for the name of the Lambda you created in the previous step (Greengrass_HelloWorld, not
the alias name), select it, and then choose Next:
5. For the version, choose Alias: GG_HelloWorld, and then choose Finish. You should see the
Greengrass_HelloWorld Lambda function in your group, using the GG_HelloWorld alias.
6. Choose the ellipsis (…), and then choose Edit Configuration:
7. On the Group-specific Lambda configuration page, make the following changes:
71

AWS IoT Greengrass Developer Guide
Configure the Lambda Function for AWS IoT Greengrass
• Set Timeout to 25 seconds. This Lambda function sleeps for 20 seconds before each invocation.
• For Lambda lifecycle, choose Make this function long-lived and keep it running indefinitely.
Note
A long-lived Lambda function starts automatically after AWS IoT Greengrass starts and
keeps running in its own container (or sandbox). This is in contrast to an on-demand Lambda
function, which starts when invoked and stops when there are no tasks left to execute. For
more information, see the section called “Lifecycle Configuration” (p. 156).
8. Keep the default values for all other fields, such as Run as, Containerization, and Input payload
data type, and choose Update to save your changes. For information about Lambda function
properties, see the section called “Controlling Greengrass Lambda Function Execution” (p. 150).
Next, create a subscription that allows the Lambda to send messages to AWS IoT. A Greengrass
Lambda function can receive and publish messages (using the MQTT protocol):
• To and from other devices (or device shadows) in the AWS IoT Greengrass core. Information about
device shadows is provided in Module 5 (p. 104).
• To connectors (p. 266).
• To other Lambda functions.
• To AWS IoT.
The AWS IoT Greengrass group controls the way in which these components interact by using
subscriptions that enable more security and to provide predictable interactions.
A subscription consists of a source, target, and topic. The source is the originator of the message.
The target is the destination of the message. The topic allows you to filter the data that is sent
from the source to the target. The source or target can be an AWS IoT Greengrass device, a Lambda
function, a device shadow, or AWS IoT. A subscription is directed in the sense that messages flow in a
specific direction. For an AWS IoT Greengrass device to send messages to and receive messages from
a Lambda function, you must set up two subscriptions: one from the device to the Lambda function
and another from the Lambda function to the device. The Greengrass_HelloWorld Lambda
function sends messages only to the hello/world topic in AWS IoT, as shown in the following
greengrassHelloWorld.py code snippet:
def greengrass_hello_world_run():
if not my_platform:
client.publish(topic='hello/world', payload='Hello world! Sent from Greengrass
Core.')
else:
72
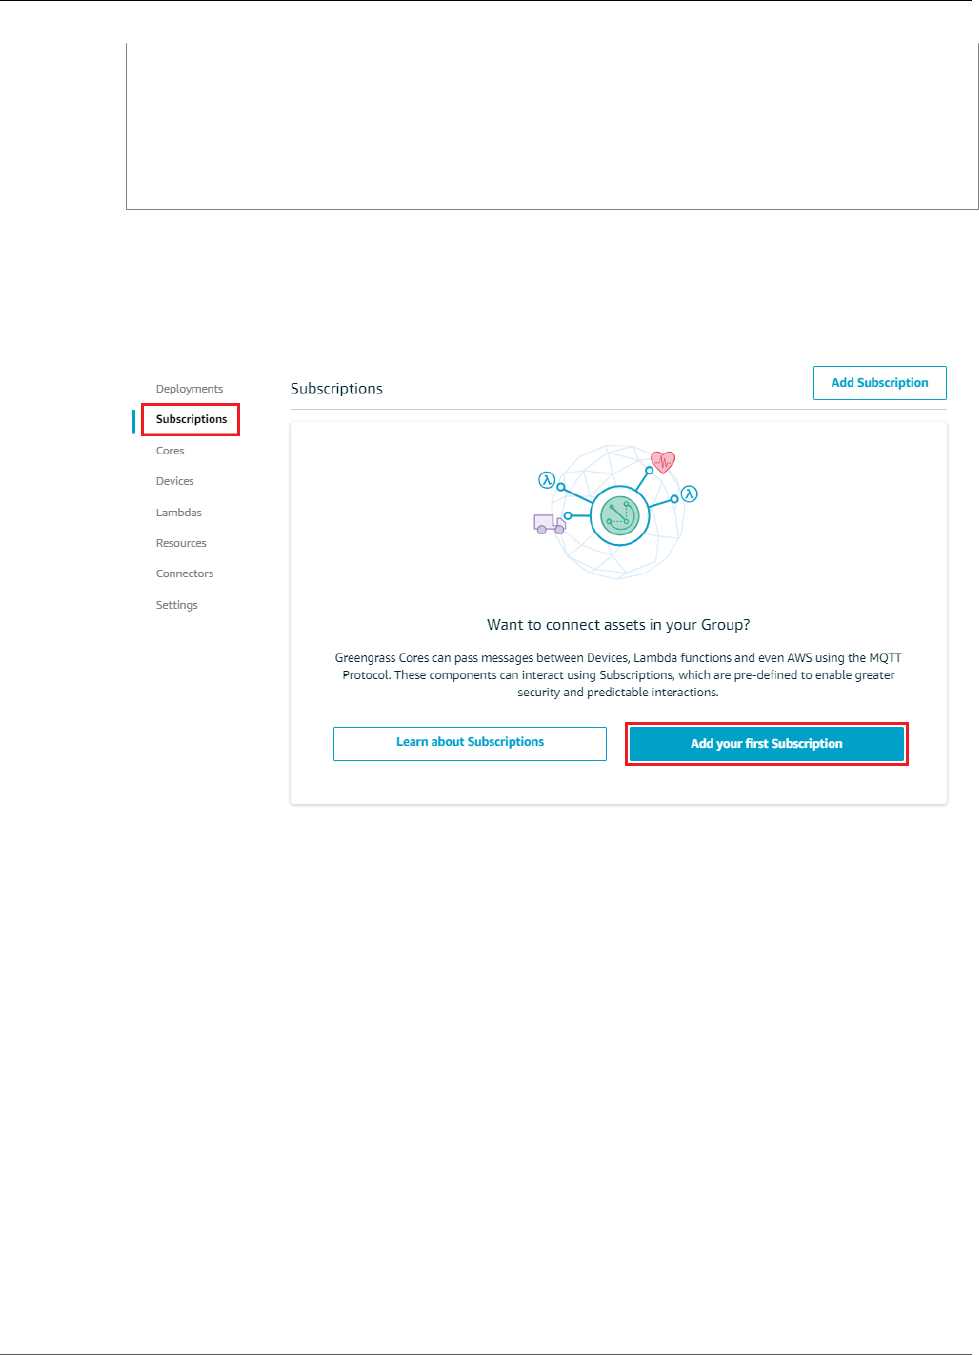
AWS IoT Greengrass Developer Guide
Configure the Lambda Function for AWS IoT Greengrass
client.publish(topic='hello/world', payload='Hello world! Sent from Greengrass
Core running on platform: {}'.format(my_platform))
# Asynchronously schedule this function to be run again in 5 seconds
Timer(5, greengrass_hello_world_run).start()
# Execute the function above:
greengrass_hello_world_run()
Because the Greengrass_HelloWorld Lambda function sends messages only to the hello/
world topic in AWS IoT, you only need to create one subscription from the Lambda function to AWS
IoT, as shown next.
9. On the group configuration page, choose Subscriptions, and then choose Add your first
Subscription.
10. In Select a source, choose Select. Then, on the Lambdas tab, choose Greengrass_HelloWorld as the
source.
73
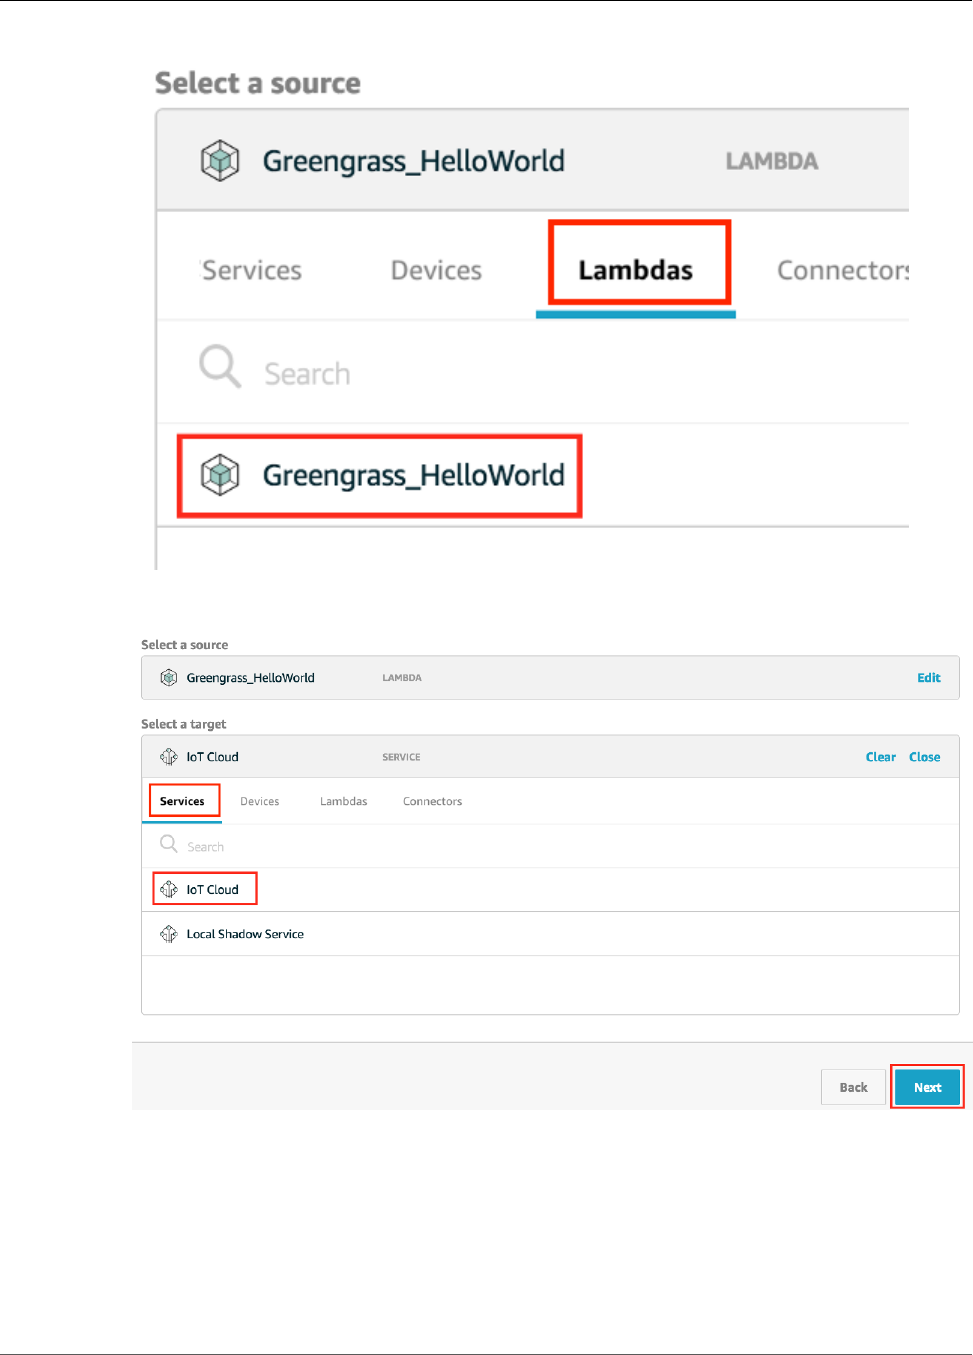
AWS IoT Greengrass Developer Guide
Configure the Lambda Function for AWS IoT Greengrass
11. For Select a target, choose Select. Then, on the Service tab, choose IoT Cloud, and then choose
Next.
12. For Topic filter, enter hello/world, and then choose Next.
74
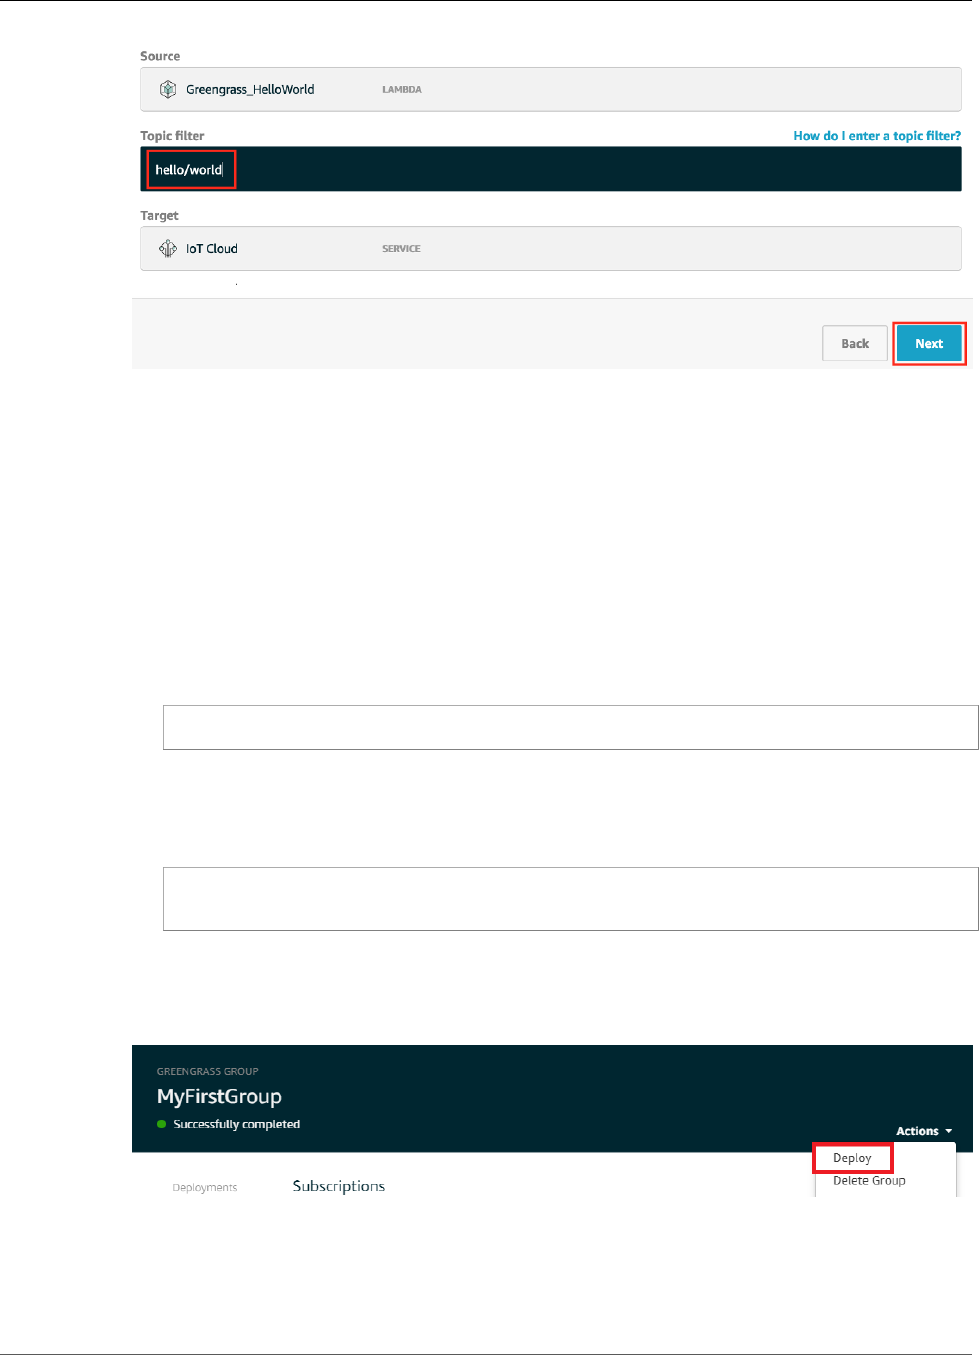
AWS IoT Greengrass Developer Guide
Deploy Cloud Configurations to a Core Device
13. Choose Finish.
Deploy Cloud Configurations to an AWS IoT
Greengrass Core Device
1. Make sure that your AWS IoT Greengrass core device is connected to the internet. (For example, see
if you can successfully navigate to a webpage.)
2. Make sure that the AWS IoT Greengrass daemon is running on your core device. Run the following
commands in your core device terminal.
a. To check whether the daemon is running:
ps aux | grep -E 'greengrass.*daemon'
If the output contains a root entry for /greengrass/ggc/packages/1.7.0/bin/daemon,
then the daemon is running.
b. To start the daemon:
cd /greengrass/ggc/core/
sudo ./greengrassd start
Now you're ready to deploy the Lambda function and subscription configurations to your AWS IoT
Greengrass core device.
3. In the AWS IoT Core console, on the group configuration page, from Actions, choose Deploy.
4. On the Configure how devices discover your core page, choose Automatic detection. This enables
devices to automatically acquireconnectivity information for the core, such as IP address, DNS, and
port number. Automatic detection is recommended, but AWS IoT Greengrass also supports manually
specified endpoints. You're only prompted for the discovery method the first time that the group is
deployed.
75
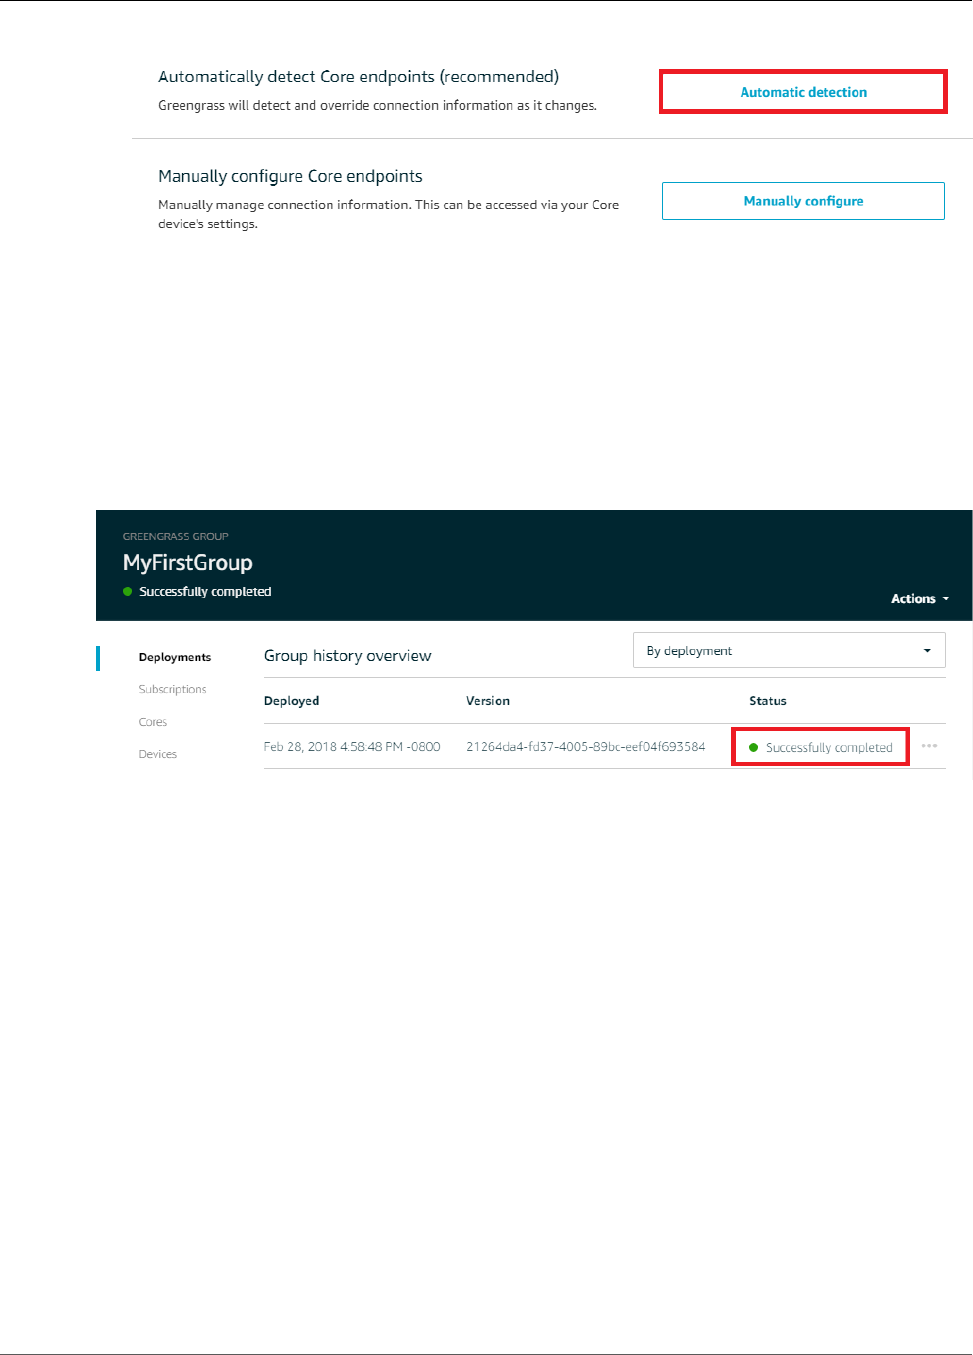
AWS IoT Greengrass Developer Guide
Verify the Lambda Function Is Running on the Device
5. If prompted, on the Grant permission to access other services page, choose Grant permission. This
creates the Greengrass service role, which allows AWS IoT Greengrass to access other AWS services
on your behalf. This role is required for deployments to succeed. You need to create a service role
only once per account.
The first deployment might take a few minutes. When the deployment is complete, you should see
Successfully completed in the Status column on the Deployments page:
Note
The deployment status is also displayed below the group's name on the page header.
For troubleshooting help, see Troubleshooting (p. 410).
Verify the Lambda Function Is Running on the Device
1. From the navigation pane of the AWS IoT Core console, choose Test.
76

AWS IoT Greengrass Developer Guide
Verify the Lambda Function Is Running on the Device
2. Choose Subscribe to topic, and configure the following fields:
• For Subscription topic, enter hello/world. (Don't choose Subscribe to topic yet.)
• For Quality of Service, choose 0.
• For MQTT payload display, choose Display payloads as strings.
77
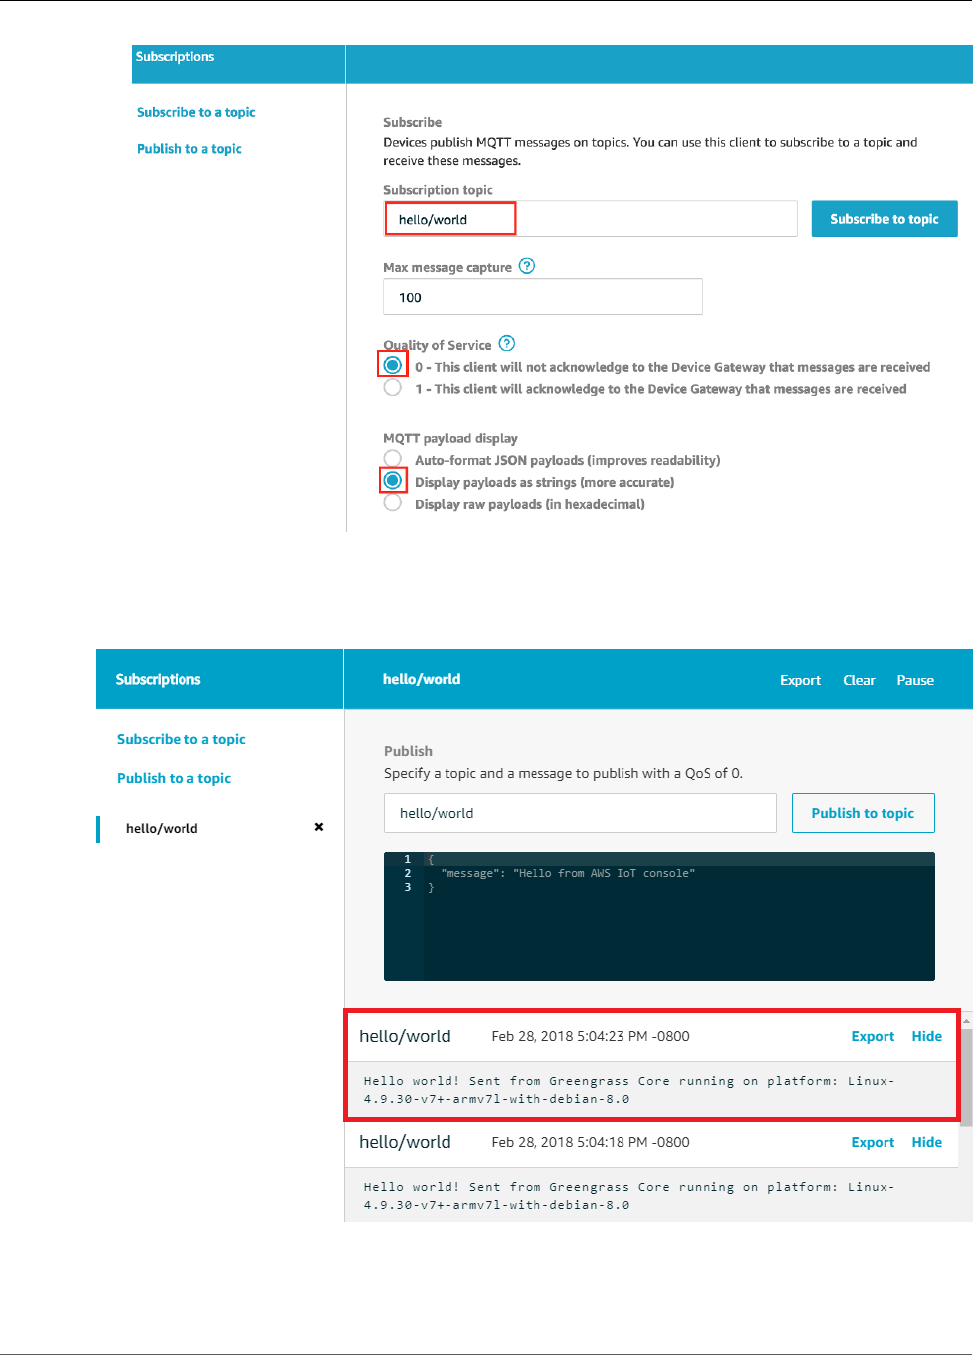
AWS IoT Greengrass Developer Guide
Verify the Lambda Function Is Running on the Device
3. Choose Subscribe to topic.
Assuming the Lambda function is running on your device, it publishes messages similar to the following
to the hello/world topic:
Although the Lambda function continues to send MQTT messages to the hello/world topic, don't
stop the AWS IoT Greengrass daemon. The remaining modules are written with the assumption that it's
running.
78

AWS IoT Greengrass Developer Guide
Module 3 (Part 2): Lambda
Functions on AWS IoT Greengrass
You can delete the function and subscription from the group:
• From the Lambdas page, choose the ellipsis (…), and then choose Remove function.
• From the Subscriptions page, choose the ellipsis (…), and then choose Delete.
The function and subscription are removed from the core during the next group deployment.
Module 3 (Part 2): Lambda Functions on AWS IoT
Greengrass
This module shows you how to configure a Lambda function and deploy it to your AWS IoT Greengrass
core device. It contains information about MQTT messaging, subscriptions, deployments on AWS IoT
Greengrass, and Lambda function configurations.
Part 1 (p. 63) of this module described how to deploy a Lambda function on a AWS IoT Greengrass
core that sends Hello World messages to AWS IoT. This part explores the differences between on-
demand and long-lived Lambda functions running on the AWS IoT Greengrass core.
Before you begin, make sure you have completed Module 1 (p. 45), Module 2 (p. 55), and Module 3
(Part 1) (p. 63).
This module should take approximately 30 minutes to complete.
Create and Package the Lambda Function
1. Download the Lambda function code to your computer (not the Greengrass core device):
a. In a web browser, open the greengrassHelloWorldCounter.py file on GitHub.
b. Choose Raw to open the unformatted version of the file.
c. Use Ctrl + S (or Command + S for the Mac) to save a copy of the
greengrassHelloWorldCounter.py file. Save the file to a folder that contains the
greengrasssdk folder.
Note
For UNIX-like systems, you can run the following Terminal command to download the
greengrassHelloWorldCounter.py file:
sudo wget https://raw.githubusercontent.com/aws-samples/aws-greengrass-samples/
master/hello-world-counter-python/greengrassHelloWorldCounter.py
2. Package the greengrassHelloWorldCounter.py file with the SDK into a .zip file, as described
in Module 3 (Part 1) (p. 63). Name the package hello_world_counter_python_lambda.zip.
79
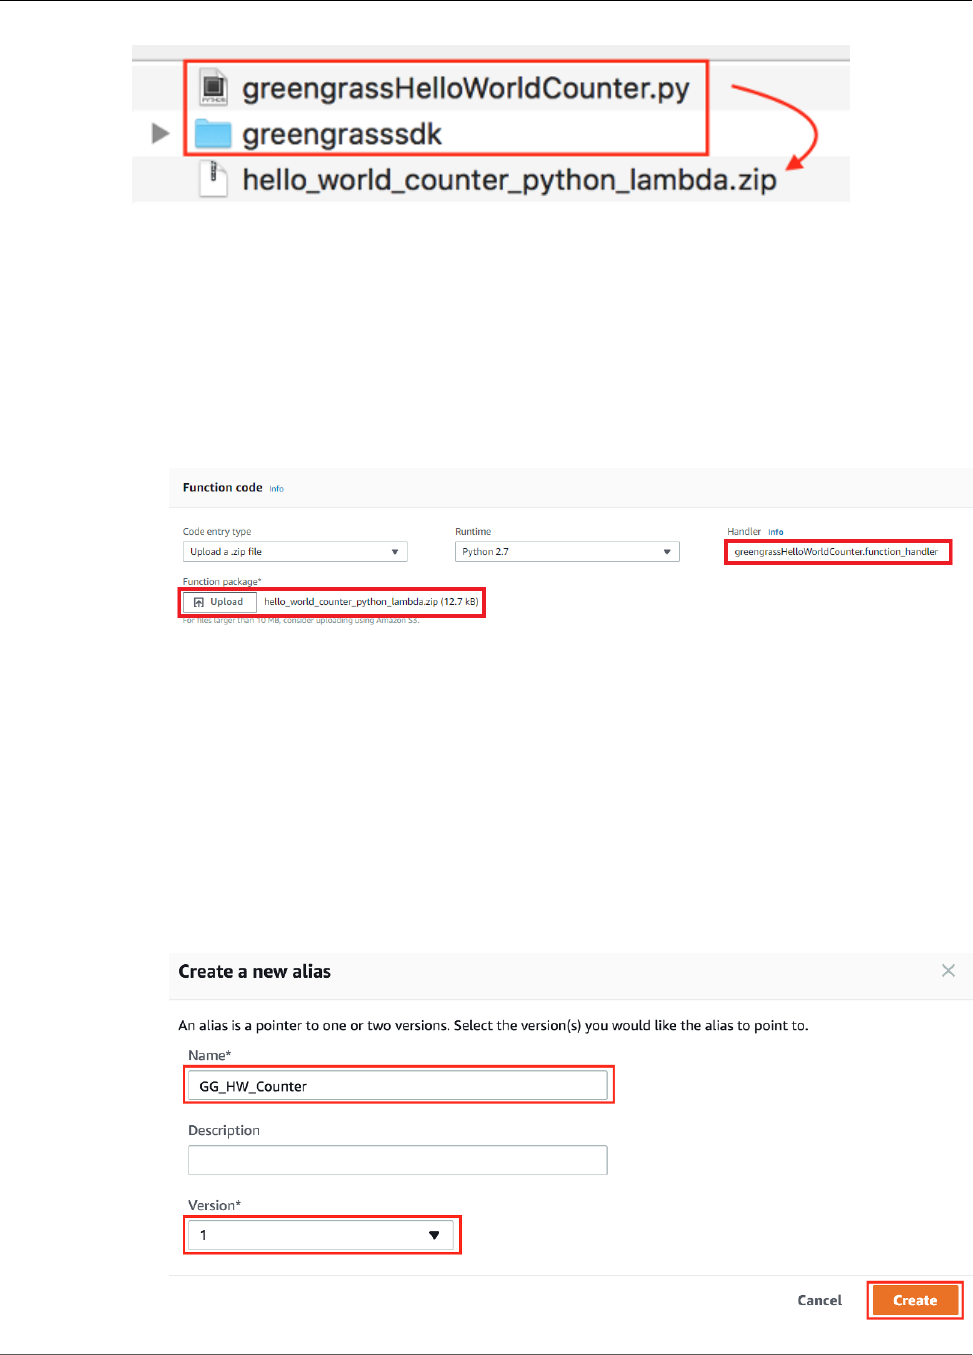
AWS IoT Greengrass Developer Guide
Create and Package the Lambda Function
3. In the Lambda console, create a Python 2.7 function named Greengrass_HelloWorld_Counter,
as described in Module 3 (Part 1) (p. 63). You can use the existing role.
4. Upload your Lambda function deployment package:
a. On the Configuration tab, under Function code, set the following fields:
• For Code entry type, choose Upload a .zip file.
• For Runtime, choose Python 2.7.
• For Handler, enter greengrassHelloWorldCounter.function_handler
b. Choose Upload, and then choose hello_world_counter_python_lambda.zip.
c. At the top of the page, choose Save.
5. Publish the first version of the function:
a. From Actions, choose Publish new version. For Version description, enter First version.
b. Choose Publish.
6. Create an alias for the function version:
a. From the Actions menu, choose Create alias, and set the following values:
• For Name, enter GG_HW_Counter.
• For Version, choose 1.
b. Choose Create.
80
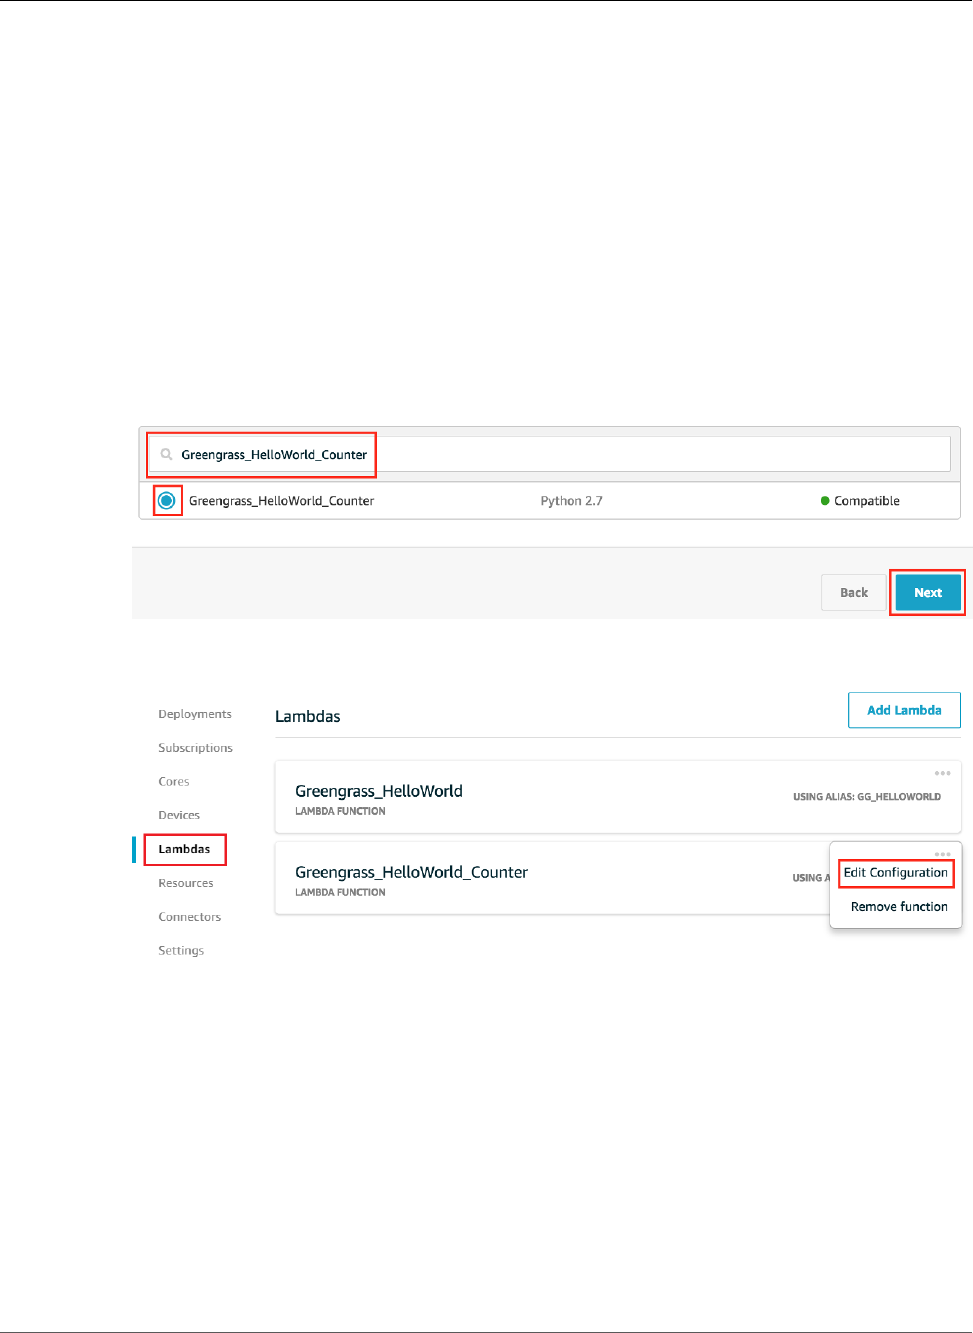
AWS IoT Greengrass Developer Guide
Configure Long-Lived Lambda
Functions for AWS IoT Greengrass
Aliases create a single entity for your Lambda function that AWS IoT Greengrass devices can
subscribe to without having to update subscriptions with Lambda version numbers every time the
function is modified.
Configure Long-Lived Lambda Functions for AWS IoT
Greengrass
You are now ready to configure your Lambda function for AWS IoT Greengrass.
1. In the AWS IoT Core console, under Greengrass, choose Groups, and then choose the group that you
created in Module 2 (p. 55).
2. On the group configuration page, choose Lambdas, and then choose Add Lambda.
3. On the Add a Lambda to your Greengrass Group page, choose Use existing Lambda.
4. On the Use existing Lambda page, choose Greengrass_HelloWorld_Counter, and then choose Next.
5. On the Select a Lambda version page, choose Alias: GG_HW_Counter, and then choose Finish.
6. On the Lambdas page, from the … menu, choose Edit Configuration.
7. On the configuration page, edit the following properties:
• Set Timeout to 25 seconds. This Lambda function sleeps for 20 seconds before each invocation.
• For Lambda lifecycle, choose Make this function long-lived and keep it running indefinitely.
• Accept the default values for all other fields, such as Run as and Containerization.
81
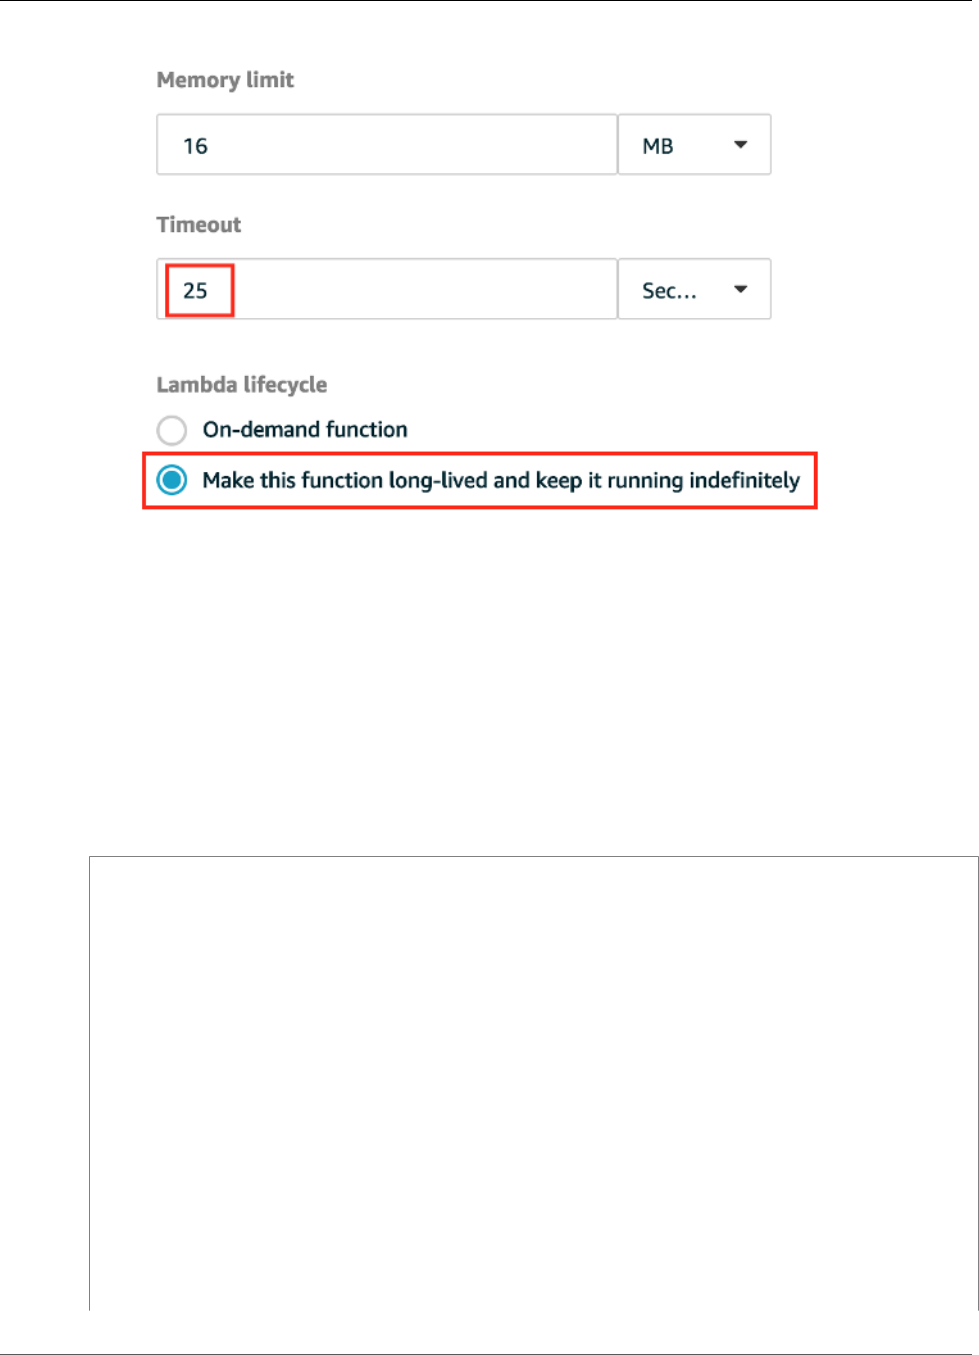
AWS IoT Greengrass Developer Guide
Test Long-Lived Lambda Functions
8. Choose Update.
Test Long-Lived Lambda Functions
A long-lived (p. 156) Lambda function starts automatically when the AWS IoT Greengrass core starts
and runs in a single container (or sandbox). Any variables or preprocessing that are defined outside of the
function handler are retained for every invocation of the function handler. Multiple invocations of the
function handler are queued until earlier invocations have been executed.
The following code is from greengrassHelloWorldCounter.py. (Code comments are removed for
brevity.) This Lambda function is similar to the greengrassHelloWorld.py function from Part 1 of
this module, but it defines a my_counter variable outside of the function handler.
import greengrasssdk
import platform
import time
import json
client = greengrasssdk.client('iot-data')
my_platform = platform.platform()
my_counter = 0
def function_handler(event, context):
global my_counter
my_counter = my_counter + 1
if not my_platform:
client.publish(
topic='hello/world/counter',
payload=json.dumps({'message': 'Hello world! Sent from Greengrass Core.
Invocation Count: {}'.format(my_counter)})
)
else:
client.publish(
topic='hello/world/counter',
82
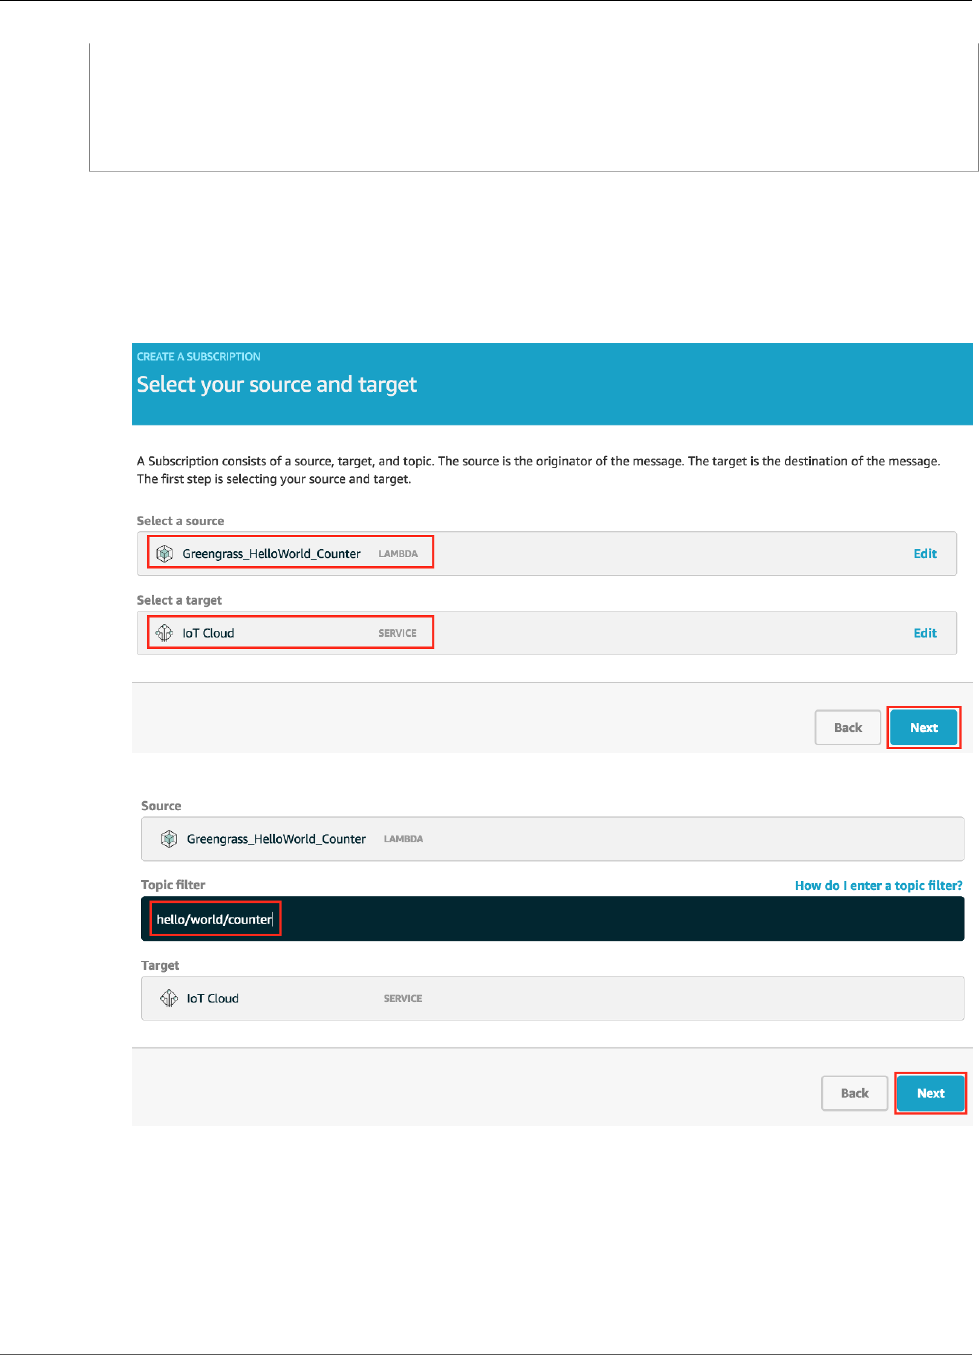
AWS IoT Greengrass Developer Guide
Test Long-Lived Lambda Functions
payload=json.dumps({'message': 'Hello world! Sent from Greengrass Core running
on platform: {}. Invocation Count: {}'
.format(my_platform, my_counter)})
)
time.sleep(20)
return
In this step, you create subscriptions that allow the Lambda function and AWS IoT to exchange MQTT
messages. Then you deploy the group and test the function.
1. On the group configuration page, choose Subscriptions, and then choose Add Subscription.
2. Under Select a source, choose the Lambdas tab, and then choose Greengrass_HelloWorld_Counter.
3. Under Select a target, choose the Services tab, choose IoT Cloud, and then choose Next.
4. For Topic filter, enter hello/world/counter. Choose Next, and then choose Finish.
This single subscription goes in one direction only: from the Greengrass_HelloWorld_Counter
Lambda function to AWS IoT. To trigger this Lambda function from the cloud, you must create a
subscription in the opposite direction.
5. Add another subscription with the IoT Cloud service as the source and the
Greengrass_HelloWorld_Counter Lambda function as the target.
Use hello/world/counter/trigger for the topic filter.
83

AWS IoT Greengrass Developer Guide
Test Long-Lived Lambda Functions
The /trigger extension is used in this topic filter because you created two subscriptions and don't
want them to interfere with each other.
6. Make sure that the AWS IoT Greengrass daemon is running, as described in Deploy Cloud
Configurations to a Core Device (p. 75).
7. On the group configuration page, from Actions, choose Deploy to deploy the group configuration to
your AWS IoT Greengrass core device.
For troubleshooting help, see Troubleshooting (p. 410).
8. After your deployment is complete, return to the AWS IoT Core console home page and choose Test.
9. Configure the following fields:
• For Subscription topic, enter hello/world/counter.
• For Quality of Service, choose 0.
• For MQTT payload display, choose Display payloads as strings.
84
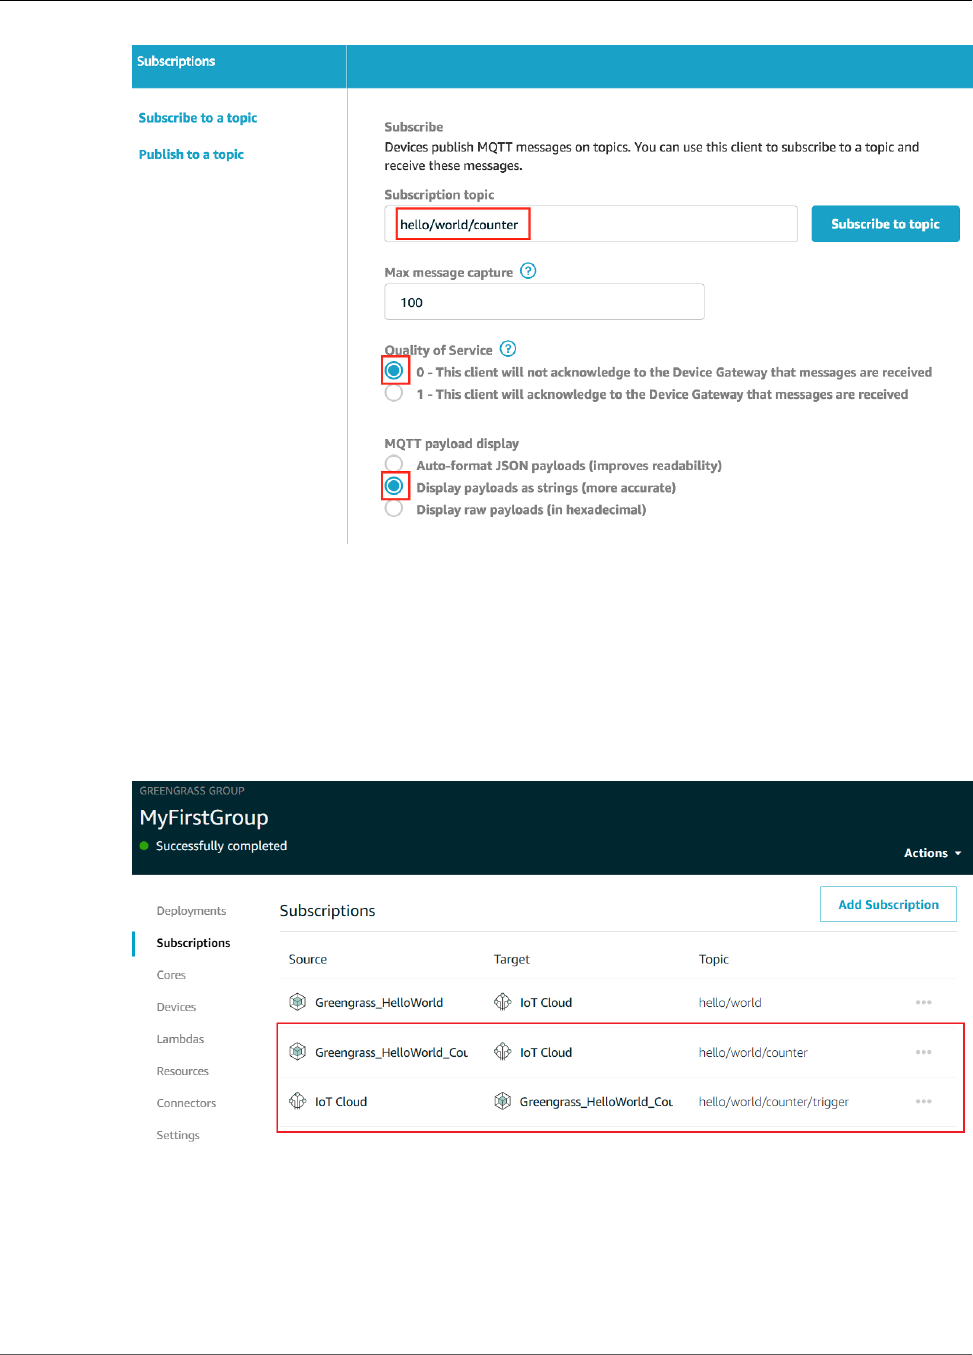
AWS IoT Greengrass Developer Guide
Test Long-Lived Lambda Functions
10. Choose Subscribe to topic.
Unlike Part 1 (p. 63) of this module, you shouldn't see any messages after you subscribe to
hello/world/counter. This is because the greengrassHelloWorldCounter.py code that
publishes to the hello/world/counter topic is inside the function handler, which runs only when
the function is invoked.
In this module, you configured the Greengrass_HelloWorld_Counter Lambda function to be invoked
when it receives an MQTT message on the hello/world/counter/trigger topic. You can see
this by examining the related subscriptions:
The Greengrass_HelloWorld_Counter to IoT Cloud subscription allows the function
to send messages to AWS IoT on the hello/world/counter topic. The IoT Cloud to
Greengrass_HelloWorld_Counter subscription allows AWS IoT to send messages to the function on
the hello/world/counter/trigger topic.
85
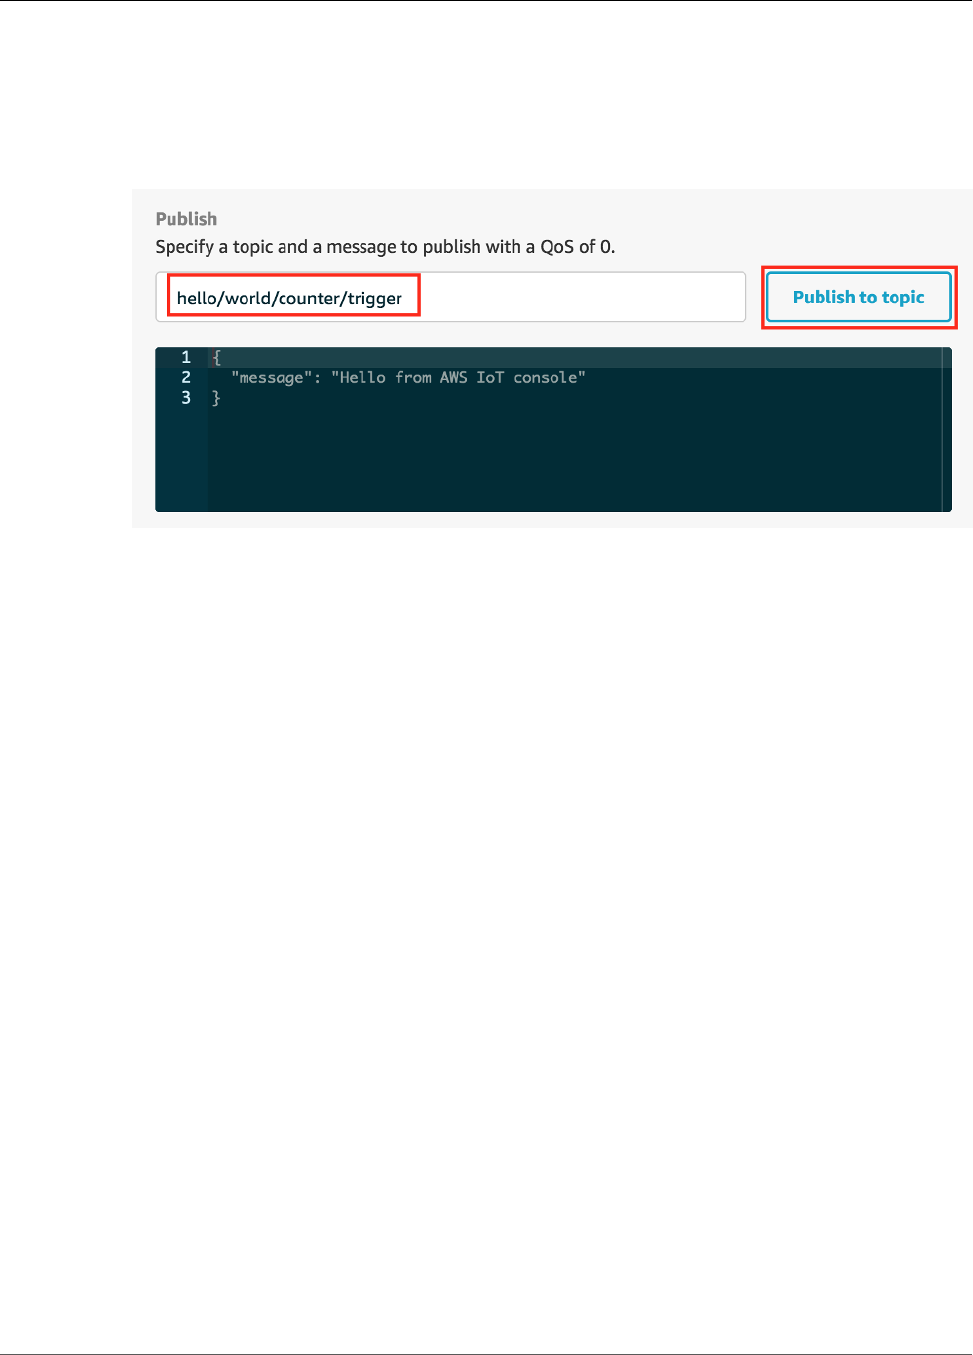
AWS IoT Greengrass Developer Guide
Test Long-Lived Lambda Functions
Note
Greengrass_HelloWorld_Counter ignores the content of received messages. It just runs the
code in function_handler, which sends a message to the hello/world/counter topic.
To review this code, see the greengrassHelloWorldCounter.py (p. 82) code listing.
11. To test the long-lived lifecycle, invoke the Lambda function by publishing a message to the hello/
world/counter/trigger topic. You can use the default message.
Every time a message is published to the hello/world/counter/trigger topic, the my_counter
variable is incremented. This invocation count is shown in the messages sent from the Lambda function.
Because the function handler includes a 20-second sleep cycle (time.sleep(20)), repeatedly triggering
the handler queues up responses from the AWS IoT Greengrass core.
86
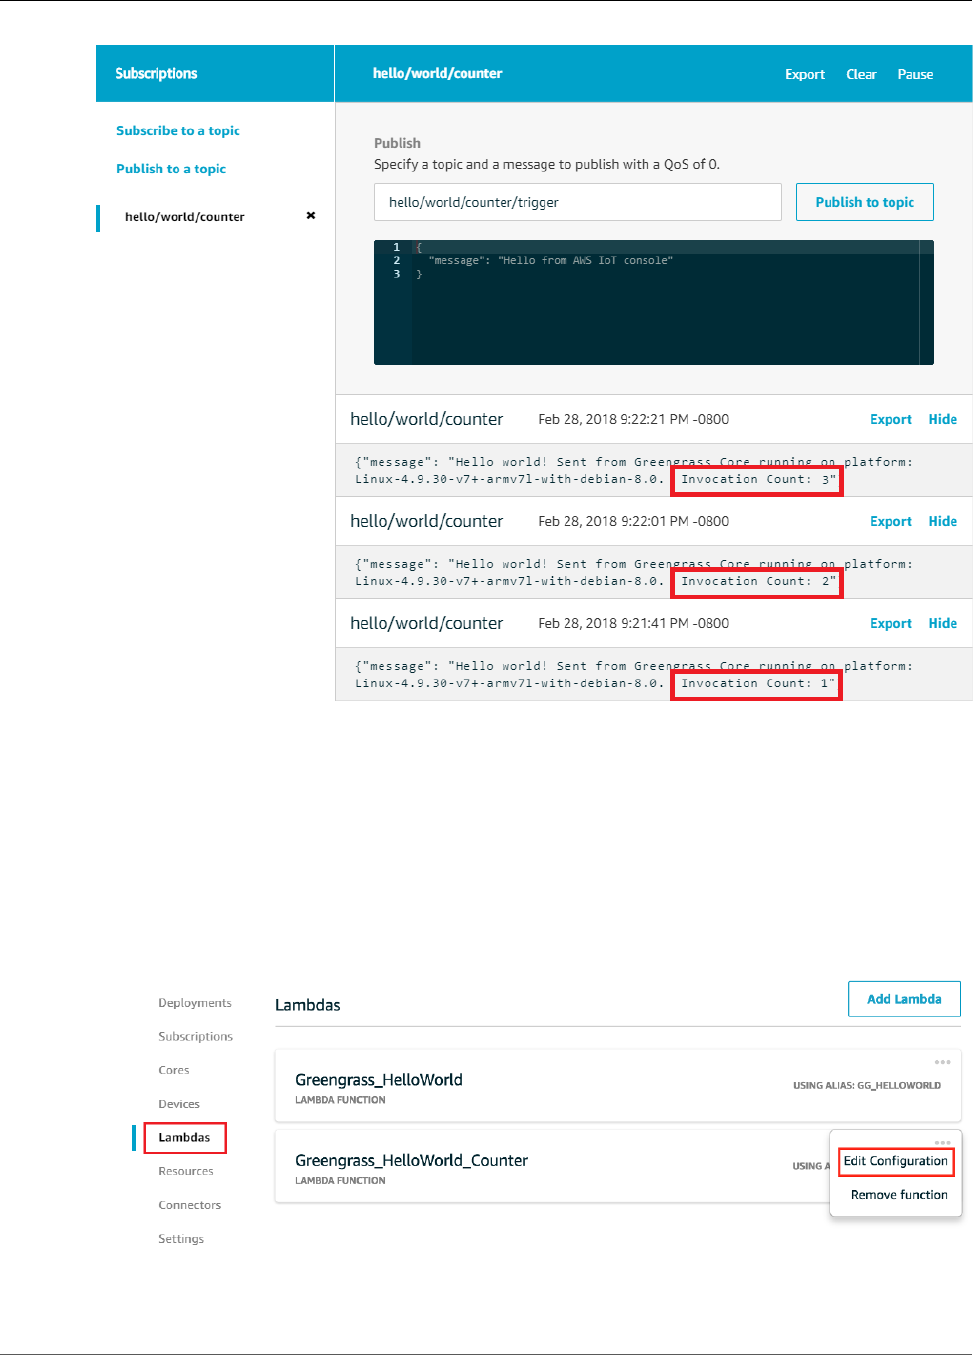
AWS IoT Greengrass Developer Guide
Test On-Demand Lambda Functions
Test On-Demand Lambda Functions
An on-demand (p. 156) Lambda function is similar in functionality to a cloud-based AWS Lambda
function. Multiple invocations of an on-demand Lambda function can run in parallel. An invocation of
the Lambda function creates a separate container to process invocations or reuses an existing container,
if resources permit. Any variables or preprocessing that are defined outside of the function handler are
not retained when containers are created.
1. On the group configuration page, choose Lambdas.
2. For the Greengrass_HelloWorld_Counter Lambda function, choose Edit Configuration.
3. Under Lambda lifecycle, choose On-demand function, and then choose Update.
87

AWS IoT Greengrass Developer Guide
Test On-Demand Lambda Functions
4. On the group configuration page, from Actions, choose Deploy to deploy the group configuration to
your AWS IoT Greengrass core device.
For troubleshooting help, see Troubleshooting (p. 410).
5. After your deployment is complete, return to the AWS IoT Core console home page and choose Test.
6. Configure the following fields:
• For Subscription topic, enter hello/world/counter.
• For Quality of Service, choose 0.
• For MQTT payload display, choose Display payloads as strings.
88

AWS IoT Greengrass Developer Guide
Test On-Demand Lambda Functions
7. Choose Subscribe to topic.
Note
You should not see any messages after you subscribe.
8. To test the on-demand lifecycle, invoke the function by publishing a message to the hello/world/
counter/trigger topic. You can use the default message.
a. Choose Publish to topic three times quickly, within five seconds of each press of the button.
Each publish invokes the function handler and creates a container for each invocation. The
invocation count is not incremented for the three times you triggered the function because each
on-demand Lambda function has its own container/sandbox.
89
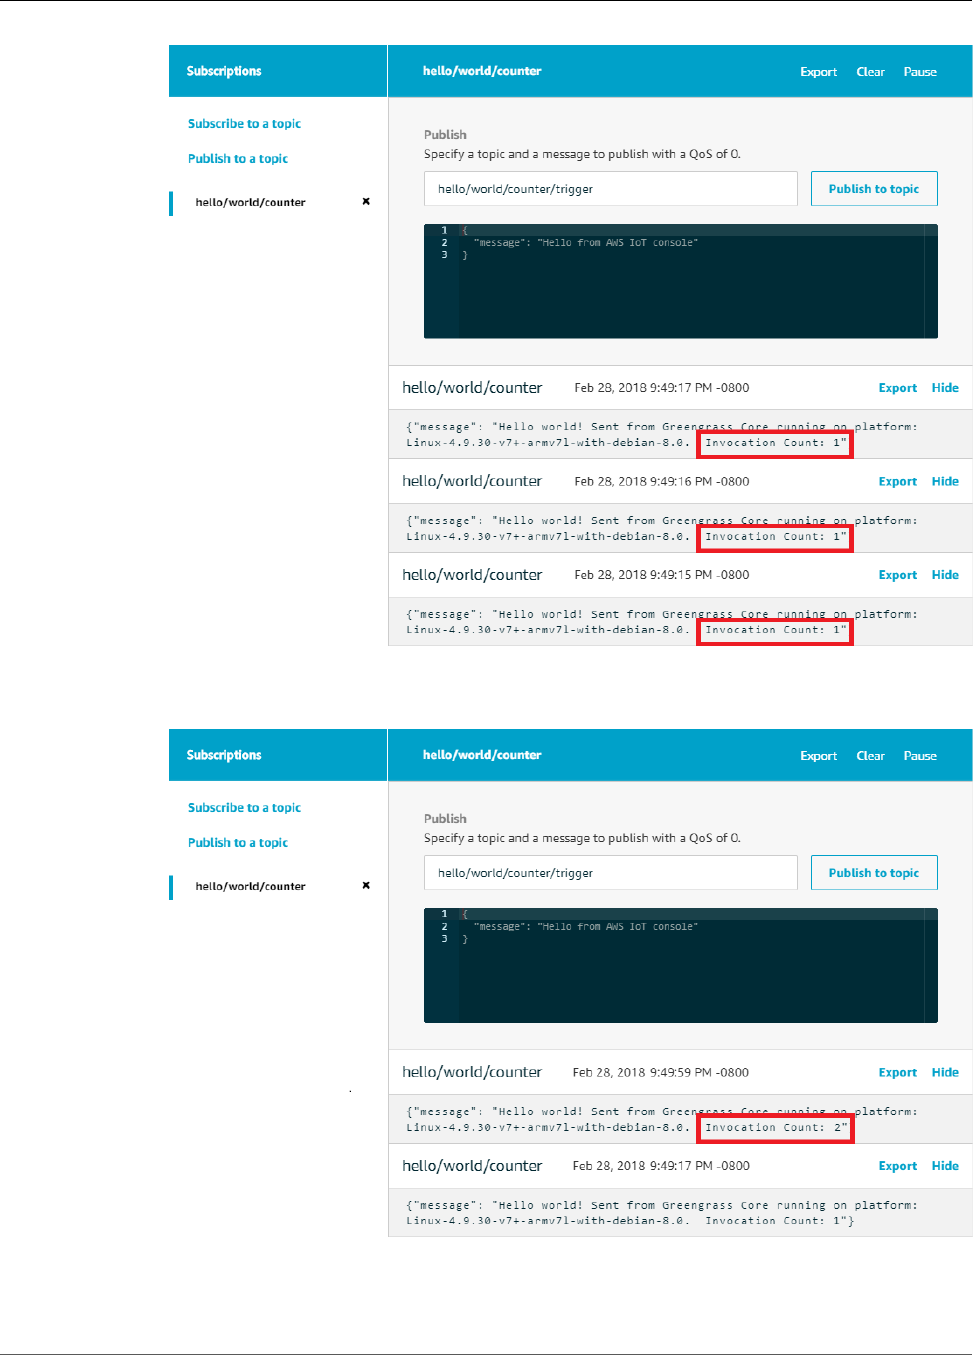
AWS IoT Greengrass Developer Guide
Test On-Demand Lambda Functions
b. After approximately 30 seconds, choose Publish to topic. The invocation count should be
incremented to 2. This shows that a container created from an earlier invocation is being reused,
and that preprocessing variables outside of the function handler were stored.
90

AWS IoT Greengrass Developer Guide
Module 4: Interacting with Devices
in an AWS IoT Greengrass Group
You should now understand the two types of Lambda functions that can run on the AWS IoT Greengrass
core. The next module, Module 4 (p. 91), shows you how devices can interact in an AWS IoT
Greengrass group.
Module 4: Interacting with Devices in an AWS IoT
Greengrass Group
This module shows you how AWS IoT devices can connect to and communicate with an AWS IoT
Greengrass core device. AWS IoT devices that connect to an AWS IoT Greengrass core are part of an AWS
IoT Greengrass group and can participate in the AWS IoT Greengrass programming paradigm. In this
module, one Greengrass device sends a Hello World message to another device in the Greengrass group.
Before you begin, make sure that you have completed Module 1 (p. 45), Module 2 (p. 55), Module 3
(Part 1) (p. 63), and Module 3 (Part 2) (p. 79). You do not need other components or devices.
This module should take less than 30 minutes to complete.
Create AWS IoT Devices in an AWS IoT Greengrass
Group
1. In the AWS IoT Core console, choose Greengrass, choose Groups, and then choose your group.
2. On the group configuration page, choose Devices, and then choose Add your first Device.
91

AWS IoT Greengrass Developer Guide
Create AWS IoT Devices in an AWS IoT Greengrass Group
3. Choose Create New Device.
4. Register this device as HelloWorld_Publisher, and then choose Next.
92
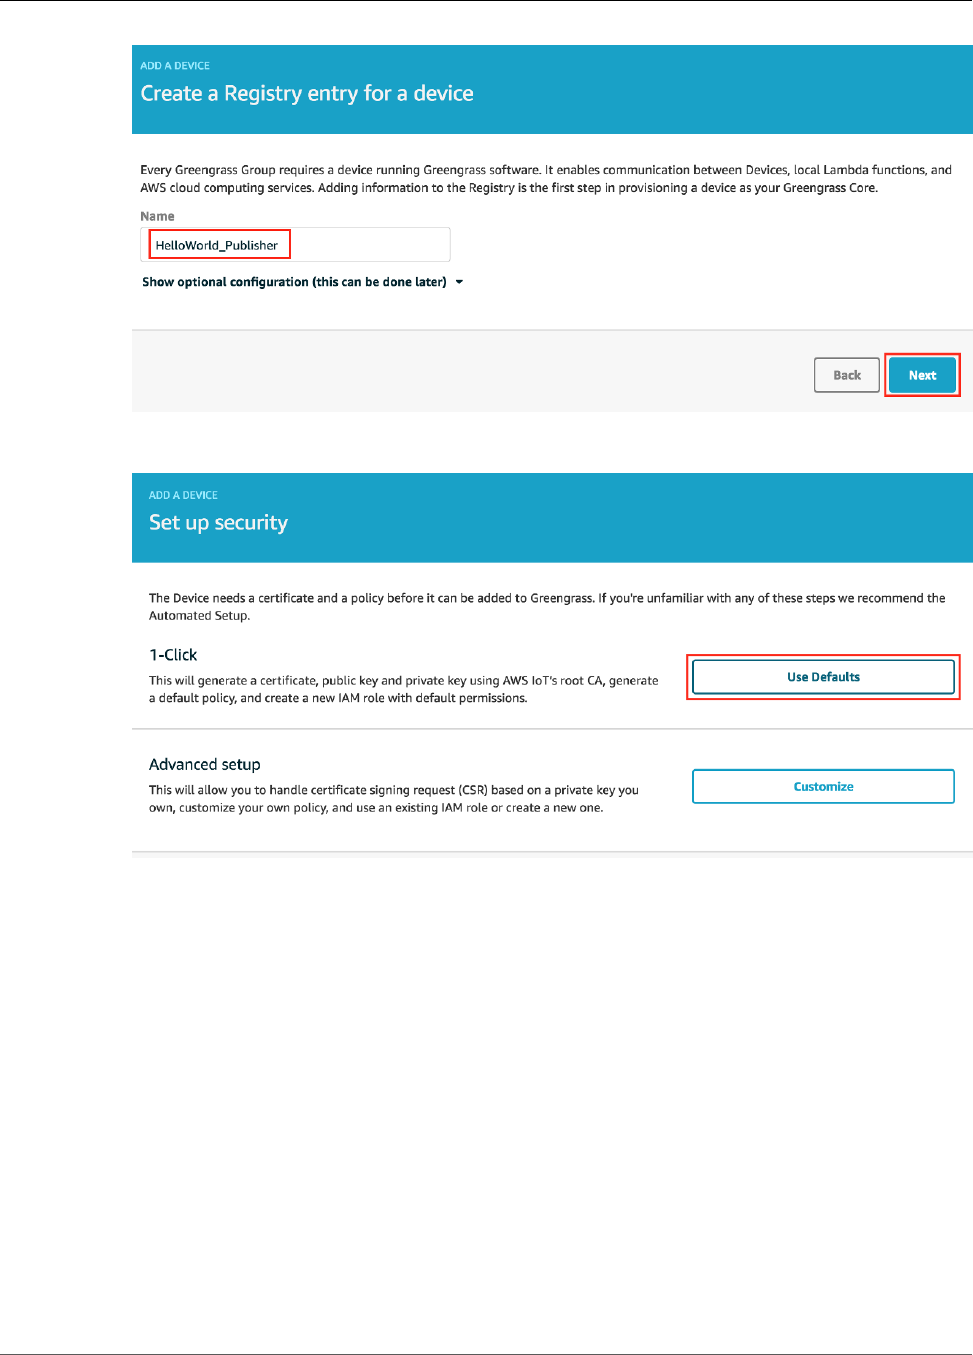
AWS IoT Greengrass Developer Guide
Create AWS IoT Devices in an AWS IoT Greengrass Group
5. For 1-Click, choose Use Defaults. This option generates a device certificate with attached AWS IoT
policy and public and private key.
6. Create a folder on your computer. Download the certificate and keys for your device into the folder.
93

AWS IoT Greengrass Developer Guide
Create AWS IoT Devices in an AWS IoT Greengrass Group
Make a note of the common hash component in the file names for the HelloWorld_Publisher device
certificate and keys (in this example, bcc5afd26d). You need it later. Choose Finish.
7. Decompress the hash-setup.tar.gz file. For example, run the following command:
tar -xzf hash-setup.tar.gz
Note
On Windows, you can decompress .tar.gz files using a tool such as 7-Zip or WinZip.
8. Choose Add Device and repeat steps 3 - 7 to add a new device to the group.
Name this device HelloWorld_Subscriber. Download the certificates and keys for the
device to your computer. Save and decompress them in the same folder that you created for
HelloWorld_Publisher.
Again, make a note of the common hash component in the file names for the
HelloWorld_Subscriber device.
You should now have two devices in your AWS IoT Greengrass group:
94
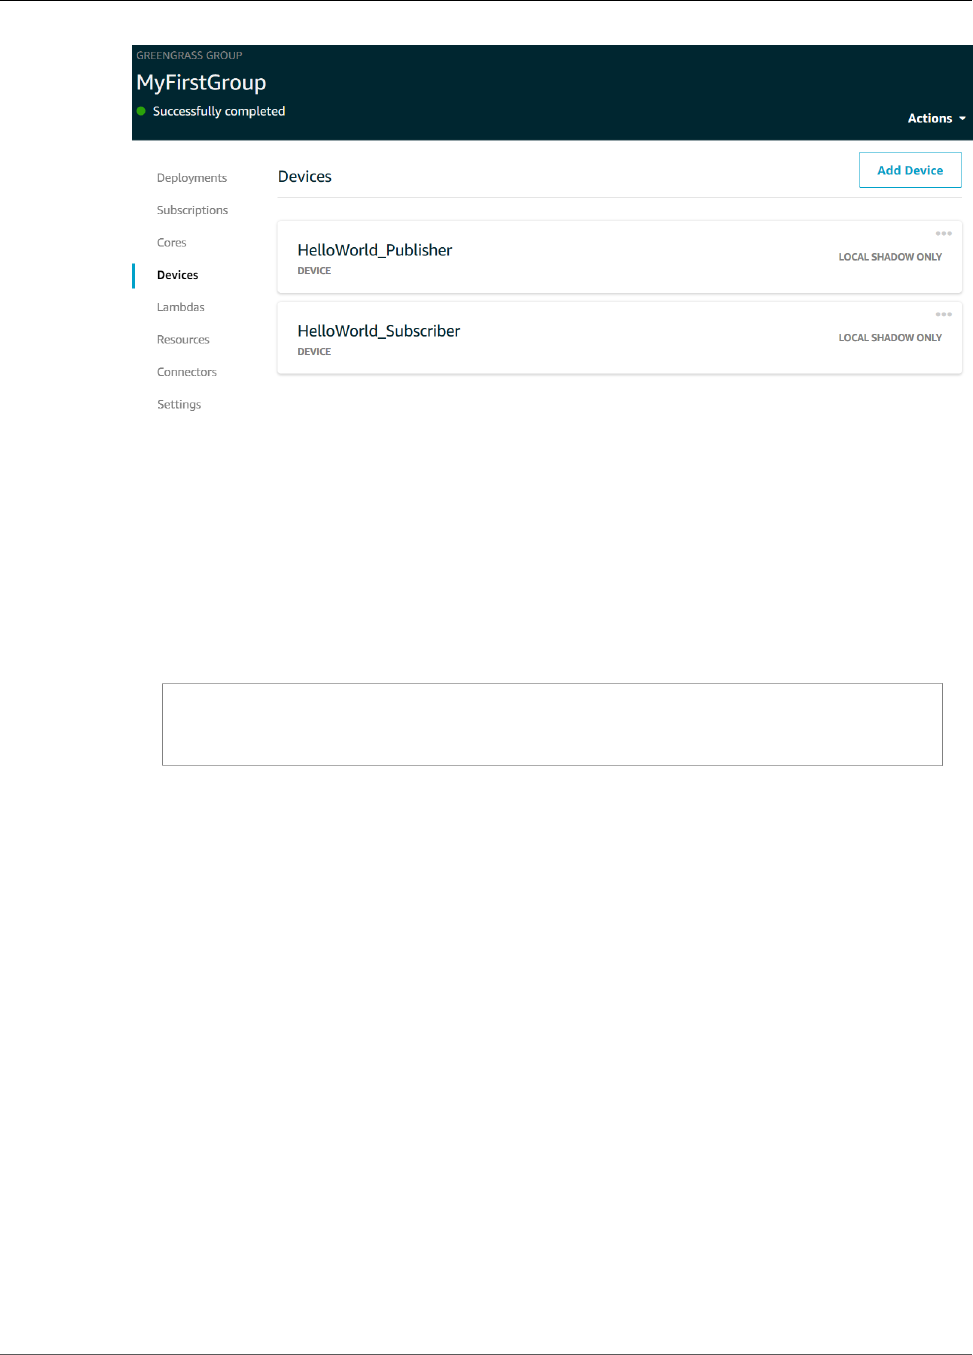
AWS IoT Greengrass Developer Guide
Configure Subscriptions
9. Review the documentation on Server Authentication in AWS IoT Core, follow the links to download
the appropriate CA certificate, and then save it as root-ca-cert.pem in the same folder. For this
module, this certificate and the certificates and keys for both devices should be in one folder on your
computer (not on the AWS IoT Greengrass core device).
Note
If you're using a web browser on the Mac and you see This certificate is already installed
as a certificate authority, open a Terminal window and run the following commands to
download the certificate into the folder that contains the HelloWorld_Publisher and
HelloWorld_Subscriber device certificates and keys:
cd path-to-folder-containing-device-certificates
curl -o ./root-ca-cert.pem https://www.amazontrust.com/repository/
AmazonRootCA1.pem
Run cat root-ca-cert.pem to ensure that the file is not empty. If the file is empty,
check the URL and try the curl command again.
Configure Subscriptions
In this step, you enable the HelloWorld_Publisher device to send MQTT messages to the
HelloWorld_Subscriber device.
1. On the group configuration page, choose Subscriptions, and then choose Add Subscription.
2. Configure the subscription.
• Under Select a source, choose Devices, and then choose HelloWorld_Publisher.
• Under Select a target, choose Devices, and then choose HelloWorld_Subscriber.
• Choose Next.
95

AWS IoT Greengrass Developer Guide
Install the AWS IoT Device SDK for Python
3. For Topic filter, enter hello/world/pubsub, choose Next, and then choose Finish.
Note
You can delete subscriptions from the previous modules. On the group's Subscriptions
page, choose the ellipsis (…) associated with a subscription, and then choose Delete.
4. Make sure that the AWS IoT Greengrass daemon is running, as described in Deploy Cloud
Configurations to a Core Device (p. 75).
5. On the group configuration page, from Actions, choose Deploy to deploy the group configuration to
your AWS IoT Greengrass core device.
For troubleshooting help, see Troubleshooting (p. 410).
The deployment status is displayed below the group name on the page header. To see deployment
details, choose Deployments.
Install the AWS IoT Device SDK for Python
AWS IoT devices can use the AWS IoT Device SDK for Python to communicate with AWS IoT and AWS
IoT Greengrass core devices (using the Python programming language). For more information, including
requirements, see the AWS IoT Device SDK for Python SDK Readme on GitHub.
1. To install the SDK onto your computer, with all required components, choose your operating system:
Windows
1. Open an elevated command prompt and run the following command:
python --version
96
AWS IoT Greengrass Developer Guide
Install the AWS IoT Device SDK for Python
If no version information is returned or if the version number is less than 2.7 for Python
2 or less than 3.3 for Python 3, follow the instructions in Downloading Python to install
Python 2.7+ or Python 3.3+. For more information, see Using Python on Windows.
2. Using a web browser, download the AWS IoT Device SDK for Python zip file and and save
it as aws-iot-device-sdk-python-latest.zip (this should be the default name). The
zip file is typically be saved to your Downloads folder. Decompress aws-iot-device-
sdk-python-latest.zip to an appropriate location, such as your home directory
(for example, cd %HOME%). Make a note of the file path to the decompressed aws-iot-
device-sdk-python-latest folder. In the next step, this file path is indicated by path-
to-SDK-folder.
3. From the elevated command prompt, run the following:
cd path-to-SDK-folder
python setup.py install
macOS
1. Open a Terminal window and run the following command:
python --version
If no version information is returned or if the version number is less that 2.7 for Python 2 or
less than 3.3 for Python 3, follow the instructions in Downloading Python to install Python
2.7+ or Python 3.3+ . For more information, see Using Python on a Macintosh.
2. In the Terminal window, run the following commands to determine the OpenSSL version:
python
>>> import ssl
>>> print ssl.OPENSSL_VERSION
Make a note of the OpenSSL version value.
Note
If you're running Python 3, use print(ssl.OPENSSL_VERSION).
To close the Python shell, run the following command:
>>> exit()
If the OpenSSL version is 1.0.1 or later, skip to step 3. Otherwise, follow these steps:
• From the Terminal window, run the following command to determine if the computer is
using Simple Python Version Management:
which pyenv
If a file path is returned, then choose the Using pyenv tab. If nothing is returned, choose
the Not using pyenv tab.
97
AWS IoT Greengrass Developer Guide
Install the AWS IoT Device SDK for Python
Using pyenv
1. See Python Releases for Mac OS X (or similar) to determine the latest stable Python
version. In the following example, this value is indicated by latest-Python-
version.
2. From the Terminal window, run the following commands:
pyenv install latest-Python-version
pyenv global latest-Python-version
For example, if the latest version for Python 2 is 2.7.14, then these commands are:
pyenv install 2.7.14
pyenv global 2.7.14
3. Close and then reopen the Terminal window and then run the following commands:
python
>>> import ssl
>>> print ssl.OPENSSL_VERSION
The OpenSSL version should be at least 1.0.1. If the version is less than 1.0.1, then
the update failed. Check the Python version value used in the pyenv install and
pyenv global commands and try again.
4. Run the following command to exit the Python shell:
>>> exit()
Not using pyenv
1. From a Terminal window, run the following command to determine if brew is
installed:
which brew
If a file path is not returned, install brew as follows:
/usr/bin/ruby -e "$(curl -fsSL https://raw.githubusercontent.com/
Homebrew/install/master/install)"
Note
Follow the installation prompts. The download for the Xcode command line
tools can take some time.
2. Run the following commands:
brew update
brew install openssl
brew install python@2
The AWS IoT Device SDK for Python requires OpenSSL version 1.0.1 (or later)
compiled with the Python executable. The brew install python command installs
a python2 executable that meets this requirement. The python2 executable is
98

AWS IoT Greengrass Developer Guide
Install the AWS IoT Device SDK for Python
installed in the /usr/local/bin directory, which should be part of the PATH
environment variable. To confirm, run the following command:
python2 --version
If python2 version information is provided, skip to the next step. Otherwise,
permanently add the /usr/local/bin path to your PATH environment variable by
appending the following line to your shell profile:
export PATH="/usr/local/bin:$PATH"
For example, if you're using .bash_profile or do not yet have a shell profile, run
the following command from a Terminal window:
echo 'export PATH="/usr/local/bin:$PATH"' >> ~/.bash_profile
Next, source your shell profile and confirm that python2 --version provides
version information. For example, if you're using .bash_profile, run the following
commands:
source ~/.bash_profile
python2 --version
python2 version information should be returned.
3. Append the following line to your shell profile:
alias python="python2"
For example, if you're using .bash_profile or do not yet have a shell profile, run
the following command:
echo 'alias python="python2"' >> ~/.bash_profile
4. Next, source your shell profile. For example, if you're using .bash_profile, run the
following command:
source ~/.bash_profile
Invoking the python command runs the Python executable that contains the
required OpenSSL version (python2) .
5. Run the following commands:
python
>>> import ssl
>>> print ssl.OPENSSL_VERSION
The OpenSSL version should be 1.0.1 or later.
6. To exit the Python shell, run the following command:
>>> exit()
3. Run the following commands to install the AWS IoT Device SDK for Python:
99
AWS IoT Greengrass Developer Guide
Install the AWS IoT Device SDK for Python
cd ~
git clone https://github.com/aws/aws-iot-device-sdk-python.git
cd aws-iot-device-sdk-python
python setup.py install
UNIX-like system
1. From a terminal window, run the following command:
python --version
If no version information is returned or if the version number is less than 2.7 for Python
2 or less than 3.3 for Python 3, follow the instructions in Downloading Python to install
Python 2.7+ or Python 3.3+. For more information, see Using Python on Unix platforms.
2. In the terminal, run the following commands to determine the OpenSSL version:
python
>>> import ssl
>>> print ssl.OPENSSL_VERSION
Make a note of the OpenSSL version value.
To close the Python shell, run the following command:
>>> exit()
If the OpenSSL version is 1.0.1 or later, skip to the next step. Otherwise, run the
command(s) to update OpenSSL for your distribution (for example, sudo yum update
openssl, sudo apt-get update, and so on).
Confirm that the OpenSSL version is 1.0.1 or later by running the following commands:
python
>>> import ssl
>>> print ssl.OPENSSL_VERSION
>>> exit()
3. Run the following commands to install the AWS IoT Device SDK for Python:
cd ~
git clone https://github.com/aws/aws-iot-device-sdk-python.git
cd aws-iot-device-sdk-python
sudo python setup.py install
2. After the AWS IoT Device SDK for Python is installed, navigate to the samples folder, open the
greengrass folder, and then copy the basicDiscovery.py file to the folder that contains the
HelloWorld_Publisher and HelloWorld_Subscriber device certificates files, as shown in the following
example. (The hash component in your file names are different.)
100
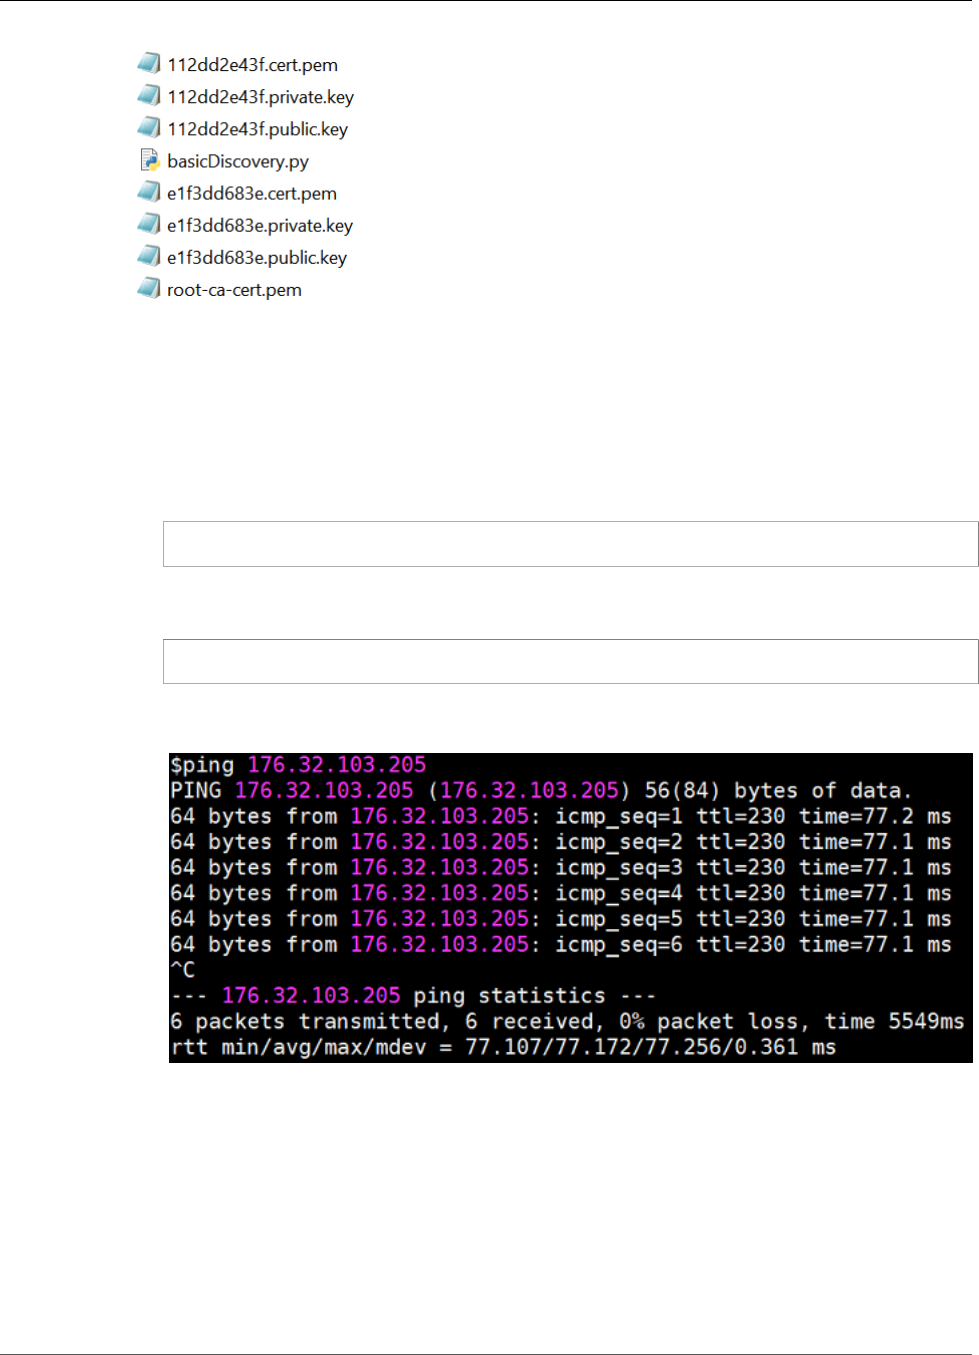
AWS IoT Greengrass Developer Guide
Test Communications
Test Communications
1. Make sure that your computer and the AWS IoT Greengrass core device are connected to the internet
using the same network.
a. On the AWS IoT Greengrass core device, run the following command to find its IP address.
hostname -I
b. On your computer, run the following command using the IP address of the core. You can use
Ctrl + C to stop the ping command.
ping IP-address
Output similar to the following indicates successful communication between the computer and
the AWS IoT Greengrass core device (0% packet loss):
Note
If you're unable to ping an EC2 instance that's running AWS IoT Greengrass, make
sure that the inbound security group rules for the instance allow ICMP traffic for Echo
Request messages. For more information, see Adding Rules to a Security Group in the
Amazon EC2 User Guide for Linux Instances.
On Windows host computers, in the Windows Firewall with Advanced Security app,
you might also need to enable an inbound rule that allows inbound echo requests (for
example, File and Printer Sharing (Echo Request - ICMPv4-In)), or create one.
2. Get your AWS IoT endpoint.
101

AWS IoT Greengrass Developer Guide
Test Communications
a. On the home page of the AWS IoT Core console, choose Settings.
b. Under Settings, make a note of the value of Endpoint. You use this value to replace the
AWS_IOT_ENDPOINT placeholder in the commands in the following steps.
102
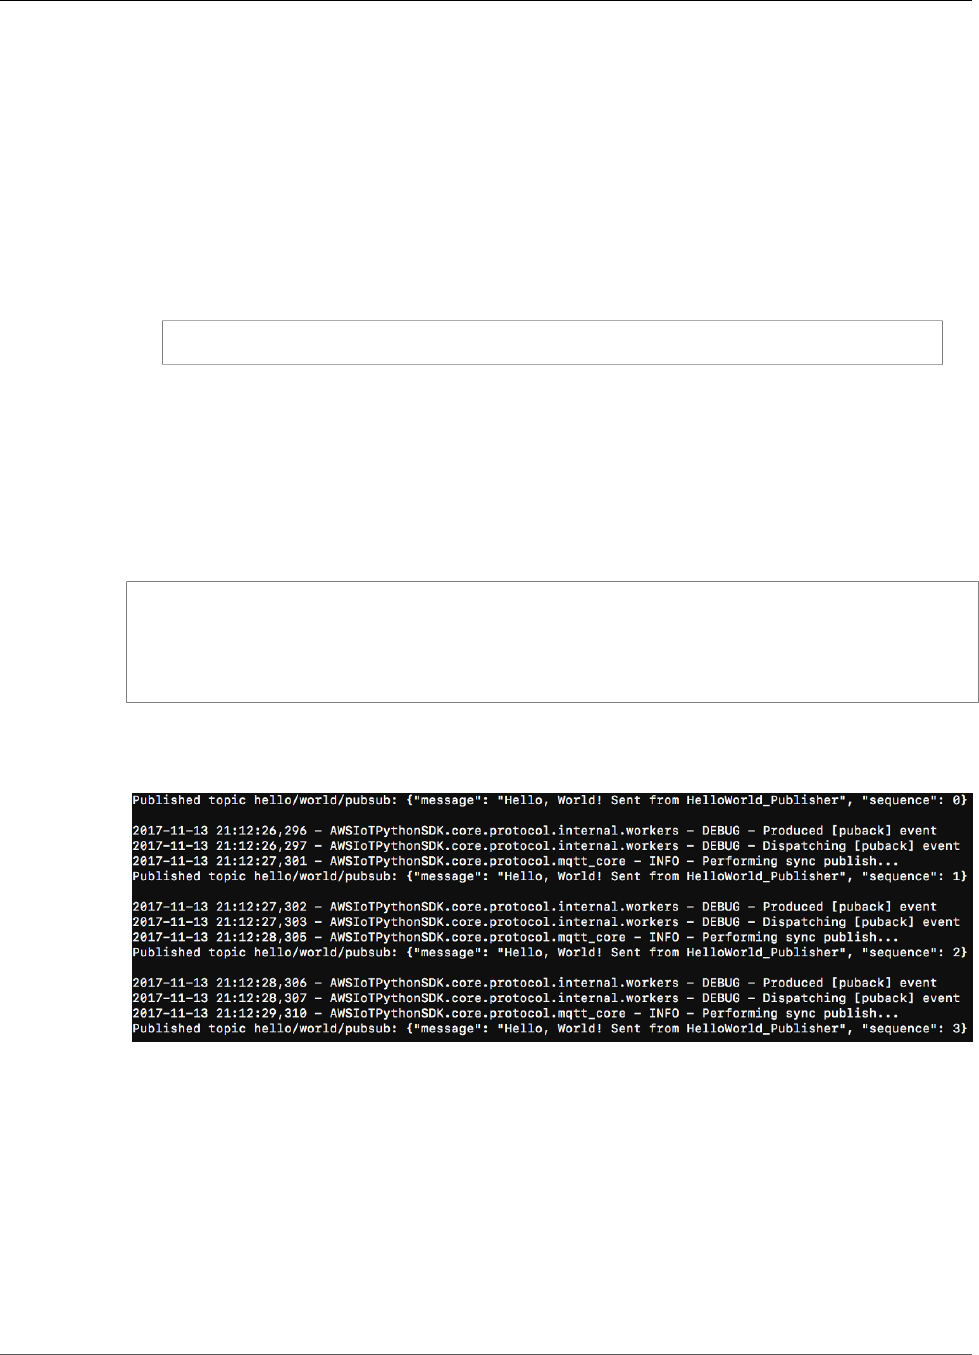
AWS IoT Greengrass Developer Guide
Test Communications
3. On your computer (not the AWS IoT Greengrass core device), open two command-line (terminal or
command prompt) windows. One window represents the HelloWorld_Publisher device and the other
represents the HelloWorld_Subscriber device.
Upon execution, basicDiscovery.py attempts to collect information on the location of the AWS
IoT Greengrass core at its endpoints. This information is stored after the device has discovered and
successfully connected to the core. This allows future messaging and operations to be executed
locally (without the need for an internet connection).
Note
You can run the following command from the folder that contains the
basicDiscovery.py file for detailed script usage information:
python basicDiscovery.py --help
4. From the HelloWorld_Publisher device window, run the following commands.
• Replace path-to-certs-folder with the path to the folder that contains the certificates, keys,
and basicDiscovery.py.
• Replace AWS_IOT_ENDPOINT with your endpoint.
• Replace the two publisher instances with the hash in the file name for your
HelloWorld_Publisher device.
cd path-to-certs-folder
python basicDiscovery.py --endpoint AWS_IOT_ENDPOINT --rootCA root-ca-cert.pem --
cert publisher.cert.pem --key publisher.private.key --thingName HelloWorld_Publisher
--topic 'hello/world/pubsub' --mode publish --message 'Hello, World! Sent from
HelloWorld_Publisher'
You should see output similar to the following, which includes entries such as Published
topic 'hello/world/pubsub': {"message": "Hello, World! Sent from
HelloWorld_Publisher", "sequence": 1}.
Note
If the script returns an error: unrecognized arguments message, change the single
quotation marks to double quotation marks for the --topic and --message parameters
and run the command again.
5. From the HelloWorld_Subscriber device window, run the following commands.
• Replace path-to-certs-folder with the path to the folder that contains the certificates, keys,
and basicDiscovery.py.
• Replace AWS_IOT_ENDPOINT with your endpoint.
• Replace the two subscriber instances with the hash in the file name for your
HelloWorld_Subscriber device.
103
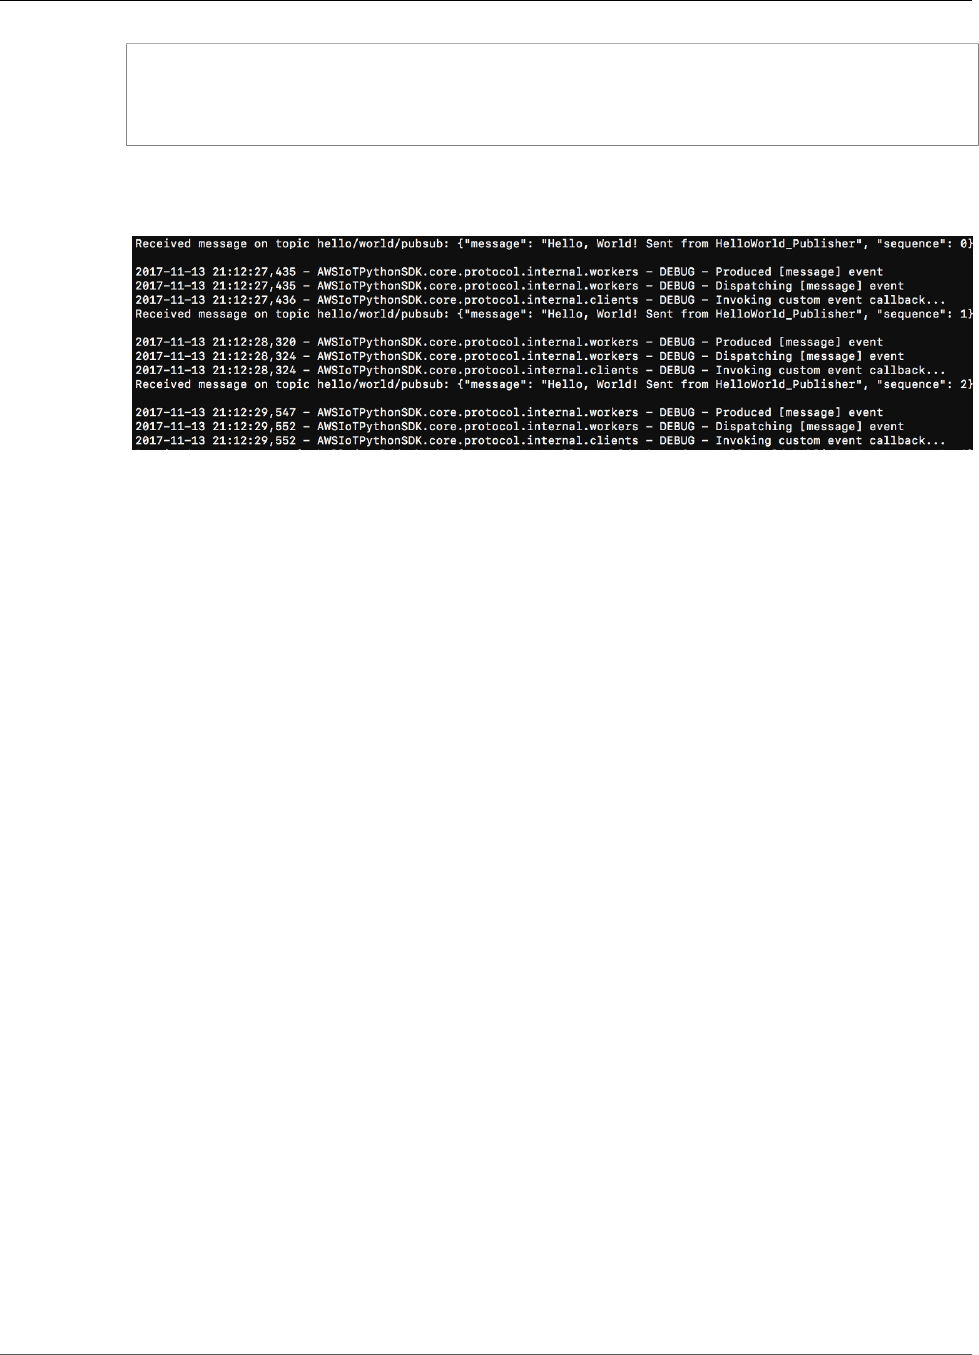
AWS IoT Greengrass Developer Guide
Module 5: Interacting with Device Shadows
cd path-to-certs-folder
python basicDiscovery.py --endpoint AWS_IOT_ENDPOINT --rootCA root-ca-cert.pem --
cert subscriber.cert.pem --key subscriber.private.key --thingName HelloWorld_Subscriber
--topic 'hello/world/pubsub' --mode subscribe
You should see the following output, which includes entries such as Received message
on topic hello/world/pubsub: {"message": "Hello, World! Sent from
HelloWorld_Publisher", "sequence": 1}.
Close the HelloWorld_Publisher window to stop messages from accruing in the HelloWorld_Subscriber
window.
Testing on a corporate network might interfere with connecting to the core. As a workaround, you can
manually enter the endpoint. This ensures that the basicDiscovery.py script connects to the correct
IP address of the AWS IoT Greengrass core device.
To manually enter the endpoint
1. Choose Greengrass, choose Groups, and then choose your group.
2. Choose Settings.
3. For Local connection detection, choose Manually manage connection information, and then
choose View Cores for specific endpoint information.
4. Choose your core, and then choose Connectivity.
5. Choose Edit and make sure that you have only one endpoint value. This value must be the IP address
endpoint for port 8883 of your AWS IoT Greengrass core device (for example, 192.168.1.4).
6. Choose Update.
Module 5: Interacting with Device Shadows
This advanced module shows you how AWS IoT Greengrass devices can interact with AWS IoT device
shadows in an AWS IoT Greengrass group. A shadow is a JSON document that is used to store current or
desired state information for a thing. In this module, you discover how one AWS IoT Greengrass device
(GG_Switch) can modify the state of another AWS IoT Greengrass device (GG_TrafficLight) and how
these states can be synced to the AWS IoT Greengrass cloud:
104
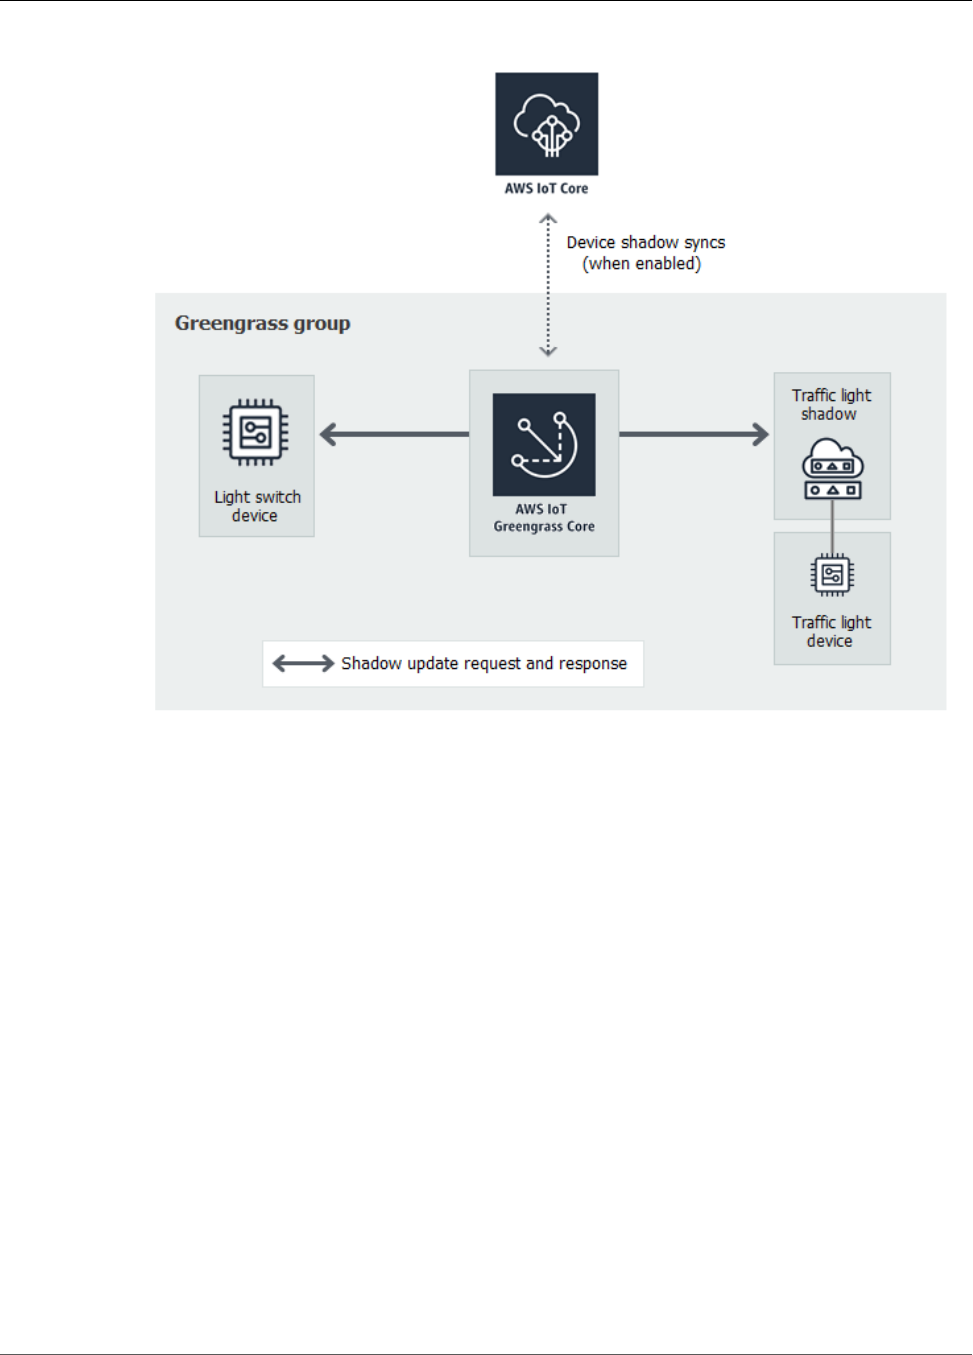
AWS IoT Greengrass Developer Guide
Configure Devices and Subscriptions
Before you begin, make sure that you have completed Module 1 (p. 45), Module 2 (p. 55), Module 3
(Part 1) (p. 63), and Module 3 (Part 2) (p. 79). You should also understand how to connect devices
to an AWS IoT Greengrass core (Module 4 (p. 91)). You do not need other components or devices.
This module should take about 30 minutes to complete.
Configure Devices and Subscriptions
Shadows can be synced to AWS IoT when the AWS IoT Greengrass core is connected to the internet. In
this module, you first use local shadows without syncing to the cloud. Then, you enable cloud syncing.
Each device has its own shadow. For more information, see Device Shadow Service for AWS IoT in the
AWS IoT Developer Guide.
1. From the Devices page, add two new devices in your AWS IoT Greengrass group. For detailed
steps of this process, see the section called “Create AWS IoT Devices in an AWS IoT Greengrass
Group” (p. 91).
• Name the devices GG_Switch and GG_TrafficLight.
• Generate and download the 1-Click default security resources for both devices.
• Make a note of the hash component in the file names of the security resources for the devices. You
use these values later.
105

AWS IoT Greengrass Developer Guide
Configure Devices and Subscriptions
2. Decompress the downloaded certificates and keys for both devices into a single folder on your
computer. For example, run the following command for each .tar.gz file.
tar -xzf hash-setup.tar.gz
Note
On Windows, you can decompress .tar.gz files using a tool such as 7-Zip or WinZip.
3. Copy the root-ca-cert.pem file that you downloaded in the previous module (p. 95) to this
folder.
4. Make sure that the devices are set to use local shadows. If not, choose the ellipsis (…), and then
choose Make local only.
5. The function code used in this module requires that you manually configure the core's endpoint.
a. On the group configuration page, choose Settings.
b. For Local connection detection, choose Manually manage connection information, and then
choose View Cores for specific endpoint information.
c. Choose your core, and then choose Connectivity.
d. Choose Edit and make sure that you have only one endpoint value. This value must be the
IP address endpoint for port 8883 of your AWS IoT Greengrass core device (for example,
192.168.1.4).
e. Choose Update.
6. Add the subscriptions in the following table to your group. For example, to create the first
subscription:
106
AWS IoT Greengrass Developer Guide
Configure Devices and Subscriptions
a. On the group configuration page, choose Subscriptions, and then choose Add subscription.
b. Under Select a source, choose Devices, and then choose GG_Switch.
c. Under Select a target, choose Services, and then choose Local Shadow Service.
d. Choose Next.
e. For Topic filter, enter $aws/things/GG_TrafficLight/shadow/update
f. Choose Next, and then choose Finish.
The topics must be entered exactly as shown in the table. Although it's possible to use wildcards to
consolidate some of the subscriptions, we don't recommend this practice. For more information, see
Shadow MQTT Topics in the AWS IoT Developer Guide.
Source Target Topic Notes
GG_Switch Local Shadow Service $aws/things/
GG_TrafficLight/
shadow/update
The GG_Switch sends
an update request to
update topic.
Local Shadow Service GG_Switch $aws/things/
GG_TrafficLight/
shadow/update/
accepted
The GG_Switch needs
to know whether the
update request was
accepted.
Local Shadow Service GG_Switch $aws/things/
GG_TrafficLight/
shadow/update/
rejected
The GG_Switch needs
to know whether the
update request was
rejected.
GG_TrafficLight Local Shadow Service $aws/things/
GG_TrafficLight/
shadow/update
The GG_TrafficLight
sends an update of its
state to the update
topic.
Local Shadow Service GG_TrafficLight $aws/things/
GG_TrafficLight/
shadow/update/delta
The Local Shadow
Service sends a
received update
to GG_TrafficLight
through the delta
topic.
Local Shadow Service GG_TrafficLight $aws/things/
GG_TrafficLight/
shadow/update/
accepted
The GG_TrafficLight
needs to know
whether its state
update was accepted.
Local Shadow Service GG_TrafficLight $aws/things/
GG_TrafficLight/
shadow/update/
rejected
The GG_TrafficLight
needs to know
whether its state
update was rejected.
The new subscriptions are displayed on the Subscriptions page. To see the full topic path of a
subscription, hover your mouse over the Topic column.
107
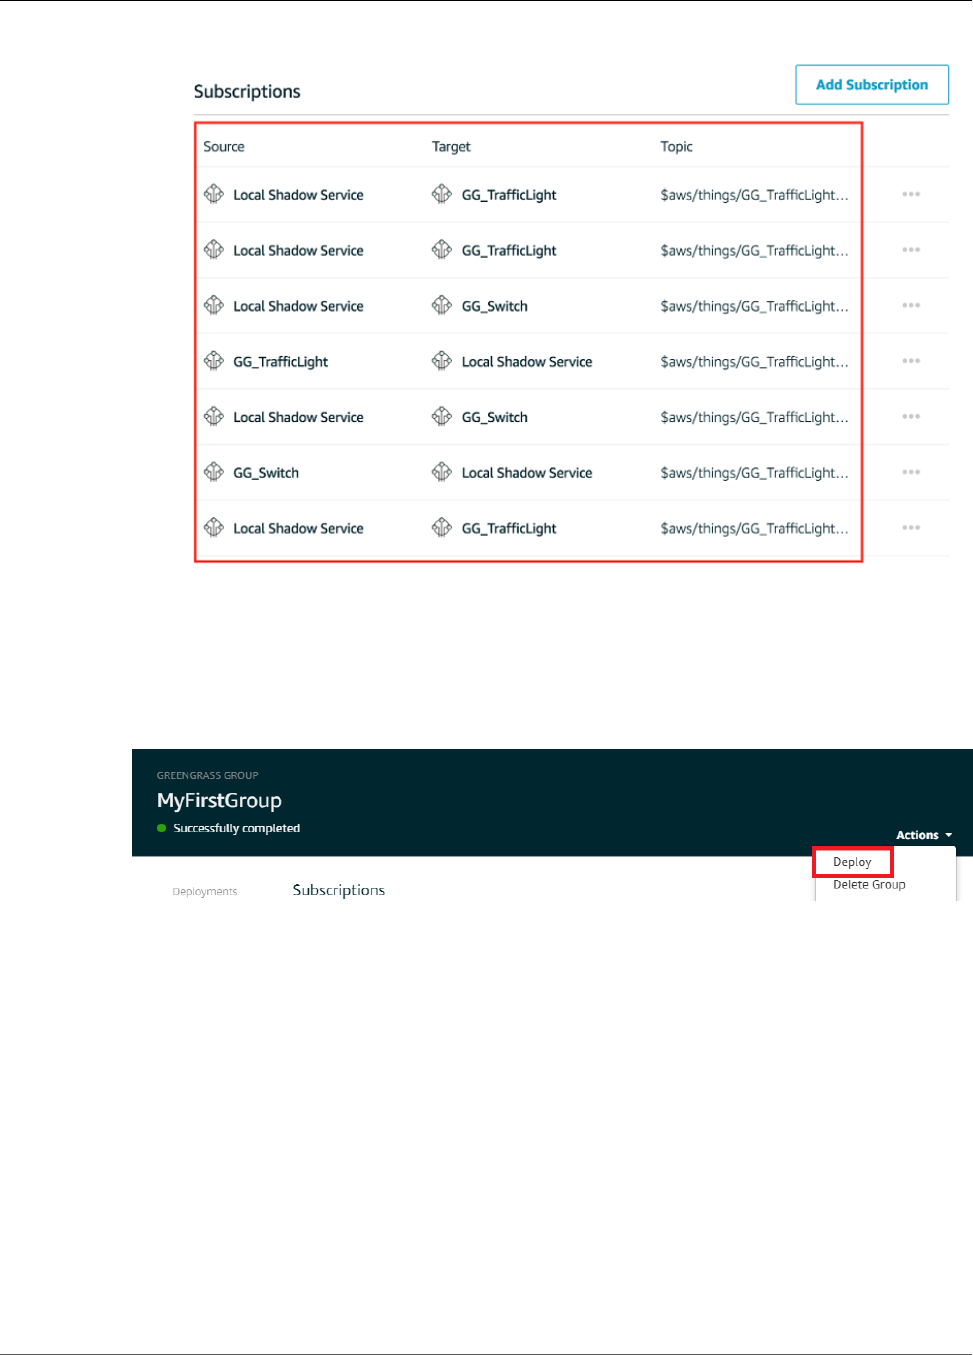
AWS IoT Greengrass Developer Guide
Download Required Files
Note
For information about the $ character, see Reserved Topics.
7. Make sure that the AWS IoT Greengrass daemon is running, as described in Deploy Cloud
Configurations to a Core Device (p. 75).
8. On the group configuration page, from Actions, choose Deploy to deploy the group configuration to
your AWS IoT Greengrass core device.
For troubleshooting help, see Troubleshooting (p. 410).
Download Required Files
1. If you haven’t already done so, install the AWS IoT Device SDK for Python. For instructions, see step
1 in the section called “Install the AWS IoT Device SDK for Python” (p. 96).
This SDK is used by AWS IoT devices to communicate with AWS IoT and with AWS IoT Greengrass
core devices.
2. From the AWS IoT Greengrass samples repository on GitHub, download the lightController.py
and trafficLight.py files to your computer. Save them in the folder that contains the GG_Switch
and GG_TrafficLight device certificates and keys.
The lightController.py script corresponds to the GG_Switch device, and the
trafficLight.py script corresponds to the GG_TrafficLight device.
108
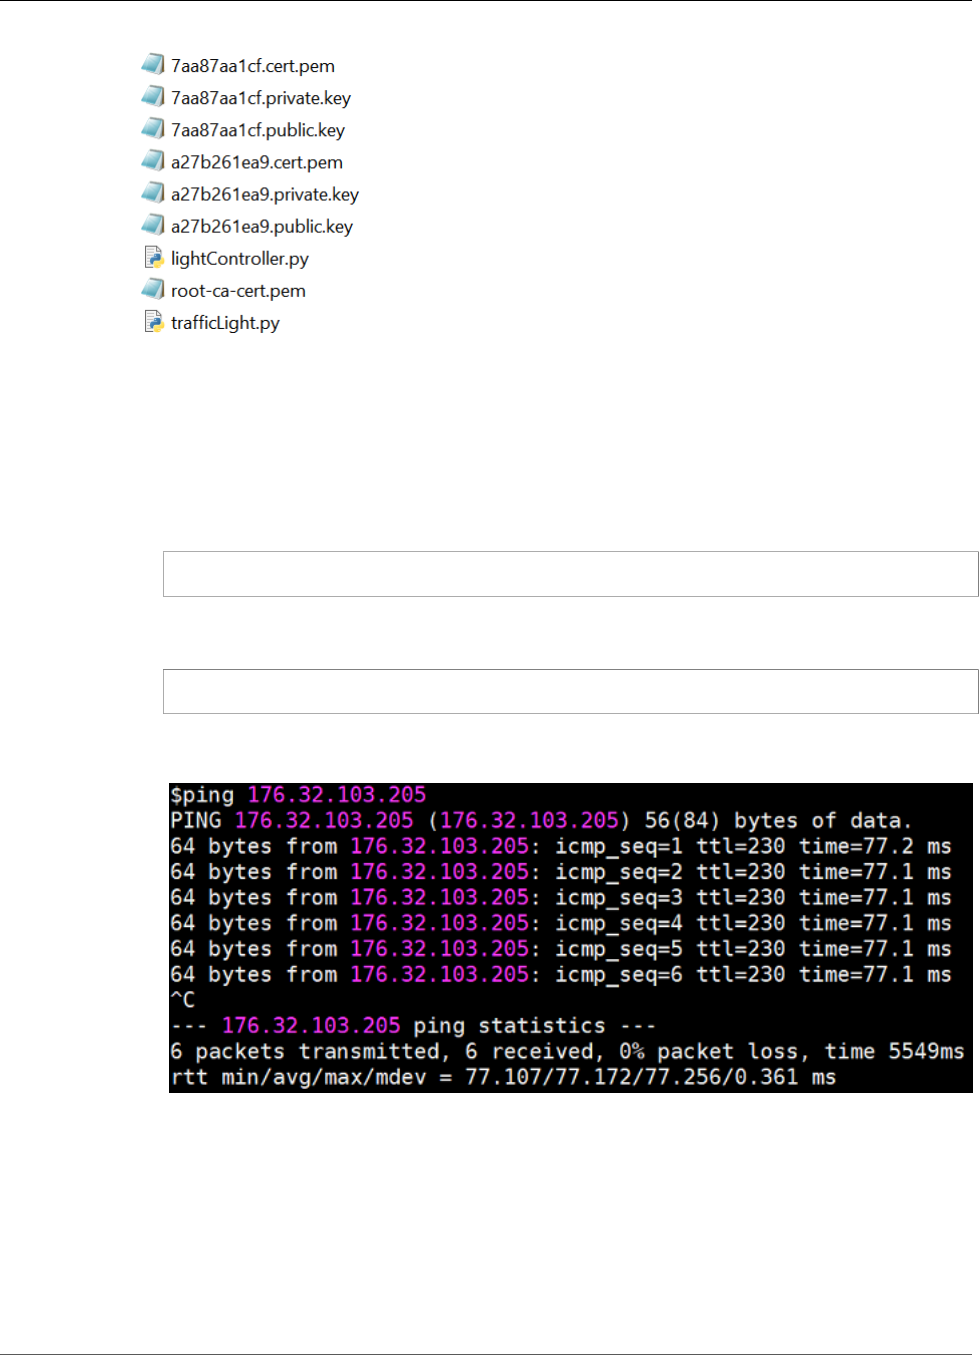
AWS IoT Greengrass Developer Guide
Test Communications (Device Syncs Disabled)
Test Communications (Device Syncs Disabled)
1. Make sure that your computer and the AWS IoT Greengrass core device are connected to the internet
using the same network.
a. On the AWS IoT Greengrass core device, run the following command to find its IP address.
hostname -I
b. On your computer, run the following command using the IP address of the core. You can use
Ctrl + C to stop the ping command.
ping IP-address
Output similar to the following indicates successful communication between the computer and
the AWS IoT Greengrass core device (0% packet loss):
Note
If you're unable to ping an EC2 instance that's running AWS IoT Greengrass, make
sure that the inbound security group rules for the instance allow ICMP traffic for Echo
Request messages. For more information, see Adding Rules to a Security Group in the
Amazon EC2 User Guide for Linux Instances.
On Windows host computers, in the Windows Firewall with Advanced Security app,
you might also need to enable an inbound rule that allows inbound echo requests (for
example, File and Printer Sharing (Echo Request - ICMPv4-In)), or create one.
2. Get your AWS IoT endpoint.
109
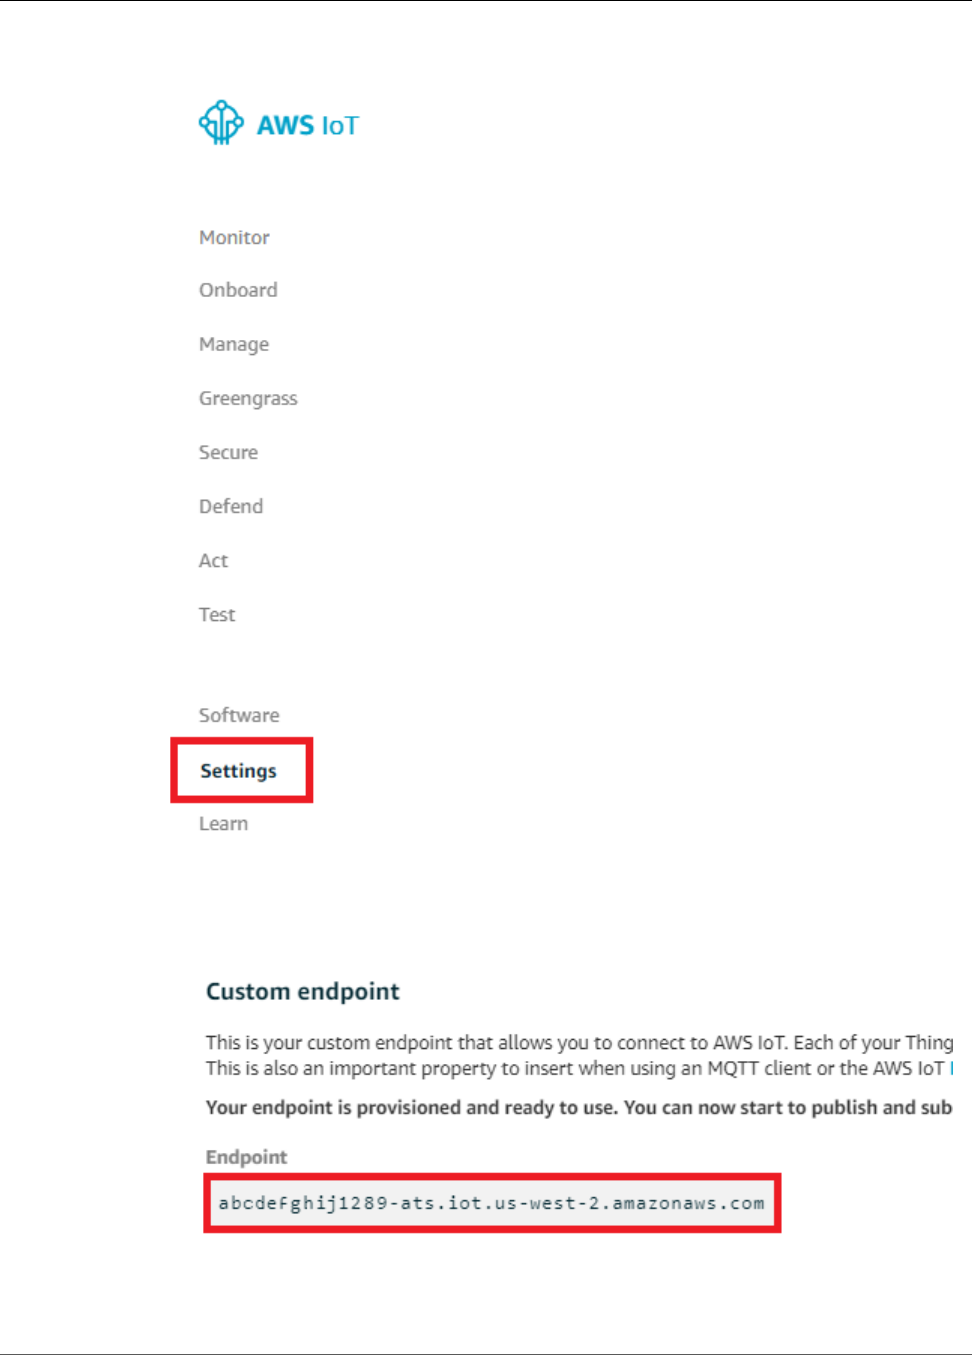
AWS IoT Greengrass Developer Guide
Test Communications (Device Syncs Disabled)
a. On the home page of the AWS IoT Core console, choose Settings.
b. Under Settings, make a note of the value of Endpoint. You use this value to replace the
AWS_IOT_ENDPOINT placeholder in the commands in the following steps.
110
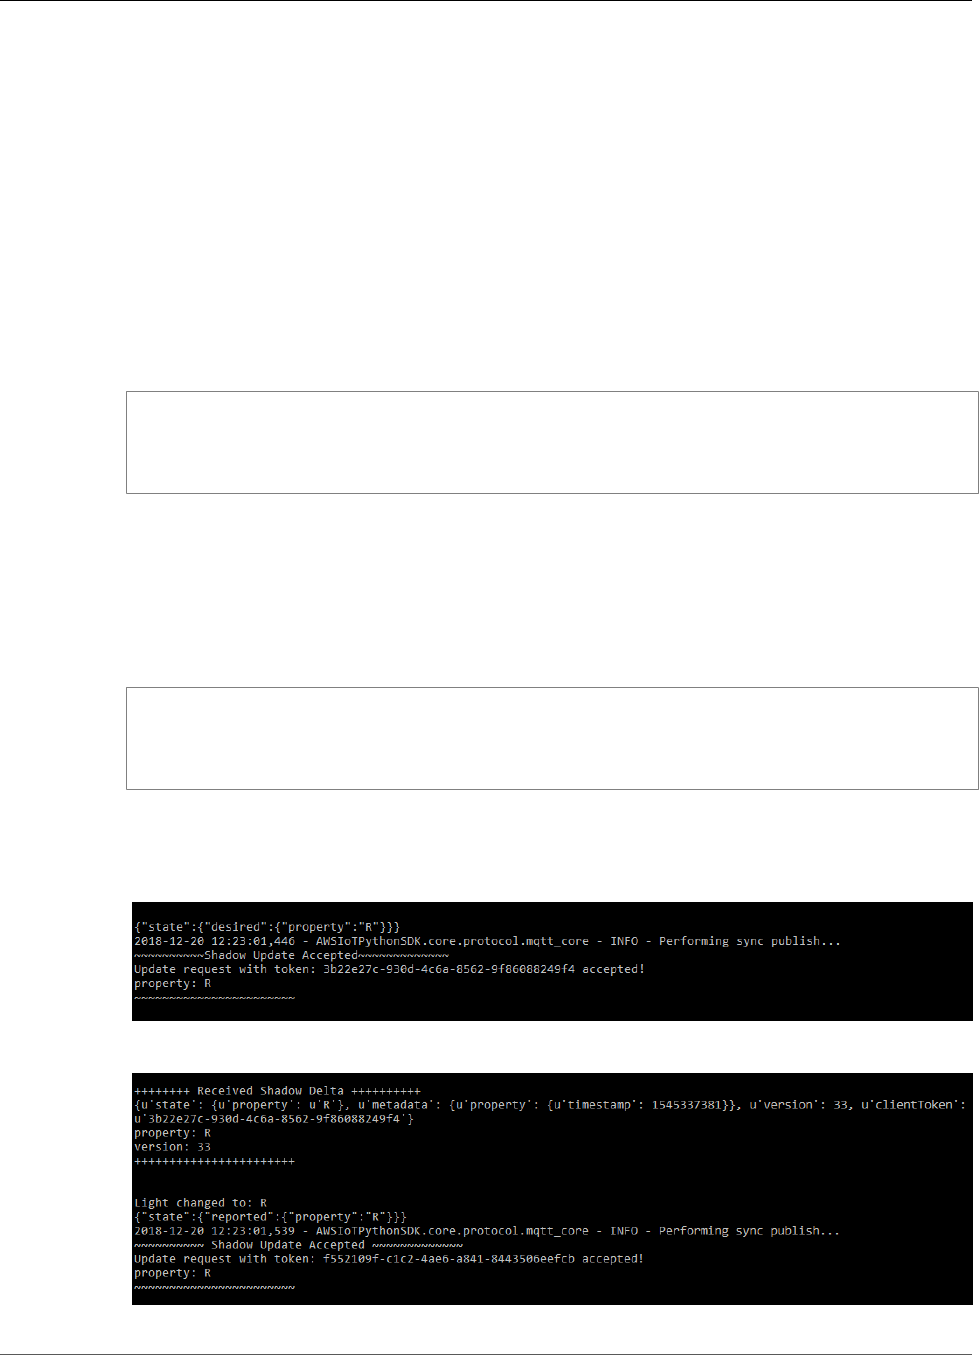
AWS IoT Greengrass Developer Guide
Test Communications (Device Syncs Disabled)
3. On your computer (not the AWS IoT Greengrass core device), open two command-line (terminal or
command prompt) windows. One window represents the GG_Switch device and the other represents
the GG_TrafficLight device.
When executed for the first time, each device script runs the AWS IoT Greengrass discovery service
to connect to the AWS IoT Greengrass core (through the internet). After a device has discovered and
successfully connected to the AWS IoT Greengrass core, future operations can be executed locally.
4. From the GG_Switch device window, run the following commands.
• Replace path-to-certs-folder with the path to the folder that contains the certificates, keys,
and Python files.
• Replace AWS_IOT_ENDPOINT with your endpoint.
• Replace the two switch instances with the hash in the file name for your GG_Switch device.
cd path-to-certs-folder
python lightController.py --endpoint AWS_IOT_ENDPOINT --rootCA root-ca-cert.pem --
cert switch.cert.pem --key switch.private.key --thingName GG_TrafficLight --clientId
GG_Switch
5. From the GG_TrafficLight device window, run the following commands.
• Replace path-to-certs-folder with the path to the folder that contains the certificates, keys,
and Python files.
• Replace AWS_IOT_ENDPOINT with your endpoint.
• Replace the two light instances with the hash in the file name for your GG_TrafficLight device.
cd path-to-certs-folder
python trafficLight.py --endpoint AWS_IOT_ENDPOINT --rootCA root-ca-cert.pem --
cert light.cert.pem --key light.private.key --thingName GG_TrafficLight --clientId
GG_TrafficLight
Every 20 seconds, the switch updates the shadow state to G, Y, and R, and the light displays its new
state, as shown next.
GG_Switch output:
GG_TrafficLight output:
111
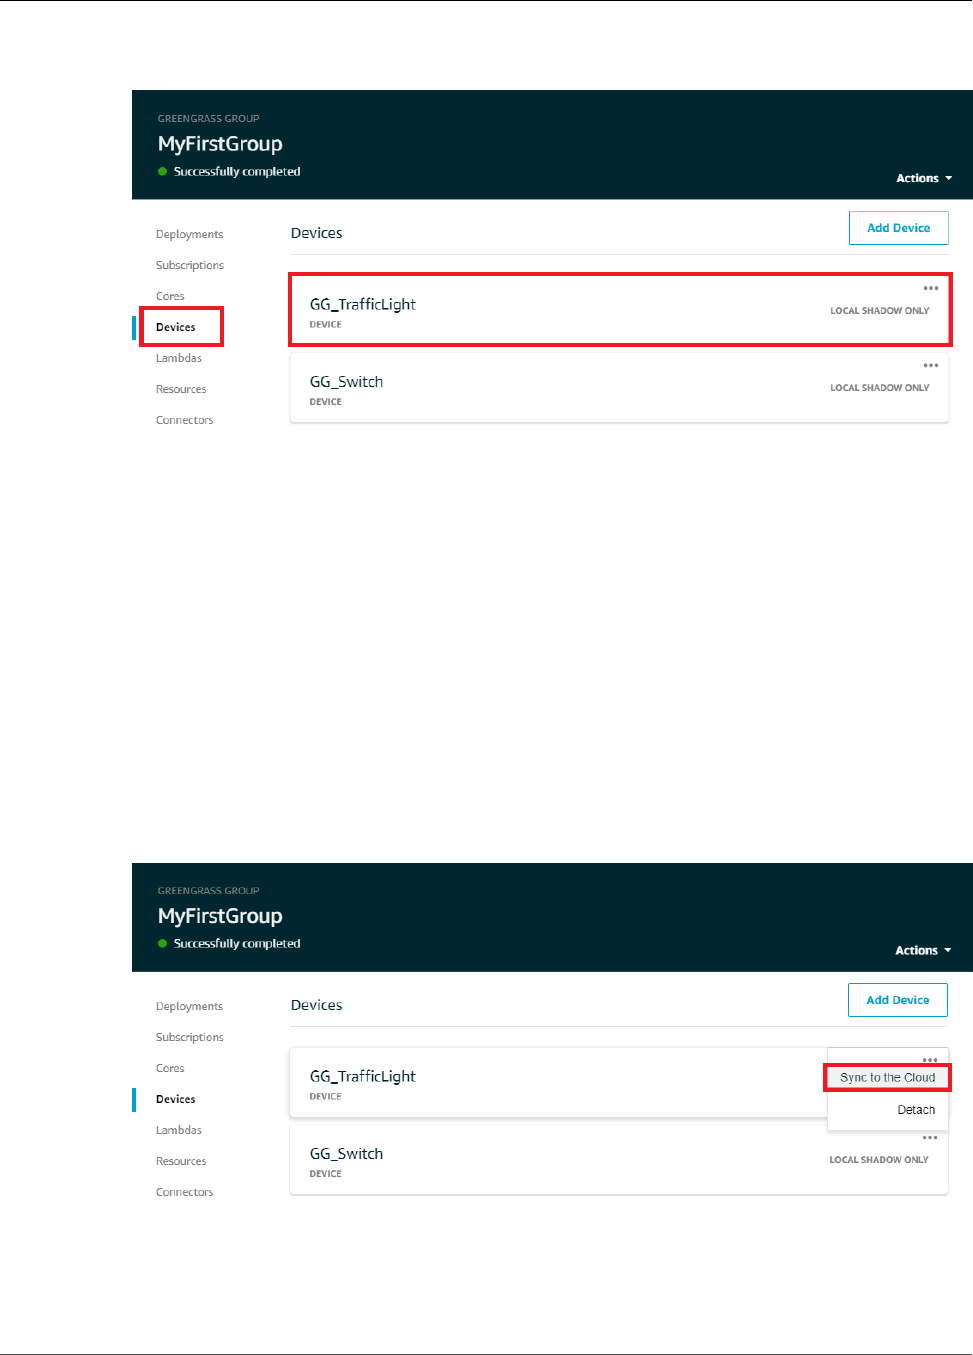
AWS IoT Greengrass Developer Guide
Test Communications (Device Syncs Enabled)
6. In the AWS IoT Core console, choose your AWS IoT Greengrass group, choose Devices, and then
choose GG_TrafficLight.
7. Choose Shadow. After the GG_Switch changes states, there should not be any updates to this
shadow topic in Shadow State. That's because the GG_TrafficLight is set to LOCAL SHADOW ONLY
as opposed to SHADOW SYNCING TO CLOUD.
8. Press Ctrl + C in the GG_Switch (lightController.py) device window. You should see that the
GG_TrafficLight (trafficLight.py) window stops receiving state change messages.
Keep these windows open so you can run the commands in the next section.
Test Communications (Device Syncs Enabled)
For this test, you configure the GG_TrafficLight device shadow to sync to AWS IoT. You run the same
commands as in the previous test, but this time the shadow state in the cloud is updated when
GG_Switch sends an update request.
1. In the AWS IoT Core console, choose your AWS IoT Greengrass group, and then choose Devices.
2. For the GG_TrafficLight device, choose the ellipsis (…), and then choose Sync to the Cloud.
You should receive a notification that the device shadow was updated.
3. On the group configuration page, from Actions, choose Deploy to deploy the group configuration to
your AWS IoT Greengrass core device.
112

AWS IoT Greengrass Developer Guide
Test Communications (Device Syncs Enabled)
For troubleshooting help, see Troubleshooting (p. 410).
4. In your two command-line windows, run the commands from the previous test for the
GG_Switch (p. 111) and GG_TrafficLight (p. 111) devices.
5. Now, check the shadow state in the AWS IoT Core console. Choose your AWS IoT Greengrass group,
choose Devices, choose GG_TrafficLight, and then choose Shadow.
Because you enabled sync of the GG_TrafficLight shadow to AWS IoT, the shadow state in the cloud
should be updated whenever GG_Switch sends an update. This functionality can be used to expose
the state of a Greengrass device to AWS IoT.
Note
If necessary, you can troubleshoot issues by viewing the AWS IoT Greengrass core logs,
particularly runtime.log:
cd /greengrass/ggc/var/log
sudo cat system/runtime.log | more
113
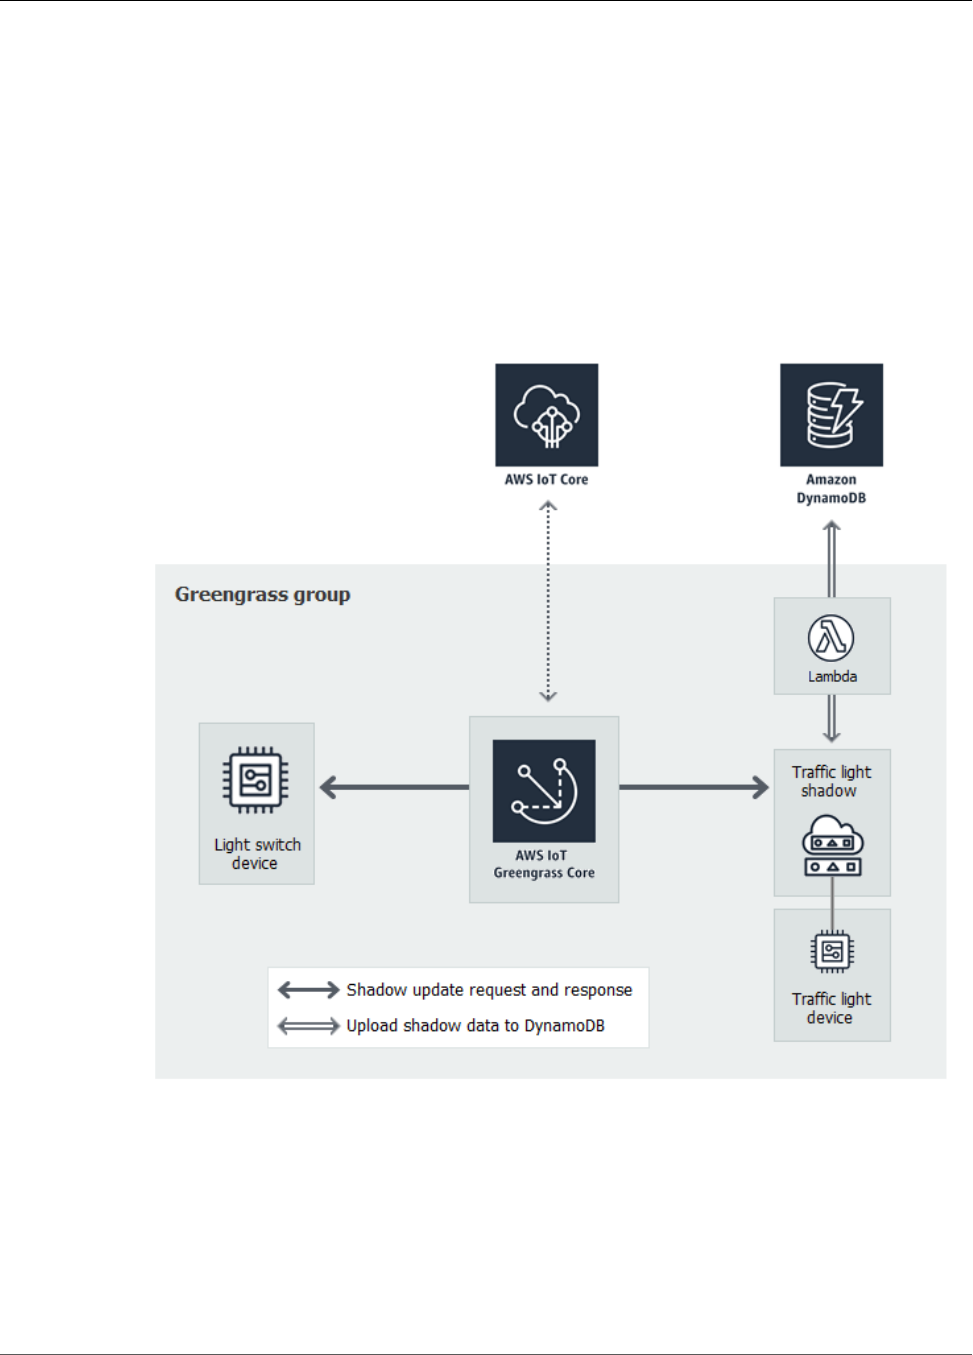
AWS IoT Greengrass Developer Guide
Module 6: Accessing Other AWS Services
You can also view GGShadowSyncManager.log and GGShadowService.log. For more
information, see Troubleshooting (p. 410).
Keep the devices and subscriptions set up. You use them in the next module. You also run the same
commands.
Module 6: Accessing Other AWS Services
This advanced module shows you how AWS IoT Greengrass cores can interact with other AWS services
in the cloud. It builds on the traffic light example from Module 5 (p. 104) and adds a Lambda function
that processes shadow states and uploads a summary to an Amazon DynamoDB table.
Before you begin, make sure that you have completed Module 1 (p. 45) through Module 5 (p. 104).
You do not need other components or devices.
This module should take approximately 30 minutes to complete.
Note
This module creates and updates a table in DynamoDB. Although most of the operations
are small and fall within the AWS Free Tier, performing some of the steps in this module
114
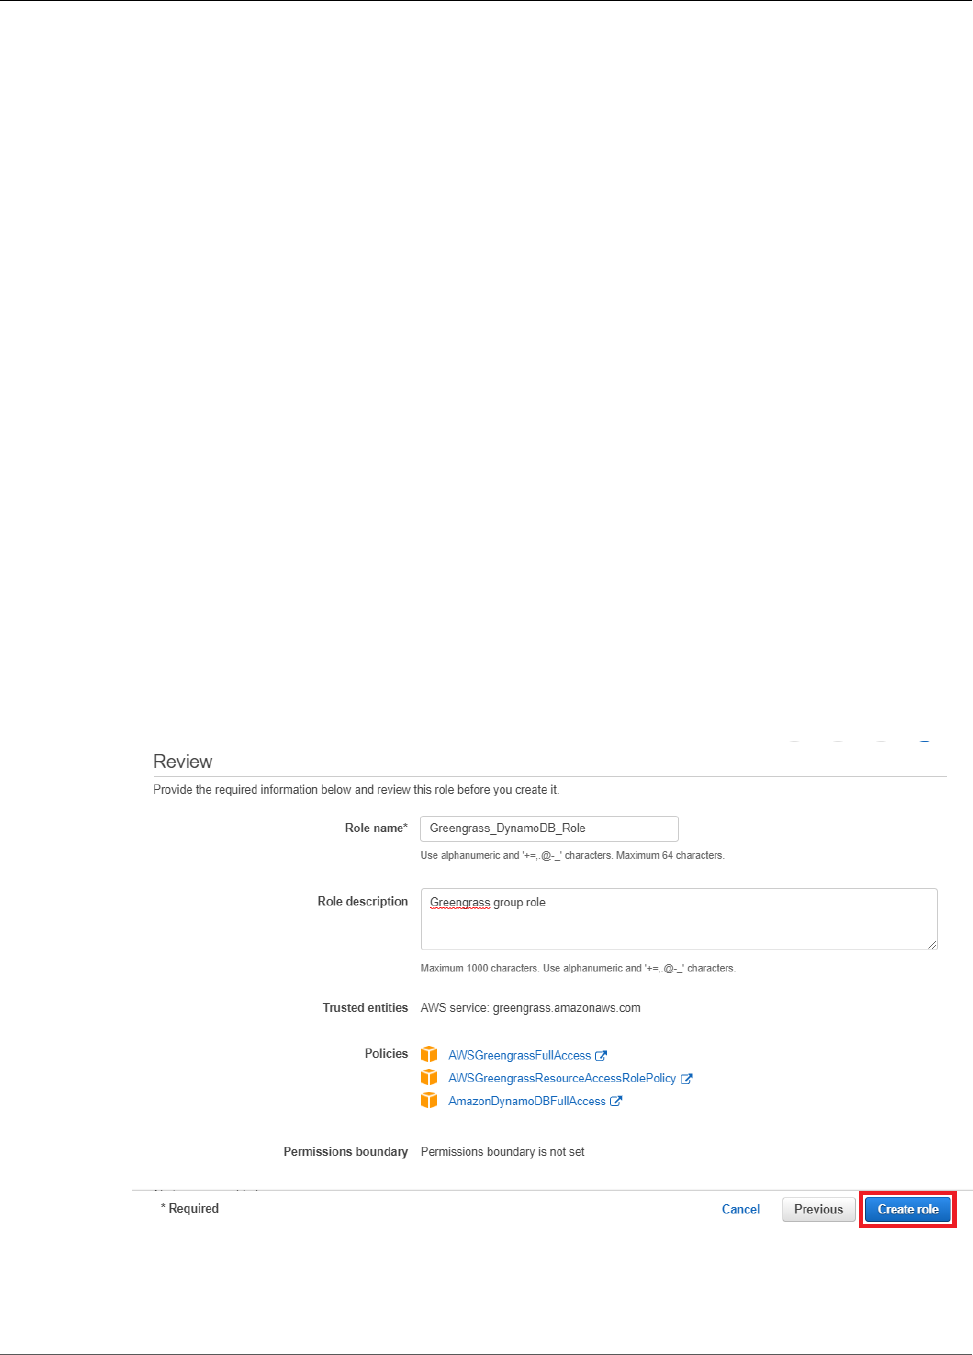
AWS IoT Greengrass Developer Guide
Configure IAM Roles
might result in charges to your account. For information about pricing, see DynamoDB pricing
documentation.
Configure IAM Roles
When you create Lambda functions that access AWS services, you must grant sufficient permissions in
the Greengrass group role to allow the functions to access those services. The group role is an IAM role
that you attach to your group.
In this module, you create a role that allows a Greengrass Lambda function to access DynamoDB. For
more information about IAM, see the AWS Identity and Access Management documentation.
1. In the IAM console, in the navigation pane, choose Roles, and then choose Create Role.
2. Under Select type of trusted entity, choose AWS service.
3. Under Choose the service that will use this role, choose Greengrass, and then choose Next:
Permissions.
4. On the Attach permissions policies page, select the following policies, and then choose Next: Tags.
•AWSGreengrassResourceAccessRolePolicy
•AWSGreengrassFullAccess
•AmazonDynamoDBFullAccess
5. Choose Next: Review. You don't need to create tags for this tutorial.
6. Enter the following values, and then choose Create role.
• For Role name, enter Greengrass_DynamoDB_Role.
• For Role description, enter Greengrass group role.
7. Repeat the previous step to create the role for the AWS Lambda service. Select the same
policies (AWSGreengrassResourceAccessRolePolicy, AWSGreengrassFullAccess, and
AmazonDynamoDBFullAccess). For Role name, enter Lambda_DynamoDB_Role.
115
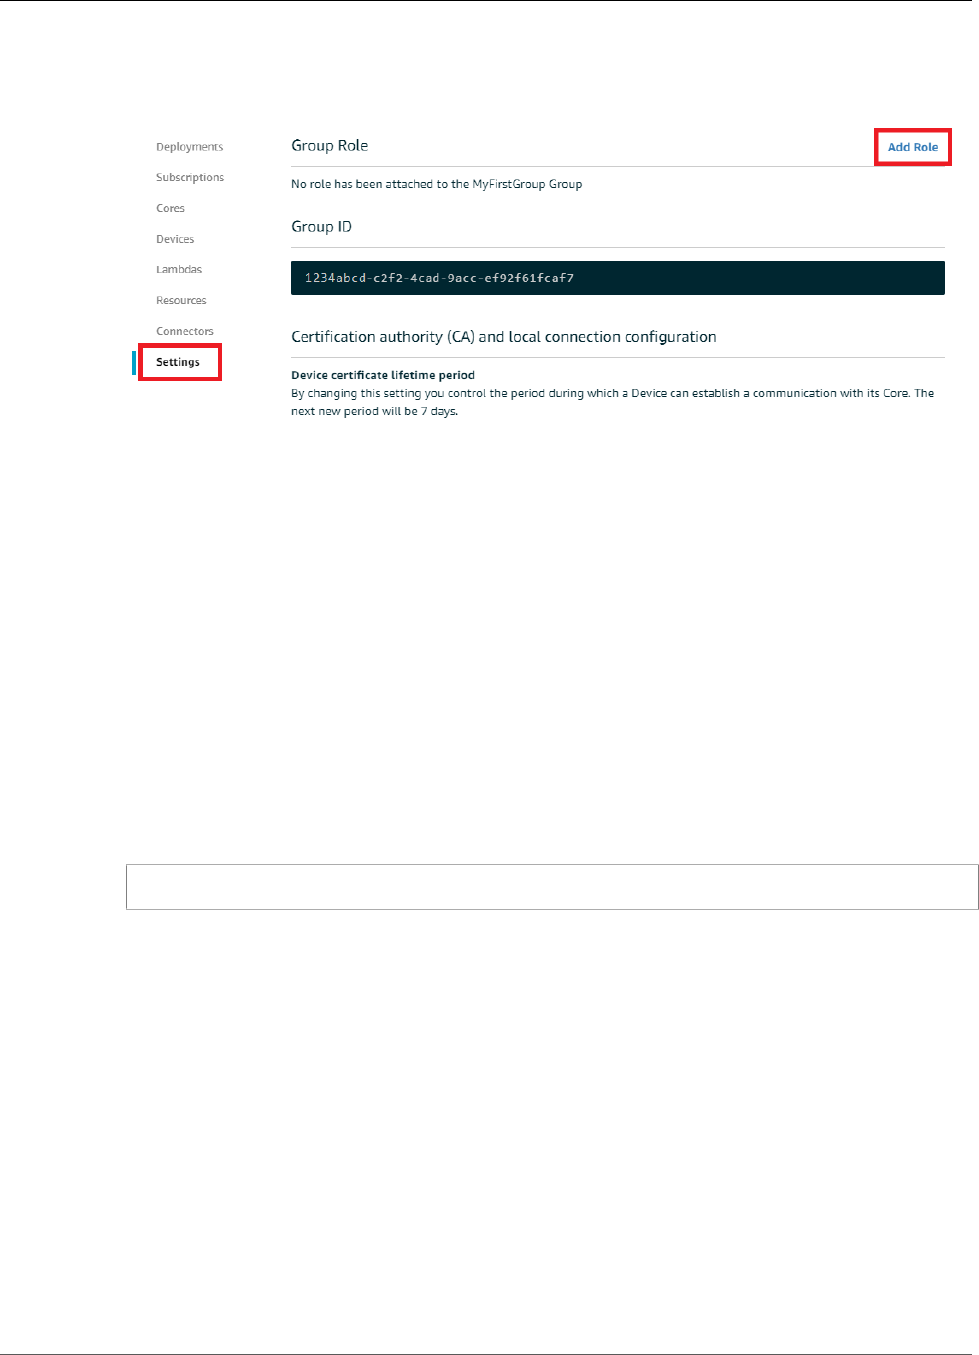
AWS IoT Greengrass Developer Guide
Create and Configure the Lambda Function
8. In the AWS IoT Core console, under Greengrass, choose Groups, and then choose your AWS IoT
Greengrass group.
9. Choose Settings, and then choose Add Role.
10. Choose Greengrass_DynamoDB_Role from the list of roles, and then choose Save.
Create and Configure the Lambda Function
In this step, you create a Lambda function that tracks the number of cars that pass the traffic light. Every
time that the GG_TrafficLight shadow state changes to G, the Lambda function simulates the passing
of a random number of cars (from 1 to 20). On every third G light change, the Lambda function sends
basic statistics, such as min and max, to a DynamoDB table.
1. On your computer, create a folder named car_aggregator.
2. From the AWS IoT Greengrass samples repository on GitHub, download the carAggregator.py
function to the car_aggregator folder.
3. Run the following command in a command-line window to install the boto3 (AWS SDK for Python)
package and its dependencies in the car_aggregator folder. (For Windows, use an elevated
command prompt.)
pip install boto3 -t path-to-car_aggregator-folder
This results in a directory listing similar to the following:
116

AWS IoT Greengrass Developer Guide
Create and Configure the Lambda Function
Greengrass Lambda functions use the AWS SDK to access other AWS services. For more information,
see Boto 3 - The AWS SDK for Python.
4. Compress the contents of the car_aggregator folder into a .zip file named
car_aggregator.zip. (Compress the folder's contents, not the folder.) This is your Lambda
function deployment package.
5. In the Lambda console, create a function named GG_Car_Aggregator, and set the remaining fields
as follows:
• For Runtime, choose Python 2.7.
• For Role, choose Choose an existing role.
• For Existing role, choose Lambda_DynamoDB_Role.
Choose Create function.
117
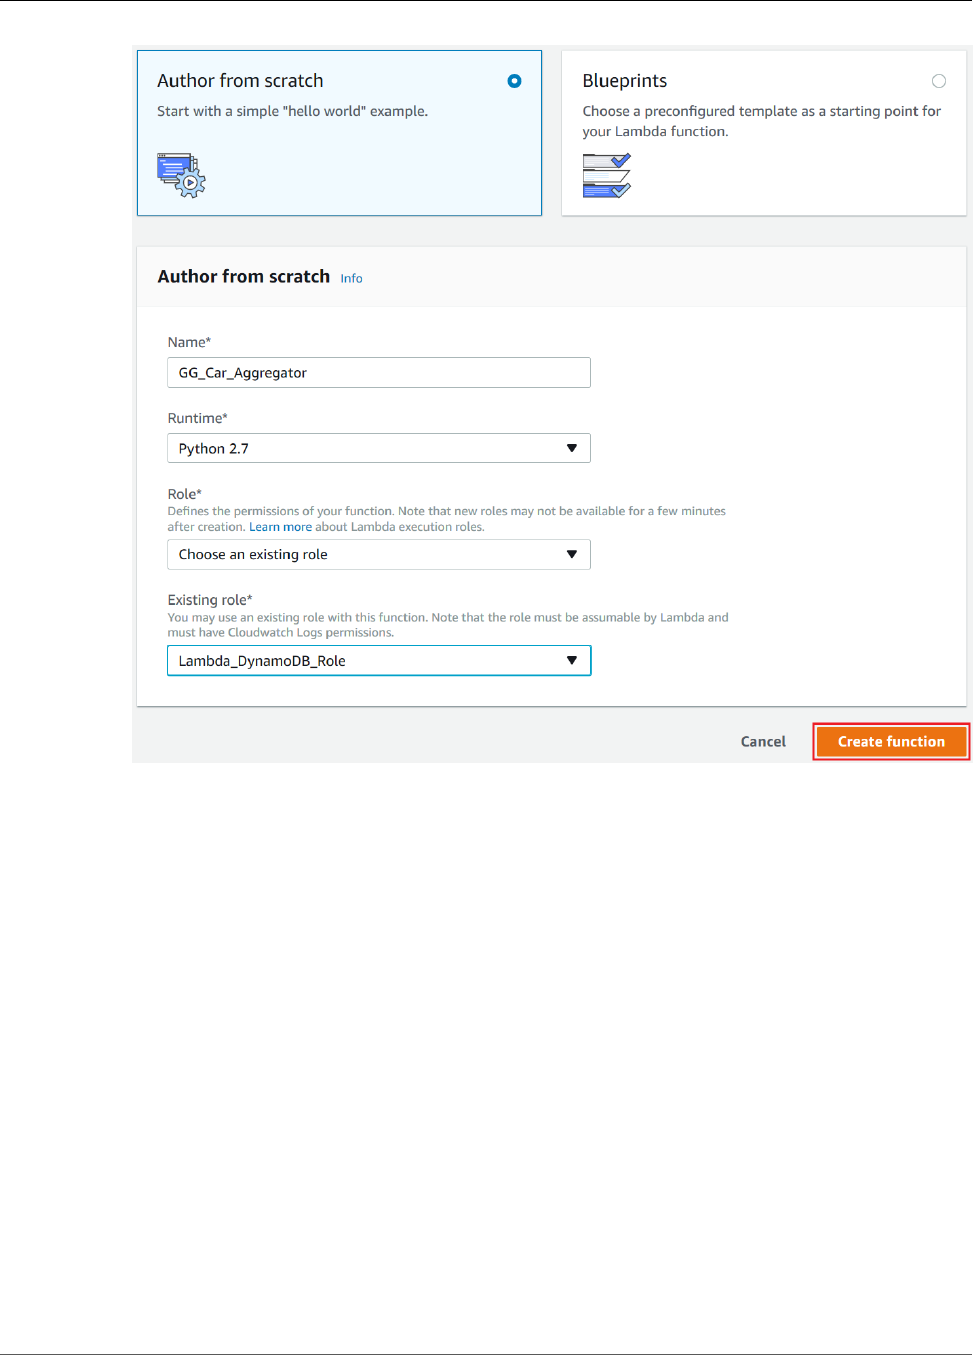
AWS IoT Greengrass Developer Guide
Create and Configure the Lambda Function
6. Upload your Lambda function deployment package:
a. On the Configuration tab, under Function code, set the following fields:
• For Code entry type, choose Upload a .zip file.
• For Runtime, choose Python 2.7.
• For Handler, enter carAggregator.function_handler
b. Choose Upload, and then choose car_aggregator.zip.
c. Choose Save.
118
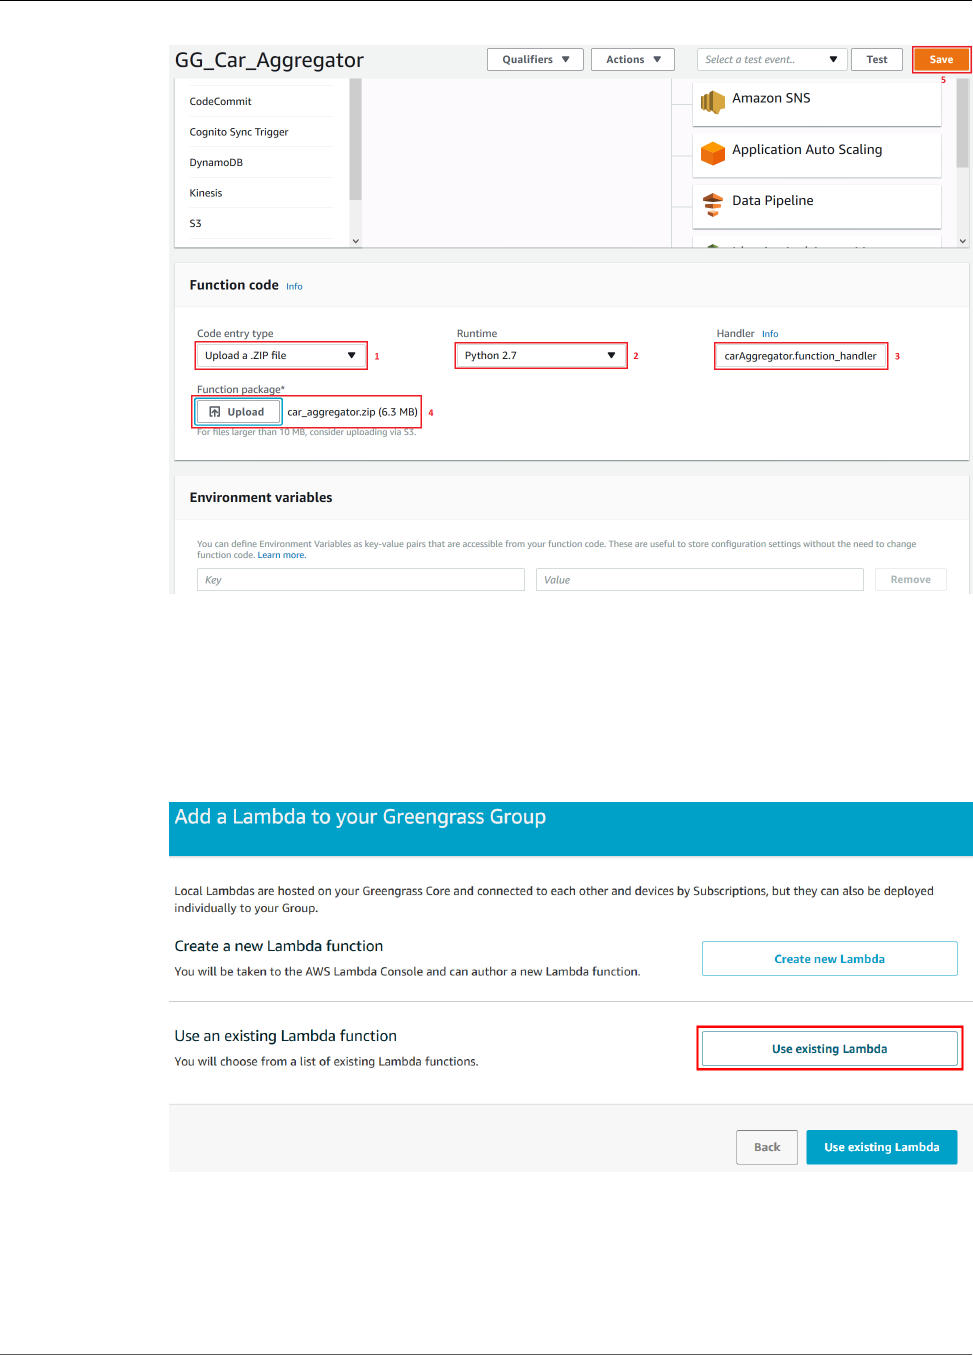
AWS IoT Greengrass Developer Guide
Create and Configure the Lambda Function
7. Publish the Lambda function, and then create an alias named GG_CarAggregator. For step-by-step
instructions, see the steps to publish the Lambda function (p. 69) and create an alias (p. 69) in
Module 3 (Part 1).
8. In the AWS IoT Core console, add the Lambda function that you just created to your AWS IoT
Greengrass group:
a. On the group configuration page, choose Lambdas, and then choose Add Lambda.
b. Choose Use existing Lambda.
c. Choose GG_Car_Aggregator, and then choose Next.
119
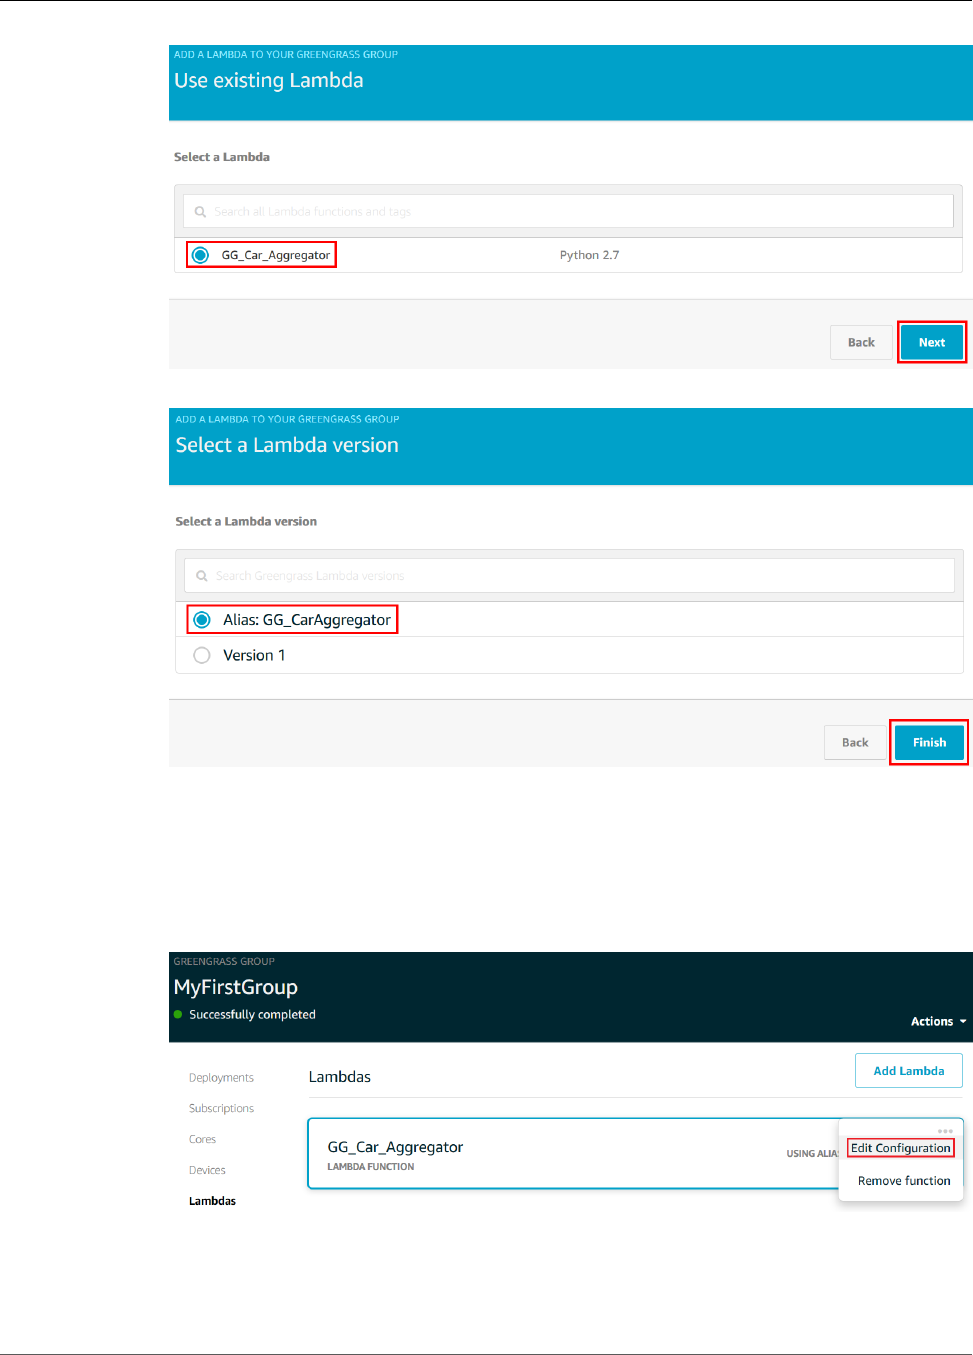
AWS IoT Greengrass Developer Guide
Create and Configure the Lambda Function
d. Choose Alias: GG_CarAggregator, and then choose Finish.
Note
You can remove other Lambda functions from earlier modules.
9. Edit the Lambda function configuration:
a. Choose the ellipsis (…) associated with the Lambda function, and then choose Edit
Configuration.
b. Under Lambda lifecycle, choose Make this function long-lived and keep it running
indefinitely, and then choose Update.
120
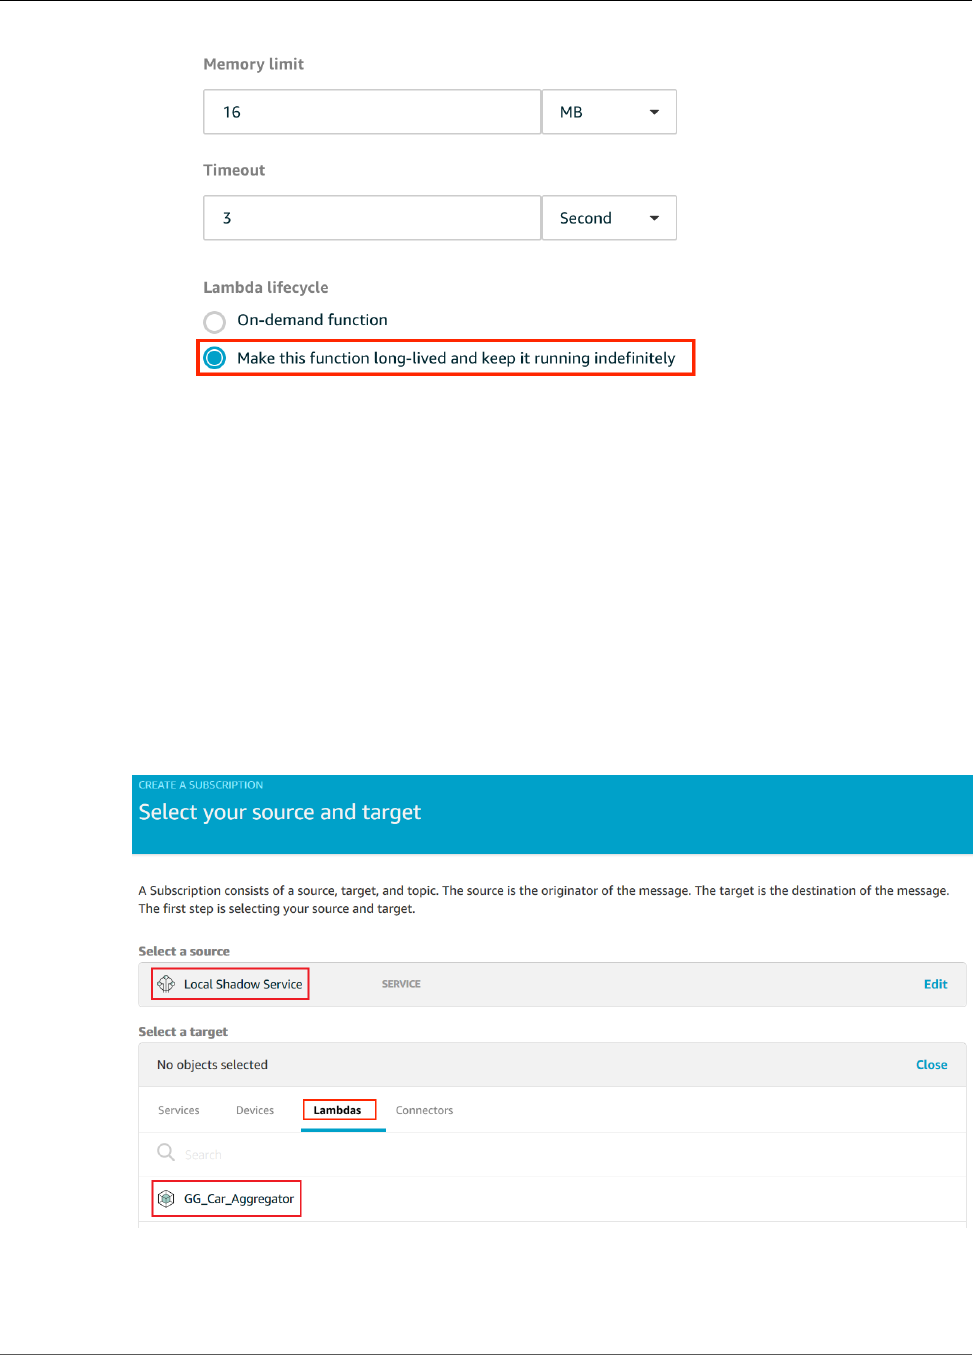
AWS IoT Greengrass Developer Guide
Configure Subscriptions
Configure Subscriptions
In this step, you create a subscription that enables the GG_TrafficLight shadow to send updated state
information to the GG_Car_Aggregator Lambda function. This subscription is added to the subscriptions
that you created in Module 5 (p. 104), which are all required for this module.
1. On the group configuration page, choose Subscriptions, and then choose Add Subscription.
2. On the Select your source and target page, set the following values:
• For Select a source, choose Services, and then choose Local Shadow Service.
• For Select a target, choose Lambdas, and then choose GG_Car_Aggregator.
Choose Next.
3. On the Filter your data with a topic page, for Topic filter, enter the following topic:
$aws/things/GG_TrafficLight/shadow/update/documents
121
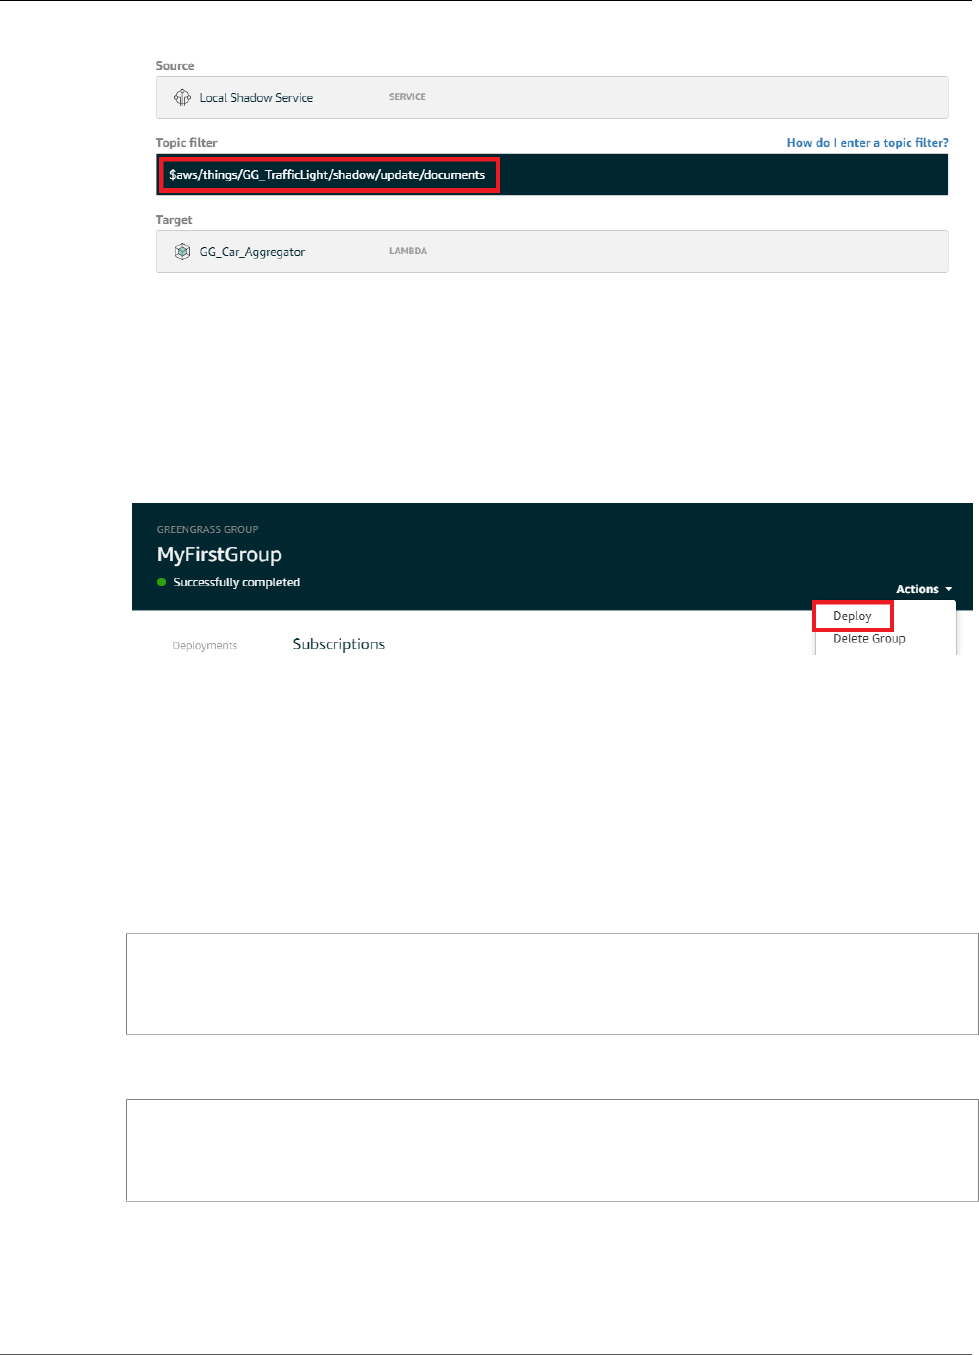
AWS IoT Greengrass Developer Guide
Test Communications
4. Choose Next, and then choose Finish.
This module requires the new subscription and the subscriptions (p. 106) that you created in
Module 5.
5. Make sure that the AWS IoT Greengrass daemon is running, as described in Deploy Cloud
Configurations to a Core Device (p. 75).
6. On the group configuration page, from Actions, choose Deploy to deploy the group configuration to
your AWS IoT Greengrass core device.
For troubleshooting help, see Troubleshooting (p. 410).
Test Communications
1. On your computer, open two command-line windows. Just as in Module 5 (p. 104), one window is
for the GG_Switch device and the other is for the GG_TrafficLight device. You use them to run the
same commands that you ran in Module 5.
Run the following commands for the GG_Switch device:
cd path-to-certs-folder
python lightController.py --endpoint AWS_IOT_ENDPOINT --rootCA root-ca-cert.pem --
cert switch.cert.pem --key switch.private.key --thingName GG_TrafficLight --clientId
GG_Switch
Run the following commands for the GG_TrafficLight device:
cd path-to-certs-folder
python trafficLight.py --endpoint AWS_IOT_ENDPOINT --rootCA root-ca-cert.pem --
cert light.cert.pem --key light.private.key --thingName GG_TrafficLight --clientId
GG_TrafficLight
Every 20 seconds, the switch updates the shadow state to G, Y, and R, and the light displays its new
state.
2. The function handler of the Lambda function is triggered on every third green light (every
three minutes), and a new DynamoDB record is created. After lightController.py and
122
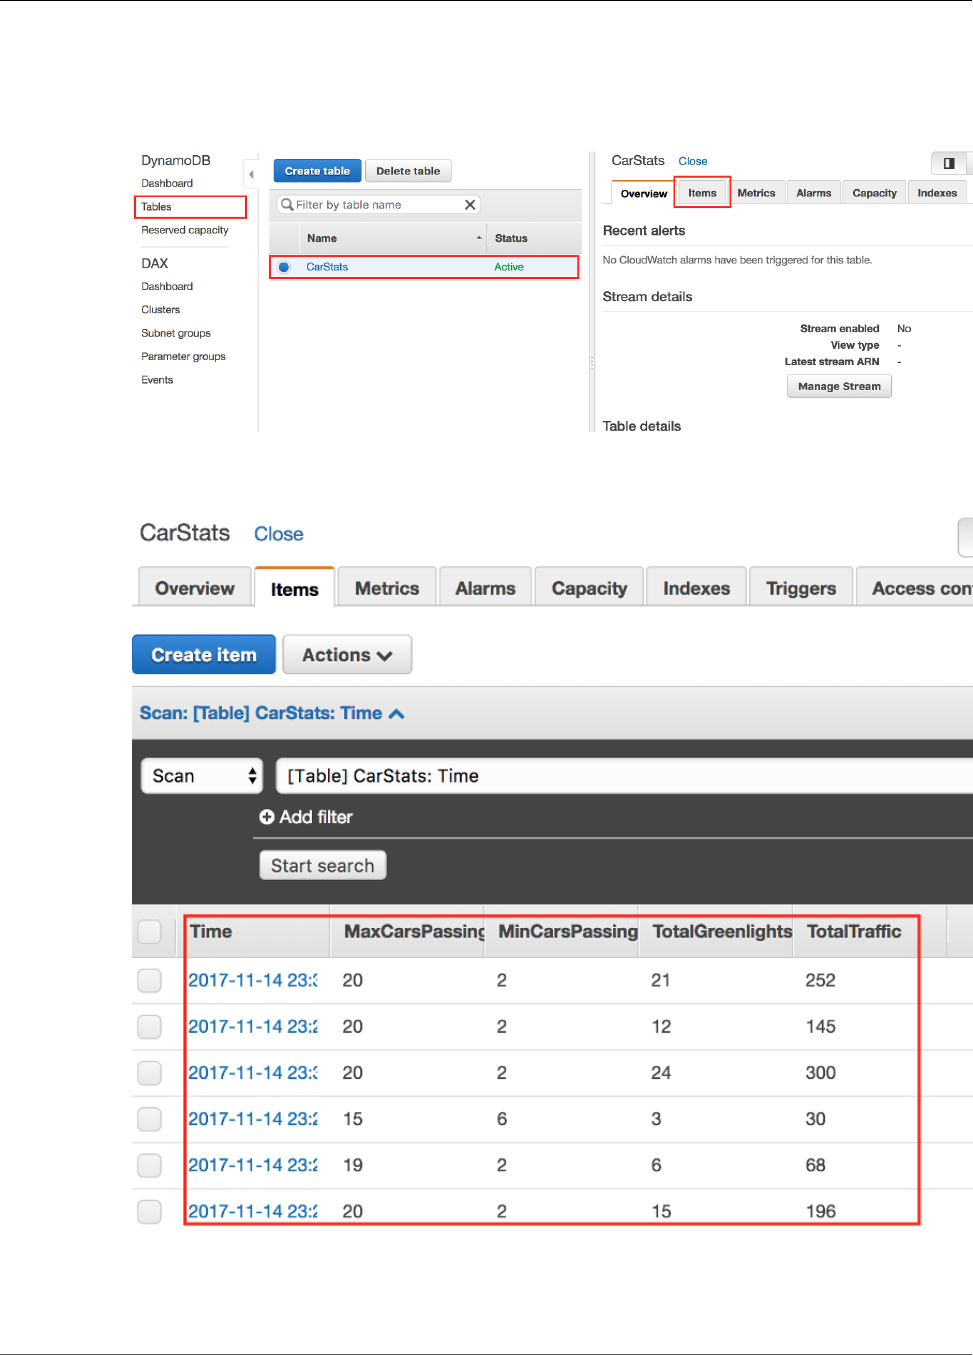
AWS IoT Greengrass Developer Guide
Test Communications
trafficLight.py have run for three minutes, go to the AWS Management Console, and open the
DynamoDB console.
3. Make sure that the N. Virginia (us-east-1) region is selected. Choose Tables and then choose the
CarStats table.
On the Items tab, you should see entries with basic statistics on cars passed (one entry for every
three minutes). You might need to choose the refresh button to view updates to the table.
Note
If necessary, you can troubleshoot issues by viewing the AWS IoT Greengrass core logs,
particularly runtime.log:
123
AWS IoT Greengrass Developer Guide
Module 7: Simulating Hardware Security Integration
cd /greengrass/ggc/var/log
sudo cat system/runtime.log | more
You can also view the user Lambda log generated by your Lambda function. Look for the
function log in the following folder:
cd /greengrass/ggc/var/log/user/your-region/your-account-id/your-function-name
For more information, see Troubleshooting (p. 410).
You have reached the end of this tutorial and should now understand the AWS IoT Greengrass
programming model and its fundamental concepts, including AWS IoT Greengrass cores, groups,
subscriptions, and the deployment process for Lambda functions running at the edge.
You can delete the DynamoDB table and the Lambda functions, and stop communications between the
AWS IoT Greengrass core device and the AWS IoT cloud. To stop communications, open a terminal on the
AWS IoT Greengrass core device and run one of the following commands:
• To shut down the AWS IoT Greengrass core device:
sudo halt
• To stop the AWS IoT Greengrass daemon:
cd /greengrass/ggc/core/
sudo ./greengrassd stop
Module 7: Simulating Hardware Security
Integration
This feature is available for AWS IoT Greengrass Core v1.7.0 only.
This advanced module shows you how to configure a simulated hardware security module (HSM) for
use with a Greengrass core. The configuration uses SoftHSM, which is a pure software implementation
that uses the PKCS#11 (p. 128) application programming interface (API). The purpose of this module
is to allow you to set up an environment where you can learn and do initial testing against a software-
only implementation of the PKCS#11 API. It is provided only for learning and initial testing, not for
production use of any kind.
You can use this configuration to experiment with using a PKCS#11-compatible service to store your
private keys. For more information about the software-only implementation, see SoftHSM. For more
information about integrating hardware security on an AWS IoT Greengrass core, including general
requirements, see the section called “Hardware Security” (p. 376).
Important
This module is intended for experimentation purposes only. We strongly discourage the use
of SoftHSM in a production environment because it might provide a false sense of additional
security. The resulting configuration doesn't provide any actual security benefits. The keys
stored in SoftHSM are not stored more securely than any other means of secrets storage in the
Greengrass environment.
124

AWS IoT Greengrass Developer Guide
Install SoftHSM
The purpose of this module is to allow you to learn about the PKCS#11 specification and do
initial testing of your software if you plan to use a real hardware-based HSM in the future.
You must test your future hardware implementation separately and completely before any
production usage because there might be differences between the PKCS#11 implementation
provided in SoftHSM and a hardware-based implementation.
If you need assistance with the onboarding of a supported hardware security module (p. 377), contact
your AWS Enterprise Support representative.
Before you begin, make sure that you completed Module 1 (p. 45) and Module 2 (p. 55) of
the Getting Started tutorial. In this module, we assume that your core is already provisioned and
communicating with AWS. This module should take about 30 minutes to complete.
Install the SoftHSM Software
In this step, you install SoftHSM and the pkcs11 tools, which are used to manage your SoftHSM instance.
• In a terminal on your AWS IoT Greengrass core device, run the following command:
sudo apt-get install softhsm2 libsofthsm2-dev pkcs11-dump
For more information about these packages, see Install softhsm2, Install libsofthsm2-dev, and
Install pkcs11-dump.
Note
If you encounter issues when using this command on your system, see SoftHSM version 2
on GitHub. This site provides more installation information, including how to build from
source.
Configure SoftHSM
In this step, you configure SoftHSM.
1. Switch to the root user.
sudo su
2. Create the softhsm2 configuration file in the root user's home directory.
mkdir -p ~/.config/softhsm2
3. Configure the token directory.
echo "directories.tokendir = $HOME/.softhsm2/tokens" > ~/.config/softhsm2/softhsm2.conf
4. Configure a file-based backend.
echo "objectstore.backend = file" >> ~/.config/softhsm2/softhsm2.conf
Note
These configuration settings are intended for experimentation purposes only. To see all
configuration options, open the manual page for the configuration file:
man softhsm2.conf
125

AWS IoT Greengrass Developer Guide
Import the Private Key
Import the Private Key into SoftHSM
In this step, you initialize the SoftHSM token, convert the private key format, and then import the private
key.
1. Initialize the SoftHSM token.
softhsm2-util --init-token --slot 0 --label greengrass
2. When prompted, enter an SO pin of 12345 and a user pin of 1234.
Note
AWS IoT Greengrass doesn't use the SO (supervisor) pin, so you can use any value.
3. Convert the private key to a format that can be used by the SoftHSM import tool. For this tutorial,
you convert the private key that you obtained from the Easy Group creation option in Module
2 (p. 55) of the Getting Started tutorial.
openssl pkcs8 -topk8 -inform PEM -outform PEM -nocrypt -in hash.private.key -
out hash.private.pem
4. Import the private key into SoftHSM.
softhsm2-util --import hash.private.pem --slot 0 --label iotkey -id 0000
This command identifies the slot as 0 and defines the key label as iotkey. You use these values in
the next section.
After the private key is imported, you can optionally remove it from the /greengrass/certs directory.
Make sure to keep the root CA and device certificates in the directory.
Configure the Greengrass Core to Use SoftHSM
In this step, you modify the Greengrass core configuration file to use SoftHSM.
1. Find the path to the SoftHSM provider library (libsofthsm2.so) on your system:
a. Get the list of installed packages for the library.
sudo dpkg -L libsofthsm2-dev
The libsofthsm2.so file is located in the softhsm directory.
b. Copy the full path to the file (for example, /usr/lib/x86_64-linux-gnu/softhsm/
libsofthsm2.so). You use this value later.
2. Stop the AWS Greengrass daemon.
cd /greengrass/ggc/core/
sudo ./greengrassd stop
3. Open the Greengrass configuration file. This is the config.json (p. 21) file in the /greengrass/
config directory.
Note
The examples in this procedure are written with the assumption that the config.json
file uses the format that's generated from the Easy Group creation option in Module
2 (p. 55) of the Getting Started tutorial.
126
AWS IoT Greengrass Developer Guide
Configure the Greengrass Core
4. In the crypto.principals object, insert the following MQTT server certificate object. Add a
comma where needed to create a valid JSON file.
"MQTTServerCertificate": {
"privateKeyPath": "path-to-private-key"
}
5. In the crypto object, insert the following PKCS11 object. Add a comma where needed to create a
valid JSON file.
"PKCS11": {
"OpenSSLEngine": "/path-to-p11-openssl-engine",
"P11Provider": "/path-to-pkcs11-provider-so",
"slotLabel": "crypto-token-name",
"slotUserPin": "crypto-token-user-pin"
}
Your file should look similar to the following:
{
"coreThing" : {
"caPath" : "root.ca.pem",
"certPath" : "hash.cert.pem",
"keyPath" : "hash.private.key",
"thingArn" : "arn:aws:iot:region:account-id:thing/core-thing-name",
"iotHost" : "host-prefix.iot.region.amazonaws.com",
"ggHost" : "greengrass.iot.region.amazonaws.com",
"keepAlive" : 600
},
"runtime" : {
"cgroup" : {
"useSystemd" : "yes"
}
},
"managedRespawn" : false,
"crypto": {
"PKCS11" : {
"OpenSSLEngine" : "/path-to-p11-openssl-engine",
"P11Provider" : "/path-to-pkcs11-provider-so",
"slotLabel" : "crypto-token-name",
"slotUserPin" : "crypto-token-user-pin"
},
"principals" : {
"IoTCertificate" : {
"privateKeyPath" : "file:///greengrass/certs/hash.private.key",
"certificatePath" : "file:///greengrass/certs/hash.cert.pem"
},
"SecretsManager" : {
"privateKeyPath" : "file:///greengrass/certs/hash.private.key"
},
"MQTTServerCertificate" : {
"privateKeyPath" : "path-to-private-key"
}
},
"caPath" : "file:///greengrass/certs/root.ca.pem"
}
}
6. Edit the crypto object:
a. Configure the PKCS11 object.
127

AWS IoT Greengrass Developer Guide
Test the Configuration
• For P11Provider, enter the full path to libsofthsm2.so.
• For slotLabel, enter 0.
• For slotUserPin, enter 1234.
b. Configure the private key paths in the principals object. Do not edit the certificatePath
property.
• For the privateKeyPath properties, enter the following RFC 7512 PKCS#11 path (which
specifies the key's label). Do this for the IoTCertificate, SecretsManager, and
MQTTServerCertificate principals.
pkcs11:object=iotkey;type=private
Note
For this tutorial, you specify the same private key for all principals. For more
information about choosing the private key for the local MQTT server, see
Performance (p. 380). For more information about the local secrets manager, see
Deploy Secrets to the Core (p. 243).
Test the Configuration
• Start the AWS Greengrass daemon.
cd /greengrass/ggc/core/
sudo ./greengrassd start
If the daemon starts successfully, then your core is configured correctly.
You are now ready to learn about the PKCS#11 specification and do initial testing with the PKCS#11
API that's provided by the SoftHSM implementation.
Important
Again, it's extremely important to be aware that this module is intended for learning
and testing only. It doesn't actually increase the security posture of your Greengrass
environment.
Instead, the purpose of the module is to enable you to start learning and testing in
preparation for using a true hardware-based HSM in the future. At that time, you must
separately and completely test your software against the hardware-based HSM prior
to any production usage, because there might be differences between the PKCS#11
implementation provided in SoftHSM and a hardware-based implementation.
See Also
•PKCS #11 Cryptographic Token Interface Usage Guide Version 2.40. Edited by John Leiseboer and Robert
Griffin. 16 November 2014. OASIS Committee Note 02. http://docs.oasis-open.org/pkcs11/pkcs11-
ug/v2.40/cn02/pkcs11-ug-v2.40-cn02.html. Latest version: http://docs.oasis-open.org/pkcs11/
pkcs11-ug/v2.40/pkcs11-ug-v2.40.html.
•RFC 7512
128

AWS IoT Greengrass Developer Guide
OTA Updates of AWS IoT Greengrass
Core Software
This feature is available for AWS IoT Greengrass Core v1.3.0 and later.
The AWS IoT Greengrass core software comes packaged with an OTA Update Agent that is capable of
updating the core's software or the OTA Update Agent itself to the latest respective versions. You can
start an update by invoking the CreateSoftwareUpdateJob API or from the Greengrass console. Updating
the Greengrass core software provides the following benefits:
• Fix security vulnerabilities.
• Address software stability issues.
• Deploy new or improved features.
An OTA update makes all these benefits available without having to perform the update manually or
having the device which is running the core software physically present. The OTA Update Agent also
performs a rollback in case of a failed OTA update. Performing an OTA update is optional but can help
you manage your AWS IoT Greengrass core devices. Look for announcements of new versions of the
core's software on the Greengrass developer forum.
In order to support an OTA update of Greengrass core software by using the OTA Update Agent, your
Greengrass core device must:
• Have available local storage three times the amount of the core's runtime usage requirement.
• Not have trusted boot enabled in the partition containing the Greengrass core platform software. (The
AWS IoT Greengrass core can be installed and run on a partition with trusted boot enabled, but cannot
perform an OTA update.)
• Have read/write permissions on the partition containing the Greengrass core platform software.
• Have a connection to the AWS cloud.
• Have a correctly configured AWS IoT Greengrass core and appropriate certificates.
Before launching an OTA Update of Greengrass core software, it is important to note the impact that
it will have on the devices in your Greengrass group, both on the core device and on client devices
connected locally to that core:
• The core will be shut down during the update.
• Any Lambda functions running on the core will be shut down. If those functions write to local
resources, they might leave those resources in an incorrect state unless shut down properly.
• During the core's downtime, all its connections with the cloud will be lost and messages routed
through the core by client devices will be lost.
• Credential caches will be lost.
• Queues which hold pending work for Lambda functions will be lost.
• Long-lived Lambda functions will lose their dynamic state information and all pending work will be
dropped.
The following state information will be preserved during an OTA Update:
• Local shadows
129
AWS IoT Greengrass Developer Guide
Greengrass OTA Agent
• Greengrass logs
• OTA Agent logs
Greengrass OTA Agent
The Greengrass OTA Agent is the software component on the device which handles update jobs created
and deployed in the cloud. The Greengrass OTA Agent is distributed in the same software package as
the Greengrass core software. The agent is located in ./greengrass/ota/ota_agent/ggc-ota and
creates its logs in /var/log/greengrass/ota/ggc_ota.txt.
You can start the Greengrass OTA Agent by executing the binary manually or by integrating it as part
of an init script such as a systemd service file. The binary should be run as root. Once started, the
Greengrass OTA Agent will begin listening for Greengrass update jobs from the cloud and execute them
sequentially. The Greengrass OTA Agent will ignore all other IoT job types.
Do not start multiple OTA Agent instances as this may cause conflicts.
If your Greengrass core or Greengrass OTA Agent is managed by an init system, see Integration With Init
Systems (p. 132) for related configurations.
CreateSoftwareUpdateJob API
The CreateSoftwareUpdateJob API creates a software update for a core or for several cores. This API can
be used to update the OTA Agent as well as the Greengrass core software. It makes use of the AWS IoT
Jobs feature which provides additional commands to manage a Greengrass core software update job. See
Jobs for more information on how to manage a Greengrass Update.
The following example shows how to create a Greengrass core software update job using the CLI:
aws greengrass create-software-update-job \
--update-targets-architecture x86_64 \
--update-targets arn:aws:iot:us-east-1:123456789012:thing/myDevice \
--update-targets-operating-system ubuntu \
--software-to-update core \
--s3-url-signer-role arn:aws:iam::123456789012:role/IotS3UrlPresigningRole \
--update-agent-log-level WARN \
--amzn-client-token myClientToken1
The create-software-update-job command returns a JSON object containing the job id and job ARN:
{
"IotJobId": "Greengrass-OTA-c3bd7f36-ee80-4d42-8321-a1da0e5b1303",
"IotJobArn": "arn:aws:iot:us-east-1:123456789012:job/Greengrass-OTA-c3bd7f36-
ee80-4d42-8321-a1da0e5b1303"
}
The create-software-update-job command has the following parameters:
--update-targets-architecture
The architecture of the core device. Must be one of armv7l, x86_64 or aarch64.
--update-targets
A list of the targets to which the OTA update should be applied. The list can contain the ARNS
of things which are cores, and the ARNs of thing groups whose members are cores. See IoT thing
groups for more information on how to place cores in an IoT thing group.
130

AWS IoT Greengrass Developer Guide
Greengrass OTA Agent
--update-targets-operating-system
The operating system of the core device. Must be one of ubuntu, amazon_linux or raspbian.
--software-to-update
Specifies whether the core's software or the OTA Agent software should be updated. Must be one of
core or ota_agent.
--s3-url-signer-role
The IAM role which is used to presign the S3 URL which links to the Greengrass software update. You
must provide a role that has the appropriate policy attached. Here is an example policy document
with the minimum required permissions:
{
"Version": "2012-10-17",
"Statement": [
{
"Sid": "AllowsIotToAccessGreengrassOTAUpdateArtifacts",
"Effect": "Allow",
"Action": [
"s3:GetObject"
],
"Resource": [
"arn:aws:s3:::us-east-1-greengrass-updates/*",
"arn:aws:s3:::us-west-2-greengrass-updates/*",
"arn:aws:s3:::ap-northeast-1-greengrass-updates/*",
"arn:aws:s3:::ap-southeast-2-greengrass-updates/*",
"arn:aws:s3:::eu-central-1-greengrass-updates/*",
"arn:aws:s3:::eu-west-1-greengrass-updates/*"
]
}
]
}
Here is an example Assume Role policy document with the minimum required trusted entities:
{
"Version": "2012-10-17",
"Statement": [
{
"Action": "sts:AssumeRole",
"Principal": {
"Service": "iot.amazonaws.com"
},
"Effect": "Allow",
"Sid": "AllowIotToAssumeRole"
}
]
}
--amzn-client-token
[Optional] A client token used to make idempotent requests. Provide a unique token to prevent
duplicate updates from being created due to internal retries.
--update-agent-log-level
[Optional] The logging level for log statements generated by the OTA Agent. Must be one of NONE,
TRACE, DEBUG, VERBOSE, INFO, WARN, ERROR, or FATAL. The default is ERROR.
Here is an example IAM policy with the minimum permissions required to call the API:
131

AWS IoT Greengrass Developer Guide
Integration with Init systems
{
"Version": "2012-10-17",
"Statement": [
{
"Sid": "AllowCreateSoftwareUpdateJob",
"Action": [
"greengrass:CreateSoftwareUpdateJob"
],
"Effect": "Allow",
"Resource": "*"
},
{
"Effect": "Allow",
"Action": [
"iam:PassRole"
],
"Resource": "arn:aws:s3:us-east-1:123456789012:role/IotS3UrlPresigningRole"
},
{
"Effect": "Allow",
"Action": [
"iot:CreateJob"
],
"Resource": "*"
}
]
}
Note
Because Greengrass is only supported on a subset of the architecture and operating system
combinations possible with this command, CreateSoftwareUpdateJob will reject requests
except for the following supported platforms:
• ubuntu/x86_64
• ubuntu/aarch64
• amazon_linux/x86_64
• raspbian/armv7l
Integration with Init systems
During an OTA update, binaries, some of which may be running, will be updated and restarted. This
may cause conflicts if an init system is monitoring the state of either the AWS IoT Greengrass core
software or the Greengrass OTA Agent during the update. To help integrate the OTA update mechanism
with your monitoring strategies, Greengrass provides the opportunity for user-defined shell scripts to
run before and after an update. To tell the OTA agent to run these shell scripts, you must include the
managedRespawn = true flag in the ./greengrass/config/config.json file. For example:
{
"coreThing": {
…
},
"runtime": {
…
},
"managedRespawn": true
}
132

AWS IoT Greengrass Developer Guide
OTA Self-Update with Managed Respawn
When the managedRespawn flag is set, the scripts must exist in the directory or the OTA Agent will fail
the update. The directory tree should look as follows:
<greengrass_root>
|-- certs
|-- config
| |-- config.json
|-- ggc
|-- usr/scripts
| |-- ggc_pre_update.sh
| |-- ggc_post_update.sh
| |-- ota_pre_update.sh
| |-- ota_post_update.sh
|-- ota
OTA Self-Update with Managed Respawn
As the OTA Agent prepares to do a self-update, if the managedRespawn flag is set to true then the OTA
Agent will look in the ./greengrass/usr/scripts directory for the ota_pre_update.sh script and
run it.
After the OTA Agent completes the update, it will attempt to run the ota_post_update.sh script from
the ./greengrass/usr/scripts directory.
AWS IoT Greengrass Core Update with Managed
Respawn
As the OTA Agent prepares to do an AWS IoT Greengrass core update, if the managedRespawn flag
is set to true, then the OTA Agent will look in the ./greengrass/usr/scripts directory for the
ggc_pre_update.sh script and run it.
After the OTA Agent completes the update, it will attempt to run the ggc_post_update.sh script from
the ./greengrass/usr/scripts directory.
Note:
• The user-defined scripts in ./greengrass/usr/scripts should be owned by root and executable
by root only.
• If managedRespawn is set to true, the scripts must exist and return a successful return code.
• If managedRespawn is set to false, the scripts will not be run even if present on the device.
• It is imperative that a device which is the target of an update not run two OTA agents for the same
AWS IoT thing. Doing so will cause the two OTA Agents to process the same jobs which will lead to
conflicts.
OTA Agent Self-Update
To perform an OTA Agent self-update follow these steps:
1. Ensure that the AWS IoT Greengrass core is correctly provisioned with valid config.json file entries
and the necessary certificates.
2. If the OTA Agent is being managed by an init system, ensure that managedRespawn = true in the
config.json file and the scripts ota_pre_update.sh and ota_post_update.sh are present in
the ./greengrass/usr/scripts directory.
133

AWS IoT Greengrass Developer Guide
Greengrass Core Software Update
3. Start the ggc-ota agent by running ./greengrass/ota/ota_agent/ggc-ota.
4. Create an OTA self update job in the cloud with the CreateSoftwareUpdateJob API (aws greengrass
create-software-update-job), making sure the --software-to-update parameter is set to
ota_agent.
5. The OTA Agent will perform a self update.
Greengrass Core Software Update
To perform an AWS IoT Greengrass core software update follow these steps:
1. Ensure that the AWS IoT Greengrass core is correctly provisioned with valid config.json file entries
and the necessary certificates.
2. If the AWS IoT Greengrass core software is being managed by an init system, ensure that
managedRespawn = true in the config.json file and the scripts ggc_pre_update.sh and
ggc_post_update.sh are present in the ./greengrass/usr/scripts directory.
3. Start the ggc-ota agent by running ./greengrass/ota/ota_agent/ggc-ota.
4. Create an OTA self update job in the cloud with the CreateSoftwareUpdateJob API (aws greengrass
create-software-update-job), making sure the --software-to-update parameter is set to
core.
5. The OTA Agent will perform an update of AWS IoT Greengrass core software.
134
AWS IoT Greengrass Developer Guide
Reset Deployments
This feature is available for AWS IoT Greengrass Core v1.1.0 and later.
You may want to reset a group's deployments in order to:
• Delete the group (for example, when the group's core has been reimaged.)
• Move the group's core to a different group.
• Revert the group to its state prior to any deployments.
• Remove the deployment configuration from the core device.
• Delete sensitive data from the core device or from the cloud.
• Deploy a new group configuration to a core without having to replace the core with another in the
current group.
Note
The Reset Deployments feature is not available in AWS IoT Greengrass Core Software v1.0.0.
Also, note that it's not possible to delete a group that has been deployed using v1.0.0.
The ResetDeployments command will clean up all deployment information which is stored in the
cloud for a given group. It will then instruct the group's core device to clean up all of its deployment
related information as well (Lambda functions, user logs, shadow database and server certificate, but
not the user defined config.json or the Greengrass core certificates.) You cannot initiate a reset of
deployments for a group if the group currently has a deployment with status Pending or Building.
aws greengrass reset-deployments --group-id <GroupId> [--force]
Arguments for the reset-deployments CLI command:
--group-id
The group ID.
--force
[Optional] Use this parameter if the group's core device has been lost, stolen or destroyed. This
option causes the reset deployment process to report success once all deployment information in
the cloud has been cleaned up, without waiting for a core device to respond. However, if the core
device is or becomes active, it will perform its clean up operations as well.
The output of the reset-deployments CLI command will look like this:
{
"DeploymentId": "4db95ef8-9309-4774-95a4-eea580b6ceef",
"DeploymentArn": "arn:aws:greengrass:us-west-2:106511594199:/greengrass/groups/
b744ed45-a7df-4227-860a-8d4492caa412/deployments/4db95ef8-9309-4774-95a4-eea580b6ceef"
}
You can check the status of the reset deployment with the get-deployment-status CLI command:
aws greengrass get-deployment-status --deployment-id DeploymentId --group-id GroupId
135

AWS IoT Greengrass Developer Guide
Arguments for the get-deployment-status CLI command:
--deployment-id
The deployment ID.
--group-id
The group ID.
The output of the get-deployment-status CLI command will look like this:
{
"DeploymentStatus": "Success",
"UpdatedAt": "2017-04-04T00:00:00.000Z"
}
The DeploymentStatus is set to Building when the reset deployment is being prepared. When the
reset deployment is ready but the AWS IoT Greengrass core has not picked up the reset deployment, the
DeploymentStatus is InProgress.
136

AWS IoT Greengrass Developer Guide
Prerequisites
Create Bulk Deployments For Groups
You can use simple API calls to deploy large numbers of Greengrass groups at once. These deployments
are triggered with an adaptive rate that has a fixed upper limit.
This tutorial describes how to use the AWS CLI to create and monitor a bulk group deployment in AWS
IoT Greengrass. The bulk deployment example in this tutorial contains multiple groups. You can use the
example in your implementation to add as many groups as you need.
The tutorial contains the following high-level steps:
1. Create and Upload the Bulk Deployment Input File (p. 137)
2. Create and Configure an IAM Execution Role (p. 139)
3. Allow Your Execution Role Access to Your S3 Bucket (p. 140)
4. Deploy the Groups (p. 141)
5. Test the Deployment (p. 143)
Prerequisites
To complete this tutorial, you need:
• One or more deployable Greengrass groups. For more information about creating AWS IoT Greengrass
groups and cores, see Getting Started with AWS IoT Greengrass (p. 44).
• The AWS CLI installed and configured on your machine. For information, see the AWS CLI User Guide.
• An S3 bucket created in the same region as AWS IoT Greengrass. For information, see Creating and
Configuring an S3 Bucket.
Note
Currently, SSE KMS enabled buckets are not supported.
Step 1: Create and Upload the Bulk Deployment
Input File
In this step, you create a deployment input file and upload it to your Amazon S3 bucket. This file is a
serialized, line-delimited JSON file that contains information about each group in your bulk deployment.
AWS IoT Greengrass uses this information to deploy each group on your behalf when you initialize your
bulk group deployment.
1. Run the following command to get the groupId for each group you want to deploy. You enter the
groupId into your bulk deployment input file so that AWS IoT Greengrass can identify each group
to be deployed.
aws greengrass list-groups
The response contains information about each group in your AWS IoT Greengrass account:
137

AWS IoT Greengrass Developer Guide
Create and Upload the Bulk Deployment Input File
{
"Groups": [
{
"Name": "string",
"Id": "string",
"Arn": "string",
"LastUpdatedTimestamp": "string",
"CreationTimestamp": "string",
"LatestVersion": "string",
"LatestVersionArn": "string"
}
],
"NextToken": "string"
}
Run the following command to get the groupVersionId of each group you want to deploy.
list-group-versions --group-id groupId
The response contains information about all of the versions in the group. Make a note of the ID of
the group version you want to use.
{
"Versions": [
{
"Arn": "string",
"Id": "string",
"Version": "string",
"CreationTimestamp": "string"
}
],
"NextToken": "string"
}
2. In your computer terminal or editor of choice, create a file, MyBulkDeploymentInputFile, from
the following example. This file contains information about each AWS IoT Greengrass group to be
included in a bulk deployment. Although this example defines multiple groups, for this tutorial, your
file can contain just one.
Note
The size of this file must be less than 100 MB.
{"GroupId":"groupId1", "GroupVersionId":"groupVersionId1",
"DeploymentType":"NewDeployment"}
{"GroupId":"groupId2", "GroupVersionId":"groupVersionId2",
"DeploymentType":"NewDeployment"}
{"GroupId":"groupId3", "GroupVersionId":"groupVersionId3",
"DeploymentType":"NewDeployment"}
...
Each record (or line) contains a group object. Each group object contains its corresponding
groupId and groupVersionId and a DeploymentType. Currently, AWS IoT Greengrass supports
NewDeployment bulk deployment types only.
Save and close your file. Make a note of the location of the file.
138

AWS IoT Greengrass Developer Guide
Create and Configure an IAM Execution Role
3. Use the following command in your terminal to upload your input file to your Amazon S3 bucket.
Replace the file path with the location and name of your file. For information, see Add an Object to a
Bucket.
aws s3 cp path/MyBulkDeploymentInputFile s3://my-bucket/
Step 2: Create and Configure an IAM Execution
Role
In this step, you use the IAM console to create a standalone execution role. You then establish a trust
relationship between the role and AWS IoT Greengrass and ensure that your IAM user has PassRole
privileges for your execution role. This allows AWS IoT Greengrass to assume your execution role and
create the deployments on your behalf.
1. Use the following policy to create an execution role. This policy document allows AWS IoT
Greengrass to access your bulk deployment input file when it creates each deployment on your
behalf.
For more information about creating an IAM role and delegating permissions, see Creating IAM
Roles.
{
"Version": "2012-10-17",
"Statement": [
{
"Sid": "VisualEditor0",
"Effect": "Allow",
"Action": "greengrass:CreateDeployment",
"Resource": [
"arn:aws:greengrass:region:accountId:/greengrass/groups/groupId1",
"arn:aws:greengrass:region:accountId:/greengrass/groups/groupId2",
"arn:aws:greengrass:region:accountId:/greengrass/groups/groupId3",
...
]
}
]
}
Note
This policy must have a resource for each group or group version in your bulk deployment
input file to be deployed by AWS IoT Greengrass. To allow access to all groups, for Resource,
specify an asterisk:
"Resource": ["*"]
2. Modify the trust relationship for your execution role to include AWS IoT Greengrass. This allows AWS
IoT Greengrass to use your execution role and the permissions attached to it. For information, see
Editing the Trust Relationship for an Existing Role.
{
"Version": "2012-10-17",
"Statement": [
139

AWS IoT Greengrass Developer Guide
Allow Your Execution Role Access to Your S3 Bucket
{
"Sid": "",
"Effect": "Allow",
"Principal": {
"Service": "greengrass.amazonaws.com"
},
"Action": "sts:AssumeRole"
}
]
}
3. Give IAM PassRole permissions for your execution role to your IAM user. This IAM user is the one
used to initiate the bulk deployment. PassRole permissions allow your IAM user to pass your
execution role to AWS IoT Greengrass for use. For more information, see Granting a User Permissions
to Pass a Role to an AWS Service.
Use the following example to update your trust policy document. Modify this example, as necessary.
{
"Version": "2012-10-17",
"Statement": [
{
"Sid": "Stmt1508193814000",
"Effect": "Allow",
"Action": [
"iam:PassRole"
],
"Resource": [
"arn:aws:iam::123456789012:user/executionRoleArn"
]
}
]
}
Step 3: Allow Your Execution Role Access to Your
S3 Bucket
To start your bulk deployment, your execution role must be able to read your bulk deployment input
file from your Amazon S3 bucket. Attach the following example policy to your Amazon S3 bucket so its
GetObject permissions are accessible to your execution role.
For more information, see How Do I Add an S3 Bucket Policy?
{
"Version": "2008-10-17",
"Id": "examplePolicy",
"Statement": [
{
"Sid": "Stmt1535408982966",
"Effect": "Allow",
"Principal": {
"AWS": [
"executionRoleArn"
]
140

AWS IoT Greengrass Developer Guide
Deploy the Groups
},
"Action": "s3:GetObject",
"Resource":
"arn:aws:s3:::my-bucket/objectKey"
}
]
}
You can use the following command in your terminal to check your bucket's policy:
aws s3api get-bucket-policy --bucket my-bucket
Note
You can directly modify your execution role to grant it permission to your Amazon S3 bucket's
GetObject permissions instead. To do this, attach the following example policy to your
execution role.
{
"Version": "2012-10-17",
"Statement": [
{
"Sid": "VisualEditor0",
"Effect": "Allow",
"Action": "s3:GetObject",
"Resource": "arn:aws:s3:::my-bucket/objectKey"
}
]
}
Step 4: Deploy the Groups
In this step, you start a bulk deployment operation for all group versions configured in your
bulk deployment input file. The deployment action for each of your group versions is of type
NewDeploymentType.
Note
You cannot call StartBulkDeployment while another bulk deployment from the same account is
still running. The request is rejected.
1. Use the following command to start the bulk deployment.
We recommend that you include an X-Amzn-Client-Token token in every StartBulkDeployment
request. These requests are idempotent with respect to the token and the request parameters. This
token can be any unique, case-sensitive string of up to 64 ASCII characters.
aws greengrass start-bulk-deployment --cli-input-json "{
"InputFileUri":"URI of file in S3 bucket",
"ExecutionRoleArn":"ARN of execution role",
"AmznClientToken":"your Amazon client token"
}"
The command should result in a successful status code of 200, along with the following response:
141

AWS IoT Greengrass Developer Guide
Deploy the Groups
{
"bulkDeploymentId": UUID
}
Make a note of the bulk deployment ID. It can be used to check the status of your bulk deployment.
2. Use the following command to check the status of your bulk deployment.
aws greengrass get-bulk-deployment-status --bulk-deployment-id 1234567
The command should return a successful status code of 200 in addition to a JSON payload of
information:
{
"BulkDeploymentStatus": Running,
"Statistics": {
"RecordsProcessed": integer,
"InvalidInputRecords": integer,
"RetryAttempts": integer
},
"CreatedAt": "string",
"ErrorMessage": "string",
"ErrorDetails": [
{
"DetailedErrorCode": "string",
"DetailedErrorMessage": "string"
}
]
}
BulkDeploymentStatus contains the current status of the bulk execution. The execution can have
one of six different statuses:
•Initializing. The bulk deployment request has been received, and the execution is preparing
to start.
•Running. The bulk deployment execution has started.
•Completed. The bulk deployment execution has finished processing all records.
•Stopping. The bulk deployment execution has received a command to stop and will terminate
shortly. You can't start a new bulk deployment while a previous deployment is in the Stopping
state.
•Stopped. The bulk deployment execution has been manually stopped.
•Failed. The bulk deployment execution has encountered an error and terminated. Error details
can be found in the ErrorDetails field.
The JSON payload also includes statistical information about the progress of the bulk deployment.
You can use this information to determine how many groups have been processed and how many
have failed. The statistical information includes:
•RecordsProcessed: The number of group records that were attempted.
•InvalidInputRecords: The total number of records that returned a non-retryable error. For
example, this can occur if a group record from the input file uses an invalid format or specifies a
142

AWS IoT Greengrass Developer Guide
Test the Deployment
nonexistent group version, or if the execution doesn't grant permission to deploy a group or group
version.
•RetryAttempts: The number of deployment attempts that returned a retryable error. For
example, a retry is triggered if the attempt to deploy a group returns a throttling error. A group
deployment can be retried up to five times.
In the case of a bulk deployment execution failure, this payload also includes an ErrorDetails
section that can be used for troubleshooting. It contains information about the cause of the
execution failure.
You can periodically check the status of the bulk deployment to confirm that it is progressing as
expected. After the deployment is complete, RecordsProcessed should be equal to the number
of deployment groups in your bulk deployment input file. This indicates that each record has been
processed.
Step 5: Test the Deployment
If needed, find the ID of your bulk deployment by using ListBulkDeployments command.
aws greengrass list-bulk-deployments
This command returns a list of all of your bulk deployments from most to least recent, including your
BulkDeploymentId.
{
"BulkDeployments": [
{
"BulkDeploymentId": 1234567,
"BulkDeploymentArn": "string",
"CreatedAt": "string"
}
],
"NextToken": "string"
}
Now call the ListBulkDeploymentDetailedReports command to gather detailed information about each
deployment.
aws greengrass list-bulk-deployment-detailed-reports --bulk-deployment-id 1234567
The command should return a successful status code of 200 along with a JSON payload of information:
{
"BulkDeploymentResults": [
{
"DeploymentId": "string",
"GroupVersionedArn": "string",
"CreatedAt": "string",
143

AWS IoT Greengrass Developer Guide
Troubleshooting Bulk Deployments
"DeploymentStatus": "string",
"ErrorMessage": "string",
"ErrorDetails": [
{
"DetailedErrorCode": "string",
"DetailedErrorMessage": "string"
}
]
}
],
"NextToken": "string"
}
This payload usually contains a paginated list of each deployment and its deployment status from most
to least recent. It also contains more information in the event of a bulk deployment execution failure.
Again, the total number of deployments listed should be equal to the number of groups you identified in
your bulk deployment input file.
The information returned can change until the deployments are in a terminal state (success or failure).
You can call this command periodically until then.
Troubleshooting Bulk Deployments
If the bulk deployment is not successful, you can try the following troubleshooting steps. Run the
commands in your terminal.
Troubleshoot input file errors
The bulk deployment can fail in the event of syntax errors in the bulk deployment input file. This returns
a bulk deployment status of Failed with an error message indicating the line number of the first
validation error. There are four possible errors:
•InvalidInputFile: Missing GroupId at line number: line number
This error indicates that the given input file line is unable to register the specified parameter. The
possible missing parameters are the GroupId and the GroupVersionId.
•InvalidInputFile: Invalid deployment type at line number : line number. Only valid type
is 'NewDeployment'.
This error indicates that the given input file line lists an invalid deployment type. At this time, the only
supported deployment type is a NewDeployment.
•Line %s is too long in S3 File. Valid line is less than 256 chars.
This error indicates that the given input file line is too long and must be shortened.
•Failed to parse input file at line number: line number
This error indicates that the given input file line is not considered valid json.
144

AWS IoT Greengrass Developer Guide
Check for concurrent bulk deployments
Check for concurrent bulk deployments
You cannot start a new bulk deployment while another one is still running or in a non-terminal state.
This can result in a Concurrent Deployment Error. You can verify that a bulk deployment is
not currently running by using the ListBulkDeployments command. This command lists your bulk
deployments from most to least recent.
{
"BulkDeployments": [
{
"BulkDeploymentId": BulkDeploymentId,
"BulkDeploymentArn": "string",
"CreatedAt": "string"
}
],
"NextToken": "string"
}
Use the BulkDeploymentId of the first listed bulk deployment to run the GetBulkDeploymentStatus
command. If your most recent bulk deployment is in a running state (Initializing or Running), use
the following command to stop the bulk deployment.
aws greengrass stop-bulk-deployment --bulk-deployment-id BulkDeploymentId
This action results in a status of Stopping until the deployment is Stopped. After the deployment has
reached a Stopped status, you can start a new bulk deployment.
Check ErrorDetails
Run the GetBulkDeploymentStatus command to return a JSON payload that contains detailed
information about any bulk deployment execution failure.
"Message": "string",
"ErrorDetails": [
{
"DetailedErrorCode": "string",
"DetailedErrorMessage": "string"
}
]
When exiting with an error, the ErrorDetails JSON payload that is returned by this call contains more
information about the bulk deployment execution failure. An error status code in the 400 series, for
example, indicates an input error, either in the input parameters or the caller dependencies.
Check the AWS IoT Greengrass Core Log
You can troubleshoot issues by viewing the AWS IoT Greengrass core logs. Use the following commands
to view runtime.log:
cd /greengrass/ggc/var/log
sudo cat system/runtime.log | more
145

AWS IoT Greengrass Developer Guide
Additional Resources
For more information about AWS IoT Greengrass logging, see Monitoring with AWS IoT Greengrass
Logs (p. 385).
Additional Resources
For more information, see the following resources:
•AWS IoT Greengrass CLI Reference
•AWS IoT Greengrass API Reference
146

AWS IoT Greengrass Developer Guide
SDKs
Run Lambda Functions on the AWS
IoT Greengrass Core
AWS IoT Greengrass provides a containerized Lambda runtime environment for user-defined code.
Lambda functions that are deployed to an AWS IoT Greengrass core run in the core's local Lambda
runtime. Local Lambda functions can be triggered by local events, messages from the cloud, and other
sources, which brings local compute functionality to connected devices. For example, you can use
Greengrass Lambda functions to filter device data before transmitting the data to the cloud.
To deploy a Lambda function to a core, you add the function to a Greengrass group (by referencing the
existing Lambda function), configure group-specific settings for the function, and then deploy the group.
If the function accesses AWS services, you also must add any required permissions to the group role.
You can configure parameters that determine how the Lambda functions run, including permissions,
isolation, memory limits, and more. For more information, see the section called “Controlling Greengrass
Lambda Function Execution” (p. 150). These settings can also enable you to run AWS IoT Greengrass
in a Docker container. For more information, see the section called “Run AWS IoT Greengrass in a Docker
Container” (p. 159).
SDKs for Greengrass Lambda Functions
AWS provides three SDKs that can be used by Greengrass Lambda functions running on an AWS
IoT Greengrass core. These SDKs are contained in different packages, so functions can use them
simultaneously. To use an SDK in a Greengrass Lambda function, you must include it in your deployment
package.
AWS IoT Greengrass Core SDK
Current version: 1.3.0
The AWS IoT Greengrass Core SDK enables Lambda functions to interact with the core device,
publish messages to AWS IoT, interact with the local shadow service, invoke other deployed Lambda
functions, and access secret resources.
The following table lists supported languages or platforms and the versions of AWS IoT Greengrass
core software that it can run on.
Language or platform GGC version
Python 2.7 1.0.0 or later
Java 8 1.1.0 or later
Node.js 6.10 1.1.0 or later
C, C++ 1.6.0 or later
The following table lists the changes introduced in AWS IoT Greengrass Core SDK versions.
147
AWS IoT Greengrass Developer Guide
SDKs
SDK version Feature changelog
1.3.0 New secretmanager client used
to access local secrets. This feature
requires AWS IoT Greengrass Core
v1.7.0.
Download the AWS IoT Greengrass Core SDK from the following locations:
• AWS IoT Greengrass Core SDK for Python, Java, or Node.js from the Software page of the AWS IoT
Core console.
• The AWS IoT Greengrass Core SDK for C from GitHub. This SDK is used by Lambda
executables (p. 157).
• All AWS IoT Greengrass Core SDK languages from the AWS IoT Greengrass Core SDK (p. 19)
downloads.
If you're running Python Lambda functions, you can use pip to install the AWS IoT Greengrass Core
SDK for Python on the core device. Then you can deploy your functions without including the SDK in
the Lambda function deployment package. For more information, see greengrasssdk.
Note
To use pip to install the Python SDK, run the following command in your core device
terminal.
pip install greengrasssdk
AWS IoT Greengrass Machine Learning SDK
Current version: 1.0.0
The AWS IoT Greengrass Machine Learning SDK enables Lambda functions to consume machine
learning models that are deployed to the Greengrass core as machine learning resources. Lambda
functions can use the SDK to invoke and interact with a local inference service that's deployed to the
core as a connector. For more information, including a code example that uses the SDK, see the the
section called “Image Classification” (p. 280) connector.
The following table lists supported languages or platforms and the versions of AWS IoT Greengrass
core software that it can run on.
Language or platform GGC version
Python 2.7 1.7.0
Download the AWS IoT Greengrass Machine Learning SDK for Python from the following locations:
• The Software page of the AWS IoT Core console.
• The AWS IoT Greengrass Machine Learning SDK (p. 20) downloads.
AWS SDKs
Enables local Lambda functions to make direct calls to AWS services, such as Amazon S3,
DynamoDB, AWS IoT, and AWS IoT Greengrass. To use an AWS SDK in a Greengrass Lambda function,
you must include it in your deployment package. When you use the AWS SDK in the same package
as the AWS IoT Greengrass Core SDK, make sure that your Lambda functions use the correct
namespaces. Greengrass Lambda functions can't communicate with cloud services when the core is
offline.
148
AWS IoT Greengrass Developer Guide
Migrating Cloud-Based Lambda Functions
Download the appropriate AWS SDKs from the Getting Started Resource Center.
For more information about creating a deployment package, see the section called “Create and Package
a Lambda Function” (p. 64) in the Getting Started tutorial or Creating a Deployment Package in the AWS
Lambda Developer Guide.
Migrating Cloud-Based Lambda Functions
The AWS IoT Greengrass Core SDK follows the AWS SDK programming model, which makes it easy to
port Lambda functions that are developed for the cloud to Lambda functions that run on an AWS IoT
Greengrass core.
For example, the following Python Lambda function uses the AWS SDK for Python to publish a message
to the topic /some/topic in the cloud:
import boto3
client = boto3.client('iot-data')
response = client.publish(
topic = "/some/topic",
qos = 0,
payload = "Some payload".encode()
)
To port the function for an AWS IoT Greengrass core, in the import statement and client initialization,
change the boto3 module name to greengrasssdk, as shown in the following example:
import greengrasssdk
client = greengrasssdk.client('iot-data')
response = client.publish(
topic = '/some/topic',
qos = 0,
payload = 'Some payload'.encode()
)
Note
The AWS IoT Greengrass Core SDK supports sending MQTT messages with QoS = 0 only.
The similarity between programming models also makes it possible for you to test your Lambda
functions in the cloud and then migrate them to AWS IoT Greengrass with minimal effort.Lambda
executables don't run in the cloud, so you can't use the AWS SDK to test them in the cloud before
deployment.
Reference Lambda Functions by Alias or Version
Greengrass groups can reference a Lambda function by alias (recommended) or by version. Using an alias
makes it easier to manage code updates because you don't have to change your subscription table or
group definition when the function code is updated. Instead, you just point the alias to the new function
version. Aliases resolve to version numbers during group deployment. When you use aliases, the resolved
version is updated to the version that the alias is pointing to at the time of deployment.
AWS IoT Greengrass doesn't support Lambda aliases for $LATEST versions. $LATEST versions aren't
bound to immutable, published function versions and can be changed at any time, which is counter to
the AWS IoT Greengrass principle of version immutability.
149

AWS IoT Greengrass Developer Guide
Controlling Greengrass Lambda Function Execution
A common practice for keeping your Greengrass Lambda functions updated with code changes is to use
an alias named PRODUCTION in your Greengrass group and subscriptions. As you promote new versions
of your Lambda function into production, point the alias to the latest stable version and then redeploy
the group. You can also use this method to roll back to a previous version.
Controlling Execution of Greengrass Lambda
Functions by Using Group-Specific Configuration
AWS IoT Greengrass provides cloud-based management of Greengrass Lambda functions. You can
configure details of how the Lambda function behaves when it runs in a particular group. Although a
function's code and dependencies are managed using AWS Lambda, AWS IoT Greengrass supports the
following group-specific configuration settings:
Run as
The access identity used to run each Lambda function. By default, Lambda functions run as ggc_user
and ggc_group. You can change the setting and choose the user ID and group ID that has the
permissions required to run the Lambda function. You can override both UID and GID or just one if
you leave the other field blank. This setting gives you more granular control over access to device
resources. We recommend that you configure your Greengrass hardware with appropriate resource
limits, file permissions, and disk quotas for the users and groups whose permissions are used to run
Lambda functions.
This feature is available for AWS IoT Greengrass Core v1.7.0 only.
Important
We recommend that you avoid running as root unless absolutely necessary. When you run a
Lambda function as root, you increase the risk of unintended changes, such as accidentally
deleting a critical file. In addition, running as root increases the risks to your data and
device from malicious individuals. If you do need to run as root, you must update the AWS
IoT Greengrass configuration to enable it. For more information, see the section called
“Running a Lambda Function as Root” (p. 152).
We disallow running as root when you run in a Greengrass container to make it more
difficult for malicious attacks to get root access on your device.
UID (number)
The user ID for the user that has the permissions required to run the Lambda function. This
setting is only available if you choose Run as another user ID/group ID. You can look up the
user ID you want to use to run the Lambda function by using the getent passwd command on
your AWS IoT Greengrass device.
GID (number)
The group ID for the group that has the permissions required to run the Lambda function. This
setting is only available if you choose Run as another user ID/group ID. You can look up the
group ID you want to use to run the Lambda function by using the getent group command on
your AWS IoT Greengrass device.
Containerization
Choose whether the Lambda function runs with the default containerization for the group, or
specify the containerization that should always be used for this Lambda function. To run without
enabling your device kernel namespace and cgroup, all your Lambda functions must run without
containerization. You can accomplish this easily by setting the default containerization for the group.
See the section called “Setting Default Containerization for Lambda Functions in a Group” (p. 155).
This feature is available for AWS IoT Greengrass Core v1.7.0 only.
150

AWS IoT Greengrass Developer Guide
Controlling Greengrass Lambda Function Execution
Note
We recommend that you run Lambda functions in a Greengrass container unless your
use case requires them to run without containerization. When running in a Greengrass
container, you can use attached resources, and gain the benefits of isolation and increased
security. Before you change the containerization, see the section called “Considerations
When Choosing Lambda Function Containerization” (p. 153).
Memory limit
The memory allocation for the function. The default is 16 MB.
Note
This setting is not available when you run a Lambda function without containerization.
Lambda functions run without containerization have no memory limit. The memory limit
setting is discarded when you change the Lambda function to run without containerization.
Timeout
The amount of time before the function or request is terminated. The default is 3 seconds.
Lifecycle
A Lambda function lifecycle can be on-demand or long-lived. The default is on-demand.
An on-demand Lambda function starts in a new or reused container when invoked. Requests to the
function might be processed by any available container. A long-lived—or pinned—Lambda function
starts automatically after AWS IoT Greengrass starts and keeps running in its own container (or
sandbox). All requests to the function are processed by the same container. For more information,
see the section called “Lifecycle Configuration” (p. 156).
Read access to /sys directory
Whether the function can access the host's /sys folder. Use this when the function must read device
information from /sys. The default is false.
Note
This setting is not available when you run a Lambda function without containerization. This
value of this setting is discarded when you change the Lambda function to run without
containerization.
Input payload data type
The expected encoding type of the input payload for the function, either JSON or binary. The default
is JSON.
Support for the binary encoding type is available starting in AWS IoT Greengrass Core Software
v1.5.0 and AWS IoT Greengrass Core SDK v1.1.0. Accepting binary input data can be useful for
functions that interact with device data, because the restricted hardware capabilities of devices
often make it difficult or impossible for them to construct a JSON data type.
Note
Lambda executables (p. 157) support the binary encoding type only, not JSON.
Environment variables
Key-value pairs that can dynamically pass settings to function code and libraries. Local environment
variables work the same way as AWS Lambda function environment variables, but are available in
the core environment.
Resource access policies
A list of up to 10 local resources (p. 169), secret resources (p. 243), and machine learning
resources (p. 195) that the Lambda function is allowed to access, and the corresponding read-
only or read-write permission. In the console, these affiliated resources are listed on the
function's Resources page.
151

AWS IoT Greengrass Developer Guide
Running a Lambda Function as Root
Note
Resource access policies apply only when Lambda functions are run in a Greengrass
container. When you run Lambda functions without containerization, you can directly access
local resources. Secret resources can be accessed when running without containerization.
Running a Lambda Function as Root
This feature is available for AWS IoT Greengrass Core v1.7.0 only.
Before you can run one or more Lambda functions as root, you must first update the AWS IoT Greengrass
configuration to enable support. Support for running Lambda functions as root is off by default. The
deployment fails if you try to deploy a Lambda function and run it as root (UID and GID of 0) and you
haven't updated the AWS IoT Greengrass configuration. An error like the following appears in the
runtime log (greengrass_root/ggc/var/log/system/runtime.log):
lambda(s)
[list of function arns] are configured to run as root while Greengrass is not configured to
run lambdas with root permissions
Important
We recommend that you avoid running as root unless absolutely necessary. When you run a
Lambda function as root, you increase the risk of unintended changes, such as accidentally
deleting a critical file. In addition, running as root increases the risks to your data and device
from malicious individuals.
To allow Lambda functions to run as root
1. On your AWS IoT Greengrass device, navigate to the greengrass-root/config folder.
Note
By default, greengrass-root is the /greengrass directory.
2. Update the config.json file to add "allowFunctionsToRunAsRoot" : "yes" to the runtime
field. For example:
{
"coreThing" : {
...
},
"runtime" : {
...
"allowFunctionsToRunAsRoot" : "yes"
},
...
}
3. Use the following commands to restart AWS IoT Greengrass:
cd /greengrass/ggc/core
sudo ./greengrassd restart
Now you can set the user ID and group ID (UID/GID) of Lambda functions to 0 to run that Lambda
function as root.
You can change the value of "allowFunctionsToRunAsRoot" to "no" and restart AWS IoT
Greengrass if you want to disallow Lambda functions to run as root.
152

AWS IoT Greengrass Developer Guide
Considerations When Choosing
Lambda Function Containerization
Considerations When Choosing Lambda Function
Containerization
This feature is available for AWS IoT Greengrass Core v1.7.0 only.
By default, Lambda functions run inside an AWS IoT Greengrass container. That container provides
isolation between your functions and the host, providing additional security for both the host and the
functions in the container.
We recommend that you run Lambda functions in a Greengrass container unless your use case requires
them to run without containerization. By running your Lambda functions in a Greengrass container, you
have more control over restricting access to resources.
Here are some example use cases for running without containerization:
• You want to run AWS IoT Greengrass on a device where you cannot make changes to the underlying
kernel. This might be due to company security policies or because the OS version does not allow it.
• You want to run your Lambda function in another container environment with its own OverlayFS, but
encounter OverlayFS conflicts when you run in a Greengrass container.
• You need access to local resources with paths that can't be determined at deployment time or whose
paths can change after deployment, such as pluggable devices.
• You have a legacy application that was written as a process and you have encountered issues when
running it as a containerized Lambda function.
Containerization Differences
Containerization Notes
AWS IoT Greengrass container • All AWS IoT Greengrass features are available
when you run a Lambda function in a
Greengrass container.
• Lambda functions that run in a Greengrass
container do not have access to the deployed
code of other Lambda functions, even if they
run with the same group ID. In other words,
your Lambda functions run with greater
isolation from one another.
• Because Lambda functions that run in an
AWS IoT Greengrass container have all child
processes execute in the same container as
the Lambda function, the child processes
are terminated when the Lambda function is
terminated.
No container • Not all AWS IoT Greengrass features are
available when you run a Lambda function
without containerization. Currently,
connectors (p. 266) and machine learning
models (p. 195) cannot run without
containerization.
• The Lambda function has read-only access to
the deployed code of other Lambda functions
that are running with the same group ID.
• Lambda functions that spawn child processes
in a different process session or with an
153
AWS IoT Greengrass Developer Guide
Considerations When Choosing
Lambda Function Containerization
Containerization Notes
overridden SIGHUP (signal hangup) handler,
such as with the nohup utility, will not
be automatically terminated by AWS IoT
Greengrass when the parent Lambda function is
terminated.
Changing the containerization for a Lambda function can cause problems when you deploy it. If you
had assigned local resources to your Lambda function that are no longer available with your new
containerization settings, deployment fails.
• When you change a Lambda function from running in a Greengrass container to running without
containerization, memory limits for the function are discarded. You must access the file system directly
instead of using attached local resources. You must remove any attached resources before you deploy.
• When you change a Lambda function from running without containerization to running in a container,
your Lambda function loses direct access to the file system. You must define a memory limit for each
function or accept the default 16 MB. You can configure those settings for each Lambda function
before you deploy.
To change containerization settings for a Lambda function
1. In the AWS IoT console, choose Greengrass, and then choose Groups.
2. Choose the group that contains the Lambda function whose settings you want to change.
3. Choose Lambdas.
4. On the Lambda function that you want to change, choose the ellipsis (…) and then choose Edit
configuration.
5. Change the containerization settings. If you configure the Lambda function to run in a Greengrass
container, you must also set the Memory limit and Read access to /sys directory properties.
6. Choose Update to save the changes to your Lambda function.
The changes take effect when the group is deployed.
You can also use the CreateFunctionDefinition and CreateFunctionDefinitionVersion in the AWS IoT
Greengrass API Reference. If you are changing the containerization setting, be sure to update the other
parameters too. For example, if you are changing from running a Lambda function in a Greengrass
container to running without containerization, be sure to clear the MemorySize parameter.
Determine the Isolation Modes Supported by Your Greengrass
Device
You can use the AWS IoT Greengrass dependency checker to determine which isolation modes
(Greengrass container/no container) are supported by your Greengrass device.
To run the AWS IoT Greengrass dependency checker
1. Download and run the AWS IoT Greengrass dependency checker from the GitHub repository.
wget https://github.com/aws-samples/aws-greengrass-samples/raw/master/greengrass-
dependency-checker-GGCv1.7.0.zip
unzip greengrass-dependency-checker-GGCv1.7.0.zip
cd greengrass-dependency-checker-GGCv1.7.0
sudo modprobe configs
154

AWS IoT Greengrass Developer Guide
Setting Default Containerization
for Lambda Functions in a Group
sudo ./check_ggc_dependencies | more
2. Where more appears, press the Spacebar key to display another page of text.
For information about the modprobe command, run man modprobe in the terminal.
Setting Default Containerization for Lambda
Functions in a Group
This feature is available for AWS IoT Greengrass Core v1.7.0 only.
You can modify the group settings to specify the default containerization for Lambda functions in the
group. You can override this setting for one or more Lambda functions in the group if you want the
Lambda functions to run with containerization different from the group default. Before you change
containerization settings, see the section called “Considerations When Choosing Lambda Function
Containerization” (p. 153).
Important
If you want to change the default containerization for the group, but have one or more
functions that use a different containerization, change the settings for the Lambda functions
before you change the group setting. If you change the group containerization setting first, the
values for the Memory limit and Read access to /sys directory settings are discarded.
To modify containerization settings for your AWS IoT Greengrass group
1. In the AWS IoT console, choose Greengrass, and then choose Groups.
2. Choose the group whose settings you want to change.
3. Choose Settings.
4. In the Lambda runtime environment section, change the containerization setting.
The changes take effect when the group is deployed.
Communication Flows for Greengrass Lambda
Functions
Greengrass Lambda functions support several methods of communicating with other members of the
AWS IoT Greengrass group, local services, and cloud services (including AWS services).
Communication Using MQTT Messages
Lambda functions can send and receive MQTT messages using a publish-subscribe pattern that's
controlled by subscriptions.
This communication flow allows Lambda functions to exchange messages with the following entities:
• Devices in the group.
• Connectors in the group.
• Other Lambda functions in the group.
• AWS IoT.
• Local Device Shadow service.
155

AWS IoT Greengrass Developer Guide
Other Communication Flows
A subscription defines a message source, a message target, and a topic (or subject) that's used to
route messages from the source to the target. Messages that are published to a Lambda function are
passed to the function's registered handler. Subscriptions enable more security and provide predictable
interactions. For more information, see the section called “Greengrass Messaging Workflow” (p. 375).
Note
When the core is offline, Greengrass Lambda functions can exchange messages with devices,
connectors, other functions, and local shadows, but messages to AWS IoT are queued. For more
information, see the section called “MQTT Message Queue” (p. 37).
Other Communication Flows
• To interact with local resources and machine learning models on a core device, Greengrass Lambda
functions use platform-specific operating system interfaces. For example, you can use the open
method in the os module in Python 2.7 functions. To allow a function to access a resource, the
function must be affiliated with the resource and granted read-only or read-write permission. For
more information, including AWS IoT Greengrass core version availability, see Access Local Resources
with Lambda Functions (p. 169) and Perform Machine Learning Inference (p. 195).
Note
If you run your Lambda function without containerization, you cannot use attached local
resources and must access those resources directly. AWS IoT Greengrass connectors and
machine learning resources are not available for Lambda functions that run without
containerization.
• Greengrass Lambda functions can use the AWS SDK to communicate with AWS services. For more
information, see AWS SDK (p. 148).
• Greengrass Lambda functions can use third-party interfaces to communicate with external cloud
services, similar to cloud-based Lambda functions.
Note
Greengrass Lambda functions can't communicate with AWS or other cloud services when the
core is offline.
Lifecycle Configuration for Greengrass Lambda
Functions
The Greengrass Lambda function lifecycle determines when a function starts and how it creates and uses
containers. The lifecycle also determines how variables and preprocessing logic that are outside of the
function handler are retained.
AWS IoT Greengrass supports the on-demand (default) or long-lived lifecycles:
•On-demand functions start when they are invoked and stop when there are no tasks left to execute.
An invocation of the function creates a separate container (or sandbox) to process invocations, unless
an existing container is available for reuse. Data that's sent to the function might be pulled by any of
the containers.
Multiple invocations of an on-demand function can run in parallel.
Variables and preprocessing logic that are defined outside of the function handler are not retained
when new containers are created.
•Long-lived (or pinned) functions start automatically when the AWS IoT Greengrass core starts and run
in a single container. All data that's sent to the function is pulled by the same container.
156

AWS IoT Greengrass Developer Guide
Lambda Executables
Multiple invocations are queued until earlier invocations are executed.
Variables and preprocessing logic that are defined outside of the function handler are retained for
every invocation of the handler.
Long-lived Lambda functions are useful when you need to start doing work without any initial input.
For example, a long-lived function can load and start processing an ML model to be ready when the
function starts receiving device data.
Note
Remember that long-lived functions have timeouts that are associated with invocations of
their handler. If you want to execute indefinitely running code, you must start it outside the
handler. Make sure that there's no blocking code outside the handler that might prevent the
function from completing its initialization.
For more information about container reuse, see Understanding Container Reuse in AWS Lambda on the
AWS Compute Blog.
Lambda Executables
This feature is available for AWS IoT Greengrass Core v1.6.0 and later.
A Lambda executable is a type of Greengrass Lambda function that you can use to run binary code in the
core environment. It lets you execute device-specific functionality natively, and benefit from the smaller
footprint of compiled code. Lambda executables can be invoked by events, invoke other functions, and
access local resources.
Lambda executables support the binary encoding type only (not JSON), but otherwise you can manage
them in your Greengrass group and deploy them like other Greengrass Lambda functions. However, the
process of creating Lambda executables is different from creating Python, Java, and Node.js Lambda
functions:
• You can't use the AWS Lambda console to create (or manage) a Lambda executable. You can create a
Lambda executable only by using the AWS Lambda API.
• You upload the function code to AWS Lambda as a compiled executable that includes the AWS IoT
Greengrass Core SDK for C.
• You specify the executable name as the function handler.
Lambda executables must implement certain calls and programming patterns in their function code. For
example, the main method must:
• Call gg_global_init to initialize Greengrass internal global variables. This function must be called
before creating any threads, and before calling any other AWS IoT Greengrass Core SDK functions.
• Call gg_runtime_start to register the function handler with the Greengrass Lambda runtime. This
function must be called during initialization. Calling this function causes the current thread to be
used by the runtime. The optional GG_RT_OPT_ASYNC parameter tells this function to not block, but
instead to create a new thread for the runtime. This function uses a SIGTERM handler.
The following snippet is the main method from the simple_handler.c code example on GitHub.
int main() {
gg_error err = GGE_SUCCESS;
157

AWS IoT Greengrass Developer Guide
Create a Lambda Executable
err = gg_global_init(0);
if(err) {
gg_log(GG_LOG_ERROR, "gg_global_init failed %d", err);
goto cleanup;
}
gg_runtime_start(handler, 0);
cleanup:
return -1;
}
For more information about requirements, constraints, and other implementation details, see AWS IoT
Greengrass Core SDK for C.
Create a Lambda Executable
After you compile your code along with the SDK, use the AWS Lambda API to create a Lambda function
and upload your compiled executable.
Note
Your function must be compiled with a C89 compatible compiler.
The following example uses the create-function CLI command to create a Lambda executable. The
command specifies:
• The name of the executable for the handler. This must be the exact name of your compiled executable.
• The path to the .zip file that contains the compiled executable.
•arn:aws:greengrass:::runtime/function/executable for the runtime. This is the runtime for
all Lambda executables.
Note
For role, you can specify the ARN of any Lambda execution role. AWS IoT Greengrass doesn't
use this role, but the parameter is required to create the function. For more information about
Lambda execution roles, see AWS Lambda Permissions Model in the AWS Lambda Developer
Guide.
aws lambda create-function \
--region aws-region \
--function-name function-name \
--handler executable-name \
--role role-arn \
--zip-file fileb://file-name.zip \
--runtime arn:aws:greengrass:::runtime/function/executable
Next, use the AWS Lambda API to publish a version and create an alias.
• Use publish-version to publish a function version.
aws lambda publish-version \
--function-name function-name \
--region aws-region
• Use create-alias to create an alias the points to the version you just published. We recommend that
you reference Lambda functions by alias when you add them to a Greengrass group.
aws lambda create-alias \
--function-name function-name \
158

AWS IoT Greengrass Developer Guide
Run AWS IoT Greengrass in a Docker Container
--name alias-name \
--function-version version-number \
--region aws-region
Note
The AWS Lambda console doesn't display Lambda executables. To update the function code, you
must also use the Lambda API.
Then, add the Lambda executable to a Greengrass group, configure it to accept binary input data in its
group-specific settings, and deploy the group. You can do this in the AWS IoT Greengrass console or by
using the AWS IoT Greengrass API.
Running AWS IoT Greengrass in a Docker Container
This feature is available for AWS IoT Greengrass Core v1.7.0 only.
AWS IoT Greengrass can be configured to run in a Docker container, which you can run on Windows,
macOS, and Linux platforms. To help you get started, AWS provides a Docker image that has the AWS IoT
Greengrass core software and dependencies installed.
Note
Connectors, local resource access, and local machine learning models can't be used in a Docker
container. These features aren't supported when the Lambda runtime environment for the
Greengrass group is set to No container (p. 153), which is required to run AWS IoT Greengrass
in a Docker container.
You can follow the instructions in the Docker file available through Amazon CloudFront, or access a
prebuilt Docker image from Amazon ECR by using the following steps:
1. Get the AWS IoT Greengrass Container Image from Amazon ECR (p. 160)
2. Create and Configure the Greengrass Group and Core (p. 162)
3. Run AWS IoT Greengrass Locally (p. 162)
4. Configure "No container" Containerization for the Group (p. 165)
5. Deploy Lambda Functions to the Docker Container (p. 165)
6. (Optional) Deploy Devices that Interact with Greengrass in the Docker Container (p. 166)
Prerequisites
To complete this tutorial, the following software and versions must be installed on your host computer.
•Docker, version 18.09 or later. Earlier versions might also work, but version 18.09 or later is preferred.
•Python, version 3.6 or later.
•pip, version 18.1 or later.
• AWS CLI, version 1.16 or later.
• To install and configure the CLI, see Installing the AWS Command Line Interface and Configuring the
AWS CLI in the AWS Command Line Interface User Guide.
• To upgrade to the latest version of the AWS CLI, run the following command:
pip install awscli --upgrade --user
Note
If you use the MSI installation of the AWS CLI on Windows, be aware of the following:
159
AWS IoT Greengrass Developer Guide
Get the AWS IoT Greengrass
Container Image from Amazon ECR
• If the installation fails to install botocore, try using the Python and pip installation.
• To upgrade to a newer CLI version, you must repeat the MSI installation process.
Step 1: Get the AWS IoT Greengrass Container Image
from Amazon ECR
AWS IoT Greengrass provides a Docker image that has the AWS IoT Greengrass core software installed.
For steps that show how to pull the container image from Amazon ECR, choose your operating system:
Pull the Container Image (Linux)
Run the following commands in your computer terminal.
1. Get the required login command, which contains an authorization token for the AWS IoT Greengrass
registry in Amazon ECR.
aws ecr get-login --registry-ids 216483018798 --no-include-email --region us-west-2
The output is the docker login command that you use in the next step.
2. Authenticate your Docker client to the AWS IoT Greengrass container image in the registry by
running the docker login command from the get-login output. The command should be
similar to the following example.
docker login -u AWS -p abCzYZ123... https://216483018798.dkr.ecr.us-
west-2.amazonaws.com
3. Retrieve the AWS IoT Greengrass container image.
docker pull 216483018798.dkr.ecr.us-west-2.amazonaws.com/aws-greengrass-docker/
amazonlinux:latest
Note
The latest tag corresponds to the latest AWS IoT Greengrass container. You can also
pull other versions from the repository. To list all images that are available in the AWS IoT
Greengrass repository, use the aws ecr list-images command. For example:
aws ecr list-images --region us-west-2 --registry-id 216483018798 --repository-
name aws-greengrass-docker/amazonlinux
4. Enable symlink and hardlink protection. If you're experimenting with running AWS IoT Greengrass in
a container, you can enable the settings for the current boot only.
Note
You might need to use sudo to run these commands.
• To enable the settings for the current boot only:
echo 1 > /proc/sys/fs/protected_hardlinks
echo 1 > /proc/sys/fs/protected_symlinks
• To enable the settings to persist across restarts:
echo '# AWS Greengrass' >> /etc/sysctl.conf
echo 'fs.protected_hardlinks = 1' >> /etc/sysctl.conf
160
AWS IoT Greengrass Developer Guide
Get the AWS IoT Greengrass
Container Image from Amazon ECR
echo 'fs.protected_symlinks = 1' >> /etc/sysctl.conf
sysctl -p
5. Enable IPv4 network forwarding, which is required for AWS IoT Greengrass cloud deployment
and MQTT communications to work on Linux. In the /etc/sysctl.conf file, set
net.ipv4.ip_forward to 1, and then reload sysctls.
sudo nano /etc/sysctl.conf
# set this net.ipv4.ip_forward = 1
sudo sysctl -p
Note
You can use the editor of your choice instead of nano.
Pull the Container Image (macOS)
Run the following commands in your computer terminal.
1. Get the required login command, which contains an authorization token for the AWS IoT Greengrass
registry in Amazon ECR.
aws ecr get-login --registry-ids 216483018798 --no-include-email --region us-west-2
The output is the docker login command that you use in the next step.
2. Authenticate your Docker client to the AWS IoT Greengrass container image in the registry by
running the docker login command from the get-login output. The command should be
similar to the following example.
docker login -u AWS -p abCzYZ123... https://216483018798.dkr.ecr.us-
west-2.amazonaws.com
3. Retrieve the AWS IoT Greengrass container image.
docker pull 216483018798.dkr.ecr.us-west-2.amazonaws.com/aws-greengrass-docker/
amazonlinux:latest
Note
The latest tag corresponds to the latest AWS IoT Greengrass container. You can also
pull other versions from the repository. To list all images that are available in the AWS IoT
Greengrass repository, use the aws ecr list-images command. For example:
aws ecr list-images --region us-west-2 --registry-id 216483018798 --repository-
name aws-greengrass-docker/amazonlinux
Pull the Container Image (Windows)
Run the following commands in a command prompt. Before you can use Docker commands on Windows,
Docker Desktop must be running.
1. Get the required login command, which contains an authorization token for the AWS IoT Greengrass
registry in Amazon ECR.
aws ecr get-login --registry-ids 216483018798 --no-include-email --region us-west-2
161

AWS IoT Greengrass Developer Guide
Create and Configure the Greengrass Group and Core
The output is the docker login command that you use in the next step.
2. Authenticate your Docker client to the AWS IoT Greengrass container image in the registry by
running the docker login command from the get-login output. The command should be
similar to the following example.
docker login -u AWS -p abCzYZ123... https://216483018798.dkr.ecr.us-
west-2.amazonaws.com
3. Retrieve the AWS IoT Greengrass container image.
docker pull 216483018798.dkr.ecr.us-west-2.amazonaws.com/aws-greengrass-docker/
amazonlinux:latest
Note
The latest tag corresponds to the latest AWS IoT Greengrass container. You can also
pull other versions from the repository. To list all images that are available in the AWS IoT
Greengrass repository, use the aws ecr list-images command. For example:
aws ecr list-images --region us-west-2 --registry-id 216483018798 --repository-
name aws-greengrass-docker/amazonlinux
Step 2: Create and Configure the Greengrass Group
and Core
The Docker image has the AWS IoT Greengrass core software installed, but you must create a Greengrass
group and core. This includes downloading certificates and the core configuration file.
• Follow the steps in the section called “Configure AWS IoT Greengrass on AWS IoT” (p. 56). Skip step
8b where you download the AWS IoT Greengrass core software. The core software and its runtime
dependencies are already set up in the Docker image.
Step 3: Run AWS IoT Greengrass Locally
After your group is configured, you're ready to configure and start the core. For steps that show how to
do this, choose your operating system:
Run Greengrass Locally (Linux)
Run the following commands in your computer terminal.
1. Decompress the certificates and configuration file (that you downloaded when you created your
Greengrass group) into a known location, such as /tmp. For example:
tar xvzf hash-setup.tar.gz -C /tmp/
2. Download the root CA certificate into the directory where you decompressed the certificates and
configuration file. The certificates enable your device to communicate with AWS IoT using the MQTT
messaging protocol over TLS. For more information, including how to choose the appropriate root
CA certificate, see the documentation on Server Authentication in AWS IoT Core.
a. Download the certificate. The following example uses AmazonRootCA1.pem.
162

AWS IoT Greengrass Developer Guide
Run AWS IoT Greengrass Locally
Replace /tmp with the path where you decompressed your certificates and configuration file.
cd /tmp/certs/
sudo wget -O root.ca.pem https://www.amazontrust.com/repository/AmazonRootCA1.pem
Note
The wget -O parameter is the capital letter O.
b. Confirm that the root.ca.pem file is not empty.
cat root.ca.pem
If the root.ca.pem file is empty, check the wget URL and try again.
3. Start AWS IoT Greengrass and bind-mount the certificates and configuration file in the Docker
container.
Replace /tmp with the path where you decompressed your certificates and configuration file.
docker run --rm --init -it --name aws-greengrass-docker \
--entrypoint /greengrass-entrypoint.sh \
-v /tmp/certs:/greengrass/certs \
-v /tmp/config:/greengrass/config \
-p 8883:8883 \
216483018798.dkr.ecr.us-west-2.amazonaws.com/aws-greengrass-docker/amazonlinux:latest
The output should look like this example:
Setting up greengrass daemon
Validating hardlink/softlink protection
Waiting for up to 30s for Daemon to start
Greengrass successfully started with PID: 10
Run Greengrass Locally (macOS)
Run the following commands in your computer terminal.
1. Decompress the certificates and configuration file (that you downloaded when you created your
Greengrass group) into a known location, such as /tmp. For example:
tar xvzf hash-setup.tar.gz -C /tmp/
2. Download the root CA certificate into the directory where you decompressed the certificates and
configuration file. The certificates enable your device to communicate with AWS IoT using the MQTT
messaging protocol over TLS. For more information, including how to choose the appropriate root
CA certificate, see the documentation on Server Authentication in AWS IoT Core.
a. Download the certificate. The following example uses AmazonRootCA1.pem.
Replace /tmp with the path where you decompressed your certificates and configuration file.
cd /tmp/certs/
sudo wget -O root.ca.pem https://www.amazontrust.com/repository/AmazonRootCA1.pem
163
AWS IoT Greengrass Developer Guide
Run AWS IoT Greengrass Locally
Note
The wget -O parameter is the capital letter O.
b. Confirm that the root.ca.pem file is not empty.
cat root.ca.pem
If the root.ca.pem file is empty, check the wget URL and try again.
3. Start AWS IoT Greengrass and bind-mount the certificates and configuration file in the Docker
container.
Replace /tmp with the path where you decompressed your certificates and configuration file.
docker run --rm --init -it --name aws-greengrass-docker \
--entrypoint /greengrass-entrypoint.sh \
-v /tmp/certs:/greengrass/certs \
-v /tmp/config:/greengrass/config \
-p 8883:8883 \
216483018798.dkr.ecr.us-west-2.amazonaws.com/aws-greengrass-docker/amazonlinux:latest
The output should look like this example:
Setting up greengrass daemon
Validating hardlink/softlink protection
Waiting for up to 30s for Daemon to start
Greengrass successfully started with PID: 10
Run Greengrass Locally (Windows)
1. Use a utility such as WinZip or 7-Zip to decompress the certificates and configuration file that
you downloaded when you created your Greengrass group. For more information, see the WinZip
documentation.
Locate the downloaded hash-setup.tar.gz file on your computer and then decompress the file
into C:\Users\%USERNAME%\Downloads\.
2. Download the root CA certificate into the directory where you decompressed the certificates and
configuration file. The certificates enable your device to communicate with AWS IoT using the MQTT
messaging protocol over TLS. For more information, including how to choose the appropriate root
CA certificate, see the documentation on Server Authentication in AWS IoT Core.
Download the certificate. This example uses AmazonRootCA1.pem.
• If you have curl installed, run the following commands in your command prompt.
cd C:\Users\%USERNAME%\Downloads\certs
curl https://www.amazontrust.com/repository/AmazonRootCA1.pem -o root.ca.pem
• Otherwise, follow these steps:
1. In a web browser, open AmazonRootCA1.pem.
2. Save the document as root.ca.pem in the C:\Users\%USERNAME%\Downloads\certs
directory, which contains the decompressed certificates.
Depending on your browser, save the file directly from the browser or copy the displayed key
to the clipboard and save it in Notepad.
164

AWS IoT Greengrass Developer Guide
Configure "No container" Containerization for the Group
3. Start AWS IoT Greengrass and bind-mount the certificates and configuration file in the Docker
container. Run the following commands in your command prompt.
docker run --rm --init -it --name aws-greengrass-docker --entrypoint /greengrass-
entrypoint.sh -v c:/Users/%USERNAME%/Downloads/certs:/greengrass/certs -v c:/Users/
%USERNAME%/Downloads/config:/greengrass/config -p 8883:8883 216483018798.dkr.ecr.us-
west-2.amazonaws.com/aws-greengrass-docker/amazonlinux:latest
When Docker prompts you to share your C:\ drive with the Docker daemon, allow it to bind-mount
the C:\ directory inside the Docker container. For more information, see Shared drives in the Docker
documentation.
The output should look like this example:
Setting up greengrass daemon
Validating hardlink/softlink protection
Waiting for up to 30s for Daemon to start
Greengrass successfully started with PID: 10
Note
If the container doesn't open the shell and exits immediately, you can debug the issue by bind-
mounting the Greengrass runtime logs when you start the image. For more information, see the
section called “To Persist Greengrass Runtime Logs Outside of the Docker Container” (p. 167).
Step 4: Configure "No container" Containerization for
the Greengrass Group
When you run AWS IoT Greengrass in a Docker container, all Lambda functions must run without
containerization. In this step, you set the the default containerization for the group to No container. You
must do this before you deploy the group for the first time.
1. In the AWS IoT console, choose Greengrass, and then choose Groups.
2. Choose the group whose settings you want to change.
3. Choose Settings.
4. Under Lambda runtime environment, choose No container.
For more information, see the section called “Setting Default Containerization for Lambda Functions in a
Group” (p. 155).
Note
By default, Lambda functions use the group containerization setting. If you override the No
container setting for any Lambda functions when AWS IoT Greengrass is running in a Docker
container, the deployment fails.
Step 5: Deploy Lambda Functions to the AWS IoT
Greengrass Docker Container
You can deploy long-lived Lambda functions to the Greengrass Docker container.
• Follow the steps in the section called “Module 3 (Part 1): Lambda Functions on AWS IoT
Greengrass” (p. 63) to deploy a long-lived Hello World Lambda function to the container.
165
AWS IoT Greengrass Developer Guide
(Optional) Deploy Devices that Interact
with Greengrass in the Docker Container
Step 6: (Optional) Deploy Devices that Interact with
Greengrass Running in the Docker Container
You can also deploy Greengrass devices that interact with AWS IoT Greengrass when it's running in a
Docker container.
• Follow the steps in the section called “Module 4: Interacting with Devices in an AWS IoT Greengrass
Group” (p. 91) to deploy devices that connect to the core and send MQTT messages.
Stopping the AWS IoT Greengrass Docker Container
To stop the AWS IoT Greengrass Docker container, press Ctrl+C in your terminal or command prompt.
This action sends SIGTERM to the Greengrass daemon process to tear down the Greengrass daemon
process and all Lambda processes that were started by the daemon process. The Docker container is
initialized with /dev/init process as PID 1, which helps in removing any leftover zombie processes. For
more information, see the Docker run reference.
Troubleshooting AWS IoT Greengrass in a Docker
Container
Use the following information to help troubleshoot issues with running AWS IoT Greengrass in a Docker
container.
Symptom Solution
You receive the error "Unknown options: -no-
include-email" when running the aws ecr
get-login command.
Make sure that you have the latest AWS CLI
version installed (for example, run: pip install
awscli --upgrade --user). If you're using
Windows and you installed the CLI using the MSI
installer, you must repeat the installation process.
For more information, see Installing the AWS
Command Line Interface on Microsoft Windows in
the AWS Command Line Interface User Guide.
You receive an error such as WARNING: IPv4 is
disabled. Networking will not work on a
Linux computer.
Enable IPv4 network forwarding as described in
this step (p. 161). AWS IoT Greengrass cloud
deployment and MQTT communications don't
work when IPv4 forwarding isn't enabled. For
more information, see Configure namespaced
kernel parameters (sysctls) at runtime in the
Docker documentation.
You receive the message Firewall Detected
while Sharing Drives when running Docker
on a Windows computer.
See the Error: A firewall is blocking file sharing
between Windows and the containers Docker
support issue. This error can also occur if you are
signed in on a virtual private network (VPN) and
your network settings are preventing the shared
drive from being mounted. In that situation, turn
off VPN and re-run the Docker container.
For general AWS IoT Greengrass troubleshooting help, see Troubleshooting (p. 410).
166

AWS IoT Greengrass Developer Guide
Troubleshooting AWS IoT Greengrass in a Docker Container
Debugging AWS IoT Greengrass in a Docker Container
To debug issues with a Docker container, you can persist the Greengrass runtime logs or attach an
interactive shell to the Docker container.
To Persist Greengrass Runtime Logs Outside of the Docker Container
You can run the AWS IoT Greengrass Docker container after bind-mounting the /greengrass/ggc/
var/log directory. The logs persist even after the container exits or is removed.
On Linux or macOS
Run the following command in a terminal. This bind-mounts the Greengrass log directory and starts
the Docker image.
Replace /tmp with the path where you decompressed your certificates and configuration file.
docker run --rm --init -it --name aws-greengrass-docker \
--entrypoint /greengrass-entrypoint.sh \
-v /tmp/certs:/greengrass/certs \
-v /tmp/config:/greengrass/config \
-v /tmp/log:/greengrass/ggc/var/log \
-p 8883:8883 \
aws-greengrass-docker/amazonlinux:1.7.0
You can then check your logs at /tmp/log on your host to see what happened while Greengrass was
running inside the Docker container.
On Windows
Run the following command in a command prompt. This bind-mounts the Greengrass log directory
and starts the Docker image.
docker run --rm --init -it --name aws-greengrass-docker --entrypoint /greengrass-
entrypoint.sh -v c:/Users/%USERNAME%/Downloads/aws-greengrass-docker-1.7.0/certs:/
greengrass/certs -v c:/Users/%USERNAME%/Downloads/aws-greengrass-docker-1.7.0/config:/
greengrass/config -v c:/Users/%USERNAME%/Downloads/aws-greengrass-docker-1.7.0/log:/
greengrass/ggc/var/log -p 8883:8883 aws-greengrass-docker/amazonlinux:1.7.0
You can then check your logs at C:/Users/%USERNAME%/Downloads/aws-greengrass-
docker-1.7.0/log on your host to see what happened while Greengrass was running inside the
Docker container.
To Attach an Interactive Shell to the Docker Container
You can attach an interactive shell to a running AWS IoT Greengrass Docker container. This can help you
investigate the state of the Greengrass Docker container.
On Linux or macOS
Run the following command in the terminal.
docker exec -it $(docker ps -a -q -f "name=aws-greengrass-docker") /bin/bash
On Windows
Run the following commands in the command prompt.
167

AWS IoT Greengrass Developer Guide
Troubleshooting AWS IoT Greengrass in a Docker Container
docker ps -a -q -f "name=aws-greengrass-docker"
Replace gg-container-id with the container_id result from the previous command.
docker exec -it gg-container-id /bin/bash
168

AWS IoT Greengrass Developer Guide
Supported Resource Types
Access Local Resources with Lambda
Functions
This feature is available for AWS IoT Greengrass Core v1.3.0 and later.
Developers who use AWS IoT Greengrass can author AWS Lambda functions in the cloud and deploy
them to core devices for local execution. On Greengrass cores running Linux, these locally deployed
Lambda functions can access local resources that are physically present on the Greengrass core device.
For example, to communicate with devices that are connected through Modbus or CANbus, you can
enable your Lambda function to access the serial port on the core device. To configure secure access to
local resources, you must guarantee the security of your physical hardware and your Greengrass core
device OS.
To get started accessing local resources, see the following tutorials:
•How to Configure Local Resource Access Using the AWS Command Line Interface (p. 171)
•How to Configure Local Resource Access Using the AWS Management Console (p. 175)
Supported Resource Types
You can access two types of local resources: volume resources and device resources.
Volume resources
Files or directories on the root file system (except under /sys, /dev, or /var). These include:
• Folders or files used to read or write information across Greengrass Lambda functions (for
example, /usr/lib/python2.x/site-packages/local).
• Folders or files under the host's /proc file system (for example, /proc/net or /proc/stat).
Supported in v1.6.0 or later only. For additional requirements, see the section called “Volume
Resources Under the /proc Directory” (p. 170).
Tip
To configure the /var, /var/run, and /var/lib directories as volume resources, first
mount the directory in a different folder and then configure the folder as a volume
resource.
Device resources
Files under /dev. Only character devices or block devices under /dev are allowed for device
resources. These include:
• Serial ports used to communicate with devices connected through serial ports (for example, /
dev/ttyS0, /dev/ttyS1).
• USB used to connect USB peripherals (for example, /dev/ttyUSB0 or /dev/bus/usb).
• GPIOs used for sensors and actuators through GPIO (for example, /dev/gpiomem).
• GPUs used to accelerate machine learning using on-board GPUs (for example, /dev/nvidia0).
• Cameras used to capture images and videos (for example, /dev/video0).
Note
/dev/shm is an exception. It can be configured as a volume resource only. Resources under
/dev/shm must be granted rw permission.
169

AWS IoT Greengrass Developer Guide
Requirements
AWS IoT Greengrass also supports resource types that are used to perform machine learning inference.
For more information, see Perform Machine Learning Inference (p. 195).
Requirements
The following requirements apply to configuring secure access to local resources:
• You must be using AWS IoT Greengrass Core Software v1.3.0 or later. To create resources for the
host's /proc directory, you must be using v1.6.0 or later.
• The local resource (including any required drivers and libraries) must be correctly installed on the
Greengrass core device and consistently available during use.
• The desired operation of the resource, and access to the resource, must not require root privileges.
• Only read or read and write permissions are available. Lambda functions cannot perform
privileged operations on the resources.
• You must provide the full path of the local resource on the operating system of the Greengrass core
device.
• A resource name or ID has a maximum length of 128 characters and must use the pattern [a-zA-
Z0-9:_-]+.
Volume Resources Under the /proc Directory
The following considerations apply to volume resources that are under the host's /proc directory.
• You must be using AWS IoT Greengrass Core Software v1.6.0 or later.
• You can allow read-only access for Lambda functions, but not read-write access. This level of access is
managed by AWS IoT Greengrass.
• You might also need to grant OS group permissions to enable read access in the file system. For
example, suppose your source directory or file has a 660 file permission, which means that only the
owner or user in the group has read (and write) access. In this case, you must add the OS group owner's
permissions to the resource. For more information, see the section called “Group Owner File Access
Permission” (p. 170).
• The host environment and the Lambda namespace both contain a /proc directory, so be sure to avoid
naming conflicts when you specify the destination path. For example, if /proc is the source path, you
can specify /host-proc as the destination path (or any path name other than "/proc").
Group Owner File Access Permission
An AWS IoT Greengrass Lambda function process normally runs as ggc_user and ggc_group. However,
you can give additional file access permissions to the Lambda function process in the local resource
definition, as follows:
• To add the permissions of the Linux group that owns the resource, use the
GroupOwnerSetting#AutoAddGroupOwner parameter or Automatically add OS group
permissions of the Linux group that owns the resource console option.
• To add the permissions of a different Linux group, use the GroupOwnerSetting#GroupOwner
parameter or Specify another OS group to add permission console option. The GroupOwner value is
ignored if GroupOwnerSetting#AutoAddGroupOwner is true.
An AWS IoT Greengrass Lambda function process inherits all of the file system permissions of ggc_user,
ggc_group, and the Linux group (if added). For the Lambda function to access a resource, the Lambda
170

AWS IoT Greengrass Developer Guide
See Also
function process must have the required permissions to the resource. You can use the chmod(1)
command to change the permission of the resource, if necessary.
See Also
•AWS IoT Greengrass Limits in the AWS General Reference
How to Configure Local Resource Access Using the
AWS Command Line Interface
This feature is available for AWS IoT Greengrass Core v1.3.0 and later.
To use a local resource, you must add a resource definition to the group definition that is deployed to
your Greengrass core device. The group definition must also contain a Lambda function definition in
which you grant access permissions for local resources to your Lambda functions. For more information,
including requirements and constraints, see Access Local Resources with Lambda Functions (p. 169).
This tutorial describes the process for creating a local resource and configuring access to it using the
AWS Command Line Interface (CLI). To follow the steps in the tutorial, you must have already created a
Greengrass group as described in Getting Started with AWS IoT Greengrass (p. 44).
For a tutorial that uses the AWS Management Console, see How to Configure Local Resource Access
Using the AWS Management Console (p. 175).
Create Local Resources
First, you use the CreateResourceDefinition command to create a resource definition that
specifies the resources to be accessed. In this example, we create two resources, TestDirectory and
TestCamera:
aws greengrass create-resource-definition --cli-input-json '{
"Name": "MyLocalVolumeResource",
"InitialVersion": {
"Resources": [
{
"Id": "data-volume",
"Name": "TestDirectory",
"ResourceDataContainer": {
"LocalVolumeResourceData": {
"SourcePath": "/src/LRAtest",
"DestinationPath": "/dest/LRAtest",
"GroupOwnerSetting": {
"AutoAddGroupOwner": true,
"GroupOwner": ""
}
}
}
},
{
"Id": "data-device",
"Name": "TestCamera",
"ResourceDataContainer": {
"LocalDeviceResourceData": {
"SourcePath": "/dev/video0",
"GroupOwnerSetting": {
"AutoAddGroupOwner": true,
171

AWS IoT Greengrass Developer Guide
Create the Greengrass Function
"GroupOwner": ""
}
}
}
}
]
}
}'
Resources: A list of Resource objects in the Greengrass group. One Greengrass group can have up to 50
resources.
Resource#Id: The unique identifier of the resource. The ID is used to refer to a resource in the Lambda
function configuration. Max length 128 characters. Pattern: [a-zA-Z0-9:_-]+.
Resource#Name: The name of the resource. The resource name is displayed in the Greengrass console.
Max length 128 characters. Pattern: [a-zA-Z0-9:_-]+.
LocalVolumeResourceData#SourcePath: The local absolute path of the volume resource on the
Greengrass core device. The source path for a volume resource type cannot start with /sys.
LocalDeviceResourceData#SourcePath: The local absolute path of the device resource. The source path
for a device resource can refer only to a character device or block device under /dev.
LocalVolumeResourceData#DestinationPath: The absolute path of the volume resource inside the
Lambda environment.
GroupOwnerSetting: Allows you to configure additional group privileges for the Lambda process. This
field is optional. For more information, see Group Owner File Access Permission (p. 170).
GroupOwnerSetting#AutoAddGroupOwner: If true, Greengrass automatically adds the specified Linux
OS group owner of the resource to the Lambda process privileges. Thus the Lambda process has the file
access permissions of the added Linux group.
GroupOwnerSetting#GroupOwner: Specifies the name of the Linux OS group whose privileges are
added to the Lambda process. This field is optional.
A resource definition version ARN is returned by CreateResourceDefinition. The ARN should be
used when updating a group definition. For example:
{
"LatestVersionArn": "arn:aws:greengrass:us-west-2:012345678901:/greengrass/
definition/resources/ab14d0b5-116e-4951-a322-9cde24a30373/versions/a4d9b882-
d025-4760-9cfe-9d4fada5390d",
"Name": "MyLocalVolumeResource",
"LastUpdatedTimestamp": "2017-11-15T01:18:42.153Z",
"LatestVersion": "a4d9b882-d025-4760-9cfe-9d4fada5390d",
"CreationTimestamp": "2017-11-15T01:18:42.153Z",
"Id": "ab14d0b5-116e-4951-a322-9cde24a30373",
"Arn": "arn:aws:greengrass:us-west-2:123456789012:/greengrass/definition/resources/
ab14d0b5-116e-4951-a322-9cde24a30373"
}
Create the Greengrass Function
After the resources are created, use the CreateFunctionDefinition command to create the
Greengrass function and grant the function access to the resource:
aws greengrass create-function-definition --cli-input-json '{
"Name": "MyFunctionDefinition",
172

AWS IoT Greengrass Developer Guide
Add the Lambda Function to the Group
"InitialVersion": {
"Functions": [
{
"Id": "greengrassLraTest",
"FunctionArn": "arn:aws:lambda:us-west-2:012345678901:function:lraTest:1",
"FunctionConfiguration": {
"Pinned": false,
"MemorySize": 16384,
"Timeout": 30,
"Environment": {
"ResourceAccessPolicies": [
{
"ResourceId": "data-volume",
"Permission": "rw"
},
{
"ResourceId": "data-device",
"Permission": "ro"
}
],
"AccessSysfs": true
}
}
}
]
}
}'
ResourceAccessPolicies: Contains the resourceId and permission which grant the Lambda access to
the resource. A Lambda function can have a maximum of 10 resources.
ResourceAccessPolicy#Permission: Specifies which permissions the Lambda has on the resource. The
available options are rw (read/write) or ro (read-only).
AccessSysfs: If true, the Lambda process can have read access to the /sys folder on the Greengrass core
device. This is used in cases where the Greengrass Lambda needs to read device information from /sys.
Again, CreateFunctionDefinition returns a function definition version ARN. The ARN should be
used in your group definition version.
{
"LatestVersionArn": "arn:aws:greengrass:us-west-2:012345678901:/greengrass/definition/
functions/3c9b1685-634f-4592-8dfd-7ae1183c28ad/versions/37f0d50e-ef50-4faf-b125-
ade8ed12336e",
"Name": "MyFunctionDefinition",
"LastUpdatedTimestamp": "2017-11-22T02:28:02.325Z",
"LatestVersion": "37f0d50e-ef50-4faf-b125-ade8ed12336e",
"CreationTimestamp": "2017-11-22T02:28:02.325Z",
"Id": "3c9b1685-634f-4592-8dfd-7ae1183c28ad",
"Arn": "arn:aws:greengrass:us-west-2:123456789012:/greengrass/definition/
functions/3c9b1685-634f-4592-8dfd-7ae1183c28ad"
}
Add the Lambda Function to the Group
Finally, use CreateGroupVersion to add the function to the group. For example:
aws greengrass create-group-version --group-id "b36a3aeb-3243-47ff-9fa4-7e8d98cd3cf5" \
--resource-definition-version-arn "arn:aws:greengrass:us-west-2:123456789012:/
greengrass/definition/resources/db6bf40b-29d3-4c4e-9574-21ab7d74316c/versions/31d0010f-
e19a-4c4c-8098-68b79906fb87" \
173

AWS IoT Greengrass Developer Guide
Add the Lambda Function to the Group
--core-definition-version-arn "arn:aws:greengrass:us-west-2:123456789012:/
greengrass/definition/cores/adbf3475-f6f3-48e1-84d6-502f02729067/
versions/297c419a-9deb-46dd-8ccc-341fc670138b" \
--function-definition-version-arn "arn:aws:greengrass:us-west-2:123456789012:/greengrass/
definition/functions/d1123830-da38-4c4c-a4b7-e92eec7b6d3e/versions/a2e90400-caae-4ffd-b23a-
db1892a33c78" \
--subscription-definition-version-arn "arn:aws:greengrass:us-west-2:123456789012:/
greengrass/definition/subscriptions/7a8ef3d8-1de3-426c-9554-5b55a32fbcb6/
versions/470c858c-7eb3-4abd-9d48-230236bfbf6a"
A new group version is returned:
{
"Arn": "arn:aws:greengrass:us-west-2:012345678901:/greengrass/groups/
b36a3aeb-3243-47ff-9fa4-7e8d98cd3cf5/versions/291917fb-ec54-4895-823e-27b52da25481",
"Version": "291917fb-ec54-4895-823e-27b52da25481",
"CreationTimestamp": "2017-11-22T01:47:22.487Z",
"Id": "b36a3aeb-3243-47ff-9fa4-7e8d98cd3cf5"
}
Your Greengrass group now contains the lraTest Lambda function that has access to two resources:
TestDirectory and TestCamera.
This example Lambda function, lraTest.py, written in Python, writes to the local volume resource:
# lraTest.py
# Demonstrates a simple use case of local resource access.
# This Lambda function writes a file "test" to a volume mounted inside
# the Lambda environment under "/dest/LRAtest". Then it reads the file and
# publishes the content to the AWS IoT "LRA/test" topic.
import sys
import greengrasssdk
import platform
import os
import logging
# Create a Greengrass Core SDK client.
client = greengrasssdk.client('iot-data')
volumePath = '/dest/LRAtest'
def function_handler(event, context):
client.publish(topic='LRA/test', payload='Sent from AWS Greengrass Core.')
try:
volumeInfo = os.stat(volumePath)
client.publish(topic='LRA/test', payload=str(volumeInfo))
with open(volumePath + '/test', 'a') as output:
output.write('Successfully write to a file.\n')
with open(volumePath + '/test', 'r') as myfile:
data = myfile.read()
client.publish(topic='LRA/test', payload=data)
except Exception as e:
logging.error("Experiencing error :{}".format(e))
return
These commands are provided by the Greengrass API to create and manage resource definitions and
resource definition versions:
•CreateResourceDefinition
•CreateResourceDefinitionVersion
•DeleteResourceDefinition
174

AWS IoT Greengrass Developer Guide
Troubleshooting
•GetResourceDefinition
•GetResourceDefinitionVersion
•ListResourceDefinitions
•ListResourceDefinitionVersions
•UpdateResourceDefinition
Troubleshooting
•Q: Why does my Greengrass group deployment fail with an error similar to:
group config is invalid:
ggc_user or [ggc_group root tty] don't have ro permission on the file: /dev/tty0
A: This error indicates that the Lambda process doesn't have permission to access the specified
resource. The solution is to change the file permission of the resource so that Lambda can access it.
(See Group Owner File Access Permission (p. 170) for details).
•Q: When I configure /var/run as a volume resource, why does the Lambda function fail to start with
an error message in the runtime.log:
[ERROR]-container_process.go:39,Runtime execution error: unable to start lambda
container.
container_linux.go:259: starting container process caused "process_linux.go:345:
container init caused \"rootfs_linux.go:62: mounting \\\"/var/run\\\" to rootfs \\\"/
greengrass/ggc/packages/1.3.0/rootfs_sys\\\" at \\\"/greengrass/ggc/packages/1.3.0/
rootfs_sys/run\\\"
caused \\\"invalid argument\\\"\""
A: AWS IoT Greengrass core currently doesn't support the configuration of /var, /var/run, and /
var/lib as volume resources. One workaround is to first mount /var, /var/run or /var/lib in a
different folder and then configure the folder as a volume resource.
•Q: When I configure /dev/shm as a volume resource with read-only permission, why does the Lambda
function fail to start with an error in the runtime.log:
[ERROR]-container_process.go:39,Runtime execution error: unable to start lambda
container.
container_linux.go:259: starting container process caused "process_linux.go:345:
container init caused \"rootfs_linux.go:62: mounting \\\"/dev/shm\\\" to rootfs \\\"/
greengrass/ggc/packages/1.3.0/rootfs_sys\\\" at \\\"/greengrass/ggc/packages/1.3.0/
rootfs_sys/dev/shm\\\"
caused \\\"operation not permitted\\\"\""”
A: /dev/shm can only be configured as read/write. Change the resource permission to rw to resolve
the issue.
How to Configure Local Resource Access Using the
AWS Management Console
This feature is available for AWS IoT Greengrass Core v1.3.0 and later.
You can configure Lambda functions to securely access local resources on the host Greengrass core
device. Local resources refer to buses and peripherals that are physically on the host, or file system
175

AWS IoT Greengrass Developer Guide
Prerequisites
volumes on the host OS. For more information, including requirements and constraints, see Access Local
Resources with Lambda Functions (p. 169).
This tutorial describes how to use the AWS Management Console to configure access to local resources
that are present on an AWS IoT Greengrass core device. It contains the following high-level steps:
1. Create a Lambda Function Deployment Package (p. 176)
2. Create and Publish a Lambda Function (p. 180)
3. Add the Lambda Function to the Group (p. 183)
4. Add a Local Resource to the Group (p. 186)
5. Add Subscriptions to the Group (p. 188)
6. Deploy the Group (p. 190)
For a tutorial that uses the AWS Command Line Interface (CLI), see How to Configure Local Resource
Access Using the AWS Command Line Interface (p. 171).
Prerequisites
To complete this tutorial, you need:
• A Greengrass group and a Greengrass core (v1.3.0 or later). To learn how to create a Greengrass group
or core, see Getting Started with AWS IoT Greengrass (p. 44).
• The following directories created on the Greengrass core device:
• /src/LRAtest
• /dest/LRAtest
The owner group of these directories must have read and write access to the directories. For example,
you might use the following command to grant access:
sudo chmod 0775 /src/LRAtest
Step 1: Create a Lambda Function Deployment
Package
In this step, you create a Lambda function deployment package, which is a ZIP file that contains the
function's code and dependencies. You also download the AWS IoT Greengrass Core SDK to include in the
package as a dependency.
1. On your computer, copy the following Python script to a local file named lraTest.py. This is the
app logic for the Lambda function.
# lraTest.py
# Demonstrates a simple use case of local resource access.
# This Lambda function writes a file "test" to a volume mounted inside
# the Lambda environment under "/dest/LRAtest". Then it reads the file and
# publishes the content to the AWS IoT "LRA/test" topic.
import sys
import greengrasssdk
import platform
import os
import logging
176

AWS IoT Greengrass Developer Guide
Create a Lambda Function Deployment Package
# Create a Greengrass Core SDK client.
client = greengrasssdk.client('iot-data')
volumePath = '/dest/LRAtest'
def function_handler(event, context):
client.publish(topic='LRA/test', payload='Sent from AWS Greengrass Core.')
try:
volumeInfo = os.stat(volumePath)
client.publish(topic='LRA/test', payload=str(volumeInfo))
with open(volumePath + '/test', 'a') as output:
output.write('Successfully write to a file.\n')
with open(volumePath + '/test', 'r') as myfile:
data = myfile.read()
client.publish(topic='LRA/test', payload=data)
except Exception as e:
logging.error("Experiencing error :{}".format(e))
return
2. Download the AWS IoT Greengrass Core SDK Python 2.7 version 1.3.0, as follows:
a. In the AWS IoT Core console, in the left pane, choose Software.
Note
You can download the SDK from the Software page in the console or from the AWS IoT
Greengrass Core SDK (p. 19) downloads. This procedure uses the console.
177
AWS IoT Greengrass Developer Guide
Create a Lambda Function Deployment Package
b. Under SDKs, for AWS IoT Greengrass Core SDK, choose Configure download.
178
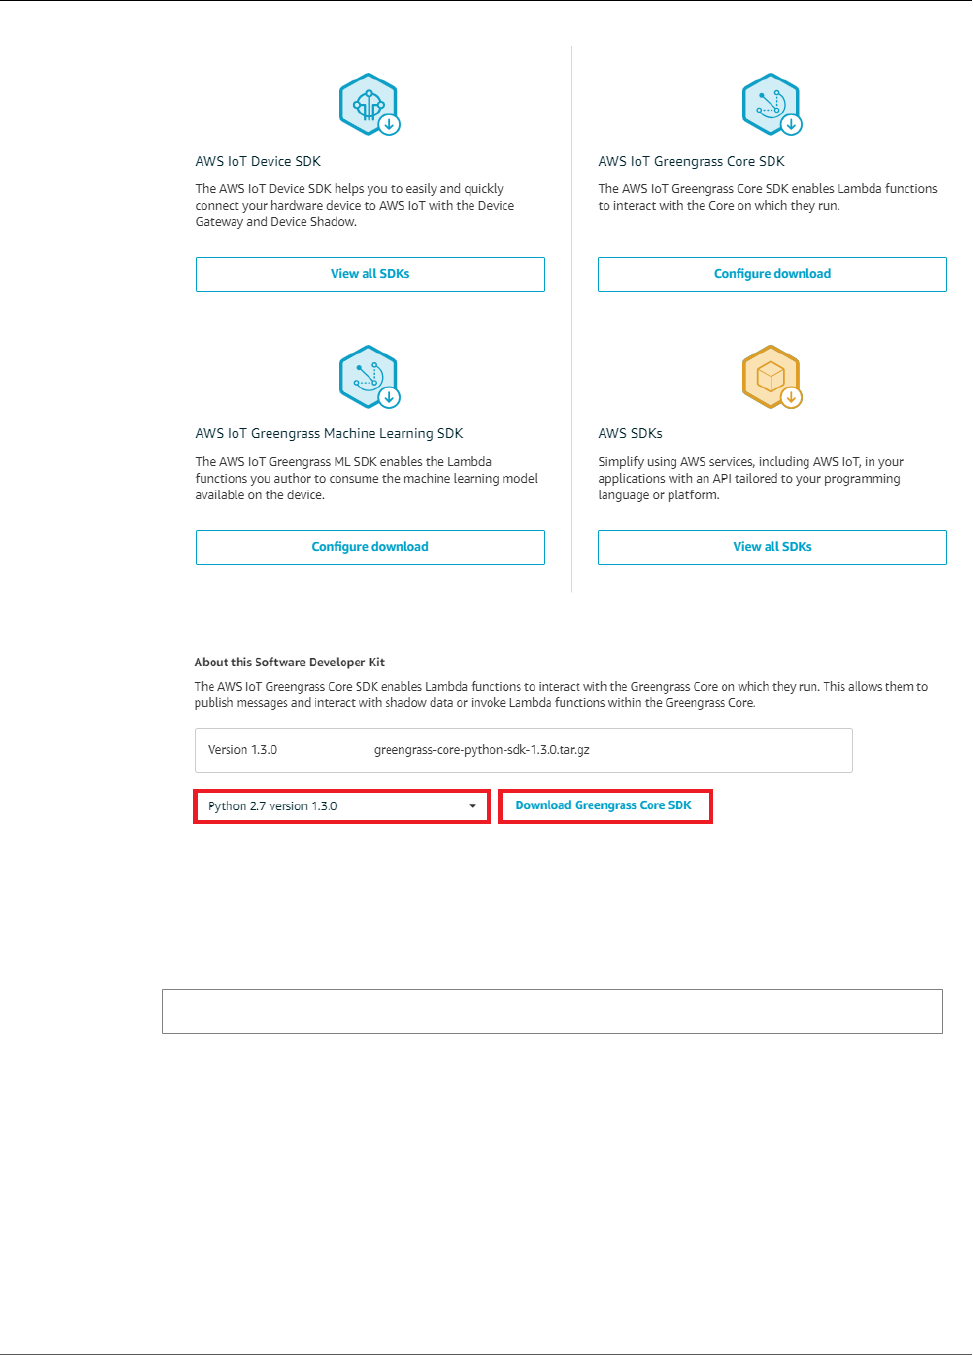
AWS IoT Greengrass Developer Guide
Create a Lambda Function Deployment Package
c. Choose Python 2.7 version 1.3.0, and then choose Download Greengrass Core SDK.
3. Unpack the greengrass-core-python-sdk-1.3.0.tar.gz file.
Note
For ways that you can do this on different platforms, see this step (p. 64) in the Getting
Started section. For example, you might use the following tar command:
tar -xzf greengrass-core-python-sdk-1.3.0.tar.gz
4. Open the extracted aws_greengrass_core_sdk/sdk folder, and unzip python_sdk_1_3_0.zip.
5. Zip the following items into a file named lraTestLambda.zip:
•lraTest.py. App logic.
•greengrasssdk. Required library for all Python Lambda functions.
•Greengrass AWS SW License (IoT additiona) vr6.txt. Required Greengrass Core Software License
Agreement.
The lraTestLambda.zip file is your Lambda function deployment package. Now you're ready to
create a Lambda function and upload the deployment package.
179
AWS IoT Greengrass Developer Guide
Create and Publish a Lambda Function
Step 2: Create and Publish a Lambda Function
In this step, you use the AWS Lambda console to create a Lambda function and configure it to use your
deployment package. Then, you publish a function version and create an alias.
First, create the Lambda function.
1. In the AWS Management Console, choose Services, and open the AWS Lambda console.
2. Choose Create function.
3. Choose Author from scratch.
4. In the Author from scratch section, use the following values:
Property Value
Name TestLRA
Runtime Python 2.7
Role Create new role from one or more templates
Role name
(This role isn't used by AWS IoT Greengrass.)
Greengrass_role_does_not_matter
5. At the bottom of the page, choose Create function.
180

AWS IoT Greengrass Developer Guide
Create and Publish a Lambda Function
Now, upload your Lambda function deployment package and register the handler.
6. On the Configuration tab for the TestLRA function, in Function code, use the following values:
Property Value
Code entry type Upload a .zip file
Runtime Python 2.7
Handler lraTest.function_handler
7. Choose Upload.
181
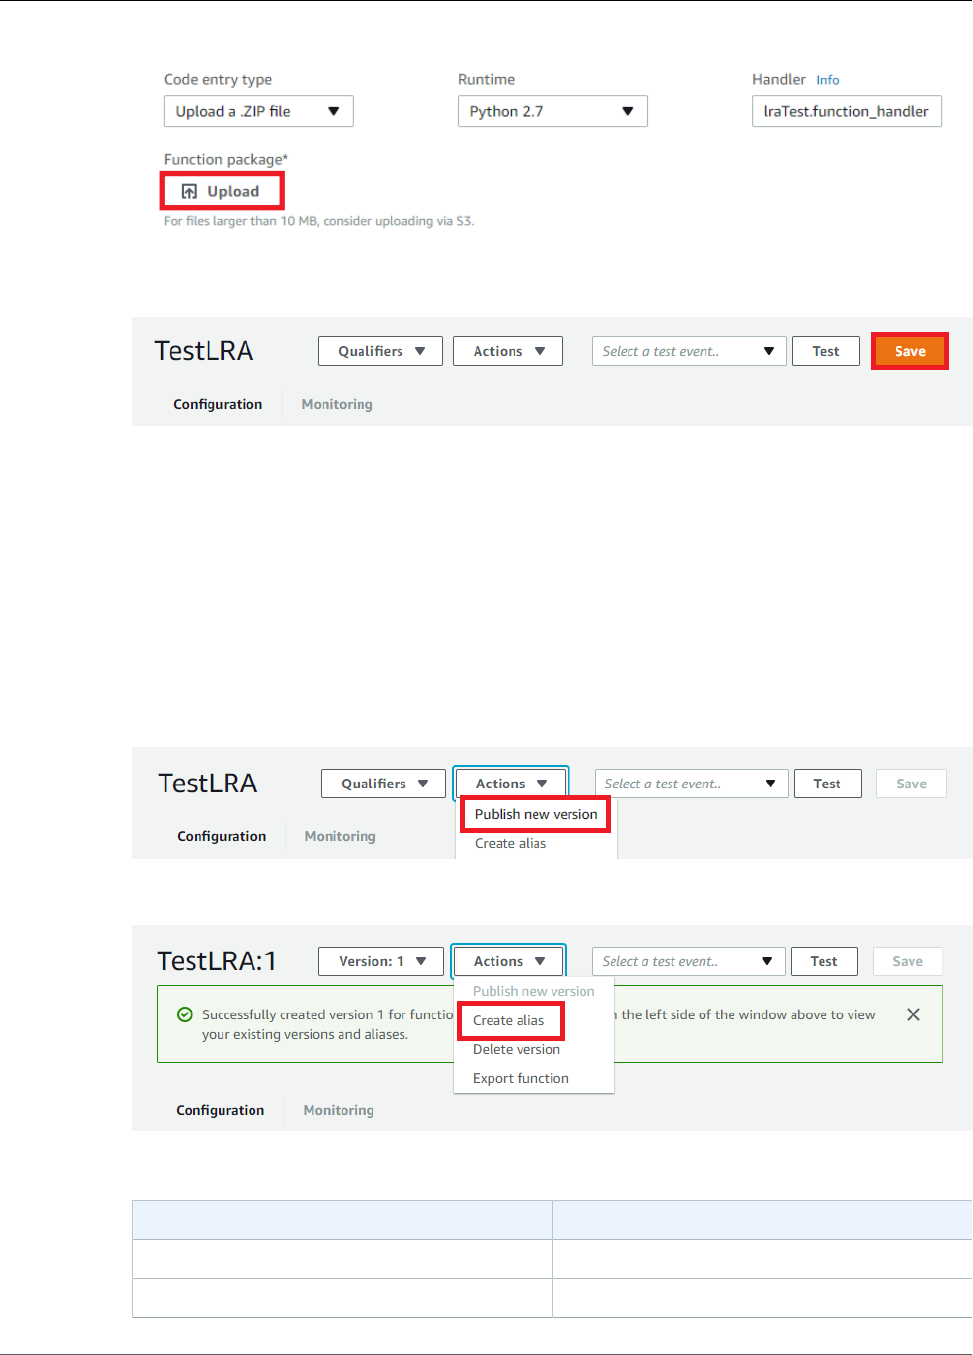
AWS IoT Greengrass Developer Guide
Create and Publish a Lambda Function
8. Choose your lraTestLambda.zip deployment package.
9. At the top of the page, choose Save.
Tip
You can see your code in the Function code section by choosing Edit code inline from the
Code entry type menu.
Next, publish the first version of your Lambda function. Then, create an alias for the version.
Note
Greengrass groups can reference a Lambda function by alias (recommended) or by version.
Using an alias makes it easier to manage code updates because you don't have to change
your subscription table or group definition when the function code is updated. Instead, you
just point the alias to the new function version.
10. From the Actions menu, choose Publish new version.
11. For Version description, type First version, and then choose Publish.
12. On the TestLRA: 1 configuration page, from the Actions menu, choose Create alias.
13. On the Create a new alias page, use the following values:
Property Value
Name test
Version 1
182
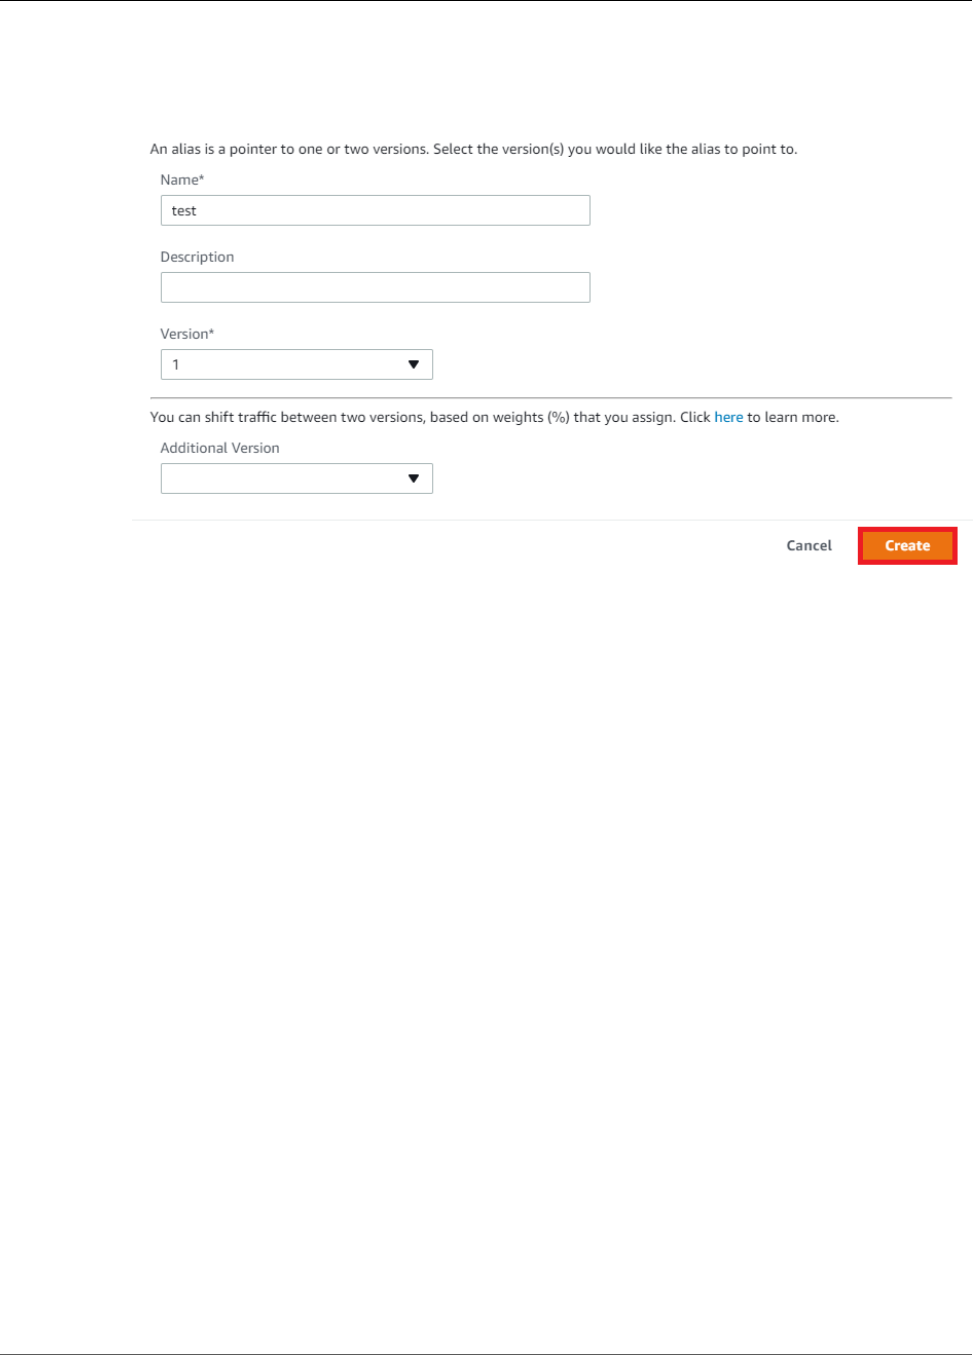
AWS IoT Greengrass Developer Guide
Add the Lambda Function to the Group
Note
AWS IoT Greengrass doesn't support Lambda aliases for $LATEST versions.
14. Choose Create.
You can now add the Lambda function to your Greengrass group.
Step 3: Add the Lambda Function to the Greengrass
Group
In this step, you add the TestLRA function to your group and configure the function's lifecycle.
First, add the Lambda function to your Greengrass group.
1. In the AWS IoT Core console, choose Greengrass, and then choose Groups.
183
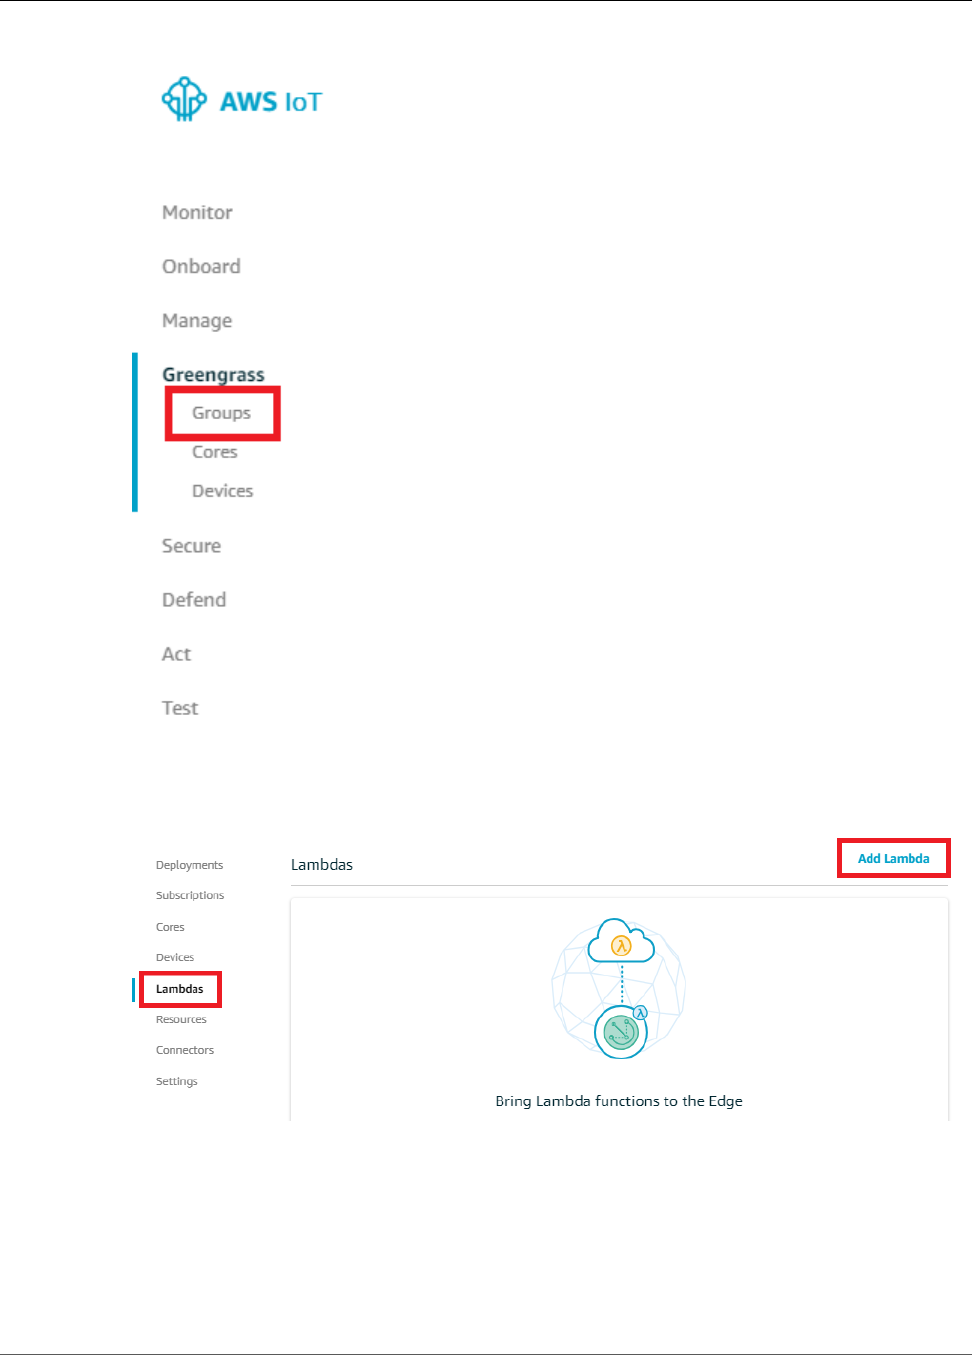
AWS IoT Greengrass Developer Guide
Add the Lambda Function to the Group
2. Choose the Greengrass group where you want to add the Lambda function.
3. On the group configuration page, choose Lambdas, and then choose Add Lambda.
4. On the Add a Lambda to your Greengrass Group page, choose Use existing Lambda.
184
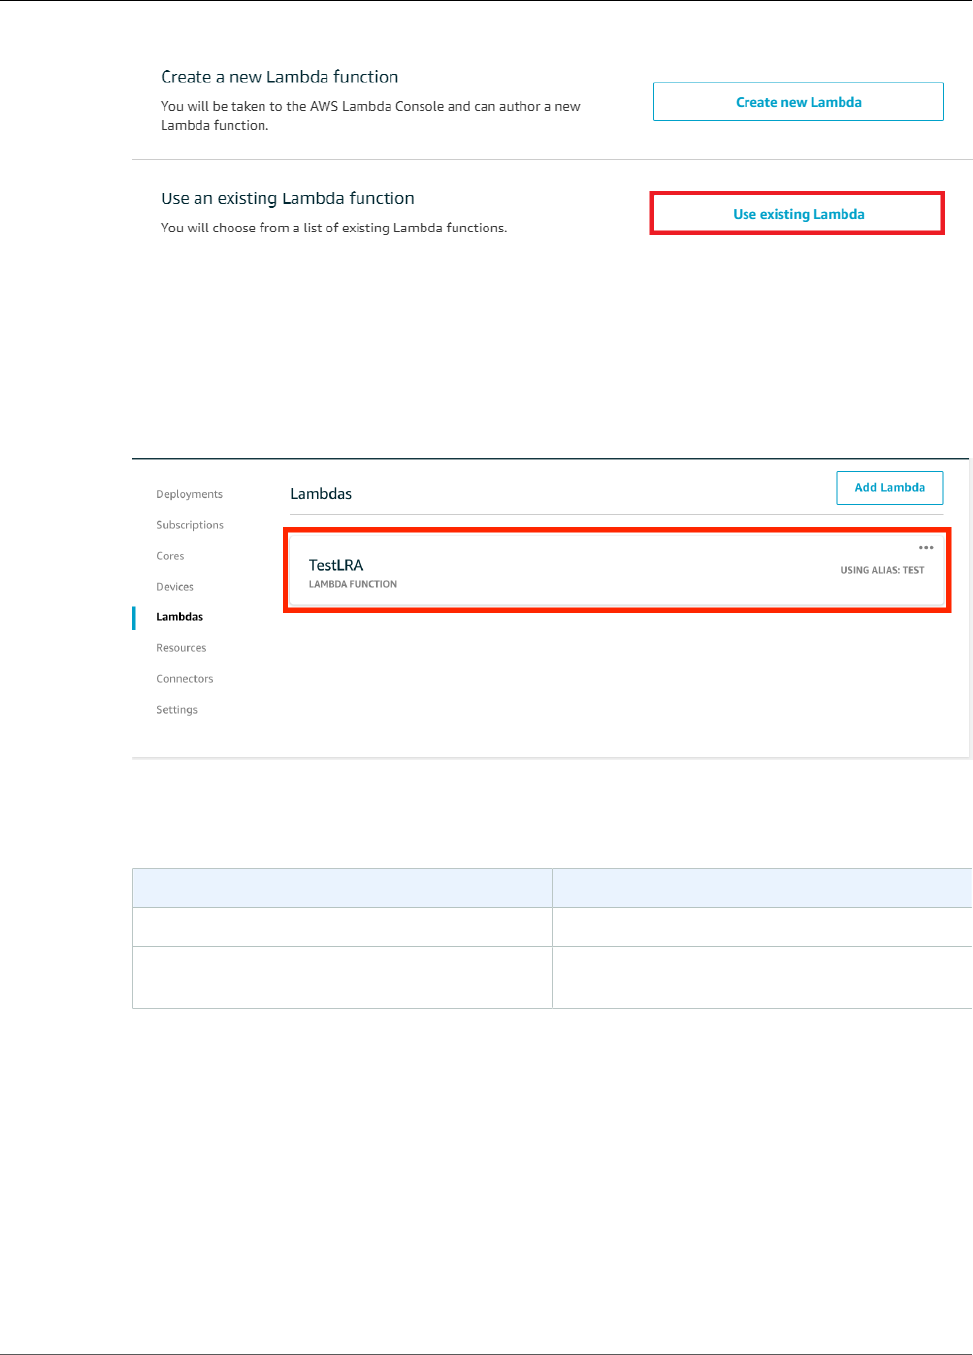
AWS IoT Greengrass Developer Guide
Add the Lambda Function to the Group
5. On the Use existing Lambda page, choose TestLRA, and then choose Next.
6. On the Select a Lambda version page, choose Alias:test, and then choose Finish.
Next, configure the lifecycle of the Lambda function.
7. On the Lambdas page, choose the TestLRA Lambda function.
8. On the TestLRA configuration page, choose Edit.
9. On the Group-specific Lambda configuration page, use the following values:
Property Value
Timeout 30 seconds
Lambda lifecycle Make this function long-lived and keep it
running indefinitely
For more information, see the section called “Lifecycle Configuration” (p. 156).
185

AWS IoT Greengrass Developer Guide
Add a Local Resource to the Group
Important
Lambda functions that use local resources (as described in this procedure) must run in a
Greengrass container. Otherwise, deployment fails if you try to deploy the function. For
more information, see Containerization (p. 150).
10. At the bottom of the page, choose Update.
Step 4: Add a Local Resource to the Greengrass
Group
In this step, you add a local volume resource to a Greengrass group and grant the function read and write
access to the resource. A local resource has a group-level scope, which makes it accessible by all Lambda
functions in the group.
1. On the group configuration page, choose Resources.
2. On the Local Resources tab, choose Add local resource.
3. On the Create a local resource page, use the following values:
186

AWS IoT Greengrass Developer Guide
Add a Local Resource to the Group
Property Value
Resource name testDirectory
Resource type Volume
Source path
(This path must exist on the host OS.)
/src/LRAtest
Destination path
(This path must exist on the host OS.)
/dest/LRAtest
Group owner file access permission Automatically add OS group permissions of the
Linux group that owns the resource
The Source path is the local absolute path of the resource on the file system of the core device. This
path can't start with /sys.
The Destination path is the absolute path of the resource in the Lambda namespace.
The Group owner file access permission option lets you grant additional file access permissions to
the Lambda process. For more information, see Group Owner File Access Permission (p. 170).
4. Under Lambda function affiliations, choose Select.
5. Choose TestLRA, choose Read and write access, and then choose Done.
187
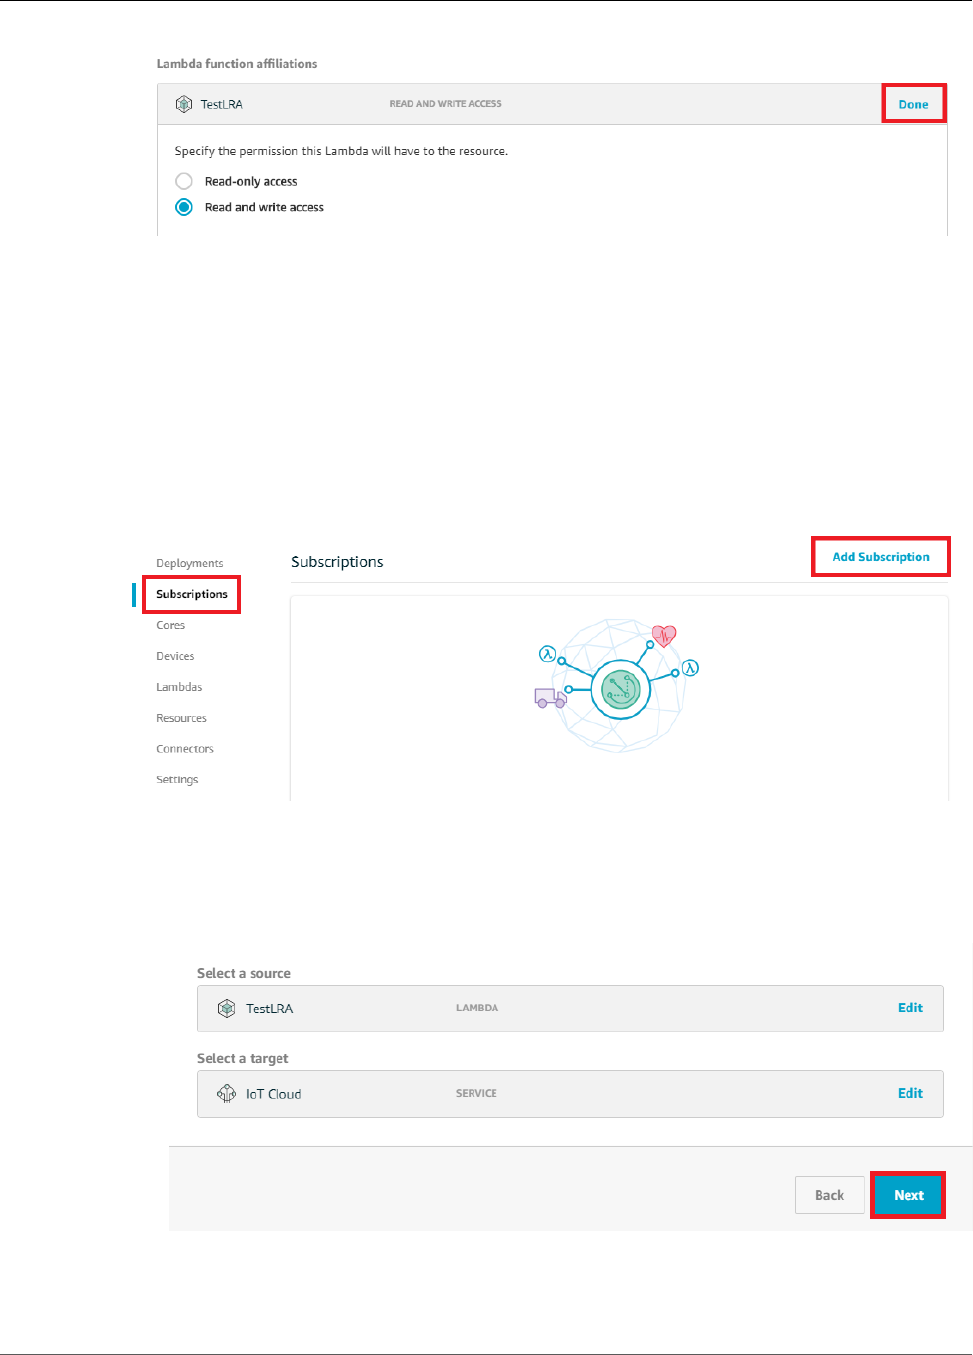
AWS IoT Greengrass Developer Guide
Add Subscriptions to the Group
6. At the bottom of the page, choose Save. The Resources page displays the new testDirectory
resource.
Step 5: Add Subscriptions to the Greengrass Group
In this step, you add two subscriptions to the Greengrass group. These subscriptions enable bidirectional
communication between the Lambda function and AWS IoT.
First, create a subscription for the Lambda function to send messages to AWS IoT Greengrass.
1. On the group configuration page, choose Subscriptions, and then choose Add Subscription.
2. On the Select your source and target page, configure the source and target, as follows:
a. For Select a source, choose Lambdas, and then choose TestLRA.
b. For Select a target, choose Services, and then choose IoT Cloud.
c. Choose Next.
3. On the Filter your data with a topic page, for Optional topic filter, type LRA/test, and then
choose Next.
188
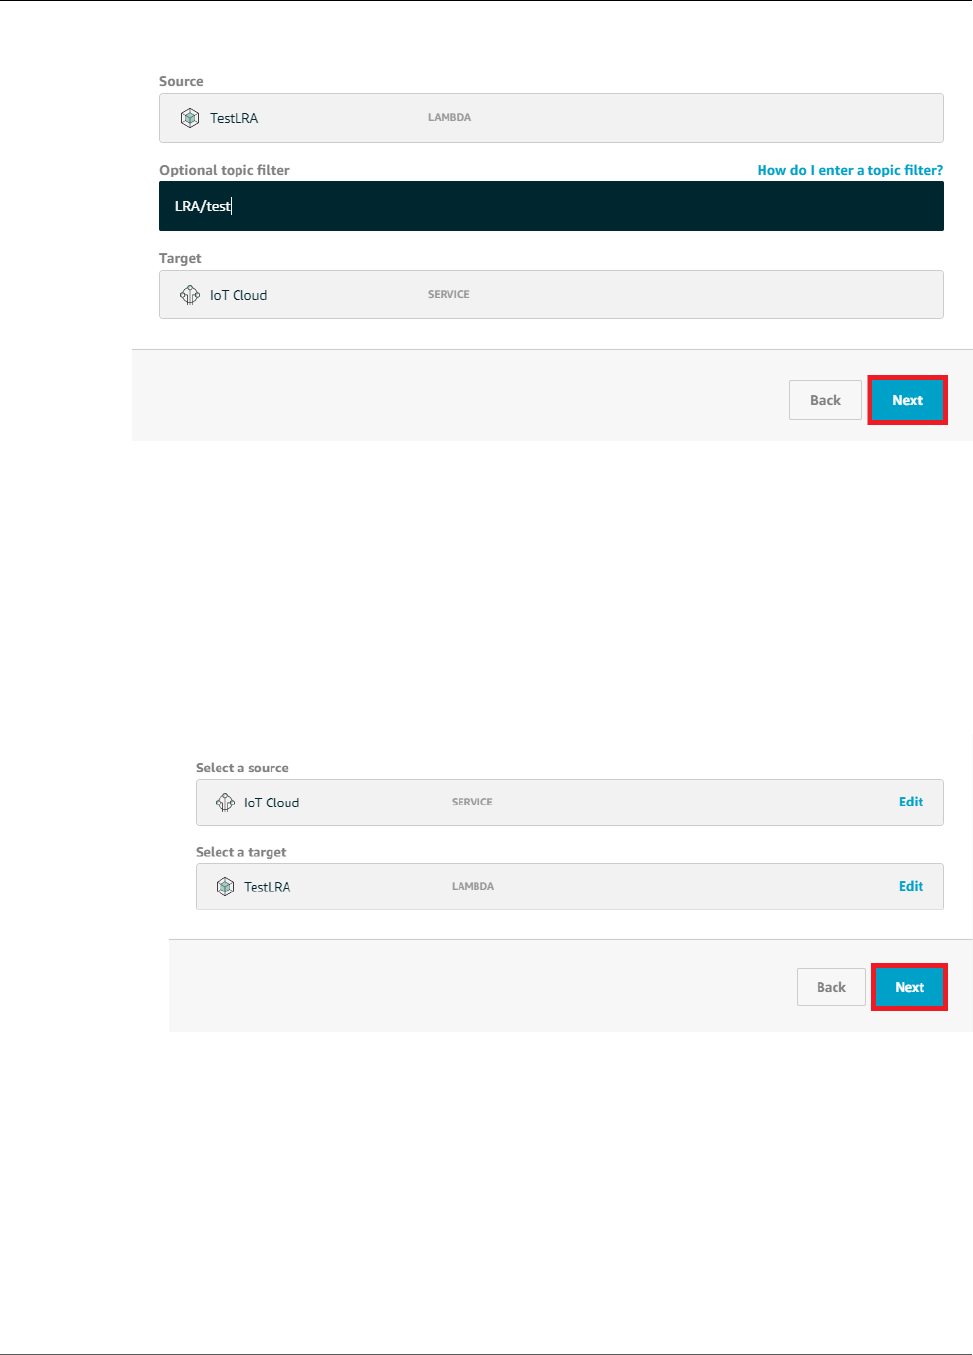
AWS IoT Greengrass Developer Guide
Add Subscriptions to the Group
4. Choose Finish. The Subscriptions page displays the new subscription.
Next, configure a subscription that invokes the function from AWS IoT.
5. On the Subscriptions page, choose Add Subscription.
6. On the Select your source and target page, configure the source and target, as follows:
a. For Select a source, choose Services, and then choose IoT Cloud.
b. For Select a target, choose Lambdas, and then choose TestLRA.
c. Choose Next.
7. On the Filter your data with a topic page, for Optional topic filter, type invoke/LRAFunction,
and then choose Next.
189
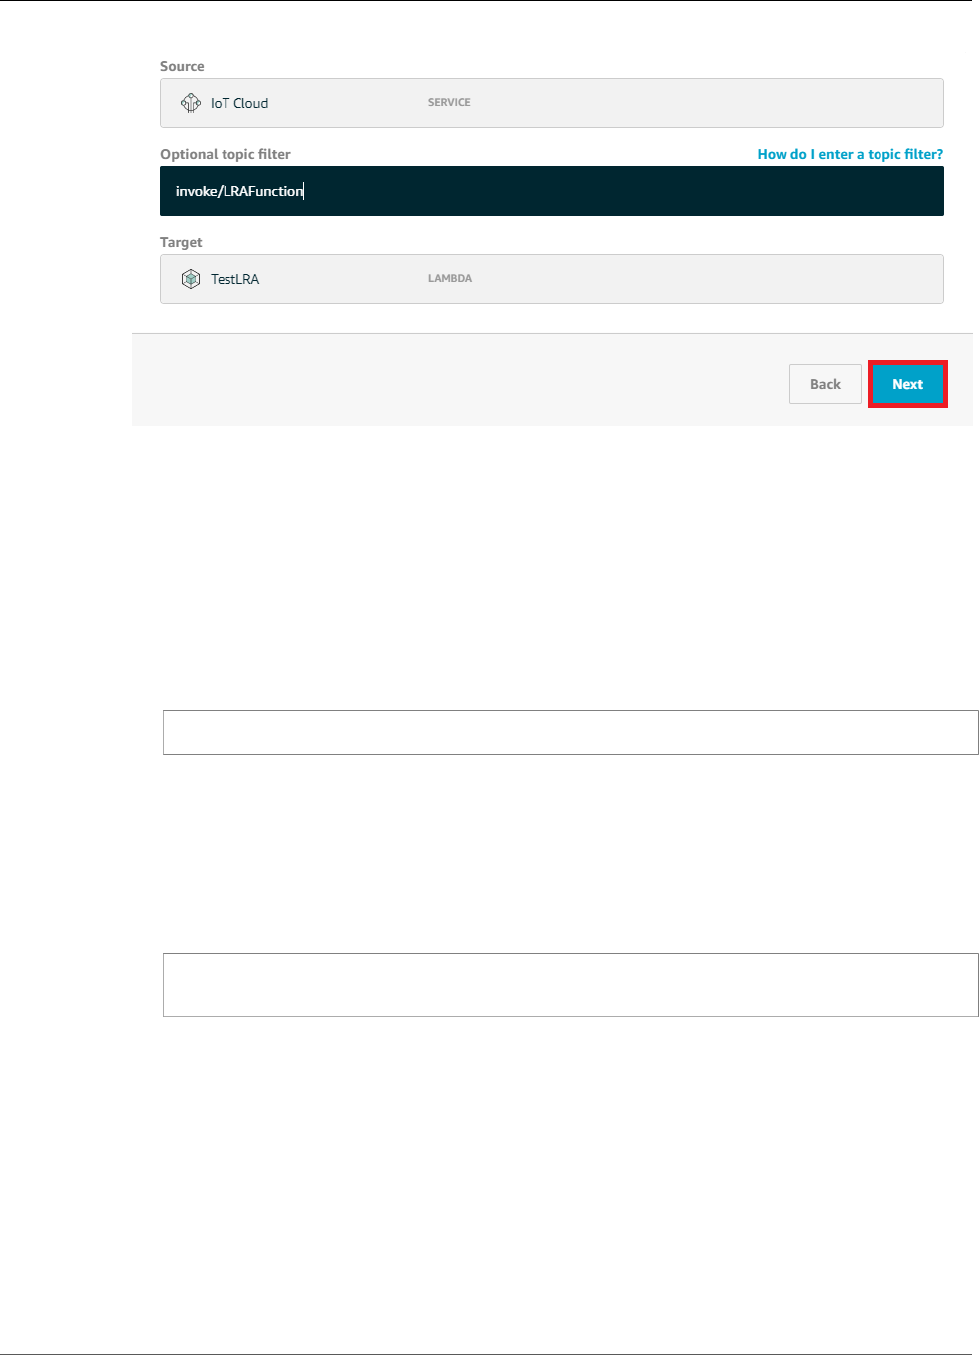
AWS IoT Greengrass Developer Guide
Deploy the Group
8. Choose Finish. The Subscriptions page displays both subscriptions.
Step 6: Deploy the AWS IoT Greengrass Group
In this step, you deploy the current version of the group definition.
1. Make sure that the AWS IoT Greengrass core is running. Run the following commands in your
Raspberry Pi terminal, as needed.
a. To check whether the daemon is running:
ps aux | grep -E 'greengrass.*daemon'
If the output contains a root entry for /greengrass/ggc/packages/1.7.0/bin/daemon,
then the daemon is running.
Note
The version in the path depends on the AWS IoT Greengrass Core software version
that's installed on your core device.
b. To start the daemon:
cd /greengrass/ggc/core/
sudo ./greengrassd start
2. On the group configuration page, choose Deployments, and from the Actions menu, choose
Deploy.
190
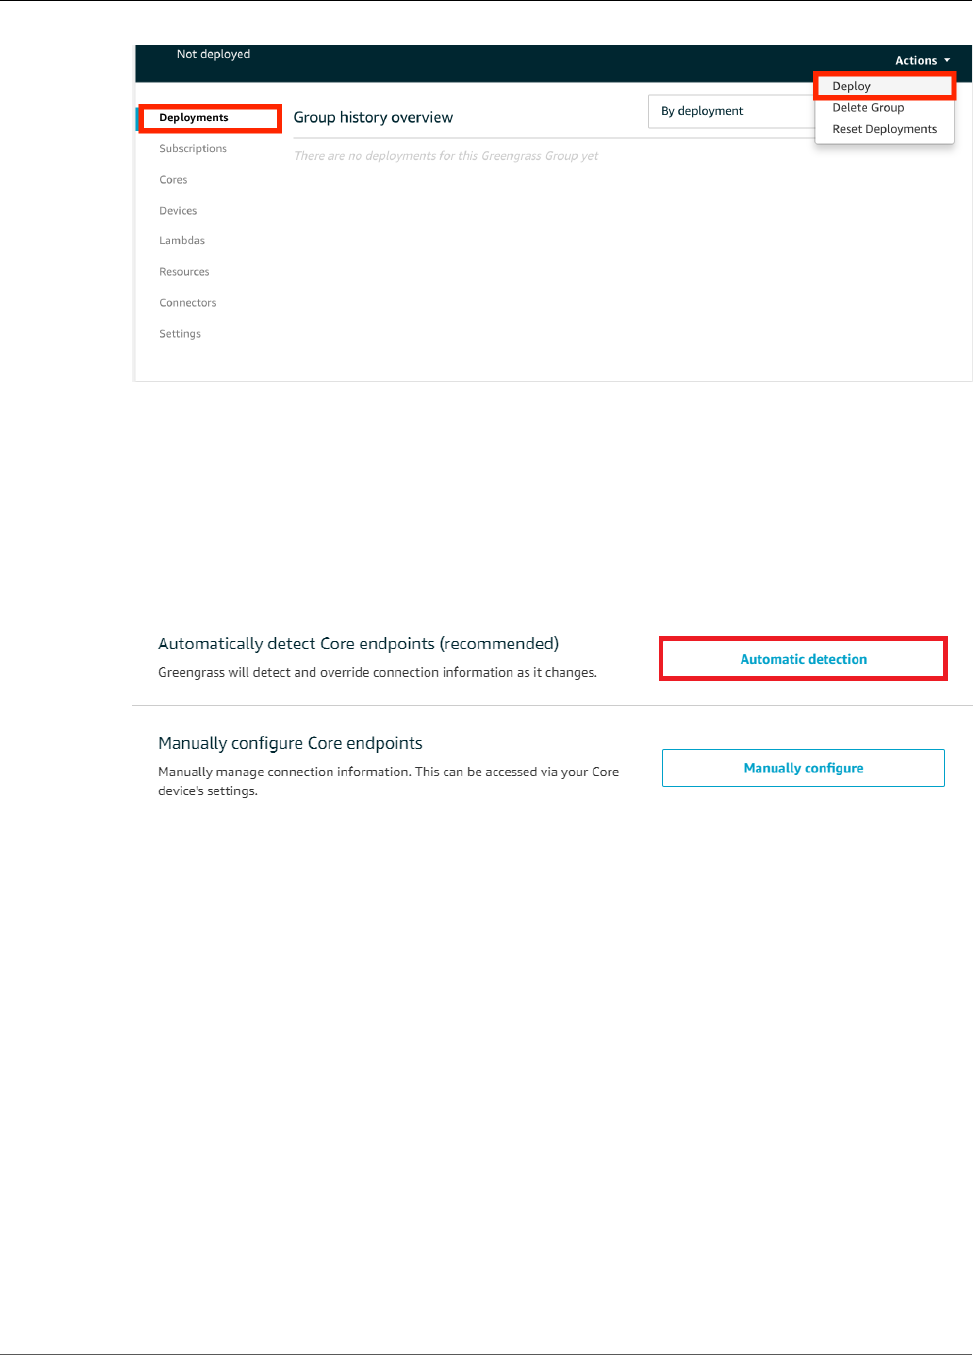
AWS IoT Greengrass Developer Guide
Test Local Resource Access
Note
Deployment will fail if you run your Lambda function without containerization and try to
access attached local resources.
3. On the Configure how devices discover your core page, choose Automatic detection.
This enables devices to automatically acquireconnectivity information for the core, such as IP
address, DNS, and port number. Automatic detection is recommended, but AWS IoT Greengrass also
supports manually specified endpoints. You're only prompted for the discovery method the first
time that the group is deployed.
Note
If prompted, grant permission to create the AWS IoT Greengrass service role on your behalf,
which allows AWS IoT Greengrass to access other AWS services. You need to do this only
one time per account.
The Deployments page shows the deployment timestamp, version ID, and status. When completed,
the deployment should show a Successfully completed status.
For troubleshooting help, see Troubleshooting (p. 410).
Test Local Resource Access
Now you can verify whether the local resource access is configured correctly. To test, you subscribe to
the LRA/test topic and publish to the invoke/LRAFunction topic. The test is successful if the Lambda
function sends the expected payload to AWS IoT.
1. On the AWS IoT Core console home page, in the left pane, choose Test.
191
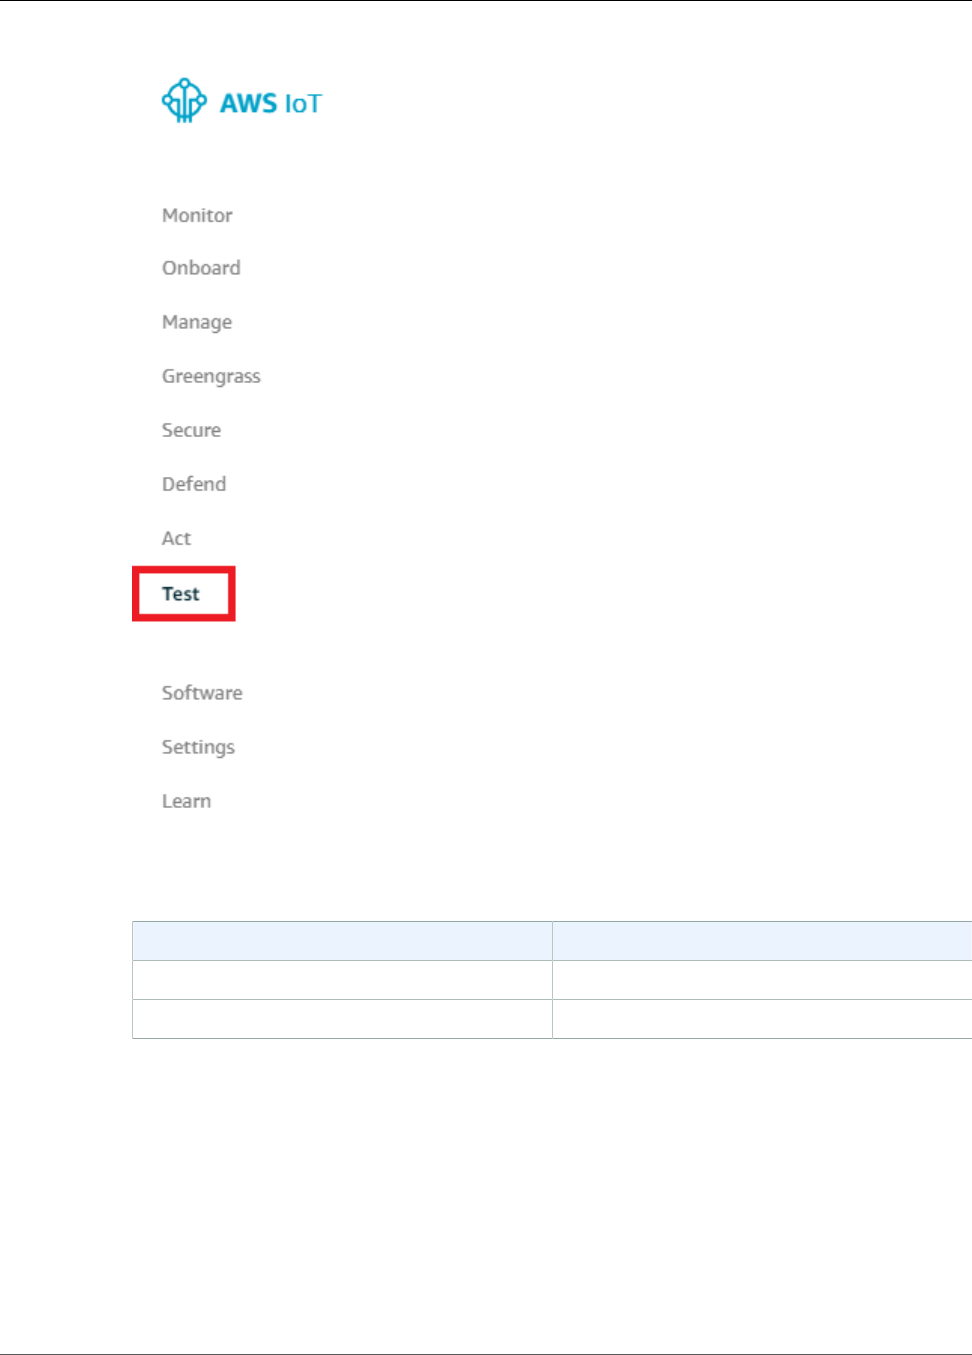
AWS IoT Greengrass Developer Guide
Test Local Resource Access
2. In the Subscriptions section, use the following values:
Property Value
Subscription topic LRA/test
MQTT payload display Display payloads as strings
3. Choose Subscribe to topic. Your Lambda function publishes to the LRA/test topic.
192
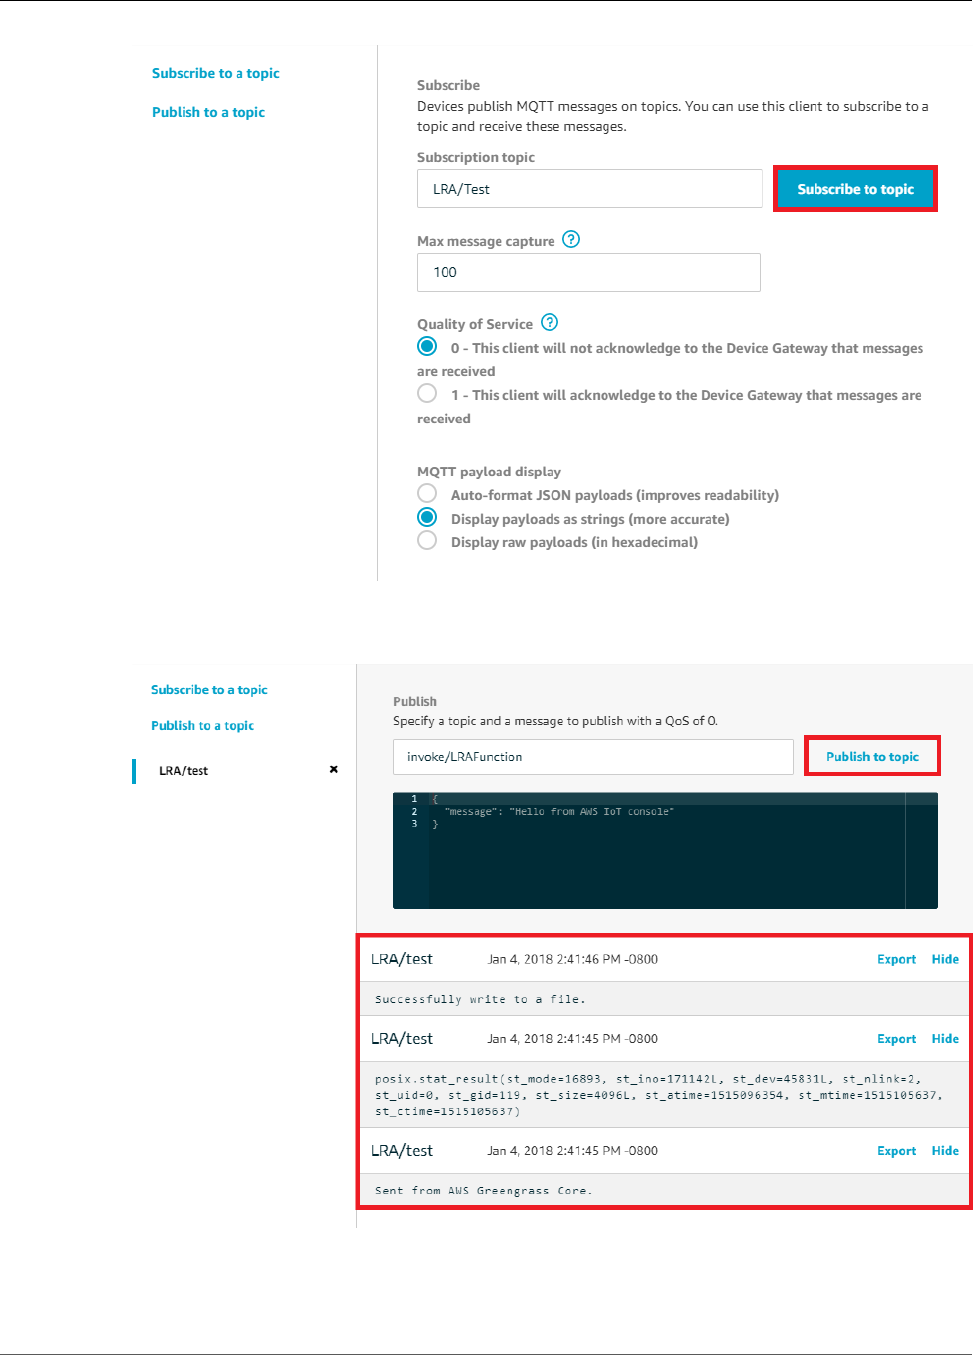
AWS IoT Greengrass Developer Guide
Test Local Resource Access
4. In the Publish section, type invoke/LRAFunction, and then choose Publish to topic to invoke
your Lambda function. The test is successful if the page displays the function's three message
payloads.
193

AWS IoT Greengrass Developer Guide
Test Local Resource Access
You can see the test file that the Lambda creates by looking in the /src/LRAtest directory on the
Greengrass core device. Although the Lambda writes to a file in the /dest/LRAtest directory, that file
is visible in the Lambda namespace only—you cant' see it in a regular Linux namespace. However, any
changes to the destination path are reflected in the source path on the actual file system.
For troubleshooting help, see Troubleshooting (p. 410).
194

AWS IoT Greengrass Developer Guide
How AWS IoT Greengrass ML Inference Works
Perform Machine Learning Inference
This feature is available for AWS IoT Greengrass Core v1.6.0 and later.
With AWS IoT Greengrass, you can perform machine learning (ML) inference at the edge on locally
generated data using cloud-trained models. This lets you benefit from the low latency and cost savings
of running local inference, yet still take advantage of cloud computing power for training models and
complex processing.
To get started performing local inference, see the section called “How to Configure Machine Learning
Inference” (p. 199).
How AWS IoT Greengrass ML Inference Works
You can train your inference models anywhere, deploy them locally as machine learning resources in a
Greengrass group, and then access them from Greengrass Lambda functions. For example, you can build
and train deep-learning models in Amazon SageMaker and deploy them to your Greengrass core. Then,
your Lambda functions can use the local models to perform inference on connected devices and send
new training data back to the cloud.
The following diagram shows the AWS IoT Greengrass ML inference workflow.
AWS IoT Greengrass ML inference simplifies each step of the ML workflow, including:
• Building and deploying ML framework prototypes.
• Accessing cloud-trained models and deploying them to Greengrass core devices.
• Creating inference apps that can access hardware accelerators (such as GPUs and FPGAs) as local
resources (p. 169).
Machine Learning Resources
Machine learning resources represent cloud-trained inference models that are deployed to an AWS IoT
Greengrass core. To deploy machine learning resources, first you add the resources to a Greengrass
195
AWS IoT Greengrass Developer Guide
Supported Model Sources
group, and then you define how Lambda functions in the group can access them. During group
deployment, AWS IoT Greengrass retrieves the source model packages from the cloud and extracts them
to directories inside the Lambda runtime namespace. Then, Greengrass Lambda functions use the locally
deployed models to perform inference.
To update a locally deployed model, first update the source model (in the cloud) that corresponds to the
machine learning resource, and then deploy the group. During deployment, AWS IoT Greengrass checks
the source for changes. If changes are detected, then AWS IoT Greengrass updates the local model.
Supported Model Sources
AWS IoT Greengrass supports Amazon SageMaker and Amazon S3 model sources for machine learning
resources.
The following requirements apply to model sources:
• S3 buckets that store your Amazon SageMaker and Amazon S3 model sources must not be encrypted
using SSE-C. For buckets that use server-side encryption, AWS IoT Greengrass ML inference currently
supports only SSE-S3 or SSE-KMS encryption options. For more information about server-side
encryption options, see Protecting Data Using Server-Side Encryption in the Amazon Simple Storage
Service Developer Guide.
• The names of S3 buckets that store your Amazon SageMaker and Amazon S3 model sources must not
include periods ("."). For more information, see the rule about using virtual hosted–style buckets with
SSL in Rules for Bucket Naming in the Amazon Simple Storage Service Developer Guide.
• Service-level region support must be available, as shown in the following table.
Region SageMaker Models S3 Models
US East (N. Virginia)
US West (Oregon)
Asia Pacific (Sydney)
Asia Pacific (Tokyo)
EU (Frankfurt)
EU (Ireland)
• AWS IoT Greengrass must have read permission to the model source, as described in the following
sections.
Amazon SageMaker
AWS IoT Greengrass supports models that are saved as Amazon SageMaker training jobs.
If you configured your Amazon SageMaker environment by creating a bucket whose name contains
sagemaker, then AWS IoT Greengrass has sufficient permission to access your Amazon SageMaker
196

AWS IoT Greengrass Developer Guide
Supported Model Sources
training jobs. The AWSGreengrassResourceAccessRolePolicy managed policy allows access to buckets
whose name contains the string sagemaker. This policy is attached to the Greengrass service role.
Otherwise, you must grant AWS IoT Greengrass read permission to the bucket where your training
job is stored. To do this, embed the following inline policy in the Greengrass service role. You can list
multiple bucket ARNs.
{
"Version": "2012-10-17",
"Statement": [
{
"Effect": "Allow",
"Action": [
"s3:GetObject"
],
"Resource": [
"arn:aws:s3:::my-bucket-name"
]
}
]
}
Note
Amazon SageMaker is a fully managed ML service that enables you to build and train
models using built-in or custom algorithms. For more information, see What Is Amazon
SageMaker in the Amazon SageMaker Developer Guide.
Amazon S3
AWS IoT Greengrass supports models that are stored in Amazon S3 as tar.gz or .zip files.
To enable AWS IoT Greengrass to access models that are stored in Amazon S3 buckets, you must
grant AWS IoT Greengrass read permission to access the buckets by doing one of the following:
• Store your model in a bucket whose name contains greengrass.
The AWSGreengrassResourceAccessRolePolicy managed policy allows access to buckets whose
name contains the string greengrass. This policy is attached to the Greengrass service role.
• Embed an inline policy in the Greengrass service role.
If your bucket name doesn't contain greengrass, add the following inline policy to the service
role. You can list multiple bucket ARNs.
{
"Version": "2012-10-17",
"Statement": [
{
"Effect": "Allow",
"Action": [
"s3:GetObject"
],
"Resource": [
"arn:aws:s3:::my-bucket-name"
]
}
]
}
For more information, see Embedding Inline Policies in the IAM User Guide.
197

AWS IoT Greengrass Developer Guide
Requirements
Requirements
The following requirements apply for creating and using machine learning resources:
• You must be using AWS IoT Greengrass Core v1.6.0 or later.
• Lambda functions can't perform privileged operations on the resource. Only read or read and
write permissions are available.
• Lambda functions configured with access to ML model resources cannot be running in non-
containerized mode.
• You must provide the full path of the resource on the operating system of the core device.
• A resource name or ID has a maximum length of 128 characters and must use the pattern [a-zA-
Z0-9:_-]+.
Runtimes and Precompiled Framework Libraries
for ML Inference
To help you quickly get started experimenting with ML inference, AWS IoT Greengrass provides runtimes
and precompiled framework libraries.
•Amazon SageMaker Neo deep learning runtime (p. 198) (Greengrass Core Software License
Agreement)
•Apache MXNet (Apache License 2.0)
•TensorFlow (Apache License 2.0)
• Chainer (MIT License)
These runtimes and precompiled libraries can be installed on NVIDIA Jetson TX2, Intel Atom, and
Raspberry Pi platforms. The runtimes and libraries are available from the Software page of the AWS IoT
Core console. You can install them directly on your core or include them as part of the software in your
Greengrass group.
Be sure to read the following information about compatibility and limitations.
Amazon SageMaker Neo deep learning runtime
You can use the Amazon SageMaker Neo deep learning runtime to perform inference with optimized
machine learning models on your AWS IoT Greengrass devices. These models are optimized using the
Amazon SageMaker Neo deep learning compiler to improve machine learning inference prediction
speeds. For more information about model optimization in Amazon SageMaker, please refer to the
Amazon SageMaker Neo documentation.
Note
Currently, you can only optimize machine learning models using the Neo deep learning compiler
in the US West (Oregon), US East (N. Virginia), and EU (Ireland) AWS Regions. However, you
can use the Neo deep learning runtime with optimized models in all AWS IoT Greengrass
core supported regions. For information, see How to Configure Optimized Machine Learning
Inference (p. 220).
MXNet Versioning
Apache MXNet doesn't currently ensure forward compatibility, so models that you train using later
versions of the framework might not work properly in earlier versions of the framework. To avoid
198

AWS IoT Greengrass Developer Guide
MXNet on Raspberry Pi
conflicts between the model-training and model-serving stages, and to provide a consistent end-to-end
experience, use the same MXNet framework version in both stages.
MXNet on Raspberry Pi
Greengrass Lambda functions that access local MXNet models must set the following environment
variable:
MXNET_ENGINE_TYPE=NaiveEngine
You can set the environment variable in the function code or add it to the function's group-specific
configuration. For an example that adds it as a configuration setting, see this step (p. 208).
Note
For general use of the MXNet framework, such as running a third-party code example, the
environment variable must be configured on the Raspberry Pi.
TensorFlow Model-Serving Limitations on Raspberry
Pi
TensorFlow officially only supports installation on 64-bit laptop or desktop operating systems.
Therefore, the precompiled TensorFlow libraries that AWS IoT Greengrass provides for 32-bit ARM
platforms (such as Raspberry Pi) have inherent limitations and are intended for experimentation
purposes only.
The following recommendations for improving inference results are based on our tests with the 32-
bit ARM precompiled libraries on the Raspberry Pi platform. These recommendations are intended for
advanced users for reference only, without guarantees of any kind.
• Models that are trained using the Checkpoint format should be "frozen" to the protocol buffer format
before serving. For an example, see the TensorFlow-Slim image classification model library.
• Don't use the TF-Estimator and TF-Slim libraries in either training or inference code. Instead, use the
.pb file model-loading pattern that's shown in the following example.
graph = tf.Graph()
graph_def = tf.GraphDef()
graph_def.ParseFromString(pb_file.read())
with graph.as_default():
tf.import_graph_def(graph_def)
Note
For more information about supported platforms for TensorFlow, see Installing TensorFlow in
the TensorFlow documentation.
How to Configure Machine Learning Inference
Using the AWS Management Console
To follow the steps in this tutorial, you must be using AWS IoT Greengrass Core v1.6.0 or later.
You can perform machine learning (ML) inference locally on a Greengrass core device using data from
connected devices. For information, including requirements and constraints, see Perform Machine
Learning Inference (p. 195).
199

AWS IoT Greengrass Developer Guide
Prerequisites
This tutorial describes how to use the AWS Management Console to configure a Greengrass group to
run a Lambda inference app that recognizes images from a camera locally, without sending data to the
cloud. The inference app accesses the camera module on a Raspberry Pi and runs inference using the
open source SqueezeNet model.
The tutorial contains the following high-level steps:
1. Configure the Rasberry Pi (p. 200).
2. Install the MXNet Framework (p. 201).
3. Create a model package (p. 203).
4. Create and publish a Lambda function (p. 203).
5. Add the Lambda function to the group (p. 208).
6. Add resources to the group (p. 210).
7. Add a subscription to the group (p. 214).
8. Deploy the group (p. 215).
Prerequisites
To complete this tutorial, you need:
•Raspberry Pi 3 Model B.
•Raspberry Pi Camera Module V2 - 8 Megapixel, 1080p. To learn how to set up the camera, see
Connecting the camera in the Raspberry Pi documentation.
• A Greengrass group and a Greengrass core. To learn how to create a Greengrass group or core, see
Getting Started with AWS IoT Greengrass (p. 44). The Getting Started section also includes steps for
installing the AWS IoT Greengrass Core software on a Raspberry Pi.
Note
This tutorial uses a Raspberry Pi, but AWS IoT Greengrass supports other platforms, such as
Intel Atom and NVIDIA Jetson TX2 (p. 220). The example for Jetson TX2 can use static images
instead of images streamed from a camera.
Step 1: Configure the Raspberry Pi
In this step, you install updates to the Rasbian operating system, install the camera module software and
Python dependencies, and enable the camera interface. Run the following commands in your Raspberry
Pi terminal.
1. Install updates to Raspbian.
sudo apt-get update
sudo apt-get dist-upgrade
2. Install the picamera interface for the camera module and other Python libraries that are required for
this tutorial.
sudo apt-get install -y python-dev python-setuptools python-pip python-picamera
3. Reboot the Raspberry Pi.
sudo reboot
4. Open the Raspberry Pi configuration tool.
200

AWS IoT Greengrass Developer Guide
Install the MXNet Framework
sudo raspi-config
5. Use the arrow keys to open Interfacing Options and enable the camera interface. If prompted, allow
the device to reboot.
6. Use the following command to test the camera setup.
raspistill -v -o test.jpg
This opens a preview window on the Raspberry Pi, saves a picture named test.jpg to your /home/
pi directory, and displays information about the camera in the Raspberry Pi terminal.
Step 2: Install the MXNet Framework
In this step, you download precompiled Apache MXNet libraries and install them on your Raspberry Pi.
Note
This tutorial uses libraries for the MXNet ML framework, but libraries for TensorFlow are also
available. For more information, including limitations, see the section called “Runtimes and
Precompiled Framework Libraries for ML Inference” (p. 198).
1. On your computer, open the AWS IoT Core console.
2. In the navigation pane, choose Software.
201
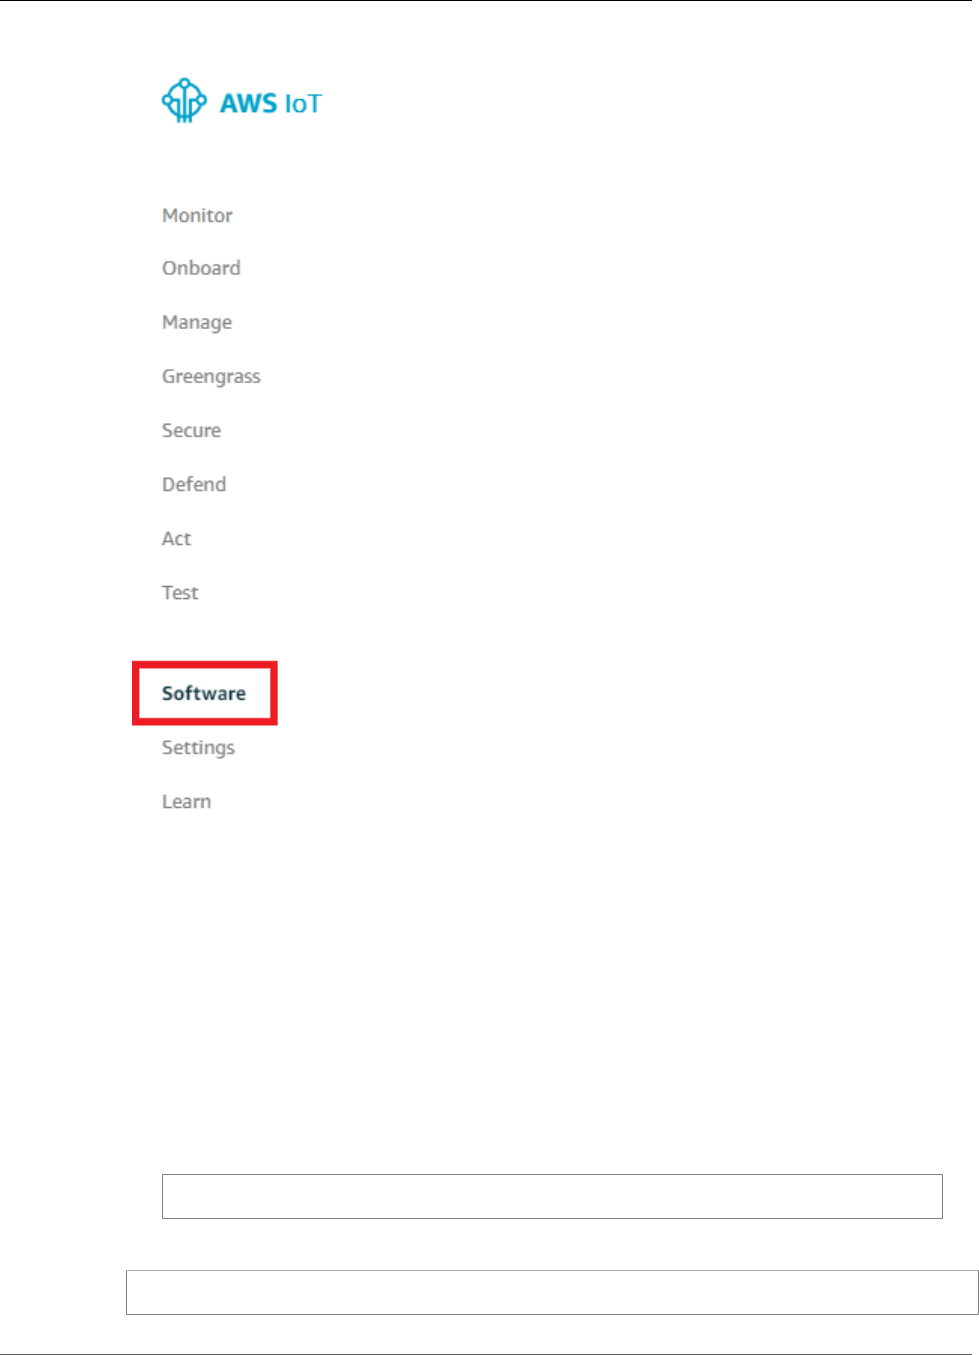
AWS IoT Greengrass Developer Guide
Install the MXNet Framework
3. In the Machine learning inference section, for Runtimes and precompiled framework libraries,
choose Configure download.
4. On the Machine learning inference page, under Software configurations, for MXNet Raspberry Pi
version 1.2.1, choose Download.
Note
By downloading this software you agree to the Apache License 2.0.
5. Transfer the downloaded ggc-mxnet-v1.2.1-python-raspi.tar.gz file from your computer to
your Raspberry Pi.
Note
For ways that you can do this on different platforms, see this step (p. 61) in the Getting
Started section. For example, you might use the following scp command:
scp ggc-mxnet-v1.2.1-python-raspi.tar.gz pi@IP-address:/home/pi
6. In your Raspberry Pi terminal, unpack the transferred file.
tar -xzf ggc-mxnet-v1.2.1-python-raspi.tar.gz
202

AWS IoT Greengrass Developer Guide
Create a Model Package
7. Install the MXNet framework.
./mxnet_installer.sh
Note
You can continue to the section called “Create a Model Package” (p. 203) while the
framework is being installed, but you must wait until the installation is complete before you
proceed to the section called “Create and Publish a Lambda Function” (p. 203).
You can optionally run unit tests to verify the installation. To do so, add the -u option to
the previous command. If successful, each test logs a line in the terminal that ends with ok.
If all tests are successful, the final log statement contains OK. Running unit tests increases
the installation time.
The script also creates a Lambda function deployment package named
greengrassObjectClassification.zip. This package contains the function code and
dependencies, including the mxnet Python module required by Greengrass Lambda functions to
work with MXNet models. You upload this deployment package later.
8. When the installation is complete, transfer greengrassObjectClassification.zip to your
computer. Depending on your environment, you can use the scp command or a utility such as
WinSCP.
Step 3: Create an MXNet Model Package
In this step, you download files for a sample pretrained MXNet model, and then save them as a .zip
file. AWS IoT Greengrass can use models from Amazon S3, provided that they use the tar.gz or .zip
format.
1. Download the following files to your computer:
•squeezenet_v1.1-0000.params. A parameter file that describes weights of the connectivity.
•squeezenet_v1.1-symbol.json. A symbol file that describes the neural network structure.
•synset.txt. A synset file that maps recognized class IDs to human-readable class names.
Note
All MXNet model packages use these three file types, but the contents of TensorFlow model
packages vary.
2. Zip the three files, and name the compressed file squeezenet.zip. You upload this model package
to Amazon S3 in the section called “Add Resources to the Group” (p. 210).
Step 4: Create and Publish a Lambda Function
In this step, you create a Lambda function and configure it to use the deployment package that was
created in Step 2: Install the MXNet Framework (p. 201). Then, you publish a function version and
create an alias.
The Lambda function deployment package is named greengrassObjectClassification.zip. It
contains an inference app that performs common tasks, such as loading models, importing Apache
MXNet, and taking actions based on predictions. The app contains the following key components:
• App logic:
•load_model.py. Loads MXNet models.
•greengrassObjectClassification.py. Runs predictions on images that are streamed from the camera.
203

AWS IoT Greengrass Developer Guide
Create and Publish a Lambda Function
• Dependencies:
•greengrasssdk. Required library for all Python Lambda functions.
•mxnet. Required library for Python Lambda functions that run local inference using MXNet.
• License:
•license. Contains the required Greengrass Core Software License Agreement.
Note
You can reuse these dependencies and license when you create new MXNet inference Lambda
functions.
First, create the Lambda function.
1. In the AWS IoT Core console, in the navigation pane, choose Greengrass, and then choose Groups.
2. Choose the Greengrass group where you want to add the Lambda function.
3. On the group configuration page, choose Lambdas, and then choose Add Lambda.
204
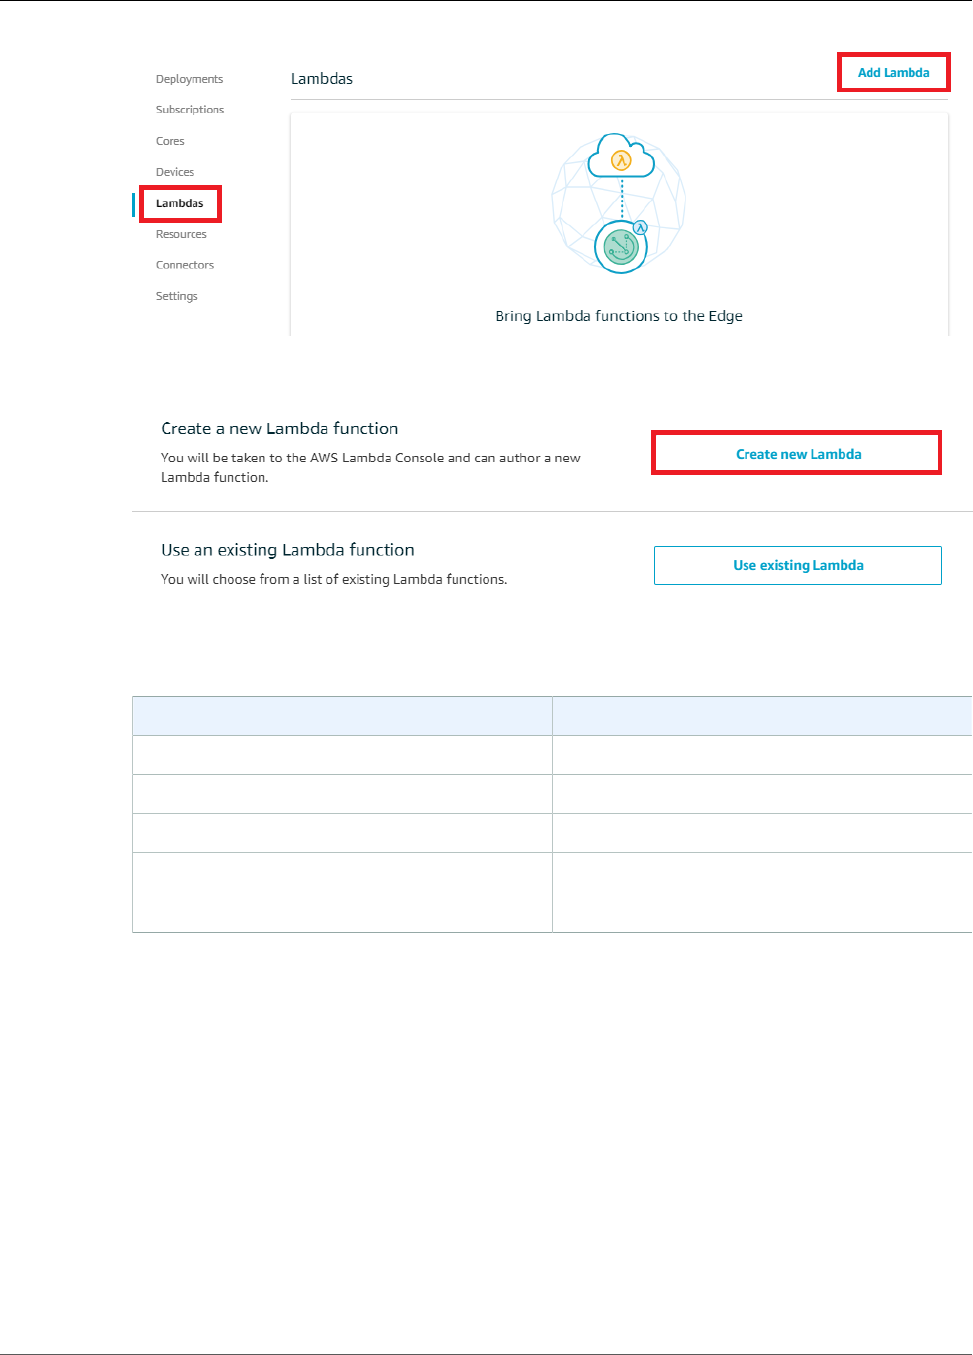
AWS IoT Greengrass Developer Guide
Create and Publish a Lambda Function
4. On the Add a Lambda to your Greengrass Group page, choose Create new Lambda. This opens the
AWS Lambda console.
5. Choose Author from scratch and use the following values to create your function:
Property Value
Name greengrassObjectClassification
Runtime Python 2.7
Role Create new role from one or more templates
Role name
(This role isn't used by AWS IoT Greengrass.)
Greengrass_Lambda_empty
6. Choose Create function.
205
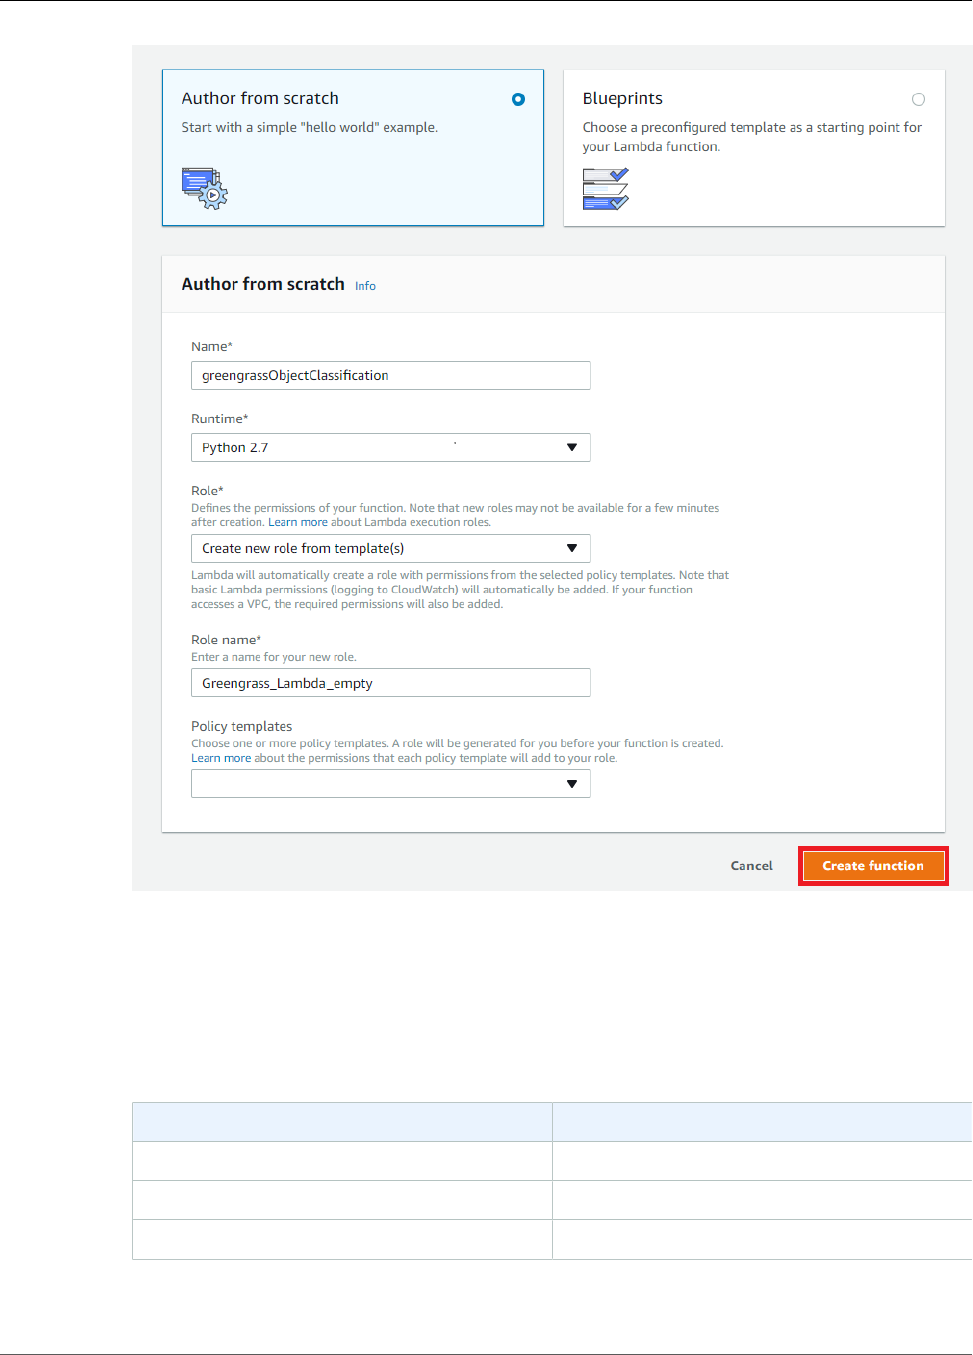
AWS IoT Greengrass Developer Guide
Create and Publish a Lambda Function
Now, upload your Lambda function deployment package and register the handler.
1. On the Configuration tab for the greengrassObjectClassification function, for Function
code, use the following values:
Property Value
Code entry type Upload a .zip file
Runtime Python 2.7
Handler greengrassObjectClassification.function_handler
2. Choose Upload.
206
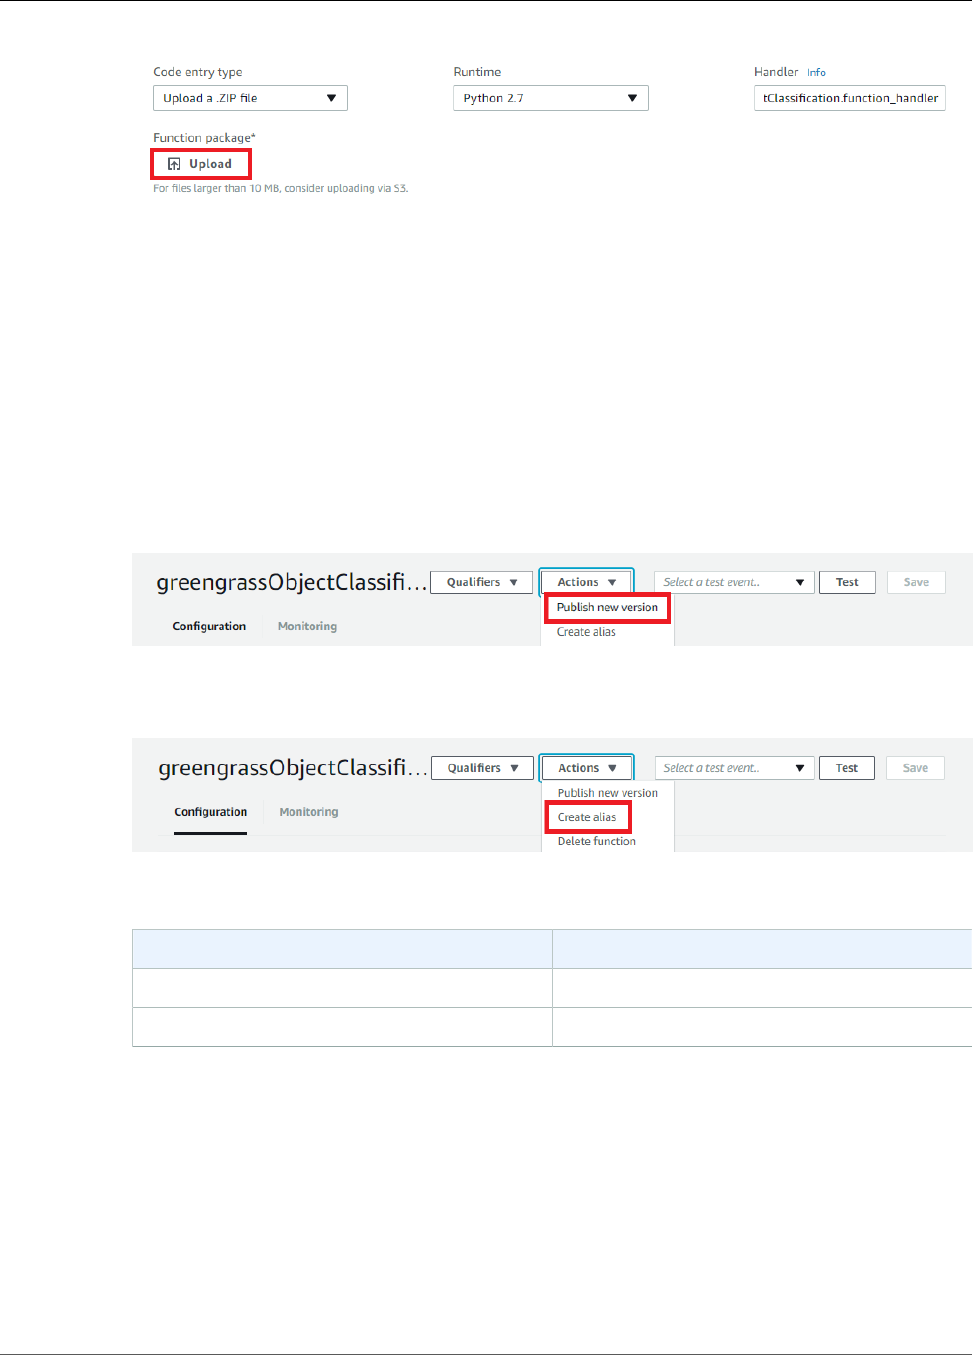
AWS IoT Greengrass Developer Guide
Create and Publish a Lambda Function
3. Choose your greengrassObjectClassification.zip deployment package.
4. Choose Save.
Next, publish the first version of your Lambda function. Then, create an alias for the version.
Note
Greengrass groups can reference a Lambda function by alias (recommended) or by version.
Using an alias makes it easier to manage code updates because you don't have to change your
subscription table or group definition when the function code is updated. Instead, you just point
the alias to the new function version.
1. From the Actions menu, choose Publish new version.
2. For Version description, enter First version, and then choose Publish.
3. On the greengrassObjectClassification: 1 configuration page, from the Actions menu, choose
Create alias.
4. On the Create a new alias page, use the following values:
Property Value
Name mlTest
Version 1
Note
AWS IoT Greengrass doesn't support Lambda aliases for $LATEST versions.
5. Choose Create.
207
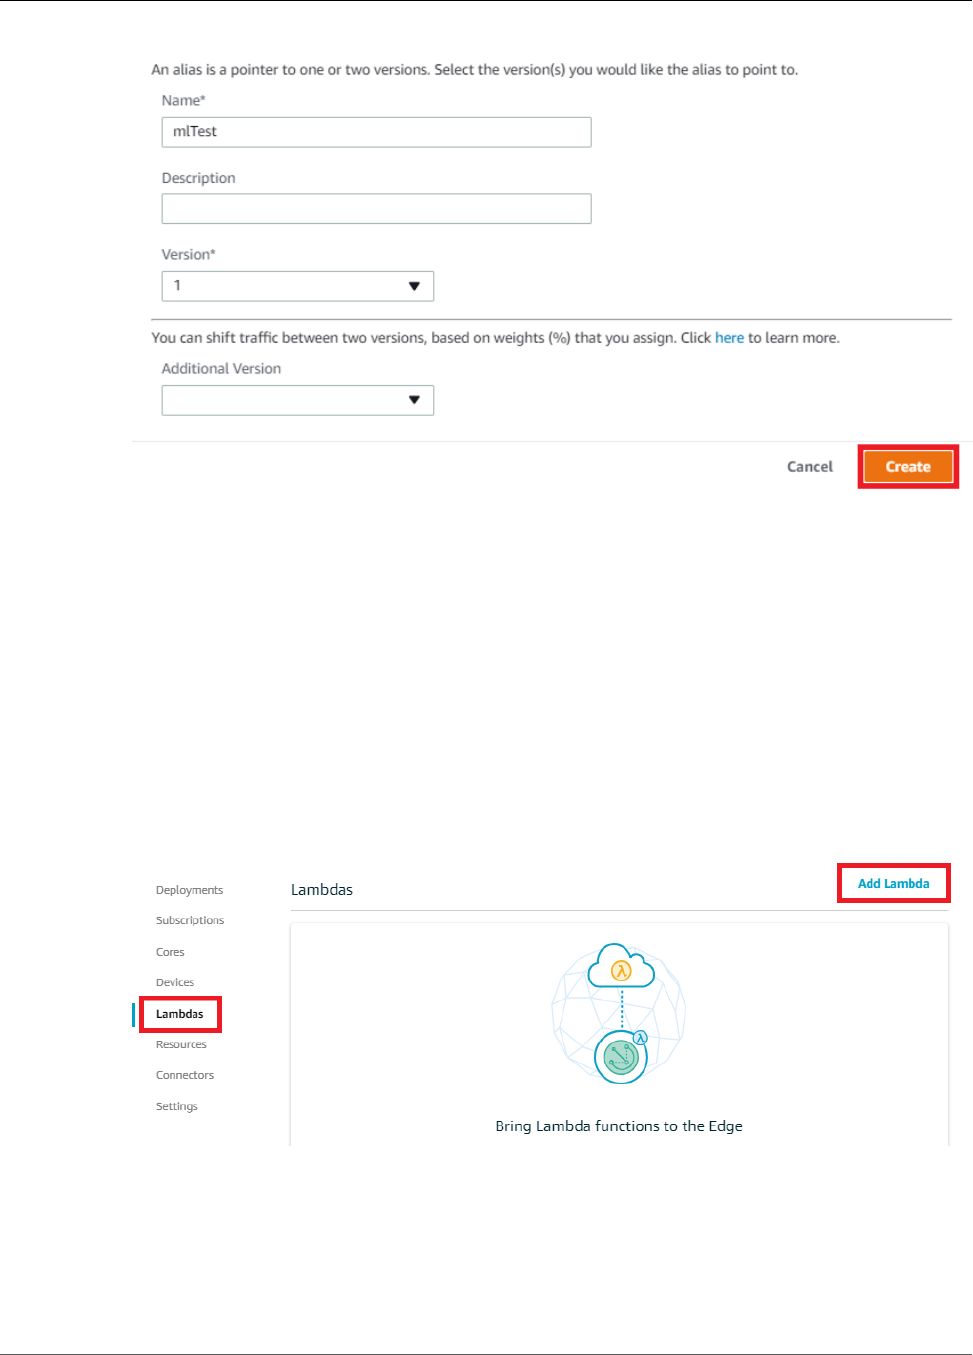
AWS IoT Greengrass Developer Guide
Add the Lambda Function to the Group
Now, add the Lambda function to your Greengrass group.
Step 5: Add the Lambda Function to the Greengrass
Group
In this step, you add the Lambda function to the group and then configure its lifecycle and environment
variables.
First, add the Lambda function to your Greengrass group.
1. In the AWS IoT Core console, open the group configuration page.
2. Choose Lambdas, and then choose Add Lambda.
3. On the Add a Lambda to your Greengrass Group page, choose Use existing Lambda.
208

AWS IoT Greengrass Developer Guide
Add the Lambda Function to the Group
4. Choose greengrassObjectClassification, and then choose Next.
5. On the Select a Lambda version page, choose Alias:mlTest, and then choose Finish.
Next, configure the lifecycle and environment variables of the Lambda function.
1. On the Lambdas page, choose the greengrassObjectClassification Lambda function.
2. On the greengrassObjectClassification configuration page, choose Edit.
3. On the Group-specific Lambda configuration page, use the following values:
Property Value
Memory limit 96 MB
Timeout 10 seconds
Lambda lifecycle Make this function long-lived and keep it
running indefinitely
Read access to /sys directory Enable
For more information, see the section called “Lifecycle Configuration” (p. 156).
209
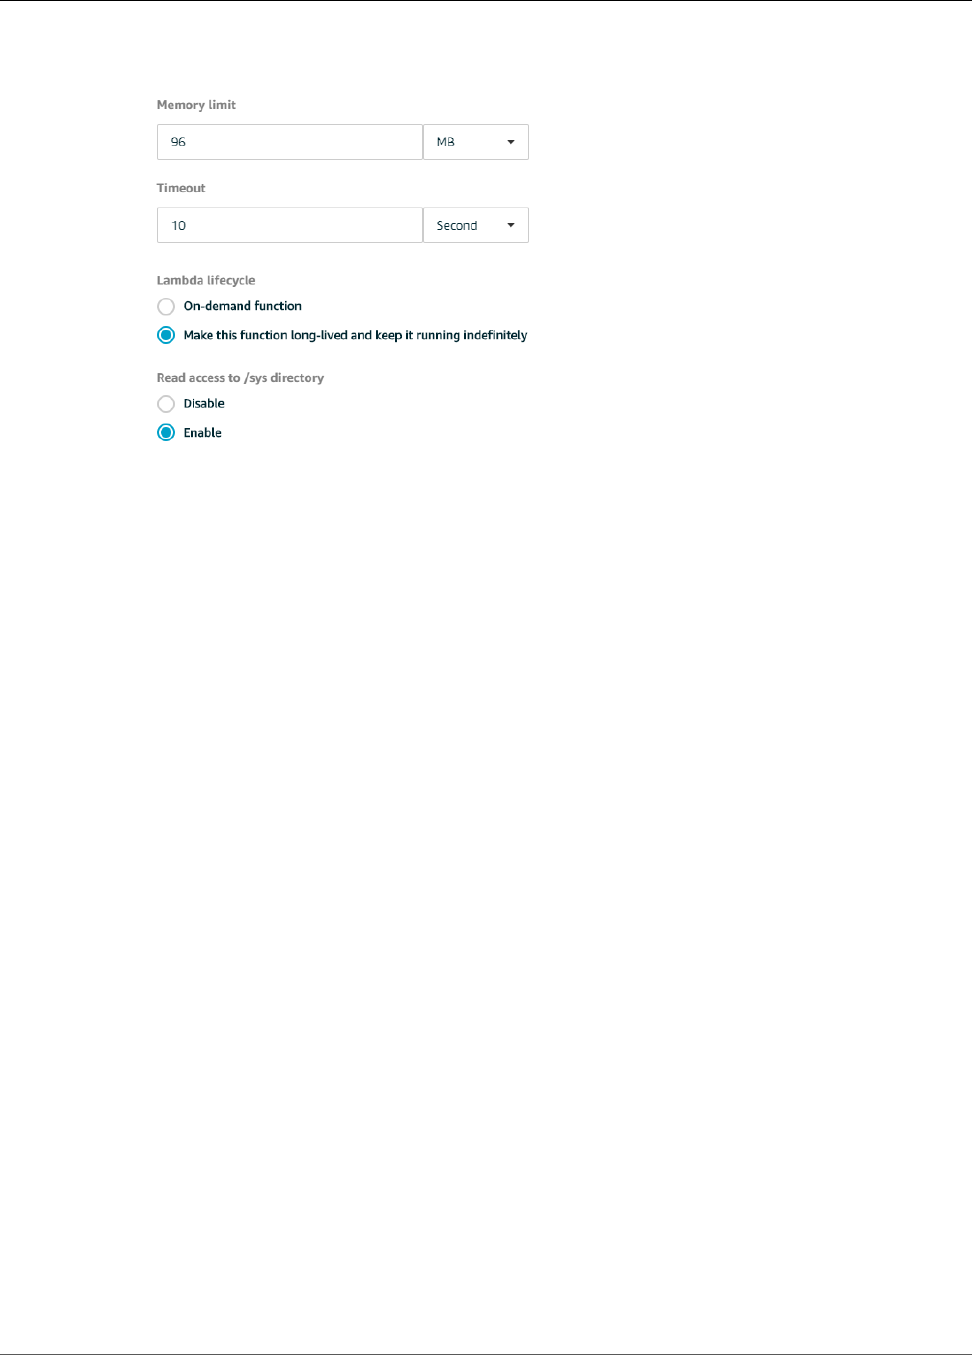
AWS IoT Greengrass Developer Guide
Add Resources to the Group
4. Under Environment variables, create a key-value pair. A key-value pair is required by functions that
interact with MXNet models on a Raspberry Pi.
For Key, enter MXNET_ENGINE_TYPE. For Value, enter NaiveEngine.
Note
In your own user-defined Lambda functions, you can optionally set the environment
variable in your function code.
5. Choose Update.
Step 6: Add Resources to the Greengrass Group
In this step, you create resources for the camera module and the ML inference model. You also affiliate
the resources with the Lambda function, which makes it possible for the function to access the resources
on the core device.
First, create two local device resources for the camera: one for shared memory and one for the device
interface. For more information about local resource access, see Access Local Resources with Lambda
Functions (p. 169).
1. On the group configuration page, choose Resources.
210
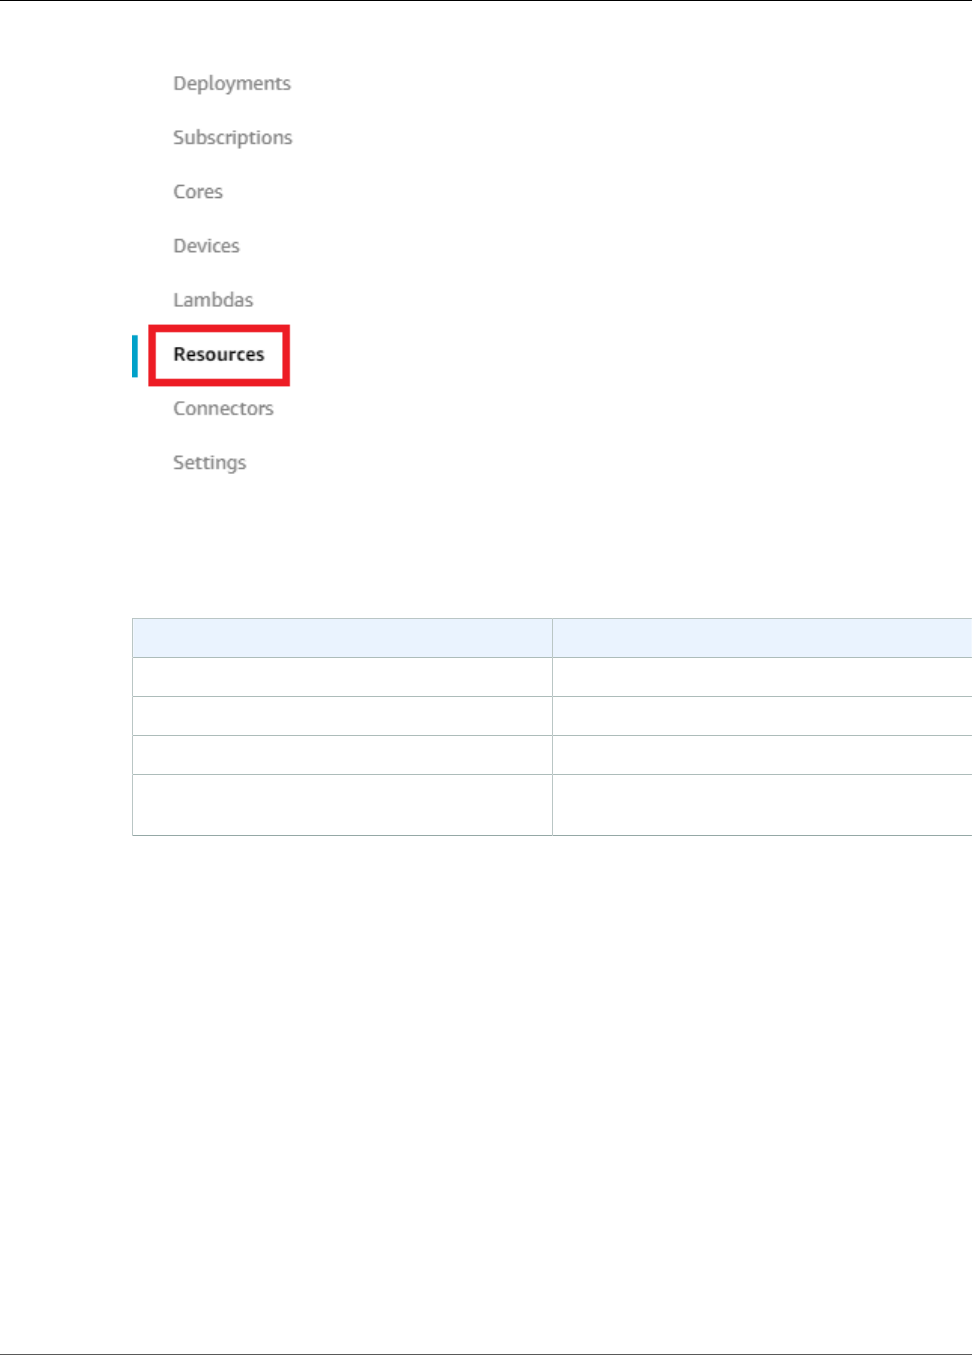
AWS IoT Greengrass Developer Guide
Add Resources to the Group
2. On the Local Resources tab, choose Add local resource.
3. On the Create a local resource page, use the following values:
Property Value
Resource name videoCoreSharedMemory
Resource type Device
Device path /dev/vcsm
Group owner file access permission Automatically add OS group permissions of the
Linux group that owns the resource
The Device path is the local absolute path of the device resource. This path can only refer to a
character device or block device under /dev.
The Group owner file access permission option lets you grant additional file access permissions to
the Lambda process. For more information, see Group Owner File Access Permission (p. 170).
211
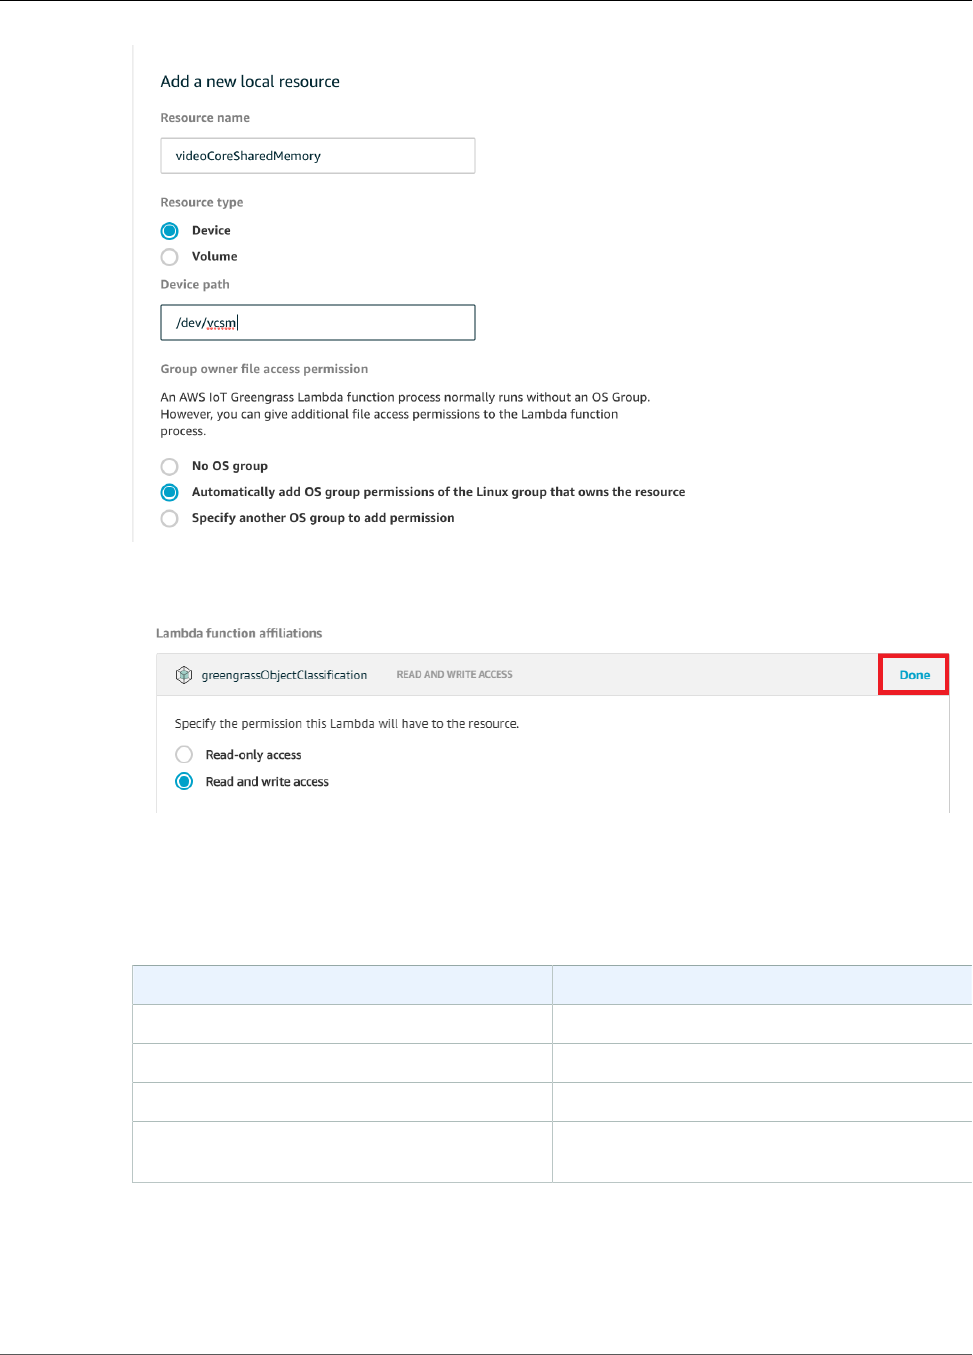
AWS IoT Greengrass Developer Guide
Add Resources to the Group
4. Under Lambda function affiliations, choose Select.
5. Choose greengrassObjectClassification, choose Read and write access, and then choose Done.
Next, you add a local device resource for the camera interface.
6. Choose Add another resource.
7. On the Create a local resource page, use the following values:
Property Value
Resource name videoCoreInterface
Resource type Device
Device path /dev/vchiq
Group owner file access permission Automatically add OS group permissions of the
Linux group that owns the resource
212
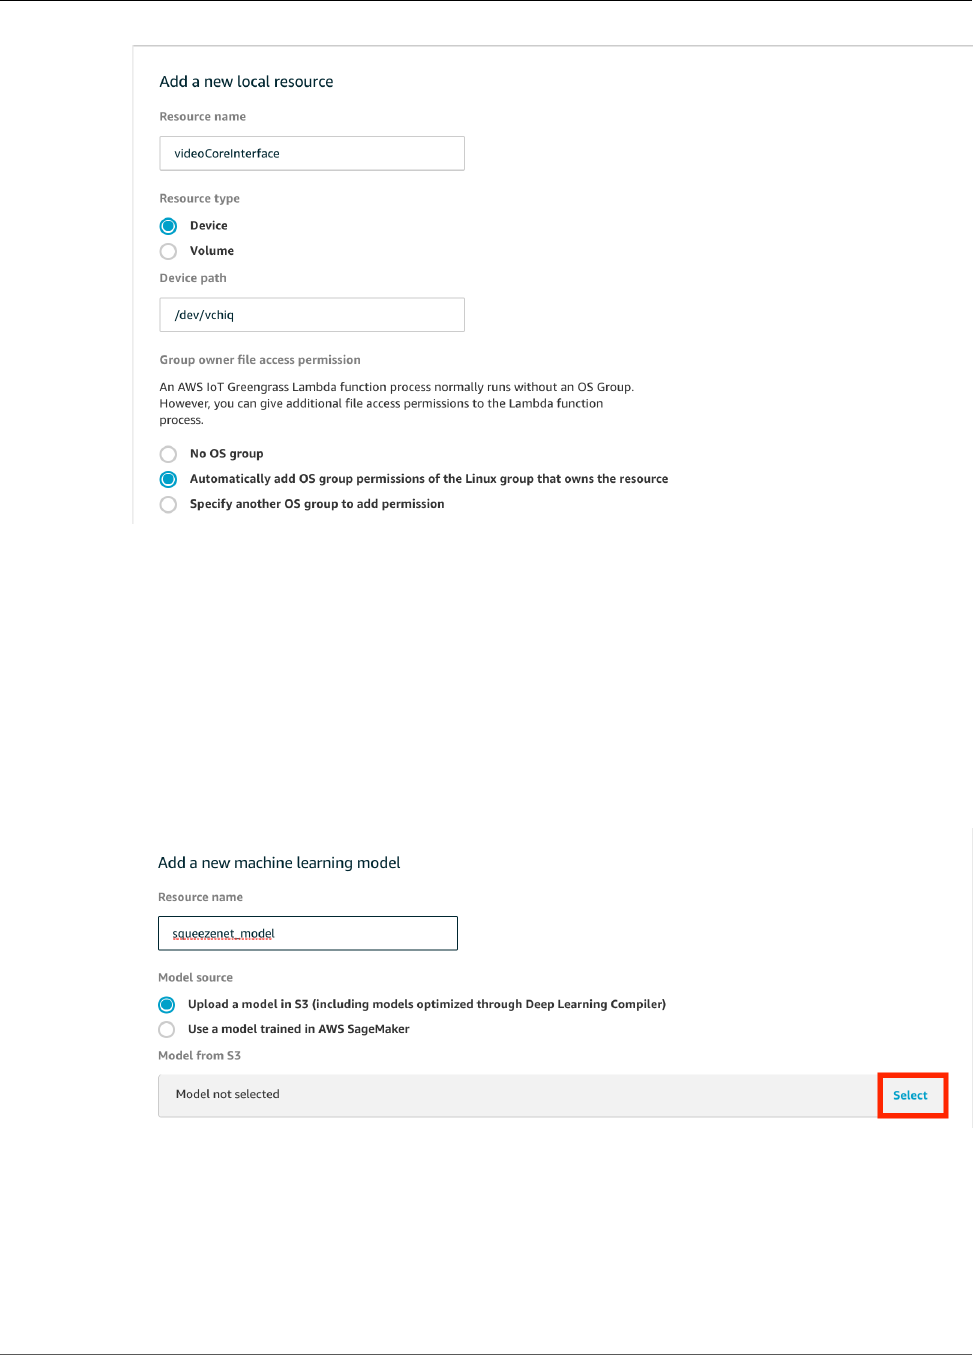
AWS IoT Greengrass Developer Guide
Add Resources to the Group
8. Under Lambda function affiliations, choose Select.
9. Choose greengrassObjectClassification, choose Read and write access, and then choose Done.
10. At the bottom of the page, choose Save.
Now, add the inference model as a machine learning resource. This step includes uploading the
squeezenet.zip model package to Amazon S3.
1. On the group configuration page for your AWS IoT Greengrass group, choose Resources. Navigate
to the Machine Learning section and choose Add machine learning resource. On the Create a
machine learning resource page, for Resource name, type squeezenet_model.
2. For Model source, choose Upload a model in S3.
3. Under Model from S3, choose Select.
4. Choose Upload a model. This opens up a new tab to the Amazon S3 console.
5. In the Amazon S3 console tab, upload your zip file to an Amazon S3 bucket. For information, see
How Do I Upload Files and Folders to an S3 Bucket?
213

AWS IoT Greengrass Developer Guide
Add a Subscription to the Group
Note
Your bucket name must contain the string greengrass in order for the bucket to be
accessible. Choose a unique name (such as greengrass-bucket-user-id-epoch-time).
Don't use a period (.) in the bucket name.
6. In the AWS IoT Greengrass console tab, locate and choose your Amazon S3 bucket. Locate your
uploaded squeezenet.zip file, and choose Select. You may need to refresh the page to update
the list of available buckets and files.
7. For Local path, enter /greengrass-machine-learning/mxnet/squeezenet.
This is the destination for the local model in the Lambda runtime namespace. When you deploy the
group, AWS IoT Greengrass retrieves the source model package and then extracts the contents to
the specified directory. The sample Lambda function for this tutorial is already configured to use this
path (in the model_path variable).
8. Under Lambda function affiliations, choose Select.
9. Choose greengrassObjectClassification, choose Read-only access, and then choose Done.
10. Choose Save.
Using Amazon SageMaker Trained Models
This tutorial uses a model that's stored in Amazon S3, but you can easily use Amazon SageMaker models
too. The AWS IoT Greengrass console has built-in Amazon SageMaker integration, so you don't need
to manually upload these models to Amazon S3. For requirements and limitations for using Amazon
SageMaker models, see the section called “Supported Model Sources” (p. 196).
To use an Amazon SageMaker model:
• For Model source, choose Use an existing SageMaker model, and then choose the name of the
model's training job.
• For Local path, enter the path to the directory where your Lambda function looks for the model.
Step 7: Add a Subscription to the Greengrass Group
In this step, you add a subscription to the group. This subscription enables the Lambda function to send
prediction results to AWS IoT by publishing to an MQTT topic.
1. On the group configuration page, choose Subscriptions, and then choose Add Subscription.
2. On the Select your source and target page, configure the source and target, as follows:
a. In Select a source, choose Lambdas, and then choose greengrassObjectClassification.
b. In Select a target, choose Services, and then choose IoT Cloud.
214
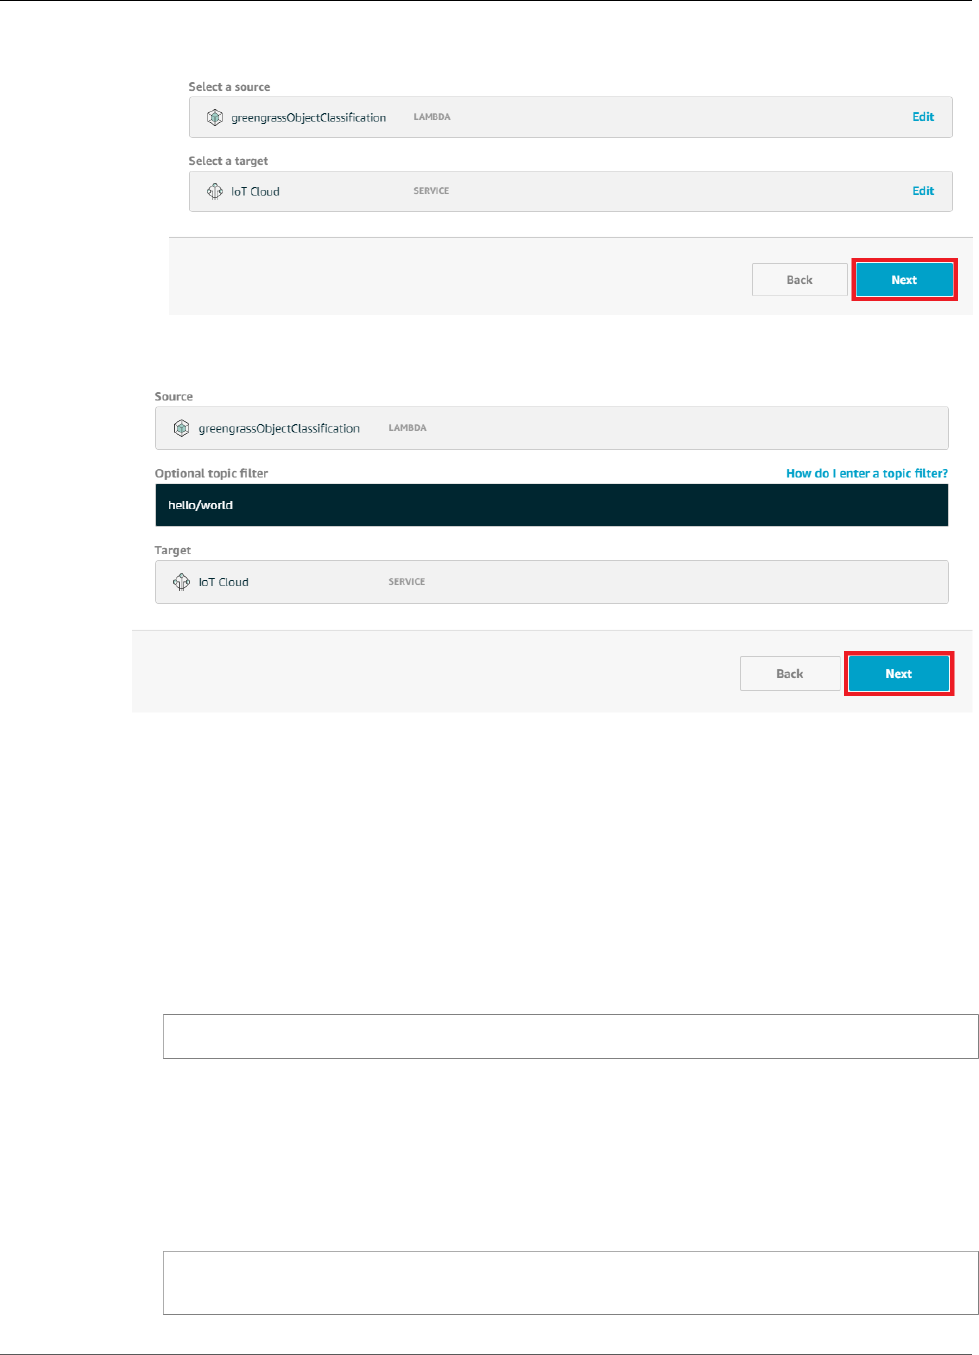
AWS IoT Greengrass Developer Guide
Deploy the Group
c. Choose Next.
3. On the Filter your data with a topic page, in Optional topic filter, enter hello/world, and then
choose Next.
4. Choose Finish.
Step 8: Deploy the Greengrass Group
In this step, you deploy the current version of the group definition to the Greengrass core device. The
definition contains the Lambda function, resources, and subscription configurations that you added.
1. Make sure that the AWS IoT Greengrass core is running. Run the following commands in your
Raspberry Pi terminal, as needed.
a. To check whether the daemon is running:
ps aux | grep -E 'greengrass.*daemon'
If the output contains a root entry for /greengrass/ggc/packages/1.7.0/bin/daemon,
then the daemon is running.
Note
The version in the path depends on the AWS IoT Greengrass Core software version
that's installed on your core device.
b. To start the daemon:
cd /greengrass/ggc/core/
sudo ./greengrassd start
215
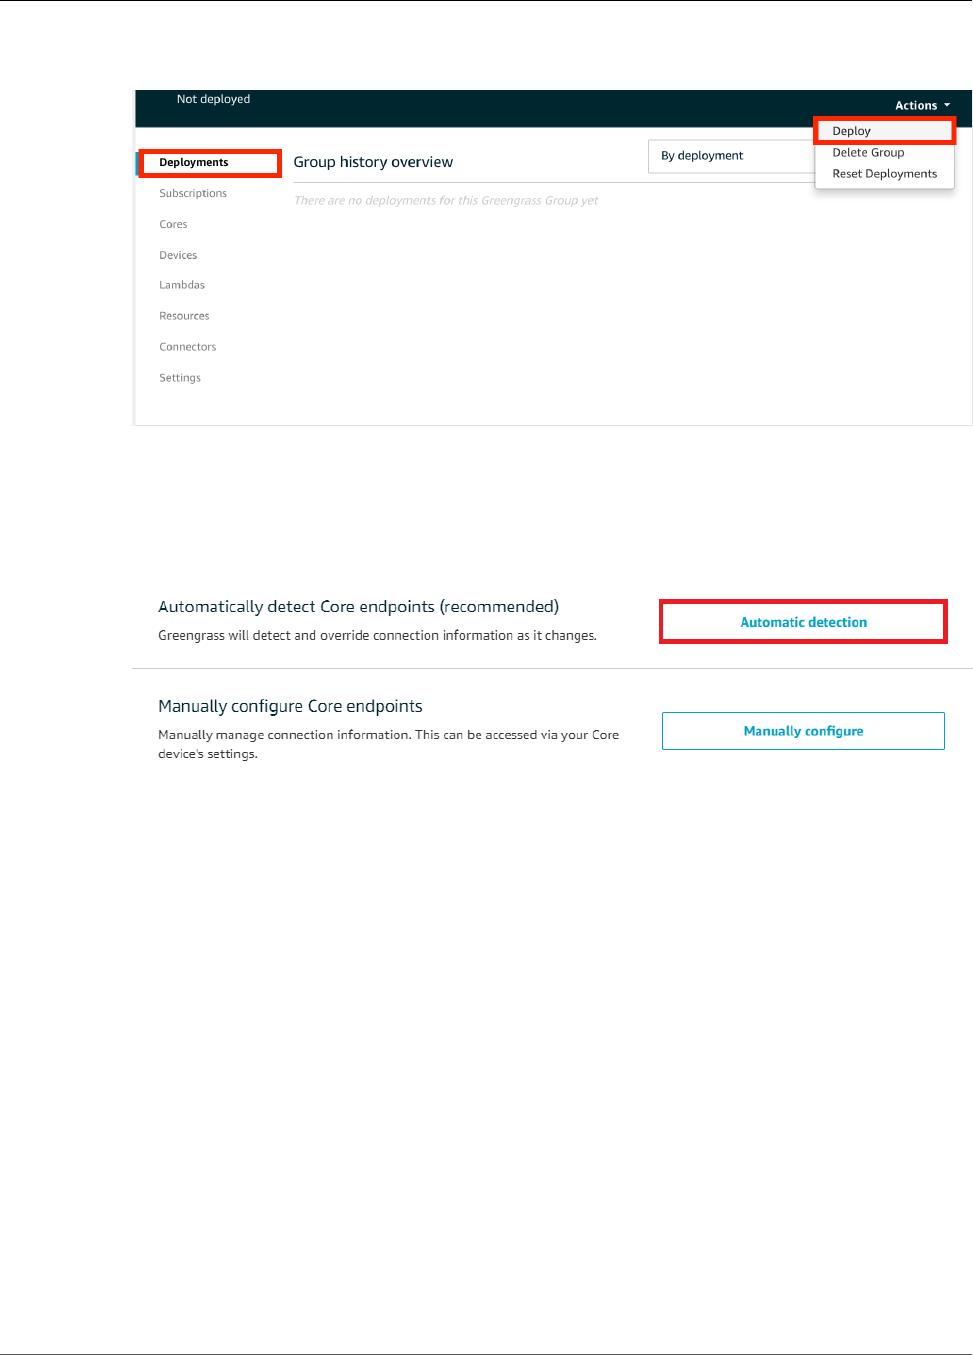
AWS IoT Greengrass Developer Guide
Test the App
2. On the group configuration page, choose Deployments, and from the Actions menu, choose
Deploy.
3. On the Configure how devices discover your core page, choose Automatic detection.
This enables devices to automatically acquireconnectivity information for the core, such as IP
address, DNS, and port number. Automatic detection is recommended, but AWS IoT Greengrass also
supports manually specified endpoints. You're only prompted for the discovery method the first
time that the group is deployed.
Note
If prompted, grant permission to create the AWS IoT Greengrass service role on your behalf,
which allows AWS IoT Greengrass to access other AWS services. You need to do this only
one time per account.
The Deployments page shows the deployment timestamp, version ID, and status. When completed,
the status displayed for the deployment should be Successfully completed.
For troubleshooting help, see Troubleshooting (p. 410).
Test the Inference App
Now you can verify whether the deployment is configured correctly. To test, you subscribe to the hello/
world topic and view the prediction results that are published by the Lambda function.
Note
If a monitor is attached to the Raspberry Pi, the live camera feed is displayed in a preview
window.
1. In the AWS IoT Core console, choose Test.
216

AWS IoT Greengrass Developer Guide
Test the App
2. For Subscriptions, use the following values:
Property Value
Subscription topic hello/world
MQTT payload display Display payloads as strings
3. Choose Subscribe to topic.
If the test is successful, the messages from the Lambda function appear at the bottom of the page.
Each message contains the top five prediction results of the image, using the format: probability,
predicted class ID, and corresponding class name.
217
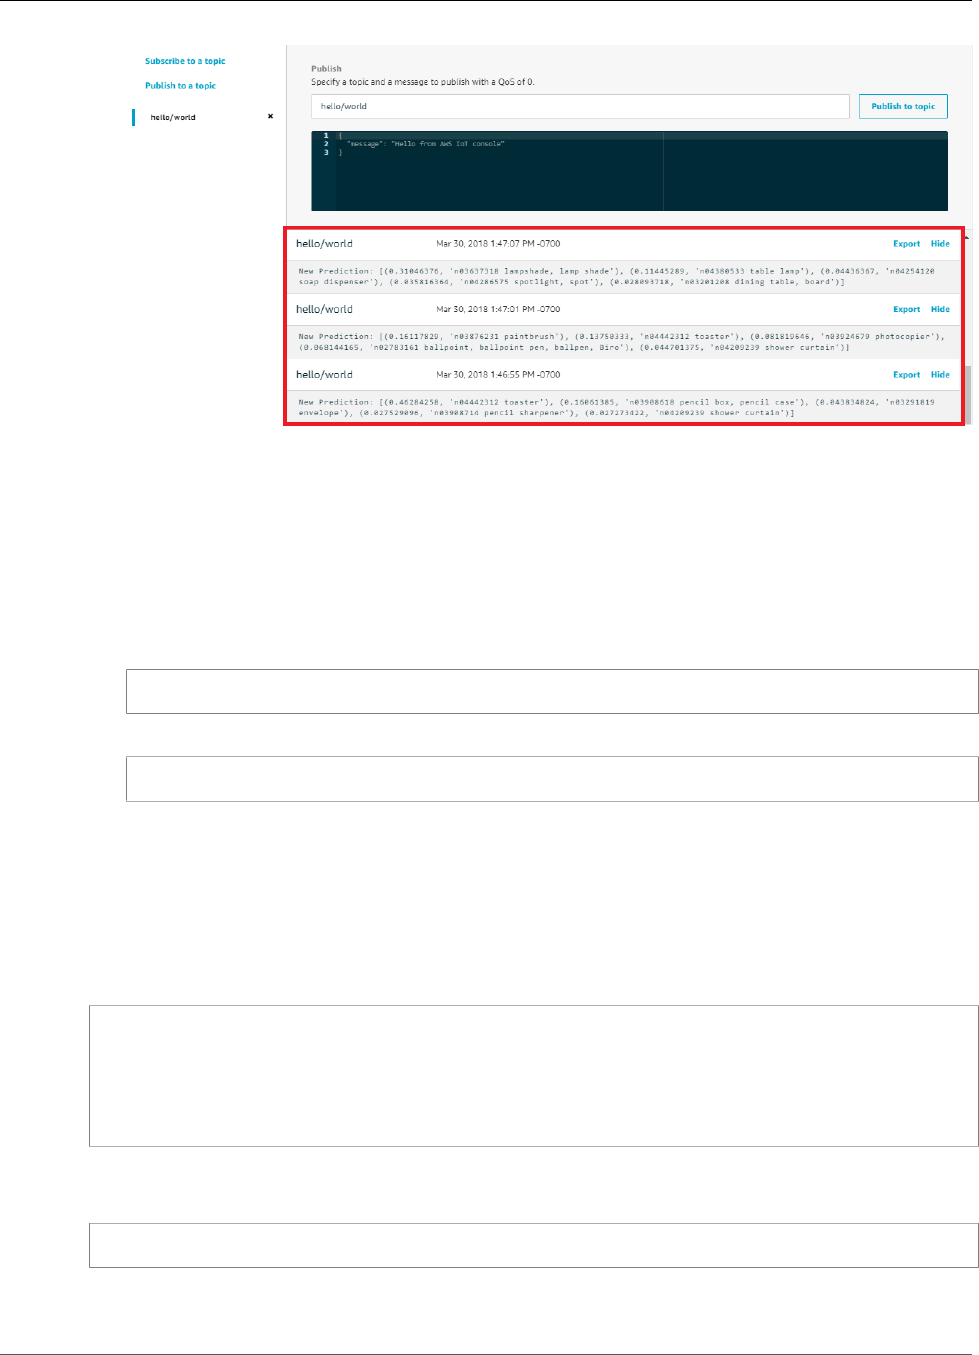
AWS IoT Greengrass Developer Guide
Test the App
Troubleshooting AWS IoT Greengrass ML Inference
If the test is not successful, you can try the following troubleshooting steps. Run the commands in your
Raspberry Pi terminal.
Check Error Logs
1. Switch to the root user.
sudo su
2. Navigate to the /log directory.
cd /greengrass/ggc/var/log
3. Check runtime.log or python_runtime.log.
For more information, see the section called “Troubleshooting with Logs” (p. 415).
"Unpacking" Error in runtime.log
If runtime.log contains an error similar to the following, make sure that your tar.gz source model
package has a parent directory.
Greengrass deployment error: unable to download the artifact model-arn: Error while
processing.
Error while unpacking the file from /tmp/greengrass/artifacts/model-arn/path to /
greengrass/ggc/deployment/path/model-arn,
error: open /greengrass/ggc/deployment/path/model-arn/squeezenet/
squeezenet_v1.1-0000.params: no such file or directory
If your package doesn't have a parent directory that contains the model files, use the following
command to try repackaging the model:
tar -zcvf model.tar.gz ./model
For example:
218

AWS IoT Greengrass Developer Guide
Test the App
#$ tar -zcvf test.tar.gz ./test
./test
./test/some.file
./test/some.file2
./test/some.file3
Note
Don't include trailing /* characters in this command.
Verify That the Lambda Function Is Successfully Deployed
1. List the contents of the deployed Lambda in the /lambda directory. Replace the placeholder values
before you run the command.
cd /greengrass/ggc/deployment/lambda/arn:aws:lambda:region:account:function:function-
name:function-version
ls -la
2. Verify that the directory contains the same content as the
greengrassObjectClassification.zip deployment package that you uploaded in Step 4:
Create and Publish a Lambda Function (p. 203).
Make sure that the .py files and dependencies are in the root of the directory.
Verify That the Inference Model Is Successfully Deployed
1. Find the process identification number (PID) of the Lambda runtime process:
ps aux | grep lambda-function-name
In the output, the PID appears in the second column of the line for the Lambda runtime process.
2. Enter the Lambda runtime namespace. Be sure to replace the placeholder pid value before you run
the command.
Note
This directory and its contents are in the Lambda runtime namespace, so they aren't visible
in a regular Linux namespace.
sudo nsenter -t pid -m /bin/bash
3. List the contents of the local directory that you specified for the ML resource.
cd /greengrass-machine-learning/mxnet/squeezenet/
ls -ls
You should see the following files:
32 -rw-r--r-- 1 ggc_user ggc_group 31675 Nov 18 15:19 synset.txt
32 -rw-r--r-- 1 ggc_user ggc_group 28707 Nov 18 15:19 squeezenet_v1.1-symbol.json
4832 -rw-r--r-- 1 ggc_user ggc_group 4945062 Nov 18 15:19 squeezenet_v1.1-0000.params
219
AWS IoT Greengrass Developer Guide
Next Steps
Next Steps
Next, explore other inference apps. AWS IoT Greengrass provides other Lambda functions that you can
use to try out local inference. You can find the examples package in the precompiled libraries folder that
you downloaded in the section called “Install the MXNet Framework” (p. 201).
Configuring an NVIDIA Jetson TX2
To run this tutorial on an NVIDIA Jetson TX2, you provide source images and configure the Lambda
function. If you're using the GPU, you must also add local device resources.
To learn how to configure your Jetson so you can install the AWS IoT Greengrass core software, see the
section called “Setting Up Other Devices” (p. 54).
1. Download static PNG or JPG images for the Lambda function to use for image classification. The app
works best with small image files. Alternatively, you can instrument a camera on the Jetson board to
capture the source images.
Save your image files in the directory that contains the greengrassObjectClassification.py
file (or in a subdirectory of this directory). This is in the Lambda function deployment package that
you upload in the section called “Create and Publish a Lambda Function” (p. 203).
2. Edit the configuration of the Lambda function to increase the Memory limit value. Use 500 MB for
CPU, or 2048 MB for GPU. Follow the procedure in the section called “Add the Lambda Function to
the Group” (p. 208).
3. GPU only: Add the following local device resources. Follow the procedure in the section called “Add
Resources to the Group” (p. 210).
For each resource:
• For Resource type, choose Device.
• For Group owner file access permission, choose Automatically add OS group permissions of the
Linux group that owns the resource.
• For Lambda function affiliations, grant Read and write access to your Lambda function.
Name Device path
nvhost-ctrl /dev/nvhost-ctrl
nvhost-gpu /dev/nvhost-gpu
nvhost-ctrl-gpu /dev/nvhost-ctrl-gpu
nvhost-dbg-gpu /dev/nvhost-dbg-gpu
nvhost-prof-gpu /dev/nvhost-prof-gpu
nvmap /dev/nvmap
How to Configure Optimized Machine Learning
Inference Using the AWS Management Console
To follow the steps in this tutorial, you must be using AWS IoT Greengrass Core v1.6.0 or later.
220

AWS IoT Greengrass Developer Guide
Prerequisites
You can use the Amazon SageMaker Neo deep learning compiler to optimize the prediction efficiency of
native machine learning inference models in many frameworks. You can then download the optimized
model and install the Amazon SageMaker Neo deep learning runtime and deploy them to your AWS IoT
Greengrass devices for faster inference.
This tutorial describes how to use the AWS Management Console to configure a Greengrass group to
run a Lambda inference example that recognizes images from a camera locally, without sending data
to the cloud. The inference example accesses the camera module on a Raspberry Pi. In this tutorial, you
download a prepackaged model that is trained by Resnet-50 and optimized in the Neo deep learning
compiler. You then use the model to perform local image classification on your AWS IoT Greengrass
device.
The tutorial contains the following high-level steps:
1. Configure the Rasberry Pi (p. 221).
2. Install the Amazon SageMaker Neo deep learning runtime (p. 222).
3. Create an inference Lambda function (p. 224).
4. Add the Lambda function to the group (p. 228).
5. Add the Amazon SageMaker Neo optimized model resource to the group (p. 229).
6. Add the camera device resource to the group (p. 230).
7. Add subscriptions to the group (p. 233).
8. Deploy the group (p. 234).
Prerequisites
To complete this tutorial, you need:
•Raspberry Pi 3 Model B set up and configured for use with AWS IoT Greengrass. To learn how to set up
your Raspberry Pi with AWS IoT Greengrass, see Module 1 and Module 2 of Getting Started with AWS
IoT Greengrass (p. 44).
•Raspberry Pi Camera Module V2 - 8 Megapixel, 1080p. To learn how to set up the camera, see
Connecting the camera in the Raspberry Pi documentation.
• A Greengrass group and a Greengrass core. To learn how to create a Greengrass group or core, see
Getting Started with AWS IoT Greengrass (p. 44).
Note
This tutorial uses a Raspberry Pi, but AWS IoT Greengrass supports other platforms, such as Intel
Atom (p. 238) and NVIDIA Jetson TX2 (p. 239).
Step 1: Configure the Raspberry Pi
In this step, you install updates to the Raspbian operating system, install the camera module software
and Python dependencies, and enable the camera interface.
Run the following commands in your Raspberry Pi terminal.
1. Install updates to Raspbian.
sudo apt-get update
sudo apt-get dist-upgrade
2. Install the picamera interface for the camera module and other Python libraries that are required for
this tutorial.
221

AWS IoT Greengrass Developer Guide
Install the Neo deep learning runtime
sudo apt-get install -y python-dev python-setuptools python-pip python-picamera
3. Reboot the Raspberry Pi.
sudo reboot
4. Open the Raspberry Pi configuration tool.
sudo raspi-config
5. Use the arrow keys to open Interfacing Options and enable the camera interface. If prompted, allow
the device to reboot.
6. Use the following command to test the camera setup.
raspistill -v -o test.jpg
This opens a preview window on the Raspberry Pi, saves a picture named test.jpg to your current
directory, and displays information about the camera in the Raspberry Pi terminal.
Step 2: Install the Amazon SageMaker Neo deep
learning runtime
In this step, you download the Neo deep learning runtime and install it onto your Raspberry Pi.
1. On your computer, open the AWS IoT Core console.
2. In the navigation pane, choose Software.
222

AWS IoT Greengrass Developer Guide
Install the Neo deep learning runtime
3. In the Machine learning inference section, for Runtimes and precompiled framework libraries,
choose Configure download.
4. On the Machine learning inference page, under Software configurations, for Deep Learning
Runtime Raspberry Pi version 1.0.0, choose Download.
5. Transfer the downloaded dlr-1.0-py2-armv7l.tar.gz file from your computer to your
Raspberry Pi. You can also use the following scp command with a path to save your file, such as /
home/pi/:
scp dlr-1.0-py2-armv7l.tar.gz pi@your-device-ip-address:path-to-save-file
6. Use the following commands to remotely sign in to your Raspberry Pi and extract the installer files.
ssh pi@your-device-ip-address
cd path-to-save-file
tar -xvzf dlr-1.0-py2-armv7l.tar.gz
7. Install the Neo deep learning runtime.
223

AWS IoT Greengrass Developer Guide
Create an Inference Lambda Function
cd dlr-1.0-py2-armv7l/
chmod 755 install-dlr.sh
sudo ./install-dlr.sh
This package contains an examples directory that contains several files you use to run this tutorial.
This directory also contains version 1.2.0 of the AWS IoT Greengrass Core SDK for Python. You can
also download the latest version of the SDK in the AWS IoT Core console.
Step 3: Create an Inference Lambda Function
In this step, you create a deployment package and a Lambda function that is configured to use the
deployment package. Then, you publish a function version and create an alias.
1. On your computer, unzip the downloaded dlr-1.0-py2-armv7l.tar.gz file you previously
copied to your Raspberry Pi.
cd path-to-downloaded-runtime
tar -xvzf dlr-1.0-py2-armv7l.tar.gz
2. The resulting dlr-1.0-py2-armv7l directory contains an examples folder containing files
including inference.py, the example code we use in this tutorial for inference. You can view this
code as a usage example to create your own inference code.
Compress the files in the examples folder into a file named
optimizedImageClassification.zip.
Note
When you create the .zip file, verify that the .py files and dependencies are in the root of
the directory.
cd path-to-downloaded-runtime/dlr-1.0-py2-armv7l/examples
zip -r optimizedImageClassification.zip .
This .zip file is your deployment package. This package contains the function code and
dependencies, including the code example that invokes the Neo deep learning runtime Python APIs
to perform inference with the Neo deep learning compiler models. You upload this deployment
package later.
3. Now, create the Lambda function.
In the AWS IoT Core console, in the navigation pane, choose Greengrass, and then choose Groups.
224

AWS IoT Greengrass Developer Guide
Create an Inference Lambda Function
4. Choose the Greengrass group where you want to add the Lambda function.
5. On the group configuration page, choose Lambdas, and then choose Add Lambda.
6. On the Add a Lambda to your Greengrass Group page, choose Create new Lambda. This opens the
AWS Lambda console.
225
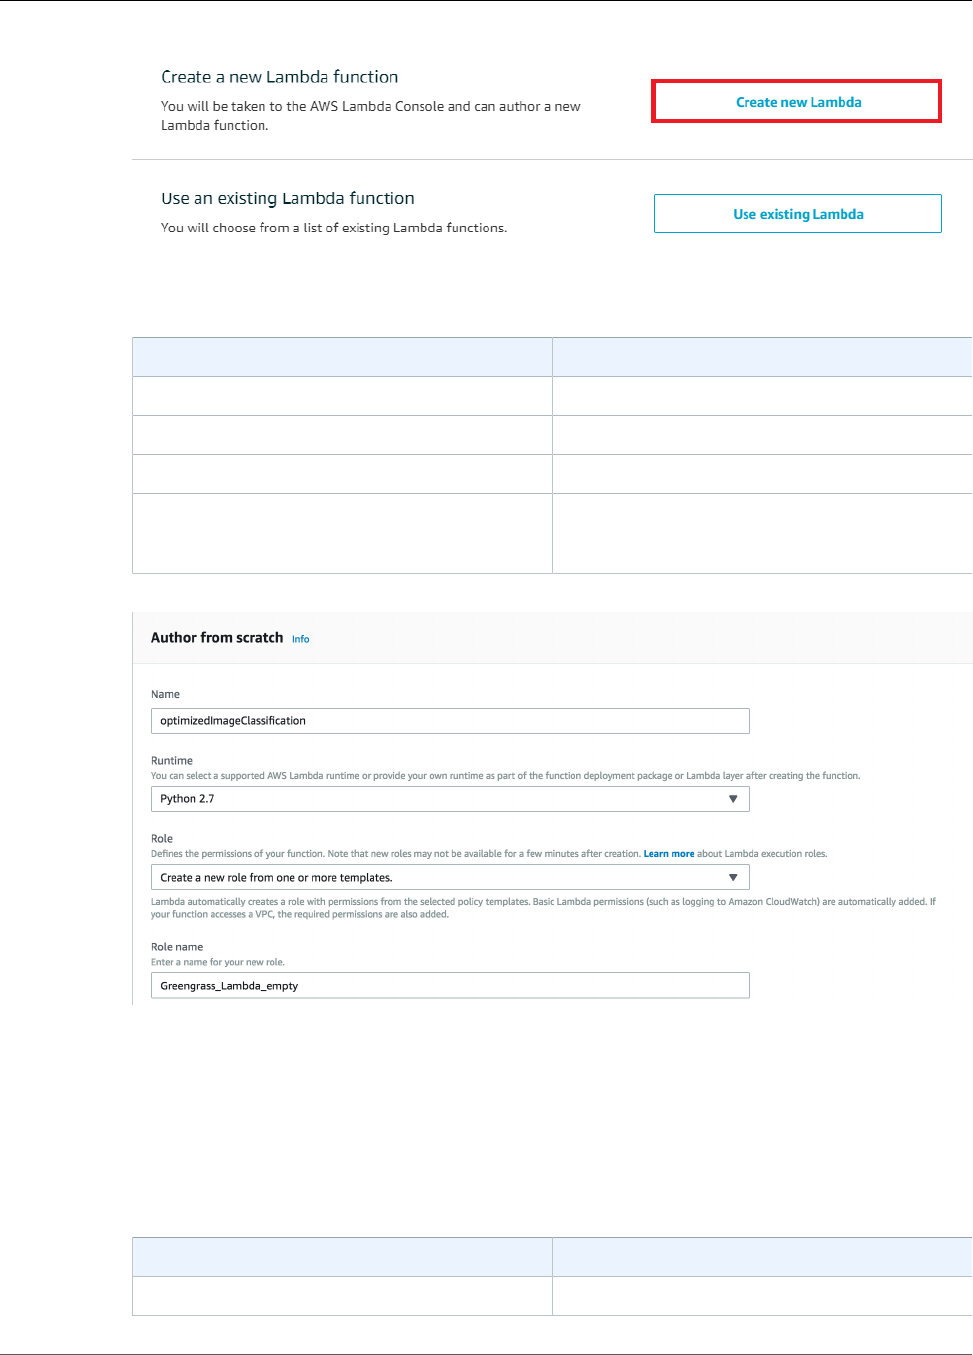
AWS IoT Greengrass Developer Guide
Create an Inference Lambda Function
7. Choose Author from scratch and use the following values to create your function:
Property Value
Name optimizedImageClassification
Runtime Python 2.7
Role Create new role from one or more templates
Role name
(This role isn't used by AWS IoT Greengrass.)
Greengrass_Lambda_empty
8. Choose Create function.
Now, upload your Lambda function deployment package and register the handler.
1. On the Configuration tab for the optimizedImageClassification function, for Function code,
use the following values:
Property Value
Code entry type Upload a .zip file
226
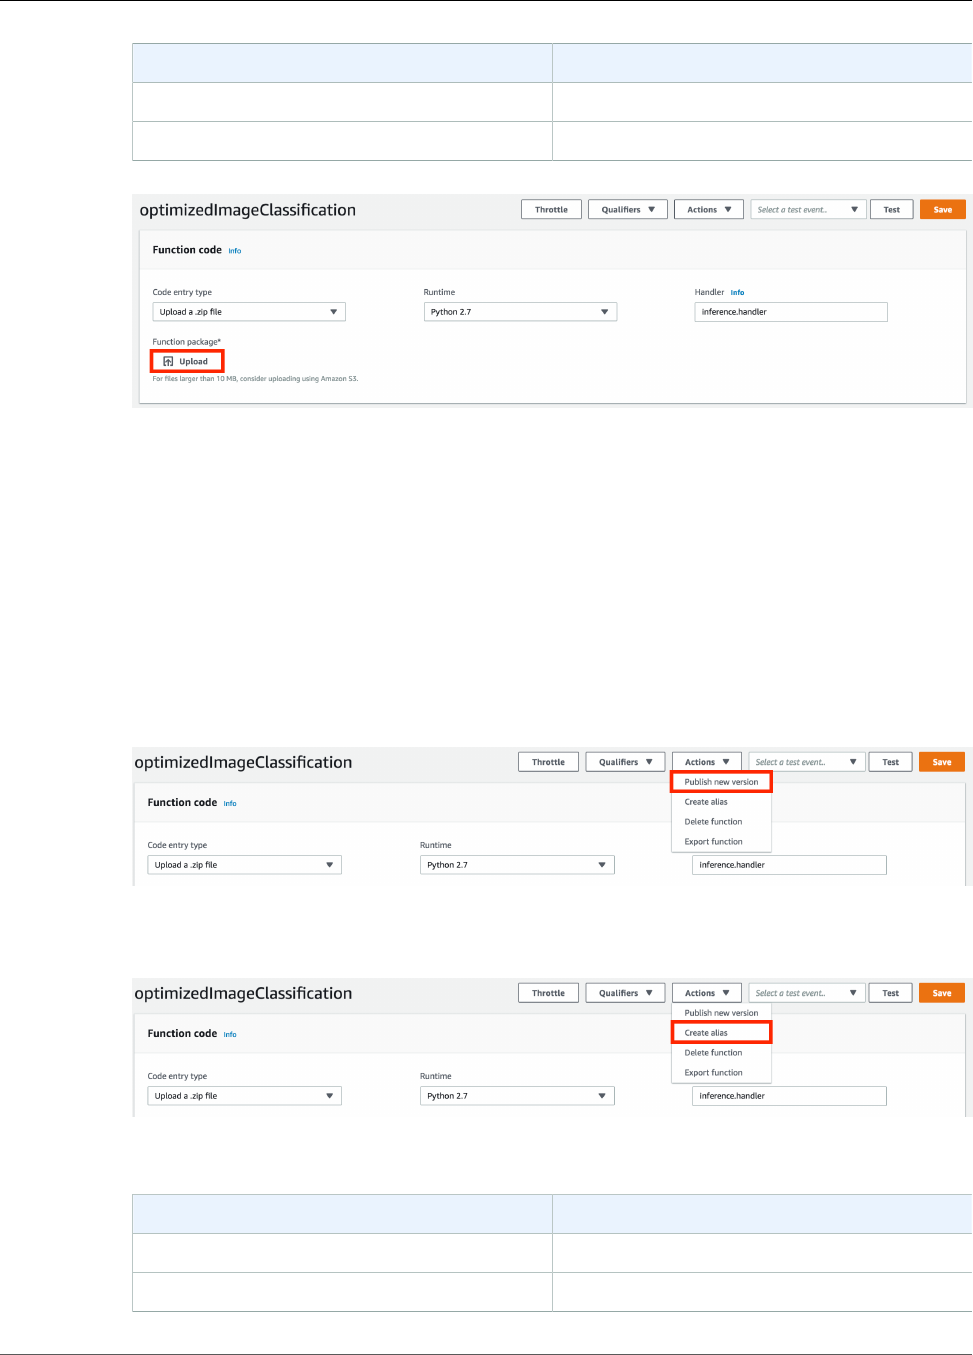
AWS IoT Greengrass Developer Guide
Create an Inference Lambda Function
Property Value
Runtime Python 2.7
Handler inference.handler
2. Choose Upload.
3. Choose your optimizedImageClassification.zip deployment package.
4. Choose Save.
Next, publish the first version of your Lambda function. Then, create an alias for the version.
Note
Greengrass groups can reference a Lambda function by alias (recommended) or by version.
Using an alias makes it easier to manage code updates because you don't have to change your
subscription table or group definition when the function code is updated. Instead, you just point
the alias to the new function version.
1. From the Actions menu, choose Publish new version.
2. For Version description, enter First version, and then choose Publish.
3. On the optimizedImageClassification: 1 configuration page, from the Actions menu, choose Create
alias.
4. On the Create a new alias page, use the following values:
Property Value
Name mlTestOpt
Version 1
227
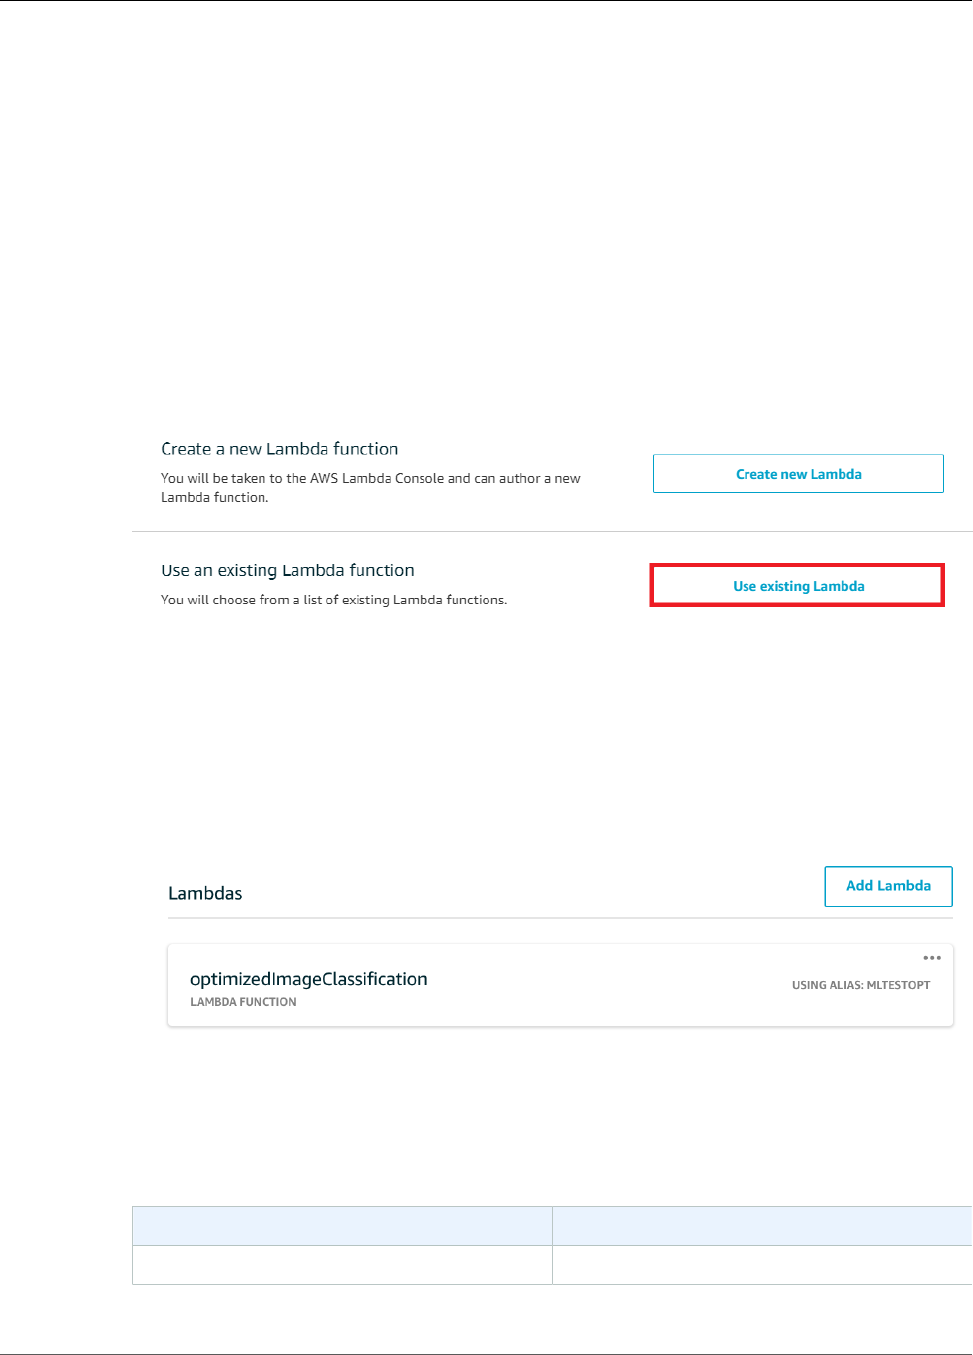
AWS IoT Greengrass Developer Guide
Add the Lambda Function to the Group
Note
AWS IoT Greengrass doesn't support Lambda aliases for $LATEST versions.
5. Choose Create.
Now, add the Lambda function to your Greengrass group.
Step 4: Add the Lambda Function to the Greengrass
Group
In this step, you add the Lambda function to the group and then configure its lifecycle.
First, add the Lambda function to your Greengrass group.
1. On the Add a Lambda to your Greengrass Group page, choose Use existing Lambda.
2. Choose optimizedImageClassification, and then choose Next.
3. On the Select a Lambda version page, choose Alias:mlTestOpt, and then choose Finish.
Next, configure the lifecycle of the Lambda function.
1. On the Lambdas page, choose the optimizedImageClassification Lambda function.
2. On the optimizedImageClassification configuration page, choose Edit.
3. On the Group-specific Lambda configuration page, use the following values:
Property Value
Memory limit 1024 MB
228

AWS IoT Greengrass Developer Guide
Add Neo Optimized Model Resource to the Group
Property Value
Timeout 10 seconds
Lambda lifecycle Make this function long-lived and keep it
running indefinitely
Read access to /sys directory Enable
For more information, see the section called “Lifecycle Configuration” (p. 156).
4. Choose Update.
Step 5: Add Amazon SageMaker Neo Optimized
Model Resource to the Greengrass Group
In this step, you create a resource for the optimized ML inference model and upload it to an Amazon S3
bucket. Then you locate the Amazon S3 uploaded model in the AWS IoT Greengrass console and affiliate
the newly created resource with the Lambda function. This makes it possible for the function to access its
resources on the core device.
1. On your computer, navigate to the Neo deep learning runtime installer package that you unpacked
earlier. Navigate to the resnet50 directory.
cd path-to-downloaded-runtime/dlr-1.0-py2-armv7l/models/resnet50
This directory contains precompiled model artifacts for an image classification model trained with
Resnet-50. Compress the files inside the resnet50 directory to create resnet50.zip.
zip -r resnet50.zip .
2. On the group configuration page for your AWS IoT Greengrass group, choose Resources. Navigate
to the Machine Learning section and choose Add machine learning resource. On the Create a
machine learning resource page, for Resource name, type resnet50_model.
3. For Model source, choose Upload a model in S3.
4. Under Model from S3, choose Select.
229
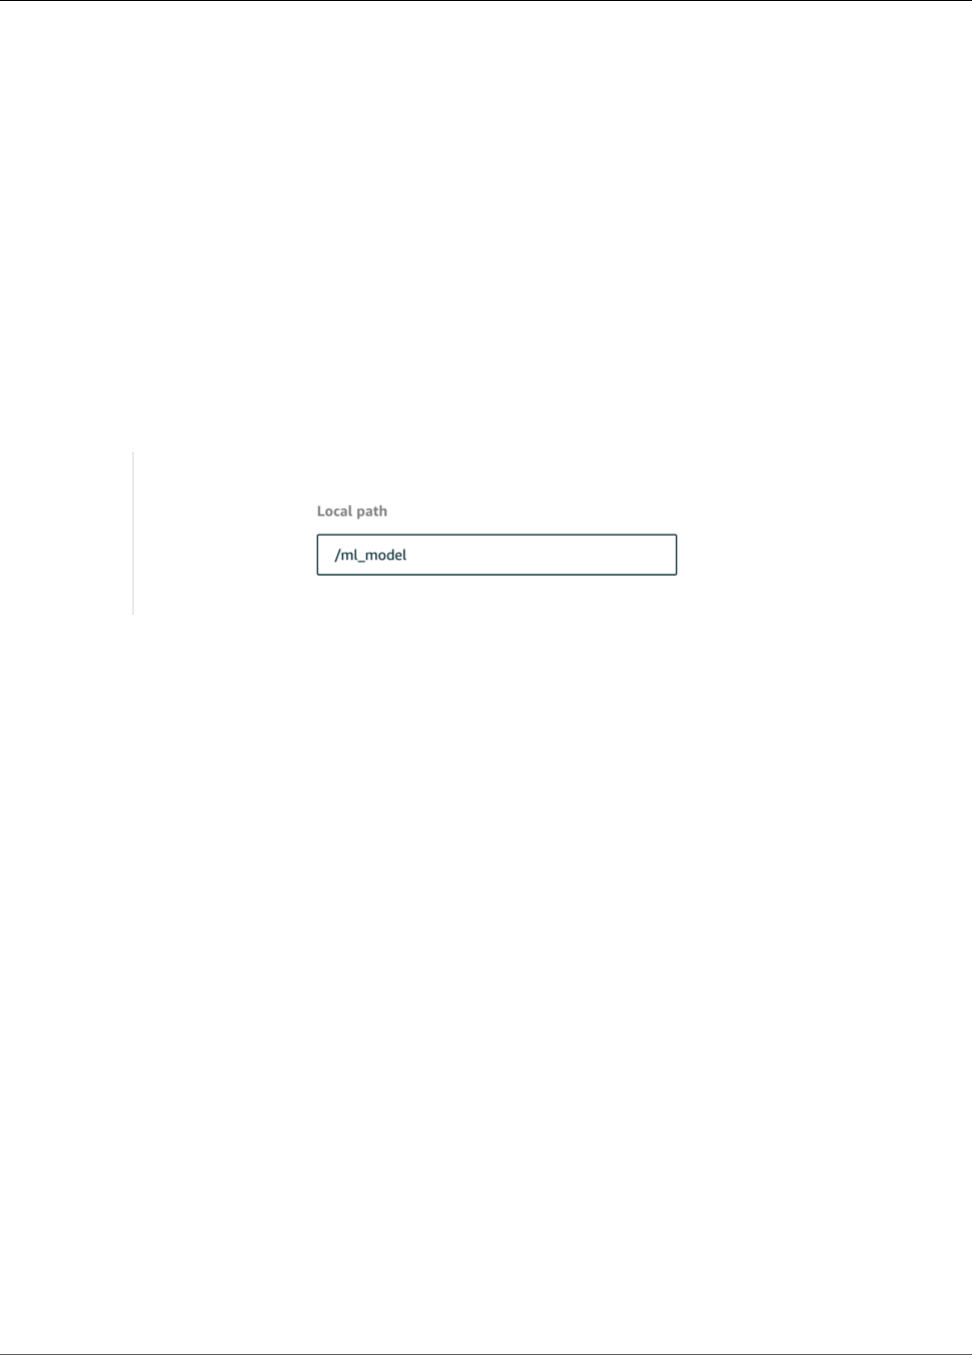
AWS IoT Greengrass Developer Guide
Add Your Camera Device Resource to the Group
Note
Currently, Amazon SageMaker models are automatically stored in Amazon S3 when
optimized. You can find your optimized model in your Amazon S3 bucket using this option.
For more information about model optimization in Amazon SageMaker, please refer to the
Amazon SageMaker Neo documentation.
5. Choose Upload a model. This opens up a new tab to the Amazon S3 console.
6. In the Amazon S3 console tab, upload your zip file to an Amazon S3 bucket. For information, see
How Do I Upload Files and Folders to an S3 Bucket?
Note
Your bucket name must contain the string greengrass in order for the bucket to be
accessible. Choose a unique name (such as greengrass-dlr-bucket-user-id-epoch-
time). Don't use a period (.) in the bucket name.
7. In the AWS IoT Greengrass console tab, locate and choose your Amazon S3 bucket. Locate your
uploaded resnet50.zip file, and choose Select. You may need to refresh the page to update the
list of available buckets and files.
8. In Local path, enter /ml_model.
This is the destination for the local model in the Lambda runtime namespace. When you deploy the
group, AWS IoT Greengrass retrieves the source model package and then extracts the contents to
the specified directory.
Note
We strongly recommend that you use the exact path provided for your local path. Using a
different local model destination path in this step causes some troubleshooting commands
provided in this tutorial to be inaccurate. If you use a different path, you must set up
a MODEL_PATH environment variable that uses the exact path you provide here. For
information about environment variables, see AWS Lambda Environment Variables.
9. Under Lambda function affiliations, choose Select.
10. Choose optimizedImageClassification, choose Read-only access, and then choose Done.
11. Choose Save.
Step 6: Add Your Camera Device Resource to the
Greengrass Group
In this step, you create a resource for the camera module and affiliate it with the Lambda function,
allowing the resource to be accessible on the AWS IoT Greengrass core.
1. On the group configuration page, choose Resources.
230
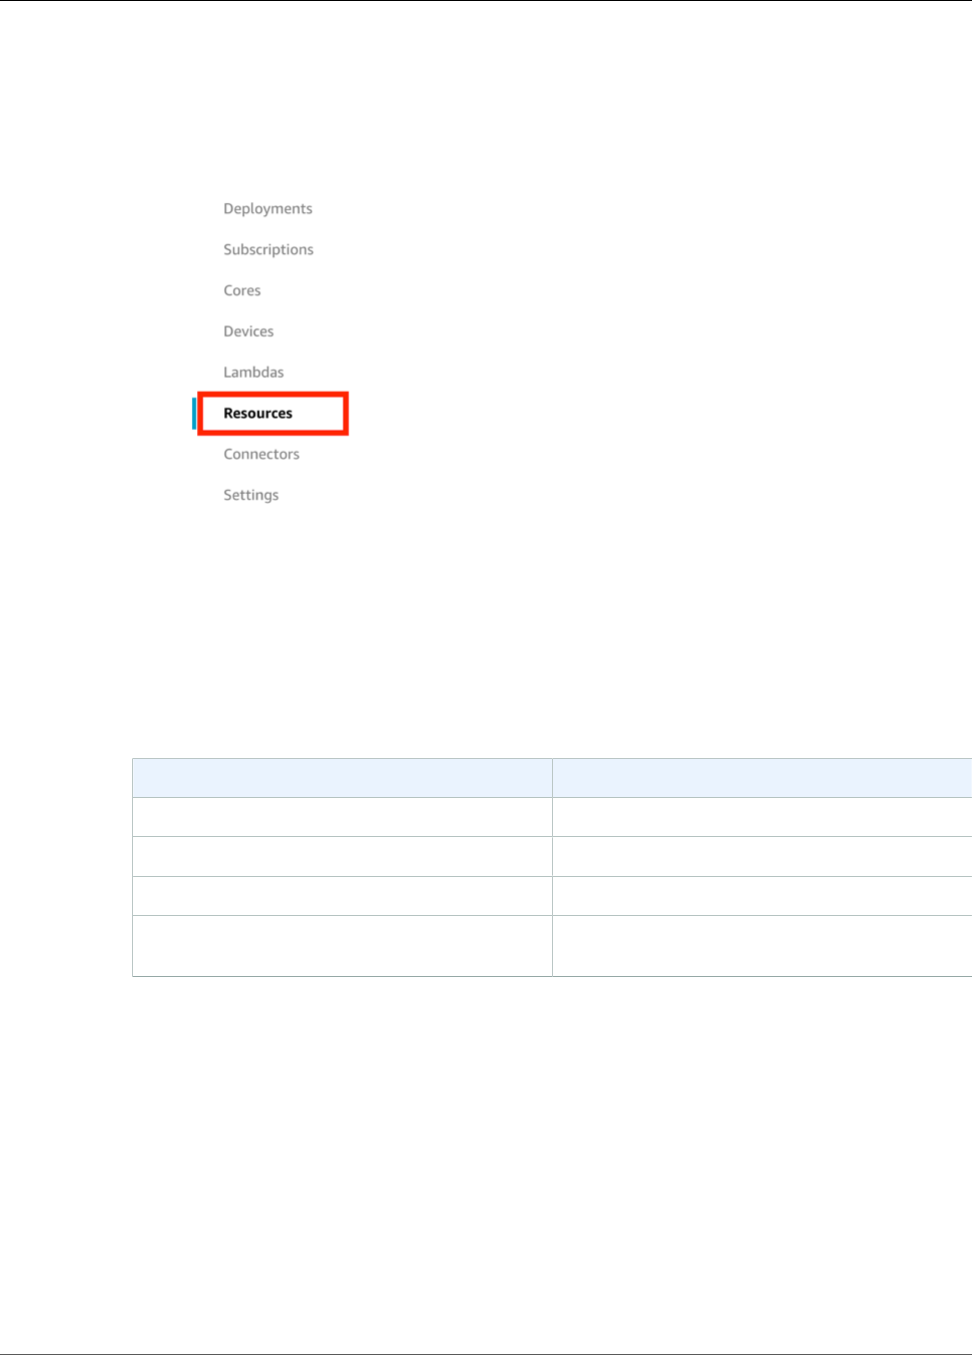
AWS IoT Greengrass Developer Guide
Add Your Camera Device Resource to the Group
2. On the Local Resources tab, choose Add local resource.
3. On the Create a local resource page, use the following values:
Property Value
Resource name videoCoreSharedMemory
Resource type Device
Device path /dev/vcsm
Group owner file access permission Automatically add OS group permissions of the
Linux group that owns the resource
The Device path is the local absolute path of the device resource. This path can only refer to a
character device or block device under /dev.
The Group owner file access permission option lets you grant additional file access permissions to
the Lambda process. For more information, see Group Owner File Access Permission (p. 170).
231
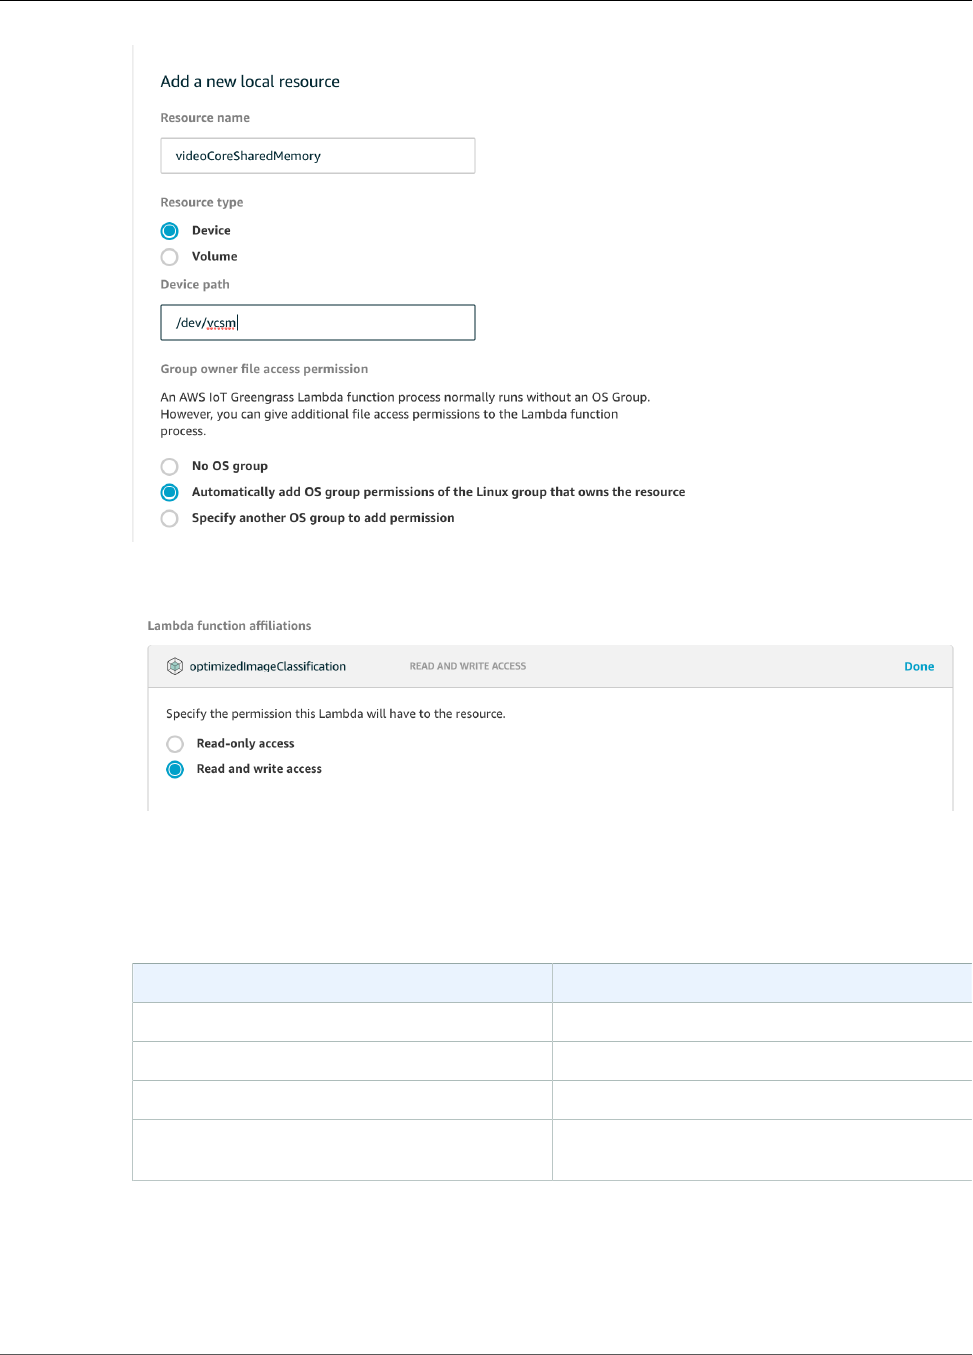
AWS IoT Greengrass Developer Guide
Add Your Camera Device Resource to the Group
4. Under Lambda function affiliations, choose Select.
5. Choose optimizedImageClassification, choose Read and write access, and then choose Done.
Next, you add a local device resource for the camera interface.
6. At the bottom of the page, choose Add another resource.
7. On the Create a local resource page, use the following values:
Property Value
Resource name videoCoreInterface
Resource type Device
Device path /dev/vchiq
Group owner file access permission Automatically add OS group permissions of the
Linux group that owns the resource
232
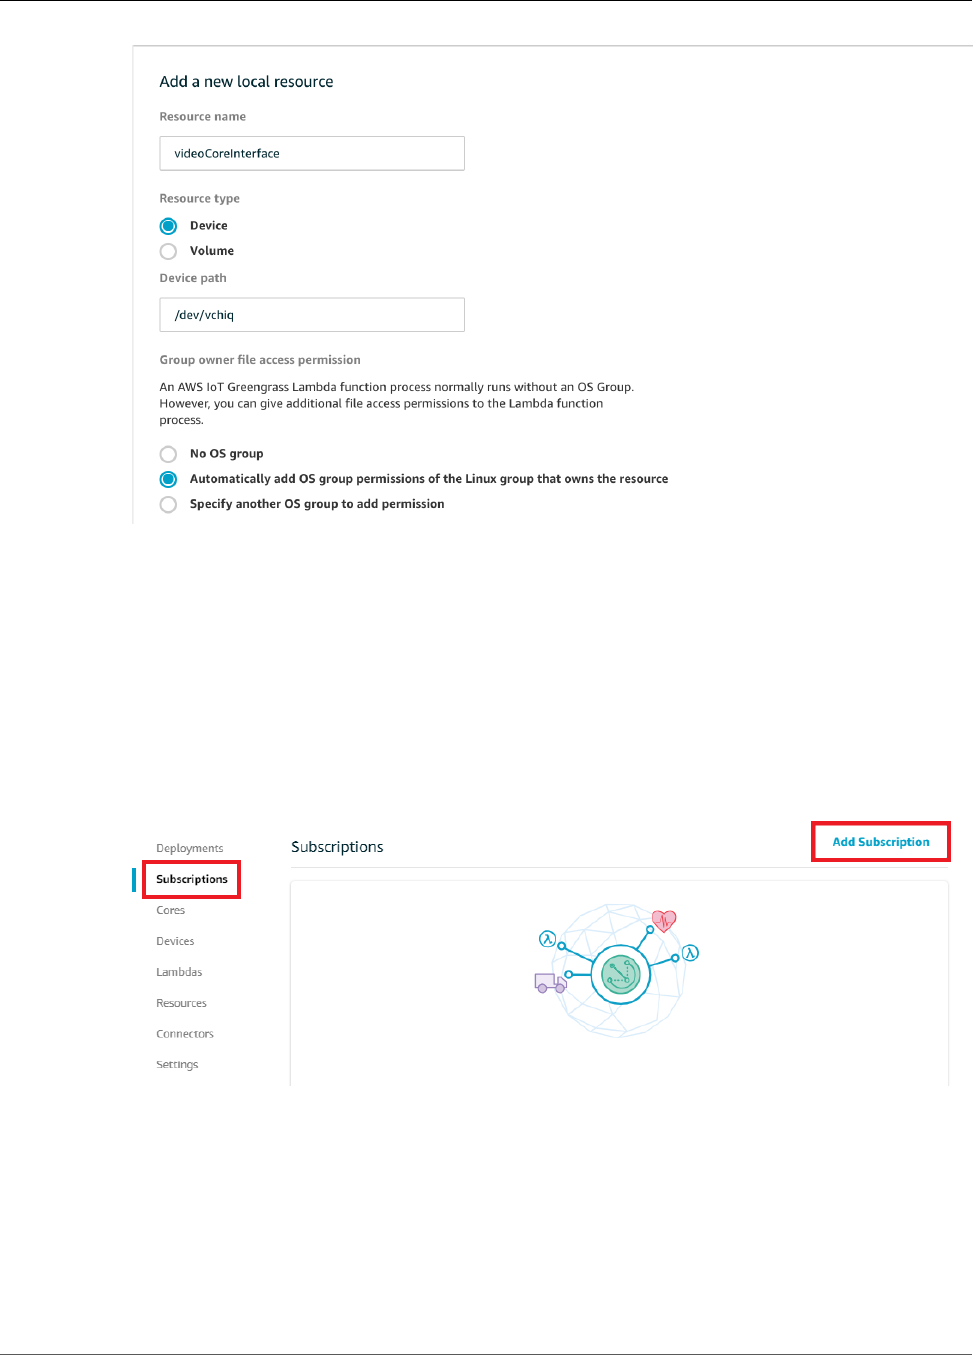
AWS IoT Greengrass Developer Guide
Add Subscriptions to the Group
8. Under Lambda function affiliations, choose Select.
9. Choose optimizedImageClassification, choose Read and write access, and then choose Done.
10. Choose Save.
Step 7: Add Subscriptions to the Greengrass Group
In this step, you add subscriptions to the group. These subscriptions enable the Lambda function to send
prediction results to AWS IoT by publishing to an MQTT topic.
1. On the group configuration page, choose Subscriptions, and then choose Add Subscription.
2. On the Select your source and target page, configure the source and target, as follows:
a. In Select a source, choose Lambdas, and then choose optimizedImageClassification.
b. In Select a target, choose Services, and then choose IoT Cloud.
c. Choose Next.
233
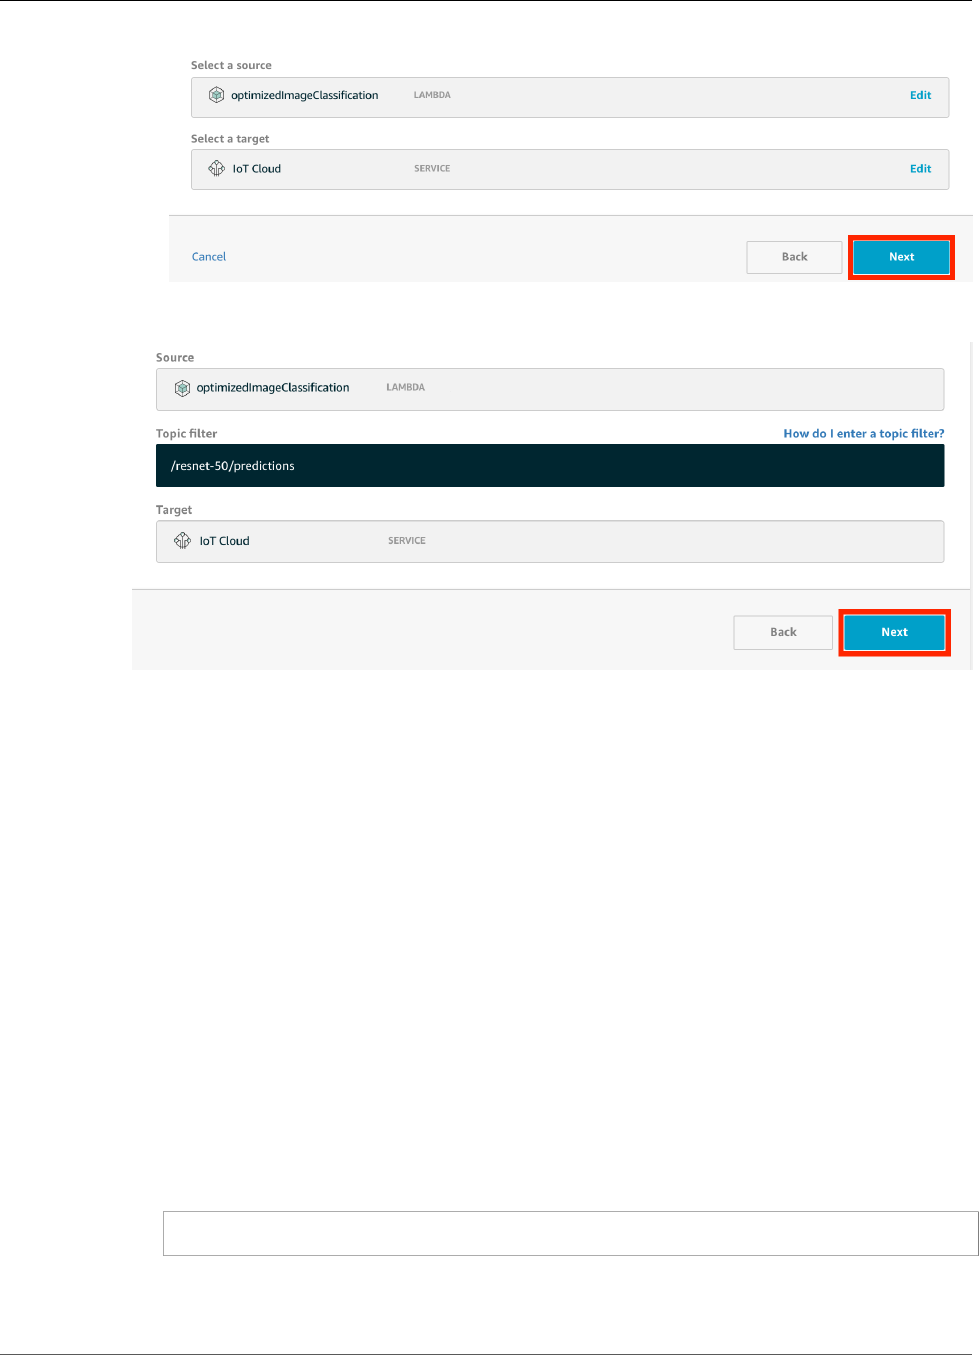
AWS IoT Greengrass Developer Guide
Deploy the Group
3. On the Filter your data with a topic page, in Optional topic filter, type /resnet-50/
predictions, and then choose Next.
4. Choose Finish.
5. Add a second subscription. On the Select your source and target page, configure the source and
target, as follows:
a. In Select a source, choose Services, and then choose IoT Cloud.
b. In Select a target, choose Lambdas, and then choose optimizedImageClassification.
c. Choose Next.
6. On the Filter your data with a topic page, in Optional topic filter, type /resnet-50/test, and
then choose Next.
7. Choose Finish.
Step 8: Deploy the Greengrass Group
In this step, you deploy the current version of the group definition to the Greengrass core device. The
definition contains the Lambda function, resources, and subscription configurations that you added.
1. Make sure that the AWS IoT Greengrass core is running. Run the following commands in your
Raspberry Pi terminal, as needed.
a. To check whether the daemon is running:
ps aux | grep -E 'greengrass.*daemon'
If the output contains a root entry for /greengrass/ggc/packages/latest-core-
version/bin/daemon, then the daemon is running.
234
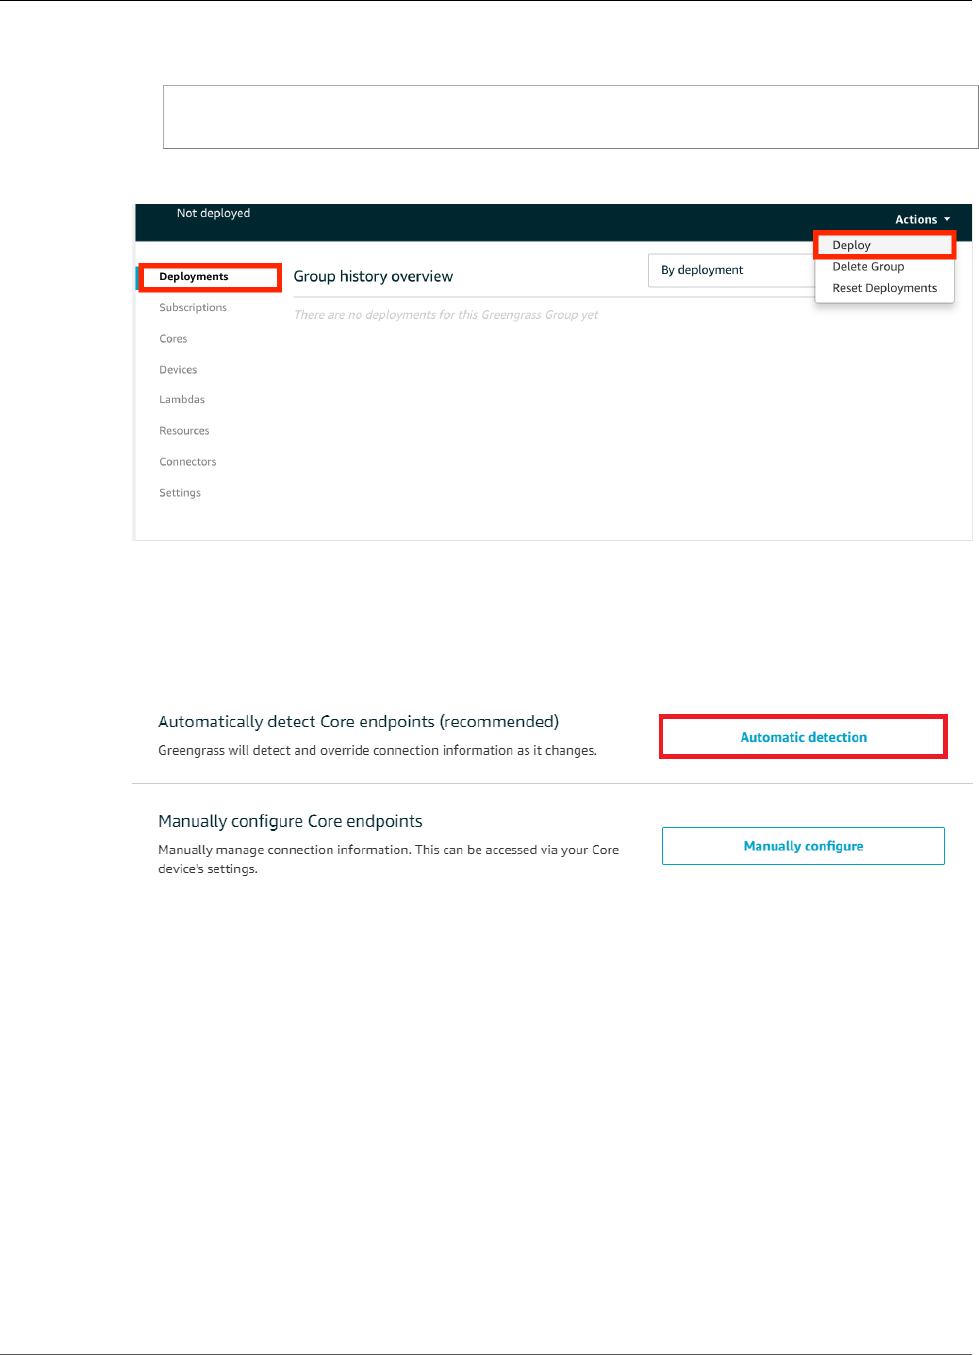
AWS IoT Greengrass Developer Guide
Deploy the Group
b. To start the daemon:
cd /greengrass/ggc/core/
sudo ./greengrassd start
2. On the group configuration page, choose Deployments, and from the Actions menu, choose
Deploy.
3. On the Configure how devices discover your core page, choose Automatic detection.
This enables devices to automatically acquireconnectivity information for the core, such as IP
address, DNS, and port number. Automatic detection is recommended, but AWS IoT Greengrass also
supports manually specified endpoints. You're only prompted for the discovery method the first
time that the group is deployed.
Note
If prompted, grant permission to create the AWS IoT Greengrass service role on your behalf,
which allows AWS IoT Greengrass to access other AWS services. You need to do this only
one time per account.
The Deployments page shows the deployment time stamp, version ID, and status. When completed,
the status displayed for the deployment should be Successfully completed.
235
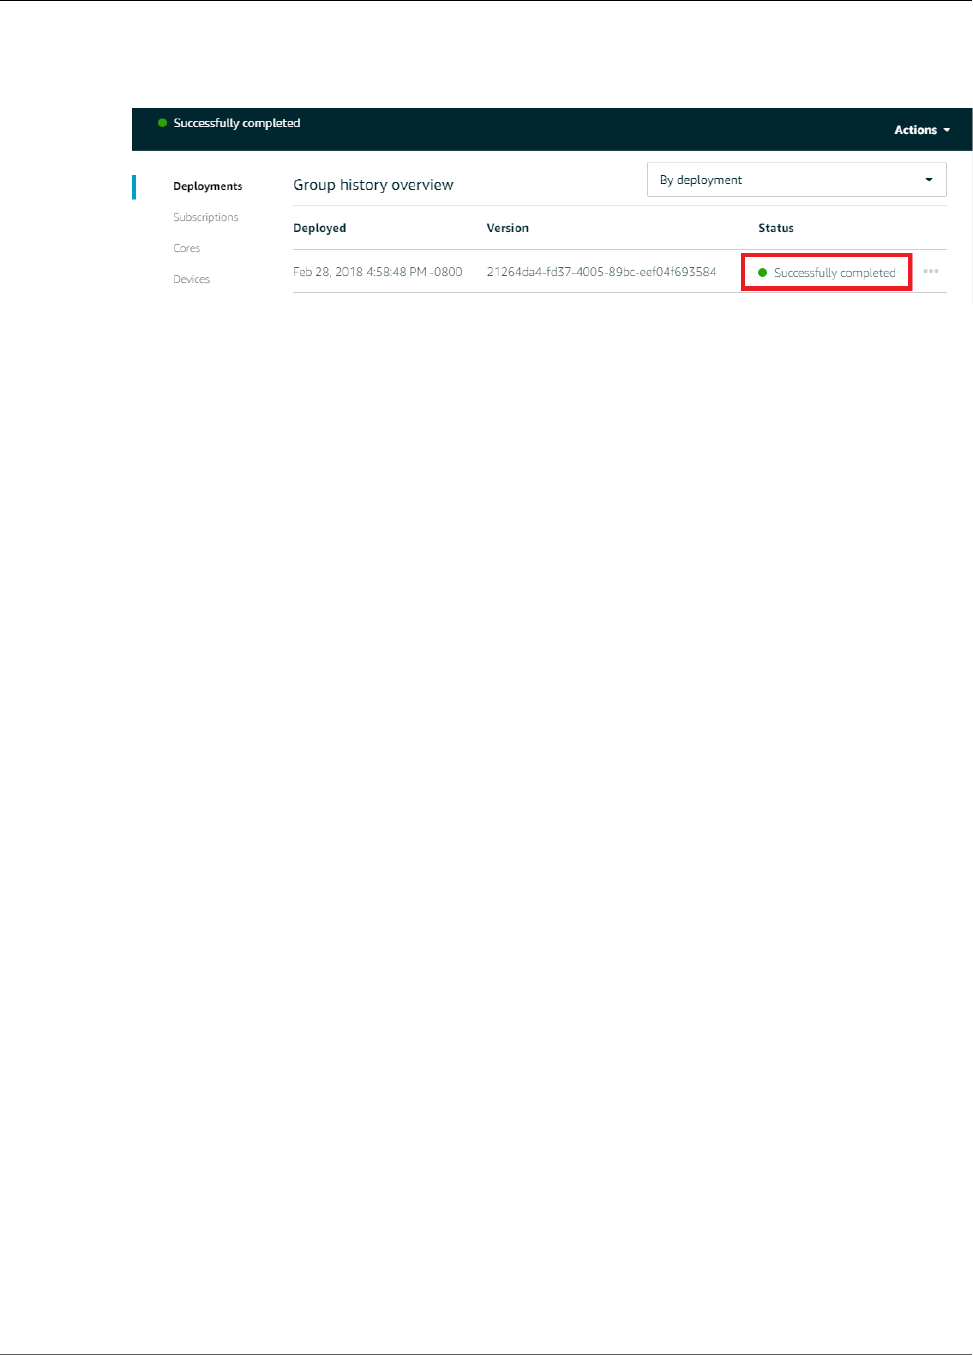
AWS IoT Greengrass Developer Guide
Test the Example
For troubleshooting help, see Troubleshooting (p. 410).
Test the Inference Example
Now you can verify whether the deployment is configured correctly. To test, you subscribe to the /
resnet-50/predictions topic and publish any message to the /resnet-50/test topic. This triggers
the Lambda function to take a photo with your Raspberry Pi and perform inference on the image it
captures.
Note
If a monitor is attached to the Raspberry Pi, the live camera feed is displayed in a preview
window.
1. On the AWS IoT Core console home page, choose Test.
236
AWS IoT Greengrass Developer Guide
Test the Example
2. For Subscriptions, choose Subscribe to a Topic. Use the following values. Leave the remaining
options at their defaults:
Property Value
Subscription topic /resnet-50/predictions
MQTT payload display Display payloads as strings
3. Choose Subscribe to topic.
4. In the /resnet-50/predictions page, specify the /resnet-50/test topic to publish to.
Choose Publish to topic.
5. If the test is successful, the published message causes the Raspberry Pi camera to capture an image.
A message from the Lambda function appears at the bottom of the page. This message contains
the prediction result of the image, using the format: predicted class name, probability, and peak
memory usage.
237
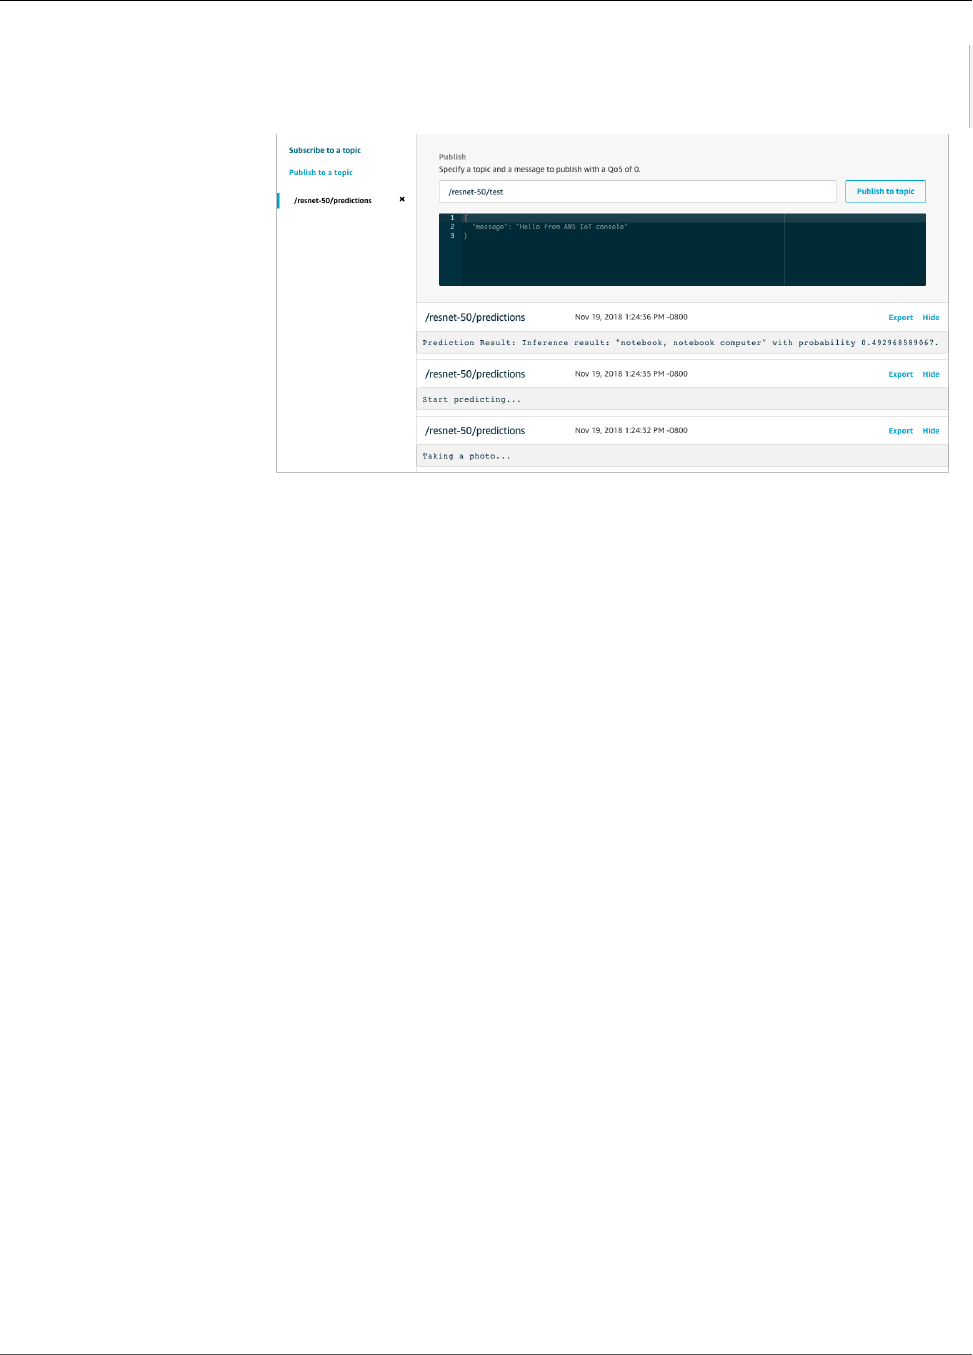
AWS IoT Greengrass Developer Guide
Configuring an Intel Atom
Configuring an Intel Atom
To run this tutorial on an Intel Atom device, you provide source images and configure the Lambda
function. In order to use the GPU for inference, you must have OpenCL version 1.0 or later installed on
your device. You must also add local device resources.
1. Download static PNG or JPG images for the Lambda function to use for image classification. The
example works best with small image files.
Save your image files in the directory that contains the inference.py file (or in a subdirectory of
this directory). This is in the Lambda function deployment package that you upload in the section
called “Create an Inference Lambda Function” (p. 224).
Note
If using Amazon DeepLens, you can choose to instead use the onboard camera or mount
your own camera to capture images and perform inference on them. However, we strongly
recommend you attempt the example with static images first.
2. Edit the configuration of the Lambda function. Follow the procedure in the section called “Add the
Lambda Function to the Group” (p. 228).
a. Increase the Memory limit value to 3000 MB.
b. Increase the Timeout value to 2 minutes. This will ensure that the request does not time out
too early. The first time inference is run after completing setup on the Intel Atom will take a few
moments.
c. Choose Enable for the Read access to /sys directory option.
d. For Lambda lifecycle, choose Make this function long-lived and keep it running indefinitely.
3. Add the following local device resource.
a. On the Navigation pane, choose Resources and Add a local resource.
238
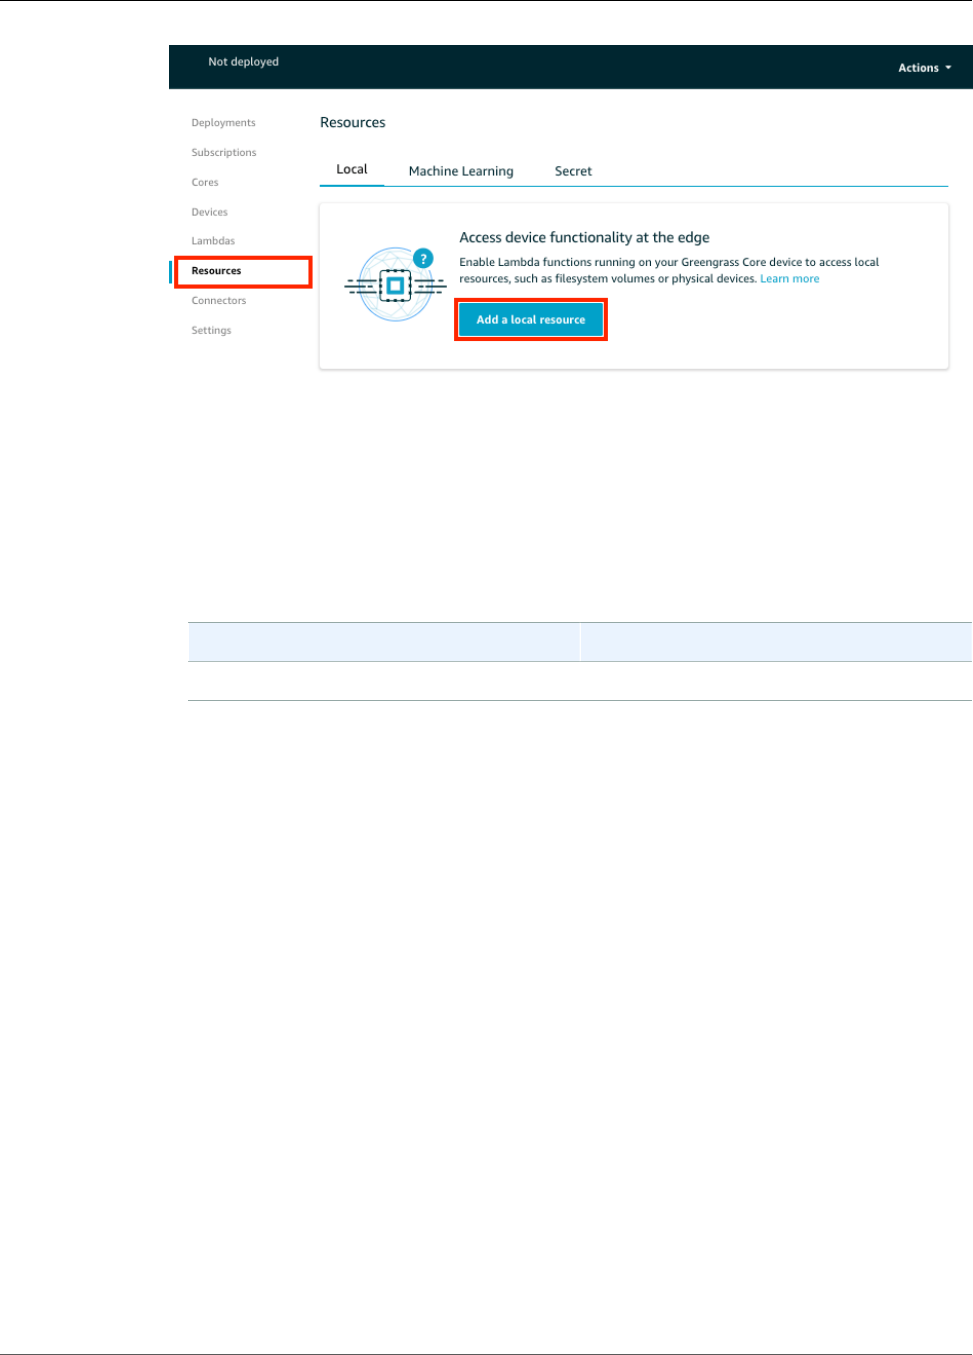
AWS IoT Greengrass Developer Guide
Configuring an NVIDIA Jetson TX2
b. For the resource:
• For Resource type, choose Device.
• For Group owner file access permission, choose Automatically add OS group permissions
of the Linux group that owns the resource.
• For Lambda function affiliations, grant Read and write access to your Lambda function.
Name Device path
renderD128 /dev/dri/renderD128
Configuring an NVIDIA Jetson TX2
To run this tutorial on an NVIDIA Jetson TX2, you provide source images and configure the Lambda
function. In order to use the GPU for inference, you must install CUDA 9.0 and cuDNN 7.0 on your device
when you image your board with Jetpack 3.3. You must also add local device resources.
To learn how to configure your Jetson so you can install the AWS IoT Greengrass core software, see the
section called “Setting Up Other Devices” (p. 54).
1. Download static PNG or JPG images for the Lambda function to use for image classification. The
example works best with small image files.
Save your image files in the directory that contains the inference.py file (or in a subdirectory of
this directory). This is in the Lambda function deployment package that you upload in the section
called “Create an Inference Lambda Function” (p. 224).
Note
You can instead choose to instrument a camera on the Jetson board to capture the source
images. However, we strongly recommend you attempt the example with static images first.
2. Edit the configuration of the Lambda function. Follow the procedure in the section called “Add the
Lambda Function to the Group” (p. 228).
a. Increase the Memory limit value. To use the provided model in GPU mode, use 2048 MB.
b. Increase the Timeout value to 5 minutes. This will ensure that the request does not time out
too early. The first time inference is run after completing setup on the Jetson will take a few
moments.
239
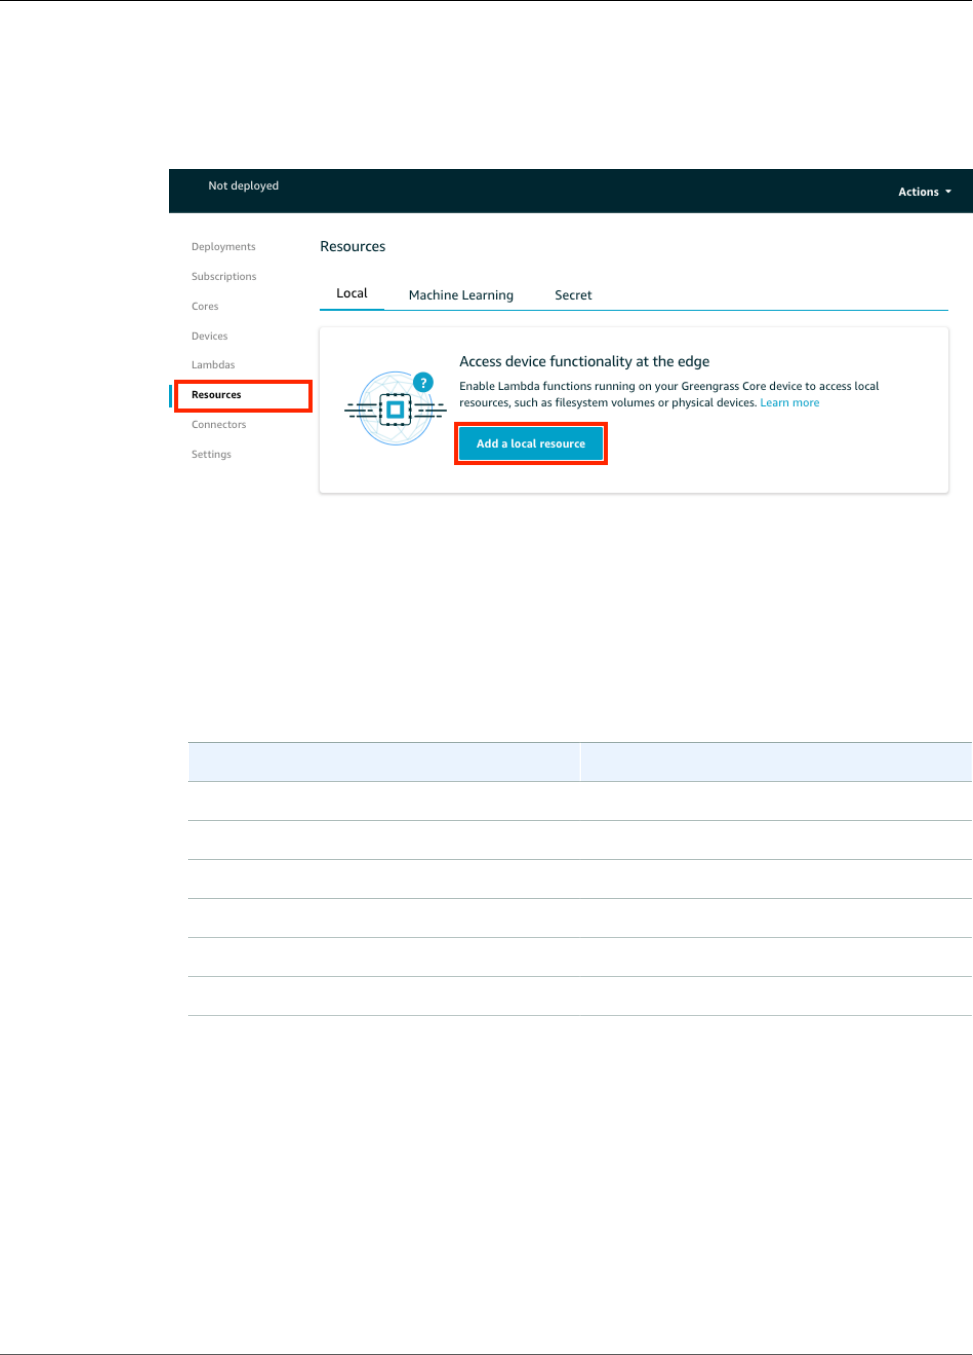
AWS IoT Greengrass Developer Guide
Troubleshooting AWS IoT Greengrass ML Inference
c. For Lambda lifecycle, choose Make this function long-lived and keep it running indefinitely.
d. For Read access to /sys directory, choose Enable.
3. Add the following local device resources.
a. On the Navigation pane, choose Resources and Add a local resource.
b. For each resource:
• For Resource type, choose Device.
• For Group owner file access permission, choose Automatically add OS group permissions
of the Linux group that owns the resource.
• For Lambda function affiliations, grant Read and write access to your Lambda function.
Name Device path
nvhost-ctrl /dev/nvhost-ctrl
nvhost-gpu /dev/nvhost-gpu
nvhost-ctrl-gpu /dev/nvhost-ctrl-gpu
nvhost-dbg-gpu /dev/nvhost-dbg-gpu
nvhost-prof-gpu /dev/nvhost-prof-gpu
nvmap /dev/nvmap
Note
The first inference after completing set up may take a few moments to complete.
Troubleshooting AWS IoT Greengrass ML Inference
If the test is not successful, you can try the following troubleshooting steps. Run the commands in your
Raspberry Pi terminal.
Check Error Logs
1. Switch to the root user.
240

AWS IoT Greengrass Developer Guide
Troubleshooting AWS IoT Greengrass ML Inference
sudo su
2. Navigate to the /log directory.
cd /greengrass/ggc/var/log
3. Check runtime.log for any errors.
cat system/runtime.log | grep 'ERROR'
You can also look in your user lambda log for any errors:
cat user/your-region/your-account-id/lambda-function-name.log | grep 'ERROR'
For more information, see the section called “Troubleshooting with Logs” (p. 415).
Verify That the Lambda Function Is Successfully Deployed
1. List the contents of the deployed Lambda in the /lambda directory. Replace the placeholder values
before you run the command.
cd /greengrass/ggc/deployment/lambda/arn:aws:lambda:region:account:function:function-
name:function-version
ls -la
2. Verify that the directory contains the same content as the optimizedImageClassification.zip
deployment package that you uploaded in Step 3: Create an Inference Lambda Function (p. 224).
Make sure that the .py files and dependencies are in the root of the directory.
Verify That the Inference Model Is Successfully Deployed
1. Find the process identification number (PID) of the Lambda runtime process:
ps aux | grep lambda-function-name
In the output, the PID appears in the second column of the line for the Lambda runtime process.
2. Enter the Lambda runtime namespace. Be sure to replace the placeholder pid value before you run
the command.
Note
This directory and its contents are in the Lambda runtime namespace, so they aren't visible
in a regular Linux namespace.
sudo nsenter -t pid -m /bin/bash
3. List the contents of the local directory that you specified for the ML resource.
Note
If your ML resource path is something other than ml_model, you must substitute that here.
241

AWS IoT Greengrass Developer Guide
Next Steps
cd /ml_model
ls -ls
You should see the following files:
56 -rw-r--r-- 1 ggc_user ggc_group 56703 Oct 29 20:07 model.json
196152 -rw-r--r-- 1 ggc_user ggc_group 200855043 Oct 29 20:08 model.params
256 -rw-r--r-- 1 ggc_user ggc_group 261848 Oct 29 20:07 model.so
32 -rw-r--r-- 1 ggc_user ggc_group 30564 Oct 29 20:08 synset.txt
Lambda function cannot find /dev/dri/renderD128
This can occur if OpenCL cannot connect to the GPU devices it needs. You must create device resources
for the necessary devices for your lambda function.
Next Steps
Next, explore other optimized models. For information, refer to the Amazon SageMaker Neo
documentation.
242
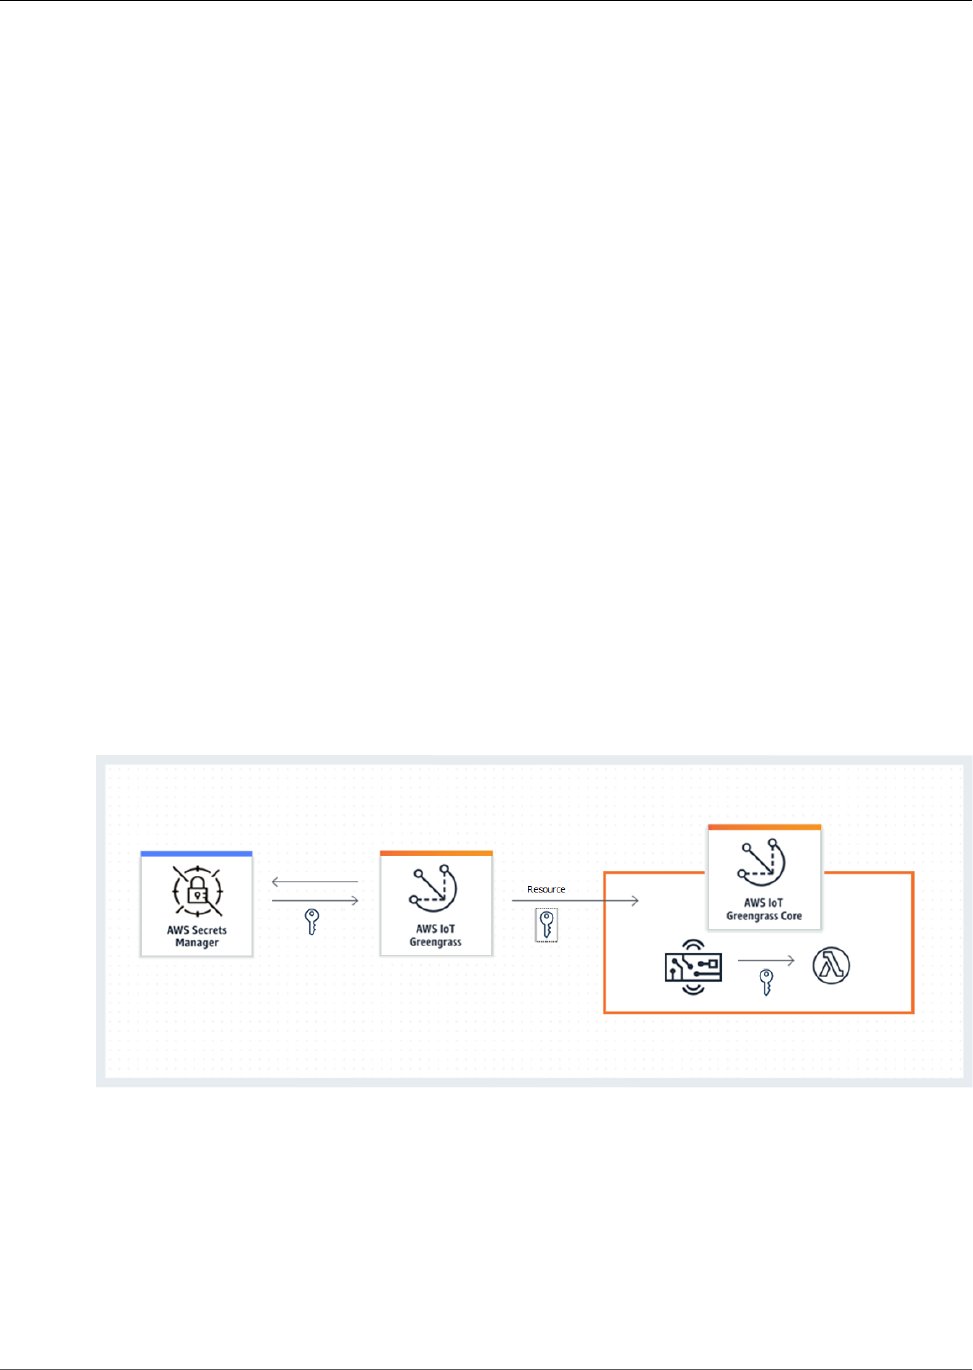
AWS IoT Greengrass Developer Guide
Deploy Secrets to the AWS IoT
Greengrass Core
This feature is available for AWS IoT Greengrass Core v1.7.0 only.
AWS IoT Greengrass lets you authenticate with services and applications from Greengrass devices
without hard-coding passwords, tokens, or other secrets.
AWS Secrets Manager is a service that you can use to securely store and manage your secrets
in the cloud. AWS IoT Greengrass extends Secrets Manager to Greengrass core devices, so your
connectors (p. 266) and Lambda functions can use local secrets to interact with services and
applications. For example, the Twilio Notifications connector uses a locally stored authentication token.
To integrate a secret into a Greengrass group, you create a group resource that references the Secrets
Manager secret. This secret resource references the cloud secret by ARN. To learn how to create, manage,
and use secret resources, see the section called “Work with Secret Resources” (p. 247).
AWS IoT Greengrass encrypts your secrets while in transit and at rest. During group deployment, AWS
IoT Greengrass fetches the secret from Secrets Manager and creates a local, encrypted copy on the
Greengrass core. After you rotate your cloud secrets in Secrets Manager, redeploy the group to propagate
the updated values to the core.
The following diagram shows the high-level process of deploying a secret to the core. Secrets are
encrypted in transit and at rest.
Using AWS IoT Greengrass to store your secrets locally offers these advantages:
•Decoupled from code (not hard-coded). This supports centrally managed credentials and helps
protect sensitive data from the risk of compromise.
•Available for offline scenarios. Connectors and functions can securely access local services and
software when disconnected from the internet.
•Controlled access to secrets. Only authorized connectors and functions in the group can access your
secrets. AWS IoT Greengrass uses private key encryption to secure your secrets. Secrets are encrypted
in transit and at rest. For more information, see the section called “Secrets Encryption” (p. 244).
243

AWS IoT Greengrass Developer Guide
Secrets Encryption
•Controlled rotation. After you rotate your secrets in Secrets Manager, redeploy the Greengrass group
to update the local copies of your secrets. For more information, see the section called “Creating and
Managing Secrets” (p. 247).
Important
AWS IoT Greengrass doesn't automatically update the values of local secrets after cloud
versions are rotated. To update local values, you must redeploy the group.
Secrets Encryption
AWS IoT Greengrass encrypts secrets in transit and at rest.
Important
Make sure that your user-defined Lambda functions handle secrets securely and don't log any
any sensitive data that's stored in the secret. For more information, see Mitigate the Risks
of Logging and Debugging Your Lambda Function in the AWS Secrets Manager User Guide.
Although this documentation specifically refers to rotation functions, the recommendation also
applies to Greengrass Lambda functions.
Encryption in transit
AWS IoT Greengrass uses Transport Layer Security (TLS) to encrypt all communication over the
internet and local network. This protects secrets while in transit, which occurs when secrets are
retrieved from Secrets Manager and deployed to the core. For supported TLS cipher suites, see the
section called “AWS IoT Greengrass Cipher Suites” (p. 375).
Encryption at rest
AWS IoT Greengrass uses the private key specified in config.json (p. 21) for encryption of the
secrets that are stored on the core. For this reason, secure storage of the private key is critical
for protecting local secrets. In the AWS shared responsibility model, it's the responsibility of the
customer to guarantee secure storage of the private key on the core device.
AWS IoT Greengrass supports two modes of private key storage:
• Using hardware security modules. For more information, see the section called “Hardware
Security” (p. 376).
Note
Currently, AWS IoT Greengrass supports only the PKCS#1 v1.5 padding mechanism for
encryption and decryption of local secrets when using hardware-based private keys. If
you're following vendor-provided instructions to manually generate hardware-based
private keys, make sure to choose PKCS#1 v1.5. AWS IoT Greengrass doesn't support
Optimal Asymmetric Encryption Padding (OAEP).
• Using file system permissions (default).
The private key is used to secure the data key, which is used to encrypt local secrets. The data key is
rotated with each group deployment.
The AWS IoT Greengrass core is the only entity that has access to the private key. Greengrass
connectors or Lambda functions that are affiliated with a secret resource get the value of the secret
from the core.
Requirements
These are the requirements for local secret support:
244

AWS IoT Greengrass Developer Guide
Specify the Private Key for Secret Encryption
• You must be using AWS IoT Greengrass Core v1.7.0.
• To get the values of local secrets, your user-defined Lambda functions must use AWS IoT Greengrass
Core SDK v1.3.0.
• The private key used for local secrets encryption must be specified in the Greengrass configuration file.
By default, AWS IoT Greengrass uses the core private key stored in the file system. To provide your own
private key, see the section called “Specify the Private Key for Secret Encryption” (p. 245).
Note
Currently, AWS IoT Greengrass supports only the PKCS#1 v1.5 padding mechanism for
encryption and decryption of local secrets when using hardware-based private keys. If you're
following vendor-provided instructions to manually generate hardware-based private keys,
make sure to choose PKCS#1 v1.5. AWS IoT Greengrass doesn't support Optimal Asymmetric
Encryption Padding (OAEP).
• AWS IoT Greengrass must be granted permission to get your secret values. This allows AWS IoT
Greengrass to fetch the values during group deployment. If you're using the default Greengrass service
role, then AWS IoT Greengrass already has access to secrets with names that start with greengrass-. To
customize access, see the section called “Allow AWS IoT Greengrass to Get Secret Values” (p. 246).
Note
We recommend that you use this naming convention to identify the secrets that AWS IoT
Greengrass is allowed to access, even if you customize permissions. The console uses different
permissions to read your secrets, so it's possible that you can select secrets in the console that
AWS IoT Greengrass doesn't have permission to fetch. Using a naming convention can help
avoid a permission conflict, which results in a deployment error.
Specify the Private Key for Secret Encryption
In this procedure, you provide the path to the private key that's used for local secret encryption. AWS IoT
Greengrass supports two modes of private key storage: hardware-based or file system-based (default).
For more information, see the section called “Secrets Encryption” (p. 244).
Follow this procedure only if you want to change the default configuration, which uses the core private
key in the file system. These steps are written with the assumption that you created your group and core
as described in Module 2 (p. 55) of the Getting Started tutorial.
1. Open the config.json (p. 21) file that's located in the /greengrass-root/config directory.
Note
greengrass-root represents the path where the AWS IoT Greengrass core software
is installed on your device. If you installed the software by following the Getting
Started (p. 44) tutorial, then this is the /greengrass directory.
2. In the crypto.principals.SecretsManager object, for the privateKeyPath property, enter
the path of the private key:
• If your private key is stored in the file system, specify the absolute path to the key. For example:
"SecretsManager" : {
"privateKeyPath" : "file:///somepath/hash.private.key"
}
• If your private key is stored in a hardware security module (HSM), specify the path using the RFC
7512 PKCS#11 URI scheme. For example:
"SecretsManager" : {
"privateKeyPath" : "pkcs11:object=private-key-label;type=private"
}
245

AWS IoT Greengrass Developer Guide
Allow AWS IoT Greengrass to Get Secret Values
For more information, see the section called “Hardware Security Configuration” (p. 377).
Note
Currently, AWS IoT Greengrass supports only the PKCS#1 v1.5 padding mechanism for
encryption and decryption of local secrets when using hardware-based private keys. If
you're following vendor-provided instructions to manually generate hardware-based
private keys, make sure to choose PKCS#1 v1.5. AWS IoT Greengrass doesn't support
Optimal Asymmetric Encryption Padding (OAEP).
Allow AWS IoT Greengrass to Get Secret Values
In this procedure, you add an inline policy to the Greengrass service role that allows AWS IoT Greengrass
to get the values of your secrets.
Follow this procedure only if you want to grant AWS IoT Greengrass custom permissions to your secrets
or if your Greengrass service role doesn't include the AWSGreengrassResourceAccessRolePolicy
managed policy. AWSGreengrassResourceAccessRolePolicy grants access to secrets with names
that start with greengrass-.
1. Run the following CLI command to get the ARN of the Greengrass service role:
aws greengrass get-service-role-for-account --region region
The returned ARN contains the role name.
{
"AssociatedAt": "time-stamp",
"RoleArn": "arn:aws:iam::account-id:role/service-role/role-name"
}
You use the ARN or name in the following step.
2. Add an inline policy that allows the secretsmanager:GetSecretValue action. For instructions,
see Adding and Removing IAM Policies in the IAM User Guide.
You can grant granular access by explicitly listing secrets or using a wildcard * naming scheme, or
you can grant conditional access to versioned or tagged secrets. For example, the following policy
allows AWS IoT Greengrass to read only the specified secrets.
{
"Version": "2012-10-17",
"Statement": [
{
"Effect": "Allow",
"Action": [
"secretsmanager:GetSecretValue"
],
"Resource": [
"arn:aws:secretsmanager:region:account-id:secret:greengrass-SecretA-
abc",
"arn:aws:secretsmanager:region:account-id:secret:greengrass-SecretB-
xyz"
]
}
]
}
246

AWS IoT Greengrass Developer Guide
See Also
Note
If you use a customer-managed AWS KMS key to encrypt secrets, your Greengrass service
role must also allow the kms:Decrypt action.
For more information about IAM policies for Secrets Manager, see Authentication and Access Control for
AWS Secrets Manager and Actions, Resources, and Context Keys You Can Use in an IAM Policy or Secret
Policy for AWS Secrets Manager in the AWS Secrets Manager User Guide.
See Also
•What Is AWS Secrets Manager? in the AWS Secrets Manager User Guide
•PKCS #1: RSA Encryption Version 1.5
Working with Secret Resources
AWS IoT Greengrass uses secret resources to integrate secrets from AWS Secrets Manager into a
Greengrass group. A secret resource is a reference to a Secrets Manager secret. For more information, see
Deploy Secrets to the Core (p. 243).
On the AWS IoT Greengrass core device, connectors and Lambda functions can use the secret resource to
authenticate with services and applications, without hard-coding passwords, tokens, or other credentials.
Creating and Managing Secrets
In a Greengrass group, a secret resource references the ARN of a Secrets Manager secret. When the
secret resource is deployed to the core, the value of the secret is encrypted and made available to
affiliated connectors and Lambda functions. For more information, see the section called “Secrets
Encryption” (p. 244).
You use Secrets Manager to create and manage the cloud versions of your secrets. You use AWS IoT
Greengrass to create, manage, and deploy your secret resources.
Important
We recommend that you follow the best practice of rotating your secrets in Secrets Manager.
Then, deploy the Greengrass group to update the local copies of your secrets. For more
information, see Rotating Your AWS Secrets Manager Secrets in the AWS Secrets Manager User
Guide.
To make a secret available on the Greengrass core
1. Create a secret in Secrets Manager. This is the cloud version of your secret, which is centrally stored
and managed in Secrets Manager. Management tasks include rotating secret values and applying
resource policies.
2. Create a secret resource in AWS IoT Greengrass. This is a type of group resource that references the
cloud secret by ARN. You can reference a secret only once per group.
3. Configure your connector or Lambda function. You must affiliate the resource with a connector or
function by specifying corresponding parameters or properties. This allows them to get the value
of the locally deployed secret resource. For more information, see the section called “Using Local
Secrets” (p. 250).
4. Deploy the Greengrass group. During deployment, AWS IoT Greengrass fetches the value of the cloud
secret and creates (or updates) the local secret on the core.
247

AWS IoT Greengrass Developer Guide
Creating and Managing Secrets
Secrets Manager logs an event in AWS CloudTrail each time that AWS IoT Greengrass retrieves a secret
value. AWS IoT Greengrass doesn't log any events related to the deployment or usage of local secrets.
For more information about Secrets Manager logging, see Monitor the Use of Your AWS Secrets
Manager Secrets in the AWS Secrets Manager User Guide.
Including Staging Labels in Secret Resources
Secrets Manager uses staging labels to identify specific versions of a secret value. Staging labels can
be system-defined or user-defined. Secrets Manager assigns the AWSCURRENT label to the most recent
version of the secret value. Staging labels are commonly used to manage secrets rotation. For more
information about Secrets Manager versioning, see Key Terms and Concepts for AWS Secrets Manager in
the AWS Secrets Manager User Guide.
Secret resources always include the AWSCURRENT staging label, and they can optionally include other
staging labels if they're required by a Lambda function or connector. During group deployment, AWS IoT
Greengrass retrieves the values of the staging labels that are referenced in the group, and then creates or
updates the corresponding values on the core.
Create and Manage Secret Resources (Console)
Creating Secret Resources (Console)
In the AWS IoT Greengrass console, you create and manage secret resources from the Secrets tab on the
group's Resources page. For tutorials that create a secret resource and add it to a group, see the section
called “How To Create a Secret Resource (Console)” (p. 252) and the section called “Get Started with
Connectors (Console)” (p. 335).
Note
Alternatively, the console allows you to create a secret and secret resource when you configure
a connector or Lambda function. You can do this from the connector's Configure parameters
page or the Lambda function's Resources page.
Managing Secret Resources (Console)
Management tasks for the secret resources in your Greengrass group include adding secret resources to
the group, removing secret resources from the group, and changing the set of staging labels (p. 248)
that are included in a secret resource.
If you point to a different secret from Secrets Manager, you must also edit any connectors that use the
secret:
1. On the group configuration page, choose Connectors.
248

AWS IoT Greengrass Developer Guide
Creating and Managing Secrets
2. From the connector's contextual menu, choose Edit.
3. The Edit parameters page displays a message to inform you that the secret ARN changed. To
confirm the change, choose Save.
If you delete a secret in Secrets Manager, remove the corresponding secret resource from the group and
from connectors and Lambda functions that reference it. Otherwise, during group deployment, AWS IoT
Greengrass returns an error that the secret can't be found. Also update your Lambda function code as
needed.
Create and Manage Secret Resources (CLI)
Creating Secret Resources (CLI)
In the AWS IoT Greengrass API, a secret is a type of group resource. The following example creates a
resource definition with an initial version that includes a secret resource named MySecretResource. For
a tutorial that creates a secret resource and adds it to a group version, see the section called “Get Started
with Connectors (CLI)” (p. 348).
The secret resource references the ARN of the corresponding Secrets Manager secret and includes two
staging labels in addition to AWSCURRENT, which is always included.
aws greengrass create-resource-definition --name MyGreengrassResources --initial-version '{
"Resources": [
{
"Id": "my-resource-id",
"Name": "MySecretResource",
"ResourceDataContainer": {
"SecretsManagerSecretResourceData": {
"ARN": "arn:aws:secretsmanager:us-
west-2:123456789012:secret:greengrass-SomeSecret-KUj89s",
"AdditionalStagingLabelsToDownload": [
"Label1",
"Label2"
]
}
}
}
]
}'
Managing Secret Resources (CLI)
Management tasks for the secret resources in your Greengrass group include adding secret resources to
the group, removing secret resources from the group, and changing the set of staging labels (p. 248)
that are included in a secret resource.
In the AWS IoT Greengrass API, these changes are implemented by using versions.
The AWS IoT Greengrass API uses versions to manage groups. Versions are immutable, so to add or
change group components—for example, the group's devices, functions, and resources—you must create
versions of new or updated components. Then, you create and deploy a group version that contains
the target version of each component. To learn more about groups, see the section called “AWS IoT
Greengrass Groups” (p. 5).
For example, to change the set of staging labels for a secret resource:
1. Create a resource definition version that contains the updated secret resource. The following example
adds a third staging label to the secret resource from the previous section.
249

AWS IoT Greengrass Developer Guide
Using Local Secrets
Note
To add more resources to the version, include them in the Resources array.
aws greengrass create-resource-definition --name MyGreengrassResources --initial-version
'{
"Resources": [
{
"Id": "my-resource-id",
"Name": "MySecretResource",
"ResourceDataContainer": {
"SecretsManagerSecretResourceData": {
"ARN": "arn:aws:secretsmanager:us-
west-2:123456789012:secret:greengrass-SomeSecret-KUj89s",
"AdditionalStagingLabelsToDownload": [
"Label1",
"Label2",
"Label3"
]
}
}
}
]
}'
2. If the ID of the secret resource is changed, update connectors and functions that use the secret
resource. In the new versions, update the parameter or property that corresponds to the resource
ID. If the ARN of the secret is changed, you must also update the corresponding parameter for any
connectors that use the secret.
Note
The resource ID is an arbitrary identifier that's provided by the customer.
3. Create a group version that contains the target version of each component that you want to send to
the core.
4. Deploy the group version.
For a tutorial that shows how to create and deploy secret resources, connectors, and functions, see the
section called “Get Started with Connectors (CLI)” (p. 348).
If you delete a secret in Secrets Manager, remove the corresponding secret resource from the group and
from connectors and Lambda functions that reference it. Otherwise, during group deployment, AWS IoT
Greengrass returns an error that the secret can't be found. Also update your Lambda function code as
needed. You can remove a local secret by deploying a resource definition version that doesn't contain the
corresponding secret resource.
Using Local Secrets in Connectors and Lambda
Functions
Greengrass connectors and Lambda functions use local secrets to interact with services and applications.
The AWSCURRENT value is used by default, but values for other staging labels (p. 248) included in the
secret resource are also available.
Connectors and functions must be configured before they can access local secrets. This affiliates the
secret resource with connector or function.
Connectors
If a connector requires access to a local secret, it provides parameters that you configure with the
information it needs to access the secret.
250

AWS IoT Greengrass Developer Guide
Using Local Secrets
• To learn how to do this in the AWS IoT Greengrass console, see the section called “Get Started
with Connectors (Console)” (p. 335).
• To learn how to do this with the AWS IoT Greengrass CLI, see the section called “Get Started with
Connectors (CLI)” (p. 348).
For information about requirements for individual connectors, see the section called “AWS-Provided
Greengrass Connectors” (p. 271).
The logic for accessing and using the secret is built into the connector.
Lambda functions
To allow a Greengrass Lambda function to access a local secret, you configure the function's
properties.
• To learn how to do this in the AWS IoT Greengrass console, see the section called “How To Create a
Secret Resource (Console)” (p. 252).
• To do this in the AWS IoT Greengrass API, you provide the following information in the
ResourceAccessPolicies property.
•ResourceId: The ID of the secret resource in the Greengrass group. This is the resource that
references the ARN of the corresponding Secrets Manager secret.
•Permission: The type of access that the function has to the resource. Only ro (read-only)
permission is supported for secret resources.
The following example creates a Lambda function that can access the MyApiKey secret resource.
aws greengrass create-function-definition --name MyGreengrassFunctions --initial-
version '{
"Functions": [
{
"Id": "MyLambdaFunction",
"FunctionArn": "arn:aws:lambda:us-
west-2:123456789012:function:myFunction:1",
"FunctionConfiguration": {
"Pinned": false,
"MemorySize": 16384,
"Timeout": 10,
"Environment": {
"ResourceAccessPolicies": [
{
"ResourceId": "MyApiKey",
"Permission": "ro"
}
],
"AccessSysfs": true
}
}
}
]
}'
To access local secrets at runtime, Greengrass Lambda functions call the get_secret_value
function from the secretsmanager client in the AWS IoT Greengrass Core SDK (v1.3.0).
The following example shows how to use the AWS IoT Greengrass Core SDK for Python to get a
secret. It passes the name of the secret to the get_secret_value function. SecretId can be
the name or ARN of the Secrets Manager secret (not the secret resource).
import greengrasssdk
251

AWS IoT Greengrass Developer Guide
How To Create a Secret Resource (Console)
# Creating a greengrass core sdk client
client = greengrasssdk.client('secretsmanager')
# This handler is called when the function is invoked
# It uses the secretsmanager client to get the value of a secret
def function_handler(event, context):
response = client.get_secret_value(SecretId='greengrass-MySecret-abc')
raw_secret = response.get('SecretString')
For text type secrets, the get_secret_value function returns a string. For binary type secrets, it
returns a base64-encoded string.
Important
Make sure that your user-defined Lambda functions handle secrets securely and don't
log any any sensitive data that's stored in the secret. For more information, see Mitigate
the Risks of Logging and Debugging Your Lambda Function in the AWS Secrets Manager
User Guide. Although this documentation specifically refers to rotation functions, the
recommendation also applies to Greengrass Lambda functions.
The current value of the secret is returned by default. This is the version that the AWSCURRENT
staging label is attached to. To access a different version, pass the name of the corresponding
staging label for the optional VersionStage argument. For example:
response = client.get_secret_value(SecretId='greengrass-MySecret-abc',
VersionStage='MyTargetLabel')
For another example function that calls get_secret_value, see Create a Lambda Function
Deployment Package (p. 255).
How To Create a Secret Resource (Console)
This feature is available for AWS IoT Greengrass Core v1.7.0 only.
This tutorial shows how to use the AWS Management Console to add a secret resource to a Greengrass
group. A secret resource is a reference to a secret from AWS Secrets Manager. For more information, see
Deploy Secrets to the Core (p. 243).
On the AWS IoT Greengrass core device, connectors and Lambda functions can use the secret resource to
authenticate with services and applications, without hard-coding passwords, tokens, or other credentials.
In this tutorial, you start by creating a secret in the AWS Secrets Manager console. Then, in the AWS IoT
Greengrass console, you add a secret resource to a Greengrass group from the group's Resources page.
This secret resource references the Secrets Manager secret. Later, you attach the secret resource to a
Lambda function, which allows the function to get the value of the local secret.
Note
Alternatively, the console allows you to create a secret and secret resource when you configure
a connector or Lambda function. You can do this from the connector's Configure parameters
page or the Lambda function's Resources page.
Only connectors that contain parameters for secrets can access secrets. For a tutorial that
shows how the Twilio Notifications connector uses a locally stored authentication token, see the
section called “Get Started with Connectors (Console)” (p. 335).
The tutorial contains the following high-level steps:
1. Create a Secrets Manager Secret (p. 253)
252

AWS IoT Greengrass Developer Guide
Prerequisites
2. Add a Secret Resource to a Group (p. 254)
3. Create a Lambda Function Deployment Package (p. 255)
4. Create a Lambda Function (p. 258)
5. Add the Function to the Group (p. 260)
6. Attach the Secret Resource to the Function (p. 261)
7. Add Subscriptions to the Group (p. 261)
8. Deploy the Group (p. 262)
The tutorial should take about 20 minutes to complete.
Prerequisites
To complete this tutorial, you need:
• A Greengrass group and a Greengrass core (v1.7.0). To learn how to create a Greengrass group and
core, see Getting Started with AWS IoT Greengrass (p. 44). The Getting Started tutorial also includes
steps for installing the AWS IoT Greengrass core software.
• AWS IoT Greengrass must be configured to support local secrets. For more information, see Secrets
Requirements (p. 244).
Note
This includes allowing access to your Secrets Manager secrets. If you're using the default
Greengrass service role, Greengrass has permission to get the values of secrets with names
that start with greengrass-.
• To get the values of local secrets, your user-defined Lambda functions must use AWS IoT Greengrass
Core SDK v1.3.0.
Step 1: Create a Secrets Manager Secret
In this step, you use the AWS Secrets Manager console to create a secret.
1. Sign in to the AWS Secrets Manager console.
Note
For more information about this process, see Step 1: Create and Store Your Secret in AWS
Secrets Manager in the AWS Secrets Manager User Guide.
2. Choose Store a new secret.
3. Under Select secret type, choose Other type of secrets.
4. Under Specify the key-value pairs to be stored for this secret:
• For Key, enter test.
• For Value, enter abcdefghi.
253

AWS IoT Greengrass Developer Guide
Add a Secret Resource to a Group
5. Keep DefaultEncryptionKey selected for the encryption key, and then choose Next.
Note
You aren't charged by AWS KMS if you use the default AWS managed key that Secrets
Manager creates in your account.
6. For Secret name, enter greengrass-TestSecret, and then choose Next.
Note
By default, the Greengrass service role allows AWS IoT Greengrass to get the value
of secrets with names that start with greengrass-. For more information, see secrets
requirements (p. 244).
7. This tutorial doesn't require rotation, so choose Disable automatic rotation, and then choose Next.
8. On the Review page, review your settings, and then choose Store.
Next, you create a secret resource in your Greengrass group that references the secret.
Step 2: Add a Secret Resource to a Greengrass Group
In this step, you configure a group resource that references the Secrets Manager secret.
1. In the AWS IoT Core console, choose Greengrass, and then choose Groups.
2. Choose the group that you want to add the secret resource to.
3. On the group configuration page, choose Resources, and then choose Secret. This tab displays the
secret resources that belong to the group. You can add, edit, and remove secret resources from this
tab.
254
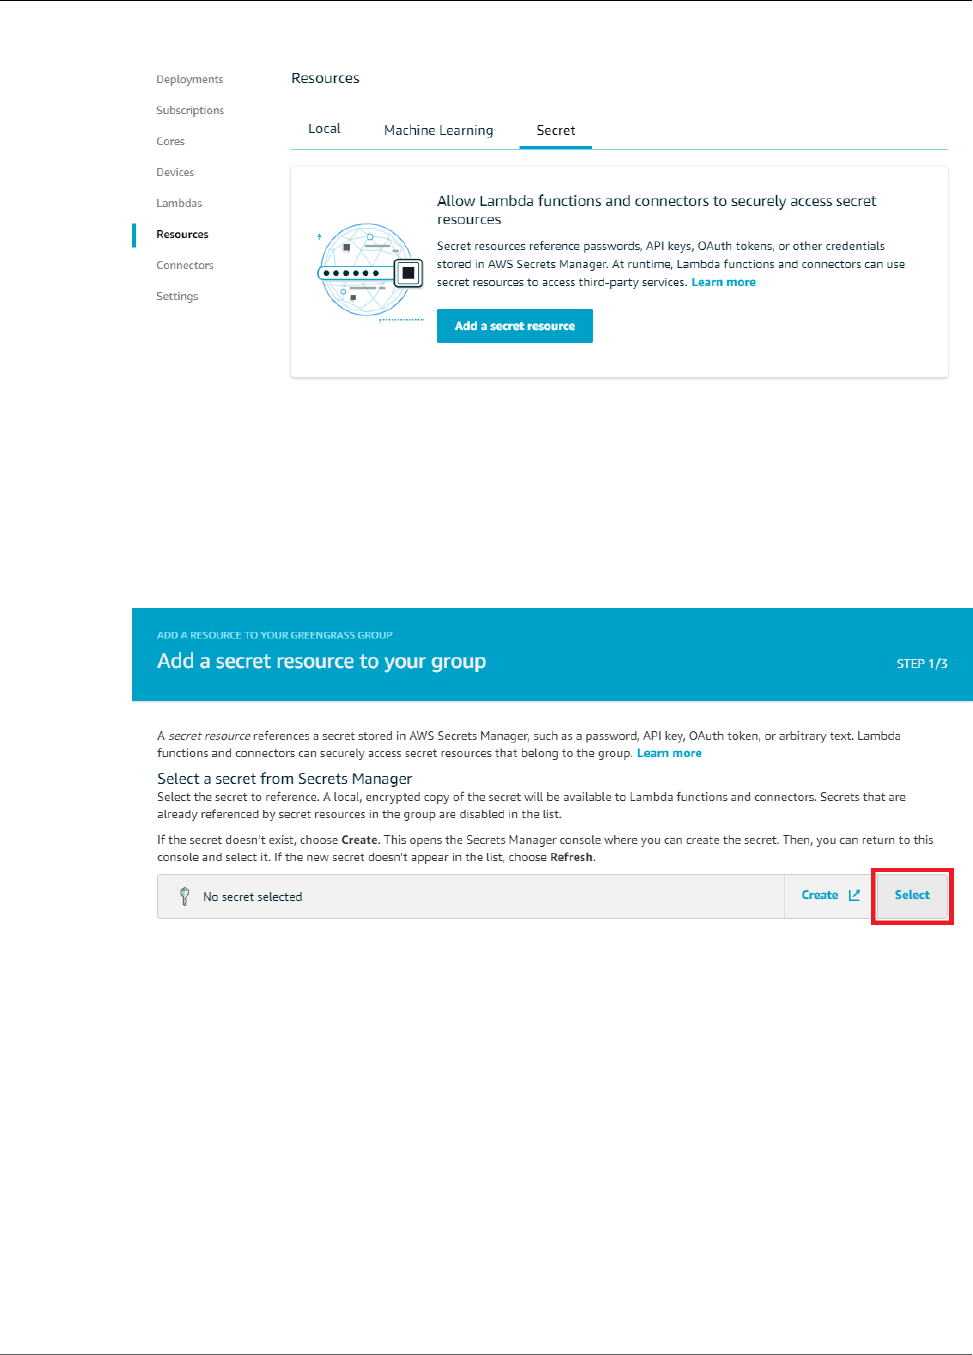
AWS IoT Greengrass Developer Guide
Create a Lambda Function Deployment Package
Note
Alternatively, the console allows you to create a secret and secret resource when you
configure a connector or Lambda function. You can do this from the connector's Configure
parameters page or the Lambda function's Resources page.
4. Choose Add a secret resource.
5. On the Add a secret resource to your group page, choose Select, and then choose greengrass-
TestSecret.
6. On the Select labels (Optional) page, choose Next. The AWSCURRENT staging label represents the
latest version of the secret. This label is always included in a secret resource.
Note
This tutorial requires the AWSCURRENT label only. You can optionally include labels that
are required by your Lambda function or connector.
7. On the Name your secret resource page, enter MyTestSecret, and then choose Save.
Step 3: Create a Lambda Function Deployment
Package
To create a Lambda function, you must first create a Lambda function deployment package that contains
the function code and dependencies. Greengrass Lambda functions require the AWS IoT Greengrass
Core SDK (p. 147) for tasks such as communicating with MQTT messages in the core environment and
255
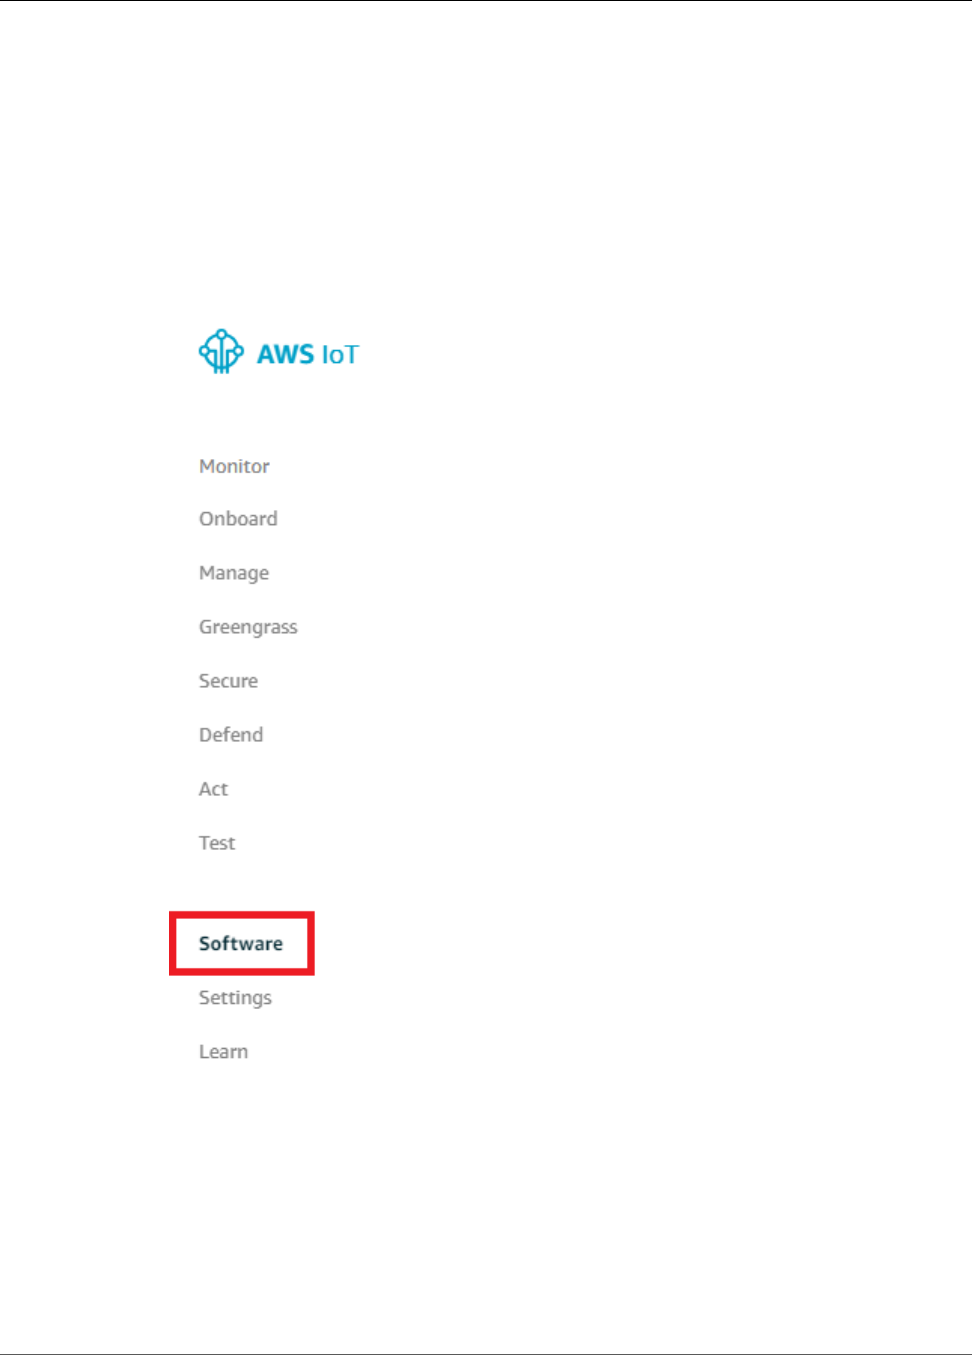
AWS IoT Greengrass Developer Guide
Create a Lambda Function Deployment Package
accessing local secrets. This tutorial creates a Python function, so you use the Python version of the SDK
in the deployment package.
Note
To get the values of local secrets, your user-defined Lambda functions must use AWS IoT
Greengrass Core SDK v1.3.0.
1. Download the AWS IoT Greengrass Core SDK Python 2.7 version 1.3.0. You can download the
SDK from the Software page in the AWS IoT Core console or from the AWS IoT Greengrass Core
SDK (p. 19) downloads. This procedure uses the console.
a. In the AWS IoT Core console, choose Software.
b. Under SDKs, for AWS IoT Greengrass Core SDK, choose Configure download.
256
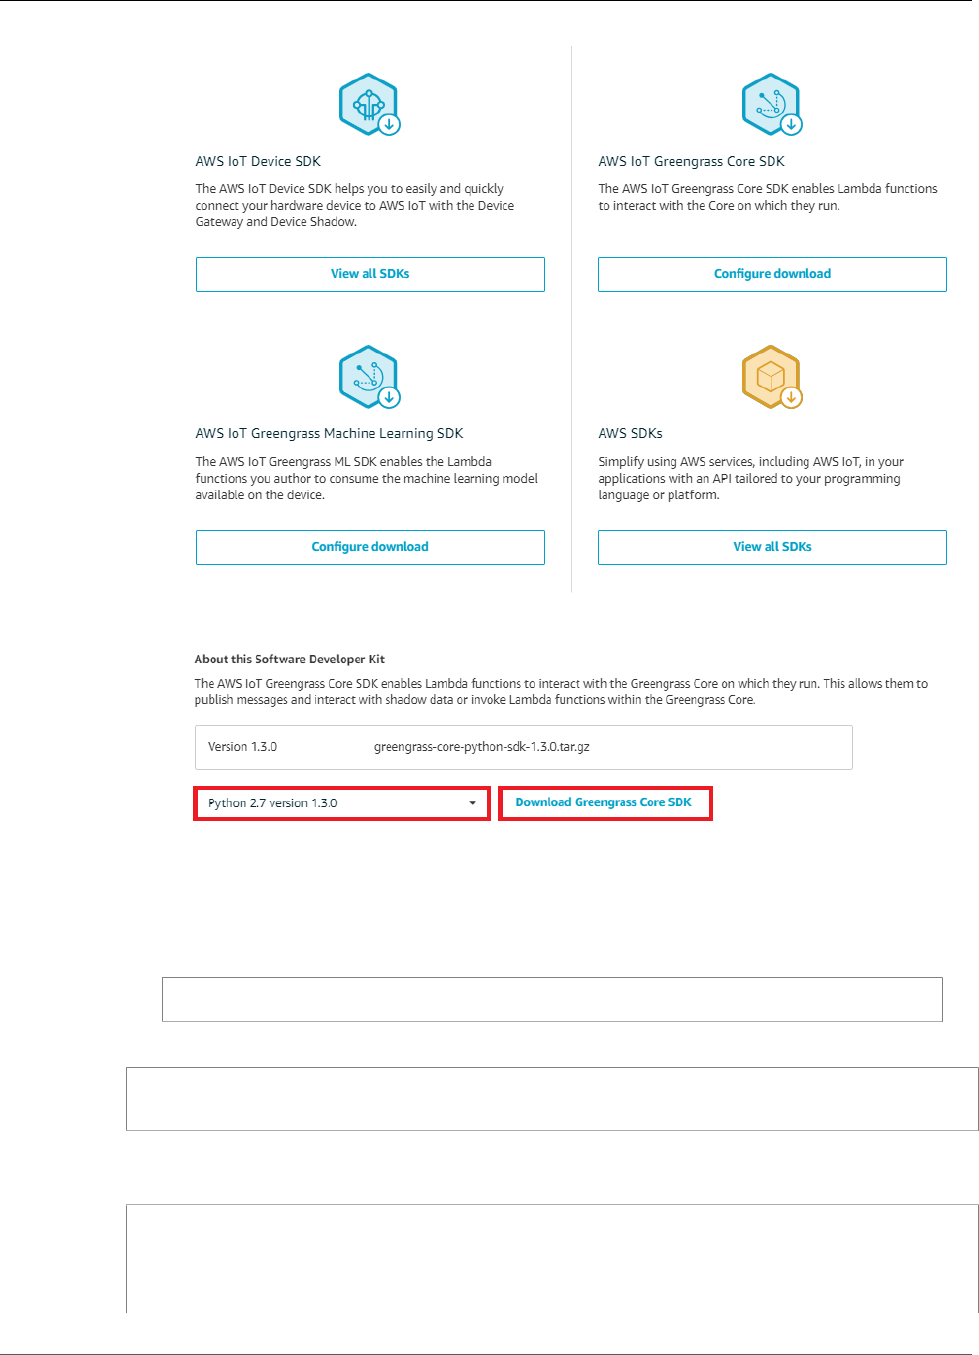
AWS IoT Greengrass Developer Guide
Create a Lambda Function Deployment Package
c. Choose Python 2.7 version 1.3.0, and then choose Download Greengrass Core SDK.
2. Unpack the greengrass-core-python-sdk-1.3.0.tar.gz file.
Note
For information about how to do this on different platforms, see this step (p. 64) in the
Getting Started section. For example, you might use the following tar command:
tar -xzf greengrass-core-python-sdk-1.3.0.tar.gz
3. Open the extracted aws_greengrass_core_sdk/sdk directory.
cd aws_greengrass_core_sdk
cd sdk
4. Unzip python_sdk_1_3_0.zip.
5. Save the following Python code function in a local file named secret_test.py.
import greengrasssdk
# Create SDK clients.
secrets_client = greengrasssdk.client('secretsmanager')
message_client = greengrasssdk.client('iot-data')
257

AWS IoT Greengrass Developer Guide
Create a Lambda Function
message = ''
# This handler is called when the function is invoked.
# It uses the 'secretsmanager' client to get the value of the test secret using the
secret name.
# The test secret is a text type, so the SDK returns a string.
# For binary secret values, the SDK returns a base64-encoded string.
def function_handler(event, context):
response = secrets_client.get_secret_value(SecretId='greengrass-TestSecret')
secret_value = response.get('SecretString')
if secret_value is None:
message = 'Failed to retrieve secret.'
else:
message = 'Success! Retrieved secret.'
message_client.publish(topic='secrets/output', payload=message)
print('published: ' + message)
The get_secret_value function supports the name or ARN of the Secrets Manager secret for the
SecretId value. This example uses the secret name. For this example secret, AWS IoT Greengrass
returns the key-value pair: {"test":"abcdefghi"}.
Important
Make sure that your user-defined Lambda functions handle secrets securely and don't
log any any sensitive data that's stored in the secret. For more information, see Mitigate
the Risks of Logging and Debugging Your Lambda Function in the AWS Secrets Manager
User Guide. Although this documentation specifically refers to rotation functions, the
recommendation also applies to Greengrass Lambda functions.
6. Zip the following items into a file named secret_test_python.zip. When you create the ZIP file,
include only the code and dependencies, not the containing folder.
•secret_test.py. App logic.
•greengrasssdk. Required library for all Python Greengrass Lambda functions.
This is your Lambda function deployment package.
Step 4: Create a Lambda Function
In this step, you use the AWS Lambda console to create a Lambda function and configure it to use your
deployment package. Then, you publish a function version and create an alias.
First, create the Lambda function.
1. In the AWS Management Console, choose Services, and open the AWS Lambda console.
2. Choose Create function.
3. Choose Author from scratch.
4. In the Author from scratch section, use the following values:
• For Name, enter SecretTest.
• For Runtime, choose Python 2.7.
• For Role, choose Create new role from one or more templates.
• For Role name, enter Greengrass_Lambda_empty. AWS IoT Greengrass doesn't use this role, so
you can create or choose any Lambda execution role.
258
AWS IoT Greengrass Developer Guide
Create a Lambda Function
5. At the bottom of the page, choose Create function.
Now, upload your Lambda function deployment package and register the handler.
1. On the Configuration tab for the SecretTest function, in Function code, use the following values:
• For Code entry type, choose Upload a .zip file.
• For Runtime, choose Python 2.7.
• For Handler, enter secret_test.function_handler.
2. Choose Upload.
3. Choose your secret_test_python.zip deployment package.
4. At the top of the page, choose Save.
Tip
You can see your code in the Function code section by choosing Edit code inline from the
Code entry type menu.
259

AWS IoT Greengrass Developer Guide
Add the Function to the Group
Next, publish the first version of your Lambda function. Then, create an alias for the version.
Note
Greengrass groups can reference a Lambda function by alias (recommended) or by version.
Using an alias makes it easier to manage code updates because you don't have to change your
subscription table or group definition when the function code is updated. Instead, you just point
the alias to the new function version.
1. Publish the Lambda function:
a. From the Actions menu, choose Publish new version.
b. For Version description, enter First version, and then choose Publish.
2. On the SecretTest: 1 configuration page, from the Actions menu, choose Create alias.
3. On the Create a new alias page, use the following values:
• For Name, enter GG_SecretTest.
• For Version, choose 1.
Note
AWS IoT Greengrass doesn't support Lambda aliases for $LATEST versions.
4. Choose Create.
Now you're ready to add the Lambda function to your Greengrass group and attach the secret resource.
Step 5: Add the Lambda Function to the Greengrass
Group
In this step, you add the Lambda function to the Greengrass group in the AWS IoT Core console.
1. On the group configuration page, choose Lambdas, and then choose Add Lambda.
2. On the Add a Lambda to your Greengrass Group page, choose Use existing Lambda.
260

AWS IoT Greengrass Developer Guide
Attach the Secret Resource to the Function
3. On the Use existing Lambda page, choose SecretTest, and then choose Next.
4. On the Select a Lambda version page, choose Alias:GG_SecretTest, and then choose Finish.
Next, affiliate the secret resource with the function.
Step 6: Attach the Secret Resource to the Lambda
Function
In this step, you attach the secret resource to the Lambda function in your Greengrass group. This
affiliates the resource with the function, which allows the function to get the value of the local secret.
1. On the group's Lambdas page, choose the SecretTest function.
2. On the function's details page, choose Resources, choose Secret, and then choose Attach a secret
resource.
3. On the Attach a secret resource to your Lambda function page, choose Choose secret resource.
4. On the Select a secret resource from your group page, choose MyTestSecret, and then choose
Save.
Step 7: Add Subscriptions to the Greengrass Group
In this step, you add subscriptions that allow AWS IoT and the Lambda function to exchange messages.
One subscription allows AWS IoT to invoke the function, and one allows the function to send output data
to AWS IoT.
1. On the group configuration page, choose Subscriptions, and then choose Add Subscription.
261
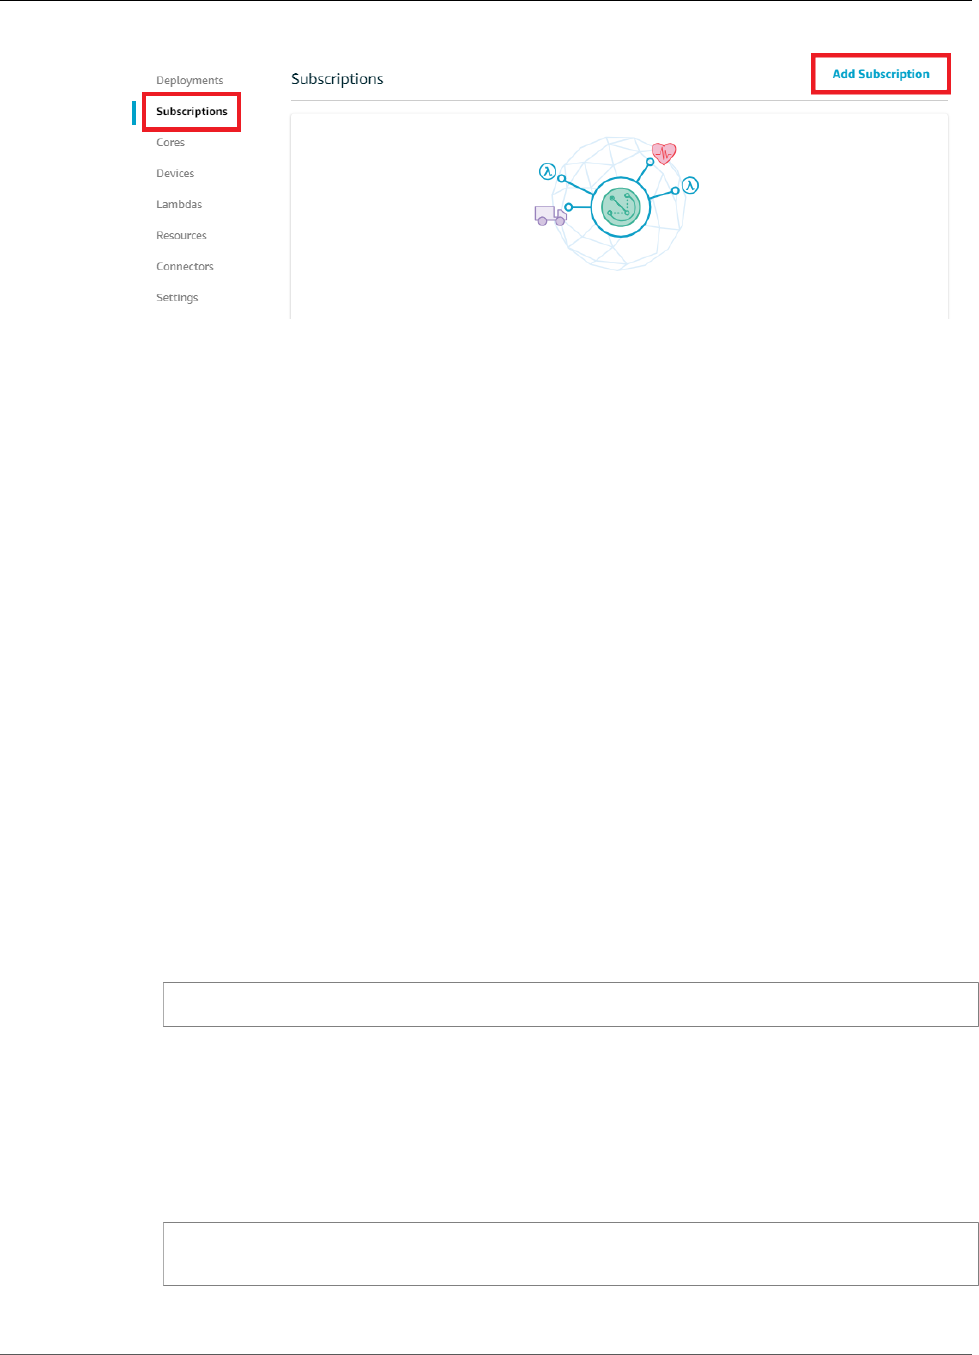
AWS IoT Greengrass Developer Guide
Deploy the Group
2. Create a subscription that allows AWS IoT to publish messages to the function.
On the Select your source and target page, configure the source and target:
a. For Select a source, choose Services, and then choose IoT Cloud.
b. For Select a target, choose Lambdas, and then choose SecretTest.
c. Choose Next.
3. On the Filter your data with a topic page, for Topic filter, enter secrets/input, and then choose
Next.
4. Choose Finish.
5. Repeat steps 1 - 4 to create a subscription that allows the function to publish status to AWS IoT.
a. For Select a source, choose Lambdas, and then choose SecretTest.
b. For Select a target, choose Services, and then choose IoT Cloud.
c. For Topic filter, enter secrets/output.
Step 8: Deploy the Greengrass Group
Deploy the group to the core device. During deployment, AWS IoT Greengrass fetches the value of the
secret from Secrets Manager and creates a local, encrypted copy on the core.
1. Make sure that the AWS IoT Greengrass core is running. Run the following commands in your
Raspberry Pi terminal, as needed.
a. To check whether the daemon is running:
ps aux | grep -E 'greengrass.*daemon'
If the output contains a root entry for /greengrass/ggc/packages/ggc-version/bin/
daemon, then the daemon is running.
Note
The version in the path depends on the AWS IoT Greengrass Core software version
that's installed on your core device.
b. To start the daemon:
cd /greengrass/ggc/core/
sudo ./greengrassd start
2. On the group configuration page, choose Deployments, and from the Actions menu, choose
Deploy.
262
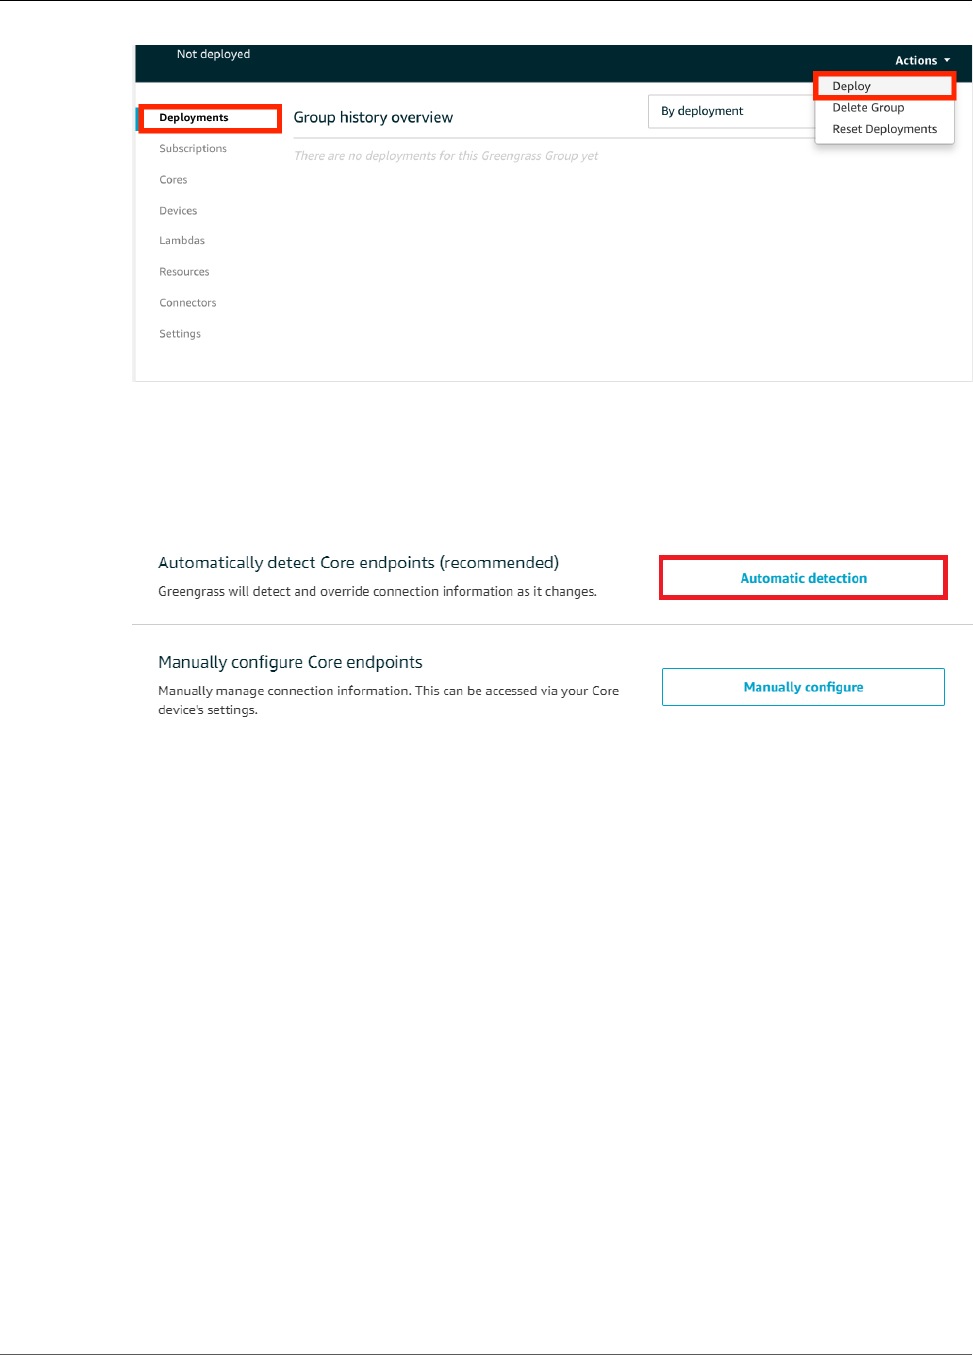
AWS IoT Greengrass Developer Guide
Test the Function
3. On the Configure how devices discover your core page, choose Automatic detection.
This enables devices to automatically acquireconnectivity information for the core, such as IP
address, DNS, and port number. Automatic detection is recommended, but AWS IoT Greengrass also
supports manually specified endpoints. You're only prompted for the discovery method the first
time that the group is deployed.
Note
If prompted, grant permission to create the AWS IoT Greengrass service role on your behalf,
which allows AWS IoT Greengrass to access other AWS services. You need to do this only
one time per account.
The Deployments page shows the deployment timestamp, version ID, and status. When completed,
the deployment should show a Successfully completed status.
For troubleshooting help, see Troubleshooting (p. 410).
Test the Function
1. On the AWS IoT Core console home page, choose Test.
263
AWS IoT Greengrass Developer Guide
Test the Function
2. For Subscriptions, use the following values, and then choose Subscribe to topic.
Property Value
Subscription topic secrets/output
MQTT payload display Display payloads as strings
3. For Publish, use the following values, and then choose Publish to topic to invoke the function.
Property Value
Topic secrets/input
Message Keep the default message. Publishing a
message invokes the Lambda function, but the
function in this tutorial doesn't process the
message body.
264

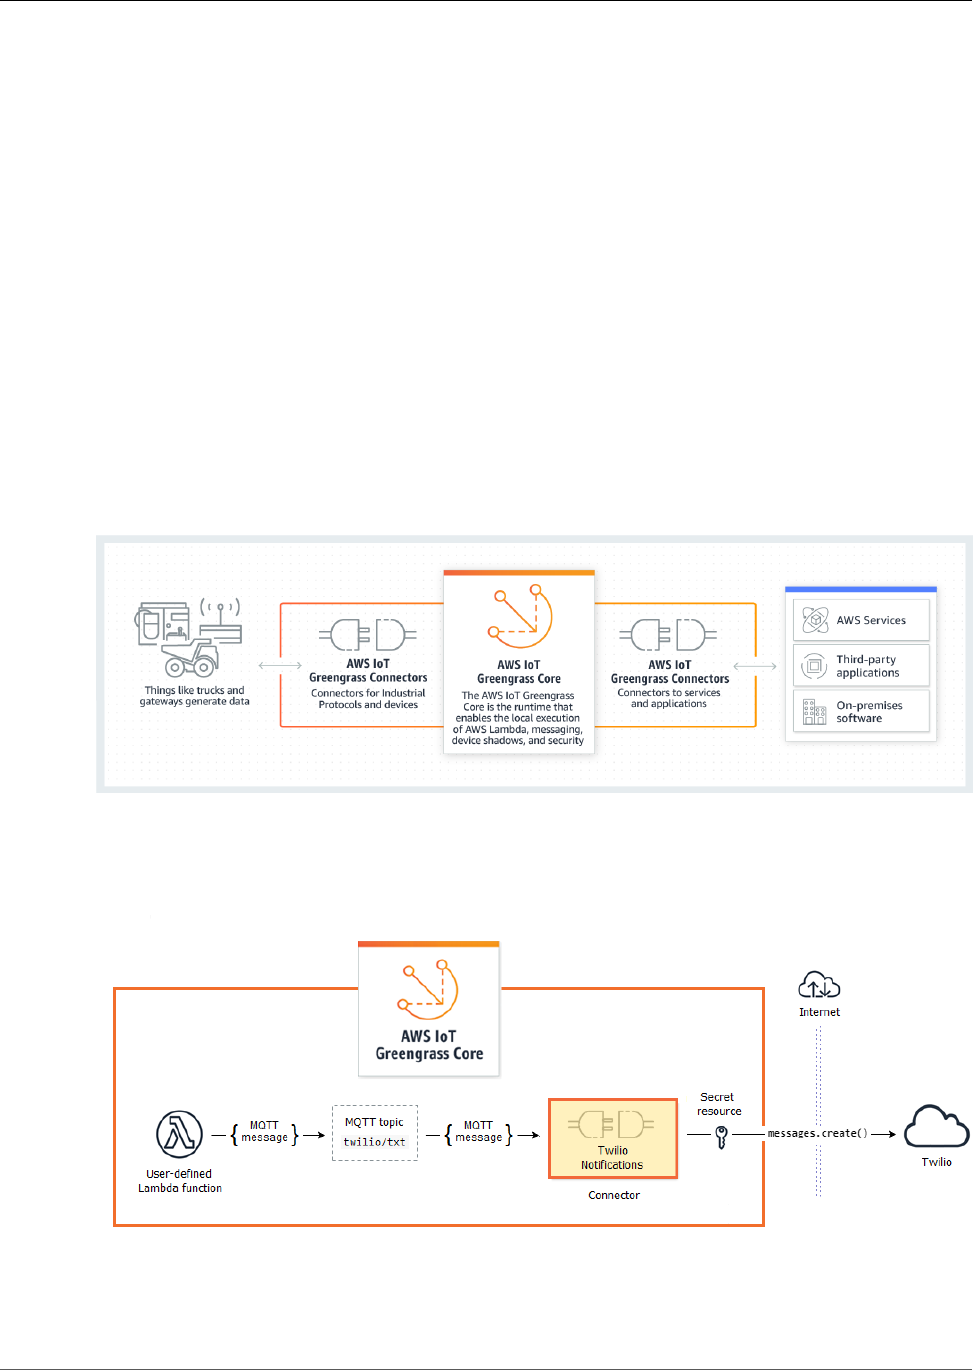
AWS IoT Greengrass Developer Guide
Integrate with Services and
Protocols Using Greengrass
Connectors
This feature is available for AWS IoT Greengrass Core v1.7.0 only.
Greengrass connectors are prebuilt modules that help accelerate the development lifecycle for common
edge scenarios. They make it easier to interact with local infrastructure, device protocols, AWS, and other
cloud services. With connectors, you can spend less time learning new protocols and APIs and more time
focusing on the logic that matters to your business.
The following diagram shows where connectors can fit into the AWS IoT Greengrass landscape.
Many connectors use MQTT messages to communicate with devices and Greengrass Lambda functions
in the group, or with AWS IoT and the local shadow service. In the following example, the Twilio
Notifications connector receives MQTT messages from a user-defined Lambda function, uses a local
reference of a secret from AWS Secrets Manager, and calls the Twilio API.
For a tutorial that creates this solution, see the section called “Get Started with Connectors
(CLI)” (p. 348).
266

AWS IoT Greengrass Developer Guide
Requirements
Greengrass connectors can help you quickly extend device capabilities or create single-purpose devices.
Connectors can make it easier to:
• Implement reusable business logic.
• Interact with cloud and local services, including AWS and third-party services.
• Ingest and process device data.
• Enable device-to-device calls using MQTT topic subscriptions and user-defined Lambda functions.
AWS provides a set of Greengrass connectors that simplify interactions with common services and data
sources. These prebuilt modules enable scenarios for logging and diagnostics, replenishment, industrial
data processing, and alarm and messaging. For more information, see the section called “AWS-Provided
Greengrass Connectors” (p. 271).
Requirements
The following requirements apply for connectors:
• You must use AWS IoT Greengrass core software v1.7.0.
• You must meet the requirements of each connector that you're using. These requirements might
include device prerequisites, required permissions, and limits. For more information, see the section
called “AWS-Provided Greengrass Connectors” (p. 271).
• A Greengrass group can contain only one configured instance of a given connector, but the instance
can be used in multiple subscriptions. For more information, see the section called “Configuration
Parameters” (p. 269).
• Connectors are not supported when the Greengrass group is configured to run Lambda functions
without containerization. For more information, see the section called “Controlling Greengrass Lambda
Function Execution” (p. 150).
Using AWS IoT Greengrass Connectors
A connector is a type of group component. Like other group components, such as devices and user-
defined Lambda functions, you add connectors to groups, configure their settings, and deploy them to
the AWS IoT Greengrass core. Connectors run in the core environment.
Some connectors can be deployed as simple standalone applications. For example, the Device Defender
connector reads system metrics from the core device and sends them to AWS IoT Device Defender for
analysis.
Other connectors can be used as building blocks in larger solutions. The following example solution
uses the Modbus-RTU Protocol Adapter connector to process messages from sensors and the Twilio
Notifications connector to trigger Twilio messages.
267
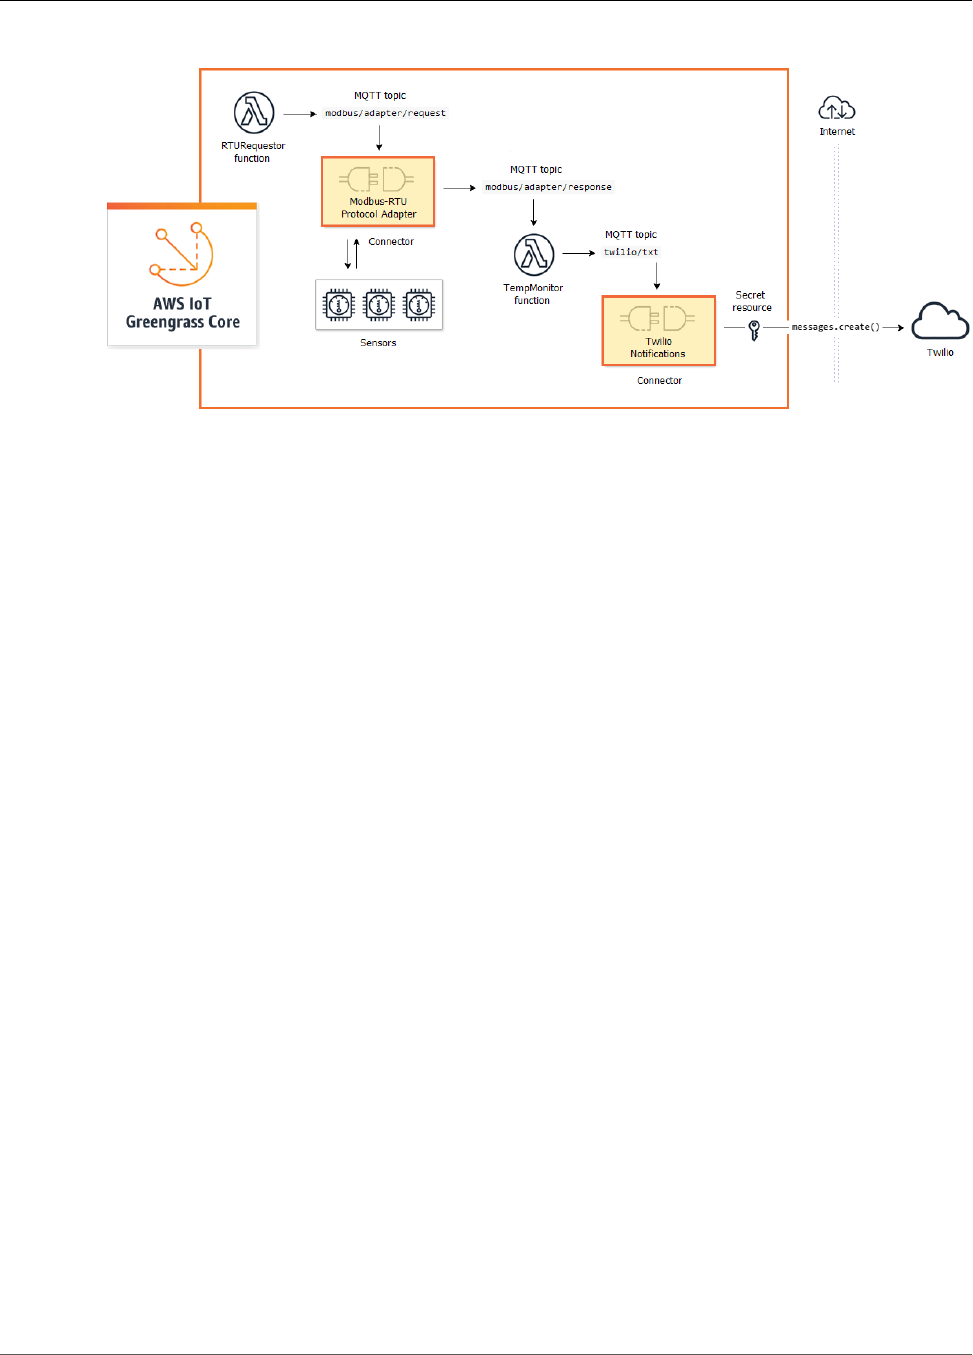
AWS IoT Greengrass Developer Guide
Using AWS IoT Greengrass Connectors
Solutions often include user-defined Lambda functions that sit next to connectors and process the data
that the connector sends or receives. In this example, the TempMonitor function receives data from
Modbus-RTU Protocol Adapter, runs some business logic, and then sends data to Twilio Notifications.
To create and deploy a solution, you follow this general process:
1. Map out the high-level data flow. Identify the data sources, data channels, services, protocols, and
resources that you need to work with. In the example solution, this includes data over the Modbus
RTU protocol, the physical Modbus serial port, and Twilio.
2. Identify the connectors to include in the solution, and add them to your group. The example solution
uses Modbus-RTU Protocol Adapter and Twilio Notifications. To help you find connectors that apply to
your scenario, and to learn about their individual requirements, see the section called “AWS-Provided
Greengrass Connectors” (p. 271).
3. Identify whether user-defined Lambda functions, devices, or resources are needed, and then create
and add them to the group. This might include functions that contain business logic or process data
into a format required by another entity in the solution. The example solution uses functions to send
Modbus RTU requests and trigger Twilio notifications. It also includes a local device resource for the
Modbus RTU serial port and a secret resource for the Twilio authentication token.
Note
Secret resources reference passwords, tokens, and other secrets from AWS Secrets Manager.
Secrets can be used by connectors and Lambda functions to authenticate with services and
applications. By default, AWS IoT Greengrass can access secrets with names that start with
"greengrass-". For more information, see Deploy Secrets to the Core (p. 243).
4. Create subscriptions that allow the entities in the solution to exchange MQTT messages. If a connector
is used in a subscription, the connector and the message source or target must use the predefined
topic syntax supported by the connector. For more information, see the section called “Inputs and
Outputs” (p. 270).
5. Deploy the group to the Greengrass core.
To learn how to create and deploy a connector, see the following tutorials:
•the section called “Get Started with Connectors (Console)” (p. 335)
•the section called “Get Started with Connectors (CLI)” (p. 348)
268

AWS IoT Greengrass Developer Guide
Configuration Parameters
Configuration Parameters
Many connectors provide parameters that let you customize the behavior or output. These parameters
are used during initialization, at runtime, or at other times in the connector lifecycle.
Parameter types and usage vary by connector. For example, the SNS connector has a parameter that
configures the default SNS topic, and Device Defender has a parameter that configures the data
sampling rate.
A group version can contain multiple connectors, but only one instance of a given connector at a time.
This means that each connector in the group can have only one active configuration. However, the
connector instance can be used in multiple subscriptions in the group. For example, you can create
subscriptions that allow many devices to send data to the Kinesis Firehose connector.
Parameters Used to Access Group Resources
Greengrass connectors use group resources to access the file system, ports, peripherals, and other local
resources on the core device. If a connector requires access to a group resource, then it provides related
configuration parameters.
Group resources include:
•Local resources (p. 169). Directories, files, ports, pins, and peripherals that are present on the
Greengrass core device.
•Machine learning resources (p. 195). Machine learning models that are trained in the cloud and
deployed to the core for local inference.
•Secret resources (p. 243). Local, encrypted copies of passwords, keys, tokens, or arbitrary text from
AWS Secrets Manager. Connectors can securely access these local secrets and use them to authenticate
to services or local infrastructure.
For example, parameters for Device Defender enable access to system metrics in the host /proc
directory, and parameters for Twilio Notifications enable access to a locally stored Twilio authentication
token.
Updating Connector Parameters
Parameters are configured when the connector is added to a Greengrass group. You can change
parameter values after the connector is added.
• In the console: From the group configuration page, open Connectors, and from the connector's
contextual menu, choose Edit.
Note
If the connector uses a secret resource that's later changed to reference a different secret, you
must edit the connector's parameters and confirm the change.
• In the API: Create another version of the connector that defines the new configuration.
The AWS IoT Greengrass API uses versions to manage groups. Versions are immutable, so to add or
change group components—for example, the group's devices, functions, and resources—you must
create versions of new or updated components. Then, you create and deploy a group version that
contains the target version of each component.
After you make changes to the connector configuration, you must deploy the group to propagate the
changes to the core.
269

AWS IoT Greengrass Developer Guide
Inputs and Outputs
Inputs and Outputs
Greengrass connectors can communicate with other entities by sending and receiving MQTT messages.
This communication is controlled by subscriptions that allow a connector to exchange data with Lambda
functions and devices in the group, or with AWS IoT and the local shadow service. For more information,
see the section called “Configure Subscriptions” (p. 95).
Connectors can be message subscribers, message publishers, or both. Each connector defines the topics
that it subscribes or publishes to. These predefined topics must be used in the subscriptions where
the connector is a message source or message target. For tutorials that include steps for configuring
subscriptions for a connector, see the section called “Get Started with Connectors (Console)” (p. 335)
and the section called “Get Started with Connectors (CLI)” (p. 348).
Note
Many connectors also have built-in modes of communication to interact with cloud or local
services. These vary by connector and might require that you configure parameters or add
permissions to the group role. For information about connector requirements, see the section
called “AWS-Provided Greengrass Connectors” (p. 271).
Input Topics
Some connectors subscribe to multiple topics for input data. For example, the Serial Stream connector
supports two topics:
•serial/+/read/#
•serial/+/write/#
For this connector, read and write requests are sent to the corresponding topic. When you create
subscriptions, make sure to use the topic that aligns with your implementation.
The + and # characters in the previous examples are wildcards. These wildcards allow subscribers to
receive messages on multiple topics and publishers to customize the topics that they publish to.
• The + wildcard can appear anywhere in the topic hierarchy. It can be replaced by one hierarchy item.
As an example, for a sensor/+/input topic, messages can be published to topics sensor/id-123/
input but not to sensor/group-a/id-123/input.
• The # wildcard can appear only at the end of the topic hierarchy. It can be replaced by zero or more
hierarchy items.
As an example, for a sensor/# topic, messages can be published to sensor/id-123 and sensor/
group-a/id-123, but not to sensor.
Wildcard characters are valid only when subscribing to topics. Messages can't be published to topics
that contain wildcards. Check the documentation for the connector to learn about its input or
output topic requirements. For more information, see the section called “AWS-Provided Greengrass
Connectors” (p. 271).
Logging
Greengrass connectors contain Lambda functions that write events and errors to Greengrass logs.
Depending on your group settings, logs are written to CloudWatch Logs, the local file system, or both.
270
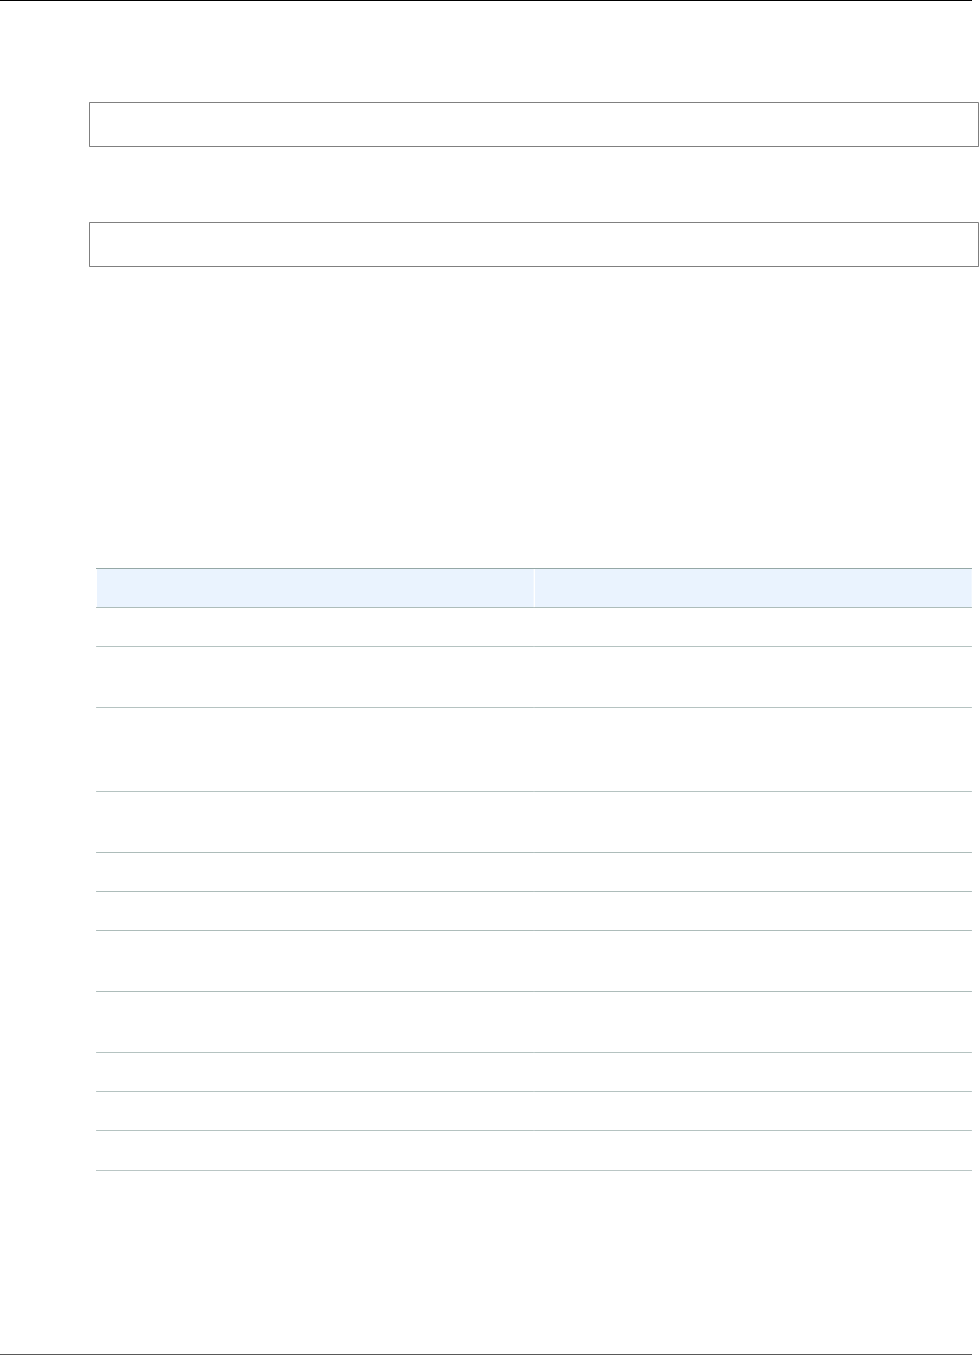
AWS IoT Greengrass Developer Guide
AWS-Provided Greengrass Connectors
Logs from connectors include the ARN of the corresponding function. The following example ARN is
from the Kinesis Firehose connector:
arn:aws:lambda:aws-region:account-id:function:KinesisFirehoseClient:1
The default logging configuration writes info-level logs to the file system using the following directory
structure:
greengrass-root/ggc/var/log/user/region/aws/function-name.log
For more information about Greengrass logging, see Monitoring (p. 385).
AWS-Provided Greengrass Connectors
AWS provides the following connectors that support common AWS IoT Greengrass scenarios. For more
information about how connectors work, see the following documentation:
•Integrate with Services and Protocols Using Connectors (p. 266)
•Get Started with Connectors (Console) (p. 335) or Get Started with Connectors (CLI) (p. 348)
Connector Description
CloudWatch Metrics (p. 271) Publishes custom metrics to Amazon CloudWatch.
Device Defender (p. 277) Sends system metrics to AWS IoT Device
Defender.
Image Classification (p. 280) Runs a local image classification inference service.
This connector provides versions for several
platforms.
Kinesis Firehose (p. 290) Sends data to Amazon Kinesis Data Firehose
delivery stream.
Modbus-RTU Protocol Adapter (p. 294) Sends requests to Modbus RTU devices.
Raspberry Pi GPIO (p. 303) Controls GPIO pins on a Raspberry Pi core device.
Serial Stream (p. 308) Reads and writes to a serial port on the core
device.
ServiceNow MetricBase Integration (p. 314) Publishes time series metrics to ServiceNow
MetricBase.
SNS (p. 320) Sends messages to an Amazon SNS topic.
Splunk Integration (p. 324) Publishes data to Splunk HEC.
Twilio Notifications (p. 328) Triggers a Twilio text or voice message.
CloudWatch Metrics
The CloudWatch Metrics connector (p. 266) publishes custom metrics from Greengrass devices to
Amazon CloudWatch. The connector provides a centralized infrastructure for publishing CloudWatch
271

AWS IoT Greengrass Developer Guide
CloudWatch Metrics
metrics, which you can use to monitor and analyze the Greengrass core environment, and act on local
events. For more information, see Using Amazon CloudWatch Metrics in the Amazon CloudWatch User
Guide.
This connector receives metric data as MQTT messages. The connector batches metrics that are in the
same namespace and publishes them to CloudWatch at regular intervals.
Requirements
This connector has the following requirements:
• AWS IoT Greengrass Core Software v1.7.0.
•Python version 2.7 installed on the core device and added to the PATH environment variable.
• An IAM policy added to the Greengrass group role that allows the cloudwatch:PutMetricData
action, as shown in the following example.
{
"Version": "2012-10-17",
"Statement": [
{
"Sid": "Stmt1528133056761",
"Action": [
"cloudwatch:PutMetricData"
],
"Effect": "Allow",
"Resource": "*"
}
]
}
For more information, see Adding and Removing IAM Policies in the IAM User Guide and Amazon
CloudWatch Permissions Reference in the IAM User Guide.
Connector Parameters
This connector provides the following parameters:
PublishInterval
The maximum number of seconds to wait before publishing batched metrics for a given namespace.
The maximum value is 900. To configure the connector to publish metrics as they are received
(without batching), specify 0.
The connector publishes to CloudWatch after it receives 20 metrics in the same namespace or after
the specified interval.
Note
The connector doesn't guarantee the order of publish events.
Display name in console: Publish interval
Required: true
Type: string
Valid values: 0 - 900
Valid pattern: [0-9]|[1-9]\d|[1-9]\d\d|900
272

AWS IoT Greengrass Developer Guide
CloudWatch Metrics
PublishRegion
The AWS Region to post CloudWatch metrics to. This value overrides the default Greengrass metrics
region. It is required only when posting cross-region metrics.
Display name in console: Publish region
Required: false
Type: string
Valid pattern: ^$|([a-z]{2}-[a-z]+-\d{1})
MemorySize
The memory (in KB) to allocate to the connector.
Display name in console: Memory size
Required: true
Type: string
Valid pattern: ^[0-9]+$
MaxMetricsToRetain
The maximum number of metrics across all namespaces to save in memory before they are replaced
with new metrics. The minimum value is 2000.
This limit applies when there's no connection to the internet and the connector starts to buffer the
metrics to publish later. When the buffer is full, the oldest metrics are replaced by new metrics.
Metrics in a given namespace are replaced only by metrics in the same namespace.
Note
Metrics are not saved if the host process for the connector is interrupted. For example, this
can happen during group deployment or when the device restarts.
Display name in console: Maximum metrics to retain
Required: true
Type: string
Valid pattern: ^([2-9]\d{3}|[1-9]\d{4,})$
Create Connector Example (CLI)
The following CLI command creates an ConnectorDefinition with an initial version that contains the
CloudWatch Metrics connector.
aws greengrass create-connector-definition --name MyGreengrassConnectors --initial-version
'{
"Connectors": [
{
"Id": "MyCloudWatchMetricsConnector",
"ConnectorArn": "arn:aws:greengrass:region::/connectors/CloudWatchMetrics/
versions/1",
"Parameters": {
"PublishInterval" : "600",
"PublishRegion" : "us-west-2",
"MemorySize" : "16",
"MaxMetricsToRetain" : "2500"
273

AWS IoT Greengrass Developer Guide
CloudWatch Metrics
}
}
]
}'
In the AWS IoT Greengrass console, you can add a connector from the group's Connectors page. For
more information, see the section called “Get Started with Connectors (Console)” (p. 335).
Input Data
This connector accepts metrics on an MQTT topic and publishes the metrics to CloudWatch. Input
messages must be in JSON format.
Topic filter
cloudwatch/metric/put
Message properties
request
Information about the metric in this message.
The request object contains the metric data to publish to CloudWatch. The metric
values must meet the specifications of the PutMetricData API. Only the namespace,
metricData.metricName, and metricData.value properties are required.
Required: true
Type: object that includes the following properties:
namespace
The user-defined namespace for the metric data in this request. CloudWatch uses
namespaces as containers for metric data points.
Note
You can't specify a namespace that begins with the reserved string "AWS/".
Required: true
Type: string
Valid pattern: [^:].*
metricData
The data for the metric.
Required: true
Type: object that includes the following properties:
metricName
The name of the metric.
Required: true
Type: string
dimensions
The dimensions that are associated with the metric. Dimensions provide more
information about the metric and its data. A metric can define up to 10 dimensions.
274

AWS IoT Greengrass Developer Guide
CloudWatch Metrics
Required: false
Type: array of dimension objects that include the following properties:
name
The dimension name.
Required: false
Type: string
value
The dimension value.
Required: false
Type: string
timestamp
The time that the metric data was received, expressed as the number of milliseconds
since Jan 1, 1970 00:00:00 UTC. If this value is omitted, the connector uses the
time that it received the message.
Required: false
Type: timestamp
value
The value for the metric.
Note
CloudWatch rejects values that are too small or too large. Values must be in
the range of 8.515920e-109 to 1.174271e+108 (Base 10) or 2e-360 to
2e360 (Base 2). Special values (for example, NaN, +Infinity, -Infinity) are
not supported.
Required: true
Type: double
unit
The unit of the metric.
Required: false
Type: string
Valid values: Seconds, Microseconds, Milliseconds, Bytes, Kilobytes,
Megabytes, Gigabytes, Terabytes, Bits, Kilobits, Megabits,
Gigabits, Terabits, Percent, Count, Bytes/Second, Kilobytes/
Second, Megabytes/Second, Gigabytes/Second, Terabytes/Second,
Bits/Second, Kilobits/Second, Megabits/Second, Gigabits/Second,
Terabits/Second, Count/Second, None
Limits
All limits that are imposed by the CloudWatch PutMetricData API apply to metrics when using
this connector. The following limits are especially important:
• 40 KB limit on API payload
• 20 metrics per API request
275

AWS IoT Greengrass Developer Guide
CloudWatch Metrics
• 150 transactions per second (TPS) for the PutMetricData API
For more information, see CloudWatch Limits in the Amazon CloudWatch User Guide.
Example input
{
"request": {
"namespace": "Greengrass",
"metricData":
{
"metricName": "latency",
"dimensions": [
{
"name": "hostname",
"value": "test_hostname"
}
],
"timestamp": 1539027324,
"value": 123.0,
"unit": "Seconds"
}
}
}
Output Data
This connector publishes status information as output data.
Topic filter
cloudwatch/metric/put/status
Example output: Success
The response includes the namespace of the metric data and the RequestId field from the
CloudWatch response.
{
"response": {
"cloudwatch_rid":"70573243-d723-11e8-b095-75ff2EXAMPLE",
"namespace": "Greengrass",
"status":"success"
}
}
Example output: Failure
{
"response" : {
"namespace": "Greengrass",
"error": "InvalidInputException",
"error_message":"cw metric is invalid",
"status":"fail"
}
}
Note
If the connector detects a retryable error (for example, throttled or connection errors), it
retries the publish in the next batch.
276

AWS IoT Greengrass Developer Guide
Device Defender
Licenses
The CloudWatch Metrics connector includes the following third-party software/licensing:
•AWS SDK for Python (Boto 3) / Apache 2.0
This connector is released under the Greengrass Core Software License Agreement.
See Also
•Integrate with Services and Protocols Using Connectors (p. 266)
•the section called “Get Started with Connectors (Console)” (p. 335)
•the section called “Get Started with Connectors (CLI)” (p. 348)
•Using Amazon CloudWatch Metrics in the Amazon CloudWatch User Guide
•PutMetricData in the Amazon CloudWatch API Reference
Device Defender
The Device Defender connector (p. 266) notifies administrators of changes in the state of a Greengrass
core device. This can help identify unusual behavior that might indicate a compromised device.
This connector reads system metrics from the /proc directory on the core device, and then publishes
the metrics to AWS IoT Device Defender. For metrics reporting details, see Device Metrics Document
Specification in the AWS IoT Developer Guide.
ARN: arn:aws:greengrass:region::/connectors/DeviceDefender/versions/1
Requirements
This connector has the following requirements:
• AWS IoT Greengrass Core Software v1.7.0.
•Python version 2.7 installed on the core device and added to the PATH environment variable.
• AWS IoT Device Defender configured to use the Detect feature to keep track of violations. For more
information, see Detect in the AWS IoT Developer Guide.
• A local volume resource (p. 169) in the Greengrass group that points to the /proc directory. The
resource must use the following properties:
• Source path: /proc
• Destination path: /host_proc (or a value that matches the valid pattern (p. 278))
• AutoAddGroupOwner: true
• The psutil library installed on the AWS IoT Greengrass core. Use the following command to install it:
pip install psutil
• The cbor library installed on the AWS IoT Greengrass core. Use the following command to install it:
pip install cbor
Connector Parameters
This connector provides the following parameters:
277

AWS IoT Greengrass Developer Guide
Device Defender
SampleIntervalSeconds
The number of seconds between each cycle of gathering and reporting metrics. The minimum value
is 300 seconds (5 minutes).
Display name in console: Metrics reporting interval
Required: true
Type: string
Valid pattern: ^[0-9]*(?:3[0-9][0-9]|[4-9][0-9]{2}|[1-9][0-9]{3,})$
ProcDestinationPath-ResourceId
The ID of the /proc volume resource.
Note
This connector is granted read-only access to the resource.
Display name in console: Resource for /proc directory
Required: true
Type: string
Valid pattern: [a-zA-Z0-9_-]+
ProcDestinationPath
The destination path of the /proc volume resource.
Display name in console: Destination path of /proc resource
Required: true
Type: string
Valid pattern: \/[a-zA-Z0-9_-]+
Create Connector Example (CLI)
The following CLI command creates an ConnectorDefinition with an initial version that contains the
Device Defender connector.
aws greengrass create-connector-definition --name MyGreengrassConnectors --initial-version
'{
"Connectors": [
{
"Id": "MyDeviceDefenderConnector",
"ConnectorArn": "arn:aws:greengrass:region::/connectors/DeviceDefender/
versions/1",
"Parameters": {
"SampleIntervalSeconds": "600",
"ProcDestinationPath": "/host_proc",
"ProcDestinationPath-ResourceId": "my-proc-resource"
}
}
]
}'
278

AWS IoT Greengrass Developer Guide
Device Defender
Note
The Lambda function in this connector has a long-lived (p. 156) lifecycle.
In the AWS IoT Greengrass console, you can add a connector from the group's Connectors page. For
more information, see the section called “Get Started with Connectors (Console)” (p. 335).
Input Data
This connector doesn't accept MQTT messages as input data.
Output Data
This connector publishes security metrics to AWS IoT Device Defender as output data.
Topic filter
$aws/things/+/defender/metrics/json
Note
This is the topic syntax that AWS IoT Device Defender expects. The connector replaces the
+ wildcard with the device name (for example, $aws/things/thing-name/defender/
metrics/json).
Example output
For metrics reporting details, see Device Metrics Document Specification in the AWS IoT Developer
Guide.
{
"header": {
"report_id": 1529963534,
"version": "1.0"
},
"metrics": {
"listening_tcp_ports": {
"ports": [
{
"interface": "eth0",
"port": 24800
},
{
"interface": "eth0",
"port": 22
},
{
"interface": "eth0",
"port": 53
}
],
"total": 3
},
"listening_udp_ports": {
"ports": [
{
"interface": "eth0",
"port": 5353
},
{
"interface": "eth0",
"port": 67
}
],
"total": 2
},
279

AWS IoT Greengrass Developer Guide
Image Classification
"network_stats": {
"bytes_in": 1157864729406,
"bytes_out": 1170821865,
"packets_in": 693092175031,
"packets_out": 738917180
},
"tcp_connections": {
"established_connections":{
"connections": [
{
"local_interface": "eth0",
"local_port": 80,
"remote_addr": "192.168.0.1:8000"
},
{
"local_interface": "eth0",
"local_port": 80,
"remote_addr": "192.168.0.1:8000"
}
],
"total": 2
}
}
}
}
Licenses
This connector is released under the Greengrass Core Software License Agreement.
See Also
•Integrate with Services and Protocols Using Connectors (p. 266)
•the section called “Get Started with Connectors (Console)” (p. 335)
•the section called “Get Started with Connectors (CLI)” (p. 348)
•Device Defender in the AWS IoT Developer Guide
Image Classification
The Image Classification connectors (p. 266) provide a machine learning (ML) inference service that
runs on the AWS IoT Greengrass core. This local inference service performs image classification using a
model trained by the Amazon SageMaker image classification algorithm.
User-defined Lambda functions use the AWS IoT Greengrass Machine Learning SDK to submit inference
requests to the local inference service. The service runs inference locally and returns probabilities that
the input image belongs to specific categories.
AWS IoT Greengrass provides Image Classification connectors for multiple platforms:
Connector Description and ARN
Image Classification Aarch64 JTX2 Image classification inference service for NVIDIA
Jetson TX2. Supports GPU acceleration.
ARN: arn:aws:greengrass:region::/
connectors/
280

AWS IoT Greengrass Developer Guide
Image Classification
Connector Description and ARN
ImageClassificationAarch64JTX2/
versions/1
Image Classification x86_64 Image classification inference service for x86_64
platforms.
ARN: arn:aws:greengrass:region::/
connectors/ImageClassificationx86-64/
versions/1
Image Classification ARMv7 Image classification inference service for ARMv7
platforms.
ARN: arn:aws:greengrass:region::/
connectors/ImageClassificationARMv7/
versions/1
Requirements
These connectors have the following requirements:
• AWS IoT Greengrass Core Software v1.7.0.
•Python version 2.7 installed on the core device and added to the PATH environment variable.
• Dependencies for the Apache MXNet framework installed on the core device. For more information,
see the section called “Installing MXNet Dependencies” (p. 286).
• An ML resource (p. 195) in the Greengrass group that references an Amazon SageMaker model source.
This model must be trained by the Amazon SageMaker image classification algorithm. For more
information, see Image Classification Algorithm in the Amazon SageMaker Developer Guide.
• An IAM policy added to the Greengrass group role that allows the
sagemaker:DescribeTrainingJob action on the target training job, as shown in the following
example.
{
"Version": "2012-10-17",
"Statement": [
{
"Effect": "Allow",
"Action": [
"sagemaker:DescribeTrainingJob"
],
"Resource": "arn:aws:sagemaker:region:account-id:training-job:training-job-
name"
}
]
}
You can grant granular or conditional access to resources (for example, by using a wildcard * naming
scheme). If you change the target training job in the future, make sure to update the group role. For
more information, see Adding and Removing IAM Policies in the IAM User Guide.
Connector Parameters
These connectors provide the following parameters.
281

AWS IoT Greengrass Developer Guide
Image Classification
MLModelDestinationPath
The absolute local path of the ML resource inside the Lambda environment. This is the destination
path that's specified for the ML resource.
Note
If you created the ML resource in the console, this is the local path.
Display name in console: Model destination path
Required: true
Type: string
Valid pattern: .+
MLModelResourceId
The ID of the ML resource that references the source model.
Display name in console: SageMaker job ARN resource
Required: true
Type: string
Valid pattern: [a-zA-Z0-9:_-]+
MLModelSageMakerJobArn
The ARN of the Amazon SageMaker training job that represents the Amazon SageMaker model
source. The model must be trained by the Amazon SageMaker image classification algorithm.
Display name in console: SageMaker job ARN
Required: true
Type: string
Valid pattern: ^arn:aws:sagemaker:[a-zA-Z0-9-]+:[0-9]+:training-job/[a-zA-Z0-9]
[a-zA-Z0-9-]+$
LocalInferenceServiceName
The name for the local inference service. User-defined Lambda functions invoke the service by
passing the name to the invoke_inference_service function of the AWS IoT Greengrass
Machine Learning SDK. For an example, see the section called “Usage Example” (p. 284).
Display name in console: Local inference service name
Required: true
Type: string
Valid pattern: [a-zA-Z0-9][a-zA-Z0-9-]{1,62}
LocalInferenceServiceTimeoutSeconds
The amount of time (in seconds) before the inference request is terminated. The minimum value is 1.
Display name in console: Timeout (second)
Required: true
Type: string
Valid pattern: [1-9][0-9]*
282

AWS IoT Greengrass Developer Guide
Image Classification
LocalInferenceServiceMemoryLimitKB
The amount of memory (in KB) that the service has access to. The minimum value is 1.
Display name in console: Memory limit (KB)
Required: true
Type: string
Valid pattern: [1-9][0-9]*
GPUAcceleration
The CPU or GPU (accelerated) computing context. This property applies to the Image Classification
Aarch64 JTX2 connector only.
Display name in console: GPU acceleration
Required: true
Type: string
Valid values: CPU or GPU
Create Connector Example (CLI)
The following CLI commands create an ConnectorDefinition with an initial version that contains an
Image Classification connector.
Example: CPU Instance
This example creates an instance of the Image Classification ARMv7l connector.
aws greengrass create-connector-definition --name MyGreengrassConnectors --initial-
version '{
"Connectors": [
{
"Id": "MyImageClassificationConnector",
"ConnectorArn": "arn:aws:greengrass:region::/connectors/
ImageClassificationARMv7/versions/1",
"Parameters": {
"MLModelDestinationPath": "/path-to-model",
"MLModelResourceId": "my-ml-resource",
"MLModelSageMakerJobArn": "arn:aws:sagemaker:us-
west-2:123456789012:training-job:MyImageClassifier",
"LocalInferenceServiceName": "imageClassification",
"LocalInferenceServiceTimeoutSeconds": "10",
"LocalInferenceServiceMemoryLimitKB": "500000"
}
}
]
}'
Example: GPU Instance
This example creates an instance of the Image Classification Aarch64 JTX2 connector, which
supports GPU acceleration on an NVIDIA Jetson TX2 board.
aws greengrass create-connector-definition --name MyGreengrassConnectors --initial-
version '{
"Connectors": [
{
"Id": "MyImageClassificationConnector",
283

AWS IoT Greengrass Developer Guide
Image Classification
"ConnectorArn": "arn:aws:greengrass:region::/connectors/
ImageClassificationAarch64JTX2/versions/1",
"Parameters": {
"MLModelDestinationPath": "/path-to-model",
"MLModelResourceId": "my-ml-resource",
"MLModelSageMakerJobArn": "arn:aws:sagemaker:us-
west-2:123456789012:training-job:MyImageClassifier",
"LocalInferenceServiceName": "imageClassification",
"LocalInferenceServiceTimeoutSeconds": "10",
"LocalInferenceServiceMemoryLimitKB": "500000",
"GPUAcceleration": "GPU"
}
}
]
}'
Note
The Lambda function in these connectors have a long-lived (p. 156) lifecycle.
In the AWS IoT Greengrass console, you can add a connector from the group's Connectors page. For
more information, see the section called “Get Started with Connectors (Console)” (p. 335).
Input Data
These connectors don't accept MQTT messages as input data.
Output Data
These connectors don't publish MQTT messages as output data.
Usage Example
The following example Lambda function uses the AWS IoT Greengrass Machine Learning SDK (p. 148) to
interact with an Image Classification connector.
Note
You can download the SDK from the Software page in the AWS IoT Core console or from the
AWS IoT Greengrass Machine Learning SDK (p. 20) downloads.
The example initializes an SDK client and synchronously calls the SDK's invoke_inference_service
function to invoke the local inference service. It passes in the algorithm type, service name, image
type, and image content. Then, the example parses the service response to get the probability results
(predictions).
import logging
from threading import Timer
import numpy as np
import greengrass_machine_learning_sdk as ml
# We assume the inference input image is provided as a local file
# to this inference client Lambda function.
with open('/test_img/test.jpg', 'rb') as f:
content = f.read()
client = ml.client('inference')
def infer():
284
AWS IoT Greengrass Developer Guide
Image Classification
logging.info('invoking Greengrass ML Inference service')
try:
resp = client.invoke_inference_service(
AlgoType='image-classification',
ServiceName='imageClassification',
ContentType='image/jpeg',
Body=content
)
except ml.GreengrassInferenceException as e:
logging.info('inference exception {}("{}")'.format(e.__class__.__name__, e))
return
except ml.GreengrassDependencyException as e:
logging.info('dependency exception {}("{}")'.format(e.__class__.__name__, e))
return
logging.info('resp: {}'.format(resp))
predictions = resp['Body'].read()
logging.info('predictions: {}'.format(predictions))
# The connector output is in the format: [0.3,0.1,0.04,...]
# Remove the '[' and ']' at the beginning and end.
predictions = predictions[1:-1]
count = len(predictions.split(','))
predictions_arr = np.fromstring(predictions, count=count, sep=',')
# Perform business logic that relies on the predictions_arr, which is an array
# of probabilities.
# Schedule the infer() function to run again in one second.
Timer(1, infer).start()
return
infer()
def function_handler(event, context):
return
The invoke_inference_service function in the AWS IoT Greengrass Machine Learning SDK accepts
the following arguments.
Argument Description
AlgoType The name of the algorithm type to use
for inference. Currently, only image-
classification is supported.
Required: true
Type: string
Valid values: image-classification
ServiceName The name of the local inference service.
Use the name that you specified for the
LocalInferenceServiceName parameter when
you configured the connector.
Required: true
Type: string
ContentType The mime type of the input image.
285

AWS IoT Greengrass Developer Guide
Image Classification
Argument Description
Required: true
Type: string
Valid values: image/jpeg, image/png
Body The content of the input image file.
Required: true
Type: binary
Installing MXNet Dependencies on the AWS IoT Greengrass Core
To use an Image Classification connector, you must install the dependencies for the Apache MXNet
framework on the core device. The connectors use the framework to serve the ML model.
Note
These connectors are bundled with a precompiled MXNet library, so you don't need to install the
MXNet framework on the core device.
AWS IoT Greengrass provides scripts to install the dependencies for the following common platforms
and devices (or to use as a reference for installing them). If you're using a different platform or device,
see the MXNet documentation for your configuration.
Before installing the MXNet dependencies, make sure that the required system libraries (p. 288) (with
the specified minimum versions) are present on the device.
NVIDIA Jetson TX2
1. Install CUDA Toolkit 9.0 and cuDNN 7.0. You can follow the instructions in the section called
“Setting Up Other Devices” (p. 54) in the Getting Started tutorial.
2. Enable universe repositories so the connector can install community-maintained open software.
For more information, see Repositories/Ubuntu in the Ubuntu documentation.
a. Open the /etc/apt/sources.list file.
b. Make sure that the following lines are uncommented.
deb http://ports.ubuntu.com/ubuntu-ports/ xenial universe
deb-src http://ports.ubuntu.com/ubuntu-ports/ xenial universe
deb http://ports.ubuntu.com/ubuntu-ports/ xenial-updates universe
deb-src http://ports.ubuntu.com/ubuntu-ports/ xenial-updates universe
3. Save a copy of the following installation script to a file named nvidiajtx2.sh on the core
device.
#!/bin/bash
set -e
echo "Installing MXNet dependencies on the system..."
echo 'Assuming that universe repos are enabled and checking dependencies...'
apt-get -y update
apt-get -y dist-upgrade
apt-get install -y liblapack3 libopenblas-dev liblapack-dev libatlas-base-dev
python-dev
echo 'Install latest pip...'
wget https://bootstrap.pypa.io/get-pip.py
286

AWS IoT Greengrass Developer Guide
Image Classification
python get-pip.py
rm get-pip.py
pip install numpy==1.15.0 scipy
echo 'Dependency installation/upgrade complete.'
4. From the directory where you saved the file, run the following command:
sudo nvidiajtx2.sh
x86_64 (Ubuntu or Amazon Linux)
1. Save a copy of the following installation script to a file named x86_64.sh on the core device.
#!/bin/bash
set -e
echo "Installing MXNet dependencies on the system..."
release=$(awk -F= '/^NAME/{print $2}' /etc/os-release)
if [ "$release" == '"Ubuntu"' ]; then
# Ubuntu. Supports EC2 and DeepLens. DeepLens has all the dependencies installed,
so
# this is mostly to prepare dependencies on Ubuntu EC2 instance.
apt-get -y update
apt-get -y dist-upgrade
apt-get install -y libgfortran3 libsm6 libxext6 libxrender1 python-dev python-
pip
elif [ "$release" == '"Amazon Linux"' ]; then
# Amazon Linux. Expect python to be installed already
yum -y update
yum -y upgrade
yum install -y compat-gcc-48-libgfortran libSM libXrender libXext python-pip
else
echo "OS Release not supported: $release"
exit 1
fi
pip install numpy==1.15.0 scipy opencv-python
echo 'Dependency installation/upgrade complete.'
2. From the directory where you saved the file, run the following command:
sudo x86_64.sh
ARMv7 (Raspberry Pi)
1. Save a copy of the following installation script to a file named armv7l.sh on the core device.
#!/bin/bash
set -e
echo "Installing MXNet dependencies on the system..."
apt-get update
287
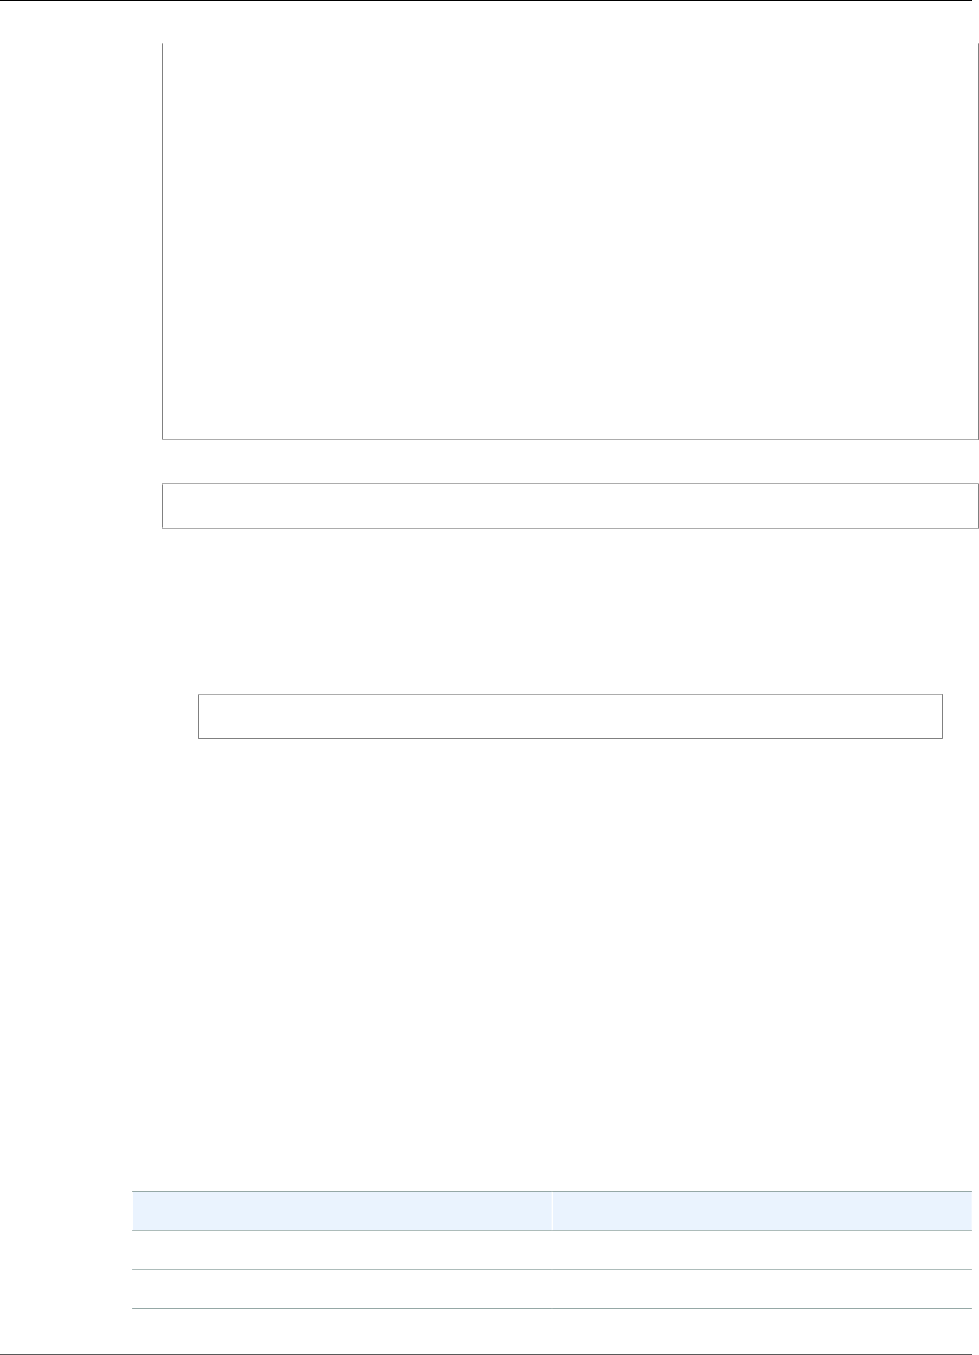
AWS IoT Greengrass Developer Guide
Image Classification
apt-get -y upgrade
apt-get install -y liblapack3 libopenblas-dev liblapack-dev python-dev
# python-opencv depends on python-numpy. The latest version in the APT repository
is python-numpy-1.8.2
# This script installs python-numpy first so that python-opencv can be installed,
and then install the latest
# numpy-1.15.x with pip
apt-get install -y python-numpy python-opencv
dpkg --remove --force-depends python-numpy
echo 'Install latest pip...'
wget https://bootstrap.pypa.io/get-pip.py
python get-pip.py
rm get-pip.py
pip install --upgrade numpy==1.15.0 picamera scipy
echo 'Dependency installation/upgrade complete.'
2. From the directory where you saved the file, run the following command:
sudo armv7l.sh
Note
On a Raspberry Pi, installing scipy using pip is a memory-intensive operation that can
cause the device to run out of memory and become unresponsive. As a workaround,
you can temporarily increase the swap size:
In /etc/dphys-swapfile, increase the value of the CONF_SWAPSIZE variable and
then run the following command to restart dphys-swapfile.
/etc/init.d/dphys-swapfile restart
Logging and Troubleshooting
Depending on your group settings, event and error logs are written to CloudWatch Logs, the local
file system, or both. Logs from this connector use the prefix LocalInferenceServiceName. If the
connector behaves unexpectedly, check the connector's logs. These usually contain useful debugging
information, such as a missing ML library dependency or the cause of a connector startup failure.
If the AWS IoT Greengrass group is configured to write local logs, the connector writes log files to
greengrass-root/ggc/var/log/user/region/aws/. For more information about Greengrass
logging, see Monitoring (p. 385).
Use the following information to help troubleshoot issues with the Image Classification connectors.
Required system libraries
The following tabs list the system libraries required for each Image Classification connector.
Image Classification Aarch64 JTX2
Library Minimum version
ld-linux-aarch64.so.1 GLIBC_2.17
libc.so.6 GLIBC_2.17
288

AWS IoT Greengrass Developer Guide
Image Classification
Library Minimum version
libcublas.so.9.0 not applicable
libcudart.so.9.0 not applicable
libcudnn.so.7 not applicable
libcufft.so.9.0 not applicable
libcurand.so.9.0 not applicable
libcusolver.so.9.0 not applicable
libgcc_s.so.1 GCC_4.2.0
libgomp.so.1 GOMP_4.0, OMP_1.0
libm.so.6 GLIBC_2.23
libpthread.so.0 GLIBC_2.17
librt.so.1 GLIBC_2.17
libstdc++.so.6 GLIBCXX_3.4.21, CXXABI_1.3.8
Image Classification x86_64
Library Minimum version
ld-linux-x86-64.so.2 GCC_4.0.0
libc.so.6 GLIBC_2.4
libgfortran.so.3 GFORTRAN_1.0
libm.so.6 GLIBC_2.23
libpthread.so.0 GLIBC_2.2.5
librt.so.1 GLIBC_2.2.5
libstdc++.so.6 CXXABI_1.3.8, GLIBCXX_3.4.21
Image Classification ARMv7
Library Minimum version
ld-linux-armhf.so.3 GLIBC_2.4
libc.so.6 GLIBC_2.7
libgcc_s.so.1 GCC_4.0.0
libgfortran.so.3 GFORTRAN_1.0
libm.so.6 GLIBC_2.4
libpthread.so.0 GLIBC_2.4
289
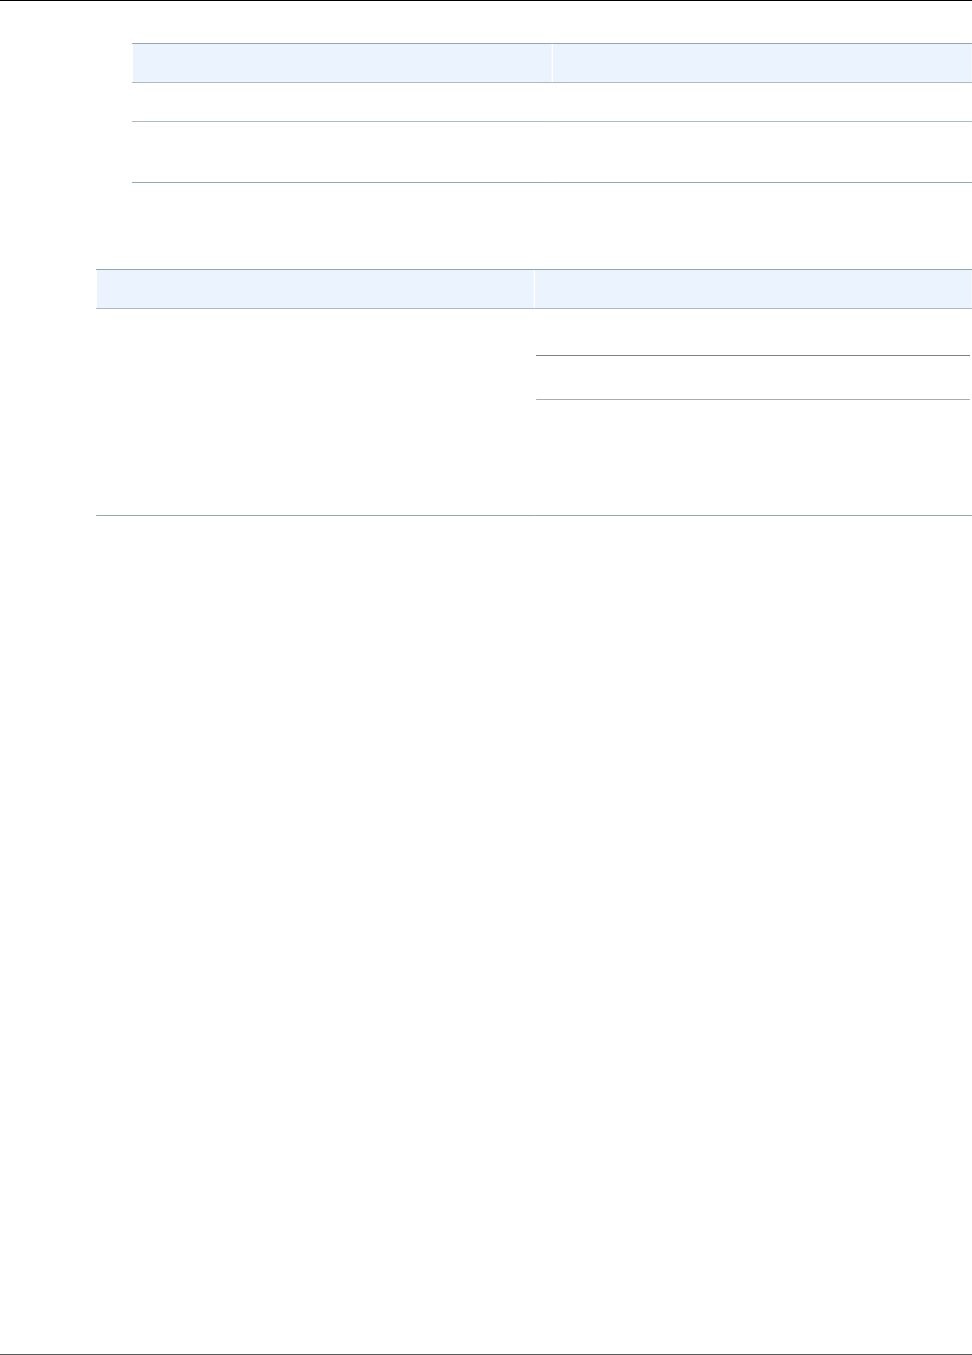
AWS IoT Greengrass Developer Guide
Kinesis Firehose
Library Minimum version
librt.so.1 GLIBC_2.4
libstdc++.so.6 CXXABI_1.3.8, CXXABI_ARM_1.3.3,
GLIBCXX_3.4.20
Issues
Symptom Solution
On a Raspberry Pi, the following error message is
logged and you are not using the camera: Failed
to initialize libdc1394
Run the following command to disable the driver:
sudo ln /dev/null /dev/raw1394
This operation is ephemeral and the symbolic
link will disappear after rebooting. Consult the
manual of your OS distribution to learn how to
automatically create the link up on reboot.
Licenses
The Image Classification connectors includes the following third-party software/licensing:
•AWS SDK for Python (Boto 3) / Apache 2.0
•mxnet / Apache 2.0
This connector is released under the Greengrass Core Software License Agreement.
See Also
•Integrate with Services and Protocols Using Connectors (p. 266)
•the section called “Get Started with Connectors (Console)” (p. 335)
•the section called “Get Started with Connectors (CLI)” (p. 348)
•Perform Machine Learning Inference (p. 195)
•Image Classification Algorithm in the Amazon SageMaker Developer Guide
Kinesis Firehose
The Kinesis Firehose connector (p. 266) publishes data through an Amazon Kinesis Data Firehose
delivery stream to destinations such as Amazon S3, Amazon Redshift, or Amazon Elasticsearch Service.
This connector is a data producer for a Kinesis delivery stream. It receives input data on an MQTT topic,
and sends the data to a specified delivery stream. The delivery stream then sends the data record to the
configured destination (for example, an S3 bucket).
ARN: arn:aws:greengrass:region::/connectors/KinesisFirehose/versions/1
Requirements
This connector has the following requirements:
290

AWS IoT Greengrass Developer Guide
Kinesis Firehose
• AWS IoT Greengrass Core Software v1.7.0.
•Python version 2.7 installed on the core device and added to the PATH environment variable.
• A configured Kinesis delivery stream. For more information, see Creating an Amazon Kinesis Data
Firehose Delivery Stream in the Amazon Kinesis Firehose Developer Guide.
• An IAM policy added to the Greengrass group role that allows the firehose:PutRecord action on
the target delivery stream, as shown in the following example:
{
"Version":"2012-10-17",
"Statement":[
{
"Sid":"Stmt1528133056761",
"Action":[
"firehose:PutRecord"
],
"Effect":"Allow",
"Resource":[
"arn:aws:firehose:region:account-id:deliverystream/stream-name"
]
}
]
}
This connector allows you to dynamically override the default delivery stream in the input
message payload. If your implementation uses this feature, the IAM policy must allow the
firehose:PutRecord permission for all target streams. You can grant granular or conditional access
to resources (for example, by using a wildcard * naming scheme). For more information, see Adding
and Removing IAM Policies in the IAM User Guide.
Connector Parameters
This connector provides the following parameters:
DefaultDeliveryStreamArn
The ARN of the default Kinesis Data Firehose delivery stream to send data to. The destination stream
can be overridden by the delivery_stream_arn property in the input message payload.
Note
The group role must allow firehose:PutRecord permission on all target delivery
streams. For more information, see the section called “Requirements” (p. 290).
Display name in console: Default delivery stream ARN
Required: true
Type: string
Valid pattern: arn:aws:firehose:([a-z]{2}-[a-z]+-\d{1}):(\d{12}):deliverystream/
([a-zA-Z0-9_\-.]+)$
Create Connector Example (CLI)
The following CLI command creates an ConnectorDefinition with an initial version that contains the
Kinesis Firehose connector.
aws greengrass create-connector-definition --name MyGreengrassConnectors --initial-version
'{
291

AWS IoT Greengrass Developer Guide
Kinesis Firehose
"Connectors": [
{
"Id": "MyKinesisFirehoseConnector",
"ConnectorArn": "arn:aws:greengrass:region::/connectors/KinesisFirehose/
versions/1",
"Parameters": {
"DefaultDeliveryStreamArn": "arn:aws:firehose:region:account-
id:deliverystream/stream-name"
}
}
]
}'
In the AWS IoT Greengrass console, you can add a connector from the group's Connectors page. For
more information, see the section called “Get Started with Connectors (Console)” (p. 335).
Input Data
This connector accepts stream content on MQTT topics, and then sends the content to the target
delivery stream. It accepts two types of input data:
• JSON data on the kinesisfirehose/message topic.
• Binary data on the kinesisfirehose/message/binary/# topic.
Topic filter: kinesisfirehose/message
Use this topic to send a message that contains JSON data.
Message properties
request
The data to send to the delivery stream and the target delivery stream, if different from the
default stream.
Required: true
Type: object that includes the following properties:
data
The data to send to the delivery stream.
Required: true
Type: bytes
delivery_stream_arn
The ARN of the target Kinesis delivery stream. Include this property to override the
default delivery stream.
Required: false
Type: string
Valid pattern: arn:aws:firehose:([a-z]{2}-[a-z]+-\d{1}):
(\d{12}):deliverystream/([a-zA-Z0-9_\-.]+)$
id
An arbitrary ID for the request. This property is used to map an input request to an output
response. When specified, the id property in the response object is set to this value. If you
don't use this feature, you can omit this property or specify an empty string.
292

AWS IoT Greengrass Developer Guide
Kinesis Firehose
Required: false
Type: string
Valid pattern: .*
Example input
{
"request": {
"delivery_stream_arn": "arn:aws:firehose:region:account-id:deliverystream/
stream2-name",
"data": "Data to send to the delivery stream."
},
"id": "request123"
}
Topic filter: kinesisfirehose/message/binary/#
Use this topic to send a message that contains binary data. The connector doesn't parse binary data.
The data is streamed as is.
To map the input request to an output response, replace the # wildcard in the message topic with
an arbitrary request ID. For example, if you publish a message to kinesisfirehose/message/
binary/request123, the id property in the response object is set to request123.
If you don't want to map a request to a response, you can publish your messages to
kinesisfirehose/message/binary/. Be sure to include the trailing slash.
Output Data
This connector publishes status information as output data.
Topic filter
kinesisfirehose/message/status
Example output: Success
{
"response": {
"firehose_record_id": "1lxfuuuFomkpJYzt/34ZU/r8JYPf8Wyf7AXqlXm",
"status": "success"
},
"id": "request123"
}
Example output: Failure
{
"response" : {
"error": "ResourceNotFoundException",
"error_message": "An error occurred (ResourceNotFoundException) when calling
the PutRecord operation: Firehose test1 not found under account 123456789012.",
"status": "fail"
},
"id": "request123"
}
293

AWS IoT Greengrass Developer Guide
Modbus-RTU Protocol Adapter
Licenses
The Kinesis Firehose connector includes the following third-party software/licensing:
•AWS SDK for Python (Boto 3) / Apache 2.0
This connector is released under the Greengrass Core Software License Agreement.
See Also
•Integrate with Services and Protocols Using Connectors (p. 266)
•the section called “Get Started with Connectors (Console)” (p. 335)
•the section called “Get Started with Connectors (CLI)” (p. 348)
•What Is Amazon Kinesis Data Firehose? in the Amazon Kinesis Developer Guide
Modbus-RTU Protocol Adapter
The Modbus-RTU Protocol Adapter connector (p. 266) polls information from Modbus RTU devices that
are in the AWS IoT Greengrass group.
This connector receives parameters for a Modbus RTU request from a user-defined Lambda function. It
sends the corresponding request, and then publishes the response from the target device as an MQTT
message.
ARN: arn:aws:greengrass:region::/connectors/ModbusRTUProtocolAdapter/versions/1
Requirements
This connector has the following requirements:
• AWS IoT Greengrass Core Software v1.7.0.
•Python version 2.7 installed on the core device and added to the PATH environment variable.
• A physical connection between the AWS IoT Greengrass core and the Modbus devices. The core must
be physically connected to the Modbus RTU network through a serial port (for example, a USB port).
• A local device resource (p. 169) in the Greengrass group that points to the physical Modbus serial port.
• A user-defined Lambda function that sends Modbus RTU request parameters to this connector. The
request parameters must conform to expected patterns and include the IDs and addresses of the
target devices on the Modbus RTU network. For more information, see the section called “Input
Data” (p. 295).
Connector Parameters
This connector supports the following parameters:
ModbusSerialPort-ResourceId
The ID of the local device resource that represents the physical Modbus serial port.
Note
This connector is granted read-write access to the resource.
Display name in console: Modbus serial port resource
Required: true
294

AWS IoT Greengrass Developer Guide
Modbus-RTU Protocol Adapter
Type: string
Valid pattern: .+
ModbusSerialPort
The absolute path to the physical Modbus serial port on the device. This is the source path that's
specified for the Modbus local device resource.
Display name in console: Source path of Modbus serial port resource
Required: true
Type: string
Valid pattern: .+
Create Connector Example (CLI)
The following CLI command creates an ConnectorDefinition with an initial version that contains the
Modbus-RTU Protocol Adapter connector.
aws greengrass create-connector-definition --name MyGreengrassConnectors --initial-version
'{
"Connectors": [
{
"Id": "MyModbusRTUProtocolAdapterConnector",
"ConnectorArn": "arn:aws:greengrass:region::/connectors/
ModbusRTUProtocolAdapter/versions/1",
"Parameters": {
"ModbusSerialDevice-ResourceId": "MyLocalModbusSerialPort",
"ModbusSerialDevice": "/path-to-port"
}
}
]
}'
Note
The Lambda function in this connector has a long-lived (p. 156) lifecycle.
In the AWS IoT Greengrass console, you can add a connector from the group's Connectors page. For
more information, see the section called “Get Started with Connectors (Console)” (p. 335).
Input Data
This connector accepts Modbus RTU request parameters from a user-defined Lambda function on an
MQTT topic. Input messages must be in JSON format.
Topic filter
modbus/adapter/request
Message properties
The request message varies based on the type of Modbus RTU request that it represents. The
following properties are required for all requests:
• In the request object:
•operation. The operation to execute, specified by name or function code. For example, to read
coils, you can specify ReadCoilsRequest or 0x01. This value must be a Unicode string.
•device. The target device of the request. This value must be between 0 - 247.
295

AWS IoT Greengrass Developer Guide
Modbus-RTU Protocol Adapter
• The id property. An ID for the request. This value is used for data deduplication and is returned
as is in the id property of all responses, including error responses. This value must be a Unicode
string.
The other parameters to include in the request depend on the operation. All request parameters are
required except the CRC, which is handled separately. For examples, see the section called “Example
Requests and Responses” (p. 298).
Example input: Using operation name
{
"request": {
"operation": "ReadCoilsRequest",
"device": 1,
"address": 0x01,
"count": 1
},
"id": "TestRequest"
}
Example input: Using function code
{
"request": {
"operation": 0x01,
"device": 1,
"address": 0x01,
"count": 1
},
"id": "TestRequest"
}
For more examples, see the section called “Example Requests and Responses” (p. 298).
Output Data
This connector publishes responses to incoming Modbus RTU requests.
Topic filter
modbus/adapter/response
Message properties
The format of the response message varies based on the corresponding request and the response
status. For examples, see the section called “Example Requests and Responses” (p. 298).
Note
A response for a write operation is simply an echo of the request. Although no meaningful
information is returned for write responses, it's a good practice to check the status of the
response.
Every response includes the following properties:
• In the response object:
•status. The status of the request. The status can be one of the following values:
•Success. The request was valid, sent to the Modbus RTU network, and a response was
returned.
•Exception. The request was valid, sent to the Modbus RTU network, and an exception
response was returned. For more information, see the section called “Response Status:
Exception” (p. 302).
296

AWS IoT Greengrass Developer Guide
Modbus-RTU Protocol Adapter
•No Response. The request was invalid, and the connector caught the error before the
request was sent over the Modbus RTU network. For more information, see the section called
“Response Status: No Response” (p. 302).
•device. The device that the request was sent to.
•operation. The request type that was sent.
•payload. The response content that was returned. If the status is No Response, this object
contains only an error property with the error description (for example, "error": "[Input/
Output] No Response received from the remote unit").
• The id property. The ID of the request, used for data deduplication.
Example output: Success
{
"response" : {
"status" : "success",
"device": 1,
"operation": "ReadCoilsRequest",
"payload": {
"function_code": 1,
"bits": [1]
}
},
"id" : "TestRequest"
}
Example output: Failure
{
"response" : {
"status" : "fail",
"error_message": "Internal Error",
"error": "Exception",
"device": 1,
"operation": "ReadCoilsRequest",
"payload": {
"function_code": 129,
"exception_code": 2
}
},
"id" : "TestRequest"
}
For more examples, see the section called “Example Requests and Responses” (p. 298).
Modbus RTU Requests and Responses
This connector accepts Modbus RTU request parameters as input data (p. 295) and publishes responses
as output data (p. 296).
The following common operations are supported.
Operation Function Code
ReadCoilsRequest 01
ReadHoldingRegistersRequest 03
ReadInputRegistersRequest 04
297

AWS IoT Greengrass Developer Guide
Modbus-RTU Protocol Adapter
Operation Function Code
WriteSingleCoilRequest 05
WriteSingleRegisterRequest 06
WriteMultipleCoilsRequest 15
WriteMultipleRegistersRequest 16
MaskWriteRegisterRequest 22
ReadWriteMultipleRegistersRequest 23
Example Requests and Responses
The following are example requests and responses for supported operations.
Read Coils
Request example:
{
"request": {
"operation": "ReadCoilsRequest",
"device": 1,
"address": 0x01,
"count": 1
},
"id": "TestRequest"
}
Response example:
{
"response" : {
"status" : "success",
"device": 1,
"operation": "ReadCoilsRequest",
"payload": {
"function_code": 1,
"bits": [1]
}
},
"id" : "TestRequest"
}
Read Holding Registers
Request example:
{
"request": {
"operation": "ReadHoldingRegistersRequest",
"device": 1,
"address": 0x01,
"count": 1
},
"id": "TestRequest"
}
298

AWS IoT Greengrass Developer Guide
Modbus-RTU Protocol Adapter
Response example:
{
"response" : {
"status" : "success",
"device": 1,
"operation": "ReadHoldingRegistersRequest",
"payload": {
"function_code": 3,
"registers": [20,30]
}
},
"id" : "TestRequest"
}
Read Input Registers
Request example:
{
"request": {
"operation": "ReadInputRegistersRequest",
"device": 1,
"address": 0x01,
"value": 1
},
"id": "TestRequest"
}
Write Single Coil
Request example:
{
"request": {
"operation": "WriteSingleCoilRequest",
"device": 1,
"address": 0x01,
"value": 1
},
"id": "TestRequest"
}
Response example:
{
"response" : {
"status" : "success",
"device": 1,
"operation": "WriteSingleCoilRequest",
"payload": {
"function_code": 5,
"address": 1,
"value": true
}
},
"id" : "TestRequest"
Write Single Register
Request example:
299

AWS IoT Greengrass Developer Guide
Modbus-RTU Protocol Adapter
{
"request": {
"operation": "WriteSingleRegisterRequest",
"device": 1,
"address": 0x01,
"value": 1
},
"id": "TestRequest"
}
Write Multiple Coils
Request example:
{
"request": {
"operation": "WriteMultipleCoilsRequest",
"device": 1,
"address": 0x01,
"values": [1,0,0,1]
},
"id": "TestRequest"
}
Response example:
{
"response" : {
"status" : "success",
"device": 1,
"operation": "WriteMultipleCoilsRequest",
"payload": {
"function_code": 15,
"address": 1,
"count": 4
}
},
"id" : "TestRequest"
}
Write Multiple Registers
Request example:
{
"request": {
"operation": "WriteMultipleRegistersRequest",
"device": 1,
"address": 0x01,
"values": [20,30,10]
},
"id": "TestRequest"
}
Response example:
{
"response" : {
"status" : "success",
"device": 1,
300

AWS IoT Greengrass Developer Guide
Modbus-RTU Protocol Adapter
"operation": "WriteMultipleRegistersRequest",
"payload": {
"function_code": 23,
"address": 1,
"count": 3
}
},
"id" : "TestRequest"
}
Mask Write Register
Request example:
{
"request": {
"operation": "MaskWriteRegisterRequest",
"device": 1,
"address": 0x01,
"and_mask": 0xaf,
"or_mask": 0x01
},
"id": "TestRequest"
}
Response example:
{
"response" : {
"status" : "success",
"device": 1,
"operation": "MaskWriteRegisterRequest",
"payload": {
"function_code": 22,
"and_mask": 0,
"or_mask": 8
}
},
"id" : "TestRequest"
}
Read Write Multiple Registers
Request example:
{
"request": {
"operation": "ReadWriteMultipleRegistersRequest",
"device": 1,
"read_address": 0x01,
"read_count": 2,
"write_address": 0x03,
"write_registers": [20,30,40]
},
"id": "TestRequest"
}
Response example:
{
301

AWS IoT Greengrass Developer Guide
Modbus-RTU Protocol Adapter
"response" : {
"status" : "success",
"device": 1,
"operation": "ReadWriteMultipleRegistersRequest",
"payload": {
"function_code": 23,
"registers": [10,20,10,20]
}
},
"id" : "TestRequest"
}
Note
The registers returned in this response are the registers that are read from.
Response Status: Exception
Exceptions can occur when the request format is valid, but the request is not completed successfully. In
this case, the response contains the following information:
• The status is set to Exception.
• The function_code equals the function code of the request + 128.
• The exception_code contains the exception code. For more information, see Modbus exception
codes.
Example:
{
"response" : {
"status" : "fail",
"error_message": "Internal Error",
"error": "Exception",
"device": 1,
"operation": "ReadCoilsRequest",
"payload": {
"function_code": 129,
"exception_code": 2
}
},
"id" : "TestRequest"
}
Response Status: No Response
This connector performs validation checks on the Modbus request. For example, it checks for invalid
formats and missing fields. If the validation fails, the connector doesn't send the request. Instead, it
returns a response that contains the following information:
• The status is set to No Response.
• The error contains the error reason.
• The error_message contains the error message.
Examples:
{
"response" : {
"status" : "fail",
302

AWS IoT Greengrass Developer Guide
Raspberry Pi GPIO
"error_message": "Invalid address field. Expected <type 'int'>, got <type 'str'>",
"error": "No Response",
"device": 1,
"operation": "ReadCoilsRequest",
"payload": {
"error": "Invalid address field. Expected Expected <type 'int'>, got <type 'str'>"
}
},
"id" : "TestRequest"
}
If the request targets a nonexistent device or if the Modbus RTU network is not working, you might get a
ModbusIOException, which uses the No Response format.
{
"response" : {
"status" : "fail",
"error_message": "[Input/Output] No Response received from the remote unit",
"error": "No Response",
"device": 1,
"operation": "ReadCoilsRequest",
"payload": {
"error": "[Input/Output] No Response received from the remote unit"
}
},
"id" : "TestRequest"
}
Licenses
The Modbus-RTU Protocol Adapter connector includes the following third-party software/licensing:
•pymodbus / BSD
•pyserial / BSD
This connector is released under the Greengrass Core Software License Agreement.
See Also
•Integrate with Services and Protocols Using Connectors (p. 266)
•the section called “Get Started with Connectors (Console)” (p. 335)
•the section called “Get Started with Connectors (CLI)” (p. 348)
Raspberry Pi GPIO
The Raspberry Pi GPIO connector (p. 266) controls general-purpose input/output (GPIO) pins on a
Raspberry Pi core device.
This connector polls input pins at a specified interval and publishes state changes to MQTT topics. It also
accepts read and write requests as MQTT messages from user-defined Lambda functions. Write requests
are used to set the pin to high or low voltage.
The connector provides parameters that you use to designate input and output pins. This behavior is
configured before group deployment. It can't be changed at runtime.
• Input pins can be used to receive data from peripheral devices.
303

AWS IoT Greengrass Developer Guide
Raspberry Pi GPIO
• Output pins can be used to control peripherals or send data to peripherals.
You can use this connector for many scenarios, such as:
• Controlling green, yellow, and red LED lights for a traffic light.
• Controlling a fan (attached to an electrical relay) based on data from a humidity sensor.
• Alerting employees in a retail store when customers press a button.
• Using a smart light switch to control other IoT devices.
Note
This connector is not suitable for applications that have real-time requirements. Events with
short durations might be missed.
ARN: arn:aws:greengrass:region::/connectors/RaspberryPiGPIO/versions/1
Requirements
This connector has the following requirements:
• AWS IoT Greengrass Core Software v1.7.0.
•Python version 2.7 installed on the core device and added to the PATH environment variable.
• Raspberry Pi 3, model B. You must know the pin sequence of your Raspberry Pi. For more information,
see the section called “GPIO Pin Sequence” (p. 304).
• A local device resource (p. 169) in the Greengrass group that points to /dev/gpiomem on the
Raspberry Pi. If you create the resource in the console, you must select the Automatically add
OS group permissions of the Linux group that owns the resource option. In the API, set the
GroupOwnerSetting.AutoAddGroupOwner property to true.
• The RPi.GPIO module installed on the Raspberry Pi. In Raspbian, this module is installed by default.
You can use the following command to reinstall it:
sudo pip install RPi.GPIO
GPIO Pin Sequence
The Raspberry Pi GPIO connector references GPIO pins by the numbering scheme of the underlying
System on Chip (SoC), not by the physical layout of GPIO pins. The physical ordering of pins might vary
in Raspberry Pi versions. For more information, see GPIO in the Raspberry Pi documentation.
The connector can't validate that the input and output pins you configure map correctly to the
underlying hardware of your Raspberry Pi. If the pin configuration is invalid, the connector returns a
runtime error when it attempts to start on the device. To resolve this issue, reconfigure the connector
and then redeploy.
Note
Make sure that peripherals for GPIO pins are properly wired to prevent component damage.
Connector Parameters
This connector provides the following parameters:
InputGpios
A comma-separated list of GPIO pin numbers to configure as inputs. Optionally append U to set a
pin's pull-up resistor, or D to set the pull-down resistor. Example: "5,6U,7D".
304

AWS IoT Greengrass Developer Guide
Raspberry Pi GPIO
Display name in console: Input GPIO pins
Required: false. You must specify input pins, output pins, or both.
Type: string
Valid pattern: ^$|^[0-9]+[UD]?(,[0-9]+[UD]?)*$
InputPollPeriod
The interval (in milliseconds) between each polling operation, which checks input GPIO pins for state
changes. The minimum value is 1.
This value depends on your scenario and the type of devices that are polled. For example, a value of
50 should be fast enough to detect a button press.
Display name in console: Input GPIO polling period
Required: false
Type: integer
Valid pattern: ^$|^[1-9][0-9]*$
OutputGpios
A comma-separated list of GPIO pin numbers to configure as outputs. Optionally append H to set a
high state (1), or L to set a low state (0). Example: "8H,9,27L".
Display name in console: Output GPIO pins
Required: false. You must specify input pins, output pins, or both.
Type: string
Valid pattern: ^$|^[0-9]+[HL]?(,[0-9]+[HL]?)*$
GpioMem-ResourceId
The ID of the local device resource that represents /dev/gpiomem.
Note
This connector is granted read-write access to the resource.
Display name in console: Resource for /dev/gpiomem device
Required: true
Type: string
Valid pattern: .+
Create Connector Example (CLI)
The following CLI command creates an ConnectorDefinition with an initial version that contains the
Raspberry Pi GPIO connector.
aws greengrass create-connector-definition --name MyGreengrassConnectors --initial-version
'{
"Connectors": [
{
"Id": "MyRaspberryPiGPIOConnector",
305

AWS IoT Greengrass Developer Guide
Raspberry Pi GPIO
"ConnectorArn": "arn:aws:greengrass:region::/connectors/RaspberryPiGPIO/
versions/1",
"Parameters": {
"GpioMem-ResourceId": "my-gpio-resource",
"InputGpios": "5,6U,7D",
"InputPollPeriod": 50,
"OutputGpios": "8H,9,27L"
}
}
]
}'
Note
The Lambda function in this connector has a long-lived (p. 156) lifecycle.
In the AWS IoT Greengrass console, you can add a connector from the group's Connectors page. For
more information, see the section called “Get Started with Connectors (Console)” (p. 335).
Input Data
This connector accepts read or write requests for GPIO pins on two MQTT topics. Input messages must
be in JSON format.
• Read requests on the gpio/+/+/read topic.
• Write requests on the gpio/+/+/write topic.
To publish to these topics, replace the + wildcards with the core thing name and the target pin number,
respectively. For example:
gpio/core-thing-name/gpio-number/read
Note
Currently, when you create a subscription that uses the Raspberry Pi GPIO connector, you must
specify a value for at least one of the + wildcards in the topic.
Topic filter: gpio/+/+/read
Use this topic to direct the connector to read the state of the GPIO pin that's specified in the topic.
The connector publishes the response to the corresponding output topic (for example, gpio/core-
thing-name/gpio-number/state).
Message properties
None. Messages that are sent to this topic are ignored.
Topic filter: gpio/+/+/write
Use this topic to send write requests to a GPIO pin. This directs the connector to set the GPIO pin
that's specified in the topic to a low or high voltage.
•0 sets the pin to low voltage.
•1 sets the pin to high voltage.
The connector publishes the response to the corresponding output /state topic (for example,
gpio/core-thing-name/gpio-number/state).
Message properties
The value 0 or 1, as an integer or string.
306

AWS IoT Greengrass Developer Guide
Raspberry Pi GPIO
Example input
0
Output Data
This connector publishes data to two topics:
• High or low state changes on the gpio/+/+/state topic.
• Errors on the gpio/+/error topic.
Topic filter: gpio/+/+/state
Use this topic to listen for state changes on input pins and responses for read requests. The
connector returns the string "0" if the pin is in a low state, or "1" if it's in a high state.
When publishing to this topic, the connector replaces the + wildcards with the core thing name and
the target pin, respectively. For example:
gpio/core-thing-name/gpio-number/state
Note
Currently, when you create a subscription that uses the Raspberry Pi GPIO connector, you
must specify a value for at least one of the + wildcards in the topic.
Example output
0
Topic filter: gpio/+/errors
Use this topic to listen for errors. The connector publishes to this topic as a result of an invalid
request (for example, when a state change is requested on an input pin).
When publishing to this topic, the connector replaces the + wildcard with the core thing name.
Example output
{
"topic": "gpio/my-core-thing/22/write",
"error": "Invalid GPIO operation",
"long_description": "GPIO 22 is configured as an INPUT GPIO. Write operations
are not permitted."
}
Licenses
This connector is released under the Greengrass Core Software License Agreement.
See Also
•Integrate with Services and Protocols Using Connectors (p. 266)
•the section called “Get Started with Connectors (Console)” (p. 335)
307

AWS IoT Greengrass Developer Guide
Serial Stream
•the section called “Get Started with Connectors (CLI)” (p. 348)
•GPIO in the Raspberry Pi documentation
Serial Stream
The Serial Stream connector (p. 266) reads and writes to a serial port on an AWS IoT Greengrass core
device.
This connector supports two modes of operation:
•Read-On-Demand. Receives read and write requests on MQTT topics and publishes the response of
the read operation or the status of the write operation.
•Polling-Read. Reads from the serial port at regular intervals. This mode also supports Read-On-
Demand requests.
Note
Read requests are limited to a maximum read length of 63994 bytes. Write requests are limited
to a maximum data length of 128000 bytes.
ARN: arn:aws:greengrass:region::/connectors/SerialStream/versions/1
Requirements
This connector has the following requirements:
• AWS IoT Greengrass Core Software v1.7.0.
•Python version 2.7 installed on the core device and added to the PATH environment variable.
• A local device resource (p. 169) in the Greengrass group that points to the target serial port.
Note
Before you deploy this connector, we recommend that you set up the serial port and verify
that it can be read from and written to.
Connector Parameters
This connector provides the following parameters:
BaudRate
The baud rate of the serial connection.
Display name in console: Baud rate
Required: true
Type: string
Valid values: 110, 300, 600, 1200, 2400, 4800, 9600, 14400, 19200, 28800, 38400,
56000, 57600, 115200, 230400
Valid pattern: ^110$|^300$|^600$|^1200$|^2400$|^4800$|^9600$|^14400$|^19200$|
^28800$|^38400$|^56000$|^57600$|^115200$|^230400$
Timeout
The timeout (in seconds) for a read operation.
308

AWS IoT Greengrass Developer Guide
Serial Stream
Display name in console: Timeout
Required: true
Type: string
Valid values: 1 - 59
Valid pattern: ^([1-9]|[1-5][0-9])$
SerialPort
The absolute path to the physical serial port on the device. This is the source path that's specified for
the local device resource.
Display name in console: Serial port
Required: true
Type: string
Valid pattern: [/a-zA-Z0-9_-]+
SerialPort-ResourceId
The ID of the local device resource that represents the physical serial port.
Note
This connector is granted read-write access to the resource.
Display name in console: Serial port resource
Required: true
Type: string
Valid pattern: [a-zA-Z0-9_-]+
PollingRead
Sets the read mode: Polling-Read or Read-On-Demand.
• For Polling-Read mode, specify true. In this mode, the PollingInterval, PollingReadType,
and PollingReadLength properties are required.
• For Read-On-Demand mode, specify false. In this mode, the type and length values are specified
in the read request.
Display name in console: Read mode
Required: true
Type: string
Valid values: true, false
Valid pattern: ^([Tt][Rr][Uu][Ee]|[Ff][Aa][Ll][Ss][Ee])$
PollingReadLength
The length of data to read in each polling read operation. This applies only when using Polling-Read
mode.
Display name in console: Polling read length
309

AWS IoT Greengrass Developer Guide
Serial Stream
Required: false. This property is required when PollingRead is true.
Type: string
Valid pattern: ^(|[1-9][0-9]{0,3}|[1-5][0-9]{4}|6[0-2][0-9]{3}|63[0-8][0-9]{2}|
639[0-8][0-9]|6399[0-4])$
PollingReadInterval
The interval (in seconds) at which the polling read takes place. This applies only when using Polling-
Read mode.
Display name in console: Polling read interval
Required: false. This property is required when PollingRead is true.
Type: string
Valid values: 1 - 999
Valid pattern: ^(|[1-9]|[1-9][0-9]|[1-9][0-9][0-9])$
PollingReadType
The type of data that the polling thread reads. This applies only when using Polling-Read mode.
Display name in console: Polling read type
Required: false. This property is required when PollingRead is true.
Type: string
Valid values: ascii, hex
Valid pattern: ^(|[Aa][Ss][Cc][Ii][Ii]|[Hh][Ee][Xx])$
RtsCts
Indicates whether to enable the RTS/CTS flow control. The default value is false. For more
information, see RTS, CTS, and RTR.
Display name in console: RTS/CTS flow control
Required: false
Type: string
Valid values: true, false
Valid pattern: ^(|[Tt][Rr][Uu][Ee]|[Ff][Aa][Ll][Ss][Ee])$
XonXoff
Indicates whether to enable the software flow control. The default value is false. For more
information, see Software flow control.
Display name in console: Software flow control
Required: false
Type: string
Valid values: true, false
310

AWS IoT Greengrass Developer Guide
Serial Stream
Valid pattern: ^(|[Tt][Rr][Uu][Ee]|[Ff][Aa][Ll][Ss][Ee])$
Parity
The parity of the serial port. The default value is N. For more information, see Parity.
Display name in console: Serial port parity
Required: false
Type: string
Valid values: N, E, O, S, M
Valid pattern: ^(|[NEOSMneosm])$
Create Connector Example (CLI)
The following CLI command creates an ConnectorDefinition with an initial version that contains the
Serial Stream connector. It configures the connector for Polling-Read mode.
aws greengrass create-connector-definition --name MyGreengrassConnectors --initial-version
'{
"Connectors": [
{
"Id": "MySerialStreamConnector",
"ConnectorArn": "arn:aws:greengrass:region::/connectors/SerialStream/
versions/1",
"Parameters": {
"BaudRate" : "9600",
"Timeout" : "25",
"SerialPort" : "/dev/serial1",
"SerialPort-ResourceId" : "my-serial-port-resource",
"PollingRead" : "true",
"PollingReadLength" : "30",
"PollingReadInterval" : "30",
"PollingReadType" : "hex"
}
}
]
}'
In the AWS IoT Greengrass console, you can add a connector from the group's Connectors page. For
more information, see the section called “Get Started with Connectors (Console)” (p. 335).
Input Data
This connector accepts read or write requests for serial ports on two MQTT topics. Input messages must
be in JSON format.
• Read requests on the serial/+/read/# topic.
• Write requests on the serial/+/write/# topic.
To publish to these topics, replace the + wildcard with the core thing name and # wildcard with the path
to the serial port. For example:
serial/core-thing-name/read/dev/serial-port
311

AWS IoT Greengrass Developer Guide
Serial Stream
Topic filter: serial/+/read/#
Use this topic to send on-demand read requests to a serial pin. Read requests are limited to a
maximum read length of 63994 bytes.
Message properties
readLength
The length of data to read from the serial port.
Required: true
Type: string
Valid pattern: ^[1-9][0-9]*$
type
The type of data to read.
Required: true
Type: string
Valid values: ascii, hex
Valid pattern: (?i)^(ascii|hex)$
id
An arbitrary ID for the request. This property is used to map an input request to an output
response.
Required: false
Type: string
Valid pattern: .+
Example input
{
"readLength": "30",
"type": "ascii",
"id": "abc123"
}
Topic filter: serial/+/write/#
Use this topic to send write requests to a serial pin. Write requests are limited to a maximum data
length of 128000 bytes.
Message properties
data
The string to write to the serial port.
Required: true
Type: string
Valid pattern: ^[1-9][0-9]*$
312
AWS IoT Greengrass Developer Guide
Serial Stream
type
The type of data to read.
Required: true
Type: string
Valid values: ascii, hex
Valid pattern: ^(ascii|hex|ASCII|HEX)$
id
An arbitrary ID for the request. This property is used to map an input request to an output
response.
Required: false
Type: string
Valid pattern: .+
Example input: ASCII request
{
"data": "random serial data",
"type": "ascii",
"id": "abc123"
}
Example input: hex request
{
"data": "base64 encoded data",
"type": "hex",
"id": "abc123"
}
Output Data
The connector publishes output data on two topics:
• Status information from the connector on the serial/+/status/# topic.
• Responses from read requests on the serial/+/read_response/# topic.
When publishing to this topic, the connector replaces the + wildcard with the core thing name and #
wildcard with the path to the serial port. For example:
serial/core-thing-name/status/dev/serial-port
Topic filter: serial/+/status/#
Use this topic to listen for the status of read and write requests. If an id property is included it the
request, it's returned in the response.
Example output: Success
{
313

AWS IoT Greengrass Developer Guide
ServiceNow MetricBase Integration
"response": {
"status": "success"
},
"id": "abc123"
}
Example output: Failure
A failure response includes an error_message property that describes the error or timeout
encountered while performing the read or write operation.
{
"response": {
"status": "fail",
"error_message": "Could not write to port"
},
"id": "abc123"
}
Topic filter: serial/+/read_response/#
Use this topic to receive response data from a read operation. The response data is Base64 encoded
if the type is hex.
Example output
{
"data": "output of serial read operation"
"id": "abc123"
}
Licenses
The Serial Stream connector includes the following third-party software/licensing:
•pyserial / BSD
This connector is released under the Greengrass Core Software License Agreement.
See Also
•Integrate with Services and Protocols Using Connectors (p. 266)
•the section called “Get Started with Connectors (Console)” (p. 335)
•the section called “Get Started with Connectors (CLI)” (p. 348)
ServiceNow MetricBase Integration
The ServiceNow MetricBase Integration connector (p. 266) publishes time series metrics from
Greengrass devices to ServiceNow MetricBase. This allows you to store, analyze, and visualize time series
data from the Greengrass core environment, and act on local events.
This connector receives time series data on an MQTT topic, and publishes the data to the ServiceNow API
at regular intervals.
You can use this connector to support scenarios such as:
314

AWS IoT Greengrass Developer Guide
ServiceNow MetricBase Integration
• Create threshold-based alerts and alarms based on time series data collected from Greengrass devices.
• Use time services data from Greengrass devices with custom applications built on the ServiceNow
platform.
ARN: arn:aws:greengrass:region::/connectors/ServiceNowMetricBaseIntegration/
versions/1
Requirements
This connector has the following requirements:
• AWS IoT Greengrass Core Software v1.7.0. AWS IoT Greengrass must be configured to support local
secrets, as described in Secrets Requirements (p. 244).
Note
This includes allowing access to your Secrets Manager secrets. If you're using the default
Greengrass service role, Greengrass has permission to get the values of secrets with names
that start with greengrass-.
•Python version 2.7 installed on the core device and added to the PATH environment variable.
• A ServiceNow account with an activated subscription to MetricBase. In addition, a metric and metric
table must be created in the account. For more information, see MetricBase in the ServiceNow
documentation.
• A text type secret in AWS Secrets Manager that stores the user name and password for your
ServiceNow instance (for basic authentication). The secret must contain "user" and "password" keys
with corresponding values. For more information, see Creating a Basic Secret in the AWS Secrets
Manager User Guide.
• A secret resource in the Greengrass group that references the Secrets Manager secret. For more
information, see Deploy Secrets to the Core (p. 243).
Connector Parameters
This connector provides the following parameters:
PublishInterval
The maximum number of seconds to wait between publish events to ServiceNow. The maximum
value is 900.
The connector publishes to ServiceNow when PublishBatchSize is reached or
PublishInterval expires.
Display name in console: Publish interval in seconds
Required: true
Type: string
Valid values: 1 - 900
Valid pattern: [1-9]|[1-9]\d|[1-9]\d\d|900
PublishBatchSize
The maximum number of metric values that can be batched before they are published to
ServiceNow.
315

AWS IoT Greengrass Developer Guide
ServiceNow MetricBase Integration
The connector publishes to ServiceNow when PublishBatchSize is reached or
PublishInterval expires.
Display name in console: Publish batch size
Required: true
Type: string
Valid pattern: ^[0-9]+$
InstanceName
The name of the instance used to connect to ServiceNow.
Display name in console: Name of ServiceNow instance
Required: true
Type: string
Valid pattern: .+
DefaultTableName
The name of the table that contains the GlideRecord associated with the time series MetricBase
database. The table property in the input message payload can be used to override this value.
Display name in console: Name of the table to contain the metric
Required: true
Type: string
Valid pattern: .+
MaxMetricsToRetain
The maximum number of metrics to save in memory before they are replaced with new metrics.
This limit applies when there's no connection to the internet and the connector starts to buffer the
metrics to publish later. When the buffer is full, the oldest metrics are replaced by new metrics.
Note
Metrics are not saved if the host process for the connector is interrupted. For example, this
can happen during group deployment or when the device restarts.
This value should be greater than the batch size and large enough to hold messages based on the
incoming rate of the MQTT messages.
Display name in console: Maximum metrics to retain in memory
Required: true
Type: string
Valid pattern: ^[0-9]+$
AuthSecretArn
The secret in AWS Secrets Manager that stores the ServiceNow user name and password. This must
be a text type secret. The secret must contain "user" and "password" keys with corresponding values.
Display name in console: ARN of auth secret
316

AWS IoT Greengrass Developer Guide
ServiceNow MetricBase Integration
Required: true
Type: string
Valid pattern: arn:aws:secretsmanager:[a-z0-9\-]+:[0-9]{12}:secret:([a-zA-Z0-9\
\]+/)*[a-zA-Z0-9/_+=,.@\-]+-[a-zA-Z0-9]+
AuthSecretArn-ResourceId
The secret resource in the group that references the Secrets Manager secret for the ServiceNow
credentials.
Display name in console: Auth token resource
Required: true
Type: string
Valid pattern: .+
Create Connector Example (CLI)
The following CLI command creates an ConnectorDefinition with an initial version that contains the
ServiceNow MetricBase Integration connector.
aws greengrass create-connector-definition --name MyGreengrassConnectors --initial-version
'{
"Connectors": [
{
"Id": "MyServiceNowMetricBaseIntegrationConnector",
"ConnectorArn": "arn:aws:greengrass:region::/connectors/
ServiceNowMetricBaseIntegration/versions/1",
"Parameters": {
"PublishInterval" : "10",
"PublishBatchSize" : "50",
"InstanceName" : "myinstance",
"DefaultTableName" : "u_greengrass_app",
"MaxMetricsToRetain" : "20000",
"AuthSecretArn" : "arn:aws:secretsmanager:region:account-
id:secret:greengrass-secret-hash",
"AuthSecretArn-ResourceId" : "MySecretResource"
}
}
]
}'
Note
The Lambda function in this connector has a long-lived (p. 156) lifecycle.
In the AWS IoT Greengrass console, you can add a connector from the group's Connectors page. For
more information, see the section called “Get Started with Connectors (Console)” (p. 335).
Input Data
This connector accepts time series metrics on an MQTT topic and publishes the metrics to ServiceNow.
Input messages must be in JSON format.
Topic filter
servicenow/metricbase/metric
317

AWS IoT Greengrass Developer Guide
ServiceNow MetricBase Integration
Message properties
request
Information about the table, record, and metric. This request represents the seriesRef object
in a time series POST request. For more information, see Clotho Time Series API - POST.
Required: true
Type: object that includes the following properties:
subject
The sys_id of the specific record in the table.
Required: true
Type: string
metric_name
The metric field name.
Required: true
Type: string
table
The name of the table to store the record in. Specify this value to override the
DefaultTableName parameter.
Required: false
Type: string
value
The value of the individual data point.
Required: true
Type: float
timestamp
The timestamp of the individual data point. The default value is the current time.
Required: false
Type: string
Example input
{
"request": {
"subject":"ef43c6d40a0a0b5700c77f9bf387afe3",
"metric_name":"u_count",
"table": "u_greengrass_app"
"value": 1.0,
"timestamp": "2018-10-14T10:30:00"
}
}
318

AWS IoT Greengrass Developer Guide
ServiceNow MetricBase Integration
Output Data
This connector publishes status information as output data.
Topic filter
servicenow/metricbase/metric/status
Example output: Success
{
"response": {
"metric_name": "Errors",
"table_name": "GliderProd",
"processed_on": "2018-10-14T10:35:00",
"response_id": "khjKSkj132qwr23fcba",
"status": "success",
"values": [
{
"timestamp": "2016-10-14T10:30:00",
"value": 1.0
},
{
"timestamp": "2016-10-14T10:31:00",
"value": 1.1
}
]
}
}
Example output: Failure
{
"response": {
"error": "InvalidInputException",
"error_message": "metric value is invalid",
"status": "fail"
}
}
Note
If the connector detects a retryable error (for example, throttled or connection errors), it
retries the publish in the next batch.
Licenses
The ServiceNow MetricBase Integration connector includes the following third-party software/licensing:
•pysnow / MIT
This connector is released under the Greengrass Core Software License Agreement.
See Also
•Integrate with Services and Protocols Using Connectors (p. 266)
•the section called “Get Started with Connectors (Console)” (p. 335)
•the section called “Get Started with Connectors (CLI)” (p. 348)
319

AWS IoT Greengrass Developer Guide
SNS
SNS
The SNS connector (p. 266) publishes messages to an Amazon SNS topic. This enables web servers,
email addresses, and other message subscribers to respond to events in the Greengrass group.
This connector receives SNS message information on an MQTT topic, and then sends the message
to a specified SNS topic. You can optionally use custom Lambda functions to implement filtering or
formatting logic on messages before they are published to this connector.
ARN: arn:aws:greengrass:region::/connectors/SNS/versions/1
Requirements
This connector has the following requirements:
• AWS IoT Greengrass Core Software v1.7.0.
•Python version 2.7 installed on the core device and added to the PATH environment variable.
• A configured SNS topic. For more information, see Create a Topic in the Amazon Simple Notification
Service Developer Guide.
• An IAM policy added to the Greengrass group role that allows the sns:Publish action on the target
SNS topic, as shown in the following example:
{
"Version":"2012-10-17",
"Statement":[
{
"Sid":"Stmt1528133056761",
"Action":[
"sns:Publish"
],
"Effect":"Allow",
"Resource":[
"arn:aws:sns:region:account-id:topic-name"
]
}
]
}
This connector allows you to dynamically override the default topic in the input message payload.
If your implementation uses this feature, the IAM policy must allow sns:Publish permission on
all target topics. You can grant granular or conditional access to resources (for example, by using a
wildcard * naming scheme). For more information, see Adding and Removing IAM Policies in the IAM
User Guide.
Connector Parameters
This connector provides the following parameters:
DefaultSNSArn
The ARN of the default SNS topic to publish messages to. The destination topic can be overridden by
the sns_topic_arn property in the input message payload.
Note
The group role must allow sns:Publish permission to all target topics. For more
information, see the section called “Requirements” (p. 320).
320

AWS IoT Greengrass Developer Guide
SNS
Display name in console: Default SNS topic ARN
Required: true
Type: string
Valid pattern: arn:aws:sns:([a-z]{2}-[a-z]+-\d{1}):(\d{12}):([a-zA-Z0-9-_]+)$
Create Connector Example (CLI)
The following CLI command creates an ConnectorDefinition with an initial version that contains the
SNS connector.
aws greengrass create-connector-definition --name MyGreengrassConnectors --initial-version
'{
"Connectors": [
{
"Id": "MySNSConnector",
"ConnectorArn": "arn:aws:greengrass:region::/connectors/SNS/versions/1",
"Parameters": {
"DefaultSNSArn": "arn:aws:sns:region:account-id:topic-name"
}
}
]
}'
In the AWS IoT Greengrass console, you can add a connector from the group's Connectors page. For
more information, see the section called “Get Started with Connectors (Console)” (p. 335).
Input Data
This connector accepts SNS message information on an MQTT topic, and then publishes the message as
is to the target SNS topic. Input messages must be in JSON format.
Topic filter
sns/message
Message properties
request
Information about the message to send to the SNS topic.
Required: true
Type: object that includes the following properties:
message
The content of the message as a string or in JSON format. For examples, see Example
input (p. 322).
To send JSON, the message_structure property must be set to json and the message
must be a string-encoded JSON object that contains a default key.
Required: true
Type: string
Valid pattern: .*
321

AWS IoT Greengrass Developer Guide
SNS
subject
The subject of the message.
Required: false
Type: ASCII text, up to 100 characters. This must begin with a letter, number, or punctuation
mark. This must not include line breaks or control characters.
Valid pattern: .*
sns_topic_arn
The ARN of the SNS topic to publish messages to. If specified, the connector publishes to
this topic instead of the default topic.
Note
The group role must allow sns:Publish permission to any target topics. For more
information, see the section called “Requirements” (p. 320).
Required: false
Type: string
Valid pattern: arn:aws:sns:([a-z]{2}-[a-z]+-\d{1}):(\d{12}):([a-zA-Z0-9-
_]+)$
message_structure
The structure of the message.
Required: false. This must be specified to send a JSON message.
Type: string
Valid values: json
id
An arbitrary ID for the request. This property is used to map an input request to an output
response. When specified, the id property in the response object is set to this value. If you don't
use this feature, you can omit this property or specify an empty string.
Required: false
Type: string
Valid pattern: .*
Limits
The message size is bounded by a maximum SNS message size of 256 KB.
Example input: String message
This example sends a string message. It specifies the optional sns_topic_arn property, which
overrides the default destination topic.
{
"request": {
"subject": "Message subject",
"message": "Message data",
"sns_topic_arn": "arn:aws:sns:region:account-id:topic2-name"
},
"id": "request123"
}
322

AWS IoT Greengrass Developer Guide
SNS
Example input: JSON message
This example sends a message as a string encoded JSON object that includes the default key.
{
"request": {
"subject": "Message subject",
"message": "{ \"default\": \"Message data\" }",
"message_structure": "json"
},
"id": "request123"
}
Output Data
This connector publishes status information as output data.
Topic filter
sns/message/status
Example output: Success
{
"response": {
"sns_message_id": "f80a81bc-f44c-56f2-a0f0-d5af6a727c8a",
"status": "success"
},
"id": "request123"
}
Example output: Failure
{
"response" : {
"error": "InvalidInputException",
"error_message": "SNS Topic Arn is invalid",
"status": "fail"
},
"id": "request123"
}
Licenses
The SNS connector includes the following third-party software/licensing:
•AWS SDK for Python (Boto 3) / Apache 2.0
This connector is released under the Greengrass Core Software License Agreement.
See Also
•Integrate with Services and Protocols Using Connectors (p. 266)
•the section called “Get Started with Connectors (Console)” (p. 335)
•the section called “Get Started with Connectors (CLI)” (p. 348)
323

AWS IoT Greengrass Developer Guide
Splunk Integration
•Publish action in the Boto 3 documentation
•What Is Amazon Simple Notification Service? in the Amazon Simple Notification Service Developer Guide
Splunk Integration
The Splunk Integration connector (p. 266) publishes data from Greengrass devices to Splunk.
This allows you to use Splunk to monitor and analyze the Greengrass core environment, and act on
local events. The connector integrates with HTTP Event Collector (HEC). For more information, see
Introduction to Splunk HTTP Event Collector in the Splunk documentation.
This connector receives logging and event data on an MQTT topic and publishes the data as is to the
Splunk API.
You can use this connector to support industrial scenarios, such as:
• Operators can use periodic data from actuators and sensors (for example, temperature, pressure, and
water readings) to trigger alarms when values exceed certain thresholds.
• Developers use data collected from industrial machinery to build ML models that can monitor the
equipment for potential issues.
ARN: arn:aws:greengrass:region::/connectors/SplunkIntegration/versions/1
Requirements
This connector has the following requirements:
• AWS IoT Greengrass Core Software v1.7.0. AWS IoT Greengrass must be configured to support local
secrets, as described in Secrets Requirements (p. 244).
Note
This includes allowing access to your Secrets Manager secrets. If you're using the default
Greengrass service role, Greengrass has permission to get the values of secrets with names
that start with greengrass-.
•Python version 2.7 installed on the core device and added to the PATH environment variable.
• The HTTP Event Collector functionality must be enabled in Splunk. For more information, see Set up
and use HTTP Event Collector in Splunk Web in the Splunk documentation.
• A text type secret in AWS Secrets Manager that stores your Splunk HTTP Event Collector token. For
more information, see About Event Collector tokens in the Splunk documentation and Creating a Basic
Secret in the AWS Secrets Manager User Guide.
Note
To create the secret in the Secrets Manager console, enter your token on the Plaintext tab.
Don't include quotation marks or other formatting. In the API, specify the token as the value
for the SecretString property.
• A secret resource in the Greengrass group that references the Secrets Manager secret. For more
information, see Deploy Secrets to the Core (p. 243).
Connector Parameters
This connector provides the following parameters:
SplunkEndpoint
The endpoint of your Splunk instance. This value must contain the protocol, hostname, and port.
324

AWS IoT Greengrass Developer Guide
Splunk Integration
Display name in console: Splunk endpoint
Required: true
Type: string
Valid pattern: ^(http:\/\/|https:\/\/)?[a-z0-9]+([-.]{1}[a-z0-9]+)*.[a-z]{2,5}(:
[0-9]{1,5})?(\/.*)?$
MemorySize
The amount of memory (in KB) to allocate to the connector.
Display name in console: Memory size
Required: true
Type: string
Valid pattern: ^[0-9]+$
SplunkQueueSize
The maximum number of items to save in memory before the items are submitted or discarded.
When this limit is met, the oldest items in the queue are replaced with newer items. This limit
typically applies when there's no connection to the internet.
Display name in console: Maximum items to retain
Required: true
Type: string
Valid pattern: ^[0-9]+$
SplunkFlushIntervalSeconds
The interval (in seconds) for publishing received data to Splunk HEC. The maximum value is 900. To
configure the connector to publish items as they are received (without batching), specify 0.
Display name in console: Splunk publish interval
Required: true
Type: string
Valid pattern: [0-9]|[1-9]\d|[1-9]\d\d|900
SplunkTokenSecretArn
The secret in AWS Secrets Manager that stores the Splunk token. This must be a text type secret.
Display name in console: ARN of Splunk auth token secret
Required: true
Type: string
Valid pattern: arn:aws:secretsmanager:[a-z]{2}-[a-z]+-\d{1}:\d{12}?:secret:[a-
zA-Z0-9-_]+-[a-zA-Z0-9-_]+
SplunkTokenSecretArn-ResourceId
The secret resource in the Greengrass group that references the Splunk secret.
325

AWS IoT Greengrass Developer Guide
Splunk Integration
Display name in console: Splunk auth token resource
Required: true
Type: string
Valid pattern: .+
SplunkCustomCALocation
The file path of the custom certificate authority (CA) for Splunk (for example, /etc/ssl/certs/
splunk.crt).
Display name in console: Splunk custom certificate authority location
Required: false
Type: string
Valid pattern: ^$|/.*
Create Connector Example (CLI)
The following CLI command creates an ConnectorDefinition with an initial version that contains the
Splunk Integration connector.
aws greengrass create-connector-definition --name MyGreengrassConnectors --initial-version
'{
"Connectors": [
{
"Id": "MySplunkIntegrationConnector",
"ConnectorArn": "arn:aws:greengrass:region::/connectors/SplunkIntegration/
versions/1",
"Parameters": {
"SplunkEndpoint": "https://myinstance.cloud.splunk.com:8088",
"MemorySize": 200000,
"SplunkQueueSize": 10000,
"SplunkFlushIntervalSeconds": 5,
"SplunkTokenSecretArn":"arn:aws:secretsmanager:region:account-
id:secret:greengrass-secret-hash",
"SplunkTokenSecretArn-ResourceId": "MySplunkResource"
}
}
]
}'
Note
The Lambda function in this connector has a long-lived (p. 156) lifecycle.
In the AWS IoT Greengrass console, you can add a connector from the group's Connectors page. For
more information, see the section called “Get Started with Connectors (Console)” (p. 335).
Input Data
This connector accepts logging and event data on an MQTT topic and publishes the received data as is to
the Splunk API. Input messages must be in JSON format.
Topic filter
splunk/logs/put
326

AWS IoT Greengrass Developer Guide
Splunk Integration
Message properties
request
The event data to send to the Splunk API. Events must meet the specifications of the services/
collector API.
Required: true
Type: object. Only the event property is required.
id
An arbitrary ID for the request. This property is used to map an input request to an output
status.
Required: false
Type: string
Limits
All limits that are imposed by the Splunk API apply when using this connector. For more information,
see services/collector.
Example input
{
"request": {
"event": "some event",
"fields": {
"severity": "INFO",
"category": [
"value1",
"value2"
]
}
},
"id": "request123"
}
Output Data
This connector publishes output data on two topics:
• Status information on the splunk/logs/put/status topic.
• Errors on the splunk/logs/put/error topic.
Topic filter: splunk/logs/put/status
Use this topic to listen for the status of the requests. Each time that the connector sends a batch
of received data to the Splunk API, it publishes a list of the IDs of the requests that succeeded and
failed.
Example output
{
"response": {
"succeeded": [
"request123",
...
327

AWS IoT Greengrass Developer Guide
Twilio Notifications
],
"failed": [
"request789",
...
]
}
}
Topic filter: splunk/logs/put/error
Use this topic to listen for errors from the connector. The error_message property that describes
the error or timeout encountered while processing the request.
Example output
{
"response": {
"error": "UnauthorizedException",
"error_message": "invalid splunk token",
"status": "fail"
}
}
Note
If the connector detects a retryable error (for example, throttled or connection errors),
it retries the publish in the next batch..
Licenses
This connector is released under the Greengrass Core Software License Agreement.
See Also
•Integrate with Services and Protocols Using Connectors (p. 266)
•the section called “Get Started with Connectors (Console)” (p. 335)
•the section called “Get Started with Connectors (CLI)” (p. 348)
Twilio Notifications
The Twilio Notifications connector (p. 266) makes automated phone calls or sends text messages
through Twilio. You can use this connector to send notifications in response to events in the Greengrass
group. For phone calls, the connector can forward a voice message to the recipient.
This connector receives Twilio message information on an MQTT topic, and then triggers a Twilio
notification.
ARN: arn:aws:greengrass:region::/connectors/TwilioNotifications/versions/1
Note
For a tutorial that shows how to use the Twilio Notifications connector, see the section called
“Get Started with Connectors (Console)” (p. 335) or the section called “Get Started with
Connectors (CLI)” (p. 348).
Requirements
This connector has the following requirements:
328

AWS IoT Greengrass Developer Guide
Twilio Notifications
• AWS IoT Greengrass Core Software v1.7.0. AWS IoT Greengrass must be configured to support local
secrets, as described in Secrets Requirements (p. 244).
Note
This includes allowing access to your Secrets Manager secrets. If you're using the default
Greengrass service role, Greengrass has permission to get the values of secrets with names
that start with greengrass-.
•Python version 2.7 installed on the core device and added to the PATH environment variable.
• A Twilio account SID, auth token, and Twilio-enabled phone number. After you create a Twilio project,
these values are available on the project dashboard.
Note
You can use a Twilio trial account. If you're using a trial account, you must add non-Twilio
recipient phone numbers to a list of verified phone numbers. For more information, see How
to Work with your Free Twilio Trial Account.
• A text type secret in AWS Secrets Manager that stores the Twilio auth token. For more information, see
Creating a Basic Secret in the AWS Secrets Manager User Guide.
Note
To create the secret in the Secrets Manager console, enter your token on the Plaintext tab.
Don't include quotation marks or other formatting. In the API, specify the token as the value
for the SecretString property.
• A secret resource in the Greengrass group that references the Secrets Manager secret. For more
information, see Deploy Secrets to the Core (p. 243).
Connector Parameters
This connector provides the following parameters.
TWILIO_ACCOUNT_SID
The Twilio account SID that's used to invoke the Twilio API.
Display name in console: Twilio account SID
Required: true
Type: string
Valid pattern: .+
TwilioAuthTokenSecretArn
The ARN of the Secrets Manager secret that stores the Twilio auth token.
Note
This is used to access the value of the local secret on the core.
Display name in console: ARN of Twilio auth token secret
Required: true
Type: string
Valid pattern: arn:aws:secretsmanager:[a-z0-9\-]+:[0-9]{12}:secret:([a-zA-Z0-9\
\]+/)*[a-zA-Z0-9/_+=,.@\-]+-[a-zA-Z0-9]+
TwilioAuthTokenSecretArn-ResourceId
The ID of the secret resource in the Greengrass group that references the secret for the Twilio auth
token.
329

AWS IoT Greengrass Developer Guide
Twilio Notifications
Display name in console: Twilio auth token resource
Required: true
Type: string
Valid pattern: .+
DefaultFromPhoneNumber
The default Twilio-enabled phone number that Twilio uses to send messages. Twilio uses this
number to initiate the text or call.
• If you don't configure a default phone number, you must specify a phone number in the
from_number property in the input message body.
• If you do configure a default phone number, you can optionally override the default by specifying
the from_number property in the input message body.
Display name in console: Default from phone number
Required: false
Type: string
Valid pattern: ^$|\+[0-9]+
Create Connector Example (CLI)
The following example CLI command creates an ConnectorDefinition with an initial version that
contains the Twilio Notifications connector.
aws greengrass create-connector-definition --name MyGreengrassConnectors --initial-version
'{
"Connectors": [
{
"Id": "MyTwilioNotificationsConnector",
"ConnectorArn": "arn:aws:greengrass:region::/connectors/TwilioNotifications/
versions/1",
"Parameters": {
"TWILIO_ACCOUNT_SID": "abcd12345xyz",
"TwilioAuthTokenSecretArn": "arn:aws:secretsmanager:region:account-
id:secret:greengrass-secret-hash",
"TwilioAuthTokenSecretArn-ResourceId": "MyTwilioSecret",
"DefaultFromPhoneNumber": "+19999999999"
}
}
]
}'
For tutorials that show how add the Twilio Notifications connector to a group, see the section called
“Get Started with Connectors (CLI)” (p. 348) and the section called “Get Started with Connectors
(Console)” (p. 335).
Input Data
This connector accepts Twilio message information on two MQTT topics. Input messages must be in
JSON format.
• Text message information on the twilio/txt topic.
• Phone message information on the twilio/call topic.
330

AWS IoT Greengrass Developer Guide
Twilio Notifications
Note
The input message payload can include a text message (message) or voice message
(voice_message_location), but not both.
Topic filter: twilio/txt
Message properties
request
Information about the Twilio notification.
Required: true
Type: object that includes the following properties:
recipient
The message recipient. Only one recipient is supported.
Required: true
Type: object that include the following properties:
name
The name of the recipient.
Required: true
Type: string
Valid pattern: .*
phone_number
The phone number of the recipient.
Required: true
Type: string
Valid pattern: \+[1-9]+
message
The text content of the text message. Only text messages are supported on this
topic. For voice messages, use twilio/call.
Required: true
Type: string
Valid pattern: .+
from_number
The phone number of the sender. Twilio uses this phone number to initiate the
message. This property is required if the DefaultFromPhoneNumber parameter isn't
configured. If DefaultFromPhoneNumber is configured, you can use this property to
override the default.
Required: false
Type: string
Valid pattern: \+[1-9]+
331

AWS IoT Greengrass Developer Guide
Twilio Notifications
retries
The number of retries. The default is 0.
Required: false
Type: integer
id
An arbitrary ID for the request. This property is used to map an input request to an output
response.
Required: true
Type: string
Valid pattern: .+
Example input
{
"request": {
"recipient": {
"name": "Darla",
"phone_number": "+12345000000",
"message": "Hello from the edge"
},
"from_number": "+19999999999",
"retries": 3
},
"id": "request123"
}
Topic filter: twilio/call
Message properties
request
Information about the Twilio notification.
Required: true
Type: object that includes the following properties:
recipient
The message recipient. Only one recipient is supported.
Required: true
Type: object that include the following properties:
name
The name of the recipient.
Required: true
Type: string
Valid pattern: .+
phone_number
The phone number of the recipient.
332

AWS IoT Greengrass Developer Guide
Twilio Notifications
Required: true
Type: string
Valid pattern: \+[1-9]+
voice_message_location
The URL of the audio content for the voice message. This must be in TwiML format.
Only voice messages are supported on this topic. For text messages, use twilio/
txt.
Required: true
Type: string
Valid pattern: .+
from_number
The phone number of the sender. Twilio uses this phone number to initiate the
message. This property is required if the DefaultFromPhoneNumber parameter isn't
configured. If DefaultFromPhoneNumber is configured, you can use this property to
override the default.
Required: false
Type: string
Valid pattern: \+[1-9]+
retries
The number of retries. The default is 0.
Required: false
Type: integer
id
An arbitrary ID for the request. This property is used to map an input request to an output
response.
Required: true
Type: string
Valid pattern: .+
Example input
{
"request": {
"recipient": {
"name": "Darla",
"phone_number": "+12345000000",
"voice_message_location": "https://some-public-TwiML"
},
"from_number": "+19999999999",
"retries": 3
},
"id": "request123"
}
333

AWS IoT Greengrass Developer Guide
Twilio Notifications
Output Data
This connector publishes status information as output data.
Topic filter
twilio/message/status
Example output: Success
{
"response": {
"status": "success",
"payload": {
"from_number": "+19999999999",
"messages": {
"message_status": "queued",
"to_number": "+12345000000",
"name": "Darla"
}
}
},
"id": "request123"
}
Example output: Failure
{
"response": {
"status": "fail",
"error_message": "Recipient name cannot be None",
"error": "InvalidParameter",
"payload": None
}
},
"id": "request123"
}
The payload property in the output is the response from the Twilio API when the message is sent.
If the connector detects that the input data is invalid (for example, it doesn't specify a required
input field), the connector returns an error and sets the value to None. The following are example
payloads:
{
'from_number':'+19999999999',
'messages': {
'name':'Darla',
'to_number':'+12345000000',
'message_status':'undelivered'
}
}
{
'from_number':'+19999999999',
'messages': {
'name':'Darla',
'to_number':'+12345000000',
'message_status':'queued'
}
}
334
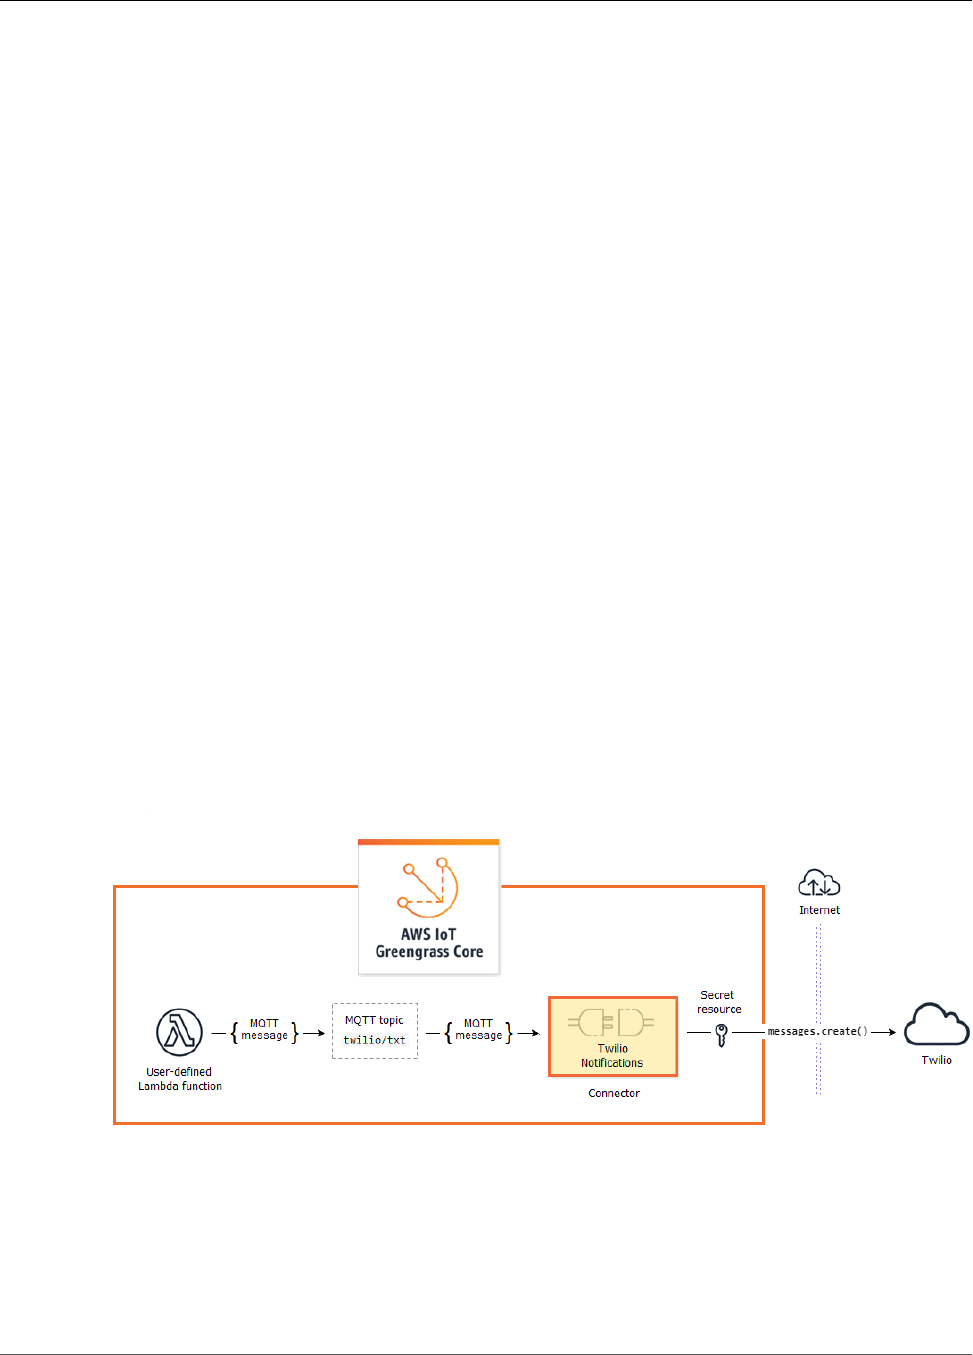
AWS IoT Greengrass Developer Guide
Get Started with Connectors (Console)
Licenses
The Twilio Notifications connector includes the following third-party software/licensing:
•twilio-python / MIT
This connector is released under the Greengrass Core Software License Agreement.
See Also
•Integrate with Services and Protocols Using Connectors (p. 266)
•the section called “Get Started with Connectors (Console)” (p. 335)
•the section called “Get Started with Connectors (CLI)” (p. 348)
•Twilio API Reference
Getting Started with Greengrass Connectors
(Console)
This feature is available for AWS IoT Greengrass Core v1.7.0 only.
This tutorial shows how to use the AWS Management Console to work with connectors.
Use connectors to accelerate your development life cycle. Connectors are prebuilt, reusable modules that
can make it easier to interact with services, protocols, and resources. They can help you deploy business
logic to Greengrass devices more quickly. For more information, see Integrate with Services and Protocols
Using Connectors (p. 266).
In this tutorial, you configure and deploy the Twilio Notifications (p. 328) connector. The connector
receives Twilio message information as input data, and then triggers a Twilio text message. The data flow
is shown in following diagram.
After you configure the connector, you create a Lambda function and a subscription.
• The function evaluates simulated data from a temperature sensor. It conditionally publishes the Twilio
message information to an MQTT topic. This is the topic that the connector subscribes to.
• The subscription allows the function to publish to the topic and the connector to receive data from the
topic.
335

AWS IoT Greengrass Developer Guide
Prerequisites
The Twilio Notifications connector requires a Twilio auth token to interact with the Twilio API. The token
is a text type secret created in AWS Secrets Manager and referenced from a group resource. This enables
AWS IoT Greengrass to create a local copy of the secret on the Greengrass core, where it is encrypted and
made available to the connector. For more information, see Deploy Secrets to the Core (p. 243).
The tutorial contains the following high-level steps:
1. Create a Secrets Manager Secret (p. 336)
2. Add a Secret Resource to a Group (p. 337)
3. Add a Connector to the Group (p. 338)
4. Create a Lambda Function Deployment Package (p. 339)
5. Create a Lambda Function (p. 342)
6. Add a Function to the Group (p. 344)
7. Add Subscriptions to the Group (p. 344)
8. Deploy the Group (p. 345)
The tutorial should take about 20 minutes to complete.
Prerequisites
To complete this tutorial, you need:
• A Greengrass group and a Greengrass core (v1.7.0). To learn how to create a Greengrass group and
core, see Getting Started with AWS IoT Greengrass (p. 44). The Getting Started tutorial also includes
steps for installing the AWS IoT Greengrass core software.
• AWS IoT Greengrass must be configured to support local secrets, as described in Secrets
Requirements (p. 244).
Note
This includes allowing access to your Secrets Manager secrets. If you're using the default
Greengrass service role, Greengrass has permission to get the values of secrets with names
that start with greengrass-.
• A Twilio account SID, auth token, and Twilio-enabled phone number. After you create a Twilio project,
these values are available on the project dashboard.
Note
You can use a Twilio trial account. If you're using a trial account, you must add non-Twilio
recipient phone numbers to a list of verified phone numbers. For more information, see How
to Work with your Free Twilio Trial Account.
Step 1: Create a Secrets Manager Secret
In this step, you use the AWS Secrets Manager console to create a text type secret for your Twilio auth
token.
1. Sign in to the AWS Secrets Manager console.
Note
For more information about this process, see Step 1: Create and Store Your Secret in AWS
Secrets Manager in the AWS Secrets Manager User Guide.
2. Choose Store a new secret.
3. Under Select secret type, choose Other type of secrets.
4. Under Specify the key/value pairs to be stored for this secret, on the Plaintext tab, enter your
Twilio auth token. Remove all of the JSON formatting and enter only the token value.
336
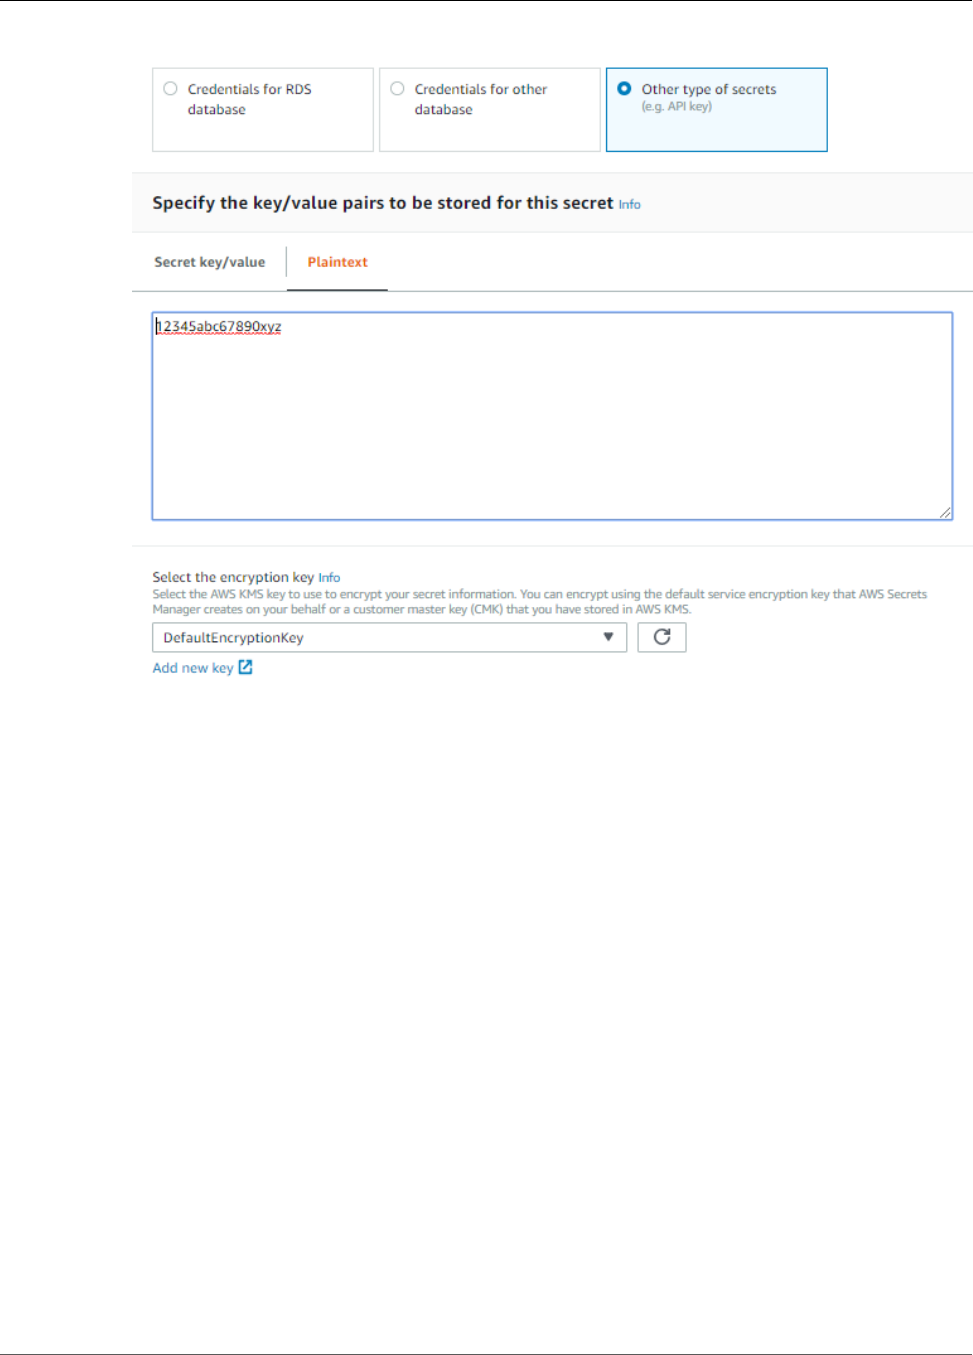
AWS IoT Greengrass Developer Guide
Add a Secret Resource to a Group
5. Keep DefaultEncryptionKey selected for the encryption key, and then choose Next.
Note
You aren't charged by AWS KMS if you use the default AWS managed key that Secrets
Manager creates in your account.
6. For Secret name, enter greengrass-TwilioAuthToken, and then choose Next.
Note
By default, the Greengrass service role allows AWS IoT Greengrass to get the value
of secrets with names that start with greengrass-. For more information, see secrets
requirements (p. 244).
7. This tutorial doesn't require rotation, so choose Disable automatic rotation, and then choose Next.
8. On the Review page, review your settings, and then choose Store.
Next, you create a secret resource in your Greengrass group that references the secret.
Step 2: Add a Secret Resource to a Greengrass Group
In this step, you add a secret resource to the Greengrass group. This resource is a reference to the secret
that you created in the previous step.
1. In the AWS IoT Core console, choose Greengrass, and then choose Groups.
2. Choose the group that you want to add the secret resource to.
3. On the group configuration page, choose Resources, and then choose Secret. This tab displays the
secret resources that belong to the group. You can add, edit, and remove secret resources from this
tab.
337

AWS IoT Greengrass Developer Guide
Add a Connector to the Group
Note
Alternatively, the console allows you to create a secret and secret resource when you
configure a connector or Lambda function. You can do this from the connector's Configure
parameters page or the Lambda function's Resources page.
4. Choose Add a secret resource.
5. On the Add a secret resource to your group page, choose Select, and then choose greengrass-
TwilioAuthToken.
6. On the Select labels (Optional) page, choose Next. The AWSCURRENT staging label represents the
latest version of the secret. This label is always included in a secret resource.
Note
This tutorial requires the AWSCURRENT label only. You can optionally include labels that
are required by your Lambda function or connector.
7. On the Name your secret resource page, enter MyTwilioAuthToken, and then choose Save.
Step 3: Add a Connector to the Greengrass Group
In this step, you configure parameters for the Twilio Notifications connector (p. 328) and add it to the
group.
1. On the group configuration page, choose Connectors, and then choose Add a connector.
2. On the Select a connector page, choose Twilio Notifications, and then choose Next.
338

AWS IoT Greengrass Developer Guide
Create a Lambda Function Deployment Package
3. On the Configure parameters page:
• For Twilio auth token resource, choose MyTwilioAuthToken. This is the secret resource that you
created in the previous step.
Note
When you choose the resource, the ARN of Twilio auth token secret property is
populated for you.
• For Default from phone number, enter your Twilio-enabled phone number.
• For Twilio account SID, enter your Twilio account SID.
4. Choose Add.
Step 4: Create a Lambda Function Deployment
Package
To create a Lambda function, you must first create a Lambda function deployment package that contains
the function code and dependencies. Greengrass Lambda functions require the AWS IoT Greengrass
Core SDK (p. 147) for tasks such as communicating with MQTT messages in the core environment and
accessing local secrets. This tutorial creates a Python function, so you use the Python version of the SDK
in the deployment package.
1. Download the AWS IoT Greengrass Core SDK Python 2.7 version 1.3.0. You can download the
SDK from the Software page in the AWS IoT Core console or from the AWS IoT Greengrass Core
SDK (p. 19) downloads. This procedure uses the console.
a. In the AWS IoT Core console, choose Software.
339

AWS IoT Greengrass Developer Guide
Create a Lambda Function Deployment Package
b. Under SDKs, for AWS IoT Greengrass Core SDK, choose Configure download.
340

AWS IoT Greengrass Developer Guide
Create a Lambda Function Deployment Package
c. Choose Python 2.7 version 1.3.0, and then choose Download Greengrass Core SDK.
2. Unpack the greengrass-core-python-sdk-1.3.0.tar.gz file.
Note
For information about how to do this on different platforms, see this step (p. 64) in the
Getting Started section. For example, you might use the following tar command:
tar -xzf greengrass-core-python-sdk-1.3.0.tar.gz
3. Open the extracted aws_greengrass_core_sdk/sdk directory.
cd aws_greengrass_core_sdk
cd sdk
4. Unzip python_sdk_1_3_0.zip.
5. Save the following Python code function in a local file named temp_monitor.py.
from __future__ import print_function
import greengrasssdk
import json
import random
341

AWS IoT Greengrass Developer Guide
Create a Lambda Function
client = greengrasssdk.client('iot-data')
# publish to the Twilio Notifications connector through the twilio/txt topic
def function_handler(event, context):
temp = event['temperature']
# check the temperature
# if greater than 30C, send a notification
if temp > 30:
data = build_request(event)
client.publish(topic='twilio/txt', payload=json.dumps(data))
print('published:' + str(data))
print('temperature:' + str(temp))
return
# build the Twilio request from the input data
def build_request(event):
to_name = event['to_name']
to_number = event['to_number']
temp_report = 'temperature:' + str(event['temperature'])
return {
"request": {
"recipient": {
"name": to_name,
"phone_number": to_number,
"message": temp_report
}
},
"id": "request_" + str(random.randint(1,101))
}
6. Zip the following items into a file named temp_monitor_python.zip. When creating the ZIP file,
include only the code and dependencies, not the containing folder.
•temp_monitor.py. App logic.
•greengrasssdk. Required library for all Python Greengrass Lambda functions.
This is your Lambda function deployment package.
Now, create a Lambda function that uses the deployment package.
Step 5: Create a Lambda Function in the AWS
Lambda Console
In this step, you use the AWS Lambda console to create a Lambda function and configure it to use your
deployment package. Then, you publish a function version and create an alias.
First, create the Lambda function.
1. In the AWS Management Console, choose Services, and open the AWS Lambda console.
2. Choose Create function.
3. Choose Author from scratch.
4. In the Author from scratch section, use the following values:
• For Name, enter TempMonitor.
• For Runtime, choose Python 2.7.
342

AWS IoT Greengrass Developer Guide
Create a Lambda Function
• For Role, choose Create new role from one or more templates.
• For Role name, enter Greengrass_Lambda_empty. AWS IoT Greengrass doesn't use this role, so
you can create or choose any Lambda execution role.
5. At the bottom of the page, choose Create function.
Now, upload your Lambda function deployment package and register the handler.
1. On the Configuration tab for the TempMonitor function, in Function code, use the following values:
• For Code entry type, choose Upload a .zip file.
• For Runtime, choose Python 2.7.
• For Handler, enter temp_monitor.function_handler.
2. Choose Upload.
3. Choose your temp_monitor_python.zip deployment package.
4. At the top of the page, choose Save.
Tip
You can see your code in the Function code section by choosing Edit code inline from the
Code entry type menu.
Next, publish the first version of your Lambda function. Then, create an alias for the version.
Note
Greengrass groups can reference a Lambda function by alias (recommended) or by version.
Using an alias makes it easier to manage code updates because you don't have to change your
subscription table or group definition when the function code is updated. Instead, you just point
the alias to the new function version.
1. Publish the Lambda function:
a. From the Actions menu, choose Publish new version.
b. For Version description, enter First version, and then choose Publish.
2. On the TempMonitor: 1 configuration page, from the Actions menu, choose Create alias.
3. On the Create a new alias page, use the following values:
• For Name, enter GG_TempMonitor.
• For Version, choose 1.
Note
AWS IoT Greengrass doesn't support Lambda aliases for $LATEST versions.
4. Choose Create.
Now you're ready to add the Lambda function to your Greengrass group.
343
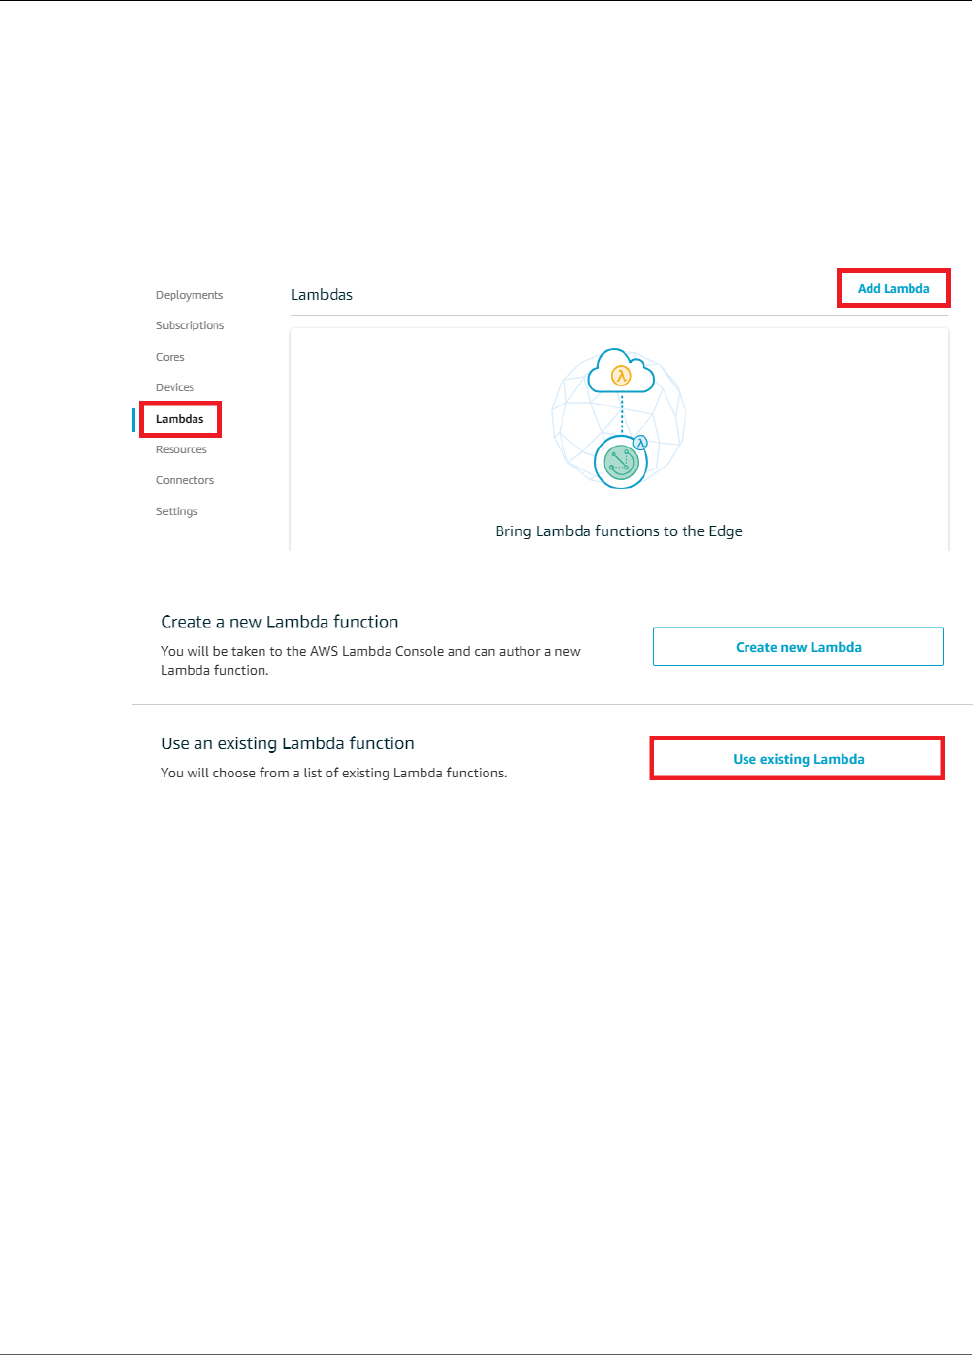
AWS IoT Greengrass Developer Guide
Add a Function to the Group
Step 6: Add a Lambda Function to the Greengrass
Group
In this step, you add the Lambda function to the group and then configure its lifecycle and environment
variables. For more information, see the section called “Controlling Greengrass Lambda Function
Execution” (p. 150).
1. On the group configuration page, choose Lambdas, and then choose Add Lambda.
2. On the Add a Lambda to your Greengrass Group page, choose Use existing Lambda.
3. On the Use existing Lambda page, choose TempMonitor, and then choose Next.
4. On the Select a Lambda version page, choose Alias:GG_TempMonitor, and then choose Finish.
Step 7: Add Subscriptions to the Greengrass Group
In this step, you add a subscription that enables the Lambda function to send input data to the
connector. The connector defines the MQTT topics that it subscribes to, so this subscription uses one of
the topics. This is the same topic that the example function publishes to.
For this tutorial, you also create subscriptions that allow the function to receive simulated temperature
readings from AWS IoT and allow AWS IoT to receive status information from the connector.
1. On the group configuration page, choose Subscriptions, and then choose Add Subscription.
344

AWS IoT Greengrass Developer Guide
Deploy the Group
2. On the Select your source and target page, configure the source and target, as follows:
a. For Select a source, choose Lambdas, and then choose TempMonitor.
b. For Select a target, choose Connectors, and then choose Twilio Notifications.
c. Choose Next.
3. On the Filter your data with a topic page, for Required topic syntax, choose twilio/txt, and
then choose Next.
4. Choose Finish.
5. Repeat steps 1 - 4 to create a subscription that allows AWS IoT to publish messages to the function.
a. For Select a source, choose Services, and then choose IoT Cloud.
b. For Select a target, choose Lambdas, and then choose TempMonitor.
c. For Topic filter, enter temperature/input.
6. Repeat steps 1 - 4 to create a subscription that allows the connector to publish messages to AWS
IoT.
a. For Select a source, choose Connectors, and then choose Twilio Notifications.
b. For Select a target, choose Services, and then choose IoT Cloud.
c. For Topic filter, twilio/message/status is entered for you. This is the predefined topic that
the connector publishes to.
Step 8: Deploy the Greengrass Group
Deploy the group to the core device.
1. Make sure that the AWS IoT Greengrass core is running. Run the following commands in your
Raspberry Pi terminal, as needed.
a. To check whether the daemon is running:
ps aux | grep -E 'greengrass.*daemon'
If the output contains a root entry for /greengrass/ggc/packages/ggc-version/bin/
daemon, then the daemon is running.
Note
The version in the path depends on the AWS IoT Greengrass Core software version
that's installed on your core device.
b. To start the daemon:
345
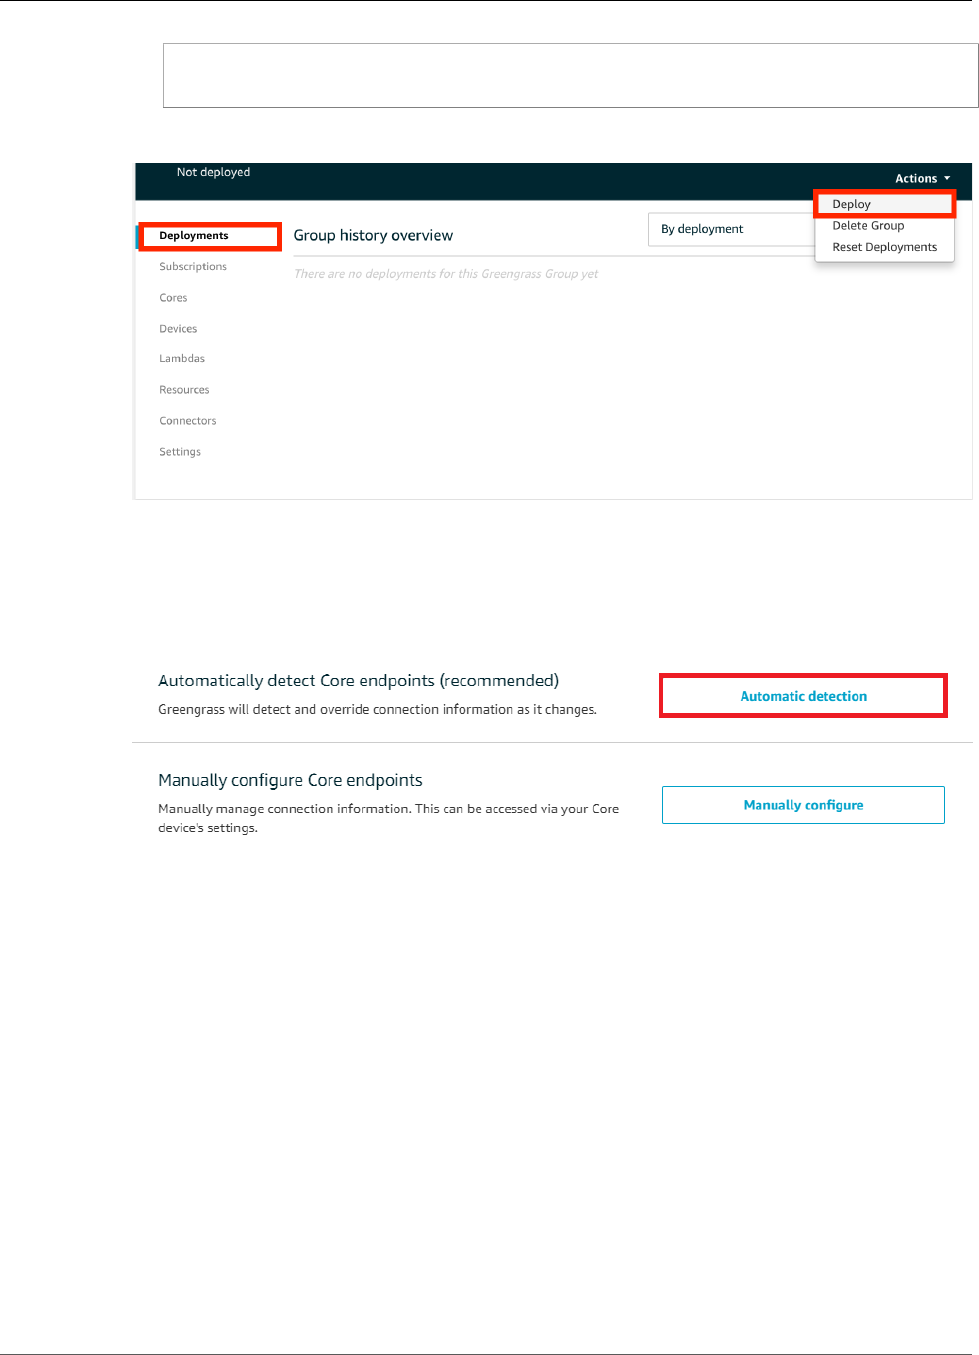
AWS IoT Greengrass Developer Guide
Test the Solution
cd /greengrass/ggc/core/
sudo ./greengrassd start
2. On the group configuration page, choose Deployments, and from the Actions menu, choose
Deploy.
3. On the Configure how devices discover your core page, choose Automatic detection.
This enables devices to automatically acquireconnectivity information for the core, such as IP
address, DNS, and port number. Automatic detection is recommended, but AWS IoT Greengrass also
supports manually specified endpoints. You're only prompted for the discovery method the first
time that the group is deployed.
Note
If prompted, grant permission to create the AWS IoT Greengrass service role on your behalf,
which allows AWS IoT Greengrass to access other AWS services. You need to do this only
one time per account.
The Deployments page shows the deployment timestamp, version ID, and status. When completed,
the deployment should show a Successfully completed status.
For troubleshooting help, see Troubleshooting (p. 410).
Test the Solution
1. On the AWS IoT Core console home page, choose Test.
346
AWS IoT Greengrass Developer Guide
Test the Solution
2. For Subscriptions, use the following values, and then choose Subscribe to topic. The Twilio
Notifications connector publishes status information to this topic.
Property Value
Subscription topic twilio/message/status
MQTT payload display Display payloads as strings
3. For Publish, use the following values, and then choose Publish to topic to invoke the function.
Property Value
Topic temperature/input
Message Replace recipient-name with a name and
recipient-phone-number with the phone
number of the text message recipient. Example:
+12345000000
347

AWS IoT Greengrass Developer Guide
See Also
Property Value
{
"to_name": "recipient-name",
"to_number": "recipient-phone-number",
"temperature": 31
}
If you're using a trial account, you must add
non-Twilio recipient phone numbers to a list of
verified phone numbers. For more information,
see Verify your Personal Phone Number.
If successful, the recipient receives the text message and the console displays the success status
from the output data (p. 334).
Now, change the temperature in the input message to 29 and publish. Because this is less than 30,
the TempMonitor function doesn't trigger a Twilio message.
See Also
•Integrate with Services and Protocols Using Connectors (p. 266)
•the section called “AWS-Provided Greengrass Connectors” (p. 271)
Getting Started with Greengrass Connectors (CLI)
This feature is available for AWS IoT Greengrass Core v1.7.0 only.
This tutorial shows how to use the AWS CLI to work with connectors.
Use connectors to accelerate your development life cycle. Connectors are prebuilt, reusable modules that
can make it easier to interact with services, protocols, and resources. They can help you deploy business
logic to Greengrass devices more quickly. For more information, see Integrate with Services and Protocols
Using Connectors (p. 266).
In this tutorial, you configure and deploy the Twilio Notifications (p. 328) connector. The connector
receives Twilio message information as input data, and then triggers a Twilio text message. The data flow
is shown in following diagram.
348
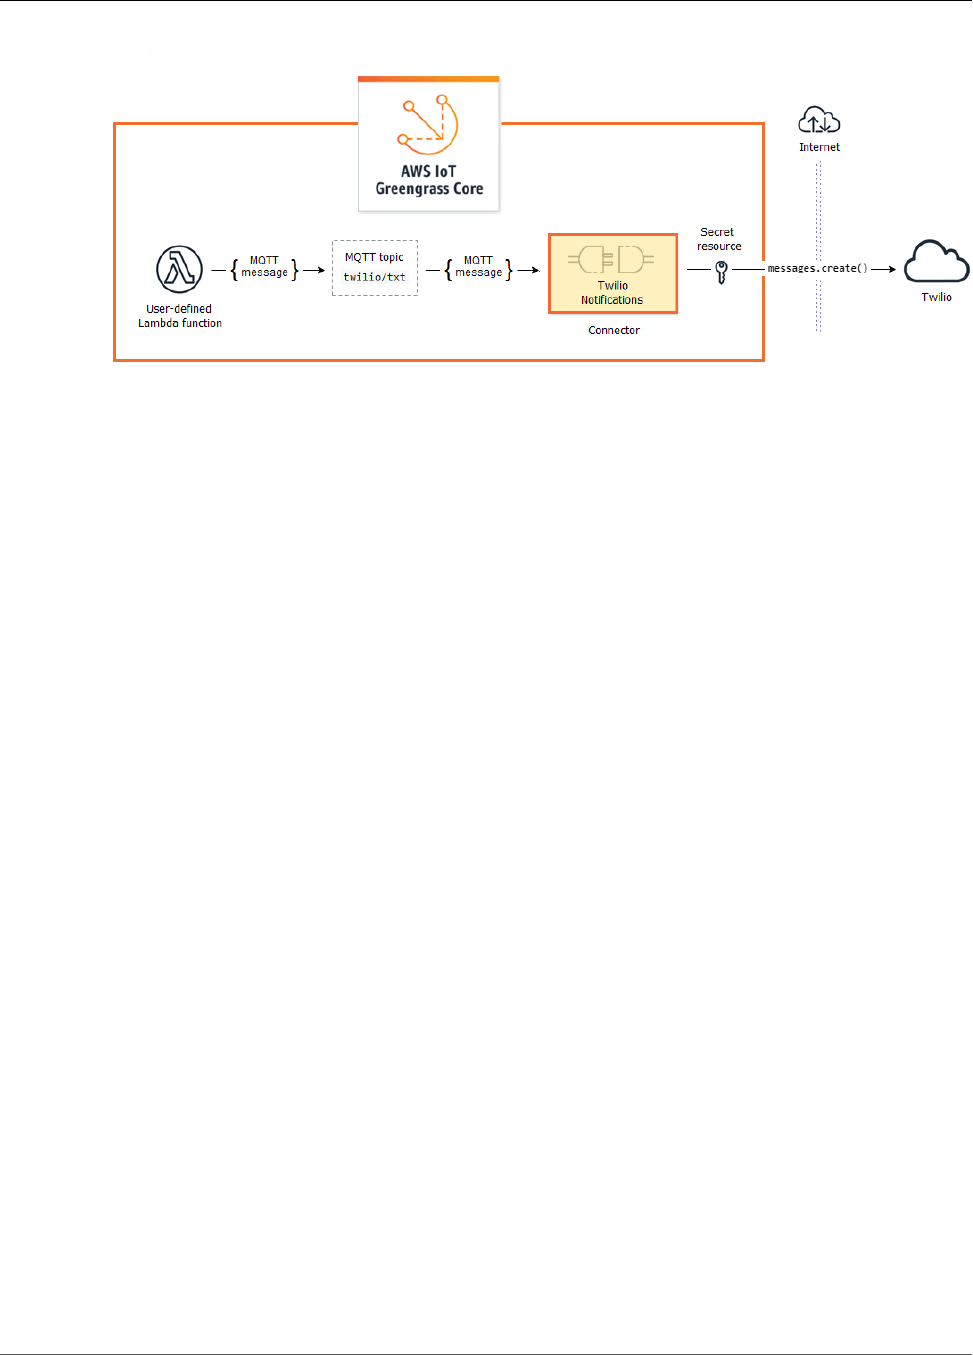
AWS IoT Greengrass Developer Guide
Get Started with Connectors (CLI)
After you configure the connector, you create a Lambda function and a subscription.
• The function evaluates simulated data from a temperature sensor. It conditionally publishes the Twilio
message information to an MQTT topic. This is the topic that the connector subscribes to.
• The subscription allows the function to publish to the topic and the connector to receive data from the
topic.
The Twilio Notifications connector requires a Twilio auth token to interact with the Twilio API. The token
is a text type secret created in AWS Secrets Manager and referenced from a group resource. This enables
AWS IoT Greengrass to create a local copy of the secret on the Greengrass core, where it is encrypted and
made available to the connector. For more information, see Deploy Secrets to the Core (p. 243).
The tutorial contains the following high-level steps:
1. Create a Secrets Manager Secret (p. 350)
2. Create a Resource Definition and Version (p. 351)
3. Create a Connector Definition and Version (p. 351)
4. Create a Lambda Function Deployment Package (p. 352)
5. Create a Lambda Function (p. 355)
6. Create a Function Definition and Version (p. 356)
7. Create a Subscription Definition and Version (p. 357)
8. Create a Group Version (p. 358)
9. Create a Deployment (p. 359)
The tutorial should take about 30 minutes to complete.
Using the AWS IoT Greengrass API
It's helpful to understand the following patterns when you work with Greengrass groups and group
components (for example, the connectors, functions, and resources in the group).
• At the top of the hierarchy, a component has a definition object that is a container for version objects.
In turn, a version is a container for the connectors, functions, or other component types.
• When you deploy to the Greengrass core, you deploy a specific group version. A group version can
contain one version of each type of component. A core is required, but the others are included as
needed.
• Versions are immutable, so you must create new versions when you want to make changes.
349

AWS IoT Greengrass Developer Guide
Prerequisites
Tip
If you receive an error when you run an AWS CLI command, add the --debug parameter and
then rerun the command to get more information about the error.
The AWS IoT Greengrass API lets you create multiple definitions for a component type.
For example, you can create a FunctionDefinition object every time that you create a
FunctionDefinitionVersion, or you can add new versions to an existing definition. This flexibility
allows you to customize your version management system.
Prerequisites
To complete this tutorial, you need:
• A Greengrass group and a Greengrass core (v1.7.0). To learn how to create a Greengrass group and
core, see Getting Started with AWS IoT Greengrass (p. 44). The Getting Started tutorial also includes
steps for installing the AWS IoT Greengrass core software.
• AWS IoT Greengrass must be configured to support local secrets, as described in Secrets
Requirements (p. 244).
Note
This includes allowing access to your Secrets Manager secrets. If you're using the default
Greengrass service role, Greengrass has permission to get the values of secrets with names
that start with greengrass-.
• A Twilio account SID, auth token, and Twilio-enabled phone number. After you create a Twilio project,
these values are available on the project dashboard.
Note
You can use a Twilio trial account. If you're using a trial account, you must add non-Twilio
recipient phone numbers to a list of verified phone numbers. For more information, see How
to Work with your Free Twilio Trial Account.
• AWS CLI installed and configured on your computer. For more information, see Installing the AWS
Command Line Interface and Configuring the AWS CLI in the AWS Command Line Interface User Guide.
The examples in this tutorial are written for Linux and other Unix-based systems. If you're using
Windows, see Specifying Parameter Values for the AWS Command Line Interface to learn about
differences in syntax.
If the command contains a JSON string, the tutorial provides an example that has the JSON on a single
line. On some systems, it might be easier to edit and run commands using this format.
Step 1: Create a Secrets Manager Secret
In this step, you use the AWS Secrets Manager API to create a secret for your Twilio auth token.
1. First, create the secret.
• Replace twilio-auth-token with your Twilio auth token.
aws secretsmanager create-secret --name greengrass-TwilioAuthToken --secret-
string twilio-auth-token
350

AWS IoT Greengrass Developer Guide
Create a Resource Definition and Version
Note
By default, the Greengrass service role allows AWS IoT Greengrass to get the value
of secrets with names that start with greengrass-. For more information, see secrets
requirements (p. 244).
2. Copy the ARN of the secret from the output. You use this to create the secret resource and to
configure the Twilio Notifications connector.
Step 2: Create a Resource Definition and Version
In this step, you use the AWS IoT Greengrass API to create a secret resource for your Secrets Manager
secret.
1. Create a resource definition that includes an initial version.
• Replace secret-arn with the ARN of the secret that you copied in the previous step.
JSON Expanded
aws greengrass create-resource-definition --name MyGreengrassResources --initial-
version '{
"Resources": [
{
"Id": "TwilioAuthToken",
"Name": "MyTwilioAuthToken",
"ResourceDataContainer": {
"SecretsManagerSecretResourceData": {
"ARN": "secret-arn"
}
}
}
]
}'
JSON Single-line
aws greengrass create-resource-definition \
--name MyGreengrassResources \
--initial-version '{"Resources": [{"Id": "TwilioAuthToken", "Name":
"MyTwilioAuthToken", "ResourceDataContainer": {"SecretsManagerSecretResourceData":
{"ARN": "secret-arn"}}}]}'
2. Copy the LatestVersionArn of the resource definition from the output. You use this value to add
the resource definition version to the group version that you deploy to the core.
Step 3: Create a Connector Definition and Version
In this step, you configure parameters for the Twilio Notifications connector.
1. Create a connector definition with an initial version.
• Replace account-sid with your Twilio account SID.
• Replace secret-arn with the ARN of your Secrets Manager secret. The connector uses this to get
the value of the local secret.
351

AWS IoT Greengrass Developer Guide
Create a Lambda Function Deployment Package
• Replace phone-number with your Twilio-enabled phone number. Twilio uses this to initiate the
text message. This can be overridden in the input message payload. Use the following format:
+19999999999.
JSON Expanded
aws greengrass create-connector-definition --name MyGreengrassConnectors --initial-
version '{
"Connectors": [
{
"Id": "MyTwilioNotificationsConnector",
"ConnectorArn": "arn:aws:greengrass:region::/connectors/
TwilioNotifications/versions/1",
"Parameters": {
"TWILIO_ACCOUNT_SID": "account-sid",
"TwilioAuthTokenSecretArn": "secret-arn",
"TwilioAuthTokenSecretArn-ResourceId": "TwilioAuthToken",
"DefaultFromPhoneNumber": "phone-number"
}
}
]
}'
JSON Single-line
aws greengrass create-connector-definition \
--name MyGreengrassConnectors \
--initial-version '{"Connectors": [{"Id": "MyTwilioNotificationsConnector",
"ConnectorArn": "arn:aws:greengrass:region::/connectors/TwilioNotifications/
versions/1", "Parameters": {"TWILIO_ACCOUNT_SID": "account-sid",
"TwilioAuthTokenSecretArn": "secret-arn", "TwilioAuthTokenSecretArn-ResourceId":
"TwilioAuthToken", "DefaultFromPhoneNumber": "phone-number"}}]}'
Note
TwilioAuthToken is the ID that you used in the previous step to create the secret
resource.
2. Copy the LatestVersionArn of the connector definition from the output. You use this value to
add the connector definition version to the group version that you deploy to the core.
Step 4: Create a Lambda Function Deployment
Package
To create a Lambda function, you must first create a Lambda function deployment package that contains
the function code and dependencies. Greengrass Lambda functions require the AWS IoT Greengrass
Core SDK (p. 147) for tasks such as communicating with MQTT messages in the core environment and
accessing local secrets. This tutorial creates a Python function, so you use the Python version of the SDK
in the deployment package.
1. Download the AWS IoT Greengrass Core SDK Python 2.7 version 1.3.0. You can download the
SDK from the Software page in the AWS IoT Core console or from the AWS IoT Greengrass Core
SDK (p. 19) downloads. This procedure uses the console.
a. In the AWS IoT Core console, choose Software.
352

AWS IoT Greengrass Developer Guide
Create a Lambda Function Deployment Package
b. Under SDKs, for AWS IoT Greengrass Core SDK, choose Configure download.
353

AWS IoT Greengrass Developer Guide
Create a Lambda Function Deployment Package
c. Choose Python 2.7 version 1.3.0, and then choose Download Greengrass Core SDK.
2. Unpack the greengrass-core-python-sdk-1.3.0.tar.gz file.
Note
For information about how to do this on different platforms, see this step (p. 64) in the
Getting Started section. For example, you might use the following tar command:
tar -xzf greengrass-core-python-sdk-1.3.0.tar.gz
3. Open the extracted aws_greengrass_core_sdk/sdk directory.
cd aws_greengrass_core_sdk
cd sdk
4. Unzip python_sdk_1_3_0.zip.
5. Save the following Python code function in a local file named temp_monitor.py.
from __future__ import print_function
import greengrasssdk
import json
import random
354

AWS IoT Greengrass Developer Guide
Create a Lambda Function
client = greengrasssdk.client('iot-data')
# publish to the Twilio Notifications connector through the twilio/txt topic
def function_handler(event, context):
temp = event['temperature']
# check the temperature
# if greater than 30C, send a notification
if temp > 30:
data = build_request(event)
client.publish(topic='twilio/txt', payload=json.dumps(data))
print('published:' + str(data))
print('temperature:' + str(temp))
return
# build the Twilio request from the input data
def build_request(event):
to_name = event['to_name']
to_number = event['to_number']
temp_report = 'temperature:' + str(event['temperature'])
return {
"request": {
"recipient": {
"name": to_name,
"phone_number": to_number,
"message": temp_report
}
},
"id": "request_" + str(random.randint(1,101))
}
6. Zip the following items into a file named temp_monitor_python.zip. When creating the ZIP file,
include only the code and dependencies, not the containing folder.
•temp_monitor.py. App logic.
•greengrasssdk. Required library for all Python Greengrass Lambda functions.
This is your Lambda function deployment package.
Step 5: Create a Lambda Function
Now, create a Lambda function that uses the deployment package.
1. First, create an IAM role so you can pass in the ARN when you create the function.
Note
AWS IoT Greengrass doesn't use this role because permissions for your Greengrass Lambda
functions are specified in the Greengrass group role. For this tutorial, you create an empty
role, or alternatively, you can use an existing execution role.
JSON Expanded
aws iam create-role --role-name Lambda_empty --assume-role-policy '{
"Version": "2012-10-17",
"Statement": [
{
"Effect": "Allow",
355
AWS IoT Greengrass Developer Guide
Create a Function Definition and Version
"Principal": {
"Service": "lambda.amazonaws.com"
},
"Action": "sts:AssumeRole"
}
]
}'
JSON Single-line
aws iam create-role --role-name Lambda_empty --assume-role-policy '{"Version":
"2012-10-17", "Statement": [{"Effect": "Allow", "Principal": {"Service":
"lambda.amazonaws.com"},"Action": "sts:AssumeRole"}]}'
2. Copy the Arn of the output.
3. Use the AWS Lambda API to create the TempMonitor function. The following command assumes
that the zip file is in the current directory.
• Replace role-arn with the Arn that you copied.
aws lambda create-function \
--function-name TempMonitor \
--zip-file fileb://temp_monitor_python.zip \
--role role-arn \
--handler temp_monitor.function_handler \
--runtime python2.7
4. Publish a version of the function.
aws lambda publish-version --function-name TempMonitor --description 'First version'
5. Create an alias for the published version.
Greengrass groups can reference a Lambda function by alias (recommended) or by version. Using an
alias makes it easier to manage code updates because you don't have to change your subscription
table or group definition when the function code is updated. Instead, you just point the alias to the
new function version.
Note
AWS IoT Greengrass doesn't support Lambda aliases for $LATEST versions.
aws lambda create-alias --function-name TempMonitor --name GG_TempMonitor --function-
version 1
6. Copy the AliasArn from the output. You use this value when you configure the function for AWS
IoT Greengrass and when you create a subscription.
Now you're ready to configure the function for AWS IoT Greengrass.
Step 6: Create a Function Definition and Version
To use a Lambda function on an AWS IoT Greengrass core, you create a function definition version
that references the Lambda function by alias and defines the group-level configuration. For more
information, see the section called “Controlling Greengrass Lambda Function Execution” (p. 150).
1. Create a function definition that includes an initial version.
356

AWS IoT Greengrass Developer Guide
Create a Subscription Definition and Version
• Replace alias-arn with the AliasArn that you copied when you created the alias.
JSON Expanded
aws greengrass create-function-definition --name MyGreengrassFunctions --initial-
version '{
"Functions": [
{
"Id": "TempMonitorFunction",
"FunctionArn": "alias-arn",
"FunctionConfiguration": {
"Executable": "temp_monitor.function_handler",
"MemorySize": 16000,
"Timeout": 5
}
}
]
}'
JSON Single-line
aws greengrass create-function-definition \
--name MyGreengrassFunctions \
--initial-version '{"Functions": [{"Id": "TempMonitorFunction",
"FunctionArn": "alias-arn", "FunctionConfiguration": {"Executable":
"temp_monitor.function_handler", "MemorySize": 16000,"Timeout": 5}}]}'
2. Copy the LatestVersionArn from the output. You use this value to add the function definition
version to the group version that you deploy to the core.
3. Copy the Id from the output. You use this value later when you update the function.
Step 7: Create a Subscription Definition and Version
In this step, you add a subscription that enables the Lambda function to send input data to the
connector. The connector defines the MQTT topics that it subscribes to, so this subscription uses one of
the topics. This is the same topic that the example function publishes to.
For this tutorial, you also create subscriptions that allow the function to receive simulated temperature
readings from AWS IoT and allow AWS IoT to receive status information from the connector.
1. Create a subscription definition that contains an initial version that includes the subscriptions.
• Replace alias-arn with the AliasArn that you copied when you created the alias for the
function. Use this ARN for both subscriptions that use it.
JSON Expanded
aws greengrass create-subscription-definition --initial-version '{
"Subscriptions": [
{
"Id": "TriggerNotification",
"Source": "alias-arn",
357

AWS IoT Greengrass Developer Guide
Create a Group Version
"Subject": "twilio/txt",
"Target": "arn:aws:greengrass:region::/connectors/TwilioNotifications/
versions/1"
},
{
"Id": "TemperatureInput",
"Source": "cloud",
"Subject": "temperature/input",
"Target": "alias-arn"
},
{
"Id": "OutputStatus",
"Source": "arn:aws:greengrass:region::/connectors/TwilioNotifications/
versions/1",
"Subject": "twilio/message/status",
"Target": "cloud"
}
]
}'
JSON Single-line
aws greengrass create-subscription-definition \
--initial-version '{"Subscriptions": [{"Id": "TriggerNotification", "Source":
"alias-arn", "Subject": "twilio/txt", "Target": "arn:aws:greengrass:region::/
connectors/TwilioNotifications/versions/1"},{"Id": "TemperatureInput",
"Source": "cloud", "Subject": "temperature/input", "Target": "alias-arn"},
{"Id": "OutputStatus", "Source": "arn:aws:greengrass:region::/connectors/
TwilioNotifications/versions/1", "Subject": "twilio/message/status", "Target":
"cloud"}]}'
2. Copy the LatestVersionArn from the output. You use this value to add the subscription definition
version to the group version that you deploy to the core.
Step 8: Create a Group Version
Now, you're ready to create a group version that contains all of the items that you want to deploy. You do
this by creating a group version that references the target version of each component type.
First, get the group ID and the ARN of the core definition version. These values are required to create the
group version.
1. Get the ID of the group:
a. List your groups.
aws greengrass list-groups
b. Copy the Id of the target group from the output. You use this to get the core definition version
and when you deploy the group.
c. Copy the LatestVersion of the group version from the output. You use this to get the core
definition version.
2. Get the ARN of the core definition version:
a. Get the group version. For this step, we assume that the latest group version includes a core
definition version.
• Replace group-id with the Id that you copied for the group.
• Replace group-version-id with the LatestVersion that you copied for the group.
358

AWS IoT Greengrass Developer Guide
Create a Deployment
aws greengrass get-group-version \
--group-id group-id \
--group-version-id group-version-id
b. Copy the CoreDefinitionVersionArn from the output.
3. Create a group version.
• Replace group-id with the Id that you copied for the group.
• Replace core-definition-version-arn with the CoreDefinitionVersionArn that you
copied for the core definition version.
• Replace resource-definition-version-arn with the LatestVersionArn that you copied
for the resource definition.
• Replace connector-definition-version-arn with the LatestVersionArn that you copied
for the connector definition.
• Replace function-definition-version-arn with the LatestVersionArn that you copied
for the function definition.
• Replace subscription-definition-version-arn with the LatestVersionArn that you
copied for the subscription definition.
aws greengrass create-group-version \
--group-id group-id \
--core-definition-version-arn core-definition-version-arn \
--resource-definition-version-arn resource-definition-version-arn \
--connector-definition-version-arn connector-definition-version-arn \
--function-definition-version-arn function-definition-version-arn \
--subscription-definition-version-arn subscription-definition-version-arn
4. Copy the value of Version from the output. This is the ID of the group version. You use this value to
deploy the group version.
Step 9: Create a Deployment
Deploy the group to the core device.
1. In a core device terminal, make sure that the AWS IoT Greengrass daemon is running.
a. To check whether the daemon is running:
ps aux | grep -E 'greengrass.*daemon'
If the output contains a root entry for /greengrass/ggc/packages/1.7.0/bin/daemon,
then the daemon is running.
b. To start the daemon:
cd /greengrass/ggc/core/
sudo ./greengrassd start
2. Create a deployment.
• Replace group-id with the Id that you copied for the group.
• Replace group-version-id with the Version that you copied for the group version.
359

AWS IoT Greengrass Developer Guide
Test the Solution
aws greengrass create-deployment \
--deployment-type NewDeployment \
--group-id group-id \
--group-version-id group-version-id
3. Copy the DeploymentId from the output.
4. Get the deployment status.
• Replace group-id with the Id that you copied for the group.
• Replace deployment-id with the DeploymentId that you copied for the deployment.
aws greengrass get-deployment-status \
--group-id group-id \
--deployment-id deployment-id
If the status is Success, the deployment was successful. For troubleshooting help, see
Troubleshooting (p. 410).
Test the Solution
1. On the AWS IoT Core console home page, choose Test.
360

AWS IoT Greengrass Developer Guide
Test the Solution
2. For Subscriptions, use the following values, and then choose Subscribe to topic. The Twilio
Notifications connector publishes status information to this topic.
Property Value
Subscription topic twilio/message/status
MQTT payload display Display payloads as strings
3. For Publish, use the following values, and then choose Publish to topic to invoke the function.
Property Value
Topic temperature/input
Message Replace recipient-name with a name and
recipient-phone-number with the phone
number of the text message recipient. Example:
+12345000000
361

AWS IoT Greengrass Developer Guide
See Also
Property Value
{
"to_name": "recipient-name",
"to_number": "recipient-phone-number",
"temperature": 31
}
If you're using a trial account, you must add
non-Twilio recipient phone numbers to a list of
verified phone numbers. For more information,
see Verify your Personal Phone Number.
If successful, the recipient receives the text message and the console displays the success status
from the output data (p. 334).
Now, change the temperature in the input message to 29 and publish. Because this is less than 30,
the TempMonitor function doesn't trigger a Twilio message.
See Also
•Integrate with Services and Protocols Using Connectors (p. 266)
•the section called “AWS-Provided Greengrass Connectors” (p. 271)
• AWS Secrets Manager commands in the AWS CLI Command Reference
• IAM commands in the AWS CLI Command Reference
• AWS Lambda commands in the AWS CLI Command Reference
• AWS IoT Greengrass commands in the AWS CLI Command Reference
362

AWS IoT Greengrass Developer Guide
Request
Greengrass Discovery RESTful API
All devices that communicate with an AWS IoT Greengrass core must be a member of a Greengrass
group. Each group must have an AWS IoT Greengrass core. The Discovery API enables devices to retrieve
information required to connect to an AWS IoT Greengrass core that is in the same Greengrass group as
the device. When a device first comes online, it can connect to the AWS IoT Greengrass cloud service and
use the Discovery API to find:
• The group to which it belongs.
• The IP address and port for the AWS IoT Greengrass core in the group.
• The group's root CA certificate, which can be used to authenticate the AWS IoT Greengrass core device.
To use this API, send HTTP requests to the Discovery API endpoint. For example:
https://greengrass-ats.iot.aws-region.amazonaws.com:8443/greengrass/discover/thing/thing-
name
Use port 8443 when connecting. For a list of supported regions and endpoints for the AWS IoT
Greengrass Discovery API, see AWS Regions and Endpoints in the AWS General Reference. This is a data
plane only API. The endpoints for group management and AWS IoT operations are different from the
Discovery API endpoints.
Request
The request contains the standard HTTP headers and is sent to the Greengrass Discovery endpoint:
HTTP GET https://greengrass-ats.iot.aws-region.amazonaws.com:8443/greengrass/discover/
thing/thing-name
Response
Response
Upon success, the response includes the standard HTTP headers plus the following code and body:
HTTP 200
BODY: response document
For more information see, Example Discover Response Documents (p. 364).
Authorization
Retrieving the connectivity information requires a policy that allows the caller to perform
thegreengrass:Discoveraction. TLS mutual authentication with a client certificate is the only
accepted form of authentication. The following is an example policy that allows a caller to perform this
action:
363

AWS IoT Greengrass Developer Guide
Example Discover Response Documents
{
"Version": "2012-10-17",
"Statement": [{
"Effect": "Allow",
"Action": "greengrass:Discover",
"Resource": ["arn:aws:iot:aws-region:aws-account:thing/thing-name"]
}]
}
Example Discover Response Documents
The following document shows the response for a device that is a member of a group with one AWS IoT
Greengrass core, one endpoint, and one group CA:
{
"GGGroups": [
{
"GGGroupId": "gg-group-01-id",
"Cores": [
{
"thingArn": "core-01-thing-arn",
"Connectivity": [
{
"id": "core-01-connection-id",
"hostAddress": "core-01-address",
"portNumber": core-01-port,
"metadata": "core-01-description"
}
]
}
],
"CAs": [
"-----BEGIN CERTIFICATE-----cert-contents-----END CERTIFICATE-----"
]
}
]
}
The following document shows the response for a device that is a member of two groups with one AWS
IoT Greengrass core, multiple endpoints, and multiple group CAs:
{
"GGGroups": [
{
"GGGroupId": "gg-group-01-id",
"Cores": [
{
"thingArn": "core-01-thing-arn",
"Connectivity": [
{
"id": "core-01-connection-id",
"hostAddress": "core-01-address",
"portNumber": core-01-port,
"metadata": "core-01-connection-1-description"
},
{
"id": "core-01-connection-id-2",
"hostAddress": "core-01-address-2",
"portNumber": core-01-port-2,
"metadata": "core-01-connection-2-description"
364

AWS IoT Greengrass Developer Guide
Example Discover Response Documents
}
]
}
],
"CAs": [
"-----BEGIN CERTIFICATE-----cert-contents-----END CERTIFICATE-----",
"-----BEGIN CERTIFICATE-----cert-contents-----END CERTIFICATE-----",
"-----BEGIN CERTIFICATE-----cert-contents-----END CERTIFICATE-----"
]
},
{
"GGGroupId": "gg-group-02-id",
"Cores": [
{
"thingArn":"core-02-thing-arn",
"Connectivity" : [
{
"id": "core-02-connection-id",
"hostAddress": "core-02-address",
"portNumber": core-02-port,
"metadata": "core-02-connection-1-description"
}
],
"CAs": [
"-----BEGIN CERTIFICATE-----cert-contents-----END CERTIFICATE-----",
"-----BEGIN CERTIFICATE-----cert-contents-----END CERTIFICATE-----",
"-----BEGIN CERTIFICATE-----cert-contents-----END CERTIFICATE-----"
]
}
]
}
}
Note
An AWS IoT Greengrass group must define exactly one AWS IoT Greengrass core. Any response
from the AWS IoT Greengrass cloud service that contains a list of AWS IoT Greengrass cores only
contains one AWS IoT Greengrass core.
365
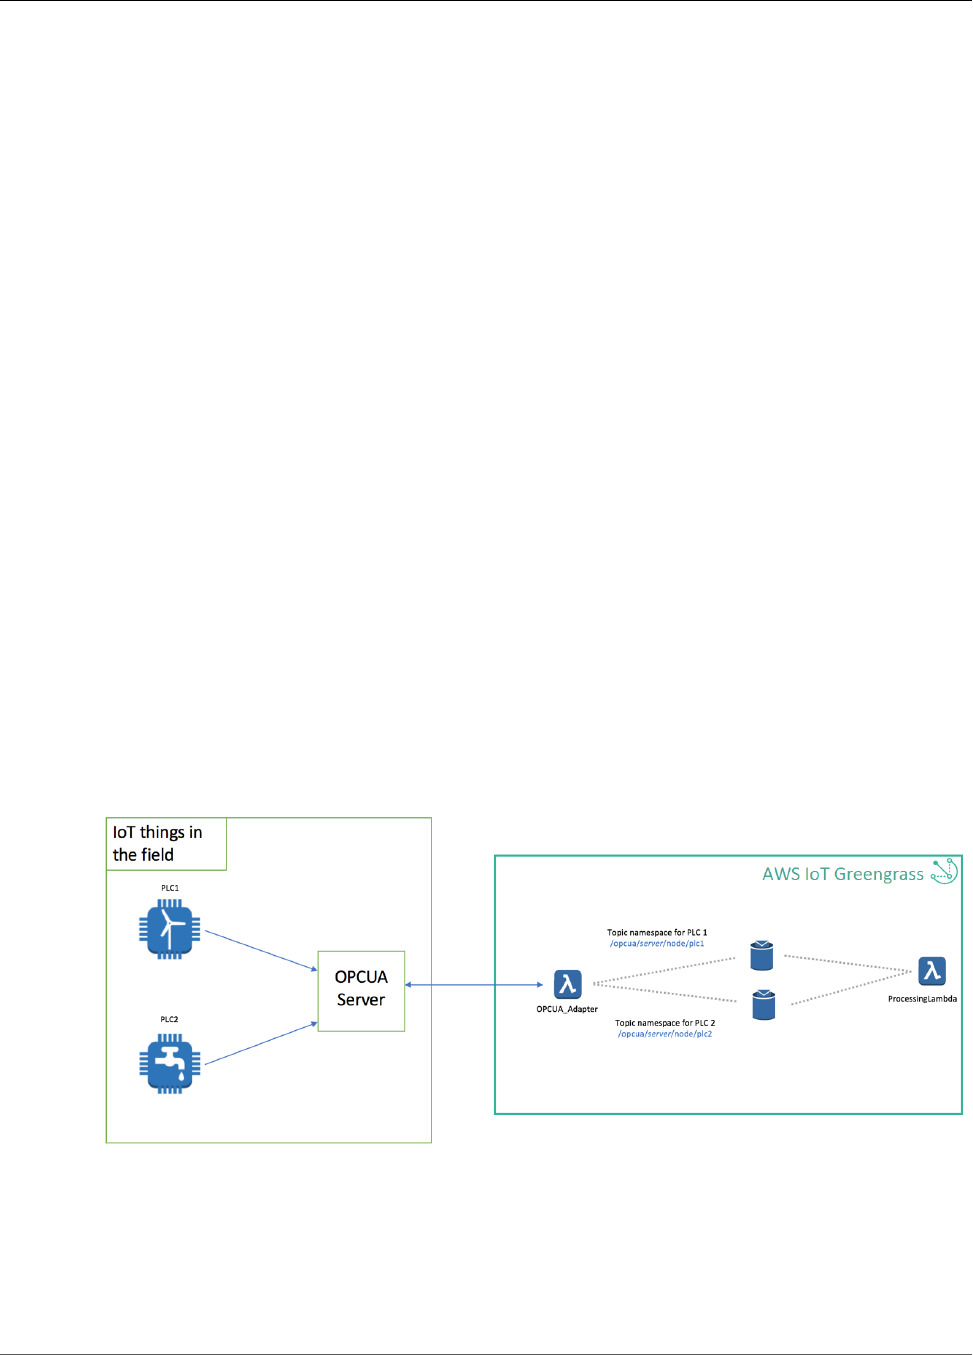
AWS IoT Greengrass Developer Guide
Architectural Overview
Use Greengrass OPC-UA to
Communicate with Industrial
Equipment
Greengrass supports OPC-UA, an information exchange standard for industrial communication. OPC-UA
allows you to ingest and process messages from industrial equipment and deliver them to devices in your
Greengrass group or to the cloud based on rules you define.
The Greengrass implementation of OPC-UA supports certificate-based authentication. It is based on an
open source implementation, and is fully customizable. You can also bring your own implementation
of OPC-UA, and implement your own support for other custom, legacy, and proprietary messaging
protocols.
In this section we will cover the following steps:
• Connect to an existing OPC-UA server.
• Monitor an existing OPC-UA node within that server.
• Get called back when the monitored node's value changes.
Architectural Overview
Greengrass implements OPC-UA as a Lambda function in NodeJS. Since Lambda functions running
on Greengrass cores have access to network resources, you can create Lambda functions that proxy
information from your existing OPC-UA servers over TCP to other functions or services in your
Greengrass group.
You can configure Greengrass to have a long-lived connection to your OPC-UA server(s), and, using
OPC-UA Subscriptions, you can have your OPCUA_Adapter Lambda function monitor changes to pre-
defined nodes. Any change to those nodes triggers a Publish event from the OPC-UA server, which will
be received by your Lambda function, and republished into predefined topic names.
The topic structure is constructed as follows:
366
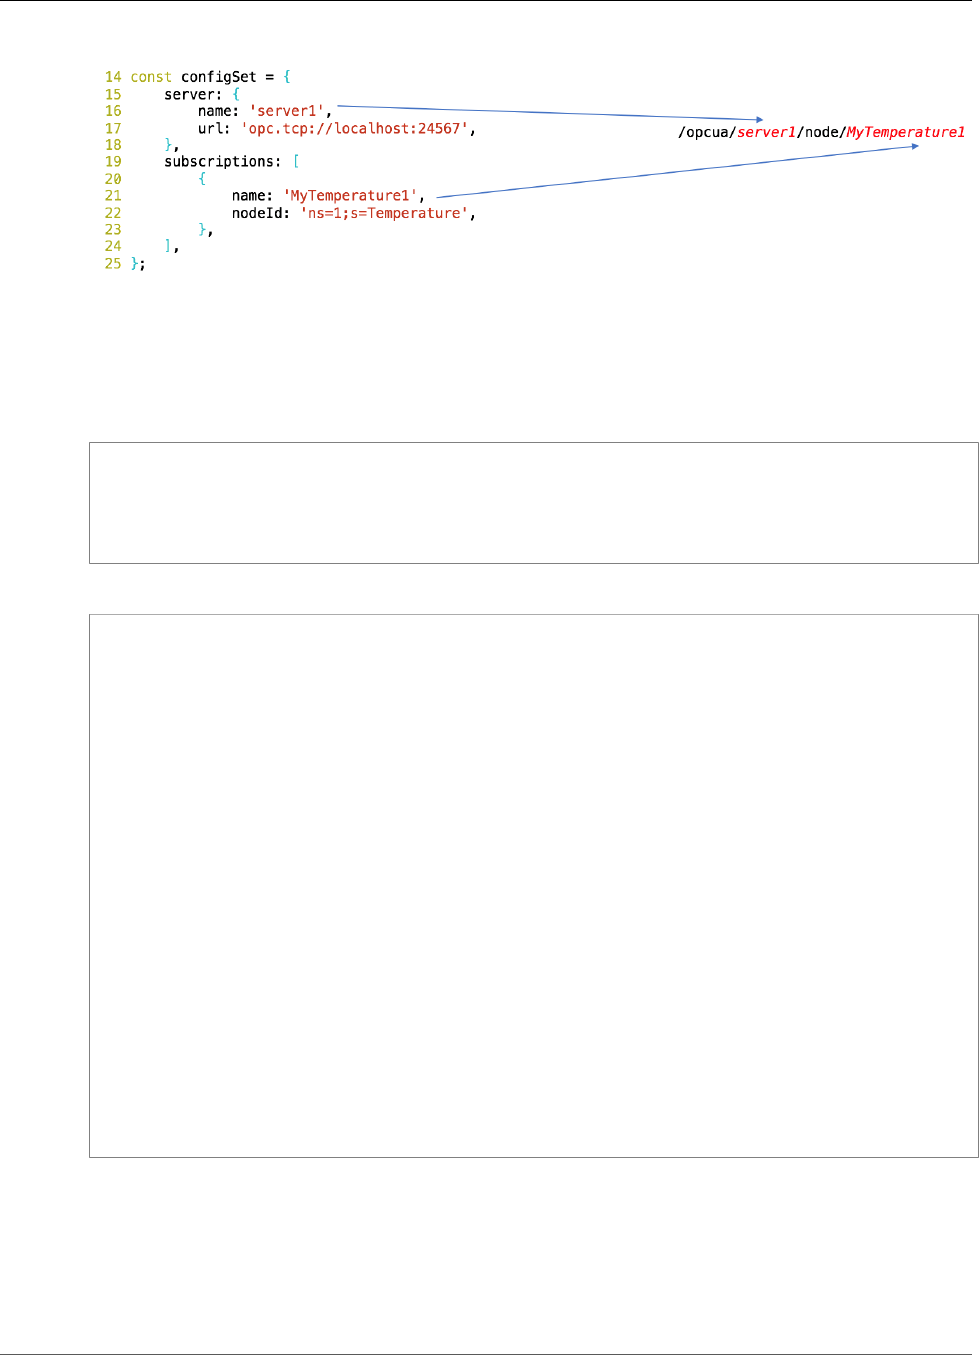
AWS IoT Greengrass Developer Guide
Set Up a Test OPC-UA Server
Set Up a Test OPC-UA Server
Use the following commands to set up a test OPC-UA server. Or, if you already have an OPC-UA server
you'd like to use instead, you may skip this step.
git clone git://github.com/node-opcua/node-opcua.git
cd node-opcua
git checkout v0.0.64
npm install
node bin/simple_server
The server produces the following output:
[ec2-user@<your_instance_id> node-opcua]$ node bin/simple_server
server PID : 28585
registering server to :opc.tcp://<your_instance_id>4840/UADiscovery
err Cannot find module 'usage'
skipping installation of cpu_usage and memory_usage nodes
server on port : 26543
endpointUrl : opc.tcp://<your_instance_id>us-west-2.compute.internal:26543
serverInfo :
applicationUri : urn:54f7890cca4c49a1:NodeOPCUA-Server
productUri : NodeOPCUA-Server
applicationName : locale=en text=NodeOPCUA
applicationType : SERVER
gatewayServerUri : null
discoveryProfileUri : null
discoveryUrls :
productName : NODEOPCUA-SERVER
buildInfo :
productUri : NodeOPCUA-Server
manufacturerName : Node-OPCUA : MIT Licence ( see http://node-
opcua.github.io/)
productName : NODEOPCUA-SERVER
softwareVersion : 0.0.65
buildNumber : 1234
buildDate : Thu Aug 03 2017 00:13:50 GMT+0000 (UTC)
server now waiting for connections. CTRL+C to stop
Make sure your Greengrass Group is ready
• Create a Greengrass group (find more details in Configure AWS IoT Greengrass on AWS IoT (p. 56).)
• Set up a Greengrass Core on one of the supported platforms (Raspberry-pi for example (p. 45))
367

AWS IoT Greengrass Developer Guide
Use Greengrass OPC-UA to
Interact with your OPC-UA Server
•Set up (p. 14) your Greengrass Core to be able to run nodejs6.x Lambda functions
Use Greengrass OPC-UA to Interact with your OPC-
UA Server
1. Prepare your Lambda function
Get the code for an OPC-UA adapter Lambda function from GitHub:
git clone https://github.com/aws-samples/aws-greengrass-samples.git
cd aws-greengrass-samples/greengrass-opcua-adapter-nodejs
npm install
Note:This Lambda function uses the node-opcua library (v0.0.64), which attempts to re-generate
some model files at runtime. That doesn't work when running as a Lambda function on Greengrass,
because Lambda functions start with a Read-Only file system, so any code trying to generate other
code would not work. The next step fixes this.
2. Change the file at node_modules/node-opcua/lib/misc/factories.js: line 109 to this:
var generated_source_is_outdated = (!generated_source_exists);
Run this command to make that change:
sed -i '109s/.*/ var generated_source_is_outdated = (!generated_source_exists);/'
node_modules/node-opcua/lib/misc/factories.js
3. Configure the server and monitored nodes
Change the configSet variable inside the index.js file of the OPC-UA Lambda function to
contain the server IP and Port that you want to connect to, as well as the node Ids you would like to
monitor. By default it comes with the following example configuration:
const configSet = {
server: {
name: 'server',
url: 'opc.tcp://localhost:26543',
},
subscriptions: [
{
name: 'MyPumpSpeed',
nodeId: 'ns=1;s=PumpSpeed',
},
],
};
In this case, we are connecting to an OPC-UA server running on the same host as our Greengrass
Core, on port 26543, and monitoring one node that has an OPC-UA Id 'ns=1;s=PumpSpeed'.
4. Configure the authentication mode
The OPC-UA library used in this example supports three modes of Authentication to your OPC-UA
server. The most secure method is Certificate Based Authentication, but the library also allows you
to specify username/password or no authentication.
368

AWS IoT Greengrass Developer Guide
Use Greengrass OPC-UA to
Interact with your OPC-UA Server
Here is how to set Certificate Based Authentication:
• Package your certificate and private key with your Lambda function, for example under a directory
named certs/.
• Change the clientOptions variable to contain certificateFile, privateKeyFile and securityModes,
securityPolicies options:
const clientOptions = {
keepSessionAlive: true,
certificateFile: /lambda/certs/<certificate_name>.pem.crt,
privateKeyFile: /lambda/certs/<private_key_name>.pem.key,
securityModes: MessageSecurityMode.SIGN,
securityPolicies: SecurityPolicy.BASIC256,
connectionStrategy: {
maxRetry: 1000000,
initialDelay: 2000,
maxDelay: 10 * 1000,
},
};
5. Upload your Lambda
Create a Greengrass Lambda function. You can find more details on how to do that in Configure
the Lambda Function for AWS IoT Greengrass (p. 70). In a nutshell, create a Lambda function code
archive by doing the following:
# Download the nodejs greengrass sdk from
# https://console.aws.amazon.com/iotv2/home?region=us-east-1#/software/greengrass/
sdk.
# Install Greengrass SDK in the node_modules directory
tar -zxvf aws-greengrass-core-sdk-js-*.tar.gz -C /tmp/
unzip /tmp/aws_greengrass_core_sdk_js/sdk/aws-greengrass-core-sdk-js.zip -d
node_modules
# Archive the whole directory as a zip file
zip -r opcuaLambda.zip * -x \*.git\*
# Create an AWS Lambda with the created zip
aws lambda create-function --function-name <Function_Name> --runtime 'nodejs6.10' --
role <Your_Role> --handler 'index.handler' --zip-file opcuaLambda.zip
Add this Lambda to your Greengrass Group. Details are, again, in: Configure the Lambda Function for
AWS IoT Greengrass (p. 70).
6. Configure and Deploy the Lambda function to your Greengrass Group
After creating your AWS Lambda function, you add it to your Greengrass Group. Follow the
instructions in same section as above.
• Make sure to specify the Lambda function as Long-Running.
• Give it at least 64MB of memory size.
You can now create a deployment with your latest configuration. You can find details in Deploy
Cloud Configurations to an AWS IoT Greengrass Core Device (p. 75).
369
AWS IoT Greengrass Developer Guide
Verify that your Lambda function is receiving OPC-
UA Publishes and posting them onto Greengrass
Verify that your Lambda function is receiving OPC-
UA Publishes and posting them onto Greengrass
As described in the Architecture section (p. 366), your Lambda function should start receiving messages
from your OPC-UA server. If you are using your own custom OPC-UA server, make sure you trigger
a change in the OPC-UA node Id you specified, so that you see the change received by your Lambda
function. If you are using the example server above, the PumpSpeed node is configured to simulate a
series of consecutive updates, so you should expect your Lambda function to receive multiple messages a
second.
You can see messages received by your Lambda function in one of two ways:
• Watch the Lambda function’s logs
You can view the logs from your Lambda function by running the following command:
sudo cat ggc/var/log/user/us-west-2/your_account_id/your_function_name.log
The logs should look similar to:
[2017-11-14T16:33:09.05Z][INFO]-started subscription : 305964
[2017-11-14T16:33:09.05Z][INFO]-monitoring node id = ns=1;s=PumpSpeed
[2017-11-14T16:33:09.099Z][INFO]-monitoredItem initialized
[2017-11-15T23:49:34.752Z][INFO]-Publishing message on topic "/opcua/
server/node/MyPumpSpeed" with Payload "{"id":"ns=1;s=PumpSpeed","value":
{"dataType":"Double","arrayType":"Scalar","value":237.5250759433095}}"
• Configure Greengrass to forward messages from your Lambda function to the IoT Cloud.
Follow the steps outlined in Verify the Lambda Function Is Running on the Device (p. 76) to receive
messages on the AWS IoT Core console.
Note:
• Make sure there is a Subscription from your Lambda function going to the IoT Cloud. Details are in
Configure the Lambda Function for AWS IoT Greengrass (p. 70).
• Since messages are forwarded to the cloud, make sure you terminate either the example server you
configured above, or stop the Greengrass core, so that you don't end up publishing a lot of messages
to IoT cloud and getting charged for them!
Next Steps
With Greengrass, you can use this same architecture to create your own implementation of OPC-UA,
and also implement your own support for custom, legacy, and proprietary messaging protocols. Since
Lambda functions running on Greengrass cores have access to network resources, you can use them to
implement support for any protocol that rides on top of TCP-IP. In addition, you can also take advantage
of Greengrass Local Resource Access to implement support for protocols that need access to hardware
adapters/drivers.
370
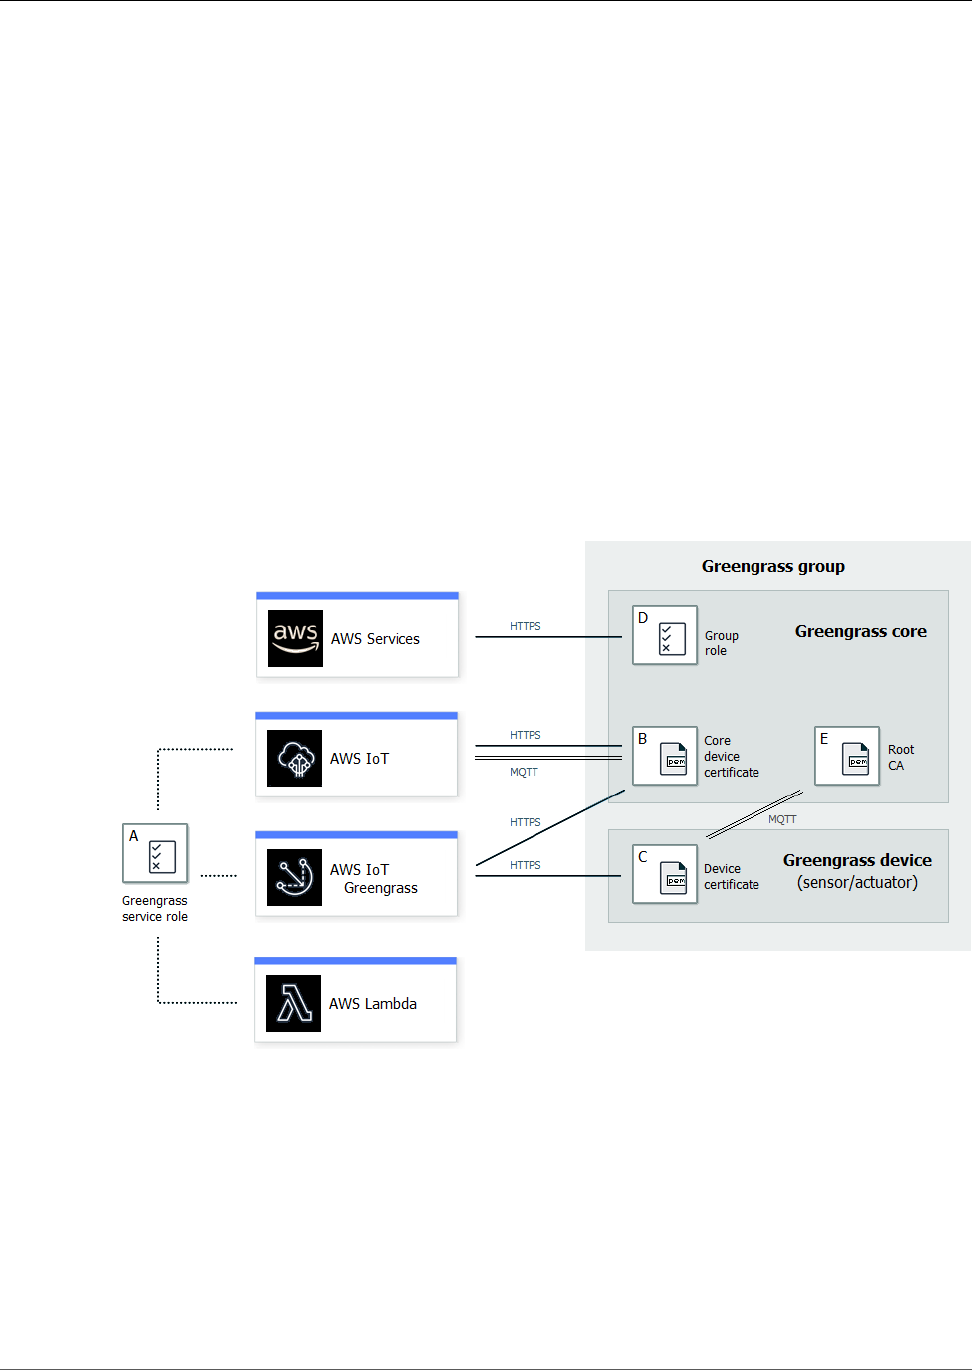
AWS IoT Greengrass Developer Guide
AWS IoT Greengrass Security
AWS IoT Greengrass uses X.509 certificates, managed subscriptions, AWS IoT policies, and IAM policies
and roles to ensure your Greengrass applications are secure. AWS IoT Greengrass core devices require an
AWS IoT thing, a device certificate, and an AWS IoT policy to communicate with the Greengrass cloud
service.
This allows AWS IoT Greengrass core devices to securely connect to the AWS IoT cloud services. It also
allows the Greengrass cloud service to deploy configuration information, Lambda functions, connectors,
and managed subscriptions to AWS IoT Greengrass core devices.
AWS IoT devices require an AWS IoT thing, a device certificate, and an AWS IoT policy to connect to the
Greengrass service. This allows AWS IoT devices to use the Greengrass Discovery Service to find and
connect to an AWS IoT Greengrass core device. AWS IoT devices use the same device certificate used to
connect to AWS IoT device gateway and AWS IoT Greengrass core devices. The following diagram shows
the components of the AWS IoT Greengrass security model:
A - Greengrass service role
A customer-created IAM role that allows AWS IoT Greengrass access to your AWS IoT, Lambda, and
other AWS resources.
B - Core device certificate
An X.509 certificate used to authenticate an AWS IoT Greengrass core.
C - Device certificate
An X.509 certificate used to authenticate an AWS IoT device.
371

AWS IoT Greengrass Developer Guide
Configuring Greengrass Security
D - Group role
A customer-created IAM role assumed by AWS IoT Greengrass when calling AWS services from a
Lambda function or connector on an AWS IoT Greengrass core.
This the Lambda execution role for all the Greengrass Lambda functions and connectors that run on
the core. Use this role to specify access permissions that your user-defined Lambda functions and
connectors need to access AWS services, such as DynamoDB.
Note
AWS IoT Greengrass doesn't use the Lambda execution role that's specified in AWS Lambda
for the cloud version of the function.
E - Group CA
A root CA certificate used by AWS IoT Greengrass devices to validate the certificate presented by an
AWS IoT Greengrass core device during TLS mutual authentication.
Configuring Greengrass Security
To configure your Greengrass application's security:
1. Create an AWS IoT thing for your AWS IoT Greengrass core device.
2. Generate a key pair and device certificate for your AWS IoT Greengrass core device.
3. Create and attach an AWS IoT policy to the device certificate. The certificate and policy allow the
AWS IoT Greengrass core device access to AWS IoT and AWS IoT Greengrass services. For more
information, see the section called “Minimal AWS IoT Policy for the AWS IoT Greengrass Core
Device” (p. 372).
4. Create a Greengrass service role. This IAM role authorizes AWS IoT Greengrass to access resources
from other AWS services on your behalf. This allows AWS IoT Greengrass to perform essential tasks,
such as retrieving AWS Lambda functions and managing AWS IoT shadows. You only need to create
a service role once per AWS account.
5. (Optional) Create a Greengrass group role. This role grants permission to Lambda functions and
connectors running on an AWS IoT Greengrass core to call other AWS services (in the cloud). You
need to do this for each Greengrass group you create.
6. Create an AWS IoT thing for each device that will connect to your AWS IoT Greengrass core.
7. Create device certificates, key pairs, and AWS IoT policies for each device that will connect to your
AWS IoT Greengrass core.
Note
You can also use existing AWS IoT things and certificates.
Minimal AWS IoT Policy for the AWS IoT Greengrass
Core Device
An AWS IoT policy defines the set of actions allowed for an AWS IoT thing (in this case, the Greengrass
core device). The policy is attached to the device certificate and used to access AWS IoT and AWS IoT
Greengrass services. AWS IoT policies are JSON documents that follow the conventions of IAM policies.
For more information, see AWS IoT Policies in the AWS IoT Developer Guide.
The following example policy includes the minimum set of actions required to support basic Greengrass
functionality for your core device. Make a note of the following:
372

AWS IoT Greengrass Developer Guide
Minimal AWS IoT Policy for the
AWS IoT Greengrass Core Device
• The policy lists the MQTT topics and topic filters that the core device can publish messages to,
subscribe to, and receive messages on, including topics used for shadow state. To support message
exchange between AWS IoT, Lambda functions, connectors, and devices in the Greengrass group,
specify the topics and topic filters that you want to allow. For more information, see Publish/Subscribe
Policy Examples in the AWS IoT Developer Guide.
• The policy includes a section that allows AWS IoT to get, update, and delete the core device's shadow.
To allow shadow sync for other devices in the Greengrass group, specify the target ARNs in the
Resource list (for example, arn:aws:iot:region:account-id:thing/device-name).
• For the greengrass:UpdateCoreDeploymentStatus permission, the final segment in the
Resource ARN is the URL-encoded ARN of the core device.
{
"Version": "2012-10-17",
"Statement": [
{
"Effect": "Allow",
"Action": [
"iot:Connect"
],
"Resource": [
"*"
]
},
{
"Effect": "Allow",
"Action": [
"iot:Publish",
"iot:Subscribe",
"iot:Receive"
],
"Resource": [
"arn:aws:iot:region:account-id:topicfilter/$aws/things/core-name-*",
"arn:aws:iot:region:account-id:topic/$aws/things/core-name-*"
]
},
{
"Effect": "Allow",
"Action": [
"iot:GetThingShadow",
"iot:UpdateThingShadow",
"iot:DeleteThingShadow"
],
"Resource": [
"arn:aws:iot:region:account-id:thing/core-name-*"
]
},
{
"Effect": "Allow",
"Action": [
"greengrass:AssumeRoleForGroup",
"greengrass:CreateCertificate"
],
"Resource": [
"*"
]
},
{
"Effect": "Allow",
"Action": [
"greengrass:GetDeployment"
],
"Resource": [
373

AWS IoT Greengrass Developer Guide
Device Connection Workflow
"arn:aws:greengrass:region:account-id:/greengrass/groups/group-id/deployments/*"
]
},
{
"Effect": "Allow",
"Action": [
"greengrass:GetDeploymentArtifacts"
],
"Resource": [
"arn:aws:greengrass:region:account-id:/greengrass/groups/group-id/deployments/*"
]
},
{
"Effect": "Allow",
"Action": [
"greengrass:UpdateCoreDeploymentStatus"
],
"Resource": [
"arn:aws:greengrass:region:account-id:/greengrass/groups/group-id/deployments/*/
cores/arn%3Aaws%3Aiot%3Aregion%3Aaccount-id%3Athing%2Fcore-name"
]
},
{
"Effect": "Allow",
"Action": [
"greengrass:GetConnectivityInfo",
"greengrass:UpdateConnectivityInfo"
],
"Resource": [
"arn:aws:iot:region:account-id:thing/core-name"
]
}
]
}
On the AWS IoT Core console, you can easily view and edit the policy that's attached to your core's
certificate.
1. In the navigation pane, choose Manage, choose Things, and then choose your core.
2. On your core's configuration page, choose Security.
3. On the Certificates page, choose your certificate.
4. On the certificate's configuration page, choose Policies, and then choose the policy.
If you want to edit the policy, choose Edit policy document.
Device Connection Workflow
This section describes how devices connect to the AWS IoT Greengrass cloud service and AWS IoT
Greengrass core devices.
• An AWS IoT Greengrass core device uses its device certificate, private key, and the AWS IoT root CA
certificate to connect to the Greengrass cloud service .
• The AWS IoT Greengrass core device downloads group membership information from the Greengrass
service.
• When a deployment is made to the AWS IoT Greengrass core device, the Device Certificate Manager
(DCM) handles certificate management for the AWS IoT Greengrass core device.
• An AWS IoT device connects to the Greengrass cloud service using its device certificate, private key,
and the AWS IoT root CA. After making the connection, the AWS IoT device uses the Greengrass
Discovery Service to find the IP address of its AWS IoT Greengrass core device. The device can also
374

AWS IoT Greengrass Developer Guide
Greengrass Messaging Workflow
download the group's root CA certificate, which can be used to authenticate the Greengrass core
device.
• An AWS IoT device attempts to connect to the AWS IoT Greengrass core, passing its device certificate
and client ID. If the client ID matches the thing name of the device and the certificate is valid, the
connection is made. Otherwise, the connection is terminated.
Greengrass Messaging Workflow
A subscription table is used to define how messages are exchanged within a Greengrass group (between
AWS IoT Greengrass core devices, AWS IoT devices, Lambda functions, and connectors). Each entry in
the subscription table specifies a source, a destination, and an MQTT topic over which messages are sent
or received. Messages can be exchanged only if an entry exists in the subscription table specifying the
source (message sender), the target (message recipient), and the MQTT topic. Subscription table entries
specify passing messages in one direction, from the source to the target. If you want two-way message
passing, create two subscription table entries, one for each direction.
MQTT Core Server Certificate Rotation
The MQTT core server certificate expires, by default, in 7 days. You can set the expiration to any value
between 7 and 30 days. When the MQTT core server certificate expires, any attempt to validate the
certificate fails. The device must be able to detect the failure and terminate the connection. Existing
connections are not affected. When the certificate expires, the AWS IoT Greengrass core device attempts
to connect to the Greengrass cloud service to obtain a new certificate. If the connection is successful,
the AWS IoT Greengrass core device downloads a new MQTT core server certificate and restarts the local
MQTT service. At this point, all AWS IoT devices connected to the core are disconnected.
If there is no internet connection when the AWS IoT Greengrass core attempts to get a new MQTT
core server certificate, AWS IoT devices are unable to connect to the AWS IoT Greengrass core until the
connection to the Greengrass cloud service is restored and a new MQTT core server certificate can be
downloaded.
When AWS IoT devices are disconnected from a core, they have to wait a short period of time and then
attempt to reconnect to the AWS IoT Greengrass core device.
AWS IoT Greengrass Cipher Suites
AWS IoT Greengrass uses the AWS IoT transport security model to encrypt communication with the cloud
by using TLS cipher suites. In addition, AWS IoT Greengrass data is encrypted when at rest (in the cloud).
For more information about AWS IoT transport security and supported cipher suites, see Transport
Security in the AWS IoT Developer Guide.
As opposed to the AWS IoT cloud, the AWS IoT Greengrass core supports the following local network TLS
cipher suites:
TLS Version Cipher
TLS_ECDHE_RSA_WITH_AES_128_CBC_SHA
TLS_ECDHE_RSA_WITH_AES_256_CBC_SHA
TLS_RSA_WITH_AES_128_CBC_SHA
TLSv1.0
TLS_RSA_WITH_AES_256_CBC_SHA
375
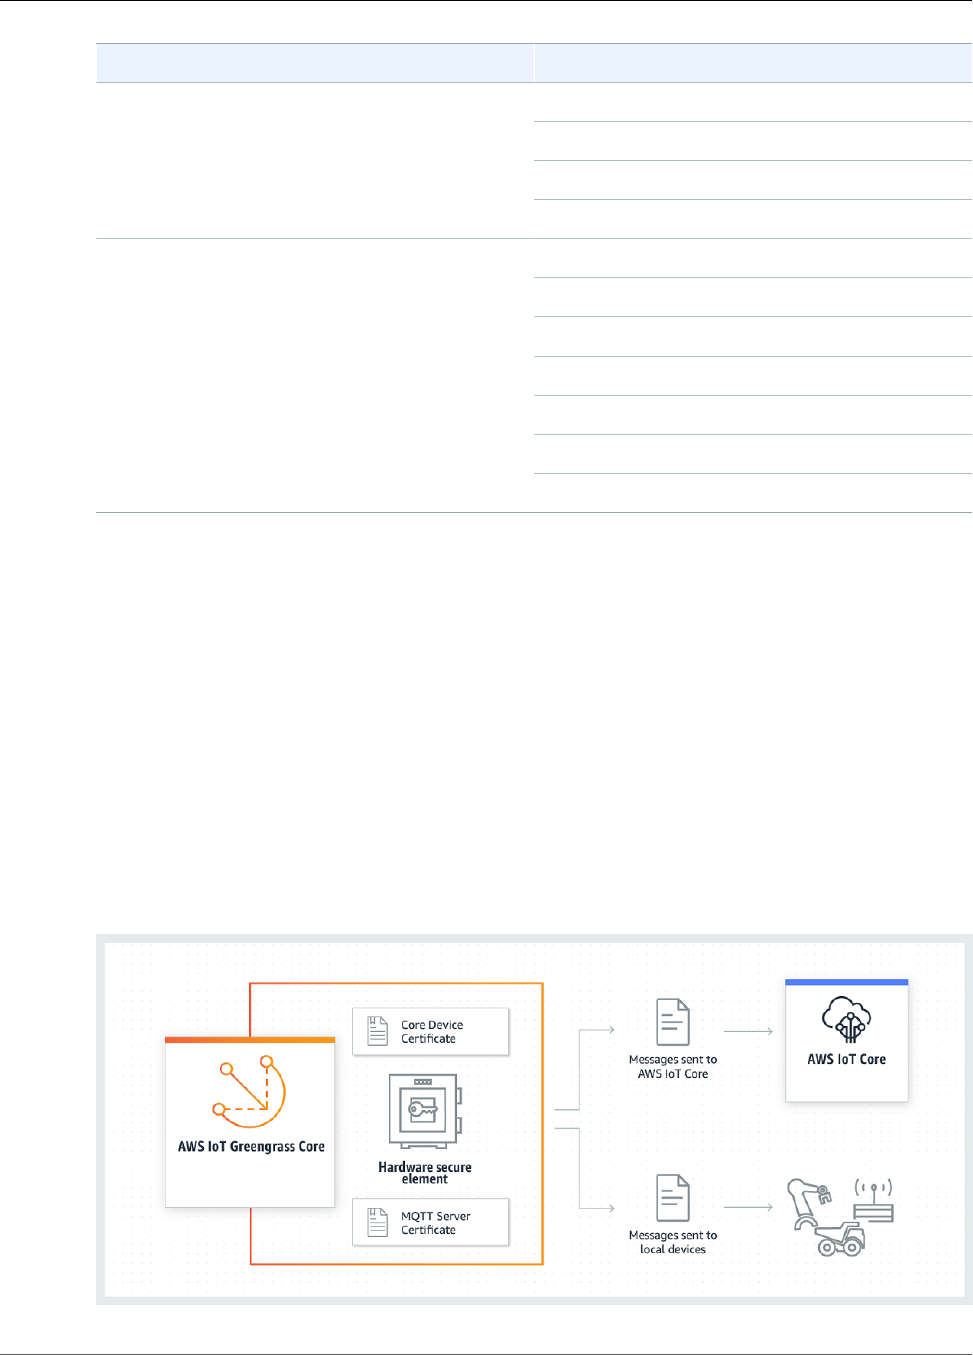
AWS IoT Greengrass Developer Guide
Hardware Security
TLS Version Cipher
TLS_ECDHE_RSA_WITH_AES_128_CBC_SHA
TLS_ECDHE_RSA_WITH_AES_256_CBC_SHA
TLS_RSA_WITH_AES_128_CBC_SHA
TLSv1.1
TLS_RSA_WITH_AES_256_CBC_SHA
TLS_ECDHE_RSA_WITH_AES_128_CBC_SHA
TLS_ECDHE_RSA_WITH_AES_256_CBC_SHA
TLS_ECDHE_RSA_WITH_AES_256_GCM_SHA384
TLS_RSA_WITH_AES_128_CBC_SHA
TLS_RSA_WITH_AES_128_GCM_SHA256
TLS_RSA_WITH_AES_256_CBC_SHA
TLSv1.2
TLS_RSA_WITH_AES_256_GCM_SHA384
Note
Only a subset of cipher suites are supported when hardware security is configured. For more
information, see the section called “Supported Cipher Suites” (p. 382).
Hardware Security Integration
This feature is available for AWS IoT Greengrass Core v1.7.0 only.
AWS IoT Greengrass supports the use of hardware security modules (HSM) through the PKCS#11
interface (p. 384) for secure storage and offloading of private keys. This prevents keys from being
exposed or duplicated in software. Private keys can be securely stored on hardware modules, such as
HSMs, Trusted Platform Modules (TPM), or other cryptographic elements.
Search for devices that are qualified for this feature in the AWS Partner Device Catalog.
The following diagram shows the hardware security architecture for an AWS IoT Greengrass core.
376

AWS IoT Greengrass Developer Guide
Requirements
On a standard installation, AWS IoT Greengrass uses two private keys. One key is used by the AWS IoT
client component during the Transport Layer Security (TLS) handshake when a Greengrass core connects
to AWS IoT. (This key is also referred to as the core private key.) The other key is used by the local MQTT
server, which enables Greengrass devices to communicate with the Greengrass core. If you want to use
hardware security for both components, you can use a shared private key or separate private keys. For
more information, see the section called “ Provisioning Practices” (p. 380).
Requirements
Before you can configure hardware security for a Greengrass core, you must have the following:
• An HSM that supports an RSA-2048 key size (or larger) and PKCS#1 v1.5 (p. 384) signature scheme.
AWS IoT Greengrass supports both RSA and ECC private keys for IoT client message encryption.
This applies to messages sent between the Greengrass core and AWS IoT cloud. However, AWS IoT
Greengrass doesn't currently support ECC private keys for local MQTT server message encryption,
which applies to messages between the Greengrass core and other Greengrass devices in the group.
Therefore, if your secure element doesn't support RSA key storage, you won't be able to use the secure
element key for local MQTT server message encryption. For these messages, you need to store an RSA
private key in the file system.
Note
Search for devices that are qualified for this feature in the AWS Partner Device Catalog.
• A PKCS#11 provider library that is loadable at runtime (using libdl) and provides PKCS#11 (p. 384)
functions.
• The hardware module must be resolvable by slot label, as defined in the PKCS#11 specification.
• The private key must be generated and loaded on the HSM by using the vendor-provided provisioning
tools.
• The private key must be resolvable by object label.
• The core device certificate. This is an AWS IoT client certificate that corresponds to the private key.
• If you're using the Greengrass OTA update agent, the OpenSSL libp11 PKCS#11 wrapper library must
be installed. For more information, see the section called “Configure OTA Updates” (p. 382).
In addition, make sure that the following conditions are met:
• The IoT client certificates that are associated with the private key are registered in AWS IoT and
activated. You can verify this from the Manage page for the core thing in the AWS IoT Core console.
• The AWS IoT Greengrass core software (v1.7.0) is installed on the core device, as described in Module
2 (p. 55) of the Getting Started tutorial.
• The certificates are attached to the Greengrass core. You can verify this from the Manage page for the
core thing in the AWS IoT Core console.
Note
Currently, AWS IoT Greengrass doesn't support loading the CA certificate or AWS IoT client
certificate directly from the HSM. The certificates must be loaded as plain-text files on the file
system in a location that can be read by Greengrass.
Hardware Security Configuration for an AWS IoT
Greengrass Core
Hardware security is configured in the Greengrass configuration file. This is the config.json (p. 21) file
that's located in the /greengrass-root/config directory.
377

AWS IoT Greengrass Developer Guide
Hardware Security Configuration
Note
To walk through the process of setting up an HSM configuration using a pure software
implementation, see the section called “Module 7: Simulating Hardware Security
Integration” (p. 124).
Important
The simulated configuration in the example doesn't provide any security benefits. It's
intended to allow you to learn about the PKCS#11 specification and do initial testing of
your software if you plan to use a hardware-based HSM in the future.
To configure hardware security in AWS IoT Greengrass, you edit the crypto object in config.json.
When using hardware security, the crypto object is used to specify paths to certificates, private keys,
and assets for the PKCS#11 provider library on the core, as shown in the following example.
"crypto": {
"PKCS11" : {
"OpenSSLEngine" : "/path-to-p11-openssl-engine",
"P11Provider" : "/path-to-pkcs11-provider-so",
"slotLabel" : "crypto-token-name",
"slotUserPin" : "crypto-token-user-pin"
},
"principals" : {
"IoTCertificate" : {
"privateKeyPath" : "pkcs11:object=core-private-key-label;type=private",
"certificatePath" : "file:///path-to-core-device-certificate"
},
"MQTTServerCertificate" : {
"privateKeyPath" : "pkcs11:object=server-private-key-label;type=private",
},
"SecretsManager" : {
"privateKeyPath": "pkcs11:object=core-private-key-label;type=private"
}
},
"caPath" : "file:///path-to-root-ca"
The crypto object contains the following properties:
Field Description Notes
caPath The absolute path to the AWS
IoT root CA.
Must be a file URI of the form:
file:///absolute/path/
to/file.
Note
Make sure that your
endpoints correspond
to your certificate
type (p. 32).
PKCS11
OpenSSLEngine Optional. The absolute path to
the OpenSSL engine .so file
to enable PKCS#11 support on
OpenSSL. This is used by the
Greengrass OTA update agent.
Must be a path to a file on the
file system.
P11Provider The absolute path to the
PKCS#11 implementation's libdl-
loadable library.
Must be a path to a file on the
file system.
378

AWS IoT Greengrass Developer Guide
Hardware Security Configuration
Field Description Notes
slotLabel The slot label that's used to
identify the hardware module.
Must conform to PKCS#11 label
specifications.
slotUserPin The user pin that's used to
authenticate the Greengrass
core to the module.
Must have sufficient permissions
to perform C_Sign with the
configured private keys.
principals
IoTCertificate The certificate and private key that the core uses to make requests
to AWS IoT.
IoTCertificate
.privateKeyPath
The path to the core private key. For file system storage, must
be a file URI of the form:
file:///absolute/path/
to/file.
For HSM storage, must be an
RFC 7512 PKCS#11 path that
specifies the object label.
IoTCertificate
.certificatePath
The absolute path to the core
device certificate.
Must be a file URI of the form:
file:///absolute/path/
to/file.
MQTTServerCertificate Optional. The private key that the core uses in combination with the
certificate to act as an MQTT server or gateway.
MQTTServerCertificate
.privateKeyPath
The path to the local MQTT
server private key.
Use this value to specify your
own private key for the local
MQTT server.
For file system storage, must
be a file URI of the form:
file:///absolute/path/
to/file.
For HSM storage, must be an
RFC 7512 PKCS#11 path that
specifies the object label.
If this property is omitted, AWS
IoT Greengrass rotates the key
based your rotation settings.
If specified, the customer is
responsible for rotating the key.
SecretsManager The private key that secures the data key used for encryption. For
more information, see Deploy Secrets to the Core (p. 243).
379

AWS IoT Greengrass Developer Guide
Provisioning Practices
Field Description Notes
SecretsManager
.privateKeyPath
The path to the local secrets
manager private key.
For file system storage, must
be a file URI of the form:
file:///absolute/path/
to/file.
For HSM storage, must be an
RFC 7512 PKCS#11 path that
specifies the object label. The
private key must be generated
using the PKCS#1 v1.5 padding
mechanism.
Provisioning Practices for AWS IoT Greengrass
Hardware Security
The following are security and performance-related provisioning practices.
Security
• Generate private keys directly on the HSM by using the internal hardware random-number
generator.
Note
If you configure private keys to use with this feature (by following the instructions
provided by the hardware vendor), be aware that AWS IoT Greengrass currently supports
only the PKCS1 v1.5 padding mechanism for encryption and decryption of local
secrets (p. 243). AWS IoT Greengrass doesn't support Optimal Asymmetric Encryption
Padding (OAEP).
• Configure private keys to prohibit export.
• Use the provisioning tool that's provided by the hardware vendor to generate a certificate signing
request (CSR) using the hardware-protected private key, and then use the AWS IoT Core console to
generate a client certificate.
Note
The practice of rotating keys doesn't apply when private keys are generated on an HSM.
Performance
The following diagram shows the AWS IoT client component and local MQTT server on the AWS IoT
Greengrass core. If you want to use an HSM configuration for both components, you can use the
same private key or separate private keys.
Note
AWS IoT Greengrass supports both RSA and ECC private keys for IoT client message
encryption. This applies to messages sent between the Greengrass core and AWS IoT cloud.
However, AWS IoT Greengrass doesn't currently support ECC private keys for local MQTT
server message encryption, which applies to messages between the Greengrass core and
other Greengrass devices in the group. Therefore, if your secure element doesn't support
RSA key storage, you won't be able to use the secure element key for local MQTT server
message encryption. For these messages, you need to store an RSA private key in the file
system.
380
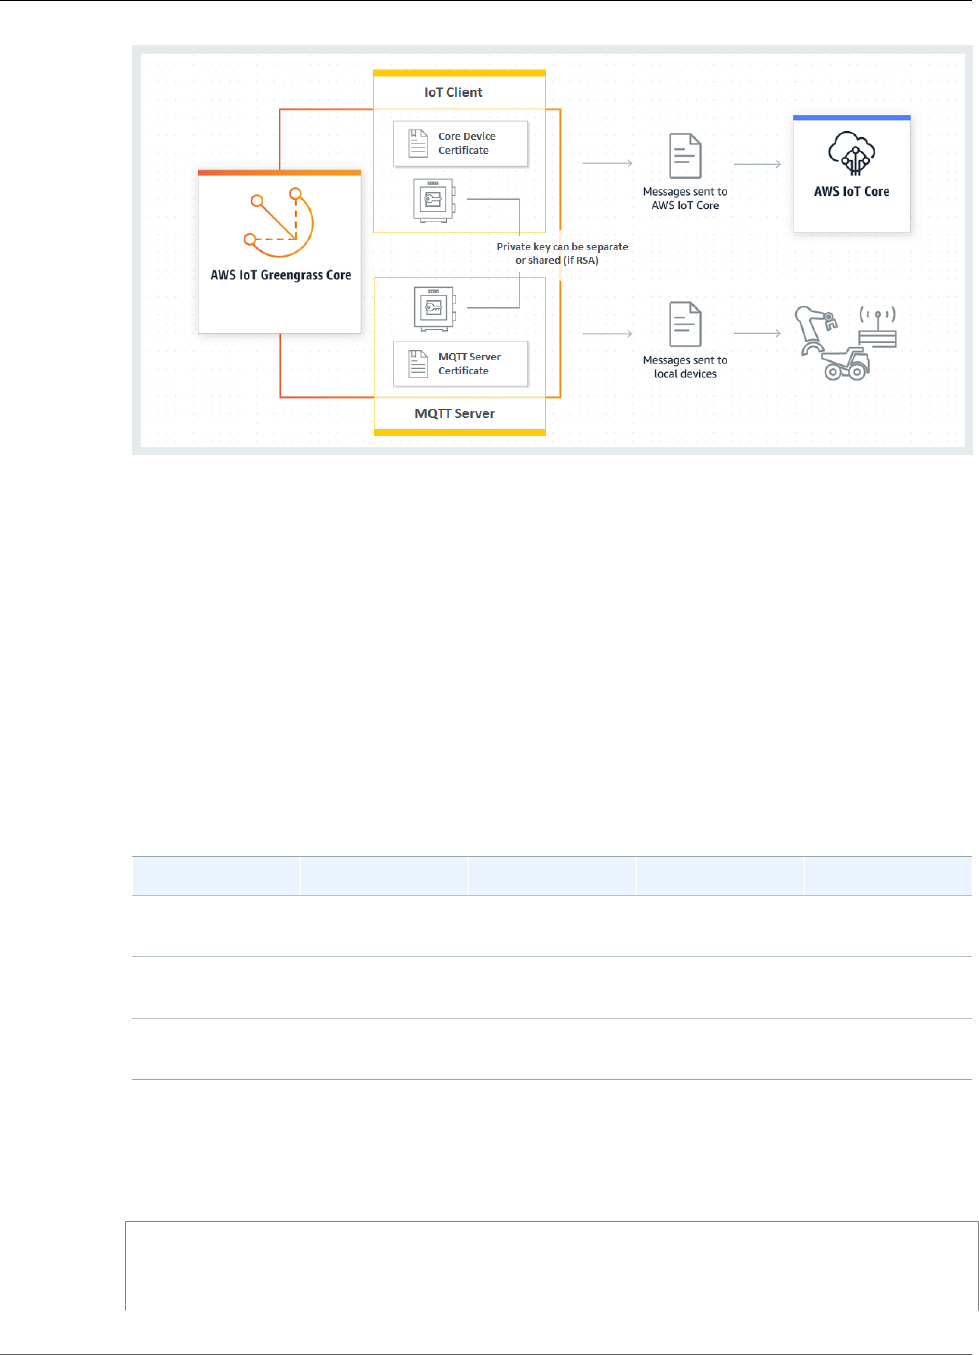
AWS IoT Greengrass Developer Guide
Provisioning Practices
In general, the IoT client key is not used very frequently because the Greengrass core software
maintains long-lived connections to the cloud. However, the MQTT server key is used every time that
a Greengrass device connects to the core. These interactions directly affect performance.
When the MQTT server key is stored on the HSM, the rate at which devices can connect depends on
the number of RSA signature operations per second that the HSM can perform. For example, if the
HSM takes 300 milliseconds to perform an RSASSA-PKCS1-v1.5 signature on an RSA-2048 private
key, then only three devices can connect to the Greengrass core per second. After the connections
are made, the HSM is no longer used and the standard Greengrass limits apply.
To mitigate performance bottlenecks, you can store the private key for the MQTT server on the file
system instead of on the HSM. With this configuration, the MQTT server behaves as if hardware
security isn't enabled.
AWS IoT Greengrass supports the following key-storage configurations so you can optimize for your
security and performance requirements.
Configuration IoT Key MQTT Key Performance
HSM Shared Key HSM: Key A HSM: Key A Limited by the
HSM or CPU
HSM for IoT only HSM: Key A File System: Key B Limited by the
CPU
Legacy File System: Key
A
File System: Key B Limited by the
CPU
To configure the Greengrass core to use file system-based keys for the MQTT server, omit the
principals.MQTTServerCertificate section from config.json (or specify a file-based
path to the key if you're not using the default key generated by AWS IoT Greengrass). The resulting
crypto object looks like this:
"crypto": {
"PKCS11": {
"OpenSSLEngine": "...",
"P11Provider": "...",
381
AWS IoT Greengrass Developer Guide
Supported Cipher Suites
"slotLabel": "...",
"slotUserPin": "...",
},
"principals": {
"IoTCertificate": {
"privateKeyPath": "...",
"certificatePath": "..."
},
"SecretsManager": {
"privateKeyPath": "..."
}
},
"caPath" : "..."
}
Supported Cipher Suites for Hardware Security
Integration
AWS IoT Greengrass supports the following cipher suites when using hardware security:
TLS Version Cipher
TLS_ECDHE_RSA_WITH_AES_128_CBC_SHATLSv1.0
TLS_ECDHE_RSA_WITH_AES_256_CBC_SHA
TLS_ECDHE_RSA_WITH_AES_128_CBC_SHATLSv1.1
TLS_ECDHE_RSA_WITH_AES_256_CBC_SHA
TLS_ECDHE_RSA_WITH_AES_128_CBC_SHA
TLS_ECDHE_RSA_WITH_AES_256_CBC_SHA
TLSv1.2
TLS_ECDHE_RSA_WITH_AES_256_GCM_SHA384
When connecting to the Greengrass core from Greengrass devices, be sure to use one of these cipher
suites to make the TLS connection.
Note
This is a subset of the cipher suites that are supported when the core is configured to use
file-based security. For the full list, see the section called “AWS IoT Greengrass Cipher
Suites” (p. 375).
Configure Support for Over-the-Air Updates
To enable over-the-air (OTA) updates of the AWS IoT Greengrass core core software when using
hardware security, you must install the OpenSC libp11 PKCS#11 wrapper library and edit the Greengrass
configuration file. For more information about OTA updates, see OTA Updates of AWS IoT Greengrass Core
Software (p. 129).
1. Stop the AWS Greengrass daemon.
cd /greengrass-root/ggc/core/
sudo ./greengrassd stop
382

AWS IoT Greengrass Developer Guide
Backward Compatibility
Note
greengrass-root represents the path where the AWS IoT Greengrass core software
is installed on your device. If you installed the software by following the Getting
Started (p. 44) tutorial, then this is the /greengrass directory.
2. Install the OpenSSL engine.
sudo apt-get install libengine-pkcs11-openssl
3. Find the path to the OpenSSL engine (libpkcs11.so) on your system:
a. Get the list of installed packages for the library.
sudo dpkg -L libengine-pkcs11-openssl
The libpkcs11.so file is located in the engines directory.
b. Copy the full path to the file (for example, /usr/lib/ssl/engines/libpkcs11.so).
4. Open the Greengrass configuration file. This is the config.json (p. 21) file in the /greengrass-
root/config directory.
5. For the OpenSSLEngine property, enter the path to the libpkcs11.so file.
{
"crypto": {
"caPath" : "file:///path-to-root-ca",
"PKCS11" : {
"OpenSSLEngine" : "/path-to-p11-openssl-engine",
"P11Provider" : "/path-to-pkcs11-provider-so",
"slotLabel" : "crypto-token-name",
"slotUserPin" : "crypto-token-user-pin"
},
...
}
...
}
Note
If the OpenSSLEngine property doesn't exist in the PKCS11 object, then add it.
6. Start the AWS Greengrass daemon.
cd /greengrass-root/ggc/core/
sudo ./greengrassd start
Backward Compatibility with Earlier Versions of the
AWS IoT Greengrass Core Software
The AWS IoT Greengrass core software with hardware security support is fully backward compatible with
config.json files that are generated for v1.6.0 and earlier. If the crypto object is not present in the
config.json configuration file, then AWS IoT Greengrass uses the file-based coreThing.certPath,
coreThing.keyPath, and coreThing.caPath properties. This backward compatibility applies
to Greengrass OTA updates, which do not overwrite a file-based configuration that's specified in
config.json.
383

AWS IoT Greengrass Developer Guide
Hardware Without PKCS#11 Support
Hardware Without PKCS#11 Support
The PKCS#11 library is typically provided by the hardware vendor or is open source. For example,
with standards-compliant hardware (such as TPM1.2), it might be possible to use existing open source
software. However, if your hardware doesn't have a corresponding PKCS#11 library implementation,
or if you want to write a custom PKCS#11 provider, you should contact your AWS Enterprise Support
representative with integration-related questions.
See Also
•PKCS #11 Cryptographic Token Interface Usage Guide Version 2.40. Edited by John Leiseboer and Robert
Griffin. 16 November 2014. OASIS Committee Note 02. http://docs.oasis-open.org/pkcs11/pkcs11-
ug/v2.40/cn02/pkcs11-ug-v2.40-cn02.html. Latest version: http://docs.oasis-open.org/pkcs11/
pkcs11-ug/v2.40/pkcs11-ug-v2.40.html.
•RFC 7512
•PKCS #1: RSA Encryption Version 1.5
384
AWS IoT Greengrass Developer Guide
CloudWatch Logs
Monitoring with AWS IoT Greengrass
Logs
AWS IoT Greengrass consists of the cloud service and the AWS IoT Greengrass core software. The core
software can write logs to CloudWatch and to the local file system of your core device. Logging is
configured at the group level.
All AWS IoT Greengrass log entries include a time stamp, log level, and information about the event.
CloudWatch Logs
If you configure CloudWatch logging, you can view the logs on the Logs page of the Amazon
CloudWatch console. Log groups for AWS IoT Greengrass logs use the following naming conventions:
/aws/greengrass/GreengrassSystem/greengrass-system-component-name
/aws/greengrass/Lambda/aws-region/account-id/lambda-function-name
Under each log group, you see log streams with the following structure:
date/account-id/greengrass-group-id/name-of-core-that-generated-log
Be aware of the following considerations when using CloudWatch Logs:
•
To enable logging to CloudWatch Logs, the following actions must be allowed in the AWS IoT
Greengrass group role:
• logs:PutLogEvents
• logs:CreateLogGroup
• logs:CreateLogStream
• logs:DescribeLogStreams
• Logs are sent to CloudWatch Logs with a limited number of retries in case there's no internet
connectivity. After the retries are exhausted, the event is dropped.
• Transaction, memory, and other limitations apply. For more information, see the section called
“Logging Limitations” (p. 389).
File System Logs
If you configure file system logging, the log files are stored under greengrass-root/ggc/var/log on
the core device, with the following high-level directory structure:
greengrass-root/ggc/var/log
385

AWS IoT Greengrass Developer Guide
Default Logging Configuration
- crash.log
- system
- log files for each Greengrass system component
- user
- log files generated by each user-defined Lambda function
Note
By default, greengrass-root is the /greengrass directory. If a write directory (p. 35) is
configured, then the logs are under that directory.
Be aware of the following considerations when using file system logs:
• Reading AWS IoT Greengrass logs on the file system requires root privileges.
• AWS IoT Greengrass supports size-based rotation and automatic cleanup when the amount of log data
is close to the configured limit.
• The crash.log file is available in file system logs only. This log isn't written to CloudWatch Logs.
• Disk usage limitations apply. For more information, see the section called “Logging
Limitations” (p. 389).
Note
Logs for AWS IoT Greengrass Core Software v1.0.0 are stored under the greengrass-root/
var/log directory.
Default Logging Configuration
If logging settings aren't explicitly configured, AWS IoT Greengrass uses the following default logging
configuration after the first group deployment.
AWS IoT Greengrass System Components
• Type - FileSystem
• Component - GreengrassSystem
• Level - INFO
• Space - 128 KB
User-defined Lambda Functions
• Type - FileSystem
• Component - Lambda
• Level - INFO
• Space - 128 KB
Note
Before the first deployment, only system components write logs to the file system because no
user-defined Lambda functions are deployed.
Configure Logging for AWS IoT Greengrass
You can use the AWS IoT Core console or the AWS IoT Greengrass APIs (p. 387) to configure AWS IoT
Greengrass logging.
386

AWS IoT Greengrass Developer Guide
Configure Logging (Console)
Note
To allow AWS IoT Greengrass to write logs to CloudWatch Logs, your group role must allow the
required CloudWatch Logs actions (p. 385).
Configure Logging (Console)
You can configure logging on the group's Settings page.
1. In the AWS IoT Core console, choose Greengrass, and then choose Groups.
2. Choose the group where you want to configure logging.
3. On the group configuration page, choose Settings.
4. Choose the logging location, as follows:
• To configure CloudWatch logging, for CloudWatch logs configuration, choose Edit.
• To configure file system logging, for Local logs configuration, choose Edit.
You can configure logging for one location or both locations.
5. On the Configure Group logging page, choose Add another log type.
6. Choose the event source, as follows:
• To log events from user-defined Lambda functions, choose User Lambdas.
• To log events from AWS IoT Greengrass system components, choose Greengrass system.
You can choose one component or both components.
7. Choose Update.
8. Choose the lowest level of events that you want to log. Events below this threshold are filtered out
and aren't stored.
9. For file system logs, specify a disk space limit.
10. Choose Save.
Configure Logging (API)
You can use AWS IoT Greengrass logger APIs to configure logging programmatically. For
example, use the CreateLoggerDefinition action to create a logger definition based on a
LoggerDefinitionVersion payload, which uses the following syntax:
{
"Loggers": [
{
"Id": "string",
"Type": "FileSystem|AWSCloudWatch",
"Component": "GreengrassSystem|Lambda",
"Level": "DEBUG|INFO|WARN|ERROR|FATAL",
"Space": "integer"
},
{
"Id": "string",
...
}
]
}
387

AWS IoT Greengrass Developer Guide
Configuration Example
LoggerDefinitionVersion is an array of one or more Logger objects that have the following
properties:
Id
An identifier for the logger.
Type
The storage mechanism for log events. When AWSCloudWatch is used, log events are sent to
CloudWatch Logs. When FileSystem is used, log events are stored on the local file system.
Valid values: AWSCloudWatch, FileSystem
Component
The source of the log event. When GreengrassSystem is used, events from Greengrass system
components are logged. When Lambda is used, events from user-defined Lambda functions are
logged.
Valid values: GreengrassSystem, Lambda
Level
The log-level threshold. Log events below this threshold are filtered out and aren't stored.
Valid values: DEBUG, INFO (recommended), WARN, ERROR, FATAL
Space
The maximum amount of local storage, in KB, to use for storing logs. This field applies only when
Type is set to FileSystem.
Configuration Example
The following LoggerDefinitionVersion example specifies a logging configuration that:
• Turns on file system ERROR (and above) logging for AWS IoT Greengrass system components.
• Turns on file system INFO (and above) logging for user-defined Lambda functions.
• Turns on CloudWatch INFO (and above) logging for user-defined Lambda functions.
{
"Name": "LoggingExample",
"InitialVersion": {
"Loggers": [
{
"Id": "1",
"Component": "GreengrassSystem",
"Level": "ERROR",
"Space": 10240,
"Type": "FileSystem"
},
{
"Id": "2",
"Component": "Lambda",
"Level": "INFO",
"Space": 10240,
"Type": "FileSystem"
},
{
"Id": "3",
388

AWS IoT Greengrass Developer Guide
Logging Limitations
"Component": "Lambda",
"Level": "INFO",
"Type": "AWSCloudWatch"
}
]
}
}
After you create a logger definition version, you can use its version ARN to create a group version before
deploying the group.
Logging Limitations
AWS IoT Greengrass has the following logging limitations.
Transactions per Second
When logging to CloudWatch is enabled, the logging component batches log events locally before
sending them to CloudWatch, so you can log at a rate higher than five requests per second per log
stream.
Memory
If AWS IoT Greengrass is configured to send logs to CloudWatch and a Lambda function logs more than
5 MB/second for a prolonged period of time, the internal processing pipeline eventually fills up. The
theoretical worst case is 6 MB per Lambda function.
Clock Skew
When logging to CloudWatch is enabled, the logging component signs requests to CloudWatch using the
normal Signature Version 4 signing process. If the system time on the AWS IoT Greengrass core device is
out of sync by more than 15 minutes, then the requests are rejected.
Disk Usage
Use the following formula to calculate the total maximum amount of disk usage for logging.
greengrass-system-component-space * 8 // 7 if automatic IP detection is disabled
+ 128KB // the internal log for the local logging
component
+ lambda-space * lambda-count // different versions of a Lambda function are
treated as one
Where:
greengrass-system-component-space
The maximum amount of local storage for the AWS IoT Greengrass system component logs.
lambda-space
The maximum amount of local storage for Lambda logs.
lambda-count
The number of deployed Lambda functions.
389

AWS IoT Greengrass Developer Guide
Log Loss
Log Loss
If your AWS IoT Greengrass core device is configured to log only to CloudWatch and there's no internet
connectivity, you have no way to retrieve the logs currently in the memory.
When Lambda functions are terminated (for example, during deployment), a few seconds' worth of logs
are not written to CloudWatch.
Logging AWS IoT Greengrass API Calls with AWS
CloudTrail
AWS IoT Greengrass is integrated with AWS CloudTrail, a service that provides a record of actions taken
by a user, role, or an AWS service in AWS IoT Greengrass. CloudTrail captures all API calls for AWS IoT
Greengrass as events. The calls captured include calls from the AWS IoT Greengrass console and code
calls to the AWS IoT Greengrass API operations. If you create a trail, you can enable continuous delivery
of CloudTrail events to an Amazon S3 bucket, including events for AWS IoT Greengrass. If you don't
configure a trail, you can still view the most recent events in the CloudTrail console in Event history.
Using the information collected by CloudTrail, you can determine the request that was made to AWS IoT
Greengrass, the IP address from which the request was made, who made the request, when it was made,
and additional details.
To learn more about CloudTrail, see the AWS CloudTrail User Guide.
AWS IoT Greengrass Information in CloudTrail
CloudTrail is enabled on your AWS account when you create the account. When activity occurs in AWS IoT
Greengrass, that activity is recorded in a CloudTrail event along with other AWS service events in Event
history. You can view, search, and download recent events in your AWS account. For more information,
see Viewing Events with CloudTrail Event History.
For an ongoing record of events in your AWS account, including events for AWS IoT Greengrass, create a
trail. A trail enables CloudTrail to deliver log files to an Amazon S3 bucket. By default, when you create
a trail in the console, the trail applies to all AWS Regions. The trail logs events from all Regions in the
AWS partition and delivers the log files to the Amazon S3 bucket that you specify. Additionally, you can
configure other AWS services to further analyze and act upon the event data collected in CloudTrail logs.
For more information, see the following:
•Overview for Creating a Trail
•CloudTrail Supported Services and Integrations
•Configuring Amazon SNS Notifications for CloudTrail
•Receiving CloudTrail Log Files from Multiple Regions and Receiving CloudTrail Log Files from Multiple
Accounts
All AWS IoT Greengrass actions are logged by CloudTrail and are documented in the AWS IoT Greengrass
API Reference. For example, calls to the AssociateServiceRoleToAccount, GetGroupVersion,
GetConnectivityInfo, and CreateFunctionDefinition actions generate entries in the CloudTrail
log files.
Every event or log entry contains information about who generated the request. The identity
information helps you determine the following:
• Whether the request was made with root or AWS Identity and Access Management (IAM) user
credentials.
390

AWS IoT Greengrass Developer Guide
Understanding AWS IoT Greengrass Log File Entries
• Whether the request was made with temporary security credentials for a role or federated user.
• Whether the request was made by another AWS service.
For more information, see the CloudTrail userIdentity Element.
Understanding AWS IoT Greengrass Log File Entries
A trail is a configuration that enables delivery of events as log files to an Amazon S3 bucket that you
specify. CloudTrail log files contain one or more log entries. An event represents a single request from
any source and includes information about the requested action, the date and time of the action, request
parameters, and so on. CloudTrail log files aren't an ordered stack trace of the public API calls, so they
don't appear in any specific order.
The following example shows a CloudTrail log entry that demonstrates the
AssociateServiceRoleToAccount action.
{
"eventVersion": "1.05",
"userIdentity": {
"type": "IAMUser",
"principalId": "AIDACKCEVSQ6C2EXAMPLE",
"arn": "arn:aws:iam::123456789012:user/Mary_Major",
"accountId": "123456789012",
"accessKeyId": "AKIAIOSFODNN7EXAMPLE",
"userName": "Mary_Major"
},
"eventTime": "2018-10-17T17:04:02Z",
"eventSource": "greengrass.amazonaws.com",
"eventName": "AssociateServiceRoleToAccount",
"awsRegion": "us-east-1",
"sourceIPAddress": "203.0.113.12",
"userAgent": "apimanager.amazonaws.com",
"errorCode": "BadRequestException",
"requestParameters": null,
"responseElements": {
"Message": "That role ARN is invalid."
},
"requestID": "a5990ec6-d22e-11e8-8ae5-c7d2eEXAMPLE",
"eventID": "b9070ce2-0238-451a-a9db-2dbf1EXAMPLE",
"readOnly": false,
"eventType": "AwsApiCall",
"recipientAccountId": "123456789012"
}
The following example shows a CloudTrail log entry that demonstrates the GetGroupVersion action.
{
"eventVersion": "1.05",
"userIdentity": {
"type": "IAMUser",
"principalId": "AIDACKCEVSQ6C2EXAMPLE",
"arn": "arn:aws:iam::123456789012:user/Mary_Major",
"accountId": "123456789012",
"accessKeyId": "AKIAIOSFODNN7EXAMPLE",
"userName": "Mary_Major",
"sessionContext": {
"attributes": {
"mfaAuthenticated": "false",
"creationDate": "2018-10-17T18:14:57Z"
}
391

AWS IoT Greengrass Developer Guide
Understanding AWS IoT Greengrass Log File Entries
},
"invokedBy": "apimanager.amazonaws.com"
},
"eventTime": "2018-10-17T18:15:11Z",
"eventSource": "greengrass.amazonaws.com",
"eventName": "GetGroupVersion",
"awsRegion": "us-east-1",
"sourceIPAddress": "203.0.113.12",
"userAgent": "apimanager.amazonaws.com",
"requestParameters": {
"GroupVersionId": "6c477753-dbf2-4cb8-acc3-5ba4eEXAMPLE",
"GroupId": "90fcf6df-413c-4515-93a8-00056EXAMPLE"
},
"responseElements": null,
"requestID": "95dcffce-d238-11e8-9240-a3993EXAMPLE",
"eventID": "8a608034-82ed-431b-b5e0-87fbdEXAMPLE",
"readOnly": true,
"eventType": "AwsApiCall",
"recipientAccountId": "123456789012"
}
The following example shows a CloudTrail log entry that demonstrates the GetConnectivityInfo
action.
{
"eventVersion": "1.05",
"userIdentity": {
"type": "IAMUser",
"principalId": "AIDACKCEVSQ6C2EXAMPLE",
"arn": "arn:aws:iam::123456789012:user/Mary_Major",
"accountId": "123456789012",
"accessKeyId": "AKIAIOSFODNN7EXAMPLE",
"userName": "Mary_Major"
},
"eventTime": "2018-10-17T17:02:12Z",
"eventSource": "greengrass.amazonaws.com",
"eventName": "GetConnectivityInfo",
"awsRegion": "us-east-1",
"sourceIPAddress": "203.0.113.12",
"userAgent": "apimanager.amazonaws.com",
"requestParameters": {
"ThingName": "us-east-1_CIS_1539795000000_"
},
"responseElements": null,
"requestID": "63e3ebe3-d22e-11e8-9ddd-5baf3EXAMPLE",
"eventID": "db2260d1-a8cc-4a65-b92a-13f65EXAMPLE",
"readOnly": true,
"eventType": "AwsApiCall",
"recipientAccountId": "123456789012"
}
The following example shows a CloudTrail log entry that demonstrates the
CreateFunctionDefinition action.
{
"eventVersion": "1.05",
"userIdentity": {
"type": "IAMUser",
"principalId": "AIDACKCEVSQ6C2EXAMPLE",
"arn": "arn:aws:iam::123456789012:user/Mary_Major",
"accountId": "123456789012",
"accessKeyId": "AKIAIOSFODNN7EXAMPLE",
"userName": "Mary_Major"
392

AWS IoT Greengrass Developer Guide
CloudTrail Logs
},
"eventTime": "2018-10-17T18:01:11Z",
"eventSource": "greengrass.amazonaws.com",
"eventName": "CreateFunctionDefinition",
"awsRegion": "us-east-1",
"sourceIPAddress": "203.0.113.12",
"userAgent": "apimanager.amazonaws.com",
"requestParameters": {
"InitialVersion": "***"
},
"responseElements": {
"CreationTimestamp": "2018-10-17T18:01:11.449Z",
"LatestVersion": "dae06a61-c32c-41e9-b983-ee5cfEXAMPLE",
"LatestVersionArn": "arn:aws:greengrass:us-east-1:123456789012:/greengrass/
definition/functions/7a94847d-d4d2-406c-9796-a3529EXAMPLE/versions/dae06a61-c32c-41e9-b983-
ee5cfEXAMPLE",
"LastUpdatedTimestamp": "2018-10-17T18:01:11.449Z",
"Id": "7a94847d-d4d2-406c-9796-a3529EXAMPLE",
"Arn": "arn:aws:greengrass:us-east-1:123456789012:/greengrass/definition/
functions/7a94847d-d4d2-406c-9796-a3529EXAMPLE"
},
"requestID": "a17d4b96-d236-11e8-a74e-3db27EXAMPLE",
"eventID": "bdbf6677-a47a-4c78-b227-c5f64EXAMPLE",
"readOnly": false,
"eventType": "AwsApiCall",
"recipientAccountId": "123456789012"
}
CloudTrail Logs
AWS IoT Greengrass is integrated with AWS CloudTrail, a service that provides a record of actions taken
by a user, role, or an AWS service in AWS IoT Greengrass. For more information, see the section called
“Logging AWS IoT Greengrass API Calls with AWS CloudTrail” (p. 390).
393

AWS IoT Greengrass Developer Guide
Prerequisites
AWS IoT Device Tester for AWS IoT
Greengrass User Guide
AWS IoT Device Tester allows you to test that AWS IoT Greengrass works locally on your device and can
communicate with the AWS IoT cloud. The components of AWS IoT Device Tester include a Test Manager
and Test Cases.
Test Manager runs on the host computer (Windows, Mac, or Linux) that is connected to the device to be
tested. The Test Manager executes test cases and aggregates results. It also provides a command line
interface to manage test execution. Test Cases contain test logic and set up the resources required for
tests.
AWS IoT Device Tester for AWS IoT Greengrass verifies that the combination your Linux device’s CPU
architecture, kernel configuration and drivers work with AWS IoT Greengrass. For more information
about the tests AWS IoT Device Tester runs, see Test Group Descriptions (p. 408).
Prerequisites
This section describes the prerequistes for AWS IoT Device Tester for AWS IoT Greengrass
Download the Latest Version of AWS IoT Device
Tester for AWS IoT Greengrass
Download the latest version of AWS IoT Device Tester onto your host computer. The software should be
extracted into a location on the file system where you have read and write permissions. Due to a path
length limitation, on Microsoft Windows, extract AWS IoT Device Tester into a root directory like C:\ or D:
\.
Create and Configure an AWS Account
If you don't have an AWS account, follow the instructions on the AWS webpage to create one. Choose
Create an AWS Account and follow the prompts.
394

AWS IoT Greengrass Developer Guide
Install the AWS Command Line Interface (CLI)
Create an IAM User in Your AWS Account
When you create an AWS account, a root user that has access to all resources in your account is created
for you. It is a best practice to create another user for everyday tasks. To create an IAM user, follow the
instructions in Creating an IAM User in Your AWS Account. For more information about the root user, see
The AWS Account Root User.
Create and Attach an IAM Policy to Your AWS Account
IAM policies grant your IAM user access to AWS resources.
To create an IAM policy
1. Browse to the IAM console.
2. In the navigation pane, choose Policies, and then choose Create Policy.
3. Choose the JSON tab and copy and paste the policy template located in the Permissions Policy
Template (p. 407) into the editor window.
4. Choose Review policy.
5. In Name, enter a name for your policy. In Description, enter an optional description. Choose Create
Policy.
After you create an IAM policy, you must attach it to your IAM user.
To attach an IAM policy to your IAM user
1. Browse to the IAM console.
2. In the navigation pane, choose Users. Find and select your IAM user.
3. Choose Add permissions, and then choose Attach existing policies directly. Find and select your
IAM policy, choose Next: Review, and then choose Add Permissions.
Install the AWS Command Line Interface (CLI)
You will need to use the CLI to perform some operations, if you don't have the CLI installed, follow the
instructions in Install the AWS CLI.
Configure the AWS IoT Greengrass Service Role
To successfully deploy a AWS IoT Greengrass group, AWS IoT Greengrass requires permissions to perform
actions on your behalf. Follow these instructions to create and associate the service role.
To create the AWS IoT Greengrass service role
1. Use the following AWS CLI command on your host computer to create a service role.
aws iam create-role --role-name GreengrassServiceRole --assume-role-policy-document '{
"Version": "2012-10-17",
"Statement": [{
"Effect": "Allow",
"Principal": {
"Service": "greengrass.amazonaws.com"
},
"Action": "sts:AssumeRole"
}]
}'
395

AWS IoT Greengrass Developer Guide
Verify AWS IoT Greengrass
Dependencies on the Device Under Test
This command generates a service role ARN that you use when you associate your AWS IoT
Greengrass service role to your AWS account.
2. Use the following AWS CLI command to attach the AWSGreengrassResourceAccessRolePolicy
to your AWS IoT Greengrass service role.
aws iam attach-role-policy --policy-arn arn:aws:iam::aws:policy/service-role/
AWSGreengrassResourceAccessRolePolicy --role-name GreengrassServiceRole
3. Use the following AWS CLI command to associate your AWS IoT Greengrass service role with your
AWS account.
aws greengrass associate-service-role-to-account --role-arn <your-greengrass-service-
role-arn>
Verify AWS IoT Greengrass Dependencies on the
Device Under Test
Before AWS IoT Device Tester can test your devices, make sure that you have set up your device to run
AWS IoT Greengrass as described in Getting Started with AWS IoT Greengrass. For information about
supported platforms, see Supported Platforms.
Configure the AWS IoT Greengrass Software
AWS IoT Device Tester tests your device for compatibility with a specific version of AWS IoT Greengrass.
AWS IoT Device Tester provides you two options to test AWS IoT Greengrass on your devices:
• Use a version of the AWS IoT Greengrass Core software downloaded from the AWS IoT console. AWS
IoT Device Tester installs the software for you.
• Use a version of the AWS IoT Greengrass Core software already installed on your device.
Note
Each version of AWS IoT Greengrass has a corresponding AWS IoT Device Tester version. You
must download the version of AWS IoT Device Tester that corresponds to the version of AWS IoT
Greengrass you are using.
Download the AWS IoT Greengrass Core Software and Configure
AWS IoT Device Tester to Use It
You can download the AWS IoT Greengrass Core software from the Software page in the AWS IoT Core
console or from the AWS IoT Greengrass Core Software (p. 19) downloads. The following procedure
shows you how to download the AWS IoT Greengrass Core software from the AWS IoT console.
To use a version of the AWS IoT Greengrass Core software downloaded from the AWS IoT
console
1. Browse to the AWS IoT console.
2. In the navigation pane, choose Software.
3. In AWS IoT Greengrass Core Software, choose Configure download.
4. From the available configurations, find the correct architecture and Linux distribution, and then
choose Download.
396

AWS IoT Greengrass Developer Guide
Configure Your Host Computer
to Access Your Device Under Test
5. Copy the tar.gz file to the <device-tester-extract-location>/products/greengrass/ggc.
Note
Do not change the name of the AWS IoT Greengrass tar.gz file.
Use an Existing Installation of AWS IoT Greengrass with AWS IoT
Device Tester
Configure AWS IoT Device Tester to test the AWS IoT Greengrass Core software installed on your
device by adding the greengrassLocation attribute to the device.json file located in the
<device_tester_extract_location>/configs folder. For example:
"greengrassLocation" : "<path-to-greengrass-on-device>"
For more information about the device.json file, see Device Configuration (p. 400).
On Linux devices, the default location of the AWS IoT Greengrass Core software is /greengrass.
Note
Your device should have a clean install of the AWS IoT Greengrass Core software where the AWS
IoT Greengrass Core software was never started.
Configure Your Host Computer to Access Your Device
Under Test
The AWS IoT Device Tester runs on your host computer and must be able to use SSH to connect to your
device. You must create an SSH key and authorize your key to sign in to your device under test.
The following instructions for creating an SSH key are written with the assumption that you are using
OpenSSL. If you are using another SSL implementation, refer to the documentation.
Create an SSH Key
AWS IoT Device Tester uses an SSH key to authenticate with your device under test. You can use the
Open SSH ssh-keygen command to create an SSH key pair. If you already have an SSH key pair on your
host computer, it is a best practice to create a new one to allow AWS IoT Device Tester to sign in to your
device under test.
Note
Windows does not come with an installed SSH client. For information about installing an SSH
client on Windows, see Download SSH Client Software.
The ssh-keygen command prompts you for a name and path to store the key pair. By default, the key
pair files are named id_rsa (private key) and id_rsa.pub (public key). On macOS and and Linux, the
default location of these files is ~/.ssh/. On Windows, the default location is C:\Users\<user-name>
\.ssh.
When you are prompted for a key phrase, type a key phrase to protect your SSH key. For more
information about creating your own SSH key and key phrases, see Generate a New SSH Key.
Adding Authorized SSH Keys to Your Device Under Test
AWS IoT Device Tester must use your SSH private key to sign in to your device under test. To authorize
your SSH private key to sign in to your device under test, use the ssh-copy-id command from your host
397

AWS IoT Greengrass Developer Guide
Root Access
computer. This command adds your public key into the ~/.ssh/authorized_keys file on your device
under test. For example:
$ ssh-copy-id<remote-ssh-user>@<remote-device-ip>
Where remote-ssh-user is the user name used to sign in to your device under test and remote-
device-ip is the IP address of the device under test to run tests against. For example:
ssh-copy-id pi@192.168.1.5
When prompted, enter the password for the user name you specified in the ssh-copy-id command.
ssh-copy-id assumes the public key is named id_rsa.pub and is stored the default location (on macOS
and Linux, ~/.ssh/ and on Windows, C:\Users\<user-name>\.ssh). If you gave the public key a
different name or stored it in a different location, you must specify the fully qualified path to your SSH
public key using the -i option to ssh-copy-id (for example, ssh-copy-id -i ~/my/path/myKey.pub). For
more information about creating SSH keys and copying public keys, see SSH-COPY-ID.
Root Access
AWS IoT Device Tester performs operations on various directories and files in a device under test (DUT).
Some of these operations require root access. To automate these operations, AWS IoT Device Tester must
be able to run commands with sudo without being prompted for a password.
Follow these steps on the device under test to allow sudo access without being prompted for a password.
Note
user and user name refer to the SSH user used by AWS IoT Device Tester to access the DUT.
To add the user to the sudo group
1. Run sudo usermod -aG sudo <username>
2. Sign out and then sign back in for changes to take effect.
Setting Configuration to Run the AWS IoT
Greengrass Qualification Suite
Before you run tests, you must configure settings for logging, AWS credentials, and devices on your host
computer.
Configure Your AWS Credentials
You must configure your IAM user credentials in the <device_tester_extract_location>/
configs/config.json. You can specify your credentials in one of two ways:
• Environment variables
• Credentials file
Configuring AWS Credentials with Environment Variables
Environment variables are variables maintained by the operating system and used by system commands.
AWS IoT Device Tester can use the AWS_ACCESS_KEY_ID and AWS_SECRET_ACCESS_KEY environment
398

AWS IoT Greengrass Developer Guide
Configuring AWS Credentials with a Credentials File
variables to store your AWS credentials. The way you set environment variables depends on the
operating system you are running.
To set environment variables on Windows
1. From the Windows 10 desktop, open the Power User Task Menu. To open the menu, move your
mouse cursor to the bottom-left corner of the screen (the Start menu icon) and right-click.
2. From the Power User Task Menu, choose System, and then choose Advanced System Settings.
Note
In Windows 10, you might need to scroll to Related settings and choose System info. In
System, choose Advanced system settings.
In System Properties, choose the Advanced tab, and then choose the Environment Variables
button.
3. Under User variables for <user-name>, choose New to create an environment variable. Enter a
name and a value for each environment variable.
To set environment variables on macOS and Linux
• Open ~/.bash_profile in any text editor and add the following lines:
export AWS_ACCESS_KEY_ID="<your-aws-access-key-id>"
export AWS_SECRET_ACCESS_KEY="<your-aws-secret-key>"
Replace the items in angle brackets (< & >) with your AWS access key ID and AWS secret key.
After you set your environment variables, close your command line window or terminal and reopen it so
the new values take effect.
To configure your AWS credentials using environment variables, set the AWS_ACCESS_KEY_ID and
AWS_SECRET_ACCESS_KEY. In the config.json file, set the method attribute to environment:
{
"awsRegion": "us-west-2",
"auth": {
"method": "environment"
}
}
Configuring AWS Credentials with a Credentials File
Create a credentials file that contains your credentials. AWS IoT Device Tester uses the same credentials
file as the AWS CLI. For more information, see Configuration and Credential Files. You must also specify a
named profile. For more information, see Named Profiles.
The following is an example JSON snippet that shows how to specify AWS credentials using a credentials
file in the config.json file:
{
"awsRegion": "us-west-2",
"auth": {
"method": "file",
"credentials": {
"profile": "default"
}
399

AWS IoT Greengrass Developer Guide
Device Configuration
}
}
Device Configuration
In addition to AWS credentials, AWS IoT Device Tester needs information about the devices available to
run tests on (for example, IP address, login information, operating system, and CPU architecture).
You can provide this information using the device.json template located in
<device_tester_extract_location>/configs/device.json:
[
{
"id": "<pool-id>",
"sku": "<sku>",
"features": [
{
"name": "os",
"value": "linux | ubuntu"
},
{
"name": "arch",
"value": "x86_64 | armv7l | aarch64"
}
],
"kernelConfigLocation": "",
"greengrassLocation": "",
"devices": [
{
"id": "<device-id>",
"connectivity": {
"protocol": "ssh",
"ip": "<ip-address>",
"auth": {
"method": "pki",
"credentials": {
"user": "<user>",
"privKeyPath": "C:/path/to/private/key"
}
}
}
}
]
}
]
All fields that contain values are required as described here:
id
A user-defined alphanumeric ID that uniquely identifies a pool of devices. Devices that belong to
a pool must be of the same type. When you run a suite of tests, devices in the pool are used to
parallelize the workload.
sku
An alphanumeric value that uniquely identifies the device under test. The SKU is used to track
qualified boards.
Note
If you want to list your board in the AWS IoT Device Catalog, the SKU you specify here must
match the SKU that you use in the listing process.
400

AWS IoT Greengrass Developer Guide
Running the Test Suite
features
An array that contains the device's supported features.
• Required features: os, arch.
• Supported OS/architecture combinations:
• linux, x86_64
• linux, armv7l
• linux, aarch64
• ubuntu, x86_64
devices.id
A user-defined unique identifier for the device being tested.
connectivity.protocol
The communication protocol used to communicate with this device. Supported values are:
•ssh
•serial (Amazon FreeRTOS only)
connectivity.ip
The IP address of the device being tested.
connectivity.auth.method
The authorization method used to access a device over the given connectivity protocol. Supported
values are:
•pki
connectivity.auth.credentials.user
The user name for signing in to the device being tested.
connectivity.auth.credentials.privKeyPath
The full path to the private key used to sign in to the device being tested.
greengrassLocation
(Optional) The location of AWS IoT Greengrass Core software on your devices. Use this attribute to
tell &IoT; Device Tester to use the version of the AWS IoT Greengrass Core software installed on your
devices.
kernelConfigLocation
(Optional) The path to the kernel configuration file. AWS IoT Device Tester uses this file to check
whether the devices have the required kernel features enabled. If not specified, AWS IoT Device
Tester uses one of the following paths: /proc/config.gz or /boot/config-<kernel-
version>.
Running the Test Suite
After you set the required configuration, you can start the tests.
The following example command line shows you how to run the qualification tests for a device pool (set
of identical devices). These commands can be found in the <devicetester-extract-location>/bin
directory.
Use the following command to run all test groups in a specified suite:
401

AWS IoT Greengrass Developer Guide
Results and Logs
devicetester_[linux | mac | win_x86-64] run-suite --suite-id GGQ_1 --pool-id <pool-id>
Use the following command to run a specific test group:
devicetester_[linux | mac | win_x86-64] run-suite --suite-id GGQ_1 --group-id <group-id> --
pool-id <pool-id>
suite-id and pool-id are optional if you are running a single test suite on a single device pool (that is,
you have only one device pool defined in your device.json file).
AWS IoT Device Tester Commands
The AWS IoT Device Tester command supports the following operations:
help
Lists information about the specified command.
list-groups
Lists the groups in given suite.
list-suites
Lists the available suites.
run-suite
Runs a suite of tests on a particular pool of devices.
Results and Logs
This section describes how to view and interpret AWS IoT Device Tester result reports and logs.
Viewing Results
After AWS IoT Device Tester executes the qualification test suite, it generates two reports. These reports
can be found in <devicetester-extract-location>/results/<execution-id>/. Both reports
capture the results from the qualification test suite execution.
The awsiotdevicetester_report.xml is the qualification test report you submit to AWS for listing
your device in the AWS IoT Device Catalog. The report contains the following elements:
• The AWS IoT Device Tester version.
• The AWS IoT Greengrass version that was tested.
• The SKU and the device name specified in the device.json file.
• The features of the device specified in the device.json file.
• The aggregate summary of test case results.
• A breakdown of test case results by libraries that were tested based on the device features (for
example, lra, shadow, mqtt, and so on).
The GGQ_Result.xml report is in standard junit.xml format that you can integrate into your existing CI/
CD platforms like Jenkins, Bamboo, and so on. The report contains the following elements:
• Aggregate summary of test case results.
• Breakdown of test case results by AWS IoT Greengrass functionality that was tested (for example, lra,
shadow, mqtt, and so on).
402

AWS IoT Greengrass Developer Guide
Results and Logs
Interpreting AWS IoT Device Tester Results
The report section in awsiotdevicetester_report.xml or GGQ_Report.xml lists the tests that
were run and the results.
The first XML tag <testsuites> contains the overall summary of the test execution. For example:
<testsuites name="GGQ results" time="2299" tests="28" failures="0" errors="0" disabled="0">
Attributes used in the <testsuites> tag
name
The name of the test suite.
time
The time (in seconds) it took to run the qualification suite.
tests
The number of test cases executed.
failures
The number of test cases that were run but did not pass.
errors
The number of test cases that AWS IoT Device tester couldn't execute.
disabled
This attribute is not used and can be ignored.
If there are no test case failures or errors, your device meets the technical requirements to run AWS IoT
Greengrass and can interoperate with AWS IoT services. If you choose to list your device in the Partner
Device Catalog, you can use this report as qualification evidence.
In the case of test case failures or errors, you can identify the test case that failed by reviewing the
<testsuites> XML tags. The <testsuite> XML tags inside the <testsuites> tag shows the test
case result summary for a test group. For example:
<testsuite name="combination" package="" tests="1" failures="0" time="161" disabled="0"
errors="0" skipped="0">
The format is similar to the <testsuites> tag, but with an additional attribute called skipped that is
not used and can be ignored. Inside each <testsuite> XML tag, there are <testcase> tags for each
executed test case for a test group. For example:
<testcase classname="Security Combination (IPD + DCM) Test Context" name="Security
Combination IP Change Tests sec4_test_1: Should rotate server cert when IPD disabled
and following changes are made:Add CIS conn info and Add another CIS conn info"
attempts="1"></testcase>>
Attributes used in the <testcase> tag
name
The name of the test case.
403

AWS IoT Greengrass Developer Guide
Testing Infrastructure
attempts
The number of times AWS IoT Device Tester executed the test case.
When a test case fails or an error occurs, <failure> or <error> tags are added to the <testcase> tag
with additional information for troubleshooting. For example:
<testcase classname="mcu.Full_MQTT" name="AFQP_MQTT_Connect_HappyCase" attempts="1">
<failure type="Failure">Reason for the test case failure</failure>
<error>Reason for the test case execution error</error>
</testcase>
Viewing Logs
AWS IoT Device Tester generates logs from test execution in <devicetester-extract-location>/
results/<execution-id>/logs. Two sets of logs are generated:
test_manager.log
Contains logs generated from the Test Manager component of AWS IoT Device Tester. For example,
logs related configuration, test sequencing and report generation are here.
<test_case_id>.log (for example, ota.log)
The logs of the test group, including logs from the device under test. When a test case fails, a
tar.gz file that contains the logs of the device under test for the test case is created (for example,
ota_prod_test_1_ggc_logs.tar.gz).
Viewing Logs
AWS IoT Device Tester generates logs and writes them to <devicetester-extract-location>/
results/<execution-id>/logs. Two sets of logs are generated:
test_manager.log
Contains the logs generated from the AWS IoT Device Tester Test Manager. These logs contain log-
related configuration, test sequencing, and test reports.
<test_case_id>
Contains the test group logs, including logs from the device under test.
Testing Infrastructure
In addition to the devices being tested, other resources (for example, AWS IoT things, AWS IoT
Greengrass groups, Lambda functions, and so on) must be created to facilitate the qualification process.
To create these resources, AWS IoT Device Tester uses the AWS credentials configured in the
config.json to make API calls on your behalf. These resources are provisioned at various times during
a test.
Test Organization
AWS IoT Device Tester organizes tests using the concepts of test suites, test groups, and individual tests.
404

AWS IoT Greengrass Developer Guide
Troubleshooting
A test suite consists of groups of tests that are related to AWS IoT Greengrass or Amazon FreeRTOS. You
should run a whole suite of tests to ensure that a product works as expected on devices.
A test group consists of individual tests that are related to the particular feature being tested.
A test consists of individual executables and configurations used to run a test to ensure the functionality
of a portion of a feature.
Troubleshooting
We recommend the following workflow for troubleshooting testing on an AWS IoT Greengrass device:
1. Read the console output.
2. Look in the GGQ_Result.xml file.
3. Investigate one of the following problem areas:
• Device configuration
• Device interface
Troubleshooting Device Configuration
When you use AWS IoT Device Tester, you must get the correct configuration files in place before you
execute the binary. If you are getting parsing and configuration errors, your first step should be to locate
and use a configuration template appropriate for your environment.
If you are still having issues, see the following debugging process.
Where Do I Look?
Start by looking in the GGQ_Report.xml file in the /results/<uuid> directory. This file contains all
of the test cases that were run and error snippets for each failure. To get all of the execution logs, look
under /results/<uuid>/<test-case-id>.log for each test group.
Parsing Errors
Occasionally, a typo in a JSON configuration can lead to parsing errors. Most of the time, the issue is a
result of omitting a bracket, comma, or quote from your JSON file. AWS IoT Device Tester performs JSON
validation and prints debugging information. It prints the line where the error occurred, the line number,
and the column number of the syntax error. This information should be enough to help you fix the error,
but if you are still having issues locating the error, you can perform validation manually in your IDE, a
text editor such as Atom or Sublime, or through an online tool like JSONLint.
Required Parameter Missing Error
Because new features are being added to AWS IoT Device Tester, changes to the configuration files
might be introduced. Using an old configuration file might break your configuration. If this happens, the
<test_case_id>.log file under /results/<uuid>/logs explicitly lists all missing parameters. AWS
IoT Device Tester also validates your JSON configuration file schemas to ensure that the latest supported
version has been used.
Could Not Start Test Error
You might encounter errors that point to failures during test start. Because there are several possible
causes for this, make sure to check the following areas for correctness:
405

AWS IoT Greengrass Developer Guide
Troubleshooting Device Configuration
• Make sure that the pool name you've included in your execution command actually exists. This is
referenced directly from your device.json file.
• Make sure that the devices in your pool have correct configuration parameters.
Permission Denied Errors
AWS IoT Device Tester performs operations on various directories and files in a device under test (DUT).
Some of these operations require root access. To automate these operations, AWS IoT Device Tester must
be able to run commands with sudo without typing a password.
Follow these steps to allow sudo access without typing a password.
Note
user and username refer to the SSH user used by AWS IoT Device Tester to access the device
under test.
1. Use sudo usermod -aG sudo <ssh-username> to add your SSH user to the sudo group
2. Sign out and then sign in for changes to take effect.
3. Open /etc/sudoers file and then add the following line to the end of the file: <ssh-username>
ALL=(ALL) NOPASSWD: ALL"
SSH Connection Errors
When AWS IoT Device Tester cannot connect to a device under test, connection failures are logged in /
results/<uuid>/logs/<test-case-id>.log. SSH failure messages appear at the top of this log file
because connecting to a device under test is one of the first operations AWS IoT Device Tester performs.
Most Windows setups use the PuTTy terminal application to connect to Linux hosts. This application
requires that standard PEM private key files are converted into a proprietary Windows format called
PPK. When AWS IoT Device Tester is configured in your device.json file, it is important to use PEM
files only. If a PPK file is used, AWS IoT Device Tester cannot create an SSH connection with the AWS IoT
Greengrass device and cannot run tests.
Command Not Found Errors While Testing OTA
You need an older version of the OpenSSL library (libssl1.0.0) to run OTA tests on AWS IoT Greengrass
devices. Most current Linux distributions use libssl version 1.0.2 or later (v1.1.0). These versions are not
compatible with OTA.
For example, on a Raspberry Pi, run the following commands to install the required version of libssl:
1. wget http://ftp.us.debian.org/debian/pool/main/o/openssl/
libssl1.0.0_1.0.2l-1~bpo8+1_armhf.deb
2. sudo dpkg -i libssl1.0.0_1.0.2l-1~bpo8+1_armhf.deb
Logging
AWS IoT Device Tester logs are placed in a single location. From the root AWS IoT Device Tester directory,
the available files are:
•./results/<uuid>
•GGQ_Report.xml
•awsiotdevicetester_report.xml
•logs/<test_case_id>.log
406

AWS IoT Greengrass Developer Guide
Permissions Policy Template
The <test_case_id>.log and GGQ_Report.xml are the most important logs to examine. The
results.xml file contains information about which tests failed with a specific error message. You can
then use the <test_case_id>.log to investigate the problem.
Console Errors
When AWS IoT Device Tester is run, failures are reported to console with brief messages. For information
about the error, look in <test_case_id>.log.
Log Errors
The <test_case_id>.log file is located in the /results/<uuid>/logs directory. Each test
execution has a unique test ID that is used to create the <uuid> directory. Individual test group logs are
under the <uuid> directory. Use the console to look up the test group that failed and then open the log
file for that test case in the /results/<uuid>/logs directory. The information in this file includes the
full build and flash command output, as well as test execution output and more verbose AWS IoT Device
Tester console output.
Permissions Policy Template
The following is a policy template that grants the permissions required for AWS IoT Device Tester:
{
"Version": "2012-10-17",
"Statement": [
{
"Sid": "VisualEditor0",
"Effect": "Allow",
"Action": [
"iam:CreateRole",
"iam:DeleteRole",
"iam:AttachRolePolicy",
"iam:PassRole",
"iam:DetachRolePolicy"
],
"Resource": [
"arn:aws:iam::*:role/idt-*"
]
},
{
"Sid": "VisualEditor1",
"Effect": "Allow",
"Action": [
"lambda:DeleteFunction",
"lambda:CreateFunction"
],
"Resource": [
"arn:aws:lambda:*:*:function:idt-*"
]
},
{
"Sid": "VisualEditor2",
"Effect": "Allow",
"Action": [
"iot:DeleteCertificate",
"iot:AttachPolicy",
"iot:DetachPolicy",
"iot:DeletePolicy",
"iot:CreateJob",
"iot:AttachThingPrincipal",
"iot:DeleteThing",
407

AWS IoT Greengrass Developer Guide
Test Group Descriptions
"iot:DescribeJob",
"iot:UpdateCertificate",
"iot:DescribeJobExecution",
"iot:DetachThingPrincipal",
"iot:CreateThing",
"iot:DeleteJob"
],
"Resource": [
"arn:aws:iot:*:*:thing/idt-*",
"arn:aws:iot:*:*:policy/idt-*",
"arn:aws:iot:*:*:cert/*",
"arn:aws:iot:*:*:job/*"
]
},
{
"Sid": "VisualEditor3",
"Effect": "Allow",
"Action": [
"iot:CreatePolicy",
"iot:CreateKeysAndCertificate",
"iot:UpdateThingShadow",
"iot:GetThingShadow",
"iot:DescribeEndpoint",
"greengrass:GetCoreDefinitionVersion",
"greengrass:GetGroupVersion",
"greengrass:CreateLoggerDefinition",
"greengrass:CreateCoreDefinition",
"greengrass:AssociateRoleToGroup",
"greengrass:CreateDeployment",
"greengrass:GetDeploymentStatus",
"greengrass:CreateGroup",
"greengrass:CreateSoftwareUpdateJob",
"greengrass:GetGroup",
"greengrass:CreateGroupVersion",
"greengrass:CreateResourceDefinition",
"greengrass:UpdateConnectivityInfo",
"greengrass:CreateSubscriptionDefinition",
"greengrass:CreateDeviceDefinition",
"greengrass:DeleteDeviceDefinition",
"greengrass:CreateFunctionDefinition",
"greengrass:GetConnectivityInfo",
"greengrass:AssociateServiceRoleToAccount",
"greengrass:GetServiceRoleForAccount"
],
"Resource": "*"
}
]
}
Test Group Descriptions
Dependencies
The dependencies test group checks if the device meets all the required technical dependencies for
AWS IoT Greengrass.
Combination (Device Security Interaction)
The combination test group verifies the functionality of the AWS IoT Greengrass Core's device
certificate manager and IP detector by changing connectivity information on the AWS IoT
Greengrass group in the cloud. The AWS IoT Greengrass server certificate should be rotated and AWS
IoT Greengrass should allow connections after rotating the certificate.
408

AWS IoT Greengrass Developer Guide
Test Group Descriptions
Device Certificate Manager (DCM)
The DCM test group verifies that the AWS IoT Greengrass Device Certificate Manager is able to
generate a server certificate upon startup and rotate them if they will expire soon.
Deployment
The Deployment test group verifies if AWS IoT Greengrass Cores can be re-deployed after a failing
pinned Python Lambda deployment.
Local Resource Access (LRA)
The LRA test group verifies the Local Resource Access (LRA) feature of AWS IoT Greengrass
by providing access to local files and directories owned by various Linux users and groups to
containerized Lambdas through AWS IoT Greengrass LRA APIs. Lambdas functions should be allowed
or denied access to local resources based on LRA configuration.
MQTT
The MQTT test group verifies the AWS IoT Greengrass message router functionality by sending
messages on a topic which is routed to two Lambda functions. Lambda functions should acknowlege
they received the message.
Native
The native test group verifies that AWS IoT Greengrass is able to run native (compiled) Lambda
functions.
Network
The network test group verifies socket connections are able to be established from within a Lambda
function. These socket connections should be allowed or denied based on AWS IoT Greengrass
seccomp configuration.
Penetration
The penetration test group checks if the AWS IoT Greengrass core software fails to start if hard/soft-
link protection and seccomp are not enabled. It also verifies other security related features.
Over-the-Air (OTA)
The OTA test group validates that OTA is able to process an OTA update from the cloud.
Shadow
The shadow test group verifies local shadow and shadow cloud syncing functionality.
Spooler
The spooler test group validates that the MQTT messages are queued with the default spooler
configuration.
Token Exchange Service (TES)
The TES test group verifies that AWS IoT Greengrass is able to exchange it's core certificate for valid
AWS credentials.
IP Detector (IPD)
The IPD test group verifies that core connectivity information is updated when there are IP changes
in a AWS IoT Greengrass Core device.
Version
Verifies the specified version of AWS IoT Greengrass software is correct.
Logging
Verifies that the AWS IoT Greengrass logging service is able to write to a log file using a Python user
Lambda function.
409

AWS IoT Greengrass Developer Guide
Troubleshooting AWS IoT Greengrass
Use the following information to help troubleshoot issues in AWS IoT Greengrass.
AWS IoT Greengrass Core Issues
Symptom Solution
Device's shadow does not sync with the cloud. Check that the AWS IoT Greengrass core has
permissions for "iot:UpdateThingShadow" and
"iot:GetThingShadow" actions.
Also see Troubleshooting Shadow Synchronization
Timeout Issues (p. 419).
The AWS IoT Greengrass core software does not
run on Raspberry Pi because user namespace is
not enabled.
Run rpi-update to update. Raspbian has
released a new kernel 4.9 that has user
namespace enabled.
The AWS IoT Greengrass core software does not
start successfully.
• Check that you are using the binaries
appropriate for your architecture.
• Check runtime.log for error messages. For
more information, see Troubleshooting with
Logs (p. 415).
• If you have recently changed from running with
no containerization to running in a AWS IoT
Greengrass container, check that you are not
missing any container dependencies.
• Check that your AWS IoT Greengrass core device
has local storage available.
The AWS IoT Greengrass core software does not
start successfully. You're running v1.6.0 or earlier
and you receive the following error in crash.log:
The configuration file is missing
the CaPath, CertPath or KeyPath. The
Greengrass daemon process with [pid =
pid] died.
Do one of the following:
• Upgrade to v1.7.0.
• Use the correct config.json format for your
core software version. For more information,
see the section called “AWS IoT Greengrass Core
Configuration File” (p. 21).
The AWS IoT Greengrass core software does
not start on a Raspberry Pi, and you receive
the following error: Failed to invoke
PutLogEvents on local Cloudwatch,
logGroup: /GreengrassSystem/
connection_manager, error:
RequestError: send request failed
caused by: Post http://path/
cloudwatch/logs/: dial tcp address:
getsockopt: connection refused,
response: { }.
This can occur if the OS version is Raspbian
Stretch and the necessary memory set up has
not been completed. Using Stretch will require
additional memory set-up. For more information,
see this step (p. 50).
The AWS IoT Greengrass core software does
not start, and you receive the following error:
Unable to create server due to: failed
to load group: chmod /greengrass-
If you deployed a Lambda executable (p. 157)
to the core, check the function's Handler
property in the group.json file (located
in /greengrass-root/ggc/deployment/group).
410

AWS IoT Greengrass Developer Guide
Symptom Solution
root/ggc/deployment/lambda/
arn:aws:lambda:region:account-
id:function:function-
name:version/file-name: no such file
or directory
If the handler is not the exact name of your
compiled executable, replace the contents of the
group.json file with an empty JSON object
({}), and run the following commands to start
Greengrass:
cd /greengrass/ggc/core/
sudo ./greengrassd start
Then, use the AWS Lambda API to update the
function configuration's handler parameter,
publish a new function version, and update the
alias. For more information, see AWS Lambda
Function Versioning and Aliases.
Assuming that you added the function to your
Greengrass group by alias (recommended), you
can now redeploy your group. (If not, then you
must point to the new function version or alias
in your group definition and subscriptions before
you deploy the group.)
The AWS IoT Greengrass core software does not
start, and you receive the following error: Spool
size should be at least 262144 bytes.
Open the group.json file (located
in /greengrass-root/ggc/deployment/
group), replace the contents of the file with an
empty JSON object ({}), and run the following
commands to start Greengrass:
cd /greengrass/ggc/core/
sudo ./greengrassd start
Then follow the steps in the the section called
“To Cache Messages in Local Storage” (p. 38)
procedure, and make sure to specify a
GG_CONFIG_MAX_SIZE_BYTES value that's
greater than or equal to 262144 for the
GGCloudSpooler function.
The greengrassd script displays: unable to
accept TCP connection. accept tcp
[::]:8000: accept4: too many open
files.
The file descriptor limit for the AWS IoT
Greengrass core software has reached the
threshold and must be increased.
Use the following command and restart the AWS
IoT Greengrass core software.
ulimit -n 2048
Note
In this example, the limit is increased to
2048. Choose a value appropriate for
your use case.
411
AWS IoT Greengrass Developer Guide
Symptom Solution
You receive the following error:
Runtime execution error: unable
to start lambda container.
container_linux.go:259: starting
container process caused
"process_linux.go:345: container init
caused \"rootfs_linux.go:50: preparing
rootfs caused \\\"permission denied\\
\"\""
Either install AWS IoT Greengrass directly under
the root directory, or ensure that the /greengrass
directory and its parent directories have execute
permissions for everyone.
The AWS IoT Greengrass core software does
not start, and you receive the following error:
Greengrass daemon running with PID:
[processid]. Some system components
failed to start. Check 'runtime.log'
for errors
Check runtime.log and crash.log for error
messages. For more information, see
Troubleshooting with Logs (p. 415).
An over-the-air (OTA) update fails
with the following error: Permission
denied when attempting to use
role arn:aws:iam::account-
id:role/role-name to access s3
url https://region-greengrass-
updates.s3.region.amazonaws.com/
core/architecture/greengrass-
core-distribution-version.tar.gz
In the signer role policy, add the target region as
a Resource. This role is used to presign the S3
URL for the Greengrass software update. For more
information, see S3 URL signer role (p. 131).
Deployment Issues
Symptom Solution
You see 403 Forbidden error on deployment in the
logs.
Make sure the policy of the AWS IoT Greengrass
core in the cloud includes "greengrass:*" as an
allowed action.
A ConcurrentDeployment error occurs when
you run create-deployment for the first time.
A deployment might be in progress. You can
run get-deployment-history to see if a
deployment was created. If not, try creating the
deployment again.
The deployment fails with the following error
message: Greengrass is not authorized
to assume the Service Role associated
with this account.
Using the AWS CLI, check that an appropriate
service role is associated with your account
by using GetServiceRoleForAccount and
ensure that the role has at least the
AWSGreengrassResourceAccessRolePolicy
permission applied. If you need to associate a
Greengrass service role with your account, use
AssociateServiceRoleToAccount.
The deployment doesn't finish. Make sure that the AWS IoT Greengrass daemon
is running on your core device. Run the following
commands in your core device terminal to check
whether the daemon is running and start it, if
needed.
412

AWS IoT Greengrass Developer Guide
Symptom Solution
1. To check whether the daemon is running:
ps aux | grep -E 'greengrass.*daemon'
If the output contains a root entry for /
greengrass/ggc/packages/1.7.0/bin/
daemon, then the daemon is running.
The version in the path depends on the AWS
IoT Greengrass Core Software version that's
installed on your core device.
2. To start the daemon:
cd /greengrass/ggc/core/
sudo ./greengrassd start
The deployment doesn't finish, and runtime.log
contains multiple wait 1s for container to
stop entries.
Restart the AWS IoT Greengrass daemon by
running the following commands in your core
device terminal.
cd /greengrass/ggc/core/
sudo ./greengrassd stop
sudo ./greengrassd start
You receive the following error: Deployment
guid of type NewDeployment for
group guid failed error: Error
while processing. group config is
invalid: 112 or [119 0] don't have rw
permission on the file: path
Ensure that the owner group of the path
directory has read and write permissions to the
directory.
The deployment fails with the following
error in runtime.log: [list of function
arns] are configured to run as root
but Greengrass is not configured
to run Lambda functions with root
permissions. Either change the value
of allowFunctionsToRunAsRoot in
greengrass_root/config/config.json to "yes" or
change the Lambda function to run as another
user/group.
Make sure that you have configured AWS IoT
Greengrass to allow Lambda functions to run with
root permissions. For more information, see the
section called “Running a Lambda Function as
Root” (p. 152).
The deployment fails with the following
error message, and you are running AWS
IoT Greengrass Core Software v1.7.0:
Deployment deployment id of type
NewDeployment for group group
id failed error: process start
failed: container_linux.go:259:
starting container process caused
"process_linux.go:250: running exec
setns process for init caused \"wait:
no child processes\""
Retry the deployment.
413
AWS IoT Greengrass Developer Guide
Create Group/Create Function Issues
Symptom Solution
You receive the error: Your 'IsolationMode'
configuration for the group is
invalid..
This error occurs when the "IsolationMode" value
in the "DefaultConfig" of function-definition-
version is not supported. Supported values are
"GreengrassContainer" and "NoContainer".
You receive the error: Your 'IsolationMode'
configuration for function with arn
function ARN is invalid..
This error occurs when the "IsolationMode" value
in the function ARN of the function-definition-
version is not supported. Supported values are
"GreengrassContainer" and "NoContainer".
You receive the error: MemorySize
configuration for function with
arn function ARN is not allowed in
IsolationMode=NoContainer.
This error occurs when you specify a MemorySize
value and you choose to run without
containerization. Lambda functions run without
containerization cannot have memory limits. You
can either remove the limit or you can change the
Lambda function to run in an AWS IoT Greengrass
container.
You receive the error: Access Sysfs
configuration for function with
arn function ARN is not allowed in
IsolationMode=NoContainer.
This error occurs when you specify true for
AccessSysfs and you choose to run without
containerization. Lambda functions run without
containerization must have their code updated
to access the file system directly and cannot
use AccessSysfs. You can either specify a value
of false for AccessSysFs or you can change the
Lambda function to run in an AWS IoT Greengrass
container.
You receive the error: RunAs Uid/Gid=0
configuration for function with
arn function ARN is not allowed in
IsolationMode=GreengrassContainer
This error occurs because you are trying to
run a Lambda function with root permissions
inside an AWS IoT Greengrass container. You
must either specify a different user and group
or you can change the IsolationMode to run
the Lambda function without containerization
(IsolationMode:NoContainer).
You receive the error: MemorySize
configuration for function with
arn function ARN is required in
IsolationMode=GreengrassContainer
This error occurs because you did not specify a
MemorySize limit for a Lambda function that you
are running in an AWS IoT Greengrass container.
Specify a MemorySize value to resolve the error.
You receive the error: Function function
ARN refers to resource of type
resourceType that is not allowed in
IsolationMode=NoContainer.
You cannot access Local.Device, Local.Volume,
ML_Model.SageMaker.Job, ML_Model.S3_Object,
or S3_Object.Generic_Archive resource types
when you run a Lambda function without
containerization. If you need those resource types,
you must run in an AWS IoT Greengrass container.
You can also access local devices directly when
running without containerization by changing the
code in your Lambda function.
You receive the error: Execution configuration for
function with arn function ARN is not allowed.
This error occurs when you create a system
Lambda function with GGIPDetector or
GGCloudSpooler and you specified IsolationMode
or RunAs configuration. You must omit the
414

AWS IoT Greengrass Developer Guide
Troubleshooting with Logs
Symptom Solution
Execution parameters for this system Lambda
function.
If you're unable to find or resolve your issue using this information, you can search the AWS IoT
Greengrass Forum or post a new thread. Members of the AWS IoT Greengrass team actively monitor the
forum.
Troubleshooting with Logs
GGC v1.7.0
If logs are configured to be stored on the local file system, start looking in the following locations.
Reading the logs on the file system requires root privileges.
greengrass-root/ggc/var/log/crash.log
Shows messages generated when an AWS IoT Greengrass core crashes.
greengrass-root/ggc/var/log/system/runtime.log
Shows messages about which component failed.
greengrass-root/ggc/var/log/system/
Contains all logs from AWS IoT Greengrass system components, such as the certificate manager
and the connection manager. By using the messages in ggc/var/log/system/ and ggc/var/
log/system/runtime.log, you should be able to find out which error occurred in AWS IoT
Greengrass system components.
greengrass-root/ggc/var/log/user/
Contains all logs from user-defined Lambda functions. Check this folder to find error messages
from your local Lambda functions.
Note
By default, greengrass-root is the /greengrass directory. If a write directory (p. 35) is
configured, then the logs are under that directory.
If the logs are configured to be stored on the cloud, use CloudWatch Logs to view log messages.
Note that crash.log is found only in file system logs on the AWS IoT Greengrass core device.
If AWS IoT is configured to write logs to CloudWatch, check those logs for information if connection
errors occur when system components attempt to connect to AWS IoT.
For more information about AWS IoT Greengrass logging, see Monitoring (p. 385).
GGC v1.6.0
If logs are configured to be stored on the local file system, start looking in the following locations.
Reading the logs on the file system requires root privileges.
greengrass-root/ggc/var/log/crash.log
Shows messages generated when an AWS IoT Greengrass core crashes.
greengrass-root/ggc/var/log/system/runtime.log
Shows messages about which component failed.
415

AWS IoT Greengrass Developer Guide
Troubleshooting with Logs
greengrass-root/ggc/var/log/system/
Contains all logs from AWS IoT Greengrass system components, such as the certificate manager
and the connection manager. By using the messages in ggc/var/log/system/ and ggc/var/
log/system/runtime.log, you should be able to find out which error occurred in AWS IoT
Greengrass system components.
greengrass-root/ggc/var/log/user/
Contains all logs from user-defined Lambda functions. Check this folder to find error messages
from your local Lambda functions.
Note
By default, greengrass-root is the /greengrass directory. If a write directory (p. 35) is
configured, then the logs are under that directory.
If the logs are configured to be stored on the cloud, use CloudWatch Logs to view log messages.
Note that crash.log is found only in file system logs on the AWS IoT Greengrass core device.
If AWS IoT is configured to write logs to CloudWatch, check those logs for information if connection
errors occur when system components attempt to connect to AWS IoT.
For more information about AWS IoT Greengrass logging, see Monitoring (p. 385).
GGC v1.5.0
If logs are configured to be stored on the local file system, start looking in the following locations.
Reading the logs on the file system requires root privileges.
greengrass-root/ggc/var/log/crash.log
Shows messages generated when an AWS IoT Greengrass core crashes.
greengrass-root/ggc/var/log/system/runtime.log
Shows messages about which component failed.
greengrass-root/ggc/var/log/system/
Contains all logs from AWS IoT Greengrass system components, such as the certificate manager
and the connection manager. By using the messages in ggc/var/log/system/ and ggc/var/
log/system/runtime.log, you should be able to find out which error occurred in AWS IoT
Greengrass system components.
greengrass-root/ggc/var/log/user/
Contains all logs from user-defined Lambda functions. Check this folder to find error messages
from your local Lambda functions.
Note
By default, greengrass-root is the /greengrass directory.
If the logs are configured to be stored on the cloud, use CloudWatch Logs to view log messages.
Note that crash.log is found only in file system logs on the AWS IoT Greengrass core device.
If AWS IoT is configured to write logs to CloudWatch, check those logs for information if connection
errors occur when system components attempt to connect to AWS IoT.
For more information about AWS IoT Greengrass logging, see Monitoring (p. 385).
GGC v1.3.0
If logs are configured to be stored on the local file system, start looking in the following locations.
Reading the logs on the file system requires root privileges.
416

AWS IoT Greengrass Developer Guide
Troubleshooting with Logs
greengrass-root/ggc/var/log/crash.log
Shows messages generated when an AWS IoT Greengrass core crashes.
greengrass-root/ggc/var/log/system/runtime.log
Shows messages about which component failed.
greengrass-root/ggc/var/log/system/
Contains all logs from AWS IoT Greengrass system components, such as the certificate manager
and the connection manager. By using the messages in ggc/var/log/system/ and ggc/var/
log/system/runtime.log, you should be able to find out which error occurred in AWS IoT
Greengrass system components.
greengrass-root/ggc/var/log/user/
Contains all logs from user-defined Lambda functions. Check this folder to find error messages
from your local Lambda functions.
Note
By default, greengrass-root is the /greengrass directory.
If the logs are configured to be stored on the cloud, use CloudWatch Logs to view log messages.
Note that crash.log is found only in file system logs on the AWS IoT Greengrass core device.
If AWS IoT is configured to write logs to CloudWatch, check those logs for information if connection
errors occur when system components attempt to connect to AWS IoT.
For more information about AWS IoT Greengrass logging, see Monitoring (p. 385).
GGC v1.1.0
If logs are configured to be stored on the local file system, start looking in the following locations.
Reading the logs on the file system requires root privileges.
greengrass-root/ggc/var/log/crash.log
Shows messages generated when an AWS IoT Greengrass core crashes.
greengrass-root/ggc/var/log/system/runtime.log
Shows messages about which component failed.
greengrass-root/ggc/var/log/system/
Contains all logs from AWS IoT Greengrass system components, such as the certificate manager
and the connection manager. By using the messages in ggc/var/log/system/ and ggc/var/
log/system/runtime.log, you should be able to find out which error occurred in AWS IoT
Greengrass system components.
greengrass-root/ggc/var/log/user/
Contains all logs from user-defined Lambda functions. Check this folder to find error messages
from your local Lambda functions.
Note
By default, greengrass-root is the /greengrass directory.
If the logs are configured to be stored on the cloud, use CloudWatch Logs to view log messages.
Note that crash.log is found only in file system logs on the AWS IoT Greengrass core device.
If AWS IoT is configured to write logs to CloudWatch, check those logs for information if connection
errors occur when system components attempt to connect to AWS IoT.
417

AWS IoT Greengrass Developer Guide
Troubleshooting Storage Issues
For more information about AWS IoT Greengrass logging, see Monitoring (p. 385).
GGC v1.0.0
If logs are configured to be stored on the local file system, start looking in the following locations.
Reading the logs on the file system requires root privileges.
greengrass-root/var/log/crash.log
Shows messages generated when an AWS IoT Greengrass core crashes.
greengrass-root/var/log/system/runtime.log
Shows messages about which component failed.
greengrass-root/var/log/system/
Contains all logs from AWS IoT Greengrass system components, such as the certificate manager
and the connection manager. Using the messages in var/log/system/ and var/log/
system/runtime.log, you should be able to find out which error occurred in AWS IoT
Greengrass system components.
greengrass-root/var/log/user/
Contains all logs from user-defined Lambda functions. Check this folder to find error messages
from your local Lambda functions.
Note
By default, greengrass-root is the /greengrass directory.
If AWS IoT Greengrass is configured to write logs to CloudWatch, you can view log messages in the
CloudWatch console (p. 385). Note that crash.log is found only in file system logs on the AWS IoT
Greengrass core device.
If AWS IoT is configured to write logs to CloudWatch, check those logs for information if connection
errors occur when system components attempt to connect to AWS IoT.
Troubleshooting Storage Issues
When the local file storage is full, some components might start failing:
• Local shadow updates do not occur.
• New AWS IoT Greengrass core MQTT server certificates cannot be downloaded locally.
• Deployments fail.
You should always be aware of the amount of free space available locally. This can be calculated based
on the sizes of deployed Lambda functions, the logging configuration (see Troubleshooting with
Logs (p. 415)), and the number of shadows stored locally.
Troubleshooting Messages
All messages sent in AWS IoT Greengrass are sent with QoS 0. By default, AWS IoT Greengrass stores
messages in an in-memory queue. Therefore, unprocessed messages are lost when the AWS IoT
Greengrass core restarts (for example, after a group deployment or device reboot). However, you can
configure AWS IoT Greengrass (v1.6.0 or later) to cache messages to the file system so they persist across
418

AWS IoT Greengrass Developer Guide
Troubleshooting Shadow Synchronization Timeout Issues
core restarts. You can also configure the queue size. For more information, see the section called “MQTT
Message Queue” (p. 37).
Note
When using the default in-memory queue, we recommend that you deploy groups or restart the
device when the service disruption is the lowest.
If you configure a queue size, make sure that it's greater than or equal to 262144 bytes (256 KB).
Otherwise, AWS IoT Greengrass might not start properly.
Troubleshooting Shadow Synchronization Timeout
Issues
GGC v1.7.0
Significant delays in communication between a Greengrass core device and the cloud might cause
shadow synchronization to fail because of a timeout. In this case, you should see log entries similar
to the following:
[2017-07-20T10:01:58.006Z][ERROR]-cloud_shadow_client.go:57,Cloud shadow
client error: unable to get cloud shadow what_the_thing_is_named for
synchronization. Get https://1234567890abcd.iot.us-west-2.amazonaws.com:8443/things/
what_the_thing_is_named/shadow: net/http: request canceled (Client.Timeout exceeded
while awaiting headers)
[2017-07-20T10:01:58.006Z][WARN]-sync_manager.go:263,Failed to get cloud
copy: Get https://1234567890abcd.iot.us-west-2.amazonaws.com:8443/things/
what_the_thing_is_named/shadow: net/http: request canceled (Client.Timeout exceeded
while awaiting headers)
[2017-07-20T10:01:58.006Z][ERROR]-sync_manager.go:375,Failed to execute sync operation
{what_the_thing_is_named VersionDiscontinued []}"
A possible fix is to configure the amount of time that the core device waits for a host
response. Open the config.json (p. 21) file in greengrass-root/config and add a
system.shadowSyncTimeout field with a timeout value in seconds. For example:
{
"system": {
"shadowSyncTimeout": 10
},
"coreThing": {
"caPath": "root-ca.pem",
"certPath": "cloud.pem.crt",
"keyPath": "cloud.pem.key",
...
},
...
}
If no shadowSyncTimeout value is specified in config.json, the default is 5 seconds.
GGC v1.6.0
If there is a significant delay in communication between a Greengrass core device and the cloud,
then shadow synchronization may fail due to a timeout. You may see something like this in your log
files:
[2017-07-20T10:01:58.006Z][ERROR]-cloud_shadow_client.go:57,Cloud shadow
client error: unable to get cloud shadow what_the_thing_is_named for
419

AWS IoT Greengrass Developer Guide
Troubleshooting Shadow Synchronization Timeout Issues
synchronization. Get https://1234567890abcd.iot.us-west-2.amazonaws.com:8443/things/
what_the_thing_is_named/shadow: net/http: request canceled (Client.Timeout exceeded
while awaiting headers)
[2017-07-20T10:01:58.006Z][WARN]-sync_manager.go:263,Failed to get cloud
copy: Get https://1234567890abcd.iot.us-west-2.amazonaws.com:8443/things/
what_the_thing_is_named/shadow: net/http: request canceled (Client.Timeout exceeded
while awaiting headers)
[2017-07-20T10:01:58.006Z][ERROR]-sync_manager.go:375,Failed to execute sync operation
{what_the_thing_is_named VersionDiscontinued []}"
A possible fix is to configure the amount of time your Greengrass core device waits for
a host response. Open the greengrass-root/config/config.json file and add a
system.shadowSyncTimeout field with a timeout value in seconds. For example:
{
"coreThing": {
"caPath": "root-ca.pem",
"certPath": "cloud.pem.crt",
"keyPath": "cloud.pem.key",
"thingArn": "arn:aws:iot:us-west-2:049039099382:thing/GGTestGroup42_Core",
"iotHost": "your-AWS-IoT-endpoint",
"ggHost": "greengrass.iot.us-west-2.amazonaws.com",
"keepAlive": 600
},
"runtime": {
"cgroup": {
"useSystemd": "yes"
}
},
"system": {
"shadowSyncTimeout": 10
}
}
If no shadowSyncTimeout value is specified in the config.json file, the default is 1 second.
GGC v1.5.0
If there is a significant delay in communication between a Greengrass core device and the cloud,
then shadow synchronization may fail due to a timeout. You may see something like this in your log
files:
[2017-07-20T10:01:58.006Z][ERROR]-cloud_shadow_client.go:57,Cloud shadow
client error: unable to get cloud shadow what_the_thing_is_named for
synchronization. Get https://1234567890abcd.iot.us-west-2.amazonaws.com:8443/things/
what_the_thing_is_named/shadow: net/http: request canceled (Client.Timeout exceeded
while awaiting headers)
[2017-07-20T10:01:58.006Z][WARN]-sync_manager.go:263,Failed to get cloud
copy: Get https://1234567890abcd.iot.us-west-2.amazonaws.com:8443/things/
what_the_thing_is_named/shadow: net/http: request canceled (Client.Timeout exceeded
while awaiting headers)
[2017-07-20T10:01:58.006Z][ERROR]-sync_manager.go:375,Failed to execute sync operation
{what_the_thing_is_named VersionDiscontinued []}"
A possible fix is to configure the amount of time your Greengrass core device waits for
a host response. Open the greengrass-root/config/config.json file and add a
system.shadowSyncTimeout field with a timeout value in seconds. For example:
{
"coreThing": {
"caPath": "root-ca.pem",
420

AWS IoT Greengrass Developer Guide
Troubleshooting Shadow Synchronization Timeout Issues
"certPath": "cloud.pem.crt",
"keyPath": "cloud.pem.key",
"thingArn": "arn:aws:iot:us-west-2:049039099382:thing/GGTestGroup42_Core",
"iotHost": "your-AWS-IoT-endpoint",
"ggHost": "greengrass.iot.us-west-2.amazonaws.com",
"keepAlive": 600
},
"runtime": {
"cgroup": {
"useSystemd": "yes"
}
},
"system": {
"shadowSyncTimeout": 10
}
}
If no shadowSyncTimeout value is specified in the config.json file, the default is 1 second.
GGC v1.3.0
If there is a significant delay in communication between a Greengrass core device and the cloud,
then shadow synchronization may fail due to a timeout. You may see something like this in your log
files:
[2017-07-20T10:01:58.006Z][ERROR]-cloud_shadow_client.go:57,Cloud shadow
client error: unable to get cloud shadow what_the_thing_is_named for
synchronization. Get https://1234567890abcd.iot.us-west-2.amazonaws.com:8443/things/
what_the_thing_is_named/shadow: net/http: request canceled (Client.Timeout exceeded
while awaiting headers)
[2017-07-20T10:01:58.006Z][WARN]-sync_manager.go:263,Failed to get cloud
copy: Get https://1234567890abcd.iot.us-west-2.amazonaws.com:8443/things/
what_the_thing_is_named/shadow: net/http: request canceled (Client.Timeout exceeded
while awaiting headers)
[2017-07-20T10:01:58.006Z][ERROR]-sync_manager.go:375,Failed to execute sync operation
{what_the_thing_is_named VersionDiscontinued []}"
A possible fix is to configure the amount of time your Greengrass core device waits for
a host response. Open the greengrass-root/config/config.json file and add a
system.shadowSyncTimeout field with a timeout value in seconds. For example:
{
"coreThing": {
"caPath": "root-ca.pem",
"certPath": "cloud.pem.crt",
"keyPath": "cloud.pem.key",
"thingArn": "arn:aws:iot:us-west-2:049039099382:thing/GGTestGroup42_Core",
"iotHost": "your-AWS-IoT-endpoint",
"ggHost": "greengrass.iot.us-west-2.amazonaws.com",
"keepAlive": 600
},
"runtime": {
"cgroup": {
"useSystemd": "yes"
}
},
"system": {
"shadowSyncTimeout": 10
}
}
If no shadowSyncTimeout value is specified in the config.json file, the default is 1 second.
421

AWS IoT Greengrass Developer Guide
Troubleshooting Shadow Synchronization Timeout Issues
GGC v1.1.0
If there is a significant delay in communication between a Greengrass core device and the cloud,
then shadow synchronization may fail due to a timeout. You may see something like this in your log
files:
[2017-07-20T10:01:58.006Z][ERROR]-cloud_shadow_client.go:57,Cloud shadow
client error: unable to get cloud shadow what_the_thing_is_named for
synchronization. Get https://1234567890abcd.iot.us-west-2.amazonaws.com:8443/things/
what_the_thing_is_named/shadow: net/http: request canceled (Client.Timeout exceeded
while awaiting headers)
[2017-07-20T10:01:58.006Z][WARN]-sync_manager.go:263,Failed to get cloud
copy: Get https://1234567890abcd.iot.us-west-2.amazonaws.com:8443/things/
what_the_thing_is_named/shadow: net/http: request canceled (Client.Timeout exceeded
while awaiting headers)
[2017-07-20T10:01:58.006Z][ERROR]-sync_manager.go:375,Failed to execute sync operation
{what_the_thing_is_named VersionDiscontinued []}"
A possible fix is to configure the amount of time your Greengrass core device waits for
a host response. Open the greengrass-root/config/config.json file and add a
system.shadowSyncTimeout field with a timeout value in seconds. For example:
{
"coreThing": {
"caPath": "root-ca.pem",
"certPath": "cloud.pem.crt",
"keyPath": "cloud.pem.key",
"thingArn": "arn:aws:iot:us-west-2:049039099382:thing/GGTestGroup42_Core",
"iotHost": "your-AWS-IoT-endpoint",
"ggHost": "greengrass.iot.us-west-2.amazonaws.com",
"keepAlive": 600
},
"runtime": {
"cgroup": {
"useSystemd": "yes"
}
},
"system": {
"shadowSyncTimeout": 10
}
}
If no shadowSyncTimeout value is specified in the config.json file, the default is 1 second.
GGC v1.0.0
Not supported.
422

AWS IoT Greengrass Developer Guide
Document History for AWS IoT
Greengrass
The following table describes important changes to the AWS IoT Greengrass Developer Guide after June
2018. For notification about updates to this documentation, you can subscribe to an RSS feed.
update-history-change update-history-description update-history-date
Amazon SageMaker Neo Deep
Learning Runtime
The Amazon SageMaker Neo
deep learning runtime supports
machine learning models that
have been optimized by the
Amazon SageMaker Neo deep
learning compiler.
November 28, 2018
Run AWS IoT Greengrass in a
Docker container
You can run AWS IoT Greengrass
in a Docker container by
configuring your Greengrass
group to run with no
containerization.
November 26, 2018
AWS IoT Greengrass Version
1.7.0 Released
New features: Greengrass
connectors, local secrets
manager, isolation and
permission settings for Lambda
functions, hardware root of trust
security, connection using ALPN
or network proxy, and Raspbian
Stretch support.
November 26, 2018
AWS IoT Greengrass Software
Downloads
The AWS IoT Greengrass Core
Software, AWS IoT Greengrass
Core SDK, and AWS IoT
Greengrass Machine Learning
SDK packages are available
for dowload through Amazon
CloudFront.
November 26, 2018
AWS IoT Device Tester for AWS
IoT Greengrass
Use AWS IoT Device Tester for
AWS IoT Greengrass to verify
that your CPU architecture,
kernel configuration, and drivers
work with AWS IoT Greengrass.
November 26, 2018
AWS CloudTrail Logging for AWS
IoT Greengrass API Calls
AWS IoT Greengrass is
integrated with AWS CloudTrail,
a service that provides a record
of actions taken by a user, role,
or an AWS service in AWS IoT
Greengrass.
October 29, 2018
423

AWS IoT Greengrass Developer Guide
Earlier Updates
Support for TensorFlow v1.10.1
on NVIDIA Jetson TX2
The TensorFlow precompiled
library for NVIDIA Jetson
TX2 that AWS IoT Greengrass
provides now uses TensorFlow
v1.10.1. This supports Jetpack
3.3 and CUDA Toolkit 9.0.
October 18, 2018
Support for MXNet v1.2.1
Machine Learning Resources
AWS IoT Greengrass supports
machine learning models that
are trained using MXNet v1.2.1.
August 29, 2018
AWS IoT Greengrass Version
1.6.0 Released
New features: Lambda
executables, configurable
message queue, configurable
reconnect retry interval, volume
resources under /proc, and
configurable write directory.
July 26, 2018
Earlier Updates
The following table describes important changes to the AWS IoT Greengrass Developer Guide before July
2018.
Change Description Date
AWS IoT
Greengrass
Version 1.5.0
Released
New features:
• Local machine learning inference using cloud-trained models. For
more information, see Perform Machine Learning Inference (p. 195).
• Greengrass Lambda functions support binary input data, in addition
to JSON.
For more information, see AWS IoT Greengrass core versions (p. 2).
March
29,
2018
AWS IoT
Greengrass
Version 1.3.0
Released
New features:
• Over-the-air (OTA) update agent capable of handling cloud-
deployed, Greengrass update jobs. For more information, see OTA
Updates of AWS IoT Greengrass Core Software (p. 129).
• Access local peripherals and resources from Greengrass Lambda
functions. For more information, see Access Local Resources with
Lambda Functions (p. 169).
November
27,
2017
AWS IoT
Greengrass
Version 1.1.0
Released
New features:
• Reset deployed AWS IoT Greengrass groups. For more information,
see Reset Deployments (p. 135).
• Support for Node.js 6.10 and Java 8 Lambda runtimes, in addition to
Python 2.7.
September
20,
2017
AWS IoT
Greengrass
Version 1.0.0
Released
AWS IoT Greengrass is generally available. June 7,
2017
424
