Guide
User Manual:
Open the PDF directly: View PDF ![]() .
.
Page Count: 21

Quick Guide
How to use dokify

Índice
Chapter 1: How to use dokify ................................................................................................................2
Introduction .............................................................................................................................................2
Processes ..................................................................................................................................................2
Imputting ..................................................................................................................................................2
Assigninig .................................................................................................................................................. 4
Assigninig clients .....................................................................................................................................5
Assigning groups .....................................................................................................................................5
Attaching...................................................................................................................................................7
Signing .................................................................................................................................................... 10
Validating/Rejecting ............................................................................................................................ 11
Trash ........................................................................................................................................................ 12
Checkin ................................................................................................................................................... 12
Checkout ................................................................................................................................................ 13
Modules .................................................................................................................................................. 13
Home ...................................................................................................................................................... 13
Users ....................................................................................................................................................... 13
Companies ............................................................................................................................................. 13
Invitation system .................................................................................................................................. 14
Employees ............................................................................................................................................. 15
Machines ................................................................................................................................................ 15
Chapter 2: Glossary .............................................................................................................................. 16
Chapter 1: How to use dokify
Introduction
There are a series of simple, basic processes that you will repeat often when using dokify.
Please bear in mind that, depending on the role that your user has been assigned, there may
be certain actions that you are unable to carry out.
The rst thing to take into account when navigating dokify is that all the data appearing on
your screen refer to the element you are currently dealing with i.e. the options in the left-
hand menu always relate to the element that you have accessed. By “element”, we mean em-
ployees, machines and companies, among other things.
Apart from the options in the left-hand menu, there are also other options located at the top,
next to the name of the element you are viewing. These are grouped in the button ,
among other things. Within this option, you can check and modify all the element informa-
tion.
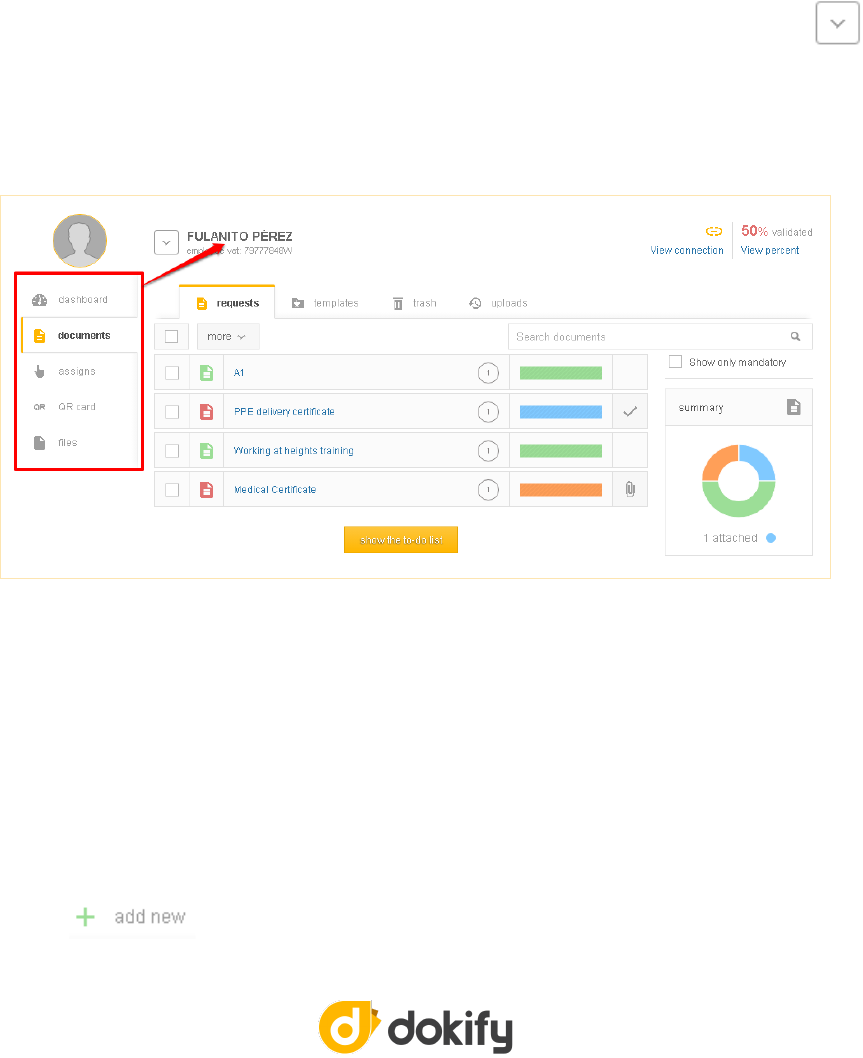
Example
In the previous image, you can see a left-hand menu with the options available to you for the
ele ment Fulanito Pérez. In the example, you have selected the document option from the
left-hand menu, so you are viewing the Fulanito Pérez documents. If you navigate to other
elements, this menu may change according to the type of element you access.
Processes
Imputting
From dokify, you can input or register users, companies, employees, machines, organisations,
groups, and requirements. The process is always the same: from any of the modules, you have
the option on the right-hand part of the top menu tab.
The form that appears will be dierent depending on the element that you are creating. Be-
fore saving, you must at least complete the obligatory elds in each form. Upon saving, dokify
will highli ght the obligatory elds that you have not completed, or the elds that you have
completed inco rrectly. You will not be able to save whilst there are errors.
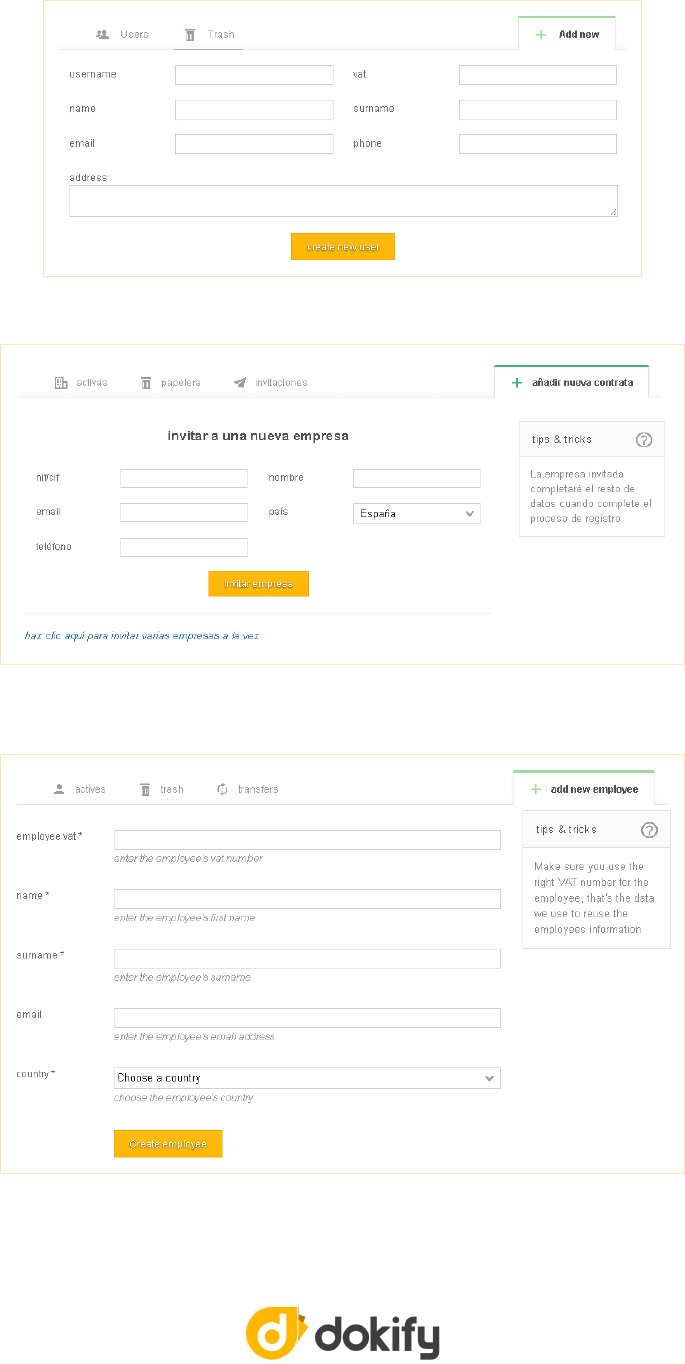
New user. Use this form to register users that access dokify.
New company. Use this form to invite companies to use dokify. If you wish to invite a large number of companies all at
once, you can use the link at the bottom.
New employee. Select the correct country for the employee so that dokify can verify the data correctly.
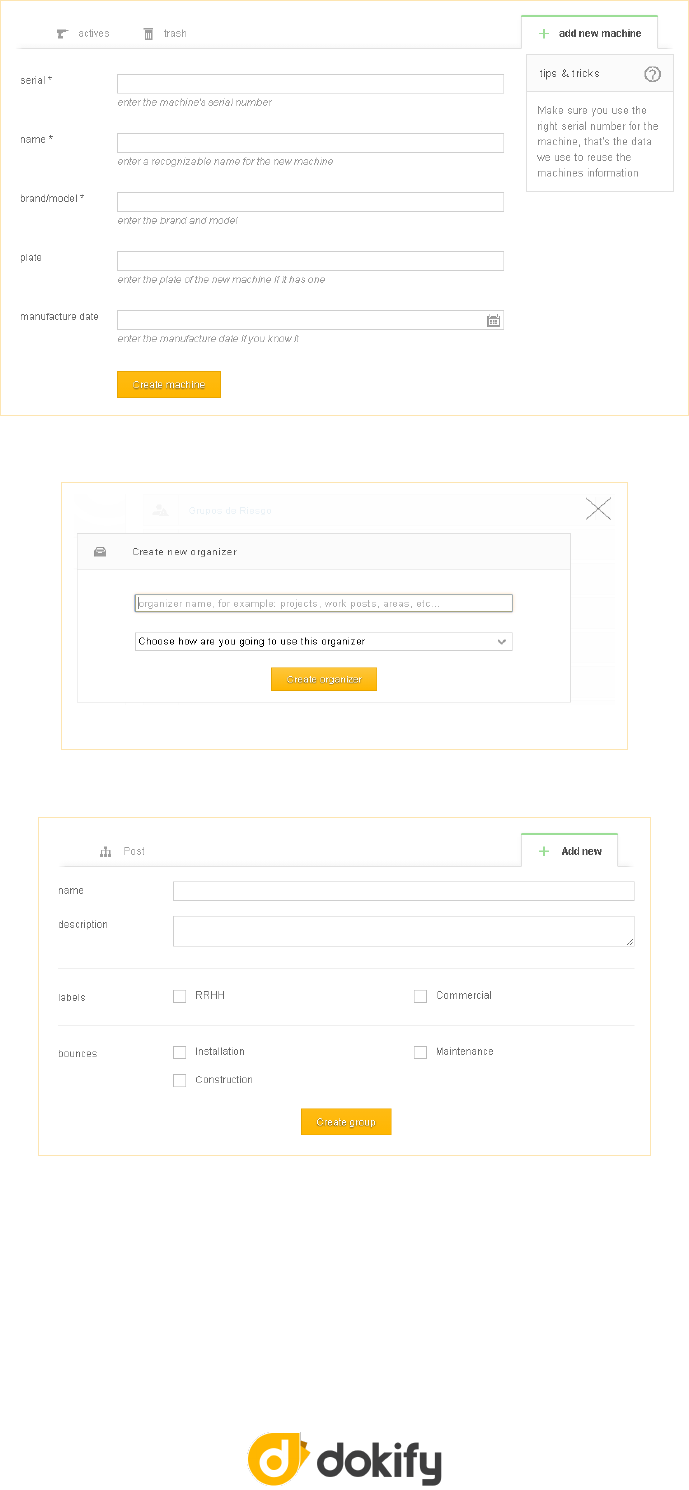
New machine. Use this form to add a machine.
New organiser. Use this form to add a new organizer
New group. Create this element within an organiser.
Assigninig
With the “assigns” option, you decide which clients you wish to assign to your elements (com-
panies, employees and machines) so that clients may view these or not. Also, for each client,
you decide which groups you wish to assign to your elements.
Both actions are the reasoning used by dokify to know which documents should be reques-
ted from which elements. Based on the assigns given to the elements, the corresponding do-
cuments will be requested from them.
It is important to assigns properly. To do so, go into the “assigns” options located in the left-
hand menu of the element you wish to congure.
Assigninig clients
Once you are in the assigns screen, click on and dokify will display a win-
dow where you can select the client companies for whom you work, who will be able to see
the element.
Please bear in mind your clients’ contractual relationships. It may be that you work directly
for a com pany but that you also work for that same company in an indirect fashion i.e. ano-
ther company has hired you to do work for one of your own clients. In this case, dokify will
show you all the possibilities and cross-relationships in the emerging window.
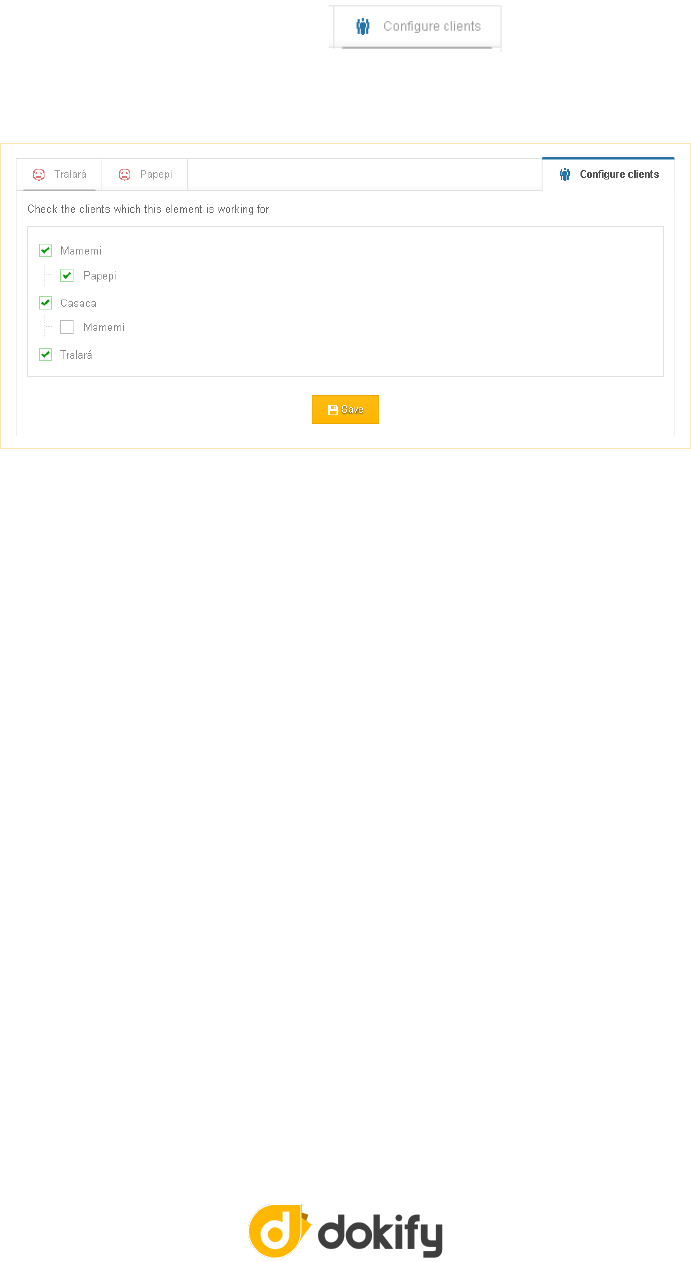
Example
You work for several clients. One of your contractors, Casa Blanca, is going to do work for one
of them, but not for all of them. To assign Casa Blanca to a client, go to view the company
Casa Blanca and click on the option “assigns” in the left-hand menu. Once you are in this
screen, click on “Con gure clients” and dokify will display a window where you will have the
option to select all client com panies for whom your contractor will work.
From this moment, only the clients you indicated will see your Casa Blanca contractor.
Remember, the fact that a client company is assigned to an employee does not mean that the
client company can modify the employee data.
Assigning groups
Once the client companies are assigned to the element, you now have to assign the groups of
each organiser that correspond to each of the client companies. To do so:
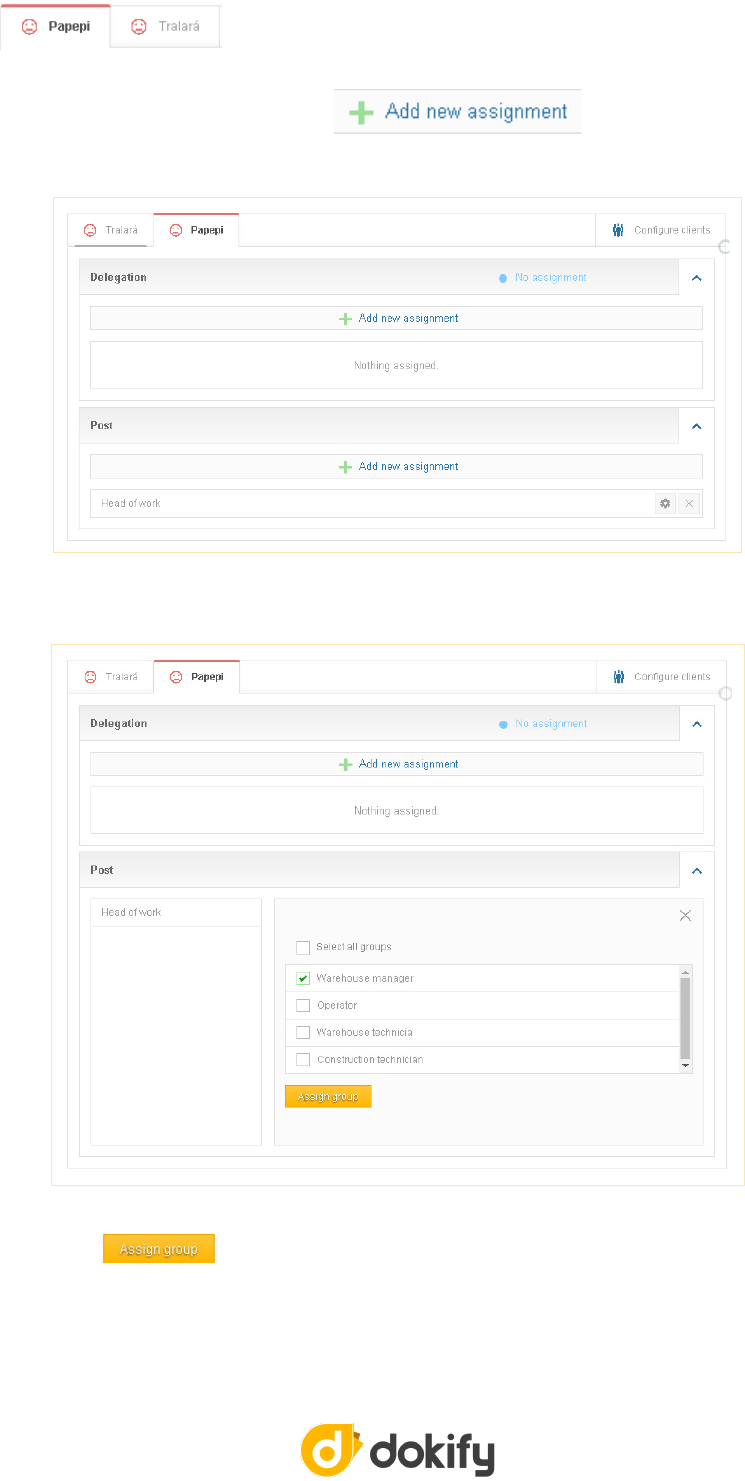
Step 1: Select the client company where you wish to make the group assigns.
Step 2: As soon as you access each of the organisers, the rst thing you will see are the groups
that you have already assigned. Click to display the list of groups
available to assign.
Step 3: Select all the groups in the list that you wish to assign to the element.
Step 4: When you have selected all the groups that you wish to assign to the element, click on
the button
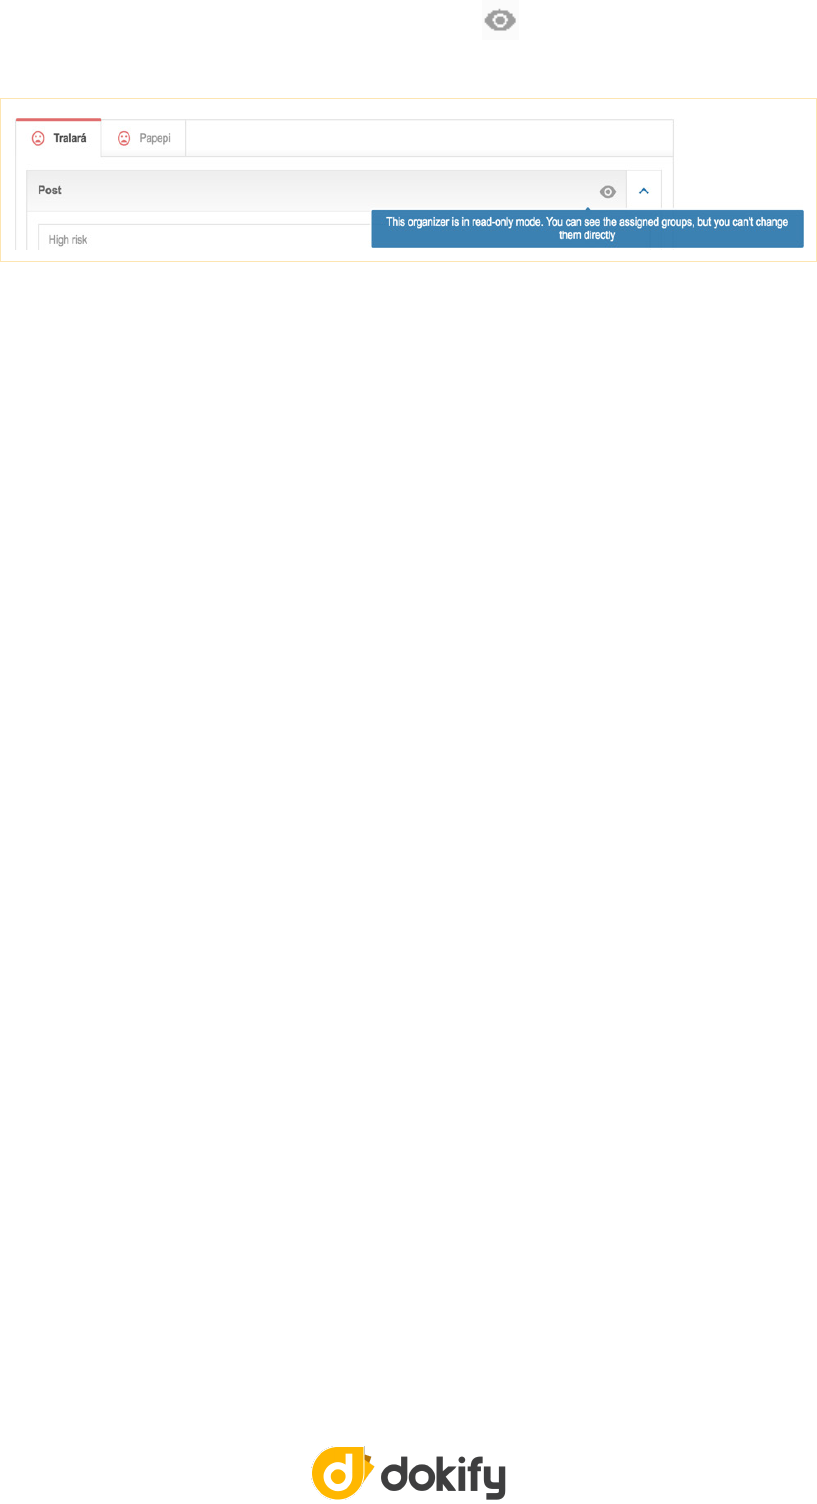
In some organisers, you will be able to see the icon , this means that this organiser is
read-only; you cannot assign any group, only consult it.
Example
The company Laleli wants to congure its employee Vanesa Vicalt. To do so, Laleli must bear
in mind that she works as a Warehouse Manager in addition to working at the Asturias Oce.
In this example, Warehouse Manager and Asturias are the groups that must be assigned to the
emplo yee Vanesa Vicalt.
These assigns will become requirements for this employee.
Ultimately, you must consider which assigns you will make for your companies, employees
and machines in order for the corresponding or relevant requirements to be requested from
them.
Attaching
It is fairly certain that you will repeat this action many times when using dokify. For each ele-
ment, you will attach the documents required of you.
As always, go to the element to which you wish to attach the documents and click on the
“docu ments” option in the left-hand menu.
Next, dokify will display the list of documents corresponding to this element, and their sta-
tus. To attach the requested documents, click on the document that you wish to attach and
click “Attach”. This option is located in the menu at the top.
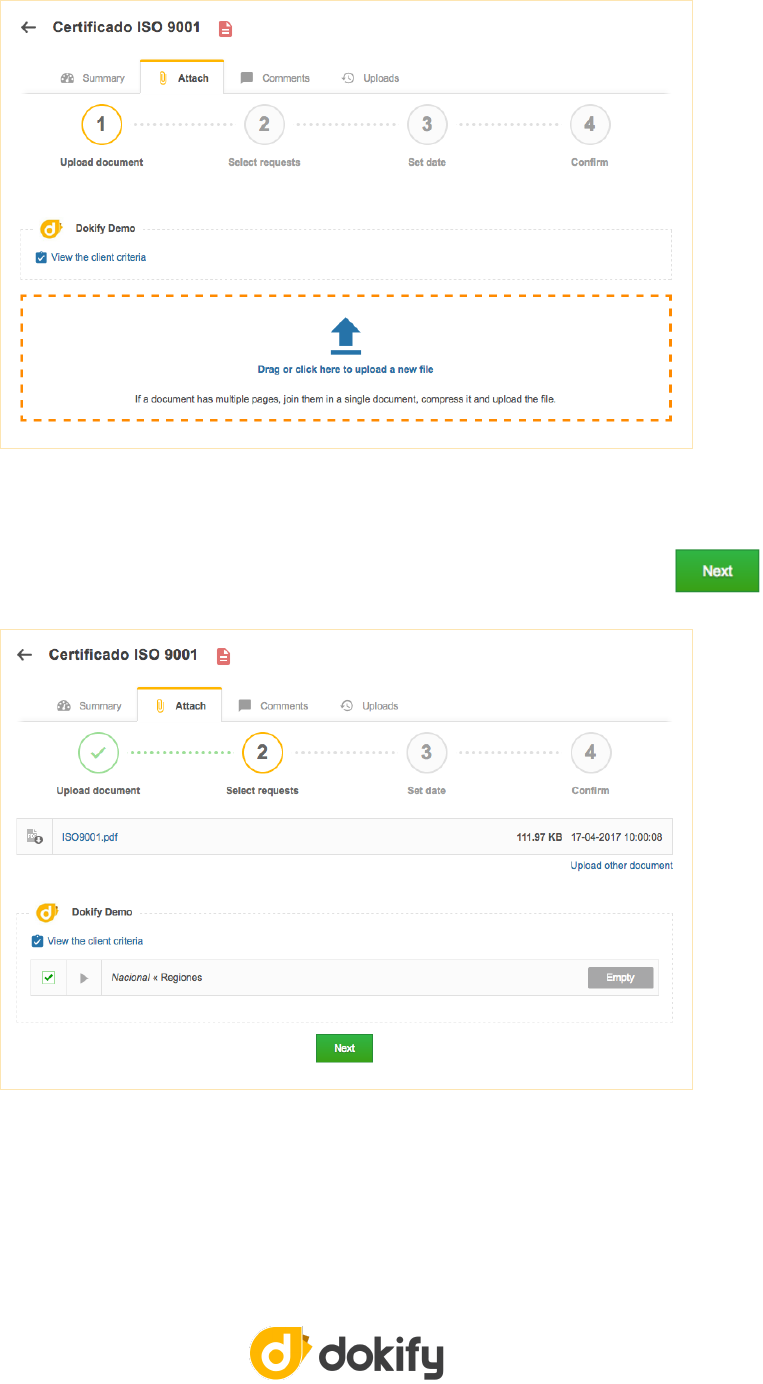
Step 1: Attach the le you want to upload. Here you can nd the validation criteria of each
client where it is indicated the requirements the document must accomplish in order to be
valid for the client.
Step 2: dokify shows a list of companies that requieres the document. Click on the check
box of the client the document will be uploaded and then click on the button

Step 3: Select the document date and click again in the button . It’s very importan
to conrm the date, If you don’t do it, you won’t be able to attach the le. keep in mind that
the system uses this date to calculate the document expiry date.
Step 4: This is the last step, here you can see all the data of the requirement you’re
attaching and also, optionally, you can include a comment to clarify anything about the
document you’re attanching. To complete the process click on and dokify will
show you an informative window to indicate the expiry date of the requirement and the
maximum and estimated validation time. If the validation is not done by dokify the
estimated and maximum validation time as well as the urgent validation option won’t be
shown.
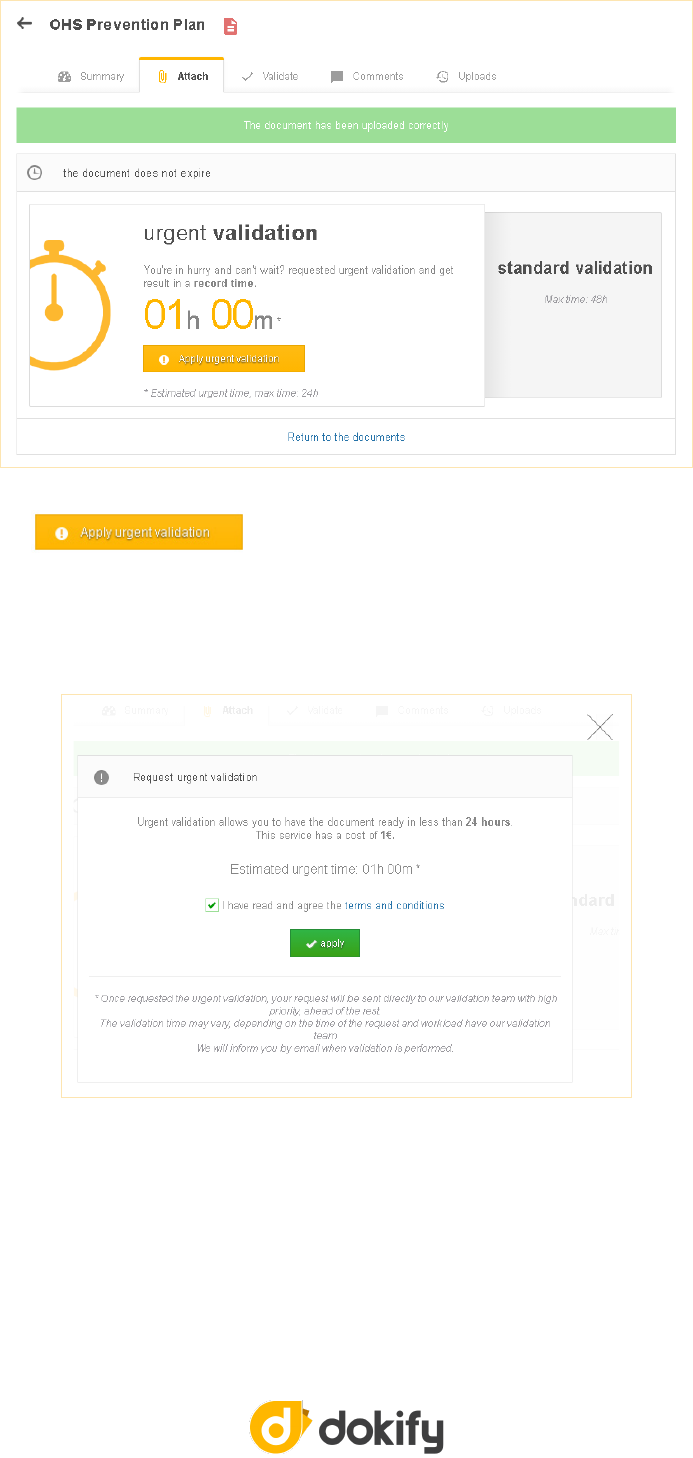
Nota: Remember that at this point, your document has already been attached.
If you would like your requirement to be validated in less time than the standard validation
time, click on . This service is subject to an additional cost, which you
always will be informed about before conrming.
Once all your documents have been attached, please wait for dokify or the company reques-
ting them to validate them. Please note that until this happens, your company is not valid.
Signing
Signing documents allows you to save time when validating documentation. If you have docu-
ments pending, which have been congured for signing, you will see the option “Sign” on the
top menu, when accessing the document you wish to sign.
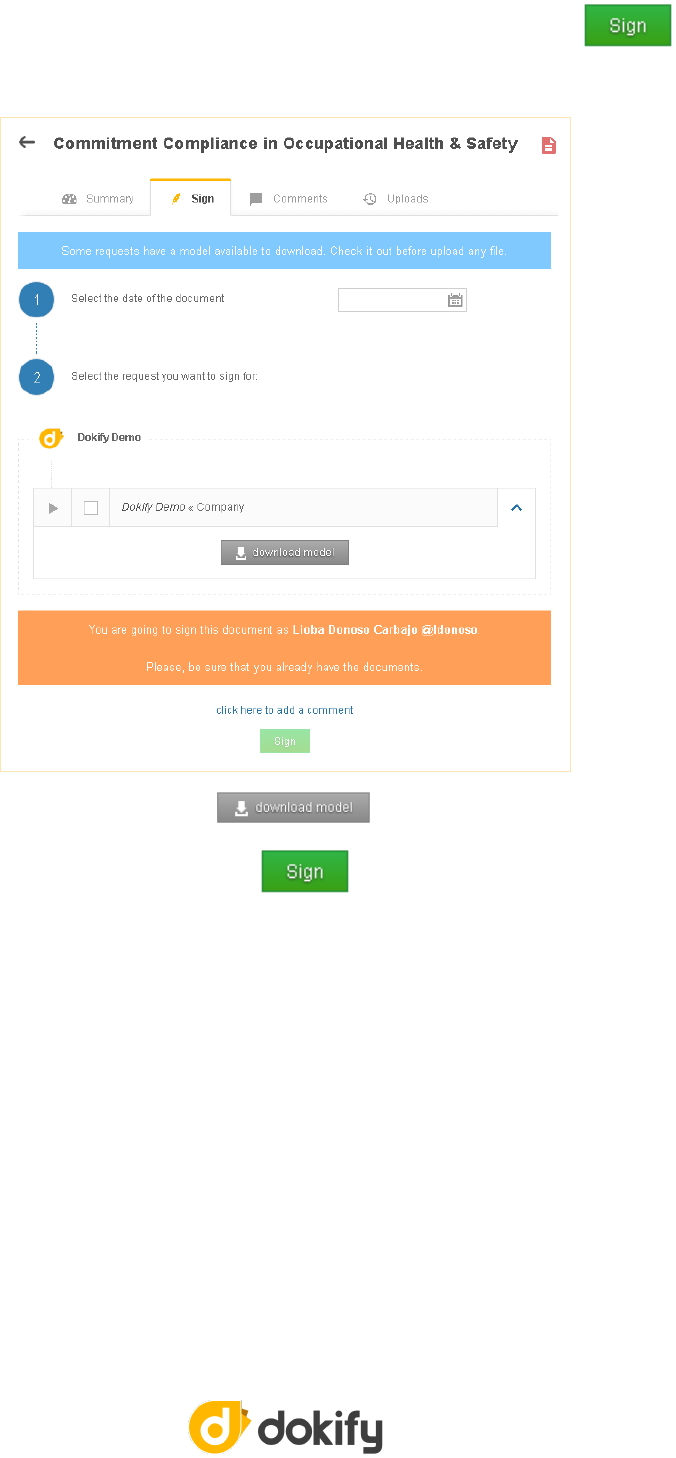
These documents only require a signature to validate that they are correct (for example, a
delivery receipt for PPEs). This replaces the usual process of downloading, printing, signing,
scanning, atta ching and waiting for validation by a simple click of the button
By clicking on the option “Sign”, a window will be displayed:
Download the document by clicking on and check that it is correct. The docu-
ment you are downloading is the one that you are going to sign, and it will have your data on
it. To con clude the signing process, click on . If the requirement needs you to intro-
duce a piece of data, a corresponding window will appear for you to complete.
Nota: This option is only available on the Premium plan.
Validating/Rejecting
The attached documents must be veried i.e. dokify or the company requesting them must
check that they are correct and therefore validate them.
Correct documents are validated and incorrect documents are rejected. Upon rejecting a
require ment, the dokify notication mechanism is activated to notify the relevant party that
the require ment has been rejected. When a document is rejected, it is possible to give a rea-
son in order to help resolve errors and attach the correct document.
As is logical, the company requesting the documents is in charge of validating or rejecting
them.
Once all your elements and company documents are validated, your company will be given
the ok and will appear in green.
Trash
In dokify, you cannot delete an element for good, but you can send it to the trash. When sen-
ding ele ments to the trash, you will stop seeing them. It is eectively as if you have deleted
them, with the advantage of being able to recover them if need be.
To send an element to the trash, go to view the element, display the options located on the
button and select “Send to trash”.
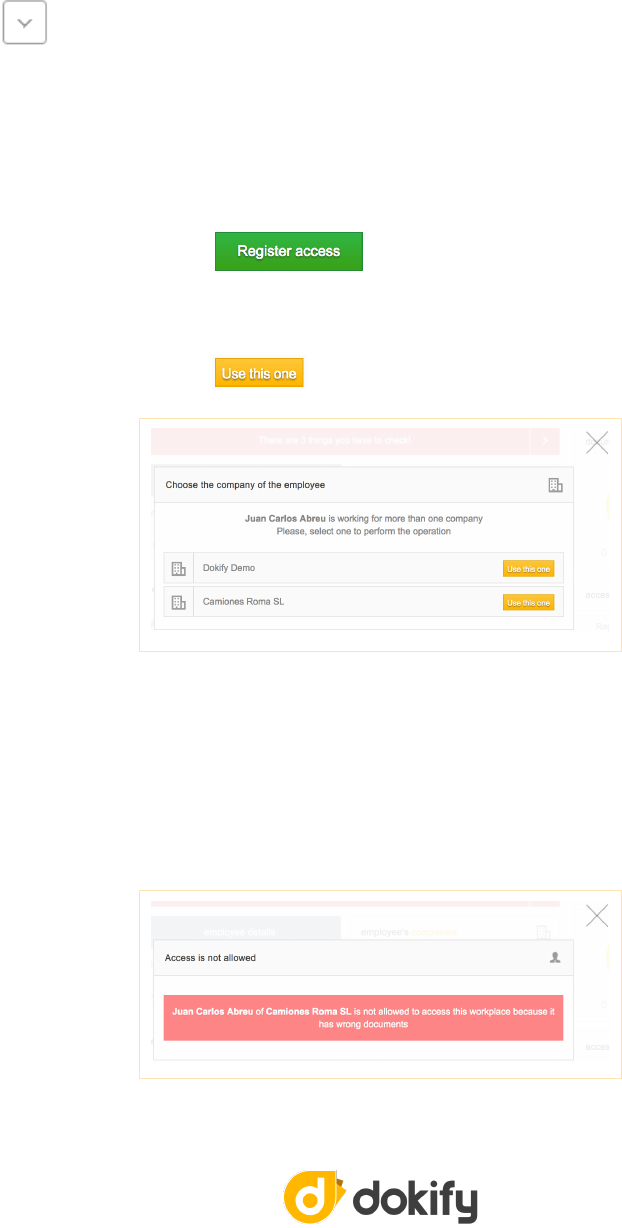
Checkin
The Checkin is the process an employee gets in your workplace. In order to carry on this pro-
cess it’s absolutely necessary to be part of if. To do so, you must follow these steps:
Step 1: Get in the dashboard of the employee that wants to access to your workplace
and click on the button , on the right side of the dashboard.
Step 2: In some cases, the employee that wants to get in works for dierent
companies. If it’s the case, dokify shows you a list of companies the employee works
for. Click on the button of the company the employee it’s going to perform
the work for.
Step 3: If the employee has all of the documents OK, dokify allows the access to your
workplace.
If the employee does not have all the documents ok, dokify would deny the access to
your workplace.
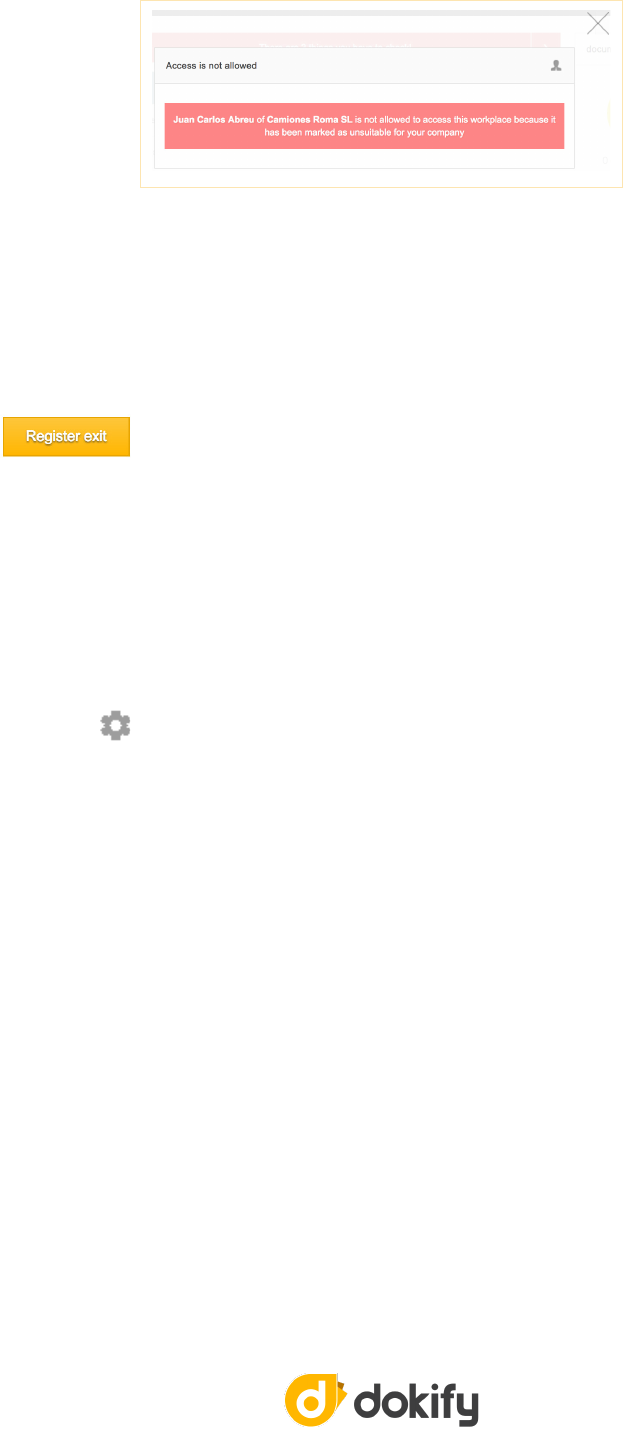
If for some reason, the employee to access is forbidden for company, the access will
be denied.
Checkout
The Check-out is the process an employee gets out from your workplace. It’s an easy and sim-
ple process.
Get in the dashboard of the employee that wants to get out of the workplace and click on the
button .
Modules
Home
The homepage or dashboard contains all your company information and direct access to all
your avai lable options. It also displays a rapid summary of your document status and your
elements.
Click on the icon , situated next to the name of your company and go to ”My company”.
Here, you will be able to consult or modify all the data relating to your company (consult
users, organisations, invoices, etc.).
Users
From “my company”, click on the option “users”. From here, you can manage your company
users. You will be able to create new users, modify data for those you already have, send
them to the trash, view assigns, etc.
Companies
Go to the module “company” to manage your contracts via the option “company” in the left-
hand menu. You will be able to invite companies who work for you to use dokify, make assig-
ns, send con tractors to the trash, and more options available from each company.
It is important that you remember to assign to your companies the corresponding client com-
panies, so that client companies can view these on their list of companies.
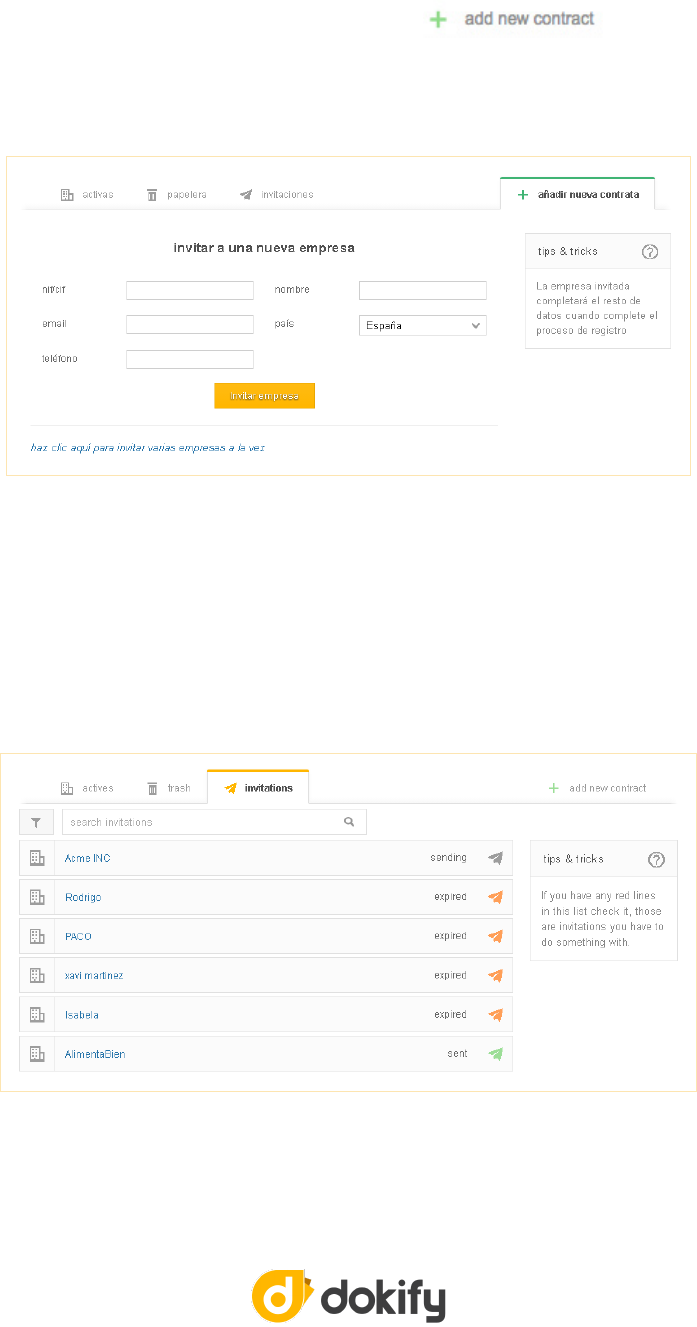
Invitation system
This system allows a company to ask its contractors to use dokify.
Inviting
To create an invitation or to invite a company to use dokify, which is the same thing, access
the option “company” in the left-hand menu and click . Complete the form
that appears, entering the CIF (Tax Identication Number) of the company you are inviting, a
contact name, an email address (which is where the invitation will be sent), and the relevant
country. dokify will corro borate the data and conrm that the CIF is valid.
Before accepting the invitation
You can control your pending invitations from the tab “invitations” within the option “com-
panies” in the left-hand menu.
From “invitations”, you have access to pending invitations and their status. By going into
each one, you will see more options. You can always send the invitation again or discard it to
cancel it.

Please note that invitations have a 20-day validity period. After this time, if the invited com-
pany does not respond, the invitation will expire.
Furthermore, you can only make one single invitation via email. That is to say, it is only possi-
ble to have one single invitation pending via email. Moreover, if an invitation has already been
accepted from a particular email address, you will not be able to create a new invitation for
this same email address. These restrictions are set by company i.e. many invitations from
many companies can be sent to a single email address, but multiple invitations from one com-
pany are not permitted.
Accepting an invitation
The company invited will receive an email containing a link to start the registration process
via a wizard. Following ve easy steps, the company will sign up. From that moment, it will
appear on your list of companies.
The link is valid for 20 days. If you try to access it after this time, you will not be able to regis-
ter and you will be informed that the invitation has expired.
Employees
Go to the module “employees” to organise all the information relating to your employees,
via the option “employees” in the left-hand menu. As with previous modules, you will be able
to input new employees, send them to the trash, or use other options available from each
employee element.
Machines
Go to the module “machines” to organise all the information relating to your machines via
the option “machines” in the left-hand menu. You will also be able to input machines, modify
existing data, or use other options available from each machine element.

Chapter 2: Glossary
A
Attach. Action of selecting a le and uploading it to dokify for use by the client. One of the
most important actions in the application.
Assign. Relationship between two elements, at least one of them being a group. The ele
ments may be: a company, an employee, a machine, a user or a group.
Attribute. Each of the congurable elements of a requirement.
Automatic expiry. Property that prompts the document to expire when the group to which
the document belongs is de-assigned.
Certications. Marks the document as a previous document before asking for any other do-
cument. The rest of the documentation will not be requested until the marked documents
are validated as Certied. The documents mar ked as Certied are understood as previous
documents and must be provi ded.
Client alias. Name that the company assigns to the document. This name is only seen if the
document is requested by a single client. If not, the name of the document type is seen.
Conditions. Restricts to which elements the document is requested, based on a comparison
of element assgns.
Download. Gives the document the property of being downloadable i.e. it is not a document
that needs to be attached. The company supplies it.
Duration. Number of days that a requirement is valid.
Example document. Download document, with a similar name to the docu ment being crea-
ted, which may serve as a template or reference.
Manual expiry. Always requests the document expiry date and suggests a date obtained
from the duration of the element, although it is not taken into account.
Obligatory. Feature that prompts a requirement to be attached in order to start working.
Reference to company. Protects the relationship between the company and the applicant
(employee or company). If the applicant ceases to be linked to the company, the requirement
will cease to be seen:
Group - Company - Applicant

Reference to contract chain. Multiplies the requirement by as many con tractor chains as
may exist between the origin and the destination:
Group - Contract chain - Applicant (employee or machine)
C
Company. Organisational unit dedicated to industrial, merchant or service activities with the
aim of prot-making.
Contract. A company acts as a contractor when it does work for another company, which
then acts as the client of the contractor.
Corporation. A mechanism to manage several companies in the same group. It is, eecti vely,
a collection of companies. Companies that belong to a corporation have certain pecu liarities.
For example, groups created for corporations can be assigned to the companies that make up
part of the corporation.
D
Dashboard. Place in the application from which you can view a summary of the company sta-
tus.
Destination module. Indicates the company, employee or machine from which a require-
ment is requested.
Document date. Date of a requirement being issued.
E
Employee. Worker at a company designated for a certain job.
A company may act as a client, as a contractor or as a subcontractor.
Expiry date. Date on which a requirement expires.
G
Group. Element assigned to a user, a company, an employee, a machine or another group.
L
Load date. Complement used to lter. It can be assigned to users, organisations, groups or
requirements.
M
Machine. Physical elements that employees use to carry out their contracted work.

N
News. Complement used by the client to inform dokify users about new developments, rules,
or anything else considered of interest. The news can be viewed on the dokify home page.
O
Origin module. Indicates the company, employee or machine, organisation or group that re-
quests a requirement.
P
Permission. Each of the actions to which the user has access.
Prole. Collection of authorisations associated with a company. A user always has a unique
prole associated with the same.
R
Rejected. Action performed to indicate that an attached document is not correct.
Relationship. Connection between two elements.
Request. Mechanism used by dokify to tell users which documents they must attach.
Requestable. Each of the elements from which a document can be requested. Requestable:
company, employee, machine.
Requirement. Collection of attributes that dene requests.
Role. Collection of authorisations that the client will supply to users. Possible roles are:
• default
• Validate
• Review
• View
• View whitout downloading
• View only companies
• View and assign
• Administrate without conguring
• Attach only

• Attach and validate
• Administrate with attaching
• Insert only
• Administrate only employees
S
Subcontractor. Company contracted by the contract.
Suggestions. Space aimed at users. A place to indicate improvements, changes or any topic
that may help dokify improve its application.
T
Tag. Complement used to lter. It can be assigned to users, organisations, groups or requi-
rements.
Type of requirement. Space aimed at users. A place to indicate improvements, changes or
any topic that may help dokify improve its application.
U
User. Formed by a user identier, a name and an email address. The user is employed to ac-
cess the application.
V
Validate. Action performed to indicate that an attached document is correct.

thank you
rst colaborative business network
minimum eort, maximum benet
The recipient(s) of this presentation acknowledge(s) and accept(s) that it is the property of Almaglobal, S.L.U (hereafter dokify), and that it is
delivered with the sole aim of assessing the possibility of establishing a commercial relationship with dokify. Upon receiving this presentation,
the recipient(s) undertake to maintain the strictest condentiality about all the information contained therein.
902 11 20 33
www.dokify.net
