Pedoman Pengguna Drupal 8 Guide Id
User Manual:
Open the PDF directly: View PDF ![]() .
.
Page Count: 228 [warning: Documents this large are best viewed by clicking the View PDF Link!]
- Pedoman Pengguna Drupal 8
- Daftar Isi
- Pengantar
- Bab 1. Memahami Drupal
- Bab 2. Merencanakan Situs Anda
- Bab 3. Instalasi
- Bab 4. Konfigurasi Dasar Situs
- Bab 5. Manajemen Dasar Halaman
- Bab 6. Menyiapkan Struktur Konten
- 6.1. Adding a Content Type
- 6.2. Deleting a Content Type
- 6.3. Adding Basic Fields to a Content Type
- 6.4. Concept: Reference Fields
- 6.5. Concept: Taxonomy
- 6.6. Setting Up a Taxonomy
- 6.7. Adding a Reference Field
- 6.8. Concept: Forms and Widgets
- 6.9. Changing Content Entry Forms
- 6.10. Concept: View Modes and Formatters
- 6.11. Changing Content Display
- 6.12. Concept: Image Styles
- 6.13. Setting Up an Image Style
- 6.14. Concept: Responsive Image Styles
- 6.15. Concept: Text Formats and Editors
- 6.16. Configuring Text Formats and Editors
- Bab 7. Mengelola Akun Pengguna
- Bab 8. Blok
- Bab 9. Membuat Daftar dengan Views
- Bab 10. Membuat Situs Anda Multilingual
- Bab 11. Mengembangkan dan Menyesuaikan Situs Anda
- 11.1. Finding Modules
- 11.2. Enabling and Disabling Maintenance Mode
- 11.3. Downloading and Installing a Module from Drupal.org
- 11.4. Finding Themes
- 11.5. Downloading and Installing a Theme from Drupal.org
- 11.6. Manually Downloading Module or Theme Files
- 11.7. Concept: Development Sites
- 11.8. Making a Development Site
- 11.9. Using Composer and Git to Download Files
- 11.10. Deploying New Site Features
- 11.11. Synchronizing Configuration Versions
- Bab 12. Mencegah dan Memperbaiki Masalah
- Bab 13. Keamanan dan Pemeliharaan
- Bab 14. Pemikiran Akhir
- Glosarium
- Indeks
- Lampiran A. Lampiran
Pedoman Pengguna Drupal 8

Pedoman Pengguna Drupal 8
Abstrak
Panduan ini ditulis terutama untuk orang-orang dengan pengetahuan minimal tentang sistem
manajemen konten Drupal. Topik-topik itu akan membantu mereka menjadi terampil menginstal,
mengelola, membangun situs, dan / atau mengelola konten dari Situs web berbasis Drupal.
Panduan ini juga ditujukan untuk orang-orang yang sudah memiliki pengalaman dengan Drupal
versi saat ini atau sebelumnya, dan ingin memperluas keterampilan dan pengetahuan mereka atau
memperbaruinya ke versi saat ini.

Daftar Isi
i. Pengantar ................................................................................................................................. vi
i.1. Hak Cipta ....................................................................................................................... vi
i.2. Audiens dan Tujuan ...................................................................................................... vi
i.3. Penyusunan .................................................................................................................. vii
i.4. Melaporkan Masalah .................................................................................................. viii
i.5. Conventions of the Guide ............................................................................................ ix
i.6. Guiding Scenario ........................................................................................................... xi
1. Memahami Drupal .................................................................................................................. 1
1.1. Concept: Drupal as a Content Management System ............................................... 1
1.2. Concept: Modules ......................................................................................................... 3
1.3. Concept: Themes .......................................................................................................... 4
1.4. Concept: Distributions ................................................................................................. 5
1.5. Concept: Types of Data ............................................................................................... 6
1.6. Concept: The Drupal Project ....................................................................................... 6
1.7. Concept: Drupal Licensing .......................................................................................... 8
2. Merencanakan Situs Anda .................................................................................................... 10
2.1. Concept: Regions in a Theme ................................................................................... 10
2.2. Planning Your Site Layout ......................................................................................... 11
2.3. Concept: Content Entities and Fields ....................................................................... 13
2.4. Concept: Modular Content ........................................................................................ 15
2.5. Planning your Content Structure ............................................................................. 16
2.6. Concept: Editorial Workflow ...................................................................................... 18
3. Instalasi ................................................................................................................................... 20
3.1. Concept: Server Requirements ................................................................................. 20
3.2. Concept: Additional Tools .......................................................................................... 21
3.3. Preparing to Install .................................................................................................... 23
3.4. Running the Installer ................................................................................................. 26
4. Konfigurasi Dasar Situs ........................................................................................................ 32
4.1. Concept: Administrative Overview ........................................................................... 32
4.2. Editing Basic Site Information .................................................................................. 35
4.3. Installing a Module .................................................................................................... 37
4.4. Uninstalling Unused Modules ................................................................................... 39
4.5. Configuring User Account Settings .......................................................................... 41
4.6. Configuring the Theme ............................................................................................. 43
5. Manajemen Dasar Halaman ................................................................................................ 48
5.1. Concept: Paths, Aliases, and URLs ........................................................................... 48
5.2. Creating a Content Item ............................................................................................ 49
5.3. Editing a Content Item .............................................................................................. 51
5.4. Editing with the In-Place Editor ................................................................................ 53
5.5. Designating a Front Page for your Site ................................................................... 54
5.6. Concept: Menu ........................................................................................................... 55
5.7. Adding a Page to the Navigation ............................................................................. 57
5.8. Changing the Order of Navigation ........................................................................... 59
6. Menyiapkan Struktur Konten ............................................................................................... 62
6.1. Adding a Content Type .............................................................................................. 62
6.2. Deleting a Content Type ............................................................................................ 66
iii

Pedoman Pengguna Drupal 8
6.3. Adding Basic Fields to a Content Type .................................................................... 67
6.4. Concept: Reference Fields ......................................................................................... 72
6.5. Concept: Taxonomy .................................................................................................... 73
6.6. Setting Up a Taxonomy ............................................................................................. 74
6.7. Adding a Reference Field .......................................................................................... 79
6.8. Concept: Forms and Widgets .................................................................................... 83
6.9. Changing Content Entry Forms ................................................................................ 83
6.10. Concept: View Modes and Formatters ................................................................... 86
6.11. Changing Content Display ...................................................................................... 87
6.12. Concept: Image Styles ............................................................................................. 90
6.13. Setting Up an Image Style ...................................................................................... 91
6.14. Concept: Responsive Image Styles ......................................................................... 94
6.15. Concept: Text Formats and Editors ........................................................................ 95
6.16. Configuring Text Formats and Editors ................................................................... 96
7. Mengelola Akun Pengguna .................................................................................................. 99
7.1. Concept: Users, Roles, and Permissions .................................................................. 99
7.2. Concept: The User 1 Account ................................................................................. 100
7.3. Creating a Role ......................................................................................................... 101
7.4. Creating a User Account ......................................................................................... 103
7.5. Assigning Permissions to a Role ............................................................................ 106
7.6. Changing a User’s Roles .......................................................................................... 108
7.7. Assigning Authors to Content ................................................................................ 110
8. Blok ....................................................................................................................................... 113
8.1. Concept: Blocks ........................................................................................................ 113
8.2. Creating A Custom Block ........................................................................................ 113
8.3. Placing a Block in a Region ..................................................................................... 116
9. Membuat Daftar dengan Views ......................................................................................... 119
9.1. Concept: Uses of Views ........................................................................................... 119
9.2. Concept: The Parts of a View .................................................................................. 120
9.3. Creating a Content List View .................................................................................. 122
9.4. Duplicating a View ................................................................................................... 126
9.5. Adding a Block Display to a View ........................................................................... 129
10. Membuat Situs Anda Multilingual ................................................................................... 134
10.1. Concept: User Interface, Configuration, and Content translation .................... 134
10.2. Adding a Language ................................................................................................ 135
10.3. Configuring Content Translation .......................................................................... 136
10.4. Translating Content ............................................................................................... 140
10.5. Translating Configuration ..................................................................................... 141
11. Mengembangkan dan Menyesuaikan Situs Anda ......................................................... 145
11.1. Finding Modules ..................................................................................................... 145
11.2. Enabling and Disabling Maintenance Mode ....................................................... 149
11.3. Downloading and Installing a Module from Drupal.org ..................................... 151
11.4. Finding Themes ...................................................................................................... 153
11.5. Downloading and Installing a Theme from Drupal.org ...................................... 157
11.6. Manually Downloading Module or Theme Files ................................................. 160
11.7. Concept: Development Sites ................................................................................. 162
11.8. Making a Development Site .................................................................................. 163
11.9. Using Composer and Git to Download Files ....................................................... 166
11.10. Deploying New Site Features .............................................................................. 169
iv

Pedoman Pengguna Drupal 8
11.11. Synchronizing Configuration Versions ............................................................... 171
12. Mencegah dan Memperbaiki Masalah ........................................................................... 174
12.1. Concept: Cache ....................................................................................................... 174
12.2. Clearing the Cache ................................................................................................. 175
12.3. Concept: Data Backups ......................................................................................... 177
12.4. Concept: Log ........................................................................................................... 178
12.5. Concept: Status Report .......................................................................................... 179
13. Keamanan dan Pemeliharaan ......................................................................................... 181
13.1. Concept: Cron ......................................................................................................... 181
13.2. Configuring Cron Maintenance Tasks .................................................................. 181
13.3. Concept: Security and Regular Updates .............................................................. 184
13.4. Keeping Track of Updates ..................................................................................... 185
13.5. Updating the Core Software ................................................................................. 186
13.6. Updating a Module ................................................................................................ 188
13.7. Updating a Theme ................................................................................................. 190
14. Pemikiran Akhir ................................................................................................................. 194
14.1. Connecting with the Community ......................................................................... 194
14.2. Getting Support ...................................................................................................... 196
14.3. Learning More ........................................................................................................ 197
Glosarium ................................................................................................................................. 199
Indeks ........................................................................................................................................ 205
A. Lampiran .............................................................................................................................. 215
A.1. Guide-Wide Attributions .......................................................................................... 215
v

Pengantar
i.1. Hak Cipta
Panduan ini ditulis oleh kontributor open source Drupal proyek. Ini adalah hak cipta
2015-2017 oleh kontributor individual, dan Dapat digunakan sesuai dengan Creative
Commons License, Attribution-ShareAlike 2.0 (CC BY-SA 2.0). Setiap halaman dalam dokumen
ini (Termasuk yang ini) memiliki pernyataan Atribut di bagian bawah, mencantumkan
Orang yang berkontribusi untuk menulis dan mengedit halaman itu. Lihat juga Bagian
A.1, “Guide-Wide Attributions” untuk pengeditan, terjemahan, dan manajemen proyek secara
menyeluruh informasi.
Lisensi CC BY-SA (sangat mirip dengan GPL) memungkinkan seseorang untuk menyalin,
memodifikasi, Dan mendistribusikan kembali modifikasi dari semua atau sebagian dari
karya ini, asalkan Berikut ini dipatuhi:
• Anda memberikan kredit yang sesuai (lihat lisensi untuk informasi lebih lanjut).
• Anda memberikan link ke lisensi.
• Anda menunjukkan apakah perubahan telah dilakukan.
• Anda mendistribusikan karya Anda dengan lisensi yang sama seperti aslinya.
Atribusi
Halaman ini telah disesuaikan dan diedit oleh Jennifer Hodgdon, dan Jojy Alphonso di Red
Crackle, diterjemahkan oleh Suryanto Rachmat, dari "Dokumentasi hak cipta dan lisensi", Hak
cipta 2000-2017 oleh kontributor individual untuk Drupal Community Documentation.
Pemberitahuan hak cipta: Copyright 2015-2017 oleh kontributor masing-masing; lihat
Bagian i.1, “Hak Cipta” untuk rinciannya. Berlisensi di bawah CC BY-SA 2.0.
i.2. Audiens dan Tujuan
Panduan ini ditulis terutama untuk orang-orang dengan pengetahuan minimal tentang
sistem manajemen konten Drupal. Topik-topik itu akan membantu mereka menjadi terampil
menginstal, mengelola, membangun situs, dan / atau mengelola konten dari Situs web
berbasis Drupal. Panduan ini juga ditujukan untuk orang-orang yang sudah memiliki
pengalaman dengan Drupal versi saat ini atau sebelumnya, dan ingin memperluas
keterampilan dan pengetahuan mereka atau memperbaruinya ke versi saat ini.
Panduan ini mengasumsikan bahwa Anda telah memutuskan ingin belajar dan
menggunakan Drupal. Jika Anda perlu mempelajari lebih lanjut sebelum memutuskan, lihat
Bagian 1.1, “Concept: Drupal as a Content Management System”.
vi

Pengantar
Bergantung pada aspek Drupal mana yang ingin Anda pelajari, Anda perlu beberapa
latar belakang pengetahuan untuk memahami panduan ini: keterampilan Internet
umum dan pengetahuan diasumsikan, dan panduan ini berkonsentrasi pada bagaimana
menggunakan perangkat lunak itu sendiri. Misalnya, bagian tentang cara menginstal Drupal
di server web diasumsikan Anda dapat memperoleh web hosting dan mencari tahu cara
mentransfer file ke Anda web host yang dipilih. Demikian pula, bagian tentang manajemen
konten menganggap Anda bisa masuk ke situs web dan isi formulir berbasis web.
Setelah membaca panduan ini, Anda seharusnya dapat:
• Rencanakan arsitektur konten untuk situs berbasis Drupal
• Bangun situs yang Anda rencanakan
• Kelola dan kelola situs Anda
• Memahami dokumentasi dan posting blog tentang topik yang tidak dibahas di sini, untuk
perluas pengetahuan dan keterampilan Anda
• Terhubung dengan komunitas Drupal di seluruh dunia
Atribusi
Ditulis oleh Jennifer Hodgdon. Diterjemahkan oleh Suryanto Rachmat
i.3. Penyusunan
Panduan pengguna ini berisi serangkaian topik, yang masing-masing mencakup tugas
(bagaimana melakukan sesuatu) atau konsep (pengetahuan latar belakang, terminologi, dan
sejenisnya). Topik konsep memiliki nama yang dimulai dengan Konsep:, sementara topik
tugas memiliki nama yang mengandung kata kerja, seperti Mengedit Informasi Situs Dasar.
Topik dikelompokkan menjadi beberapa bab dalam urutan logis, dengan konsep dan
tugas disisipkan sehingga konsep disajikan sebelum tugas terkait, dan tugas membangun
satu sama lain. Untuk memanfaatkan ini, Anda dianjurkan untuk membaca keseluruhan
panduan dalam urutan yang disajikan, mungkin melewatkan topik yang tidak menarik atau
informasi yang sudah Anda ketahui. Ingat untuk mencoba tugasnya pada situs Anda sendiri
saat Anda membaca panduan ini; kebanyakan orang belajar lebih baik dengan melakukan
daripada membaca.
Jika Anda suka, Anda juga dapat menggunakan indeks atau daftar isi untuk melompat
lurus ke topik yang ingin Anda pelajari, daripada membaca keseluruhan panduan. Untuk
memfasilitasi pendekatan ini, setiap topik mencantumkan pengetahuan prasyarat yang
Anda perlukan untuk memahaminya, jika ada (dengan tautan ke topik yang menyajikan
pengetahuan itu); topik tugas juga mencantumkan prasyarat situs (hal-hal yang Anda perlu
mengonfigurasi atau membuat di situs Anda untuk melakukan tugas). Juga, sebagian besar
topik memiliki bagian akhir tempat Anda dapat menemukan informasi terkait dan/atau
tugas untuk pemahaman yang diperluas, untuk melanjutkan pembelajaran Anda.
vii

Pengantar
Anda juga mungkin ingin merujuk ke bagian Glosarium saat Anda membaca - itu memberi
definisi singkat sebagian besar terminologi yang digunakan dalam panduan, dengan tautan
ke topik yang memiliki penjelasan lebih rinci.
Atribusi
Ditulis oleh Jennifer Hodgdon. Diterjemahkan oleh Suryanto Rachmat
i.4. Melaporkan Masalah
Tujuan
Laporkan masalah dengan panduan ini, seperti:
• Informasi yang salah atau tidak mengikuti praktik terbaik
• Langkah-langkah yang tidak berhasil
• Cuplikan layar atau teks yang tidak sesuai dengan apa yang Anda lihat di layar
• Tulisan yang tidak jelas
• Tempat-tempat di mana meja atau screen shot akan membantu memperjelas teks
• Kegagalan untuk mendefinisikan terminologi
• Hilang prasyarat pengetahuan atau prasyarat situs untuk suatu topik
• Kesalahan ketik, ejaan, tata bahasa, atau pemformatan
• Tautan rusak
Langkah-langkah
1. Catat topik atau topik yang mengandung masalah yang Anda temukan.
2. Masuk ke Drupal.org (Anda perlu membuat akun pengguna jika Anda belum
memilikinya).
3. Kunjungi Halaman masalah Panduan Pengguna pada Drupal.org.
4. Verifikasi bahwa masalah yang Anda temukan belum dilaporkan dalam masalah lain:
• Jika hanya ada beberapa masalah terbuka, pindai kolom Summary untuk melihat
apakah salah satu deskripsi mereka sesuai dengan masalah yang Anda temukan.
Anda mungkin juga perlu membaca beberapa masalah untuk memastikan, yang
dapat Anda lakukan dengan mengklik tautan di kolom Summary.
• Jika daftar masalah terbuka panjang, masukkan kata kunci yang terkait dengan
masalah yang Anda temukan atau judul topik tempat masalah terjadi di kotak Search
for, dan klik Search untuk mengurangi daftar masalah. Kemudian pindai ringkasan
atau baca masalah untuk melihat apakah mereka cocok dengan masalah Anda.
5. Jika Anda menemukan bahwa masalah Anda belum dilaporkan, klik Create a new issue,
dan isi laporan masalah sebagai berikut:
viii

Pengantar
Nama bidang Penjelasan Contoh nilai
Title Ringkasan singkat masalah
yang Anda temukan
Petunjuk dalam
"Menambahkan Jenis
Konten" tidak berfungsi
Category Jenis masalah sedang
dilaporkan
Laporan bug
Version Versi panduan yang Anda
temukan masalahnya
8.x-0.x-dev
Issue summary Detail masalah yang Anda
temukan
Di topik "Menambahkan
tipe konten", di langkah
3, ketika saya mengklik
Simpan, saya mendapat
pesan galat berikut: …
6. Baca kembali Title dan Issue summary yang Anda masukkan, dan verifikasi bahwa
informasi berikut disertakan dalam laporan Anda:
• Penjelasan lengkap tentang masalah yang Anda temukan * Nama topik atau topik
tempat Anda menemukan masalah * Bahasa yang Anda baca di panduan (jika bukan
bahasa Inggris) * Jika Anda membaca panduan di situs web, tautan ke halaman atau
halaman dengan masalah
7. Klik Save untuk melaporkan masalah.
8. Periksa kembali masalah ini dalam beberapa hari. Jika salah satu pengelola proyek telah
meminta klarifikasi, tanggapi dengan menambahkan komentar untuk masalah ini.
Atribusi
Ditulis oleh Jennifer Hodgdon. Diterjemahkan oleh Suryanto Rachmat
i.5. Conventions of the Guide
Assumptions and prerequisites
This guide has the following assumptions and prerequisites:
• This guide is organized into topics; see Bagian i.3, “Penyusunan” for details. Many topics
include a Prerequisite knowledge section, which lists other topics whose content knowledge
is needed in order to understand the topic you are reading. Some background knowledge
that is not covered in the guide is also assumed; see Bagian i.2, “Audiens dan Tujuan” for
details.
• Many task topics list Site prerequisites, which are tasks that you’ll need to have completed
on your site before you’ll be able to do the task in the topic you are reading.
• The specifics of the site prerequisites relate to the scenario used throughout this guide of
building a site for a farmers market (see Bagian i.6, “Guiding Scenario” for details). You can
ix
Pengantar
adapt the tasks to your own scenario, but you will also need to remember the changes
you made when deciding if your site satisfies the site prerequisites for a task.
• For all task topics after Bagian 3.4, “Running the Installer”, there is also an implicit
prerequisite: you must have installed the content management software on your site, and
be logged in to a user account with sufficient permissions to do the task (such as the user
account created when you installed your site, which automatically has full permissions).
• If you read all the topics in order, and perform all of the steps in the task topics as you go
(staying logged in), you should have the background knowledge and site prerequisites in
place for each topic as you read it.
Text conventions
The following conventions are used in the text of this guide:
• The URL example.com means the base URL of your website. See the Navigation section
below for more details on how URLs internal to your site are indicated.
• Text you should see in the user interface of your site is shown in italics, such as: Click Save
configuration. This only applies to text in the user interface that comes from the software,
not to text that was entered in a previous topic. For example, in a topic about editing, you
might see this instruction: Click Edit in the row of the About page (Edit would be in italics,
but About would not be, because the About page was created in a previous topic).
• URLs, file names, and newly-introduced terminology are also shown in italics.
• Text that you should type at a shell command line is shown in monospace type, such as:
drush cr
• Within this guide, the word directory is always used to refer to file directories (which some
people prefer to call folders).
Navigation
To do most of the task topics in this guide, you will need to navigate to one or more pages in
the administrative interface of your site. You might see something like this in the instructions
(this will make more sense after you have the base software installed):
In the Manage administrative menu, navigate to Structure > Taxonomy (admin/structure/
taxonomy).
Navigation instructions like this assume that you have the core Toolbar module installed,
and this example means that in the menu bar at the top of your site, you would need to
click Manage to expose the menu choices, then click Structure, then Taxonomy, and that at
the end, you would be on a page with URL http://example.com/admin/structure/taxonomy (if
your site base URL is http://example.com).
Here’s another example:
x
Pengantar
In the Manage administrative menu, navigate to Configuration > System > Site information
(admin/config/system/site-information).
In this example, after clicking on Manage and Configuration, you would need to find the
System section of the page, and within that, click Site information. After that, you’d end up on
http://example.com/admin/config/system/site-information.
One other note: if you are using the standard administrative core Seven theme, many "Add"
buttons in the administrative interface are displayed with + signs on them. For instance, on
admin/content, the Add new content button appears as + Add new content. However, this is
theme-dependent and is not really part of the text on the button (for instance, it would not
necessarily be read by a screen reader), so in this guide, the convention is to not mention
the + sign on the buttons.
Filling in forms
Many of the task topics in this guide include steps where you will fill out a web form. In most
cases, a screen capture image of the form will be included, along with a table of the values
you will need to enter into each form field. For example, you might see a table that starts out
like this, explaining the site information form you would see if you navigated to Configuration
> System > Site information (admin/config/system/site-information):
Field name Explanation Example value
Site name Name of your site Anytown Farmers Market
To use this table, find the field labeled Site name in the form, and enter the name of your site
in this field. An example site name of "Anytown Farmers Market" is suggested in the table,
which relates to the scenario of building a website for a farmers market that you’ll find all
through this guide (see Bagian i.6, “Guiding Scenario” for details).
Attributions
Written/edited by Jennifer Hodgdon.
i.6. Guiding Scenario
xi

Pengantar
When reading this guide, it is helpful to have a website building project in mind. The
following project scenario provides context and links together the examples in this guide:
You are making a website for a farmers market. The site needs to display information about
the location and hours of the market, and an About page with the history of the market.
It also needs to list the vendors. Vendors should be able to edit their listings (including a
logo or photo), and post recipes. Site visitors should be able to browse recipes, or locate
recipes using ingredients that they purchased at the market. Some visitors to your site speak
another language, so the main pages and vendor pages need to be translated.
Attributions
Written/edited by Jennifer Hodgdon.
xii

Bab 1. Memahami Drupal
1.1. Concept: Drupal as a Content Management
System
What is a Content Management System?
A content management system (CMS) is a software tool that lets users add, publish, edit, or
remove content from a website, using a web browser on a smartphone, tablet, or desktop
computer. Typically, the CMS software is written in a scripting language, and its scripts run
on a computer where a database and a web server are installed. The content and settings
for the website are usually stored in a database, and for each page request that comes to
the web server, the scripts combine information from the database and assets (JavaScript
files, CSS files, image files, etc. that are part of the CMS or have been uploaded) to build the
pages of the website.
The combination of the operating system that the CMS runs on, the scripting language it is
written in, the database it stores its information in, and the web server that runs the scripts to
retrieve information and return it to the site visitor’s web browser is known as the stack that
the CMS runs on; the commonly used combination of the Linux operating system, Apache
web server, MySQL database, and PHP scripting language is known as the LAMP stack.
What is Drupal?
Drupal is a flexible CMS based on the LAMP stack, with a modular design allowing features
to be added and removed by installing and uninstalling modules, and allowing the entire
look and feel of the website to be changed by installing and uninstalling themes. The base
Drupal download, known as Drupal Core, contains the PHP scripts needed to run the basic
CMS functionality, several optional modules and themes, and many JavaScript, CSS, and
image assets. Many additional modules and themes can be downloaded from the Drupal.org
website.
Drupal can also run on other technology stacks:
• The operating system can be Windows or Mac OS instead of Linux.
• The web server can be Nginx or IIS instead of Apache.
• The database can be PostgreSQL or SQLite instead of MySQL, or a MySQL-compatible
replacement such as MariaDB or Percona.
Other operating systems, web servers, and databases can also be made to work; however,
the scripts that the software uses are written in PHP, so that cannot be changed.
1

Memahami Drupal
What are the reasons for using Drupal?
When building a website, you have your choice of using one of the many existing CMS
packages and hosted services, developing your own CMS, or building the site without using
a CMS. Here are some of the reasons you might choose to use Drupal:
• Building a small, simple site with static HTML pages is not difficult, and you can get a simple
site up very quickly. Setting up a site in a CMS generally requires more time initially, but
brings you the benefits of on-line editing (easier for less experienced content maintainers),
uniformity (harder to maintain using static HTML for larger sites), and the possibility of
more complex features requiring a database.
• Some CMS software is special-purpose; for instance, there are packages and hosted
services that you can use to build a blog or a club membership website. Drupal, in contrast,
is a general-purpose CMS. If you are building a special-purpose site, you might choose to
use a special-purpose CMS; however, if your site falls even slightly outside the intended
purpose, you will probably be better off using a general-purpose CMS rather than trying
to adapt a special-purpose CMS.
• Building your own CMS-type software can seem attractive. However, using a general-
purpose CMS like Drupal as a starting point is usually a better idea, because the basic
CMS functionality (such as user accounts and content management) has thousands of
developer hours behind it, including many years of user testing, bug fixing, and security
hardening.
• Some CMS software packages are expensive to purchase a license for. Some are free
or have a free version, but have restrictive licenses that do not allow you to make
modifications and extensions. You might prefer to use a package (like Drupal) that has a
less restrictive software license, and is developed by a world-wide community. See Bagian
1.6, “Concept: The Drupal Project” for more on this topic.
Related topics
•Bagian 1.2, “Concept: Modules”
•Bagian 1.3, “Concept: Themes”
•Bagian 1.4, “Concept: Distributions”
•Bagian 1.6, “Concept: The Drupal Project”
Additional resources
•The Drupal overview
•Drupal.org page "FAQ" (Frequently Asked Questions)
•Drupal.org page "Case Studies"
•Wikipedia page "Content management systems"
•Wikipedia page "Modular design"
Attributions
2

Memahami Drupal
Written and edited by Kristof van Tomme at Pronovix, Jennifer Hodgdon, and Michael Lenahan
at erdfisch.
1.2. Concept: Modules
Prerequisite knowledge
Bagian 1.1, “Concept: Drupal as a Content Management System”
What is a module?
A module is a set of PHP, JavaScript, and/or CSS files that extends site features and adds
functionality. You can turn the features and functionality on by installing the module, and
you can turn it off by uninstalling the module; before uninstalling, you may need to remove
data and configuration related to the feature or functionality. Each module that is installed
adds to the time needed to generate pages on your site, so it is a good idea to uninstall
modules that are not needed.
The core download provides modules for functionality such as:
• Managing user accounts (the core User module)
• Managing basic content (the core Node module) and fields (the core Field and Field UI
modules; there are also core modules providing field types)
• Managing navigation menus (the core Menu UI module)
• Making lists, grids, and blocks from existing content (the core Views and Views UI modules)
You can download additional contributed modules from the Drupal.org Module Downloads, or
create your own custom modules.
Related topics
•Bagian 1.3, “Concept: Themes”
•Bagian 1.4, “Concept: Distributions”
•Bagian 4.4, “Uninstalling Unused Modules”
•Bagian 11.1, “Finding Modules”
•Bagian 11.3, “Downloading and Installing a Module from Drupal.org”
•Bagian 13.3, “Concept: Security and Regular Updates”
•Bagian 13.6, “Updating a Module”
Additional resources
Drupal.org community documentation page "Module developer’s guide"
3

Memahami Drupal
Attributions
Written by Jennifer Hodgdon.
1.3. Concept: Themes
Prerequisite knowledge
Bagian 1.1, “Concept: Drupal as a Content Management System”
What is a Theme?
A theme is a set of files that define the visual look and feel of your site. The core software
and modules that run on your site determine which content (including HTML text and other
data stored in the database, uploaded images, and any other asset files) is displayed on the
pages of your site. The theme determines the HTML markup and CSS styling that wraps the
content.
The core software provides several basic themes with the core distribution. These themes
have largely been designed and built by the community over the last several years and will
all be good choices for building your first sites and becoming more familiar with how the
core software works.
Drupal is a well-established CMS so the market for 3rd party themes - both free and paid
- is very robust.
If none of the 3rd party options suit your needs, you’ll need to create a custom theme. A
custom theme can be as simple as a single CSS file that adds styling to the markup provided
by the core software. Guidance for creating custom themes in Drupal 8 can be found in the
Drupal.org community documentation page "Theming Drupal".
Related topics
•Bagian 11.4, “Finding Themes”
•Bagian 11.5, “Downloading and Installing a Theme from Drupal.org”
•Bagian 1.2, “Concept: Modules”
Additional resources
Drupal.org community documentation page "Theming Drupal"
Attributions
4

Memahami Drupal
Written and edited by John Grubb and Jennifer Hodgdon.
1.4. Concept: Distributions
Prerequisite knowledge
•Bagian 1.1, “Concept: Drupal as a Content Management System”
•Bagian 1.2, “Concept: Modules”
•Bagian 1.3, “Concept: Themes”
What are Distributions?
Distributions provide site features and functions for a specific type of site as a single
download containing the core software, contributed modules, themes, and pre-defined
configuration. A distribution makes it possible to set up a complex, use-specific site in fewer
steps than installing and configuring elements individually.
There are two main types of distributions:
Full-featured Distributions
A full-featured distribution is a project that provides a complete solution to set up
a site for a specialized purpose such as academic, business, government, nonprofit,
publishing, social, etc. For example, you could use an existing distribution for farmers
markets to build your own website, or you could share your set-up for the farmers market
site as a distribution for others to use.
Other Distributions
Distributions can also be quick-start tools that developers and site builders can use as
a starting point.
Related topics
Bagian 14.1, “Connecting with the Community”
Additional resources
Drupal.org Drupal Distribution Downloads
Attributions
Adapted and edited by Diána Lakatos and Antje Lorch, from "Distributions" and "Download
& Extend — Distributions" copyright 2000-2017 by the individual contributors to the Drupal
Community Documentation.
5

Memahami Drupal
1.5. Concept: Types of Data
What are the types of data?
The data and information on your site is divided up into four types, which are edited,
translated, and stored differently. These four types are:
Content
Information (text, images, etc.) meant to be displayed to site visitors. This type of
information tends to be relatively permanent, but can normally be edited.
Configuration
Information about your site that is not content, but is also relatively permanent, and is
used to define how your site behaves or is displayed. It is sometimes also displayed to
site visitors, but tends to be smaller pieces of text (like field labels, the name of your site,
etc.) rather than larger chunks that you’d normally think of as Content.
State
Information of a temporary nature about the current state of your site, such as the time
when cron jobs were last run.
Session
Information about individual site visitors' interactions with the site, such as whether they
are logged in and their cookies. This is technically a subtype of State information, since
it is also temporary.
Related topics
•Bagian 2.3, “Concept: Content Entities and Fields”
•Bagian 13.1, “Concept: Cron”
•Bagian 7.1, “Concept: Users, Roles, and Permissions”
•Bagian 10.1, “Concept: User Interface, Configuration, and Content translation”
Attributions
Adapted by Jennifer Hodgdon from "Overview of Configuration (vs. other types of information)",
copyright 2000-2017 by the individual contributors to the Drupal Community Documentation
1.6. Concept: The Drupal Project
Prerequisite knowledge
Bagian 1.1, “Concept: Drupal as a Content Management System”
6

Memahami Drupal
What is Free and Open Source Software?
Free and Open Source Software (FOSS) is software that is developed by a community of
people, released under a non-commercial license, and whose source code (the program files
that make up the software) is freely available. For more information on the non-commercial
license used by Drupal, see Bagian 1.7, “Concept: Drupal Licensing”.
What is the Drupal project?
The Drupal project is a FOSS project whose purpose is to develop the core content
management system software, as well as add-on modules, additional themes, translations,
documentation, and special-purpose distributions. The people who contribute their time
and money to the Drupal project come from all over the world, and are a diverse community
that comes together for this common purpose.
The community encompasses many smaller groups who perform many different tasks
such as developing a particular piece of Drupal-related software, writing documentation,
maintaining the security of Drupal software, translating Drupal software into a particular
language, using Drupal for some specific purpose, and coming together to meet in person
within a particular geographical area.
For more on how you can connect to and communicate with the world-wide community, see
Bagian 14.1, “Connecting with the Community” and Bagian 14.2, “Getting Support”.
What is the Drupal Association?
The Drupal Association is a non-profit organization dedicated to supporting the Drupal
project and community. Its main functions are:
• Putting on large conventions around the world
• Maintaining the Drupal.org websites and the servers that they run on
• Promoting Drupal as a web platform
• Supporting Drupal education and training
• Providing grants to the Drupal community in support of its mission
• Raising funds for these purposes
Related topics
•Bagian 1.7, “Concept: Drupal Licensing”
•Bagian 13.3, “Concept: Security and Regular Updates”
•Bagian 14.1, “Connecting with the Community”
•Bagian 14.2, “Getting Support”
Additional resources
•Drupal project governance
7

Memahami Drupal
•Drupal Code of Conduct
Attributions
Written by Jennifer Hodgdon.
1.7. Concept: Drupal Licensing
Prerequisite knowledge
Bagian 1.1, “Concept: Drupal as a Content Management System”
What is Drupal Licensing?
Drupal and all contributed files hosted on Drupal.org are licensed under the GNU General
Public License (GPL), version 2 or later. That means you are free to download, reuse, modify,
and distribute any files that are part of a project on Drupal.org under the terms of GPL version
2 or 3. You can also run the core software in combination with any code with any license that
is compatible with version 2 or 3.
Drupal contributors should follow these guidelines:
• All files (PHP, JavaScript, images, Flash, etc.) that are part of a project on Drupal.org have
to be under GPL version 2 or later.
• All Drupal contributors retain copyright on their code, but agree to release it under the
same license as Drupal.
• Drupal modules and themes are a derivative work of Drupal. If you distribute them, you
must do so under the terms of GPL version 2 or later.
• All content on Drupal.org itself is copyrighted by its original contributors, and is licensed
under the Creative Commons Attribution-ShareAlike license 2.0.
• Sample code on Drupal.org is also available under GPL version 2 or later.
Related topics
Bagian 14.1, “Connecting with the Community”
Additional resources
•Drupal.org page on "Licensing"
•"Drupal 8 LICENSE.txt" page on api.drupal.org
•GNU General Public License, version 2
•GNU General Public License, version 3
8

Bab 2. Merencanakan Situs Anda
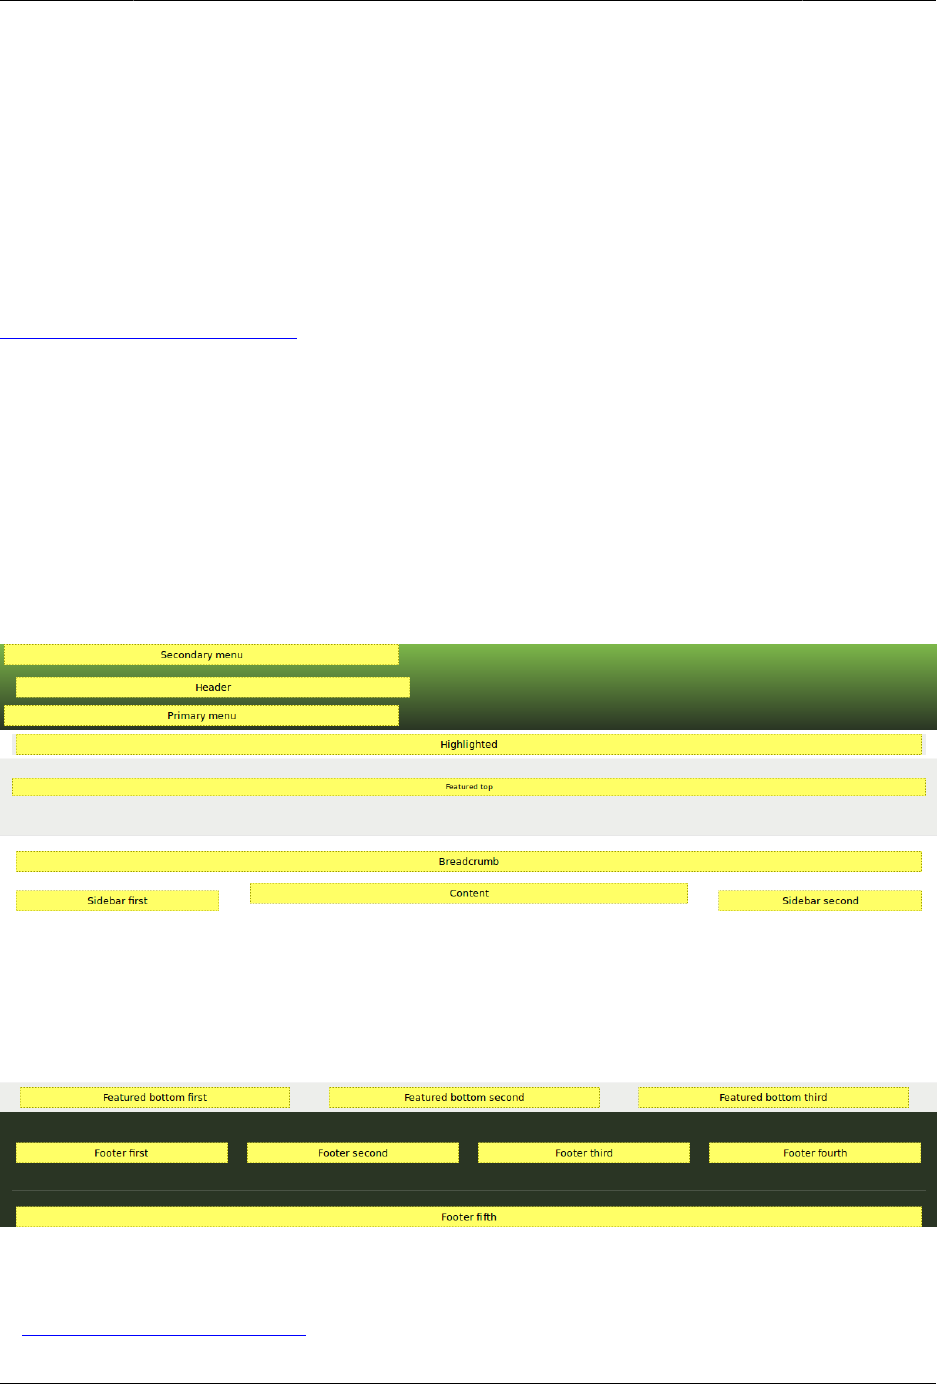
2.1. Concept: Regions in a Theme
Prerequisite knowledge
Bagian 1.3, “Concept: Themes”
What is a region?
Besides its primary content, a web page contains other content such as site branding (site
name, slogan, and logo), navigation aids (menus, links, and icons), formatted text, and
images. Each theme provides a set of named regions, such as Header, Content, and Sidebar,
where site builders may choose to place their content.
The available regions depend on the theme design. Only the Content region, which contains
the primary content, is required; others are optional. The core Bartik theme provides the
eighteen regions highlighted in the following image.
Related topics
•Bagian 8.1, “Concept: Blocks”
10

Merencanakan Situs Anda
•Bagian 2.3, “Concept: Content Entities and Fields”
•Bagian 8.3, “Placing a Block in a Region”
Additional resources
•Drupal.org community documentation page "Assigning content to regions"
Attributions
Written and edited by John MacDonald, and Michael Lenahan at erdfisch.
2.2. Planning Your Site Layout
Goal
Plan the navigation and layout of the site, for both mobile and desktop browsers.
Prerequisite knowledge
•Bagian 1.3, “Concept: Themes”
•Bagian 2.1, “Concept: Regions in a Theme”
•Bagian i.6, “Guiding Scenario”
Steps
It is a good idea to plan the site layout before you start building the site and writing content;
however, your plan may need to be revised either before you start implementing it or after
you have some of the site built with draft content in place, based on budgetary concerns or
stakeholder feedback.
1. Make a list of the information that your site should present to visitors. In the farmers
market scenario, this might include:
• Location of the market, with directions and a map
• Hours and days the market is open
• History of the market
• List of vendors
• Details about each vendor
• Searchable list of recipes
• Details about each recipe
• List of the most recently added recipes
11

Merencanakan Situs Anda
2. Decide which information should be on which pages or types of pages on the site:
Information that should be on all pages
Address, hours, and recently-added recipes list
Vendor details pages
Information about each vendor on its own page
Recipe details pages
Details of each recipe on its own page
Home page
Location, map, directions, and hours
About page
History of the market
Vendors list page
List of vendors, with links to vendor detail pages
Recipe list page
Searchable list of recipes, with links to recipe detail pages
3. Decide which information is the most important on each page. Site visitors using mobile
phones or other small browsers will often only see the content that is presented first,
and they may not scroll down to see all of the information.
4. Decide which of these pages should appear in the main site navigation. For instance, the
main navigation might consist of the Home, About, Vendors, and Recipes pages.
5. Make a rough design sketch for each page, showing how it would look when viewed on
a small screen such as a phone, as well as on a larger screen such as a desktop browser.
Considering that most site visitors will be using smaller browsers, it is a good idea to
start with the phone-size layout, to make sure that these visitors will be able to find the
information they need without too much scrolling.
In making these page layout plans, you might find that you need to revise your plan for
which information should be on which pages. For example, you might decide that the
address, hours, and recently-added recipes list would all fit well in the right sidebar area
of all pages, when the site is viewed on desktop-sized browsers. On the other hand, you
might decide that for mobile browsers, you would instead put the address and hours
in a short format at the top of each page, but only display the recent recipe list at the
bottom of the home page.
Expand your understanding
Bagian 2.5, “Planning your Content Structure”
Attributions
12
Merencanakan Situs Anda
Written by Jennifer Hodgdon.
2.3. Concept: Content Entities and Fields
Prerequisite knowledge
•Bagian 1.5, “Concept: Types of Data”
•Bagian 1.2, “Concept: Modules”
What is a content entity?
A content entity (or more commonly, entity) is an item of content data, which can consist of
text, HTML markup, images, attached files, and other data that is intended to be displayed
to site visitors. Content entities can be defined by the core software or by modules.
Content entities are grouped into entity types, which have different purposes and are
displayed in very different ways on the site. Most entity types are also divided into entity
sub-types, which are divisions within an entity type to allow for smaller variations in how the
entities are used and displayed. Here is a table of some common content entity types:
Entity type Entity sub-type Defining Module Main uses
Content item Content type Node module Content intended
to be the main page
area for pages on the
site
Example: In the farmers market site example, you might have
content types for basic pages, vendor pages, and recipe pages.
Comment Comment type Comment module Commentary added
to content entities
(typically to Content
item entities)
Example: On a blog site, blog posts might have comments. They
are not needed in the farmers market site example.
User profile (none) User module Data related to a
person with a user
account (login access)
on the site
Example: Every site has at least basic user profiles with user
names and email addresses; social networking sites may have
more complex user profiles with more information.
Custom block Block type Custom Block module Text and images in
smaller chunks, often
13
Merencanakan Situs Anda
Entity type Entity sub-type Defining Module Main uses
displayed in the site
header, footer, or
sidebar
Example: In the farmers market site example, you might put the
hours and location in a sidebar block.
Taxonomy term Vocabulary Taxonomy module Used to classify other
types of content
Example: In the farmers market site example, you might classify
Recipe content with an Ingredients taxonomy vocabulary, with
taxonomy terms like Carrots and Tomatoes. In a blogging site,
blog posts might be classified using a Tags vocabulary, and
perhaps also a Categories vocabulary.
File (none) File module An image or
attachment file
that is tracked and
managed by the
site, often attached
to other types of
content
Example: In the farmers market site example, both Recipe and
Vendor pages might have image attachments, which would
(behind the scenes) be managed as File entities by the site.
Contact form Form type Contact module A form that lets site
visitors contact site
owners
Example: A contact form is needed in the farmers market site
example.
What is a field?
Within entity items, the data is stored in individual fields, each of which holds one type of
data, such as formatted or plain text, images or other files, or dates. Field types can be
defined by the core software or by modules.
Fields can be added by an administrator on entity sub-types, so that all entity items of a
given entity sub-type have the same collection of fields available. For example, the Vendor
content type in the farmers market example might have fields for the vendor name, a logo
image, website URL, and description, whereas the Basic page content type might only have
fields for the title and page body. When you create or edit entity items, you are specifying
the values for the fields on the entity item.
Related topics
•Bagian 2.5, “Planning your Content Structure”
14

Merencanakan Situs Anda
•Bagian 5.2, “Creating a Content Item”
•Bagian 6.1, “Adding a Content Type”
•Bagian 6.5, “Concept: Taxonomy”
•Bagian 7.1, “Concept: Users, Roles, and Permissions”
•Bagian 8.1, “Concept: Blocks”
Attributions
Written and edited by Jennifer Hodgdon and Grant Dunham.
2.4. Concept: Modular Content
Prerequisite knowledge
•Bagian 2.3, “Concept: Content Entities and Fields”
•Bagian 2.2, “Planning Your Site Layout”
What is modular content?
Given that the content of your site is stored in a database, it is desirable to make the
content modular, meaning that certain pages on your site, rather than being edited as a
whole page, are instead generated automatically from other content items. For instance, in
the farmers market site scenario, you might create individual content items for recipes. If
the recipe content items have a field that keeps track of ingredients, then your site could
include a composite page that would list recipes, and allow visitors to search for a recipe
that contained some particular ingredient they had bought at the market.
Smaller sections of pages can also be generated as composites. For instance, recipe content
items could have a field that keeps track of which vendor submitted the recipe (see Bagian
6.4, “Concept: Reference Fields”), with the vendor details edited in separate vendor content
items. This would allow you to do the following on your site:
• On each Recipe page, there could be an area that displays some information about the
vendor that submitted the recipe, such as their name and market stall number.
• Each vendor page could have a section that lists the recipes they have submitted.
The key idea is that each piece of information is only edited in one place. When
vendor information is updated, all recipe pages that display that vendor information are
automatically updated; when a recipe is submitted by a vendor, it is automatically displayed
on the vendor page. The core Views module is the usual way to use modular content to
create composite pages and page sections; see Bagian 9.1, “Concept: Uses of Views” for more
information. Also, view modes are useful for defining different ways to display each content
item; see Bagian 6.10, “Concept: View Modes and Formatters” for more information.
15

Merencanakan Situs Anda
Related topics
•Bagian 2.5, “Planning your Content Structure”
•Bagian 6.1, “Adding a Content Type”
•Bagian 6.3, “Adding Basic Fields to a Content Type”
•Bagian 6.4, “Concept: Reference Fields”
•Bagian 6.10, “Concept: View Modes and Formatters”
•Bagian 9.1, “Concept: Uses of Views”
Attributions
Written by Jennifer Hodgdon.
2.5. Planning your Content Structure
Goal
Make a plan for the content structure of the site (which type and subtype of entity to use for
which content), and which pages will contain listings of content.
Prerequisite knowledge
•Bagian 2.3, “Concept: Content Entities and Fields”
•Bagian 2.4, “Concept: Modular Content”
•Bagian i.6, “Guiding Scenario”
Steps
1. Brainstorm about what content your site needs to contain, which could include content
that visitors would be looking for, as well as content that you want to show to visitors.
The result could be the description in Bagian i.6, “Guiding Scenario”.
2. For each identified piece of content, decide which content entity type would be the best
fit. In doing this, you’ll need to consider where and how the content will be used and
edited on the site. For example, in the farmers market site scenario, you might want to
display the hours and location of the farmers market on the sidebar of every page. For
that content, a single custom block makes sense. As another example, you might decide
that pages displaying information about each vendor should be content items managed
by the core Node module, because you want vendors to be able to edit their own listings.
The core Node module permission system lets you do this easily.
These decisions do not necessarily always have only one right answer; for instance, you
could decide that vendor pages should be user profiles instead of content items, but if
16

Merencanakan Situs Anda
you did that the content would be tied to a specific user account, and it would not be as
easy to later change the ownership of a vendor page to a different user account.
3. Within each content entity type you identified, decide what division into entity sub-types
would make sense. For example, in the farmers market site example, you would probably
decide that under the Content item entity type, there should be one content type for
basic pages (Home and About), one for vendor pages, and one for recipe pages.
4. For each entity sub-type you decided on, decide what fields are needed. For instance,
the Vendor content type might need fields for the vendor name, web page URL, image,
and description.
5. Decide on what entity listings are needed, which could be entire pages or smaller areas
on the page. For each listing, you’ll need to determine what entity items should be listed.
Then you’ll need to decide in what order and with what filtering options they should be
displayed; for example, you might want to give the site visitor the option to search by
keyword, to filter the list down to a subset, or to sort the list. You’ll also need to decide
what information from the entity items should be shown, which might result in adding
to the list of fields you determined in the previous step. The farmers market site, for
example, needs to have a Recipes listing page that lists content items of type Recipe,
with the ability to filter by ingredients, so that means that the Recipe content type needs
an Ingredients field.
6. For each identified field on each entity subtype, identify what type of data it should
contain (such as plain text, formatted text, a date, an image file, etc.), and how many
values should be allowed. Most fields are single-valued, but for example, a Recipe should
allow for multiple values in its Ingredients field.
7. Consider which fields would be best as references to taxonomy term entities: fields
whose values should be chosen from a list of allowed values. Allowed values that
are expected to change and grow over time, are good candidates. An example is the
Ingredients field for the Recipe content type.
8. Consider which fields should reference other content entities. An example is that since
vendors will be submitting recipes, a field will be needed on the Recipe content type that
references the Vendor content item for the vendor who submitted the recipe.
Here’s an example of the resulting content structure for the farmers market scenario
example site:
Entity type Entity sub-type Examples Fields
Content item Basic page Home page, about
page
Title, page body
Content item Vendor A page for each
vendor at the market
Vendor name, page
body, image, URL
Content item Recipe A page for each
submitted recipe
Recipe name,
page body, image,
reference to Vendor
who submitted
it, Ingredients
taxonomy
17
Merencanakan Situs Anda
Entity type Entity sub-type Examples Fields
Custom block (generic) Copyright notice for
footer, Hours and
location for sidebar
No special fields
Taxonomy term Ingredients Carrots, tomatoes,
and other recipe
ingredients
No special fields
Contact form (generic) Generic contact form Name, email, subject,
message
User profile (none) Will not be displayed
on site
No special fields
And here are the listings the site needs:
Page or page area Entity type and sub-
type
Filter/sort/
pagination
Fields displayed
Vendors page Vendor content items All vendors,
alphabetical, paged
Image, vendor name,
trimmed body
Recipes page Recipe content items Filter by ingredients,
alphabetical, paged
Image, recipe name
Recent recipes
sidebar
Recipe content items List 5 most recent Image, recipe name
Expand your understanding
•Bagian 6.1, “Adding a Content Type”
•Bagian 6.3, “Adding Basic Fields to a Content Type”
•Bagian 6.6, “Setting Up a Taxonomy”
Related concepts
Bagian 6.5, “Concept: Taxonomy”
Attributions
Written and edited by Jennifer Hodgdon and Grant Dunham.
2.6. Concept: Editorial Workflow
Prerequisite knowledge
Bagian 1.1, “Concept: Drupal as a Content Management System”
18

Merencanakan Situs Anda
What is an Editorial Workflow?
An Editorial Workflow is the process organizations follow to create, review, edit and publish
content.
Depending on the size and processes of the organization, multiple people in different roles
can be part of the process. For example, content creators collect information and write
content, editors review, edit, ask for changes, and publish the content once it’s considered
ready to be shared with the audience.
In your site, content types can have either a Published or an Unpublished flag to track their
workflow states, that you can set for each content item when saving:
• Published content items are visible to all visitors of the site.
• Unpublished content items are not visible to the visitors of the site, but can be seen by
authenticated users who have the permissions to view unpublished versions of specific
content items.
Most content entity types support revision tracking, if it is enabled by an administrator for
the entity sub-type. If you have revision tracking enabled, the software will store old versions
of the content each time it’s revised, and add notes about what is changed. This allows you
to look at the history and revert to older versions.
Using the Unpublished flag and Revisions, you can build an editorial workflow that lets
content creators and editors work on the live site without displaying the content to visitors.
When the content is ready to be published, all they need to do is save it as Published.
Related topics
•Bagian 5.2, “Creating a Content Item”
•Bagian 5.3, “Editing a Content Item”
Additional resources
Talking about online content, organizations would also want to consider post-publication
phases of the editorial workflow: content teams might need to update already published
content. Some organizations might need a more complex workflow with the options to
configure which content type goes through the workflow process, set up user roles and
permissions, set different workflow states (for example draft, needs review, published).
For more complex workflows, you can add install or more modules from the contributed
Workbench Suite module to your site.
Attributions
Written and edited by Diána Lakatos at Pronovix, and Grant Dunham.
19

Bab 3. Instalasi
3.1. Concept: Server Requirements
What are the requirements for running the core software?
Disk space
A minimum installation requires 15 MB. 60 MB is needed for a website with many contributed
modules and themes installed. Keep in mind you need much more for the database, files
uploaded by the users, media, backups, and other files.
Web server
Apache (Recommended)
Apache is the most commonly used web server. The core software will work on Apache
2.x hosted on UNIX/Linux, OS X, or Windows that have the Apache mod_rewrite module
installed and enabled. The Apache VirtualHost configuration must contain the directive
AllowOverride All to allow the .htaccess file to be used.
Nginx
Nginx is a commonly used web server that focuses on high concurrency, performance
and low memory usage. The core software will work on Nginx 1.1 or greater hosted
on UNIX/Linux, OS X, or Windows. The ngx_http_rewrite_module must be installed and
enabled.
Hiawatha
Hiawatha is a web server with a strong focus on security. It also aims at being easy to use
and lightweight. Research performed by independent researchers proves that Hiawatha
offers a performance comparable to other web servers under normal conditions, but
much better while under attack. URL Toolkit must be installed and configured to rewrite
URLs.
Microsoft IIS
Microsoft IIS is a web server and set of feature extension modules for use with Microsoft
Windows. The core software will work with IIS 5, IIS 6, or IIS 7 if PHP is configured
correctly. Because clean URLs are required, you may need to use a third party product.
For IIS 7, you can use the Microsoft URL Rewrite module or a third party solution.
Database
Use one of the following databases:
20

Instalasi
• MySQL - 5.5.3 (MariaDB 5.5.20, Percona 5.5.8) or higher with an InnoDB-compatible
primary storage engine
• PostgreSQL - 9.1.2 or higher
• SQLite - 3.4.2 or higher
PHP
PHP 5.5.9 or higher.
Additional resources
Drupal.org community documentation page "System requirements"
Attributions
Adapted by Karl Kedrovsky and Brian Emery from "System requirements", copyright 2000-2017
by the individual contributors to the Drupal Community Documentation.
3.2. Concept: Additional Tools
What tools are available for site builders?
There are several additional tools available that help you create sites faster, more accurately
and with less effort.
Drush
See below for more about Drush.
Git
Git is a version control system you can use to track changes made to files within your
entire site, or files relating only to the module or theme that you are using. Git makes it
possible to try out changes, and if necessary, revert to a previous version. It can be used
as well to track changes in the configuration files and synchronize the configuration of
different sites. Git has become the standard for web development projects.
Composer
See below for more about Composer.
Devel
The contributed Devel module helps with development tasks such as debugging and
inspecting code, analyzing database queries, and generating dummy content.
21

Instalasi
What is special about Drush?
Drush is a command-line tool for building and maintaining sites, providing an alternative to
using the administrative interface for many operations. Many site builders and maintainers
prefer to use Drush whenever possible, and consider the time spent installing and learning
to use Drush to be a good investment. Reasons to consider using Drush:
• Drush provides a large number of commands for tasks such as installing the base
software, modules, and themes; updating software; performing database operations,
including copying and querying; resetting passwords; and clearing the cache. Some
contributed modules and themes also define Drush commands.
• Doing administrative tasks using Drush is typically faster and less tedious than performing
the same tasks through the administrative interface.
• Since Drush is a command-line interface, you can write scripts that combine Drush
commands and other commands on the server, to automate more complicated tasks.
• Drush provides additional functionality not available via the administrative interface; for
example, running database queries.
If you want to use Drush, you will need to have command-line terminal access to the server
where your website will be hosted, and you will need to have a compatible version of the
Drush tool installed on that server. Check the Drush website for installation instructions and
version compatibility. There is also documentation on the available Drush commands on
that site.
What is Composer used for?
Composer is a tool for managing PHP dependencies, where the developer specifies what
version of each external library is needed, and Composer manages the process of
downloading and installing the libraries.
The core software is a primary user of Composer, because it makes use of several externally-
developed software libraries, which must be downloaded and installed in order for the core
software to work. When you install the core software, you either need to download an archive
that contains compatible versions of the external libraries, or you need to run Composer to
download the external libraries after the initial download.
Some contributed modules also make use of externally-developed software libraries; for
example, a Facebook integration module might require Facebook’s integration library to be
installed for the module to work, and a geographical module might make use of a standard
library of geographical functions. To install a module with external dependencies, you will
need to run Composer.
What tools are available for module and theme developers?
In addition to the site builder tools mentioned above, the following tools are useful for
module and theme developers.
22

Instalasi
Drupal Console
Drupal Console is a command-line tool that generates boilerplate code and interacts with
a Drupal site. It can generate, for example, block or form code, install modules and
themes, and create dummy content. Drupal Console makes use of the Symfony Console.
Coder
Coder is a command-line tool that checks if your modules and themes comply with coding
standards and other best practices. It can also fix coding standard violations.
Firebug
Firebug is a Firefox plugin that allows viewing, editing, debugging, and monitoring CSS,
HTML, and JavaScript in a separate browser window. The contributed Drupal for Firebug
module displays Drupal debugging and SQL query information in the Firebug window.
Related topics
Bagian 11.9, “Using Composer and Git to Download Files”
Additional resources
•Drupal.org community documentation page "Development tools"
•Drupal.org community documentation page "Using Composer with Drupal"
Attributions
Written and edited by Boris Doesborg and Jennifer Hodgdon.
3.3. Preparing to Install
Goal
Choose an appropriate way to install the core software, and handle any required
prerequisites.
Prerequisite knowledge
•Bagian 3.1, “Concept: Server Requirements”
•Bagian 3.2, “Concept: Additional Tools”
Site prerequisites
If you want to use Drush to install the core software, Drush must be installed. See Bagian
3.2, “Concept: Additional Tools”.
23

Instalasi
Steps
1. Choose a method for installing the core software.
Try a free online demo
Use an online provider to get a demo installation of the core software in 20 minutes
or less. See the Drupal.org page "Try Drupal".
Use a one-click installer from your hosting provider
If you choose to install the core software at your hosting provider, your hosting
provider may have specific documentation and/or a one-click install that you can use.
See Drupal.org’s list of hosting providers that support Drupal.
Use Drush
You will need to have Drush installed and command-line access to the site. See Bagian
3.2, “Concept: Additional Tools”.
Use the web installer
You will need space on a local or hosted web server to install the core software
manually.
Use a pre-configured environment
Use a pre-configured environment or virtual machine that contains Drupal and all
the required supporting software to install Drupal locally. See the section for your
operating system under Drupal.org’s Local server setup guide for possible options.
2. If you are installing using Drush or the web installer, set up a URL and hosting for your
site, either at an external hosting provider or on your own computer. Verify that the
hosting is working by putting a simple HTML file in the web root directory of the hosting,
and visiting the URL for your site.
3. If you are installing using Drush or the web installer, create a database, along with a
database user account with full access.
4. If you are installing using Drush, type the following at the Drush command line, where
example is the name of the directory that the core software will be downloaded to, and
DB_NAME, DB_USER and DB_PASS are your database’s credentials:
drush dl drupal --drupal-project-rename=example
cd example
drush site-install standard --db-url='mysql://DB_USER:DB_PASS@localhost/DB_NAME' --site- name=example
5. If you are installing using the web installer, upload the core software files manually. To
do this using Git and/or Composer, see Bagian 11.9, “Using Composer and Git to Download
Files”; to do this by downloading a zipped archive:
a. Go to https://www.drupal.org and click Download & Extend on the top-level menu.
24
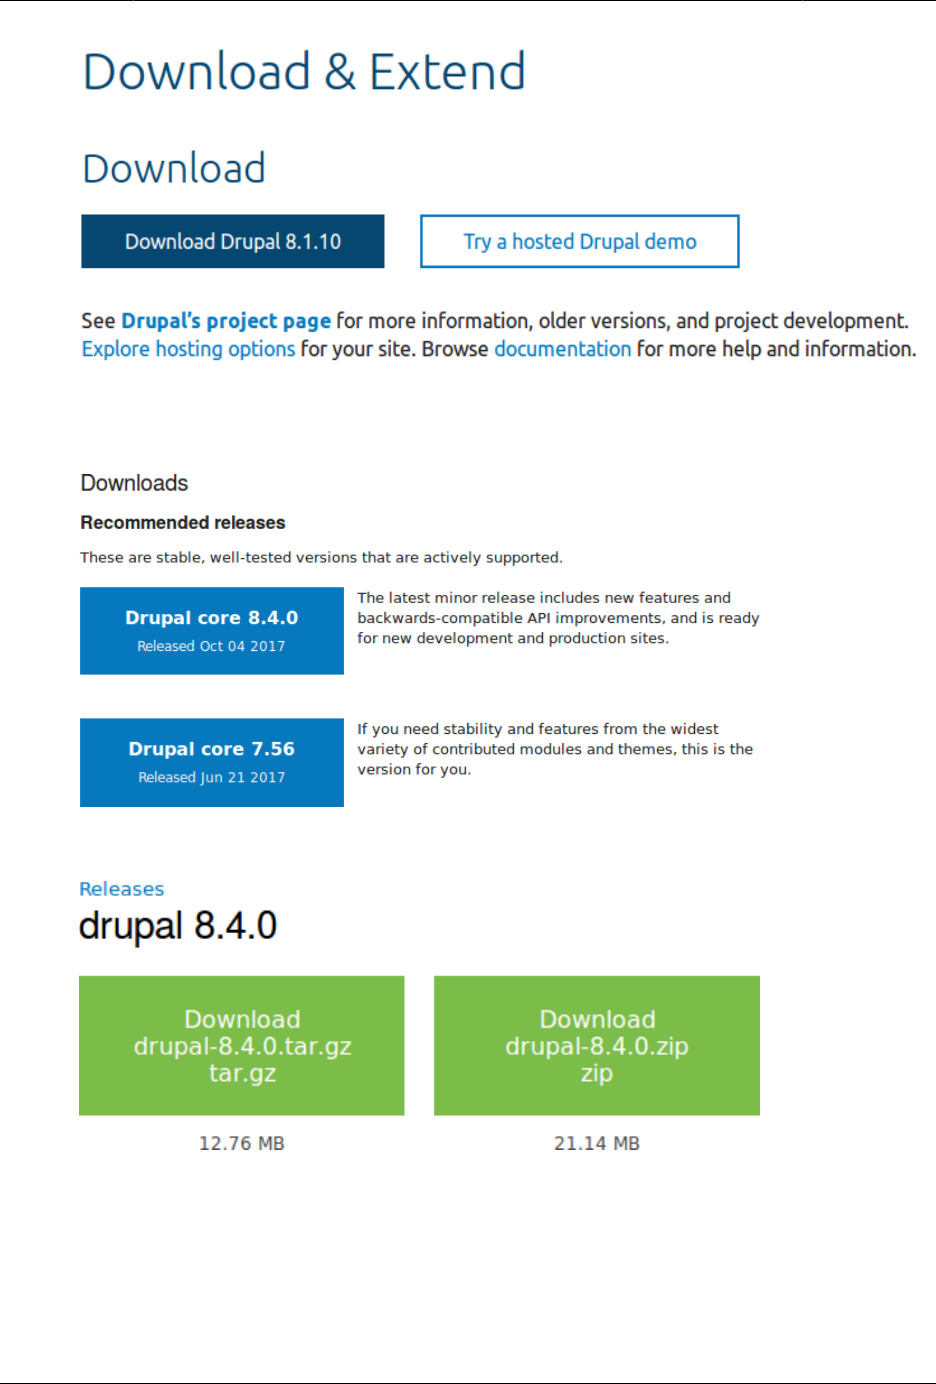
Instalasi
b. Click the Download Drupal button (of the appropriate version) to be taken to the
Downloads page.
c. Click the version you wish to download under Recommended releases.
d. Download the tar.gz or zip file to your local machine.
e. Upload the downloaded file to your hosting account. Log in to the control panel and
navigate to the HTML directory. Save the file there.
f. Uncompress the tar.gz or zip file, which will create a new directory. If you do not have
terminal access, or your hosting server is not running Linux, your hosting control
25

Instalasi
panel’s file manager should provide a way to extract the files. If you have terminal
access to your hosting server (running Linux), you can use a command like:
tar -xzf drupal-8.3.2.tar.gz
g. Delete the compressed file from the server, unless your unpacking method already
deleted it.
h. Rename the directory or reconfigure your web hosting, so that the directory name
matches the directory your web hosting is configured to use for your site.
Expand your understanding
Run the installer if you chose web installer to install the core software. See Bagian 3.4,
“Running the Installer”.
Additional resources
Drush
Attributions
Written and edited by Drew Gorton, Michael Lenahan at erdfisch, Jennifer Hodgdon, and Jojy
Alphonso at Red Crackle.
3.4. Running the Installer
Goal
Install the core software and create the admin account by running the included installer.
Prerequisite knowledge
Bagian 3.1, “Concept: Server Requirements”
Site prerequisites
Bagian 3.3, “Preparing to Install”
Steps
1. If you are using a 1-click install from a hosting provider or demo site, you will most
likely see some or all of the following screens as part of the installation process. If you
uploaded the core files manually, to start the installer, open a browser and visit the URL
that you set up for your hosting.
26
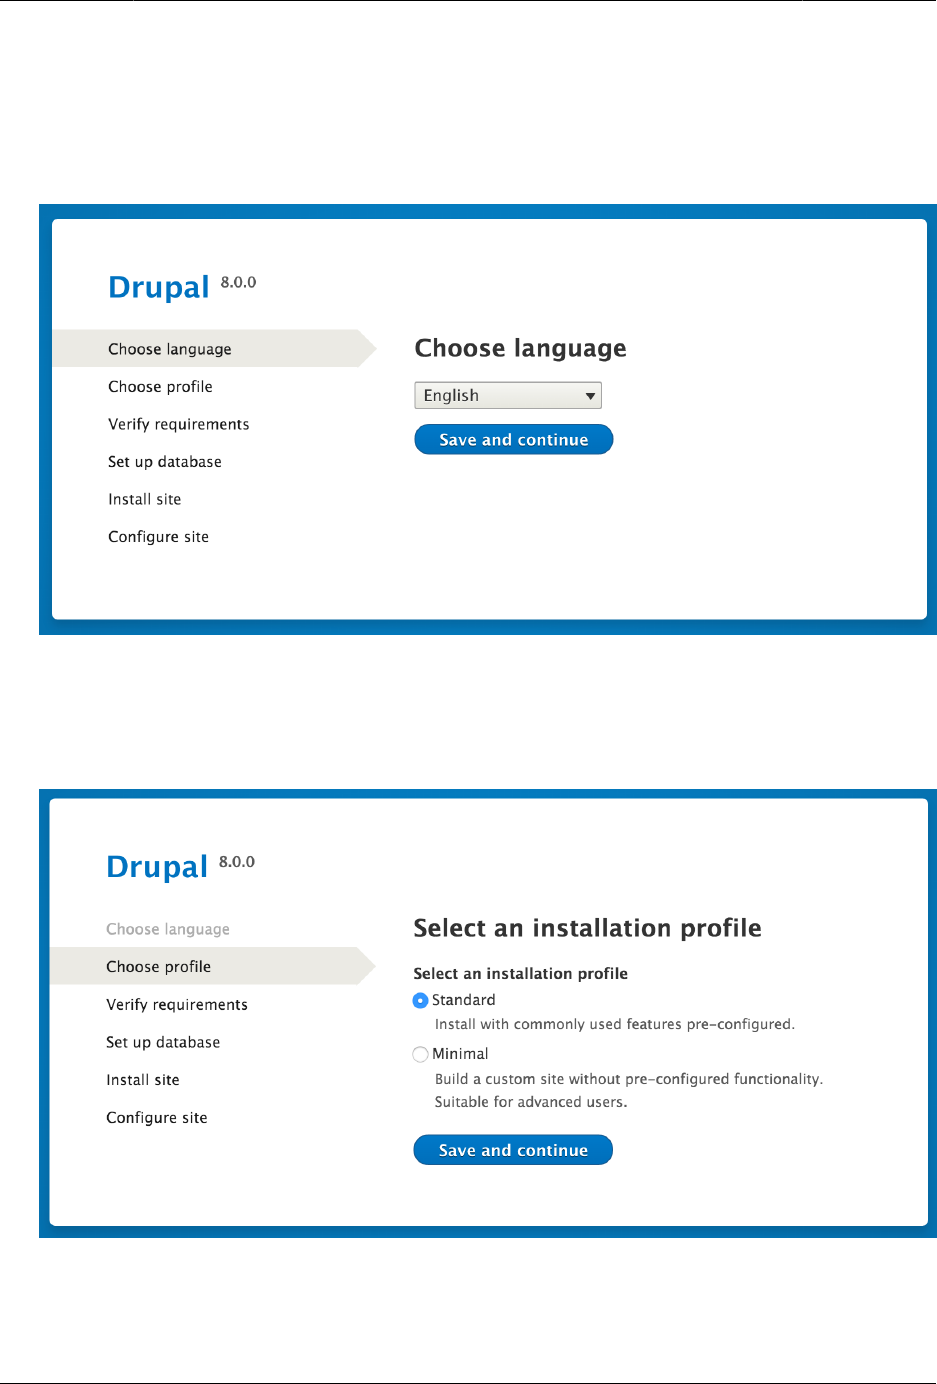
Instalasi
2. Select a language on the first page of the installer; for example, English. You could
optionally choose from any of the other listed languages. The language files for the
chosen language will be downloaded and installed so that the rest of the installation
process can be finished in the chosen language. After choosing a language, click Save
and continue.
3. Select an installation profile. Installation profiles provide site features and functions for
a specific type of site as a single download containing the core software, contributed
modules, themes, and pre-defined configuration. Core contains two installation profiles.
Select the core Standard installation profile. Click Save and continue.
4. The next step in the installer will verify that your system meets the minimum
requirements. If it does not, you’ll be presented with an outline of what needs to be
27
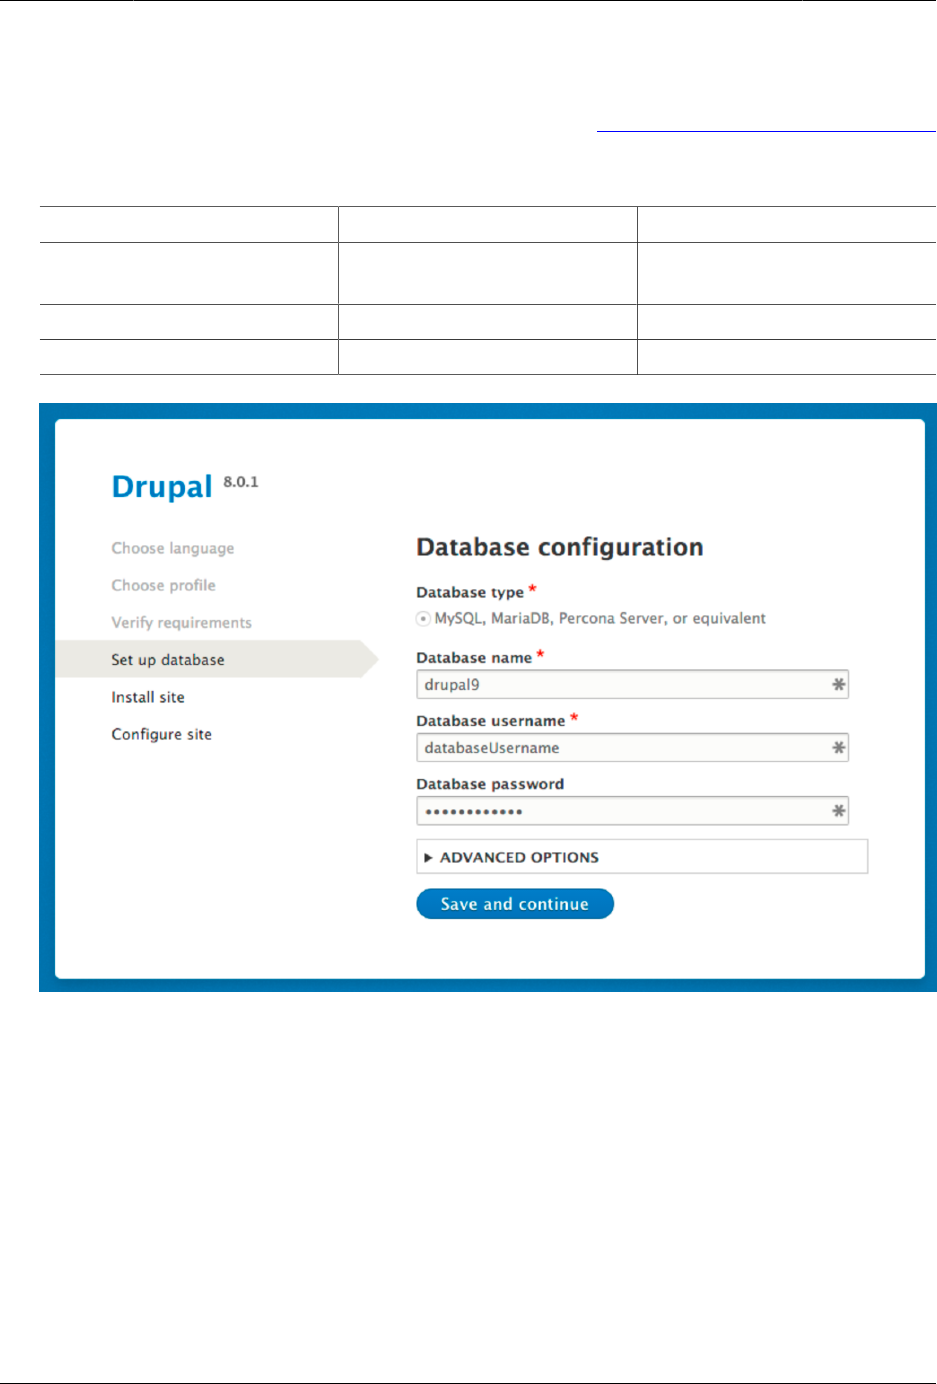
Instalasi
corrected in order to proceed. If it does, the installer will automatically advance to the
next step.
5. Provide details of the database you created in the Bagian 3.3, “Preparing to Install”
chapter. Then click Save and continue.
Field name Explanation Value
Database name The custom name given to
the database
drupal8
Database username Username created databaseUsername
Database password Password chosen
6. The next step will display a progress bar under the heading Installing Drupal. After the
installer has completed, it will automatically advance to the next step.
28
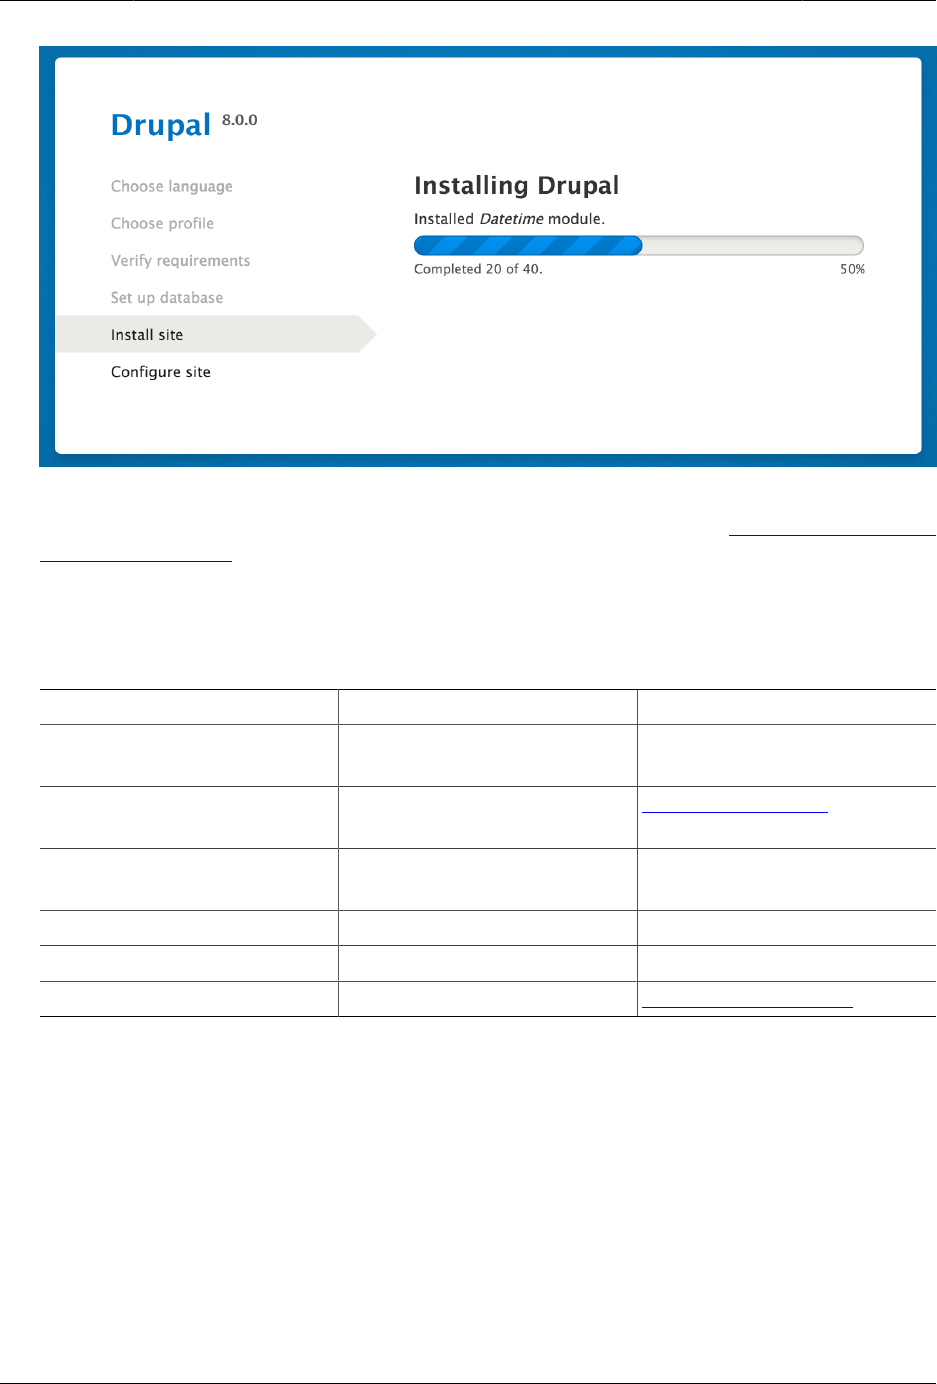
Instalasi
7. The final step is to configure some basic information about your new site. Note that the
user account you create in this step is the site’s admin account. See Bagian 7.2, “Concept:
The User 1 Account” for important information about this unique account. You can safely
name this account "admin", and make sure to choose a secure and unique password.
Fill in the form with the following information:
Field name Explanation Value
Site name The name chosen for the
site
Anytown Farmers Market
Site email address The email associated with
the site
info@example.com
Username The designated user’s
credentials
admin
Password The password chosen
Confirm password Repeat the password
Email address The user’s email admin@example.com
The remaining fields can likely be left at their default values.
29
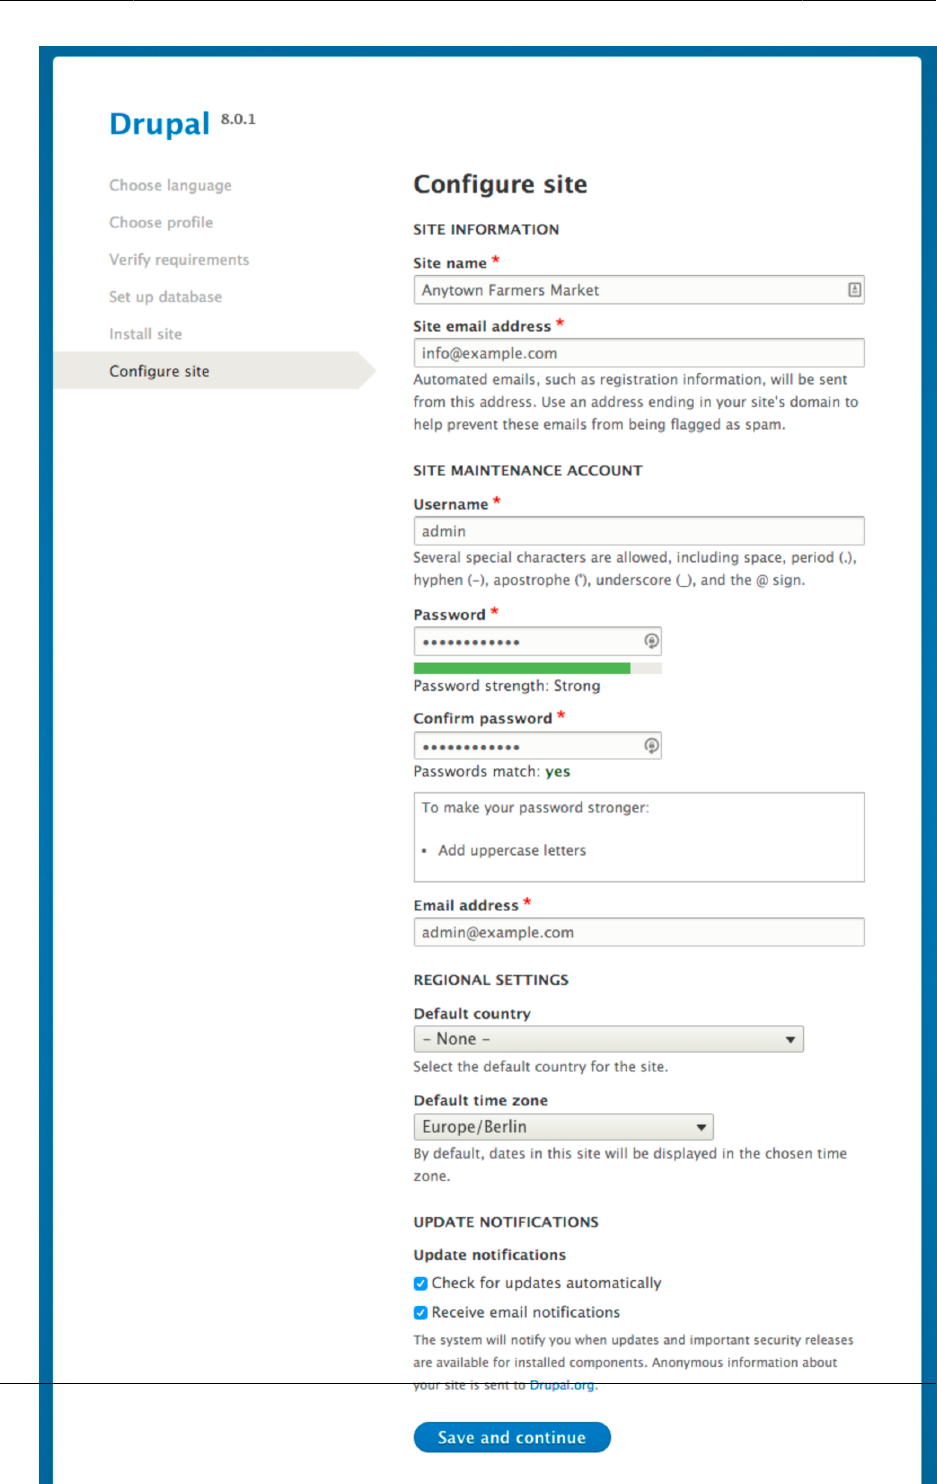
Instalasi
30
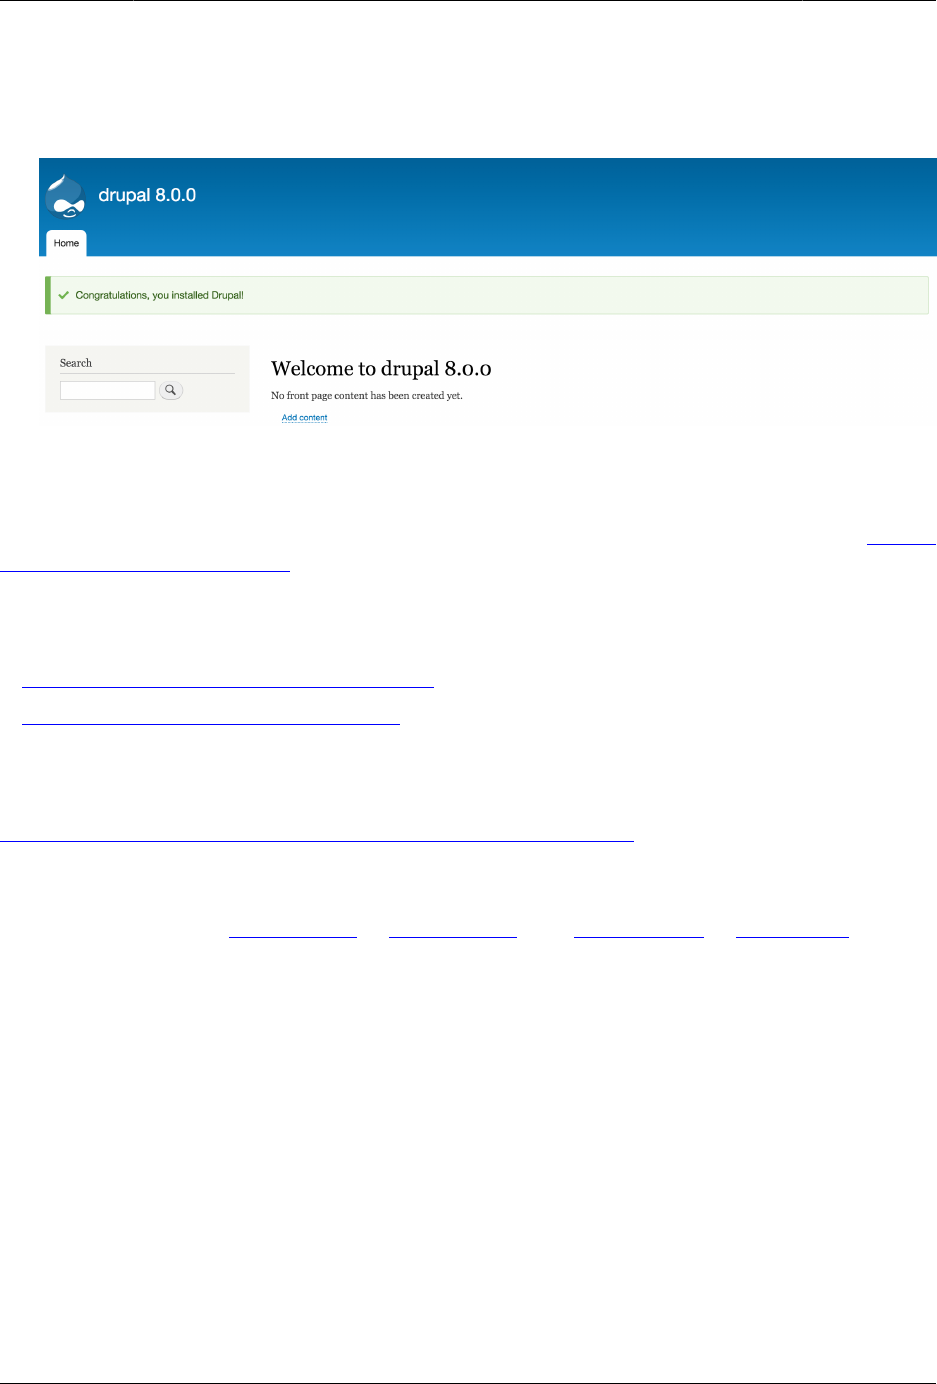
Instalasi
8. Click Save and continue.
9. You will be redirected to the front page of your new site and you should see the message
Congratulations, you installed Drupal! displayed at the top of the page.
Expand your understanding
Check the Status Report to see if there are any problems with the installation. See Bagian
12.5, “Concept: Status Report”.
Related concepts
•Bagian 11.7, “Concept: Development Sites”
•Bagian 3.2, “Concept: Additional Tools”
Additional resources
Drupal.org community documentation page "Create A Database"
Attributions
Written and edited by Joe Shindelar at Drupalize.Me, and Jojy Alphonso at Red Crackle.
31
Bab 4. Konfigurasi Dasar Situs
4.1. Concept: Administrative Overview
Prerequisite knowledge
•Bagian 1.3, “Concept: Themes”
•Bagian 1.2, “Concept: Modules”
What is the administrative menu?
The toolbar provided by the core Toolbar module displays the Manage administrative menu
at the top or left side of the site, for users with permission to see it. This menu provides
access to all of the administrative areas of the site. The menu entries will vary depending
on which modules are active on your site and the permissions of the person viewing the
menu; if you install using the core Standard installation profile and have full administrative
permissions, the top-level entries are as follows:
Content
Lists and manages existing content, and allows creation of new content.
Structure
Contains a list of links for managing structural elements of the site, such as blocks,
content types, menus, and taxonomy.
Appearance
Manages themes and appearance-related settings.
Extend
Manages the installation and uninstallation of modules.
Configuration
Contains links to settings pages for various site features.
People
Manages users, roles, and permissions.
32

Konfigurasi Dasar Situs
Reports
Contains links to logs, update information, search information, and other information
about the site’s status.
Help
Lists help topics for installed modules that provide them.
The arrow button on the far right side of the second line of the toolbar (or far left side, if the
site is being viewed using a right-to-left-reading language like Arabic) can be used to switch
the menu from appearing horizontally at the top of the page, to a vertical format on the left
side (or right side, in right-to-left languages). When viewed vertically, the menu becomes an
interactive tree.
33
Konfigurasi Dasar Situs
This guide has a standard way to describe navigation to administrative pages using the
administrative toolbar. See Bagian i.5, “Conventions of the Guide” for more information.
What are contextual links?
Some administrative and editing functionality on the site can be accessed through the
contextual links displayed by the core Contextual Links module. Contextual links take you to
34
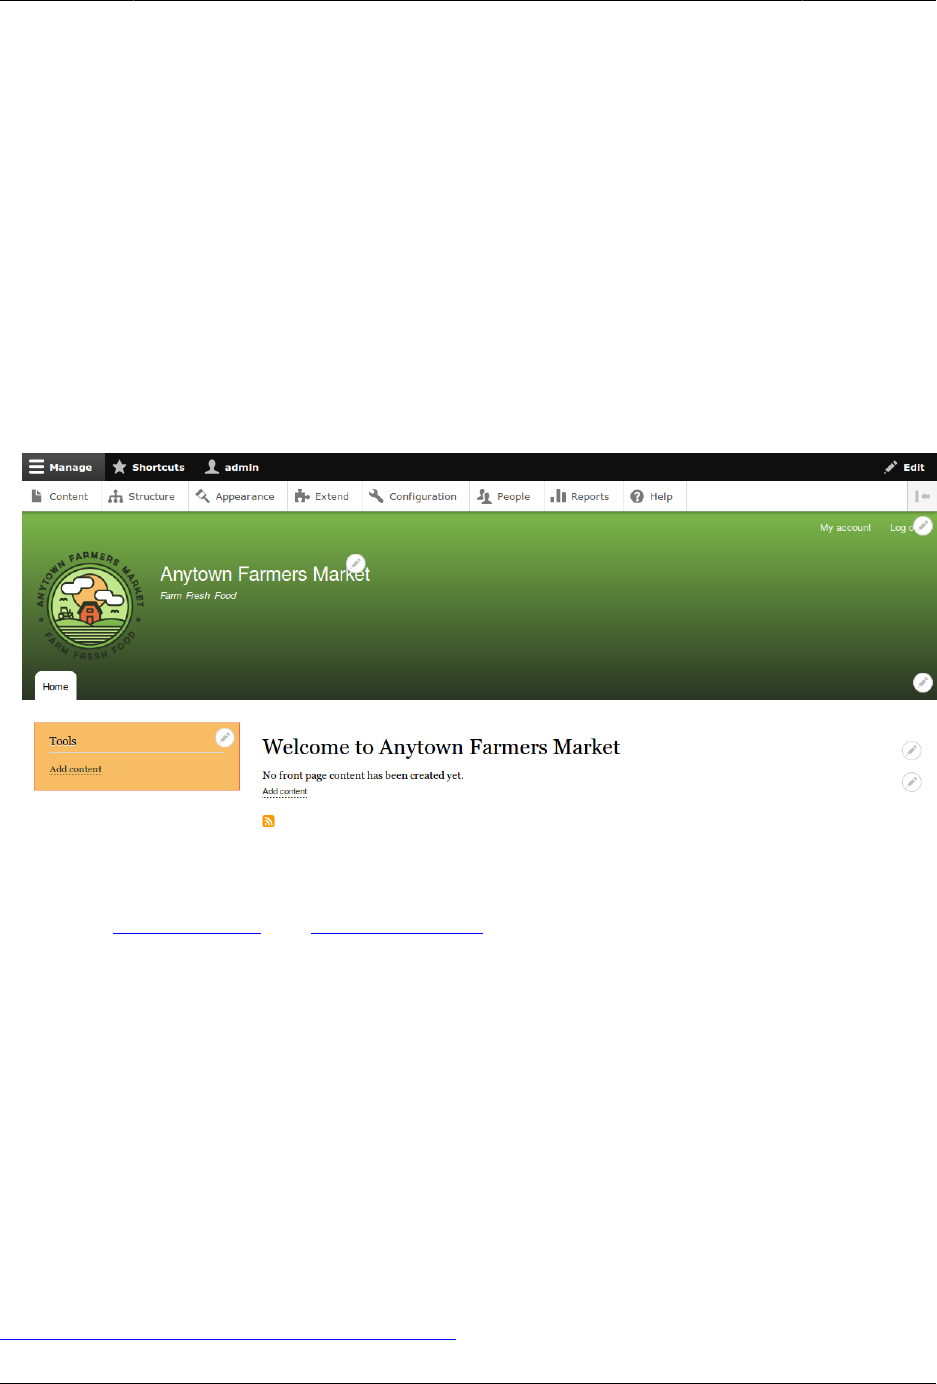
Konfigurasi Dasar Situs
some of the same pages that you can access through the administrative menu, but instead
of having to navigate through the menu hierarchy, these links are provided near where the
related content is displayed on your site.
Contextual links have to be activated to be visible. If your site’s theme uses the default styling
for contextual links, a pencil icon is used to indicate that contextual links are present and
activated, and if you click the icon, you will see the contextual links. There are two ways to
activate the pencil icons that provide access to the contextual links:
• If you are using a mouse in a browser, the icon will temporarily appear when you hover
over an area that has related contextual links.
• You can click the master pencil icon (or its Edit link) at the right end of the top bar in the
toolbar, which will activate all of the contextual links on the current page. This icon is only
visible on pages with contextual links.
Attributions
Written by Scott Wilkinson and Jennifer Hodgdon.
4.2. Editing Basic Site Information
Goal
Change basic site information such as Site name, Slogan, Default time zone.
Prerequisite knowledge
Bagian 4.1, “Concept: Administrative Overview”
35
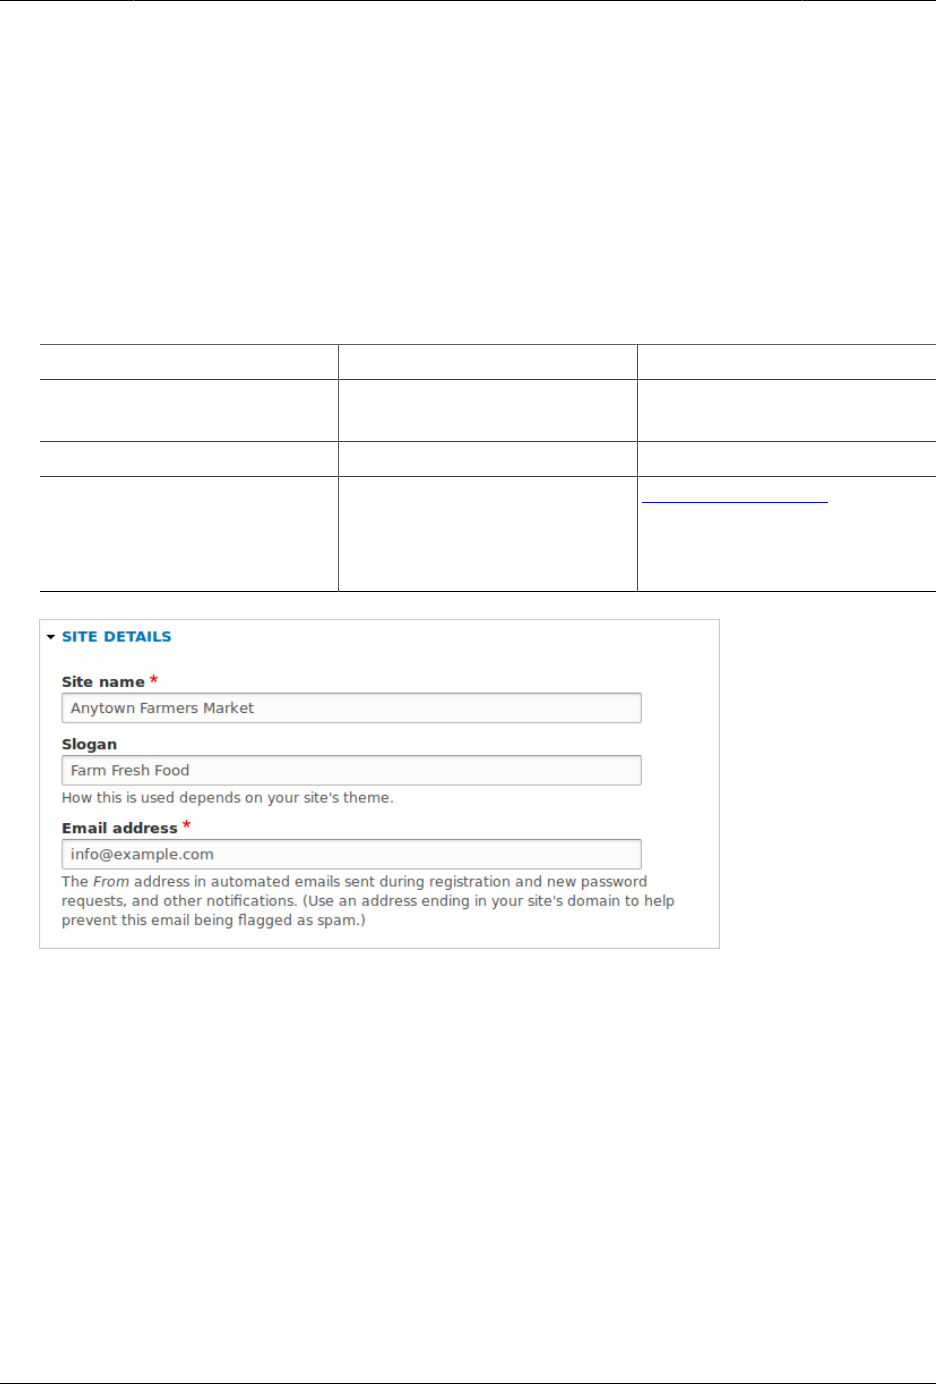
Konfigurasi Dasar Situs
Steps
Configuring the basic site information
1. In the Manage administrative menu, navigate to Configuration > System > Basic
site settings (admin/config/system/site-information) to change the Site name, Slogan,
administrative Email address, or the Default front page path.
2. Fill in the available fields as appropriate for your site.
Field name Explanation Example value
Site name Used to identify the site and
displayed in browsers
Anytown Farmers Market
Slogan Usually displayed sitewide Farm Fresh Food
Email address Used as From address in
automated email messages
(registrations, password
resets, etc)
info@example.com
3. After editing the fields, click Save configuration to see the changes applied to the site.
Configuring default Regional settings
1. In the Manage administrative menu, navigate to Configuration > Regional and language
> Regional settings (admin/config/regional/settings).
2. Select the appropriate country from the Default country select list in the Locale section,
and set which day will be displayed as First day of week on your site.
3. In the Time zones section, select the sitewide Default time zone from the list and configure
user-specific time zones.
36
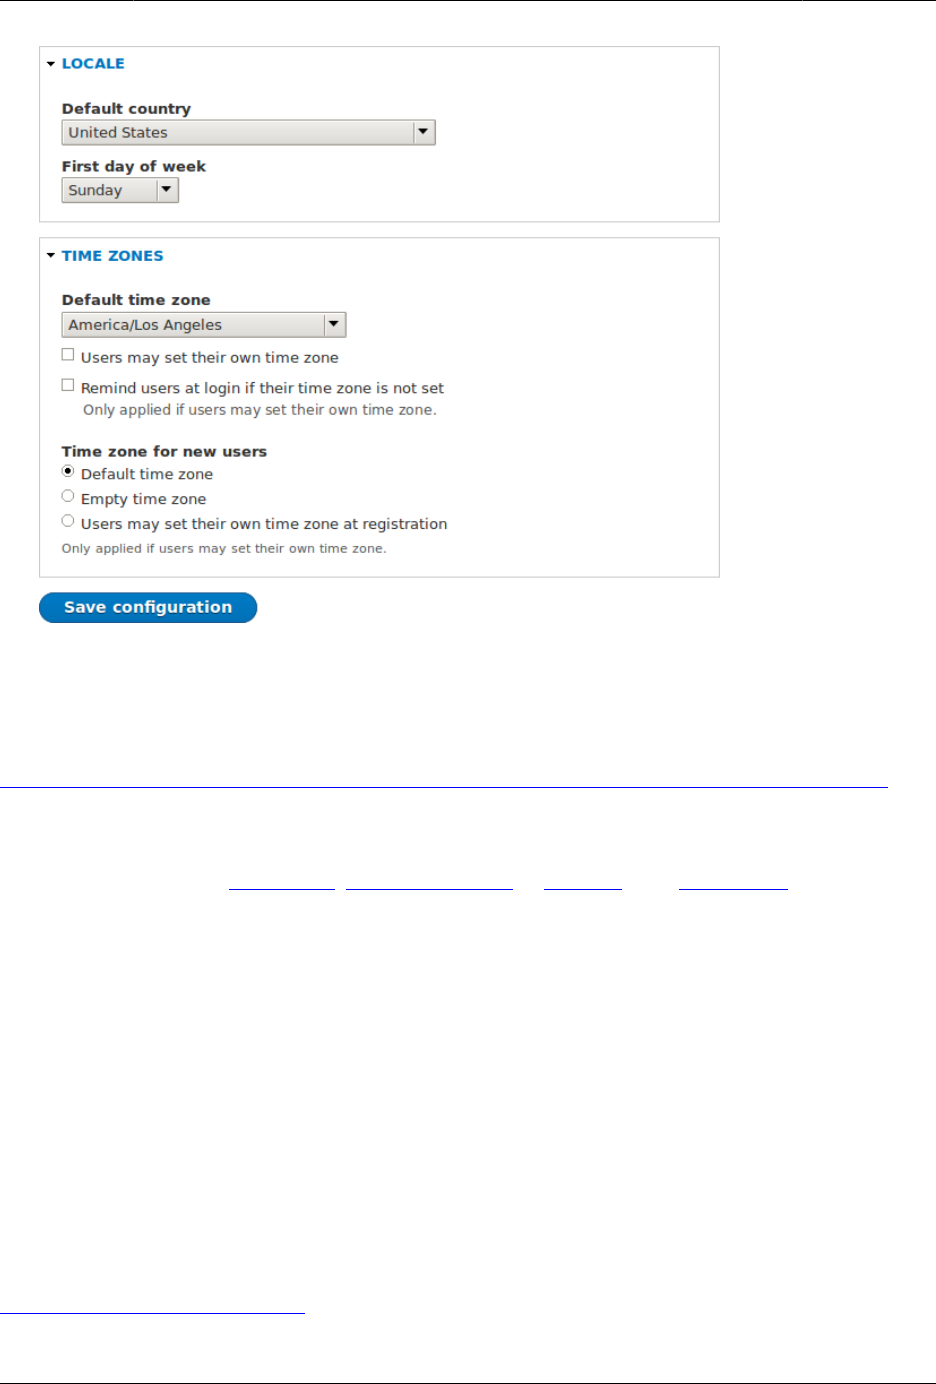
Konfigurasi Dasar Situs
4. After editing the fields, click Save configuration to see the changes applied to the site.
Additional resources
Drupal.org community documentation page "Getting started with Drupal 8 administration"
Attributions
Written and edited by Sree Veturi, Michael Lenahan at erdfisch, and Antje Lorch.
4.3. Installing a Module
Goal
Install a core module, or a contributed module whose files have already been uploaded to
the site, through the administrative interface or using Drush.
Prerequisite knowledge
Bagian 1.2, “Concept: Modules”
37
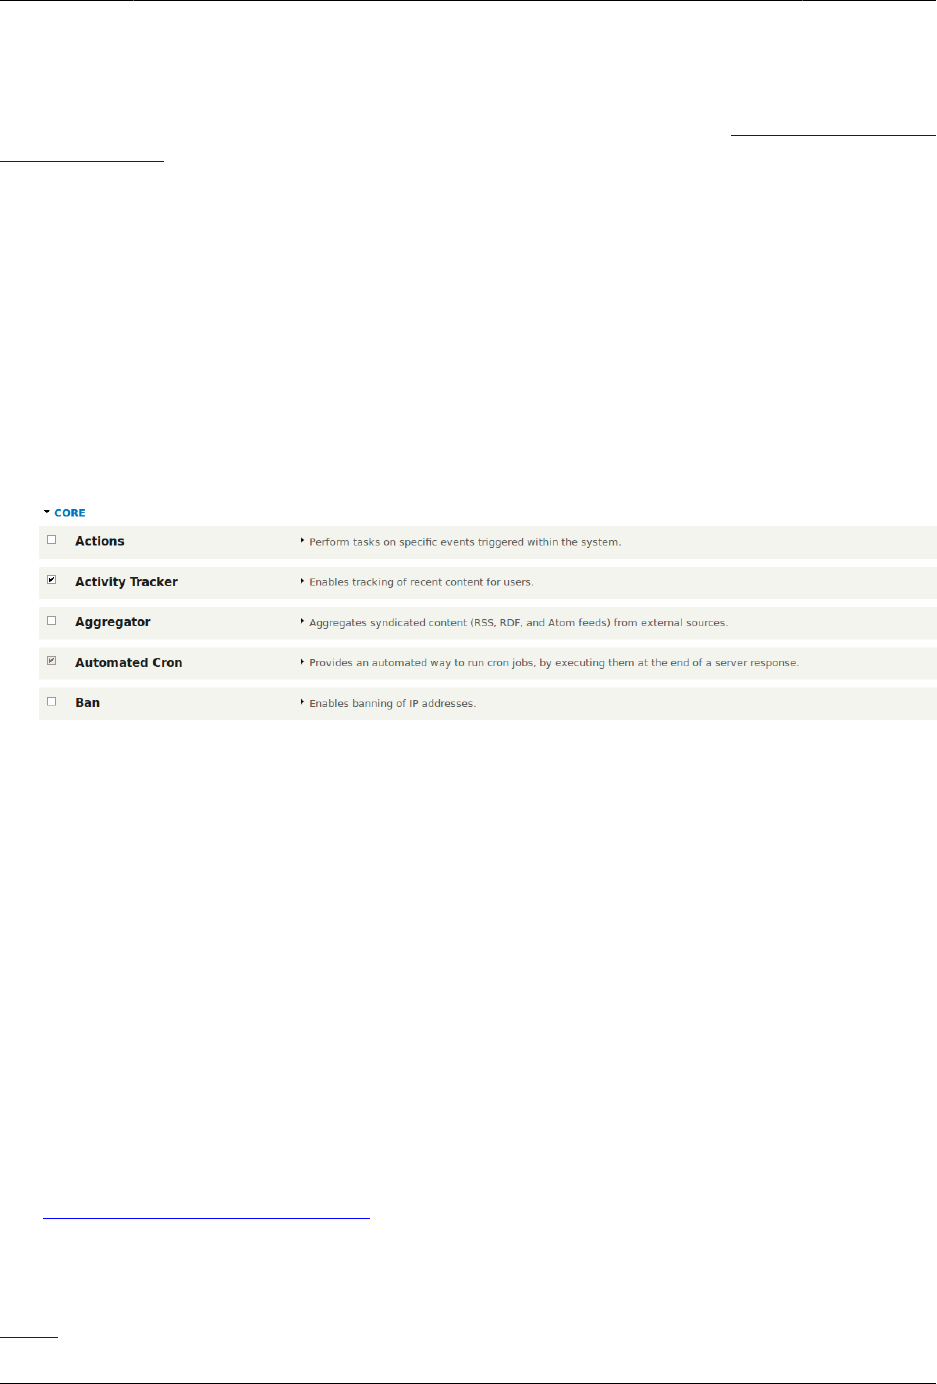
Konfigurasi Dasar Situs
Site prerequisites
If you want to use Drush to install modules, Drush must be installed. See Bagian 3.2, “Concept:
Additional Tools”.
Steps
You can use the administrative interface or Drush to install modules.
Using the administrative interface
1. In the Manage administrative menu, navigate to Extend (admin/modules). The Extend page
appears showing all the available modules in your site.
2. Check the boxes for the module or modules you want to install. For example, check the
box for the core Activity Tracker module.
3. Click Install. The checked modules will be installed.
Using Drush
1. In the Manage administrative menu, navigate to Extend (admin/modules). The Extend page
appears showing all the available modules in your site.
2. Find the machine name of the module you want to install, by expanding the information
area for the module. For instance, the core Activity Tracker module’s machine name is
tracker.
3. Run the following Drush command to install the module:
drush en tracker
Expand your understanding
If you do not see the effect of these changes in your site, you might need to clear the cache.
See Bagian 12.2, “Clearing the Cache”.
Additional resources
Drush
38
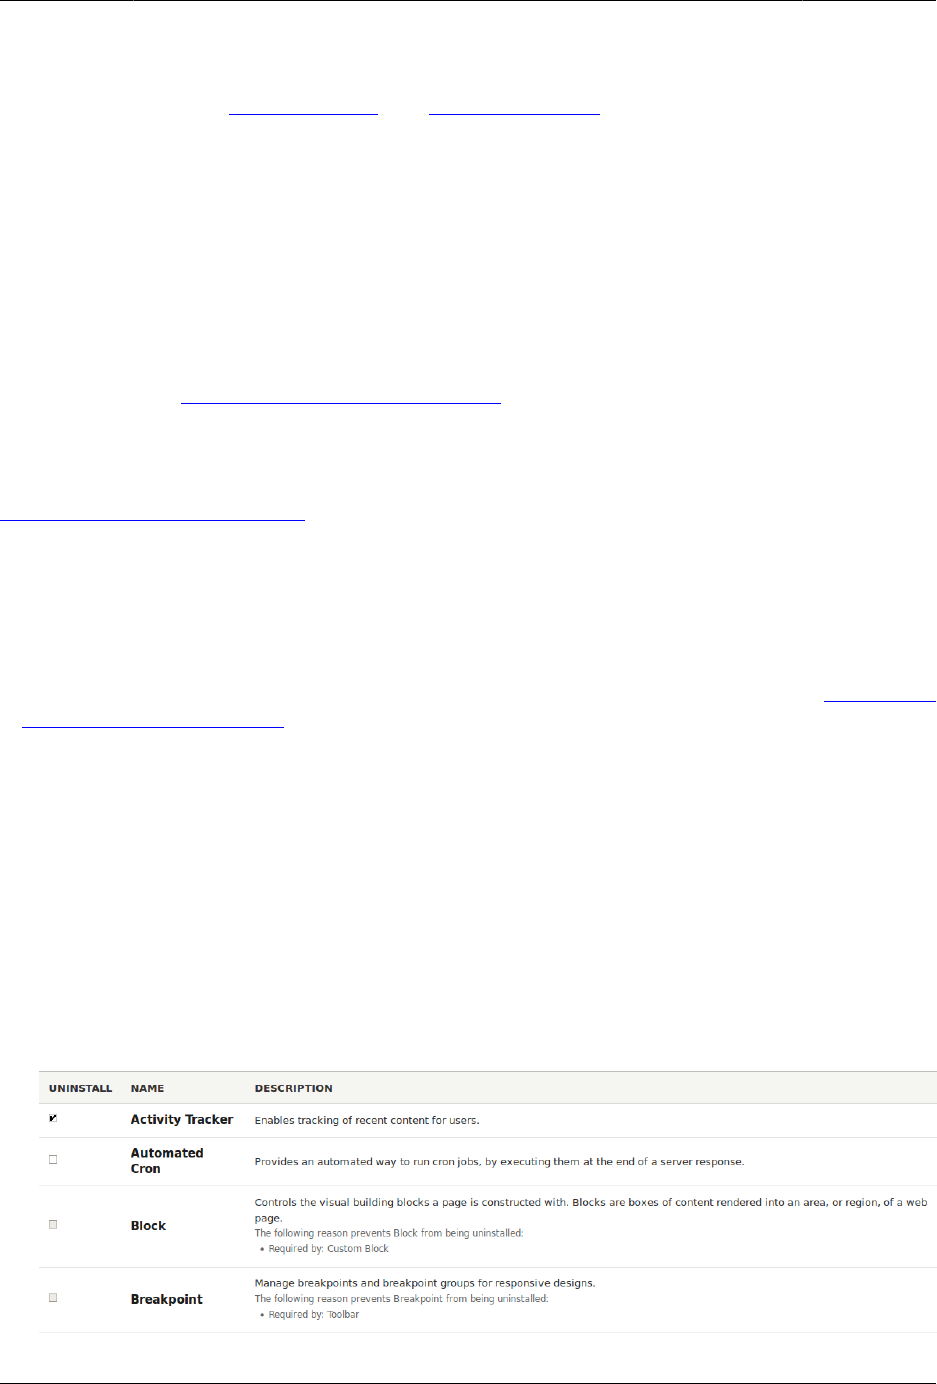
Konfigurasi Dasar Situs
Attributions
Written and edited by Boris Doesborg and Jennifer Hodgdon.
4.4. Uninstalling Unused Modules
Goal
Uninstall the core Search and History modules, as well as the core Activity Tracker module if
you installed it in Bagian 4.3, “Installing a Module”, to reduce overhead.
Prerequisite knowledge
Bagian 1.2, “Concept: Modules”
Site prerequisites
• You must have at least one unused module on your site that you want to uninstall, such
as the core Search module.
• If you want to use Drush to uninstall modules, Drush must be installed. See Bagian 3.2,
“Concept: Additional Tools”.
Steps
You can use the administrative interface or Drush to uninstall modules.
Using the administrative interface
1. In the Manage administrative menu, navigate to Extend > Uninstall (admin/modules/
uninstall) where you will find the list of modules that are ready to be uninstalled.
2. Check the boxes for the modules you are uninstalling (Search, History, and Activity
Tracker). Click Uninstall at the bottom of the page.
39
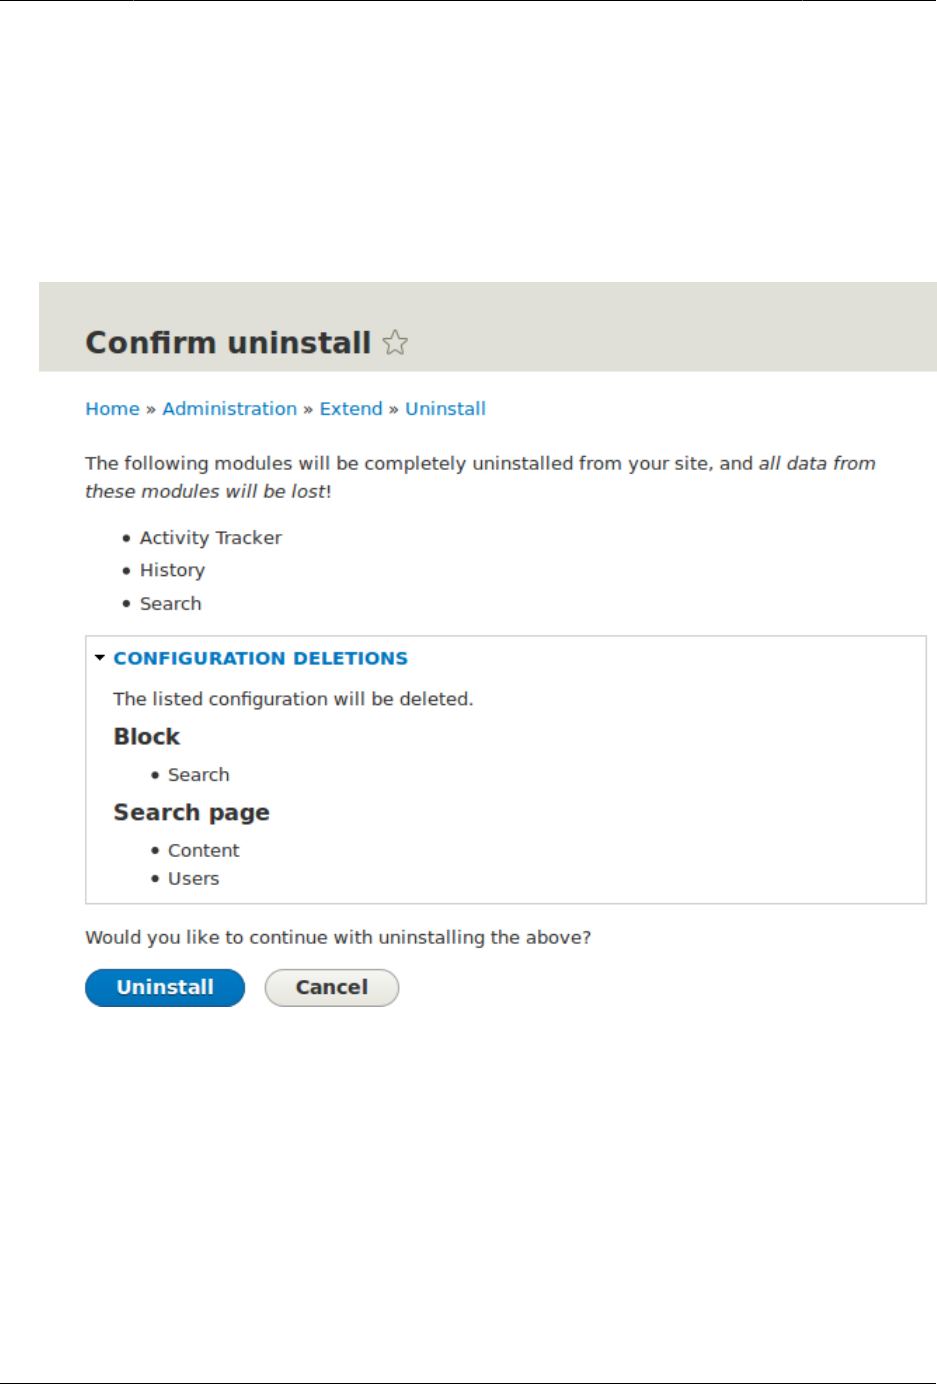
Konfigurasi Dasar Situs
Catatan
You cannot uninstall a module if it is required by some other module(s) and/or
functionality. For example, the core File module is required by the core Text Editor,
CKEditor, and Image modules. It can’t be uninstalled unless you uninstall its
dependent module(s) and functionality first. A module that cannot be uninstalled
yet will have a disabled checkbox, restricting you from uninstalling it.
3. Step 2 will prompt you to confirm the module uninstall request. Click Uninstall.
Using Drush
1. In the Manage administrative menu, navigate to Extend (admin/modules). The Extend page
appears showing all the available modules in your site.
2. Find the machine name of the module you want to uninstall, by expanding the
information area for the module. For instance, the core Activity Tracker module’s
machine name is tracker.
3. Run the following Drush command to uninstall the module:
drush pm-uninstall tracker
40

Konfigurasi Dasar Situs
Expand your understanding
•Bagian 3.2, “Concept: Additional Tools”
•Bagian 12.2, “Clearing the Cache”
• You can also uninstall the core Comment module by following these steps, but only after
comment fields have been removed, which is a side effect of Bagian 6.2, “Deleting a Content
Type”.
Attributions
Written and edited by Surendra Mohan, and Jojy Alphonso at Red Crackle.
4.5. Configuring User Account Settings
Goal
Turn off the ability for people to register user accounts on the site. Also, review and/or edit
the email messages generated by the site for events related to user accounts.
Prerequisite knowledge
Bagian 4.1, “Concept: Administrative Overview”
Steps
1. In the Manage administrative menu, navigate to Configuration > People > Account settings
(admin/config/people/accounts).
2. Under Registration and cancellation, select Administrators only as the people with
permissions to register user accounts. You can check Require email verification when a
visitor creates an account in case you want to change the settings for account registration
later on.
41
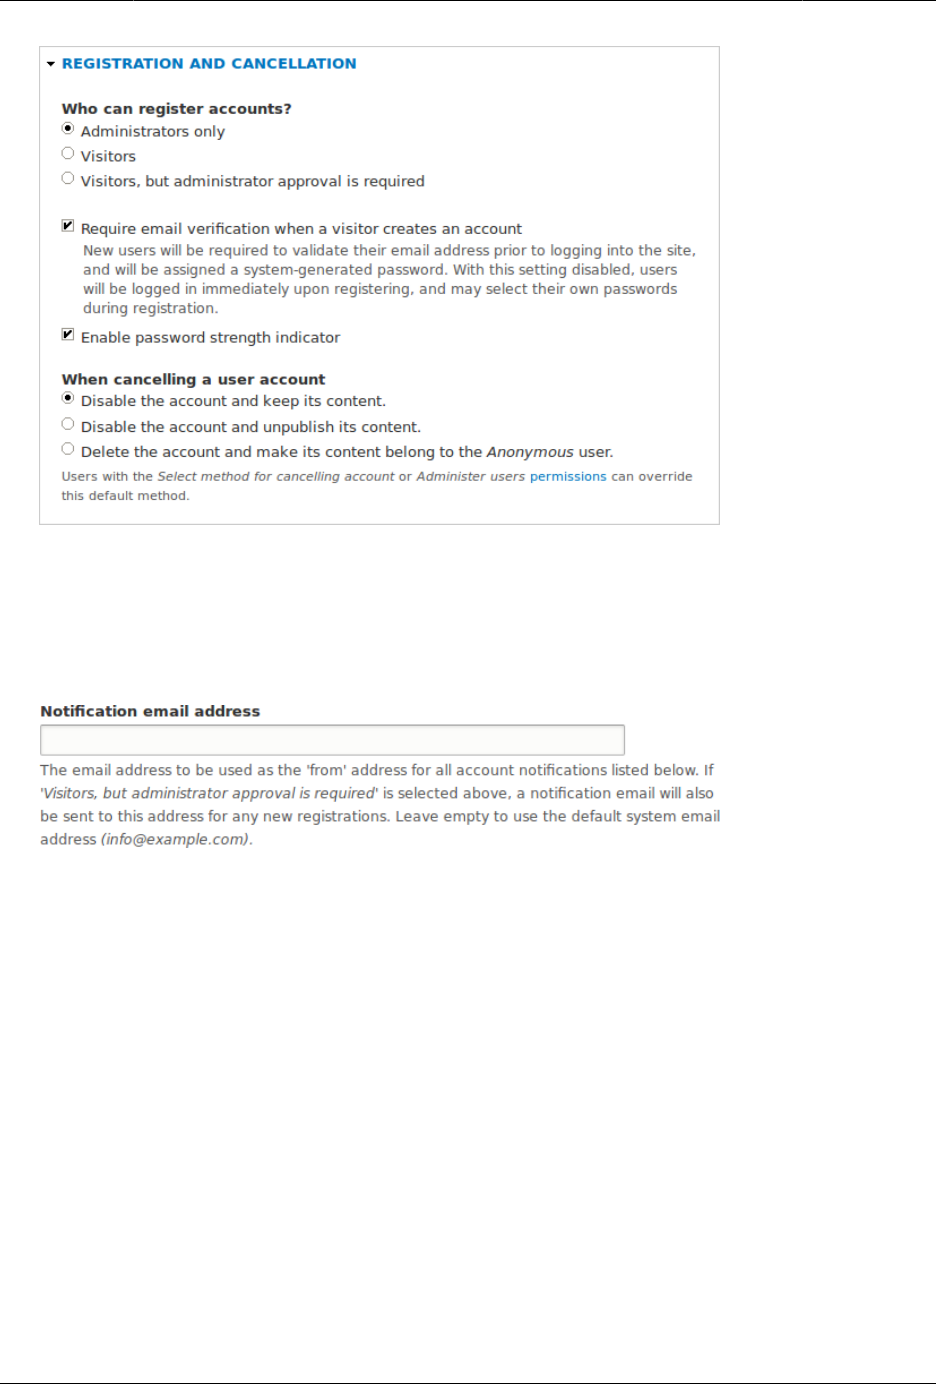
Konfigurasi Dasar Situs
3. Optionally, change the default email address from which user account notifications from
the farmers market website will be sent. This will help you maintain a separate email
address from the one used for the website in general. For example, this email address
for user account notifications will be useful for a staff member(s) communicating with
vendors.
4. Optionally, edit the email templates in the Emails section to customize automated emails.
There are seven email templates available with the core. They are meant for different
user-specific occasions. All of them can be personalized and three can be disabled via
checkboxes: activation, blocking, and cancellation.
You can send out your own text (for example, welcoming the new vendors for whom
accounts were just created) by editing the the Welcome (new user created by administrator)
template.
42
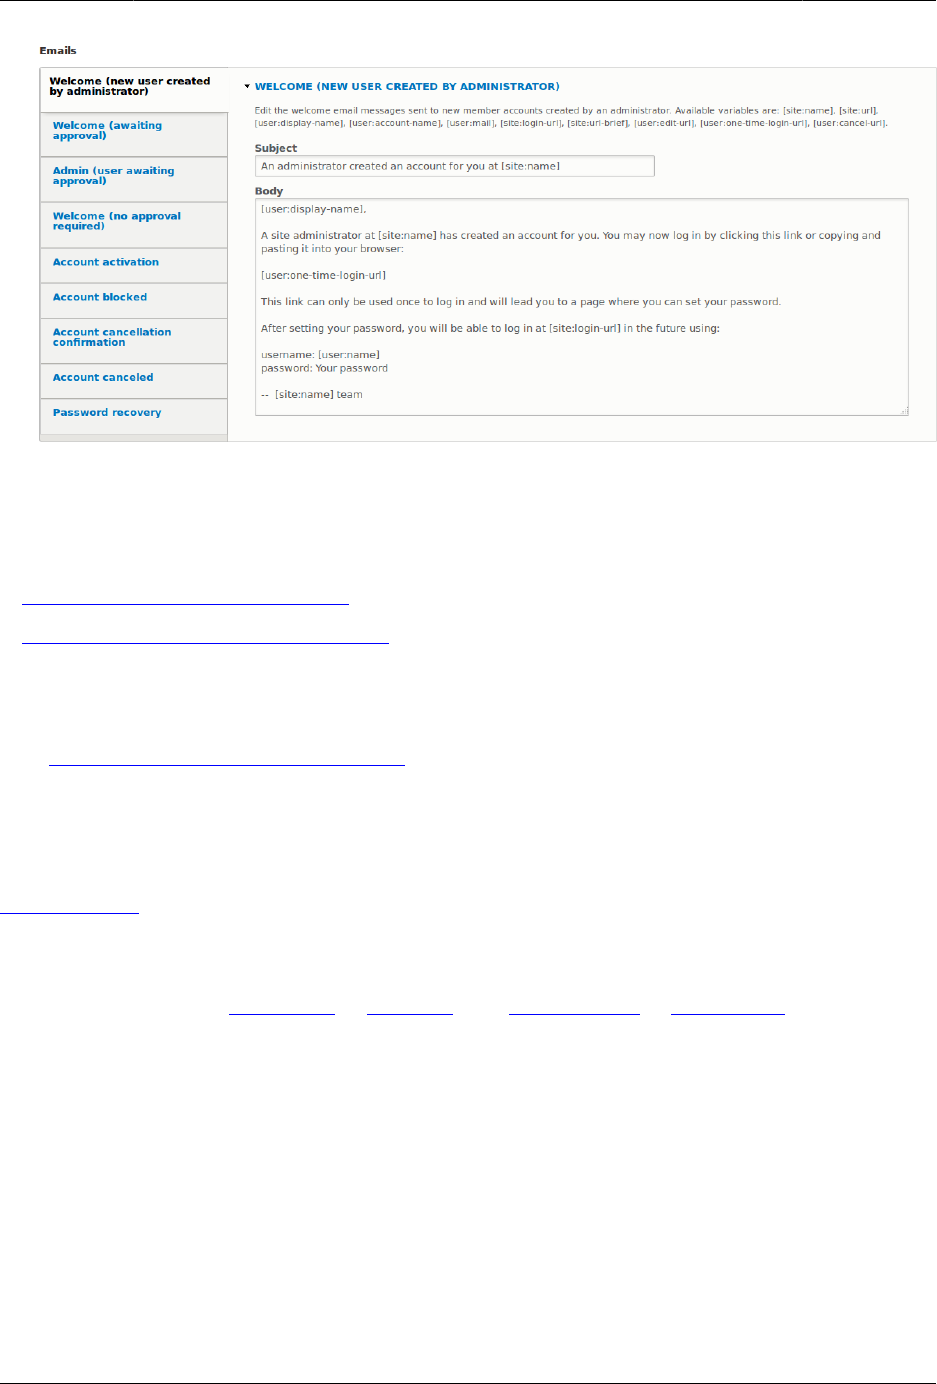
Konfigurasi Dasar Situs
5. Click Save configuration to save the changes.
Expand your understanding
•Bagian 12.2, “Clearing the Cache”
•Bagian 7.4, “Creating a User Account”
Related concepts
See Bab 7, Mengelola Akun Pengguna for more information about user accounts and
permissions.
Additional resources
Security Guide can help you with a more safety-focused approach to configuration.
Attributions
Written and edited by Laura Vass at Pronovix, and Jojy Alphonso at Red Crackle.
4.6. Configuring the Theme
Goal
Edit the settings of the default core Bartik theme to change the color scheme and to add
a logo.
43
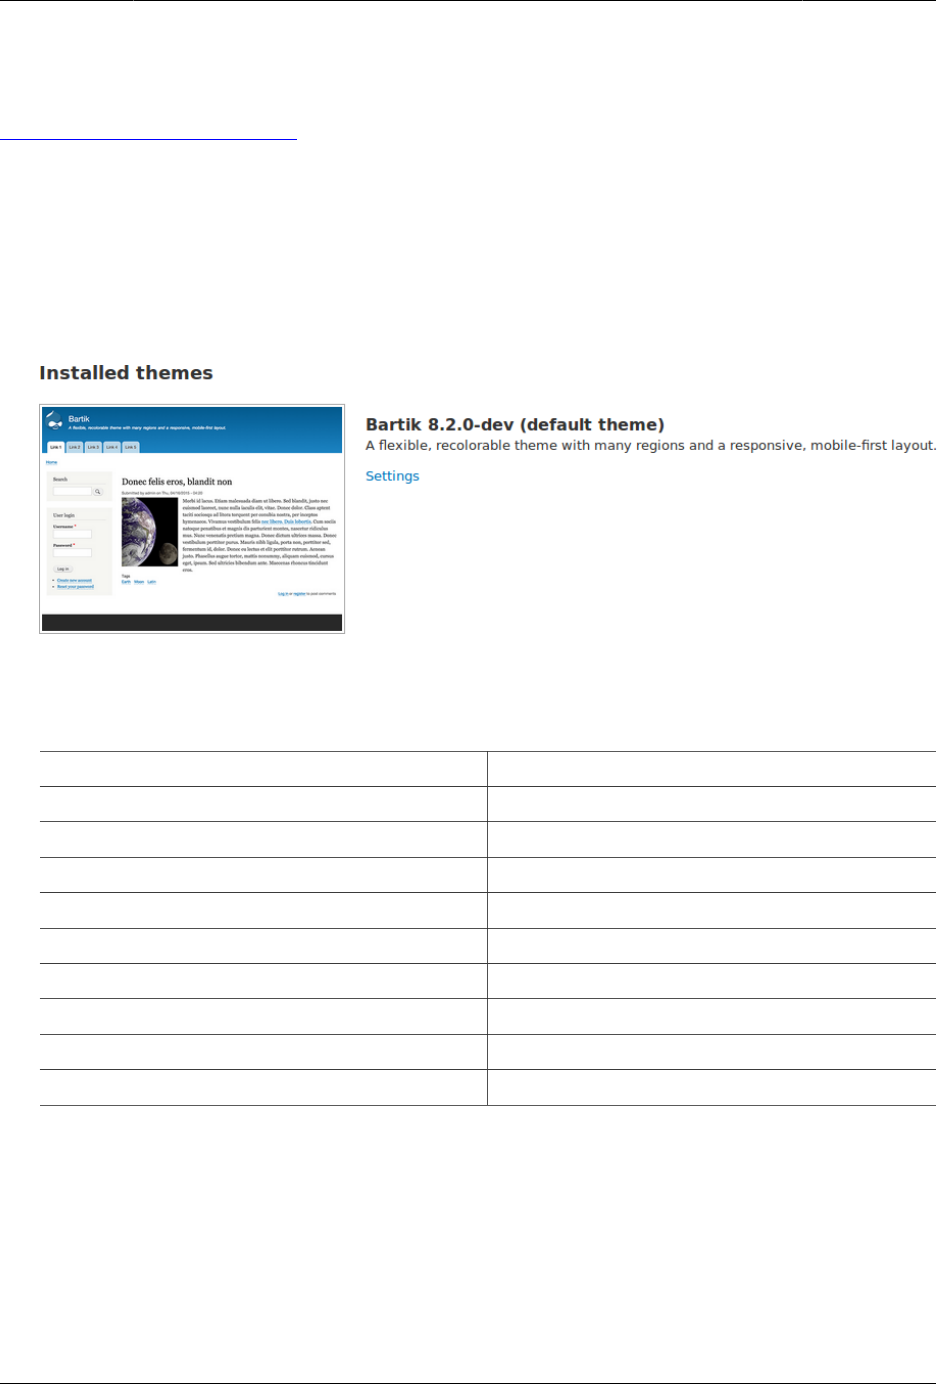
Konfigurasi Dasar Situs
Prerequisite knowledge
Bagian 1.3, “Concept: Themes”
Steps
1. In the Manage administrative menu, navigate to Appearance (admin/appearance).
2. Under Installed themes, you will find Bartik listed as your default theme. Under Bartik
(default theme), click Settings.
3. Under Color scheme, click inside each color build box and type the proper color codes
you would like to add. For example, use the following colors:
Area Color
Header background top #7db84a (green)
Header background bottom #2a3524 (dark green)
Main background #ffffff (white)
Sidebar background #f8bc65 (light orange)
Sidebar borders #e96b3c (orange)
Footer background #2a3524 (dark green)
Title and slogan #ffffff (white)
Text color #000000 (black)
Link color #2a3524 (dark green)
Note: You can also use the color wheel on the right to select colors of your choice. The
web color codes will be added for you.
44
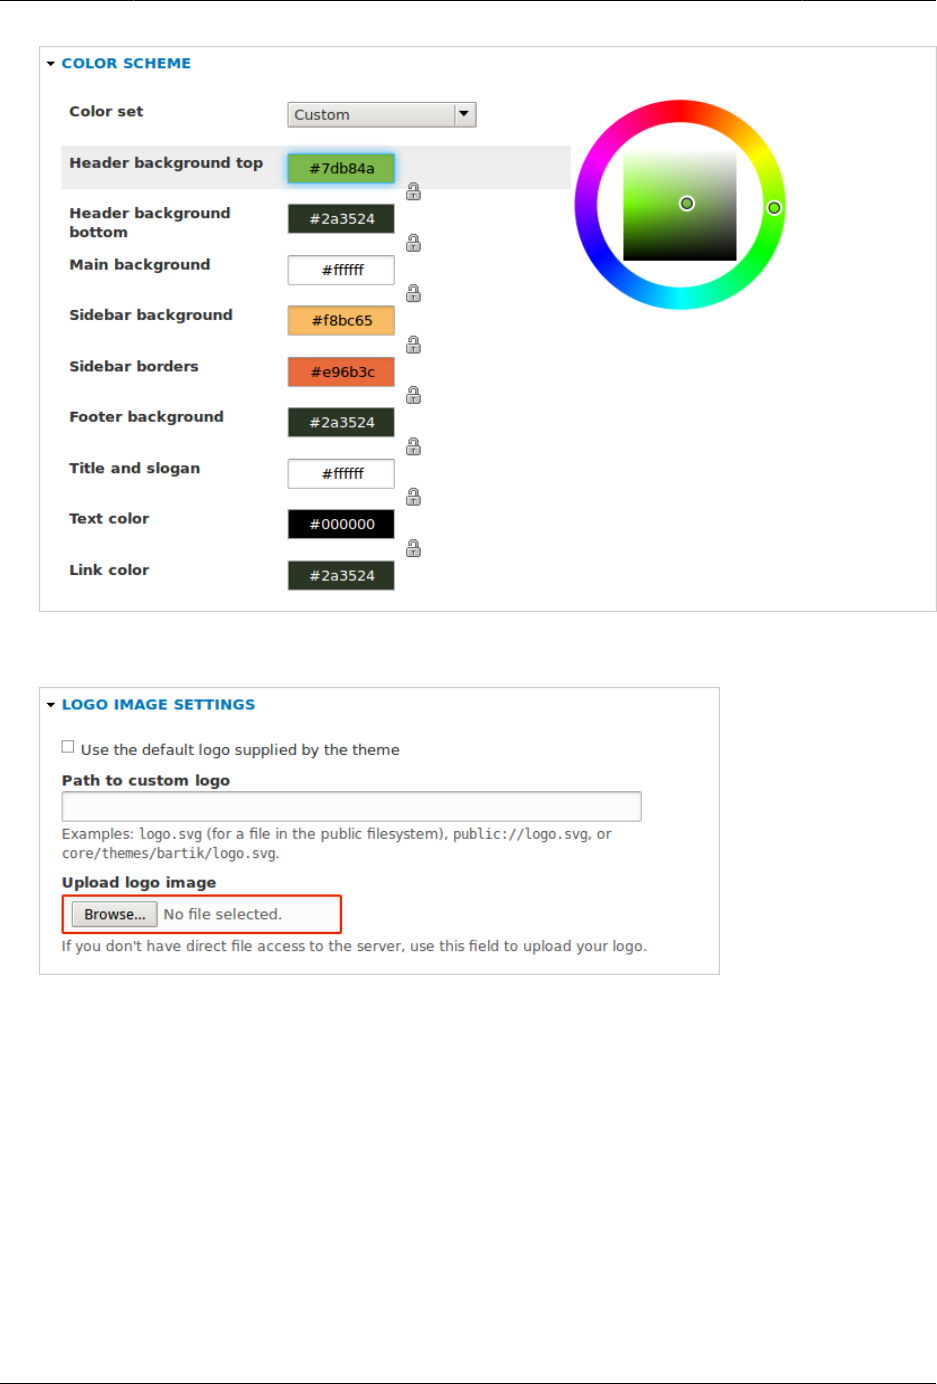
Konfigurasi Dasar Situs
4. Under Logo image, uncheck Use the logo supplied by the theme.
5. Under Upload logo image, locate a logo file and upload it to your site. Note: You can
also set a universal logo for all themes under Appearance > Settings (admin/appearance/
settings). A custom logo for your theme will override the universal logo.
Once you have selected the file you would like to upload, you will see its filename next
to the Choose File or Browse button in your browser.
6. In order to save your changes and see the updated colors and logo on your site, click
Save configuration at the bottom of the page.
Note: Under Color scheme, there is a Preview section that displays a sample of how your
website will look with the new settings.
45
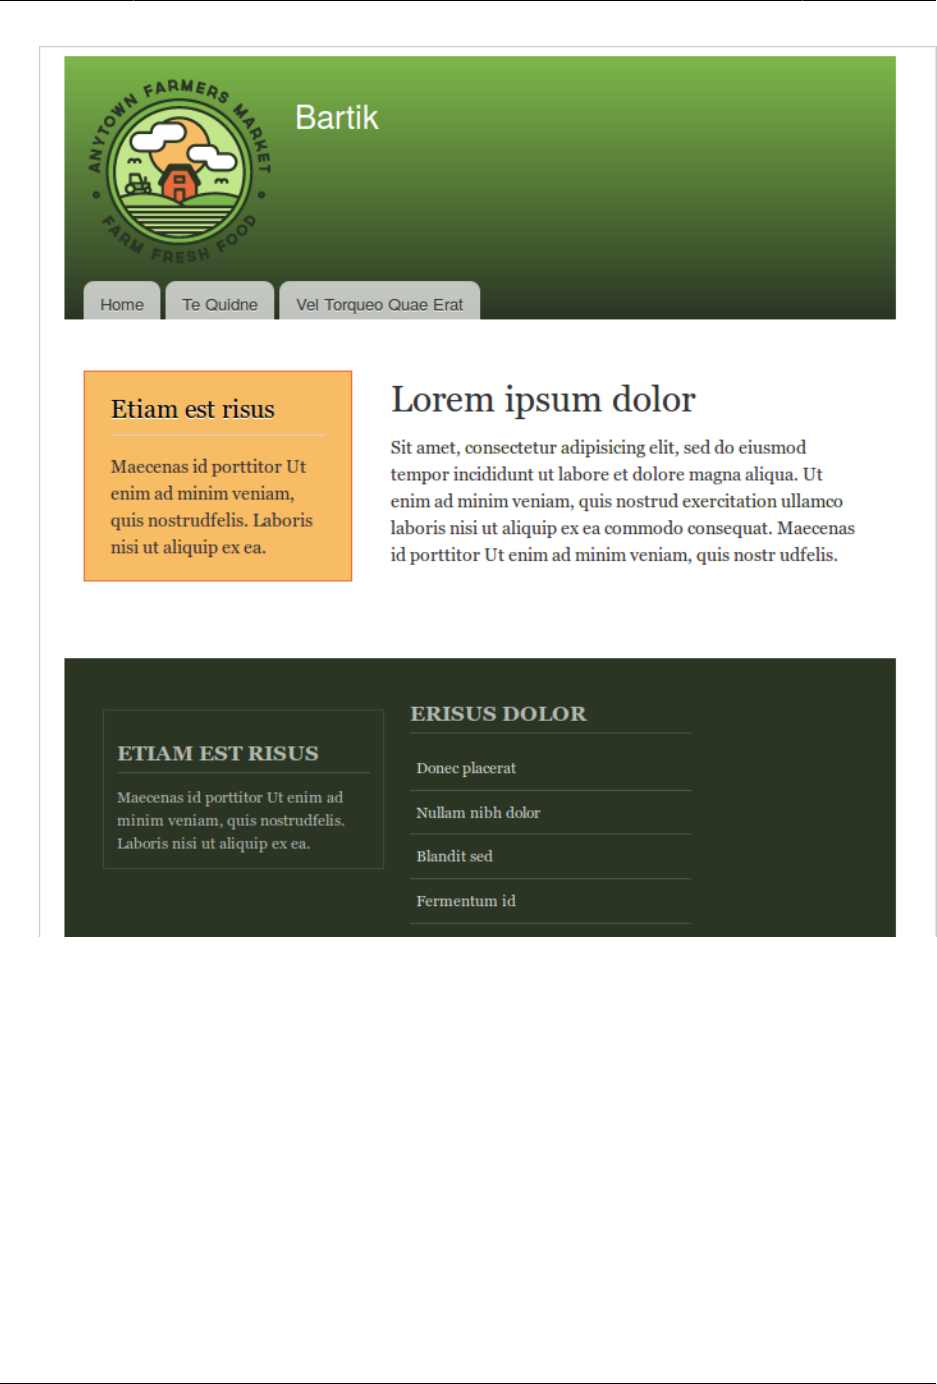
Konfigurasi Dasar Situs
7. Click Return to site or Home in the toolbar to verify that you have updated the core Bartik
theme settings for your website.
46
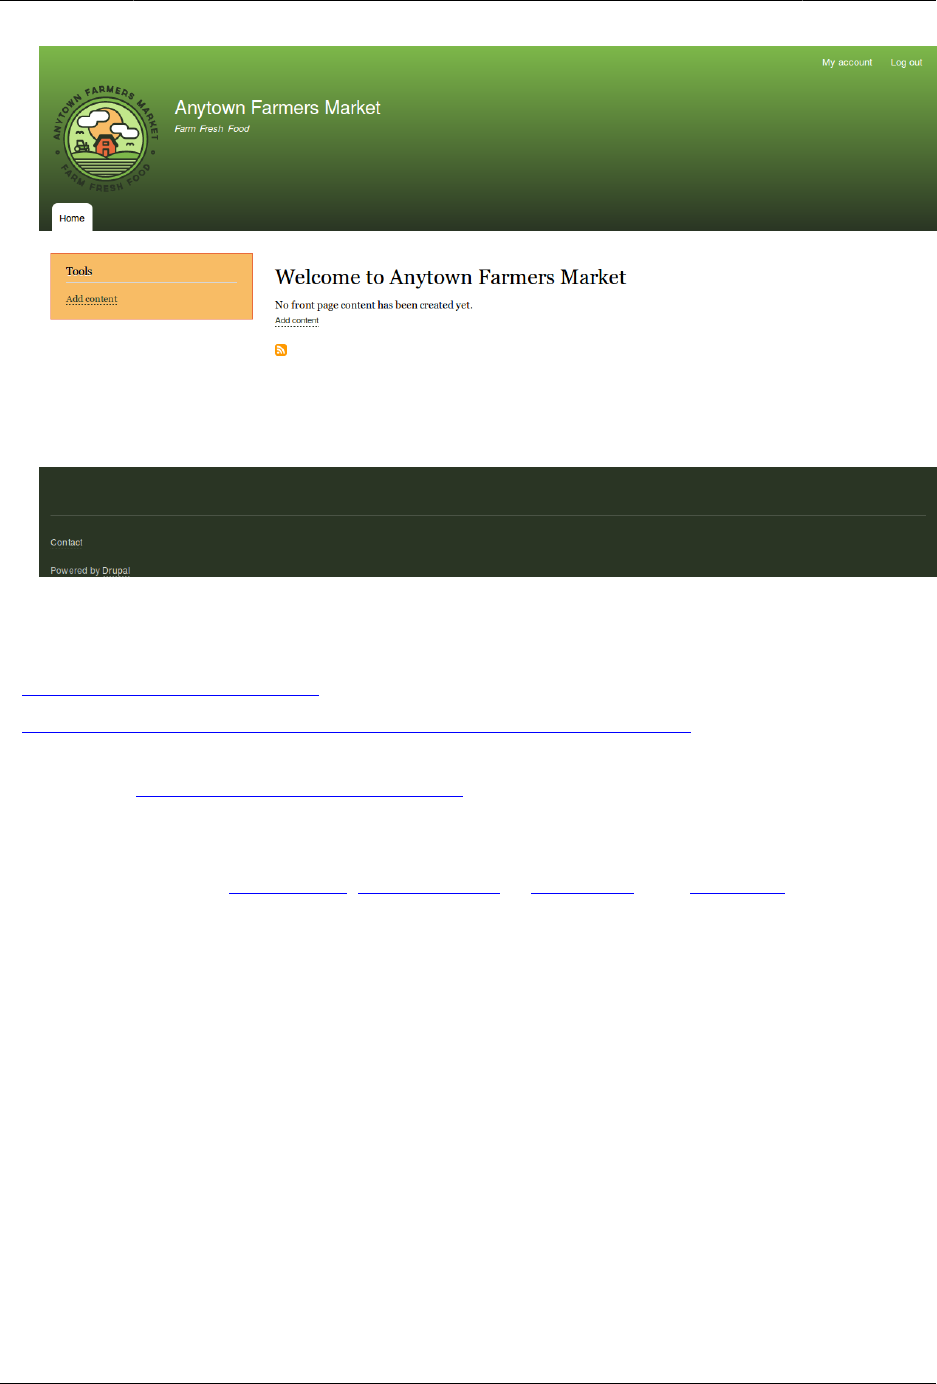
Konfigurasi Dasar Situs
Expand your understanding
•Bagian 11.4, “Finding Themes”
•Bagian 11.5, “Downloading and Installing a Theme from Drupal.org”
• If you do not see the effect of these changes in your site, you might need to clear the
cache. See Bagian 12.2, “Clearing the Cache”.
Attributions
Written and edited by Ann Greazel, Amanda Luker at Advomatic, and Jack Haas.
47

Bab 5. Manajemen Dasar Halaman
5.1. Concept: Paths, Aliases, and URLs
What is a URL?
URL is the abbreviation for "Uniform Resource Locator", which is the page’s address on the
web. It is the "name" by which a browser identifies a page to display. In the example "Visit
us at example.com.", example.com is the URL for the home page of your website. Users use
URLs to locate content on the web.
What is a Path?
A path is the unique, last part of the URL for a specific function or piece of content. For
example, for a page whose full URL is http://example.com/node/7, the path is node/7.
Here are some examples of paths you might find in your site:
•node/7
•taxonomy/term/6
•admin/content/comment
•user/login
•user/3
What is an Alias?
The core software has a feature called "URL Alias" that allows you to provide a more
understandable name to the content. So, if you have an "About Us" page with the path
node/7, you can set up an alias so that your visitors will see it as http://www.example.com/
AboutUs. The core Path module, which supports URL aliasing, provides this functionality.
Related topics
•Bagian 5.2, “Creating a Content Item”
•Bagian 5.3, “Editing a Content Item”
Attributions
Adapted by Diána Lakatos at Pronovix from "URL aliases", and "Understanding Drupal paths"
copyright 2000-2017 by the individual contributors to the Drupal Community Documentation
48

Manajemen Dasar Halaman
5.2. Creating a Content Item
Goal
Create and publish a content item that will be used as the home page of the site.
Prerequisite knowledge
Bagian 5.1, “Concept: Paths, Aliases, and URLs”
Site prerequisites
The Basic page content type must exist. This is created on your site when you install with the
core Standard installation profile.
Steps
1. In the Manage administrative menu, navigate to Content > Add content > Basic page (node/
add/page). The Create Basic page form appears.
2. Click Edit summary.
3. Fill in the fields as shown below.
Field name Explanation Value
Title Title of the page. Will also
be used as a meta tag in
the source code, URL alias,
and as label of the content
item in administration
screens
Home
Summary Summary of the value of
the body field. Can be used
as teaser in overview pages
Opening times and location
of City Market.
Body Full content of the page Welcome to City Market -
your neighborhood farmers
market!
Open: Sundays, 9 AM to 2
PM, April to September
Location: Parking lot of
Trust Bank, 1st & Union,
downtown
URL path settings > URL
alias
Alternate relative path for
the content
/home
49
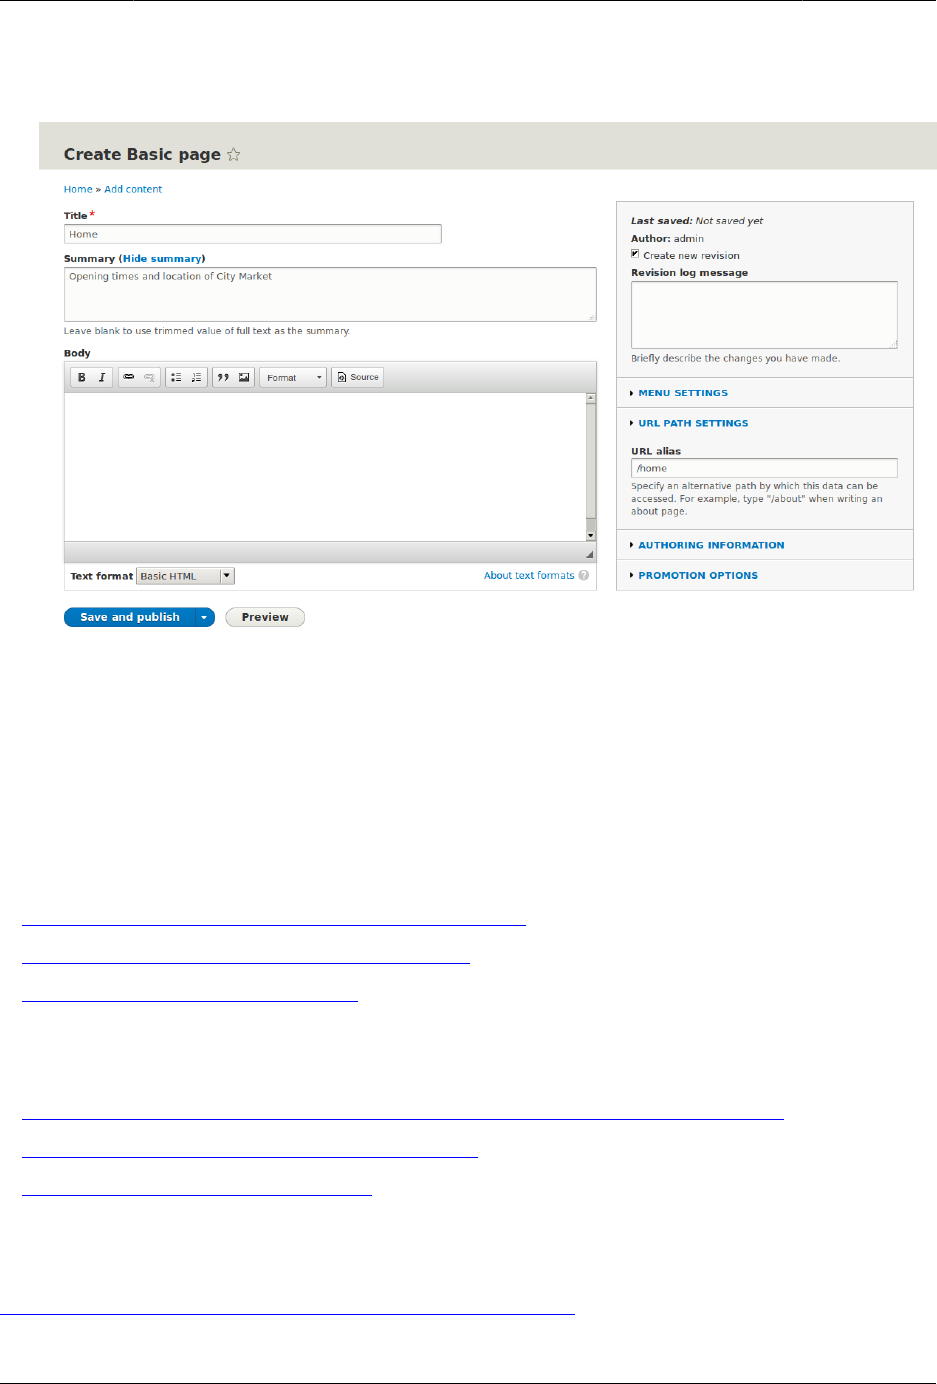
Manajemen Dasar Halaman
By clicking the Source button in the rich text editor toolbar, you can see the HTML source
code of the text that you are editing.
4. Click Preview to ensure everything looks like expected.
5. Click Back to content editing.
6. Click Save and publish. The content is saved and can be found on the Content page.
7. Follow the same steps to create an About page, with title "About", and a body telling
about the history of the farmer’s market.
Expand your understanding
•Bagian 5.5, “Designating a Front Page for your Site”
•Bagian 5.7, “Adding a Page to the Navigation”
•Bagian 10.4, “Translating Content”
Related concepts
•Bagian 10.1, “Concept: User Interface, Configuration, and Content translation”
•Bagian 5.1, “Concept: Paths, Aliases, and URLs”
•Bagian 5.3, “Editing a Content Item”
Additional resources
Drupal.org community documentation page "About nodes"
50
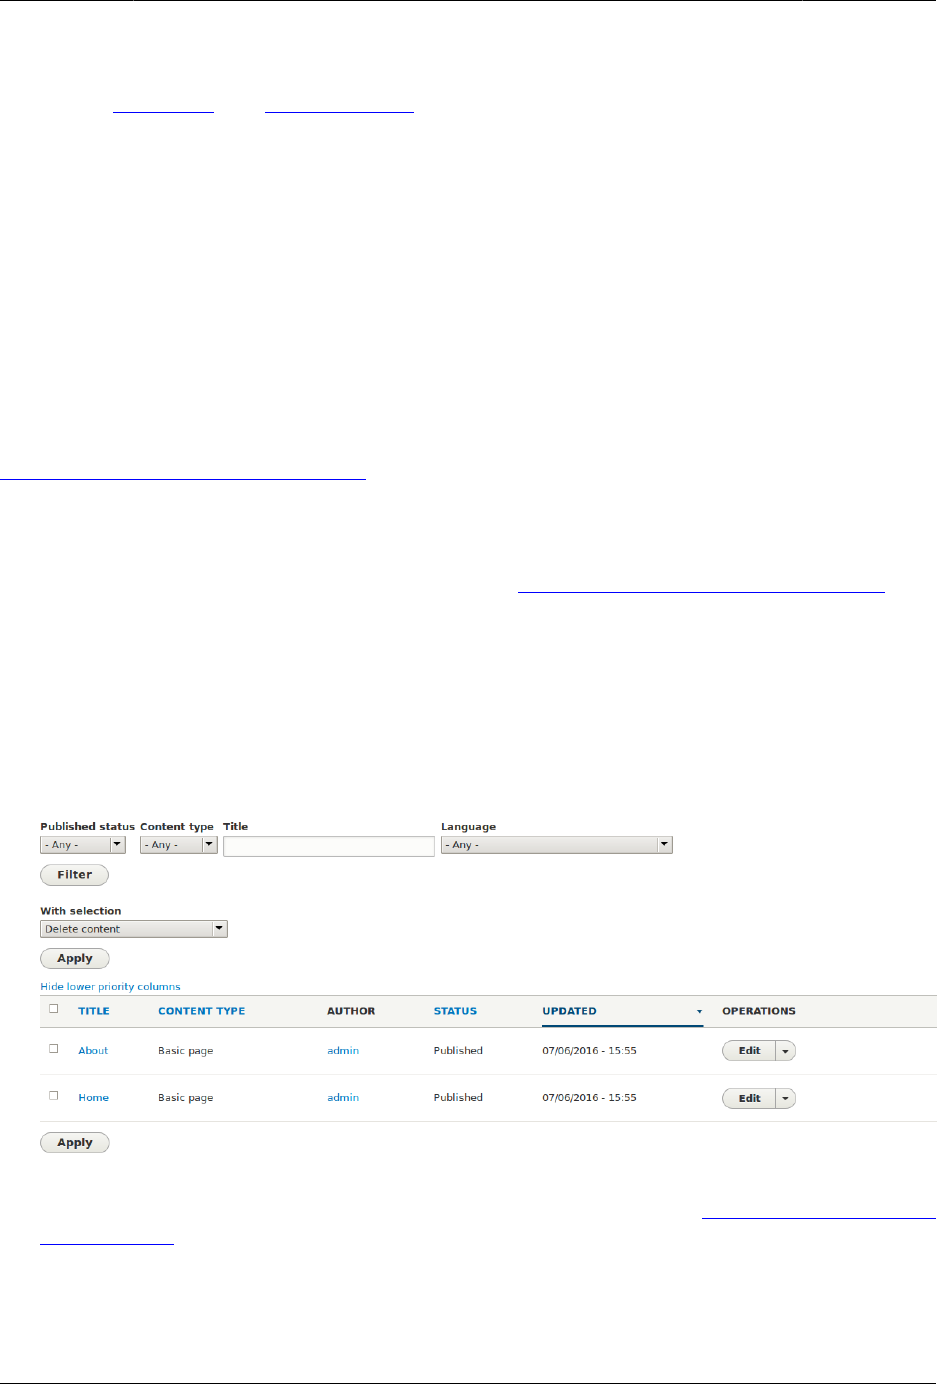
Manajemen Dasar Halaman
Attributions
Written by Agnes Kiss and Boris Doesborg.
5.3. Editing a Content Item
Goal
Update the hours on the Home page content item.
Prerequisite knowledge
Bagian 5.2, “Creating a Content Item”
Site prerequisites
A content item for the Home page must exist. See Bagian 5.2, “Creating a Content Item”.
Steps
1. In the Manage administrative menu, navigate to Content (admin/content).
2. If the content item you want to edit was updated or created recently, it should appear
near the top of the content list on that page. If not, you can use the Content type, Title,
or other filters to locate the content item.
3. Click Edit in the row of the content item you want to edit (Home), to open the content
editing form. Update the opening hours in the Body field. See Bagian 5.2, “Creating a
Content Item” for an explanation of the fields and a screenshot.
4. Check Create new revision in the box on the right, if it is not already checked, and enter a
Revision log message explaining what changes you are making (for example, you might
enter "Updated opening hours"). This text will appear in the revision log for the page.
51
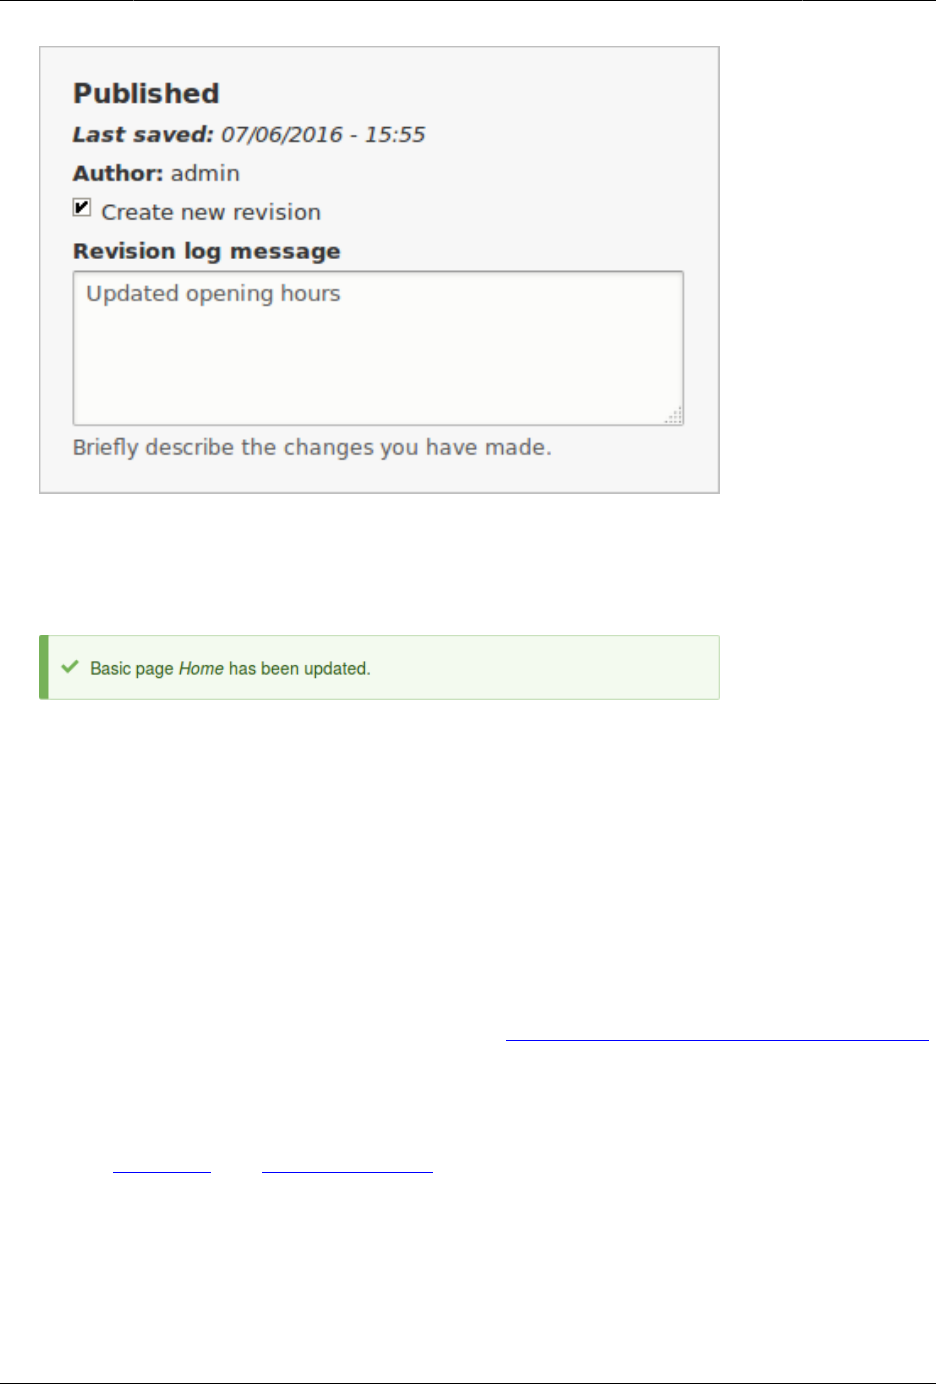
Manajemen Dasar Halaman
5. Click Save and keep published to save your changes.
6. You will be redirected back to the Content administrative page, and there should be a
message showing that the content item was updated.
Expand your understanding
As an alternative to the first two steps above, you can also reach the content edit form as
follows:
1. Starting from your site’s home page, use the site’s navigation menus to locate the page
where the content you want to edit is displayed to visitors.
2. Most themes will display an Edit link or tab near the top of that page to people with
permission to edit the page; clicking the link will take you to the full content edit form.
3. You could also use the in-place editor (refer to Bagian 5.4, “Editing with the In-Place Editor”)
from this page.
Attributions
Written by Chris Dart and Jennifer Hodgdon.
52
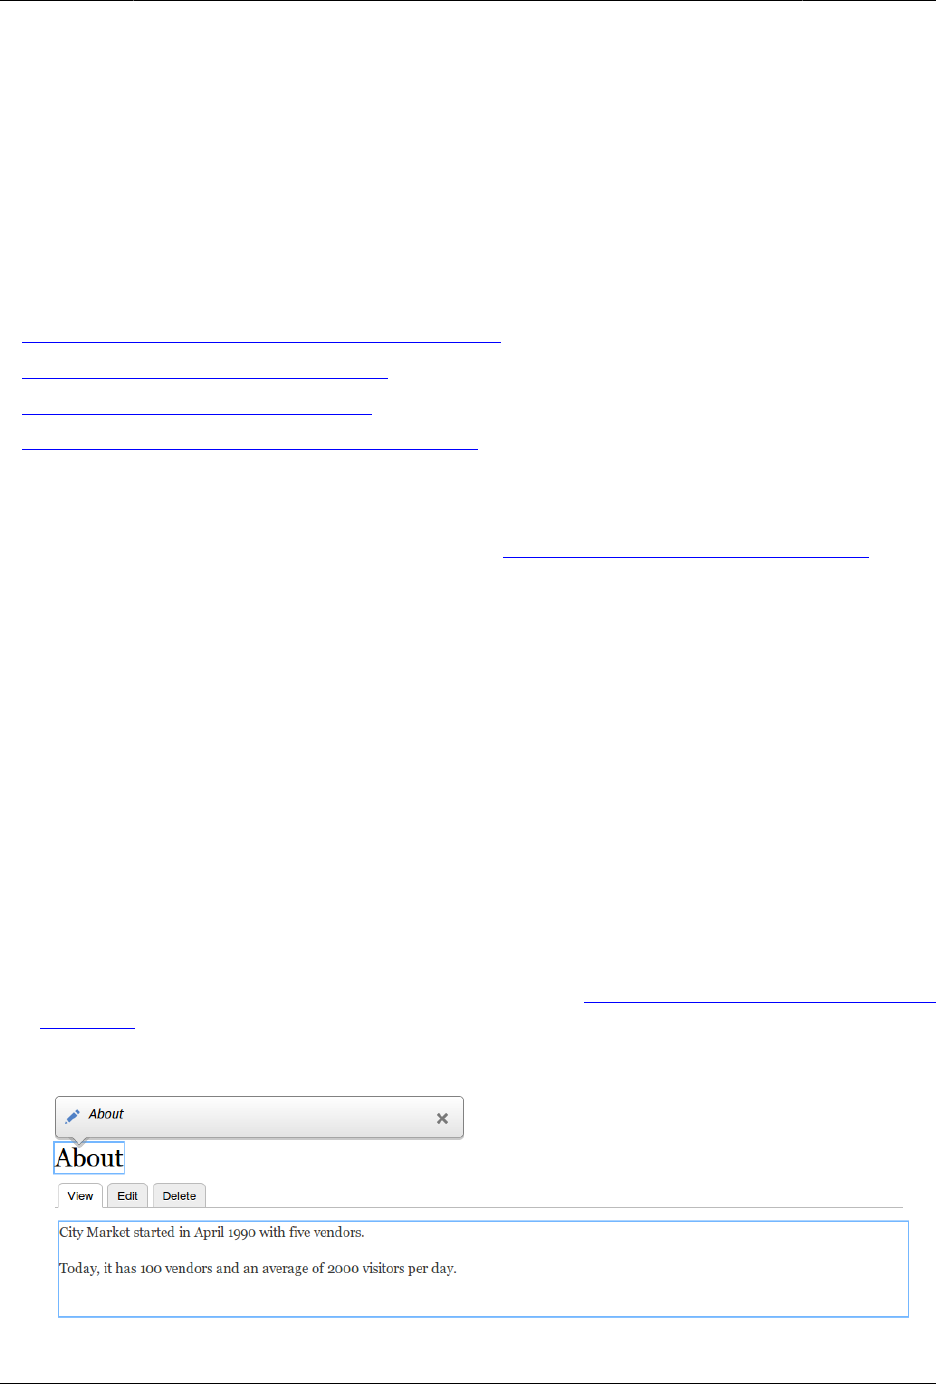
Manajemen Dasar Halaman
5.4. Editing with the In-Place Editor
Goal
Use the in-place editor to add information to the About page without opening the full editor
page.
Prerequisite knowledge
•Bagian 2.3, “Concept: Content Entities and Fields”
•Bagian 5.2, “Creating a Content Item”
•Bagian 5.3, “Editing a Content Item”
•Bagian 4.1, “Concept: Administrative Overview”
Site prerequisites
The About page you want to edit must exist. See Bagian 5.2, “Creating a Content Item”.
Steps
Navigate to the About page to edit content with the in-place editor. If the page has not yet
been added to a navigation menu, you can find and open it by following these steps:
1. In the Manage administrative menu, navigate to Content (admin/content).
2. If the content item you want to edit was updated or created recently, it should appear
near the top of the content list on that page. If not, you can use Type, Title, or other filters
to locate the content item.
3. Find the About page and click it.
Once the content you want to edit is being viewed in your browser, follow these steps to
use the quick editor:
1. Find the section of the page that displays the content you want to edit, and turn on quick
editing mode using the Quick edit contextual link (see Bagian 4.1, “Concept: Administrative
Overview” for instructions on how to access contextual links). You will see each editable
field on this content item outlined in blue; also, a hovering dialog box will appear.
53
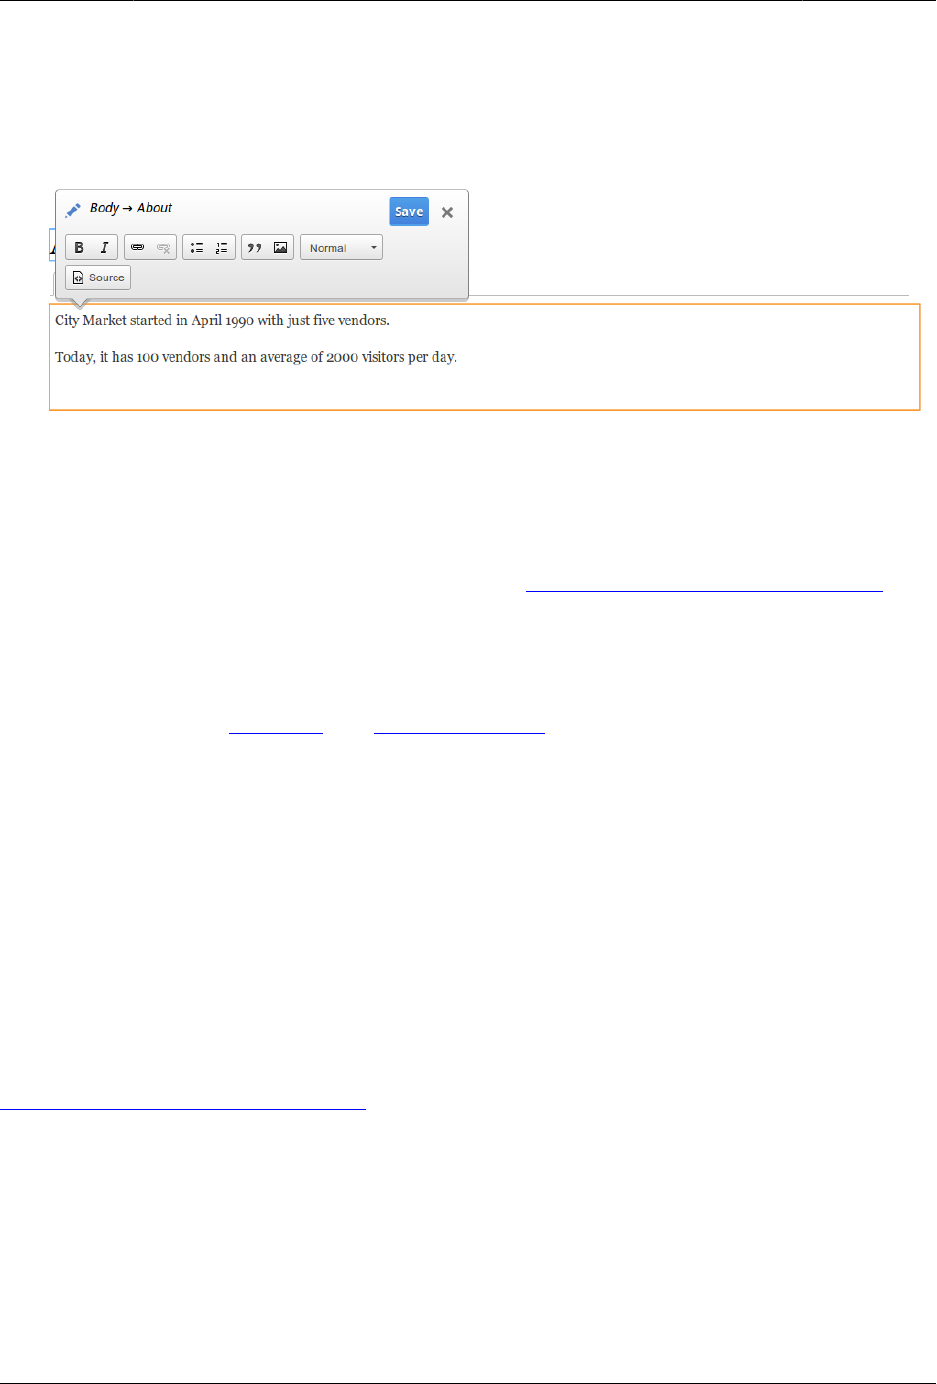
Manajemen Dasar Halaman
2. Click the Body text area to begin editing. The Body field supports a rich text editor. The
editing toolbar will be displayed in a hovering dialog box.
3. Add some information about City Market. A Save button will appear in the hovering
dialog box, and the field outline will change color.
4. If you are satisfied with your edits, click Save in the hovering dialog box. If not, click "x"
to discard your edits, and confirm. Either way, quick editing mode will be turned off.
Expand your understanding
Try using the full editor on the same content (see Bagian 5.3, “Editing a Content Item”) and
note that there is much more information that can be edited that is not available in the quick
editor.
Attributions
Written and edited by David Lee and Jennifer Hodgdon.
5.5. Designating a Front Page for your Site
Goal
Configure which content item is displayed as the front page of your website.
Site prerequisites
The content item that you want to designate as the front page of your site must exist. See
Bagian 5.2, “Creating a Content Item”.
Steps
1. In the Manage administrative menu, navigate to Configuration > System > Basic site
settings (admin/config/system/site-information).
2. Under Front page, replace /node with the name of the page you would like to make the
home page. To use the home page that was previously created, provide its path /home.
Click Save configuration.
54
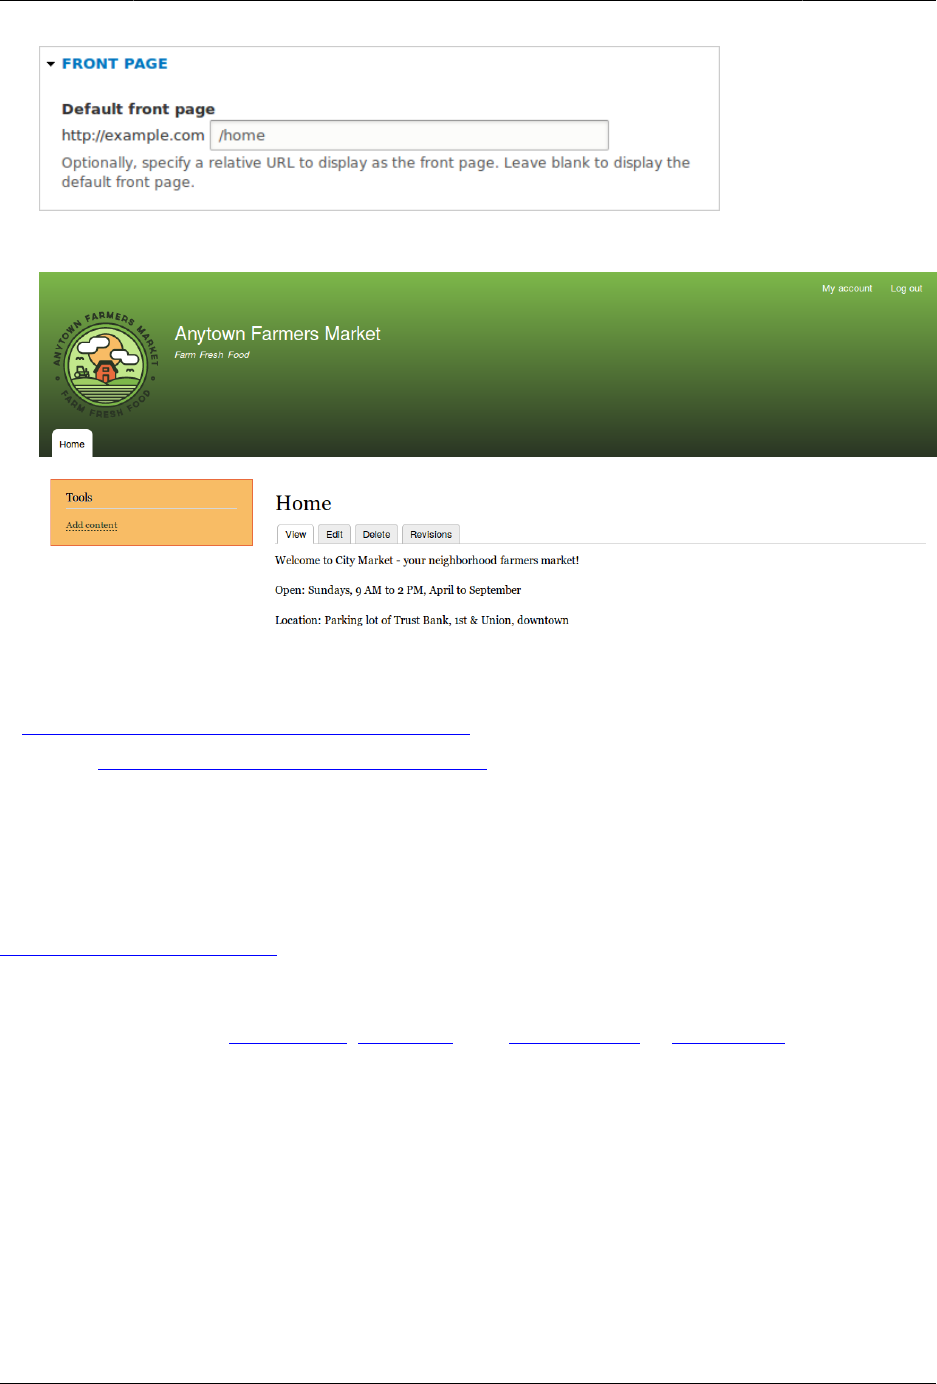
Manajemen Dasar Halaman
3. Navigate to the home page to verify that it displays content as configured by you.
Expand your understanding
•Bagian 5.7, “Adding a Page to the Navigation”
• Follow Bagian 5.2, “Creating a Content Item” to create an error page to be used as a
404 (page not found) or 403 (not authorized) response on your site. Then following the
steps here, you can designate it as the error response, in the Error pages section of the
configuration.
Related concepts
Bagian 5.6, “Concept: Menu”
Attributions
Written and edited by Ann Greazel, Jack Haas, and Jojy Alphonso at Red Crackle.
5.6. Concept: Menu
What is a menu?
Menus are a collection of links (menu items) used to navigate a website. The core Menu
UI module provides an interface to control and customize the menu system. Menus are
55

Manajemen Dasar Halaman
primarily displayed as a hierarchical list of links. By default, new menu items are placed inside
a built-in menu labeled Main navigation, but administrators can also create custom menus.
The core Standard installation profile contains five menus:
Main navigation
Links to sections intended for site visitors. They are usually created by site administrators.
Administration
Links to administrative tasks. This menu mainly contains links supplied by modules on
your site.
User account menu
Links to tasks associated with the user account such as My account and Log out.
Footer
Links to important pages within the site intended for the footer. They are usually created
by site administrators.
Tools
Links to tasks necessary for site visitors. Some modules feature their links here.
You can customize menus in the following ways, using the menu administration
functionality:
• Creating new custom menus.
• Adding new menu items.
• Reordering menu items by setting their "weight" or by dragging them into place.
• Renaming menu items.
• Changing the link title (the tooltip that appears when you mouse over a menu item).
• Moving a menu item into a different menu by editing its Parent property.
A menu item will only be shown to a visitor if they have the rights to view the page it links
to. For example, the admin menu item is not shown to visitors who are not logged in.
Related topics
•Bagian 5.7, “Adding a Page to the Navigation”
•Bagian 5.8, “Changing the Order of Navigation”
• To display a menu, you will need to place the block that corresponds to the menu in
a region of your theme; see Bagian 8.1, “Concept: Blocks”, Bagian 2.1, “Concept: Regions
in a Theme”, and Bagian 8.3, “Placing a Block in a Region”. The core Standard installation
profile places all of the menus it defines except Administration in regions of the core
56
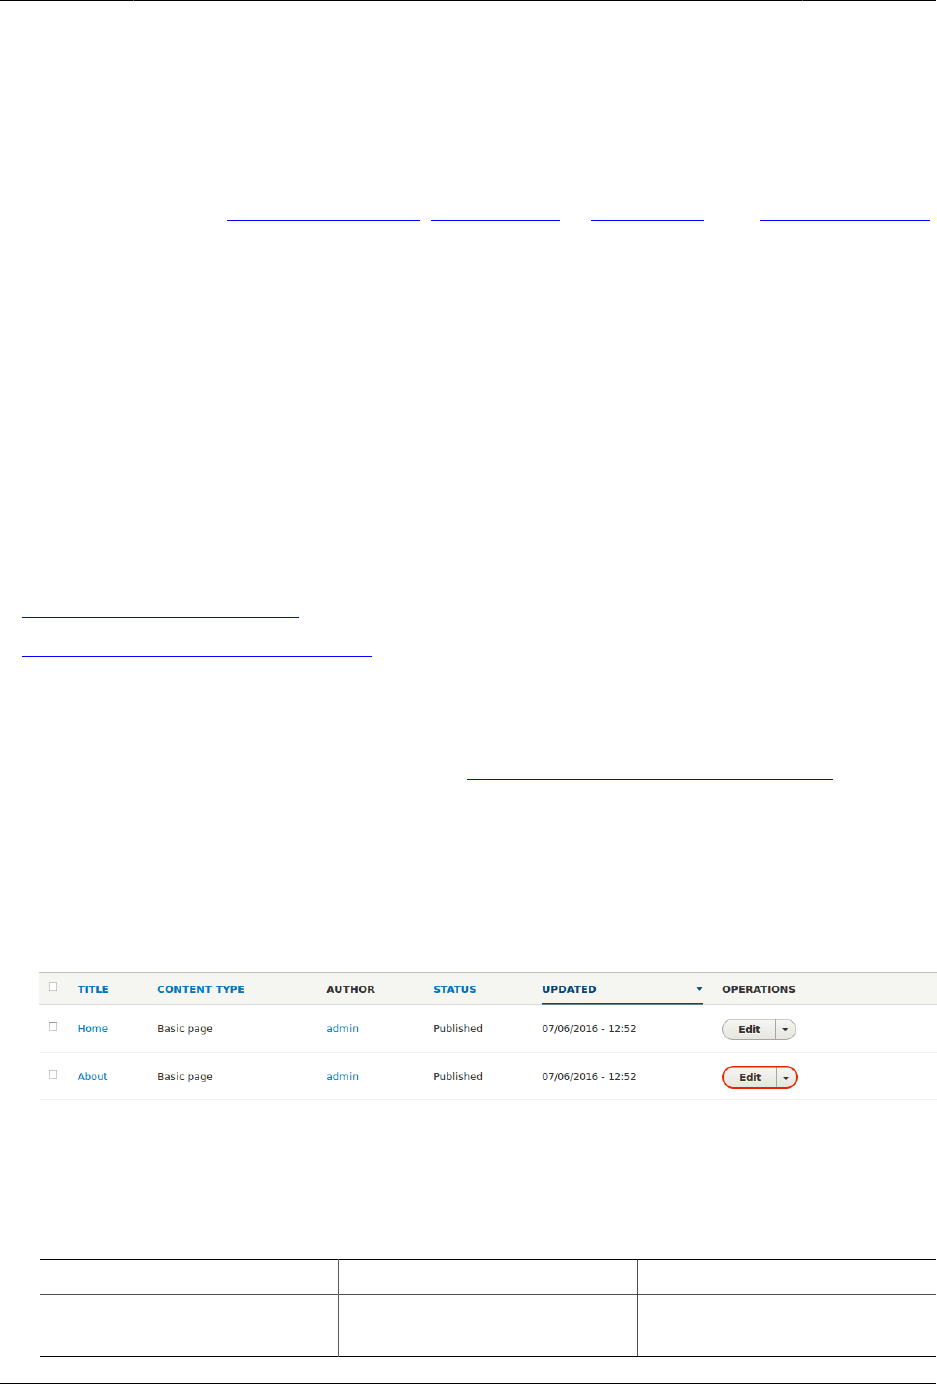
Manajemen Dasar Halaman
Bartik theme. The core Toolbar module, which is installed by the core Standard installation
profile, displays the Administration menu; it is also displayed by the contributed Admin
Toolbar module.
Attributions
Written and edited by Ajay Viswambharan, Jojy Alphonso at Red Crackle, and Jennifer Hodgdon.
5.7. Adding a Page to the Navigation
Goal
Add a page to the navigation. For example, the About page.
Prerequisite knowledge
•Bagian 5.6, “Concept: Menu”
•Bagian 5.3, “Editing a Content Item”
Site prerequisites
The About page content item must exist. See Bagian 5.2, “Creating a Content Item”.
Steps
1. In the Manage administrative menu, navigate to Content (admin/content).
2. Find the About page, and click Edit in that row. The content editing form appears.
3. Click Menu settings on the right to expand it.
4. Check Provide a menu link for the menu options to appear.
5. Enter values from the table below:
Field name Explanation Example value
Menu link title Title that will be displayed
in the menu
About
57
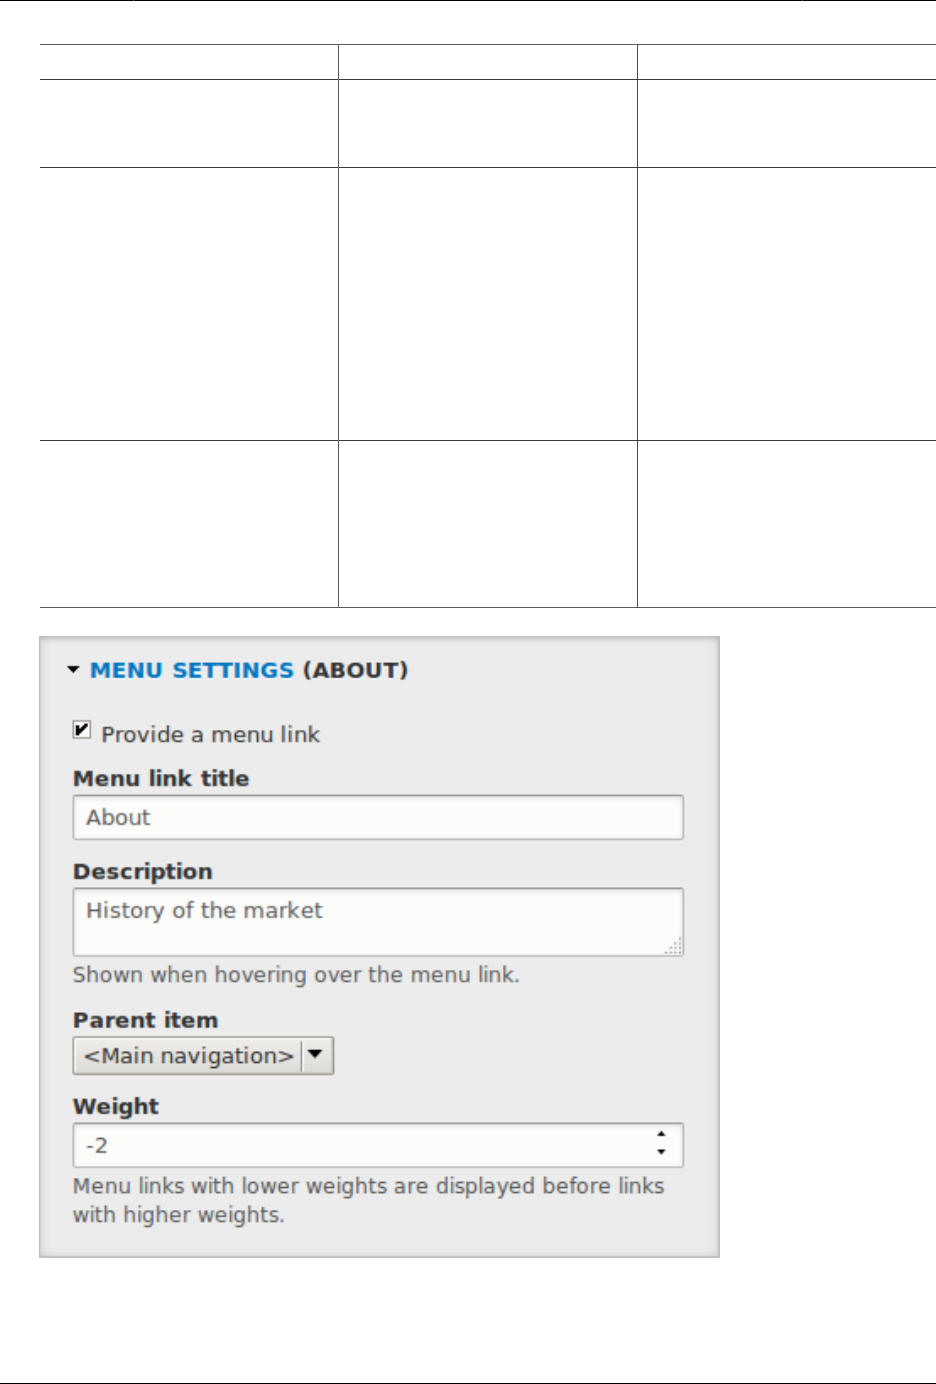
Manajemen Dasar Halaman
Field name Explanation Example value
Description Text that will be displayed
when a visitor hovers over
the link
History of the market
Parent item Location of the page in
the menu hierarchy. For
example, if you choose
<Main navigation>, the page
will appear in the highest
level of the navigation. By
choosing another menu
item as parent, you can
create a menu hierarchy of
multiple levels.
<Main navigation>
Weight The order in which the page
should appear in the menu
(lower-weighted menu
items will be shown before
higher-weighted menu
items)
-2
6. Click Save and keep published to save the changes. Click Home or Return to site in the
navigation bar to see the result, which could look like the picture below.
58
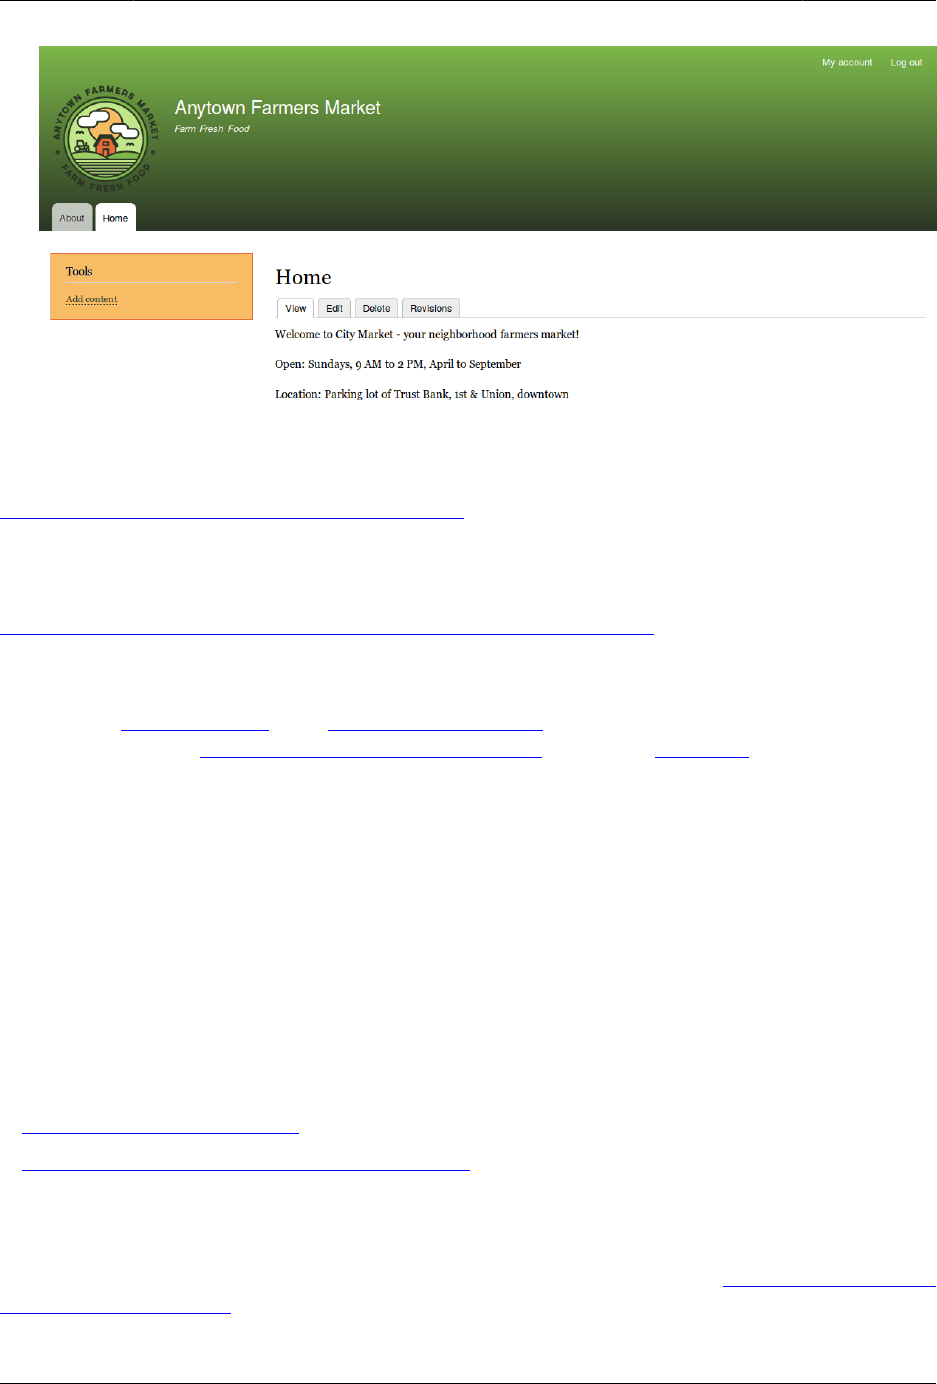
Manajemen Dasar Halaman
Expand your understanding
Bagian 5.8, “Changing the Order of Navigation”
Additional resources
Drupal.org community documentation page "Working with menus"
Attributions
Adapted by Boris Doesborg from "Working with Menus", copyright 2000-2017 by the individual
contributors to the Drupal Community Documentation; edited by Jack Haas.
5.8. Changing the Order of Navigation
Goal
Reorder the items in a menu.
Prerequisite knowledge
•Bagian 5.6, “Concept: Menu”
•Bagian 5.7, “Adding a Page to the Navigation”
Site prerequisites
Home and About pages must exist in the main navigation menu. See Bagian 5.7, “Adding a
Page to the Navigation”.
59
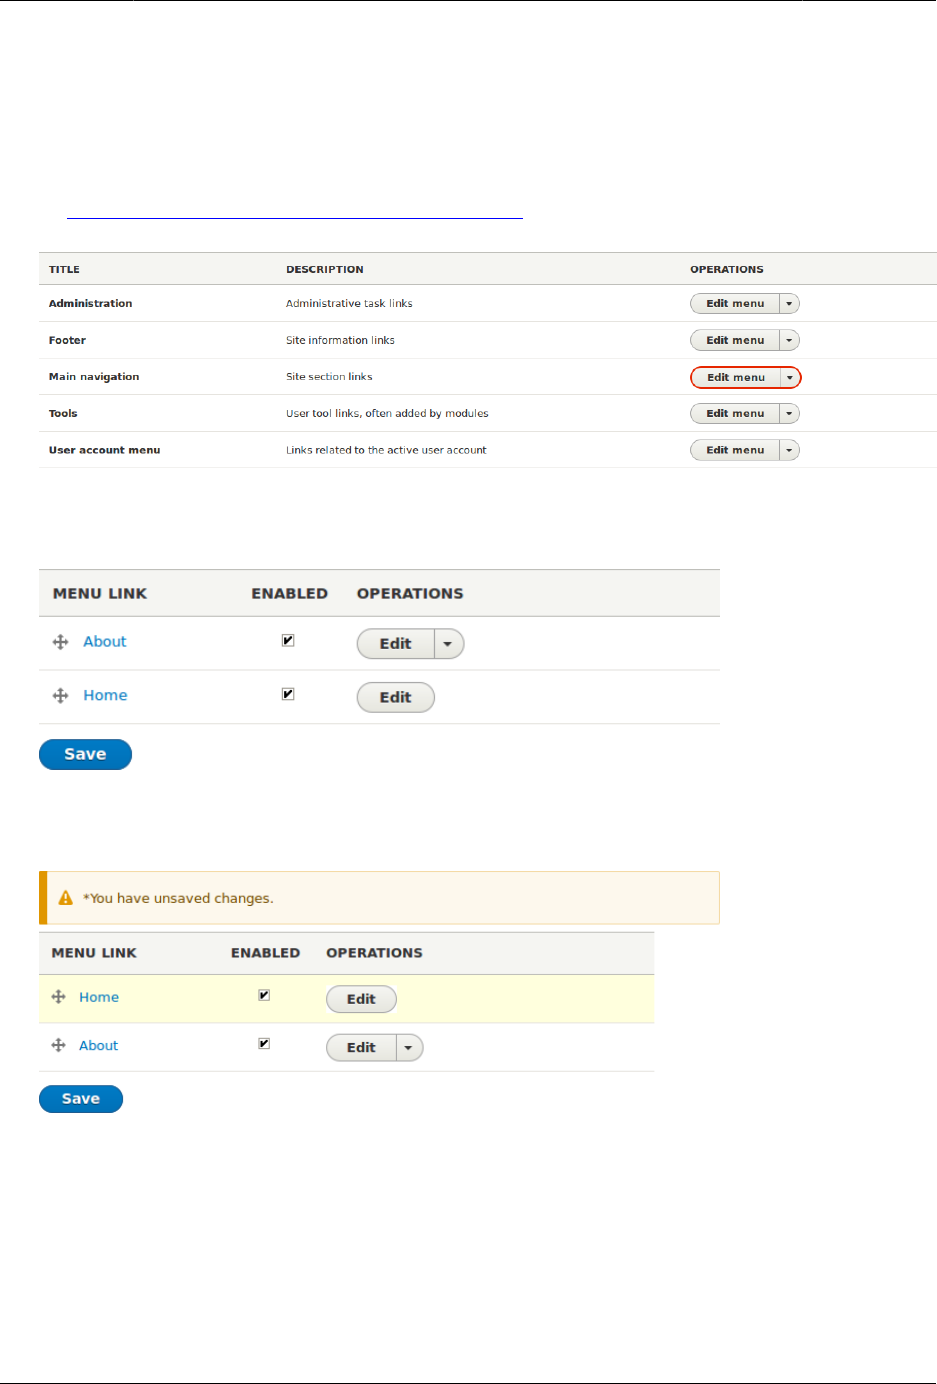
Manajemen Dasar Halaman
Steps
1. In the Manage administrative menu, navigate to Structure > Menus (admin/structure/
menu) where all menus on your site are listed. Click Edit Menu from the Operations
dropdown for Main navigation. You can also reach this page using contextual links (refer
to Bagian 4.1, “Concept: Administrative Overview”) for the menu.
2. The Edit menu page will display a list of each item in the menu you chose (Main
navigation).
3. Use the cross bar handles to reorder the menu items. Drag the Home menu item above
the About menu item so that it appears first.
4. Click Save.
5. The home page now displays the main navigation with the Home menu item displayed
first.
60
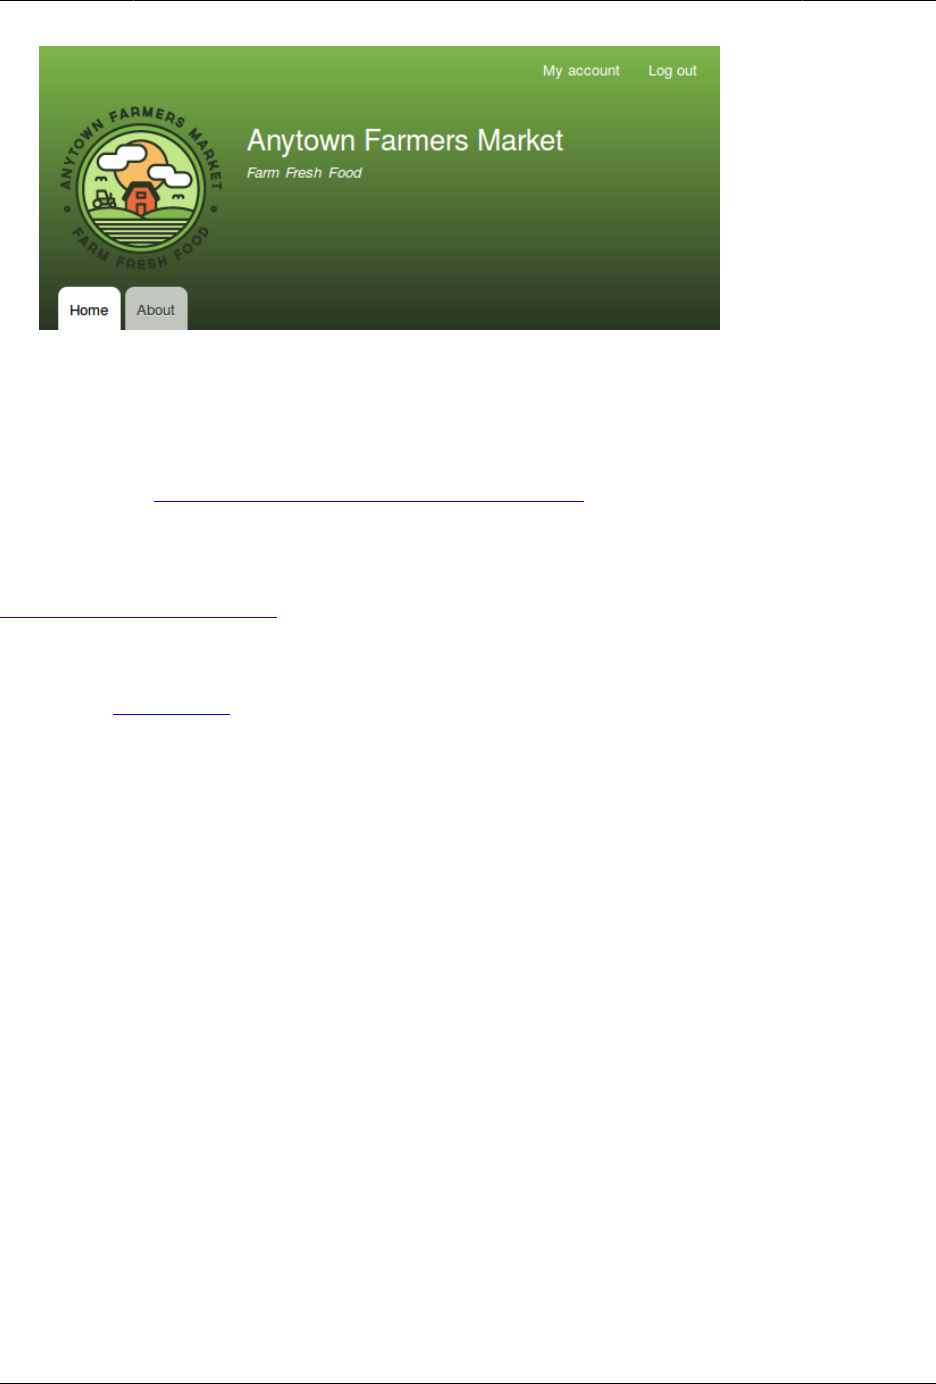
Manajemen Dasar Halaman
Expand your understanding
Add a menu item called Contact, leading to the /contact page, to your Main navigation menu.
The contact page is provided by the core Contact module; you may want to edit its layout
and fields (see Bagian 6.9, “Changing Content Entry Forms”).
Related concepts
Bagian 5.6, “Concept: Menu”
Attributions
Written by Ann Greazel.
61
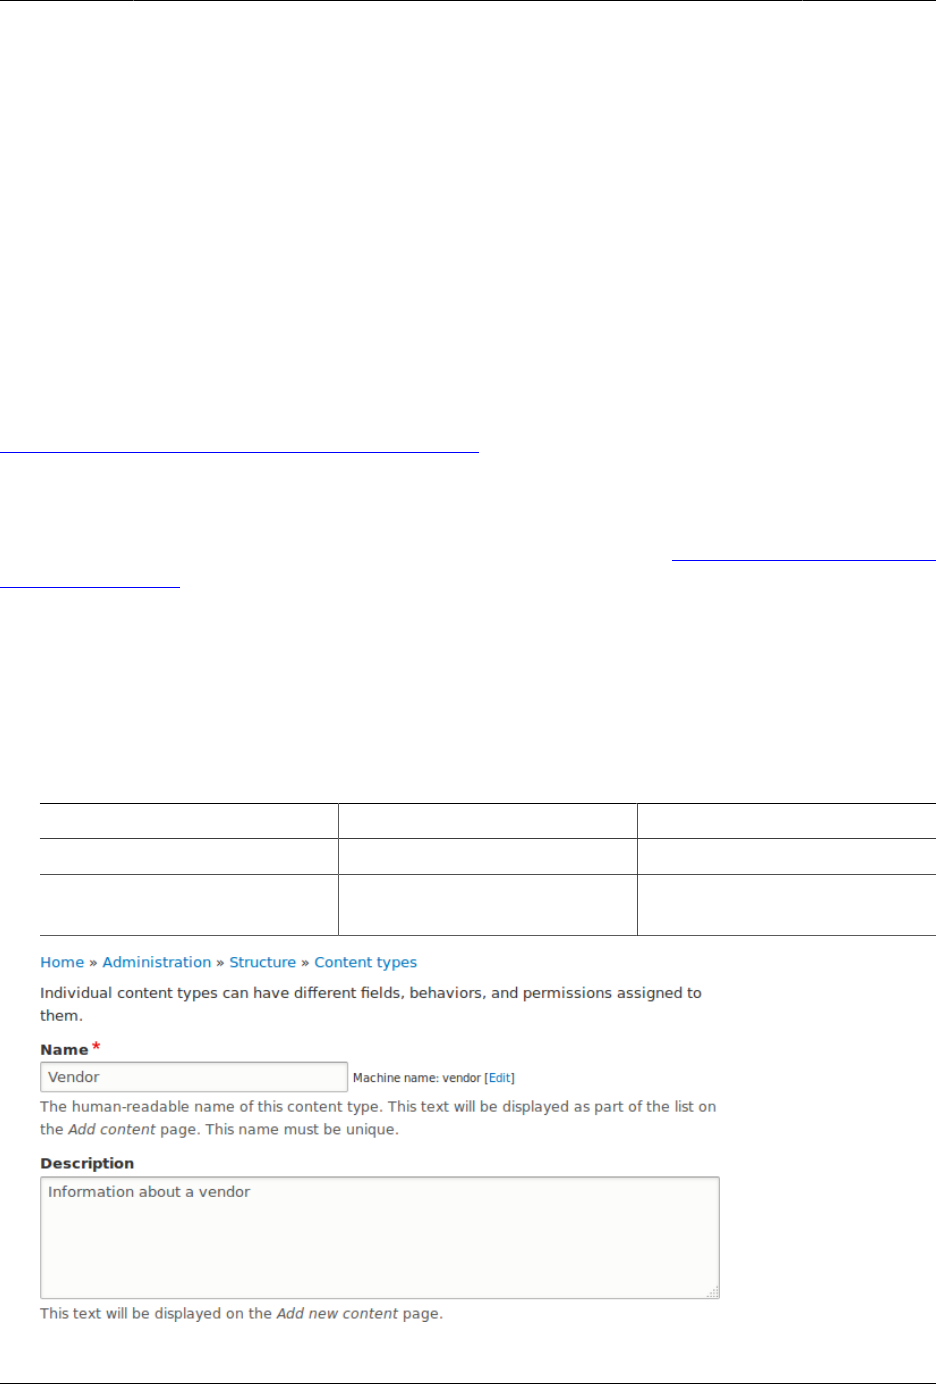
Bab 6. Menyiapkan Struktur Konten
6.1. Adding a Content Type
Goal
Add and configure a new content type Vendor.
Prerequisite knowledge
Bagian 2.3, “Concept: Content Entities and Fields”
Site prerequisites
You need to have a plan in place for your content structure. See Bagian 2.5, “Planning your
Content Structure”.
Steps
1. In the Manage administrative menu, navigate to Structure > Content types (admin/
structure/types). The Content types page appears showing all the available types of
content.
2. Click Add content type. The Add content type page appears. Fill in the fields as shown below.
Field name Explanation Example value
Name Name of the content type Vendor
Description Explain the use of the
content type
Information about a vendor
62
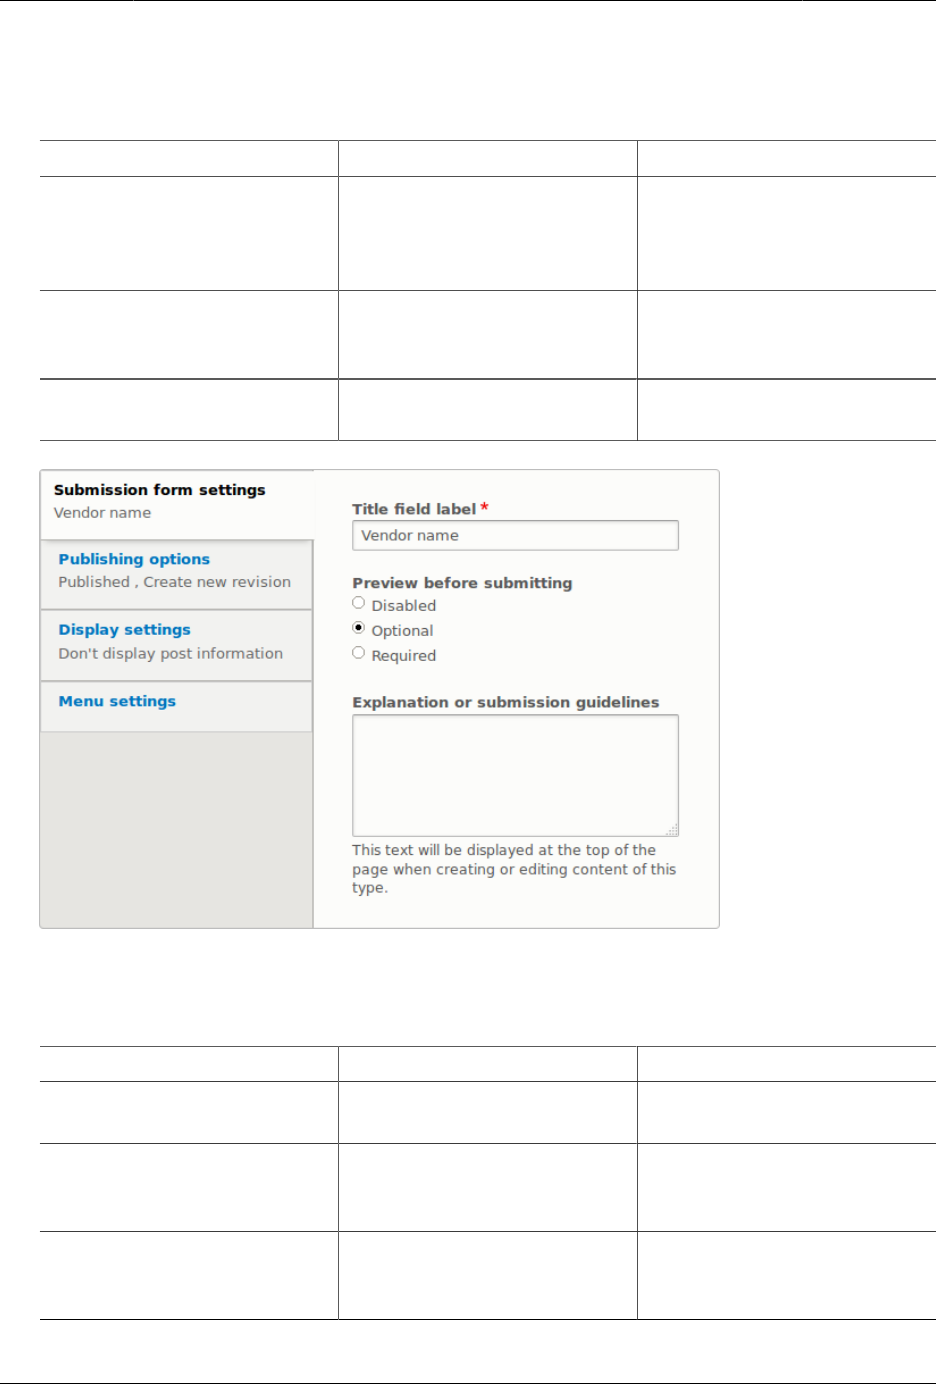
Menyiapkan Struktur Konten
3. In the vertical tab Submission form settings, configure the form that is used for creating
and editing content of this type. Fill in the fields as shown below.
Field name Explanation Example value
Title field label Label of the Title field that
is shown when editing or
creating content of this
type.
Vendor name
Preview before submitting Option to choose whether
you should preview the
content before submitting.
Optional
Explanation or submission
guidelines
Instructions for creating or
editing content.
(Leave blank)
4. In the vertical tab Publishing options, decide on default options for new content of this
type. Fill in the fields as shown below.
Field name Explanation Example value
Published Make the content item
published by default.
Checked
Promoted to front page In a default website, this
setting can be used to show
content on the homepage.
Unchecked
Sticky at top of lists In a default website, this
setting can be used to keep
content on top of a list.
Unchecked
63
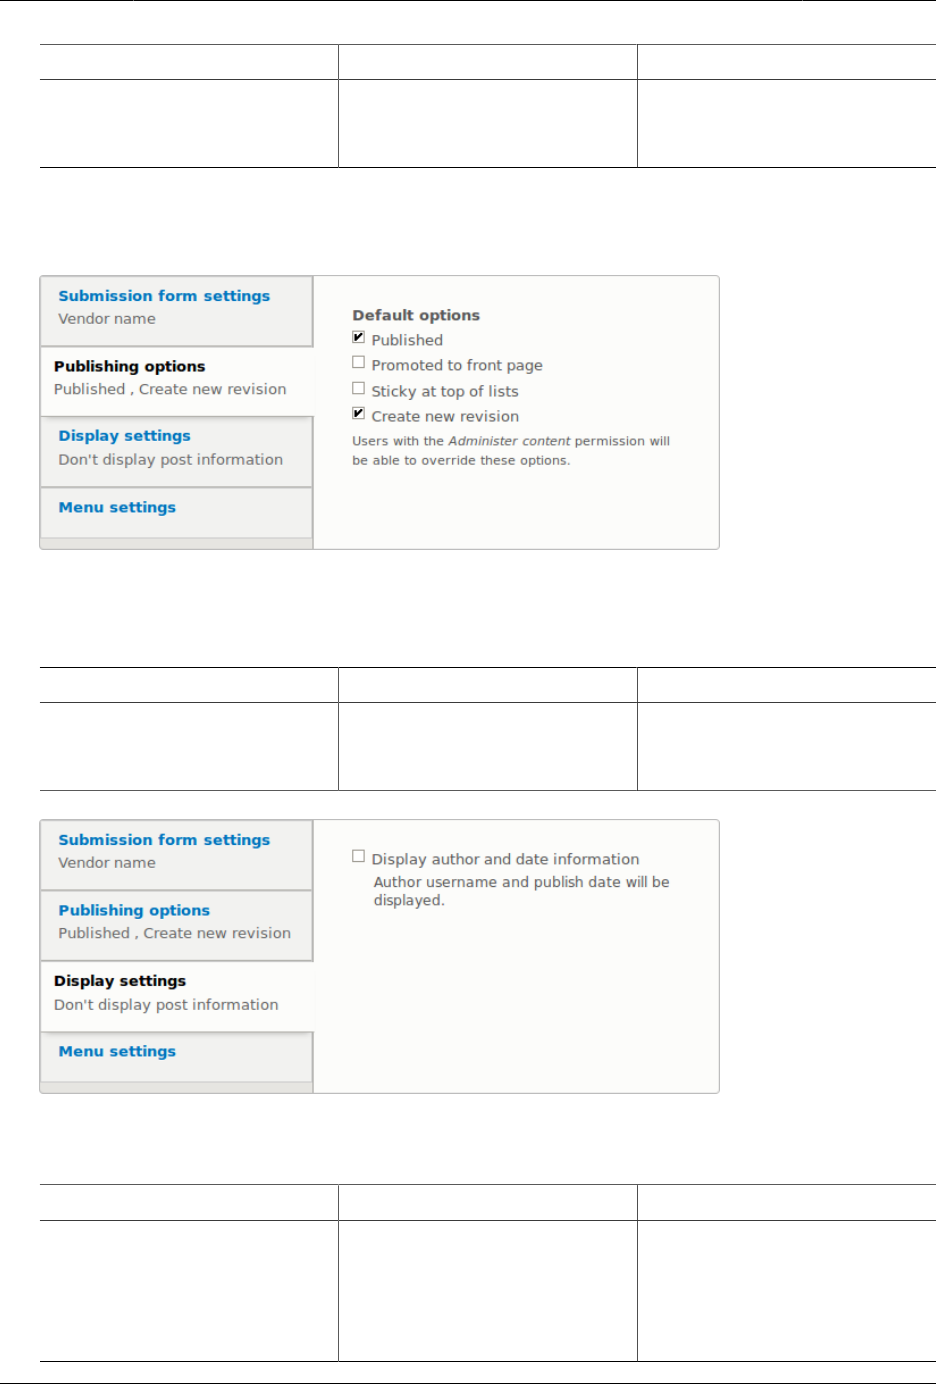
Menyiapkan Struktur Konten
Field name Explanation Example value
Create new revision Create a new revision each
time the vendor is being
edited.
Checked
Changing these settings does not affect the content items that have already been
created.
5. In the vertical tab Display settings, decide if the author and publication date will be visible
in the content item. Fill in the fields as shown below.
Field name Explanation Example value
Display author and date
information
Display the author
username and publication
date on each vendor page.
Unchecked
6. In the vertical tab Menu settings, fill in the fields as shown below.
Field name Explanation Example value
Available menus Menus that this type of
content can be added
to. Vendors do not need
to appear in menus, so
uncheck all menu options.
Unchecked
64
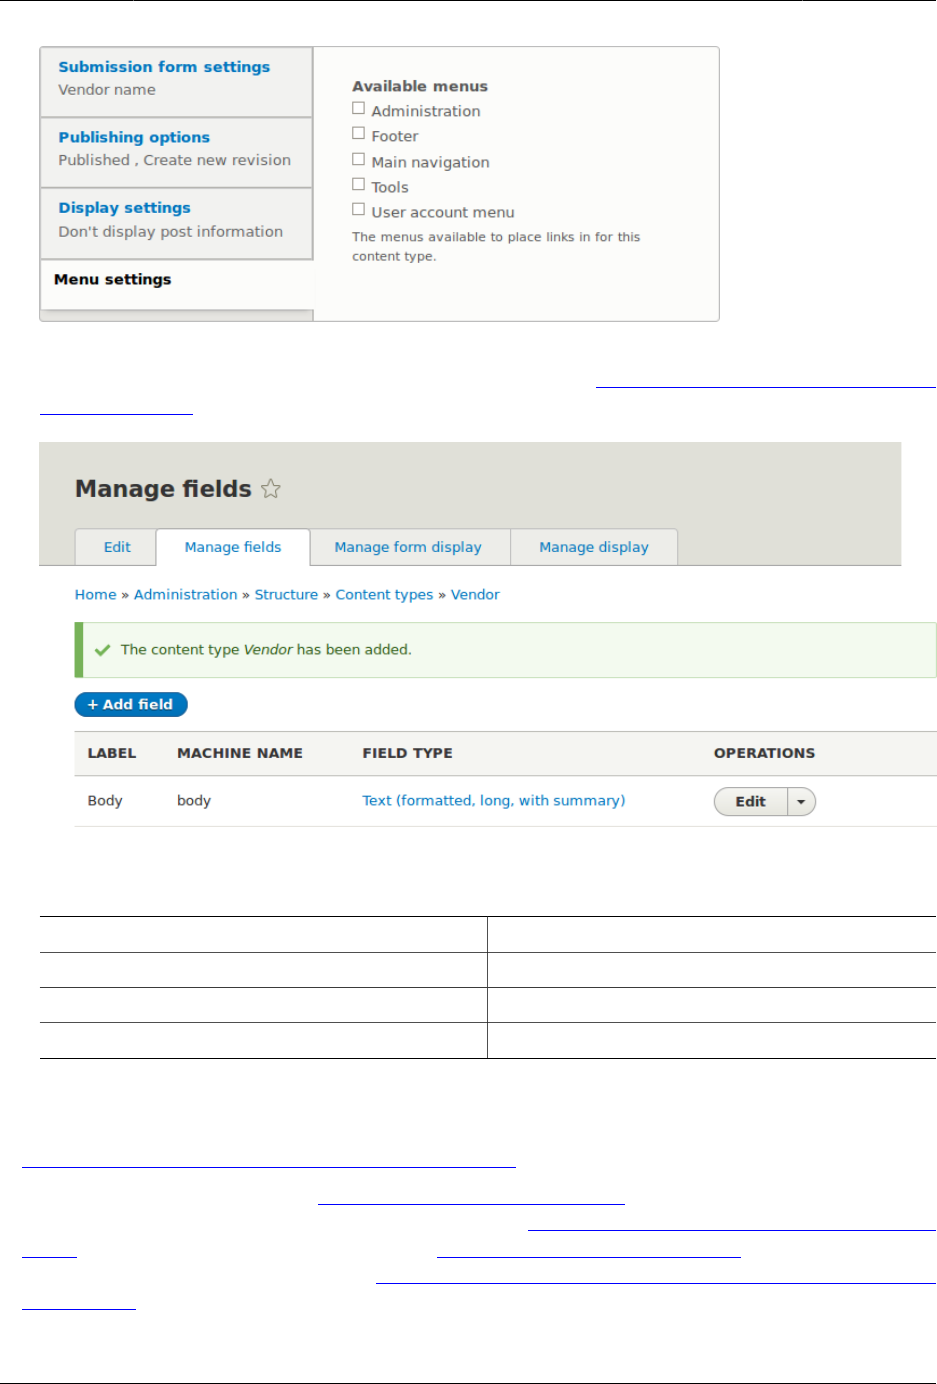
Menyiapkan Struktur Konten
7. Click Save and manage fields to save the content type. The Manage fields page appears
that allows you to add fields to the content type. See Bagian 6.3, “Adding Basic Fields to
a Content Type”
8. Follow the same steps to create a content type for recipes. Example values for the fields
in the forms, where they are different from the steps above:
Field name Example value
Name Recipe
Description A recipe submitted by a vendor
Submission form settings - Title Recipe name
Expand your understanding
•Bagian 6.3, “Adding Basic Fields to a Content Type”
• Install and configure the contributed Pathauto module so that content items get
automatically generated URLs/path aliases. See Bagian 5.1, “Concept: Paths, Aliases, and
URLs” for more on URLs within your site, Bagian 11.1, “Finding Modules” for instructions on
finding contributed modules, and Bagian 11.3, “Downloading and Installing a Module from
Drupal.org” for instructions on downloading and installing contributed modules.
65
Menyiapkan Struktur Konten
Attributions
Written and edited by Sree Veturi, Boris Doesborg, and Jennifer Hodgdon.
6.2. Deleting a Content Type
Goal
Delete the unneeded content type Article.
Prerequisite knowledge
Bagian 4.1, “Concept: Administrative Overview”
Site prerequisites
The Article content type must exist. It is created on your site when you install with the core
Standard installation profile.
Steps
1. In the Manage administrative menu, navigate to Structure > Content types (admin/
structure/types). The Content types page appears.
2. Click Delete in the Operations dropdown button for the Article content type.
3. A confirmation page is displayed. Click Delete.
66
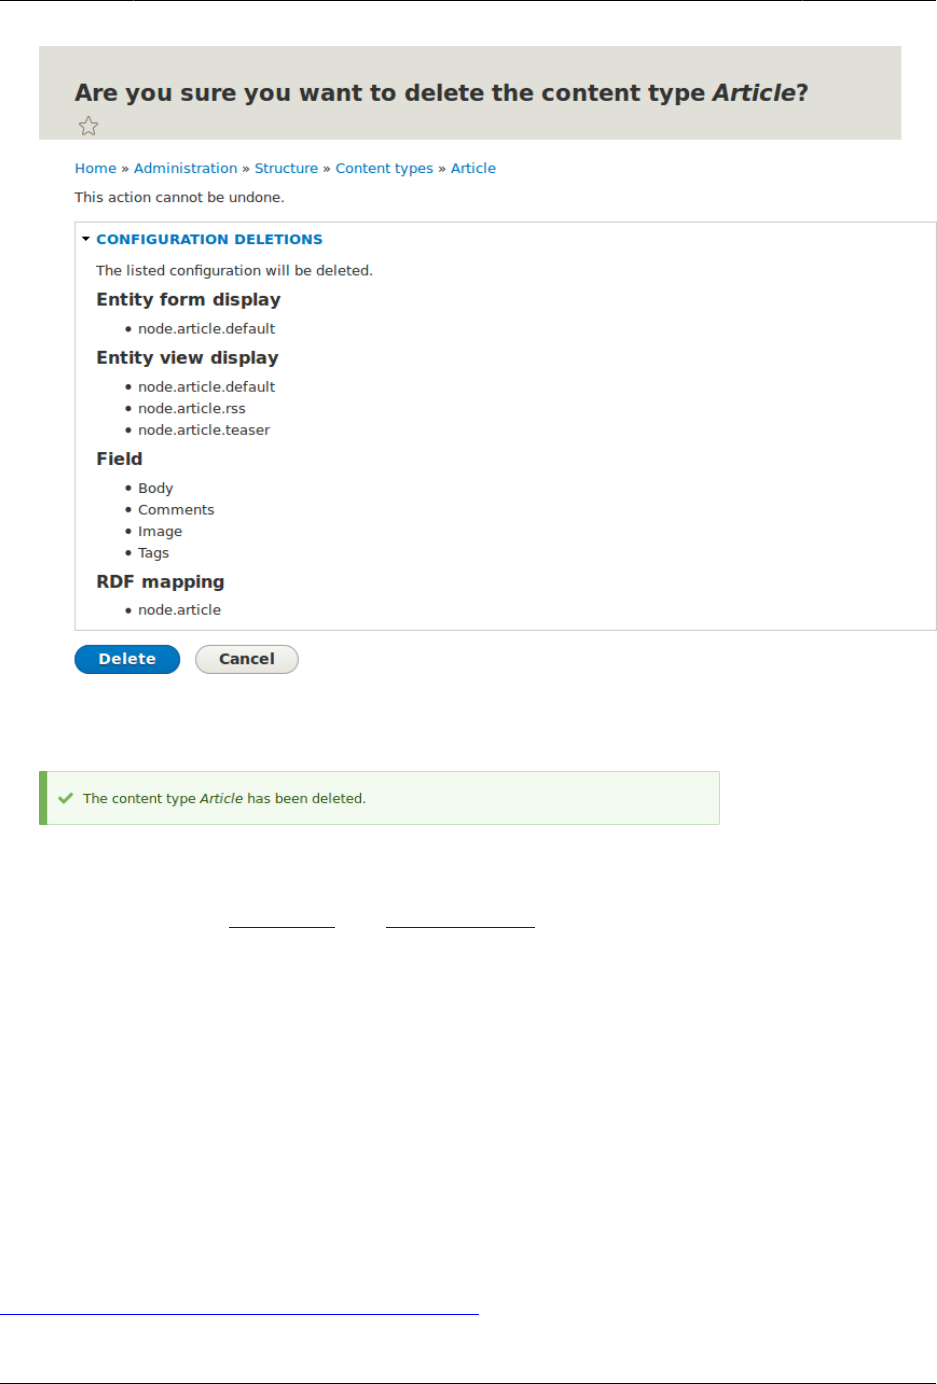
Menyiapkan Struktur Konten
4. The Content types page appears with a confirmation message saying that the content
type has been deleted:
Attributions
Written and edited by Sree Veturi and Boris Doesborg.
6.3. Adding Basic Fields to a Content Type
Goal
Add a link field and an image field to the Vendor content type.
Prerequisite knowledge
Bagian 2.3, “Concept: Content Entities and Fields”
67
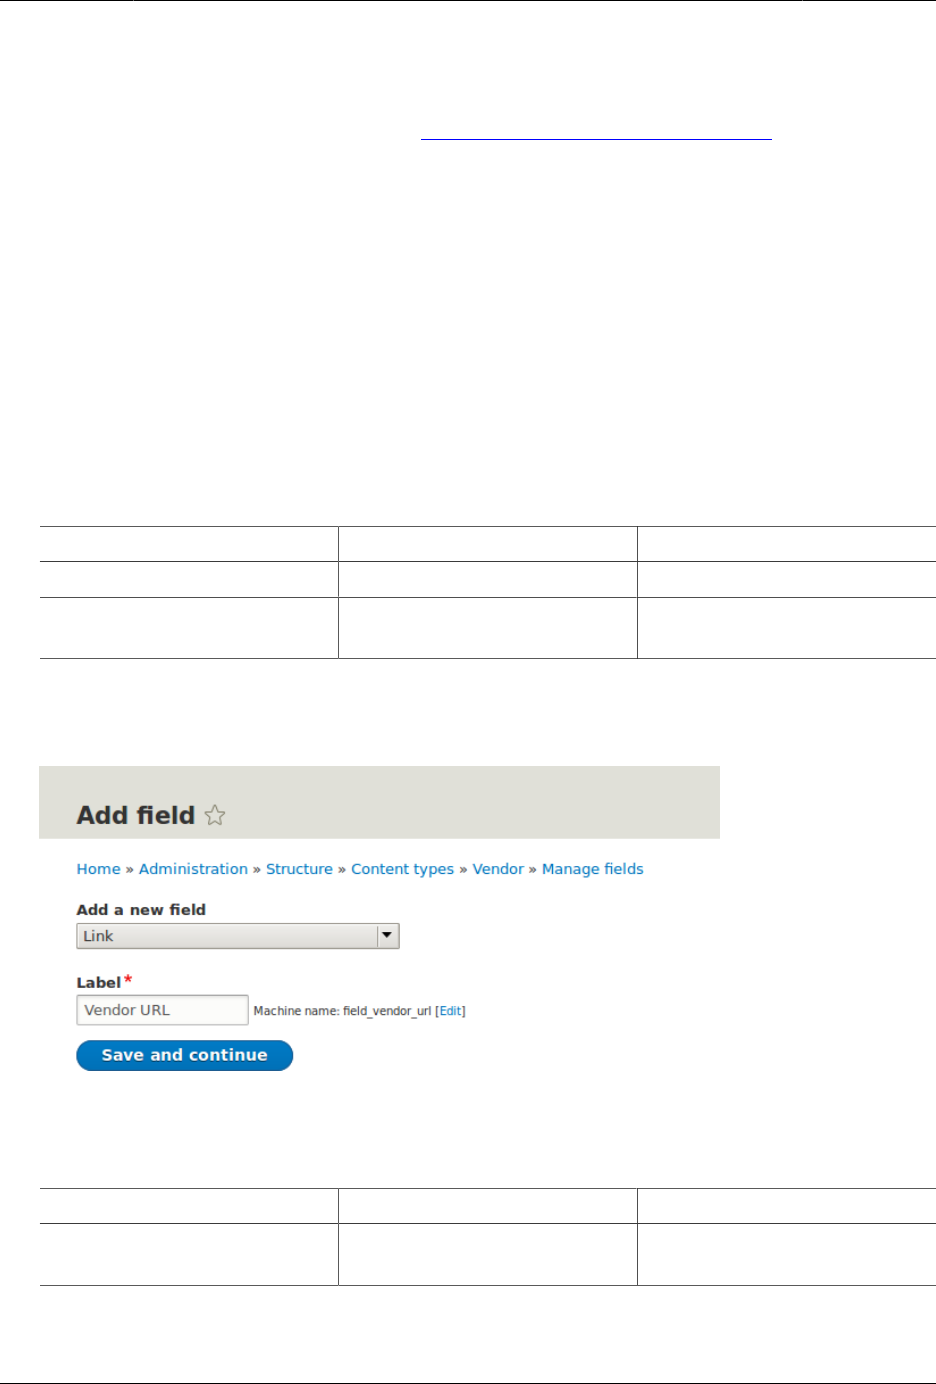
Menyiapkan Struktur Konten
Site prerequisites
The Vendor content type must exist. See Bagian 6.1, “Adding a Content Type”.
Steps
Add the fields Vendor URL and Main image to the Vendor content type.
1. In the Manage administrative menu, navigate to Structure > Content types (admin/
structure/types). Then click Manage fields in the dropdown button for the Vendor content
type. The Manage fields page appears.
2. Click Add field. The Add field page appears. You can either create a new field for the
content type or re-use an existing field.
3. Fill in the fields as shown below.
Field name Explanation Value
Add a new field Field type Link
Label Label that is visible in
administration pages
Vendor URL
A machine name is automatically generated, based on the Label value. Click Edit if you
want to override the default name.
4. Click Save and continue. The page Vendor URL appears which lets you set the allowed
number of values. Fill in the fields as shown below.
Field name Explanation Value
Allowed number of values The number of values that
can be entered
Limited, 1
5. Click Save field settings. The page Vendor URL settings for Basic page appears which allows
you to configure the field. Fill in the fields as shown below.
68
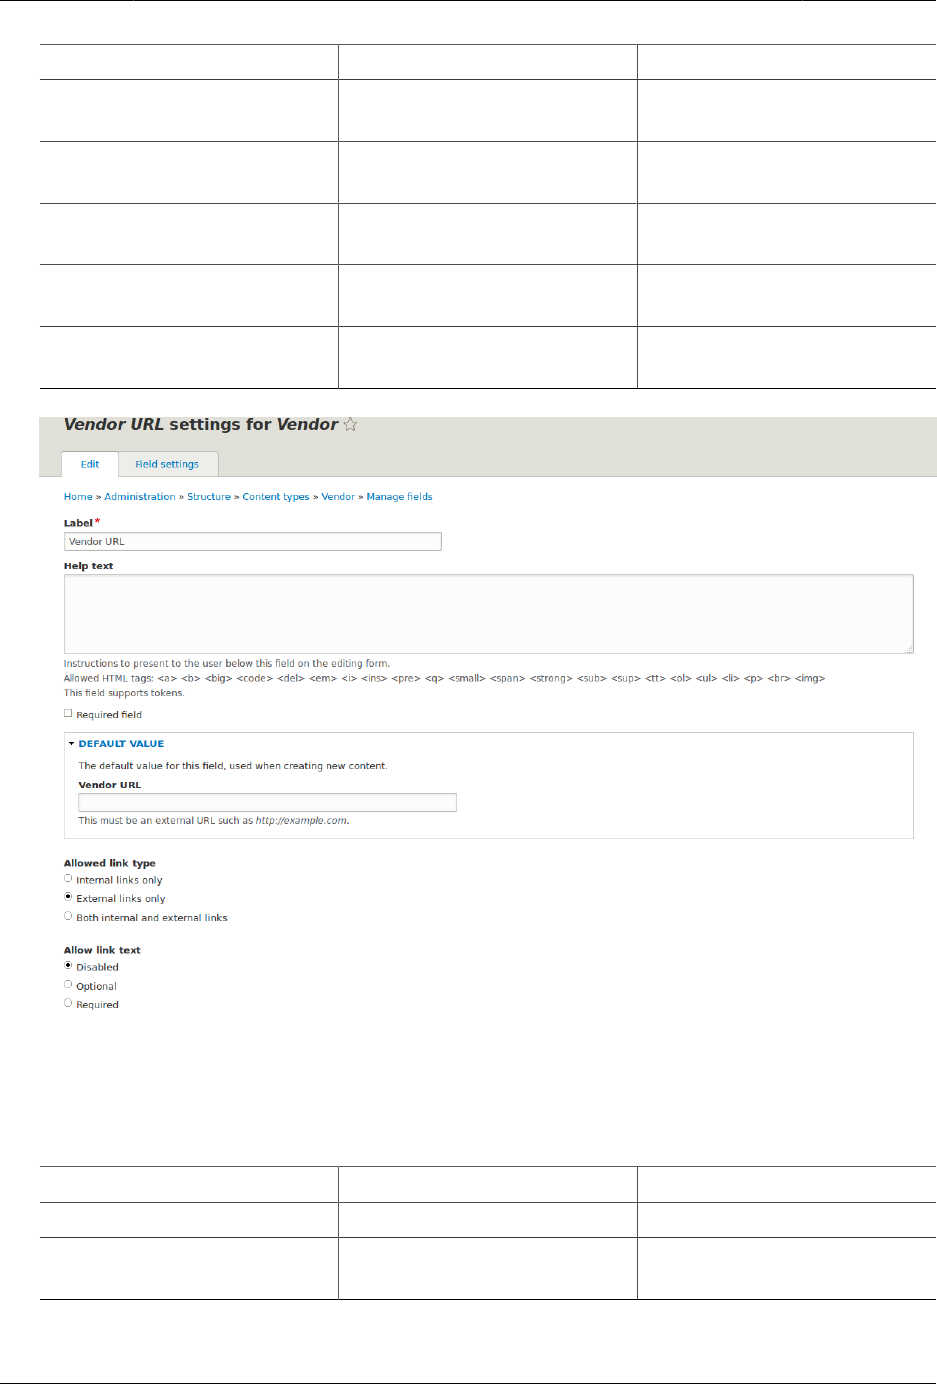
Menyiapkan Struktur Konten
Field name Explanation Value
Label Label that is visible in the
content form
Vendor URL
Help text The instruction that is
shown below the field
(leave blank)
Required field Whether the field is
required or not
Unchecked
Allowed link type The kind of links that can be
entered
External links only
Allow link text Whether a link text can be
entered
Disabled
6. Click Save settings. The Vendor URL has been added to the content type. Continue
creating the Main image field.
7. Click Add field. The Add field page appears. Fill in the fields as shown below.
Field name Explanation Value
Add a new field Field type Image
Label Label that is visible in
administration pages
Main image
8. Click Save and continue. The page Main image appears. Fill in the fields as shown below.
69
Menyiapkan Struktur Konten
Field name Explanation Value
Allowed number of values The number of values that
can be entered
Limited, 1
You can set a default image here. This will be used when you do not provide an image
when creating a Vendor content item.
9. Click Save field settings. The page Main image settings for Basic page appears. Fill in the
fields as shown below.
Field name Explanation Value
Label Label that is visible in the
content form
Main image
Help text The instruction that is
shown below the field
(leave blank)
Required field Whether the field is
required or not
Checked
Allowed file extensions The type of images that can
be uploaded
png, gif, jpg, jpeg
File directory The directory where the
files will be stored. By
providing a file directory
value, you ensure that
all images uploaded via
the Main image field will
be located in the same
directory.
vendors
Minimum image resolution The minimum resolution of
the uploaded image
600 x 600
Maximum upload size The maximum file size of
the uploaded image
5 MB
Enable Alt field Whether an alternative text
can be entered
Checked
Alt field required Whether an alternative text
is required
Checked
70
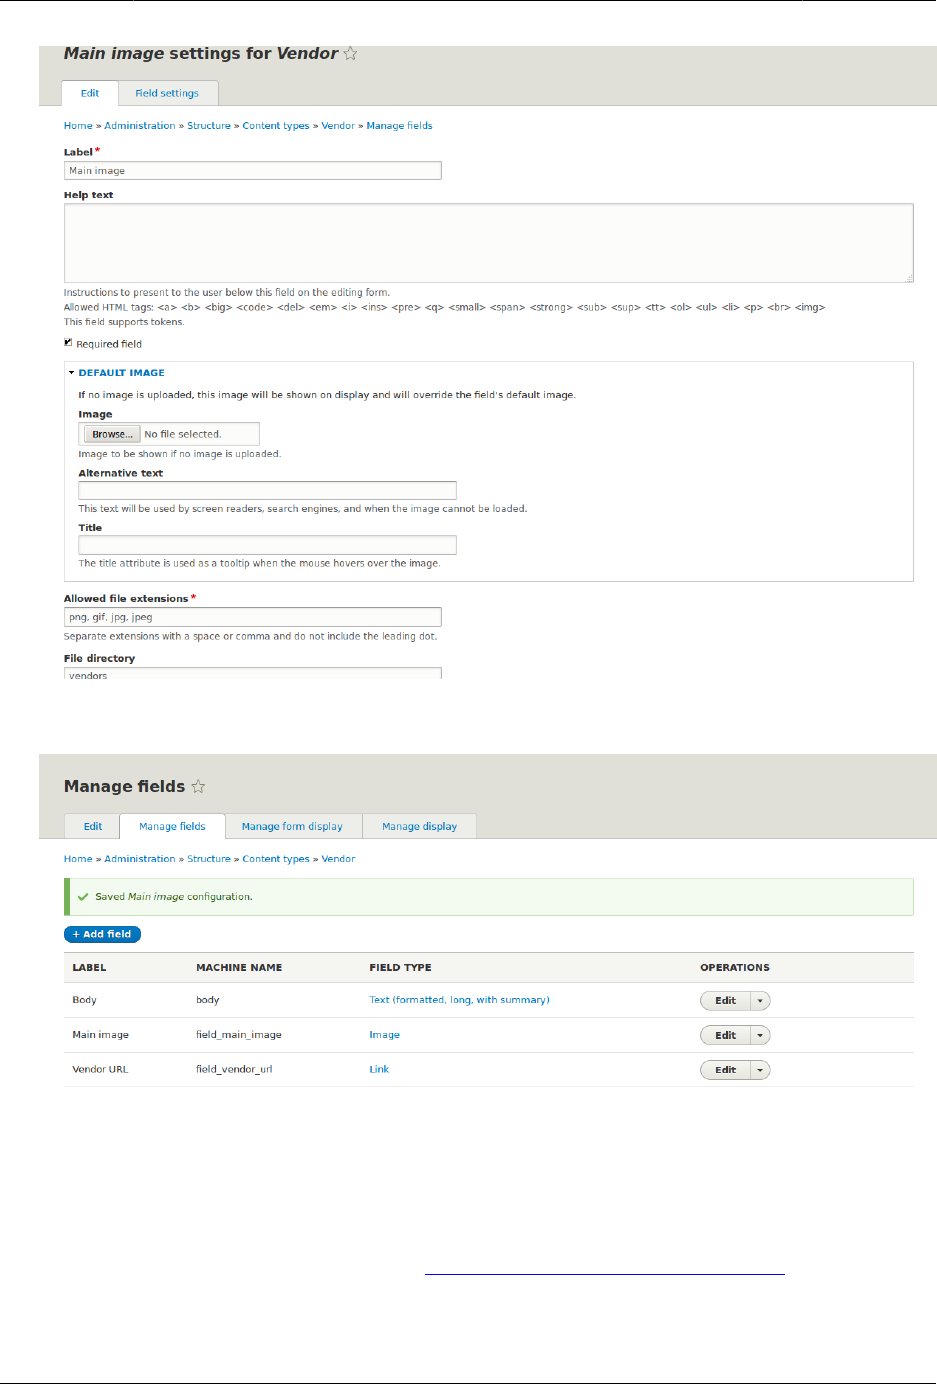
Menyiapkan Struktur Konten
10. Click Save settings. Main image has been added to the content type.
11. Add a Main image field to the Recipe content type, using similar steps. Start by navigating
to the Recipe content type’s Manage Fields page in step 1. Then skip to step 7 and
follow the remaining steps, but reuse the existing Main image field you created for the
Vendor content type rather than creating a new field. In subsequent steps, some of the
configuration screens will not be available, because of the field reuse.
12. Create two Vendor content items (see Bagian 5.2, “Creating a Content Item”) called "Happy
Farm" and "Sweet Honey". Make sure that they include images and URLs.
71

Menyiapkan Struktur Konten
Expand your understanding
•Bagian 6.12, “Concept: Image Styles”
•Bagian 6.11, “Changing Content Display”
•Bagian 6.9, “Changing Content Entry Forms”
Additional resources
Drupal.org community documentation page "Add a field to a content type"
Attributions
Written by Sree Veturi and Boris Doesborg.
6.4. Concept: Reference Fields
Prerequisite knowledge
Bagian 2.3, “Concept: Content Entities and Fields”
What is a reference field?
A reference field is a field that represents a relationship between an entity and one or
more other entities, which may belong to the same or different entity type. The three most
commonly-used reference fields are:
Content reference
A reference to a content item. For example, you might want to connect recipes to
the vendors who submitted them. You would set up a content reference field called
Submitted by referencing Vendor content items on the Recipe content type.
Taxonomy term reference
A reference to a taxonomy term. For example, you might want to connect recipes to their
ingredients. You would set up a taxonomy term reference field called Ingredients on the
Recipe content type. This reference field will point to the vocabulary Ingredients.
User reference
A reference to a user account. For example, you might want to connect recipes with their
chefs. You would set up a user reference field called Chefs on the Recipe content type.
72

Menyiapkan Struktur Konten
Related topics
Bagian 6.5, “Concept: Taxonomy”
Attributions
Written and edited by Surendra Mohan, and Jojy Alphonso at Red Crackle.
6.5. Concept: Taxonomy
Prerequisite knowledge
•Bagian 2.3, “Concept: Content Entities and Fields”
•Bagian 6.4, “Concept: Reference Fields”
What is Taxonomy?
Taxonomy is used to classify website content. One common example of taxonomy is the tags
used to classify or categorize posts in a blog website; the farmers market website could use
an ingredients taxonomy to classify recipes. Individual taxonomy items are known as terms
(the blog tags or recipe ingredients in these examples); and a set of terms is known as a
vocabulary (the set of all blog post tags, or the set of all recipe ingredients in these examples).
Technically, taxonomy terms are an entity type and the entity subtypes are the vocabularies.
Like other entities, taxonomy terms can have fields attached; for instance, you could set up
an image field to contain an icon for each term.
An individual vocabulary can organize its terms in a hierarchy, or it could be flat. For example,
blog tags normally have a flat structure, while a recipe ingredients vocabulary could be
hierarchical (for example, tomatoes could be a sub-term of vegetables, and under tomatoes,
you could have green and red tomatoes).
Taxonomy terms are normally attached as reference fields to other content entities, which
is how you can use them to classify content. When you set up a taxonomy reference field,
you can let users enter terms in two ways:
Free tagging
New terms can be created right on the content editing form.
Fixed list of terms
The list of terms is curated and managed outside the content editing form, and users
can only choose from the existing list when editing content.
73
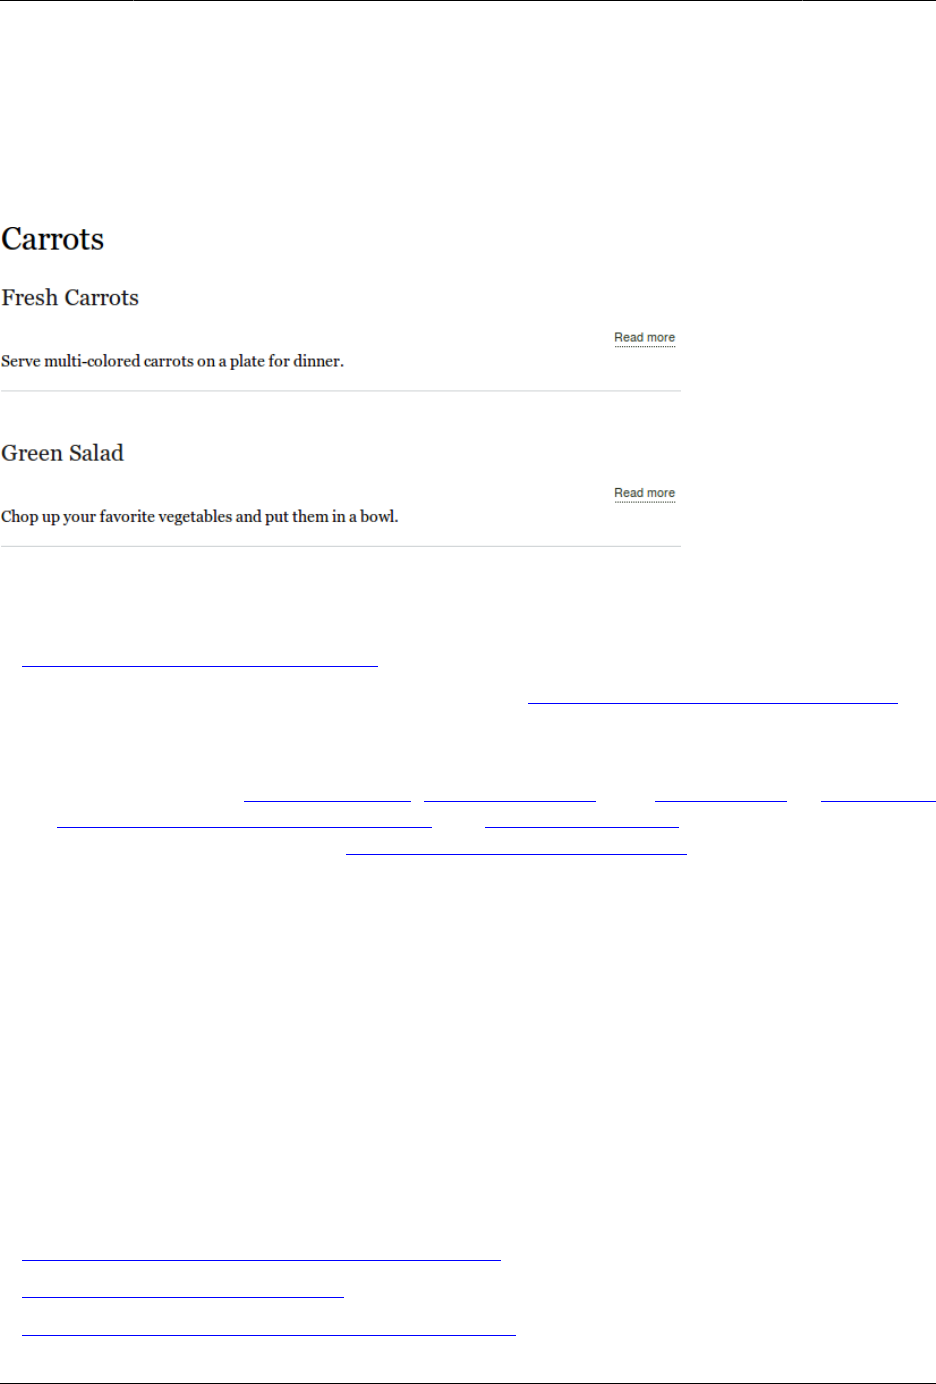
Menyiapkan Struktur Konten
Taxonomy reference fields can be added to any entity, such as user accounts, custom blocks,
or regular content items. If you use them to classify regular content items, your site will
automatically be set up with taxonomy listing pages for each term; each of these pages lists
all of the content items that are classified with that term. For example, if you created several
recipes that all had carrots as an ingredient, you might see something like this on the Carrots
taxonomy listing page:
Related topics
•Bagian 6.6, “Setting Up a Taxonomy”.
• The listing pages are views, which are covered in Bab 9, Membuat Daftar dengan Views.
Attributions
Adapted and edited by Surendra Mohan, Jennifer Hodgdon, and Jojy Alphonso at Red Crackle
from "Organizing content with taxonomies" and "About taxonomies", copyright 2000-2017 by
the individual contributors to the Drupal Community Documentation.
6.6. Setting Up a Taxonomy
Goal
Create an Ingredients vocabulary and add it to the Recipe content type as a field that can
contain an unlimited number of values and that allows adding new terms to the vocabulary.
Prerequisite knowledge
•Bagian 2.3, “Concept: Content Entities and Fields”
•Bagian 6.5, “Concept: Taxonomy”
•Bagian 6.3, “Adding Basic Fields to a Content Type”
74
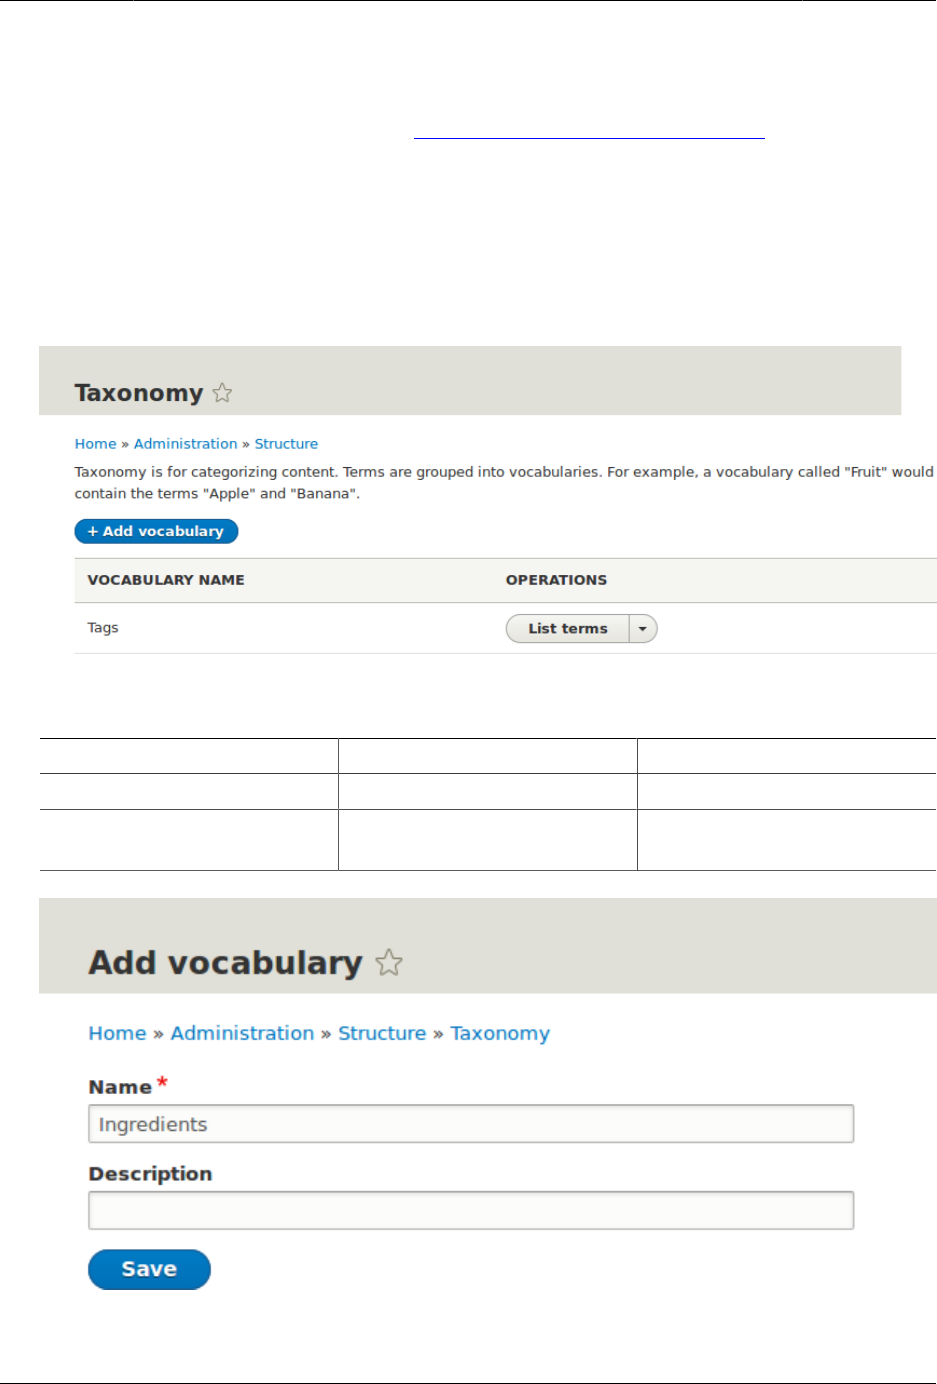
Menyiapkan Struktur Konten
Site prerequisites
The Recipe content type must exist. See Bagian 6.1, “Adding a Content Type”.
Steps
1. In the Manage administrative menu, navigate to Structure > Taxonomy (admin/structure/
taxonomy). You will see the Tags vocabulary that was created with the core Standard
installation profile.
2. Click Add vocabulary, and fill in the values below.
Field name Explanation Example value
Name The name of the vocabulary Ingredients
Description A brief note about the
vocabulary
(Leave blank)
3. Click Save. You will be taken to the Ingredients page, which shows a list of all the terms
in this vocabulary.
75
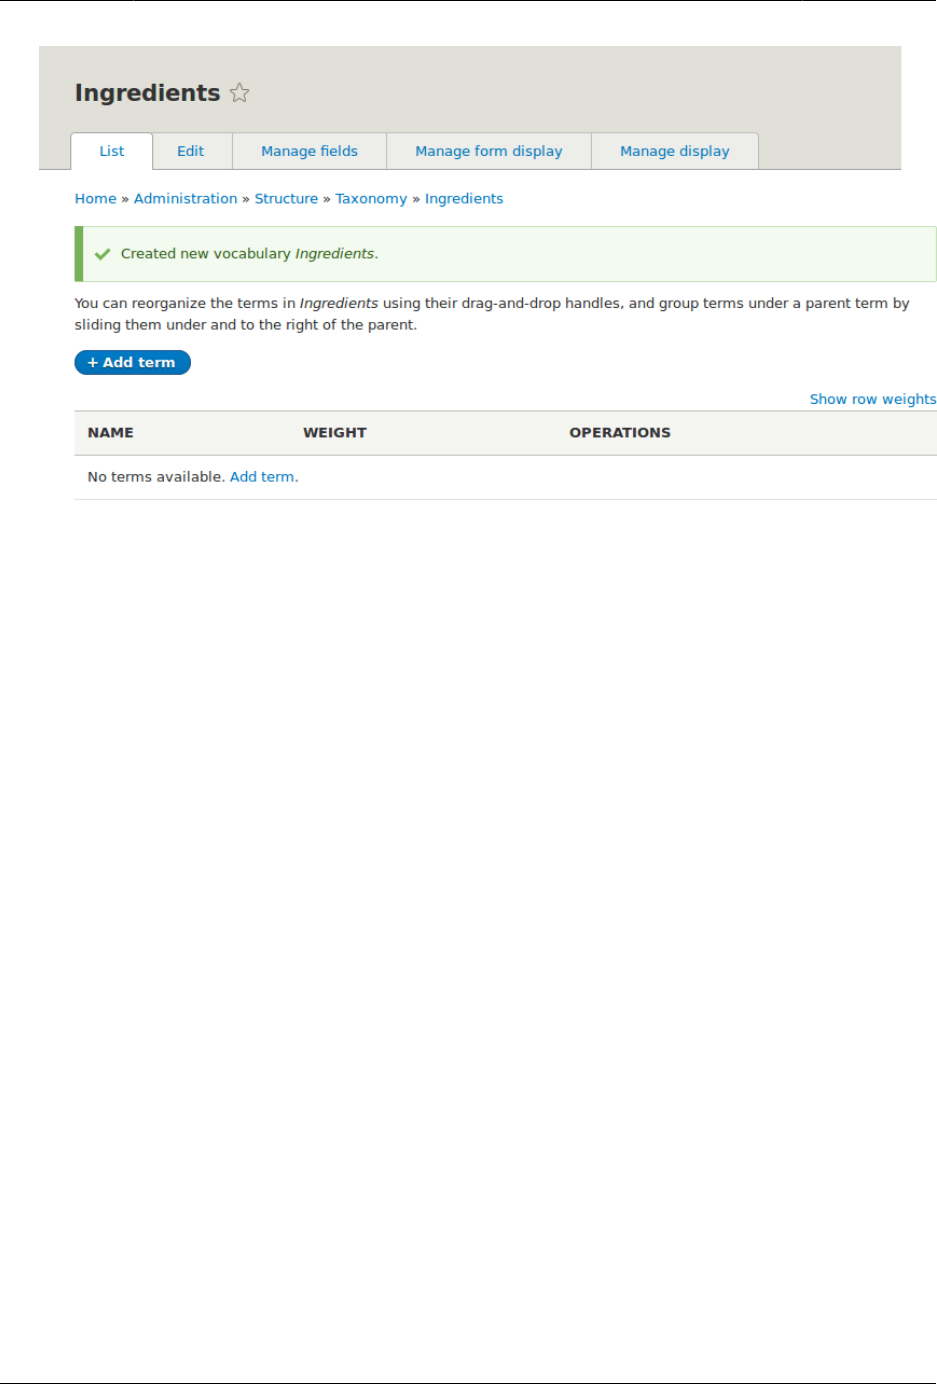
Menyiapkan Struktur Konten
4. Click Add term. Enter "Butter" in the Name field. Click Save.
76
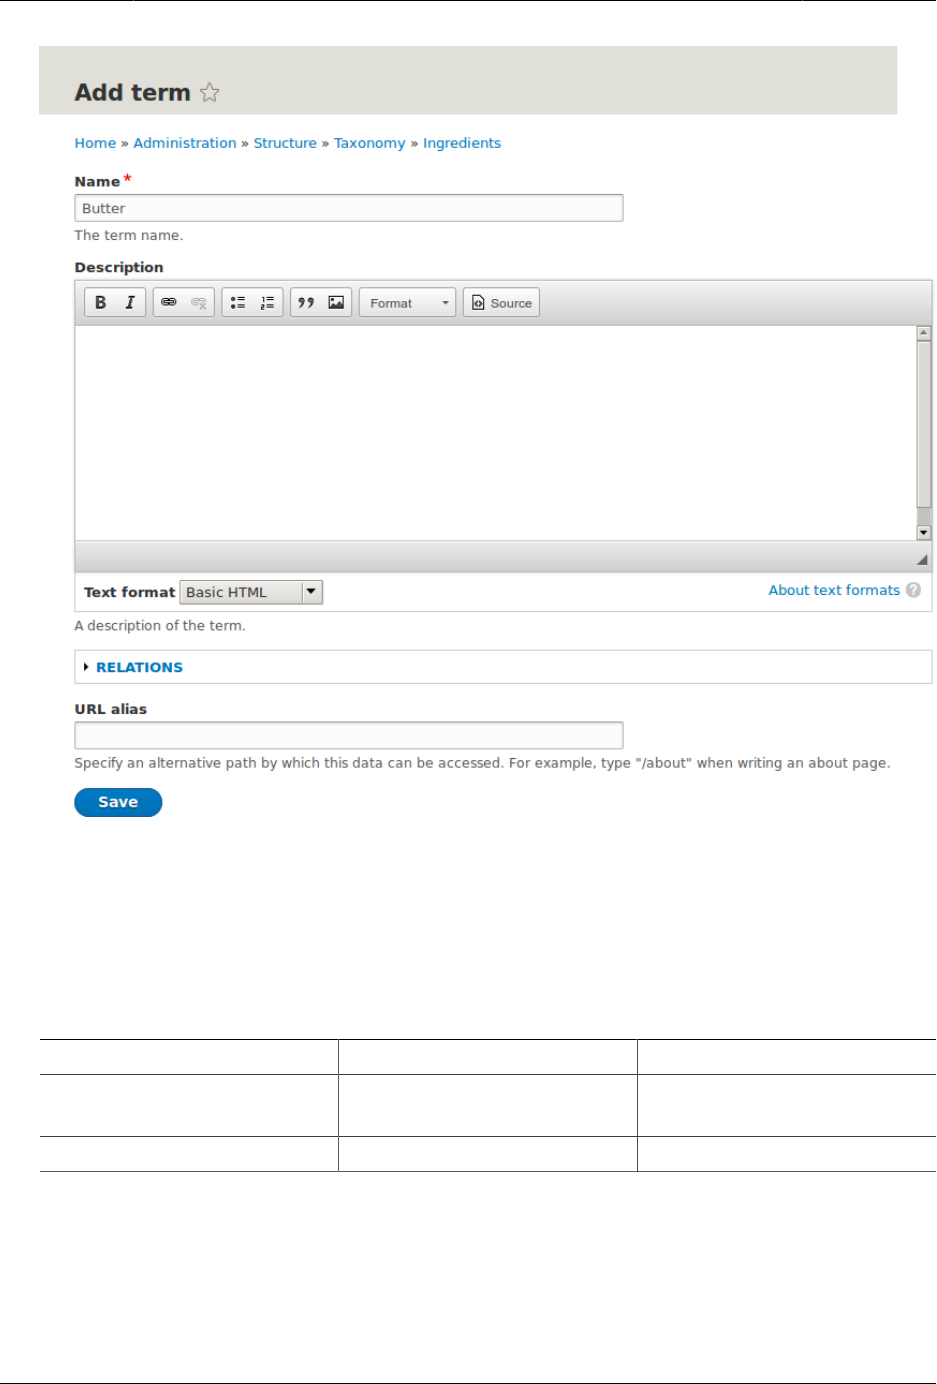
Menyiapkan Struktur Konten
5. You will receive a confirmation about the term you created. Add more terms. For
example, "Eggs" and "Milk".
6. In the Manage administrative menu, navigate to Structure > Content Types (admin/
structure/types). Click Manage fields for your Recipe content type.
7. Click Add field, and enter values from the table below. Click Save and continue.
Field name Explanation Value
Add a new field Select the field type Reference > Taxonomy
term
Label The title to give the field Ingredients
77
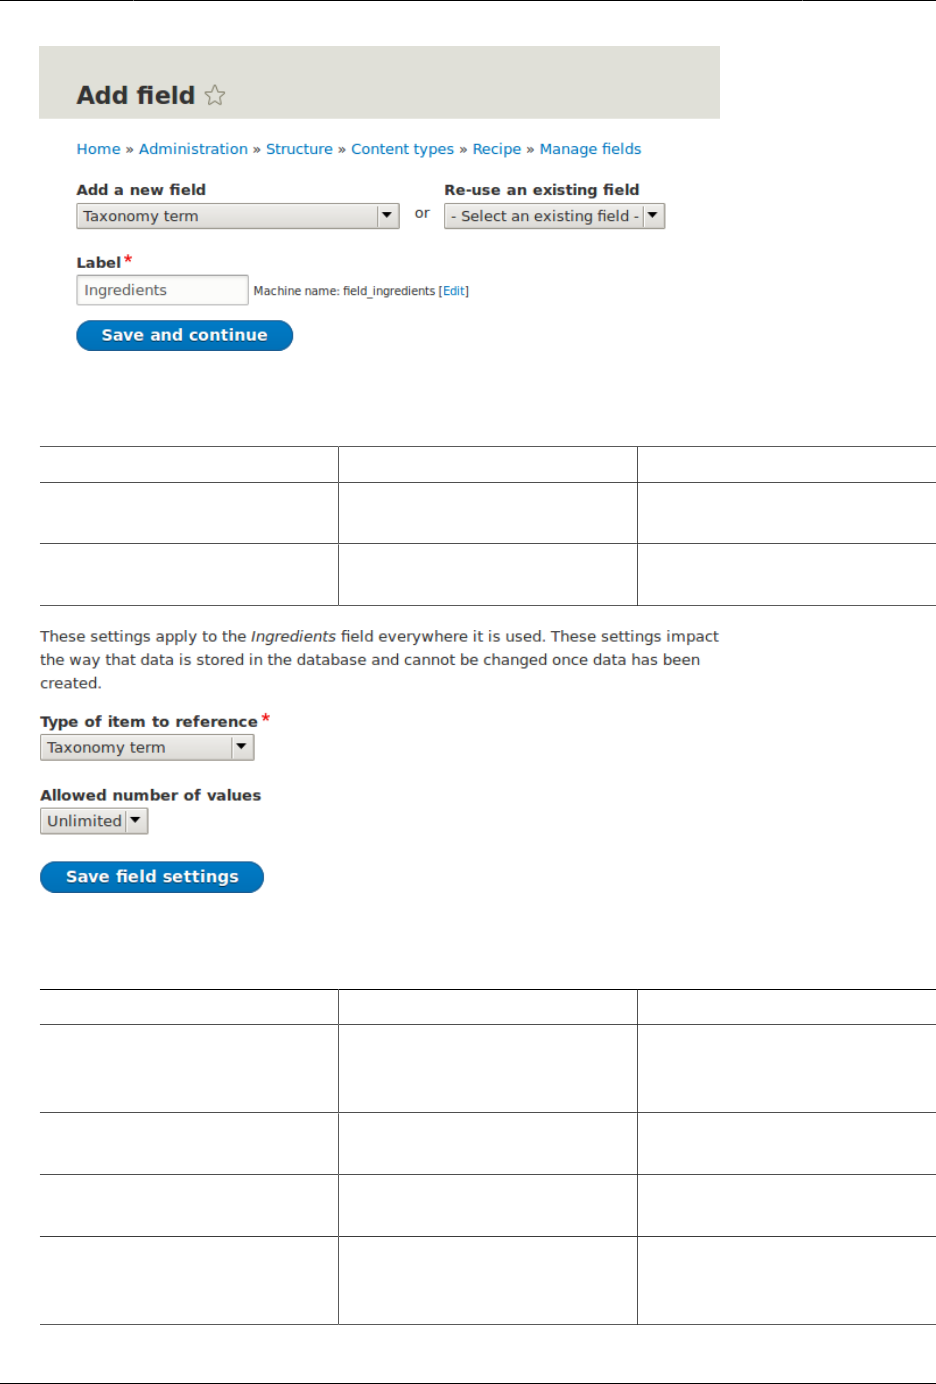
Menyiapkan Struktur Konten
8. On the following configuration screen, enter the values from the table below. Click Save
field settings.
Field name Explanation Value
Type of item to reference The type of entity that is
referenced by the field
Taxonomy term
Allowed number of values The number of values a
user can enter
Unlimited
9. On the following configuration screen, enter the values from the table below. Click Save
settings.
Field name Explanation Value
Help text Help shown to users
creating content
Enter ingredients that
site visitors might want to
search for
Reference type > Reference
method
Select the method used to
choose allowed values
Default
Reference type > Available
Vocabularies
Select the vocabulary to
choose allowed values from
Ingredients
Reference type > Create
referenced entities if they
don’t already exist
Whether new ingredient
terms can be created from
the content editing form
Checked
78
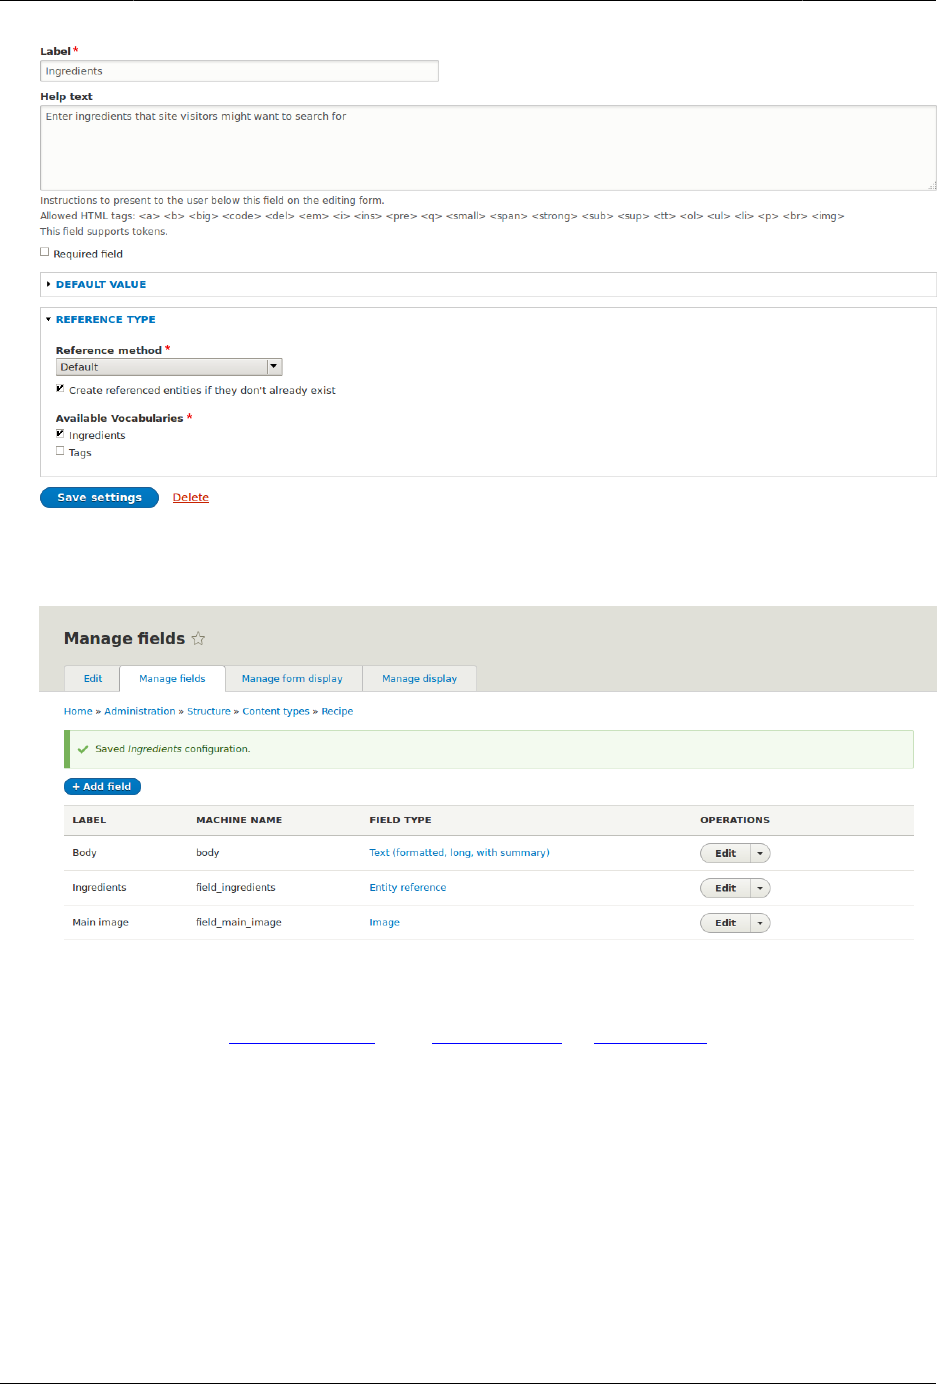
Menyiapkan Struktur Konten
10. Click Save settings. You will be taken back to the Manage Fields page. A message will be
displayed saying that the configuration for Ingredients is complete.
Attributions
Written and edited by Bob Snodgrass, and Jojy Alphonso at Red Crackle.
6.7. Adding a Reference Field
Goal
Add a reference field so that recipes can be linked to the vendor that has submitted it.
79
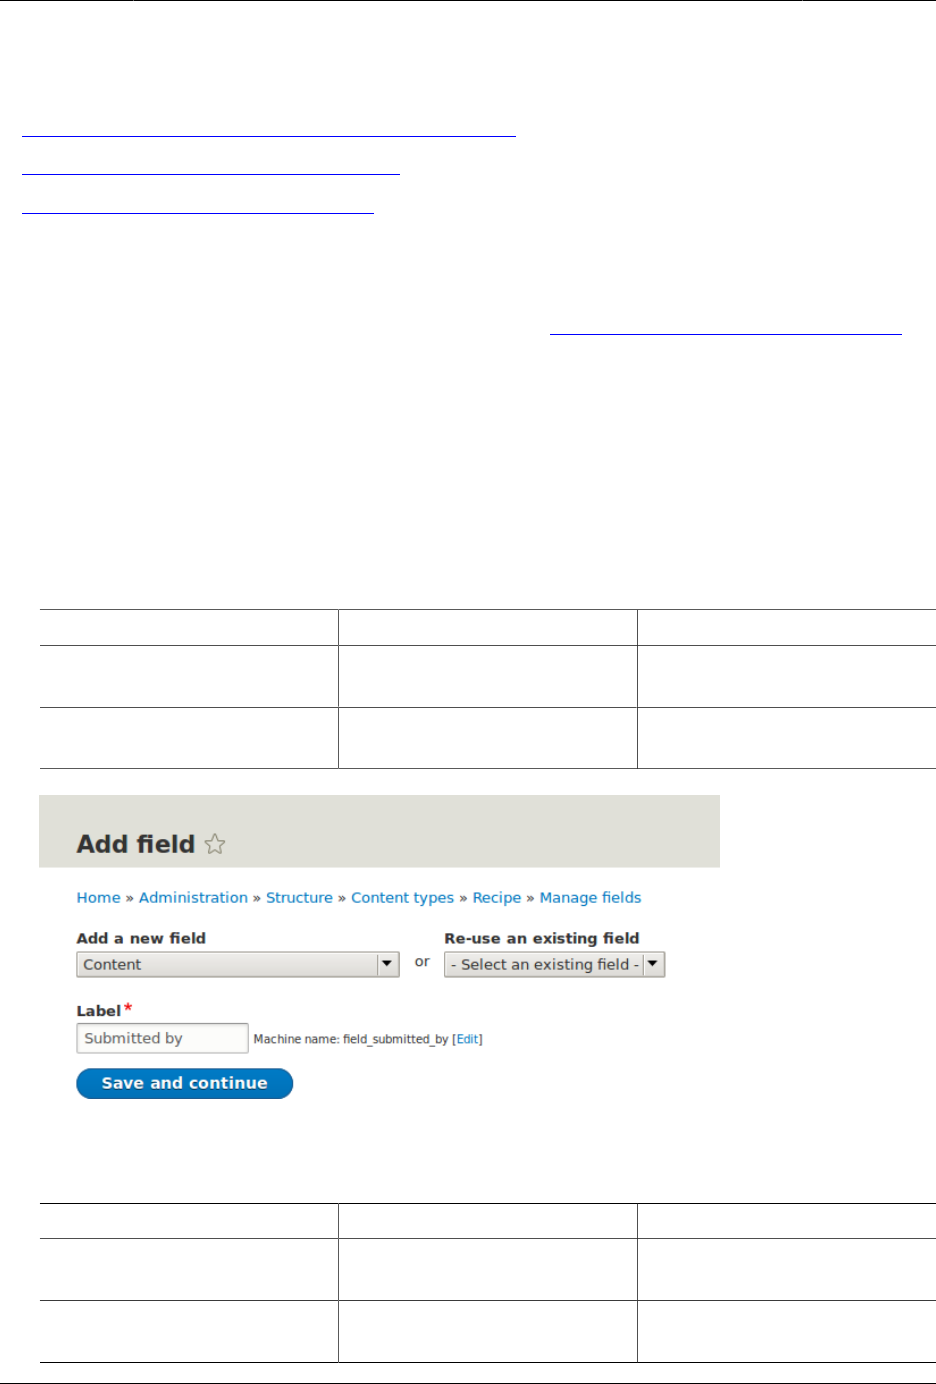
Menyiapkan Struktur Konten
Prerequisite knowledge
•Bagian 6.3, “Adding Basic Fields to a Content Type”
•Bagian 6.4, “Concept: Reference Fields”
•Bagian 6.1, “Adding a Content Type”
Site prerequisites
The Recipe and Vendor content types must exist. See Bagian 6.1, “Adding a Content Type”.
Steps
1. In the Manage administrative menu, navigate to Structure > Content types (admin/
structure/types). Then click Manage fields in the dropdown button for the Recipe content
type. The Manage fields page appears.
2. Click Add field. The Add field page appears. Fill in the fields as shown below. Click Save
and continue.
Field name Explanation Value
Add a new field Option to specify the field
type
Reference > Content
Label The title you want to give
the field
Submitted by
3. The page Submitted by appears which lets you set the allowed number of values. Fill in
the fields as shown below. Click Save field settings.
Field name Explanation Value
Type of item to reference Option to select the type of
referenced item
Content
Allowed number of values Specify the count of values
associated with the field
Limited, 1
80
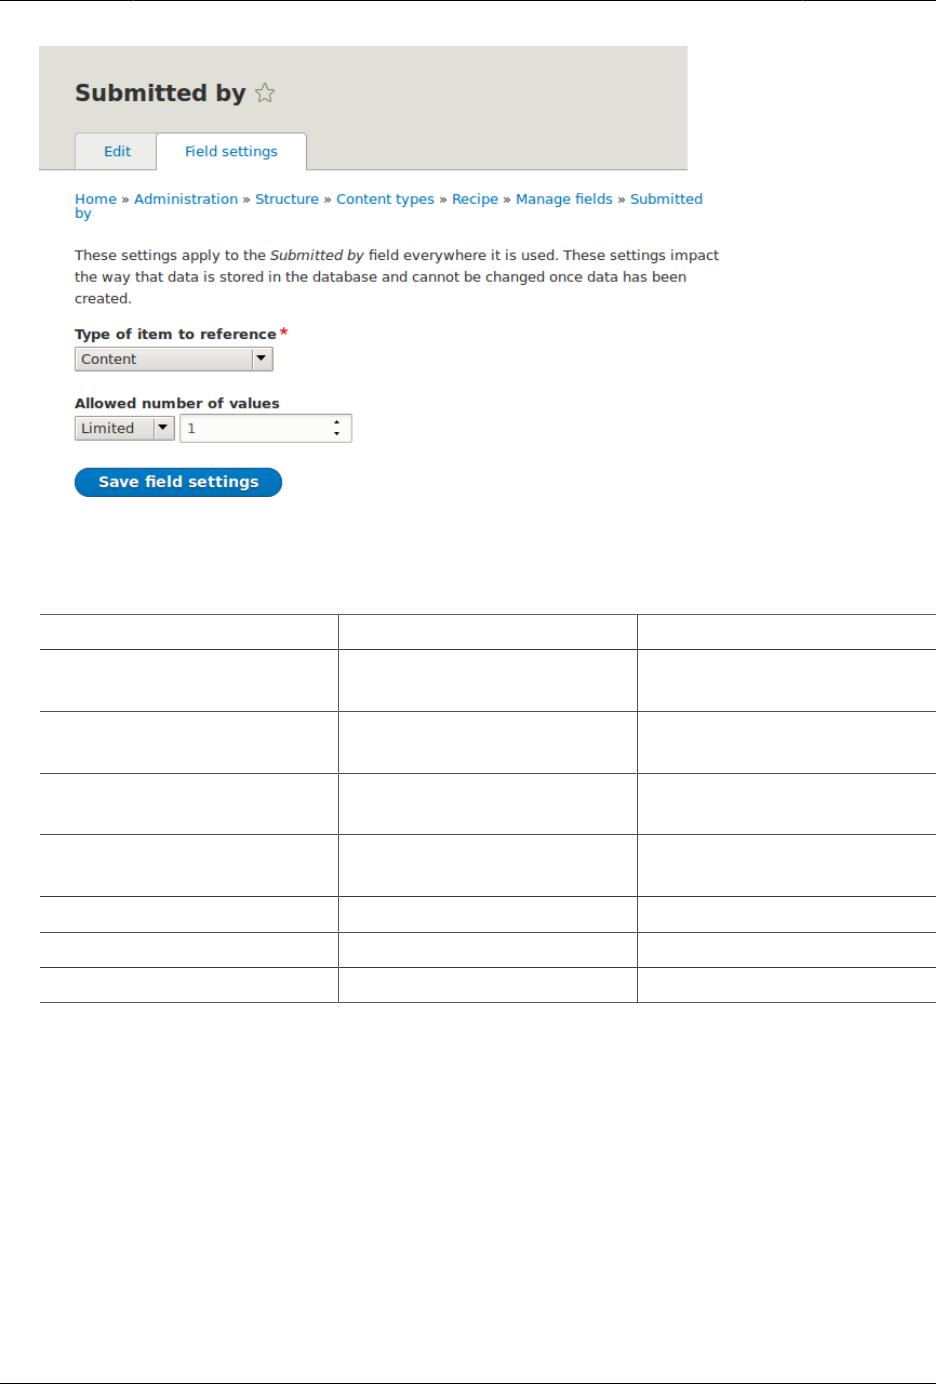
Menyiapkan Struktur Konten
4. The page Submitted by settings for Recipe appears which allows you to configure the field.
Fill in the fields as shown below. Click Save settings.
Field name Explanation Value
Label Title shown for this field on
the page
Submitted by
Help text Brief text aiding the person
creating content
Choose the vendor that
submitted this recipe
Required field Whether a value has to be
provided or not
Checked
Reference method Option to select reference
method
Default
Content types Specify the content type Vendor
Sort by Sorting field Title
Sort direction Sorting order Ascending
81
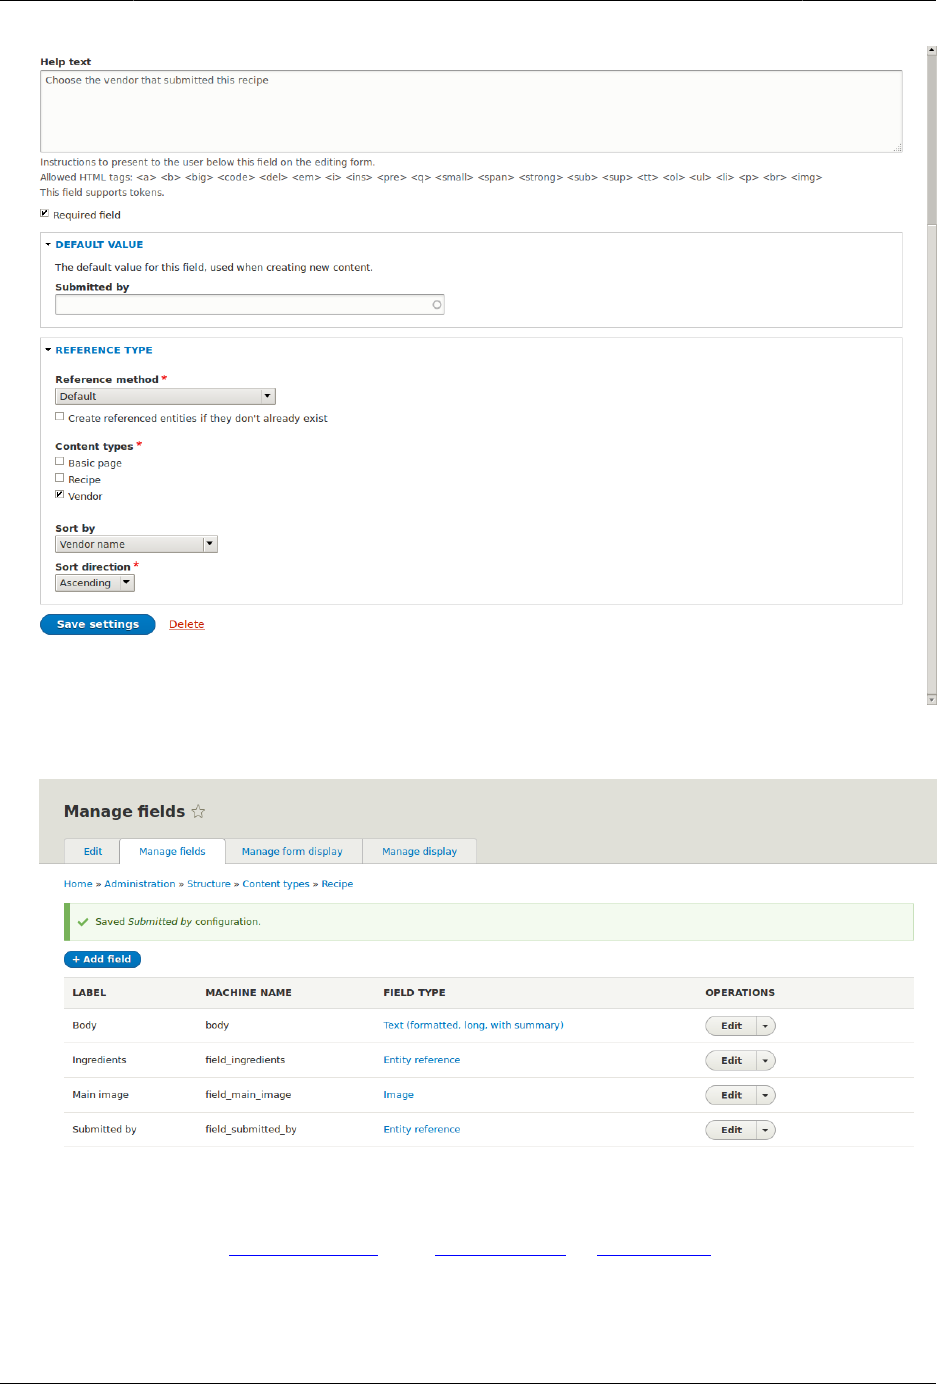

Menyiapkan Struktur Konten
6.8. Concept: Forms and Widgets
Prerequisite knowledge
Bagian 2.3, “Concept: Content Entities and Fields”
What are forms and widgets?
The content management system software that your site is running allows administrators
to edit content and configure settings online, using various web forms. In particular,
content editing forms are used to edit your site’s content, and they are configurable
by administrators; settings configuration forms are provided by modules and cannot
themselves be configured.
The data in your site’s content is stored in one or more fields that are attached to the content
type and/or sub-type. When you configure the content editing form for each content sub-
type, you can:
• Select a widget for each field. A widget defines the method used to enter the data for the
field. For example, a taxonomy term can be chosen using an autocomplete field, a select
list, or a tags-style field that lets editors add new tags automatically.
• Configure widget settings. For example, you can choose the size of a plain-text entry field.
• Hide one or more fields from the editing form.
• Reorder the fields.
In principle, you can also have multiple content editing forms available for each content sub-
type. This feature is rarely used, however; the only exception in common use is for the user
profile fields: you can use different forms for user registration and user editing. For example,
you might have a limited set of fields shown when users first register on the site, and more
fields shown later on when they edit their profiles.
Related topics
•Bagian 6.9, “Changing Content Entry Forms”
•Bagian 6.10, “Concept: View Modes and Formatters”
Attributions
Written by Jennifer Hodgdon.
6.9. Changing Content Entry Forms
Goal
Change the Recipe form to use a different widget to enter terms in the Ingredients field.
83

Menyiapkan Struktur Konten
Prerequisite knowledge
•Bagian 6.1, “Adding a Content Type”
•Bagian 6.3, “Adding Basic Fields to a Content Type”
•Bagian 6.5, “Concept: Taxonomy”
•Bagian 6.8, “Concept: Forms and Widgets”
Site prerequisites
The Recipe content type must exist, and it must have an Ingredients taxonomy term
reference field. See Bagian 6.1, “Adding a Content Type” and Bagian 6.6, “Setting Up a
Taxonomy”.
Steps
1. In the Manage administrative menu, navigate to Content > Add content > Recipe (node/
add/recipe) to look at the content entry form that is set up by default. Notice how you
have to enter ingredients one by one, instead of having a more compact format.
2. In the Manage administrative menu, navigate to Structure > Content types (admin/
structure/types). Then click Manage form display on the dropdown button for the Recipe
content type. The Manage form display page appears.
3. For the Ingredients field, select Autocomplete (Tags style) in the Widget column.
84
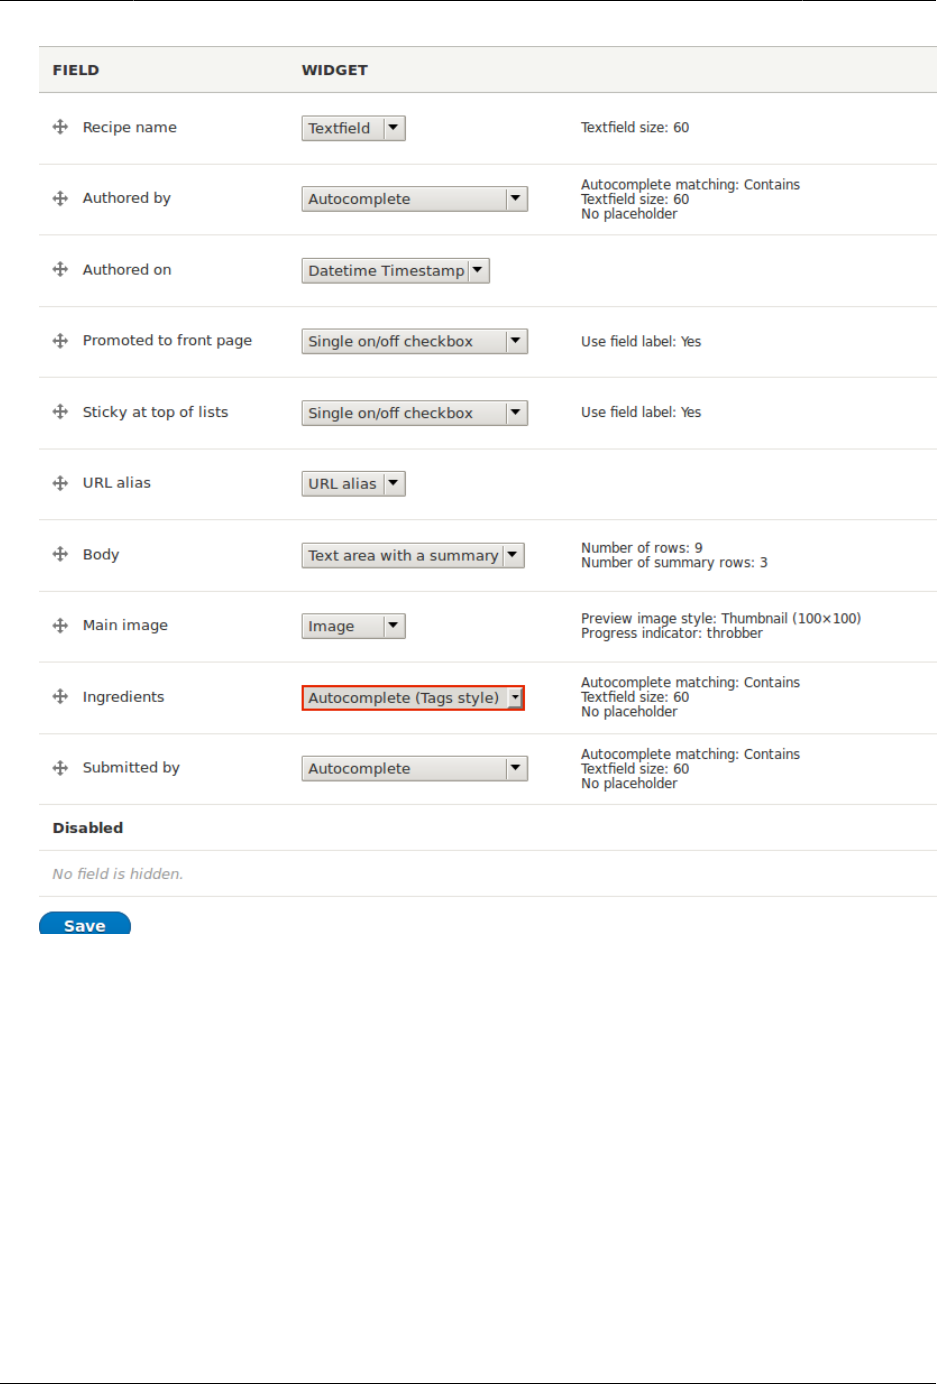
Menyiapkan Struktur Konten
4. Click Save.
5. In the Manage administrative menu, navigate to Content > Add content > Recipe (node/
add/recipe) to verify the changed behavior of the content form. The Ingredients field is
now a single text field that accepts multiple values.
85
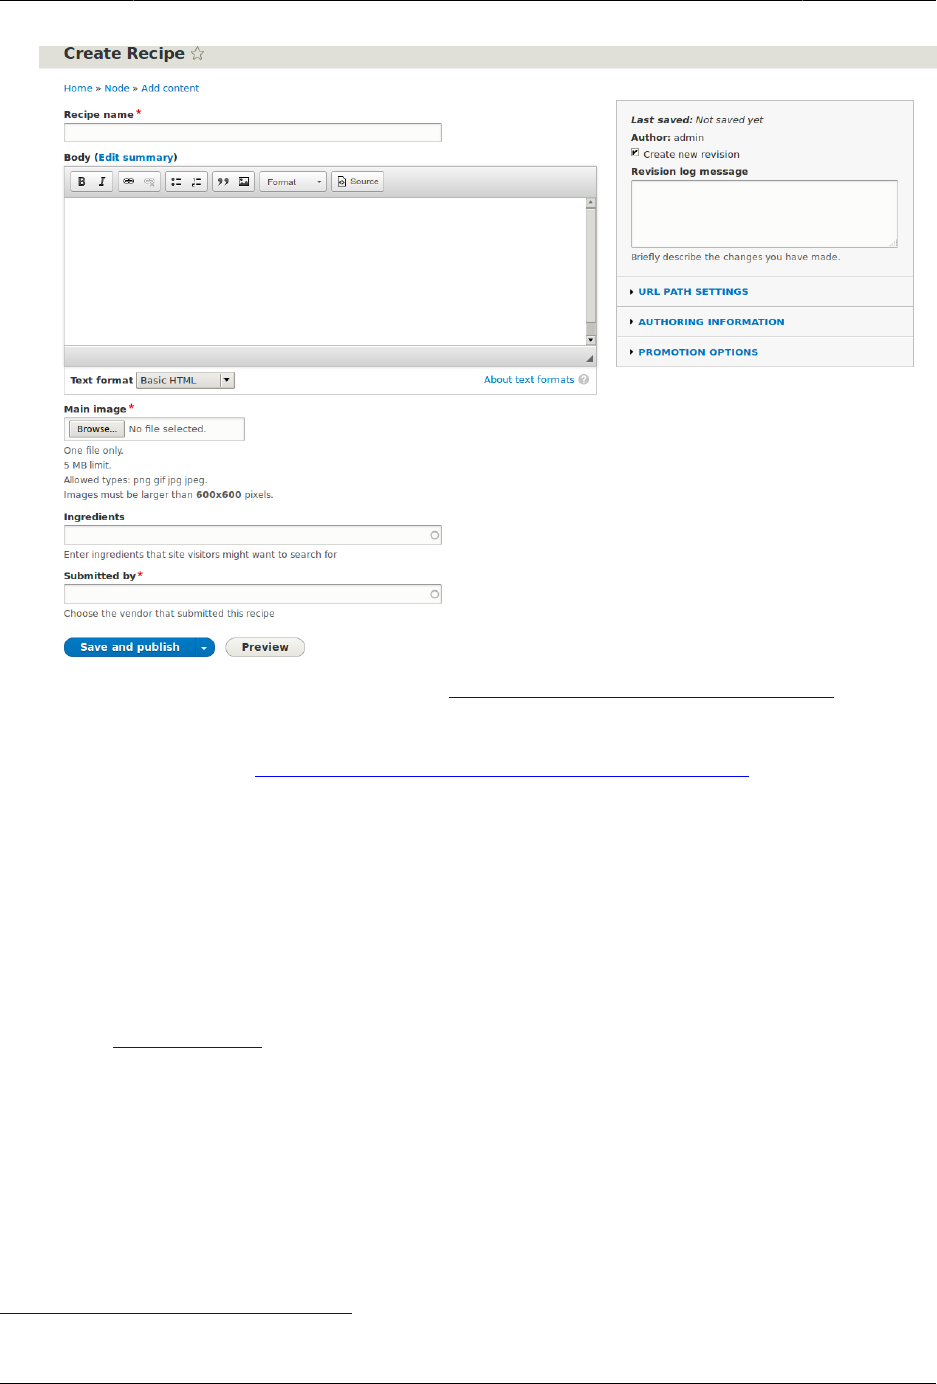
Menyiapkan Struktur Konten
6. Create two Recipe content items (see Bagian 5.2, “Creating a Content Item”), such as
recipes for "Green Salad" and "Fresh Carrots". Make sure all the fields have values,
including images, ingredients, and submitted by (set this to one of the Vendor content
items you created in Bagian 6.3, “Adding Basic Fields to a Content Type”).
Expand your understanding
Change the main site Contact form by navigating in the Manage administrative menu to
Structure > Contact forms. For instance, you may want to hide the Send yourself a copy or
Language fields.
Attributions
Written by Boris Doesborg.
6.10. Concept: View Modes and Formatters
Prerequisite knowledge
Bagian 6.1, “Adding a Content Type”
86

Menyiapkan Struktur Konten
What is a View mode?
How an entity (such as content, a user or a comment) is displayed, depends on the context
in which it is shown. This context is known as a view mode. Examples of view modes are:
• a full page of the content with all the field values
• a teaser of the content with a thumbnail image and a Read more link
• a full user profile with a zoomable portrait photo
• a user avatar with username and a link to the profile
Every view mode can be configured through the administration pages. To see the
configuration options for the view modes of the Recipe content type, navigate in the Manage
administrative menu to Structure > Content types (admin/structure/types) and click Manage
display from the dropdown button. In each view mode, all fields can be hidden or displayed,
and if they are displayed, you can choose and configure the field formatter.
What is a field formatter?
A field formatter is a setting for displaying the field values. For example, long text fields can
be displayed trimmed or full-length, and taxonomy term reference fields can be displayed
in plain text or linked to the taxonomy term page. Consult the Manage display page to see
the field formatters for the fields of the Recipe content type.
Related topics
•Bagian 6.1, “Adding a Content Type”
•Bagian 6.11, “Changing Content Display”
Additional resources
Drupal.org community documentation page "View modes"
Attributions
Adapted by Boris Doesborg from "View modes", copyright 2000-2017 by the individual
contributors to the Drupal Community Documentation.
6.11. Changing Content Display
Goal
Make the content items more readable, accessible, and visibly attractive by reordering the
fields, hiding labels, and tuning the output of the fields.
87
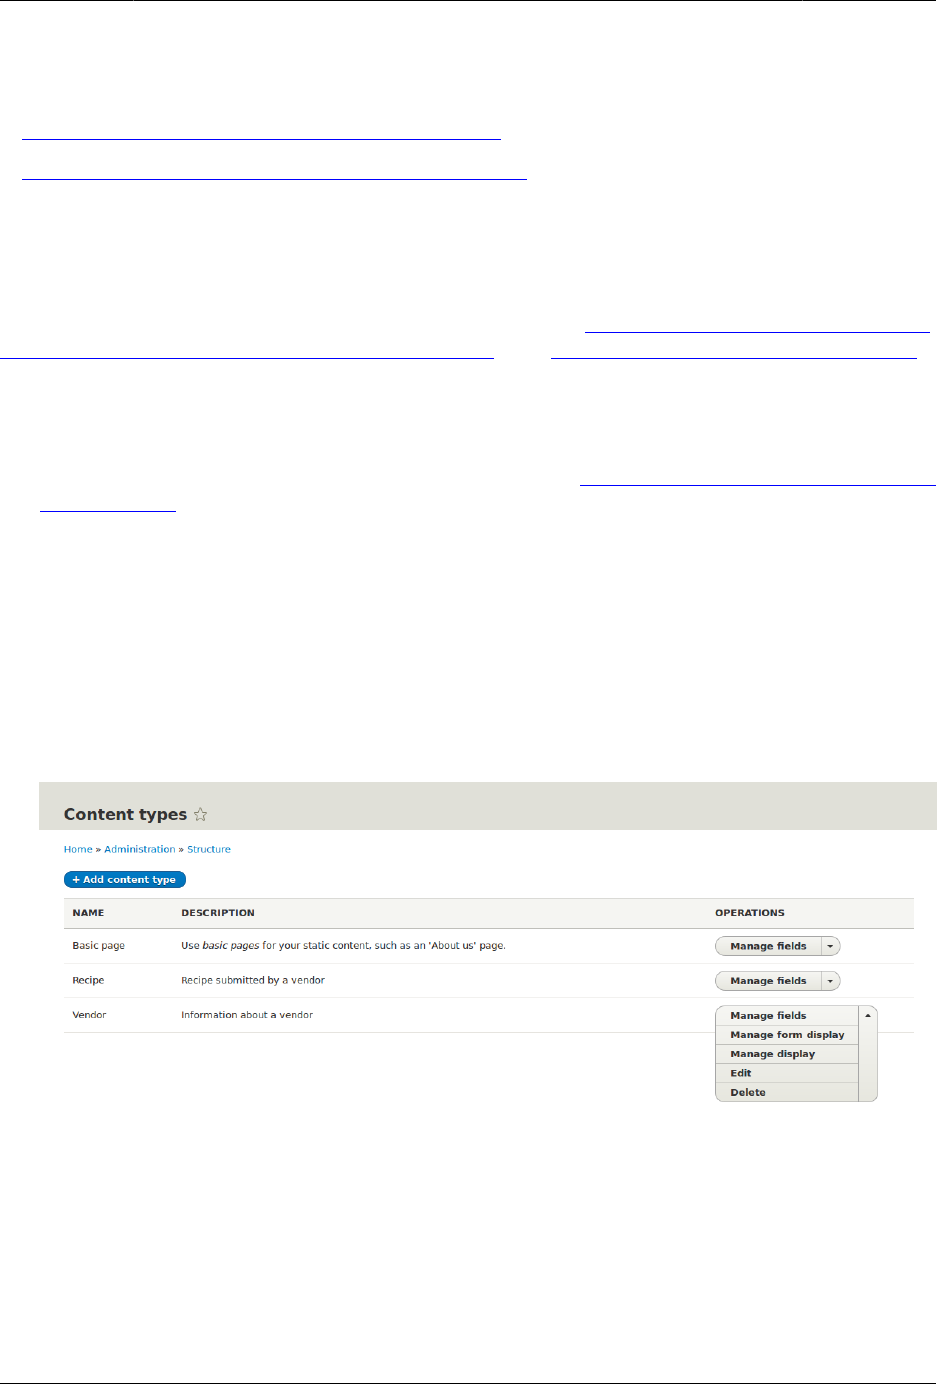
Menyiapkan Struktur Konten
Prerequisite knowledge
•Bagian 2.3, “Concept: Content Entities and Fields”
•Bagian 6.10, “Concept: View Modes and Formatters”
Site prerequisites
The Vendor content type must exist, it must have Main Image and Vendor URL fields, and
your site must have at least one Vendor content item. See Bagian 6.1, “Adding a Content Type”,
Bagian 6.3, “Adding Basic Fields to a Content Type”, and Bagian 5.2, “Creating a Content Item”.
Steps
1. Find and view a Vendor content item you created in Bagian 6.3, “Adding Basic Fields to a
Content Type”. Notice that there are several things that could be done to improve how
the page looks:
• The Main Image and Vendor URL fields should not have labels.
• The order of the fields should be changed so that the image comes first.
• The image should be smaller.
2. To fix the first two problems, and update some additional settings, in the Manage
administrative menu, navigate to Structure > Content types (admin/structure/types). Then
click Manage display in the dropdown button for the Vendor content type.
3. Under the Label column, select Hidden for Main image. Do the same for Vendor URL.
88
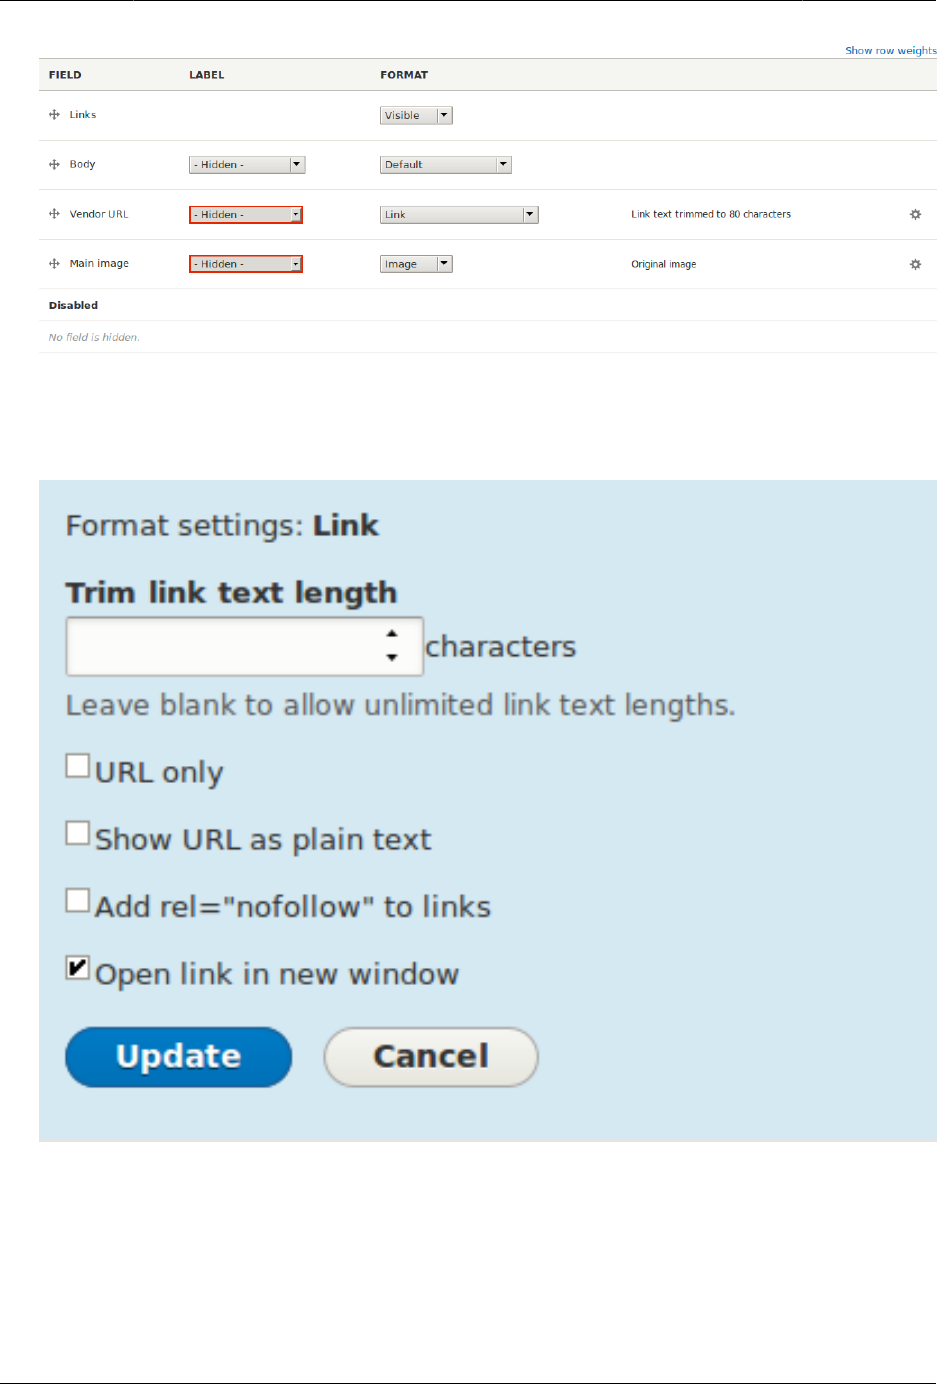
Menyiapkan Struktur Konten
4. Click the gear for the Vendor URL field. Clear the Trim link text length setting. Links will
no longer have a trim length. Check the Open link in new window checkbox. Now, when
the link is clicked, it will open in a new browser window. Click Update.
5. Drag the cross arrows next to the field items to reorder as Main image, Body, Vendor
URL, and Links.
89
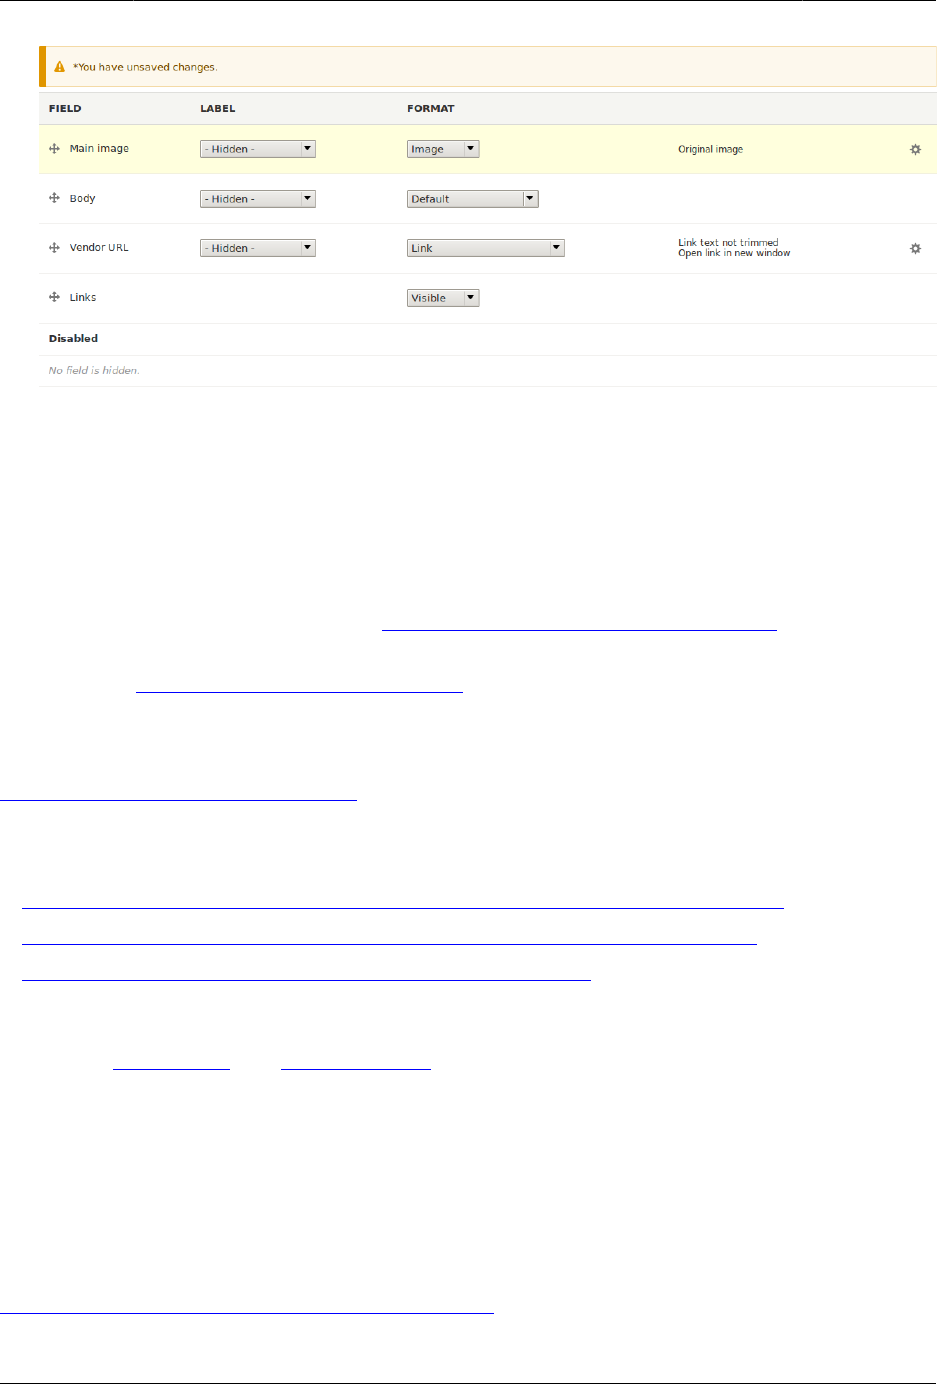
Menyiapkan Struktur Konten
6. Click Save.
7. Find the Vendor content item from step 1 again, and verify that the updates have been
made.
8. Repeat similar steps to manage the display of the Recipe content type fields.
Expand your understanding
• Make the main image smaller. See Bagian 6.13, “Setting Up an Image Style”.
• If you do not see the effect of these changes in your site, you might need to clear the
cache. See Bagian 12.2, “Clearing the Cache”.
Related concepts
Bagian 6.12, “Concept: Image Styles”
Additional resources
•Drupal.org community documentation page "Specify how fields are displayed"
•Drupal.org community documentation page "Rearrange the order of fields"
•Drupal.org community documentation page "View modes"
Attributions
Written by Ann Greazel and Boris Doesborg.
6.12. Concept: Image Styles
Prerequisite knowledge
Bagian 6.3, “Adding Basic Fields to a Content Type”
90

Menyiapkan Struktur Konten
What are image styles?
Image styles allow you to upload a single image but display it in several ways; each display
variation, or image style, is the result of applying one or more effects to the original image.
As an example, you might upload a high-resolution image with a 4:3 aspect ratio, and display
it scaled down, square cropped, or black-and-white (or any combination of these effects).
The core software provides a way to do this efficiently:
1. Configure an image style with the desired effects on the Image styles page (admin/config/
media/image-styles).
2. The effects will be applied the first time a particular image is requested in that style.
3. The resulting image is saved.
4. The next time that same style is requested, the saved image is retrieved without the
need to recalculate the effects.
The core software provides several effects that you can use to define styles; others may be
provided by contributed modules.
Visit the Image styles page via the Manage administrative menu, navigate to Configuration
> Media > Image styles (admin/config/media/image-styles) to see the image styles that are
defined by default.
Related topics
•Bagian 6.13, “Setting Up an Image Style”
•Bagian 6.14, “Concept: Responsive Image Styles”
•Bagian 6.3, “Adding Basic Fields to a Content Type”
Additional resources
Drupal.org community documentation page "Working with images in Drupal 7 and 8"
Attributions
Adapted and edited by Boris Doesborg, and Jojy Alphonso at Red Crackle, from "Working with
images in Drupal 7 and 8", copyright 2000-2017 by the individual contributors to the Drupal
Community Documentation
6.13. Setting Up an Image Style
Goal
Add an image style and use it to display images on Vendor pages.
91
Menyiapkan Struktur Konten
Prerequisite knowledge
•Bagian 6.3, “Adding Basic Fields to a Content Type”
•Bagian 6.11, “Changing Content Display”
•Bagian 6.12, “Concept: Image Styles”
Site prerequisites
• Vendor and Recipe content types must exist. See Bagian 6.1, “Adding a Content Type”.
• Main image fields must exist for both content types. See Bagian 6.3, “Adding Basic Fields
to a Content Type”.
• Content items must exist for both content types. See Bagian 6.1, “Adding a Content Type”,
Bagian 6.3, “Adding Basic Fields to a Content Type”, and Bagian 5.2, “Creating a Content Item”.
Steps
1. In the Manage administrative menu, navigate to Configuration > Media > Image styles
(admin/config/media/image-styles).
2. Click Add image style.
3. Enter the name Extra medium (300x200)
4. Click Create new style. The page Edit style Extra medium (300x200) appears.
5. In the Effect table, select Scale and crop. Click Add.
6. Fill in the fields as shown below.
Field name Value
Width 300
Height 200
7. Click Add effect. The image style is saved with the chosen effects.
92
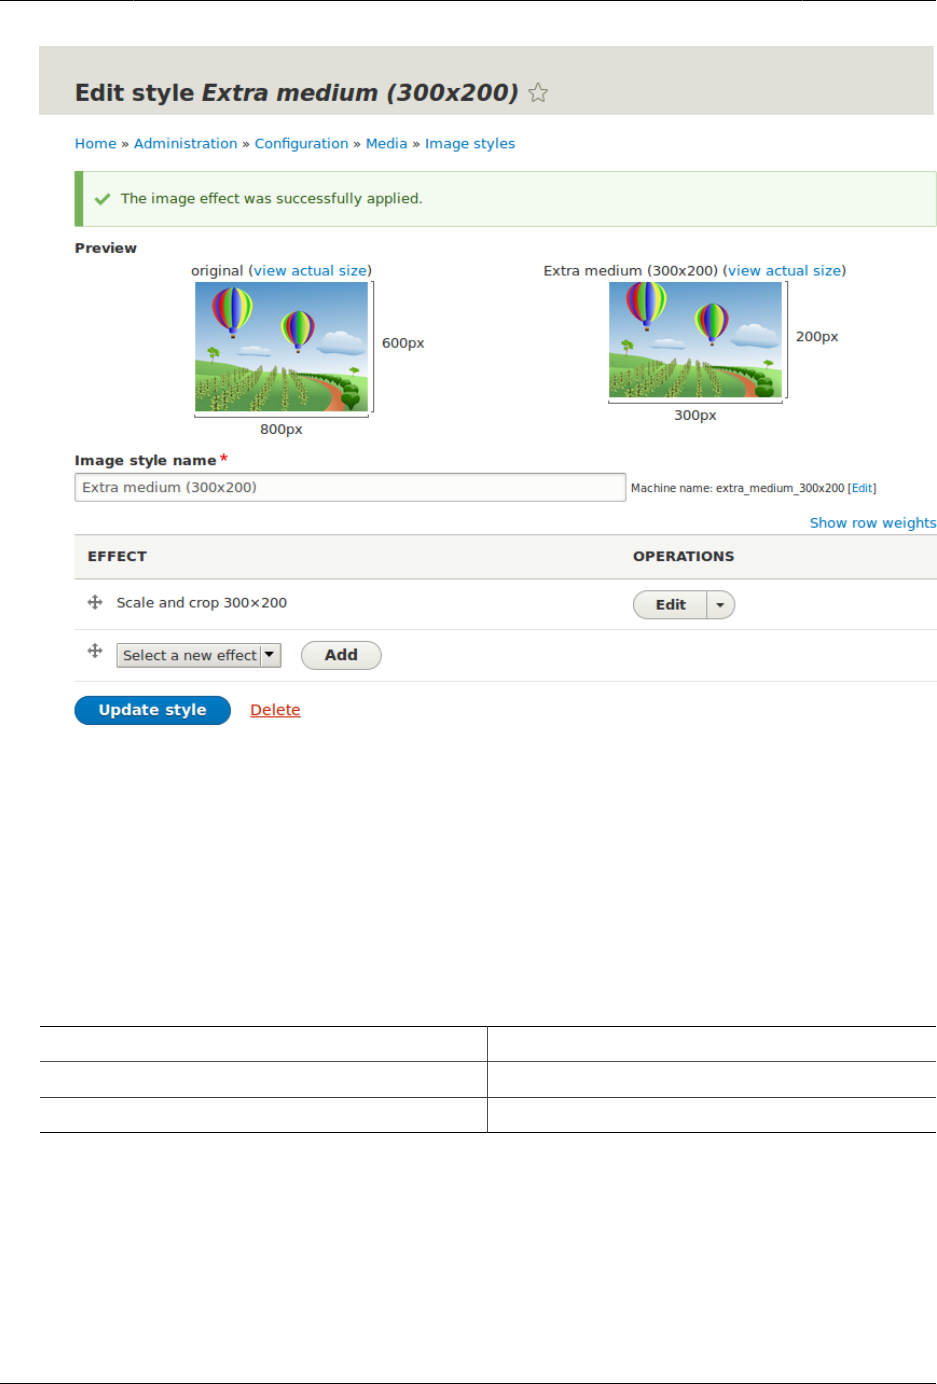
Menyiapkan Struktur Konten
8. In the Manage administrative menu, navigate to Structure > Content types (admin/
structure/types).
9. Click Manage display in the Operations dropdown for the Vendor content type. The
Manage display page (admin/structure/types/manage/vendor/display) appears.
10. Ensure that the secondary tab Default is selected.
11. Click the cogwheel next to Main image for the configuration options.
12. Fill in the fields as shown below.
Field name Value
Image style Extra medium (300x200)
Link image to Nothing
93
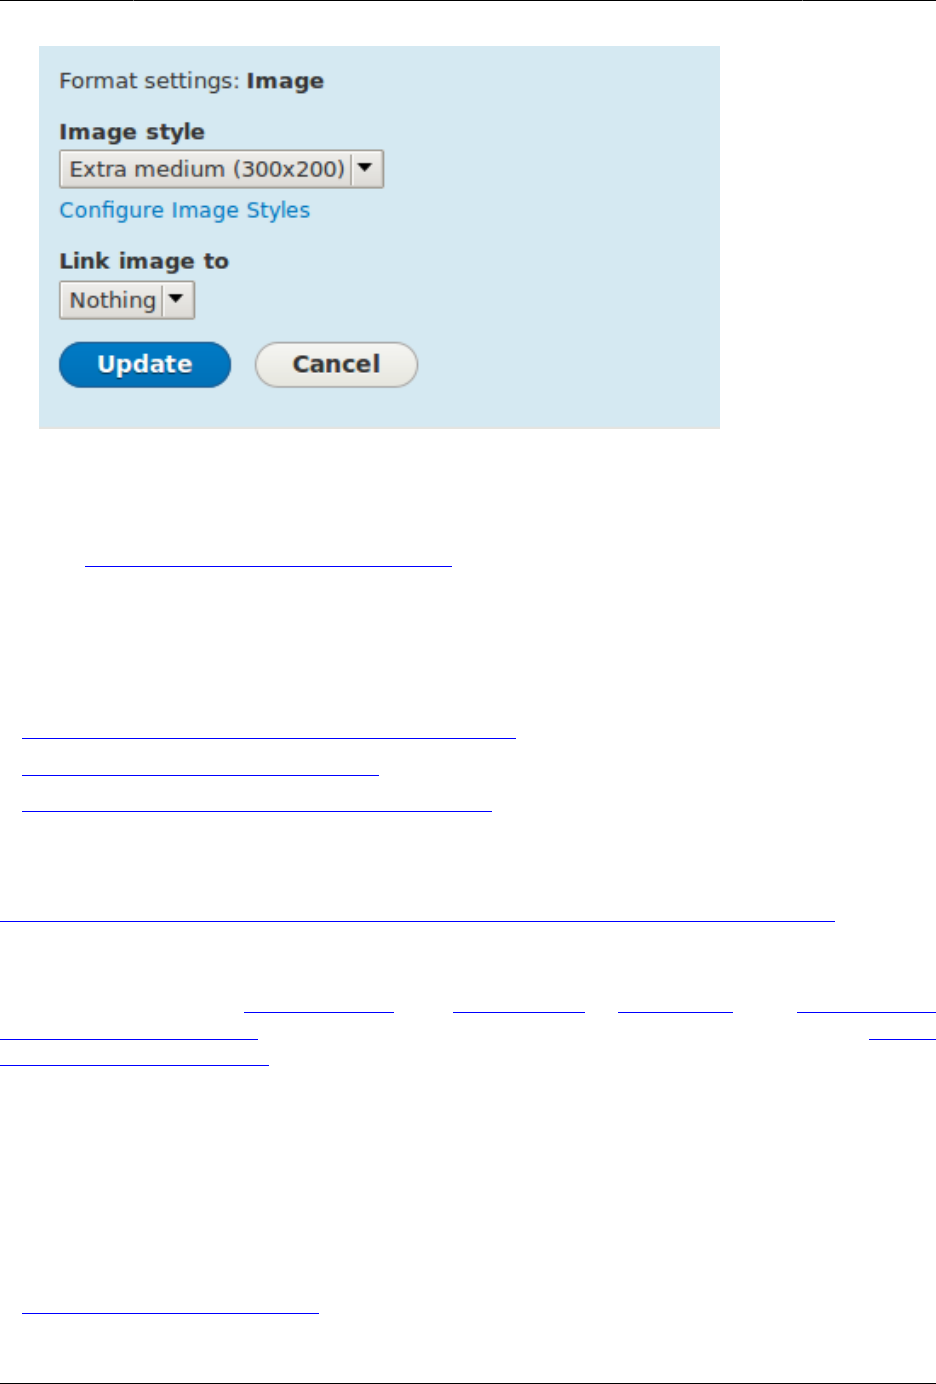
Menyiapkan Struktur Konten
13. Click Update.
14. Click Save. The new image style will be used while displaying Vendor content.
15. Open a Vendor content item and verify that it now shows up with the scaled-down image.
See Bagian 5.3, “Editing a Content Item” for information on how to locate an existing
content item.
16. Repeat steps 8-15 for the Recipe content type.
Related concepts
•Bagian 6.3, “Adding Basic Fields to a Content Type”
•Bagian 6.12, “Concept: Image Styles”
•Bagian 6.14, “Concept: Responsive Image Styles”
Additional resources
Drupal.org community documentation page "Working with images in Drupal 7 and 8"
Attributions
Adapted and edited by Boris Doesborg, and Jojy Alphonso at Red Crackle from "Working with
images in Drupal 7 and 8", copyright 2000-2017 by the individual contributors to the Drupal
Community Documentation.
6.14. Concept: Responsive Image Styles
Prerequisite knowledge
•Bagian 1.3, “Concept: Themes”
94

Menyiapkan Struktur Konten
•Bagian 6.11, “Changing Content Display”
•Bagian 6.12, “Concept: Image Styles”
What are responsive image styles?
The core Responsive Image module provides responsive image styles. This allows you to
have images in your website that are specifically sized for different screen sizes. This is
useful, for example, to make your site load faster on mobile devices because image sizes
are optimized for smaller screens.
A responsive image style is a mapping between images styles and breakpoints. Breakpoints
are the points where a responsive design needs to change in order to respond to different
screen sizes. Responsive image styles can only be used if the breakpoints are defined in the
theme.
When a responsive image style is defined, it can be used in the display settings for Image
fields. This allows the site to display responsive images using the HTML5 picture tag.
Related topics
Bagian 6.3, “Adding Basic Fields to a Content Type”
Additional resources
•Drupal.org community documentation page "Responsive web design"
•Drupal.org community documentation page "Responsive images in Drupal 8"
•Drupal.org community documentation page "Working with breakpoints in Drupal 8"
Attributions
Adapted by Boris Doesborg from Responsive images in Drupal 8, copyright 2000-2017 by the
individual contributors to the Drupal Community Documentation.
6.15. Concept: Text Formats and Editors
What are text formats and filters?
Text formats change how HTML tags and other text are processed and displayed on your
site. Text formats are composed of a series of filters, each of which transforms text. When
users create content, a text format is associated with the content, and the full, original text
is stored in the database. The content is then passed through the filters in the text format
before it becomes output on the site.
The core Filter module provides text format functionality, and the core Standard installation
profile sets up Basic HTML, Restricted HTML, and Full HTML text formats. Each text format
95

Menyiapkan Struktur Konten
has an associated permission, so that you can allow only trusted users to use permissive
text formats. This restricts untrusted users to text formats like Basic HTML, which filters out
dangerous HTML tags.
What are the editors associated with text formats?
Each text format can be associated with an editor, such as a visual WYSIWYG (What You See
Is What You Get) HTML editor. The core Text Editor module provides the ability to associate
editors with text formats, and to configure the editors (such as adding and removing buttons
from their toolbars). The core CKEditor module provides the industry-standard editor known
as CKEditor, so that it can be used to edit HTML content on your site.
What is cross-site scripting?
Cross-site scripting (XSS) is a security vulnerability typically found in websites. In a site that
is not well protected, malicious users can enter script into web pages that are viewed by
other users (for example, in a comment or in the body of a page). A cross-site scripting
vulnerability may be used by attackers to login as another user. It is important to configure
the text formats of your website to prevent such abuse.
Related topics
Bagian 13.3, “Concept: Security and Regular Updates”
Additional resources
•Drupal.org community documentation page "Filter module: text formats that filter user input"
•Wikipedia page "Cross-site scripting"
Attributions
Written and edited by Boris Doesborg and Jennifer Hodgdon.
6.16. Configuring Text Formats and Editors
Goal
Add a horizontal rule tag to the Basic HTML text format, and a corresponding button to its
editor configuration.
Prerequisite knowledge
Bagian 6.15, “Concept: Text Formats and Editors”
96
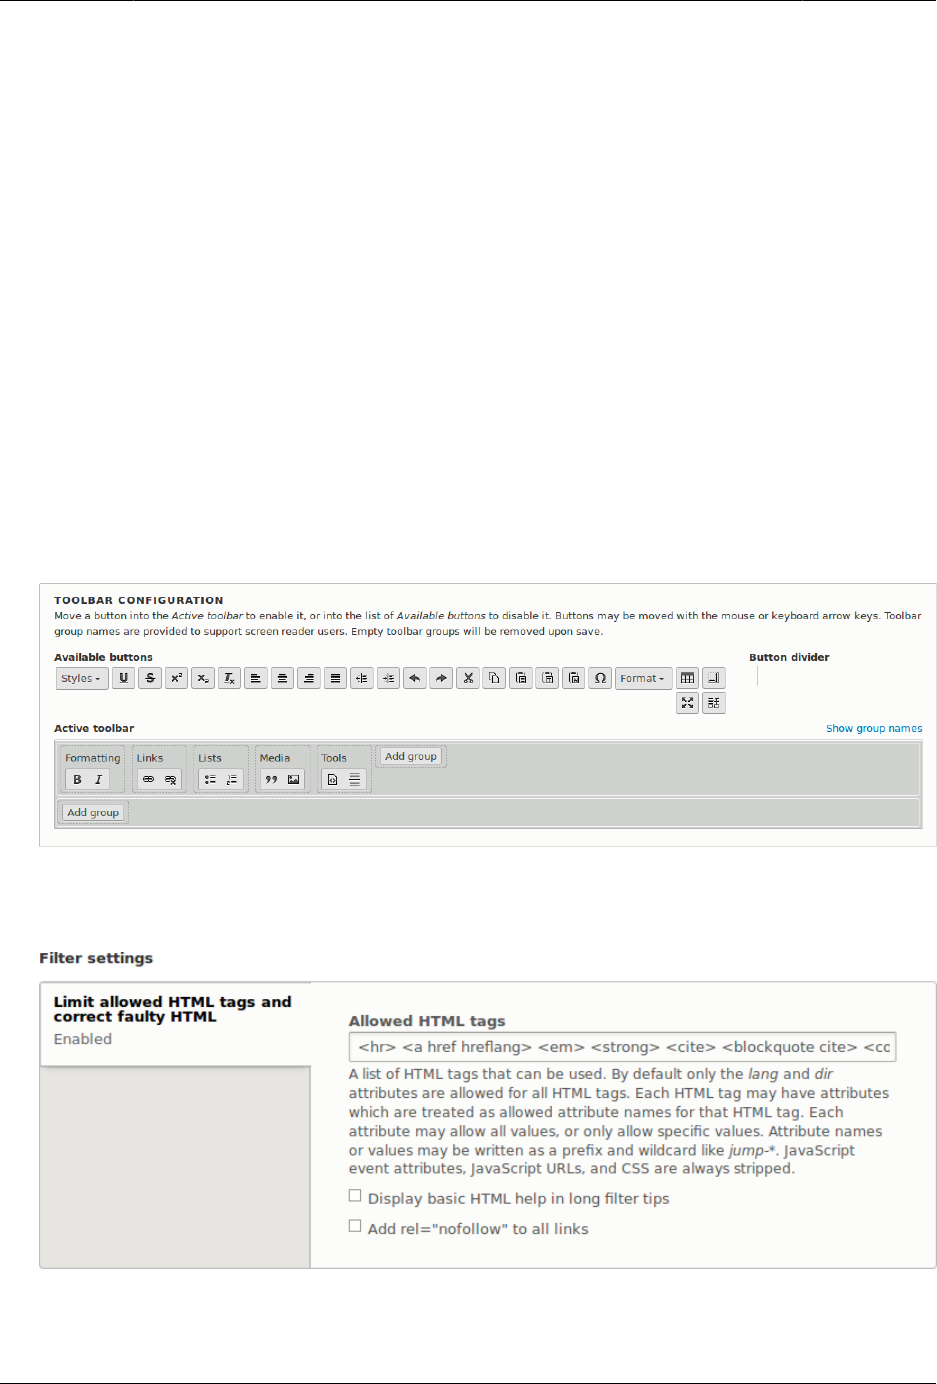
Menyiapkan Struktur Konten
Site prerequisites
• The core Filter, Editor, and CKEditor modules must be installed. They are installed on your
site when you install with the core Standard installation profile.
• The Basic HTML text format must exist. This is created on your site when you install with
the core Standard installation profile.
Steps
1. In the Manage administrative menu, navigate to Configuration > Content authoring >
Text formats and editors (admin/config/content/formats). The Text formats and editors page
appears.
2. Click Configure for the Basic HTML text format. The Basic HTML page appears.
3. Note that CKEditor is selected in the Text editor field. This allows you to configure the
editor’s toolbar.
4. Drag the horizontal rule button from Available buttons to Tools in Active toolbar. You may
need to click the Show group names link to see the Tools group name.
5. Note that you can change the Filter processing order.
6. In the field Allowed HTML tags, add <hr> to what is already present.
7. Click Save configuration. You will be taken back to the Text formats and editors page. A
message will be displayed saying that the text format has been updated.
97
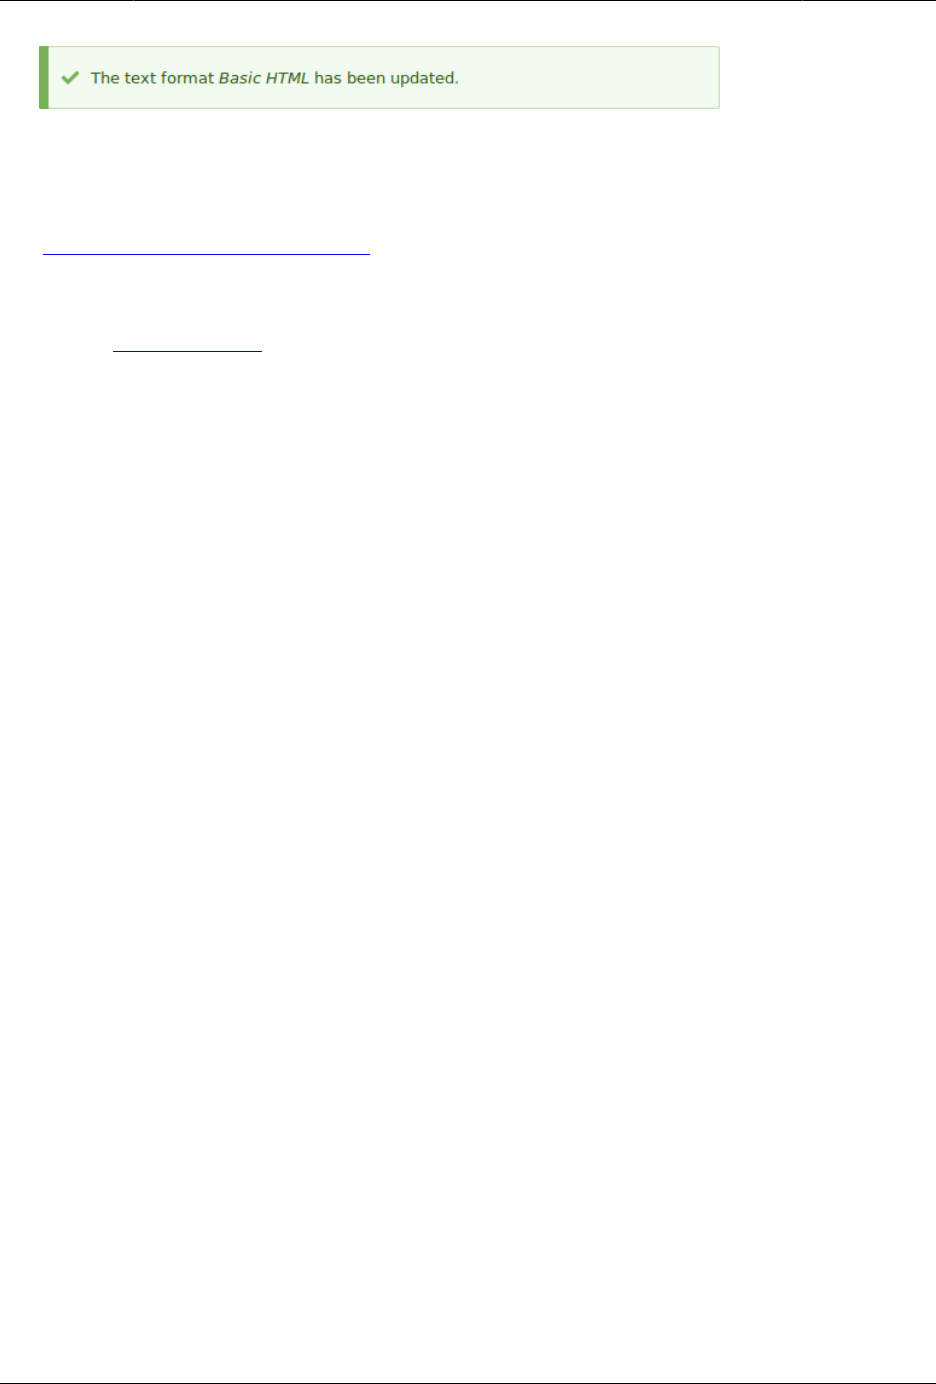

Bab 7. Mengelola Akun Pengguna
7.1. Concept: Users, Roles, and Permissions
What are Users?
Anyone who visits your website is a user, including you. There are three groups of users:
• Users who are not logged in, or anonymous users
• Users who are logged in, or authenticated users
• The administrative user account that was automatically created when you installed your
site, or User 1. See Bagian 7.2, “Concept: The User 1 Account”.
What are Permissions?
The ability to do actions on your site (including viewing content, editing content, and
changing configuration) is governed by permissions. Each permission has a name (such as
View published content) and covers one action or a small subset of actions. A user must be
granted a permission in order to do the corresponding action on the site; permissions are
defined by the modules that provide the actions.
What are Roles?
Rather than assigning individual permissions directly to each user, permissions are grouped
into roles. You can define one or more roles on your site, and then grant permissions to
each role. The permissions granted to authenticated and anonymous users are contained in
the Authenticated user and Anonymous user roles, and depending on the installation profile
you used when you installed your site, there may also be an Administrator role that is
automatically assigned all permissions on your site.
Each user account on your site is automatically given the Authenticated user role, and may
optionally be assigned one or more additional roles. When you assign a role to a user
account, the user will have all the permissions of the role when logged in.
It is a good practice to make several roles on your site. In the farmers market site example,
you might want the following roles:
• A Vendor role that allows vendors to edit their own vendor listing page
• A Content editor role for editing the general farmers market pages
• A User manager role for managing the vendor accounts
99

Mengelola Akun Pengguna
• The Administrator role that was installed with your site, for expert users to manage the
site configuration
Related topics
•Bagian 7.3, “Creating a Role”
•Bagian 7.5, “Assigning Permissions to a Role”
•Bagian 7.6, “Changing a User’s Roles”
•Bagian 7.4, “Creating a User Account”
•Bagian 7.2, “Concept: The User 1 Account”
•Bagian 7.7, “Assigning Authors to Content”
Additional resources
•Drupal.org community documentation page "Users, roles and permissions"
•Drupal.org community documentation page "Managing Users"
•Drupal.org community documentation page "User Roles"
Attributions
Adapted by Mark LaCroix, Boris Doesborg, and Jennifer Hodgdon from "User Roles", copyright
2000-2017 by the individual contributors to the Drupal Community Documentation.
7.2. Concept: The User 1 Account
Prerequisite knowledge
Bagian 7.1, “Concept: Users, Roles, and Permissions”
What is the user 1 account?
During the installation of your site, you created the first user account. Each user account
internally has a numeric user ID, and since the ID of this user is one, it is commonly referred
to as the user 1 account. This user account is special, because independent of what roles it is
assigned, someone logged in as user 1 has permission to do all actions on the site, including
viewing and editing all content, editing any user account, changing site configuration,
installing and uninstalling modules, and running the update script.
Because of this level of permission, some people refer to this account as the root user,
similar to the "root" user account that has full administrative permissions in Linux and other
operating systems.
100

Mengelola Akun Pengguna
It is usually better to make separate accounts for each administrative user, giving them the
Administrator role, rather than having all administrative users log in using the user 1 account.
There are several reasons for this:
• Some actions and updates on the site are logged, and if everyone uses the same account,
it is difficult to know who did them if you have questions.
• The Administrator role permissions can be modified to be safer than the full permissions of
the user 1 account, so that people do not inadvertently change site features that shouldn’t
be changed.
• People’s responsibilities on a site may change over time. With ordinary user accounts, this
can be mirrored in permissions by assigning or unassigning roles to their user accounts.
If they are all using the user 1 account, this is more difficult.
• On some sites, the author of content or comments is displayed or tracked, and if everyone
uses the same account to create content, it is difficult to know who created the content.
It is not possible to delete the user 1 account from the administrative user interface. It would
be possible to do with a database query, but it could cause problems in your site and is not
advisable.
Additional resources
Drupal.org community documentation page "Accounts and roles"
Attributions
Written and edited by Mark LaCroix and Jennifer Hodgdon.
7.3. Creating a Role
Goal
Create a Vendor role to allow some - but not all - users to perform specific tasks.
Prerequisite knowledge
Bagian 7.1, “Concept: Users, Roles, and Permissions”
Steps
1. In the Manage administrative menu, navigate to People > Roles (admin/people/roles).
2. You will find default roles Anonymous user, Authenticated user, and Administrator already
present.
101
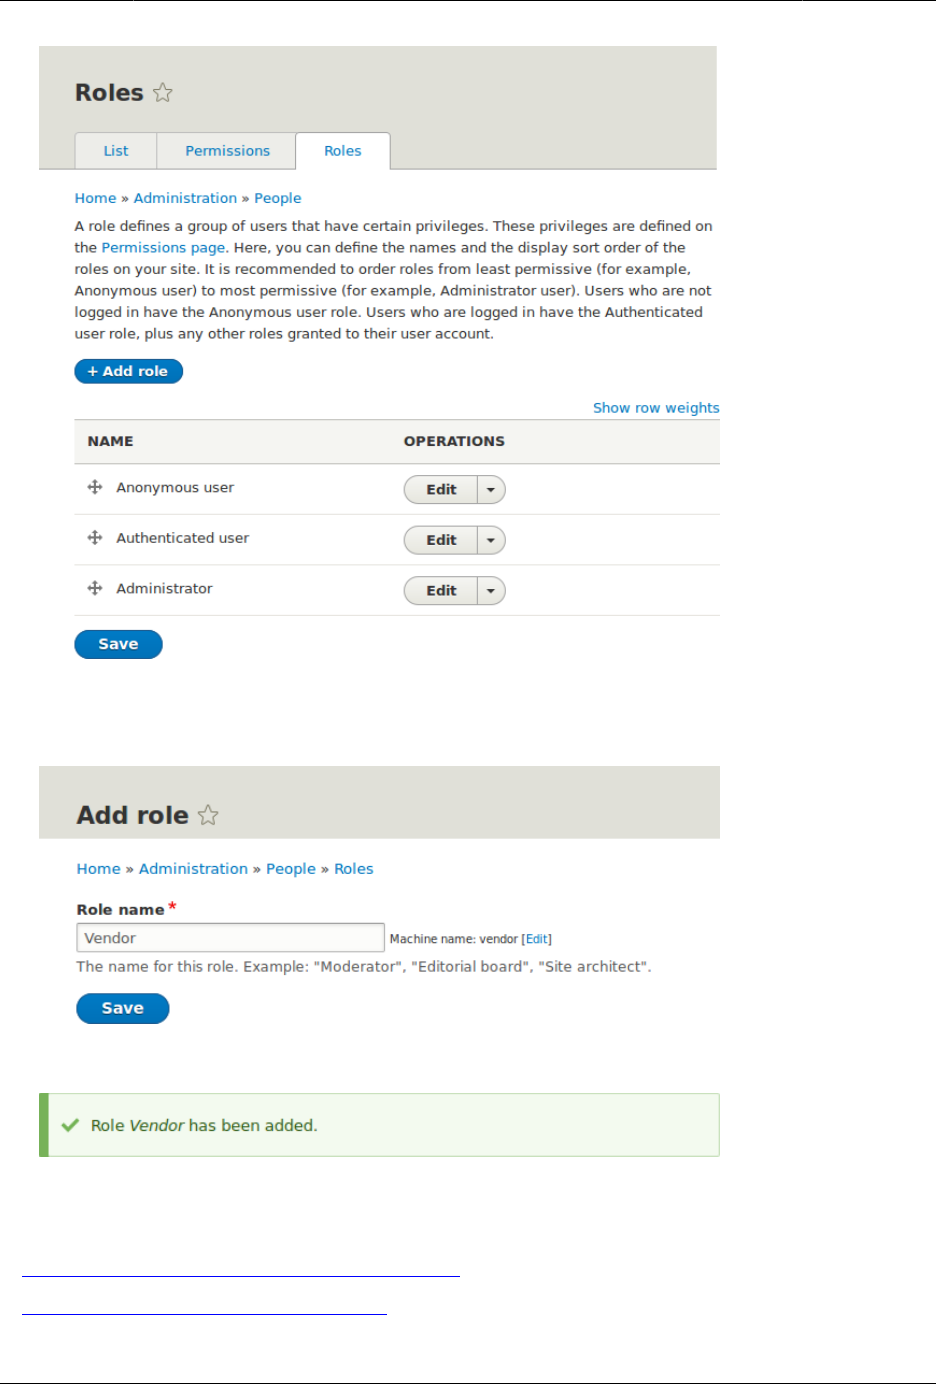
Mengelola Akun Pengguna
3. Click Add Role to add a custom role.
4. Type Vendor in the Role name field. Click Save.
5. You will see the message "Role Vendor has been added." displayed at the top of the page.
Expand your understanding
•Bagian 7.5, “Assigning Permissions to a Role”
•Bagian 7.6, “Changing a User’s Roles”
102

Mengelola Akun Pengguna
Additional resources
Drupal.org community documentation page "User Roles"
Attributions
Adapted and edited by Jack Probst, Boris Doesborg, and Joe Shindelar from "User Roles",
copyright 2000-2017 by the individual contributors to the Drupal Community Documentation
7.4. Creating a User Account
Goal
Create Vendor user accounts for Sweet Honey and Happy Farm vendors.
Prerequisite knowledge
•Bagian 7.1, “Concept: Users, Roles, and Permissions”
•Bagian 7.2, “Concept: The User 1 Account”
•Bagian 7.3, “Creating a Role”
Site prerequisites
The Vendor role must exist on your site. See Bagian 7.3, “Creating a Role”.
Steps
1. In the Manage administrative menu, navigate to People (admin/people).
2. Click Add user.
103

Mengelola Akun Pengguna
3. Fill in the form fields. See the table below.
Field name Explanation Example value
Email address A valid email address for
the vendor. All emails from
the system will be sent to
this address. The email
address is not made public.
honey@example.com
Username A username for the
vendor that they will
use to sign in or author
content items. Spaces are
allowed; punctuation is not
allowed except for periods,
Sweet Honey
104
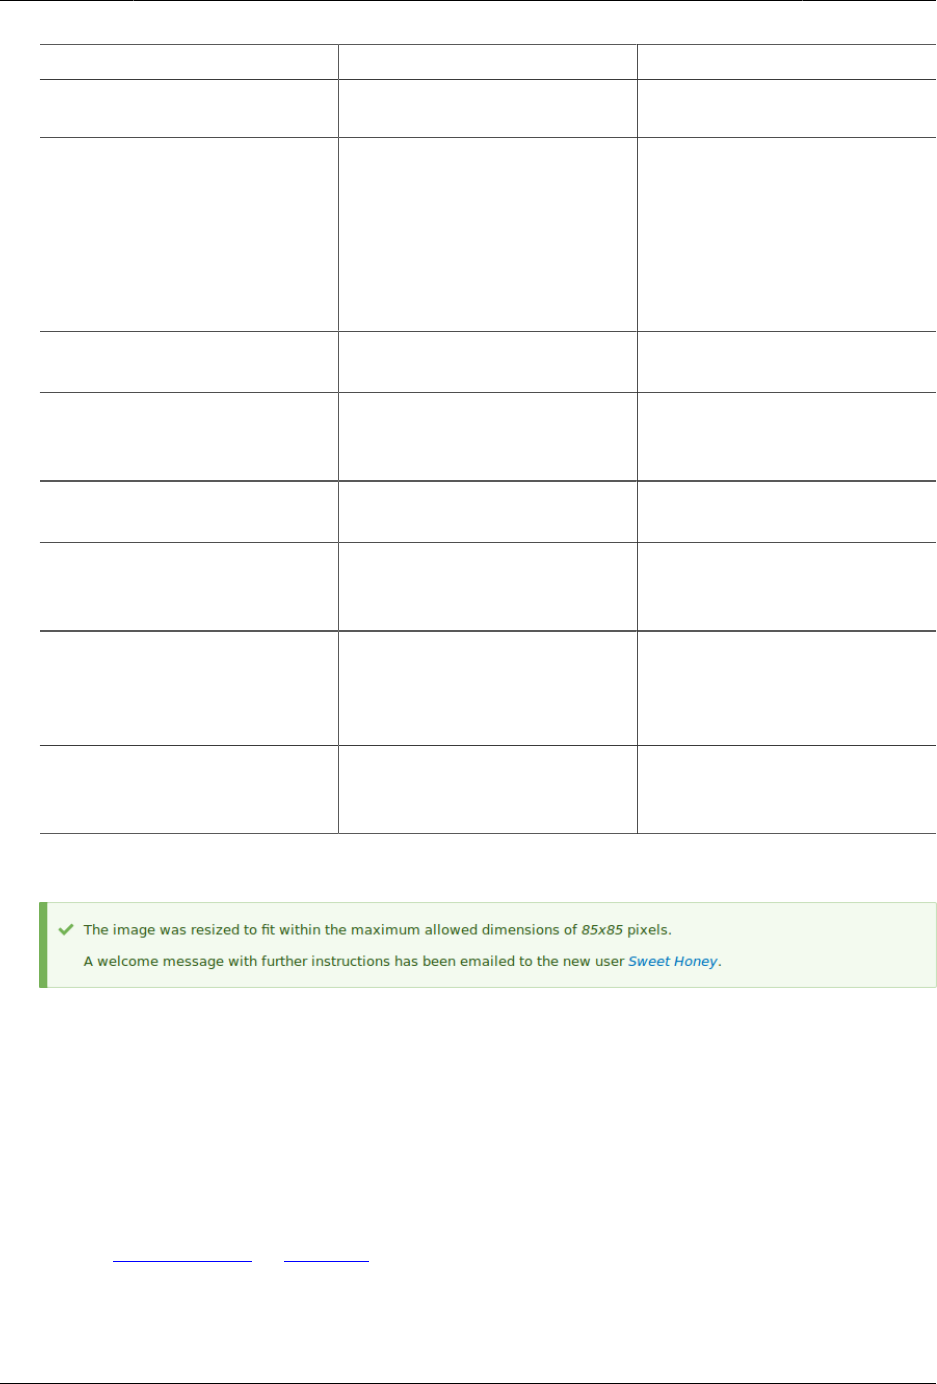
Mengelola Akun Pengguna
Field name Explanation Example value
hyphens, apostrophes, and
underscores.
Password A password the vendor
will use to sign in to the
site. You can see how safe
the password is on the
Password strength gauge.
You also get tips on how to
make it safer.
(Make a secure password)
Confirm password Type the same password to
avoid any typing mistakes.
(Repeat password)
Status Set the status of the user
account. Blocked users will
not be able to sign in.
Active
Roles Set the role of the user
account.
Vendor
Notify user of new account Whether or not to send a
notification to the vendor’s
email address.
Checked
Picture Click Browse and select
a picture to upload.
Pay attention to size
restrictions.
Photo of the vendor
Contact settings Enable or disable the
display of a contact form
for the account.
Checked
4. Click Create new account. You will get a notification about the user account creation.
5. Create a second Vendor account for Happy Farm by following the steps above.
Expand your understanding
Create a user account for yourself.
Attributions
Written by Diána Lakatos at Pronovix.
105

Mengelola Akun Pengguna
7.5. Assigning Permissions to a Role
Goal
Change the permissions for the Vendor role so that users can create, edit, and delete Recipe
and Vendor content, format the content, and contact each other.
Prerequisite knowledge
•Bagian 7.1, “Concept: Users, Roles, and Permissions”
Site prerequisites
The Vendor role must exist on your site. See Bagian 7.3, “Creating a Role”.
Steps
1. In the Manage administrative menu, navigate to People > Roles (admin/people/roles). The
Roles page appears.
2. Click Edit permissions in the dropdown for the Vendor role. The Edit role page appears
where you can see all the available actions for the website such as, for example, Post
comments or Administer blocks. The available permissions depend on the modules that
are installed in the site. Note: Some permissions may have security implications. Be
cautious while assigning permissions to roles.
3. Check the boxes for the following permissions, listed by module:
Module Permission
Contact Use users' personal contact forms
Filter Use the Restricted HTML text format
Node Recipe: Create new content
Node Recipe: Edit own content
Node Recipe: Delete own content
Node Vendor: Edit own content
Quick Edit Access in-place editing
106
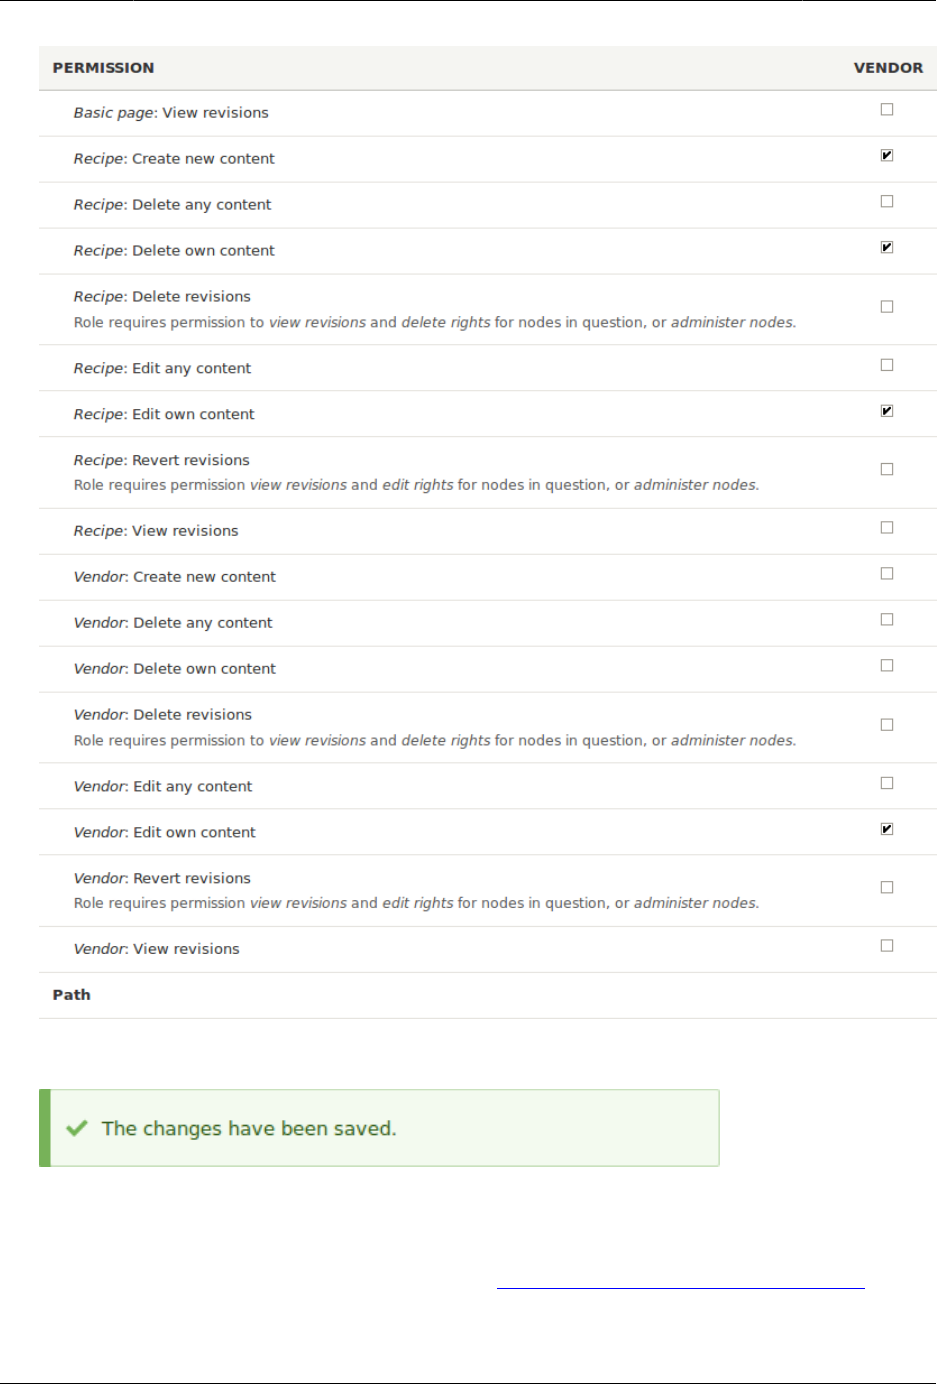

Mengelola Akun Pengguna
•Bagian 7.6, “Changing a User’s Roles”
Related concepts
Bagian 7.2, “Concept: The User 1 Account”
Additional resources
Drupal.org community documentation page "Managing Users"
Attributions
Adapted and edited by Boris Doesborg, Brian Emery, and Jojy Alphonso at Red Crackle, from
"User Roles", copyright 2000-2017 by the individual contributors to the Drupal Community
Documentation.
7.6. Changing a User’s Roles
Goal
Change or add roles to a given user, either by editing a single-user or by applying a bulk
operation.
Prerequisite knowledge
Bagian 7.1, “Concept: Users, Roles, and Permissions”
Site prerequisites
The user account that you want to update, and the role you want it to have, must already
exist. See Bagian 7.4, “Creating a User Account”, Bagian 7.3, “Creating a Role”, and Bagian 7.5,
“Assigning Permissions to a Role”.
Steps
Updating the roles using single-user editing method
1. In the Manage administrative menu, navigate to People (admin/people).
2. Locate the user 1 account (named "admin") to assign it the Administrator role. If it is not
immediately visible, use the Name or email contains filter, or other filters, to narrow down
the list.
3. Click Edit to update the user account.
108
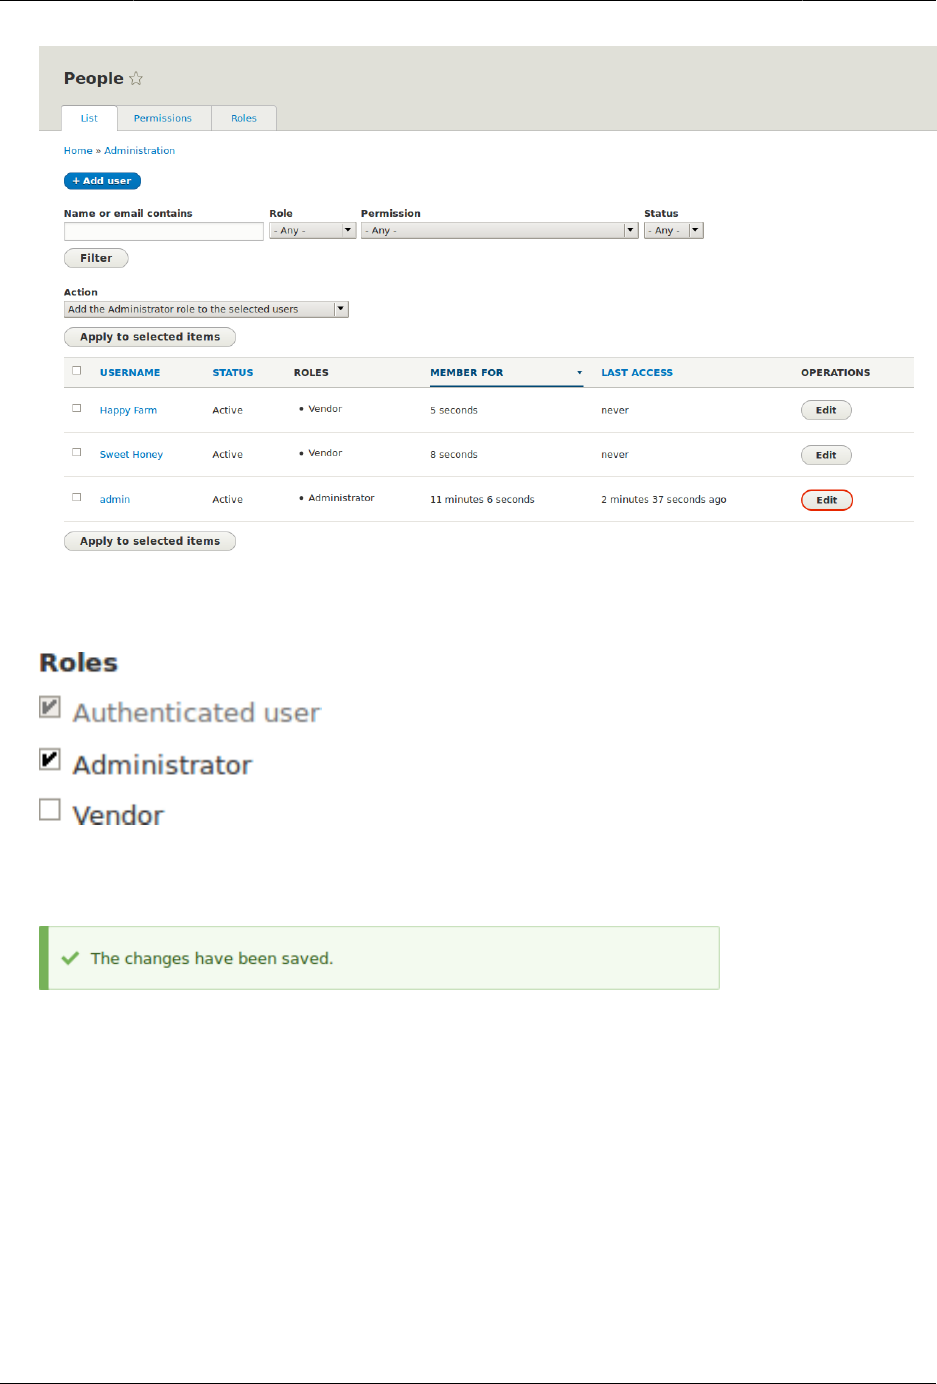
Mengelola Akun Pengguna
4. On the Edit page, scroll down to Roles section. Check the Administrator role for the user
account.
5. Click Save to update the user account. You should be returned to the People page and
see a message saying that the changes have been saved.
Updating the roles using bulk editing method
1. If the users Happy Farm and Sweet Honey did not already have the Vendor role, here is
how you would add it. In the Manage administrative menu, navigate to People (admin/
people).
2. Locate Vendor user accounts Sweet Honey and Happy Farm and check them. If they are
not immediately visible, use the Name or email contains filter, or other filters, to narrow
down the list.
3. Select Add the Vendor role to the selected users from the Action select list.
109
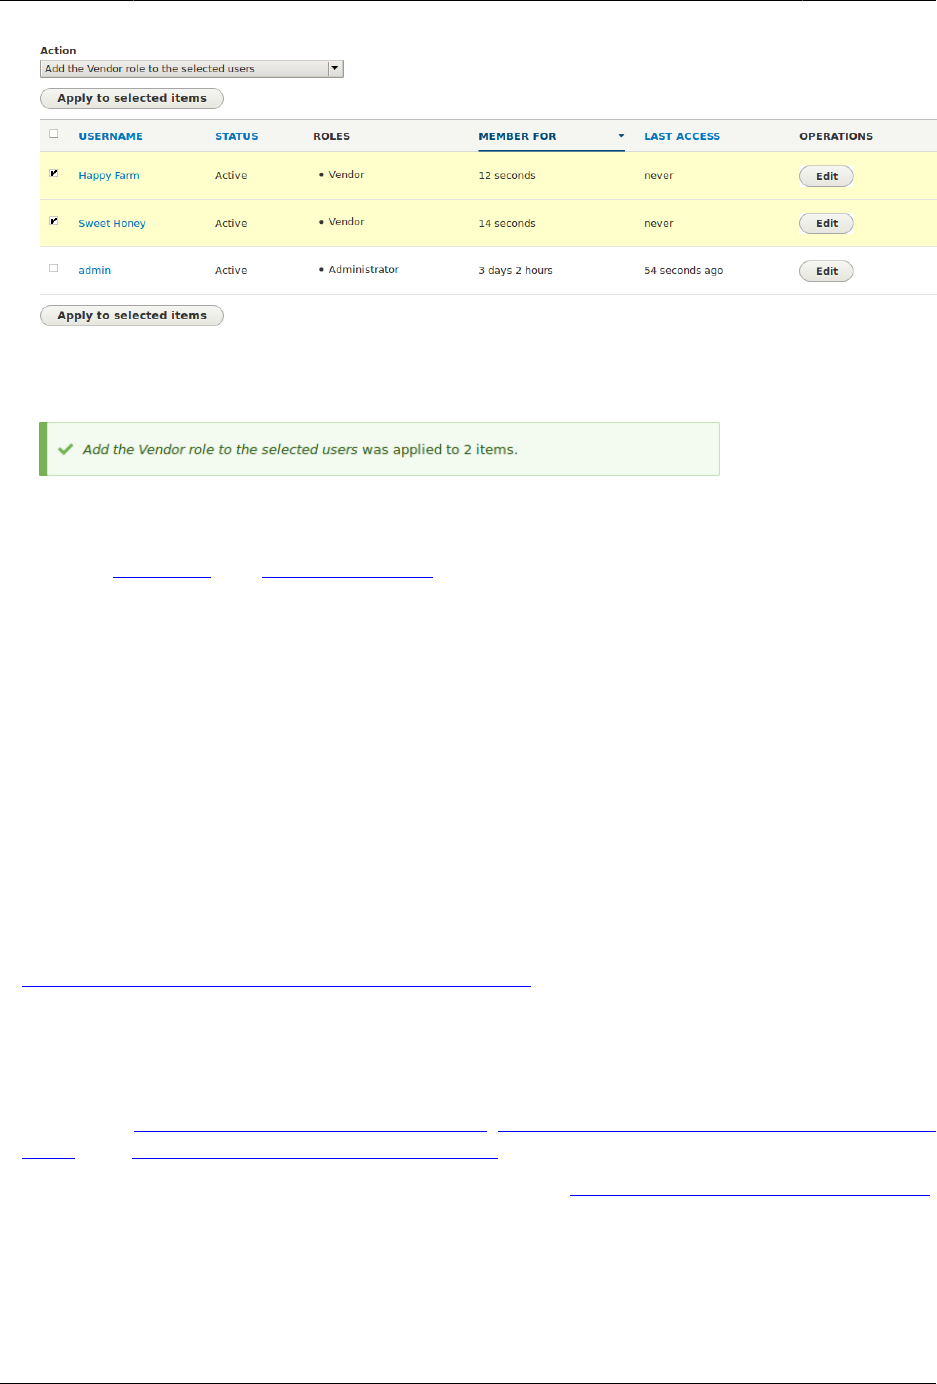
Mengelola Akun Pengguna
4. Click Apply to selected items. You should see a message indicating that the desired
changes were made.
Attributions
Written by Chris Dart and Jennifer Hodgdon
7.7. Assigning Authors to Content
Goal
Assign Vendor content items Happy Farm and Sweet Honey to the corresponding Vendor
user accounts, so they can edit their own Vendor profiles on the site.
Prerequisite knowledge
•Bagian 7.1, “Concept: Users, Roles, and Permissions”
Site prerequisites
• The Vendor content type must exist, and your site must have at least two Vendor content
items. See Bagian 6.1, “Adding a Content Type”, Bagian 6.3, “Adding Basic Fields to a Content
Type”, and Bagian 5.2, “Creating a Content Item”.
• User accounts for at least two vendors must exist. See Bagian 7.4, “Creating a User Account”.
Steps
1. In the Manage administrative menu, navigate to Content (admin/content).
110
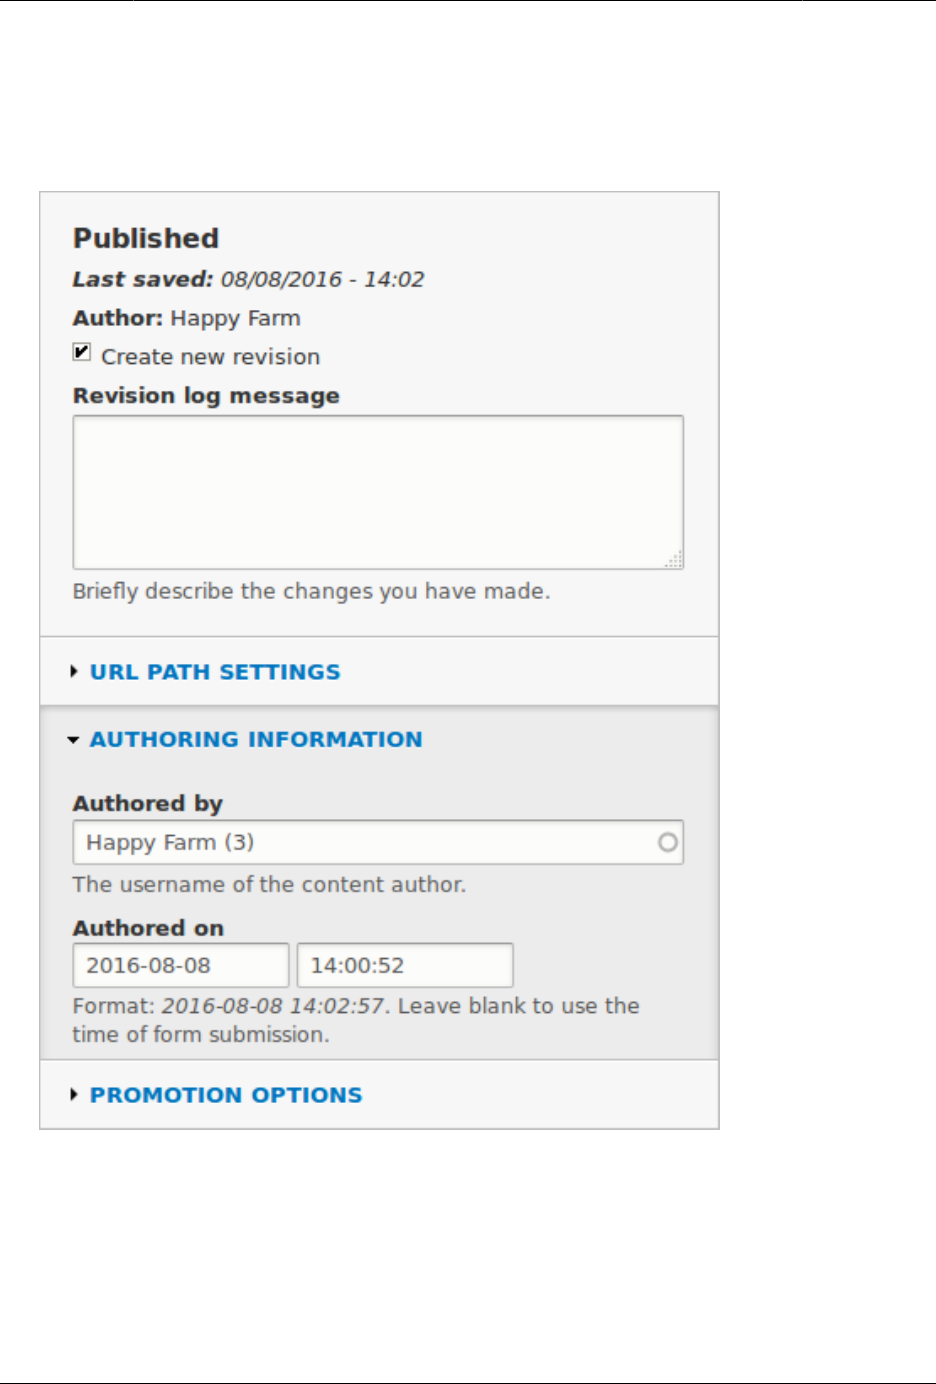
Mengelola Akun Pengguna
2. Find Vendor content item Happy Farm in the list. If it is not immediately visible, you can
filter the list by Published status, Content type (Vendor), Title, or Language. Click Edit for
the Vendor content item you would like to assign an author to.
3. Locate the information block and click Authoring information.
4. Start typing the Vendor’s user name Happy Farm in the Authored by field. The field lists
matching user names. Select the Vendor’s user name from the list.
5. Click Save and keep published.
6. You will get a notification that the Vendor content item has been updated.
111

Bab 8. Blok
8.1. Concept: Blocks
What is a block?
Blocks are individual pieces of your site’s web page layout. They are placed inside the regions
(see Bagian 2.1, “Concept: Regions in a Theme”) of your theme, and can be created, removed,
and rearranged in the Block layout (admin/structure/block) administration page. Examples of
blocks include the Who’s online listing, the main navigation menu, and the breadcrumb trail.
The main page content is also a block.
Some modules make new blocks available for placement on your site. For example, when
the core Search module is installed and configured, it provides a block that contains a search
form. You may also create and place your own custom blocks.
Each block has its own configuration settings, which allow you to select which pages of your
site will display the block. It is even possible to place multiple copies of a block, each with its
own separate configuration and visibility rules.
Related topics
•Bagian 2.1, “Concept: Regions in a Theme”
•Bagian 8.2, “Creating A Custom Block”
•Bagian 8.3, “Placing a Block in a Region”
Attributions
Adapted by Les Lim from "Working with blocks (content in regions)" copyright 2000-2017 by the
individual contributors to the Drupal Community Documentation.
8.2. Creating A Custom Block
Goal
Create a block showing the hours and location of the farmers market.
Prerequisite knowledge
•Bagian 8.1, “Concept: Blocks”
113
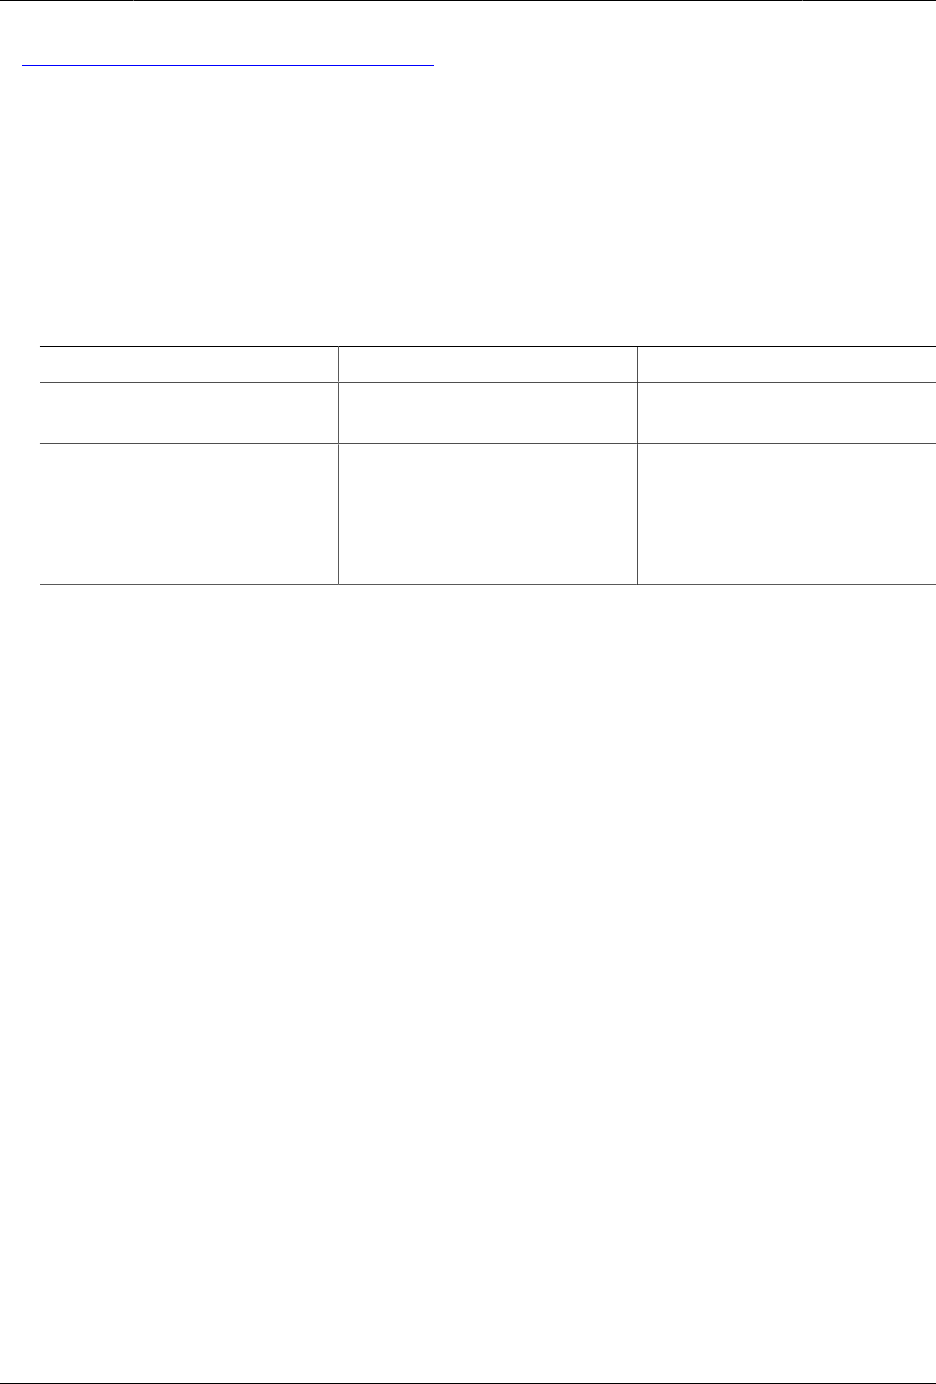
Blok
•Bagian 2.1, “Concept: Regions in a Theme”
Steps
1. In the Manage administrative menu, navigate to Structure > Block layout > Custom block
library (admin/structure/block/block-content).
2. Click Add custom block. The Add custom block page appears.
3. Fill in the fields as shown below.
Field name Explanation Example value
Block description Name of the block shown to
administrators
Hours and location block
Body Content of the block when
it is displayed
Open: Sundays, 9 AM to 2
PM, April to September<br /
>Location: Parking lot of
Trust Bank, 1st & Union,
downtown Anytown.
114
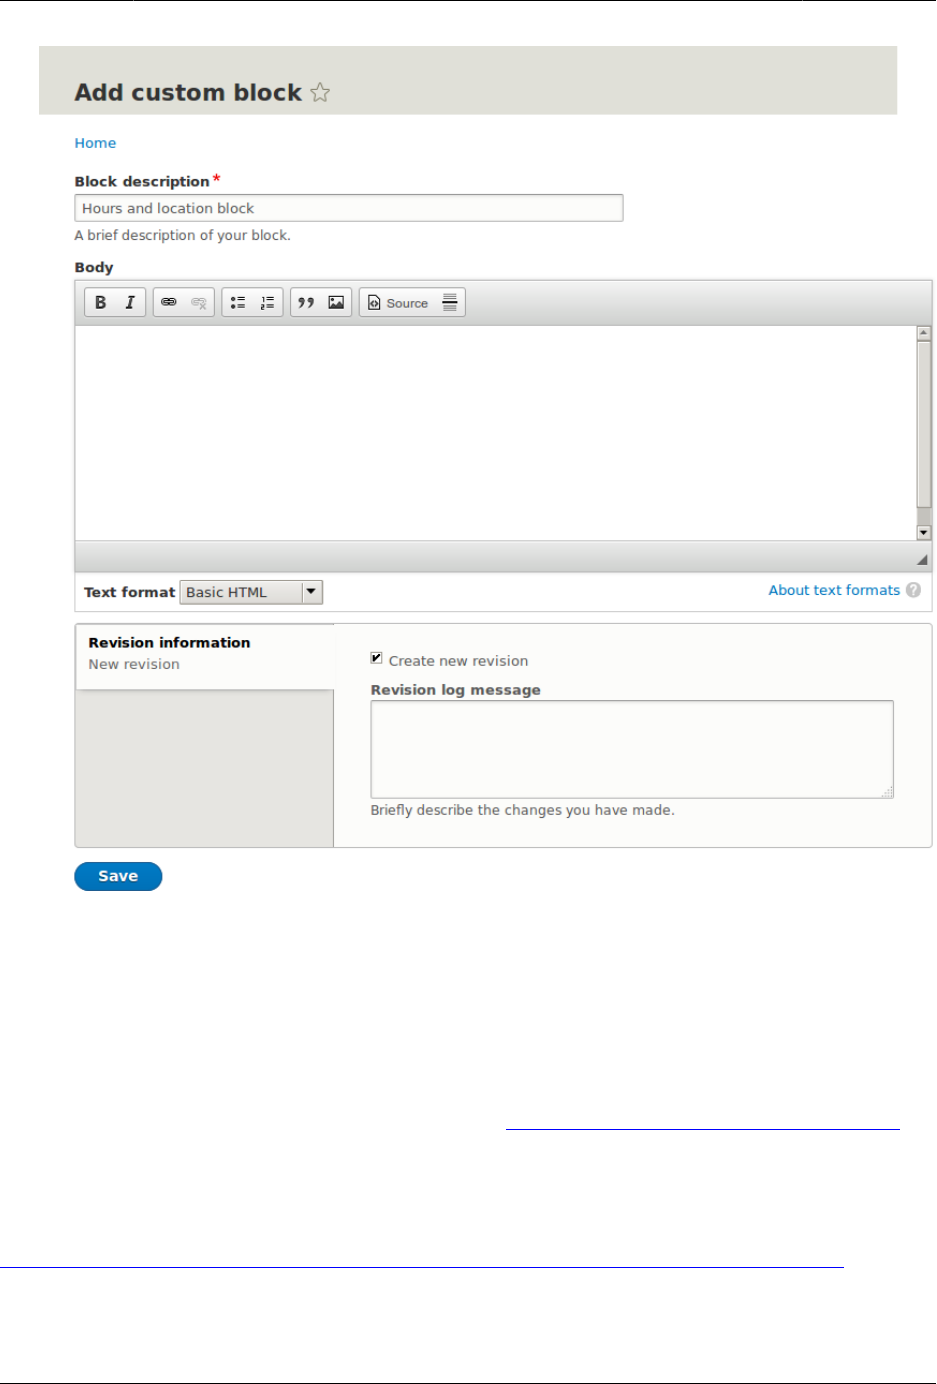
Blok
4. Click Save. A message appears indicating the block has been saved.
Expand your understanding
• Edit the content of your custom block. In the Manage administrative menu, navigate to
Structure > Block layout > Custom block library (admin/structure/block/block-content). Find
your block in the list and click Edit to make changes.
• Place the block you created in the sidebar. See Bagian 8.3, “Placing a Block in a Region” for
details.
Additional resources
Drupal.org community documentation page "Working with blocks (content in regions)"
Attributions
115

Blok
Adapted by Jacob Redding and Boris Doesborg from Working with blocks (content in regions),
copyright 2000-2017 by the individual contributors to the Drupal Community Documentation.
8.3. Placing a Block in a Region
Goal
Place the Opening hours and location block in the website’s sidebar.
Prerequisite knowledge
Bagian 8.1, “Concept: Blocks”
Site prerequisites
• The core Bartik theme must be installed and set as default. See Bagian 4.6, “Configuring
the Theme”.
• The Opening hours and location block must exist. See Bagian 8.2, “Creating A Custom Block”.
Steps
1. In the Manage administrative menu, navigate to Structure > Block layout (admin/structure/
block). The Block layout page appears, listing the theme’s regions.
2. Ensure that in the secondary tab the core Bartik theme is selected. Block placement is
defined per theme.
3. Locate the region Sidebar second in the list and click Place block next to it. The Place block
window appears, listing all the blocks.
4. Locate the block Opening hours and location and click Place block next to it. The Configure
block window appears. Fill in the fields as shown below.
Field name Value
Title Hours and location
Display title Checked
Region Sidebar second
You can also hide or display the block on specific pages. In the case of the Farmer’s
market website you do not set any of these configuration options because you want to
show the block everywhere.
116
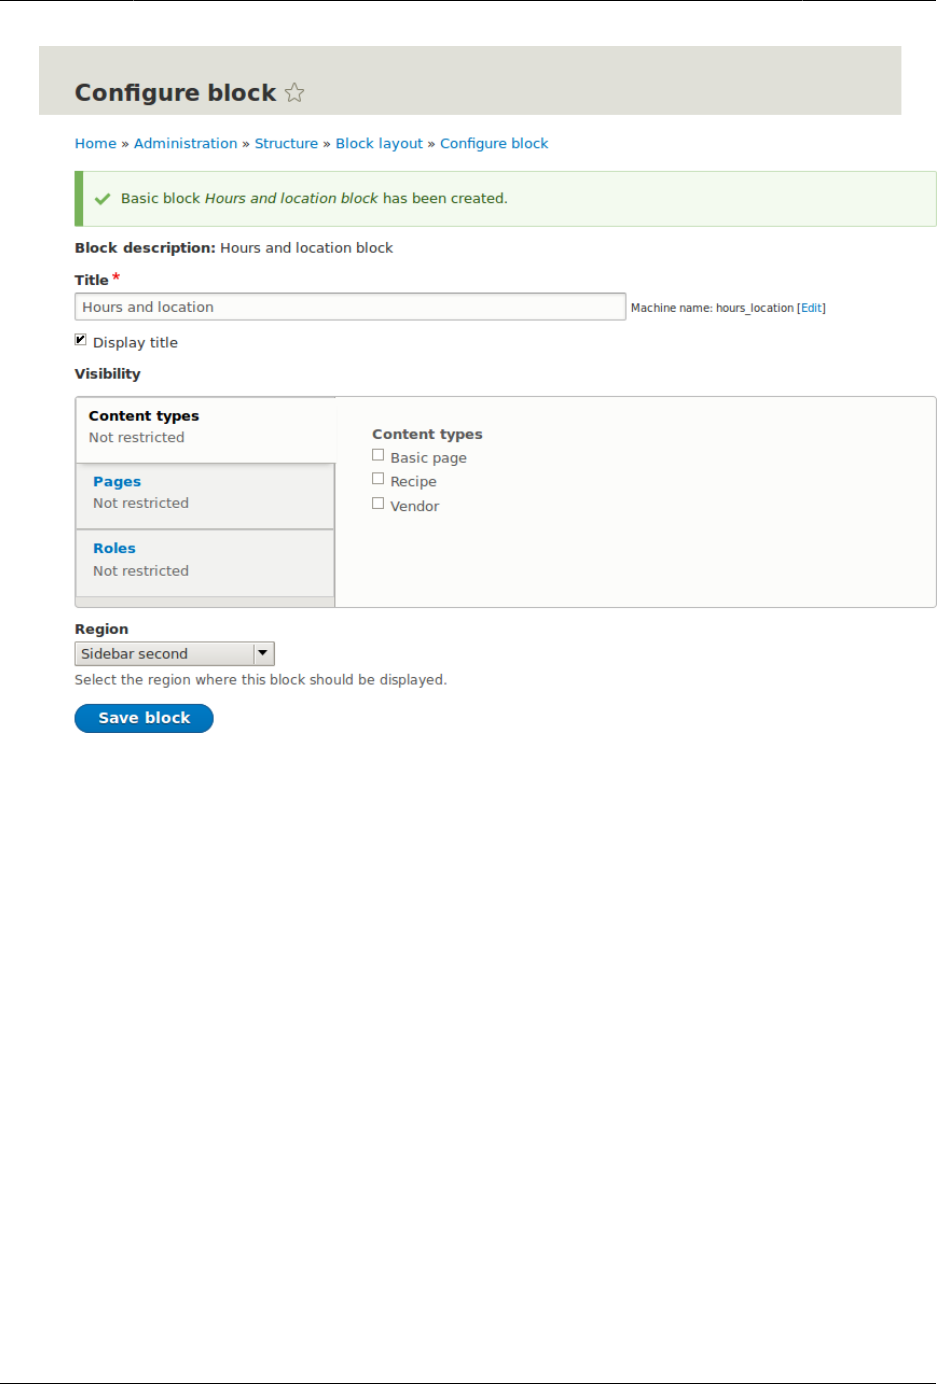
Blok
5. Click Save block. The Block layout page appears. You can drag blocks to change the order
in which they will appear.
6. Verify that the Opening hours and location block is listed in the Sidebar second region,
and click Save blocks.
The block has been placed on the sidebar of all pages that use the core Bartik theme.
117
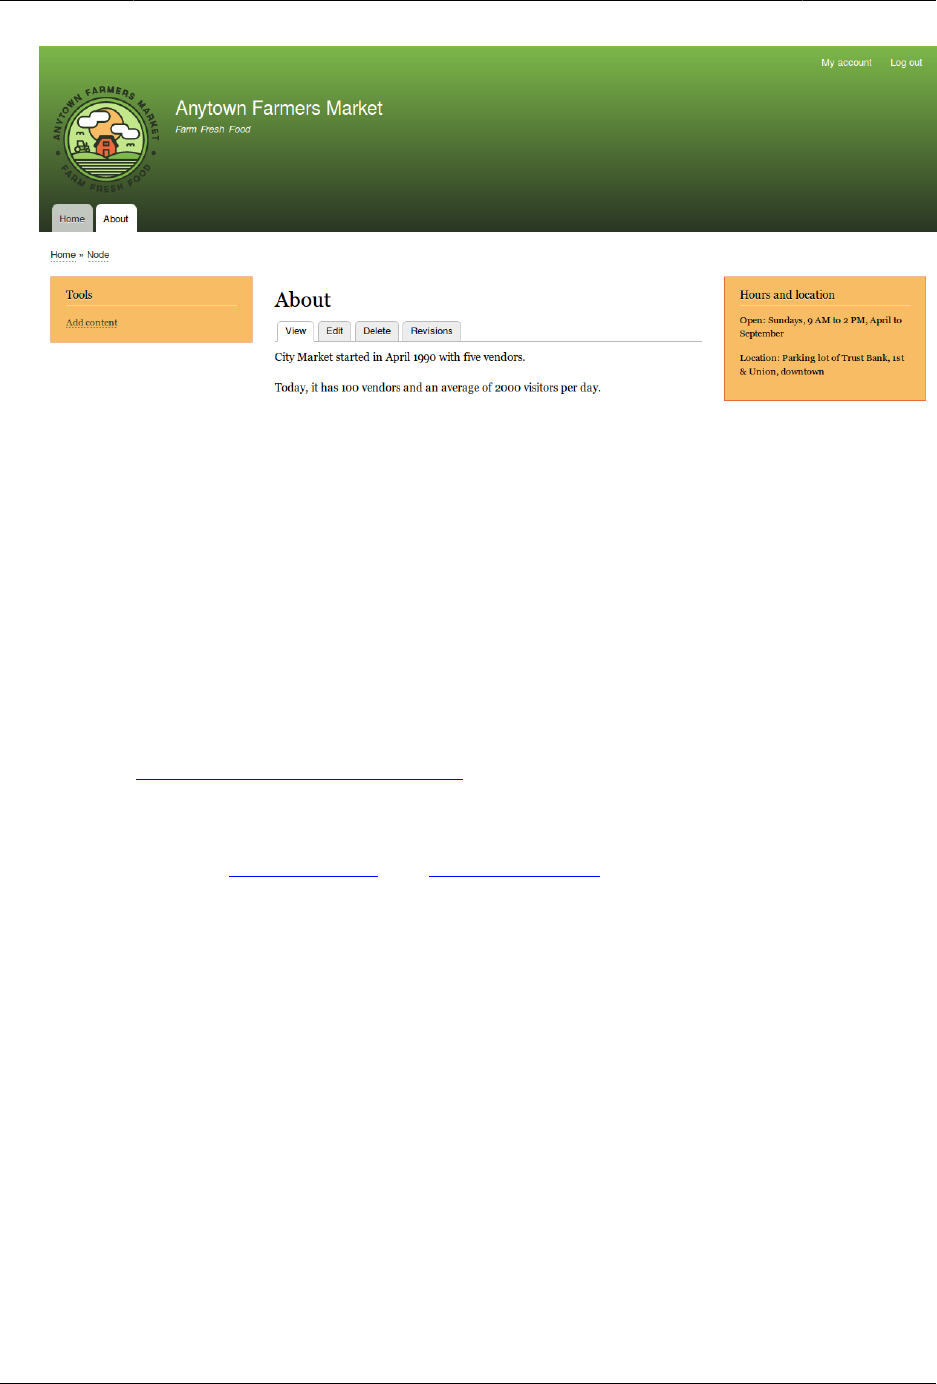
Blok
Expand your understanding
• Remove the Powered by Drupal block from the Footer fifth region by setting the region to
- None -.
• Remove the Tools block from the Sidebar first region by setting the region to - None -. This
block is only visible to logged-in users.
• Place the User login block in a region.
• If you do not see the effect of these changes in your site, you might need to clear the
cache. See Bagian 12.2, “Clearing the Cache”.
Attributions
Written and edited by Boris Doesborg and Jennifer Hodgdon.
118

Bab 9. Membuat Daftar dengan Views
9.1. Concept: Uses of Views
Prerequisite knowledge
•Bagian 2.4, “Concept: Modular Content”
•Bagian 2.3, “Concept: Content Entities and Fields”
What is a view?
A view is a listing of content on a website. The core Views module handles the display of
views, and the core Views UI module allows you to create and edit them in the administrative
interface. When you define views, you are interested in taking data from your website and
displaying it to the user.
What types of data can be displayed using views?
You can create views to output practically any content entity that is stored in the system. For
example, you can create the following lists for the farmers market site:
• Lists of vendors
• Lists of recipes
• Lists of the most recent content on the site
• Lists of users on the site
What are the ways data can be output using views?
A listing created by a view can be in any of the following forms:
• Table with sortable fields
• Grid layouts
• Teasers or pictures that link to articles
• Blocks
• JSON output
• RSS feeds
• Calendars
119

Membuat Daftar dengan Views
• On-screen slideshows
Related topics
•Bagian 9.2, “Concept: The Parts of a View”
•Bagian 9.3, “Creating a Content List View”
Attributions
Written and edited by Michael Lenahan at erdfisch, and Jojy Alphonso at Red Crackle.
9.2. Concept: The Parts of a View
Prerequisite knowledge
•Bagian 2.3, “Concept: Content Entities and Fields”
•Bagian 2.4, “Concept: Modular Content”
•Bagian 9.1, “Concept: Uses of Views”
•Bagian 5.1, “Concept: Paths, Aliases, and URLs”
•Bagian 8.1, “Concept: Blocks”
What are the parts of a view?
When you are editing a view in the administrative interface, you will see the following parts
(or sections), which allow you to specify what data to output, in what order, and in what
format:
Display
Each view can have one or more displays, each of which produces one type of output.
Options for display types include:
Page
Makes output at a particular URL, for the main page content at that URL.
Block
Makes output in a block, which can be placed on pages.
Feed
Makes an RSS or another type of feed.
120

Membuat Daftar dengan Views
Attachment
Makes output that you can attach to another display.
Format
Depending on the display type, you can choose to output your data in a table, grid, HTML
list, or another format. Some formats also give you a second choice that lets you output
either rendered entities or fields; other formats do not give you this choice (for example,
if you use a table format, you must always use fields).
Fields
Depending on the format choice, you may be able to choose which content fields are
output. For example, if you were making a view of recipe content items, in a block display
you might show only the recipe names, while in a full page display you might also show
an image field because you have more space.
Filter criteria
Filters limit the data to be output, based on criteria such as whether the content has
been published or not, the type of content, or a field value. For instance, to make a
view of recipe content items, you would need to filter to the Recipe content type, and to
published recipes. Filters can also be exposed, which means that users will have a form
where they can choose their own filter values. You might use this on a Recipe page to let
users filter for recipes with certain ingredients.
Sort criteria
Defines the order to present the output, which can be based on any content field.
Contextual filters
Contextual filters are like regular filters, except that the values come from the context of
the view display, such as the full URL of the page being displayed, the current date or
time, or some other value that can be detected by the view calculation.
Relationships
Relationships allow you to expand what is displayed in your view, by relating the base
content being displayed to other content entities. Relationships are created using fields
on the base content that relate it to the other content; one example is that all regular
content items have an author field, which references the user account of the person who
authored the content. Once you have created a relationship, you can display fields from
the referenced entity in the view.
Related topics
Bagian 9.3, “Creating a Content List View”
Attributions
Written and edited by Surendra Mohan and Jennifer Hodgdon.
121

Membuat Daftar dengan Views
9.3. Creating a Content List View
Goal
Create a page listing vendors that will be automatically updated whenever a vendor is added,
deleted, or updated on the site.
Prerequisite knowledge
•Bagian 9.1, “Concept: Uses of Views”
•Bagian 9.2, “Concept: The Parts of a View”
Site prerequisites
• The core Views and Views UI modules must be installed. These are installed for you when
you install with the core Standard installation profile.
• The Vendor content type must exist, with URL and Main image fields. Your site must have a
couple of Vendor content items. See Bagian 6.1, “Adding a Content Type”, Bagian 6.3, “Adding
Basic Fields to a Content Type”, and Bagian 5.2, “Creating a Content Item”.
• The Medium (220x220) image style must be defined. This is created on your site when you
install the core Image module (installed with the core Standard installation profile) but can
be recreated if deleted. See Bagian 6.13, “Setting Up an Image Style”.
Steps
1. In the Manage administrative menu, navigate to Structure > Views > Add view (admin/
structure/views/add). The Add view wizard appears.
2. Fill in the fields as shown below.
Field name Explanation Example value
View name Name of the view that
will be visible in the
administration pages
Vendors
Show Type of information listed
in the view
Content
of type Specify content type Vendor
sorted by List order Title
Create a page Create a page that displays
the view
Checked
Page title Title show above the view Vendors
Path Address of the page vendors
122
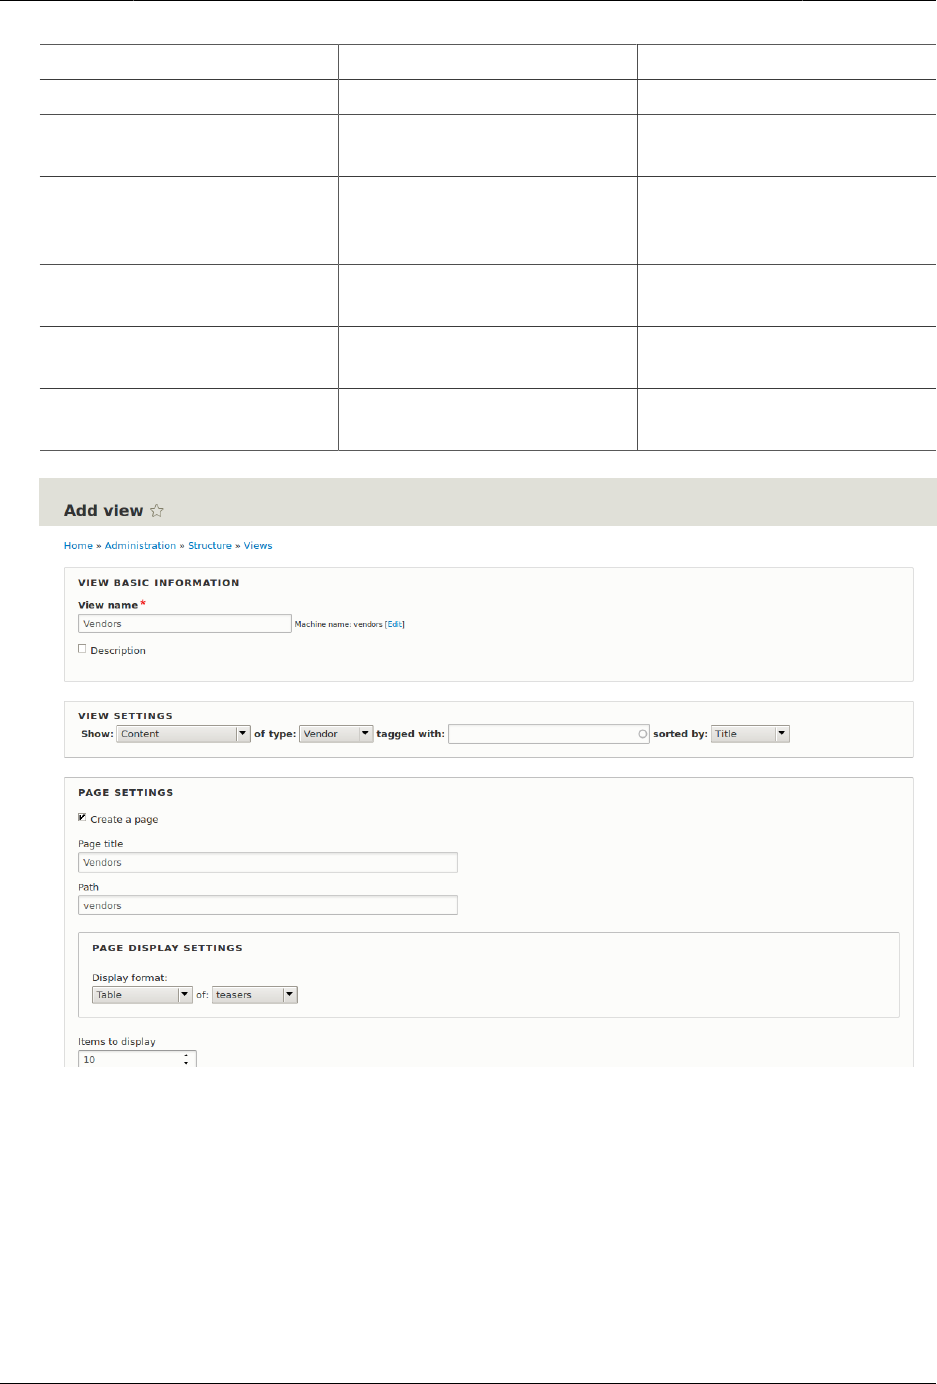
Membuat Daftar dengan Views
Field name Explanation Example value
Display format Type of list Table
Items to display Number of items visible on
the page
10
Use a pager Split up the list in several
pages if there are more
items
Checked
Create a menu link Add the view page to the
menu
Checked
Menu Menu in which to add the
link
Main navigation
Link text Label of the link in the
menu
Vendors
3. Click Save and edit. The view configuration page appears.
4. Click Add from the dropdown button in the Fields section. The Add fields pop-up appears.
5. Enter the word "image" in the search field.
6. Check Main image in the table.
7. Click Apply. The Configure field: Content: Main Image pop-up appears.
8. Fill in the fields as shown below.
123
Membuat Daftar dengan Views
Field name Explanation Example value
Create a label Add a label before the field
value
Unchecked
Image style The format of the image Medium (220x220)
Link image to Add a link to the content
item
Content
9. Click Apply. The view configuration page appears.
10. Click Add from the dropdown button in the Fields section. The Add fields pop-up appears.
11. Enter the word "body" in the search field.
12. Select Body in the table.
13. Click Apply. The Configure field: Content: Body pop-up appears.
14. Fill in the fields as shown below.
Field name Explanation Example value
Create a label Add a label before the field
value
Unchecked
Formatter The presentation of the
field value
Summary or trimmed
Trimmed limit: The number of maximum
characters shown
120
15. Click Apply. The view configuration page appears.
16. Click Content: Title (Title) in the Fields list. The Configure field: Content: Title pop-up appears.
17. Uncheck Create a label. This will remove the label that was created by the wizard.
18. Click Apply. The view configuration page appears.
19. Click Rearrange from the dropdown button in the Fields section. The Rearrange fields pop-
up appears.
20. Drag the fields into the right order: Image, Title. Body.
21. Click Apply. The view configuration page appears.
22. Optionally, click Update preview for a preview.
23. Click Save.
124
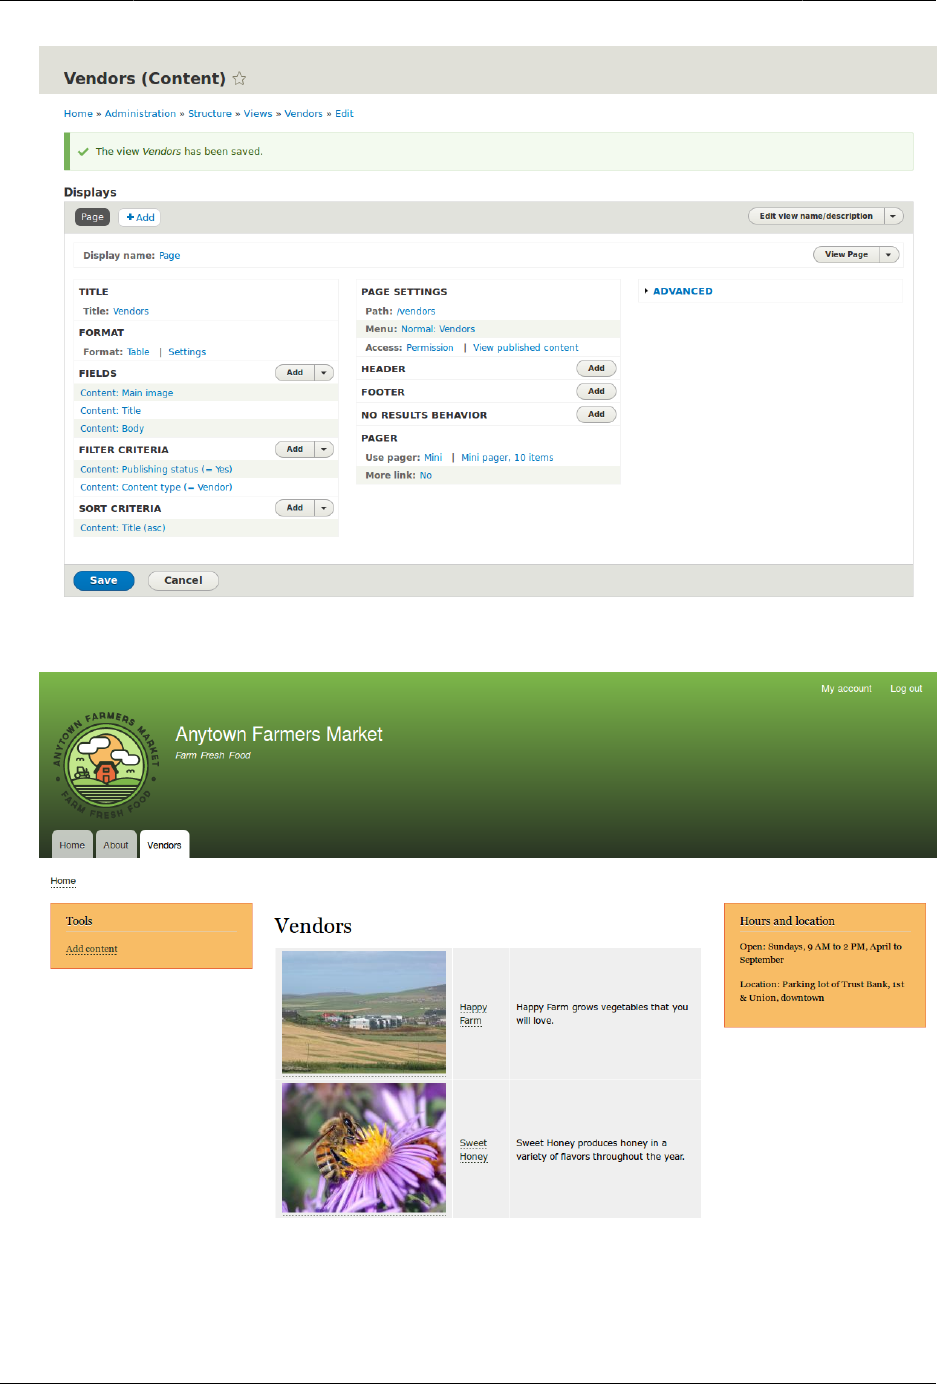
Membuat Daftar dengan Views
24. Navigate to the homepage and click Vendors from the main navigation to see the result.
125

Membuat Daftar dengan Views
Expand your understanding
The link to the view in the main navigation will probably not be in the right place. Change
the order of the menu items in the main navigation. See Bagian 5.8, “Changing the Order of
Navigation”.
Attributions
Written/edited by Boris Doesborg and Jennifer Hodgdon.
9.4. Duplicating a View
Goal
Create a page listing recipes by duplicating the existing Vendors view. Modify the page so
that the recipes are displayed in a grid and can by filtered by ingredients.
Prerequisite knowledge
•Bagian 9.1, “Concept: Uses of Views”
•Bagian 9.2, “Concept: The Parts of a View”
•Bagian 9.3, “Creating a Content List View”
Site prerequisites
• The Vendor and Recipe content types must exist; both must have Main image fields, and
the Recipe content type must have an Ingredients field. Your site must also have a couple
of Recipe content items. See Bagian 6.1, “Adding a Content Type”, Bagian 6.3, “Adding Basic
Fields to a Content Type”, Bagian 6.6, “Setting Up a Taxonomy”, Bagian 6.9, “Changing Content
Entry Forms”, and Bagian 5.2, “Creating a Content Item”.
• The Vendors view must exist. See Bagian 9.3, “Creating a Content List View”.
Steps
1. In the Manage administrative menu, navigate to Structure > Views (admin/structure/views).
Find the view "Vendors" and click Duplicate in its dropdown button.
126
Membuat Daftar dengan Views
2. Name the duplicate "Recipes" and click Duplicate. The view configuration page appears.
3. Change the title of the view page to "Recipes" by clicking Vendors in the Title section. The
Page: The title of this view pop-up appears. Type in "Recipes". Click Apply.
4. Change from a table to a grid format by clicking Table in the Format section. The Page:
How should this view be styled pop-up appears. Check Grid and click Apply. The Page: Style
options pop-up appears. Retain the default values and click Apply.
5. Retain only the title and image fields for the Recipes view by clicking Content: Body in the
Fields section. Click Remove in the pop-up that appears.
6. Change the content type filter to use the Recipe content type by clicking Content: Type
(=Vendor) in the Filter criteria section. In the Configure filter criterion: Content: Type pop-
up, check Recipe and uncheck Vendor. Click Apply.
7. Add a further filter that is exposed to visitors by clicking Add in the Filter criteria
section. Search for "ingredients" and check "Ingredients (field_ingredients)". Click Add
and configure filter criteria.
8. The appearing pop-up offers extra settings on vocabulary and selection type. Click Apply
and continue. The next pop-up allows you to expose this filter to visitors. Fill in the fields
as shown below, and click Apply.
127
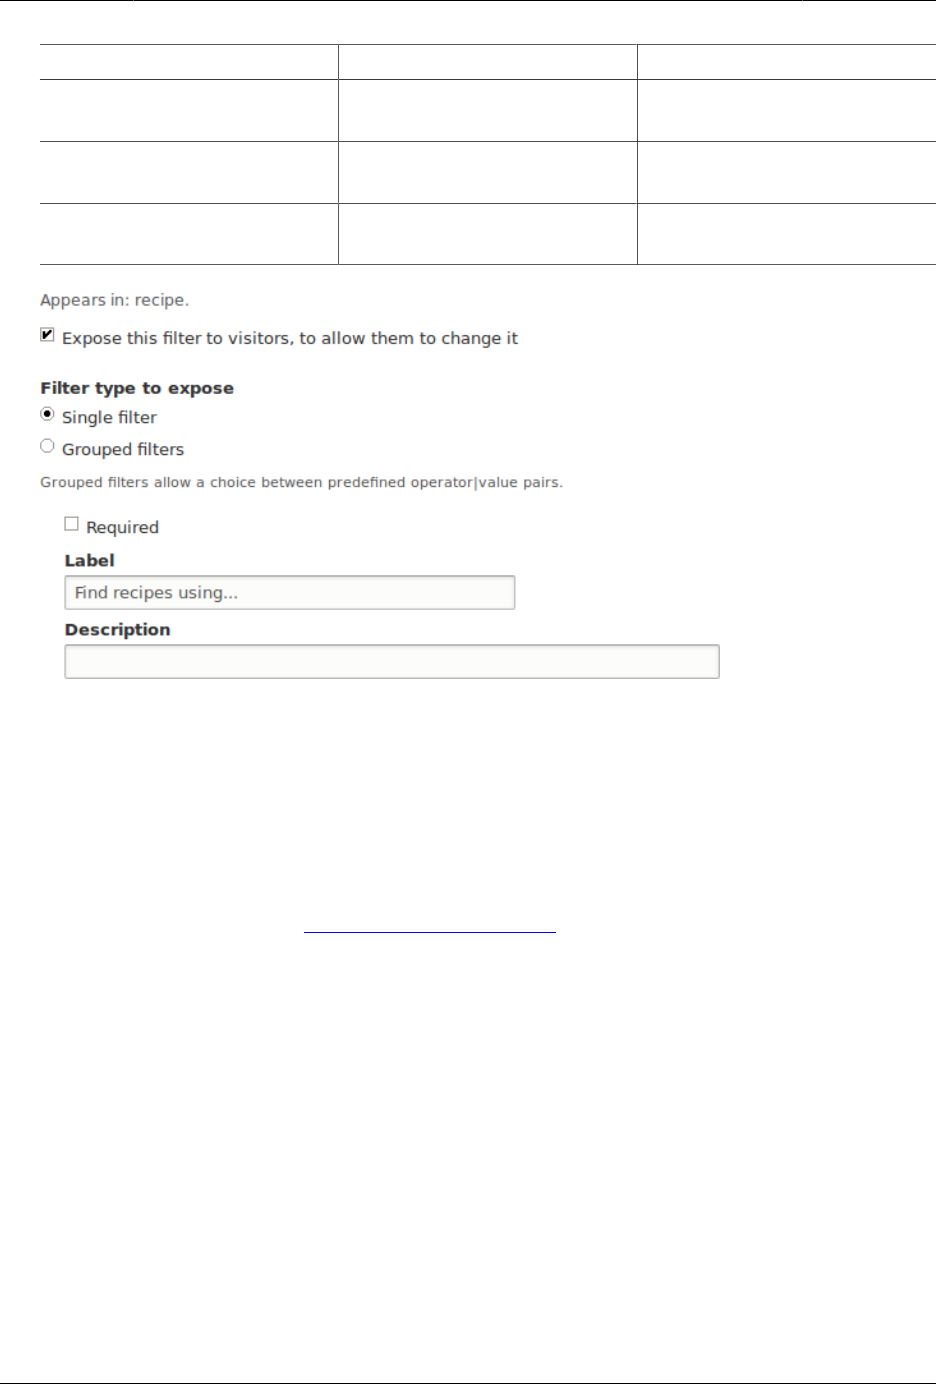
Membuat Daftar dengan Views
Field name Explanation Example value
Expose this filter to visitors,
to allow them to change it
Allow visitors to filter and
search
Checked
Required Whether a value has to be
provided or not
Unchecked
Label Label shown for this filter
on the view page
Find recipes using…
9. Change the Path label field to "Recipes" by clicking "/vendors" in the Page settings section.
In the pop-up that appears, enter the path "recipes" and click Apply.
Note that when editing a view, you enter paths without the leading "/", unlike on other
administrative pages (such as when providing a path to a content item page).
10. Change the menu link title by clicking "Normal: Vendors" in the Page settings section. In
the pop-up that appears, change the title to "Recipes" and click Apply.
11. In order to use Ajax (see Ajax entry in the Glossary) to make filtering and paging faster
for users, click Advanced to expand the section for more options. In the Other section,
change Use AJAX: No to "Yes" by clicking No and checking Use AJAX in the pop-up that
appears. Click Apply.
12. Click Save to save the view.
13. Go back to the home page and click Recipes in the navigation to view the new Recipes
page.
128
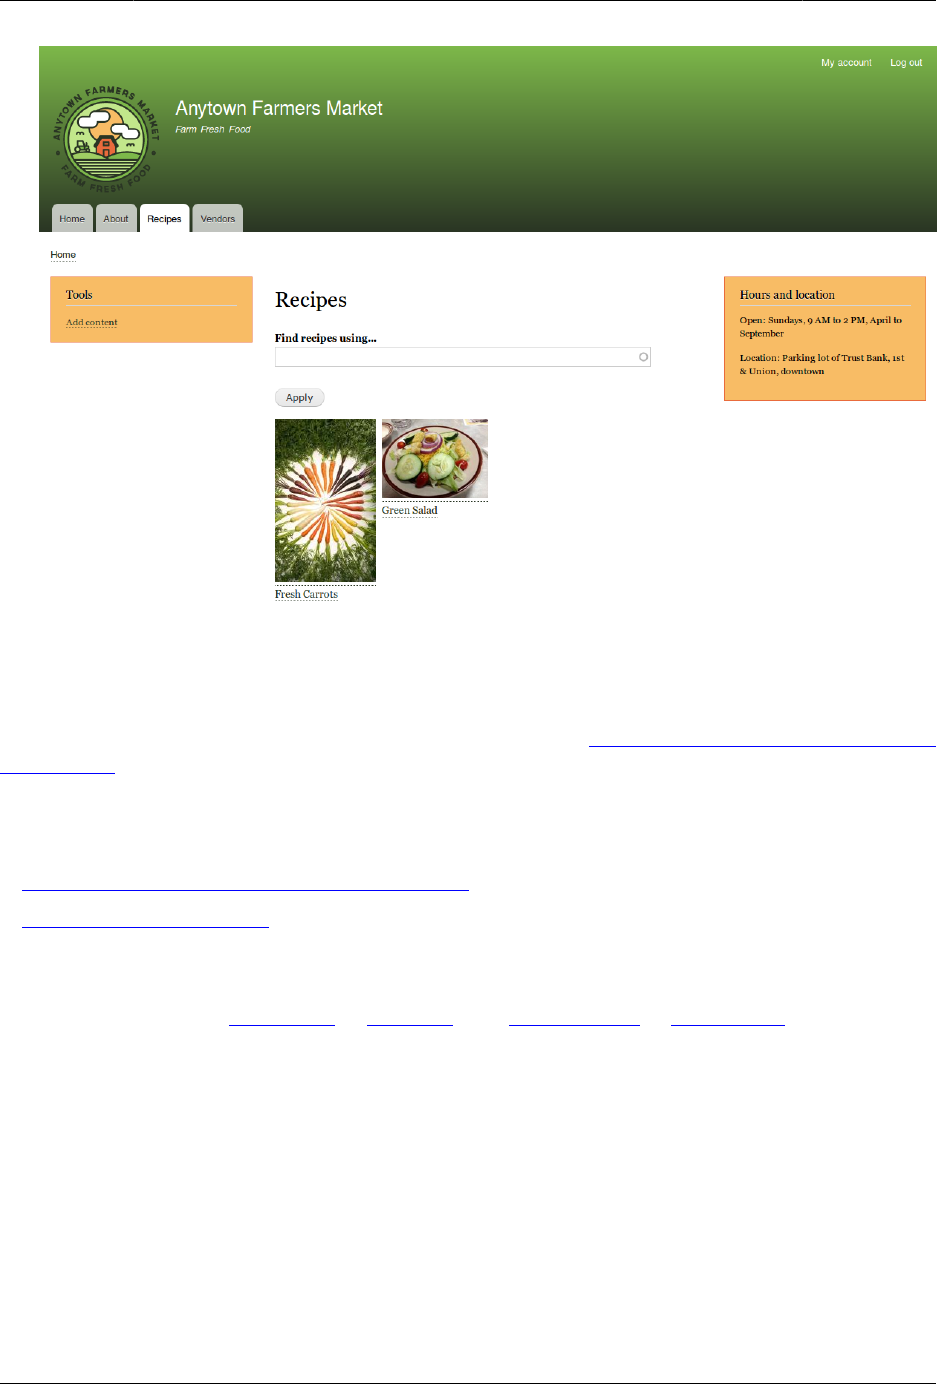
Membuat Daftar dengan Views
Expand your understanding
The link to the view in the main navigation will probably not be in the right place. Change
the order of the menu items in the main navigation. See Bagian 5.8, “Changing the Order of
Navigation”.
Related concepts
•Bagian 2.5, “Planning your Content Structure”
•Ajax entry in the Glossary
Attributions
Written and edited by Laura Vass at Pronovix, and Jojy Alphonso at Red Crackle.
9.5. Adding a Block Display to a View
Goal
Add a block display to the Recipes view to display the most recent recipes in a sidebar, and
change its configuration without changing the existing Recipes page view.
129
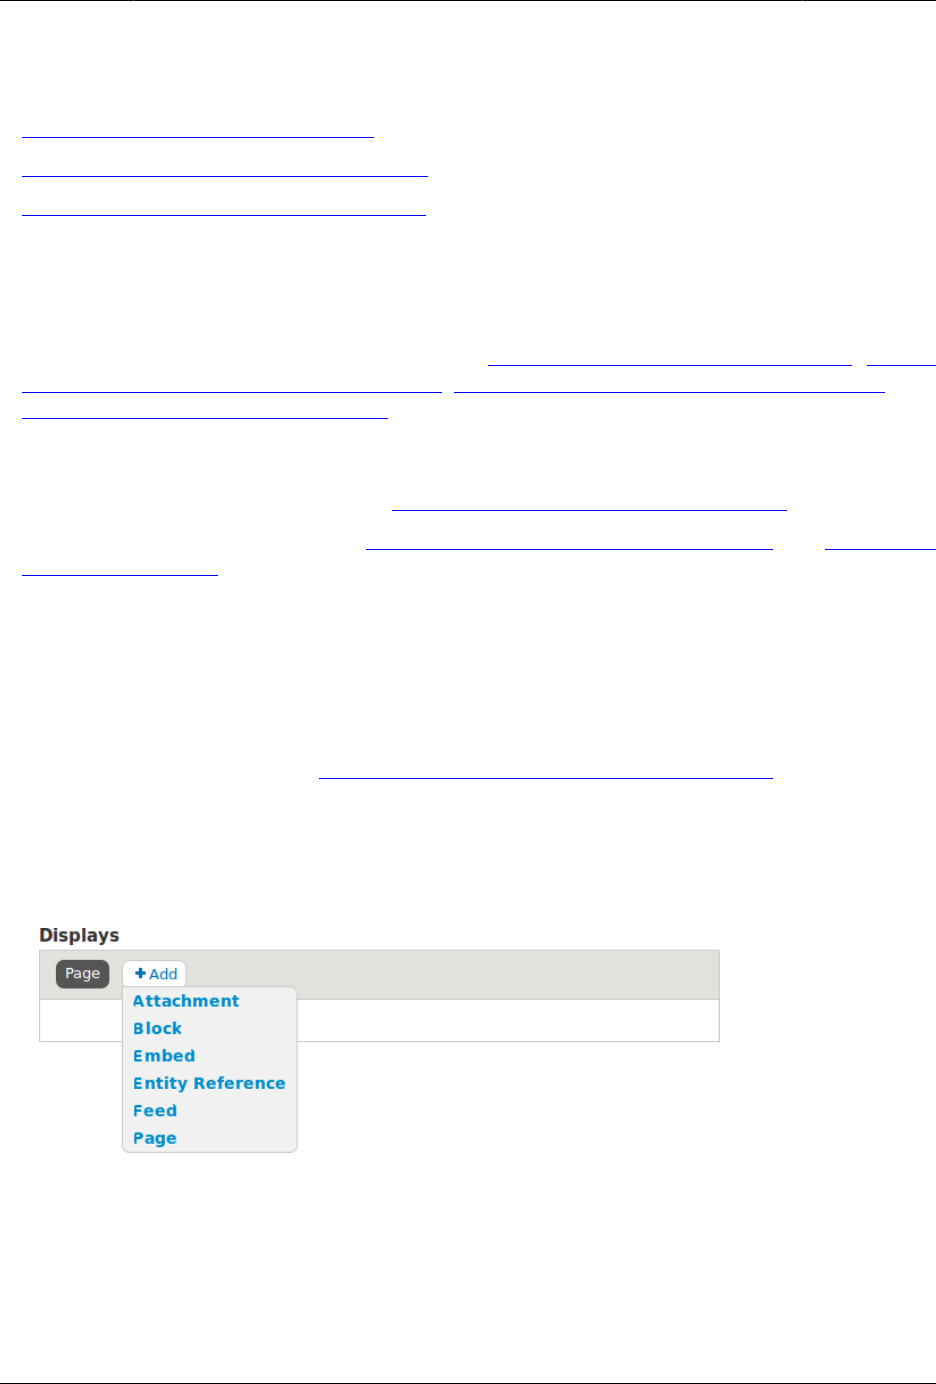
Membuat Daftar dengan Views
Prerequisite knowledge
•Bagian 9.1, “Concept: Uses of Views”
•Bagian 9.2, “Concept: The Parts of a View”
•Bagian 9.3, “Creating a Content List View”
Site prerequisites
• The Recipe content type must exist, it must have a Main image field, and your site must
have a couple of Recipe content items. See Bagian 6.1, “Adding a Content Type”, Bagian
6.3, “Adding Basic Fields to a Content Type”, Bagian 6.9, “Changing Content Entry Forms”, and
Bagian 5.2, “Creating a Content Item”.
• The Thumbnail (100x100) image style must be defined. This is created on your site when
you install the core Image module (installed with the core Standard installation profile)
but can be recreated if deleted. See Bagian 6.13, “Setting Up an Image Style”.
• The Recipes view must exist. See Bagian 9.3, “Creating a Content List View” and Bagian 9.4,
“Duplicating a View”.
Steps
1. In the Manage administrative menu, navigate to Structure > Views (admin/structure/views).
Find the view "Recipes" and click Edit from its dropdown button. Alternatively, navigate to
the Recipes page in the main site navigation, and click the Edit view contextual link in the
main area of the page. See Bagian 4.1, “Concept: Administrative Overview” for information
about contextual links.
2. Create a new block display by clicking Add in the Displays section. Click Block from the
dropdown button. The new display is created, and the focus is automatically switched
to its configuration.
3. Change the title of this display by clicking Block next to Display name. The Block: The name
and the description of this display pop-up appears. Change the Administrative name to
"Recent recipes". Click Apply.
4. Change the title of the view by clicking Title: Recipes in the Title section. In the pop-up
that appears, select This block (override) from the For select list. Change the title to "New
recipes" and click Apply (this display).
130

Membuat Daftar dengan Views
5. Change the view’s style by clicking Format: Grid in the Format section. In the pop-up that
appears, select This block (override) from the For select list. Select Unformatted list and
Click Apply (this display). You can further configure the style options in the next pop-up
that appears. Then click Apply.
6. Configure the image field by clicking Content: Main image in the Fields section. In the
pop-up that appears, select This block (override) from the For select list. Select Image style
Thumbnail (100x100). Click Apply (this display).
131
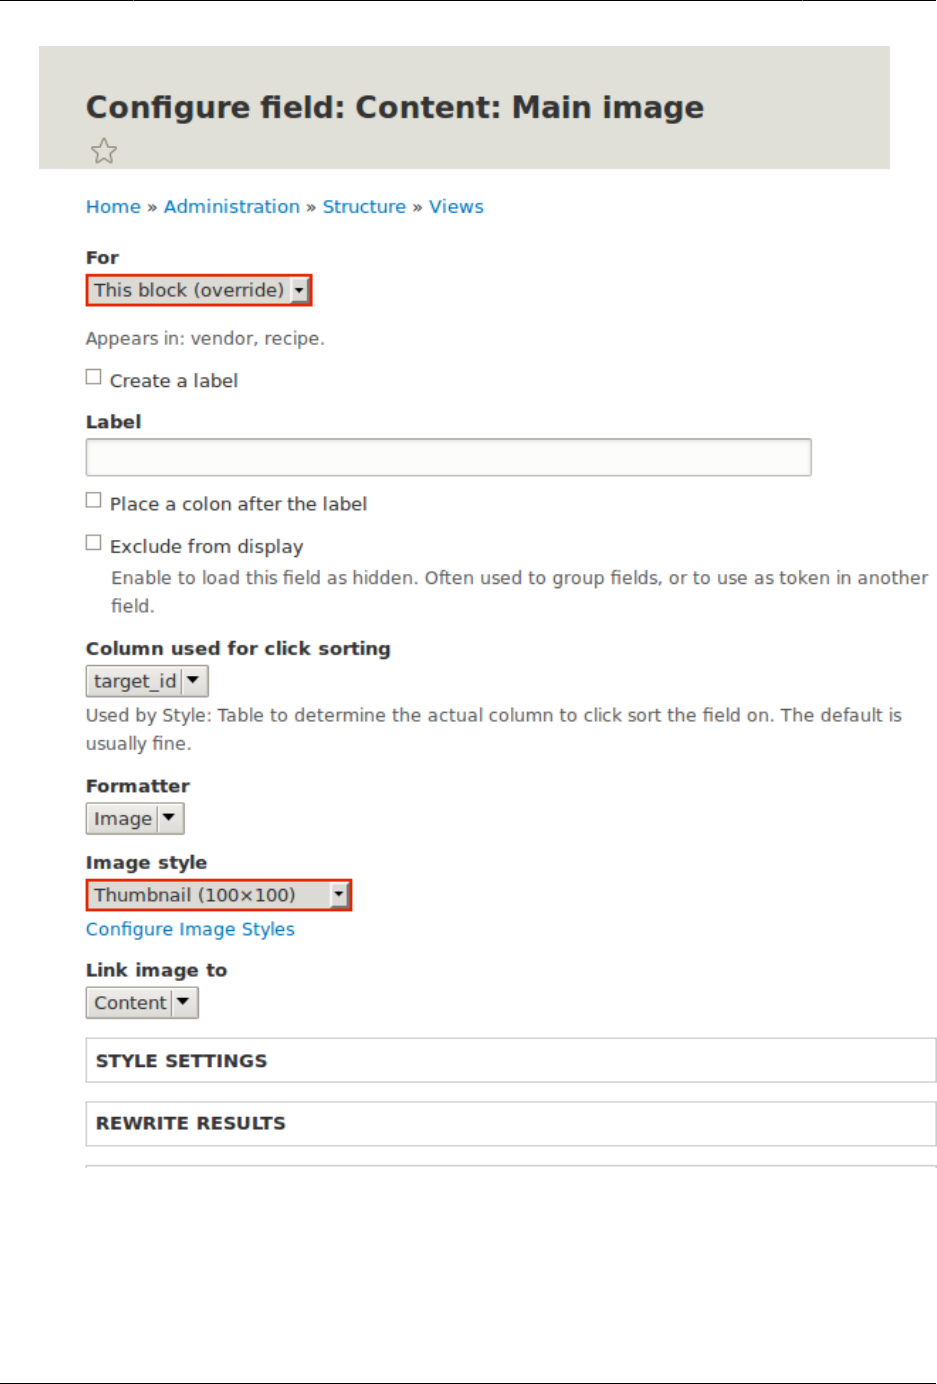
Membuat Daftar dengan Views
7. Remove ingredients as a filter by clicking Content: Ingredients (exposed) in the Filter criteria
section. In the pop-up that appears, select This block (override) from the For select list.
Click Remove at the bottom.
132
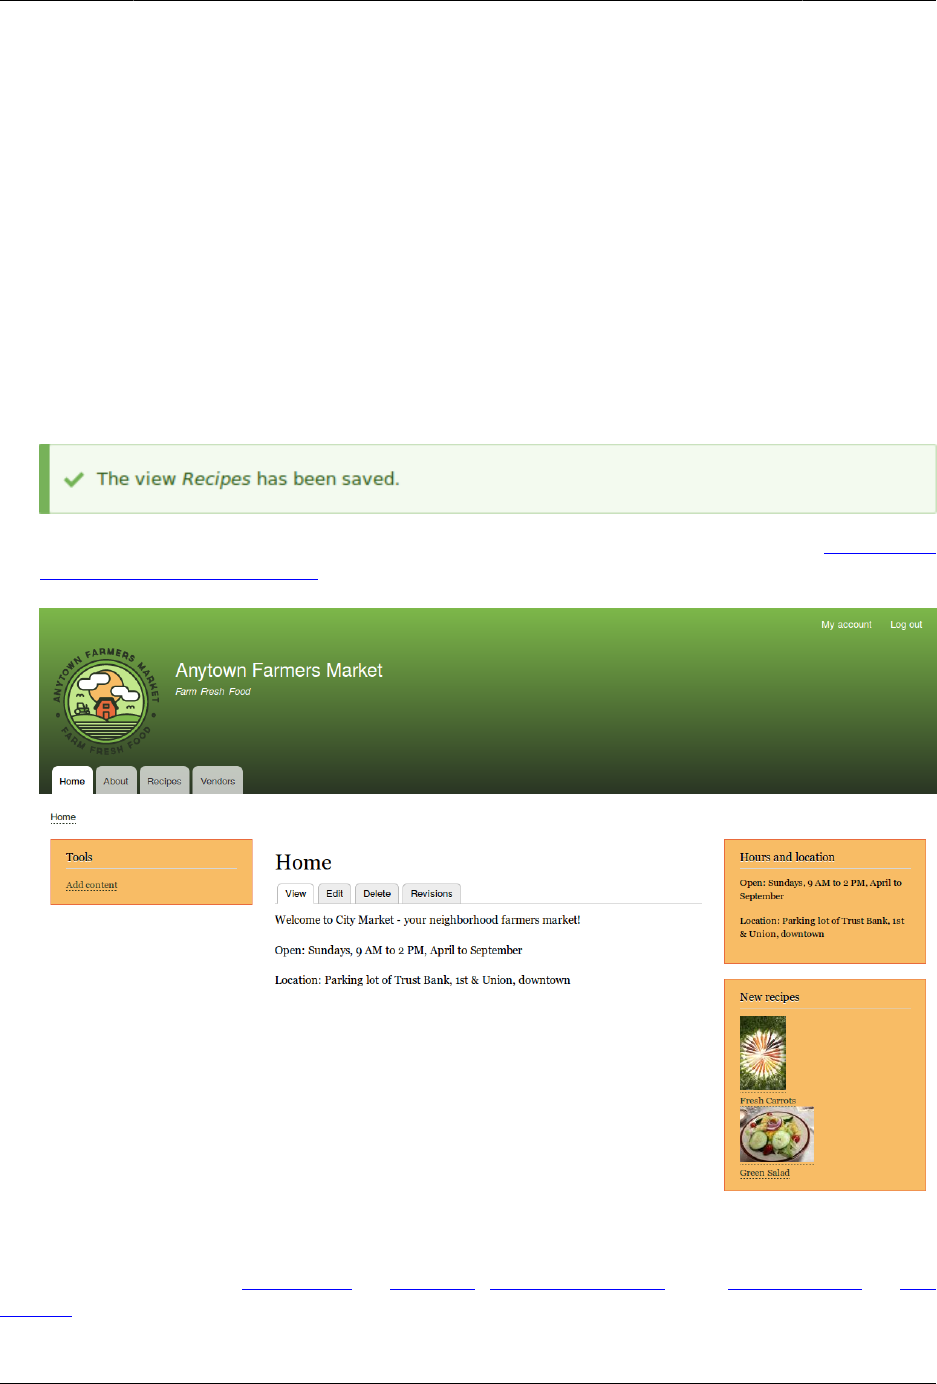
Membuat Daftar dengan Views
8. Configure how you want the content to be sorted in the view by clicking Add in the Sort
criteria section. In the pop-up that appears, select This block (override) from the For select
list. Check the field Authored on (from Content category), and then Add and configure sort
criteria.
9. In the appearing configuration pop-up, select Sort descending to have the most recent
recipes appear first. Click Apply.
10. Specify the number of items to be displayed by clicking Use pager: Mini in the Pager
section. In the pop-up that appears, select This block (override) from the For select list.
Under Pager, select Display a specified number of items. Click Apply (this display). In the
Block: Pager options pop-up, provide "5" as the value for Items to display. Click Apply.
11. Click Save. You will either see the view editing page again, or the Recipes page,
depending on what you did in step 1. You should also see a message saying that the
view has been saved.
12. Place the "Recipes: Recent Recipes" block in the Sidebar second region. See Bagian 8.3,
“Placing a Block in a Region”. Navigate to the site’s home page to see the block.
Attributions
Written and edited by Laura Vass at Pronovix, Jennifer Hodgdon, and Jojy Alphonso at Red
Crackle.
133

Bab 10. Membuat Situs Anda
Multilingual
10.1. Concept: User Interface, Configuration,
and Content translation
Prerequisite knowledge
•Bagian 1.5, “Concept: Types of Data”
•Bagian 1.2, “Concept: Modules”
•Bagian 2.3, “Concept: Content Entities and Fields”
What can be translated on your site?
The base language for the software that your site runs (core software, modules, and theme)
is English. However, you can create either a site that displays in a different language or
a multi-lingual site; if you do so, all relevant text, images, and file attachments should be
shown in the appropriate language for each site visitor. You need to have the core Language
module installed in order to use a language other than English on the site.
There are three types of information that you can translate, each with its own method for
translating:
User interface text
Built-in text present in the core software, modules, and themes. This can be translated
from the base English language of the software into the language(s) of your site.
Typically, rather than needing to translate this text yourself, you can download
translations. You need to have the core Interface Translation module installed in order
to translate this text.
Configuration text
Text whose structure and initial values are defined by the core software, modules, and
theme, but that you can edit. Examples include the labels for fields in your content types,
header text in views, your site name, and the content of automatic email messages that
your site sends out. After creating configuration text in the default language of your
site, you can translate it into other languages. You need to have the core Configuration
Translation module installed in order to translate this text.
Content text and files
If your site is multilingual, you can configure the content fields on your site to be
translatable. After creating content in one language, you can translate it into other
134

Membuat Situs Anda Multilingual
languages. Fields can contain textual information or uploaded files, and for each field on
each content type, you can configure it to be translatable or non-translatable. You need
to have the core Content Translation module installed in order to translate this text.
Related topics
•Bagian 10.2, “Adding a Language”
•Bagian 10.3, “Configuring Content Translation”
•Bagian 10.4, “Translating Content”
•Bagian 10.5, “Translating Configuration”
Attributions
Written by Jennifer Hodgdon.
10.2. Adding a Language
Goal
Add one or more languages to your site and define which one is used by default.
Prerequisite knowledge
Bagian 10.1, “Concept: User Interface, Configuration, and Content translation”
Steps
1. Install the four core multilingual modules (Language, Interface Translation, Content
Translation, and Configuration Translation), by following the steps in Bagian 4.3,
“Installing a Module”.
2. In the Manage administrative menu, navigate to Configuration > Regional and language
> Languages (admin/config/regional/language).
3. Click Add language.
4. Select Spanish (or your preferred language) from the Language name select list. Click Add
language. After waiting for translations to finish downloading, you will be returned to
the Languages page, with a confirmation message and the new language shown.
135
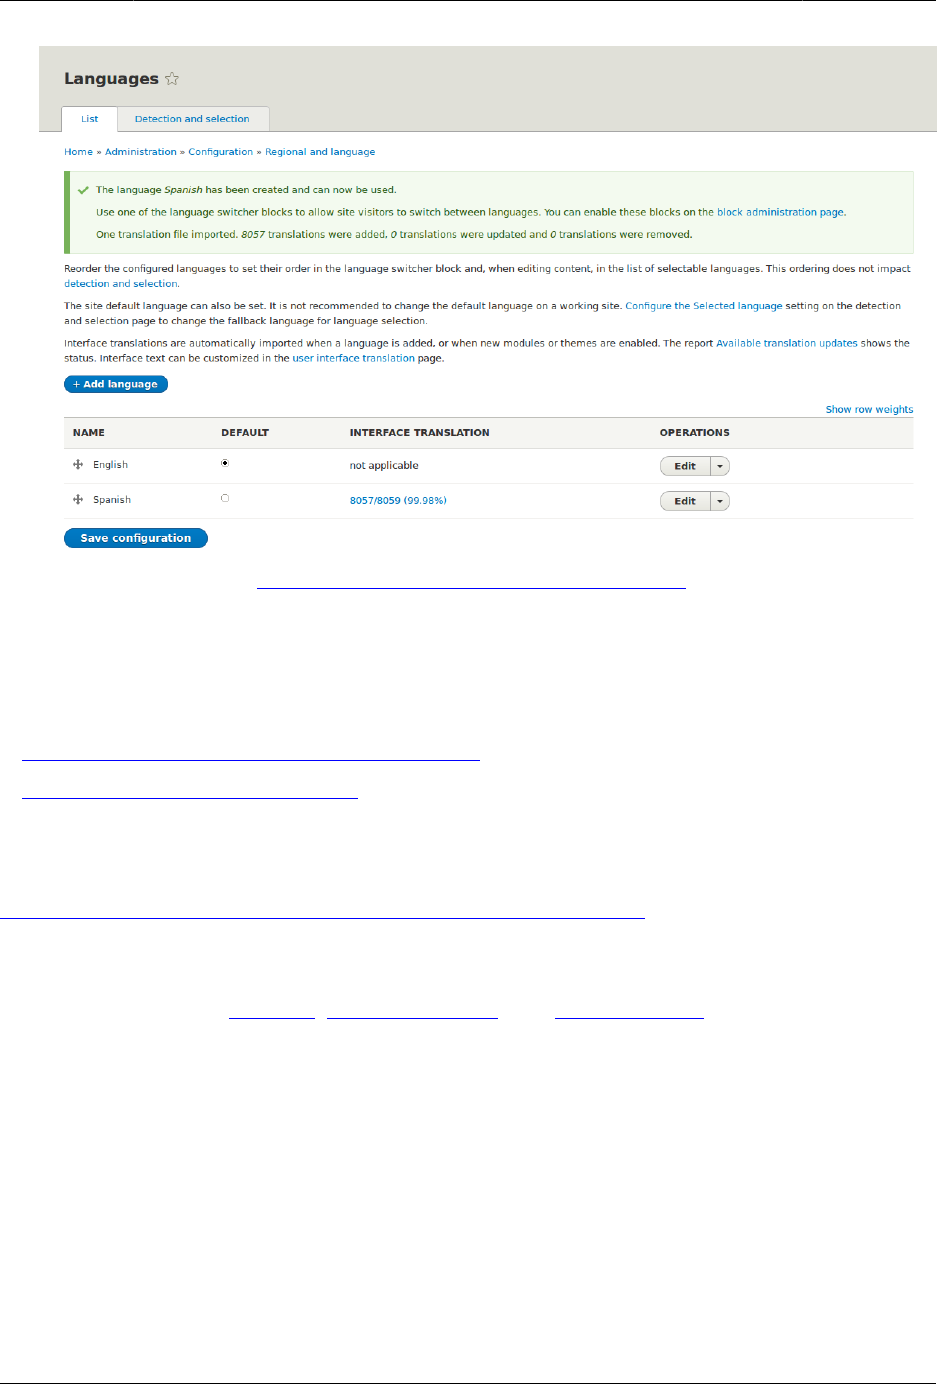
Membuat Situs Anda Multilingual
5. Follow the steps in Bagian 8.3, “Placing a Block in a Region” to place the Language
switcher block in the Sidebar second region. This will enable site visitors to switch between
languages, once the site has been translated.
Expand your understanding
•Bagian 10.3, “Configuring Content Translation”
•Bagian 10.4, “Translating Content”
Additional resources
Drupal.org page "Resource Guide: Configuring a Multilingual Site"
Attributions
Written and edited by Leila Tite, Jennifer Hodgdon, and Boris Doesborg.
10.3. Configuring Content Translation
Goal
Make Custom block, Custom menu link, and Content entity types translatable. Select specific
subtypes and set which fields of these can be translated.
136
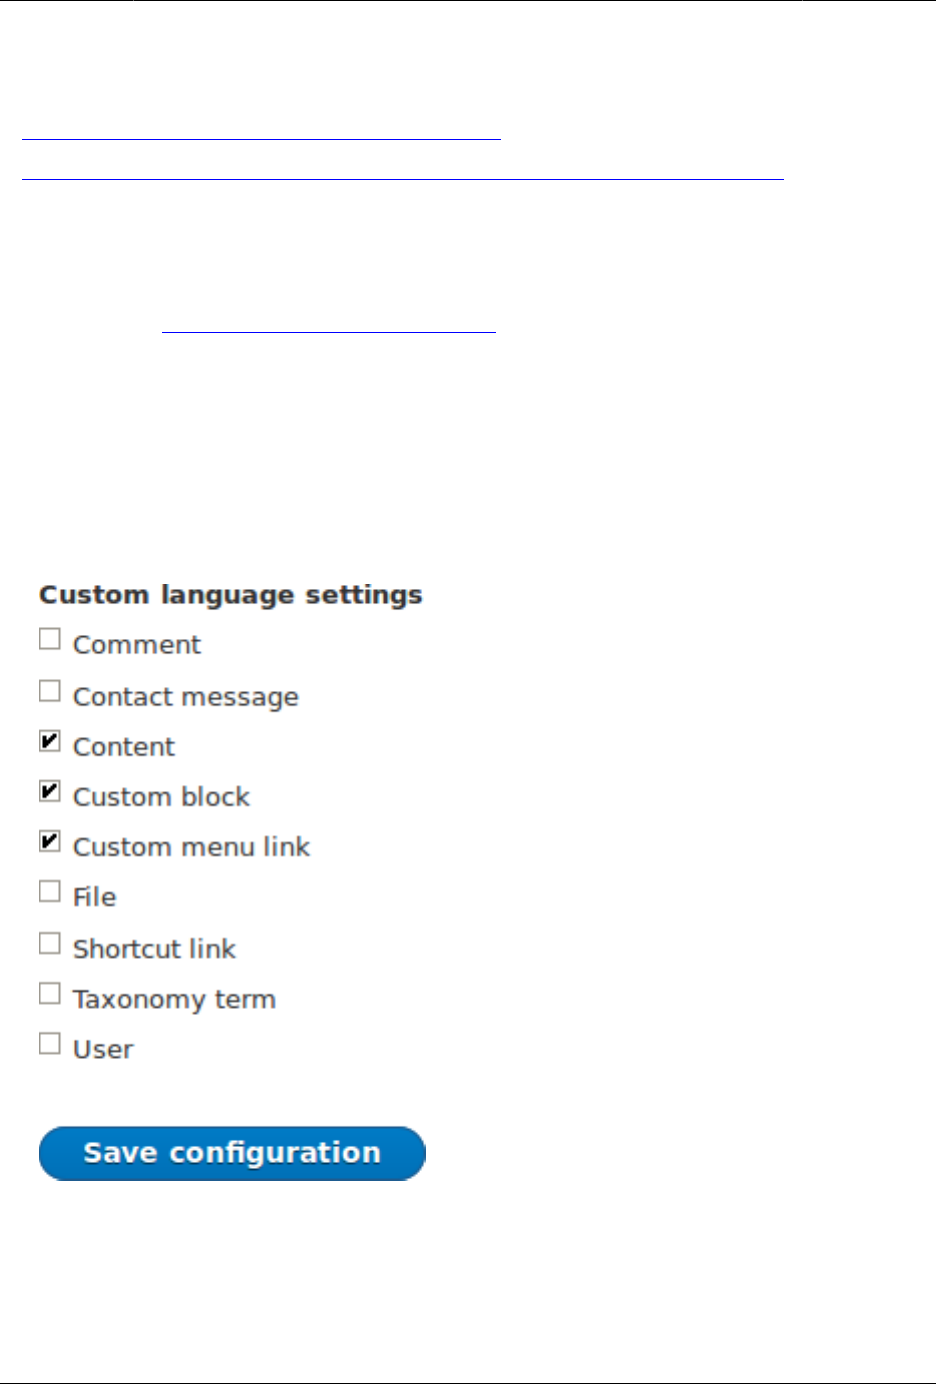
Membuat Situs Anda Multilingual
Prerequisite knowledge
•Bagian 2.3, “Concept: Content Entities and Fields”
•Bagian 10.1, “Concept: User Interface, Configuration, and Content translation”
Site prerequisites
The core Content Translation module must be installed, and your site must have at least two
languages. See Bagian 10.2, “Adding a Language”.
Steps
1. In the Manage administrative menu, navigate to Configuration > Regional and language >
Content language and translation (admin/config/regional/content-language).
2. Under Custom language settings, check Content, Custom block and Custom menu link to
make these entity types translatable.
3. Configuration options appear for Content, Custom block and Custom menu link. Choose
the subtypes you want to translate for each entity type. Check Basic page for Content,
Basic block for Custom block and Custom menu link for Custom menu link.
4. Verify the settings for the entity types as shown below:
137
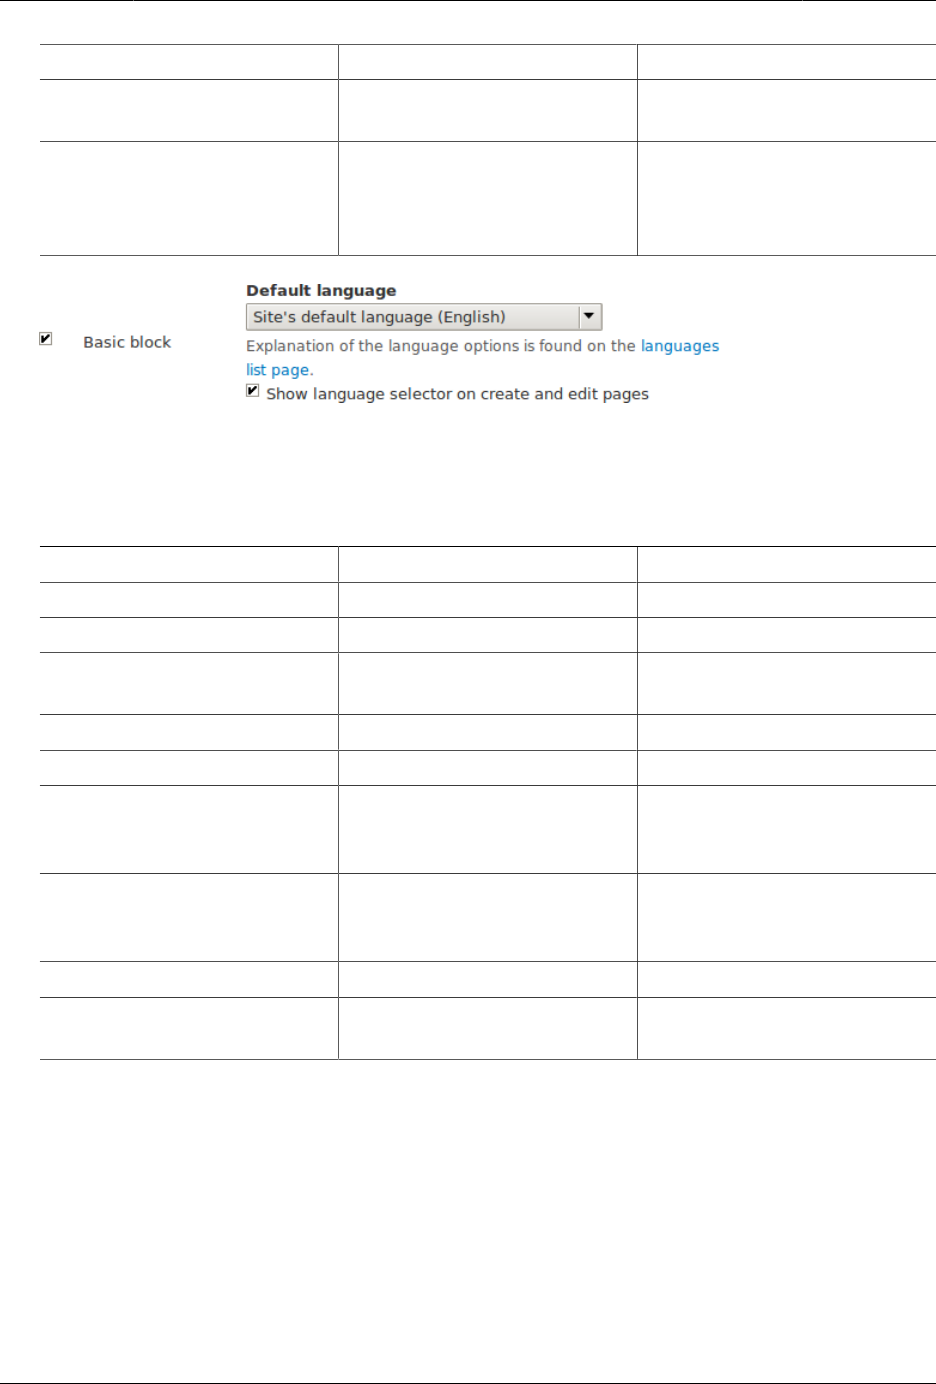
Membuat Situs Anda Multilingual
Field name Explanation Example value
Default language The default language for
the entity subtype
Site’s default language
(English)
Show language selector on
create and edit pages
Whether or not the
language selector should
be shown while editing and
creating content
Checked
5. Choose the fields that should be translatable for Basic page as shown in the table below.
If a field is not translation-dependent, leave it unchecked. Enabling translation for fields
that are numbers or dates has use for accountability or implementing workflows.
Field name Explanation Example value
Title The title of the content Checked
Authored by The author Unchecked
Publishing status Whether the content has
been published or not
Checked
Authored on Date of publishing Unchecked
Changed Date of last update Unchecked
Promoted to front page Whether the content will be
included in some content
views
Unchecked
Sticky at top of lists Whether the content will
be displayed first in some
content views
Unchecked
URL alias Nicer URL for the content Checked
Body The main content of the
page
Checked
138
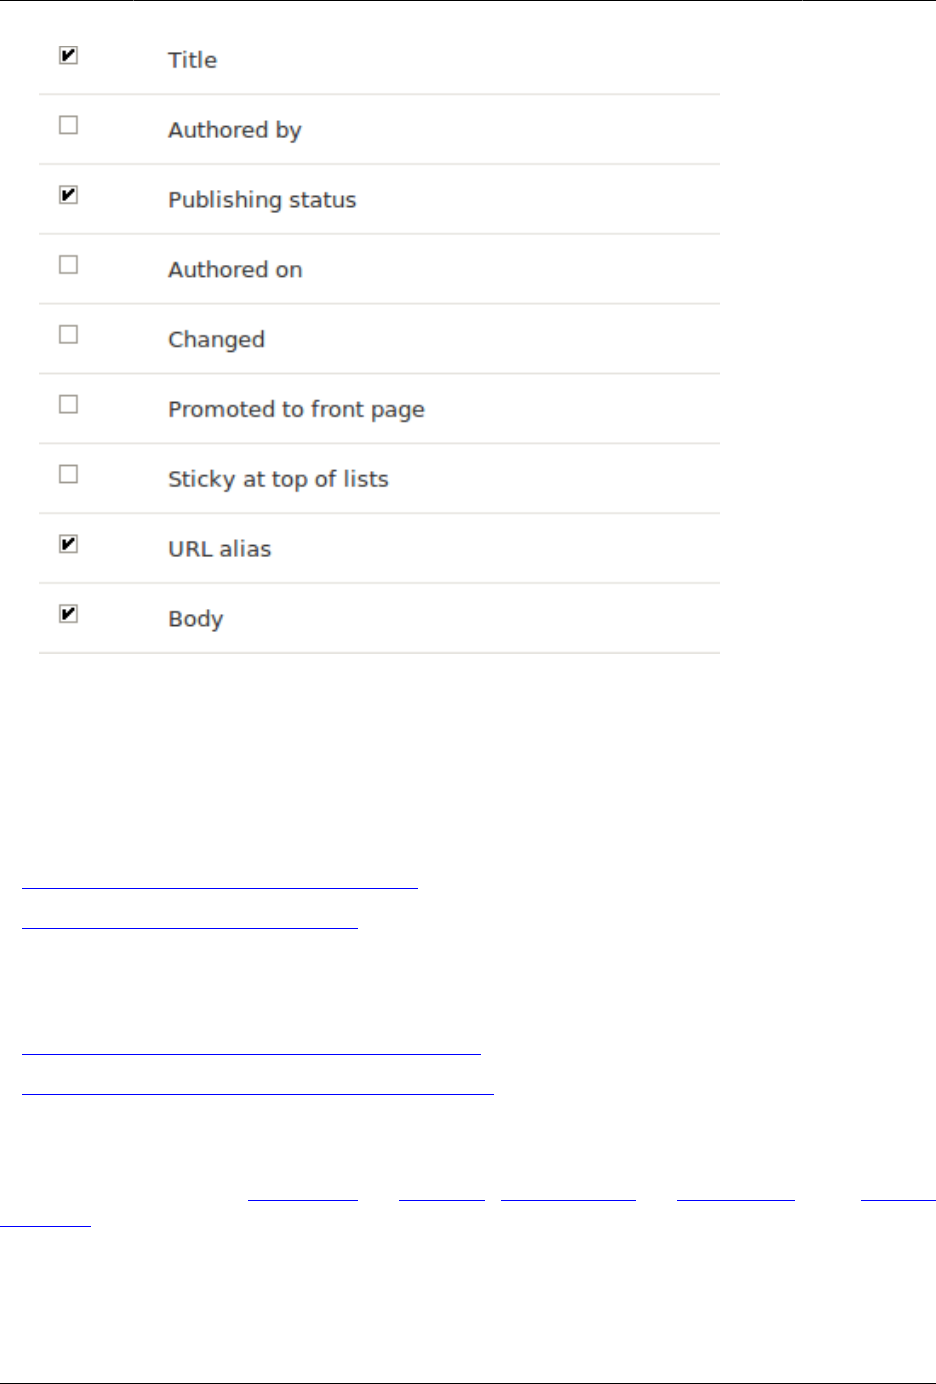
Membuat Situs Anda Multilingual
6. Similarly, check the appropriate boxes for translatable fields belonging to Basic block and
Custom menu link.
7. Click Save configuration.
Expand your understanding
•Bagian 10.5, “Translating Configuration”
•Bagian 10.4, “Translating Content”
Additional resources
•Blog post "Multilingual Drupal 8 tidbits, part 5"
•Blog post "Multilingual Drupal 8 tidbits, part 17"
Attributions
Written and edited by Laura Vass at Pronovix, Jojy Alphonso at Red Crackle, and Jennifer
Hodgdon.
139

Membuat Situs Anda Multilingual
10.4. Translating Content
Goal
Translate the home page to Spanish.
Prerequisite knowledge
Bagian 10.1, “Concept: User Interface, Configuration, and Content translation”
Site prerequisites
• The Home content item must exist. See Bagian 5.2, “Creating a Content Item”.
• The core Content Translation module must be installed, and your site must have at least
two languages. See Bagian 10.2, “Adding a Language”.
• The Basic page content type must be configured to be translatable. See Bagian 10.3,
“Configuring Content Translation”.
Steps
1. In the Manage administrative menu, navigate to Content (admin/content).
2. Locate the home page. You can search for it by entering "Home" in the title field.
3. Select Translate from the dropdown button in the row of the Home content item. The
page Translations of Home appears.
4. Click Add in the row Spanish.
5. Note that the user interface has switched to Spanish. To switch it back to English,
remove the first instance of es in the browser’s URL. For example, if your URL looks like
example.com/es/node/5/translations/add/en/es, remove the es that comes immediately
after example.com.
6. Fill in the fields as shown below. You will have to click and expand URL path settings on
the right to provide the value for URL alias.
Field name Explanation Value
Title Translated title of the page Página principal
140

Membuat Situs Anda Multilingual
Field name Explanation Value
Body Translated body of the
page
Bienvenido al mercado de
la ciudad - ¡el mercado de
agricultores de tu barrio!
Horario: Domingos de
9:00 a 14:00. Desde Abril a
Septiembre Lugar: parking
del Banco Trust número 1.
En el centro de la ciudad
URL path settings > URL
alias
Translated address of the
webpage
pagina-principal
7. Click Save and keep published (this translation).
8. Go to your site’s home page to view the newly translated page.
Expand your understanding
• Follow the steps above to translate more content on your site.
•Bagian 10.5, “Translating Configuration”
Attributions
Written by Boris Doesborg.
10.5. Translating Configuration
Goal
Translate the labels on the Recipes view page into Spanish.
Prerequisite knowledge
•Bagian 10.1, “Concept: User Interface, Configuration, and Content translation”
•Bagian 9.3, “Creating a Content List View”
Site prerequisites
• The core Configuration Translation module must be installed, and your site must have at
least two languages. See Bagian 10.2, “Adding a Language”.
• The Recipes view must exist. See Bagian 9.3, “Creating a Content List View” and Bagian 9.4,
“Duplicating a View”.
141

Membuat Situs Anda Multilingual
Steps
The basic steps for translating any configuration on your site are:
1. Locate the page where the configuration you want to translate is created or edited in the
site’s primary language. For example, to translate the site name, you need to find the
page where you would edit the site name (see Bagian 4.2, “Editing Basic Site Information”).
2. Find a link, tab, or button on the page that says "Translate" or something similar. Click
this link, tab, or button.
3. Find a button that will let you add a translation in the desired language, and click this
button.
4. Enter the translation in the form, and save.
Most configuration is fairly straightforward and intuitive to edit in this manner. Views
configuration is an exception, because the translation editing form is nothing like the view
editing form, and it is complex and hierarchical rather than being a simple form with just
a few fields. As an example of how to translate a view, here are the steps to translate the
labels in the Recipes view to Spanish:
1. In the Manage administrative menu, navigate to Structure > Views (admin/structure/views).
2. Locate the Recipes view and click Translate from the dropdown button.
3. Click Add in the row Spanish. The page Add Spanish translation for Recipes view appears.
4. Find Displays > Master Display settings > Recipes default display Options. Translate the
Display title from "Recipes" to "Recetas".
5. Find Displays > Master display settings > Recipes default display options > Exposed form >
Reset options. Translate Submit button text (Apply) to "Applicar". The other buttons and
labels in this section do not appear on the Recipes page or block, and do not need to
be translated.
142
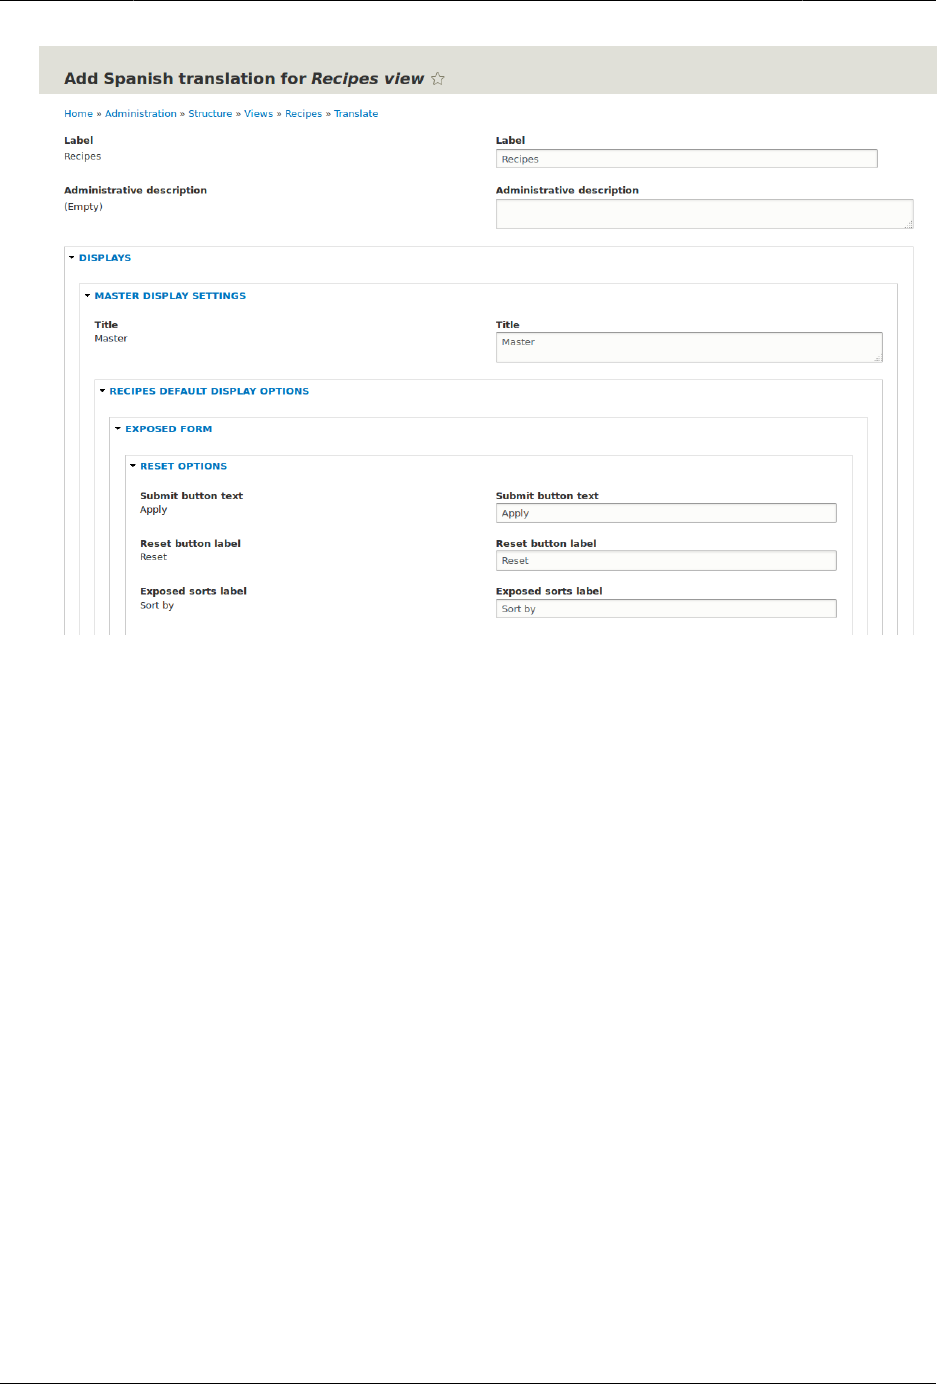
Membuat Situs Anda Multilingual
6. Find Displays > Master display settings > Recipes default display options > Filters > (Empty)
taxonomy term ID > Find recipes using… Expose. In the Label field, enter "Encontrar recetas
usando…".
7. Click Save translation.
8. Navigate to the Recipes page and switch to Spanish using the Language switcher block.
Verify that the labels have been translated.
Expand your understanding
• Translate the block display title in the Recent recipes display settings section of the Recipes
view.
• Translate the page title in the Vendors view.
• Translate other configuration. Some examples of where to find the translation pages:
• To translate the site name, navigate in the Manage administrative menu to Configuration
> System > Basic site settings > Translate system information (admin/config/system/site-
information/translate).
• To translate the contact form, navigate in the Manage administrative menu to Structure
> Contact forms (admin/structure/contact). Click Translate in the dropdown button in the
Website feedback row.
• To translate the name of a menu, navigate in the Manage administrative menu to
Structure > Menus (admin/structure/menu). Click Translate in the dropdown button for the
menu whose name you want to translate.
143

Membuat Situs Anda Multilingual
• Menu items within a menu are considered to be content (not configuration); see Bagian
10.3, “Configuring Content Translation” to enable translation. Once translation is enabled,
navigate in the Manage administrative menu to Structure > Menus (admin/structure/
menu). Click Edit menu in the dropdown button for the menu whose links you want to
translate. Click Translate in the dropdown button for the link you want to translate.
• To translate field labels on a content type, navigate in the Manage administrative menu
to Structure > Content types (admin/structure/types). Click Manage fields in the dropdown
button for the content type whose field labels you want to edit. Click Translate in the
dropdown button for the field whose label you want to edit.
• Translate content. See Bagian 10.4, “Translating Content”.
Attributions
Written and edited by Boris Doesborg and Jennifer Hodgdon.
144
Bab 11. Mengembangkan dan
Menyesuaikan Situs Anda
11.1. Finding Modules
Goal
Find and evaluate modules on Drupal.org.
Prerequisite knowledge
•Bagian 1.1, “Concept: Drupal as a Content Management System”
•Bagian 1.2, “Concept: Modules”
Steps
1. Go to Drupal.org, and navigate to Download & Extend > Modules (https://www.drupal.org/
project/project_module).
2. Filter your search using the categories on the module search page. Fill in the fields as
shown below.
Field name Explanation Example value
Maintenance status How actively should the
module be maintained?
Actively maintained
Development status What kind of development
should the module
undergo?
Any
Module categories The module’s topic area. Administration
Core compatibility The version of the core
software the module is
compatible with.
8.x
Status Project status: Sandbox
projects are experimental
projects. Full projects have
already gone through an
approval process, but they
can still be in development.
Full projects
Search Modules Search for Admin Toolbar, a
module that will be covered
Admin Toolbar
145
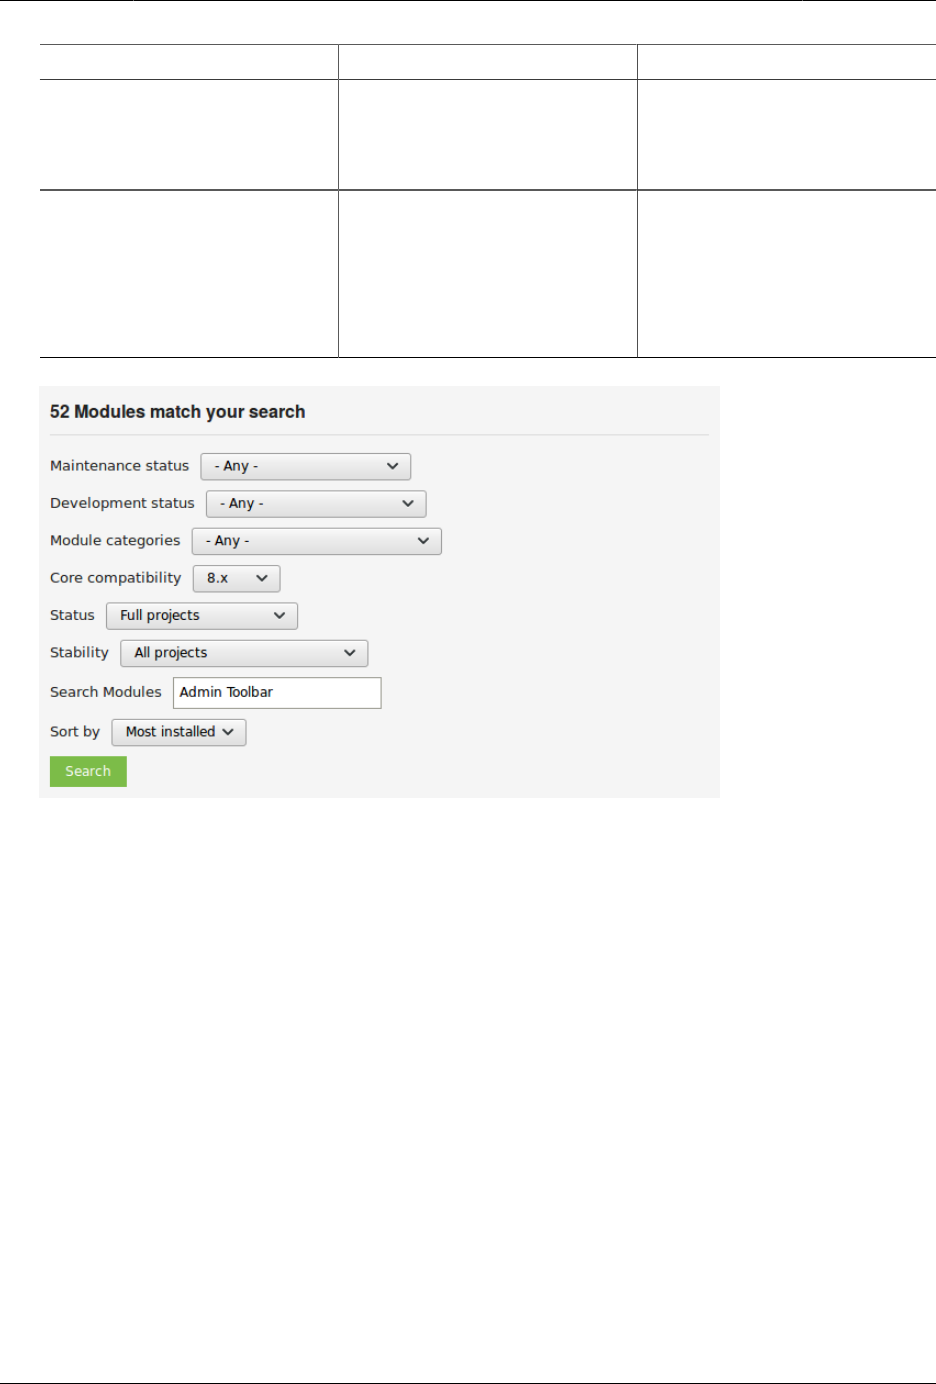
Mengembangkan dan Menyesuaikan Situs Anda
Field name Explanation Example value
in detail later. Alternatively,
you can also leave the field
blank if you are not sure
which module to search for.
Sort by Order your search results
by criteria like Most installed
(popular modules that
many sites use) or Last
release (date of latest
version released).
Most installed
3. Click Search. Search results will appear.
146
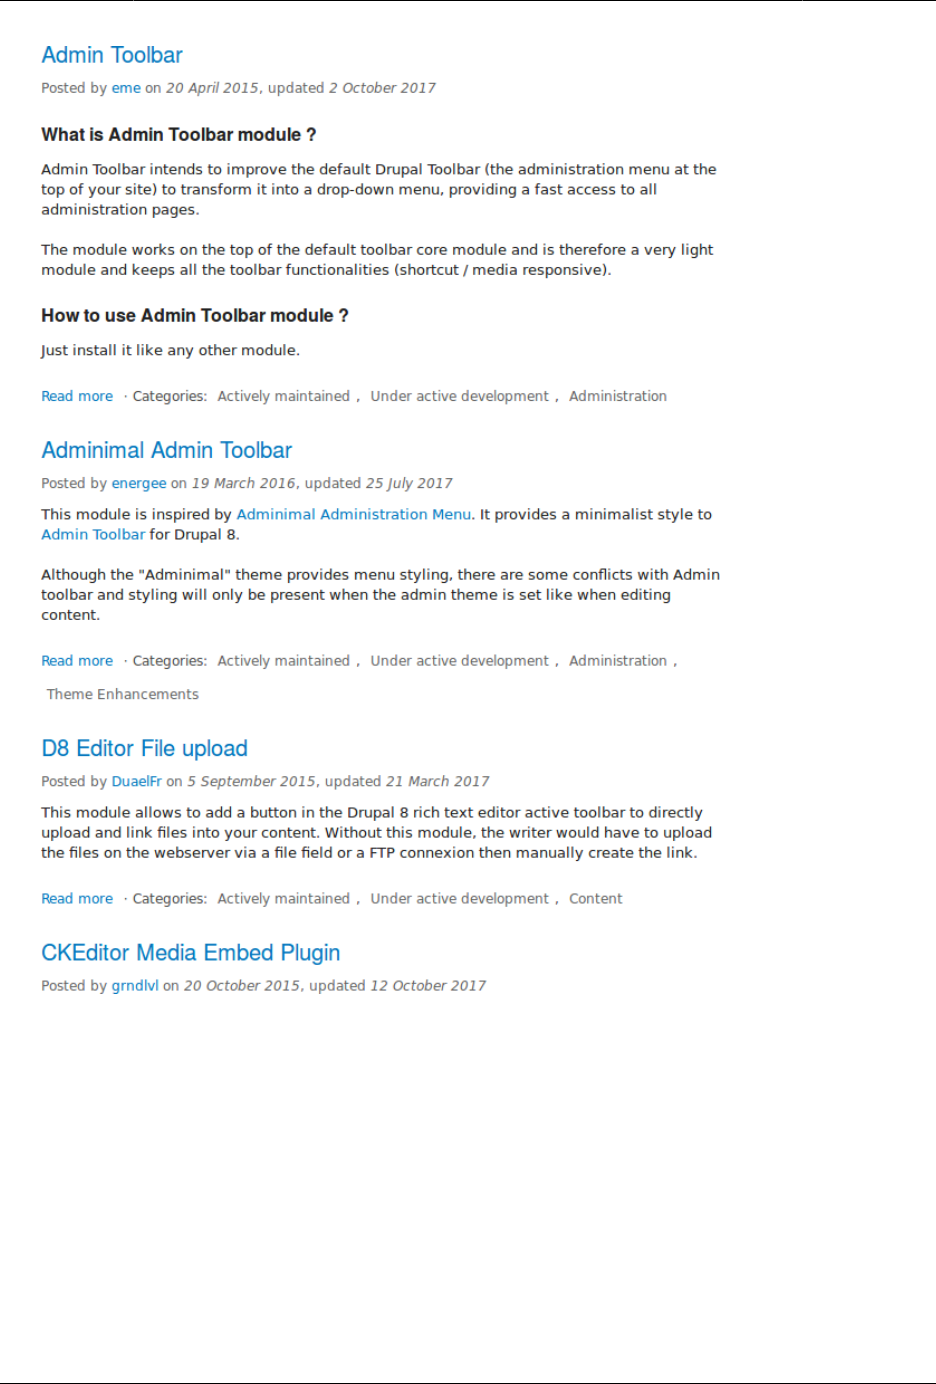
Mengembangkan dan Menyesuaikan Situs Anda
4. To further evaluate a module, click its title in the list of search results to visit its project
page.
Some aspects to pay attention to when evaluating modules:
• Project description: The description of the module on its project page should be clear and
useful. You should get an idea of its features and requirements.
• Maintenance status: If a module is Actively maintained, you can be sure that there will
be security updates, bug fixes and feature improvements provided on a regular basis.
However, if the module is unmaintained or abandoned, you shouldn’t use it.
147
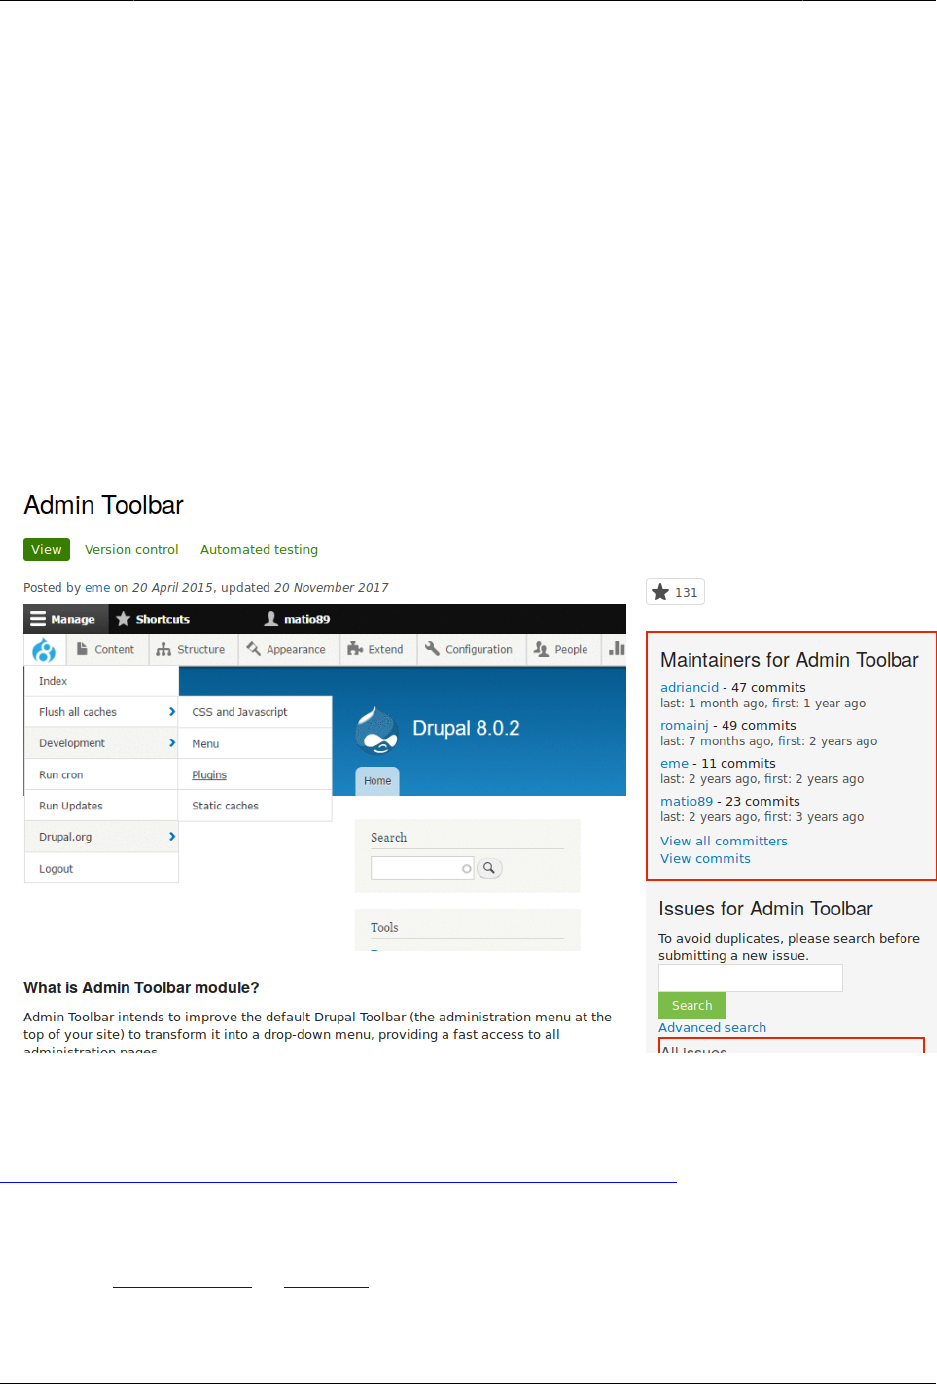
Mengembangkan dan Menyesuaikan Situs Anda
• Development status: Under active development means you can expect new features to be
added to the project, but some aspects (for example, API) may still change. Maintenance
fixes only means that the project is considered feature complete.
• Reported installs, downloads: You can see how many people have downloaded and how
many sites use the module. If it’s only used by a few sites, it might be a unique solution
that not many people need, or it might be a warning sign that you shouldn’t use it either.
• Maintainers: When was the last commit (the last time someone updated something on the
module) or last release (new version)? If the project has few open issues, a long time since
commits/releases might be appropriate, but if it has a lot of open issues and there are no
commits/releases, that would be a clue that it might be abandoned.
• Issues: See if there are any open issues, potential problems with the module. Check the
Statistics to see how regularly issues are responded to.
• Resources: Check if the module has documentation or a README file, that can help you
install, configure, explore, and test it.
Expand your understanding
Bagian 11.3, “Downloading and Installing a Module from Drupal.org”
Attributions
Written by Diána Lakatos at Pronovix.
148
Mengembangkan dan Menyesuaikan Situs Anda
11.2. Enabling and Disabling Maintenance
Mode
Goal
Put your site in maintenance mode to allow users with the right permissions to use the site
while users without this permission are presented with a message that the site is under
maintenance.
Prerequisite knowledge
Bagian 13.3, “Concept: Security and Regular Updates”
Steps
Enabling maintenance mode
1. In the Manage administrative menu, navigate to Configuration > Development >
Maintenance mode (admin/config/development/maintenance). The Maintenance mode page
appears.
2. Fill in the fields as shown below.
Field name Explanation Value
Put site into maintenance
mode
Enable the maintenance
mode
Checked
Message to display when in
maintenance mode
The information that is
shown to website visitors
when the mode is enabled.
Variables such as @site can
be used in the message
@site is currently under
maintenance but should be
back shortly. Thank you for
your patience.
3. Click Save configuration.
4. Verify that the site is in maintenance mode by accessing it from another browser where
you aren’t logged in. If you are not able to verify, try clearing the cache. See Bagian 12.2,
“Clearing the Cache”.
149
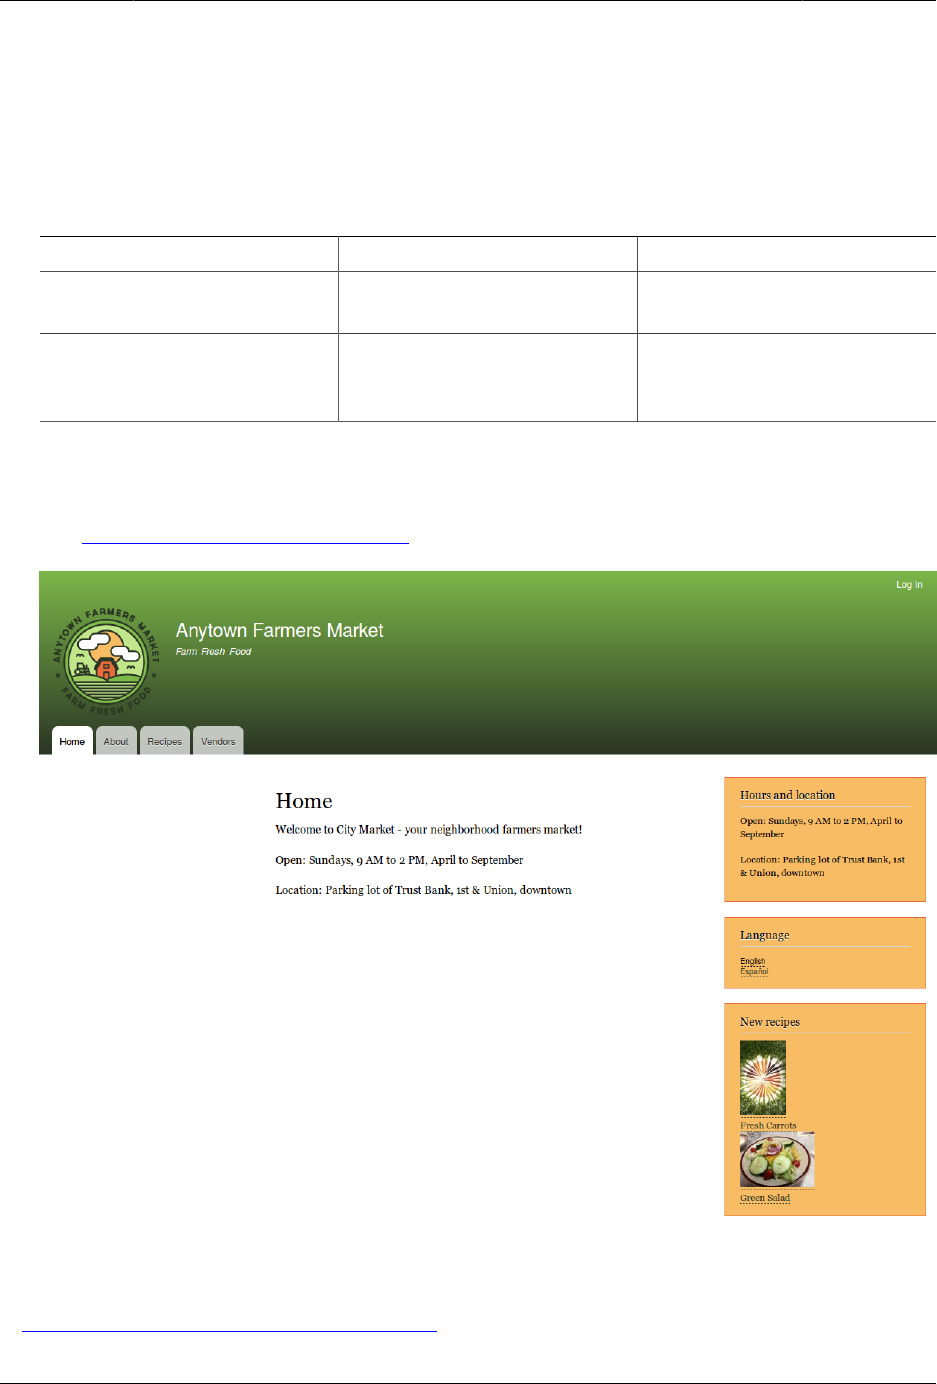
Mengembangkan dan Menyesuaikan Situs Anda
Disabling maintenance mode
1. In the Manage administrative menu, navigate to Configuration > Development >
Maintenance mode (admin/config/development/maintenance). The Maintenance mode page
appears.
2. Fill in the fields as shown below.
Field name Explanation Value
Put site into maintenance
mode
Disable the maintenance
mode
Unchecked
Message to display when in
maintenance mode
No message required while
disabling. You can leave the
field blank.
3. Click Save configuration.
4. Verify that the site is no longer in maintenance mode by accessing it from another
browser where you aren’t logged in. If you are not able to verify, try clearing the cache.
See Bagian 12.2, “Clearing the Cache”.
Expand your understanding
•Bagian 13.5, “Updating the Core Software”
150

Mengembangkan dan Menyesuaikan Situs Anda
•Bagian 13.7, “Updating a Theme”
•Bagian 13.6, “Updating a Module”
Attributions
Written and edited by Boris Doesborg, and Jojy Alphonso at Red Crackle.
11.3. Downloading and Installing a Module
from Drupal.org
Goal
Download and install the contributed Admin Toolbar module, which allows you to easily
browse through the administration section of the website.
Prerequisite knowledge
•Bagian 1.2, “Concept: Modules”
•Bagian 11.1, “Finding Modules”
•Bagian 3.2, “Concept: Additional Tools”
Site prerequisites
• If you want to install modules via the website, the core Update Manager module must be
installed. See Bagian 4.3, “Installing a Module” for instructions on installing modules.
• If you want to use Drush, Drush must be installed. See Bagian 3.2, “Concept: Additional
Tools”.
Steps
You can use the administrative interface or Drush to install a contributed module. If you are
installing a custom module rather than a contributed module, if you see a message saying
Installing modules and themes requires FTP access to your server, or if the steps below do not
work to download and unpack the module files, follow the steps in Bagian 11.6, “Manually
Downloading Module or Theme Files”. If you are installing a contributed module with external
dependencies that are managed by Composer, follow the steps for downloading in Bagian
11.9, “Using Composer and Git to Download Files”. In either of these cases, then continue here
with step 7 in the instructions for the administrative interface below.
Using the administrative interface
1. On the Admin toolbar project page on drupal.org (https://www.drupal.org/project/
admin_toolbar), scroll to the Downloads section at the bottom of the page.
151
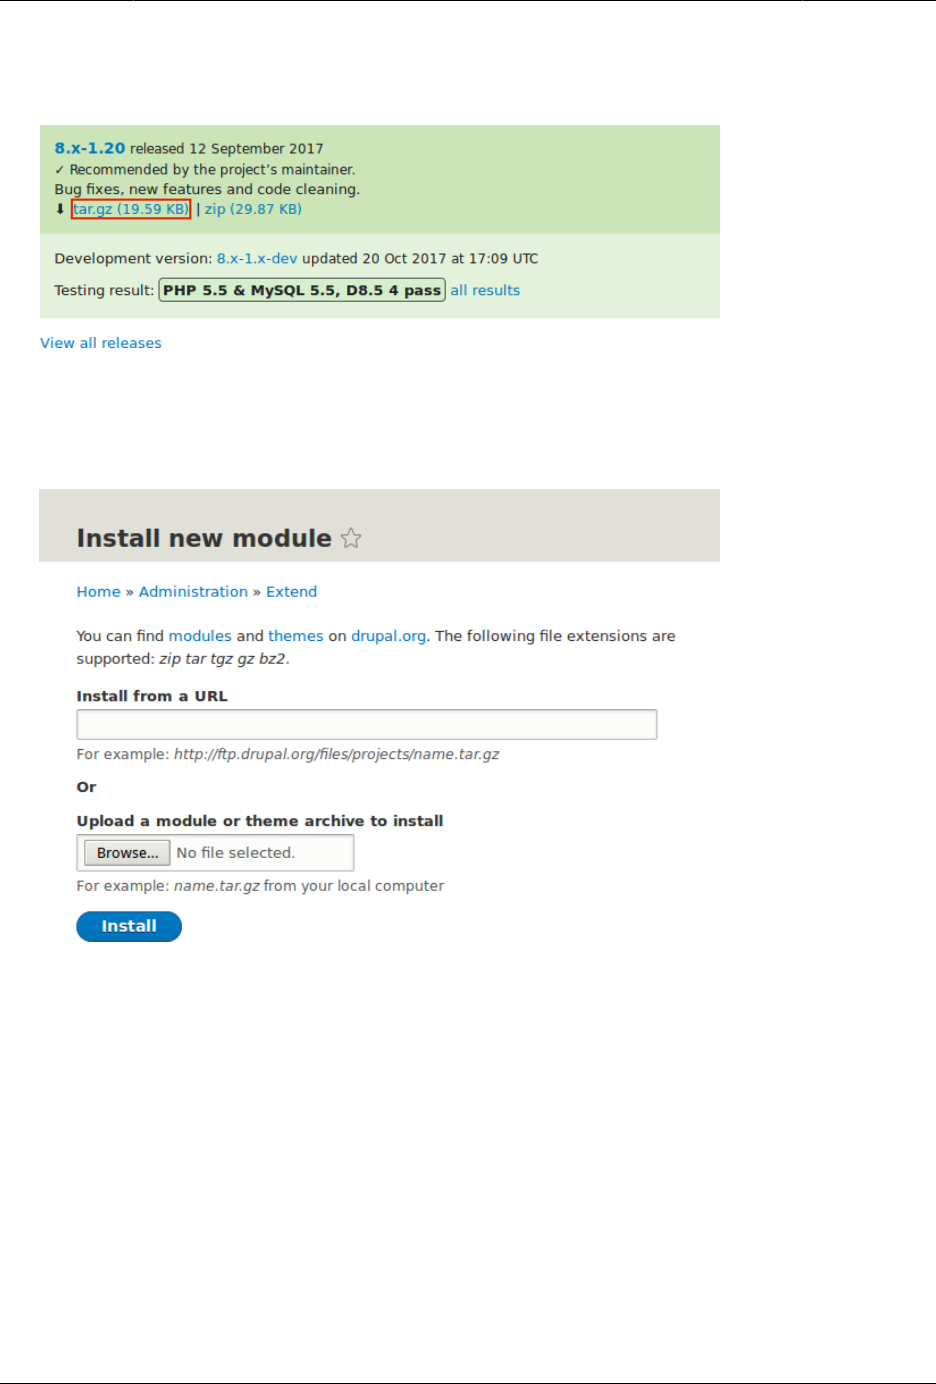
Mengembangkan dan Menyesuaikan Situs Anda
2. Copy the address of the tar.gz link. Depending on your device and browser, you might
do this by right clicking and selecting Copy link address.
3. In the Manage administrative menu, navigate to Extend (admin/modules). The Extend page
appears.
4. Click Install new module. The Install new module page appears.
5. In the field Install from a URL, paste the copied download link. This value could look like
this: https://ftp.drupal.org/files/projects/admin_toolbar-8.x-1.14.tar.gz
6. Click Install to upload and unpack the new module on the server. The files are being
downloaded to the modules directory.
7. Click Enable newly added modules to return to the Extend page. If you used the manual
uploading procedure, start with this step, and reach the Extend page by using the Manage
administrative menu and navigating to Extend (admin/modules).
8. Locate and check Admin toolbar.
9. Click Install to turn on the new module.
152

Mengembangkan dan Menyesuaikan Situs Anda
Using Drush
1. Find the project name for the module you want to install, which is the last segment of
the module’s project page URL. For example, if the project URL is https://www.drupal.org/
project/admin_toolbar, the project name is "admin_toolbar".
2. Run the following Drush commands, giving the project name (for example,
admin_toolbar) as a parameter:
drush dl admin_toolbar
drush en admin_toolbar
3. Follow the instructions on the screen.
Expand your understanding
• Verify that the contributed Admin Toolbar module is working by browsing through the menu
in the administration section.
• Install and configure the contributed Pathauto module so that content pages in your site get
nice URLs by default. See Bagian 5.1, “Concept: Paths, Aliases, and URLs” for more on URLs.
• If you do not see the effect of these changes in your site, you might need to clear the
cache. See Bagian 12.2, “Clearing the Cache”.
Additional resources
•Drupal.org community documentation page "Contributed modules"
•"Download and Extend" page on Drupal.org
•Admin Toolbar module on Drupal.org
Attributions
Written and edited by Boris Doesborg and Jennifer Hodgdon.
11.4. Finding Themes
Goal
Find and evaluate themes on Drupal.org.
Prerequisite knowledge
•Bagian 1.1, “Concept: Drupal as a Content Management System”
•Bagian 1.3, “Concept: Themes”
153

Mengembangkan dan Menyesuaikan Situs Anda
Steps
1. Go to https://www.drupal.org, and navigate to Download & Extend > Themes (https://
www.drupal.org/project/project_theme).
2. Filter your search using the categories on the theme search page. For example, you
might use these filters:
Field name Explanation Example value
Maintenance status How actively is the theme
maintained? If a theme is
actively maintained, you
can expect bug fixes and
improvements on a regular
basis.
Actively maintained
Development status What kind of development
is the theme undergoing?
If you select Under active
development, you can
expect new features to
be added, and some
aspects may still change.
If you select Maintenance
fixes only, it means that
the theme is considered
complete.
Any
Core compatibility The Drupal version the
theme is compatible with.
8.x
Status Sandbox projects are
experimental projects.
Full projects have already
gone through an approval
process, but they can still
be in development.
Full projects
Search Themes Search by search term in
the theme’s description.
-
Sort by Order your search results
by criteria like Most installed
(popular themes that many
sites use) or Last release
(date of latest version
released).
Most installed
154
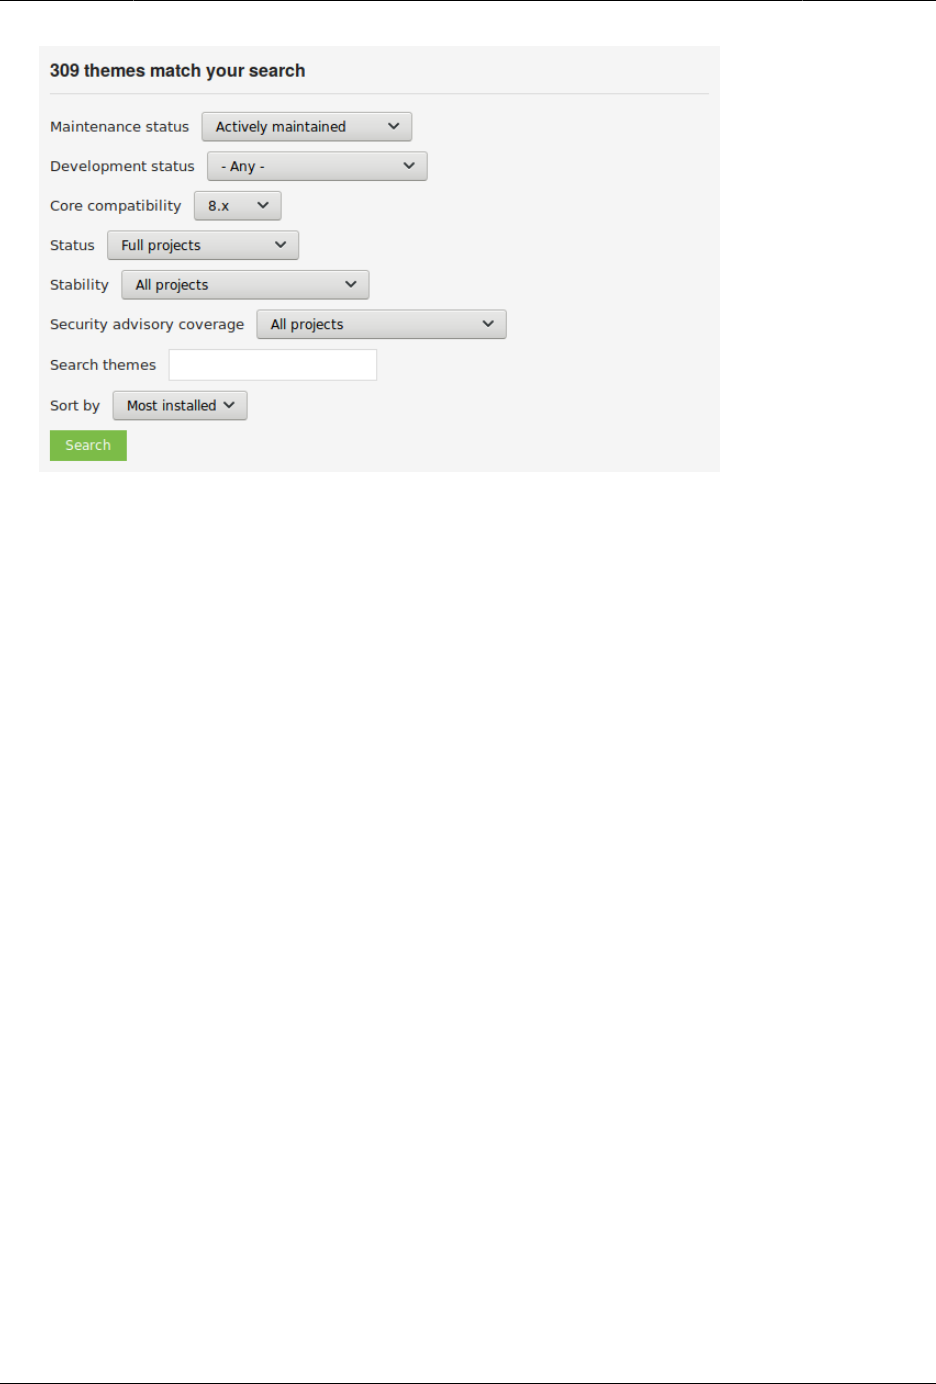
Mengembangkan dan Menyesuaikan Situs Anda
3. Click Search. Search results will appear.
155
Mengembangkan dan Menyesuaikan Situs Anda
4. To further evaluate a theme, click its title in the list of search results to visit its project
page.
Some aspects to pay attention to while evaluating themes:
• Introduction: The description of the theme on its project page should be clear and useful.
A screenshot of the theme helps your evaluation as well.
• Downloads: The theme should be available for your version of the core software. Pay
attention to the color-coding: Themes marked green are recommended to be used on
156

Mengembangkan dan Menyesuaikan Situs Anda
live sites, the ones marked yellow should be carefully evaluated before use, and the ones
marked red are only recommended for testing.
• Project Information: Check the theme’s maintenance and development status, and how
frequently it’s downloaded and installed.
• Issues: See if there are any open issues or potential problems with the theme.
• Resources: Check if the theme has documentation.
Expand your understanding
•Bagian 11.5, “Downloading and Installing a Theme from Drupal.org”
Attributions
Written by Diána Lakatos.
11.5. Downloading and Installing a Theme from
Drupal.org
Goal
Download and install a theme from Drupal.org.
Prerequisite knowledge
•Bagian 11.4, “Finding Themes”
•Bagian 3.2, “Concept: Additional Tools”
Site prerequisites
If you want to install via the website, the core Update Manager module must be installed.
See Bagian 4.3, “Installing a Module” for instructions on installing modules.
If you want to use Drush, Drush must be installed. See Bagian 3.2, “Concept: Additional Tools”.
Steps
You can use the administrative interface or Drush to install a contributed theme. If you are
installing a custom theme rather than a contributed theme, if you see a message saying
Installing modules and themes requires FTP access to your server, or if the steps below do not
work to download and unpack the theme files, follow the steps in Bagian 11.6, “Manually
Downloading Module or Theme Files”. If you are installing a contributed theme with external
dependencies that are managed by Composer, follow the steps for downloading in Bagian
157
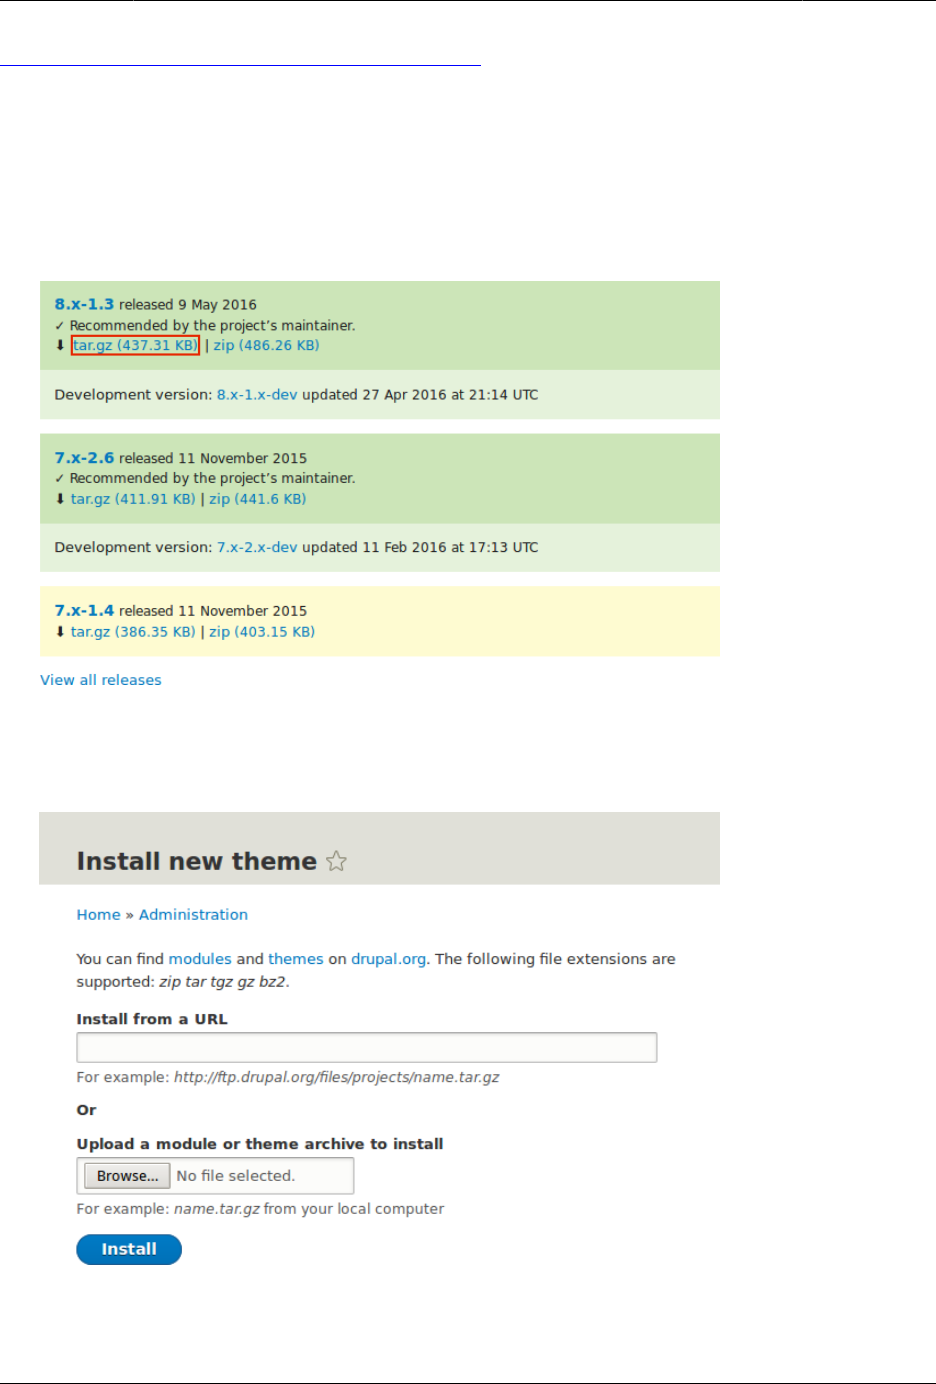
Mengembangkan dan Menyesuaikan Situs Anda
11.9, “Using Composer and Git to Download Files”. In either of these cases, then continue here
with step 7 in the instructions for the administrative interface below.
Using the administrative interface
1. On the theme’s project page on drupal.org (for example, https://www.drupal.org/project/
mayo), scroll to the Downloads section at the bottom of the page.
2. Right-click tar.gz to copy the address.
3. In the Manage administrative menu, navigate to Appearance (admin/appearance). The
Appearance page appears.
4. Click Install new theme. The Install new theme page appears.
5. In the field Install from a URL, paste the copied download link. This value could look like
https://ftp.drupal.org/files/projects/mayo-8.x-1.3.tar.gz.
158
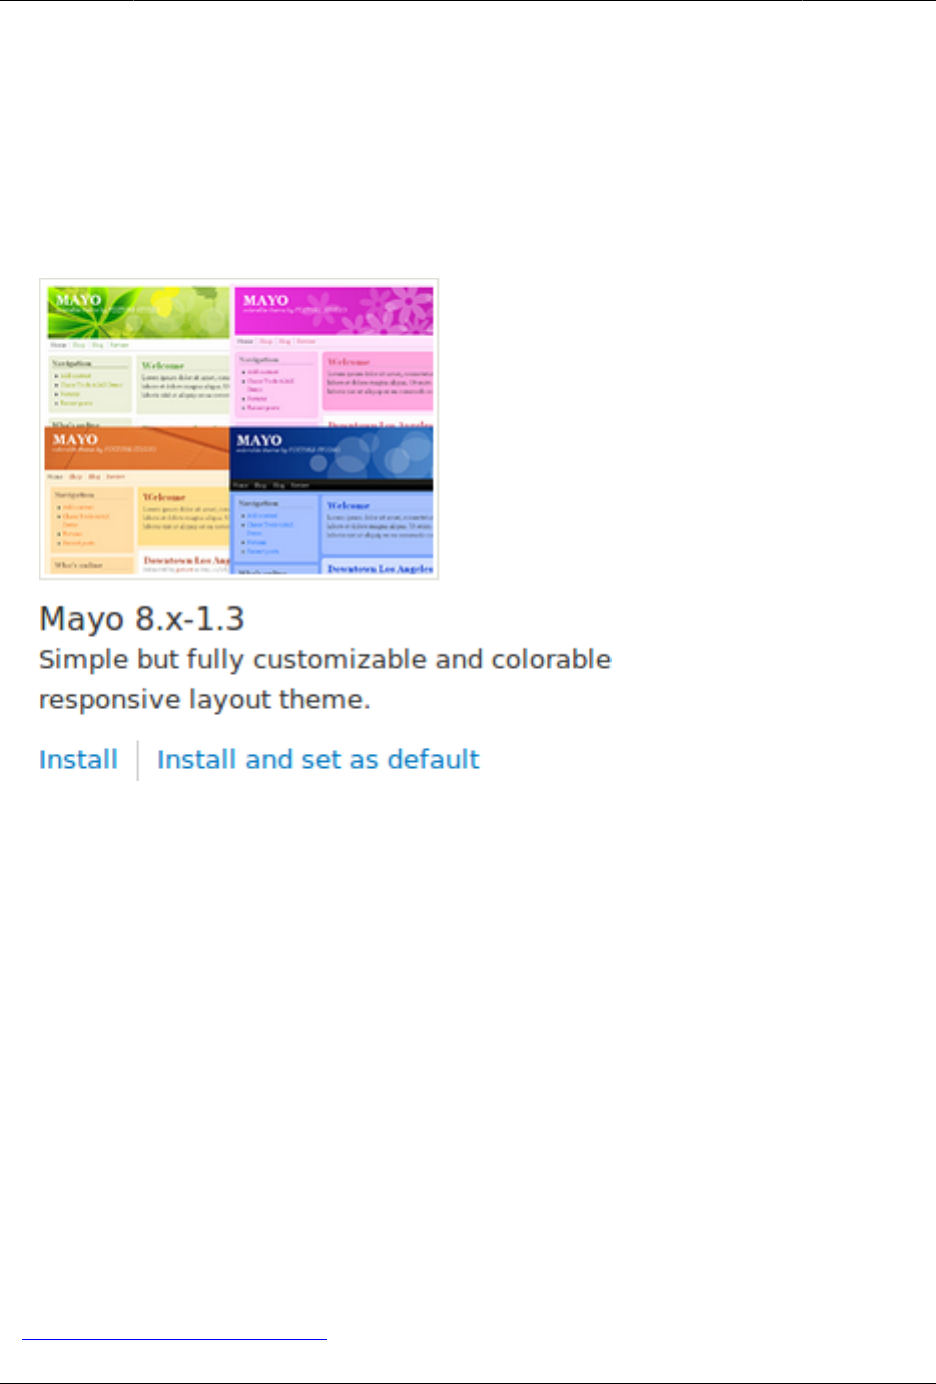
Mengembangkan dan Menyesuaikan Situs Anda
6. Click Install to upload and unpack the new theme on the server. The files are being
downloaded to the themes directory.
7. Click Install newly added themes to return to the Appearance page. If you used the manual
uploading procedure, start with this step, and reach the Appearance page by using the
Manage administrative menu and navigating to Appearance (admin/appearance).
8. Locate the new theme under Uninstalled themes and click Install and set as default to use
it. All non-administrative pages on the site will now use this new theme.
Using Drush
1. Find the project name for the theme you want to install, which is the last segment of
the theme’s project page URL. For example, if the project URL is https://www.drupal.org/
project/mayo, the project name is mayo.
2. Run the following Drush commands, giving the project name (for example, mayo) as a
parameter:
drush dl mayo
drush en mayo
drush config-set system.theme default mayo
3. Follow the instructions on the screen.
Expand your understanding
• In the Manage administrative menu, navigate to Appearance (admin/appearance) and
uninstall any themes that you are not using.
•Bagian 11.1, “Finding Modules”
159

Mengembangkan dan Menyesuaikan Situs Anda
•Bagian 11.3, “Downloading and Installing a Module from Drupal.org”
• If you do not see the effect of these changes in your site, you might need to clear the
cache. See Bagian 12.2, “Clearing the Cache”.
Attributions
Written and edited by Joe Shindelar at Drupalize.Me, and Boris Doesborgh.
11.6. Manually Downloading Module or Theme
Files
Goal
Manually download module or theme files and upload them to your site, if the website or
Drush methods for installing or updating a module or theme do not work, or if you are
placing a custom-written module or theme.
Prerequisite knowledge
•Bagian 1.2, “Concept: Modules”
•Bagian 11.1, “Finding Modules”
•Bagian 1.3, “Concept: Themes”
•Bagian 11.4, “Finding Themes”
Site prerequisites
You need to be facing any of the following to perform the manual download described in
this topic:
• File permission issues
• FTP permission issues
• You created a custom module/theme or received its files from someone
• You could not successfully complete the instructions in Bagian 11.3, “Downloading and
Installing a Module from Drupal.org”, Bagian 11.5, “Downloading and Installing a Theme from
Drupal.org”, Bagian 13.6, “Updating a Module”, or Bagian 13.7, “Updating a Theme”
Skip this topic if none of the above applies to you.
Steps
If you are installing a module or theme from Drupal.org, follow the downloading instructions,
and then the uploading/unpacking instructions. If you created the module or theme, skip the
160
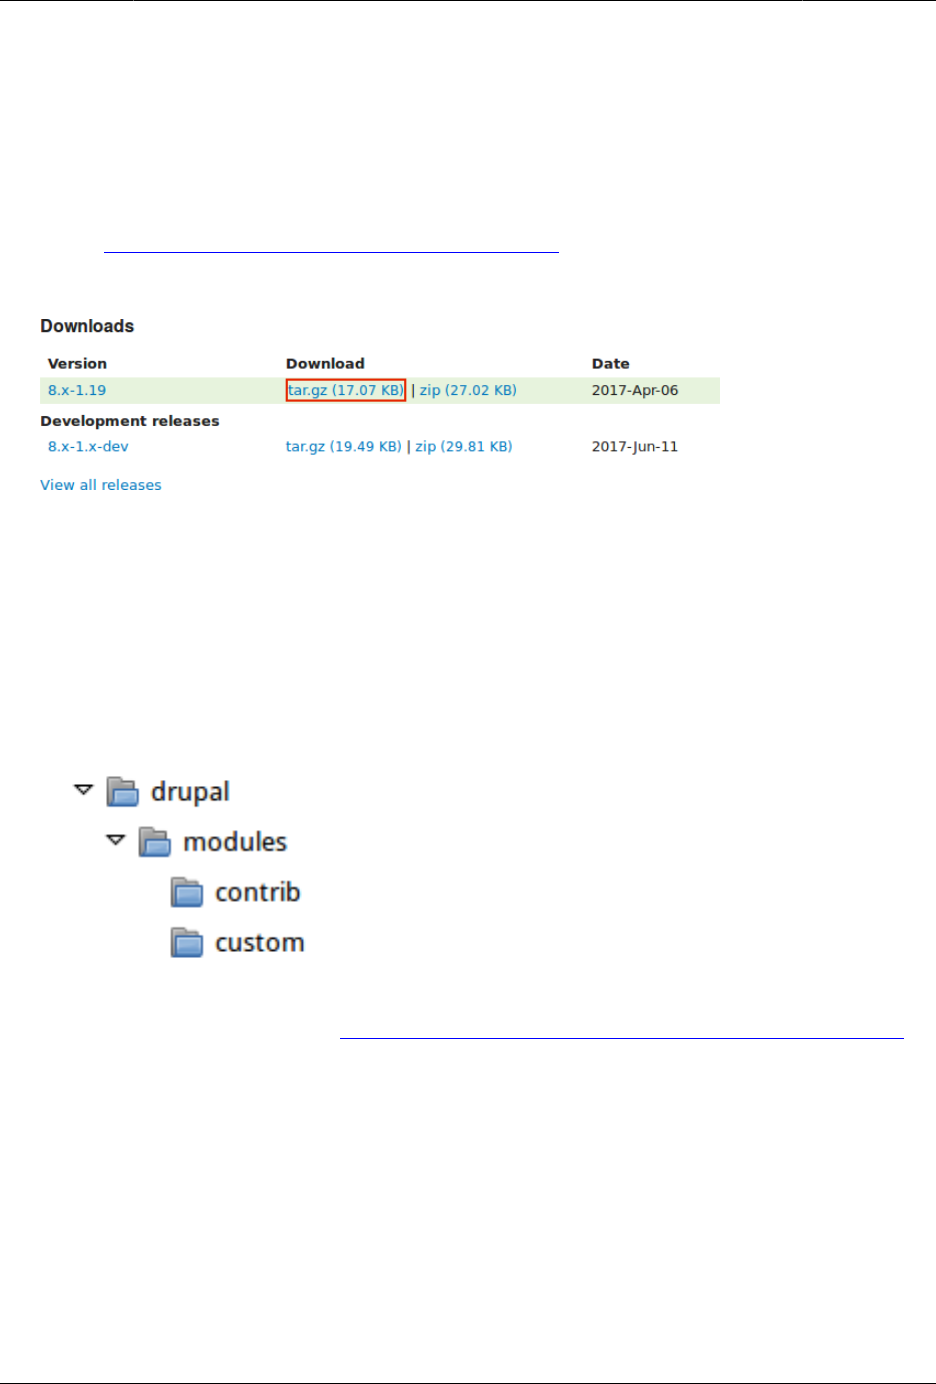
Mengembangkan dan Menyesuaikan Situs Anda
downloading step. Instead, create an archive file (that you know how to extract on the server)
and proceed with the steps in uploading/unpacking, using whatever method is appropriate
for the way you initially created the archive file.
Downloading the files
1. Open the module or theme project page on drupal.org; for example, the Admin toolbar
page (https://www.drupal.org/project/admin_toolbar).
2. Scroll to the Downloads section near the bottom of the page.
3. Click tar.gz to download the file to your computer.
Uploading the files to your site and unpacking them
1. If you are adding a new module or theme, create subdirectories in your top-level modules
and themes directories (if they don’t already exist). Typically, people make a contrib
subdirectory for contributed modules and themes that are downloaded from Drupal.org,
and a custom subdirectory for modules and themes that they created. Your modules
directory might look like this:
2. If you are replacing an existing module or theme with an updated version, put the site
into maintenance mode. See Bagian 11.2, “Enabling and Disabling Maintenance Mode”.
3. If you are replacing an existing module or theme with an updated version, find and
delete all the existing files and directories for the existing module or theme. Modules
are normally located in directories under the top-level modules directory, and themes
are normally located in directories under the top-level themes directory.
4. Upload the .tar.gz file (or whatever archive you created) to your site. Place it in either the
same location from which you deleted the directory (if replacing an existing module or
theme) or the appropriate subdirectory of modules or themes (if adding a new module
or theme).
5. Extract the files from the .tar.gz archive (or whatever archive you created), making a
subdirectory in the same location as the archive file. If you do not have terminal access,
161

Mengembangkan dan Menyesuaikan Situs Anda
or your hosting server is not running Linux, your hosting control panel’s file manager
should provide a way to extract the files. If you have terminal access to your hosting
server (running Linux) and you are using a tar.gz file, you can use a command like:
tar -xzf admin_toolbar-8.x-1.17.tar.gz
6. Delete the compressed file from the server, unless your unpacking method already
deleted it.
7. Refer to Bagian 11.3, “Downloading and Installing a Module from Drupal.org”, Bagian 11.5,
“Downloading and Installing a Theme from Drupal.org”, Bagian 13.6, “Updating a Module”,
or Bagian 13.7, “Updating a Theme” to complete the installation or update of the module
or theme. Start at the step after the automatic download has been completed.
Expand your understanding
• If you work with multiple environments (for example, a local development site and a
production site) you will have to repeat the steps on each environment, or re-clone the
environment. See Bagian 11.8, “Making a Development Site”.
• If you added a new theme, navigate in the Manage administrative menu to Appearance
(admin/appearance) and uninstall the old theme.
Additional resources
•Drupal.org community documentation page "Updating modules"
•Drupal.org community documentation page "Installing contributed modules (Drupal 8)"
•Drupal.org community documentation page "Installing themes"
Attributions
Written and edited by Boris Doesborg, Jennifer Hodgdon, and Marc Isaacson.
11.7. Concept: Development Sites
What are Development Sites?
Development Sites are different copies of the same site used for developing, updating, and
testing a site without risking the integrity of the live site.
An example deployment workflow for site building will usually include the sites mentioned
below:
Local environment
The development process starts with developers working on new features, bug fixes,
theming, and configuration in their local environment.
162

Mengembangkan dan Menyesuaikan Situs Anda
Development site
Developers push the changes they’ve been working on to the development site. For a
team of more than one developer, version control is usually used. Git is a version control
system that tracks your files for any changes. You can then commit those changes to a
repository. Using Git allows team members to work on the same site without overriding
each other’s work. It also makes it possible to easily roll back to previous stages of the
development.
Staging site
The staging site can be used for testing, or presenting the changes to the client for
approval. QA (Quality Assurance) and UAT (User Acceptance Testing) are most often
carried out on the staging site. It is recommended to have live content on both the
development and staging sites, so that you can test how the new features will work with
the existing content.
Production site
The live site on the web available to visitors. It contains new features that have been
proven safe to go live.
Based on the project’s size, scope, requirements, or stakeholders, stages from the above
workflow can be removed, or additional stages can be added. For example, a testing site
before staging can be added to separate testing and user acceptance processes.
Related topics
•Bagian 11.8, “Making a Development Site”
•Bagian 2.6, “Concept: Editorial Workflow”
Additional resources
Drupal.org community documentation page "Introduction to Git"
Attributions
Written and edited by Diána Lakatos, and Jojy Alphonso at Red Crackle.
11.8. Making a Development Site
Goal
Make a copy of a site that you can use to develop new features and test updates on.
163

Mengembangkan dan Menyesuaikan Situs Anda
Prerequisite knowledge
Bagian 11.7, “Concept: Development Sites”
Site prerequisites
• You have a live, developed site that you would like to make a copy of for development
purposes.
• If you want to use Drush for some of the steps in this task, Drush must be installed. See
Bagian 3.2, “Concept: Additional Tools”.
Steps
1. Follow the steps in Bagian 3.3, “Preparing to Install”, so that you have hosting set up for
your development site, you know where the web root is for your development site, and
you have an empty database and database user for your development site to use.
2. Make a database dump file from your live site’s database. Try one of the following
methods:
• If you are using MySQL as your database, and your live site’s server has phpMyAdmin
installed (it is available from many hosting control panels), use the Export tab in
phpMyAdmin to export in SQL format. Using gzip compression on the output file is
suggested, to reduce the file size.
• If you are using MySQL and have access to the command line, use this command
(substituting in your site’s database name, user name, and password):
mysqldump -u USERNAME -p'PASSWORD' DATABASENAME > BACKUPFILE.sql
• If you prefer to use Drush, use this command:
drush sql-dump > BACKUPFILE.sql
• Use the contributed Backup and Migrate module from within your live site. See
Bagian 11.3, “Downloading and Installing a Module from Drupal.org” for instructions on
installing contributed modules.
You now have a database dump stored in the file BACKUPFILE.sql. For security reasons,
avoid storing this file on your hosting server anywhere under the Drupal site root. This
will prevent others from getting a copy of your database.
3. Copy all of the files from the web root of your live site to the web root of your
development site.
4. Edit the sites/default/settings.php file under your development site’s top-level directory in
a plain-text editor. Find the lines near the end that contain the database name, database
username, and database password, and update them to the information about the
development site database you set up. The lines look something like this (before editing):
$databases['default']['default'] = array (
'database' => 'live_site_database_name',
164

Mengembangkan dan Menyesuaikan Situs Anda
'username' => 'live_site_database_username',
'password' => 'live_site_database_password',
5. Check whether your settings.php file has the following setting; if yes, then you will need
to edit this to point to your development site URL instead of your production site URL:
$settings['trusted_host_patterns']
6. Import the database dump file you created, into the development site’s database. Try
one of the following methods:
• If you are using MySQL as your database, and your live site’s server has PHPMyAdmin
installed (it is available from many hosting control panels), use the Import tab in
PHPMyAdmin. You may find that you have to restart the import a few times, if your
database was large.
• If you are using MySQL and have access to the command line, use this command
(substituting in your site’s database name, user name, and password; if you made a
gzip-compressed backup file, you will also need to uncompress it first):
mysql -u USERNAME -pPASSWORD DATABASE_NAME < BACKUPFILE.sql
• If you prefer to use Drush, use this command:
drush sql-query --file=BACKUPFILE.sql
7. If your development and live sites need to have different configuration, then you have
to use configuration overrides in the settings.php file. The $config variable will help you
maintain override values separately from the standard configuration data. For instance,
you might want the site name to be "Anytown Farmers Market" on the production site,
but "Development Site for Anytown Farmers Market" on the development site. To do
that, you could have the production value in the site configuration (in the database), and
on the development site, in the settings.php file, you would need to have:
$config['system.site']['name'] = "Development Site for Anytown Farmers Market";
Expand your understanding
• Verify that the development site is working correctly.
• Log in to the development site as an administrator, and clear the cache. See Bagian 12.2,
“Clearing the Cache”.
•Bagian 11.10, “Deploying New Site Features”
Additional resources
•Drupal.org community documentation page "Backing up a site"
•Drupal.org community documentation page "Create a Test Site"
Attributions
Written and edited by Jennifer Hodgdon, Joe Shindelar at Drupalize.Me, and Jojy Alphonso at
Red Crackle.
165

Mengembangkan dan Menyesuaikan Situs Anda
11.9. Using Composer and Git to Download
Files
Goal
Use Composer and/or Git to download files and dependencies in the core software, or in
add-on modules and themes.
Prerequisite knowledge
•Bagian 3.2, “Concept: Additional Tools”
•Bagian 11.7, “Concept: Development Sites”
Site prerequisites
If you want to use Git or Composer, they must be installed either on a local development
server or your live site. See Bagian 3.2, “Concept: Additional Tools”.
Steps
If you are unable to install the Git or Composer tools on your live server, after following the
steps in any of the sections below on your local server, you will need to transfer any updated
or added files to your live server. The recommended procedure is to make an archive or zip
file of the new and changed files, transfer the archive to your live server, and extract it there.
If you are using Composer, make sure to check for updates and additions to the following
files, in the root of your installation:
•vendor directory
•autoload.php
•composer.json
•composer.lock
Using Git to download a project
Follow these steps if you want to download the development version of the core software,
or of a contributed module or theme, from the project’s Git version control repository:
1. In a command-line window, change to one level above the directory where you want
the files to reside. For the core software, this would be your web root. For an add-on
module, this would be the modules directory, or a sub-directory like contrib under the
modules directory.
2. Locate the page for the project that you want to download on Drupal.org; for example,
https://www.drupal.org/project/drupal for the core software, or https://www.drupal.org/
project/admin_toolbar for the contributed Admin Toolbar module.
166

Mengembangkan dan Menyesuaikan Situs Anda
3. Click the Version control link near the top of the page, which opens up a page giving Git
commands for this project.
4. Copy the git clone command under Setting up repository for the first time, and paste it
into your command line. For example, it might be:
git clone --branch 8.2.x https://git.drupal.org/project/drupal.git
5. This will create a directory named with the short name of the project (drupal in this
example), and download the required files into that directory. If necessary, rename the
directory.
6. If you downloaded the drupal project (the core software), follow the instructions below
to download its external dependencies.
7. Later on, you can change to the created directory and run the command git pull to
update the files to the latest version from the Git repository for the project.
Using Composer to download external core dependencies
Follow these steps if you downloaded the core software files using Git, which does not
include the external dependencies:
1. Change to the core software’s root directory.
2. Run the command composer install at the command line. The external dependencies
will be downloaded.
Using Composer to download the core software
Follow these steps if you have not yet downloaded or installed the core software, and you
want to use Composer to download both the core software and its external dependencies:
1. At the command line, change to one level above the directory where you want the
software to reside.
2. Enter this command, where my_site_name is the directory you want to create:
composer create-project drupal/drupal my_site_name
Using Composer to download a module or theme
Follow these steps if you have already downloaded the core software, and you want to
use Composer to add a contributed module or theme (usually because it has external
dependencies that need to be downloaded with Composer):
1. If you have not already done so, tell Composer about the download location for
contributed modules and themes, by entering this command from the root of your site
installation:
composer config repositories.drupal composer https://packages.drupal.org/8
2. If you have not already done so, you can optionally override the default location where
Composer will put downloaded modules and themes. For example, typically you would
want contributed modules to go in a contrib subdirectory of the top-level modules
directory, instead of the default location of modules. To make this change, edit the
167

Mengembangkan dan Menyesuaikan Situs Anda
composer.json file at the root level in your site installation. Find the line that says
"extra": {, and add these lines following that line:
"installer-paths": {
"modules/contrib/{$name}": ["type:drupal-module"],
"modules/custom/{$name}": ["type:drupal-custom-module"],
"profiles/contrib/{$name}": ["type:drupal-profile"],
"themes/contrib/{$name}": ["type:drupal-theme"],
"themes/custom/{$name}": ["type:drupal-custom-theme"],
"libraries/{$name}": ["type:drupal-library"],
"drush/{$name}": ["type:drupal-drush"]
},
3. Each time you want to add a contributed module or theme, determine the project’s short
name. This is the last part of the URL of the project page; for example, the Geofield
module, at https://www.drupal.org/project/geofield, has short name geofield.
4. To download the contributed module or theme, along with its external dependencies,
enter the following command at the root of your site (substituting the short name of the
module or theme for geofield):
composer require drupal/geofield
Using Composer to update a project’s files
Follow these steps to update the files for the core software or a contributed module or
theme, after having already started to manage dependencies with Composer:
1. Determine the short name of the project you want to update. For the core software, it is
drupal. For contributed modules and themes, it is the last part of the URL of the project
page; for example, the Geofield module, at https://www.drupal.org/project/geofield, has
short name geofield.
2. Determine how to enter the version number you want to update to. For example, for
version 8.x-1.7 of a contributed module, you would enter just the 1.7, and for the core
software version 8.3.1, you would enter 3.1.
3. Enter the following command at the root of your site (substituting the short name of the
module or theme for geofield and the correct version number):
composer require drupal/geofield:1.7
Additional resources
Drupal.org community documentation page "Using Composer with Drupal"
Attributions
Adapted by Jennifer Hodgdon from "Using Composer with Drupal", copyright 2000-2017 by the
individual contributors to the Drupal Community Documentation.
168

Mengembangkan dan Menyesuaikan Situs Anda
11.10. Deploying New Site Features
Goal
Copy a view that you have created in a local development site to the production site.
Prerequisite knowledge
•Bagian 11.8, “Making a Development Site”
•Bagian 11.11, “Synchronizing Configuration Versions”
•Bagian 11.7, “Concept: Development Sites”
Site prerequisites
• The core Configuration Manager module must be installed in both the development and
production sites. See Bagian 4.3, “Installing a Module” for instructions on installing core
modules.
• The Vendor content type must exist in both the development and production sites, with
the same fields. See Bagian 6.1, “Adding a Content Type”.
• The Vendors view must exist in the development site but not the production site. See
Bagian 9.3, “Creating a Content List View”.
Steps
1. Open the local development site.
2. In the Manage administrative menu, navigate to Configuration > Development
> Configuration synchronization > Export > Single item (admin/config/development/
configuration/single/export). The Single export page appears.
3. Select View from the Configuration type list.
4. Select Vendors from the Configuration name list. The configuration appears in the
textarea.
5. Copy the configuration from the textarea.
169
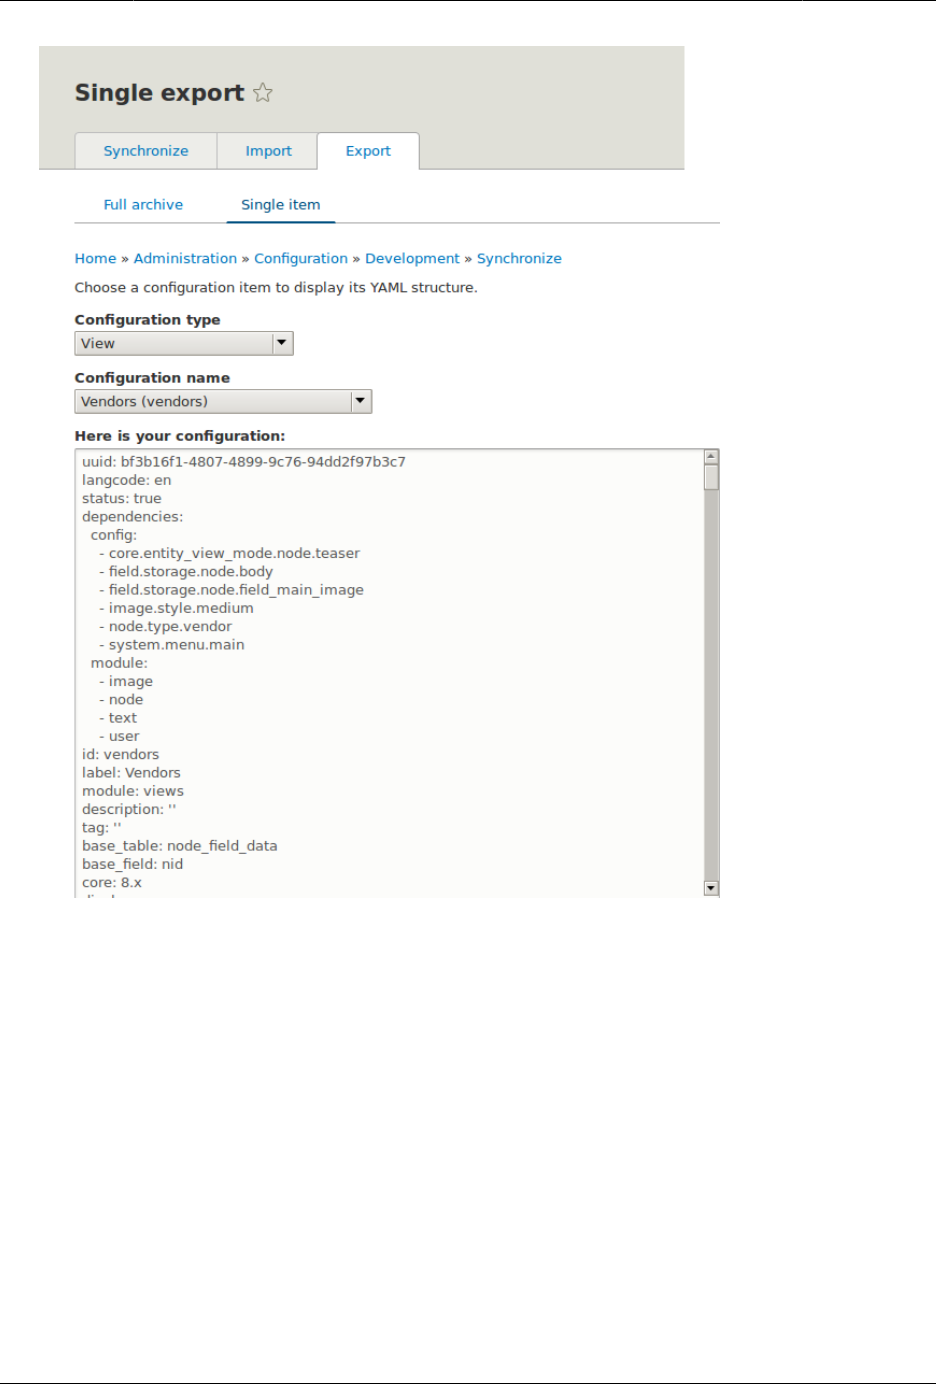
Mengembangkan dan Menyesuaikan Situs Anda
6. Open the production site.
7. In the Manage administrative menu, navigate to Configuration > Development
> Configuration synchronizationImport > Single item (admin/config/development/
configuration). The Import page appears.
8. Select View from the Configuration type list.
9. Paste the configuration in the textarea.
10. Click Import. The confirmation page appears.
11. Click Confirm.
12. Verify that the view was imported by navigating in the Manage administrative menu to
Structure > Views.
170

Mengembangkan dan Menyesuaikan Situs Anda
Expand your understanding
The steps in this topic show how to export and import a single configuration item. However,
often if you develop functionality on a development website and want to transfer it to your
production site, you will need to transfer multiple configuration items. For instance, if you
developed a new content type with fields, you would need to transfer several configuration
items for each field, one for the content type itself, and possibly multiple view mode and
form mode items, and they would have to be transferred in the right order. Getting this right
can be both tedious and difficult.
As an alternative, you can export and import the complete configuration of the site. For
this, you would need a local development site that is a clone of the production site (see
Bagian 11.8, “Making a Development Site”), and then you can follow the steps in Bagian 11.11,
“Synchronizing Configuration Versions” to synchronize configuration between development
and production sites.
Another alternative is to use the contributed Features module, which allows exporting and
importing bundled functionality (for example, all the configuration for a photo gallery).
Finally, if you do not see the effect of these changes in your site, you might need to clear the
cache. See Bagian 12.2, “Clearing the Cache”.
Related concepts
•Bagian 11.7, “Concept: Development Sites”
•Bagian 2.6, “Concept: Editorial Workflow”
Attributions
Written by Boris Doesborg.
11.11. Synchronizing Configuration Versions
Goal
Synchronize the configuration between a development and live site.
Prerequisite knowledge
•Bagian 1.5, “Concept: Types of Data”
•Bagian 3.3, “Preparing to Install”
•Bagian 11.7, “Concept: Development Sites”
•Bagian 11.8, “Making a Development Site”
171

Mengembangkan dan Menyesuaikan Situs Anda
Site prerequisites
• You must have a development copy of your production site. See Bagian 11.8, “Making a
Development Site”.
• The core Configuration Manager module must be installed on both the development and
production sites. See Bagian 4.3, “Installing a Module” for instructions on how to install core
modules.
• You must have changed configuration on either the production or development site (the
source site), and want to synchronize the changes to the other site (the destination site). As
an example, you can develop a new content type, fields, and views on your development
site, and when it is all working correctly, deploy the changes to the live site.
• All configuration that should not be synchronized between the source and destination
sites must be stored in configuration overrides in the settings.php file rather than in the
database. See Bagian 11.8, “Making a Development Site”.
Steps
1. In the source site, in the Manage administrative menu, navigate to Configuration
> Development > Configuration synchronization > Export (admin/config/development/
configuration/full/export).
2. Click Export. Your site will generate an archive of the full site configuration. Save the file
on your local computer.
3. In the destination site, in the Manage administrative menu, navigate to Configuration
> Development > Configuration synchronization > Import (admin/config/development/
configuration/full/import).
4. Browse to find the downloaded configuration archive, and click Upload. Your
configuration archive will be uploaded to the destination site, and you will be redirected
to the configuration Synchronize page (admin/config/development/configuration) with a
message saying your files were uploaded.
5. Verify that the differences shown on the page are what you expect. You may see
configuration items that have been added, deleted, or changed; for changed items, you
can click View differences to see what the changes are.
6. When you are satisfied, click Import all to import the configuration changes.
Expand your understanding
• If the changes you have made involve only one configuration item (such as one view),
you can use the single configuration export/import feature to deploy the change between
sites. See Bagian 11.10, “Deploying New Site Features”.
• After the step where you export the full configuration from the source site, you might also
want to unpack the archive and commit it to a version control system, such as Git, to track
changes in your site configuration. See Bagian 3.2, “Concept: Additional Tools”.
Attributions
172


Bab 12. Mencegah dan Memperbaiki
Masalah
12.1. Concept: Cache
Prerequisite knowledge
Bagian 1.1, “Concept: Drupal as a Content Management System”
What is the page cache?
The software that runs your site, on each page request, must perform calculations and
retrieve data from the database, in order to compose the page that is sent to the web
browser or other application that is accessing the site. These calculations take time, which
can mean that your page load time is longer than would be desirable.
There are several ways that page load time can be sped up, including installing software
on the server. The system includes the core Internal Page Cache and Dynamic Page Cache
modules, which do not require any additional server software; they use a database cache
mechanism to speed up your site. The way these modules work is that during page
calculations, intermediate results and the final page output are stored in a special database
area (known as the cache). Then the next time a compatible request is made, intermediate
or final results, as appropriate, can be retrieved and used rather than redoing the entire
calculation. In addition, when content or data that affects a particular calculation is updated,
the affected cached data is removed from the cache, forcing that part of the calculation to
be redone the next time it is needed.
These caching modules normally work reasonably well, and offer at least some speed-up for
most sites. However, sometimes the page cache can have problems, such as:
• Corrupted data in the cache, leading to garbled or incorrect page output
• Old data remaining in the cache too long, leading to outdated page output
• Insufficient caching, leading to slow page loads
What other data is cached?
Independent of whether the two page cache modules are installed on your site, the software
that your site runs will still cache the output of many internal calculations. The core systems
that cache data include:
• The theme system caches information in the database cache about which template files
are used to render various types of data. If you are developing a new theme and add a
new template file, you’ll need to clear this cache to have your theme file recognized.
174

Mencegah dan Memperbaiki Masalah
• CSS and JavaScript files can optionally be optimized and compressed (depending on your
site settings). If so, the compressed versions are stored in the file system so that they don’t
have to be re-optimized too often. If you are developing a module or theme, you may
need to either turn off or clear this file cache to have changes to CSS or JavaScript files
be recognized.
• The system locates certain low-level PHP functions and classes, such as hook
implementations and plugin classes, from your installed modules and stores information
about which module has which functionality. If you are developing a new module or
adding features to an existing module, you may need to clear this cache to have your new
features be recognized.
Related topics
If you have problems with your site, the first thing to try to fix it is usually to clear the cache.
See Bagian 12.2, “Clearing the Cache” for more information.
Additional resources
Learn about additional caching and performance optimization methods in the Drupal.org
community documentation page "Caching to improve performance".
Attributions
Written by Jennifer Hodgdon.
12.2. Clearing the Cache
Goal
Clear or rebuild your site’s internal caches to ensure they are up-to-date with the most recent
data, using the user interface or Drush.
Prerequisite knowledge
•Bagian 12.1, “Concept: Cache”
•Bagian 3.2, “Concept: Additional Tools”
Site prerequisites
If you want to use Drush to clear the cache, Drush must be installed. See Bagian 3.2, “Concept:
Additional Tools”.
175

Mencegah dan Memperbaiki Masalah
Steps
You can use the administrative interface or Drush to clear the cache.
Using the administrative interface
1. In the Manage administrative menu, navigate to Configuration > Development >
Performance (admin/config/development/performance).
2. Click Clear all caches.
3. A message saying the cache has been cleared appears at the top of the page.
Using Drush
You can use one of two commands:
• Use the command drush cache-rebuild to clear and rebuild all cached data for a site.
After running this command, you will see the output message "Cache rebuild complete."
• Use the command drush cc to see a list of individual caches and then choose the specific
cache you would like to clear. Running this command should produce output like the
following:
> drush cc
Enter a number to choose which cache to clear.
[0] : Cancel
[1] : drush
[2] : theme-registry
[3] : menu
[4] : css-js
[5] : block
[6] : module-list
[7] : theme-list
[8] : render
[9] : views
Choose a cache to clear by entering the number associated with that cache. Press "Enter"
to continue.
Additional resources
Drupal.org community documentation page "Clearing or rebuilding Drupal’s cache"
Attributions
Adapted and edited by Joe Shindelar and Jack Haas from "Clearing or rebuilding Drupal’s cache",
copyright 2000-2017 by the individual contributors to the Drupal Community Documentation.
176

Mencegah dan Memperbaiki Masalah
12.3. Concept: Data Backups
Prerequisite knowledge
•Bagian 1.1, “Concept: Drupal as a Content Management System”
•Bagian 3.3, “Preparing to Install”
What is a site backup?
If something happens to the computer (or computers) that your site and its database are
running on, or if you lose access to this computer, you could lose some or all of your site’s
data. You could also lose data if your site is hacked, or if someone with administrative
privileges on your site deletes or alters data mistakenly from the administrative interface.
In order to prevent scenarios like this from being permanent, expensive data losses, it is
important to make regular backups of your site’s data, and to store them in a location that
is separate from the computer where your site is running.
The frequency with which you should make data backups, and how many backups you
should keep, depends on how frequently your site is changing. If you have a very large
amount of content on your site that is being added to or updated many times per day, you
would want to make more frequent backups than you would for a site that changes rarely.
Also consider that some time could pass between when a data problem occurs and when you
notice that it is a problem, so storing a sequence of backups (so that you can go back to the
last known good data and retrieve that), rather than overwriting a single backup repeatedly,
is a good practice.
Another consideration is that whatever format you store your backups in, it is a good idea
to verify that you can actually retrieve lost data from your backups. You might want to test
several possible data loss scenarios, and make sure that your data can be restored to the
site in all cases.
In order to make a complete backup of your site, you will need to make copies of the
following:
• The data in the sites directory, including the sites/default/settings.php file.
• The data in your site’s database. A few tables can be truncated, such as those storing the
temporary data cache and user login session information, but it is always safe to back up
the entire database.
• Uploaded files, such as images and other attachments. The location of these files is
configurable; the standard location is the sites/default/files directory under your site root.
In the Manage administrative menu, navigate to Configuration > Media > File system (admin/
config/media/file-system) to check the file upload locations; to change them, you’ll need to
edit your settings.php file.
• Modules, themes and any other software files you have customized. You can find
customized modules and themes in the modules and themes directories respectively. Some
177

Mencegah dan Memperbaiki Masalah
people prefer to back up all software files, including core files and contributed modules
and themes (which you could recover by downloading them again from the source), rather
than trying to pick out specific files that definitely need to be backed up.
You can perform a test to confirm whether your backup has been done right by making a
development copy of the site (see Bagian 11.8, “Making a Development Site”).
Related topics
•Bagian 13.5, “Updating the Core Software”
•Bagian 11.8, “Making a Development Site”
•Bagian 12.1, “Concept: Cache”
Additional resources
•Drupal.org community documentation page "Backing up a site"
• The contributed Backup and Migrate module, which can be used to set up automatic backups
of the database and uploaded files.
Attributions
Written by Jennifer Hodgdon.
12.4. Concept: Log
What is a Log?
Your site captures system events in a log to be reviewed by an authorized individual at a later
time. The log is a list of recorded events containing usage data, performance data, errors,
warnings, and operational information. It is vital to check the log on a regular basis as it is
often the only way to tell what is going on.
You can find your site’s recent log messages in the Manage administrative menu by
navigating to Reports > Recent log messages (admin/reports/dblog).
178
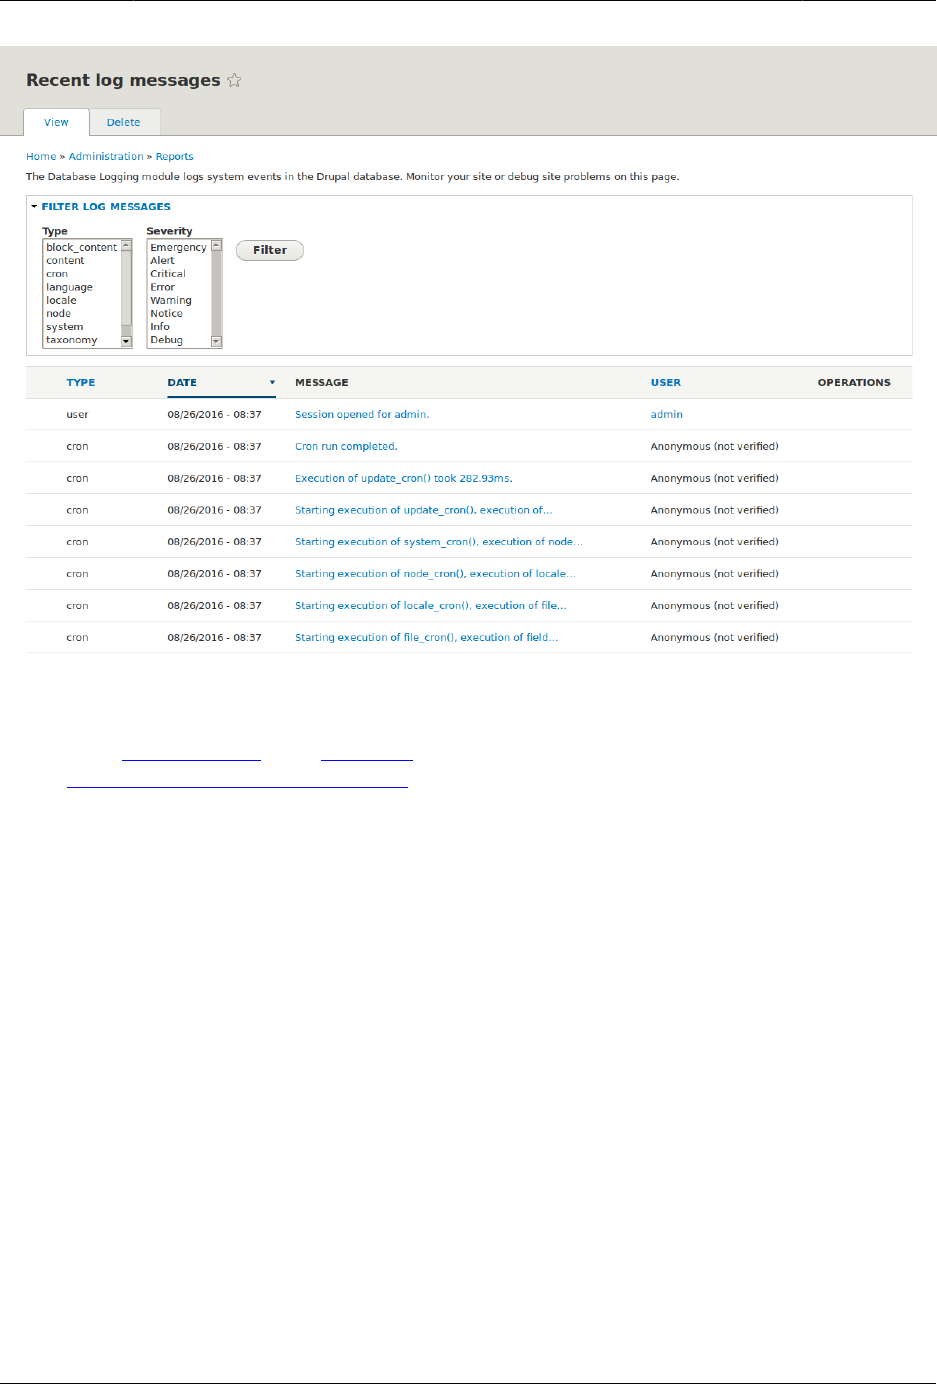
Mencegah dan Memperbaiki Masalah
Attributions
Adapted by Diána Lakatos from "Reports" copyright 2000-2017 by the individual contributors
to the Drupal Community Documentation
12.5. Concept: Status Report
What is a Status Report?
The status report is a short overview of your site’s parameters as well as any problems
detected with your installation. It may be useful to copy and paste this information into
support requests filed on Drupal.org’s support forums and project issue queues or when
asking for help on other channels.
You can find the status report in the Manage administrative menu by navigating to Reports
> Status report (admin/reports/status).
179
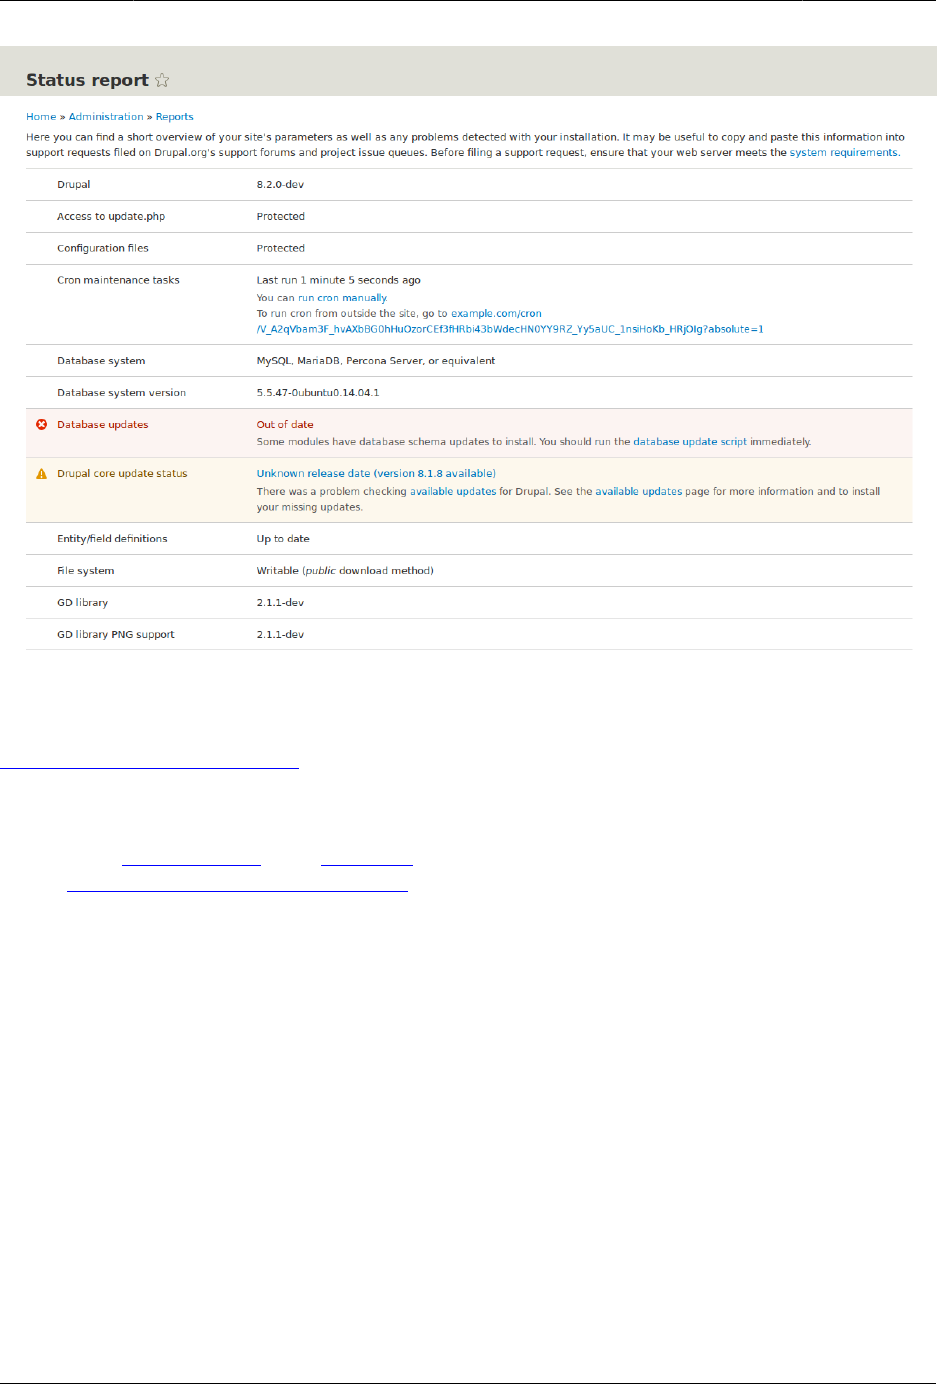

Bab 13. Keamanan dan Pemeliharaan
13.1. Concept: Cron
What are cron tasks?
To ensure that your site and its modules continue to function well, a group of administrative
operations should be run periodically. These operations are called cron tasks. Examples of
cron tasks are: checking for module and theme updates, indexing content for search, or
cleaning up temporary files.
What is the relationship between the site’s cron tasks and
Unix cron?
Linux/Unix-based operating systems have a cron scheduler that can be used to run periodic
tasks. You can use the server’s cron scheduler to schedule runs of the site’s cron tasks.
Alternatively, you can use the core Automated Cron module to run tasks. You can check the
site’s cron tasks' status in the status report.
Related topics
•Bagian 13.2, “Configuring Cron Maintenance Tasks”
•Bagian 12.5, “Concept: Status Report”
Additional resources
Drupal.org community documentation page "Setting up cron"
Attributions
Written and edited by Diána Lakatos at Pronovix, Dave Hansen-Lange at Advomatic, and Boris
Doesborg.
13.2. Configuring Cron Maintenance Tasks
Goal
Check whether cron maintenance tasks are run regularly, and if not, either install the core
Automated Cron module or run cron maintenance tasks from outside the website.
181

Keamanan dan Pemeliharaan
Prerequisite knowledge
Bagian 13.1, “Concept: Cron”
Steps
1. Review the Status report (see Bagian 12.5, “Concept: Status Report”) to see when cron
maintenance tasks were last run.
If you installed the website using the core Standard installation profile (or similar), then
cron maintenance tasks might already be running via the core Automated Cron module.
By default, these tasks are run about every three hours.
2. Choose whether to run cron maintenance tasks using the core Automated Cron module,
or by other means. The core Automated Cron module might not be suitable for some
websites because:
• Each time someone accesses a page on the site, the module checks how long it has
been since cron maintenance tasks have last run, and then runs them if necessary. If
no one visits the website for a long time, cron maintenance tasks will not be run.
• Cron maintenance tasks are run after the page has been generated. This means there
is less time for the tasks to be run before various server timeouts are reached (for
example, PHP execution timeout). If this happens, the logs (see Bagian 12.4, “Concept:
Log”) will show error messages that cron is unable to complete.
• There is a small scalability cost associated with the core Automated Cron module. This
is because one of the web server’s processes is occupied (and can’t serve other web
pages) until the cron maintenance tasks are complete.
3. If you want to use the core Automated Cron module, first make sure it is installed (it is
installed with the core Standard install profile; see Bagian 4.3, “Installing a Module” if it
is not installed).
Next, configure the module to control how frequently cron maintenance tasks are run.
In the Manage administrative menu, navigate to Configuration > System > Cron (admin/
config/system/cron). Choose the desired interval in the Cron settings section, and click
Save configuration.
182
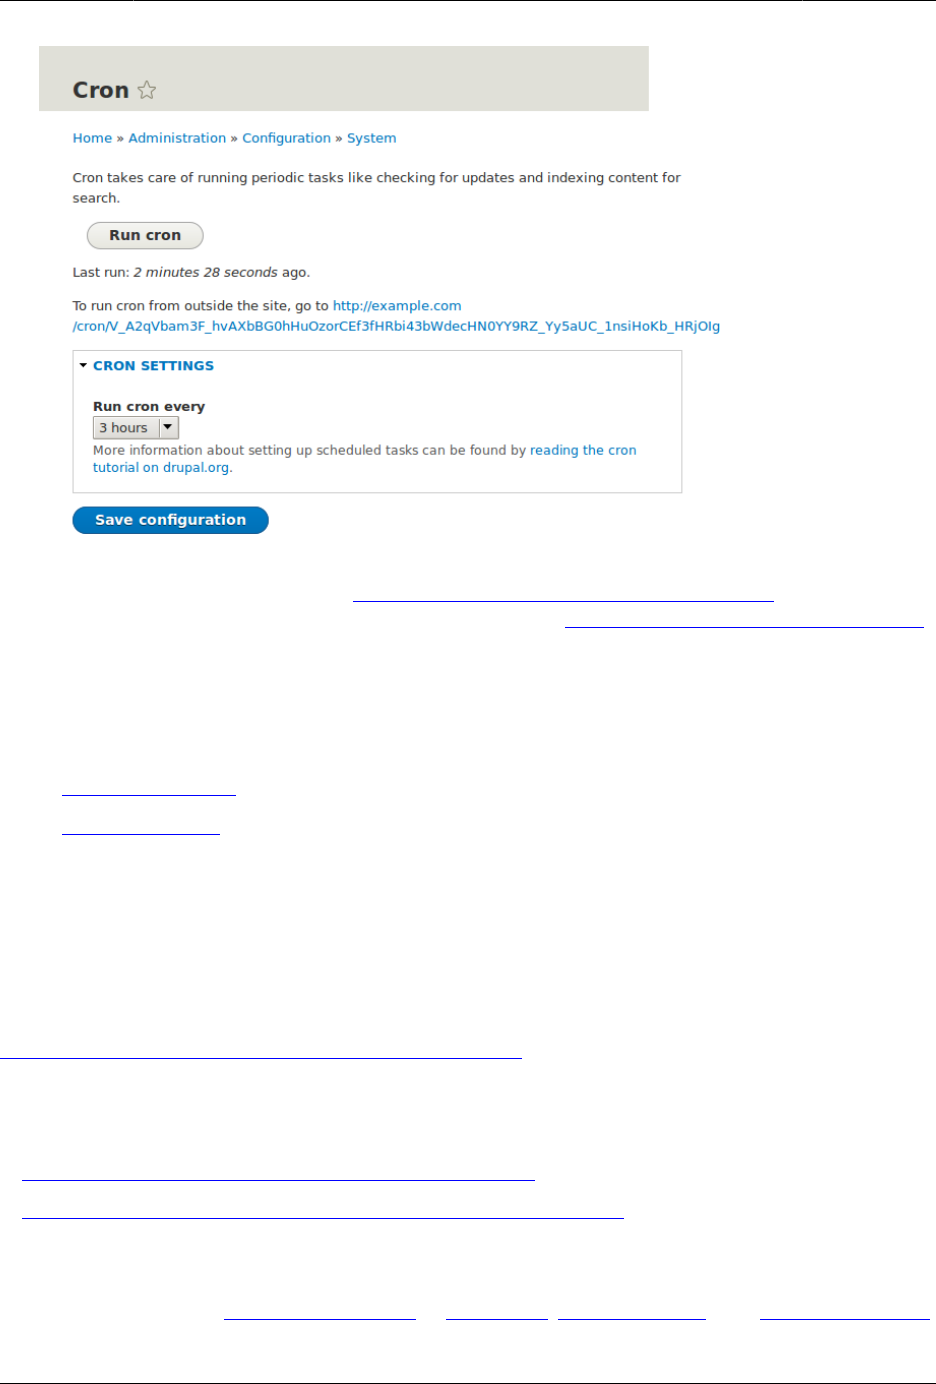
Keamanan dan Pemeliharaan
4. If you want to run cron maintenance tasks from outside the website, uninstall the core
Automated Cron module (see Bagian 4.4, “Uninstalling Unused Modules”). Next, find the
cron URL. This URL is shown in the Status report (see Bagian 12.5, “Concept: Status Report”),
and in the Cron administration page (see previous step). The URL looks like this: http://
www.example.com/cron/0MgWtfB33FYbbQ5UAC3L0LL3RC0PT3RNUBZILLA0Nf1Re
Whenever this URL is visited, cron maintenance tasks will run. Set up one of the following
schedulers to access this URL regularly:
•The Cron daemon (Linux, OS X, Solaris, BSD)
•Scheduled Tasks (Windows)
• A cron SASS provider (software as a service)
• A cron manager provided by your web hosting provider (see the documentation
provided by your provider)
Related concepts
Bagian 13.3, “Concept: Security and Regular Updates”
Additional resources
•Drush page "Running Drupal cron tasks from Drush"
•Drupal.org community documentation page "Setting up cron"
Attributions
Written and edited by Dave Hansen-Lange at Advomatic, Boris Doesborg, and Jennifer Hodgdon.
183

Keamanan dan Pemeliharaan
13.3. Concept: Security and Regular Updates
Prerequisite knowledge
•Bagian 1.1, “Concept: Drupal as a Content Management System”
•Bagian 1.2, “Concept: Modules”
•Bagian 1.3, “Concept: Themes”
•Bagian 1.6, “Concept: The Drupal Project”
What are security updates?
Any software occasionally has bugs, and sometimes these bugs have security implications.
When security bugs are fixed in the core software, modules, or themes that your site uses,
they are released in a security update. You will need to apply security updates in order to
keep your site secure. See Bagian 13.4, “Keeping Track of Updates” to learn how to be notified
of security updates by email, and Bagian 13.5, “Updating the Core Software”, Bagian 13.6,
“Updating a Module”, and Bagian 13.7, “Updating a Theme” to learn how to make updates.
What is the security team?
The Drupal open-source project has a team of volunteers who track security-related bugs
and release security updates. They also help other developers fix bugs, and maintain
information for users on how to keep their websites secure. You can learn more about the
security team and their practices and processes at the Drupal.org Security Team page.
How are security bugs reported?
It is important that security problems be kept confidential until they are fixed, so that sites
are less likely to be compromised before they can be secured. If you find a potential security
problem in any of the software you downloaded from the Drupal.org website, follow the
procedures on the Drupal.org Security Team page to report it.
What are regular (non-security) updates?
The core software, modules, and themes also periodically have regular updates to add new
features and fix bugs. These updates are less critical than security updates. As a general best
practice, updates should be applied as long as they do not cause problems with your site.
Testing on a development copy of your site is always a good idea before applying updates on
a live site. This is because some updates may include changes that are not compatible with
the modules or themes on your site, or that will break a particular functionality on your site.
Related topics
•Bagian 13.4, “Keeping Track of Updates”
•Bagian 13.5, “Updating the Core Software”
•Bagian 13.6, “Updating a Module”
184

Keamanan dan Pemeliharaan
•Bagian 13.7, “Updating a Theme”
•Bagian 11.8, “Making a Development Site”
Additional resources
•Drupal.org community documentation page "Securing your site"
•"Security advisories" on Drupal.org
•Drupal.org Security team
Attributions
Written and edited by Boris Doesborg and Jennifer Hodgdon.
13.4. Keeping Track of Updates
Goal
Keep your site safe and up-to-date by keeping up with the latest security updates.
Prerequisite knowledge
Bagian 13.3, “Concept: Security and Regular Updates”
Steps
There are a few different ways to receive notifications of security releases:
• In the Manage administrative menu, navigate to Reports > Available updates > Settings.
Enter the email addresses to be notified when updates are available. You can also specify
whether you want daily or weekly updates. Click Save configuration.
• Subscribe to the security announcements email list. To subscribe, log in to Drupal.org,
go to your user profile page and subscribe to the security newsletter on the Edit > My
newsletters tab.
• Follow @drupalsecurity on Twitter.
• Subscribe to RSS feeds for core security updates, contributed project updates and public
service announcements.
Related concepts
•Bagian 13.3, “Concept: Security and Regular Updates”
•Bagian 13.5, “Updating the Core Software”
•Bagian 13.6, “Updating a Module”
•Bagian 13.7, “Updating a Theme”
185

Keamanan dan Pemeliharaan
Additional resources
•"Security advisories" on Drupal.org
•Drupal.org Security Team
•@drupalsecurity on Twitter
Attributions
Written by Sarah German at Advomatic.
13.5. Updating the Core Software
Goal
Update the core software, either through the administrative interface or by using Drush.
Site prerequisites
• If you want to use Drush, Drush must be installed. See Bagian 3.2, “Concept: Additional
Tools”.
• If your site is live, you should test this process in a development environment before
running it on your production site. See Bagian 11.8, “Making a Development Site”.
Steps
1. Make a complete backup of your site. Refer to Bagian 12.3, “Concept: Data Backups”.
2. Open settings.php (/sites/default/settings.php) in any plain text editor. Find the line with
the $settings[update_free_access] variable. By default, it is set to "FALSE" due to security
reasons. Change the setting to "TRUE":
$settings['update_free_access'] = TRUE;
3. Disable any caching technique (memcache, varnish, and so on) your application might
be using.
4. Put your site in maintenance mode. See Bagian 11.2, “Enabling and Disabling Maintenance
Mode”.
5. If you are using Composer to manage dependencies, or using Git, skip the next six steps,
and instead see Bagian 11.9, “Using Composer and Git to Download Files” for instructions
on downloading updated files. Continue with the update.php step.
6. Download the tar.gz or zip file archive for the latest version of Drupal 8.x core from
Drupal.org Drupal Core Downloads. See Bagian 3.3, “Preparing to Install” for more details
on how to find the latest version.
7. Upload the archive file to your web hosting server.
186

Keamanan dan Pemeliharaan
8. Extract the archive file to a temporary directory on your server (should be outside the
directory where the site is hosted). Your hosting control panel’s file manager should
provide a way to extract the files. Or, if you have terminal access to your hosting server
(running Linux), you can use a command like:
tar -xzf drupal-8.3.2.tar.gz
9. You can also use Drush to download the archive and extract it in one step, by navigating
to the temporary directory on the server and entering this command:
drush dl drupal
10. In your site hosting directory, delete the core and vendor directories, and all files that are
not in a subdirectory, including .htaccess, composer.json, and autoload.php. Don’t delete
custom and customized files because you may end up losing the custom functionality
stored in them.
11. Copy the core and vendor directories and the non-custom/non-customized files that you
deleted in the preceding step from the temporary directory to your site directory.
12. Run the update.php script using either of the following:
• Visit http://www.example.com/update.php in your browser (where www.example.com is
your site’s URL). Click Continue in the first screen to run the updates and successfully
complete the script.
• Run the following Drush command: drush updb
13. If you get any error or warning, re-run the update.php script again till all the updates
have been completed successfully.
14. Open settings.php (/sites/default/settings.php) in a text editor. Find the line with the
$settings[update_free_access] variable and update it to "FALSE":
$settings['update_free_access'] = FALSE;
15. Click Administration pages to return to the administration section of your site.
16. Take your site out of maintenance mode. See Bagian 11.2, “Enabling and Disabling
Maintenance Mode”.
17. Clear the cache. See Bagian 12.2, “Clearing the Cache”.
18. Re-enable any caching technique you disabled at Step 3.
19. You should have the updated version running. You can verify the current version of your
software by checking the Status report (see Bagian 12.5, “Concept: Status Report”).
Expand your understanding
•Bagian 3.2, “Concept: Additional Tools”
•Bagian 11.8, “Making a Development Site”
•Bagian 12.3, “Concept: Data Backups”
Related concepts
Bagian 12.5, “Concept: Status Report”
187

Keamanan dan Pemeliharaan
Additional resources
•"Drupal Core Downloads" page on Drupal.org
•"Registry Rebuild" page on Drupal.org
• The file /core/UPDATE.txt within your installation.
Attributions
Written and edited by Surendra Mohan, Boris Doesborgh, and Jojy Alphonso at Red Crackle.
13.6. Updating a Module
Goal
Update a contributed module and run the Database updates script.
Prerequisite knowledge
•Bagian 13.3, “Concept: Security and Regular Updates”
•Bagian 13.1, “Concept: Cron”
Site prerequisites
• A contributed module has been installed and there is an update available for it. See Bagian
11.3, “Downloading and Installing a Module from Drupal.org” and Bagian 13.4, “Keeping Track
of Updates”.
• If your site is live, you should test this process in a development environment before
running it on your production site. See Bagian 11.8, “Making a Development Site”.
• You have created a full-site backup. See Bagian 12.3, “Concept: Data Backups”.
• If you want to use the user interface, the core Update Manager module must be installed.
See Bagian 4.3, “Installing a Module” for instructions on installing core modules.
• If you want to use Drush, Drush must be installed. See Bagian 3.2, “Concept: Additional
Tools”.
Steps
Before you start, check for module-specific update instructions. This is typically necessary
while updating modules that involve the usage of third-party libraries. Read and understand
all module-specific requirements before proceeding with the updates. To find instructions,
check the module’s project page Read Documentation link.
To view further instructions, download the tar.gz or .zip file from the project page to your
local computer. Unzip the file and look for README.txt, INSTALL.txt, and UPGRADE.txt that come
188
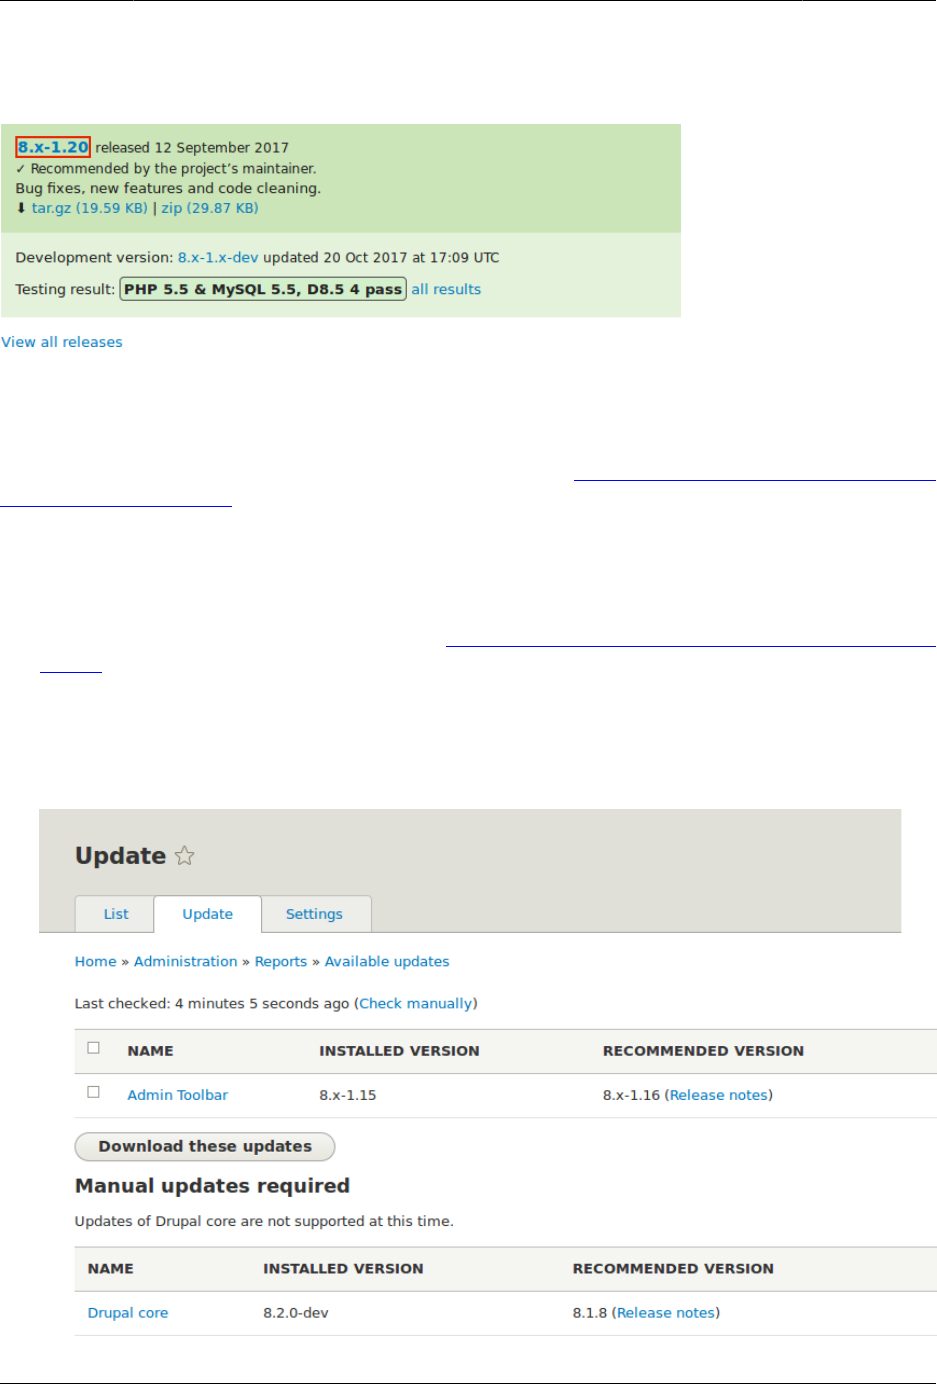
Keamanan dan Pemeliharaan
with the module’s installation file. Also, review the release notes on the project page by
clicking the version number you’re downloading.
You can use the administrative interface or Drush to update a contributed module. If you are
updating a custom module rather than a contributed module, if you see a message saying
Installing modules and themes requires FTP access to your server, or if the steps below do not
work to obtain the new module files, follow the steps in Bagian 11.6, “Manually Downloading
Module or Theme Files”. You can then continue here with step 6 in the instructions for the
administrative interface below.
Using the administrative interface
1. Put your site in maintenance mode. See Bagian 11.2, “Enabling and Disabling Maintenance
Mode”.
2. In the Manage administrative menu, navigate to Reports > Available updates > Update
(admin/reports/updates/update).
3. Find and check the module in the list. Click Download these updates for the module.
189

Keamanan dan Pemeliharaan
4. Click Continue.
5. Click Run database updates. If you obtained the new module files manually, start with this
step, and reach the database updates page by typing the URL example.com/update.php
in your browser.
6. Click Continue and apply all updates. The database update scripts will be executed.
7. Click Administration pages to return to the administration section of your site.
8. Take your site out of maintenance mode. See Bagian 11.2, “Enabling and Disabling
Maintenance Mode”.
9. Clear the cache (refer to Bagian 12.2, “Clearing the Cache”).
Using Drush
1. Find the project name for the module you wish to update. It is the last segment of the
module’s project page URL. For example, if the project URL is https://www.drupal.org/
project/admin_toolbar, the project name is "admin_toolbar".
2. Run the following Drush command, giving the project name (for example,
admin_toolbar) as a parameter (if you have more than one module to update, add the
additional module project names to the end of the command, separated by spaces):
drush up admin_toolbar
3. Follow the instructions on the screen.
Expand your understanding
• Review the site log (refer to Bagian 12.4, “Concept: Log”) once the updates are complete
to check for errors.
•Bagian 13.7, “Updating a Theme”
Additional resources
Drupal.org community documentation page "Updating modules"
Attributions
Adapted by Boris Doesborgh, and Sarah German at Advomatic, from "Updating modules",
copyright 2000-2017 by the individual contributors to the Drupal Community Documentation.
13.7. Updating a Theme
Goal
Update a contributed theme on your site and run the Database Updates script.
190

Keamanan dan Pemeliharaan
Prerequisite knowledge
•Bagian 13.3, “Concept: Security and Regular Updates”
•Bagian 13.1, “Concept: Cron”
Site prerequisites
• A contributed theme has been installed and there is an update available for it. See Bagian
11.5, “Downloading and Installing a Theme from Drupal.org” and Bagian 13.4, “Keeping Track
of Updates”.
• If your site is live, you should test this process in a development environment before
running it on your production site. See Bagian 11.8, “Making a Development Site”.
• You have created a full site backup. See Bagian 12.3, “Concept: Data Backups”.
• If you want to use the user interface, the core Update Manager module must be installed.
See Bagian 4.3, “Installing a Module” for instructions on installing core modules.
• If you want to use Drush, Drush must be installed. See Bagian 3.2, “Concept: Additional
Tools”.
Steps
You can use the administrative interface or Drush to update a contributed theme. If you are
updating a custom theme rather than a contributed theme, if you see a message saying
Installing modules and themes requires FTP access to your server, or if the steps below do not
work to obtain the new theme files, follow the steps in Bagian 11.6, “Manually Downloading
Module or Theme Files”, and then continue with step 6 in the instructions for administrative
interface below.
Using the administrative interface
1. Put your site in maintenance mode. See Bagian 11.2, “Enabling and Disabling Maintenance
Mode”.
2. In the Manage administrative menu, navigate to Reports > Available updates > Update
(admin/reports/updates/update).
3. Find and check the theme in the list. Click Download these updates for the theme.
191
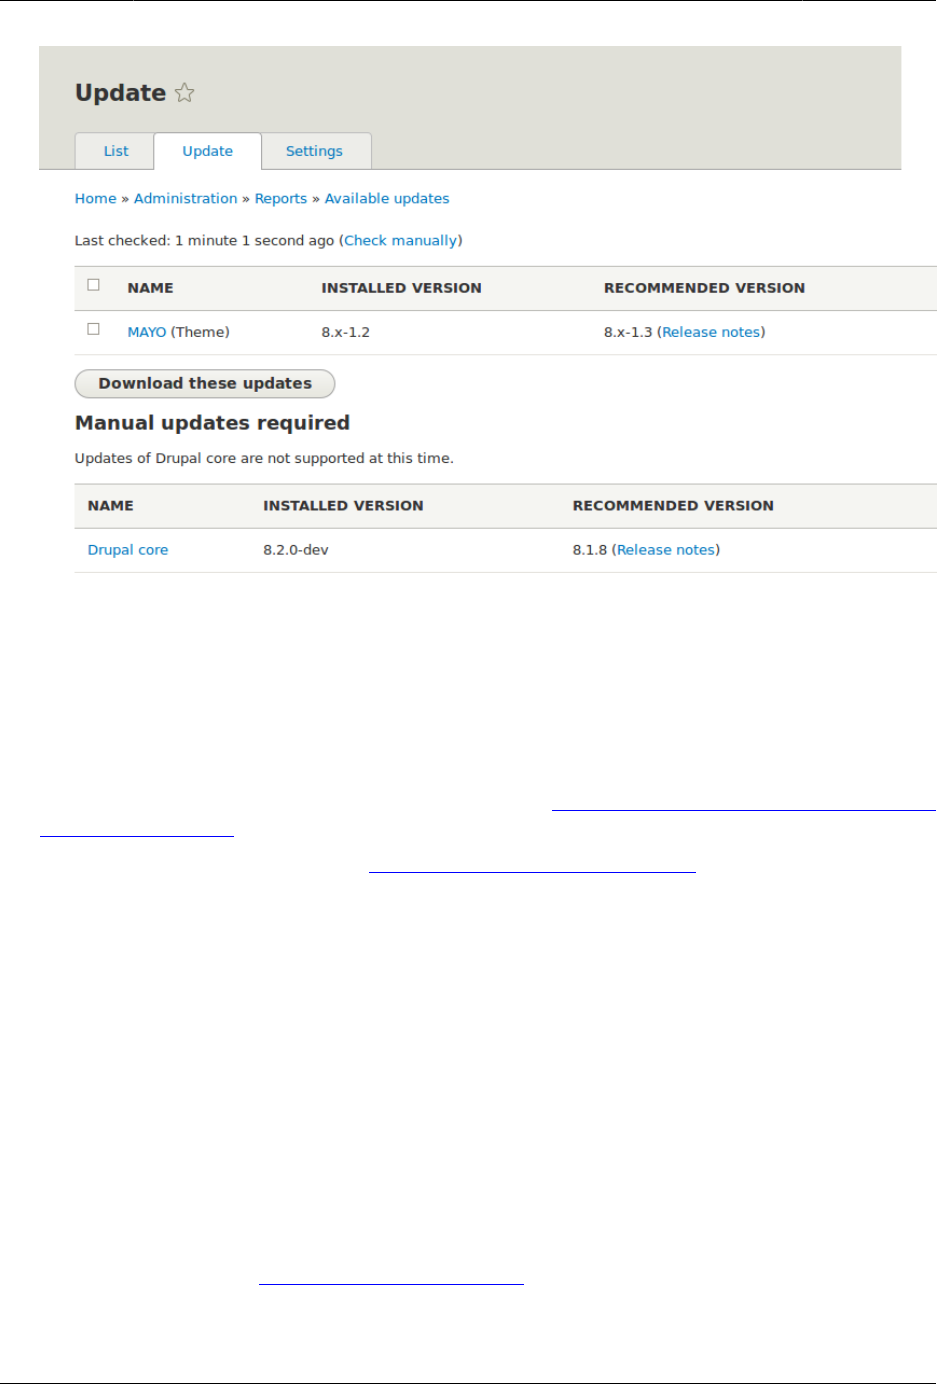
Keamanan dan Pemeliharaan
4. Click Continue.
5. Click Run database updates. If you obtained the new theme files manually, start with this
step, and reach the database updates page by typing the URL example.com/update.php
in your browser.
6. Click Continue to run the updates. The database update scripts will be executed.
7. Click Administration pages to return to the administration section of your site.
8. Take your site out of maintenance mode. See Bagian 11.2, “Enabling and Disabling
Maintenance Mode”.
9. Clear the Drupal cache (refer to Bagian 12.2, “Clearing the Cache”).
Using Drush
1. Find the project name for the theme you wish to update, which is the last segment of
the theme’s project page URL. For example, if the project URL is https://www.drupal.org/
project/mayo, the project name is "mayo".
2. Run the following Drush command, giving the project name (for example, mayo) as a
parameter:
drush up mayo
3. Follow the instructions on the screen.
Expand your understanding
• Review the site log, see Bagian 12.4, “Concept: Log”, once the updates are complete to check
for errors.
192


Bab 14. Pemikiran Akhir
14.1. Connecting with the Community
Prerequisite knowledge
Bagian 1.6, “Concept: The Drupal Project”
How can you connect with the community?
The Drupal project has a world-wide community of developers and users. One of the best
ways to improve your knowledge of the platform is to connect with others that are using
it, and get involved in the open-source community. There are many ways that you can get
started:
Attend an event
There are both regional and international Drupal events held around the world. See the
"DrupalCon" page on Drupal.org to find international events, and the "Event Calendar" on
groups.drupal.org or drupical.com to find regional events.
Join a local group
There are Drupal user groups all around the world. Many of them have regular meetings,
which you can attend to learn more about Drupal and connect to other Drupal users.
Find local user groups on groups.drupal.org.
Participate in a topical or language group
There are also interest groups for a wide range of topics, which have on-line discussion
forums. Find topical groups on groups.drupal.org. Many languages have their own
websites too; you can find them on the "Language-specific communities" page on
Drupal.org.
Chat online
The Drupal project uses IRC for on-line chatting. There are regional, topical, and general-
purpose chat groups available. Find out more on the "IRC" page on Drupal.org.
Report a problem
See below.
Contribute
You can contribute your time and expertise to the community in many ways, such as:
194

Pemikiran Akhir
• Developing modules or themes. See the "Contribute to Development" page on
Drupal.org, or improving them (using the issue queues for existing projects).
• Translating the user interface. See localize.drupal.org.
• Writing documentation. See "Contribute to Documentation" on Drupal.org.
• Answer Support questions. See Bagian 14.2, “Getting Support”.
How can you report a problem or suggest a feature?
Each project within the community (such as the Drupal Core project for the base software,
and projects for each contributed theme and module) uses issues to keep track of software
bugs and plans for new features. You can participate by creating a bug report when you
find a problem, creating a feature request, or commenting on existing issues. Search before
creating an issue, to make sure that the problem or feature has not already been reported or
requested. See the Drupal.org page "Use the issue queue" and the Drupal.org page "Reporting
a problem" for more information.
If you find a problem that you believe is related to security, such as a cross-site scripting
vulnerability, do not report it in the standard issue queue. Instead, report it to the security
team. See the Drupal.org page "How to report a security issue" for details.
Related topics
Bagian 14.2, “Getting Support”
Additional resources
•"Code of Conduct" on Drupal.org
•"Event Calendar" on groups.drupal.org or drupical.com
•"Where is the Drupal Community?" page on Drupal.org
•groups.drupal.org
•"IRC" page on Drupal.org
•"Ways to get involved" page on Drupal.org
•Drupal.org page "Why get involved?"
•Drupal.org page "Contributor tasks"
•Drupal.org page "Use the issue queue"
•Drupal.org page "Reporting a problem"
•Drupal.org page "How to report a security issue"
Attributions
Written by Jennifer Hodgdon, and Joe Shindelar at Drupalize.Me.
195

Pemikiran Akhir
14.2. Getting Support
Prerequisite knowledge
•Bagian 1.6, “Concept: The Drupal Project”
•Bagian 14.1, “Connecting with the Community”
Where can you find support?
The Drupal project is open-source, so if you have questions about or problems with the
software, your options for finding answers and fixes are somewhat different from what they
would be for commercial software.
There are several options for free support provided by community volunteers. First, some
IRC channels, local groups, and language communities encourage support questions,
through on-line chat, in-person meetings, or websites (find out more about these on Bagian
14.1, “Connecting with the Community”).
Second, some (but not all) contributed module, distribution, and theme projects encourage
you to post support requests in issues. Generally, projects that have a very large number
of users do not allow support requests in their issues (Drupal Core is in that category),
while projects with a smaller number of users welcome the occasional support question. Be
respectful of developer time and read the documentation for the project before posting a
question in an issue. On the other hand, all projects encourage you to use issues to report
problems and bugs; see Bagian 14.1, “Connecting with the Community” to learn more about
that.
In addition to those resources, the following sites provide free forums where volunteers
answer support questions about Drupal:
• The Drupal.org Forums
•"Drupal Answers" on StackExchange
If you prefer to pay for support (presumably in exchange for more extensive service or better
availability), you can find service providers in the "Drupal Marketplace" on Drupal.org.
Related topics
•Bagian 14.3, “Learning More”
•Bagian 14.1, “Connecting with the Community”
Additional resources
•"Support" page on Drupal.org
•"Drupal Marketplace" on Drupal.org
196

Pemikiran Akhir
• The Drupal.org Forums
•"Drupal Answers" on StackExchange
Attributions
Written by Jennifer Hodgdon.
14.3. Learning More
Prerequisite knowledge
•Bagian 1.6, “Concept: The Drupal Project”
•Bagian 14.1, “Connecting with the Community”
Where can you go to learn more?
The following resources should prove useful to you, as you continue to advance your skills:
"Drupal Community Documentation" section on Drupal.org
Wiki-like documentation contributed by the Drupal community, ranging from basic
to advanced, about all aspects of Drupal (site building and administration, theming,
development, and contributed modules).
api.drupal.org
Reference documentation for programmers about the Drupal API.
"Drupal Planet" page on Drupal.org
An aggregation of blog posts about Drupal from around the web, posted by blogging
members of the Drupal community who have applied for inclusion. Topics range from
programming to site building to Drupal news.
Groups, events, and meetups
See Bagian 14.1, “Connecting with the Community” for more about topical, regional, and
language groups, as well as local, regional, and international events.
"Training Marketplace" page on Drupal.org
The Marketplace lists paid training providers. For free training, check whether events
include training sessions; there are also free or very low-cost training events listed on
the "Global Training Days" page on Drupal.org.
Support sites
See Bagian 14.2, “Getting Support” to locate support forums; searching them can be useful
for learning about specific topics.
197


Glosarium
Ajax
A web technology used to exchange data with a server to dynamically update parts of a
web page (for example, forms) without needing entire page reloads.
Alias
A user-friendly name to replace the internal path that the system assigns to a URL on the
site. For example, you might assign an alias of /about to the About page on your site, to
replace the internal path /node/5. This would give the page a URL of http://example.com/
about instead of http://example.com/node/5. See Bagian 5.1, “Concept: Paths, Aliases, and
URLs” for more information.
Anonymous
A person (user) interacting with the site who is not logged in. See Bagian 7.1, “Concept:
Users, Roles, and Permissions” for more information.
Block
A chunk of content (text, images, links, etc.) that can be displayed on a page of a site.
Blocks are displayed in regions. See Bagian 8.1, “Concept: Blocks” for more information.
Breakpoint
Breakpoints are used to separate the height or width of browser screens, printers, and
other media output types into steps. A responsive site adjusts its presentation at these
breakpoints. See Bagian 6.14, “Concept: Responsive Image Styles” for more information.
Bundle
Synonym for Entity subtype.
Cache
The site’s internal cache stores the output of time-consuming calculations, such as
computing output for an HTML page request, and then retrieves them instead of
recalculating the next time they are needed. External caching systems can also be used
on the web server to speed up a site’s response. See Bagian 12.1, “Concept: Cache” for
more information on the internal cache.
CMS
Acronym for Content Management System.
Configuration
Information about your site that is not content, and is meant to be more permanent than
state information, such as the name of your site, the content types and views you have
defined, etc. See Bagian 1.5, “Concept: Types of Data” for more information.
199

Glosarium
Content
Information meant to be displayed on your site, such as text, images, downloads, etc. See
also Configuration and State. See Bagian 1.5, “Concept: Types of Data” for more information.
Content item
An item of content that is typically meant to be displayed as the main content of a page
on your site. This is an entity type. See Bagian 2.3, “Concept: Content Entities and Fields” for
more information.
Content Management System (CMS)
A collection of tools designed to allow the creation, modification, organization, search,
retrieval and removal of information on a website. See Bagian 1.1, “Concept: Drupal as a
Content Management System” for more information.
Content type
An entity subtype for the content itementity type. Each content type is used for some
particular purpose on the site, and each has its own fields. For example, a site for a
farmers market might have a content type for simple pages, and another for a vendor
listing page. See Bagian 2.3, “Concept: Content Entities and Fields” for more information.
Contextual link
A link to an administrative page for editing or configuring a feature of the site, shown
in the context where that feature is displayed. Example: a link to configure a menu
that is shown when you hover your mouse over the menu. See Bagian 4.1, “Concept:
Administrative Overview” for more information.
Contributed
Modules, themes, and distributions that are not part of the Drupal core download, and that
can be downloaded separately from the Drupal.org website.
Cron
On some operating systems, cron is a command scheduler application that executes
commands or scripts periodically. Your site defines periodic tasks, also known as cron
tasks, that need to be triggered either by an operating system cron scheduler, or
internally. See Bagian 13.1, “Concept: Cron” for more information.
Distribution
A single download that provides a shortcut for setting up a specific type of site, such as
a website for a club or for e-commerce. A distribution contains Drupal core, along with
contributedmodules and/or themes; many distributions also pre-configure the site or even
create sample content upon installation. See Bagian 1.4, “Concept: Distributions” for more
information.
Drupal core
The files, themes, profiles, and modules included with the standard project software
download. See Bagian 1.1, “Concept: Drupal as a Content Management System” for more
information.
Entity
An item of either content or configuration data, although in common usage, the term
often refers to content entities. Examples include content items, custom blocks, taxonomy
200

Glosarium
terms, and definitions of content types; the first three are content entities, and the last is a
configuration entity. See also Entity type, Entity subtype, and Field. See Bagian 2.3, “Concept:
Content Entities and Fields” for more information.
Entity subtype
Within a contententity type, a grouping of entities that share the same fields. For example,
within the content item entity type, a farmers market site might have subtypes (known
as content types) for static pages and vendor pages, each with its own group of fields.
You may also see the term bundle used (especially in programmer documentation) as a
synonym of entity subtype. See Bagian 2.3, “Concept: Content Entities and Fields” for more
information.
Entity type
The overall type of an entity; in common usage, it is only applied to a content entity.
Examples include content types, taxonomy terms, and custom blocks. See Bagian 2.3,
“Concept: Content Entities and Fields” for more information.
Field
Data of a certain type that is attached to a contententity. For instance, on a farmers market
site’s vendor content type, you might have fields for an image, the vendor description,
and a taxonomy term. See Bagian 2.3, “Concept: Content Entities and Fields” for more
information.
Field bundle
Synonym for Entity subtype.
Field formatter
Configuration that defines how the data in a field is displayed. For example, a text field
could be displayed with a prefix and/or suffix, and it could have its HTML tags stripped
out or limited. See also View mode and Field widget. See Bagian 6.10, “Concept: View Modes
and Formatters” for more information.
Field widget
Configuration that defines how someone can enter or edit data for a field on a data entry
form. For example, a text field could use a single-line or multi-line entry box, and there
could be a setting for the size of the box. See also Field formatter. See Bagian 6.8, “Concept:
Forms and Widgets” for more information.
Formatter
See Field formatter.
FOSS
Acronym for Free and Open Source Software, meaning software that is developed by a
community of people and released under a non-commercial license. See also GPL. See
Bagian 1.6, “Concept: The Drupal Project” for more information.
GPL
Acronym for the GNU General Public License, a non-commercial software license. All
software downloaded from the Drupal.org website is licensed under the "GNU General
Public License, version 2". See also FOSS. See Bagian 1.7, “Concept: Drupal Licensing” for
more information.
201

Glosarium
Image style
A set of processing steps that transform a base image into a new image; typical
processing includes scaling and cropping. See Bagian 6.12, “Concept: Image Styles” for
more information.
LAMP
Acronym for Linux, Apache, MySQL, and PHP: the software on the web server that the
scripts commonly run on (although it can use other operating systems, web servers, and
databases). See Bagian 3.1, “Concept: Server Requirements” for more information.
Log
A list of recorded events on the site, such as usage data, performance data, errors,
warnings, and operational information. See Bagian 12.4, “Concept: Log” for more
information.
Menu
A set of links used for navigation on a site, which may be arranged in a hierarchy. See
Bagian 5.6, “Concept: Menu” for more information.
Module
Software (usually PHP, JavaScript, and/or CSS) that extends site features and adds
functionality. The Drupal project distinguishes between core and contributed modules.
See Bagian 1.2, “Concept: Modules” for more information.
Path
The unique, last part of the internal URL that the system assigns to a page on the site,
which can be a visitor-facing page or an administrative page. For example, the internal
URL for the About page on your site might be http://example.com/node/5, and in this case,
the path is node/5. See also Alias. See Bagian 5.1, “Concept: Paths, Aliases, and URLs” for
more information.
Permission
The ability to perform some action on the site, such as editing a particular type of
content, or viewing user profiles. See also Role. See Bagian 7.1, “Concept: Users, Roles, and
Permissions” for more information.
Reference field
A field that represents a relationship between an entity and one or more other entities,
which may be the same entity type or a different type. For example, on a farmers market
site, a recipe content item might have a reference field to the vendor (also a content
item) that posted the recipe. Taxonomy term fields are also reference fields. See Bagian
6.4, “Concept: Reference Fields” for more information.
Region
A defined area of a page where content can be placed, such as the header, footer, main
content area, left sidebar, etc. Regions are defined by themes, and the content displayed
in each region is contained in blocks. See Bagian 2.1, “Concept: Regions in a Theme” for
more information.
202

Glosarium
Responsive
A site or theme is said to be responsive if it adjusts its presentation in response to the
size of the browser screen, printer, or other media output type. See also Breakpoint. See
Bagian 6.14, “Concept: Responsive Image Styles” for more information.
Revision
A record of the past or present state of a contententity, as it is edited over time. See Bagian
2.6, “Concept: Editorial Workflow” for more information.
Role
A named set of permissions that can be applied to a user account. See Bagian 7.1, “Concept:
Users, Roles, and Permissions” for more information.
Security update
An update that fixes a security-related bug, such as a hacking vulnerability. See Bagian
13.3, “Concept: Security and Regular Updates” for more information.
State
Information of a temporary nature about the current state of your site, such as the time
when cron was last run, etc. See also Content and Configuration. See Bagian 1.5, “Concept:
Types of Data” for more information.
Taxonomy
The process of classifying content. See Bagian 6.5, “Concept: Taxonomy” for more
information.
Taxonomy term
A term used to classify content, such as a tag or a category. See also Vocabulary. See
Bagian 6.5, “Concept: Taxonomy” for more information.
Text format
Configuration that defines the processing that happens to user-entered text before it is
shown in the browser. This might include stripping or limiting HTML tags, or turning
URLs into links. See Bagian 6.15, “Concept: Text Formats and Editors” for more information.
Theme
Software and asset files (images, CSS, PHP code, and/or templates) that determine the
style and layout of the site. The Drupal project distinguishes between core and contributed
themes. See Bagian 1.3, “Concept: Themes” for more information.
UI
Acronym for User Interface.
Update
A newer version of your site’s software, either Drupal core or a module or theme. See
also Security update. See Bagian 13.3, “Concept: Security and Regular Updates” for more
information.
User
A person interacting with the site, either logged-in or anonymous. See Bagian 7.1,
“Concept: Users, Roles, and Permissions” for more information.
203

Glosarium
User interface
The text, styles, and images that are visible on a site, separated logically into the user
interface for site visitors and the administrative user interface.
User one (User 1)
The initial user account that is created when you install the site (whose ID number is 1).
It automatically has all permissions, even if it is not assigned an administrative role. See
Bagian 7.2, “Concept: The User 1 Account” for more information.
View
A formatted listing of data; typically, the data comes from contententities. For example,
on a farmers market site, you might create a content item for each vendor. You could
then make view that generates a listing page that shows a thumbnail image and short
description of each vendor, linking to the full-page content item. Using the same data,
you could also make a view that generates a new vendors block, which would show
information from the most recently added vendors. See Bagian 2.4, “Concept: Modular
Content” for more information.
View mode
A set of field formatterconfiguration for all of the fields of a contententity, some of which
may be hidden. Each entity subtype can have one or more view modes defined; for
example, content types typically have Full and Teaser view modes, where the Teaser view
mode displays fewer or trimmed-down fields. See Bagian 6.10, “Concept: View Modes and
Formatters” for more information.
Vocabulary
A group of taxonomy terms to choose from when classifying content in a particular way,
such as the list of all of the vendor categories on a farmers market site. Technically,
vocabularies are the entity subtype for the taxonomy term entity type. See Bagian 6.5,
“Concept: Taxonomy” for more information.
Widget
See Field widget.
Wizard
A web form that allows you to fill in a few values, and creates something with sensible
defaults based on the values you chose. For example, there are wizards for creating views
of different types. See Bagian 9.3, “Creating a Content List View” for more information.
WYSIWYG
Acronym for What You See is What You Get, meaning a method for editing content where
what you see on the editing screen closely resembles the final product. See Bagian 6.16,
“Configuring Text Formats and Editors” for more information.
204

Indeks
A
Account setting
configuring, 41
Admin Toolbar module
downloading, 151
installing, 151
Administration
overview, 32
Administrative interface
using to update the core software, 186
Administrative menu
overview, 32, 55
Administrative user account
overview, 99
Ajax
definition, 199
Alias
definition, 199
overview, 48
Anonymous
definition, 199
Anonymous user
overview, 99
Apache web server
version requirements, 20
Appearance menu entry
administrative menu, 32
Attributions for this document, 215
Authenticated user
overview, 99
Author
assigning, 110
Automated Cron module
configuring, 181
overview, 181
B
Backup
overview, 177
Bartik theme
configuring, 43
regions in, 10
Basic page
creating, 49
Block
creating, 113
creating from a view, 129
definition, 199
entity type, 13
overview, 113
placing in a region, 116
Breadcrumb region
overview, 10
Breakpoint
definition, 199
overview, 95
Bug
reporting, 184, 194
Bundle
definition, 199
C
Cache
clearing, 175
definition, 199
overview, 174
rebuilding, 175
Chatting online, 194, 196
CKEditor module
configuring, 96
CKEditor text editor
default assignment to text format, 96
CMS (Content Management System)
definition, 199
overview, 1
Coder tool
overview, 21
Color scheme
configuring, 43
Comment entity type
overview, 13
Comment module
entity type, 13
Community
connecting with, 194
Composer tool
overview, 21
using to download modules, 166
using to download the core software, 166
using to download themes, 166
Composite page
creating with modular content, 15
Configuration
as a type of data, 6
205

Indeks
copying, 169
definition, 199
deploying, 169
synchronizing between development and
live site, 171
translating, 134, 141
Configuration Manager module
using to synchronize the configuration
between a development and live site, 171
Configuration menu entry
administrative menu, 32
Configuration Translation module
installing, 135
overview, 134
Configuring
content translation, 136
home page, 54
site, 35
text format, 96
Contact form entity type
overview, 13
Contact module
entity type, 13
Content
adding to menu while editing, 57
as a type of data, 6
assigning author, 110
backing up, 177
definition, 199
displaying, 87
editing, 51, 53
editing entry form, 83
entity type, 13
finding, 51
modular, 15
translating, 134, 140
translation, 136
Content attributions for this document,
215
Content display
changing, 87
managing, 87
Content editing form
overview, 83
Content entity type
overview, 13
Content item
creating, 49
definition, 200
Content list view
creating, 122
Content Management System (CMS)
definition, 199, 200
overview, 1
Content menu entry
administrative menu, 32
Content reference field
adding, 79
overview, 72
Content region
overview, 10
Content structure
planning, 16
Content Translation module
installing, 135
overview, 134
Content type
adding, 62
adding field to, 67
definition, 200
deleting, 66
Contextual filters part of view
overview, 120
Contextual link
definition, 200
overview, 32
Contributed
definition, 200
Contributed module
definition, 200
downloading, 151, 160, 166
evaluating, 145
finding, 145
installing, 151
overview, 3
updating, 188
Contributed theme
definition, 200
downloading, 157, 160, 166
enabling, 157
evaluating, 153
finding, 153
installing, 157
updating, 190
Contributing to the project, 194
Copyright for this document, vi, 215
Core module
overview, 3
206

Indeks
Core software
installation requirements, 20
installing, 26
updating, 186
Core theme
overview, 4
Country setting
configuring, 35
Cron command scheduler
definition, 200
Cron task
configuring, 181
definition, 200
overview, 181
Cross-site scripting (XSS)
preventing, 95
Custom block
creating, 113
entity type, 13
Custom block module
entity type, 13
Custom menu
overview, 55
Custom theme
enabling, 157
installing, 157
overview, 4
D
Data type
configuration, 6
content, 6
overview, 6
session, 6
state, 6
Database
backing up, 177
configuring during the installation
process, 26
installation requirements, 20
Deployment workflow
overview, 162
Devel tool
overview, 21
Development site
making, 163
overview, 162
synchronizing with live site, 171
Disk space
installation requirements, 20
Display part of view
overview, 120
Distribution
definition, 200
full-featured, 5
overview, 5
quick-start, 5
Documentation
about Drupal, 197
about the Drupal API, 197
available on drupal.org, 197
contributed by the Drupal Community,
197
Drupal Planet blog posts, 197
for programmers, 197
Downloading
core software, 23, 166
module, 151, 166
module or theme files manually, 160
theme, 157, 166
Drupal Association
overview, 7
Drupal Console tool
overview, 21
Drupal content management system
overview, 1
server requirements, 1
Drupal core
definition, 200
installing, 26
overview, 1
preparing install, 23
Drupal licensing
overview, 8
Drupal project
connecting with, 194
overview, 7
Drupal training
resources for, 197
Drupal user group
finding, 194
Drupal.org website
downloading and installing module from,
151
downloading and installing theme from,
157
downloading modules and themes from, 1
finding and evaluating modules on, 145
207

Indeks
finding and evaluating themes on, 153
Drush tool
overview, 21
using to download and install module, 151
using to download and install theme, 157
using to install the core software, 23
using to uninstall module, 39
using to update module, 188
using to update the core software, 186
using to update theme, 190
Dynamic Page Cache module
overview, 174
E
Editing content, 51, 53
Editor
configuring, 96
Editor module
configuring, 96
Editorial Workflow
overview, 19
Effect
image, 91, 91
Email address
configuring, 35
Enabling
module, 151
theme, 157
Entity
definition, 200
overview, 13
Entity reference field
adding, 79
Entity subtype
definition, 201
overview, 13
Entity type
definition, 201
overview, 13
Entity view mode
overview, 87
Error
log report, 178
Error page
configuring, 35
Event
Drupal, 194
Extend menu entry
administrative menu, 32
F
Farmers market
usage scenario for this document, xi
Feature
copying, 169
deploying, 169
Featured regions
overview, 10
Field
adding to content type, 67
content reference, 72
definition, 201
for adding references, 79
overview, 13, 83
reference, 72
taxonomy term reference, 72
user reference, 72
Field bundle
definition, 201
Field formatter
definition, 201
overview, 87
Field module
overview, 3
Field UI module
overview, 3
Field widget
definition, 201
Fields part of view
overview, 120
File
backing up, 177
File module
entity type, 13
Filter criteria part of view
overview, 120
Filter module
configuring, 96
Firebug tool
overview, 21
First day of week
configuring, 35
Footer menu
overview, 55
Footer regions
overview, 10
Form
overview, 83
208

Indeks
Form entity type
overview, 13
Format part of view
overview, 120
Formatter
definition, 201
overview, 87
Forum
user support, 196
FOSS (Free and Open Source Software)
definition, 201
overview, 7
Free and Open Source Software (FOSS)
definition, 201
overview, 7
Front page
configuring, 35, 54
Full editor, 53
Full-featured distribution
overview, 5
Functionality
extending, 151
G
Git tool
overview, 21
Glossary, 199
GNU General Public License
definition, 201
overview, 8
GPL (General Public License or GNU General
Public License)
definition, 201
overview, 8
Group
finding, 194
Guiding scenario for this document (farmers
market), xi
H
Header region
overview, 10
Help menu entry
administrative menu, 32
Help region
overview, 10
Hiawatha web server
version requirements, 20
Highlighted region
overview, 10
Home page
configuring, 54
creating, 49
HTML5 picture tag
and responsive images, 95
I
Image
resizing, 91
Image effect
overview, 91
Image field
adding, 67
Image module
creating a view, 122
Image style
creating, 91
definition, 201
overview, 91
responsive, 95
In-place editor, 53
Installation process, 26
Installation profile, 26
Installation requirements
database, 20
disk space, 20
overview, 20
PHP programming language, 20
web server, 20
Installer tool
running, 26
Installing
core software, 20, 23
development site, 162
module, 151
staging site, 162
theme, 157
Interest group
finding, 194
Interface Translation module
installing, 135
overview, 134
Internal Page Cache module
overview, 174
Internet Relay Chat (IRC)
using to chat online, 194, 196
IRC (Internet Relay Chat)
using to chat online, 194, 196
209

Indeks
L
Label
translating, 141
LAMP (Linux Apache MySQL PHP)
definition, 202
Language
adding, 135
Language module
installing, 135
overview, 134
Layout
planning, 11
Learning resource
link to, 197
Legal
overview, 8
Licensing
overview, 8
Linux Apache MySQL PHP (LAMP)
definition, 202
Listing content
using Views module to, 122
Live site
synchronizing with development site, 171
Locale setting
configuring, 35
Log
definition, 202
overview, 178
Logo image
configuring, 43
M
Maintenance mode
disabling, 149
enabling, 149
overview, 149
Manage administrative menu
overview, 32
Manually downloading module or theme
files
overview, 160
Menu
adding a link to page, 57
administrative, 55
custom, 55
definition, 202
footer, 55
main, 55
overview, 55
user account, 55
Menu items
reordering, 59
Menu region
overview, 10
Menu UI module
overview, 3
Metadata
creating, 74
Microsoft IIS web server
version requirements, 20
Modular content
overview, 15
Module
Admin Toolbar, 151
CKEditor, 96
Comment, 13
Configuration Manager, 171
Configuration Translation, 134, 135
Contact, 13
Content Translation, 134, 135
contributed, 3, 151
core, 3
custom, 151
Custom Block, 13
definition, 202
downloading, 151, 160, 166
Dynamic Page Cache, 174
Editor, 96
enabling, 37, 151
evaluating, 145
Field, 3
Field UI, 3
File, 13
Filter, 96
finding, 145
Image, 122
installing, 37, 151
Interface Translation, 134, 135
Internal Page Cache, 174
Language, 134, 135
Menu UI, 3
Node, 3, 13
overview, 3
Taxonomy, 13
uninstalling unused, 39
Update Manager, 151, 157
210

Indeks
updating, 188
User, 3, 13
Views, 3, 122, 126, 129
Views UI, 3
Multilingual modules
enabling, 135
installing, 135
MySQL database
version requirements, 20
N
Navigation
changing the order of menu items, 59
linking menu to page, 57
Nginx web server
version requirements, 20
Node module
entity type, 13
overview, 3
P
Page
adding to menu while editing, 57
composite, 15
Page cache
overview, 174
Path
definition, 202
overview, 48
People menu entry
administrative menu, 32
Performance
improving, 39
log report, 178
status report, 179
Permission
changing, 106
changing role, 108
definition, 202
denying, 106
granting, 106
overview, 99
PHP programming language
version requirements, 20
PHP version
status report, 179
Planning
site layout, 11
PostgreSQL database
version requirements, 20
Primary menu region
overview, 10
Profile
installation, 26
Published flag
overview, 19
Q
Quick editor, 53
Quick-start distribution
overview, 5
R
Reference field
adding, 79
content, 72
definition, 202
overview, 72
taxonomy term, 72
user, 72
Region
breadcrumb, 10
content, 10
definition, 202
featured, 10
footer, 10
header, 10
help, 10
highlighted, 10
menu, 10
overview, 10
placing a block in, 116
primary menu, 10
secondary menu, 10
sidebar, 10
Regional setting
configuring, 35
Relationships part of view
overview, 120
Report
Recent log messages, 178
Reports menu entry
administrative menu, 32
Resource
documentation and training, 197
Responsive
definition, 202
Responsive image style
211

Indeks
overview, 95
Revision
definition, 203
overview, 19
Role
administrator, 101
anonymous user, 101
authenticated user, 101
changing, 108
changing permission, 106
creating, 101
definition, 203
overview, 99
S
Scenario for this document (farmers market)
overview, xi
Secondary menu region
overview, 10
Security
assigning permission, 106
cross-site scripting, 95
managing user accounts, 41
overview, 184
status report, 179
text format, 95
user account settings, 41
user one account, 100
Security announcement
subscribing to by email, 185
subscribing to on Twitter, 185
Security bug
reporting, 184
Security team
overview, 184
Security update
applying, 188, 190
definition, 203
keeping track of, 185
Server information
status report, 179
Session
as a type of data, 6
Sidebar regions
overview, 10
Site email address
configuring, 35
Site information
status report, 179
Site layout
planning, 11
Site name
configuring, 35
Site plan
content structure, 16
Site slogan
configuring, 35
Site tagline
configuring, 35
Slogan
configuring, 35
Software dependencies
managing, 166
Software version
status report, 179
Sort criteria part of view
overview, 120
SQLight database
version requirements, 20
Staging site
making, 163
overview, 162
State
as a type of data, 6
definition, 203
Status report
overview, 179
Structure menu entry
administrative menu, 32
Style
image, 91, 91
Support
finding, 196
T
Tagline
configuring, 35
Taxonomy
creating, 74
definition, 203
overview, 73
Taxonomy module
entity type, 13
Taxonomy term
definition, 203
overview, 13
Taxonomy term reference field
adding, 79
212

Indeks
overview, 72
Term (taxonomy)
fixed list, 73
free tagging, 73
overview, 73
Term list
creating, 74
Terminology (Glossary), 199
Text format
configuring, 96
definition, 203
overview, 95
Theme
configuring, 43
contributed, 157
core, 4
custom, 4, 157
definition, 203
downloading, 157, 160, 166
enabling, 157
evaluating, 153
finding, 153
installing, 157
overview, 4
regions in, 10
third-party, 4
updating, 190
Third-party theme
overview, 4
Time zone setting
configuring, 35
Tool
Coder, 21
Composer, 21
Devel, 21
drupal Console, 21
Drush, 21
Firebug, 21
Git, 21
Toolbar
overview, 32
Training
Global Training Days, 197
resource, 197
Training Marketplace, 197
Translating
configuration, 141
content, 140
label, 141
overview, 134
view, 141
Troubleshooting
log report, 178
status report, 179
U
UI (User Interface)
definition, 203
Uniform Resource Locator (URL)
overview, 48
Uninstalling
unused modules, 39
Unpublished flag
overview, 19
Update
definition, 203
keeping track of, 185
overview, 184
status report, 179
Update Manager module
overview, 185
using to install module, 151
using to install theme, 157
Update status
status report, 179
URL (Uniform Resource Locator)
overview, 48
URL alias
overview, 48
URL field
adding, 67
Usage scenario for this document (farmers
market), xi
User
administrative, 100
configuring account setting, 41
creating account, 103
definition, 203
overview, 99
root, 100
user one, 100
User account menu
overview, 55
User group
finding, 194
User interface
translating, 134
User Interface (UI)
213

Indeks
definition, 203
User module
entity type, 13
overview, 3
User one
definition, 204
User profile entity type
overview, 13
User reference field
adding, 79
overview, 72
User role
changing, 108
creating, 101
overview, 99
User-entered content
filtering, 95
V
View
adding block display to, 129
and modular content, 15
contextual filters part, 120
creating, 122
definition, 204
display part, 120
duplicating, 126
fields part, 120
filter criteria part, 120
format part, 120
overview, 119
parts of, 120
relationships part, 120
sort criteria part, 120
translating, 141
View mode
definition, 204
overview, 87
Views module
adding to a view, 129
creating a view, 122
duplicating a view, 126
overview, 3, 15, 119
Views UI module
overview, 3
Vocabulary
creating, 74
definition, 204
overview, 13, 73
W
Web installer
running, 26
using to install the core software, 23
Web server
installation requirements, 20
What You See Is What You Get (WYSIWYG)
configuring editor, 96
definition, 204
Widget
definition, 201, 204
overview, 83
Wizard
definition, 204
WYSIWYG (What You See Is What You Get)
configuring editor, 96
definition, 204
X
XSS (Cross-site scripting)
preventing, 95
214

Lampiran A. Lampiran
A.1. Guide-Wide Attributions
This guide was written by contributors to the Drupal open-source project, and is licensed
under the CC BY-SA 2.0 license. See Bagian i.1, “Hak Cipta” for more information. Details about
the contributors for guide-wide tasks are below. For individual topics, the attributions for
writing, editing, and/or translating are at the end of each topic.
Project coordination of original (English, Drupal 8) text
Writing of the initial version of this guide was coordinated by the following people:
•Amber Matz - Volunteer coordination and project management
•Jennifer Hodgdon - Content oversight
•Joe Shindelar - Content oversight
•Antje Lorch - Content oversight
Writing, editing, and testing of original text
The following people contributed to guide-wide writing:
• The glossary was written and adapted by Jennifer Hodgdon, with parts from "Glossary",
"Overview of Configuration (vs. other types of information)", and "Working with breakpoints
in Drupal 8", each copyright 2000-2017 by the individual contributors to the Drupal
Community Documentation.
• The index was improved and curated by Anna van Raaphorst.
• Topic summaries were written by Jojy Alphonso at Red Crackle.
Guide-wide editing was done by the following people:
•Amber Matz at Drupalize.Me
•Anna van Raaphorst
•Antje Lorch
•Balu Ertl
•Boris Doesborg
•Charles Leverington
•chirag shah
•Grant Dunham
215

Lampiran
•Jennifer Hodgdon
•Joe Shindelar at Drupalize.Me
•Jojy Alphonso at Red Crackle — who copy edited the vast majority of the User Guide
•Kamal Kant Pansari at Intelliswift
•Michael Lenahan at erdfisch
•Swarad Mokal at Blisstering Solutions
The content was tested by:
•Zach Carter
• A workshop organized by the "Spokane Drupal User Group" on groups.drupal.org, with
students from the Web Development Certificate program at Spokane Community College
Images
Most of the images in the guide are screen captures from the Drupal software, generated
by software written by Jennifer Hodgdon.
The word Drupal, the Druplicon logo (which appears as part of several images throughout
the guide), and the Drupal wordmark logo (which is part of the cover image), are registered
trademarks of Dries Buytaert).
The cover image is a CC BY-SA 2.0 licensed illustration by Amanda Luker at Advomatic.
The Anytown Farmers Market logo, which appears as part of several images throughout the
guide, is a CC BY-SA 2.0 licensed illustration by Justin Harrell at Drupalize.Me.
The honey bee image, which appears as part of several images throughout the guide, is a
public domain image by John Severns at the English Wikipedia project via Wikimedia Commons.
The farm image, which appears as part of several images throughout the guide, is a public
domain image by Xianmin Chang via Wikimedia Commons.
The salad image, which appears as part of several images throughout the guide, is a public
domain image by Yinan Chen via Wikimedia Commons.
The carrot image, which appears as part of several images throughout the guide, is public
domain image K11611-1 by Stephen Ausmus at the Agricultural Research Service of the United
States Department of Agriculture via Wikimedia Commons.
Translation into Bahasa Indonesia
The Bahasa Indonesia translation of this guide was coordinated by:
•Suryanto Rachmat
•Pratomo Ardianto
216
