Guide To Setup CI/CD Tools Ci
User Manual:
Open the PDF directly: View PDF ![]() .
.
Page Count: 42
- Guide to Setup CI/CD Tools
- Table of Contents
- Setup VM on VirtualBox
- Setup VM Network
- Install and setup GitLab on Ubuntu 18.04 server.
- Install OpenJDK 8/11 in Ubuntu 18.04
- Install Jenkins Server on Ubuntu 18.04
- Installation and configuration of docker in Ubuntu 18.04
Guide to Setup CI/CD Tools
Table of Contents
Setup VM on VirtualBox 1
Setup VM Network 13
Install and setup GitLab on Ubuntu 18.04 server. . . . . . . . . . . . . . . . . . . . . . . . . . . . . . . . . . . . . . . . . . . . . . Ê18
Install OpenJDK 8/11 in Ubuntu 18.04 . . . . . . . . . . . . . . . . . . . . . . . . . . . . . . . . . . . . . . . . . . . . . . . . . . . . . . . . Ê20
Install Jenkins Server on Ubuntu 18.04. . . . . . . . . . . . . . . . . . . . . . . . . . . . . . . . . . . . . . . . . . . . . . . . . . . . . . . Ê21
Prerequiste . . . . . . . . . . . . . . . . . . . . . . . . . . . . . . . . . . . . . . . . . . . . . . . . . . . . . . . . . . . . . . . . . . . . . . . . . . . . . Ê21
Installtion. . . . . . . . . . . . . . . . . . . . . . . . . . . . . . . . . . . . . . . . . . . . . . . . . . . . . . . . . . . . . . . . . . . . . . . . . . . . . . . Ê21
Installation and configuration of docker in Ubuntu 18.04 . . . . . . . . . . . . . . . . . . . . . . . . . . . . . . . . . . . . . . Ê23
Install docker package . . . . . . . . . . . . . . . . . . . . . . . . . . . . . . . . . . . . . . . . . . . . . . . . . . . . . . . . . . . . . . . . . . . Ê23
Enable docker command execution without sudo. . . . . . . . . . . . . . . . . . . . . . . . . . . . . . . . . . . . . . . . . . . Ê24
Install and setup NEXUS 3 on Ubuntu 18.04 . . . . . . . . . . . . . . . . . . . . . . . . . . . . . . . . . . . . . . . . . . . . . . . . Ê24
Setup Maven Repository 26
Setup docker private registry 26
Install Helm Repository.. . . . . . . . . . . . . . . . . . . . . . . . . . . . . . . . . . . . . . . . . . . . . . . . . . . . . . . . . . . . . . . . Ê33
Steps to Integrate Gitlab with Jenkins. . . . . . . . . . . . . . . . . . . . . . . . . . . . . . . . . . . . . . . . . . . . . . . . . . . . . . Ê36
Jenkins Server configuration . . . . . . . . . . . . . . . . . . . . . . . . . . . . . . . . . . . . . . . . . . . . . . . . . . . . . . . . . . . Ê36
Jenkins-to-Gitlab Clone AUthentication . . . . . . . . . . . . . . . . . . . . . . . . . . . . . . . . . . . . . . . . . . . . . . . . . . Ê37
Steps to Integrate Jenkins with Gitlab. . . . . . . . . . . . . . . . . . . . . . . . . . . . . . . . . . . . . . . . . . . . . . . . . . . . . . Ê39
Add NEXUS deployer credentials. 39
Add Environment variables related to docker registry. 39
Testing. 40
Setup VM on VirtualBox
The below steps guides through to create Virtual Machine in VirtualBox.
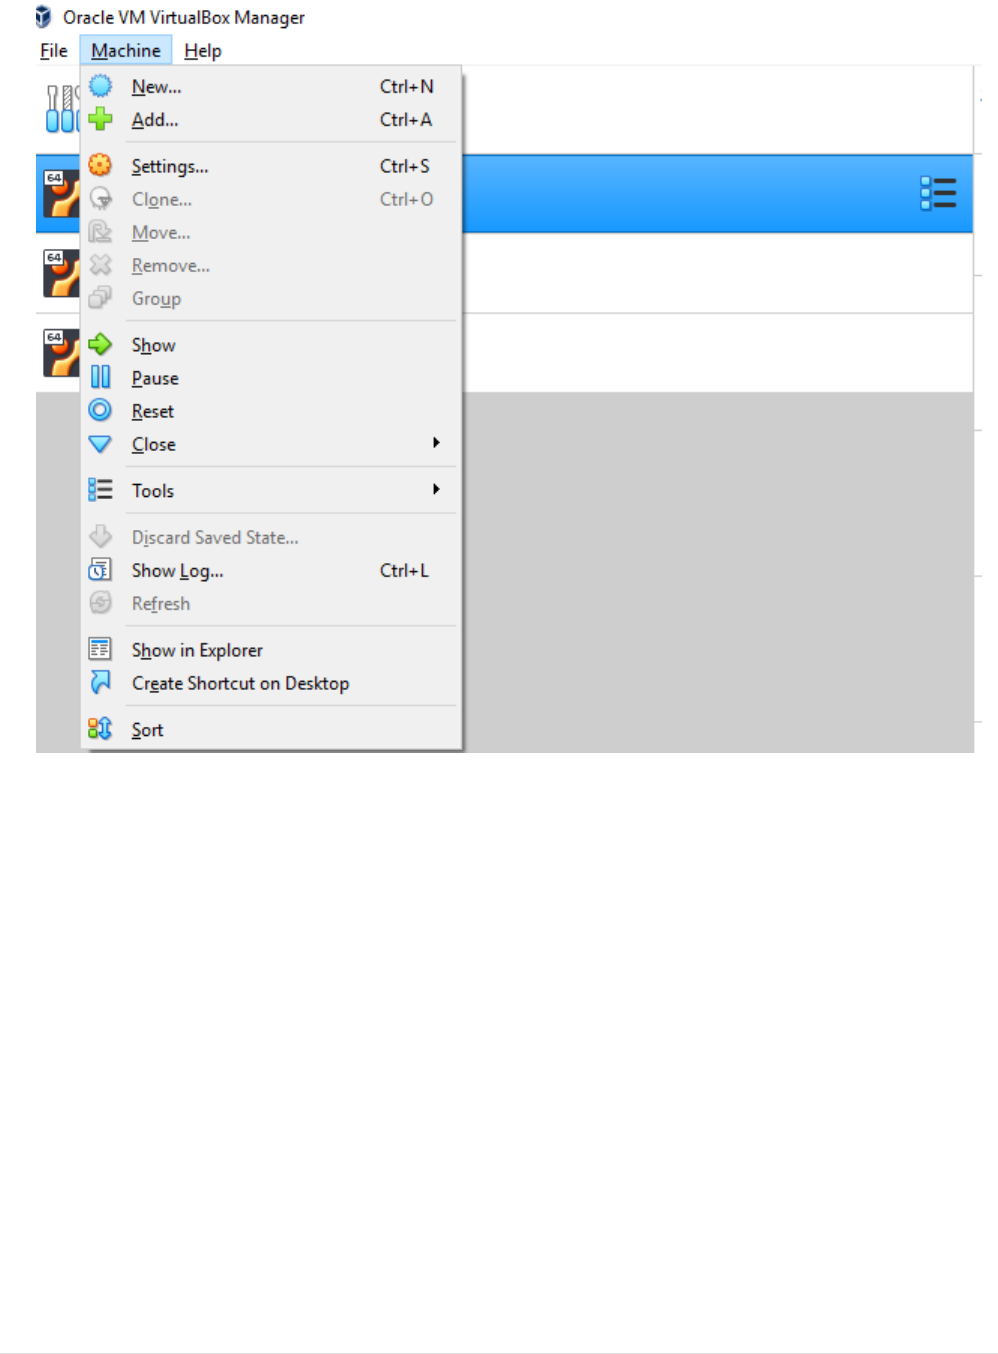
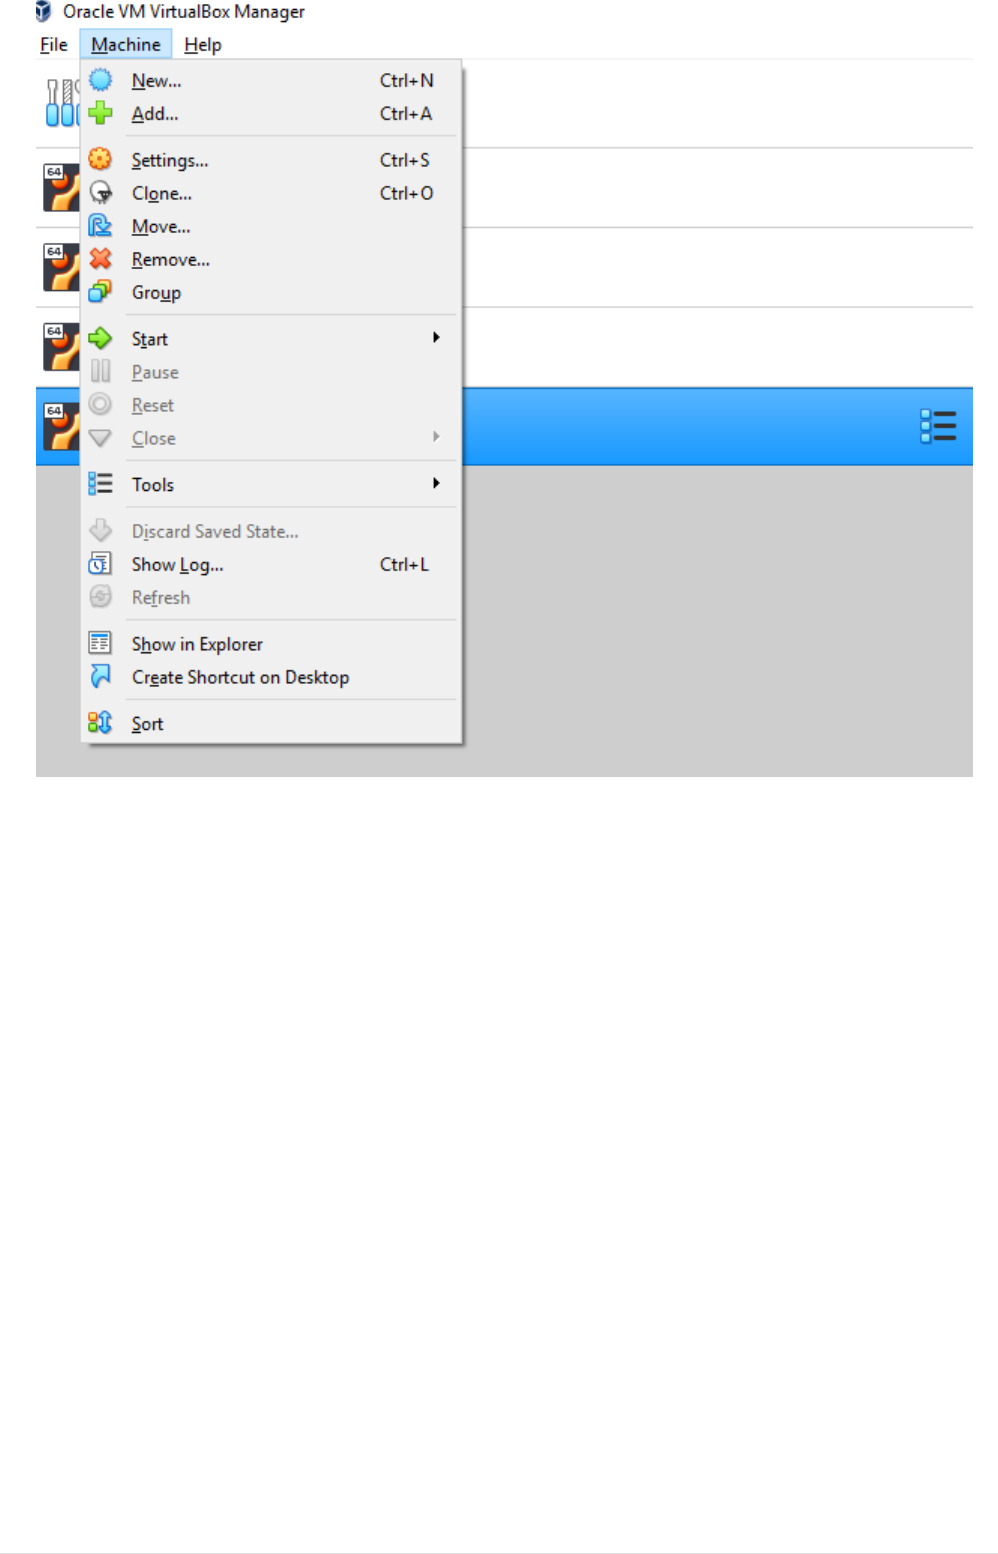
•In VirtualBox home screen go to Machine Menu and click on New (Machine→New), which
would open VM creation form window.
•In VM creation Window set VM name, location to store machine config and logs. and OS type
desired(In our case it will be Linux) and version (Ubuntu 18.04).
1
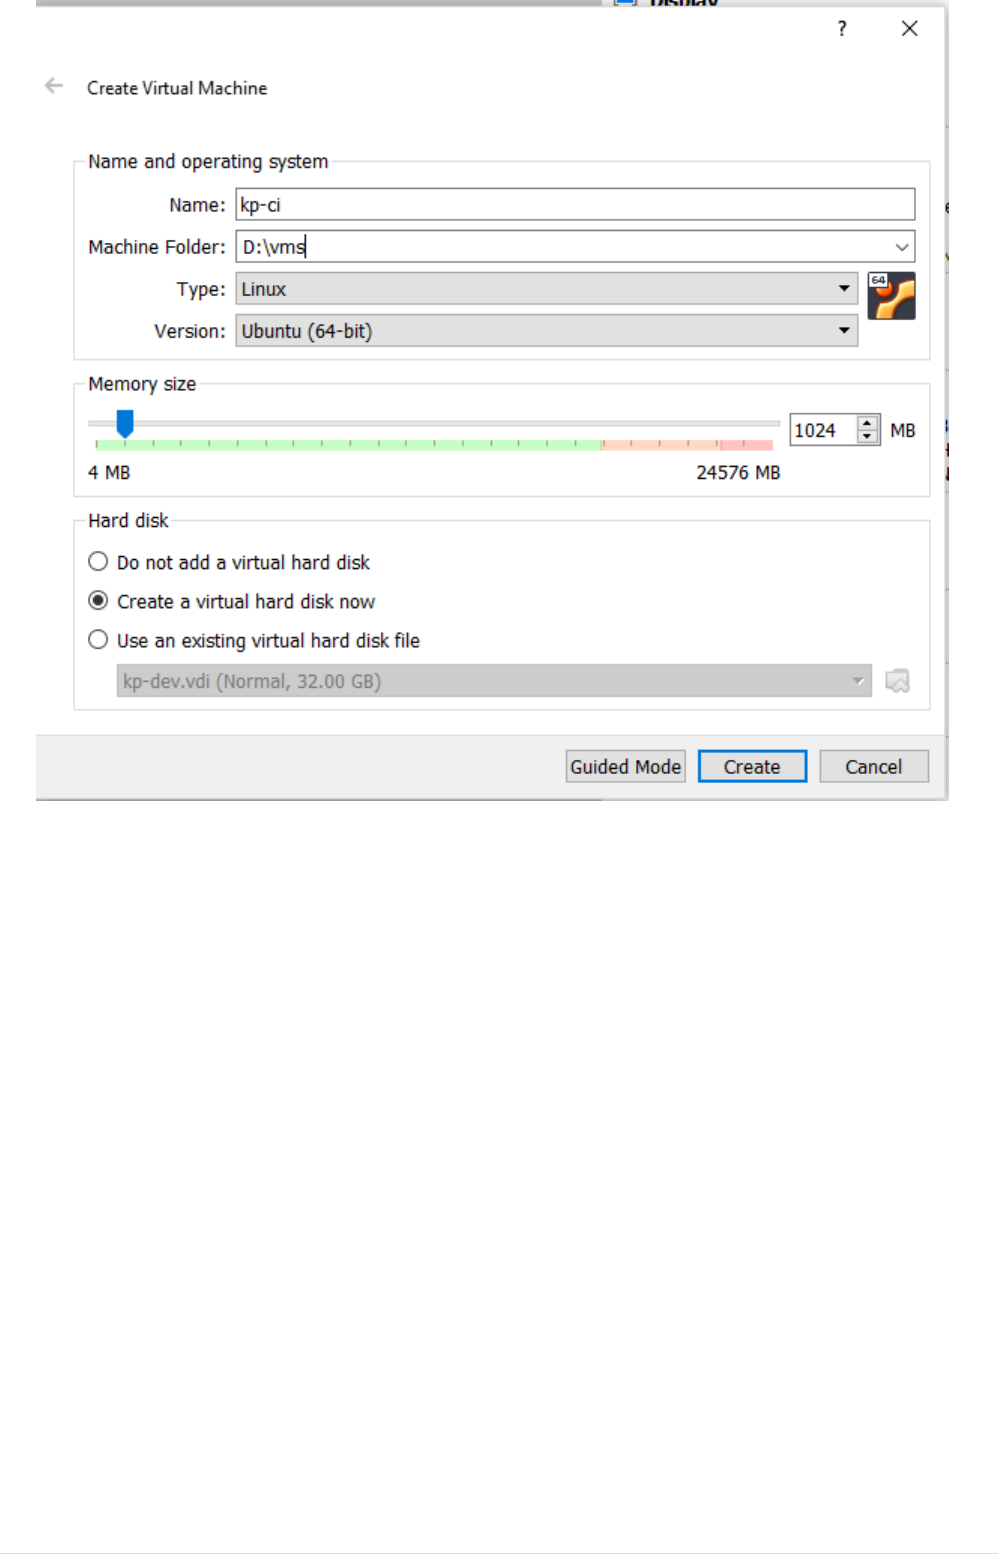
•Click on expert mode and set desired RAM(min 4GB)
•Select Option Create new Virtual Harddisk now and click create.
2

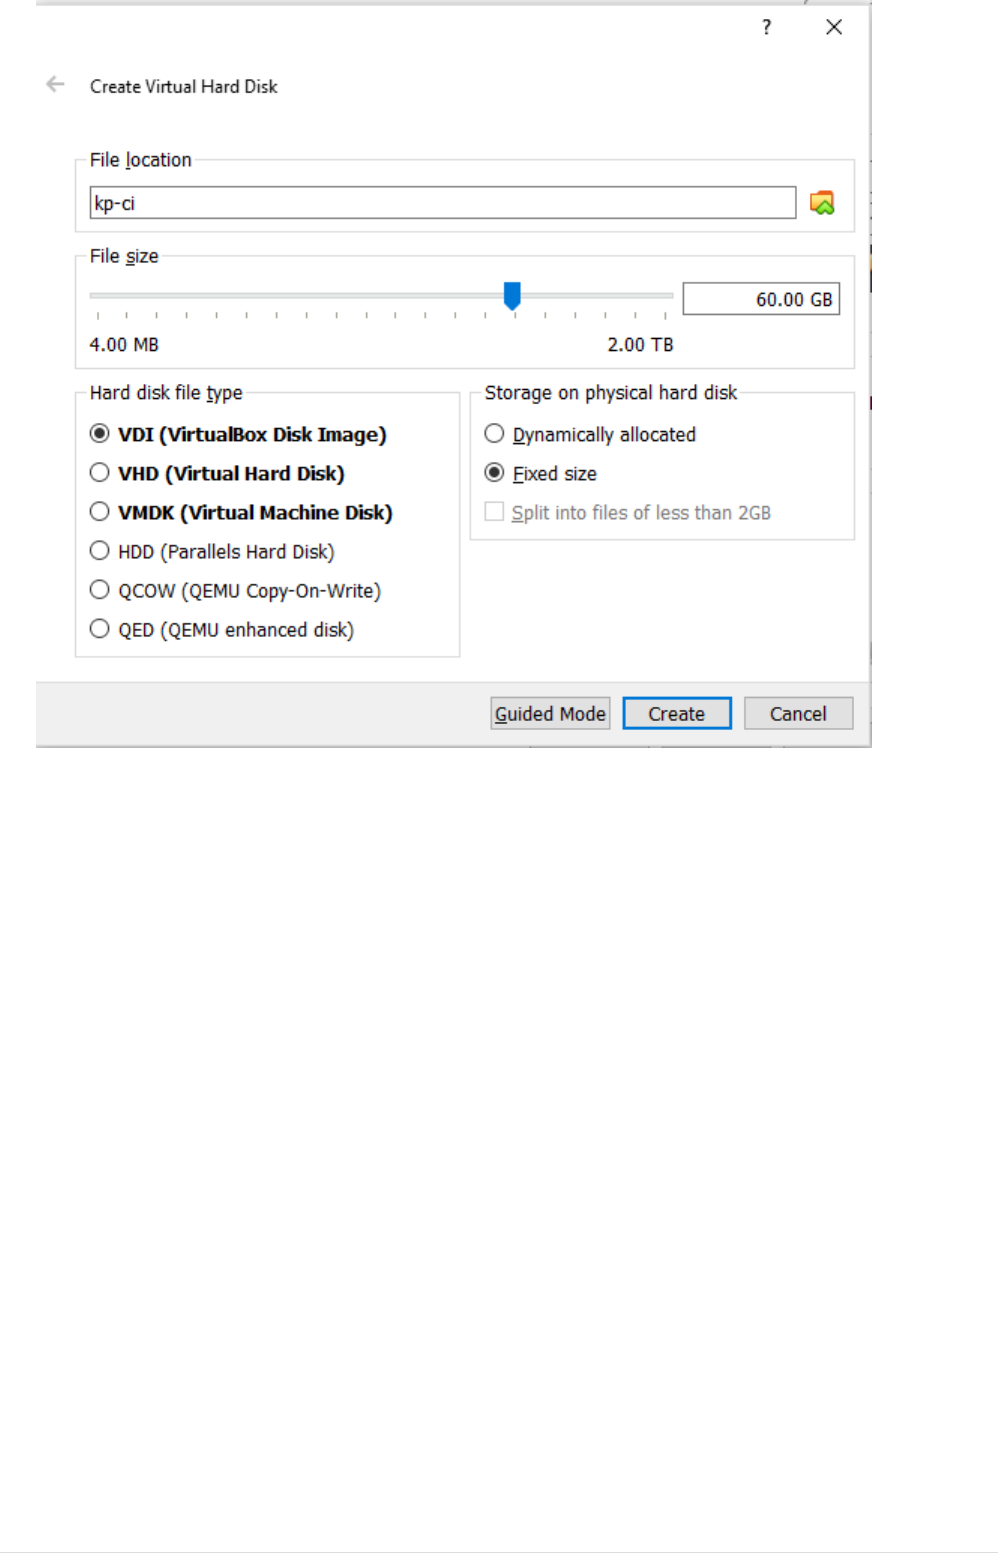
•Provide directory location to store VM image, set Hard disk space required(min 20GB) and set
Fixed Size Mode so that we get better performance. Let the image type be default VDI. Then
click Create Button(It would take couple of minutes to create Allocate Image)
3
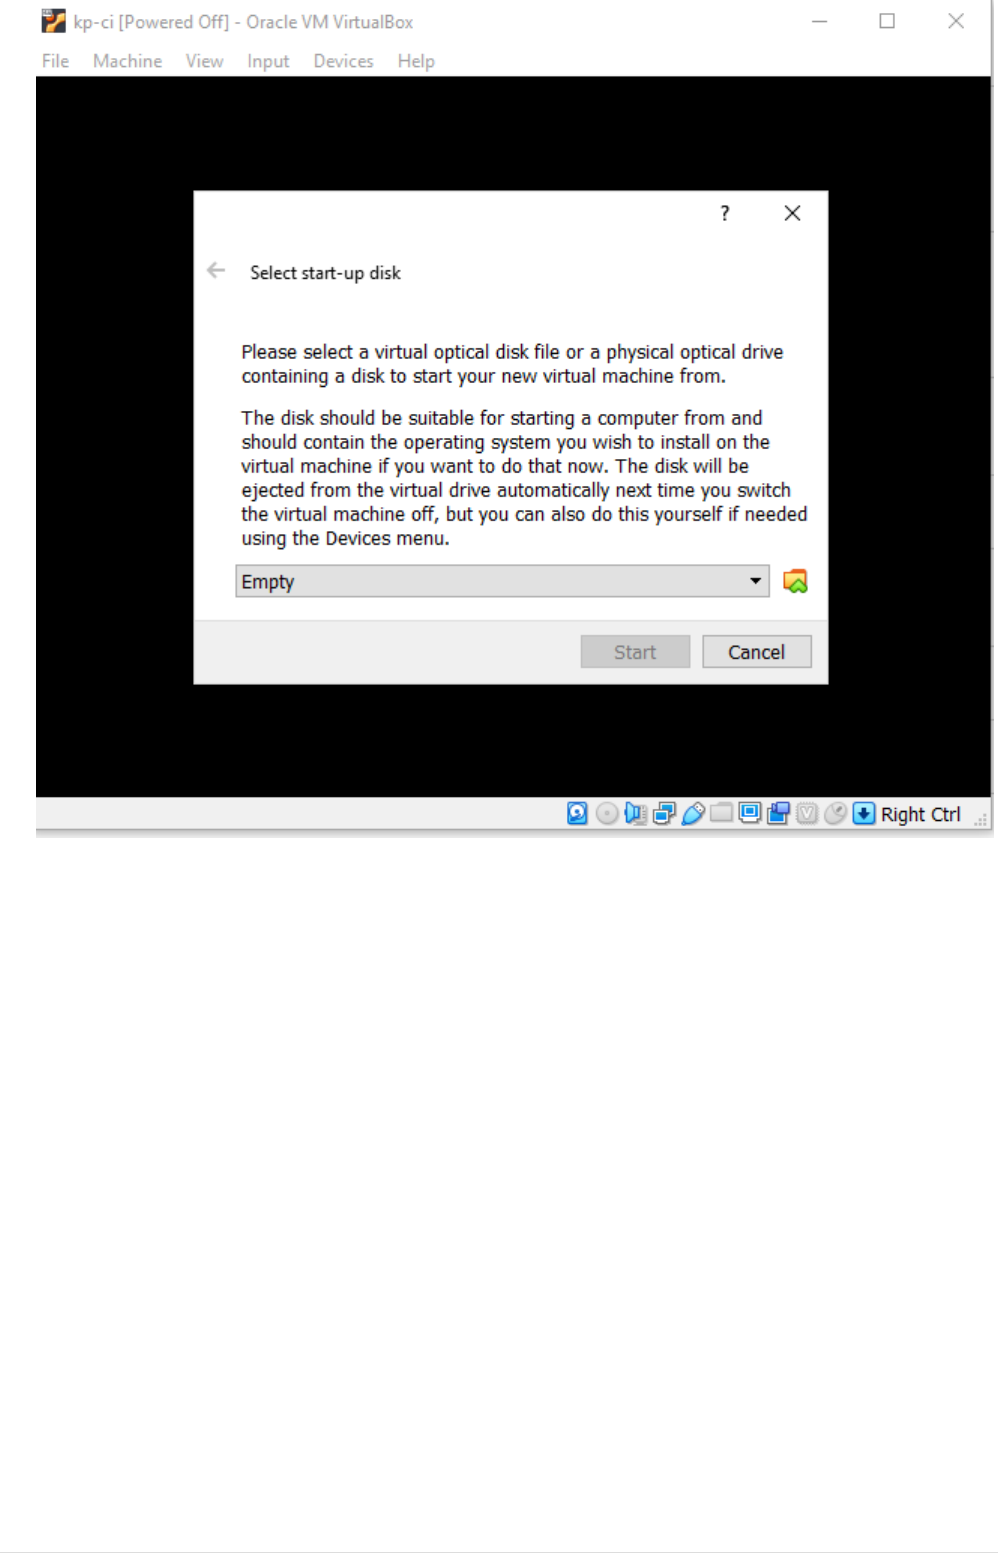
•Now, Double click on the VM Name in VBox home page. which start the VM.
•A option will popup to provide OS Image. Browse to OS image location and provide OS image
(ubuntu-18.04.1.0-live-server-amd64.iso). Then click on button start.
4
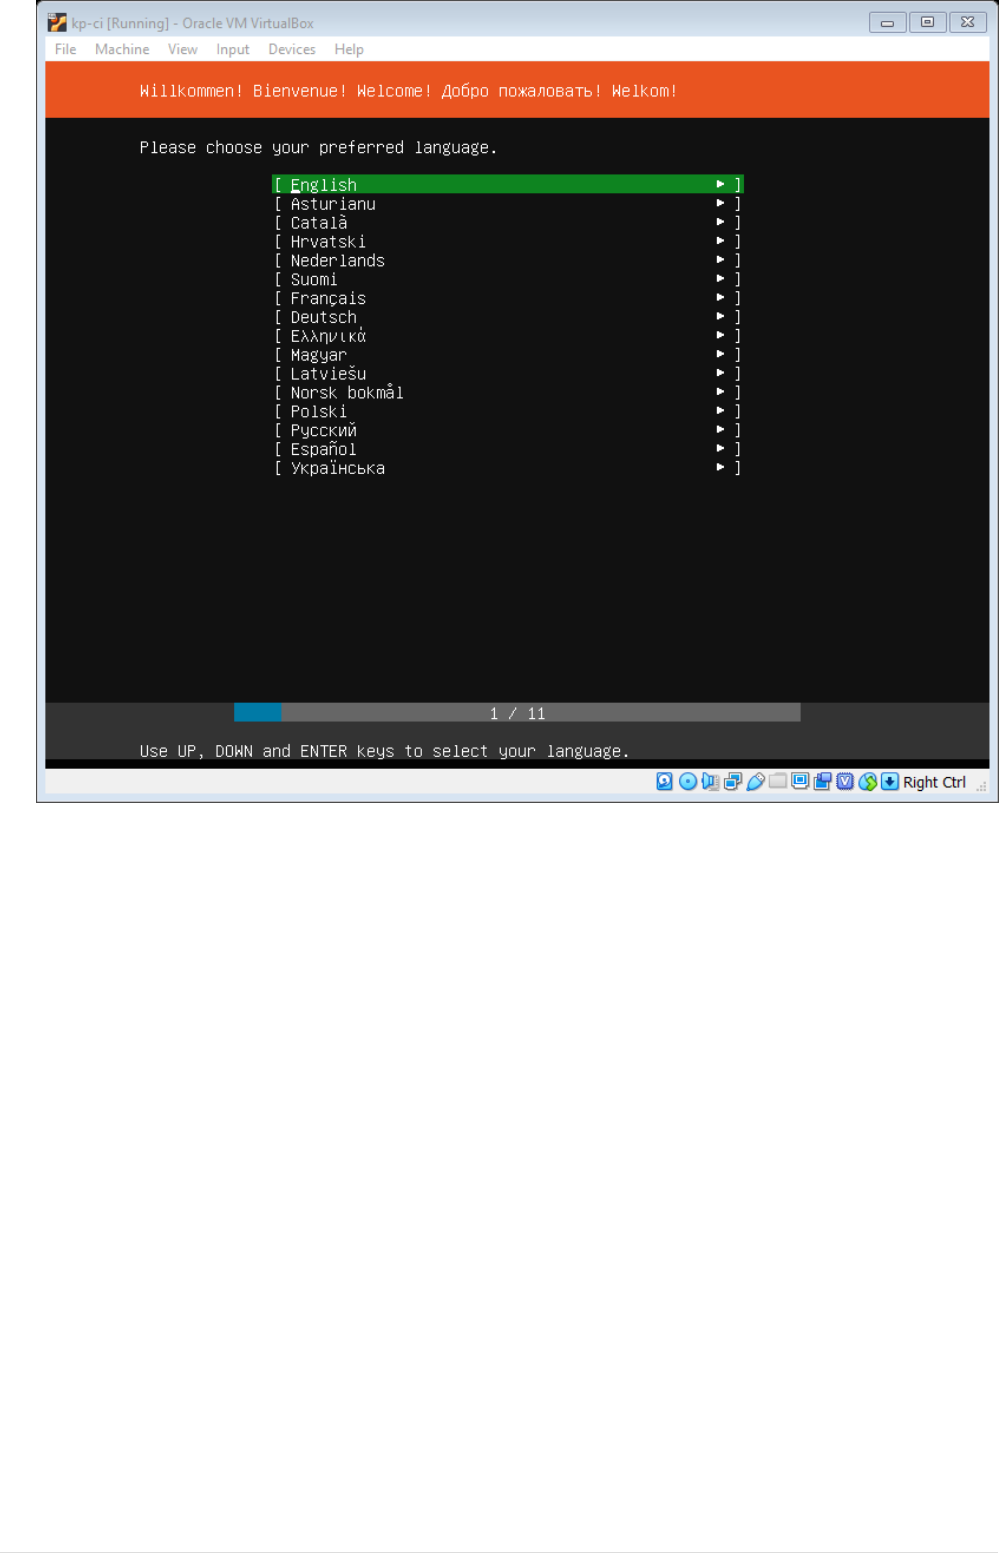
•After image is loaded, you will be asked to choose the language, set the desired language.
5
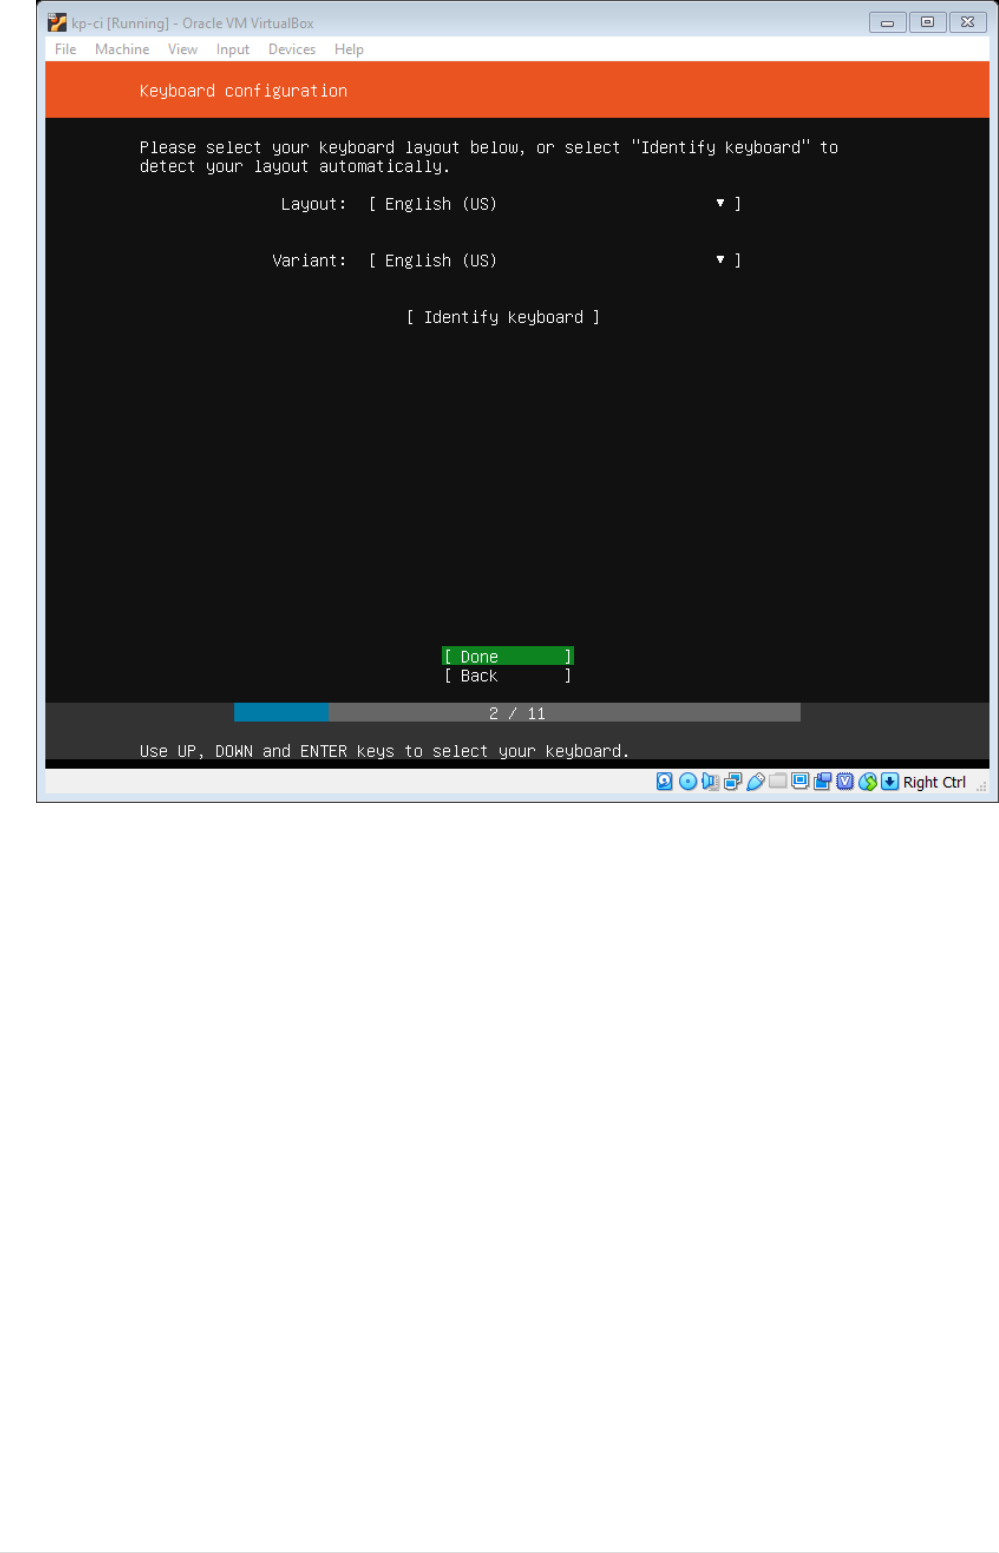
•Next you will be prompted to select keyboard layout, let the default configuration be as it is.
Navigate to Done using tab and click enter.
6
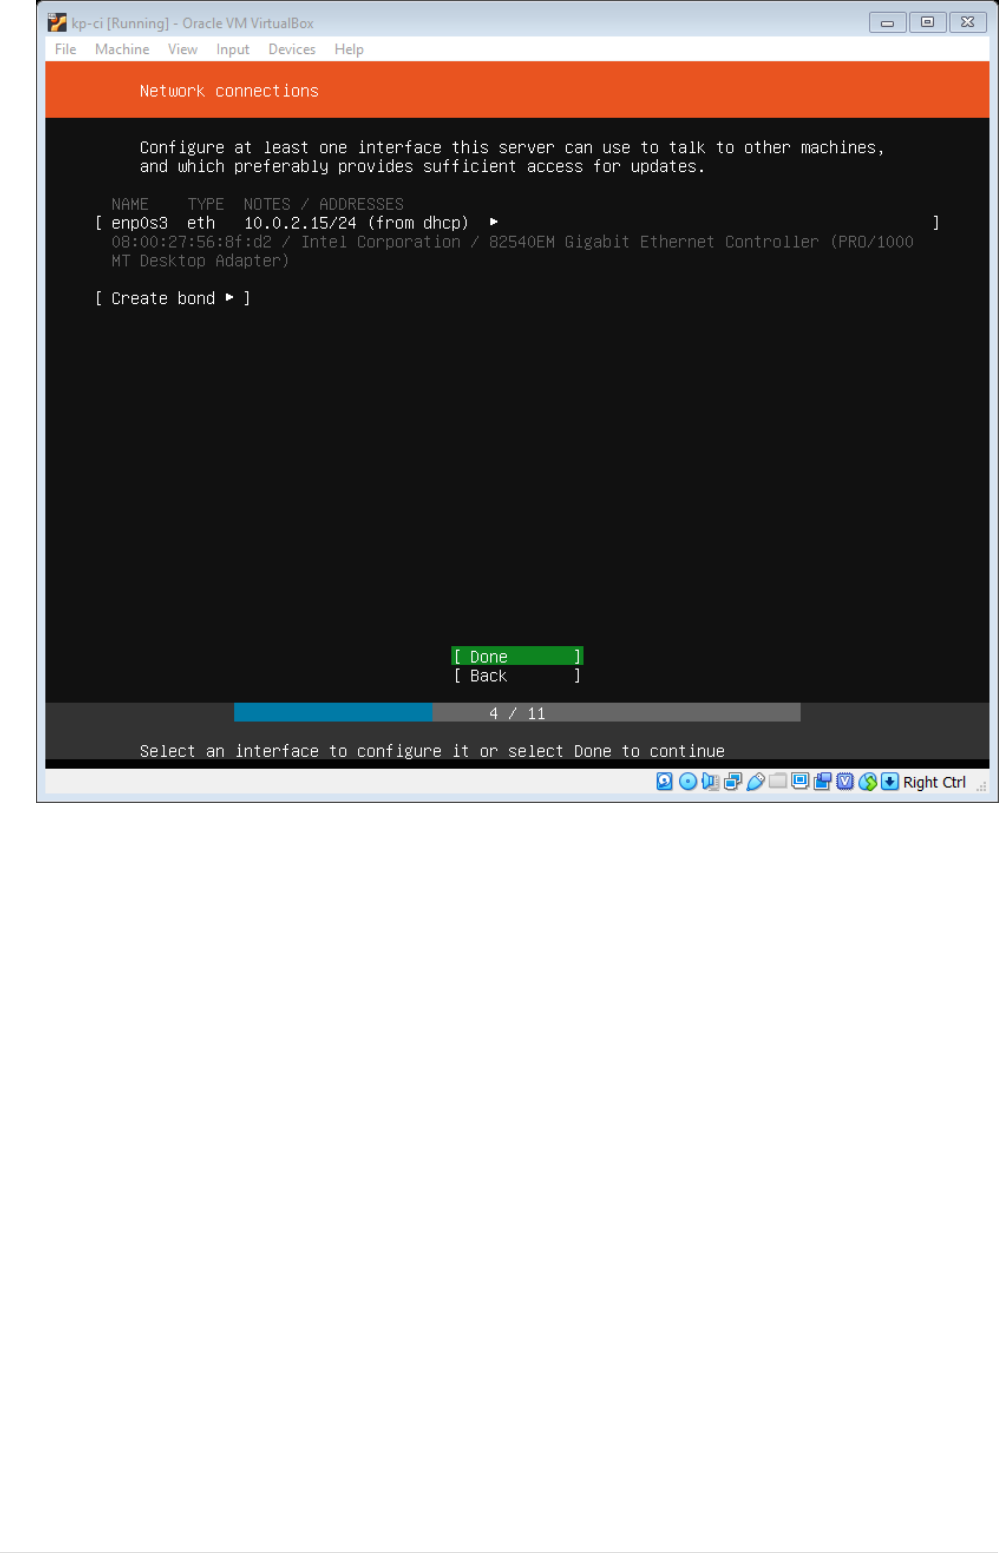
•Next you will be prompted to select Network interface, let the default configuration be as it is
will change it later on. Navigate to Done using tab and click enter.
7
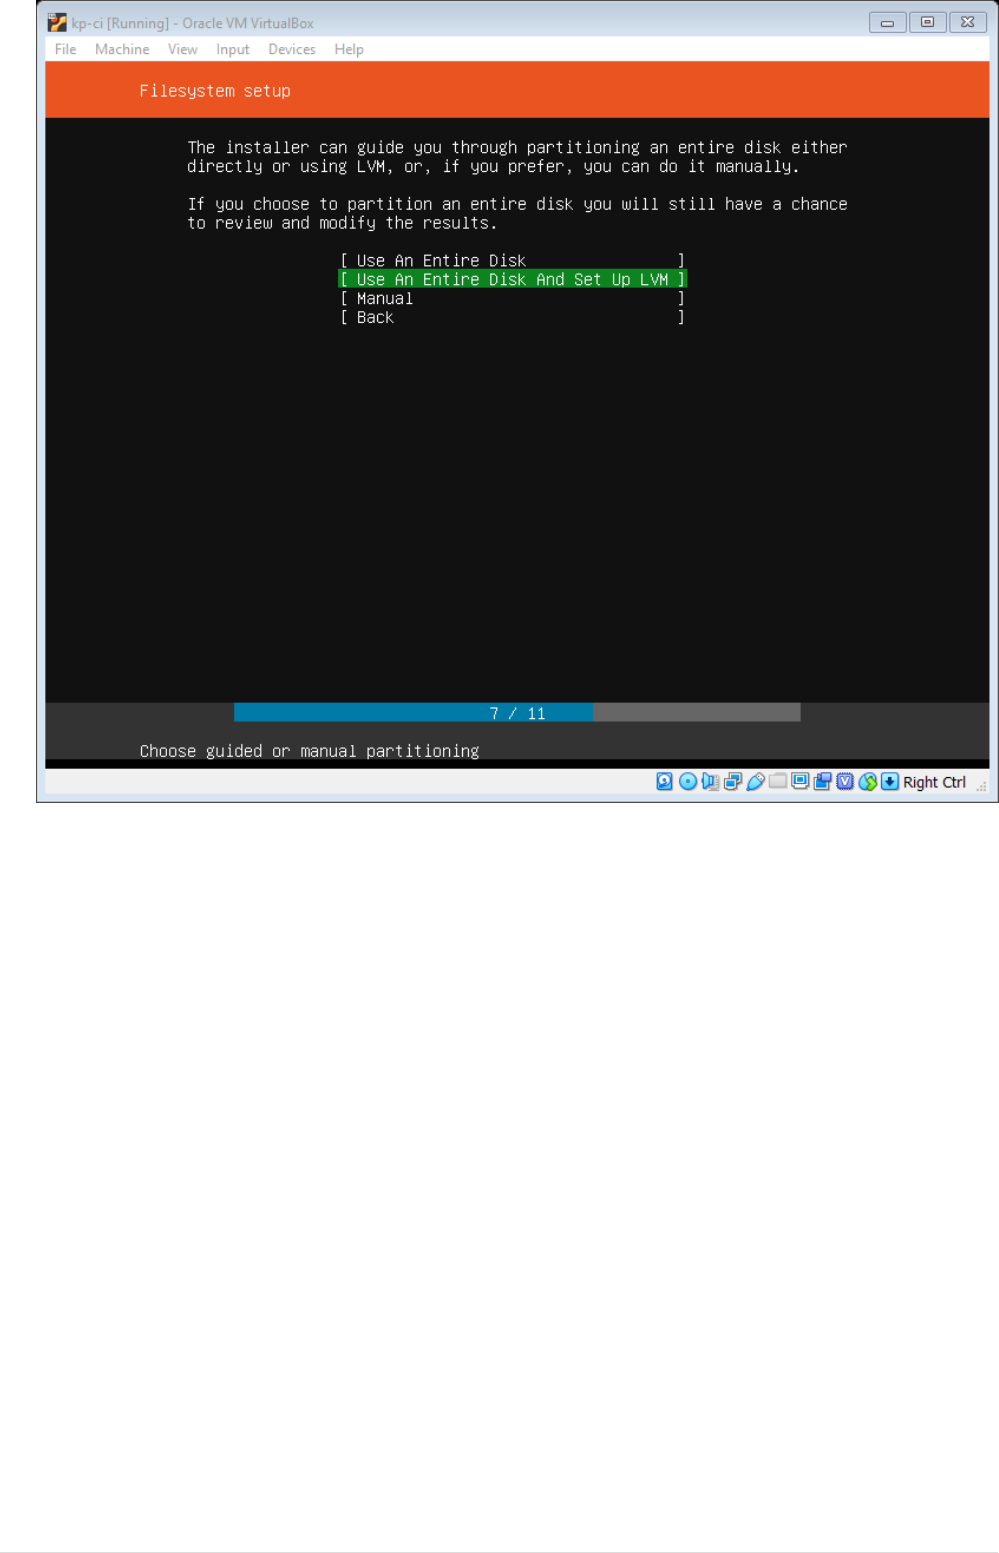
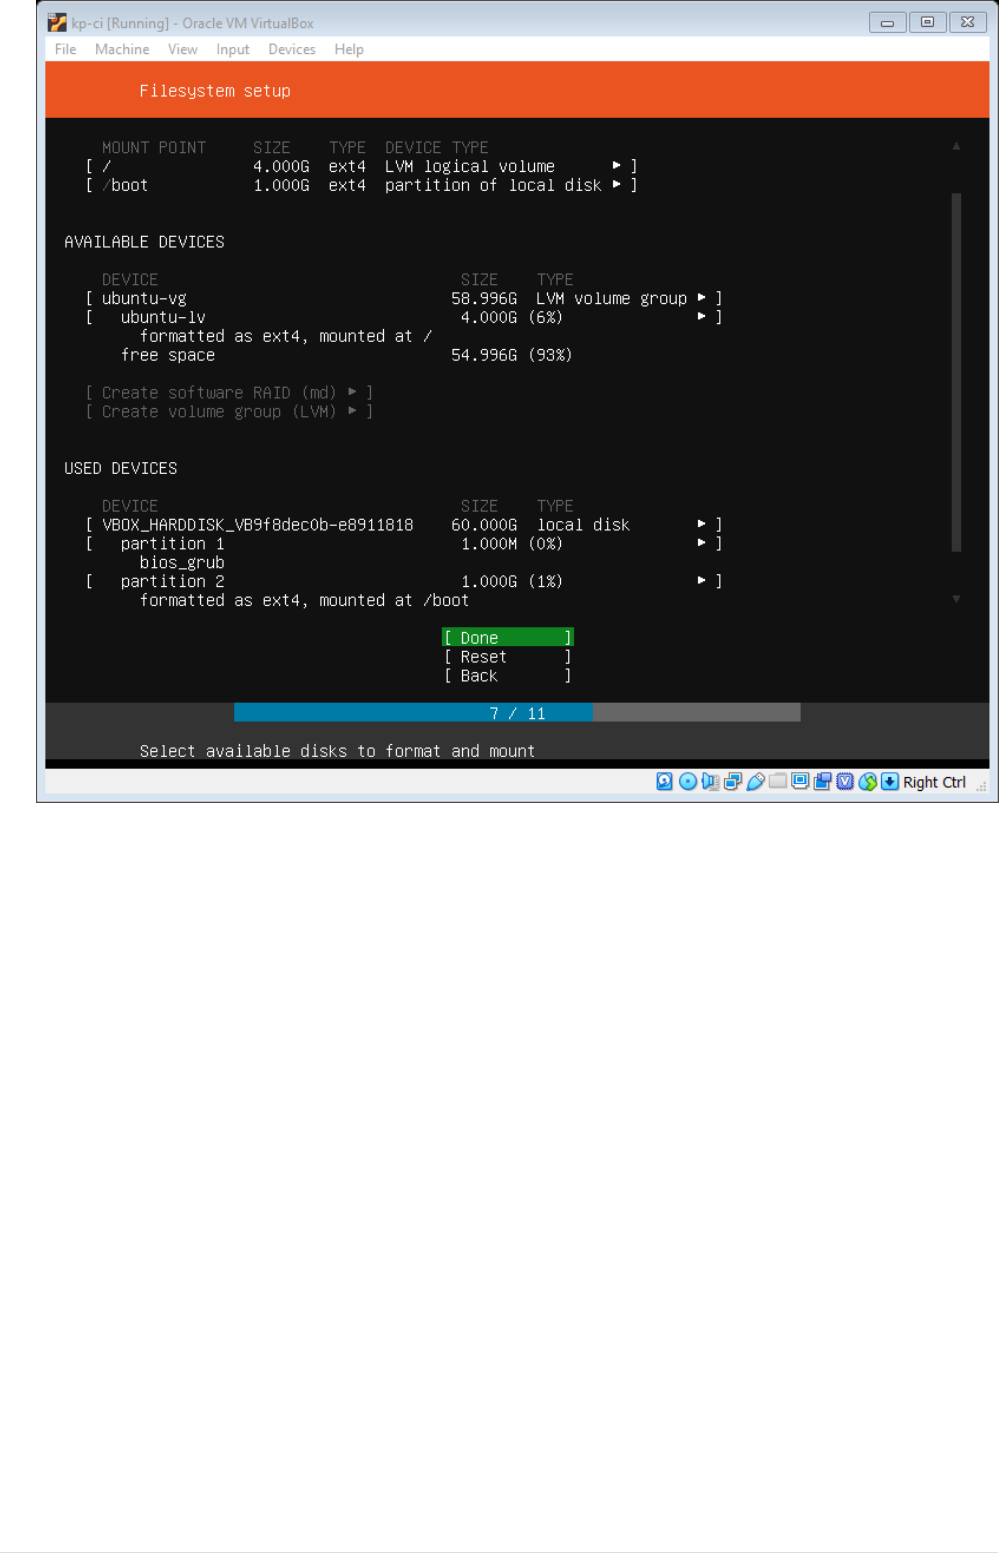
•Next setup hard drive by selecting option entire disk with LVM. CAUTION: When choosing LVM
make sure you’ve selected added entire disk to VG by default in 18.04 4GB is selected. You can
add the Disk at later point as well.
8
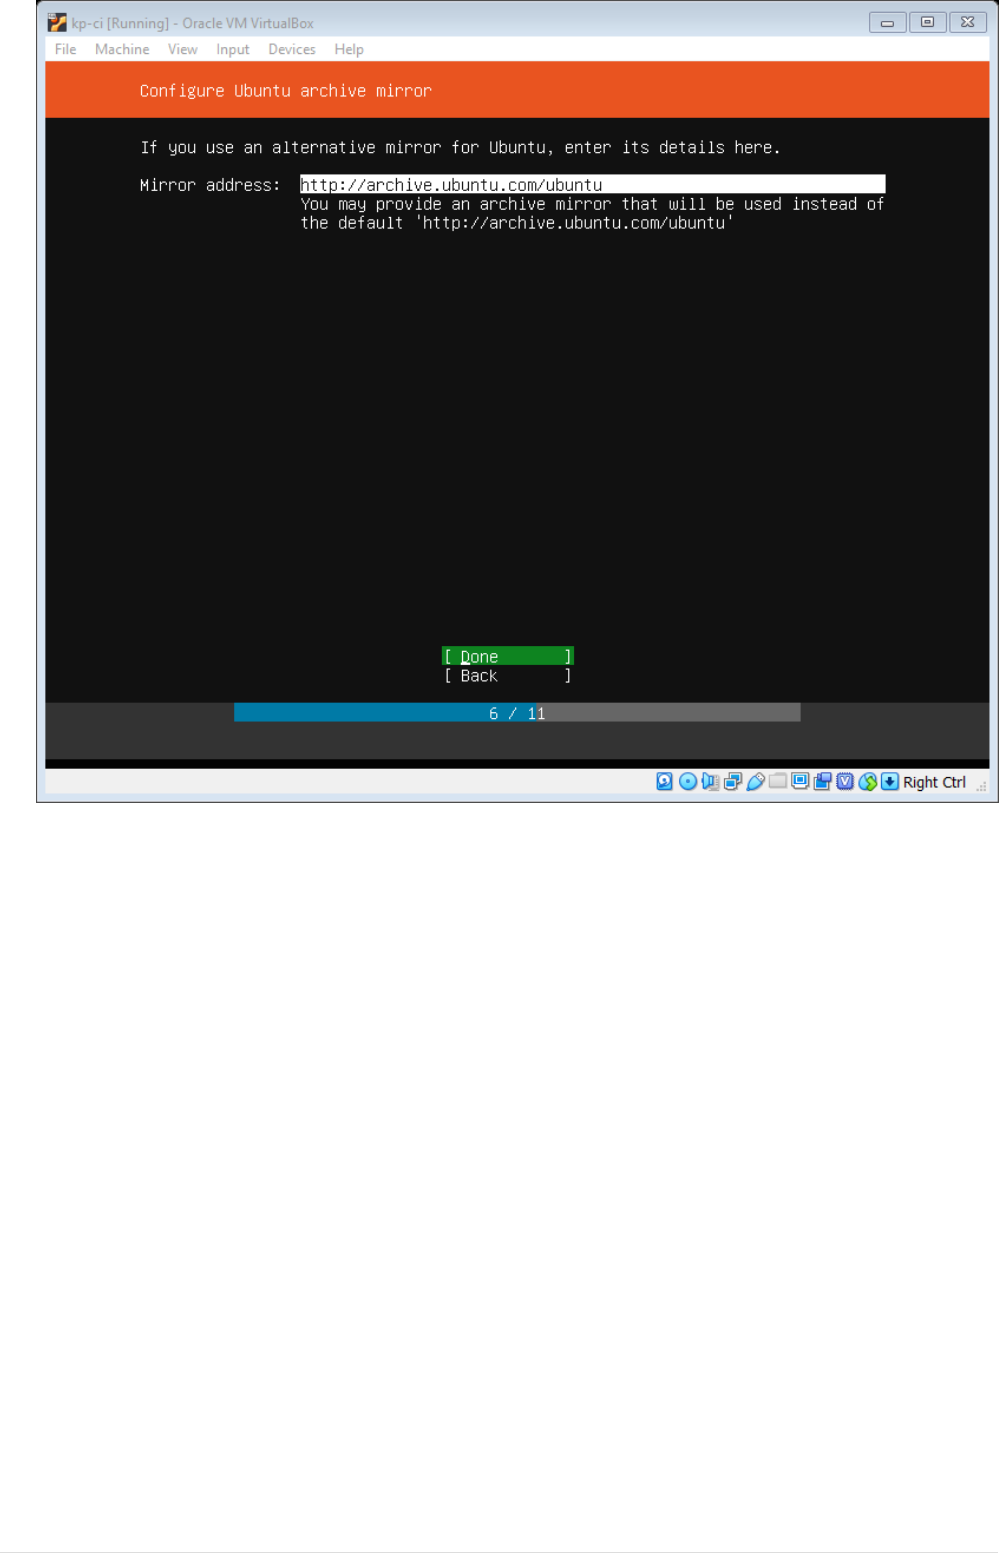
•Navigate through Configure Ubuntu Archive Mirror with default values.
9
•A summary window will shown describing the Disk Partitions, Navigate to Done option and
press Enter.
10
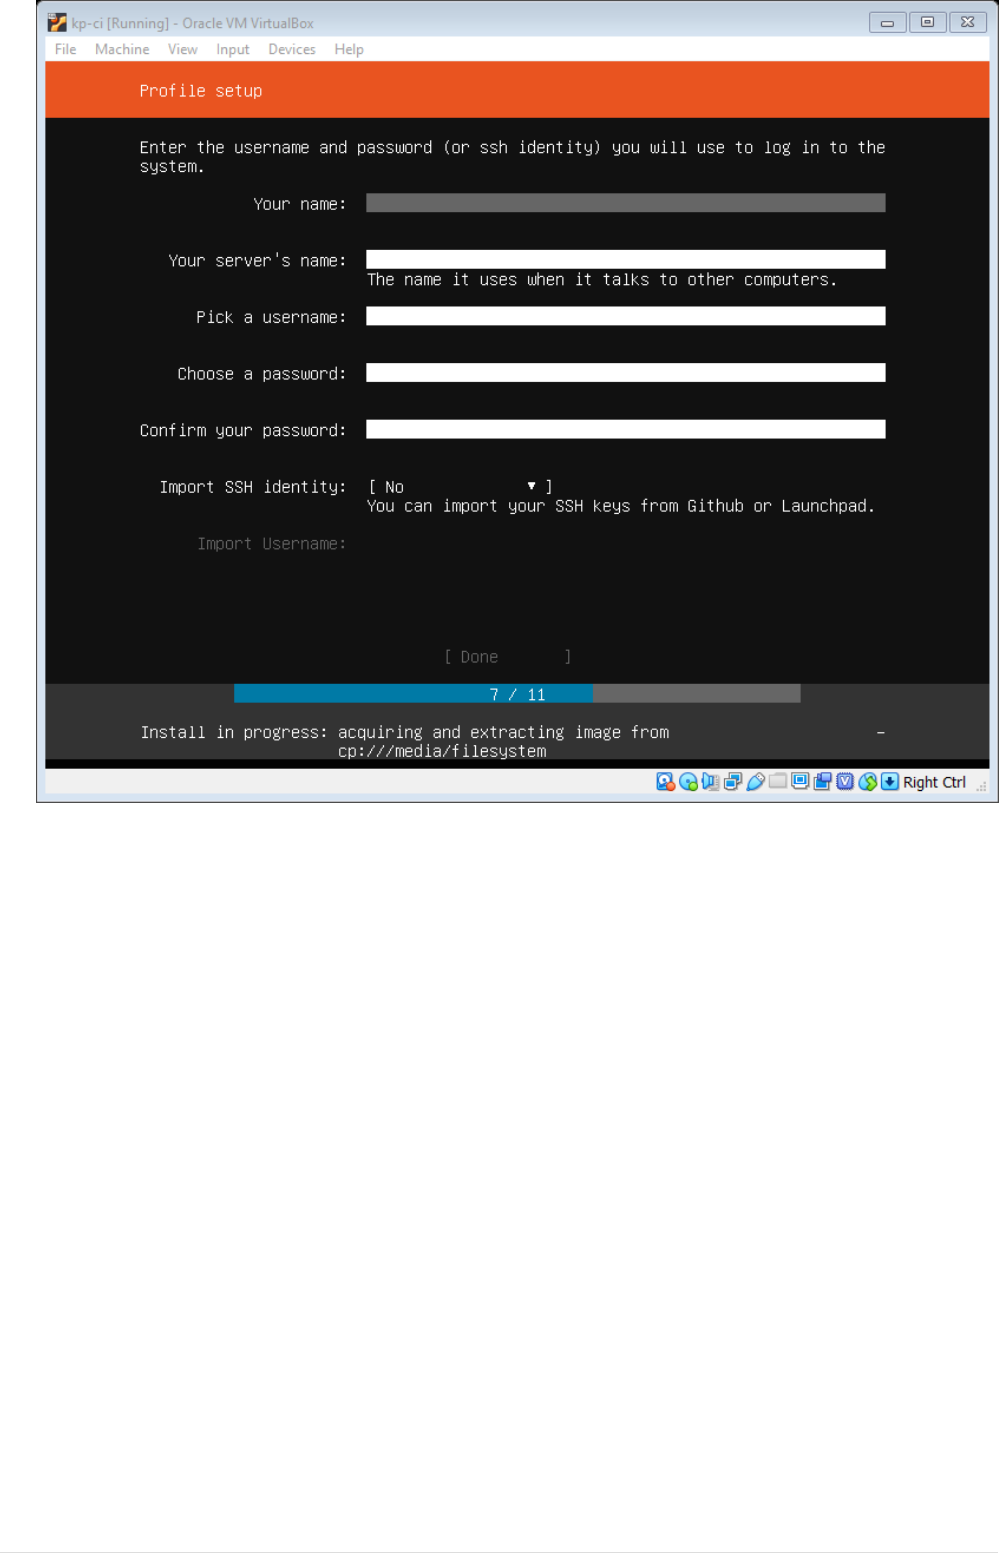
•Next Profile setup window comes up, fill all the details.
11
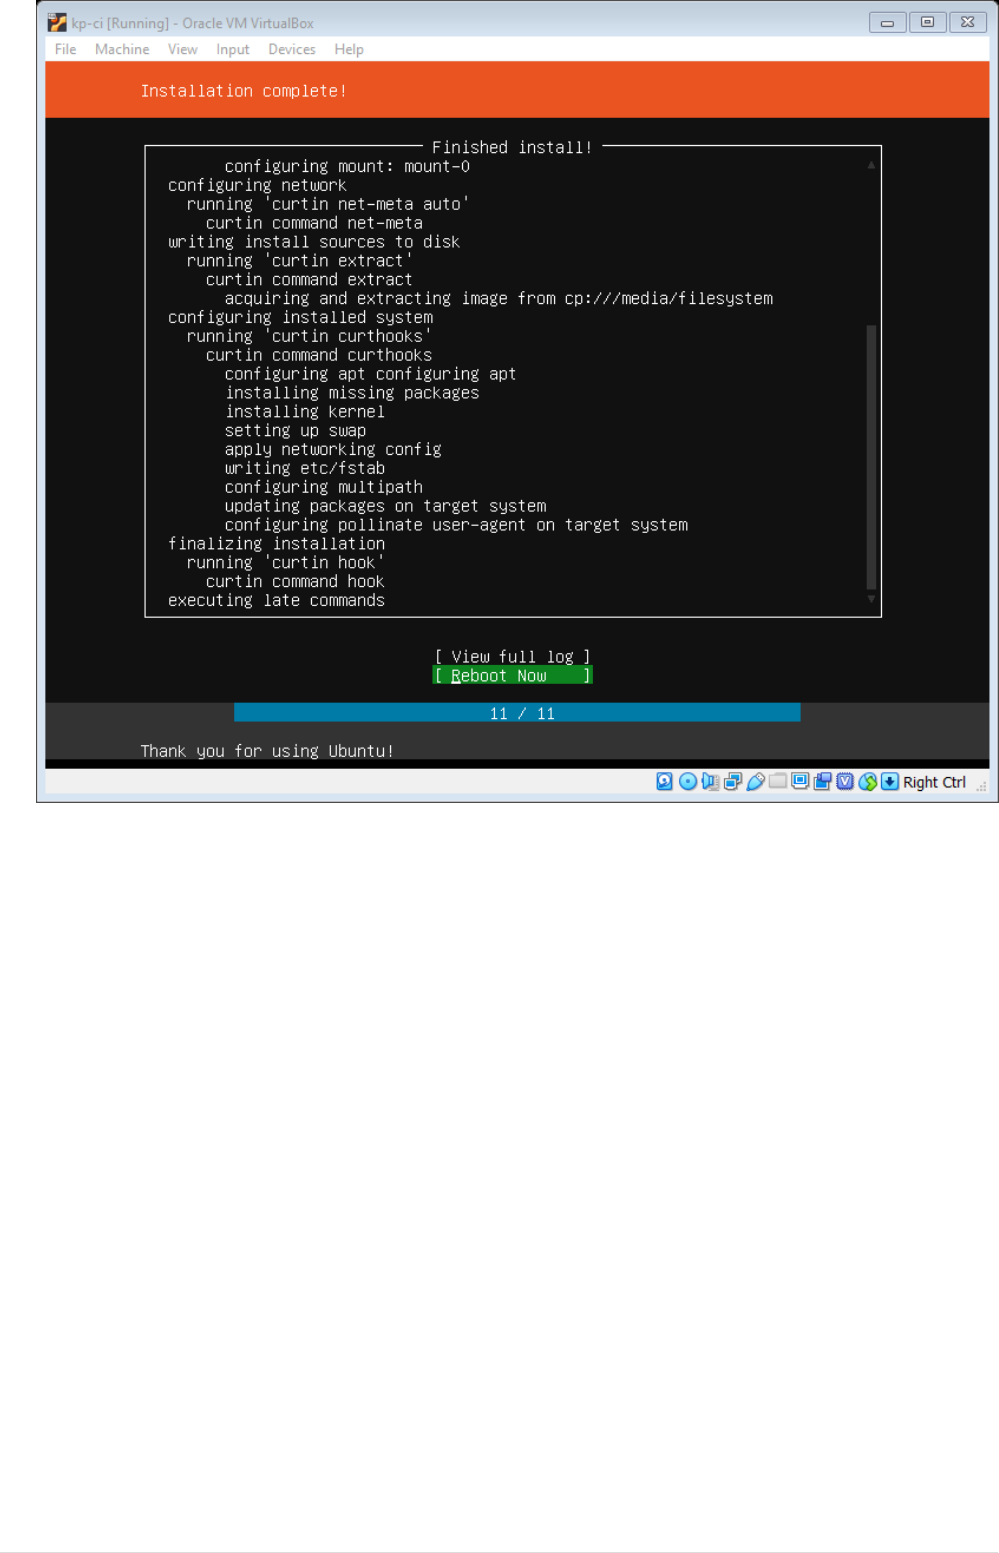
•Once you navigate from profile setup window, it would take sometime to setup OS. Once Setup
completes, would prompt to install grub, select yes to install grub, finally after installation click
on Reboot
12
Setup VM Network
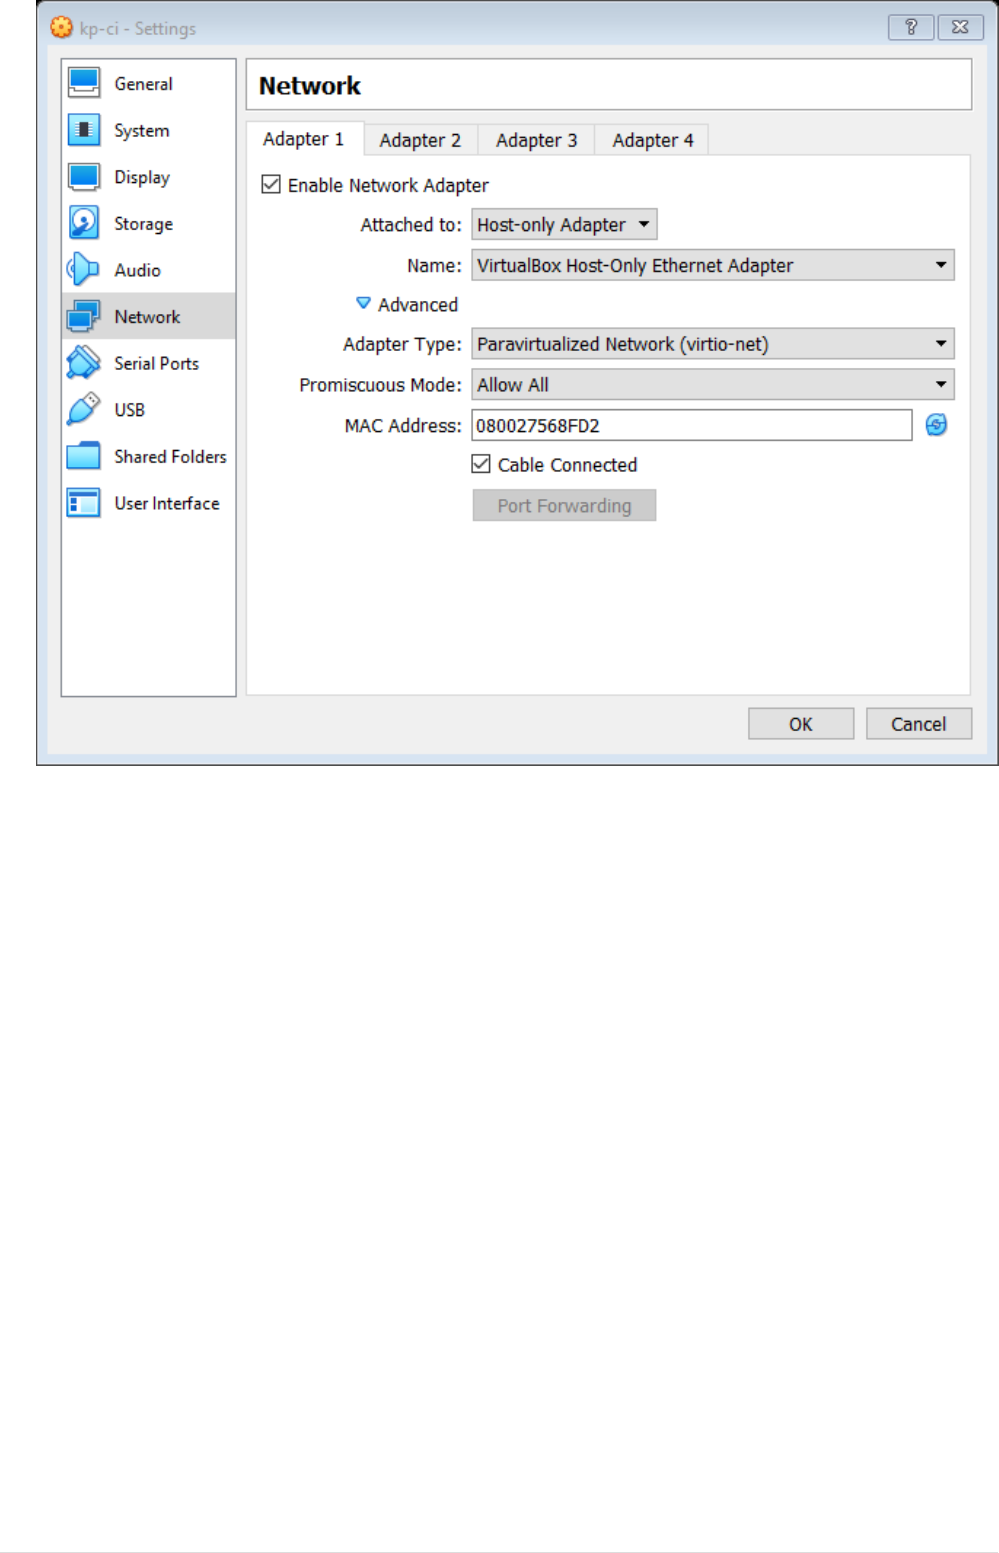
We will add 3 Networks to VM, with first network being host only, second network being NAT and
final network being Bridged
•Shutdown the VM.
•Select the VM, Navigate to Machine→Settings and select tab Network.
13
•Select Adapter 1 tab and set attached-to Host-Only Adapter and fill the details as show below.
14
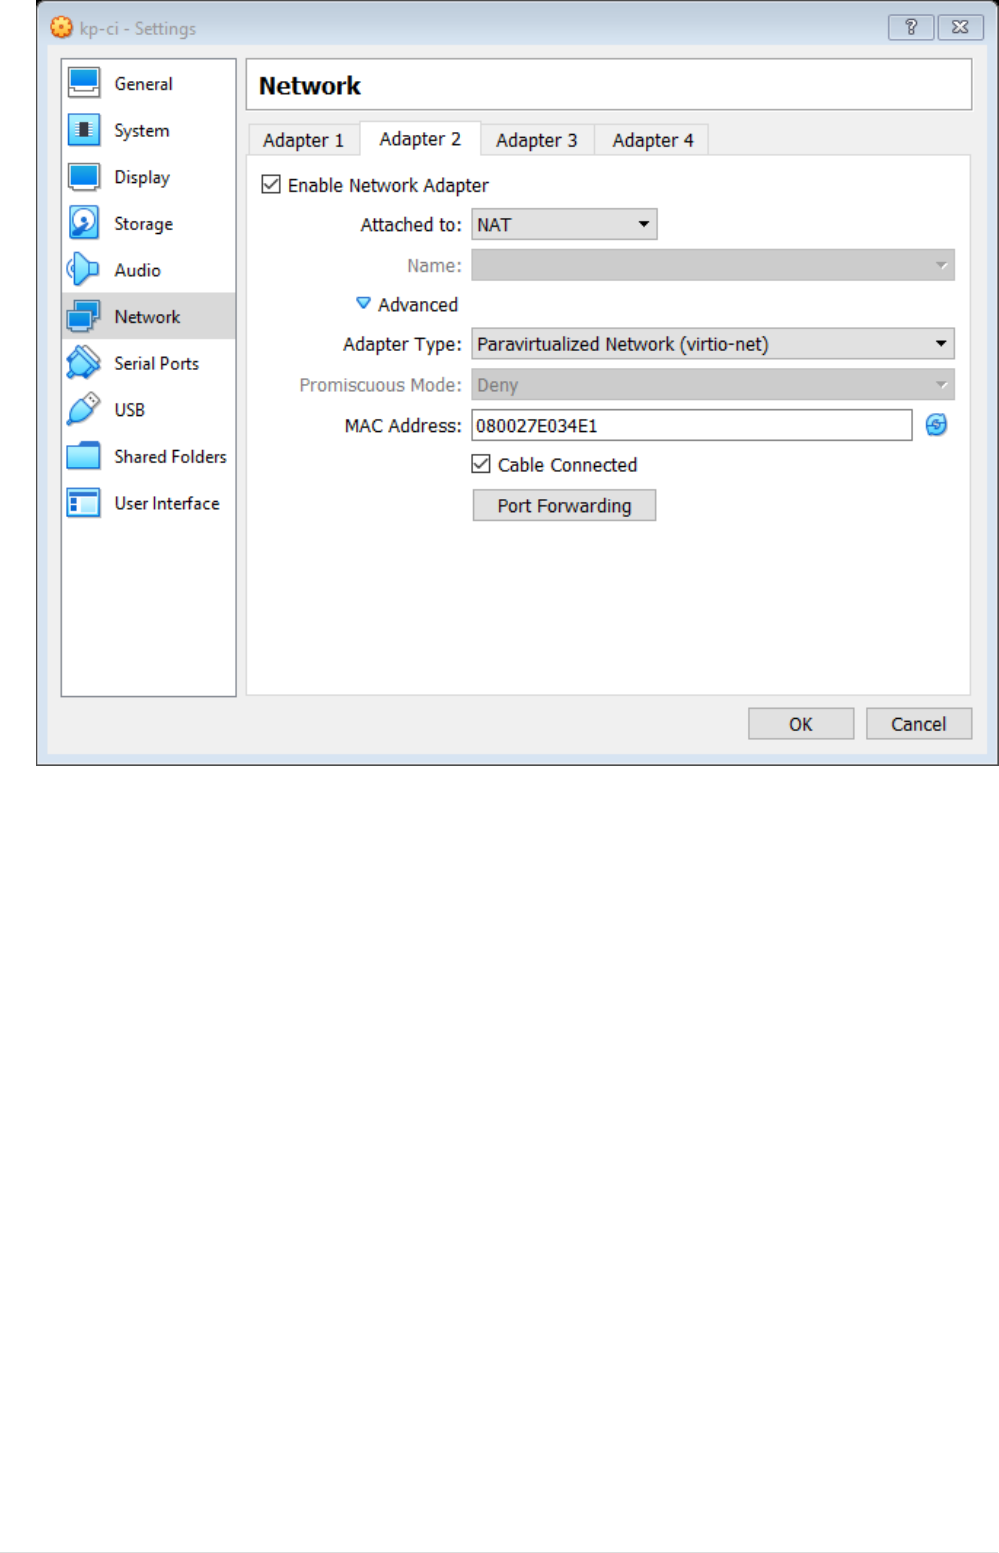
•Select Adapter 2 tab and set attached-to NAT and fill the details as show below.
15
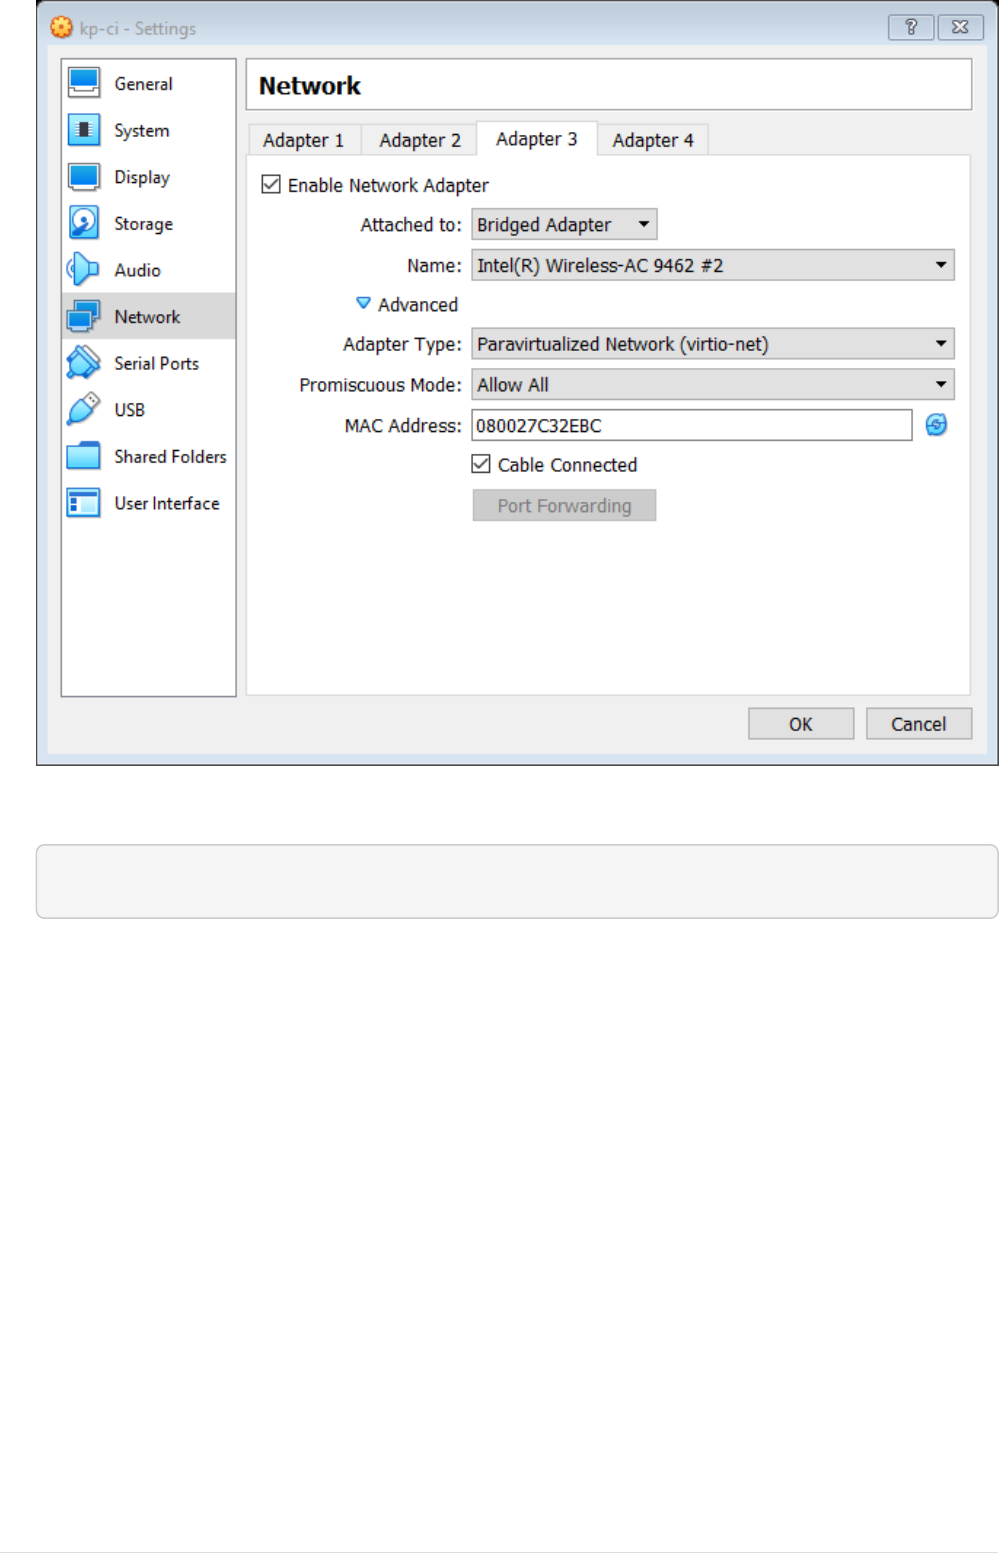
•Select Adapter 3 tab and set attached-to Bridged and fill the details as show below.
16
•Start the VM, login to the VM, execute below command and note down list of interface names.
$ ifconfig -a
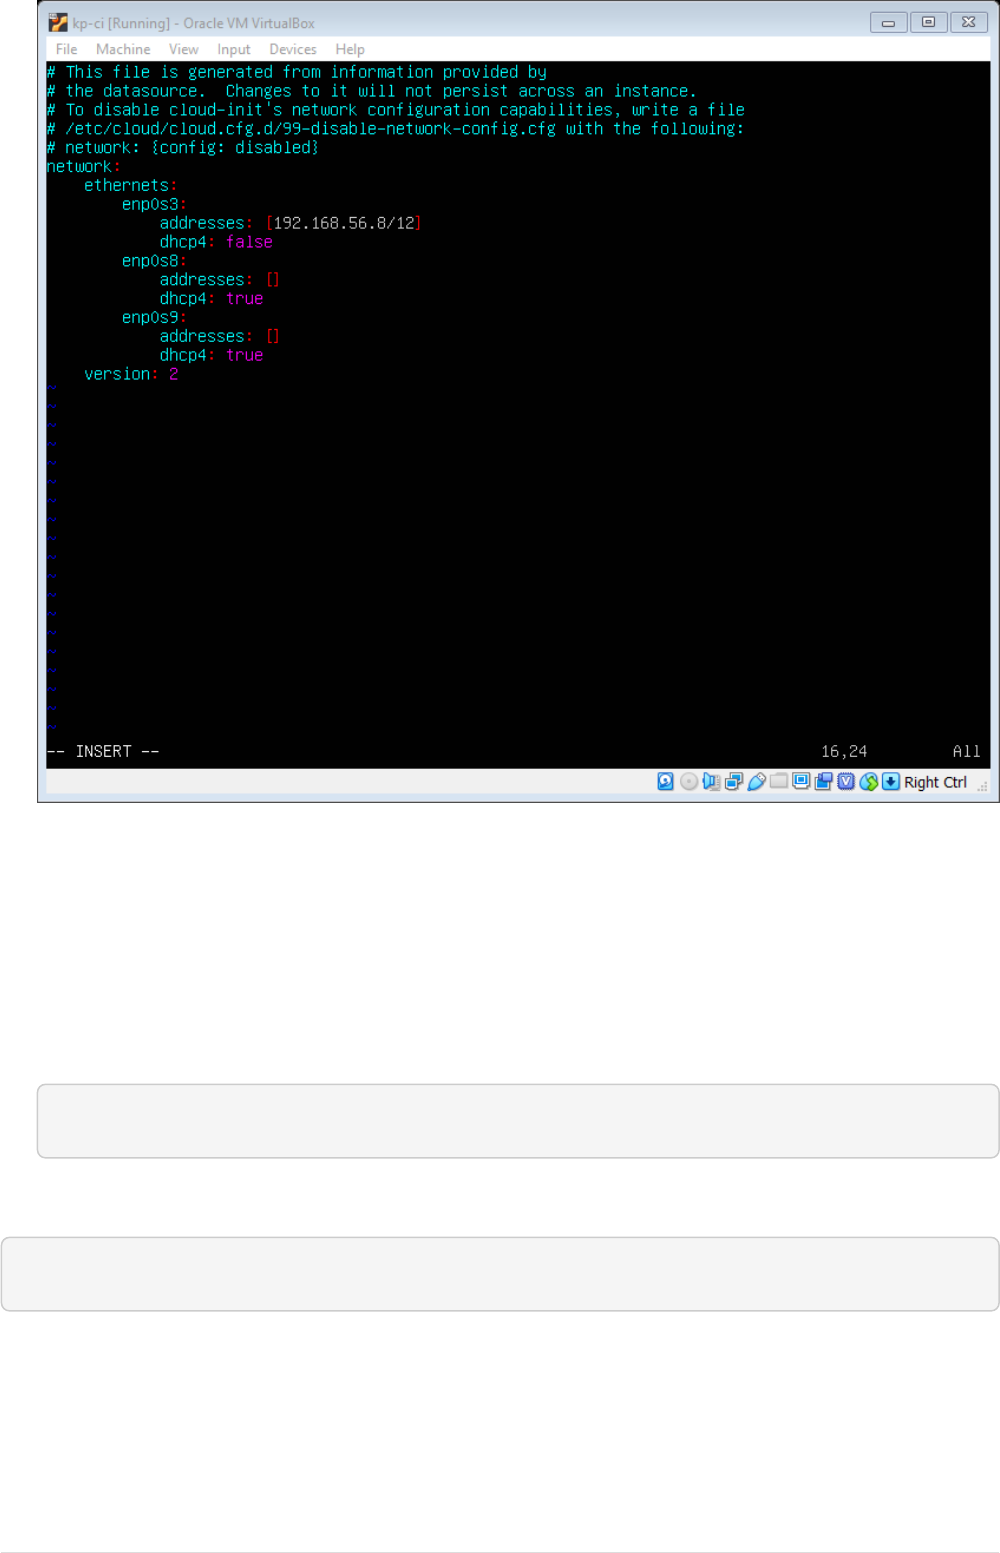
•Open netplan yaml file at /etc/netplan/50-cloud-init.yaml and set static IP for host-only
adapter and dhcp IP auto discovery for NAT and Bridged, For Host-only network before setting
up note down the subnet for Host only adapter from VirtualBox Network. You can also setup a
static IP from Bridge Network. A sample configuration is as shown below.
17
•Reboot the VM.
Install and setup GitLab on Ubuntu 18.04 server.
Install Gitlab
•Update packages
$ sudo apt-get update
•Install additional packages
$ sudo apt-get install -y curl openssh-server ca-certificates
•Add the GitLab package repository and install the package
Add the GitLab package repository.
18

$ curl https://packages.gitlab.com/install/repositories/gitlab/gitlab-ce/script.deb.sh
\
Ê | sudo bash
•Next, install the GitLab package. Change https://gitlab.example.com to the URL at which you
want to access your GitLab instance. Installation will automatically configure and start GitLab
at that URL. For https:// URLs GitLab will automatically request a certificate with Let’s Encrypt,
which requires inbound HTTP access and a valid hostname. You can also use your own
certificate or just use http://.
$ sudo EXTERNAL_URL="https://gitlab.example.com" apt-get install gitlab-ce
•Browse to the hostname and login.
On your first visit, you’ll be redirected to a password reset screen. Provide the password for the
initial administrator account and you will be redirected back to the login screen. Use the default
account’s username root to login.
Setup Email Address using Gmail.
•Enable 2-way Authentication by following the steps here
•Generate App code.
◦Go to your Google Account.
◦On the left navigation panel, click Security.
◦On the "Signing in to Google" panel, click App passwords. If prompted, enter your password.
If you can’t get to the page, 2-Step Verification is:
▪Not set up for your account
▪Set up for security keys only
◦At the bottom, click Select app and choose the app you’re using.
◦Click Select device and choose the device you’re using.
◦Click Generate.
◦Follow the instructions to enter the App password (the 16 character code in the yellow bar)
on your device.
◦Copy the app password and click Done.
•Setup SMTP server on Gitlab
◦Open /etc/gitlab/gitlab.rb
$ sudo vim /etc/gitlab/gitlab.rb
19

◦Copy the below content and update email and password generated in previous step
gitlab_rails['smtp_enable'] = true
gitlab_rails['smtp_address'] = "smtp.gmail.com"
gitlab_rails['smtp_port'] = 587
gitlab_rails['smtp_user_name'] = "my.email@gmail.com"
gitlab_rails['smtp_password'] = "my-gmail-password"
gitlab_rails['smtp_domain'] = "smtp.gmail.com"
gitlab_rails['smtp_authentication'] = "login"
gitlab_rails['smtp_enable_starttls_auto'] = true
gitlab_rails['smtp_tls'] = false
gitlab_rails['smtp_openssl_verify_mode'] = 'peer'
gitlab_rails['gitlab_email_from'] = 'gitlab@example.com'
gitlab_rails['gitlab_email_reply_to'] = 'noreply@example.com'
•Reload the configuration be executing below command
$ sudo gitlab-ctl reconfigure
•Testing gitlab’s ability to send email
◦Open Ruby console
$ sudo gitlab-rails console
◦Execute below command after updating destination email address
> Notify.test_email('destination_email@address.com', 'Message Subject',
'<html><body>Message Body</body></html>').deliver_now
Install JDK-8 as Jenkins LTS does not support JDK-11
Install OpenJDK 8/11 in Ubuntu 18.04
Below are the steps to install openjdk 8/11 in ubuntu 18.04. The default jdk shipped in ubuntu 18.04
is JDK-10.
•Add Java PPA Repository.
$ sudo add-apt-repository ppa:webupd8team/java
•Update apt cache.
20
$ sudo apt update
•Now you can install openjdk-8 or openjdk-11 using below command.
$ sudo apt install openjdk-8-jdk
•Update Java alternatives.
$ sudo update-alternatives --install /usr/bin/java java usr/lib/jvm/java-8-openjdk-amd64/bin/java 1000
Install Jenkins Server on Ubuntu
18.04
Prerequiste
•JDK-8
Installtion
•Update Jenkins key cache.
$ wget -q -O - https://pkg.jenkins.io/debian/jenkins.io.key | sudo apt-key add -
•Add Repository.
$ sudo sh -c 'echo deb https://pkg.jenkins.io/debian-stable binary/ >
/etc/apt/sources.list.d/jenkins.list'
•Update package
$ sudo apt-get update
•Install Jenkins server
$ sudo apt-get install jenkins
This package installation will:
21
•Setup Jenkins as a daemon launched on start. See /etc/init.d/jenkins for more details.
•Create a jenkins user to run this service.
•Direct console log output to the file /var/log/jenkins/jenkins.log. Check this file if you are
troubleshooting Jenkins.
•Populate /etc/default/jenkins with configuration parameters for the launch, e.g JENKINS_HOME
•Set Jenkins to listen on port 8080. Access this port with your browser to start configuration.
If your /etc/init.d/jenkins file fails to start Jenkins, edit the /etc/default/jenkins
to replace the line ----HTTP_PORT=8080---- with ----HTTP_PORT=8081---- Here,
"8081" was chosen but you can put another port available.
•While configuring on UI select Install recommended plugins.
Configure Email Notification using Gmail.
•Go to Manager Jenkins -→ Configure System.
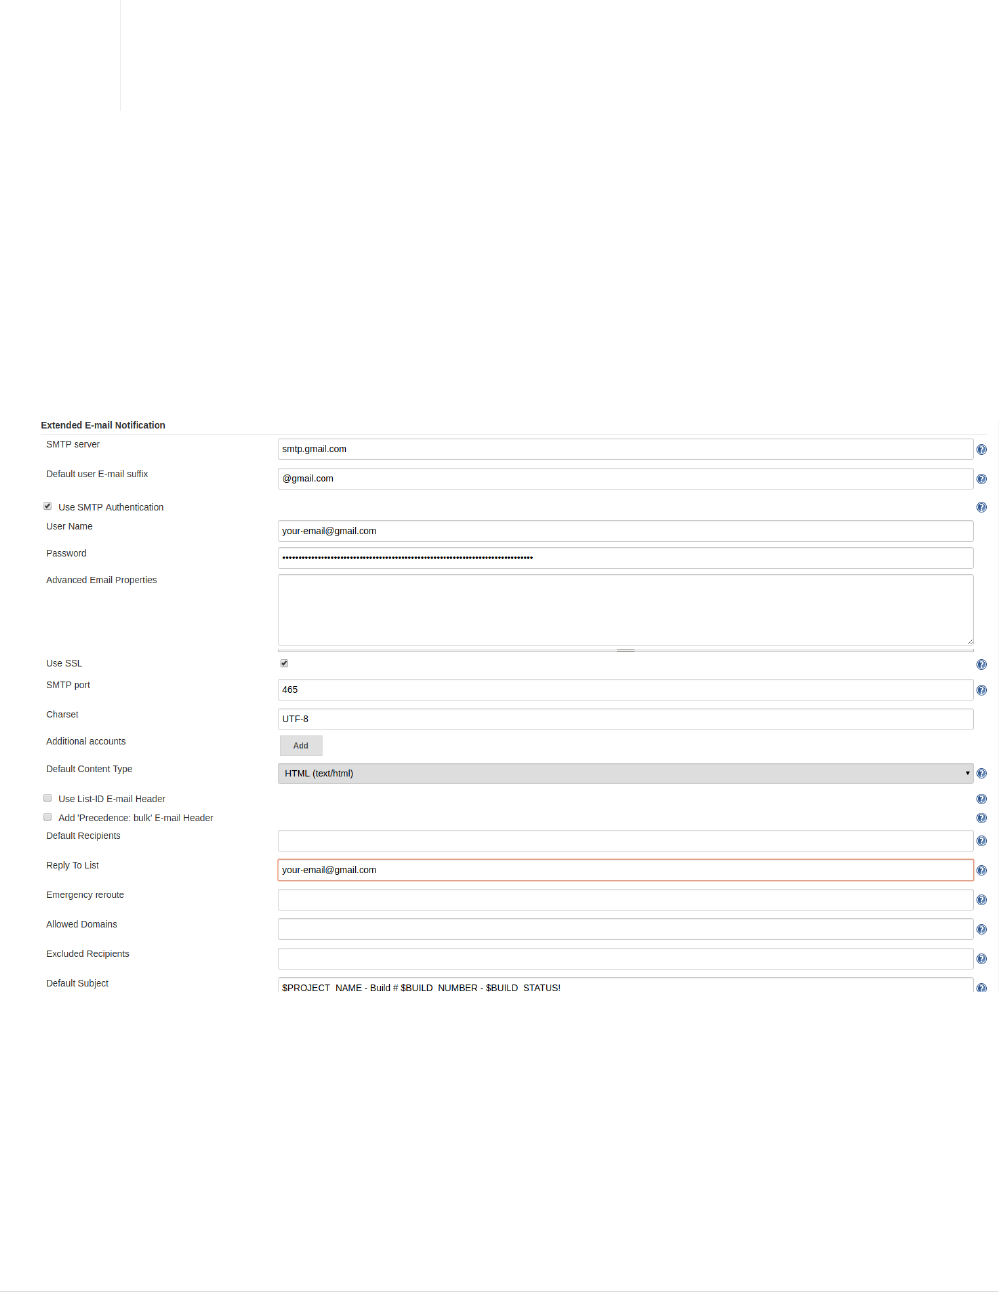
•Goto Extending Email Notification section. Fill details as shown in below screenshot with your
email address. SMTP Server is smtp.gmail.com, select adavanced option and set username and
password(password should be your app code) set USE SSL with Port 465
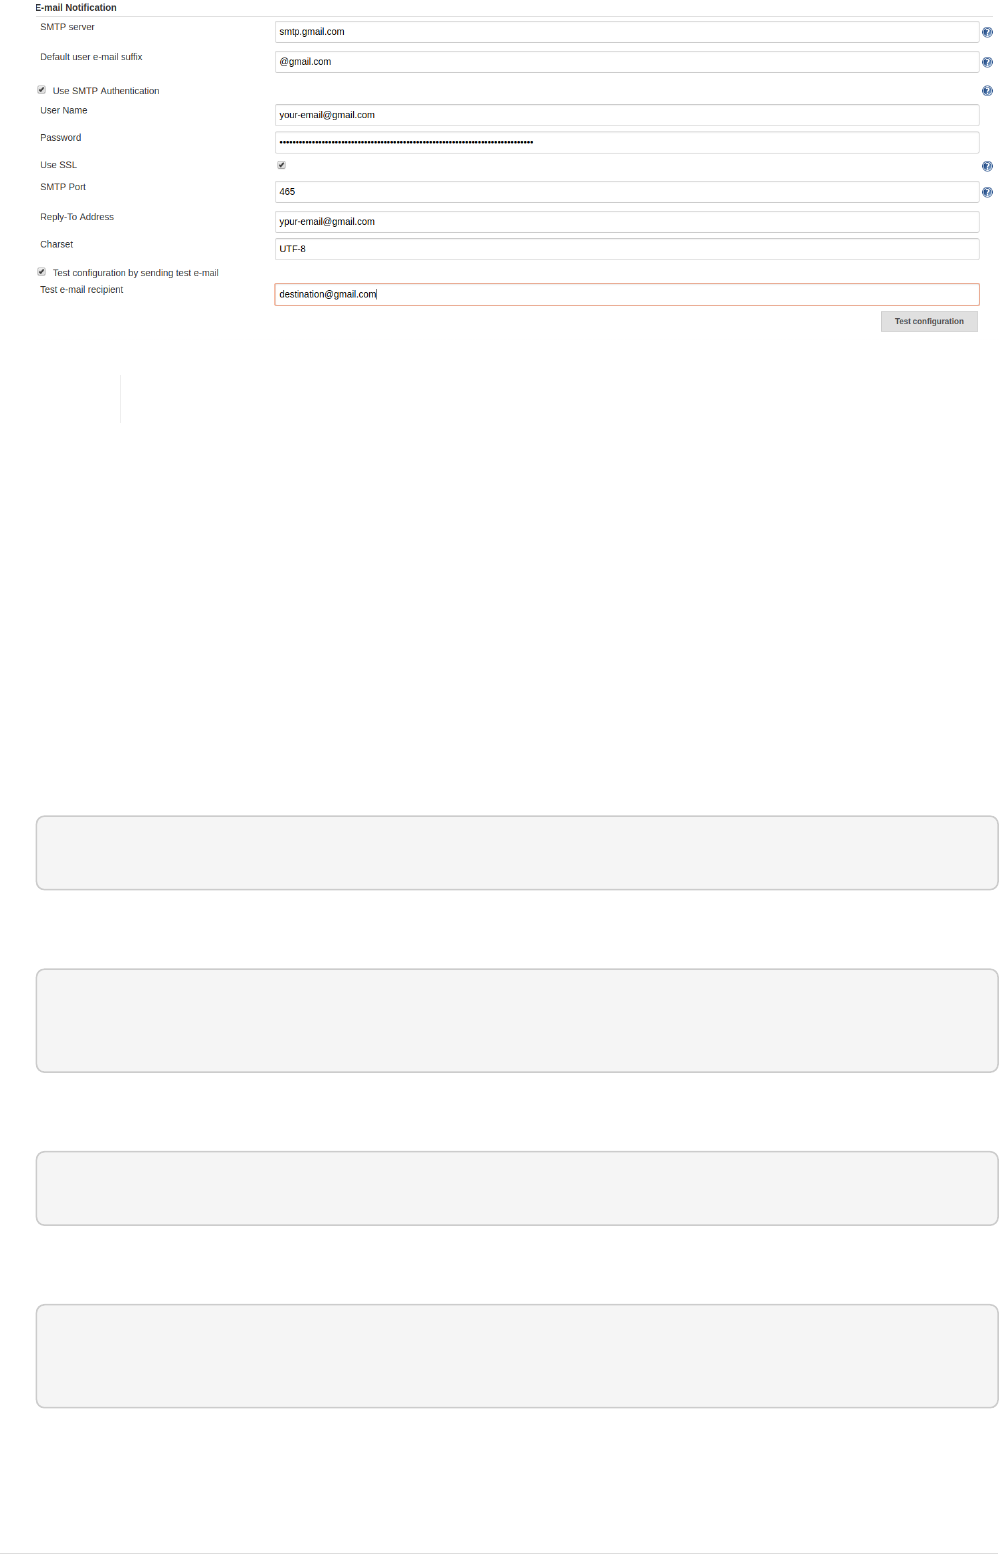
•Goto E-mail Notification section. Fill details as shown in below screenshot with your email
address. SMTP Server is smtp.gmail.com, select adavanced option and set username and
password(password should be your app code) set USE SSL with Port 465
22
Use jenkins user while adding user to docker group.
Installation and configuration of
docker in Ubuntu 18.04
Install docker package
Below are the steps to install docker in ubuntu 18.04
•First update existing packages.
$ sudo apt update ; sudo apt upgrade
•Install utility packages
$ sudo apt install apt-transport-https ca-certificates curl software-properties-
common
•Add GPG key
$ curl -fsSL https://download.docker.com/linux/ubuntu/gpg | sudo apt-key add -
•Add docker repository to apt sources.
$ sudo add-apt-repository "deb [arch=amd64]
https://download.docker.com/linux/ubuntu bionic stable"
•Update apt sources and install docker
23

$ sudo apt update ; sudo apt install docker-ce
•Verify docker service is started.
$ sudo systemctl status docker
Enable docker command execution without sudo.
•We need to add user to docker group to enable docker command execution without sudo user.
◦To add current user
Ê$ sudo usermod -aG docker ${USER}
◦Alternatively to add any other user
Ê$ sudo usermod -aG docker <username>
•Verify if user is added to docker group by listing the groups the user is added to.
$ id -nG ${USER}
•Login to new session, now you can execute docker commands without need sudo access.
$ su - ${USER}
Install and setup NEXUS 3 on Ubuntu 18.04
•Download the NEXUS package
$ wget https://sonatype-
download.global.ssl.fastly.net/repository/repositoryManager/3/nexus-3.15.2-01-
unix.tar.gz
Checkout for the latest version instead of 3.15
•Extract the file
$ tar -xzvf nexus-3.15.2-01-unix.tar.gz
24
•Move the file to /opt directory.
$ sudo mv nexus-3.15.2-01 /opt/nexus-server/nexus-3.15.2-01.
•Create user nexus
$ sudo addUser nexus
•Give sudo permission to user nexus
$ sudo usermod -aG sudo nexus
•Change the ownersource,ship of the directory.
$ sudo chown nexus:nexus /opt/nexus-server
•In bin/nexus.rc assign the user between the quotes in the line below.
run_as_user="nexus"
•Create a file called nexus.service. Add the following contents, then save the file in the
/etc/systemd/system/ directory:
[Unit]
Description=nexus service
After=network.target
[Service]
Type=forking
LimitNOFILE=65536
ExecStart=/opt/nexus-server/nexus-3.15.2-01/bin/nexus start
ExecStop=/opt/nexus-server/nexus-3.15.2-01/bin/nexus stop
User=nexus
Restart=on-abort
[Install]
WantedBy=multi-user.target
•Activate the service with the following commands:
25

sudo systemctl daemon-reload
sudo systemctl enable nexus.service
sudo systemctl start nexus.service
•Default username and password is admin and admin123 respectively with port beign 8081
Setup Maven Repository
We will not create maven repository additionally, NEXUS comes with a default configuration for
Maven with repositories.
Following are the repositories created for maven.
•maven-releases, for hosting your release artifacts locally.
•maven-snapsource,shots, for hosting your snapsource,shot artifacts locally.
•maven-central, a repository of type proxy that connects to central maven repository.
•maven-public, a repository of type 'group` which holds the above repository, we connect to this
repository from dev machine, the order of searching for artifacts as defined above.
Setup docker private registry
By default, the Docker client communicates with the repo using HTTPS. Since I didn’t have the
certificate, will use HTTP instead of HTTPS.
The Docker repo requires 2 different ports. We are going to use 8184 for pull from
the proxy repo and 8185 for pull and pusource,sh to the private repo of release
and 8186 for pull and pusource,sh of snapsource,shots.
•Create a blob store.(optional)
Goto settings → repository → Blob stores → Create blob store, provide name of the location,
path also can be customized. image::docker_blob_store_1.png[]
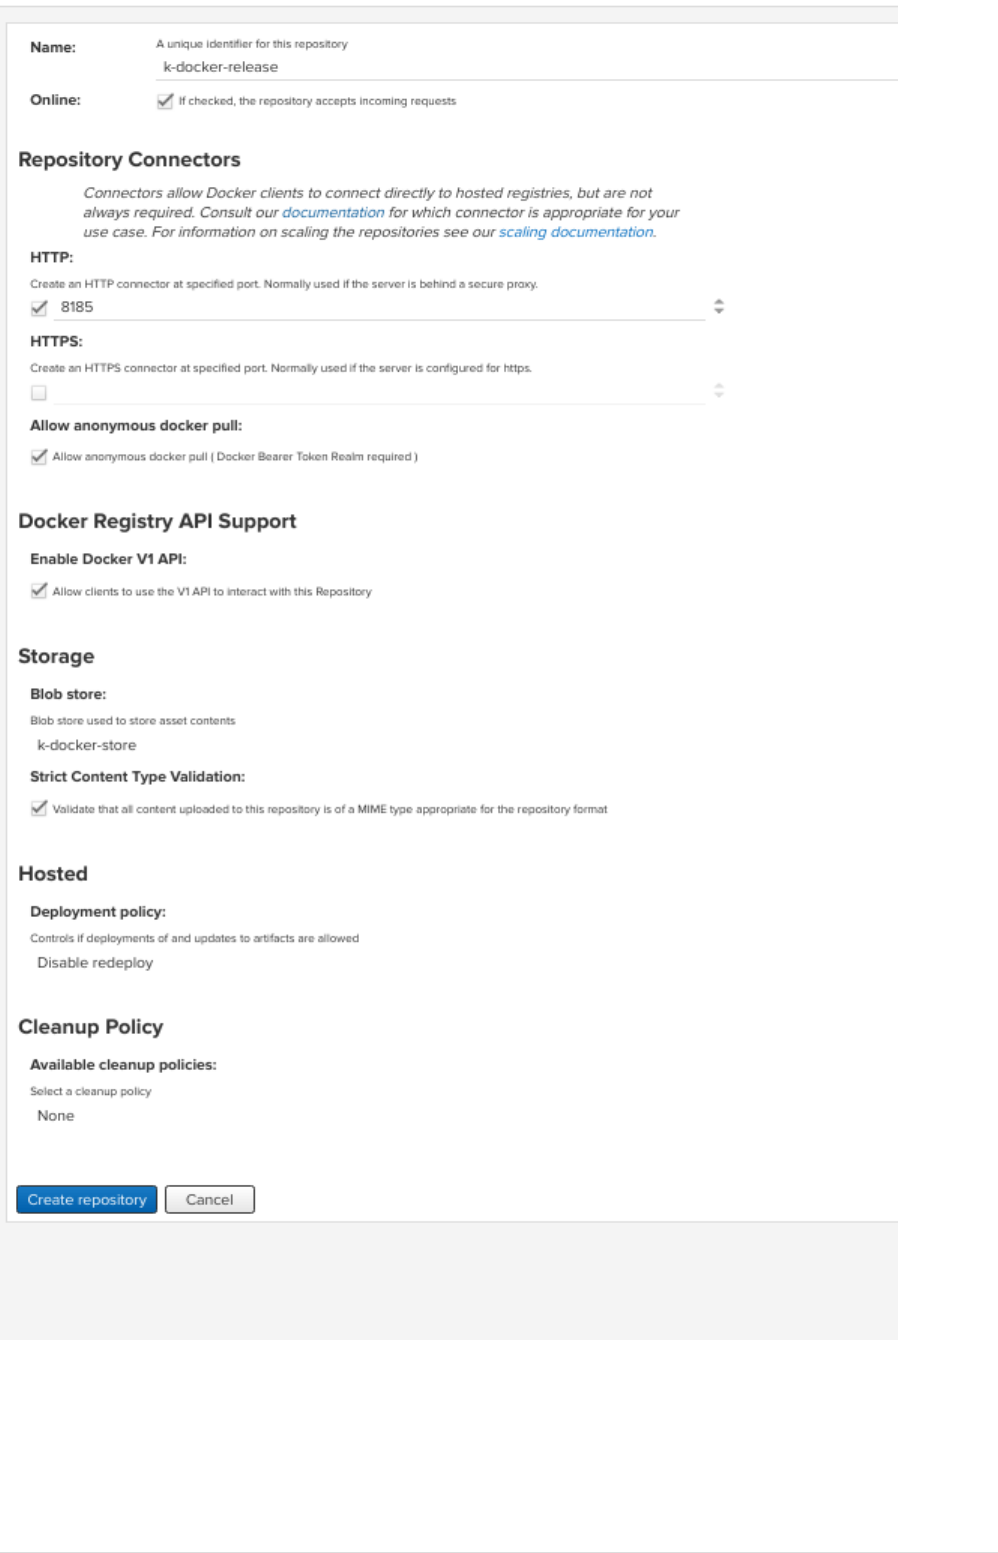
•Create a private repository for releases
Goto settings → repository → repositories → Create repository, a repository recipe page pops
up, select docker(hosted)
◦Set name for the repository docker-release
◦Choose HTTP type and set port to 8185
◦Set anonymous docker pull (optional)
◦Enable docker V1 API.
◦Select previously created blob store from the dropdown.
◦Deployment policy Disable redeploy
◦Cleanup policy none.
26
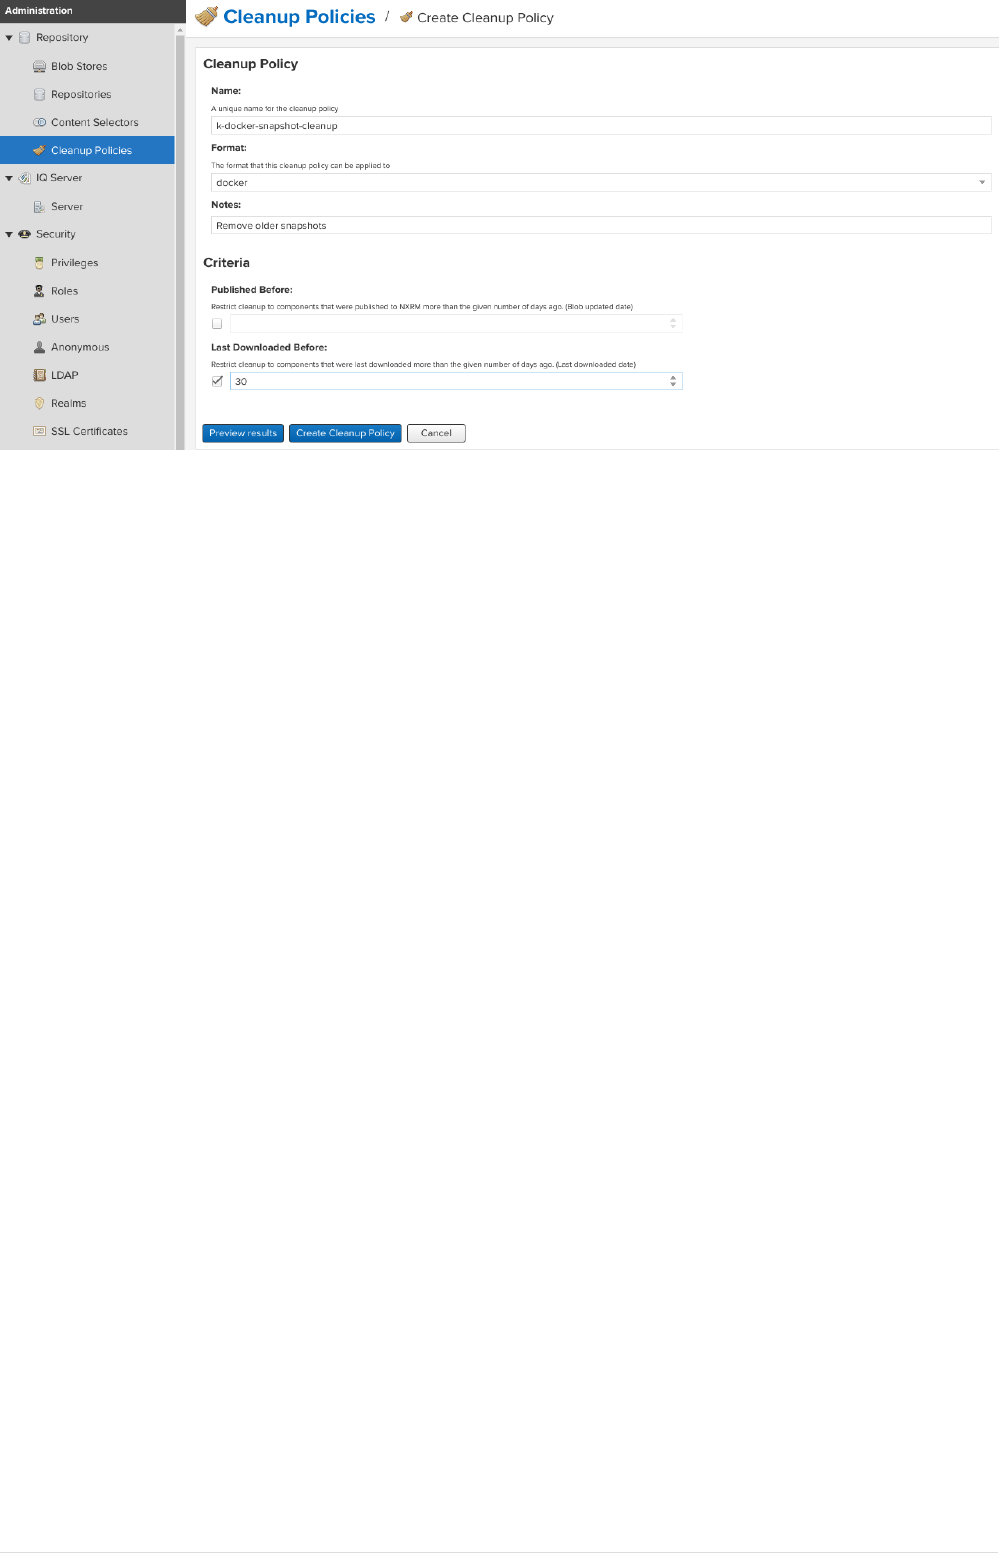
•Create a cleanup policy
Goto settings → repository → cleanup policies → create cleanup policy. set name, format to
'docker` and criteria as Last Downloaded before.
27
•Create a private repository for snapsource,shots
Goto settings → repository → repositories → Create repository, a repository recipe page pops
up, select docker(hosted)
◦Set name for the repository docker-snapsource,shots
◦Choose HTTP type and set port to 8186
◦Set anonymous docker pull (optional)
◦Enable docker V1 API.
◦Select previously created blob store from the dropdown.
◦Deployment policy Allow redeploy
◦Cleanup policy to previously created policy.
[docker snapsource,shots repository 1] | docker_snapsource,shots_repository_1.png
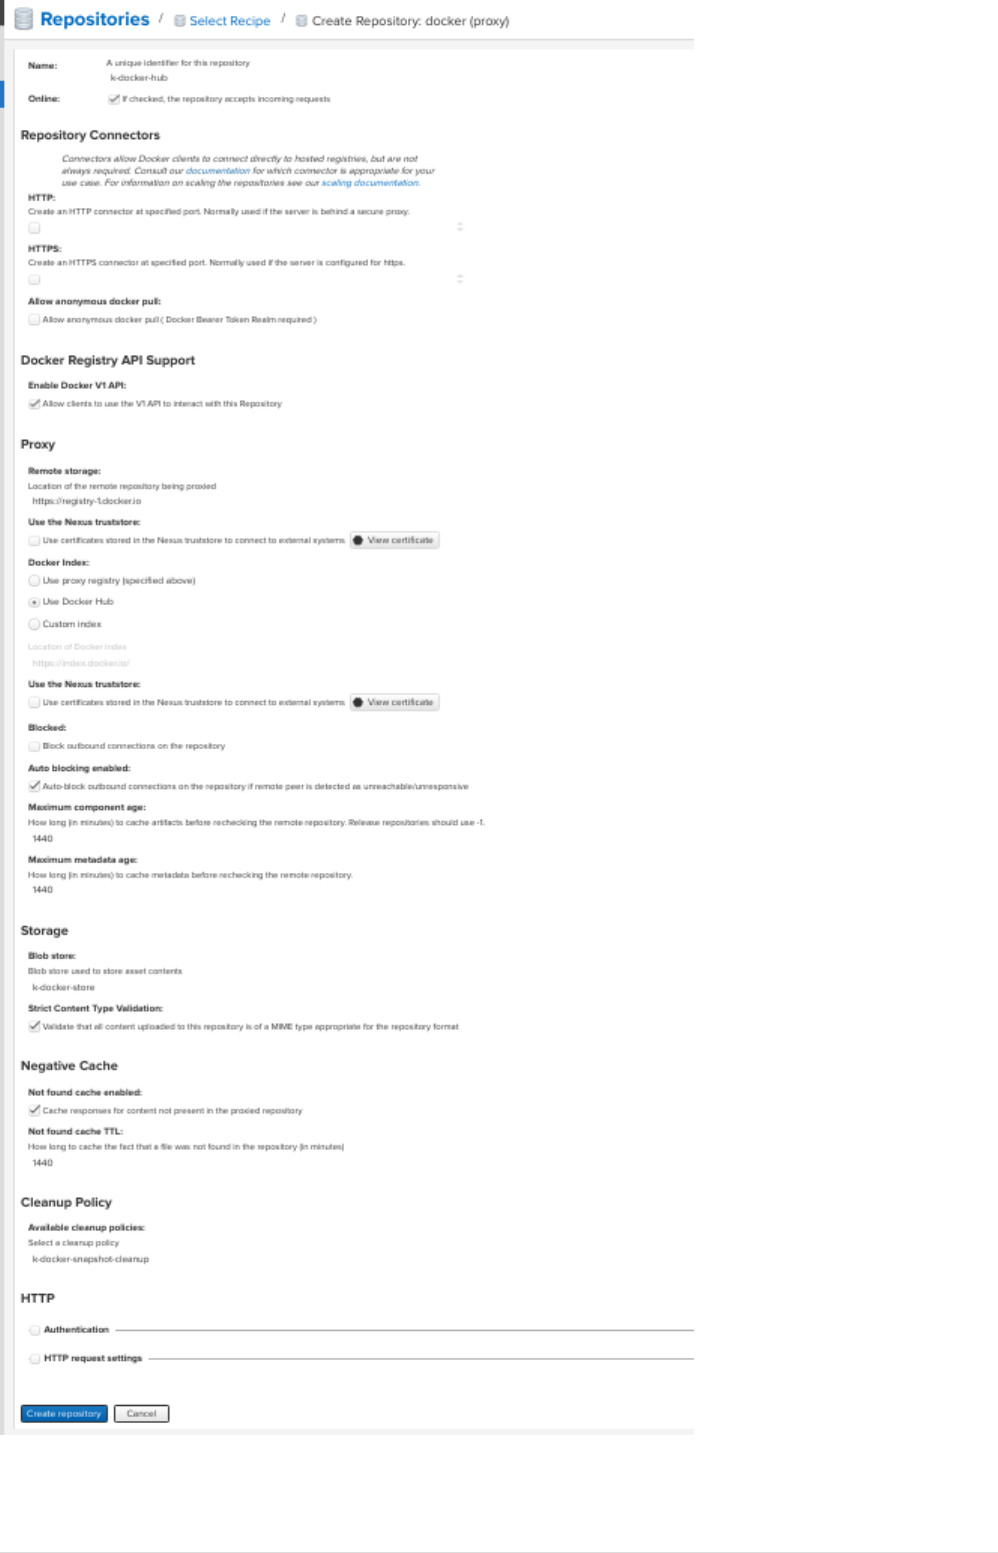
•Create a proxy repository for docker hub
A repository that proxies everything you download from the official registry, Docker Hub. Next
time you download the same dependency, it will be cached in your Nexus.
Goto settings → repository → repositories → Create repository, a repository recipe page pops
up, select docker(proxy)
Set primarily these parameters, name, remote storage(https://registry-1.docker.io), docker
index to docker hub
28
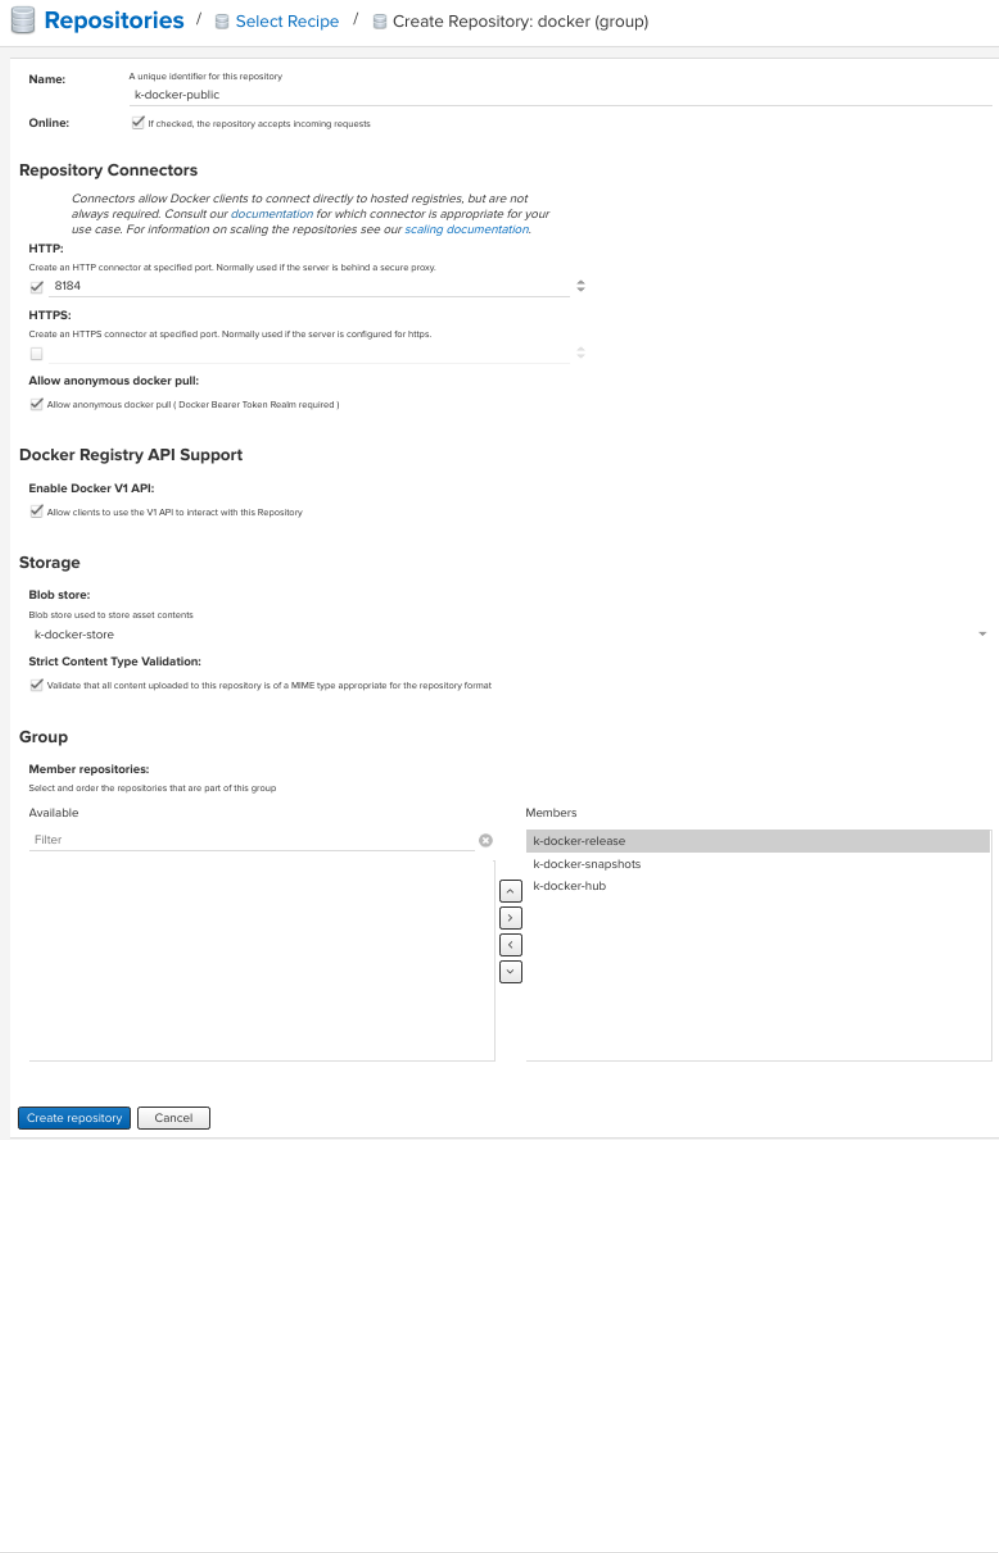
•Create Group Repository.
29

This will group all the above repos and provide you a single URL to configure your clients to
download from to.
Goto settings → repository → repositories → Create repository, a repository recipe page pops
up, select docker(group)
◦Set name for the repository docker-public
◦Choose HTTP type and set port to 8184
◦Set anonymous docker pull (optional)
◦Enable docker V1 API.
◦Select previously created blob store from the dropdown.
◦Finally add docker-release, docker-snapsource,shots and 'docker-hub` in order as
source,shown below.
30
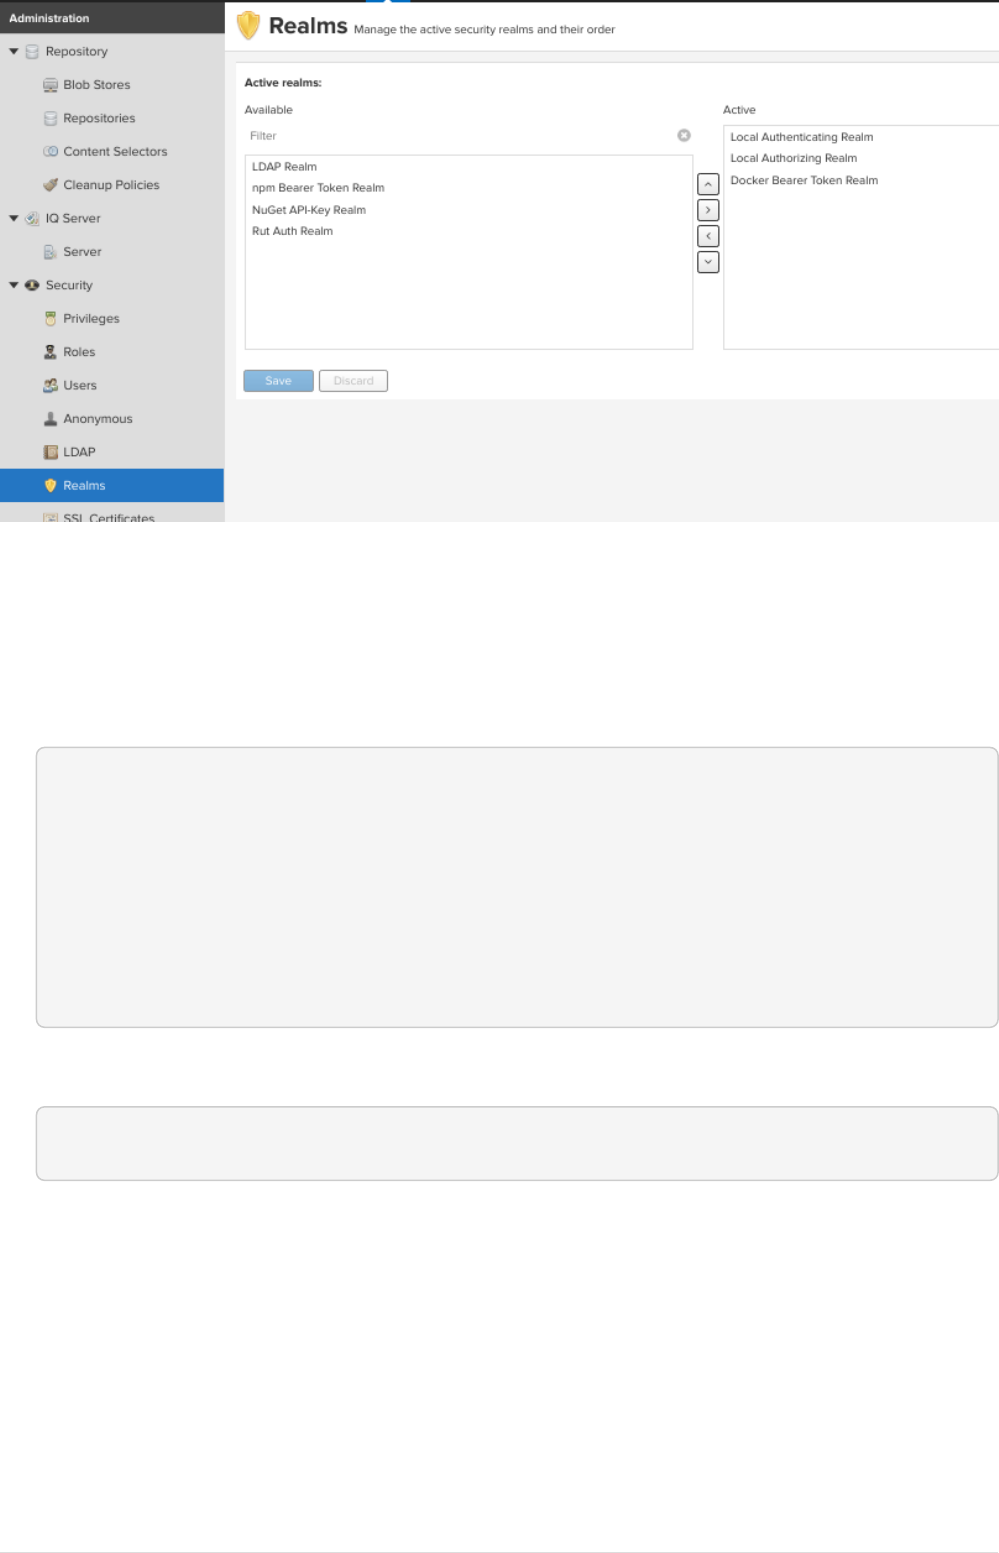
•To enable anonymous pull goto settings → security → realms, add docker Bearer token Realm.
31
Setup dev machine to use HTTP protocol.
To interact with your repo, the first thing is to configure the Docker daemon in your machine to
accept working with HTTP instead of HTTPS.
•If its ubuntu machine open/create /etc/docker/daemon.json add following details:
{
Ê "insecure-registries": [
Ê "kp-ci:8184",
Ê "kp-ci:8185",
Ê "kp-ci:8186"
Ê ],
Ê "disable-legacy-registry": true
}
•Restart docker daemon service.
$ sudo systemctl restart docker
Create user with deployment privileges.
•First we need to create custom role before creating a user, goto settings → security → Roles →
Create Role ⇒ New Role. Add role Id and role name. and also and below list of privileges.
◦nx-blobstores-all
◦nx-component-upload(most probably this source,should alone with view source,should
suffice, though I did not test)
◦nx-repository-admin---*
32

◦nx-repository-view---*
•Next goto settings → security → users → create user, a new popup comes prompting for user
details fill all the details and set status to Active and also add the role created at previous step
by moving the role from left hand side box to right hand side box.
Install Helm Repository.
Build from source code.
•Clone the project.
git clone https://github.com/sonatype-nexus-community/nexus-repository-helm.git
•change directory
cd nexus-repository-helm
•Build the source.
$ mvn clean package -DskipTests
If you want stable release checkout by last released version tag.
Enable Helm repository
•Copy the bundle from target to Copy the bundle into
<nexus_dir>/system/org/sonatype/nexus/plugins/nexus-repository-helm/0.0.7/nexus-repository-
helm-0.0.7.jar
Êsudo mkdir -p /opt/nexus-server/nexus-3.15.2-
01/system/org/sonatype/nexus/plugins/nexus-repository-helm/0.0.7/
Êsudo target/nexus-repository-helm-0.0.7.jar \
Ê /opt/nexus-server/nexus-3.15.2-01/system/org/sonatype/nexus/plugins/nexus-
repository-helm/0.0.7/
Êsudo chown nexus:nexus -R /opt/nexus-server/nexus-3.15.2-
01/system/org/sonatype/nexus/plugins/nexus-repository-helm/0.0.7/
•Update OSGi feature by updating features.xml at
<nexus_home>/system/org/sonatype/nexus/assemblies/nexus-core-feature/3.15.2-01/nexus-core-
feature-3.15.2-01-features.xml
◦Add entire highlighted line under nexus-core-feature section.
33

<feature name="nexus-core-feature"
description="org.sonatype.nexus.assemblies:nexus-core-feature"
version="3.15.2.01">
Ê <details>org.sonatype.nexus.assemblies:nexus-core-feature</details>
Ê <feature version="3.15.2.01" prerequisite="false" dependency="false"
>nexus-audit-plugin</feature>
Ê <feature version="3.15.2.01" prerequisite="false" dependency="false"
>nexus-blobstore-tasks</feature>
Ê <feature version="3.15.2.01" prerequisite="false" dependency="false"
>nexus-ssl-plugin</feature>
Ê <feature version="3.15.2.01" prerequisite="false" dependency="false"
>nexus-coreui-plugin</feature>
Ê <feature version="3.15.2.01" prerequisite="false" dependency="false"
>nexus-repository-httpbridge</feature>
Ê <feature version="3.15.2.01" prerequisite="false" dependency="false"
>nexus-repository-maven</feature>
Ê <feature version="3.15.2.01" prerequisite="false" dependency="false"
>nexus-repository-npm</feature>
Ê <feature version="3.15.2.01" prerequisite="false" dependency="false"
>nexus-repository-pypi</feature>
Ê <feature version="3.15.2.01" prerequisite="false" dependency="false"
>nexus-repository-raw</feature>
Ê <strong><feature version="0.0.7" prerequisite="false" dependency=
"false">nexus-repository-helm</feature></strong>
Ê <feature version="3.15.2.01" prerequisite="false" dependency="false"
>nexus-restore-maven</feature>
Ê <feature version="3.15.2.01" prerequisite="false" dependency="false"
>nexus-blobstore-s3</feature>
Ê <feature version="3.15.2.01" prerequisite="false" dependency="false"
>nexus-restore-npm</feature>
Ê <feature version="3.15.2.01" prerequisite="false" dependency="false"
>nexus-restore-pypi</feature>
Ê <feature version="3.15.2.01" prerequisite="false" dependency="false"
>nexus-restore-raw</feature>
Ê <feature version="3.15.2.01" prerequisite="false" dependency="false"
>nexus-script-plugin</feature>
Ê <feature version="3.15.2.01" prerequisite="false" dependency="false"
>nexus-task-log-cleanup</feature>
Ê <feature prerequisite="true" dependency="false">wrap</feature>
</feature>
◦Add below xml section either below nexus-core-feature or just above </features
<feature name="nexus-repository-helm"
description="org.sonatype.nexus.plugins:nexus-repository-helm" version="0.0.7">
Ê <details>org.sonatype.nexus.plugins:nexus-repository-helm</details>
Ê <bundle>mvn:org.sonatype.nexus.plugins/nexus-repository-helm/0.0.7</bundle>
</feature>
34
•Once features.xml file is updated restart the nexus service.
$ sudo systemctl restart nexus.service
•Verify nexus service start is successful.
$ sudo systemctl status nexus.service
Create a hosted Helm repository
Current implementation supports hosted and proxy repositories, and does not support group, We
will be creating only hosted helm repository, creating proxy should be straight forward.
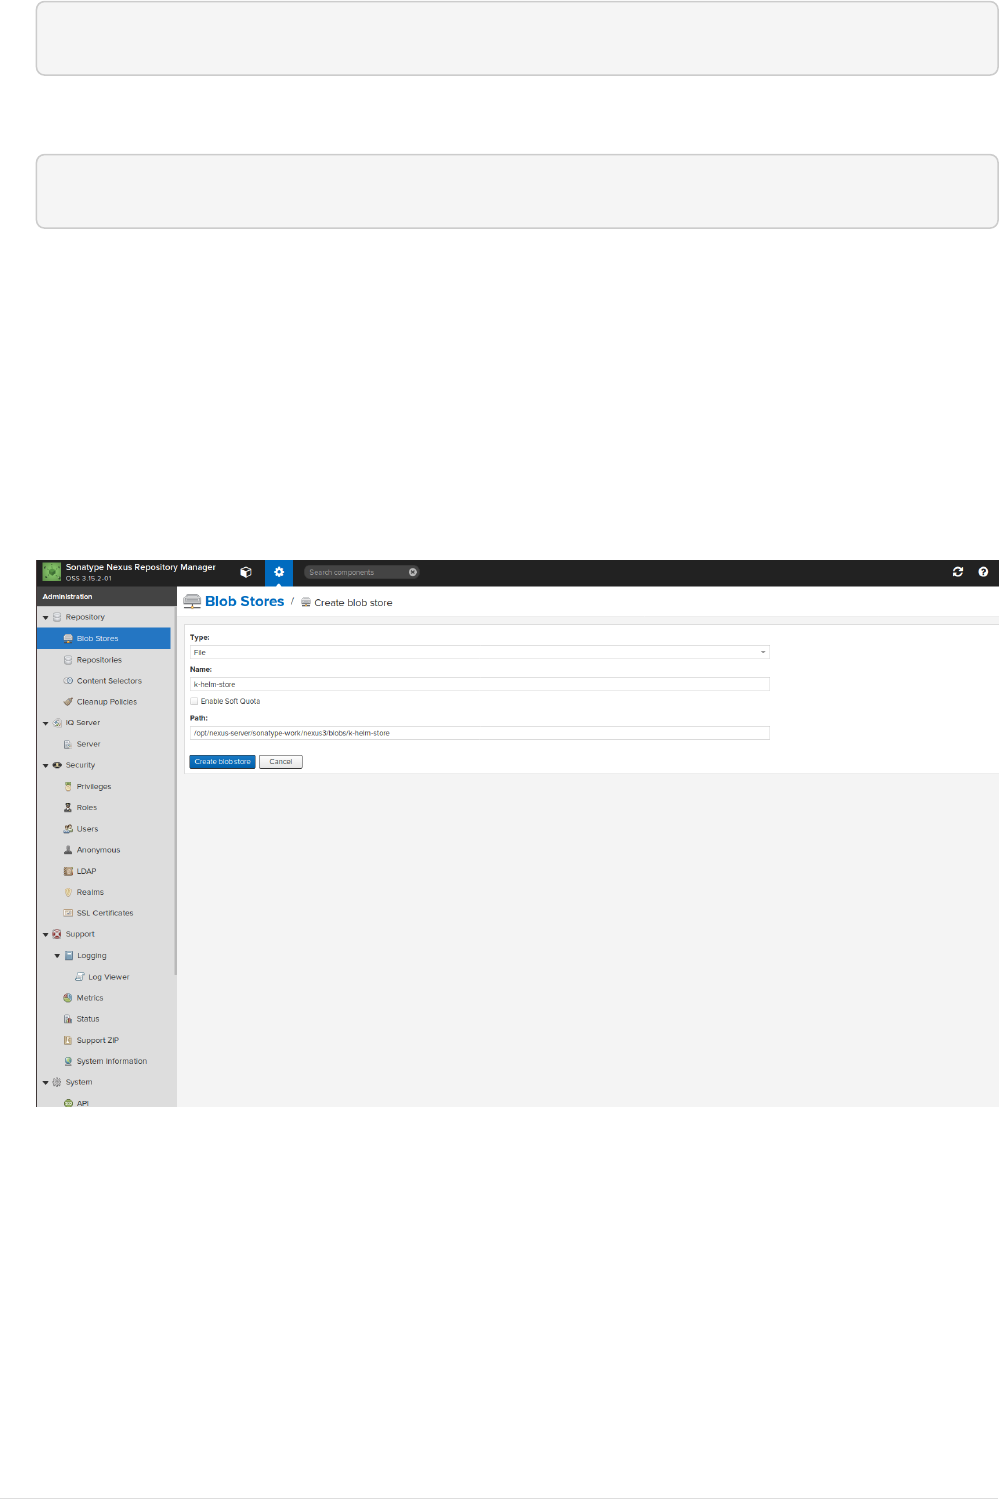
•Create blob to store helm packages.
Go to settings → repository → Blob stores → Create blob, fill the blob name, if required change
the path keep the blob store directory/path as is.
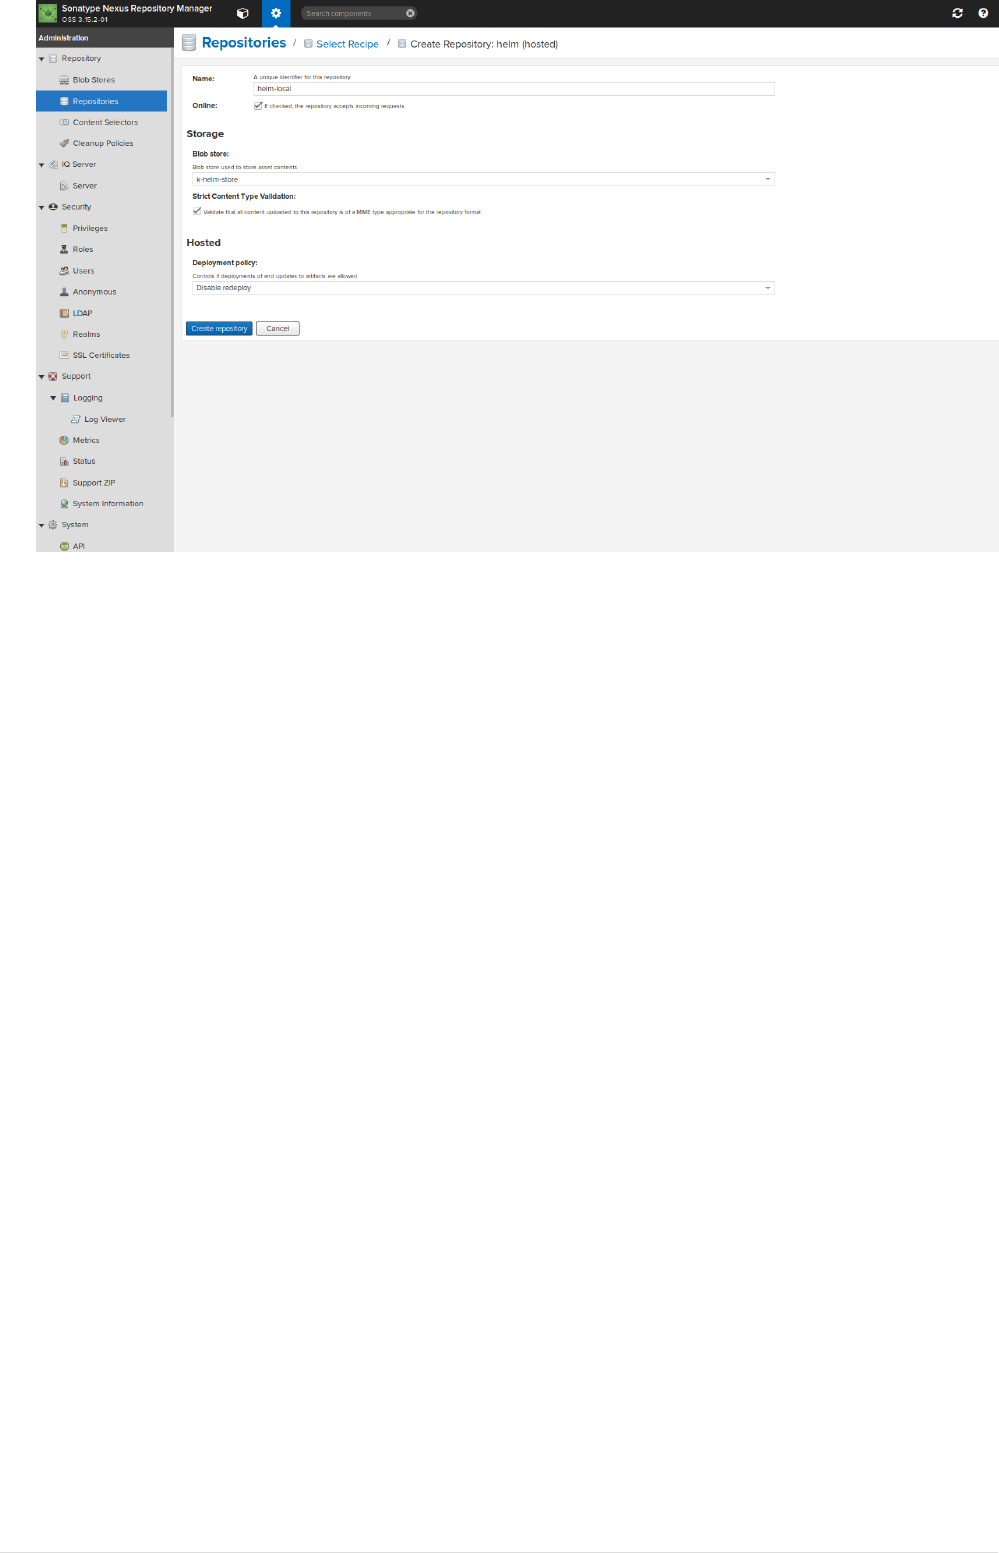
•Create helm local repository.
Go to settings → repository → Repositories → Create Repository, and select helm(hosted) from
list of repositories. Set the desired name and the also set the blob name that was created in
previous step.
35
Steps to Integrate Gitlab with Jenkins
Jenkins Server configuration
Install Plugins
•Goto Manage Jenkins → Manage Plguins → Available Tab and install following plugins.
◦Violation Comments to GitLab
◦GitLab
◦Blue Ocean
◦Common API for Blue Ocean
◦Config API for Blue Ocean
◦Dashboard for Blue Ocean
◦Events API for Blue Ocean
◦Git Pipeline for Blue Ocean
◦JWT for Blue Ocean
◦Personalization for Blue Ocean
◦Pipeline implementation for Blue Ocean
◦REST API for Blue Ocean
◦REST Implementation for Blue Ocean
◦Web for Blue Ocean
◦Blue Ocean Pipeline Editor
36

◦Blue Ocean Executor Info
◦Pipeline SCM API for Blue Ocean
◦docker
◦HTML Publisher
◦Pipeline Utility Steps
Create User for Gitlab
We need to create a user in Jenkins, such that when a JOBs executed by this user, when JOB is
triggered by Webhooks from Gitlab.
•Goto Manager Jenkins → Manage Users → Create User and add user details.
Jenkins-to-GitLab authentication
This auth configuration is only used for accessing the GitLab API for sending build
status to GitLab. It is not used for cloning git repos. The credentials for cloning
(usually SSH credentials) should be configured separately, in the git plugin. This
plugin can be configured to send build status messages to GitLab, which show up
in the GitLab Merge Request UI. To enable this functionality:
•Create a new user in GitLab
•Give this user 'Developer' permissions on each repo you want Jenkins to send build status to
•Log in or 'Impersonate' that user in GitLab, click the user’s icon/avatar and choose Settings
•Click on 'Access Tokens'
•Create a token named e.g. 'jenkins' with 'api' scope; expiration is optional
•Copy the token immediately, it cannot be accessed after you leave this page
•On the Global Configuration page in Jenkins, in the GitLab configuration section, supply the
GitLab host URL, e.g. http://your.gitlab.server
•Click the 'Add' button to add a credential, choose 'GitLab API token' as the kind of credential,
and paste your GitLab user’s API key into the 'API token' field
•Click the 'Test Connection' button; it should succeed.
Jenkins-to-Gitlab Clone AUthentication
We need to Add SSH key to enable Jenkins to clone repositories.
•Generate SSH public/private key using below command
$ ssh-keygen -t rsa
•Goto Manage Jenkins → Configure Credentials → Credentials → ` System` → Global Credentials
37

→ Add Credentials
•Select Kind as ssh username with private key
•Set the username generate in previous section.
•Set ID
•Select option private key enter directly and add key from cat ~/.ssh/id_rsa
•Provide pass phrase if you’ve added
•And click ok
•Now login to Gitlab with user created in previous section.
•On Top right corner click on User Avatar → Settings and then on 'SSH Keys'.
•Add the public key from output of cat ~/.ssh/id_rsa/pub
Create Project and configure project settings in Gitlab.
•Now create a sample Project with Jenkinsfile in Gitlab.
pipeline {
Ê agent any
Ê stages {
Ê stage('Hello') {
Ê steps {
Ê echo "Hello from Jenkins pipeline"
Ê }
Ê }
Ê }
}
•Add Build User to the project with role Developer
•Goto Jenkins Server and create new multibranch project say k-sample-ci-project
•In Branch Sources section select Git
•Provide the git clone URL of the Gitlab project. git@localhost:k-projects/sample-ci-project.git
•Select Credentials as Git SSH User added in previous section.
•Click Save
Adding Webhook.
•Log in as that user (this is required even if you are a Jenkins admin user), then click on the
user’s name in the top right corner of the page
•Click Configure → API Token → Add new Token then 'generate', and note/copy the User ID and API
Token
38

•Now goto Gitlab Project → <code>settings</code> → <code>Integration</code> add
the webhook <code><a href="http://localhost:8182/project/<jenkins_project_name>"
class="bare">http://localhost:8182/project/<jenkins_project_name></a>;</code>, and api
token from previous step. click the 'Test' button, and it should succeed and trigger a JOB.
To prevent this type of exploitation from happening, starting with GitLab 10.6, all
Webhook requests to the current GitLab instance server address and/or in a
private network will be forbidden by default. That means that all requests made to
127.0.0.1, ::1 and 0.0.0.0, as well as IPv4 10.0.0.0/8, 172.16.0.0/12, 192.168.0.0/16 and
IPv6 site-local (ffc0::/10) addresses won’t be allowed.
This behavior can be overridden by enabling the option “Allow requests to the
local network from hooks and services” in the “Outbound requests” section inside
the Admin area under Settings (/admin/application_settings/network)
Steps to Integrate Jenkins with Gitlab
The below steps details, how to build maven project( specifically a spring boot project) and create a
image out of it and publish the image to NEXUS.
A sample spring boot project with Jenkins declarative pipeline and Dockerfile can be accessed from
here
Import the above project to gitlab server directly and configure the project detailed through in
previous section to integrate gitlab and Jenkins.
Make sure while setting up webhook to select the trigger when merge request is
created.
Add NEXUS deployer credentials.
Goto manage jenkins → configure credentials → credentials → system → global credentials → Add
credentials. choose kind username and password and add all details.
set the id to Deployer as it is hardcoded to Jenkinsfile.(The hardcode is required
since we will be using multiple docker registry for release and snapshots. If a
single registry is used we can directly configure the docker registry url and
credentials in configure system → docker section.)
Add Environment variables related to docker registry.
Goto manage jenkins → configure system, environment section. add below environment variables.
Field Value
DOCKER_RELEASE_REGISTRY kp-ci:8185
DOCKER_RELEASE_REGISTRY_URL http://kp-ci:8185/
DOCKER_SNAPSHOTS_REGISTRY kp-ci:8186
39

DOCKER_SNAPSHOTS_REGISTRY_URL http://kp-ci:8185/
We are configuring here release and snapshot registry urls.
Testing.
•Clone the project from the gitlab.
•Make any dummy change.
•Push the changes to gitlab.
•A Jenkins job should get triggered as soon as you pushed the changes to Gitlab.
•Create a merge request.
•Merge the change.
•Another Jenkins job should get triggered as soon as merged to master.
•At the end of the job a docker image must be pushed to NEXUS.
•Now use below command to pull the image and run the container.
$ docker pull kp-ci:8184/apps/k-ci-sample
Here we are using public port to access the image not release/snapshot port.
Job might fail while running stage build images with error message related to
version security issue. Goto manage jenkins → In-proccess script approval,
approve any pending approvals.
40
