Head First C#: A Learner's Guide To Real World Programming With Visual C# And .NET (Head Guides) C Learners Net
head-first-c-a-learners-guide-to-real-world-programming-with-visual-c-and-net
head-first-c-a-learners-guide-to-real-world-programming-with-visual-c-and-net
User Manual:
Open the PDF directly: View PDF ![]() .
.
Page Count: 840 [warning: Documents this large are best viewed by clicking the View PDF Link!]
- Table of Contents
- Intro: How to use this book.
- Chapter 1. Get productive with C#: Visual applications, in 10 minutes or less
- Chapter 2. It’s all just code: Under the hood
- Chapter 3. Objects: get oriented! Making code make sense
- Chapter 4. Types and references: It’s 10:00. Do you know where your data is?
- C# Lab: A Day at the Races
- Chapter 5. Encapsulation: Keep your privates...private
- Chapter 6. Inheritance: Your object’s family tree
- Chapter 7. Interfaces and abstract classes: Making classes keep their promises
- Chapter 8. Enums and collections: Storing lots of data
- C# Lab: The Quest
- Chapter 9. Reading and writing files: Save the byte array, save the world
- Chapter 10. Exception handling: Putting out fires gets old
- Chapter 11. Events and delegates. What your code does when you’re not looking
- Chatper 12. Review and preview: Knowledge, power, and building cool stuff
- Chapter 13. Controls and graphics: Make it pretty
- Chapter 14. Captain Amazing: The Death of the Object
- Chapter 15. LINQ: Get control of your data
- C# Lab: Invaders
- Appendix i: Leftovers: The top 11 things we wanted to include in this book

Advance Praise for Head First C#
“I’ve never read a computer book cover to cover, but this one held my interest from the first page to the
last. If you want to learn C# in depth and have fun doing it, this is THE book for you.”
— Andy Parker, fledgling C# programmer
“It’s hard to really learn a programming language without good engaging examples, and this book is full
of them! Head First C# will guide beginners of all sorts to a long and productive relationship with C#
and the .NET Framework.”
—Chris Burrows, developer for Microsoft’s C# Compiler team
“With Head First C#, Andrew and Jenny have presented an excellent tutorial on learning C#. It is very
approachable while covering a great amount of detail in a unique style. If you’ve been turned off by
more conventional books on C#, you’ll love this one.”
—Jay Hilyard, software developer, co-author of C# 3.0 Cookbook
“I’d reccomend this book to anyone looking for a great introduction into the world of programming and
C#. From the first page onwards, the authors walks the reader through some of the more challenging
concepts of C# in a simple, easy-to-follow way. At the end of some of the larger projects/labs, the
reader can look back at their programs and stand in awe of what they’ve accomplished.”
—David Sterling, developer for Microsoft’s Visual C# Compiler team
“Head First C# is a highly enjoyable tutorial, full of memorable examples and entertaining exercises. Its
lively style is sure to captivate readers—from the humorously annotated examples, to the Fireside Chats,
where the abstract class and interface butt heads in a heated argument! For anyone new to programming,
there’s no better way to dive in.”
— Joseph Albahari, C# Design Architect at Egton Medical Information Systems,
the UK’s largest primary healthcare software supplier,
co-author of C# 3.0 in a Nutshell
“[Head First C#] was an easy book to read and understand. I will recommend this book to any developer
wanting to jump into the C# waters. I will recommend it to the advanced developer that wants to
understand better what is happening with their code. [I will recommend it to developers who] want to
find a better way to explain how C# works to their less-seasoned developer friends.”
—Giuseppe Turitto, C# and ASP.NET developer for Cornwall Consulting Group
“Andrew and Jenny have crafted another stimulating Head First learning experience. Grab a pencil, a
computer, and enjoy the ride as you engage your left brain, right brain, and funny bone.”
—Bill Mietelski, software engineer
“Going through this Head First C# book was a great experience. I have not come across a book series
which actually teaches you so well.…This is a book I would definitely recommend to people wanting to
learn C#”
—Krishna Pala, MCP
Praise for other Head First books
“Kathy and Bert’s Head First Java transforms the printed page into the closest thing to a GUI you’ve ever
seen. In a wry, hip manner, the authors make learning Java an engaging ‘what’re they gonna do next?’
experience.”
—Warren Keuffel, Software Development Magazine
“Beyond the engaging style that drags you forward from know-nothing into exalted Java warrior status,
Head First Java covers a huge amount of practical matters that other texts leave as the dreaded “exercise
for the reader….” It’s clever, wry, hip and practical—there aren’t a lot of textbooks that can make that
claim and live up to it while also teaching you about object serialization and network launch protocols. ”
— Dr. Dan Russell, Director of User Sciences and Experience Research
IBM Almaden Research Center (and teaches Artificial Intelligence at
Stanford University)
“It’s fast, irreverent, fun, and engaging. Be careful—you might actually learn something!”
— Ken Arnold, former Senior Engineer at Sun Microsystems
Co-author (with James Gosling, creator of Java),
The Java Programming Language
“I feel like a thousand pounds of books have just been lifted off of my head.”
—Ward Cunningham, inventor of the Wiki and founder of the Hillside Group
“Just the right tone for the geeked-out, casual-cool guru coder in all of us. The right reference for
practical development strategies—gets my brain going without having to slog through a bunch of tired
stale professor -speak.”
— Travis Kalanick, Founder of Scour and Red Swoosh
Member of the MIT TR100
“There are books you buy, books you keep, books you keep on your desk, and thanks to O’Reilly and the
Head First crew, there is the penultimate category, Head First books. They’re the ones that are dog-
eared, mangled, and carried everywhere. Head First SQL is at the top of my stack. Heck, even the PDF I
have for review is tattered and torn.”
— Bill Sawyer, ATG Curriculum Manager, Oracle
“This book’s admirable clarity, humor and substantial doses of clever make it the sort of book that helps
even non-programmers think well about problem-solving.”
— Cory Doctorow, co-editor of Boing Boing
Author, Down and Out in the Magic Kingdom
and Someone Comes to Town, Someone Leaves Town
Praise for other Head First books
“I received the book yesterday and started to read it…and I couldn’t stop. This is definitely très ‘cool.’ It
is fun, but they cover a lot of ground and they are right to the point. I’m really impressed.”
— Erich Gamma, IBM Distinguished Engineer, and co-author of
Design Patterns
“One of the funniest and smartest books on software design I’ve ever read.”
— Aaron LaBerge, VP Technology, ESPN.com
“What used to be a long trial and error learning process has now been reduced neatly into an engaging
paperback.”
— Mike Davidson, CEO, Newsvine, Inc.
“Elegant design is at the core of every chapter here, each concept conveyed with equal doses of
pragmatism and wit.”
— Ken Goldstein, Executive Vice President, Disney Online
“I ♥ Head First HTML with CSS & XHTML—it teaches you everything you need to learn in a ‘fun
coated’ format.”
— Sally Applin, UI Designer and Artist
“Usually when reading through a book or article on design patterns, I’d have to occasionally stick myself
in the eye with something just to make sure I was paying attention. Not with this book. Odd as it may
sound, this book makes learning about design patterns fun.
“While other books on design patterns are saying ‘Bueller… Bueller… Bueller…’ this book is on the float
belting out ‘Shake it up, baby!’”
— Eric Wuehler
“I literally love this book. In fact, I kissed this book in front of my wife.”
— Satish Kumar
Other related books from O’Reilly
Programming C# 4.0
C# 4.0 in a Nutshell
C# Essentials
C# Language Pocket Reference
Other books in O’Reilly’s Head First series
Head First Java
Head First Object-Oriented Analysis and Design (OOA&D)
Head Rush Ajax
Head First HTML with CSS and XHTML
Head First Design Patterns
Head First Servlets and JSP
Head First EJB
Head First PMP
Head First SQL
Head First Software Development
Head First JavaScript
Head First Ajax
Head First Statistics
Head First Physics
Head First Programming
Head First Ruby on Rails
Head First PHP & MySQL
Head First Algebra
Head First Data Analysis
Head First Excel

Beijing • Cambridge • Kln • Sebastopol • Taipei • Tokyo
Andrew Stellman
Jennifer Greene
Head First
C#
Second Edition
Wouldn’t it be dreamy
if there was a C# book that
was more fun than endlessly
debugging code? It’s probably
nothing but a fantasy....

Head First C#
Second Edition
by Andrew Stellman and Jennifer Greene
Copyright © 2010 Andrew Stellman and Jennifer Greene. All rights reserved.
Printed in the United States of America.
Published by O’Reilly Media, Inc., 1005 Gravenstein Highway North, Sebastopol, CA 95472.
O’Reilly Media books may be purchased for educational, business, or sales promotional use. Online editions are also
available for most titles (http://my.safaribooksonline.com). For more information, contact our corporate/institutional sales
department: (800) 998-9938 or corporate@oreilly.com.
Series Creators: Kathy Sierra, Bert Bates
Cover Designers: Louise Barr, Karen Montgomery
Production Editor: Rachel Monaghan
Proofreader: Emily Quill
Indexer: Lucie Haskins
Page Viewers: Quentin the whippet and Tequila the pomeranian
Printing History:
November 2007: First Edition.
May 2010: Second Edition.
The O’Reilly logo is a registered trademark of O’Reilly Media, Inc. The Head First series designations, Head First C#,
and related trade dress are trademarks of O’Reilly Media, Inc.
Microsoft, Windows, Visual Studio, MSDN, the .NET logo, Visual Basic and Visual C# are registered trademarks of
Microsoft Corporation.
Many of the designations used by manufacturers and sellers to distinguish their products are claimed as trademarks.
Where those designations appear in this book, and O’Reilly Media, Inc., was aware of a trademark claim, the
designations have been printed in caps or initial caps.
While every precaution has been taken in the preparation of this book, the publisher and the authors assume no
responsibility for errors or omissions, or for damages resulting from the use of the information contained herein.
No bees, space aliens, or comic book heroes were harmed in the making of this book.
ISBN: 978-1-449-38034-2
[SB]
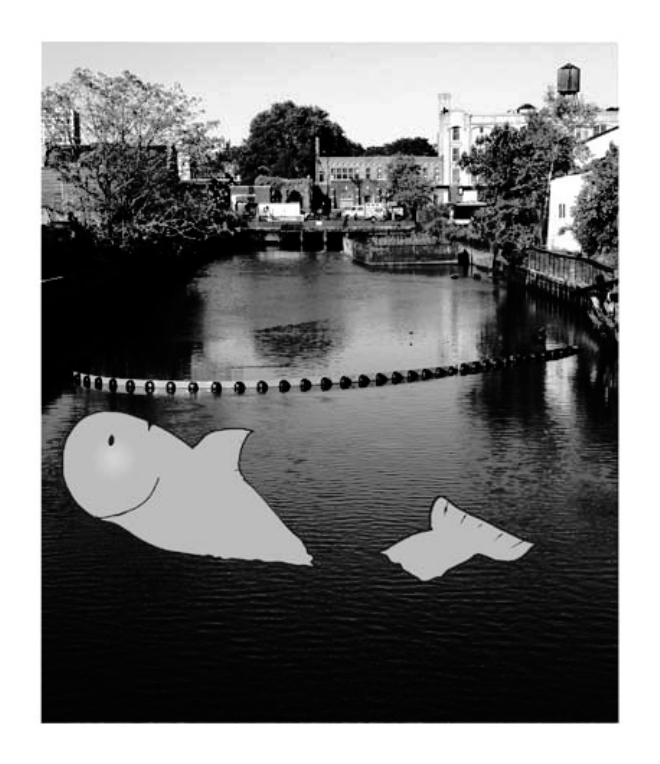
This book is dedicated to the loving memory of Sludgie the Whale,
who swam to Brooklyn on April 17, 2007.
You were only in our canal for a day,
but you’ll be in our hearts forever.

viii
Jennifer Greene studied philosophy in
college but, like everyone else in the field, couldn’t
find a job doing it. Luckily, she’s a great software
engineer, so she started out working at an online
service, and that’s the first time she really got a
good sense of what good software development
looked like.
She moved to New York in 1998 to work on
software quallity at a financial software company.
She managed a team of testers at a really cool
startup that did artificial intelligence and natural
language processing.
Since then, she’s traveled all over the world to work
with different software teams and build all kinds of
cool projects.
She loves traveling, watching Bollywood movies,
reading the occasional comic book, playing PS3
games (especially LittleBigPlanet!), and owning a
whippet.
Andrew Stellman, despite being raised a
New Yorker, has lived in Pittsburgh twice. The
first time was when he graduated from Carnegie
Mellon’s School of Computer Science, and then
again when he and Jenny were starting their
consulting business and writing their first book for
O’Reilly.
When he moved back to his hometown, his first
job after college was as a programmer at EMI-
Capitol Records—which actually made sense,
since he went to LaGuardia High School of
Music and Art and the Performing Arts to study
cello and jazz bass guitar. He and Jenny first
worked together at that same financial software
company, where he was managing a team of
programmers. He’s had the privilege of working
with some pretty amazing programmers over the
years, and likes to think that he’s learned a few
things from them.
When he’s not writing books, Andrew keeps
himself busy writing useless (but fun) software,
playing music (but video games even more),
experimenting with circuits that make odd noises,
studying taiji and aikido, having a girlfriend
named Lisa, and owning a pomeranian.
the authors
Jenny and Andrew have been building software and writing about software engineering together since they
first met in 1998. Their first book,
Applied Software Project Management
, was published by O’Reilly in
2005. They published their first book in the Head First series,
Head First PMP
, in 2007.
They founded Stellman & Greene Consulting in 2003 to build a really neat software project for
scientists studying herbicide exposure in Vietnam vets. When they’re not building software or writing
books, they do a lot of speaking at conferences and meetings of software engineers, architects and
project managers.
Check out their blog,
Building Better Software
:
http://www.stellman-greene.com
Jenny
Andrew
Thanks for buying our book! We really
love writing about this stuff, and we
hope you get a kick out of reading it… …because we know
you’re going to have a
great time learning C#.
This photo (and the photo of the
Gowanus Canal) by Nisha Sondhe
table of contents
ix
Table of Contents (Summary)
Table of Contents (the real thing)
Your brain on C#. You’re sitting around trying to learn something, but
your brain keeps telling you all that learning isn’t important. Your brain’s saying,
“Better leave room for more important things, like which wild animals to avoid and
whether nude archery is a bad idea.” So how do you trick your brain into thinking
that your life really depends on learning C#?
Intro
Who is this book for? xxx
We know what you’re thinking xxxi
Metacognition xxxiii
Bend your brain into submission xxxv
What you need for this book xxxvi
Read me xxxvii
The technical review team xxxviii
Acknowledgments xxxix
Intro xxix
1 Get productive with C#: Visual Applications, in 10 minutes or less 1
2 It’s All Just Code: Under the hood 41
3 Objects: Get Oriented: Making code make sense 85
4 Types and References: It’s 10:00. Do you know where your data is? 125
C# Lab 1: A Day at the races 169
5 Encapsulation: Keep your privates… private 179
6 Inheritance: Your object’s family tree 215
7 Interfaces and abstract classes: Making classes keep their promises 269
8 Enums and collections: Storing lots of data 327
C# Lab 2: The Quest 385
9 Reading and Writing Files: Save the byte array, save the world 407
10 Exception Handling: Putting out fires gets old 463
11 Events and Delegates: What your code does when you’re not looking 507
12 Review and Preview: Knowledge, power, and building cool stuff 541
13 Controls and Graphics: Make it pretty 589
14 Captain Amazing: The Death of the Object 647
15 LINQ: Get control of your data 685
C# Lab 3: Invaders 713
i Leftovers: The top 11 things we wanted to include in this book 735
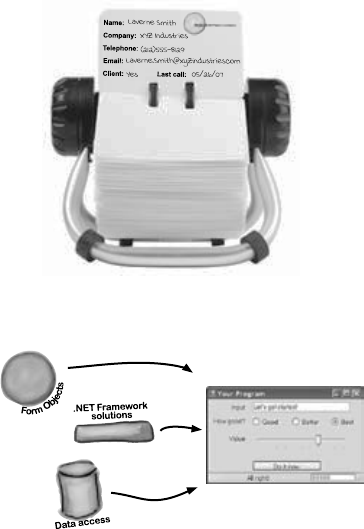
table of contents
x
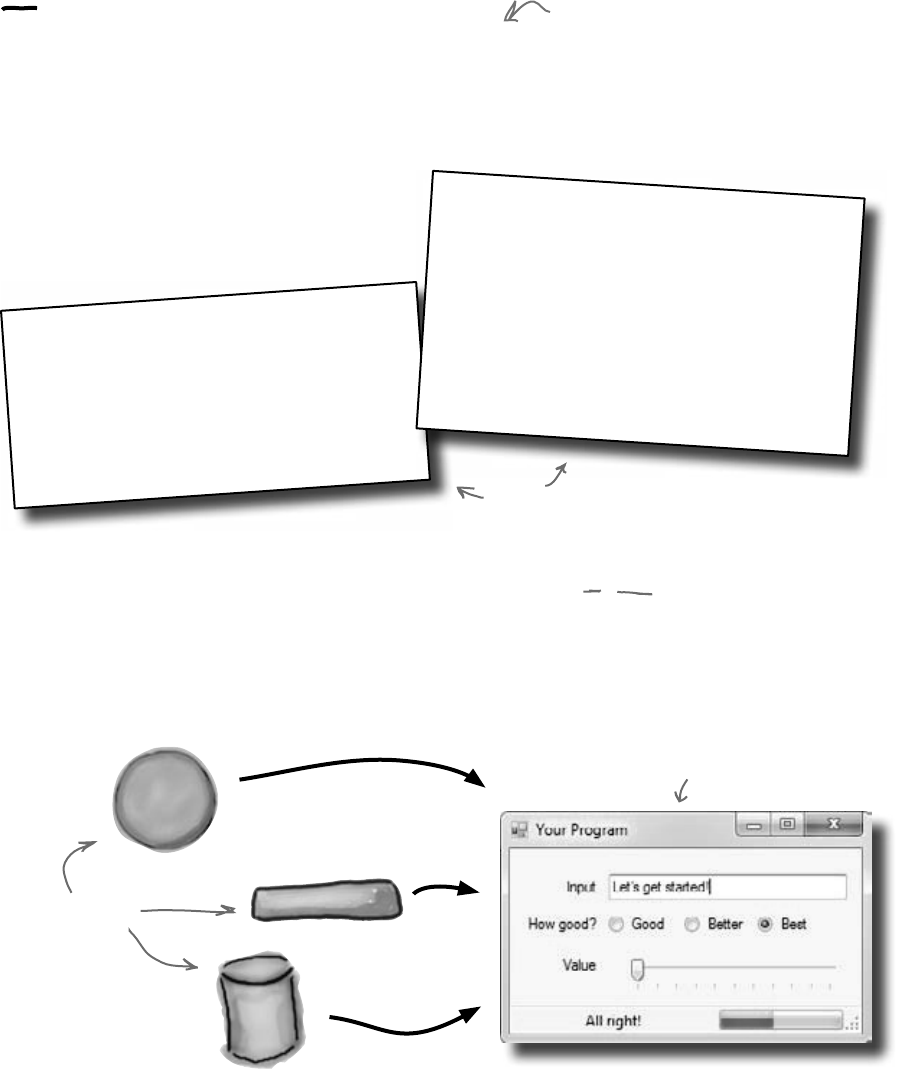
Visual Applications, in 10 minutes or less
1Want to build great programs really fast
With C#, you’ve got a powerful programming language and a valuable tool
at your fingertips. With the Visual Studio IDE, you’ll never have to spend hours
writing obscure code to get a button working again. Even better, you’ll be able
to focus on getting your work done, rather than remembering which method
parameter was for the name of a button, and which one was for its label. Sound
appealing? Turn the page, and let’s get programming.
get productive with C#
Why you should learn C# 2
C# and the Visual Studio IDE make lots of things easy 3
Help the CEO go paperless 4
Get to know your users’ needs before you start
building your program 5
What you do in Visual Studio… 8
What Visual Studio does for you… 8
Develop the user interface 12
Visual Studio, behind the scenes 14
Add to the auto-generated code 15
We need a database to store our information 18
The IDE created a database 19
SQL is its own language 19
Creating the table for the Contact List 20
Finish building the table 25
Insert your card data into the database 26
Connect your form to your database objects with a data source 28
Add database-driven controls to your form 30
How to turn YOUR application into EVERYONE’S application 35
Give your users the application 36
You’re NOT done: test your installation 37
You’ve built a complete data-driven application 38
table of contents
xi
Under the hood
You’re a programmer, not just an IDE user.
You can get a lot of work done using the IDE. But there’s only so far it
can take you. Sure, there are a lot of repetitive tasks that you do when
you build an application. And the IDE is great at doing those things for
you. But working with the IDE is only the beginning. You can get your
programs to do so much more—and writing C# code is how you do it.
Once you get the hang of coding, there’s nothing your programs can’t do.
it’s all just code
2
When you’re doing this… 42
…the IDE does this 43
Where programs come from 44
The IDE helps you code 46
When you change things in the IDE, you’re also changing
your code 4849
Anatomy of a program 50
Your program knows where to start 5253
Two classes can be in the same namespace 59
Your programs use variables to work with data 60
C# uses familiar math symbols 62
Use the debugger to see your variables change 63
Loops perform an action over and over 65
Time to start coding 66
if/else statements make decisions 67
Set up conditions and see if they’re true 68
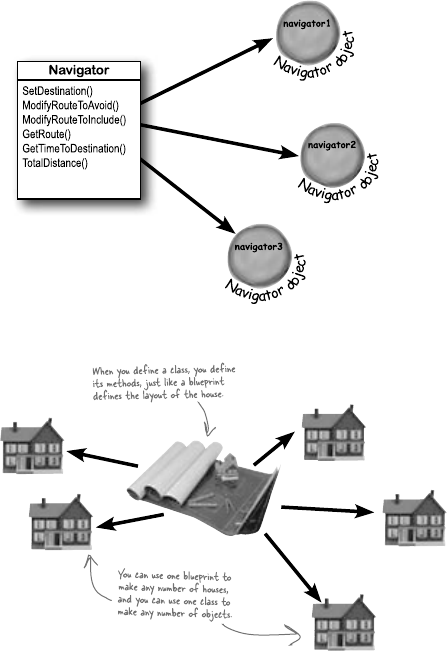
table of contents
xii
3Making Code Make Sense
Every program you write solves a problem.
When you’re building a program, it’s always a good idea to start by thinking about what
problem your program’s supposed to solve. That’s why objects are really useful. They
let you structure your code based on the problem it’s solving, so that you can spend your
time thinking about the problem you need to work on rather than getting bogged down in
the mechanics of writing code. When you use objects right, you end up with code that’s
intuitive to write, and easy to read and change.
objects: get oriented!
new Navigator()
new Navigator()
new Navigator()
How Mike thinks about his problems 86
How Mike’s car navigation system thinks about his problems 87
Mike’s Navigator class has methods to set and modify routes 88
Use what you’ve learned to build a program that uses a class 8990
Mike can use objects to solve his problem 92
You use a class to build an object 93
When you create a new object from a class, it’s called an instance
of that class 94
A better solution…brought to you by objects! 95
An instance uses fields to keep track of things 100
Let’s create some instances! 101
What’s on your program’s mind 103
You can use class and method names to make your code intuitive 104
Give your classes a natural structure 106
Class diagrams help you organize your classes so they make sense 108
Build a class to work with some guys 112
Create a project for your guys 113
Build a form to interact with the guys 114
There’s an easier way to initialize objects 117
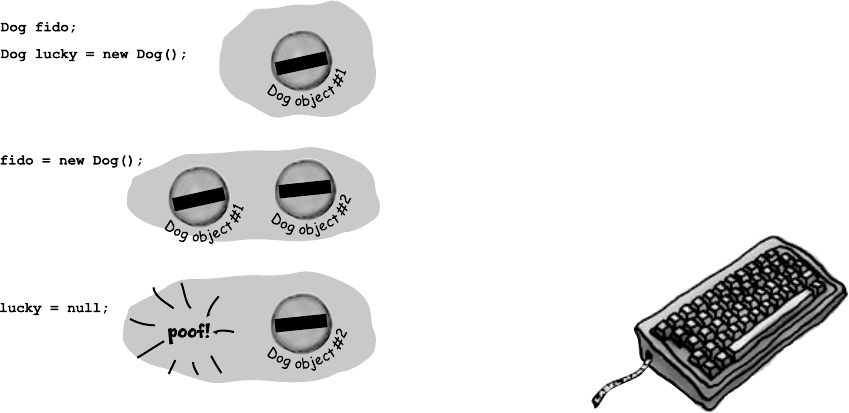
table of contents
xiii
4It’s 10:00. Do you know where your data is?
Data type, database, Lieutenant Commander Data…
it’s all important stuff. Without data, your programs are useless. You
need information from your users, and you use that to look up or produce new
information to give back to them. In fact, almost everything you do in programming
involves working with data in one way or another. In this chapter, you’ll learn the
ins and outs of C#’s data types, see how to work with data in your program, and
even figure out a few dirty secrets about objects (pssst…objects are data, too).
types and references
The variable’s type determines what kind of data it can store 126
A variable is like a data to-go cup 128
10 pounds of data in a 5 pound bag 129
Even when a number is the right size, you can’t just assign it to
any variable 130
When you cast a value that’s too big, C# will adjust it automatically 131
C# does some casting automatically 132
When you call a method, the arguments must be compatible
with the types of the parameters 133
Combining = with an operator 138
Objects use variables, too 139
Refer to your objects with reference variables 140
References are like labels for your object 141
If there aren’t any more references, your object gets
garbage-collected 142
Multiple references and their side effects 144
Two references means TWO ways to change an object’s data 149
A special case: arrays 150
Welcome to Sloppy Joe’s Budget House o’ Discount Sandwiches! 152
Objects use references to talk to each other 154
Where no object has gone before 155
Build a typing game 160
fido
Lucky
fido
Lucky
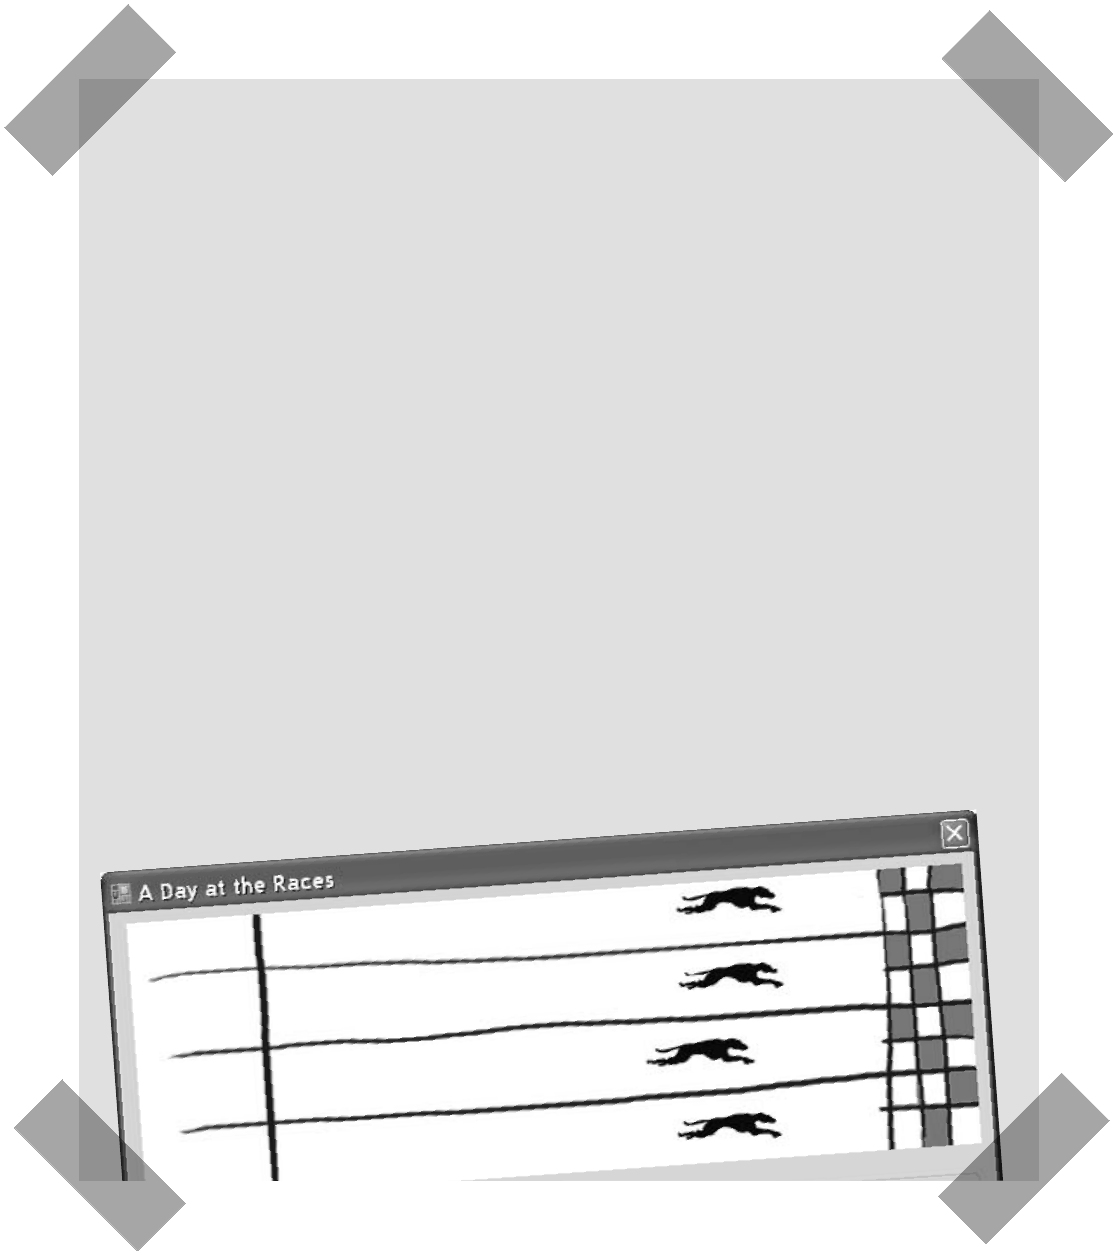
table of contents
xiv
Joe, Bob, and Al love going to the track, but they’re
tired of losing all their money. They need you to build a
simulator for them so they can figure out winners before
they lay their money down. And, if you do a good job,
they’ll cut you in on their profits.
C# Lab 1
A Day at the Races
The spec: build a racetrack simulator 170
The Finished Product 178
table of contents
xv
5Keep your privates… private
Ever wished for a little more privacy
Sometimes your objects feel the same way. Just like you don’t want anybody you
don’t trust reading your journal or paging through your bank statements, good objects
don’t let other objects go poking around their fields. In this chapter, you’re going to
learn about the power of encapsulation. You’ll make your object’s data private, and
add methods to protect how that data is accessed.
encapsulation
Kathleen is an event planner 180
What does the estimator do? 181
Kathleen’s Test Drive 186
Each option should be calculated individually 188
It’s easy to accidentally misuse your objects 190
Encapsulation means keeping some of the data in a class private 191
Use encapsulation to control access to your class’s methods
and fields 192
But is the realName field REALLY protected? 193
Private fields and methods can only be accessed from
inside the class 194
Encapsulation keeps your data pristine 202
Properties make encapsulation easier 203
Build an application to test the Farmer class 204
Use automatic properties to finish the class 205
What if we want to change the feed multiplier? 206
Use a constructor to initialize private fields 207

table of contents
xvi
6Your object’s family tree
Sometimes you
DO
want to be just like your parents.
Ever run across an object that almost does exactly what you want your object to do?
Found yourself wishing that if you could just change a few things, that object would
be perfect? Well, that’s just one reason that inheritance is one of the most powerful
concepts and techniques in the C# language. Before you’re through with this chapter,
you’ll learn how to subclass an object to get its behavior, but keep the flexibility to
make changes to that behavior. You’ll avoid duplicate code, model the real world
more closely, and end up with code that’s easier to maintain.
inheritance
Kathleen does birthday parties, too 216
We need a BirthdayParty class 217
Build the Party Planner version 2.0 218
When your classes use inheritance, you only need to write
your code once 226
Kathleen needs to figure out the cost of her parties, no matter what
kind of parties they are. 226
Build up your class model by starting general and getting
more specific 227
How would you design a zoo simulator? 228
Use inheritance to avoid duplicate code in subclasses 2290
Think about how to group the animals 231
Create the class hierarchy 232
Every subclass extends its base class 233
A subclass can override methods to change or replace methods
it inherited 238
Any place where you can use a base class, you can use one of
its subclasses instead 239
A subclass can hide methods in the superclass 246
Use the override and virtual keywords to inherit behavior 248251
Now you’re ready to finish the job for Kathleen! 252
Build a beehive management system 257
First you’ll build the basic system 258
Use inheritance to extend the bee management system 263
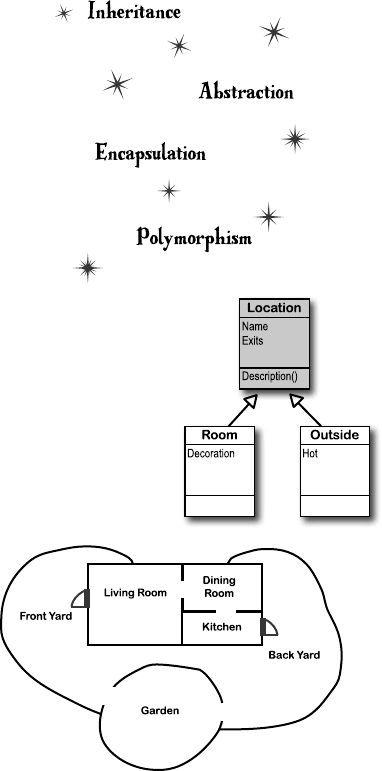
table of contents
xvii
7Making classes keep their promises
Actions speak louder than words.
Sometimes you need to group your objects together based on the things they can
do rather than the classes they inherit from. That’s where interfaces come in—they
let you work with any class that can do the job. But with great power comes great
responsibility, and any class that implements an interface must promise to fulfill all of
its obligations…or the compiler will break their kneecaps, see?
interfaces and abstract classes
Let’s get back to bee-sics 270
We can use inheritance to create classes for different types of bees 271
An interface tells a class that it must implement certain methods
and properties 272
Use the interface keyword to define an interface 273
Classes that implement interfaces have to include ALL of the
interface’s methods 275
You can’t instantiate an interface, but you can reference an interface 278278
Interface references work just like object references 279
You can find out if a class implements a certain interface with “is” 280
Interfaces can inherit from other interfaces 281
Upcasting works with both objects and interfaces 285
Downcasting lets you turn your appliance back into a coffee maker 286
Upcasting and downcasting work with interfaces, too 287
There’s more than just public and private 291
Access modifiers change visibility 292
Some classes should never be instantiated 295
An abstract class is like a cross between a class and an interface 296
An abstract method doesn’t have a body 299
Polymorphism means that one object can take many different forms 307
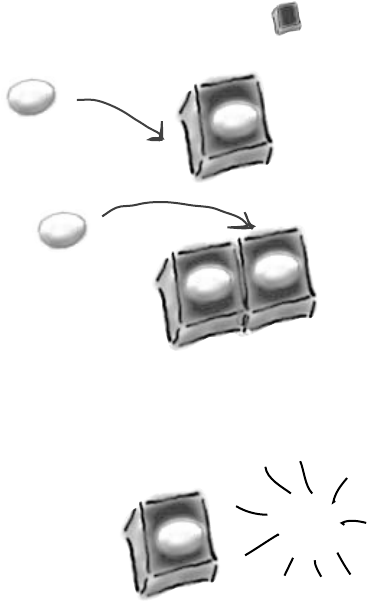
table of contents
xviii
8Storing lots of data
When it rains, it pours.
In the real world, you don’t get to handle your data in tiny little bits and pieces.
No, your data’s going to come at you in loads, piles, and bunches. You’ll need
some pretty powerful tools to organize all of it, and that’s where collections
come in. They let you store, sort, and manage all the data that your programs
need to pore through. That way, you can think about writing programs to work
with your data, and let the collections worry about keeping track of it for you.
enums and collections
Strings don’t always work for storing categories of data 328
Enums let you work with a set of valid values 329
Enums let you represent numbers with names 330
We could use an array to create a deck of cards… 333
Lists are more flexible than arrays 336
Generics can store any type 340
Collection initializers work just like object initializers 344
Let’s create a List of Ducks 345
Lists are easy, but SORTING can be tricky 346
IComparable <Duck> helps your list sort its ducks 347
Use IComparer to tell your List how to sort 348
Create an instance of your comparer object 349
IComparer can do complex comparisons 350
Overriding a ToString() method lets an object describe itself 353
Update your foreach loops to let your Ducks and Cards
print themselves 354
You can upcast an entire list using IEnumerable 356
You can build your own overloaded methods 357
The Dictionary Functionality Rundown 364
Build a program that uses a Dictionary 365
And yet MORE collection types… 377
A queue is FIFO—First In, First Out 378
A stack is LIFO—Last In, First Out 379
poof!
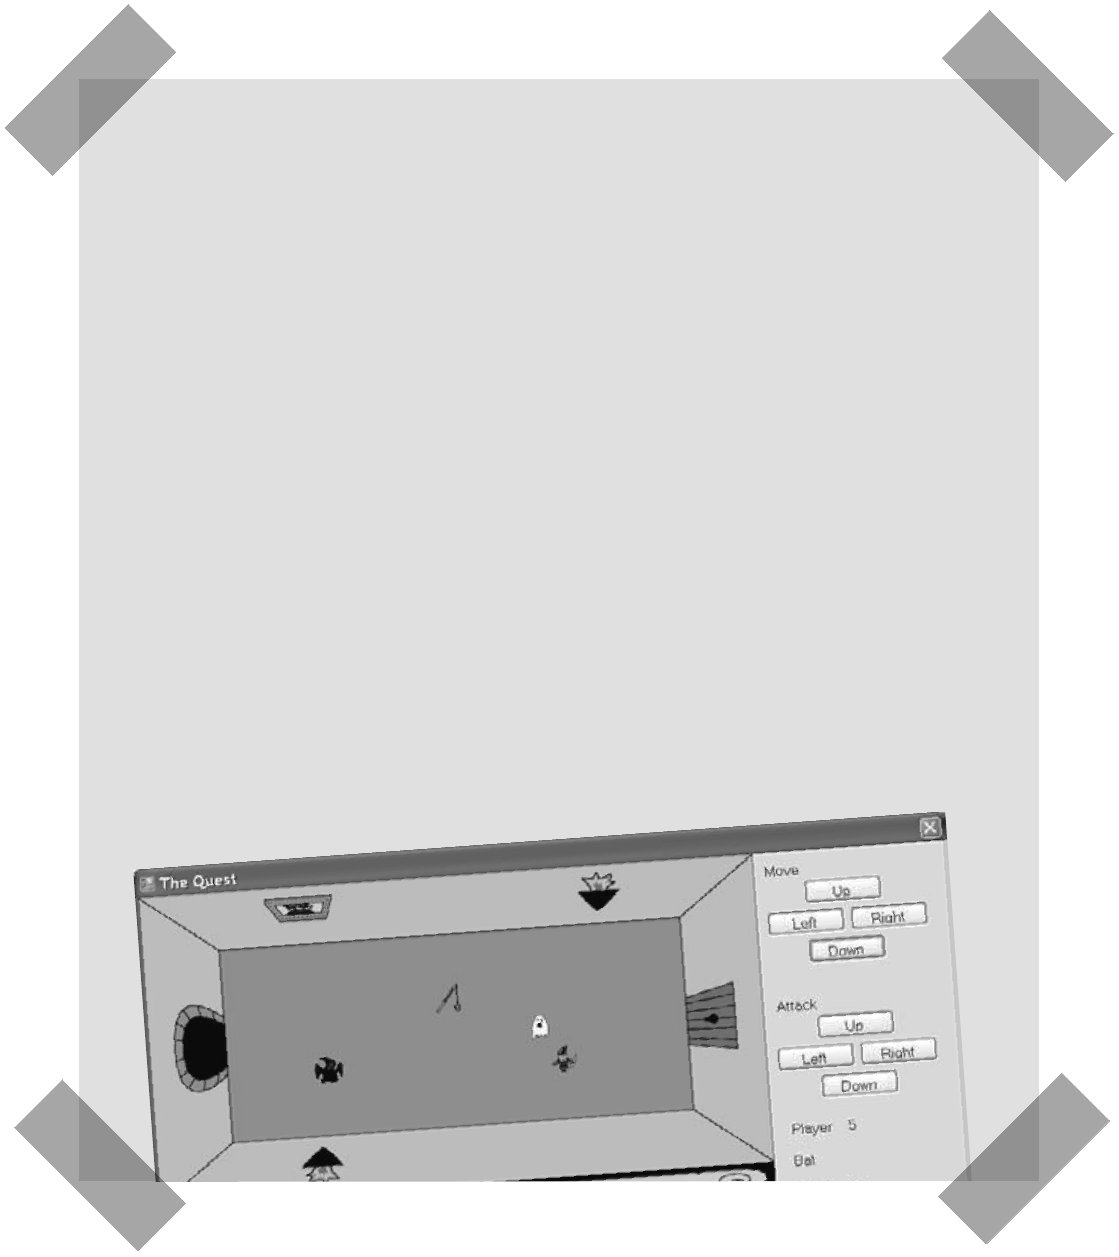
table of contents
xix
C# Lab 2
The Quest
Your job is to build an adventure game where a mighty
adventurer is on a quest to defeat level after level of
deadly enemies. You’ll build a turn-based system, which
means the player makes one move and then the enemies
make one move. The player can move or attack, and then
each enemy gets a chance to move and attack. The game
keeps going until the player either defeats all the enemies
on all seven levels or dies.
The spec: build an adventure game 386
The fun’s just beginning! 406
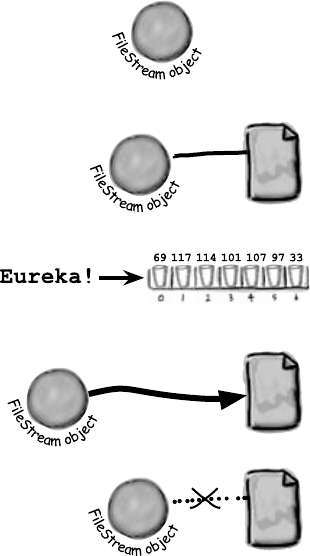
table of contents
xx
9Save the byte array, save the world
Sometimes it pays to be a little persistent.
So far, all of your programs have been pretty short-lived. They fire up, run for
a while, and shut down. But that’s not always enough, especially when you’re
dealing with important information. You need to be able to save your work. In
this chapter, we’ll look at how to write data to a file, and then how to read that
information back in from a file. You’ll learn about the .NET stream classes,
and also take a look at the mysteries of hexadecimal and binary.
reading and writing files
6
9
1
1
7
1
1
4
1
0
1
1
0
7
9
7
3
3
.NET uses streams to read and write data 408
Different streams read and write different things 409
A FileStream reads and writes bytes to a file 410
How to write text to a file in 3 simple steps 411
Reading and writing using two objects 415
Data can go through more than one stream 416
Use built-in objects to pop up standard dialog boxes 419
Dialog boxes are just another .NET control 420
Dialog boxes are objects, too 421
IDisposable makes sure your objects are disposed of properly 427
Avoid file system errors with using statements 428
Writing files usually involves making a lot of decisions 434
Use a switch statement to choose the right option 435
Serialization lets you read or write a whole object all at once 442
.NET uses Unicode to store characters and text 447
C# can use byte arrays to move data around 448
You can read and write serialized files manually, too 451
Working with binary files can be tricky 453
Use file streams to build a hex dumper 454
StreamReader and StreamWriter will do just fine (for now) 455
Use Stream.Read() to read bytes from a stream 456

table of contents
xxi
10 Putting out fires gets old
Programmers aren’t meant to be firefighters.
You’ve worked your tail off, waded through technical manuals and a few engaging
Head First books, and you’ve reached the pinnacle of your profession: master
programmer. But you’re still getting panicked phone calls in the middle of the night
from work because your program crashes, or doesn’t behave like it’s supposed
to. Nothing pulls you out of the programming groove like having to fix a strange bug…
but with exception handling, you can write code to deal with problems that come up.
Better yet, you can even react to those problems, and keep things running.
exception handling
Brian needs his excuses to be mobile 464
When your program throws an exception, .NET generates an
Exception object. 468
All exception objects inherit from Exception 472
The debugger helps you track down and prevent exceptions
in your code 473
Use the IDE’s debugger to ferret out exactly what went wrong in the
Excuse Manager 474
Handle exceptions with try and catch 479
What happens when a method you want to call is risky? 480
Use the debugger to follow the try/catch flow 482
If you have code that ALWAYS should run, use a finally block 484
One class throws an exception, another class catches the exception 491
Bees need an OutOfHoney exception 492
An easy way to avoid a lot of problems:
using gives you try and finally for free 495
Exception avoidance: implement IDisposable to
do your own cleanup 496
The worst catch block EVER: catch-all plus comments 498
Temporary solutions are OK (temporarily) 499
A few simple ideas for exception handling 500
Brian finally gets his vacation… 505
table of contents
xxii
11 What your code does when you’re not looking
events and delegates
Your objects are starting to think for themselves.
You can’t always control what your objects are doing. Sometimes things…happen. And
when they do, you want your objects to be smart enough to respond to anything that
pops up. And that’s what events are all about. One object publishes an event, other
objects subscribe, and everyone works together to keep things moving. Which is great,
until you want your object to take control over who can listen. That’s when callbacks will
come in handy.
Ever wish your objects could think for themselves? 508
But how does an object KNOW to respond? 508
When an EVENT occurs…objects listen 509
Then, the other objects handle the event 511
Connecting the dots 512
The IDE creates event handlers for you automatically 516
Generic EventHandlers let you define your own event types 522
The forms you’ve been building all use events 523
One event, multiple handlers 524
Connecting event senders with event receivers 526
A delegate STANDS IN for an actual method 527
Delegates in action 528
An object can subscribe to an event… 531
Use a callback to control who’s listening 532
A callback is just a way to use delegates 534
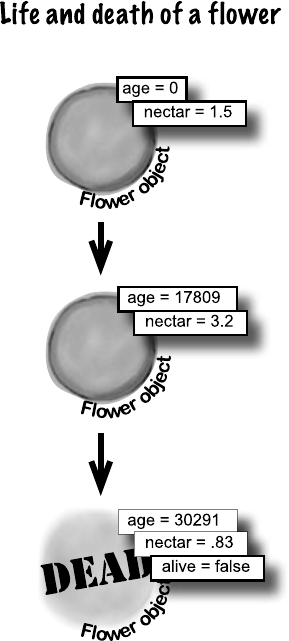
table of contents
xxiii
12 Knowledge, power, and building cool stuff
review and preview
Learning’s no good until you BUILD something.
Until you’ve actually written working code, it’s hard to be sure if you really get some
of the tougher concepts in C#. In this chapter, we’re going to use what we’ve learned
to do just that. We’ll also get a preview of some of the new ideas coming up soon.
And we’ll do all that by building phase I of a really complex application to make
sure you’ve got a good handle on what you’ve already learned from earlier chapters.
So buckle up…it’s time to build some software!
You’ve come a long way, baby 542
We’ve also become beekeepers 543
The beehive simulator architecture 544
Building the beehive simulator 545
Life and death of a flower 549
Now we need a Bee class 550
P. A. H. B. (Programmers Against Homeless Bees) 554
The hive runs on honey 554
Filling out the Hive class 558
The hive’s Go() method 559
We’re ready for the World 560
We’re building a turn-based system 561
Here’s the code for World 562
Giving the bees behavior 568
The main form tells the world to Go() 570
We can use World to get statistics 571
Timers fire events over and over again 572
Let’s work with groups of bees 580
A collection collects…DATA 581
LINQ makes working with data in collections and databases easy 583
One final challenge: Open and Save 585
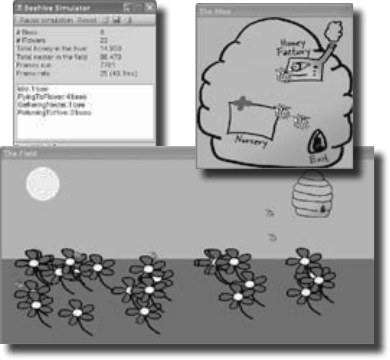
table of contents
xxiv
13 Make it pretty
controls and graphics
Sometimes you have to take graphics into your own hands.
We’ve spent a lot of time relying on controls to handle everything visual in our applications.
But sometimes that’s not enough—like when you want to animate a picture. And once
you get into animation, you’ll end up creating your own controls for your .NET programs,
maybe adding a little double buffering, and even drawing directly onto your forms.
It all begins with the Graphics object, bitmaps, and a determination to not accept the
graphics status quo.
You’ve been using controls all along to interact with your programs 590
Form controls are just objects 591
Use controls to animate the beehive simulator 592
Add a renderer to your architecture 594
Controls are well suited for visual display elements 596
Build your first animated control 599
Create a button to add the BeeControl to your form 602
Your controls need to dispose their controls, too! 603
A UserControl is an easy way to build a control 604
Your simulator’s renderer will use your BeeControl to draw
animated bees on your forms 606
Add the hive and field forms to the project 608
Build the renderer 609
You resized your Bitmaps using a Graphics object 618
Your image resources are stored in Bitmap objects 619
Use System.Drawing to TAKE CONTROL of graphics yourself 620
A 30-second tour of GDI+ graphics 621
Use graphics to draw a picture on a form 622
Graphics can fix our transparency problem… 627
Use the Paint event to make your graphics stick 628
A closer look at how forms and controls repaint themselves 631
Double buffering makes animation look a lot smoother 634
Use a Graphics object and an event handler for printing 640

table of contents
xxv
14
CAPTAIN AMAZING
THE DEATH
OF THE OBJECT
Your last chance to DO something…your object’s finalizer 654
When EXACTLY does a finalizer run? 655
Dispose() works with using, finalizers work with garbage collection 656
Finalizers can’t depend on stability 658
Make an object serialize itself in its Dispose() 659
A struct looks like an object… 663
…but isn’t an object 663
Values get copied; references get assigned 664
The stack vs. the heap: more on memory 667
Use out parameters to make a method return more than one value 670
Pass by reference using the ref modifier 671
Use optional parameters to set default values 672
Use nullable types when you need nonexistent values 673
Nullable types help you make your programs more robust 674
Captain Amazing…not so much 677
Extension methods add new behavior to EXISTING classes 678
Extending a fundamental type: string 6800

table of contents
xxvi
15 Get control of your data
LINQ
It’s a data-driven world…you better know how to live in it.
Gone are the days when you could program for days, even weeks, without dealing with
loads of data. But today, everything is about data. In fact, you’ll often have to work
with data from more than one place…and in more than one format. Databases, XML,
collections from other programs…it’s all part of the job of a good C# programmer. And
that’s where LINQ comes in. LINQ not only lets you query data in a simple, intuitive way,
but it lets you group data, and merge data from different data sources.
An easy project… 686
…but the data’s all over the place 687
LINQ can pull data from multiple sources 688
.NET collections are already set up for LINQ 689
LINQ makes queries easy 690
LINQ is simple, but your queries don’t have to be 691
LINQ is versatile 694
LINQ can combine your results into groups 699
Combine Jimmy’s values into groups 700
Use join to combine two collections into one query 703
Jimmy saved a bunch of dough 704
Connect LINQ to a SQL database 706
Use a join query to connect Starbuzz and Objectville 710
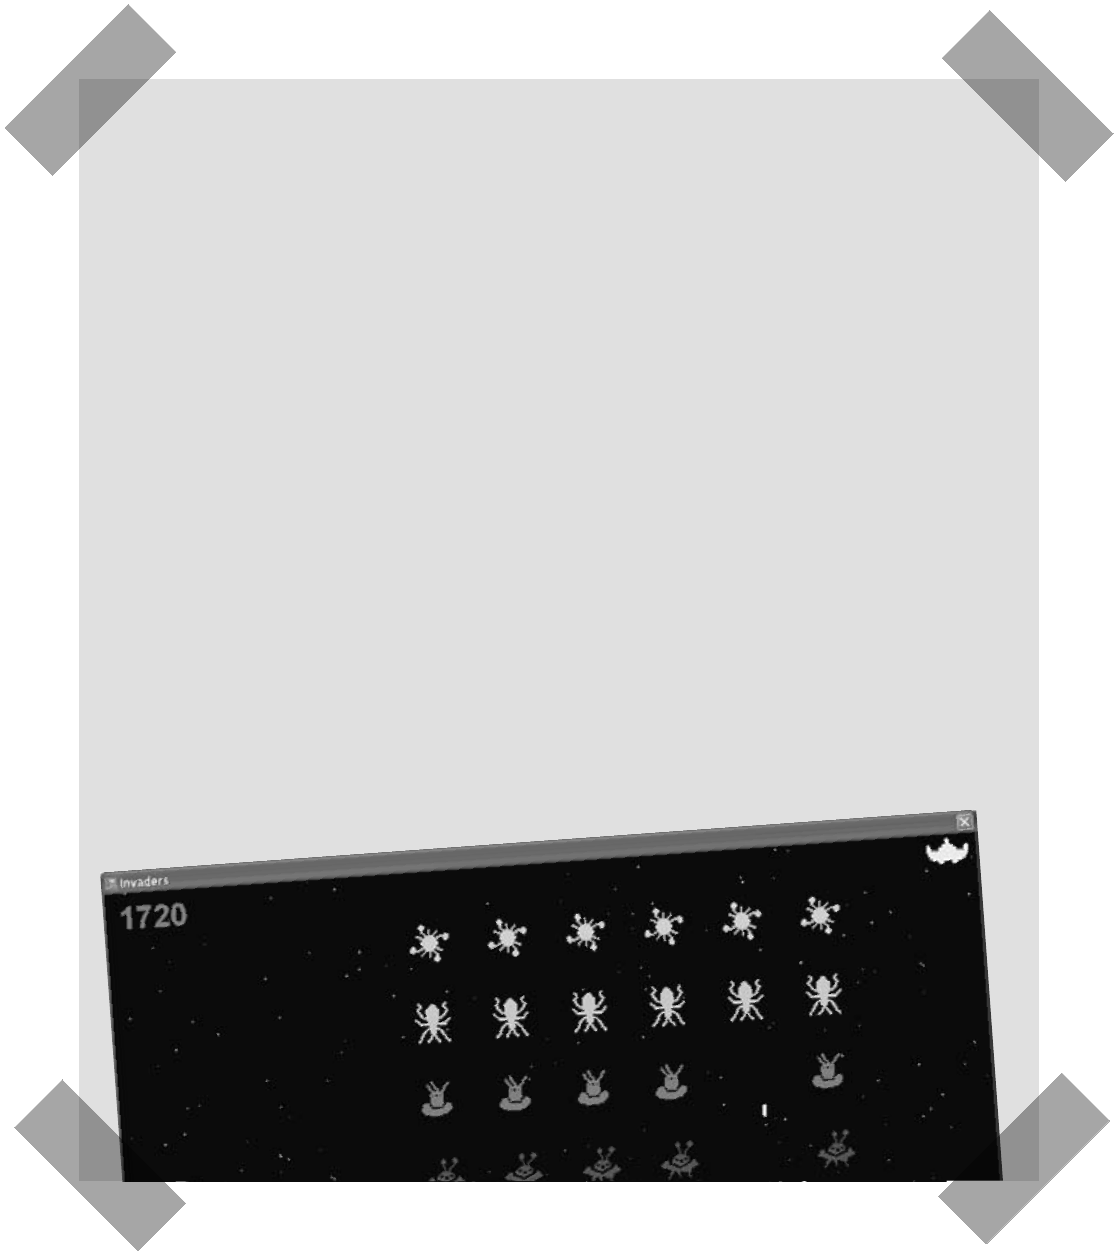
table of contents
xxvii
C# Lab 3
Invaders
In this lab you’ll pay homage to one of the most popular,
revered and replicated icons in video game history, a
game that needs no further introduction. It’s time to
build Invaders.
The grandfather of video games 714
And yet there’s more to do… 733
table of contents
xxviii
iThe top 11 things we wanted to include
in this book
leftovers
The fun’s just beginning
We’ve shown you a lot of great tools to build some really powerful software with C#. But
there’s no way that we could include every single tool, technology, or technique in this
book—there just aren’t enough pages. We had to make some really tough choices about
what to include and what to leave out. Here are some of the topics that didn’t make the
cut. But even though we couldn’t get to them, we still think that they’re important and
useful, and we wanted to give you a small head start with them.
#1. The Basics 736
#2. Namespaces and assemblies 742
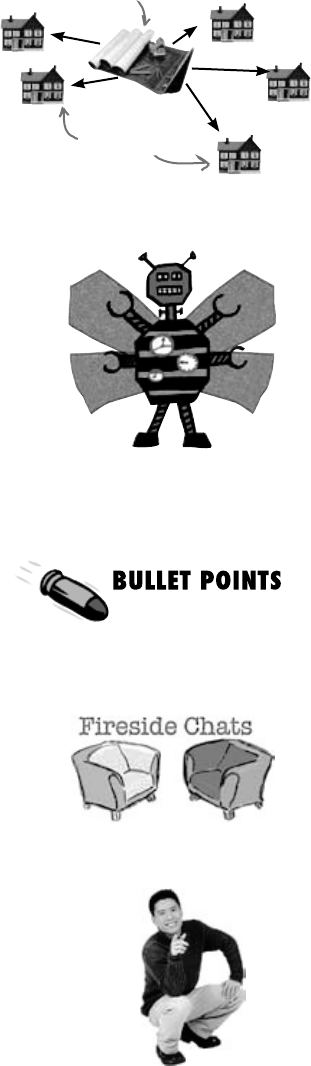
#3. Use BackgroundWorker to make your UI responsive 746
#4. The Type class and GetType() 749
#5. Equality, IEquatable, and Equals() 750
#6. Using yield return to create enumerable objects 753
#7. Refactoring 756
#8. Anonymous types, anonymous methods, and
lambda expressions 758
#9. Serializing data using DataContractSerializer 760
#10. LINQ to XML 762
#11. Windows Presentation Foundation 764
Did you know that C# and the .NET Framework can… 766

xxix
how to use this book
Intro
I can’t believe they
put
that
in a C#
programming book!
In this section, we answer the burning question:
“So why DID they put that in a C# programming book?”
xxx intro
how to use this book
1
2
3
Who is this book for?
Who should probably back away from this book?
If you can answer “yes” to all of these:
If you can answer “yes” to any of these:
this book is for you.
this book is not for you.
[Note from marketing: this book is
for anyone with a credit card.]
Do you want to learn C#?
Do you like to tinker—do you learn by doing, rather than
just reading?
Do you prefer stimulating dinner party conversation
to dry, dull, academic lectures?
1
2
3
Does the idea of writing a lot of code make you bored
and a little twitchy?
Are you a kick-butt C++ or Java programmer looking for
a reference book?
Are you afraid to try something different? Would
you rather have a root canal than mix stripes with
plaid? Do you believe that a technical book can’t be
serious if C# concepts are anthropomorphized?

you are here 4 xxxi
the intro
Great. Only
700 more dull,
dry, boring pages.
We know what you’re thinking.
And we know what your
brain
is thinking.
“How can this be a serious C# programming book?”
“What’s with all the graphics?”
“Can I actually learn it this way?”
Your brain craves novelty. It’s always searching, scanning, waiting for
something unusual. It was built that way, and it helps you stay alive.
So what does your brain do with all the routine, ordinary, normal things
you encounter? Everything it can to stop them from interfering with
the brain’s real job—recording things that matter. It doesn’t bother
saving the boring things; they never make it past the “this is obviously
not important” filter.
How does your brain know what’s important? Suppose you’re out for
a day hike and a tiger jumps in front of you, what happens inside your
head and body?
Neurons fire. Emotions crank up. Chemicals surge.
And that’s how your brain knows…
This must be important! Don’t forget it!
But imagine you’re at home, or in a library. It’s a safe, warm, tiger-free zone.
You’re studying. Getting ready for an exam. Or trying to learn some
tough technical topic your boss thinks will take a week, ten days at
the most.
Just one problem. Your brain’s trying to do you a big favor. It’s trying
to make sure that this obviously non-important content doesn’t clutter
up scarce resources. Resources that are better spent storing the really
big things. Like tigers. Like the danger of fire. Like how you should
never have posted those “party” photos on your Facebook page.
And there’s no simple way to tell your brain, “Hey brain, thank you
very much, but no matter how dull this book is, and how little I’m
registering on the emotional Richter scale right now, I really do want
you to keep this stuff around.”
Your brain thinks
THIS is important.
Your brain thinks
THIS isn’t worth
saving.
xxxii intro
how to use this book
We think of a “Head First” reader as a learner.
So what does it take to
learn
something First, you have to
get
it, then make sure
you don’t
forget
it. It’s not about pushing facts into your head. Based on the
latest research in cognitive science, neurobiology, and educational psychology,
learning
takes a lot more than text on a page. We know what turns your brain on.
Some of the Head First learning principles:
Make it visual. Images are far more memorable than words alone, and
make learning much more effective (up to 89% improvement in recall and
transfer studies). It also makes things more understandable. Put the
words within or near the graphics they relate to, rather than on
the bottom or on another page, and learners will be up to twice as likely to
solve problems related to the content.
Use a conversational and personalized style. In recent studies,
students performed up to 40% better on post-learning tests if the content spoke
directly to the reader, using a first-person, conversational style rather than
taking a formal tone. Tell stories instead of lecturing. Use casual language.
Don’t take yourself too seriously. Which would you pay more attention to: a
stimulating dinner party companion, or a lecture?
Get the learner to think more deeply. In other words, unless you
actively flex your neurons, nothing much happens in your head. A reader
has to be motivated, engaged, curious, and inspired to solve problems, draw
conclusions, and generate new knowledge. And for that, you need challenges,
exercises, and thought-provoking questions, and activities that involve both
sides of the brain and multiple senses.
Get—and keep—the reader’s attention. We’ve all had the “I really want to learn this but
I can’t stay awake past page one” experience. Your brain pays attention to things that are out of
the ordinary, interesting, strange, eye-catching, unexpected. Learning a new, tough,
technical topic doesn’t have to be boring. Your brain will learn much more quickly if
it’s not.
Touch their emotions. We now know that your ability to remember
something is largely dependent on its emotional content. You remember what
you care about. You remember when you feel something. No, we’re not talking
heart-wrenching stories about a boy and his dog. We’re talking emotions like
surprise, curiosity, fun, “what the…?” , and the feeling of “I Rule!” that comes when
you solve a puzzle, learn something everybody else thinks is hard, or realize you
know something that “I’m more technical than thou” Bob from engineering doesn’t.

you are here 4 xxxiii
the intro
If you really want to learn, and you want to learn more quickly and more deeply,
pay attention to how you pay attention. Think about how you think. Learn how you
learn.
Most of us did not take courses on metacognition or learning theory when we were
growing up. We were expected to learn, but rarely taught to learn.
But we assume that if you’re holding this book, you really want to learn how to
build programs in C#. And you probably don’t want to spend a lot of time. If you
want to use what you read in this book, you need to remember what you read. And
for that, you’ve got to understand it. To get the most from this book, or any book or
learning experience, take responsibility for your brain. Your brain on this content.
The trick is to get your brain to see the new material you’re learning
as Really Important. Crucial to your well-being. As important as
a tiger. Otherwise, you’re in for a constant battle, with your brain
doing its best to keep the new content from sticking.
Metacognition: thinking about thinking
I wonder how I
can trick my brain
into remembering
this stuff…
So just how
DO
you get your brain to treat C# like
it was a hungry tiger?
There’s the slow, tedious way, or the faster, more effective way.
The slow way is about sheer repetition. You obviously know that
you are able to learn and remember even the dullest of topics
if you keep pounding the same thing into your brain. With enough
repetition, your brain says, “This doesn’t feel important to him, but he keeps looking
at the same thing over and over and over, so I suppose it must be.”
The faster way is to do anything that increases brain activity, especially different
types of brain activity. The things on the previous page are a big part of the solution,
and they’re all things that have been proven to help your brain work in your favor. For
example, studies show that putting words within the pictures they describe (as opposed to
somewhere else in the page, like a caption or in the body text) causes your brain to try to
makes sense of how the words and picture relate, and this causes more neurons to fire.
More neurons firing = more chances for your brain to get that this is something worth
paying attention to, and possibly recording.
A conversational style helps because people tend to pay more attention when they
perceive that they’re in a conversation, since they’re expected to follow along and hold up
their end. The amazing thing is, your brain doesn’t necessarily care that the “conversation”
is between you and a book! On the other hand, if the writing style is formal and dry, your
brain perceives it the same way you experience being lectured to while sitting in a roomful
of passive attendees. No need to stay awake.
But pictures and conversational style are just the beginning.
xxxiv intro
how to use this book
Here’s what WE did:
We used pictures, because your brain is tuned for visuals, not text. As far as your
brain’s concerned, a picture really is worth a thousand words. And when text and
pictures work together, we embedded the text in the pictures because your brain
works more effectively when the text is within the thing the text refers to, as opposed
to in a caption or buried in the text somewhere.
We used redundancy, saying the same thing in different ways and with different media types,
and multiple senses, to increase the chance that the content gets coded into more than one area
of your brain.
We used concepts and pictures in unexpected ways because your brain is tuned for novelty,
and we used pictures and ideas with at least some emotional content, because your brain
is tuned to pay attention to the biochemistry of emotions. That which causes you to feel
something is more likely to be remembered, even if that feeling is nothing more than a little
humor, surprise, or interest.
We used a personalized, conversational style, because your brain is tuned to pay more
attention when it believes you’re in a conversation than if it thinks you’re passively listening
to a presentation. Your brain does this even when you’re reading.
We included more than 80 activities, because your brain is tuned to learn and remember
more when you do things than when you read about things. And we made the exercises
challenging-yet-do-able, because that’s what most people prefer.
We used multiple learning styles, because you might prefer step-by-step procedures,
while someone else wants to understand the big picture first, and someone else just
wants to see an example. But regardless of your own learning preference, everyone
benefits from seeing the same content represented in multiple ways.
We include content for both sides of your brain, because the more of your brain you
engage, the more likely you are to learn and remember, and the longer you can stay focused.
Since working one side of the brain often means giving the other side a chance to rest, you
can be more productive at learning for a longer period of time.
And we included stories and exercises that present more than one point of view,
because your brain is tuned to learn more deeply when it’s forced to make evaluations and
judgments.
We included challenges, with exercises, and by asking questions that don’t always have
a straight answer, because your brain is tuned to learn and remember when it has to work at
something. Think about it—you can’t get your body in shape just by watching people at the
gym. But we did our best to make sure that when you’re working hard, it’s on the right things.
That you’re not spending one extra dendrite processing a hard-to-understand example,
or parsing difficult, jargon-laden, or overly terse text.
We used people. In stories, examples, pictures, etc., because, well, because you’re a person.
And your brain pays more attention to people than it does to things.
When you define a class, you define
its methods, just like a blueprint
defines the layout of the house.
You can use one blueprint to
make any number of houses,
and you can use one class to
make any number of objects.
you are here 4 xxxv
the intro
So, we did our part. The rest is up to you. These tips are a
starting point; listen to your brain and figure out what works
for you and what doesn’t. Try new things.
1
3
4
5Drink water. Lots of it.
Your brain works best in a nice bath of fluid.
Dehydration (which can happen before you ever
feel thirsty) decreases cognitive function.
Make this the last thing you read before
bed. Or at least the last challenging thing.
6
7
9Write a lot of software!
There’s only one way to learn to program: writing
a lot of code. And that’s what you’re going to do
throughout this book. Coding is a skill, and the only
way to get good at it is to practice. We’re going to
give you a lot of practice: every chapter has exercises
that pose a problem for you to solve. Don’t just skip
over them—a lot of the learning happens when
you solve the exercises. We included a solution to
each exercise—don’t be afraid to peek at the
solution if you get stuck! (It’s easy to get snagged on
something small.) But try to solve the problem before
you look at the solution. And definitely get it working
before you move on to the next part of the book.
Listen to your brain.
8Feel something.
Your brain needs to know that this matters. Get
involved with the stories. Make up your own
captions for the photos. Groaning over a bad joke
is still better than feeling nothing at all.
Pay attention to whether your brain is getting
overloaded. If you find yourself starting to skim
the surface or forget what you just read, it’s time
for a break. Once you go past a certain point, you
won’t learn faster by trying to shove more in, and
you might even hurt the process.
Talk about it. Out loud.
Speaking activates a different part of the brain.
If you’re trying to understand something, or
increase your chance of remembering it later, say
it out loud. Better still, try to explain it out loud
to someone else. You’ll learn more quickly, and
you might uncover ideas you hadn’t known were
there when you were reading about it.
Part of the learning (especially the transfer to
long-term memory) happens
after
you put the
book down. Your brain needs time on its own, to
do more processing. If you put in something new
during that processing time, some of what you
just learned will be lost.
Read the “There are No Dumb Questions”
That means all of them. They’re not optional
sidebars—they’re part of the core content!
Don’t skip them.
Slow down. The more you understand,
the less you have to memorize.
Don’t just read. Stop and think. When the
book asks you a question, don’t just skip to the
answer. Imagine that someone really is asking
the question. The more deeply you force your
brain to think, the better chance you have of
learning and remembering.
Cut this out and stick it
on your refrigerator.
Here’s what YOU can do to
bend
your brain into submission
2Do the exercises. Write your own notes.
We put them in, but if we did them for you,
that would be like having someone else do
your workouts for you. And don’t just look at
the exercises. Use a pencil. There’s plenty of
evidence that physical activity
while
learning
can increase the learning.
xxxvi intro
how to use this book
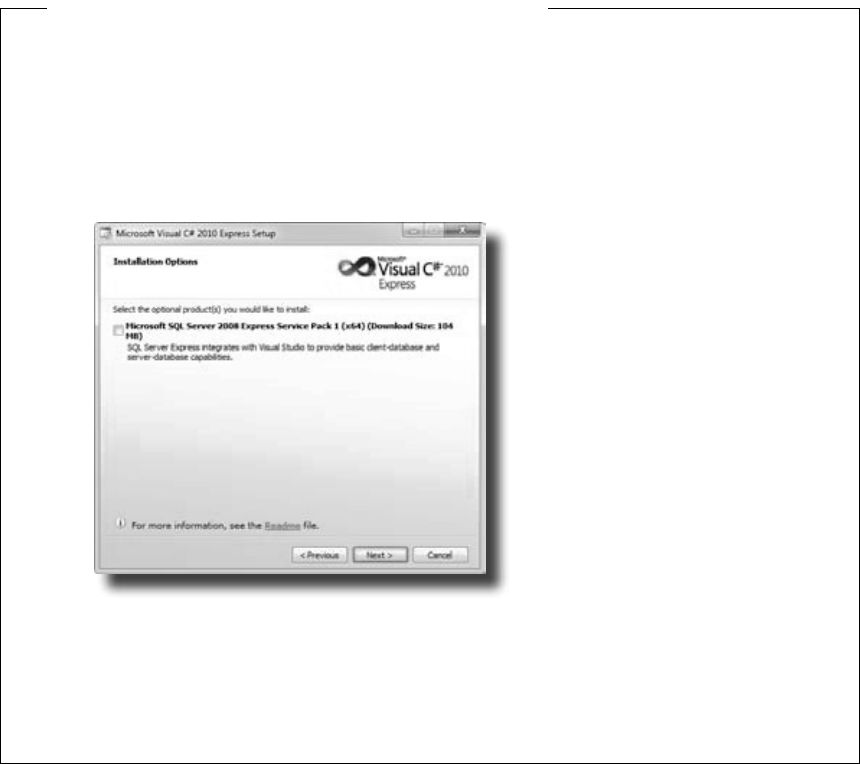
We wrote this book using Visual C# 2010 Express Edition, which uses C# 4.0 and .NET Framework 4.0. All of
the screenshots that you see throughout the book were taken from that edition, so we recommend that you use it.
If you’re using Visual Studio 2010 Professional, Premium, Ultimate or Test Professional editions, you’ll see some
small differences, which we’ve pointed out wherever possible. You can download the Express Edition for free
from Microsoft’s website—it installs cleanly alongside other editions, as well as previous versions of Visual Studio.
SETTING UP VISUAL STUDIO 2010 EXPRESS EDITION
� It’seasyenoughtodownloadandinstallVisualC#2010ExpressEdition.Here’sthelinktotheVisualStudio
2010ExpressEditiondownloadpage:
http://www.microsoft.com/express/downloads/
Youdon’tneedtocheckanyoftheoptionsintheinstallertogetthecodeinthisbooktorun,butfeelfreetoif
youwant.
� DownloadtheinstallationpackageforVisualC#2010ExpressEdition.Makesureyoudoacomplete
installation.Thatshouldinstalleverythingthatyouneed:theIDE(whichyou’lllearnabout),.NETFramework
4.0,andothertools.
� Onceyou’vegotitinstalled,you’llhaveanewStartmenuoption:Microsoft Visual C# 2010 Express Edition.
ClickonittobringuptheIDE,andyou’reallset.
What you need for this book:
If you absolutely must use an
older version of Visual Studio,
C# or the .NET Framework,
then please keep in mind that
you’ll come across topics in this
book that won’t be compatible
with your version. The C# team
at Microsoft has added some
pretty cool features to the
language. Keep in mind that
if you’re not using the latest
version, there will be some code
in this book that won’t work.
you are here 4 xxxvii
the intro
Read me
This is a learning experience, not a reference book. We deliberately stripped out
everything that might get in the way of learning whatever it is we’re working on at
that point in the book. And the rst time through, you need to begin at the beginning,
because the book makes assumptions about what you’ve already seen and learned.
The activities are NOT optional.
The exercises and activities are not add-ons; they’re part of the core content of the
book. Some of them are to help with memory, some for understanding, and some to
help you apply what you’ve learned. Don’t skip the written problems. The pool
puzzles are the only things you don’t have to do, but they’re good for giving your brain a
chance to think about twisty little logic puzzles.
The redundancy is intentional and important.
One distinct difference in a Head First book is that we want you to really get it. And we
want you to nish the book remembering what you’ve learned. Most reference books
don’t have retention and recall as a goal, but this book is about learning, so you’ll see
some of the same concepts come up more than once.
Do all the exercises!
The one big assumption that we made when we wrote this book is that you want to
learn how to program in C#. So we know you want to get your hands dirty right away,
and dig right into the code. We gave you a lot of opportunities to sharpen your skills
by putting exercises in every chapter. We’ve labeled some of them “Do this!”—when
you see that, it means that we’ll walk you through all of the steps to solve a particular
problem. But when you see the Exercise logo with the running shoes, then we’ve left
a big portion of the problem up to you to solve, and we gave you the solution that we
came up with. Don’t be afraid to peek at the solution—it’s not cheating! But you’ll
learn the most if you try to solve the problem rst.
We’ve also placed all the exercise solutions’ source code on the web so you can download
it. You’ll nd it at http://www.headrstlabs.com/books/hfcsharp/
The “Brain Power” exercises don’t have answers.
For some of them, there is no right answer, and for others, part of the learning
experience of the Brain Power activities is for you to decide if and when your answers
are right. In some of the Brain Power exercises you will nd hints to point you in the
right direction.
We use a lot of diagrams to
make tough concepts easier
to understand.
You should do ALL of the
“Sharpen your pencil” activities
Activities marked with the
Exercise (running shoe) logo
are really important! Don’t
skip them if you’re serious
about learning C#.
If you see the Pool Puzzle logo,
the activity is optional, and if
you don’t like twisty logic, you
won’t like these either.
m
i
5
A
g
e
n
t
c
i
a
A
g
e
n
t

xxxviii intro
The technical review team
the review team
Lisa Kellner
Technical Reviewers:
When we wrote this book, it had a bunch of mistakes, issues, problems, typos, and terrible arithmetic errors. OK, it
wasn’t quite that bad. But we’re still really grateful for the work that our technical reviewers did for the book. We
would have gone to press with errors (including one or two big ones) had it not been for the most kick-ass review team
EVER.…
First of all, we really want to thank Chris Burrows and David Sterling for their enormous amount of technical
guidance. We also want to thank Lisa Kellner—this is our sixth book that she’s reviewed for us, and she made a huge
difference in the readability of the final product. Thanks, Lisa! And special thanks to Nick Paladino. Thanks!
Chris Burrows is a developer at Microsoft on the C# Compiler team who focused on design and implementation of
language features in C# 4.0, most notably dynamic.
David Sterling has worked on the Visual C# Compiler team for nearly 3 years.
Nicholas Paldino has been a Microsoft MVP for .NET/C# since the discipline’s inception in the MVP program and has
over 13 years of experience in the programming industry, specifically targeting Microsoft technologies.
Not pictured (but just
as awesome are the
reviewers from the first
edition): Joe Albahari,
Jay Hilyard, Aayam
Singh, Theodore, Peter
Ritchie,Bill Meitelski
Andy Parker, Wayne
Bradney, Dave Murdoch,
Bridgette Julie Landers.
And special thanks
to Jon Skeet for his
thorough review and
suggestions for the first
edition!
David Sterling
Nick Paladino
Chris Burrows
David really helped us out,
especially with some very
neat IDE tricks.
We’re especially grateful for
Chris’s insight and almost
ridiculously helpful feedback.
you are here 4 xxxix
the intro
Acknowledgments
Our editor:
We want to thank our editors, Brett McLaughlin and
Courtney Nash, for editing this book. Brett helped with a lot of
the narrative, and the comic idea in Chapter 14 was completely his,
and we think it turned out really well. Thanks!
Lou Barr
Brett McLaughlin
There are so many people at O’Reilly we want to thank that we hope we
don’t forget anyone. Special thanks to production editor Rachel Monaghan,
indexer Lucie Haskins, Emily Quill for her sharp proofread, Ron
Bilodeau for volunteering his time and preflighting expertise, and Sanders
Kleinfeld for offering one last sanity check—all of whom helped get this
book from production to press in record time. And as always, we love Mary
Treseler, and can’t wait to work with her again! And a big shout out to our
other friends and editors, Andy Oram and Mike Hendrickson. And if
you’re reading this book right now, then you can thank the greatest publicity
team in the industry: Marsee Henon, Sara Peyton, Mary Rotman,
Jessica Boyd, Kathryn Barrett, and the rest of the folks at Sebastopol.
Lou Barr is an amazing graphic designer who went above and beyond
on this one, putting in unbelievable hours and coming up with some pretty
amazing visuals. If you see anything in this book that looks fantastic, you can
thank her (and her mad InDesign skillz) for it. She did all of the monster and
alien graphics for the labs, and the entire comic book. Thanks so much, Lou!
You are our hero, and you’re awesome to work with.
Sanders Kleinfeld
The O’Reilly team:
Courtney Nash

xl intro
Safari® Books Online
Safari Books Online is an on-demand digital library that lets you easily search over 7,500
technology and creative reference books and videos to find the answers you need quickly.
With a subscription, you can read any page and watch any video from our library online. Read books on your cell
phone and mobile devices. Access new titles before they are available for print, and get exclusive access to manuscripts
in development and post feedback for the authors. Copy and paste code samples, organize your favorites, download
chapters, bookmark key sections, create notes, print out pages, and benefit from tons of other time-saving features.
O’Reilly Media has uploaded this book to the Safari Books Online service. To have full digital access
to this book and others on similar topics from O’Reilly and other publishers, sign up for free at
http://my.safaribooksonline.com/?portal=oreilly.
safari books online

this is a new chapter 1
Don’t worry, Mother. With Visual
Studio and C#, you’ll be able to
program so fast that you’ll never
burn the pot roast again.
get productive with c#
1
Visual Applications, in 10
minutes or less
Want to build great programs really fast
With C#, you’ve got a powerful programming language and a valuable tool
at your fingertips. With the Visual Studio IDE, you’ll never have to spend hours
writing obscure code to get a button working again. Even better, you’ll be able
to focus on getting your work done, rather than remembering which method
parameter was for the name of a button, and which one was for its label. Sound
appealing? Turn the page, and let’s get programming.
2 Chapter 1
Why you should learn C#
C# and the Visual Studio IDE make it easy for you to get to the business
of writing code, and writing it fast. When you’re working with C#, the
IDE is your best friend and constant companion.
c# makes it easy
What you get with Visual Studio and C#…
With a language like C#, tuned for Windows
programming, and the Visual Studio IDE, you can focus
on what your program is supposed to do immediately:
Here’s what the IDE automates for you…
Every time you want to get started writing a program, or
just putting a button on a form, your program needs a
whole bunch of repetitive code.
using System;
using System.Collections.Generic;
using System.Windows.Forms;
namespace A_New_Program
{
static class Program
{
/// <summary>
/// The main entry point for the application.
/// </summary>
[STAThread]
static void Main()
{
Application.EnableVisualStyles();
Application.SetCompatibleTextRenderingDefault(false);
Application.Run(new Form1());
}
}
}
private void InitializeComponent()
{
this.button1 = new System.Windows.Forms.Button();
this.SuspendLayout();
//
// button1
//
this.button1.Location = new System.Drawing.Point(105, 56);
this.button1.Name = “button1”;
this.button1.Size = new System.Drawing.Size(75, 23);
this.button1.TabIndex = 0;
this.button1.Text = “button1”;
this.button1.UseVisualStyleBackColor = true;
this.button1.Click += new System.EventHandler(this.button1_Click);
//
// Form1
//
this.AutoScaleDimensions = new System.Drawing.SizeF(8F, 16F);
this.AutoScaleMode = System.Windows.Forms.AutoScaleMode.Font;
this.ClientSize = new System.Drawing.Size(292, 267);
this.Controls.Add(this.button1);
this.Name = “Form1”;
this.Text = “Form1”;
this.ResumeLayout(false);
}
It takes all this code just to draw
a button on a form. Adding a few
more visual elements to the form
could take 10 times as much code.
Data access
C#, the .NET framework,
and the Visual Studio IDE
have pre-built structures
that handle the tedious
code that’s part of most
programming tasks.
.NET Framework
solutions
The result is a better
looking application that
takes less time to write.
F
o
r
m
O
b
j
e
c
t
s
The IDE—or Visual Studio Integrated
Development Environment—is an
important part of working in C#. It’s
a program that helps you edit your
code, manage your files, and publish your
projects.

you are here 4 3
get productive with c#
Build an application, FAST. Creating programs in C# is a snap. The
language is powerful and easy to learn, and the Visual Studio IDE does a lot
of work for you automatically. You can leave mundane coding tasks to the IDE
and focus on what your code should accomplish.
1
Create and interact with databases. The IDE includes an easy-to-use
interface for building databases, and integrates seamlessly with SQL Server
Compact Edition and many other popular database systems.
3
Design a great looking user interface. The Form Designer in the
Visual Studio IDE is one of the easiest design tools to use out there. It
does so much for you that you’ll find that making stunning user interfaces
is one of the most satisfying parts of developing a C# application. You can
build full-featured professional programs without having to spend hours
writing a graphical user interface entirely from scratch.
2
Focus on solving your REAL problems. The IDE does a lot for you, but
you are still in control of what you build with C#. The IDE just lets you focus on
your program, your work (or fun!), and your customers. But the IDE handles all the
grunt work, such as:
≥Keeping track of all your projects
≥Making it easy to edit your project’s code
≥Keeping track of your project’s graphics, audio, icons, and other resources
≥Managing and interacting with databases
All this means you’ll have all the time you would’ve spent doing this routine
programming to put into building killer programs.
4
When you use C# and Visual Studio, you get all of
these great features, without having to do any extra
work. Together, they let you:
You’re going to see exactly
what we mean next.
C# and the Visual Studio IDE make
lots of things easy

4 Chapter 1
Name:
Company:
Telephone:
Email:
Client: Last call:
Laverne Smith
XYZ Industries
(212)555-8129
Laverne.Smith@XyZindustriescom
Yes 05/26/07
The Objectville Paper Company just hired a new CEO. He loves hiking,
coffee, and nature…and he’s decided that to help save forests, he wants
to become a paperless executive, starting with his contacts. He’s heading
to Aspen to go skiing for the weekend, and expects a new address book
program by the time he gets back. Otherwise…well…it won’t be just the
old CEO who’s looking for a job.
Help the CEO go paperless
the boss needs your help
You’d better find a way
to get this data onto the
CEO’s laptop quick.
you are here 4 5
get productive with c#
Windows installer
SQL
Database
The CEO wants to be able to run his
program on his desktop and laptop, so
an installer is a must.
We already know that Visual C#
makes working with databases
easy. Having contacts in a
database lets the CEO and
the sales team all access the
information, even though there’s
only one copy of the data.
Get to know your users’ needs before
you start building your program
Before we can start writing the address book application—or any
application—we need to take a minute and think about who’s going to
be using it, and what they need from the application.
The CEO needs to be able to run his address book program
at work and on his laptop, too. He’ll need an installer to
make sure that all of the right files get onto each machine.
1
The Objectville Paper Company sales team wants to
access his address book, too. They can use his data to
build mailing lists and get client leads for more paper
sales.
The CEO figures a database would be the best way for
everyone in the company to see his data, and then he
can just keep up with one copy of all his contacts.
2
Think about your
users and their
needs before you
start building the
code, and they’ll
be happy with the
final product once
you’re done!
6 Chapter 1
here’s your goal
SELECT command
INSERT command
UPDATE command
DELETE command
P
i
c
t
u
r
e
B
o
x
o
b
j
e
c
t
T
a
b
l
e
A
d
a
p
t
e
r
o
b
j
e
c
t
B
i
n
d
i
n
g
S
o
u
r
c
e
o
b
j
e
c
t
.NET Visual Objects .NET Database
Objects
Database
diagram
Here’s what you’re going to build
You’ll be building a Windows form with a
bunch of visual controls on it.
The application has a
separate data layer
that interacts with
the database.
You’re going to need an application with a graphical user
interface, objects to talk to a database, the database itself, and
an installer. It sounds like a lot of work, but you’ll build all of
this over the next few pages.
Here’s the structure of the program we’re going to create:
Each of these objects
represents a control
on the address book
form we’ll create.
We’ll need objects to talk to
our tables, a diagram to let our
application know what the database
structure is, and more.
S
y
s
t
e
m
.
W
i
n
d
o
w
s
.
F
o
r
m
o
b
j
e
c
t
T
o
o
l
B
a
r
o
b
j
e
c
t
d
a
t
a
e
n
t
r
y
o
b
j
e
c
t
s
D
a
t
a
S
e
t
o
b
j
e
c
t
B
i
n
d
i
n
g
N
a
v
i
g
a
t
o
r
o
b
j
e
c
t
you are here 4 7
get productive with c#
SQL
Database
Table
Stored
Procedures
Data Storage Deployment Package
Windows installer
Database
.exe
Program
file
The data is all stored in a table in
a SQL Server Compact database.
Once the program’s built,
it’ll be packaged up into a
Windows installer.
Here’s the database itself, which
Visual Studio will help us create
and maintain.
The sales
department will
just need to
point and click
to install and
then use his
program.
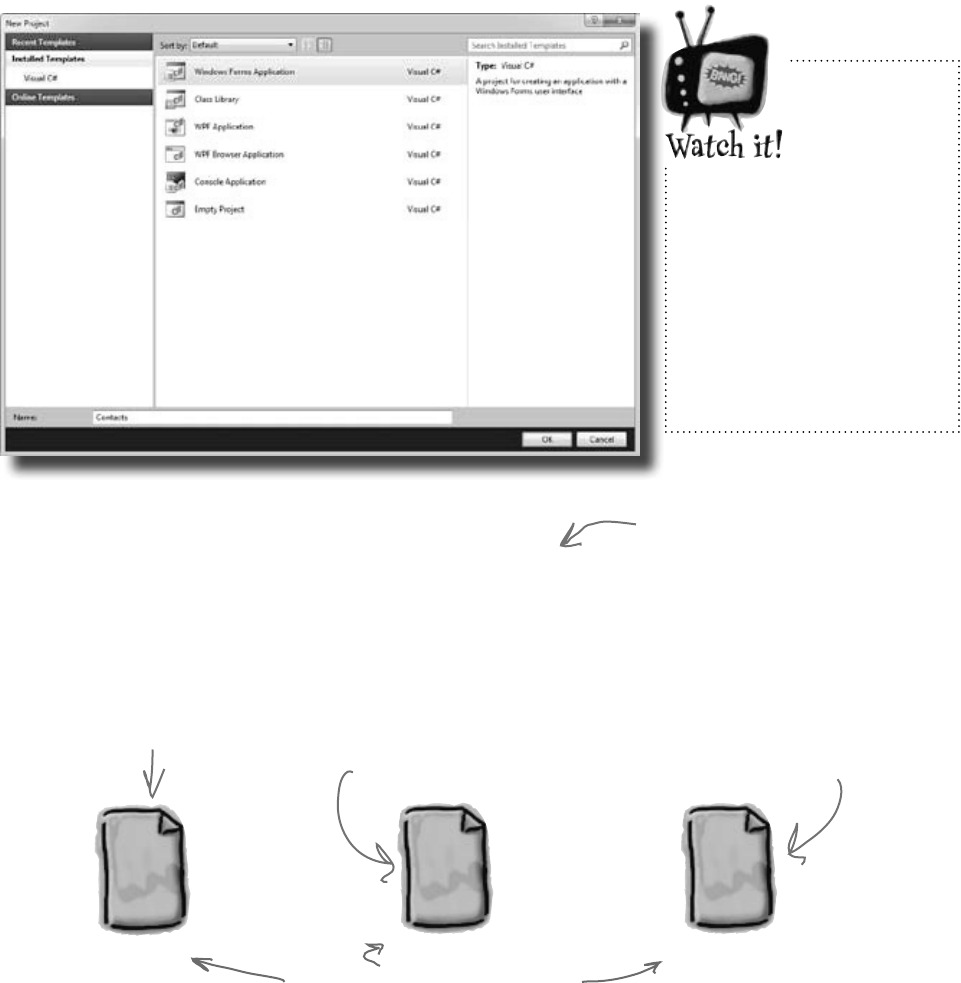
8 Chapter 1
let’s get started
C#
Form1.Designer.cs
C#
Form1.cs
The code that
defines the form
and its objects
lives here.
This file contains the C#
code that defines the
behavior of the form.
What you do in Visual Studio…
Go ahead and start up Visual Studio, if you haven’t already. Skip over the start page and select New Project from
the File menu. Name your project “Contacts” and click OK. There are several project types to choose from.
Select Windows Forms Application and choose “Contacts” as the name for your new project.
C#
Program.cs
This has the code
that starts up
the program and
displays the form.
What Visual Studio does for you…
As soon as you save the project, the IDE creates Form1.cs, Form1.
Designer.cs, and Program.cs file, when you create a new project. It
adds these to the Solution Explorer window, and by default, puts those files in
My Documents\Visual Studio 2010\Projects\Contacts\.
Visual Studio creates all three of
these files automatically.
Things may
look a bit
different in
your IDE.
This is what the “New
Project” window looks
like in Visual Studio 2010
Express Edition. If you’re
using the Professional or
Team Foundation edition, it
might be a bit different. But
don’t worry, everything still
works exactly the same.
Make sure that you save your project
as soon as you create it by selecting
“Save All” from the File menu—that’ll
save all of the project files out to
the folder. If you select “Save”, it
just saves the one you’re working on.
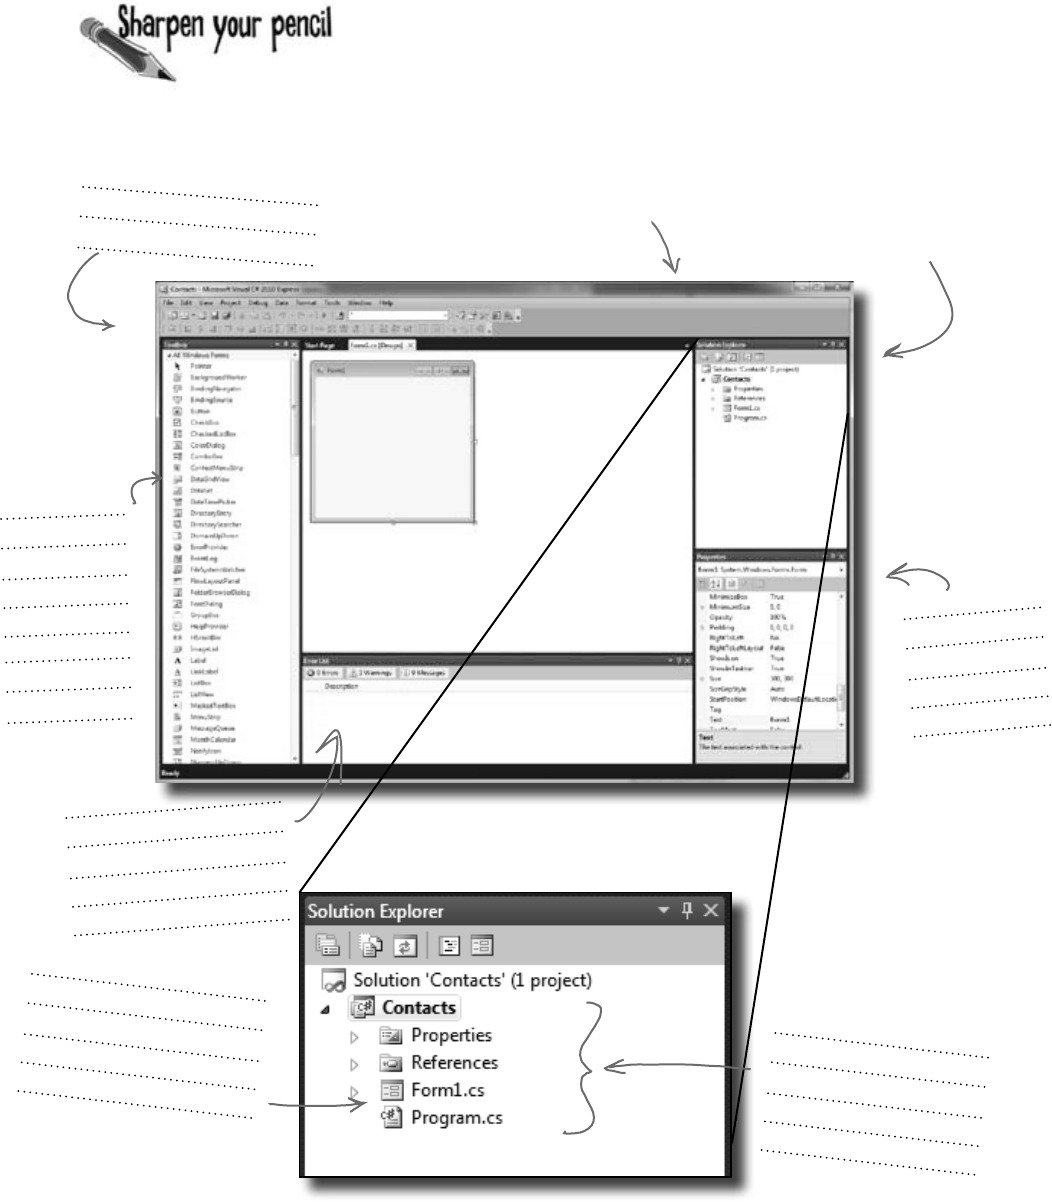
you are here 4 9
get productive with c#
Below is what your screen probably looks like right now. You should be able to figure out the
purpose of most of these windows and files based on what you already know. Make sure you open
the Toolbox and Error List windows by choosing them from the View >> Other Windows menu.
Then in each of the blanks, try and fill in an annotation saying what that part of the IDE does. We’ve
done one to get you started.
This toolbar has buttons
that apply to what you’re
currently doing in the IDE.
We’ve blown up this
window below so you
have more room.
If your IDE doesn’t look exactly like this
picture, you can select “Reset Window
Layout” from the Window menu.
If you don’t see the
Error List or Toolbox,
choose them from View
>> Other Windows.
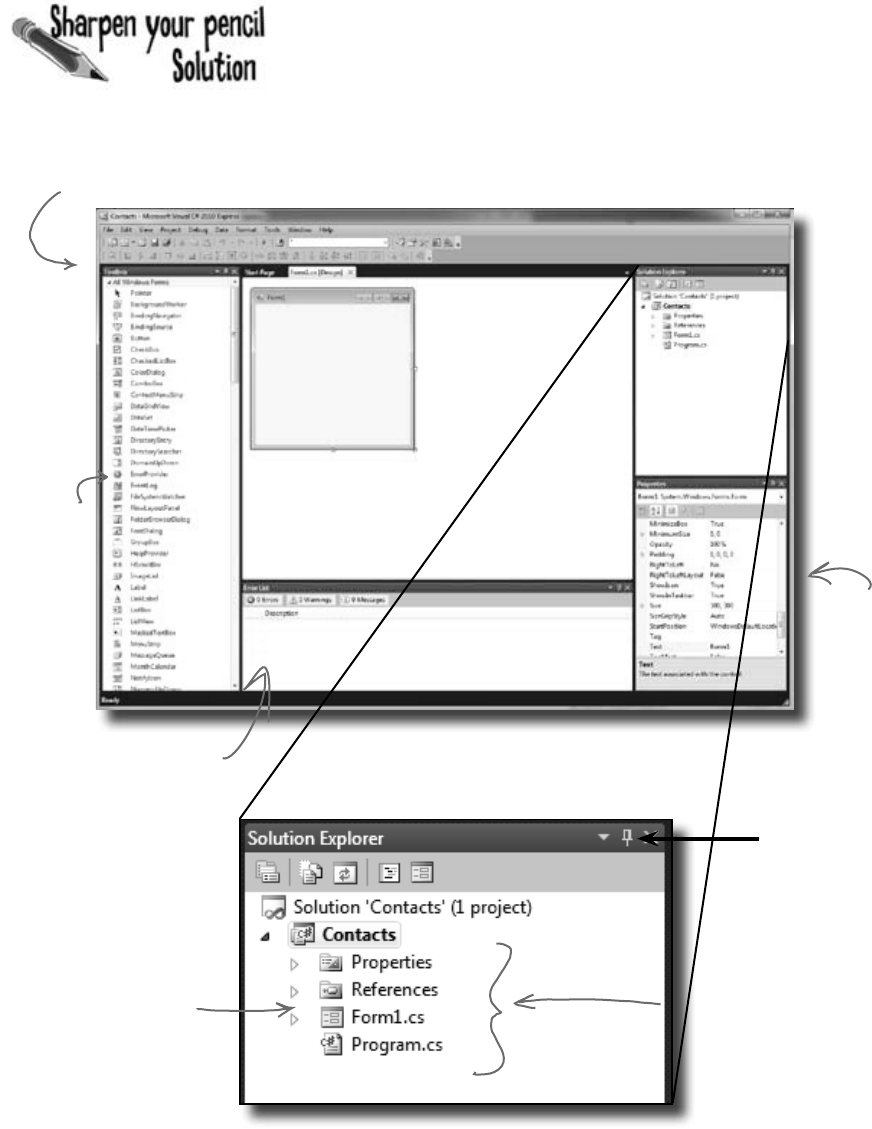
10 Chapter 1
We’ve filled in the annotations about the different sections of the Visual
Studio C# IDE. You may have some different things written down, but you
should have been able to figure out the basics of what each window and
section of the IDE is used for.
This toolbar has buttons
that apply to what you’re
currently doing in the IDE.
know your ide
This window shows
properties of the
control currently
selected on your
form.
This is the
toolbox. It
has a bunch of
visual controls
that you can
drag onto your
form.
This Error List window shows
you when there are errors in
your code. This pane will show
lots of diagnostic info about
your program.
The Form1.cs and Program.cs
files that the IDE created
for you when you added the
new project appear in the
Solution Explorer.
You can switch between
files using the Solution
Explorer in the IDE.
See this little
pushpin icon?
If you click it,
you can turn
auto-hide on or
off. The Toolbox
window has
auto-hide turned
on by default.

you are here 4 11
get productive with c#
Q: So if the IDE writes all this code
for me, is learning C# just a matter of
learning how to use the IDE?
A:No.TheIDEisgreatatautomatically
generatingsomecodeforyou,butitcan
onlydosomuch.Therearesomethingsit’s
reallygoodat,likesettingupgoodstarting
pointsforyou,andautomaticallychanging
propertiesofcontrolsonyourforms.But
thehardpartofprogramming—figuringout
whatyourprogramneedstodoandmaking
itdoit—issomethingthatnoIDEcando
foryou.EventhoughtheVisualStudioIDE
isoneofthemostadvanceddevelopment
environmentsoutthere,itcanonlygosofar.
It’syou—nottheIDE—whowritesthecode
thatactuallydoesthework.
Q: I created a new project in Visual
Studio, but when I went into the “Projects”
folder under My Documents, I didn’t see it
there. What gives?
A:Whenyoufirstcreateanewprojectin
VisualStudio2010Express,theIDEcreates
theprojectinyourLocalSettings\
ApplicationData\Temporary
Projectsfolder.Whenyousavethe
projectforthefirsttime,itwillpromptyou
foranewfilename,andsaveitintheMy
Documents\VisualStudio
2010\Projectsfolder.Ifyoutryto
openanewprojectorclosethetemporary
one,you’llbepromptedtoeithersaveor
discardthetemporaryproject.(NOTE: The
other, non-Express versions of Visual Studio
do not use a temporary projects folder. They
create the project directly in Projects!)
Q: What if the IDE creates code I don’t
want in my project?
A:Youcanchangeit.TheIDEissetupto
createcodebasedonthewaytheelement
youdraggedoraddedismostcommonly
used.Butsometimesthat’snotexactlywhat
youwanted.EverythingtheIDEdoesfor
you—everylineofcodeitcreates,everyfile
itadds—canbechanged,eithermanuallyby
editingthefilesdirectlyorthroughaneasy-
to-useinterfaceintheIDE.
Q: Is it OK that I downloaded and
installed Visual Studio Express? Or do
I need to use one of the versions of
Visual Studio that isn’t free in order to do
everything in this book?
A:There’snothinginthisbookthatyou
can’tdowiththefreeversionofVisualStudio
(whichyoucandownloadfromMicrosoft’s
website).Themaindifferencesbetween
Expressandtheothereditions(Professional
andTeamFoundation)aren’tgoingtoget
inthewayofwritingC#andcreatingfully
functional,completeapplications.
Q: Can I change the names of the files
the IDE generates for me?
A:Absolutely.Whenyoucreateanew
project,theIDEgivesyouadefaultformcalled
Form1(whichhasfilescalledForm1.cs,
Form1.Designer.cs,andForm1.
resx).ButyoucanusetheSolution
Explorertochangethenamesofthefilesto
whateveryouwant.Bydefault,thenamesof
thefilesarethesameasthenameoftheform.
Ifyouchangethenamesofthefiles,you’ll
beabletoseeinthePropertieswindowthat
theformwillstillbecalledForm1.Youcan
changethenameoftheformbychangingthe
“(Name)”lineinthePropertieswindow.Ifyou
do,thefilenameswon’tchange.
C#doesn’tcarewhatnamesyouchoosefor
yourfilesoryourforms(oranyotherpartof
theprogram),althoughthereareafewrules
forthis.Butifyouchoosegoodnames,it
makesyourprogramseasiertoworkwith.
Fornow,don’tworryaboutnames—we’lltalk
alotmoreabouthowtochoosegoodnames
forpartsofyourprogramlateron.
Q: I’m looking at the IDE right now,
but my screen doesn’t look like yours! It’s
missing some of the windows, and others
are in the wrong place. What gives?
A:Ifyouclickonthe“ResetWindow
Layout”commandunderthe“Window”menu,
theIDEwillrestorethedefaultwindowlayout
foryou.Thenyoucanusethe“View>>
OtherWindows”menutomakeyourscreen
lookjustliketheonesinthischapter.
Visual Studio will
generate code
you can use as a
starting point for
your applications.
Making sure
the application
does what it’s
supposed to do
is entirely up to
you.
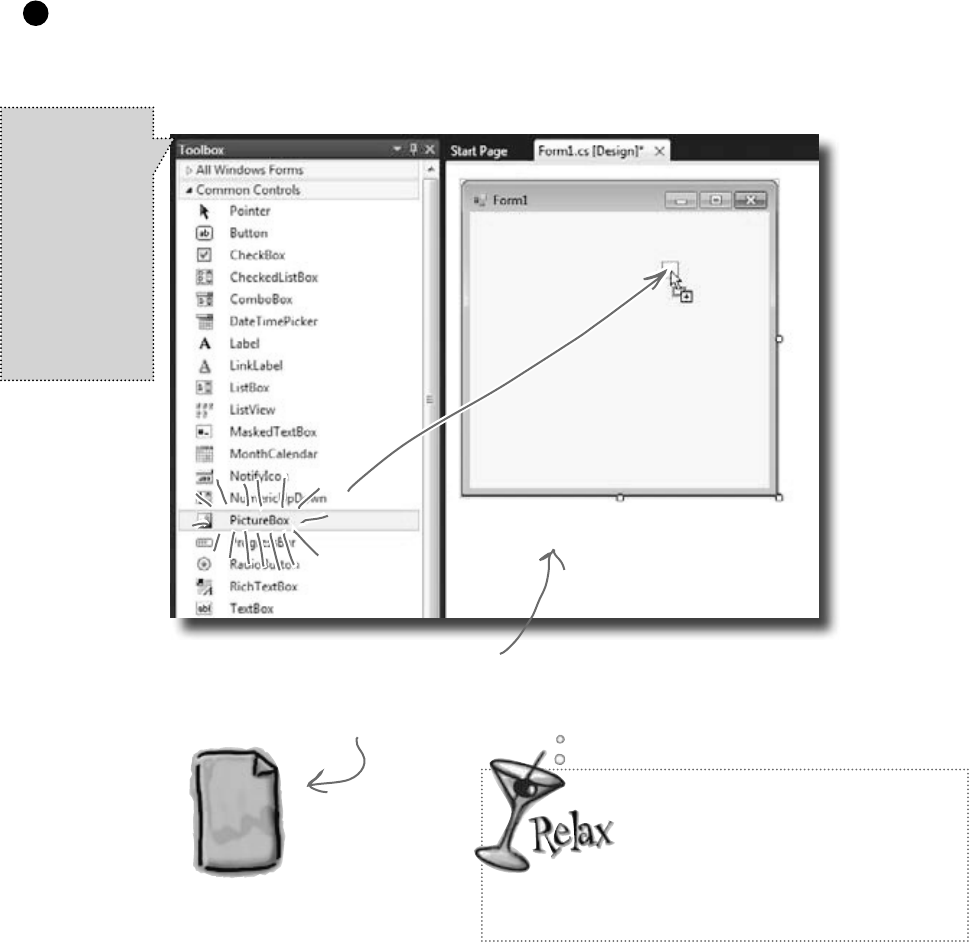
12 Chapter 1
Adding controls and polishing the user interface is as easy as
dragging and dropping with the Visual Studio IDE. Let’s add a
logo to the form:
Develop the user interface
a picturebox is worth a thousand words
Use the PictureBox control to add a picture.
Click on the PictureBox control in the Toolbox, and drag it
onto your form. In the background, the IDE added code to
Form1.Designer.cs for a new picture control.
1
C#
Form1.Designer.cs
Every time you make a change to a control’s
properties on the form, the code in Form1.
Designer.cs is getting changed by the IDE.
If you don’t see
the toolbox, try
hovering over the
word “Toolbox”
that shows up
in the upper
left-hand corner
of the IDE. If it’s
not there, select
“Toolbox” from
the View menu to
make it appear.
It’s OK if you’re not a pro at user
interface design.
We’ll talk a lot more about designing
good user interfaces later on. For now,
just get the logo and other controls on your form, and
worry about behavior. We’ll add some style later.
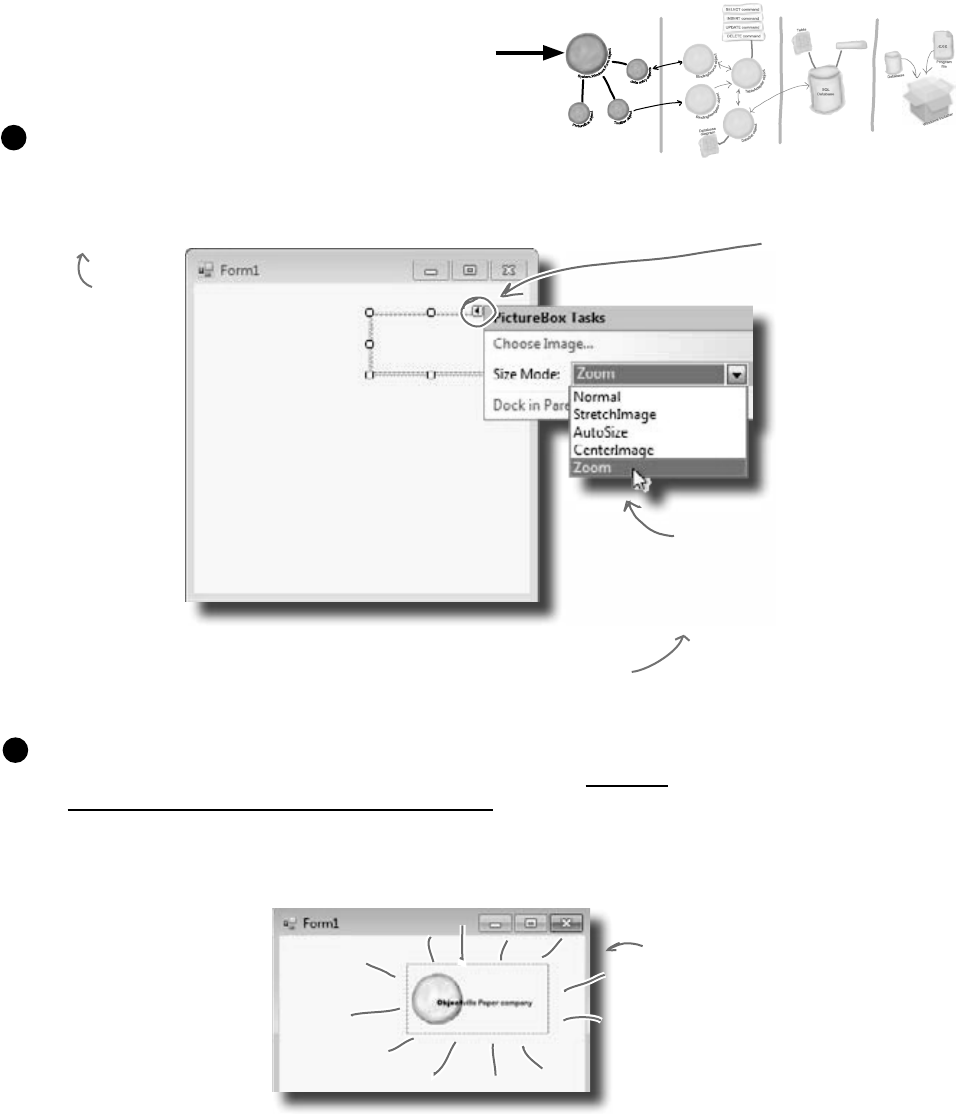
you are here 4 13
get productive with c#
You are Here
Set the PictureBox to Zoom mode.
Every control on your form has properties that you can
set. Click the little black arrow for a control to access
these properties. Change the PictureBox’s Size property
to “Zoom” to see how this works:
2
Click on this little
black arrow to access
a control’s properties.
Choose “Zoom” so that
the PictureBox frame
will change to match the
size of the picture you
put in it.
Download the Objectville Paper Company logo.
Download the Objectville Paper Co. logo from Head First Labs (http://
www.headfirstlabs.com/books/hfcsharp) and save it to your hard drive.
Then click the PictureBox properties arrow, and select Choose Image. You’ll see a
Select Resources window pop up. Click the “Local Resource” radio button to enable the
“Import…” button at the top of the form. Click that button, find your logo, and you’re all set.
3
Here’s the OPC logo,
and the PictureBox
zooms to get the size
just right.
.NET
Database
Objects
.NET Visual
Objects
Data Storage Deployment
Pack age
You can also use the
“Properties” window in
the IDE to set the
Size property. The
little black arrow is
just there to make
it easy to access
the most common
properties of any
control.
Then click “Choose Image” to bring up
the Select Resource dialog box so you
can import a local resource.
Stored
Procedures
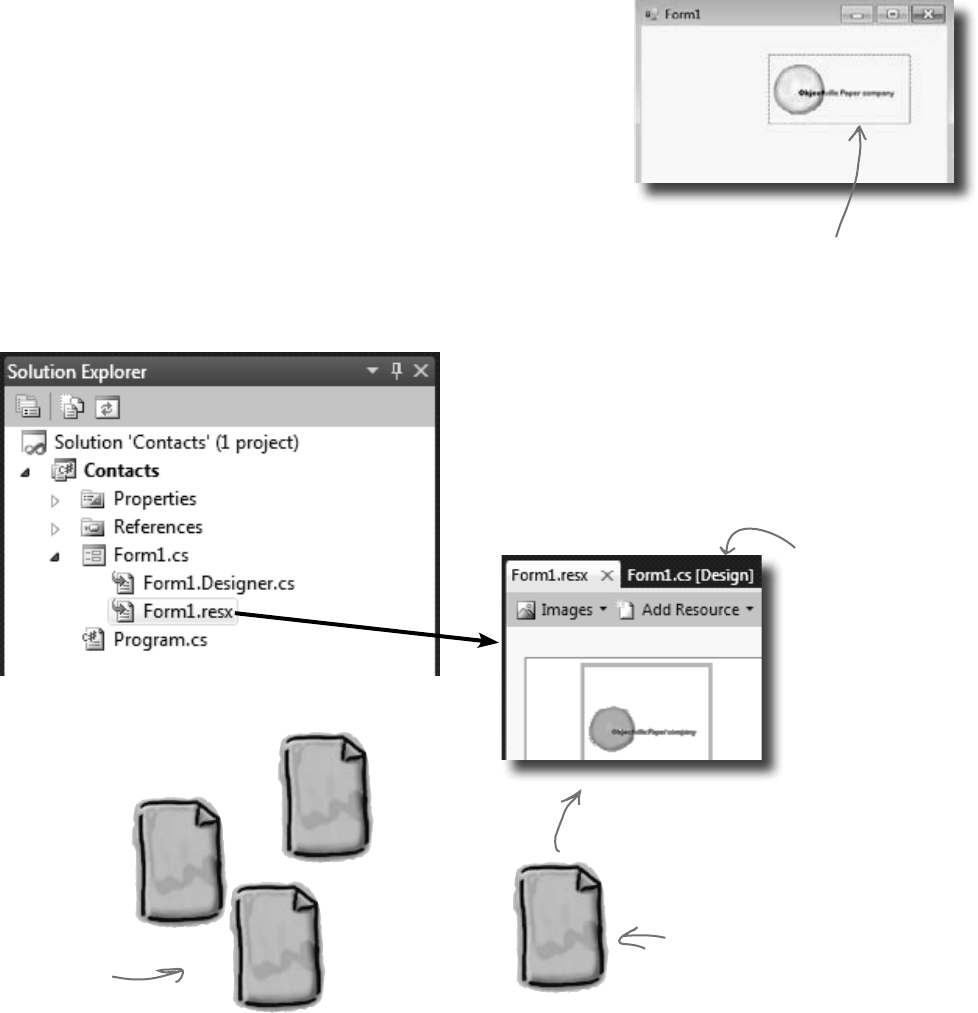
14 Chapter 1
Every time you do something in the Visual Studio IDE, the IDE is
writing code for you. When you created the logo and told Visual
Studio to use the image you downloaded, Visual Studio created a resource
and associated it with your application. A resource is any graphics file,
audio file, icon, or other kind of data file that gets bundled with your
application. The graphics file gets integrated into the program, so that
when it’s installed on another computer, the graphic is installed along with
it and the PictureBox can use it.
When you dragged the PictureBox control onto your form, the IDE
automatically created a resource file called Form1.resx to store that
resource and keep it in the project. Double-click on this file, and you’ll be
able to see the newly imported image.
Visual Studio, behind the scenes
This image is now a resource of the
Contact List application.
C#
Form1.Designer.cs
C#
Form1.cs C#
Program.cs
C#
Form1.resx
Here are the files
Visual Studio
created earlier.
conserving c#’s natural resources
When you imported the image, the
IDE created this file for you.
It contains all of the resources
(graphics, video, audio and other
stored data) associated with Form1.
Go to the Solution Explorer and click on the “expand” icon next
to Form1.cs to expand it (if it’s not already expanded). This
will display two files: Form1.Designer.cs and Form1.
resx. Double-click on Form1.resx, click on the arrow next
to “Strings”, and select “Images” from the drop-down list (or hit
Ctrl-2) to see the logo that you imported. That file is what links it
to the PictureBox, and the IDE added code to do the linking.
If you chose the other
“Import.” button from
the Select Resource
dialog on the last page,
then your image will
show up in the Resources
folder in the Solution
Explorer instead. Don’t
worry—just go back to
Select Resources, choose
“Local Resource,” and
reimport the image into
the resources, and it’ll
show up here.
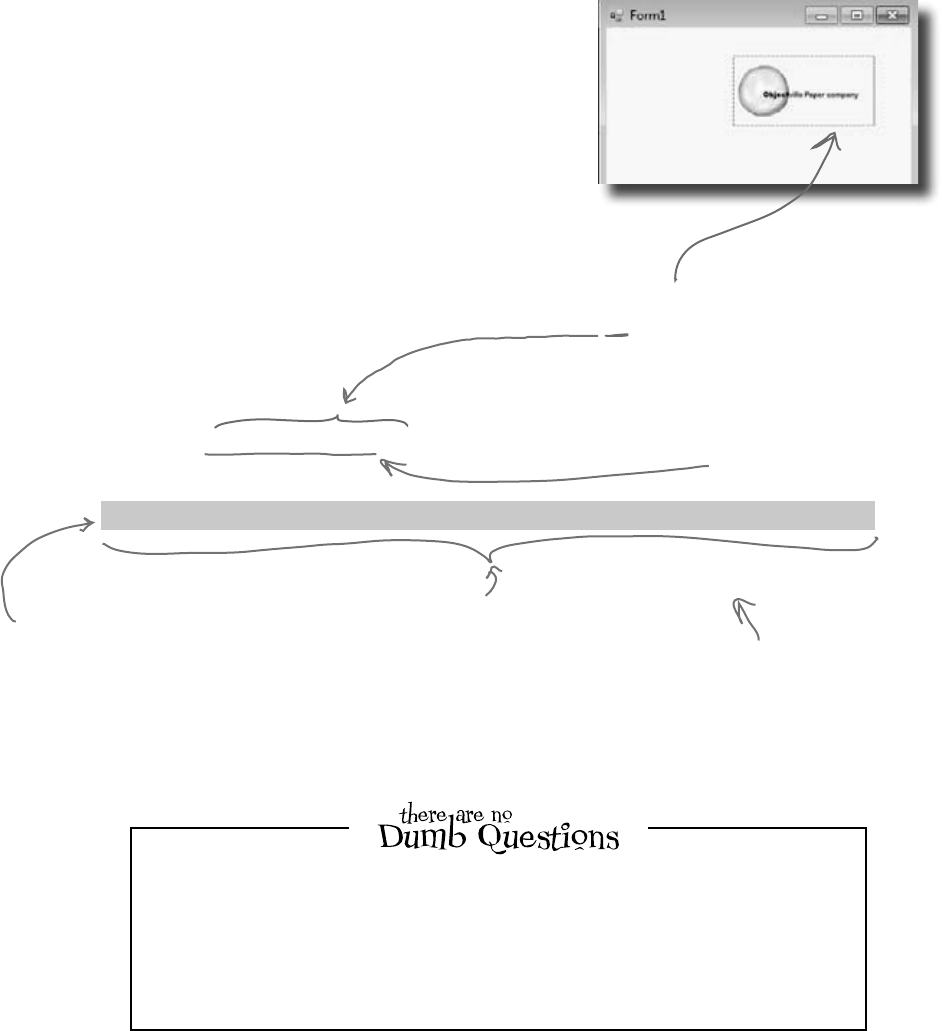
you are here 4 15
get productive with c#
Add to the auto-generated code
The IDE creates lots of code for you, but you’ll still want to get
into this code and add to it. Let’s set the logo up to show an About
message when the users run the program and click on the logo.
When you’re editing a form in the IDE, double-clicking on any of
the toolbox controls causes the IDE to automatically add code to
your project. Make sure you’ve got the form showing in the IDE,
and then double-click on the PictureBox control. The IDE will
add code to your project that gets run any time a user clicks on the
PictureBox. You should see some code pop up that looks like this:
public partial class Form1 : Form
{
public Form1()
{
InitializeComponent();
}
private void pictureBox1_Click(object sender, EventArgs e)
{
MessageBox.Show(“Contact List 1.0.\nWritten by: Your Name”, “About”);
}
}
When you double-clicked on the PictureBox control,
the IDE created this method. It will run every time
a user clicks on the logo in the running application.
When you double-click on the
PictureBox, it will open this
code up with a cursor blinking
right here. Ignore any windows
the IDE pops up as you type;
it’s trying to help you, but we
don’t need that right now.
Type in this line of code. It causes a message
box to pop up with the text you provide. The
box will be titled “About”.
Q: What’s a method?
A:Amethodisjustanamed block of code.
We’lltalkalotmoreaboutmethodsinChapter2.
Q: What does that \n thing do?
A:That’salinebreak.IttellsC#toput
“ContactList1.0.”ononeline,andthenstarta
newlinefor“Writtenby:”.
This method name gives you a
good idea about when it runs:
when someone clicks on this
PictureBox control.
Once you’ve typed in the line
of code, save it using the Save
icon on the IDE toolbar or
by selecting “Save” from the
File menu. Get in the habit of
doing “Save All” regularly!
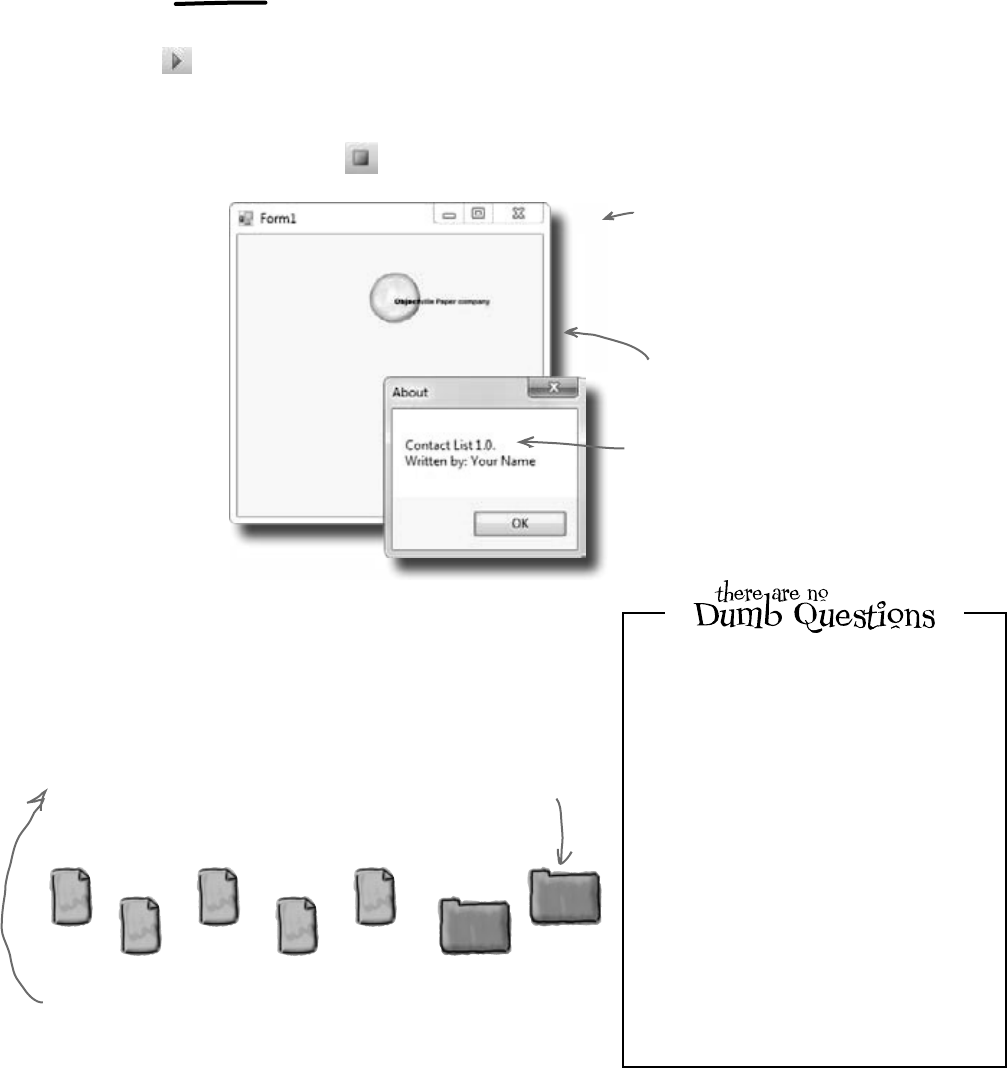
16 Chapter 1
run the app (already!)
Press the F5 key on your keyboard, or click the green
arrow button ( ) on the toolbar to check out what you’ve
done so far. (This is called “debugging,” which just means
running your program using the IDE.) You can stop
debugging by selecting “Stop Debugging” from the Debug
menu or clicking this toolbar button: .
You can already run your application
Clicking on the
OPC logo brings up
the About box you
just coded.
All three of these
buttons work—and you
didn’t have to write any
code to make them work.
Q: In my IDE, the green arrow is marked as
“Debug.” Is that a problem?
A:No.Debugging,atleastforourpurposes
rightnow,justmeansrunningyourapplication
insidetheIDE.We’lltalkalotmoreabout
debugginglater,butfornow,youcansimplythink
aboutitasawaytorunyourprogram.
Q: I don’t see the Stop Debugging button
on my toolbar. What gives?
A:TheStopDebuggingbuttonshowsupina
specialtoolbarthatonly shows upwhenyour
programisrunning.Trystartingtheapplication
again,andseeifitappears.
When you run your program, Visual Studio copies
your files to My Documents\VisualStudio
2010\Projects\Contacts\Contacts\
bin\debug. You can even hop over to that
directory and run your program by double-clicking
on the .exe file the IDE creates.
Where are my files?
C#
Form1.
Designer.cs
C#
Form1.resx
C#
Form1.cs
C#
Program.cs
C#
bin
Properties
Contacts.csproj
This isn’t a mistake; there are two levels of folders. The inner
folder has the actual C# code files.
C# turns your
program into a
file that you can
run, called an
executable. You’ll
find it in here, in
the debug folder.
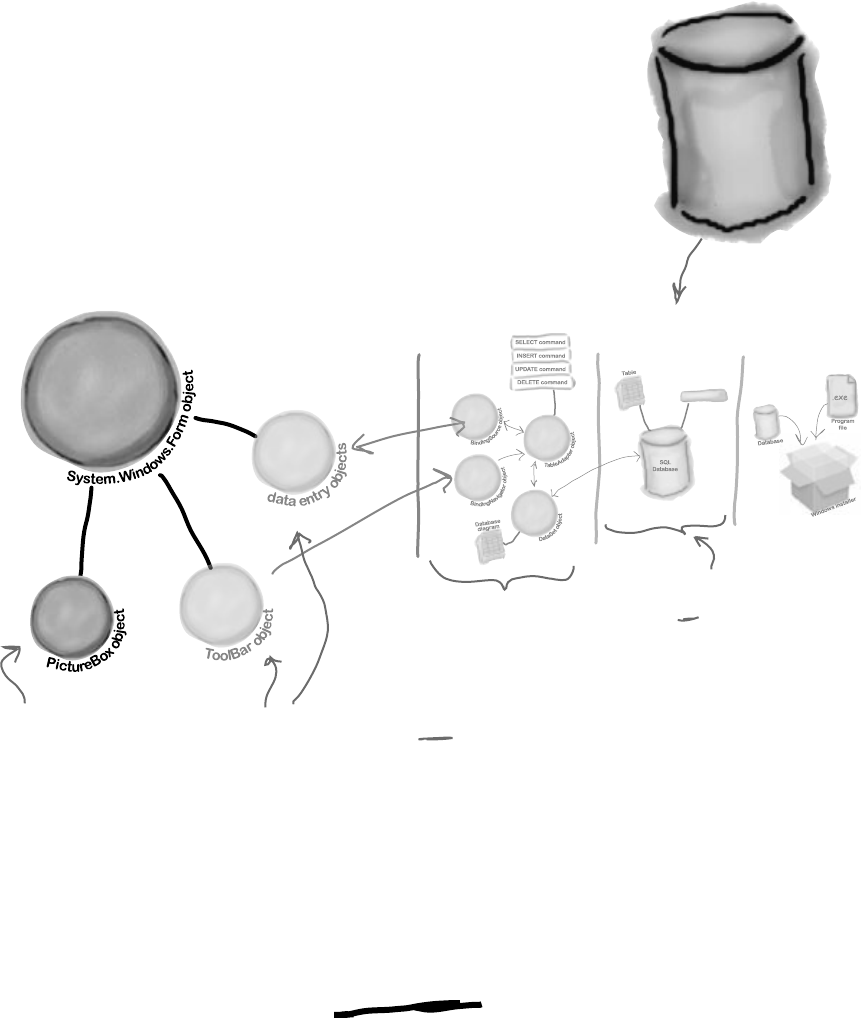
you are here 4 17
get productive with c#
We’ve built a form and created a PictureBox object that pops up a
message box when it’s clicked on. Next, we need to add all the other
fields from the card, like the contact’s name and phone number.
Let’s store that information in a database. Visual Studio can connect
fields directly to that database for us, which means we don’t have to
mess with lots of database access code (which is good). But for that
to work, we need to create our database so that the controls on the
form can hook up to it. So we’re going to jump from the .NET Visual
Objects straight to the Data Storage section.
Here’s what we’ve done so far
SQL
Database
Visual Studio can generate code to connect your
form to a database, but you need to have the
database in place BEFORE generating that code.
.NET
Database
Objects
.NET Visual
Objects
Data Storage Deployment
Package
Here’s what we’ve
already done…
…but we still need some
objects to interact
with the data we’ll put
in our database.
This step is about
connecting our form
to the database, so
we’re not ready for
it yet, since we don’t
have a database.
So we need to focus
on this step next:
creating our database,
and putting some
initial data into it.
Stored
Procedures
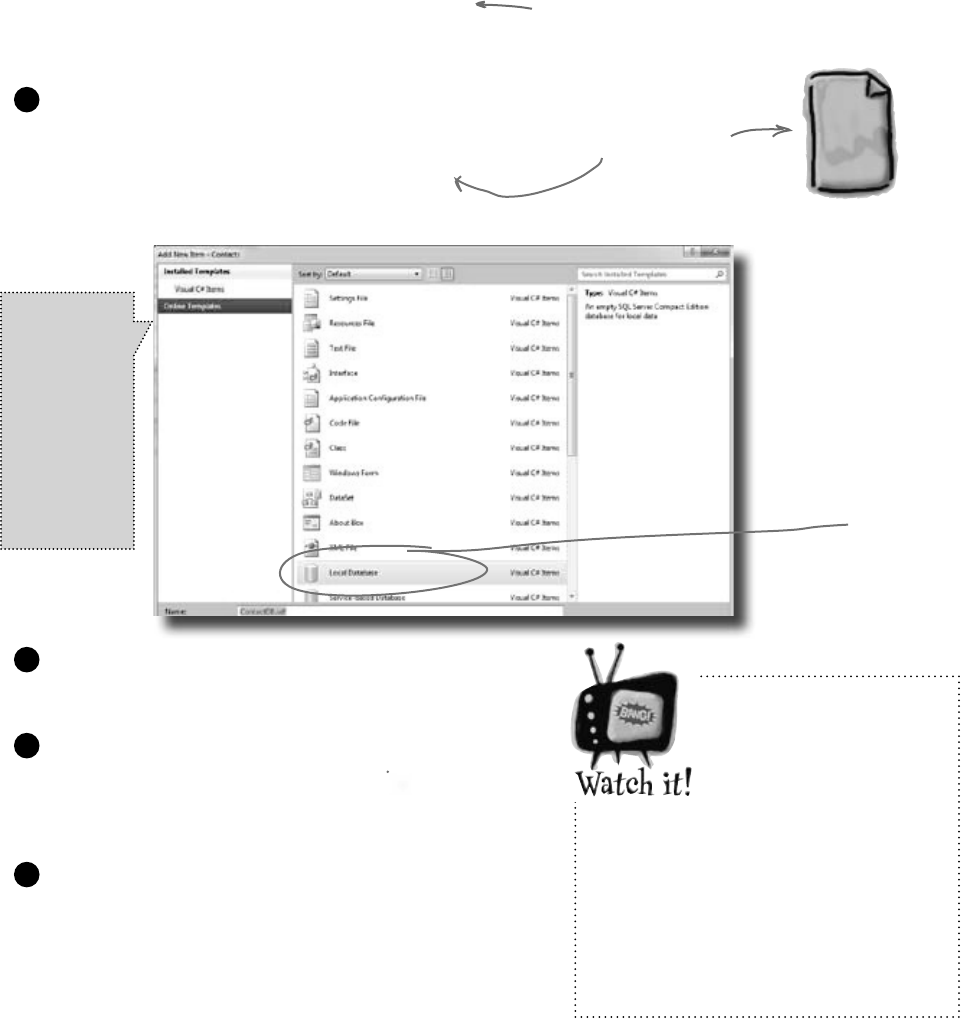
18 Chapter 1
If you’re not using
the Express edition,
you’ll see “Server
Explorer” instead of
“Database Explorer.”
The Visual Studio 2010 Professional
and Team Foundation editions don’t
have a Database Explorer window.
Instead, they have a Server Explorer
window, which does everything the
Database Explorer does, but also lets
you explore data on your network.
Before we add the rest of the fields to the form, we need
to create a database to hook the form up to. The IDE
can create lots of the code for connecting our form to
our data, but we need to define the database itself first.
Make sure you’ve
stopped debugging
before you continue.
We need a database to store our information
Add a new SQL database to your project.
In the Solution Explorer, right-click the Contacts project,
select Add, and then choose New Item. Choose the SQL
Database icon, and name it ContactDB.sdf.
1
Cancel the Data Source Configuration Wizard.
For now, we want to skip configuring a data source, so
click the Cancel button. We’ll come back to this once
we’ve set up our database structure.
3
A Local Database is
actually a SQL Server
Compact Edition
database file, which
typically has the
extension SDF. It gives
you an easy way to
embed a database into
your program.
View your database in the Solution Explorer.
Go to the Solution Explorer, and you’ll see that
ContactDB has been added to the file list. Double-click
ContactDB.sdf in the Solution Explorer and look at the
left side of your screen. The Toolbox has changed to a
Database Explorer.
4
save it for later
SQL
ContactDB.sdf
This file is our
new database.
Choose Local
Database
to create a
SQL Server
Compact
Edition file,
which will hold
your entire
database.
Name your file
ContactDB.sdf.
Click on the Add button in the Add New Item
window.
2
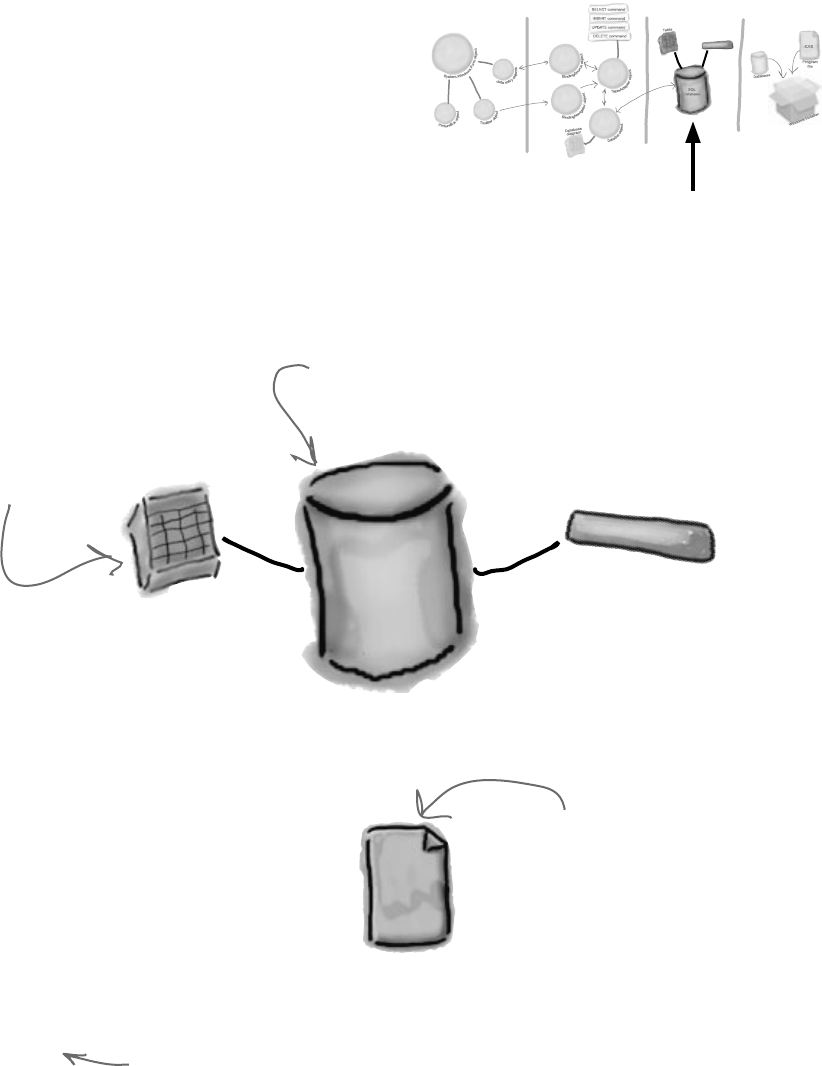
you are here 4 19
get productive with c#
SQL
ContactDB.sdf
The SQL database is in this file.
We’re just about to define tables
and data for it, and all of that
will be stored in here too.
When you told the IDE to add a new SQL database to
your project, the IDE created a new database for you. A
SQL database is a system that stores data for you in an
organized, interrelated way. The IDE gives you all the
tools you need to maintain your data and databases.
Data in a SQL database lives in tables. For now, you
can think of a table like a spreadsheet. It organizes your
information into columns and rows. The columns are the
data categories, like a contact’s name and phone number,
and each row is the data for one contact card.
The IDE created a database
Tables
Stored
Procedures
SQL
Database
SQL stands for Structured Query Language.
It’s a programming language for accessing data in
databases. It’s got its own syntax, keywords, and
structure. SQL code takes the form of statements
and queries, which access and retrieve the data.
A SQL database can hold stored procedures,
which are a bunch of SQL statements and queries
that are stored in the database and can be run at
any time. The IDE generates SQL statements and
stored procedures for you automatically to let your
program access the data in the database.
SQL is its own language
A SQL database stores your
data, and has information about
how it’s structured and SQL
code to help you access it.
Your data’s stored in a
table with columns and
rows, like in a spreadsheet.
[note from marketing: Can we get a plug
for Head First SQL in here?]
You are Here
.NET
Database
Objects
.NET Visual
Objects
Data Storage Deployment
Pack age
Stored
Procedures
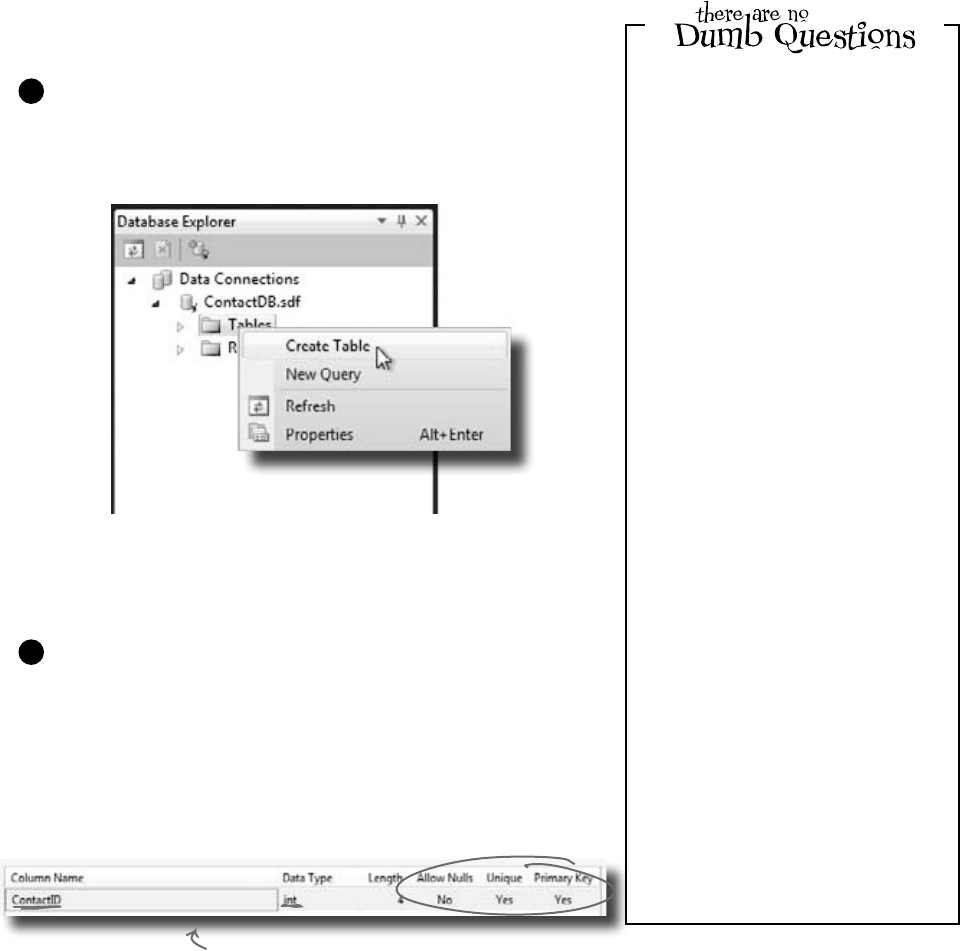
20 Chapter 1
data storage made easy
Creating the table for the Contact List
We have a database, and now we need to store information
in it. But our information actually has to go into a table,
the data structure that databases use to hold individual bits
of data. For our application, let’s create a table called
“People” to store all the contact information:
Add a table to the ContactDB database.
Right-click on Tables in the Database Explorer, and select
Create Table. This will open up a window where you can
define the columns in the table you just created.
1
Now we need to add columns to our table. First, let’s add a
column called ContactID to our new People table, so that
each Contact record has its own unique ID.
Add a ContactID column to the People table.
Type “ContactID” in the Column Name field, and
select Int from the Data Type drop-down box. Be sure
to select “No” for Allow Nulls.
Finally, let’s make this the primary key of our table.
Highlight the ContactID column you just created, and
click the Primary Key button. This tells the database
that each entry will have a unique primary key entry.
2
Add a new column called “ContactID” with data type “int”. Make sure to
set “Allow Nulls” to No, “Unique” to Yes, and Primary Key to “Yes.”
Q: What’s a column again?
A:Acolumnisonefieldofatable.Soina
Peopletable,youmighthaveaFirstNameand
LastNamecolumn.Itwillalwayshaveadata
type,too,likeStringorDateorBool.
Q: Why do we need this ContactID
column?
A:IthelpstohaveauniqueIDforeach
recordinmostdatabasetables.Sincewe’re
storingcontactinformationforindividual
people,wedecidedtocreateacolumnforthat,
andcallitContactID.
Q: What’s that Int from Data Type mean?
A:Thedatatypetellsthedatabasewhat
typeofinformationtoexpectforacolumn.
Intstandsforinteger,whichisjustawhole
number.SotheContactIDcolumnwillhave
wholenumbersinit.
Q: This is a lot of stuff. Should I be
getting all of this?
A:No,it’sOKifyoudon’tunderstand
everythingrightnow.Yourgoalrightnow
shouldbetostarttogetfamiliarwiththebasics
ofusingtheVisualStudioIDEtolayoutyour
formandrunyourprogram.(Ifyou’redyingto
knowmoreaboutdatabases,youcanalways
pickupHead First SQL.)
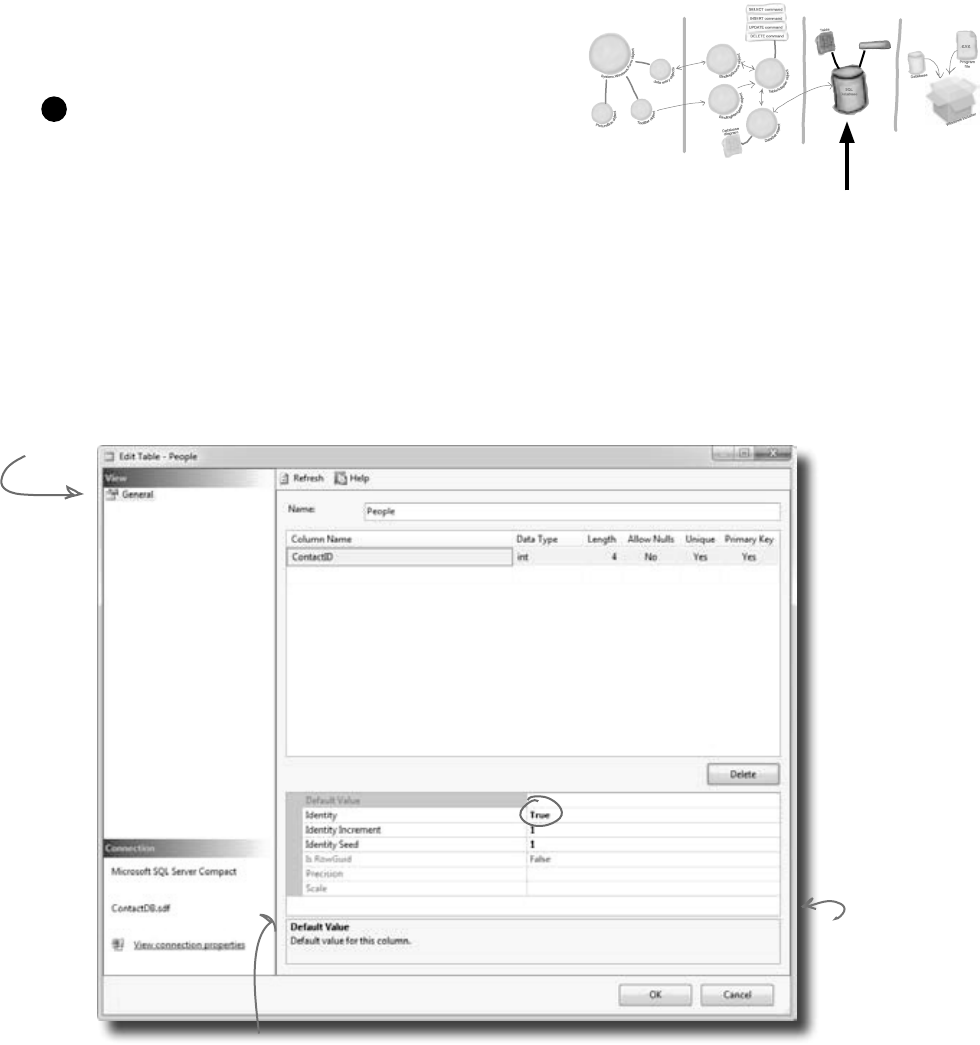
you are here 4 21
get productive with c#
This will make
it so that the
ContactID
field updates
automatically
whenever a new
record is added.
A primary key helps
your database look
up records quickly.
Since the primary
key is the main way
your program will
locate records, it
always needs to
have a value.
Tell the database to autogenerate IDs.
Since ContactID is a number for the database, and not
our users, we can tell our database to handle creating and
assigning IDs for us automatically. That way, we don’t have
to worry about writing any code to do this.
In the properties below your table, set Identity to “True” to
make ContactID an identity column for your table.
And make sure you specify the table name “People” in the
Name box at the top of the window.
3
This window is what you use
to define your table and
the data it will store.
You’ll need to click on the right column and
select “True” from the drop-down next to
Identity to designate ContactID as your
table’s record Identifier.
You are Here
.NET
Database
Objects
.NET Visual
Objects
Data Storage Deployment
Pack age
Stored
Procedures
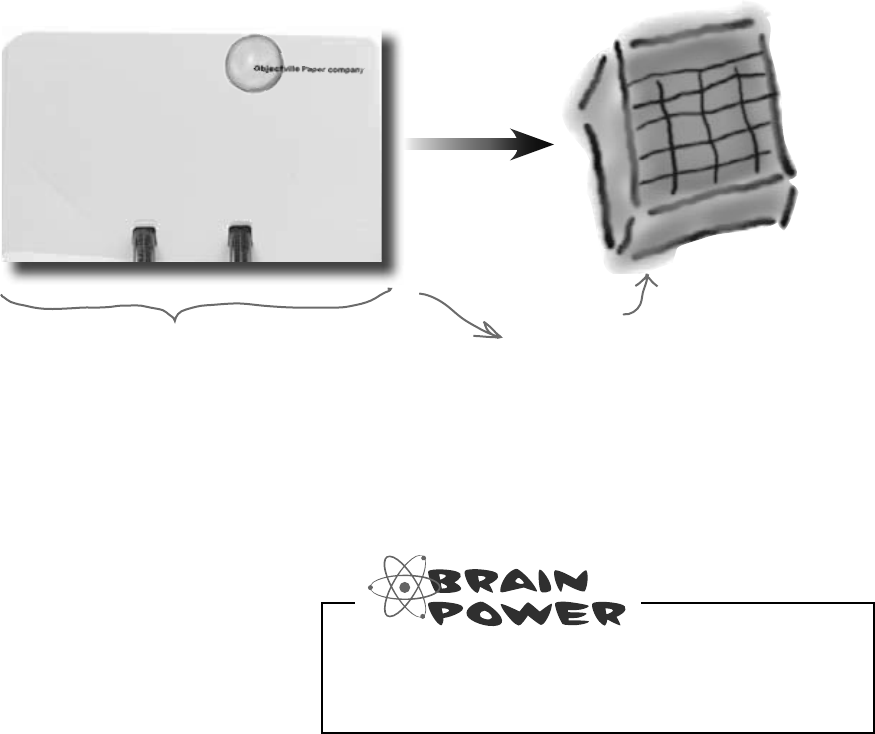
22 Chapter 1
let’s table this discussion
The blanks on the contact card
are columns in our People table
Now that you’ve created a primary key for the table, you need
to define all of the fields you’re going to track in the database.
Each field on our written contact card should become a
column in the People table.
Each blank on the card
should map to a column in
the people table.
People
For each person, we want to store data:
her name, company, phone number, email
address, if she’s an OPC client, and the
date of the last time she was called.
What kinds of problems could result from having
multiple rows stored for the same person?
Name:
Company:
Telephone:
Email:
Client: Last call:
Laverne Smith
XYZ Industries
(212)555-8129
Laverne.Smith@XyZindustries.com
Yes 05/26/07
you are here 4 23
get productive with c#
Now that you’ve created a People table and a primary key column, you need to add columns for all of the data
fields. See if you can work out which data type goes with each of the columns in your table, and also match the
data type to the right description.
Last Call
Name
ContactID
Client?
int
bit
nvarchar(100)
datetime
Column Name
This type stores a date
and time
A Boolean true/false type
A string of letters,
numbers, and other
characters with a
maximum length of 100
A whole number
DescriptionData Type
24 Chapter 1
it’s just my type
Now that you’ve created a People table and a primary key column, you need to add columns for all of the data
fields. See if you can work out which data type goes with each of the columns in your table, and also match the
data type to the right description.
Last Call
Name
ContactID
Client?
int
bit
nvarchar(100)
datetime
Column Name
This type stores a date
and time
A Boolean true/false type
A string of letters,
numbers, and other
characters with a
maximum length of 100
A whole number
DescriptionData Type
you are here 4 25
get productive with c#
If you set Allow
Nulls to No, the
column must
have a value.
Click on the OK button to save your new table. This will add an empty table
to your database.
Bit fields
hold True or
False values
and can be
represented
as a checkbox.
Finish building the table
Go back to where you entered the ContactID column
and add the other five columns from the contact card.
Here’s what your database table should look like
when you’re done:
Some cards might
have some missing
information, so we’ll
let certain columns
be blank.
Once you click OK,
Visual Studio adds a
new People table to
the database.
ContactDB
People
This new table is empty, but it’s
ready for you to add data!
You are Here
.NET
Database
Objects
.NET Visual
Objects
Data Storage Deployment
Pack age
Stored
Procedures
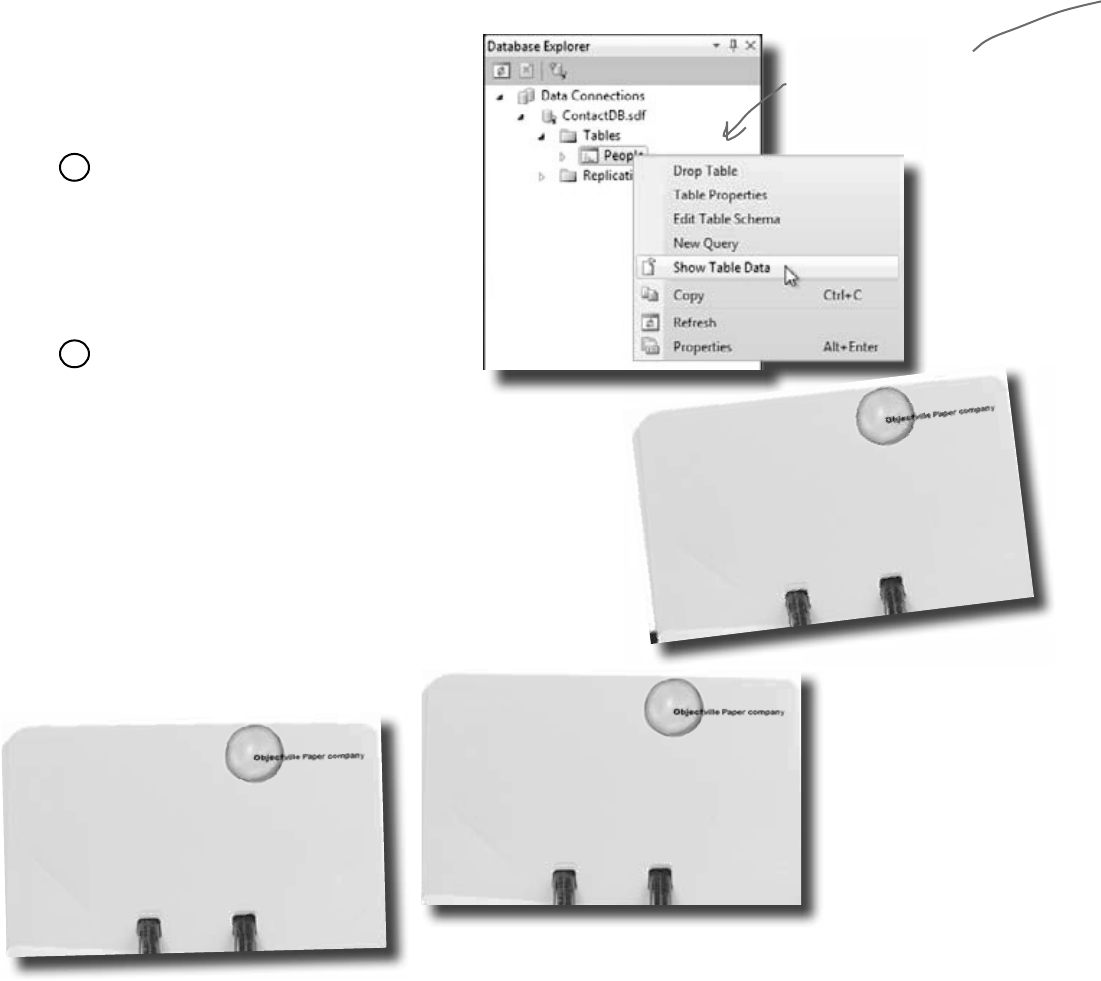
26 Chapter 1
Now you’re ready to start entering cards into the database.
Here are some of the boss’s contacts—we’ll use those to
set up the database with a few records.
adding your data
Type “True” or “False”
in the Client column.
That’ll get translated
to the way SQL stores
yes or no info.
Once you see the Table grid in the
main window, go ahead and add all
of the data below. (You’ll see all null
values at first—just type over them
when you add your first row. And
ignore the exclamation points that
appear next to the data.) You don’t
need to fill in the ContactID column;
that happens automatically.
2
Expand Tables and then right-click
on the People table in the Database
Explorer (or Server Explorer) and
select Show Table Data.
1
Insert your card data into the database
Your job is to enter
the data from all six
of these cards into
the People table.
Name:
Company:
Telephone:
Email:
Client: Last call:
Liz Nelson
JTP
(419)555-2578
LizNelson@JTP.ORg
Yes 03/04/09
Name:
Company:
Telephone:
Email:
Client: Last call:
Lucinda Ericson
Ericson Events
(212)555-9523
Lucy@EricsonEvents.info
No 05/17/10
Name:
Company:
Telephone:
Email:
Client: Last call:
Lloyd Jones
Black Box inc.
(718)555-5638
LJones@Xblackboxinc.com
Yes 05/26/10
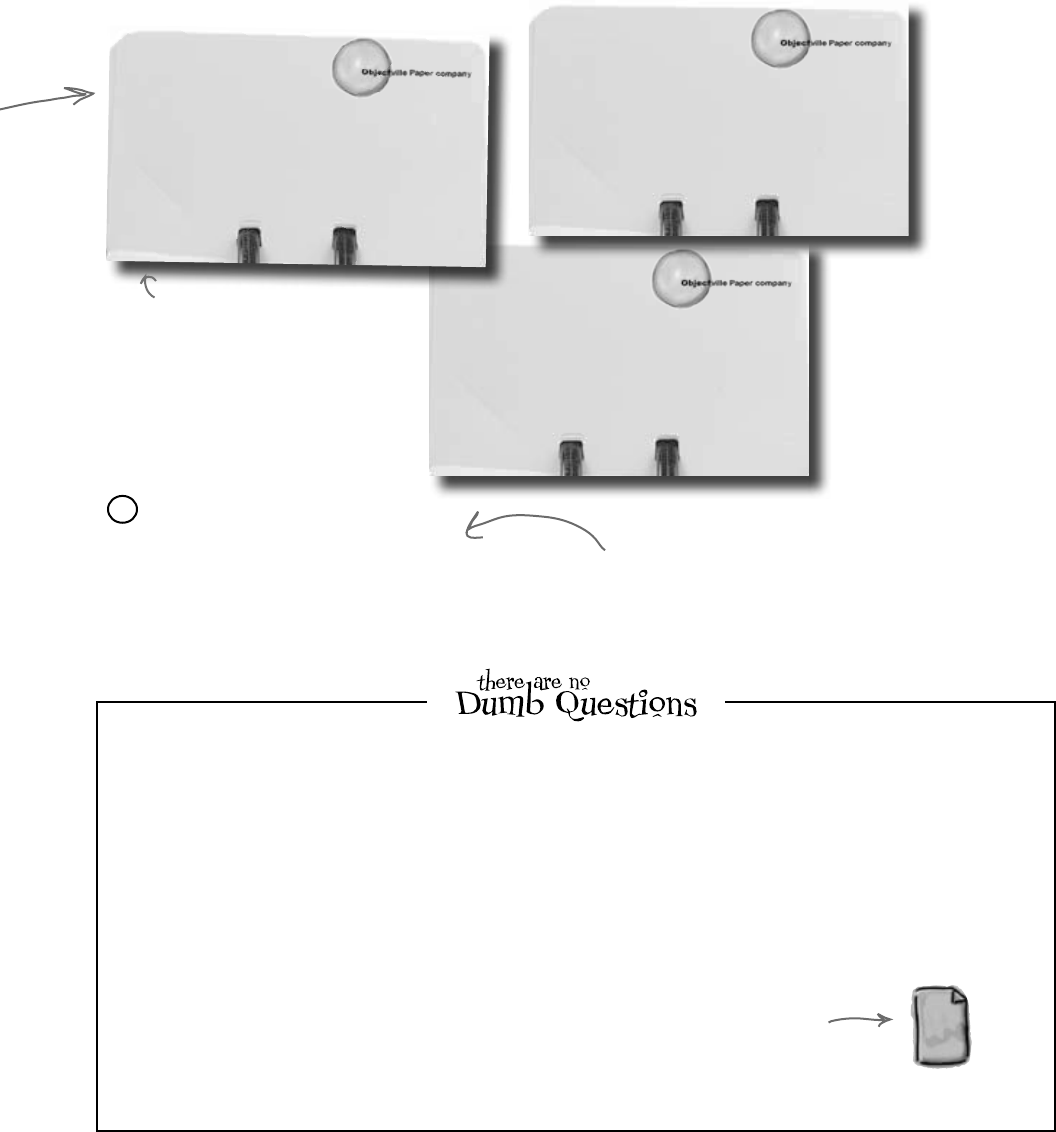
you are here 4 27
get productive with c#
Name:
Company:
Telephone:
Email:
Client: Last call:
Laverne Smith
XYZ Industries
(212)555-8129
Laverne.Smith@XyZindustries.com
Yes 04/11/10
“Save All” tells the IDE to save
everything in your application.
That’s different from “Save”, which
just saves the file you’re working on.
Once you’ve entered all six records,
select Save All from the File menu
again. That should save the records
to the database.
3
Q: So what happened to the data after I entered it? Where
did it go?
A:TheIDEautomaticallystoredthedatayouenteredintothe
Peopletableinyourdatabase.Thetable,itscolumns,thedata
types,andallofthedatainsideitisallstoredintheSQLServer
Compactdatabasefile,ContactDB.sdf.Thatfileisstoredaspart
ofyourproject,andtheIDEupdatesitjustlikeitupdatesyour
codefileswhenyouchangethem.
Q: OK, I entered these six records. Will they be part of
my program forever?
A:Yes,they’reasmuchapartoftheprogramasthecode
thatyouwriteandtheformthatyou’rebuilding.Thedifferenceis
thatinsteadofbeingcompiledintoanexecutableprogram,the
ContactDB.sdffileiscopiedandstoredalongwiththeexecutable.
Whenyourapplicationneedstoaccessdata,itreadsandwrites
toContactDB.sdf,intheprogram’soutputdirectory.
SQL
ContactDB.sdf
This file is actually a SQL
database, and your program
can use it with the code the
IDE generated for you.
Name:
Company:
Telephone:
Email:
Client: Last call:
Sarah Kalter
Kalter, Riddle and Stoft
(614)555-5641
Sarah@KRS.org
no 12/10/08
Name:
Company:
Telephone:
Email:
Client: Last call:
Matt Franks
XYZ Industries
(212)555-8125
Matt.Franks@XyZindustries.com
Yes 05/26/10
Objectville Paper Company is in the
United States, so the CEO writes
dates so that 05/26/10 means May
26, 2010. If your machine is set to
a different location, you may need to
enter dates differently; you might
need to use 26/05/10 instead.
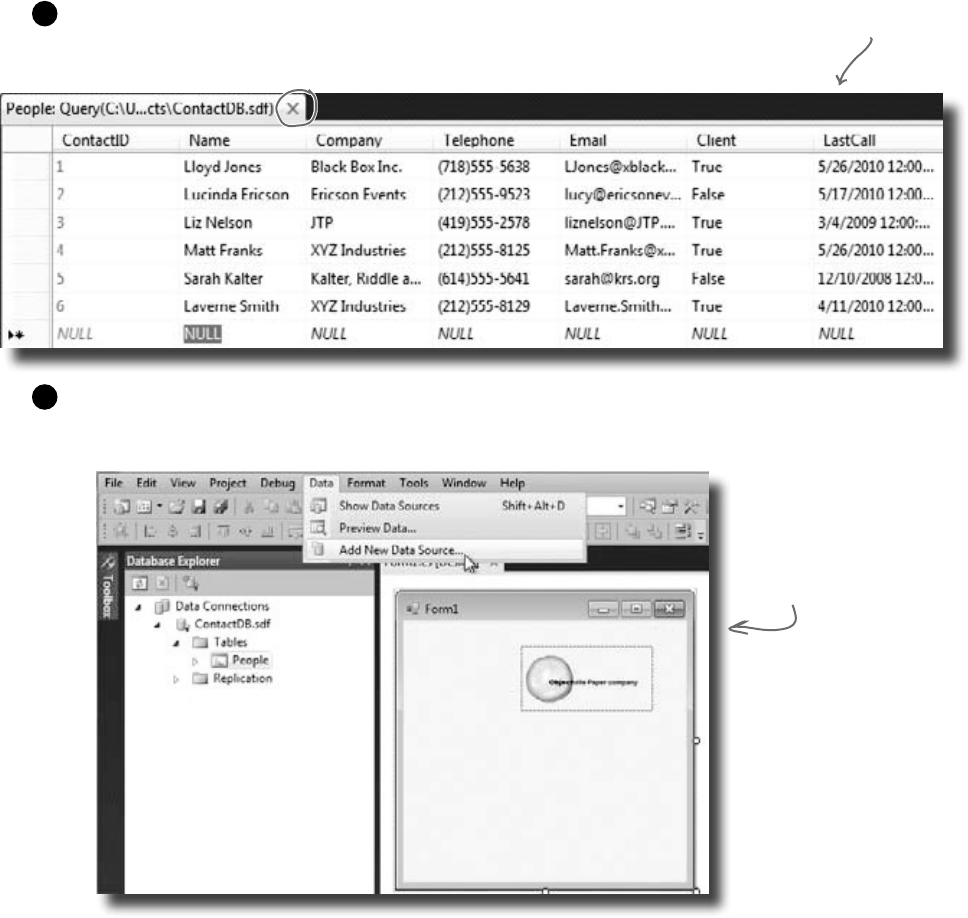
28 Chapter 1
We’re finally ready to build the .NET database objects that our
form will use to talk to your database. We need a data source,
which is really just a collection of SQL statements your program
will use to talk to the ContactDB database.
Once you’re done entering data,
close the data entry window to
get back to your form.
the data’s all in there
The data source you’re
creating will handle all the
interactions between your
form and your database.
Connect your form to your database
objects with a data source
Go back to your application’s form.
Close out the People table and the ContactDB database
diagram. You should now have the Form1.cs [Design] tab visible.
1
Add a new data source to your application.
This should be easy by now. Click the Data menu, and then
select Add New Data Source…from the drop-down.
2
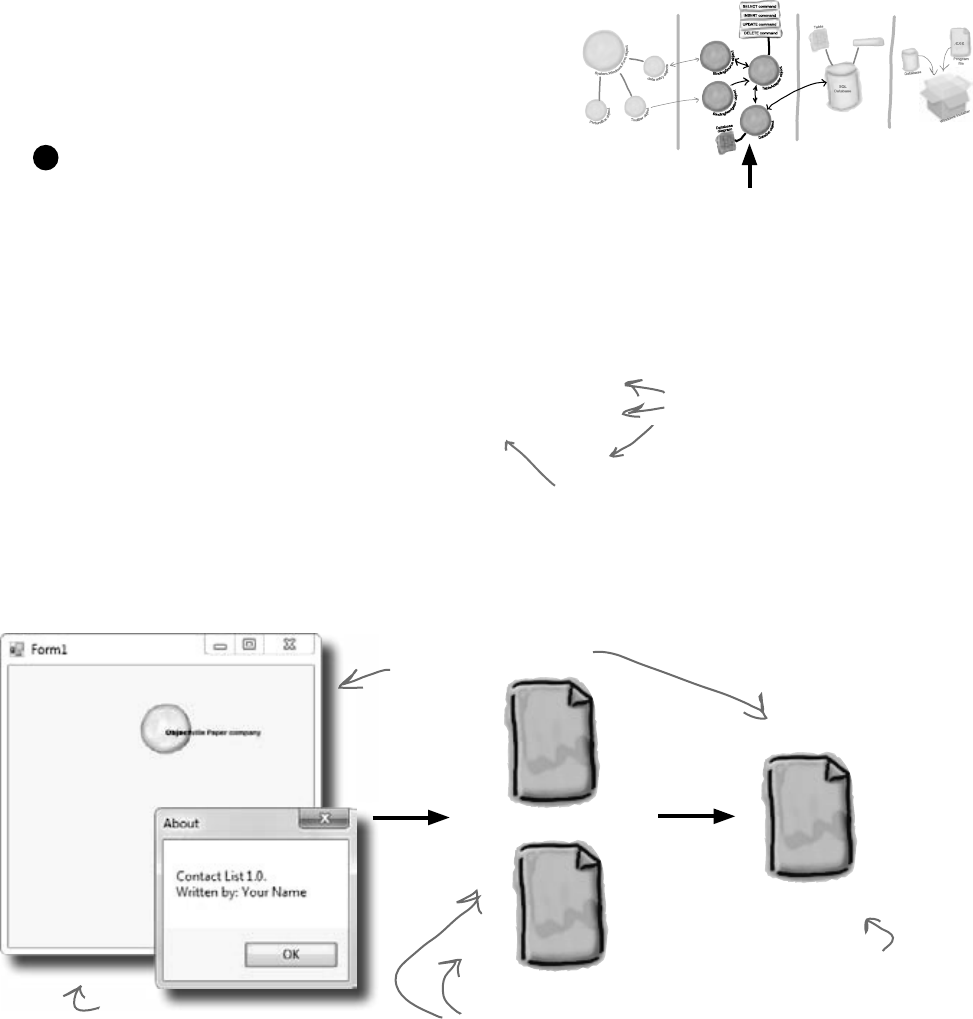
you are here 4 29
get productive with c#
C#
ContactDBDataSet.
Designer.cs
XML
ContactDBDataSet.xsd
These steps connect your
new data source with
the People table in the
ContactDB database.
SQL
ContactDB.sdf
These files are what’s
generated by the data
source you just set up.
Here’s your existing form.
This file is your database.
Now your form can use the data
source to interact with the
ContactDB database.
You are Here
.NET
Database
Objects
.NET Visual
Objects
Data Storage Deployment
Pack age
Configure your new data source.
Now you need to set up your data source to use the ContactDB
database. Here’s what to do:
≥Step 1: Choose a Data Source Type. Select Database
and click the Next button.
≥Step 2: Choose a Database Model. Select Dataset and
click the Next button.
≥Step 3: Choose Your Data Connection. You should see
your Contact database in the drop-down. Click Next.
≥Step 4: Choose Your Database Objects. Click the
Tables checkbox.
≥In the Dataset Name field, make sure it says
“ContactDBDataSet” and click Finish.
3
Stored
Procedures
In the non-Express editions, you may be
asked to save the connection in the app
config. Answer “Yes.”

30 Chapter 1
All of the columns
you created should
show up here.
Click this arrow and choose Details to
tell the IDE to add individual controls
to your form rather than one large
spreadsheet-like data control.
Now we can go back to our form and add some more controls. But these
aren’t just any controls—they are controls that are bound to our database
and the columns in the People table. That just means that a change to
the data in one of the controls on the form automatically changes the
data in the matching column in the database.
Here’s how to create several database-driven controls:
Add database-driven controls to your form
bind it all together
It took a little work, but now we’re
back to creating form objects that
interact with our data storage.
Select the data source you want to use.
Select Show Data Sources from the Data pull-down menu. This
will bring up the Data Sources window, showing the sources you
have set up for your application.
1
This window shows you all your data
sources. We’ve only got one setup, but
you could have more for different
tables or databases.
You can also
look for, and
click on, the
Data Sources
tab along the
bottom of your
Database
Explorer window.
Select the People table.
Under the ContactDBDataSet, you should see the People table and all of the columns in it.
Click the “expand” icon next to the People table to expand it—you’ll see the columns that you
added to your table. When you click on the People table in the Data Sources window and drag
it onto your form, the IDE automatically adds data controls to your form that the user can use
to browse and enter data. By default it adds a DataGridView, which lets the user work with the
data using one big spreadsheet-like control. Click the arrow next to the People table and select
Details—that tells the IDE to add individual controls to your form for each column in the table.
2
If you don’t see this tab,
select Show Data Sources
from the Data menu.
You’ll only see this drop-down if you’ve
got a form designer window open in the
IDE. It lets you drag data controls
directly out of your data source and
onto your form.
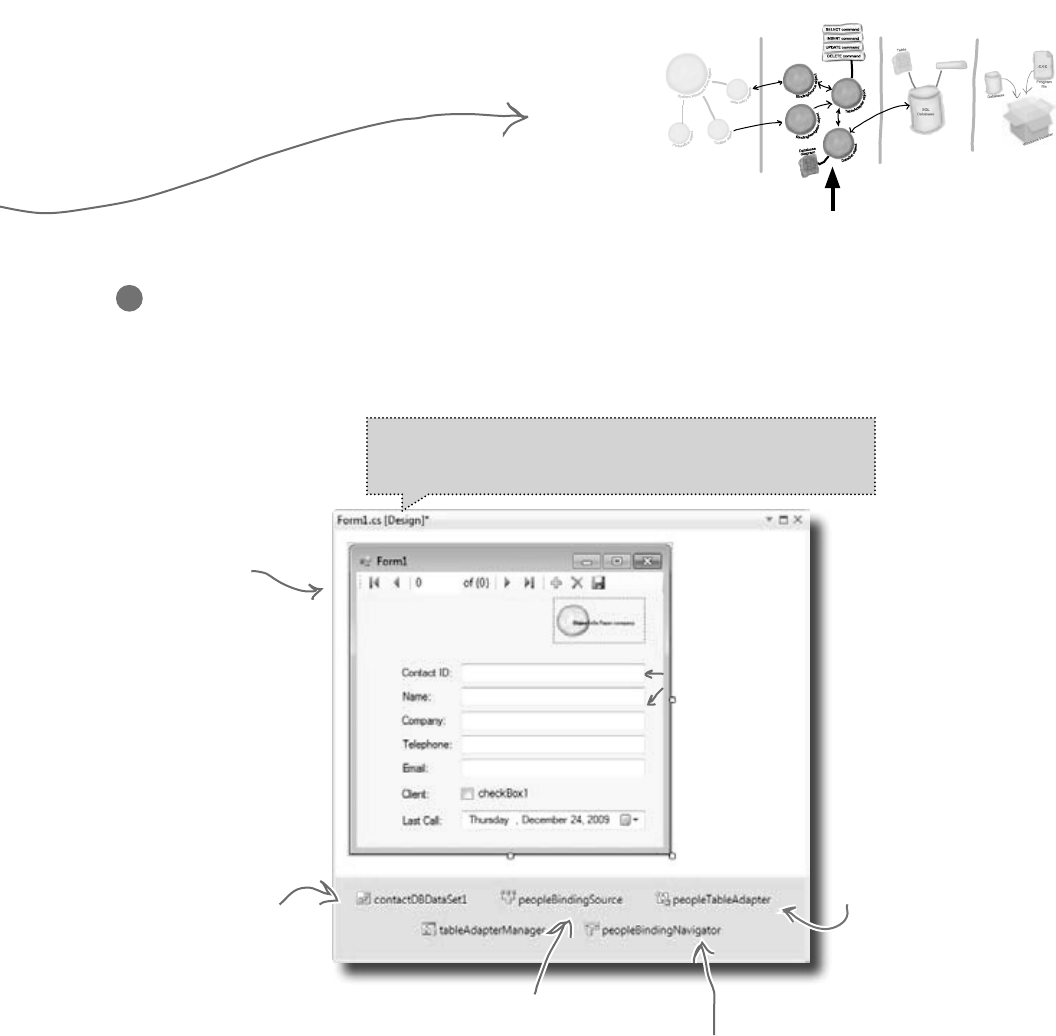
you are here 4 31
get productive with c#
When you
dragged the
People table
onto the form,
a control was
created for
each column in
the table.
These won’t
show up on
your form, but
represent the
code that the
IDE created to
interact with
the People table
and ContactDB
database.
The IDE
creates this
toolbar for
navigating
through the
People table.
This object connects the
form to your People table.
This adapter allows your
controls to interact
with SQL commands
that the IDE and data
source generated for you.
The binding navigator
connects the toolbar
controls to your
table.
Create controls that bind to the People table.
Drag and drop the People table onto your form in the form
designer window. You should see controls appear for each
column in your database. Don’t worry too much about how they
look right now; just make sure that they all appear on the form.
3
If you accidentally click out of the form you’re working on, you
can always get back to it by clicking the “Form1.cs [Design]”
tab, or opening Form1.cs from the Solution Explorer.
You are Here
.NET
Database
Objects
.NET Visual
Objects
Data Storage Deployment
Pack age
Stored
Procedures
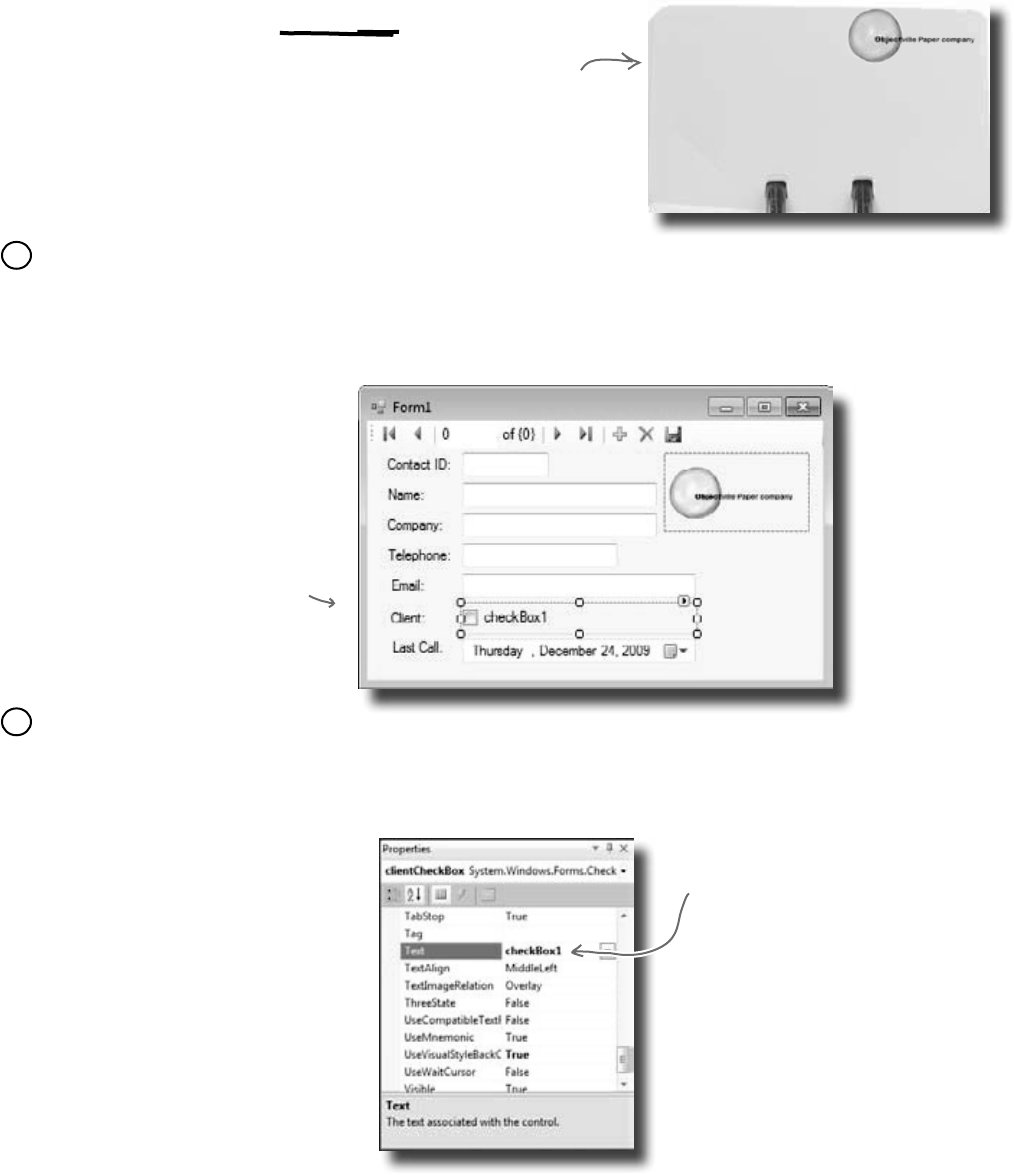
32 Chapter 1
Right now, the form works. But it doesn’t look that great. Your
application has to do more than be functional. It should be
easy to use. With just a few simple steps, you can make the
form look a lot more like the paper cards we were using at the
beginning of the chapter.
make it pretty
Blue lines will show
up on the form as
you drag controls
around. They’re
there to help you
line the fields up.
Good programs are intuitive to use
Our form would
be more intuitive
if it looked
a lot like the
contact card.
Line up your fields and labels.
Line up your fields and labels along the left edge of
the form. Your form will look like other applications,
and make your users feel more comfortable using it.
1
Change the Text Property on the Client checkbox.
When you first drag the fields onto the form, your Client
checkbox will have a label to the right that needs to be deleted.
Right below the Solution Explorer, you’ll see the Properties
window. Scroll down to the Text property and delete the
“checkbox1” label.
2
Delete this word to make
the label go away.
Name:
Company:
Telephone:
Email:
Client: Last call:
Laverne Smith
XYZ Industries
(212)555-8129
Laverne.Smith@XyZindustriescom
Yes 05/26/07
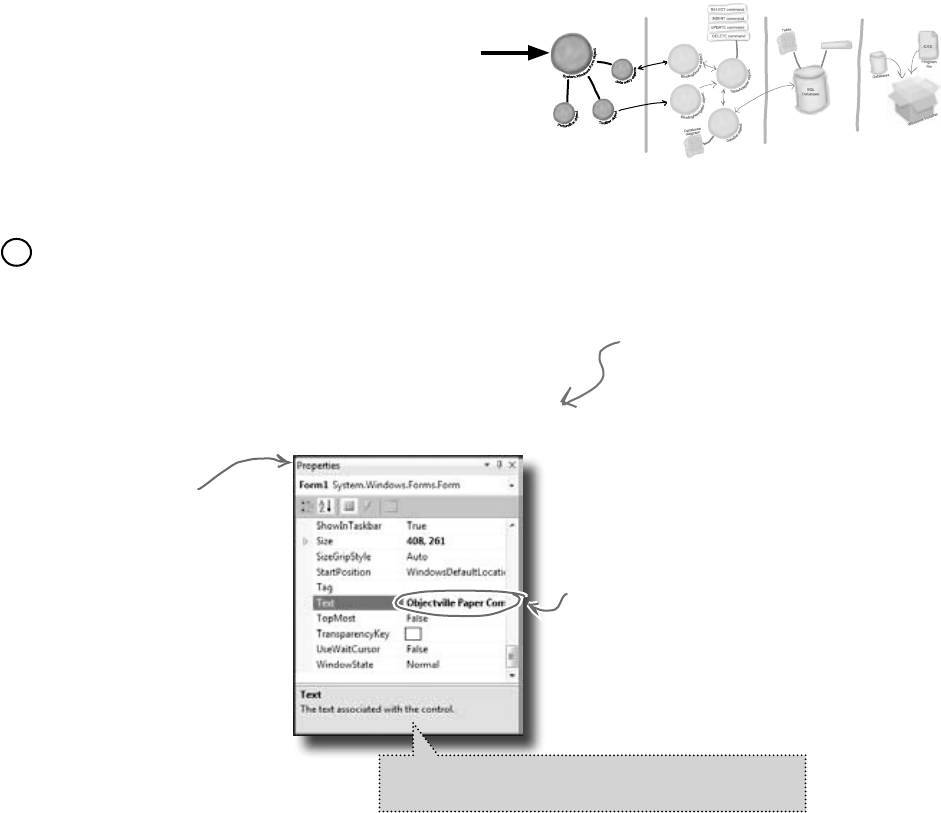
you are here 4 33
get productive with c#
The Text property
controls the heading on
your form’s title bar.
Make the application look professional.
You can change the name of the form by clicking on any empty
space within the form, and finding the Text property in the
Properties window of your IDE. Change the name of the form
to Objectville Paper Company Contact List.
You can also turn off the Maximize and Minimize buttons
in this same window, by looking for the MaximizeBox and
MinimizeBox properties. Set these both to False.
3
The Properties window
should be right below
Solution Explorer, in
the lower right pane of
your IDE.
A good application not only works, but is easy
to use. It’s always a good idea to make sure it
behaves as a typical user would expect it to.
You are Here
.NET
Database
Objects
.NET Visual
Objects
Data Storage Deployment
Pack age
The reason you want to turn
off the Maximize button is
that maximizing your form
won’t change the positions of
the controls, so it’ll look weird.
If you don’t have a Properties window, you can turn
it on by selecting it from the View drop-down menu.
Stored
Procedures
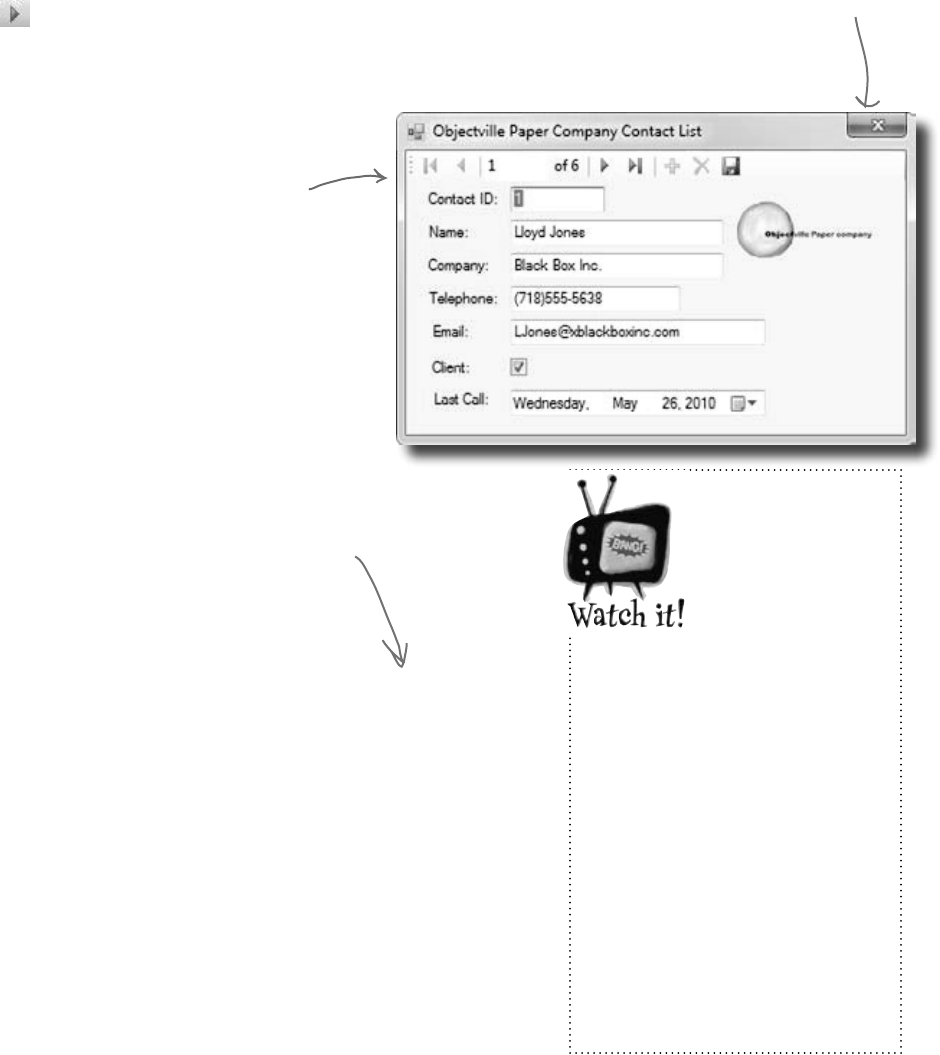
34 Chapter 1
OK, just one more thing to do… run your program and make sure
it works the way you think it should! Do it the same way you did
before—press the F5 key on your keyboard, or click the green arrow
button on the toolbar (or choose “Run” from the Debug menu).
You can always run your programs at any time, even when they’re not
done—although if there’s an error in the code, the IDE will tell you
and stop you from executing it.
Click the X box in the corner
to stop the program so you
can move on to the next step.
The IDE builds first, then runs
When you run your program in the IDE it actually does two things. First it
builds your program, then it executes it. This involves a few distinct parts.
It compiles the code, or turns it into an executable file. Then it places the
compiled code, along with any resources and other files, into a subdirectory
underneath the bin folder.
In this case, you’ll find the executable and SQL database file in bin/
debug. Since it copies the database out each time, any changes you
make will be lost the next time you run inside the IDE. But if you run the
executable from Windows, it’ll save your data—until you build again, at
which point the IDE will overwrite the SQL database with a new copy that
contains the data you set up from inside the Database Explorer.
ok, one last thing…
Test drive
Building your
program
overwrites
the data in
your database.
These controls
let you page
through the
different records
in the database.
We’ll spend more time
on this in the next
chapter.
Every time you
build your
program, the
IDE puts a
fresh copy of
the database
in the bin
folder. This will overwrite
any data you added when
you ran the program.
When you debug your program,
the IDE rebuilds it if the
code has changed—which
means that your database will
sometimes get overwritten
when you run your program in
the IDE. If you run the program
directly from the bin/debug or
bin/release folder, or if you
use the installer to install it on
your machine, then you won’t
see this problem.
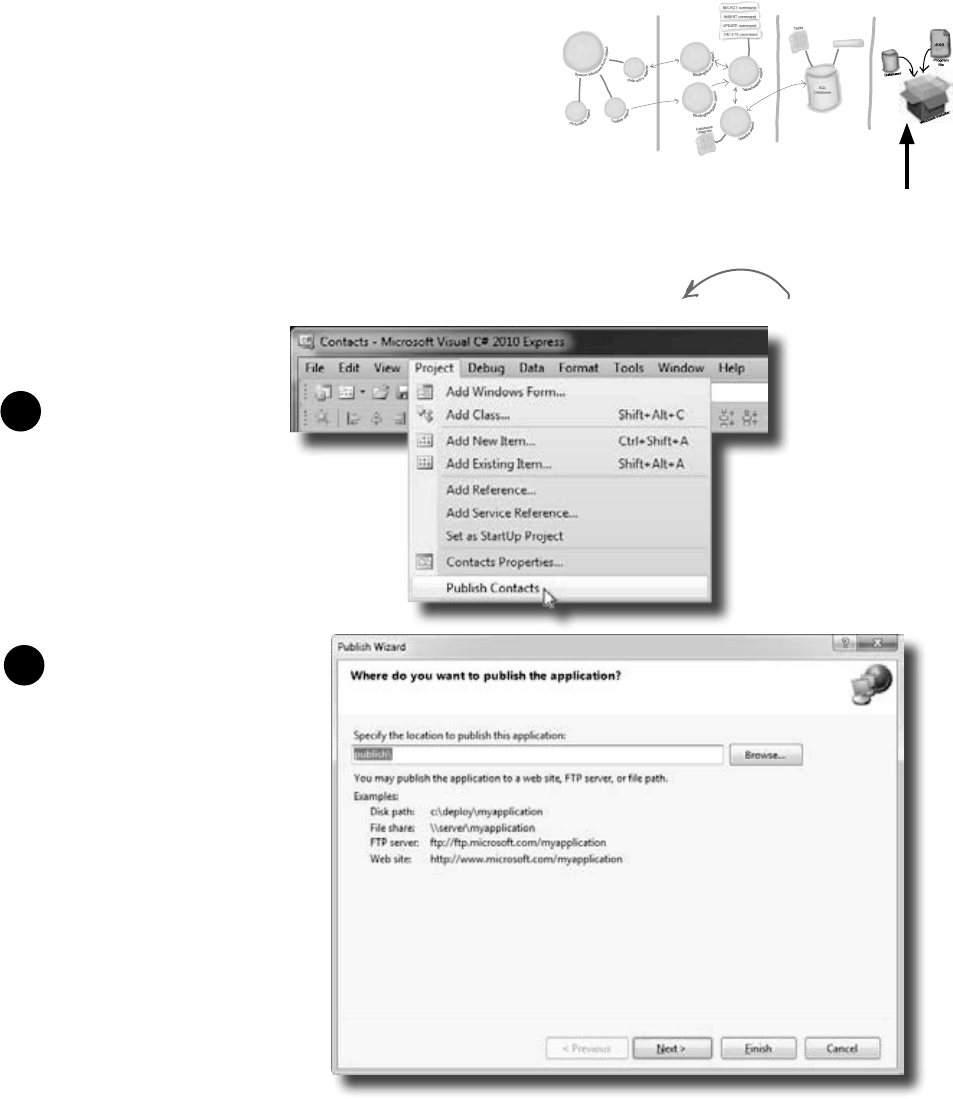
you are here 4 35
get productive with c#
At this point, you’ve got a great program. But it only runs
on your machine. That means that nobody else can use the
app, pay you for it, see how great you are and hire you…
and your boss and customers can’t see the reports you’re
generating from the database.
C# makes it easy to take an application you’ve created, and
deploy it. Deployment is taking an application and installing
it onto other machines. And with the Visual C# IDE, you
can set up a deployment with just two steps.
How to turn YOUR application
into EVERYONE’S application
1Select Publish Contacts from
the Project menu.
Building the solution just
copies the files to your
local machine. Publish
creates a Setup executable
and a configuration file
so that any machine could
install your program.
2Just accept all of the defaults in
the Publish Wizard by clicking
Finish. You’ll see it package up
your application and then show
you a folder that has your Setup.
exe in it.
You are Here
.NET
Database
Objects
.NET Visual
Objects
Data Storage Deployment
Pack age
Stored
Procedures
If you’re using Visual Studio
Express, you’ll find “Publish”
in the Project menu, but in
other editions it may be in
the Build menu.

36 Chapter 1
This is how your
users will install
the program on
their computers!
This file tells the installer
everything that needs
to be included when the
program is installed.
This is where all of the
supporting files for the
installer are stored.
Once you’ve created a deployment, you’ll have a new folder
called publish/. That folder has several things in it, all
used for installation. The most important for your users is
setup, a program that will let them install your program on
their own computers.
Give your users the application
My secretary just told me that you’ve
got the new contact database working
already. Pack your bags—we’ve got room on
the jet to Aspen for a go-getter like you!
Sounds like the boss is pleased. Good job!
There’s just one more thing to do before
you can jet off to the slopes, though…
share the love
You may
need to
run the
installer as
administrator.
If SQL Server
Compact isn’t already
installed on the
machine, the installer
will automatically
download and install
it. On some machines,
this won’t work unless
you run the setup
as administrator, so
right-click on “setup”
and choose “Run
as administrator” to
install it. If you don’t
have access to do
that, don’t worry! You
don’t need to in order
to move forward in the
book.
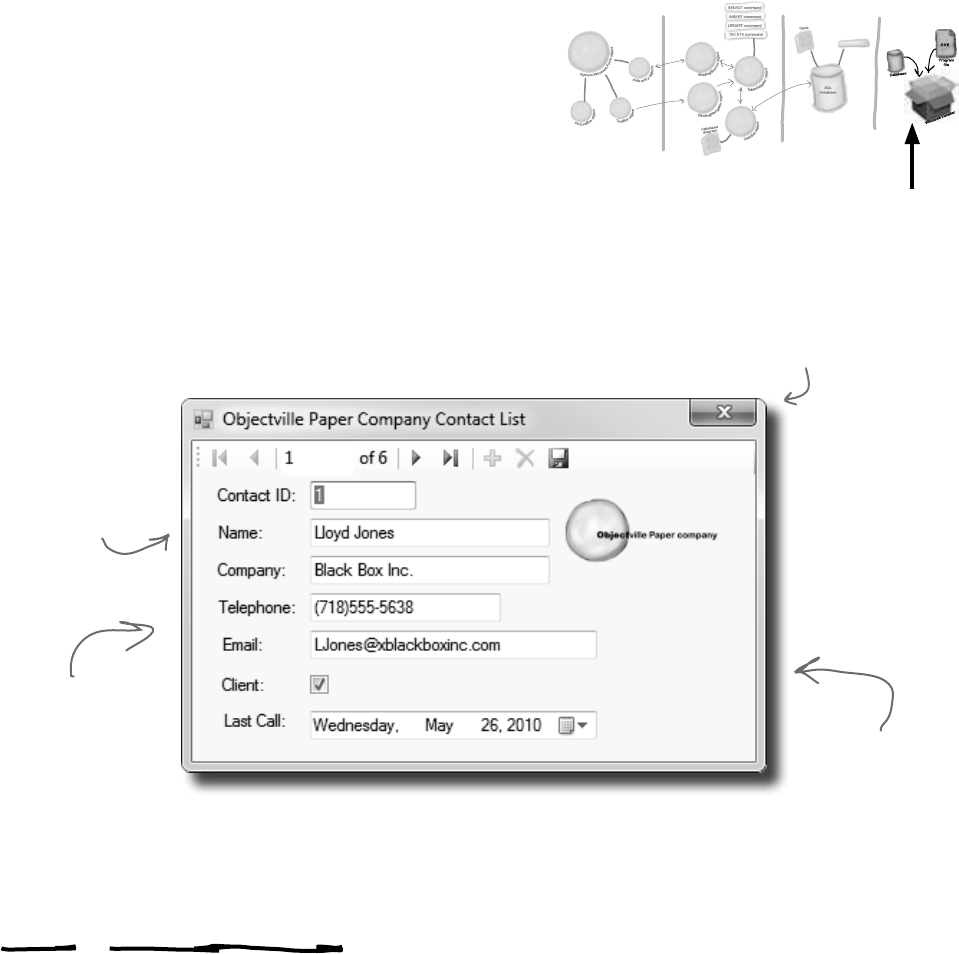
you are here 4 37
get productive with c#
You are Here
.NET
Database
Objects
.NET Visual
Objects
Data Storage Deployment
Pack age
The contacts you
entered are all
there. They’re part
of the ContactDB.
sdf database file,
which gets installed
along with your
program.
You can use the
arrows and the
text field to switch
between records.
Go ahead…make
some changes.
You’ve deployed
it so this time,
they’ll stick.
You’re NOT done: test
your installation
Before you pop the cork on any champagne bottles, you need
to test your deployment and installation. You wouldn’t give
anyone your program without running it first, would you?
Close the Visual Studio IDE. Click the setup program,
and select a location on your own computer to install the
program. Now run it from there, and make sure it works like
you expect. You can add and change records, too, and they’ll
be saved to the database.
Now you can make changes
to the data, and they’ll get
saved to the database.
TEST EVERYTHING!
Test your program, test
your deployment, test the
data in your application.
Stored
Procedures
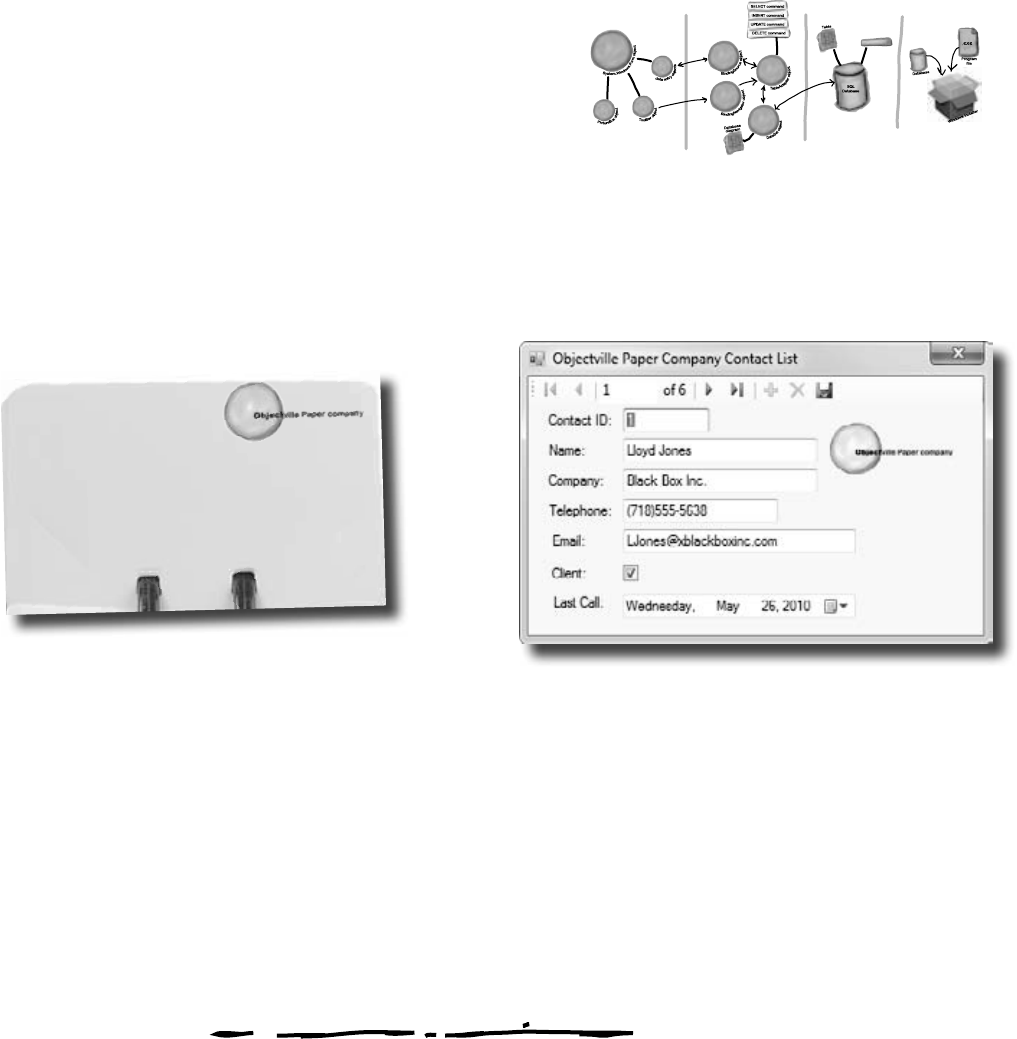
38 Chapter 1
From this
You’ve built a complete
data-driven application
The Visual Studio IDE made it pretty easy to create
a Windows application, create and design a database,
and hook the two together. You even were able to
build an installer with a few extra clicks.
to this
in no time flat.
The power of Visual C# is that you can quickly
get up and running, and then focus on what
your program’s supposed to do…not lots of
windows, buttons, and SQL access code.
.NET
Database
Objects
.NET Visual
Objects
Data Storage Deployment
Pack age
Name:
Company:
Telephone:
Email:
Client: Last call:
Lloyd Jones
Black Box inc.
(718)555-5638
LJones@Xblackboxinc.com
Yes 05/26/07
super fast!
Stored
Procedures

you are here 4 39
get productive with c#
CSharpcross
Take some time to sit back and exercise your C# vocabulary with
this crossword; all of the solution words are from this chapter.
1 2 3
4 5
6 7
8
9 10 11
12 13
14
15
16
Across
3. The __________ explorer is where you edit the
contents of your SQL tables and bind them to
your program
5. An image, sound, icon, or file that's attached to
your project in a way that your code can access
easily
9. You build one of these so you can deploy your
program to another computer
12. What the "I" in IDE stands for
14. When you double-clicked on a control, the
IDE created this for you and you added code to it
15. Every row contains several of these, and all of
them can have different data types
16. The _________ Explorer shows you all of the
files in your project
Down
1. What's happening when code is turned into an
executable
2. What you change to alter the appearance or
behavior of controls on your form
3. What you're doing when you run your program
from inside the IDE
4. The "About" box in the Objectville Paper
Company Contact List program was one of these
6. You displayed the Objectville Paper Company
logo with one of these
7. Before you start building a program, you
should always think about users and their ______
8. A database can use many of these to store
data
10. The data type in a SQL database that you use
to store true/false values
11. Before you can run your program, the IDE
does this to create the executable and move files
to the output directory
13. You drag controls out of this and onto your
form
40 Chapter 1
crossword solution
CSharpcross Solution
C
1P
2D
3A T A B A S E
O M
4R
5E S O U R C E
M E O B P
6N
7
P S T
8P U I E
I
9N S T A L L E R B
10 G C E B
11
L A B R I
12 N T
13 E G R A T E D U
E G L T T O I U S I
E E I O N R L
B E L G M
14 E T H O D
C
15 O L U M N S B B
X S
16 O L U T I O N
X X
Across
3. The __________ explorer is where you edit the
contents of your SQL tables and bind them to
your program [database]
5. An image, sound, icon, or file that's attached to
your project in a way that your code can access
easily [resource]
9. You build one of these so you can deploy your
program to another computer [installer]
12. What the "I" in IDE stands for [integrated]
14. When you double-cli
IDE created this for you
[method]
15. Every row contains several of these, and all of
them can have different data types [columns]
16. The _________ Explorer shows you all of the
files in your project [solution]
Down
1. What's happening when code is turned into an
executable [compile]
2. What you change to alter the appearance or
behavior of controls on your form [properties]
3. What you're doing when you run your program
from inside the IDE [debugging]
4. The "About" box in the Objectville Paper
Company Contact List program was one of these
[messagebox]
aper Company
]
7. Before you start building a program, you
should always think about users and their ______
[needs]
8. A database can use many of these to store
data [table]
10. The data type in a SQL database that you use
to store true/false values [bit]
11. Before you can run your program, the IDE
does this to create the executable and move files
to the output directory [build]
13. You drag controls out of this and onto your
form [toolbox]

this is a new chapter 41
it’s all just code
2
Under the hood
You’re a programmer, not just an IDE user.
You can get a lot of work done using the IDE. But there’s only so far it
can take you. Sure, there are a lot of repetitive tasks that you do when
you build an application. And the IDE is great at doing those things for
you. But working with the IDE is only the beginning. You can get your
programs to do so much more—and writing C# code is how you do it.
Once you get the hang of coding, there’s nothing your programs can’t do.
One of these days
I’ll figure out what’s
going on under there…
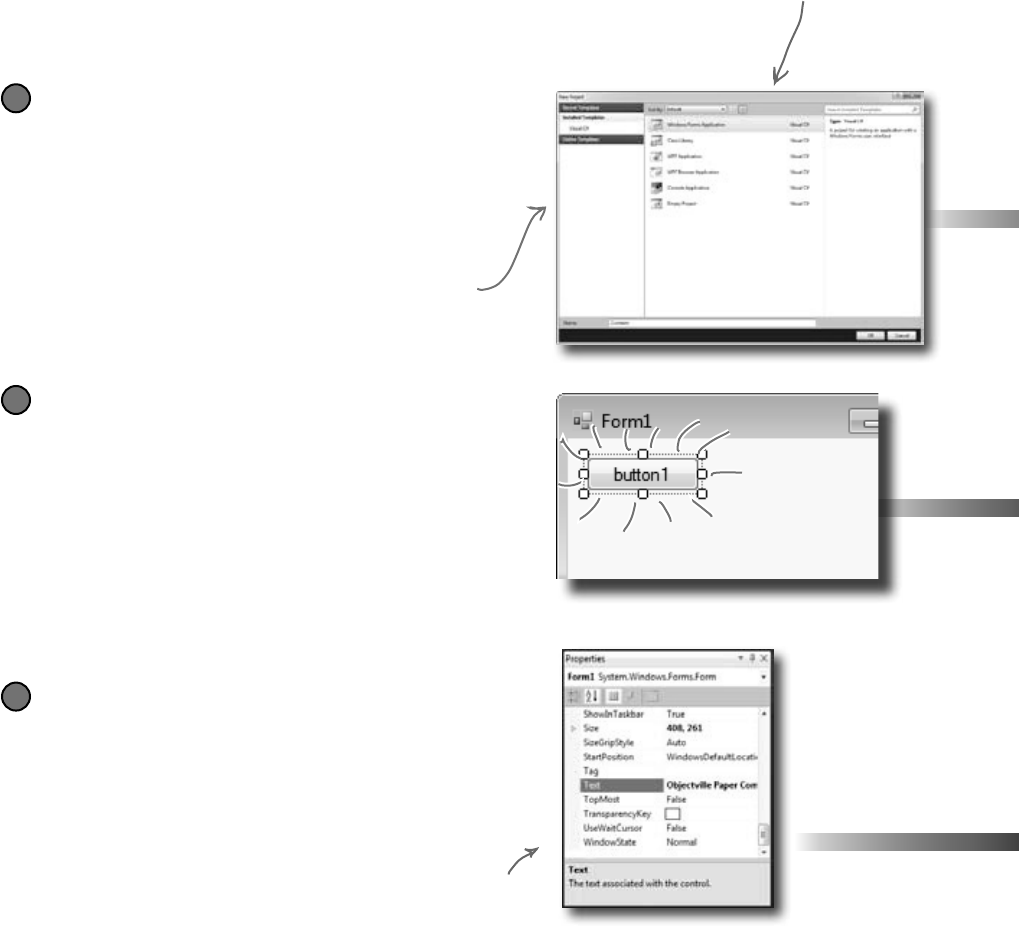
42 Chapter 2
When you’re doing this…
The IDE is a powerful tool—but that’s all it is, a tool for you to use. Every time
you change your project or drag and drop something in the IDE, it creates code
automatically. It’s really good at writing boilerplate code, or code that can be
reused easily without requiring much customization.
Let’s look at what the IDE does in typical application development, when you’re…
The Properties window in the IDE is a
really easy way to edit a specific chunk
of code in Form1.Designer.cs automatically.
It would take a lot longer to do it by
hand. Use the F4 shortcut to open the
Properties window if it’s closed.
at your service
Creating a Windows Forms Application project
There are several kinds of applications the IDE lets you
build, but we’ll be concentrating on Windows Forms
applications for now. Those are programs that have
visual elements, like forms and buttons.
1
Dragging a button out of the toolbox and
onto your form, and then double-clicking it
Buttons are how you make things happen in your form.
We’ll use a lot of buttons to explore various parts of the
C# language. They’re also a part of almost every C#
application you’ll write.
2
Setting a property on your form
The Properties window in the IDE is a really
powerful tool that you can use to change attributes of
just about everything in your program: all visual and
functional properties for the controls on your form,
attributes of your databases, and even options on your
project itself.
3
All of these tasks have to
do with standard actions
and boilerplate code. Those
are the things the IDE is
great for helping with.
Make sure you always create a Windows Forms Application
project—that tells the IDE to create an empty form
and add it to your new project.
you are here 4 43
it’s all just code
…the IDE does this
private void button1_Click(object sender, EventArgs e)
{
}
Form1.cs
WindowsApplication1
.csproj
Form1.cs Form1.Designer.cs Program.cs Properties
The IDE knows how to add an empty method
to handle a button click. But it doesn’t know
what to put inside it—that’s your job.
Form1.Designer.cs
Form1.Designer.cs
partial class Form1
{
.
.
.
this.Text = “Objectville Paper Company Contact List”;
.
.
.
}
The IDE went into this file…
…and updated this line of code.
These files are created from
a predefined template that
contains the basic code to
create and display a form.
...the IDE opens the Form1.Designer.cs file and
updates a line of code.
3
...the IDE adds code to the Form1.Designer.cs file that adds
the button to the form, and then adds code to the Form1.cs
file to handle the button click.
2
...the IDE creates the files and folders
for the project.
1
Every time you make a change in the IDE, it makes a
change to the code, which means it changes the files that
contain that code. Sometimes it just modifies a few lines,
but other times it adds entire files to your project.
This code
gets added to
Form1.cs.

44 Chapter 2
Where programs come from
A C# program may start out as statements in a bunch of
files, but it ends up as a program running in your computer.
Here’s how it gets there.
The .NET Framework gives you the right tools for the job
C# is just a language—by itself, it can’t actually do anything. And that’s where
the .NET Framework comes in. Remember that Maximize button you turned
off for the Contacts form? When you click the Maximize button on a window,
there’s code that tells the window how to maximize itself and take up the whole
screen. That code is part of the .NET Framework. Buttons, checkboxes, lists…
those are all pieces of the .NET Framework. So are the internal bits that hooked
your form up to the database. It’s got tools to draw graphics, read and write files,
manage collections of things…all sorts of tools for a lot of jobs that programmers
have to do every day.
The tools in the .NET Framework are divided up into namespaces. You’ve seen
these namespaces before, at the top of your code in the “using” lines. One namespace
is called System.Windows.Forms—it’s where your buttons, checkboxes, and
forms come from. Whenever you create a new Windows Forms Application project,
the IDE will add the necessary files so that your project contains a form, and those
files have the line “using System.Windows.Forms;” at the top.
great, the “talk”
Every program starts out as source code files
You’ve already seen how to edit a program, and how the IDE saves your program
to files in a folder. Those files are your program—you can copy them to a new
folder and open them up, and everything will be there: forms, resources, code, and
anything else you added to your project.
You can think of the IDE as a kind of fancy file editor. It automatically does the
indenting for you, changes the colors of the keywords, matches up brackets for you,
and even suggests what words might come next. But in the end, all the IDE does is
edit the files that contain your program.
The IDE bundles all of the files for your program into a solution by creating a
solution (.sln) file and a folder that contains all of the other files for the program.
The solution file has a list of the project files (which end in .csproj) in the
solution, and the project files contain lists of all the other files associated with
the program. In this book, you’ll be building solutions that only have one project
in them, but you can easily add other projects to your solution using the IDE’s
Solution Explorer.
There’s no reason you
couldn’t build your
programs in Notepad,
but it’d be a lot
more time-consuming.
you are here 4 45
it’s all just code
Build the program to create an executable
When you select “Build Solution” from the Build menu, the IDE
compiles your program. It does this by running the compiler, which
is a tool that reads your program’s source code and turns it into an
executable. The executable is a file on your disk that ends in .exe—
that’s what you double-click on to run your program. When you build
the program, it creates the executable inside the bin folder, which is
inside the project folder. When you publish your solution, it copies
the executable (and any other files necessary) into the folder you’re
publishing to.
When you select “Start Debugging” from the Debug menu, the IDE
compiles your program and runs the executable. It’s got some more
advanced tools for debugging your program, which just means running
it and being able to pause (or “break”) it so you can figure out what’s
going on.
Your program runs inside the CLR
When you double-click on the executable, Windows runs your program.
But there’s an extra “layer” between Windows and your program called
the Common Language Runtime, or CLR. Once upon a time, not
so long ago (but before C# was around), writing programs was harder,
because you had to deal with hardware and low-level machine stuff. You
never knew exactly how someone was going to configure his computer.
The CLR—often referred to as a virtual machine—takes care of all
that for you by doing a sort of “translation” between your program and
the computer running it.
You’ll learn about all sorts of things the CLR does for you. For example,
it tightly manages your computer’s memory by figuring out when your
program is finished with certain pieces of data and getting rid of them
for you. That’s something programmers used to have to do themselves,
and it’s something that you don’t have to be bothered with. You won’t
know it at the time, but the CLR will make your job of learning C# a
whole lot easier.
You don’t really have to worry
about the CLR much right
now. It’s enough to know
it’s there, and takes care
of running your program for
you automatically. You’ll learn
more about it as you go.
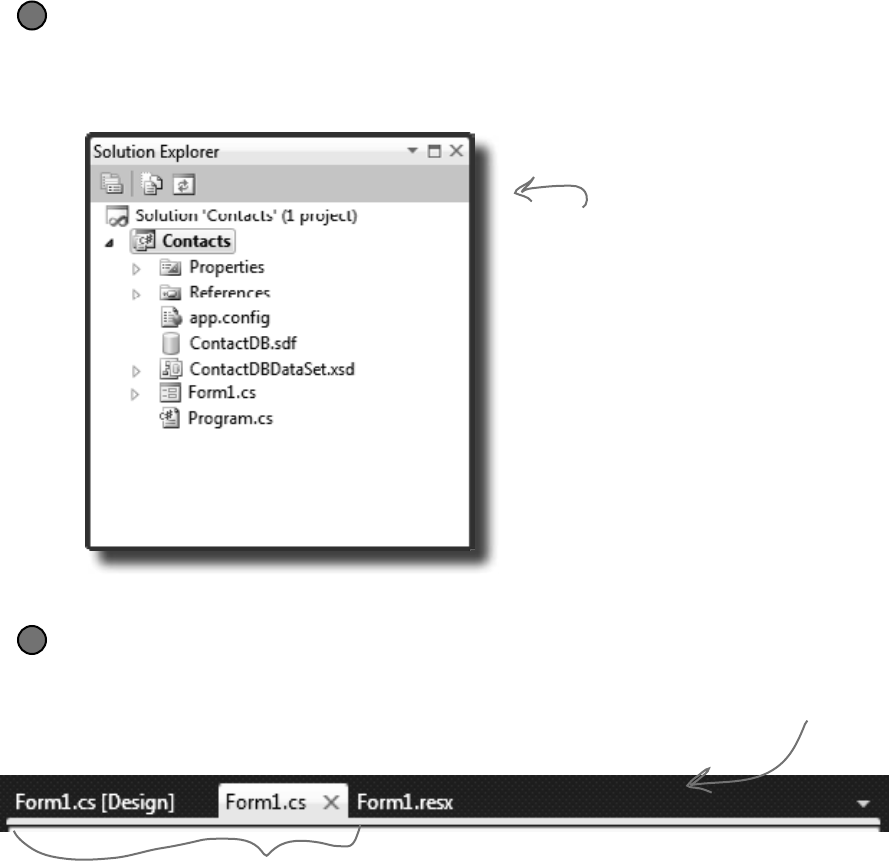
46 Chapter 2
The IDE helps you code
You’ve already seen a few of the things that the IDE can do.
Let’s take a closer look at some of the tools it gives you.
The Solution Explorer shows you everything in your project
You’ll spend a lot of time going back and forth between classes, and the easiest
way to do that is to use the Solution Explorer. Here’s what the Solution Explorer
looks like after creating the Objectville Paper Company Contact List program:
≥
Use the tabs to switch between open files
Since your program is split up into more than one file, you’ll usually have several
code files open at once. When you do, each one will be in its own tab in the code
editor. The IDE displays an asterisk (*) next to a filename if it hasn’t been saved yet.
≥
When you’re working on a form, you’ll often have two tabs
for it at the same time—one for the form designer, and
one to view the form’s code. Use control-tab to switch
between open windows quickly.
The Solution
Explorer shows
you how the
different files
in the solution
folder.
Here’s the form’s
resource file that
you added the
Objectville Paper
Company logo to.
mother’s little helper
you are here 4 47
it’s all just code
The Error List helps you troubleshoot compiler errors
If you haven’t already discovered how easy it is to make typos in a C#
program, you’ll find out very soon! Luckily, the IDE gives you a great tool for
troubleshooting them. When you build your solution, any problems that keep it
from compiling will show up in the Error List window at the bottom of the IDE:
Double-click on an error, and the IDE will jump to the problem in the code:
≥
The IDE helps you write code
Did you notice little windows popping up as you typed code into the IDE? That’s
a feature called IntelliSense, and it’s really useful. One thing it does is show you
possible ways to complete your current line of code. If you type MessageBox and
then a period, it knows that there are three valid ways to complete that line:
If you select Show and type (, the IDE’s IntelliSense will show you information
about how you can complete the line:
The IDE also has shortcuts called snippets that let you type an abbreviation to tell
it to fill in the rest of the code. Here’s a useful one: type mbox and press the Tab key
twice, and the IDE will fill in the MessageBox.Show method for you:
≥
The IDE knows that MessageBox has three
methods called Equals, ReferenceEquals, and Show.
If you type S, it selects Show. Type “(“ or space,
Tab, or Enter to tell the IDE to fill it in for you.
That can be a real timesaver if you’re typing a lot
of really long method names.
This means that there
are 21 different ways
that you can call the
MessageBox’s Show
method (like ways to
display different buttons
or icons).
When you use Start Debugging
to run your program inside
the IDE, the first thing it
does is build your program. If
it compiles, then your program
runs. If not, it won’t run, and
will show you errors in the
Error List.
The IDE will show a red
underscore to show you
that there’s an error.
A missing semicolon
at the end of a
statement is one of
the most common
errors that keeps your
program from building!

48 Chapter 2
The IDE is great at writing visual code for you. But don’t
take our word for it. Open up Visual Studio, create a new
Windows Forms Application project, and see for yourself.
Open up the designer code
Open the Form1.Designer.cs file in the IDE. But this time, instead of opening it in
the Form Designer, open up its code by right-clicking on it in the Solution Explorer and
selecting “View Code.” Look for the Form1 class declaration:
1
Windows Form Designer generated code
+
partial class Form1
Notice how it’s a partial class? We’ll talk about that in a minute.
Find and expand the designer-generated code for the PictureBox control
Then go back to the Form1.Designer.cs tab in the IDE. Scroll down and look for this line in the code:
Click on the + on the left-hand side of the line to expand the code. Scroll down and find these lines:
2
//
// pictureBox1
//
this.pictureBox1.Location = new System.Drawing.Point(276, 28);
this.pictureBox1.Name = “pictureBox1”;
this.pictureBox1.Size = new System.Drawing.Size(100, 50);
this.pictureBox1.TabIndex = 0;
this.pictureBox1.TabStop = false;
Don’t worry if the
numbers in your code
for the Location and
Size lines are a little
different than these…
let’s dig in
When you change things in the IDE,
you’re also changing your code
Do this!
When you see a “Do this!”, pop open the IDE
and follow along. We’ll tell you exactly what
to do, and point out what to look for to get
the most out of the example we show you.
Click on the plus sign
Open up the Form designer and add a PictureBox to your form
Get used to working with more than one tab. Go to the Solution Explorer and open up the
Form designer by double-clicking on Form1.cs. Drag a new PictureBox onto a new form.
2
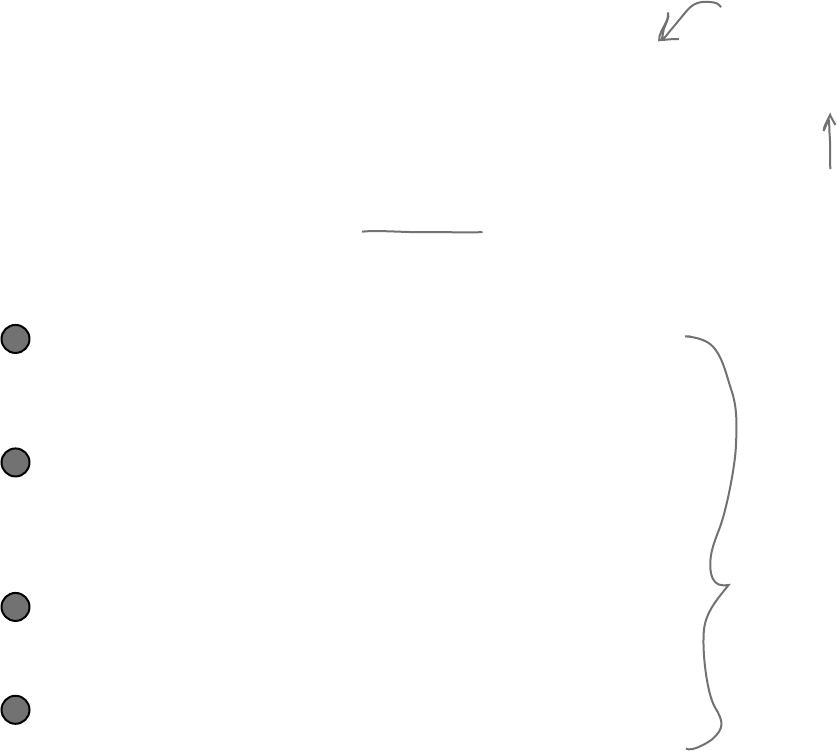
you are here 4 49
it’s all just code
/// <summary>
/// Required method for Designer support - do not modify
/// the contents of this method with the code editor.
/// </summary>
There’s nothing more attractive to a kid than a big sign that says, “Don’t
touch this!” Come on, you know you’re tempted… let’s go modify the
contents of that method with the code editor! Add a button to your
form, and then go ahead and do this:
Change the code that sets the button1.Text property. What
do you think it will do to the Properties window in the IDE?
Give it a shot—see what happens! Now go back to the form designer and
check the Text property. Did it change?
1
Stay in the designer, and use the Properties window to
change the Name property to something else.
See if you can find a way to get the IDE to change the Name property. It’s
in the Properties window at the very top, under “(Name)”. What happened
to the code? What about the comment in the code?
2
Change the code that sets the Location property to (0,0) and
the Size property to make the button really big.
Did it work?
3
Go back to the designer, and change the button’s BackColor
property to something else.
Look closely at the Form1.Designer.cs code. Were any lines added?
4
You don’t have to save the
form or run the program
to see the changes. Just
make the change in the code
editor, and then click on
the tab labeled “Form1.cs
[Design]” to flip over to the
form designer—the changes
should show up immediately.
It’s always easier to use the IDE to change your form’s
Designer‑generated code. But when you do, any change you
make in the IDE ends up as a change to your project’s code.
Wait, wait! What did that say?
Scroll back up for a minute. There it is, at the top of the Windows
Form Designer–generated code section:
Most comments only start
with two slashes (//).
But the IDE sometimes
adds these three-slash
comments.
These are XML comments,
and you can use them to
document your code. Flip to
“Leftovers” section #1 in the
Appendix of this book to learn
more about them.
50 Chapter 2
Anatomy of a program
Namespace
Class
Method 1
statement
statement
Method 2
statement
statement
Every time you make a new program, you
define a namespace for it so that its code is
separate from the .NET Framework classes.
A class has one or more methods.
Your methods always have to
live inside a class. And methods
are made up of statements—like
the ones you’ve already seen.
A class contains a piece of your
program (although some very small
programs can have just one class).
The code file starts by using the .NET Framework tools
You’ll find a set of using lines at the top of every program file. They tell C# which parts of
the .NET Framework to use. If you use other classes that are in other namespaces, then you’ll
add using lines for them, too. Since forms often use a lot of different tools from the .NET
Framework, the IDE automatically adds a bunch of using lines when it creates a form and
adds it to your project.
1
Every C# program’s code is structured in exactly the
same way. All programs use namespaces, classes,
and methods to make your code easier to manage.
Let’s take a closer look at your code
Open up the code from your Contacts project’s Form1.cs so
we can go through it piece by piece.
using System;
using System.Collections.Generic;
using System.ComponentModel;
using System.Data;
using System.Drawing;
using System.Linq;
using System.Text;
using System.Windows.Forms;
These using lines are at the top
of every code file. They tell
C# to use all of those .NET
Framework classes. Each one tells
your program that the classes in
this particular .cs file will use all
of the classes in one specific .NET
Framework namespace.
your program makes a statement
One thing to keep in mind: you don’t actually have to use a using statement. You can always
use the fully qualified name. So if you leave out using System.Windows.Forms, you can
still show a message box by calling System.Windows.Forms.MessageBox.Show(),
and the compiler will know what namespace you’re talking about.
you are here 4 51
it’s all just code
namespace Contacts
{
public partial class Form1 : Form
{
public Form1()
{
InitializeComponent();
}
C# programs are organized into classes
Every C# program is organized into classes. A class can do anything, but most classes do one
specific thing. When you created the new program, the IDE added a class called Form1 that
displays a form.
2
Classes contain methods that perform actions
When a class needs to do something, it uses a method. A method takes an input, performs
some action, and sometimes produces an output. The way you pass input into a method is by
using parameters. Methods can behave differently depending on what input they’re given.
Some methods produce output. When they do, it’s called a return value. If you see the
keyword void in front of a method, that means it doesn’t return anything.
3
A statement performs one single action
When you added the MessageBox.Show() line to your program, you were adding a
statement. Every method is made up of statements. When your program calls a method, it
executes the first statement in the method, then the next, then the next, etc. When the method
runs out of statements or hits a return statement, it ends, and the program resumes after the
statement that originally called the method.
4
private void pictureBox1_Click(object sender, EventArgs e)
{
MessageBox.Show(“Contact List 1.0”, “About”);
}
}
}
This is a class called Form1. It contains all of the code to draw the
form and the Toolbox controls on it. The IDE created it when you
told it to create a new Windows Forms Application project.
This is a method called pictureBox1_Click() that
gets called when the user clicks on the picture box.
This line calls a method named
InitializeComponent(), which the
IDE also created for you.
This method has two parameters called
sender and e.
This is a statement. You already
know what it does—it pops up a
little message box window.
Look for the
matching pairs
of brackets.
Every { is
eventually
paired up with
a }. Some
pairs can be
inside others.
Your statement called the Show() method,
which is part of the MessageBox class, which
is inside the System.Windows.Forms namespace.
Your statement passed two parameters to the Show()
method. The first one was a string of text to display
in the message box, and the second one was a string to
display in its title bar.
When you called your program Contacts, the IDE created a
namespace for it called Contacts by adding the namespace
keyword at the top of your code file. Everything inside its
pair of curly brackets is part of the Contacts namespace.
52 Chapter 2
Your program knows where to start
using System;
using System.Linq;
using System.Collections.Generic;
using System.Windows.Forms;
namespace Contacts
{
static class Program
{
/// <summary>
/// The main entry point for the application.
/// </summary>
[STAThread]
static void Main()
{
Application.EnableVisualStyles();
Application.SetCompatibleTextRenderingDefault(false);
Application.Run(new Form1());
}
}
}
When you created the new Windows Application solution, one of the files the
IDE added was called Program.cs. Go to the Solution Explorer and double-
click on it. It’s got a class called Program, and inside that class is a method called
Main(). That method is the entry point, which means that it’s the very first
thing that’s run in your program.
This statement creates and
displays the Contacts form, and
ends the program when the
form’s closed.
I do declare!
The first part of every class or
method is called a declaration.
Remember, this is just a starting point for you to
dig into the code. But before you do, you’ll need to
know what you’re looking at.
a closer look
1
2
3
4
5
Your Code Up Close
The namespace for all this code is
Contacts. We’ll talk about namespaces
more in a few pages.
Every time you run your program,
it starts here, at the entry point.
Here’s some code the IDE built for you
automatically in the last chapter. You’ll
find it in Program.cs.
Every C# program can only
have one entry point method,
and it’s always called Main().
That’s how it knows where to
start when you run it.
Lines that begin with two or more slashes are
comments, which you can add anywhere you want.
The slashes tell C# to ignore them.

you are here 4 53
it’s all just code
Every C# program must
have exactly one method
called Main. That method
is the entry point for
your code.
When you run your code,
the code in your Main()
method is executed FIRST.
Namespaces let you use the same name
in different programs, as long as those
programs aren’t also in the same namespace.
C# and .NET have lots of built-in features.
You’ll find lines like this at the top of almost every C# class
file. System.Windows.Forms is a namespace. The
using System.Windows.Forms line makes everything
in that namespace available to your program. In this case, that
namespace has lots of visual elements in it like buttons and
forms.
1
The IDE chose a namespace for your code.
Here’s the namespace the IDE created for you—it chose
Contacts based on your project’s name. All of the code in
your program lives in this namespace.
2
Your code is stored in a class.
This particular class is called Program. The IDE created it
and added the code that starts the program and brings up the
Contacts form.
3
This code has one method, and it
contains several statements.
A namespace has classes in it, and classes have methods.
Inside each method is a set of statements. In this
program, the statements handle starting up the Contacts
form. Methods are where the action happens—every
method does something.
4
Each program has a special kind of
method called the entry point.
Every C# program must have exactly one
method called Main. Even though your
program has a lot of methods, only one can be
the first one that gets executed, and that’s your
Main method. C# checks every class in your
code for a method that reads static void
Main(). Then, when the program is run, the
first statement in this method gets executed, and
everything else follows from that first statement.
5
You can have multiple
classes in a single namespace.
Your programs will use more and more
namespaces like this one as you learn
about C# and .NET’s other built-in
features throughout the book.
Technically, a program can have more
than one Main() method, and you can
tell C# which one is the entry point…
but you won’t need to do that now.
If you didn’t specify the “using” line,
you’d have to explicitly type out System.
Windows.Forms every time you use
anything in that namespace.
54 Chapter 2
You can change your
program’s entry point
As long as your program has an entry point, it doesn’t
matter which class your entry point method is in, or
what that method does. Open up the program you
wrote in Chapter 1, remove the Main method in
Program.cs, and create a new entry point.
Go back to Program.cs and change the name of the Main method to
NotMain. Now try to build and run the program. What happens?
1
Now let’s create a new entry point. Add a new class called AnotherClass.
cs. You add a class to your program by right-clicking on the project name
in the Solution Explorer and selecting “Add>>Class…”. Name your class
file AnotherClass.cs. The IDE will add a class to your program called
AnotherClass. Here’s the file the IDE added:
2
Write down what happened
when you changed the
method name, and why you
think that happened.
Add a new using line to the top of the file: using System.Windows.Forms;
Don’t forget to end the line with a semicolon!
3
class AnotherClass
{
public static void Main()
{
MessageBox.Show(“Pow!”);
}
}
using System;
using System.Linq;
using System.Collections.Generic;
using System.Text;
namespace Contacts
{
class AnotherClass
{
}
}
These four standard using
lines were added to the file.
The IDE automatically named the
class based on the filename.
This class is in the same Contacts namespace
that the IDE added when you first created
the Windows Application project.
Add this method to the AnotherClass class by typing it in between the curly brackets:
4
MessageBox is a class that lives
in the System.Windows.Forms
namespace, which is why you had
to add the using line in step #3.
Show() is a method that’s part of
the MessageBox class.
classy things
Do this!
Right-click on the
project in Properties
and select “Add” and
“Class…”
you are here 4 55
it’s all just code
using System;
using System.Linq;
using System.Text;
using System.Windows.Forms;
namespace SomeNamespace
{
class MyClass {
public static void DoSomething() {
MessageBox.Show(“This is a message”);
}
}
}
Now run it!
So what happened?
Instead of popping up the Contacts application, your
program now shows this message box. When you made
the new Main() method, you gave your program a new
entry point. Now the first thing the program does is run
the statements in that method—which means running
that MessageBox.Show() statement. There’s nothing
else in that method, so once you click the OK button, the
program runs out of statements to execute and then it ends.
Figure out how to fix your program so it pops up Contacts again.
5
Hint: You only have
to change two lines in
two files to do it.
Fill in the annotations so they describe the lines in this C# file
that they’re pointing to. We’ve filled in the first one for you.
C# classes have these “using”
lines to add methods from
other namespaces
56 Chapter 2
using System;
using System.Linq;
using System.Text;
using System.Windows.Forms;
namespace SomeNamespace
{
class MyClass {
public static void DoSomething() {
MessageBox.Show(“This is a message”);
}
}
}
get some answers
Fill in the annotations so they describe the lines in this C# file
that they’re pointing to. We’ve filled in the first one for you.
C# classes have these “using”
lines to add methods from
other namespaces.
All of the code lives in
classes, so the program
needs a class here.
This is a statement.
When it’s executed,
it pops up a little
window with a
message inside of it.
Q: What’s with all the curly brackets?
A:C#usescurlybrackets(or“braces”)to
groupstatementstogetherintoblocks.Curly
bracketsalwayscomeinpairs.You’llonly
seeaclosingcurlybracketafteryouseean
openingone.TheIDEhelpsyoumatchup
curlybrackets—justclickonone,andyou’ll
seeitanditsmatchgetshadeddarker.
Q: I don’t quite get what the entry
point is. Can you explain it one more
time?
A:Yourprogramhasawholelotof
statementsinit,butthey’renotallrunat
once.Theprogramstartswiththefirst
statementintheprogram,executesit,and
thengoesontothenextone,andthenext
one,etc.Thosestatementsareusually
organizedintoabunchofclasses.Sowhen
yourunyourprogram,howdoesitknow
whichstatementtostartwith?
That’swheretheentrypointcomesin.The
compilerwillnotbuildyourcodeunlessthereis
exactly one method called Main(),which
wecalltheentrypoint.Theprogramstarts
runningwiththefirststatementinMain().
Q: How come I get errors in the
Error List window when I try to run my
program? I thought that only happened
when I did “Build Solution.”
A:Becausethefirstthingthathappens
whenyouchoose“StartDebugging”from
themenuorpressthetoolbarbuttonto
startyourprogramrunningisthatitsaves
allthefilesinyoursolutionandthentriesto
compilethem.Andwhenyoucompileyour
code—whetherit’swhenyourunit,orwhen
youbuildthesolution—ifthereareerrors,
theIDEwilldisplaythemintheErrorList
insteadofrunningyourprogram.
This class has one method.
Its name is “DoSomething,”
and when it’s called it pops
up a MessageBox..
A lot of the errors that show up when you compile
your code also show up in the Error List window and
as red squiggles under your code.
you are here 4 57
it’s all just code
Set properties for a label
Match each of these fragments of code generated by the IDE to what it does.
(Some of these are new—take a guess and see if you got it right!)
partial class Form1
{
.
.
.
this.BackColor = Color.DarkViolet;
.
.
.
}
partial class Form1
{
.
.
.
this.MaximizeBox = false;
.
.
.
}
number_of_pit_stopsLabel.Name
= “number_of_pit_stopsLabel”;
number_of_pit_stopsLabel.Size
= new System.Drawing.Size(135, 17);
number_of_pit_stopsLabel.Text
= “Number of pit stops:”;
partial class Form1
{
private void InitializeComponent()
{
.
.
.
}
}
// This loop gets executed three times
/// <summary>
/// Bring up the picture of Rover when
/// the button is clicked
/// </summary>
Nothing—it’s a comment that the
programmer added to explain the code
to anyone who’s reading it
Disable the maximize icon ( ) in the
title bar of the Form1 window
A special kind of comment that the IDE
uses to explain what an entire block of
code does
Change the background color of the
Form1 window
A block of code that executes whenever
a program opens up a Form1 window
58 Chapter 2
Set properties for a label
partial class Form1
{
.
.
.
this.BackColor = Color.DarkViolet;
.
.
.
}
partial class Form1
{
.
.
.
this.MaximizeBox = false;
.
.
.
}
number_of_pit_stopsLabel.Name
= “number_of_pit_stopsLabel”;
number_of_pit_stopsLabel.Size
= new System.Drawing.Size(135, 17);
number_of_pit_stopsLabel.Text
= “Number of pit stops:”;
partial class Form1
{
private void InitializeComponent()
{
.
.
.
}
}
// This loop gets executed three times
/// <summary>
/// Bring up the picture of Rover when
/// the button is clicked
/// </summary>
Nothing—it’s a comment that the
programmer added to explain the code
to anyone who’s reading it
A special kind of comment that the IDE
uses to explain what an entire block of
code does
Change the background color of the
Form1 window
A block of code that executes whenever
a program opens up a Form1 window
Match each of these fragments of code generated by the IDE to what it does.
(Some of these are new—take a guess and see if you got it right!)
exercise solution
Disable the maximize icon ( ) in the
title bar of the Form1 window
you are here 4 59
it’s all just code
namespace PetFiler2 {
class Fish {
public void Swim() {
// statements
}
}
partial class Cat {
public void Purr() {
// statements
}
}
}
MoreClasses.cs
SomeClasses.cs
namespace PetFiler2 {
class Dog {
public void Bark() {
// statements go here
}
}
partial class Cat {
public void Meow() {
// more statements
}
}
}
Take a look at these two class files from a
program called PetFiler2. They’ve got
three classes: a Dog class, a Cat class, and
a Fish class. Since they’re all in the same
PetFiler2 namespace, statements in the
Dog.Bark() method can call Cat.Meow()
and Fish.Swim(). It doesn’t matter how
the various namespaces and classes are divided
up between files. They still act the same when
they’re run.
When a class is “public”
it means every other
class in the program can
access its methods.
Two classes can be in the
same namespace
You can only split a class up into different
files if you use the partial keyword. You
probably won’t do that in any of the code
you write in this book, but the IDE used it
to split your form up into two files, Form1.
cs and Form1.Designer.cs.
Since these classes are in the same namespace,
they can all “see” each other—even though
they’re in different files. A class can span
multiple files too, but you need to use the
partial keyword when you declare it.
There’s more to namespaces and class declarations, but you
won’t need them for the work you’re doing right now. Flip to #2
in the “Leftovers” appendix to read more.
60 Chapter 2
Declare your variables
Whenever you declare a variable, you tell your program its type and its name.
Once C# knows your variable’s type, it’ll keep your program from compiling
if you make a mistake and try to do something that doesn’t make sense, like
subtract “Fido” from 48353.
int maxWeight;
string message;
bool boxChecked;
These are the names
of these variables.
These are the variable types.
These names are for YOU.
Like methods and classes, use
names that make sense and
describe the variable’s usage.
C# uses the variable type
to define what data these
variables can hold.
your mileage may vary
Your programs use variables to work with data
When you get right down to it, every program is basically a data cruncher.
Sometimes the data is in the form of a document, or an image in a
video game, or an instant message. But it’s all just data. And that’s where
variables come in. A variable is what your program uses to store data.
Variables vary
A variable is equal to different values at different times while your
program runs. In other words, a variable’s value varies. (Which is
why “variable” is such a good name.) This is really important, because
that idea is at the core of every program that you’ve written or will ever
write. So if your program sets the variable myHeight equal to 63:
int myHeight = 63;
any time myHeight appears in the code, C# will replace it with its
value, 63. Then, later on, if you change its value to 12:
myHeight = 12;
C# will replace myHeight with 12—but the variable is still called
myHeight.
Whenever your
program needs to
work with numbers,
text, true/false
values, or any other
kind of data, you’ll
use variables to keep
track of them.
Are you
already
familiar with
another
language?
If so, you might find a few
things in this chapter seem
really familiar. Still, it’s worth
taking the time to run through
the exercises anyway,
because there may be a few
ways that C# is different from
what you’re used to.
you are here 4 61
it’s all just code
var-i-a-ble, adjective.
able to be changed or adapted.
The drill’s variable speed bit let
Bob change the drill speed from slow
to fast based on the job he had to do.
If you write code
that uses a variable
that hasn’t been
assigned a value,
your code won’t
compile. It’s easy
to avoid that error
by combining your
variable declaration
and assignment into a
single statement.
You have to assign values to variables
before you use them
Try putting these statements into a C# program:
int z;
MessageBox.Show(“The answer is ” + z);
Go ahead, give it a shot. You’ll get an error, and the IDE will
refuse to compile your code. That’s because the compiler
checks each variable to make sure that you’ve assigned it a
value before you use it. The easiest way to make sure you
don’t forget to assign your variables values is to combine
the statement that declares a variable with a statement that
assigns its value:
int maxWeight = 25000;
string message = “Hi!”;
bool boxChecked = true;
These values
are assigned to
the variables.
Each declaration has a type,
exactly like before.
Once you’ve assigned a value
to your variable, that value
can change. So there’s no
disadvantage to assigning a
variable an initial value when
you declare it.
A few useful types
Every variable has a type that tells C# what kind of data it can
hold. We’ll go into a lot of detail about the many different types
in C# in Chapter 4. In the meantime, we’ll concentrate on the
three most popular types. int holds integers (or whole numbers),
string holds text, and bool holds Boolean true/false values.
62 Chapter 2
int number = 15;
number = number + 10;
number = 36 * 15;
number = 12 - (42 / 7);
number += 10;
number *= 3;
number = 71 / 3;
int count = 0;
count ++;
count --;
string result = “hello”;
result += “ again ” + result;
MessageBox.Show(result);
result = “the value is: ” + count;
result = “”;
bool yesNo = false;
bool anotherBool = true;
yesNo = !anotherBool;
operators are standing by
C# uses familiar math symbols
Once you’ve got some data stored in a variable, what can you
do with it? Well, if it’s a number, you’ll probably want to add,
subtract, multiply, or divide it. And that’s where operators come
in. You already know the basic ones. Let’s talk about a few more.
Here’s a block of code that uses operators to do some simple math:
We declared a new
int variable called
number and set it to
15. Then we added 10
to it. After the second
statement, number is
equal to 25.
The third statement changes the
value of number, setting it equal to
36 times 15, which is 540. Then it
resets it again, setting it equal to
12 - (42 / 7), which is 6.
This operator is a little different.
+= means take the value of number
and add 10 to it. Since number is
currently equal to 6, adding 10 to it
sets its value to 16.
The *= operator
is similar to +=,
except it multiplies
the current value of
number by 3, so it
ends up set to 48.
You’ll use int a lot for counting, and when you do, the ++
and -- operators come in handy. ++ increments count
by adding one to the value, and -- decrements count by
subtracting one from it, so it ends up equal to zero.
Don’t worry about
memorizing these
operators now.
You’ll get to know them
because you’ll see ’em over and over again.
A bool stores true
or false. The !
operator means NOT.
It flips true to
false, and vice versa.
When you use the + operator
with a string, it just puts
two strings together. It’ll
automatically convert
numbers to strings for you.
This MessageBox
will pop up a box
that says “hello
again hello”
The “” is an empty string.
It has no characters.
(It’s kind of like a zero
for adding strings.)
Normally, 71 divided by 3 is 23.666666.... But when you’re
dividing two ints, you’ll always get an int result, so 23.666…
gets truncated to 23.
To programmers, the
word “string” almost
always means a string of
text, and “int” is almost
always short for integer.
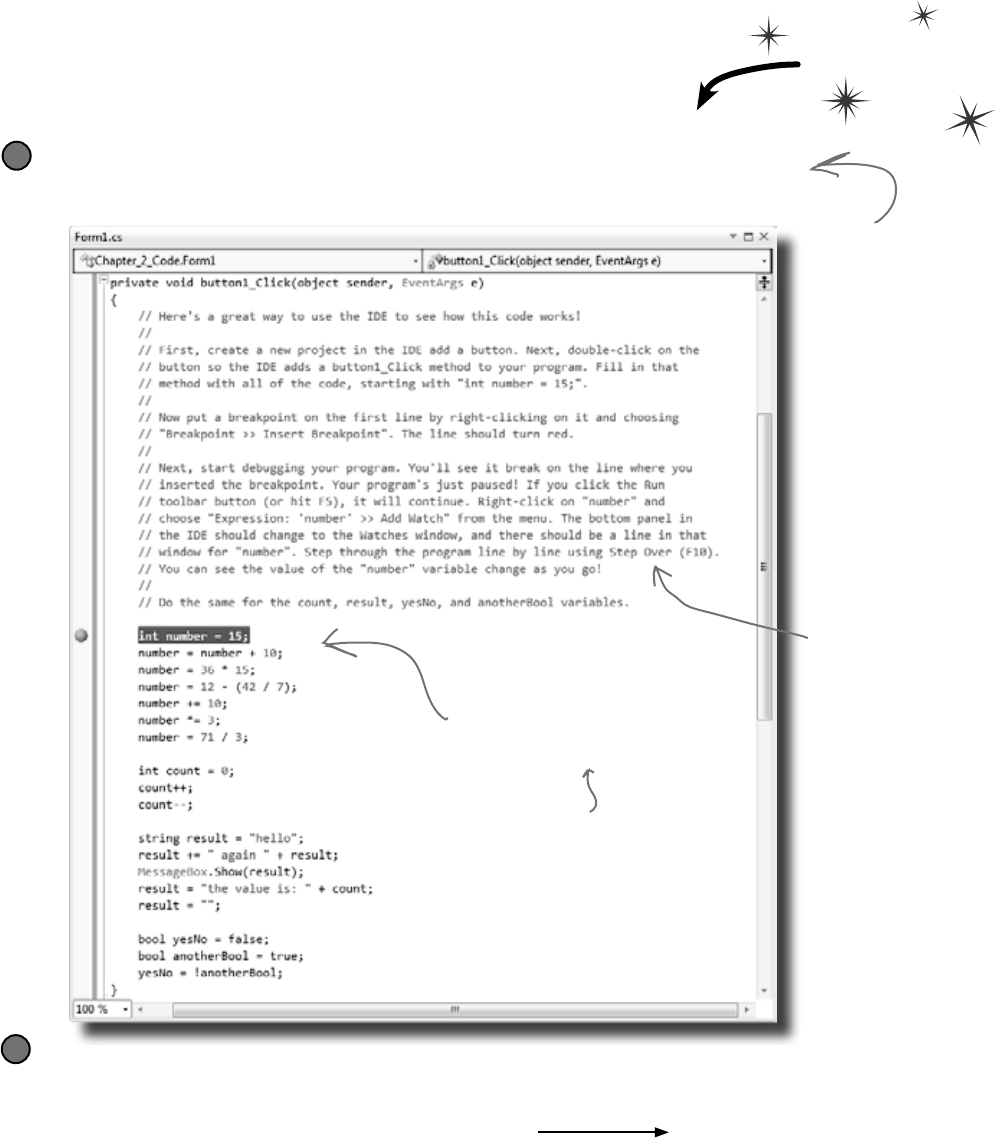
you are here 4 63
it’s all just code
Debug this!
Flip the page and keep going!
When you set a breakpoint on a line
of code, the line turns red and a
red dot appears in the margin of
the code editor.
When you debug your code by
running it inside the IDE, as
soon as your program hits a
breakpoint it’ll pause and let you
inspect and change the values of
all the variables.
The debugger is a great tool for understanding how your programs
work. You can use it to see the code on the previous page in action.
Use the debugger to see your variables change
Create a new Windows Forms Application project
Drag a button onto your form and double-click it. Enter all of the code on the previous
page. Then take a look at the comments in the screenshot below:
1
Insert a breakpoint on the first line of code
Right-click on the first line of code (int number = 15;) and choose “Insert Breakpoint” from the
Breakpoint menu. (You can also click on it and choose Debug >> Toggle Breakpoint or press F9.)
2
Creating a new
Windows Forms
Application project
will tell the IDE to
create a new project
with a blank form
and an entry point.
You might want to
name it something like
“Chapter 2 program
1”—you’ll be building a
whole lot of programs
throughout the book.
Comments (which either
start with two or more
slashes or are surrounded
by /* and */ marks)
show up in the IDE as
green text. You don’t
have to worry about
what you type in between
those marks, because
comments are always
ignored by the compiler.
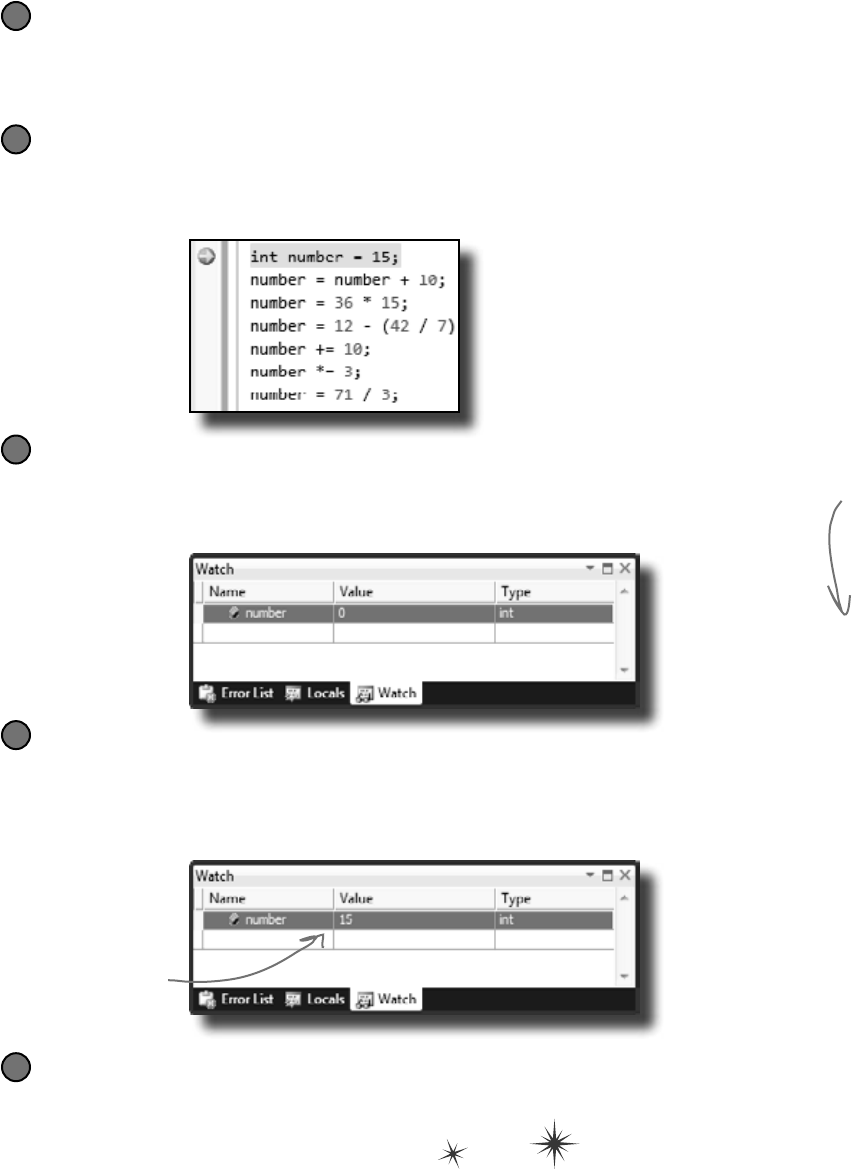
64 Chapter 2
stop bugging me!
Start debugging your program
Run your program in the debugger by clicking the Start Debugging button
(or by pressing F5, or by choosing Debug >> Start Debugging from the
menu). Your program should start up as usual and pop up the form.
3
Click on the button to trigger the breakpoint
As soon as your program gets to the line of code that has the breakpoint,
the IDE automatically brings up the code editor and highlights the current
line of code in yellow.
4
Add a watch for the number variable
Right-click on the number variable (any occurrence of it will do!) and
choose Expression: ‘number’ >> Add Watch from the menu. The
Watch window should appear in the panel at the bottom of the IDE:
5
Step through the code
Press F10 to step through the code. (You can also choose Debug >> Step Over
from the menu, or click the Step Over button in the Debug toolbar.) The current
line of code will be executed, setting the value of number to 15. The next line of
code will then be highlighted in yellow, and the Watch window will be updated:
6
Adding a watch
can help you
keep track of
the values of
the variables in
your program.
This will really
come in handy
when your
programs get
more complex.
You can also hover over
a variable while you’re
debugging to see its value
displayed in a tooltip…and
you can pin it so it says open!
As soon as the number
variable gets a new
value (15), its watch is
updated.
Continue running the program
When you want to resume, just press F5 (or Debug >> Continue), and the
program will resume running as usual.
7
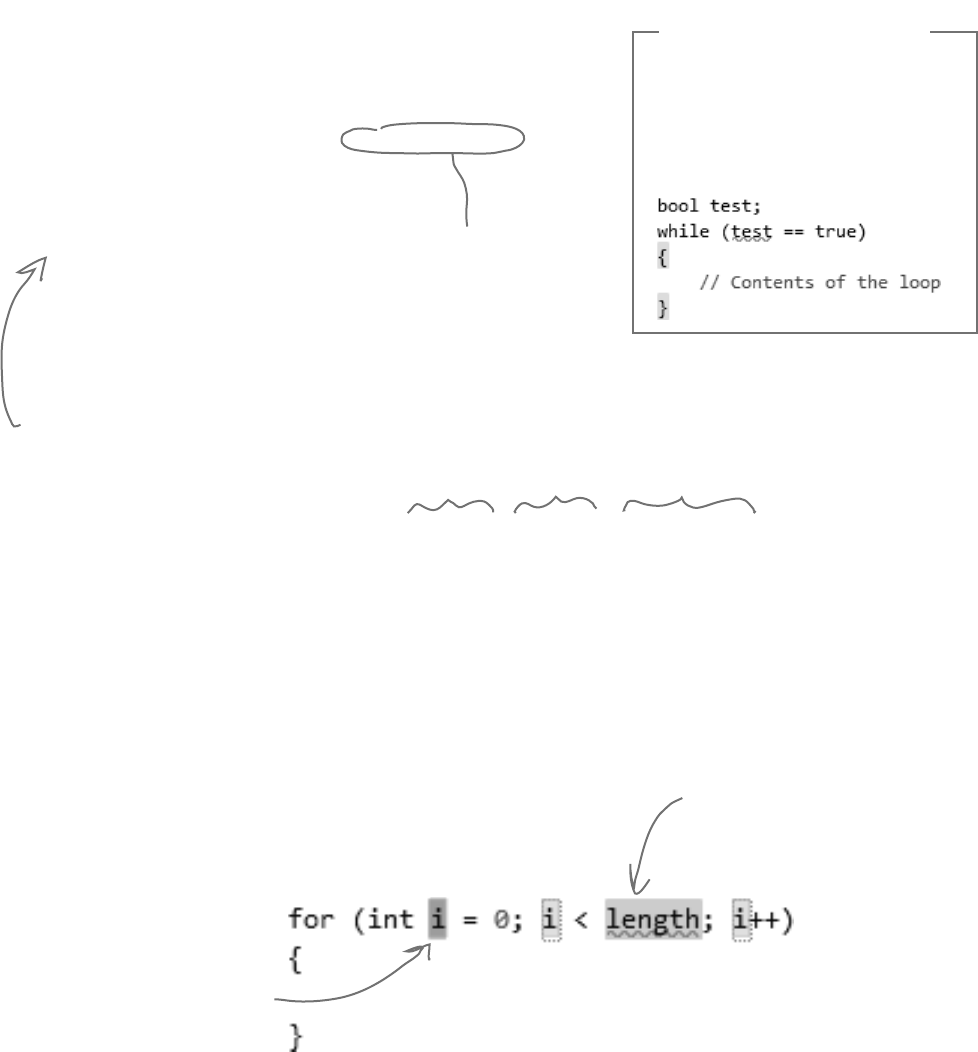
you are here 4 65
it’s all just code
That’s a big part of why
booleans are so important. A
loop uses a test to figure
out if it should keep looping.
Here’s a peculiar thing about most large programs: they almost always
involve doing certain things over and over again. And that’s what
loops are for—they tell your program to keep executing a certain set
of statements as long as some condition is true (or false!).
while (x > 5)
{
x = x - 3;
}
for (int i = 0; i < 8; i = i + 2)
{
MessageBox.Show(“I’ll pop up 4 times”);
}
Every for loop has three statements. The first sets
up the loop. The statement will keep looping as long as
the second one is true. And the third statement gets
executed after each time through the loop.
In a while loop, all of
the statements inside
the curly brackets get
executed as long as
the condition in the
parentheses is true.
Use a code snippet to write simple for loops
You’ll be typing for loops in just a minute, and the IDE can help
speed up your coding a little. Type for followed by two tabs,
and the IDE will automatically insert code for you. If you type
a new variable, it’ll automatically update the rest of the snippet.
Press tab again, and the cursor will jump to the length.
If you change the variable to
something else, the snippet
automatically changes the
other two occurrences of it.
Press tab to get the cursor
to jump to the length. The
number of times this loop runs
is determined by whatever
you set length to. You can
change length to a number or a
variable.
Loops perform an action over and over
If your brackets (or braces—either name
will do) don’t match up, your program
won’t build, which leads to frustrating
bugs. Luckily, the IDE can help with this!
Put your cursor on a bracket, and the
IDE highlights its match:
IDE Tip: Brackets
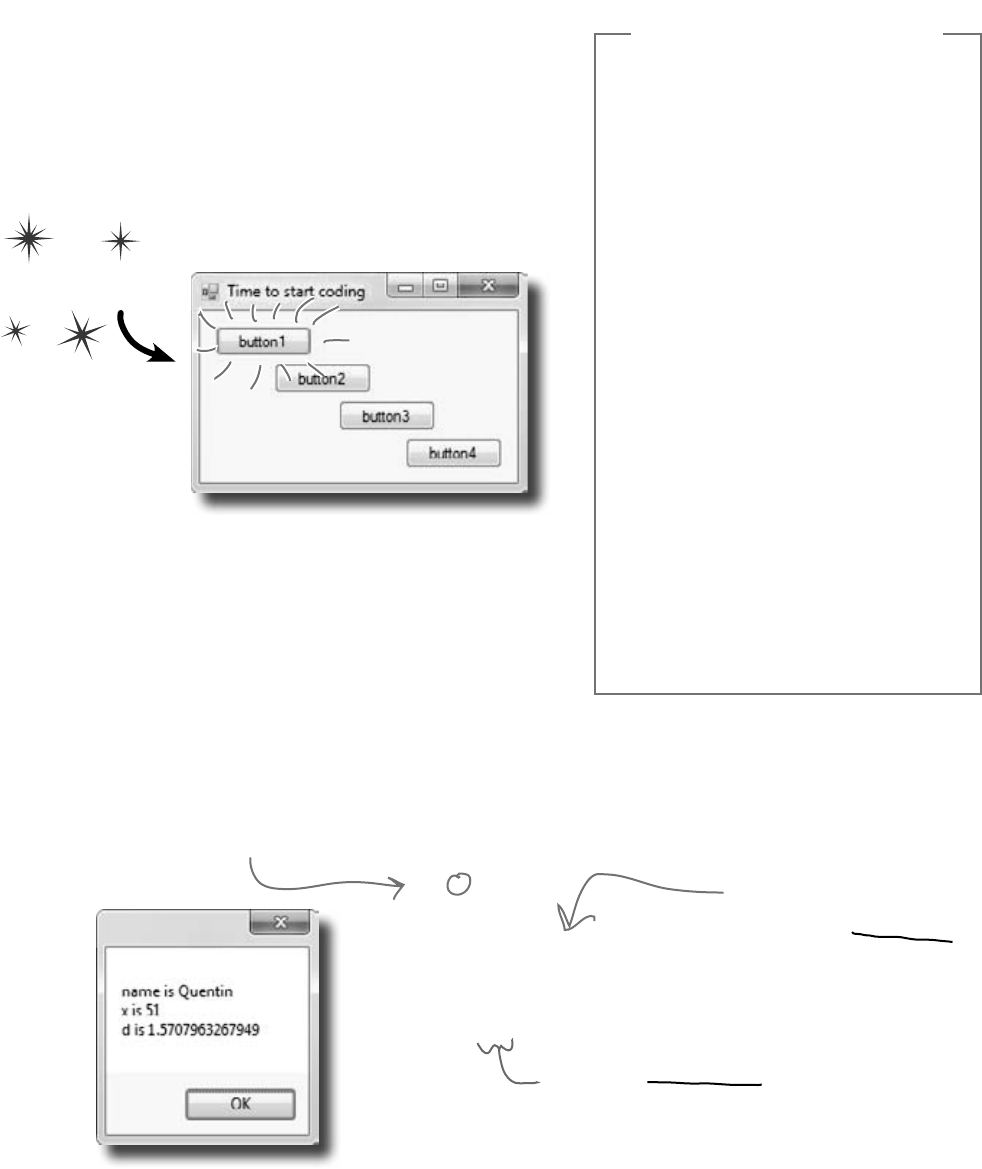
66 Chapter 2
private void button1_Click(object sender, EventArgs e)
{
// this is a comment
string name = “Quentin”;
int x = 3;
x = x * 17;
double d = Math.PI / 2;
MessageBox.Show(“name is “ + name
+ “\nx is “ + x
+ “\nd is “ + d);
}
Time to start coding
The real work of any program is in its statements. But
statements don’t exist in a vacuum. So let’s set the stage
for digging in and getting some code written. Create a
new Windows Forms Application project.
Build this form
Add statements to show a message
Get started by double-clicking on the first button. Then add
these statements to the button1_Click() method. Look
closely at the code and the output it produces.
±
Don’t forget that all your statements need
to end in a semicolon:
name = “Joe”;
±
You can add comments to your code by
starting them with two slashes:
// this text is ignored
±
Variables are declared with a name and a
type (there are plenty of types that you’ll
learn about in Chapter 4):
int weight;
// weight is an integer
±
The code for a class or a method goes
between curly braces:
public void Go() {
// your code here
}
±
Most of the time, extra whitespace is fine:
int j = 1234 ;
is the same as:
int j = 1234;
A few helpful tips
x is a variable. The “int”
part tells C# that it’s
an integer, and the rest
of the statement sets
its value to 3.
There’s a built-in class called
Math, and it’s got a member
called PI. Math lives in the
System namespace, so the
file this code came from
needs to have a using System;
line at the top.
ready, set, code!
The \n is an escape sequence
to add a line break to the
message box.

you are here 4 67
it’s all just code
if/else statements make decisions
Use if/else statements to tell your program to do certain
things only when the conditions you set up are (or aren’t)
true. A lot of if/else statements check if two things are equal.
That’s when you use the == operator. That’s different from the
single equals sign (=) operator, which you use to set a value.
Don’t confuse the two equals sign operators!
You use one equals sign (=) to set a variable’s value, but two equals
signs (==) to compare two variables. You won’t believe how many bugs in
programs—even ones made by experienced programmers!—are caused
by using = instead of ==. If you see the IDE complain that you “cannot implicitly
convert type ‘int’ to ‘bool’”, that’s probably what happened.
if (someValue == 24)
{
// You can have as many statements
// as you want inside the brackets
MessageBox.Show(“The value was 24.”);
} else {
MessageBox.Show(“The value wasn’t 24.”);
}
if (someValue == 24)
{
MessageBox.Show(“The value was 24.”);
}
Every if statement
starts with a
conditional test.
The statement inside
the curly brackets is
executed only if the
test is true.
if/else statements are
pretty straightforward.
If the conditional
test is true, the
program executes the
statements between the
first set of brackets.
Otherwise, it executes
the statements between
the second set.
Always use two equals signs to check if
two things are equal to each other.
68 Chapter 2
Set up conditions and see if they’re true
Use if/else statements to tell your program to do certain
things only when the conditions you set up are (or aren’t) true.
private void button2_Click(object sender, EventArgs e)
{
int x = 5;
if (x == 10)
{
MessageBox.Show(“x must be 10”);
}
else
{
MessageBox.Show(“x isn’t 10”);
}
}
Set a variable and then check its value
Here’s the code for the second button. It’s an if/else statement that
checks an integer variable called x to see if it’s equal to 10.
Here’s the output. See if you can tweak one line
of code and get it to say “x must be 10” instead.
the things you can do
Make sure you stop your program before
you do this—the IDE won’t let you edit
the code while the program’s running.
You can stop it by closing the window,
using the stop button on the toolbar, or
selecting “Stop Debugging” from the
Debug menu.
Use logical operators to check conditions
You’ve just looked at the == operator, which you use to test whether two
variables are equal. There are a few other operators, too. Don’t worry about
memorizing them right now—you’ll get to know them over the next few
chapters.
≥The != operator works a lot like ==, except it’s true if the two things
you’re comparing are not equal.
≥You can use > and < to compare numbers and see if one is bigger or
smaller than the other.
≥The ==, !=, >, and < operators are called conditional operators.
When you use them to test two variables or values, it’s called
performing a conditional test.
≥You can combine individual conditional tests into one long test using
the && operator for AND and the || operator for OR. So to check if
i equals 3 or j is less than 5, do (i == 3) || (j < 5).
When you use
a conditional
operator to
compare two
numbers, it’s
called a
conditional test.
First we set
up a variable
called x and
make it equal
to 5. Then we
check if it’s
equal to 10.
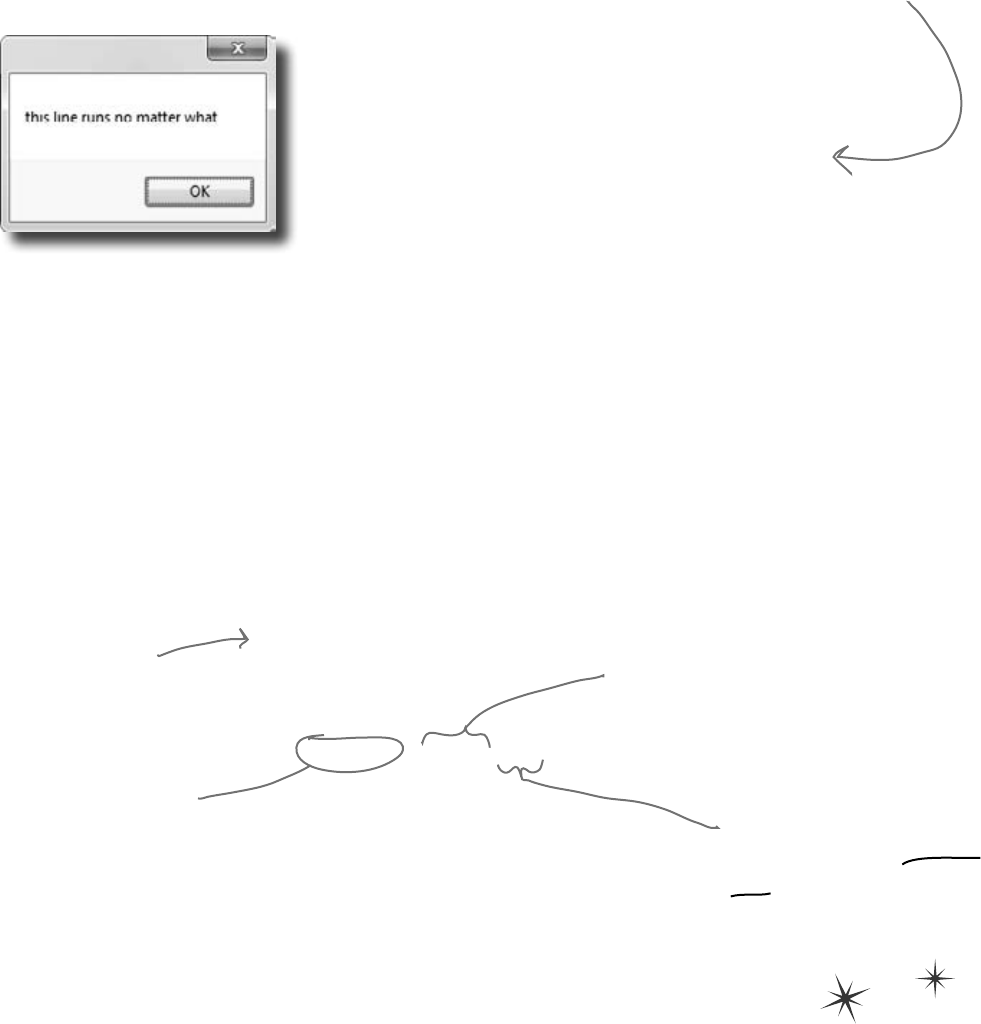
you are here 4 69
it’s all just code
private void button3_Click(object sender, EventArgs e)
{
int someValue = 4;
string name = “Bobbo Jr.”;
if ((someValue == 3) && (name == “Joe”))
{
MessageBox.Show(“x is 3 and the name is Joe”);
}
MessageBox.Show(“this line runs no matter what”);
}
Add another conditional test
The third button makes this output. Now make a change to
two lines of code so that it pops up both message boxes.
This line checks someValue to
see if it’s equal to 3, and then
it checks to make sure name
is “Joe”.
Add loops to your program
Here’s the code for the last button. It’s got two loops. The first is a while loop,
which repeats the statements inside the brackets as long as the condition is true—do
something while this is true. The second one is a for loop. Take a look and see how it
works.
Before you click on the button, read through the code and try to figure out what the
message box will show. Then click the button and see if you were right!
private void button4_Click(object sender, EventArgs e)
{
int count = 0;
while (count < 10)
{
count = count + 1;
}
for (int i = 0; i < 5; i++)
{
count = count - 1;
}
MessageBox.Show(“The answer is ” + count);
}
The second part of the for statement is
the test. It says “for as long as i is less than
five the loop should keep on going”. The test
is run before the code block, and the block
is executed only if the test is true.
This sets up the loop.
It just assigns a
value to the integer
that’ll be used in it.
This statement gets executed at
the end of each loop. In this case,
it adds one to i every time the
loop executes. This is called the
iterator, and it’s run immediately
after all the statements in the
code block.
This loop keeps
repeating as long as
the count variable
is less than 10.
70 Chapter 2
More about conditional tests
You can do simple conditional tests by checking the value of a variable
using a comparison operator. Here’s how you compare two ints, x and y:
x < y (less than)
x > y (greater than)
x == y (equals—and yes, with two equals signs)
These are the ones you’ll use most often.
int result = 0; // this variable will hold the final result
int x = 6; // declare a variable x and
while (x > 3) {
// execute these statements as long as
result = result + x; // add x
x = x - 1; // subtract
}
for (int z = 1; z < 3; z = z + 1) {
// start the loop by
// keep looping as long as
// after each loop,
result = result + z; //
}
// The next statement will pop up a message box that says
//
MessageBox.Show(“The result is ” + result);
Let’s get a little more practice with conditional tests and loops. Take a
look at the code below. Circle the conditional tests, and fill in the blanks
so that the comments correctly describe the code that’s being run.
set it to 6
We filled in the
first one for you.
over and over and over and…
you are here 4 71
it’s all just code
Wait up! There’s a flaw in your
logic. What happens to my loop if I
write a conditional test that never
becomes false?
Then your loop runs forever!
Every time your program runs a conditional test, the result
is either true or false. If it’s true, then your program
goes through the loop one more time. Every loop should
have code that, if it’s run enough times, should cause
the conditional test to eventually return false. But if it
doesn’t, then the loop will keep running until you kill the
program or turn the computer off !
Can you think of a reason that you’d want to write a
loop that never stops running? (Hint: You’ll use one
in Chapter 13….)
Here are a few loops. Write down if each loop will repeat forever or
eventually end. If it’s going to end, how many times will it loop?
Loop #1
int count = 5;
while (count > 0) {
count = count * 3;
count = count * -1;
}
Loop #2
int i = 0;
int count = 2;
while (i == 0) {
count = count * 3;
count = count * -1;
}
Loop #3
int j = 2;
for (int i = 1; i < 100;
i = i * 2)
{
j = j - i;
while (j < 25)
{
j = j + 5;
}
}
Loop #5
int p = 2;
for (int q = 2; q < 32;
q = q * 2)
{
while (p < q)
{
p = p * 2;
}
q = p - q;
}
Loop #4
while (true) { int i = 1;}
This is sometimes called an infinite loop,
and there are actually times when you’ll
want to use one in your program.
Remember, a for loop always
runs the conditional test at the
beginning of the block, and the
iterator at the end of the block.
Hint: q starts out equal to
2. Think about when the
iterator “q = q * 2” is
executed.
For Loop #3, how
many times will this
statement be executed?
For Loop #5, how
many times will this
statement be executed?
72 Chapter 2
int result = 0; // this variable will hold the final result
int x = 6; // declare a variable x and
while (x > 3) {
// execute these statements as long as
result = result + x; // add x
x = x - 1; // subtract
}
for (int z = 1; z < 3; z = z + 1) {
// start the loop by
// keep looping as long as
// after each loop,
result = result + z; //
}
// The next statement will pop up a message box that says
//
MessageBox.Show(“The result is ” + result);
set it to 6
x is greater than 3
to the result variable
1 from the value of x
declaring a variable z and setting it to 1
z is less than 3
add 1 to z
The result is 18
add the value of z to result
Let’s get a little more practice with conditional tests and loops. Take a
look at the code below. Circle the conditional tests, and fill in the blanks
so that the comments correctly describe the code that’s being run.
Here are a few loops. Write down if each loop will repeat forever or
eventually end. If it’s going to end, how many times will it loop?
Loop #1
This loop executes once
Loop #2
This loop runs forever
Loop #3
This loop executes 7 times
Loop #4
Another infinite loop
Loop #5
This loop
executes 8 times
if only, but only if
This loop runs twice—first with z set to 1, and
then a second time with z set to 2. Once it hits
3, it’s no longer less than 3, so the loop stops.
Take the time to really figure this one out. Here’s a perfect opportunity to try out the debugger on your own! Set a
breakpoint on the statement q = p - q;. Add watches for the variables p and q and step through the loop.

you are here 4 73
it’s all just code
Q: Is every statement always in a class?
A:Yes.AnytimeaC#programdoessomething,it’sbecause
statementswereexecuted.Thosestatementsareapartofclasses,
andthoseclassesareapartofnamespaces.Evenwhenitlooks
likesomethingisnotastatementinaclass—likewhenyouuse
thedesignertosetapropertyonanobjectonyourform—ifyou
searchthroughyourcodeyou’llfindthattheIDEaddedorchanged
statementsinsideaclasssomewhere.
Q: Are there any namespaces I’m not allowed to use? Are
there any I have to use?
A:Yes,thereareafewnamespacesthatarenotrecommendedto
use.NoticehowalloftheusinglinesatthetopofyourC#class
filesalwayssaidSystem?That’sbecausethere’saSystem
namespacethat’susedbythe.NETFramework.It’swhereyou
findallofyourimportanttoolstoaddpowertoyourprograms,like
System.Data,whichletsyouworkwithtablesanddatabases,
andSystem.IO,whichletsyouworkwithfilesanddatastreams.
Butforthemostpart,youcanchooseanynameyouwantfora
namespace(aslongasitonlyhasletters,numbers,andunderscores).
Whenyoucreateanewprogram,theIDEwillautomaticallychoosea
namespaceforyoubasedontheprogram’sname.
Q: I still don’t get why I need this partial class stuff.
A:Partialclassesarehowyoucanspreadthecodeforone
classbetweenmorethanonefile.TheIDEdoesthatwhenit
createsaform—itkeepsthecodeyoueditinonefile(likeForm1.
cs),andthecodeitmodifiesautomaticallyforyouinanotherfile
(Form1.Designer.cs).Youdon’tneedtodothatwitha
namespace,though.Onenamespacecanspantwo,three,ora
dozenormorefiles.Justputthenamespacedeclarationatthetopof
thefile,andeverythingwithinthecurlybracketsafterthedeclaration
isinsidethesamenamespace.Onemorething:youcanhavemore
thanoneclassinafile.Andyoucanhavemorethanonenamespace
inafile.You’lllearnalotmoreaboutclassesinthenextfewchapters.
Q: Let’s say I drag something onto my form, so the IDE
generates a bunch of code automatically. What happens to that
code if I click “Undo”?
A:Thebestwaytoanswerthisquestionistotryit!Giveitashot—
dosomethingwheretheIDEgeneratessomecodeforyou.
Dragabuttononaform,changeproperties.Thentrytoundoit.What
happens?Well,forsimplethingsyou’llseethattheIDEissmart
enoughtoundoititself.Butformorecomplexthings,likeadding
anewSQLdatabasetoyourproject,you’llbegivenawarning
message.Itstillknowshowtoundotheaction,butitmaynotbeable
toredoit.
Q: So exactly how careful do I have to be with the code that’s
automatically generated by the IDE?
A:Youshouldgenerallybeprettycareful.It’sreallyusefulto
knowwhattheIDEisdoingtoyourcode,andonceinawhileyou’ll
needtoknowwhat’sinthereinordertosolveaseriousproblem.But
inalmostallcases,you’llbeabletodoeverythingyouneedtodo
throughtheIDE.
¢Youtellyourprogramtoperformactionsusing
statements.Statementsarealwayspartofclasses,and
everyclassisinanamespace.
¢Everystatementendswithasemicolon(;).
¢WhenyouusethevisualtoolsintheVisualStudioIDE,
itautomaticallyaddsorchangescodeinyourprogram.
¢Codeblocksaresurroundedbycurlybraces{ }.
Classes,whileloops,if/elsestatements,andlotsof
otherkindsofstatementsusethoseblocks.
¢Aconditionaltestiseithertrueorfalse.Youuse
conditionalteststodeterminewhenaloopends,and
whichblockofcodetoexecuteinanif/elsestatement.
¢Anytimeyourprogramneedstostoresomedata,you
useavariable.Use=toassignavariable,and==to
testiftwovariablesareequal.
¢Awhilelooprunseverythingwithinitsblock(defined
bycurlybraces)aslongastheconditional testis
true.
¢Iftheconditionaltestisfalse,thewhileloopcode
blockwon’trun,andexecutionwillmovedowntothe
codeimmediatelyaftertheloopblock.
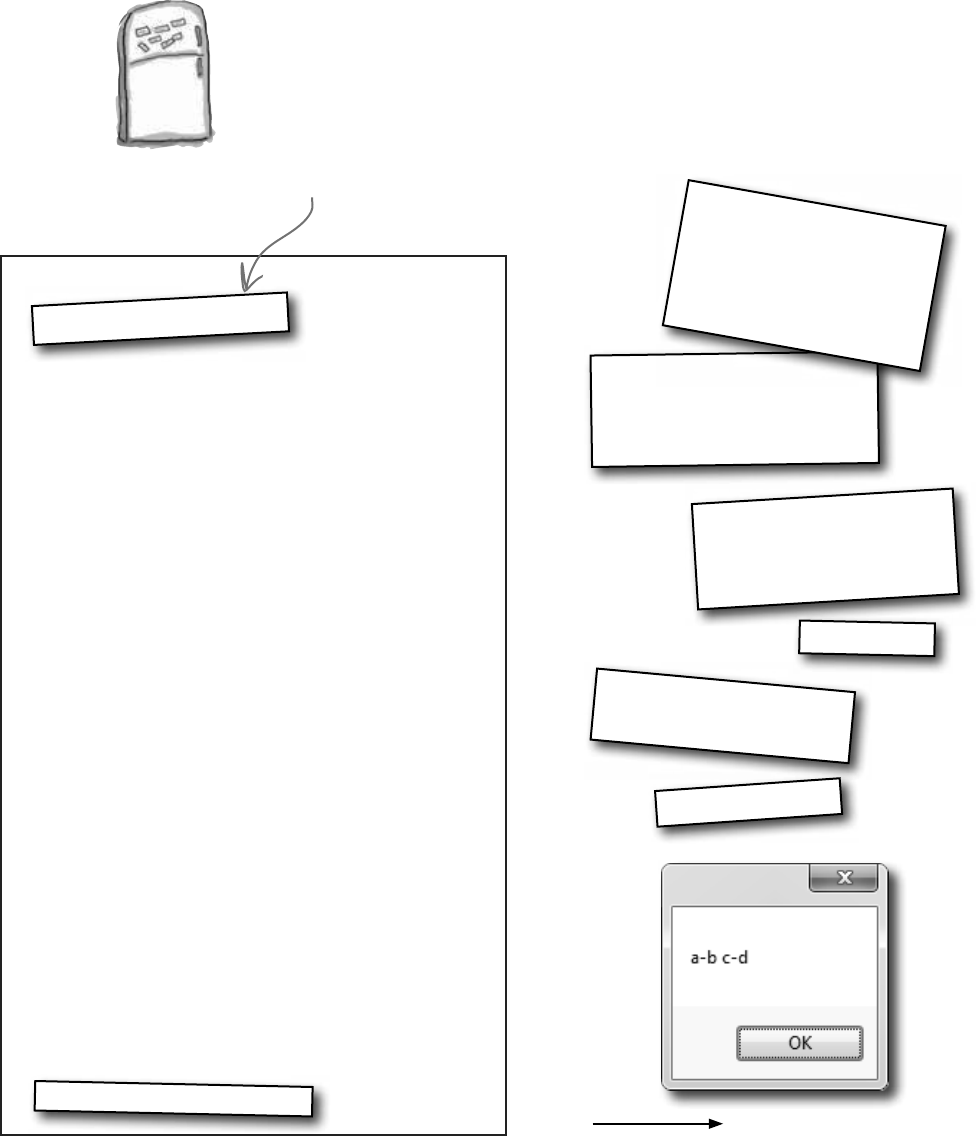
74 Chapter 2
Output:
This magnet didn’t fall
off the fridge…
Answers on page 82.
your code… now in magnet form
Code Magnets
Part of a C# program is all scrambled up on the fridge. Can you rearrange
the code snippets to make a working C# program that produces the
message box? Some of the curly braces fell on the floor and they were
too small to pick up, so feel free to add as many of those as you need!
(Hint: you’ll definitely need to add a couple. Just write them in!)
if (x == 2) {
Result = Result + “b c”;
}
x = x - 1;
Result = Result + “-”;
if (x == 1) {
Result = Result + “d”;
x = x - 1;
}
if (x > 2) {
Result = Result + “a”;
}
string Result = “”;
int x = 3;
while (x > 0) {
MessageBox.Show(Result);
The “” is an empty string—it means Result
has no characters in it yet.
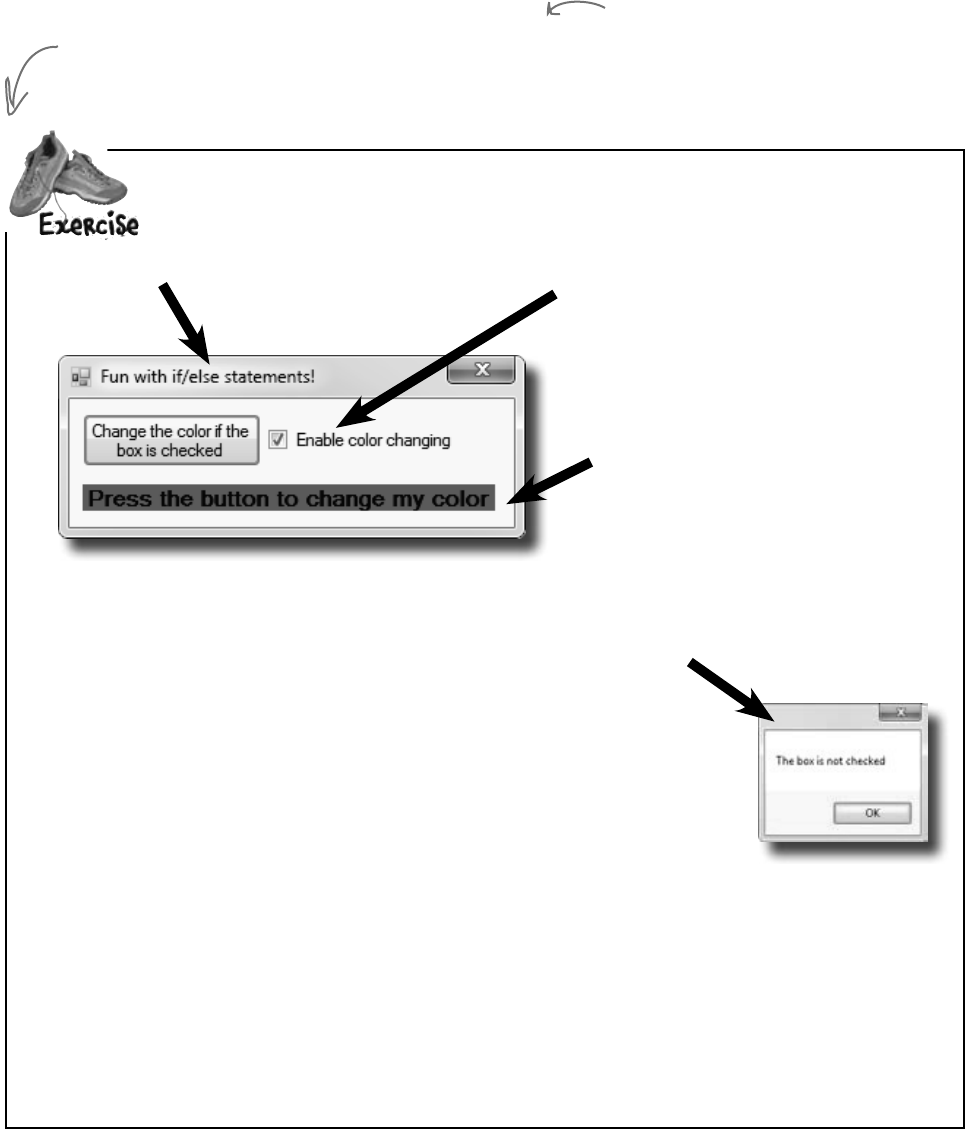
you are here 4 75
it’s all just code
Timetogetsomepracticeusingif/elsestatements.Canyoubuildthisprogram?
Here’s the form.
This is a label.
You can use the properties to change the
font size and make it boldface. Use the
BackColor property to set to red—choose
“Red” from the selection of web colors.
Add this checkbox.
Drag it out of the toolbox and onto your
form. Use the Text property to change the
text that’s next to it. (You also use the Text
property to change the button and label text.)
Pop up this message if the user clicks the button but the
box IS NOT checked.
If your checkbox is named checkBox1 (you can change the Name property
if you want), then here’s the conditional test to see if it’s checked:
checkBox1.Checked == true
If the user clicks the button and the box IS checked, change the
background color of the label.
If the label background color is red, change it to blue when the button is clicked. If it’s blue,
change it back to red. Here’s a statement that sets the background color of a label called label1:
label1.BackColor = Color.Red;
(Hint: The conditional test to check whether a label’s background color is red looks a lot like that
statement—but with one important difference!)
We’ll give you a lot of exercises like this throughout the book.
We’ll give you the answer in a couple of pages. If you get stuck,
don’t be afraid to peek at the answer—it’s not cheating!
You’ll be creating a lot of applications
throughout this book, and you’ll need to give
each one a different name. We recommend
naming this one “2 Fun with if-else
statements” based on the chapter number
and the text in the title bar of the form.
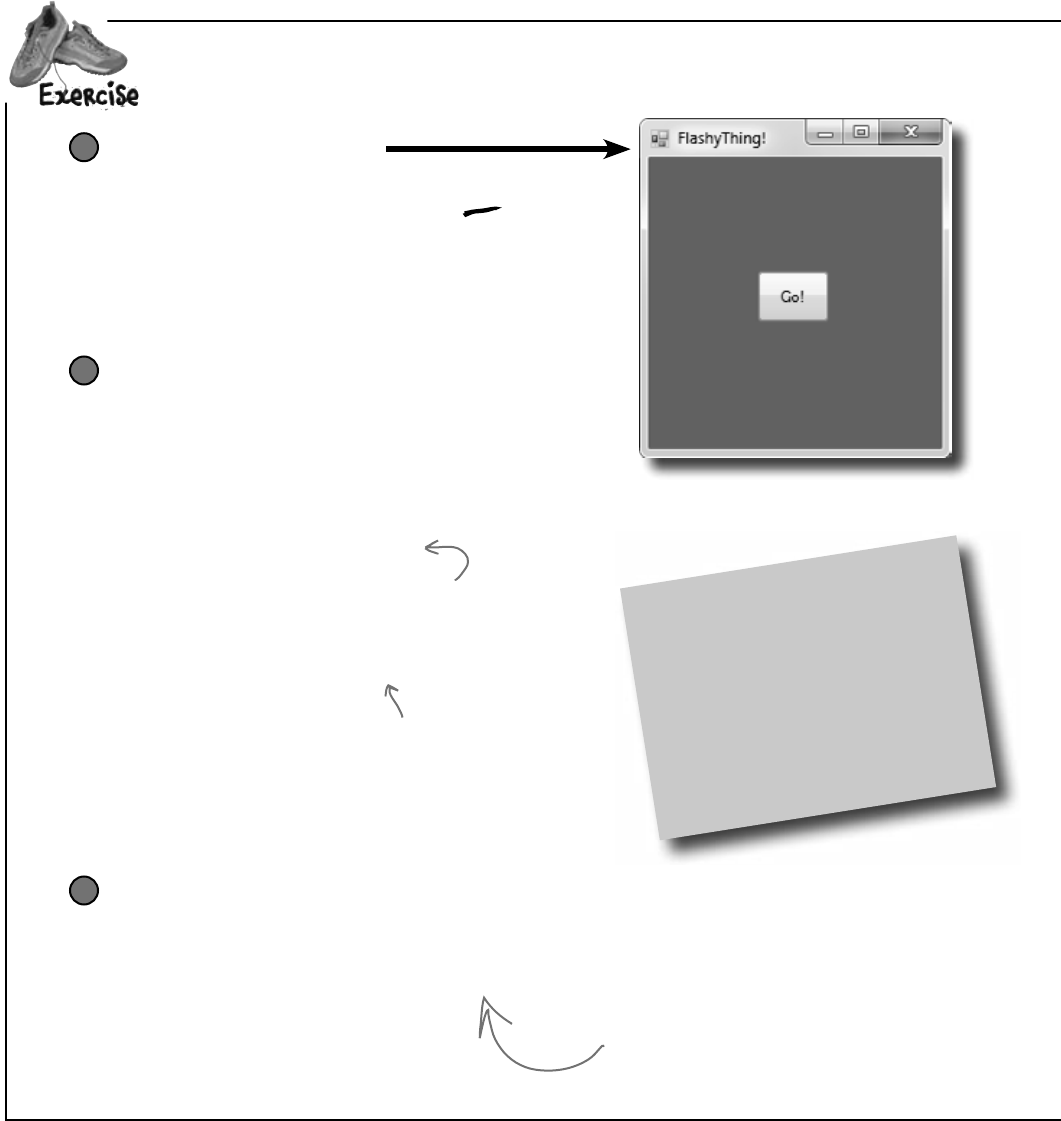
76 Chapter 2
this.BackColor = Color.FromArgb(c, 255 - c, c);
Application.DoEvents();
Here’s the form to build
1
Make the form background go all psychedelic!
When the button’s clicked, make the form’s background
color cycle through a whole lot of colors! Create a loop that
has a variable c go from 0 to 253. Here’s the block of code
that goes inside the curly brackets:
2
Make it slower
Slow down the flashing by adding this line after the
Application.DoEvents() line:
3
Color me impressed!
.NET has a bunch of predefined
colors like Blue and Red, but it also
lets you make your own colors using
the Color.FromArgb() method, by
specifying three numbers: a red value,
a green value, and a blue value.
This line tells the program to stop your loop momentarily and do
the other things it needs to do, like refresh the form, check for
mouse clicks, etc. Try taking out this line and seeing what happens.
The form doesn’t redraw itself, because it’s waiting until the loop is
done before it deals with those events.
System.Threading.Thread.Sleep(3);
This statement inserts a 3 millisecond
delay in the loop. It’s a part of
the .NET library, and it’s in the
System.Threading namespace.
Hint: If you declare a variable inside a for loop—for (int c = 0; …)—then
that variable’s only valid inside the loop’s curly brackets. So if you have
two for loops that both use the variable, you’ll either declare it in each
loop or have one declaration outside the loop. And if the variable c is
already declared outside of the loops, you can’t use it in either one.
ooh, pretty!
Let’sbuildsomethingflashy!StartbycreatinganewWindowsFormsApplicationintheIDE.
For now, you’ll use Application.DoEvents() to make sure
your form stays responsive while it’s in a loop, but it’s
kind of a hack. You shouldn’t use this code outside of a
toy program like this. Later on in the book, you’ll learn
about a much better way to let your programs do more
than one thing at a time!
you are here 4 77
it’s all just code
Make it smoother
Let’s make the colors cycle back to where they started. Add another loop that has
c go from 254 down to 0. Use the same block of code inside the curly brackets.
4
Keep it going
Surround your two loops with another loop that continuously executes and doesn’t
stop, so that when the button is pressed, the background starts changing colors and
then keeps doing it. (Hint: The while (true) loop will run forever!)
5
When one loop is
inside another
one, we call it a
“nested” loop.
Make it stop
Make the loop you added in step #5 stop when the program is
closed. Change your outer loop to this:
while (Visible)
Now run the program and click the X box in the corner. The
window closes, and then the program stops! Except…there’s a
delay of a few seconds before the IDE goes back to edit mode.
6
Uh-oh! The program doesn’t stop!
Run your program in the IDE. Start it looping. Now close the window. Wait a
minute—the IDE didn’t go back into edit mode! It’s acting like the program
is still running. You need to actually stop the program using the square stop
button in the IDE (or select “Stop Debugging” from the Debug menu).
Can you figure out what’s causing that
delay? Can you fix it so the program ends
immediately when you close the window?
Hint: The && operator means
“AND”. It’s how you string a bunch
of conditional tests together into
one big test that’s true only if the
first test is true AND the second
is true AND the third, etc. And
it’ll come in handy to solve this
problem.
When you’re checking a Boolean value like Visible
in an if statement or a loop, sometimes it’s
tempting to test for (Visible == true). You can
leave off the “== true”—it’s enough to include
the Boolean.
When you’re working with a
form or control, Visible is
true as long as the form or
control is being displayed. If
you set it to false, it makes
the form or control disappear.
78 Chapter 2
using System;
using System.Collections.Generic;
using System.ComponentModel;
using System.Data;
using System.Drawing;
using System.Linq;
using System.Text;
using System.Windows.Forms;
namespace Fun_with_If_Else
{
public partial class Form1 : Form
{
public Form1()
{
InitializeComponent();
}
private void button1_Click(object sender, EventArgs e)
{
if (checkBox1.Checked == true)
{
if (label1.BackColor == Color.Red)
{
label1.BackColor = Color.Blue;
}
else
{
label1.BackColor = Color.Red;
}
}
else
{
MessageBox.Show(“The box is not checked”);
}
}
}
}
Timetogetsomepracticeusingif/elsestatements.Canyoubuildthisprogram?
Here’s the code for the form. We named our solution
“Fun with If Else”, so the IDE made the namespace
Fun_with_If_Else. If you gave your solution a
different name, it’ll have a different namespace.
The IDE added the method called
button1_Click() to your form
when you double-clicked on the
button. The method gets run
every time the button’s clicked.
The inner if statement
checks the label’s
color. If the label
is currently red, it
executes a statement
to turn it blue.
This MessageBox pops up if
the checkbox isn’t checked.
The outer if
statement checks
the checkbox to
see if it’s been
checked. Check!
This statement’s
run if the label’s
background color is
not red to make it
set back to red.
exercise solution
You can download the code for all of the exercise solutions
in this book from www.headfirstlabs.com/books/hfcsharp/
you are here 4 79
it’s all just code
private void button1_Click(object sender, EventArgs e) {
while (Visible) {
for (int c = 0; c < 254 && Visible; c++) {
this.BackColor = Color.FromArgb(c, 255 - c, c);
Application.DoEvents();
System.Threading.Thread.Sleep(3);
}
for (int c = 254; c >= 0 && Visible; c--) {
this.BackColor = Color.FromArgb(c, 255 - c, c);
Application.DoEvents();
System.Threading.Thread.Sleep(3);
}
}
}
Let’sbuildsomethingflashy!
Sometimes we won’t show you the entire code
in the solution, just the bits that changed. All
of the logic in the FlashyThing project is in this
button1_Click() method that the IDE added when
you double-clicked the button in the form designer.
Was your code a little different than ours? There’s more than one way
to solve any programming problem—like you could have used while loops
instead of for loops. If your program works, then you got the exercise right!
We fixed the extra delay by
using the && operator to make
each of the for loops also check
Visible. That way the loop ends
as soon as Visible turns false.
The outer loop
keeps running as
long as the form
is visible. As soon
as it’s closed,
Visible is false,
and the while
will stop looping.
The first for loop makes the
colors cycle one way, and the
second for loop reverses them
so they look smooth.
When the IDE added this method, it added an extra
return before the curly bracket. Sometimes we’ll put the
bracket on the same line like this to save space—but C#
doesn’t care about extra space, so this is perfectly valid.
Can you figure out what’s causing that
delay? Can you fix it so the program ends
immediately when you close the window?
The delay happens because the for loops need to finish before the
while loop can check if Visible is still true. You can fix it by adding
&& Visible to the conditional test in each for loop.
We used &&
Visible instead
of && Visible
== true. It’s
just like saying
“if it’s visible”
instead of “if
it’s true that
it’s visible”—they
mean the same
thing.
Consistency is generally really important to make it easy
for people to read code. But we’re purposefully showing you
different ways, because you’ll need to get used to reading
code from different people using different styles.
80 Chapter 2
Pool Puzzle
Your job is to take code snippets from
the pool and place them into
the blank lines in the code. You
may not use the same snippet
more than once, and you won’t
need to use all the snippets.
Your goal is to make a class
that will compile and run. Don’t
be fooled—this one’s harder than it
looks.
Note: each snippet
from the pool can only
be used once!
Poem = Poem + “ ”;
Poem = Poem + “a “;
Poem = Poem + “n“;
Poem = Poem + “an“;
x = x + 1;
x = x + 2;
x = x - 2;
x = x - 1;
x > 0
x < 1
x > 1
x > 3
x < 4
Poem = Poem + “noys “;
Poem = Poem + “oise “;
Poem = Poem + “ oyster “;
Poem = Poem + “annoys”;
Poem = Poem + “noise”;
int x = 0;
String Poem = “”;
while ( __________ ) {
_____________________________
if ( x < 1 ) {
___________________________
}
_____________________________
if ( __________ ) {
____________________________
___________
}
if ( x == 1 ) {
____________________________
}
if ( ___________ ) {
____________________________
}
____________
}
__________________
MessageBox.Show(Poem);
Output
this puzzle’s tougher than it looks
We included these “Pool Puzzle” exercises throughout the book
to give your brain an extra-tough workout. If you’re the kind
of person who loves twisty little logic puzzles, then you’ll love
this one. If you’re not, give it a shot anyway—but don’t be
afraid to look at the answer to figure out what’s going on.
And if you’re stumped by a pool puzzle, definitely move on.
Answers on page 83.
you are here 4 81
it’s all just code
Csharpcross
How does a crossword help you learn C#? Well, all the words are C#-
related and from this chapter. The clues also provide mental twists and
turns that will help you burn alternative routes to C# right into your brain.
1
2 3
4 5
6 7
8 9 10
11 12
13 14
15
16
Across
3. You give information to a method using these
4. button1.Text and checkBox3.Name are examples of
8. Every statement ends with one of these
10. The name of every C# program's entry point
11. Contains methods
12. Your statements live here
14. A kind of variable that's either true or false
15. A special method that tells your program where to
start
16. This kind of class spans multiple files
Down
1. The output of a method is its _________ value
2. System.Windows.Forms is an example of one of
these
5. A tiny piece of a program that does something
6. A block of code is surrounded by
7. The kind of test that tells a loop when to end
9. You can call _________.Show() to pop up a simple
Windows dialog box
13. The kind of variable that contains a whole number
Across
3.Yougiveinformationtoamethodusingthese
_________
4.button1.TextandcheckBox3.Nameareexamplesof
8.Everystatementendswithoneofthese
10.ThenameofeveryC#program’sentrypoint
11.Containsmethods
12.Yourcodestatementsliveinoneofthese
14.Akindofvariablethat’seithertrueorfalse
15.Aspecialmethodthattellsyourprogramwheretostart
16.Thiskindofclassspansmultiplefiles
Down
1.Theoutputofamethodisits_________value
2.System.Windows.Formsisanexampleofoneof
these
5.Atinypieceofaprogramthatdoessomething
6.Ablockofcodeissurroundedby_________
7.Thekindoftestthattellsaloopwhentoend
9.Youcancall_________.Show()topopupasimple
Windowsdialogbox
13.Thekindofvariablethatcontainsawholenumber
82 Chapter 2
exercise solutions
Output:
This magnet didn’t fall
off the fridge…
Code Magnets Solution
Part of a C# program is all scrambled up on the fridge. Can you
rearrange the code snippets to make a working C# program that
produces the message box? Some of the curly braces fell on the
floor and they were too small to pick up, so feel free to add as
many of those as you need!
string Result = “”;
MessageBox.Show(Result);
int x = 3;
while (x > 0) {
if (x > 2) {
Result = Result + “a”;
}
x = x - 1;
Result = Result + “-”;
if (x == 2) {
Result = Result + “b c”;
}
if (x == 1) {
Result = Result + “d”;
x = x - 1;
}
The first time through the
loop, x is equal to 3 so this
conditional test will be true.
This statement makes x
equal to 2 the first time
through the loop, and 1 the
second time through.
you are here 4 83
it’s all just code
int x = 0;
String Poem = “”;
while ( x < 4 ) {
Poem = Poem + “a”;
if ( x < 1 ) {
Poem = Poem + “ ”;
}
Poem = Poem + “n”;
if ( x > 1 ) {
Poem = Poem + “ oyster”;
x = x + 2;
}
if ( x == 1 ) {
Poem = Poem + “noys ”;
}
if ( x < 1 ) {
Poem = Poem + “oise ”;
}
x = x + 1;
}
MessageBox.Show(Poem);
Pool Puzzle Solution
Your job was to take code snippets from the
pool and place them into the blank lines
in the code. Your goal was to make a
class that will compile and run.
Did you get a different
solution? Type it into the IDE
and see if it works! There’s
more than one correct solution
to the pool puzzle.
If you want a real challenge, see if you
can figure out what it is! Here’s a hint:
There’s another solution that keeps the
word fragments in order.
Output:
84 Chapter 2
Csharpcross Solution
R
1
N
2P
3A R A M E T E R S
A T
M P
4R O P E R T I E S
5U
B
6E T R C
7
R S
8E M
9I C O L O N M
10 A I N O
A P E T N
C
11 L A S S M
12 E T H O D
K C S M I
E E A I
13 B
14 O O L E A N T
T G N N I
S E
15 N T R Y P O I N T O
B E N
O G A
X E P
16 A R T I A L
R
Across
3. You give information to a method using these
[parameters]
4. button1.Text and checkBox3.Name are examples of
[properties]
8. Every statement ends with one of these [semicolon]
10. The name of every C# program's entry point
[main]
11. Contains methods [class]
12. Your statements live here [method]
14. A kind of variable that's either true or false
[boolean]
15. A special method that tells your program where to
start [entry point]
16. This kind of class spans multiple files [partial]
Down
1. The output of a method is its _________ value
[return]
2. System.Windows.Forms is an example of one of
these [namespace]
5. A tiny piece of a program that does something
[statement]
6. A block of code is surrounded by [brackets]
7. The kind of test that tells a loop when to end
[conditional]
9. You can call _________.Show() to pop up a simple
Windows dialog box [MessageBox]
13. The kind of variable that contains a whole number
[integer]
crossword solution

this is a new chapter 85
objects: get oriented!
3
Making code make sense
Every program you write solves a problem.
When you’re building a program, it’s always a good idea to start by thinking about what
problem your program’s supposed to solve. That’s why objects are really useful. They
let you structure your code based on the problem it’s solving, so that you can spend your
time thinking about the problem you need to work on rather than getting bogged down in
the mechanics of writing code. When you use objects right, you end up with code that’s
intuitive to write, and easy to read and change.
...and that’s why my
Husband class doesn’t have a
HelpOutAroundTheHouse()
method or a PullHisOwnWeight()
method.

86 Chapter 3
How Mike thinks about his problems
Mike’s a programmer about to head out to a job
interview. He can’t wait to show off his C# skills, but
first he has to get there—and he’s running late!
This is Frank Loudly with
your eye-in-the-sky shadow traffic
report. It looks like a three-car
pileup on Liberty has traffic backed
up all the way to 32nd Street.
I’ll take the 31st Street
bridge, head up Liberty Avenue,
and go through Bloomfield.
No problem. If I take
Route 28 instead, I’ll
still be on time!
Mike figures out the route he’ll take to get to the interview.
1
Good thing he had his radio on. There’s
a huge traffic jam that’ll make him late!
2
Mike comes up with a new route to get
to his interview on time.
3
Mike sets his destination,
then comes up with a route.
Mike gets new
information about a
street he needs to avoid.
Now he can come up
with a new route to
the interview.
mike’s going places
you are here 4 87
objects: get oriented!
How Mike’s car navigation system thinks about his problems
Mike built his own GPS navigation system, which he
uses to help him get around town. Navigator
SetCurrentLocation()
SetDestination()
ModifyRouteToAvoid()
ModifyRouteToInclude()
GetRoute()
GetTimeToDestination()
TotalDistance()
SetDestination(“Fifth Ave & Penn Ave”);
string route;
route = GetRoute();
“Take 31st Street Bridge to Liberty Avenue to Bloomfield”
string route;
route = GetRoute();
“Take Route 28 to the Highland Park Bridge to Washington Blvd”
ModifyRouteToAvoid(“Liberty Ave”);
The navigation system sets
a destination and comes up
with a route.
Mike’s navigation system solves the street
navigation problem the same way he does.
The navigation system gets
new information about a
street it needs to avoid.
Now it can come up with a new
route to the destination.
Here’s the output from the
GetRoute() method—it’s
a string that contains the
directions Mike should follow.
GetRoute() gives a new route
that doesn’t include the
street Mike wants to avoid.
Here’s a diagram of a class
in Mike’s program. It shows
the name on top, and the
methods on the bottom.

88 Chapter 3
Some methods have a return value
Every method is made up of statements that do things. Some methods just execute
their statements and then exit. But other methods have a return value, or a value
that’s calculated or generated inside the method, and sent back to the statement that
called that method. The type of the return value (like string or int) is called the
return type.
The return statement tells the method to immediately exit. If your method doesn’t
have a return value—which means it’s declared with a return type of void—then
the return statement just ends with a semicolon, and you don’t always have to
have one in your method. But if the method has a return type, then it must use the
return statement.
Here’s a statement that calls a method to multiply two numbers. It returns an int:
Mike’s Navigator class has methods to set and modify routes
Mike’s Navigator class has methods, which are where the action happens. But unlike the
button_Click() methods in the forms you’ve built, they’re all focused around a single
problem: navigating a route through a city. That’s why Mike stuck them together into one
class, and called that class Navigator.
Mike designed his Navigator class so that it’s easy to create and modify routes. To get a
route, Mike’s program calls the SetDestination() method to set the destination, and
then uses the GetRoute() method to put the route into a string. If he needs to change the
route, his program calls the ModifyRouteToAvoid() method to change the route so that
it avoids a certain street, and then calls the GetRoute() method to get the new directions.
class Navigator {
public void SetCurrentLocation(string locationName) { ... }
public void SetDestination(string destinationName) { ... };
public void ModifyRouteToAvoid(string streetName) { ... };
public string GetRoute() { ... };
}
This is the return type of the method. It means that the
statement calling the GetRoute() method can use it to set a
string variable that will contain the directions. When it’s void,
that means the method doesn’t return anything.
string route =
GetRoute();
Mike chose method
names that would make
sense to someone who
was thinking about how
to navigate a route
through a city.
public int MultiplyTwoNumbers(int firstNumber, int secondNumber) {
int result = firstNumber * secondNumber;
return result;
}
int myResult = MultiplyTwoNumbers(3, 5);
Here’s an example of a method
that has a return type—it
returns an int. The method uses
the two parameters to calculate
the result and uses the return
statement to pass the value
back to the statement that
called it.
Methods can take values like 3 and
5. But you can also use variables to
pass values to a method.
set methods and modify routes
you are here 4 89
objects: get oriented!
Create a new Windows Forms Application project in the IDE. Then add a class file to it called
Talker.cs by right-clicking on the project in the Solution Explorer and selecting “Class…” from
the Add menu. When you name your new class file “Talker.cs”, the IDE will automatically name
the class in the new file Talker. Then it’ll pop up the new class in a new tab inside the IDE.
1
Use what you’ve learned to build a program that uses a class
Let’s hook up a form to a class, and make its button call a method inside that class. Do this!
Add using System.Windows.Forms; to the top of the class file. Then add code to the class:
class Talker {
public static int BlahBlahBlah(string thingToSay, int numberOfTimes)
{
string finalString = “”;
for (int count = 1; count <= numberOfTimes; count++)
{
finalString = finalString + thingToSay + “\n”;
}
MessageBox.Show(finalString);
return finalString.Length;
}
}
2
The BlahBlahBlah() method’s return value is an
integer that has the total length of the message it
displayed. You can add “.Length” to any string to
figure out how long it is.
This line of code adds the
contents of thingToSay and a line
break (“\n”) onto the end of it to
the finalString variable.
This is called a property. Every string
has a property called Length. When it
calculates the length of a string, a line
break (“\n”) counts as one character.
This statement
declares a finalString
variable and sets it
equal to an empty
string.
Flip the page to keep going!
¢Classeshavemethodsthatcontainstatementsthatperformactions.Youcandesignaclassthatiseasytouseby
choosingmethodsthatmakesense.
¢Somemethodshaveareturn type.Yousetamethod’sreturntypeinitsdeclaration.Amethodwithadeclarationthatstarts
“public int”returnsanintvalue.Here’sanexampleofastatementthatreturnsanintvalue:return 37;
¢Whenamethodhasareturntype,itmusthaveareturnstatementthatreturnsavaluethatmatchesareturntype.Soif
you’vegotamethodthat’sdeclared“public string”thenyouneedareturnstatementthatreturnsastring.
¢Assoonasareturnstatementinamethodexecutes,yourprogramjumpsbacktothestatementthatcalledthemethod.
¢Notallmethodshaveareturntype.Amethodwithadeclarationthatstarts“public void”doesn’treturnanythingat
all.Youcanstilluseareturnstatementtoexitavoidmethod:if(finishedEarly){ return; }
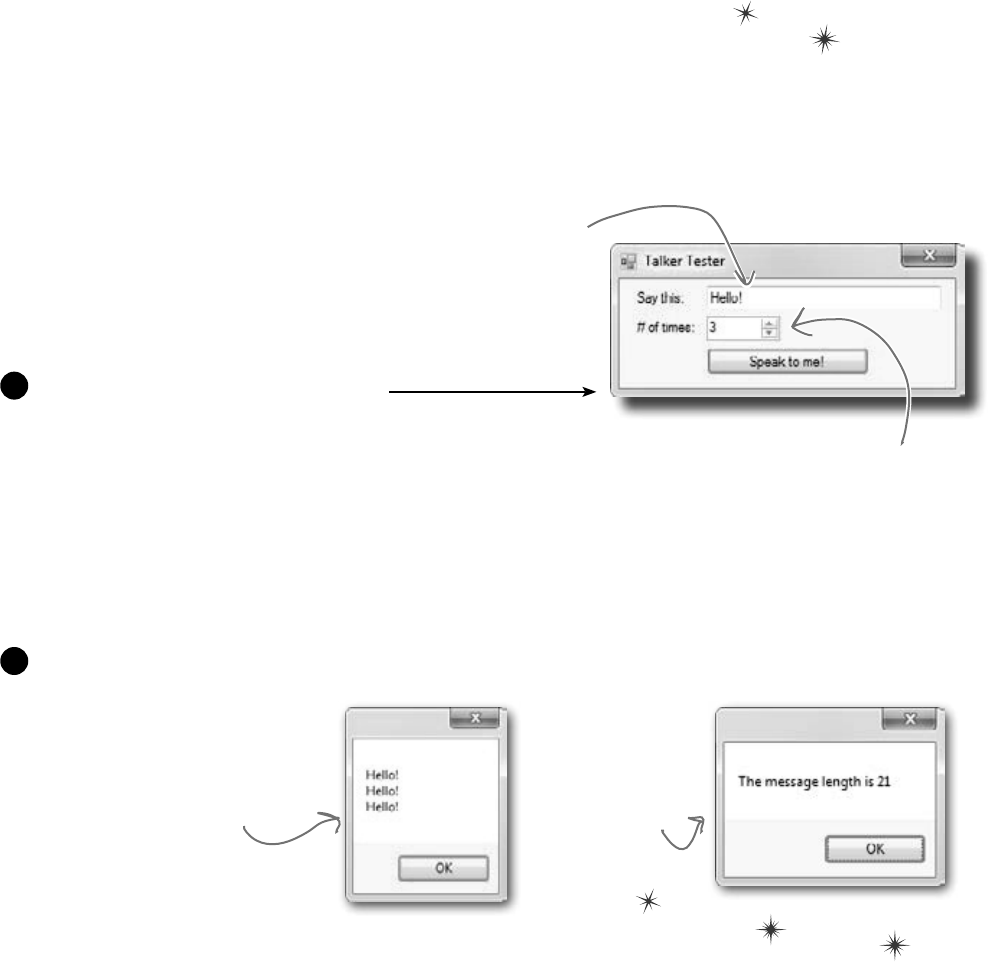
90 Chapter 3
introducing objects
Make your project’s form look like this.
Then double-click on the button and have it run this code that calls BlahBlahBlah() and assigns its return
value to an integer called len:
private void button1_Click(object sender, EventArgs e)
{
int len = Talker.BlahBlahBlah(textBox1.Text, (int)numericUpDown1.Value);
MessageBox.Show(“The message length is ” + len);
}
3
This is a NumericUpDown control.
Set its Minimum property to 1, its
Maximum property to 10, and its
Value property to 3.
Set the default text of
the TextBox to “Hello!”
using its Text property.
Now run your program! Click the button and watch it pop up two
message boxes. The class pops up the first message box, and the
form pops up the second one.
4
The BlahBlahBlah() method
pops up this message box
based on what’s in its
parameters.
When the
method returns
a value, the form
pops it up in this
message box.
So what did you just build?
The new class has one method called BlahBlahBlah() that takes two parameters. The first
parameter is a string that tells it something to say, and the second is the number of times to say it.
When it’s called, it pops up a message box with the message repeated a number of times. Its return
value is the length of the string. The method needs a string for its thingToSay parameter and a
number for its numberOfTimes parameter. It’ll get those parameters from a form that lets the user
enter text using a TextBox control and a number using NumericUpDown control.
Now add a form that uses your new class!
You can add a class to your project and share
its methods with the other classes in the project.
you are here 4 91
objects: get oriented!
It’d be great if I
could compare a few
routes and figure out
which is fastest....
Mike gets an idea
The interview went great! But the traffic
jam this morning got Mike thinking about
how he could improve his navigator.
Navigator
SetDestination()
ModifyRouteToAvoid()
ModifyRouteToInclude()
GetRoute()
GetTimeToDestination()
TotalDistance()
Navigator2
SetDestination()
ModifyRouteToAvoid()
ModifyRouteToInclude()
GetRoute()
GetTimeToDestination()
TotalDistance()
Navigator3
SetDestination()
ModifyRouteToAvoid()
ModifyRouteToInclude()
GetRoute()
GetTimeToDestination()
TotalDistance()
He could create three different Navigator classes…
Mike could copy the Navigator class code and paste it into two more
classes. Then his program could store three routes at once.
Whoa, that can’t be right!
What if I want to change a
method? Then I need to go
back and fix it in three places.
Right! Maintaining three copies of the same code
is really messy. A lot of problems you need to solve need a
way to represent one thing a bunch of different times. In this case,
it’s a bunch of routes. But it could be a bunch of turbines, or dogs,
or music files, or anything. All of those programs have one thing in
common: they always need to treat the same kind of thing in the
same way, no matter how many of the thing they’re dealing with.
This box is a class diagram. It lists
all of the methods in a class, and
it’s an easy way to see everything
that it does at a glance.

92 Chapter 3
for instance…
new Navigator()
new Navigator()
N
a
v
i
g
a
t
o
r
o
b
j
e
c
t
navigator3
Mike can use objects to solve his problem
Objects are C#’s tool that you use to work with
a bunch of similar things. Mike can use objects
to program his Navigator class just once, but
use it as many times as he wants in a program.
N
a
v
i
g
a
t
o
r
o
b
j
e
c
t
navigator1
N
a
v
i
g
a
t
o
r
o
b
j
e
c
t
navigator2
new Navigator()
Navigator
SetCurrentLocation()
SetDestination()
ModifyRouteToAvoid()
ModifyRouteToInclude()
GetRoute()
GetTimeToDestination()
TotalDistance()
Navigator navigator1 = new Navigator();
navigator1.SetDestination(“Fifth Ave & Penn Ave”);
string route;
route = navigator1.GetRoute();
All you need to create an
object is the new keyword
and the name of a class.
Now you can use the object! When you
create an object from a class, that object
has all of the methods from that class.
This is the Navigator class
in Mike’s program. It lists
all of the methods that a
Navigator object can use.
Mike needed to compare
three different routes
at once, so he used
three Navigator objects
at the same time.

you are here 4 93
objects: get oriented!
H
o
u
s
e
o
b
j
e
c
t
H
o
u
s
e
o
b
j
e
c
t
H
o
u
s
e
o
b
j
e
c
t
A class is like a blueprint for an object. If you wanted to build
five identical houses in a suburban housing development, you
wouldn’t ask an architect to draw up five identical sets of
blueprints. You’d just use one blueprint to build five houses.
You use a class to build an object
When you define a class, you define
its methods, just like a blueprint
defines the layout of the house.
You can use one blueprint to
make any number of houses,
and you can use one class to
make any number of objects.
House
GiveShelter()
GrowLawn()
MailDelivered()
ClogDrainPipes()
AccruePropertyTaxes()
NeedRepairs()
An object gets its methods from its class
Once you build a class, you can create as many objects as you want from
it using the new statement. When you do, every method in your class
becomes part of the object.
115 Maple
Drive
38 Pine
Street
26A Elm
Lane
94 Chapter 3
objects improve your code
H
o
u
s
e
o
b
j
e
c
t
115 Maple
Drive
When you create a new object from a class,
it’s called an instance of that class
Check it out for yourself!
Open any project that uses a button called button1,
and use the IDE to search the entire project for the
text “button1 = new”. You’ll find the code that
the IDE added to the form designer to create the
instance of the Button class.
in-stance, noun.
an example or one occurrence of
something. The IDE search-and-
replace feature finds every instance
of a word and changes it to another.
Do this!
Guess what…you already know this stuff ! Everything in the toolbox
is a class: there’s a Button class, a TextBox class, a Label
class, etc. When you drag a button out of the toolbox, the IDE
automatically creates an instance of the Button class and calls
it button1. When you drag another button out of the toolbox,
it creates another instance called button2. Each instance of
Button has its own properties and methods. But every button acts
exactly the same way, because they’re all instances of the same class.
Before: Here’s a picture of your
computer’s memory when your
program starts.
After: Now it’s
got an instance
of the House
class in memory.
House mapleDrive115 = new House();
Your program
executes a new
statement.

you are here 4 95
objects: get oriented!
N
a
v
i
g
a
t
o
r
o
b
j
e
c
t
navigator3
4.2 miles
N
a
v
i
g
a
t
o
r
o
b
j
e
c
t
navigator1
3.5 miles
N
a
v
i
g
a
t
o
r
o
b
j
e
c
t
navigator2
3.8 miles
N
a
v
i
g
a
t
o
r
o
b
j
e
c
t
navigator1
3.5 miles
A better solution…brought to you by objects!
Mike came up with a new route comparison program that uses objects to find
the shortest of three different routes to the same destination. Here’s how he
built his program.
string destination = textBox1.Text;
Navigator navigator1 = new Navigator();
navigator1.SetDestination(destination);
route = navigator1.GetRoute();
Navigator
SetCurrentLocation()
SetDestination()
ModifyRouteToAvoid()
ModifyRouteToInclude()
GetRoute()
GetTimeToDestination()
TotalDistance()
He created a Navigator object and set its destination.
2
Mike set up a GUI with a text box—textBox1 contains the destination for the three
routes. Then he added textBox2, which has a street that one of the routes should avoid; and
textBox3, which contains a different street that the third route has to include.
1
Then he added a second Navigator object called navigator2. He
called its SetDestination() method to set the destination, and
then he called its ModifyRouteToAvoid() method.
3
The third Navigator object is called navigator3. Mike set its
destination, and then called its ModifyRouteToInclude() method.
4
The SetDestination(),
ModifyRouteToAvoid(), and
ModifyRouteToInclude()
methods all take a string as a
parameter.
Now Mike can call each object’s TotalDistance() method to figure
out which route is the shortest. And he only had to write the code once,
not three times!
5
Any time you
create a new
object from a
class, it’s called
creating an
instance of
that class.
GUI stands for Graphical
User Interface, which is
what you’re building when
you make a form in the
form designer.
The navigator1
object is an
instance of the
Navigator class.
96 Chapter 3
a little head first secret sauce
Wait a minute! You didn’t give
me nearly enough information
to build the navigator program.
That’s right, we didn’t. A geographic navigation program is
a really complicated thing to build. But complicated programs follow
the same patterns as simple ones. Mike’s navigation program is an
example of how someone would use objects in real life.
Theory and practice
Speaking of patterns, here’s a pattern that you’ll see over and over again
throughout the book. We’ll introduce a concept or idea (like objects) over the
course of a few pages, using pictures and small code excerpts to demonstrate the
idea. This is your opportunity to take a step back and try to understand what’s
going on without having to worry about getting a program to work.
H
o
u
s
e
o
b
j
e
c
t
115 Maple
Drive
When we’re introducing a new concept
(like objects), keep your eyes open for
pictures and code excerpts like this.
House mapleDrive115 = new House();
After we’ve introduced a concept, we’ll give you a chance to get it into your
brain. Sometimes we’ll follow up the theory with a writing exercise—like the
Sharpen your pencil exercise on the next page. Other times we’ll jump straight
into code. This combination of theory and practice is an effective way to get
these concepts off of the page and stuck in your brain.
A little advice for the code exercises
If you keep a few simple things in mind, it’ll make the code exercises go
smoothly:
≥It’s easy to get caught up in syntax problems, like missing parentheses
or quotes. One missing bracket can cause many build errors.
≥It’s much better to look at the solution than get frustrated with a
problem. When you’re frustrated, your brain doesn’t like to learn.
≥All of the code in this book is tested and definitely works in Visual
Studio 2010! But it’s easy to accidentally type things wrong (like
typing a one instead of a lowercase L).
≥If your solution just won’t build, try downloading it from the Head
First Labs website: http://www.headfirstlabs.com/hfcsharp
When you run into
a problem with
a coding exercise,
don’t be afraid
to peek at the
solution. You can
also download the
solution from the
Head First Labs
website.
you are here 4 97
objects: get oriented!
Follow the same steps that Mike followed on the facing page to write
the code to create Navigator objects and call their methods.
string destination = textBox1.Text;
string route2StreetToAvoid = textBox2.Text;
string route3StreetToInclude = textBox3.Text;
Navigator navigator1 = new Navigator();
navigator1.SetDestination(destination);
int distance1 = navigator1.TotalDistance();
1. Create the navigator2 object, set its destination, call its ModifyRouteToAvoid() method, and use its
TotalDistance() method to set an integer variable called distance2.
We gave you a head start. Here’s
the code Mike wrote to get the
destination and street names from
the textboxes.
int shortestDistance = Math.Min(distance1, Math.Min(distance2, distance3));
The Math.Min() method built into the .NET Framework compares two numbers and
returns the smallest one. Mike used it to find the shortest distance to the destination.
2. Create the navigator3 object, set its destination, call its ModifyRouteToInclude() method, and use its
TotalDistance() method to set an integer variable called distance3.
And here’s the code to create the
navigator object, set its destination,
and get the distance.
Navigator navigator2 =
navigator2.
navigator2.
int distance2 =
98 Chapter 3
string destination = textBox1.Text;
string route2StreetToAvoid = textBox2.Text;
string route3StreetToInclude = textBox3.Text;
Navigator navigator1 = new Navigator();
navigator1.SetDestination(destination);
int distance1 = navigator1.TotalDistance();
static cling
Follow the same steps that Mike followed on the facing page to write
the code to create Navigator objects and call their methods.
1. Create the navigator2 object, set its destination, call its ModifyRouteToAvoid() method, and use its
TotalDistance() method to set an integer varable called distance2.
int shortestDistance = Math.Min(distance1, Math.Min(distance2, distance3));
2. Create the navigator3 object, set its destination, call its ModifyRouteToInclude() method, and use its
TotalDistance() method to set an integer varable called distance3.
Navigator navigator2 =
navigator2.
navigator2.
int distance2 =
new Navigator()
SetDestination(destination);
ModifyRouteToAvoid(route2StreetToAvoid);
navigator2.TotalDistance();
Navigator navigator3 = new Navigator()
navigator3.SetDestination(destination);
navigator3.ModifyRouteToInclude(route3StreetToInclude);
int distance3 = navigator3.TotalDistance();
The Math.Min() method built into the .NET Framework compares two numbers and
returns the smallest one. Mike used it to find the shortest distance to the destination.
And here’s the code to create the
navigator object, set its destination,
and get the distance.
We gave you a head start. Here’s
the code Mike wrote to get the
destination and street names from
the textboxes.
you are here 4 99
objects: get oriented!
Yes! That’s why you used the static keyword in your methods.
Take another look at the declaration for the Talker class you built a few pages ago:
class Talker
{
public static int BlahBlahBlah(string thingToSay, int numberOfTimes)
{
string finalString = “”;
When you called the method you didn’t create a new instance of Talker. You just did this:
Talker.BlahBlahBlah(“Hello hello hello”, 5);
That’s how you call static methods, and you’ve been doing that all along. If you take away
the static keyword from the BlahBlahBlah() method declaration, then you’ll have to
create an instance of Talker in order to call the method. Other than that distinction, static
methods are just like object methods. You can pass parameters, they can return values, and
they live in classes.
There’s one more thing you can do with the static keyword. You can mark your whole
class as static, and then all of its methods must be static too. If you try to add a non-static
method to a static class, it won’t compile.
I’ve written a few classes now, but I haven’t used “new”
to create an instance yet! So does that mean I can call
methods without creating objects?
Q: When I think of something that’s “static,” I think of
something that doesn’t change. Does that mean non-static
methods can change, but static methods don’t? Do they
behave differently?
A:No,bothstaticandnon-staticmethodsactexactlythe
same.Theonlydifferenceisthatstaticmethodsdon’trequire
aninstance,whilenon-staticmethodsdo.Alotofpeoplehave
troublerememberingthat,becausetheword“static”isn’treally
allthatintuitive.
Q: So I can’t use my class until I create an instance of
an object?
A:Youcanuseitsstaticmethods.Butifyouhavemethods
thataren’tstatic,thenyouneedaninstancebeforeyoucan
usethem.
Q: Then why would I want a method that needs an
instance? Why wouldn’t I make all my methods static?
A:Becauseifyouhaveanobjectthat’skeepingtrackof
certaindata—likeMike’sinstancesofhisNavigator
classthateachkepttrackofadifferentroute—thenyoucan
useeachinstance’smethodstoworkwiththatdata.Sowhen
MikecalledhisModifyRouteToAvoid()method
inthenavigator2instance,itonlyaffectedtheroute
thatwasstoredinthatparticularinstance.Itdidn’taffectthe
navigator1ornavigator3objects.That’showhe
wasabletoworkwiththreedifferentroutesatthesametime—
andhisprogramcouldkeeptrackofallofit.
Q: So how does an instance keep track of data?
A:Turnthepageandfindout!
100 Chapter 3
An instance uses fields to keep track of things
You change the text on a button by setting its Text property in the
IDE. When you do, the IDE adds code like this to the designer:
button1.Text = “Text for the button”;
Now you know that button1 is an instance of the Button class.
What that code does is modify a field for the button1 instance.
You can add fields to a class diagram—just draw a horizontal line in
the middle of it. Fields go above the line, methods go underneath it.
Technically, it’s setting a
property. A property is very
similar to a field—but we’ll
get into all that a little
later on.
Class
Field1
Field2
Field3
Method1()
Method2()
Method3()
Methods are what an object does. Fields are what the object knows.
When Mike created three instances of Navigator classes, his program created three objects.
Each of those objects was used to keep track of a different route. When the program created the
navigator2 instance and called its SetDestination() method, it set the destination for that
one instance. But it didn’t affect the navigator1 instance or the navigator3 instance.
An object’s behavior is defined by its methods,
and it uses fields to keep track of its state.
This is where a class
diagram shows the
fields. Every instance
of the class uses
them to keep track
of its state.
Add this line to
separate the fields
from the methods.
Navigator
Destination
Route
SetCurrentLocation()
SetDestination()
ModifyRouteToAvoid()
ModifyRouteToInclude()
GetRoute()
GetTimeToDestination()
TotalDistance()
Every instance of Navigator knows
its destination and its route.
What a Navigator object does is
let you set a destination, modify
its route, and get information
about that route.
an object’s state of affairs

you are here 4 101
objects: get oriented!
Clown
Name
Height
TalkAboutYourself()
Let’s create some instances!
It’s easy to add fields to your class. Just declare
variables outside of any methods. Now every
instance gets its own copy of those variables. class Clown {
public string Name;
public int Height;
public void TalkAboutYourself() {
MessageBox.Show(“My name is ”
+ Name + “ and I’m ”
+ Height + “ inches tall.”);
}
}
Write down the contents of each message box that will be displayed
after the statement next to it is executed.
Clown oneClown = new Clown();
oneClown.Name = “Boffo”;
oneClown.Height = 14;
oneClown.TalkAboutYourself();
Clown anotherClown = new Clown();
anotherClown.Name = “Biff”;
anotherClown.Height = 16;
anotherClown.TalkAboutYourself();
Clown clown3 = new Clown();
clown3.Name = anotherClown.Name;
clown3.Height = oneClown.Height - 3;
clown3.TalkAboutYourself();
anotherClown.Height *= 2;
anotherClown.TalkAboutYourself();
“My name is _______ and I’m ______ inches tall.”
“My name is _______ and I’m ______ inches tall.”
“My name is _______ and I’m ______ inches tall.”
“My name is _______ and I’m ______ inches tall.”
Remember, when you see
“void” in front of a method,
it means that it doesn’t
return any value.
When you want to create instances
of your class, don’t use the static
keyword in either the class declaration
or the method declaration.
Remember, the *= operator tells C#
to take whatever’s on the left of the
operator and multiply it by whatever’s
on the right.
102 Chapter 3
Write down the contents of each message box that will be displayed
after the statement next to it is executed.
Clown oneClown = new Clown();
oneClown.Name = “Boffo”;
oneClown.Height = 14;
oneClown.TalkAboutYourself();
Clown anotherClown = new Clown();
anotherClown.Name = “Biff”;
anotherClown.Height = 16;
anotherClown.TalkAboutYourself();
Clown clown3 = new Clown();
clown3.Name = anotherClown.Name;
clown3.Height = oneClown.Height - 3;
clown3.TalkAboutYourself();
anotherClown.Height *= 2;
anotherClown.TalkAboutYourself();
“My name is _______ and I’m ______ inches tall.”
“My name is _______ and I’m ______ inches tall.”
“My name is _______ and I’m ______ inches tall.”
“My name is _______ and I’m ______ inches tall.”
Each of these new statements creates an instance of the Clown
class by reserving a chunk of memory on the heap for that
object and filling it up with the object’s data.
Boffo
Biff
Biff
Biff
14
16
11
32
Thanks for the memory
When your program creates an object, it lives in a part of the
computer’s memory called the heap. When your code creates an
object with a new statement, C# immediately reserves space in the
heap so it can store the data for that object.
Let’s take a closer look at what happened here
Here’s a picture of the heap before the
project starts. Notice that it’s empty.
When your program creates a new object, it gets added to the heap.
a heaping helping of objects
you are here 4 103
objects: get oriented!
C
l
o
w
n
o
b
j
e
c
t
#
3
“Biff”
11
C
l
o
w
n
o
b
j
e
c
t
#
2
“Biff”
32
C
l
o
w
n
o
b
j
e
c
t
#
1
“Boffo”
14
C
l
o
w
n
o
b
j
e
c
t
#
3
“Biff”
11
C
l
o
w
n
o
b
j
e
c
t
#
2
“Biff”
16
C
l
o
w
n
o
b
j
e
c
t
#
1
“Boffo”
14
C
l
o
w
n
o
b
j
e
c
t
#
2
“Biff”
16
C
l
o
w
n
o
b
j
e
c
t
#
1
“Boffo”
14
C
l
o
w
n
o
b
j
e
c
t
#
1
Clown oneClown = new Clown();
oneClown.Name = “Boffo”;
oneClown.Height = 14;
oneClown.TalkAboutYourself();
1
Clown anotherClown = new Clown();
anotherClown.Name = “Biff”;
anotherClown.Height = 16;
anotherClown.TalkAboutYourself();
2
Clown clown3 = new Clown();
clown3.Name = anotherClown.Name;
clown3.Height = oneClown.Height - 3;
clown3.TalkAboutYourself();
3
anotherClown.Height *= 2;
anotherClown.TalkAboutYourself();
4
What’s on your program’s mind
Here’s how your program creates a new instance of the
Clown class:
Clown myInstance = new Clown();
That’s actually two statements combined into one. The
first statement declares a variable of type Clown (Clown
myInstance;). The second statement creates a new
object and assigns it to the variable that was just created
(myInstance = new Clown();). Here’s what the heap
looks like after each of these statements:
The first object
is created, and its
fields are set.
These statements create
the second object and fill it
with data.
Then the third Clown object is
created and populated.
There’s no new command, which means
these statements don’t create a new
object. They’re just modifying one
that’s already in memory.
This object is an instance of the
Clown class.
“Boffo”
14
104 Chapter 3
You can use class and method
names to make your code intuitive
When you put code in a method, you’re making a choice about how to structure
your program. Do you use one method? Do you split it into more than one? Or do
you even need a method at all? The choices you make about methods can make your
code much more intuitive—or, if you’re not careful, much more convoluted.
int t = m.chkTemp();
if (t > 160) {
T tb = new T();
tb.clsTrpV(2);
ics.Fill();
ics.Vent();
m.airsyschk();
}
Here’s a nice, compact chunk of code. It’s from a control program that
runs a machine that makes candy bars.
1
Those statements don’t give you any hints about why the code’s doing what it’s doing. In this case, the
programmer was happy with the results because she was able to get it all into one method. But making
your code as compact as possible isn’t really useful! Let’s break it up into methods to make it easier to
read, and make sure the classes are given names that make sense. But we’ll start by figuring out what the
code is supposed to do.
2
General Electronics Type 5 Candy Bar Maker
Specification Manual
The nougat temperature must be checked every 3 minutes by an
automated system. If the temperature exceeds 160°C, the candy
is too hot, and the system must perform the candy isolation
cooling system (CICS) vent procedure.
• Close the trip throttle valve on turbine #2
• Fill the isolation cooling system with a solid stream of water
• Vent the water
• Verify that there is no evidence of air in the system
How do you figure out what
your code is supposed to do?
Well, all code is written for
a reason. So it’s up to you to
figure out that reason! In this
case, we can look up the page
in the specification manual
that the programmer followed.
Take a second and look at that code. Can you figure out what it does?
The clsTrpV()
method has one
parameter, but we
don’t know what
it’s supposed to be.
The chkTemp() method returns an
integer… but what does it do?
making methods make sense
“tb”, “ics”, and “m”
are terrible names!
We have no idea
what they do. And
what’s that T class
for?
you are here 4 105
objects: get oriented!
public void DoCICSVentProcedure() {
Turbine turbineController = new Turbine();
turbineController.CloseTripValve(2);
IsolationCoolingSystem.Fill();
IsolationCoolingSystem.Vent();
Maker.CheckAirSystem();
}
public boolean IsNougatTooHot() {
int temp = Maker.CheckNougatTemperature();
if (temp > 160) {
return true;
} else {
return false;
}
}
That page from the manual made it a lot easier to understand the code. It also gave us some great
hints about how to make our code easier to understand. Now we know why the conditional test checks
the variable t against 160—the manual says that any temperature above 160°C means the nougat
is too hot. And it turns out that m was a class that controlled the candy maker, with static methods
to check the nougat temperature and check the air system. So let’s put the temperature check into a
method, and choose names for the class and the methods that make the purpose obvious.
3
You can make your code easier to read and write by thinking about
the problem your code was built to solve. If you choose names for your
methods that make sense to someone who understands that problem,
then your code will be a lot easier to decipher…and develop!
What does the specification say to do if the nougat is too hot? It tells us to perform the candy isolation
cooling system (or CICS) vent procedure. So let’s make another method, and choose an obvious name
for the T class (which turns out to control the turbine) and the ics class (which controls the isolation
cooling system, and has two static methods to fill and vent the system):
4
Now the code’s a lot more intuitive! Even if you don’t know that the CICS vent procedure needs to
be run if the nougat is too hot, it’s a lot more obvious what this code is doing:
5
if (IsNougatTooHot() == true) {
DoCICSVentProcedure();
}
This method’s return type is
Boolean, which means it returns a
true or false value.
A void return type means
the method doesn’t
return any value at all.
The IsNougatTooHot()
method’s return type
By naming the class “Maker” and the
method “CheckNougatTemperature”,
the code is a lot easier to understand.

106 Chapter 3
Give your classes a natural structure
Take a second and remind yourself why you want to make your methods intuitive:
because every program solves a problem or has a purpose. It might not
be a business problem—sometimes a program’s purpose (like FlashyThing) is just to
be cool or fun! But no matter what your program does, the more you can make your
code resemble the problem you’re trying to solve, the easier your program will be to
write (and read, and repair, and maintain…).
CandyController
DoMaintenanceTests()
DoCICSVentProcedure()
IsNougatTooHot()
Let’s build a class diagram
Take another look at the if statement in #5 on the previous page. You already know that statements
always live inside methods, which always live inside classes, right? In this case, that if statement was
in a method called DoMaintenanceTests(), which is part of the CandyController class.
Now take a look at the code and the class diagram. See how they relate to each other?
class CandyController {
public void DoMaintenanceTests() {
...
if (IsNougatTooHot() == true) {
DoCICSVentProcedure();
}
...
}
public void DoCICSVentProcedure() ...
public boolean IsNougatTooHot() ...
}
Use class diagrams to plan out your classes
A class diagram is a simple way to draw your
classes out on paper. It’s a really valuable tool
for designing your code BEFORE you start
writing it.
Write the name of the class at the top of
the diagram. Then write each method in the
box at the bottom. Now you can see all of the
parts of the class at a glance!
ClassName
Method()
Method()
Method()
.
.
.
classes au naturale
you are here 4 107
objects: get oriented!
t
Turbine
The code for the candy control system we built on the previous
page called three other classes. Flip back and look through the
code, and fill in their class diagrams.
Fill()
We filled in the class name
for this one. What method
goes here?
One of the classes had
a method called Fill().
Fill in its class name
and its other method.
There was one other
class in the code on the
previous page. Fill in its
name and method.
108 Chapter 3
t
Turbine
CloseTripValve() Fill()
IsolationCoolingSystem
Vent()
Maker
CheckNougatTemperature()
CheckAirSystem()
a few helpful tips
The code for the candy control system we built on the
previous page called three other classes. Flip back and
look through the code, and fill in their class diagrams.
Class diagrams help you organize your
classes so they make sense
Writing out class diagrams makes it a lot easier to spot potential problems in your
classes before you write code. Thinking about your classes from a high level before
you get into the details can help you come up with a class structure that will make
sure your code addresses the problems it solves. It lets you step back and make sure
that you’re not planning on writing unnecessary or poorly structured classes or
methods, and that the ones you do write will be intuitive and easy to use.
Dishwasher
CleanDishes()
AddDetergent()
SetWaterTemperature()
ParkTheCar()
Dishwasher
CleanDishes()
AddDetergent()
SetWaterTemperature()
The class is called
“Dishwasher”, so all the
methods should be about
washing dishes. But one
method—ParkTheCar()—has
nothing to do with dishes, so it
should be taken out and put in
another class.
You could figure out that
Maker is a class because it
appears in front of a dot in
Maker.CheckAirSystem().
you are here 4 109
objects: get oriented!
v
DeliveryGuy
AddAPizza()
PizzaDelivered()
TotalCash()
ReturnTime()
Each of these classes has a serious design flaw. Write down what
you think is wrong with each class, and how you’d fix it.
Class23
CandyBarWeight()
PrintWrapper()
GenerateReport()
Go()
These two classes are part of a system that a pizza parlor uses to
track the pizzas that are out for delivery.
This class is part of the candy manufacturing system from earlier.
CashRegister
MakeSale()
NoSale()
PumpGas()
Refund()
TotalCashInRegister()
GetTransactionList()
AddCash()
RemoveCash()
The CashRegister class is part of a program that’s used by an
automated convenience store checkout system.
DeliveryGirl
AddAPizza()
PizzaDelivered()
TotalCash()
ReturnTime()
110 Chapter 3
Here’s how we corrected the classes. We show just one
possible way to fix the problems—but there are plenty of other ways
you could design these classes depending on how they’ll be used.
create a class
CandyMaker
CandyBarWeight()
PrintWrapper()
GenerateReport()
MakeTheCandy()
These two classes are part of a system that a pizza parlor uses to
track the pizzas that are out for delivery.
This class is part of the candy manufacturing system from earlier.
CashRegister
MakeSale()
NoSale()
Refund()
TotalCashInRegister()
GetTransactionList()
AddCash()
RemoveCash()
The CashRegister class is part of a program that’s used by an
automated convenience store checkout system.
DeliveryPerson
Gender
AddAPizza()
PizzaDelivered()
TotalCash()
ReturnTime()
The class name doesn’t describe what the class does. A programmer
who sees a line of code that calls Class23.Go() will have no idea what
that line does. We’d also rename the method to something that’s more
descriptive—we chose MakeTheCandy(), but it could be anything.
It looks like the DeliveryGuy class and the DeliveryGirl class
both do the same thing—they track a delivery person who’s out
delivering pizzas to customers. A better design would replace
them with a single class that adds a field for gender..
All of the methods in the class do stuff that has to do with
a cash register—making a sale, getting a list of transactions,
adding cash… except for one: pumping gas. It’s a good idea to
pull that method out and stick it in another class.
We added the Gender field because we
assumed there was a reason to track delivery
guys and girls separately, and that’s why
there were two classes for them.
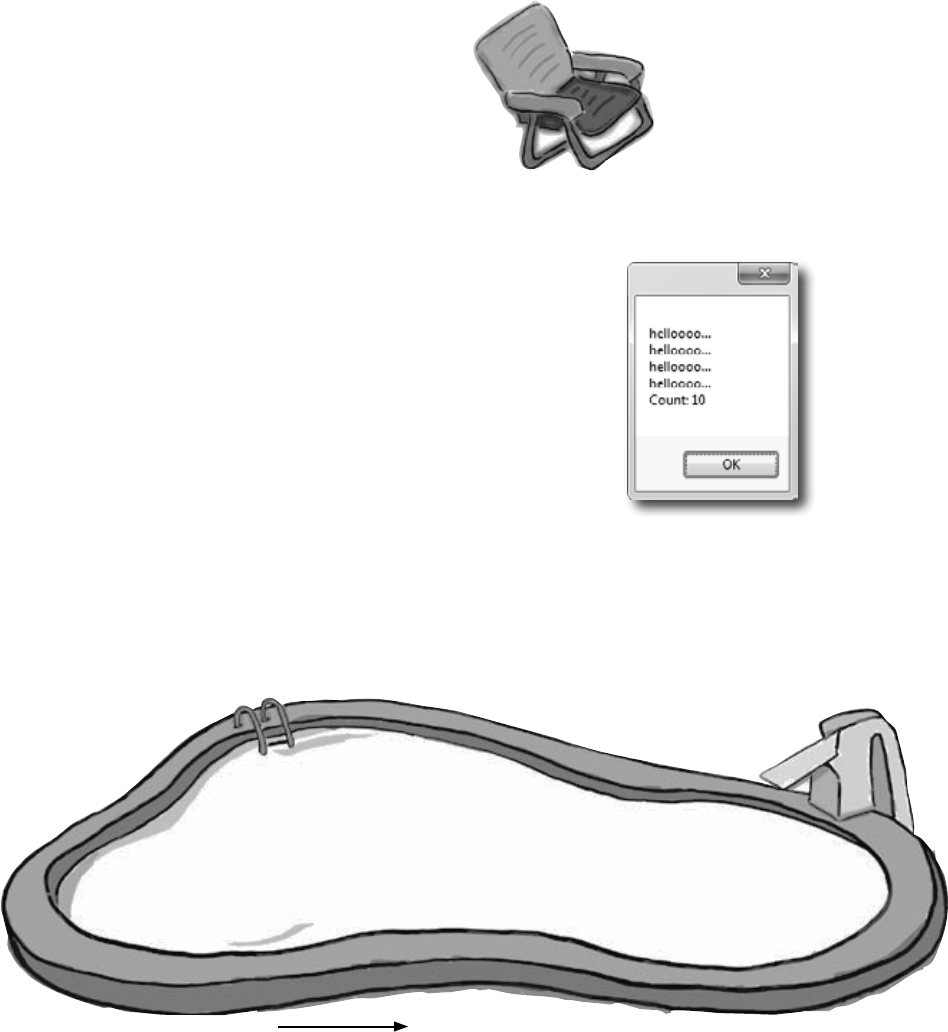
you are here 4 111
objects: get oriented!
x == 3
x == 4
x < 4
x < 5
x > 0
x > 1
public partial class Form1 : Form
{
private void button1_Click(object sender, EventArgs e)
{
String result = “”;
Echo e1 = new Echo();
_________________________
int x = 0;
while ( ___________ ) {
result = result + e1.Hello() + “\n”;
__________________________
if ( ____________ ) {
e2.count = e2.count + 1;
}
if ( ____________ ) {
e2.count = e2.count + e1.count;
}
x = x + 1;
}
MessageBox.Show(result + “Count: ” + e2.count);
}
class ____________ {
public int _________ = 0;
public string ___________ {
return “helloooo...”;
}
}
}
Output
e1 = e1 + 1;
e1 = count + 1;
e1.count = count + 1;
e1.count = e1.count + 1;
e2 = e1;
Echo e2;
Echo e2 = e1;
Echo e2 = new Echo( );
x
y
e2
count
Echo
Tester
Echo( )
Count( )
Hello( )
Bonus Question!
If the last line of output was
24 instead of 10, how would
you complete the puzzle?
You can do it by changing
just one statement.
Answers on page 122.
Pool Puzzle
Your job is to take code snippets from the
pool and place them into the blank
lines in the code. You may use
the same snippet more than once,
and you won’t need to use all the
snippets. Your goal is to make
classes that will compile and run
and produce the output listed.
Note: Each
snippet from the
pool can be used
more than once!

112 Chapter 3
Build a class to work with some guys
Joe and Bob lend each other money all the time. Let’s create a class to
keep track of them. We’ll start with an overview of what we’ll build.
G
u
y
o
b
j
e
c
t
#
2
G
u
y
o
b
j
e
c
t
#
1
Guy
Name
Cash
GiveCash()
ReceiveCash()
The new statements
that create the two
instances live in the
code that gets run as
soon as the form is
created. Here’s what
the heap looks like
after the form is
loaded.
We’ll create a Guy class and add two instances of it to a form
The form will have two fields, one called joe (to keep track of the first object),
and the other called bob (to keep track of the second object).
1
We’ll set each Guy object’s cash and name fields
The two objects represent different guys, each with his own name and a
different amount of cash in his pocket.
2
G
u
y
o
b
j
e
c
t
#
2
“Bob”
50
G
u
y
o
b
j
e
c
t
#
1
“Joe”
100
We’ll give cash to the guys and take cash from them
We’ll use each guy’s ReceiveCash() method to increase a guy’s cash,
and we’ll use his GiveCash() method to reduce it.
3
G
u
y
o
b
j
e
c
t
#
1
“Joe”
75
Each guy has a Name
field that keeps track of
his name, and a Cash field
that has the number of
bucks in his pocket.
When you take an instance
of Guy and call its
ReceiveCash() method, you
pass the amount of cash
the guy will take as a
parameter. So calling joe.
ReceiveCash(25) tells Joe
to receive 25 bucks and
add them to his wallet.
The form calls the object’s ReceiveCash()
method. It’s called ReceiveCash() because
he’s receiving the cash.
The method returns the
number of bucks that the guy
added to his Cash field.
working class guys
G
u
y
o
b
j
e
c
t
#
1
“Joe”
50 joe.ReceiveCash(25);
We chose names for the
methods that make sense.
You call a Guy object’s
GiveCash() method to tell
him to give up some of his
cash, and his ReceiveCash()
method when you want him
to take some cash back.
We could have called them
GiveCashToSomeone() and
ReceiveCashFromSomeone(),
but that would have been
very long!
you are here 4 113
objects: get oriented!
Do this!
class Guy {
public string Name;
public int Cash;
public int GiveCash(int amount) {
if (amount <= Cash && amount > 0) {
Cash -= amount;
return amount;
} else {
MessageBox.Show(
“I don’t have enough cash to give you ” + amount,
Name + “ says...”);
return 0;
}
}
public int ReceiveCash(int amount) {
if (amount > 0) {
Cash += amount;
return amount;
} else {
MessageBox.Show(amount + “ isn’t an amount I’ll take”,
Name + “ says...”);
return 0;
}
}
}
Create a project for your guys
Create a new Windows Forms Application project (because we’ll
be using a form). Then use the Solution Explorer to add a new
class to it called Guy. Make sure to add “using System.
Windows.Forms;” to the top of the Guy class file. Then fill
in the Guy class. Here’s the code for it:
The Guy class has two fields. The Name field is
a string, and it’ll contain the guy’s name (“Joe”).
And the Cash field is an int, which will keep
track of how many bucks are in his pocket.
The GiveCash() method has one parameter
called amount that you’ll use to tell the
guy how much cash to give you.
He uses an if statement to check
whether he has enough cash—if he
does, he takes it out of his pocket and
returns it as the return value.
The Guy makes
sure that you’re
asking him for a
positive amount
of cash, otherwise
he’d add to his
cash instead of
taking away from
it.
If the guy doesn’t have enough cash, he’ll
tell you so with a message box, and then
he’ll make GiveCash() return 0.
Be careful with your curly brackets. It’s easy to
have the wrong number—make sure that every opening
bracket has a matching closing bracket. When they’re
all balanced, the IDE will automatically indent them
for you when you type the last closing bracket.
The ReceiveCash() method works just like
the GiveCash() method. It’s passed an
amount as a parameter, checks to make
sure that amount is greater than zero,
and then adds it to his cash.
If the amount was positive, then the
ReceiveCash() method returns the amount
added. If it was zero or negative, the guy
shows a message box and then returns 0.
114 Chapter 3
Build a form to interact with the guys
The Guy class is great, but it’s just a start. Now put together
a form that uses two instances of the Guy class. It’s got labels
that show you their names and how much cash they have, and
buttons to give and take cash from them. Build this!
Add two buttons and three labels to your form
The top two labels show how much cash each guy has. We’ll also add a field called bank to the
form—the third label shows how much cash is in it. We’re going to have you name some of the
labels that you drag onto the forms. You can do that by clicking on each label that you want
to name and changing its “(Name)” row in the Properties window. That’ll make your code a
lot easier to read, because you’ll be able to use “joesCashLabel” and “bobsCashLabel” instead of
“label1” and “label2”.
1
Add fields to your form
Your form will need to keep track of the two guys, so you’ll need a field for each of them. Call
them joe and bob. Then add a field to the form called bank to keep track of how much money
the form has to give to and receive from the guys.
namespace Your_Project_Name {
public partial class Form1 : Form {
Guy joe;
Guy bob;
int bank = 100;
public Form1() {
InitializeComponent();
}
2
Since we’re using
Guy objects to
keep track of
Joe and Bob,
you declare
their fields in
the form using
the Guy class.
The amount of cash
in the form’s bank
field goes up and down
depending on how much
money the form gave to
and received from the
Guy objects.
Name the top label
joesCashLabel, the label
underneath it bobsCashLabel,
and the bottom label
bankCashLabel. You can
leave their Text properties
alone; we’ll add a method to
the form to set them.
This button will call
the Joe object’s
ReceiveCash() method,
passing it 10 as
the amount, and
subtracting from the
form’s bank field the
cash that Joe receives.
This button will call the Bob
object’s GiveCash() method,
passing it 5 as the amount, and
adding the cash that Bob gives
to the form’s bank field.
joe says, “where’s my money?”
you are here 4 115
objects: get oriented!
Add a method to the form to update the labels
The labels on the right-hand side of the form show how much cash each guy has and how much
is in the bank field. So add the UpdateForm() method to keep them up to date—make sure
the return type is void to tell C# that the method doesn’t return a value. Type this method
into the form right underneath where you added the bank field:
public void UpdateForm() {
joesCashLabel.Text = joe.Name + “ has $” + joe.Cash;
bobsCashLabel.Text = bob.Name + “ has $” + bob.Cash;
bankCashLabel.Text = “The bank has $” + bank;
}
3
Double-click on each button and add the code to interact with the objects
Make sure the left-hand button is called button1, and the right-hand button is called button2.
Then double-click each of the buttons—when you do, the IDE will add two methods called
button1_Click() and button2_Click() to the form. Add this code to each of them:
private void button1_Click(object sender, EventArgs e) {
if (bank >= 10) {
bank -= joe.ReceiveCash(10);
UpdateForm();
} else {
MessageBox.Show(“The bank is out of money.”);
}
}
private void button2_Click(object sender, EventArgs e) {
bank += bob.GiveCash(5);
UpdateForm();
}
4
The “Receive $5 from Bob” button
doesn’t need to check how much is
in the bank, because it’ll just add
whatever Bob gives back. If Bob’s out of money,
GiveCash() will return zero.
When the user clicks the “Give $10 to
Joe” button, the form calls the Joe
object’s ReceiveCash() method—but only
if the bank has enough money.
The bank needs at least $10 to give to
Joe. If there’s not enough, it’ll pop up
this message box.
This new method
is simple. It just
updates the three
labels by setting
their Text properties.
You’ll have each
button call it to keep
the labels up to date.
Start Joe out with $50 and start Bob out with $100
It’s up to you to figure out how to get Joe and Bob to start out with their Cash and
Name fields set properly. Put it right underneath InitializeComponent() in the form.
That’s part of that designer-generated method that gets run once, when the form is first initialized.
Once you’ve done that, click both buttons a number of times—make sure that one button takes
$10 from the bank and adds it to Joe, and the other takes $5 from Bob and adds it to the bank.
public Form1() {
InitializeComponent();
// Initialize joe and bob here!
}
5
Add the lines of code here to
create the two objects and set
their Name and Cash fields.
Notice how the labels
are updated using the
Guy objects’ Name and
Cash fields.
116 Chapter 3
Make sure you save the
project now—we’ll come
back to it in a few pages.
It’s up to you to figure out how to get Joe and Bob to start out with their Cash
and Name fields set properly. Put it right underneath InitializeComponent() in
the form.
public Form1() {
InitializeComponent();
bob = new Guy();
bob.Name = “Bob”;
bob.Cash = 100;
joe = new Guy();
joe.Name = “Joe”;
joe.Cash = 50;
UpdateForm();
}
Here’s where we set up the first
instance of Guy. The first line
creates the object, and the next
two set its fields.
Q: Why doesn’t the solution start with “Guy bob = new
Guy()”? Why did you leave off the first “Guy”?
A:Becauseyoualreadydeclaredthebobfieldatthetopofthe
form.Rememberhowthestatement“int i = 5;”isthesame
asthetwostatements“int i”and“i = 5;”?Thisisthesame
thing.Youcouldtrytodeclarethebobfieldinonelinelikethis:
“Guy bob = new Guy();”.Butyoualreadyhavethefirst
partofthatstatement(“Guy bob;”)atthetopofyourform.So
youonlyneedthesecondhalfoftheline,thepartthatsetsthebob
fieldtocreateanewinstanceofGuy().
Q: OK, so then why not get rid of the “Guy bob;” line at
the top of the form?
A:Thenavariablecalledbobwillonlyexistinsidethatspecial
“public Form1()”method.Whenyoudeclareavariable
insideamethod,it’sonlyvalidinsidethemethod—youcan’taccess
itfromanyothermethod.Butwhenyoudeclareitoutsideofyour
methodbutinsidetheformoraclassthatyouadded,thenyou’ve
addedafieldaccessiblefromany other methodinsidetheform.
Q: What happens if I don’t leave off that first “Guy”?
A:You’llrunintoproblems—yourformwon’twork,becauseit
won’teversettheform’sbobvariable.Thinkaboutitforaminute,
andyou’llseewhyitworksthatway.Ifyouhavethiscodeatthetop
ofyourform:
public partial class Form1 : Form {
Guy bob;
andthenyouhavethiscodelateron,insideamethod:
Guy bob = new Guy();
thenyou’vedeclaredtwovariables.It’salittleconfusing,because
theybothhavethesamename.Butoneofthemisvalidthroughout
theentireform,andtheotherone—thenewoneyouadded—isonly
validinsidethemethod.Thenextline(bob.Name = “Bob”;)
onlyupdatesthatlocalvariable,anddoesn’ttouchtheoneinthe
form.Sowhenyoutrytorunyourcode,it’llgiveyouanastyerror
message(“NullReferenceExceptionnothandled”),whichjustmeans
youtriedtouseanobjectbeforeyoucreateditwithnew.
Then we do the same for the
second instance of the Guy class.
Make sure you call UpdateForm() so
the labels look right when the form
first pops up.
exercise solution
you are here 4 117
objects: get oriented!
There’s an easier way to initialize objects
Almost every object that you create needs to be initialized in some way.
And the Guy object is no exception—it’s useless until you set its Name
and Cash fields. It’s so common to have to initialize fields that C# gives
you a shortcut for doing it called an object initializer. And the IDE’s
IntelliSense will help you do it.
joe = new Guy();
joe.Name = “Joe”;
joe.Cash = 50;
joe = new Guy() { Cash = 50, Name = “Joe” };
joe = new Guy() {
joe = new Guy() { Cash = 50,
Delete the second two lines and the semicolon after “Guy(),” and add a right curly bracket.
2
Here’s the original code that you wrote to
initialize Joe’s Guy object.
1
Press space. As soon as you do, the IDE pops up an IntelliSense window that shows you all of
the fields that you’re able to initialize.
3
joe = new Guy() { Cash = 50
Press tab to tell it to add the Cash field. Then set it equal to 50.
4
Type in a comma. As soon as you do, the other field shows up.
5
Finish the object initializer. Now you’ve saved yourself two lines of code!
5
Object intializers
save you time and
make your code
more compact
and easier to
read…and the
IDE helps you
write them.
This new declaration does exactly the same
thing as the three lines of code you wrote
originally. It’s just shorter and easier to read.
joe = new Guy() {
118 Chapter 3
N
a
v
i
g
a
t
o
r
o
b
j
e
c
t
bestRoute
o
b
j
O
b
j
e
c
t
myInst
±
You’re building your program to solve a problem.
Spend some time thinking about that problem. Does it break down into pieces
easily? How would you explain that problem to someone else? These are good
things to think about when designing your classes.
A few ideas for designing intuitive classes
±
What real-world things will your program use?
A program to help a zoo keeper track her animals’ feeding schedules might have
classes for different kinds of food and types of animals.
±
Use descriptive names for classes and methods.
Someone should be able to figure out what your classes and methods do just by
looking at their names.
±
Look for similarities between classes.
Sometimes two classes can be combined into one if they’re really similar. The candy
manufacturing system might have three or four turbines, but there’s only one
method for closing the trip valve that takes the turbine number as a parameter.
It’d be great if I
could compare a few
routes and figure out
which is fastest....
BlockedRoad
Name
Duration
FindDetour()
ClosedRoad
StreetName
ReasonItsClosed
CalculateDelay()
Detour
Name
Duration
ReasonItsClosed
FindDetour()
CalculateDelay()
a few helpful tips
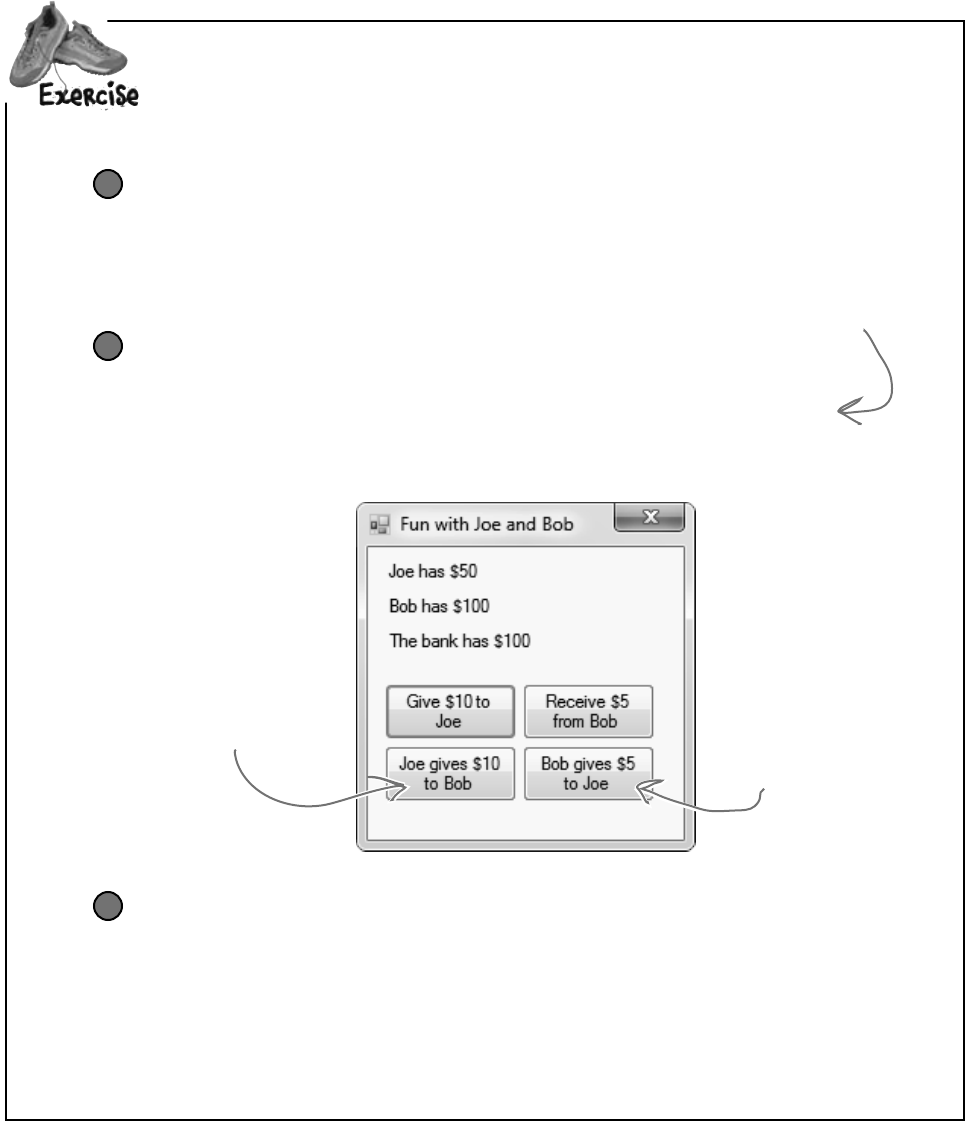
you are here 4 119
objects: get oriented!
Use an object initializer to initialize Bob’s instance of Guy
You’ve already done it with Joe. Now make Bob’s instance work with an object
initializer too.
1
Add two more buttons to your form
The first button tells Joe to give 10 bucks to Bob, and the second tells Bob to give 5
bucks back to Joe. Before you double-click on the button, go to the Properties
window and change each button’s name using the “(Name)” row—it’s at the top of
the list of properties. Name the first button joeGivesToBob, and the second one
bobGivesToJoe.
2
This button tells Joe to
give 10 bucks to Bob, so
you should use the “(Name)”
row in the Properties
window to name it
joeGivesToBob.
This button tells Bob to
give 5 bucks to Joe. Name
it bobGivesToJoe.
Make the buttons work
Double-click on the joeGivesToBob button in the designer. The IDE will add a
method to the form called joeGivesToBob_Click() that gets run any time the
button’s clicked. Fill in that method to make Joe give 10 bucks to Bob. Then double-
click on the other button and fill in the new bobGivesToJoe_Click() method
that the IDE creates so that Bob gives 5 bucks to Joe. Make sure the form updates itself
after the cash changes hands.
3
Addbuttonstothe“FunwithJoeandBob”programtomaketheguysgiveeachothercash.
If you already clicked the button, just delete
it, add it back to your form, and rename it.
Then delete the old button3_Click() method
that the IDE added before, and use the new
method it adds now.
120 Chapter 3
exercise solution
Addbuttonstothe“FunwithJoeandBob”programtomaketheguysgiveeachothercash.
public partial class Form1 : Form {
Guy joe;
Guy bob;
int bank = 100;
public Form1() {
InitializeComponent();
bob = new Guy() { Cash = 100, Name = “Bob” };
joe = new Guy() { Cash = 50, Name = “Joe” };
UpdateForm();
}
public void UpdateForm() {
joesCashLabel.Text = joe.Name + “ has $” + joe.Cash;
bobsCashLabel.Text = bob.Name + “ has $” + bob.Cash;
bankCashLabel.Text = “The bank has $” + bank;
}
private void button1_Click(object sender, EventArgs e) {
if (bank >= 10) {
bank -= joe.ReceiveCash(10);
UpdateForm();
} else {
MessageBox.Show(“The bank is out of money.”);
}
}
private void button2_Click(object sender, EventArgs e) {
bank += bob.GiveCash(5);
UpdateForm();
}
private void joeGivesToBob_Click(object sender, EventArgs e) {
bob.ReceiveCash(joe.GiveCash(10));
UpdateForm();
}
private void bobGivesToJoe_Click(object sender, EventArgs e) {
joe.ReceiveCash(bob.GiveCash(5));
UpdateForm();
}
}
Here are the object initializers for
the two instances of the Guy class.
Bob gets initialized with 100 bucks
and his name.
The trick here is
thinking through
who’s giving the
cash and who’s
receiving it.
Take a close look at
how the Guy methods
are being called. The
results returned
by GiveCash() are
pumped right into
ReceiveCash() as its
parameter.
To make Joe give cash
to Bob, we call Joe’s
GiveCash() method and
send its results into
Bob’s ReceiveCash()
method.
Before you go on, take a minute and flip to #1 in the “Leftovers” appendix,
because there’s some basic syntax that we haven’t covered yet. You won’t
need it to move forward, but it’s a good idea to see what’s there.
you are here 4 121
objects: get oriented!
Objectcross
It’s time to give your left brain a break, and put that
right brain to work: all the words are object-related
and from this chapter.
1
2 3 4 5 6
7
8 9
10
11
12
13
14 15
Across
2. If a method's return type is _____, it doesn't return
anything.
7. An object's fields define its _______
9. A good method __________ makes it clear what the
method does.
10. Where objects live
11. What you use to build an object
13. What you use to pass information into a method
14. The statement you use to create an object
15. A special kind of field that's used by the form
controls
Down
1. This form control lets the user choose a number
from a range you set.
3. It's a great idea to create a class ________ on paper
before you start writing code
4. What an object uses to keep track of what it knows
5. These define what an object does
6. An object's methods define its ________
7. Don't use this keyword in your class declaration if
you want to be able to create instances of it
8. An object is an ______________ of a class
12. This statement tells a method to immediately exit,
and specifies the value that should be passed back to
the statement that called the method.
Across
2.Ifamethod’sreturntypeis_____,itdoesn’treturnanything
7.Anobject’sfieldsdefineits_______
9.Agoodmethod__________makesitclearwhatthemethod
does
10.Whereobjectslive
11.Whatyouusetobuildanobject
13.Whatyouusetopassinformationintoamethod
14.Thestatementyouusetocreateanobject
15.Usedtosetanattributeoncontrolsandotherclasses
Down
1.Thisformcontrolletstheuserchooseanumberfromarange
youset
3.It’sagreatideatocreateaclass________onpaperbefore
youstartwritingcode
4.Anobjectusesthistokeeptrackofwhatitknows
5.Thesedefinewhatanobjectdoes
6.Anobject’smethodsdefineits________
7.Don’tusethiskeywordinyourclassdeclarationifyouwantto
beabletocreateinstancesofit
8.Anobjectisan______________ofaclass
12.Thisstatementtellsamethodtoimmediatelyexit,andcan
specifythevaluethatshouldbepassedbacktothestatement
thatcalledthemethod
122 Chapter 3
public partial class Form1 : Form
{
private void button1_Click(object sender, EventArgs e)
{
String result = “”;
Echo e1 = new Echo();
_________________________
int x = 0;
while ( ___________ ) {
result = result + e1.Hello() + “\n”;
__________________________
if ( ____________ ) {
e2.count = e2.count + 1;
}
if ( ____________ ) {
e2.count = e2.count + e1.count;
}
x = x + 1;
}
MessageBox.Show(result + “Count: ” + e2.count);
}
class ____________ {
public int _________ = 0;
public string ___________ {
return “helloooo...”;
}
}
}
puzzle solutions
That’sthecorrectanswer.
Andhere’sthebonusanswer!
Pool Puzzle Solution
Your job was to take code snippets from
the pool and place them into the
blank lines in the code. Your goal
was to make classes that will
compile and run and produce the
output listed.
Echo e2 = new Echo( );
x < 4
e1.count = e1.count + 1;
x > 0
x == 3
Echo count
Echo e2 = e1;
Hello()
you are here 4 123
objects: get oriented!
N
1
U
M V
2O I D
3F
4M
5B
6
E I I E S
7T A T E
R I
8N
9A M E T T H
I N G L H
10 E A P A
C
11 L A S S R D O T V
U T A R
12 D I I
P P
13 A R A M E T E R S C O
D N T R
O C U
W N
14 E W P
15 R O P E R T Y
N N
Across
2. If a method's return type is _____, it doesn't return
anything. [void]
7. An object's fields define its _______ [state]
9. A good method __________ makes it clear what the
method does. [name]
10. Where objects live [heap]
11. What you use to build an object [class]
13. What you use to pass information into a method
[parameters]
14. The statement you use to create an object [new]
15. A special kind of field that's used by the form
controls [property]
Down
1. This form control lets the user choose a number
from a range you set. [numericupdown]
3. It's a great idea to create a class ________ on paper
before you start writing code [diagram]
4. What an object uses to keep track of what it knows
[field]
5. These define what an object does [methods]
6. An object's methods define its ________ [behavior]
7. Don't use this keyword in your class declaration if
you want to be able to create instances of it [static]
8. An object is an ______________ of a class
[instance]
12. This statement tells a method to immediately exit,
and specifies the value that should be passed back to
the statement that called the method. [return]
Objectcross Solution

this is a new chapter 125
This data just got garbage collected.
types and references
4
It’s 10:00.
Do you know where your data is?
Data type, database, Lieutenant Commander Data…
it’s all important stuff. Without data, your programs are useless. You
need information from your users, and you use that to look up or produce new
information to give back to them. In fact, almost everything you do in programming
involves working with data in one way or another. In this chapter, you’ll learn the
ins and outs of C#’s data types, see how to work with data in your program, and
even figure out a few dirty secrets about objects (pssst…objects are data, too).
126 Chapter 4
The variable’s type determines what
kind of data it can store
There are a bunch of types built into C#, and each one stores a
different kind of data. You’ve already seen some of the most common
ones, and you know how to use them. But there are a few that you
haven’t seen, and they can really come in handy, too.
Types you’ll use all the time
It shouldn’t come as a surprise that int, string, bool, and double are the most
common types.
≥int can store any whole number from –2,147,483,648 to 2,147,483,647.
≥string can hold text of any length (including the empty string “”).
≥bool is a Boolean value—it’s either true or false.
≥double can store real numbers from ±5.0 × 10−324 to ±1.7 × 10308 with up to
16 significant figures. That range looks weird and complicated, but it’s actually
pretty simple. The “significant figures” part means the precision of the number:
35,048,410,000,000, 1,743,059, 14.43857, and 0.00004374155 all have seven
significant figures. The 10308 thing means that you can store any number as large
as 10308 (or 1 followed by 308 zeroes)—as long as it only has 16 or fewer significant
figures. On the other end of the range, 10-324 means that you can store any number
as small as 10-324 (or a decimal point followed by 324 zeroes followed by 1)… but,
you guessed it, as long as it only has 16 or fewer significant figures.
More types for whole numbers
Once upon a time, computer memory was really expensive, and processors were really
slow. And, believe it or not, if you used the wrong type, it could seriously slow down your
program. Luckily, times have changed, and most of the time if you need to store a whole
number you can just use an int. But sometimes you really need something bigger… and
once in a while, you need something smaller, too. That’s why C# gives you more options:
≥byte can store any whole number between 0 and 255.
≥sbyte can store any whole number from –128 to 127
≥short can store any whole number from –32,768 to 32,767.
≥ushort can store any whole number from 0 to 65,535.
≥uint can store any whole number from 0 to 4,294,967,295.
≥long can store any whole number between minus and plus 9 billion billion.
≥ulong can store any whole number between 0 and about 18 billion billion.
A lot of times, if
you’re using these
types it’s because
you’re solving a
problem where
it really helps to
have the “wrapping
around” effect that
you’ll read about in
a few minutes.
The “u”
stands for
“unsigned”
not my type
A whole number doesn’t
have a decimal point.
The “s” in sbyte stands for “signed,”
which means it can be negative (the
“sign” is a minus sign).
“float” is short for
“floating point”—as
opposed to a “fixed
point” number, which
always has the same
number of decimal
places.
you are here 4 127
types and references
When you used the
Value property in
your numericUpDown
control, you were
using a decimal.
You can use the Windows calculator to convert between decimal (normal, base-10) numbers and
binary numbers (base-2 numbers written with only ones and zeroes)—put it in Scientific mode, enter
a number, and click the Bin radio button to convert to binary. Then click Dec to convert it back. Now
enter some of the upper and lower limits for the whole number types (like –32,768 and 255)
and convert them to binary. Can you figure out why C# gives you those particular limits?
Types for storing really HUGE and really tiny numbers
Sometimes 7 significant figures just isn’t precise enough. And, believe it or not, sometimes 1038
isn’t big enough and 10-45 isn’t small enough. A lot of programs written for finance or scientific
research run into these problems all the time, so C# gives us two more types:
≥float can store any number from ±1.5. × 10-45 to ±3.4 × 1038 with 7 significant digits.
≥decimal can store any number from ±1.0 × 10⁻²⁸ to ±7.9 × 1028 with 28–29
significant digits.
Literals have types, too
When you type a number directly into your C# program, you’re using a literal… and
every literal is automatically assigned a type. You can see this for yourself—just enter this
line of code that assigns the literal 14.7 to an int variable:
int myInt = 14.7;
Now try to build the program. You’ll get this:
That’s the same error you’ll get if you try to set an int equal to a double variable. What
the IDE is telling you is that the literal 14.7 has a type—it’s a double. You can change its
type to a float by sticking an F on the end (14.7F). And 14.7M is a decimal.
If you try to assign a
float literal to a double
or a decimal literal to a
float, the IDE will give
you a helpful message
reminding you to add
the right suffix. Cool!
A few more useful built-in types
Sometimes you need to store a single character like Q or 7 or $, and when you do you’ll
use the char type. Literal values for char are always inside single quotes ('x', '3').
You can include escape sequences in the quotes, too ('\n' is a line break, '\t' is
a tab). You write an escape sequence in your C# code using two characters, but your
program stores each escape sequence as a single character in memory.
And finally, there’s one more important type: object. You’ve already seen how you
can create objects by creating instances of classes. Well, every one of those objects can
be assigned to an object variable. You’ll learn all about how objects and variables
that refer to objects work later in this chapter.
You’ll learn a lot more
about how char and
byte relate to each
other in Chapter 9.
A “literal” just means a number that you
type into your code. So when you type “int
i = 5;”, the 5 is a literal.
When your
program needs
to deal with
currency, you
usually want to
use a decimal
to store the
number.
The “M” stands for “money”—seriously!
Windows 7 has a really neat feature in Calculator called “Programmer”
mode, where you can see binary and decimal at the same time!
128 Chapter 4
A variable is like a data to-go cup
All of your data takes up space in memory. (Remember the heap
from last chapter?) So part of your job is to think about how much
space you’re going to need whenever you use a string or a number in
your program. That’s one of the reasons you use variables. They let
you set aside enough space in memory to store your data.
Think of a variable like a cup that you keep your data in. C# uses
a bunch of different kinds of cups to hold different kinds of data.
And just like the different sizes of cups at the coffee shop, there are
different sizes of variables, too.
long int short byte
64 32 16 8
float double decimal
32 64 128
Numbers that have decimal places are stored differently than
whole numbers. You can handle most of your numbers that have
decimal places using float, the smallest data type that stores
decimals. If you need to be more precise, use a double. And
if you’re writing a financial application where you’ll be storing
currency values, you’ll want to use the decimal type.
It’s not always about numbers, though. (You wouldn’t expect to
get hot coffee in a plastic cup or cold coffee in a paper one.) The
C# compiler also can handle characters and non-numeric types.
The char type holds one character, and string is used for lots
of characters “strung” together. There’s no set size for a string
object, either. It expands to hold as much data as you need to store
in it. The bool data type is used to store true or false values, like
the ones you’ve used for your if statements.
bool char string
8 16
You’ll use long
for whole
numbers that
are going to be
really big.
int is commonly used for whole
numbers. It holds numbers up to
2,147,483,647.
These are the number of bits of memory set aside for the variable when you declare it.
These types are for
fractions. Larger
variables store more
decimal places.
A short will hold whole numbers
up to 32,767.
byte holds numbers
between zero and 255.
depends on
the size
of the string
i’ll take an ice cream float to go
Not all data ends up on the heap. Value
types usually keep their data in another
part of memory called the stack. You’ll
learn all about that in Chapter 14.
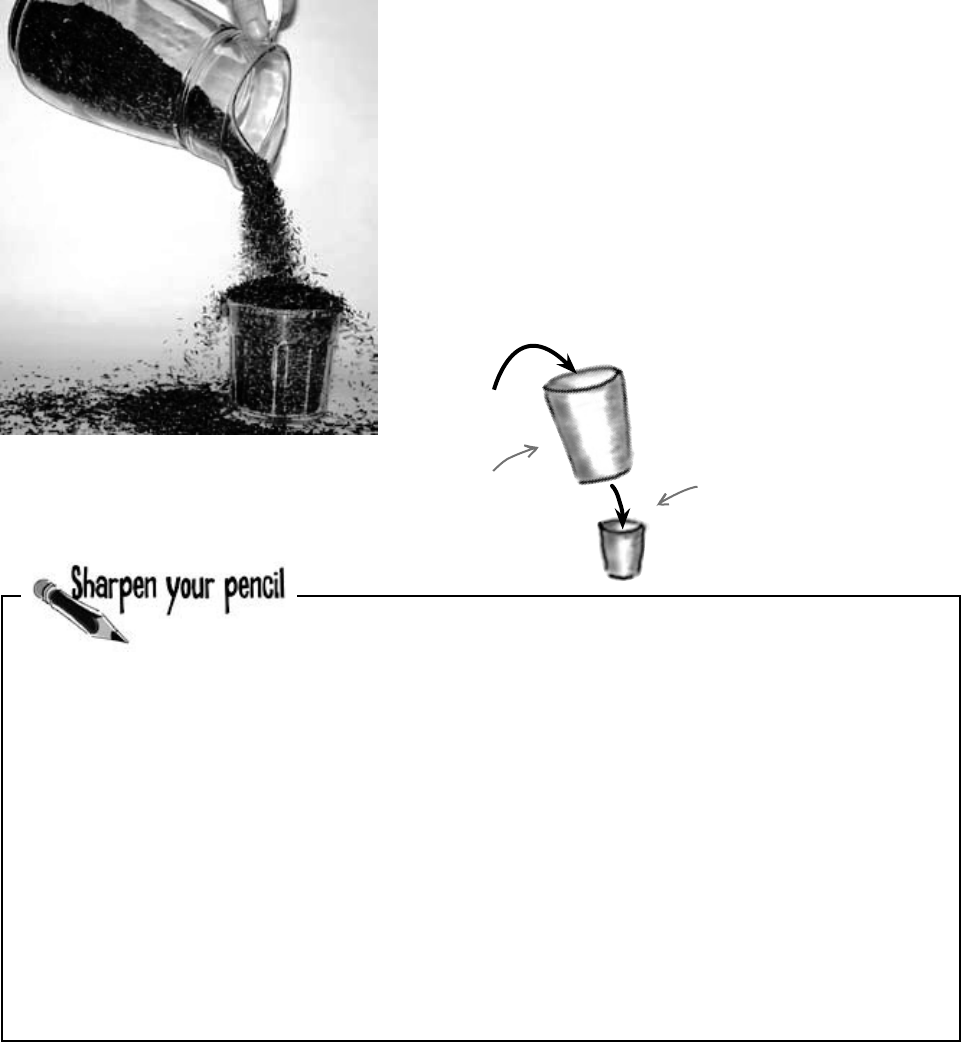
you are here 4 129
types and references
Three of these statements won’t compile, either because they’re
trying to cram too much data into a small variable or because
they’re putting the wrong type of data in. Circle them.
10 pounds of data in a 5 pound bag
When you declare your variable as one type, that’s how your
compiler looks at it. Even if the value is nowhere near the upper
boundary of the type you’ve declared, the compiler will see the cup
it’s in, not the number inside. So this won’t work:
int leaguesUnderTheSea = 20000;
short smallerLeagues = leaguesUnderTheSea;
20,000 would fit into a short, no problem. But since
leaguesUnderTheSea is declared as an int, the compiler sees
it as int-sized and considers it too big to put in a short container.
The compiler won’t make those translations for you on the fly. You
need to make sure that you’re using the right type for the data
you’re working with.
int hours = 24;
short y = 78000;
bool isDone = yes;
short RPM = 33;
int balance = 345667 - 567;
string taunt = “your mother”;
byte days = 365;
long radius = 3;
char initial = ‘S’;
string months = “12”;
20,000
int
short
All the compiler sees is an
int going into a short (which
doesn’t work). It doesn’t care
about the value in the int cup.
This makes sense. What if you
later put a larger value in the
int cup, one that wouldn’t fit
into the short cup? The compiler
is trying to protect you.
130 Chapter 4
Three of these statements won’t compile, either because they’re
trying to cram too much data into a small variable or because
they’re putting the wrong type of data in. Circle them.
short y = 78000;
bool isDone = yes;
byte days = 365;
A byte can only hold a
value of up to 256. You’ll
need a short for this.
The short type holds
numbers from -32,767
to 32,768. This
number’s too big!
You can only assign a value of
“true” or “false” to a bool.
Even when a number is the right size,
you can’t just assign it to any variable
Let’s see what happens when you try to assign
a decimal value to an int variable.
Create a new project and add a button to it. Then add these lines to the
button’s Click() method:
decimal myDecimalValue = 10;
int myIntValue = myDecimalValue;
MessageBox.Show(“The myIntValue is ” + myIntValue);
1
Check out how
the IDE figured
out that you
were probably
missing a cast.
Try building your program. Uh oh—you got an error that looks like this:
2
Make the error go away by casting the decimal to an int. Once you change
the second line so it looks like this, your program will compile and run:
int myIntValue = (int) myDecimalValue;
3
casting call
Take a minute to flip back
to the beginning of the last
chapter and check out how
you used casting when you
passed the NumericUpDown.
Value to the Talker Tester
form.
Do this
So what happened?
The compiler won’t let you assign a value to a variable if it’s the wrong type—even
if that variable can hold the value just fine—because that’s the underlying cause
behind an enormous number of bugs. When you use casting, you’re essentially
making a promise to the compiler that you know the types are different, and that
in this particular instance it’s OK for C# to cram the data into the new variable.
Here’s where you cast the
decimal value to an int.
you are here 4 131
types and references
When you cast a value that’s too
big, C# will adjust it automatically
You’ve already seen that a decimal can be cast to an
int. It turns out that any number can be cast to any other
number. But that doesn’t mean the value stays intact
through the casting. If you cast an int variable that’s set
to 365 to a byte variable, 365 is too big for the byte. But
instead of giving you an error, the value will just wrap
around: for example, 256 cast to a byte will have a value
of 0. 257 would be converted to 1, 258 to 2, etc., up to 365,
which will end up being 109. And once you get back to
255 again, the conversion value “wraps” back to zero.
Hey, I’ve been combining
numbers and strings in my
message boxes since I learned
about loops in Chapter 2! Have I
been converting types all along?
Yes! The + operator converts for
you.
What you’ve been doing is using the +
operator, which does a lot of converting
for you automatically—but it’s especially
smart about it. When you use + to add a
number or Boolean to a string, then it’ll
automatically convert that value to a string,
too. If you use + (or *, /, or -) with two
different types, it automatically converts
the smaller type to the bigger one.
Here’s an example:
int myInt = 36;
double myFloat = 16.4D;
myFloat = myInt + myFloat;
Since an int can fit into a float but a
float can’t fit into an int, the + operator
converts myInt to a float before adding it
to myFloat.
When you’re
assigning a number
value to a double,
you need to add a
D to the end of
the number to tell
the compiler that
it’s a float, and
not a double.
You can’t always cast any type to any
other type. Create a new project, drag a
button onto a form, double-click on it, and type
these statements in. Then build your program—it
will give lots of errors. Cross out the ones that
give errors. That’ll help you figure out which
types can be cast , and which can’t!
int myInt = 10;
byte myByte = (byte)myInt;
double myDouble = (double)myByte;
bool myBool = (bool)myDouble;
string myString = “false”;
myBool = (bool)myString;
myString = (string)myInt;
myString = myInt.ToString();
myBool = (bool)myByte;
myByte = (byte)myBool;
short myShort = (short)myInt;
char myChar = ‘x’;
myString = (string)myChar;
long myLong = (long)myInt;
decimal myDecimal = (decimal)myLong;
myString = myString + myInt + myByte
+ myDouble + myChar;
Wrap it yourself!
There’s no mystery to how casting “wraps”
the numbers—you can do it yourself. Just
pop up the Windows calculator, switch
it to Scientific mode, and calculate 365
Mod 256 (using the “Mod” button, which
does a modulo calculation). You’ll get 109.
132 Chapter 4
a true convert
long l = 139401930;
short s = 516;
double d = l - s;
d = d / 123.456;
MessageBox.Show(“The answer is ” + d);
When you use + it’s smart enough
to convert the decimal to a string.
The - operator
subtracted the short
from the long, and the
= operator converted
the result to a double.
C# does some casting automatically
There are two important conversions that don’t require
you to do the casting. The first is done automatically any
time you use arithmetic operators, like in this example:
The other way C# converts types for you automatically is when
you use the + operator to concatenate strings (which just
means sticking one string on the end of another, like you’ve been
doing with message boxes). When you use + to concatenate
a string with something that’s another type, it automatically
converts the numbers to strings for you. Here’s an example. The
first two lines are fine, but the third one won’t compile.
long x = 139401930;
MessageBox.Show(“The answer is ” + x);
MessageBox.Show(x);
The C# compiler spits out an error that mentions something
about invalid arguments (an argument is what C# calls the
value that you’re passing into a method’s parameter). That’s
because the parameter for MessageBox.Show() is a
string, and this code passed a long, which is the wrong
type for the method. But you can convert it to a string really
easily by calling its ToString() method. That method is a
member of every value type and object. (All of the classes you
build yourself have a ToString() method that returns the
class name.) That’s how you can convert x to something that
MessageBox.Show() can use:
MessageBox.Show(x.ToString());
You can’t always cast any type to any other
type. Create a new project, drag a button onto a
form, and type these statements into its method.
Then build your program—it will give lots of
errors. Cross out the ones that give errors. That’ll
help you figure out which types can be cast , and
which can’t!
int myInt = 10;
byte myByte = (byte)myInt;
double myDouble = (double)myByte;
bool myBool = (bool)myDouble;
string myString = “false”;
myBool = (bool)myString;
myString = (string)myInt;
myString = myInt.ToString();
myBool = (bool)myByte;
myByte = (byte)myBool;
short myShort = (short)myInt;
char myChar = ‘x’;
myString = (string)myChar;
long myLong = (long)myInt;
decimal myDecimal = (decimal)myLong;
myString = myString + myInt + myByte
+ myDouble + myChar;
you are here 4 133
types and references
When you call a method, the arguments must
be compatible with the types of the parameters
Try calling MessageBox.Show(123)—passing MessageBox.Show()
a literal (123) instead of a string. The IDE won’t let you build your program.
Instead, it’ll show you an error in the IDE: “Argument ‘1’: cannot convert from
‘int’ to ‘string’.” Sometimes C# can do the conversion automatically—like if
your method expects an int, but you pass it a short—but it can’t do that for
ints and strings.
But MessageBox.Show() isn’t the only method that will give you compiler
errors if you try to pass it a variable whose type doesn’t match the parameter.
All methods will do that, even the ones you write yourself. Go ahead and try
typing this completely valid method into a class:
When the
compiler gives
you an “invalid
arguments” error,
it means that
you tried to call
a method with
variables whose
types didn’t match
the method’s
parameters.
public int MyMethod(bool yesNo) {
if (yesNo) {
return 45;
} else {
return 61;
}
}
It works just fine if you pass it what it expects (a bool)—call MyMethod(true) or
MyMethod(false), and it compiles just fine.
But what happens if you pass it an integer or a string instead? The IDE gives you a
similar error to the one that you got when you passed 123 to MessageBox.Show().
Now try passing it a Boolean, but assigning the return value to a string or passing it on
to MessageBox.Show(). That won’t work, either—the method returns an int, not
a long or the string that MessageBox.Show() expects.
One reminder—the code that calls
this parameter doesn’t have to pass
it a variable called yesNo. It just has
to pass it a Boolean value or variable.
The only place it’s called yesNo is
inside the method’s code.
if statements always test to see if something’s true
Did you notice how we wrote our if statement like this:
if (yesNo) {
We didn’t have to explicitly say “if (yesNo == true)”. That’s because an if statement always
checks if something’s true. You check if something’s false using ! (an exclamation point, or
the NOT operator). “if (!yesNo)” is the same thing as “if (yesNo == false)”. In our code
examples from now on, you’ll usually just see us do “if (yesNo)” or “if (!yesNo)”, and not
explicitly check to see if a Boolean is true or false.
You can assign
anything to a variable,
parameter, or field
with the type object.
A parameter is what you
define in your method. An
argument is what you pass
to it. A method with an int
parameter can take a byte
argument.
134 Chapter 4
Thereareabout77reserved wordsinC#.ThesearewordsreservedbytheC#compiler;you
can’tusethemforvariablenames.You’llknowalotofthemreallywellbythetimeyoufinishthe
book.Herearesomeyou’vealreadyused.WritedownwhatyouthinkthesewordsdoinC#.
this table is reserved
namespace
for
class
public
else
new
using
if
while
Answers on page 164.
Actually, C# does give you a way to use reserved keywords as
variable names, by putting @ in front of the keyword. You can
do that with non-reserved names too, if you want to.
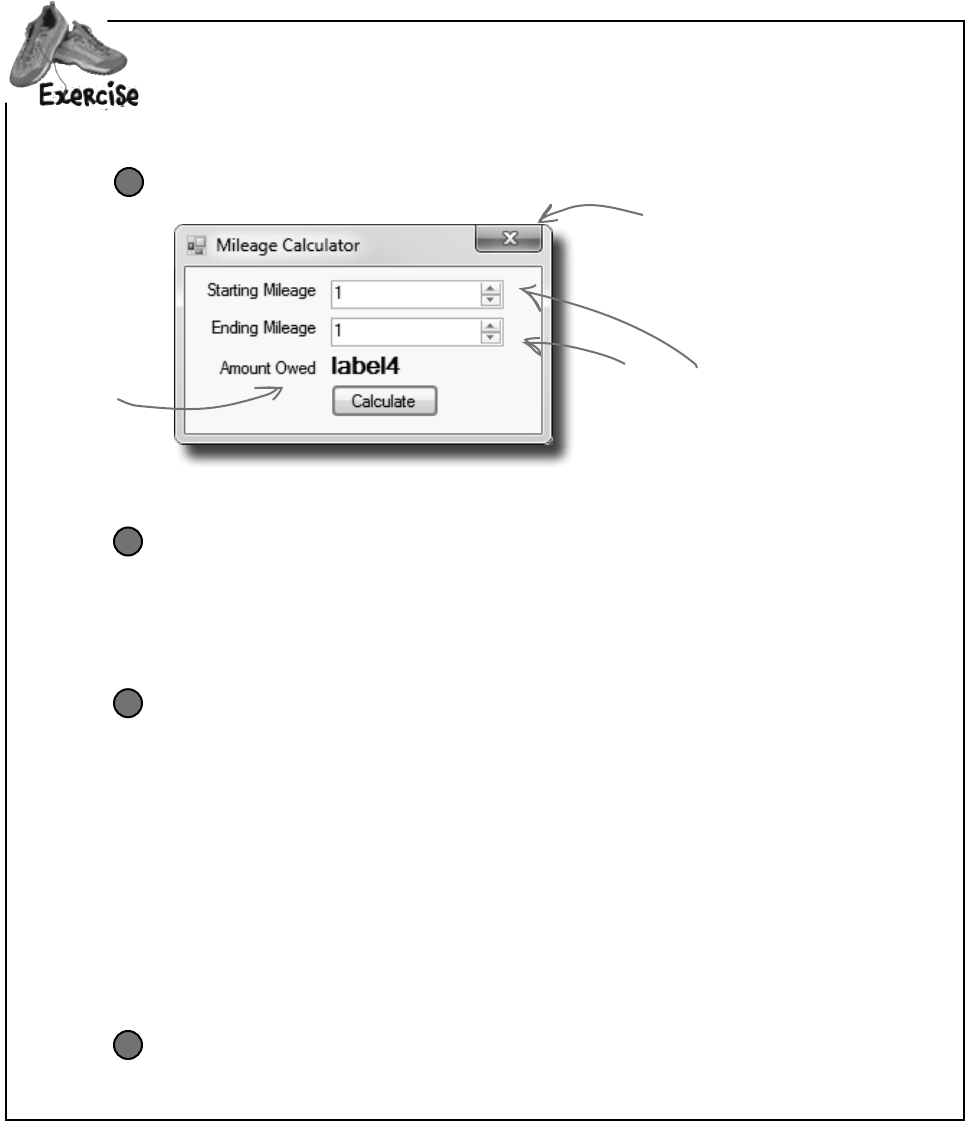
you are here 4 135
types and references
Createareimbursementcalculatorforabusinesstrip.Itshouldallowtheusertoenterastarting
andendingmileagereadingfromthecar’sodometer.Fromthosetwonumbers,itwillcalculate
howmanymilesshe’straveledandfigureouthowmuchsheshouldbereimbursedifher
companypaysher$.39foreverymilesheputsonhercar.
Start with a new Windows project.
Make the form look like this:
1
Create the variables you’ll need for the calculator.
Put the variables in the class definition at the top of Form1. You need two whole
number variables to track the starting odometer reading and the ending odometer reading.
Call them startingMileage and endingMileage. You need three numbers
that can hold decimal places. Make them doubles and call them milesTraveled,
reimburseRate, and amountOwed. Set the value for reimburseRate to .39.
2
For the two NumericUpDown
controls, set the Minimum property
to 1 and Maximum to 999999.
Get rid of
the minimize
and maximize
buttons.
This label is 12
pt bold.
When you’re done with the form, double-click on the
button to add some code to the project.
Make your calculator work.
Add code in the button1_Click() method to:
≥Make sure that the number in the Starting Mileage field is smaller than the number
in the Ending Mileage field. If not, show a message box that says “The starting
mileage must be less than the ending mileage”. Make the title for the message box
“Cannot Calculate”.
≥Subtract the starting number from the ending number and then multiply it by the
reimburse rate using these lines:
milesTraveled = endingMileage -= startingMileage;
amountOwed = milesTraveled *= reimburseRate;
label4.Text = “$” + amountOwed;
3
Run it.
Make sure it’s giving the right numbers. Try changing the starting value to be higher than
the ending value and make sure it’s giving you the message box.
4
136 Chapter 4
vYouwereaskedtocreateareimbursementcalculatorforabusinesstrip.Here’sthecodeforthe
firstpartoftheexercise.
something’s wrong…
public partial class Form1 : Form
{
int startingMileage;
int endingMileage;
double milesTraveled;
double reimburseRate = .39;
double amountOwed;
public Form1() {
InitializeComponent();
}
private void button1_Click(object sender, EventArgs e){
startingMileage = (int) numericUpDown1.Value;
endingMileage = (int)numericUpDown2.Value;
if (startingMileage <= endingMileage){
milesTraveled = endingMileage -= startingMileage;
amountOwed = milesTraveled *= reimburseRate;
label4.Text = “$” + amountOwed;
} else {
MessageBox.Show(
“The starting mileage must be less than the ending mileage”,
“Cannot Calculate Mileage”);
}
}
}
Did you remember
that you have
to change the
decimal value from
the numericUpDown
control to an int?
int
works great for whole
numbers. This number could
go all the way up to 999,999.
So a
short
or a
byte
won’t cut it.
This block is
supposed to figure
out how many
miles were traveled
and then multiply
them by the
reimbursement rate.
This button seems to work, but it has a
pretty big problem. Can you spot it?
We used an alternate way
of calling the MessageBox.
Show() method here. We gave
it two parameters: the first
one is the message to display,
and the second one goes in
the title bar.
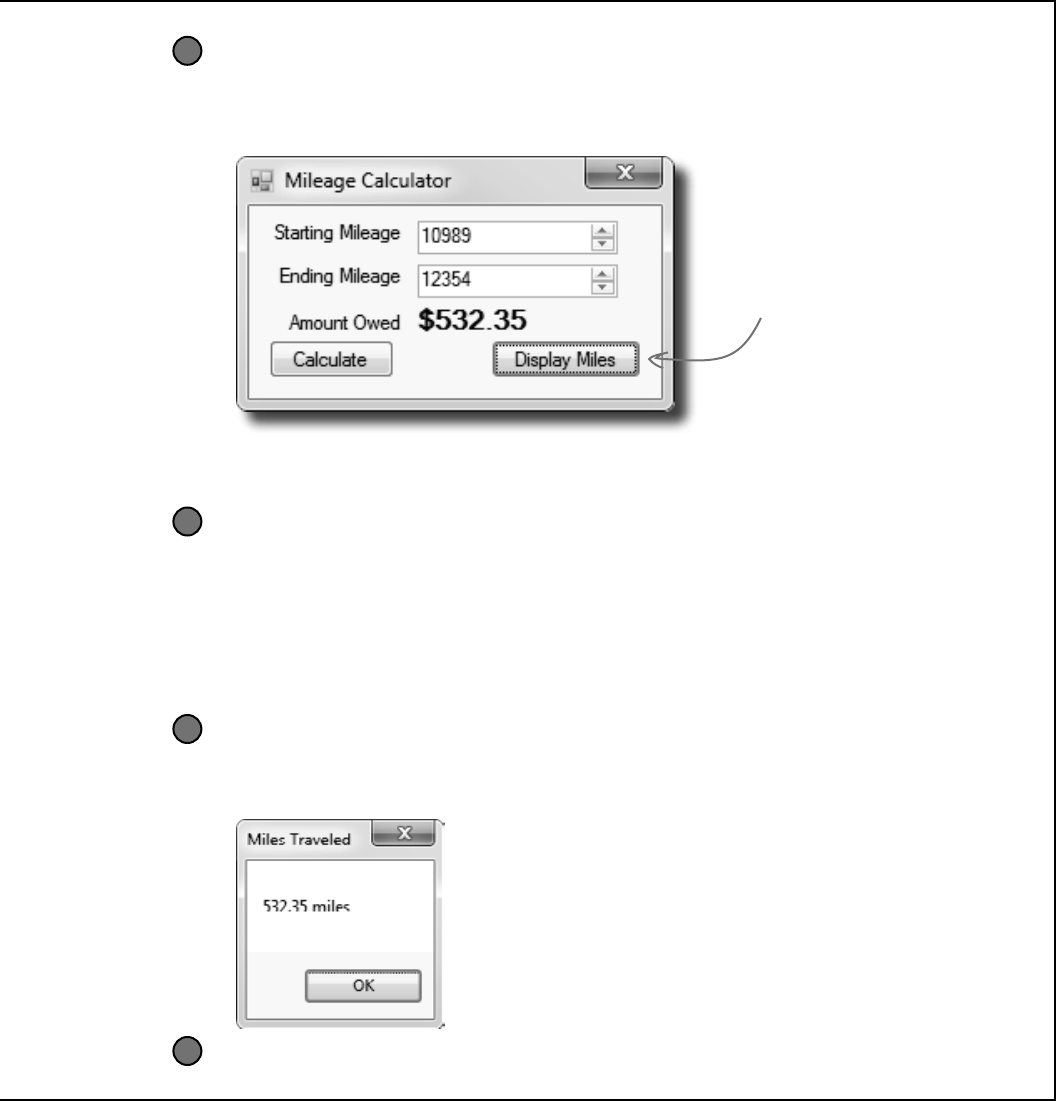
you are here 4 137
types and references
vNow add another button to the form.
Let’s track down that problem by adding a button to your form that shows the value
of the milesTraveled field. (You could also use the debugger for this!)
1
One line should do it.
All we need to do is get the form to display the milesTraveled variable, right? So this line
should do that:
private void button2_Click(object sender, EventArgs e) {
Messagebox.Show(milesTraveled + “ miles”, “Miles Traveled”);
}
2
When you’re done with the form, double-click on the
Display Miles button to add some code to the project.
Run it.
Type in some values and see what happens. First enter a starting mileage and
ending mileage, and click the Calculate button. Then click the Display Miles
button to see what’s stored in the milesTraveled field.
3
Um, something’s not right…
No matter what numbers you use, the number of miles always matches the amount owed. Why?
4
Clicking this button after
you’ve clicked Calculate should
show the number of miles
traveled in a message box.

138 Chapter 4
operators are standing by
private void button1_Click(object sender, EventArgs e)
{
startingMileage = (int) numericUpDown1.Value;
endingMileage = (int)numericUpDown2.Value;
if (startingMileage <= endingMileage){
milesTraveled = endingMileage -= startingMileage;
amountOwed = milesTraveled *= reimburseRate;
label4.Text = “$” + amountOwed;
} else {
MessageBox.Show(“The starting mileage number must
be less than the ending mileage number”,
“Cannot Calculate Mileage”);
}
Take a good look at the operator we used to subtract ending mileage from
starting mileage (-=). The problem is it doesn’t just subtract, it also assigns
a value to the variable on the left side of the subtraction sign. The same
thing happens in the line where we multiply number of miles traveled by the
reimbursement rate. We should replace the -= and the *= with just - and *:
Combining = with an operator
These are
called compound
operators. This
one subtracts
startingMileage
from endingMileage
but also assigns
the new value to
endingMileage and
milesTraveled at
the same time.
So can good variable names help you out here Definitely! Take a
close look at what each variable is supposed to do. You already get a lot of
clues from the name milesTraveled—you know that’s the variable that
the form is displaying incorrectly, and you’ve got a good idea of how that
value ought to be calculated. So you can take advantage of that when you’re
looking through your code to try to track down the bug. It’d be a whole lot
harder to find the problem if the incorrect lines looked like this instead:
mT = eM -= sM;
aO = mT *= rR;
milesTraveled = endingMileage - startingMileage;
amountOwed = milesTraveled * reimburseRate;
This is better—now
your code won’t modify
endingMileage and
milesTraveled.
Variables named like this are
essentially useless in telling you
what their purpose might be.
you are here 4 139
types and references
Objects use variables, too
So far, we’ve looked at objects separate from other types. But
an object is just another data type. Your code treats objects
exactly like it treats numbers, strings, and Booleans. It uses
variables to work with them:
Using an int Using an object
Write a statement to declare the object.
Dog spot;
1
Write a statement to declare the integer.
int myInt;
1
Assign a value to the object.
spot = new Dog();
2
Assign a value to the new variable.
myInt = 3761;
2
Check one of the object’s fields.
while (spot.IsHappy) {
3
Use the integer in your code.
while (i < myInt) {
3
When you have a class
like Dog, you use it as
the type in a variable
declaration statement.
Objects are just one more type of
variable your program can use.
If your program needs to work with a whole
number that’s really big, use a long. If it needs
a whole number that’s small, use a short. If it
needs a yes/no value, use a boolean. And if it
needs something that barks and sits, use a Dog. No
matter what type of data your program needs to
work with, it’ll use a variable.
So it doesn’t matter if I’m
working with an object or a numeric
value. If it’s going into memory, and my
program needs to use it, I use a variable.
140 Chapter 4
G
u
y
o
b
j
e
c
t
#
1
Joe
get the reference
When you create a new object, you use code like new Guy(). But that’s not enough;
even though that code creates a new Guy object on the heap, it doesn’t give you
a way to access that object. You need a reference to the object. So you create
a reference variable: a variable of type Guy with a name, like joe. So joe
is a reference to the new Guy object you created. Any time you want to use that
particular guy, you can reference it with the reference variable called joe.
So when you have a variable that is an object type, it’s a reference variable: a
reference to a particular object. Take a look:
Refer to your objects with reference variables
public partial class Form1 : Form
{
Guy joe;
public Form1()
{
InitializeComponent();
joe = new Guy();
}
That’s called
instantiating
the object.
Here’s the heap before your
code runs. Nothing there.
Here’s the heap after
this code runs. There’s an
object, with the variable
Joe referring to it.
This variable
is named
joe, and will
reference
an object of
type Guy.
This is the
reference variable…
…and this is the
object that joe
now refers to.
The ONLY way to
reference this Guy object
is through the reference
variable called joe.
Creating a reference is like making a label
with a label maker—instead of sticking it
on your stuff, you’re using it to label an
object so you can refer to it later.
you are here 4 141
types and references
In your kitchen, you probably have a container of salt and sugar. If you
switched their labels, it would make for a pretty disgusting meal—even
though the labels changed, the contents of the containers stayed the same.
References are like labels. You can move labels around and point them at
different things, but it’s the object that dictates what methods and data are
available, not the reference itself.
References are like labels for your object
customer
unclejoe
dad
brother
joe
heyyou
programmer
This object is of type Guy.
It’s a SINGLE object with
MULTIPLE references.
You never refer to your object directly. For example, you can’t write code like
Guy.GiveCash() if Guy is your object type. The C# compiler doesn’t
know which Guy you’re talking about, since you might have several instances
of Guy on the heap. So you need a reference variable, like joe, that you
assign to a specific instance, like Guy joe = new Guy().
Now you can call methods, like joe.GiveCash(). joe refers to a specific
instance of the Guy class, and your C# compiler knows exactly which
instance to use. And, as you saw above, you might have multiple labels
pointing to the same instance. So you could say Guy dad = joe, and
then call dad.GiveCash(). That’s OK, too—that’s what Joe’s kid does
every day.
Form1’s button1_Click method
has a variable called “Joe” that
references this object.
There are lots of different
references to this same Guy, because
a lot of different methods use
him for different things. Each
reference has a different name
that makes sense in its context.
Every one of these labels
is a different reference
variable, but they all
point to the SAME Guy
object.
When your code
needs to work
with an object
in memory, it
uses a reference,
which is a
variable whose
type is a class
of the object it’s
going to point to.
A reference is
like a label that
your code uses
to talk about a
specific object.
An instance of the Guy
class is keeping a reference
to this object in a variable
called “Dad”.
142 Chapter 4
G
u
y
o
b
j
e
c
t
G
u
y
o
b
j
e
c
t
#
2
G
u
y
o
b
j
e
c
t
#
1
G
u
y
o
b
j
e
c
t
#
2
If all of the labels come off of an object, programs can no longer
access that object. That means C# can mark the object for garbage
collection. That’s when C# gets rid of any unreferenced objects, and
reclaims the memory those objects took up for your program’s use.
For an object
to stay in the
heap, it has to
be referenced.
Some time
after the last
reference to
the object
disappears, so
does the object.
If there aren’t any more references,
your object gets garbage-collected
JOE
When you use the “new” statement,
you’re telling C# to create an object.
When you take a reference variable
like “Joe” and assign it to that
object, it’s like you’re slapping a new
label on it.
Here’s some code that creates an object.
Guy joe = new Guy()
{ Name = “Joe”, Cash = 50 };
1
Now let’s create a second object.
Guy bob = new Guy()
{ Name = “Bob”, Cash = 75 };
2
bob
JOE
Let’s take the reference to the first object, and
change it to point at the second object.
joe = bob;
3
Now joe is pointing to the same
object as bob.
bob
JOE
poof!
that’s sanitation engineer thank you very much
Now we have two Guy object
instances, and two reference
variables: one for each Guy.
But there is no longer
a reference to the
first Guy object…
…so C# marks the
object for garbage
collection, and
eventually trashes it.
It’s gone!
“Joe”
50
“Bob”
75
“Joe”
50
“Bob”
75
you are here 4 143
types and references
Across
1.Thesecondpartofavariabledeclaration
4.“namespace”,“for”,“while”,“using”,and“new”areexamples
of_____________words
6.What(int)doesinthislineofcode:x=(int)y;
8.Whenanobjectnolongerhasanyreferencespointingtoit,
it’sremovedfromtheheapusing____________collection
10.Whatyou’redoingwhenyouusethe+operatortosticktwo
stringstogether
14.Thenumerictypethatholdsthebiggestnumbers
15.Thetypethatstoresasingleletterornumber
16.\nand\rare_______sequences
17.Thefourwholenumbertypesthatonlyholdpositive
numbers
Down
2.Youcancombinethevariabledeclarationandthe_________
intoonestatement
3.Avariablethatpointstoanobject
5.Whatyourprogramusestoworkwithdatathat’sinmemory
7.Ifyouwanttostoreacurrencyvalue,usethistype
9.+=and-=arethiskindofoperator
11.Avariabledeclarationalwaysstartswiththis
12.Everyobjecthasthismethodthatconvertsittoastring
13.Whenyou’vegotavariableofthistype,youcanassignany
valuetoit
1 2
345
6
7
8
9
10 11 12
13
14
15
16 17
Across
1. The second part of a variable declaration
4. "namespace", "for", "while", "using" and "new" are
examples of _____________ words.
6. What (int) does in this line of code: x = (int) y;
8. When an object no longer has any references
pointing to it, it's removed from the heap using
____________ collection.
10. What you're doing when you use the + operator to
stick two strings together.
14. The type that holds the biggest numbers.
15. The type that stores a single letter or number
16. \n and \r are _______ sequences
17. The four whole number types that only hold
positive numbers
Down
2. You can combine the variable declaration and the
____________ into one statement.
3. A variable that points to an object
5. What your program uses to work with data that's in
memory
7. If you want to store a currency value, use this type
9. += and -= are this kind of operator
11. A variable declaration always starts with this.
12. Every object has this method that converts it to a
string.
13. When you've got a variable of this type, you can
assign any value to it
Typecross
Take a break, sit back, and give
your right brain something
to do. It’s your standard
crossword; all of the solution
words are from this chapter.
When you’re done, turn the
page and take on the rest
of the chapter.
Answers on page 165.
144 Chapter 4
D
o
g
o
b
j
e
c
t
#
1
D
o
g
o
b
j
e
c
t
#
3
D
o
g
o
b
j
e
c
t
#
1
D
o
g
o
b
j
e
c
t
#
2
so many labels
You’ve got to be careful when you start moving around reference
variables. Lots of times, it might seem like you’re simply pointing
a variable to a different object. But you could end up removing all
references to another object in the process. That’s not a bad thing, but
it may not be what you intended. Take a look:
Multiple references and their side effects
D
o
g
o
b
j
e
c
t
#
1
Rover
Rover
SPOT
Fido
Fido
Rover
SPOT
Lucky
Dog rover = new Dog();
rover.Breed = “Greyhound”;
1
Dog fido = new Dog();
fido.Breed = “Beagle”;
Dog spot = rover;
2
Dog lucky = new Dog();
lucky.Breed = “Dachshund”;
fido = rover;
3
Fido is another Dog object.
But Spot is just another
reference to the first object.
Lucky is a third object.
But Fido is now pointing
to Object #1. So, Object
#2 has no references.
It’s done as far as the
program is concerned.
Objects:______
References:_____
Objects:______
References:_____
Objects:______
References:_____
1
1
2
3
2
4
poof!

you are here 4 145
types and references
Dog rover = new Dog();
rover.Breed = “Greyhound”;
Dog rinTinTin = new Dog();
Dog fido = new Dog();
Dog quentin = fido;
1
Dog spot = new Dog();
spot.Breed = “Dachshund”;
spot = rover;
2
Dog lucky = new Dog();
lucky.Breed = “Beagle”;
Dog charlie = fido;
fido = rover;
3
Objects:______
References:_____
Objects:______
References:_____
rinTinTin = lucky;
Dog laverne = new Dog();
laverne.Breed = “pug”;
4
Objects:______
References:_____
charlie = laverne;
lucky = rinTinTin;
5
Objects:______
References:_____
Objects:______
References:_____
Now it’s your turn. Here’s one long block of code. Figure out how many
objects and references there are at each stage. On the right-hand side,
draw a picture of the objects and labels in the heap.

146 Chapter 4
D
o
g
o
b
j
e
c
t
#
5
D
o
g
o
b
j
e
c
t
#
3
D
o
g
o
b
j
e
c
t
#
1
D
o
g
o
b
j
e
c
t
#
4
D
o
g
o
b
j
e
c
t
#
1
D
o
g
o
b
j
e
c
t
#
3
D
o
g
o
b
j
e
c
t
#
5
D
o
g
o
b
j
e
c
t
#
4
D
o
g
o
b
j
e
c
t
#
2
D
o
g
o
b
j
e
c
t
#
3
D
o
g
o
b
j
e
c
t
#
1
D
o
g
o
b
j
e
c
t
#
4
D
o
g
o
b
j
e
c
t
#
3
D
o
g
o
b
j
e
c
t
#
1
D
o
g
o
b
j
e
c
t
#
2
D
o
g
o
b
j
e
c
t
#
3
swapping elephants
Dog rover = new Dog();
rover.Breed = “Greyhound”;
Dog rinTinTin = new Dog();
Dog fido = new Dog();
Dog quentin = fido;
1
Dog spot = new Dog();
spot.Breed = “Dachshund”;
spot = rover;
2
Dog lucky = new Dog();
lucky.Breed = “Beagle”;
Dog charlie = fido;
fido = rover;
3
Objects:______
References:_____
Objects:______
References:_____
rinTinTin = lucky;
Dog laverne = new Dog();
laverne.Breed = “pug”;
4
Objects:______
References:_____
charlie = laverne;
lucky = rinTinTin;
5
Objects:______
References:_____
Objects:______
References:_____
Now it’s your turn. Here’s one long block of code. Figure out how many
objects and references there are at each stage. On the right-hand side,
draw a picture of the objects and labels in the heap.
3
3
4
7
4
8
4
8
One new Dog object is
created but Spot is the
only reference to it. When
Spot is set = to Rover,
that object goes away.
Here a new Dog object is
created, but when Fido is
set to Rover, Fido’s object
from #1 goes away.
Charlie was set to Fido
when Fido was still on
object #3. Then, after
that, Fido moved to object
#1, leaving Charlie behind.
Here the references move
around but no new objects
are created. And setting
Lucky to Rin Tin Tin did
nothing because they already
pointed to the same object.
4
5
fido
quentin
rover
rintintin
fido
quentin
spot
rover
rintintin
fido
quentin
spot
LUCKY charlie
rover
fido
quentin
spot
LUCKY charlie
LAVERNE
rover
rintintin
fido
quentin
spot
LUCKY
LAVERNE
charlie
D
o
g
o
b
j
e
c
t
#
1
rover
D
o
g
o
b
j
e
c
t
#
2
rintintin
rintintin
poof!
Dog #2 lost its
last reference, and
it went away.
When Rin Tin Tin
moved to Lucky’s
object, the old Rin Tin
Tin object disappeared.
you are here 4 147
types and references
Createaprogramwithanelephantclass.Maketwoelephantinstancesandthenswap
thereferencevaluesthatpointtothem,withoutgettinganyElephantinstancesgarbage-
collected.
Start with a new Windows Application project.
Make the form look like this:
1
Create the Elephant class.
Add an Elephant class to the project. Have a look at the Elephant class diagram—you’ll need an int
field called EarSize and a String field called Name. (Make sure both are public.) Then add a method
called WhoAmI() that displays a message box that tells you the name and ear size of the elephant.
2
Create two Elephant instances and a reference.
Add two Elephant fields to the Form1 class (in the area right below the class declaration) named
Lloyd and Lucinda. Initialize them so they have the right name and ear size. Here are the
Elephant object initializers to add to your form:
lucinda = new Elephant() { Name = “Lucinda”, EarSize = 33 };
lloyd = new Elephant() { Name = “Lloyd”, EarSize = 40 };
3
Make the “Lloyd” and “Lucinda” buttons work.
Have the Lloyd button call lloyd.WhoAmI() and the Lucinda button call lucinda.WhoAmI().
4
Hook up the swap button.
Here’s the hard part. Make the Swap button exchange the two references, so that when you click
Swap, the Lloyd and Lucinda variables swap objects and a “Objects swapped” box is displayed.
Test out your program by clicking the Swap button and then clicking the other two buttons. The first
time you click Swap, the Lloyd button should pop up Lucinda’s message box, and the Lucinda button
should pop up Lloyd’s message box. If you click the Swap button again, everything should go back.
5
Elephant
Name
EarSize
WhoAmI()
Clicking on the “Lucinda”
button calls lucinda.WhoAmI(),
which displays this message box.
C# garbage-collects any object with no references to it. So here’s your
hint: If you want to pour a glass of beer into another glass that’s currently
full of water, you’ll need a third glass to pour the water into....
Here’s the class diagram
for the Elephant class
you need to create.
The WhoAmI() method should pop
up this message box. Make sure the
message includes the ear size and the
title bar includes the name.
148 Chapter 4
Createaprogramwithanelephantclass.Maketwoelephantinstancesandthenswap
thereferencevaluesthatpointtothem,withoutgettinganyElephantinstancesgarbage-
collected.
Why do you think we didn’t add a Swap() method to the Elephant class?
using System.Windows.Forms;
class Elephant {
public int EarSize;
public string Name;
public void WhoAmI() {
MessageBox.Show(“My ears are ” + EarSize + “ inches tall.”,
Name + “ says…”);
}
}
public partial class Form1 : Form {
Elephant lucinda;
Elephant lloyd;
public Form1()
{
InitializeComponent();
lucinda = new Elephant()
{ Name = “Lucinda”, EarSize = 33 };
lloyd = new Elephant()
{ Name = “Lloyd”, EarSize = 40 };
}
private void button1_Click(object sender, EventArgs e) {
lloyd.WhoAmI();
}
private void button2_Click(object sender, EventArgs e) {
lucinda.WhoAmI();
}
private void button3_Click(object sender, EventArgs e) {
Elephant holder;
holder = lloyd;
lloyd = lucinda;
lucinda = holder;
MessageBox.Show(“Objects swapped”);
}
}
There’s no new statement for the
reference because we don’t want to
create another instance of Elephant.
If you just point Lloyd
to Lucinda, there won’t
be any more references
pointing to Lloyd and
his object will be lost.
That’s why you need
to have the Holder
reference hold onto
the Lloyd object until
Lucinda can get there.
This is the Elephant
class definition code
in the Elephant.cs
file we added to the
project. Don’t forget
the “using System.
Windows.Forms;” line
at the top of the
class. Without it, the
MessageBox statement
won’t work.
Here’s the Form1 class code
from Form1.cs.
hold that reference
strings and arrays are
different from all of the
other data types you’ve
seen, because they’re the
only ones without a set size
(think about that for a bit).
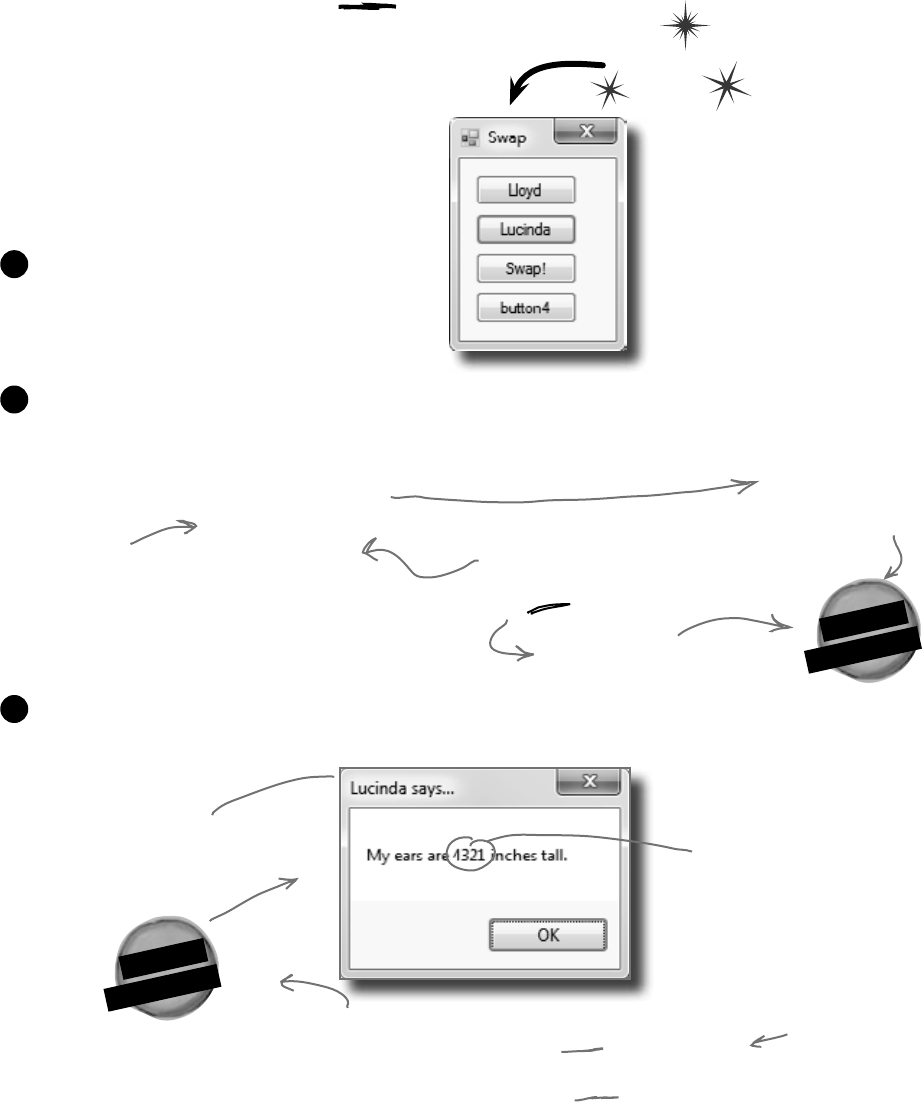
you are here 4 149
types and references
E
l
e
p
h
a
n
t
O
b
j
e
c
t
E
l
e
p
h
a
n
t
O
b
j
e
c
t
private void button4_Click(object sender, EventArgs e)
{
lloyd = lucinda;
lloyd.EarSize = 4321;
lloyd.WhoAmI();
}
Two references means TWO
ways to change an object’s data
Besides losing all the references to an object, when
you have multiple references to an object, you can
unintentionally change an object. In other words, one
reference to an object may change that object, while
another reference to that object has no idea that
something has changed. Watch:
Do this
Add another button to your form.
1
Add this code for the button. Can you guess what’s going to happen when you click it?
2
OK, go ahead and click the new button. Wait a second, that’s the Lucinda message
box. Didn’t we call the WhoAmI() method from Lloyd?
3
You’re calling the
WhoAmI() method from
the lloyd object.
It’s lucinda’s
message box…
But we set this
EarSize using the
lloyd reference! What
gives?
Lloyd
Lucinda
After this code runs,
both the lloyd and lucinda
variables reference the
SAME Elephant object.
Lloyd
Lucinda
lloyd and lucinda are now interchangeable. Changes to
one affect the object that BOTH are pointing at…
there’s no longer a real difference between lloyd and
lucinda, since they point to the SAME object.
But lloyd points at the same
thing that lucinda does.
This statement
says to set
EarSize to 4321
on whatever
object the lloyd
reference happens
to point to.
Note that the
data is NOT being
overwritten—the
only things changing
are the references.

150 Chapter 4
int[] heights;
heights = new int[7];
heights[0] = 68;
heights[1] = 70;
heights[2] = 63;
heights[3] = 60;
heights[4] = 58;
heights[5] = 72;
heights[6] = 74;
A
r
r
a
y
pick an object out of a line-up
A special case: arrays
name
The type
of each
element in
the array.
Notice that the array is an object,
even though the 7 elements are just
value types—like the ones on the first
two pages of this chapter.
7 int variables
heights
In memory, the array
is stored as one chunk
of memory, even though
there are multiple int
variables within it.
If you have to keep track of a lot of data of the same type, like a list of heights
or a group of dogs, you can do it in an array. What makes an array special is
that it’s a group of variables that’s treated as one object. An array gives you
a way of storing and changing more than one piece of data without having to
keep track of each variable individually. When you create an array, you declare
it just like any other variable, with a name and a type:
bool[] myArray;
myArray = new bool[15];
myArray[4] = true;
You declare an array by
specifying its type, followed
by square brackets.
Use each element in an array like
it is a normal variable
When you use an array, first you need to declare a reference
variable that points to the array. Then you need to create the
array object using the new statement, specifying how big you
want the array to be. Then you can set the elements in the
array. Here’s an example of code that declares and fills up an
array—and what’s happening on the heap when you do it. The
first element in the array has an index of zero.
You could combine the declaration
of the myArray variable with its
initialization—just like any other
variable. Then it’d look like this:
bool[] myArray = new bool[15];
You use the new keyword
to create an array because
it’s an object. So an
array variable is a kind of
reference variable.
This line sets the value of the fifth
element of myArray to true. It’s the
fifth one because the first is myArray[0],
the second is myArray[1], etc.
This array has 15
elements within it.
You
reference
these by
index, but
each one
works
essentially
like a normal
int variable.
int int int int int int int
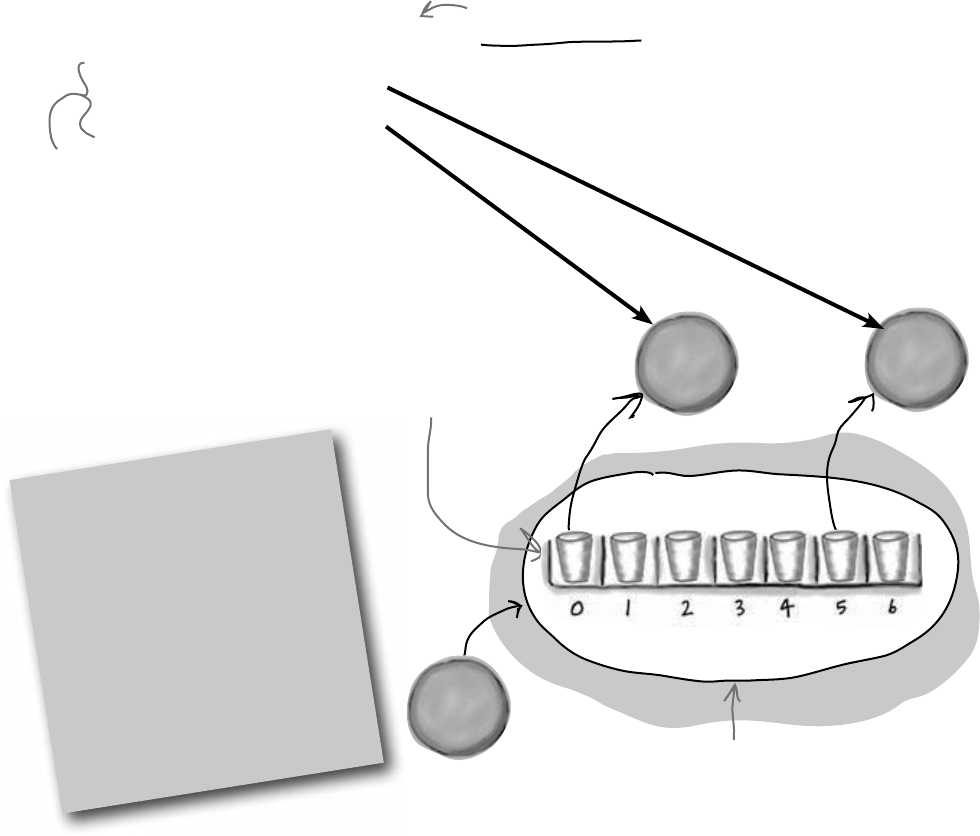
you are here 4 151
types and references
D
o
g
O
b
j
e
c
t
D
o
g
O
b
j
e
c
t
You can create an array of object references just like you create an
array of numbers or strings. Arrays don’t care what type of variable
they store; it’s up to you. So you can have an array of ints, or an
array of Duck objects, with no problem.
Here’s code that creates an array of 7 Dog variables. The line that
initializes the array only creates reference variables. Since there are
only two new Dog() lines, only two actual instances of the Dog
class are created.
Dog[] dogs = new Dog[7];
dogs[5] = new Dog();
dogs[0] = new Dog();
Arrays can contain a bunch of
reference variables, too
This line declares a
dogs variable to hold an
array of references to
Dog objects, and then
creates a 7-element
array.
These two lines create new
instances of Dog() and put
them at indexes 0 and 5.
When you set or
retrieve an element
from an array, the
number inside the
brackets is called
the index. The first
element in the array
has an index of zero.
All of the elements in the array are
references. The array itself is an object.
7 Dog variables
The first line of code only
created the array, not the
instances. The array is a
list of seven Dog reference
variables.
Dog Dog Dog Dog Dog Dog Dog
A
r
r
a
y
An array’s length
You can find out how many
elements are in an array using its
Length property. So if you’ve got
an array called heights, then you
can use heights.Length to find
out how long it is. If there are
7 elements in the array, that’ll
give you 7—which means the array
elements are numbered 0 to 6.
152 Chapter 4
Welcome to Sloppy Joe’s Budget House o’ Discount Sandwiches!
Sloppy Joe has a pile of meat, a whole lotta bread, and more condiments
than you can shake a stick at. But what he doesn’t have is a menu! Can
you build a program that makes a new random menu for him every day?
sloppy joe sez: “it’s not old, it’s vintage”
Start a new project and add a MenuMaker class
If you need to build a menu, you need ingredients. And arrays would be perfect
for those lists. We’ll also need some way of choosing random ingredients to
combine together into a sandwich. Luckily, the .NET Framework has a built-in
class called Random that generates random numbers. So we’ll have four fields
in our class: a Randomizer field that holds a reference to a Random object, and
three arrays of strings to hold the meats, condiments, and breads.
1
Do this
class MenuMaker {
public Random Randomizer;
string[] Meats = { “Roast beef”, “Salami”, “Turkey”, “Ham”, “Pastrami” };
string[] Condiments = { “yellow mustard”, “brown mustard”,
“honey mustard”, “mayo”, “relish”, “french dressing” };
string[] Breads = { “rye”, “white”, “wheat”, “pumpernickel”,
“italian bread”, “a roll” };
}
MenuMaker
Randomizer
Meats
Condiments
Breads
GetMenuItem()
public string GetMenuItem() {
string randomMeat = Meats[Randomizer.Next(Meats.Length)];
string randomCondiment = Condiments[Randomizer.Next(Condiments.Length)];
string randomBread = Breads[Randomizer.Next(Breads.Length)];
return randomMeat + “ with ” + randomCondiment + “ on ” + randomBread;
}
Add a GetMenuItem() method to the class that generates a random sandwich
The point of the class is to generate sandwiches, so let’s add a method to do exactly that. It’ll
use the Random object’s Next() method to choose a random meat, condiment, and bread
from each array. When you pass an int parameter to Next(), the method returns a random
that’s less than that parameter. So if your Random object is called Randomizer, then calling
Randomizer.Next(7) will return a random number between 0 and 6.
So how do you know what parameter to pass into the Next() method? Well, that’s easy—just
pass in each array’s Length. That will return the index of a random item in the array.
2
The method puts a random item from the Meats array into randomMeat by
passing Meats.Length to the Random object’s Next() method. Since there are 5
items in the Meats array, Meats.Length is 5, so Next(5) will return a random
number between 0 and 4.
The field called
Randomizer holds
a reference to a
Random object.
Calling its Next()
method will
generate random
numbers.
The class has three fields to
store three different arrays of
strings. It’ll use them to build
the random menu items.
The GetMenuItem()
method returns
a string that
contains a sandwich
built from random
elements in the
three arrays.
Remember, use square brackets to
access a member of an array.The
value of Breads[2] is “wheat”.
Notice how you’re
initializing these
arrays? That’s
called a collection
initializer, and
you’ll learn all
about them in
Chapter 8.
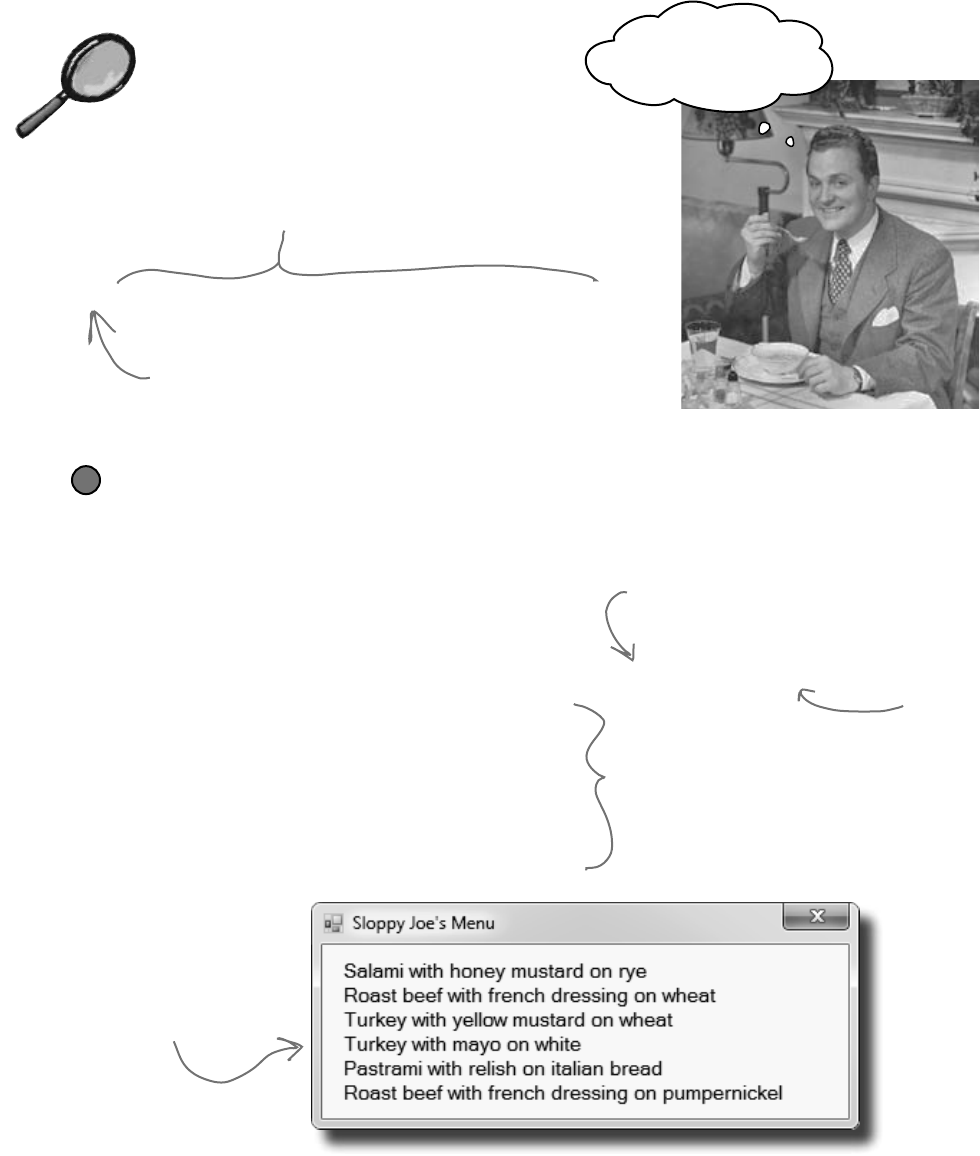
you are here 4 153
types and references
I eat all my meals
at Sloppy Joe’s!
How it works…
Meats[Randomizer.Next(Meats.Length)]
Meats is an array of strings. It’s got five elements,
numbered from zero to 4. So Meats[0] equals
“Roast Beef”, and Meats[3] equals “Ham”.
The randomizer.Next(7) method gets a random number that’s
less than 7. Meats.Length returns the number of elements in
Meats. So randomizer.Next(Meats.Length) gives
you a random number that’s greater than or equal to zero,
but less than the number of elements in the Meats array.
Build your form
Add six labels to the form, label1 through label6. Then add code to set each label’s
Text property using a MenuMaker object. You’ll need to initialize the object using a new
instance of the Random class. Here’s the code:
public Form1() {
InitializeComponent();
MenuMaker menu = new MenuMaker() { Randomizer = new Random() };
label1.Text = menu.GetMenuItem();
label2.Text = menu.GetMenuItem();
label3.Text = menu.GetMenuItem();
label4.Text = menu.GetMenuItem();
label5.Text = menu.GetMenuItem();
label6.Text = menu.GetMenuItem();
}
3
Use an object initializer to set the
MenuMaker object’s Randomizer field to
a new instance of the Random class.
Now you’re all set to
generate six different
random sandwiches using the
GetMenuItem() method.
When you run the
program, the six labels
show six different
random sandwiches.
Here’s something
to think about.
What would
happen if you
forgot to
initialize the
MenuMaker
object’s
Randomizer
field? Can you
think of a way
to keep this
from happening?
154 Chapter 4
Objects use references to talk to each other
So far, you’ve seen forms talk to objects by using reference variables to call their
methods and check their fields. Objects can call one another’s methods using
references, too. In fact, there’s nothing that a form can do that your objects can’t do,
because your form is just another object. And when objects talk to each other,
one useful keyword that they have is this. Any time an object uses the this keyword,
it’s referring to itself—it’s a reference that points to the object that calls it.
Here’s a method to tell an elephant to speak
Let’s add a method to the Elephant class. Its first parameter is a message from an
elephant. Its second parameter is the elephant that said it:
public void TellMe(string message, Elephant whoSaidIt) {
MessageBox.Show(whoSaidIt.Name + “ says: ” + message,);
}
Here’s what it looks like when it’s called. You can add to button4_Click(), but add it
before the statement that resets the references! (lloyd = lucinda;)
lloyd.TellMe(“Hi”, lucinda);
We called Lloyd’s TellMe() method, and passed it two parameters: “Hi” and a reference to
Lucinda’s object. The method uses its whoSaidIt parameter to access the Name parameter
of whatever elephant was passed into TellMe() using its second parameter.
1
Lloyd uses whoToTalkTo
(which has a reference to
Lucinda) to call TellMe()
this is replaced
with a reference to
Lloyd’s object
This method in the Elephant class calls another
elephant’s TalkTo() method. It lets one elephant
communicate with another one.
your object’s a chatty cathy
Elephant
Name
EarSize
WhoAmI()
TellMe()
SpeakTo()
Here’s a method that calls another method
Now let’s add this SpeakTo() method to the Elephant class. It uses a special keyword:
this. That’s a reference that lets an object talk about itself.
public void SpeakTo(Elephant whoToTalkTo, string message) {
whoToTalkTo.TellMe(message, this);
}
Let’s take a closer look at how this works.
lloyd.SpeakTo(lucinda, “Hello”);
When Lloyd’s SpeakTo() method is called, it uses its talkTo parameter (which has a
reference to Lucinda) to call Lucinda’s TellMe() method.
whoToTalkTo.TellMe(message, this);
lucinda.TellMe(message, [a reference to Lloyd]);
So Lucinda acts as if she was called with (“Hello”, lloyd), and shows this message:
2
you are here 4 155
types and references
Q: One more time—my form is an
object?
A:Yes!That’swhyyourclasscodestarts
withaclassdeclaration.Openupcodefor
aformandseeforyourself.Thenopenup
Program.csinanyprogramyou’ve
writtensofarandlookinsidetheMain()
method—you’llfind“new Form1()”.
Q: Why would I ever use null?
A:Thereareafewwaysyouseenull
usedintypicalprograms.Themostcommon
wayistestingforit:
if (lloyd == null) {
Thattestwillreturntrueifthelloyd
referenceissettonull.
Anotherwayyou’llseethenullkeyword
usediswhenyouwantyourobjecttoget
garbage-collected.Ifyou’vegotareference
toanobjectandyou’refinishedwiththe
object,settingthereferencetonullwill
immediatelymarkitforcollection(unless
there’sanotherreferencetoitsomewhere).
Q: You keep talking about garbage
collecting, but what’s actually doing the
collecting?
A:Rememberhowwetalkedaboutthe
Common Language Runtime (or CLR)
backatthebeginningofthefirstchapter?
That’sthevirtualmachinethatrunsall.NET
programs.Avirtual machineisawayforit
toisolaterunningprogramsfromtherestof
theoperatingsystem.Onethingthatvirtual
machinesdoismanagethememorythat
theyuse.Thatmeansthatitkeepstrackof
allofyourobjects,figuresoutwhenthelast
referencetotheobjectdisappears,andfrees
upthememorythatitwasusing.
Where no object has gone before
There’s another important keyword that you’ll use with objects.
When you create a new reference and don’t set it to anything, it has
a value. It starts off set to null, which means it’s not pointing to
anything.
D
o
g
o
b
j
e
c
t
#
2
fido
poof!
Dog fido;
Dog lucky = new Dog();
fido = new Dog();
Right now, there’s only
one object. The fido
reference is set to null.
D
o
g
o
b
j
e
c
t
#
1
Lucky
lucky = null;
D
o
g
o
b
j
e
c
t
#
2
fido
D
o
g
o
b
j
e
c
t
#
1
Lucky
Now that fido’s pointing
to an object, it’s no
longer equal to null.
When we set lucky to null,
it’s no longer pointing at its
object, so it gets garbage-
collected.
156 Chapter 4
Q: I’m still not sure I get how
references work.
A:Referencesarethewayyouuseallofthe
methodsandfieldsinanobject.Ifyoucreatea
referencetoaDogobject,youcanthenuse
thatreferencetoaccessanymethodsyou’ve
createdfortheDogobject.Ifyouhavea
(non-static)methodcalledDog.Bark()or
Dog.Beg(),youcancreateareference
calledspot.Thenyoucanusethattoaccess
spot.Bark()orspot.Beg().You
couldalsochangeinformationinthefieldsfor
theobjectusingthereference.Soyoucould
changeaBreedfieldusingspot.Breed.
Q: Wait, then doesn’t that mean that
every time I change a value through a
reference I’m changing it for all of the
other references to that object, too?
A:Yes.Ifroverisareferencetothe
sameobjectasspot,changingrover.
Breedto“beagle”wouldmakeitsothat
spot.Breedwas“beagle.”
Q:I still don’t get that stuff about
different types holding different sized
values. What’s the deal with that?
A:OK.Thethingaboutvariablesisthey
assignasizetoyournumbernomatterhow
bigitsvalueis.Soifyounameavariable
andgiveitalong typeeventhoughthe
numberisreallysmall(like,say,5),theCLR
setsasideenoughmemoryforittogetreally
big.Whenyouthinkaboutit,that’sreally
useful.Afterall,they’recalledvariables
becausetheychangeallthetime.
TheCLRassumesyouknowwhatyou’re
doingandyou’renotgoingtogiveavariable
atypethatyoudon’tneed.Soeventhough
thenumbermightnotbebignow,there’sa
chancethataftersomemathhappens,it’ll
change.TheCLRgivesitenoughmemory
tohandlewhatevertypeofnumberyoucallit.
Q: Remind me again—what does
“this” do?
A:thisisaspecialvariablethatyou
canonlyuseinsideanobject.Whenyou’re
insideaclass,youusethistorefer
toanyfieldormethodofthatparticular
instance.It’sespeciallyusefulwhenyou’re
workingwithaclasswhosemethodscall
otherclasses.Oneobjectcanuseittosend
a reference to itselftoanotherobject.So
ifSpotcallsoneofRover’smethods
passingthisasaparameter,he’sgiving
RoverareferencetotheSpotobject.
this and that
Any time you’ve got
code in an object
that’s going to be
instantiated, the
instance can use the
special this variable
that has a reference
to itself.
¢WhenyoudeclareavariableyouALWAYSgiveatype.
Sometimesyoucombineitwithsettingthevalue.
¢Therearevalue typesforvariablesthatholddifferent
sizesofnumbers.Thebiggestnumbersshouldbeofthe
typelongandthesmallestones(upto255)canbe
declaredasbytes.
¢Everyvaluetypehasasize,andyoucan’tputavalueof
abiggertypeintoasmallervariable,nomatterwhatthe
actualsizeofthedatais.
¢Whenyou’reusingliteralvalues,usetheFsuffixto
indicateafloat(15.6F)andMforadecimal(36.12M).
¢Thereareafewtypes(likeshorttoint)thatC#
knowshowtoconvertautomatically.Whenthecompiler
won’tletyousetavariableequaltoavalueofadifferent
type,that’swhenyouneedtocastit.
¢Therearesomewordsthatarereservedbythe
languageandyoucan’tnameyourvariableswiththem.
They’rewordslikefor,while,using,new,and
othersthatdospecificthingsinthelanguage.
¢Referencesarelikelabels:youcanhaveasmany
referencestoanobjectasyouwant,andtheyallreferto
thesamething.
¢Ifanobjectdoesn’thaveanyreferencestoit,it
eventuallygetsgarbage-collected.
There’s actually a very specific case where you don’t declare a type – you’ll
learn about it when you use the “var” keyword in Chapter 14.
you are here 4 157
types and references
private void button1_Click(object sender, EventArgs e)
{
Elephant[] elephants = new Elephant[7];
elephants[0] = new Elephant() { Name = “Lloyd”, EarSize = 40 };
elephants[1] = new Elephant() { Name = “Lucinda”, EarSize = 33 };
elephants[2] = new Elephant() { Name = “Larry”, EarSize = 42 };
elephants[3] = new Elephant() { Name = “Lucille”, EarSize = 32 };
elephants[4] = new Elephant() { Name = “Lars”, EarSize = 44 };
elephants[5] = new Elephant() { Name = “Linda”, EarSize = 37 };
elephants[6] = new Elephant() { Name = “Humphrey”, EarSize = 45 };
Elephant biggestEars = elephants[0];
for (int i = 1; i < elephants.Length; i++)
{
if (elephants[i].EarSize > biggestEars.EarSize)
{
biggestEars = elephants[i];
}
}
MessageBox.Show(biggestEars.EarSize.ToString());
}
Here’s an array of Elephant objects and a loop that will go through
it and find the one with the biggest ears. What’s the value of the
biggestEars.Ears after each iteration of the for loop?
Be careful—this loop starts
with the second element of the
array (at index 1) and iterates
six times until i is equal to the
length of the array.
We’re creating an array of 7
Elephant() references.
Every array
starts with
index 0, so the
first elephant
in the array is
Elephants[0].
This line makes the biggestEars
reference point at whatever
elephant elephants[i] points to.
Answers on page 166.
Iteration #1 biggestEars.EarSize = _________
Iteration #2 biggestEars.EarSize = _________
Iteration #3 biggestEars.EarSize = _________
Iteration #4 biggestEars.EarSize = _________
Iteration #5 biggestEars.EarSize = _________
Iteration #6 biggestEars.EarSize = _________
158 Chapter 4
refNum = index[y];
int y = 0;
string result = “”;
MessageBox.Show(result);
y = y + 1;
index[0] = 1;
index[1] = 3;
index[2] = 0;
index[3] = 2;
result += islands[refNum];
int[] index = new int[4];
result += “\nisland = ”;
string[] islands = new string[4];
int refNum;
while (y < 4) {
private void button1_Click (object sender, EventArgs e)
{
islands[0] = “Bermuda”;
islands[1] = “Fiji”;
islands[2] = “Azores”;
islands[3] = “Cozumel”;
}
Code Magnets
The code for a button is all scrambled up on the fridge. Can you
reconstruct the code snippets to make a working method that
produces the output listed below?
}
code magnets and pool puzzle
Answers on page 167.
you are here 4 159
types and references
Note: Each snippet from
the pool can be used
more than once.
class Triangle
{
double area;
int height;
int length;
public static void Main(string[] args)
{
string results = “”;
__________
___________________________
while ( ________ )
{
_________________________
_____.height = (x + 1) * 2;
_____.length = x + 4;
__________________
results += “triangle ” + x + “, area”;
results += “ = ” + _____.area + “\n”;
___________
}
___________
x = 27;
Triangle t5 = ta[2];
ta[2].area = 343;
results += “y = ” + y;
MessageBox.Show(results +
“, t5 area = ” + t5.area);
}
void setArea()
{
____________ = (height * length) / 2;
}
}
Output
Bonus Question!
For extra bonus points, use snippets
from the pool to fill in the two blanks
missing from the output.
Here’s the entry point for the
application. Assume it’s in a file with
the right “using” lines at the top.
x = x + 1;
x = x + 2;
x = x - 1; x < 4
x < 5
Triangle [ ] ta = new Triangle(4);
Triangle ta = new [ ] Triangle[4];
Triangle [ ] ta = new Triangle[4];
ta = new Triangle();
ta[x] = new Triangle();
ta.x = new Triangle();
ta[x] = setArea();
ta.x = setArea();
ta[x].setArea();
int x;
int y;
int x = 0;
int x = 1;
int y = x;
area
ta.area
ta.x.area
ta[x].area
ta.x
ta(x)
ta[x]
x
y
28
30.0
4, t5 area = 18
4, t5 area = 343
27, t5 area = 18
27, t5 area = 343
Hint: SetArea()
is NOT a
static method.
Flip back to
Chapter 3 for
a refresher on
what the static
keyword means.
Pool Puzzle
Your job is to take code snippets
from the pool and place them
into the blank lines in the
code. You may use the same
snippet more than once, and
you won’t need to use all the
snippets. Your goal is to make
a class that will compile and run
and produce the output listed.
Answers on page 168.
160 Chapter 4
build something fun!
Build a typing game
You’ve reached a milestone…you know enough to build a game! Here’s how your game will
work. The form will display random letters. If the player types one of them, it disappears
and the accuracy rate goes up. If the player types an incorrect letter, the accuracy rate
goes down. As the player keeps typing letters, the game goes faster and faster, getting more
difficult with each correct letter. If the form fills up with letters, the game is over! Do this
Build the form.
Here’s what the form will look like in the form designer:
1
You’ll need to:
≥Turn off the minimize box and maximize box. Then set the form’s FormBorderStyle
property to Fixed3D. That way, the player won’t be able to accidentally drag and resize it.
Then resize it so that it’s much wider than it is tall (we set our form’s size to 876, 174).
≥Drag a ListBox out of the Toolbox onto the form. Set its Dock property to Fill, and its
MultiColumn property to True. Set its Font to 72 point bold.
≥In the Toolbox, expand the “All Windows Forms” group at the top. This will display many
controls. Find the Timer control and double-click on it to add it to your form.
≥Find the StatusStrip in the “All Windows Forms” group in the Toolbox and double-
click on it to add a status bar to your form. You should now see the StatusStrip and
Timer icons in the gray area at the bottom of the form designer:
See how you can use a Timer to make your
form do more than one thing at once? Take
a minute and flip to #3 in the “Leftovers”
appendix to learn about another way to do that.
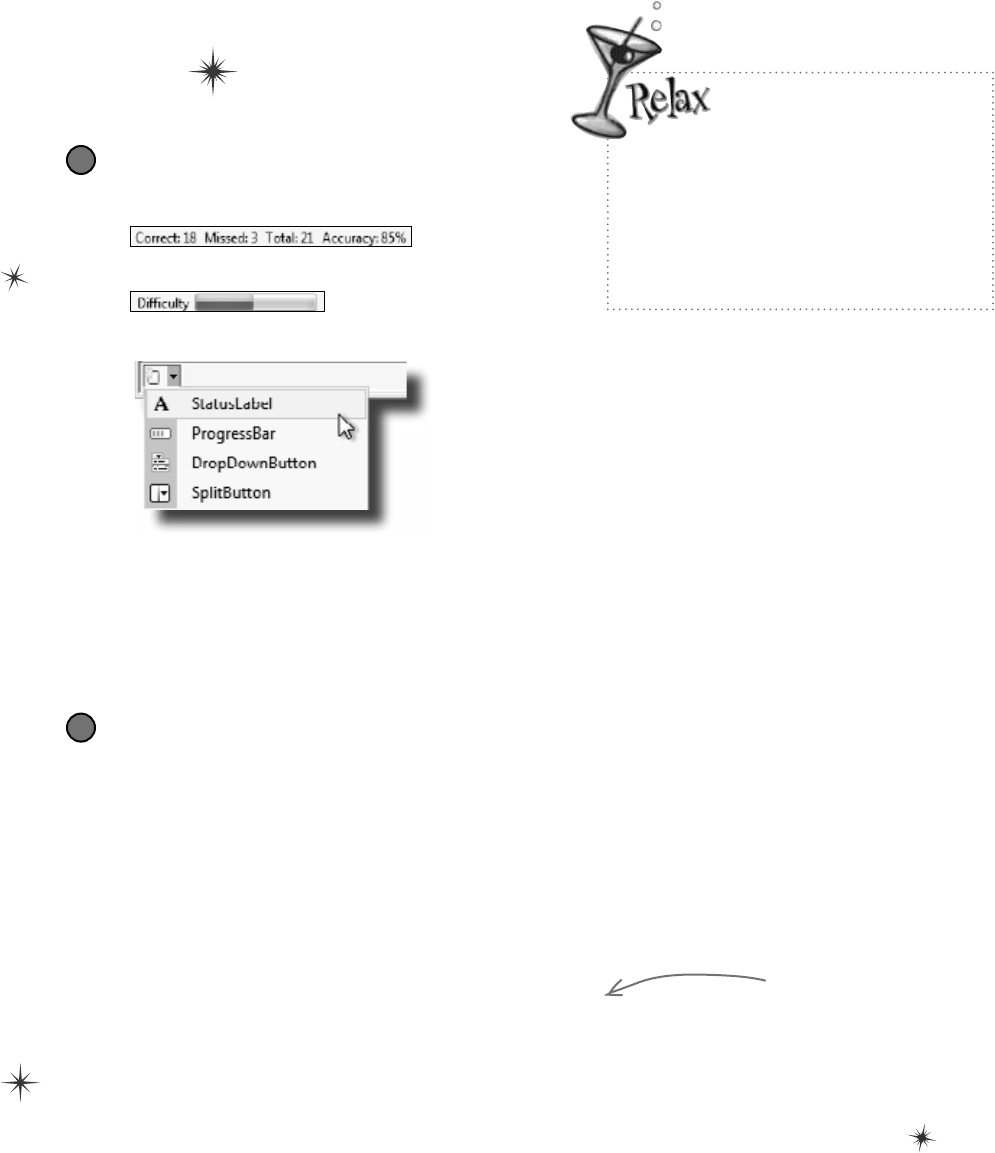
you are here 4 161
types and references
You’ll be using three new
controls, but they’re easy
to work with!
Even though you haven’t seen a ListBox,
StatusStrip, or Timer before, you already
know how to set their properties and work
with them in your code. You’ll learn a lot
more about them in the next few chapters.
Set up the Timer control.
Did you notice how your Timer control didn’t show up on your form? That’s because
the Timer is a non-visual control. It doesn’t actually change the look and feel of the
form. It does exactly one thing: it calls a method over and over again. Set the
Timer control’s Interval property to 800, so that it calls its method every 800
milliseconds. Then double-click on the timer1 icon in the designer. The IDE will
do what it always does when you double-click on a control: it will add a method to
your form. This time, it’ll add one called timer1_Tick. Here’s the code for it:
3
private void timer1_Tick(object sender, EventArgs e)
{
// Add a random key to the ListBox
listBox1.Items.Add((Keys)random.Next(65, 90));
if (listBox1.Items.Count > 7)
{
listBox1.Items.Clear();
listBox1.Items.Add(“Game over”);
timer1.Stop();
}
}
Set up the StatusStrip control.
Take a closer look at the status bar at the bottom of the
screenshot. On one side, it’s got a series of labels:
2
And on the other side, it’s got a label and a progress bar:
Add a StatusLabel to your StatusStrip by clicking its drop-down and selecting StatusLabel:
≥Set the StatusStrip’s SizingGrip property to False.
≥Use the Properties window to set its (Name) to correctLabel and its Text to “Correct: 0”.
Add three more StatusLabels: missedLabel, totalLabel, and accuracyLabel.
≥Add one more StatusLabel. Set its Spring to True, TextAlign to MiddleRight, and
Text to “Difficulty”. Finally, add a ProgressBar and name it difficultyProgressBar.
You’ll add a field called
“random” in just a minute.
Can you guess what its
type will be?
162 Chapter 4
the key to a great game
Add a class to keep track of the player stats.
If the form is going to display the total number of keys the player pressed, the number that
were missed and the number that were correct, and the player’s accuracy, then we’ll need
a way to keep track of all that data. Sounds like a job for a new class! Add a class called
Stats to your project. It’ll have four int fields called Total, Missed, Correct, and
Accuracy, and a method called Update with one bool parameter: true if the player
typed a correct letter that was in the ListBox, or false if the player missed one.
4Stats
Total
Missed
Correct
Accuracy
Update()
class Stats
{
public int Total = 0;
public int Missed = 0;
public int Correct = 0;
public int Accuracy = 0;
public void Update(bool correctKey)
{
Total++;
if (!correctKey)
{
Missed++;
}
else
{
Correct++;
}
Accuracy = 100 * Correct / (Missed + Correct);
}
}
Every time the Update() method is
called, it recalculates the % correct
and puts it in the Accuracy field.
Add fields to your form to hold a Stats object and a Random object.
You’ll need an instance of your new Stats class to actually store the information,
so add a field called stats to store it. And you already saw that you’ll need a field
called random—it’ll contain a Random object.
Add the two fields to the top of your form:
public partial class Form1 : Form
{
Random random = new Random();
Stats stats = new Stats();
...
5
you are here 4 163
types and references
Handle the keystrokes.
There’s one last thing your game needs to do: any time the player hits a key, it needs to check if that key
is correct (and remove the letter from the ListBox if it is), and update the stats on the StatusStrip.
6
private void Form1_KeyDown(object sender, KeyEventArgs e)
{
// If the user pressed a key that's in the ListBox, remove it
// and then make the game a little faster
if (listBox1.Items.Contains(e.KeyCode))
{
listBox1.Items.Remove(e.KeyCode);
listBox1.Refresh();
if (timer1.Interval > 400)
timer1.Interval -= 10;
if (timer1.Interval > 250)
timer1.Interval -= 7;
if (timer1.Interval > 100)
timer1.Interval -= 2;
difficultyProgressBar.Value = 800 - timer1.Interval;
// The user pressed a correct key, so update the Stats object
// by calling its Update() method with the argument true
stats.Update(true);
}
else
{
// The user pressed an incorrect key, so update the Stats object
// by calling its Update() method with the argument false
stats.Update(false);
}
// Update the labels on the StatusStrip
correctLabel.Text = "Correct: " + stats.Correct;
missedLabel.Text = "Missed: " + stats.Missed;
totalLabel.Text = "Total: " + stats.Total;
accuracyLabel.Text = "Accuracy: " + stats.Accuracy + "%";
}
Run your game.
Your game’s done! Give it a shot and see how well you do. You may need to adjust the font size of the
ListBox to make sure it holds exactly 7 letters, and you can change the difficulty by adjusting the values that
are subtracted from timer1.Interval in the Form1_KeyDown() method.
7
This is the part that increases the difficulty
as the player gets more keys right. You can
make the game easier by reducing the amounts
that are subtracted from timer1.Interval, or
make it harder by increasing them.
This if statement
checks the ListBox
to see if it contains
the key the player
pressed. If it does,
then the key gets
removed from the
ListBox and the
game difficulty is
increased.
When the player
presses a key, the
Form1_KeyDown()
method calls the
Stats object’s
Update() method to
update the player
stats, and then it
displays them in the
StatusStrip.
Go back to the form designer and select the form.
Then go to the Properties window and click on the
lightning bolt button. Scroll to the KeyDown row
and double-click on it. This tells the IDE to add
a method called Form1_KeyDown() that gets
called every time the user presses a key. Here’s the
code for the method:
Click this button to
change the Properties
window’s view. The
button to the left
of it switches the
Properties window
back to showing you
properties.
These are called
events, and you’ll
learn a lot more
about them later on.

164 Chapter 4
Thereareabout77reserved wordsinC#.ThesearewordsreservedbytheC#compiler;you
can’tusethemforvariablenames.You’llknowalotofthemreallywellbythetimeyoufinishthe
book.Herearesomeyou’vealreadyused.WritedownwhatyouthinkthesewordsdoinC#.
namespace
for
class
public
else
new
using
if
while
Namespaces make sure that the names you are using in your program don’t collide
with the ones in the .NET Framework or other external classes you’ve used in your
program. All of the classes and methods in a program are inside a namespace.
This lets you do a loop that executes three statements. First it declares the
variable it’s going to use, then there’s the statement that evaluates the variable
against a condition. The third statement does something to the value.
A class is how you define an object. Classes have properties and methods.
Properties are what they know and methods are what they do.
A public class can be used by every other class in the project. When a variable or
method is declared as public, it can be used by classes and called by methods that are
outside of the one it’s being declared in.
Code that starts with else will get executed if the if statement preceding it fails.
You use this to create a new instance of an object.
This is a way of listing off all of the namespaces you are using in your program. using
lets you use code from the .NET Framework and predefined classes from third parties
as well as classes you can make yourself.
One way of setting up a conditional statement in a program. It says
if one thing is true, do one thing and if not do something else.
while loops are loops that keep on going as long as the condition in them is true.
exercise solutions
you are here 4 165
types and references
Typecross Solution
N
1A
2M E
R
3S R
4E S E R V
5E D
E S A
F I R
E G C
6A S T I N G
R N A D
7
E M G
8A R B A G E
N E L C C
9
C
10 O N C A T
11 E N A T
12 E I O
E T Y O M M
O
13 P S A P
D
14 O U B L E T L O
J C
15 H A R U
E I N
E
16 S C A P E U
17 N S I G N E D
T G
Across
1. The second part of a variable declaration [name]
4. "namespace", "for", "while", "using" and "new" are
examples of _____________
6. What (int) does in this line of code: x = (int) y;
[casting]
8. When an object no longer has any references
pointing to it, it's removed from the heap using
____________ collection. [garbage]
10. What you're doing when you use the + operator to
stick two strings together. [concatenate]
14. The type that holds the biggest numbers. [double]
15. The type that stores a single letter or number
[char]
16. \n and \r are _______ sequences [escape]
17. The four whole number types that only hold
positive numbers [unsigned]
Down
2. You can combine the variable declaration and the
____________ into one statement. [assignment]
n object [reference]
5. What your program uses to work with data that's in
memory [variable]
7. If you want to store a currency value, use this type
[decimal]
9. += and -= are this kind of operator [compound]
11. A variable declaration always starts with this.
[type]
12. Every object has this method that converts it to a
string. [tostring]
13. When you've got a variable of this type, you can
assign any value to it [object]
166 Chapter 4
private void button1_Click(object sender, EventArgs e)
{
Elephant[] elephants = new Elephant[7];
elephants[0] = new Elephant() { Name = “Lloyd”, EarSize = 40 };
elephants[1] = new Elephant() { Name = “Lucinda”, EarSize = 33 };
elephants[2] = new Elephant() { Name = “Larry”, EarSize = 42 };
elephants[3] = new Elephant() { Name = “Lucille”, EarSize = 32 };
elephants[4] = new Elephant() { Name = “Lars”, EarSize = 44 };
elephants[5] = new Elephant() { Name = “Linda”, EarSize = 37 };
elephants[6] = new Elephant() { Name = “Humphrey”, EarSize = 45 };
Elephant biggestEars = elephants[0];
for (int i = 1; i < elephants.Length; i++)
{
if (elephants[i].EarSize > biggestEars.EarSize)
{
biggestEars = elephants[i];
}
}
MessageBox.Show(biggestEars.EarSize.ToString());
}
Iteration #1 biggestEars.EarSize = _________
Iteration #2 biggestEars.EarSize = _________
Iteration #3 biggestEars.EarSize = _________
Iteration #4 biggestEars.EarSize = _________
Iteration #5 biggestEars.EarSize = _________
Iteration #6 biggestEars.EarSize = _________
exercise solutions
40
42
42
44
44
45
Did you remember that
the loop starts with the
second element of the
array? Why do you think
that is?
The biggestEars
reference is used to
keep track of which
element we’ve seen while
going through the for
loop has the biggest
ears so far.
The for loop starts with the second elephant and
compares it to whatever elephant biggestEars
points to. If its ears are bigger, it points
biggestEars at that elephant instead. Then it
moves to the next one, then the next one…by the
end of the loop biggestEars points to the one
with the biggest ears.
Here’s an array of Elephant objects and a loop that will go through
it and find the one with the biggest ears. What’s the value of the
biggestEars.Ears after each iteration of the for loop?
Use the debugger to check
this! Put your breakpoint here
and watch biggestEars.EarSize.
you are here 4 167
types and references
Code Magnets Solution
The code for a button is all scrambled up on the fridge. Can you
reconstruct the code snippets to make a working method that
produces the output listed below?
private void button1_Click (object sender, EventArgs e)
{
string result = “”;
int[] index = new int[4];
index[0] = 1;
index[1] = 3;
index[2] = 0;
index[3] = 2;
islands[0] = “Bermuda”;
islands[1] = “Fiji”;
islands[2] = “Azores”;
islands[3] = “Cozumel”;
string[] islands = new string[4];
int y = 0;
int refNum;
while (y < 4) {
refNum = index[y];
result += “\nisland = ”;
result += islands[refNum];
y = y + 1;
}
}
MessageBox.Show(result);
The result string is built up
using the += operator to
concatenate lines onto it.
This while loop
pulls a value from
the index[] array
and uses it for
the index in the
islands[] array.
The islands[] array is
initialized here.
Here’s where the
index[] array
gets initialized.
168 Chapter 4
class Triangle
{
double area;
int height;
int length;
public static void Main(string[] args)
{
string results = “”;
__________
___________________________
while ( ________ )
{
_________________________
_____.height = (x + 1) * 2;
_____.length = x + 4;
__________________
results += “triangle ” + x + “, area”;
results += “ = ” + _____.area + “\n”;
___________
}
___________
x = 27;
Triangle t5 = ta[2];
ta[2].area = 343;
results += “y = ” + y;
MessageBox.Show(results +
“, t5 area = ” + t5.area);
}
void setArea()
{
____________ = (height * length) / 2;
}
}
28
4, t5 area = 343
After this line,
we’ve got an array
of four Triangle
references—but
there aren’t any
Triangle objects yet!
Notice how this class contains
the entry point, but it also
creates an instance of itself?
That’s completely legal in C#.
The setArea() method
uses the height and
length fields to set the
area field. Since it’s not
a static method, it can
only be called from inside
an instance of Triangle.
The while loop
creates the four
instances of
Triangle by calling
the new statement
four times.
Pool Puzzle Solution
Bonus Answer
int x = 0;
Triangle[] ta = new Triangle[4];
x < 4
ta[x] = new Triangle();
ta[x]
ta[x].setArea();
ta[x]
x = x + 1;
int y = x;
area
ta[x]
exercise solutions

C# Lab 169
Name: Date:
C# Lab 169
This lab gives you a spec that describes a program
for you to build, using the knowledge you’ve gained
over the last few chapters.
This project is bigger than the ones you’ve seen so far.
So read the whole thing before you get started, and
give yourself a little time. And don’t worry if you get
stuck—there’s nothing new in here, so you can move
on in the book and come back to the lab later.
We’ve lled in a few design details for you, and we’ve
made sure you’ve got all the pieces you need…and
nothing else.
It’s up to you to nish the job. You can download
an executable for this lab from the website…but we
won’t give you the code for the answer.
C# Lab
A Day at the Races
170
A Day at the Races
The spec: build a racetrack simulator
Joe, Bob, and Al love going to the track, but they’re
tired of losing all their money. They need you to build a
simulator for them so they can figure out winners before
they lay their money down. And, if you do a good job,
they’ll cut you in on their profits.
Here’s what you’re going to build for them....
The Guys
Joe, Bob, and Al want to bet on a dog race. Joe starts with 50 bucks,
Bob starts with 75 bucks, and Al starts with 45 bucks. Before
each race, they’ll each decide if they want to bet, and how
much they want to put down. The guys can change their bets
right up to the start of the race…but once the race starts, all
bets are final.
The Betting Parlor
The betting parlor keeps track of how much cash each
guy has, and what bet he’s placed. There’s a minimum
bet of 5 bucks. The parlor only takes one bet per person
for any one race.
The parlor checks to make
sure that the guy who’s betting
has enough cash to cover his
bet—so the guys can’t place a
bet if they don’t have the cash
to cover the bet.
Welcome to Curly’s
Betting Parlor
Minimum Bet: $5
One bet per person per race
Got enough cash?
171
A Day at the Races
Betting
Every bet is double-or-nothing—either the winner doubles
his money, or he loses what he bet. There’s a minimum
bet of 5 bucks, and each guy can bet up to 15 bucks on a
single dog. If the dog wins, the bettor ends up with twice
the amount that he bet (after the race is complete). If he
loses, that amount disappears from his pile.
The Race
There are four dogs that run on a straight track. The
winner of the race is the first dog to cross the finish line.
The race is totally random, there are no handicaps or
odds, and a dog isn’t more likely to win his next race
based on his past performance.
If you want to build a handicap
system, by all means do it! It’ll
be really good practice writing
some fun code.
Sound fun? We’ve got more details coming up…
All bets: double-or-nothing
Minimum Bet: $5
Up to $15 per dog
Win: $$ added
Lose: $$ removed
Say a guy places a $10 bet at the window. At
the end of the race, if his dog wins, his cash
goes up by $10 (because he keeps the original $10
he bet, plus he gets $10 more from winning). If
he loses, his cash goes down by $10.
172
A Day at the Races
You’ll need three classes and a form
Greyhound
StartingPosition
RacetrackLength
MyPictureBox
Location
Randomizer
Run()
TakeStartingPosition()
class Greyhound {
public int StartingPosition; // Where my PictureBox starts
public int RacetrackLength; // How long the racetrack is
public PictureBox MyPictureBox = null; // My PictureBox object
public int Location = 0; // My Location on the racetrack
public Random Randomizer; // An instance of Random
public bool Run() {
// Move forward either 1, 2, 3 or 4 spaces at random
// Update the position of my PictureBox on the form
// Return true if I won the race
}
public void TakeStartingPosition() {
// Reset my location to the start line
}
}
You’ll build three main classes in the project, as well as a GUI for the
simulator. You should have an array of three Guy objects to keep track
of the three guys and their winnings, and an array of four Greyhound
objects that actually run the race. Also, each instance of Guy should
have its own Bet object that keeps track of his bet and pays out (or
takes back) cash at the end of the race.
We’ve gotten you started with class descriptions and some snippets of
code to work from. You’ve got to finish everything up.
Your object can control things on your form…
The Greyhound class keeps track of its position on the racetrack during the race. It also
updates the location of the PictureBox representing the dog moving down the race
track. Each instance of Greyhound uses a field called MyPictureBox to reference
the PictureBox control on the form that shows the picture of the dog. Suppose the
distance variable contains the distance to move the dog forward. Then this code will
update the location of MyPictureBox by adding distance to its X value:
Point p = MyPictureBox.Location;
p.X += distance;
MyPictureBox.Location = p;
We’ve given you the skeleton of
the class you need to build. Your
job is to fill in the methods.
You get the current
location of the picture…
…add the value to move forward
to its X coordinate…
…and then update the picture
box location on the form.
See how the class diagram
matches up with the code?
We’ve added comments to give
you an idea of what to do.
Don’t overthink this…
sometimes you just need to set
a variable, and you’re done.
You’ll need to add “using
System.Windows.Forms” to
the top of the Greyhound
and Guy classes. And you’ll
need to add “using System.
Drawing;” to Greyhound,
because it uses Point.
You’ll have to make sure
the form passes the
right picture box into
each Greyhound’s object
initializer.
You only need one instance of Random—each Greyhound’s
Randomizer reference should point to the same Random object.
The Greyhound object initializer is pretty
straightforward. Just make sure you pass a
reference to the right PictureBox on the
form to each Greyhound object.
173
A Day at the Races
Bet
Amount
Dog
Bettor
GetDescription
PayOut
Guy
Name
MyBet
Cash
MyRadioButton
MyLabel
UpdateLabels()
PlaceBet()
ClearBet()
Collect()
class Guy {
public string Name; // The guy’s name
public Bet MyBet; // An instance of Bet() that has his bet
public int Cash; // How much cash he has
// The last two fields are the guy’s GUI controls on the form
public RadioButton MyRadioButton; // My RadioButton
public Label MyLabel; // My Label
public void UpdateLabels() {
// Set my label to my bet’s description, and the label on my
// radio button to show my cash (“Joe has 43 bucks”)
}v
public void ClearBet() { } // Reset my bet so it’s zero
public bool PlaceBet(int Amount, int Dog) {
// Place a new bet and store it in my bet field
// Return true if the guy had enough money to bet
}
public void Collect(int Winner) { } // Ask my bet to pay out
}
class Bet {
public int Amount; // The amount of cash that was bet
public int Dog; // The number of the dog the bet is on
public Guy Bettor; // The guy who placed the bet
public string GetDescription() {
// Return a string that says who placed the bet, how much
// cash was bet, and which dog he bet on (“Joe bets 8 on
// dog #4”). If the amount is zero, no bet was placed
// (“Joe hasn’t placed a bet”).
}
public int PayOut(int Winner) {
// The parameter is the winner of the race. If the dog won,
// return the amount bet. Otherwise, return the negative of
// the amount bet.
}
}
Hint: You’ll instantiate Bet
in the Guy code. Guy willl
use the this keyword to
pass a reference to himself
to the Bet’s initializer.
Add your code here.
The key here is to use the Bet
object…let it do the work.
Remember that bets
are represented by
instances of Bet.
This is a common programming task:
assembling a string or message from
several individual bits of data.
This is the object that
Guy uses to represent
bets in the application.
When you initialize
the Guy object, make
sure you set its MyBet
field to null, and call
its UpdateLabels()
method as soon as it’s
initialized.
The object initializer for Bet just
sets the amount, dog, and bettor.
Once you set MyLabel to one of the
labels on the form, you’ll be able to change
the label’s text using MyLabel.Text. And
the same goes for MyRadioButton!
174
A Day at the Races
Here’s your application architecture
S
y
s
t
e
m
.
W
i
n
d
o
w
s
.
F
o
r
m
o
b
j
e
c
t
G
r
e
y
h
o
u
n
d
[
]
a
r
r
a
y
G
u
y
[
]
a
r
r
a
y
Among the visual objects will be
four PictureBox controls for
the pictures of the dogs. You’ll
pass references to them to the
object initializers of the four
Greyhound objects. It’ll also have
three RadioButton controls and
three labels, which you’ll pass to
the object initializers of the
three Guy objects.
The guys array contains
references to three Guy
objects. Each of those
objects has a field called
bet, which is a reference
to a Bet object.
The dogs array contains four
references, each of which points
to a separate instance of the
Greyhound class.
Array of Greyhound references
Array of Guy references
The form needs to initialize
both of these arrays when
it starts up.
Spend some time looking closely at the architecture. It
looks pretty complicated at first, but there’s nothing here
you don’t know. Your job is to recreate this architecture
yourself, starting with the Greyhound and Guy arrays in
your main form.
G
r
e
y
h
o
u
n
d
o
b
j
e
c
t
G
r
e
y
h
o
u
n
d
o
b
j
e
c
t
G
r
e
y
h
o
u
n
d
o
b
j
e
c
t
G
r
e
y
h
o
u
n
d
o
b
j
e
c
t
V
i
s
u
a
l
o
b
j
e
c
t
s
G
u
y
o
b
j
e
c
t
B
e
t
o
b
j
e
c
t
G
u
y
o
b
j
e
c
t
B
e
t
o
b
j
e
c
t
G
u
y
o
b
j
e
c
t
B
e
t
o
b
j
e
c
t
175
A Day at the Races
G
r
e
y
h
o
u
n
d
[
]
a
r
r
a
y
S
y
s
t
e
m
.
W
i
n
d
o
w
s
.
F
o
r
m
o
b
j
e
c
t
B
e
t
o
b
j
e
c
t
G
u
y
o
b
j
e
c
t
F
o
r
m
o
b
j
e
c
t
When a Guy places a bet, he
creates a new Bet object
Guy[1].PlaceBet(7, 3)
First the form tells Guy #2
to place a bet for 7 bucks on
dog #3…
MyBet = new Bet()
{ Amount = 7, dog = 3, Bettor = this };
…so Guy #2 creates a new
instance of Bet, using the this
keyword to tell the Bet object
that he’s the bettor…
true
…and since the Guy had enough money to
place the bet, PlaceBet() returns true.
The form tells the dogs to keep
running until there’s a winner
The Bet object figures out if it
should pay out
while ( there’s no winner ) {
for ( loop through each dog, making
sure there’s still no winner ) {
have the dog run one pace
}
}
When the user
tells the form to
start the race,
the form starts
a loop to animate
each dog running
along the track.
Each dog’s Run() method checks to
see if that dog won the race, so
the loops should end immediately as
soon as one of the dog wins.
Guy[1].Collect(winningDog) MyBet.PayOut(winningDog)
if ( my dog won ) {
return Amount;
} else {
return -Amount;
}
The Guy will add the result of Bet.
Payout() to his cash. So if the dog won,
it should return Amount; otherwise, it’ll
return -Amount.
The betting parlor in the form tells
each Guy which dog won so he can
collect any winnings from his bet.
B
e
t
o
b
j
e
c
t
G
u
y
o
b
j
e
c
t
F
o
r
m
o
b
j
e
c
t
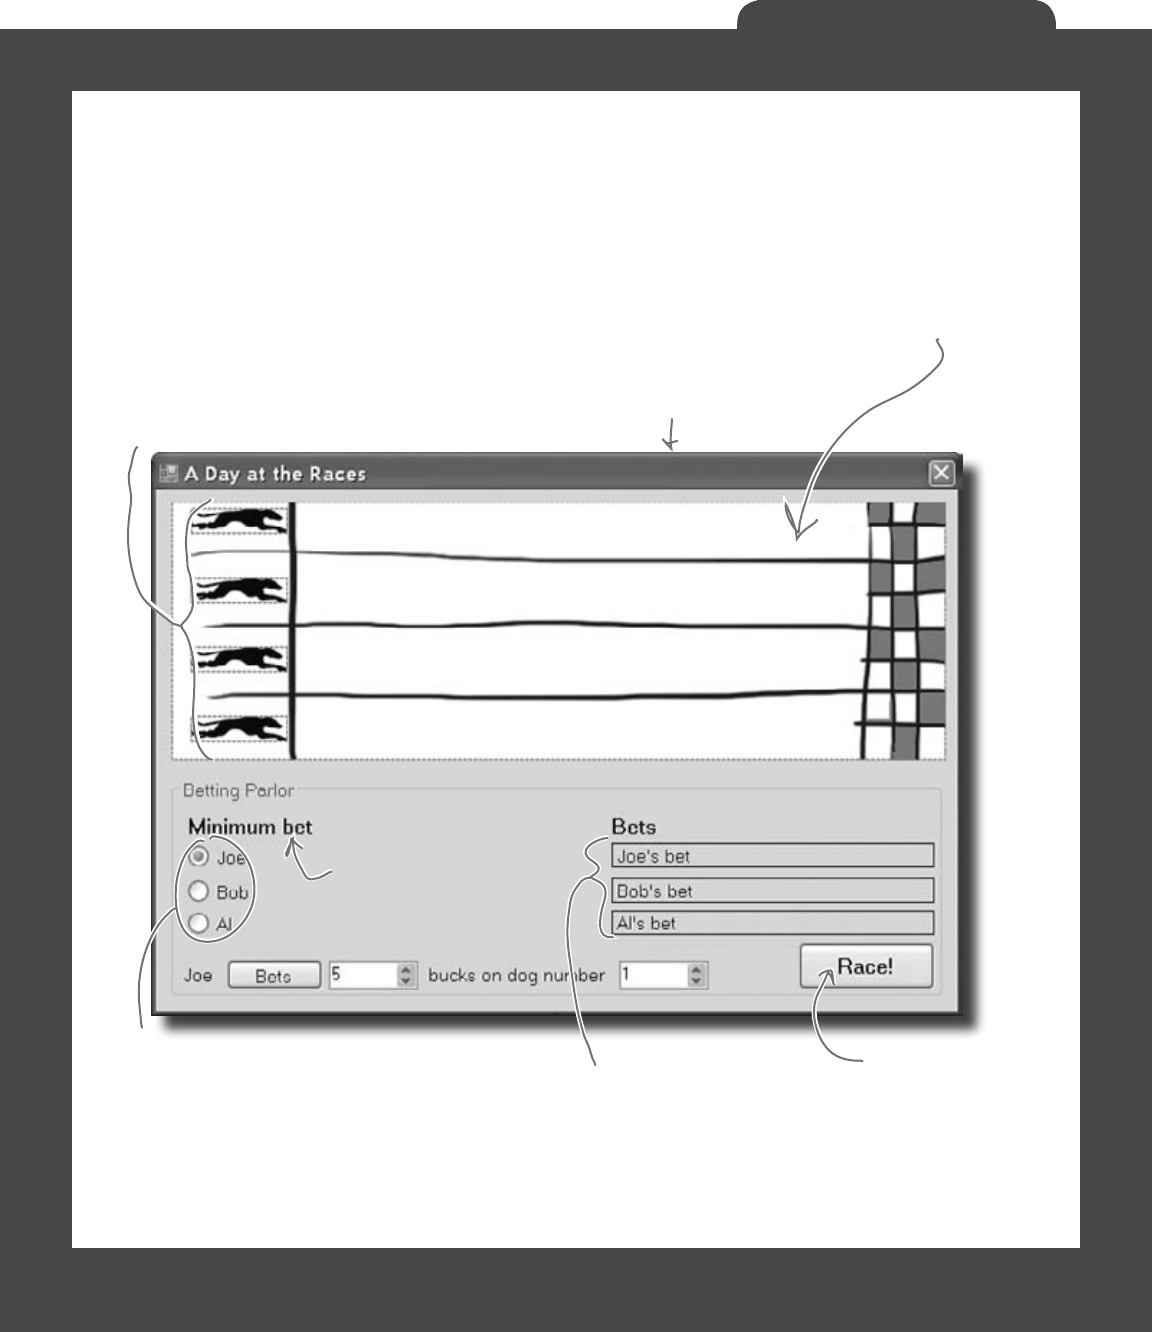
176
A Day at the Races
Here’s what your GUI should look like
The graphical user interface for the “Day at the Races” application
consists of a form that’s divided into two sections. The top is the
racetrack: a PictureBox control for the track, and four more for
the dogs. The bottom half of the form shows the betting parlor, where
three guys (Joe, Bob, and Al) can bet on the outcome of the race.
All three guys can bet on
the race, but there’s only
one betting window so
only one guy can place a
bet at a time.These radio
buttons are used to select
which guy places the bet.
When a Guy places a bet, it overwrites
any previous bet he placed. The current
bets show up in these label controls.
Each label has AutoSize set to False
and BorderStyle set to FixedSingle.
Once all bets are
placed, click this
button to start
the race.
Each of the four dogs has its own PictureBox control. When
you initialize each of the four Greyhound objects, each one’s
MyPicturebox field will have a reference to one of these objects.
You’ll pass the reference (along with the racetrack length and
starting position) to the Greyhound’s object initializer.
You’ll use the Length property
of the racetrack PictureBox
control to set the racetrack
length in the Greyhound object,
which it’ll use to figure out if
it won the race.
The form should update this
label with the minimum bet
using the Minimum property
of the NumericUpDown
control for the bet amount.
You can download the graphics files from www.headfirstlabs.com/books/hfcsharp/
Make sure you set each
PictureBox’s SizeMode
property to Zoom.
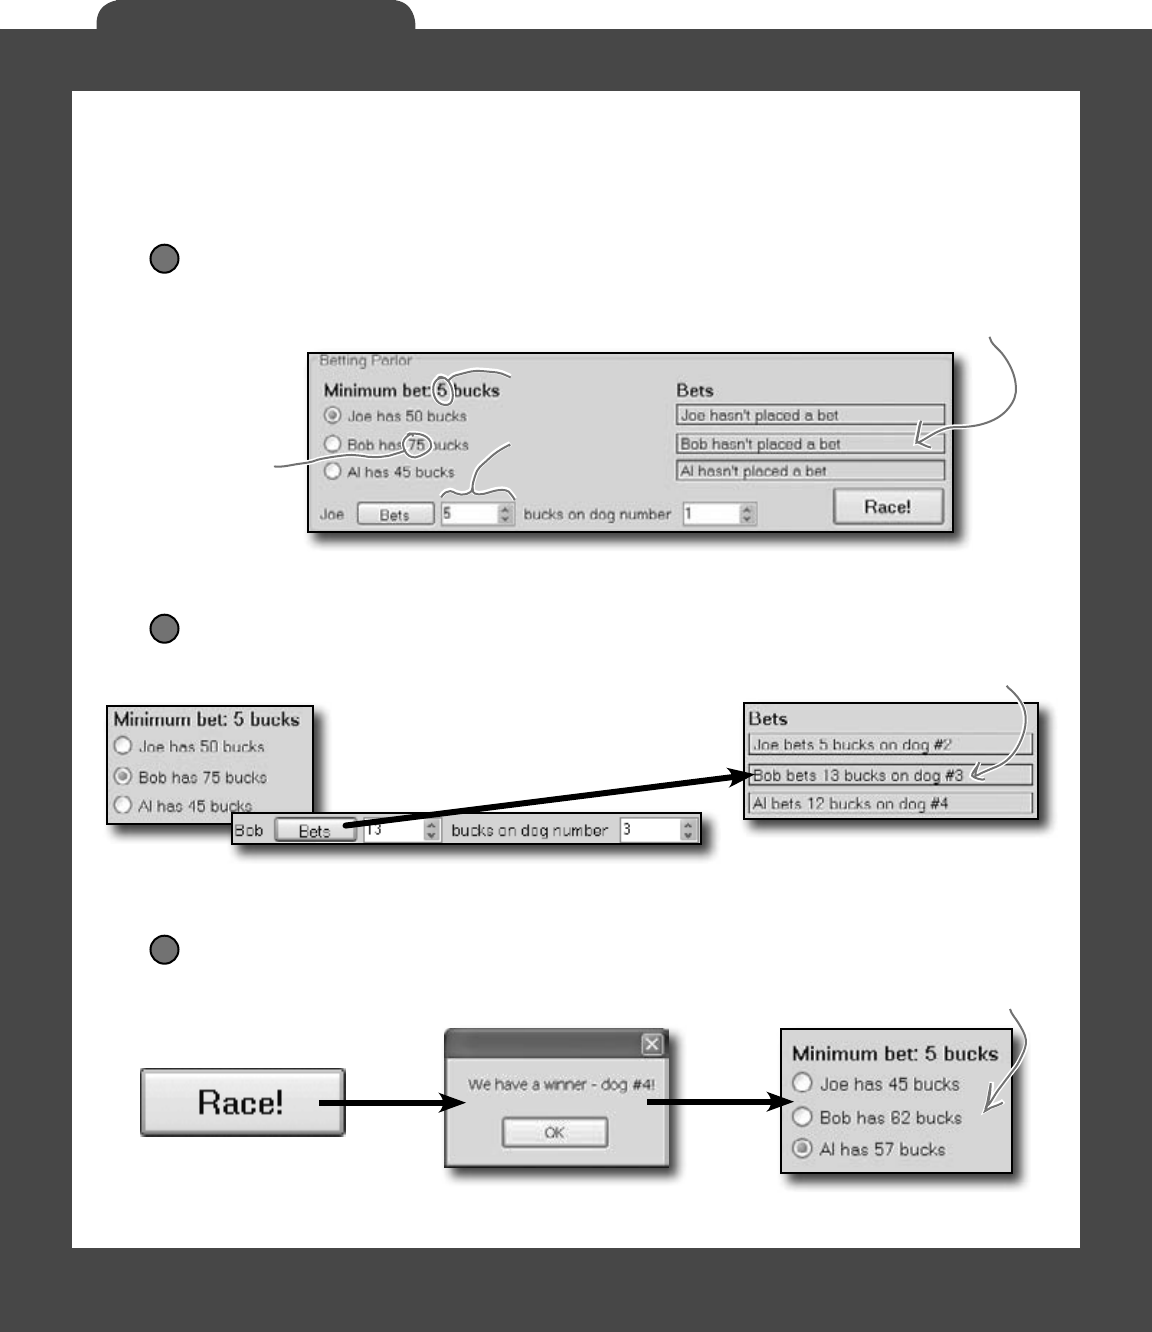
177
A Day at the Races
Placing bets
Use the controls in the Betting Parlor group box to place
each guy’s bet. There are three distinct stages here:
No bets have been placed yet
When the program first starts up, or if a race has just finished, no bets
have been placed in the betting parlor. You’ll see each guy’s total cash
next to his name on the left.
1
Each guy places his bets
To place a bet, select the guy’s radio button, select an amount and a dog, and click
the Bets button. His PlaceBet() method will update the label and radio button.
2
Each guy’s cash
shows up here.
The minimum bet
should be the same
as the minimum value
in the bet control.
When a guy places a bet,
his Guy object updates this
label using the MyLabel
reference. He also updates
the cash he has using his
MyRadioButton reference.
After the race, each guy collects his winnings (or pays up!)
Once the race is complete and there’s a winner, each Guy object calls his
Collect() method and adds his winnings or losses to his cash.
3
Once Bob places
his bet, his Guy
object updates this
label and the radio
button text.
Since Al bet 12 bucks
on the winning dog, his
cash goes up by 12. The
other two guys lose the
money they bet.
Make sure all the Greyhound objects share one Random object! If each dog
creates its own new instance of Random, you might see a bug where all of the dogs
generate the same sequence of random numbers.
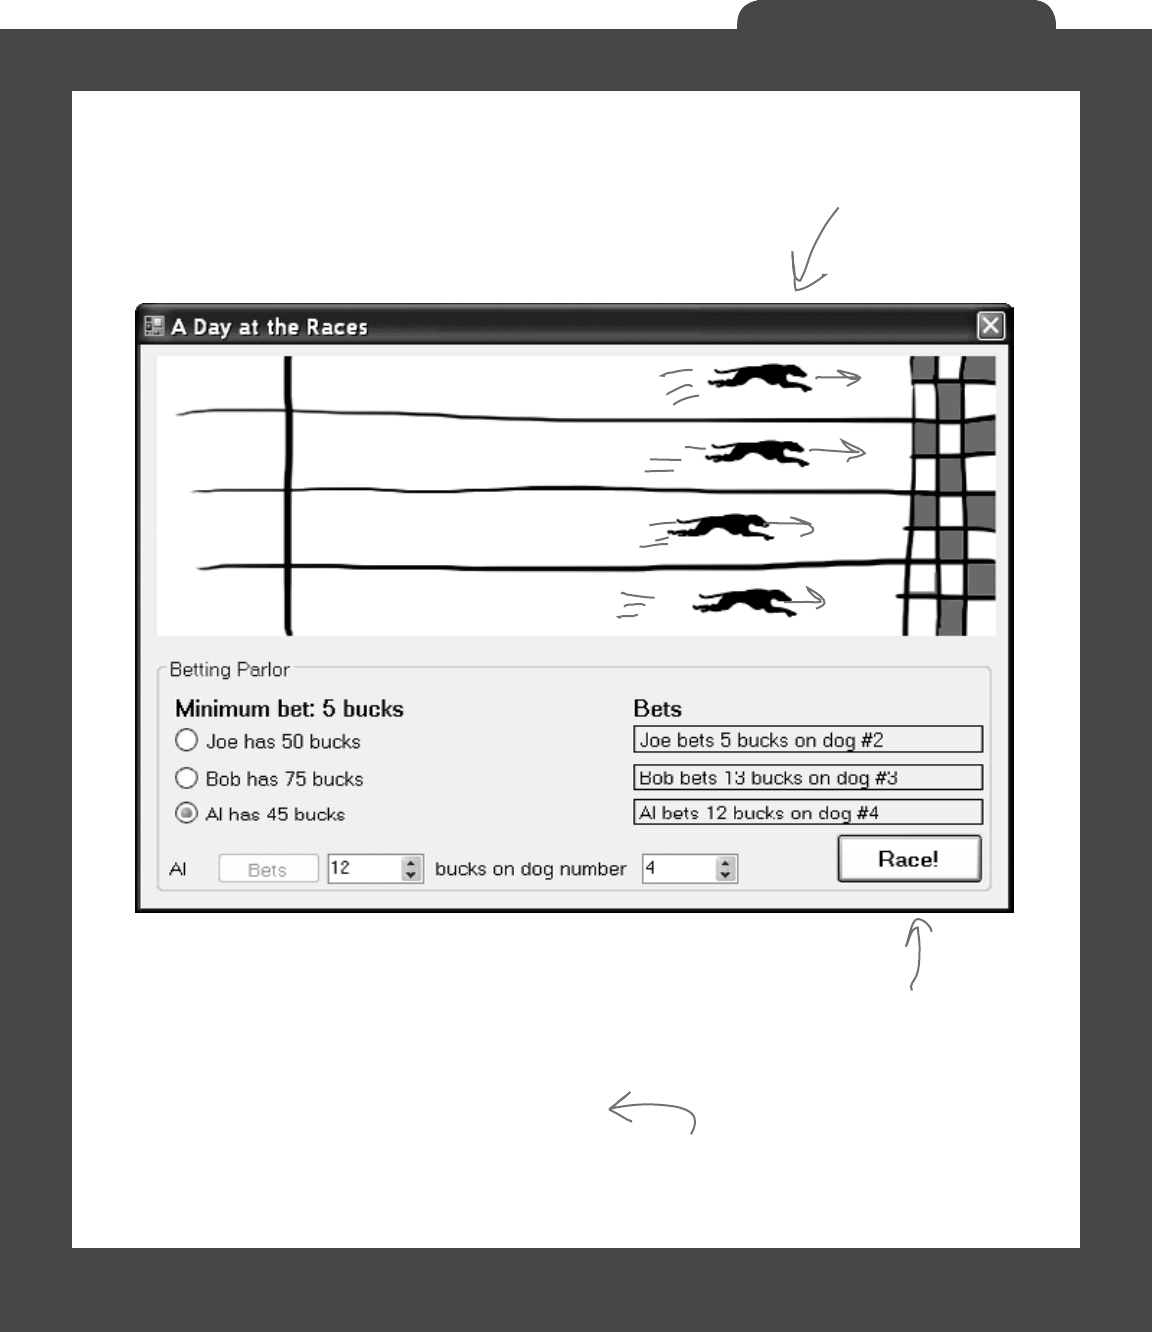
178
A Day at the Races
The Finished Product
You’ll know your “Day at the Races” application is
done when your guys can place their bets and watch
the dogs race.
During the race, the four dog
images run across the racetrack
until one of them wins the race.
During the race, no bets can be
placed…and make sure you can’t
start a new race while the dogs
are running!
You can download a finished executable,
as well as the graphics files for the
four dogs and the racetrack, from the
Head First Labs website:
www.headfirstlabs.com/books/hfcsharp
But you won’t find the source code! In real life, you
don’t get a solution to your programming problems.
Here’s your chance to really test your C# knowledge
and see just how much you’ve learned!

this is a new chapter 179
encapsulation
5
private
Ever wished for a little more privacy
Sometimes your objects feel the same way. Just like you don’t want anybody you
don’t trust reading your journal or paging through your bank statements, good objects
don’t let other objects go poking around their fields. In this chapter, you’re going to
learn about the power of encapsulation. You’ll make your object’s data private,
and add methods to protect how that data is accessed.
No peeking!
Keep your privates…

180 Chapter 5
Kathleen is an event planner
kathleen needs your help
She’s been planning dinner parties for
her clients and she’s doing really well.
But lately she’s been having a hard time
responding to clients fast enough with an
estimate for her services.
When a new client calls Kathleen to do a party, she needs to find
out the number of guests, what kind of drinks to serve, and what
decorations she should buy. Then she uses a pretty complicated
calculation to figure out the total cost, based on a flow chart she’s
been using for years. The bad news is that it takes her a long time
to work through her chart, and while she’s estimating, her potential
clients are checking out other event planners.
It’s up to you to build her a C#-driven event estimator and save
her business. Imagine the party she’ll throw you when you succeed!
Kathleen would rather spend
her time planning events, not
planning estimates.
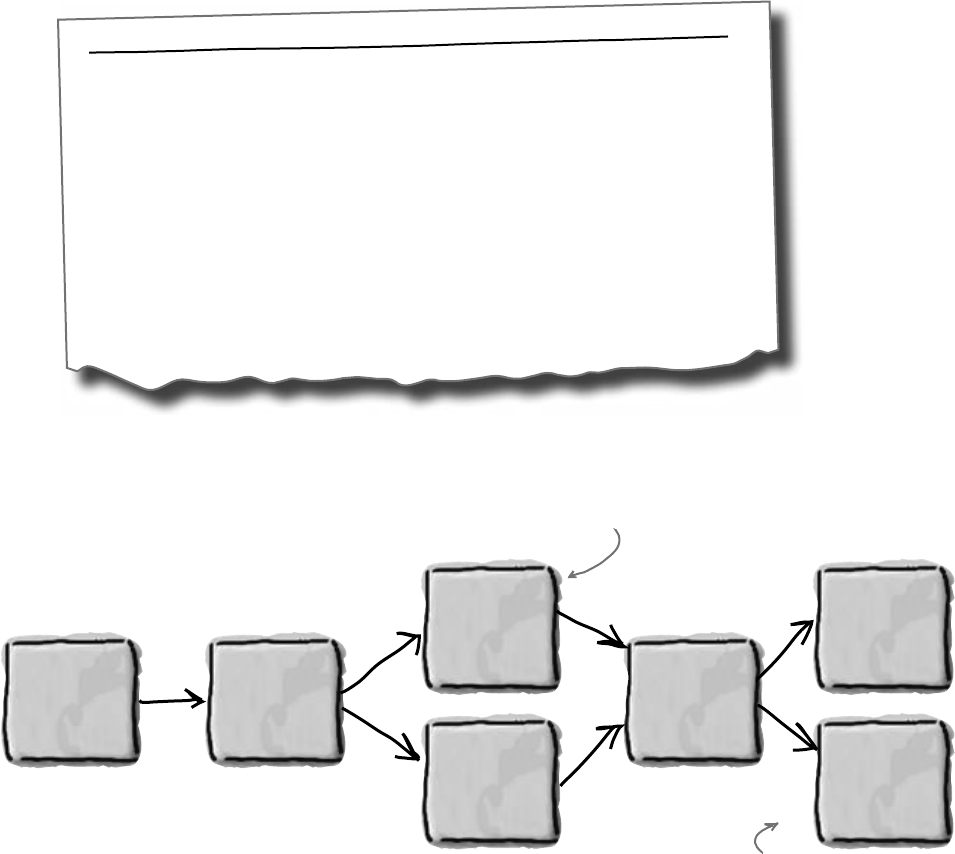
you are here 4 181
encapsulation
What does the estimator do?
Kathleen runs down some of the basics of her system
for figuring out the costs of an event. Here’s part of
what she came up with:
Kathleen’s Party Planning Program—Cost Estimate for a Dinner Party
• For each person on the guest list there’s a $25 food charge.
• Clients have a choice when it comes to drinks. Most parties serve alcohol, which
costs $20 per person. But they can also choose to have a party without alcohol.
Kathleen calls that the “Healthy Option,” and it only costs $5 per person to have
soda and juice instead of alcohol. Choosing the Healthy Option is a lot easier for
her, so she gives the client a 5% discount on the entire party, too.
• There are two options for the cost of decorations. If a client goes with the
normal decorations, it’s $7.50 per person with a $30 decorating fee. A client can
also upgrade the party decorations to the “Fancy Option”—that costs $15 per
person with a $50 one-time decorating fee.
Number of
people.
Food ($25 per
person)
Healthy
Option?
Alcohol
($20 per
person)
Fancy
decorations?
Juice and soda
($5 per person +
5% discount on
total cost)
Fancy
Decorations
($15 per person
+$50 decorating
fee)
Normal
Decorations
($7.50 per
person +$30
decorating fee)
Yes
No
Yes
No
Here’s another look at this same set of costs, broken
down into a little flow chart to help you see how it works:
Some of these choices involve
a change to the final price of
the event, as well as individual
per-person costs.
While most choices affect the
cost for each guest, there are
also one-time fees to figure in.
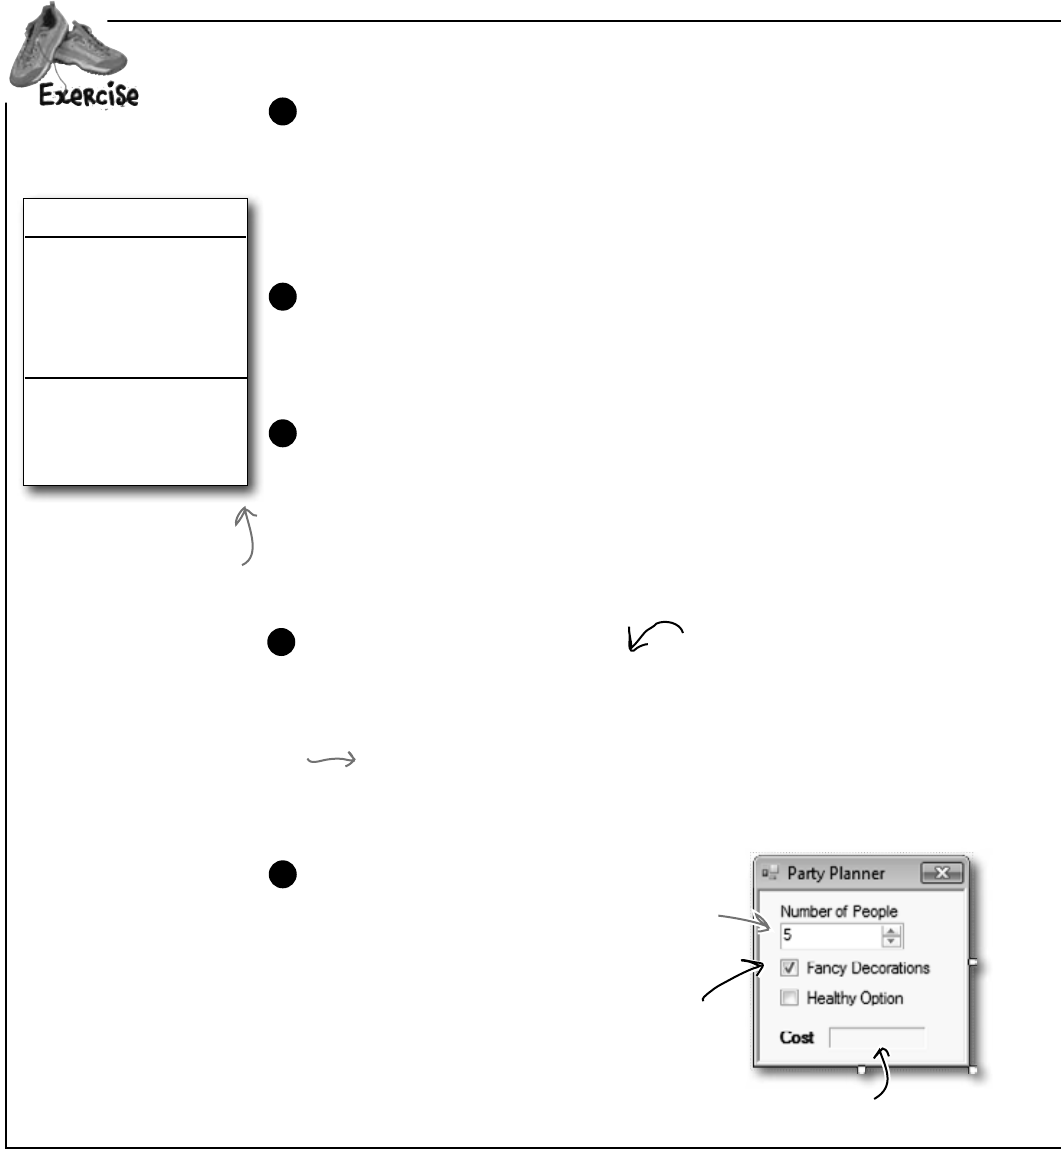
182 Chapter 5
v
DinnerParty
NumberOfPeople
CostOfBeveragesPerPerson
CostOfDecorations
SetHealthyOption()
CalculateCostOfDecorations()
CalculateCost()
Create a new Windows Application project and add a class file to it called
DinnerParty.cs, and build the DinnerParty class using the class diagram
to the left. It’s got three methods: CalculateCostOfDecorations(),
SetHealthyOption(), and CalculateCost(). For the fields, use
decimal for the two costs, int for the number of people, and bool to keep
track of whether or not the Healthy Option was selected. Make sure you add an
M after every literal you assign to a decimal value (10.0M).
1
Add this code to your form:
DinnerParty dinnerParty;
public Form1() {
InitializeComponent();
dinnerParty = new DinnerParty() { NumberOfPeople = 5 };
dinnerParty.SetHealthyOption(false);
dinnerParty.CalculateCostOfDecorations(true);
DisplayDinnerPartyCost();
}
4
Flip back to the previous page to be sure you’ve got all of the logic right for
the methods. Only one of them returns a value (a decimal)—the other
two are void. The CalculateCostOfDecorations() method figures
out the cost of decorations for the number of people attending the party.
Use the CalculateCost() method to figure out the total cost by adding
the cost of the decorations to the cost of drinks and food per person. If
the client wants the Healthy Option, you can apply the discount inside the
CalculateCost()method after you’ve figured out the total cost.
3
This is a label named labelCost. The Text Property is empty, the BorderStyle
property set to Fixed3D, and the AutoSize property set to false.
Here’s the class diagram for
the DinnerParty class you’ll
need to create.
Set the default
value to 5. The
minimum should be
1 and the maximum
should be 20.
Build a program to solve Kathleen’s party estimating problem.
Here’s what the form
should look like. Use
the NumericUpDown
control’s properties to set
the maximum number
of people to 20, the
minimum to 1, and the
default to 5. Get rid of the
maximize and minimize
buttons, too.
5
Here’s a useful C# tool. Since the cost of food won’t be changed by the
program, you can declare it as a constant, which is like a variable except
that its value can never be changed. Here’s the declaration to use:
public const int CostOfFoodPerPerson = 25;
2
The SetHealthyOption() method uses
a bool parameter (healthyOption) to
update the CostOfBeveragesPerPerson
field based on whether or not the
client wants the Healthy Option.
ok, no problem
You don’t need to add “using
System.Windows.Forms;” to your
DinnerParty class, because it
doesn’t use MessageBox.Show()
or anything else from that .NET
Framework namespace.
Set the Fancy
Decorations
checkbox’s Checked
property to True.
You’ll declare the dinnerParty field in
the form, and then add these four lines
below InitializeComponent().
you are here 4 183
encapsulation
v
Instead of using a button to calculate the costs, this form will update the cost label
automatically as soon as you use a checkbox or the NumericUpDown control. The first
thing you need to do is create a method in the form that displays the cost.
Add this method to Form1( ). It’ll get called when the NumericUpDown control is clicked:
private void DisplayDinnerPartyCost()
{
decimal Cost = dinnerParty.CalculateCost(checkBox2.Checked);
costLabel.Text = Cost.ToString(“c”);
}
6
Double-click on the Fancy Decorations checkbox on the form and make
sure that it first calls CalculateCostOfDecorations() and then
DisplayDinnerPartyCost(). Next, double-click the Healthy Option
checkbox and make sure that it calls the SetHealthyOption() method in
the DinnerParty class and then calls the DisplayDinnerPartyCost()
method.
8
Now hook up the NumericUpDown field to the NumberOfPeople variable you
created in the DinnerParty class and display the cost in the form. Double-click on
the NumericUpDown control—the IDE will add an event handler to your code.
That’s a method that gets run every time the control is changed. It’ll reset the number
of people in the party. Fill it in like this:
private void numericUpDown1_ValueChanged(
object sender, EventArgs e)
{
dinnerParty.NumberOfPeople = (int) numericUpDown1.Value;
DisplayDinnerPartyCost();
}
Uh-oh—there’s a problem with this code. Can you spot it? Don’t worry if you
don’t see it just yet. We’ll dig into it in just a couple of minutes!
7
This method will
get called by all of
the other methods
you create on the
form. It’s how you
update the cost
label with the right
value whenever
anything changes.
These are just two-line methods. The first
line will call the method you created in the
class to figure out the costs, and the second
will display the total cost on the form.
The value you send from the form to the
method will be fancyBox.Checked. That will
be passed as a boolean parameter to the
method in the class.
Add this method to the form—it’ll
recalculate the cost of the party
and put it in the Cost label.
Change the name of the
label that displays the cost
to costLabel.
This is true if the
checkbox for the Healthy
Option is checked.
You’ve been using
event handlers
all along—when
you double-click
on a button,
the IDE adds
a Click event
handler. Now
you know what
it’s called.
You need to cast numericUpDown.Value to
an int because it’s a Decimal property.
Passing “c” to ToString() tells
it to format the cost as a
currency value. If you’re in a
country that uses dollars, it’ll
add a dollar sign.

184 Chapter 5
wv
exercise solution
class DinnerParty {
const int CostOfFoodPerPerson = 25;
public int NumberOfPeople;
public decimal CostOfBeveragesPerPerson;
public decimal CostOfDecorations = 0;
public void SetHealthyOption(bool healthyOption) {
if (healthyOption) {
CostOfBeveragesPerPerson = 5.00M;
} else {
CostOfBeveragesPerPerson = 20.00M;
}
}
public void CalculateCostOfDecorations(bool fancy) {
if (fancy)
{
CostOfDecorations = (NumberOfPeople * 15.00M) + 50M;
} else {
CostOfDecorations = (NumberOfPeople * 7.50M) + 30M;
}
}
public decimal CalculateCost(bool healthyOption) {
decimal totalCost = CostOfDecorations +
((CostOfBeveragesPerPerson + CostOfFoodPerPerson)
* NumberOfPeople);
if (healthyOption) {
return totalCost * .95M;
} else {
return totalCost;
}
}
}
Here’s the code that goes into DinnerParty.cs.
This applies the 5% discount to
the overall event cost if the
non-alcoholic option was chosen.
Using a constant for CostOfFoodPerPerson
ensures the value can’t be changed. It also
makes the code easier to read—it’s clear that
this value never changes.
When the form first creates
the object, it uses the initializer
to set NumberOfPeople. Then
it calls SetHealthyOption() and
CalculateCostOfDecorations() to
set the other fields.
We used “if (Fancy)” instead of
typing “if (Fancy == true)” because
the if statement always checks if the
condition is true.
We used parentheses to make sure the
math works out properly.

you are here 4 185
encapsulation
wv
public partial class Form1 : Form {
DinnerParty dinnerParty;
public Form1() {
InitializeComponent();
dinnerParty = new DinnerParty() { NumberOfPeople = 5 };
dinnerParty.CalculateCostOfDecorations(fancyBox.Checked);
dinnerParty.SetHealthyOption(healthyBox.Checked);
DisplayDinnerPartyCost();
}
private void fancyBox_CheckedChanged(object sender, EventArgs e) {
dinnerParty.CalculateCostOfDecorations(fancyBox.Checked);
DisplayDinnerPartyCost();
}
private void healthyBox_CheckedChanged(object sender, EventArgs e) {
dinnerParty.SetHealthyOption(healthyBox.Checked);
DisplayDinnerPartyCost();
}
private void numericUpDown1_ValueChanged(object sender, EventArgs e) {
dinnerParty.NumberOfPeople = (int)numericUpDown1.Value;
DisplayDinnerPartyCost();
}
private void DisplayDinnerPartyCost() {
decimal Cost = dinnerParty.CalculateCost(healthyBox.Checked);
costLabel.Text = Cost.ToString(“c”);
}
}
Changes to the checkboxes on the form set
the healthyOption and Fancy booleans to
true or false in the SetHealthyOption() and
CalculateCostOfDecorations() methods.
We call DisplayDinnerPartyCost to
initialize the label that shows the
cost as soon as the form’s loaded.
We had you use a decimal for the prices because it’s designed for monetary values. Just make
sure you always put an “M” after every literal—so if you want to store $35.26, make sure you
write 35.26M. You can remember this because the M stands for Money!
We named our checkboxes “healthyBox”
and “fancyBox” so you could see what’s
going on in their event handler methods.
The new dinner party cost needs to be
recalculated and displayed any time the number
changes or the checkboxes are checked.
String formatting
You’ve already seen how you can convert any variable to a string using its ToString() method.
If you pass “c” to ToString(), it converts it to the local currency. You can also pass it “f3” to
format it as a decimal number with three decimal places, “0” (that’s a zero) to convert it to
a whole number, “0%” for a whole number percentage, and “n” to display it as a number with a
comma separator for thousands. Take a minute and see how each of these looks in your program!
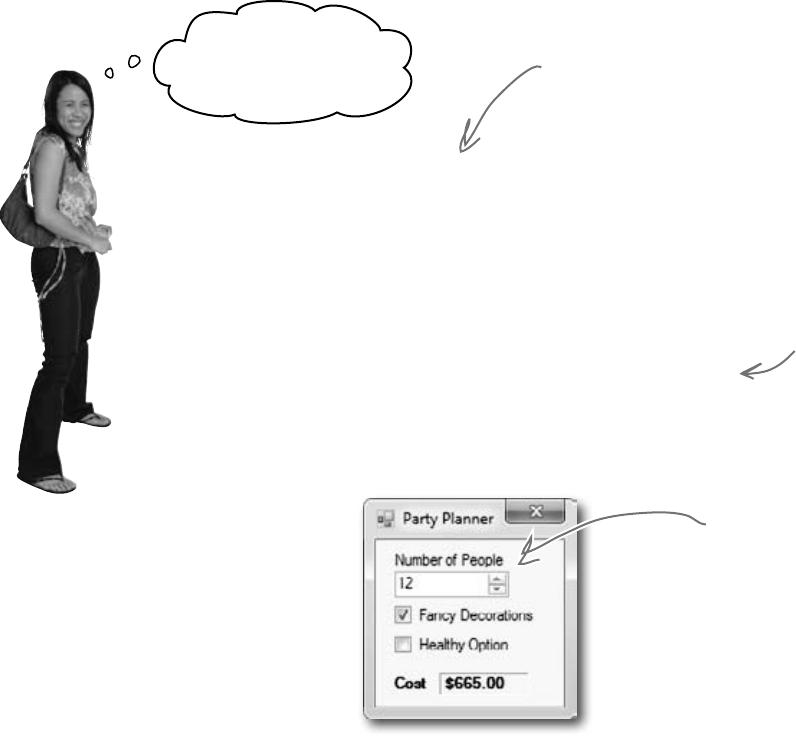
186 Chapter 5
Kathleen’s Test Drive
something’s gone terribly wrong
This rocks!
Estimating is about to
get a whole lot easier.
Rob (on phone): Hi Kathleen. How are the arrangements
for my dinner party going?
Kathleen: Just great. We were out looking at decorations this
morning and I think you’ll love the way the party’s going to
look.
Rob: That’s awesome. Listen, we just got a call from my wife’s
aunt. She and her husband are going to be visiting for the next
couple of weeks. Can you tell me what it does to the estimate
to move from 10 to 12 people on the guest list?
Kathleen: Sure! I’ll have that for you in just one minute.
Kathleen: OK. It looks like the total cost for the dinner will
go from $575 to $665.
Rob: Only $90 difference? That sounds like a great deal! What
if we decide to cut the fancy decorations? What’s the cost then?
Changing the Number of
People value from 10 to 12
and hitting enter shows $665
as the total cost. Hmm, that
seems a little low....
Rob’s one of Kathleen’s
favorite clients. She did his
wedding last year, and now
she’s planning an important
dinner party for him.
When you start the
program, the Fancy
Decorations box should
already be checked
because you set its
Checked property
to true. Setting the
number of people to 10
gives a cost of $575.
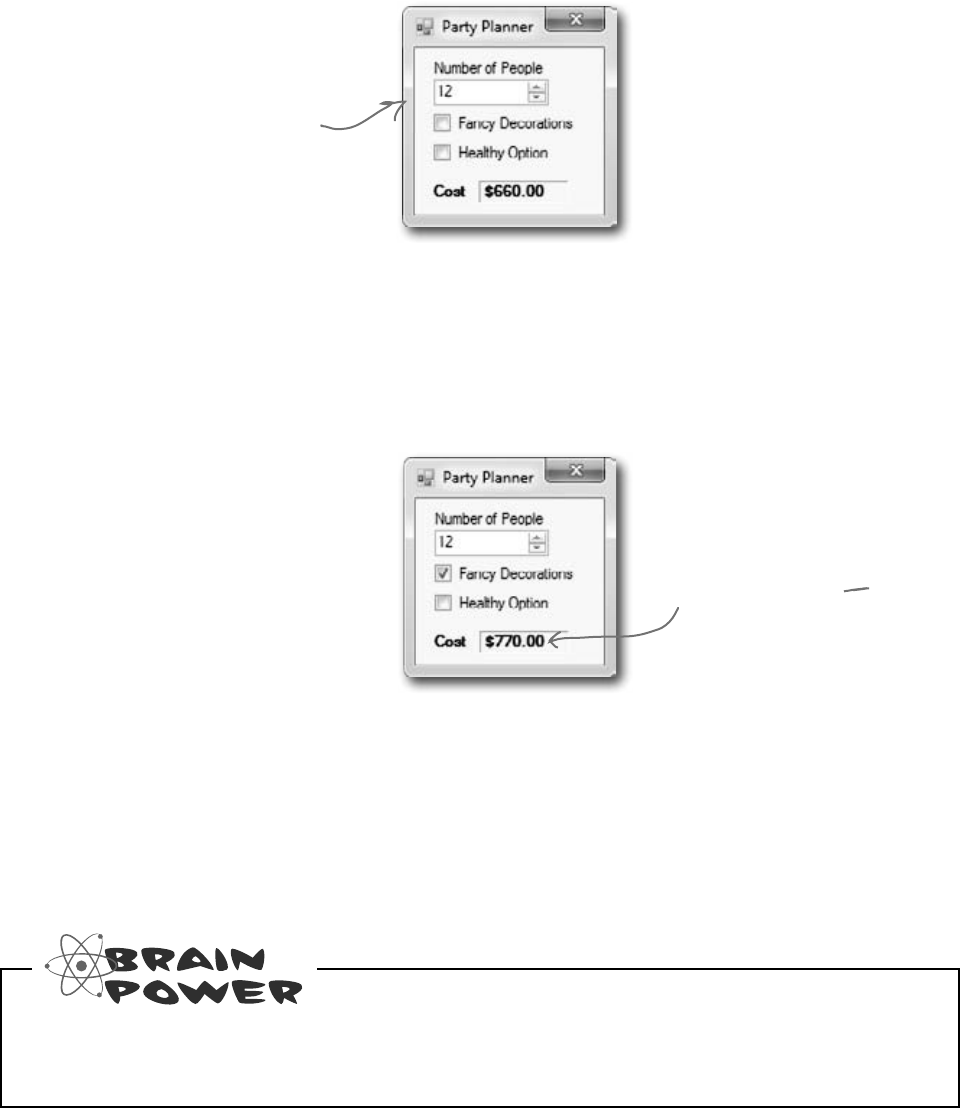
you are here 4 187
encapsulation
Kathleen: Um, it looks like…um, $660.
Rob: $660? I thought the decorations were $15 per person. Did you change your
pricing or something? If it’s only $5 difference, we might as well go with the fancy
decorations. I’ve gotta tell you though, this pricing is confusing.
Kathleen: We just had this new program written to do the estimation for us.
But it looks like there might be a problem. Just one second while I add the fancy
decorations back to the bill.
Kathleen: Rob, I think there’s been a mistake. It looks like the cost with the fancy
decorations just shot up to $770. That does seem to make more sense. But I am
beginning not to trust this application. I’m going to send it back for some bug fixes
and work up your estimate by hand. Can I get back to you tomorrow?
Rob: I am not paying $770 just to add two people to the party. The price you
quoted me before was a lot more reasonable. I’ll pay you the $665 you quoted me in
the first place, but I just can’t go higher than that!
When you turn the Fancy
Decorations back on, the
number shoots up to $770.
These numbers are just wrong.
Turning off the Fancy
Decorations checkbox only
reduces the amount by $5.
That can’t be right!
Why do you think the numbers are coming out wrong every time Kathleen makes a change?
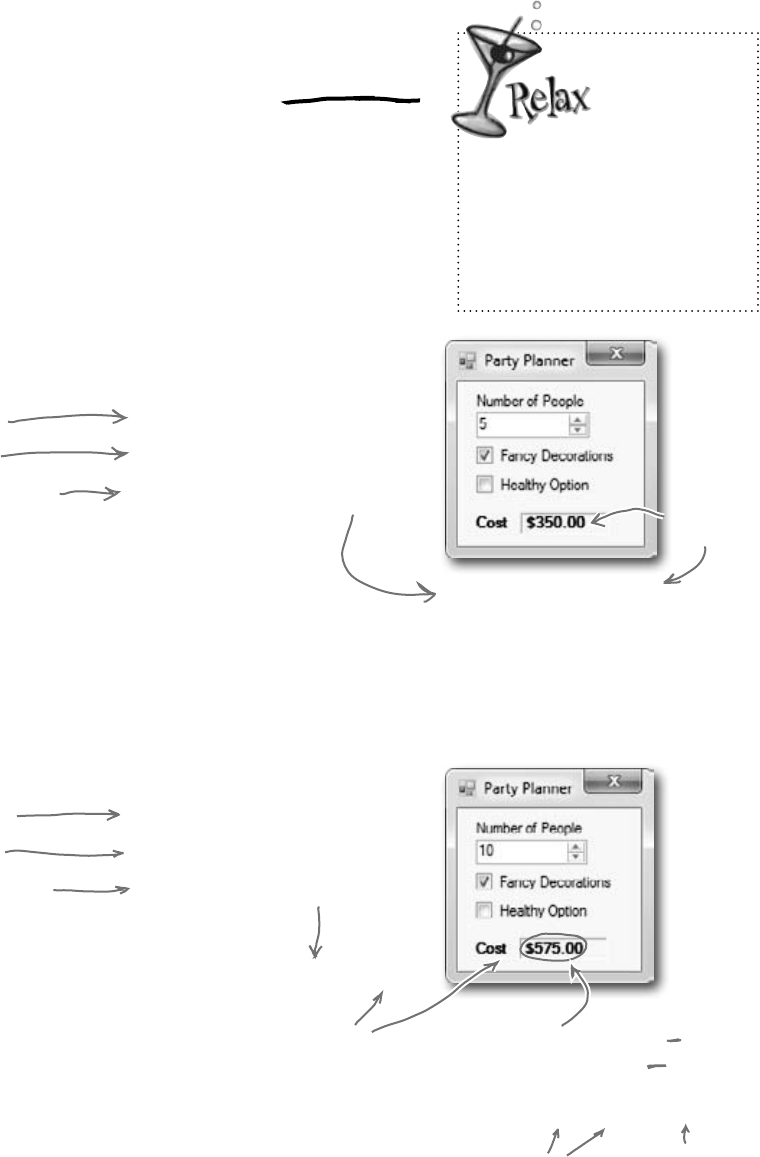
188 Chapter 5
wasn’t expecting that
Each option should be calculated individually
Even though we made sure to calculate all of the amounts according
to what Kathleen said, we didn’t think about what would happen when
people made changes to just one of the options on the form.
When you launch the program, the form sets the number of people to 5
and Fancy Decorations to true. It leaves Healthy Option unchecked and
it calculates the cost of the dinner party as $350. Here’s how it comes up
with the initial total cost:
5 people.
$20 per person for drinks
$25 per person for food
$15 per person for decorations
plus $50 fee.
Total cost of drinks = $100
Total cost of food = $125
Total cost of decorations = $125
$100 + $125 + 125 = $350
When you change the number of guests, the application should
recalculate the total estimate the same way. But it doesn’t:
10 people.
$20 per person for drinks
$25 per person for food
$15 per person for decorations
plus $50 fee.
Total cost of drinks = $200
Total cost of food = $250
Total cost of decorations = $200
$200 + $250+ 200 = $650
So far, so good.
The program is adding the old cost of
decorations up with the new cost of
food and drink.
It’s doing $200 + $250 + $125= $575
.
This is the total
we should get.
But we’re not
getting it!
New food and drink cost.
Old decorations.
Don’t worry!
This one
wasn’t your
fault.
We built a nasty little bug into the
code we gave you to show you just
how easy it is to have problems
with how objects use one another’s
fields…and just how hard those
problems are to spot.
Uncheck the Fancy Decorations
checkbox and then check it again.
This will cause the DinnerParty object’s
CostOfDecorations field to be updated,
and then the correct cost of $650 will show up.
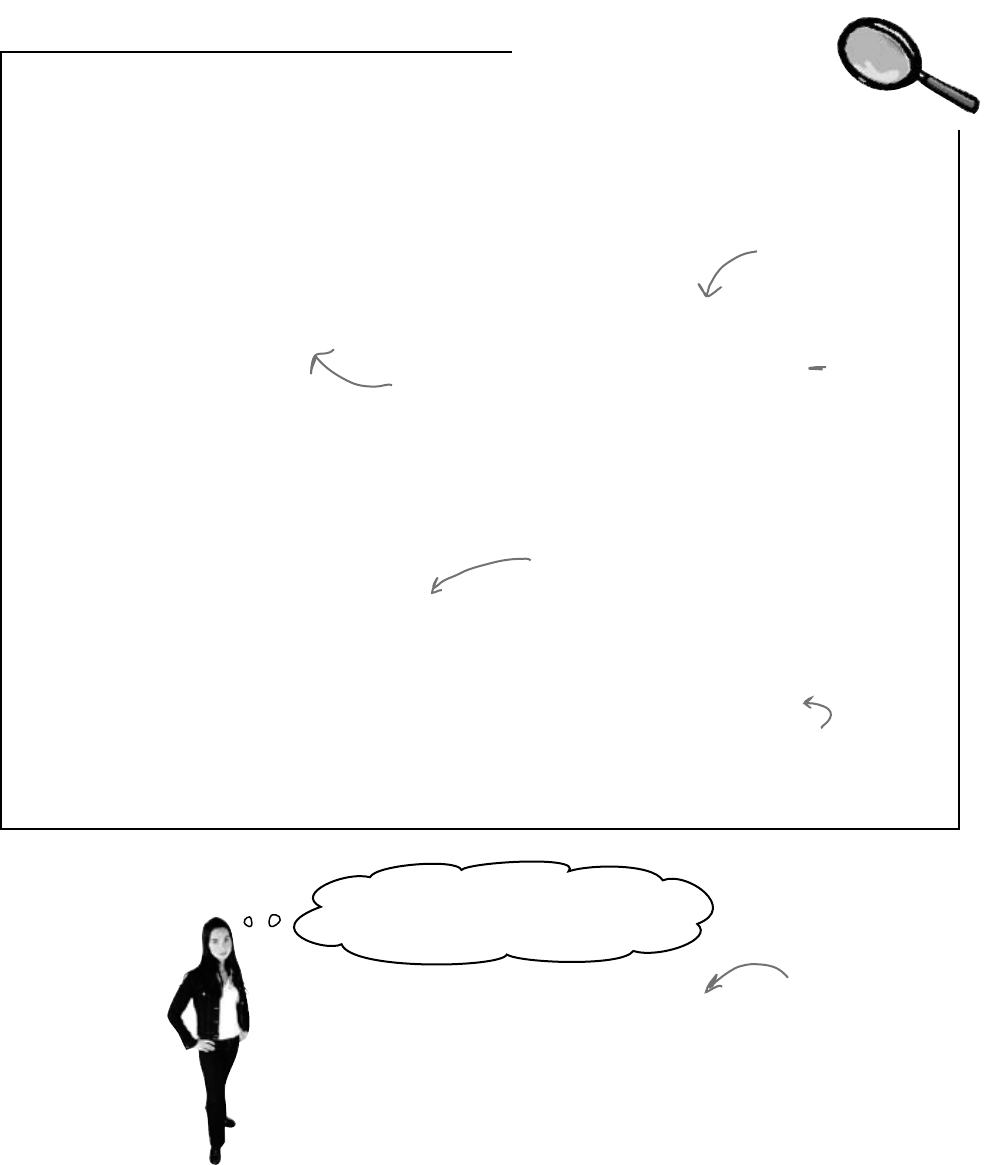
you are here 4 189
encapsulation
The Problem Up Close
Take a look at the method that handles changes to the value in the numericUpDown
control. It sets the value from the field to the NumberofPeople variable and then
calls the DisplayDinnerPartyCost() method. Then it counts on that method
to handle recalculating all the individual new costs.
private void numericUpDown1_ValueChanged(
object sender, EventArgs e) {
dinnerParty.NumberOfPeople = (int)numericUpDown1.Value;
DisplayDinnerPartyCost();
}
public void CalculateCostOfDecorations(bool Fancy) {
if (Fancy) {
CostOfDecorations = (NumberOfPeople * 15.00M) + 50M;
} else {
CostOfDecorations = (NumberOfPeople * 7.50M) + 30M;
}
}
So, when you make a change to the value in the NumberofPeople
field, this method never gets called:
This line sets the value
of NumberofPeople
in this instance of
DinnerParty to the
value in the form.
This method calls the CalculateCost() method, but not
the CalculateCostofDecorations() method.
People won’t always use your classes in
exactly the way you expect.
Luckily, C# gives you a powerful tool to make sure your
program always works correctly—even when people do
things you never thought of. It’s called encapsulation
and it’s a really helpful technique for working with objects.
Hold on! I assumed Kathleen would
always set all three options at once!
This variable is set to $125 from when the
form first called it, and since this method
doesn’t get called again, it doesn’t change.
That’s why the number corrects itself when you turn
fancy decorations back on. Clicking the checkbox makes
the program run CalculateCostOf Decorations() again.
…and sometimes
those “people” who
are using your classes
are you! You might
be writing a class
today that you’ll be
using tomorrow.
190 Chapter 5
It’s easy to accidentally misuse your objects
Kathleen ran into problems because her form ignored the convenient
CalculateCostOfDecorations() method that you set up and instead
went directly to the fields in the DinnerParty class. So even though your
DinnerParty class worked just fine, the form called it in an unexpected way…
and that caused problems.
NumberOfPeople = 10;
CalculateCostOfDecorations(true);
F
o
r
m
How the DinnerParty class expected to be called
The DinnerParty class gave the form a perfectly good method to
calculate the total cost of decorations. All it had to do was set the number
of people and then call CalculateCostOfDecorations(), and then
CalculateCost() will return the correct cost.
1
Even though the form didn’t set up
the party properly, CalculateCost() still
returned a number…and there was no
way for Kathleen to know that the
number was wrong.
CalculateCost() returns $650
How the DinnerParty class was actually called
The form set the number of people, but just called the CalculateCost()
method without first recalculating the cost of the decorations. That threw off
the whole calculation, and Kathleen ended up giving Rob the wrong price.
2
NumberOfPeople = 10;
CalculateCost() returns $575
protect your objects
D
i
n
n
e
r
P
a
r
t
y
o
b
j
e
c
t
F
o
r
m
D
i
n
n
e
r
P
a
r
t
y
o
b
j
e
c
t

you are here 4 191
encapsulation
Encapsulation means keeping some of
the data in a class private
There’s an easy way to avoid this kind of problem: make sure that there’s only one
way to use your class. Luckily, C# makes it easy to do that by letting you declare
some of your fields as private. So far, you’ve only seen public fields. If you’ve
got an object with a public field, any other object can read or change that field.
But if you make it a private field, then that field can only be accessed from
inside that object (or by another object of the same class).
en-cap-su-la-ted, adj.
enclosed by a protective coating
or membrane. The divers were fully
encapsulated by their submersible,
and could only enter and exit through
the airlock.
class DinnerParty {
private int numberOfPeople;
...
public void SetPartyOptions(int people, bool fancy) {
numberOfPeople = people;
CalculateCostOfDecorations(fancy);
}
public int GetNumberOfPeople() {
return numberOfPeople;
}
If you want to make a field private, all you need
to do is use the private keyword when you declare
it. That tells C# that if you’ve got an instance
of DinnerParty, its numberOfPeople field can only
be read and written by that instance—or another
instance of DinnerParty. Other objects won’t even
know it’s there.
Other objects still need a way to set the
number of people for the dinner party. One
good way to give them access to it is to
add methods to set or get the number of
people. That way you can make sure that
the CalculateCostOfDecorations() method
gets run every time the number of people is
changed. That’ll take care of that pesky bug.
By making the field that holds the number
of party guests private, we only give the
form one way to tell the DinnerParty class
how many people are at the party—and
we can make sure the cost of decorations
is recalculated properly. When you make
some data private and then write code to
use that data, it’s called encapsulation.
Use your laziness to your
own benefit—if you leave
off the “private” or
“public”, then C# will just
assume that your field is
private.
Also, a class’s static methods can access the
private field in any instance of that class.
192 Chapter 5
Use encapsulation to control access to your
class’s methods and fields
When you make all of your fields and methods public, any other class
can access them. Everything your class does and knows about becomes
an open book for every other class in your program…and you just saw
how that can cause your program to behave in ways you never expected.
Encapsulation lets you control what you share and what you keep private
inside your class. Let’s see how this works:
SecretAgent
Alias
RealName
Password
AgentGreeting()
Super-spy Herb Jones is defending life, liberty, and the pursuit of
happiness as an undercover agent in the USSR. His ciaAgent object is
an instance of the SecretAgent class.
1
Agent Jones has a plan to help him evade the enemy KGB agents. He
added an AgentGreeting() method that takes a password as its
parameter. If he doesn’t get the right password, he’ll only reveal his
alias, Dash Martin.
2
Seems like a foolproof way to protect the agent’s identity, right? As
long as the agent object that calls it doesn’t have the right password,
the agent’s name is safe.
3
AgentGreeting(“the jeep is parked outside”)
The ciaAgent object is an
instance of the SecretAgent
class, while kgbAgent is an
instance of EnemyAgent.
“Dash Martin”
spy versus spy
The KGB only gets the alias of
the CIA agent. Perfect. Right?
The KGB agent uses the wrong
password in his greeting.
EnemyAgent
Borscht
Vodka
ContactComrades()
OverthrowCapitalists()
RealName: “Herb Jones”
Alias: “Dash Martin”
Password: “the crow flies at midnight”
c
i
a
A
g
e
n
t
k
g
b
A
g
e
n
t
c
i
a
A
g
e
n
t
you are here 4 193
encapsulation
public string RealName;
Setting your variables
public means they can be
accessed, and even changed,
from outside the class.
string name = ciaAgent.RealName;
Agent Jones can use private fields to keep his identity secret from
enemy spy objects. Once he declares the realName field as private, the
only way to get to it is by calling methods that have access to the
private parts of the class. So the KGB agent is foiled!
private string realName;
Keeping your fields and methods
private makes sure no outside
code is going to make changes to
the values you’re using when you
don’t expect it.
You’d also want to make sure that the field
that stores the password is private, otherwise
the enemy agent can get to it.
He left the field public...
Why go through all of
the trouble to guess his
password? I can just get
his name directly!
But is the realName field REALLY protected?
So as long as the KGB doesn’t know any CIA agent passwords, the
CIA’s real names are safe. Right? But what about the field declaration
for the realName field:
Setting your variables as public means
they can be accessed, and even changed,
from outside the class.
There’s no need to call any
method. The realName field is
wide open for everyone to see!
Just replace public with
private, and boom, your
fields are now hidden
from the world.
k
g
b
A
g
e
n
t
c
i
a
A
g
e
n
t
The kgbAgent object can’t
access the ciaAgent’s private
fields because they’re instances
of different classes.
194 Chapter 5
Q: OK, so I need to access private data through
public methods. What happens if the class with the
private field doesn’t give me a way to get at that
data, but my object needs to use it?
A:Thenyoucan’taccessthedatafromoutsidethe
object.Whenyou’rewritingaclass,youshouldalways
makesurethatyougiveotherobjectssomewayto
getatthedatatheyneed.Privatefieldsareavery
importantpartofencapsulation,butthey’reonlypart
ofthestory.Writingaclasswithgoodencapsulation
meansgivingasensible,easy-to-usewayforother
objectstogetthedatatheyneed,withoutgivingthem
accesstohijackdatayourclassneeds.
Q: Why would I ever want to keep a field with
no way for another class to access?
A:Sometimesaclassneedstokeeptrackof
informationthatisnecessaryforittooperate,butthat
nootherobjectreallyneedstosee.Here’sanexample.
Whencomputersgeneraterandomnumbers,theyuse
specialvaluescalledseeds.Youdon’tneedtoknow
howtheywork,buteveryinstanceof
Randomactuallycontainsanarrayofseveraldozen
numbersthatitusestomakesurethatNext()
alwaysgivesyouarandomnumber.Ifyoucreatean
instanceofRandom,youwon’tbeabletoseethat
array.That’sbecauseyoudon’tneedit—butifyou
hadaccesstoit,youmightbeabletoputvaluesinit
thatwouldcauseittogivenon-randomvalues.Sothe
seedshavebeencompletelyencapsulatedfromyou.
Q: Hey, I just noticed that all of the event
handlers I’ve been using have the private
keyword. Why are they private?
A:BecauseC#formsaresetupsothatonlythe
controlsontheformscantriggereventhandlers.
Whenyouputtheprivatekeywordinfrontof
anymethod,thenthatmethodcanonlybeusedfrom
insideyourclass.WhentheIDEaddsaneventhandler
methodtoyourprogram,itdeclaresitasprivateso
otherformsorobjectscan’tgettoit.Butthere’snorule
thatsaysthataneventhandlermustbeprivate.Infact,
youcancheckthisoutforyourself—double-clickona
button,thenchangeitseventhandlerdeclarationto
public.Thecodewillstillcompileandrun.
Private fields and methods can only be
accessed from inside the class
There’s only one way that an object can get at the data stored inside another
object’s private fields: by using the public fields and methods that return the data.
But while KGB and MI5 agents need to use the AgentGreeting() method,
friendly spies can see everything—any class can see private fields in other
instances of the same class.
keeping secrets
AgentGreeting(“the crow flies at midnight”)
Now that the fields are private,
this is pretty much the only
way the mi5Agent can get the
ciaAgent’s real name.
“Herb Jones”
mi5agent is an
instance of the
BritishAgent class,
so it doesn’t have
access to ciaAgent’s
private fields either.
The only
way that
one object
can get to
data stored
in a private
field inside
another
object is by
using public
methods
that return
the data.
m
i
5
A
g
e
n
t
c
i
a
A
g
e
n
t
Only another
ciaAgent object
can see them.

you are here 4 195
encapsulation
Here’s a class with some private fields. Circle the statements
below that won’t compile if they’re run from outside the
class using an instance of the object called mySuperChef.
class SuperChef
{
public string cookieRecipe;
private string secretIngredient;
private const int loyalCustomerOrderAmount = 60;
public int Temperature;
private string ingredientSupplier;
public string GetRecipe (int orderAmount)
{
if (orderAmount >= loyalCustomerOrderAmount)
{
return cookieRecipe + “ ” + secretIngredient;
}
else
{
return cookieRecipe;
}
}
}
1. string ovenTemp = mySuperChef.Temperature;
2. string supplier = mySuperChef.ingredientSupplier;
3. int loyalCustomerOrderAmount = 94;
4. mySuperChef.secretIngredient = “cardamom”;
5. mySuperChef.cookieRecipe = “get 3 eggs, 2 1/2 cup flour, 1 tsp salt,
1 tsp vanilla and 1.5 cups sugar and mix them together. Bake for 10
minutes at 375. Yum!”;
6. string recipe = mySuperChef.GetRecipe(56);
7. After running all of the lines that will compile above, what’s the value of recipe?
196 Chapter 5
class SuperChef
{
public string cookieRecipe;
private string secretIngredient;
private const int loyalCustomerOrderAmount = 60;
public int Temperature;
private string ingredientSupplier;
public string GetRecipe (int orderAmount)
{
if (orderAmount >= loyalCustomerOrderAmount)
{
return cookieRecipe + “ ” + secretIngredient;
}
else
{
return cookieRecipe;
}
}
}
1. string ovenTemp = mySuperChef.Temperature;
2. string supplier = mySuperChef.ingredientSupplier;
3. int loyalCustomerOrderAmount = 54;
4. mySuperChef.secretIngredient = “cardamom”;
5. mySuperChef.cookieRecipe = “Get 3 eggs, 2 1/2 cup flour, 1 tsp salt,
1 tsp vanilla and 1.5 cups sugar and mix them together. Bake for 10
minutes at 375. Yum!”;
6. string recipe = mySuperChef.GetRecipe(56);
7. After running all of the lines that will compile above, what’s the value of recipe?
leaving something to the imagination
The only way to get the secret
ingredient is to order a whole
lot of cookies. Outside code
can’t access this field directly.
“Get 3 eggs, 2 1/2 cup flour, 1 tsp salt, 1 tsp vanilla and 1.5 cups sugar and mix them together.
Bake for 10 minutes at 375. Yum!”
Here’s a class with some private fields. Circle the statements below
that won’t compile if they’re run from outside the class using an
instance of the object called mySuperChef.
#1 doesn’t compile because you
can’t just assign an int to a
string.
#2 and #4 don’t compile
because ingredientSupplier and
secretIngredient are private.
Even though you created a local variable called
loyalCustomerAmount and set it to 54, that
didn’t change the object’s loyalCustomerAmount
value, which is still 60—so it won’t print the
secret ingredient.

you are here 4 197
encapsulation
Because sometimes you want your class
to hide information from the rest of the
program.
A lot of people find encapsulation a little odd the first time
they come across it because the idea of hiding one class’s
fields, properties, or methods from another class is a little
counterintuitive. But there are some very good reasons that
you’ll want to think about what information in your class
to expose to the rest of the program.
Something’s really not right here. If I make a
field private, all that does is keep my program from
compiling another class that tries to use it. But if I
just change the “private” to “public” my program builds
again! Adding “private” just broke my program. So why
would I ever want to make a field private?
Encapsulation
means having
one class hide
information
from another.
It helps you
prevent bugs in
your programs.
Encapsulation makes your classes…
≥Easy to use
You already know that classes use fields to keep track of their state. And a lot
of them use methods to keep those fields up to date—methods that no other
class will ever call. It’s pretty common to have a class that has fields, methods,
and properties that will never be called by any other class. If you make those
members private, then they won’t pop up in the IntelliSense window later
when you need to use that class.
≥Easy to maintain
Remember that bug in Kathleen’s program? It happened because the form
accessed a field directly rather than using a method to set it. If that field had
been private, you would have avoided that bug.
≥Flexible
A lot of times, you’ll want to go back and add features to a program you
wrote a while ago. If your classes are well encapsulated, then you’ll know
exactly how to use them later on.
How could building a poorly encapsulated class now
make your programs harder to modify later?
198 Chapter 5
mike’s mess
Route
StartPoint
EndPoint
Length
GetRouteLength()
GetStartPoint()
GetEndPoint()
SetStartPoint()
SetEndPoint()
ChangeStartPoint()
ChangeEndPoint()
Remember Mike’s street navigation program from Chapter 3? Mike joined a
geocaching group, and he thinks his navigator will give him an edge. But it’s been a
while since he’s worked on it, and now he’s run into a little trouble. Mike’s navigator
program has a Route class that stores a single route between two points. But he’s
running into all sorts of bugs because he can’t seem to figure out how it’s supposed
to be used! Here’s what happened when Mike tried to go back to his navigator and
modify the code:
≥Mike set the StartPoint property to the GPS coordinates of his home
and the EndPoint property to the coordinates of his office, and checked
the Length property. It said the length was 15.3. When he called the
GetRouteLength() method, it returned 0.
≥He uses the SetStartPoint() property to set the start point to the
coordinates of his home and the SetEndPoint() property to set the end
point to his office. The GetRouteLength() method returned 9.51, and
the Length property contained 5.91.
≥When he tried using the StartPoint property to set the starting point and
the SetEndPoint() method to set the ending point, GetRouteLength()
always returned 0 and the Length property always contained 0.
≥When he tried using the SetStartPoint() method to set the starting point
and the EndPoint property to set the ending point, the Length property
contained 0, and the GetRouteLength() method caused the program to
crash with an error that said something about not being able to divide by zero.
Ugh, I can’t
remember if
I was supposed to set the
StartPoint field or use the
SetStartPoint() method. I know
I had this all working before!
Mike’s navigator program could use better encapsulation
Geocaching is a sport where people
use their GPS navigators to hide
and seek containers that can be
hidden anywhere in the world.
Mike is really into GPS stuff, so
you can see why he likes it so much.
Here’s the Route object from Mike’s navigator program. Which properties or
methods would you make private in order to make it easier to use?
There are lots of ways to solve this problem, all potentially correct! Write down the one you think is best.
you are here 4 199
encapsulation
Think of an object as a black box
Sometimes you’ll hear a programmer refer to an object as a “black box,”
and that’s a pretty good way of thinking about them. When you call an
object’s methods, you don’t really care how that method works—at least,
not right now. All you care about is that it takes the inputs you gave it and
does the right thing.
Right now, Mike just wants to think
about his Route object as a black box.
He wants to feed his coordinates into it
and get a length out of it. He doesn’t
want to think about how the Route
calculates that length…at least, not
right now.
Route
I know my Route object
works! What matters
to me now is figuring
out how to use it for my
geocaching project.
Back in Chapter 3, Mike was thinking
about how to build his navigator.
That’s when he really cared about how
the Route object worked. But that
was a while ago.
Since then, he got his navigator working,
and he’s been using it for a long time. He
knows it works well enough to be really
useful for his geocaching team. Now he
wants to reuse his Route object.
If you
encapsulate
your classes
well today,
that makes
them a lot
easier to reuse
tomorrow.
If only Mike had thought about
encapsulation when he originally built
his Route object! If he had, then it
wouldn’t be giving him a headache today!
Start Point
End Point
Length
When you come back to
code that you haven’t looked
at in a long time, it’s easy
to forget how you intended
it to be used. That’s where
encapsulation can make
your life a lot easier!

200 Chapter 5
good ideas for easy encapsulation
And just like chess, there are an almost unlimited number
of possible encapsulation strategies!
So a well-encapsulated class does
exactly the same thing as one
that has poor encapsulation!
Exactly! The difference is that the well-
encapsulated one is built in a way that
prevents bugs and is easier to use.
It’s easy to take a well-encapsulated class and turn it into a poorly
encapsulated class: do a search-and-replace to change every
occurrence of private to public.
And that’s a funny thing about the private keyword: you can
generally take any program and do that search-and-replace, and
it will still compile and work in exactly the same way. That’s one
reason that encapsulation is difficult for some programmers to
understand.
Until now, everything you’ve learned has been about making
programs do things—perform certain behaviors. Encapsulation
is a little different. It doesn’t change the way your program
behaves. It’s more about the “chess game” side of programming:
by hiding certain information in your classes when you design
and build them, you set up a strategy for how they’ll interact later.
The better the strategy, the more flexible and maintainable your
programs will be, and the more bugs you’ll avoid.

you are here 4 201
encapsulation
±Think about ways the fields can be misused.
What can go wrong if they’re not set properly?
±Is everything in your class public?
If your class has nothing but public fields and methods, you probably
need to spend a little more time thinking about encapsulation.
±What fields require some processing or calculation to
happen when they’re set?
Those are prime candidates for encapsulation. If someone writes
a method later that changes the value in any one of them, it could
cause problems for the work your program is trying to do.
A few ideas for encapsulating classes
±Only make fields and methods public if you need to.
If you don’t have a reason to declare something public, don’t. You could
make things really messy for yourself by making all of the fields in your
program public—but don’t just go making everything private, either.
Spending a little time up front thinking about which fields really need to
be public and which don’t can save you a lot of time later.
The cost of decorations
needs to be figured out first.
Once you know that, you can just add
it up with the cost of the food and
drink to get the total cost.
202 Chapter 5
Encapsulation keeps your data pristine
Sometimes the value in a field changes as your program does
what it’s supposed to do. If you don’t explicitly tell your program
to reset the value, you can do your calculations using the old
one. When this is the case, you want to have your program
execute some statements any time a field is changed—like
having Kathleen’s program recalculate the cost every time
you change the number of people. We can avoid the problem
by encapsulating the data using private fields. We’ll provide a
method to get the value of the field, and another method to set
the field and do all the necessary calculations.
get it, set it, got it, good
class Farmer
{
private int numberOfCows;
}
public const int FeedMultiplier = 30;
public int GetNumberOfCows()
{
return numberOfCows;
}
public void SetNumberOfCows(int newNumberOfCows)
{
numberOfCows = newNumberOfCows;
BagsOfFeed = numberOfCows * FeedMultiplier;
}
When you create a form to let a user enter the number of cows into a numeric field,
you need to be able to change the value in the numberOfCows field. To do that,
you can create a method that returns the value of the field to the form object:
We’d better make this field private
so nobody can change it without also
changing bagsOfFeed—if they get
out of sync, that’ll create bugs!
We’ll add a method to give
other classes a way to get
the number of cows.
And here’s a method to set the
number of cows that makes sure
the BagsOfFeed field is changed
too. Now there’s no way for the
two to get out of sync.
A quick example of encapsulation
A Farmer class uses a field to store the number of cows, and
multiplies it by a number to figure out how many bags of cattle
feed are needed to feed the cows:
These accomplish the same thing!
We used camelCase for the private fields and PascalCase for the
public ones. PascalCase means capitalizing the first letter in every
word in the variable name. camelCase is similar to PascalCase,
except that the first letter is lowercase. That makes the
uppercase letters look like “humps” of a camel.
The farmer
needs 30 bags
of feed for
each cow.

you are here 4 203
encapsulation
private int numberOfCows;
public int NumberOfCows
{
get
{
return numberOfCows;
}
set
{
numberOfCows = value;
BagsOfFeed = numberOfCows * FeedMultiplier;
}
}
You can use properties, which are methods that look just like fields to other
objects. A property can be used to get or set a backing field, which is just a
name for a field set by a property.
Properties make encapsulation easier
We’ll rename the private field to numberOfCows
(notice the lowercase “n”). This will become the
backing field for the NumberOfCows property.
You’ll often use properties by combining
them with a normal field declaration. Here’s
the declaration for NumberOfCows.
This is a get accessor. It’s a method that’s run any time
the NumberOfCows property is read. It has a return value
that matches the type of the variable—in this case it
returns the value of the private numberOfCows property.
This is a set accessor that’s called every time the
NumberOfCows property is set. Even though the method
doesn’t look like it has any parameters, it actually has one
called value that contains whatever value the field was set to.
These accomplish the same thing!
private void button1_Click(object sender, EventArgs e) {
Farmer myFarmer = new Farmer();
myFarmer.NumberOfCows = 10;
int howManyBags = myFarmer.BagsOfFeed;
myFarmer.NumberOfCows = 20;
howManyBags = myFarmer.BagsOfFeed;
}
You use get and set accessors exactly like fields. Here’s code for a button that sets the
numbers of cows and then gets the bags of feed:
When this line sets
NumberOfCows to 10, the
set accessor sets the
private numberOfCows field
and then updates the public
BagsOfFeed field.
Even though the code treats NumberOfCows like
a field, it runs the set accessor, passing it 20.
And when it queries the BagsOfFeed field it runs
the get accessor, which returns 300.
Since the NumberOfCows set
accessor updated BagsOfFeed,
now you can get its value.
204 Chapter 5
Build an application to test the Farmer class
Create a new Windows Forms application that we can use to test the Farmer class and
see properties in action. We’ll use the Console.WriteLine() method to write the
results to the output window in the IDE. Do this
Add the Farmer class to your project:
class Farmer {
public int BagsOfFeed;
public const int FeedMultiplier = 30;
private int numberOfCows;
public int NumberOfCows {
(add the get and set accessors from the previous page)
}
}
1
Here’s the form for the code. It uses Console.WriteLine() to send its output to the Output
window (which you can bring up by selecting “Output” from the Debug >> Windows menu). You
can pass several parameters to WriteLine()—the first one is the string to write. If you include
“{0}” inside the string, then WriteLine() replaces it with the first parameter. It replaces “{1}”
with the second parameter, “{2}” with the third, etc.
public partial class Form1 : Form {
Farmer farmer;
public Form1() {
InitializeComponent();
farmer = new Farmer() { NumberOfCows = 15 };
}
private void numericUpDown1_ValueChanged(object sender, EventArgs e) {
farmer.NumberOfCows = (int)numericUpDown1.Value;
}
private void calculate_Click(object sender, EventArgs e) {
Console.WriteLine(“I need {0} bags of feed for {1} cows”,
farmer.BagsOfFeed, farmer.NumberOfCows);
}
}
3
Build this form:
2
Set the NumericUpDown
control’s Value to 15, its
Minimum to 5, and its
Maximum to 300.
Name this button “calculate”—it
uses the public Farmer data to
write a line to the output.
WriteLine() replaces “{0}” with the
value in the first parameter, and “{1}”
with the second parameter.
Use the Console.WriteLine()
method to send a line of text
to the IDE’s Output window.
private property (no trespassing)

you are here 4 205
encapsulation
Use automatic properties to finish the class
It looks like the Cow Calculator works really well. Give it a shot—run it and click the button. Then change the number
of cows to 30 and click it again. Do the same for 5 cows and then 20 cows. Here’s what your Output window should
look like:
But there’s a problem with the class. Add a button to the form that executes this statement:
farmer.BagsOfFeed = 5;
Now run your program again. It works fine until you press the new button. But press that button and then press
the Calculate button again. Now your ouput tells you that you need 5 bags of feed—no matter how many cows
you have! As soon as you change the NumericUpDown, the Calculate button should work again.
Fully encapsulate the Farmer class
The problem is that your class isn’t fully encapsulated. You used properties to encapsulate
NumberOfCows, but BagsOfFeed is still public. This is a common problem. In fact, it’s so common that C#
has a way of automatically fixing it. Just change the public BagsOfFeed field to an automatic property.
And the IDE makes it really easy for you to add automatic properties. Here’s how:
Remove the BagsOfFeed field from the Farmer class. Put your cursor where the field used to
be, and then type prop and press the tab key twice. The IDE will add this line to your code:
public int MyProperty { get; set; }
1
Press the tab key—the cursor jumps to MyProperty. Change its name to BagsOfFeed:
public int BagsOfFeed { get; set; }
Now you’ve got a property instead of a field. When C# sees this, it works exactly the same as if you had
used a backing field (like the private numberOfCows behind the public NumberOfCows property).
2
That hasn’t fixed our problem yet. But there’s an easy fix—just make it a read-only property:
public int BagsOfFeed { get; private set; }
Try to rebuild your code—you’ll get an error on the line in the button that sets BagsOfFeed telling
you that the set accessor is inaccessible. You can’t modify BagsOfFeed from outside the
Farmer class—you’ll need to remove that line in order to get your code to compile, so remove the
button from the form. Now your Farmer class is better encapsulated!
3
The prop-tab-tab code snippet
adds an automatic property to
your code.
Can you see how this
could lead you to
accidentally add a
really irritating bug
in your program?
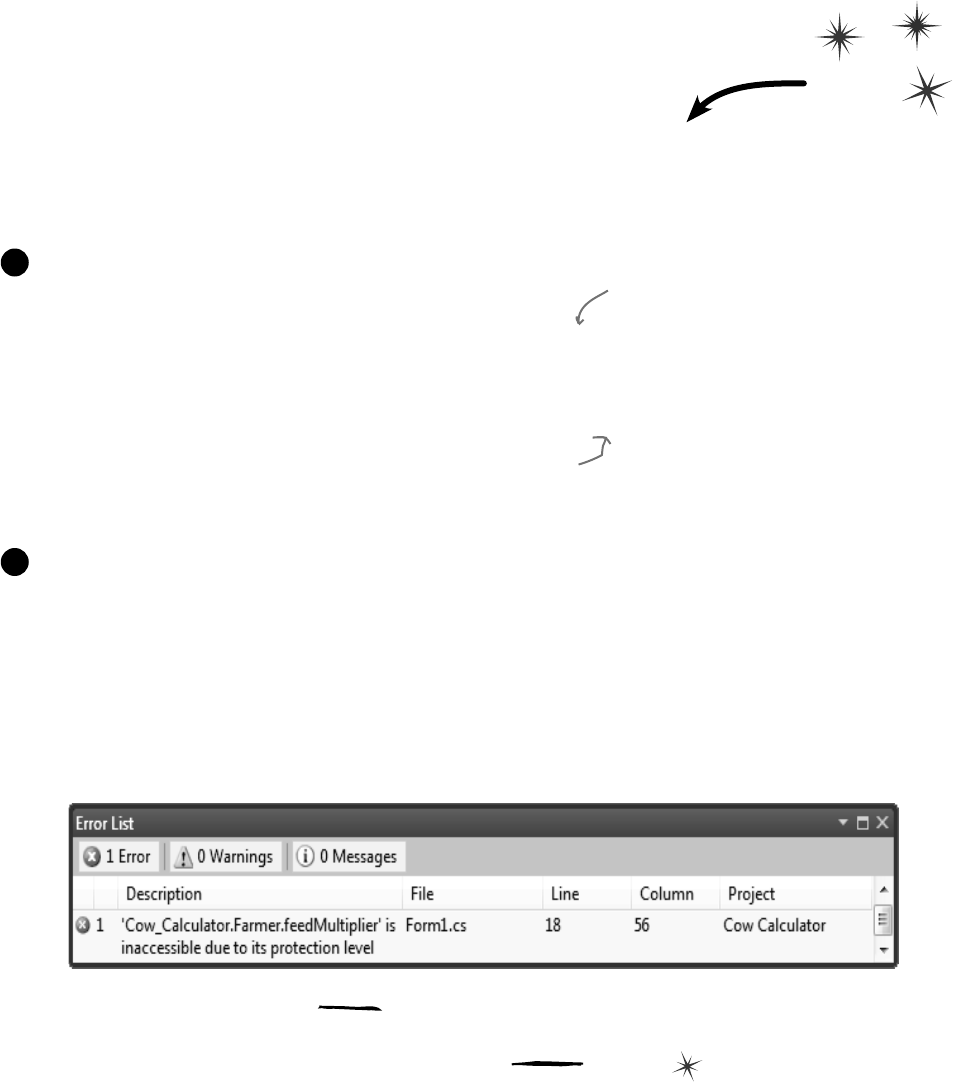
206 Chapter 5
set it up
What if we want to change the feed multiplier?
We built the Cow Calculator to use a const for the feed multiplier. But what if we
want to use the same Farmer class in different programs that need different feed
multipliers? You’ve seen how poor encapsulation can cause problems when you
make fields in one class too accessible to other classes. That’s why you should only
make fields and methods public if you need to. Since the Cow Calculator
never updates FeedMultiplier, there’s no need to allow any other class to set it.
So let’s change it to a read-only property that uses a backing field.
Remove this line from your program:
public const int FeedMultiplier = 30;
Use prop-tab-tab to add a read-only property. But instead of adding
an automatic property, use a backing field:
private int feedMultiplier;
public int FeedMultiplier { get { return feedMultiplier; } }
1
Go ahead and make that change to your code. Then run it. Uh-oh—something’s wrong!
BagsOfFeed always returns 0 bags.
Wait, that makes sense. FeedMultiplier never got initialized. It starts out with the
default value of zero and never changes. When it’s multiplied by the number of cows,
it still gives you zero. So add an object initializer:
public Form1() {
InitializeComponent();
farmer = new Farmer() { NumberOfCows = 15, feedMultiplier = 30 };
Uh-oh—the program won’t compile! You should get this error:
2
You can only initialize public fields and properties inside an object initializer.
So how can you make sure your object gets initialized properly if some of
the fields that need to be initialized are private?
Do this!
This property acts just like an int field,
except instead of storing a value it just
returns the backing field, feedMultiplier.
And since there’s no set accessor, it’s
read-only. It has a public get, which
means any other class can read the value
of FeedMultiplier. But since its set is
private, that makes it read-only— it can
only be set by an instance of Farmer.
Since we changed FeedMultiplier from a public const to a private int field, we changed its name, so it
starts with a lowercase “f”. That’s a pretty standard naming convention you’ll see throughout the book.
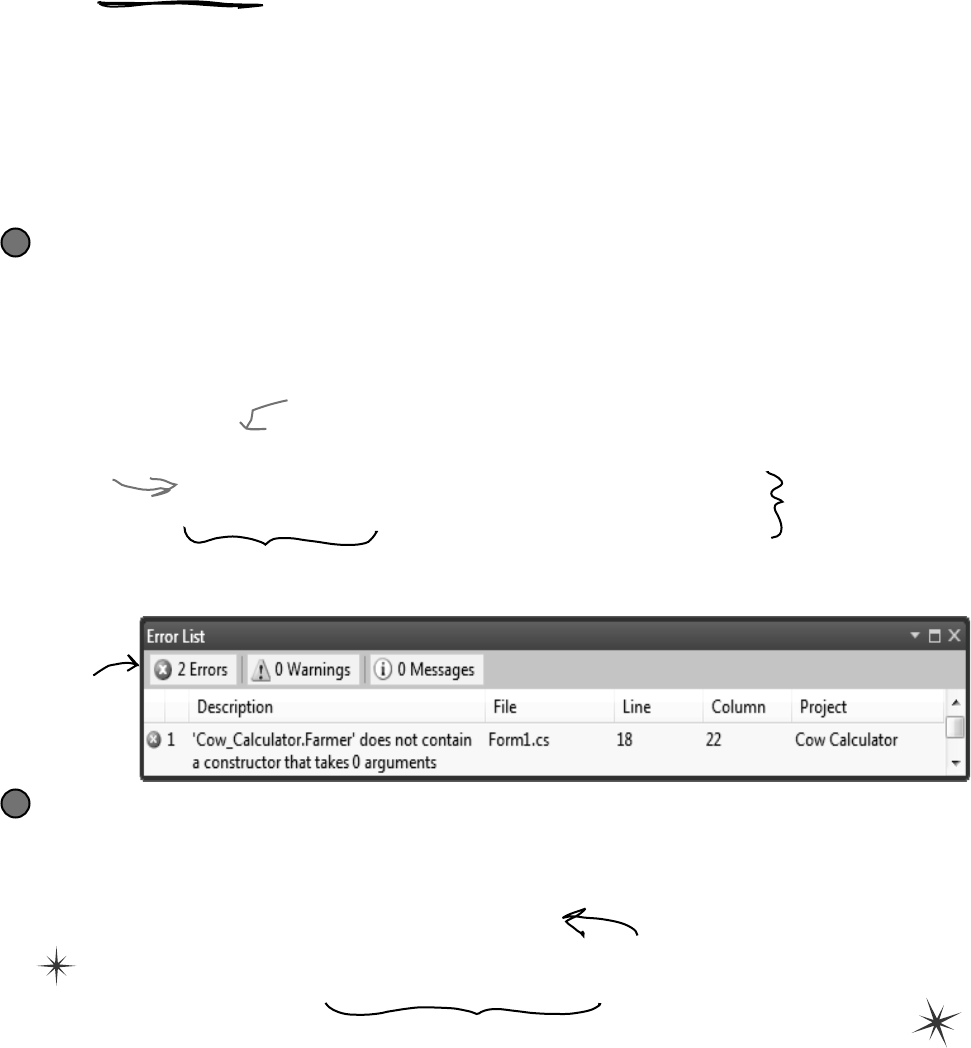
you are here 4 207
encapsulation
Use a constructor to initialize private fields
If you need to initialize your object, but some of the fields that need to be initialized
are private, then an object initializer just won’t do. Luckily, there’s a special method that
you can add to any class called a constructor. If a class has a constructor, then that
constructor is the very first thing that gets executed when the class is created with
the new statement. You can pass parameters to the constructor to give it values that need
to be initialized. But the constructor does not have a return value, because you don’t
actually call it directly. You pass its parameters to the new statement. And you already
know that new returns the object—so there’s no way for a constructor to return anything.
public Farmer(int numberOfCows, int feedMultiplier) {
this.feedMultiplier = feedMultiplier;
NumberOfCows = numberOfCows;
}
public Form1() {
InitializeComponent();
farmer = new Farmer(15, 30);
}
Add a constructor to your Farmer class
This constructor only has two lines, but there’s a lot going on here. So let’s take it step by step. We already know
that we need the number of cows and a feed multiplier for the class, so we’ll add them as parameters to the
constructor. Since we changed feedMultiplier from a const to an int, now we need an initial value for
it. So let’s make sure it gets passed into the constructor. We’ll use the constructor to set the number of cows, too.
1
Now change the form so that it uses the constructor
The only thing you need to do now is change the form so that the new statement that creates the Farmer
object uses the constructor instead of an object initializer. Once you replace the new statement, both errors will
go away, and your code will work!
2
Notice how there’s no “void” or “int” or another type after
“public”. That’s because constructors don’t have a return value.
The first thing we’ll do
is set the feed multiplier,
because it needs to be set
before we can call the
NumberOfCows set accessor.
If we just set the private numberOfCows field, the NumberOfCows set accessor
would never be called. Setting NumberOfCows makes sure it’s called.
You already know that the form is an
object. Well, it’s got a constructor too!
That’s what this method is—notice how
it’s named Form1 (like the class) and it
doesn’t have a return value.
All you have to do to
add a constructor
to a class is add a
method that has the
same name as the
class and no return
value.
Here’s where the new statement calls the constructor. It looks just like any other new
statement, except that it has parameters that it passes into the constructor method.
When you type it in, watch for the IntelliSense pop-up—it looks just like any other method.
This is the error
you’ll get if
your constructor
takes parameters
but your new
doesn’t have any.
The “this”
keyword in this.
feedMultiplier tells
C# that you’re
talking about the
field, not the
parameter with the
same name.
208 Chapter 5
Q: Is it possible to have a constructor without any
parameters?
A:Yes.It’sactuallyverycommonforaclasstohavea
constructorwithoutaparameter.Infact,you’vealreadyseenan
exampleofit—your form’s constructor.Lookinsideanewly
addedWindowsformandfinditsconstructor’sdeclaration:
public Form1() {
InitializeComponent();
}
That’stheconstructorforyourformobject.Itdoesn’ttake
anyparameters,butitdoeshavetodoalot.Takeaminute
andopenupForm1.Designer.cs.Findthe
InitializeComponent()methodbyclickingontheplus
signnextto“WindowsFormDesignergeneratedcode”.
Thatmethodinitializesallofthecontrolsontheformandsets
alloftheirproperties.Ifyoudraganewcontrolontoyourform
intheIDE’sformdesignerandsetsomeofitspropertiesinthe
Propertieswindow,you’llseethosechangesreflectedinsidethe
InitializeComponent()method.
TheInitializeComponent()methodiscalledinside
theform’sconstructorsothatthecontrolsallgetinitializedassoonas
theformobjectiscreated.(Remember,everyformthatgetsdisplayed
isjustanotherobjectthathappenstousemethodsthatthe.NET
FrameworkprovidesintheSystem.Windows.Forms
namespacetodisplaywindows,buttons,andothercontrols.)
When a method’s parameter
has the same name as a
field, then it masks the
field.
Did you notice how the constructor’s
feedMultiplier parameter looks just like
the backing field behind the FeedMultiplier
property? If you wanted to use the backing
field inside the constructor, you’d use the this
keyword: feedMultiplier refers to the
parameter, and this.feedMultiplier is how
you’d access the private field.
Constructors
Way Up Close
public Farmer(int numberOfCows, int feedMultiplier) {
this.feedMultiplier = feedMultiplier;
NumberOfCows = numberOfCows;
}
Let’s take a closer look at the Farmer constructor so we can get a good sense
of what’s really going on.
This constructor has two parameters, which work just like
ordinary parameters. The first one gives the number of cows,
and the second one is the feed multiplier.
We need to set the feed multiplier first,
because the second statement calls the
NumberOfCows set accessor, which needs
feedMultiplier to have a value in order to
set BagsOfFeed.
We need a way to differentiate the field called
feedMultiplier from the parameter with the
same name. That’s where the “this” keyword
comes in really handy.
Constructors don’t
return anything, so
there’s no return type.
Since “this” is always a reference to the current object, this.feedMultiplier
refers to the field. If you leave “this” off, then feedMultiplier refers
to the parameter. So the first line in the constructor sets the private
feedMultiplier field equal to the second parameter of the constructor.
constructors deconstructed

you are here 4 209
encapsulation
Q: Why would I need complicated
logic in a get or set accessor? Isn’t it just
a way of creating a field?
A:Becausesometimesyouknowthat
everytimeyousetafield,you’llhavetodo
somecalculationorperformsomeaction.
ThinkaboutKathleen’sproblem—sheran
intotroublebecausetheformdidn’trun
themethodtorecalculatethecostofthe
decorationsaftersettingthenumberof
peopleintheDinnerPartyclass.Ifwe
replacedthefieldwithasetaccessor,then
wecouldmakesurethatthesetaccessor
recalculatesthecostofthedecorations.(In
fact,you’reabouttodoexactlythatinjusta
coupleofpages!)
Q: Wait a minute—so what’s the
difference between a method and a get or
set accessor?
A:Thereisnone!Getandsetaccessors
areaspecialkindofmethod—onethatlooks
justlikeafieldtootherobjects,andiscalled
wheneverthatfieldisset.Getaccessors
alwaysreturnavaluethat’sthesametype
asthefield,andsetaccessorsalwaystake
exactlyoneparametercalledvalue
whosetypeisthesameasthefield.Oh,
andbytheway,youcanjustsay“property”
insteadof“getandsetaccessor.”
Q: So you can have ANY kind of
statement in a property?
A:Absolutely.Anythingyoucandoina
method,youcandoinaproperty.Theycan
callothermethods,accessotherfields,even
createobjectsandinstances.Buttheyonly
getcalledwhenapropertygetsaccessed,
soitdoesn’tmakesensetohaveany
statementsinthemthatdon’thavetodowith
gettingorsettingtheproperty.
Q: If a set accessor always takes a
parameter called value, why doesn’t
its declaration have parentheses
with “int value” in them, like you’d
have with any other method that takes a
parameter called value?
A:BecauseC#wasbuilttokeepyoufrom
havingtotypeinextrainformationthatthe
compilerdoesn’tneed.Theparametergets
declaredwithoutyouhavingtoexplicitlytype
itin,whichdoesn’tsoundlikemuchwhen
you’reonlytypingoneortwo—butwhenyou
havetotypeafewhundred,itcanbeareal
timesaver(nottomentionabugpreventer).
Everysetaccessoralwayshasexactlyone
parametercalledvalue,andthetypeof
thatparameteralwaysmatchesthetype
oftheproperty.C#hasalltheinformation
itneedsaboutthetypeandparameteras
soonasyoutype“set {”.Sothere’sno
needforyoutotypeanymore,andtheC#
compilerisn’tgoingtomakeyoutypemore
thanyouhaveto.
Q:Wait a sec—is that why I don’t add a
return value to my constructor?
A:Exactly!Yourconstructordoesn’thave
areturnvaluebecauseeveryconstructor
isalwaysvoid.Itwouldberedundantto
makeyoutype“void”atthebeginningof
eachconstructor,soyoudon’thaveto.
Q: Can I have a get without a set or a
set without a get?
A:Yes!Whenyouhaveagetaccessor
butnoset,youcreatearead-onlyproperty.
Forexample,theSecretAgentclass
mighthaveaReadOnlyfieldforthe
name:
string name = “Dash Martin”;
public string Name {
get { return name; }
}
Andifyoucreateapropertywithaset
accessorbutnoget,thenyourbacking
fieldcanonlybewritten,notread.The
SecretAgentclasscouldusethatfora
Passwordpropertythatotherspiescould
writetobutnotsee:
public string Password {
set {
if (value == secretCode) {
name = “Herb Jones”;
}
}
Bothofthosetechniquescancomeinreally
handywhenyou’redoingencapsulation.
Q:I’ve been using objects for a while,
but I haven’t written a constructor. Does
that mean some classes don’t need one?
A:No,itjustmeansthatC#automatically
makesazero-parameterconstructorif
there’snonedefined.Ifyoudefinea
constructor,thenitdoesn’tdothat.That’sa
valuabletoolforencapsulation,becauseit
meansthatyouhavetheoption—butnotthe
requirement—toforceanyoneinstantiating
yourclasstouseyourconstructor.
Properties (get and set
accessors) are a special
kind of method that’s
only run when another
class reads or writes a
property.
210 Chapter 5
Take a look at the get and set accessors here. The form that is using this
class has a new instance of CableBill called thisMonth and calls
the GetThisMonthsBill() method with a button click. Write down
the value of the amountOwed variable after the code below executed.
class CableBill {
private int rentalFee;
public CableBill(int rentalFee) {
this.rentalFee = rentalFee;
discount = false;
}
private int payPerViewDiscount;
private bool discount;
public bool Discount {
set {
discount = value;
if (discount)
payPerViewDiscount = 2;
else
payPerViewDiscount = 0;
}
}
public int CalculateAmount(int payPerViewMoviesOrdered) {
return (rentalFee - payPerViewDiscount) * payPerViewMoviesOrdered;
}
}
1. CableBill january = new CableBill(4);
MessageBox.Show(january.CalculateAmount(7).ToString());
2. CableBill february = new CableBill(7);
february.payPerViewDiscount = 1;
MessageBox.Show(february.CalculateAmount(3).ToString());
3. CableBill march = new CableBill(9);
march.Discount = true;
MessageBox.Show(march.CalculateAmount(6).ToString());
what’s in a name?
What’s the value of
amountOwed?
What’s the value of
amountOwed?
What’s the value of
amountOwed?
you are here 4 211
encapsulation
Q: I noticed that you used uppercase
names for some fields but lowercase
ones for others. Does that matter?
A:Yes—itmatterstoyou.Butitdoesn’t
mattertothecompiler.C#doesn’tcarewhat
younameyourvariables,butifyouchoose
weirdnamesthenitmakesyourcodehardto
read.Sometimesitcangetconfusingwhen
youhavevariablesthatarenamedthesame,
exceptonestartswithanuppercaseletterand
theotherstartswithalowercaseone.
CasemattersinC#.Youcanhavetwo
differentvariablescalledPartyand
partyinthesamemethod.It’llbe
confusingtoread,butyourcodewillcompile
justfine.Hereareafewtipsaboutvariable
namestohelpyoukeepitstraight.They’re
nothard-and-fastrules—thecompiler
doesn’tcarewhetheravariableisuppercase
orlowercase—butthey’regoodsuggestions
tohelpmakeyourcodeeasiertoread.
1.Whenyoudeclareaprivatefield,itshould
beincamelCaseandstartwithalowercase
letter.(It’scalledcamelCasebecauseit
startswithalowercaseletterandadditional
wordsareuppercase,sotheyresemble
humpsonacamel.)
2.Publicpropertiesandmethodsarein
PascalCase(theystartwithanuppercase
letter).
3.Parameterstomethodsshouldbein
camelCase.
4.Somemethods,especiallyconstructors,
willhaveparameterswiththesamenames
asfields.Whenthishappens,theparameter
masksthefield,whichmeansstatements
inthemethodthatusethenameendup
referringtotheparameter,notthefield.Use
thethiskeywordtofixtheproblem—add
ittothevariabletotellthecompileryou’re
talkingaboutthefield,nottheparameter.
This code has problems. Write down what you think is wrong with
the code, and what you’d change.
class GumballMachine {
private int gumballs;
private int price;
public int Price
{
get
{
return price;
}
}
public GumballMachine(int gumballs, int price)
{
gumballs = this.gumballs;
price = Price;
}
public string DispenseOneGumball(int price, int coinsInserted)
{
if (this.coinsInserted >= price) { // check the field
gumballs -= 1;
return “Here’s your gumball”;
} else {
return “Please insert more coins”;
}
}
}
212 Chapter 5
1. CableBill january = new CableBill(4);
MessageBox.Show(january.CalculateAmount(7).ToString());
2. CableBill february = new CableBill(7);
february.payPerViewDiscount = 1;
MessageBox.Show(february.CalculateAmount(3).ToString());
3. CableBill march = new CableBill(9);
march.Discount = true;
MessageBox.Show(march.CalculateAmount(6).ToString());
This code has problems. Write down what you think is wrong with
the code, and what you’d change.
encapsulation prevents bugs
What’s the value of
amountOwed?
What’s the value of
amountOwed?
What’s the value of
amountOwed?
28
won’t compile
42
public GumballMachine(int gumballs, int price)
{
gumballs = this.gumballs;
price = Price;
}
public string DispenseOneGumball(int price, int coinsInserted)
{
if (this.coinsInserted >= price) { // check the field
gumballs -= 1;
return “Here’s your gumball”;
} else {
return “Please insert more coins”;
}
}
The “this” keyword
is on a parameter,
where it doesn’t
belong. It should be
on price, because
that field is masked
by a parameter.
This parameter masks the
private field called Price, and
the comment says the method is
supposed to be checking the value
of the price backing field.
The “this” keyword is on the wrong
“gumballs.” this.gumballs refers to the
property, while gumballs refers to the
parameter.
Lowercase price refers to the parameter to
the constructor, not the field. This line sets
the PARAMETER to the value returned by the
Price get accessor, but Price hasn’t even been
set yet! So it doesn’t do anything useful. If you
change the constructor’s parameter to uppercase
Price, this line will work properly.
Write down the value of the amountOwed variable after the code
below executed.
you are here 4 213
encapsulation
If we make sure that the cost of the
decorations is recalculated every time
the number of people is updated, then
CalculateCost() will always return the
right amount.
How to fix the Dinner Party calculator
To fix the DinnerParty class, we’ll need to make sure the CalculateCostOfDecorations()
method is called every time NumberOfPeople changes.
1
NumberOfPeople = 10;
CalculateCost() returns $650
F
o
r
m
D
i
n
n
e
r
P
a
r
t
y
o
b
j
e
c
t
CalculateCostOfDecorations()
We need to recalculate the decoration cost
every time the number of people changes.
Usewhatyou’velearnedaboutpropertiesandconstructorstofixKathleen’sPartyPlannerprogram.
Add properties and a constructor
All you need to do to fix Kathleen’s problem is make sure the DinnerParty class is well
encapsulated. You’ll start by changing NumberOfPeople to a property that calls
CalculateCostOfDecorations() any time it’s called. Then you’ll add a constructor that
makes sure the instance is initialized properly. Finally, you’ll change the form so it uses the new
constructor. If you do this right, that’s the only change you’ll need to make to the form.
≥You’ll need to create a new property for NumberOfPeople that has a set accessor that calls
CalculateCostOfDecorations(). It’ll need a backing field called numberOfPeople.
≥The NumberOfPeople set accessor needs to have a value to pass as the parameter to
the CalculateCostOfDecorations() method. So add a private bool field called
fancyDecorations that you set every time CalculateCostOfDecorations() is called.
≥Add a constructor that sets up the class. It needs to take three parameters for the number of people,
Healthy Option, and fancy decorations. The form currently calls two methods when it initializes
the DinnerParty object—move them into the constructor:
dinnerParty.CalculateCostOfDecorations(fancyBox.Checked);
dinnerParty.SetHealthyOption(healthyBox.Checked);
≥Here’s the constructor for the form—everything else in the form stays the same:
public Form1() {
InitializeComponent();
dinnerParty = new DinnerParty((int)numericUpDown1.Value,
healthyBox.Checked, fancyBox.Checked);
DisplayDinnerPartyCost();
}
2
214 Chapter 5
class DinnerParty {
const int CostOfFoodPerPerson = 25;
private int numberOfPeople;
public int NumberOfPeople {
get { return numberOfPeople; }
set {
numberOfPeople = value;
CalculateCostOfDecorations(fancyDecorations);
}
}
private bool fancyDecorations;
public decimal CostOfBeveragesPerPerson;
public decimal CostOfDecorations = 0;
public DinnerParty(int numberOfPeople, bool healthyOption, bool fancyDecorations) {
NumberOfPeople = numberOfPeople;
this.fancyDecorations = fancyDecorations;
SetHealthyOption(healthyOption);
CalculateCostOfDecorations(fancyDecorations);
}
public void SetHealthyOption(bool healthyOption) {
if (healthyOption) {
CostOfBeveragesPerPerson = 5.00M;
} else {
CostOfBeveragesPerPerson = 20.00M;
}
}
public void CalculateCostOfDecorations(bool fancy) {
fancyDecorations = fancy;
if (fancy) {
CostOfDecorations = (NumberOfPeople * 15.00M) + 50M;
} else {
CostOfDecorations = (NumberOfPeople * 7.50M) + 30M;
}
}
public decimal CalculateCost(bool healthyOption) {
decimal totalCost = CostOfDecorations
+ ((CostOfBeveragesPerPerson + CostOfFoodPerPerson) * NumberOfPeople);
if (healthyOption) {
return totalCost * .95M;
} else {
return totalCost;
}
}
}
exercise solution
Usewhatyou’velearnedaboutpropertiesandconstructorstofixKathleen’sPartyPlanner
program.
Now that numberOfPeople is private, there’s
no way for the form to change it without
also recalculating the cost of the decorations.
That’ll fix the bug that almost cost Kathleen
one of her best clients!
By using a property, you can make
sure that the cost of decorations is
recalculated every time the number
of people changes.
Be careful how you use
“this.”. You’ll need it to tell
the difference between the
parameter and private field
named numberOfPeople.
So you’ll need
to put “this.”
in front of
“fancyDecorations”
because the
fancyDecorations
parameter masks
the private field
with the same name.
Make sure you store the
fancy decorations in a field
so the NumberOfPeople set
accessor can use it.

this is a new chapter 215
inheritance
6
Your object’s family tree
Sometimes you
DO
want to be just like your parents.
Ever run across an object that almost does exactly what you want your object to do?
Found yourself wishing that if you could just change a few things, that object would
be perfect? Well, that’s just one reason that inheritance is one of the most powerful
concepts and techniques in the C# language. Before you’re through with this chapter,
you’ll learn how to subclass an object to get its behavior, but keep the flexibility to
make changes to that behavior. You’ll avoid duplicate code, model the real world
more closely, and end up with code that’s easier to maintain.
So there I was riding my bicycle
object down Dead Man’s Curve
when I realized it inherited from
TwoWheeler and I forgot to add a
Brakes() method...long story short,
twenty-six stitches and Mom said I’m
grounded for a month.

216 Chapter 6
I just got a call for a
birthday party for 10 people.
Can your program handle that?
Most of the changes
have to do with cakes
and writing.
Kathleen does birthday parties, too
Cost Estimate for a Birthday Party
• $25 per person.
• There are two options for the cost of decorations. If a client
goes with the normal decorations, it’s $7.50 per person with a $30
decorating fee. A client can also upgrade the party decorations
to the “Fancy Option”—that costs $15 per person with a $50 one-
time decorating fee.
• When the party has four people or less, use an 8-inch cake ($40),
Otherwise, she uses a 16-inch cake ($75).
• Writing on the cake costs $.25 for each letter. The 8-inch cake can
have up to 16 letters of writing, and the 16-inch one can have up
to 40 letters of writing.
The application should handle both types of parties. Use a tab control,
one tab for each kind of party.
Now that you got your program working, Kathleen is using it all the
time. But she doesn’t just handle dinner parties—she does birthdays
too, and they’re priced a little differently. She’ll need you to add
birthdays to her program.
happy birthday baby
These are both the same
as the dinner party.
you are here 4 217
inheritance
We need a BirthdayParty class
BirthdayParty
NumberOfPeople
CostOfDecorations
CakeSize
CakeWriting
CalculateCostOfDecorations()
CalculateCost()
Create a new BirthdayParty class
Your new class will need to calculate the costs, deal with
decorations, and check the size of the writing on the cake.
1
Modifying your program to calculate the cost of Kathleen’s
birthday parties means adding a new class and changing the
form to let you handle both kinds of parties.
Here’s what we’re going to do:
Add a TabControl to your form
Each tab on the form is a lot like the GroupBox control you used
to choose which guy placed the bet in the Betting Parlor lab. Just
click on the tab you want to display, and drag controls into it.
2
Label the first tab and move the Dinner Party controls into it
You’ll drag each of the controls that handle the dinner party into the new tab.
They’ll work exactly like before, but they’ll only be displayed when the dinner
party tab is selected.
3
Label the second tab and add new Birthday Party controls to it
You’ll design the interface for handling birthday parties just like you did for the
dinner parties.
4
Wire your birthday party class up to the controls
Now all you need to do is add a BirthdayParty reference to the form’s fields, and
add the code to each of your new controls so that it uses its methods and properties.
5
Q: Why can’t we just create a new instance of
DinnerParty, like Mike did when he wanted to compare
three routes in his navigation program?
A:BecauseifyoucreatedanotherinstanceoftheDinnerParty
class,you’donlybeabletouseittoplanextradinnerparties.Two
instancesofthesameclasscanbereallyusefulifyouneedtomanage
twodifferentpiecesofthesamekindofdata.Butifyouneedtostore
different kinds of data,you’llneeddifferent classestodoit.
Q: How do I know what to put in the new class?
A:Beforeyoucanstartbuildingaclass,youneedtoknow
whatproblemit’ssupposedtosolve.That’swhyyouhadtotalkto
Kathleen—she’sgoingtobeusingtheprogram.Goodthingyoutook
alotofnotes!Youcancomeupwithyourclass’smethods,fields,and
propertiesbythinkingaboutitsbehavior(whatitneeds to do)andits
state(whatitneeds to know).
You’ll do all this in a
minute—but first you’ll
need to get a sense of
what the job involves.
218 Chapter 6
BirthdayParty
NumberOfPeople
CostOfDecorations
CakeSize
CakeWriting
CalculateCostOfDecorations()
CalculateCost()
Add the new BirthdayParty class to your program
You already know how you’ll handle the NumberOfPeople property
and the CostOfDecorations method—they’re just like their
counterparts in DinnerParty. We’ll start by creating your new class
and adding those, and then we’ll add the rest of the behavior.
≥Add a public int field called CakeSize. You’ll be adding a
private method called CalculateCakeSize() that sets
CakeSize to either 8 or 16 depending on the number of people.
So first we’ll add the constructor and the NumberOfPeople set
accessor. We’ll also add a couple more fields and a constant.
1
another kind of party
Make sure you use decimal as
the type for the fields and
properties that hold currency.
Do this!
Build the Party Planner version 2.0
Start a new project—we’re going to build Kathleen a new version of her
program that handles birthdays and dinner parties. We’ll start by creating a well-
encapsulated BirthdayParty class to do the actual calculation.
using System.Windows.Forms;
class BirthdayParty {
public const int CostOfFoodPerPerson = 25;
public decimal CostOfDecorations = 0;
private bool fancyDecorations;
public int CakeSize;
public BirthdayParty(int numberOfPeople,
bool fancyDecorations, string cakeWriting)
{
this.numberOfPeople = numberOfPeople;
this.fancyDecorations = fancyDecorations;
CalculateCakeSize();
this.CakeWriting = cakeWriting;
CalculateCostOfDecorations(fancyDecorations);
}
The constructor’s calling the set accessor to
set the cake writing, in case the parameter
is too long for the cake, so it’s got to
calculate the cake size first.
When the BirthdayParty object is initialized, it needs
to know the number of people, the kind of decorations,
and the writing on the cake, so it can start out with
the right cake cost when CalculateCost() is called.
The constructor sets the properties
and then runs the calculations.
Make sure you’ve added this using statement to the top of
the class, because you’ll be calling MessageBox.Show().
you are here 4 219
inheritance
private void CalculateCakeSize() {
if (NumberOfPeople <= 4)
CakeSize = 8;
else
CakeSize = 16;
}
private string cakeWriting = “”;
public string CakeWriting {
get { return this.cakeWriting; }
set {
int maxLength;
if (CakeSize == 8)
maxLength = 16;
else
maxLength = 40;
if (value.Length > maxLength) {
MessageBox.Show(“Too many letters for a ” + CakeSize + “ inch cake”);
if (maxLength > this.cakeWriting.Length)
maxLength = this.cakeWriting.Length;
this.cakeWriting = cakeWriting.Substring(0, maxLength);
}
else
this.cakeWriting = value;
}
}
The CalculateCakeSize() method sets
the CakeSize field. It’s called by the
NumberOfPeople set accessor and the
CalculateCost() method.
Here’s where the CakeWriting property
makes sure that the cake’s writing is
never too long for the cake size. Its set
accessor checks the cake size, then uses
the backing field’s Length property to
make sure it’s not too long. If it is, it
cuts the string down to the right size.
≥You’ll need a CakeWriting string property to hold the writing on
the cake. The CakeWriting set accessor checks CakeSize because
different sizes of cake can hold different numbers of letters. Then it uses
value.Length to check how long the string is. If it’s too long, instead
of setting the private field, the set accessor pops up a message box that
says, “Too many letters for a 16-inch cake” (or 8-inch cake).
≥And you’ll need that CalculateCakeSize() method, too. Here it is:
Did you notice how
we left out some
of the brackets?
When you only have
one statement in a
code block, you don’t
need to add curly
brackets around it.
Every string has a Substring() method that returns a
portion of the string. This one cuts it down to the
allowed length, so you’ll need to reload the writing into
the textbox when the text or cake size changes.
This property is a little more
complex than the ones you’ve seen
before. It checks the cake size to
see if it’s too long for the cake,
using the maxLength variable to
store the maximum length. If it’s
too long, it gives an error message
and then cuts the backing field
down to the right size, so it can be
reloaded into the text box.
Curly brackets are optional for single-line blocks
A lot of times you’ll have an if statement or while loop that’s just got a single
statement inside its block. When that happens a lot, you can end up with a whole lot
of curly brackets—and that can be a real eyesore! C# helps you avoid that problem
by letting you drop the curly brackets if there’s just one statement. So this is
perfectly valid syntax for a loop and an if statement:
for (int i = 0; i < 10; i++) if (myValue == 36)
DoTheJob(i); myValue *= 5;

220 Chapter 6
public decimal CalculateCost() {
decimal TotalCost = CostOfDecorations + (CostOfFoodPerPerson * NumberOfPeople);
decimal CakeCost;
if (CakeSize == 8)
CakeCost = 40M + CakeWriting.Length * .25M;
else
CakeCost = 75M + CakeWriting.Length * .25M;
return TotalCost + CakeCost;
}
private int numberOfPeople;
public int NumberOfPeople {
get { return numberOfPeople; }
set {
numberOfPeople = value;
CalculateCostOfDecorations(fancyDecorations);
CalculateCakeSize();
this.CakeWriting = cakeWriting;
}
}
public void CalculateCostOfDecorations(bool fancy) {
fancyDecorations = fancy;
if (fancy)
CostOfDecorations = (NumberOfPeople * 15.00M) + 50M;
else
CostOfDecorations = (NumberOfPeople * 7.50M) + 30M;
}
}
We’re using decimal because we’re dealing with
prices and currency.
Making the CakeWriting method cut down
the size of the cake is only half of the
solution. The other half is making sure
that the CakeWriting set accessor gets run
every time the number of people changes.
The CalculateCost() method is a
lot like the one from DinnerParty,
except that it adds the cost of
the cake instead of the Healthy
Choice option.
So when the number of people
changes, the class first
recalculates the cake size, and
then it uses its set accessor for
CakeWriting to cut the text
down—so if a 10-person party
turns into a 4-person one, their
36-letter message will be cut
down to one that’ll fit on the
smaller cake.
This method is just like the one in
the DinnerParty class.
kathleen’s gonna love this
≥Finish off the BirthdayParty class by adding the CalculateCost()
method. But instead of taking the decoration cost and adding the cost of
beverages (which is what happens in DinnerParty), it’ll add the cost of
the cake.
Keep on going with the BirthdayParty class…
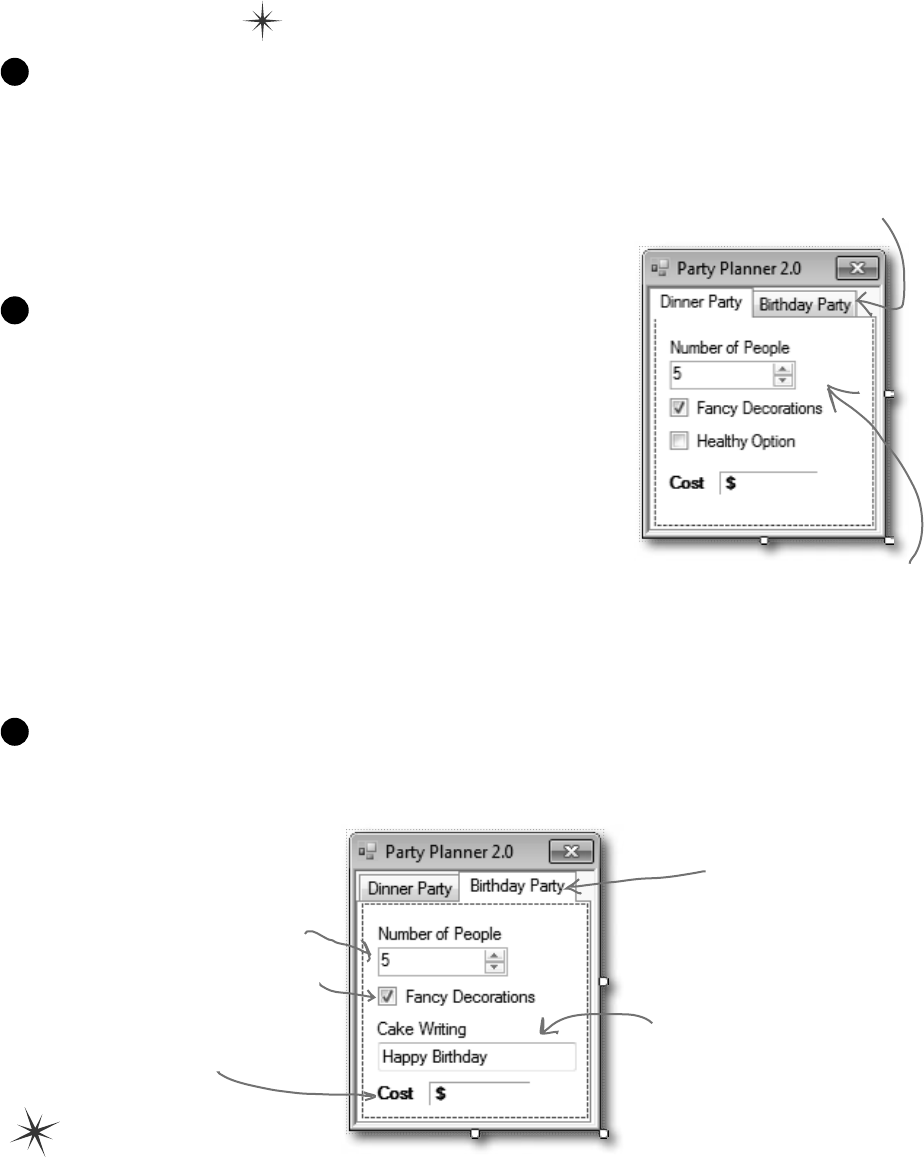
you are here 4 221
inheritance
Use a TabControl to add tabs to the form
Drag a TabControl out of the toolbox and onto your form, and
resize it so it takes up the entire form. Change the text of each
tab using the TabPages property: a “…” button shows up in the
Properties window next to the property. When you click it, the IDE
pops up a window that lets you edit the properties of each tab. Set the
Text property of the tabs to “Dinner Party” and “Birthday Party”.
2
Paste the Dinner Party controls onto their tab
Open up the Party Planner program from Chapter 5 in another
IDE window. Select the controls on the tab, copy them, and
paste them into the new Dinner Party tab. You’ll need to
click inside the tab to make sure they get pasted into the right
place (otherwise you’ll get an error about not being able to add a
component to a container of type TabControl).
One thing to keep in mind here: when you copy and paste a control
into a form, you’re only adding the control itself, not the event
handlers for the control. And you’ll need to check to make sure
that the (Name) is set correctly in the Properties window for each of
them. Make sure that each control has the same name as it did in
your Chapter 5 project, and then double-click on each control after
you add it to add a new empty event handler.
3
Build the Birthday Party user interface
The Birthday Party GUI has a NumericUpDown control for the number of people, a
CheckBox control for fancy decorations, and a Label control with a 3D border for the cost.
Then you’ll add a TextBox control for the cake writing.
4
Click on the tabs to switch
between them. Use the
TabCollection property to
change the text for each
tab. Click the “…” button
next to it and select each
tab’s Text property.
After you drag the Dinner
Party controls onto the tab,
they’ll only be visible when the
Dinner Party tab is selected.
This tab uses the
NumericUpDown, CheckBox,
and Label controls just like
the Dinner Party tab does.
Name them numberBirthday,
fancyBirthday, and
birthdayCost.
Add a TextBox control called
cakeWriting for the writing
on the cake (and a label above
it so the user knows what it’s
for). Use its Text property
to give it a default value of
“Happy Birthday”.
Click on the Birthday Party
tab and add the new controls.
222 Chapter 6
public partial class Form1 : Form {
DinnerParty dinnerParty;
BirthdayParty birthdayParty;
public Form1() {
InitializeComponent();
dinnerParty = new DinnerParty((int)numericUpDown1.Value,
healthyBox.Checked, fancyBox.Checked);
DisplayDinnerPartyCost();
birthdayParty = new BirthdayParty((int)numberBirthday.Value,
fancyBirthday.Checked, cakeWriting.Text);
DisplayBirthdayPartyCost();
}
// The fancyBox, healthyBox, and numericUpDown1 event handlers and
// the DisplayDinnerCost() method are identical to the ones in the
// Dinner Party exercise at the end of Chapter 5.
The BirthdayParty instance is
initialized in the form’s constructor,
just like the instance of DinnerParty.
The CheckBox and NumericUpDown controls’ event
handlers are just like the ones for the dinner party.
finish the form
Put it all together
All the pieces are there—now it’s just a matter of writing a little code to make the controls work.
≥You’ll need fields in your form that have references to a BirthdayParty object and a
DinnerParty object, and you’ll need to instantiate them in the constructor.
≥You already have code for the dinner party controls’ event handlers—they’re in your
Chapter 5 project. If you haven’t double-clicked on the NumericUpDown and CheckBox
controls in the Dinner Party tab to add the event handlers, do it now. Then copy the
contents of each event handler from the Chapter 5 program and paste them in here. Here’s
the code for the form:
5
Keep on going with the code for the form…
private void numberBirthday_ValueChanged(object sender, EventArgs e) {
birthdayParty.NumberOfPeople = (int)numberBirthday.Value;
DisplayBirthdayPartyCost();
}
private void fancyBirthday_CheckedChanged(object sender, EventArgs e) {
birthdayParty.CalculateCostOfDecorations(fancyBirthday.Checked);
DisplayBirthdayPartyCost();
}
≥Add code to the NumericUpDown control’s event handler method to set the object’s
NumberOfPeople property, and make the Fancy Decorations checkbox work.
you are here 4 223
inheritance
private void DisplayBirthdayPartyCost() {
cakeWriting.Text = birthdayParty.CakeWriting;
decimal cost = birthdayParty.CalculateCost();
birthdayCost.Text = cost.ToString(“c”);
}
}
The way that the form
handles the cake writing
can be really simple because
the BirthdayParty class
is well encapsulated. All
the form has to do is use
its controls to set the
properties on the object,
and the object takes care
of the rest.
All the intelligence for dealing with the writing, the
number of people, and the cake size is built into the
NumberOfPeople and CakeWriting set accessors, so the
form just has to set and display the values.
≥Use the Events page in the Properties window to add a new
TextChanged event handler to the cakeWriting TextBox. Click
on the lightning bolt button in the Properties window to switch to the
Events page. Then select the TextBox and scroll down until you find the
TextChanged event. Double-click on it to add a new event handler for it.
private void cakeWriting_TextChanged(object sender, EventArgs e) {
birthdayParty.CakeWriting = cakeWriting.Text;
DisplayBirthdayPartyCost();
}
≥Add a DisplayBirthdayPartyCost() method and add it to
all of the event handlers so the cost label is updated automatically
any time there’s a change.
…and you’re done with the form!
When you select the
cakeWriting TextBox
and double-click on the
TextChanged row in
the Events page of the
Properties window, the
IDE will add a new event
handler that gets fired
every time the text in
the box changes.
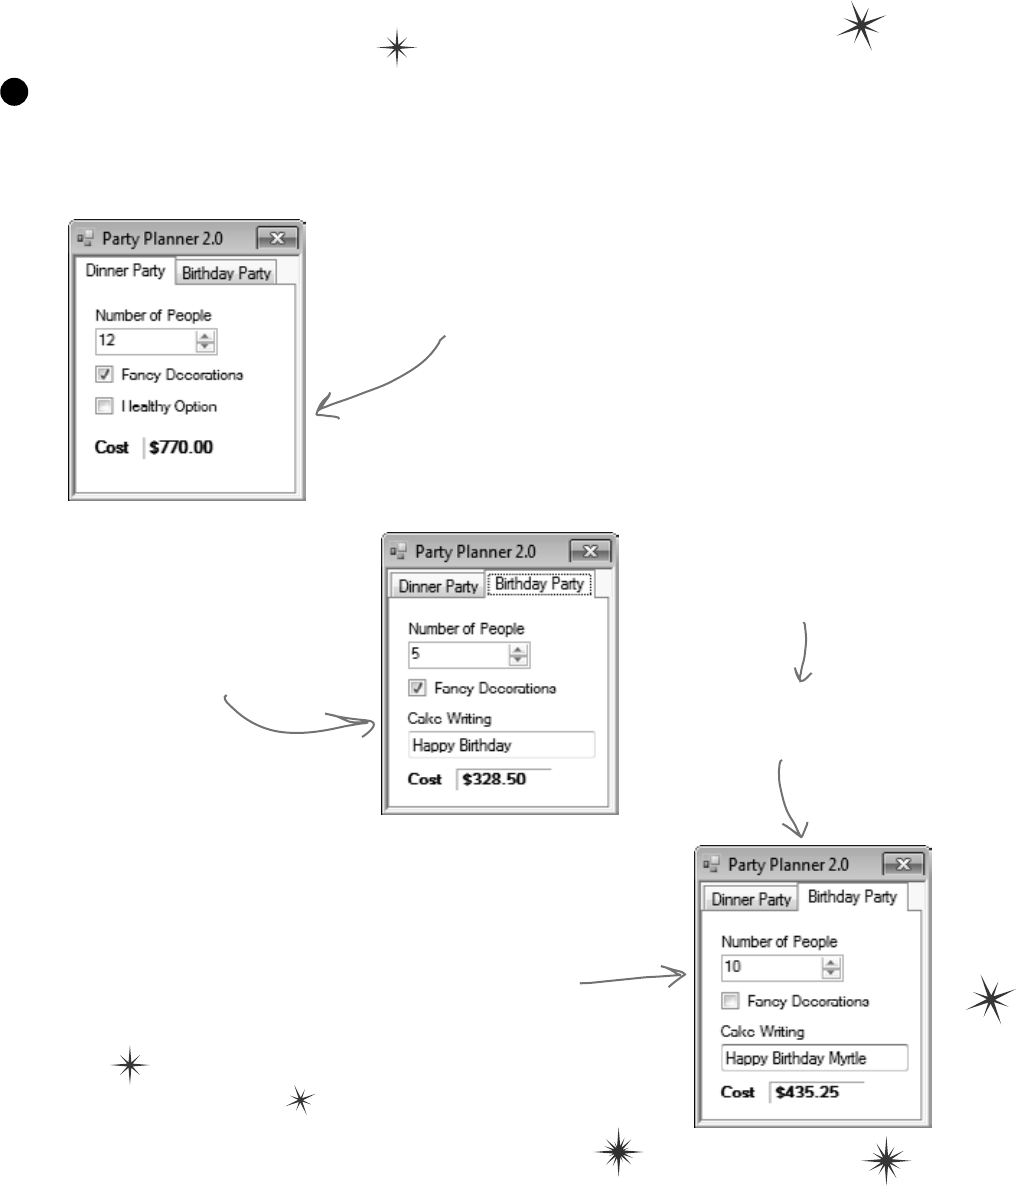
224 Chapter 6
it lives!
Your program’s done—time to run it
Make sure the program works the way it’s supposed to. Check that it
pops up a message box if the writing is too long for the cake. Make sure
the price is always right. If it’s working, you’re done!
6
Start up the program and go to
the Dinner Party tab. Make sure
that it works just like your old
Party Planner program.
Click on the Birthday Party tab.
Make sure the cost changes when
you change the number of people
or click the Fancy Decorations
checkbox.
Does the calculation work
correctly? In this case, 10
people means $25 per person
($250) plus $75 for a 16”
cake plus $7.50 per person
($75) for the non-fancy
decorations plus a $30
decorating fee plus $.25 per
letter for 21 letters on the
cake ($5.25).
So $250 + $75 + $75 + $30
+ $5.25 = $435.25. It works!
When you type in the Cake Writing
text box, the TextChanged event
handler should update the cost
every time you add or remove a
letter.

you are here 4 225
inheritance
One more thing…can you add a $100 fee
for parties over 12?
Kathleen’s gotten so much business using your program that she can afford
to charge a little more for some of her larger clients. So what would it take to
change your program to add in the extra charge?
≥Change the DinnerParty.CalculateCost() to check
NumberOfPeople and add $100 to the return value if it’s over 12.
≥Do the exact same thing for BirthdayParty.CalculateCost().
Take a minute and think about how you’d add a fee to both the
DinnerParty and BirthdayParty classes. What code would you write?
Where would it have to go?
Easy enough…but what happens if there are three similar classes? Or four? Or
twelve? And what if you had to maintain that code and make more changes
later? What if you had to make the same exact change to five or six closely
related classes?
Wow, I’d have to write the same
code over and over again. That’s
a really inefficient way to work.
There’s got to be a better way!
You’re right! Having the same code repeated in
different classes is inefficient and error-prone.
Lucky for us, C# gives us a better way to build classes that are
related to each other and share behavior: inheritance.
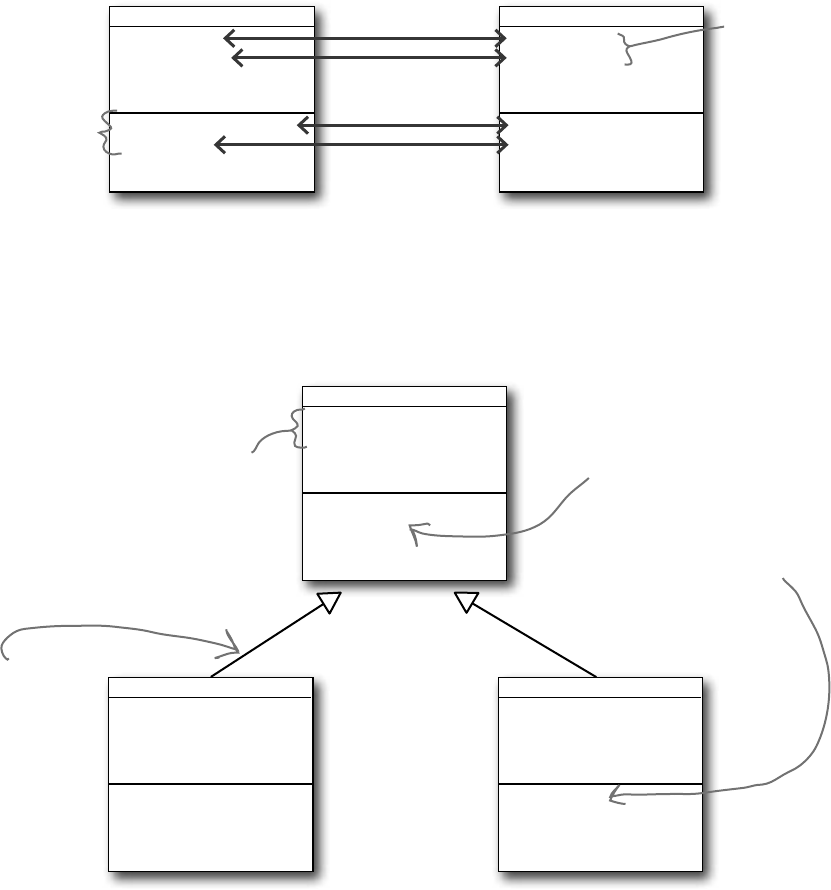
226 Chapter 6
When your classes use inheritance, you only
need to write your code once
It’s no coincidence that your DinnerParty and BirthdayParty classes have
a lot of the same code. When you write C# programs, you often create classes that
represent things in the real world—and those things are usually related to each other.
Your classes have similar code because the things they represent in the real world—a
birthday party and a dinner party—have similar behaviors.
DinnerParty
NumberOfPeople
CostOfDecorations
HealthyOption
CostOfBeveragesPerPerson
CalculateCostOfDecorations()
CalculateCost()
SetHealthyOption()
BirthdayParty
NumberOfPeople
CostOfDecorations
CakeSize
CakeWriting
CalculateCostOfDecorations()
CalculateCost()
Party
NumberOfPeople
CostOfDecorations
CalculateCostOfDecorations()
CalculateCost()
BirthdayParty
NumberOfPeople
CakeSize
CakeWriting
CalculateCost()
DinnerParty
NumberOfPeople
HealthyOption
CostOfBeveragesPerPerson
CalculateCost()
SetHealthyOption()
A birthday party
handles the number
of people and the
cost of decorations
in almost the same
way as a dinner
party.
Kathleen needs
to figure out
the cost of her
parties, no matter
what kind of
parties they are.
Dinner parties and birthday parties are both parties
When you have two classes that are more specific cases of something more
general, you can set them up to inherit from the same class. When you do that,
each of them is a subclass of the same base class.
Both kinds of parties
have to keep track of the
number of people and the
cost of decorations, so you
can move that into the
base class.
The way both parties handle the
number of people and calculating
the total cost is similar but
distinct. We can break up the
behavior for these things so the
similar part is in the base class,
while putting the distinct pieces
in the two subclasses.
Both subclasses
inherit the
decoration
calculation from
the base class, so
they don’t need
to include it.
This arrow in
the class diagram
means the
DinnerParty class
inherits from the
Party class.
no need to use gold when anything shiny will do

you are here 4 227
inheritance
in-her-it, verb.
to derive an attribute from one’s
parents or ancestors. She wanted the
baby to inherit her big brown eyes,
and not her husband’s beady blue ones.
Build up your class model by starting general
and getting more specific
General General
Specific Specific
Food
Dairy Product
Cheese
Cheddar
Aged Vermont Cheddar
Animal
Bird
Songbird
Mockingbird
Northern Mockingbird
C# programs use inheritance because it mimics the relationship that the things
they model have in the real world. Real-world things are often in a hierarchy
that goes from more general to more specific, and your programs have their
own class hierarchy that does the same thing. In your class model, classes
further down in the hierarchy inherit from those above it.
If you have a recipe that calls
for cheddar cheese, then you
can use aged Vermont cheddar.
But if it specifically needs aged
Vermont, then you can’t just
use any cheddar—you need that
specific cheese.
Every bird is an
animal, but not every
animal is a bird.
To someone looking for a pet,
any songbird might do. But
to an ornithologist studying
the mimidae bird family,
confusing the Northern
and Southern mockingbirds
would be unacceptable.
In a class model,
Cheese might inherit
from DairyProduct,
which would inherit
from Food.
Something lower on the hierarchy inherits
most or all of the attributes of everything
above it. All animals eat and mate, so
Northern Mockingbirds eat and mate.

228 Chapter 6
How would you design a zoo simulator?
Lions and tigers and bears…oh my! Also, hippos, wolves, and the
occasional cat. Your job is to design a program that simulates a zoo. (Don’t
get too excited—we’re not going to actually build the code, just design the
classes to represent the animals.)
We’ve been given a list of some of the animals that will be in the program,
but not all of them. We know that each animal will be represented by
an object, and that the objects will move around in the simulator, doing
whatever it is that each particular animal is programmed to do.
More importantly, we want the program to be easy for other programmers
to maintain, which means they’ll need to be able to add their own classes
later on if they want to add new animals to the simulator.
So what’s the first step? Well, before we can talk about specific animals,
we need to figure out the general things they have in common—the
abstract characteristics that all animals have. Then we can build those
characteristics into a class that all animal classes can inherit from.
Look for things the animals have in common
Take a look at these six animals. What do a lion, a hippo, a tiger,
a cat, a wolf, and a dalmatian have in common? How are they
related? You’ll need to figure out their relationships so you can
come up with a class model that includes all of them.
1
it’s a jungle out there
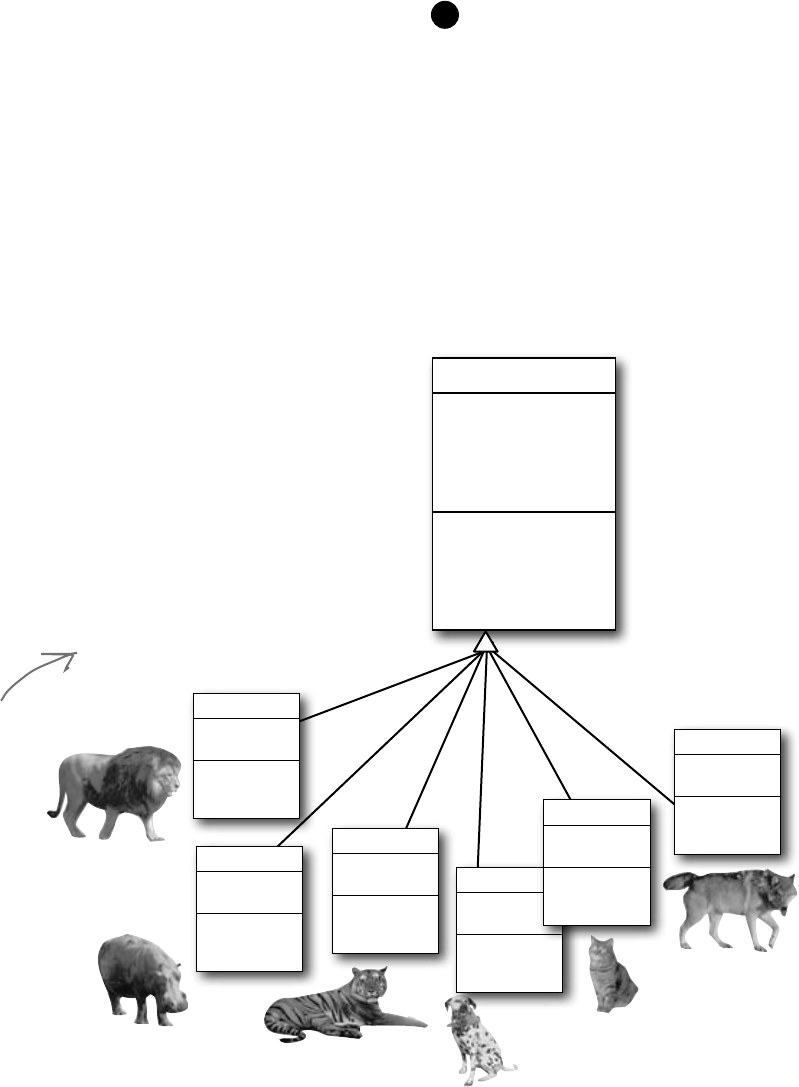
you are here 4 229
inheritance
Animal
Picture
Food
Hunger
Boundaries
Location
MakeNoise()
Eat()
Sleep()
Roam()
You already know that duplicate code sucks. It’s hard to maintain, and
always leads to headaches down the road. So let’s choose fields and
methods for an Animal base class that you only have to write once,
and each of the animal subclasses can inherit from them. Let’s start with
the public fields:
≥Picture: an image that you can put into a PictureBox.
≥Food: the type of food this animal eats. Right now, there can be only
two values: meat and grass.
≥Hunger: an int representing the hunger level of the animal. It
changes depending on when (and how much) the animal eats.
≥Boundaries: a reference to a class that stores the height, width, and
location of the pen that the animal will roam around in.
≥Location: the X and Y coordinates where the animal is standing.
In addition, the Animal class has four methods the animals can inherit:
≥MakeNoise(): a method to let the animal make a sound.
≥Eat(): behavior for when the animal encounters its preferred food.
≥Sleep(): a method to make the animal lie down and take a nap.
≥Roam(): the animals like to wander around their pens in the zoo.
Use inheritance to avoid duplicate
code in subclasses Build a base class to give
the animals everything
they have in common
The fields, properties, and methods
in the base class will give all of
the animals that inherit from it
a common state and behavior.
They’re all animals, so it makes
sense to call the base class Animal.
2
Choosing a base class is
about making choices. You
could have decided to
use a ZooOccupant class
that defines the feed
and maintenance costs,
or an Attraction class
with methods for how
the animals entertain the
zoo visitors. But we think
Animal makes the most
sense here. Do you agree?
Lion
Hippo
Tiger
Dog
Cat
Wolf
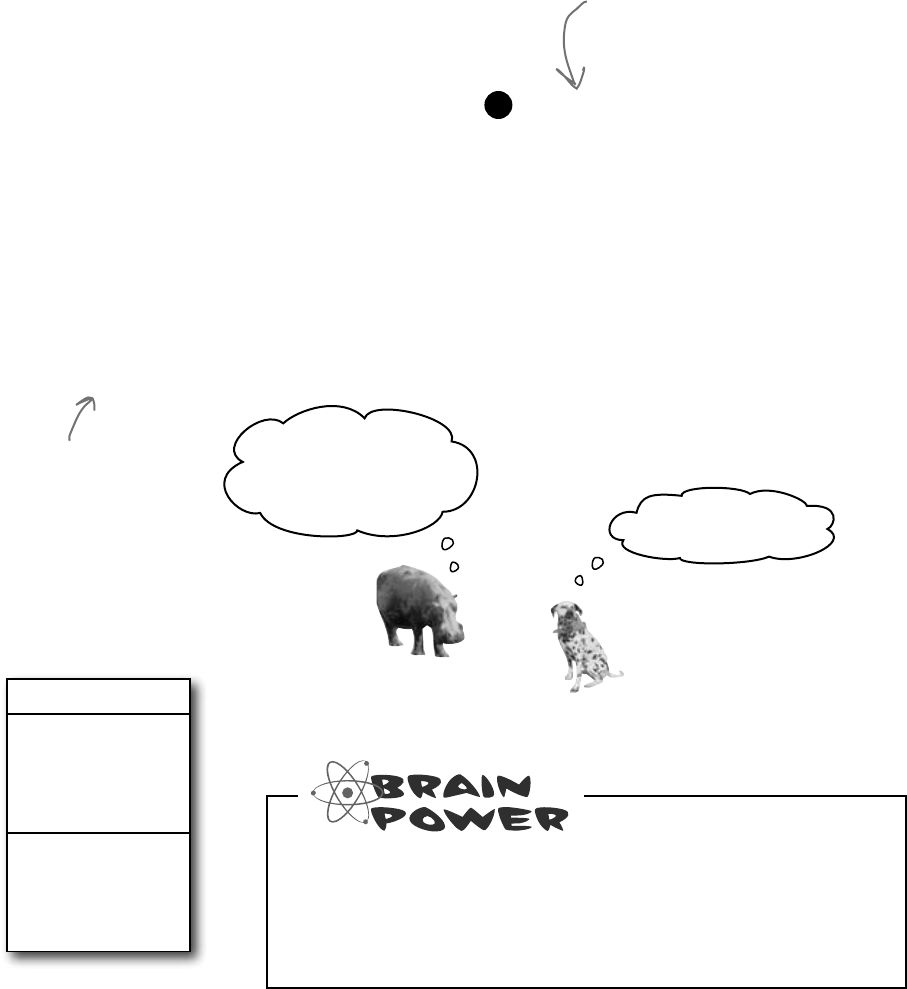
230 Chapter 6
Animal
Picture
Food
Hunger
Boundaries
Location
MakeNoise()
Eat()
Sleep()
Roam()
Different animals make different noises
Lions roar, dogs bark, and as far as we know hippos don’t
make any sound at all. Each of the classes that inherit from
Animal will have a MakeNoise() method, but each of those
methods will work a different way and will have different code.
When a subclass changes the behavior of one of the methods
that it inherited, we say that it overrides the method.
Think about what you need to override
When a subclass changes the behavior of a method it
inherited, we call it overriding. Every animal needs to
eat. But a dog might take little bites of meat, while a hippo
eats huge mouthfuls of grass. So what would the code for
that behavior look like? Both the dog and the hippo would
override the Eat() method. The hippo’s method would have
it consume, say, 20 pounds of hay each time it was called.
The dog’s Eat() method, on the other hand, would reduce
the zoo’s food supply by one 12-ounce can of dog food.
Grass is yummy! I
could go for a good
pile of hay right now.
I beg to differ.
We already know that some animals will override the
MakeNoise() and Eat() methods. Which animals will
override Sleep() or Roam()? Will any of them? What about
the properties—which animals will override some properties?
Figure out what each animal
does that the Animal class does
differently—or not at all
What does each type of animal do that
all the other animals don’t? Dogs eat dog
food, so the dog’s Eat() method will
need to override the Animal.Eat()
method. Hippos swim, so a hippo will have
a Swim() method that isn’t in the Animal
class at all.
3
Just because a property or a method
is in the Animal base class, that
doesn’t mean every subclass has to use
it the same way…or at all!
So when you’ve got a subclass
that inherits from a base
class, it must inherit all of
the base class’s behaviors…
but you can modify them in
the subclass so they’re not
performed exactly the same
way. That’s what overriding is
all about.
warning: don’t feed the programmers

you are here 4 231
inheritance
Think about how to group the animals
Aged Vermont cheddar is a kind of cheese, which is a dairy
product, which is a kind of food, and a good class model for food
would represent that. Lucky for us, C# gives us an easy way to do
it. You can create a chain of classes that inherit from each other,
starting with the topmost base class and working down. So you
could have a Food class, with a subclass called DairyProduct
that serves as the base class for Cheese, which has a subclass
called Cheddar, which is what AgedVermontCheddar
inherits from.
Look for classes that have a lot
in common
Don’t dogs and wolves seem pretty similar?
They’re both canines, and it’s a good bet
that if you look at their behavior they have a
lot in common. They probably eat the same
food and sleep the same way. What about
domestic cats, tigers, and lions? It turns out
all three of them move around their habitats
in exactly the same way. It’s a good bet that
you’ll be able to have a Feline class that
lives between Animal and those three cat
classes that can help prevent duplicate code
between them.
4
Animal
Picture
Food
Hunger
Boundaries
Location
MakeNoise()
Eat()
Sleep()
Roam()
Hippo
MakeNoise()
Eat()
Tiger
MakeNoise()
Eat()
Dog
MakeNoise()
Eat()
Cat
MakeNoise()
Eat()
Wolf
MakeNoise()
Eat()
There’s a pretty good
chance that we’ll be
able to add a Canine
class that the dogs
and wolves both inherit
from.
Lion
MakeNoise()
Eat()
The subclasses
inherit all four
methods from
Animal, but
we’re only having
them override
MakeNoise() and
Eat().
That’s why we only
show those two
methods in the
class diagrams.
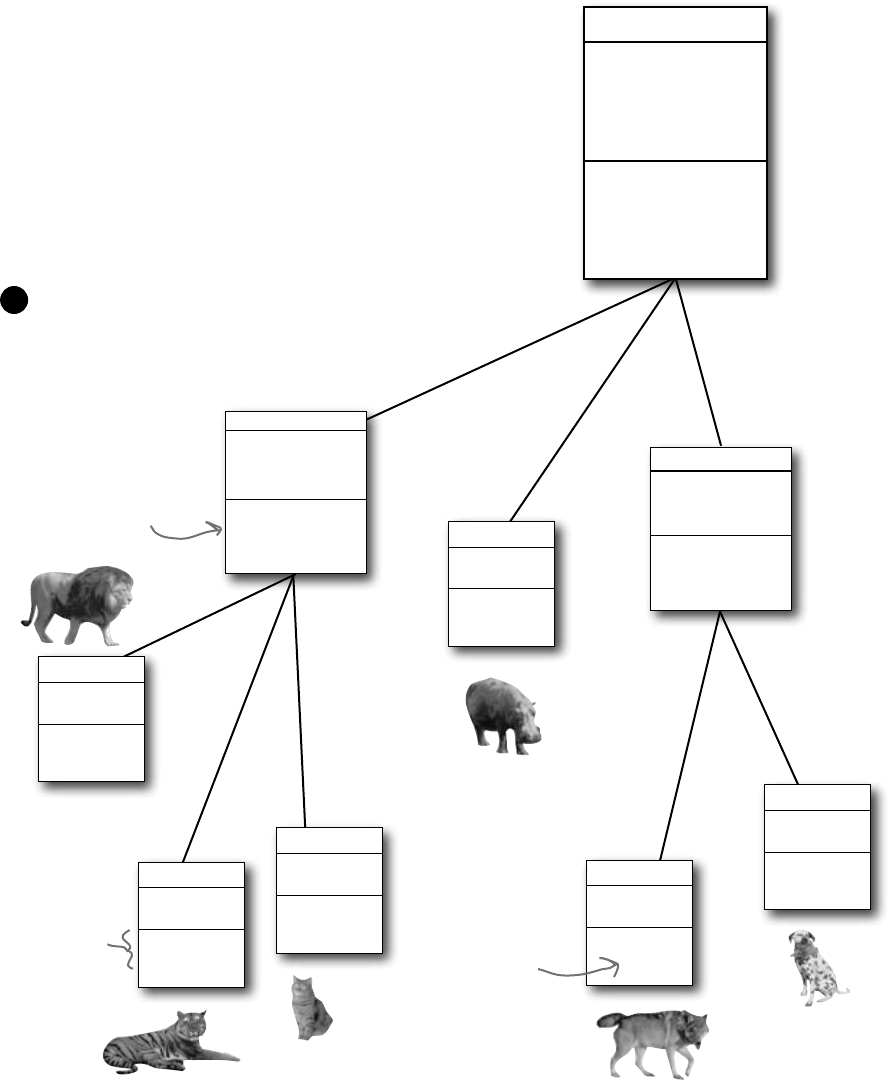
232 Chapter 6
Feline
Roam()
Canine
Eat()
Sleep()
Animal
Picture
Food
Hunger
Boundaries
Location
MakeNoise()
Eat()
Sleep()
Roam()
Lion
MakeNoise()
Eat()
Hippo
MakeNoise()
Eat()
Tiger
MakeNoise()
Eat()
Dog
MakeNoise()
Cat
MakeNoise()
Eat()
Wolf
MakeNoise()
Our wolves and
dogs eat the
same way, so
we moved their
common Eat()
method up to
the Canine class.
The three cats roam the
same way, so they share
an inherited Roam()
method. But each one
still eats and makes noise
differently, so they’ll all
override the Eat() and
MakeNoise() methods
that they inherited
from Animal.
Since Feline overrides Roam(),
anything that inherits from it
gets its new Roam() and not
the one in Animal.
Create the class hierarchy
When you create your classes so that there’s a base class at the top with
subclasses below it, and those subclasses have their own subclasses that
inherit from them, what you’ve built is called a class hierarchy. This is
about more than just avoiding duplicate code, although that is certainly
a great benefit of a sensible hierarchy. But when it comes down to it, the
biggest benefit you’ll get is that your code becomes really easy to understand
and maintain. When you’re looking at the zoo simulator code, when you see
a method or property defined in the Feline class, then you immediately know
that you’re looking at something that all of the cats share. Your hierarchy
becomes a map that helps you find your way through your program.
Finish your class hierarchy
Now that you know how you’ll organize the animals,
you can add the Feline and Canine classes.
5
extend your objects
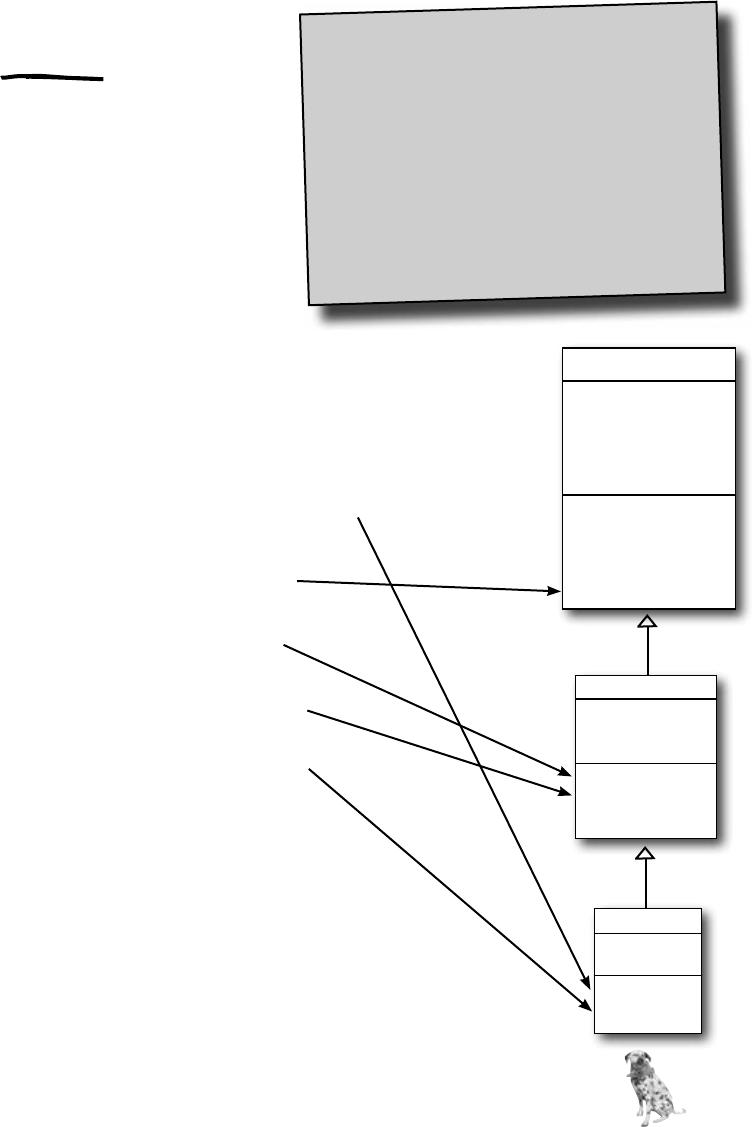
you are here 4 233
inheritance
Dog spot = new Dog();
spot.MakeNoise();
spot.Roam();
spot.Eat();
spot.Sleep();
spot.Fetch();
You’re not limited to the methods that a subclass inherits
from its base class…but you already know that! After all,
you’ve been building your own classes all along. When you
add inheritance to a class, what you’re doing is taking the
class you’ve already built and extending it by adding all of
the fields, properties, and methods in the base class. So if you
wanted to add a Fetch() method to the dog, that’s perfectly
normal. It won’t inherit or override anything—only the dog
will have that method, and it won’t end up in Wolf, Canine,
Animal, Hippo, or any other class.
makes a new Dog object
calls the version in Dog
calls the version in Animal
calls the version in Canine
calls the version in Canine
calls the version in Dog
C# always calls the most specific method
If you tell your dog object to roam, there’s only one method that can
be called—the one in the Animal class. But what about telling your
dog to make noise? Which MakeNoise() is called?
Well, it’s not too hard to figure it out. A method in the Dog class tells
you how dogs do that thing. If it’s in the Canine class, it’s telling you
how all canines do it. And if it’s in Animal, then it’s a description of
that behavior that’s so general that it applies to every single animal. So
if you ask your dog to make a noise, first C# will look inside the Dog
class to find the behavior that applies specifically to dogs. If Dog didn’t
have one, it’d then check Canine, and after that it’d check Animal.
hi-er-ar-chy, noun.
an arrangement or classification
in which groups or things are
ranked one above the other. The
president of Dynamco had worked
his way up from the mailroom to the
top of the corporate hierarchy.
Animal
Picture
Food
Hunger
Boundaries
Location
MakeNoise()
Eat()
Sleep()
Roam()
Canine
Eat()
Sleep()
Dog
MakeNoise()
Fetch()
Every subclass extends its
base class
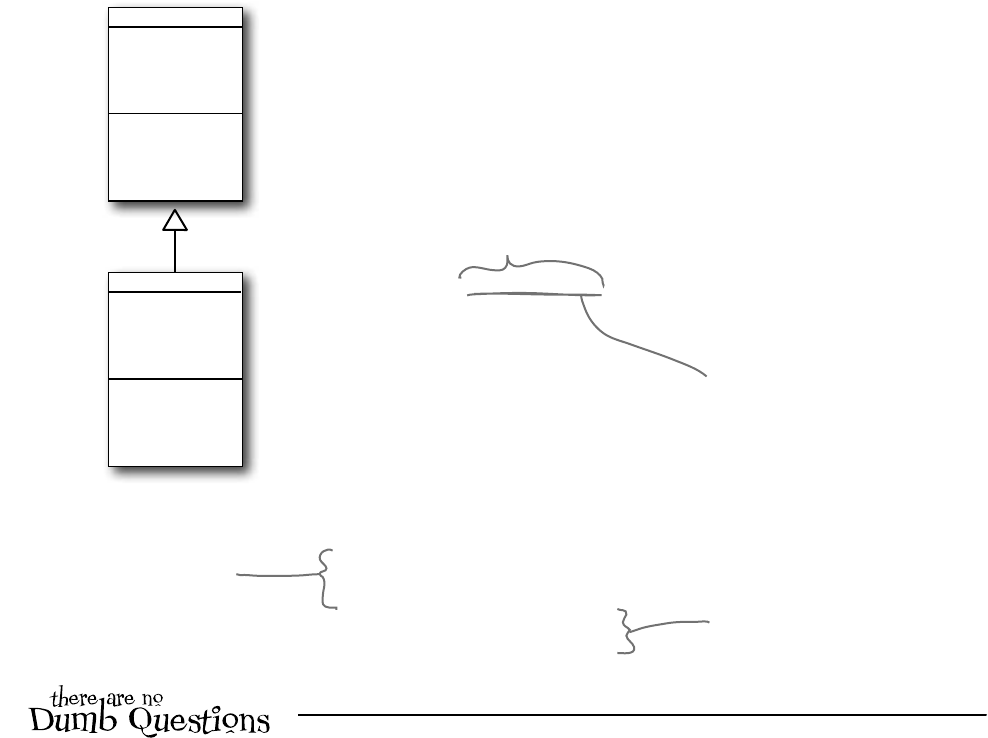
234 Chapter 6
Use a colon to inherit from a base class
When you’re writing a class, you use a colon (:) to have it inherit from
a base class. That makes it a subclass, and gives it all of the fields,
properties, and methods of the class it inherits from.
Bird
Wingspan
Fly()
Vertebrate
NumberOfLegs
Eat()
class Vertebrate
{
public int NumberOfLegs;
public void Eat() {
// code to make it eat
}
}
class Bird : Vertebrate
{
public double Wingspan;
public void Fly() {
// code to make the bird fly
}
}
public button1_Click(object sender, EventArgs e) {
Bird tweety = new Bird();
tweety.Wingspan = 7.5;
tweety.Fly();
tweety.NumberOfLegs = 2;
tweety.Eat();
}
tweety is an instance
of Bird, so it’s got
the Bird methods
and fields as usual.
The Bird class uses a colon to inherit from the
Vertebrate class. This means that it inherits all of
the fields, properties, and methods from Vertebrate.
You extend a class
by adding a colon to
the end of the class
declaration, followed by
the base class to inherit
from.
Since the Bird class inherits
from Vertebrate, every instance
of Bird also has the fields
and methods defined in the
Vertebrate class.
When a subclass
inherits from a
base class, all
of the fields,
properties, and
methods in the
base class are
automatically
added to the
subclass.
base how low can you go?
Q: Why does the arrow point up, from the subclass to the
base class? Wouldn’t the diagram look better with the arrow
pointing down instead?
A:Itmightlookbetter,butitwouldn’tbeasaccurate.Whenyou
setupaclasstoinheritfromanotherone,youbuildthatrelationship
intothesubclass—thebaseclassremainsthesame.Andthatmakes
sensewhenyouthinkaboutitfromtheperspectiveofthebaseclass.
Itsbehavioriscompletelyunchangedwhenyouaddaclassthat
inheritsfromit.Thebaseclassisn’tevenawareofthisnewclass
thatinheritedfromit.Itsmethods,fields,andpropertiesremain
entirelyintact.Butthesubclassdefinitelychangesitsbehavior.Every
instanceofthesubclassautomaticallygetsalloftheproperties,fields,
andmethodsfromthebaseclass,anditallhappensjustbyaddinga
colon.That’swhyyoudrawthearrowonyourdiagramsothatit’spart
ofthesubclass,andpointstothebaseclassthatitinheritsfrom.
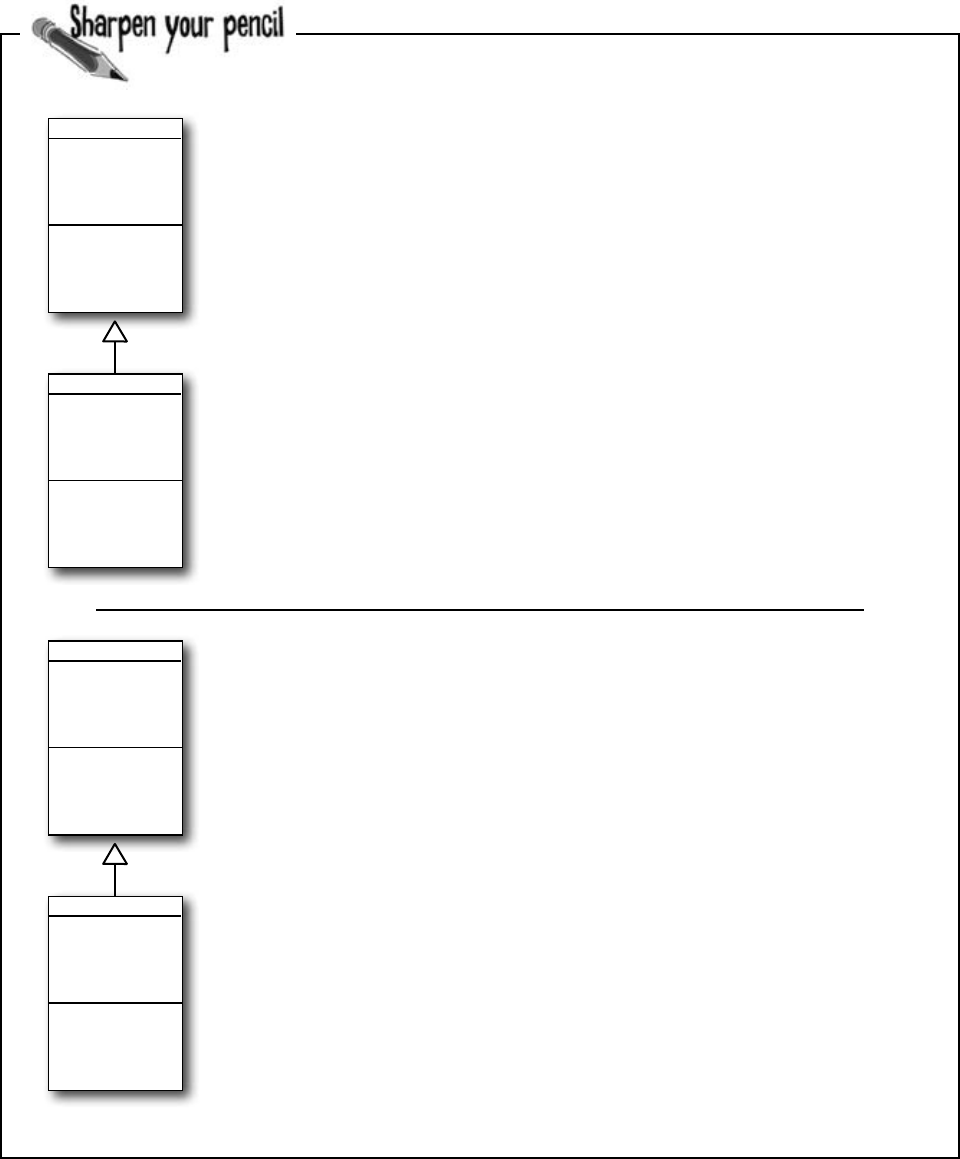
you are here 4 235
inheritance
Take a look at these class models and declarations, and then
circle the statements that won’t work.
FirePlane
BucketCapacity
FillBucket()
Aircraft
AirSpeed
Altitude
TakeOff()
Land()
class Aircraft {
public double AirSpeed;
public double Altitude;
public void TakeOff() { ... };
public void Land() { ... };
}
class FirePlane : Aircraft {
public double BucketCapacity;
public void FillBucket() { ... };
}
public void FireFightingMission() {
FirePlane myFirePlane = new FirePlane();
new FirePlane.BucketCapacity = 500;
Aircraft.Altitude = 0;
myFirePlane.TakeOff();
myFirePlane.AirSpeed = 192.5;
myFirePlane.FillBucket();
Aircraft.Land();
}
BLT
SlicesOfBacon
AmountOfLettuce
AddSideOfFries()
Sandwich
Toasted
SlicesOfBread
CountCalories()
class Sandwich {
public boolean Toasted;
public int SlicesOfBread;
public int CountCalories() { ... }
}
class BLT : Sandwich {
public int SlicesOfBacon;
public int AmountOfLettuce;
public int AddSideOfFries() { ... }
}
public BLT OrderMyBLT() {
BLT mySandwich = new BLT();
BLT.Toasted = true;
Sandwich.SlicesOfBread = 3;
mySandwich.AddSideOfFries();
mySandwich.SlicesOfBacon += 5;
MessageBox.Show(“My sandwich has ”
+ mySandwich.CountCalories + “calories”.);
return mySandwich;
}
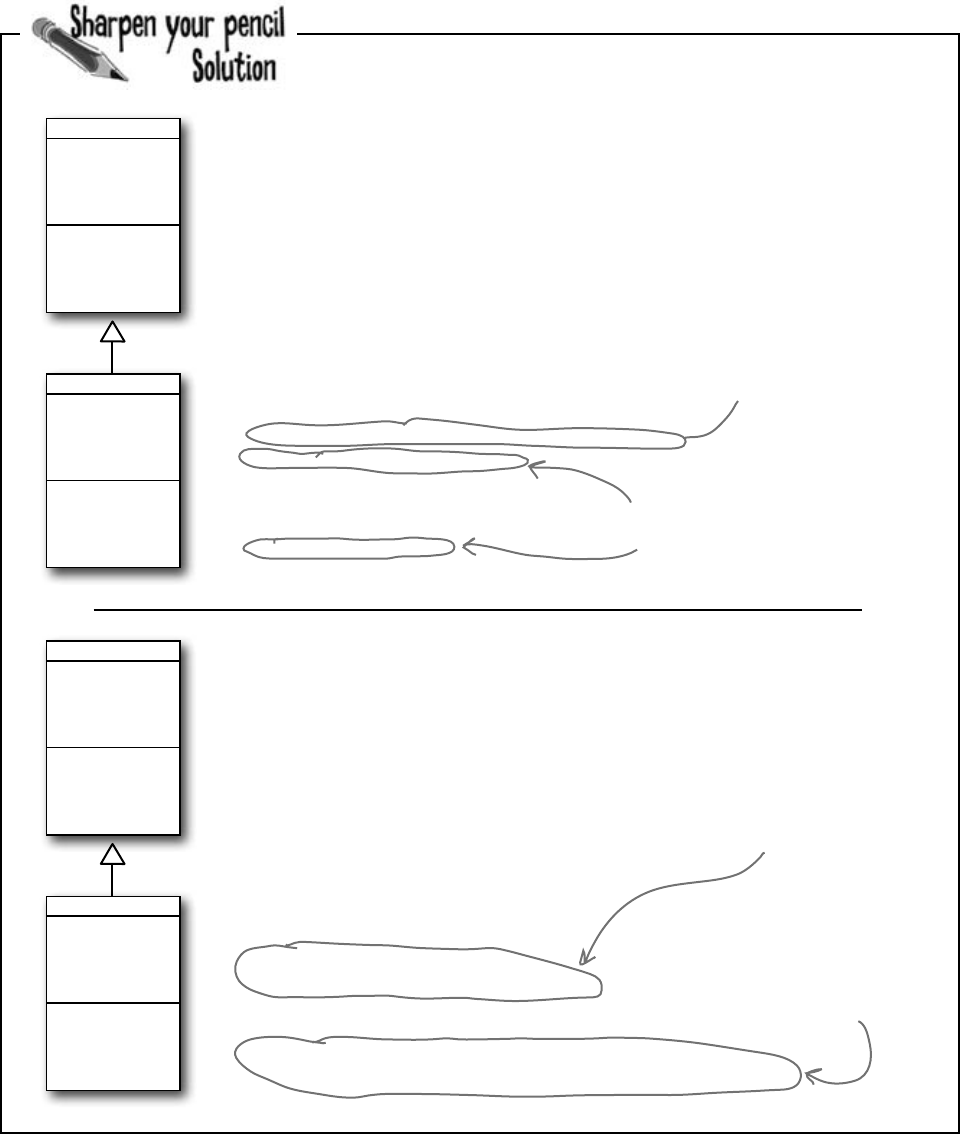
236 Chapter 6
i can think of one way to make a penguin fly…
Take a look at these class models and declarations, and then
circle the statements that won’t work.
FirePlane
BucketCapacity
FillBucket()
Aircraft
AirSpeed
Altitude
TakeOff()
Land()
class Aircraft {
public double AirSpeed;
public double Altitude;
public void TakeOff() { ... };
public void Land() { ... };
}
class FirePlane : Aircraft {
public double BucketCapacity;
public void FillBucket() { ... };
}
public void FireFightingMission() {
FirePlane myFirePlane = new FirePlane();
new FirePlane.BucketCapacity = 500;
Aircraft.Altitude = 0;
myFirePlane.TakeOff();
myFirePlane.AirSpeed = 192.5;
myFirePlane.FillBucket();
Aircraft.Land();
}
BLT
SlicesOfBacon
AmountOfLettuce
AddSideOfFries()
Sandwich
Toasted
SlicesOfBread
CountCalories()
class Sandwich {
public boolean Toasted;
public int SlicesOfBread;
public int CountCalories() { ... }
}
class BLT : Sandwich {
public int SlicesOfBacon;
public int AmountOfLettuce;
public int AddSideOfFries() { ... }
}
public BLT OrderMyBLT() {
BLT mySandwich = new BLT();
BLT.Toasted = true;
Sandwich.SlicesOfBread = 3;
mySandwich.AddSideOfFries();
mySandwich.SlicesOfBacon += 5;
MessageBox.Show(“My sandwich has ”
+ mySandwich.CountCalories + “calories”.);
return mySandwich;
}
These statements all use the
class names instead of the name
of the instance, myFirePlane.
That’s not how you use
the
new
keyword.
CountCalories is a method, but
this statement doesn’t include
the parentheses () after the
call to the method.
These properties are part of the
instance, but the statements are
trying to call them incorrectly
using the class names.
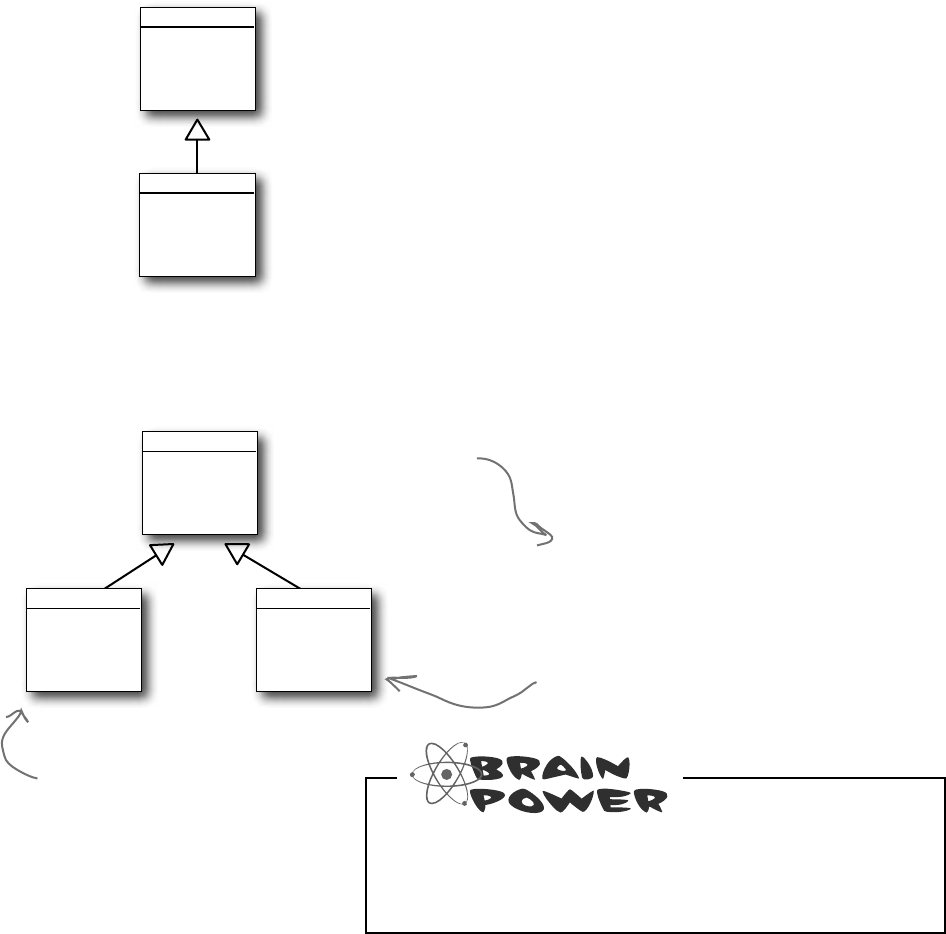
you are here 4 237
inheritance
We know that inheritance adds the base class
fields, properties, and methods to the subclass…
Inheritance is simple when your subclass
needs to inherit all of the base class
methods, properties, and fields.
Bird
Fly()
LayEggs()
PreenFeathers()
Pigeon
Coo()
…but some birds don’t fly!
What do you do if your base class has a
method that your subclass needs to modify?
Bird
Fly()
LayEggs()
PreenFeathers()
Pigeon
Coo()
Penguin
Swim()
Pigeons fly, lay eggs, and
preen their feathers, so
there’s no problem with the
Pigeon class inheriting from
Bird.
Penguin objects shouldn’t be able to fly!
But if the Penguin class inherits from Bird,
then you’ll have penguins flying all over the
place. So what do we do?
class Bird {
public void Fly() {
// here’s the code to make the bird fly
}
public void LayEggs() { ... };
public void PreenFeathers() { ... };
}
class Pigeon : Bird {
public void Coo() { ... }
}
class Penguin : Bird {
public void Swim() { ... }
}
public void BirdSimulator() {
Pigeon Harriet = new Pigeon();
Penguin Izzy = new Penguin();
Harriet.Fly();
Harriet.Coo();
Izzy.Fly();
}
If this were your Bird Simulator code, what would
you do to keep the penguins from flying?
Izzy is an instance
of Penguin. Since it
inherited the Fly()
method, there’s nothing
stopping it from flying.
Both Pigeon and Penguin
inherit from Bird, so
they both get the
Fly(), LayEggs(), and
PreenFeathers() methods.
Pigeon is a
subclass of Bird,
so any fields and
methods in Bird
are automatically
part of Pigeon,
too.
238 Chapter 6
A subclass can override methods to change
or replace methods it inherited
Sometimes you’ve got a subclass that you’d like to inherit
most of the behaviors from the base class, but not all of them.
When you want to change the behaviors that a class has
inherited, you can override the methods.
class Bird {
public virtual void Fly() {
// code to make the bird fly
}
}
class Penguin : Bird {
public override void Fly() {
MessageBox.Show(“Penguins can’t fly!”)
}
} Use the override keyword to
add a method to your subclass
that replaces one that it
inherited. Before you can
override a method, you need to
mark it virtual in the base class.
Adding the virtual
keyword to the Fly()
method tells C# that
a subclass is allowed to
override it.
Add the virtual keyword to the method in the base class
A subclass can only override a method if it’s marked with the virtual keyword, which
tells C# to allow the subclass to override methods.
1
Add a method with the same name to the derived class
You’ll need to have exactly the same signature—meaning the same return value and
parameters—and you’ll need to use the override keyword in the declaration.
2
When you override a method, your new
method needs to have exactly the same
signature as the method in the base
class it’s overriding. In this case, that
means it needs to be called Fly, return
void, and have no parameters.
To override the Fly() method, add
an identical method to the subclass
and use the override keyword.
manual override
you are here 4 239
inheritance
Any place where you can use a base class, you
can use one of its subclasses instead
One of the most useful things you can do with inheritance is use a subclass in
place of the base class it inherits from. So if your Recipe() method takes a
Cheese object and you’ve got an AgedVermontCheddar class that inherits
from Cheese, then you can pass an instance of AgedVermontCheddar to
the Recipe() method. Recipe() only has access to the fields, properties,
and methods that are part of the Cheese class, though—it doesn’t have access
to anything specific to AgedVermontCheddar.
public void SandwichAnalyzer(Sandwich specimen) {
int calories = specimen.CountCalories();
UpdateDietPlan(calories);
PerformBreadCalculations(specimen.SlicesOfBread, specimen.Toasted);
}
Let’s say we have a method to analyze Sandwich objects:
1
You could pass a sandwich to the method—but you could also pass a BLT. Since a BLT is a
kind of sandwich, we set it up so that it inherits from the Sandwich class:
2
public button1_Click(object sender, EventArgs e) {
BLT myBLT = new BLT();
SandwichAnalyzer(myBLT);
}
You can always move down the class diagram—a reference variable can always be set equal
to an instance of one of its subclasses. But you can’t move up the class diagram.
3
public button2_Click(object sender, EventArgs e) {
Sandwich mySandwich = new Sandwich();
BLT myBLT = new BLT();
Sandwich someRandomSandwich = myBLT;
BLT anotherBLT = mySandwich; // <--- THIS WON’T COMPILE!!!
}
You can assign myBLT to any
Sandwich variable because a BLT
is a kind of sandwich.
But you can’t assign mySandwich to a BLT
variable, because not every sandwich is a BLT!
That’s why this last line will cause an error.
BLT
SlicesOfBacon
AmountOfLettuce
AddSideOfFries()
Sandwich
Toasted
SlicesOfBread
CountCalories()
We’ll talk about this more
in the next chapter!

240 Chapter 6
a = 6; 56
b = 5; 11
a = 5; 65
A short C# program is listed below. One block of
the program is missing! Your challenge is to match
the candidate block of code (on the left) with
the output—what’s in the message box that the
program pops up—that you’d see if the block were
inserted. Not all the lines of output will be used,
and some of the lines of output might be used more
than once. Draw lines connecting the candidate
blocks of code with their matching output.
candidate code
goes here
(three lines)
class A {
public int ivar = 7;
public ___________ string m1() {
return “A’s m1, ”;
}
public string m2() {
return “A’s m2, ”;
}
public ___________ string m3() {
return “A’s m3, ”;
}
}
class B : A {
public ___________ string m1() {
return “B’s m1, ”;
}
}
class C : B {
public ___________ string m3() {
return “C’s m3, ” + (ivar + 6);
}
}
class Mixed5 {
public static void Main(string[] args) {
A a = new A();
B b = new B();
C c = new C();
A a2 = new C();
string q = “”;
System.Windows.Forms.MessageBox.Show(q);
}
}
code
candidates:
output:
q += b.m1();
q += c.m2();
q += a.m3();
q += c.m1();
q += c.m2();
q += c.m3();
q += a.m1();
q += b.m2();
q += c.m3();
q += a2.m1();
q += a2.m2();
q += a2.m3();
A’s m1, A’s m2, C’s m3, 6
B’s m1, A’s m2, A’s m3,
A’s m1, B’s m2, A’s m3,
B’s m1, A’s m2, C’s m3, 13
B’s m1, C’s m2, A’s m3,
B’s m1, A’s m2, C’s m3, 6
A’s m1, A’s m2, C’s m3, 13
}
}
}
}
Mi
x
ed
Messages
Here’s the entry point for the program—it
doesn’t show a form, it just pops up a message box.
Instructions:
1. Fill in the four blanks in the code.
2. Match the code candidates to the output.
(Don’t just type this into the IDE—you’ll learn
a lot more if you figure this out on paper!)
get a little practice
Hint: Think really hard about
what this line really means.
you are here 4 241
inheritance
class TestBoats {
Main(){
xyz = “”;
b1 = new Boat();
Sailboat b2 = new ();
Rowboat = new Rowboat();
b2.setLength(32);
xyz = b1. ();
xyz += b3. ();
xyz += .move();
System.Windows.Forms.MessageBox.Show(xyz);
}
}
class : Boat {
public () {
return “ ”;
}
}
OUTPUT:
Rowboat
Sailboat
Boat
subclasses
int length
int b1
override
stroke natasha
Testboats drift
return int len
public
int b2
private
hoist sail
continue
int b2
int b3
break
length
b1
b2 b3
len
move
rowTheBoat
setLength
getLength
string
int
void
static
:
virtual
;
Hint: This is the
entry point for
the program.
Pool Puzzle
Your job is to take code snippets from the pool and place them into
the blank lines in the code. You may use the same snippet more
than once, and you might not need to use all the snippets. Your
goal is to make a set of classes that will compile and run together
as a program. Don’t be fooled—this one’s harder than it looks.
class Rowboat
{
public
rowTheBoat() {
return “stroke natasha”;
}
}
class
{
private int
;
void
( ) {
length = len;
}
public int getLength() {
;
}
public
move() {
return
“
”;
}
}
242 Chapter 6
get some practice
q += b.m1();
q += c.m2();
q += a.m3();
q += c.m1();
q += c.m2();
q += c.m3();
q += a.m1();
q += b.m2();
q += c.m3();
q += a2.m1();
q += a2.m2();
q += a2.m3();
A’s m1, A’s m2, C’s m3, 6
B’s m1, A’s m2, A’s m3,
A’s m1, B’s m2, C’s m3, 6
B’s m1, A’s m2, C’s m3, 13
B’s m1, C’s m2, A’s m3,
A’s m1, B’s m2, A’s m3,
B’s m1, A’s m2, C’s m3, 6
A’s m1, A’s m2, C’s m3, 13
}
}
}
}
class A {
public ___________ string m1() {
...
public ___________ string m3() {
}
virtual
virtual
class B : A {
public ___________ string m1() {
...
class C : B {
public ___________ string m3() {
override
override
a = 6; 56
b = 5; 11
a = 5; 65
Mi
x
ed
Messages
Pool Puzzle Solution
class Rowboat
: Boat
{
public
string
rowTheBoat() {
return “stroke natasha”;
}
}
class
Boat
{
private int
length
;
public
void
setLength
( int len ) {
length = len;
}
public int getLength() {
return length
;
}
public
virtual string
move() {
return
“
drift
”;
}
}
class TestBoats {
public static void Main(){
string xyz = “”;
Boat b1 = new Boat();
Sailboat b2 = new Sailboat ();
Rowboat b3 = new Rowboat();
b2.setLength(32);
xyz = b1. move ();
xyz += b3. move ();
xyz += b2 .move();
System.Windows.Forms.MessageBox.Show(xyz);
}
}
class Sailboat : Boat {
public override string move () {
return “ hoist sail ”;
}
}
You can always substitute a reference to a subclass in place of
a base class. In other words, you can always use something
more specific in place of something more general—so if
you’ve got a line of code that asks for a Canine, you can
send it a reference to a Dog. So this line of code:
A a2 = new C();
means that you’re instantiating a new C object, and then
creating an A reference called a2 and pointing it at that
object. Names like A, a2, and C make for a good puzzle,
but they’re a little hard to understand. Here are a few lines
that follow the same pattern, but have names that you can
understand:
Sandwich mySandwich = new BLT();
Cheese ingredient= new AgedVermontCheddar();
Songbird tweety = new NorthernMockingbird();

you are here 4 243
inheritance
Q: About the entry point that you
pointed out in the Pool Puzzle—does this
mean I can have a program that doesn’t
have a Form1 form?
A:Yes.WhenyoucreateanewWindows
Applicationproject,theIDEcreatesall
thefilesforthatprojectforyou,including
Program.cs(whichcontainsastaticclass
withanentrypoint)andForm1.cs(which
containsanemptyformcalledForm1).
Try this:insteadofcreatinganewWindows
Applicationproject,createanemptyproject
byselecting“EmptyProject”insteadof
“WindowsApplication”whenyoucreatea
newprojectintheIDE.Thenaddaclass
filetoitintheSolutionExplorerandtypein
everythinginthePoolPuzzlesolution.Since
yourprogramusesamessagebox,you
needtoaddareferencebyright-clicking
on“References”intheSolutionExplorer,
selecting“AddReference”,andchoosing
System.Windows.Formsfromthe.NETtab.
(That’sanotherthingtheIDEdoesforyou
automaticallywhenyoucreateaWindows
Application.)Finally,select“Properties”from
theProjectmenuandchoosethe“Windows
Application”outputtype.
Nowrunit…you’llseetheresults!
Congratulations,youjustcreatedaC#
programfromscratch.
Q: Can I inherit from the class that
contains the entry point?
A:Yes.Theentrypointmustbeastatic
method,butthatmethoddoesn’t have
to beinastaticclass.(Remember,the
statickeywordmeansthattheclass
can’tbeinstantiated,butthatitsmethods
areavailableassoonastheprogramstarts.
SointhePoolPuzzleprogram,youcan
callTestBoats.Main()fromany
othermethodwithoutdeclaringareference
variableorinstantiatinganobjectusinga
newstatement.)
Q: I still don’t get why they’re called
“virtual” methods—they seem real to me!
A:Thename“virtual”hastodowithhow
.NEThandlesthevirtualmethodsbehindthe
scenes.Itusessomethingcalledavirtual
methodtable(orvtable).That’satablethat
.NETusestokeeptrackofwhichmethods
areinheritedandwhichoneshavebeen
overridden.Don’tworry—youdon’tneedto
knowhowitworkstousevirtualmethods!
Q: What did you mean by only being
able to move up the class diagram but
not being able to move down?
A:Whenyou’vegotadiagramwithone
classthat’saboveanotherone,theclass
that’shigherupismoreabstractthanthe
onethat’slowerdown.Morespecificor
concreteclasses(likeShirtorCar)
inheritfrommoreabstractones(like
ClothingorVehicle).Whenyou
thinkaboutitthatway,it’seasytoseehow
ifallyouneedisavehicle,acarorvanor
motorcyclewilldo.Butifyouneedacar,a
motorcyclewon’tbeusefultoyou.
Inheritanceworksexactlythesameway.If
youhaveamethodwithVehicleasa
parameter,andiftheMotorcycleclass
inheritsfromtheVehicleclass,thenyou
canpassaninstanceofMotorcycle
tothemethod.Butifthemethodtakes
Motorcycleasaparameter,youcan’t
passanyVehicleobject,becauseitmay
beaVaninstance.ThenC#wouldn’tknow
whattodowhenthemethodtriestoaccess
theHandlebarsproperty!
You can always
pass an instance
of a subclass to
any method whose
parameters expect
a class that it
inherits from.
Flip back to the beginning
of Chapter 2 if you need a
refresher on Main() and the
entry point!

244 Chapter 6
you really do need them
There’s an important reason for virtual and override!
The virtual and override keywords aren’t just for decoration. They
actually make a real difference in how your program works. But don’t take our
word for it—here’s a real example to show you how they work.
Look, I just don’t see why I need to use those
“virtual” and “override” keywords. If I don’t use them, the IDE just
gives me a warning, but the warning doesn’t actually mean anything—my
program still runs! I mean, I’ll put the keywords in if it’s the “right”
thing to do, but it just seems like I’m jumping through hoops for no
good reason.
Console applications
don’t use forms
If you create a console application instead
of a Windows Forms application, all the IDE
creates for you is a new class called Program
with an empty Main() entry point method.
When you run it, it pops up a command
window to display the output. You can read
more about console applications in Appendix A.
Create a new console application and add classes.
Right-click on the project in the Solution Explorer and add classes, just like normal. Add the
following five classes: Jewels, Safe, Owner, Locksmith, and JewelThief.
1
Do this!
Instead of creating a Windows Forms
application, you’re going to create a
new console application instead! This
means it won’t have a form.
class Safe {
private Jewels contents = new Jewels();
private string safeCombination = “12345”;
public Jewels Open(string combination)
{
if (combination == safeCombination)
return contents;
else
return null;
}
public void PickLock(Locksmith lockpicker) {
lockpicker.WriteDownCombination(safeCombination);
}
}
class Jewels {
public string Sparkle() {
return "Sparkle, sparkle!";
}
}
Add the code for the new classes.
Here’s the code for the five new classes you added:
2
A Safe object keeps a Jewels reference
in its contents field. It doesn’t return
that reference unless Open() is called
with the right combination.
A locksmith can pick the combination
lock and get the combination by calling
the PickLock() method and passing in a
reference to himself. The safe calls his
WriteDownCombination() method with
the combination.
Notice how
the private
keyword
hides the
contents and
combination.
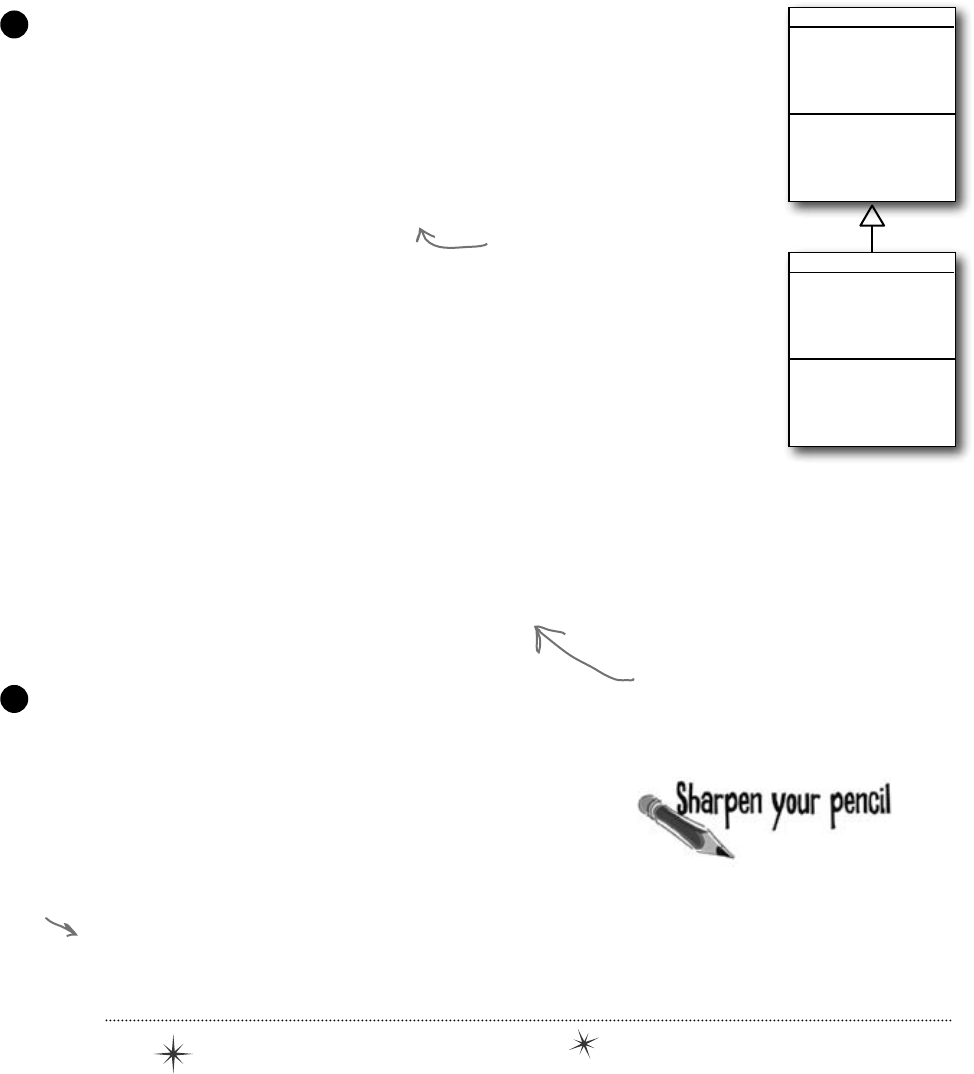
you are here 4 245
inheritance
class Owner {
private Jewels returnedContents;
public void ReceiveContents(Jewels safeContents) {
returnedContents = safeContents;
Console.WriteLine("Thank you for returning my jewels! " + safeContents.Sparkle());
}
}
class Locksmith {
public void OpenSafe(Safe safe, Owner owner) {
safe.PickLock(this);
Jewels safeContents = safe.Open(writtenDownCombination);
ReturnContents(safeContents, owner);
}
private string writtenDownCombination = null;
public void WriteDownCombination(string combination) {
writtenDownCombination = combination;
}
public void ReturnContents(Jewels safeContents, Owner owner) {
owner.ReceiveContents(safeContents);
}
}
class JewelThief : Locksmith {
private Jewels stolenJewels = null;
public void ReturnContents(Jewels safeContents, Owner owner) {
stolenJewels = safeContents;
Console.WriteLine("I'm stealing the contents! " + stolenJewels.Sparkle());
}
}
class Program {
static void Main(string[] args) {
Owner owner = new Owner();
Safe safe = new Safe();
JewelThief jewelThief = new JewelThief();
jewelThief.OpenSafe(safe, owner);
Console.ReadKey();
}
}
Here’s the Main() method for the Program class.
But don’t run it just yet! Before you run the program, try to figure
out what it’s going to print to the console.
4
JewelThief
privatestolenJewels
ReturnContents()
Locksmith
OpenSafe()
WriteDownCombination()
ReturnContents()
The JewelThief class inherits from Locksmith.
Jewel thieves are locksmiths gone bad! They can pick the lock on the safe, but
instead of returning the jewels to the owner they steal them!
3
A JewelThief object inherits the
OpenSafe() and WriteDownCombination()
methods. But when the OpenSafe()
method calls ReturnContents() to
return the jewels to the owner, the
JewelThief steals them instead!
A Locksmith’s OpenSafe() method
picks the lock, opens the safe, and
returns the contents to the owner.
Read through the code for your program. Before
you run it, write down what you think it will
print to the console. (Hint: Figure out what
JewelThief inherits from Locksmith!)
ReadKey()
waits for the
user to press
a key. It keeps
the program
from ending.
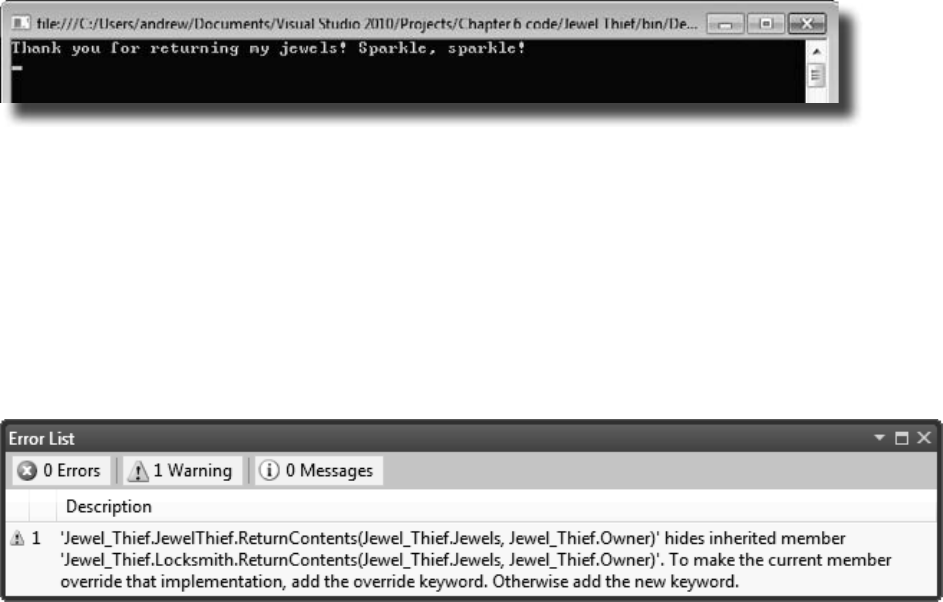
246 Chapter 6
hide and seek
A subclass can hide methods in the superclass
Go ahead and run the JewelThief program. Since it’s a console application, instead
of writing its console output to the Output window, it’ll pop up a command window
and print the output there. Here’s what you should see:
Did you expect the program’s output to be different? Maybe something like this:
I’m stealing the contents! Sparkle, sparkle!
It looks like the JewelThief acted just like a Locksmith! So what happened?
Hiding methods versus overriding methods
The reason the JewelThief object acted like a Locksmith object when its
ReturnContents() method was called was because of the way the JewelThief class
declared its ReturnContents() method. There’s a big hint in that warning message
you got when you compiled your program:
Since the JewelThief class inherits from Locksmith and replaces
the ReturnContents() method with its own method, it looks
like JewelThief is overriding Locksmith’s ReturnContents()
method. But that’s not actually what’s happening. You probably
expected JewelThief to override the method (which we’ll talk about
in a minute), but instead JewelThief is hiding it.
There’s a big difference. When a subclass hides the method, it replaces
(technically, it “redeclares”) a method in its base class that has the same
name. So now our subclass really has two different methods that share
a name: one that it inherits from its base class, and another brand-new
one that’s defined in its own class.
If a subclass just adds
a method with the same
name as a method in its
superclass, it only hides
the superclass method
instead of overriding it.

you are here 4 247
inheritance
Use different references to call hidden methods
The JewelThief only hides the ReturnContents() method (as opposed to extending it), and that causes
it to act like a Locksmith object whenever it’s called like a Locksmith object. JewelThief inherits one
version of ReturnContents() from Locksmith, and it defines a second version of it, which means that
there are two different methods with the same name. That means your class needs two different ways to call it.
And, in fact, it has exactly that. If you’ve got an instance of JewelThief, you can use a JewelThief
reference variable to call the new ReturnContents() method. But if you use a Locksmith reference
variable to call it, it’ll call the hidden Locksmith ReturnContents() method.
// The JewelThief subclass hides a method in the Locksmith base class,
// so you can get different behavior from the same object based on the
// reference you use to call it!
// Declaring your JewelThief object as a Locksmith reference causes it to
// call the base class ReturnContents() method
Locksmith calledAsLocksmith = new JewelThief();
calledAsLocksmith.ReturnContents(safeContents, owner);
// Declaring your JewelThief object as a JewelThief reference causes it to
// call the JewelThief's ReturnContents() method instead, because it hides
// the base class's method of the same name.
JewelThief calledAsJewelThief = new JewelThief();
calledAsJewelThief.ReturnContents(safeContents, owner);
Use the new keyword when you’re hiding methods
Take a close look at that warning message. Sure, we never really read most of our warnings, right? But this
time, actually read what it says: To make the current member override that implementation, add
the override keyword. Otherwise add the new keyword.
So go back to your program and add the new keyword.
new public void ReturnContents(Jewels safeContents, Owner owner) {
As soon as you add new to your JewelThief class’s ReturnContents() method declaration, that
error message will go away. But your program still won’t act the way you expect it to! It still calls the
ReturnContents() method defined in the Locksmith object. Why? Because the ReturnContents()
method is being called from a method defined by the Locksmith class—specifically, from inside
Locksmith.OpenSafe(), even though it’s being initiated by a JewelThief object. If JewelThief
only hides the ReturnContents() method, its own ReturnContents() will never be called.
Can you figure out how to get JewelThief to override the ReturnContents() method
instead of just hiding it? See if you can do it before turning to the next page!

248 Chapter 6
and that’s why you need those keywords
Use the override and virtual keywords to inherit behavior
We really want our JewelThief class to always use its own ReturnContents()
method, no matter how it’s called. This is the way we expect inheritance to work most
of the time, and it’s called overriding. And it’s very easy to get your class to do it.
The first thing you need to do is use the override keyword when you declare the
ReturnContents() method, like this:
class JewelThief {
...
override public void ReturnContents
(Jewels safeContents, Owner owner)
But that’s not everything you need to do. If you just add that override and try to
compile, you’ll get an error that looks like this:
Again, take a really close look and actually read the error. JewelThief can’t override the
inherited member ReturnContents() because it’s not marked virtual, abstract,
or override in Locksmith. Well, that’s an easy error to fix! Just mark Locksmith’s
ReturnContents() with the virtual keyword:
class Locksmith {
...
virtual public void ReturnContents
(Jewels safeContents, Owner owner)
And that’s the output we were looking for.
Now run your program again. Here’s what you should see:

you are here 4 249
inheritance
If you want to
override a method in
a base class, always
mark it with the
virtual keyword,
and always use the
override keyword
any time you want
to override the
method in a subclass.
If you don’t, you’ll
end up accidentally
hiding methods
instead.
When I come up with my class
hierarchy, I usually want to override
methods and not hide them. But if I
do hide them, I’ll always use the new
keyword, right?
Exactly. Most of the time you want to
override methods, but hiding them is
an option.
When you’re working with a subclass that extends
a base class, you’re much more likely to use
overriding than you are to use hiding. So when you
see that compiler warning about hiding a method,
pay attention to it! Make sure you really want
to hide the method, and didn’t just forget to use
the virtual and override keywords. If you
always use the virtual, override, and new
keywords correctly, you’ll never run into a problem
like this again!
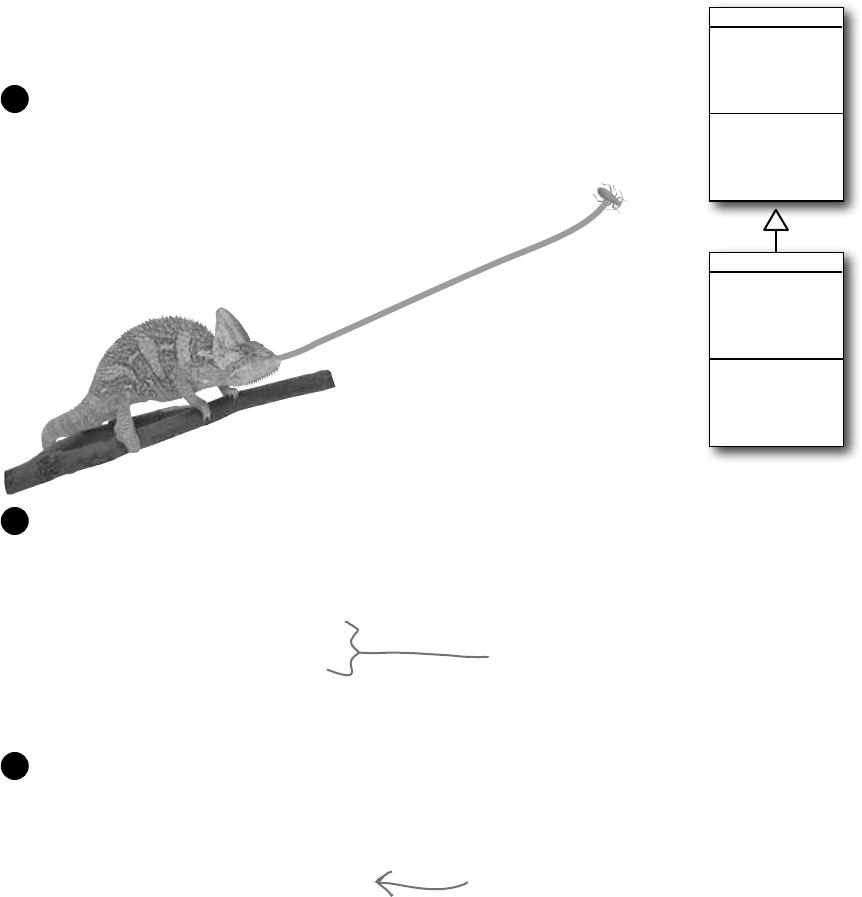
250 Chapter 6
A subclass can access its base class using the base keyword
Even when you override a method or property in your base class,
sometimes you’ll still want to access it. Luckily, we can use base, which
lets us access any method in the base class.
Chameleon
TongueLength
Color
CatchWithTongue()
Vertebrate
NumberOfLegs
Eat()
Swallow()
Digest()
class Vertebrate {
public virtual void Eat(Food morsel) {
Swallow(morsel);
Digest();
}
}
class Chameleon : Vertebrate {
public override void Eat(Food morsel) {
CatchWithTongue(morsel);
Swallow(morsel);
Digest();
}
}
All animals eat, so the Vertebrate class has an Eat() method that
takes a Food object as its parameter.
1
Chameleons eat by catching food with their tongues. So the Chameleon class inherits
from Vertebrate but overrides Eat().
2
The chameleon needs to swallow and digest
the food, just like any other animal. Do we
really need to duplicate this code, though?
Instead of duplicating the code, we can use the base keyword to call the method that
was overridden. Now we have access to both the old and the new version of Eat().
3
class Chameleon : Vertebrate {
public override void Eat(Food morsel) {
CatchWithTongue(morsel);
base.Eat(morsel);
}
}
This line calls the Eat() method in the base
class that Chameleon inherited from.
detour: construction ahead
Now that you’ve had a chance to absorb some of the ideas behind inheritance, here’s something to think
about. While reusing code is a good way to save keystrokes, another valuable part of inheritance is that it
makes it easier to maintain your code later. Can you think of a reason why that’s true?
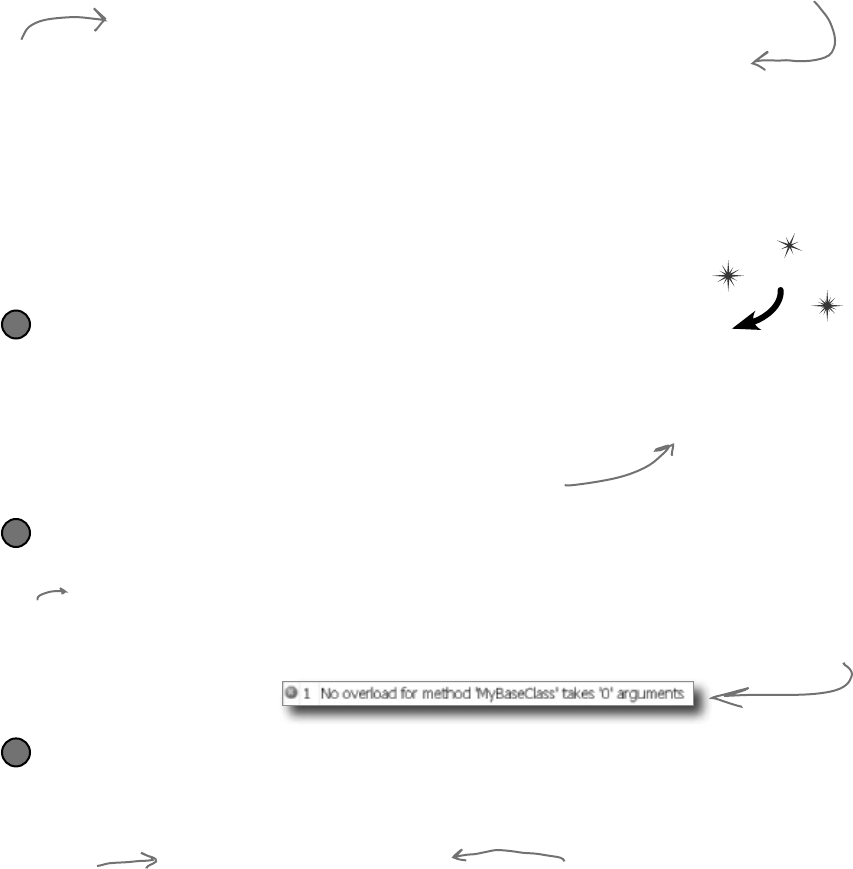
you are here 4 251
inheritance
When a base class has a constructor, your subclass needs one, too
If your class has constructors that take parameters, then any class that
inherits from it must call one of those constructors. The subclass’s
constructor can have different parameters from the base class constructor.
class Subclass : BaseClass {
public Subclass(parameter list)
: base(the base class’s parameter list) {
// first the base class constructor is executed
// then any statements here get executed
}
}
The base class constructor is executed
before the subclass constructor
But don’t take our word for it—see for yourself !
Fix the error by making the constructor call the one from the base class
Then instantiate the subclass and see what order the two message boxes pop up!
class MySubclass : MyBaseClass{
public MySubclass(string baseClassNeedsThis, int anotherValue)
: base(baseClassNeedsThis)
{
// the rest of the subclass is the same
3
Do this!
Create a base class with a constructor that pops up a message box
Then add a button to a form that instantiates this base class and shows a message box:
class MyBaseClass {
public MyBaseClass(string baseClassNeedsThis) {
MessageBox.Show(“This is the base class: ” + baseClassNeedsThis);
}
}
1
Try adding a subclass, but don’t call the constructor
Then add a button to a form that instantiates this subclass and shows a message box:
class MySubclass : MyBaseClass{
public MySubclass(string baseClassNeedsThis, int anotherValue) {
MessageBox.Show(“This is the subclass: ” + baseClassNeedsThis
+ “ and ” + anotherValue);
}
}
2
Keep an eye
out for this
slightly cryptic
error. It means
that your
subclass didn’t
call the base
constructor.
Add this extra line to the end of
your subclass’s constructor declaration
to tell C# that it needs to call the
base class’s constructor every time the
subclass is instantiated.
Add this line to tell C# to call the constructor in
the base class. It has a parameter list that shows
what gets passed to the base class constructor. Then
the error will go away and you can make a button to
see the two message boxes pop up!
Here’s the
constructor for
the subclass.
Select Build >>
Build Solution in
the IDE and you’ll
get an error from
this code.
This is a parameter that the
base class constructor needs.
This is how
we send the
base class the
parameter its
constructor
needs.
252 Chapter 6
Now you’re ready to finish the job for Kathleen!
When you last left Kathleen, you’d finished adding
birthday parties to her program. She needs you to
charge an extra $100 for parties over 12. It seemed
like you were going to have to write the same exact
code twice, once for each class. Now that you know
how to use inheritance, you can have them inherit
from the same base class that contains all of their
shared code, so you only have to write it once.
DinnerParty
NumberOfPeople
CostOfDecorations
CostOfBeveragesPerPerson
HealthyOption
CalculateCostOfDecorations()
CalculateCost()
SetHealthyOption()
BirthdayParty
NumberOfPeople
CostOfDecorations
CakeSize
CakeWriting
CalculateCostOfDecorations()
CalculateCost()
Let’s create the new class model
We’ll still have the same DinnerParty and BirthdayParty classes, but now they’ll inherit from a
single Party class. We need them to have exactly the same methods, properties, and fields, so we don’t
have to make any changes to the form. But some of those methods, properties, and fields will be moved
into the Party base class, and we may have to override a few of them.
1
If we play our cards right, we should be able to change the
two classes without making any changes to the form!
DinnerParty
NumberOfPeople
CostOfDecorations
CostOfBeveragesPerPerson
HealthyOption
CalculateCostOfDecorations()
CalculateCost()
SetHealthyOption()
BirthdayParty
NumberOfPeople
CostOfDecorations
CakeSize
CakeWriting
CalculateCostOfDecorations()
CalculateCost()
Party
NumberOfPeople
CostOfDecorations
CalculateCostOfDecorations()
CalculateCost()
kathleen still needs our help

you are here 4 253
inheritance
Build the Party base class
Create the Party class—make sure it’s public. You’ll need to look really closely at the
properties and methods in the class diagram, and figure out what you need to move out of
DinnerParty and BirthdayParty and into Party.
≥Move the NumberOfPeople and CostOfDecorations properties into it so
that they’re compatible with both DinnerParty and BirthdayParty.
≥Do the same for CalculateCostOfDecorations() and CalculateCost().
If those methods need any private fields, you’ll need to move them, too. (Remember,
subclasses can only see public fields—once you move a private field to Party, the
DinnerParty and BirthdayParty classes won’t have access to it.)
≥You’ll also need a constructor. Take a close look at the BirthdayParty and
DinnerParty constructors—anything they have in common should be moved to it.
≥Now add the $100 bonus for parties over 12 people. After all, that’s why we’re
doing this! It’s common to both birthday and dinner parties, so it belongs in Party.
2
Make DinnerParty inherit from Party
Now that Party does a lot of the things DinnerParty does, you can eliminate the overlap
and only keep the part of DinnerParty that’s unique to dinner parties.
≥Make sure the constructor is working properly. Does it do anything the Party
constructor doesn’t? If so, keep that and then leave everything else to the base class
constructor.
≥Any logic that has to do with setting the Healthy Option should stay in DinnerParty.
≥Uh-oh—we can’t override the CalculateCost() method here if we want to
keep the form code the same, because our form needs to pass it a bool called
healthyOption. So instead, we’ll overload it—which just means adding a
new CalculateCost() method to the class that takes different parameters. So
you’ll use exactly the same declaration for the method that you used at the beginning
of the chapter. But you can still take advantage of inheritance by calling base.
CalculateCost() to access the CalculateCost() method in the Party class.
3
Make BirthdayParty inherit from Party
Do the same thing for BirthdayParty—leave anything not specific to birthdays to the
base class, and only keep the birthday-specific functionality in BirthdayParty.
≥What does the BirthdayParty constructor need to do that’s not part of Party?
≥You’ll need to deal with the cost of the cake inside of BirthdayParty. That
touches a method and a property, so you’ll need to override them.
≥Yes, you can override a property! It’s just like overriding a method. When you set the
value of base.NumberOfPeople, it calls the property’s set accessor in the base
class. You’ll need to use the base keyword to both get and set the value.
4
You’ll learn all
about overloading
in Chapter
8—this is just a
sneak preview to
give you a leg up
on it later.
Later on, you’ll
learn about
the “protected”
keyword. A
protected
field is public
to a subclass,
but private to
everyone else.
254 Chapter 6
class Party
{
const int CostOfFoodPerPerson = 25;
private bool fancyDecorations;
public decimal CostOfDecorations = 0;
public Party(int numberOfPeople, bool fancyDecorations) {
this.fancyDecorations = fancyDecorations;
this.NumberOfPeople = numberOfPeople;
}
private int numberOfPeople;
public virtual int NumberOfPeople {
get { return numberOfPeople; }
set {
numberOfPeople = value;
CalculateCostOfDecorations(fancyDecorations);
}
}
public void CalculateCostOfDecorations(bool fancy) {
fancyDecorations = fancy;
if (fancy)
CostOfDecorations = (NumberOfPeople * 15.00M) + 50M;
else
CostOfDecorations = (NumberOfPeople * 7.50M) + 30M;
}
public virtual decimal CalculateCost() {
decimal TotalCost = CostOfDecorations + (CostOfFoodPerPerson * NumberOfPeople);
if (NumberOfPeople > 12)
{
TotalCost += 100M;
}
return TotalCost;
}
}
Checkitout—youchangedtheDinnerPartyandBirthdayParty
classessothattheyinheritedfromthesamebaseclass,
Party.Thenyouwereabletomakethechangetothecost
calculationtoaddthe$100fee,andyoudidn’thaveto
changetheformatall.Neat!
The decoration calculation is
identical in both birthday and
dinner parties, so it makes sense
to move it to Party. That way
none of the code is duplicated
in multiple classes.
The cost calculation needs to be a virtual method
because the birthday party overrides it (and also
extends it by calling the base class method).
NumberOfPeople needs to be virtual
because BirthdayParty needs to override
it (so that a change to the number of
people calculates a new cake size).
exercise solution
The Party constructor does
everything that was previously
in both the DinnerParty and
BirthdayParty constructors.
This code was moved straight out of
the DinnerParty and BirthdayParty
classes and into Party.
you are here 4 255
inheritance
class BirthdayParty : Party {
public int CakeSize;
public BirthdayParty(int numberOfPeople, bool fancyDecorations, string cakeWriting)
: base(numberOfPeople, fancyDecorations) {
CalculateCakeSize();
this.CakeWriting = cakeWriting;
CalculateCostOfDecorations(fancyDecorations);
}
private void CalculateCakeSize() {
if (NumberOfPeople <= 4)
CakeSize = 8;
else
CakeSize = 16;
}
private string cakeWriting = “”;
public string CakeWriting {
get { return this.cakeWriting; }
set {
int maxLength;
if (CakeSize == 8)
maxLength = 16;
else
maxLength = 40;
if (value.Length > maxLength) {
MessageBox.Show(“Too many letters for a “ + CakeSize + “ inch cake”);
if (maxLength > this.cakeWriting.Length)
maxLength = this.cakeWriting.Length;
this.cakeWriting = cakeWriting.Substring(0, maxLength);
} else
this.cakeWriting = value;
}
}
public override decimal CalculateCost() {
decimal CakeCost;
if (CakeSize == 8)
CakeCost = 40M + CakeWriting.Length * .25M;
else
CakeCost = 75M + CakeWriting.Length * .25M;
return base.CalculateCost() + CakeCost;
}
public override int NumberOfPeople {
get { return base.NumberOfPeople; }
set {
base.NumberOfPeople = value;
CalculateCakeSize();
this.CakeWriting = cakeWriting;
}
}
}
The CakeWriting
property stays intact
in the BirthdayParty
class too.
The constructor relies on the base class
to do most of the work. Then it calls
CalculateCakeSize(), just like the old
BirthdayParty constructor did.
The NumberOfPeople property has to
override the one in Party because the set
accessor needs to recalculate the cake
size. The set accessor needs to call base.
NumberOfPeople so that the set accessor
in Party also gets executed.
CalculateCost() also needs to be
overridden, because it needs to
first calculate the cost of the cake,
and then add it to the cost that’s
calculated in the Party class’s
CalculateCost() method.
The CalculateCakeSize()
method is specific to
birthday parties, so it stays
in the BirthdayParty class.
Continues on page 256.
256 Chapter 6
continued
from p.255
class DinnerParty : Party
{
public decimal CostOfBeveragesPerPerson;
public DinnerParty(int numberOfPeople, bool healthyOption,
bool fancyDecorations)
: base(numberOfPeople, fancyDecorations) {
SetHealthyOption(healthyOption);
CalculateCostOfDecorations(fancyDecorations);
}
public void SetHealthyOption(bool healthyOption) {
if (healthyOption)
CostOfBeveragesPerPerson = 5.00M;
else
CostOfBeveragesPerPerson = 20.00M;
}
public decimal CalculateCost(bool healthyOption) {
decimal totalCost = base.CalculateCost()
+ (CostOfBeveragesPerPerson * NumberOfPeople);
if (healthyOption)
return totalCost * .95M;
else
return totalCost;
}
}
Here’s the last class in Kathleen’s solution.
(There’s no change to the form code.)
This public field is only used in dinner
parties, not birthday parties, so it
stays in the class.
To do what the old
DinnerParty class did, the
new constructor calls the
Party constructor and then
calls SetHealthyOption().
The SetHealthyOption() method
stays exactly the same.
DinnerParty needs a different CalculateCost()
that takes a parameter, so instead of
overriding it we overloaded it. It calls the
CalculateCost() method in Party using the
base keyword, and then adds the cost of
the beverages and adds in the healthy option
discount.
The program’s
perfect. It’s so much easier to run
my business now—thanks so much!
great job!
You’ll learn all about
how overloading works in
Chapter 8.
Uh-oh—there’s still a potential bug in the program!
Now the DinnerParty class has two CalculateCost() methods, one that it inherits from Party
and this new one that we added. We haven’t fully encapsulated the class—someone could easily misuse
this code by calling the wrong CalculateCost() method. So if you do this:
DinnerParty dinner = new DinnerParty(5, true, true);
decimal cost1 = dinner.CalculateCost(true);
decimal cost2 = dinner.CalculateCost();
cost1 will be set to 261.25, while cost2 will be set to 250. This isn’t an academic question—it’s a real problem.
Sometimes there’s code in the base class that you don’t want to call directly. Even worse, we never intended the
Party class to be instantiated…but there’s nothing stopping someone from doing it. Do we even know what will
happen if someone creates an instance of Party? We can be pretty sure it’ll do something we didn’t plan for.
Luckily, C# gives us a really good solution to these problems, which you’ll learn about in the next chapter!
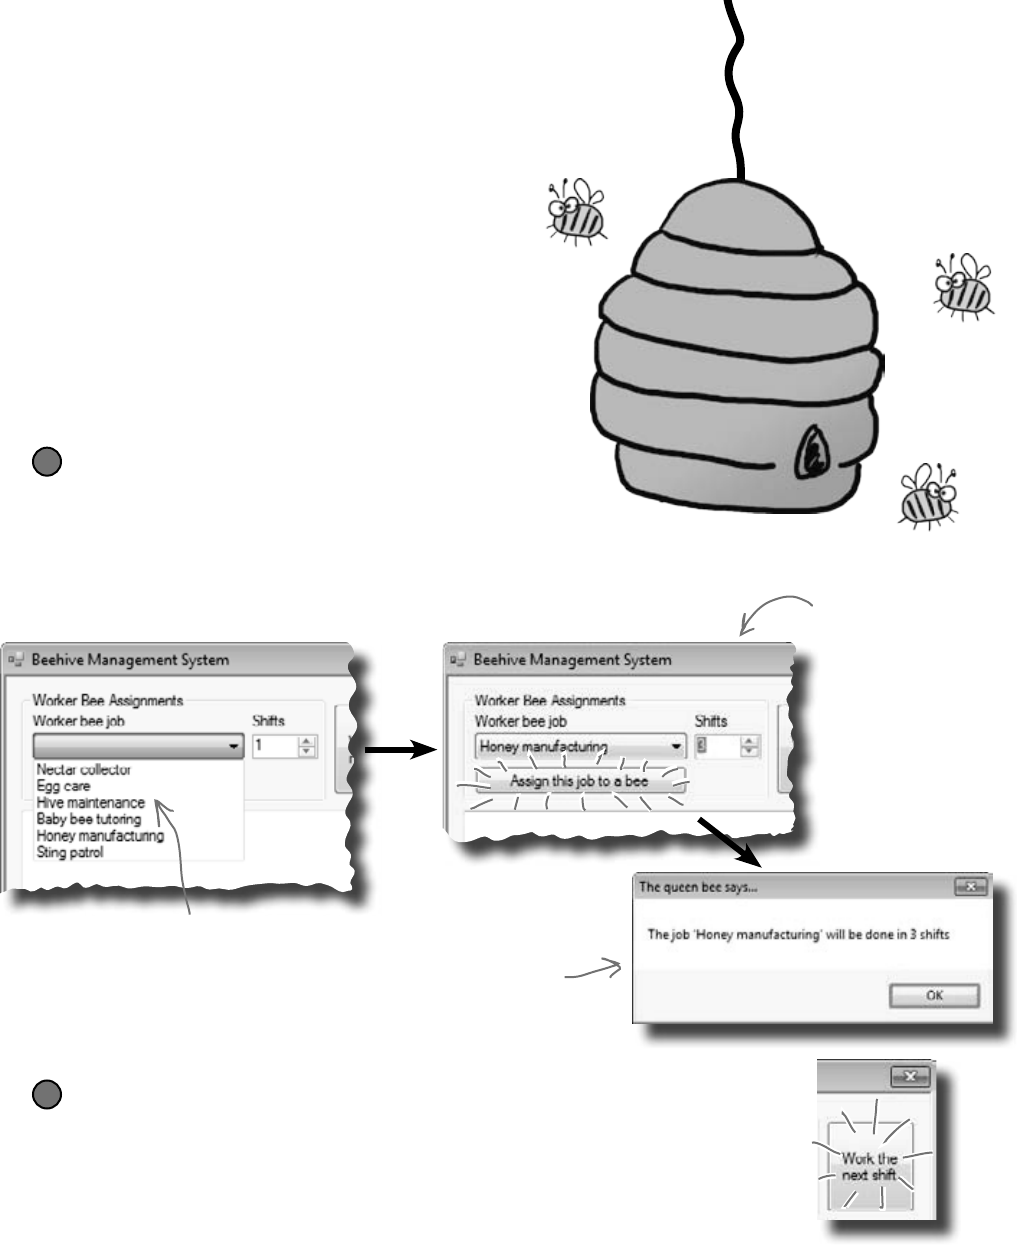
you are here 4 257
inheritance
Build a beehive management system
A queen bee needs your help! Her hive is out of control, and
she needs a program to help manage it. She’s got a beehive full
of workers, and a whole bunch of jobs that need to be done
around the hive. But somehow she’s lost control of which bee
is doing what, and whether or not she’s got the beepower to do
the jobs that need to be done.
It’s up to you to build a beehive management system to help
her keep track of her workers. Here’s how it’ll work:
The queen assigns jobs to her workers
There are six possible jobs that the workers can do. Some
know how to collect nectar and manufacture honey, others
can maintain the hive and patrol for enemies. A few bees can
do every job in the hive. So your program will need to give
her a way to assign a job to any bee that’s available to do it.
1
This drop-down list shows all six jobs that the
workers can do.The queen knows what jobs need
to be done, and she doesn’t really care which bee
does each job. So she just selects which job has to
be done—the program will figure out if there’s a
worker available to do it and assign the job to him.
The bees work shifts,
and most jobs require
more than one shift.
So the queen enters
the number of shifts
the job will take, and
clicks the “Assign
this job” button.
If there’s a bee
available to do the job,
the program assigns
the job to the bee and
lets the queen know
it’s taken care of.
When the jobs are all assigned, it’s time to work
Once the queen’s done assigning the work, she’ll tell the bees to work the next
shift by clicking the “Work the next shift” button. The program then generates
a shift report that tells her which bees worked that shift, what jobs they did, and
how many more shifts they’ll be working each job.
2
258 Chapter 6
First you’ll build the basic system
This project is divided into two parts. The first part is a bit of a review,
where you’ll create the basic system to manage the hive. It’s got two classes,
Queen and Worker. You’ll build the form for the system, and hook it up
to the two classes. And you’ll make sure the classes are well encapsulated so
they’re easy to change when you move on to the second part.
Queen
privateworkers:Worker[]
privateshiftNumber:int
AssignWork()
WorkTheNextShift()
Worker
CurrentJob:string
ShiftsLeft:int
privatejobsICanDo:string[]
privateshiftsToWork:int
privateshiftsWorked:int
DoThisJob()
WorkOneShift()
String.IsNullOrEmpty()
Each bee stores his current job as a string. So a worker can figure out if he’s
currently doing a job by checking his CurrentJob property—it’ll be equal to an
empty string if he’s waiting for his next job. C# gives you an easy way to do
that: String.IsNullOrEmpty(CurrentJob) will return true if the CurrentJob
string is either empty or null, and false otherwise.
Sometimes class diagrams
list private fields and types.
The program has one Queen object that manages the work being done.
≥The Queen uses an array of Worker objects to track each of the
worker bees and whether or not those bees have been assigned jobs.
It’s stored in a private Worker[ ] field called worker.
≥The form calls the AssignWork() method, passing a string for
the job that needs to be performed and an int for the number of
shifts. It’ll return true if it finds a worker to assign the job to, or false
if it couldn’t find a worker to do that job.
≥The form’s “Work the next shift” button calls
WorkTheNextShift(), which tells the workers to work and returns
a shift report to display. It tells each Worker object to work one shift, and
then checks that worker’s status so it can add a line to the shift report.
The queen uses an array of Worker objects to keep track of all of the
workers and what jobs they’re doing.
≥CurrentJob is a read-only property that tells the Queen object
what job the worker’s doing (“Sting patrol”, “Hive maintenance”,
etc.). If the worker isn’t doing any job, it’ll return an empty string.
≥The Queen object attempts to assign a job to a worker using its
DoThisJob() method. If that worker is not already doing the
job, and if it’s a job that he knows how to do, then he’ll accept the
assignment and the method returns true. Otherwise, it returns false.
≥When the WorkOneShift() method is called, the worker works
a shift. He keeps track of how many shifts are left in the current
job. If the job is done, then he resets his current job to an empty
string so that he can take on his next assignment.
CurrentJob and ShiftsLeft are
read-only properties.
help the queen
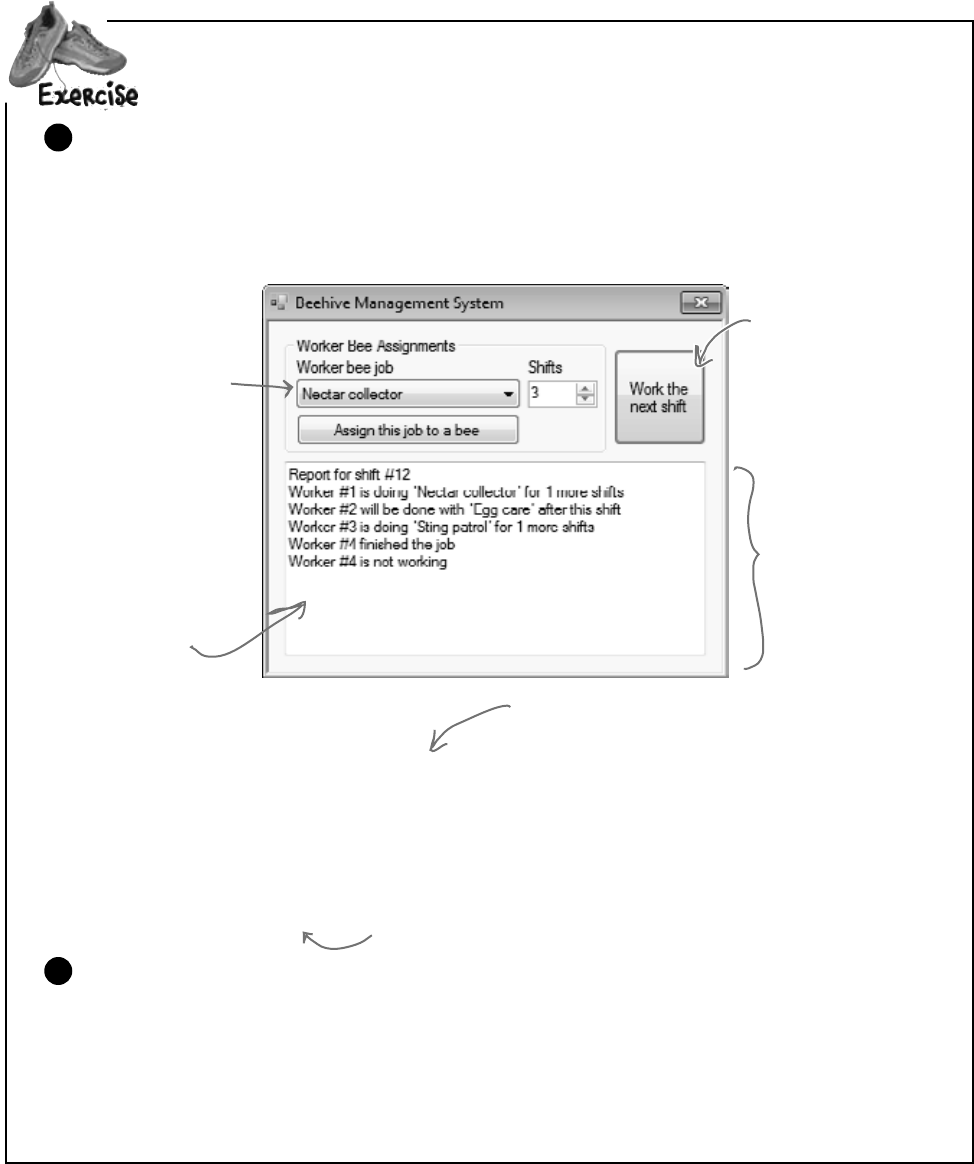
you are here 4 259
inheritance
public Form1() {
InitializeComponent();
Worker[] workers = new Worker[4];
workers[0] = new Worker(new string[] { “Nectar collector”, “Honey manufacturing” });
workers[1] = new Worker(new string[] { “Egg care”, “Baby bee tutoring” });
workers[2] = new Worker(new string[] { “Hive maintenance”, “Sting patrol” });
workers[3] = new Worker(new string[] { “Nectar collector”, “Honey manufacturing”,
“Egg care”, “Baby bee tutoring”, “Hive maintenance”, “Sting patrol” });
queen = new Queen(workers);
}
Each Worker object’s constructor takes one
parameter, an array of strings that tell it
what jobs it knows how to do.
Your form will need a Queen field called queen. You’ll pass that array
of Worker object references to the Queen object’s constructor.
Build the form
The form is pretty simple—all of the intelligence is in the Queen and Worker classes. The form
has a private Queen field, and two buttons call its AssignWork() and WorkTheNextShift()
methods. You’ll need to add a ComboBox control for the bee jobs (flip back to the previous page
to see its list items), a NumericUpDown control, two buttons, and a multiline text box for the shift
report. You’ll also need the form’s constructor—it’s below the screenshot.
1
Look closely at this
shift report, which the
Queen object generates.
It starts with a shift
number, and then reports
what each worker is doing.
Use the escape sequences
“\r\n” to add a line break
in the middle of a string.
The nextShift button
calls the queen’s
WorkTheNextShift()
method, which returns a
string that contains the
shift report.
This is a ComboBox control
named “workerBeeJob”.
Use its Items property to
set the list, and set its
DropDownStyle property
to “DropDownList” so
the user is only allowed
to choose items from the
list. The Shifts box is a
NumericUpDown control
called “shifts.”
Name this TextBox “report”
and set its MultiLine
property to true.
Aqueenbeeneedsyourhelp!Usewhatyou’velearnedaboutclassesandobjectstobuilda
beehivemanagementsystemtohelphertrackherworkerbees.
Build the Worker and Queen classes
You’ve got almost everything you need to know about the Worker and Queen classes. There are just a
couple more details. Queen.AssignWork() loops through the Queen object’s worker array and
attempts to assign the job to each worker using its DoThisJob() method. The Worker object checks
its jobsICanDo string array to see if it can do the job. If it can, it sets its private shiftsToWork field
to the job duration, its CurrentJob to the job, and its shiftsWorked to zero. When it works a shift, it
increases shiftsWorked by one. The read-only ShiftsLeft property returns shiftsToWork -
shiftsWorked—the queen uses it to see how many shifts are left on the job.
2

260 Chapter 6
class Worker {
public Worker(string[] jobsICanDo) {
this.jobsICanDo = jobsICanDo;
}
public int ShiftsLeft {
get {
return shiftsToWork - shiftsWorked;
}
}
private string currentJob = “”;
public string CurrentJob {
get {
return currentJob;
}
}
private string[] jobsICanDo;
private int shiftsToWork;
private int shiftsWorked;
public bool DoThisJob(string job, int numberOfShifts) {
if (!String.IsNullOrEmpty(currentJob))
return false;
for (int i = 0; i < jobsICanDo.Length; i++)
if (jobsICanDo[i] == job) {
currentJob = job;
this.shiftsToWork = numberOfShifts;
shiftsWorked = 0;
return true;
}
return false;
}
public bool WorkOneShift() {
if (String.IsNullOrEmpty(currentJob))
return false;
shiftsWorked++;
if (shiftsWorked > shiftsToWork) {
shiftsWorked = 0;
shiftsToWork = 0;
currentJob = “”;
return true;
}
else
return false;
}
}
CurrentJob is a read-
only property that
tells the queen which
job needs to be done.
The constructor just
sets the JobsICanDo
property, which is a
string array. It’s private
because we want the
queen to ask the worker
to do a job, rather than
make her check whether
he knows how to do it.
The queen uses the worker’s
DoThisJob() method to assign
work to him—he checks his
JobsICanDo property to see if
he knows how to do the job.
The queen uses the worker’s
WorkOneShift() method to
tell him to work the next
shift. The method only
returns true if this is the
very last shift that he’s
doing the job. That way the
queen can add a line to the
report that the bee will be
done after this shift.
Take a close look at the logic here. First it
checks the currentJob field: if the worker’s
not working on a job, it just returns false,
which stops the method. If not, then it
increments ShiftsWorked, and then checks
to see if the job’s done by comparing it with
ShiftsToWork. If it is, the method returns
true. Otherwise it returns false.
exercise solution
We used !—the NOT operator—to
check if the string is NOT null or
empty. It’s just like checking to see
if something’s false.
ShiftsLeft is a read-only
property that calculates
how many shifts are left
on the current job.
you are here 4 261
inheritance
class Queen {
public Queen(Worker[] workers) {
this.workers = workers;
}
private Worker[] workers;
private int shiftNumber = 0;
public bool AssignWork(string job, int numberOfShifts) {
for (int i = 0; i < workers.Length; i++)
if (workers[i].DoThisJob(job, numberOfShifts))
return true;
return false;
}
public string WorkTheNextShift() {
shiftNumber++;
string report = “Report for shift #” + shiftNumber + “\r\n”;
for (int i = 0; i < workers.Length; i++)
{
if (workers[i].WorkOneShift())
report += “Worker #” + (i + 1) + “ finished the job\r\n”;
if (String.IsNullOrEmpty(workers[i].CurrentJob))
report += “Worker #” + (i + 1) + “ is not working\r\n”;
else
if (workers[i].ShiftsLeft > 0)
report += “Worker #” + (i + 1) + “ is doing ‘“ + workers[i].CurrentJob
+ “’ for “ + workers[i].ShiftsLeft + “ more shifts\r\n”;
else
report += “Worker #” + (i + 1) + “ will be done with ‘“
+ workers[i].CurrentJob + “’ after this shift\r\n”;
}
return report;
}
}
Queen queen;
private void assignJob_Click(object sender, EventArgs e) {
if (queen.AssignWork(workerBeeJob.Text, (int)shifts.Value) == false)
MessageBox.Show(“No workers are available to do the job ‘”
+ workerBeeJob.Text + “’”, “The queen bee says...”);
else
MessageBox.Show(“The job ‘” + workerBeeJob.Text + “’ will be done in ”
+ shifts.Value + “ shifts”, “The queen bee says...”);
}
private void nextShift_Click(object sender, EventArgs e) {
report.Text = queen.WorkTheNextShift();
}
We already gave you the constructor. Here’s the rest of the code for the form:
The queen keeps her array of workers private
because once they’re assigned, no other class
should be able to change them…or even see
them, since she’s the only one who gives them
orders. The constructor sets the field’s value.
When she assigns work to her worker bees, she starts with
the first one and tries assigning him the job. If he can’t
do it, she moves on to the next. When a bee who can do
the job is found, the method returns (which stops the loop).
The queen’s
WorkTheNextShift()
method tells each
worker to work a
shift and adds a
line to the report
depending on the
worker’s status.
The form uses its queen field to
keep a reference to the Queen
object, which in turn has an array
of references to the worker objects.
The assignJob button calls the
queen’s AssignWork() method
to assign work to a worker,
and displays a message box,
depending on whether or not a
worker’s available to do the job.
The nextShift button tells the queen to work the next shift. She
generates a report, which it displays in the report text box.
262 Chapter 6
Inheritancecross
Before you move on to the next part of the exercise,
give your brain a break with a quick crossword.
you’re not done
1
2 3
4
5
6 7
8
9 10
11
Across
5. This method gets the value of a property.
7. This method returns true if you pass it “”.
8. The constructor in a subclass doesn’t need the same
_____ as the constructor in its base class.
9. A control on a form that lets you create tabbed applications.
11. This type of class can't be instantiated.
Down
1. A _______ can override methods from its base class.
2. If you want a subclass to override a method, mark the
method with this keyword in the base class.
3. A method in a class that’s run as soon as it’s instantiated.
4. What a subclass does to replace a method in the base
class.
6. This contains base classes and subclasses.
7. What you’re doing by adding a colon to a class declaration.
10. A subclass uses this keyword to call the members of the
class it inherited from.
Answers on page 268.
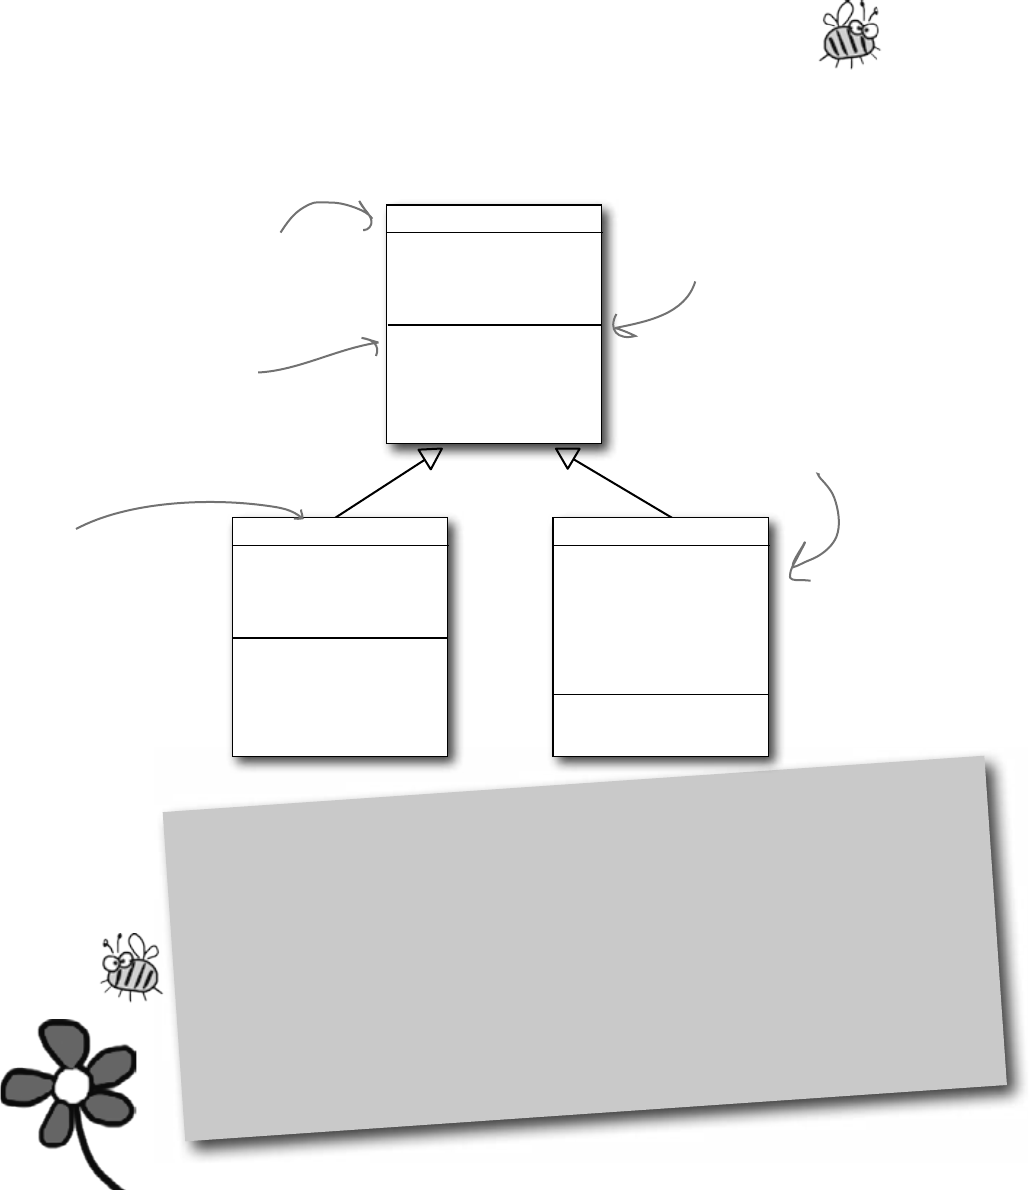
you are here 4 263
inheritance
Add Existing Item
Whenever you have a two-part exercise, it’s always a good idea to start a new project for
the second part. That way you can always get back to the first solution if you need it. An
easy way to do that is to right-click on the project name in the new project’s Solution
Explorer in the IDE, select “Add Existing Item” from the menu, navigate to the old project’s
folder, and select the files you want to add. The IDE will make new copies of those files in
the new project’s folder, and add them to the project. There are a few things to watch out
for, though. The IDE will NOT change the namespace, so you’ll need to edit each class file
and change its namespace line by hand. And if you add a form, make sure to add its designer
(.Designer.cs) and resource (.resx) files—and make sure you change their namespaces, too.
Use inheritance to extend the
bee management system
Now that you have the basic system in place, use inheritance to let it track how much
honey each bee consumes. Different bees consume different amounts of honey, and
the queen consumes the most honey of all. So you’ll use what you’ve learned about
inheritance to create a Bee base class that Queen and Worker inherit from.
Queen
privateworkers:Worker[]
privateshiftNumber:int
AssignWork()
WorkTheNextShift()
Worker
CurrentJob:string
ShiftsLeft:int
privatejobsICanDo:string[]
privateshiftsToWork:int
privateshiftsWorked:int
DoThisJob()
WorkOneShift()
Bee
publicShiftsLeft:int
virtual
GetHoneyConsumption():
double
The Bee class has the basic honey
consumption behavior. Since honey
consumption requires the number
of shifts left, we’ll move the
ShiftsLeft property into it and
mark it as virtual so the Worker can
override it.
The worker just needs to
subclass Bee and override the
ShiftsLeft method with the
one you already wrote.
The queen needs to
change her report to add
honey consumption data.
That means she needs
to add each worker’s
honey consumption—and
since she consumes honey
herself, she’ll need to
inherit from Bee and
override its virtual
GetHoneyConsumption()
method.
Sometimes we’ll show you
return values and private
members in class diagrams.
All bees consume honey, so we’ll add a
GetHoneyConsumption() method to the base class
so the queen and workers can inherit it. But
queens and workers consume honey differently.
We’ll make it a virtual method, so one of the
subclasses can override it.
264 Chapter 6
The queen needs to know how much honey the hive uses
The queen just got a call from her accountant bees, who told her that the hive isn’t producing enough
honey. She’ll need to know how much honey she and her workers are using so she can decide whether to
divert workers from egg maintenance to honey production.
≥All bees eat honey, so the hive runs through a lot of honey. That’s why they need to keep making
more of it.
≥Worker bees use more honey when they’re working. They need the most honey when the job starts,
to give them plenty of energy for the job. They consume less and less as the job goes on. On the last
shift the bee uses 10 units of honey; on the second-to-last shift he uses 11 units; on the shift before
that he uses 12 units, etc. So if the bee is working (meaning his ShiftsLeft is greater than zero),
then you can find out how many units of honey to consume by adding 9 to ShiftsLeft.
≥If a bee doesn’t have a job (i.e., its ShiftsLeft is zero), he only uses 7.5 units of honey for the shift.
≥These numbers are all for normal bees. If a bee weighs over 150 milligrams, it uses 35% more
honey. This doesn’t include queens, though (see below).
≥Queens require a lot of honey. A queen uses more honey when she’s got more workers doing
jobs, because it’s a lot of work overseeing them. She needs to consume as much honey as if she’d
worked as many shifts as the worker with the most shifts left on his job.
≥Then she needs even more honey: she uses 20 extra units of honey per shift if there are 2 or fewer
workers working, or 30 extra units of honey if there are 3 or more worker bees doing jobs. The
queen’s consumption isn’t subject to the 35% rule, since all queens weigh 275 milligrams.
≥The queen needs all the honey consumption numbers added to the end of each shift report.
1
Create a Bee class to handle the honey calculations
Since the workers and queen all do their honey calculations in similar ways, you’ll be able to avoid
duplicating your code by having a Bee base class that Worker and Queen can inherit from. You know
that each bee needs to know its weight (so it knows whether to multiply its honey expenditure by 35%).
≥Create a GetHoneyConsumption() method that calculates the amount of honey that a
worker uses. Since the workers and queen all need to do this calculation but the queen needs to do
extra calculations as well, it makes sense for the worker to inherit it and the queen to override it.
≥The GetHoneyConsumption() method needs the number of shifts left, so add a virtual read-
only property called ShiftsLeft that returns zero. The worker’s ShiftsLeft will override it.
≥The honey consumption calculation needs to know the bee’s weight, so the Bee constructor will
need to take the weight as a parameter and store it in a field. Since no other class needs to use it,
you should make it private.
2
We’renotdoneyet!Thequeenneedstokeeptrackofhowmuchhoneythehiveisspendingon
itsworkers.Here’saperfectchancetouseyournewinheritanceskills!
Here’s a good rule of thumb. You should make fields and methods
private by default, and only make them public if another class needs
them. That way you avoid bugs in your programs caused by one class
accessing another class’s properties or methods incorrectly.
we’re all just bees
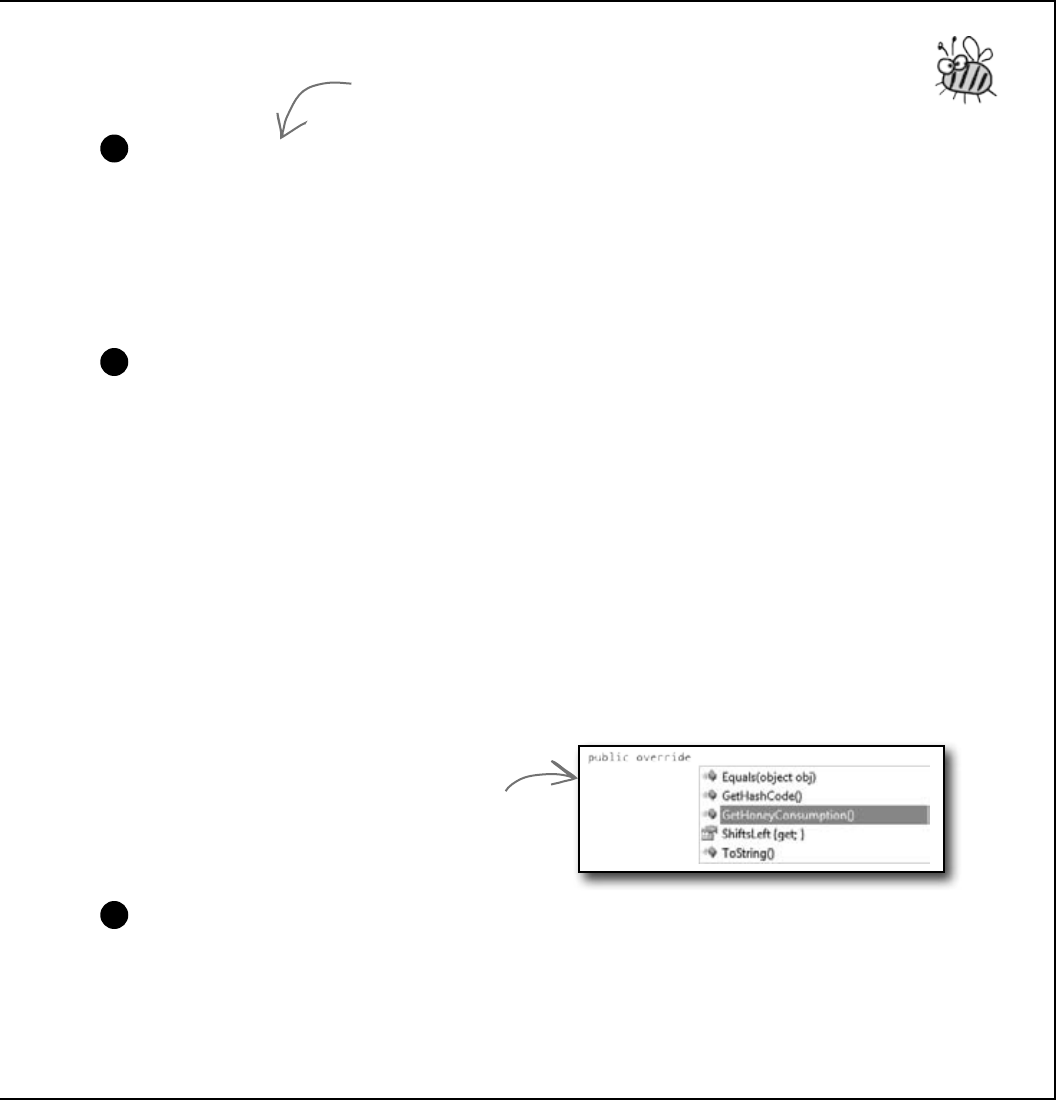
you are here 4 265
inheritance
Make the Worker class inherit from Bee
You’ll need to set up the constructor to call the base class constructor, like you did with
Kathleen. You’ll need to change the Worker constructor so that it takes the bee’s weight as
a parameter, and pass that parameter on to the base class constructor. Then, just add the
override keyword to the Worker’s ShiftLeft method. Once you do that, each worker
will be able to calculate his honey consumption for the queen…and you don’t have to make
any more changes to the Worker class!
3
Make the Queen class inherit from Bee
The Queen class needs a little more alteration than the Worker class, since she needs to actually do the
honey calculation and add it to the shift report.
≥Override the Bee.GetHoneyConsumption() method and add the queen’s extra calculation.
She’ll need to figure out whether she has 2 or fewer workers with jobs, so she knows whether she
needs 20 or 30 units. Then she’ll need to add that to the number of units she’d use if she had the
same number of shifts left as the worker with the most shifts left.
≥Update the queen’s WorkTheNextShift() method by adding the honey consumption line
to the report. Add a loop to add up the honey consumption for each worker and also to find the
worker with the largest honey consumption—do it before the queen tells each worker to work
the shift (so she gets the consumption numbers for the current shift). She’ll add those up, add
her own consumption, and then add a line to the end of the shift report that says, “Total Honey
Consumption: xxx units” (where xxx is the number of units of honey consumed).
≥You’ll need to update the Queen constructor just like you did for Worker.
4
Update the form to instantiate the bees properly
Since you changed the Queen and Worker constructors, you’ll also need to change the way they’re called.
Each constructor has a new Weight parameter, so you’ll need the weights to use:
≥Worker Bee #1: 175mg; Worker Bee #2: 114mg; Worker Bee #3: 149mg;
Worker Bee #4: 155mg; Queen Bee: 275mg
That’s the only change you’ll need to make to the form!
5
Hint: You can use the slightly cryptic “no overload” error
message to your advantage! Have the Worker class inherit
from Bee, then build your project. When the IDE displays
the error, double-click on it and the IDE will jump right
to the Worker constructor automatically. How convenient!
Go to the Queen class and type “public
override”—when you press the space
bar, the IDE automatically lists all the
methods you can override. Select the
method you want to override and it’ll fill
in the base method call automatically.
266 Chapter 6
public Form1() {
InitializeComponent();
Worker[] workers = new Worker[4];
workers[0] = new Worker(new string[] { “Nectar collector”, “Honey manufacturing” }, 175);
workers[1] = new Worker(new string[] { “Egg care”, “Baby bee tutoring” }, 114);
workers[2] = new Worker(new string[] { “Hive maintenance”, “Sting patrol” }, 149);
workers[3] = new Worker(new string[] { “Nectar collector”, “Honey manufacturing”,
“Egg care”, “Baby bee tutoring”, “Hive maintenance”, “Sting patrol” }, 155);
queen = new Queen(workers);
}
Inheritance made
it easy for you to
update your code
and add the new
honey consumption
behavior to the
Queen and Worker
classes. It would
have been a lot
harder to make
this change if
you’d had a lot of
duplicated code.
class Bee {
public Bee(double weight) {
this.weight = weight;
}
public virtual int ShiftsLeft {
get { return 0; }
}
private double weight;
public virtual double GetHoneyConsumption() {
double consumption;
if (ShiftsLeft == 0)
consumption = 7.5;
else
consumption = 9 + ShiftsLeft;
if (weight > 150)
consumption *= 1.35;
return consumption;
}
}
The only change to the form is that the
weights need to be added to the Worker
constructors.
The Bee class has a constructor
that sets its Weight field and
a HoneyConsumption() method
that calculates how much honey
a worker consumes.
If a bee has 1 shift
left, he consumes 10;
if 2 left, he consumes
11, etc. If he has no job,
then he consumes 7.5. If
ShiftsLeft is zero, then
the bee has no job.
If the bee weighs more than
150mg, then consumption
goes up by 35%.
Here’s the Bee class. It does the basic honey
consumption calculation that’s used by both
the Worker and Queen classes.
Only the form constructor changed—the
rest of the form is exactly the same.
exercise solution
you are here 4 267
inheritance
class Worker : Bee {
public Worker(string[] jobsICanDo, int weight)
: base(weight) {
this.jobsICanDo = jobsICanDo;
}
public override int ShiftsLeft {
// ... the rest of the class is the same ...
All the Worker class needed was to inherit
from Bee and have its constructor adjusted
so that it takes a Weight parameter and
passes it on to the base class constructor,
and overrides the Bee.ShiftsLeft property
by adding the override keyword to the
property declaration.
The Queen class needed a few changes,
starting with inheriting from Bee.
This loop
looks at the
consumption
of all the
workers and
finds the
one with
the largest
consumption.
class Queen : Bee {
public Queen(Worker[] workers)
: base(275) {
this.workers = workers;
}
public string WorkTheNextShift()
{
double totalConsumption = 0;
for (int i = 0; i < workers.Length; i++)
totalConsumption += workers[i].GetHoneyConsumption();
totalConsumption += GetHoneyConsumption();
// ... here’s where the original code for this method goes, minus the return statement
report += “Total honey consumption: ” + totalConsumption + “ units”;
return report;
}
public override double GetHoneyConsumption() {
double consumption = 0;
double largestWorkerConsumption = 0;
int workersDoingJobs = 0;
for (int i = 0; i < workers.Length; i++) {
if (workers[i].GetHoneyConsumption() > largestWorkerConsumption)
largestWorkerConsumption = workers[i].GetHoneyConsumption();
if (workers[i].ShiftsLeft > 0)
workersDoingJobs++;
}
consumption += largestWorkerConsumption;
if (workersDoingJobs >= 3)
consumption += 30;
else
consumption += 20;
return consumption;
}
}
The queen overrides the Bee’s
GetHoneyConsumption() method to
do her honey calculation. It finds the
worker with the largest consumption
and adds either 20 or 30 to it based
on how many workers are working.
The WorkTheNextShift() has a loop
added to the top that calls each
worker’s GetHoneyConsumption()
method, and then calls her own
GetHoneyConsumption() method to
come up with a total consumption.
The queen weighs 275mg, so her constructor
calls the base Bee constructor and passes it a
weight of 275.
The rest of WorkTheNextShift() is the same,
except that it adds the honey line to the report.
If there are 3 or more workers
doing jobs, the queen needs 30
more units of honey; otherwise,
she needs 20 more units.
268 Chapter 6
Inheritancecross Solution
crossword solution
S
1
U V
2C
3
B I O
4O
A
5C C E S S O R V N
L T E S
H
6A I
7S N U L L O R E M P T Y
I S N A R R
E S H L I U
R E D C
P
8A R A M E T E R S E T
R I O
C T T
9A B
10 C O N T R O L
H A
Y S
11 T A T I C
E
Across
5. This method gets the value of a property. [ACCESSOR]
7. This method returns true if you pass it “”.
[ISNULLOREMPTY]
8. The constructor in a subclass class doesn’t need the same
_____ as the constructor in its base class. [PARAMETERS]
9. A control on a form that lets you create tabbed applications.
[TABCONTROL]
11. This type of class can't be instantiated. [STATIC]
Down
1. A _______ can override methods from its base class.
[SUBCLASS]
2. If you want a subclass to override a method, mark the
method with this keyword in the base class. [VIRTUAL]
3. A method in a class that’s run as soon as it’s instantiated.
[CONSTRUCTOR]
4. What a subclass does to replace a method in the base
class. [OVERRIDE]
6. This contains base classes and subclasses [HIERARCHY]
7. What you’re doing when add a colon to a class declaration.
[INHERIT]
10. A subclass uses this keyword to call the members of the
class it inherited from. [BASE]
this is a new chapter 269
OK, OK, I know I implemented
the BookieCustomer interface,
but I can’t code the PayMoney()
method until next weekend.
interfaces and abstract classes
7
Making classes
keep their promises
Actions speak louder than words.
Sometimes you need to group your objects together based on the things they can
do rather than the classes they inherit from. That’s where interfaces come in—they
let you work with any class that can do the job. But with great power comes great
responsibility, and any class that implements an interface must promise to fulfill all of
its obligations…or the compiler will break their kneecaps, see?
You’ve got three days before
I send some Thug objects by to
make sure you implement the
WalksWithALimp() method.

270 Chapter 7
Let’s get back to bee-sics
The General Bee-namics corporation wants to make the
Beehive Management System you created in the last chapter
into a full-blown Hive Simulator. Here’s an overview of the
specification for the new version of the program:
General Bee-namics Hive Simulator
To better represent life in the hive, we’ll need to add specialized
capabilities to the worker bees.
• All bees consume honey and have a weight.
• Queens assign work, monitor shift reports, and tell workers to
work the next shift.
• All worker bees work shifts.
• Sting patrol bees will need to be able to sharpen their stingers,
look for enemies, and sting them.
• Nectar collector bees are responsible for finding flowers,
gathering nectar, and then returning to the hive.
The bees in the new Hive Simulator will still consume honey
in the same way they did before. The queen still needs to be
able to assign work to the workers and see the shift reports
that tell who’s doing what. The workers work shifts just like
they did before, too, it’s just that the jobs they are doing have
been elaborated a little bit.
The Bee and Worker
classes don’t look like
they’ll change much.
We can extend the
classes we already
have to handle these
new features.
Looks like we’ll need to be able to
store different data for the worker
bees depending on the job they do.
worker bees, unite!
Lots of things are still the same
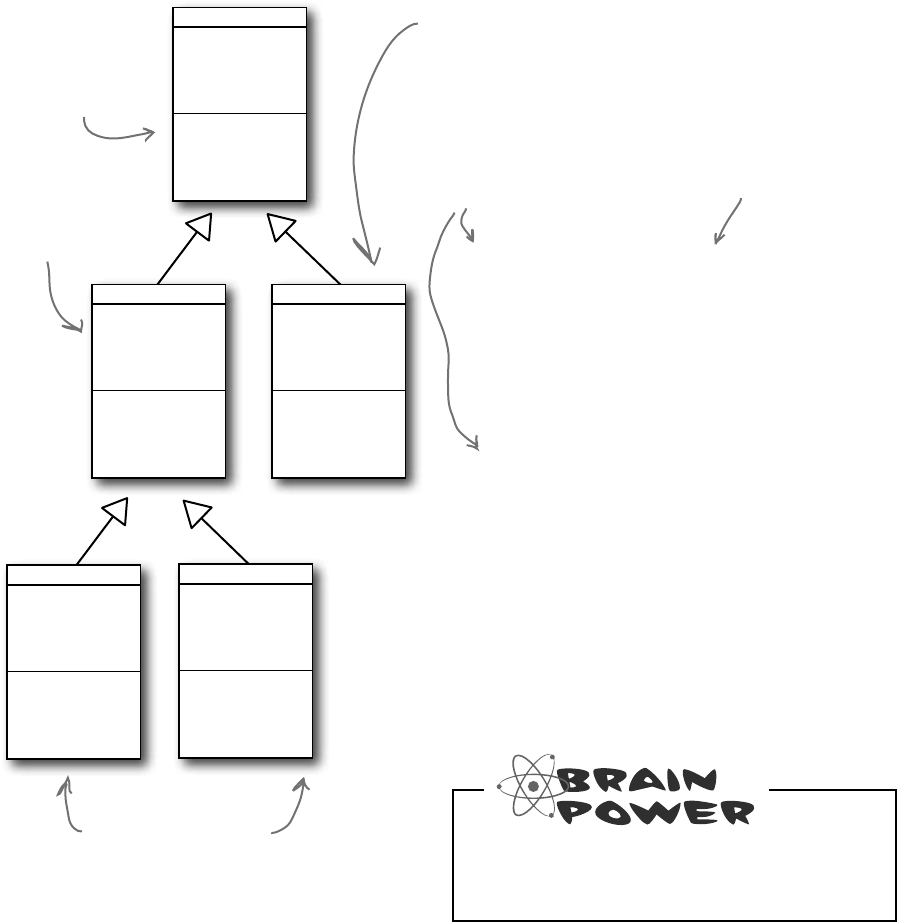
you are here 4 271
interfaces and abstract classes
We can use inheritance to create
classes for different types of bees
Here’s a class hierarchy with Worker and Queen classes
that inherit from Bee, and Worker has subclasses
NectarCollector and StingPatrol.
Worker
Job
ShiftsToWork
ShiftsWorked
ShiftsLeft
DoThisJob()
WorkOneShift()
Bee
Weight
HoneyConsumption()
StingPatrol
StingerLength
EnemyAlert
SharpenStinger()
LookForEnemies()
Sting()
NectarCollector
Nectar
FindFlowers()
GatherNectar()
ReturnToHive()
Queen
Worker[]
ShiftNumber
AssignWork()
WorkTheNextShift()
HoneyConsumption()
What happens if you have a bee that
needs to sting and collect nectar?
class StingPatrol : Worker
{
int StingerLength;
bool enemyAlert;
public bool SharpenStinger (int Length)
{...}
public bool LookForEnemies(){...}
public void Sting(string Enemy){...}
}
class NectarCollector : Worker
{
int Nectar;
public void FindFlowers (){...}
public void GatherNectar(){...}
public void ReturnToHive(){...}
}
This is what the new
subclasses will look like.
Here’s where
information about
weight and honey
consumption is stored.
And these classes
hold the information
particular to each job.
Here’s where all
of the information
about working shifts
is kept.
StingPatrol and
NectarCollector inherit
from the Worker class.
Remember how the queen
needed extra honey? Here’s
where we overrode her
HoneyConsumption() method.
272 Chapter 7
N
e
c
t
a
r
C
o
l
l
e
c
t
o
r
o
b
j
e
c
t
An interface tells a class that it must
implement certain methods and properties
A class can only inherit from one other class. So creating two separate subclasses for
the StingPatrol and NectarCollector bees won’t help us if we have a bee
that can do both jobs.
You use an
interface to
require a class
to include all
of the methods
and properties
listed inside the
interface—if
it doesn’t, the
compiler will
throw an error.
interfaces for jobs
The queen’s DefendTheHive() method can only tell StingPatrol
objects to keep the hive safe. She’d love to train the other bees to use
their stingers, but she doesn’t have any way to command them to attack:
There are NectarCollector objects that know how to collect nectar from flowers, and instances
of StingPatrol that can sharpen their stingers and patrol for enemies. But even if the queen could
teach the NectarCollector to defend the hive by adding methods like SharpenStinger() and
LookForEnemies() to its class definition, she still couldn’t pass it into her DefendTheHive()
method. She could use two different methods:
I wish you guys
could help defend
the hive.
Q
u
e
e
n
o
b
j
e
c
t
class Queen {
private void DefendTheHive(StingPatrol patroller) { ... }
}
private void DefendTheHive(StingPatrol patroller);
private void AlternateDefendTheHive(NectarCollector patroller);
Even if the queen adds sting patrol methods
to a NectarCollector object, she still can’t
pass it to her DefendTheHive() method
because it expects a StingPatrol reference.
She can’t just set a StingPatrol reference
equal to a NectarCollector object.
But that’s not a particularly good solution. Both of those methods
would be identical, because they’d call the same methods in the objects
passed to them. The only difference is that one method would take a
StingPatrol, and the other would take a NectarCollector
that happens to have the methods necessary for patrolling the hive. And
you already know how painful it is to maintain two identical methods.
Luckily, C# gives us interfaces to handle situations like that.
Interfaces let you define a bunch of methods that a class must have.
An interface requires that a class has certain methods, and the way
that it does that is by making the compiler throw errors if it
doesn’t find all the methods required by the interface in every class
that implements it. Those methods can be coded directly in the class,
or they can be inherited from a base class. The interface doesn’t care
how the methods or properties get there, as long as they’re there
when the code is compiled.
She could add a second method called
AlternateDefendTheHive() that takes a
NectarCollector reference instead, but that would
be cumbersome and difficult to work with.
Plus, the DefendTheHive() and
AlternateDefendTheHive() methods would be identical
except for the type of the parameter. If she wanted
to teach the BabyBeeCare or Maintenance objects to
defend the hive, she’d need to keep adding new methods.
What a mess!
N
e
c
t
a
r
C
o
l
l
e
c
t
o
r
o
b
j
e
c
t
you are here 4 273
interfaces and abstract classes
Q
u
e
e
n
o
b
j
e
c
t
interface IStingPatrol
{
int AlertLevel { get;}
int StingerLength { get; set;}
bool LookForEnemies();
int SharpenStinger(int length);
}
interface INectarCollector
{
void FindFlowers();
void GatherNectar();
void ReturnToHive();
}
You declare an
interface like this:
Interfaces don’t store
data. So they don’t have
fields…but they can have
properties.
You don’t write the code for the
methods in the interface, just
their names. You write the code
in the class that implements it.
Any class that
implements this
method must
have all of these
methods and
properties, or the
program won’t
compile.
Everything in a
public interface
is automatically
public, because
you’ll use it to
define the public
methods and
properties of
any class that
implements it.
Interface names start with I
Whenever you create an interface, you should make
its name start with an uppercase I. There’s no rule
that says you need to do it, but it makes your code
a lot easier to understand. You can see for yourself
just how much easier that can make your life. Just
go into the IDE to any blank line inside any method
and type “I”—IntelliSense shows .NET interfaces.
Use the interface keyword to define an interface
Adding an interface to your program is a lot like adding a class,
except you never write any methods. You just define the methods’
return type and parameters, but instead of a block of statements
inside curly brackets you just end the line with a semicolon.
Interfaces do not store data, so you can’t add any fields. But
you can add definitions for properties. The reason is that get and set
accessors are just methods, and interfaces are all about forcing classes
to have certain methods with specific names, types, and parameters.
So if you’ve got a problem that looks like it could be solved by adding
a field to an interface, try using a property instead—odds are, it’ll
do what you’re looking for.
Any class that implements
this interface will need a
SharpenStinger() method that
takes an int parameter.
Now that I know you can
defend the hive, we’ll all
be a lot safer!
So how does this help the queen? Now she can make one single method that takes any
object that knows how to defend the hive:
private void DefendTheHive(IStingPatrol patroller)
This gives the queen a single method that can take a StingPatrol, NectarStinger,
and any other bee that knows how to defend the hive—it doesn’t matter which class she passes
to the method. As long as it implements IStingPatrol, the DefendTheHive() method
is guaranteed that the object has the methods and properties it needs to defend the hive.
Since this takes an IStingPatrol reference, you can pass it
ANY object that implements IStingPatrol.
274 Chapter 7
Q: I still don’t quite get how interfaces improve
the beehive code. You’ll still need to add a
NectarStinger class, and it’ll still have
duplicate code…right?
A:Interfacesaren’taboutpreventingyoufromduplicating
code.They’reaboutlettingyouuseoneclassinmorethan
onesituation.Thegoalistocreateoneworkerbeeclassthat
candotwodifferentjobs.You’llstillneedtocreateclasses
forthem—that’snotthepoint.Thepointoftheinterfaces
isthatnowyou’vegotawaytohaveaclassthatdoesany
numberofjobs.SayyouhaveaPatrolTheHive()
methodthattakesaStingPatrolobject
andaCollectNectar()methodthat
takesaNectarCollectorobject.But
youdon’twantStingPatroltoinheritfrom
NectarCollectororviceversa—eachclasshas
publicmethodsandpropertiesthattheotheroneshouldn’t
have.Nowtakeaminuteandtrytothinkofawaytocreate
onesingleclasswhoseinstancescouldbepassedtoboth
methods.Seriously,putthebookdown,takeaminuteand
trytothinkupaway!Howdoyoudoit?
Interfacesfixthatproblem.Nowyoucancreatean
IStingPatrolreference—anditcanpointtoanyobjectthat
implementsIStingPatrol,nomatterwhatthe
actualclassis.ItcanpointtoaStingPatrol,ora
NectarStinger,orevenatotallyunrelatedobject.
Ifyou’vegotanIStingPatrolreferencepointing
toanobject,thenyouknowyoucanuseallofthemethods
andpropertiesthatarepartoftheIStingPatrol
interface,regardlessoftheactualtypeoftheobject.
Buttheinterfaceisonlypartofthesolution.You’llstillneedto
createanewclassthatimplementsit,sinceitdoesn’tactually
comewithanycode.Interfacesaren’taboutavoidingthe
creationofextraclassesoravoidingduplicatecode.They’re
aboutmakingoneclassthatcandomorethanonejob
withoutrelyingoninheritance,asinheritancebringsalotof
extrabaggage—you’llhavetoinheriteverymethod,property,
andfield,notjustthosethathavetodowiththespecificjob.
Canyouthinkofwaysthatyoucouldstillavoidduplicating
codewhileusinganinterface?Youcouldcreateaseparate
classcalledStingerorProboscistocontain
thecodethat’sspecifictostingingorcollectingnectar.
NectarStingerandNectarCollector
couldbothcreateaprivateinstanceofProboscis,and
anytimetheyneededtocollectnectar,they’dcallitsmethods
andsetitsproperties.
class NectarStinger : Worker, INectarCollector,
IStingPatrol {
public int AlertLevel {
get { return alertLevel; }
}
public int StingerLength {
get { return stingerLength; }
set {
stingerLength = value;
}
}
public bool LookForEnemies() {...}
public int SharpenStinger(int length)
{...}
public void FindFlowers() {...}
public void GatherNectar() {...}
public void ReturnToHive() {...}
}
You implement an interface with a colon
operator, just like you inherit.
You can use
more than one
interface if you
separate them
with commas.
Every method
in the interface
has a method
in the class.
Otherwise it
wouldn’t compile.
When you create a NectarStinger object,
it will be able to do the job of both a
NectarCollector and a StingPatrol worker bee.
This class inherits from Worker and
implements INectarCollector and
IStingPatrol.
The NectarStinger
sets the backing
field for the
AlertLevel
property in its
LookForEnemies()
method.
When you’ve got a class that implements an interface, it acts just like
any other class. You can instantiate it with new and use its methods:
NectarStinger bobTheBee = new NectarStinger();
bobTheBee.LookForEnemies();
bobTheBee.FindFlowers();
Now you can create an instance of
NectarStinger that does both jobs
You use the colon operator to implement an interface, just like
you do for inheritance. It works like this: the first thing after the colon
is the class it inherits from, followed by a list of interfaces—unless it
doesn’t inherit from a class, in which case it’s just a list of interfaces
(in no particular order).
The bee retracts its
stinger when there
are no enemies around,
so the backing field
changes its value over
time.
a little bit nectarcollector and a little bit stingpatrol
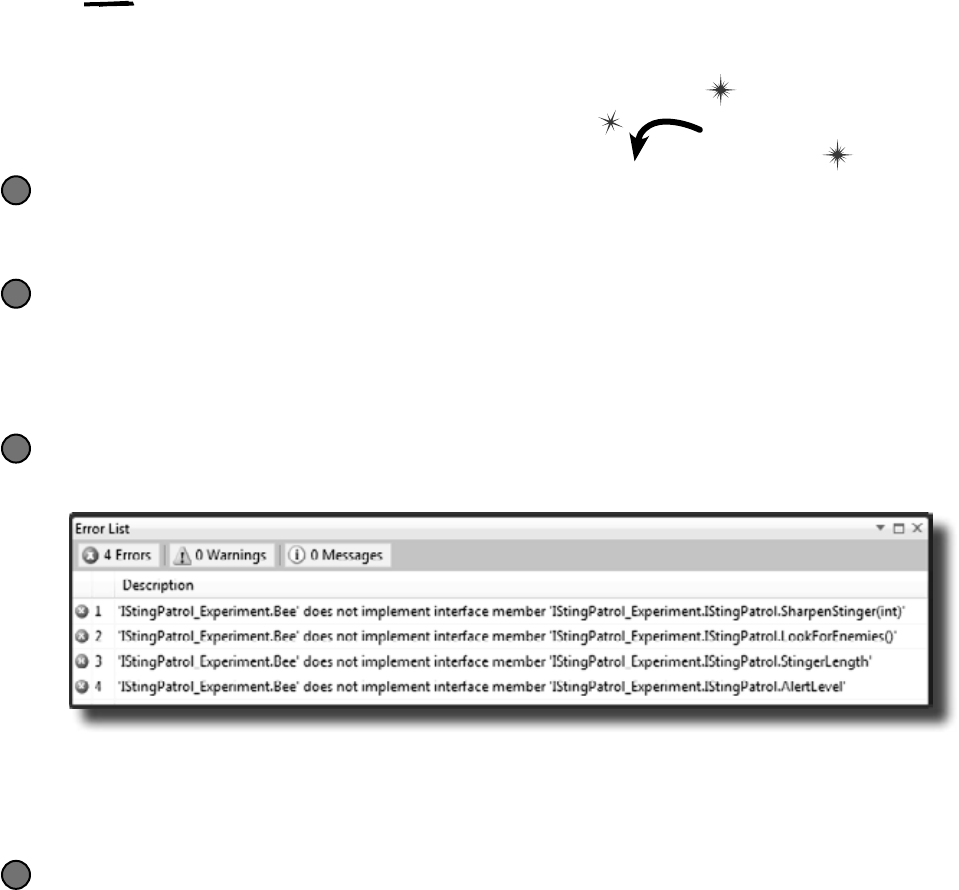
you are here 4 275
interfaces and abstract classes
Classes that implement interfaces have to
include ALL of the interface’s methods
Implementing an interface means that you have to have a method in the class
for each and every property and method that’s declared in the interface—if it
doesn’t have every one of them, it won’t compile. If a class implements more
than one interface, then it needs to include all of the properties and methods in
each of the interfaces it implements. But don’t take our word for it... Do this!
Create a new application and add a new class file called IStingPatrol.cs
Instead of adding a class, type in the IStingPatrol interface from two pages ago.
Your program should compile.
1
Add a Bee class to the project
Don’t add any properties or methods yet. Just have it implement IStingPatrol:
class Bee : IStingPatrol
{
}
2
Try to compile the program
Select “Rebuild” from the Build menu. Uh-oh—the compiler won’t let you do it:
3
Add the methods and properties to the Bee class
Add a LookForEnemies method and a SharpenStinger method—they don’t have to do anything,
they just need to compile. Then add a get accessor for an int called AlertLevel and get and set
accessors for an int called StingerLength. Now the program will compile!
4
You’ll see one of these “does not implement” errors for
every member of IStingPatrol that’s not implemented
in the class. The compiler really wants you to
implement every method in the interface.
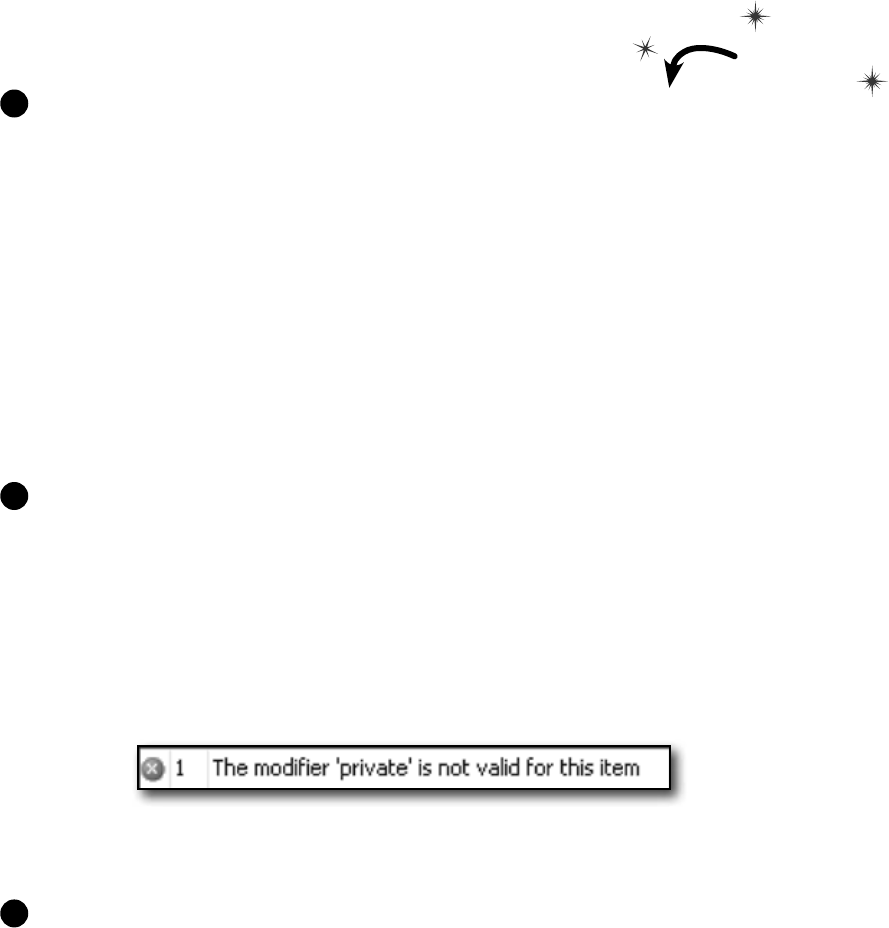
276 Chapter 7
class TallGuy {
public string Name;
public int Height;
public void TalkAboutYourself() {
MessageBox.Show(“My name is ” + Name + “ and I’m ”
+ Height + “ inches tall.”);
}
}
private void button1_Click(object sender, EventArgs e) {
TallGuy tallGuy = new TallGuy() { Height = 74, Name = “Jimmy” };
tallGuy.TalkAboutYourself();
}
You don’t need to
type “public” inside the
interface, because it
automatically makes
every property and
method public.
Here’s the TallGuy class, and the code for a button that creates it using an object initializer
and calls its TalkAboutYourself() method. Nothing new here—we’ll use it in a minute:
1
Let’s create an IClown interface for the class.
You already know that everything inside an interface has to be public. But don’t take our
word for it. Create a new project and declare an interface on your own, like this:
interface IClown
Now try to declare a private method inside the interface:
private void Honk();
Select Build>>Build Solution in the IDE. You’ll see this error:
Now go ahead and delete the private access modifier—the error will go away and
your program will compile just fine.
2
Before you go on to the next page, see if you can create the rest of the IClown interface, and modify the
TallGuy class to implement this interface. Add your interface to your project just like you add a class:
right-click on the project in the Solution Explorer and add a class file called IClown.cs.
Your new IClown interface should have a void method called Honk that doesn’t take any parameters, and
a string read-only property called FunnyThingIHave that has a get accessor but no set accessor.
3
clowning around
Do this!
Get a little practice using interfaces
Interfaces are really easy to use, and the best way to understand them
is to start using them. So create a new Windows Forms Application
project, drag a button onto the form, and get started!
you are here 4 277
interfaces and abstract classes
Here’s the interface—did you get it right?
interface IClown
{
string FunnyThingIHave { get; }
void Honk();
}
4
OK, now modify the TallGuy class so that it implements IClown.
Remember, the colon operator is always followed by the base class to inherit
from (if any), and then a list of interfaces to implement, all separated by
commas. Since there’s no base class and only one interface to implement, the
declaration looks like this:
class TallGuy : IClown
Then make sure the rest of the class is the same, including the two fields and
the method. Select “Build Solution” from the Build menu in the IDE to compile
and build the program. You’ll see two errors, including this one:
‘TallGuy’ does not implement interface
member ‘IClown.Honk()’
X
The errors will go away as soon as you add all of the methods and properties
defined in the interface. So go ahead and implement the interface. Add a read-
only string property called FunnyThingIHave with a get accessor that always
returns the string “big shoes”. Then add a Honk() method that pops up a
message box that says, “Honk honk!”
Here’s what it’ll look like:
public string FunnyThingIHave {
get { return “big shoes”; }
}
public void Honk() {
MessageBox.Show(“Honk honk!”);
}
5
Now your code will compile! Update your button so that it calls the
TallGuy object’s Honk() method.
6
All the interface requires is that a class that
implements it has a property called FunnyThingIHave
with a get accessor. You can put any get accessor in
there, even one that just returns the same string every
time. Most get accessors won’t do this, but this will
work just fine if it does what you need it to do.
The interface says that you need a public
void method called Honk, but it doesn’t say
what that method needs to do. It can do
anything at all—no matter what it does, the
code will compile as long as some method is
there with the right signature.
What the IDE is telling
you is that when you said
TallGuy would implement
IClown, you promised to
add all of the properties
and methods in that
interface…and then you
broke that promise!
TallGuy will implement the IClown interface.
Here’s an example of an interface
that has a get accessor without a
set accessor. Remember, interfaces
can’t contain fields, but when you
implement this read-only property in
a class, it’ll look like a field to other
objects.
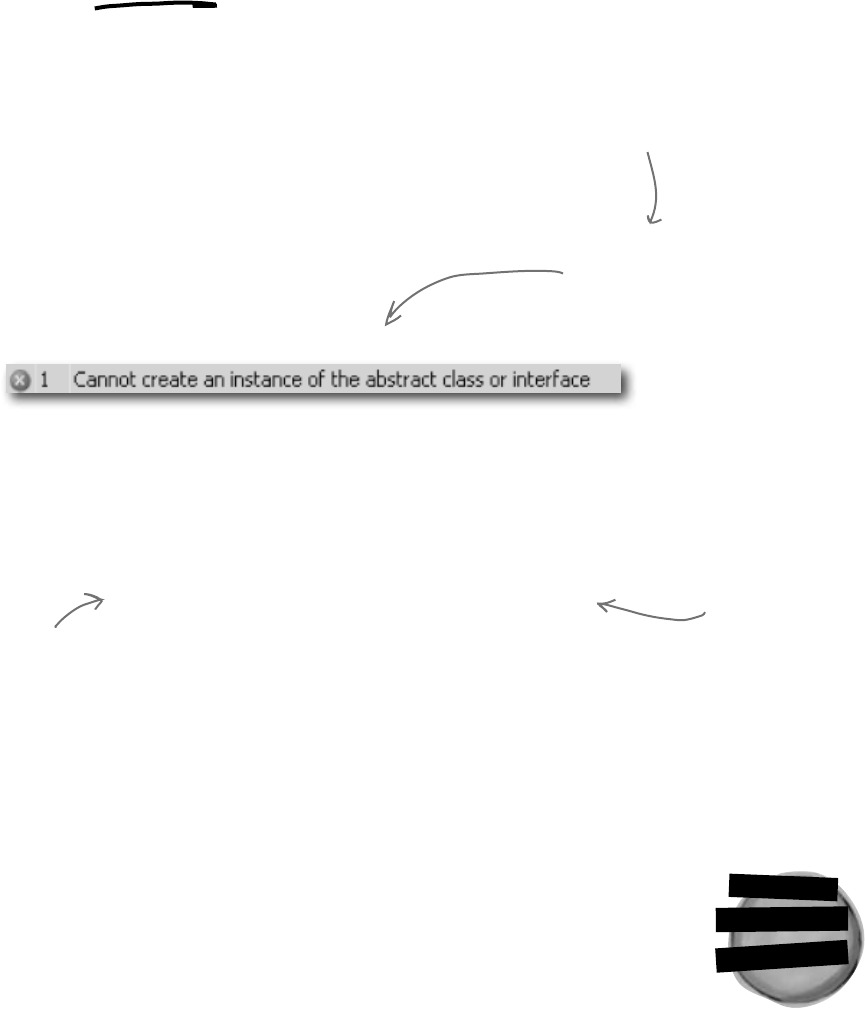
278 Chapter 7
You can’t instantiate an interface,
but you can reference an interface
Say you had a method that needed an object that could perform
the FindFlowers() method. Any object that implemented the
INectarCollector interface would do. It could be a Worker
object, Robot object, or Dog object, as long as it implements the
INectarCollector interface.
That’s where interface references come in. You can use one
to refer to an object that implements the interface you need
and you’ll always be sure that it has the right methods for your
purpose—even if you don’t know much else about it.
NectarStinger fred = new NectarStinger();
IStingPatrol george = fred;
The first line is an ordinary new statement, creating a reference called Fred
and pointing it to a NectarStinger object.
The second line is where things start to get interesting, because that line of
code creates a new reference variable using IStingPatrol. That
line may look a little odd when you first see it. But look at this:
NectarStinger ginger = fred;
You know what this third statement does—it creates a new NectarStinger
reference called ginger and points it at whatever object fred is pointing to.
The george statement uses IStingPatrol the same way.
Even though this
object can do
more, when you
use an interface
reference you only
have access to
the methods in
the interface.
IStingPatrol dennis = new IStingPatrol();
If you try to instantiate
an interface, the compiler
will complain.
This won’t work…
…but this will.
You can’t use the new keyword with an interface, which makes sense—the
methods and properties don’t have any implementation. If you could
create an object from an interface, how would it know how to behave?
interfaces don’t make objects
So what happened?
There’s only one new statement, so only one object was created. The
second statement created a reference variable called george that can
point to an instance of any class that implements IStingPatrol.
N
e
c
t
a
r
S
t
i
n
g
e
r
o
b
j
e
c
t
fred
Remember how you
could pass a BLT
reference into any
class that expects a
Sandwich, because BLT
inherits from Sandwich?
Well, this is the same
thing—you can use a
NectarStinger in any
method or statement
that expects an
IStingPatrol.
george
ginger
You can create an array of IWorker
references, but you can’t instantiate an
interface. But what you can do is point
those references at new instances of classes
that implement IWorker. Now you can have
an array that holds many different kinds of
objects!
you are here 4 279
interfaces and abstract classes
S
t
i
n
g
P
a
t
r
o
l
N
e
c
t
a
r
C
o
l
l
e
c
t
o
r
N
e
c
t
a
r
S
t
i
n
g
e
r
S
t
i
n
g
P
a
t
r
o
l
N
e
c
t
a
r
C
o
l
l
e
c
t
o
r
S
t
i
n
g
P
a
t
r
o
l
N
e
c
t
a
r
C
o
l
l
e
c
t
o
r
S
t
i
n
g
P
a
t
r
o
l
N
e
c
t
a
r
C
o
l
l
e
c
t
o
r
Interface references work just like object references
You already know all about how objects live on the heap.
When you work with an interface reference, it’s just another
way to refer to the same objects you’ve already been dealing
with. Look—it’s easy!
BERTHA
BIFF
Create a couple of bees
This is totally familiar stuff by now.
StingPatrol biff = new StingPatrol();
NectarCollector bertha = new NectarCollector();
1
Add IStingPatrol and INectarCollector references
You can use interface references just like you use any other
reference type.
IStingPatrol defender = biff;
INectarCollector cutiePie = bertha;
2
BERTHA
BIFF
defender
Assign a new instance to an interface reference
You don’t actually need an object reference—you can create a new
object and assign it straight to an interface reference variable.
INectarCollector gatherer = new NectarStinger();
4
BERTHA
defender
gatherer
An interface reference will keep an object alive
When there aren’t any references pointing to an object, it
disappears. But there’s no rule that says those references all have
to be the same type! An interface reference is just as good as an
object reference when it comes to keeping track of objects.
biff = null;
3
cutiePie
BERTHA
defender
cutiePie
cutiePie
This object didn’t disappear
because defender is still
pointing to it.
These two statements use interfaces to
create new references to existing objects. You
can only point an interface reference at an
instance of a class that implements it.
Let’s assume that StingPatrol implements the
IStingPatrol interface and NectarCollector
implements the INectarCollector interface.
280 Chapter 7
Worker[] bees = new Worker[3];
bees[0] = new NectarCollector();
bees[1] = new StingPatrol();
bees[2] = new NectarStinger();
for (int i = 0; i < bees.Length; i++)
{
if (bees[i] is INectarCollector)
{
bees[i].DoThisJob(“Nectar Collector”, 3);
}
}
You can find out if a class implements
a certain interface with “is”
Sometimes you need to find out if a certain class implements an interface. Suppose
we have all our worker bees in an array, called Bees. We can make the array hold
the type Worker, since all worker bees will be Worker classes, or subclasses of
that type.
But which of the worker bees can collect nectar? In other words, we want to know
if the class implements the INectarCollector interface. We can use the is
keyword to find out exactly that.
We’ve got an array of
Worker bees who are all
eligible to go on a nectar
collecting mission. So we’ll
loop through the array,
and use “is” to figure out
which ones have the right
methods and properties
to do the job.
Now that we know the bee is a nectar
collector, we can assign it the job of
collecting nectar.
is lets you compare interfaces
AND also other types, too!
If you have some other class that doesn’t inherit from Worker but does implement the
INectarCollector interface, then it’ll be able to do the job, too! But since it doesn’t
inherit from Worker, you can’t get it into an array with other bees. Can you think of a
way to get around the problem and create an array with both bees and this new class?
All the workers are in an
array of Workers. We’ll use
“is” to sort out which type of
worker each bee is.
This is like saying, if this bee implements the
INectarCollector interface…do this.
we’re expecting a big inheritance
Q: Wait a minute. When I put a
property in an interface, it looks just
like an automatic property. Does
that mean I can only use automatic
properties when I implement an
interface?
A:No,notatall.It’struethata
propertyinsideaninterfacelooksvery
similartoanautomaticproperty—like
JobandShiftsLeftinthe
IWorkerinterfaceonthenextpage.
Butthey’redefinitelynotautomatic
properties.YoucouldimplementJob
likethis:
public Job { get; private
set; }
Youneedthatprivateset,because
automaticpropertiesrequireyouto
havebothasetandaget(even
ifthey’reprivate).Butyoucouldalso
implementitlikethis:
public job { get { return
“Accountant”; } }
andthecompilerwillbeperfectlyhappy
withthat,too.Youcanalsoaddaset
accessor—theinterfacerequiresa
get,butitdoesn’tsayyoucan’thave
aset,too.(Ifyouuseanautomatic
propertytoimplementit,youcan
decideforyourselfwhetheryouwant
thesettobeprivateorpublic.)
you are here 4 281
interfaces and abstract classes
Interfaces can inherit from other interfaces
When one class inherits from another, it gets all of the methods and
properties from the base class. Interface inheritance is even simpler.
Since there’s no actual method body in any interface, you don’t have
to worry about calling base constructors or methods. The inherited
interfaces simply accumulate all of the methods and properties from
the interfaces they inherit from. (interface)
IWorker
Job
ShiftsLeft
DoThisJob()
WorkOneShift()
interface IWorker
{
string Job { get; }
int ShiftsLeft { get; }
void DoThisJob(string job, int shifts)
void WorkOneShift()
}
interface IStingPatrol : IWorker
{
int AlertLevel { get;}
int StingerLength { get; set;}
bool LookForEnemies();
int SharpenStinger(int length);
}
Any class that implements an interface that inherits
from IWorker must implement its methods and properties
When a class implements an interface, it has to include every property and
method in that interface. And if that interface inherits from another one, then all
of those properties and methods need to be implemented, too.
We’ve created a new
IWorker interface that
the other interfaces
inherit from.
Here’s the same IStingPatrol
interface, but now it inherits from
the IWorker interface. It looks
like a tiny change, but it makes a
huge difference in any class that
implements IStingPatrol.
When we draw an
interface on a class
diagram, we’ll show
inheritance using
dashed lines.
(interface)
INectarCollector
Nectar
FindFlowers()
GatherNectar()
ReturnToHive()
(interface)
IStingPatrol
StingerLength
EnemyAlert
SharpenStinger()
LookForEnemies()
Sting()
A class that implements
IStingPatrol must not only
implement these methods…
(interface)
IWorker
Job
ShiftsLeft
DoThisJob()
WorkOneShift()
...but the methods of the
IWorker interface this interface
inherits from, too.
282 Chapter 7
class RoboBee : Robot, IWorker
{
private int shiftsToWork;
private int shiftsWorked;
public int ShiftsLeft
{get {return shiftsToWork - shiftsWorked;}}
public string Job { get; private set; }
public bool DoThisJob(string job, int shiftsToWork){...}
public void WorkOneShift() {...}
}
The RoboBee 4000 can do a worker bee’s job
without using valuable honey
Let’s create a new bee, a RoboBee 4000, that runs on gas. We can
have it inherit from the IWorker interface, though, so it can do
everything a normal worker bee can.
class Robot
{
public void ConsumeGas() {...}
}
The RoboBee class
implements all the
methods from the
IWorker interface.
If RoboBee didn’t implement everything in the IWorker
interface, the code wouldn’t compile.
This is our basic Robot
class, so robots can run
on gasoline.
Any class can implement
ANY interface as long
as it keeps the promise
of implementing the
interface’s methods and
properties.
The RoboBee class
inherits from Robot and
implements IWorker. That
means it’s a robot, but can
do the job of a worker
bee. Perfect!
RoboBee
ShiftsToWork
ShiftsWorked
ShiftsLeft
Job
DoThisJob()
Remember, for other classes in the application, there’s no
functional difference between a RoboBee and a normal worker
bee. They both implement the IWorker interface, so both act
like worker bees as far as the rest of the program is concerned.
But, you could distinguish between the types by using is:
if (workerBee is Robot) {
// now we know workerBee
// is a Robot object
}
We can see what class
or interface workerBee
implements or subclasses
with “is”.
Icanhascheezburger
you are here 4 283
interfaces and abstract classes
is tells you what an object implements,
as tells the compiler how to treat your object
Sometimes you need to call a method that an object gets from an interface it
implements. But what if you don’t know if that object is the right type? You
use is to find that out. Then, you can use as to treat that object—which
you now know is the right type—as having the method you need to call.
IWorker[] bees = new IWorker[3];
bees[0] = new NectarStinger();
bees[1] = new RoboBee();
bees[2] = new Worker();
for (int i = 0; i < bees.Length; i++) {
if (bees[i] is INectarCollector) {
INectarCollector thisCollector;
thisCollector = bees[i] as INectarCollector;
thisCollector.GatherNectar();
...
All these bees implement IWorker,
but we don’t know which ones
implement other interfaces, like
INectarCollector.
We can’t call
INectarCollector methods
on the bees. They’re of
type IWorker, and don’t
know about INectarCollector
methods.
NOW we can call INectarCollector methods.
Take a look at the array on the left. For each of these statements,
write down which values of i would make it evaluate to true.
Also, two of them won’t compile—cross those lines out.
IWorker[] Bees = new IWorker[8];
Bees[0] = new NectarStinger();
Bees[1] = new RoboBee();
Bees[2] = new Worker();
Bees[3] = Bees[0] as IWorker;
Bees[4] = IStingPatrol;
Bees[5] = null;
Bees[6] = Bees[0];
Bees[7] = new INectarCollector();
1. (Bees[i] is INectarCollector)
2. (Bees[i] is IStingPatrol)
3. (Bees[i] is IWorker)
We’re looping through each bee…
…and checking to
see if it implements
INectarCollector.
We use “as” to say,
treat this object AS
an INectarCollector
implementation.
284 Chapter 7
IWorker[] Bees = new IWorker[8];
Bees[0] = new NectarStinger();
Bees[1] = new RoboBee();
Bees[2] = new Worker();
Bees[3] = Bees[0] as IWorker;
Bees[4] = IStingPatrol;
Bees[5] = null;
Bees[6] = Bees[0];
Bees[7] = new INectarCollector();
1. (Bees[i] is INectarCollector)
2. (Bees[i] is IStingPatrol)
3. (Bees[i] is IWorker)
0 and 6
0, 6
0, 1, 2, 3, and 6
Take a look at the array on the left. For each of these statements,
write down which values of i would make it evaluate to true.
Also, two of them won’t compile—cross them out.
NectarStinger()
implements the
IStingPatrol
interface.
A CoffeeMaker is also an Appliance
If you’re trying to figure out how to cut down your energy bill each month, you
don’t really care what each of your appliances does. You only really care that they
consume power. So if you were writing a program to monitor your electricity
consumption, you’d probably just write an Appliance class. But if you needed
to be able to distinguish a coffee maker from an oven, you’d have to build a class
hierarchy. So you’d add the methods and properties that are specific to a coffee
maker or oven to some CoffeeMaker and Oven classes, and they’d inherit from
an Appliance class that has their common methods and properties.
it looks like one thing, but it’s really another!
CoffeeMaker
CoffeeLeft
FillWithWater()
MakeCoffee()
Appliance
PluggedIn
Color
ConsumePower()
Oven
Capacity
Preheat()
HeatUp()
Reheat()
public void MonitorPower(Appliance appliance) {
// code to add data to a household
// power consumption database
}
CoffeeMaker misterCoffee = new CoffeeMaker();
MonitorPower(misterCoffee);
Here’s a method
in the program to
monitor the power
consumption for a
house.
This code would appear later on in the
program to monitor the coffee maker’s
power consumption.
Even though the MonitorPower() method takes
a reference to an Appliance object, you can
pass it the misterCoffee reference because
CoffeeMaker is a subclass of Appliance.
You already saw this
in the last chapter,
when you saw how
you could pass a
BLT reference to
a method that
expected a Sandwich.

you are here 4 285
interfaces and abstract classes
Upcasting works with both objects and interfaces
When you substitute a subclass for a base class—like substituting a coffee maker for an
appliance or a BLT for a sandwich—it’s called upcasting. It’s a really powerful tool
that you get when you build class hierarchies. The only drawback to upcasting is that
you can only use the properties and methods of the base class. In other words, when you
treat a coffee maker like an appliance, you can’t tell it to make coffee or fill it with water.
But you can tell whether or not it’s plugged in, since that’s something you can do with
any appliance (which is why the PluggedIn property is part of the Appliance class).
Let’s create some objects
We can create a CoffeeMaker and Oven class as usual:
CoffeeMaker misterCoffee = new CoffeeMaker();
Oven oldToasty = new Oven();
1
What if we want to create an array of appliances?
You can’t put a CoffeeMaker in an Oven[ ] array, and you can’t put an Oven in a
CoffeeMaker[ ] array. But you can put both of them in an Appliance[ ] array:
Appliance[] kitchenWare = new Appliance[2];
kitchenWare[0] = misterCoffee;
kitchenWare[1] = oldToasty;
2
But you can’t treat an appliance like an oven
When you’ve got an Appliance reference, you can only access the methods and properties
that have to do with appliances. You can’t use the CoffeeMaker methods and properties
through the Appliance reference even if you know it’s really a CoffeeMaker. So these
statements will work just fine, because they treat a CoffeeMaker object like an Appliance:
Appliance powerConsumer = new CoffeeMaker();
powerConsumer.ConsumePower();
But as soon as you try to use it like a CoffeeMaker:
powerConsumer.MakeCoffee();
your code won’t compile, and the IDE will display an error:
because once you upcast from a subclass to a base class, then you can only access the
methods and properties that match the reference that you’re using to access the object.
3
‘Appliance’ does not contain a
definition for ‘MakeCoffee’
X
C
o
f
f
e
e
M
a
k
e
r
o
b
j
e
c
t
power
consumer
This line won’t compile because
powerConsumer is an Appliance
reference, so it can only be used
to do Appliance things.
You can use upcasting to create an
array of appliances that can hold
both coffee makers and ovens.
We’ll start by instantiating
an Oven object and a
CoffeeMaker object as usual.
powerConsumer
is an Appliance
reference
pointing to a
CoffeeMaker
object.
286 Chapter 7
upcasting is easy downcasting is risky
When downcasting fails, as returns null
So what happens if you try to use as to convert an Oven object into a
CoffeeMaker? It returns null—and if you try to use it, .NET will cause
your program to break.
if (powerConsumer is CoffeeMaker) {
Oven foodWarmer = powerConsumer as Oven;
foodWarmer.Preheat();
}
Downcasting lets you turn your
appliance back into a coffee maker
Upcasting is a great tool, because it lets you use a coffee maker or an oven
anywhere you just need an appliance. But it’s got a big drawback—if you’re
using an Appliance reference that points to a CoffeeMaker object, you
can only use the methods and properties that belong to Appliance. And that’s
where downcasting comes in: that’s how you take your previously upcast
reference and change it back. You can figure out if your Appliance is really a
CoffeeMaker using the is keyword. And once you know that, you can convert
the Appliance back to a CoffeeMaker using the as keyword.
We’ll start with the CoffeeMaker we already upcast
Here’s the code that we used:
Appliance powerConsumer = new CoffeeMaker();
powerConsumer.ConsumePower();
1
C
o
f
f
e
e
M
a
k
e
r
o
b
j
e
c
t
power
consumer
But what if we want to turn the Appliance back into a CoffeeMaker?
The first step in downcasting is using the is keyword to check if it’s even an option.
if (powerConsumer is CoffeeMaker)
// then we can downcast!
2
Now that we know it’s a CoffeeMaker, let’s use it like one
The is keyword is the first step. Once you know that you’ve got an Appliance reference
that’s pointing to a CoffeeMaker object, you can use as to downcast it. And that lets
you use the CoffeeMaker class’s methods and properties. And since CoffeeMaker
inherits from Appliance, it still has its Appliance methods and properties.
if (powerConsumer is CoffeeMaker) {
CoffeeMaker javaJoe = powerConsumer as CoffeeMaker;
javaJoe.MakeCoffee();
}
3
C
o
f
f
e
e
M
a
k
e
r
o
b
j
e
c
t
power
consumer
javaJoe
Here’s our Appliance
reference that points
to a CoffeeMaker
object from the last
page.
The javaJoe reference
points to the
same CoffeeMaker
object as
powerConsumer. But
it’s a CoffeeMaker
reference, so it can
call the MakeCoffee()
method.
powerConsumer is NOT an Oven object. So when
you try to downcast it with “as”, the foodWarmer
reference ends up set to null. And when you try to
use a null reference, this happens....
Uh-oh, these
don’t match!
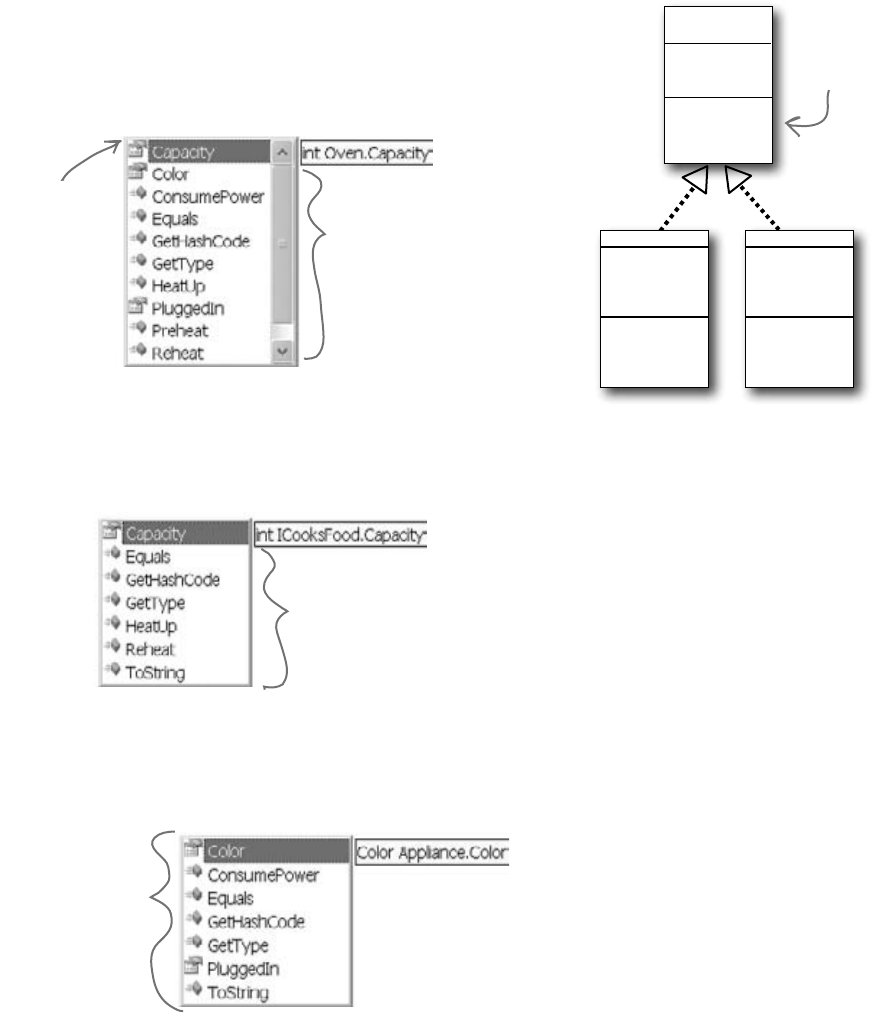
you are here 4 287
interfaces and abstract classes
Upcasting and downcasting work with interfaces, too
You already know that is and as work with interfaces. Well, so do all of the upcasting
and downcasting tricks. Let’s add an ICooksFood interface for any class that can heat
up food. And we’ll add a Microwave class—both Microwave and Oven implement
the ICooksFood interface. Now there are three different ways that you can access an
Oven object. And the IDE’s IntelliSense can help you figure out exactly what you
can and can’t do with each of them:
(interface)
ICooksFood
Capacity
HeatUp()
Reheat()
Oven
Capacity
Preheat()
HeatUp()
Reheat()
Microwave
Capacity
HeatUp()
Reheat()
MakePopcorn()
Any class that
implements
ICooksFood is
an appliance
that can heat
up food.
Three different
references that
point to the
same object can
access different
methods and
properties,
depending on
the reference’s
type.
ICooksFood cooker;
if (misterToasty is ICooksFood)
cooker = misterToasty as ICooksFood;
cooker.
Appliance powerConsumer;
if (misterToasty is Appliance)
powerConsumer = misterToasty;
powerConsumer.
Oven misterToasty = new Oven();
misterToasty.
misterToasty is an Oven reference
pointing to an Oven object, so
it can access all of the methods
and properties…but it’s the least
general type, so you can only
point it at Oven objects.
cooker is an ICooksFood reference
pointing to that same Oven object. It
can only access ICooksFood members,
but it can also point to a Microwave
object.
powerConsumer is an
Appliance reference. It
only lets you get to the
public fields, methods, and
properties in Appliance.
You can also point it at
a CoffeeMaker object if
you want.
As soon as you
type the dot,
the IntelliSense
window will pop
up with a list
of all of the
members you can
use.
288 Chapter 7
Q:So back up—you told me that I
can always upcast but I can’t always
downcast. Why?
A:Becausethecompilercanwarnyou
ifyourupcastiswrong.Theonlytimean
upcastwon’tworkisifyou’retryingtosetan
objectequaltoaclassthatitdoesn’tinherit
fromoraninterfacethatitdoesn’timplement.
Andthecompilercanfigureoutimmediately
thatyoudidn’tupcastproperly,andwillgive
youanerror.
Ontheotherhand,thecompilerdoesn’t
knowhowtocheckifyou’redowncasting
fromanobjectorinterfacereferencetoa
referencethat’snotvalid.That’sbecauseit’s
perfectlylegaltoputanyclassorinterface
nameontheright-handsideoftheas
keyword.Ifthedowncastisillegal,thenthe
asstatementwilljustreturnnull.And
it’sagoodthingthatthecompilerdoesn’t
stopyoufromdoingthat,becausethereare
plentyoftimeswhenyou’dwanttodoit.
Q:Someone told me that an interface
is like a contract, but I don’t really get
why. What does that mean?
A:Yes,we’veheardthattoo—alot
ofpeopleliketosaythataninterfaceis
likeacontract.(That’sareallycommon
questiononjobinterviews.)Andit’strue,to
someextent.Whenyoumakeyourclass
implementaninterface,you’retellingthe
compilerthatyoupromisetoputcertain
methodsintoit.Thecompilerwillholdyouto
thatpromise.
Butwethinkthatit’seasiertoremember
howinterfacesworkifyouthinkofan
interfaceasakindofchecklist.Thecompiler
runsthroughthechecklisttomakesurethat
youactuallyputallofthemethodsfromthe
interfaceintoyourclass.Ifyoudidn’t,it’ll
bomboutandnotletyoucompile.
Q:What if I want to put a method body
into my interface? Is that OK?
A:No,thecompilerwon’tletyoudothat.An
interfaceisn’tallowedtohaveanystatements
initatall.Eventhoughyouusethecolon
operatortoimplementaninterface,it’snot
thesamethingasinheritingfromaclass.
Implementinganinterfacedoesn’taddany
behaviortoyourclassatall,ormakeany
changestoit.Allitdoesistellthecompiler
tomakesurethatyourclasshasallofthe
methodsthattheinterfacesaysitshouldhave.
Q:Then why would I want to use an
interface? It seems like it’s just adding
restrictions, without actually changing
my class at all.
A:Becausewhenyourclassimplements
aninterface,thenaninterfacereferencecan
pointtoanyinstanceofthatclass.Andthat’s
reallyusefultoyou—itletsyoucreateone
referencetypethatcanworkwithawhole
bunchofdifferentkindsofobjects.
Here’saquickexample.Ahorse,anox,a
mule,andasteercanallpullacart.Butin
ourzoosimulator,Horse,Ox,Mule,
andSteerwouldallbedifferentclasses.
Let’ssayyouhadacart-pullingrideinyour
zoo,andyouwantedtocreateanarrayof
anyanimalthatcouldpullcartsaround.Uh-
oh—youcan’tjustcreateanarraythatwill
holdallofthose.Iftheyallinheritedfromthe
samebaseclass,thenyoucouldcreatean
arrayofthose.Butitturnsoutthattheydon’t.
Sowhat’llyoudo?
That’swhereinterfacescomeinhandy.You
cancreateanIPullerinterfacethathas
methodsforpullingcartsaround.Nowyou
coulddeclareyourarraylikethis:
IPuller[] pullerArray;
Nowyoucanputareferencetoany
animalyouwantinthatarray,aslongasit
implementstheIPullerinterface.
Q:Is there an easier way to implement
interfaces? It’s a lot of typing!
A:Whyyes,thereis!TheIDEgivesyou
averypowerfulshortcutthatautomatically
implementsaninterfaceforyou.Juststart
typingyourclass:
class
Microwave : ICooksFood
{ }
ClickonICooksFood—you’llseeasmallbar
appearunderneaththe“I”.Hoveroveritand
you’llseeaniconappearunderneathit:
Clickontheiconandchoose“Implement
Interface‘ICooksFood’”fromthemenu.It’ll
automaticallyaddanymembersthatyou
haven’timplementedyet.Eachonehasa
singlethrowsstatementinit—they’ll
causeyourprogramtohalt,asareminder
incaseyouforgettoimplementoneofthem.
(You’lllearnaboutthrowsinChapter10.)
An interface is like
a checklist that the
compiler runs through
to make sure your
class implemented a
certain set of methods.
no dumb questions
Sometimes it’s hard to click
on the icon, but Ctrl-period
will work, too.
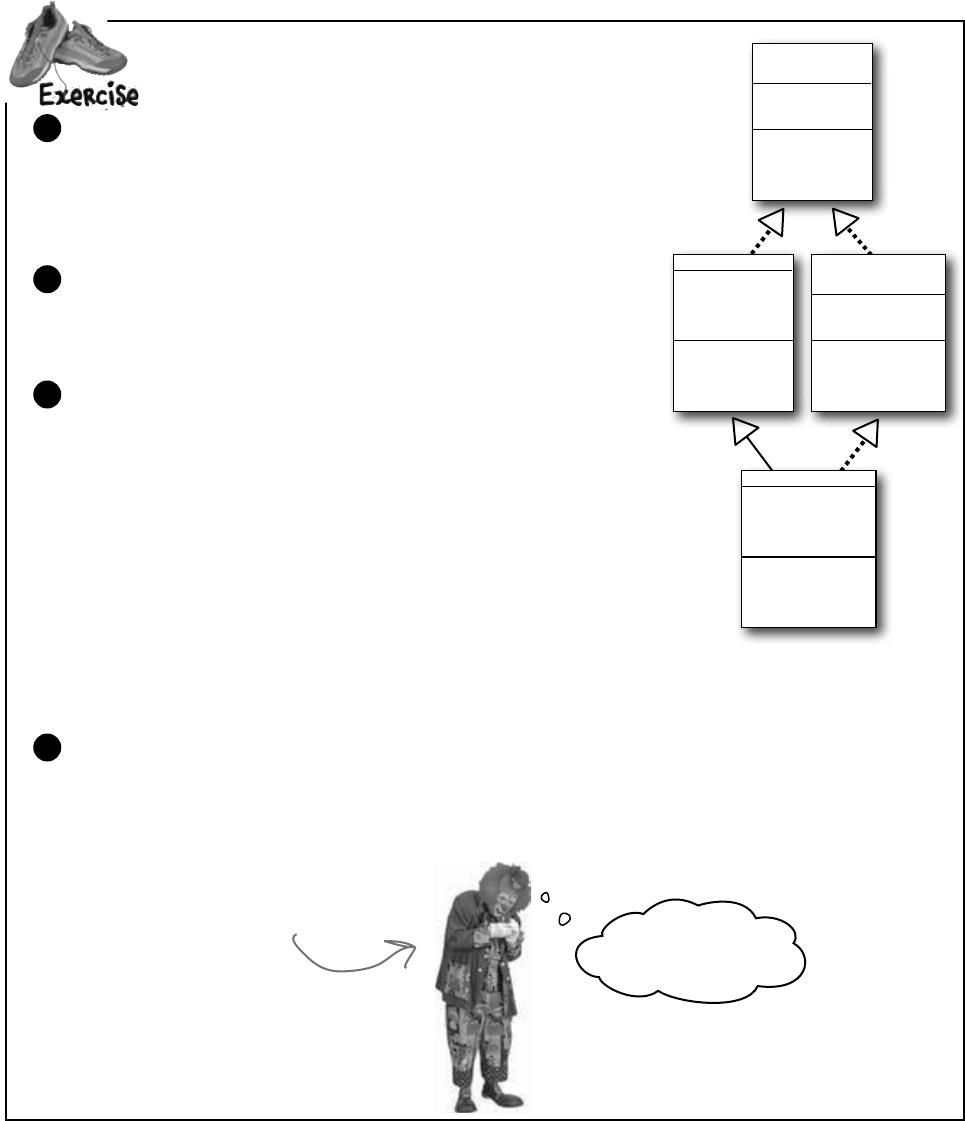
you are here 4 289
interfaces and abstract classes
Start with the IClown interface from the last “Do This!” on page 277:
interface IClown {
string FunnyThingIHave { get; }
void Honk();
}
1
ExtendtheIClowninterfaceanduseclassesthatimplementit.
Extend IClown by creating a new interface, IScaryClown, that
inherits from IClown. It should have an additional string
property called ScaryThingIHave with a get accessor but no set
accessor, and a void method called ScareLittleChildren().
2
Create these classes:
≥A funny clown class called FunnyFunny that uses a private
string variable to store a funny thing. Use a constructor that takes
a parameter called FunnyThingIHave and uses it to set the
private field. The Honk()method should say, “Honk honk! I have
a ” followed by the funny thing it has. The FunnyThingIHave
set accessor should return the same thing.
≥A scary clown class called ScaryScary that uses a private variable to
store an integer that was passed to it by its constructor in a parameter
called numberOfScaryThings. The ScaryThingIHave get
accessor should return a string consisting of the number from the
constructor followed by “spiders”. The ScareLittleChildren()
pops up a message box that says, “Boo! Gotcha!”
3
Here’s code for a button—but it’s not working. Can you figure out how to fix it?
private void button1_Click(object sender, EventArgs e) {
ScaryScary fingersTheClown = new ScaryScary(“big shoes”, 14);
FunnyFunny someFunnyClown = fingersTheClown;
IScaryClown someOtherScaryclown = someFunnyClown;
someOtherScaryclown.Honk();
}
4
You better get this
one right…or else!
Fingers the Clown is scary.
IClown
(interface)
FunnyThingIHave
Honk()
ScaryScary
ScaryThingIHave
ScareLittleChildern()
FunnyFunny
FunnyThingIHave
Honk()
IScaryClown
(interface)
ScaryThingIHave
ScareLittleChildren()
290 Chapter 7
ExtendtheIClowninterfaceanduseclassesthatimplementit.
interface IClown {
string FunnyThingIHave { get; }
void Honk();
}
interface IScaryClown : IClown {
string ScaryThingIHave { get; }
void ScareLittleChildren();
}
class FunnyFunny : IClown {
public FunnyFunny(string funnyThingIHave) {
this.funnyThingIHave = funnyThingIHave;
}
private string funnyThingIHave;
public string FunnyThingIHave {
get { return “Honk honk! I have ” + funnyThingIHave; }
}
public void Honk() {
MessageBox.Show(this.FunnyThingIHave);
}
}
class ScaryScary : FunnyFunny, IScaryClown {
public ScaryScary(string funnyThingIHave, int numberOfScaryThings)
: base(funnyThingIHave) {
this.numberOfScaryThings = numberOfScaryThings;
}
private int numberOfScaryThings;
public string ScaryThingIHave {
get { return “I have ” + numberOfScaryThings + “ spiders”; }
}
public void ScareLittleChildren() {
MessageBox.Show(“Boo! Gotcha!”);
}
}
private void button1_Click(object sender, EventArgs e) {
ScaryScary fingersTheClown = new ScaryScary(“big shoes”, 14);
FunnyFunny someFunnyClown = fingersTheClown;
IScaryClown someOtherScaryclown = someFunnyClown as ScaryScary;
someOtherScaryclown.Honk();
}
Since ScaryScary is a subclass of FunnyFunny and FunnyFunny
implements IClown, ScaryScary implements IClown too.
You can set a FunnyFunny reference equal
to a ScaryScary object because ScaryScary
inherits from FunnyFunny. But you can’t set
any IScaryClown reference to just any clown,
because you don’t know if that clown is scary.
That’s why you need to use the as keyword.
no no! nooo! noo! no more scary clowns!
You could have
implemented the
IClown method and
property again, but
why not just inherit
from FunnyFunny?
The Honk()
method just uses
this set accessor
to display its
message—no need
to have the same
code twice.
You can also use the someOtherScaryClown reference to call
ScareLittleChildren()—but you can’t get to it from the
someFunnyClown reference.

you are here 4 291
interfaces and abstract classes
There’s more than just public and private
You already know how important the private keyword is, how you use it, and
how it’s different from public. C# has a name for these keywords: they’re
called access modifiers. The name makes sense, because when you change
an access modifier on a property, field, or method of a class—its members—or
the entire class, you change the way other classes can access it. There are a few
more access modifiers that you’ll use, but we’ll start with the ones you know:
public means that anyone can access it
When you mark a class or class member public, you’re telling C# that any instance of any
other class can access it. It’s the least restrictive access modifier. And you’ve already seen how
it can get you in trouble—only mark class members public if you have a reason. That’s how
you make sure your classes are well encapsulated.
≥
We call a class’s methods,
fields, and properties its
members. Any member can be
marked with the public or
private access modifier.
private means that only other members can access it
When you mark a class member private, then it can only be accessed from other members
inside that class or other instances of that class. You can’t mark a class private—
unless that class lives inside another class, in which case it’s only available to instances
of its container class. Then it’s private by default, and if you want it to be public you need to
mark it public.
≥
protected means public to subclasses, private to everyone else
You’ve already seen how a subclass can’t access the private fields in its base class—it has
to use the base keyword to get to the public members of the base object. Wouldn’t it
be convenient if the subclass could access those private fields? That’s why you have the
protected access modifier. Any class member marked protected can be accessed by
any other member of its class, and any member of a subclass of its class.
≥
internal means public only to other classes in an assembly
The built-in .NET Framework classes are assemblies—libraries of classes that are in your
project’s list of references. You can see a list of assemblies by right-clicking on “References”
in the Solution Explorer and choosing “Add Reference…”—when you create a new
Windows Forms application, the IDE automatically includes the references you need to build
a Windows application. When you build an assembly, you can use the internal keyword
to keep classes private to that assembly, so you can only expose the classes you want. You can
combine this with protected—anything you mark protected internal can only be
accessed from within the assembly or from a subclass.
≥
sealed says that this class can’t be subclassed
There are some classes that you just can’t inherit from. A lot of the .NET Framework classes
are like this—go ahead, try to make a class that inherits from String (that’s the class whose
IsEmptyOrNull() method you used in the last chapter). What happens? The compiler
won’t let you build your code—it gives you the error “cannot derive from sealed type ‘string’”.
You can do that with your own classes—just add sealed after the access modifier.
≥
If you leave off
the access modifier
when you declare
a class member, it
defaults to private.
If you leave off the access
modifier when you declare
a class or an interface,
then by default it’s set to
internal. And that’s just
fine for most classes—it
means that any other class
in the assembly can read it.
If you’re not using multiple
assemblies, internal will
work just as well as public
for classes and interfaces.
Give it a shot—go to an
old project, change some
of the classes to internal,
and see what happens.
Sealed is a modifier,
but it’s not an access
modifier. That’s
because it only affects
inheritance—it doesn’t
change the way the class
can be accessed.
(as long as they can access the declaring class)
There’s a little more to all of these definitions. Take a peek at
leftover #2 in the appendix to learn more about them.
292 Chapter 7
class FunnyFunny : IClown {
public FunnyFunny(string funnyThingIHave) {
this.funnyThingIHave = funnyThingIHave;
}
protected string funnyThingIHave;
public string FunnyThingIHave {
get { return “Honk honk! I have ” + funnyThingIHave; }
}
public void Honk() {
MessageBox.Show(this.FunnyThingIHave);
}
}
Access modifiers change visibility
Let’s take a closer look at the access modifers and how they affect the scope of the
various class members. We made two changes: the funnyThingIHave backing
field is now protected, and we changed the ScareLittleChildren()
method so that it uses the funnyThingIHave field:
interface IClown {
string FunnyThingIHave { get; }
void Honk();
}
interface IScaryClown : IClown {
string ScaryThingIHave { get; }
void ScareLittleChildren();
}
This is a really common way to
use “this”, since the parameter
and backing field have the same
name. funnyThingIHave refers
to the parameter, while this.
funnyThingIHave is the backing field.
Make these two changes to
your own exercise solution.
Then change the protected
access modifier back to private
and see what errors you get.
By adding
“this”, we told
C# that we’re
talking about
the backing
field, not the
parameter that
has the same
name.
minty fresh scope
The “this” keyword also changes what variable
you’re referring to. It says to C#, “Look
at the current instance of the class to find
whatever I’m connected to—even if that
matches a parameter or local variable.”
When you use “this” with a property, it
tells C# to execute the set or get
accessor.
We changed FunnyThingIHave
to protected. Look and see
how it affects the ScaryScary.
ScareLittleChildren() method.
Here are two interfaces. IClown defines a clown who honks his
horn and has a funny thing. IScaryClown inherits from clown. A
scary clown does everything a clown does, plus he has a scary thing
and scares little children.
1
The FunnyFunny class implements the IClown interface. We made the funnyThingIHave
field protected so that it can be accessed by any instance of a subclass of FunnyFunny.
2
you are here 4 293
interfaces and abstract classes
private void button1_Click(object sender, EventArgs e) {
ScaryScary fingersTheClown = new ScaryScary(“big shoes”, 14);
FunnyFunny someFunnyClown = fingersTheClown;
IScaryClown someOtherScaryclown = someFunnyClown as ScaryScary;
someOtherScaryclown.Honk();
}
class ScaryScary : FunnyFunny, IScaryClown {
public ScaryScary(string funnyThingIHave,
int numberOfScaryThings)
: base(funnyThingIHave) {
this.numberOfScaryThings = numberOfScaryThings;
}
private int numberOfScaryThings;
public string ScaryThingIHave {
get { return “I have ” + numberOfScaryThings + “ spiders”; }
}
public void ScareLittleChildren() {
MessageBox.Show(“You can’t have my ”
+ base.funnyThingIHave);
}
}
The protected keyword
tells C# to make something
private to everyone except
instances of a subclass.
If we’d left funnyThingIHave private,
this would cause the compiler to give
you an error. But when we changed
it to protected, that made it visible
to any subclass of FunnyFunny.
Since this button click
event handler is not
part of FunnyFunny and
ScaryScary, it can’t
access the protected
funnyThingIHave field. It’s outside of both classes, so the statements
inside it only have access to the public members
of any FunnyFunny or ScaryScary objects.
The “base” keyword tells C# to use
the value from the base class. But
we could also use “this” in this case.
Can you figure out why?
Access Modifiers
Up Close
numberOfScaryThings
is private, which is
typical of a backing
field. So only another
instance of ScaryScary
would be able to see it.
The ScaryScary class implements the IScaryClown
interface. It also inherits from FunnyFunny, and since
FunnyFunny implements IClown, that means ScaryScary
does, too. Take a look at how the ScareLittleChildren()
method accesses the funnyThingIHave backing field—it can
do that because we used the protected access modifier. If we’d
made it private instead, then this code wouldn’t compile.
3
Here’s a button that instantiates FunnyFunny and ScaryScary. Take a look at how it uses as to
downcast someFunnyClown to an IScaryClown reference.
4
We put in some extra steps to show you that you could
upcast ScaryScary to FunnyFunny, and then downcast
that to IScaryClown. But all three of those lines could
be collapsed into a single line. Can you figure out how?

294 Chapter 7
Q: Why would I want to use an
interface instead of just writing all of the
methods I need directly into my class?
A:Youmightendupwithalotofdifferent
classesasyouwritemoreandmore
complexprograms.Interfacesletyougroup
thoseclassesbythekindofworktheydo.
Theyhelpyoubesurethateveryclassthat’s
goingtodoacertainkindofworkdoesit
usingthesamemethods.Theclasscando
theworkhoweveritneedsto,andbecause
oftheinterface,youdon’tneedtoworry
abouthowitdoesittogetthejobdone.
Here’sanexample:youcanhavea
truckclassandasailboatclassthat
implementICarryPassenger.Say
theICarryPassengerinterface
stipulatesthatanyclassthatimplements
ithastohaveaConsumeEnergy()
method.Yourprogramcouldusethem
bothtocarrypassengerseventhoughthe
sailboatclass’sConsumeEnergy()
methoduseswindpowerandthetruck
class’smethodusesdieselfuel.
Imagineifyoudidn’thavethe
ICarryPassengerinterface.Thenit
wouldbetoughtotellyourprogramwhich
vehiclescouldcarrypeopleandwhich
couldn’t.Youwouldhavetolookthrough
eachclassthatyourprogrammightuse
andfigureoutwhetherornottherewasa
methodforcarryingpeoplefromoneplaceto
another.Thenyou’dhavetocalleachofthe
vehiclesyourprogramwasgoingtousewith
whatevermethodwasdefinedforcarrying
passengers.Andsincethere’snostandard
interface,theycouldbenamedallsortsof
thingsorburiedinsideothermethods.You
canseehowthat’llgetconfusingprettyfast.
Q:Why do I need to use a property?
Can’t I just include a field?
A:Goodquestion.Aninterfaceonlydefines
thewayaclassshoulddoaspecifickindofjob.
It’snotanobjectbyitself,soyoucan’tinstantiate
itanditcan’tstoreinformation.Ifyouaddeda
fieldthatwasjustavariabledeclaration,thenC#
wouldhavetostorethatdatasomewhere—and
aninterfacecan’tstoredatabyitself.Aproperty
isawaytomakesomethingthatlookslikeafield
tootherobjects,butsinceit’sreallyamethod,it
doesn’tactuallystoreanydata.
Q:What’s the difference between a
regular object reference and an interface
reference?
A:Youalreadyknowhowaregular,
everydayobjectreferenceworks.Ifyou
createaninstanceofSkateboard
calledVertBoard,andthenanew
referencetoitcalledHalfPipeBoard,
theybothpointtothesamething.Butif
Skateboardimplementstheinterface
IStreetTricksandyoucreatean
interfacereferencetoSkateboardcalled
StreetBoard,itwillonlyknowthe
methodsintheSkateboardclassthatare
alsointheIStreetTricksinterface.
Allthreereferencesareactuallypointingtothe
sameobject.Ifyoucalltheobjectusingthe
HalfPipeBoardorVertBoard
references,you’llbeabletoaccessany
methodorpropertyintheobject.Ifyoucall
itusingtheStreetBoardreference,
you’llonlyhaveaccesstothemethodsand
propertiesintheinterface.
Q: Then why would I ever want to use
an interface reference if it limits what I
can do with the object?
A:Interfacereferencesgiveyouaway
ofworkingwithabunchofdifferentkinds
ofobjectsthatdothesamething.You
cancreateanarrayusingtheinterface
referencetypethatwillletyoupass
informationtoandfromthemethodsin
ICarryPassengerwhetheryou’re
workingwithatruckobject,ahorseobject,
aunicycleobject,oracarobject.The
wayeachofthoseobjectsdoesthejobis
probablyalittledifferent,butwithinterface
references,youknowthattheyallhave
thesamemethodsthattakethesame
parametersandhavethesamereturntypes.
So,youcancallthemandpassinformation
totheminexactlythesameway.
Q: Why would I make something
protected instead of private or public?
A:Becauseithelpsyouencapsulateyour
classesbetter.Therearealotoftimesthata
subclassneedsaccesstosomeinternalpart
ofitsbaseclass.Forexample,ifyouneed
tooverrideaproperty,it’sprettycommonto
usethebackingfieldinthebaseclassinthe
getaccessor,sothatitreturnssomesortof
variationofit.Butwhenyoubuildclasses,
youshouldonlymakesomethingpublic
ifyouhaveareasontodoit.Usingthe
protectedaccessmodifierletsyouexposeit
onlytothesubclassthatneedsit,andkeep
itprivatefromeveryoneelse.
Interface references
only know about
the methods and
properties that
are defined in the
interface.
eww, duplicate code!
you are here 4 295
interfaces and abstract classes
Some classes should never be instantiated
Let’s start with a basic class for a student shopping at the student bookstore.
class Shopper {
public void ShopTillYouDrop()
while (TotalSpent < CreditLimit)
BuyFavoriteStuff();
}
public virtual void BuyFavoriteStuff () {
// No implementation here - we don’t know
// what our student likes to buy!
}
}
Here’s the ArtStudent class—it subclasses Shopper:
class ArtStudent : Shopper {
public override void BuyFavoriteStuff () {
BuyArtSupplies();
BuyBlackTurtlenecks();
BuyDepressingMusic();
}
}
And the EngineeringStudent class also inherits from Shopper:
class EngineeringStudent : Shopper {
public override void BuyFavoriteStuff () {
BuyPencils();
BuyGraphingCalculator();
BuyPocketProtector();
}
}
Remember our zoo simulator class hierarchy? You’ll definitely end up
instantiating a bunch of hippos, dogs, and lions. But what about the
Canine and Feline classes? How about the Animal class? It turns out
that there are some classes that just don’t need to be instantiated…and, in
fact, don’t make any sense if they are. Here’s an example.
Shopper
TotalSpent
CreditLimit
ShopTillYouDrop()
BuyFavoriteStuff()
ArtStudent
BuyFavoriteStuff()
Engineering
Student
BuyFavoriteStuff()
The ArtStudent and
EngineeringStudent
classes both override
the BuyFavoriteStuff()
method, but they buy
very different things.
So what happens when you instantiate Shopper? Does it ever make sense to do it?
296 Chapter 7
A method that has a declaration but
no statements or method body is
called an abstract method. Inheriting
classes must implement all abstract
methods, just like when they inherit
from an interface.
An abstract class is like a cross
between a class and an interface
Suppose you need something like an interface, that requires classes to
implement certain methods and properties. But you need to include some
code in that interface, so that certain methods don’t have to be implemented
in each inheriting class. What you want is an abstract class. You get the
features of an interface, but you can write code in it like a normal class.
Only abstract classes can have abstract
methods. If you put an abstract
method into a class, then you’ll have to
mark that class abstract or it won’t
compile. You’ll learn more about how to
mark a class abstract in a minute.
An abstract class is like a normal class
You define an abstract class just like a normal one. It has fields and
methods, and you can inherit from other classes, too, exactly like with
a normal class. There’s almost nothing new to learn here, because
you already know everything that an abstract class does!
≥
An abstract class is like an interface
When you create a class that implements an interface, you agree to
implement all of the properties and methods defined in that interface.
An abstract class works the same way—it can include declarations
of properties and methods that, just like in an interface, must be
implemented by inheriting classes.
≥
But an abstract class can’t be instantiated
The biggest difference between an abstract class and a concrete
class is that you can’t use new to create an instance of an abstract
class. If you do, C# will give you an error when you try to compile
your code.
≥
The opposite of abstract
is concrete. A concrete
method is one that has a
body, and all the classes
you’ve been working with so
far are concrete classes.
This error is because you have
abstract methods without any
code! The compiler won’t let you
instantiate a class with missing
code, just like it wouldn’t let you
instantiate an interface.
Cannot create an instance of the
abstract class or interface ‘MyClass’
X
i can’t believe it’s not an interface!

you are here 4 297
interfaces and abstract classes
Because you want to provide some code, but
still require that subclasses fill in the rest of the code.
Sometimes bad things happen when you create objects that should never be
created. The class at the top of your class diagram usually has some fields that it
expects its subclasses to set. An Animal class may have a calculation that depends
on a Boolean called HasTail or Vertebrate, but there’s no way for it to set that itself.
Here’s an example…
class Venus : PlanetMission {
public Venus() {
MilesToPlanet = 40000000;
RocketFuelPerMile = 100000;
RocketSpeedMPH = 25000;
}
}
class Mars : PlanetMission {
public Mars() {
MilesToPlanet = 75000000;
RocketFuelPerMile = 100000;
RocketSpeedMPH = 25000;
}
}
class PlanetMission {
public long RocketFuelPerMile;
public long RocketSpeedMPH;
public int MilesToPlanet;
public long UnitsOfFuelNeeded() {
return MilesToPlanet * RocketFuelPerMile;
}
public int TimeNeeded() {
return MilesToPlanet / (int) RocketSpeedMPH;
}
public string FuelNeeded() {
return “You’ll need ”
+ MilesToPlanet * RocketFuelPerMile
+ “ units of fuel to get there. It’ll take ”
+ TimeNeeded() + “ hours.”;
}
}
private void button3_Click(object s, EventArgs e) {
PlanetMission planet = new PlanetMission();
MessageBox.Show(planet.FuelNeeded());
}
Wait, what? A class that I can’t instantiate?
Why would I even want something like that?
private void button1_Click(object s, EventArgs e) {
Mars mars = new Mars();
MessageBox.Show(mars.FuelNeeded());
}
private void button2_Click(object s, EventArgs e) {
Venus venus = new Venus();
MessageBox.Show(venus.FuelNeeded());
}
Before you flip the page, try to
figure out what will happen when
the user clicks the third button....
The constructors for the Mars and Venus
subclasses set the three fields they inherited
from Planet. But those fields won’t get set
if you instantiate Planet directly. So what
happens when FuelNeeded() tries to use them?
It doesn’t make sense to
set these fields in the
base class, because we
don’t know what rocket
or planet we’ll be using.
Here’s a class that the Objectville
Astrophysics Club uses to send
their rockets to different planets.
The astrophysicists have two
missions—one to Mars, and
one to Venus.
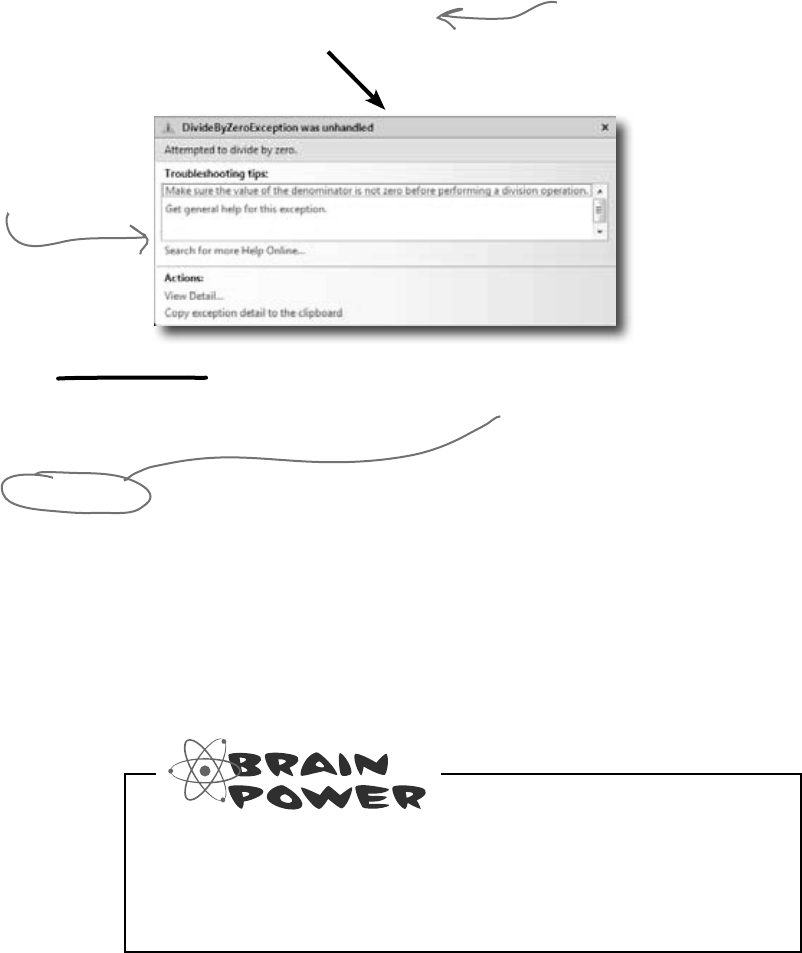
298 Chapter 7
private void button3_Click(object s, EventArgs e) {
PlanetMission planet = new PlanetMission();
MessageBox.Show(planet.FuelNeeded());
}
Like we said, some classes should never be instantiated
The problems all start when you create an instance of the
PlanetMission class. Its FuelNeeded() method
expects the fields to be set by the subclass. But when they
aren’t, they get their default values—zero. And when C#
tries to divide a number by zero…
When the FuelNeeded()
method tried to divide
by RocketSpeedMPH,
it was zero. And when
you divide by zero, this
happens.
The PlanetMission class
wasn’t written to be
instantiated. We were only
supposed to inherit from
it. But we did instantiate
it, and that’s where the
problems started.
Solution: use an abstract class
When you mark a class abstract, C# won’t let you write
code to instantiate it. It’s a lot like an interface—it acts like a
template for the classes that inherit from it.
abstract class PlanetMission {
public long RocketFuelPerMile;
public long RocketSpeedMPH;
public int MilesToPlanet;
public long UnitsOfFuelNeeded() {
return MilesToPlanet * RocketFuelPerMile;
}
// the rest of the class is defined here
}
Now C# will
refuse to compile
our program until
we remove the
line that creates
an instance of
PlanetMission.
Adding the abstract keyword to the class
declaration tells C# this is an abstract class,
and can’t be instantiated.
abstract classes avoid this mess
Flip back to the solution to Kathleen’s party planning program in the
previous chapter on pages 254–256, and take another look at the
encapsulation problems that we left in the code. Can you figure out
how you’d use an abstract class to solve them?
you are here 4 299
interfaces and abstract classes
abstract class PlanetMission {
public abstract void SetMissionInfo(
int milesToPlanet, int rocketFuelPerMile,
long rocketSpeedMPH);
// the rest of the class...
It really sucks to be
an abstract method.
You don’t have a body.
An abstract method doesn’t have a body
You know how an interface only has declarations for methods and properties, but
it doesn’t actually have any method bodies? That’s because every method in an
interface is an abstract method. So let’s implement it! Once we do, the error
will go away. Any time you extend an abstract class, you need to make sure that
you override all of its abstract methods. Luckily, the IDE makes this job easier.
Just type “public override”—as soon as you press space, the IDE will display
a drop-down box with a list of any methods that you can override. Select the
SetMissionInfo() method and fill it in:
This abstract method is just like what you’d
see in an interface—it doesn’t have a body,
but any class that inherits from PlanetMission
has to implement the SetMissionInfo() method
or the program won’t compile.
‘VenusMission’ does not implement inherited abstract
member ‘PlanetMission.SetMissionInfo(long, int, int)’
X
If we add that method in and try to build
the program, the IDE gives us an error:
So let’s implement it! Once we do, the error will go away.
class Venus : PlanetMission {
public Venus() {
SetMissinInfo(40000000, 100000, 25000);
}
public override SetMissionInfo(int milesToPlanet, long rocketFuelPerMile,
int rocketSpeedMPH) {
this.MilesToPlanet = milesToPlanet;
this.RocketFuelPerMile = rocketFuelPerMile;
this.RocketSpeedMPH = rocketSpeedMPH;
}
}
Every method in
an interface is
automatically abstract,
so you don’t need to use
the abstract keyword
in an interface, just in
an abstract class. Only
abstract classes can
have abstract methods…
but they can have
concrete methods too.
When you inherit
from an abstract
class, you need to
override all of its
abstract methods.
300 Chapter 7
Given:
interface Foo { }
class Bar : Foo { }
interface Vinn { }
abstract class Vout : Vinn { }
abstract class Muffie : Whuffie { }
class Fluffie : Muffie { }
interface Whuffie { }
class Zoop { }
class Boop : Zoop { }
class Goop : Boop { }
class Gamma : Delta, Epsilon { }
interface Epsilon { }
interface Beta { }
class Alpha : Gamma,Beta { }
class Delta { }
What’s the Picture ?
(interface)
Foo
Bar
1)
2)
3)
4)
5)
Here’s your chance to demonstrate your artistic abilities. On the left you’ll find sets
of class and interface declarations. Your job is to draw the associated class diagrams
on the right. We did the first one for you. Don’t forget to use a dashed line for
implementing an interface and a solid line for inheriting from a class.
worth a thousand words
1)
2)
3)
4)
5)
you are here 4 301
interfaces and abstract classes
Click
Top
Fee
Clack
Tip
Fi
Foo
Bar
Baz
Zeta
Beta
Alpha
Delta
1
2
3
4
5
Given:
What’s the Declaration ?
1)
2)
3)
4)
5)
public class Click { }
public class Clack : Click { }
On the left you’ll find sets of class diagrams. Your job is to turn
these into valid C# declarations. We did number 1 for you.
Clack
Clack
Clack
extends
implements
class
interface
abstract class
KEY
302 Chapter 7
What’s the Picture ?
(interface)
Vinn
2)
Vout
3)
Fluffie
(interface)
Whuffie
Muffie
4)
Boop
Goop
Zoop
5)
(interface)
Epsilon
(interface)
Beta
Alpha
Delta
Gamma
Tonight’s talk: An abstract class and an interface butt heads
over the pressing question, “Who’s more important?”
Abstract Class:
I think it’s obvious who’s more important between the
two of us. Programmers need me to get their jobs done.
Let’s face it. You don’t even come close.
You can’t really think you’re more important than
me. You don’t even use real inheritance—you only get
implemented.
Better? You’re nuts. I’m much more flexible than you.
I can have abstract methods or concrete ones. I can
even have virtual methods if I want. Sure, I can’t be
instantiated but then, neither can you. And I can do
pretty much anything else a regular class does.
Interface:
Nice. This oughta be good.
Great, here we go again. Interfaces don’t use real
inheritance. Interfaces only implement. That’s just plain
ignorant. Implementation is as good as inheritance, in
fact it’s better!
Yeah? What if you want a class that inherits from
you and your buddy? You can’t inherit from two
classes. You have to choose which class to inherit from.
And that’s just plain rude! There’s no limit to the number
of interfaces a class can implement. Talk about flexible!
With me, a programmer can make a class do anything.
them’s fightin’ words

you are here 4 303
interfaces and abstract classes
What’s the Declaration ?
abstract class Top { }
class Tip : Top { }
2) abstract class Fee { }
abstract class Fi : Fee { }
3)
interface Foo { }
class Bar : Foo { }
class Baz : Bar { }
4) interface Zeta { }
class Alpha : Zeta { }
interface Beta { }
class Delta : Alpha, Beta { }
5)
Abstract Class:
You might be overstating your power a little bit.
That’s exactly the kind of drivel I’d expect from an
interface. Code is extremely important! It’s what
makes your programs run.
Really? I doubt that—programmers always care
what’s in their properties and methods.
Yeah, sure, tell a coder he can’t code.
Interface:
You think that just because you can contain code,
you’re the greatest thing since sliced bread. But
you can’t change the fact that a program can only
inherit from one class at a time. So you’re a little
limited. Sure, I can’t include any code. But really,
code is overrated.
Nine times out of ten, a programmer wants to make
sure an object has certain properties and methods,
but doesn’t really care how they’re implemented.
OK, sure. Eventually. But think about how many
times you’ve seen a programmer write a method
that takes an object that just needs to have a certain
method, and it doesn’t really matter right at that
very moment exactly how the method’s built. Just
that it’s there. So bang! The programmer just needs
to write an interface. Problem solved!
Whatever!
Delta inherits
from Alpha and
implements Beta.
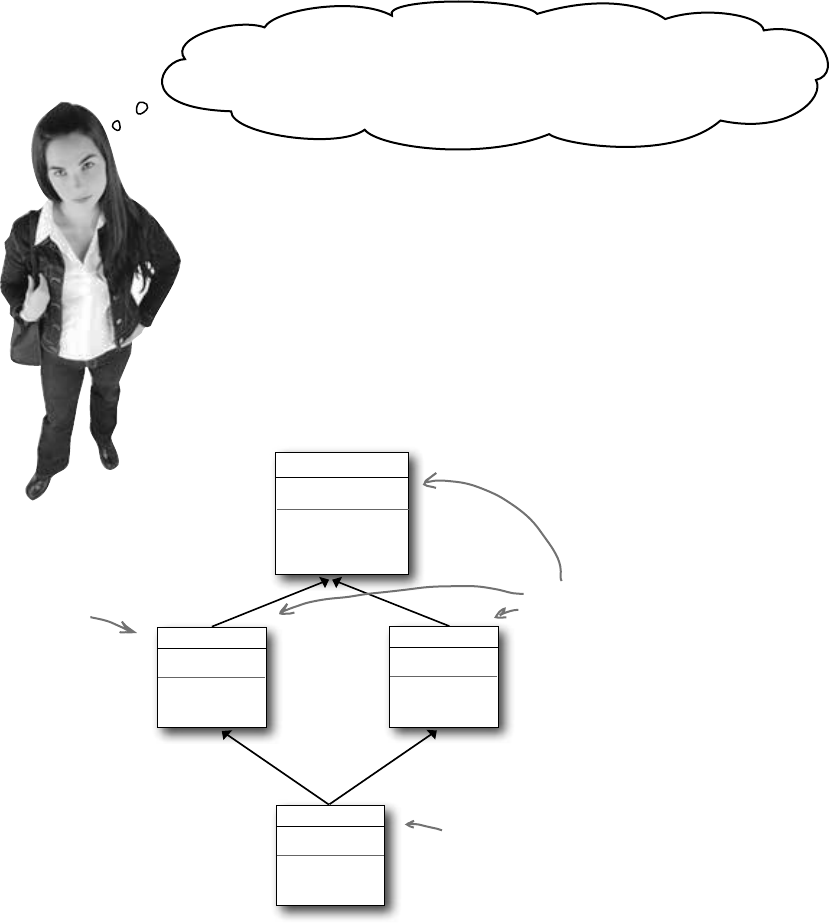
304 Chapter 7
I’m still hung up on not being able to inherit from two classes. I
can’t inherit from more than one class, so I have to use interfaces.
That’s a pretty big limitation of C#, right?
It’s not a limitation, it’s a protection.
If C# let you inherit from more than one base class, it would
open up a whole can of worms. When a language lets one
subclass inherit from two base classes, it’s called multiple
inheritance. And by giving you interfaces instead, C# saves
you from a big fat mess that we like to call....
The Deadly Diamond of Death!
Television
ShowAMovie()
MovieTheater
MoviePlayer
intScreenWidth
ShowAMovie()
ShowAMovie()
HomeTheater
?
Which ShowAMovie() method runs
when you call ShowAMovie() on the
HomeTheater object?
Imagine that the ScreenWidth
property is used by both Television and
MovieTheater, with different values.
What happens if HomeTheater needs to
use both values of ScreenWidth—say,
to show both made-for-TV movies and
feature films?
A language that allows the Deadly Diamond of Death can lead to some
pretty ugly situations, because you need special rules to deal with this kind
of ambiguous situation…which means extra work for you when you’re
building your program! C# protects you from having to deal with this by
giving you interfaces. If Television and MovieTheater are interfaces
instead of classes, then the same ShowAMovie() method can satisfy both
of them. All the interface cares about is that there’s some method called
ShowAMovie().
Television and MovieTheater both inherit
from MoviePlayer, and both override the
ShowAMovie() method. Both inherit the
ScreenWidth property, too.
multiple inheritance sucks
Avoid ambiguity!

you are here 4 305
interfaces and abstract classes
class : {
public Acts() : base(“Acts”) { }
public override {
return 5;
}
}
class : {
public override string Face {
get { return “Of76”; }
}
public static void Main(string[] args) {
string result = “”;
Nose[] i = new Nose[3];
i[0] = new Acts();
i[1] = new Clowns();
i[2] = new Of76();
for (int x = 0; x < 3; x++) {
result += ( + “ ”
+ ) + “\n”;
}
MessageBox.Show(result);
}
}
Nose {
;
string Face { get; }
}
abstract class : {
public virtual int Ear()
{
return 7;
}
public Picasso(string face)
{
= face;
}
public virtual string Face {
{ ; }
}
string face;
}
class : {
public Clowns() : base(“Clowns”) { }
}
Note: Each snippet
from the pool can
be used more than
once!
int Ear()
this
this.
face
this.face
:
;
class
abstract
interface
Acts( );
Nose( );
Of76( );
Clowns( );
Picasso( ); Acts
Nose
Of76
Clowns
Picasso
i
i( )
i(x)
i[x]
i.Ear(x)
i[x].Ear()
i[x].Ear(
i[x].Face
Of76 [ ] i = new Nose[3];
Of76 [ 3 ] i;
Nose [ ] i = new Nose( );
Nose [ ] i = new Nose[3];
class
5 class
7 class
7 public class
Here’s the entry point—this is a
complete C# program.
get
set
return
Output
Answers on page 324.
Pool Puzzle
Your job is to take code snippets from the pool and place them
into the blank lines in the code and output. You may use the
same snippet more than once, and you won’t need to use all the
snippets. Your goal is to make a set of classes that will compile
and run and produce the output listed.
306 Chapter 7
OK, I think I’ve got a
pretty good handle on
objects now!
You’re an object oriented programmer.
There’s a name for what you’ve been doing. It’s called
object oriented programming, or OOP. Before
languages like C# came along, people didn’t use
objects and methods when writing their code. They
just used functions (which is what they call methods in
a non-OOP program) that were all in one place—as
if each program were just one big static class that only
had static methods. It made it a lot harder to create
programs that modeled the problems they were solving.
Luckily, you’ll never have to write programs without
OOP, because it’s a core part of C#.
The four principles of object oriented programming
When programmers talk about OOP, they’re referring to four important principles.
They should seem very familiar to you by now because you’ve been working
with every one of them. You’ll recognize the first three principles just from their
names: inheritance, abstraction, and encapsulation. The last one’s called
polymorphism. It sounds a little odd, but it turns out that you already know all
about it too.
Polymorphism
Encapsulation
Inheritance
Abstraction
Encapsulation means creating
an object that keeps track
of its state internally using
private fields, and uses public
properties and methods to let
other classes work with only
the part of the internal data
that they need to see.
You’re using abstraction when you
create a class model that starts with
more general—or abstract—classes,
and then has more specific classes
that inherit from it.
The word “polymorphism”
literally means “many
forms”. Can you think of
a time when an object
has taken on many forms
in your code?
This just means having one
class or interface that
inherits from another.
The idea that you could combine
your data and your code into
classes and objects was a
revolutionary one when it was
first introduced—but that’s how
you’ve been building all your C#
programs so far, so you can think
of it as just plain programming.
form of…a bucket of eagles!
you are here 4 307
interfaces and abstract classes
Polymorphism means that one object
can take many different forms
Any time you use a mockingbird in place of an animal or aged
Vermont cheddar in a recipe that just calls for cheese, you’re using
polymorphism. That’s what you’re doing any time you upcast or
downcast. It’s taking an object and using it in a method or a statement
that expects something else.
Keep your eyes open for polymorphism in the next
exercise!
You’re about to do a really big exercise—the biggest one you’ve seen so
far—and you’ll be using a lot of polymorphism in it, so keep your eyes
open. Here’s a list of four typical ways that you’ll use polymorphism. We
gave you an example of each of them (you won’t see these particular lines
in the exercise, though). As soon as you see similar code in what you write
for the exercise, check it off the following list:
Taking any reference variable that uses one class and setting it
equal to an instance of a different class.
NectarStinger bertha = new NectarStinger();
INectarCollector gatherer = bertha;
You’re using
polymorphism
when you take an
instance of one
class and use it
in a statement
or a method that
expects a different
type, like a
parent class or an
interface that the
class implements.
Upcasting by using a subclass in a statement or method that expects its
base class.
spot = new Dog();
zooKeeper.FeedAnAnimal(spot);
Creating a reference variable whose type is an interface and
pointing it to an object that implements that interface.
IStingPatrol defender = new StingPatrol();
Downcasting using the as keyword.
void MaintainTheHive(IWorker worker) {
if (worker is HiveMaintainer) {
HiveMaintainer maintainer = worker as HiveMaintainer;
...
If FeedAnAnimal() expects an Animal object,
and Dog inherits from Animal, then you can
pass Dog to FeedAnAnimal().
The MaintainTheHive() method takes any
IWorker as a parameter. It uses as to
point a HiveMaintainer reference to the
worker.
This is upcasting, too!
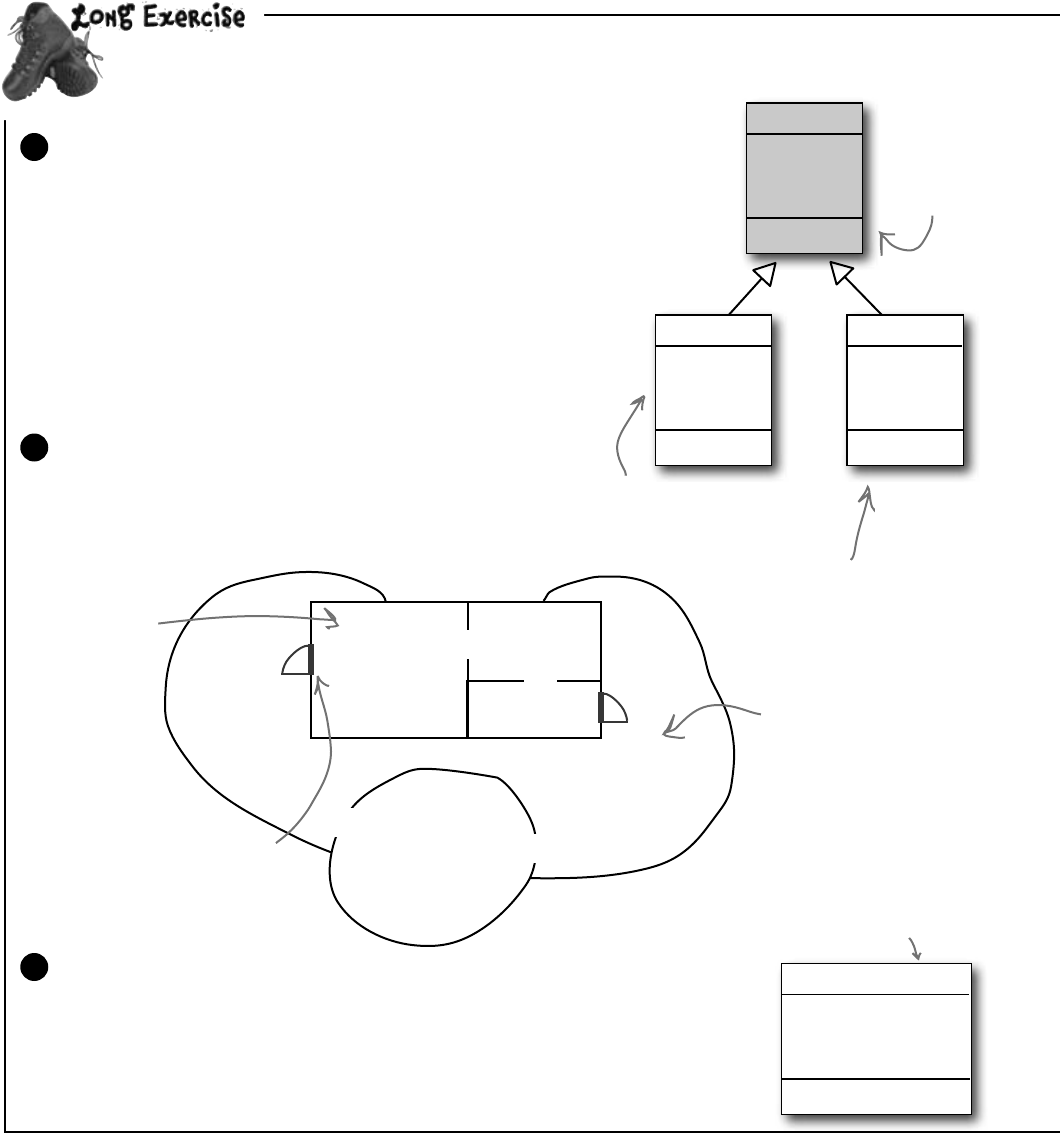
308 Chapter 7
Let’s build a house!Createamodelofahouseusingclassestorepresentthe
roomsandlocations,andaninterfaceforanyplacethathasadoor.
Location
Name
Exits
Description()
Start with this class model
Every room or location in your house will be represented by its
own object. The interior rooms all inherit from Room, and the
outside places inherit from Outside, and both subclass the same
base class, Location. It has two fields: Name is the name of the
location (“Kitchen”), and Exits is an array of Location objects
that the current location connects to. So diningRoom.Name will
be equal to “Dining Room”, and diningRoom.Exits will be
equal to the array { LivingRoom, Kitchen }.
Create a Windows Application project and add
Location, Room, and Outside classes to it.
1
You can move
between the back
yard and the front
yard, and both of
them connect to the
garden.
Living Room
Dining
Room
Kitchen
Front Yard
Back Yard
Garden
You’ll need the blueprint for the house
This house has three rooms, a front yard, a back yard, and
a garden. There are two doors: the front door connects the
living room to the front yard, and the back door connects
the kitchen to the back yard.
2
Room
Decoration
Outside
Hot
The living room
connects to
the dining room,
which also
connects to
the kitchen.
IHasExteriorDoor
DoorDescription
DoorLocation
Use the IHasExteriorDoor interface for rooms with an exterior door
There are two exterior doors in the house, the front door and the back door. Every
location that has one (the front yard, back yard, living room, and kitchen) should
implement IHasExteriorDoor. The DoorDescription read-only property
contains a description of the door (the front door is “an oak door with a brass
knob”, the back door is “a screen door”). The DoorLocation property contains a
reference to the Location where the door leads (kitchen).
3
Inside locations each have
some kind of a decoration
in a read-only property.
This symbol is an exterior door
between the front yard and the living
room. There’s also an exterior door
between the kitchen and back yard.
let’s get started
Outside locations can be hot,
so the Outside class has a
read-only Boolean property
called Hot.
Location is an
abstract class.
That’s why
we shaded it
darker in the
class diagram.
All rooms have doors, but only a few
rooms have an exterior door that
leads inside or outside the house.
you are here 4 309
interfaces and abstract classes
abstract class Location {
public Location(string name) {
this.name = name;
}
public Location[] Exits;
private string name;
public string Name {
get { return name; }
}
public virtual string Description {
get {
string description = “You’re standing in the “ + name
+ “. You see exits to the following places: ”;
for (int i = 0; i < Exits.Length; i++) {
description += “ ” + Exits[i].Name;
if (i != Exits.Length - 1)
description += “,”;
}
description += “.”;
return description;
}
}
}
Here’s the Location class
To get you started, here’s the Location class:
4
Remember, Location is an
abstract class—you can
inherit from it and declare
reference variables of type
Location, but you can’t
instantiate it.
We’re not done yet—flip the page!
The constructor sets the name
field, which is the read-only Name
property’s backing field.
The Room
class will
override
and extend
Description
to add the
decoration,
and Outside
will add the
temperature.
Create the classes
First create the Room and Outside classes based on the class model. Then
create two more classes: OutsideWithDoor, which inherits from Outside
and implements IHasExteriorDoor, and RoomWithDoor, which subclasses
Room and implements IHasExteriorDoor.
Here are the class declarations to give you a leg up:
5
class OutsideWithDoor : Outside, IHasExteriorDoor
{
// The DoorLocation property goes here
// The read-only DoorDescription property goes here
}
class RoomWithDoor : Room, IHasExteriorDoor
{
// The DoorLocation property goes here
// The read-only DoorDescription property goes here
}
The Description property
returns a string that
describes the room, including
the name and a list of all
of the locations it connects
to (which it finds in the
Exits[] field). Its subclasses
will need to change the
description slightly, so
they’ll override it.
The public Exits field is an array of
Location references that keeps track
of all of the other places that this
location connects to.
This one’s going
to be a pretty big
exercise…but we
promise it’s a lot
of fun! And you’ll
definitely know this
stuff once you get
through it.
Description is a
virtual method.
You’ll need to
override it.
Get the classes started now—we’ll give you more
details about them on the next page.

310 Chapter 7
R
o
o
m
W
i
t
h
D
o
o
r
o
b
j
e
c
t
O
u
t
s
i
d
e
o
b
j
e
c
t
O
u
t
s
i
d
e
W
i
t
h
D
o
o
r
o
b
j
e
c
t
R
o
o
m
o
b
j
e
c
t
O
u
t
s
i
d
e
o
b
j
e
c
t
(continued)
Nowthatyou’vegottheclassmodel,youcancreatetheobjectsforallofthepartsofthe
house,andaddaformtoexploreit.
Finish building the classes, and instantiate their instances
You’ve got all the classes—now it’s time to finish them and build your objects.
≥You’ll need to make sure that the constructor for the Outside class sets the read-only Hot property and
overrides the Description property to add the text “It’s very hot here.” if Hot is true. It’s hot in the
back yard but not the front yard or garden.
≥The constructor for Room needs to set the Decoration, and should override the Description property
to add, “You see (the decoration) here.” The living room has an antique carpet, the dining room has a crystal
chandelier, and the kitchen has stainless steel appliances and a screen door that leads to the back yard.
≥Your form needs to create each of the objects and keep a reference to each one. So add a method to the
form called CreateObjects() and call it from the form’s constructor.
≥Instantiate each of the objects for the six locations in the house. Here’s one of those lines:
RoomWithDoor livingRoom = new RoomWithDoor(“Living Room”,
“an antique carpet” , “an oak door with a brass knob”);
≥Your CreateObjects() method needs to populate the Exits[] field in each object:
frontYard.Exits = new Location[] { backYard, garden };
7
How your house objects work
Here’s the architecture for two of your objects, frontYard and diningRoom. Since each of
them has a door, they both need to be instances of a class that implements IHasExteriorDoor.
The DoorLocation property keeps a reference to the location on the other side of the door.
6
Exits[]
Exits[]
DoorLocation
LivingRoom
DoorLocation
Garden BackYard
FrontYard
DiningRoom
FrontYard is an
OutsideWithDoor
object, which is a
subclass of Outside
that implements
IHasExteriorDoor.
LivingRoom is an instance of
RoomWithDoor, which inherits
from Room and implements
IHasExteriorDoor.
Exits is an
array of
Location
references,
so this line
creates one that has
two references in it.
You started building the IHasExteriorDoor
interface and added these two classes that
implement it. One inherits from Room, the other is
a subclass of Outside. Now it’s time to finish them.
These are
curly brackets.
Anything else will
cause an error.
watch your objects do stuff!
Exits is an array of Location
references. LivingRoom has
one exit, so its Exits array
has a length of 1.
Every location
will have its
own field in
the form class.
you are here 4 311
interfaces and abstract classes
Build a form to explore the house
Build a simple form to let you explore the house. It’ll have a big multiline text box called
description to show the description of the current room. A ComboBox called exits lists
all of the exits in the current room. It’s got two buttons: goHere moves to the room selected in
the ComboBox, and goThroughTheDoor is only visible when there’s an exterior door.
8
This is a multiline TextBox that
displays the Description() of
the current location. Its name is
description.
This is a ComboBox
Click the goHere
button to move to
another location.
This button is only visible
when you’re in a room with
an exterior door. You can
make it visible or invisible by
setting its Visible property
to true or false. It’s called
goThroughTheDoor.
The ComboBox contains a
list of all of the exits, so
name it exits. Make sure
its DropDownStyle is set
to DropDownList.
Now you just need to make the form work!
You’ve got all the pieces, now you just need to put them together.
≥You’ll need a field in your form called currentLocation to keep track of your current location.
≥Add a MoveToANewLocation() method that has a Location as its parameter. This
method should first set currentLocation to the new location. Then it’ll clear the combo
box using its Items.Clear() method, and then add the name of each location in the
Exits[ ] array using the combo box’s Items.Add() method. Finally, reset the combo box
so it displays the first item in the list by setting its SelectedIndex property to zero.
≥Set the text box so that it has the description of the current location.
≥Use the is keyword to check if the current location has a door. If it does, make the “Go
through the door” button visible using its Visible property. If not, make it invisible.
≥If the “Go here:” button is clicked, move to the location selected in the combo box.
≥If the “Go through the door” button is clicked, move to the location that the door connects to.
9
Hint: When you choose an item in the combo box, its
selected index in the combo box will be the same as the
index of the corresponding location in the Exits[] array.
Another hint: Your form’s currentLocation field is
a Location reference. So even though it’s pointing
to an object that implements IHasExteriorDoor,
you can’t just type “currentLocation.DoorLocation”
because DoorLocation isn’t a field in Location.
You’ll need to downcast if you want to get the door
location out of the object.
Here’s where you’ll
set up what populates
the ComboBox.

312 Chapter 7
interface IHasExteriorDoor {
string DoorDescription { get; }
Location DoorLocation { get; set; }
}
class Room : Location {
private string decoration;
public Room(string name, string decoration)
: base(name) {
this.decoration = decoration;
}
public override string Description {
get {
return base.Description + “ You see ” + decoration + “.”;
}
}
}
class RoomWithDoor : Room, IHasExteriorDoor {
public RoomWithDoor(string name, string decoration, string doorDescription)
: base(name, decoration)
{
this.doorDescription = doorDescription;
}
private string doorDescription;
public string DoorDescription {
get { return doorDescription; }
}
private Location doorLocation;
public Location DoorLocation {
get { return doorLocation; }
set { doorLocation = value; }
}
}
Here’sthecodetomodelthehouse.Weusedclassestorepresenttherooms
andlocations,andaninterfaceforanyplacethathasadoor.
Here’s the IHasExteriorDoor interface.
The Room class inherits from Location
and adds a backing field for the
read-only Decoration property. Its
constructor sets the field.
The RoomWithDoor class inherits
from Room and implements
IHasExteriorDoor. It does everything
that the room does, but it adds a
description of the exterior door
to the constructor. It also adds
DoorLocation, a reference to the
location that the door leads to.
DoorDescription and DoorLocation
are required by IHasExteriorDoor.
exercise solution
you are here 4 313
interfaces and abstract classes
class Outside : Location {
private bool hot;
public bool Hot { get { return hot; } }
public Outside(string name, bool hot)
: base(name)
{
this.hot = hot;
}
public override string Description {
get {
string NewDescription = base.Description;
if (hot)
NewDescription += “ It’s very hot.”;
return NewDescription;
}
}
}
class OutsideWithDoor : Outside, IHasExteriorDoor {
public OutsideWithDoor(string name, bool hot, string doorDescription)
: base(name, hot)
{
this.doorDescription = doorDescription;
}
private string doorDescription;
public string DoorDescription {
get { return doorDescription; }
}
private Location doorLocation;
public Location DoorLocation {
get { return doorLocation; }
set { doorLocation = value; }
}
public override string Description {
get {
return base.Description + “ You see ” + doorDescription + “.”;
}
}
}
Outside is a lot like Room—it
inherits from Location, and adds a
backing field for the Hot property,
which is used in the Description()
method extended from the base
class.
OutsideWithDoor inherits
from Outside and implements
IHasExteriorDoor, and it looks a lot
like RoomWithDoor.
We’re not done yet—flip the page!
The base class’s Description property
fills in whether or not the location
is hot. And that relies on the original
Location class’s Description property
to add the main description and exits.
314 Chapter 7
public partial class Form1 : Form
{
Location currentLocation;
RoomWithDoor livingRoom;
Room diningRoom;
RoomWithDoor kitchen;
OutsideWithDoor frontYard;
OutsideWithDoor backYard;
Outside garden;
public Form1() {
InitializeComponent();
CreateObjects();
MoveToANewLocation(livingRoom);
}
private void CreateObjects() {
livingRoom = new RoomWithDoor(“Living Room”, “an antique carpet”,
“an oak door with a brass knob”);
diningRoom = new Room(“Dining Room”, “a crystal chandelier”);
kitchen = new RoomWithDoor(“Kitchen”, “stainless steel appliances”, “a screen door”);
frontYard = new OutsideWithDoor(“Front Yard”, false, “an oak door with a brass knob”);
backYard = new OutsideWithDoor(“Back Yard”, true, “a screen door”);
garden = new Outside(“Garden”, false);
diningRoom.Exits = new Location[] { livingRoom, kitchen };
livingRoom.Exits = new Location[] { diningRoom };
kitchen.Exits = new Location[] { diningRoom };
frontYard.Exits = new Location[] { backYard, garden };
backYard.Exits = new Location[] { frontYard, garden };
garden.Exits = new Location[] { backYard, frontYard };
livingRoom.DoorLocation = frontYard;
frontYard.DoorLocation = livingRoom;
kitchen.DoorLocation = backYard;
backYard.DoorLocation = kitchen;
}
The form uses these reference
variables to keep track of each
of the rooms in the house.
This is how the form keeps track
of which room is being displayed.
The form’s constructor creates
the objects and then uses the
MoveToANewLocation method.
When the form creates
the objects, first it
needs to instantiate
the classes and pass the
right information to
each one’s constructor.
Here’s where the Exits[] array
for each instance is populated.
We need to wait to do this
until after all the instances are
created, because otherwise we
wouldn’t have anything to put into
each array!
For the IHasExteriorDoor
objects, we need to set
their door locations.
Here’s where we pass
the door description to
the OutsideWithDoor
constructors.
Here’sthecodefortheform.It’sallintheForm1.cs,insidetheForm1declaration.
exercise solution
(continued)

you are here 4 315
interfaces and abstract classes
private void MoveToANewLocation(Location newLocation) {
currentLocation = newLocation;
exits.Items.Clear();
for (int i = 0; i < currentLocation.Exits.Length; i++)
exits.Items.Add(currentLocation.Exits[i].Name);
exits.SelectedIndex = 0;
description.Text = currentLocation.Description;
if (currentLocation is IHasExteriorDoor)
goThroughTheDoor.Visible = true;
else
goThroughTheDoor.Visible = false;
}
private void goHere_Click(object sender, EventArgs e) {
MoveToANewLocation(currentLocation.Exits[exits.SelectedIndex]);
}
private void goThroughTheDoor_Click(object sender, EventArgs e) {
IHasExteriorDoor hasDoor = currentLocation as IHasExteriorDoor;
MoveToANewLocation(hasDoor.DoorLocation);
}
}
But we’re not done yet!
It’s fine to create a model of a house, but wouldn’t it be cool to turn it into a game?
Let’s do it! You’ll play Hide and Seek against the computer. We’ll need to add an
Opponent class and have him hide in a room. And we’ll need to make the house a
lot bigger. Oh, and he’ll need someplace to hide! We’ll add a new interface so that
some rooms can have a hiding place. Finally, we’ll update the form to let you check
the hiding places, and keep track of how many moves you’ve made trying to find
your opponent. Sound fun? Definitely!
First we need to clear the combo box,
then we can add each of the locations’
names to it. Finally, we set its selected
index (or which line is highlighted)
to zero so it shows the first item
in the list. Don’t forget to set the
ComboBox’s DropDownStyle property
to “DropDownList”—that way the
user won’t be able to type anything
into the combo box.
The MoveToANewLocation() method
displays a new location in the form.
This makes the “Go through the door” button invisible if the
current location doesn’t implement IHasExteriorDoor.
When the user clicks
the “Go here:” button,
it moves to the
location selected in
the combo box.
We need to use the as keyword in order
to downcast currentLocation to an
IHasExteriorDoor so we can get access to
the DoorLocation field.
Let’s get started!

316 Chapter 7
Time for hide and seek!Buildonyouroriginalhouseprogramtoaddmorerooms,hiding
places,andanopponentwhohidesfromyou.
Add an IHidingPlace interface
We don’t need to do anything fancy here. Any Location subclass that implements IHidingPlace
has a place for the opponent to hide. It just needs a string to store the name of the hiding place (“in
the closet”, “under the bed”, etc.).
≥Give it a get accessor, but no set accessor—we’ll set this in the constructor, since once a room
has a hiding place we won’t ever need to change it.
1
Add classes that implement IHidingPlace
You’ll need two more classes: OutsideWithHidingPlace (which inherits from Outside) and
RoomWithHidingPlace (which inherits from Room). Also, let’s make any room with a door have a
hiding place, so it’ll have to inherit from RoomWithHidingPlace instead of Room.
2
Add a class for your opponent
The Opponent object will find a random hiding place in the house, and it’s your job to find him.
≥He’ll need a private Location field (myLocation) so he can keep track of where he is,
and a private Random field (random) to use when he moves to a random hiding place.
≥The constructor takes the starting location and sets myLocation to it, and sets random
to a new instance of Random. He starts in the front yard (that’ll be passed in by the form),
and moves from hiding place to hiding place randomly. He moves 10 times when the game
starts. When he encounters an exterior door, he flips a coin to figure out whether or not to go
through it.
≥Add a Move() method that moves the opponent from his current location to a new location.
First, if he’s in a room with a door, then he flips a coin to decide whether or not to go through
the door, so if random.Next(2) is equal to 1, he goes through it. Then he chooses one of
the exits from his current location at random and goes through it. If that location doesn’t have
a hiding place, then he’ll do it again—he’ll choose a random exit from his current location
and go there, and he’ll keep doing it over and over until he finds a place to hide.
≥Add a Check() method that takes a location as a parameter and returns true if he’s hiding
in that location, or false otherwise.
3
Add more rooms to the house
Update your CreateObjects() method to add more rooms:
≥Add stairs with a wooden bannister that connect the living room to the upstairs hallway,
which has a picture of a dog and a closet to hide in.
≥The upstairs hallway connects to three rooms: a master bedroom with a large bed, a
second bedroom with a small bed, and a bathroom with a sink and a toilet. Someone
could hide under the bed in either bedroom or in the shower.
≥The front yard and back yard both connect to the driveway, where someone could hide in
the garage. Also, someone could hide in the shed in the garden.
4
build your opponent
Create a new project, and use the IDE’s
“Add Existing Item” feature to add the
classes from the first part of the exercise.
So every room with an exterior
door will also have a hiding place.
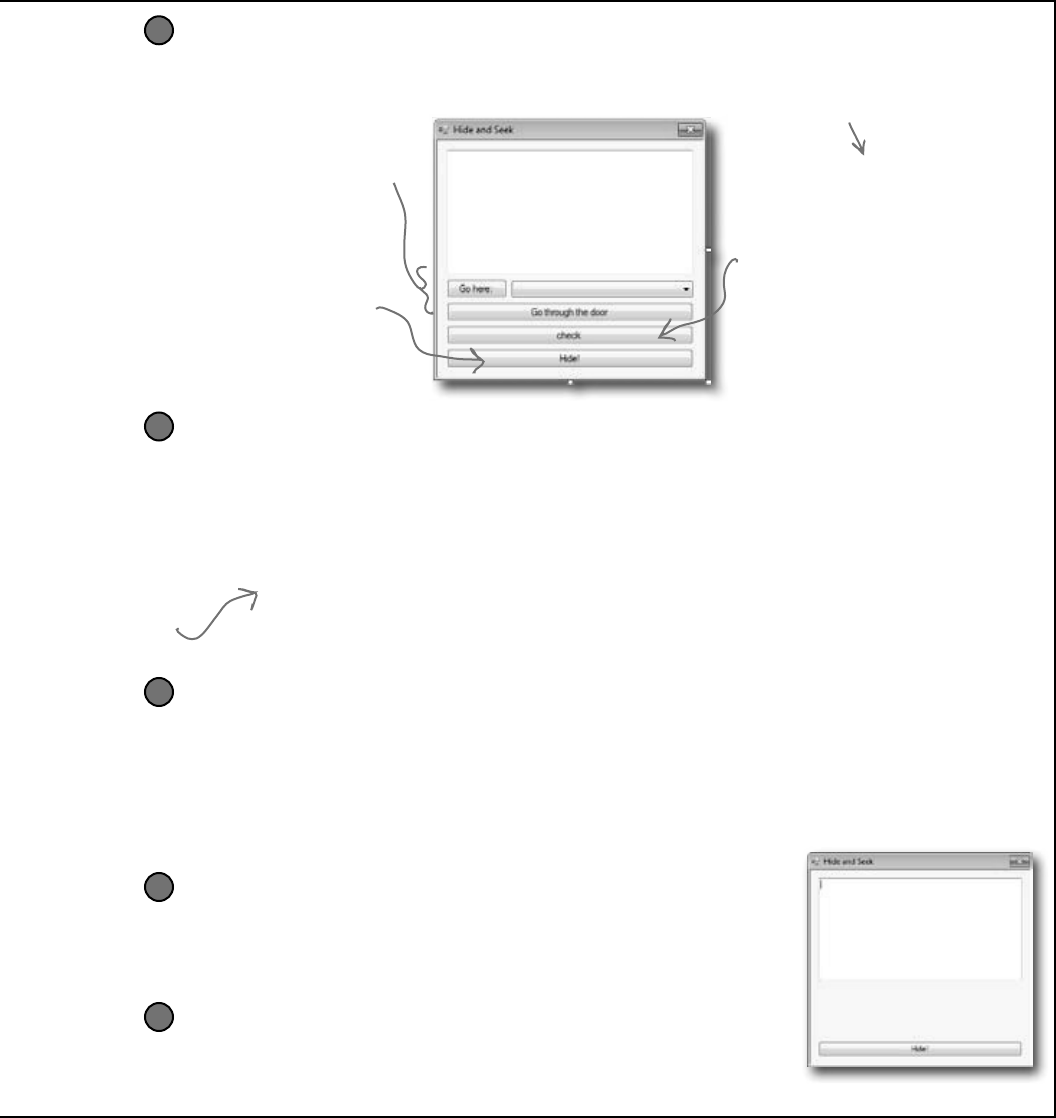
you are here 4 317
interfaces and abstract classes
OK, time to update the form
You’ll need to add a few buttons to the form. And we’ll get a little more intricate with
making them visible or invisible, depending on the state of the game.
5
When the game first starts, the
hide button is the only one displayed.
When you click it, the form counts
to 10 in the text box, and calls the
opponent’s Move() method 10 times.
Then it makes this button invisible.
You use the top two buttons and the
combo box exactly the same way as
before, except that they’re only visible
while the game is running.
This is the button you’ll use to
check the room’s hiding place. It’s
only visible if you’re in a room that
has a place to hide. When it’s shown,
the Text property is changed
from “check” to the word “Check”
followed by the name of the hiding
place—so for a room with a hiding
place under the bed, the button will
say, “Check under the bed”.
Add a method to redraw the form, and another one to reset the game
Add a RedrawForm() method that puts the right text in the description text box, makes the buttons
visible or invisible, and puts the correct label on the middle button. Then add a ResetGame()
method that’s run when you find your opponent. It resets the opponent object so that he starts in the
front yard again—he’ll hide when you click the “Hide!” button. It should leave the form with nothing
but the text box and “Hide!” button visible. The text box should say where you found the opponent,
and how many moves it took.
7
Make the buttons work
There are two new buttons to add to the form.
≥The middle button checks the hiding place in the current room and is only visible when
you’re in a room with a place to hide using the opponent’s Check() method. If you found
him, then it resets the game.
≥The bottom button is how you start the game. It counts to 10 by showing “1…”, waiting 200
milliseconds, then showing “2…”, then “3…”, etc., in the text box. After each number, it tells
the opponent to move by calling his Move() method. Then it shows, “Ready or not, here I
come!” for half a second, and then the game starts.
6
Make it look right when you start the program
When you first start the program, all you should see is an empty text box
and the “Hide!” button. When you click the button, the fun begins!
9
Keep track of how many moves the player made
Make sure the text box displays the number of times you checked a hiding
place or moved between rooms. When you find the opponent, he should pop
up a mesage box that says, “You found me in X moves!”
8
The middle button’s called check. You
don’t need to set its Text property.
Flip back to
Chapter 2 for
a refresher on
DoEvents() and
Sleep()—they’ll
come in handy.
318 Chapter 7
Buildonyouroriginalhouseprogramtoaddmorerooms,hidingplaces,andanopponentwho
hidesfromyou.
interface IHidingPlace {
string HidingPlaceName { get; }
}
class RoomWithHidingPlace : Room, IHidingPlace {
public RoomWithHidingPlace(string name, string decoration, string hidingPlaceName)
: base(name, decoration)
{
this.hidingPlaceName = hidingPlaceName;
}
private string hidingPlaceName;
public string HidingPlaceName {
get { return hidingPlaceName; }
}
public override string Description {
get {
return base.Description + “ Someone could hide “ + hidingPlaceName + “.”;
}
}
}
class RoomWithDoor : RoomWithHidingPlace, IHasExteriorDoor {
public RoomWithDoor(string name, string decoration,
string hidingPlaceName, string doorDescription)
: base(name, decoration, hidingPlaceName)
{
this.doorDescription = doorDescription;
}
private string doorDescription;
public string DoorDescription {
get { return doorDescription; }
}
private Location doorLocation;
public Location DoorLocation {
get { return doorLocation; }
set { doorLocation = value; }
}
}
Here’s the new IHidingPlace interface. It
just has one string field with a get accessor
that returns the name of the hiding place.
The RoomWithHidingPlace class inherits
from Room and implements IHidingPlace by
adding the HidingPlaceName property. The
constructor sets its backing field.
Since we decided every room with a
door also needed a hiding place, we
made RoomWithDoor inherit from
RoomWithHidingPlace. The only
change to it is that its constructor
takes a hiding place name and sends
it on to the RoomWithHidingPlace
constructor.
exercise solution
you are here 4 319
interfaces and abstract classes
class OutsideWithHidingPlace : Outside, IHidingPlace {
public OutsideWithHidingPlace(string name, bool hot, string hidingPlaceName)
: base(name, hot)
{ this.hidingPlaceName = hidingPlaceName; }
private string hidingPlaceName;
public string HidingPlaceName {
get { return hidingPlaceName; }
}
public override string Description {
get {
return base.Description + “ Someone could hide ” + hidingPlaceName + “.”;
}
}
}
class Opponent {
private Random random;
private Location myLocation;
public Opponent(Location startingLocation) {
myLocation = startingLocation;
random = new Random();
}
public void Move() {
if (myLocation is IHasExteriorDoor) {
IHasExteriorDoor LocationWithDoor =
myLocation as IHasExteriorDoor;
if (random.Next(2) == 1)
myLocation = LocationWithDoor.DoorLocation;
}
bool hidden = false;
while (!hidden) {
int rand = random.Next(myLocation.Exits.Length);
myLocation = myLocation.Exits[rand];
if (myLocation is IHidingPlace)
hidden = true;
}
}
public bool Check(Location locationToCheck) {
if (locationToCheck != myLocation)
return false;
else
return true;
}
}
The Opponent class constructor takes a
starting location. It creates a new instance
of Random, which it uses to move randomly
between rooms.
The Move() method first checks if the current
room has a door using the is keyword—if so, it
has a 50% chance of going through it. Then it
moves to a random location, and keeps moving
until it finds a hiding place.
The guts of the Move() method is this while loop. It
keeps looping until the variable hidden is true—and it sets
it to true when it finds a room with a hiding place.
The Check() method just checks the
opponent’s location against the location
that was passed to it using a Location
reference. If they point to the same
object, then he’s been found!
The OutsideWithHidingPlace class inherits
from Outside and implements IHidingPlace
just like RoomWithHidingPlace does.
We’re not done yet—flip the page!
320 Chapter 7
int Moves;
Location currentLocation;
RoomWithDoor livingRoom;
RoomWithHidingPlace diningRoom;
RoomWithDoor kitchen;
Room stairs;
RoomWithHidingPlace hallway;
RoomWithHidingPlace bathroom;
RoomWithHidingPlace masterBedroom;
RoomWithHidingPlace secondBedroom;
OutsideWithDoor frontYard;
OutsideWithDoor backYard;
OutsideWithHidingPlace garden;
OutsideWithHidingPlace driveway;
Opponent opponent;
private void MoveToANewLocation(Location newLocation) {
Moves++;
currentLocation = newLocation;
RedrawForm();
}
private void RedrawForm() {
exits.Items.Clear();
for (int i = 0; i < currentLocation.Exits.Length; i++)
exits.Items.Add(currentLocation.Exits[i].Name);
exits.SelectedIndex = 0;
description.Text = currentLocation.Description + “\r\n(move #” + Moves + “)”;
if (currentLocation is IHidingPlace) {
IHidingPlace hidingPlace = currentLocation as IHidingPlace;
check.Text = “Check “ + hidingPlace.HidingPlaceName;
check.Visible = true;
}
else
check.Visible = false;
if (currentLocation is IHasExteriorDoor)
goThroughTheDoor.Visible = true;
else
goThroughTheDoor.Visible = false;
}
public Form1() {
InitializeComponent();
CreateObjects();
opponent = new Opponent(frontYard);
ResetGame(false);
}
Here are all the fields in the Form1
class. It uses them to keep track of
the locations, the opponent, and the
number of moves the player has made.
The Form1 constructor creates the objects,
sets up the opponent, and then resets the game.
We added a boolean parameter to ResetGame()
so that it only displays its message when you
win, not when you first start up the program.
The MoveToANewLocation() method sets the
new location and then redraws the form.
RedrawForm() populates the combo box list, sets the
text (adding the number of moves), and then makes
the buttons visible or invisible depending on whether
or not there’s a door or the room has a hiding place.
We need the hiding place
name but we’ve only got the
CurrentLocation object, which
doesn’t have a HidingPlaceName
property. So we can use as
to copy the reference to an
IHidingPlace variable.
exercise solution
(continued)
Here’sallthecodefortheform.Theonlythings
thatstaythesamearethegoHere_Click()and
goThroughTheDoor_Click()methods.

you are here 4 321
interfaces and abstract classes
private void CreateObjects() {
livingRoom = new RoomWithDoor(“Living Room”, “an antique carpet”,
“inside the closet”, “an oak door with a brass handle”);
diningRoom = new RoomWithHidingPlace(“Dining Room”, “a crystal chandelier”,
“in the tall armoire”);
kitchen = new RoomWithDoor(“Kitchen”, “stainless steel appliances”,
“in the cabinet”, “a screen door”);
stairs = new Room(“Stairs”, “a wooden bannister”);
hallway = new RoomWithHidingPlace(“Upstairs Hallway”, “a picture of a dog”,
“in the closet”);
bathroom = new RoomWithHidingPlace(“Bathroom”, “a sink and a toilet”,
“in the shower”);
masterBedroom = new RoomWithHidingPlace(“Master Bedroom”, “a large bed”,
“under the bed”);
secondBedroom = new RoomWithHidingPlace(“Second Bedroom”, “a small bed”,
“under the bed”);
frontYard = new OutsideWithDoor(“Front Yard”, false, “a heavy-looking oak door”);
backYard = new OutsideWithDoor(“Back Yard”, true, “a screen door”);
garden = new OutsideWithHidingPlace(“Garden”, false, “inside the shed”);
driveway = new OutsideWithHidingPlace(“Driveway”, true, “in the garage”);
diningRoom.Exits = new Location[] { livingRoom, kitchen };
livingRoom.Exits = new Location[] { diningRoom, stairs };
kitchen.Exits = new Location[] { diningRoom };
stairs.Exits = new Location[] { livingRoom, hallway };
hallway.Exits = new Location[] { stairs, bathroom, masterBedroom, secondBedroom };
bathroom.Exits = new Location[] { hallway };
masterBedroom.Exits = new Location[] { hallway };
secondBedroom.Exits = new Location[] { hallway };
frontYard.Exits = new Location[] { backYard, garden, driveway };
backYard.Exits = new Location[] { frontYard, garden, driveway };
garden.Exits = new Location[] { backYard, frontYard };
driveway.Exits = new Location[] { backYard, frontYard };
livingRoom.DoorLocation = frontYard;
frontYard.DoorLocation = livingRoom;
kitchen.DoorLocation = backYard;
backYard.DoorLocation = kitchen;
}
The new CreateObjects() method
creates all the objects to build the
house. It’s a lot like the old one, but it
has a whole lot more places to go.
Wow—you could add an entire wing onto the house just
by adding a couple of lines! That’s why well-encapsulated
classes and objects are really useful.
We’re still not done—flip the page!
322 Chapter 7
private void ResetGame(bool displayMessage) {
if (displayMessage) {
MessageBox.Show(“You found me in ” + Moves + “ moves!”);
IHidingPlace foundLocation = currentLocation as IHidingPlace;
description.Text = “You found your opponent in “ + Moves
+ “ moves! He was hiding ” + foundLocation.HidingPlaceName + “.”;
}
Moves = 0;
hide.Visible = true;
goHere.Visible = false;
check.Visible = false;
goThroughTheDoor.Visible = false;
exits.Visible = false;
}
private void check_Click(object sender, EventArgs e) {
Moves++;
if (opponent.Check(currentLocation))
ResetGame(true);
else
RedrawForm();
}
private void hide_Click(object sender, EventArgs e) {
hide.Visible = false;
for (int i = 1; i <= 10; i++) {
opponent.Move();
description.Text = i + “... “;
Application.DoEvents();
System.Threading.Thread.Sleep(200);
}
description.Text = “Ready or not, here I come!”;
Application.DoEvents();
System.Threading.Thread.Sleep(500);
goHere.Visible = true;
exits.Visible = true;
MoveToANewLocation(livingRoom);
}
When you click the check
button, it checks whether or
not the opponent is hiding in
the current room. If he is, it
resets the game. If not, it
redraws the form (to update
the number of moves).
The hide button is the one that starts the
game. The first thing it does is make itself
invisible. Then it counts to 10 and tells the
opponent to move. Finally, it makes the first
button and the combo box visible, and then
starts off the player in the living room.
The MoveToANewLocation() method calls
RedrawForm().
The ResetGame() method resets the game. It
displays the final message, then makes all the
buttons except the “Hide!” one invisible.
We want to display the name of the
hiding place, but CurrentLocation is a
Location reference, so it doesn’t give
us access to the HidingPlaceName field.
Luckily, we can use the as keyword to
downcast it to an IHidingPlace reference
that points to the same object.
exercise solution
(continued)
Here’s the rest of the code for the form. The goHere and
goThroughTheDoor button event handlers are identical to
the ones in the first part of this exercise, so flip back a few
pages to see them.
Remember DoEvents() from FlashyThing
in Chapter 2? Without it, the text box
doesn’t refresh itself and the program looks
frozen.
you are here 4 323
interfaces and abstract classes
OOPcross
1
2
3 4 5
6 7
8
9
10
11 12
13
14
15 16
17
18
Across
3. What an abstract method doesn't have
4. C# doesn't allow _____________ inheritance
6. When you subclass to a method that expects its
base class, you're using this OOP principle
8. The OOP principle where you hide private data and only
expose those methods and fields that other classes need
access to
10. One of the four principles of OOP that you implement using
the colon operator
14. Every method in an interface is automatically ___________
15. If your class implements an interface that __________
from another interface, then you need to implement all of its
members, too
17. An access modifier that's not valid for anything inside an
interface
18. Object __________ Programming means creating programs
that combine your data and code together into classes and
objects
Down
1. When you move common methods from specific classes to
a more general class that they all inherit from, you're using this
OOP principle
2. If a class that implements an interface doesn't implement all
of its methods, getters, and setters, then the project won't
___________
5. Everything in an interface is automatically ___________
7. An abstract class can include both abstract and
____________ methods
9. You can't ____________ an abstract class
11. A class that implements this must include all of the methods,
getters, and setters that it defines
12. What you do with an interface
13. The is keyword returns true if an __________ implements
an interface
16. An interface can't technically include a __________, but it
can define getters and setters that look just like one from the
outside
pass a
324 Chapter 7
class Acts : Picasso {
public Acts() : base(“Acts”) { }
public override int Ear() {
return 5;
}
}
class Of76 : Clowns {
public override string Face {
get { return “Of76”; }
}
public static void Main(string[] args) {
string result = “”;
Nose[] i = new Nose[3];
i[0] = new Acts();
i[1] = new Clowns();
i[2] = new Of76();
for (int x = 0; x < 3; x++) {
result += ( i[x].Ear() + “ ”
+ i[x].Face ) + “\n”;
}
MessageBox.Show(result);
}
}
interface Nose {
int Ear() ;
string Face { get; }
}
abstract class Picasso : Nose {
public virtual int Ear()
{
return 7;
}
public Picasso(string face)
{
this.face = face;
}
public virtual string Face {
get { return face ; }
}
string face;
}
class Clowns : Picasso {
public Clowns() : base(“Clowns”) { }
}
exercise solutions
Here’s where the Acts class calls the constructor
in Picasso, which it inherits from. It passes “Acts”
into the constructor, which gets stored in the face
property.
Properties can
appear anywhere in
the class! It’s easier
to read your code if
they’re at the top,
but it’s perfectly
valid to have the
face property at
the bottom of the
Picasso class.
Face is a get accessor that
returns the value of the
face property. Both of them
are defined in Picasso and
inherited into the subclasses.
Pool Puzzle Solution from page 305
Your job is to take code snippets from the pool and place them
into the blank lines in the code and output. You may use the
same snippet more than once, and you won’t need to use all the
snippets. Your goal is to make a set of classes that will compile
and run and produce the output listed.
you are here 4 325
interfaces and abstract classes
A
1
C
2B
B
3O D Y S M
4U L T I P
5L E
M T U
P
6O L Y M O R P H I S M B C
7
I A L O
L E
8N C A P S U L A T I O N
E I
9T C C
I
10 N H E R I T A N C E R
S O E
T N I
11 I
12 T
A O
13 N M E
N A
14 B S T R A C T P
T J E L
I
15 N H E R I T S R E F
16
A C F M I
T T P
17 R I V A T E E
E C N L
O
18 R I E N T E D
Across
3. What an abstract method doesn't have [BODY]
4. C# doesn't allow _____________ inheritance. [MULTIPLE]
6. When you use a pass subclass to a method that expects its
base class, you're using this OOP principle. [POLYMORPHISM]
8. The OOP principle where you hide private data and only
expose those methods and fields that other classes need
access to. [ENCAPSULATION]
10. One of the four principles of OOP that you implement using
the colon operator [INHERITANCE]
14. Every method in an interface is automatically ___________.
[ABSTRACT]
15. Your class that implements an interface that __________
from another interface, then you need to implement all of its
members too. [INHERITS]
17. An access modifier that's not valid for anything inside an
interface. [PRIVATE]
18. Object __________ Programming means creating programs
that combine your data and code together into classes and
objects. [ORIENTED]
Down
1. When you move common methods from specific classes to
more a general class that they all inherit from, you're using this
OOP principle. [ABSTRACTION]
2. If a class that implements an interface doesn't implement all
of its methods, getters and setters, then the project won't
___________. [COMPILE]
5. Everything in an interface is automatically [PUBLIC]
7. An abstract class can include both abstract and
____________ methods. [CONCRETE]
9. You can't ____________ an abstract class. [INSTANTIATE]
11. A class that implements this must include all of the methods,
getters and setters that it defines. [INTERFACE]
12. What you do with an interface [IMPLEMENT]
13. The is keyword returns true if an ____________ implements
an interface. [OBJECT]
16. An interface can't technically include a __________, but it
can define getters and setters that look just like one from the
outside. [FIELD]
OOPcross solution

this is a new chapter 327
enums and collections
8
Storing lots of data
When it rains, it pours.
In the real world, you don’t get to handle your data in tiny little bits and
pieces. No, your data’s going to come at you in loads, piles, and bunches.
You’ll need some pretty powerful tools to organize all of it, and that’s where
collections come in. They let you store, sort, and manage all the data that
your programs need to pore through. That way, you can think about writing
programs to work with your data, and let the collections worry about keeping
track of it for you.
Finally, a way to organize
my Boyfriend objects!
328 Chapter 8
Strings don’t always work for
storing categories of data
Suppose you have several worker bees, all represented by
Worker classes. How would you write a constructor that took
a job as a parameter? If you use a string for the job name, you
might end up with code that looks like this:
Worker buzz = new Worker(“Attorney General”);
Worker clover = new Worker(“Dog Walker”);
Worker gladys = new Worker(“Newscaster”);
You could probably add code to the Worker constructor to check each
string and make sure it’s a valid bee job. However, if you add new jobs
that bees can do, you’ve got to change this code and recompile the
Worker class. That’s a pretty short-sighted solution. What if you have
other classes that need to check for the types of worker bees they can be?
Now you’ve got to duplicate code, and that’s a bad path to go down.
What we need is a way to say, “Hey, there are only certain values that are
allowed here.” We need to enumerate the values that are OK to use.
Our code would allow these values to be passed
in a constructor even though the program only
supports Sting Patrol, Nectar Collector, and
other jobs that a bee does.
This code compiles, no problem. But these jobs don’t
make any sense for a bee. The Worker class really
shouldn’t allow these types as valid data.
Our bee management software kept track
of each worker’s job using a string like
“Sting Patrol” or “Nectar Collector”.
nurse sharks and carpenter ants

you are here 4 329
enums and collections
Enums let you work with a set
of valid values
An enum is a data type that only allows certain values for that piece
of data. So we could define an enum called Jobs, and define the
allowed jobs:
enum Job {
NectarCollector,
StingPatrol,
HiveMaintenance,
BabyBeeTutoring,
EggCare,
HoneyManufacturing,
}
private void button1_Click(object sender EventArgs e)
{
Worker buzz = new Worker(Jobs.AttorneyGeneral);
}
This is the name of the enum.
‘Jobs’ does not contain a definition for
‘AttorneyGeneral’
X
Each of these is a
valid job. Any can be
used as a Jobs value.
Separate each value
with a comma, and end
the whole thing with a
curly brace.
Now, you can reference these with types like this:
Worker nanny = new Worker(Job.EggCare);
This is the
name of the
enum.
Finally, the value
you want from
the enum.
But you can’t just make up a new value for the enum! If you do,
the program won’t compile.
We’ve changed the Worker constructor
to accept Worker.Jobs as its
parameter type.
Here’s the error you get
from the compiler.
The last enumerator
doesn’t have to end
with a comma, but
using one makes it
easier to rearrange
them using cut and
paste.
The stuff inside the brackets is
called the enumerator list, and
each item is an enumerator. The
whole thing together is called an
enumeration.
But most people just
call them enums.
330 Chapter 8
You can cast the enum as a number and do calculations with it, or you can use the
ToString() method to treat the name as a string. If you don’t assign any number
to a name, the items in the list will be given values by default. The first item will be
assigned a 0 value, the second a 1, etc.
But what happens if you want to use really big numbers for one of the enumerators?
The default type for the numbers in an enum is int, so you’ll need to specify the type
you need using the : operator, like this:
public enum TrickScore : long {
Sit = 7,
Beg = 2500000000025
}
public enum TrickScore {
Sit = 7,
Beg = 25,
RollOver = 50,
Fetch = 10,
ComeHere = 5,
Speak = 30,
}
int value = (int)TrickScore.Fetch * 3;
MessageBox.Show(value.ToString());
TrickScore score = (TrickScore)value;
MessageBox.Show(score.ToString());
Enums let you represent numbers with names
Sometimes it’s easier to work with numbers if you have names for them. You can assign
numbers to the values in an enum and use the names to refer to them. That way, you don’t
have a bunch of unexplained numbers floating around in your code. Here’s an enum to keep
track of the scores for tricks at a dog competition:
These don’t have
to be in any
particular order,
and you can give
multiple names to
the same number.
The (int) cast tells the compiler to turn this into the
number it represents. So since TrickScore.Fetch has a
value of 10, (int)TrickScore.Fetch turns it into the
int value 10.
You can cast an int back to
a TrickScore. Since value is
equal to 30, score gets set
to TrickScore.Fetch. So when
you call score.ToString(), it
returns “Fetch”.
If you tried to compile this code without specifying long as the type, you’d get this message:
Cannot implicitly convert type ‘long’ to ‘int’.
Supply a name, then “=”,
then the number that name
stands in for.
Since Fetch has a value of
10, this statement sets
value to 30.
This tells the compiler to treat
values in the TrickScore enum as
longs, not ints.
names are better than numbers
You can cast an int
to an enum, and
you can cast an
(int-based) enum
back to an int.
Here’s an excerpt from a method that uses the
TrickScore enum by casting it to and from an int.
Some enums use a different type,
like byte or long—like the one at
the bottom of this page—and you
can cast those back to their type.

you are here 4 331
enums and collections
Q: Hold on a second. When I was typing in that code, I
noticed that an IntelliSense window popped up that said
something about “3 of 3” when I used that Random.Next()
method. What was that about?
A:Whatyousawwasamethodthatwasoverloaded.Whena
classhasamethodthatyoucancallmorethanoneway,it’scalled
overloading.Whenyou’reusingaclasswithanoverloadedmethod,
theIDEletsyouknowalloftheoptionsthatyouhave.Inthiscase,
theRandomclasshasthreepossibleNext()methods.As
soonasyoutype“random.Next(”intothecodewindow,theIDEpops
upitsIntelliSenseboxthatshowstheparametersforthedifferent
overloadedmethods.Theupanddownarrowsnexttothe“3of3”let
youscrollbetweenthem.That’sreallyusefulwhenyou’redealing
withamethodthathasdozensofoverloadeddefinitions.Sowhen
you’redoingit,makesureyouchoosetherightoverloadedNext()
method!Butdon’tworrytoomuchnow—we’lltalkalotabout
overloadinglateroninthechapter.
v
Usewhatyou’velearnedaboutenumstobuildaclassthatholdsaplayingcard.
Create a new project and add a Card class
You’ll need two public fields: Suit (which will be Spades, Clubs, Diamonds, or
Hearts) and Value (Ace, Two, Three…Ten, Jack, Queen, King). And you’ll
need a read-only property, Name (“Ace of Spades”, “Five of Diamonds”).
1
Use two enums to define the suits and values
Use the familiar Add >> Class feature in the IDE to add them, replacing the word class
with enum in the newly added files. Make sure that (int)Suits.Spades is equal
to 0, followed by Clubs (equal to 1), Diamonds (2), and Hearts (3). Make the values
equal to their face values: (int)Values.Ace should equal 1, Two should be 2, Three
should be 3, etc. Jack should equal 11, Queen should be 12, and King should be 13.
2
Add a property for the name of the card
Name should be a read-only property. The get accessor should return a string that describes the card.
This code will run in a form that calls the Name property from the card class and displays it:
Card card = new Card(Suits.Spades, Values.Ace);
string cardName = card.Name;
The value of cardName should be “Ace of Spades”.
3
Card
Suit
Value
Name
Add a form button that pops up the name of a random card
You can get your program to create a card with a random suit and value by casting a random
number between 0 and 3 as a Suits and another random number between 1 and 13 as a
Values. To do this, you can take advantage of a feature of the built-in Random class that gives
it three different ways to call its Next() method:
Random random = new Random();
int numberBetween0and3 = random.Next(4);
int numberBetween1and13 = random.Next(1, 14);
int anyRandomInteger = random.Next();
4
To make this work, your Card
class will need a constructor
that takes two parameters.
This tells Random to return a value at least 1 but under 14.
When you’ve got more
than one way to call
a method, it’s called
overloading. More on
that later....
332 Chapter 8
enum Suits {
Spades,
Clubs,
Diamonds,
Hearts
}
enum Values {
Ace = 1,
Two = 2,
Three = 3,
Four = 4,
Five = 5,
Six = 6,
Seven = 7,
Eight = 8,
Nine = 9,
Ten = 10,
Jack = 11,
Queen = 12,
King = 13
}
class Card {
public Suits Suit { get; set; }
public Values Value { get; set; }
public Card(Suits suit, Values value) {
this.Suit = suit;
this.Value = value;
}
public string Name {
get { return Value.ToString() + “ of “ + Suit.ToString(); }
}
}
Random random = new Random();
private void button1_Click(object sender, EventArgs e) {
Card card = new Card((Suits)random.Next(4), (Values)random.Next(1, 14));
MessageBox.Show(card.Name);
}
When you don’t specify values, the
first item in the list is equal to
zero, the second is 1, the third is
2, etc.
Here’s where we set the value of
Values.Ace to 1.
The Card class has a
Suit property of type
Suits, and a Value
property of type Values.
The get accessor for the Name property
can take advantage of the way an enum’s
ToString() method returns its name
converted to a string.
Here’s where we use the
overloaded Random.Next()
method to generate a
random number that we
cast to the enum.
Here’s the code for the button that pops
up the name of a random card.
Adeckofcardsisagreatexampleofwherelimitingvaluesisimportant.Nobody
wantstoturnovertheircardsandbefacedwithaJokerofClubs,ora13of
Hearts.Here’showwewrotetheCardclass.
arrays…who needs ’em?
you are here 4 333
enums and collections
We could use an array to create a deck of cards…
What if you want to create a class to represent a deck of cards? It would need a
way to keep track of every card in the deck, and it’d need to know what order they
were in. A Card array would do the trick—the top card in the deck would be at
value 0, the next card at value 1, etc. Here’s a starting point—a Deck that starts
out with a full deck of 52 cards.
How would you add a Shuffle() method to the Deck class that
rearranges the cards in random order? What about a method to deal the
first card off the top of the deck? How would you add a card to the deck?
class Deck {
private Card[] cards = {
new Card(Suits.Spades, Values.Ace),
new Card(Suits.Spades, Values.Two),
new Card(Suits.Spades, Values.Three),
// ...
new Card(Suits.Diamonds, Values.Queen),
new Card(Suits.Diamonds, Values.King),
};
public void PrintCards() {
for (int i = 0; i < cards.Length; i++)
Console.WriteLine(cards[i].Name());
}
}
This array declaration
would continue all the
way through the deck.
It’s just abbreviated
here to save space.
…but what if you wanted to do more?
Think of everything you might need to do with a deck of cards, though. If
you’re playing a card game, you routinely need to change the order of the
cards, and add and remove cards from the deck. You just can’t do that with
an array very easily.

334 Chapter 8
Arrays are hard to work with
An array is fine for storing a fixed list of values or references. But once you need
to move array elements around, or add more elements than the array can hold,
things start to get a little sticky.
Every array has a length, and you need to know the length to work with it. You could use
null references to keep some array elements empty:
1
But now things get complicated. It’s easy enough to add a Peek() method that just returns a
reference to the top card—so you can peek at the top of the deck. But what if you want to add
a card? If topCard is less than the array’s Length, you can just put your card in the array at
that index and add 1 to topCard. But if the array’s full, you’ll need to create a new, bigger array
and copy the existing cards to it. Removing a card is easy enough—but after you subtract 1 from
topCard, you’ll need to make sure to set the removed card’s array index back to null. And what
if you need to remove a card from the middle of the list? If you remove card 4, you’ll need to
move card 5 back to replace it, and then move 6 back, then 7 back…wow, what a mess!
3
C
a
r
d
o
b
j
e
c
t
C
a
r
d
o
b
j
e
c
t
C
a
r
d
o
b
j
e
c
t
You’d need to keep track of how many cards are being held. So you’d need an int field,
which we could call topCard that would hold the index of the last card in the array. So
our 3-card array would have a Length of 7, but we’d set topCard equal to 3.
2
This array has a Length of 7,
but it’s only storing 3 cards.
Indexes 3, 4, 5, and
6 are equal to null, so
they’re not holding any
cards.
We’ll add a topCard field to keep
track of how many cards are in the
array. Any index above topCard has a
null Card reference.
There’s actually an Array.Resize()
method built into the .NET
Framework that does exactly that.
fine collectibles
you are here 4 335
enums and collections
Lists make it easy to store collections of…anything
The .NET Framework has a bunch of collection classes that handle all of those
nasty issues that come up when you add and remove array elements. The most
common sort of collection is a List<T>. Once you create a List<T> object, it’s
easy to add an item, remove an item from any location in the list, peek at an item,
and even move an item from one place in the list to another. Here’s how a list works:
C
a
r
d
o
b
j
e
c
t
First you create a new instance of List<T>
Every array has a type—you don’t just have an array, you have an int array, a Card
array, etc. Lists are the same way. You need to specify the type of object or value that the
list will hold by putting it in angle brackets <> when you use the new keyword to create it.
List<Card> cards = new List<Card>();
1
Now you can add to your List<T>
Once you’ve got a List<T> object, you can add as many items to it as you want (as long as they’re
polymorphic with whatever type you specified when you created your new List<T>).
cards.Add(new Card(Suits.Diamonds, Values.King);
cards.Add(new Card(Suits.Clubs, Values.Three);
cards.Add(new Card(Suits.Hearts, Values.Ace);
2
L
i
s
t
<
C
a
r
d
>
o
b
j
e
c
t
You specified <Card> when you
created the list, so now this
list only holds references to
Card objects.
C
a
r
d
o
b
j
e
c
t
L
i
s
t
<
C
a
r
d
>
o
b
j
e
c
t
C
a
r
d
o
b
j
e
c
t
King of
Diamonds
Three of
Clubs
Ace of
Hearts
You can add as many
cards as you want to
the List - just call its
Add() method. It’ll make
sure it’s got enough
“slots” for the items. If
it starts to run out, it’ll
automatically resize itself.
A list keeps its elements
in order, just like an
array. King of Diamonds
is first, 3 of Clubs
is second, and Ace of
Hearts is third.
The <T> at the end
of List<T> means
it’s generic.
The T gets replaced with a type—so
List<int> just means a List of
ints.You’ll get plenty of practice with
generics over the next few pages.
Which means
they’re
assignable
to the type:
interfaces,
abstract classes,
base classes, etc.
We’ll sometimes
leave the <T> off
because it can
make the book a
little hard to read.
When you see List,
think List<T>!
336 Chapter 8
Lists are more flexible than arrays
The List class is built into the .NET Framework, and it lets you do a lot of
things with objects that you can’t do with a plain old array. Check out some
of the things you can do with a List<T>.
You can make one.
List<Egg> myCarton = new List<Egg>();
1
Add something to it.
Egg x = new Egg();
myCarton.Add(x);
2
Add something else to it.
Egg y = new Egg();
myCarton.Add(y);
3
Find out how many things are in it.
int theSize = myCarton.Count;
4
Figure out where that thing is.
int idx = myCarton.IndexOf(y);
6
Take something out of it.
myCarton.Remove(y);
7
Find out if it has something in particular in it.
bool Isin = myCarton.Contains(x);
5
A new List object is
created on the heap. But
there’s nothing in it yet.
Now the List expands to hold
the Egg object…
…and expands again to hold
the second Egg object.
Now you can search for any
Egg inside the list. This would
definitely come back true.
When we removed y, we left only x in
the List, so it shrank! And eventually
it will get garbage-collected.
The index for x would be 0 and the
index for y would be 1.
x
x
poof!
wow, what an improvement!
xy
you are here 4 337
enums and collections
List<String> myList =
new List <String>(); String [] myList = new String[2];
String a = “Yay!”; String a = “Yay!”;
myList.Add(a);
String b = “Bummer”; String b = “Bummer”;
myList.Add(b);
int theSize = myList.Count;
Guy o = myList[1];
bool isIn = myList.Contains(b);
List regular array
Fill in the rest of the table below by looking at the List code on
the left and putting in what you think the code might be if it were
using a regular array instead. We don’t expect you to get all of
them exactly right, so just make your best guess.
Hint: You’ll need more than one
line of code here.
We filled in a couple for you....
Assume these statements are all
executed in order, one after another.

338 Chapter 8
List regular array
Lists are objects that use methods just like every
other class you’ve used so far. You can see the list
of methods available from within the IDE just by
typing a . next to the List name, and you pass
parameters to them just the same as you would for
a class you created yourself.
With arrays you’re a lot more limited. You need
to set the size of the array when you create it, and
any logic that’ll need to be performed on it will
need to be written on your own.
Your job was to fill in the rest of the table by looking at the List code
on the left and putting in what you think the code might be if it were
using a regular array instead.
one size fits all
List<String> myList =
new List <String>();
String[] myList = new String[2];
String a = “Yay!” String a = “Yay!”;
myList.Add(a); myList[0] = a;
String b = “Bummer”; String b = “Bummer”;
myList.Add(b); myList[1] = b;
int theSize = myList.Count; int theSize = myList.Length;
Guy o = myList[1]; Guy o = myList[1];
bool isIn = myList.Contains(b); bool isIn = false;
for (int i = 0; i < myList.
Length; i++) {
if (b == myList[i]) {
isIn = true;
}
}
The .NET Framework does have an
Array class, which makes some of these
things a little easier to do, but we’re
concentrating on List objects because
they’re a lot easier to use.

you are here 4 339
enums and collections
List<Shoe> shoeCloset = new List<Shoe>();
shoeCloset.Add(new Shoe()
{ Style = Style.Sneakers, Color = “Black” });
shoeCloset.Add(new Shoe()
{ Style = Style.Clogs, Color = “Brown” });
shoeCloset.Add(new Shoe()
{ Style = Style.Wingtips, Color = “Black” });
shoeCloset.Add(new Shoe()
{ Style = Style.Loafers, Color = “White” });
shoeCloset.Add(new Shoe()
{ Style = Style.Loafers, Color = “Red” });
shoeCloset.Add(new Shoe()
{ Style = Style.Sneakers, Color = “Green” });
int numberOfShoes = shoeCloset.Count;
foreach (Shoe shoe in shoeCloset) {
shoe.Style = Style.Flipflops;
shoe.Color = “Orange”;
}
shoeCloset.RemoveAt(4);
Shoe thirdShoe = shoeCloset[3];
Shoe secondShoe = shoeCloset[2];
shoeCloset.Clear();
shoeCloset.Add(thirdShoe);
if (shoeCloset.Contains(secondShoe))
Console.WriteLine(“That’s surprising.”);
Lists shrink and grow dynamically
class Shoe {
public Style Style;
public string Color;
}
enum Style {
Sneakers,
Loafers,
Sandals,
Flipflops,
Wingtips,
Clogs,
}
We’re declaring a List
of Shoe objects called
ShoeCloset.
This returns the
total number of
Shoe objects in
the List.
foreach is a special kind of
loop for Lists. It will execute
a statement for each object
in the List. This loop creates
an identifier called shoe. As
the loop goes through the
items, it sets shoe equal to
the first item in the list, then
the second, then the third,
until the loop is done.
The Remove() method will
remove the object by its
reference; RemoveAt() does
it by index number.
The Clear() method
removes all of the
objects in a List.
The great thing about a List is that you don’t need to know how long it’ll be when you
create it. A List automatically grows and shrinks to fit its contents. Here’s an example
of a few of the methods that make working with Lists a lot easier than arrays. Create
a new Console Application and add this code to the Main() method. It won’t print
anything—use the debugger to step through the code and see what’s going on.
This foreach loop goes
through each of the
shoes in the closet.
Here’s the Shoe class we’re using,
and the Style enum it uses.
foreach loops work on arrays, too! In
fact, they work on any collection.
You can use a
new
statement inside
the List.Add() method.
We saved references
to two shoes before
we cleared the list. We
added one back, but
the other’s still missing.
This line will never run, because Contains() will return false. We
only added thirdShoe into the cleared list, not fifthShoe.
Do this!
340 Chapter 8
Generics can store any type
You’ve already seen that a List can store strings or Shoes.
You could also make Lists of integers or any other object
you can create. That makes a List a generic collection.
When you create a new List object, you tie it to a specific
type: you can have a List of ints, or strings, or Shoe objects.
That makes working with Lists easy—once you’ve created
your list, you always know the type of data that’s inside it.
List<T> name = new List<T>();
The .NET Framework comes with some generic
interfaces that let the collections you’re building work
with any and all types. The List class implement those
interfaces, and that’s why you could create a List of
integers and work with it in pretty much the same way
that you would work with a List of Shoe objects.
Check it out for yourself. Type the word List into
the IDE, and then right-click on it and select “Go To
Definition”. That will take you to the declaration for
the List class. It implements a few interfaces:
This doesn’t actually mean that you add the letter T. It’s a
notation that you’ll see whenever a class or interface works
with all types. The <T> part means you can put a type in
there, like List<Shoe>, which limits its members to that type.
¢Listisaclassinthe.NETFramework.
¢AListresizes dynamicallytowhatever
sizeisneeded.It’sgotacertaincapacity—
onceyouaddenoughdatatothelist,it’llgrow
toaccommodateit.
¢ToputsomethingintoaList,useAdd().
ToremovesomethingfromaList,use
Remove().
¢Youcanremoveobjectsusingtheirindex
numberusingRemoveAt().
¢YoudeclarethetypeoftheListusinga
type argument,whichisatypenamein
anglebrackets.Example:List<Frog>
meanstheListwillbeabletoholdonly
objectsoftypeFrog.
¢Tofindoutwheresomethingis(andifitis)in
aList,useIndexOf().
¢TogetthenumberofelementsinaList,
usetheCountproperty.
¢YoucanusetheContains()methodto
findoutifaparticularobjectisinaList.
¢foreachisaspecialkindofloopthat
williteratethroughalloftheelementsina
Listandexecutecodeonit.Thesyntax
foraforeachloopisforeach (string s in
StringList). Youdon’thavetotellthe
foreachlooptoincrementbyone;itwillgo
throughtheentireListallonitsown.
This is where Add(), Clear(),
CopyTo(), and Remove()
come from. It’s the basis
for all generic collections.
This interface lets you use
foreach, among other things.
This is where RemoveAt(), IndexOf(), and
Insert() come from.
Lists can be either very flexible (allowing any
type) or very restrictive. So they do what arrays
do, and then quite a few things more.
membership has its privileges
class List<T> : IList<T>,
ICollection<T>, IEnumerable<T>, IList,
ICollection, IEnumerable
.

you are here 4 341
enums and collections
Code Magnets
Can you reconstruct the code snippets to make
a working Windows Form that will pop up the
message box below when you click a button?
private void button1_Click(object sender,
EventArgs e){
string result = “”;
}
a.RemoveAt(2);
List<string> a = new List<string>();
public void printL (List<string> a){
a.Add(zilch);
a.Add(rst);
a.Add(second);
a.Add(third);
if (a.Contains(“two”)) {
a.Add(twopointtwo);
}
if (a.Contains(“three”)){
a.Add(“four”);
}
foreach (string element in a)
{
result += “\n” + element;
}
MessageBox.Show(result);
}
}
if (a.IndexOf(“four”) != 4) {
a.Add(fourth);
}
printL(a);
string zilch = “zero”;
string rst = “one”;
string second = “two”;
string third = “three”;
string fourth = “4.2”;
string twopointtwo = “2.2”;
342 Chapter 8
exercise solution
Code Magnets Solution
string result = “”;
}
a.RemoveAt(2);
List<string> a = new List<string>();
public void printL (List<string> a){
a.Add(zilch);
a.Add(rst);
a.Add(second);
a.Add(third);
if (a.Contains(“two”)) {
a.Add(twopointtwo);
}
if (a.Contains(“three”)){
a.Add(“four”);
}
foreach (string element in a)
{
result += “\n” + element;
}
MessageBox.Show(result);
}
if (a.IndexOf(“four”) != 4) {
a.Add(fourth);
}
printL(a);
string zilch = “zero”;
string rst = “one”;
string second = “two”;
string third = “three”;
string fourth = “4.2”;
string twopointtwo = “2.2”;
Can you figure
out why “2.2”
never gets added
to the list, even
though it’s
declared here?
RemoveAt() removes
the element at
index #2—which is
the third element in
the list.
The foreach loop goes
through all of the
elements in the list
and prints them.
The printL() method uses a
foreach loop to go through a
list of strings, add each of
them to one big string, and
then show it in a message box.
private void button1_Click(object sender, EventArgs e)
{
}
Remember how we talked about using
intuitive names back in Chapter 3? Well,
that may make for good code, but it makes
these puzzles way too easy. Just don’t use
cryptic names like “printL()” in real life!
you are here 4 343
enums and collections
Q: So why would I ever use an enum
instead of a List? Don’t they solve the
same problem?
A:Enumsarealittledifferentthan
Lists.Firstandforemost,enumsare
types,whileListsareobjects.
Youcanthinkofenumsasahandywayto
storelists of constantssoyoucanrefer
tothembyname.They’regreatforkeeping
yourcodereadableandmakingsurethat
youarealwaysusingtherightvariable
namestoaccessvaluesthatyouusereally
frequently.
AListcanstorejustaboutanything.
Sinceit’salistofobjects,eachelementina
listcanhaveitsownmethodsandproperties.
Enums,ontheotherhand,havetobe
assignedoneofthevalue typesinC#(like
theonesonthefirstpageofChapter4).So
youcan’tstorereferencevariablesinthem.
Enumscan’tdynamicallychangetheirsize
either.Theycan’timplementinterfacesor
havemethods,andyou’llhavetocastthem
toanothertypetostoreavaluefroman
enuminanothervariable.Addallofthatup
andyou’vegotsomeprettybigdifferences
betweenthetwowaysofstoringdata.But
botharereallyusefulintheirownright.
Q: OK, it sounds like Lists are
pretty powerful. So why would I ever want
to use an array?
A:Ifyouknowthatyouhaveafixed
numberofitemstoworkwith,orifyouwant
afixedsequenceofvalueswithafixed
length,thenanarrayisperfect.Luckily,you
caneasilyconvertanylisttoanarrayusing
theToArray()method…andyoucan
convertanarraytoalistusingoneofthe
overloadedconstructorsfortheList<T>
object.
Q: I don’t get the name “generic”. Why
is it called a generic collection? Why isn’t
an array generic?
A:Agenericcollectionisacollection
object(orabuilt-inobjectthatletsyoustore
andmanageabunchofotherobjects)that’s
beensetuptostoreonlyonetype(ormore
thanonetype,whichyou’llseeinaminute).
Q: OK, that explains the “collection”
part. But what makes it “generic”?
A:Supermarketsusedtocarrygeneric
itemsthatwerepackagedinbigwhite
packageswithblacktypethatjustsaidthe
nameofwhatwasinside(“PotatoChips”,
“Cola”,“Soap”,etc.).Thegenericbrandwas
allaboutwhatwasinsidethebag,andnot
abouthowitwasdisplayed.
Thesamethinghappenswithgenericdata
types.YourList<T>willworkexactlythe
samewithwhateverhappenstobeinside
it.AlistofShoeobjects,Cardobjects,
ints,longs,orevenotherlistswillstillactat
thecontainerlevel.Soyoucanalwaysadd,
remove,insert,etc.,nomatterwhat’sinside
thelistitself.
Q: Can I have a list that doesn’t have
a type?
A:No.Everylist—infact,everygeneric
collection(andyou’lllearnabouttheother
genericcollectionsinjustaminute)—must
haveatypeconnectedtoit.C#doeshave
non-genericlistscalledArrayLists
thatcanstoreanykindofobject.Ifyou
wanttouseanArrayList,you
needtoincludea“using System.
Collections;”lineinyourcode.But
youreallyshouldn’teverneedtodothis,
becauseaList<object>willwork
justfine!
When you create
a new List object,
you always supply
a type—that tells
C# what type of
data it’ll store. A
list can store a
value type (like int,
bool, or decimal) or
a class.
Arrays also take up less memory
and CPU time for your programs,
but that only accounts for a tiny
performance boost. If you have to
do the same thing, say, millions of
times a second, you might want to
use an array and not a list. But if
your program is running slowly, it’s
pretty unlikely that switching from
lists to arrays will fix the problem.
The term “generic” refers to the
fact that even though a specific
instance of List can only store
one specific type, the List class in
general works with any type.
That’s what the <T> stuff is all about. It’s the way that you tie
a specific instance of a List to one type. But the List class as a
whole is generic enough to work with ANY type. That’s why generic
collections are different from anything you’ve seen so far.
344 Chapter 8
initial here
Collection initializers work just like object initializers
List<Shoe> shoeCloset = new List<Shoe>();
shoeCloset.Add(new Shoe() { Style = Style.Sneakers, Color = “Black” });
shoeCloset.Add(new Shoe() { Style = Style.Clogs, Color = “Brown” });
shoeCloset.Add(new Shoe() { Style = Style.Wingtips, Color = “Black” });
shoeCloset.Add(new Shoe() { Style = Style.Loafers, Color = “White” });
shoeCloset.Add(new Shoe() { Style = Style.Loafers, Color = “Red” });
shoeCloset.Add(new Shoe() { Style = Style.Sneakers, Color = “Green” });
List<Shoe> shoeCloset = new List<Shoe>() {
new Shoe() { Style = Style.Sneakers, Color = “Black” },
new Shoe() { Style = Style.Clogs, Color = “Brown” },
new Shoe() { Style = Style.Wingtips, Color = “Black” },
new Shoe() { Style = Style.Loafers, Color = “White” },
new Shoe() { Style = Style.Loafers, Color = “Red” },
new Shoe() { Style = Style.Sneakers, Color = “Green” },
};
C# gives you a nice bit of shorthand to cut down on typing when you need to
create a list and immediately add a bunch of items to it. When you create a
new List object, you can use a collection initializer to give it a starting list
of items. It’ll add them as soon as the list is created.
The same code rewritten using a collection initializer
You saw this code a few
pages ago—it creates a new
List<Shoe> and fills it with
new Shoe objects.
The statement to create
the list is followed by
curly brackets that
contain separate new
statements, separated by
commas.
You’re not limited to
using new statements
in the initializer—you
can include variables,
too.
A collection initializer makes your code more
compact by letting you combine creating a list
with adding an initial set of items.
You can create a collection
initializer by taking each item
that was being added using Add()
and adding it to the statement
that creates the list.
Notice how each Shoe object is
initialized with its own object
initializer? You can nest them inside
a collection initializer, just like this.
you are here 4 345
enums and collections
Duck
Size
Kind
Quack()
Swim()
Eat()
Walk()
List<Duck> ducks = new List<Duck>() {
new Duck() { Kind = KindOfDuck.Mallard, Size = 17 },
new Duck() { Kind = KindOfDuck.Muscovy, Size = 18 },
new Duck() { Kind = KindOfDuck.Decoy, Size = 14 },
new Duck() { Kind = KindOfDuck.Muscovy, Size = 11 },
new Duck() { Kind = KindOfDuck.Mallard, Size = 14 },
new Duck() { Kind = KindOfDuck.Decoy, Size = 13 },
};
// This keeps the output from disappearing before you can read it
Console.ReadKey();
Let’s create a List of Ducks
Here’s a Duck class that keeps track of your extensive
duck collection. (You do collect ducks, don’t you?) Create
a new Console Application and add a new Duck class
and KindOfDuck enum.
Each duck has a size—this
one is 17 inches long.
You’ve got some
Muscovy ducks.
Some of the ducks
are mallards.
And you’ve got a few
wooden decoys.
class Duck {
public int Size;
public KindOfDuck Kind;
}
enum KindOfDuck {
Mallard,
Muscovy,
Decoy,
}
Here’s the initializer for your List of Ducks
We’ve got six ducks, so we’ll create a List<Duck> that has a
collection initializer with six statements. Each statement in the
initializer creates a new duck, using an object initializer to set
each Duck object’s Size and Kind field. Add this code to
your Main() method in Program.cs:
We’ll use an enum
called KindOfDuck to
keep track of what
sort of ducks are in
your collection.
The class has two public
fields. It’s also got some
methods, which we’re not
showing here.
Do this!
Add Duck and
KindOfDuck to
your project.
You’ll be adding code to your Main()
method to print to the console. Make
sure you keep this line at the end so the
program stays open until you hit a key.

346 Chapter 8
Lists are easy, but SORTING can be tricky
It’s not hard to think about ways to sort numbers or letters. But what do you
sort two objects on, especially if they have multiple fields? In some cases you
might want to order objects by the value in the name field, while in other
cases it might make sense to order objects based on height or date of birth.
There are lots of ways you can order things, and lists support any of them.
You could sort a list of ducks by size…
…or by kind.
Sorted smallest to biggest....
Sorted by kind of duck....
getting your ducks in a row
Lists know how to sort themselves
Every list comes with a Sort() method that rearranges all of the items
in the list to put them in order. Lists already know how to sort most
built-in types and classes, and it’s easy to teach them how to sort your own
classes.
D
u
c
k
o
b
j
e
c
t
D
u
c
k
o
b
j
e
c
t
L
i
s
t
<
D
u
c
k
>
o
b
j
e
c
t
D
u
c
k
o
b
j
e
c
t
17” duck
11” duck
14” duck
Sort()
L
i
s
t
<
D
u
c
k
>
o
b
j
e
c
t
D
u
c
k
o
b
j
e
c
t
D
u
c
k
o
b
j
e
c
t
11” duck
D
u
c
k
o
b
j
e
c
t
14” duck
17” duck
After the list of ducks is
sorted, it’s got the same
items in it—but they’re in
a different order.
Technically, it’s not the List<T> that
knows how to sort itself. It depends on
an IComparer<T> object, which you’ll
learn about in a minute.
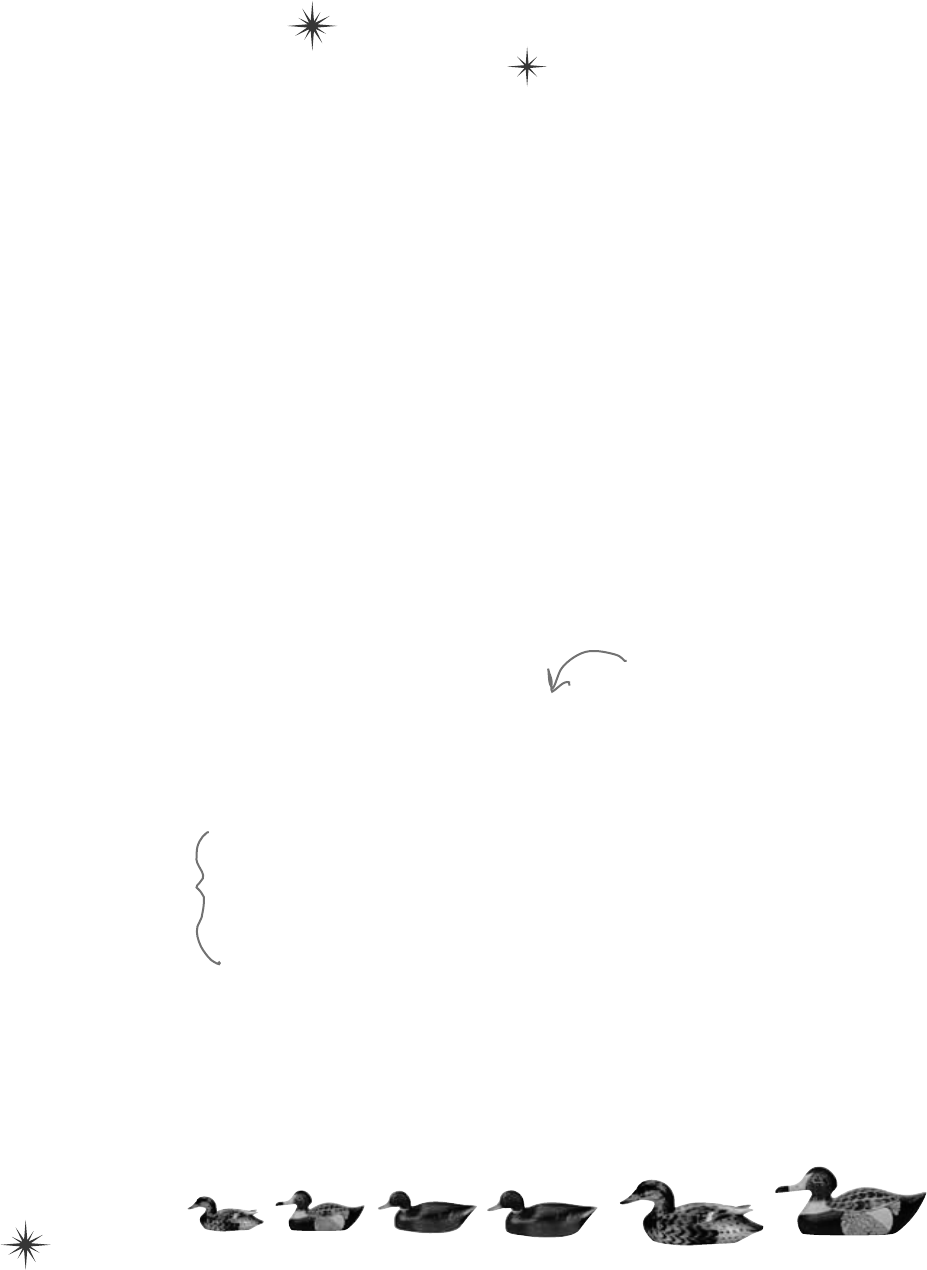
you are here 4 347
enums and collections
IComparable<Duck> helps your list sort its ducks
The List.Sort() method knows how to sort any type or class that implements the
IComparable<T> interface. That interface has just one member—a method called
CompareTo(). Sort() uses an object’s CompareTo() method to compare it with
other objects, and uses its return value (an int) to determine which comes first.
But sometimes you need to sort a list of objects that don’t implement IComparable<T>,
and .NET has another interface to help with that. You can pass Sort() an instance of a
class that implements IComparer<T>. That interface also has one method. The List
object’s Sort() method uses the comparer object’s Compare() method to compare pairs
of objects, in order to figure out which one comes first in the sorted list.
An object’s CompareTo() method compares it to another object
One way to let our List object sort is to modify the Duck class to implement
IComparable<Duck>. To do that, we’d add a CompareTo() method that takes a Duck
reference as a parameter. If the duck to compare should come after the current duck in the
sorted list, CompareTo() returns a positive number.
Update your project’s Duck class by implementing IComparable<Duck> so that it sorts
itself based on duck size:
class Duck : IComparable<Duck> {
public int Size;
public KindOfDuck Kind;
public int CompareTo(Duck duckToCompare) {
if (this.Size > duckToCompare.Size)
return 1;
else if (this.Size < duckToCompare.Size)
return -1;
else
return 0;
}
}
You can make
any class
work with the
List’s built‑in
Sort() method
by having it
implement
IComparable<T>
and adding a
CompareTo()
method.
When you implement IComparable<T>, you
specify the type being compared when you
have the class implement the interface.
Most CompareTo() methods
look a lot like this. This
method first compares the
Size field against the other
duck’s Size field. If this
duck is bigger, it returns 1.
If it’s smaller, it returns -1.
And if they’re the same size,
it returns zero.
If you want to sort your list from smallest
to biggest, have CompareTo() return a
positive number if it’s comparing to a
smaller duck, and a negative number if it’s
comparing to a bigger one.
Add this code to the end of your Main() method above the call to Console.
ReadKey() to tell your list of ducks to sort itself. Use the debugger to see this at
work by putting a breakpoint in the CompareTo() method.
ducks.Sort();
348 Chapter 8
Your List will
sort differently
depending on how
you implement
IComparer<T>.
class DuckComparerBySize : IComparer<Duck>
{
public int Compare(Duck x, Duck y)
{
if (x.Size < y.Size)
return -1;
if (x.Size > y.Size)
return 1;
return 0;
}
}
This class implements IComparer,
and specifies the type of object it
can sort: Duck objects.
Lists have a special interface built into the .NET Framework that lets
you build a separate class to help the List<T> sort out its members.
By implementing the IComparer<T> interface, you can tell
your List exactly how you want it to sort your objects. You do that by
implementing the Compare() method in the IComparer<T> interface.
It takes two object parameters, x and y, and returns an int. If x is less than
y, it should return a negative value. If they’re equal, it should return zero.
And if x is greater than y, it should return a positive value.
Here’s an example of how you’d declare a comparer class to compare
Duck objects by size. Add it to your project as a new class:
Use IComparer to tell your List how to sort
The Compare() method returns an
int, and has two parameters: both
of the type you’re sorting.
These will always match:
the same type in each.
You can do whatever
types of comparisons
you want in the method.
Any negative number means
object x should go before
object y. x is “less than” y.
Any positive value means object
x should go after object y. x
is “greater than” y.
0 means that these two
objects should be treated
as the same (using this
comparison calculation).
sort it out amongst yourselves
public static void PrintDucks(List<Duck> ducks)
{
foreach (Duck duck in ducks)
Console.WriteLine(duck.Size.ToString() + “-inch ” + duck.Kind.ToString());
Console.WriteLine(“End of ducks!”);
}
Here’s a method to print the
ducks in a List<Duck>.
Add this PrintDucks method to
your Program class in your project
so you can print the ducks in a list.
Update your Main() method to call
it before and after you sort the
list so you can see the results!

you are here 4 349
enums and collections
Create an instance of your comparer object
When you want to sort using IComparer<T>, you need to create a new
instance of the class that implements it. That object exists for one reason—
to help List.Sort() figure out how to sort the array. But like any other
(non-static) class, you need to instantiate it before you use it.
Multiple IComparer implementations, multiple ways
to sort your objects
You can create multiple IComparer<Duck> classes with different sorting
logic to sort the ducks in different ways. Then you can use the comparer
you want when you need to sort in that particular way. Here’s another duck
comparer implementation to add to your project:
class DuckComparerByKind : IComparer<Duck> {
public int Compare(Duck x, Duck y) {
if (x.Kind < y.Kind)
return -1;
if (x.Kind > y.Kind)
return 1;
else
return 0;
}
}
DuckComparerByKind kindComparer = new DuckComparerByKind();
ducks.Sort(kindComparer);
PrintDucks(ducks);
We compared the ducks’ Kind
properties, so the ducks are sorted
based on the index value of the
KindOfDuck enum.
This comparer sorts by duck
type. Remember, when you
compare the enum Kind, you’re
comparing their index values.
Notice how “greater than” and
“less than” have a different
meaning here. We used < and > to
compare enum index values, which
lets us put the ducks in order.
Here’s an example of how enums
and Lists work together. Enums
stand in for numbers, and are used
in sorting of lists.
DuckComparerBySize sizeComparer = new DuckComparerBySize();
ducks.Sort(sizeComparer);
PrintDucks(ducks);
We left out the code you already
saw a few pages ago to initialize
the list. Make sure you initialize
your list before you try to sort
it! If you don’t, you’ll get a null
pointer exception.
You’ll pass Sort() a reference to the
new DuckComparerBySize object as its
parameter.
Sorted smallest to biggest....
Sorted by kind of duck....
So Mallard comes before
Muscovy, which comes
before Decoy.
Add this code to your program’s
Main() method to see how the
ducks get sorted.
More duck sorting
code for your
Main() method.
350 Chapter 8
pick a card any card
IComparer can do complex comparisons
One advantage to creating a separate class for sorting your ducks is
that you can build more complex logic into that class—and you can
add members that help determine how the list gets sorted.
enum SortCriteria {
SizeThenKind,
KindThenSize,
}
class DuckComparer : IComparer<Duck> {
public SortCriteria SortBy = SortCriteria.SizeThenKind;
public int Compare(Duck x, Duck y) {
if (SortBy == SortCriteria.SizeThenKind)
if (x.Size > y.Size)
return 1;
else if (x.Size < y.Size)
return -1;
else
if (x.Kind > y.Kind)
return 1;
else if (x.Kind < y.Kind)
return -1;
else
return 0;
else
if (x.Kind > y.Kind)
return 1;
else if (x.Kind < y.Kind)
return -1;
else
if (x.Size > y.Size)
return 1;
else if (x.Size < y.Size)
return -1;
else
return 0;
}
}
DuckComparer comparer = new DuckComparer();
comparer.SortBy = SortCriteria.KindThenSize;
ducks.Sort(comparer);
PrintDucks(ducks);
comparer.SortBy = SortCriteria.SizeThenKind;
ducks.Sort(comparer);
PrintDucks(ducks);
Here’s a more complex class to
compare ducks. Its Compare() method
takes the same parameters, but it
looks at the public SortBy field to
determine how to sort the ducks.
This enum tells the object which
way to sort the ducks.
This if statement checks the SortBy
field. If it’s set to SizeThenKind,
then it first sorts the ducks by size,
and then within each size it’ll sort
the ducks by their kind.
Instead of just returning 0 if the two
ducks are the same size, the comparer
checks their kind, and only returns 0
if the two ducks are both the same
size and the same kind.
If SortBy isn’t set to SizeThenKind,
then the comparer first sorts by the
kind of duck. If the two ducks are the
same kind, then it compares their size.
Here’s how we’d use this comparer object.
First we’d instantiate it as usual. Then
we can set the object’s SortBy field
before calling ducks.Sort(). Now you
can change the way the list sorts its
ducks just by changing one field in the
object. Add this code to the end of
your Main() method. Now it sorts and
re-sorts the list a bunch of times!
If you don’t provide Sort() with
an IComparer<T> object , it uses
a default one that can sort value
types or compare references. Flip
to Leftover #5 in the Appendix to
learn a little more about comparing
objects.
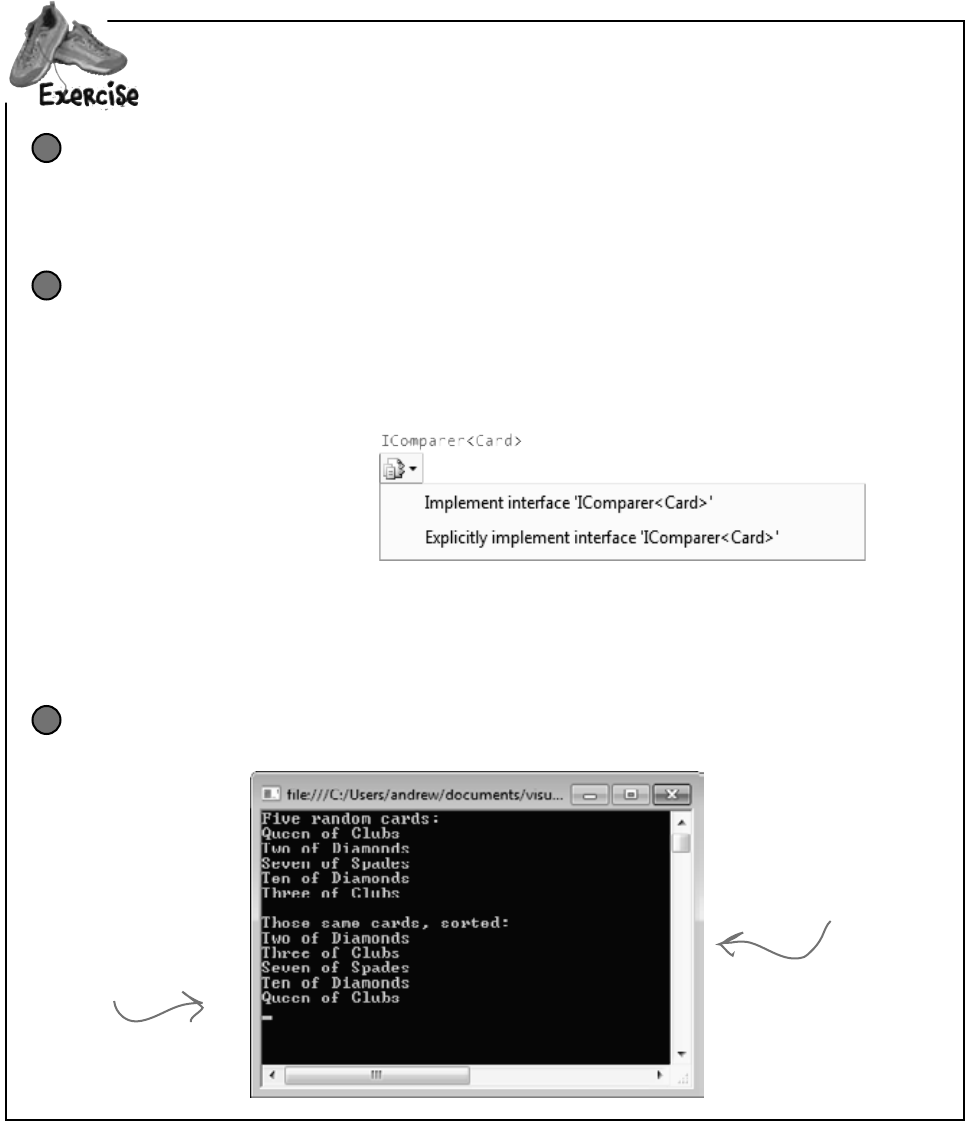
you are here 4 351
enums and collections
vv Createfiverandomcardsandthensortthem.
Create code to make a jumbled set of cards
Create a new Console Application and add code to the Main() method that creates five random
Card objects. After you create each object, use the built-in Console.WriteLine() method to
write its name to the output. Use Console.ReadKey() at the end of the program to keep your
window from disappearing when the program finishes.
1
Create a class that implements IComparer<Card> to sort the cards
Here’s a good chance to use that IDE shortcut to implement an interface:
class CardComparer_byValue : IComparer<Card>
Then click on IComparer<Card> and hover over the I. You’ll see a box appear underneath it.
When you click on the box, the IDE pops up its “Implement interface” window:
Click on “Implement interface IComparer<Card>” in the box to tell the IDE to automatically fill
in all of the methods and properties that you need to implement. In this case, it creates an empty
Compare() method to compare two cards, x and y. Write the method so that it returns 1 if x is
bigger than y, –1 if it’s smaller, and 0 if they’re the same card. In this case, make sure that any king
comes after any jack, which comes after any four, which comes after any ace.
2
Make sure the output looks right
Here’s what your output window should look like after you click the button.
3
When you use the built-in
Console.WriteLine()
method, it adds a line
to this output. Console.
ReadKey() waits for you
to press a key before the
program ends.
Your IComparer
object needs to sort
the cards by value,
so the cards with
the lowest values are
first in the list.
Sometimes it’s a little hard to
get this box to pop up, so the
IDE has a useful shortcut.: just
press ctrl-period.
352 Chapter 8
class CardComparer_byValue : IComparer<Card> {
public int Compare(Card x, Card y) {
if (x.Value < y.Value) {
return -1;
}
if (x.Value > y.Value) {
return 1;
}
if (x.Suit < y.Suit) {
return -1;
}
if (x.Suit > y.Suit) {
return 1;
}
return 0;
}
}
static void Main(string[] args)
{
Random random = new Random();
Console.WriteLine(“Five random cards:”);
List<Card> cards = new List<Card>();
for (int i = 0; i < 5; i++)
{
cards.Add(new Card((Suits)random.Next(4),
(Values)random.Next(1, 14)));
Console.WriteLine(cards[i].Name);
}
Console.WriteLine();
Console.WriteLine(“Those same cards, sorted:”);
cards.Sort(new CardComparer_byValue());
foreach (Card card in cards)
{
Console.WriteLine(card.Name);
}
Console.ReadKey();
}
Createfiverandomcardsandthensortthem.
Here’s the “guts” of the
card sorting, which uses the
built-in List.Sort() method.
Sort() takes an IComparer
object, which has one method:
Compare(). This implementation
takes two cards and first
compares their values, then
their suits.
If none of the other four return
statements were hit, the cards must be
the same—so return zero.
If x has a bigger value,
return 1. If x’s value
is smaller, return -1.
Remember, both return
statements end the
method immediately.
These statements only get
executed if x and y have the
same value—that means the
first two return statements
weren’t executed.
Here’s a generic List
of Card objects to
store the cards. Once
they’re in the list, it’s
easy to sort them
using an IComparer.
look it up
We’re using Console.ReadKey() to keep console
applications from exiting after they finish. This
is great for learning, but not so great if you want
to write real command-line applications. If you
use Ctrl-F5 to start your program, the IDE runs
it without debugging. When it finishes, it prints
“Press any key to continue…” and waits for a
keypress. But it doesn’t debug your program
(because it’s running without debugging), so
your breakpoints and watches won’t work.
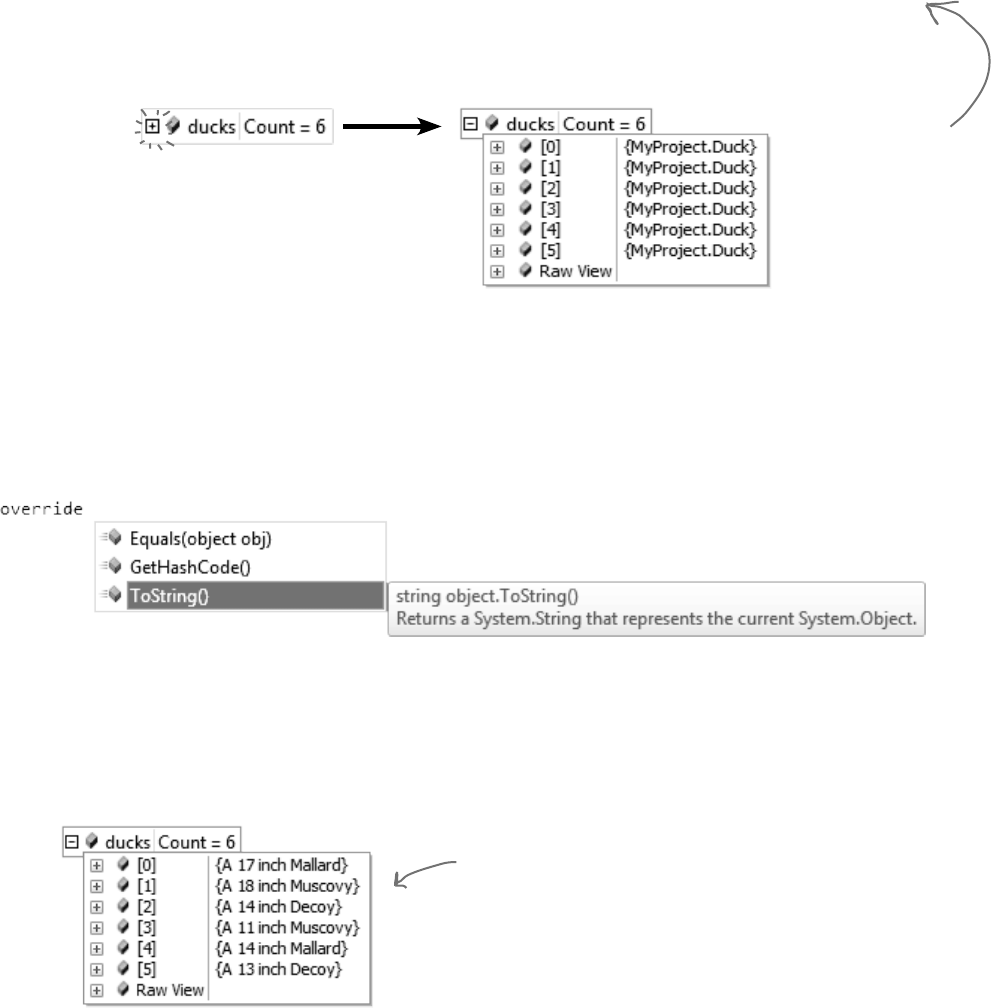
you are here 4 353
enums and collections
Every .NET object has a method called ToString() that converts it to a string. By default, it just returns the
name of your class (MyProject.Duck). The method is inherited from Object (remember, that’s the base class for every
object). This is a really useful method, and it’s used a lot. For example, the + operator to concatenate strings automatically
calls an object’s ToString(). And Console.WriteLine() or String.Format() will automatically call it
when you pass objects to them, which can really come in handy when you want to turn an object into a string.
Go back to your duck sorting program. Put a breakpoint in the Main() method anywhere after the list is initialized
and debug your program. Then hover over any ducks variable so it shows the value in a window. Any time you
look at a variable in the debugger that’s got a reference to a List, you can explore the contents of it by clicking the +
button:
Luckily, ToString() is a virtual method on Object, the base class of every object. So all you need to do is
override the ToString() method—and when you do, you’ll see the results immediately in the IDE’s Watch
window! Open up your Duck class and start adding a new method by typing override. As soon as you press space,
the IDE will show you the methods you can override:
Click on ToString() to tell the IDE to add a new ToString() method. Replace the contents so it looks like this:
public override string ToString()
{
return "A " + Size + " inch " + Kind.ToString();
}
Run your program and look at the list again. Now the IDE shows you the contents of your Ducks!
Hmm, that’s not as useful as we’d hoped. You can see that there are six Duck objects in the list
(“MyProject” is the namespace we used). If you click the + button next to a duck, you can see
its Kind and Size values. But wouldn’t it be easier if you could see all of them at once?
When the IDE’s debugger shows
you an object, it calls the
object’s ToString() method and
shows you its contents.
So instead of
passing a value to
Console.WriteLine(),
String.Format(),
etc., you can pass
an object—its
ToString() method is
called automatically.
That also works with
value types like ints
and enums, too!
Overriding a ToString() method lets an object describe itself
The IDE calls the ToString() method when it displays
an object in its Watch window. But the ToString()
method that Duck inherited from Object just returns
its class name. It would be really useful if we could
make ToString() more informative.
354 Chapter 8
foreach loopy
Update your foreach loops to let your
Ducks and Cards print themselves
You’ve seen two different examples of programs looping through a list of objects and calling Console.
WriteLine() to print a line to the console for each object—like this foreach loop that prints every card
in a List<Card>:
foreach (Card card in cards)
{
Console.WriteLine(card.Name);
}
The PrintDucks() method did something similar for Duck objects in a List:
This is a pretty common thing to do with objects. But now that your Duck has a ToString() method,
your PrintDucks() method should take advantage of it:
public static void PrintDucks(List<Duck> ducks) {
foreach (Duck duck in ducks) {
Console.WriteLine(duck);
}
Console.WriteLine(“End of ducks!”);
}
Add this to your Ducks program and run it again. It prints the same output. And now if you want to add, say,
a Gender property to your Duck object, you just have to update the ToString() method, and everything
that uses it (including the PrintDucks() method) will reflect that change.
Add a ToString() method to your Card object, too
Your Card object already has a Name property that returns the name of the card:
public string Name
{
get { return Value.ToString() + “ of ” + Suit.ToString(); }
}
That’s exactly what its ToString() method should do. So add a ToString() method to the Card class:
public override string ToString()
{
return Name;
}
Now your programs that use Card objects will be easier to debug.
foreach (Duck duck in ducks)
{
Console.WriteLine(duck.Size.ToString() + “-inch ” + Kind);
}
If you pass Console.WriteLine()
a reference to an object, it will
call that object’s ToString()
method automatically.
ToString() is useful for a lot more than just
making your objects easier to identify in the IDE.
Keep your eyes open over the next few chapters,
and you’ll see how useful it is for every object to
have a way to convert itself to a string. That’s
why every object has a ToString() method.
The + operator automatically
calls the KindOfDuck enum’s
ToString() method.
You’re still allowed to call
ToString() like this, but now
you know it’s not necessary in
this case, because + calls it
automatically.

you are here 4 355
enums and collections
When you write a foreach loop,
you’re using IEnumerable<T>
Go to the IDE, find a List<Duck> variable, and use IntelliSense to take a look at its
GetEnumerator() method. Start typing “.GetEnumerator” and see what comes up:
Add a line to create a new array of Duck objects:
Duck[] duckArray = new Duck[6];
Then type duckArray.GetEnumerator—the array also has a GetEnumerator() method.
That’s because all List, and arrays implement an interface called IEnumerable<T>, which
contains one method. That method, GetEnumerator(), returns an Enumerator object.
It’s the Enumerator object that provides the machinery that lets you loop through a list in order.
Here’s a foreach loop that loops through a List<Duck> with a variable called duck:
foreach (Duck duck in ducks) {
Console.WriteLine(duck);
}
And here’s what that loop is actually doing behind the scenes:
IEnumerator<Duck> enumerator = ducks.GetEnumerator();
while (enumerator.MoveNext()) {
Duck duck = enumerator.Current;
Console.WriteLine(duck);
}
IDisposable disposable = enumerator as IDisposable;
if (disposable != null) disposable.Dispose();
(Don’t worry about the last two lines for now. You’ll learn about IDisposable in Chapter 9.)
Those two loops print out the same ducks. You can see this for yourself by running both of them;
they’ll both have the same output.
Here’s what’s going on. When you’re looping through a list or array (or any other collection), the
MoveNext() method returns true if there’s another element in the list, or false if the enumerator
has reached the end of the list. The Current property always returns a reference to the current
element. Add it all together, and you get a foreach loop!
What do you think would happen during a foreach loop if your ToString()
method changes one of the object’s fields?
When a collection
implements
IEnumerable<T>,
it’s giving you a way
to write a loop that
goes through its
contents in order.
foreach Loops
Up Close
Try experimenting with this by changing your Duck’s ToString() to increment the Size property. Debug your program
and hover over a Duck. Then do it again. Remember, each time you do it, the IDE calls its ToString() method.
Collection initializers work
with ANY IEnumerable<T>
object!
Technically, there’s a
little more than this,
but you get the idea....
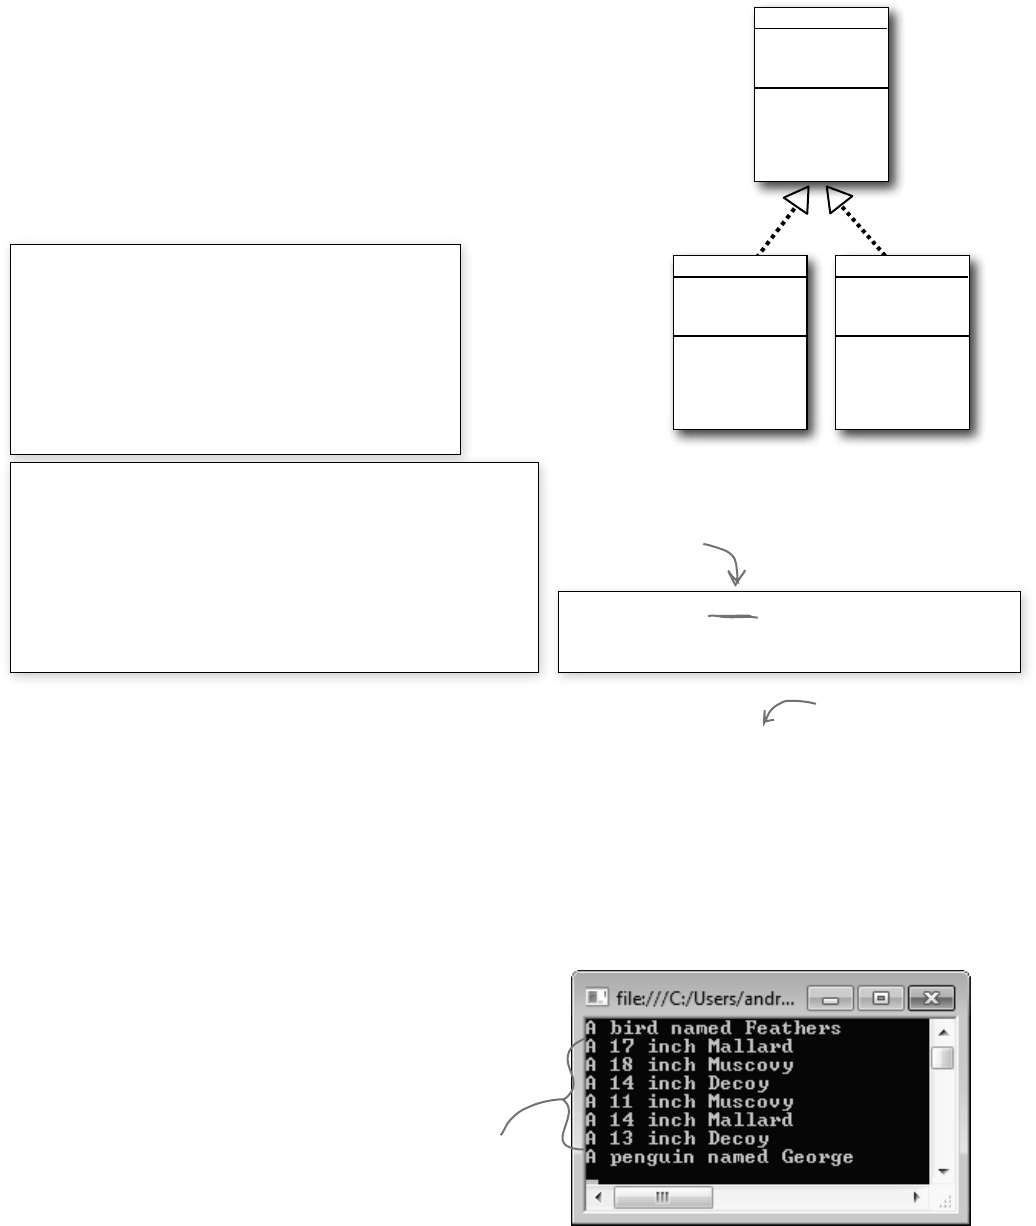
356 Chapter 8
nobody here but us ducks
You can upcast an entire list using IEnumerable
Remember how you can upcast any object to its superclass? Well, when you’ve got a
List of objects, you can upcast the entire list at once. It’s called covariance, and all
you need for it is an IEnumerable<T> interface reference.
Create a Console Application and add a base class, Bird (for Duck to extend), and a
Penguin class. We’ll use the ToString() method to make it easy to see which class is which.
Bird
Name
Fly()
PenguinDuck
Size
Kind
class Bird {
public string Name { get; set; }
public void Fly() {
Console.WriteLine("Flap, flap");
}
public override string ToString() {
return "A bird named " + Name;
}
}
class Penguin : Bird
{
public void Fly() {
Console.WriteLine(“Penguins can’t fly!”);
}
public override string ToString() {
return “A penguin named ” + base.Name;
}
}
class Duck : Bird, IComparable<Duck> {
// The rest of the class is the same
}
Here’s a Bird class, and a Penguin class that
inherits from it. Add them to a new Console
Application project, then copy your existing Duck
class into it. Just change its declaration so that
it extends Bird.
Here are the first few lines of your Main() method to initialize your list and then upcast it.
List<Duck> ducks = new List<Duck>() { // initialize your list as usual }
IEnumerable<Bird> upcastDucks = ducks;
Take a close look at that last line of code. You’re taking a reference to your List<Duck> and assigning it to an
IEnumerable<Bird> interface variable. Debug through it and you’ll see it’s pointing to the same object.
Combine your birds into a single list
Covariance is really useful when you want to take a collection of objects and add them to a more general list. Here’s an
example: if you have a list of Bird obects, you can add your Duck list to it in one easy step. Here’s an example that
uses the List.AddRange() method, which you can use to add the contents of one list into another.
List<Bird> birds = new List<Bird>();
birds.Add(new Bird() { Name = “Feathers” });
birds.AddRange(upcastDucks);
birds.Add(new Penguin() { Name = “George” });
foreach (Bird bird in birds) {
Console.WriteLine(bird);
}
Copy the same collection
initializer you’ve been
using to initialize your
List of ducks.
Once the ducks were upcast
into an IEnumerable<Bird>,
you could add them to a list
of Bird objects.
you are here 4 357
enums and collections
You can build your own overloaded methods
You’ve been using overloaded methods and even an overloaded
constructor that were part of the built-in .NET Framework classes and
objects, so you can already see how useful they are. Wouldn’t it be cool
if you could build overloaded methods into your own classes? Well, you
can—and it’s easy! All you need to do is write two or more methods that
have the same name but take different parameters. Do this!
Create a new project and add the Card class to it.
You can do this easily by right-clicking on the project in the Solution Explorer and selecting “Existing
Item” from the Add menu. The IDE will make a copy of the class and add it to the project. The file
will still have the namespace from the old project, so go to the top of the Card.cs file and
change the namespace line to match the name of the new project you created. Then do the same
for the Values and Suits enums.
1
Add some new overloaded methods to the card class.
Create two static DoesCardMatch() methods. The first one should check a card’s suit. The
second should check its value. Both return true only if the card matches.
public static bool DoesCardMatch(Card cardToCheck, Suits suit) {
if (cardToCheck.Suit == suit) {
return true;
} else {
return false;
}
}
public static bool DoesCardMatch(Card cardToCheck, Values value) {
if (cardToCheck.Value == value) {
return true;
} else {
return false;
}
}
2
Overloaded methods don’t have
to be static, but it’s good to get
a little practice writing static
methods.
Add a button to the form to use the new methods.
Add this code to the button:
Card cardToCheck = new Card(Suits.Clubs, Values.Three);
bool doesItMatch = Card.DoesCardMatch(cardToCheck, Suits.Hearts);
MessageBox.Show(doesItMatch.ToString());
As soon as you type “DoesCardMatch(” the IDE will show you that you really did build an
overloaded method:
Take a minute and play around with the two methods so you can get used to overloading.
3
If you don’t do this, you’ll only be able
to access the Card class by specifying its
namespace (like oldnamespace.Card).
You’ve seen overloading already. Flip
back to the solution to Kathleen’s
party planning program in Chapter
6 on pages 253–256—you added an
overloaded CalculateCost() method to
the DinnerParty class.
Notice how you’re using ToString() here. That’s because
MessageBox.Show() takes a string, not a bool or object..
You can also use a using statement
instead of changing the namespace.
If you want to learn more about
namespaces, take a minute and flip
to Leftover #2 in the Appendix.
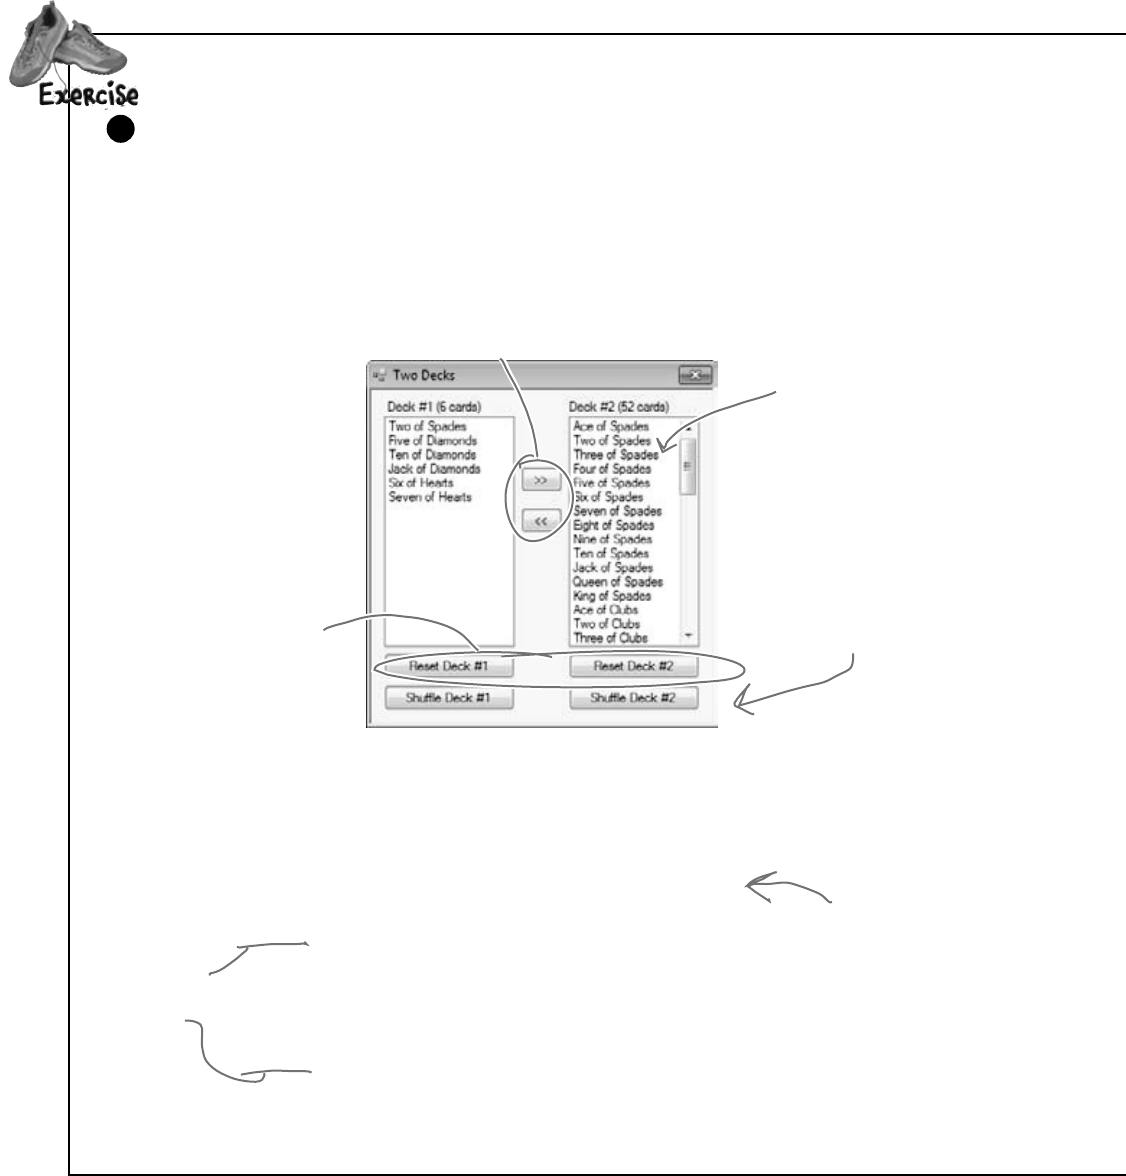
358 Chapter 8
v
Build a form that lets you move cards between two decks
You’ve built a card class already. Now it’s time to build a class to hold any number of cards, which we’ll call
Deck. A real-life deck has 52 cards, but the Deck class can hold any number of cards—or no cards at all.
Then you’ll build a form that shows you the contents of two Deck objects. When you first start the program,
deck #1 has up to 10 random cards, and deck #2 is a complete deck of 52 cards, both sorted by suit and
then value—and you can reset either deck to its initial state using two Reset buttons. The form also has
buttons (labeled “<<” and “>>”) to move cards between the decks.
1
These buttons are named moveToDeck2 (top) and moveToDeck1
(bottom). They move cards from one deck to the other.
The reset1 and reset2
buttons first call the
ResetDeck() method and then
the RedrawDeck() method.
These buttons are
named shuffle1 and
shuffle2. They call
the appropriate Deck.
Shuffle() method, and
then redraw the deck.
Use two ListBox controls to
show the two decks. When the
moveToDeck1 button is clicked,
it moves the selected card
from deck #2 to deck #1.
Remember, you can use a
control’s Name property to
give it a name to make your
code easier to read. Then
when you double-click on
the button, its event handler
is given a matching name.
In addition to the event handlers for the six buttons, you’ll need to add two methods for the form. First add a
ResetDeck() method, which resets a deck to its initial state. It takes an int as a parameter: if it’s passed 1, it
resets the first Deck object by reinitializing it to an empty deck and a random number of up to 10 random cards;
if it’s passed 2, it resets the second Deck object so that it contains a full 52-card deck. Then add this method:
private void RedrawDeck(int DeckNumber) {
if (DeckNumber == 1) {
listBox1.Items.Clear();
foreach (string cardName in deck1.GetCardNames())
listBox1.Items.Add(cardName);
label1.Text = “Deck #1 (“ + deck1.Count + “ cards)”;
} else {
listBox2.Items.Clear();
foreach (string cardName in deck2.GetCardNames())
listBox2.Items.Add(cardName);
label2.Text = “Deck #2 (“ + deck2.Count + “ cards)”;
}
}
The RedrawDeck() method
shuffles the deck, draws
random cards from it, and
updates the two listbox
controls with whatever
happens to be in the two
Deck objects.
Take a look at
how we used the
foreach loop to
add each of the
cards in the
deck to the
listbox.
all hands on deck
GetsomepracticeusingListsbybuildingaclasstostoreadeckofcards,
alongwithaformthatusesit.
you are here 4 359
enums and collections
v
class Deck {
private List<Card> cards;
private Random random = new Random();
public Deck() {
cards = new List<Card>();
for (int suit = 0; suit <= 3; suit++)
for (int value = 1; value <= 13; value++)
cards.Add(new Card((Suits)suit, (Values)value));
}
public Deck(IEnumerable<Card> initialCards) {
cards = new List<Card>(initialCards);
}
public int Count { get { return cards.Count; } }
public void Add(Card cardToAdd) {
cards.Add(cardToAdd);
}
public Card Deal(int index) {
Card CardToDeal = cards[index];
cards.RemoveAt(index);
return CardToDeal;
}
public void Shuffle() {
// this method shuffles the cards by rearranging them in a random order
}
public IEnumerable<string> GetCardNames() {
// this method returns a string array that contains each card’s name
}
public void Sort() {
cards.Sort(new CardComparer_bySuit());
}
}
Hint: The ListBox
control’s SelectedIndex
property will be the
same as the index of
the card in the list.
You can pass it directly
to the Deal() method.
If no card is selected,
it’ll be less than zero.
In that case, the
moveToDeck button
should do nothing.
Another hint: The form makes it really easy to test your Shuffle() method.
Keep clicking the “Reset Deck #1” button until you get a three-card deck.
That’ll make it easy to see if your shuffling code works.
Deck
Count
Add()
Deal()
GetCardNames()
Shufe()
Sort()
Build the Deck class
Here’s the skeleton for the Deck class. We’ve filled in several of the methods for you. You’ll need to finish it
by writing the Shuffle() and GetCardNames() methods, and you’ll have to get the Sort() method
to work. We also added two useful overloaded constructors: one that creates a complete deck of 52
cards, and another that takes an array of Card objects and loads them into the deck.
2
When you have the declarations for a class
without the implementation, it’s called a “skeleton”.
If you don’t pass parameters
into the constructor, it creates
a complete deck of 52 cards.
This overloaded constructor takes one
parameter—an array of cards, which
it loads as the initial deck.
The Deck stores its cards in a List—but it keeps
it private to make sure it’s well encapsulated.
The Deal method deals one card
out of the deck—it removes the
Card object from the deck and
returns a reference to it. You
can deal from the top of the
deck by passing it 0, or deal
from the middle by passing it
the index of the card to deal.
You’ll need to write the Shuffle()
method and the GetCardNames()
method, and add a class that
implements IComparer to make the
Sort() method work. And you’ll
need to add the Card class you
already wrote. If you use “Add
Existing Item” to add it, don’t
forget to change its namespace.
The parameter
has the type
IEnumerable<Card>,
which lets you pass
any collection into
the constructor,
not just a List<T>
or an array.
Again, even though
GetCardNames()
returns an
array, we expose
IEnumerable<string>.

360 Chapter 8
class Deck {
private List<Card> cards;
private Random random = new Random();
public Deck() {
cards = new List<Card>();
for (int suit = 0; suit <= 3; suit++)
for (int value = 1; value <= 13; value++)
cards.Add(new Card((Suits)suit, (Values)value));
}
public Deck(IEnumerable<Card> initialCards) {
cards = new List<Card>(initialCards);
}
public int Count { get { return cards.Count; } }
public void Add(Card cardToAdd) {
cards.Add(cardToAdd);
}
public Card Deal(int index) {
Card CardToDeal = cards[index];
cards.RemoveAt(index);
return CardToDeal;
}
public void Shuffle() {
List<Card> NewCards = new List<Card>();
while (cards.Count > 0) {
int CardToMove = random.Next(cards.Count);
NewCards.Add(cards[CardToMove]);
cards.RemoveAt(CardToMove);
}
cards = NewCards;
}
public IEnumerable<string> GetCardNames() {
string[] CardNames = new string[cards.Count];
for (int i = 0; i < cards.Count; i++)
CardNames[i] = cards[i].Name;
return CardNames;
}
public void Sort() {
cards.Sort(new CardComparer_bySuit());
}
}
Buildaclasstostoreadeckofcards,alongwithaformthatusesit.
Here’s the constructor that creates a complete
deck of 52 cards. It uses a nested for loop. The
outside one loops through the four suits. That
means the inside loop that goes through the 13
values runs four separate times, once per suit.
Here’s the other constructor—this class
has two overloaded constructors, each
with different parameters.
The Add and Deal methods are pretty
straightforward—they use the methods
for the Cards list. The Deal method
removes a card from the list, and the
Add method adds a card to the list.
Your GetCardNames() method needs to
create an array that’s big enough to
hold all the card names. This one uses a
for loop, but it could also use foreach.
The Shuffle() method creates a
new instance of List<Cards> called
NewCards. Then it pulls random cards
out of the Cards field and sticks
them in NewCards until Cards is empty.
Once it’s done, it resets the Cards
field to point to the new instance.
The old instance won’t have any more
references pointing to it, so it’ll get
collected by the garbage collector.
exercise solution
you are here 4 361
enums and collections
class CardComparer_bySuit : IComparer<Card>
{
public int Compare(Card x, Card y)
{
if (x.Suit > y.Suit)
return 1;
if (x.Suit < y.Suit)
return -1;
if (x.Value > y.Value)
return 1;
if (x.Value < y.Value)
return -1;
return 0;
}
}
Deck deck1;
Deck deck2;
Random random = new Random();
public Form1() {
InitializeComponent();
ResetDeck(1);
ResetDeck(2);
RedrawDeck(1);
RedrawDeck(2);
}
private void ResetDeck(int deckNumber) {
if (deckNumber == 1) {
int numberOfCards = random.Next(1, 11);
deck1 = new Deck(new Card[] { });
for (int i = 0; i < numberOfCards; i++)
deck1.Add(new Card((Suits)random.Next(4),
(Values)random.Next(1, 14)));
deck1.Sort();
} else
deck2 = new Deck();
}
To reset deck #1, this method first uses random.Next()
to pick how many cards will go into the deck, and then
creates a new empty deck. It uses a for loop to add
that many random cards. It finishes off by sorting the
deck. Resetting deck #2 is easy—just create a new
instance of Deck().
The form’s constructor
needs to reset the two
decks, and then it draws
them.
Sorting by suit is a lot like
sorting by value. The only
difference is that in this
case the suits are compared
first, and then the values
are compared only if the
suits match.
We’re not done yet—flip the page!
Instead of using if/else
if, we used a series of if
statements. This works
because each if statement
only executes if the previous
one didn’t—otherwise the
previous one would have
returned.
You’ve already got the
RedrawDeck() method
from the instructions.

362 Chapter 8
private void reset1_Click(object sender, EventArgs e) {
ResetDeck(1);
RedrawDeck(1);
}
private void reset2_Click(object sender, EventArgs e) {
ResetDeck(2);
RedrawDeck(2);
}
private void shuffle1_Click(object sender, EventArgs e) {
deck1.Shuffle();
RedrawDeck(1);
}
private void shuffle2_Click(object sender, EventArgs e) {
deck2.Shuffle();
RedrawDeck(2);
}
private void moveToDeck1_Click(object sender, EventArgs e) {
if (listBox2.SelectedIndex >= 0)
if (deck2.Count > 0) {
deck1.Add(deck2.Deal(listBox2.SelectedIndex));
}
RedrawDeck(1);
RedrawDeck(2);
}
private void moveToDeck2_Click(object sender, EventArgs e) {
if (listBox1.SelectedIndex >= 0)
if (deck1.Count > 0)
deck2.Add(deck1.Deal(listBox1.SelectedIndex));
RedrawDeck(1);
RedrawDeck(2);
}
}
Here’s the rest of the
code for the form.
These buttons are
pretty simple—first
reset or shuffle the
deck, then redraw it.
Naming your controls makes it a lot easier to read
your code. If these were called button1_Click,
button2_Click, etc., you wouldn’t know which
button’s code you were looking at!
You can use the ListBox
control’s SelectedIndex property
to figure out which card the
user selected and then move it
from one deck to the other. (If
it’s less than zero, no card was
selected, so the button does
nothing.) Once the card’s moved,
both decks need to be redrawn.
information overload
(continued)
you are here 4 363
enums and collections
Use a dictionary to store keys and values
A list is like a big long page full of names. But what if you also want, for each name, an
address? Or for every car in the garage list, you want details about that car? You need a
dictionary. A dictionary lets you take a special value—the key—and associate that key
with a bunch of data—the value. And one more thing: a specific key can only appear
once in any dictionary.
dic
•
tion
•
ar
•
y
A book that lists the words of a language in
alphabetical order and gives their meaning.
This is the key. It’s
how you look up a
definition in (you
guessed it) a dictionary.
This is the value. It’s the data
associated with a particular key.
private void button1_Click(object sender, EventArgs e)
{
Dictionary<string, string> wordDefinition =
new Dictionary<string, string>();
wordDefinition.Add (“Dictionary”, “A book that lists the words of a ”
+ “language in alphabetical order and gives their meaning”);
wordDefinition.Add (“Key”, “A thing that provides a means of gaining access to ”
+ “our understanding something.”);
wordDefinition.Add (“Value”, “A magnitude, quantity, or number.”);
if (wordDefinition.ContainsKey(“Key”)){
MessageBox.Show(wordDefinition[“Key”]);
}
}
Here’s how you get the value for a key.
It looks kind of like an array index-get
the value for the key at this index.
This dictionary has string values for
keys, and strings as the value. It’s like a
real dictionary: term, and definition.
ContainsKey() tells you if a key is in
the dictionary. Handy, huh?
The Add()
method is how
you add keys
and values to
the dictionary.
Dictionary <Tkey, TValue> kv = new Dictionary <TKey, TValue>();
These are like List<T>. The <T> means
a type goes in there. So you can declare
one type for the key, and another type
for the value.
These represent types. The first
type in the angle brackets is always
the key, and the second is always
the data.
Here’s how you declare a Dictionary in C#:
And here’s a Dictionary in action:
Add() takes a
key, and then
the value.

364 Chapter 8
The Dictionary Functionality Rundown
Dictionaries are a lot like lists. Both types are flexible in letting you work with lots of data types,
and also come with lots of built-in functionality. Here are the basic Dictionary methods:
map anything to anything
±Add an item.
You can add an item to a dictionary by passing a key and a value to its Add() method.
Dictionary<string, string> myDictionary = new Dictionary<string, string>();
myDictionary.Add(“some key”, “some value”);
±Look up a value using its key.
The most important thing you’ll do with a dictionary is look up values—which makes
sense, because you stored those values in a dictionary so you could look them up using
their unique keys. For this Dictionary<string, string>, you’ll look up values using a
string key, and it’ll return a string.
string lookupValue = myDictionary[“some key”];
±Remove an item.
Just like a List, you can remove an item from a dictionary using the Remove() method.
All you need to pass to the Remove method is the Key value to have both the key and the
value removed.
myDictionary.Remove(“some key”);
±Get a list of keys.
You can get a list of all of the keys in a dictionary using its Keys property and loop
through it using a foreach loop. Here’s what that would look like:
foreach (string key in myDictionary.Keys) { ... };
±Count the pairs in the dictionary.
The Count property returns the number of key-value pairs that are in the dictionary:
int howMany = myDictionary.Count;
Your key and value can be different types
Dictionaries are really versatile and can hold just about anything, from strings to numbers and even objects.
Here’s an example of a dictionary that’s storing an integer as a key and a duck object as a value.
Dictionary<int, Duck> duckDictionary = new Dictionary<int, Duck>();
duckDictionary.Add(376, new Duck()
{ Kind = KindOfDuck.Mallard, Size = 15 });
Keys is a property of your dictionary object. This particular
dictionary has string keys, so Keys is a collection of strings.
Keys are unique in a Dictionary; any key appears exactly
once. Values can appear any number of times—two keys
can have the same value. That way, when you look up or
remove a key, the Dictionary knows what to remove.
It’s common to see a
dictionary that maps
integers to objects when
you’re assigning unique ID
numbers to objects.
you are here 4 365
enums and collections
Build a program that uses a Dictionary
Here’s a quick program that any New York baseball fan will like. When an
important player retires, the team retires the player’s jersey number. Let’s
build a program that looks up who wore famous numbers and when those
numbers were retired. Here’s a class to keep track of a jersey number:
Do this!
class JerseyNumber {
public string Player { get; private set; }
public int YearRetired { get; private set; }
public JerseyNumber(string player, int numberRetired) {
Player = player;
YearRetired = numberRetired;
}
}
public partial class Form1 : Form {
Dictionary<int, JerseyNumber> retiredNumbers = new Dictionary<int, JerseyNumber>() {
{3, new JerseyNumber(“Babe Ruth”, 1948)},
{4, new JerseyNumber(“Lou Gehrig”, 1939)},
{5, new JerseyNumber(“Joe DiMaggio”, 1952)},
{7, new JerseyNumber(“Mickey Mantle”, 1969)},
{8, new JerseyNumber(“Yogi Berra”, 1972)},
{10, new JerseyNumber(“Phil Rizzuto”, 1985)},
{23, new JerseyNumber(“Don Mattingly”, 1997)},
{42, new JerseyNumber(“Jackie Robinson”, 1993)},
{44, new JerseyNumber(“Reggie Jackson”, 1993)},
};
public Form1() {
InitializeComponent();
foreach (int key in retiredNumbers.Keys) {
number.Items.Add(key);
}
}
private void number_SelectedIndexChanged(object sender, EventArgs e) {
JerseyNumber jerseyNumber = retiredNumbers[(int)number.SelectedItem] as JerseyNumber;
nameLabel.Text = jerseyNumber.Player;
yearLabel.Text = jerseyNumber.YearRetired.ToString();
}
}
Yogi Berra was #8
for one team and Cal
Ripken, Jr. was #8
for another. But in
a Dictionary only one
key can map to a single
value, so we’ll only
include numbers from
one team here. Can
you think of a way to
store retired numbers
for multiple teams?
Use a collection
initializer to populate
your Dictionary with
JerseyNumber objects.
Add each key from
the dictionary to the
ComboBox’s Items
collection.
Use the ComboBox’s SelectedIndexChanged event
to update the two labels on the form with the
values from the JerseyNumber object retrieved
from the Dictionary.
The ComboBox’s SelectedItem
property is an Object. Since the
Dictionary key is an int, we need
to cast it to an int value before
doing the lookup in the Dictionary.
Here’s the form:
And here’s all of the code for the form:

366 Chapter 8
BuildagameofGo Fish!thatyoucanplayagainstthecomputer.
This exercise is a little different....
There’s a good chance that you’re learning C# because you want a job as a professional developer. That’s
why we modeled this exercise after a professional assignment. When you’re working as a programmer on a
team, you don’t usually build a complete program from start to finish. Instead, you’ll build a piece of a bigger
program. So we’re going to give you a puzzle that’s got some of the pieces already filled in. The code for the
form is given to you in step #3. You just have to type it in—which may seem like a great head start, but it
means that your classes have to work with that code. And that can be a challenge!
Start with the spec
Every professional software project starts with a specification, and this one is no
exception. You’ll be building a game of the classic card game Go Fish! Different
people play the game by slightly different rules, so here’s a recap of the rules you’ll
be using:
≥The game starts with a deck of 52 cards. Five cards are dealt to each
player. The pile of cards that’s left after everyone’s dealt a hand is called
the stock. Each player takes turns asking for a value (“Do you have any
sevens?”). Any other player holding cards with that value must hand them
over. If nobody has a card with that value, then the player must “go fish”
by taking a card from the stock.
≥The goal of the game is to make books, where a book is the complete
set of all four cards that have the same value. The player with the most
books at the end of the game is the winner. As soon as a player collects
a book, he places it face-up on the table so all the other players can see
what books everyone else has.
≥When placing a book on the table causes a player to run out of cards,
then he has to draw five more cards from the stock. If there are fewer
than five cards left in the stock, he takes all of them. The game is over
as soon as the stock is out of cards. The winner is then chosen based on
whoever has the most books.
≥For this computer version of Go Fish, there are two computer players and
one human player. Every round starts with the human player selecting
one of the cards in his hand, which is displayed at all times. He does this
by choosing one of the cards and indicating that he will ask for a card.
Then the two computer players will ask for their cards. The results of
each round will be displayed. This will repeat until there’s a winner.
≥The game will take care of all of the trading of cards and pulling out of
books automatically. Once there’s a winner, the game is over. The game
displays the name of the winner (or winners, in case of a tie). No other
action can be taken—the player will have to restart the program in order
to start a new game.
1
If you don’t
know what
you’re building
before you start,
then how would
you know when
you’re done?
That’s why most
professional
software
projects
start with a
specification
that tells you
what you’re
going to build.
go fish!
you are here 4 367
enums and collections
Set the ReadOnly property
of the two TextBox controls
to True—that will make them
read-only text boxes, and set the
Multiline property to true.
Set this button’s Name property to buttonAsk, and set its Enabled
property to False. That will disable it, which means it can’t be
pressed. The form will enable it as soon as the game starts.
Set this button’s Name property
to buttonStart. It’s disabled in
this screenshot, but it starts out
enabled. It’ll get disabled once the
game is started.
This TextBox control should have its
Name property set to textName. In this
screenshot, it’s disabled, but it should be
enabled when the program starts.
These are
TextBox
controls named
textProgress
and textBooks.
The player’s
current hand is
displayed in a
ListBox control
called listHand.
You can set its
name using the
Name property.
Build the form
Build the form for the Go Fish! game. It should have a ListBox control for the
player’s hand, two TextBox controls for the progress of the game, and a button to let
the player ask for a card. To play the game, the user will select one of the cards from
the hand and click the button to ask the computer players if they have that card.
2
We’re not done yet—flip the page!
368 Chapter 8
(continued)
public partial class Form1 : Form {
public Form1() {
InitializeComponent();
}
private Game game;
private void buttonStart_Click(object sender, EventArgs e) {
if (String.IsNullOrEmpty(textName.Text)){
MessageBox.Show(“Please enter your name”, “Can’t start the game yet”);
return;
}
game = new Game(textName.Text, new List<string> { “Joe”, “Bob” }, textProgress);
buttonStart.Enabled = false;
textName.Enabled = false;
buttonAsk.Enabled = true;
UpdateForm();
}
private void UpdateForm() {
listHand.Items.Clear();
foreach (String cardName in game.GetPlayerCardNames())
listHand.Items.Add(cardName);
textBooks.Text = game.DescribeBooks();
textProgress.Text += game.DescribePlayerHands();
textProgress.SelectionStart = textProgress.Text.Length;
textProgress.ScrollToCaret();
}
private void buttonAsk_Click(object sender, EventArgs e) {
textProgress.Text = “”;
if (listHand.SelectedIndex < 0) {
MessageBox.Show(“Please select a card”);
return;
}
if (game.PlayOneRound(listHand.SelectedIndex)) {
textProgress.Text += “The winner is... ” + game.GetWinnerName();
textBooks.Text = game.DescribeBooks();
buttonAsk.Enabled = false;
} else
UpdateForm();
}
}
Here’s the code for the form
Enter it exactly like you see here. The rest of the code that you write will have to work with it.
3
This is the only class that the form
interacts with. It runs the whole game.
When you start a new game, it creates a new
instance of the Game class, enables the “Ask”
button, disables the “Start Game” button,
and then redraws the form.
This method
clears and
repopulates
the ListBox
that holds
the player’s
hand, and then
updates the
text boxes.
Using SelectionStart and
ScrollToCaret() like this
scrolls the text box to the
end, so if there’s too much
text to display at once it
scrolls down to the bottom.
The player selects one of the cards and clicks the “Ask”
button to see if any of the other players have a card that
matches its value. The Game class plays a round using the
PlayOneRound() method.
The Enabled
property enables
or disables a
control on the
form.
here’s the form code
The SelectionStart line moves
the flashing text box cursor
to the end, and once it’s
moved, the ScrollToCaret()
method scrolls the text box
down to the cursor.
you are here 4 369
enums and collections
You’ll need this code, too
You’ll need the code you wrote before for the Card class, the Suits and Values enums, the Deck
class, and the CardComparer_byValue class. But you’ll need to add a few more methods to the
Deck class…and you’ll need to understand them in order to use them.
4
public Card Peek(int cardNumber) {
return cards[cardNumber];
}
public Card Deal() {
return Deal(0);
}
public bool ContainsValue(Values value) {
foreach (Card card in cards)
if (card.Value == value)
return true;
return false;
}
public Deck PullOutValues(Values value) {
Deck deckToReturn = new Deck(new Card[] { });
for (int i = cards.Count - 1; i >= 0; i--)
if (cards[i].Value == value)
deckToReturn.Add(Deal(i));
return deckToReturn;
}
public bool HasBook(Values value) {
int NumberOfCards = 0;
foreach (Card card in cards)
if (card.Value == value)
NumberOfCards++;
if (NumberOfCards == 4)
return true;
else
return false;
}
public void SortByValue() {
cards.Sort(new CardComparer_byValue());
}
The Peek() method lets you take a
peek at one of the cards in the deck
without dealing it.
Someone overloaded Deal() to make it a little easier
to read. If you don’t pass it any parameters, it deals
a card off the top of the deck.
The ContainsValue() method searches through
the entire deck for cards with a certain value,
and returns true if it finds any. Can you
guess how you’ll use this in the Go Fish game?
You’ll use the PullOutValues()
method when you build the code to
get a book of cards from the deck.
It looks for any cards that match
a value, pulls them out of the deck,
and returns a new deck with those
cards in it.
The HasBook() method checks a
deck to see if it contains a book
of four cards of whatever value
was passed as the parameter. It
returns true if there’s a book in
the deck, false otherwise.
The SortByValue() method sorts the
deck using the Comparer_byValue class.
Still not done—flip the page!

370 Chapter 8
(continued)
Now comes the HARD part: Build the Player class
There’s an instance of the Player class for each of the three players in the
game. They get created by the buttonStart button’s event handler.
5
class Player
{
private string name;
public string Name { get { return name; } }
private Random random;
private Deck cards;
private TextBox textBoxOnForm;
public Player(String name, Random random, TextBox textBoxOnForm) {
// The constructor for the Player class initializes four private fields, and then
// adds a line to the TextBox control on the form that says, “Joe has just
// joined the game” - but use the name in the private field, and don’t forget to
// add a line break at the end of every line you add to the TextBox.
}
public IEnumerable<Values> PullOutBooks() { } // see the facing page for the code
public Values GetRandomValue() {
// This method gets a random value—but it has to be a value that’s in the deck!
}
public Deck DoYouHaveAny(Values value) {
// This is where an opponent asks if I have any cards of a certain value
// Use Deck.PullOutValues() to pull out the values. Add a line to the TextBox
// that says, “Joe has 3 sixes” - use the new Card.Plural() static method
}
public void AskForACard(List<Player> players, int myIndex, Deck stock) {
// Here’s an overloaded version of AskForACard() - choose a random value
// from the deck using GetRandomValue() and ask for it using AskForACard()
}
public void AskForACard(List<Player> players, int myIndex, Deck stock, Values value) {
// Ask the other players for a value. First add a line to the TextBox: “Joe asks
// if anyone has a Queen”. Then go through the list of players that was passed in
// as a parameter and ask each player if he has any of the value (using his
// DoYouHaveAny() method). He’ll pass you a deck of cards - add them to my deck.
// Keep track of how many cards were added. If there weren’t any, you’ll need
// to deal yourself a card from the stock (which was also passed as a parameter),
// and you’ll have to add a line to the TextBox: “Joe had to draw from the stock”
}
// Here’s a property and a few short methods that were already written for you
public int CardCount { get { return cards.Count; } }
public void TakeCard(Card card) { cards.Add(card); }
public IEnumerable<string> GetCardNames() { return cards.GetCardNames(); }
public Card Peek(int cardNumber) { return cards.Peek(cardNumber); }
public void SortHand() { cards.SortByValue(); }
}
Look closely at each of the comments—they tell
you what the methods are supposed to do. Your
job is to fill in the methods.
go get ’em tiger!
you are here 4 371
enums and collections
public IEnumerable<Values> PullOutBooks() {
List<Values> books = new List<Values>();
for (int i = 1; i <= 13; i++) {
Values value = (Values)i;
int howMany = 0;
for (int card = 0; card < cards.Count; card++)
if (cards.Peek(card).Value == value)
howMany++;
if (howMany == 4) {
books.Add(value);
for (int card = cards.Count - 1; card >= 0; card--)
cards.Deal(card);
}
}
return books;
}
public partial class Card {
public static string Plural(Values value) {
if (value == Values.Six)
return “Sixes”;
else
return value.ToString() + “s”;
}
}
You’ll need to add this method to the Card class
It’s a static method to take a value and return its plural—that way a ten will return
“Tens” but a six will return “Sixes” (with “es” on the end). Since it’s static, you call it
with the class name—Card.Plural()—and not from an instance.
6
Nearly there—keep flipping!
That Peek() method we added to the Deck class will come
in handy. It lets the program look at one of the cards in
the deck by giving its index number, but unlike Deal() it
doesn’t remove the card.
You’ll have to build TWO overloaded versions of the
AskForACard() method. The first one is used by the
opponents when they ask for cards—it’ll look through
their hands and find a card to ask for. The second
one is used when the player asks for the card. Both
of them ask EVERY other player (both computer and
human) for any cards that match the value.
We used a partial class to add this
static method to Card to make it
easy for you to see what’s going
on. But you don’t need to use a
partial class—if you want, you
can just add it straight into the
existing Card class.

372 Chapter 8
(continued)
The rest of the job: Build the Game class
The form keeps one instance of Game. It manages the game play. Look
closely at how it’s used in the form.
7
class Game {
private List<Player> players;
private Dictionary<Values, Player> books;
private Deck stock;
private TextBox textBoxOnForm;
public Game(string playerName, IEnumerable<string> opponentNames, TextBox textBoxOnForm) {
Random random = new Random();
this.textBoxOnForm = textBoxOnForm;
players = new List<Player>();
players.Add(new Player(playerName, random, textBoxOnForm));
foreach (string player in opponentNames)
players.Add(new Player(player, random, textBoxOnForm));
books = new Dictionary<Values, Player>();
stock = new Deck();
Deal();
players[0].SortHand();
}
private void Deal() {
// This is where the game starts - this method’s only called at the beginning
// of the game. Shuffle the stock, deal five cards to each player, then use a
// foreach loop to call each player’s PullOutBooks() method.
}
public bool PlayOneRound(int selectedPlayerCard) {
// Play one round of the game. The parameter is the card the player selected
// from his hand - get its value. Then go through all of the players and call
// each one’s AskForACard() methods, starting with the human player (who’s
// at index zero in the Players list - make sure he asks for the selected
// card’s value). Then call PullOutBooks() - if it returns true, then the
// player ran out of cards and needs to draw a new hand. After all the players
// have gone, sort the human player’s hand (so it looks nice in the form).
// Then check the stock to see if it’s out of cards. If it is, reset the
// TextBox on the form to say, “The stock is out of cards. Game over!” and return
// true. Otherwise, the game isn’t over yet, so return false.
}
public bool PullOutBooks(Player player) {
// Pull out a player’s books. Return true if the player ran out of cards, otherwise
// return false. Each book is added to the Books dictionary. A player runs out of
// cards when he’s used all of his cards to make books—and he wins the game.
}
public string DescribeBooks() {
// Return a long string that describes everyone’s books by looking at the Books
// dictionary: “Joe has a book of sixes. (line break) Ed has a book of Aces.”
}
book ’em danno
Using IEnumerable<T> in
public class members is
a great way to make your
classes more flexible, and
that’s something you need
to think about when your
code needs to be reused.
Now someone else can use
a string[]. List<string>, or
something else entirely to
instantiate the Game class.
It’s great for encapsulation, too. If
you expose an IEnumerable<T> instead
of, say, a List<T>, then you can’t
accidentally write code that modifies it.
The Player and Game classes both use a reference to
the multiline TextBox on the form to print messages
for the user to read. Make sure you add “using
System.Windows.Forms;” to the top of their files.

you are here 4 373
enums and collections
public string GetWinnerName() {
// This method is called at the end of the game. It uses its own dictionary
// (Dictionary<string, int> winners) to keep track of how many books each player
// ended up with in the books dictionary. First it uses a foreach loop
// on books.Keys -- foreach (Values value in books.Keys) -- to populate
// its winners dictionary with the number of books each player ended up with.
// Then it loops through that dictionary to find the largest number of books
// any winner has. And finally it makes one last pass through winners to come
// up with a list of winners in a string (“Joe and Ed”). If there’s one winner,
// it returns a string like this: “Ed with 3 books”. Otherwise it returns a
// string like this: “A tie between Joe and Bob with 2 books.”
}
// Here are a couple of short methods that were already written for you:
public IEnumerable<string> GetPlayerCardNames() {
return players[0].GetCardNames();
}
public string DescribePlayerHands() {
string description = “”;
for (int i = 0; i < players.Count; i++) {
description += players[i].Name + “ has ” + players[i].CardCount;
if (players[i].CardCount == 1)
description += “ card.” + Environment.NewLine;
else
description += “ cards.” + Environment.NewLine;
}
description += “The stock has ” + stock.Count + “ cards left.”;
return description;
}
Here’s a hint for writing the GetWinnerName() method: You’ll need to create a new Dictionary<string, int> called
winners at the top of the method. The winners dictionary will let you use each player’s name to look up the number
of books he made during the game. First you’ll use a foreach loop to go through the books that the players made and
build the dictionary. Then you’ll use another foreach loop to find the highest number of books associated with any
player. But there might be a tie—more than one player might have the most books! So you’ll need one more foreach
loop to look for all the players in winners that have the number of books that you found in the second loop and build a
string that says who won.
Use Envrionment.NewLine to add line breaks
You’ve been using \n throughout the book to add line breaks to message boxes. .NET also gives you a convenient
constant for addling line breaks: Environment.NewLine. It always contains the constant value “\r\n”. If you
actually look at the characters that make up a Windows-formatted text file, at the end of every line you’ll
see two characters: ‘\r’ and ‘\n’. Other operating systems (like Unix) only use a ‘\n’ to indicate the end of
each line. The MessageBox.Show() method is smart enough to automatically convert ‘\n’ characters to line
breaks, but your code can be easier to read if you use Environment.NewLine instead of escape characters. Also,
Environment.NewLine is what gets appended to the end of each line when you use Console.WriteLine().
Go to the Watch
window and type
(int)’\r’ to cast the
character \r to a
number. It turns into
13. ‘\n’ turns into 10.
Every char turns into
its own unique number
called its Unicode
value. You’ll learn
more about that in
the next chapter.
374 Chapter 8
private void Deal() {
stock.Shuffle();
for (int i = 0; i < 5; i++)
foreach (Player player in players)
player.TakeCard(stock.Deal());
foreach (Player player in players)
PullOutBooks(player);
}
public bool PlayOneRound(int selectedPlayerCard) {
Values cardToAskFor = players[0].Peek(selectedPlayerCard).Value;
for (int i = 0; i < players.Count; i++) {
if (i == 0)
players[0].AskForACard(players, 0, stock, cardToAskFor);
else
players[i].AskForACard(players, i, stock);
if (PullOutBooks(players[i])) {
textBoxOnForm.Text += players[i].Name
+ “ drew a new hand” + Environment.NewLine;
int card = 1;
while (card <= 5 && stock.Count > 0) {
players[i].TakeCard(stock.Deal());
card++;
}
}
players[0].SortHand();
if (stock.Count == 0) {
textBoxOnForm.Text =
“The stock is out of cards. Game over!” + Environment.NewLine;
return true;
}
}
return false;
}
public bool PullOutBooks(Player player)
{
IEnumerable<Values> booksPulled = player.PullOutBooks();
foreach (Values value in booksPulled)
books.Add(value, player);
if (player.CardCount == 0)
return true;
return false;
}
Herearethefilled-inmethodsintheGameclass.
exercise solution
The Deal() method gets called when the
game first starts—it shuffles the deck and
then deals five cards to each player. Then
it pulls out any books that the players
happened to have been dealt.
As soon as the player clicks the “Ask
for a card” button, the game calls
AskForACard() with that card. Then
it calls AskForACard() for each
opponent.
After the player or
opponent asks for a
card, the game pulls
out any books that he
made. If a player’s out
of books, he draws a
new hand by dealing up
to 5 cards from the
stock.
After the round is played, the game sorts the
player’s hand to make sure it’s displayed in order on
the form. Then it checks to see if the game’s over.
If it is, PlayOneRound() returns true.
PullOutBooks() looks through a player’s cards to see
if he’s got four cards with the same value. If he
does, they get added to his books dictionary. And if
he’s got no cards left afterward, it returns true.

you are here 4 375
enums and collections
public string DescribeBooks() {
string whoHasWhichBooks = “”;
foreach (Values value in books.Keys)
whoHasWhichBooks += books[value].Name + “ has a book of ”
+ Card.Plural(value) + Environment.NewLine;
return whoHasWhichBooks;
}
public string GetWinnerName() {
Dictionary<string, int> winners = new Dictionary<string, int>();
foreach (Values value in books.Keys) {
string name = books[value].Name;
if (winners.ContainsKey(name))
winners[name]++;
else
winners.Add(name, 1);
}
int mostBooks = 0;
foreach (string name in winners.Keys)
if (winners[name] > mostBooks)
mostBooks = winners[name];
bool tie = false;
string winnerList = “”;
foreach (string name in winners.Keys)
if (winners[name] == mostBooks)
{
if (!String.IsNullOrEmpty(winnerList))
{
winnerList += “ and ”;
tie = true;
}
winnerList += name;
}
winnerList += “ with ” + mostBooks + “ books”;
if (tie)
return “A tie between ” + winnerList;
else
return winnerList;
}
We’re not done yet—flip the page!
The form needs to display a list of books,
so it uses DescribeTheBooks() to turn the
player’s books dictionary into words.
Once the last card’s been picked up, the
game needs to figure out who won. That’s
what the GetWinnerName() does. And
it’ll use a dictionary called winners to
do it. Each player’s name is a key in the
dictionary; its value is the number of books
that player got during the game.
Next the game looks through the dictionary
to figure the number of books that the
player with the most books has. It puts that
value in a variable called mostBooks.
Now that we know which player
has the most books, the method
can come up with a string that
lists the winner (or winners).
376 Chapter 8
(continued)
public Player(String name, Random random, TextBox textBoxOnForm) {
this.name = name;
this.random = random;
this.textBoxOnForm = textBoxOnForm;
this.cards = new Deck( new Card[] {} );
textBoxOnForm.Text += name +
“ has just joined the game” + Environment.NewLine;
}
public Values GetRandomValue() {
Card randomCard = cards.Peek(random.Next(cards.Count));
return randomCard.Value;
}
public Deck DoYouHaveAny(Values value) {
Deck cardsIHave = cards.PullOutValues(value);
textBoxOnForm.Text += Name + “ has ” + cardsIHave.Count + “ ”
+ Card.Plural(value) + Environment.NewLine;
return cardsIHave;
}
public void AskForACard(List<Player> players, int myIndex, Deck stock) {
Values randomValue = GetRandomValue();
AskForACard(players, myIndex, stock, randomValue);
}
public void AskForACard(List<Player> players, int myIndex,
Deck stock, Values value) {
textBoxOnForm.Text += Name + “ asks if anyone has a ”
+ value + Environment.NewLine;
int totalCardsGiven = 0;
for (int i = 0; i < players.Count; i++) {
if (i != myIndex) {
Player player = players[i];
Deck CardsGiven = player.DoYouHaveAny(value);
totalCardsGiven += CardsGiven.Count;
while (CardsGiven.Count > 0)
cards.Add(CardsGiven.Deal());
}
}
if (totalCardsGiven == 0) {
textBoxOnForm.Text += Name +
“ must draw from the stock.” + Environment.NewLine;
cards.Add(stock.Deal());
}
}
Herearethefilled-inmethodsinthePlayerclass.
exercise solution
Here’s the constructor for the Player class.
It sets its private fields and adds a line to
the progress text box saying who joined.
The GetRandomValue() method uses Peek() to
look at a random card in the player’s hand.
DoYouHaveAny() uses
the PullOutValues()
method to pull out and
return all cards that
match the parameter.
There are two overloaded
AskForACard() methods.
This one is used by the
opponents—it gets a
random card from the
hand and calls the other
AskForACard().
This AskForACard() method
looks through every player
(except for the one asking),
calls its DoYouHaveAny()
method, and adds any cards
handed over to the hand.
If no cards were handed over, the player has to
draw from the stock using its Deal() method.
Bonus mini-exercise: Can you figure out a way to improve
encapsulation and design in your Player class by replacing
List<Player> with IEnumerable<Player> in these two
methods without changing the way the software works Flip to
Leftover #7 in the Appendix for a useful tool to help with that.
you are here 4 377
enums and collections
And yet MORE collection types…
List and Dictionary objects are two of the built-in generic collections that are
part of the .NET Framework. Lists and dictionaries are very flexible—you can access any
of the data in them in any order. But sometimes you need to restrict how your program
works with the data because the thing that you’re representing inside your program works
like that in the real world. For situations like this, you’ll use a Queue or a Stack. Those
are the other two generic collections that are similar to lists, but they’re especially good at
making sure that your data is processed in a certain order.
Generic collections are an important part of
the .NET Framework
They’re really useful—so much that the IDE automatically adds
this statement to the top of every class you add to your project:
using System.Collections.Generic;
Almost every large project that you’ll work on will include some
sort of generic collection, because your programs need to store
data. And when you’re dealing with groups of similar things in
the real world, they almost always naturally fall into a category
that corresponds pretty well to one of these kinds of collections.
Use a Queue when the first
object you store will be the first
one you’ll use, like:
≥Cars moving down a one-way street
≥People standing in line
≥Customers on hold for a customer
service support line
≥Anything else that’s handled on a
first-come, first-served basis
Use a Stack when you always want
to use the object you stored most
recently, like:
≥Furniture loaded into the back of a
moving truck
≥A stack of books where you want to
read the most recently added one first
≥People boarding or leaving a plane
≥A pyramid of cheerleaders, where the
ones on top have to dismount first…
imagine the mess if the one on the
bottom walked away first!
The stack is first in, last out: the first object
that goes into the stack is the last one that
comes out of it.
A queue is first-in first-out, which
means that the first object that
you put into the queue is the first
one you pull out of it to use.
A queue is like a
list that lets you put
objects on the end of
the list and use the
ones in the front. A
stack only lets you
access the last object
you put into it.
You can, however, use foreach to
enumerate through a stack or queue,
because they implement IEnumerable!
There are other types of
collections, too—but these
are the ones that you’re
most likely to come in
contact with.
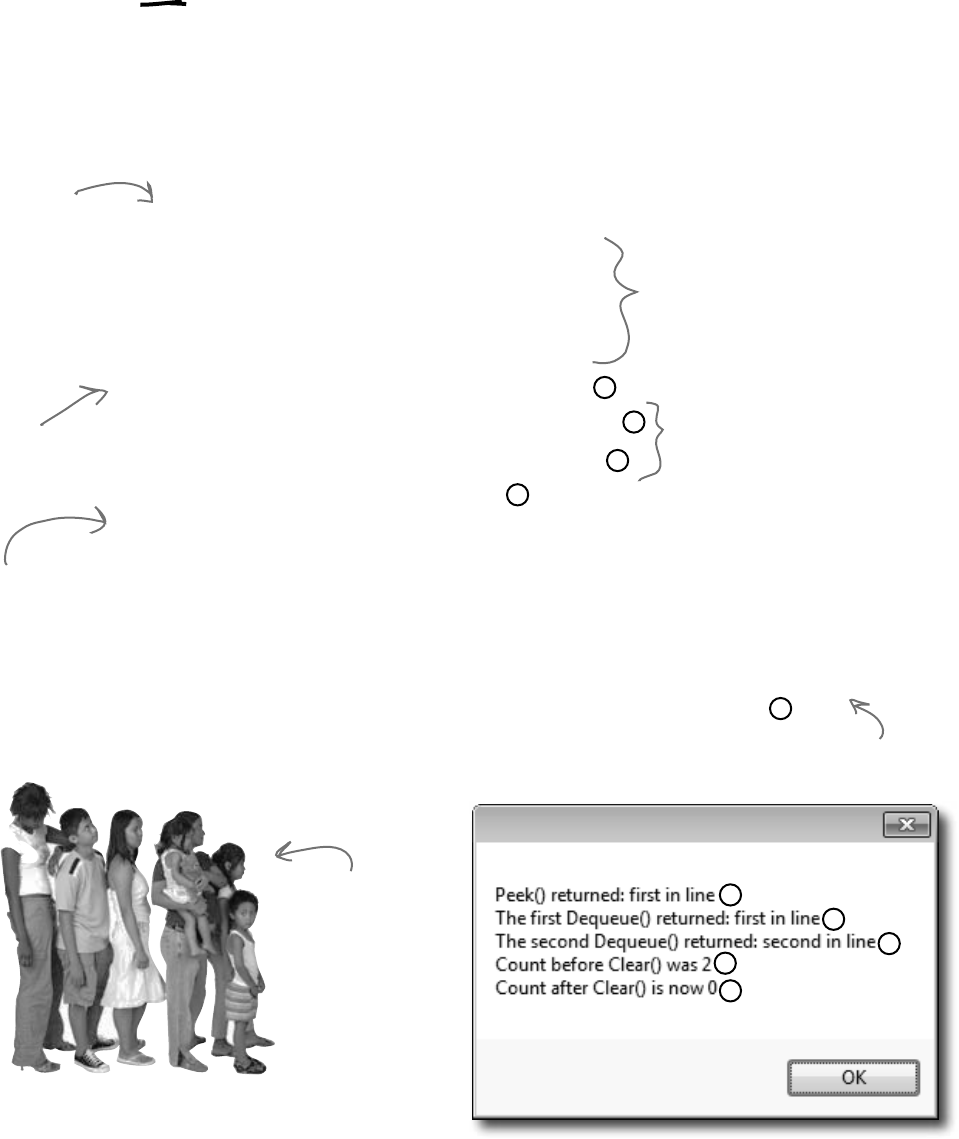
378 Chapter 8
A queue is FIFO—First In, First Out
A queue is a lot like a list, except that you can’t just add or remove items at any
index. To add an object to a queue, you enqueue it. That adds the object to the
end of the queue. You can dequeue the first object from the front of the queue.
When you do that, the object is removed from the queue, and the rest of the objects
in the queue move up a position.
Queue<string> myQueue = new Queue<string>();
myQueue.Enqueue(“first in line”);
myQueue.Enqueue(“second in line”);
myQueue.Enqueue(“third in line”);
myQueue.Enqueue(“last in line”);
string takeALook = myQueue.Peek();
string getFirst = myQueue.Dequeue();
string getNext = myQueue.Dequeue();
int howMany = myQueue.Count;
myQueue.Clear();
MessageBox.Show(“Peek() returned: “ + takeALook + “\n”
+ “The first Dequeue() returned: “ + getFirst + “\n”
+ “The second Dequeue() returned: “ + getNext + “\n”
+ “Count before Clear() was “ + howMany + “\n”
+ “Count after Clear() is now “ + myQueue.Count);
1
2
3
5
4
1
2
3
5
4
The Clear()
method
removes all
objects from
the queue.
Create a
new queue
of strings.
Peek() lets
you take
a “look” at
the first
item in the
queue without
removing it.
Here’s where we add four
items to the queue. When we
pull them out of the queue,
they’ll come out in the same
order they went in.
The first Dequeue() pulls the
first item out of the queue. Then
the second one shifts up into
the first place—the next call to
Dequeue() pulls that one out next.
The queue’s Count property returns
the number of items in the queue.
Objects in a
queue need to
wait their turn.
The first one in
the queue is the
first one to come
out of it.
don’t you hate waiting in line?
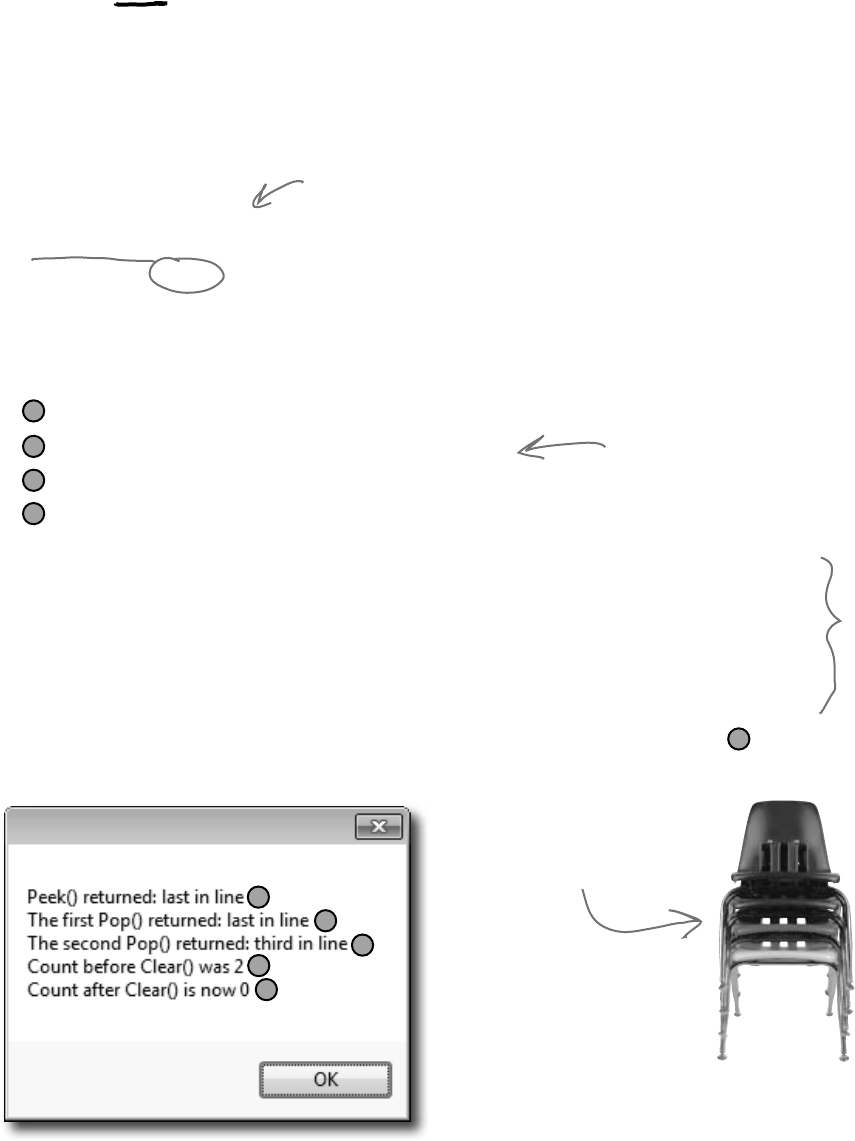
you are here 4 379
enums and collections
A stack is LIFO—Last In, First Out
A stack is really similar to a queue—with one big difference. You push each item
onto a stack, and when you want to take an item from the stack, you pop one off
of it. When you pop an item off of a stack, you end up with the most recent item
that you pushed onto it. It’s just like a stack of plates, magazines, or anything else—
you can drop something onto the top of the stack, but you need to take it off before
you can get to whatever’s underneath it.
Stack<string> myStack = new Stack<string>();
myStack.Push(“first in line”);
myStack.Push(“second in line”);
myStack.Push(“third in line”);
myStack.Push(“last in line”);
string takeALook = myStack.Peek();
string getFirst = myStack.Pop();
string getNext = myStack.Pop();
int howMany = myStack.Count;
myStack.Clear();
MessageBox.Show(“Peek() returned: “ + takeALook + “\n”
+ “The first Pop() returned: “ + getFirst + “\n”
+ “The second Pop() returned: “ + getNext + “\n”
+ “Count before Clear() was “ + howMany + “\n”
+ “Count after Clear() is now “ + myStack.Count);
4
5
3
2
1
4
5
3
2
1
Creating a stack is just
like creating any other
generic collection.
When you push
an item onto a
stack, it pushes
the other items
back one notch
and sits on top.
When you pop an item
off the stack, you get
the most recent item
that was added.
The last object you put
on a stack is the first
object that you pull
off of it.
You can
also use
Environment.
NewLine
instead of \n
here, but we
wanted the
code to be
easier to read.
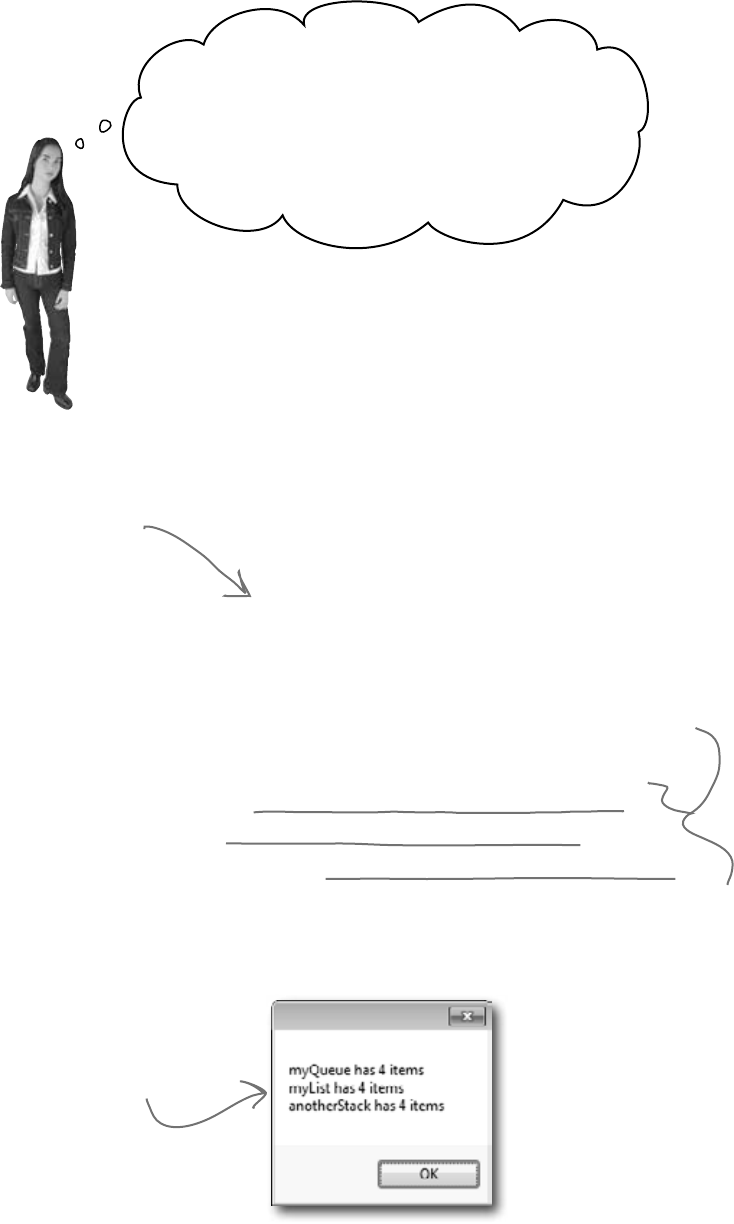
380 Chapter 8
Wait a minute, something’s bugging me. You
haven’t shown me anything I can do with a stack
or a queue that I can’t do with a list—they just
save me a couple of lines of code. But I can’t get at
the items in the middle of a stack or a queue. I can
do that with a list pretty easily! So why would I
give that up just for a little convenience?
Don’t worry—you don’t give up anything when you use a
queue or a stack.
It’s really easy to copy a Queue object to a List object. And it’s just as
easy to copy a List to a Queue, a Queue to a Stack…in fact, you can
create a List, Queue, or Stack from any other object that implements the
IEnumerable interface. All you have to do is use the overloaded constructor
that lets you pass the collection you want to copy from as a parameter. That
means you have the flexibility and convenience of representing your data with
the collection that best matches the way you need it to be used. (But remember,
you’re making a copy, which means you’re creating a whole new object and
adding it to the heap.)
Stack<string> myStack = new Stack<string>();
myStack.Push(“first in line”);
myStack.Push(“second in line”);
myStack.Push(“third in line”);
myStack.Push(“last in line”);
Queue<string> myQueue = new Queue<string>(myStack);
List<string> myList = new List<string>(myQueue);
Stack<string> anotherStack = new Stack<string>(myList);
MessageBox.Show(“myQueue has “ + myQueue.Count + “ items\n”
+ “myList has “ + myList.Count + “ items\n”
+ “anotherStack has “ + anotherStack.Count + “ items\n”);
Let’s set up a stack with
four items—in this case, a
stack of strings.
It’s easy to convert that stack
to a queue, then copy the queue
to a list, and then copy the list
to another stack.
All four items were
copied into the new
collections.
…and you can always use
a foreach loop to access
all of the members in a
stack or a queue!
flapjacks and lumberjacks
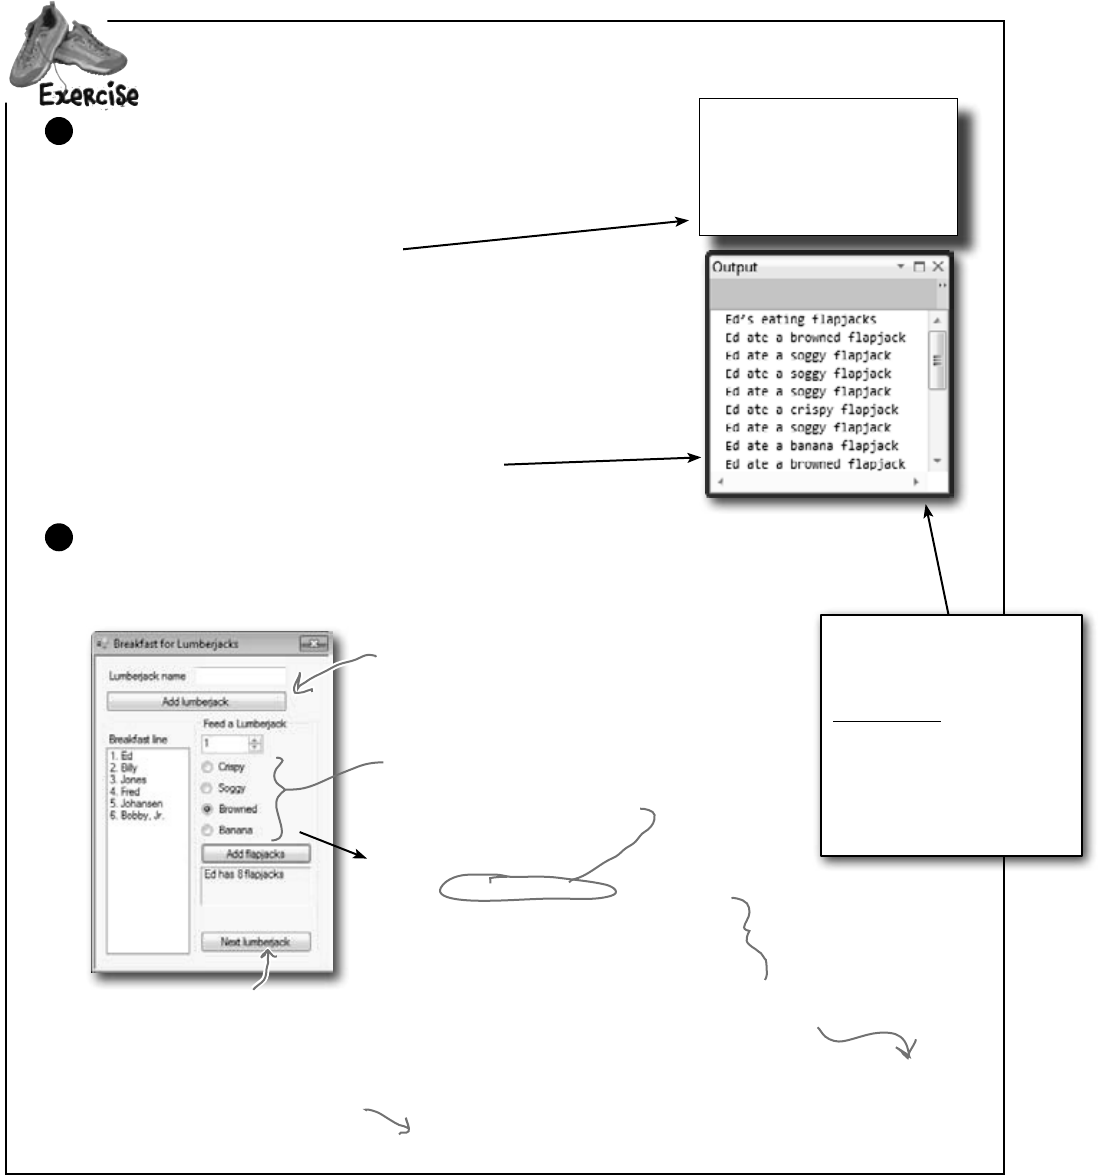
you are here 4 381
enums and collections
private void addFlapjacks_Click(...) {
Flapjack food;
if (crispy.Checked == true)
food = Flapjack.Crispy;
else if (soggy.Checked == true)
food = Flapjack.Soggy;
else if (browned.Checked == true)
food = Flapjack.Browned;
else
food = Flapjack.Banana;
Lumberjack currentLumberjack = breakfastLine.Peek();
currentLumberjack.TakeFlapjacks(food,
(int)howMany.Value);
RedrawList();
}
enum Flapjack {
Crispy,
Soggy,
Browned,
Banana
}
class Lumberjack {
private string name;
public string Name { get { return name; } }
private Stack<Flapjack> meal;
public Lumberjack(string name) {
this.name = name;
meal = new Stack<Flapjack>();
}
public int FlapjackCount { get { // return the count } }
public void TakeFlapjacks(Flapjack Food, int HowMany) {
// Add some number of flapjacks to the Meal stack
}
public void EatFlapjacks() {
// Write this output to the console
}
}
Writeaprogramtohelpacafeteriafulloflumberjackseatsomeflapjacks.StartwiththeLumberjack
class,fillinginthemissingcode.Thendesigntheform,andaddthebuttoneventhandlerstoit.
Here’s the Lumberjack class. Fill in the get accessor for FlapjackCount
and the TakeFlapjacks and EatFlapjacks methods.
1
Build this form. It lets you enter the names of lumberjacks into a text box so they get in the breakfast
line. You can give the lumberjack at the front of the line a plate of flapjacks, and then tell him to move
on to eat them using the “Next lumberjack” button. We’ve given you the click event handler for the “Add
flapjacks” button. Use a queue called breakfastLine to keep track of the lumberjacks.
2
You’ll need to add a RedrawList() method
to update the list box with the contents
of the queue. All three buttons will call it.
Here’s a hint: it uses a foreach loop.
When the user clicks “Add Lumberjack”, add the name
in the name text box to the breakfastLine queue.
When you drag these RadioButton controls into the
group box, the form automatically links them and
only allows the user to check one of them at a time.
Look at the addFlapjacks_Click method to figure
out what they should be named.
Peek() returns a reference to
the first lumberjack in the
queue.
This button should dequeue the next lumberjack,
call his EatFlapjacks(), then redraw the list box.
Note the special
“else if” syntax.
This
listbox
is called
line.
The NumericUpDown control is called
howMany, and the label is called nextInLine.
Notice how the Flapjack
enum uses uppercase letters
(“Soggy”), but the output has
lowercase letters (“soggy”)
Here’s a hint to help you get
the output right. ToString()
returns a string object, and
one of its public members is
a method called ToLower()
that returns a lowercase
version of the string.
382 Chapter 8
Aprivate Queue<Lumberjack> breakfastLine = new Queue<Lumberjack>();
private void addLumberjack_Click(object sender, EventArgs e) {
breakfastLine.Enqueue(new Lumberjack(name.Text));
name.Text = “”;
RedrawList();
}
private void RedrawList() {
int number = 1;
line.Items.Clear();
foreach (Lumberjack lumberjack in breakfastLine) {
line.Items.Add(number + “. ” + lumberjack.Name);
number++;
}
if (breakfastLine.Count == 0) {
groupBox1.Enabled = false;
nextInLine.Text = “”;
} else {
groupBox1.Enabled = true;
Lumberjack currentLumberjack = breakfastLine.Peek();
nextInLine.Text = currentLumberjack.Name + “ has ”
+ currentLumberjack.FlapjackCount + “ flapjacks”;
}
}
private void nextLumberjack_Click(object sender, EventArgs e) {
Lumberjack nextLumberjack = breakfastLine.Dequeue();
nextLumberjack.EatFlapjacks();
nextInLine.Text = “”;
RedrawList();
}
class Lumberjack {
private string name;
public string Name { get { return name; } }
private Stack<Flapjack> meal;
public Lumberjack(string name) {
this.name = name;
meal = new Stack<Flapjack>();
}
public int FlapjackCount { get { return meal.Count; } }
public void TakeFlapjacks(Flapjack food, int howMany) {
for (int i = 0; i < howMany; i++) {
meal.Push(food);
}
}
public void EatFlapjacks() {
Console.WriteLine(name + “’s eating flapjacks”);
while (meal.Count > 0) {
Console.WriteLine(name + “ ate a ”
+ meal.Pop().ToString().ToLower() + “ flapjack”);
}
}
}
The RedrawList()
method uses a
foreach loop to pull
the lumberjacks out
of their queue and
add each of them to
the list box.
We called the list box “line”, and the label
between the two buttons “nextInLine”.
This if statement updates the
label with information about the
first lumberjack in the queue.
The TakeFlapjacks
method updates the
Meal stack.
The EatFlapjacks
method uses a while
loop to print out the
lumberjack’s meal.
exercise solution
meal.Pop() returns an enum, whose ToString() method is called to return a string
object, whose ToLower() method is called to return another string object.
Here’s where the Flapjack enum is
made lowercase. Take a minute and
figure out what’s going on.
you are here 4 383
enums and collections
Collectioncross
1 2
3 4 5
6 7
8 9
10 11 12
13
14
15
16
17 18 19
20
21
Across
3. An instance of a ______________ collection only
works with one specific type.
6. A special kind of loop that only works on collections
9. The name of the method you use to send a string to
the output
10. How you remove something from a stack
11. An object that's like an array but more flexible
13. Two methods in a class with the same name but
different parameters are...
15. A method to figure out if a certain object is in a
collection
19. An easy way to keep track of categories
20. All generic collections implement this interface
21. How you remove something from a queue
Down
1. The generic collection that lets you map keys to
values
2. This collection is first-in, first-out
4. The built-in class that lets your program write text
to the output
5. A method to find out how many things are in a
collection
7. The only method in the IComparable interface
8. Most professional projects start with this
12. An object that implements this interface helps
your list sort its contents
14. How you add something to a queue
16. This collection is first-in, last-out
17. How you add something to a stack
18. This method returns the next object to come off of
a stack or queue
Across
3.Aninstanceofa______________collectiononlyworkswith
onespecictype
6.AspecialkindofloopthatworksonIEnumerable<T>
9.Thenameofthemethodyouusetosendastringtothe
output
10.Howyouremovesomethingfromastack
11.Anobjectthat’slikeanarraybutmoreexible
13.Twomethodsinaclasswiththesamenamebutdifferent
parametersare______________.
15.Amethodtogureoutifacertainobjectisinacollection
19.Aneasywaytokeeptrackofcategories
20.Allgenericcollectionsimplementthisinterface
21.Howyouremovesomethingfromaqueue
Down
1.Thegenericcollectionthatletsyoumapkeystovalues
2.Thiscollectionisrst-in,rst-out
4.Thebuilt-inclassthatletsyourprogramwritetexttothe
output
5.Amethodtondouthowmanythingsareinacollection
7.TheonlymethodintheIComparableinterface
8.Mostprofessionalprojectsstartwiththis
12.Anobjectthatimplementsthisinterfacehelpsyourlistsort
itscontents
14.Howyouaddsomethingtoaqueue
16.Thiscollectionisrst-in,last-out
17.Howyouaddsomethingtoastack
18.Thismethodreturnsthenextobjecttocomeoffofastackor
queue
384 Chapter 8
Collectioncross solution
crossword solution
D
1Q
2
G
3E N E R I C C
4C
5U
C O F
6O R E A C
7H
S
8W
9R I T E L I N E U U O
P I S N E M
E P
10 O P O L
11 I
12 S T P
C N L C A
I A O
13 V E R L O A D E D R
F R M E
I Y E
14 P T
C C
15 O N T A I N S O
A S
16 Q R
T P
17 P
18 T U E
19 N U M
I
20 E N U M E R A B L E R
O S E C U
N H K K D
21 E Q U E U E
Across
3. An instance of a ______________ collection only
works with one specific type. [generic]
6. A special kind of loop that only works on collections
[foreach]
9. The name of the method you use to send a string to
the output [writeline]
10. How you remove something from a stack [pop]
11. An object that's like an array but more flexible
[list]
13. Two methods in a class with the same name but
different parameters are... [overloaded]
15. A method to figure out if a certain object is in a
collection [contains]
19. An easy way to keep track of categories [enum]
20. All generic collections implement this interface
[ienumerable]
21. How you remove something from a queue [dequeue]
Down
1. The generic collection that lets you map keys to
values [dictionary]
2. This collection is first-in, first-out [queue]
4. The built-in class that lets your program write text
to the output [console]
5. A method to find out how many things are in a
collection [count]
7. The only method in the IComparable interface
[CompareTo]
8. Most professional projects start with this
[specification]
12. An object that implements this interface helps
your list sort its contents [icomparer]
14. How you add something to a queue [enqueue]
16. This collection is first-in, last-out [stack]
17. How you add something to a stack [push]
18. This method returns the next object to come off of
a stack or queue [peek]

C# Lab 385
Name: Date:
This lab gives you a spec that describes a program
for you to build, using the knowledge you’ve gained
over the last few chapters.
This project is bigger than the ones you’ve seen so
far. So read the whole thing before you get started,
and give yourself a little time. And don’t worry if
you get stuck—there’s nothing new in here, so you
can move on in the book and come back to the lab
later.
We’ve lled in a few design details for you, and
we’ve made sure you’ve got all the pieces you
need…and nothing else.
It’s up to you to nish the job. You can download
an executable for this lab from the website…but we
won’t give you the code for the answer.
C# Lab
The Quest
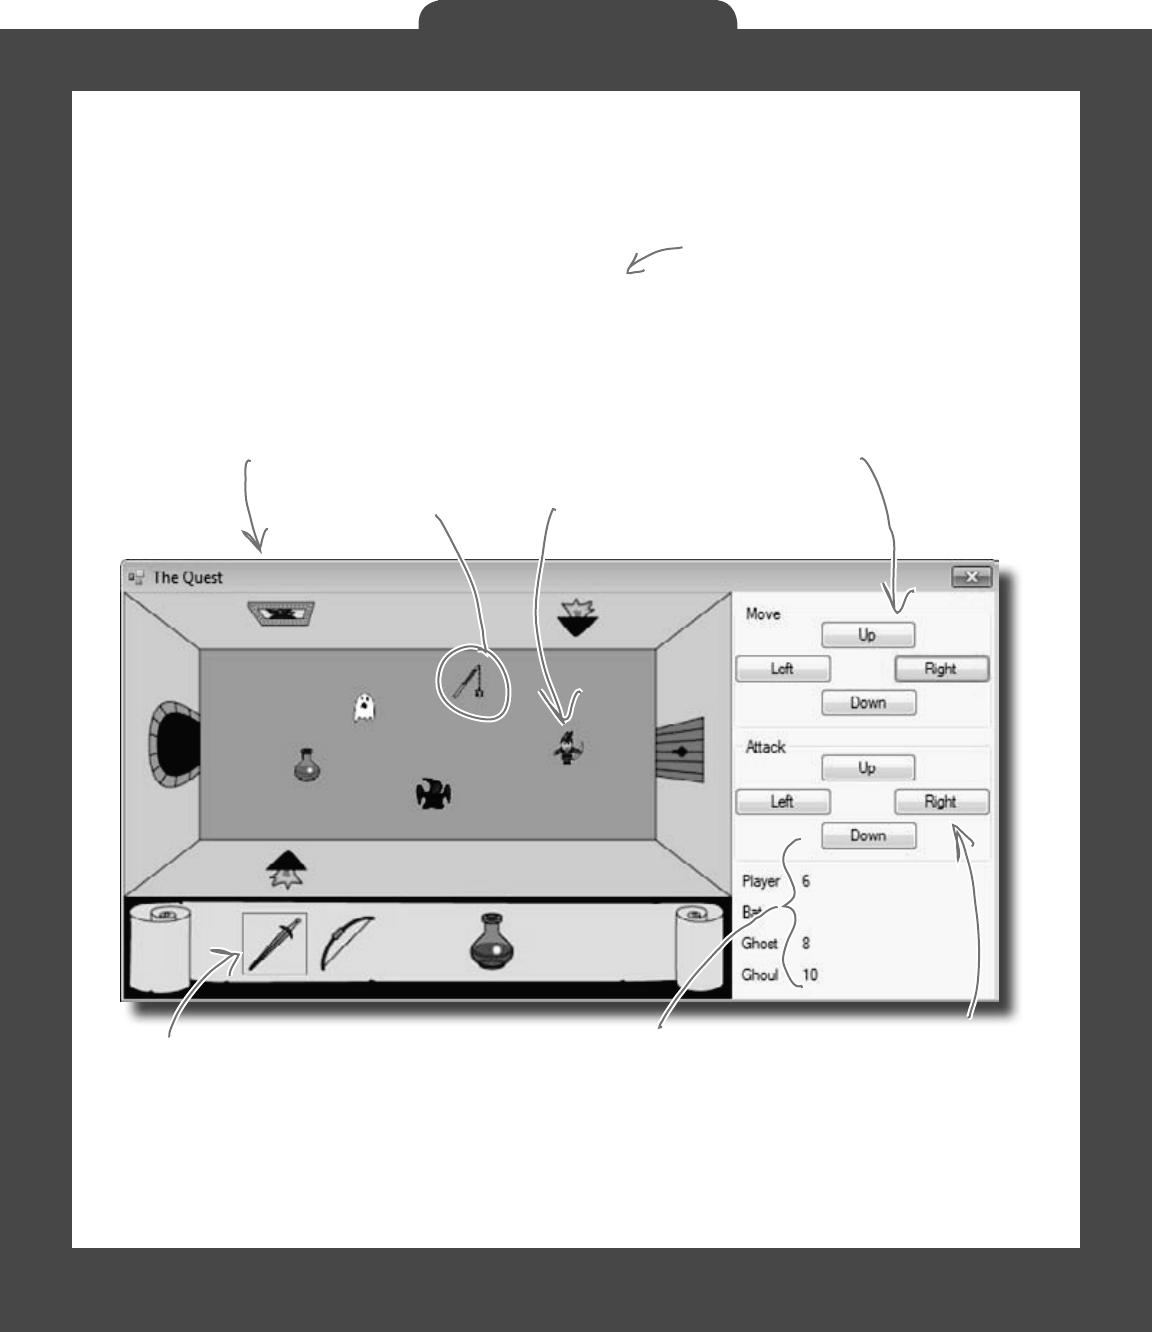
386 Head First Lab #1
The Quest
The spec: build an adventure game
Your job is to build an adventure game where a mighty adventurer
is on a quest to defeat level after level of deadly enemies. You’ll
build a turn-based system, which means the player makes
one move and then the enemies make one move. The player can
move or attack, and then each enemy gets a chance to move and
attack. The game keeps going until the player either defeats all the
enemies on all seven levels or dies.
The player moves
using the four
Move buttons.
The game window gives an overhead
view of the dungeon where the
player fights his enemies.
These four buttons are
used to attack enemies
and drink potions.
(The player can use
any of the buttons to
drink a potion.)
The game shows you the number of
hit points for the player and enemies.
When the player attacks an enemy,
the enemy’s hit points go down. Once
the hit points get down to zero, the
enemy or player dies.
The player and
enemies move around
in the dungeon.
Here’s the player’s inventory. It shows
what items the player’s picked up, and
draws a box around the item that
they’re currently using. The player
clicks on an item to equip it, and uses
the Attack button to use the item.
The player can pick
up weapons and
potions along the way.
The enemies get a bit
of an advantage—they
move every turn, and
after they move they’ll
attack the player if he’s
in range.
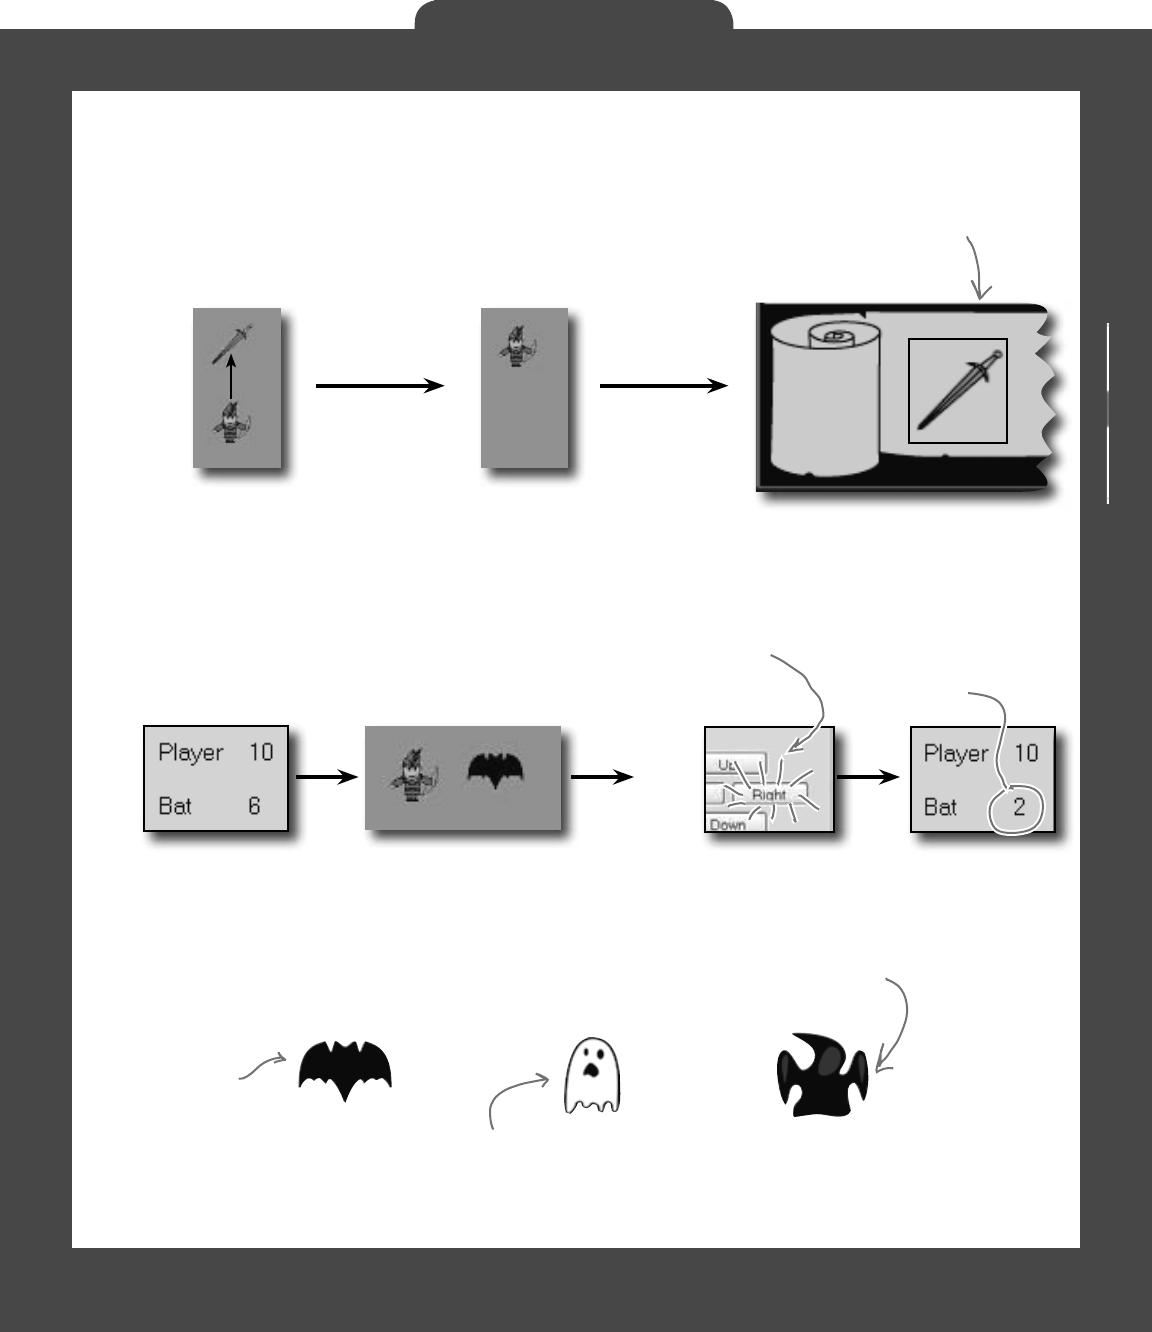
you are here 4 387
The Quest
The player picks up weapons…
There are weapons and potions scattered around the
dungeon that the player can pick up and use to defeat his
enemies. All he has to do is move onto a weapon, and it
disappears from the floor and appears in his inventory.
A black box around a weapon means it’s currently
equipped. Different weapons work differently—they have
different ranges, some only attack in one direction while
others have a wider range, and they cause different
levels of damage to the enemies they hit.
…and attacks enemies with them
Every level in the game has a weapon that the player can
pick up and use to defeat his enemies. Once the weapon’s
picked up, it should disappear from the game floor.
The attack causes the
bat’s hit points to
drop, from 6 to 2 in
this case.
Higher levels bring more enemies
There are three different kinds of enemies: a bat, a ghost, and
a ghoul. The first level has only a bat. The seventh level is the
last one, and it has all three enemies.
A ghoul moves quickly
toward the player, and
causes heavy damage
when it attacks.
The bat flies
around somewhat
randomly. When it’s
near the player,
it causes a small
amount of damage.
The ghost moves slowly toward the
player. As soon as it’s close to the
player, it attacks and causes a medium
amount of damage.
The bat is to the right of
the player, so he hits the
Right attack button.
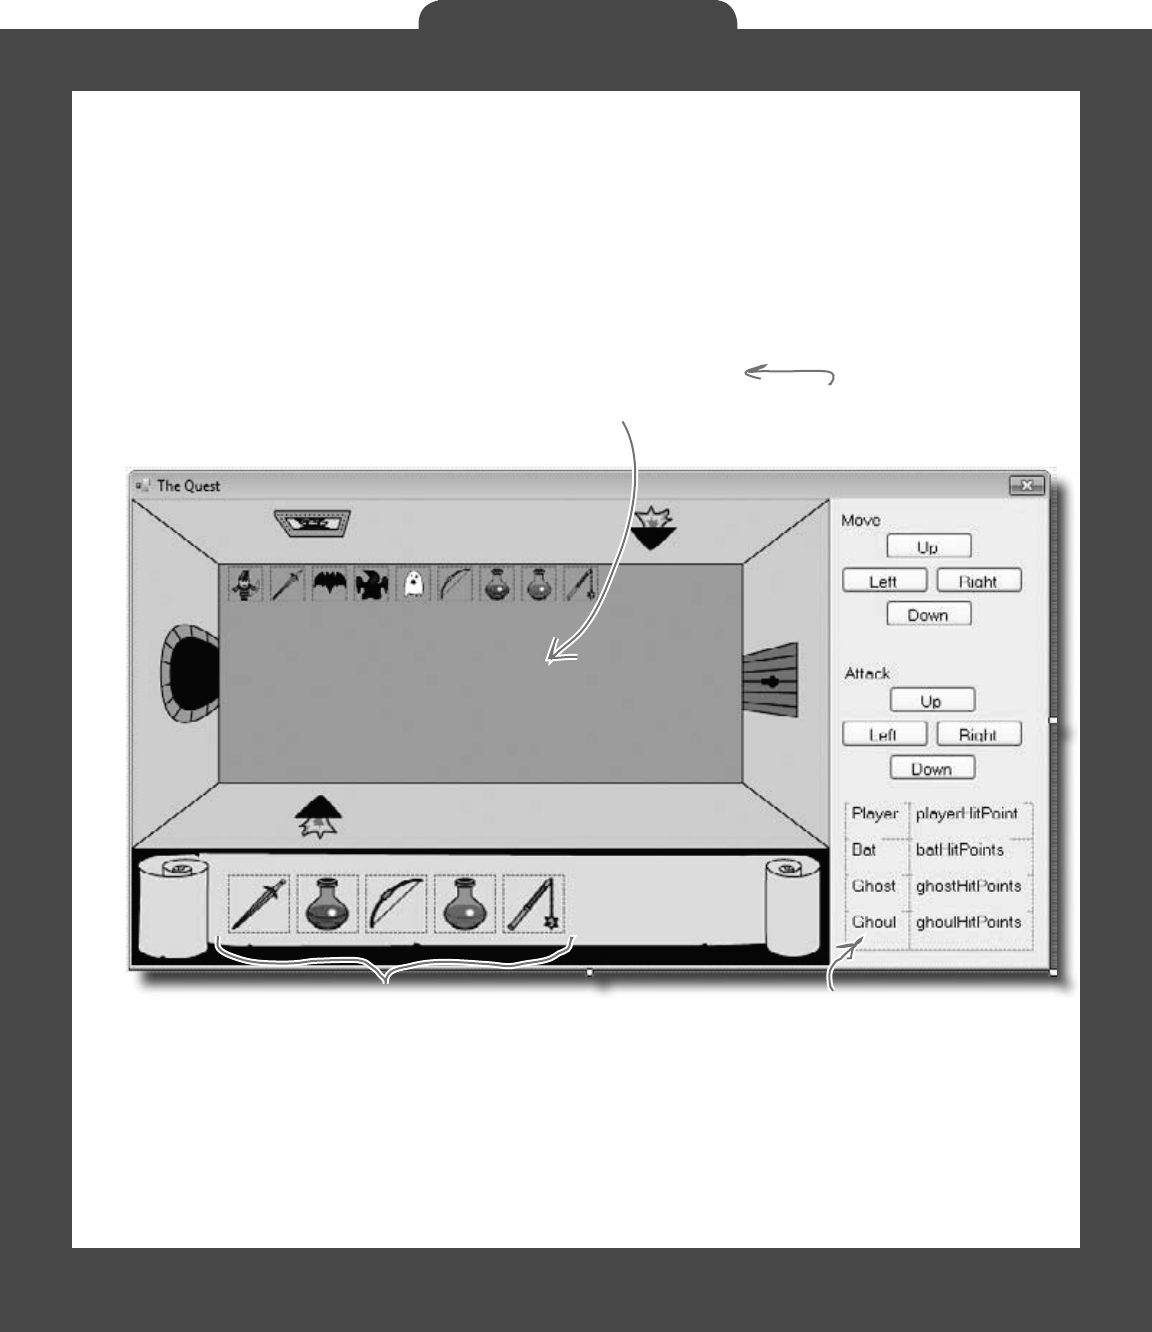
388 Head First Lab #1
The Quest
The design: building the form
The form gives the game its unique look. Use the form’s
BackgroundImage property to display the image of the dungeon
and the inventory, and a series of PictureBox controls to show
the player, weapons, and enemies in the dungeon. You’ll use a
TableLayoutPanel control to display the hit points for the player,
bat, ghost, and ghoul as well as the buttons for moving and attacking.
Each of these icons is a PictureBox.
The dungeon itself is a static image,
displayed using the BackgroundImage
property of the form.
Hit points, movement buttons, and
attack buttons are all displayed in a
TableLayoutPanel.
Download the background image and the graphics for the
weapons, enemies, and player from the Head First Labs
website: www.headfirstlabs.com/books/hfcsharp
Make sure the
BackgroundImageLayout
property is set to None.
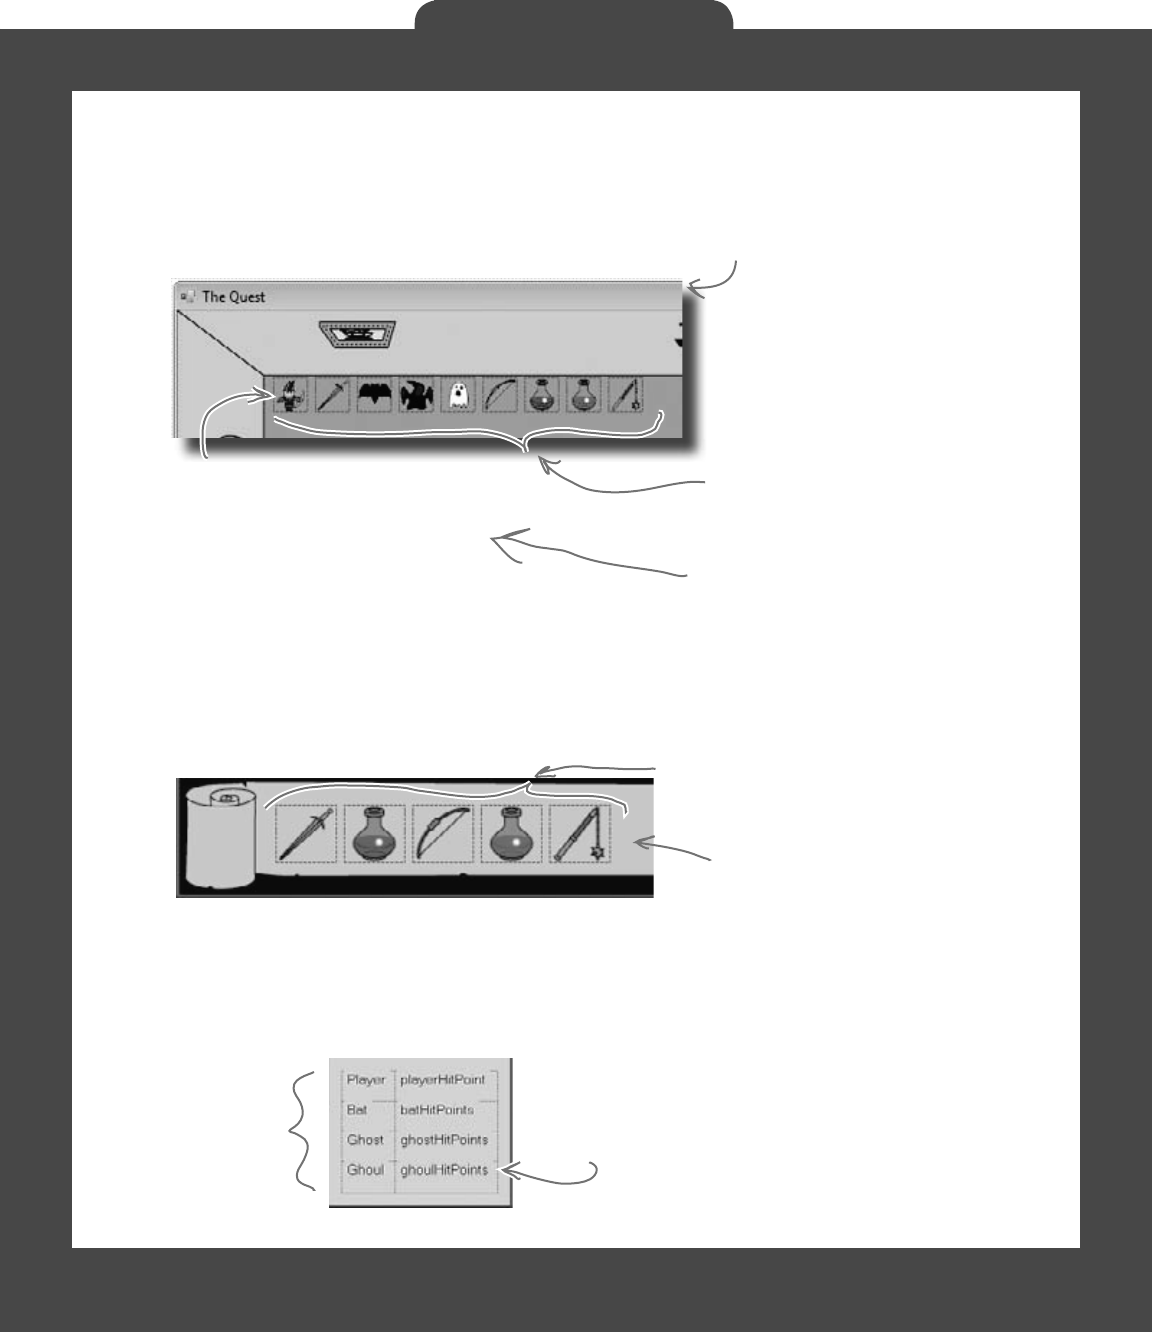
you are here 4 389
The Quest
Add nine PictureBox controls to the
dungeon. Use the Size property to
make each one 30x30. It doesn’t
matter where you place them—the
form will move them around. Use the
little black arrow that shows up when
you click on the PictureBox to set
each to one of the images from the
Head First Labs website.
You’ll need five more
50x50 PictureBoxes
for the inventory.
2 columns, 4 rows…8
cells for your hit
point statistics.
When the player equips one of the weapons,
the form should set the BorderStyle of
that weapon icon to FixedSingle and the
rest of the icons’ BorderStyle to None.
Everything in the dungeon is a PictureBox
Players, weapons, and enemies should all be represented by icons. Add
nine PictureBox controls, and set their Visible properties to
False. Then, your game can move around the controls, and toggle
their Visible properties as needed.
After you’ve added the nine PictureBox controls,
right-click on the player’s icon and select “Bring
to Front”, then send the three weapon icons to
the back. That ensures player icons stay “above”
any items that are picked up.
The inventory contains PictureBox controls, too
You can represent the inventory of the player as five 50×50
PictureBox controls. Set the BackColor property of each to Color.
Transparent (if you use the Properties window to set the property, just
type it into the BackColor row). Since the picture files have a transparent
background, you’ll see the scroll and dungeon behind them:
Build your stats window
The hit points are in a TableLayoutPanel, just like the
attack and movement buttons. For the hit points, create two
columns in the panel, and drag the column divider to the left a
bit. Add four rows, each 25% height, and add in Label controls
to each of the eight cells:
Each cell has a Label in it,
and you can update those
values during the game.
Controls overlap each other in the IDE, so
the form needs to know which ones are in
front, and which are in back. That’s what
the “Bring to Front” and “Send to Back”
form designer commands do.
You can set a PictureBox’s BackColor
property to Color.Transparent to let the
form’s background picture or color show
through any transparent pixels in the
picture.
390 Head First Lab #1
The Quest
The architecture: using the objects
G
a
m
e
o
b
j
e
c
t
F
o
r
m
o
b
j
e
c
t
L
i
s
t
<
E
n
e
m
y
>
W
e
a
p
o
n
o
b
j
e
c
t
P
l
a
y
e
r
o
b
j
e
c
t
You’ll need several types of objects in your game: a Player
object, several subtypes of an Enemy object, and several sub-types
of a Weapon object. And you’ll also need one object to keep up
with everything that’s going on: the Game object.
The Game object handles turns
When one of your form’s move buttons is clicked, the form
will call the Game object’s Move() method. That method
will let the player take a turn, and then let all the enemies
move. So it’s up to Game to handle the turn-based movement
portion of the game.
For example, here’s how the move buttons work:
F
o
r
m
o
b
j
e
c
t
P
l
a
y
e
r
o
b
j
e
c
t
P
l
a
y
e
r
o
b
j
e
c
t
Move
Button
Clicked
Near
Player
After the player moves,
Game tells each of the
enemies to Move().
4. if (NearPlayer())
game.HitPlayer();
When the user clicks
one of the four move
buttons, the form calls
Game’s Move() method.
Game’s Move() method
first calls the Player
object’s Move() method to
tell the player to move.
If any of the enemies
end up near the player
after they’ve moved,
they attack the player.
We left the parameters out of this diagram.
Each Move() method takes a direction, and
some of them take a Random object, too.
The form never interacts
directly with the players,
weapons, or enemies.
Game takes the input from
the form and deals with the
objects in the game.
The Game object
keeps up with
players, weapons,
and a list of
enemies.
1
.
g
a
m
e
.
M
o
v
e
(
)
2
.
p
l
a
y
e
r
.
M
o
v
e
(
)
G
a
m
e
o
b
j
e
c
t
G
a
m
e
o
b
j
e
c
t
3
.
e
n
e
m
y
.
M
o
v
e
(
)
E
n
e
m
y
o
b
j
e
c
t
This is just the general overview. We’ll give
you a lot more details on how the player
and enemies move, how the enemy figures
out if it’s near the player, etc.
There’s only one weapon per level,
so the game just needs a Weapon
reference, not a List. The Player,
however, has a List<Weapon> to
hold the inventory.

you are here 4 391
The Quest
The form delegates activity to the Game object
Movement, attacking, and inventory all begin in the form. So clicking a
movement or attack button, or an item in inventory, triggers code in your
form. But it’s the Game object that controls the objects in the game. So
the form has to pass on anything that happens to the Game object, and
then the Game object takes it from there:
G
a
m
e
o
b
j
e
c
t
F
o
r
m
o
b
j
e
c
t
1
.
M
o
v
e
(
D
i
r
e
c
t
i
o
n
.
R
i
g
h
t
,
r
a
n
d
o
m
)
;
2. UpdateCharacters();
The Form object calls the
game’s Move(), and then calls
its own UpdateCharacters()
method to update the screen.
Use a Direction enum for
the four button directions.
This UpdateCharacters() method is part of the
form. It reads the location of the player, enemies,
and any weapons currently in the dungeon and
moves the PictureBoxes to match them.
G
a
m
e
o
b
j
e
c
t
F
o
r
m
o
b
j
e
c
t
2. UpdateCharacters();
How moving works
How attacking works
How the inventory scroll works
G
a
m
e
o
b
j
e
c
t
F
o
r
m
o
b
j
e
c
t
inventoryBow.BorderStyle =
BorderStyle.FixedSingle;
inventorySword.BorderStyle =
BorderStyle.None;
i
f
(
g
a
m
e
.
C
h
e
c
k
P
l
a
ye
r
In
v
e
n
t
o
r
y
(
“
B
o
w
”
)
)
{
g
a
m
e
.
E
q
u
i
p
(
“B
o
w
”
)
;
The inventory scroll displays all of
the icons for the items that the
player has picked up.
Move
Button
Clicked
Attack
Button
Clicked
Inventory
Icon
Clicked
Attacking is like
movement…the form
calls Attack() on
Game, and Game
handles dealing with
the attack.
The UpdateCharacters() method
also checks the player’s inventory
and makes sure the correct icons are
displayed on the inventory scroll.
The BorderStyle property
highlights the active item in
the player’s inventory.
Game handles updating
locations, so when
UpdateCharacters() is
called, things are moved
to their new locations.
1
.
A
t
t
a
c
k
(
D
i
r
e
c
t
i
o
n
.
R
i
g
h
t
,
r
a
n
d
o
m
)
;
Game.Move() calls the enemies’
Move() methods, which all
take a random reference.
When the player hits an
enemy, it causes a random
amount of damage (up to
a maximum damage limit).
All the other weapons’
borders should be
turned off.
392 Head First Lab #1
The Quest
using System.Drawing;
class Game {
public List<Enemy> Enemies;
public Weapon WeaponInRoom;
private Player player;
public Point PlayerLocation { get { return player.Location; } }
public int PlayerHitPoints { get { return player.HitPoints; } }
public List<string> PlayerWeapons { get { return player.Weapons; } }
private int level = 0;
public int Level { get { return level; } }
private Rectangle boundaries;
public Rectangle Boundaries { get { return boundaries; } }
public Game(Rectangle boundaries) {
this.boundaries = boundaries;
player = new Player(this,
new Point(boundaries.Left + 10, boundaries.Top + 70));
}
public void Move(Direction direction, Random random) {
player.Move(direction);
foreach (Enemy enemy in Enemies)
enemy.Move(random);
}
public void Equip(string weaponName) {
player.Equip(weaponName);
}
public bool CheckPlayerInventory(string weaponName) {
return player.Weapons.Contains(weaponName);
}
public void HitPlayer(int maxDamage, Random random) {
player.Hit(maxDamage, random);
}
You’ll need Rectangle and Point from
System.Drawing, so be sure to add this
to the top of your class.
These are OK as public properties if Enemy and Weapon are well
encapsulated…in other words, just make sure the form can’t do
anything inappropriate with them.
The game keeps a private Player object. The
form will only interact with this through
methods on Game, rather than directly.
The Rectangle object has Top, Bottom,
Left, and Right fields, and works
perfectly for the overall game area.
Building the Game class
We’ve gotten you started with the Game class in the code below.
There’s a lot for you to do—so read through this code carefully, get
it into the IDE, and get ready to go to work:
Movement is simple: move the player in the
direction the form gives us, and move each
enemy in a random direction.
These are all
great examples
of encapsulation....
Game doesn’t know
how Player handles
these actions, it just
passes on the needed
information and lets
Player do the rest.
Game starts out with a bounding box for
the dungeon, and creates a new Player
object in the dungeon.
you are here 4 393
The Quest
public void IncreasePlayerHealth(int health, Random random) {
player.IncreaseHealth(health, random);
}
public void Attack(Direction direction, Random random) {
player.Attack(direction, random);
foreach (Enemy enemy in Enemies)
enemy.Move(random);
}
private Point GetRandomLocation(Random random) {
return new Point(boundaries.Left +
random.Next(boundaries.Right / 10 - boundaries.Left / 10) * 10,
boundaries.Top +
random.Next(boundaries.Bottom / 10 - boundaries.Top / 10) * 10);
}
public void NewLevel(Random random) {
level++;
switch (level) {
case 1:
Enemies = new List<Enemy>();
Enemies.Add(new Bat(this, GetRandomLocation(random)));
WeaponInRoom = new Sword(this, GetRandomLocation(random));
break;
}
}
}
GetRandomLocation() will come in handy in
the NewLevel() method, which will use it to
determine where to place enemies and weapons.
We only added the case for
Level 1. It’s your job to add
cases for the other levels.
Attack() is almost exactly like Move().
The player attacks, and the enemies all
get a turn to move.
This is just a math trick to get a
random location within the rectangle
that represents the dungeon area.
Finish the rest of the levels
It’s your job to finish the NewLevel() method. Here’s the
breakdown for each level:
Level Enemies Weapons
2 Ghost Blue potion
3 Ghoul Bow
4 Bat, Ghost Bow, if not picked up on 3; otherwise, blue potion
5 Bat, Ghoul Red potion
6 Ghost, Ghoul Mace
7 Bat, Ghost, Ghoul Mace, if not picked up on 6; otherwise, red potion
8 N/A N/A - end the game with Application.Exit()
So if the blue potion is still
in the player’s inventory from
Level 2, nothing appears on
this level.
This only appears if
the red potion from
Level 5 has already
been used up.
We’ve only got room in the inventory for one
blue potion and one red potion. So if the
player already has a red potion, then the
game shouldn’t add a red potion to the level
(and the same goes for the blue potion).
394 Head First Lab #1
The Quest
Finding common behavior: movement
Mover
(abstract)
Nearby(locationToCheck: Point,
distance: int): bool
Move(direction: Direction,
boundaries: Rectangle): Point
Location: Point
You already know that duplicate code is bad, and duplicate code
usually shows up when two or more objects share the same behavior.
That’s the case in the dungeon game, too…both enemies and players
move.
Let’s create a Mover class, to abstract that common behavior into a
single place. Player and Enemy will inherit from Mover. And even
though weapons don’t move around, they inherit from Mover, too,
because they need some of its properties and methods. Mover has
a Move() method for moving around, and a read-only Location
property that the form can use to position a subclass of Mover.
Nearby() takes a point,
and figures out if it’s
within a certain distance
away from the object.
Move takes a direction as well
as the dungeon’s boundaries, and
calculates where the end point of
that movement would be.
Mover is abstract, so
can’t be instantiated.
You’ll only instantiate
Player and Enemy, which
inherit from it.
Player
Attack(direction: Direction, random: Random)
Hit(maxDamage: int, random: Random)
Equip(weaponName: String)
Move(direction: Direction)
Weapons: List<Weapon>
HitPoints: int
Player and Enemy both
inherit from Mover.
You can call Nearby() and
Move() on both Enemy
and Player now.
Add a Direction enum
The Mover class, as well as several other classes, need
a Direction enum. Create this enum, and give it four
enumerated values: Up, Down, Left, and Right.
Enemy
(abstract)
Move(random: Random)
Hit(maxDamage: int,
random: Random)
HitPoints: int
The Player class overrides
the Move() method.
Enemies don’t
have an Attack()
method because
their attacking is
built into Move().
Weapon
(abstract)
PickUpWeapon()
DamageEnemy()
PickedUp
Location
We added return values
and parameters to this
class diagram to make
it easier for you to see
what’s going on.
you are here 4 395
The Quest
abstract class Mover {
private const int MoveInterval = 10;
protected Point location;
public Point Location { get { return location; } }
protected Game game;
public Mover(Game game, Point location) {
this.game = game;
this.location = location;
}
public bool Nearby(Point locationToCheck, int distance) {
if (Math.Abs(location.X - locationToCheck.X) < distance &&
(Math.Abs(location.Y - locationToCheck.Y) < distance)) {
return true;
} else {
return false;
}
}
public Point Move(Direction direction, Rectangle boundaries) {
Point newLocation = location;
switch (direction) {
case Direction.Up:
if (newLocation.Y - MoveInterval >= boundaries.Top)
newLocation.Y -= MoveInterval;
break;
case Direction.Down:
if (newLocation.Y + MoveInterval <= boundaries.Bottom)
newLocation.Y += MoveInterval;
break;
case Direction.Left:
if (newLocation.X - MoveInterval >= boundaries.Left)
newLocation.X -= MoveInterval;
break;
case Direction.Right:
if (newLocation.X + MoveInterval <= boundaries.Right)
newLocation.X += MoveInterval;
break;
default: break;
}
return newLocation;
}
}
The Nearby method checks a Point against this object’s current
location. If they’re within distance of each other, then it
returns true; otherwise, it returns false.
The Mover class source code
Here’s the code for Mover:
Since protected properties are only
available to subclasses, the form object
can’t set the location…only read it
through the public get method we define.
Instances of Mover take in the Game
object and a current location.
The Move() method
tries to move one step
in a direction. If it
can, it returns the
new Point. If it hits a
boundary, it returns
the original Point.
If the end location is
outside the boundaries,
the new location
stays the same as the
starting point.
Finally, this new location is
returned (which might still be the
same as the starting location!).
396 Head First Lab #1
The Quest
class Player : Mover {
private Weapon equippedWeapon;
private int hitPoints;
public int HitPoints { get { return hitPoints; } }
private List<Weapon> inventory = new List<Weapon>();
public List<string> Weapons {
get {
List<string> names = new List<string>();
foreach (Weapon weapon in inventory)
names.Add(weapon.Name);
return names;
}
}
public Player(Game game, Point location);
: base(game, location) {
hitPoints = 10;
}
public void Hit(int maxDamage, Random random) {
hitPoints -= random.Next(1, maxDamage);
}
public void IncreaseHealth(int health, Random random) {
hitPoints += random.Next(1, health);
}
public void Equip(string weaponName) {
foreach (Weapon weapon in inventory) {
if (weapon.Name == weaponName)
equippedWeapon = weapon;
}
}
}
The Player class keeps track of the player
Here’s a start on the Player class. Start with this code
in the IDE, and then get ready to add to it.
The player’s constructor sets
its hitPoints to 10 and then
calls the base class constructor.
When an enemy hits the player,
it causes a random amount of
damage. And when a potion
increases the player’s health, it
increases it by a random amount.
The Equip() method tells the player to
equip one of his weapons. The Game
object calls this method when one of the
inventory icons is clicked.
A Player object can only have one Weapon
object equipped at a time.
All of the properties
of Player are hidden
from direct access.
Player inherits
from Mover, so
this passes in
the Game and
location to that
base class.
A Player can hold
multiple weapons in
inventory, but can only
equip one at a time.
Even though potions help the player
rather than hurt the enemy, they’re
still considered weapons by the game.
That way the inventory can be a
List<Weapon>, and the game can
point to one with its WeaponInRoom
reference.
The Player and Enemy objects need to
stay inside the dungeon, which means
they need to know the boundaries of the
playing area. Use the Contains() method
of the boundaries Rectangle to make sure
they don’t move out of bounds.
you are here 4 397
The Quest
Potions will implement an IPotion interface (more on that
in a minute), so you can use the “is” keyword to see if a
Weapon is an implementation of IPotion.
Write the Move() method for the Player
Game calls the Player’s Move() method to tell a player to move
in a certain direction. Move() takes the direction to move as an
argument (using the Direction enum you should have already
added). Here’s the start of that method:
This happens when one of
the movement buttons on
the form is clicked.
public void Move(Direction direction) {
base.location = Move(direction, game.Boundaries);
if (!game.WeaponInRoom.PickedUp) {
// see if the weapon is nearby, and possibly pick it up
}
}
You’ve got to fill in the rest of this method. Check and see if the
weapon is near the player (within a single unit of distance). If
so, pick up the weapon and add it to the player’s inventory.
If the weapon is the only weapon the player has, go ahead and
equip it immediately. That way, the player can use it right away,
on the next turn.
The Weapon and form will handle
making the weapon’s PictureBox
invisible when the player picks it up…
that’s not the job of the Player class.
Add an Attack() method, too
Next up is the Attack() method. This is called when one of the
form’s attack buttons is clicked, and carries with it a direction (again,
from the Direction enum). Here’s the method signature:
public void Attack(Direction direction, Random random) {
// Your code goes here
}
If the player doesn’t have an equipped weapon, this method
won’t do anything. If the player does have an equipped weapon,
this should call the weapon’s Attack() method.
But potions are a special case. If a potion is used, remove it
from the player’s inventory, since it’s not available anymore.
Move is in the Mover
base class.
The weapons all have an Attack()
method that takes a Direction enum
and a Random object. The player’s
Attack() will figure out which weapon
is equipped and call its Attack().
If the weapon is a
potion, then Attack()
removes it from the
inventory after the
player drinks it.
When the player picks up a weapon, it
needs to disappear from the dungeon
and appear in the inventory.
398 Head First Lab #1
The Quest
Bats, ghosts, and ghouls inherit from the Enemy class
abstract class Enemy : Mover {
private const int NearPlayerDistance = 25;
private int hitPoints;
public int HitPoints { get { return hitPoints; } }
public bool Dead { get {
if (hitPoints <= 0) return true;
else return false;
}
}
public Enemy(Game game, Point location, int hitPoints)
: base(game, location) { this.hitPoints = hitPoints; }
public abstract void Move(Random random);
public void Hit(int maxDamage, Random random) {
hitPoints -= random.Next(1, maxDamage);
}
protected bool NearPlayer() {
return (Nearby(game.PlayerLocation,
NearPlayerDistance));
}
protected Direction FindPlayerDirection(Point playerLocation) {
Direction directionToMove;
if (playerLocation.X > location.X + 10)
directionToMove = Direction.Right;
else if (playerLocation.X < location.X - 10)
directionToMove = Direction.Left;
else if (playerLocation.Y < location.Y - 10)
directionToMove = Direction.Up;
else
directionToMove = Direction.Down;
return directionToMove;
}
}
We’ll give you another useful abstract class: Enemy. Each
different sort of enemy has its own class that inherits from the
Enemy class. The different kinds of enemies move in different
ways, so the Enemy abstract class leaves the Move method
as an abstract method—the three enemy classes will need to
implement it differently, depending on how they move.
If you feed FindPlayerDirection()
the player’s location, it’ll use
the base class’s location field to
figure out where the player is in
relation to the enemy and return
a Direction enum that tells you in
which direction the enemy needs to
move in order to move toward the
player.
The Enemy class inherited the Nearby()
method from Mover, which it can use to
figure out whether it’s near the player.
When the player attacks
an enemy, it calls the
enemy’s Hit() method, which
subtracts a random number
from the hit points.
Enemy
(abstract)
Move(random: Random)
Hit(maxDamage: int,
random: Random)
HitPoints: int
Each
subclass
of Enemy
implements
this.
The form can use this read-only
property to see if the enemy should
be visible in the game dungeon.
you are here 4 399
The Quest
class Bat : Enemy {
public Bat(Game game, Point location)
: base(game, location, 6)
{ }
public override void Move(Random random) {
// Your code will go here
}
}
Ghost
Move()
Ghoul
Move()
Bat
Move()
Write the different Enemy subclasses
The three Enemy subclasses are pretty straightforward. Each enemy has a
different number of starting hit points, moves differently, and does a different
amount of damage when it attacks. You’ll need to have each one pass a different
startingHitPoints parameter to the Enemy base constructor, and you’ll have
to write different Move() methods for each subclass.
Here’s an example of how one of those classes might look:
The bat starts with 6 hit points, so it
passes 6 to the base class constructor.
The bat starts with 6 hit points. It’ll keep moving toward the player
and attacking as long as it has one or more hit points. When it
moves, there’s a 50% chance that it’ll move toward the player, and a
50% chance that it’ll move in a random direction. After the bat moves,
it checks if it’s near the player—if it is, then it attacks the player with
up to 2 hit points of damage.
The ghost is harder to defeat than the bat, but like the bat, it will only
move and attack if its hit points are greater than zero. It starts with 8
hit points. When it moves, there’s a 1 in 3 chance that it’ll move toward
the player, and a 2 in 3 chance that it’ll stand still. If it’s near the player,
it attacks the player with up to 3 hit points of damage.
The ghoul is the toughest enemy. It starts with 10 hit points, and only
moves and attacks if its hit points are greater than zero. When it moves,
there’s a 2 in 3 chance that it’ll move toward the player, and a 1 in 3
chance that it’ll stand still. If it’s near the player, it attacks the player
with up to 4 hit points of damage.
Once an enemy has no more hit points,
the form will no longer display it. But
it’ll still be in the game’s Enemies list
until the player finishes the level.
You probably won’t need any constructor for
these; the base class handles everything.
Each of these subclasses the
Enemy base class, which in turn
subclasses Mover.
We’ll have to make
sure the form
sees if an enemy
should be visible
at every turn.
The bat flies around
somewhat randomly, so
it uses Random to fly
in a random direction
half the time.
The ghost
and ghoul use
Random to make
them move more
slowly than the
player.
400 Head First Lab #1
The Quest
abstract class Weapon : Mover {
protected Game game;
private bool pickedUp;
public bool PickedUp { get { return pickedUp; } }
private Point location;
public Point Location { get { return location; } }
public Weapon(Game game, Point location) {
this.game = game;
this.location = location;
pickedUp = false;
}
public void PickUpWeapon() { pickedUp = true; }
public abstract string Name { get; }
public abstract void Attack(Direction direction, Random random);
protected bool DamageEnemy(Direction direction, int radius,
int damage, Random random) {
Point target = game.PlayerLocation;
for (int distance = 0; distance < radius; distance++) {
foreach (Enemy enemy in game.Enemies) {
if (Nearby(enemy.Location, target, radius)) {
enemy.Hit(damage, random);
return true;
}
}
target = Move(direction, target, game.Boundaries);
}
return false;
}
}
We need a base Weapon class, just like we had a base Enemy class.
And each weapon has a location, as well as a property indicating
whether or not it’s been picked up. Here’s the base Weapon class:
Weapon inherits from Mover,
each weapon inherits from Weapon
Weapon
(abstract)
PickUpWeapon()
DamageEnemy()
PickedUp
Location
Each weapon class needs to
implement a Name property and an
Attack() method that determines
how that weapon attacks.
The constructor sets the game and location
fields, and sets pickedUp to false (because
it hasn’t been picked up yet).
A pickedUp weapon shouldn’t
be displayed anymore…the
form can use this get
accessor to figure that out.
Each
weapon’s
Name
property
returns
its name
(“Sword”,
“Mace”,
“Bow”).
Each weapon has a
different range and
pattern of attack, so
the weapons implement
the Attack() method
differently.
Every weapon has a location
in the game dungeon.
The DamageEnemy() method is called by
Attack(). It attempts to find an enemy in
a certain direction and radius. If it does, it
calls the enemy’s Hit() method and returns
true. If no enemy’s found, it returns false.
Weapon inherits
from Mover
because it uses
its Nearby() and
Move() methods in
DamageEnemy().
The Nearby() method in the Mover class only takes two
parameters, a Point and an int, and it compares the Point to
the Mover field location. You’ll need to add an overloaded
Nearby() that’s almost identical, except that it takes three
parameters, two Points and a distance, which compares the
first Point to the second Point (instead of location).
you are here 4 401
The Quest
Bow
Attack()
Name
Mace
Attack()
Name
Sword
Attack()
Name
Different weapons attack in different ways
Each subclass of Weapon has its own name and attack logistic. Your job is to
implement these classes. Here’s the basic skeleton for a Weapon subclass:
The sword is the first weapon the player picks up. It’s got a wide angle
of attack: if he attacks up, then it first tries to attack an enemy that’s in
that direction—if there’s no enemy there, it looks in the direction that’s
clockwise from the original attack and attacks any enemy there, and if
it still fails to hit then it attempts to attack an enemy counterclockwise
from the original direction of attack. It’s got a radius of 10, and causes
3 points of damage.
The bow has a very narrow angle of attack, but it’s got a very long
range—it’s got an attack radius of 30, but only causes 1 point of
damage. Unlike the sword, which attacks in three directions (because
the player swings it in a wide arc), when the player shoots the bow in a
direction, it only shoots in that one direction.
The mace is the most powerful weapon in the dungeon. It doesn’t
matter in which direction the player attacks with it—since he swings it
in a full circle, it’ll attack any enemy within a radius of 20 and cause up
to 6 points of damage.
Think carefully
about this…what
is to the right
of the direction
left? What is to
the left of up?
class Sword : Weapon {
public Sword(Game game, Point location)
: base(game, location) { }
public override string Name { get { return “Sword”; } }
public override void Attack(Direction direction, Random random) {
// Your code goes here
}
}
Each subclass represents one of the
three weapons: a sword, bow, or mace.
Each subclass relies on the base class
to do the initialization work.
You’re basically hardcoding in
the name of each weapon.
The Game object will pass on
the direction to attack in.
The different weapons will call DamageEnemy() in various ways. The
Mace attacks in all directions, so if the player’s attacking to the
right, it’ll call DamageEnemy(Direction.Right, 20, 6, random). If
that didn’t hit an enemy, it’ll attack Up. If there’s no enemy there,
it’ll try Left, then Down—that makes it swing in a full circle.
The player can use the
weapons over and over—they
never get dropped or used up.
402 Head First Lab #1
The Quest
IPotion
(interface)
Used
Weapon
(abstract)
PickUpWeapon()
DamageEnemy()
PickedUp
Location
Potions implement the IPotion interface
There are two potions, a blue potion and a red potion, which increase the
player’s health. They act just like weapons—the player picks them up in
the dungeon, equips them by clicking on the inventory, and uses them
by clicking one of the attack buttons. So it makes sense for them to
inherit from the abstract Weapon class.
But potions act a little differently, too, so you’ll need to add an IPotion
interface so they can have extra behavior: increasing the player’s health.
The IPotion interface is really simple. Potions only need to add one read-
only property called Used that returns false if the player hasn’t used the
potion, and true if he has. The form will use it to determine whether or
not to display the potion in the inventory.
RedPotion
Attack()
Name
BluePotion
Attack()
Name
The BluePotion class’s Name property should return the string
“Blue Potion”. Its Attack() method will be called when the player
uses the blue potion—it should increase the player’s health by up to
5 hit points by calling the IncreasePlayerHealth() method.
After the player uses the potion, the potion’s Used() method
should return true.
The potions inherit from the Weapon class because
they’re used just like weapons—the player clicks on
the potion in the inventory scroll to equip it, and
then clicks any of the attack buttons to use it.
The RedPotion class is very similar to BluePotion, except that
its Name property returns the string “Red Potion”, and its Attack()
method increases the player’s health by up to 10 hit points.
interface IPotion {
bool Used { get; }
}
RedPotion
Attack()
Name
BluePotion
Attack()
Name
IPotion makes potions
usable only once. It’s
also possible to find
out if a Weapon is a
potion with “if (weapon
is IPotion)” because of
this interface.
You should be able to
write these classes using
this class diagram and
the information below.
If the player picks up a blue potion
on level 2, uses it, and then picks
up another one on level 4, the game
will end up creating two different
BluePotion instances.
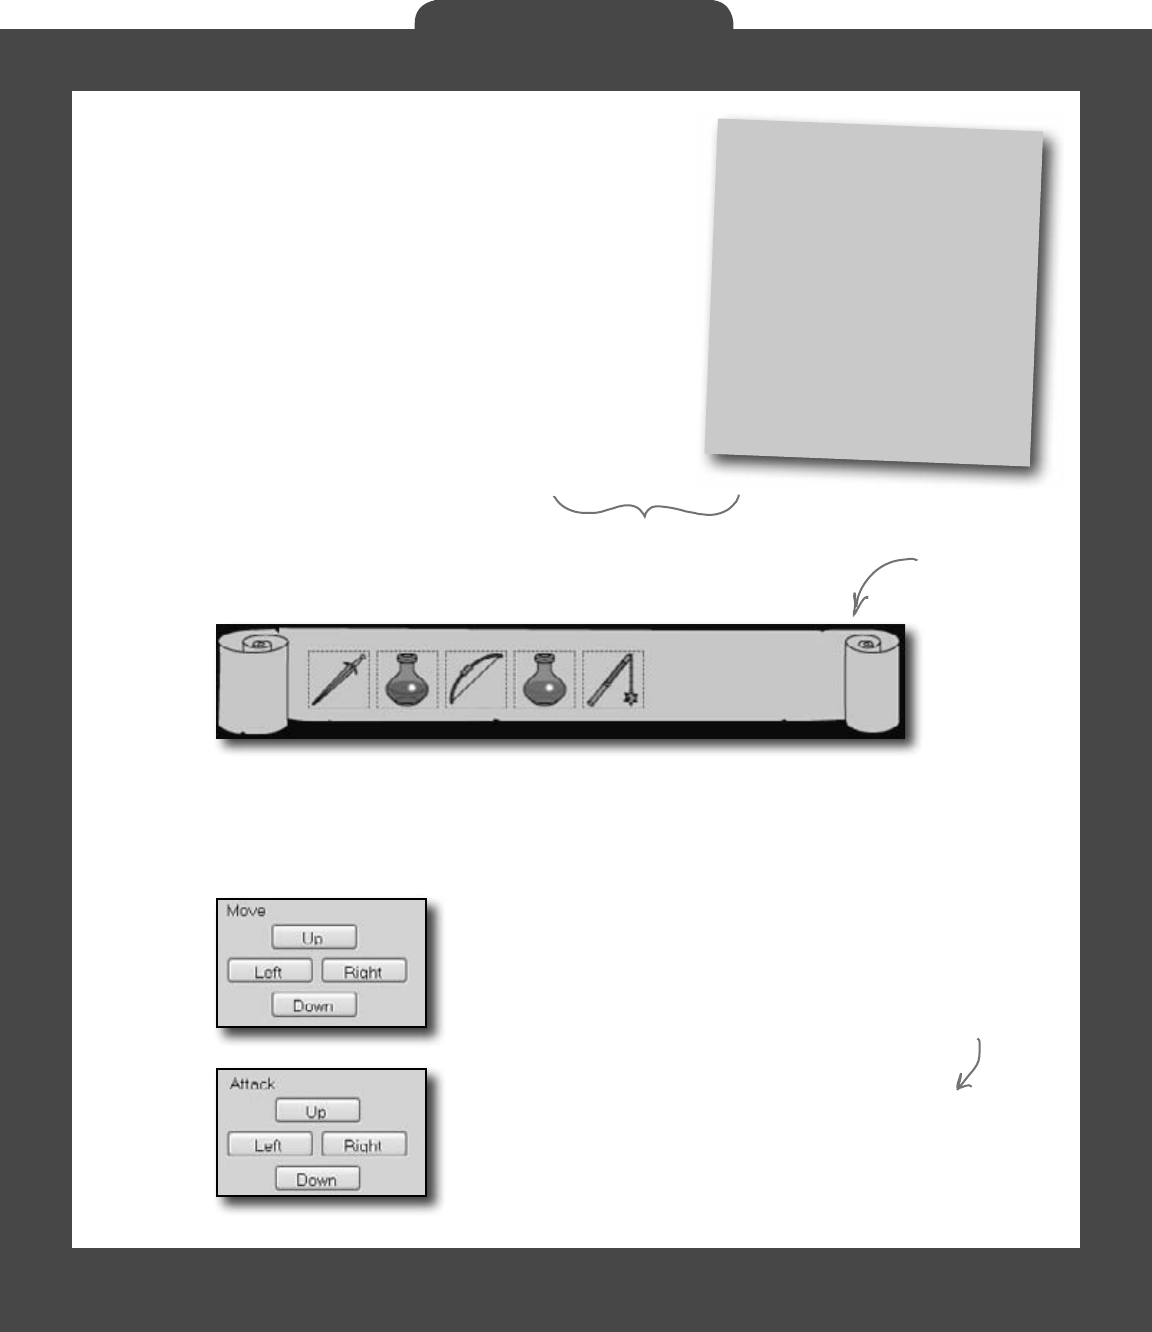
you are here 4 403
The Quest
private Game game;
private Random random = new Random();
private void Form1_Load(object sender,
EventArgs e) {
game = new Game(new Rectangle(78, 57, 420, 155));
game.NewLevel(random);
UpdateCharacters();
}
The form brings it all together
There’s one instance of the Game object, and it lives as a private field of
your form. It’s created in the form’s Load event, and the various event
handlers in the form use the fields and methods on the Game object to
keep the game play going.
Everything begins with the form’s Load event handler, which passes the
Game a Rectangle that defines the boundaries of the dungeon play
area. Here’s some form code to get you going:
The form has a separate event handler for each of these PictureBox’s Click events. When the
player clicks on the sword, it first checks to make sure the sword is in the player’s inventory using the
Game object’s CheckPlayerInventory() method. If the player’s holding the sword, the form
calls game.Equip() to equip it. It then sets each PictureBox’s BorderStyle property to
draw a box around the sword, and make sure none of the other icons has a box around it.
Using a Rectangle
You’ll find a lot of Rectangles any
time you work with forms. You
can create one by passing it X, Y,
Width, and Height values, or two
Points (for opposite corners). Once
you’ve got a rectangle instance, you
can also access its Left, Right,
Top, and Bottom, as well as its X,
Y, Width, and Height values.
These are the boundaries of the
dungeon in the background image
you’ll download and add to the form.
There’s an event handler for each of the four movement buttons.
They’re pretty simple. First the button calls game.Move() with
the appropriate Direction value, and then it calls the form’s
UpdateCharacters() method.
The four attack button event handlers are also really simple.
Each button calls game.Attack(), and then calls the form’s
UpdateCharacters() method. If the player equips a potion,
it’s still used the same way—by calling game.Attack()—but
potions have no direction. So make the Left, Right, and Down
buttons invisible when the player equips a potion, and change the
text on the Up button to say “Drink”.
Remember to
double-click on
each PictureBox
so the IDE adds
a separate event
handler method
for each of them.
Make sure you change the buttons
back when the player equips the
sword, bow, or mace.
404 Head First Lab #1
The Quest
public void UpdateCharacters() {
Player.Location = game.PlayerLocation;
playerHitPoints.Text =
game.PlayerHitPoints.ToString();
bool showBat = false;
bool showGhost = false;
bool showGhoul = false;
int enemiesShown = 0;
// more code to go here...
The form’s UpdateCharacters() method
moves the PictureBoxes into position
The last piece of the puzzle is the form’s UpdateCharacters() method.
Once all the objects have moved and acted on each other, the form updates
everything…so weapons that been dropped have their PictureBoxes’
Visible properties set to false, enemies and players are drawn in their
new locations (and dead ones are made invisible), and inventory is updated.
Here’s what you need to do:
Update the player’s position and stats
The first thing you’ll do is update the player’s PictureBox location and the
label that shows his hit points. Then you’ll need a few variables to determine
whether you’ve shown each of the various enemies.
1
Update each enemy’s location and hit points
Each enemy could be in a new location and have a different set of hit points. You need to
update each enemy after you’ve updated the player’s location:
Once you’ve looped through all the enemies on the level, check the showBat variable. If
the bat was killed, then showBat will still be false, so make its PictureBox invisible
and clear its hit points label. Then do the same for showGhost and showGhoul.
2
The showBat variable will be set to true if
we made the bat’s PictureBox visible. Same
goes for showGhost and showGhoul.
foreach (Enemy enemy in game.Enemies) {
if (enemy is Bat) {
bat.Location = enemy.Location;
batHitPoints.Text = enemy.HitPoints.ToString();
if (enemy.HitPoints > 0) {
showBat = true;
enemiesShown++;
}
}
// etc...
You’ll need two more if statements like this
in your foreach loop—one for the ghost
and one for the ghoul.
This goes right after
the code from above.
This will affect the
visibility of the enemy
PictureBox controls in
just a bit.
you are here 4 405
The Quest
weaponControl.Location = game.WeaponInRoom.Location;
if (game.WeaponInRoom.PickedUp) {
weaponControl.Visible = false;
} else {
weaponControl.Visible = true;
}
if (game.PlayerHitPoints <= 0) {
MessageBox.Show(“You died”);
Application.Exit();
}
if (enemiesShown < 1) {
MessageBox.Show(“You have defeated the enemies on this level”);
game.NewLevel(random);
UpdateCharacters();
}
Update the weapon PictureBoxes
Declare a weaponControl variable and use a big switch statement to set it equal to
the PictureBox that corresponds to the weapon in the room.
sword.Visible = false;
bow.Visible = false;
redPotion.Visible = false;
bluePotion.Visible = false;
mace.Visible = false;
Control weaponControl = null;
switch (game.WeaponInRoom.Name) {
case “Sword”:
weaponControl = sword; break;
The rest of the cases should set the variable weaponControl to the correct control on
the form. After the switch, set weaponControl.Visible to true to display it.
3
Set the Visible property on each inventory icon PictureBox
Check the Game object’s CheckPlayerInventory() method to figure out whether
or not to display the various inventory icons.
4
Here’s the rest of the method
The rest of the method does three things. First it checks to see if the player’s already
picked up the weapon in the room, so it knows whether or not to display it. Then it
checks to see if the player died. And finally, it checks to see if the player’s defeated all of
the enemies. If he has, then the player advances to the next level.
5
Application.Exit() immediately quits the program.
It’s part of System.Windows.Forms, so you’ll need
the appropriate using statement if you want to
use it outside of a form.
Every level has one weapon. If
it’s been picked up, we need to
make its icon invisible.
If there are no more enemies on the
level, then the player’s defeated them
all and it’s time to go to the next level.
Make sure your controls’ names
match these names. It’s easy to end
up with bugs that are difficult to
track down if they don’t match.
You’ll have more cases for
each weapon type.

406 Head First Lab #1
The Quest
The fun’s just beginning!
Seven levels, three enemies…that’s a pretty decent game. But you
can make it even better. Here are a few ideas to get you started.…
Make the enemies smarter
Can you gure out how to change the enemies’ Move() methods so that they’re harder to defeat?
Then see if you can change their constants to properties, and add a way to change them in the
game.
Add more levels
The game doesn’t have to end after seven levels. See if you can add more…can you gure out how
to make the game go on indenitely? If the player does win, make a cool ending animation with
dancing ghosts and bats! And the game ends pretty abruptly if the player dies. Can you think of a
more user-friendly ending? Maybe you can let the user restart the game or retry his last level.
Add different kinds of enemies
You don’t need to limit the dangers to ghouls, ghosts, and bats. See if you can add more enemies to
the game.
Add more weapons
The player will denitely need more help defeating any new enemies you’ve added. Think of new
ways that the weapons can attack, or different things that potions can do. Take advantage of the
fact that Weapon is a subclass of Mover—make magic weapons the player has to chase around!
Add more graphics
You can go to www.headrstlabs.com/books/hfcsharp/ to nd more graphics les for additional
enemies, weapons, and other images to help spark your imagination.
Make it an action game
Here’s an interesting challenge. Can you gure out how to use the KeyDown event and Timer you
used in the Key Game in Chapter 4 to change this from a turn-based game into an action game?
This is your chance to show off! Did you come up with a cool new
version of the game? Join the Head First C# forum and claim your
bragging rights: www.headfirstlabs.com/books/hfcsharp/

this is a new chapter 407
OK, go ahead with our shopping
list…chicken wire…tequila…grape
jelly…bandages…yes, dear, I am
writing this down.
reading and writing files
9
Save the byte array, save the world
Sometimes it pays to be a little persistent.
So far, all of your programs have been pretty short-lived. They fire up, run for
a while, and shut down. But that’s not always enough, especially when you’re
dealing with important information. You need to be able to save your work. In
this chapter, we’ll look at how to write data to a file, and then how to read that
information back in from a file. You’ll learn about the .NET stream classes,
and also take a look at the mysteries of hexadecimal and binary.
408 Chapter 9
b
y
t
e
s
r
e
a
d
f
r
o
m
t
h
e
f
i
l
e
S
t
r
e
a
m
o
b
j
e
c
t
M
a
i
n
f
o
r
m
S
t
r
e
a
m
o
b
j
e
c
t
M
a
i
n
f
o
r
m
.NET uses streams to read and write data
A stream is the .NET Framework’s way of getting data in and out of
your program. Any time your program reads or writes a file, connects
to another computer over a network, or generally does anything
where it sends or receives bytes from one place to another, you’re
using streams.
input = stream.Read(...);
input contains data read
from the stream
b
y
t
e
s
w
r
it
t
e
n
t
o
t
h
e
f
i
l
e
stream.Write(...);
output contains data to
write to the stream
Whenever you
want to read
data from a
file or write
data to a file,
you’ll use a
Stream object.
Let’s say you have a simple program—a form
with an event handler that needs to read data
from a file. You’ll use a Stream object to do it.
And if your program needs to write data out
to the file, it can use another Stream object.
islands in the stream
You use a
Stream object…
…and the stream works
with the file directly.
You can use a different
Stream object, but the
process is the same.
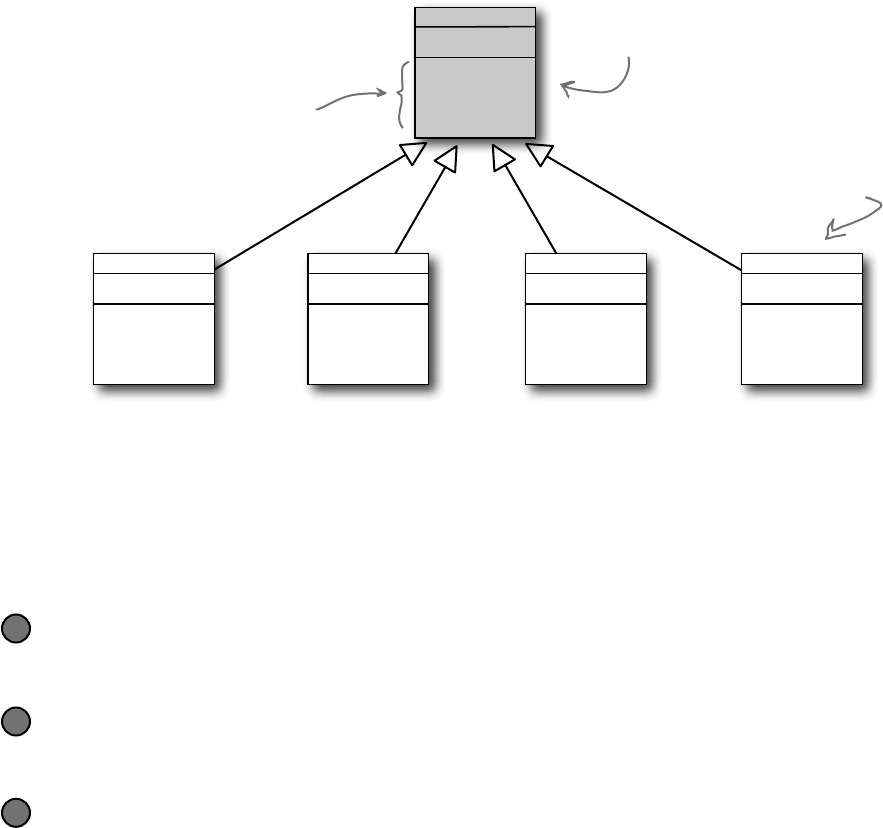
you are here 4 409
reading and writing files
Things you can do with a stream:
Write to the stream.
You can write your data to a stream through a stream’s Write()
method.
1
Read from the stream.
You can use the Read() method to get data from a file, or a network,
or memory, or just about anything else, using a stream.
2
Change your position within the stream.
Most streams support a Seek() method that lets you find a position
within the stream so you can read or insert data at a specific place.
3
Stream
Close()
Read()
Seek()
Write()
Streams let you
read and write
data. Use the
right kind of
stream for the
data you’re
working with.
A FileStream
object lets you
read from and
write to files.
A MemoryStream
object lets you read
from and write
data to chunks of
memory.
A NetworkStream
object lets you read
and write data to
other computers or
devices on a network.
A GZipStream
object lets you
compress data so
that it takes up less
space and is easier to
download and store.
These are just some
of the methods in the
Stream class.
Stream is an abstract class,
so you can’t instantiate it on
its own.
FileStream
Close()
Read()
Seek()
Write()
MemoryStream
Close()
Read()
Seek()
Write()
NetworkStream
Close()
Read()
Seek()
Write()
GZipStream
Close()
Read()
Seek()
Write()
Different streams read and write different things
Every stream is a subclass of the abstract Stream class, and there are a bunch
of built-in stream classes to do different things. We’ll be concentrating on reading
and writing regular files, but everything you learn in this chapter will just as easily
apply to compressed or encrypted files, or network streams that don’t use files at all.
Each subclass adds
methods and properties
specific to that class’s
functionality.
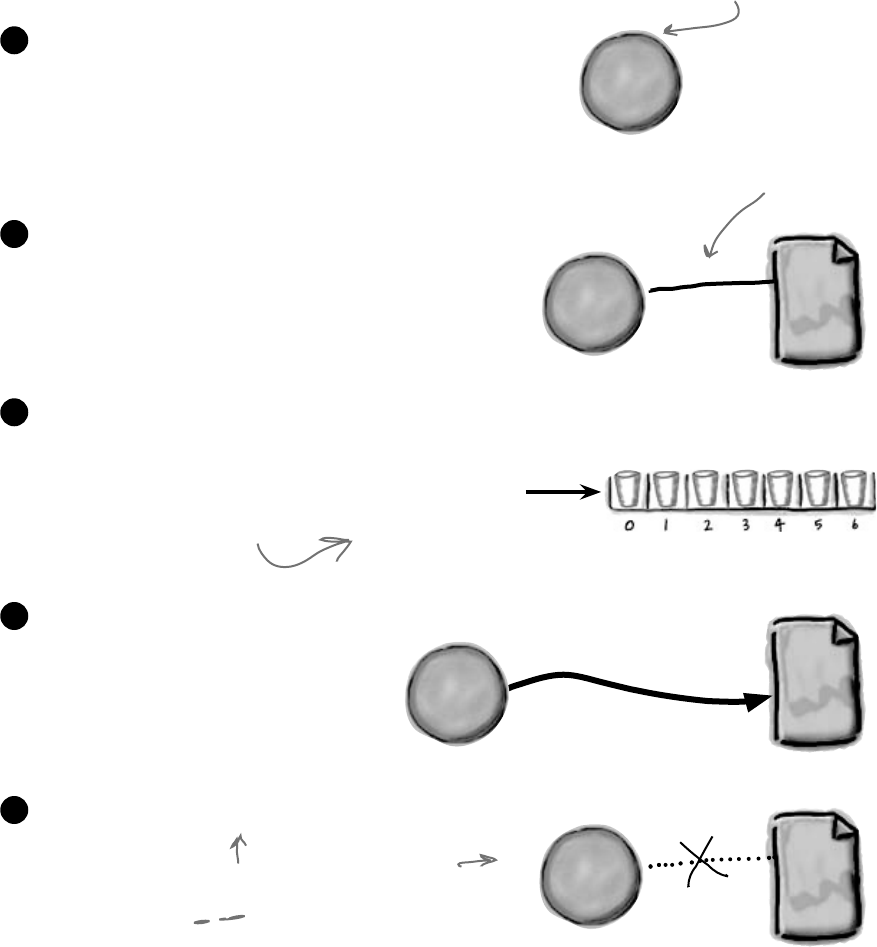
410 Chapter 9
A FileStream reads and writes bytes to a file
When your program needs to write a few lines of text
to a file, there are a lot of things that have to happen:
The FileStream attaches itself to a file.
2
Streams write bytes to files, so you’ll need to convert the string that you
want to write to an array of bytes.
3
Call the stream’s Write() method and pass it the byte array.
4
Close the stream so other programs can access the file.
5
Create a new FileStream object and tell it to write to the file.
1
Eureka!
69 117 114 101 107 97 33
so much easier
Make sure you add using System.
IO; to any program that uses streams.
A FileStream can only be
attached to one file at a time.
Forgetting to close a stream is a
big deal. Otherwise, the file will be
locked, and other programs won’t
be able to use it until you close your
stream.
6
9
1
1
7
1
1
4
1
0
1
1
0
7
9
7
3
3
This is called encoding, and we’ll
talk more about it later on…
F
i
l
e
S
t
r
e
a
m
o
b
j
e
c
t
F
i
l
e
S
t
r
e
a
m
o
b
j
e
c
t
F
i
l
e
S
t
r
e
a
m
o
b
j
e
c
t
F
i
l
e
S
t
r
e
a
m
o
b
j
e
c
t
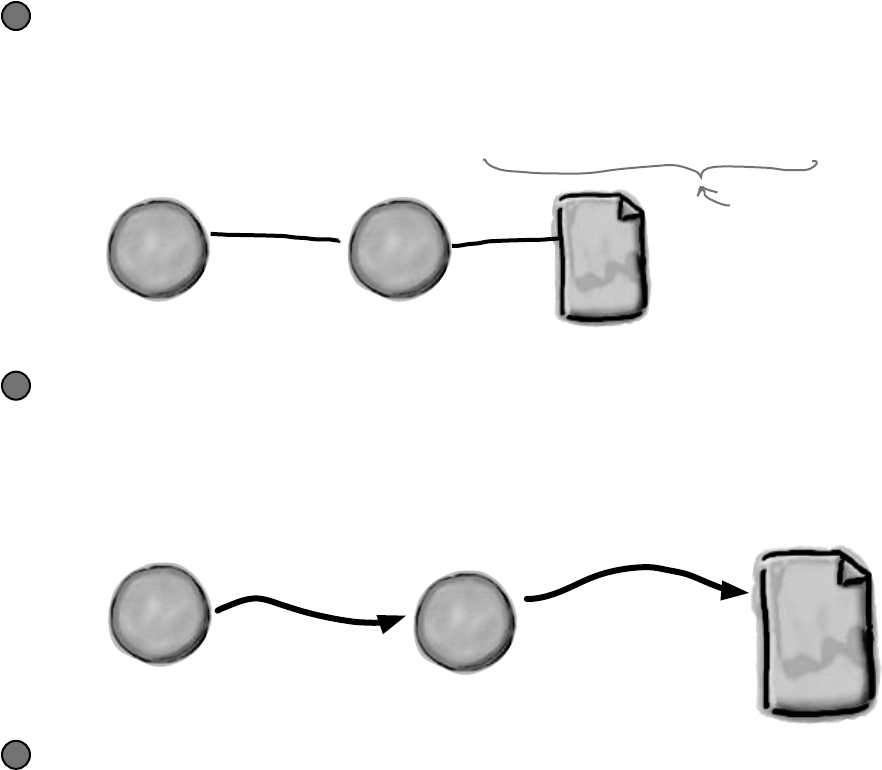
you are here 4 411
reading and writing files
How to write text to a file in 3 simple steps
C# comes with a convenient class called StreamWriter that does
all of those things in one easy step. All you have to do is create a new
StreamWriter object and give it a filename. It automatically creates a
FileStream and opens the file. Then you can use the StreamWriter’s
Write() and WriteLine() methods to write everything to the file you
want.
Use the StreamWriter’s constructor to open or create a file
You can pass a filename to the StreamWriter() constructor. When you do, the writer automatically
opens the file. StreamWriter also has an overloaded constructor that takes a bool: true if you want
to add text to the end of an existing file (or append), or false if you want to delete the existing file and
create a new file with the same name.
StreamWriter writer = new StreamWriter(@”C:\newfiles\toaster oven.txt”, true);
1
Use the Write() and WriteLine() methods to write to the file
These methods work just like the ones in Console: Write() writes text, and WriteLine() writes
text and adds a line break to the end. If you include “{0}”, “{1}”, “{2}”, etc., inside the string you’re
writing, the methods include parameters in the strings being written: “{0}” is replaced with the first
parameter after the string being written, “{1}” is replaced with the second, etc.
writer.WriteLine(“The {0} is set to {1} degrees.”, appliance, temp);
2
Call the Close() method to release the file
If you leave the stream open and attached to a file, then it’ll keep the file locked open
and no other program will be able to use it. So make sure you always close your files!
writer.Close();
3
T
h
e
t
o
a
s
t
e
r
o
v
e
n
…
…
i
s
s
e
t
t
o
3
5
0
d
e
g
r
e
e
s
.
Putting @ in front of the
filename tells C# to treat
this as a literal string without
escape characters like \t for
tab or \n for newline.
S
t
r
e
a
m
W
r
i
t
e
r
o
b
j
e
c
t
F
i
l
e
S
t
r
e
a
m
o
b
j
e
c
t
S
t
r
e
a
m
W
r
i
t
e
r
o
b
j
e
c
t
F
i
l
e
S
t
r
e
a
m
o
b
j
e
c
t
StreamWriter
creates and
manages a
FileStream
object for you
automatically.
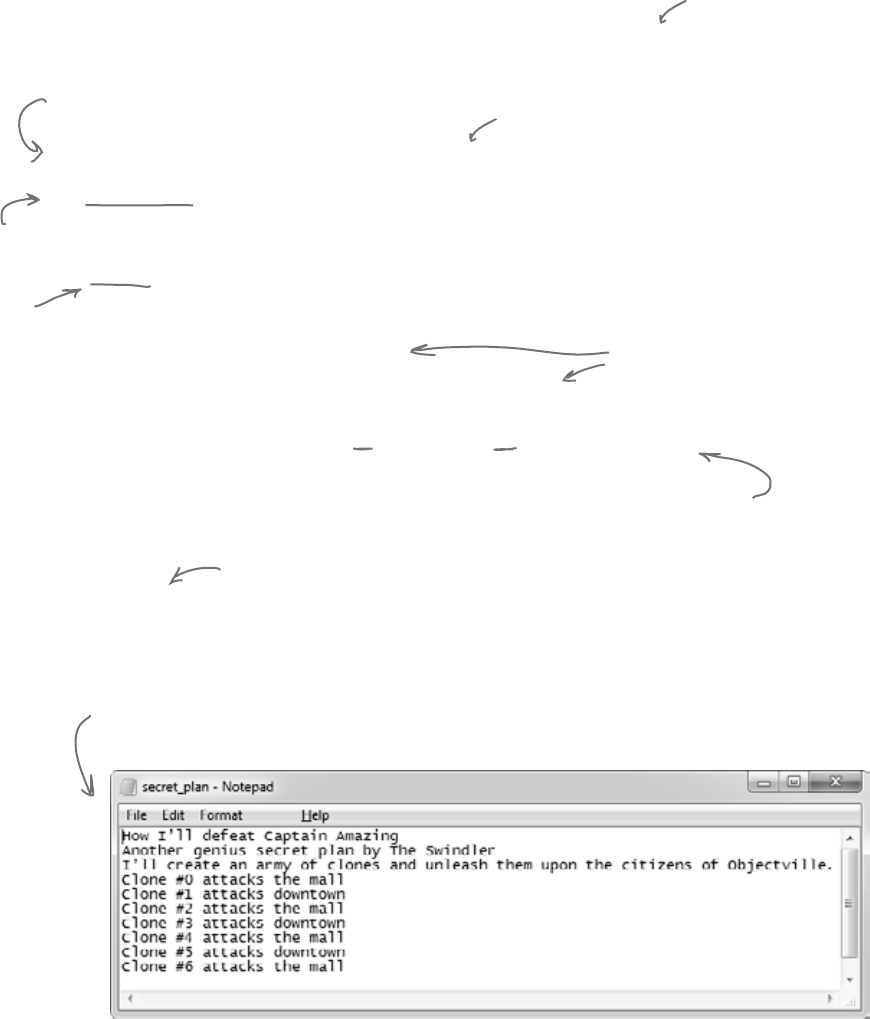
412 Chapter 9
StreamWriter sw = new StreamWriter(@”C:\secret_plan.txt”);
sw.WriteLine(“How I’ll defeat Captain Amazing”);
sw.WriteLine(“Another genius secret plan by The Swindler”);
sw.Write(“I’ll create an army of clones and ”);
sw.WriteLine(“unleash them upon the citizens of Objectville.”);
string location = “the mall”;
for (int number = 0; number <= 6; number++){
sw.WriteLine(“Clone #{0} attacks {1}”, number, location);
if (location == “the mall”) { location = “downtown”; }
else { location = “the mall”; }
}
sw.Close();
This line creates the StreamWriter object and
tells it where the file will be.
The path starts with an @ sign so
that the StreamWriter doesn’t
interpret the “\” as the start of
an escape sequence.
WriteLine()
adds a new line
after writing.
Write() sends
just the text,
with no extra
line feeds at
the end.
Close() frees up any connections to the
file and any resources the StreamWriter is
using. The text doesn’t get written if you
don’t close the stream.
You can use the {}
within the text to
pass in variables to the
string being written.
{0} is replaced by the
first parameter after
the string, {1} by the
second, and so on.
This is what the above code produces.
Can you figure out what’s
going on with the location
variable in this code?
The Swindler launches another diabolical plan
The citizens of Objectville have long lived in fear of the Swindler.
Now he’s using a StreamWriter to implement another evil
plan. Let’s take a look at what’s going on. Create a new Console
Application and add this to the Main() method::
write it down
StreamWriter is
in the System.IO
namespace, so
make sure you add
“using System.IO;”
to the top of your
program.
It’s probably not a
good idea to write to
your root folder, and
your OS might not even
let you do it. So pick
another directory you
want to write to.

you are here 4 413
reading and writing files
StreamWriter Magnets
Suppose you have the code for button1_Click() shown
below. Your job is to use the magnets to build code for the Flobbo
class so that when the event handler is called, it produces the
output shown at the bottom of the page. Good luck!
private void button1_Click(object sender, EventArgs e) {
Flobbo f = new Flobbo(“blue yellow”);
StreamWriter sw = f.Snobbo();
f.Blobbo(f.Blobbo(f.Blobbo(sw), sw), sw);
}
Output:
class Flobbo {
private string Zap;
public Flobbo(string Zap) {
this.Zap = Zap;
}
}
public bool Blobbo(StreamWriter sw) {
sw.WriteLine(Zap);
Zap = “green purple”;
return false;
if (Already) {
} else {
}
sw.WriteLine(Zap);
Zap = “red orange”;
return true;
}
}
}
public StreamWriter Snobbo() {
return new
StreamWriter(“macaw.txt”);
public bool Blobbo
(bool Already, StreamWriter sw) {
sw.WriteLine(Zap);
sw.Close();
return false;
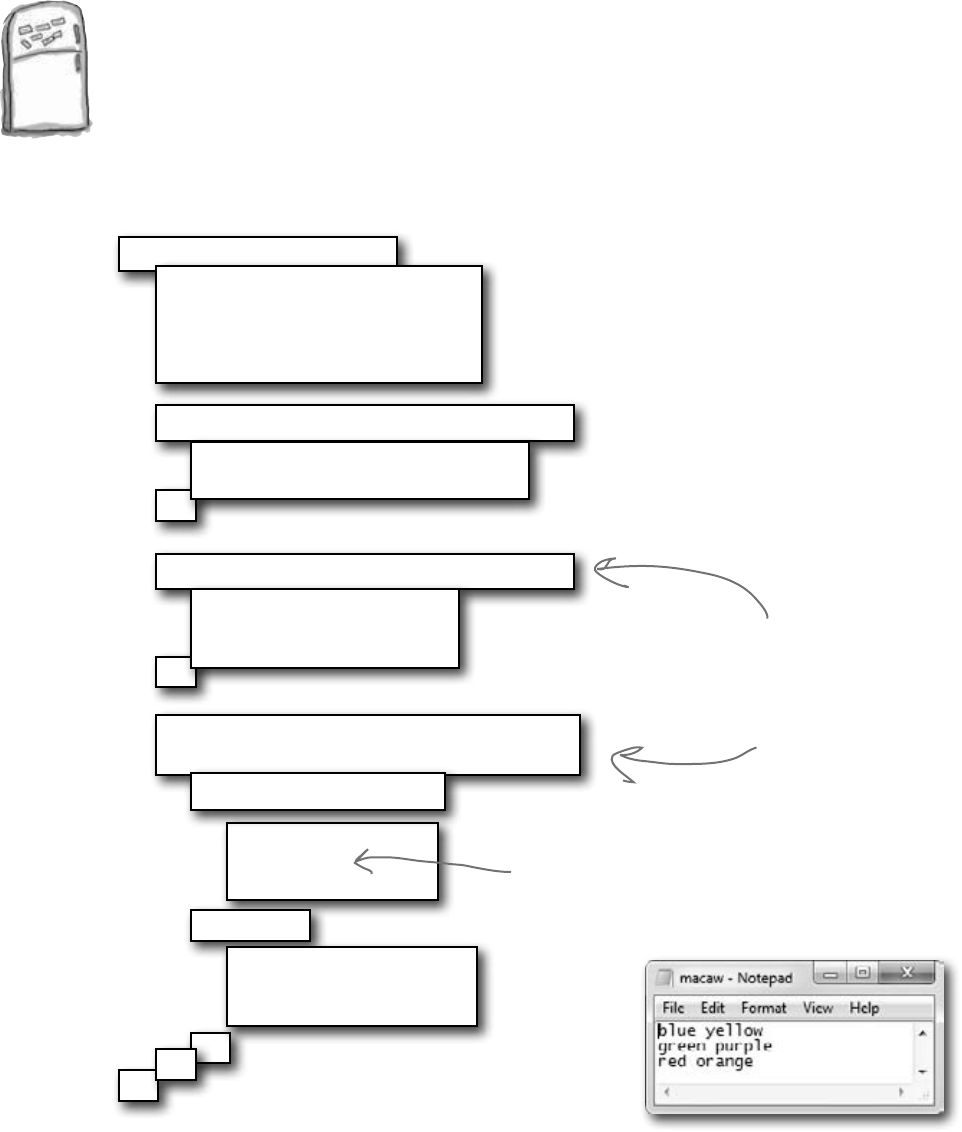
414 Chapter 9
StreamWriter Magnets Solution
Your job was to construct the Flobbo class from the magnets
to create the desired output.
class Flobbo {
private string Zap;
public Flobbo(string Zap) {
this.Zap = Zap;
}
}
public bool Blobbo(StreamWriter sw) {
public bool Blobbo
(bool Already, StreamWriter sw) {
sw.WriteLine(Zap);
sw.Close();
return false;
sw.WriteLine(Zap);
Zap = “green purple”;
return false;
if (Already) {
} else {
}
sw.WriteLine(Zap);
Zap = “red orange”;
return true;
}
}
}
public StreamWriter Snobbo() {
return new
StreamWriter(“macaw.txt”);
private void button1_Click(object sender, EventArgs e) {
Flobbo f = new Flobbo(“blue yellow”);
StreamWriter sw = f.Snobbo();
f.Blobbo(f.Blobbo(f.Blobbo(sw), sw), sw);
}
Output:
The Blobbo() method
is overloaded—it’s got
two declarations with
different parameters.
Make sure you close
files when you’re done
with them.
read it in
Just a reminder: we picked
intentionally weird variable
names and methods in these
puzzles because if we used
really good names, the
puzzle would be too easy!
Don’t use names like this in
your code, ok?
you are here 4 415
reading and writing files
Reading and writing using two objects
Let’s read Swindler’s secret plans with another stream, a StreamReader.
StreamReader works just like StreamWriter, except instead
of writing a file you give the reader the name of the file to read in its
constructor. The ReadLine() method returns a string that contains the
next line from the file. You can write a loop that reads lines from it until its
EndOfStream field is true—that’s when it runs out of lines to read:
StreamReader reader =
new StreamReader(@“c:\secret_plan.txt”);
StreamWriter writer =
new StreamWriter(@“c:\emailToCaptainAmazing.txt”);
writer.WriteLine(“To: CaptainAmazing@objectville.net”);
writer.WriteLine(“From: Commissioner@objectiville.net”);
writer.WriteLine(“Subject: Can you save the day... again?”);
writer.WriteLine();
writer.WriteLine(“We’ve discovered the Swindler’s plan:”);
while (!reader.EndOfStream) {
string lineFromThePlan = reader.ReadLine();
writer.WriteLine(“The plan -> ” + lineFromThePlan);
}
writer.WriteLine();
writer.WriteLine(“Can you help us?”);
writer.Close();
reader.Close();
An empty WriteLine() method
writes a blank line.
This loop reads a line from
the reader and writes it
out to the writer.
This program uses a StreamReader to read the
Swindler’s plan, and a StreamWriter to write a file
that will get emailed to Captain Amazing.
Make sure to close every
stream that you open, even if
you’re just reading a file.
Pass the file you want
to read from into the
StreamReader’s constructor.
EndOfStream is the property
that tells you if there’s no
data left unread in the file.
One quick note. We’re playing a little
fast and loose with the word “stream.” A
StreamReader (which inherits from
TextReader) is a class that reads
characters from streams. It’s not a stream
itself. When you pass a filename into its
constructor, it creates a stream for you, and
closes it when you call its Close() method.
It’s also got an overloaded constructor that
takes a Stream. See how that works
The StreamReader and StreamWriter
opened up their own streams when
you instantiated them. Calling their
Close() methods tells them to close
those streams.
416 Chapter 9
Stream
Close()
Read()
Seek()
Write()
CryptoStream
Close()
Read()
Seek()
Write()
Data can go through more than one stream
One big advantage to working with streams in .NET is that you can have your data
go through more than one stream on its way to its final destination. One of the many
types of streams that .NET ships with is the CryptoStream class. This lets you
encrypt your data before you do anything else with it:
I
’
l
l
c
r
e
a
t
e
a
n
a
r
m
y
o
f
C
l
o
n
e
s
a
n
d
*
3
y
d
4
ÿ
Ö
n
d
f
r
5
6
d
ì
¢
L
1
═
Using a normal FileStream, your data
gets written directly to a file as text.
You write normal
text to a
CryptoStream.
Now your FileStream writes
the encrypted text to the file.
CryptoStream inherits
from the abstract
Stream class, just
like the other stream
classes.
don’t cross the streams
*
3
y
d
4
ÿ
Ö
n
d
f
r
5
6
d
ì
¢
L
1
═
This CryptoStream is
connected to a FileStream,
and gives that file stream
your text, but encrypted.
You can CHAIN streams. One stream
can write to another stream, which
writes to another stream…often
ending with a network or file stream.
C
r
y
p
t
o
S
t
r
e
a
m
o
b
j
e
c
t
F
i
l
e
S
t
r
e
a
m
o
b
j
e
c
t
F
i
l
e
S
t
r
e
a
m
o
b
j
e
c
t

you are here 4 417
reading and writing files
Pool Puzzle
Your job is to take code snippets from
the pool and place them into the
blank lines in the program. You
can use the same snippet more
than once, and you won’t need
to use all the snippets. Your goal
is to make the program produce
the output shown to the right.
Note: Each snippet
from the pool can
be used more than
once!
Stream
reader
writer
StreamReader
StreamWriter
Open
Close
Fargo
Utah
Idaho
Dakota
Pineapple
HowMany
HowMuch
HowBig
HowSmall
int
long
string
enum
class
public
private
this
class
static
=
>=
<=
!=
==
++
--
for
while
foreach
class Pizza {
private ____________ _______;
public Pizza(__________ _______) {
______.writer = writer;
}
public void ______(______.Fargo f) {
writer._________(f);
writer.__________();
}
}
class Party {
private ____________ reader;
public Party(____________ reader) {
__________.reader = reader;
}
public void HowMuch(__________ q) {
q._________(reader._________());
reader.__________();
}
}
class Pineapple {
const ______ d = “delivery.txt”;
public _____ ______
{ North, South, East, West, Flamingo }
public static void Main() {
__________ o = new ____________(“order.txt”);
Pizza pz = new Pizza(new __________(d, true));
pz.________(Fargo.Flamingo);
for (_____ w = 3; w >= 0; w--) {
Pizza i = new Pizza
(new ___________(d, false));
i.Idaho((Fargo)w);
Party p = new Party(new __________(d));
p.___________(o);
}
o.___________(“That’s all folks!”);
o.__________();
}
}
ReadLine
WriteLine
418 Chapter 9
class Pineapple {
const string d = “delivery.txt”;
public enum Fargo { North, South, East, West, Flamingo }
public static void Main() {
StreamWriter o = new StreamWriter(“order.txt”);
Pizza pz = new Pizza(new StreamWriter(d, true));
pz.Idaho(Fargo.Flamingo);
for (int w = 3; w >= 0; w--) {
Pizza i = new Pizza(new StreamWriter(d, false));
i.Idaho((Fargo)w);
Party p = new Party(new StreamReader(d));
p.HowMuch(o);
}
o.WriteLine(“That’s all folks!”);
o.Close();
}
}
class Pizza {
private StreamWriter writer;
public Pizza(StreamWriter writer) {
this.writer = writer;
}
public void Idaho(Pineapple.Fargo f) {
writer.WriteLine(f);
writer.Close();
}
}
class Party {
private StreamReader reader;
public Party(StreamReader reader) {
this.reader = reader;
}
public void HowMuch(StreamWriter q) {
q.WriteLine(reader.ReadLine());
reader.Close();
}
}
Pool Puzzle Solution
The Pizza class keeps a
StreamWriter as a private
field, and its Idaho() method
writes Fargo enums to the
file using their ToString()
methods, which WriteLine()
calls automatically.
Here’s the entry point for
the program. It creates a
StreamWriter that it passes to
the Party class. Then it loops
through the Fargo members,
passing each of them to the
Pizza.Idaho() method to print.
This enum (specifically, its
ToString() method) is used to
print a lot of the output.
The Party class has a
StreamReader field, and
its HowMuch() method
reads a line from that
StreamReader and writes
it to a StreamWriter.
a serious dialog
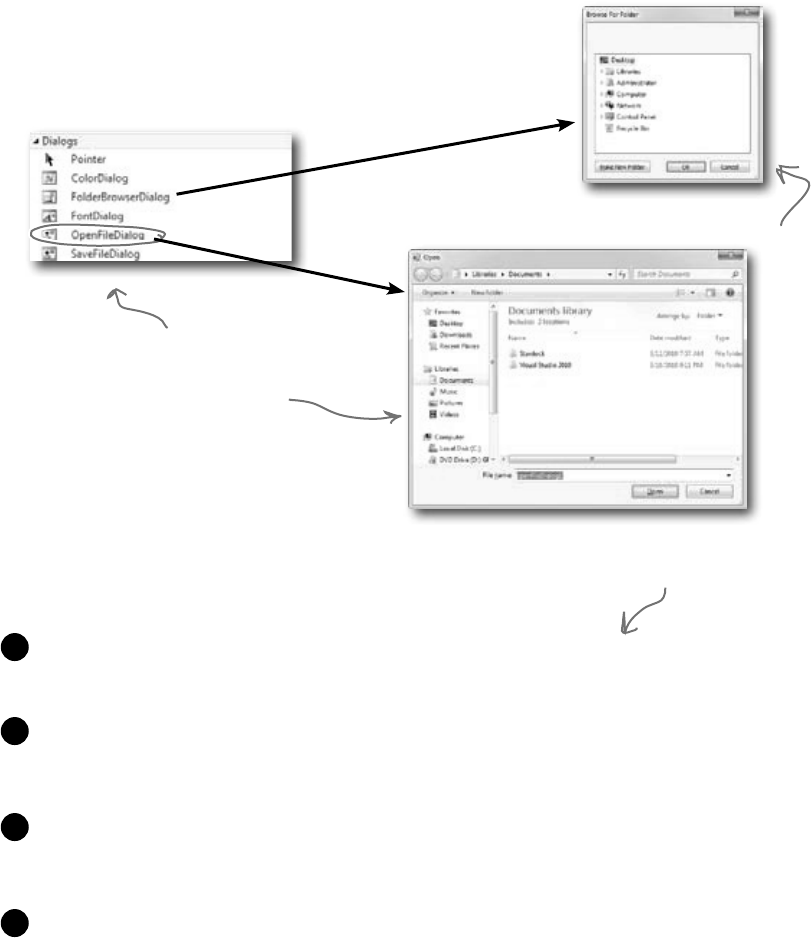
you are here 4 419
reading and writing files
Use built-in objects to pop up standard dialog boxes
When you’re working on a program that reads and writes files, there’s
a good chance that you’ll need to pop up a dialog box at some point to
prompt the user for a filename. That’s why .NET ships with objects to
pop up the standard Windows file dialog boxes.
ShowDialog() pops up a dialog box
Displaying a dialog box is easy. Here’s all you
need to do:
Create an instance of the dialog box object. You can do this in code
using new, or you can drag it out of the Toolbox and onto your form.
1
Set the dialog box object’s properties. A few useful ones include Title (which
sets the text in the title bar), InitialDirectory (which tells it which
directory to open first), and FileName (for Open and Save dialog boxes).
2
Call the object’s ShowDialog() method. That pops up the dialog box,
and doesn’t return until the user clicks the OK or Cancel button, or closes
the window.
3
The ShowDialog() method returns a DialogResult, which is an enum.
Some of its members are OK (which means the user clicked OK), Cancel, Yes,
and No (for Yes/No dialog boxes).
4
.NET has dialog boxes built in,
like this OpenFileDialog for
selecting a file to open.
This is the
FolderBrowseDialog
dialog box.
We’ll walk you through
these steps in a minute.
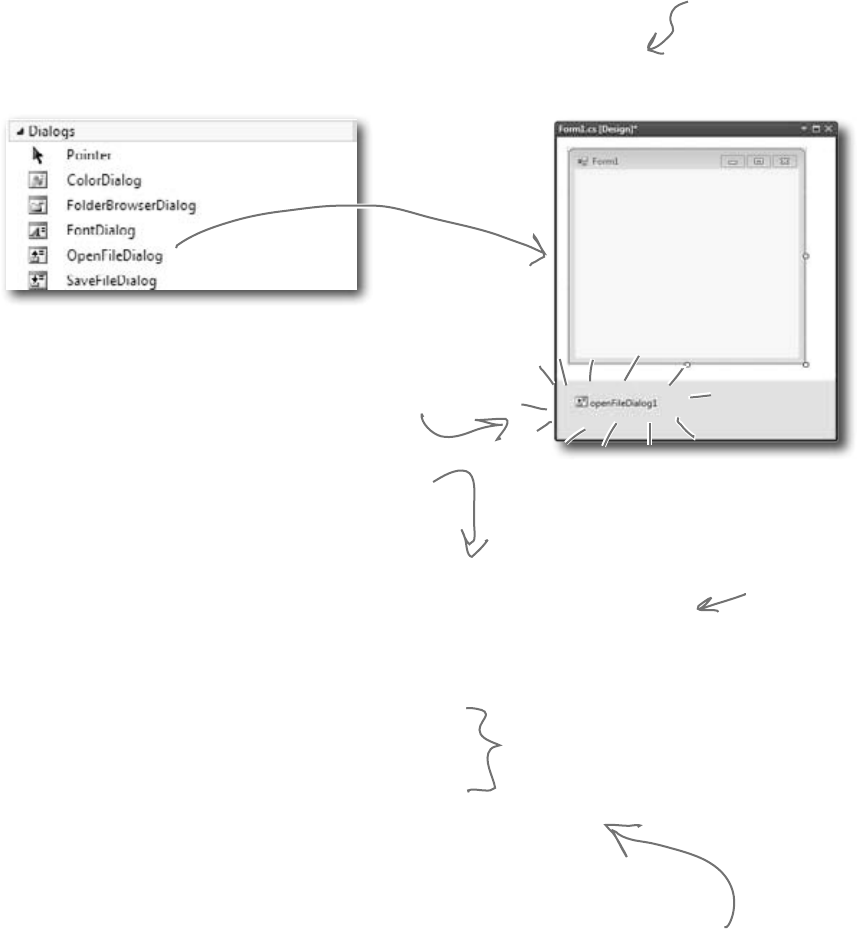
420 Chapter 9
Dialog boxes are just another .NET control
You can add Windows standard file dialog boxes to your program by dragging them
to your form—just drag an OpenFileDialog control out of the Toolbox and drop
it onto your form. Instead of showing up as a visual control, you’ll see it appear in the
space below your form. That’s because it’s a component, which is a special kind of
non-visual Toolbox control that doesn’t appear directly on the form, but which you
can still use in your form’s code just like you use any other control.
When you drag a component out of the
Toolbox and onto your form, the IDE
displays it in the space underneath the
form editor.
openFileDialog1.InitialDirectory = @“c:\MyFolder\Default\”;
openFileDialog1.Filter = “Text Files (*.txt)|*.txt|”
+ “Comma-Delimited Files (*.csv)|*.csv|All Files (*.*)|*.*”;
openFileDialog1.FileName = “default_file.txt”;
openFileDialog1.CheckFileExists = true;
openFileDialog1.CheckPathExists = false;
DialogResult result = openFileDialog1.ShowDialog();
if (result == DialogResult.OK){
OpenSomeFile(openFileDialog1.FileName);
}
The InitialDirectory property changes the folder
that’s first displayed when the dialog opens.
These properties tell the dialog box
to display an error message if the
user tries to open up a file or path
that doesn’t exist on the drive.
Display the dialog box using its ShowDialog() method, which returns a
DialogResult. That’s an enum that you can use to check whether or not the
user hit the OK button. It’ll be set to DialogResult.OK if the user clicked OK,
and DialogResult.Cancel if he hit Cancel.
dialog boxes are objects too
The Filter
property lets you
change the filters
that show up on
the bottom of the
dialog box, such as
what types of files
to show.
“Non-visual” just means
it doesn’t appear on your
form when you drag it
out of the Toolbox.
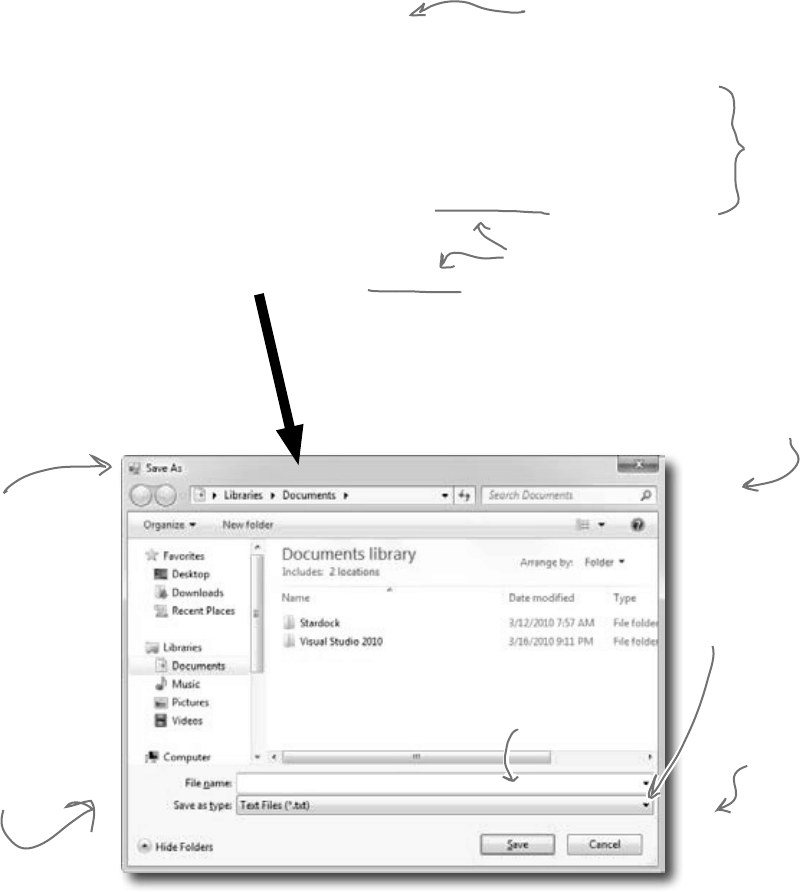
you are here 4 421
reading and writing files
Dialog boxes are objects, too
An OpenFileDialog object shows the standard Windows “Open” window,
and the SaveFileDialog shows the “Save” window. You can display
them by creating a new instance, setting the properties on the object, and
calling its ShowDialog() method. The ShowDialog() method returns
a DialogResult enum (because some dialog boxes have more than two
buttons or results, so a simple bool wouldn’t be enough).
The Title property lets
you change this text.
Change the “Save as
type” list using the
Filter property.
The DialogResult
returned by the
ShowDialog() method
lets you figure out
which button the
user clicked.
The ShowDialog()
method pops up
the dialog box and
opens the folder
specified in the
InitialDirectory
property.
When the user chooses a
file, its full path is saved
in the FileName property.
The SaveFileDialog
object pops up the
standard Windows
“Save as…” dialog box.
saveFileDialog1 = new SaveFileDialog();
saveFileDialog1.InitialDirectory = @“c:\MyFolder\Default\”;
saveFileDialog1.Filter = “Text Files (*.txt)|*.txt|”
+ “Comma-Delimited Files (*.csv)|*.csv|All Files (*.*)|*.*”;
DialogResult result = saveFileDialog1.ShowDialog();
if (result == DialogResult.OK){
SaveTheFile(saveFileDialog1.FileName);
}
The ShowDialog() and FileName
properties work exactly the same
as on the OpenFileDialog object.
When you drag a save dialog object out
of the Toolbox and onto your form, the
IDE just adds a line like this to your
form’s InitializeComponent() method.
The Filter property isn’t
hard to figure out. Just
compare what’s between the |
characters in the string with
what shows up in the window.
422 Chapter 9
Use the built-in File and Directory classes
to work with files and directories
Like StreamWriter, the File class creates streams that let you work with files behind
the scenes. You can use its methods to do most common actions without having to create
the FileStreams first. Directory objects let you work with whole directories full of
files.
Things you can do with a File:
Find out if the file exists
You can check to see if a file exists using the
Exists() method. It’ll return true if it does
and false if it doesn’t.
1
Read from and write to the file
You can use the OpenRead() method to get data
from a file, or the Create() or OpenWrite()
method to write to the file.
2
Append text to the file
The AppendAllText() method lets you append
text to an already-created file. It even creates the file
if it’s not there when the method runs.
3
Things you can do with a Directory:
Create a new directory
Create a directory using the CreateDirectory() method. All
you have to do is supply the path; this method does the rest.
1
Get a list of the files in a directory
You can create an array of files in a directory using the
GetFiles() method; just tell the method which directory you
want to know about and it will do the rest.
2
Delete a directory
Deleting a directory is really simple too. Just use the Delete() method.
3
Get information about the file
The GetLastAccessTime() and
GetLastWriteTime() methods return the
date and time when the file was last accessed
and modified.
4
FileInfo works just like File
If you’re going to be doing a lot of work with
a file, you might want to create an instance of
the FileInfo class instead of using the File class’s
static methods.
The FileInfo class does just about everything the
File class does except you have to instantiate
it to use it. You can create a new instance of
FileInfo and access its
Exists()
method or its
OpenRead()
method in just the same way.
The only difference is that the File class
is faster for a small number of actions, and
FileInfo is better suited for big jobs.
directory assistance
File is a static class, so
it’s just a set of methods
that let you work with
files. FileInfo is an object
that you instantiate, and
its methods are the same as
the ones you see on File.

you are here 4 423
reading and writing files
Q:I still don’t get that {0} and {1} thing that was part of the
StreamWriter.
A:Whenyou’reprintingstringstoafile,you’lloftenfindyourselfin
thepositionofhavingtoprintthecontentsofabunchofvariables.For
example,youmighthavetowritesomethinglikethis:
writer.WriteLine(“My name is ” + name +
“and my age is ” + age);
Itgetsreallytediousandsomewhaterror-pronetohavetokeepusing+
tocombinestrings.It’seasiertotakeadvantageof{0}and{1}:
writer.WriteLine(
“My name is {0} and my age is {1}”,
name, age);
It’saloteasiertoreadthatcode,especiallywhenmanyvariablesare
includedinthesameline.
Q:Why did you put an @ in front of the string that contained the
filename?
A:Whenyouaddastringliteraltoyourprogram,thecompiler
convertsescapesequenceslike\nand\rtospecialcharacters.
Thatmakesitdifficulttotypefilenames,whichhavealotofbackslash
charactersinthem.Ifyouput@infrontofastring,ittellsC#notto
interpretescapesequences.ItalsotellsC#toincludelinebreaksin
yourstring,soyoucanhitEnterhalfwaythroughthestringandit’ll
includethatasalinebreakintheoutput:
string twoLine = @"this is a string
that spans two lines.";
Q:And what do \n and \t mean again?
A:Thoseareescapesequences.\nisalinefeedand\tisa
tab.\risareturncharacter,orhalfofaWindowsreturn—inWindows
textfiles,lineshavetoendwith\r\n(likewetalkedaboutwhenwe
introducedEnvironment.NewLinefromChapter8).Ifyouwant
touseanactualbackslashinyourstringandnothaveC#interpretitasthe
beginningofanescapesequence,justdoadoublebackslash:\\.
Q:What was that in the beginning about converting a string to a
byte array? How would that even work?
A:You’veprobablyheardmanytimesthatfilesonadiskare
representedasbitsandbytes.Whatthatmeansisthatwhenyouwrite
afiletoadisk,theoperatingsystemtreatsitasonelongsequence
ofbytes.TheStreamReaderandStreamWriterare
convertingfrombytestocharactersforyou—that’scalledencodingand
decoding.RememberfromChapter4howabytevariablecanstore
anynumberbetween0and255?Everyfileonyourharddriveisone
longsequenceofnumbersbetween0and255.It’suptotheprograms
thatreadandwritethosefilestointerpretthosebytesasmeaningful
data.WhenyouopenafileinNotepad,itconvertseachindividualbyte
toacharacter—forexample,Eis69andais97(butthisdependson
theencoding…you’lllearnmoreaboutencodingsinjustaminute).And
whenyoutypetextintoNotepadandsaveit,Notepadconvertseachof
thecharactersbackintoabyteandsavesittodisk.Andifyouwantto
writeastringtoastream,you’llneedtodothesame.
Q:If I’m just using a StreamWriter to write to a file, why
do I really care if it’s creating a FileStream for me?
A:Ifyou’reonlyreadingorwritinglinestoorfromatextfileinorder,
thenallyouneedareStreamReaderandStreamWriter.
Butassoonasyouneedtodoanythingmorecomplexthanthat,
you’llneedtostartworkingwithotherstreams.Ifyoueverneedto
writedatalikenumbers,arrays,collections,orobjectstoafile,a
StreamWriterjustwon’tdo.Butdon’tworry,we’llgointoalot
moredetailabouthowthatwillworkinjustaminute.
Q:What if I want to create my own dialog boxes? Can I do that?
A:Yes,youdefinitelycan.Youcanaddanewformtoyour
projectanddesignittolookexactlyhowyouwant.Thenyou
cancreateanewinstanceofitwithnew(justlikeyoucreated
anOpenFileDialogobject).Thenyoucancallits
ShowDialog()method,andit’llworkjustlikeanyotherdialog
box.We’lltalkalotmoreaboutaddingotherformstoyourprogramin
Chapter13.
Q:Why do I need to worry about closing streams after I’m done
with them?
A:Haveyoueverhadawordprocessortellyouitcouldn’topenafile
becauseitwas“busy”?Whenoneprogramusesafile,Windowslocks
itandpreventsotherprogramsfromusingit.Andit’lldothatforyour
programwhenitopensafile.Ifyoudon’tcalltheClose()method,
thenit’spossibleforyourprogramtokeepafilelockedopenuntilit
ends.
424 Chapter 9
.NET has two built-in classes with a bunch of static methods for working
with files and folders. The File class gives you methods to work with
files, and the Directory class lets you work with directories. Write
down what you think each of these lines of code does.
Code What the code does
if (!Directory.Exists(@“c:\SYP”)) {
Directory.CreateDirectory(@“c:\SYP”);
}
if (Directory.Exists(@“c:\SYP\Bonk”)) {
Directory.Delete(@“c:\SYP\Bonk”);
}
Directory.CreateDirectory(@“c:\SYP\Bonk”);
Directory.SetCreationTime(@“c:\SYP\Bonk”,
new DateTime(1976, 09, 25));
string[] files = Directory.GetFiles(@“c:\windows\”,
“*.log”, SearchOption.AllDirectories);
File.WriteAllText(@“c:\SYP\Bonk\weirdo.txt”,
@”This is the first line
and this is the second line
and this is the last line”);
File.Encrypt(@“c:\SYP\Bonk\weirdo.txt”);
File.Copy(@“c:\SYP\Bonk\weirdo.txt”,
@“c:\SYP\copy.txt”);
DateTime myTime =
Directory.GetCreationTime(@“c:\SYP\Bonk”);
File.SetLastWriteTime(@“c:\SYP\copy.txt”, myTime);
File.Delete(@“c:\SYP\Bonk\weirdo.txt”);
do it yourself notepad
See if you can guess what this one
does—you haven’t seen it yet.
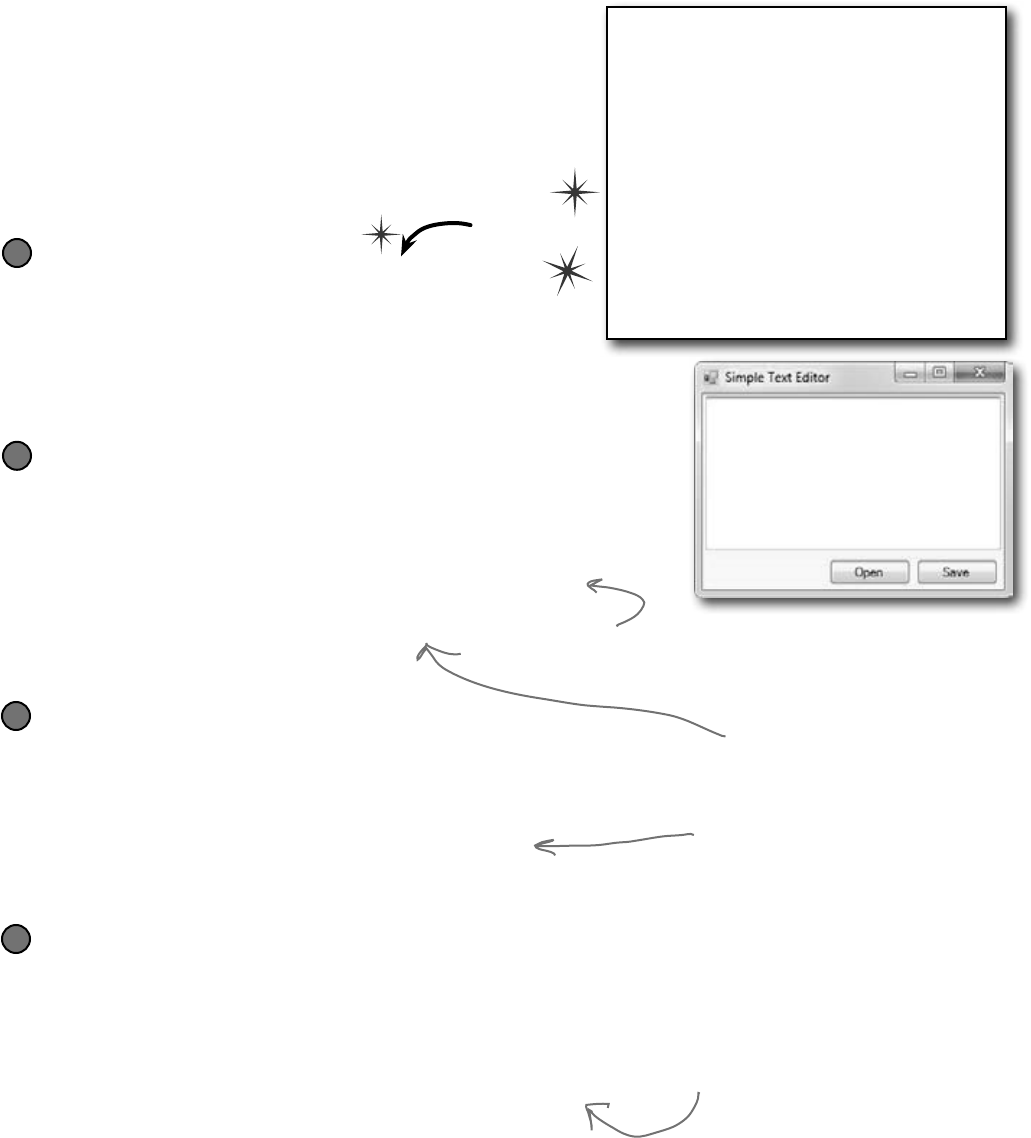
you are here 4 425
reading and writing files
Use file dialogs to open and save files
(all with just a few lines of code)
You can build a program that opens a text file. It’ll let you make
changes to the file and save your changes, with very little code,
all using standard .NET controls. Here’s how:
Do this
Build a simple form.
All you need is a TextBox and two Buttons. Drop the
OpenFileDialog and SaveFileDialog controls onto
the form, too. Double-click on the buttons to create their event
handlers and add a private string field called name to
the form. Don’t forget to put a using statement up top for
System.IO.
1
Hook the Open button up to the openFileDialog.
The Open button shows an OpenFileDialog and then uses File.
ReadAllText() to read the file into the text box:
private void open_Click(object sender, EventArgs e) {
if (openFileDialog1.ShowDialog() == DialogResult.OK) {
name = openFileDialog1.FileName;
textBox1.Clear();
textBox1.Text = File.ReadAllText(name);
}
}
2
Now, hook up the Save button.
The Save button uses the File.WriteAllText() method to save the file:
private void save_Click(object sender, EventArgs e) {
if (saveFileDialog1.ShowDialog() == DialogResult.OK) {
name = saveFileDialog1.FileName;
File.WriteAllText(name, textBox1.Text);
}
}
3
Play with the other properties of the dialog boxes.
± Use the Title property of the saveFileDialog to change the
text in the title bar.
± Set the initialFolder property to have the OpenFileDialog
start in a specified directory.
± Filter the OpenFileDialog so it will only show text files using the
Filter property.
4
Clicking Open shows the
OpenFileDialog control.
The ReadAllText() and
WriteAllText() methods are
part of the File class. That’s
coming up on the next page.
We’ll look at them in more
detail in just a few pages.
This is a TextBox
with Multiline set
to true.
If you don’t add a filter, then
the drop-down lists at the bottom
of the open and save dialog boxes
will be empty. Try using this filter:
“Text Files (*.txt)|*.txt”.
Here’s a trick to make your TextBox fill up
the form. Drag a TableLayoutPanel from
the Containers toolbox onto the form, set
its Dock property to Fill, and use its Rows
and Columns property editors to give it two
rows and one column. Drag the TextBox into
the top cell. Then drag a FlowLayoutPanel
out of the Toolbox into the bottom cell, set
its Dock to Fill, set its FlowDirection
property to RightToLeft, and drag the two
buttons onto it. Set the size of the top row in the
TableLayoutPanel to 100%, and resize the
bottom row so that the two buttons just fit. Now
your editor will resize smoothly!
426 Chapter 9
Code What the code does
if (!Directory.Exists(@”c:\SYP”)) {
Directory.CreateDirectory(@”c:\SYP”);
}
Check if the C:\SYP folder exists. If it
doesn’t, create it.
if (Directory.Exists(@”c:\SYP\Bonk”)) {
Directory.Delete(@”c:\SYP\Bonk”);
}
Check if the C:\SYP\Bonk folder exists. If
it does, delete it.
Directory.CreateDirectory(@”c:\SYP\Bonk”); Create the directory C:\SYP\Bonk.
Directory.SetCreationTime(@”c:\SYP\Bonk”,
new DateTime(1976, 09, 25)); Set the creation time for the C:\SYP\Bonk
folder to September 25, 1976.
string[] files = Directory.GetFiles(@”c:\windows\”,
“*.log”, SearchOption.AllDirectories); Get a list of all files in C:\Windows that
match the *.log pattern, including all
matching files in any subdirectory.
File.WriteAllText(@”c:\SYP\Bonk\weirdo.txt”,
@”This is the first line
and this is the second line
and this is the last line”);
Create a file called “weirdo.txt” (if it
doesn‘t already exist) in the C:\SYP\Bonk
folder and write three lines of text to it.
File.Encrypt(@”c:\SYP\Bonk\weirdo.txt”); Take advantage of built-in Windows
encryption to encrypt the file “weirdo.txt”
using the logged-in account’s credentials.
File.Copy(@”c:\SYP\Bonk\weirdo.txt”,
@”c:\SYP\copy.txt”); Copy the C:\SYP\Bonk\weirdo.txt file to
C:\SYP\Copy.txt.
DateTime myTime =
Directory.GetCreationTime(@”c:\SYP\Bonk”); Declare the myTime variable and set it equal
to the creation time of the C:\SYP\Bonk
folder.
File.SetLastWriteTime(@”c:\SYP\copy.txt”, myTime); Alter the last write time of the copy.txt
file in C:\SYP\ so it’s equal to whatever
time is stored in the myTime variable.
File.Delete(@”c:\SYP\Bonk\weirdo.txt”); Delete the C:\SYP\Bonk\weirdo.txt file.
.NET has two built-in classes with a bunch of static methods for working
with files and folders. The File class gives you methods to work with
files, and the Directory class lets you work with directories. Your job
was to write down what each bit of code did.
This is an alternative to using
a CryptoStream.
dispose in the proper receptacle
you are here 4 427
reading and writing files
IDisposable makes sure your objects are disposed of properly
A lot of .NET classes implement a particularly useful interface called
IDisposable. It has only one member: a method called Dispose().
Whenever a class implements IDisposable, it’s telling you that there
are important things that it needs to do in order to shut itself down, usually
because it’s allocated resources that it won’t give back until you tell it to.
The Dispose() method is how you tell the object to release those resources.
You can use the “Go To Definition” feature in the IDE to show you the
official C# definition of IDisposable. Go to your project and type
“IDisposable” anywhere inside a class. Then right-click on it and select “Go
To Definition” from the menu. It’ll open a new tab with code in it. Expand all
of the code and this is what you’ll see:
namespace System
{
// Summary:
// Defines a method to release allocated resources.
public interface IDisposable
{
// Summary:
// Performs application-defined tasks
// associated with freeing, releasing, or
// resetting unmanaged resources.
void Dispose();
}
}
You’ll learn
more about
“Go To
Definition”
later on.
A lot of classes allocate important resources, like
memory, files, and other objects. That means they
take them over, and don’t give them back until
you tell them you’re done with those resources.
al-lo-cate, verb.
to distribute resources
or duties for a particular
purpose. The programming
team was irritated at their project
manager because he allocated
all of the conference rooms for a
useless management seminar.
Any class that implements IDisposable will immediately
release any resources that it took over as soon as you
call its Dispose() method. It’s almost always the last
thing you do before you’re done with the object.
Declare an
object in a using
block and that
object’s Dispose()
method is called
automatically.
Go To Definition
There’s a handy feature in the IDE that lets you automatically jump to the
definition for any variable, object, or method. Just right-click on it and
select “Go To Definition”, and the IDE will automatically jump right to the
code that defines it. You can also press F12 instead of using the menu.
428 Chapter 9
Avoid file system errors with using statements
We’ve been telling you all chapter that you need to close your streams. That’s
because some of the most common bugs that programmers run across when they
deal with files are caused when streams aren’t closed properly. Luckily, C# gives
you a great tool to make sure that never happens to you: IDisposable and
the Dispose() method. When you wrap your stream code in a using
statement, it automatically closes your streams for you. All you need to do is
declare your stream reference with a using statement, followed by a block
of code (inside curly brackets) that uses that reference. When you do that, the
using statement automatically calls the stream’s Dispose() method
as soon as it finishes running the block of code. Here’s how it works:
A using statement is always
followed by an object declaration…
using (StreamWriter sw = new StreamWriter(”secret_plan.txt”)) {
sw.WriteLine(“How I’ll defeat Captain Amazing”);
sw.WriteLine(“Another genius secret plan”);
sw.WriteLine(“by The Swindler”);
}
…and then a block of code
within curly braces.
When the using statement ends,
the Dispose() method of the
object being used is run.
In this case, the object being used is pointed
to by sw—which was declared in the using
statement—so the Dispose() method of the
Stream class is run…which closes the stream.
These statements
can use the object
created in the
using statement
above like any
normal object.
These “using” statements are
different from the ones at
the top of your code.
that’s a lot of vet appointments
Use multiple using statements for multiple objects
You can pile using statements on top of each other—you don’t need extra sets of curly
brackets or indents.
using (StreamReader reader = new StreamReader(“secret_plan.txt”))
using (StreamWriter writer = new StreamReader(“email.txt”))
{
// statements that use reader and writer
}
Any time you
use a stream,
you should
ALWAYS
declare it
inside a using
statement. That
makes sure it’s
always closed!
Every stream has a Dispose()
method that closes the stream. So
if you declare your stream in a using
statement, it will always close itself!
You don’t need to call Close() on the
streams now, because the using statement
will close them automatically.
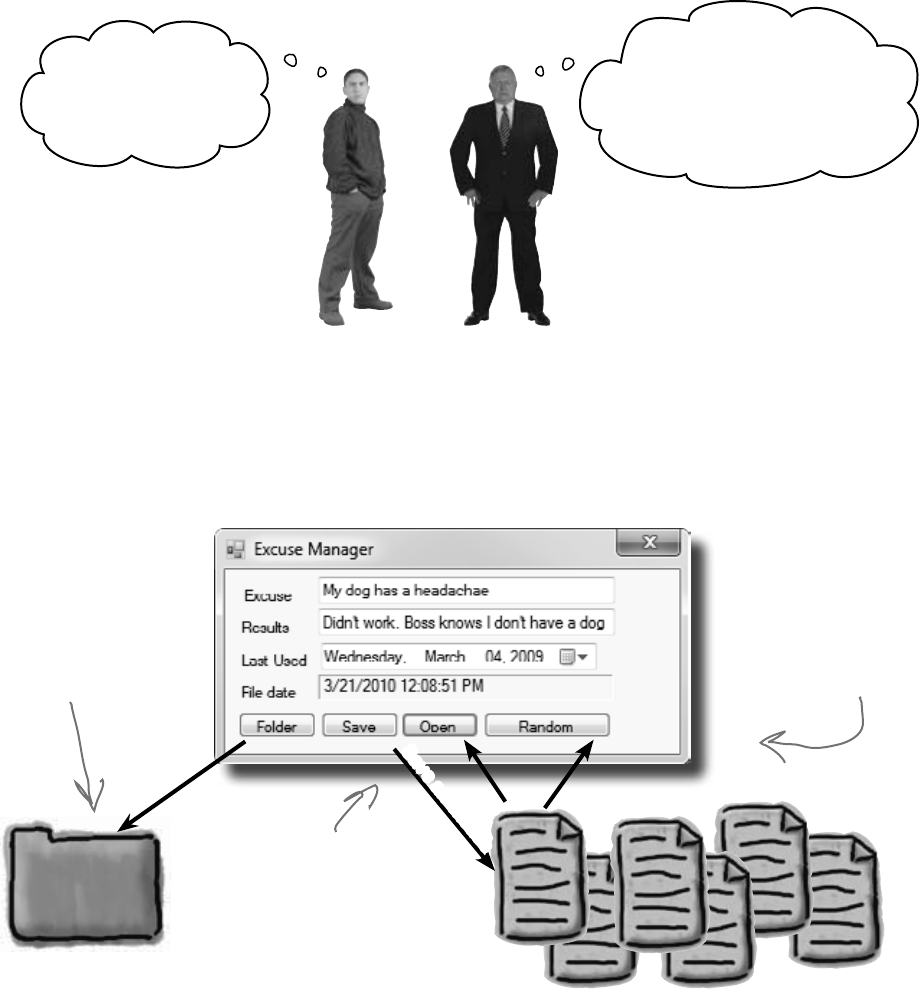
you are here 4 429
reading and writing files
Trouble at work
Meet Brian. He likes his job as a C# developer, but he loves taking
the occasional day off. His boss hates when people take vacation
days, so Brian’s got to come up with a good excuse.
Sorry I’ve gotta leave
early, boss. My cat’s
got a vet appointment.
That’s the ninth vet
appointment you’ve had
since March, son. If I find out
you’re lying to me, you’d better
start looking for a new job!
You can help Brian out by building a program
to manage his excuses
Use what you know about reading and writing files to build an
excuse manager that Brian can use to keep track of which excuses
he’s used recently and how well they went over with the boss.
Save an excuse
Sometimes Brian’s too
lazy to think up an
excuse. Let’s add a
button to load up a
random excuse from his
excuse folder.
The folder contains one text
file for each excuse. When
Brian clicks the Save button,
the current excuse is saved out
to the folder. The Open button
lets him open a saved excuse.
Brian wants to keep
all of his excuses in
one place, so let’s let
him select a folder to
store all of them.
430 Chapter 9
Create an Excuse class and store an instance of it in the form
Now add a CurrentExcuse field to the form to hold the current excuse. You’ll need three overloaded
constructors: one for when the form’s first loaded, one for opening up a file, and one for a random excuse.
Add methods OpenFile() to open an excuse (for the constructors to use), and Save() to save the excuse.
Then add this UpdateForm() method to update the controls (it’ll give you some hints about the class):
private void UpdateForm(bool changed) {
if (!changed) {
this.description.Text = currentExcuse.Description;
this.results.Text = currentExcuse.Results;
this.lastUsed.Value = currentExcuse.LastUsed;
if (!String.IsNullOrEmpty(currentExcuse.ExcusePath))
FileDate.Text = File.GetLastWriteTime(currentExcuse.ExcusePath).ToString();
this.Text = “Excuse Manager”;
}
else
this.Text = “Excuse Manager*”;
this.formChanged = changed;
}
And make sure you initialize the excuse’s LastUsed value in the form’s constructor:
public Form1() {
InitializeComponent();
currentExcuse.LastUsed = lastUsed.Value;
}
2
Build the form
This form has a few special features:
≥When the form’s first loaded, only the Folder button should be enabled—
disable the other three buttons until the user selects a folder.
≥When the form opens or saves an excuse, it displays the file date for the excuse file using
a Label control with AutoSize set to False and BorderStyle set to Fixed3D.
≥After an excuse is saved, the form pops up an “Excuse Written” message box.
≥The Folder button brings up a folder browser dialog box. If the user selects a folder,
it enables the Save, Open, and Random Excuse buttons.
≥The form knows when there are unsaved changes. When there are no unsaved
changes, the text on the form’s title bar is “Excuse Manager”. But when the user
has changed any of the three fields, the form adds an asterisk (*) to the title bar.
The asterisk goes away when the data is saved or a new excuse is opened.
≥The form will need to keep track of the current folder and whether or not the
current excuse has been saved. You can figure out when the excuse hasn’t been
saved by using the Changed event handlers for the three input controls.
1
This parameter indicates whether
or not the form has changed.
You’ll need a field in your form to
keep track of this status.
Make the Folder button open a folder browser
When the user clicks on the Folder button, the form should pop up a “Browse for Folder” dialog
box. The form will need to store the folder in a field so that the other dialog boxes can use it.
When the form first loads, the Save, Open, and Random Excuse buttons are disabled, but if
the user selects a folder then the Folder button enables them.
3
BuildtheexcusemanagersoBriancanmanagehisexcusesatwork.
Double-click on the input controls so the IDE builds
Changed event handlers for you. The event handlers for
the three input controls will first change the Excuse
instance and then call UpdateForm(true)—then it’s up to
you to change the fields on your form.
When you drag
a text box to a
form and double-
click on it, you
create a Changed
event handler for
that field.
Excuse
Description:string
Results:string
LastUsed:DateTime
ExcusePath:string
OpenFile(string)
Save(string)
Remember, the !
means NOT—so
this checks if
the excuse path
is NOT null or
empty.
brian needs excuses
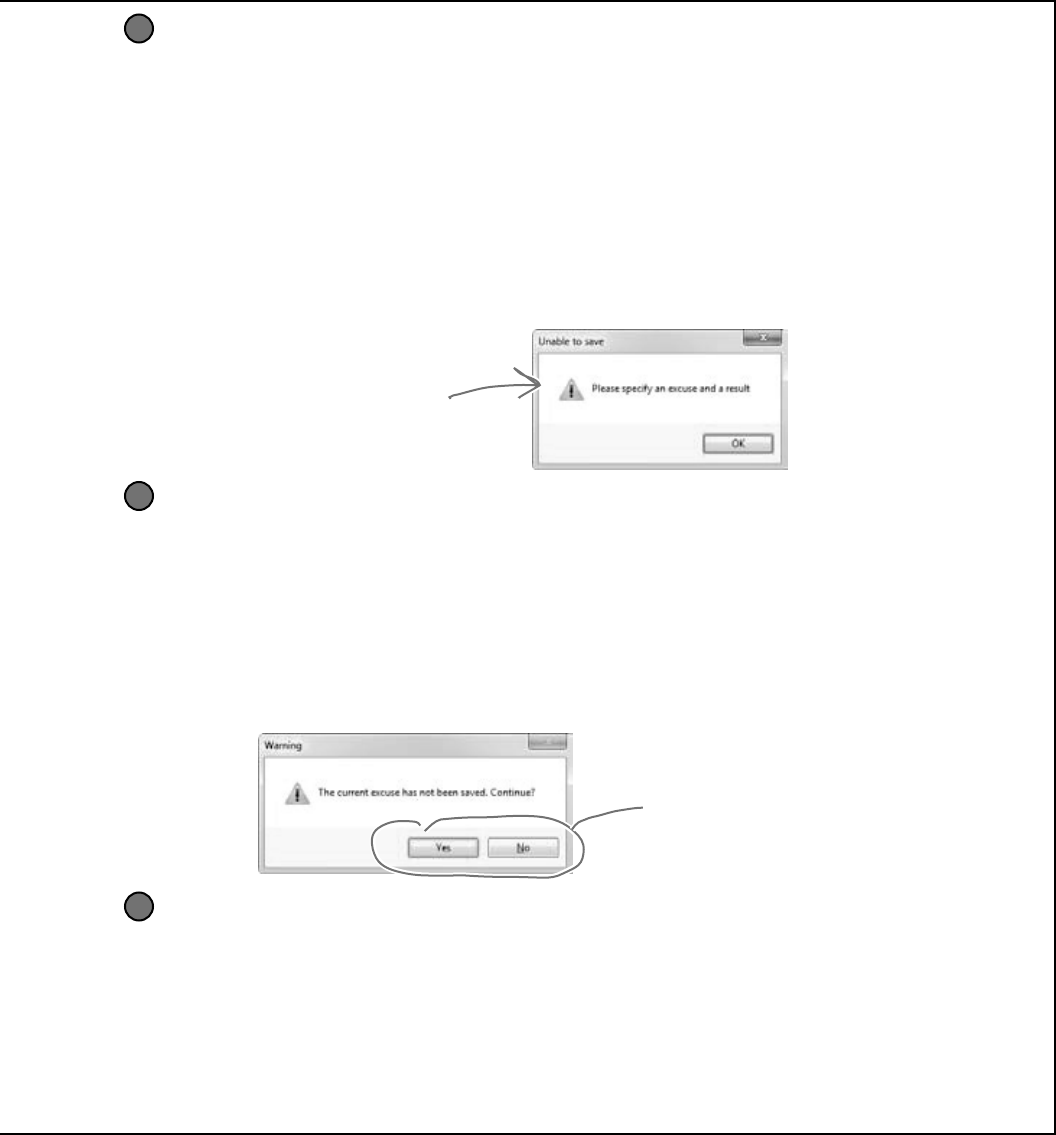
you are here 4 431
reading and writing files
Make the Save button save the current excuse to a file
Clicking the Save button should bring up the Save As dialog box.
≥Each excuse is saved to a separate text file. The first line of the file is the excuse, the second is the
result, and the third is the date last used (using the DateTimePicker’s ToString() method).
The Excuse class should have a Save() method to save an excuse out to a specified file.
≥When the Save As dialog box is opened, its folder should be set to the folder that the user
selected using the Folder button, and the filename should be set to the excuse plus a “.txt”
extension.
≥The dialog box should have two filters: Text Files (*.txt) and All Files (*.*).
≥If the user tries to save the current excuse but has left either the excuse or the result blank, the
form should pop up a warning dialog box:
4
You can display this Exclamation icon by
using the overloaded MessageBox.Show()
method that allows you to specify a
MessageBoxIcon parameter.
Make the Open button open a saved excuse
Clicking the Open button should bring up the Open dialog box.
≥When the Open dialog box is opened, its folder should be set to the folder that the user
selected using the Folder button.
≥Add an Open() method to the Excuse class to open an excuse from a given file.
≥Use Convert.ToDateTime() to load the saved date into the DateTimePicker control.
≥If the user tries to open a saved excuse but the current excuse hasn’t been saved, it pops up this
dialog box:
5
Show a Yes/No dialog box by using
the overloaded MessageBox.Show()
method that lets you specify the
MessageBoxButtons.YesNo parameter. If
the user clicks “No”, then Show() returns
DialogResult.No.
Finally, make the Random Excuse button load a random excuse
When the user clicks the Random Excuse button, it looks in the excuse folder, chooses one of the
excuses at random, and opens it.
≥The form will need to save a Random object in a field and pass it to one of the overloaded
constructors of the Excuse object.
≥If the current excuse hasn’t been saved, the button should pop up the same warning dialog
box as the Open button.
6
432 Chapter 9
private Excuse currentExcuse = new Excuse();
private string selectedFolder = “”;
private bool formChanged = false;
Random random = new Random();
private void folder_Click(object sender, EventArgs e) {
folderBrowserDialog1.SelectedPath = selectedFolder;
DialogResult result = folderBrowserDialog1.ShowDialog();
if (result == DialogResult.OK) {
selectedFolder = folderBrowserDialog1.SelectedPath;
save.Enabled = true;
open.Enabled = true;
randomExcuse.Enabled = true;
}
}
private void save_Click(object sender, EventArgs e) {
if (String.IsNullOrEmpty(description.Text) || String.IsNullOrEmpty(results.Text)) {
MessageBox.Show(“Please specify an excuse and a result”,
“Unable to save”, MessageBoxButtons.OK, MessageBoxIcon.Exclamation);
return;
}
saveFileDialog1.InitialDirectory = selectedFolder;
saveFileDialog1.Filter = “Text files (*.txt)|*.txt|All files (*.*)|*.*”;
saveFileDialog1.FileName = description.Text + “.txt”;
DialogResult result = saveFileDialog1.ShowDialog();
if (result == DialogResult.OK) {
currentExcuse.Save(saveFileDialog1.FileName);
UpdateForm(false);
MessageBox.Show(“Excuse written”);
}
}
private void open_Click(object sender, EventArgs e) {
if (CheckChanged()) {
openFileDialog1.InitialDirectory = selectedFolder;
openFileDialog1.Filter = “Text files (*.txt)|*.txt|All files (*.*)|*.*”;
openFileDialog1.FileName = description.Text + “.txt”;
DialogResult result = openFileDialog1.ShowDialog();
if (result == DialogResult.OK) {
currentExcuse = new Excuse(openFileDialog1.FileName);
UpdateForm(false);
}
}
}
private void randomExcuse_Click(object sender, EventArgs e) {
if (CheckChanged()) {
currentExcuse = new Excuse(random, selectedFolder);
UpdateForm(false);
}
}
BuildtheexcusemanagersoBriancanmanagehisexcusesatwork.
The form uses fields to store the current Excuse
object to the selected folder and remember whether
or not the current excuse has changed, and to keep a
Random object for the Random Excuse button.
Here’s where the filters are
set for the Save As dialog.
Use the DialogResult enum
returned by the Open and Save
dialog boxes to make sure you only
open or save if the user clicked
“OK”, and not “Cancel”.
If the user selected a folder,
the form saves the folder name
and then enables the other three
buttons.
This will cause two rows to show up
in the “Files of Type” drop-down at
the bottom of the Save dialog box:
one for Text Files (*.txt), and one
for All Files (*.*).
exercise solution
The two vertical bars mean OR—this is true if
description is empty OR results is empty.

you are here 4 433
reading and writing files
private bool CheckChanged() {
if (formChanged) {
DialogResult result = MessageBox.Show(
“The current excuse has not been saved. Continue?”,
“Warning”, MessageBoxButtons.YesNo, MessageBoxIcon.Warning);
if (result == DialogResult.No)
return false;
}
return true;
}
private void description_TextChanged(object sender, EventArgs e) {
currentExcuse.Description = description.Text;
UpdateForm(true);
}
private void results_TextChanged(object sender, EventArgs e) {
currentExcuse.Results = results.Text;
UpdateForm(true);
}
private void lastUsed_ValueChanged(object sender, EventArgs e) {
currentExcuse.LastUsed = lastUsed.Value;
UpdateForm(true);
}
class Excuse {
public string Description { get; set; }
public string Results { get; set; }
public DateTime LastUsed { get; set; }
public string ExcusePath { get; set; }
public Excuse() {
ExcusePath = “”;
}
public Excuse(string excusePath) {
OpenFile(excusePath);
}
public Excuse(Random random, string folder) {
string[] fileNames = Directory.GetFiles(folder, “*.txt”);
OpenFile(fileNames[random.Next(fileNames.Length)]);
}
private void OpenFile(string excusePath) {
this.ExcusePath = excusePath;
using (StreamReader reader = new StreamReader(excusePath)) {
Description = reader.ReadLine();
Results = reader.ReadLine();
LastUsed = Convert.ToDateTime(reader.ReadLine());
}
}
public void Save(string fileName) {
using (StreamWriter writer = new StreamWriter(fileName))
{
writer.WriteLine(Description);
writer.WriteLine(Results);
writer.WriteLine(LastUsed);
}
}
}
MessageBox.Show() also returns a
DialogResult enum that we can check.
We made sure to use a using
statement every time we
opened a stream. That way
our files will always be closed.
The Random Excuse button uses Directory.GetFiles() to
read all of the text files in the selected folder into an
array, and then chooses a random array index to open.
Here are the three
Changed event handlers
for the three input
fields on the form. If any
of them are triggered,
that means the excuse
has changed, so first
we update the Excuse
instance and then we
call UpdateForm(), add
the asterisk to the
form’s title bar, and set
Changed to true.
Here’s where the using
statement comes in. We
declared the StreamWriter
inside a using statement, so
its Close() method is called
for us automatically!
Passing true to UpdateForm() tells it
to just mark the form as changed, but
not update the input controls.
Did you call LastUsed.ToString()? Remember, WriteLine() calls it automatically!
434 Chapter 9
Writing files usually involves
making a lot of decisions
You’ll write lots of programs that take a single input, maybe from a
file, and have to decide what to do based on that input. Here’s code
that uses one long if statement—it’s pretty typical. It checks the
part variable and prints different lines to the file based on which
enum it uses. There are lots of choices, so lots of else ifs:
enum BodyPart {
Head,
Shoulders,
Knees,
Toes
}
private void WritePartInfo(BodyPart part, StreamWriter writer) {
if (part == BodyPart.Head)
writer.WriteLine(“the head is hairy”);
else if (part == BodyPart.Shoulders)
writer.WriteLine(“the shoulders are broad”);
else if (part == BodyPart.Knees)
writer.WriteLine(“the knees are knobby”);
else if (part == BodyPart.Toes)
writer.WriteLine(“the toes are teeny”);
else
writer.WriteLine(“some unknown part is unknown”);
}
Here’s an enum—we’ll want to compare
a variable against each of the four
members and write a different line to the
StreamWriter depending on which one it
matches. We’ll also write something different
if none of them match.
If we use a series of if/else
statements, then we end
up writing this “if (part
==[option])” over and over.
We’ve got a final else in case
we didn’t find a match.
i’m the decider
What sort of things can go wrong when you write code
that has this many if/else statements? Think about typos
and bugs caused by brackets, a single equals sign, etc.
you are here 4 435
reading and writing files
Use a switch statement to
choose the right option
Comparing one variable against a bunch of different values is
a really common pattern that you’ll see over and over again.
It’s especially common when you’re reading and writing
files. It’s so common, in fact, that C# has a special kind of
statement designed specifically for this situation.
A switch statement lets you compare one variable against
many values in a way that’s compact and easy to read. Here’s
a switch statement that does exactly the same thing as the
series of if/else statements on the opposite page:
enum BodyPart
{
Head,
Shoulders,
Knees,
Toes,
}
private void WritePartInfo(BodyPart part, StreamWriter writer)
{
switch (part) {
case BodyPart.Head:
writer.WriteLine(“the head is hairy”);
break;
case BodyPart.Shoulders:
writer.WriteLine(“the shoulders are broad”);
break;
case BodyPart.Knees:
writer.WriteLine(“the knees are knobby”);
break;
case BodyPart.Toes:
writer.WriteLine(“the toes are teeny”);
break;
default:
writer.WriteLine(“some unknown part is unknown”);
break;
}
}
A switch statement
compares ONE
variable against
MULTIPLE
possible values.
Switch statements can end
with a “default:” block that
gets executed if none of the
other cases are matched.
You’ll start with the switch
keyword followed by the variable
that’s going to be compared against
a bunch of different possible values.
The body of the switch
statement is a series
of cases that compare
whatever follows the
switch keyword against
a particular value.
Each of these cases consists
of the case keyword
followed by the value
to compare and a colon.
After that is a series of
statements followed by
“break;”. Those statements
will be executed if the case
matches the comparison value.
Every case ends
with “break;” so
C# knows where
one case ends and
the next begins.
There’s nothing about a switch
statement that’s specifically
related to files. It’s just a useful
C# tool that we can use here.
You can also end a
case with “return”
– the program will
compile as long as
there’s no way for
one case to “fall
through” to the
next one.
436 Chapter 9
Use a switch statement to let your deck of
cards read from a file or write itself out to one
Writing a card out to a file is straightforward—just make a loop that writes the name
of each card out to a file. Here’s a method you can add to the Deck object that does
exactly that:
public void WriteCards(string filename) {
using (StreamWriter writer = new StreamWriter(filename)) {
for (int i = 0; i < cards.Count; i++) {
writer.WriteLine(cards[i].Name);
}
}
}
But what about reading the file in? It’s not quite so simple. That’s where the switch
statement can come in handy.
Suits suit;
switch (suitString) (
case “Spades”:
suit = Suits.Spades;
break;
case “Clubs”:
suit = Suits.Clubs;
break;
case “Hearts”:
suit = Suits.Hearts;
break;
case “Diamonds”:
suit = Suits.Diamonds;
break;
default:
MessageBox.Show(suitString + “ isn’t a valid suit!”);
}
The switch statement starts with a
value to compare against. This switch
statement is called from a method
that has a suit stored in a string.
Each of these case lines compares
some value against the value in
the switch line. If they match,
it executes all of the following
statements until it hits a break.
The default line comes at the end.
If none of the cases match, the
statements after the default get
executed instead.
The switch
statement lets
you test one
value against a
bunch of cases
and execute
different
statements
depending on
which one it
matches.
asleep at the switch
you are here 4 437
reading and writing files
public Deck(string filename) {
cards = new List<Card>();
StreamReader reader = new StreamReader(filename);
while (!reader.EndOfStream) {
bool invalidCard = false;
string nextCard = reader.ReadLine();
string[] cardParts = nextCard.Split(new char[] { ‘ ’ });
Values value = Values.Ace;
switch (cardParts[0]) {
case “Ace”: value = Values.Ace; break;
case “Two”: value = Values.Two; break;
case “Three”: value = Values.Three; break;
case “Four”: value = Values.Four; break;
case “Five”: value = Values.Five; break;
case “Six”: value = Values.Six; break;
case “Seven”: value = Values.Seven; break;
case “Eight”: value = Values.Eight; break;
case “Nine”: value = Values.Nine; break;
case “Ten”: value = Values.Ten; break;
case “Jack”: value = Values.Jack; break;
case “Queen”: value = Values.Queen; break;
case “King”: value = Values.King; break;
default: invalidCard = true; break;
}
Suits suit = Suits.Clubs;
switch (cardParts[2]) {
case “Spades”: suit = Suits.Spades; break;
case “Clubs”: suit = Suits.Clubs; break;
case “Hearts”: suit = Suits.Hearts; break;
case “Diamonds”: suit = Suits.Diamonds; break;
default: invalidCard = true; break;
}
if (!invalidCard) {
cards.Add(new Card(suit, value));
}
}
}
You can use a switch statement to build a new constructor for the Deck
class that you wrote in the last chapter. This constructor reads in a file and
checks each line for a card. Any valid card gets added to the deck.
There’s a method that you can find on every string that’ll come in handy:
Split(). It lets you split the string into an array of substrings by passing it
a char[] array of separator characters that it’ll use to split the string up.
This switch statement
checks the first word
in the line to see if it
matches a value. If it
does, the right value
is assigned to the
value
variable.
We do the same thing for
the third word in the line,
except we convert this
one to a suit.
Add an overloaded Deck() constructor that
reads a deck of cards in from a file
This line tells C# to split the nextCard
string using a space as a separator
character. That splits the string “Six
of Diamonds” into the array {“Six”, “of”,
“Diamonds”}.

438 Chapter 9
All that code just to read in one simple card?
That’s way too much work! What if my object has a
whole bunch of fields and values? Are you telling me I
need to write a switch statement for each of them?
There’s an easier way to store your objects in
files. It’s called serialization.
Instead of painstakingly writing out each field and value to
a file line by line, you can save your object the easy way by
serializing it out to a stream. Serializing an object is like
flattening it out so you can slip it into a file. And on the
other end, you can deserialize it, which is like taking it out
of the file and inflating it again.
p.s. i’ll find my frog
Ok, just to come clean here: There’s also a method called
Enum.Parse() — you’ll learn about it in Chapter 14 —
that will convert the string “Spades” to the enum value
Suits.Spades. But serialization still makes a lot more
sense here. You’ll find out more about that shortly....
you are here 4 439
reading and writing files
When you create an instance of an
object, it has a state. Everything
that an object “knows” is what makes
one instance of a class different from
another instance of the same class.
What happens to an object when it’s serialized?
1Object on the heap 2Object serialized
00100101
Width
01000110
Height
00100101
01000110
When C# serializes an object, it saves
the complete state of the object, so
that an identical instance (object) can be
brought back to life on the heap later.
The instance variable values
for width and height are
saved to the file “file.dat”,
along with a little more
info that the CLR needs
to restore the object later
(like the type of the object
and each of its fields).
file.dat
This object has two byte
fields, width and height.
It seems like something mysterious has to happen to an object in order to copy
it off of the heap and put it into a file, but it’s actually pretty straightforward.
3And later on…
Later—maybe days later, and in a
different program—you can go back to
the file and deserialize it. That pulls
the original class back out of the file
and restores it exactly as it was, with
all of its fields and values intact.
Object on the heap again
440 Chapter 9
But what exactly IS an object’s
state? What needs to be saved?
We already know that an object stores its state in its fields. So when an
object is serialized, every one of those fields needs to be saved to the file.
Serialization starts to get interesting when you have more complicated objects. 37
and 70 are bytes—those are value types, so they can just be written out to a file
as-is. But what if an object has an instance variable that’s an object reference? What
about an object that has five instance variables that are object references? What if
those object instance variables themselves have instance variables?
Think about it for a minute. What part of an object is potentially unique? Imagine
what needs to be restored in order to get an object that’s identical to the one that
was saved. Somehow everything on the heap has to be written to the file.
What has to happen for this Car object to be saved so
that it gets restored back to its original state? Let’s say
the car has three passengers and a 3-liter engine and
all-weather radial tires…aren’t those things all part of the
Car object’s state? What should happen to them?
The Car object has references
to an Engine object, an array
of Tire objects, and a List<>
of Passenger objects. Those are
part of its state, too—what
happens to them?
Each of the passenger
objects has its own
references to other
objects. Do those need
to be saved, too?
The Engine object is
private. Should it be
saved, too?
save the cheerleader
E
n
g
i
n
e
o
b
j
e
c
t
T
i
r
e
[
]
a
r
r
a
y
o
b
j
e
c
t
L
i
s
t
<
P
a
s
s
e
n
g
e
r
s
>
o
b
j
e
c
t
C
a
r
o
b
j
e
c
t
you are here 4 441
reading and writing files
D
o
g
g
y
I
D
o
b
j
e
c
t
D
o
g
g
y
I
D
o
b
j
e
c
t
D
o
g
o
b
j
e
c
t
L
i
s
t
<
D
o
g
>
o
b
j
e
c
t
K
e
n
n
e
l
o
b
j
e
c
t
“Fido”
“Spike”
When an object is serialized, all of the
objects it refers to get serialized, too…
…and all of the objects they refer to, and all of the objects those other objects refer to,
and so on and so on. But don’t worry—it may sound complicated, but it all happens
automatically. C# starts with the object you want to serialize and looks through its
fields for other objects. Then it does the same for each of them. Every single object
gets written out to the file, along with all the information C# needs to reconstitute it
all when the object gets deserialized.
When you ask C# to serialize
the Kennel object, it looks for
any field that has a reference
to another object.
One of the fields of
the Kennel object is
this List<Dog> that
contains two Dog
objects, so C# will
need to serialize
them, too.
Each of the two Dog objects
has references to a DoggyID
object and a Collar object.
They’ll need to get serialized
along with each Dog.
DoggyID and Collar are the end
of the line—they don’t have
references to any other objects.
Breed.Mutt
6 years old
18 pounds
11” tall
Breed.Beagle
4 years old
32 pounds
14” tall
D
o
g
o
b
j
e
c
t
C
o
l
l
a
r
o
b
j
e
c
t
C
o
l
l
a
r
o
b
j
e
c
t
Some people call this whole
group of connected objects a
“graph.”

442 Chapter 9
Serialization lets you read or
write a whole object all at once
You’re not just limited to reading and writing lines of text to your files. You can
use serialization to let your programs copy entire objects to files and read
them back in…all in just a few lines of code! There’s a tiny amount of prep work
you need to do—add one [Serializable] line to the top of the class to
serialize—but once you do that, everything’s ready to write.
It’s quick to copy
an object out to
a file or read it
in from one. You
can serialize or
deserialize it.
using (Stream output = File.Create(filenameString)) {
formatter.Serialize(output, objectToSerialize);
}
You’ll need a BinaryFormatter object
If you want to serialize an object—any object—the first thing you do is create an
instance of BinaryFormatter. It’s really straightforward to do—and all it takes
is one line of code (and an extra using line at the top of the class file).
Now just create a stream and read or write your objects
Use the Serialize() method from the BinaryFormatter object to write any
object out to a stream.
And once you’ve got an object serialized out to a file, use the BinaryFormatter
object’s Deserialize() method to read it back in. The method returns a
reference, so you need to cast the output so that it matches the type of the reference
variable you’re copying it to.
The Serialize() method takes an
object and writes it out to a
stream. That’s a whole lot easier
than building a method to write it
out yourself!
When you use Deserialize() to read an
object back from a stream, don’t forget
to cast the return value to match the
type of object you’re reading.
The File.Create() method
creates a new file. You can
open an existing one using File.
OpenWrite().
using System.Runtime.Serialization.Formatters.Binary;
...
BinaryFormatter formatter = new BinaryFormatter();
serialized for your protection
using (Stream input = File.OpenRead(filenameString)) {
SomeObj obj = (SomeObj)formatter.Deserialize(input);
}
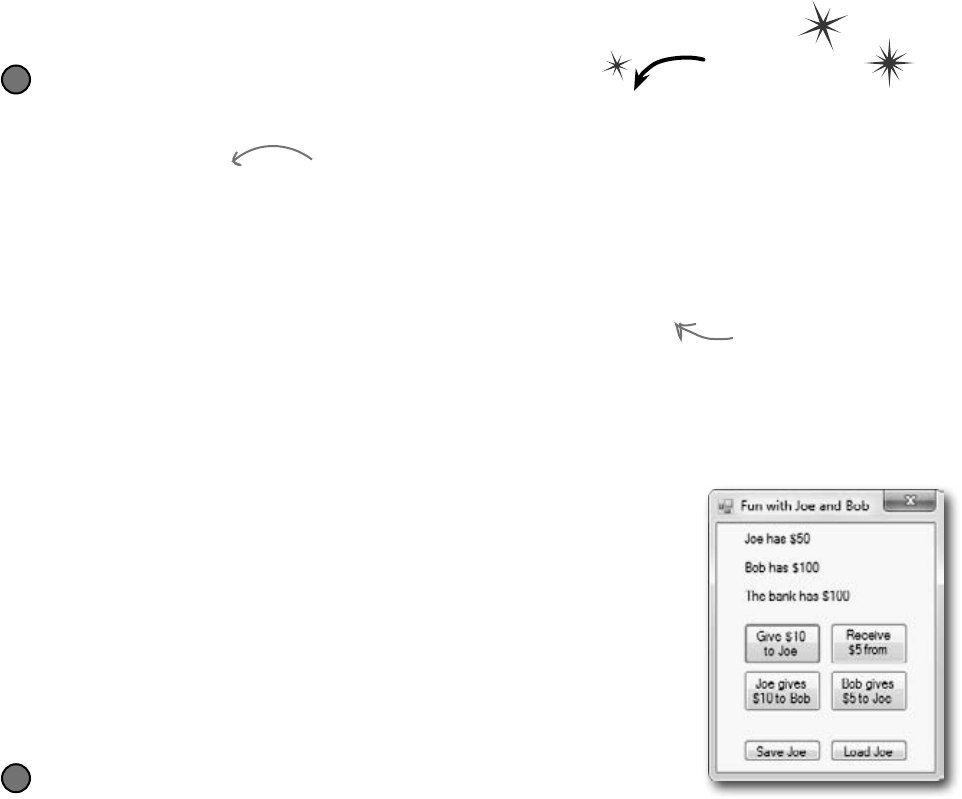
you are here 4 443
reading and writing files
If you want your class to be serializable, mark
it with the [Serializable] attribute
An attribute is a special tag that you can add to the top of any C# class. It’s how C# stores
metadata about your code, or information about how the code should be used or treated. When you
add [Serializable] to the top of a class just above the class declaration, you’re telling
C# that your class is safe for serialization. And you only use it with classes that include fields that are
either value types (like an int, decimal, or enum) or other serializable classes. If you don’t add the
attribute to the class you want to serialize, or if you include a field with a type that isn’t serializable,
then your program will have an error when you try to run it. See for yourself… Do this
Create a class and serialize it
Remember the Guy class from Chapter 3? Let’s serialize Joe so we can keep a file that knows how much
money he’s got in his pocket even after you close your program.
[Serializable]
class Guy
Here’s code to serialize it to a file called Guy_file.dat—add a “Save Joe” button and a “Load Joe”
button to the form:
using System.IO;
using System.Runtime.Serialization.Formatters.Binary;
...
private void saveJoe_Click(object sender, EventArgs e)
{
using (Stream output = File.Create(“Guy_File.dat”)) {
BinaryFormatter formatter = new BinaryFormatter();
formatter.Serialize(output, joe);
}
}
private void loadJoe_Click(object sender, EventArgs e)
{
using (Stream input = File.OpenRead(“Guy_File.dat”)) {
BinaryFormatter formatter = new BinaryFormatter();
joe = (Guy)formatter.Deserialize(input);
}
UpdateForm();
}
1
Run the program and play around with it
If Joe had two hundred dollars saved up from his transactions with Bob during your time running
the program, it would be a pain to lose all that money just because you needed to exit. Now your
program can save Joe out to a file and restore him whenever you want.
2
You’ll need these two using
lines. The first one is
for the file and stream
methods, and the second
is for serialization.
You need to add this attribute to the top
of any class in order to serialize it.
444 Chapter 9
Let’s serialize and deserialize a deck of cards
Take a deck of cards and write it out to a file. C# makes
serializing objects really easy. All you need to do is
create a stream and write out your objects.
Create a new project and add the Deck and Card classes
Right-click on the project in the Solution Explorer and choose “Add/Existing Item”, and add the
Card and Deck classes (and the Suits and Values enums and CardComparer_bySuit and
CardComparer_byValue interfaces) you used in Go Fish! in Chapter 8. You’ll also need to add the two
card comparer classes, since Deck uses them. The IDE will copy the files into the new project—make sure
you change the namespace line at the top of each class file to match your new project’s namespace.
1
Mark the classes serializable
Add the [Serializable] attribute to both classes you added to the
project.
2
Add a couple of useful methods to the form
The RandomDeck method creates a random deck of cards, and the
DealCards method deals all of the cards and prints them to the console.
Random random = new Random();
private Deck RandomDeck(int number) {
Deck myDeck = new Deck(new Card[] { });
for (int i = 0; i < number; i++)
{
myDeck.Add(new Card(
(Suits)random.Next(4),
(Values)random.Next(1, 14)));
}
return myDeck;
}
private void DealCards(Deck deckToDeal, string title) {
Console.WriteLine(title);
while (deckToDeal.Count > 0)
{
Card nextCard = deckToDeal.Deal(0);
Console.WriteLine(nextCard.Name);
}
Console.WriteLine(“------------------”);
}
3
If you don’t do
this, C# won’t let
you serialize the
classes to a file.
Do this
The DealCards()
method deals each of
the cards off of the
deck and prints it to
the console.
This creates an empty
deck and then adds some
random cards to it using
the Card class from the
last chapter.
i like milk on my serial
you are here 4 445
reading and writing files
OK, prep work’s done.. now serialize that deck
Start by adding buttons to serialize a random deck to a file and read it back. Check the
console output to make sure the deck you wrote out is the same as the deck you read.
private void button1_Click(object sender, EventArgs e) {
Deck deckToWrite = RandomDeck(5);
using (Stream output = File.Create(“Deck1.dat”)) {
BinaryFormatter bf = new BinaryFormatter();
bf.Serialize(output, deckToWrite);
}
DealCards(deckToWrite, “What I just wrote to the file”);
}
private void button2_Click(object sender, EventArgs e) {
using (Stream input = File.OpenRead(“Deck1.dat”)) {
BinaryFormatter bf = new BinaryFormatter();
Deck deckFromFile = (Deck)bf.Deserialize(input);
DealCards(deckFromFile, “What I read from the file”);
}
}
4
The BinaryFormatter object
takes any object marked with
the Serializable attribute—in
this case a Deck object—and
writes it out to a stream using
its Serialize() method.
The BinaryFormatter’s
Deserialize() method returns
an Object, which is just the
general type that every C#
object inherits from—which is
why we need to cast it to a
Deck object.
Now serialize a bunch of decks to the same file
Once you open a stream, you can write as much as you want to it. You can serialize as
many objects as you need into the same file. So now add two more buttons to write out a
random number of decks to the file. Check the output to make sure everything looks good.
private void button3_Click(object sender, EventArgs e) {
using (Stream output = File.Create(“Deck2.dat”)) {
BinaryFormatter bf = new BinaryFormatter();
for (int i = 1; i <= 5; i++) {
Deck deckToWrite = RandomDeck(random.Next(1,10));
bf.Serialize(output, deckToWrite);
DealCards(deckToWrite, “Deck #” + i + “ written”);
}
}
}
private void button4_Click(object sender, EventArgs e) {
using (Stream input = File.OpenRead(“Deck2.dat”)) {
BinaryFormatter bf = new BinaryFormatter();
for (int i = 1; i <= 5; i++) {
Deck deckToRead = (Deck)bf.Deserialize(input);
DealCards(deckToRead, “Deck #” + i + “ read”);
}
}
}
5
You can serialize
one object after
another to the
same stream.
As long as you cast the
objects you read off the
stream to the right type,
there’s no limit to the
number of objects you can
serialize.
Take a look at the file you wrote
Open up Deck1.dat in Notepad (File.Create() created it in the bin\
Debug folder under your project folder). It may not be something you’d read on the
beach, but it’s got all the information to restore your whole deck of cards.
6
Notice how the line that
reads a single deck from
the file uses (Deck) to cast
the output of Deserialize()
to a Deck. That’s because
Deserialize() returns an
object, but doesn’t necessarily
know what type of object.
446 Chapter 9
When you serialize objects out to a file, they’re
written in a binary format.
But that doesn’t mean it’s indecipherable—just compact. That’s why you
can recognize the strings when you open up a file with serialized objects
in it: that’s the most compact way C# can write strings to a file—as
strings. But writing out a number as a string would be really wasteful.
Any int can be stored in four bytes. So it would be odd if C# stored,
say, the number 49,369,144 as an 8-character string that you could
read—10 characters if you include commas. That would be a waste of
space!
Wait a minute. I’m not sure I like all this writing objects out
to some weird file that looks like garbage when I open it up. When
I wrote the deck of cards as strings, I could open up the output in
Notepad and see everything in it. Isn’t C# supposed to make it easy
for me to understand everything I’m doing?
.NETusesUnicodetoencodeacharorstringintobytes.Luckily,Windowshasauseful
littletooltohelpusfigureouthowUnicodeworks.OpenuptheCharacterMap(it’sinthe
StartmenuunderAccessories/SystemTools,ordoStart/Runandtype“charmap.exe”).
Behind
the Scenes
When you look at all the letters and symbols that are used in languages all around the world, you realize just how
many different things need to be written to a file just to store text. That’s why .NET encodes all of its strings and
characters in a format called Unicode. Encoding just means taking the logical data (like the letter H) and turning it
into bytes (the number 72). It needs to do that because letters, numbers, enums, and other data all end up in bytes
on disk or in memory. And that’s why Character Map is useful—it shows you how letters are encoded into numbers.
Select the Arial font and
scroll down until you reach
the Hebrew letters. Find the
letter Shin and click on it.
As soon as you click on the
letter, its Unicode number
shows up in the status bar. The
Hebrew letter Shin is number
05E9. That’s a hexadecimal
number—“hex” for short.
You can convert it to decimal using
the Windows calculator: open it up,
put it in Scientific mode, click the
“Hex” radio button, enter “05E9”,
and then click “Dec”—it’s 1,513.
Unicode is an
industry standard
developed by a
non-profit group
called the Unicode
Consortium, and
it works across
programs and
different computer
platforms. Take a
minute and look
at their website:
http://unicode.org/
builds character
you are here 4 447
reading and writing files
.NET uses Unicode to store characters and text
The two C# types for storing text and characters—string and char—keep their data in
memory as Unicode. When that data’s written out as bytes to a file, each of those Unicode
numbers is written out to the file. So start a new project and drag three buttons onto a form,
and we’ll use the File.WriteAllBytes() and ReadAllBytes() methods to get a
sense of exactly how Unicode data is written out to a file.
Write a normal string out to a file and read it back
Use the same WriteAllText() method that you used in the text editor to have the first
button write the string “Eureka!” out to a file called “eureka.txt”. Then create a new byte array
called eurekaBytes, read the file into it, and then print out all of the bytes read:
File.WriteAllText(“eureka.txt”, “Eureka!”);
byte[] eurekaBytes = File.ReadAllBytes(“eureka.txt”);
foreach (byte b in eurekaBytes)
Console.Write(“{0} ”, b);
Console.WriteLine();
You’ll see these bytes written to the output: 69 117 114 101 107 97 33. Now open up the
file in the Simple Text Editor that you wrote earlier in the chapter. It says “Eureka!”
1
The ReadAllBytes() method returns a reference
to a new array of bytes that contains all of the
bytes that were read in from the file.
Do this!
Make the second button display the bytes as hex numbers
It’s not just Character Map that shows numbers in hex. Almost anything you read that has to do with
encoding data will show that data in hex, so it’s useful to know how to work with it. Make the code
for the second button’s event handler in your program identical to the first one, except change
the Console.Write() line so it looks like this instead:
Console.Write(“{0:x2} ”, b);
That tells Write() to print parameter 0 (the first one after the string to print) as a two-character
hex code. So it writes the same seven bytes in hex instead of decimal: 45 75 72 65 6b 61 21
2
Hex uses the numbers 0 through 9 and
letters A through F to represent numbers
in base 16, so 6B is equal to 107.
Make the third button write out Hebrew letters
Go back to Character Map and double-click on the Shin character (or click the Select button). It’ll add it to
the “Characters to copy” box. Then do the same for the rest of the letters in “Shalom”: Lamed (U+05DC),
Vav (U+05D5), and Final Mem (U+05DD). Now add the code for the third button’s event handler. It’ll
look exactly like button 2, except for one change. Click the “Copy” button in Character Map, and then
paste the letters over “Eureka!” and add the Encoding.Unicode parameter, so it looks like this:
File.WriteAllText(“eureka.txt”, “םולש”, Encoding.Unicode);
Did you notice that the IDE pasted the letters in backward? That’s because it knows that Hebrew is
read right-to-left, so any time it encounters Hebrew Unicode letters, it displays them right-to-left. Put
your cursor in the middle of the letters—the left and right arrow keys reversed! That makes it a lot easier
if you need to type in Hebrew. Now run the code, and look closely at the output: ff fe e9 05 dc 05
d5 05 dd 05. The first two characters are “FF FE”, which is the Unicode way of saying that we’re
going to have a string of two-byte characters. The rest of the bytes are the Hebrew letters—but they’re
reversed, so U+05E9 appears as e9 05. Now open the file up in your Simple Text Editor—it looks right!
3
448 Chapter 9
Since all your data ends up encoded as bytes, it makes sense to
think of a file as one big byte array. And you already know
how to read and write byte arrays.
C# can use byte arrays to move data around
byte[] greeting;
greeting = File.ReadAllBytes(filename);
Hello!!
7 byte variables
72 101 108 108 111 33 33
7 byte variables
33 33 111 108 108 101 72
!!olleH
Array.Reverse(greeting);
File.WriteAllBytes(filename, greeting);
Here’s the code to create a byte array,
open an input stream, and read data
into bytes 0 through 6 of the array.
This is a static method for
Arrays that reverses the
order of the bytes. We’re
just using it to show that the
changes you make to the byte
array get written out to the
file exactly.
Now the bytes are in
reverse order.
When the program writes the
byte array out to a file, the
text is in reverse order too.
These numbers are
the Unicode numbers
for the characters in
“Hello!!”
take a byte out of crime
Reversing the bytes in “Hello!!” only works because each of those
characters is one byte long. Can you figure out why this won’t work
for םולש?

you are here 4 449
reading and writing files
Use a BinaryWriter to write binary data
You could encode all of your strings, chars, ints, and floats into byte arrays before writing
them out to files, but that would get pretty tedious. That’s why .NET gives you a very useful
class called BinaryWriter that automatically encodes your data and writes it to
a file. All you need to do is create a FileStream and pass it into the BinaryWriter’s
constructor. Then you can call its methods to write out your data. So add another button to
your program, and we’ll show you how to use BinaryWriter().
__ __ __ __ __ __ __ __ __ __ __ __ __ __ __ __ __ __ __ __ - ___ bytes
Start by creating a Console Application and setting up some data to write to a file.
int intValue = 48769414;
string stringValue = “Hello!”;
byte[] byteArray = { 47, 129, 0, 116 };
float floatValue = 491.695F;
char charValue = ‘E’;
1
Do this!
To use a BinaryWriter, first you need to open a new stream with File.Create():
using (FileStream output = File.Create(“binarydata.dat”))
using (BinaryWriter writer = new BinaryWriter(output)) {
2
Now just call its Write() method. Each time you do, it adds new bytes onto the end of the
file that contain an encoded version of whatever data you passed it as a parameter.
writer.Write(intValue);
writer.Write(stringValue);
writer.Write(byteArray);
writer.Write(floatValue);
writer.Write(charValue);
}
3
Each Write() statement encodes one
value into bytes, and then sends those
bytes to the FileStream object. You
can pass it any value type, and it’ll
encode it automatically.
Here’s a hint: Strings can be
different lengths, so the string has
to start with a number to tell .NET
how long it is. Also, you can look up
the string and char Unicode values
using Character Map.
If you use File.Create(), it’ll start a new file—if
there’s one there already, it’ll blow it away and
start a brand new one. There’s also the File.
OpenWrite() method, which opens the existing one
and starts overwriting it from the beginning.
Now use the same code you used before to read in the file you just wrote.
byte[] dataWritten = File.ReadAllBytes(“binarydata.dat”);
foreach (byte b in dataWritten)
Console.Write(“{0:x2} “, b);
Console.WriteLine(“ - {0} bytes”, dataWritten.Length);
Console.ReadKey();
Write down the output in the blanks below. Can you figure out what bytes
correspond to each of the five Write() statements? Mark each group of bytes with
the name of the variable.
4
The FileStream
writes the bytes to
the end of the file.
StreamWriter also encodes your
data. It just specializes in text
and text encoding.
450 Chapter 9
86 29 e8 02 06 48 65 6c 6c 6f 21 2f 81 00 74 f6 d8 f5 43 45 20
__ __ __ __ __ __ __ __ __ __ __ __ __ __ __ __ __ __ __ __ - ___ bytes
intValue stringValue byteArray charValue
char holds a Unicode
character, and ‘E’ only
takes one byte—it’s
encoded as U+0045.
Use BinaryReader to read the data back in
The BinaryReader class works just like BinaryWriter. You create a
stream, attach the BinaryReader object to it, and then call its methods.
But the reader doesn’t know what data’s in the file! And it has no way
of knowing. Your float value of 491.695F was encoded as d8 f5 43 45. But
those same bytes are a perfectly valid int—1,140,185,334. So you’ll need to
tell the BinaryReader exactly what types to read from the file. Add one
more button to your form, and have it read the data you just wrote.
float and int values take up 4 bytes when you
write them to a file. If you’d used long or
double, then they’d take up 8 bytes each.
If you use the Windows
calculator to convert these
bytes from hex to decimal, you
can see that these are the
numbers in byteArray.
The first byte in the string is 6—that’s
the length of the string. You can use
Character Map to look up each of the
characters in “Hello!”—it starts with
U+0048 and ends with U+0021.
Start out by setting up the FileStream and BinaryReader objects:
using (FileStream input = File.OpenRead(“binarydata.dat”))
using (BinaryReader reader = new BinaryReader(input)) {
1
You tell BinaryReader what type of data to read by calling its different methods.
int intRead = reader.ReadInt32();
string stringRead = reader.ReadString();
byte[] byteArrayRead = reader.ReadBytes(4);
float floatRead = reader.ReadSingle();
char charRead = reader.ReadChar();
2
Each value type has its own method in
BinaryReader() that returns the data
in the correct type. Most don’t need
any parameters, but ReadBytes() takes
one parameter that tells BinaryReader
how many bytes to read.
You tell BinaryReader what type of data to read by calling its different methods.
Console.Write(“int: {0} string: {1} bytes: ”, intRead, stringRead);
foreach (byte b in byteArrayRead)
Console.Write(“{0} ”, b);
Console.Write(“ float: {0} char: {1} ”, floatRead, charRead);
}
Console.ReadKey();
Here’s the output that gets printed to the console:
int: 48769414 string: Hello! bytes: 47 129 0 116 float: 491.695 char: E
3
Don’t take our word for it.
Replace the line that reads the
float with a call to ReadInt32().
(You’ll need to change the type
of floatRead to int.) Then you
can see for yourself what it
reads from the file.
an amalgam of data
you are here 4 451
reading and writing files
You can read and write serialized files manually, too
Serialized files don’t look so pretty when you open them up in Notepad. You’ll find all
the files you write in your project’s bin\Debug folder—let’s take a minute and get more
acquainted with the inner workings of a serialized file.
Serialize two Card objects to different files
Use the serialization code you’ve already written to serialize the Three of Clubs to three-c.dat
and Six of Hearts to six-h.dat. Check to make sure that both files were written out and are now
in a folder, and that they both have the same file size. Then open one of them in Notepad:
1
Write a loop to compare the two binary files
We used the ReadByte() method to read the next byte from a stream—it returns an int that contains
the value of that byte. We also used the stream’s Length field to make sure we read the whole file.
byte[] firstFile = File.ReadAllBytes(“three-c.dat”);
byte[] secondFile = File.ReadAllBytes(“six-h.dat”);
for (int i = 0; i < firstFile.Length; i++)
if (firstFile[i] != secondFile[i])
Console.WriteLine(“Byte #{0}: {1} versus {2}”,
i, firstFile[i], secondFile[i]);
2
This loop examines the first byte from each of
the files and compares them, then the second byte,
then the third, etc. When it finds a difference, it
writes a line to the console.
There are
some words in
the file, but
it’s mostly
unreadable.
The two files are read into two
different byte arrays, so they can
be compared byte by byte. Since
the same class was serialized to two
different files, they’ll be almost
identical…but let’s see just HOW
identical they are.
We’re not done yet—flip the page!
Do this!
When you write to a file, you don’t
always start from a clean slate!
Be careful if you use File.OpenWrite(). It
doesn’t delete the file—it just starts overwriting
the data starting at the beginning. That’s why
we’ve been using File.Create()—it creates a new file.
452 Chapter 9
Take a look at the console output to see how the two files differ
The console should show that two bytes differ:
Byte #322: 1 versus 3
Byte #382: 3 versus 6
That should make a lot of sense! Go back to the Suits enum from the last chapter, and you’ll find
the value for Clubs is 1 and the value for Hearts is 3, so that’s the first difference. And the second
difference—six versus three—is pretty obviously the card’s value. You might see different byte
numbers, which isn’t surprising: you might be using a different namespace, which would change the
length of the file.
3
Write code to manually create a new file that contains the King of Spades
We’ll take one of the arrays that we read, alter it to contain a new card, and write it back out.
firstFile[322] = (byte)Suits.Spades;
firstFile[382] = (byte)Values.King;
File.Delete(“king-s.dat”);
File.WriteAllBytes(“king-s.dat”, firstFile);
Now deserialize the card from king-s.dat and see if it’s the King of Spades!
4
Now that you know which bytes
contain the suit and value, you
can change just those bytes
in the array before it gets
written out to king-s.dat.
If you found
different
byte numbers
in step #3,
substitute
them in here.
Remember how the namespace was included as part
of the serialized file? If your namespace is different,
then the byte numbers will be different, too.
Find where the files differ, and use
that information to alter them
Hmm, if byte #322 in the serialized file
represents the suit, then we should be able to
change the suit of the card by reading that file
in, changing that one byte, and writing it out
again. (Remember, your own serialized file might
store the suit at a different location.)
celebrate our differences
The loop you just wrote pinpoints exactly where the two serialized
Card files differ. Since the only difference between the two objects
were their Suit and Value fields, then that should be the only
difference in their files, too. So if we find the bytes that hold the suit
and value, we should be able to change them to make a new card
with whatever suit and value we want!
You can also serialize your
objects to XML. Flip to
leftover #9 in the appendix
to learn more about it.
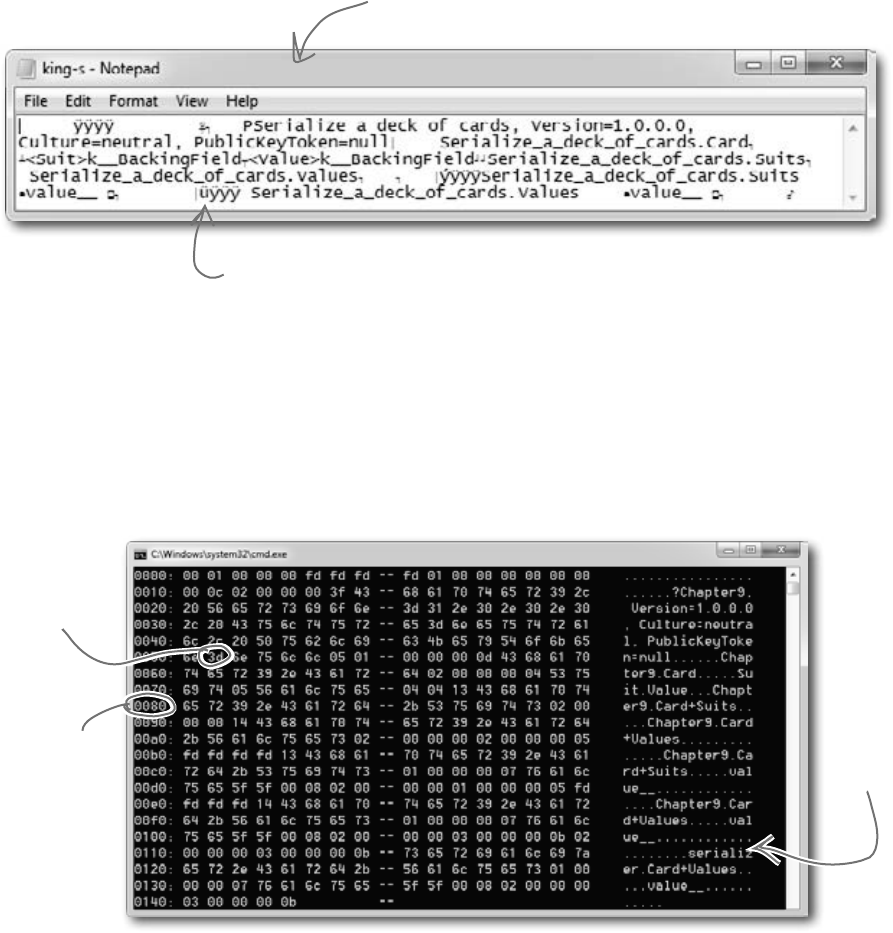
you are here 4 453
reading and writing files
There’s another option—it’s a format called a “hex dump,” and it’s a pretty standard way to look at
binary data. It’s definitely more informative than looking at the file in Notepad. Hexadecimal—or
“hex”—is a convenient way to display bytes in a file. Every byte takes 2 characters to display in hex, so
you can see a lot of data in a really small space, and a format that makes it easy to spot patterns. Also,
it’s useful to display binary data in rows that are 8, 16, or 32 bytes long because most binary data tends
to break down in chunks of 4, 8, 16, or 32…like all the types in C#. For example, an int takes up 4
bytes, and is 4 bytes long when serialized on disk. Here’s what that same file looks like as a hex dump,
using one of any number of free hex dump programs available for Windows:
Working with binary files can be tricky
What do you do if you have a file and you aren’t quite sure what’s inside it? You don’t
know what application created it, and you need to know something about it—but when
you open it in Notepad, it looks like a bunch of garbage. What if you’ve exhausted
all your other options, and really need to just look inside? Looking at that picture, it’s
pretty clear that Notepad just isn’t the right tool.
Here’s the serialized card, opened up in
Notepad. That’s not going to be useful at all.
You can make out a few things—like the enum names (“Suit” and
“Value”), and the name of the namespace we used (“Serialize_a_
deck_of_cards”). But that’s not all that helpful.
You can immediately
see the numeric
value of each byte
in the file.
The number at the
beginning of each
line is the offset
(or distance into the
file) of the first
byte in the line.
You still
get to see
the original
text, but
the garbage
characters
are replaced
with dots.
454 Chapter 9
How to make a hex dump
Start with some familiar text:
We the People of the United States, in Order to form a more perfect Union...
Here’s what a hex dump of that text would look like:
Each of those numbers—57, 65, 6F—is the value of one byte in the file. The reason some of the “numbers”
have letter values is that they’re hexadecimal (or hex). That’s just another way of writing a number. Instead of
using ten digits from 0 to 9, it uses sixteen digits from 0 to 9 plus the letters A through F.
Each line in our hex dump represents sixteen characters in the input that was used to generate it. In our
dump, the first four characters are the offset in the file—the first line starts at character 0, the next at
character 16 (or hex 10), then character 32 (hex 20), etc. (Other hex dumps look slightly different, but this
one will do for us.)
Use file streams to build a hex dumper
A hex dump is a hexadecimal view of the contents of a file, and it’s
a really common way for programmers to take a deep look at a file’s
internal structure. Most operating systems ship with a built-in hex
dump utility. Unfortunately, Windows doesn’t. So let’s build one!
69 73 6e 27 74 20 74 68 69 73 20 66 75 6e 3f 0a
Again, you can immediately see the
numeric value of each byte in the file.
We’ll add the number at the beginning of each line by using
the offset of the first byte in the line.
And we’ll
need to
replace the
garbage
characters
with periods.
0000: 57 65 20 74 68 65 20 50 -- 65 6f 70 6c 65 20 6f 66 We the People of
0010: 20 74 68 65 20 55 6e 69 -- 74 65 64 20 53 74 61 74 the United Stat
0020: 65 73 2c 20 69 6e 20 4f -- 72 64 65 72 20 74 6f 20 es, in Order to
0030: 66 6f 72 6d 20 61 20 6d -- 6f 72 65 20 70 65 72 66 form a more perf
0040: 65 63 74 20 55 6e 69 6f -- 6e 2e 2e 2e ect Union...
String.Format() uses parameters
just like Console.WriteLine(), so you
don’t need to learn anything new
to use it.
Working with hex
You can put hex numbers directly into your program—just add the
characters 0x (a zero followed by an x) in front of the number:
int j = 0x20;
MessageBox.Show(“The value is ” + j);
When you use the + operator to concatenate a number into a
string, it gets converted to decimal. You can use the static String.
Format() method to convert your number to a hex-formatted
string instead:
string h = String.Format(“{0:x2}”, j);
you are here 4 455
reading and writing files
Our hex dumper will write its dump out to a file, and since it’s just writing text a
StreamWriter will do just fine. But we can also take advantage of the ReadBlock()
method in StreamReader. It reads a block of characers into a char array—you
specify the number of characters you want to read, and it’ll either read that many
characters or, if there are fewer than that many left in the file, it’ll read the rest of the file.
Since we’re displaying 16 characters per line, we’ll read blocks of 16 characters.
So add one more button to your program—add this hex dumper to it. Change the first
two lines so that they point to real files on your hard drive. Start with a serialized Card
file. Then see if you can modify it to use the Open and Save As dialog boxes.
using (StreamReader reader = new StreamReader(@”c:\files\inputFile.txt”))
using (StreamWriter writer = new StreamWriter(@”c:\files\outputFile.txt”, false))
{
int position = 0;
while (!reader.EndOfStream) {
char[] buffer = new char[16];
int charactersRead = reader.ReadBlock(buffer, 0, 16);
writer.Write(“{0}: ”, String.Format(“{0:x4}”, position));
position += charactersRead;
for (int i = 0; i < 16; i++) {
if (i < charactersRead) {
string hex = String.Format(“{0:x2}”, (byte)buffer[i]);
writer.Write(hex + “ ”);
}
else
writer.Write(“ ”);
if (i == 7) { writer.Write(“-- ”); }
if (buffer[i] < 32 || buffer[i] > 250) { buffer[i] = ‘.’; }
}
string bufferContents = new string(buffer);
writer.WriteLine(“ ” + bufferContents.Substring(0, charactersRead));
}
}
You can convert a
char[] array to a
string by passing it
to the overloaded
constructor for
string.
Every string has a Substring method that returns a piece of the string.
In this case, it returns the first charactersRead characters starting
at the beginning (position 0). (Look back at the top of the loop to see
where charactersRead is set—the ReadBlock() method returns the number
of characters that it read into the array.)
The static String.Format
method converts numbers
to strings. “{0:x4}” tells
Format() to print the
second parameter—in
this case, position—as a
4-character hex number.
A StreamReader’s EndOfStream property returns false if
there are characters still left to read in the file.
This ReadBlock() call reads up to 16
characters into a char array.
This loop goes
through the
characters
and prints
each of them
to a line in
the output.
Some characters with a value under
32 don’t print, so we’ll replace all
of them with a period.
StreamReader and StreamWriter will do just fine (for now)
The reason the method’s
called “ReadBlock()” is
that when you call it, it
“blocks” (which means it
keeps executing and doesn’t
return to your program)
until it’s either read all the
characters you asked for or
run out of data to read.
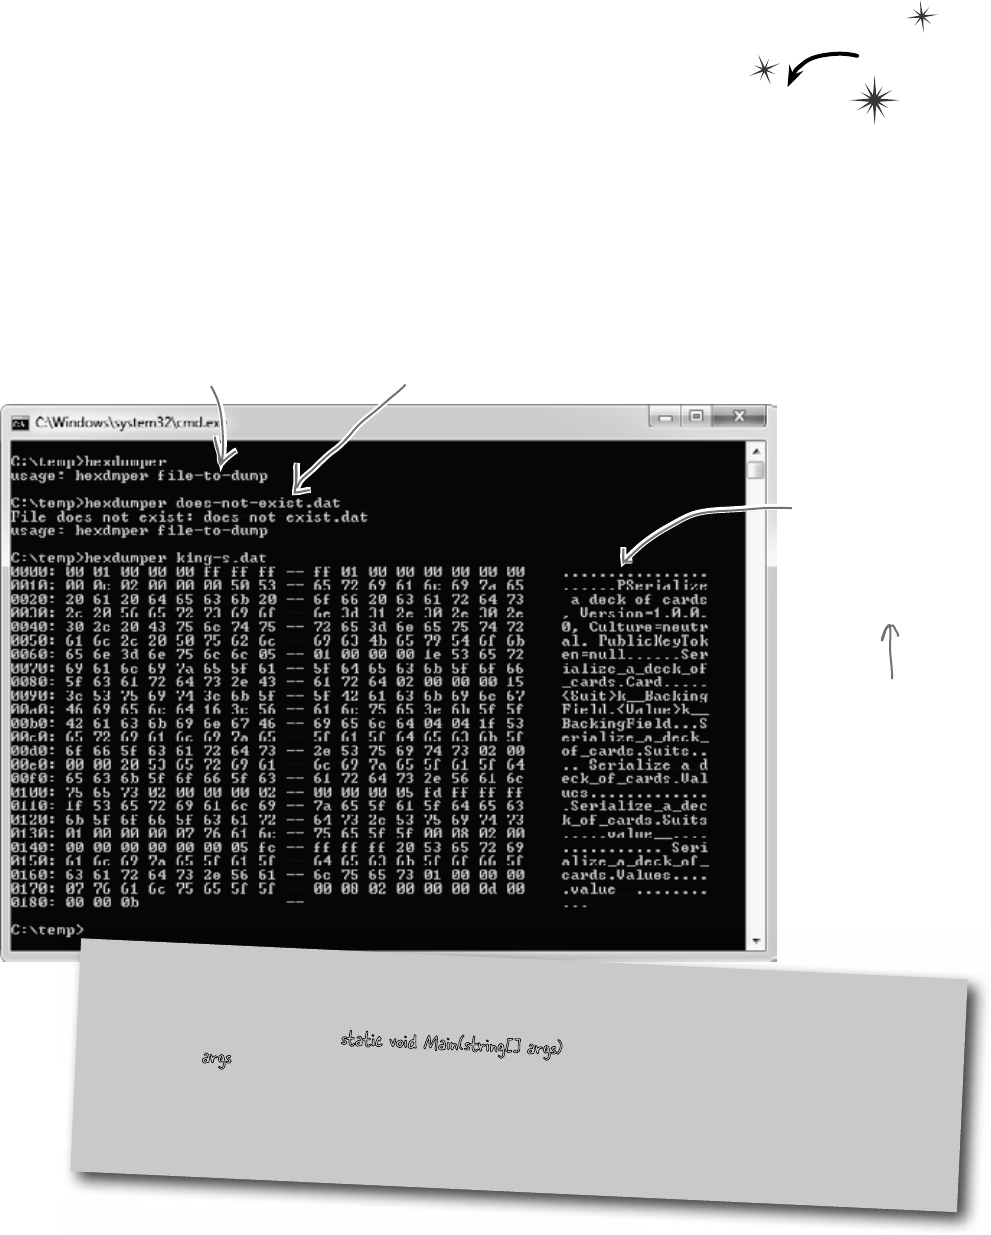
456 Chapter 9
build hexdump right
Use Stream.Read() to read bytes from a stream
The hex dumper works just fine for text files. But there’s a problem. Try using File.
WriteAllBytes() to write an array of bytes with values over 127 to a file and then run it through
your dumper. Uh oh—they’re all read in as “fd”! That’s because StreamReader is built to read
text files, which only contain bytes with values under 128. So let’s do this right—by reading the
bytes directly from the stream using the Stream.Read() method. And as a bonus, we’ll build it just
like a real hex dump utility: we’ll make it take a filename as a command-line argument.
Create a new Console Application and call it hexdumper. The code for the program is on the
facing page. Here’s what it will look like when you run the program:
If you run hexdumper without any
arguments, it returns an error message
and exits with an error code.
It also exits with an error if you pass it
the name of a file that doesn’t exist.
If you pass it a
valid filename, it’ll
write a hex dump
of the contents
of the file to the
console.
Using command-line arguments
Every time you create a new Console Application project, Visual Studio creates a Program class with an entry point
method that has this declaration: static void Main(string[] args). If you run your program with command-line
arguments, the args parameter will contain those arguments. And it’s not just for Console Applications, either: open up
any Windows Forms Application project’s Program.cs file, and you’ll see the same thing.
You’ll want to pass command-line arguments when you’re debugging your program. To pass arguments when you run your
program in the IDE’s debugger, choose “Properties…” from the Project menu and enter them on the Debug tab.
Do this
Normally we use Console.
WriteLine() to print
to the console. But
we’ll use Console.Error.
WriteLine() to print
error messages so they
don’t get redirected
if we use > or >> to
redirect the output.
you are here 4 457
reading and writing files
static void Main(string[] args)
{
if (args.Length != 1)
{
Console.Error.WriteLine(“usage: hexdmper file-to-dump”);
System.Environment.Exit(1);
}
if (!File.Exists(args[0]))
{
Console.Error.WriteLine(“File does not exist: {0}”, args[0]);
System.Environment.Exit(2);
}
using (Stream input = File.OpenRead(args[0]))
{
int position = 0;
byte[] buffer = new byte[16];
while (position < input.Length)
{
int charactersRead = input.Read(buffer, 0, buffer.Length);
if (charactersRead > 0)
{
Console.Write("{0}: ", String.Format("{0:x4}", position));
position += charactersRead;
for (int i = 0; i < 16; i++)
{
if (i < charactersRead)
{
string hex = String.Format("{0:x2}", (byte)buffer[i]);
Console.Write(hex + " ");
}
else
Console.Write(" ");
if (i == 7)
Console.Write("-- ");
if (buffer[i] < 32 || buffer[i] > 250) { buffer[i] = (byte)'.'; }
}
string bufferContents = Encoding.UTF8.GetString(buffer);
Console.WriteLine(" " + bufferContents.Substring(0, charactersRead));
}
}
}
}
Command-line arguments will be
passed using the args parameter.
If args.Length is not
equal to 1, then either
zero or more than one
argument was passed on
the command line.
Let’s make sure that a
valid file was passed. If
it doens’t exist, print a
different error message
and return a different
exit code.
This Exit() method quits the
program. If you pass it an int, it
will return that error code (which
is useful when writing command
scripts and batch files).
We don’t need a
StreamReader because
we’re reading bytes
directly from the stream.
This part of the
program is exactly
the same, except
the buffer contains
bytes and not
characters (but
String.Format()
does the right
thing in either case).
Use the Stream.Read() method
to read bytes directly into
a buffer. Notice how this
time the buffer is a byte
array. That makes sense—we’re
reading bytes, not characters
from a text file.
Notice how we’re using Console.
Error.WriteLine() here.
This is an easy way to convert a byte array to a
string. It’s part of Encoding.UTF8 (or another
Unicode encoding, or ASCII, or another encoding)
because different encodings can map the same byte
array to different strings.
458 Chapter 9
Q: Why didn’t I have to use the
Close() method to close the file after
I used File.ReadAllText() and
File.WriteAllText()?
A:TheFileclasshasseveralvery
usefulstaticmethodsthatautomatically
openupafile,readorwritedata,and
thenclose it automatically.Inaddition
totheReadAllText()and
WriteAllText()methods,
thereareReadAllBytes()and
WriteAllBytes(),whichworkwith
bytearrays,andReadAllLines()
andWriteAllLines(),whichread
andwritestringarrays,whereeachstringin
thearrayisaseparatelineinthefile.Allof
thesemethodsautomaticallyopenandclose
thestreams,soyoucandoyourwholefile
operationinasinglestatement.
Q: If the FileStream has methods
for reading and writing, why do I ever
need to use StreamReader and
StreamWriter?
A:TheFileStreamclassisreally
usefulforreadingandwritingbytestobinary
files.Itsmethodsforreadingandwriting
operatewithbytesandbytearrays.Butalot
ofprogramsworkexclusivelywithtextfiles—
likethefirstversionoftheExcuseGenerator,
whichonlywrotestringsouttofiles.That’s
wheretheStreamReaderand
StreamWritercomeinreallyhandy.
Theyhavemethodsthatarebuiltspecifically
forreadingandwritinglinesoftext.Without
them,ifyouwantedtoreadalineoftextin
fromafile,you’dhavetofirstreadabyte
arrayandthenwritealooptosearchthrough
thatarrayforalinebreak—soit’seasytosee
howtheymakeyourlifeeasier.
Q: When should I use File, and
when should I use FileInfo?
A:Themaindifferencebetweenthe
FileandFileInfoclassesisthatthe
methodsinFilearestatic,soyoudon’t
needtocreateaninstanceofthem.Onthe
otherhand,FileInforequiresthatyou
instantiateitwithafilename.Insomecases,
thatwouldbemorecumbersome,likeifyou
onlyneedtoperformasinglefileoperation
(likejustdeletingormovingonefile).On
theotherhand,ifyouneedtodomanyfile
operationstothesamefile,thenit’smore
efficienttouseFileInfo,because
youonlyneedtopassitthefilenameonce.
Youshoulddecidewhichonetousebased
ontheparticularsituationyouencounter.
Inotherwords,ifyou’redoingonefile
operation,useFile.Ifyou’redoingalotof
fileoperationsinarow,useFileInfo.
Q: Back up a minute. Why was
“Eureka!” written out with one byte per
character, but when I wrote out the
Hebrew letters they took up two bytes?
And what was that “FF FE” thing at the
beginning of the bytes?
A:Whatyou’reseeingisthedifference
betweentwoclosely relatedUnicode
encodings.PlainEnglishletters,numbers,
normalpunctuationmarks,andsome
standardcharacters(likecurlybrackets,
ampersands,andotherthingsyouseeon
yourkeyboard)allhaveverylowUnicode
numbers—between0and127.(Ifyou’ve
usedASCIIbefore,they’rethesameasthe
ASCIIcharacters.)Ifafileonlycontains
thoseUnicodecharacterswithlownumbers,
itjustprintsouttheirbytes.
Thingsgetalittlemorecomplicated
whenyouaddhigher-numberedUnicode
charactersintothemix.Onebytecanonly
holdanumberbetween0and255.Buttwo
bytesinarowcanstorenumbersbetween0
and65,536—which,inhex,isFFFF.Thefile
needstobeabletotellwhateverprogram
opensitupthatit’sgoingtocontainthese
higher-numberedcharacters.Soitputs
aspecialreservedbytesequenceatthe
beginningofthefile:“FFFE”.That’scalled
the“byteordermark.”Assoonasaprogram
seesthat,itknowsthatallofthecharacters
areencodedwithtwobyteseach.(SoanE
isencodedas0045—withleadingzeroes.)
Q: Why is it called a byte order mark?
A:Rememberhowyourbyteswere
reversed?Shin’sUnicodevalueofU+05E9
waswrittentothefileasE905.That’s
called“littleendian.”Gobacktothecode
thatwroteoutthosebytesandchangethe
thirdparametertoWriteAllText():
Encoding.BigEndianUnicode.
Thattellsittowritethedataoutin“bigendian,”
whichdoesn’tflipthebytesaround.You’llsee
thebytescomeoutas“05E9”thistime.You’ll
alsoseeadifferentbyteordermark:“FEFF”.
AndyourSimpleTextEditorissmartenough
toreadbothofthem!
no dumb questions
If you’re writing a string that
only has Unicode characters
with low numbers, it writes
one byte per character. But
if it’s got high‑numbered
characters, they’ll be written
using two or more bytes each.
The encoding is called UTF-8, which .NET uses by default. You
can tell File.WriteAllText() to use a different encoding by passing
it a different Encoding value. You can learn more about Unicode
encodings at http://unicode.org.
you are here 4 459
reading and writing files
Make the Excuse class serializable
Mark the Excuse class with the [Serializable] attribute to make it
serializable. Also, you’ll need to add the using line:
using System.Runtime.Serialization.Formatters.Binary;
1
Change the Excuse.Save() method to serialize the excuse
When the Save() method writes a file out to the folder, instead of using
StreamWriter to write the file out, have it open a file and serialize itself out.
You’ll need to figure out how the current class can deserialize itself.
2
Change the Excuse.OpenFile() method to deserialize an excuse
You’ll need to create a temporary Excuse object to deserialize from the file, and
then copy its fields into the current class.
3
Hint: What keyword
can you use inside of
a class that returns a
reference to itself?
ChangeBrian’sExcuseManagersoitusesbinaryfileswithserializedExcuseobjects
insteadoftextfiles.
Wow, that was really easy! All the code for saving and
opening excuses was inside the Excuse class. I just had to
change the class—I barely had to touch the form at all. It’s like the
form doesn’t even care how the class saves its data. It just passes in
the filename and knows everything will get saved properly.
Now just change the form so it uses a new file extension
There’s just one very small change you need to make to the form. Since we’re
no longer working with text files, we shouldn’t use the .txt extension anymore.
Change the dialog boxes, default filenames, and directory search code so that
they work with *.excuse files instead.
4
That’s right! Your code was very easy to change
because the class was well encapsulated.
When you’ve got a class that hides its internal operations from
the rest of the program and only exposes the behavior that needs
to be exposed, it’s called a well-encapsulated class. In the
Excuse Manager program, the form doesn’t have any information
about how excuses are saved to files. It just passes a filename into
the excuse class, and the class takes care of the rest. That makes
it very easy to make big changes to how your class works with
files. The better you encapsulate your classes, the easier they are
to alter later on.
Remember how
encapsulation was
one of the four
core OOP principles?
Here’s an example
of how using those
principles makes your
programs better.
460 Chapter 9
ChangeBrian’sExcuseManagersoitusesbinaryfileswithserialized
Excuseobjectsinsteadoftextfiles.
private void save_Click(object sender, EventArgs e) {
// existing code
saveFileDialog1.Filter = “Excuse files (*.excuse)|*.excuse|All files (*.*)|*.*”;
saveFileDialog1.FileName = description.Text + “.excuse”;
// existing code
}
private void open_Click(object sender, EventArgs e) {
// existing code
openFileDialog1.Filter =
“Excuse files (*.excuse)|*.excuse|All files (*.*)|*.*”;
// existing code
}
[Serializable]
class Excuse {
public string Description { get; set; }
public string Results { get; set; }
public DateTime LastUsed { get; set; }
public string ExcusePath { get; set; }
public Excuse() {
ExcusePath = “”;
}
public Excuse(string excusePath) {
OpenFile(excusePath);
}
public Excuse(Random random, string folder) {
string[] fileNames = Directory.GetFiles(folder, “*.excuse”);
OpenFile(fileNames[random.Next(fileNames.Length)]);
}
private void OpenFile(string excusePath) {
this.ExcusePath = excusePath;
BinaryFormatter formatter = new BinaryFormatter();
Excuse tempExcuse;
using (Stream input = File.OpenRead(excusePath)) {
tempExcuse = (Excuse)formatter.Deserialize(input);
}
Description = tempExcuse.Description;
Results = tempExcuse.Results;
LastUsed = tempExcuse.LastUsed;
}
public void Save(string fileName) {
BinaryFormatter formatter = new BinaryFormatter();
using (Stream output = File.OpenWrite(fileName)) {
formatter.Serialize(output, this);
}
}
}
We pass in “this”
because we want this
class to be serialized.
The only change to the form
is to have it change the file
extension it passes to the
Excuse class.
The constructor for loading
random excuses needs to look
for the “.excuse” extension
instead of “*.txt” files.
exercise solution
Standard save and
open dialog boxes do
the trick here.
You only need to change these three statements in the
form: two in the Save button’s Click event, and one in the
Open button’s—they just change the dialogs to use the
.excuse extension, and set the default save filename.
Here’s the entire Excuse class.
you are here 4 461
reading and writing files
1 2 3 4
5 6 7
8 9
10
11 12
13
14
15
16
17 18
19
Across
6. The method in the File class that checks whether or
not a specific file is on the drive
9. This statement indicates the end of a case inside a
switch statement
10. The abstract class that FileStream inherits from
11. A nonvisual control that lets you pop up the
standard Windows "Save As" dialog box
15. How you write numbers in base-16
16. If you don't call this method, your stream could be
locked open so other methods or programs can't open it
17. The StreamReader method that reads data into a
char[] array
18. An encoding system that assigns a uniue number to
each character
Down
1. This class has a method that writes any value type
to a file
2. The static method in the Array class that turns an
array backwards
3. The event handler that gets run whenever someone
modifies the data in an input control
4. This class has many static methods that let you
manipulate folders
5. Using this OOP principle makes it a lot easier to
maintain your code
7. If you don't use this attribute to indicate that a class
can be written to a stream, BinaryFormatter will
generate an error
8. This BinaryFormatter method reads an object from
a stream
12. \n and \r are examples of this kind of sequence
Filecross
Across
6.ThemethodintheFileclassthatcheckswhetherornota
specificfileisonthedrive
9.Thisstatementindicatestheendofacaseinsideaswitchstatement
10.TheabstractclassthatFileStreaminheritsfrom
11.Anon-visualcontrolthatletsyoupopupthestandardWindows
“SaveAs”dialogbox
15.Howyouwritenumbersinbase-16
16.Ifyoudon’tcallthismethod,yourstreamcouldbelockedopenso
othermethodsorprogramscan’topenit
17.TheStreamReadermethodthatreadsdataintoachar[]
array
18.Anencodingsystemthatassignsauniquenumbertoeachcharacter
19.Usethisstatementtoindicatewhichstatementsshouldbeexecuted
whenthevaluebeingtestedinaswitchstatementdoesnotmatch
anyofthecases
Down
1.Thisclasshasamethodthatwritesatypetoafile
2.ThestaticmethodintheArrayclassthatturnsanarraybackward
3.Theeventhandlerthatgetsrunwheneversomeonemodifiesthe
datainaninputcontrol
4.Thisclasshasmanystaticmethodsthatletyoumanipulatefolders
5.UsingthisOOPprinciplemakesitaloteasiertomaintainyourcode
7.Ifyoudon’tusethisattributetoindicatethataclasscanbewrittento
astream,BinaryFormatterwillgenerateanerror
8.ThisBinaryFormattermethodreadsanobjectfromastream
12.\nand\rareexamplesofthiskindofsequence
13.ThisclassletsyouperformalltheoperationsintheFileclassfor
aspecificfile
14.Thismethodsendstexttoastreamfollowedbyalinebreak
462 Chapter 9
Filecross
solution
exercise solution
B
1R
2C
3D
4
I E
5E H E
6X I S T S
7
D
8N N V B
9R E A K R E
E A C E N E R
S
10 T R E A M R G C I
E Y P S E T A
R W S
11 A V E F I L E
12 D I A L O G L
I R U S R I
A I L F
13 C Y Z
L T A I A W
14 A
I E T L P R B
Z R I H
15 E X A D E C I M A L L
E O I T E
N N C
16 L O S E
F L
R
17 E A D B L O C K U
18 N I C O D E
N
D
19 E F A U L T
Across
6. The method in the File class that checks whether or
not a specific file is on the drive [exists]
9. This statement indicates the end of a case inside a
switch statement [break]
10. The abstract class that FileStream inherits from
[stream]
11. A nonvisual control that lets you pop up the
standard Windows "Save As" dialog box
[savefiledialog]
15. How you write numbers in base-16 [hexadecimal]
16. If you don't call this method, your stream could be
locked open so other methods or programs can't open it
[close]
17. The StreamReader method that reads data into a
char[] array [readblock]
Down
1. This class has a method that writes any value type
to a file [binarywriter]
2. The static method in the Array class that turns an
array backwards [reverse]
3. The event handler that gets run whenever someone
modifies the data in an input control [changed]
4. This class has many static methods that let you
manipulate folders [directory]
5. Using this OOP principle makes it a lot easier to
maintain your code [encapsulation]
7. If you don't use this attribute to indicate that a class
can be written to a stream, BinaryFormatter will
generate an error [serializable]
8. This BinaryFormatter method reads an object from
a stream [deserialize]

this is a new chapter 463
Good thing I wrote code to
handle my HangoverException.
exception handling
10
Putting out fires gets old
Programmers aren’t meant to be firefighters.
You’ve worked your tail off, waded through technical manuals and a few engaging
Head First books, and you’ve reached the pinnacle of your profession: master
programmer. But you’re still getting panicked phone calls in the middle of the night
from work because your program crashes, or doesn’t behave like it’s supposed
to. Nothing pulls you out of the programming groove like having to fix a strange
bug…but with exception handling, you can write code to deal with problems
that come up. Better yet, you can even react to those problems, and keep things
running.
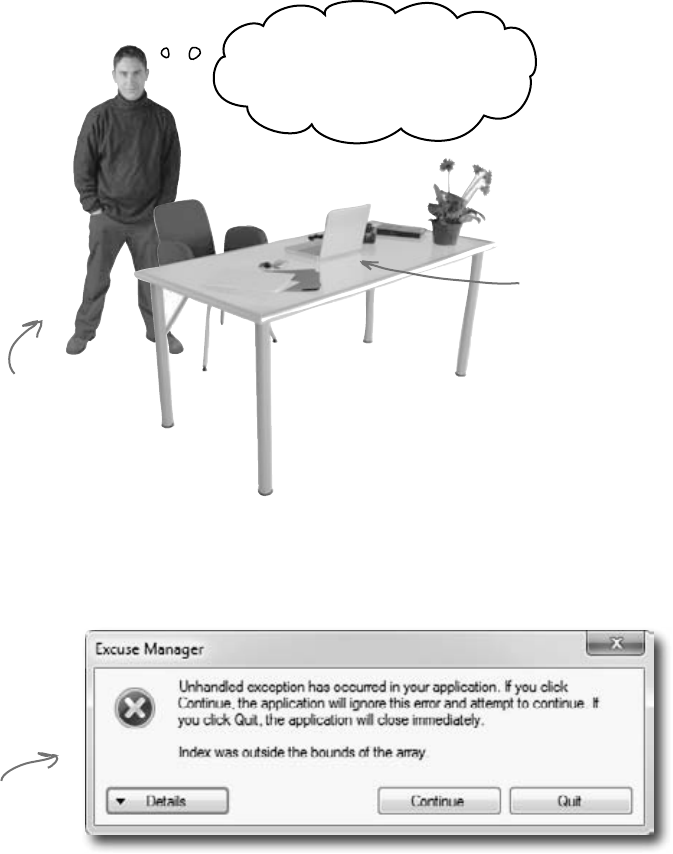
464 Chapter 10
Brian needs his excuses to be mobile
Brian recently got reassigned to the international division. Now
he flies all over the world. But he still needs to keep track of his
excuses, so he installed the program you built on his laptop and
takes it with him everywhere.
Work’s boring today. I want to
go scuba diving. Time to fire up
the Excuse Generator.
Brian’s got the excuse
Generator running on
his laptop.
Same ol’ Brian…
always looking for
an excuse to get
out of work.
An unhandled
exception…must
have been a
problem we didn’t
account for.
mo’ programs mo’ problems
But the program isn’t working!
Brian clicks the “Random Excuse” button, and gets a pretty nasty
looking error. Something about not finding his excuses. What gives?
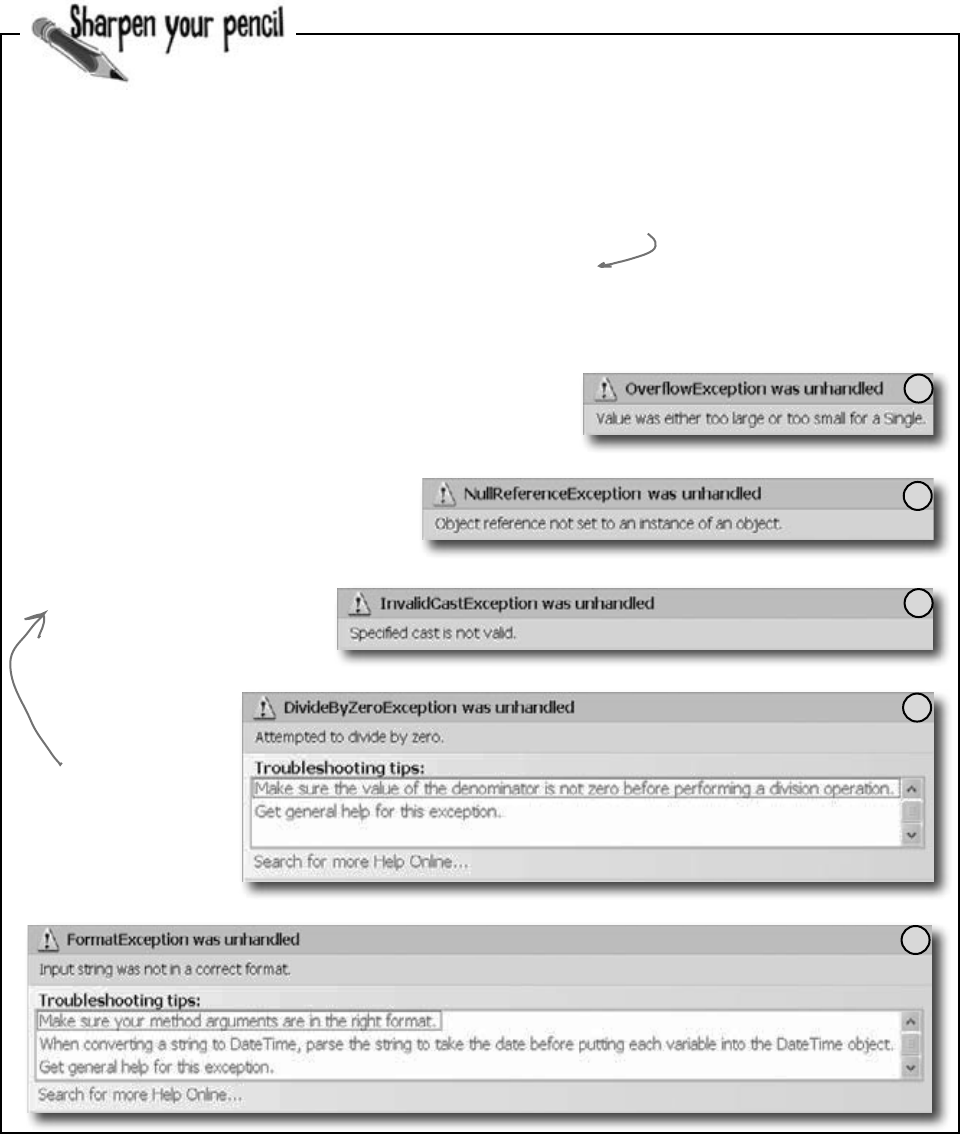
you are here 4 465
exception handling
public static void BeeProcessor() {
object myBee = new HoneyBee(36.5, “Zippo”);
float howMuchHoney = (float)myBee;
HoneyBee anotherBee = new HoneyBee(12.5, “Buzzy”);
double beeName = double.Parse(anotherBee.MyName);
double totalHoney = 36.5 + 12.5;
string beesWeCanFeed = “”;
for (int i = 1; i < (int) totalHoney; i++) {
beesWeCanFeed += i.ToString();
}
float f =
float.Parse(beesWeCanFeed);
int drones = 4;
int queens = 0;
int dronesPerQueen = drones / queens;
anotherBee = null;
if (dronesPerQueen < 10) {
anotherBee.DoMyJob();
}
}
1
2
3
5
4
Here’s another example of some broken code. There are five different exceptions
that this code throws, and the error messages are shown on the right. It’s your
job to match the line of code that has a problem with the exception that line
generates. Read the exception messages for a good hint.
Calling double.Parse(“32”) will
parse a string and return a
double value, like 32.
When you have a
reference that
doesn’t point to any
object, it gets a
special value called
null. Setting a
reference to null
tells C# it doesn’t
point to anything.
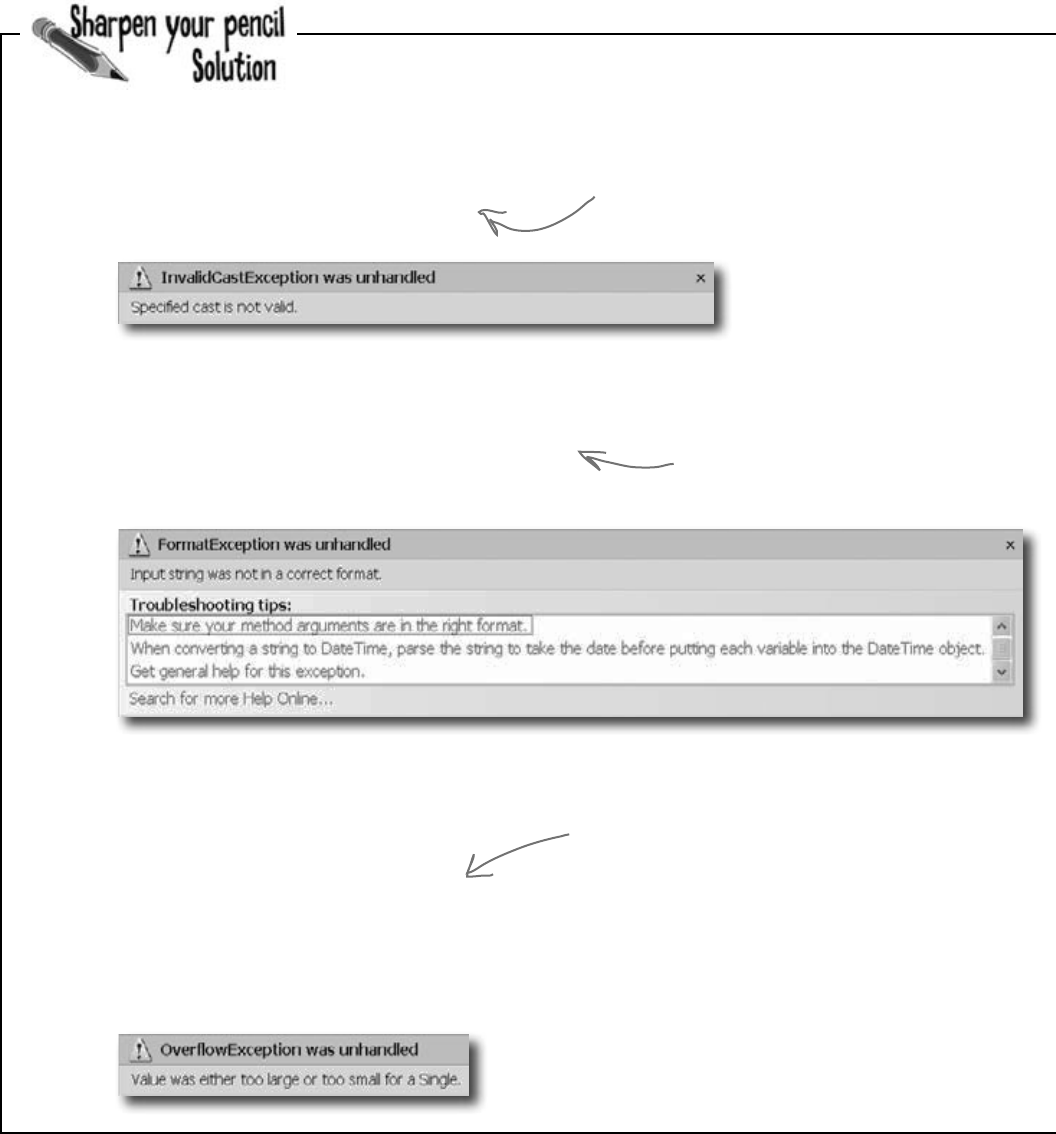
466 Chapter 10
HoneyBee anotherBee = new HoneyBee(12.5, “Buzzy”);
double beeName = double.Parse(anotherBee.MyName);
object myBee = new HoneyBee(36.5, “Zippo”);
float howMuchHoney = (float)myBee;
Your job was to match the line of code that has a
problem with the exception that line generates.
C# lets you cast myBee to a float—but there’s no way
to convert a HoneyBee object to a float value. When your
code actually runs, the CLR has no idea how to actually do
that cast, so it throws an InvalidCastException.
The Parse() method wants you
to give it a string in a certain
format. “Buzzy” isn’t a string
it knows how to convert to a
number. That’s why it throws
a FormatException.
breaking the rules
double totalHoney = 36.5 + 12.5;
string beesWeCanFeed = “”;
for (int i = 1; i < (int) totalHoney; i++) {
beesWeCanFeed += i.ToString();
}
float f = float.Parse(beesWeCanFeed);
The for loop will create a string called
beesWeCanFeed that contains a number with over
60 digits in it. There’s no way a float can hold
a number that big, and trying to cram it into a
float will throw an OverflowException.
You’d never actually get all these exceptions
in a row—the program would throw the first
exception and then stop. You’d only get to
the second exception if you fixed the first.
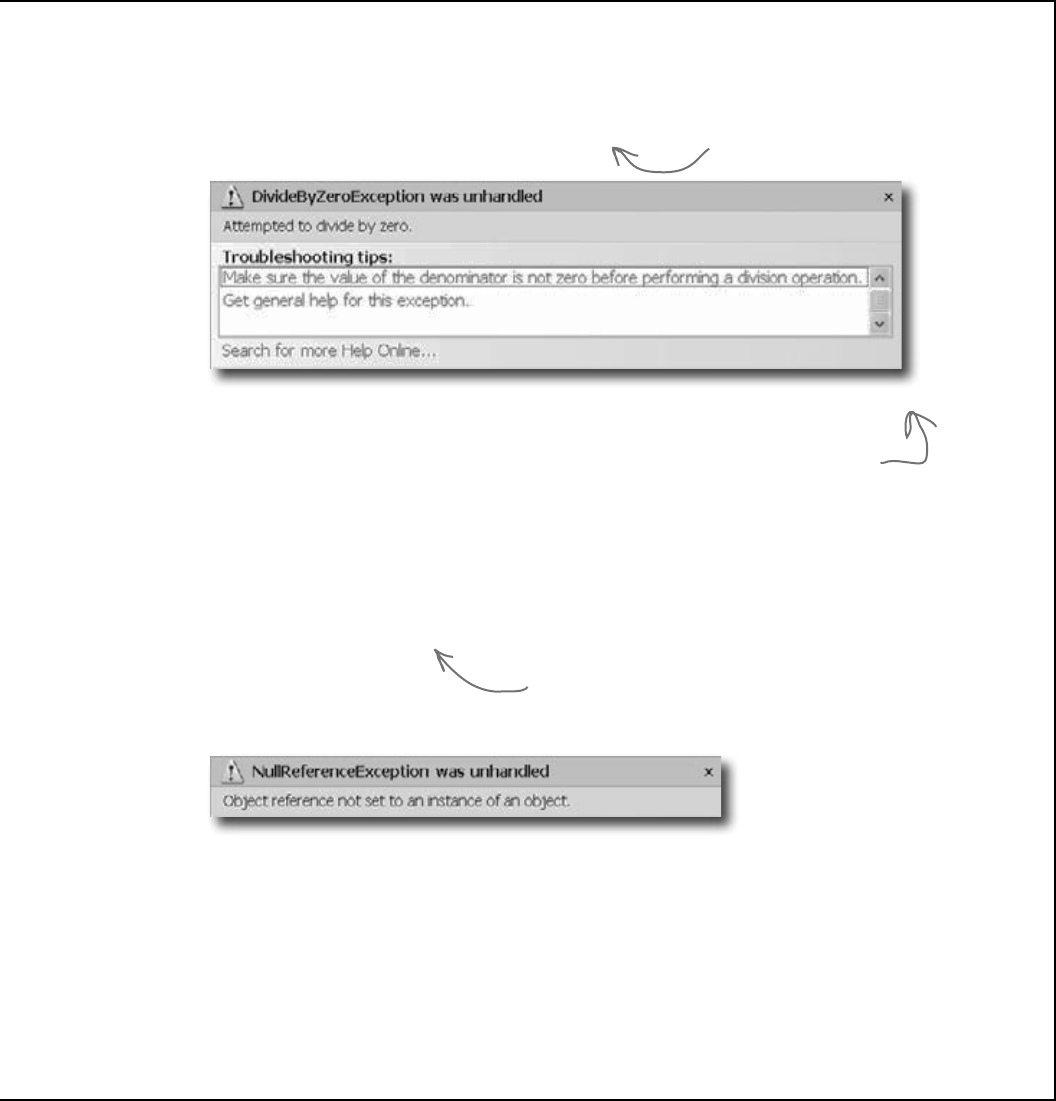
you are here 4 467
exception handling
Setting the anotherBee reference variable equal to
null tells C# that it doesn’t point to anything. So
instead of pointing to an object, it points to nothing.
Throwing a NullReferenceException is C#’s way of
telling you that there’s no object whose DoMyJob()
method can be called.
anotherBee = null;
if (dronesPerQueen < 10) {
anotherBee.DoMyJob();
}
int drones = 4;
int queens = 0;
int dronesPerQueen = drones / queens;
That DivideByZero error didn’t have to happen. You can see just by looking
at the code that there’s something wrong. The same goes for the other
exceptions. These problems were preventable—and the more you know
about exceptions, the better you’ll be at keeping your code from crashing.
It’s really easy to throw a
DivideByZeroException. Just
divide any number by zero.
Dividing any integer by zero always throws this kind of exception. Even if you
don’t know the value of queens, you can prevent it just by checking the value to
make sure it’s not zero before you divide it into drones.
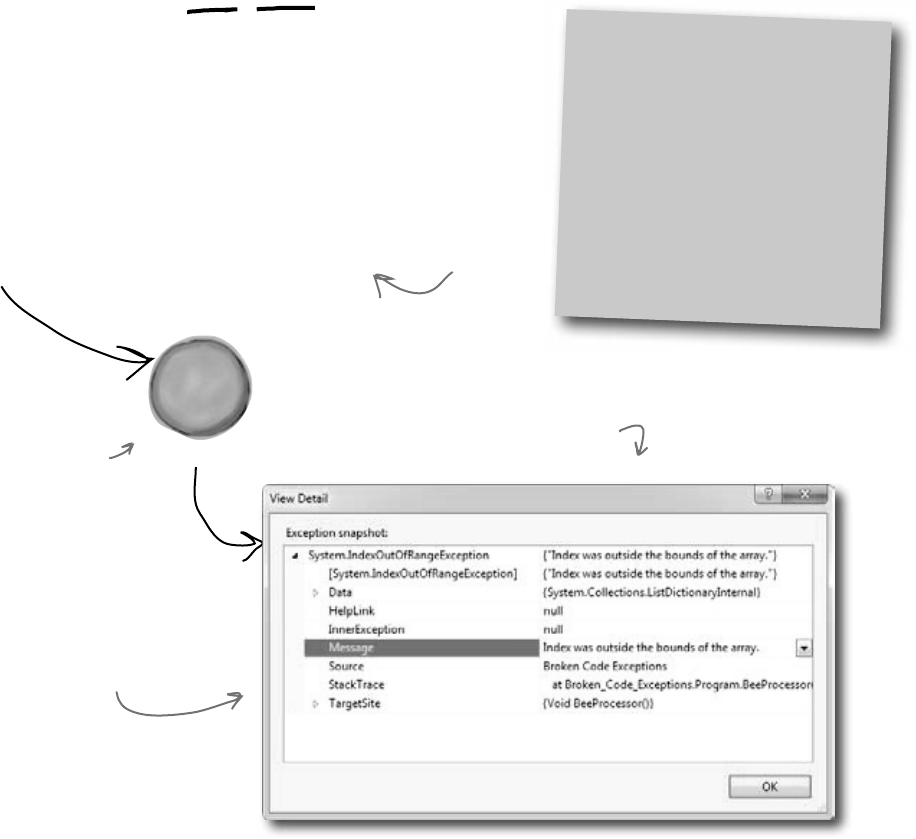
468 Chapter 10
E
x
c
e
p
t
i
o
n
o
b
j
e
c
t
When your program throws an exception,
.NET generates an Exception object.
You’ve been looking at .NET’s way of telling you something went
wrong in your program: an exception. In .NET, when an exception
occurs, an object is created to represent the problem. It’s called, no
surprise here, Exception.
For example, suppose you have an array with four items. Then, you try
and access the sixteenth item (index 15, since we’re zero-based here):
ex-cep-tion, noun.
a person or thing that is
excluded from a general
statement or does not
follow a rule. While Jim
usually hates peanut butter, he
made an exception for Ken’s
peanut butter fudge.
int[] anArray = {3, 4, 1, 11};
int aValue = anArray[15];
.NET goes to the trouble of creating an object because it wants to give you all
the information about what caused the exception. You may have code to fix,
or you may just need to make some changes to how you handle a particular
situation in your program.
In this case, an IndexOutOfRangeException indicates you have a bug:
you’re trying to access an index in the array that’s out of range. You’ve also got
information about exactly where in the code the problem occurred, making it
easy to track down (even if you’ve got thousands of lines of code).
The exception object has a
message that tells you what’s
wrong and a list of all of the
calls that were made to the
system’s memory leading up to the
event that caused the exception.
You can see this detail
by clicking on the View
Detail link in the unhandled
exception window.
As soon as your program
runs into an exception, it
generates an object with all
the data it has about it.
This code is
obviously going to
cause problems.
mmm fudge

you are here 4 469
exception handling
Q: Why are there so many kinds of exceptions?
A:Thereareallsortsofwaysthatyoucanwritecodethat
C#simplydoesn’tknowhowtodealwith.Itwouldbedifficult
totroubleshootyourproblemsifyourprogramsimplygavea
genericerrormessage(“Aproblemoccurredatline37”).It’sa
loteasiertotrackdownandfixproblemsinyourcodewhenyou
knowspecificallywhatkindoferroroccurred.
Q: So what is an exception, really?
A:It’sanobjectthat.NETcreateswhenthere’saproblem.
Youcanspecificallygenerateexceptionsinyourcode,too(more
aboutthatinaminute).
Q: Wait, what? It’s an object?
A:Yes,anexceptionisanobject.Thepropertiesinthe
objecttellyouinformationabouttheexception.Forexample,
it’sgotaMessagepropertythathasausefulstringlike
“Specifiedcastwasinvalid”or“Valuewaseithertoolargeor
toosmallforaSingle”,whichiswhatitusedtogeneratethe
exceptionwindow.Thereasonthat.NETgeneratesitistogive
youasmuchinformationasitcanaboutexactlywhatwasgoing
onwhenitexecutedthestatementthatthrewtheexception.
Q: OK, I still don’t get it. Sorry. Why are there so many
different kinds of exceptions, again?
A:Becausetherearesomanywaysthatyourcodecanact
inunexpectedways.Therearealotofsituationsthatwillcause
yourcodetosimplycrash.Itwouldbereallyhardtotroubleshoot
theproblemsifyoudidn’tknowwhythecrashhappened.
Bythrowingdifferentkindsofexceptionsunderdifferent
circumstances,.NETisgivingyoualotofreallyvaluable
informationtohelpyoutrackdownandcorrecttheproblem.
Q: So exceptions are there to help me, not just cause a
pain in my butt?
A:Yes!Exceptionsareallabouthelpingyouexpectthe
unexpected.Alotofpeoplegetfrustratedwhentheyseecode
throwanexception.Butifyouthinkaboutanexceptionas
.NET’swayofhelpingyoutrackdownanddebugyourprogram,it
reallyhelpsoutwhenyou’retryingtotrackdownwhat’scausing
thecodetobombout.
Q: So when my code throws an exception, it’s not
necessarily because I did something wrong?
A:Exactly.Sometimesyourdata’sdifferentthanyou
expectedittobe—likeyou’vegotamethodthat’sdealingwith
anarraythat’salotlongerorshorterthanyouanticipatedwhen
youfirstwroteit.Anddon’tforgetthathumanbeingsareusing
yourprogram,andtheyalmostalwaysactinanunpredictable
way.Exceptionsare.NET’swaytohelpyouhandlethose
unexpectedsituationssothatyourcodestillrunssmoothlyand
doesn’tsimplycrashorgiveacryptic,uselesserrormessage.
Q: Once I knew what I was looking for, it was pretty clear
that the code on the previous page was going to crash. Are
all exceptions easy to spot?
A:No.Unfortunately,therewillbetimeswhenyourcode
willhaveproblems,andit’llbereallyhardtofigureoutwhat’s
causingthemjustbylookingatit.That’swhytheIDEgivesyou
areallyusefultoolcalledthedebugger.Itletsyoupauseyour
programandexecuteitstatementbystatement,inspectingthe
valueofeachindividualvariableandfieldasyougo.Thatmakes
italoteasierforyoutofigureoutwhereyourcodeisactingin
awaythat’sdifferentfromhowyouexpectittoact.That’swhen
youhavethebestchanceoffindingandfixingtheexceptions—
or,evenbetter,preventingtheminthefirstplace.
Exceptions are all about
helping you find and fix
situations where your
code behaves in ways
you didn’t expect.
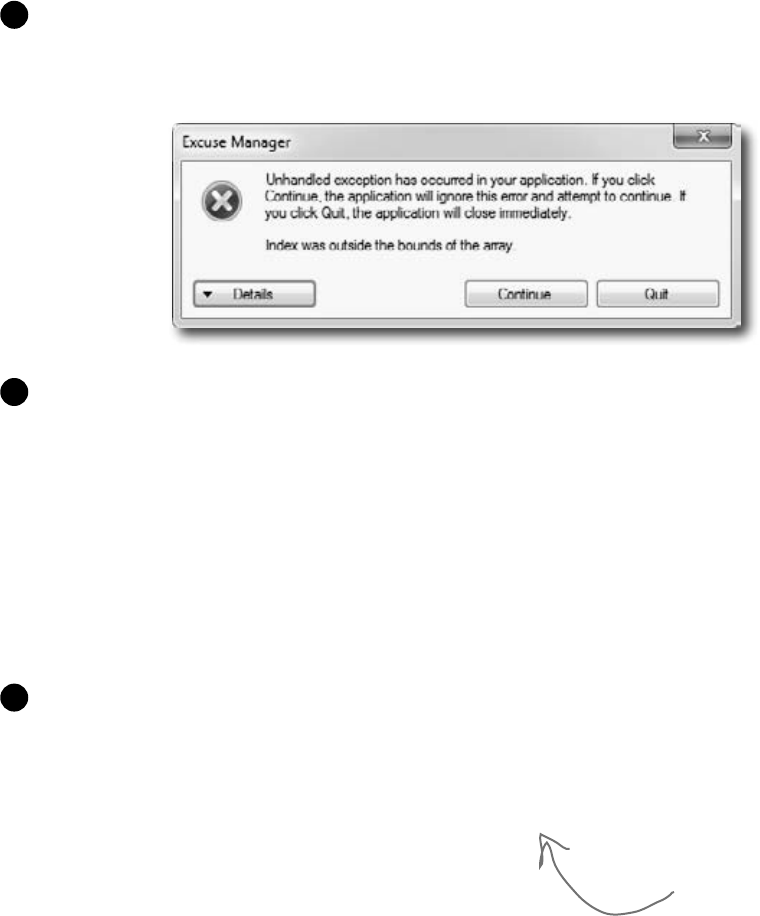
470 Chapter 10
Brian’s code did something unexpected
When Brian wrote his excuse manager, he never expected
the user to try to pull a random excuse out of an empty
directory.
public Excuse(Random random, string Folder) {
string[] fileNames = Directory.GetFiles(Folder, “*.excuse”);
OpenFile(fileNames[random.Next(fileNames.Length)]);
}
The problem happened when Brian pointed his Excuse Manager program at an
empty folder on his laptop and clicked the Random button. Let’s take a look at
it and see if we can figure out what went wrong. Here’s the unhandled exception
window that popped up when he ran the program outside the IDE:
1
OK, that’s a good starting point. It’s telling us that the index was outside the
bounds of the array, right? So let’s look for an array in the code for the Random
Excuse button’s event handler:
2
private void randomExcuse_Click(object sender, EventArgs e) {
if (CheckChanged()) {
currentExcuse = new Excuse(random, selectedFolder);
UpdateForm(false);
}
}
Hmm, no arrays in there. But it creates a new Excuse object using one of the
overloaded constructors. Maybe there’s an array in the constructor code:
3
Bingo! There’s the array.
We must be trying to use
an index that’s past the
end of the array.
nobody expects the …

you are here 4 471
exception handling
That’s right. Exceptions are a really useful tool
that you can use to find places where your code
acts in ways you don’t expect.
A lot of programmers get frustrated the first time they see an
exception. But exceptions are really useful, and you can use them to
your advantage. When you see an exception, it’s giving you a lot of
clues to help you figure out when your code is reacting to a situation
that you didn’t anticipate. And that’s good for you: it lets you know
about a new scenario that your program has to handle, and it gives
you an opportunity to do something about it.
It turns out that Directory.GetFiles() returns an empty array when you
point it at a directory with no files in it. Hey, we can test for that! All we need
to do is add a check to make sure the directory’s not empty before we
open a file, and the nasty unhandled exception window will be replaced with an
informative message box.
4
private void randomExcuse_Click(object sender, EventArgs e) {
string[] fileNames = Directory.GetFiles(selectedFolder,”*.excuse”);
if (fileNames.Length == 0) {
MessageBox.Show(“Please specify a folder with excuse files in it”,
“No excuse files found”);
} else {
if (CheckChanged() == true) {
CurrentExcuse = new Excuse(random, Folder);
UpdateForm(false);
}
}
}
By checking for excuse
files in the folder before
we create the Excuse
object, we can prevent
the exception from being
thrown—and pop up a
helpful message box, too.
Oh, I get it. Exceptions aren’t always bad.
Sometimes they identify bugs, but a lot of the time
they’re just telling me that something happened
that was different from what I expected.

472 Chapter 10
All exception objects inherit from Exception
.NET has lots of different exceptions it may need to report. Since many of these
have a lot of similar features, inheritance comes into play. .NET defines a base
class, called Exception, that all specific exceptions types inherit from.
The Exception class has a couple of useful members. The Message property
stores an easy-to-read message about what went wrong. And StackTrace tells
you what code was being executed when the exception occurred, and what led up
to the exception. (There are others, too, but we’ll use those first.)
IndexOutOfRange
Exception
Message
StackTrace
GetBaseException()
ToString()
FormatException
Message
StackTrace
GetBaseException()
ToString()
OverflowException
Message
StackTrace
GetBaseException()
ToString()
Exception
Message
StackTrace
GetBaseException()
ToString()
Exception can be extended like
any other class. So you can write
your own exception classes, and use
Message and any other Exception
properties and methods.
It’s really useful that .NET
gives us so many types of
exceptions, because each
different exception is thrown
in a different situation. You
can learn a lot about the
unexpected action that’s causing
the exception just by looking at
which one was thrown.
ToString() generates a summary
of all of the information in the
exception’s fields and returns it in
a string.
the exception family tree
DivideByZero
Exception
Message
StackTrace
GetBaseException()
ToString()
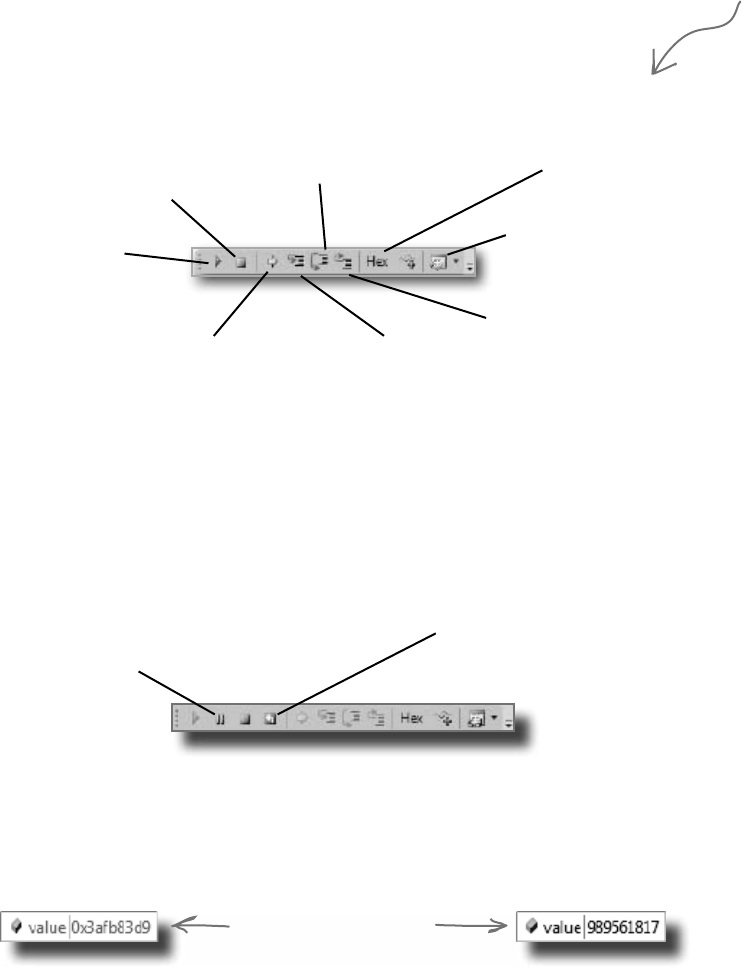
you are here 4 473
exception handling
Continue: run until the
next breakpoint is hit
or the program ends.
Show the next statement that’s
going to run.
Stop: end the program and
exit the debugger.
Step into: execute the next
statement. If it’s a method, execute
the first statement in the method.
Step over: execute the next
statement. If it’s a method,
execute it as a single statement.
Step out: run the rest of the
statements in the current method,
and break when it’s done.
The debugger helps you track down and
prevent exceptions in your code
Before you can add exception handling to your program, you need to know which
statements in your program are throwing the exception. That’s where the debugger
that’s built into the IDE can be really helpful. You’ve been using the debugger
throughout the book, but now let’s take a few minutes and really dig into it. When
you run the debugger, the IDE pops up a toolbar with some really useful buttons.
Take a minute and hover your mouse cursor over each of them to see what it does:
Put your IDE into Expert mode to expand the Debug toolbar
When you first start using Visual Studio 2010 Express, it’s set to Basic Settings mode,
which is great for getting started. But now that you’ve been using it for a while, let’s
change it. Choose Tools >> Settings >> Expert Settings from the menu (it may
take the IDE a minute to adjust its settings). Now take another look at the debug toolbar.
You’ll see that it added two new buttons (the other editions already have them turned on):
The Debug toolbar only shows
up when you’re debugging your
program in the IDE. So you’ll have
to run a program in order to hover
over the toolbar icons.
Locals: show the values of all of
the local variables currently in
memory.
Toggle hexadecimal display on
and off.
Break all causes the program
to stop in its tracks as if it hit a
breakpoint.
Restart stops the program and
starts it up again.
Toggle hexadecimal mode on and off
Press the Hex button to turn hexadecimal mode on, then hover over any field or
variable. Then press it again to turn off hexadecimal mode. The IDE automatically
converts values to hex for you—and you learned last chapter how valuable that can be.
Here’s the same value
displayed in hex mode on
the left and decimal mode
on the right.
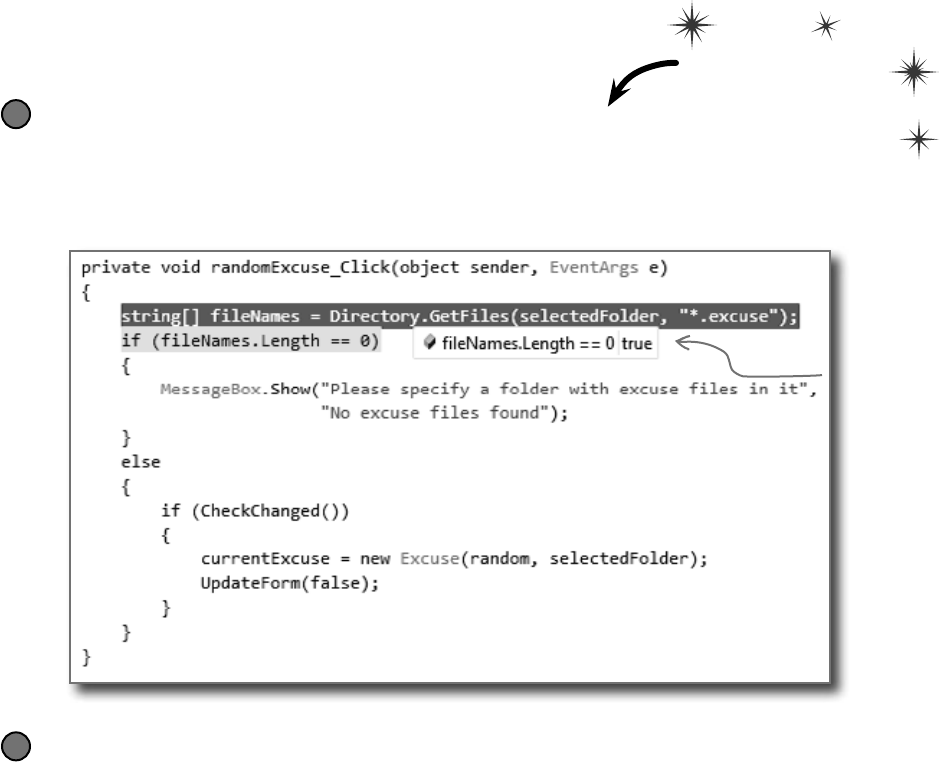
474 Chapter 10
Use the IDE’s debugger to ferret out exactly
what went wrong in the Excuse Manager
Let’s use the debugger to take a closer look at the problem that we ran
into in the Excuse Manager. You’ve probably been using the debugger
a lot over the last few chapters, but we’ll go through it step by step
anyway—to make sure we don’t leave out any details.
Add a breakpoint to the Random button’s event handler
You’ve got a starting point—the exception happens when the Random Excuse button is clicked
after an empty folder is selected. So open up the code for the button, click anywhere in the first
line of the method (Debug >> Toggle Breakpoint or F9), and then run the program. Select an
empty folder and click the Random button to make your program break at the breakpoint:
1
Debug this
you don’t know where that watch has been
Step through the event handler and into the Excuse constructor
Use the Step Into command (using either the toolbar or the F11 key) to move through the
application line by line. Since you selected an empty folder, you should see the program execute
the MessageBox.Show() and then exit the event handler.
Now select a folder with excuses in it and click the Random button again, then keep
stepping into the code. (Make sure you’re using Step Into, not Step Over—although you might
want to step over the CheckChanged() method.) When it gets to the line that creates the
new Excuse object, it’ll jump straight into the constructor. Step past the first line so it sets the
fileNames variable. Then hover over the variable to see its value, too.
2
Hover over the
fileNames.Length
property to show
the hovering
expression window,
then click the
pushpin to pin it so
it doesn’t disappear.

you are here 4 475
exception handling
Use the Watch window to reproduce the problem
You’ve already seen how powerful the Watch window is. Now we’ll use it to reproduce the exception.
Right-click on fileNames and choose Expression: ‘fileNames’ >> Add Watch to add a watch to
the Watch window. Then click on the empty line below fileNames and enter the expression
random.Next(fileNames.Length) to tell the debugger to add a watch for it. Here’s what the
Watch window should look like for a folder with three excuses (so fileNames has length 3).
3
Set fileNames equal to an empty string array
The Watch window has another very useful feature—it lets you change the value of variables and
fields that it’s displaying. It even lets you execute methods and create new objects—and when
you do, it displays its re-evaluate icon ( ) that you can click to tell it to execute that line again, because
sometimes running the same method twice will generate different results (like with Random).
Double-click on the value for fileNames—you’ll see the text {string[3]} highlighted. Replace it
with new string[0]. You should immediately see two things. First, you’ll see the expand icon next to
the fileNames variable disappear, because now it’s empty. And second, the random.Next() line will
become gray with a re-evaluate icon ( ). Click the icon to execute the method again, which should return 0.
4
Reproduce the problem that threw Brian’s original exception
Here’s where debugging gets really interesting. Add one more line to the debugger—the statement that
actually threw the exception: fileNames[random.Next(fileNames.Length)]. As soon as you
type it in, the Watch window evaluates it…and that throws the exception. It tells you that it found the
exception by displaying an exclamation point, and displays the text of the exception in the Value column.
5
When you get an exception, you can go back and reproduce it in the debugger. That’s
another way that more descriptive exception messages can help you fix your code.
This exclamation
point is the Watch
window’s way of
telling you it found
an exception.
This icon
tells the
Watch
window to
re-evaluate
the Next()
method.
We’ll use the Watch window
to reproduce the problem
that caused the exception.
We’ll start by adding the
fileNames array.
We know the problem
happened with an empty
fileNames array, so we’ll
use the Watch window
to change its value to an
empty string array.

476 Chapter 10
Q: How come Brian’s unhandled
exception window looked different from
the one in the IDE?
A:Becausewhenyourunaprogram
insidetheIDE,you’rerunningitinthe
debugger,whichbreaks the program
(asifyou’dpressedtheBreakAllbutton
orinsertedabreakpoint)assoonasit
interceptsanexception,anddisplaysitin
ausefulwindow.Thatletsyouinspectthe
Exceptionobjectandyourprogram’s
fieldsandvariablessoyoucantrackdown
theproblem.
WhenBrianranhisprogram,hewasn’t
runningitfrominsidetheIDE.He’d
publishedhisprogramandinstalledit,just
likeyoudidbackinChapter1withthe
ContactListprogram.Youcanrunyour
programoutsidetheIDEanytimewithout
publishingit—justbuildyourprogram,which
causesVisualStudiotocreateanexecutable
file.Lookinsideyourproject’sfolderforthe
bin/folder—oneofitssubdirectories
shouldhavetheexefileforyour
application.Ifyourunthat,anyexceptions
thatitthrowswillbeunhandledandshowthe
samewindowthatBriansaw.
Q: So that’s it? When an exception
happens outside the IDE, my program
just stops and there’s nothing I can do
about it?
A:Well,yourprogramdoesstopwhen
there’sanunhandledexception.Butthat
doesn’tmeanthatallofyourexceptions
havetobeunhandled!We’lltalkalotmore
abouthowyoucanhandleexceptionsinyour
code.There’snoreasonyourusersever
havetoseeanunhandledexception.
Q: How do I know where to put a
breakpoint?
A:That’sareallygoodquestion,and
there’snoonerightanswer.Whenyourcode
throwsanexception,it’salwaysagood
ideatostartwiththestatementthatthrewit.
Butusually,theproblemactuallyhappened
earlierintheprogram,andtheexception
isjustfalloutfromit.Forexample,the
statementthatthrowsadividebyzeroerror
couldbedividingvaluesthatweregenerated
10statementsearlierbutjusthaven’tbeen
usedyet.Sothere’snoonegoodanswerto
whereyoushouldputabreakpoint,because
everysituationisdifferent.Butaslongas
you’vegotagoodideahowyourcodeworks,
youshouldbeabletofigureoutagood
startingpoint.
Q: Can I run any method in the Watch
window?
A:Yes.Anystatementthat’svalidin
yourprogramwillworkinsidetheWatch
window,eventhingsthatmakeabsolutelyno
sensetoruninsideaWatchwindow.Here’s
anexample.Bringupaprogram,startit
running,breakit,andthenaddthistothe
Watchwindow:System.Threading.
Thread.Sleep(2000).(Remember,
thatmethodcausesyourprogramtodelay
fortwoseconds.)There’snoreasonyou’d
everdothatinreallife,butit’sinterestingto
seewhathappens:you’llgetanhourglass
fortwosecondswhilethemethodevaluates.
Then,sinceSleep()hasnoreturn
value,theWatchwindowwilldisplaythe
value,“Expression has been
evaluated and has no value”
toletyouknowthatitdidn’treturnanything.
Butitdidevaluateit.Notonlythat,butit
displaysIntelliSensepopupsto
helpyoutypecodeintothewindow.That’s
usefulbecauseit’lltellyouwhatmethodsare
availabletoanobjectwhenyourprogramis
running.
Q: Wait, so isn’t it possible for me
to run something in the Watch window
that’ll change the way my program runs?
A:Yes!Notpermanently,butitcan
definitelyaffectyourprogram’soutput.But
evenbetter,justhoveringoverfieldsinside
thedebuggercancauseyourprogramto
changeitsbehavior,becausehoveringover
apropertyexecutes its get accessor.Ifyou
haveapropertythathasagetaccessorthat
executesamethod,thenhoveringoverthat
propertywillcausethatmethodtoexecute.
Andifthatmethodsetsavalueinyour
program,thenthatvaluewillstaysetifyou
runtheprogramagain.Andthatcancause
someprettyunpredictableresultsinsidethe
debugger.Programmershaveanamefor
resultsthatseemtobeunpredictableand
random:they’recalledheisenbugs(which
isajokethatmakessensetophysicistsand
catsinboxes).
When you run your
program inside the
IDE, an unhandled
exception will
cause it to break
as if it had run
into a breakpoint.
make a break for it
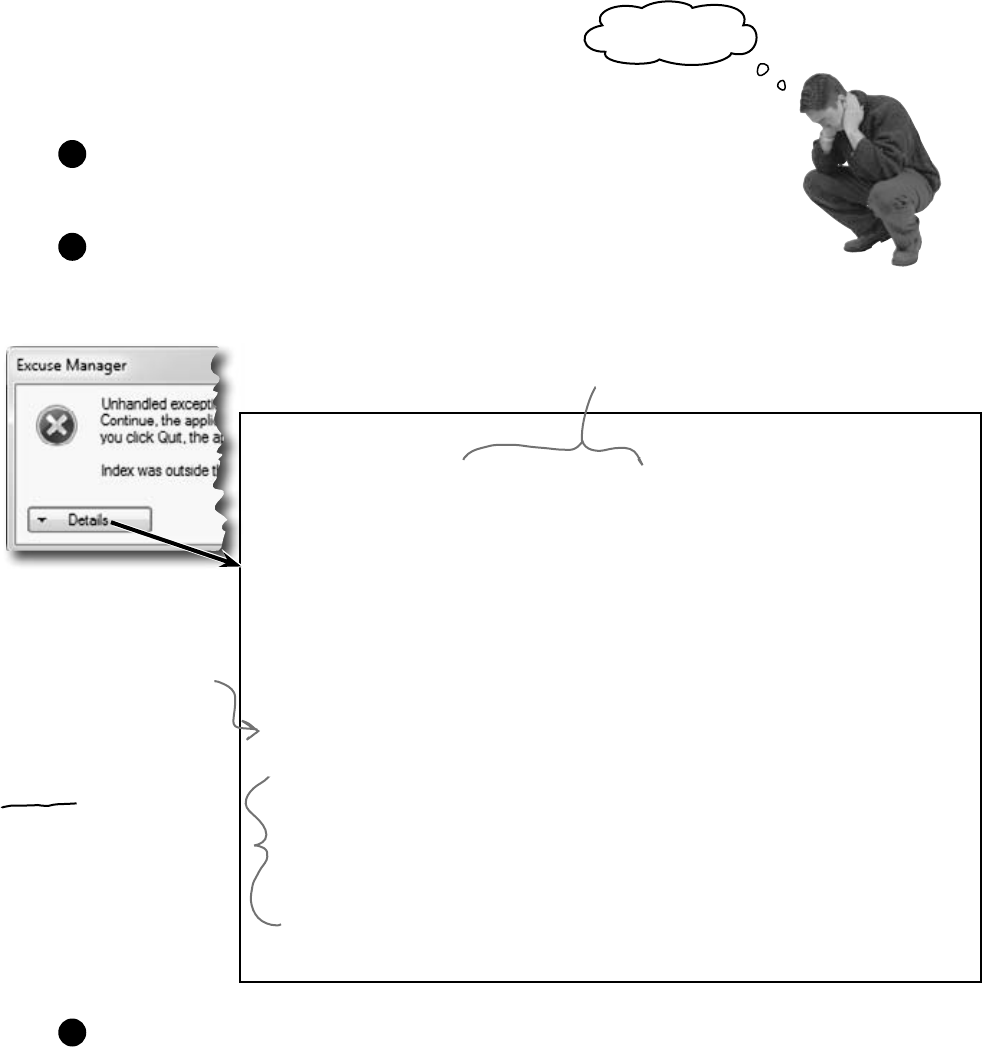
you are here 4 477
exception handling
**************ExceptionText**************
System.Runtime.Serialization.SerializationException:EndofStreamencounteredbeforeparsing
wascompleted.
atSystem.Runtime.Serialization.Formatters.Binary.__BinaryParser.Run()
atSystem.Runtime.Serialization.Formatters.Binary.ObjectReader.Deserialize(HeaderHa
ndlerhandler,__BinaryParserserParser,BooleanfCheck,BooleanisCrossAppDomain,
IMethodCallMessagemethodCallMessage)
atSystem.Runtime.Serialization.Formatters.Binary.BinaryFormatter.Deserialize(Stream
serializationStream,HeaderHandlerhandler,BooleanfCheck,BooleanisCrossAppDomain,
IMethodCallMessagemethodCallMessage)
atSystem.Runtime.Serialization.Formatters.Binary.BinaryFormatter.Deserialize(Stream
serializationStream)
atChapter10.Excuse.OpenFile(String ExcusePath)inC:\DocumentsandSettings\Administrator\
MyDocuments\VisualStudio2005\Projects\Chapter10\Chapter10\Excuse.cs:line40
atChapter10.Excuse..ctor(Random random, String Folder)inC:\DocumentsandSettings\
Administrator\MyDocuments\VisualStudio2005\Projects\Chapter10\Chapter10\Excuse.cs:line30
atChapter10.Form1.randomExcuse_Click(Object sender, EventArgs e)inC:\Documentsand
Settings\Administrator\MyDocuments\VisualStudio2005\Projects\Chapter10\Chapter10\Form1.
cs:line146
Uh oh—the code’s still got problems…
Brian was happily using his Excuse Manager when he remembered
that he had a folder full of excuses that he made when he first built
the program—but he forgot that he made that folder before he
added serialization to the program. Let’s see what happens....
You can re-create Brian’s problem—just create your own text-based Excuse file
using Notepad. The first line should be the description, the second should be the
results, and the third should be the last used date (“10/4/2007 12:08:13 PM”).
1
Pop open the Excuse Manager and open up the excuse. It throws an exception!
But this time, click on the Details button so we can take a closer look at what it says.
Pay attention to the call stack—that’s what it’s called when a method is called by
another method, which is called by another method, etc.
2
So the Details button in the unhandled exception window tells you a lot about what
caused this problem. Can you think of anything you can do about it?
3
No, not again!
It looks like there was
a problem with the
BinaryFormatter—which
makes sense, because it
was trying to deserialize
a text file.
The program threw a SerializationException. Can we figure out
what line threw it from the exception details?
You can learn a lot from the
call stack, which tells you
which methods were running.
You can see that the Excuse
class’s OpenFile() method
was being called from its
constructor (“.ctor”), which
was called from the “Random
Excuse” button’s click event
handler.
478 Chapter 10
Wait a second. Of course the program’s
gonna crash—I gave it a bad file. Users
screw up all the time. You can’t expect me
to do anything about that, right?
Actually, there is something you can do about it.
Yes, it’s true that users screw up all the time. That’s a fact of life.
But that doesn’t mean you can’t do anything about it. There’s
a name for programs that deal with bad data, malformed input,
and other unexpected situations gracefully: they’re called robust
programs. And C# gives you some really powerful exception
handling tools to help you make your programs more robust.
Because while you can’t control what your users do, you can make
sure that your program doesn’t crash when they do it.
ro-bust, adj.
sturdy in construction; able
to withstand or overcome
adverse conditions. After the
Tacoma Narrows Bridge disaster,
the civil engineering team looked
for a more robust design for
the bridge that would replace it.
BinaryFormatter will throw an
exception if there’s anything at all
wrong with a serialized file.
It’s easy to get the Excuse Manager to throw
a SerializationException—just feed
it any file that’s not a serialized Excuse object. When you
try to deserialize an object from a file, BinaryFormatter
expects the file to contain a serialized object that matches
the class that it’s trying to read. If the file contains anything
else, anything at all, then the Deserialize() method will
throw a SerializationException.
users are unpredictable
you are here 4 479
exception handling
Handle exceptions with try and catch
In C#, you can basically say, “Try this code, and if an exception
occurs, catch it with this other bit of code.” The part of the code
you’re trying is the try block, and the part where you deal with
exceptions is called the catch block. In the catch block, you
can do things like print a friendly error message instead of letting
your program come to a screeching halt:
private void randomExcuse_Click(object sender, EventArgs e)
{
// ... code you added a few pages ago goes here ...
try {
if (CheckChanged() == true) {
currentExcuse = new Excuse(random, selectedFolder);
UpdateForm(false);
}
}
catch (SerializationException) {
MessageBox.Show(
“Your excuse file was invalid.”,
“Unable to open a random excuse”);
}
}
This is the simplest kind of exception
handling: stop the program, write out the
exception message, and keep running.
The catch keyword means that the
block immediately following it contains
an exception handler.
If throwing an exception makes your code
automatically jump to the catch block, what happens
to the objects and data you were working with before
the exception happened?
Put the code that might throw
an exception inside the try block.
If no exception happens, it’ll get
run exactly as usual, and the
statements in the catch block will
be ignored. But if a statement
in the try block throws an
exception, the rest of the try
block won’t get executed.
This is the
try block. You
start exception
handling with
try. In this
case, we’ll put
the existing
code in it.
When an exception
is thrown, the
program immediately
jumps to the catch
statement and
starts executing
the catch block.
480 Chapter 10
1Let’s say your user is
using your code, and
gives it some input
that it didn’t expect.
2That method does
something risky,
something that might
not work at runtime.
3You need to
know
that
the method you’re
calling is risky.
What happens when a method you want to call is risky?
4You then write code
that can handle the
failure if it
does
happen. You need to be
prepared, just in case.
user
a class
you wrote
a
u
s
e
r
g
i
v
e
s
i
n
p
u
t
t
o
y
o
u
r
m
e
t
h
o
d
public void
Process(Input i) {
if (i.IsBad()) {
explode();
}
}
user
your class, now with
exception handling
public class Data {
public void
Process(Input i) {
if (i.IsBad()) {
explode();
}
}
}
a class
you wrote
public class Data {
public void
Process(Input i) {
if (i.IsBad()) {
explode();
}
}
}
public class Data {
public void
Process(Input i) {
if (i.IsBad()) {
explode();
}
}
}
user
n
o
w
y
o
u
r
p
r
o
g
r
a
m
’
s
m
o
r
e
r
o
b
u
s
t
some input
˙∆å˚ß∂ıÏÔ˚œ∑ˆ
øƒ¥∂∫√˚Ω∆¬˙√˚
ÔÒÎ˙˚∆¬åߥ∂ÒÅ
∆˚åƒ˙ß∂∆˙å∆˚ß
ƒå∂ß˙˚ƒ∆˚å∂ß∂
´˙®£√•√∂¨∂¬∆ƒ
ƒ˜å∂√˚祃´∂ˆ´
∂å˚∆ƒ´∫®˚´¨√∂
public class Data {
public void
Process(Input i) {
try {
if (i.IsBad()) {
explode();
} catch {
HandleIt();
}
}
}
Users are unpredictable. They feed all sorts of weird data into your
program, and click on things in ways you never expected. And
that’s just fine, because you can handle unexpected input with good
exception handling.
“Runtime” just means “while your program is
running.” Some people refer to exceptions as
“runtime errors.”
a class
you wrote
My Process() method
will blow up if it gets
bad input data!
I wonder
what happens
if I click here…
Wow, this program’s really stable!
risky business
If you can come up with a way to do a
less risky thing that avoids throwing the
exception, that’s the best possible outcome!
But some risks just can’t be avoided, and
that’s when you want to do this.
you are here 4 481
exception handling
Q: So when do I use try and catch?
A:Anytimeyou’rewritingriskycode,or
codethatcouldthrowanexception.Thetrick
isfiguringoutwhichcodeisrisky,andwhich
codeissafer.
You’vealreadyseenthatcodethatuses
inputprovidedbyausercanberisky.Users
giveyouincorrectfiles,wordsinsteadof
numbers,andnamesinsteadofdates,and
theyprettymuchclickeverywhereyoucould
possiblyimagine.Agoodprogramwilltake
allthatinputandworkinacalm,predictable
way.Itmightnotgivetheusersaresultthey
canuse,butitwillletthemknowthatitfound
theproblemandhopefullysuggestasolution.
Q: How can a program suggest a
solution to a problem it doesn’t even
know about in advance?
A:That’swhatthecatchblockisfor.A
catchblockisonlyexecutedwhencode
inthetryblockthrowsanexception.It’s
yourchancetomakesuretheuserknows
thatsomethingwentwrong,andtoletthe
userknowthatit’sasituationthatmightbe
corrected.
IftheExcuseManagersimplycrasheswhen
there’sbadinput,that’snotparticularly
useful.Butifittriestoreadtheinputand
displaysgarbageintheform,that’salsonot
useful—infact,somepeoplemightsay
thatit’sworse.Butifyouhavetheprogram
displayanerrormessagetellingtheuserthat
itcouldn’treadthefile,thentheuserhasan
ideaofwhatwentwrong,andinformation
thathecanusetofixtheproblem.
Q: So the debugger should really only
be used to troubleshoot exceptions then?
A:No.Asyou’vealreadyseenmany
timesthroughoutthebook,thedebugger’s
areallyusefultoolthatyoucanuse
toexamineanycodeyou’vewritten.
Sometimesit’susefultostepthroughyour
codeandcheckthevaluesofcertainfields
andvariables—likewhenyou’vegotareally
complexmethod,andyouwanttomakesure
it’sworkingproperly.
Butasyoumayhaveguessedfromthe
name“debugger,”itsmostcommonuseis
totrackdownandremovebugs.Sometimes
thosebugsareexceptionsthatgetthrown.
Butalotofthetime,you’llbeusingthe
debuggertotrytofindotherkindsof
problems,likecodethatgivesaresultthat
youdon’texpect.
Q: I’m not sure I totally got what you
did with the Watch window.
A:Whenyou’redebuggingaprogram,
youusuallywanttopayattentiontohow
afewvariablesandfieldschange.That’s
wheretheWatchwindowcomesin.Ifyou
addwatchesforafewvariables,theWatch
windowupdatestheirvalueseverytimeyou
stepinto,outof,orovercode.Thatletsyou
monitorexactlywhathappenstothemafter
everystatement,whichcanbereallyuseful
whenyou’retryingtotrackdownaproblem.
TheWatchwindowalsoletsyoutypeinany
statementyouwant,andit’llevaluateit.If
thestatementupdatesanyofthefieldsand
variablesinyourprogram,thenitdoesthat,
too.Thatletsyouchangevalueswhileyour
programisrunning,whichcanbeanother
reallyusefultoolforreproducingexceptions
andotherbugs.
The catch block
is only executed
when code in the
try block throws
an exception. It
gives you a chance
to make sure
your user has the
information to fix
the problem.
Any changes you make in the Watch
window just affect the data in memory,
and only last as long as the program
is running. Restart your program, and
values that you changed will be undone.
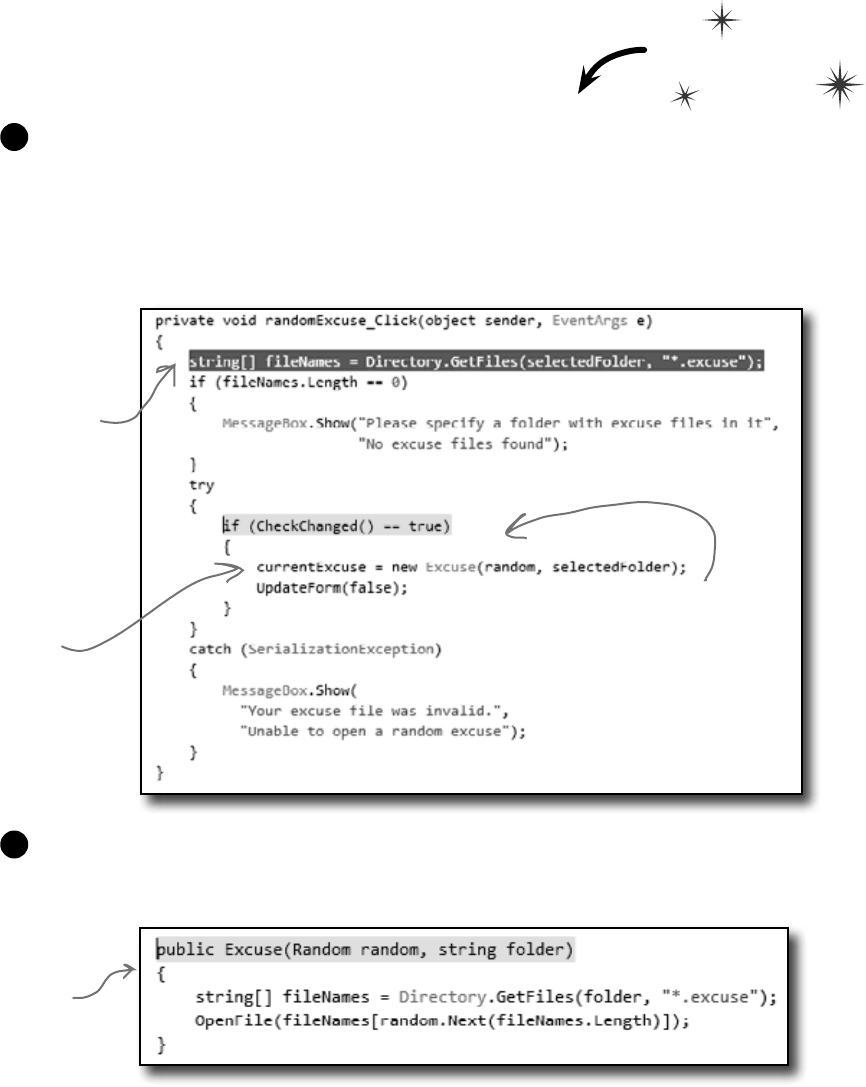
482 Chapter 10
An important part of exception handling is that when a statement in
your try block throws an exception, the rest of the code in the block
gets short-circuited. The program’s execution immediately jumps to
the first line in the catch block. But don’t take our word for it....
Debug this
Make sure that you’ve incorporated all of the code from this chapter into the Random Excuse button’s
Click event handler in your Excuse Manager. Place a breakpoint on the first line in the event handler.
Then run your program in the IDE. Click the Folder button and specify a folder with a single excuse
file in it—and make sure it’s not a valid excuse file (but still has the “.excuse” extension). Press the
Random Excuse button. The debugger should break the program at the breakpoint you placed earlier.
Press the Step Over button (or F10) six times to get to the statement that calls the Excuse constructor.
Here’s what your debugger screen should look like:
1
Use Step Into (F11) to step into the new statement. The debugger will jump to the Excuse constructor, and
position its yellow “next statement” bar over the declaration line in the code. Keep hitting Step Into (F11) to
step into the OpenFile() method. Watch what happens when you hit the Deserialize() line.
2
go with the flow
Use the debugger to follow the try/catch flow
Step over the
statements until
your yellow “next
statement” bar
shows that the
next statement to
get executed will
create the new
Excuse object.
Here’s the
breakpoint we
placed earlier on
the first line of
the event handler.
Use the Step Over (F10) command in
the debugger so it doesn’t step into the
CheckChanged() method.
As soon as you step into
the new statement
that creates the
Excuse object, the
debugger jumps to the
constructor code.
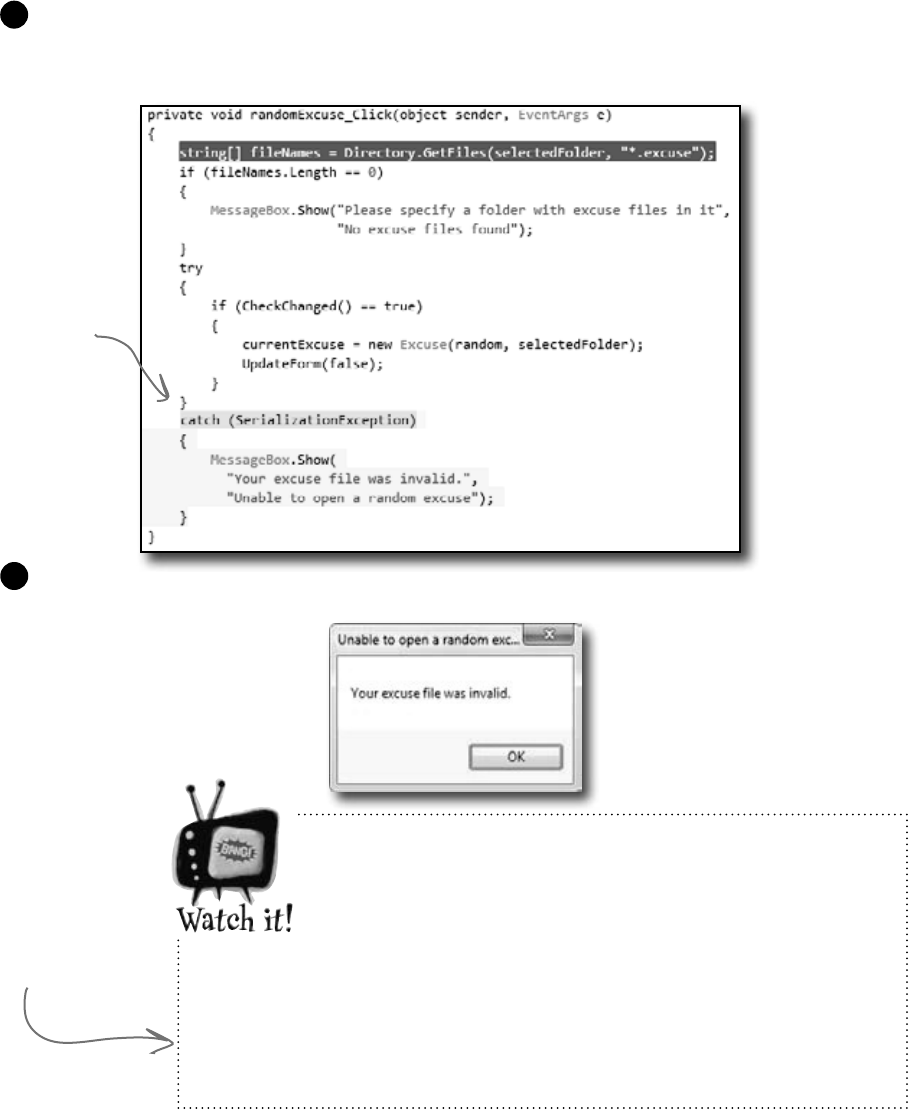
you are here 4 483
exception handling
Keep stepping through the code. As soon as the debugger executes the Deserialize() statement, the
exception is thrown and the program short-circuits right past the call to UpdateForm() and jumps
straight to the catch block.
3
Be careful with exceptions in a constructor!
You’ve noticed by now that a constructor doesn’t have a return
value, not even void. That’s because a constructor doesn’t
actually return anything. Its only purpose is to initialize an
object—which is a problem for exception handling inside the
constructor. When an exception is thrown inside the constructor, then the
statement that tried to instantiate the class won’t end up with an instance
of the object. That’s why you had to move the try/catch block to the
button’s event handler. That way, if there’s an exception in the constructor,
the code won’t expect CurrentExcuse to contain a valid Excuse object.
Here’s a career
tip: a lot of C#
programming job
interviews include
a question about
how you deal with
exceptions in a
constructor.
Start the program again by pressing the Continue button (or F5). It’ll begin running the
program again, starting with whatever’s highlighted by the yellow “next statement” block—in
this case, the catch block.
4
The debugger will
highlight the catch
statement with
its yellow “next
statement” block,
but it shows the
rest of the block
in gray to show you
that it’s about to
execute the whole
thing.
484 Chapter 10
If you have code that ALWAYS
should run, use a finally block
When your program throws an exception, a couple of things can happen. If the exception
isn’t handled, your program will stop processing and crash. If the exception is handled, your
code jumps to the catch block. But what about the rest of the code in your try block? What
if you were closing a stream, or cleaning up important resources? That code needs to run,
even if an exception occurs, or you’re going to make a mess of your program’s state. That’s
where the finally block comes in really handy. It comes after the try and catch blocks.
The finally block always runs, whether or not an exception was thrown. Here’s how
you’d use it to finish the event handling in the Random Excuse button:
clean up after yourself
private void randomExcuse_Click(object sender, EventArgs e) {
string[] fileNames = Directory.GetFiles(selectedFolder, “*.excuse”);
if (fileNames.Length == 0) {
MessageBox.Show(“Please specify a folder with excuse files in it”,
“No excuse files found”);
} else {
try {
if (CheckChanged() == true) {
currentExcuse = new Excuse(random, selectedFolder);
}
}
catch (SerializationException) {
currentExcuse = new Excuse();
currentExcuse.Description = “”;
currentExcuse.Results = “”;
currentExcuse.LastUsed = DateTime.Now;
MessageBox.Show(
“Your excuse file was invalid.”,
“Unable to open a random excuse”);
}
finally {
UpdateForm(false);
}
}
}
If the Excuse constructor throws an exception, we
have no way of knowing what’s in CurrentExcuse.
But you do know that no instance of Excuse was
created. So the catch block creates a new Excuse
object and clears out all its fields.
The finally block makes
sure that UpdateForm()
gets run whether or not an
exception was thrown. So
if the Excuse constructor
successfully read an excuse,
it’ll call UpdateForm(),
but it’ll also call it if the
constructor threw an
exception and cleared out
the excuse.
Always catch specific exceptions like SerializationException. You typically follow a catch statement
with a specific kind of exception telling it what to catch. It’s valid C# code to just have “catch (Exception)” and
you can even leave the exception type out and just use catch. When you do that, it catches all exceptions, no
matter what type of exception is thrown. But it’s a really bad practice to have a catch-all exception handler like
that. Your code should always catch as specific an exception as possible.
SerializationException is in the System.Runtime.
Serialization namespace, so you’ll need to add
using System.Runtime.Serialization;
to the top of your form’s file.
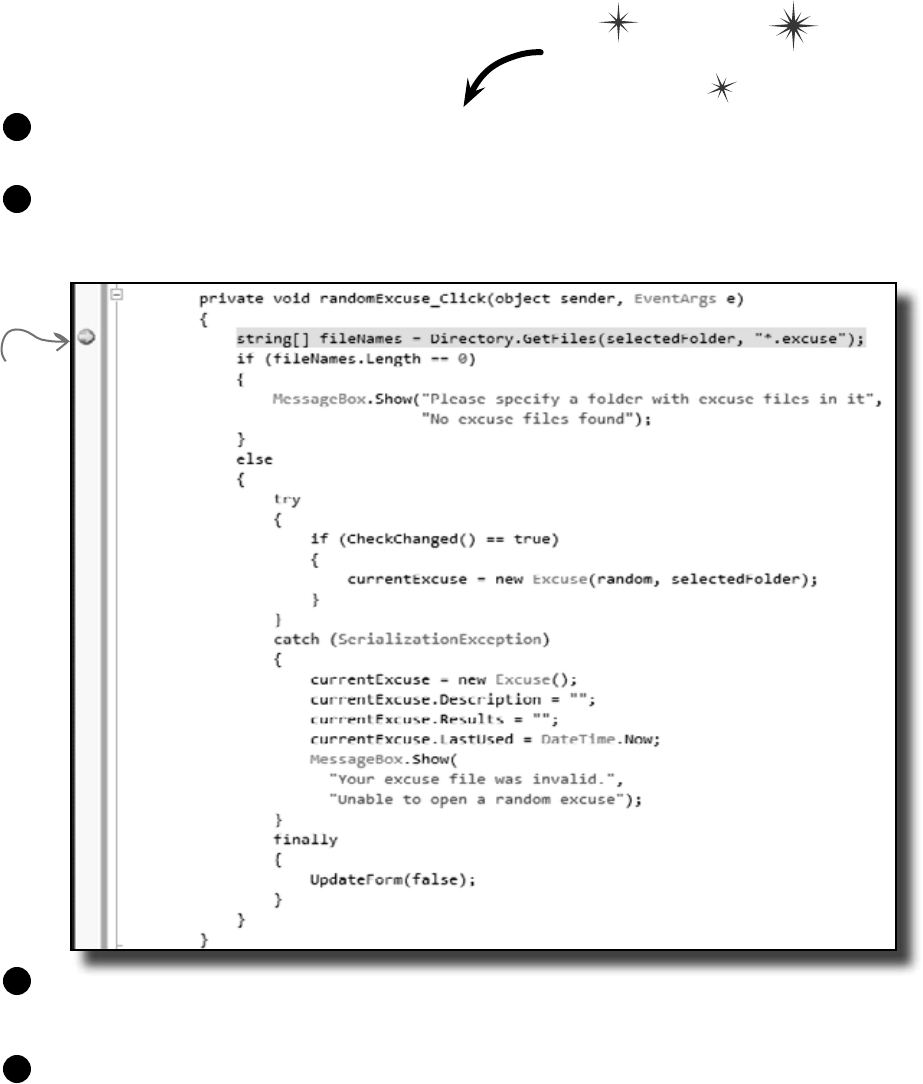
you are here 4 485
exception handling
Now debug this
Update the Random Excuse button’s event handler with the code on the facing page. Then
place a breakpoint on the first line in the method and debug the program.
1
Run the program normally, and make sure that the Random Excuse button works when you
set the program’s folder to one with a bunch of normal excuse files in it. The debugger should
break at the breakpoint you set:
2
Step through the rest of the Random Excuse button’s event handler and make sure it runs the
way you expect it to. It should finish the try block, skip over the catch block (because no
exceptions were thrown), and then execute the finally block.
3
Now set the program’s folder so that it’s pointed to the folder with one malformed excuse file
in it and click the Random Excuse button. It should start executing the try block, and then
jump to the catch block when it throws the exception. After it finishes all of the statements
in the catch block, it’ll execute the finally block.
4
When
the “next
statement”
bar and the
breakpoint are
on the same
line, the IDE
shows you the
yellow arrow
placed over the
big red dot in
the margin.

486 Chapter 10
Q: Back up a second. So every time
my program runs into an exception, it’s
going to stop whatever it’s doing unless I
specifically write code to catch it. How is
that a good thing?
A:Oneofthebestthingsabout
exceptionsisthattheymakeitreallyobvious
whenyourunintoproblems.Imaginehow
easyitcouldbeinacomplexapplicationfor
youtolosetrackofalloftheobjectsyour
programwasworkingwith.Exceptionscall
attentiontoyourproblemsandhelpyou
rootouttheircausessothatyoualways
knowthatyourprogramisdoingwhatit’s
supposedtodo.
Anytimeanexceptionoccursinyour
program,somethingyouexpectedtohappen
didn’t.Maybeanobjectreferencewasn’t
pointingwhereyouthoughtitwas,oritwas
possibleforausertosupplyavalueyou
hadn’tconsidered,orafileyouthoughtyou’d
beworkingwithsuddenlyisn’tavailable.If
somethinglikethathappenedandyoudidn’t
knowit,it’slikelythattheoutputofyour
programwouldbewrong,andthebehavior
fromthatpointonwouldbeprettydifferent
fromyouexpectedwhenyouwrotethe
program.
Nowimaginethatyouhadnoideatheerror
hadoccurredandyourusersstartedcalling
youupwithincorrectdataandtellingyou
thatyourprogramwasunstable.That’swhy
it’sagoodthingthatexceptionsdisrupt
everythingyourprogramisdoing.Theyforce
youtodealwiththeproblemwhileit’seasy
tofindandfix.
Q: OK, so now what’s a handled
exception and what’s an unhandled
exception?
A:Wheneveryourprogramthrowsan
exception,theruntimeenvironmentwill
searchthroughyourcodelookingfora
catchblockthathandlesit.Ifyou’ve
writtenone,thecatchblockwillexecute
anddowhateveryouspecifiedforthat
particularexception.Sinceyouwrotea
catchblocktodealwiththaterrorup
front,thatexceptionisconsideredhandled.
Iftheruntimecan’tfindacatchblockto
matchtheexception,itstopseverythingyour
programisdoingandraisesanerror.That’s
anunhandledexception.
Q: But isn’t it easier to use a catch-all
exception? Isn’t it safer to write code that
always catches every exception?
A:Youshouldalways do your best
to avoid catching Exception,and
insteadcatchspecificexceptions.Youknow
thatoldsayingabouthowanounceof
preventionisbetterthanapoundofcure?
That’sespeciallytrueinexceptionhandling.
Dependingoncatch-allexceptionsisusually
justawaytomakeupforbadprogramming.
Forexample,you’remuchbetteroffusing
File.Exists()tocheckforafile
beforeyoutrytoopenitthancatchinga
FileNotFoundException.While
someexceptionsareunavoidable,you’llfind
thatasurprisingnumberofthemneverhave
tobethrowninthefirstplace.
It’ssometimesreallyusefultoleave
exceptionsunhandled.Real-lifeprograms
havecomplexlogic,andit’softendifficult
torecovercorrectlywhensomethinggoes
wrong,especiallywhenaproblemoccurs
veryfardownintheprogram.Byonly
handlingspecificexceptions,avoiding
catch-allexceptionhandlers,andletting
thoseexceptionsbubbleuptogetcaught
onatoplevel,youendupwithmuchmore
robustcode.
Q: What happens when you have a
catch that doesn’t specify a particular
exception?
A:Acatchblocklikethatwillcatchany
kindofexceptionthetryblockcanthrow.
Q: If a catch block with no specified
exception will catch anything, why would
I ever want to specify?
A:Goodquestion.Becausecertain
exceptionsmightrequiredifferentactions
tokeepyourprogrammoving.Anexception
thathappenswhenyoudividebyzeromight
haveacatchblockwhereyougoback
andsetsomenumbervaluestosavesome
ofthedatayou’vebeenworkingwith.Anull
referenceexceptionmightrequirethatyou
createnewinstancesofanobjectifyou’re
goingtorecover.
Q: Does all error handling happen in a
try/catch/finally sequence?
A:No.Youcanmixitupabit.Youcould
havemultiple catch blocksifyouwanted
todealwithlotsofdifferentkindsoferrors.You
couldalsohavenocatchblockatall.It’s
legaltohaveatry/finallyblock.That
wouldn’thandleanyexceptions,butitwould
makesurethatthecodeinthefinally
blockranevenifyougotstoppedhalfway
throughthetryblock.Butwe’lltalkalotmore
aboutthatinaminute....
An unhandled exception
means your program
will run unpredictably.
That’s why the program
stops whenever it runs
into one.
exceptions lead to instability
you are here 4 487
exception handling
Pool Puzzle
Your job is to take code snippets from
the pool and place them into the
blank lines in the program. You
can use the same snippet more
than once, and you won’t need
to use all the snippets. Your
goal is to make the program
produce the output.
Note: Each snippet
from the pool can be
used more than once!
using System.IO;
public static void Main() {
Kangaroo joey = new Kangaroo();
int koala = joey.Wombat(
joey.Wombat(joey.Wombat(1)));
try {
Console.WriteLine((15 / koala)
+ “ eggs per pound”);
}
catch (___________________) {
Console.WriteLine(“G’Day Mate!”);
}
}
class Kangaroo {
___________ fs;
int croc;
int dingo = 0;
public int Wombat(int wallaby) {
_______ __;
try {
if (________ > 0) {
__ = _____.OpenWrite(“wobbiegong”);
croc = 0;
} else if (________ < 0) {
croc = 3;
} else {
___ = _____.OpenRead(“wobbiegong”);
croc = 1;
}
}
catch (IOException) {
croc = -3;
}
catch {
croc = 4;
}
finally {
if (______ > 2) {
croc ___ dingo;
}
}
________ ______;
}
}
Exception
IOException
NullPointerException
DivideByZeroException
InvalidCastException
OutOfMemoryException
dingo
wallaby
koala
croc
platypus
ef
i
fs
int
j
++
-=
+=
==
=
FileInfo
File
Directory
Stream
FileStream
Output: G’day Mate!
return
The pool puzzles are getting harder, and the names are getting more obscure to give you
fewer hints. You’ll really need to work through the problem Remember, the puzzles are
optional, so don’t worry if you need to move on and come back to this one…but if you
really want to get this stuff into your brain, these puzzles will do the trick
488 Chapter 10
public static void Main() {
Kangaroo joey = new Kangaroo();
int koala = joey.Wombat(joey.Wombat(joey.Wombat(1)));
try {
Console.WriteLine((15 / koala) + “ eggs per pound”);
}
catch (DivideByZeroException) {
Console.WriteLine(“G’Day Mate!”);
}
}
class Kangaroo {
FileStream fs;
int croc;
int dingo = 0;
public int Wombat(int wallaby) {
dingo ++;
try {
if (wallaby > 0) {
fs = File.OpenWrite(“wobbiegong”);
croc = 0;
} else if (wallaby < 0) {
croc = 3;
} else {
fs = File.OpenRead(“wobbiegong”);
croc = 1;
}
}
catch (IOException) {
croc = -3;
}
catch {
croc = 4;
}
finally {
if (dingo > 2) {
croc -= dingo;
}
}
return croc;
}
}
Pool Puzzle Solution
one object’s trash is another’s treasure
This catch block only
catches exceptions where
the code divides by zero.
The clue that this is a
FileStream is that it has
an OpenRead() method and
throws an IOException.
You already know that you always have
to close files when you’re done with
them. If you don’t, the file will be
locked open, and if you try to open it
again it’ll throw an IOException.
This code opens a file called “wobbiegong”
and keeps it open the first time it’s
called. Later on, it opens the file again.
But it never closed the file, which causes
it to throw an IOException.
Joey.Wombat() is called three
times, and the third time it
returns zero. That causes
the WriteLine() to throw a
DivideByZeroException.
Remember, you should avoid catch-
all exceptions in your code. But you
should also avoid other things we do
to make puzzles more interesting, like
using obfuscated variable names.

you are here 4 489
exception handling
E
x
c
e
p
t
i
o
n
o
b
j
e
c
t
Use the Exception object to get
information about the problem
We’ve been saying all along that .NET generates an Exception object when
an exception is thrown. When you write your catch block, you have access to
that object. Here’s how it works:
s
t
r
i
n
g
m
e
ss
a
ge
=
e
x
.
M
e
s
s
a
g
e
;
An object is humming along, doing its thing, when it encounters
something unexpected and throws an exception.
1
Uh oh—what the
heck happened?
Luckily, its try/catch block caught the exception. Inside the catch
block, it gave the exception a name: ex.
try {
DoSomethingRisky();
}
catch (RiskyThingException ex) {
string message = ex.Message;
MessageBox.Show(message, “I took too many risks!”);
}
2
The exception object stays around until the catch block is done. Then
the ex reference disappears, and it’s eventually garbage-collected.
3
When you specify a type of exception in
the catch block, if you provide a variable
name, then your code can use it to access
the Exception object.
A
n
o
b
j
e
c
t
A
n
o
b
j
e
c
t
EX
490 Chapter 10
Use more than one catch block to
handle multiple types of exceptions
You know that you can catch a specific type of exception…but what if you write code where more
than one problem can occur? In these cases, you may want to write code that handles each different
type of exception. That’s where using more than one catch block comes in. Here’s an example
from the code in the beehive nectar processing plant. You can see how it catches several kinds of
exceptions. In some cases it uses properties in the Exception object. It’s pretty common to use the
Message property, which usually contains a description of the exception that was thrown. You can
also call throw; to rethrow the message, so it can be handled further up the call stack.
public void ProcessNectar(NectarVat vat, Bee worker, HiveLog log) {
try {
NectarUnit[] units = worker.EmptyVat(vat);
for (int count = 0; count < worker.UnitsExpected, count++) {
stream hiveLogFile = log.OpenLogFile();
worker.AddLogEntry(hiveLogFile);
}
}
catch (VatEmptyException) {
vat.Emptied = true;
}
catch (HiveLogException ex) {
throw;
}
catch (IOException ex) {
worker.AlertQueen(“An unspecified file error happened: ”
+ “Message: ” + ex.Message + “\r\n”
+ “Stack trace: ” + ex.StackTrace + “\r\n”
+ “Data: ” + ex.Data + “\r\n”);
}
finally {
vat.Seal();
worker.FinishedJob();
}
}
When you have several catch blocks, they’re
examined in order. In this code, first it checks for
a VatEmptyException and then a HiveLogException.
The last catch block catches IOException.
That’s the base class for several different file
exceptions, including FileNotFoundException and
EndOfStreamException.
This statement uses three properties in the Exception object:
Message, which has the message you’d normally see in the exception
window in the IDE (“Attempted to divide by zero”); StackTrace,
which gives you a summary of the call stack; and Data, which
sometimes contains pertinent data that’s associated with the
exception.
This catch block assigns the exception to the variable ex, which
it can use to get information from the Exception object.
You can also call the
exception’s ToString()
method to get a lot of
the pertinent data into
your MessageBox.
playing catch
If you won’t use the Exception object,
there’s no need to declare it.
It’s fine for two
blocks to use the
same name (“ex”)
for the Exception.
Sometimes you
want to bubble
an exception up
to the method
that called
this one by
using throw; to
rethrow the
exception.
you are here 4 491
exception handling
B
e
e
P
r
o
f
i
l
e
o
b
j
e
c
t
H
i
v
e
o
b
j
e
c
t
B
e
e
P
r
o
f
i
l
e
o
b
j
e
c
t
One class throws an exception,
another class catches the exception
When you’re building a class, you don’t always know how it’s going to be used. Sometimes
other people will end up using your objects in a way that causes problems—and sometimes
you do it yourself! That’s where exceptions come in.
The whole point behind throwing an exception is to see what might go wrong, so you can
put in place some sort of contingency plan. You don’t usually see a method that throws
an exception and then catches it. An exception is usually thrown in one method and then
caught in a totally different one—usually in a different object.
Instead of this…
Without good exception handling, one exception can
halt the entire program. Here’s how it would work in
a program that manages bee profiles for a queen bee.
…we can do this.
The BeeProfile object can intercept the exception
and add a log entry. Then it can turn around and
throw the exception back to the hive, which catches it
and recovers gracefully.
The BeeProfile object tried
to read a file but it wasn’t
there, so File.Open() threw
an exception. The hive didn’t
catch it, so it went unhandled.
stream = File.Open(profile);
try {
stream = File.Open(profile);
} catch (FileNotFoundException ex) {
WriteLogEntry(“unable to find ” +
profile + “: ” + ex.Message();
throw;
}
try {
prof = new BeeProfile(“prof.dat”);
} catch (FileNotFoundException) {
Hive.RecreateBeeProfile(“prof.dat”);
}
This BeeProfile object’s constructor expects
the filename for a profile data file that it’ll
open using File.Open(). If there’s a problem
opening the file, the program bombs out.
Now when the hive tries to create a
new BeeProfile object by passing it an
invalid filename, it can trust BeeProfile
to log the error and then alert it to
the problem by throwing an exception.
The hive can catch the exception and
take some corrective action—in this case,
recreating the bee profile.
Notice how the BeeProfile object
intercepts the exception, logs it using its
WriteLogEntry() method, and then throws
it again so it’s passed along to the hive.
n
e
w
B
e
e
P
r
o
f
i
l
e
(
“
p
r
o
f
.
d
a
t
”
)
n
e
w
B
e
e
P
r
o
f
i
l
e
(
“
p
r
o
f
.
d
a
t
”
)
H
i
v
e
o
b
j
e
c
t
Of course, one method in a single class can
throw a method that’s caught by another
method in the same class.
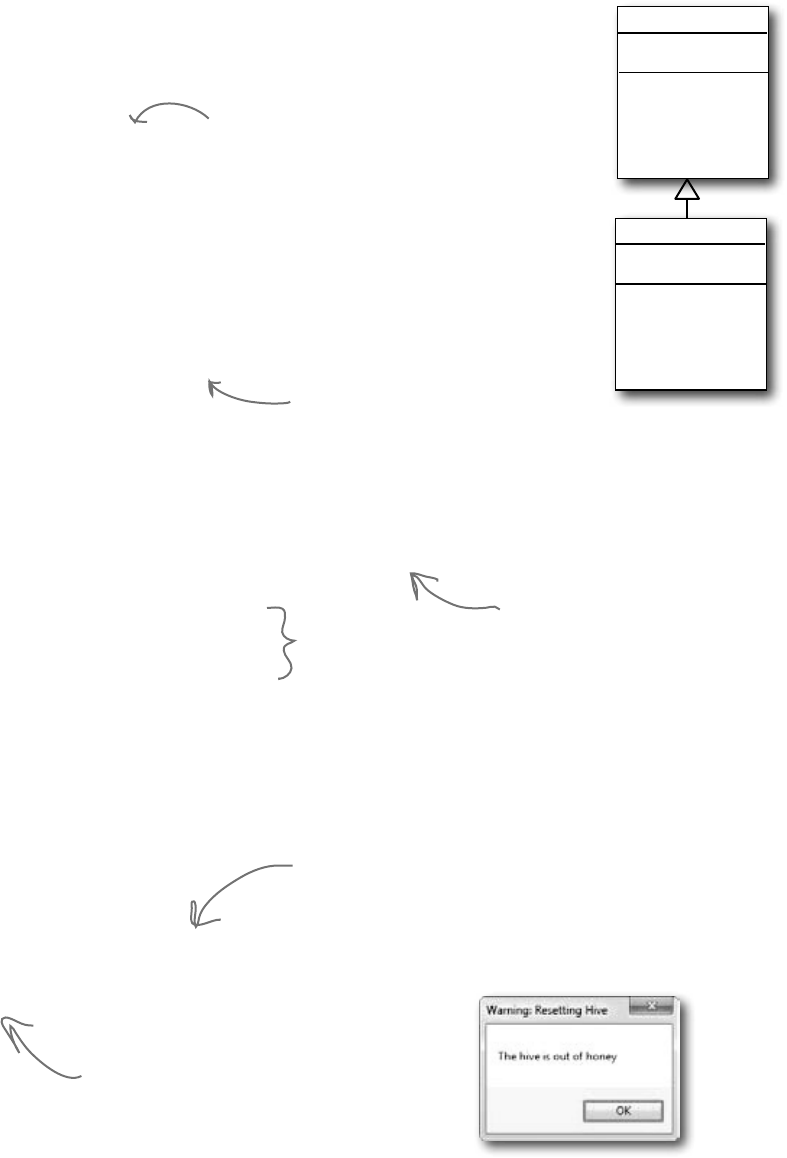
492 Chapter 10
Bees need an OutOfHoney exception
Your classes can throw their own exceptions. For example, if you get a null parameter in a method
that was expecting a value, it’s pretty common to throw the same exception a .NET method would:
throw new ArgumentException();
But sometimes you want your program to throw an exception because of a special condition that
could happen when it runs. The bees we created in the hive, for example, consume honey at a
different rate depending on their weight. If there’s no honey left to consume, it makes sense to have
the hive throw an exception. You can create a custom exception to deal with that specific error
condition just by creating your own class that inherits from Exception and then throwing the
exception whenever you encounter a specific error.
class OutOfHoneyException : System.Exception {
public OutOfHoneyException(string message) : base(message) { }
}
class HoneyDeliverySystem {
...
public void FeedHoneyToEggs() {
if (honeyLevel == 0) {
throw new OutOfHoneyException(“The hive is out of honey.”);
} else {
foreach (Egg egg in Eggs) {
...
}
public partial class Form1 : Form {
...
private void consumeHoney_Click(object sender, EventArgs e) {
HoneyDeliverySystem delivery = new HoneyDeliverySystem();
try {
delivery.FeedHoneyToEggs()
}
catch (OutOfHoneyException ex){
MessageBox.Show(ex.Message, “Warning: Resetting Hive”);
Hive.Reset();
}
}
}
You can catch a custom
exception by name just
like any other exception,
and do whatever you
need to do to handle it.
This throws a new
instance of the
exception object.
You need to create a class for
your exception and make sure
that it inherits from System.
Exception. Notice how we’re
overloading the constructor so we
can pass an exception message.
In this case, if the hive is out of honey none
of the bees can work, so the simulator can’t
continue. The only way to keep the program
working once the hive runs out of honey is
to reset it, and we can do that by putting
the code to reset it in the catch block.
If there’s honey in the
hive, the exception will
never get thrown and
this code will run.
Exception
Message
StackTrace
GetBaseException()
ToString()
your Exception
Message
StackTrace
GetBaseException()
ToString()
your very own exception
Your methods can throw this exception if they get
invalid or unexpected values in their parameters.
you are here 4 493
exception handling
public static void Main() {
Console.Write(“when it “);
ExTestDrive.Zero(“yes”);
Console.Write(“ it “);
ExTestDrive.Zero(“no”);
Console.WriteLine(“.”);
}
class MyException : Exception { }
output:
when it thaws it throws.
Exception Magnets
Arrange the magnets so the application writes
the output to the console.
class ExTestDrive {
public static void Zero(string test) {
Console.Write(“r”);
}
}
try {
Console.Write(“t”);
Console.Write(“o”);
doRisky(test);
}
} catch (MyException) {
Console.Write(“a”);
} finally {
Console.Write(“w”);
Console.Write(“s”);
}
static void DoRisky(String t) {
Console.Write(“h”);
if (t == “yes”) {
throw new MyException();
}
494 Chapter 10
class ExTestDrive {
public static void Zero(string test) {
Console.Write(“r”);
}
}
try {
Console.Write(“t”);
Console.Write(“o”);
doRisky(test);
}
Console.Write(“a”);
} finally {
Console.Write(“w”);
Console.Write(“s”);
}
static void DoRisky(String t) {
Console.Write(“h”);
if (t == “yes”) {
}
public static void Main() {
Console.Write(“when it “);
ExTestDrive.Zero(“yes”);
Console.Write(“ it “);
ExTestDrive.Zero(“no”);
Console.WriteLine(“.”);
}
class MyException : Exception { }
output:
when it thaws it throws.
Exception Magnets Solution
Arrange the magnets so the application writes the
output to the console.
a little review
} catch (MyException) {
throw new MyException();
This line defines a custom
exception called MyException,
which gets caught in a catch
block in the code.
The doRisky() method only
throws an exception if it’s
passed the string “yes”.
This line only gets executed
if doRisky() doesn’t throw
the exception.
The Zero() method either
prints “thaws” or “throws”,
depending on whether it was
passed “yes” or something else
as its test parameter.
The finally block makes sure that
the method always prints “w”.
And the “s” is printed outside the
exception handler, so it always
prints, too.
you are here 4 495
exception handling
¢Anystatementcanthrowanexceptionifsomethingfails
atruntime.
¢Useatry/catchblocktohandleexceptions.
Unhandledexceptionswillcauseyourprogramtostop
executionandpopupanerrorwindow.
¢Anyexceptionintheblockofcodeafterthetry
statementwillcausetheprogram’sexecutionto
immediatelyjumptothefirststatementintheblockof
codeaftercatch.
¢TheExceptionobjectgivesyouinformation
abouttheexceptionthatwascaught.Ifyouspecifyan
Exceptionvariableinyourcatchstatement,that
variablewillcontaininformationaboutanyexception
throwninthetryblock:
try {
// statements that might
// throw exceptions
} catch (IOException ex) {
// if an exception is thrown,
// ex has information about it
}
¢Therearemanydifferentkindsofexceptionsthat
youcancatch.Eachhasitsownobjectthatinherits
fromException.Reallytrytoavoidjustcatching
Exception—catchspecificexceptionsinstead.
¢Eachtrycanhavemorethanonecatch:
try { ... }
catch (NullReferenceException ex) {
// these statements will run if a
// NullReferenceException is thrown
}
catch (OverflowException ex) { ... }
catch (FileNotFoundException) { ... }
catch (ArgumentException) { ... }
¢Yourcodecanthrowanexceptionusingthrow:
throw new Exception(“Exception message”);
¢Yourcodecanalsorethrow anexceptionusing
throw;butthisonlyworksinsideofacatchblock.
Rethrowinganexceptionpreservesthecallstack.
¢Youcancreateacustomexceptionbyinheritingfrom
theExceptionbaseclass.
class CustomException : Exception;
¢Mostofthetime,youonlyneedtothrowexceptions
thatarebuiltinto.NET,likeArgumentException.
Thereasonyouusedifferentkindsofexceptionsisso
thatyoucangive more information to your users.
Poppingupawindowwiththetext“Anunknown
errorhasoccurred”isnotnearlyasusefulasanerror
messagethatsays“Theexcusefolderisempty.Please
selectadifferentfolderifyouwanttoreadexcuses.”
An easy way to avoid a lot of problems:
using gives you try and finally for free
You already know that using is an easy way to make sure that
your files always get closed. But what you didn’t know is that it’s
really just a C# shortcut for try and finally!
using (YourClass c
= new YourClass() ) {
// code
}
YourClass c = new YourClass();
try {
// code
} finally {
c.Dispose();
}
When you use a using
statement, you’re
taking advantage of
finally to make sure
its Dispose() method
is always called.
is like this
Remember, when you declare a reference in
a “using” statement, its Dispose() method is
automatically called at the end of the block.
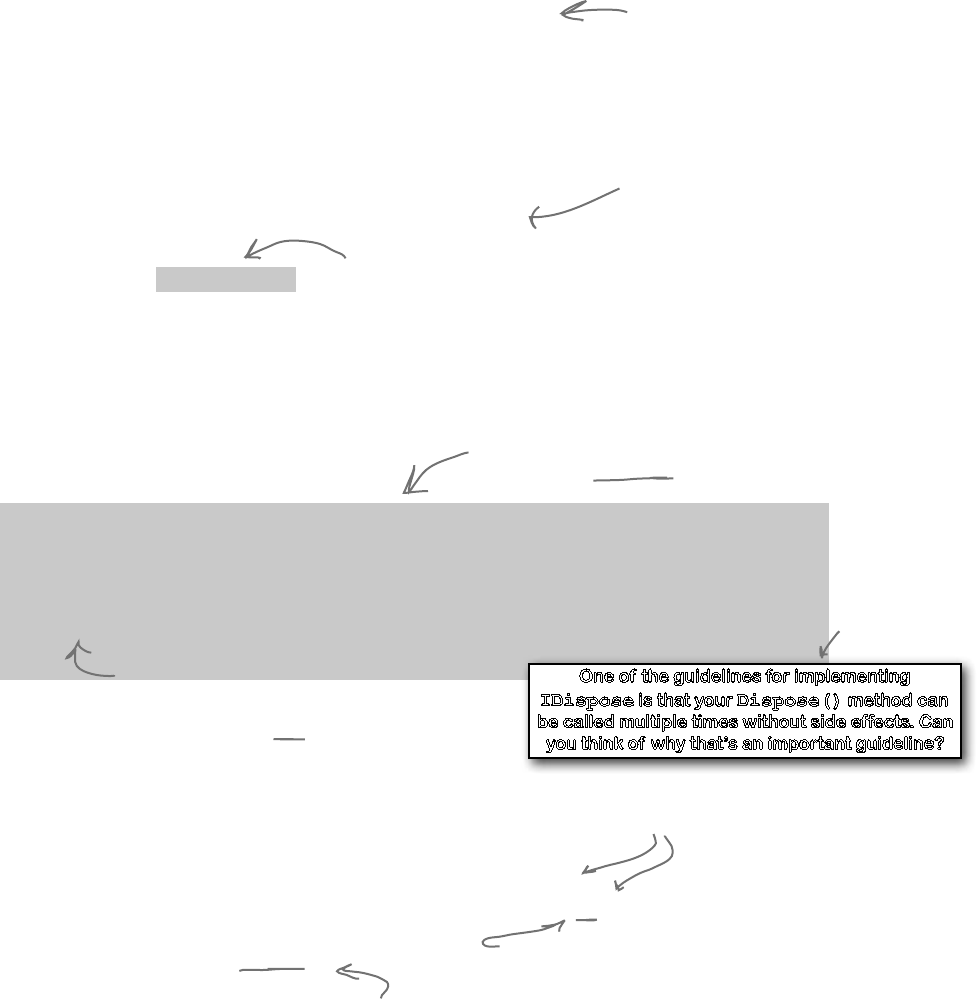
496 Chapter 10
using (Stream log = new File.Write(“log.txt”))
using (Nectar nectar = new Nectar(16.3, hive, log)) {
Bee.FlyTo(flower);
Bee.Harvest(nectar);
Bee.FlyTo(hive);
}
class Nectar : IDisposable {
private double amount;
private BeeHive hive;
private Stream hiveLog;
public Nectar(double amount, BeeHive hive, Stream hiveLog) {
this.amount = amount;
this.hive = hive;
this.hiveLog = hiveLog;
}
public void Dispose() {
if (amount > 0) {
hive.Add(amount);
hive.WriteLog(hiveLog, amount + " mg nectar added to the hive");
amount = 0;
}
}
}
The IDisposable interface only has one member: the
Dispose() method. Whatever you put in this method will
get executed at the end of the using statement…or
whenever Dispose() is called manually.
Your object must implement IDisposable if you want to
use your object within a using statement.
You’ll see nested using statements like this
when you need to declare two IDisposable
references in the same block of code.
Exception avoidance: implement
IDisposable to do your own cleanup
Streams are great, because they already have code written to close
themselves when the object is disposed of. But what if you have your own
custom object, and it always needs to do something when it’s disposed of ?
Wouldn’t it be great if you could write your own code that got run if your
object was used in a using statement?
C# lets you do just that with the IDisposable interface. Implement
IDisposable, and write your cleanup code in the Dispose()
method, like this:
This particular code empties any remaining
nectar into the hive and logs a message.
It’s important, and must happen, so we put
it in the Dispose() method.
We can use multiple using statements now. First, let’s use a built-in object
Stream, which implements IDisposable. Then, we’ll work with our
updated Nectar object, which also implements IDisposable:
The Nectar object uses the log stream,
which will close automatically at the end
of the outer using statement.
Then the Bee object uses the Nectar
object, which will add its nectar to
the hive automatically at the end of
the inner using statement.
an ounce of prevention
IDisposable is a really effective
way to avoid common exceptions
and problems. Make sure you use
using statements any time you’re
working with any class that
implements it.
You can only use a class in a “using”
statement if it implements IDisposable;
otherwise, your program won’t compile.
One of the guidelines for implementing
IDispose is that your Dispose() method can
be called multiple times without side effects. Can
you think of why that’s an important guideline
This Dispose()
method was
written so it
could be called
many times,
not just once.
you are here 4 497
exception handling
If try/catch is so great, why doesn’t
the IDE just put it around everything? Then
we wouldn’t have to write all these try/
catch blocks on our own, right?
You want to know what type of exception is
thrown, so you can handle that exception.
There’s more to exception handling than just printing out a
generic error message. For instance, in the excuse finder, if we
know we’ve got a FileNotFoundException, we might
print an error that suggested where the right files should be
located. If we have an exception related to databases, we
might send an email to the database administrator. All that
depends on you catching specific exception types.
This is why there are so
many classes that inherit
from Exception, and why
you may even want to write
your own classes to inherit
from Exception.
Q: Can I only use objects that
implement IDisposable with a
using statement?
A:Yes.IDisposableistailor-made
toworkwithusingstatements,and
addingausingstatementisjustlike
creatinganewinstanceofaclass,except
thatitalwayscallsitsDispose()
method.
Q:Can you put any statement inside a
using block?
A:Definitely.Thewholeideawith
usingisthatithelpsyoumakesurethat
everyobjectyoucreatewithitisdisposed.
Butwhatyoudowiththoseobjectsisentirely
uptoyou.Infact,youcancreateanobject
withausingstatementandnevereven
useitinsidetheblock.Butthatwouldbe
prettyuseless,sowedon’trecommend
doingthat.
Q: Can you call Dispose()
outside of a using statement?
A:Yes.Youdon’teveractuallyneed
touseausingstatement.Youcancall
Dispose()yourselfwhenyou’redone
withtheobject.Oryoucandowhatever
cleanupisnecessary—likecallingastream’s
Close()methodmanually.Butifyouuse
ausingstatement,it’llmakeyourcode
easiertounderstandandpreventproblemsthat
happenifyoudon’tdisposeofyourobjects.
Q: You mentioned a “try/finally”
block. Does that mean it’s OK to have a
try and finally without a catch?
A:Yes!Youcandefinitelyhavea
tryblockwithoutacatch,andjusta
finally.Itlookslikethis:
try {
DoSomethingRisky();
SomethingElseRisky();
}
finally {
AlwaysExecuteThis();
}
IfDoSomethingRisky()throwsan
exception,thenthefinallyblockwill
immediatelyrun.
Q: Does Dispose() only work with
files and streams?
A:No,therearealotofclassesthat
implementIDisposable,andwhen
you’reusingoneyoushouldalwaysuse
ausingstatement.(You’llseesomeof
theminthenextfewchapters.)Andifyou
writeaclassthathastobedisposedof
inacertainway,thenyoucanimplement
IDisposable,too.
498 Chapter 10
The worst catch block EVER: catch-all plus comments
A catch block will let your program keep running if you want.
An exception gets thrown, you catch the exception, and instead of
shutting down and giving an error message, you keep going. But
sometimes, that’s not such a good thing.
Take a look at this Calculator class, which seems to be acting
funny all the time. What’s going on?
You should handle your exceptions, not bury them
class Calculator {
...
public void Divide(int dividend, int divisor) {
try {
this.quotient = dividend / divisor;
} catch {
// Note from Jim: we need to figure out a way to prevent
// people from entering in zero in a division problem.
}
}
}
Just because you can keep your program running doesn’t mean
you’ve handled your exceptions. In the code above, the calculator
won’t crash…at least, not in the Divide() method. But what if
some other code calls that method, and tries to print the results?
If the divisor was zero, then the method probably returned an
incorrect (and unexpected) value.
Instead of just adding a comment and burying the exception,
you need to handle the exception. And if you’re not able to
handle the problem, don’t leave empty or commented catch
blocks! That just makes it harder for someone else to track down
what’s going on. It’s better to let the program continue to throw
exceptions, because then it’s easy to figure out what’s going wrong.
Here’s the problem. If divisor
is zero, this will create a
DivdeByZeroException.
But there’s a catch block. So
why are we still getting errors?
the one that got away
The programmer thought that he
could bury his exceptions by using
an empty catch block, but he just
caused a headache for whoever
had to track down problems with
it later.
Remember, when your code doesn’t
handle an exception, the exception
bubbles up the call stack. Letting an
exception bubble up is a perfectly valid
way of handling an exception.
you are here 4 499
exception handling
class Calculator {
...
public void Divide(int dividend, int divisor) {
try {
this.quotient = dividend / divisor;
} catch (Exception ex) {
using (StreamWriter sw = new StreamWriter(@”C:\Logs\errors.txt”);
sw.WriteLine(ex.getMessage());
};
}
}
}
I get it. It’s sort of like using
exception handling to place a
marker in the problem area.
This still needs to be fixed, but
short-term, this makes it clear
where the problem occurred. Still,
wouldn’t it be better to figure
out why your Divide method is
being called with a zero divisor in
the first place?
Handling exceptions doesn’t always mean
the same thing as FIXING exceptions.
It’s never good to have your program bomb out. But it’s
way worse to have no idea why it’s crashing or what it’s
doing to users’ data. That’s why you need to be sure that
you’re always dealing with the errors you can predict and
logging the ones you can’t.
Temporary solutions are OK (temporarily)
Sometimes you find a problem, and know it’s a problem, but aren’t
sure what to do about it. In these cases, you might want to log the
problem and note what’s going on. That’s not as good as handling
the exception, but it’s better than doing nothing.
Here’s a temporary solution to the calculator:
…but in real life,
“temporary” solutions have
a nasty habit of becoming
permanent.
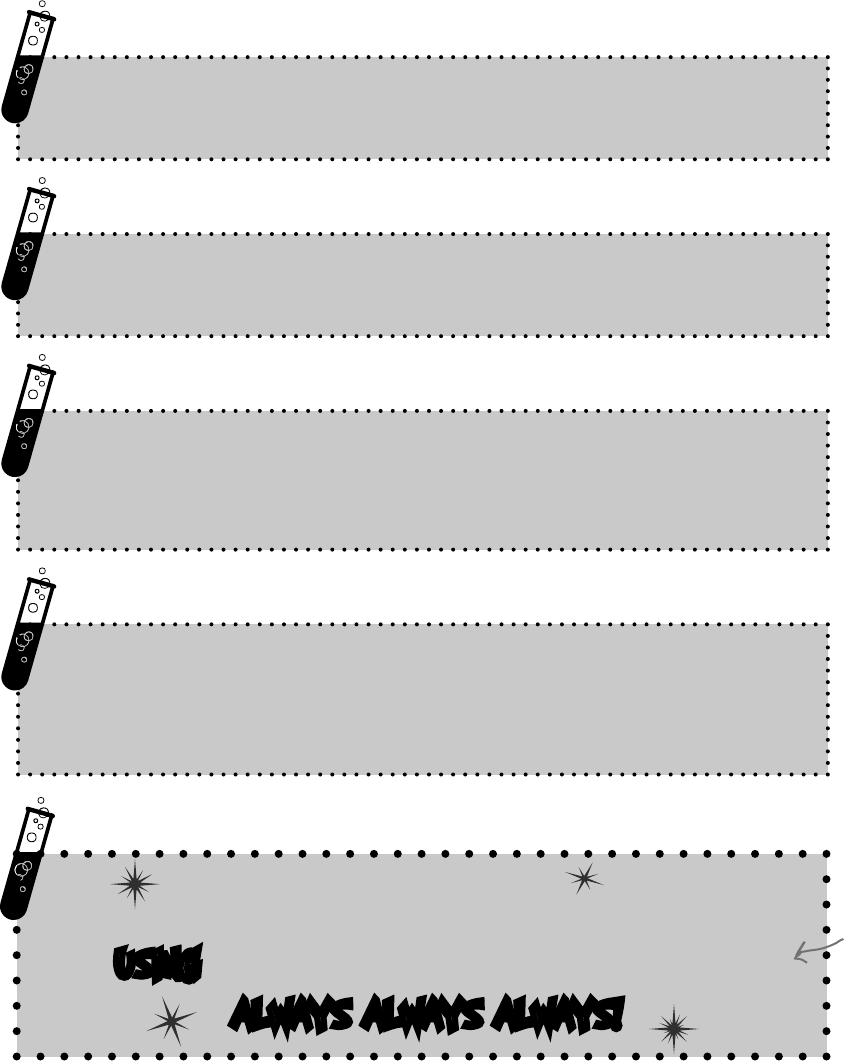
500 Chapter 10
A few simple ideas for exception handling
Design your code to handle failures GRACEFULLY.
Give your users USEFUL error messages.
Throw built-in .NET exceptions where you can. Only throw
custom exceptions if you need to give custom information.
Think about code in your try block that COULD get
short-circuited.
Avoid unnecessary file system errors…ALWAYS USE
A USING BLOCK ANY TIME YOU USE A STREAM!
ALWAYS ALWAYS ALWAYS!
…and most of all…
some quick suggestions
Or anything else
that implements
IDisposable.
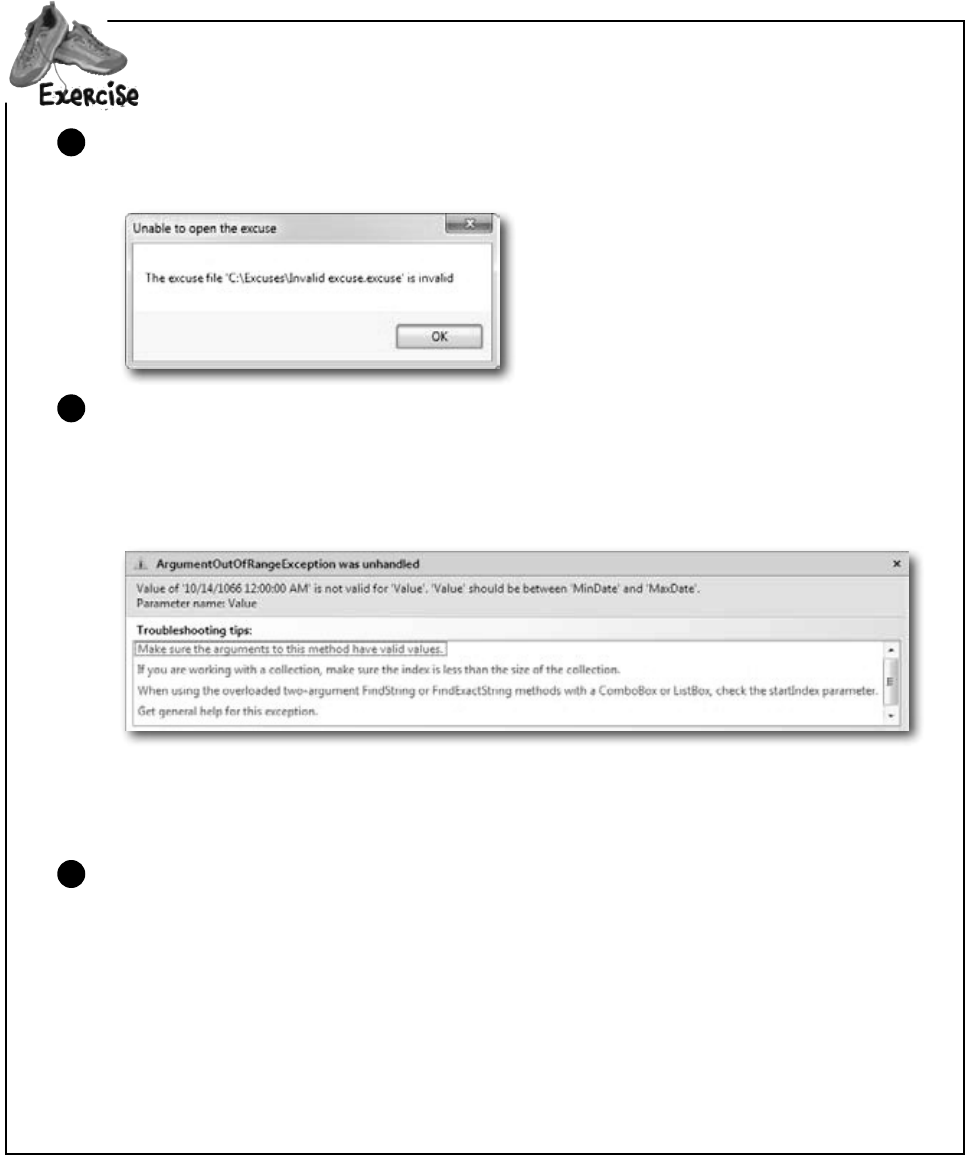
you are here 4 501
exception handling
Usewhatyouknowabouttry/catch/finallytoimprovetheexceptionhandlingin
Brian’sExcuseManager.
You’re not done yet. Let’s build a particularly devious little invalid excuse file. Put a breakpoint on
the first line of the Excuse.Save() method, then run the program and save an excuse. When
the program breaks, add a watch for the LastUsed property. Then edit its value in the Watch
window and set it to DateTime.Parse(“October 14, 1066”) — you should see the
value of the property update to that date. Tell the debugger to continue (F5). Did you get this
ArgumentOutOfRange exception?
2
You’re getting that exception because the form tried to set the DateTimePicker control’s Value
property to a value that’s lower than its MinDate. But more importantly, before it threw the
exception, the Excuse class wrote out a file. This is a really useful technique that you should
keep in mind: generating files with known bad data so you can use them later to test your program.
Add exception handling to the Open button’s Click event handler. Just make a simple
try/catch block that pops up a message box. Here’s what it should pop up if you try to
open up a file that’s not a real excuse file:
1
Load the file you just created with bad data. You should get the same exception. You’ll get
a different exception if you try to open a file that’s not a valid excuse file. Add an exception
handling block nested inside the one you added in step 2 so it doesn’t fail when you try to
load an invalid excuse file (which can happen in several situations). Here’s what to do:
1. Declare a Boolean variable called clearForm above the try/catch block. You’ll set this
to true if there’s an exception, and check it later to see if the form should be cleared.
2. Add another try/catch block inside the one you just added to the Open button.
3. Add a finally block to the outer try/catch to reset the form to its original empty
state. Reset LastUsed.Value to DateTime.Now (which returns the current date) if
the clearForm variable is set to true.
3
502 Chapter 10
Usewhatyouknowabouttry/catch/finallytoimprovetheexceptionhandlingto
Brian’sExcuseManager.
exercise solution
private void open_Click(object sender, EventArgs e) {
if (CheckChanged()) {
openFileDialog1.InitialDirectory = selectedFolder;
openFileDialog1.Filter =
“Excuse files (*.excuse)|*.excuse|All files (*.*)|*.*”;
openFileDialog1.FileName = description.Text + “.excuse”;
DialogResult result = openFileDialog1.ShowDialog();
if (result == DialogResult.OK) {
bool clearForm = false;
try {
currentExcuse = new Excuse(openFileDialog1.FileName);
try {
UpdateForm(false);
}
catch (ArgumentOutOfRangeException) {
MessageBox.Show(“The excuse file ‘“
+ openFileDialog1.FileName + “’ had a invalid data”,
“Unable to open the excuse”);
clearForm = true;
}
}
catch (SerializationException ex) {
MessageBox.Show(“An error occurred while opening the excuse ‘“
+ openFileDialog1.FileName + “’\n” + ex.Message,
“Unable to open the excuse”, MessageBoxButtons.OK,
MessageBoxIcon.Error);
clearForm = true;
}
finally {
if (clearForm) {
description.Text = “”;
results.Text = “”;
lastUsed.Value = DateTime.Now;
}
}
}
}
}
Here’s the try/catch block to create a pop-up
error, in case problems occur when the form calls
the Excuse constructor to load an excuse.
Here’s a nested try/catch. It handles
exceptions that happen if the file that
gets loaded has data that is out of
range. That’s not the same as problems
arising from the Excuse constructor.
Both catch blocks set clearForm to true so
that this finally block knows that the form
should be reset. It’s OK to have code that
interacts with your finally block, since you
know finally blocks will always run.
Here’s the message box from the outer try/
catch block. It prints the exception message.
We’re not using the
exception object, so
the catch statement
doens’t need a variable
name after the
exception type.
you are here 4 503
exception handling
1 2
3 4
5 6
7
8 9
10 11 12
13
14 15
16
17
18
Across
5. The base class that DivideByZeroException and
FormatException inherit from
8. An ____________exception happens when you try to cast a
value to a variable that can’t hold it
10. If the next statement is a method, “Step _____” tells the
debugger to execute all the statements in the method and break
immediately afterward
12. If you ____ your exceptions, it can make them hard to track
down
13. This method is always called at the end of a using block
14. The field in the Exception object that contains a string
with a description
15. One try block can have multiple _______ blocks
17. The ________ block contains any statements that absolutely
must be run after an exception is handled
18. An __________exception means you tried to cram a
number that was too big into a variable that couldn’t hold it
Down
1. The window in the IDE that you can use to check your
variables’ values
2. You’ll get an exception if you try to divide by this
3. Toggle this if you want the debugger to stop execution when it
hits a specific line of code
4. “Step ____” tells the debugger to execute the rest of the
statements in the current method and then break
6. What a reference contains if it doesn’t point to anything
7. You can only declare a variable with a using statement if it
implements this interface
9. When a statement has a problem, it ________ an exception
11. A program that handles errors well
16. If the next statement is a method, “Step _____” tells the
debugger to execute the first statement in that method
Exceptioncross

504 Chapter 10
W
1Z
2
B
3A O
4E
R T U R
E
5X C E P T I O N
6
A H U I
7
K I
8N V A L I D C A S T
9
P L I H
O
10 V E R
11 S B
12 U R Y
I O P O
N B D
13 I S P O S E W
T U S S
M
14 E S S A G E C
15 A T C H
T I
16 B
F
17 I N A L L Y
T E
O
18 V E R F L O W
Across
5. The base class that DivideByZeroException and
FormatException inherit from [EXCEPTION]
8. An ____________Exception happens when you try to cast a
value to a variable that can't hold it [INVALIDCAST]
10. If the next statement is a method, "Step _____" tells the
debugger to execute all the statements in the method and break
immediately afterwards [OVER]
12. If you ____ your exceptions, it can make them hard to track
down [BURY]
13. This method is always called at the end of a using block
[DISPOSE]
14. The field in the Exception object that contains a string with a
description [MESSAGE]
15. One try block can have multiple _______ blocks [CATCH]
17. The ________ block contains any statements that absolutely
must be run after an exception is handled [FINALLY]
18. An __________Exception means you tried to cram a
number that was too big into a variable that couldn't hold it
[OVERFLOW]
Down
1. The window in the IDE that you can use to check your
variables' values [WATCH]
2. You'll get an exception if you try to divide by this [ZERO]
3. Toggle this if you want the debugger to stop execution when it
hits a specific line of code [BREAKPOINT]
4. "Step ____" tells the debugger to execute the rest of the
statements in the current method and then break [OUT]
6. What a reference contains if it doesn't point to anything
[NULL]
7. You can only declare a variable with a using statement if it
implements this interface [IDISPOSABLE]
9. When a statement has a problem, it ________ an exception
[THROWS]
11. A program that handles errors well. [ROBUST]
16. If the next statement is a method, "Step _____" tells the
debugger to execute the first statement in that method [INTO]
Exceptioncross Solution
get it? finally? yeah, we’re funny
you are here 4 505
exception handling
Good ol’ Brian. Never
misses a day of work unless
he’s got a real problem.
Your exception handling skills did more
than just prevent problems. They ensured
that Brian’s boss has no idea anything
went wrong in the first place! Good exception
handling is invisible
to your users. The
program never crashes,
and if there are
problems, they are
handled gracefully,
without confusing
error messages.
Brian finally gets
his vacation…
Now that Brian’s got a handle on his
exceptions, his job’s going smoothly
and he can take that well-deserved
(and boss-approved!) vacation day.
…and things are looking
up back home!

this is a new chapter 507
events and delegates
11
What your code does when
you’re not looking
Your objects are starting to think for themselves.
You can’t always control what your objects are doing. Sometimes things…happen. And
when they do, you want your objects to be smart enough to respond to anything that
pops up. And that’s what events are all about. One object publishes an event, other
objects subscribe, and everyone works together to keep things moving. Which is great,
until you want your object to take control over who can listen. That’s when callbacks will
come in handy.
I’d better subscribe to that
TreePopsUpOutOfNowhere
event, or I’ll have to call my
OnBrokenLeg() method.
508 Chapter 11
Ever wish your objects could think for themselves?
Suppose you’re writing a baseball simulator. You’re going to model a game, sell the
software to the Yankees (they’ve got deep pockets, right?), and make a million bucks.
You create your Ball, Pitcher, Umpire, and Fan objects, and a whole lot more.
You even write code so that the Pitcher object can catch a ball.
Now you just need to connect everything together. You add an OnBallInPlay()
method to Ball, and now you want your Pitcher object to respond with its event
handler method. Once the methods are written, you just need to tie the separate
methods together:
We want the pitcher to
catch this ball.
Ball.OnBallInPlay(70, 82)
Pitcher.CatchBall(70, 90)
Here’s the problem. You really want your Ball object to only worry about
getting hit, and your Pitcher object to only worry about catching balls
that come its way. In other words, you really don’t want the Ball telling the
Pitcher, “I’m coming to you.”
When the ball gets
hit, OnBallInPlay()
gets called.
The ball was hit with a 70 degree
trajectory from home plate, and it’s
going to travel 82 feet.
The pitcher can handle the
angle the ball was hit, and
the distance (90 is greater
than 82).
But how does an object KNOW to respond?
The Ball doesn’t know which
fielder will pick it up…maybe the
Pitcher, or maybe the Catcher,
or maybe ThirdBaseman who
decided to ScootIn().
You want an
object to worry
about itself, not
other objects.
You’re separating
the concerns of
each object.
This doesn’t mean that objects can’t
interact. It just means that a Ball
shouldn’t determine who fields it.
That’s not the Ball’s job.
B
a
l
l
o
b
j
e
c
t
P
i
t
c
h
e
r
o
b
j
e
c
t
B
a
l
l
o
b
j
e
c
t
That’s a commonly used way
of naming methods—we’ll
talk more about it later.
publisher, meet subscriber
you are here 4 509
events and delegates
F
a
n
o
b
j
e
c
t
P
i
t
c
h
e
r
o
b
j
e
c
t
U
m
p
i
r
e
o
b
j
e
c
t
What you need to do when the ball is hit is to use an event. An event is simply
something that’s happened in your program. Then, other objects can
respond to that event—like our Pitcher object.
Even better, more than one object can listen for events. So the Pitcher could
listen for a ball-being-hit event, as well as a Catcher, ThirdBaseman, an
Umpire, even a Fan. And each object can respond to the event differently.
So what we want is a Ball object that can raise an event. Then, we want to
have other objects to subscribe to that particular type of event…that
just means listen for it, and get notified when that event occurs.
BallInPlay event raised
When an EVENT occurs…objects listen
~If we
subscribe to the
BallInPlay event, we’ll
always get notified when
the ball’s in play.
event, noun.
a thing that happens,
especially something of
importance. The solar
eclipse was an amazing
event to behold.
The pitcher and other
players want to try and
field the ball.
The Fan object
subscribes in case a ball
goes into the seats.
The umpire checks every ball
to see if it’s fair or foul,
and monitors what happens.
Events look like lightning
bolts in the IDE too.
You’ll see an icon like
this next to events in
IntelliSense and in the
properties window.
When a Ball gets
hit, it raises a
BallInPlay event.
Any object can subscribe to this event…and
the Ball object doesn’t need to know what
objects are subscribed.
Once your object “hears” about an event, you can set up some code to run.
That code is called an event handler. An event handler gets information
about the event, and runs every time that event occurs.
Remember, all this happens without your intervention at runtime. So you
write code to raise an event, and then you write code to handle those events,
and fire up your application. Then, whenever an event is raised, your handler
kicks into action…without you doing anything. And, best of all, your objects have
separate concerns. They’re worrying about themselves, not other objects.
Want to DO SOMETHING with an
event? You need an event handler
We’ve been doing this
all along. Every time
you click a button, an
event is raised, and
your code responds to
that event.
B
a
l
l
o
b
j
e
c
t
510 Chapter 11
B
a
l
l
E
v
e
n
t
A
r
g
s
One object raises its event, others listen for it…
Let’s take a look at how events, event handlers, and subscriptions
works in C#:
Something triggers an event
The ball gets hit. It’s time for the Ball object to raise a new event.
2
The ball raises an event
A new event gets raised (we’ll talk about exactly how that works in just a minute). That
event also has some arguments, like the velocity of the ball, as well as its trajectory.
Those arguments are attached to the event as an instance of an EventArgs object,
and then the event is sent off, available to anyone listening for it.
3
The Ball object starts everything
rolling. Its job is to raise an event
when it gets hit and goes into play.
BallInPlay is an event that gets
fired off by Ball.
BallInPlay references a new
object, BallEventArgs, which is
just a class that defines fields
for Velocity and Trajectory.
~
BallInPlay event
B
a
l
l
o
b
j
e
c
t
B
a
l
l
o
b
j
e
c
t
Sometimes we’ll talk
about raising an event,
or firing it, or invoking
it—they’re all the same
thing. People just use
different names for it.
P
i
t
c
h
e
r
o
b
j
e
c
t
U
m
p
i
r
e
o
b
j
e
c
t
F
a
n
o
b
j
e
c
t
First, other objects subscribe to the event
Before the Ball can raise its BallInPlay event, other objects need to
subscribe to it. That’s their way of saying, any time a BallInPlay event
occurs, we want to know about it.
1
These objects are saying they
want to know any time a
BallInPlay event is raised.
Every object adds its own
event handler to listen for
the event—just like you add
button1_Click() to your
programs to listen for Click
events.
~
BallInPlay event
if a tree falls in the woods…

you are here 4 511
events and delegates
F
a
n
o
b
j
e
c
t
P
i
t
c
h
e
r
o
b
j
e
c
t
U
m
p
i
r
e
o
b
j
e
c
t
B
a
l
l
E
v
e
n
t
A
r
g
s
~
BallInPlay event
P
i
t
c
h
e
r
o
b
j
e
c
t
U
m
p
i
r
e
o
b
j
e
c
t
F
a
n
o
b
j
e
c
t
B
a
l
l
E
v
e
n
t
A
r
g
s
~
BallInPlay event
B
a
l
l
o
b
j
e
c
t
Then, the other objects handle the event
Subscribers get notification
Since the Pitcher, Umpire, and Fan object subscribed to the Ball
object’s BallInPlay event, they all get notified—all of their event
handler methods get called one after another.
4
Once an event is raised, all the objects subscribed to that event get
notification, and can do something:
As soon as the ball raises its
event, it creates a BallEventArgs
object with the ball’s trajectory
and distance so it can pass it to
the subscribers’ event handlers.
Each object handles the event
Now, Pitcher, Umpire, and Fan can all handle the BallInPlay event in their
own way. But they don’t all run at the same time—their event handlers get called
one after another, with a reference to a BallEventArgs object as its parameter.
5
The Pitcher object checks
BallEventArgs, and if the ball
is close, it fields the ball.
The Umpire watches. It might even subscribe to
other events, like BallFielded or BallThrown,
to further react to what happens.
The Fan object checks
BallEventArgs to see if
the ball is close enough
to catch.
Here’s what each object that handles the
event gets to work with. It should also get a
reference to the object that raised the event.
Events are handled on a
first-come, first-served
basis—the object that
subscribes first gets
notified first.
An event handler is just the
method in the subscriber object
that gets run when the event is
raised.
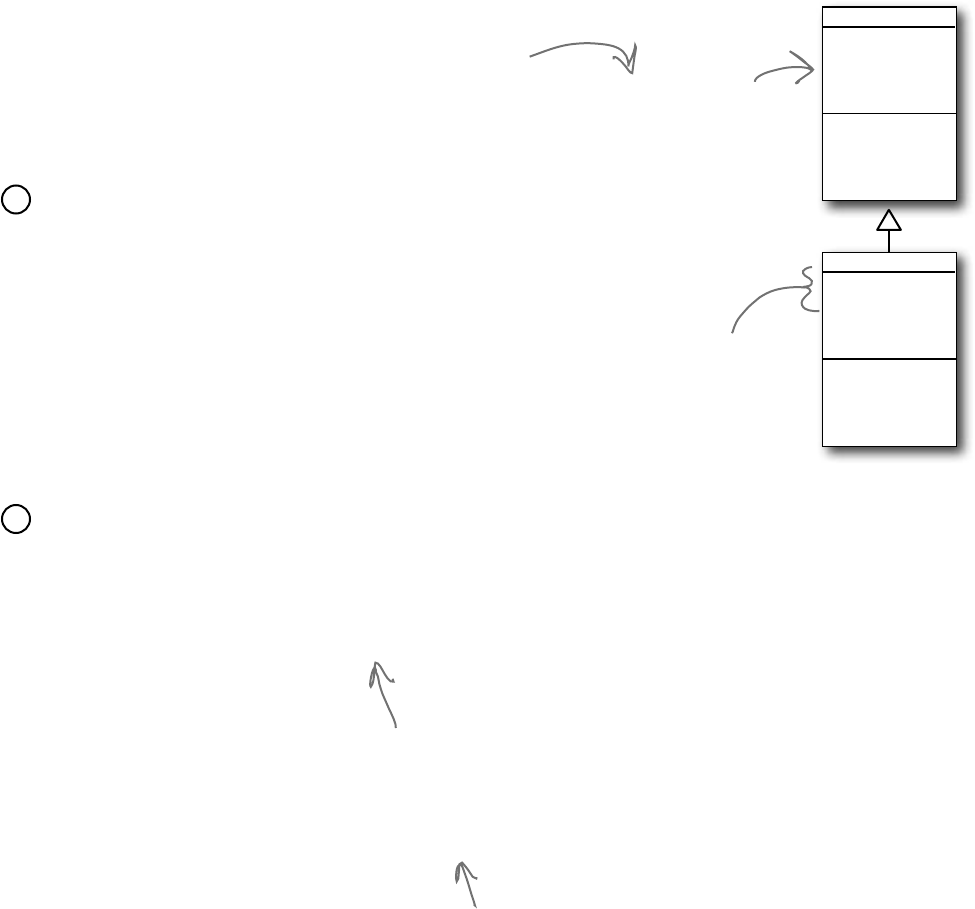
512 Chapter 11
Connecting the dots
Now that you’ve got a handle on what’s going on,
let’s take a closer look at how the pieces fit together.
Luckily, there are only a few moving parts.
We need an object for the event arguments
Remember, our BallInPlay event has a few arguments that it
carries along. So we need a very simple object for those arguments.
.NET has a standard class for it called EventArgs, but that class
has no members. Its sole purpose is to allow your event arguments
object to be passed to the event handlers that use it. Here’s the class
declaration:
class BallEventArgs : EventArgs
1
BallEventArgs
Trajectory
Distance
EventArgs
It’s a good idea (although not required)
for your event argument objects to
inherit from EventArgs. That’s an
empty class—it has no public members.
The ball will use these
properties to pass
information to the
event handlers about
where the ball’s been hit.
Next we’ll need to define the event in the class that’ll raise it
The ball class will have a line with the event keyword—this is how it informs
other objects about the event, so they can subscribe to it. This line can be
anywhere in the class—it’s usually near the property declarations. But as long as
it’s in the Ball class, other objects can subscribe to a ball’s event. It looks like this:
public event EventHandler BallInPlay;
2
Events are usually public. This
event is defined in the Ball
class, but we’ll want Pitcher,
Umpire, etc., to be able to
reference it. You could make
it private if you only wanted
other instances of the same
class to subscribe to it.
After the event keyword comes EventHandler.
That’s not a reserved C# keyword—it’s defined
as part of .NET. The reason you need it is to tell
the objects subscribing to the event what their
event handler methods should look like.
When you use EventHandler, you’re telling other methods that
their event handlers need to take two parameters: an object
named sender and an EventArgs reference named e. sender is
a reference to the object that raised the event, and e is a
reference to an EventArgs object.
It means that you can
upcast your EventArgs
object in case you
need to send it to an
event that doesn’t
handle it in particular.
i came here for an argument
you are here 4 513
events and delegates
The subscribing classes need event handler methods
Every object that has to subscribe to the Ball’s BallInPlay event needs to have an
event handler. You already know how event handlers work—every time you added a
method to handle a button’s Click event or a NumericUpDown’s ValueChanged
event, the IDE added an event handler method to your class. The Ball’s
BallInPlay event is no different, and an event handler for it should look pretty familiar:
void ball_BallInPlay(object sender, EventArgs e)
3
There’s no C# rule that says your event handlers
need to be named a certain way, but there’s a
pretty standard naming convention: the name of
the object reference, followed by an underscore,
followed by the name of the event.
The class that has this particular event
handler method has a Ball reference variable
called ball, so its BallInPlay event handler
starts with “ball_”, followed by the name of
the event being handled, “BallInPlay”.
The BallInPlay event declaration listed its event
type as EventHandler, which means that it needs
to take two parameters—an object called sender
and an EventArgs called e—and have no return
value.
Each individual object subscribes to the event
Once we’ve got the event handler set up, the various Pitcher, Umpire, ThirdBaseman, and
Fan objects need to hook up their own event handlers. Each one of them will have its own specific
ball_BallInPlay method that responds differently to the event. So if there’s a Ball object
reference variable or field called ball, then the += operator will hook up the event handler:
ball.BallInPlay += new EventHandler(ball_BallInPlay);
4
Turn the page, there’s a little more....
This tells C# to hook the event
handler up to the BallInPlay
event of whatever object the ball
reference is pointing to.
The += operator tells
C# to subscribe an
event handler to an
event.
This part specifies which
event handler method to
subscribe to the event.
The event handler method’s signature
(its parameters and return value) has to
match the one defined by EventHandler
or the program won’t compile.
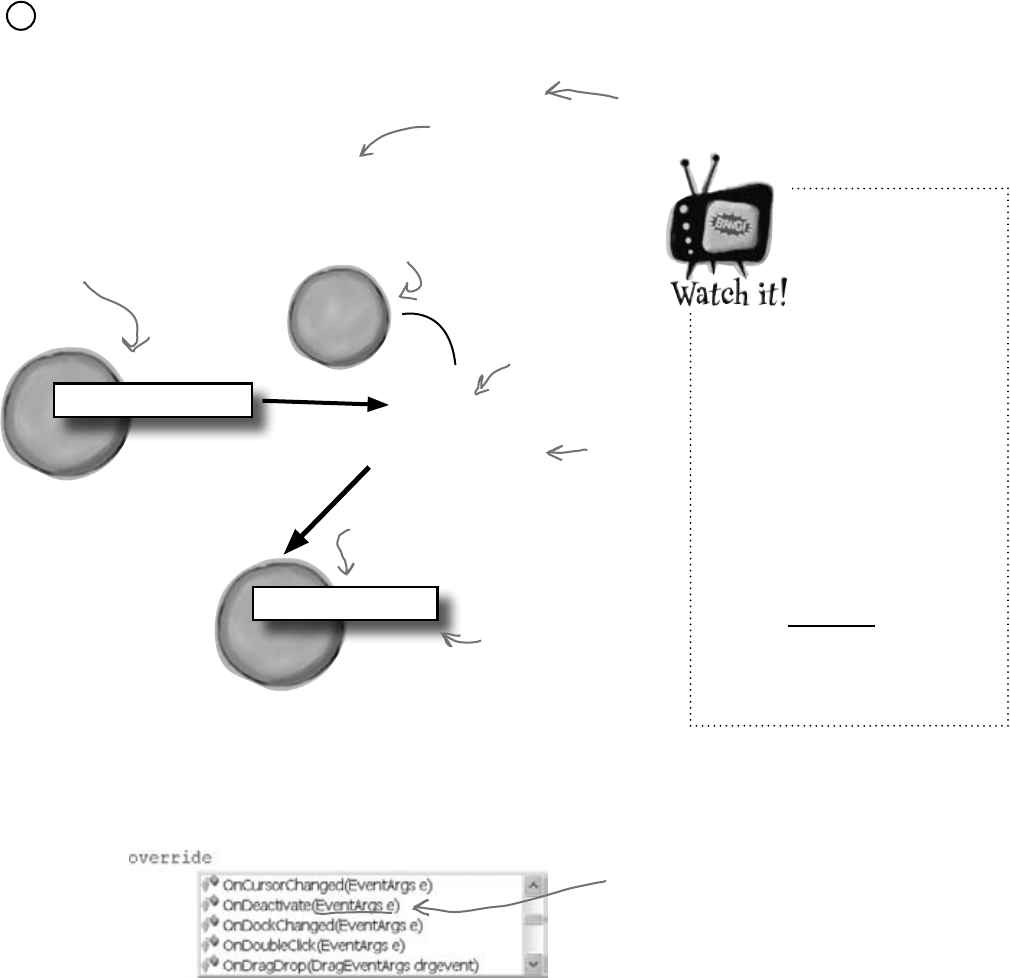
514 Chapter 11
If you raise an
event with no
handlers, it’ll
throw an
exception.
If no other objects have
added their event handlers
to an event, it’ll be null. So
always check to make sure
your event handler isn’t
equal to null before you raise
it. If you don’t, it’ll throw a
NullReferenceException.
That’s also why you should
copy the event to a variable
before you check to see if it’s
null—in extremely rare cases,
the event can become null
between the the null check
and the time that it’s called.
P
i
t
c
h
e
r
o
b
j
e
c
t
B
a
l
l
o
b
j
e
c
t
BallInPlay(this, e)
ball_BallInPlay()
The ball gets hit, and
the Ball object goes
into action…
…by creating a new
BallEventArgs object
with the right data…
…and
passing
it to the
event being
raised.
Now the
event is
active. Who’s
subscribed?
The pitcher hooked up its
event handler to the ball’s
BallInPlay event.
So the pitcher’s
method gets called
with the right data,
and can do what it
wants with the event.
~
BallInPlay event
B
a
l
l
E
v
e
n
t
A
r
g
s
A Ball object raises its event to notify subscribers that it’s in play
Now that the events are all set up, the Ball can raise its event in response to something else
that happens in the simulator. Raising an event is easy—it just calls the BallInPlay event.
EventHandler ballInPlay = BallInPlay;
if (ballInPlay != null)
ballInPlay(this, e);
5
Use a standard name when you add a method to raise an event
Take a minute and go to the code for any form, and type the keyword override any place you’d
declare a method. As soon as you press space, an IntelliSense window pops up:
There are a huge number of events that a Form object can raise, and every one of them has its own
method that raises it. The form’s OnDoubleClick() raises the DoubleClick event, and that’s
the whole reason it’s there. So the Ball event will follow the same convention: we’ll make sure it
has a method called OnBallInPlay that takes a BallEventArgs object as a parameter.
The baseball simulator will call that method any time it needs the ball to raise its BallInPlay
event—so when the simulator detects that the bat hit the ball, it’ll create a new instance of
BallEventArgs with the ball’s trajectory and distance and pass it to OnBallInPlay().
Notice how each of these methods
takes an EventArgs as a parameter?
They all pass that parameter on to
the event when they raise it.
e is a new
BallEventArgs object.
the event of the season
BallInPlay is copied to a variable,
ballInPlay, which is null-checked and
used to raise the event.
you are here 4 515
events and delegates
Q: Why do I need to include the word
EventHandler when I declare an
event? I thought the event handler was
what the other objects used to subscribe
to the events.
A:That’strue—whenyouneedto
subscribetoanevent,youwriteamethod
calledaneventhandler.Butdidyounotice
howweusedEventHandlerinthe
theeventdeclaration(step#2)andinthe
linetosubscribetheeventhandlertoit(step
#4)?WhatEventHandlerdoesis
definethesignatureoftheevent—ittells
theobjectssubscribingtotheeventexactly
howtheyneedtodefinetheireventhandler
methods.Specifically,itsaysthatifyouwant
tosubscribeamethodtothisevent,itneeds
totaketwoparameters(anobjectand
anEventArgsreference)andhavea
voidreturnvalue.
Q: What happens if I try to use a
method that doesn’t match the ones that
are defined by EventHandler?
A:Thenyourprogramwon’tcompile.
Thecompilerwillmakesurethatyou
don’teveraccidentallysubscribean
incompatibleeventhandlermethodtoan
event.That’swhythestandardeventhandler,
EventHandler,issouseful—assoon
asyouseeit,youknowexactlywhatyour
eventhandlermethodneedstolooklike.
Q:Wait, “standard” event handler?
There are other kinds of event handlers?
A:Yes!Youreventsdon’thave to
sendanobjectandanEventArgs.
Infact,theycansendanythingatall—or
nothingatall!Lookatthelastlineinthe
IntelliSensewindowatthebottomofthefacing
page.NoticehowtheOnDragDrop
methodtakesaDragEventArgs
referenceinsteadofanEventArgs
reference?DragEventArgs
inheritsfromEventArgs,just
likeBallEventArgsdoes.The
form’sDragDropeventdoesn’tuse
EventHandler.Itusessomethingelse,
DragEventArgs,andifyouwantto
handleit,youreventhandlermethodneedsto
takeanobjectandaDragEventArgs
reference.
Theparametersoftheeventaredefined
byadelegate—EventHandlerand
DragEventArgsaretwoexamplesof
delegates.Butwe’lltalkmoreaboutthatin
aminute.
Q: So I can probably have my event
handlers return something other than
void, too, right?
A:Well,youcan,butit’softenabadidea.
Ifyoudon’treturnvoidfromyourhandler,
youcan’tchaineventhandlers.Thatmeans
youcan’tconnectmorethanonehandler
toeachevent.Sincechainingisahandy
feature,you’ddobesttoalwaysreturn
voidfromyoureventhandlers.
Q:Chaining? What’s that?
A:It’showmorethanoneobjectcan
subscribetothesameevent—theychain
theireventhandlersontotheevent,oneafter
another.We’lltalkalotmoreaboutthatina
minute,too.
Q: Is that why I used += when when
I added my event handler? Like I’m
somehow adding a new handler to
existing handlers?
A:Exactly!Anytimeyouaddanevent
handler,youwanttouse+=.Thatway,your
handlerdoesn’treplaceexistinghandlers.
Itjustbecomesoneinwhatmaybeavery
longchainofothereventhandlers,allof
whicharelisteningtothesameevent.
Q:Why does the ball use “this” when
it raises the BallInPlay() event?
A:Becausethat’sthefirstparameter
ofthestandardeventhandler.Haveyou
noticedhoweveryClickeventhandler
methodhasaparameter“objectsender”?
Thatparameterisareference to the
object that’s raising the event.Soif
you’rehandlingabuttonclick,sender
pointstothebuttonthatwasclicked.And
ifyou’rehandlingaBallInPlay
event,senderwillpointtotheBall
objectthat’sinplay—andtheballsetsthat
parametertothiswhenitraisestheevent.
A SINGLE event is
always raised by a
SINGLE object.
But a SINGLE
event can be
responded to by
MULTIPLE objects.

516 Chapter 11
The IDE creates event handlers for you automatically
Most programmers follow the same convention for naming their event handlers. If
there’s a Ball object that has a BallInPlay event and the name of the reference
holding the object is called ball, then the event handler would typically be named
ball_BallInPlay(). That’s not a hard-and-fast rule, but if you write your code
like that, it’ll be a lot easier for other programmers to read.
Luckily, the IDE makes it really easy to name your event handlers properly. It has a
feature that automatically adds event handler methods for you when you’re
working with a class that raises an event. It shouldn’t be too surprising that the IDE
can do this for you—after all, this is exactly what it does when you double-click on a
button in your form.
Start a new Windows application and add the Ball and BallEventArgs
Here’s the Ball class:
class Ball {
public event EventHandler BallInPlay;
public void OnBallInPlay(BallEventArgs e) {
EventHandler ballInPlay = BallInPlay;
if (ballInPlay != null)
ballInPlay(this, e);
}
}
And here’s the BallEventArgs class:
class BallEventArgs : EventArgs {
public int Trajectory { get; private set; }
public int Distance { get; private set; }
public BallEventArgs(int trajectory, int distance) {
this.Trajectory = trajectory;
this.Distance = distance;
}
}
1
Do this
Start adding the Pitcher’s constructor
Add a new Pitcher class to your project. Then give it a constructor that takes a Ball reference
called ball as a parameter. There will be one line of code in the constructor to add its event
handler to ball.BallInPlay. Start typing the statement, but don’t type += yet.
public Pitcher(Ball ball) {
ball.BallInPlay
}
2
that’ll save you some typing
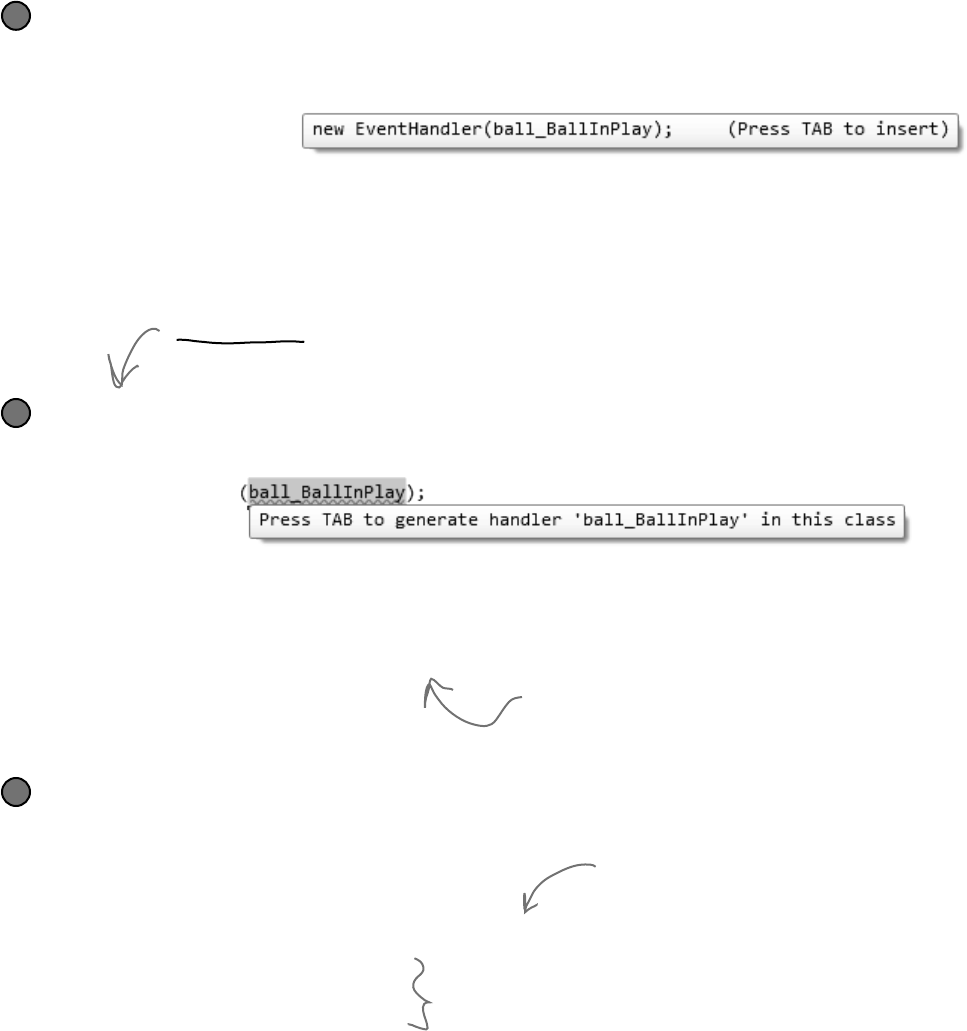
you are here 4 517
events and delegates
The IDE will add your event handler, too
You’re not done—you still need to add a method to chain onto the event. Luckily, the IDE takes care
of that for you, too.
new EventHandler
Hit the tab key again to make the IDE add this event handler method to your Pitcher class. The
IDE will always follow the objectName_HandlerName() convention:
void ball_BallInPlay(object sender, EventArgs e) {
throw new NotImplementedException();
}
4
Type += and the IDE will finish the statement for you
As soon as you type += in the statement, the IDE displays a very useful little box:
public Pitcher(Ball ball) {
ball.BallInPlay +=
}
3
As soon as you press the tab key, the IDE will finish the statement for you. It’ll look like this:
public Pitcher(Ball ball) {
ball.BallInPlay += new EventHandler(ball_BallInPlay);
}
Finish the pitcher’s event handler
Now that you’ve got the event handler’s skeleton added to your class, fill in the rest of its code. The
pitcher should catch any low balls; otherwise, he covers first base.
void ball_BallInPlay(object sender, EventArgs e) {
if (e is BallEventArgs) {
BallEventArgs ballEventArgs = e as BallEventArgs;
if ((ballEventArgs.Distance < 95) && (ballEventArgs.Trajectory < 60))
CatchBall();
else
CoverFirstBase();
}
}
5
The IDE always fills in this
NotImplementedException() as a placeholder so
if you run the code it’ll throw an exception
that tells you that you still need to implement
something it filled in automatically.
You’ll add these methods
in a minute.
When you double-click on a button in the form designer, the IDE does the
exact same trick—adding an event handler automatically—except that it adds
the code to the form’s InitializeComponent() method in the Form1.Designer.cs
file instead of just adding it to the end of the class file.
Since BallEventArgs is a subclass of
EventArgs, we’ll downcast it using the
as keyword so we can use its properties.
518 Chapter 11
2It’stimetoputwhatyou’velearnedsofarintopractice.YourjobistocompletetheBalland
Pitcherclasses,addaFanclass,andmakesuretheyallworktogetherwithaverybasic
versionofyourbaseballsimulator.
Complete the Pitcher class.
Below is what we’ve got for Pitcher. Add the CatchBall() and CoverFirstBase()
methods. Both should print out that the catcher has either caught the ball or run to first base.
1
class Pitcher {
public Pitcher(Ball ball) {
ball.BallInPlay += new EventHandler(ball_BallInPlay);
}
void ball_BallInPlay(object sender, EventArgs e) {
if (e is BallEventArgs){
BallEventArgs ballEventArgs = e as BallEventArgs;
if ((ballEventArgs.Distance < 95) && (ballEventArgs.Trajectory < 60))
CatchBall();
else
CoverFirstBase();
}
}
}
Write a Fan class.
Create another class called Fan. Fan should also subscribe to the
BallInPlay event in its constructor. The fan’s event handler should see if
the distance is greater than 400 feet and the trajectory is greater than 30 (a
home run), and grab for a glove to try and catch the ball if it is. If not, the fan
should scream and yell. Write out what’s going on with the fan to the console.
2
You’ll need to implement these
two methods to write a line of
output to the console.
P
i
t
c
h
e
r
o
b
j
e
c
t
F
a
n
o
b
j
e
c
t
?
Look at the output window on
the facing page to see exactly
what it should print.
put it all together

you are here 4 519
events and delegates
2
Build a very simple simulator.
Create a new application. The application should have two NumericUpDown
controls: one for the ball’s distance, and one for its trajectory. Add a button
labeled “Play ball!” When “Play ball!” is clicked, a ball is hit with the values in
the two NumericUpDowns. Your form should look something like this:
3
Create the following output.
See if you can make your simulator generate this output with three successive
balls put into play. Write down the values you used to get the result below:
4
Ball 3:
Trajectory:
Distance:
Ball 2:
Trajectory:
Distance:
Ball 1:
Trajectory:
Distance:
The value for trajectory
can range from 0 to
100, so set its Minimum
property to 0, Maximum
to 100, and Value to 20.
The Distance can range
from 0 to 500, with a
default value of 100.
Don’t forget to cast the
Value
properties to ints
before you use them.
520 Chapter 11
class Ball
{
public event EventHandler BallInPlay;
public void OnBallInPlay(BallEventArgs e) {
EventHandler ballInPlay = BallInPlay;
if (ballInPlay != null)
ballInPlay(this, e);
}
}
class BallEventArgs : EventArgs
{
public int Trajectory { get; private set; }
public int Distance { get; private set; }
public BallEventArgs(int trajectory, int distance)
{
this.Trajectory = trajectory;
this.Distance = distance;
}
}
class Fan {
public Fan(Ball ball)
{
ball.BallInPlay += new EventHandler(ball_BallInPlay);
}
void ball_BallInPlay(object sender, EventArgs e)
{
if (e is BallEventArgs) {
BallEventArgs ballEventArgs = e as BallEventArgs;
if (ballEventArgs.Distance > 400 && ballEventArgs.Trajectory > 30)
Console.WriteLine(“Fan: Home run! I’m going for the ball!”);
else
Console.WriteLine(“Fan: Woo-hoo! Yeah!”);
}
}
}
It’stimetoputwhatyou’velearnedsofarintopractice.YourjobistocompletetheBalland
Pitcherclasses,addaFanclass,andmakesuretheyallworktogetherwithaverybasic
versionofyourbaseballsimulator.
Read-only
automatic
properties work
really well in event
arguments because
the event handlers
only read the data
passed to them.
The OnBallInPlay() method just raises
the BallInPlay event—but it has
to check to make sure it’s not null,
otherwise it’ll throw an exception.
The Fan object’s constructor
chains its event handler onto the
BallInPlay event.
The fan’s BallInPlay
event handler looks
for any ball that’s
high and long.
exercise solution
you are here 4 521
events and delegates
class Pitcher {
public Pitcher(Ball ball) {
ball.BallInPlay += new EventHandler(ball_BallInPlay);
}
void ball_BallInPlay(object sender, EventArgs e) {
if (e is BallEventArgs) {
BallEventArgs ballEventArgs = e as BallEventArgs;
if ((ballEventArgs.Distance < 95) && (ballEventArgs.Trajectory < 60))
CatchBall();
else
CoverFirstBase();
}
}
private void CatchBall() {
Console.WriteLine(“Pitcher: I caught the ball”);
}
private void CoverFirstBase() {
Console.WriteLine(“Pitcher: I covered first base”);
}
}
public partial class Form1 : Form {
Ball ball = new Ball();
Pitcher pitcher;
Fan fan;
public Form1() {
InitializeComponent();
pitcher = new Pitcher(ball);
fan = new Fan(ball);
}
private void playBallButton_Click(object sender, EventArgs e) {
BallEventArgs ballEventArgs = new BallEventArgs(
(int)trajectory.Value, (int)distance.Value);
ball.OnBallInPlay(ballEventArgs);
}
}
75
105
48
80
Here are the values
we used to get the
output. Yours might
be a little different.
You already have the
pitcher’s BallInPlay event
handler. It looks for any
low balls.
The form needs one ball,
one fan, and one pitcher.
It hooks the fan and
pitcher up to the ball in
its constructor.
When the button’s clicked, the form tells the
pitcher to pitch the ball to the batter, which tells
the ball to fire off its BallInPlay event, which calls
the event handlers in the Pitcher and Fan objects.
Ball 3:
Trajectory:
Distance:
Ball 2:
Trajectory:
Distance:
Ball 1:
Trajectory:
Distance:
40
435
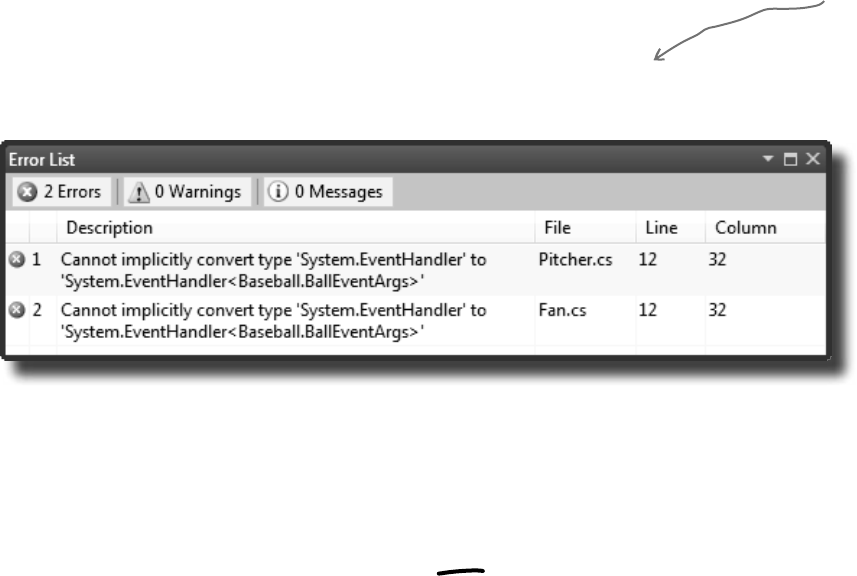
522 Chapter 11
Use implicit conversion by leaving out the new keyword and the event type
If you use the IDE to automatically create the event handler method like you did a few pages ago, it will always
contain the new keyword followed by the event handler type. But if you leave out the new keyword and the
event handler type, C# will do an implicit conversion and figure out the type for you:
ball.BallInPlay += ball_BallInPlay;
Try replacing the code in the Pitcher and Fan constructors with the line above. When you run the program,
it will still work just fine.
introducing the events page
Take a look at the event declaration in your Ball class:
public event EventHandler BallInPlay;
Now take a look at the Click event declaration from a button, form, and most of the other
controls you’ve been using:
public event EventHandler Click;
Notice anything? They have different names, but they’re declared exactly the same way. And
while that works just fine, someone looking at your class declaration doesn’t necessarily know
that the BallEventHandler will always pass it a BallEventArgs when the event is
fired. Luckily, .NET gives us a great tool to communicate that information very easily: a generic
EventHandler. Change your ball’s BallInPlay event handler so it looks like this:
Now rebuild your code. You should see two errors in the Error List window:
Generic EventHandlers let you define your own event types
public event EventHandler<BallEventArgs> BallInPlay;
Now that you changed the event declaration, your Pitcher and Fan classes need to be updated so that
they hook up to the events by passing the generic argument to EventHandler:
ball.BallInPlay += new EventHandler<BallEventArgs>(ball_BallInPlay);
The generic
argument to
EventHandler has
to be a subclass
of EventArgs.
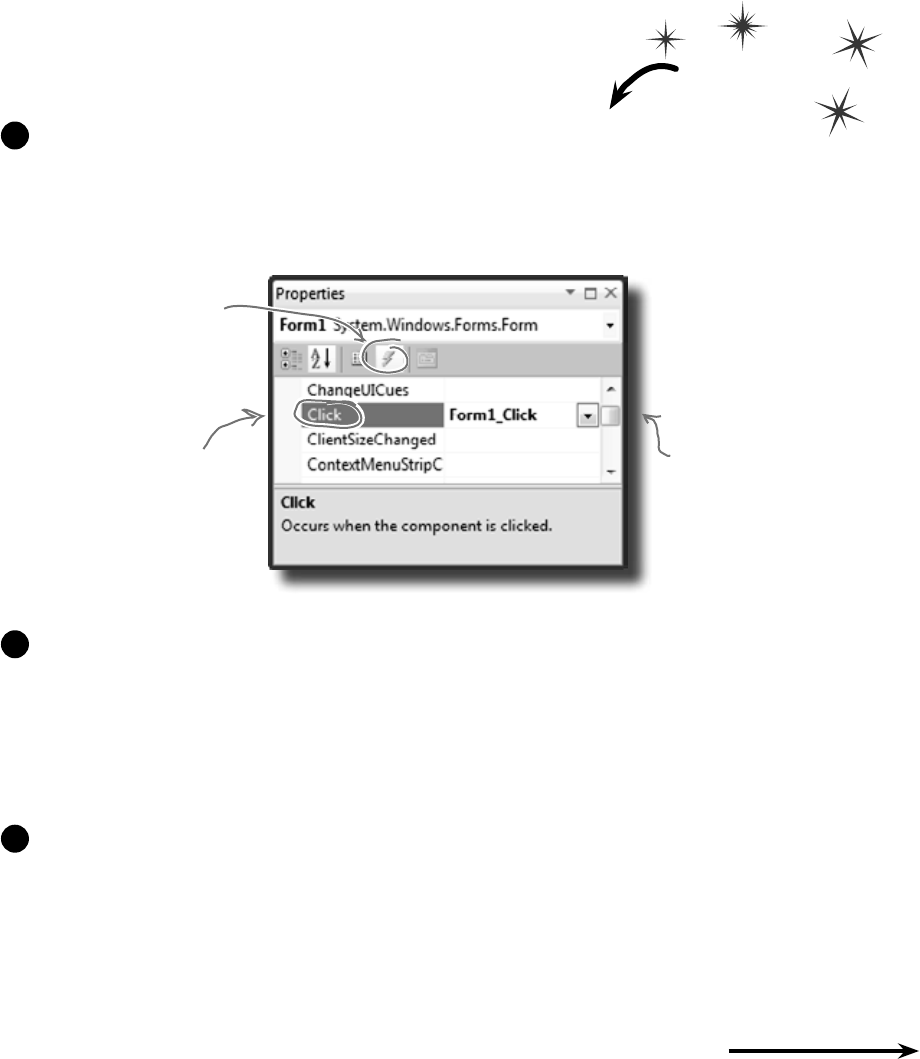
you are here 4 523
events and delegates
The forms you’ve been building all use events
Every time you’ve created a button, double-clicked on it in the designer,
and written code for a method like button1_Click(), you’ve been
working with events. Do this
Visual Studio did more than just write a little method declaration for you, though. It also
hooked the event handler up to the Form object’s Click event. Open up Form1.Designer.
cs and use the Quick Find (Edit >> Find and Replace >> Quick Find) feature in the IDE to
search for the text Form1_Click in the current project. You’ll find this line of code:
this.Click += new System.EventHandler(this.Form1_Click);
Now run the program and make sure your code works!
3
Create a new Windows Application project. Go to the Properties window for the form.
Remember those icons at the top of the window? Click on the Events button (it’s the one with
the lightning bolt icon) to bring up the events page in the Properties window:
1
Scroll down to Click and double-
click on the word “Click”. When
you do, the IDE will add a new
click event handler to your form
that gets fired every time you
click on it. And it’ll add a line
to Form1.Designer.cs to hook the
event handler up to the event.
You can see all of the
events for a control:
just click on it and
then click on this
events button in the
Properties window.
You can create an event that
will fire every time someone
clicks on the form by selecting
Form1_Click next to Click in the
events window.
Double-click on the “Click” row in the events page. The IDE will automatically add an event
handler method to your form called Form1_Click. Add this line of code to it:
private void Form1_Click(object sender, EventArgs e) {
MessageBox.Show(“You just clicked on the form”);
}
2
You’re not done yet—flip the page!

524 Chapter 11
Event handlers always need to be “hooked up.”
If you drag a button onto your form and add a method
called button1_Click() that has the right parameters
but isn’t registered to listen to your button, the method
won’t ever get called. Double-click on the button in the
designer—the IDE will see the default event handler name is taken, so
it’ll add an event handler for the button called button1_Click_1().
introducing the events page
Here’s a really useful thing that you can do with events: you can chain them
so that one event or delegate calls many methods, one after another. Let’s
add a few buttons to your application to see how it works.
Add these two methods to your form:
private void SaySomething(object sender, EventArgs e) {
MessageBox.Show(“Something”);
}
private void SaySomethingElse(object sender, EventArgs e) {
MessageBox.Show(“Something else”);
}
Now add two buttons to your form. Double-click on each button to add its event
handler. Here’s the code for both event handlers:
private void button1_Click(object sender, EventArgs e) {
this.Click += new EventHandler(SaySomething);
}
private void button2_Click(object sender, EventArgs e) {
this.Click += new EventHandler(SaySomethingElse);
}
4
5
One event, multiple handlers
Q: When I added a new
event handler to the Pitcher
object, why did the IDE make it
throw an exception?
A:Itaddedcodetothrow
aNotImplementedException
toremindyouthatyoustill
needtoimplementcodethere.
That’sareallyusefulexception,
becauseyoucanuseitasa
placeholderjustliketheIDEdid.
Forexample,you’lltypicallyuse
itwhenyouneedtobuildthe
skeletonofaclassbutyoudon’t
wanttofillinallthecodeyet.
Thatway,ifyourprogramthrows
thatexception,youknowit’s
becauseyoustillneedtofinish
thecode,andnotbecauseyour
programisbroken.
Before you go on, take a minute and think about what those two buttons do. Each button hooks up a
new event handler to the form’s Click event. In the first three steps, you used the IDE to add an
event handler as usual to pop up a message box every time the form fired its Click event—it added code
to Form1.Designer.cs that used the += operator to hook up its event handler.
Now you added two buttons that use the exact same syntax to chain additional event handlers onto the
same Click event. So before you go on, try to guess what will happen if you run the program, click the
first button, then click the second button, and then click on the form. Can you figure it out before you run
the program?

you are here 4 525
events and delegates
So what happened?
Every time you clicked one of the buttons, you chained another method—either Something()
or SomethingElse()—onto the form’s Click event. You can keep clicking the buttons, and
they’ll keep chaining the same methods onto the event. The event doesn’t care how many
methods are chained on, or even if the same method is in the chain more than once. It’ll just call
them all every time the event fires, one after another, in the order they were added.
SaySomething()
SaySomethingElse()
F
o
r
m
1
o
b
j
e
c
t
~
Click event
Form1_Click()
SaySomethingElse()
The same method
can be chained on
to an event more
than once.
When you click these buttons,
they chain different event
handlers onto the form’s
Click event.
That means you won’t see
anything when you click the
buttons! You’ll need to click
on the form, because the
buttons change the form’s
behavior by modifying its
Click event.
Now run your program and do this:
≥Click the form—you’ll see a message box pop up that says, “You just clicked on the form”.
≥Now click button1 and then click on the form again. You’ll see two message boxes
pop up: “You just clicked on the form” and then “Something”.
≥Click button2 twice and then click on the form again. You’ll see four message boxes:
“You just clicked on the form”, “Something”, “Something else”, and “Something else”.
Just what you’d expect–the
form’s Click event handler
pops up a message box.
But every time you
click a button, it
causes yet another
message box to pop
up the next time
you click on the
form!
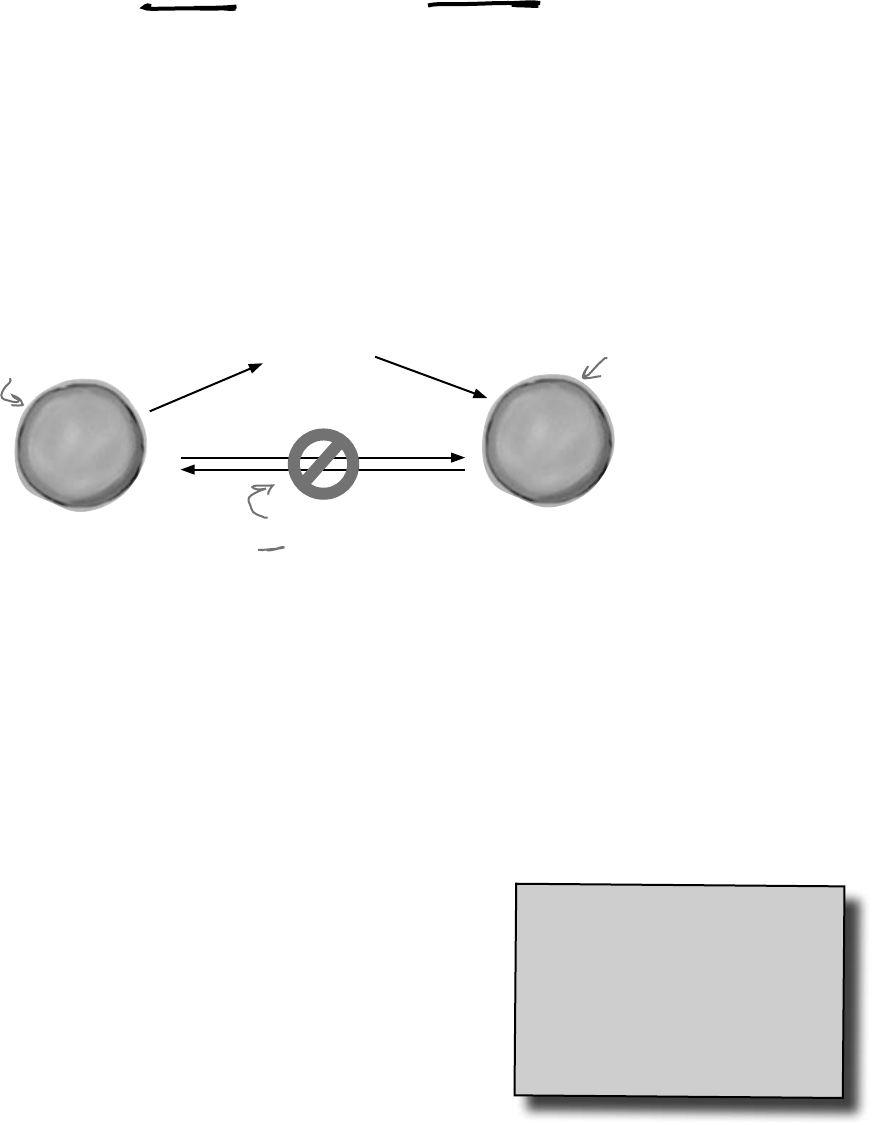
526 Chapter 11
Connecting event senders with event receivers
One of the trickiest things about events is that the sender of the event has
to know what kind of event to send—including the arguments to pass to the
event. And the receiver of the event has to know about the return type and the
arguments its handler methods must use.
But—and here’s the tricky part—you can’t tie the sender and receiver together.
You want the sender to send the event and not worry about who receives it. And the
receiver cares about the event, not the object that raised the event. So both sender
and receiver focus on the event, not each other.
del-e-gate, noun.
a person sent or
authorized to represent
others. The president sent
a delegate to the summit.
Ball needs to know
about BallInPlay,
because it needs to
raise that event.
Pitcher needs to know about
BallInPlay, so it can respond
to that event, and build an
appropriate event handler.
Ball does NOT want to worry
about Pitcher. It doesn’t care
what type of object works with it:
Fan, Pitcher, Umpire, etc.
~
BallInPlay event
“My people will get in touch with your people.”
You know what this code does:
Ball currentBall;
It creates a reference variable that can point to any Ball object. It’s
not tied to a single Ball. Instead, it can point to any ball object—or it
can be null, and not point to anything at all.
An event needs a similar kind of reference—except instead of pointing
to an object, it needs one that points to a method. Every event needs
to keep track of a list of methods that are subscribed to it. You’ve already
seen that they can be in other classes, and they can even be private. So
how does it keep track of all of the event handler methods that it needs
to call? It uses something called a delegate.
P
i
t
c
h
e
r
o
b
j
e
c
t
B
a
l
l
o
b
j
e
c
t
givers and receivers
you are here 4 527
events and delegates
A delegate STANDS IN for an actual method
One of the most useful aspects of events is that when an event fires, it has no idea
whose event handler methods it’s calling. Anyone who happens to subscribe to an event
gets his event handler called. So how does the event manage that?
It uses a C# type called a delegate. A delegate is a special kind of reference type that
lets you refer to a method inside a class…and delegates are the basis for events.
You’ve actually already been using delegates throughout this chapter! When you created
the BallInPlay event, you used EventHandler. Well, an EventHandler is
just a delegate. If you right-click on EventHandler in the IDE and select “Go to
definition”, this is what you’ll see (try it yourself):
public delegate void EventHandler(object sender, EventArgs e);
A delegate adds a new type to your project
When you add a delegate to your project, you’re adding a delegate type. And when you use it to create a field or variable,
you’re creating an instance of that delegate type. So create a new Console Application project. Then add a new
class file to the project called ConvertsIntToString.cs. But instead of putting a class inside it, add a single line:
delegate string ConvertsIntToString(int i);
Next, add a method called HiThere() to your Program class:
private static string HiThere(int i)
{
return "Hi there! #" + (i * 100);
}
Finally, fill in the Main() method:
static void Main(string[] args)
{
ConvertsIntToString someMethod = new ConvertsIntToString(HiThere);
string message = someMethod(5);
Console.WriteLine(message);
Console.ReadKey();
}
The someMethod variable is pointing to the HiThere() method. When your program calls someMethod(5), it calls
HiThere() and passes it the argument 5, which causes it to return the string value “Hi there! #500”—exactly as if it
were called directly. Take a minute and step through the program in the debugger to see exactly what’s going on.
Do this
So this delegate can be
used to reference any
method that takes an
object and an EventArgs
and has no return value.
When you create a
delegate, all you need
to do is specify the
signature of methods
that it can point to.
This specifies the return value of the delegate’s
signature—which means an EventHandler can only
point to methods with void return values.
The name of this delegate is
EventHandler.
You can set someMethod just like any other
variable. When you call it like a method, it calls
whatever method it happens to point to.
This method’s signature
matches ReturnsAString.
ConvertsIntToString is a delegate type that
you’ve added to your project. Now you can
use it to declare variables. This is just like
how you can use a class or interface as a
type to define variables.
someMethod is a variable whose type is
ConvertsIntToString. It’s a lot like a reference
variable, except instead of putting a label on an
object on the heap you’re putting a label on a method.
528 Chapter 11
Do this
Delegates in action
There’s nothing mysterious about delegates—in fact, they
don’t take much code at all to use. Let’s use them to help a
restaurant owner sort out his top chef ’s secret ingredients.
Create a new Windows project and add a delegate
Delegates usually appear outside of any other classes, so add a new class file to your project and
call it GetSecretIngredient.cs. It will have exactly one line of code in it:
delegate string GetSecretIngredient(int amount);
(Make sure you delete the class declaration entirely.) This delegate can be used to create a variable
that can point to any method that takes one int parameter and returns a string.
1
Add a class for the first chef, Suzanne
Suzanne.cs will hold a class that keeps track of the first chef ’s secret ingredient. It has a
private method called SuzannesSecretIngredient() with a signature that matches
GetSecretIngredient. But it also has a read-only property—and check out that property’s
type. It returns a GetSecretIngredient. So other objects can use that property to get a
reference to her SuzannesIngredientList() method.
class Suzanne {
public GetSecretIngredient MySecretIngredientMethod {
get {
return new GetSecretIngredient(SuzannesSecretIngredient);
}
}
private string SuzannesSecretIngredient(int amount) {
return amount.ToString() + “ ounces of cloves”;
}
}
2
Then add a class for the second chef, Amy
Amy’s method works a lot like Suzanne’s:
class Amy {
public GetSecretIngredient AmysSecretIngredientMethod {
get {
return new GetSecretIngredient(AmysSecretIngredient);
}
}
private string AmysSecretIngredient(int amount) {
if (amount < 10)
return amount.ToString()
+ “ cans of sardines -- you need more!”;
else
return amount.ToString() + “ cans of sardines”;
}
}
3
Amy’s GetSecretIngredient property
returns a new instance of the
GetSecretIngredient delegate that’s
pointing to her secret ingredient method.
Amy’s secret
ingredient method
also takes an int
called amount and
returns a string,
but it returns a
different string
from Suzanne’s.
Suzanne’s secret
ingredient method
takes an int
called amount and
returns a string
that describes her
secret ingredient.
delegate your authority
you are here 4 529
events and delegates
Create a new Windows project and add a delegate
Build this form.
Here’s the code for the form:
GetSecretIngredient ingredientMethod = null;
Suzanne suzanne = new Suzanne();
Amy amy = new Amy();
private void useIngredient_Click(object sender, EventArgs e) {
if (ingredientMethod != null)
Console.WriteLine(“I’ll add ” + ingredientMethod((int)amount.Value));
else
Console.WriteLine(“I don’t have a secret ingredient!”);
}
private void getSuzanne_Click(object sender, EventArgs e) {
ingredientMethod = new GetSecretIngredient(suzanne.MySecretIngredientMethod);
}
private void getAmy_Click(object sender, EventArgs e) {
ingredientMethod = new GetSecretIngredient(amy.AmysSecretIngredientMethod);
}
4
Use the debugger to explore how delegates work
You’ve got a great tool—the IDE’s debugger—that can really help you get a handle on how delegates work.
Do the following steps:
≥Start by running your program. First click the “Get the ingredient” button—it should write a line to
the console that says, “I don’t have a secret ingredient!”
≥Click the “Get Suzanne’s delegate” button—that takes the form’s ingredientMethod field
(which is a GetSecretIngredient delegate)—and sets it equal to whatever Suzanne’s
GetSecretIngredient property returns. That property returns a new instance of the
GetSecretIngredient type that’s pointing to the SuzannesSecretIngredient() method.
≥Click the “Get the ingredient” button again. Now that the form’s ingredientMethod field
is pointing to SuzannesSecretIngredient(), it calls that, passing it the value in the
numericUpDown control (make sure it’s named amount) and writing its output to the console.
≥Click the “Get Amy’s delegate” button. It uses the Amy.GetSecretIngredient property to set the
form’s ingredientMethod field to point to the AmysSecretIngredient() method.
≥Click the “Get the ingredient” button one more time. Now it calls Amy’s method.
≥Now use the debugger to see exactly what’s going on. Place a breakpoint on the first line of each of
the three methods in the form. Then restart the program (which resets the ingredientMethod
so that it’s equal to null), and start over with the above five steps. Use the Step Into (F11) feature
of the debugger to step through every line of code. Watch what happens when you click “Get the
ingredient”. It steps right into the Suzanne and Amy classes, depending on which method the
ingredientMethod field is pointing to.
5

530 Chapter 11
Pool Puzzle
Your job is to take snippets from the pool
and place them into the blank lines in the
code. You can use the same snippet more
than once, and you won’t need to use all
the snippets. Your goal is to complete the
code for a form that writes this output to
the console when its button1 button is
clicked.
Output
Fingers is coming to get you!
Note: Each thing from
the pool can be used
more than once
public Form1() {
InitializeComponent();
this.______ += new EventHandler(Minivan);
this.______ += new EventHandler(____________);
}
void Towtruck(object sender, EventArgs e) {
Console.Write(“is coming ”);
}
void Motorcycle(object sender, EventArgs e) {
button1.______ += new EventHandler(____________);
}
void Bicycle(object sender, EventArgs e) {
Console.WriteLine(“to get you!”);
}
void ____________(object sender, EventArgs e) {
button1.______ += new EventHandler(Dumptruck);
button1.______ += new EventHandler(____________);
}
void ____________(object sender, EventArgs e) {
Console.Write(“Fingers ”);
}
Load
Save
Open
Close
Click
Scroll
+
++
==
-=
=
Van
Car
Minivan
Motorcycle
Tricycle
Airplane
Bicycle
Dumptruck
Towtruck
Flatbed
event
delegate
int
private
public
some events are too public
you are here 4 531
events and delegates
B
a
t
E
v
e
n
t
A
r
g
s
B
a
l
l
o
b
j
e
c
t
B
a
t
o
b
j
e
c
t
An object can subscribe to an event…
Suppose we add a new class to our simulator, a Bat class, and that class adds a
HitTheBall event into the mix. Here’s how it works: if the simulator detects that the
player hit the ball, it calls the Bat object’s OnHitTheBall() method, which raises a
HitTheBall event.
So now we can add a bat_HitTheBall method to the Ball class that subscribes to
the Bat object’s HitTheBall event. Then when the ball gets hit, its own event handler
calls its OnBallInPlay() method to raise its own event, BallInPlay, and the chain
reaction begins. Fielders field, fans scream, umpires yell…we’ve got a ball game.
bat.OnHitTheBall() bat_HitTheBall()
Now its event handler can
take information about
how hard the swing was,
figure out the distance
and trajectory, and raise a
BallInPlay event.
~
HitTheBall event
The simulator detects that
the bat collided with the ball,
so it calls the bat object’s
OnHitTheBall() method.
Ball subscribed to the
HitTheBall event.
…but that’s not always a good thing!
There’s only ever going to be one ball in play at any time. But if the Bat
object uses an event to announce to the ball that it’s been hit, then any Ball
object can subscribe to it. And that means we’ve set ourselves up for a nasty
little bug—what happens if a programmer accidentally adds three more
Ball objects? Then the batter will swing, hit, and four different balls
will fly out into the field!
B
a
l
l
o
b
j
e
c
t
B
a
l
l
o
b
j
e
c
t
bat_HitTheBall()
bat_HitTheBall()
Uh-oh! These balls were
supposed to be held in reserve
in case the first one was hit
out of the park.
B
a
t
E
v
e
n
t
A
r
g
s
~
HitTheBall event
B
a
l
l
o
b
j
e
c
t
bat_HitTheBall()
B
a
l
l
o
b
j
e
c
t
bat_HitTheBall()
But a careless programmer subscribed
them all to the bat’s HitTheBall
event…so when the bat hit the ball
that the pitcher threw, all four of
them flew out into the field!
532 Chapter 11
callbacks to the rescue
B
a
l
l
o
b
j
e
c
t
B
a
l
l
o
b
j
e
c
t
B
a
l
l
o
b
j
e
c
t
B
a
l
l
o
b
j
e
c
t
B
a
t
o
b
j
e
c
t
Use a callback to control who’s listening
Our system of events only works if we’ve got one Ball and one Bat. If you’ve got several
Ball objects, and they all subscribe to the public event HitTheBall, then they’ll all go
flying when the event is raised. But that doesn’t make any sense…it’s really only one Ball
object that got hit. We need to let the one ball that’s being pitched hook itself up to the bat,
but we need to do it in a way that doesn’t allow any other balls to hook themselves up.
That’s where a callback comes in handy. It’s a technique that you can use with delegates.
Instead of exposing an event that anyone can subscribe to, an object uses a method (often a
constructor) that takes a delegate as an argument and holds onto that delegate in a private
field. We’ll use a callback to make sure that the Bat notifies exactly one Ball:
HitTheBall() OnBallInPlay()
BallHasBeenHit()
BallHasBeenHit()
BallHasBeenHit()
The Bat will keep its delegate field private
The easiest way to keep the wrong Ball objects from chaining themselves onto the Bat’s
delegate is for the bat to make it private. That way, it has control over which Ball object’s
method gets called.
1
The Bat’s constructor takes a delegate that points to a method in the ball
When the ball is in play, it creates the new instance of the bat, and it passes the Bat object a
pointer to its OnBallInPlay() method. This is called a callback method because the
Bat is using it to call back to the object that instantiated it.
2
When the bat hits the ball, it calls the callback method
But since the bat kept its delegate private, it can be 100% sure that no other ball has been hit.
That solves the problem!
3
p
r
i
v
a
t
e
hitBallCallback
B
a
t
o
b
j
e
c
t
hitBallCallback
The Ball object passes a delegate
reference to its own OnBallInPlay()
method to the Bat’s constructor.
The bat saves that delegate in its
private hitTheBallCallback field.
The other balls can’t
chain themselves onto
the delegate because
it’s a private field in
the Bat object.
Now the Bat object can
call its hitBallCallback
delegate, which calls
the Ball object’s
OnBallInPlay() method.
you are here 4 533
events and delegates
public Form1() {
InitializeComponent();
this.Load += new EventHandler(Minivan);
this.Load += new EventHandler(Motorcycle);
}
void Towtruck(object sender, EventArgs e) {
Console.Write(“is coming ”);
}
void Motorcycle(object sender, EventArgs e) {
button1.Click += new EventHandler(Bicycle);
}
void Bicycle(object sender, EventArgs e) {
Console.WriteLine(“to get you!”);
}
void Minivan(object sender, EventArgs e) {
button1.Click += new EventHandler(Dumptruck);
button1.Click += new EventHandler(Towtruck);
}
void Dumptruck(object sender, EventArgs e) {
Console.Write(“Fingers ”);
}
The constructor
chains two event
handlers onto
the load events.
They get fired
off as soon
as the form is
loaded.
The two Load event handlers
hook up three separate event
handlers to the button’s
Click event handler.
When the button
is clicked, it calls
the three event
handlers that are
chained to it.
The Case of the Golden Crustacean
Henry “Flatfoot” Hodgkins is a TreasureHunter. He’s hot on the trail of one of the most
prized possessions in the rare and unusual aquatic-themed jewelry markets: a jade-encrusted
translucent gold crab. But so are lots of other TreasureHunters. They all got a reference to
the same crab in their constructor, but Henry wants to claim the prize first.
In a stolen set of class diagrams, Henry discovers that the GoldenCrab class raises a
RunForCover event every time anyone gets close to it. Even better, the event includes
NewLocationArgs, which detail where the crab is moving to. But none of the other
treasure hunters know about the event, so Henry figures he can cash in.
Henry adds code to his constructor to register his treasure_RunForCover( )
method as an event handler for the RunForCover event on the crab reference he’s got.
Then, he sends a lowly underling after the crab, knowing it will run away, hide, and raise
the RunForCover event—giving Henry’s treasure_RunForCover( ) method all the
information he needs.
Everything goes according to plan, until Henry gets the new location and rushes to grab the
crab. He’s stunned to see three other TreasureHunters already there, fighting over the crab.
How did the other treasure hunters beat Henry to the crab?
Pool Puzzle
Solution
Answers on page 537.
Five Minute
Mystery
534 Chapter 11
A callback is just a way to use delegates
A callback is a different way of using a delegate. It’s not a new
keyword or operator. It just describes a pattern—a way that you use
delegates with your classes so that one object can tell another object,
“Notify me when this happens—if that’s OK with you!”
We set the callback in the Bat object’s constructor. But
in some cases, it makes more sense to set up the callback
method using a public method or property’s set accessor.
Do this
Define another delegate in your baseball project
Since the Bat will have a private delegate field that points to the Ball object’s OnBallInPlay()
method, we’ll need a delegate that matches its signature:
delegate void BatCallback(BallEventArgs e);
1
Add the Bat class to the project
The Bat class is simple. It’s got a HitTheBall() method that the simulator will call every time
a ball is hit. That HitTheBall() method uses the hitBallCallback() delegate to call the
ball’s OnBallInPlay() method (or whatever method is passed into its constructor).
class Bat {
private BatCallback hitBallCallback;
public Bat(BatCallback callbackDelegate) {
this.hitBallCallback = new BatCallback(callbackDelegate);
}
public void HitTheBall(BallEventArgs e) {
if (hitBallCallback != null)
hitBallCallback(e);
}
}
2
We’ll need to hook the bat up to a ball
So how does the Bat’s constructor get a reference to a particular ball’s OnBallInPlay() method?
Easy—just call that Ball object’s GetNewBat() method, which you’ll have to add to Ball:
public Bat GetNewBat()
{
return new Bat(new BatCallback(OnBallInPlay));
}
3
The Bat object’s callback will point to a
Ball object’s OnBallInPlay() method, so
the callback’s delegate needs to match the
signature of OnBallInPlay()—so it needs to
take a BallEventArgs parameter and have
a void return value.
Make sure you
check every
delegate to
make sure
it’s not null,
otherwise it
could throw a
null reference
exception.
The Ball’s GetNewBat() method
creates a new Bat object, and it uses
the BatCallBack delegate to pass a
reference to its own OnBallInPlay()
method to the new bat. That’s the
callback method the bat will use when
it hits the ball.
leave a message i’ll call you back
Delegates don’t always need to live in their own files.
Try putting this one in the same file as Bat.
We used = instead of += because in this case, we only want one bat to listen to any
one ball, so this delegate only gets set once. But there’s nothing stopping you from
writing a callback that uses += to call back to multiple methods. The point of the
callback is that the object doing the calling is in control of who’s listening. In an
event, other objects demand to be notified by adding event handlers. In a callback,
other objects simply turn over their delegates and politely ask to be notified.
you are here 4 535
events and delegates
¢Whenyouaddadelegatetoyourproject,you’re
creating a new type thatstoresreferencestomethods.
¢Eventsusedelegatestonotifyobjectsthatactionshave
occurred.
¢Objectssubscribetoanobject’seventiftheyneedto
reacttosomethingthathappenedinthatobject.
¢AnEventHandlerisakindofdelegatethat’sreally
commonwhenyouworkwithevents.
¢Youcanchainseveraleventhandlersontooneevent.
That’swhyyouuse+=toassignahandlertoanevent.
¢Alwayscheckthataneventordelegateisnotnullbefore
youuseittoavoidaNullReferenceException.
¢Allofthecontrolsinthetoolboxuseeventstomake
thingshappeninyourprograms.
¢Whenoneobjectpassesareferencetoamethodto
anotherobjectsoit—andonlyit—canreturninformation,
it’scalledacallback.
¢Eventsletanymethodsubscribetoyourobject’sevents
anonymously,whilecallbacksletyourobjectsexercise
morecontroloverwhichdelegatestheyaccept.
¢Bothcallbacksandeventsusedelegatestoreference
andcallmethodsinotherobjects.
¢Thedebuggerisareallyusefultooltohelpyou
understandhowevents,delegates,andcallbackswork.
Takeadvantageofit!
Now we can encapsulate the Ball class a little better
It’s unusual for one of the On... methods that raise an event to be public. You can check this
for yourself—go to the form and try to call the playBall button’s OnClick() event. You won’t
be able to, because it’s protected (so a subclass can override it). So let’s follow that pattern with
our ball, too, by making its OnBallInPlay() method protected:
protected void OnBallInPlay(BallEventArgs e) {
EventHandler<BallEventArgs> ballInPlay = BallInPlay;
if (ballInPlay != null)
ballInPlay(this, e);
}
4
All that’s left to do is hook up the form
The form can’t call the Ball object’s OnBallInPlay() method anymore—which is exactly
what we wanted. That’s why we set up the Ball.GetNewBat() method. Now the form needs
to ask the Ball for a new bat in order to hit the ball. And when it does, the Ball object will
make sure that its OnBallInPlay() method is hooked up to the bat’s callback.
private void playBallButton_Click(object sender, EventArgs e)
{
Bat bat = ball.GetNewBat();
BallEventArgs ballEventArgs = new BallEventArgs(
(int)trajectory.Value, (int)distance.Value);
bat.HitTheBall(ballEventArgs);
}
Now run the program—it should work exactly like it did before. But it’s now protected from
any problems that would be caused by more than one ball listening for the same event.
5
This is a really standard pattern that you’ll
see over and over again when you work with
.NET classes. When a .NET class has an event
that gets fired, you’ll almost always find a
protected method that starts with “On”.
If the form (or the simulator) wants
to hit a Ball object, it needs to
get a new Bat object from that
ball. The ball will make sure that
the callback is hooked up to the bat.
Now when the form calls the bat’s
HitTheBall() method, it calls the
ball’s OnBallInPlay() method, which
fires its BallInPlay event.
But don’t take our word for it—pop it open in the debugger!
536 Chapter 11
Q: How are callbacks different from events?
A:Eventsanddelegatesarepartof.NET.They’reawayforone
objecttoannouncetootherobjectsthatsomethingspecifichas
happened.Whenoneobjectpublishesanevent,anynumberofother
objectscansubscribetoitwithoutthepublishingobjectknowingor
caring.Whenanobjectfiresoffanevent,ifanyonehappenstohave
subscribedtoitthenitcallseachoftheireventhandlers.
Callbacksarenotpartof.NETatall—instead,“callback”isjusta
nameforthewayweusedelegates(orevents—there’snothing
stoppingyoufromusingaprivateeventtobuildacallback).A
callbackisjustarelationshipbetweentwoclasseswhereoneobject
requeststhatitbenotified.Comparethistoanevent,whereone
objectdemandsthatitbenotifiedofthatevent.
Q: So a callback isn’t an actual type in .NET?
A:No,itisn’t.Acallbackisapattern—it’sjustanovelwayof
usingtheexistingtypes,keywords,andtoolsthatC#comeswith.Go
backandtakeanotherlookatthecallbackcodeyoujustwrotefor
thebatandball.Didyouseeanynewkeywordsthatwehaven’tused
before?Nope!Butitdoesuseadelegate,whichisa.NETtype.
Itturnsoutthattherearealotofpatternsthatyoucanuse.Infact,
there’sawholeareaofprogrammingcalleddesign patterns. Alotof
problemsthatyou’llrunintohavebeensolvedbefore,andtheones
thatpopupoverandoveragainhavetheirowndesignpatternsthat
youcanbenefitfrom.
Q: So callbacks are just private events?
A:Notquite.Itseemseasytothinkaboutitthatway,but
privateeventsareadifferentbeastaltogether.Rememberwhat
theprivateaccessmodifierreallymeans?Whenyoumark
aclassmemberprivate,onlyinstancesofthatsameclass
canaccessit.Soifyoumarkaneventprivate,thenother
instancesofthesameclasscansubscribetoit.That’sdifferentfrom
acallback,becauseitstillinvolvesoneormoreobjectsanonymously
subscribingtoanevent.
Q: But it looks just like an event, except with the event
keyword, right?
A:Thereasonacallbacklookssomuchlikeaneventisthat
theybothusedelegates.Anditmakessensethattheybothuse
delegates,becausethat’sC#’stoolforlettingoneobjectpass
anotherobjectareferencetooneofitsmethods.
Butthebigdifferencebetweennormaleventsandcallbacksis
thataneventisawayforaclasstopublishtotheworldthatsome
specificthinghashappened.Acallback,ontheotherhand,isnever
published.It’sprivate,andthemethodthat’sdoingthecallingkeeps
tightcontroloverwhoit’scalling.
Check out “Head First Design Patterns” at the Head First
Labs website. It’s a great way to learn about different
patterns that you can apply to your own programs.
www.headfirstlabs.com/books/hfdp/
The first one you’ll learn about is called
the “Observer” (or “Publisher-Subscriber”)
pattern, and it’ll look really familiar to
you. One object publishes information, and
other objects subscribe to it. Hmmm....
design patterns are useful

you are here 4 537
events and delegates
The Case of the Golden Crustacean
How did the other treasure hunters beat Henry to the crab?
The crux of the mystery lies in how the treasure hunter seeks his quarry. But
first we’ll need to see exactly what Henry found in the stolen diagrams.
In a stolen set of class diagrams, Henry discovers that the GoldenCrab class raises
a RunForCover event every time anyone gets close to it. Even better, the event includes
NewLocationArgs, which detail where the crab is moving to. But none of the other
treasure hunters know about the event, so Henry figures he can cash in.
Five Minute
Mystery
Solved
class GoldenCrab {
public delegate void Escape(NewLocationArgs e);
public event Escape RunForCover;
public void SomeonesNearby() {
NewLocationArgs e = new NewLocationArgs(“Under the rock”);
RunForCover(e);
}
}
class NewLocationArgs {
public NewLocationArgs(HidingPlace newLocation) {
this.newLocation = newLocation;
}
private HidingPlace newLocation;
public HidingPlace NewLocation { get { return newLocation; } }
}
So how did Henry take advantage of his newfound insider information?
Henry adds code to his constructor to register his treasure_RunForCover() method as an event handler for the
RunForCover event on the crab reference he’s got. Then, he sends a lowly underling after the crab, knowing it
will run away, hide, and raise the RunForCover event—giving Henry’s treasure_RunForCover() method all the
information he needs.
class TreasureHunter {
public TreasureHunter(GoldenCrab treasure) {
treasure.RunForCover += new GoldenCrab.Escape(treasure_RunForCover);
}
void treasure_RunForCover(NewLocationArgs e) {
MoveHere(e.NewLocation);
}
void MoveHere(HidingPlace Location) {
// ... code to move to a new location ...
}
}
And that explains why Henry’s plan backfired. When he added the event handler to the
TreasureHunter constructor, he was inadvertently doing the same thing for all of the treasure
hunters! And that meant that every treasure hunter’s event handler got chained onto the same
RunForCover event. So when the Golden Crustacean ran for cover, everyone was notified about the
event. And all of that that would have been fine if Henry were the first one to get the message. But Henry
had no way of knowing when the other treasure hunters would have been called—if they subscribed
before he did, they’d get the event first.
Any time someone comes
close to the golden crab,
its SomeonesNearby()
method fires off a
RunForCover event, and
it finds a place to hide.
Henry thought he was being clever by altering his
class’s constructor to add an event handler that calls
his MoveHere() method every time the crab raises its
RunForCover event. But he forgot that the other
treasure hunters inherit from the same class, and his
clever code adds their event handlers to the chain, too!
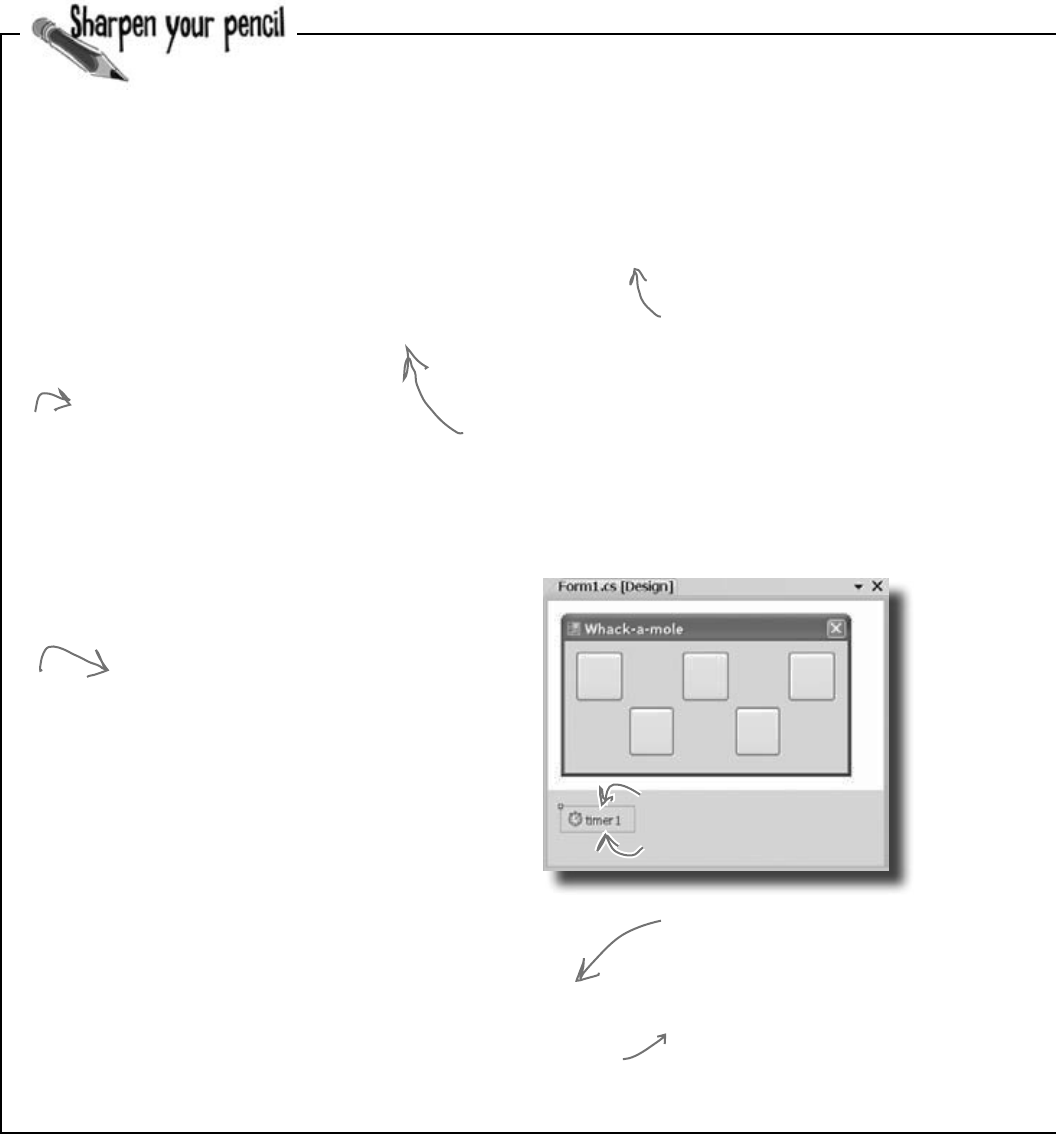
538 Chapter 11
public partial class Form1 : Form {
Mole mole;
Random random = new Random();
public Form1() {
InitializeComponent();
mole = new Mole(random, new Mole.____________(_____________________));
timer1.Interval = random.Next(500, 1000);
timer1.Start();
}
private void timer1_Tick(object sender, EventArgs e) {
timer1.Stop();
ToggleMole();
}
private void ToggleMole() {
if (mole.Hidden == true)
mole.Show();
else
mole.HideAgain();
timer1.Interval = random.Next(500, 1000);
timer1.Start();
}
private void MoleCallBack(int moleNumber, bool show) {
if (moleNumber < 0) {
timer1.Stop();
return;
}
Button button;
switch (moleNumber) {
case 0: button = button1; break;
case 1: button = button2; break;
case 2: button = button3; break;
case 3: button = button4; break;
default: button = button5; break;
}
if (show == true) {
button.Text = “HIT ME!”;
button.BackColor = Color.Red;
} else {
button.Text = “”;
button.BackColor = SystemColors.Control;
}
timer1.Interval = random.Next(500, 1000);
timer1.Start();
}
private void button1_Click(object sender, EventArgs e) {
mole.Smacked(0);
}
}
When you type in the code, add
five button event handlers.
Have button2_click() call mole.
Smacked(1), and then make
button3 call mole.Smacked(2),
and make button4 call mole.
Smacked(3) and button5 call
mole.Smacked(4).
Fill in the blanks to make this game of Whack-a-mole
work. You need to supply the code that does the
callbacks. Once you’ve got it filled in, go ahead and
type it into the IDE. Or you can try to get it working in
the IDE, and then fill in the blanks afterward. It’s fun!
Remember the Timer control?
Drag it out of the toolbox,
then double-click on it.
When you double-click on the timer in the
form (after you drag it out of the toolbox),
the IDE will create this event handler for it.
Timers fire the Tick event over and over again.
You’ll learn all about them in the next chapter.
The form passes a delegate
pointing to a callback
method into the mole’s
constructor. Fill it in.
Just add these event handlers the usual
way by double-clicking on the buttons in
the form designer.
This switch
makes sure
that the
right button
changes its
color and
text.
This method’s
called to pop
up or hide
the mole when
the timer’s
elapsed.
whack that mole!
you are here 4 539
events and delegates
using System.Windows.Forms;
class Mole {
public ______________ void PopUp(int hole, bool show);
private ___________ popUpCallback;
private bool hidden;
public bool Hidden { get { return hidden; } }
private int timesHit = 0;
private int timesShown = 0;
private int hole = 0;
Random random;
public Mole(Random random, PopUp popUpCallback) {
if (popUpCallback == null)
throw new ArgumentException(“popUpCallback can’t be null”);
this.random = random;
this._____________________ = _____________________;
hidden = true;
}
public void Show() {
timesShown++;
hidden = false;
hole = random.Next(5);
_____________________(hole, true);
}
public void HideAgain() {
hidden = true;
_____________________(hole, false);
CheckForGameOver();
}
public void Smacked(int holeSmacked) {
if (holeSmacked == hole) {
timesHit++;
hidden = true;
CheckForGameOver();
_____________________(hole, false);
}
}
private void CheckForGameOver() {
if (timesShown >= 10) {
popUpCallback(-1, false);
MessageBox.Show(“You scored ” + timesHit, “Game over”);
Application.Exit();
}
}
}
Fill in the delegate and field to
hold the delegate—they’re both
at the top of the Mole class.
When the form creates a new Mole
object, it passes it a reference
to its callback method. Take a
look in the form to see how the
constructor is called, and then fill
in this blank.
After the mole shows itself, it
needs to call the method on the
form that displays the mole by
turning the button red and showing
the text “HIT ME!”
The HideAgain() and Smacked()
methods also use the callback delegate
to call the method on the form.
The way the game works is that it uses the
timer to wait a random period of time between
half a second and 1.5 seconds. Once that time
has elapsed, it tells the mole to show itself.
The form gives the Mole object a callback that
it uses to tell the form to show or hide the
mole in one of the five holes. The form uses its
timer to wait between .5 and 1.5 seconds again,
and then tells the mole to hide itself.
The game’s over after the mole shows itself 10
times. Your score is the number of times you hit it.
Here’s where we make sure the callback
is not null—if it is, the Mole object
throws an ArgumentException.
540 Chapter 11
public partial class Form1 : Form {
private void Form1_Load(object sender, EventArgs e) {
mole = new Mole(random, new Mole.____________(_____________________));
timer1.Interval = random.Next(500, 1000);
timer1.Start();
}
}
class Mole {
public ______________ void PopUp(int hole, bool show);
private ___________ popUpCallback;
...
public Mole(Random random, PopUp popUpCallback) {
this.random = random;
this._____________________ = _____________________;
hidden = true;
}
public void Show() {
timesShown++;
hidden = false;
hole = random.Next(5);
_____________________(hole, true);
}
public void HideAgain() {
hidden = true;
_____________________(hole, false);
CheckForGameOver();
}
public void Smacked(int holeSmacked) {
if (holeSmacked == hole) {
timesHit++;
hidden = true;
CheckForGameOver();
_____________________(hole, false);
}
PopUp MoleCallBack
delegate
PopUp
popUpCallback popUpCallback
popUpCallback
popUpCallback
popUpCallback
Fill in the blanks to make this game of Whack-a-mole work. You need to supply
the code that does the callbacks. Once you’ve got it filled in, go ahead and
type it into the IDE. It’s fun!
This is where the form passes a reference to its
MoleCallBack() method into the Mole object. That
lets the mole call its method.
Here’s where the mole defines its
delegate and uses it to set up a
private field to hold a reference
to the method on the form that
changes the colors of the buttons.
When the form creates a new instance of
the Mole object, it passes a reference to its
MoleCallBack() method to the constructor
as a parameter. This line in the constructor
copies that reference to its popUpCallback
field. Its methods can use that field to call
the MoleCallBack() method in the form.
When the mole shows itself, hides again, or
gets smacked, the Mole object uses its
popUpCallback delegate field to call the
method on the form that changes the color
and text of one of the buttons.
exercise solution

this is a new chapter 541
I just know I read about how
upcasting and downcasting make
event handling easier somewhere....
review and preview
12
Knowledge, power, and
building cool stuff
Learning’s no good until you BUILD something.
Until you’ve actually written working code, it’s hard to be sure if you really get some of
the tougher concepts in C#. In this chapter, we’re going to use what we’ve learned to
do just that. We’ll also get a preview of some of the new ideas coming up soon. And
we’ll do all that by building phase I of a really complex application to make sure
you’ve got a good handle on what you’ve already learned from earlier chapters. So
buckle up…it’s time to build some software!
542 Chapter 12
You’ve come a long way, baby
We’ve come a long way since we first used the IDE to help us rescue the
Objectville Paper Company. Here’s just a few of the things you’ve done
over the last several hundred pages:
[note from human resources: “baby” is no longer
politically correct. Please use age-challenged or
infant to avoid offending readers.]
N
a
v
i
g
a
t
o
r
o
b
j
e
c
t
navigator3
4.2 miles
N
a
v
i
g
a
t
o
r
o
b
j
e
c
t
navigator1
3.5 miles
N
a
v
i
g
a
t
o
r
o
b
j
e
c
t
navigator2
3.8 miles
Navigator
SetLocation()
SetDestination()
ModifyRouteToAvoid()
ModifyRouteToInclude()
GetRoute()
GetTimeToDestination()
TotalDistance()
7 int variables
heights[]
int int int int int int int
.NET Framework
solutions
F
o
r
m
O
b
j
e
c
t
s
Data access
DinnerParty
NumberOfPeople
CostOfDecorations
CostOfBeveragesPerPerson
HealthyOption
CalculateCostOfDecorations()
CalculateCost()
SetHealthyOption()
BirthdayParty
NumberOfPeople
CostOfDecorations
CakeSize
CakeWriting
CalculateCostOfDecorations()
CalculateCost()
Party
NumberOfPeople
CostOfDecorations
CalculateCostOfDecorations()
CalculateCost()
You’ve used inheritance, as well
as interfaces and subclasses,
to build object trees.
You’ve built forms, used the
.NET Framework, and even
talked with databases.
You’ve used events to notify
objects about certain things
that happen, while keeping your
objects’ concerns separate.
Objects, classes, instances…
all these strange terms are
now part of your everyday
programming toolbox.
Even complex types like arrays
are no big deal to work with.
Debugging and exceptions
are part of your problem-
eliminating techniques.
my brain’s full
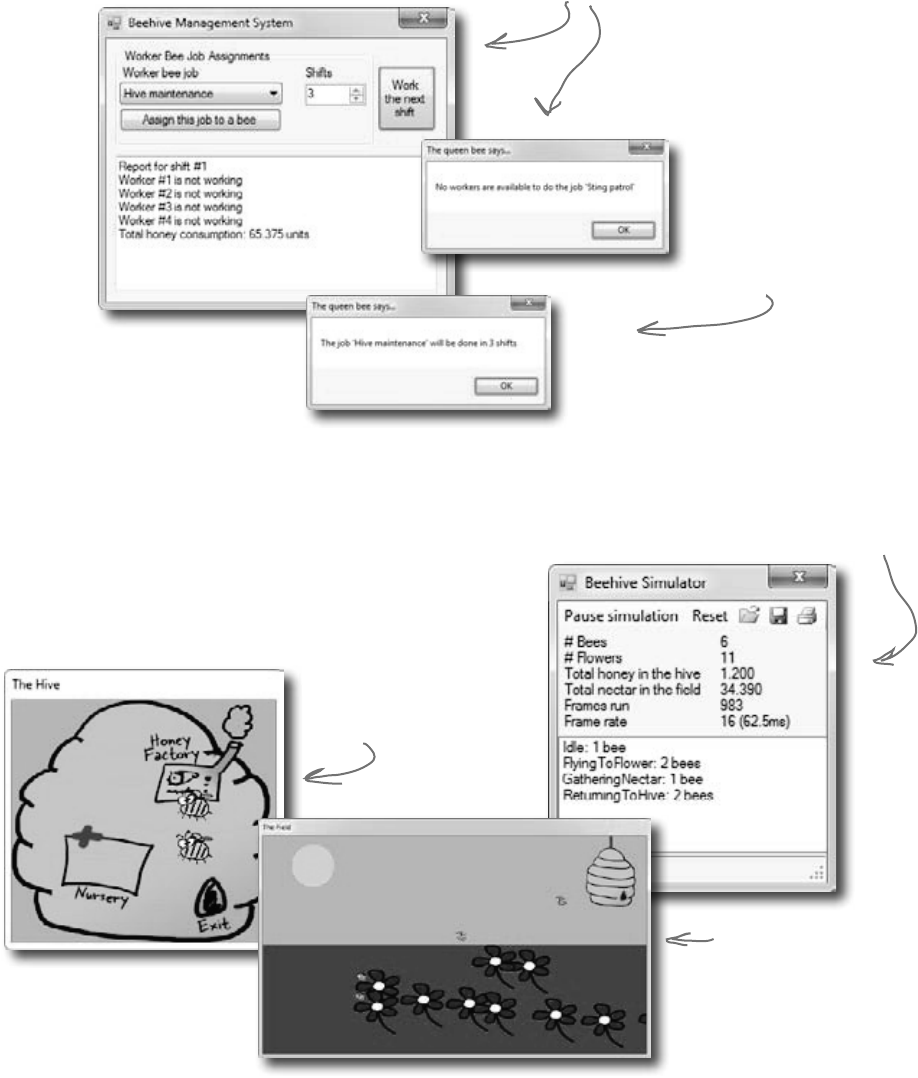
you are here 4 543
review and preview
We’ve also become beekeepers
Back in Chapter 6, we built some bee classes. Remember these?
We had different bees
doing different jobs…
…and even shifts
that the bees
worked on.
But we can do a lot better now…
You’ve learned a lot since Chapter 6, though. So let’s start from
scratch, and build an animated beehive simulator over the
next few chapters. We’ll end up with a user interface that shows
us the hive and the field the bees are flying around, and even a
stats window letting users know what their bees are doing.
The Hive window shows
us what’s happening.
The stats window
lets us monitor the
simulation in detail.
We can even watch the bees
work a field of flowers.
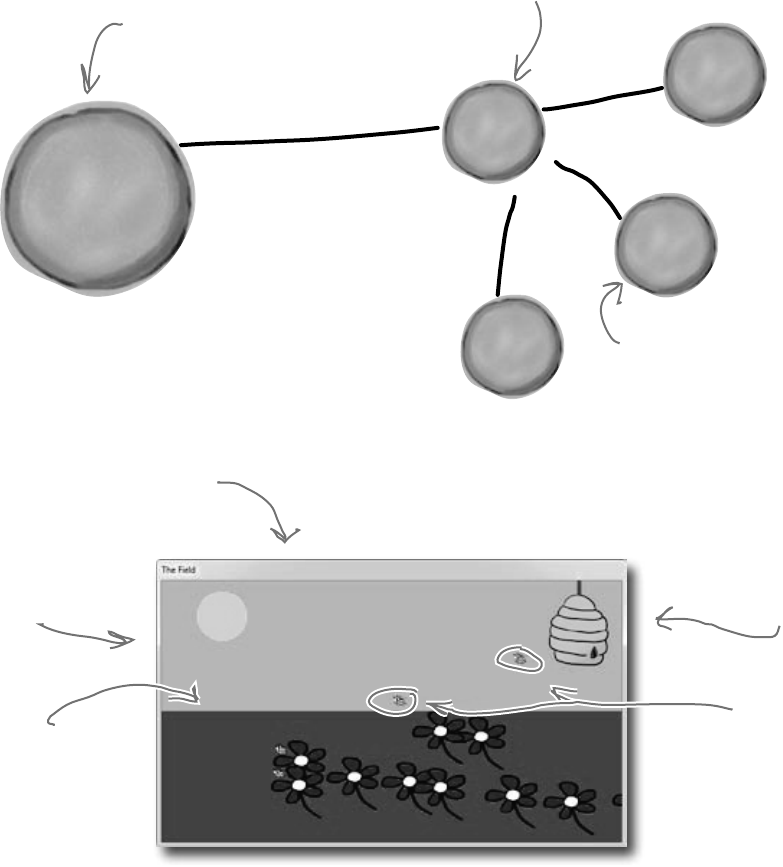
544 Chapter 12
The beehive simulator architecture
S
y
s
t
e
m
.
W
i
n
d
o
w
s
.
F
o
r
m
s
.
F
o
r
m
Main form
L
i
s
t
o
f
B
e
e
o
b
j
e
c
t
s
H
i
v
e
o
b
j
e
c
t
L
i
s
t
o
f
F
l
o
w
e
r
o
b
j
e
c
t
s
Here’s the architecture for the bee simulator. Even
though the simulator will be controlling a lot of different
bees, the overall object model is pretty simple.
This is the object for the main
window that shows the bee
stats and messages.
The World object keeps track of
everything in the simulator: the
state of the hive, every bee, and
every flower.
Each bee knows its
location (outside the
hive at point 174, 36)
and its state (“flying
to a flower”, “gathering
nectar”, “making honey”).
Everything in the architecture maps to the
overall world of bees, which we’ll build a GUI
for in the next chapter.
World represents the
entire thing.
We’ll need Flower objects
for each flower.
The Hive is home base
for the bees.
And of course, we’ll
need a Bee class.
doesn’t look too tough…right?
W
o
r
l
d
o
b
j
e
c
t

you are here 4 545
review and preview
Building the beehive simulator
Of course, we’ve never built anything this complex before,
so it’s going to take us a couple of chapters to put all the
pieces together. Along the way, you’ll add timers, LINQ,
and a lot of graphical skill to your toolkit.
Here’s what you’re going to do in this chapter (more to
come in the next):
Build a Flower class that ages, produces nectar,
and eventually wilts and dies.
1
Build a Bee class that has several different states
(gathering nectar from a flower, returning to the
hive), and knows what to do based on its state.
2
Build a Hive class that has an entrance, exit,
nursery for new bees, and honey factory for
turning collected nectar into honey.
3
Build a World class that manages the hive,
flowers, and bees at any given moment.
4
Build a main form that collects statistics from the
other classes and keeps the world going.
5
546 Chapter 12
Let’sjumprightintosomecode.Firstup,weneedaFlowerclass.TheFlowerclasshasa
locationdefinedbyapoint,anage,andalifespan.Astimegoeson,theflowergetsolder.Then,
whenitsagereachesitslifespan,theflowerdies.It’syourjobtoputallthisintoaction.
Flower
Location:Point
Age:int
Alive:bool
Nectar:double
NectarHarvested:double
lifespan:int
HarvestNectar():double
Go()
Write the skeleton code for Flower
Below is the class diagram for Flower. Write the basic class skeleton. Location,
Age, Alive, Nectar, and NectarHarvested are automatic properties.
NectarHarvested is writable; the other four are read-only. For now, leave the methods
blank; we’ll come back to those in a minute.
1
All of these should be
read-only properties
except NectarHarvested.
This is used only in the
class, so it just needs to
be a private field.
The type after the
colon is the type of
the variable…
…or the return type
of the method.
Add several constants to the class
We need lots of constants for flowers. Add six to your Flower class:
2
LifeSpanMin, the shortest flower lifespan
LifeSpanMax, the longest flower lifespan
InitialNectar, how much nectar a flower starts with
MaxNectar, how much nectar a flower can hold
NectarAddedPerTurn, how much nectar gets added each time the flower grows older
NectarGatheredPerTurn, how much nectar gets collected during a cycle
You should be able to figure out the types for each constant based on their
values. Flowers live between 15,000 and 30,000 cycles, and have 1.5 units
of nectar when they start out. They can store up to 5 units of nectar. In
each cycle of life, a flower adds 0.01 units of nectar, and in a single cycle,
0.3 units can be collected.
A class “skeleton” is just its field,
property, and method declarations,
with no implementation.
FYI, you don’t usually
show constants in a
class diagram.
stop and smell the flowers
Since this simulator will be animated,
we’ll be drawing it frame by frame. We’ll
use the words “frame,” “cycle,” and
“turn” interchangeably.
you are here 4 547
review and preview
Build the constructor
The constructor for Flower should take in a Point, indicating the flower’s location, and an
instance of the Random class. You should be able to use those arguments to set the location
of the flower, and then set its age to 0, set the flower to alive, and set its nectar to the initial
amount of nectar for a flower. Since no nectar has been harvested yet, set that variable
correctly, as well. Finally, figure out the flower’s lifespan. Here’s a line of code to help you:
3
lifeSpan = random.Next(LifeSpanMin, LifeSpanMax + 1);
This will only work if you’ve got your
variables and constants named right, as well
as the argument to the Flower constructor.
Write code for the HarvestNectar() method
Every time this method is called, it should check to see if the nectar gathered every cycle
is larger than the amount of nectar left. If so, return 0. Otherwise, you should remove
the amount collected in a cycle from the nectar the flower has left, and return how much
nectar was collected. Oh, and don’t forget to add that amount to the NectarHarvested
variable, which keeps up with the total nectar collected from this particular flower.
4
Hint: You’ll use NectarGatheredPerTurn,
Nectar, and NectarHarvested in this method,
but nothing else.
Write code for the Go() method
This is the method that makes the flower go. Assume every time this method is called, one
cycle passes, so update the flower’s age appropriately. You’ll also need to see if the age is
greater than the flower’s lifespan. If so, the flower dies.
Assuming the flower stays alive, you’ll need to add the amount of nectar each flower gets
in a cycle. Be sure and check against the maximum nectar your flower can store, and don’t
overrun that.
5
Answers on the next page…try and finish
your code and compile it before peeking.
The final product will be animated, with little
pictures of bees flying around. The Go() method
will be called once every frame, and there will be
several frames run per second.
You’ll need to add using System.Drawing; to the top of any class file that uses a Point.
548 Chapter 12
class Flower {
private const int LifeSpanMin = 15000;
private const int LifeSpanMax = 30000;
private const double InitialNectar = 1.5;
private const double MaxNectar = 5.0;
private const double NectarAddedPerTurn = 0.01;
private const double NectarGatheredPerTurn = 0.3;
public Point Location { get; private set; }
public int Age { get; private set; }
public bool Alive { get; private set; }
public double Nectar { get; private set; }
public double NectarHarvested { get; set; }
private int lifeSpan;
public Flower(Point location, Random random) {
Location = location;
Age = 0;
Alive = true;
Nectar = InitialNectar;
NectarHarvested = 0;
lifeSpan = random.Next(LifeSpanMin, LifeSpanMax + 1);
}
public double HarvestNectar() {
if (NectarGatheredPerTurn > Nectar)
return 0;
else {
Nectar -= NectarGatheredPerTurn;
NectarHarvested += NectarGatheredPerTurn;
return NectarGatheredPerTurn;
}
}
public void Go() {
Age++;
if (Age > lifeSpan)
Alive = false;
else {
Nectar += NectarAddedPerTurn;
if (Nectar > MaxNectar)
Nectar = MaxNectar;
}
}
}
YourjobwastobuildtheFlowerclassforourbeehivesimulator. Flower
Location:Point
Age:int
Alive:bool
Nectar:double
NectarHarvested:double
lifespan:int
HarvestNectar():double
Go()
Make sure the flower
stops adding nectar
after it’s dead.
Location, Age,
Alive, and Nectar
are all read-
only automatic
properties.
NectarHarvested
will need to be
accessible to other
classes.
Flowers have random
lifespans, so the field
of flowers doesn’t all
change at once.
A bee calls HarvestNectar() to get
nectar out of a flower. A bee can
only harvest a little bit of nectar
at a time, so he’ll have to sit near
the flower for several turns until
the nectar’s all gone.
As part of the
simulator’s animation,
the Go() method will be
called each frame. This
makes the flower age
just a tiny little bit per
frame. As the simulator
runs, those tiny bits will
add up over time.
where have all the flowers gone?
Point lives in the System.Drawing namespace, so make sure you
added using System.Drawing; to the top of the class file.
you are here 4 549
review and preview
Q: It doesn’t look like
NectarHarvested is used anywhere in
the class, except where we increment it.
What’s that variable for?
A:Goodcatch!We’replanningaheada
bit.Eventually,thesimulatorwillkeepan
eyeonflowers,andhowmuchtotalnectar
hasbeenharvested,forourstatistics
monitor.Soleaveitin,andourother
classeswilluseitshortly.
Q: Why all the read-only automatic
properties?
A:RememberChapter5,andhiding
ourprivates?Alwaysagoodpractice.
Flowerscantakecareofthosevalues,so
we’vemadethemread-only.Otherobjects,
likebeesandthehive,shouldbeable
toreadthoseproperties,butnotchange
them.Butremember,they’reonlyread-
onlyoutsideoftheclass—codeinsidethe
classcanaccesstheprivatesetaccesor.
Q: My code looks different. Did I do
something wrong?
A:Youmighthaveyourcodeineach
methodinadifferentorder,butaslong
asyourcodefunctionsthesamewayas
oursdoes,you’llbeOK.That’sanother
aspectofencapsulation:theinternals
ofeachclassaren’timportanttoother
classes,aslongaseachclassdoeswhat
it’ssupposedtodo.
Life and death of a flower
Our flower goes through a basic turn, living, adding nectar,
having nectar harvested, and eventually dying:
F
l
o
w
e
r
o
b
j
e
c
t
age = 0
nectar = 1.5
F
l
o
w
e
r
o
b
j
e
c
t
age = 17809
nectar = 3.2
F
l
o
w
e
r
o
b
j
e
c
t
age = 30291
nectar = .83
DEAD
alive = false
When a flower is created, it
has an age of 0, and a small
amount of nectar.
Eventually, we’ll have other
classes harvesting nectar, too.
So that reduces the overall
nectar the flower has.
As the flower gets
older, it produces
more nectar.
Eventually, the flower’s
age hits its lifespan, and
the flower dies.
If Go() increases the age of the Flower by 1, and the lifespan range
is between 15,000 and 30,000, that means Go() will get called at least
15,000 times for each flower before it dies. How would you handle calling
the method that many times? What if there are 10 flowers? 100? 1,000?
550 Chapter 12
class Bee {
private const double HoneyConsumed = 0.5;
private const int MoveRate = 3;
private const double MinimumFlowerNectar = 1.5;
private const int CareerSpan = 1000;
public int Age { get; private set; }
public bool InsideHive { get; private set; }
public double NectarCollected { get; private set; }
private Point location;
public Point Location { get { return location; } }
private int ID;
private Flower destinationFlower;
public Bee(int id, Point location) {
this.ID = id;
Age = 0;
this.location = location;
InsideHive = true;
destinationFlower = null;
NectarCollected = 0;
}
public void Go(Random random) {
Age++;
}
Now we need a Bee class
With flowers ready to be harvested, we need a Bee class. Below is
the basic code for Bee. The Bee knows its age, whether or not it’s
in the hive, and how much nectar it can collect. We’ve also added a
method to move the bee toward a specific destination point.
Like the Flower class, there
are several bee-specific
constants we need to define.
We used a backing field for location.
If we’d used an automatic property,
MoveTowardsLocation() wouldn’t
be able to set its members directly
(“Location.X -= MoveRate”).
A bee needs an ID and
an initial location.
Bees start out inside the
hive, they don’t have a
flower to go to, and they
don’t have any nectar.
We’ll have to add a lot
more code to Go() before
we’re done, but this will
get us started.
MinimumFlowerNectar is
how the bee figures out
which flowers are eligible
for harvesting.
Each bee will be assigned its own
unique ID number.
busy bee
you are here 4 551
review and preview
private bool MoveTowardsLocation(Point destination) {
if (Math.Abs(destination.X - location.X) <= MoveRate &&
Math.Abs(destination.Y - location.Y) <= MoveRate)
return true;
if (destination.X > location.X)
location.X += MoveRate;
else if (destination.X < location.X)
location.X -= MoveRate;
if (destination.Y > location.Y)
location.Y += MoveRate;
else if (destination.Y < location.Y)
location.Y -= MoveRate;
return false;
}
This method starts by
figuring out if we’re
already within our
MoveRate of being at
the destination.
If we’re not close enough,
then we move toward the
destination by our move rate.
We return false, since we’re
not yet at the destination
point. We need to keep moving.
Beeshavelotsofthingstheycando.Belowisalist.CreateanewenumthatBeeusescalled
BeeState.Youshouldalsocreatearead-onlyautomaticpropertycalledCurrentState
foreachBeetotrackthatbee’sstate.Setabee’sinitialstatetoidle,andintheGo()method,
addaswitchstatementthathasanoptionforeachitemintheenum.
The enum item What the item means
Idle The bee isn’t doing anything
FlyingToFlower The bee’s flying to a flower
GatheringNectar The bee’s gathering nectar from a flower
ReturningToHive The bee’s heading back to the hive
MakingHoney The bee’s making honey
Retired The bee’s hung up his wings
Here we used Math.Abs() to calculate the absolute
value of the difference between the destination and
the current location.
The MoveTowardsLocation()
destination moves the bee’s
current location by changing
the X and Y values of its
location field. It returns
true if the bee’s reached its
destination.
If the bee
reached its
destination,
the method
returns true;
otherwise, it
returns false.
552 Chapter 12
Beeshavelotsofthingstheycando.Belowisalist.CreateanewenumthatBeeuses
calledBeeState.YoushouldalsocreateaprivatecurrentStatefieldforeachBeeto
trackthatbee’sstate.Setabee’sinitialstatetoidle,andintheGo()method,addaswitch
statementthathasanoptionforeachitemintheenum.
enum BeeState {
Idle,
FlyingToFlower,
GatheringNectar,
ReturningToHive,
MakingHoney,
Retired
}
class Bee {
// constant declarations
// variable declarations
public BeeState CurrentState { get; private set; }
public Bee(int ID, Point initialLocation) {
this.ID = ID;
Age = 0;
location = initialLocation;
InsideHive = true;
CurrentState = BeeState.Idle;
destinationFlower = null;
NectarCollected = 0;
}
Here’s the enum with all
the different bee states.
We also need a variable to track
the state of each bee.
The bee starts out idle.
bee cool
Did you remember to add using System.Drawing; to the top of the
class file (because it uses Point)?

you are here 4 553
review and preview
public void Go(Random random) {
Age++;
switch (CurrentState) {
case BeeState.Idle:
if (Age > CareerSpan) {
CurrentState = BeeState.Retired;
} else {
// What do we do if we’re idle?
}
break;
case BeeState.FlyingToFlower:
// move towards the flower we’re heading to
break;
case BeeState.GatheringNectar:
double nectar = destinationFlower.HarvestNectar();
if (nectar > 0)
NectarCollected += nectar;
else
CurrentState = BeeState.ReturningToHive;
break;
case BeeState.ReturningToHive:
if (!InsideHive) {
// move towards the hive
} else {
// what do we do if we’re inside the hive?
} break;
case BeeState.MakingHoney:
if (NectarCollected < 0.5) {
NectarCollected = 0;
CurrentState = BeeState.Idle;
} else {
// once we have a Hive, we’ll turn the nectar into honey
}
break;
case BeeState.Retired:
// Do nothing! We’re retired!
break;
}
}
}
Here’s the switch() statement to
handle each bee’s state.
You should have
each of these
states covered.
We’ve filled out a few
of the states. It’s OK
if you didn’t come up
with this code, but go
ahead and add it in now.
If the age reaches the bee’s lifespan,
the bee retires. But he’ll finish the
current job before he does.
We’ll fill this code in
a bit later.
Here, we harvest
nectar from the
flower we’re working….
…and if there’s nectar
left, add it to what
we’ve already collected…
…but if there’s no nectar
left, head for the hive.
Returning to the hive is
different based on whether
we’re already in the hive or not.
The bee adds half a unit of
nectar to the honey factory
at a time. If there’s not
enough nectar to add, the
factory can’t use it so the
bee just discards it.
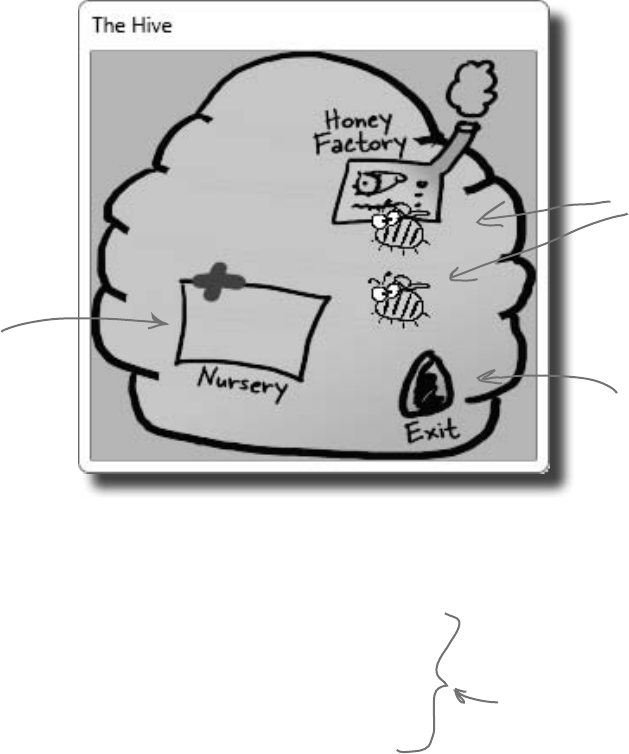
554 Chapter 12
P. A. H. B. (Programmers Against Homeless Bees)
We’ve got bees, and flowers full of nectar. We need to write code so
the bees can collect nectar, but before that happens, where do the
bees get created in the first place? And where do they take all that
nectar? That’s where a Hive class comes in.
The hive isn’t just a place for bees to come back to, though. It has
several locations within it, all with different points in the world.
There’s the entrance and the exit, as well as a nursery for birthing
more bees and a honey factory for turning nectar into honey.
Bees come in the entrance,
and leave from the exit. It’s
all very orderly.
New bees are
created and
start out in the
hive nursery.
Each location is distinct,
and bees can travel from
one to the other just like
they can go from the hive
to a flower.
The hive runs on honey
The other big part that the hive plays is keeping up with how much
honey it has stored up. It takes honey for the hive to keep running,
and if new bees need to be created, that takes honey, too. On top
of that, the honey factory has to take nectar that bees collect and
turn that into honey. For every unit of nectar that comes in, .25
units of honey can be created.
Think about this for a second…as time
passes, the hive uses honey to run, and to
create more bees. Meanwhile, other bees
are bringing in nectar, which gets turned
into honey, which keeps things going longer.
It’s up to you (with some help) to model all
of this in the simulator code.
beehive hairdo
you are here 4 555
review and preview
It’suptoyoutowritethecodeforHive.
Write the skeleton code for Hive
Like we did with the Flower class, you should start with
a basic skeleton for Hive. The class diagram is shown to
the right. Make Honey a read-only automatic property,
locations should be private, and beeCount is only
used internally, so can be a private field.
1Hive
Honey:double
locations:Dictionary<string,Point>
beeCount:int
InitializeLocations()
AddHoney(Nectar:double):bool
ConsumeHoney(amount:double):bool
AddBee(random:Random)
Go(random:Random)
GetLocation(location:string):Point
Define the constants for the Hive
You need a constant for the initial number of bees (6), the amount
of honey the hive starts with (3.2), the maximum amount of honey
the hive can store (15), the ratio of units of nectar produced from
units of honey (.25), the maximum number of bees (8), and the
minimum honey required for the hive to birth new bees (4).
2
You’ll have to figure out good names for
each, as well as the types. For types,
don’t just think about initial values, but
also the values these constants will be
used with. Doubles pair best with other
doubles, and ints with other ints.
Write the code to work with Locations
First, write the GetLocation() method. It should take in
a string, look up that string in the locations dictionary,
and return the associated point. If it’s not there, throw an
ArgumentException.
Then, write the InitializeLocations() method. This
method should set up the following locations in the hive:
3
Entrance, at (600, 100)
Nursery, at (95, 174)
HoneyFactory, at (157, 98)
Exit, at (194, 213)
Build the Hive constructor
When a hive is constructed, it should set its honey to the initial
amount of honey all hives have. It should set up the locations
in the hive, and also create a new instance of Random. Then,
AddBee() should be called—passing in the Random instance you
just created—once for each bee that starts out in the hive.
4
Each of these maps to a location
within the 2D space that our hive
takes up. Later on, we’ll have to
make sure the simulator makes the
hive cover all these points.
In this simulation, we’re just
assuming one hive, with fixed
points. If you wanted multiple
hives, you might make the
points relative to the hive,
instead of the overall world.
AddBee() needs a Random object because it adds
a random value to the Nursery location—that way
the bees don’t start on top of each other.
556 Chapter 12
YourjobwastostartbuildingtheHiveclass.
class Hive {
private const int InitialBees = 6;
private const double InitialHoney = 3.2;
private const double MaximumHoney = 15.0;
private const double NectarHoneyRatio = .25;
private const double MinimumHoneyForCreatingBees = 4.0;
private const int MaximumBees = 8;
private Dictionary<string, Point> locations;
private int beeCount = 0;
public double Honey { get; private set; }
private void InitializeLocations() {
locations = new Dictionary<string, Point>();
locations.Add(“Entrance”, new Point(600, 100));
locations.Add(“Nursery”, new Point(95, 174));
locations.Add(“HoneyFactory”, new Point(157, 98));
locations.Add(“Exit”, new Point(194, 213));
}
public Point GetLocation(string location) {
if (locations.Keys.Contains(location))
return locations[location];
else
throw new ArgumentException(“Unknown location: ” + location);
}
public Hive() {
Honey = InitialHoney;
InitializeLocations();
Random random = new Random();
for (int i = 0; i < InitialBees; i++)
AddBee(random);
}
public bool AddHoney(double nectar) { return true; }
public bool ConsumeHoney(double amount) { return true; }
private void AddBee(Random random) { }
public void Go(Random random) { }
}
You might have different names
for your constants. That’s OK, as
long as you’re consistent in the
rest of your code.
We made MaximumHoney
a double, since it can
range from InitialHoney
(3.2) to this value. Since
InitialHoney will need to
be a double, it’s best to
make this a double, too.
Remember dictionaries?
Ours stores a location,
keyed with a string value.
Don’t forget to create a
new instance of Dictionary,
or this won’t work.
The rest of this
method is pretty
straightforward.
You should have called
AddBee() once for each bee
that a hive starts with.
We don’t have code
for these yet, but
you should have built
empty methods as
placeholders.
This method protects other classes from
working with our locations dictionary
and changing something they shouldn’t.
It’s an example of encapsulation.
first design then build
Make sure you add “using System.
Drawing;” because this code uses
Point.
You could also throw a NotImplementedException in any method you
haven’t implemented yet. That’s a great way to keep track of code you
still have to build.

you are here 4 557
review and preview
Isn’t this sort of a weird way
to build code? Our bees don’t know about
flowers yet, and our hive is full of empty
method declarations. Nothing actually works
yet, right?
Real code is built bit by bit
It would be nice if you could write all the code for a single
class at one time, compile it, test it, and put it away, and
then start on your next class. Unfortunately, that’s almost
never possible.
More often than not, you’ll write code just the way we are
in this chapter: piece by piece. We were able to build pretty
much the entire Flower class, but when it came to Bee,
we’ve still got some work to do (mostly telling it what to do
for each state).
And now, with Hive, we’ve got lots of empty methods to
fill in. Plus, we haven’t hooked any Bees up to the Hive.
And there’s still that nagging problem about how to call the
Go() method in all these objects thousands of times.…
But we didn’t really start out
by putting the classes together! We
figured out the architecture first,
and then started building.
First you design, then you build
We started out the project knowing exactly what we
wanted to build: a beehive simulator. And we know
a lot about how the bees, flowers, hive, and world all
work together. That’s why we started out with the
architecture, which told us how the classes would work
with each other. Then we could move on to each class,
designing them individually.
Projects always go a lot more smoothly if you have a good
idea of what you’re building before you start building it.
That seems pretty straightforward and common-sense. But
it makes all the difference in the final product.

558 Chapter 12
Filling out the Hive class
Let’s get back to the Hive class, and fill in a few of
those missing methods:
class Hive {
// constant declarations
// variable declarations
// InitializeLocations()
// GetLocation()
// Hive constructor
public bool AddHoney(double nectar) {
double honeyToAdd = nectar * NectarHoneyRatio;
if (honeyToAdd + Honey > MaximumHoney)
return false;
Honey += honeyToAdd;
return true;
}
public bool ConsumeHoney(double amount) {
if (amount > Honey)
return false;
else {
Honey -= amount;
return true;
}
}
private void AddBee(Random random) {
beeCount++;
int r1 = random.Next(100) - 50;
int r2 = random.Next(100) - 50;
Point startPoint = new Point(locations[“Nursery”].X + r1,
locations[“Nursery”].Y + r2);
Bee newBee = new Bee(beeCount, startPoint);
// Once we have a system, we need to add this bee to the system
}
public void Go(Random random) { }
}
First, we figure out how
much honey this nectar can
be converted to…
…and then see if there’s
room in the hive for that
much more honey.
If there’s room, we add the
honey to the hive.
This method takes an amount of
honey, and tries to consume it
from the hive’s stores.
If there’s not enough honey in the hive
to meet the demand, we return false.
If there’s enough, remove it from the
hive’s stores and return true.
This is
private…
only Hive
instances
can create
bees.
This creates a point within
50 units in both the X
and Y direction from the
nursery location.
Add a new
bee, at the
designated
location.
We’ll finish AddBee() and fill in
the Go() method soon….
make the hive Go()

you are here 4 559
review and preview
The hive’s Go() method
We’ve already written a Go() method for Flower, and a Go()
method for Bee (even though we’ve got some additional code to
add in). Here’s the Go() method for Hive:
public void Go(Random random) {
if (Honey > MinimumHoneyForCreatingBees)
AddBee(random);
}
Unfortunately, this isn’t very realistic. Lots of times in a busy
hive, the queen doesn’t have time to create more bees. We don’t
have a QueenBee class, but let’s assume that when there’s
enough honey to create bees, a new bee actually gets created
10% of the time. We can model that like this:
public void Go(Random random) {
if (Honey > MinimumHoneyForCreatingBees
&& random.Next(10) == 1) {
AddBee(random);
}
}
This is an easy way to simulate a 1 in
10 chance of a bee getting created.
It comes up with a random number
between 0 and 9. If the number is 1,
then create the bee.
The only constraint (at least for now)
is the hive must have enough honey to
create more bees.
The same instance of Random that
got passed to Go() gets sent to the
AddBee() method.
One reason to leave it out is so that you
can save the Random seed—that way
you can rerun a specific simulation…if
you feel like doing that later!
Q: So the hive can create an infinite
number of bees?
A:Rightnowitcan—or,atleast,it’sgot
averylargelimit—butyou’reright,that’snot
veryrealistic.Lateron,we’llcomebackto
this,andaddaconstraintthatonlyletsso
manybeesexistinoursimulatorworldat
onetime.
Q: Couldn’t we assign that instance
of Random to a property of the class,
instead of passing it on to AddBee()?
A:Yousurecould.ThenAddBeecould
usethatproperty,ratherthanaparameter
passedin.There’snotreallyarightanswer
tothisone;it’suptoyou.
Q: I still don’t understand how all of
these Go() methods are getting called.
A:That’sOK,we’rejustabouttogetto
that.First,though,weneedonemoreobject:
theWorldclass,whichwillkeeptrackof
everythingthat’sgoingoninthehive,track
allthebees,andevenkeepupwithflowers.
560 Chapter 12
S
y
s
t
e
m
.
W
i
n
d
o
w
s
.
F
o
r
m
s
.
F
o
r
m
Main form
L
i
s
t
o
f
B
e
e
o
b
j
e
c
t
s
H
i
v
e
o
b
j
e
c
t
L
i
s
t
o
f
F
l
o
w
e
r
o
b
j
e
c
t
s
W
o
r
l
d
o
b
j
e
c
t
We’re ready for the World
With the Hive, Bee, and Flower classes in place, we can
finally build the World class. World handles coordination
between all the individual pieces of our simulator: keeping
up with all the bees, telling the hive if there is room for
more bees, locating flowers, etc.:
We don’t have
all the code for
these classes
written, but we’ve
got the basic
parts in place.
The World will
keep up with lists
of the flowers
and the bees.
Our form, when we develop it,
uses the World object to keep
up with what’s going on.
World is really just
a big container and
engine for all the
individual parts.
foreach (Bee bee in Bees)
bee.Go(random);
The World object keeps everything Go()ing
One of the biggest tasks of the World object is, for each turn in
the simulator, to call Go() on every Flower, Bee, and Hive
instance. In other words, World makes sure that life continues
in the simulator world.
We still have to deal with
calling World’s Go() method,
but we’ll come back to that.
hive.Go(random);
foreach (Flower flower in Flowers)
flower.Go(random);
Go()
Go() in World calls Go() on all
the other objects in the world.
take on the world
S
y
s
t
e
m
.
W
i
n
d
o
w
s
.
F
o
r
m
s
.
F
o
r
m
Main form
L
i
s
t
o
f
B
e
e
o
b
j
e
c
t
s
H
i
v
e
o
b
j
e
c
t
L
i
s
t
o
f
F
l
o
w
e
r
o
b
j
e
c
t
s
W
o
r
l
d
o
b
j
e
c
t

you are here 4 561
review and preview
Bee
Bee
Bee
Bee
Bee
We’re building a turn-based system
Our Go() methods in each object are supposed to run each turn, or cycle, of our
simulator. A turn in this case just means an arbitrary amount of time: for instance, a
turn could be every 10 seconds, or every 60 seconds, or every 10 minutes.
The main thing is that a turn affects every object in the world. The hive ages by one
“turn,” checking to see if it needs to add more bees. Then each bee takes a turn, moving
a very small distance toward its destination or doing one small action, and getting older.
Then each flower takes a turn, manufacturing a little nectar and getting older too. And
that’s what World does: it makes sure that every time its Go() method is called, every
object in the world gets a turn to act.
W
o
r
l
d
o
b
j
e
c
t
Go()
Every time Go() in World is
called, every object in the world
has to get a turn to Go().
Hive
Go() Go()
Go()
Each Bee and each Flower
must have Go() called, or the
simulator breaks down.
One of the big object-oriented principles we’ve been using in the simulator
is encapsulation (flip back to Chapter 5 for a refresher). See if you can look
over the code we’ve developed so far and come up with two examples of
encapsulation for each class you’ve built.
Hive Bee Flower
1.
2.
1.
2.
1.
2.
Each “turn” will be drawn
as a single frame of
animation, so the world
only needs to change a
tiny little bit each turn.
Flower
Flower
Flower
Flower
Flower
562 Chapter 12
using System.Drawing;
class World {
private const double NectarHarvestedPerNewFlower = 50.0;
private const int FieldMinX = 15;
private const int FieldMinY = 177;
private const int FieldMaxX = 690;
private const int FieldMaxY = 290;
public Hive Hive;
public List<Bee> Bees;
public List<Flower> Flowers;
public World() {
Bees = new List<Bee>();
Flowers = new List<Flower>();
Random random = new Random();
for (int i = 0; i < 10; i++)
AddFlower(random);
}
public void Go(Random random) {
Hive.Go(random);
for (int i = Bees.Count - 1; i >= 0; i--) {
Bee bee = Bees[i];
bee.Go(random);
if (bee.CurrentState == BeeState.Retired)
Bees.Remove(bee);
}
double totalNectarHarvested = 0;
for (int i = Flowers.Count - 1; i >= 0; i--) {
Flower flower = Flowers[i];
flower.Go();
totalNectarHarvested += flower.NectarHarvested;
if (!flower.Alive)
Flowers.Remove(flower);
}
Here’s the code for World
The World class is actually one of the simpler classes in our simulator.
Here’s a starting point for the code. But if you look closely, you’ll notice
that it’s missing a few things (which you’ll add in just a minute).
These define the bounds of the
field, which is where flowers can live.
Every world has one hive, a list
of bees, and a list of flowers.
When we create a new world, we
initialize our lists, create a new hive,
and then add 10 initial flowers.
This is easy…we just tell the
Hive to Go(), passing in a
Random instance.
If a bee’s retired, we need to take
it out of the world.
We run through all the current
bees and tell them Go().
We run through each flower
and tell it to Go().
We need to keep up with
how much nectar’s been
collected this turn, too.
So we get that by summing
up the nectar collected
from each flower.
Just like bees, we remove any flowers
that die during this turn.
what in the world are you doing? Encapsulation alert!
Take a look at the public Hive, Bees,
and Flowers fields. Another class
could accidentally reset any of
those to null, which would cause
serious problems! Can you think of
a way to use properties or methods
to encapsulate them better?
you are here 4 563
review and preview
if (totalNectarHarvested > NectarHarvestedPerNewFlower) {
foreach (Flower flower in Flowers)
flower.NectarHarvested = 0;
AddFlower(random);
}
}
private void AddFlower(Random random)
{
Point location = new Point(random.Next(FieldMinX, FieldMaxX),
random.Next(FieldMinY, FieldMaxY));
Flower newFlower = new Flower(location, random);
Flowers.Add(newFlower);
}
}
Bees pollinate flowers as they harvest
nectar. Once they’ve harvested enough
nectar from the flowers, they’ve
pollinated enough for the world to add a
new flower.
If there’s enough nectar in the field,
the world adds a new flower.
This handles coming up with a random
location in the field…
…and then adding a new flower
in that location.
One of the big object-oriented principles we’ve been using in the simulator
is encapsulation (flip back to Chapter 5 for a refresher). See if you can look
over the code we’ve developed so far and come up with two examples of
encapsulation for each class you’ve built.
Hive Bee Flower
1. The hive’s Locations
dictionary is private
2. It gives the bees a
method to add honey
1. The bee’s location is
read-only
2. So is its age. So other
classes can’t write to them
1. The flower provides a
method to gather nectar
2. And it keeps its alive
boolean private
Here are the ones we came
up with. Did you come up
with any others?
Q: Why don’t you use foreach
loops to remove dead flowers and retired
bees?
A:Becauseyoucan’t remove items
fromacollectionfrominsideaforeach
loopthat’siteratingonit.Ifyoudo,.NETwill
throwanexception.
Q: OK, then why does each of those
for loops start at the end of the list and
count down to 0?
A:Becauseeachloopneedstopreserve
thenumberingofthelist.Let’ssayyou
startedatthebeginningofalistoffive
flowers,andyourloopdiscoveredthatone
oftheflowersinthemiddlewasdead.Ifit
removesthefloweratindex#3,nowthelist
onlyhas4flowersinit,andthere’sanew
floweratindex#3—andthatflowerwillend
upgettingskipped,becausethenexttime
throughtheloopit’lllookatindex#4.
Iftheloopstartsattheend,thentheflower
thatmovesintotheemptyslotwillalready
havebeenlookedatbytheloop,sothere’s
nochanceofmissingaflower.
564 Chapter 12
Withallfourofourcoreclassesinplace,we’vegotsomeworktodototiethemall
together.Followthestepsbelow,andyoushouldhaveworkingBee,Hive,Flower,
andWorldclasses.Butbeware:you’llhavetomakechangestoalmosteveryclass,in
severalplaces,beforeyou’redone.
Update Bee to take in a Hive and World reference.
Nowthatwe’vegotaclassforHiveandaclassforWorld,Beeobjectsneedto
knowaboutboth.Updateyourcodetotakeinreferencestoabee’shiveandworldas
parameterstoitsconstructorandsavethosereferencesforlateruse.
1
Update Hive to take in a World reference.
JustasaBeeneedstoknowaboutitsHive,aHiveneedstoknowaboutits
World.UpdateHivetotakeinaWorldreferenceinitsconstructor,andsavethat
reference.YoushouldalsoupdatethecodeinHivethatcreatesnewbeestopass
intotheBeeareferencetoitself(theHive)andtheWorld.
2
Update World to pass itself into a new Hive.
UpdateyourWorldclasssothatwhenitcreatesanewHive,it
passesinareferencetoitself.
3
Place an upper limit on the bees that Hive can create.
TheHiveclasshasaMaximumBeesconstantthatdetermines
howmanybeestheHivecansupport(insideandoutsidethehive,
combined).NowthattheHivehasaccesstotheWorld,youshould
beabletoenforcethatconstraint.
4
Hint: Look at code near where
you create or add bees. There
are two places where code
related to this occurs in Hive,
so be careful.
When the Hive creates bees, let the World know.
TheWorldclassusesaListofbeeobjectstokeepupwithallthe
beesthatexist.WhentheHivecreatesanewBee,makesurethat
BeegetsaddedtotheoveralllistthattheWorldiskeepingupwith.
5
put it all together
STOP! At this point, you should be able to compile all of
your code. If you can’t, check through it and correct any
mistakes before continuing on.

you are here 4 565
review and preview
Q: Why did you throw an exception in the Hive class’s
GetLocation() method?
A:Becauseweneededawaytodealwithbaddatapassedinto
theparameter.Thehivehasafewlocations,buttheparameterto
GetLocations()canpassanystring.Whathappensifthere’s
abugintheprogramthatcausesaninvalidstring(likeanempty
string,orthenameofalocationthat’snotinthelocationsdictionary)
tobesentastheparameter?Whatshouldthemethodreturn?
Whenyou’vegotaninvalidparameterandit’snotclear
whattodowithit,it’salwaysagoodideatothrowanew
ArgumentException.Here’showtheGetLocation()
methoddoesit:
throw new ArgumentException(
“Unknown location: ” + location);
ThisstatementcausestheHiveclasstothrowan
ArgumentExceptionwiththemessage“Unknownlocation:”
thatcontainsthelocationthatitcouldn’tfind.
Thereasonthisisusefulisthatitimmediatelyalertsyouifabad
locationparameterispassedtothemethod.Andbyincludingthe
parameterintheexceptionmessage,you’regivingyourselfsome
valuableinformationthatwillhelpyoudebugtheproblem.
Q: What’s the point of storing all the locations in a Point if
we’re not drawing anything?
A:Everybeehasalocation,whetherornotyoudrawitonthe
screeninthatlocation.ThejoboftheBeeobjectistokeeptrack
ofwhereitisintheworld.EachtimeitsGo()methodiscalled,it
needstomoveaverysmalldistancetowarditsdestination.
Now,eventhoughwemaynotbedrawingapictureofthebeeyet,
thebeestillneedstokeeptrackofwhereitisinsidethehiveorinthe
field,becauseitneedstoknowifit’sarrivedatitsdestination.
Q: Then why use Point to store the location, and not
something else? Aren’t Points specifically for drawing?
A:Yes,aPointiswhatallofthevisualcontrolsusefortheir
Locationproperties.Plus,it’llcomeinhandywhenwedothe
animation.However,justbecause.NETusesthemthatway,that
doesn’tmeanit’snotalsousefulforustokeeptrackoflocations.Yes,
wecouldhavecreatedourownBeeLocationclasswithinteger
fieldscalledXandY.ButwhyreinventthewheelwhenC#and.NET
giveusPointforfree?
It’s almost always easier to
repurpose or extend an existing
class that does MOSTLY what you
want it to do, rather than creating
an all‑new class from scratch.
566 Chapter 12
Withallfourofourcoreclassesinplace,we’vegotsomeworktodototiethemall
together.Followthestepsbelow,andyoushouldhaveworkingBee,Hive,Flower,
andWorldclasses.Here’showwemadethechangestoputthisintoplace.
Update Bee to take in a Hive and World reference.
Nowthatwe’vegotaclassforHiveandaclassforWorld,Beeobjectsneedto
knowaboutboth.Updateyourcodetotakeinreferencestoabee’shiveandworldin
theconstructorandsavethosereferencesforlateruse.
1
class Bee {
// existing constant declarations
// existing variable declarations
private World world;
private Hive hive;
public Bee(int ID, Point InitialLocation, World world, Hive hive) {
// existing code
this.world = world;
this.hive = hive;
}
}
Update Hive to take in a World reference.
JustasaBeeneedstoknowaboutitsHive,aHiveneedstoknowaboutits
World.UpdateHivetotakeinaWorldreferenceinitsconstructor,andsavethat
reference.YoushouldalsoupdatethecodeinHivethatcreatesnewbeestopass
intotheBeeareferencetoitself(theHive)andtheWorld.
2
class Hive {
private World world;
public Hive(World world) {
this.world = world;
// existing code
}
public void AddBee(Random random) {
// other bee creation code
Bee newBee = new Bee(beeCount, startPoint, world, this);
}
}
This is pretty straightforward…take
these in, assign them to private fields.
More basic code…get the
reference, set a private
field. You want to assign
the world FIRST because
the rest of the constructor
needs to use it.
New bees need a
reference to the world,
and to the hive, now.
exercise solution
you are here 4 567
review and preview
private void AddBee(Random random) {
beeCount++;
// Calculate the starting point
Point startPoint = // start the near the nursery
Bee newBee = new Bee(beeCount, startPoint, world, this);
world.Bees.Add(newBee);
}
Place an upper limit on the bees that Hive can create.
TheHiveclasshasaMaximumBeesconstantthatdetermines
howmanybeestheHivecansupport(insideandoutsidethehive,
combined).NowthattheHivehasaccesstotheWorld,youshould
beabletoenforcethatconstraint.
3
public void Go(Random random) {
if (world.Bees.Count < MaximumBees
&& Honey > MinimumHoneyForCreatingBees
&& random.Next(10) == 1) {
AddBee(random);
}
}
We can use the World
object to see how many
total bees there are, and
compare that to the
maximum bees for this hive.
We put that comparison first. If there’s no
room for bees, no sense in seeing if there’s
enough honey to create bees.
When the Hive creates bees, let the World know.
TheWorldclasskeepsupwithallthebeesthatexist.Whenthe
HivecreatesanewBee,makesurethatBeegetsaddedtothe
overalllistthattheWorldiskeepingupwith.
4
We add the new bee to the
world’s overall bee list.
This demonstrates one of
the reasons we need a World
reference in the Hive class.
If you’re having trouble getting this running, you can download the
code for this exercise (and all the others, too) from:
http://www.headfirstlabs.com/books/hfcsharp/
public World() {
Bees = new List<Bee>();
Flowers = new List<Flower>();
Hive = new Hive(this);
Random random = new Random();
for (int i = 0; i < 10; i++)
AddFlower(random);
}
Update World to pass itself into a new Hive.
UpdateyourWorldclasssothatwhenitcreatesanewHive,it
passesinareferencetoitself.
5
This passes in the reference
to the Hive.

568 Chapter 12
public void Go(Random random) {
Age++;
switch (CurrentState) {
case BeeState.Idle:
if (Age > CareerSpan) {
CurrentState = BeeState.Retired;
} else if (world.Flowers.Count > 0
&& hive.ConsumeHoney(HoneyConsumed)) {
Flower flower =
world.Flowers[random.Next(world.Flowers.Count)];
if (flower.Nectar >= MinimumFlowerNectar && flower.Alive) {
destinationFlower = flower;
CurrentState = BeeState.FlyingToFlower;
}
}
break;
case BeeState.FlyingToFlower:
if (!world.Flowers.Contains(destinationFlower))
CurrentState = BeeState.ReturningToHive;
else if (InsideHive) {
if (MoveTowardsLocation(hive.GetLocation(“Exit”))) {
InsideHive = false;
location = hive.GetLocation(“Entrance”);
}
}
else
if (MoveTowardsLocation(destinationFlower.Location))
CurrentState = BeeState.GatheringNectar;
break;
case BeeState.GatheringNectar:
double nectar = destinationFlower.HarvestNectar();
if (nectar > 0)
NectarCollected += nectar;
else
CurrentState = BeeState.ReturningToHive;
break;
Giving the bees behavior
The one big piece of code that’s missing in our current classes
is the Bee’s Go() method. We were able to code a few of
the states earlier, but there are plenty left (Idle is incomplete,
FlyingToFlower, and part of MakingHoney).
Let’s finish up those remaining states now:
If we’re idle, we want to go find
another flower to harvest from.
See if there are flowers left, and
then consume enough honey to keep on
going. Otherwise, we’re stuck.
We need another
living flower with
nectar.
Assuming that all
works out, go to the
new flower.
If we can get to the exit, then we’re out of the hive.
Update our location. Since we’re now on the field form,
we should fly out near the entrance.
Make sure the flower hasn’t
died as we’re heading toward it.
If we’re out of
the hive, and the
flower is alive,
get to it and
start gathering
nectar.
That’s why we passed a
reference to the hive
to the Bee constructor.
make the bees behave themselves

you are here 4 569
review and preview
case BeeState.ReturningToHive:
if (!InsideHive) {
if (MoveTowardsLocation(hive.GetLocation(“Entrance”))) {
InsideHive = true;
location = hive.GetLocation(“Exit”);
}
}
else
if (MoveTowardsLocation(hive.GetLocation(“HoneyFactory”)))
CurrentState = BeeState.MakingHoney;
break;
case BeeState.MakingHoney:
if (NectarCollected < 0.5) {
NectarCollected = 0;
CurrentState = BeeState.Idle;
}
else
if (hive.AddHoney(0.5))
NectarCollected -= 0.5;
else
NectarCollected = 0;
break;
case BeeState.Retired:
// Do nothing! We’re retired!
break;
}
}
Try and give this
nectar to the hive.
If the hive could use the
nectar to make honey…
…remove it from the bee.
If the hive’s full, AddHoney() will
return false, so the bee just dumps the
rest of the nectar so he can fly out
on another mission.
If we’ve made it to the hive,
update our location and the
insideHive status.
If we’re already in the hive, head
to the honey factory.
Suppose you wanted to change the simulator so it took two turns to reach
a flower, and two turns to go from a flower back to the hive. Without writing
any code, which methods of which classes would you have to change to
put this new behavior into place?
This is the exit. When
the hive stores its “Exit”
location, it corresponds to
the point on the Hive form
that shows the picture of
the exit.
This is the entrance. When
the bees fly back to the
hive, they fly toward the
entrance of the hive on
the field form.
That’s why the location dictionary stores two
separate “Exit” and “Entrance” locations.
Once the bee’s retired, he just has to
wait around until the Hive removes him
from the list. Then he’s off to Miami!
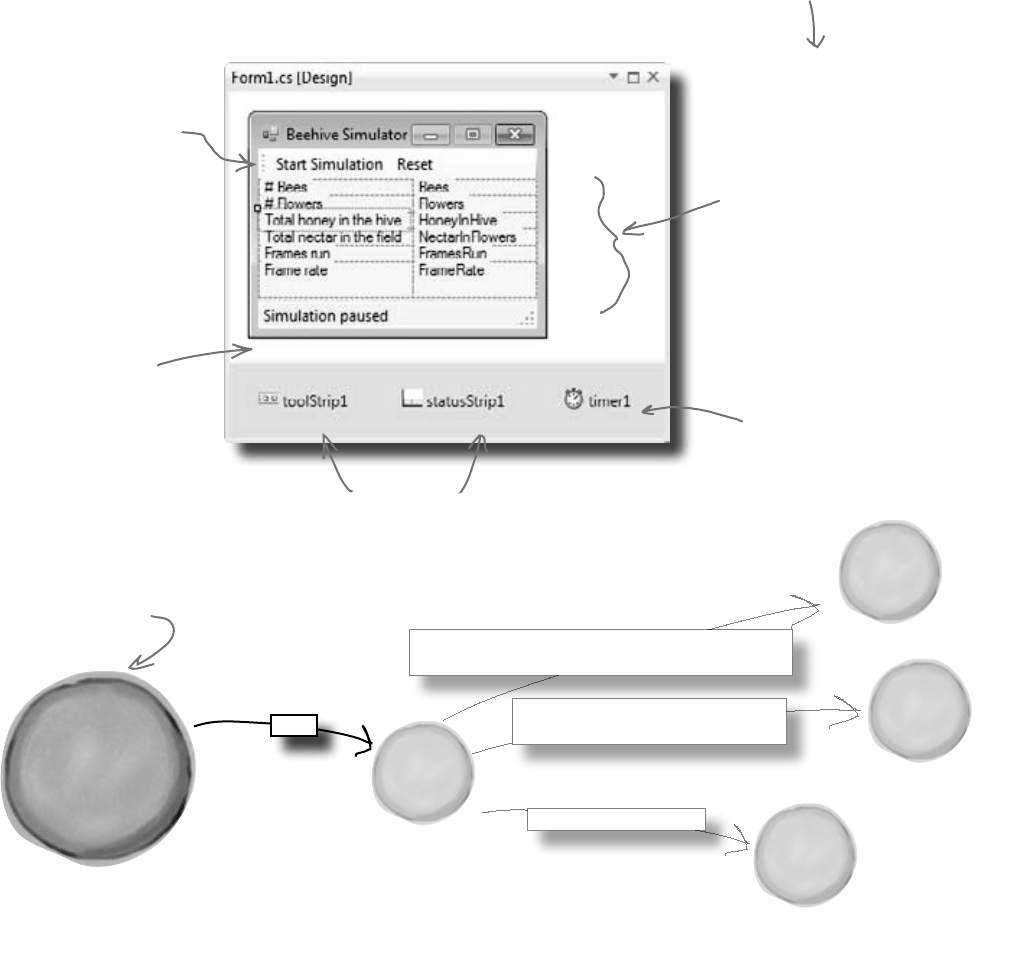
570 Chapter 12
The main form tells the world to Go()
OK, so you know that the world advances by one frame every
time its Go() method is called. But what calls that Go()
method? Why, the main form, of course! Time to lay it out.
Go ahead and add a new form to your project. Make it look like
the form below. We’re using some new controls, but we’ll explain
them all over the next several pages.
Each of these labels
lives in one cell of a
TableLayoutPanel control.
You lay it out just like a
table in Microsoft Word.
Click on the little black
arrow to add, remove, and
resize columns and rows.
The ToolStrip control puts
a toolstrip at the top of
your form. You can add
the two buttons using the
drop-down that appears on
the ToolStrip when you’re
in the form designer. Set
each button’s DisplayStyle
to Text.
Add a StatusStrip to
put a status bar on the
bottom. Use the drop-
down that appears on
the StatusStrip in
the designer to add a
StatusLabel to it.
Add a Timer control
to the form. It
doesn’t show up at
all—it’s a non-visual
component that the
form designer displays
as an icon in the space
below the form.
We’re finally getting to the
code that moves the World
object along.
The ToolStrip control adds a toolbar to the top of
your form, and StatusStrip adds a status bar to the
bottom. But they also appear as icons in the area
below the form, so you can edit their properties.
pop goes the world
hive.Go(random);
foreach (Bee bee in Bees)
bee.Go(random);
foreach (Flower flower in Flowers)
flower.Go(random);
Go()
S
y
s
t
e
m
.
W
i
n
d
o
w
s
.
F
o
r
m
s
.
F
o
r
m
Main form
L
i
s
t
o
f
B
e
e
o
b
j
e
c
t
s
H
i
v
e
o
b
j
e
c
t
L
i
s
t
o
f
F
l
o
w
e
r
o
b
j
e
c
t
s
W
o
r
l
d
o
b
j
e
c
t
The labels in the right-hand column
will show the stats. Name them “Bees”,
“Flowers”, “HoneyInHive”, etc.
you are here 4 571
review and preview
private void UpdateStats(TimeSpan frameDuration) {
Bees.Text = world.Bees.Count.ToString();
Flowers.Text = world.Flowers.Count.ToString();
HoneyInHive.Text = String.Format(“{0:f3}”, world.Hive.Honey);
double nectar = 0;
foreach (Flower flower in world.Flowers)
nectar += flower.Nectar;
NectarInFlowers.Text = String.Format(“{0:f3}”, nectar);
FramesRun.Text = framesRun.ToString();
double milliSeconds = frameDuration.TotalMilliseconds;
if (milliSeconds != 0.0)
FrameRate.Text = string.Format(“{0:f0} ({1:f1}ms)”,
1000 / milliSeconds, milliSeconds);
else
FrameRate.Text = “N/A”;
}
Most of this just
involves getting
data from
the world and
updating labels.
Print the first parameter
as a number with no
decimals, then a space, then
print the second parameter
with one decimal followed
by the letters “ms” (in
parentheses)
This indicates how long passes for
a turn…we’ll have to send this
parameter in from somewhere else,
in just a few pages.
We can use World to get statistics
Now we want to update all these controls. But we don’t need click handlers
for each one; instead, let’s use a single method that will update the different
statistics in the simulator window (we’ll explain framesRun shortly):
Be sure
you match
your label
names on
the form
with your
code.
Whoa! Where did that World object
come from…we haven’t created that yet, have
we? And what’s all that time and frame stuff?
Let’s create a World
You’re right, we need to create the World object. Add this
line to your form’s constructor:
public Form1() {
InitializeComponent();
world = new World();
}
Go ahead and add a private World field to your form
called world.
That just leaves all the time-related code. We’ve always said
we needed a way to run Go() in World over and over…
sounds like we need some sort of timer.
Add this method
into Form1.
This code uses the same
String.Format() method you
used in the hex dump. But
instead of printing in hex
using “x2”, you use “f3” to
display a number with three
decimal places.
We’ll talk
more about
this when we
create that
TimeSpan
object.
The frame rate is the number of frames
run per second. We’re using a TimeSpan
object to store how long it took to run the
frame. We divide 1000 by the number of
milliseconds it took to run the frame—that
gives us the total number of milliseconds it
took to run the last frame.
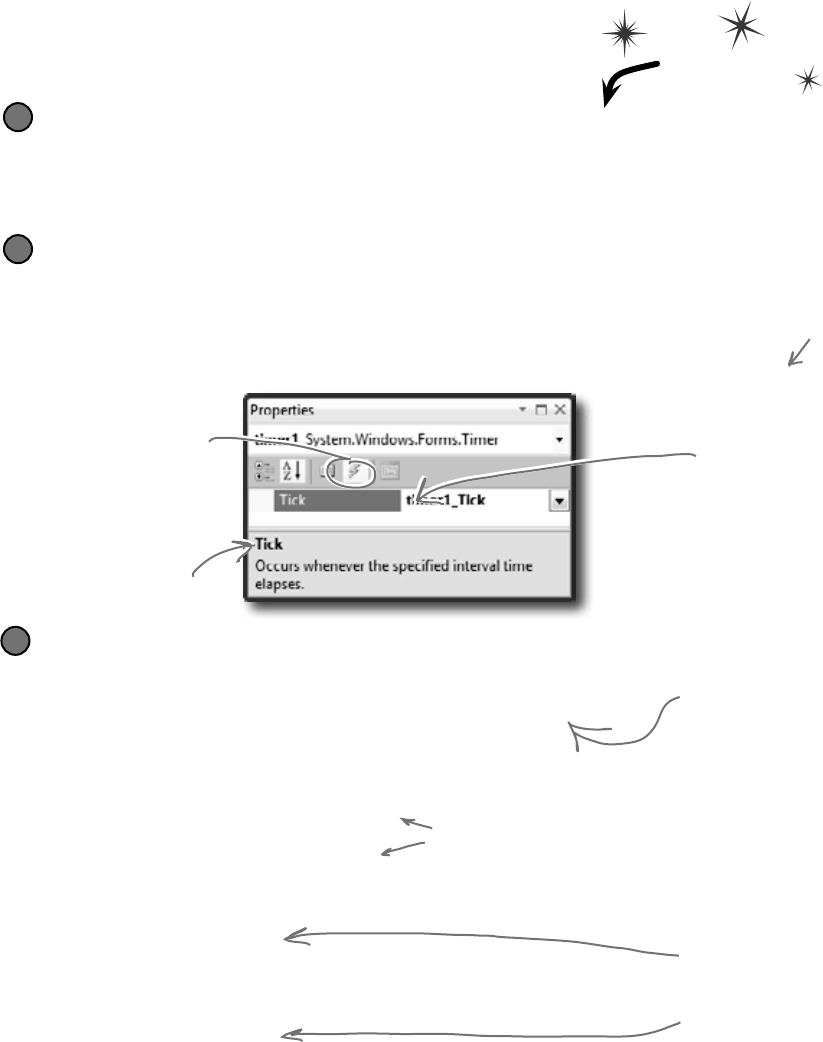
572 Chapter 12
Timers fire events over and over again
Remember how you used a loop to animate the greyhounds? Well, there’s
a better way to do it. A timer is an especially useful component that
triggers an event over and over again, up to a thousand times a second. Do this
Create a new project with a timer and three buttons
You don’t have to close your current project—just pop open a new instance of Visual
Studio and start up a new project. Drag a timer and three buttons onto the form. Click
on the timer icon at the bottom of the designer and set its Interval property to 1000. That
number is measured in milliseconds—it tells the timer to fire its tick event once a second.
1
Open the IDE’s Properties window and click on the Events button.
(Remember, the Events button looks like a lightning bolt, and it lets you manage the
events for any of your form’s controls.) The timer control has exactly one event, Tick.
Click on the Timer icon in the designer, then double-click on its row in the
Events page and the IDE will create a new event handler method for you and hook it up
to the property automatically.
2
The Events button in the
Properties window lets you
work with all the events
for each of your controls.
The Timer control has
one event called Tick.
If you double-click here,
the IDE creates an
event handler method
for you automatically.
The bottom of the window
has a description of the event.
Add code to the Tick event and to your buttons
Here’s some code that will help you get a sense of how the timer works:
private void timer1_Tick(object sender, EventArgs e) {
Console.WriteLine(DateTime.Now.ToString());
}
private void toggleEnabled_Click(object sender, EventArgs e) {
if (timer1.Enabled)
timer1.Enabled = false;
else
timer1.Enabled = true;
}
private void startTimer_Click(object sender, EventArgs e){
timer1.Start();
Console.WriteLine(“Enabled = ” + timer1.Enabled);
}
private void stopTimer_Click(object sender, EventArgs e) {
timer1.Stop();
Console.WriteLine(“Enabled = ” + timer1.Enabled);
}
3
This statement writes the
current date and time to the
output. Check the output
window to make sure the tick
event is fired once a second
(every 1000 milliseconds).
The timer’s Enabled property
starts and stops the timer.
The timer’s Start() method
starts the timer and sets
Enabled to true. The Stop()
method stops the timer and
sets Enabled to false.
Take a minute and create a new project
so you can see how timers work. Then we’ll
get back to the simulator and put your
new knowledge to work.
These buttons let
you play with the
Enabled property
and the Start()
and Stop()
methods. The
first one switches
Enabled between
true and false, and
the other two call
the Start() and
Stop() methods.
play it again
You can also just
double-click on
the Timer icon
to add the event
handler instead
of using the
Properties window.
you are here 4 573
review and preview
How do C# and .NET tell the timer what to do every tick? How
does the timer1_Tick() method get run every time your
timer ticks? Well, we’re back to events and delegates, just
like we talked about in the last chapter. Use the IDE’s “Go To
Definition” feature to remind yourself how the EventHandler
delegate works:
Right-click on your timer1 variable and select “Go To Definition”
The “Go To Definition” feature will cause the IDE to automatically jump to the location in the code
where the timer1 variable is defined. The IDE will jump you to the code it created to add timer1 as a
property in the Form1 object in Form1.Designer.cs. Scroll up in the file until you find this line:
this.timer1.Tick += new System.EventHandler(this.timer1_Tick);
4
Now right-click on EventHandler and select “Go To Definition”
The IDE will automatically jump to the code that defines EventHandler. Take a look at the name
of the new tab that it opened to show you the code: “EventHandler [from metadata]”. This means
that the code to define EventHandler isn’t in your code. It’s built into the .NET Framework, and
the IDE generated a “fake” line of code to show you how it’s represented:
public delegate void EventHandler(object sender, EventArgs e);
5
The timer’s using an event
handler behind the scenes
This is the Tick event
of your timer control.
You’ve set this to occur
every 1000 milliseconds.
Here’s one of the System’s
delegates: the basic event
handler. It’s a delegate…a
pointer to one or more methods.
Here’s the method you
just wrote, timer1_Tick().
You’re telling the delegate
to point to that method.
Here’s why every event in C# generally takes
an Object and EventArgs parameter-that’s
the form of the delegate that C# defines
for event handling.
Each event is of type EventHandler.
So our Tick event now points to the
timer1_Tick() method.
What code would you write to run the World’s Go() method
10 times a second in our beehive simulator?
The timer’s Tick event
is an average, everyday
event handler, just
like the ones to handle
button clicks.
Behind
the Scenes
574 Chapter 12
Add a timer to the simulator
Let’s add a timer to the simulator. You’ve already got a timer control,
probably called timer1. Instead of using the IDE to generate a
timer1_Tick() method, though, we can wire the timer to an event
handler method called RunFrame() manually:
public partial class Form1 : Form {
World world;
private Random random = new Random();
private DateTime start = DateTime.Now;
private DateTime end;
private int framesRun = 0;
public Form1() {
InitializeComponent();
world = new World();
timer1.Interval = 50;
timer1.Tick += new EventHandler(RunFrame);
timer1.Enabled = false;
UpdateStats(new TimeSpan());
}
private void UpdateStats(TimeSpan frameDuration) {
// Code from earlier to update the statistics
}
public void RunFrame(object sender, EventArgs e) {
framesRun++;
world.Go(random);
end = DateTime.Now;
TimeSpan frameDuration = end - start;
start = end;
UpdateStats(frameDuration);
}
}
You should have a World
property from earlier.
These will be used to figure out
how long the simulator’s been
running at any given point.
Run every 50 milliseconds.
We set the handler to our own
method, RunFrame().
Timer starts off.
We also start out by updating stats, with a
new TimeSpan (0 time elapsed).
A second
is 1000
milliseconds, so
our timer will
tick 20 times a
second.
We want to keep up with
how many frames-or
turns-have passed.
Increase the frame count, and
tell the world to Go().
Next, we figure out the
time elapsed since the last
frame was run.
Finally, update the stats again,
with the new time duration.
DateTime &TimeSpan
.NET uses the DateTime class to
store information about a time, and
its Now property returns the current
date and time. If you want to find
the difference between two times, use
a TimeSpan object: just subtract one
DateTime object from another, and
that’ll return a TimeSpan object that
holds the difference between them.
TimeSpan has properties like Days, Hours,
Seconds, and Milliseconds that let you
measure the span in different units.
good timing
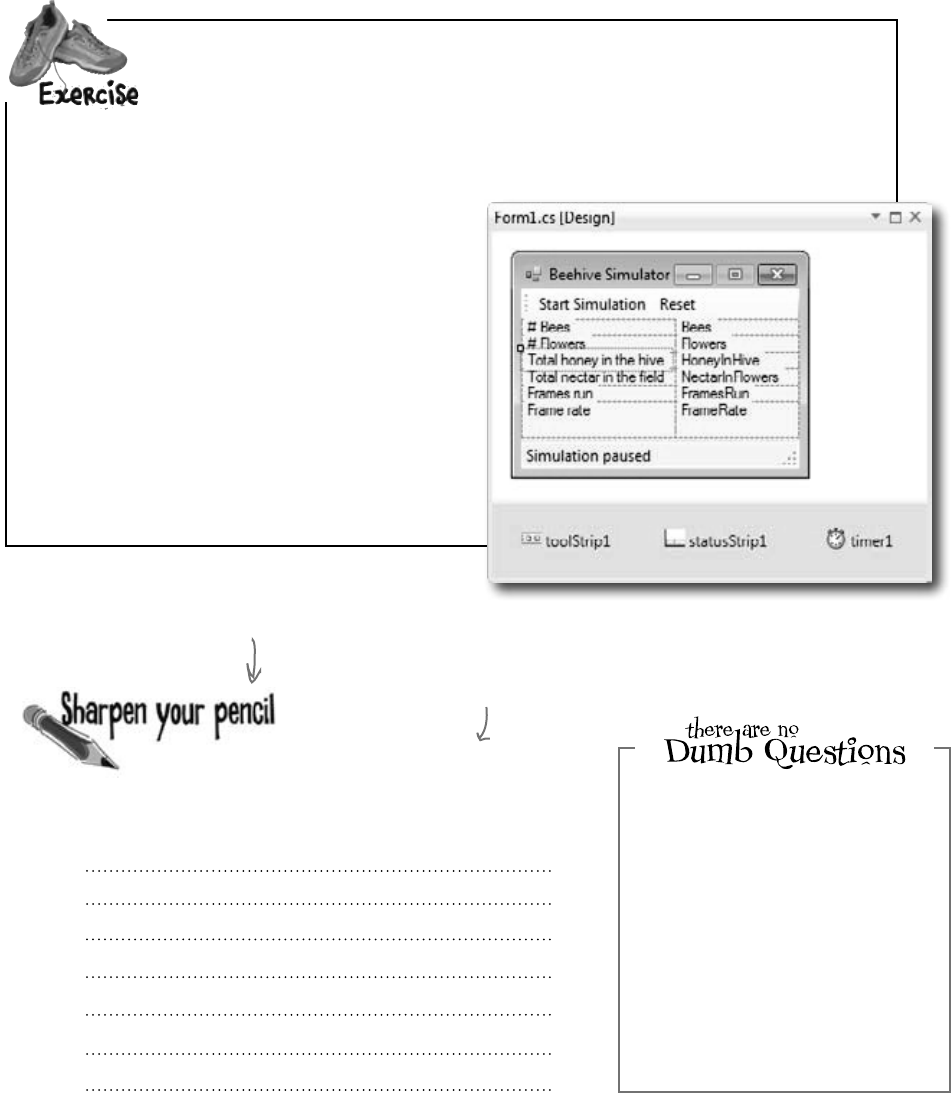
you are here 4 575
review and preview
Your job is to write the event handlers for the Start Simulation and
Reset buttons in the ToolStrip. Here’s what each button should do:
1. Initially, the first button should read “Start Simulation.”
Pressing it causes the simulation to start, and the
label to change to “Pause
Simulation.” If the simulation
is paused, the button should
read, “Resume simulation.”
2. The second button should
say “Reset.” When it’s
pressed, the world should
be recreated. If the timer is
paused, the text of the first
button should change from
“Resume simulation” to “Start
Simulation.”
What do you think is left to be done in this phase
of the simulator? Try running the program. Write
down everything you think we still need to take
care of before moving on to the graphical stuff.
There’s no single answer to this question—we just
want you to think about what’s left to do.
Q: We’ve been using the term
“turn,” but now you’re talking about
frames. What’s the difference?
A:Semantics,really.We’restill
dealinginturns:littlechunksoftime
whereeveryobjectintheworldgets
toact.Butsincewe’llsoonbeputting
someheavy-dutygraphicsinplace,
we’vestartedusing“frame,”asina
graphicalgame’sframe-rate.
If you haven’t
dragged a ToolStrip
and StatusStrip out
of the toolbox and
onto your form, do
it now.
Just double-click on a ToolStrip button
in the designer to make the IDE add its
event handler, just like a normal button.
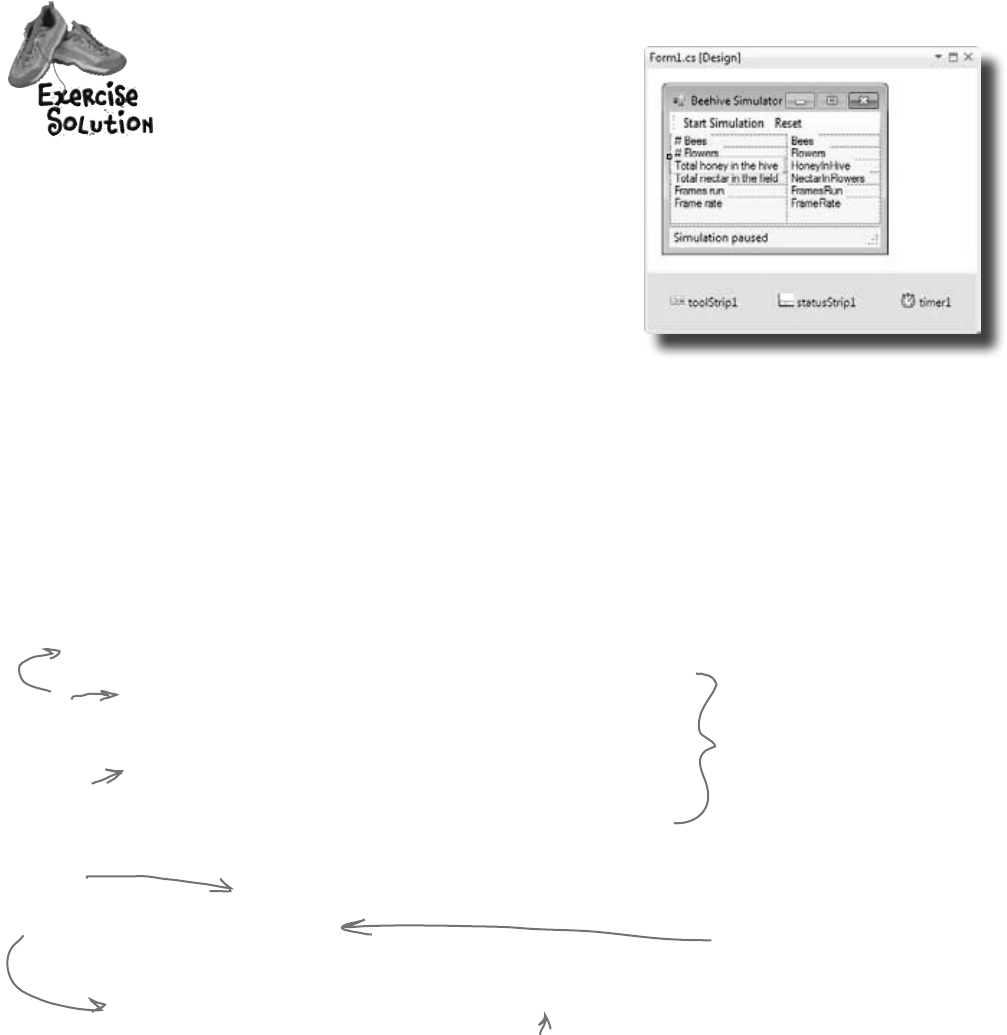
576 Chapter 12
Your job was to write the event handlers for the Start
Simulation and Reset buttons.
public partial class Form1 : Form {
// variable declarations
public Form1() {
InitializeComponent();
world = new World();
}
private void Form1_Load(object sender, tArgs e) {
// code to start simulator
}
private void UpdateStats(TimeSpan frameDuration) {
// Code from earlier to update the statistics
}
public void RunFrame(object sender, EventArgs e) {
// event handler for timer
}
private void startSimulation_Click(object sender, EventArgs e) {
if (timer1.Enabled) {
toolStrip1.Items[0].Text = “Resume simulation”;
timer1.Stop();
} else {
toolStrip1.Items[0].Text = “Pause simulation”;
timer1.Start();
}
}
private void reset_Click(object sender, EventArgs e) {
framesRun = 0;
world = new World();
if (!timer1.Enabled)
toolStrip1.Items[0].Text = “Start simulation”;
}
}
Toggle the timer,
and update the
message.
Resetting the simulator is
just a matter of recreating
the World instance and
resetting framesRun.
The only time we need to change
the first button’s label is if it says,
“Resume simulation.” If it says, “Pause
simulation,” it doesn’t need to change.
Be sure
your
form’s
control
names
match up
with what
you use in
your code.
get it going
you are here 4 577
review and preview
Test drive
You’ve done a ton of work. Compile your
code, fix any typos, and run the simulator.
How’s it look?
Looks pretty good!
All these numbers
should update as the
world moves along.
Your start/pause and
reset buttons should
all work.
Hmmm…our status strip
seems to be the only
thing not working.
Here’s your chance to put together everything you’ve learned. We need to
allow bees to tell our simulator what they’re doing. When they do, we want
our simulator to update the status message in the simulator.
This time, it’s up to you to not only write most of the code, but to figure out
what code you need to write. How can you have a method in your simulator
that gets called every time a bee changes its state?
To give you a little help, we’ve written the method to add to the form. The
Bee class should call this method any time its state changes:
private void SendMessage(int ID, string Message) {
statusStrip1.Items[0].Text = “Bee #” + ID + “: ” + Message;
}
* OK, one more
hint. You’ll need to
make changes to
all but one of your
classes to make
this work.

578 Chapter 12
exercise solution
Yourjobwastocomeupwithawayforbeestoletthesimulatorknow
aboutwhatthey’redoing.
Here’s what we added to the Bee class.
class Bee {
// all our existing code
public BeeMessage MessageSender;
public void Go(Random random) {
Age++;
BeeState oldState = CurrentState;
switch (currentState) {
// the rest of the switch statement is the same
}
if (oldState != CurrentState
&& MessageSender != null)
MessageSender(ID, CurrentState.ToString());
}
}
We used a callback to hook each
individual bee object up to the
form’s SendMessage() method.
If the status of the Bee changed, we
call back the method our BeeMessage
delegate points to, and let that method
know about the status change.
class Hive {
// all our existing code
public BeeMessage MessageSender;
public Hive(World world, BeeMessage MessageSender) {
this.MessageSender = MessageSender;
// existing constructor code
}
public void AddBee(Random random) {
// existing AddBee() code
Bee newBee = new Bee(beeCount, startPoint, world, this);
newBee.MessageSender += this.MessageSender;
world.Bees.Add(newBee);
}
Here are the changes
we made to the Hive.
Hive needs a delegate too, so
it can pass on the methods for
each bee to call when they’re
created in AddBee().
AddBee() now has to make sure
that each new bee gets the
method to point at.
It uses a delegate called
BeeMessage that takes a bee ID
and a message. The bee uses it to
send messages back to the form.
you are here 4 579
review and preview
BeeMessage is our delegate. It’s also
a match with the SendMessage()
method we wrote in the form. Add
it to its own file called BeeMessage.
cs—it should be in the namespace, but
outside of any class.
class World {
// all our existing code
public World(BeeMessage messageSender) {
Bees = new List<Bee>();
Flowers = new List<Flower>();
Hive = new Hive(this, messageSender);
Random random = new Random();
for (int i = 0; i < 10; i++)
AddFlower(random);
}
}
World doesn’t need to have a
delegate of its own. It just passes
on the method to call to the Hive
instance.
The World class required some changes as well.
public partial class Form1 : Form {
// variable declarations
public Form1() {
InitializeComponent();
world = new World(new BeeMessage(SendMessage));
// the rest of the Form1 constructor
}
private void reset_Click(object sender, EventArgs e) {
framesRun = 0;
world = new World(new BeeMessage(SendMessage));
if (!timer1.Enabled)
toolStrip1.Items[0].Text = “Start simulation”;
}
private void SendMessage(int ID, string Message) {
statusStrip1.Items[0].Text = “Bee #” + ID + “: ” + Message;
}
}
Last but not least, here’s the
updated form. Anything not shown
stayed the same.
We create a new delegate from the
Bee class (make sure you declared
BeeMessage public), and point it at
our SendMessage() method.
Same thing here…create the
world with the method for
bees to call back.
This is the method we gave
you…be sure to add it in, too.
public delegate void BeeMessage(int ID, string Message);
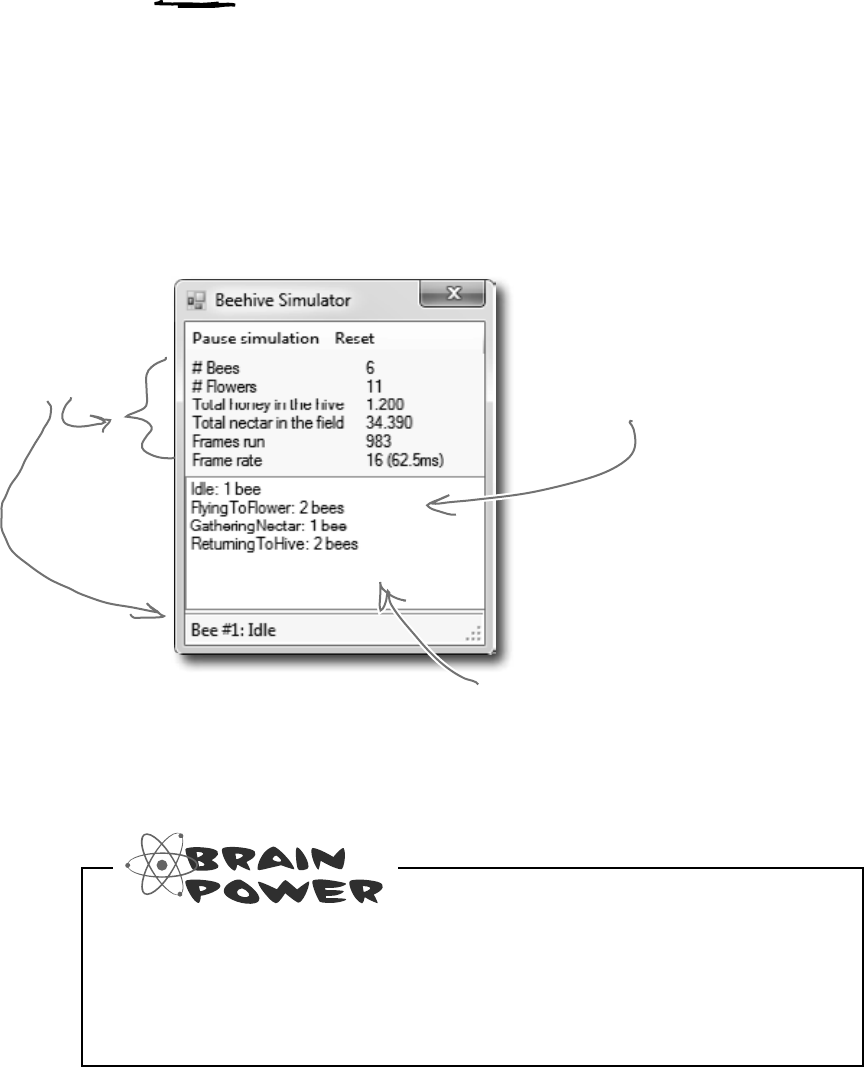
580 Chapter 12
Let’s work with groups of bees
Your bees should be buzzing around the hive and the field,
and your simulation should be running! How cool is that? But
since we don’t have the visual part of the simulator working
yet—that’s what we’re doing in the next chapter—all the
information we have so far is the messages that the bees are
sending back to the main form with their callbacks. So let’s
add more information about what the bees are doing.
You know enough to gather the information you’d need to populate that
ListBox—take a minute and think through how that would work. But it’s
a little more complex than it seems at first. What would you need to do to
figure out how many bees are in each of the various Bee.State states?
You already have the form
updating these stats and
displaying the messages
that the bees send as
they do their jobs.
At any time, there are a bunch of bees flying around.
The new ListBox will display how many bees are doing
each job. In this case, two bees are flying to flowers,
one is at a flower gathering nectar, one is returning
to the hive, and two are in the honey factory
turning nectar into honey.
Go ahead and add a
ListBox to your form.
We’ll use it to display
some extra stats about
the bees in the world.
group the bees
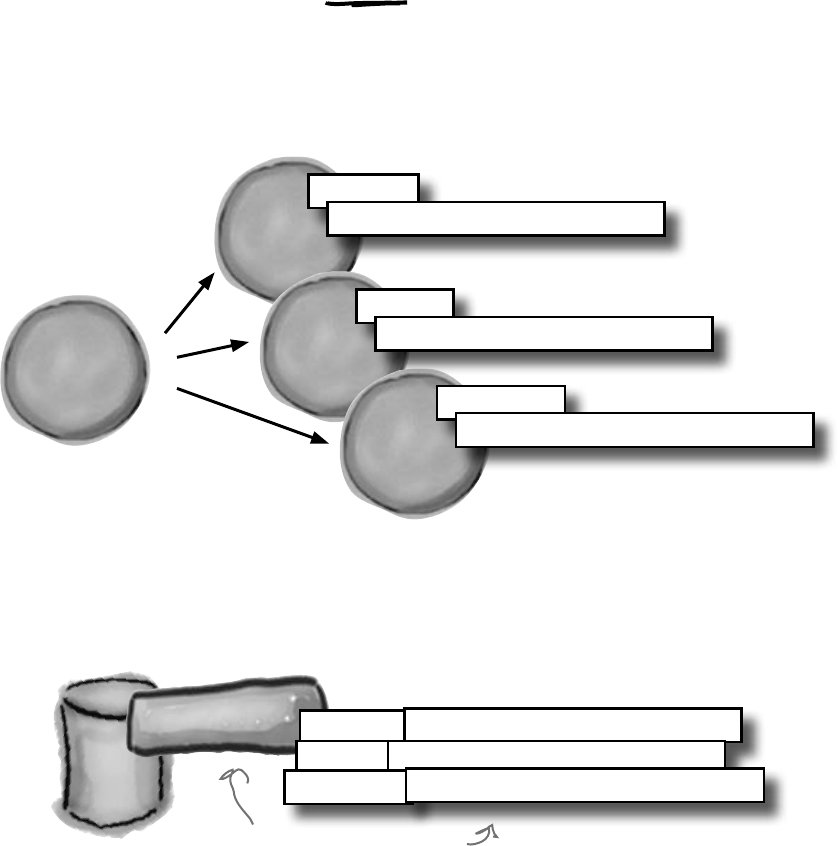
you are here 4 581
review and preview
A collection collects…DATA
Our bees are stored in a List<Bee>, which is one of the
collection types. And collection types really just store data…a
lot like a database does. So each bee is like a row of data,
complete with a state, and ID, and so on. Here’s how our bees
look as a collection of objects:
Database
ID = 987
Bee currentState = MakingHoney
ID = 12
Bee currentState = FlyingToFlower
ID = 1982
Bee currentState = GatheringNectar
L
i
s
t
o
f
B
e
e
o
b
j
e
c
t
s
Bees
There’s a lot of data in the Bee objects’ fields. You can almost
think of a collection of objects the same way you think of
rows in a database. Each object holds data in its fields, the
same way each row in a database holds data in its columns.
Bees table
ID = 987 currentState = MakingHoney
ID = 12 currentState = FlyingToFlower
ID = 1982 currentState = GatheringNectar
Suppose we had a Bees table, and
each row in the table had an ID
column and a currentState column.
Most collections—especially
when they hold objects—
can be thought of as data
stores, just like a database.
582 Chapter 12
Who cares if you can think
about a collection as a database if you
can’t use a collection like a database?
What a total waste of time....
What if you could query collections,
databases, and even XML documents
with the same basic syntax?
C# has a really useful feature called LINQ (which
stands for Language INtegrated Query). The idea
behind LINQ is that it gives you a way to take an array,
list, stack, queue, or other collection and work with all
the data inside it all at once in a single operation.
But what’s really great about LINQ is that you can use
the same syntax that works with collections as you can
for working with databases.
We’ll spend most of
Chapter 15 working
with LINQ.
ID = 987
Bee currentState = MakingHoney
ID = 12
Bee currentState = FlyingToFlower
ID = 1982
Bee currentState = GatheringNectar
L
i
s
t
o
f
B
e
e
o
b
j
e
c
t
s
Bees
Database
Bees table
ID = 987 currentState = MakingHoney
ID = 12 currentState = FlyingToFlower
ID = 1982 currentState = GatheringNectar
XML
<bee id=”987” currentState=”MakingHoney” />
<bee id=”12” currentState=”FlyingToFlower” />
<bee id=”1982” currentState=”GatheringNectar” />
var beeGroups =
from bee in world.Bees
group bee by bee.CurrentState
into beeGroup
orderby beeGroup.Key
select beeGroup;
LINQ
This LINQ query works essentially
the same with data in a collection
or a database.
If we had our bee data in a database—
or even an XML file—LINQ could work
with them in exactly the same way.
missing LINQ

you are here 4 583
review and preview
LINQ makes working with data in
collections and databases easy
We’re going to spend an entire chapter on LINQ before long, but we can
use LINQ and some Ready Bake Code to add some extra features to our
simulator. Ready Bake Code is code you should type in, and it’s OK if
you don’t understand it all. You’ll learn how it all works in Chapter 15.
private void SendMessage(int ID, string Message) {
statusStrip1.Items[0].Text = “Bee #” + ID + “: “ + Message;
var beeGroups =
from bee in world.Bees
group bee by bee.CurrentState into beeGroup
orderby beeGroup.Key
select beeGroup;
listBox1.Items.Clear();
foreach (var group in beeGroups) {
string s;
if (group.Count() == 1)
s = “”;
else
s = “s”;
listBox1.Items.Add(group.Key.ToString() + “: “
+ group.Count() + “ bee” + s);
if (group.Key == BeeState.Idle
&& group.Count() == world.Bees.Count()
&& framesRun > 0) {
listBox1.Items.Add(“Simulation ended: all bees are idle”);
toolStrip1.Items[0].Text = “Simulation ended”;
statusStrip1.Items[0].Text = “Simulation ended”;
timer1.Enabled = false;
}
}
}
The group’s Key is the bee’s
CurrentState, so that’s the order the
states will be displayed on the form.
This bit of code makes sure it says, “1 bee”
and “3 bees”, keeping the plural right.
Ready Bake
Code
This is a LINQ query. It takes all the
bees in the Bees collection, and groups
them by their CurrentState property.
Make sure
this matches
the list box
control’s
name on
your form.
beeGroups is from the LINQ query. We can
count the members, and iterate over them.
Finally, add the group
status (its key) and
count to the list box.
Here’s another nice
feature. Since we know
how many bees are idle…
…we can see if ALL
bees are idle. If so,
the hive’s out of honey,
so let’s stop the
simulation.
We’ll learn a lot more about LINQ in
upcoming chapters.
You don’t need to memorize LINQ syntax or
try to drill all of this into your head right now.
You’ll get a lot more practice working with LINQ in Chapter 15.

584 Chapter 12
save the world
Test drive (Part 2)
Go ahead and compile your code and run your project. If
you get any errors, double-check your syntax, especially
with the new LINQ code. Then, fire up your simulator!
These stats come from
the form querying the
World object.
The timer on your form
controls the running of
the simulation.
LINQ queries
your collections
to feed you this
data every turn.
Bees call back your simulator
form to update the form every
time their status changes.
You’ll add these standard items, and
event handlers to make them work
[NonSerialized] keeps data from getting serialized
Sometimes you want to serialize part of an object, not all of it. It might have data that you don’t want
written to the disk. Let’s say you’re building a system that a user logs into, and you want to save an
object that stores the user’s options and settings to a file. You might mark the
password
field with the
[NonSerialized] attribute. That way, when you Serialize() the object, it will skip that field.
The [NonSerialized] attribute is especially useful when your object has a reference to an object that is not
serializable. For example, if you try to serialize a Form, Seralize() will throw a SerializationException. So if
our object has a reference to a Form object, then when you try to serialize it the serializer will follow that
link and try to serialize the Form, too…which will throw that exception. But if you mark the field that
holds the reference with the [NonSerialized] attribute, then Serialize() won’t follow the reference at all.
When one object has a
method that’s hooked up to
a delegate or event handler
in another object, that’s a
reference that serialization
will try to follow.
So if you try to serialize an object
that’s got an event handler listening
to an event on a control, then if you
don’t mark it [NonSerialized] it’ll
try to serialize the control, which
will throw a SerializationException.
you are here 4 585
review and preview
Addcodetomakethesaveandopenbuttonswork.
Add the button event handlers
The new standard buttons are named openToolStripButton, saveToolStripButton,
and printToolStripButton. Just double-click on them to add their event handlers.
2
Add the Open, Save, and Print icons
The ToolStrip control has a really useful feature—it can automatically insert
picture buttons for standard icons: new, open, save, print, cut, copy, paste, and help.
Just right-click on the ToolStrip icon at the bottom of the Form Designer window
and select “Insert Standard Items”. Then click on the first item—that’s the
“new” icon—and delete it. Keep the next three items, because they’re the ones we
need (open, save, and print). After that comes a separator; you can either delete it
or move it between the Reset button and the save buton. Then delete the rest of
the buttons. Make sure you set its CanOverflow property to false (so it doesn’t add
an overflow menu button to the right-hand side of the toolbar) and its GripStyle
property to Hidden (so it removes the sizing grip from the left-hand side).
1
One final challenge: Open and Save
We’re almost ready to take on graphics, and add some visual eye candy to
our simulator. First, though, let’s do one more thing to this version: allow
loading, saving, and printing of bee statistics.
1. Make the save button serialize the world to a file.Thesavebuttonshouldstopthetimer(itcanrestartitafter
savingifthesimulatorwasrunning).ItshoulddisplayaSavedialogbox,andiftheuserspecifiesafilenamethenit
shouldserializetheWorldobject,andthenumberofframesthathavebeenrun.
WhenyoutrytoserializetheWorldobject,itwillthrowaSerializationExceptionwiththismessage:Type
‘Form1’is not marked as serializable.That’sbecausetheserializerfoundoneoftheBeeMessagefieldsand
triedtofollowit.Sincethedelegatewashookeduptoafieldontheform,theserializertriedtoserializetheform,too.
Fixthisproblembyaddingthe[NonSerialized]attributetotheMessageSenderfieldsintheHiveandBee
classes,so.NETdoesn’ttryandserializethecodeyourdelegatespointto.
2. Make the open button deserialize the world from a file.Takecareofthetimerjustlikeinthesavebutton:popup
anOpendialogbox,anddeserializetheworldandthenumberofframesrunfromtheselectedfile.Thenyoucanhook
uptheMessageSenderdelegatesagainandrestartthetimer(ifnecessary).
3. Don’t forget about exception handling!Makesuretheworldisintactifthere’saproblemreadingorwritingthefile.
Considerpoppingupahuman-readableerrormessageindicatingwhatwentwrong.
You’ll add the Print
button now—we’ll make
it print a status page
for the hive in the
next chapter.
586 Chapter 12
exercise solution
private void saveToolStripButton_Click(object sender, EventArgs e) {
bool enabled = timer1.Enabled;
if (enabled)
timer1.Stop();
SaveFileDialog saveDialog = new SaveFileDialog();
saveDialog.Filter = “Simulator File (*.bees)|*.bees”;
saveDialog.CheckPathExists = true;
saveDialog.Title = “Choose a file to save the current simulation”;
if (saveDialog.ShowDialog() == DialogResult.OK) {
try {
BinaryFormatter bf = new BinaryFormatter();
using (Stream output = File.OpenWrite(saveDialog.FileName)) {
bf.Serialize(output, world);
bf.Serialize(output, framesRun);
}
}
catch (Exception ex) {
MessageBox.Show(“Unable to save the simulator file\r\n” + ex.Message,
“Bee Simulator Error”, MessageBoxButtons.OK, MessageBoxIcon.Error);
}
}
if (enabled)
timer1.Start();
}
YourjobwastomaketheSaveandOpenbuttonswork.
Don’t forget the extra using statements.
[Serializable]
class World {
[Serializable]
class Hive {
You’ll need to make the World, Hive, Flower,
and Bee classes serializable. When you
serialize the world, .NET will find its
references to Hive, Flower, and Bee objects
and serialize them, too.
Here’s the code for the Save button.
Here’s where
the world is
written out
to a file.
We decided to use “.bees”
as the extension for
simulator save files.
After we save the file,
we can restart the
timer (if we stopped it).
Remember, when we serialize World, everything
it references gets serialized…all the bees,
flowers, and the hive.
using System.IO;
using System.Runtime.Serialization.Formatters.Binary;
[Serializable]
class Flower {
[Serializable]
class Bee {
[NonSerialized]
public BeeMessage MessageSender;
And make sure the MessageSender fields
in the Hive and Bee classes are marked
[NonSerialized].

you are here 4 587
review and preview
private void openToolStripButton_Click(object sender, EventArgs e) {
World currentWorld = world;
int currentFramesRun = framesRun;
bool enabled = timer1.Enabled;
if (enabled)
timer1.Stop();
OpenFileDialog openDialog = new OpenFileDialog();
openDialog.Filter = “Simulator File (*.bees)|*.bees”;
openDialog.CheckPathExists = true;
openDialog.CheckFileExists = true;
openDialog.Title = “Choose a file with a simulation to load”;
if (openDialog.ShowDialog() == DialogResult.OK) {
try {
BinaryFormatter bf = new BinaryFormatter();
using (Stream input = File.OpenRead(openDialog.FileName)) {
world = (World)bf.Deserialize(input);
framesRun = (int)bf.Deserialize(input);
}
}
catch (Exception ex) {
MessageBox.Show(“Unable to read the simulator file\r\n” + ex.Message,
“Bee Simulator Error”, MessageBoxButtons.OK, MessageBoxIcon.Error);
world = currentWorld;
framesRun = currentFramesRun;
}
}
world.Hive.MessageSender = new BeeMessage(SendMessage);
foreach (Bee bee in world.Bees)
bee.MessageSender = new BeeMessage(SendMessage);
if (enabled)
timer1.Start();
}
Before opening the file and reading from it,
save a reference to the current world and
framesRun. If there’s a problem, you can revert
to these and keep running.
Here’s the code for the
Open button.
Set up the Open
File dialog box
and pop it up.
Here’s where we deserialize
the world and the number
of frames run to the file.
If the file operations throw an exception, we
restore the current world and framesRun.
using ensures
the stream
gets closed.
Once everything is loaded, we
hook up the delegates and
restart the timer.
You’ll need to get your simulator up and running before you move on
to the next chapter. You can download a working version from the
Head First Labs website: www.headfirstlabs.com/books/hfcsharp/

this is a new chapter 589
controls and graphics
13
Make it pretty
Sometimes you have to take graphics into your own hands.
We’ve spent a lot of time relying on controls to handle everything visual in our applications.
But sometimes that’s not enough—like when you want to animate a picture. And once
you get into animation, you’ll end up creating your own controls for your .NET programs,
maybe adding a little double buffering, and even drawing directly onto your forms.
It all begins with the Graphics object, bitmaps, and a determination to not accept the
graphics status quo.
590 Chapter 13
You’ve been using controls all along
to interact with your programs
TextBoxes, PictureBoxes, Labels…you’ve got a pretty good
handle by now on how you can use the controls in the IDE’s toolbox.
But what do you really know about them? There’s a lot more to a
control than just dragging an icon onto your form.
You can create your own controls
The controls in the toolbox are really useful for building forms and
applications, but there’s nothing magical about them. They’re just
classes, like the classes that you’ve been writing on your own. In fact,
C# makes it really easy for you to create controls yourself, just by
inheriting from the right base class.
≥
Your custom controls show up in the IDE’s toolbox
There’s also nothing mysterious about the toolbox in the IDE. It just
looks in your project’s classes and the built-in .NET classes for any
controls. If it finds a class that implements the right interface, then
it displays an icon for it in the toolbox. If you add your own custom
controls, they’ll show up in the toolbox, too.
≥
You can write code to add controls to your form, and even
remove controls, while your program’s running
Just because you lay out a form in the IDE’s form designer, it doesn’t mean
that it has to stay like that. You’ve already moved plenty of PictureBox
controls around (like when you built the greyhound race). But you can add or
remove controls, too. In fact, when you build a form in the IDE, all it’s doing
is writing the code that adds the controls to the form…which means you can
write similar code, and run that code whenever you want.
≥
You can create a class
that inherits from any
of the existing control
classes—even if it
doesn’t have any other
code in it—and it’ll
automatically show up in
the toolbox.
objects everywhere
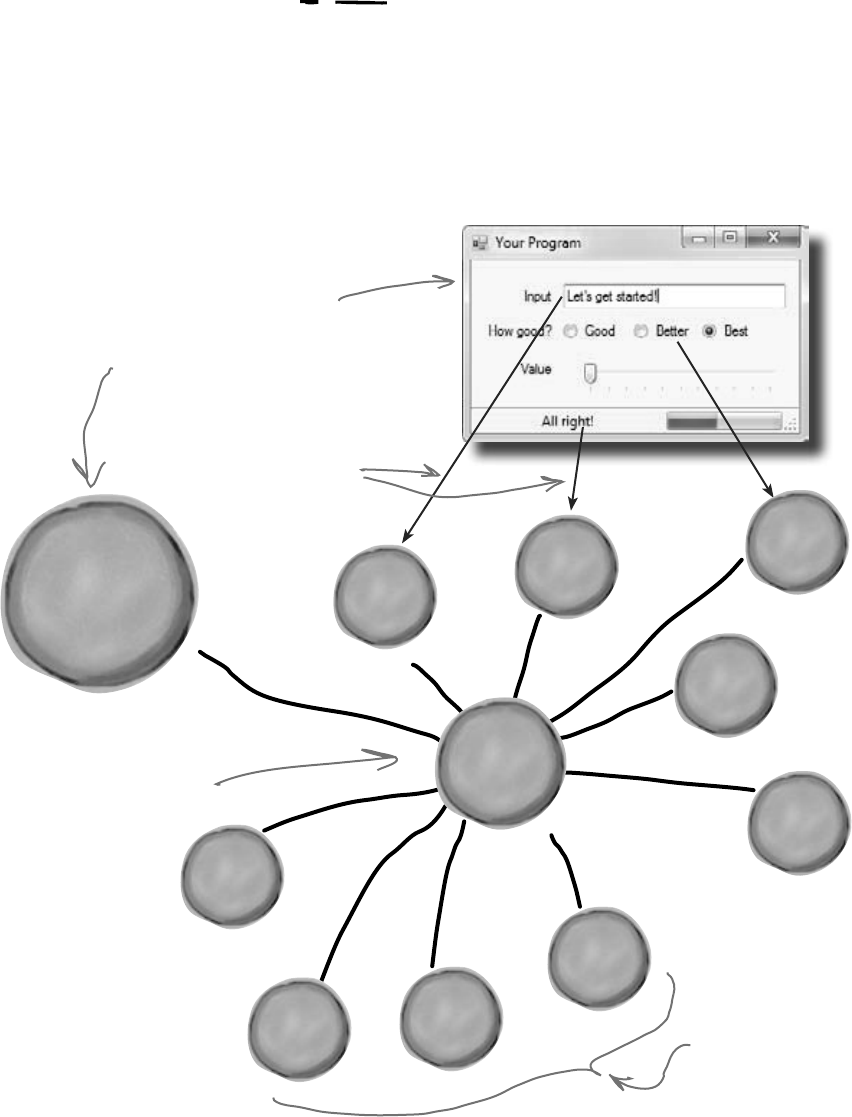
you are here 4 591
controls and graphics
S
y
s
t
e
m
.
W
i
n
d
o
w
s
.
F
o
r
m
s
.
F
o
r
m
Form controls are just objects
You already know how important controls are to your forms. You’ve been
using buttons, text boxes, picture boxes, checkboxes, group boxes, labels, and
other forms since Chapter 1. Well, it turns out that those controls are just
objects, just like everything else you’ve been working with.
A control is just an object, like any other object—it just happens to know how
to draw itself. The Form object keeps track of its controls using a special
collection called Controls, which you can use to add or remove controls in
your own code.
Here’s the form for a
simple application. Its
Controls collection keeps a
reference to each of the
control objects on the
form.
There are 9 controls on
this form, so the Controls
collection contains 9
references to individual
control objects.
Since there are three
labels on the form,
the Controls collection
will contain three
Label objects.
Each control in the form
is just an instance of a
particular object.
R
a
d
i
o
B
u
t
t
o
n
o
b
j
e
c
t
B
u
t
t
o
n
o
b
j
e
c
t
T
e
x
t
B
o
x
o
b
j
e
c
t
R
a
d
i
o
B
u
t
t
o
n
o
b
j
e
c
t
R
a
d
i
o
B
u
t
t
o
n
o
b
j
e
c
t
T
r
a
c
k
B
a
r
o
b
j
e
c
t
L
a
b
e
l
o
b
j
e
c
t
L
a
b
e
l
o
b
j
e
c
t
L
a
b
e
l
o
b
j
e
c
t
C
o
n
t
r
o
l
s
o
b
j
e
c
t
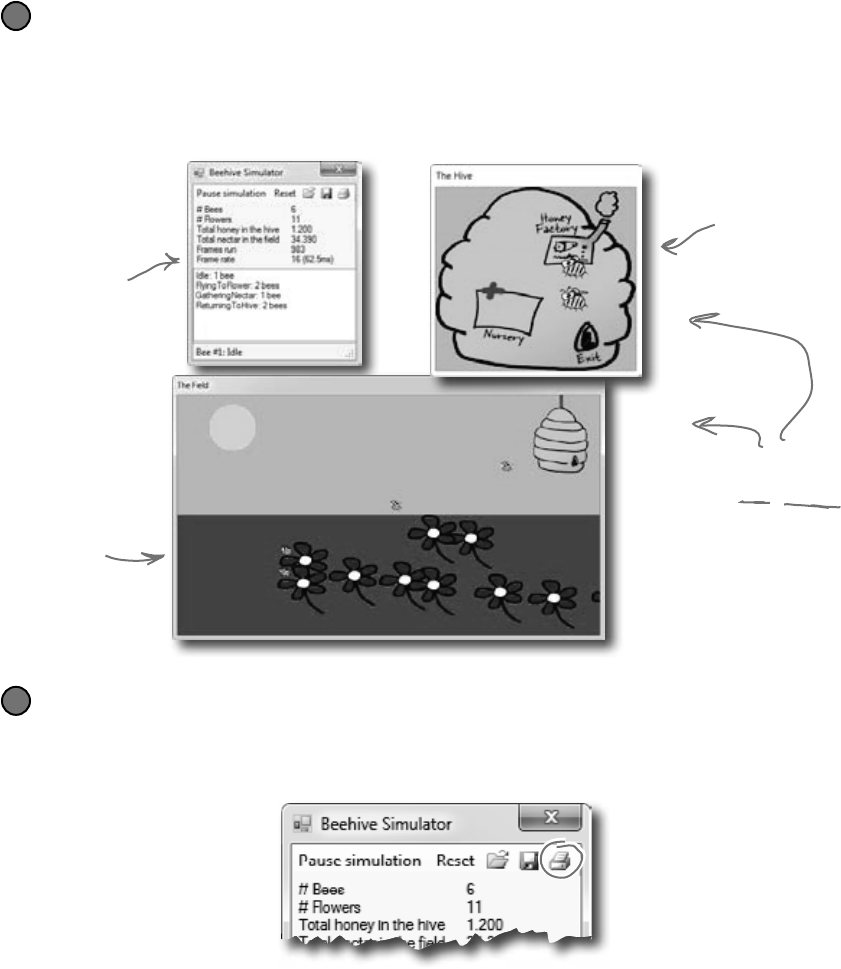
592 Chapter 13
Use controls to animate the beehive simulator
You’ve built a cool simulator, but it’s not much to look at. It’s time to create a
really stunning visualization that shows those bees in action. You’re about to
build a renderer that animates the beehive…and controls are the key.
The user interface shows you everything that’s going on
Your simulator will have three different windows. You’ve already built the main “heads-up display”
stats window that shows stats about the current simulation and updates from the bees. Now you’ll
add a window that shows you what’s going in inside the hive, and a window that shows the field of
flowers where the bees gather nectar.
1
We’ll make the Print button in the stats window work
The stats window has working Open and Save buttons, but the Print button
doesn’t work yet. We’ll be able to reuse a lot of the graphics code to get the Print
button on the ToolStrip to print an info page about what’s going on.
2
These two windows are
child windows—when
you minimize the main
window, the other two
disappear along with it.
And when you move the
main window around, the
other two follow it.
The form you built in the
last chapter becomes the
heads-up display for the
simulator.
This window shows what’s
going on in the hive.
This window displays
the field of flowers
and the bees
gathering nectar.
how cute!
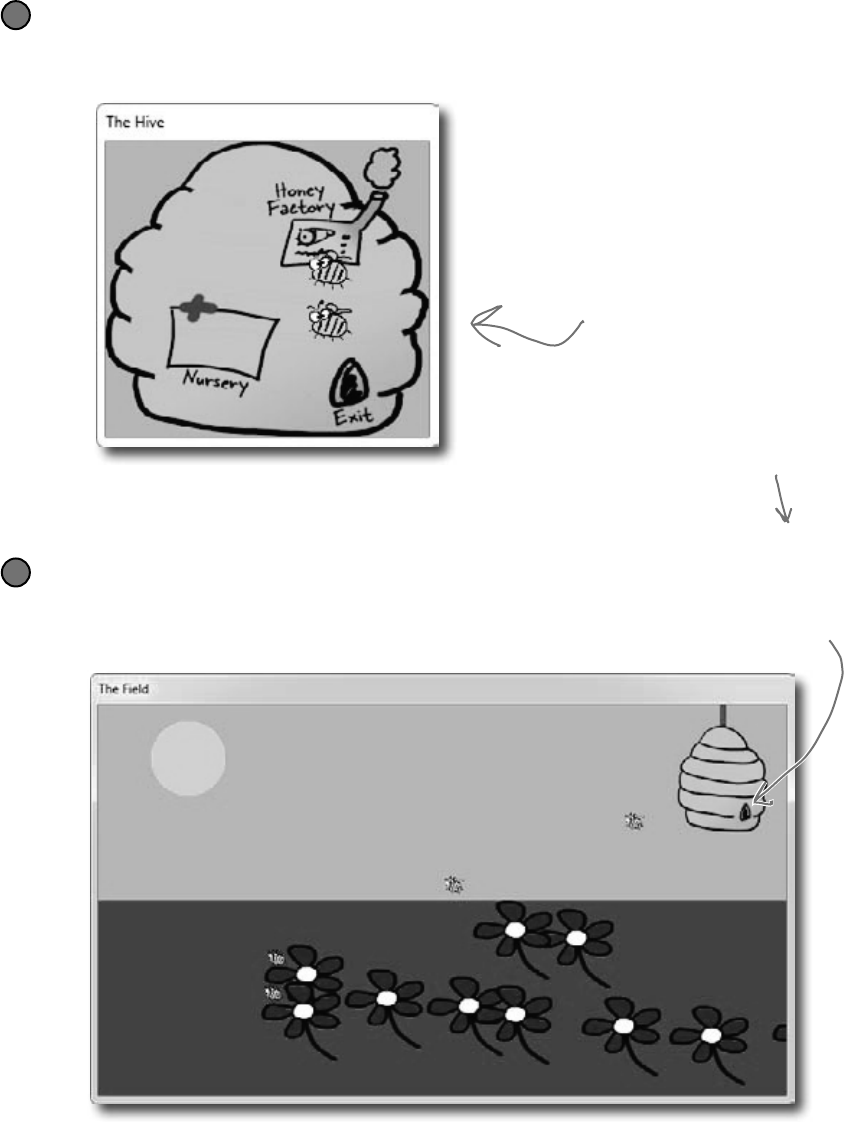
you are here 4 593
controls and graphics
The hive window shows you what’s going on inside the hive
As the bees fly around the world, you’ll need to animate each one. Sometimes they’re
inside the hive, and when they are, they show up in this window.
3
The hive has three
important locations in it.
The bees are born in the
nursery, they have to fly
to the exit to leave the
hive to gather nectar from
the flowers, and when they
come back they need to go
to the honey factory to
make honey.
The field window is where the bees collect the nectar
Bees have one big job: to collect nectar from the flowers, and bring
it back to the hive to make honey. Then they eat honey to give them
energy to fly out and get more nectar.
4
Here’s the entrance to the
hive. When bees fly into it,
they disappear from the
field form and reappear near
the exit in the hive form.
The hive exit is on the hive form, and
the entrance is on the field form.
(That’s why we put both of them in
the hive’s locations dictionary.)
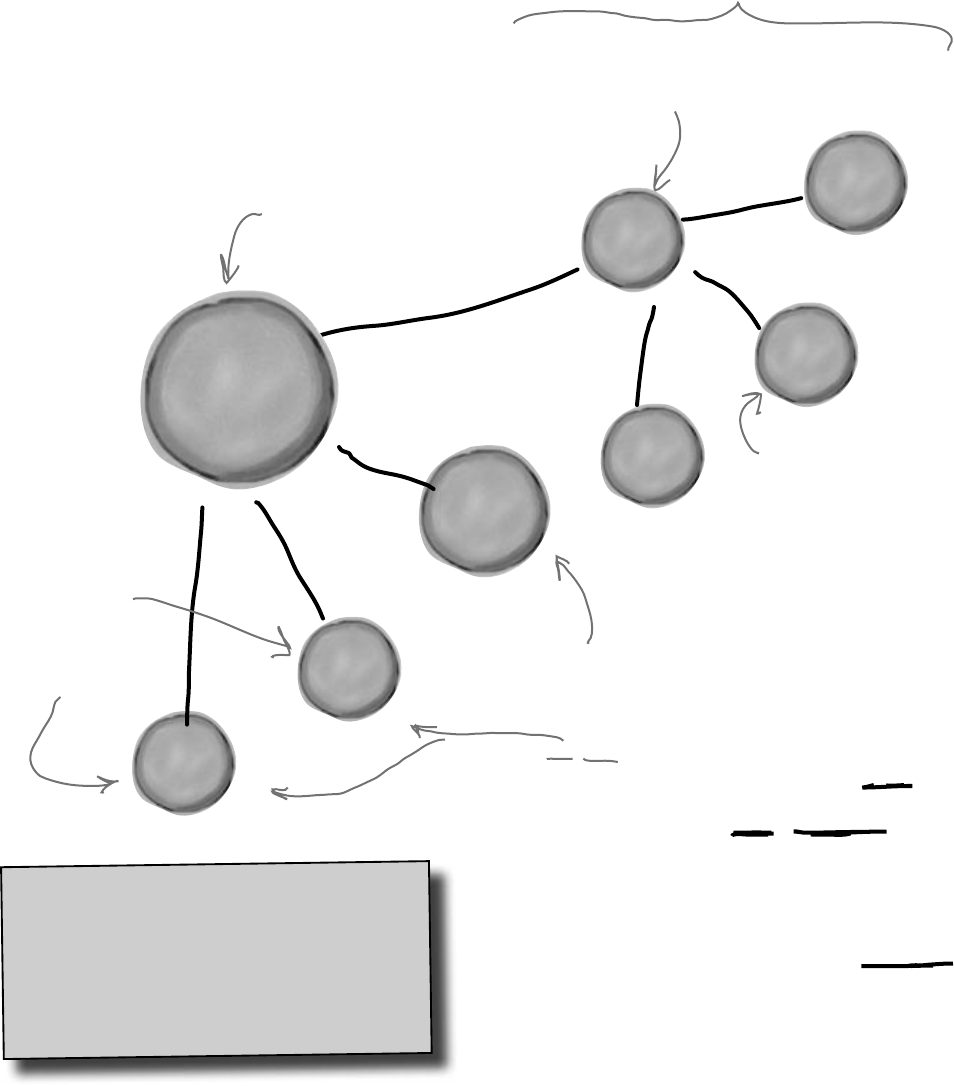
594 Chapter 13
Add a renderer to your architecture
W
o
r
l
d
o
b
j
e
c
t
H
i
v
e
f
o
r
m
R
e
n
d
e
r
e
r
o
b
j
e
c
t
F
i
e
l
d
f
o
r
m
L
i
s
t
o
f
F
l
o
w
e
r
o
b
j
e
c
t
s
L
i
s
t
o
f
B
e
e
o
b
j
e
c
t
s
H
i
v
e
o
b
j
e
c
t
S
y
s
t
e
m
.
W
i
n
d
o
w
s
.
F
o
r
m
s
.
F
o
r
m
Main form
We need another class that reads the information in the
world and uses it to draw the hive, bees, and flowers on
the two new forms. We’ll add a class called Renderer
to do exactly that. And since your other classes are well
encapsulated, this won’t require a lot of changes to your
existing code.
This is the object for the main
window that you’ve already built.
The Hive and
Field objects are
forms, tied to
your main form.
The World object keeps track of
everything in the simulator: the
state of the hive, every bee, and
every flower.
Each bee knows its
location—and we can use
that location to draw
the bee on the form.
Because Bee,
Hive, Flower, and
World are well
encapsulated, a
class that renders
those objects can
be added without
lots of changes to
existing code.
The renderer reads the
information from the
World object and uses
that information to
update the two forms. It
keeps a reference to the
World object, as well as
the Hive form object and
the Field form object.
ren-der, verb.
to represent or depict artistically.
Sally’s art teacher asked the class to look
at all of the shadows and lines in the
model and render them on the page.
You’ve already built these objects.
a sweet rendition

you are here 4 595
controls and graphics
The renderer draws everything in
the world on the t wo forms
The World object keeps track of everything in the simulation: the
hive, the bees, and the flowers. But it doesn’t actually draw anything
or produce any output. That’s the job of the Renderer object. It
reads all of the information in the World, Hive, Bee, and Flower
objects and draws them on the forms.
R
e
n
d
e
r
e
r
o
b
j
e
c
t
W
o
r
l
d
o
b
j
e
c
t
checks fields for state
draws the bees
and flowers in
the field
R
e
n
d
e
r
e
r
o
b
j
e
c
t
draws the bees in the hive
returns the state of the objects
The simulator renders the world after each frame
After the main form calls the world’s Go() method, it should call the
renderer’s Render() method to redraw the display windows. For example,
each flower will be displayed using a PictureBox control. But let’s go
further with bees and create an animated control. You’ll create this new
control, called BeeControl, and define its behavior yourself.
F
i
e
l
d
f
o
r
m
H
i
v
e
f
o
r
m
S
y
s
t
e
m
.
W
i
n
d
o
w
s
.
F
o
r
m
s
.
F
o
r
m
Main form
renderer.Render()
moves each
bee’s BeeControl
moves each
BeeControl and
flower PictureBox
The renderer keeps track of which visual
control is used to represent a particular bee
or flower using Dictionary objects, where the
Bee or Flower object is the key.
The World is encapsulated, so Renderer only
needs to use the properties on World and
its related objects to get the information
it needs, and render the information on the
display windows.
596 Chapter 13
Controls are well suited for
visual display elements
When a new bee is added to the hive, we’ll want our simulator to add a new
BeeControl to the Hive form and change its location as it moves around the
world. When that bee flies out of the hive, our simulator will need to remove the
control from the Hive form and add it to the Field form. And when it flies
back to the hive with its load of nectar, its control needs to be removed from the
Field form and added back to the Hive form. And all the while, we’ll want the
animated bee picture to flap its wings. Controls will make it easy to do all of that.
F
i
e
l
d
f
o
r
m
H
i
v
e
f
o
r
m
H
i
v
e
f
o
r
m
R
e
n
d
e
r
e
r
o
b
j
e
c
t
R
e
n
d
e
r
e
r
o
b
j
e
c
t
H
i
v
e
f
o
r
m
R
e
n
d
e
r
e
r
o
b
j
e
c
t
Controls.Add(new BeeControl());
The world adds a new bee, and the renderer creates a new BeeControl
and adds it to the Hive form’s Controls collection.
1
When the bee flies out of the hive and enters the field, the renderer
removes the BeeControl from the hive’s Controls collection and adds
it to the Field form’s Controls collection.
2
Controls.Remove(theBee);
Controls.Add(theBee);
A bee will retire if it’s idle and it’s gotten too old. If the renderer checks the
world’s Bees list and finds that the bee is no longer there, it removes the
control from the Hive form.
3
Controls.Remove(theBee);
taking control of graphics
you are here 4 597
controls and graphics
Can you figure out what each of these code snippets does? Assume
each snippet is inside a form, and write down your best guess.
this.Controls.Add(new Button());
Form2 childWindow = new Form2();
childWindow.BackgroundImage =
Properties.Resources.Mosaic;
childWindow.BackgroundImageLayout =
ImageLayout.Tile;
childWindow.Show();
Label myLabel = new Label();
myLabel.Text = “What animal do you like?”;
myLabel.Location = new Point(10, 10);
ListBox myList = new ListBox();
myList.Items.AddRange( new object[]
{ “Cat”, “Dog”, “Fish”, “None” } );
myList.Location = new Point(10, 40);
Controls.Add(myLabel);
Controls.Add(myList);
Label controlToRemove = null;
foreach (Control control in Controls) {
if (control is Label
&& control.Text == “Bobby”)
controlToRemove = control as Label;
}
Controls.Remove(controlToRemove);
controlToRemove.Dispose();
Bonus question: Why do you think
we didn’t put the Controls.Remove()
statement inside the foreach loop?
You don’t need to write down
each line, as much as summarize
what’s going on in the code block.
Try it out if you want, and
write why you think you got the
result that .NET gave you.
If you’ve got a ListBox on your form,
you can use its AddRange() method
to add list items.

598 Chapter 13
Can you figure out what each of these code snippets does? Assume
each snippet is inside a form, and write down what you think it does.
this.Controls.Add(new Button());
Form2 childWindow = new Form2();
childWindow.BackgroundImage =
Properties.Resources.Mosaic;
childWindow.BackgroundImageLayout =
ImageLayout.Tile;
childWindow.Show();
Label myLabel = new Label();
myLabel.Text = “What animal do you like?”;
myLabel.Location = new Point(10, 10);
ListBox myList = new ListBox();
myList.Items.AddRange( new object[]
{ “Cat”, “Dog”, “Fish”, “None” } );
myList.Location = new Point(10, 40);
Controls.Add(myLabel);
Controls.Add(myList);
Label controlToRemove = null;
foreach (Control control in Controls) {
if (control is Label
&& control.Text == “Bobby”)
controlToRemove = control as Label;
}
Controls.Remove(controlToRemove);
controlToRemove.Dispose();
Bonus question: Why do you think
we didn’t put the Controls.Remove()
statement inside the foreach loop?
Create a new button and add it to the
form. It’ll have default values (e.g., the Text
property will be empty).
There’s a second Form in the application
called Form2, so this creates it, sets its
background image to a resource image called
“Mosaic”, makes the background image so it’s
tiled instead of stretched, and then displays
the window to the user.
This code creates a new label, sets its text,
and moves it to a new position. Then it
creates a new list box, adds four items to
the list, and moves it just underneath the
label. It adds the label and list box to the
form, so they both get displayed immediately.
This loop searches through all the controls on
the form until it finds a label with the text
“Bobby”. Once it finds the label, it removes it
from the form.
You can’t modify the Controls collection
(or any other collection) in the middle of a
foreach loop that’s iterating through it.
If you try, .NET will throw an exception. It
needs the collection intact, otherwise it’ll lose its
place and give you unpredictable results. That’s
why you’d use a for loop for this instead.
buzz buzz buzz
What happens if there’s no control named
“Bobby” in the Controls collection?

you are here 4 599
controls and graphics
Build your first animated control
You’re going to build your own control that draws an animated bee
picture. If you’ve never done animation, it’s not as hard as it sounds: you
draw a sequence of pictures one after another, and produce the illusion of
movement. Lucky for us, the way C# and .NET handle resources makes it
really easy for us to do animation.
1
2
3
4
Once you download the four bee
animation pictures (Bee animation 1.png
through Bee animation 4.png) from Head
First Labs, you’ll add them to your
project’s resources. When you flash these
four bees quickly one after another, it’ll
look like their wings are flapping.
We want a control in the toolbox
If you build BeeControl right, it’ll appear as a control
that you can drag out of your toolbox and onto your form.
It’ll look just like a PictureBox showing a picture of a
bee, except that it’ll have animated flapping wings.
As long as we extend the right classes,
.NET takes care of showing our
control in the IDE toolbox.
This is like a PictureBox, but the
image is set, and there’s animation
that we’ll build in. Any guesses as to
what class BeeControl subclasses?
Download the images for this chapter
from the Head First Labs website:
www.headfirstlabs.com/books/
hfcsharp/

600 Chapter 13
BeeControl is LIKE a PictureBox…so let’s
start by INHERITING from PictureBox
Since every control in the toolbox is just an object, it’s easy to make a new control.
All you need to do is add a new class to your project that inherits from an existing
control, and add any new behavior you want your control to perform.
We want a control—let’s call it a BeeControl—that shows an animated
picture of a bee flapping its wings, but we’ll start with a control that shows
a non-animated picture, and then just add animation. So we’ll start with a
PictureBox, and then we’ll add code to draw an animated bee on it.
Create a new project and add the four animation cells to the project’s resources, just like you added
the Objectville Paper Company logo to your project way back in Chapter 1. But instead of adding them
to the form resources, add them to the project’s resources. Find your project’s Resources.resx file in
the Solution Explorer (it’s under Properties). Double-click on it to bring up the project’s Resources page.
1
In Chapter 1, we added the logo
graphic to the form’s Resources
file. This time we’re adding the
resources to the project’s global
collection of resources, which
makes them available to every
class in the project (through the
Properties.Resources collection).
We’ve drawn a four-cell bee animation to import into your resources that you can
download from http://www.headfirstlabs.com/books/hfcsharp/. Then, go
to the Resources page, select “Images” from the first drop-down at the top of the screen,
and select “Add Existing File…” from the “Add Resource” drop-down.
2
Animate this!
Bee animation 1.png Bee animation 2.png Bee animation 3.png Bee animation 4.png
These appear under
your project, not a
particular form.
Import each of these images into
your project’s resources.
Take a minute and flip back
to Chapter 1 to remind
yourself how you did this.
DIY control
Double-click on Resources.
resx to bring up the
Resources page.
you are here 4 601
controls and graphics
pictureBox1.Image =
Properties.Resources.Bee_animation_1;
When you add images or other resources to the project’s Resources file, you can access
them using the Properties.Resources class. Just go to any line in your code and
type Properties.Resources.—as soon as you do, IntelliSense pops up a drop-
down list that shows all of the pictures you’ve imported.
3
This sets the image used for a
particular PictureBox’s image (and
for our starting image).
Note that “.” at the end…that’s what
tells the IDE to pop up the properties
and methods of the class you typed in.
These images are stored as
public properties of the
Properties.Resources class.
Now add your BeeControl! Just add this BeeControl class to your project:
class BeeControl : PictureBox {
private Timer animationTimer = new Timer();
public BeeControl() {
animationTimer.Tick += new EventHandler(animationTimer_Tick);
animationTimer.Interval = 150;
animationTimer.Start();
BackColor = System.Drawing.Color.Transparent;
BackgroundImageLayout = ImageLayout.Stretch;
}
private int cell = 0;
void animationTimer_Tick(object sender, EventArgs e) {
cell++;
switch (cell) {
case 1: BackgroundImage = Properties.Resources.Bee_animation_1; break;
case 2: BackgroundImage = Properties.Resources.Bee_animation_2; break;
case 3: BackgroundImage = Properties.Resources.Bee_animation_3; break;
case 4: BackgroundImage = Properties.Resources.Bee_animation_4; break;
case 5: BackgroundImage = Properties.Resources.Bee_animation_3; break;
default: BackgroundImage = Properties.Resources.Bee_animation_2;
cell = 0; break;
}
}
}
Then rebuild your program. Go back to the form designer and look in the toolbox, and the
BeeControl is there. Drag it onto your form—you get an animated bee!
4
When you change the code for a control, you need to rebuild
your program to make your changes show up in the designer.
Here’s where you
initialize the timer
by instantiating it,
setting its Interval
property, and then
adding its tick
event handler.
Each time the timer’s
tick event fires, it
increments
cell
, and
then does a switch
based on it to assign
the right picture to
the Image property
(inherited from
PictureBox).
Once we get back to frame #1,
we’ll reset cell back to 0.
You’ll need to add a
“using System.Windows.
Forms” line for the
PictureBox and Timer.
When the
program’s running,
each picture is
stored in memory
as a Bitmap object.
Make sure you
add “using System.
Windows.Forms”
to the top of the
class file.
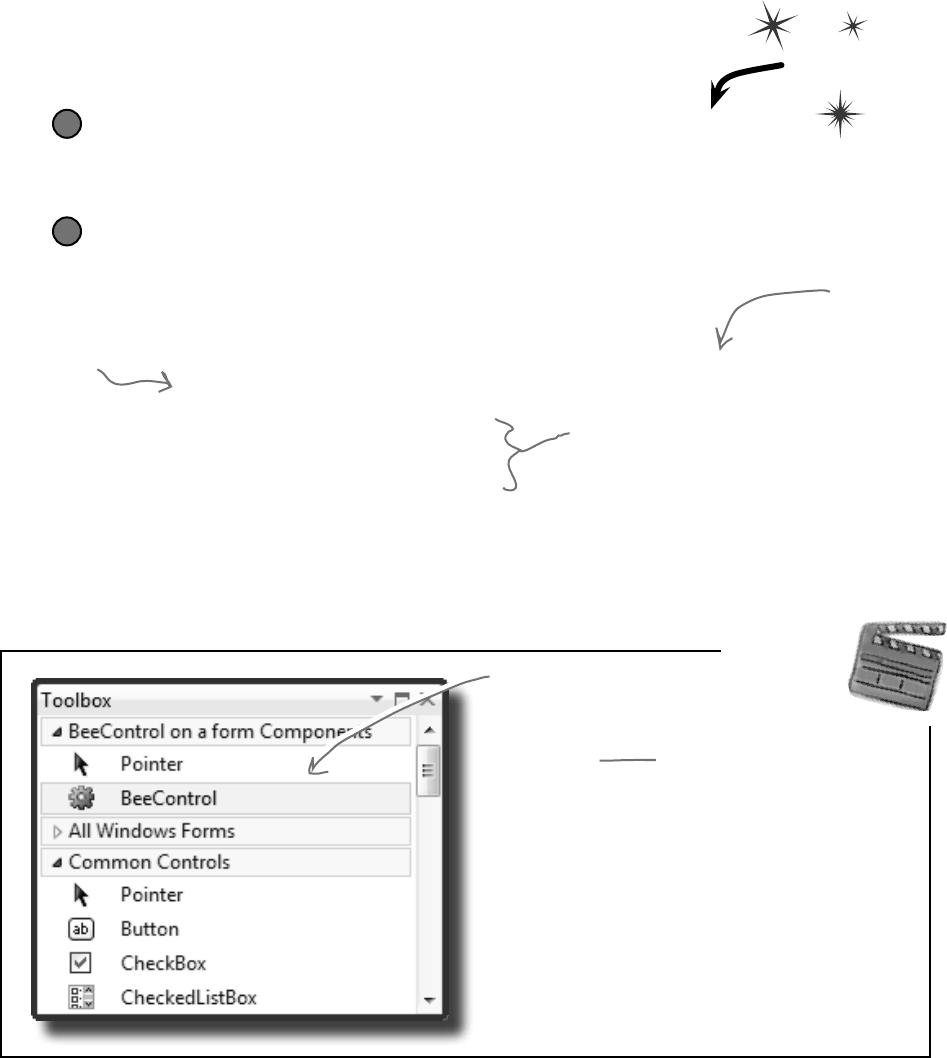
602 Chapter 13
Create a button to add the BeeControl to your form
It’s easy to add a control to a form—just add it to the Controls collection. And it’s just as
easy to remove it from the form by removing it from Controls. But controls implement
IDisposable, so make sure you always dispose your control after you remove it.
Every visual control in your
toolbox inherits from System.
Windows.Forms.Control. That
class has members that should be
pretty familiar by now: Visible,
Width, Height, Text, Location,
BackColor, BackgroundImage…
all of those familiar properties you
see in the Properties window for
any control.
Behind
the Scenes
You can add your own
control to the toolbox just
by creating a class that
inherits from Control.
Remove the BeeControl from your form, and then add a button
Go to the form designer and delete the BeeControl from the form. Then add a
button. We’ll make the button add and remove a BeeControl.
1
When you add
a control to
the Controls
collection, it
appears on
the form
immediately.
Add a button to add and remove the bee control
Here’s the event handler for it:
BeeControl control = null;
private void button1_Click(object sender, EventArgs e) {
if (control == null) {
control = new BeeControl() { Location = new Point(100, 100) };
Controls.Add(control);
} else {
using (control) {
Controls.Remove(control);
}
control = null;
}
}
Now when you run your program, if you click the button once it’ll add a new BeeControl to
the form. Click it again and it’ll delete it. It uses the private control field to hold the reference
to the control. (It sets the reference to null when there’s no control on the form.)
2
We’re taking advantage of a
using statement to make sure
the control is disposed after
it’s removed from the Controls
collection.
Now do this
controls are disposable
You can use an
object initializer to
set the BeeControl
properties after
it’s instantiated.
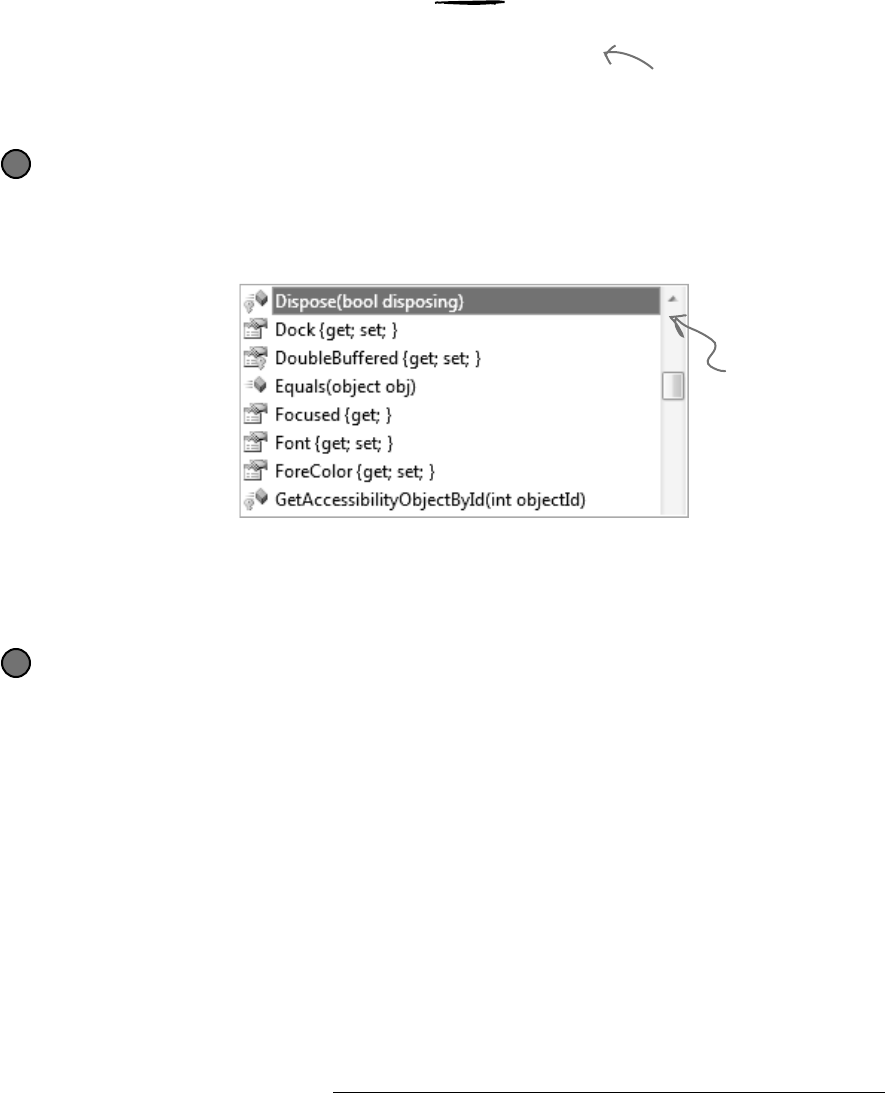
you are here 4 603
controls and graphics
Override the Dispose() method and dispose of the timer
Since BeeControl inherits from a control, then that control must have a Dispose() method. So we can
just override and extend that method to dispose our timer. Just go into the control and type override:
class BeeControl : PictureBox {
override
As soon as you click on Dispose(), the IDE will fill in the method with a call to base.Dispose():
protected override void Dispose(bool disposing) {
base.Dispose(disposing);
}
3
Add the code to dispose the timer
Add code to the end of the new Dispose() method that the IDE added for you so
that it calls animationTimer.Dispose() if the disposing argument is true.
protected override void Dispose(bool disposing) {
base.Dispose(disposing);
if (disposing) {
animationTimer.Dispose();
}
}
Now the BeeControl will dispose of its timer as part of its own Dispose()
method. It cleans up after itself !
But don’t take our word for it—set a breakpoint on the line you added and
run your program. Every time a BeeControl object is removed from the form’s
Controls collection, its Dispose() method is called.
4
Your controls need to dispose their controls, too!
There’s a problem with the BeeControl. Controls need to be disposed after
they’re done. But the BeeControl creates a new instance of Timer, which
is a control that shows up in the toolbox…and it never gets disposed! That’s a
problem. Luckily, it’s easy to fix—just override the Dispose() method.
When you type “override”
inside a class, the IDE
pops up an IntelliSense
window with all of the
methods you can override.
Select the Dispose()
method and it’ll fill one in
for you!
Any control
that you write
from scratch
is responsible
for disposing
any other
controls (or
disposable
objects) that it
creates.
The control class implements
IDisposable, so you need to make
sure every control you use gets
disposed.
Here we’re overriding a protected
Dispose() method that’s called by
the control’s implementation of
IDisposable.Dispose(). It should only
dispose the timer if the disposing
argument is true.
We won’t go into any more detail about this particular disposal pattern. But if you plan on building custom controls,
you definitely should read this: http://msdn.microsoft.com/en-us/library/system.idisposable.aspx
604 Chapter 13
A UserControl is an easy way to build a control
There’s an easier way to build your own toolbox controls. Instead of creating a
class that inherits from an existing control, all you need to do is use the IDE
to add a UserControl to your project. You work with a UserControl
just like a form. You can drag other controls out of the toolbox and onto it—it
uses the normal form designer in the IDE. And you can use its events just like
you do with a form. So let’s rebuild the BeeControl using a UserControl.
A UserControl is an easy way to add a control to the toolbox. Edit a
UserControl just like a form—you can drag other controls out of the
toolbox onto it, and you can use its events exactly like a form’s events.
Create a brand-new Windows Forms Application project. Add the four bee images to its resources.
Drag a button to the form and give it exactly the same code as to add and remove a BeeControl.
1
Do this
Right-click on the project in the Solution Explorer and select “Add >> User Control…”. Have the
IDE add a user control called BeeControl. The IDE will open up the new control in the
form designer.
2
Drag a Timer control onto your user control. It’ll show up at the bottom of the designer, just like
with a form. Use the Properties window to name it animationTimer and set its Interval
to 150 and its Enabled to true. Then double-click on it—the IDE will add its Tick event
handler. Just use the same Tick event handler that you used earlier to animate the first bee control.
3
Now update the BeeControl’s constructor:
public BeeControl() {
InitializeComponent();
BackColor = System.Drawing.Color.Transparent;
BackgroundImageLayout = ImageLayout.Stretch;
}
4
Now run your program—the button code should still work exactly the same as before, except
now it’s creating your new UserControl-based BeeControl. The button now adds and
removes your UserControl-based BeeControl.
5
You can also do this from the Properties
page in the IDE, instead of using code.
Use the animationTimer_Tick() method and
the cell field from the old bee control.
user controls make it easy
you are here 4 605
controls and graphics
But I’ve been using
controls all this time, and I’ve
never disposed a single one of
them! Why should I start now?
You didn’t dispose your controls because your forms
did it for you.
But don’t take our word for it. Use the IDE’s search function to search
your project for the word “Dispose”, and you’ll find that the IDE added
a method in Form1.Designer.cs to override the Dispose()
method that calls its own base.Dispose(). When the form is
disposed, it automatically disposes everything in its Controls
collection so you don’t have to worry about it. But once you start
removing controls from that collection or creating new instances
of controls (like the Timer in the BeeControl) outside of the
Controls collection, then you need to do the disposal yourself.
Q: Why does the form code for the
PictureBox-based BeeControl
work exactly the same with the
UserControl-based BeeControl?
A:Becausethecodedoesn’tcarehow
theBeeControlobjectisimplemented.
Itjustcaresthatitcanaddtheobjecttothe
form’sControlsmethod.
Q: I double-clicked on my
OldBeeControl class in the
Solution Explorer, and it had a message
about adding components to my class.
What’s that about?
A:Whenyoucreateacontrolbyadding
aclasstoyourprojectthatinheritsfrom
PictureBoxoranothercontrol,theIDE
doessomecleverthings.Oneofthethings
itdoesisletyouworkwithcomponents,
thosenon-visualcontrolslikeTimerand
OpenFileDialogthatshowupinthe
spacebeneathyourformwhenyouwork
withthem.
Giveitatry—createanemptyclassthat
inheritsfromPictureBox.Thenrebuild
yourprojectanddouble-clickonitintheIDE.
You’llgetthismessage:
To add components to your class, drag
them from the Toolbox and use the
Properties window to set their properties.
DraganOpenFileDialogoutof
thetoolboxandontoyournewclass.It’ll
appearasanicon.Youcanclickonitand
setitsproperties.Setafewofthem.Now
gobacktothecodeforyourclass.Check
outtheconstructor—theIDEaddedcode
toinstantiatetheOpenFileDialog
objectandsetitsproperties.
Q: When I changed the properties
in the OpenFileDialog, I noticed
an error message in the IDE: “You must
rebuild your project for the changes to
show up in any open designers.” Why did
I get this error?
A:Becausethedesignerrunsyour
control,anduntilyourebuildyourcodeit’s
notrunningthelatestversionofthecontrol.
Rememberhowthewingsofthebee
wereflappingwhenyoufirstcreatedyour
BeeControl,evenwhenyoudragged
itoutofthetoolboxandintothedesigner?
Youweren’trunningyourprogramyet,but
thecodethatyouwrotewasbeingexecuted.
ThetimerwasfiringitsTickevent,and
youreventhandlerwaschangingthepicture.
TheonlywaytheIDEcanmakethathappen
isifthecodewereactuallycompiledand
runninginmemorysomewhere.Soit’s
remindingyoutoupdateyourcodesoitcan
displayyourcontrolsproperly.
606 Chapter 13
Your simulator’s renderer will use your BeeControl
to draw animated bees on your forms
Now you’ve got the tools to start adding animation to your simulator. With a BeeControl
class and two forms, you just need a way to position bees, move them from one form to the
other, and keep up with the bees. You’ll also need to position flowers on the FieldForm,
although since flowers don’t move, that’s pretty simple. All of this is code that we can put
into a new class, Renderer. Here’s what that class will do:
The renderer keeps a reference to the world and each child form
At the very top of the Renderer class you’ll need a few important fields. The
class has to know the location of each bee and flower, so it needs a reference to the
World. And it’ll need to add, move, and remove controls in the two forms, so it
needs a reference to each of those forms:
class Renderer {
private World world;
private HiveForm hiveForm;
private FieldForm fieldForm;
2
The renderer uses dictionaries to keep track of the controls
World keeps track of its Bee objects using a List<Bee> and a List<Flower> to store
its flowers. The renderer needs to be able to look at each of those Bee and Flower objects
and figure out what BeeControl and PictureBox they correspond to—or, if it can’t
find a corresponding control, it needs to create one. So here’s a perfect opportunity to use
dictionaries. We’ll need two more private fields in Renderer:
private Dictionary<Flower, PictureBox> flowerLookup =
new Dictionary<Flower, PictureBox>();
private Dictionary<Bee, BeeControl> beeLookup =
new Dictionary<Bee, BeeControl>();
3
These two dictionary collections
let the renderer store exactly
one control for each bee or
flower in the world.
Start your Renderer
class with these lines.
We’ll add to this class
throughout the chapter.
These dictionaries become one-to-one
mappings between a bee or flower and
the control for that bee or flower.
The stats form will be the parent of the hive and field forms
The first step in adding graphics to the beehive simulator will be adding two
forms to the project. You’ll add one called HiveForm (to show the inside of the
hive) and one called FieldForm (which will show the field of flowers). Then
you’ll add lines to the main form’s constructor to show its two child forms. Pass a
reference to the main form to tell Windows that the stats form is their owner:
public Form1() {
// other code in the Form1 constructor
hiveForm.Show(this);
fieldForm.Show(this);
1
Every form object has a Show()
method. If you want to set another
form as its owner, just pass a
reference to that form to Show().
You’ll want the hive and
field forms “linked” to
the stats form—that does
useful things like minimizing
the hive and field forms
when you minimize the stats
form. You can do this by
telling Windows that the
stats form is their owner.
here’s what you’ll do…
We’ll build the
renderer in a minute.
But before we jump
in and start coding,
let’s take a minute
and come up with
a plan for how the
Renderer class will
work…
you are here 4 607
controls and graphics
The bees and flowers already know their locations
There’s a reason we stored each bee and flower location using a Point. Once we have a
Bee object, we can easily look up its BeeControl and set its location.
beeControl = beeLookup[bee];
beeControl.Location = bee.Location;
4
For each bee or flower, we can look up the
matching control. Then, set that control’s
location to match the location of the bee
or flower object.
If a bee doesn’t have a control, the renderer adds it to the hive form
It’s easy enough for the renderer to figure out if a particular bee or flower has a control. If the
dictionary’s ContainsKey() method returns false for a particular Bee object, that means
there’s no control on the form for that bee. So Renderer needs to create a BeeControl, add it to
the dictionary, and then add the control to the form. (It also calls the control’s BringToFront()
method, to make sure the control doesn’t get hidden behind the flower PictureBoxes.)
if (!beeLookup.ContainsKey(bee)) {
beeControl = new BeeControl() { Width = 40, Height = 40 };
beeLookup.Add(bee, beeControl);
hiveForm.Controls.Add(beeControl);
beeControl.BringToFront();
} else
beeControl = beeLookup[bee];
5
ContainsKey() tells us if the bee
exists in the dictionary. If not, then
we need to add that bee, along with a
corresponding control.
BringToFront() ensures the bee
appears “on top of” any flowers on
the FieldForm, and on top of the
background of the HiveForm.
The renderer is acting on the two forms,
as well as all the objects you built in the
last chapter for the simulator.
Remember how a dictionary can use anything as a key?
Well, this one uses a Bee object as a key. The renderer
needs to know which BeeControl on the form belongs
to a particular bee. So it looks up that bee’s object
in the dictionary, which spits out the correct control.
Now the renderer can move it around.
H
i
v
e
f
o
r
m
R
e
n
d
e
r
e
r
o
b
j
e
c
t
S
y
s
t
e
m
.
W
i
n
d
o
w
s
.
F
o
r
m
s
.
F
o
r
m
Main form
F
i
e
l
d
f
o
r
m
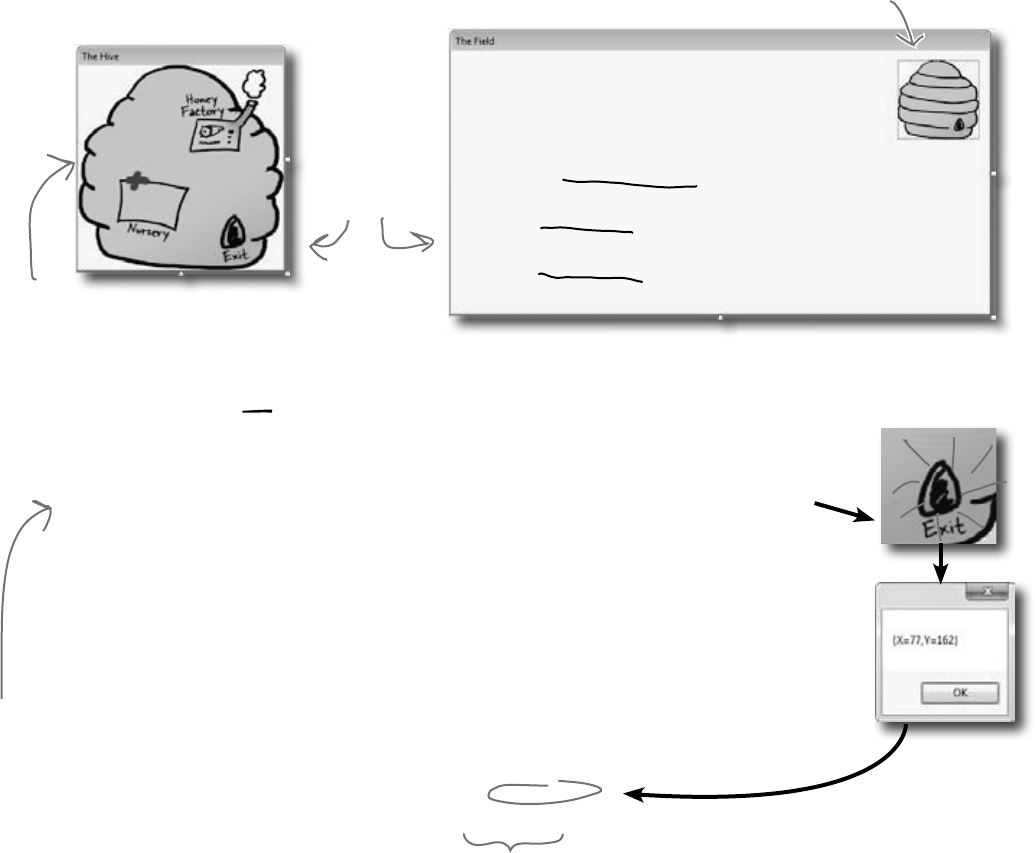
608 Chapter 13
Add the hive and field forms to the project
Figure out where your locations are
You need to figure out where the hive is on your FieldForm. Using the Properties window, create
a handler for the MouseClick event for the Hive form, and add this code:
private void HiveForm_MouseClick(object sender, MouseEventArgs e) {
MessageBox.Show(e.Location.ToString());
}
We’ll get your form running on the next few pages. Once it’s running, click on the exit of the hive in
the picture. The event handler will show you the exact coordinates of the spot that you clicked.
Add the same handler to the Field form, too. Then, by clicking, get the coordinates of the
exit, the nursery, and the honey factory. Using all these locations, you’ll be able to update the
InitializeLocations() method you wrote in the Hive class in the last chapter:
Now you need forms to put bees on. So start with your existing beehive simulator project, and
use “Add >> Existing Item…” to add your new BeeControl user control. The UserControl
has a .cs file, a .designer.cs file, and a .resx file—you’ll need to add all three. Then open up
the code for both the .cs and .designer.cs files, and change the namespace lines so they match
the namespace of your new project. Rebuild your project; the BeeControl should now show up in
the toolbox. You’ll also need to add the graphics to the new project’s resources. Then add two more
Windows forms to the project by right-clicking on the project in the Solution Explorer and choosing
“Windows Form…” from the Add menu. If you name the files HiveForm.cs and FieldForm.cs,
the IDE will automatically set their Name properties to HiveForm and FieldForm. You already
know that forms are just objects, so HiveForm and FieldForm are really just two more classes.
This is a PictureBox
control with its
BackgroundImage
set to the outside
hive picture and
BackgroundImageLayout
set to Stretch. When you
load the hive pictures into
the Resource Designer,
they’ll show up in the
list of resources when
you click the “…” button
next to BackgroundImage
in the Properties window.
Set the form’s BackgroundImage property to the
inside hive picture, and its BackgroundImageLayout
property to Stretch.
private void InitializeLocations()
{
locations = new Dictionary<string, Point>();
locations.Add(“Entrance”, new Point(626, 110));
locations.Add(“Nursery”, new Point(77, 162));
locations.Add(“HoneyFactory”, new Point(157, 78));
locations.Add(“Exit”, new Point(175, 180));}
You’ll need the inside and outside hive
images—“Hive (inside).png” and “Hive
(outside).png”—loaded into your resources.
Then add these two forms. Set each
form’s FormBorderStyle property to
FixedSingle (so the user can’t resize it),
the ControlBox property to false (to take
away its minimize and maximize controls),
and StartPosition to Manual (so its
Location property is settable).
Remove the mouse click
handler when you’re done…
you just needed it to get the
locations on your forms.
These are the coordinates that worked for us, but if your form
is a little bigger or smaller, your coordinates will be different.
Remember, go to the Properties window, click on the lightning-bolt
icon to bring up the Events window, scroll down to the MouseClick row
and double-click on it. The IDE will add the event handler for you.
Make sure
you resize
both forms
so they look
like these
screenshots.
let’s get started!
Once you get
your simulator
running, you
can use this
to tweak the
Hive’s locations
collection.

you are here 4 609
controls and graphics
Renderer
Render()
Reset()
Here’s the complete Renderer class. The main form calls this
class’s Render() method right after it calls World.Go() to draw
the bees and flowers on the forms. You’ll need to make sure that the
flower graphic (Flower.png) is loaded into the project, just like
the animated bee images.
Build the renderer
All fields in the renderer
are private because no
other class needs to update
any of its properties. It’s
fully encapsulated. The
world just calls Render()
to draw the world to the
forms, and Reset() to clear
the controls on the forms
if it needs to reset.
class Renderer {
private World world;
private HiveForm hiveForm;
private FieldForm fieldForm;
private Dictionary<Flower, PictureBox> flowerLookup =
new Dictionary<Flower, PictureBox>();
private List<Flower> deadFlowers = new List<Flower>();
private Dictionary<Bee, BeeControl> beeLookup =
new Dictionary<Bee, BeeControl>();
private List<Bee> retiredBees = new List<Bee>();
public Renderer(World world, HiveForm hiveForm, FieldForm fieldForm) {
this.world = world;
this.hiveForm = hiveForm;
this.fieldForm = fieldForm;
}
public void Render() {
DrawBees();
DrawFlowers();
RemoveRetiredBeesAndDeadFlowers();
}
public void Reset() {
foreach (PictureBox flower in flowerLookup.Values) {
fieldForm.Controls.Remove(flower);
flower.Dispose();
}
foreach (BeeControl bee in beeLookup.Values) {
hiveForm.Controls.Remove(bee);
fieldForm.Controls.Remove(bee);
bee.Dispose();
}
flowerLookup.Clear();
beeLookup.Clear();
}
The renderer keeps references to
the world and the two forms it
draws the bees on.
The world uses Bee and Flower objects
to keep track of every bee and
flower in the world. The forms use
a PictureBox to display each flower
and a BeeControl to display each bee.
The renderer uses these dictionaries
to connect each bee and flower to its
own BeeControl or PictureBox.
When a flower dies
or a bee retires, it
uses the deadFlowers
and retiredBees lists
to clean out the
dictionaries.
The timer on the main form that runs the
animation calls the Render() method, which
updates the bees and the flowers, and then
cleans out its dictionaries.
If the simulator is reset, it calls each
form’s Controls.Remove() method to
completely clear out the controls on
the two forms. It finds all of the
controls in each of its two dictionaries
and removes them from the forms,
calling Dispose() on each of them. Then
it clears the two dictionaries.
610 Chapter 13
private void DrawFlowers() {
foreach (Flower flower in world.Flowers)
if (!flowerLookup.ContainsKey(flower)) {
PictureBox flowerControl = new PictureBox() {
Width = 45,
Height = 55,
Image = Properties.Resources.Flower,
SizeMode = PictureBoxSizeMode.StretchImage,
Location = flower.Location
};
flowerLookup.Add(flower, flowerControl);
fieldForm.Controls.Add(flowerControl);
}
foreach (Flower flower in flowerLookup.Keys) {
if (!world.Flowers.Contains(flower)) {
PictureBox flowerControlToRemove = flowerLookup[flower];
fieldForm.Controls.Remove(flowerControlToRemove);
flowerControlToRemove.Dispose();
deadFlowers.Add(flower);
}
}
}
private void DrawBees() {
BeeControl beeControl;
foreach (Bee bee in world.Bees) {
beeControl = GetBeeControl(bee);
if (bee.InsideHive) {
if (fieldForm.Controls.Contains(beeControl))
MoveBeeFromFieldToHive(beeControl);
} else if (hiveForm.Controls.Contains(beeControl))
MoveBeeFromHiveToField(beeControl);
beeControl.Location = bee.Location;
}
foreach (Bee bee in beeLookup.Keys) {
if (!world.Bees.Contains(bee)) {
beeControl = beeLookup[bee];
if (fieldForm.Controls.Contains(beeControl))
fieldForm.Controls.Remove(beeControl);
if (hiveForm.Controls.Contains(beeControl))
hiveForm.Controls.Remove(beeControl);
beeControl.Dispose();
retiredBees.Add(bee);
}
}
}
The first foreach loop uses
the flowerLookup dictionary
to check each flower to
see if it’s got a control on
the form. If it doesn’t, it
creates a new PictureBox
using an object initializer,
adds it to the form, and
then adds it to the
flowerLookup dictionary.
It takes two foreach loops to draw the flowers. The first looks
for new flowers and adds their PictureBoxes. The second looks
for dead flowers and removes their PictureBoxes.
DrawFlowers() uses the
Location property in
the Flower object to
set the PictureBox’s
location on the form.
The second foreach loop
looks for any PictureBox in
the flowerLookup dictionary
that’s no longer on the form
and removes it.
After it removes the PictureBox, it calls its
Dispose() method. Then it adds the Flower
object to deadFlowers so it’ll get cleared later.
DrawBees() also uses two foreach
loops, and it does the same basic
things as DrawFlowers(). But
it’s a little more complex, so we
split some of its behavior out
into separate methods to make it
easier to understand.
DrawBees() checks if a bee is in
the hive but its control is on the
FieldForm, or vice versa. It uses
two extra methods to move the
BeeControls between the forms.
The second foreach loop works
just like in DrawFlowers(),
except it needs to remove the
BeeControl from the right
form.
Once the BeeControl
is removed, we need
to call its Dispose()
method—the user
control will dispose of
its timer for us.
here’s the renderer class
you are here 4 611
controls and graphics
private BeeControl GetBeeControl(Bee bee) {
BeeControl beeControl;
if (!beeLookup.ContainsKey(bee)) {
beeControl = new BeeControl() { Width = 40, Height = 40 };
beeLookup.Add(bee, beeControl);
hiveForm.Controls.Add(beeControl);
beeControl.BringToFront();
}
else
beeControl = beeLookup[bee];
return beeControl;
}
private void MoveBeeFromHiveToField(BeeControl beeControl) {
hiveForm.Controls.Remove(beeControl);
beeControl.Size = new Size(20, 20);
fieldForm.Controls.Add(beeControl);
beeControl.BringToFront();
}
private void MoveBeeFromFieldToHive(BeeControl beeControl) {
fieldForm.Controls.Remove(beeControl);
beeControl.Size = new Size(40, 40);
hiveForm.Controls.Add(beeControl);
beeControl.BringToFront();
}
private void RemoveRetiredBeesAndDeadFlowers() {
foreach (Bee bee in retiredBees)
beeLookup.Remove(bee);
retiredBees.Clear();
foreach (Flower flower in deadFlowers)
flowerLookup.Remove(flower);
deadFlowers.Clear();
}
}
GetBeeControl() looks up a bee in the
beeLookup dictionary and returns it. If
it’s not there, it creates a new 40 x 40
BeeControl and adds it to the hive form
(since that’s where bees are born).
Don’t forget that
the ! means NOT.
MoveBeeFromHiveToField() takes a specific
BeeControl out of the hive form’s Controls
collection and adds it to the field form’s
Controls collection.
MoveBeeFromFieldToHive() moves a
BeeControl back to the hive form.
It has to make it bigger again.
The bees on the field form are smaller than
the ones on the hive form, so the method
needs to change BeeControl’s Size property.
After all the controls are moved around,
the renderer calls this method to clear
any dead flowers and retired bees out of
the two dictionaries.
Whenever DrawBees() and DrawFlowers()
found that a flower or bee was no longer
in the world, it added them to the
deadFlowers and retiredBees lists to be
removed at the end of the frame.
You’ll need to make sure you’ve got using System.Drawing
and using System.Windows.Forms at the top of the
Renderer class file.

612 Chapter 13
public partial class Form1 : Form {
private HiveForm hiveForm = new HiveForm();
private FieldForm fieldForm = new FieldForm();
private Renderer renderer;
// the rest of the fields
public Form1() {
InitializeComponent();
MoveChildForms();
hiveForm.Show(this);
fieldForm.Show(this);
ResetSimulator();
timer1.Interval = 50;
timer1.Tick += new EventHandler(RunFrame);
timer1.Enabled = false;
UpdateStats(new TimeSpan());
}
private void MoveChildForms() {
hiveForm.Location = new Point(Location.X + Width + 10, Location.Y);
fieldForm.Location = new Point(Location.X,
Location.Y + Math.Max(Height, hiveForm.Height) + 10);
}
public void RunFrame(object sender, EventArgs e) {
framesRun++;
world.Go(random);
renderer.Render();
// previous code
}
private void Form1_Move(object sender, EventArgs e) {
MoveChildForms();
}
The main form’s constructor
moves the two child forms
in place, then displays them.
Then it calls ResetSimulator(),
which instantiates Renderer.
The form passes a reference
to itself into Form.Show() so
it becomes the parent form.
When the main form loads, it creates an
instance of each of the other two forms.
They’re just objects in the heap for now—
they won’t be displayed until their Show()
methods are called.
This code moves the two
forms so that the hive
form is next to the main
stats form and the field
form is below both of them.
Adding this one line to RunFrame makes the
simulator update the graphics each time the
world’s Go() method is called.
The Move event is fired
every time the main
form is moved. Calling
MoveChildForms() makes
sure the child forms
always move along with
the main form.
Use the Events button in the Properties
window to add the Move event.handler.
Now connect the main form to your two new
forms, HiveForm and FieldForm
It’s great to have a renderer, but so far, there aren’t any forms to render
onto. We can fix that by going back to the main Form class (probably
called Form1) and making some code changes:
Move the code to instantiate the World
into the ResetSimulator() method.
The code to
reset the world
moved to the
ResetSimulator()
method.
hook it up
Make sure you’ve set the field and hive
forms’ StartPosition property to Manual,
or else MoveChildForms() won’t work.
Since both child forms have StartPosition set
to Manual, the main form can move them using
the Location property.
you are here 4 613
controls and graphics
private void ResetSimulator() {
framesRun = 0;
world = new World(new Bee.BeeMessage(SendMessage));
renderer = new Renderer(world, hiveForm, fieldForm);
}
private void reset_Click(object sender, EventArgs e) {
renderer.Reset();
ResetSimulator();
if (!timer1.Enabled)
toolStrip1.Items[0].Text = “Start simulation”;
}
private void openToolStripButton_Click(object sender, EventArgs e) {
// The rest of the code in this button stays exactly the same.
renderer.Reset();
renderer = new Renderer(world, hiveForm, fieldForm);
}
}
Finally, you’ll need to add code to
the Open button on the ToolStrip
to use the Reset() method to
remove the bees and flowers from
the two forms’ Controls collections,
and then create a new renderer
using the newly loaded world.
The Reset button needs to
call Reset() to clear out all
the BeeControls and flower
PictureBoxes, and then reset
the simulator.
Here’s where we create new instances of
the World and Renderer classes, which
resets the simulator.
Q: I saw that you showed the form using a Show() method,
but I don’t quite get what was going on with passing this as a
parameter.
A:Thisallcomesdowntotheideathataformisjustanother
class.Whenyoudisplayaform,you’rejustinstantiatingthatclass
andcallingitsShow()method.There’sanoverloadedversionof
Show()thattakesoneparameter,aparentwindow.Whenone
formisaparentofanother,itcausesWindowstosetupaspecial
relationshipbetweenthem—forexample,whenyouminimizethe
parentwindow,itautomaticallyminimizesallofthatform’schild
windows,too.
Q:Can you alter the preexisting controls and muck around
with their code?
A:No,youcan’tactuallyaccessthecodeinsidethecontrols
thatshipwithVisualStudio.However,everysingleoneofthose
controlsisaclassthatyoucaninherit,justlikeyouinheritedfrom
PictureBoxtocreateyourBeeControl.Ifyouwantto
addorchangebehaviorinanyofthosecontrols,youaddyourown
methodsandpropertiesthatmanipulatetheonesinthebaseclass.
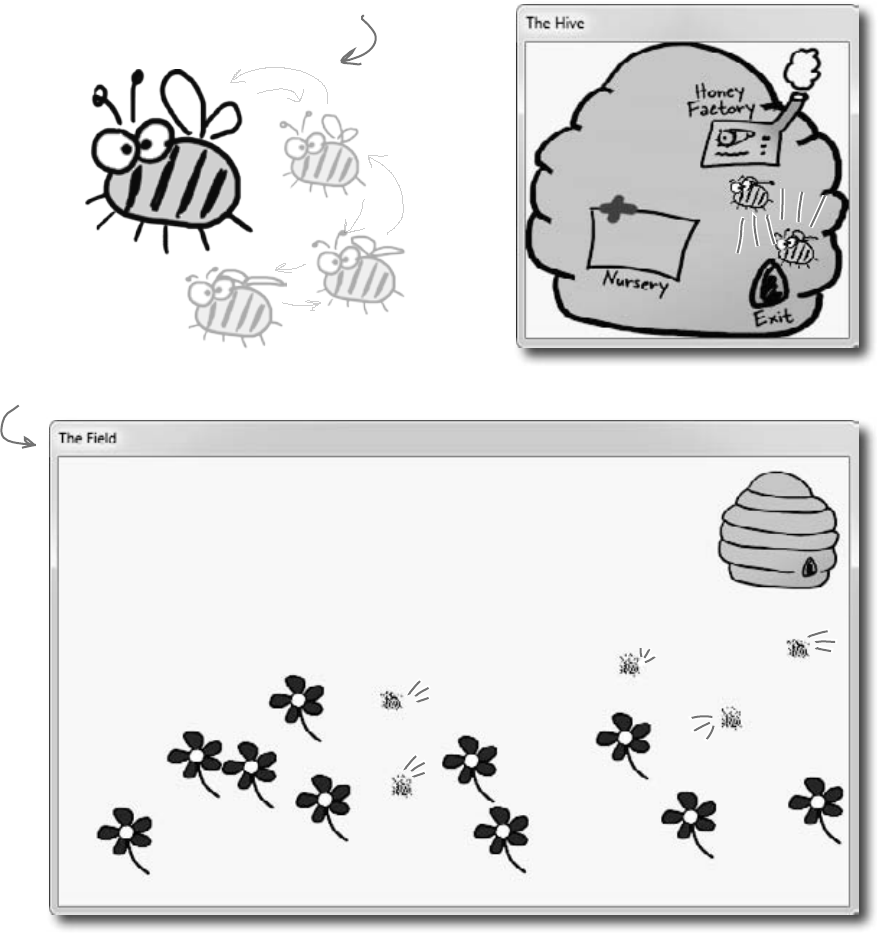
614 Chapter 13
Test drive…ahem…buzz
Compile all your code, chase down any errors you’re
getting, and run your simulator.
Your bees should be happily
flapping their wings now.
Try changing the
constants on your
simulator, and seeing how
the renderer handles more
bees or flowers.
something’s wrong
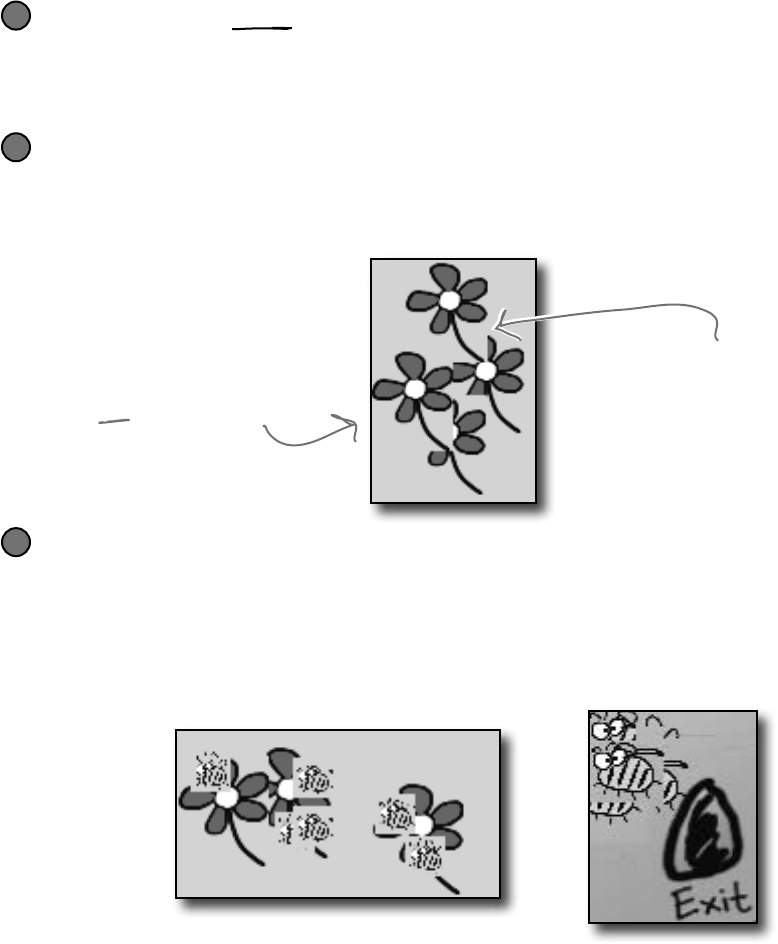
you are here 4 615
controls and graphics
Looks great, but something’s not quite right…
Look closely at the bees buzzing around the hive and the flowers, and you’ll
notice some problems with the way they’re being rendered. Remember
how you set each BeeControl’s BackColor property to Color.
Transparent? Unfortunately, that wasn’t enough to keep the simulator from
having some problems that are actually pretty typical of graphics programs.
The flowers’ “transparent” backgrounds aren’t really transparent
And there’s another, completely separate problem. When we saved the graphics files for
the flowers, we gave them transparent backgrounds. But while that made sure that each
flower’s background matched the background of the form, it doesn’t look so nice when
flowers overlap each other.
2
The bees’ backgrounds aren’t transparent, either
It turns out that Color.Transparent really does have some limitations. When the
bees are hovering over the flowers, the same “cut-out” glitch happens. Transparency
works a little better with the hive form, where the form’s background image does show
through the transparent areas of the bee graphics. But when the bees overlap, the same
problems occur. And if you watch closely as the bees move around the hive, you’ll see
some glitches where the bee images are sometimes distorted when they move.
3
When you set a PictureBox’s
background color to Transparent, it
draws any transparent pixels in the
image so they match the background
of the form…which isn’t always the
right thing to do.
When one PictureBox overlaps
another, C# draws the
transparent pixels so they match
the form, not the other control
that it overlaps, causing weird
rectangular “cut-outs” any time
two flowers overlap.
There are some serious performance issues
Did you notice how the whole simulator slows down when all the bees are inside the hive?
If not, try adding more bees by increasing the constants in the Hive class. Keep your eye
on the frame rate—add more bees, and it starts to drop significantly.
1
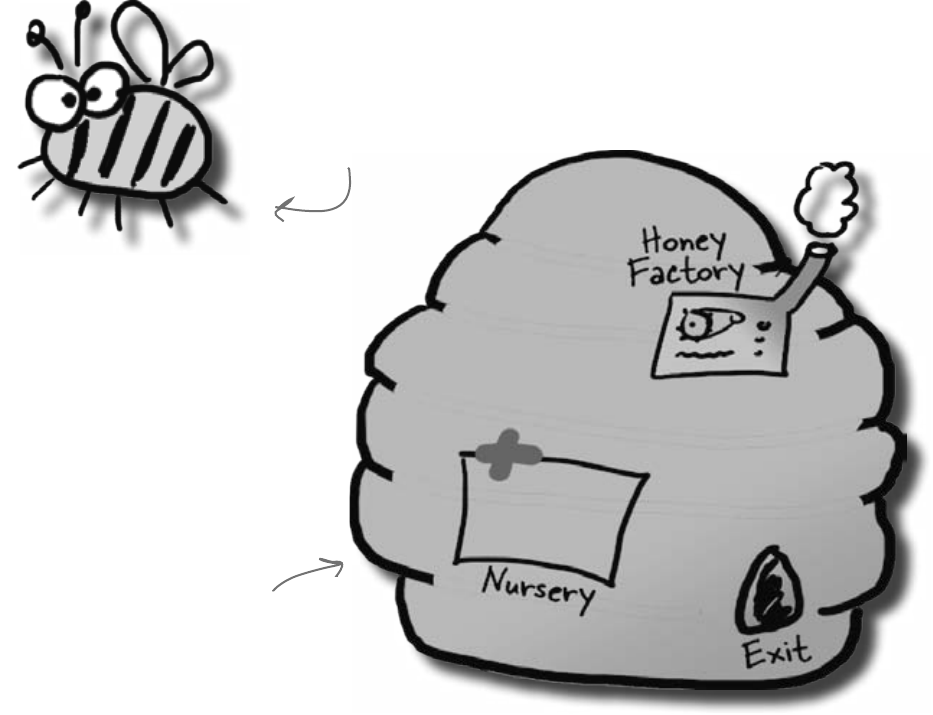
616 Chapter 13
Let’s take a closer look at those performance issues
Each bee picture you downloaded is big. Really big. Pop one of them open in Windows
Picture Viewer and see for yourself. That means the PictureBox needs to shrink it
down every time it changes the image, and scaling an image up or down takes time. The
reason the bees move a lot slower when there’s a lot of them flying around inside the
hive is that the inside hive picture is HUGE. And when you made the background for the
BeeControl transparent, it needs to do double work: first it has to shrink the bee picture
down, and then it needs to shrink a portion of the form’s background down so that it can
draw it in the transparent area behind the bee.
…so all we need to do to speed up the simulator’s performance
is to shrink down all the pictures before we try to display them.
Bee animation 1.png
Hive (Inside).png
The graphics files for the bees
are really BIG. The PictureBox
needs to scale the picture down
to size every time it displays a
new animation frame. That takes
a lot of time…
The bee picture is
really big, and the
PictureBox needs
time to shrink it
down every time
it displays a new
animation frame.
The inside hive picture is huge.
Every time a bee flies in front
of it, its PictureBox needs to
scale it down to the size of the
control. It needs to do that
to show part of the picture
any place the bee picture’s
transparent background lets it
show through.
we bit off more than the program could chew
you are here 4 617
controls and graphics
All we need to do to speed up the graphics performance is add a method
to the renderer that scales any image to a different size. Then we can
resize each picture once when it’s loaded, and only use the scaled-
down version in the bee control and for the hive form’s background.
public static Bitmap ResizeImage(Bitmap picture, int width, int height) {
Bitmap resizedPicture = new Bitmap(width, height);
using (Graphics graphics = Graphics.FromImage(resizedPicture)) {
graphics.DrawImage(picture, 0, 0, width, height);
}
return resizedPicture;
}
Add the ResizeImage method to the renderer
All of the pictures in your project (like Properties.Resources.Flower) are stored as
Bitmap objects. Here’s a static method that resizes bitmaps—add it to the Renderer class:
1
We’ll take a closer look at what this Graphics object is
and how this method works in the next few pages
Add this ResizeCells method to your BeeControl
Your BeeControl can store its own Bitmap objects—in this case, an array of four of them. Here’s a
control that’ll populate that array, resizing each one so that it’s exactly the right size for the control:
2
Do this
Set the form’s background image manually
Go to the Properties window and set the hive form’s background image to (none). Then go to its
constructor and set the image to one that’s sized properly.
5
public partial class HiveForm : Form {
public HiveForm() {
InitializeComponent();
BackgroundImage = Renderer.ResizeImage(
Properties.Resources.Hive__inside_,
ClientRectangle.Width, ClientRectangle.Height);
}
}
Your form has a ClientRectangle property that
contains a Rectangle that has the dimensions of
its display area.
Now run the simulator—it’s much faster!
private Bitmap[] cells = new Bitmap[4];
private void ResizeCells() {
cells[0] = Renderer.ResizeImage(Properties.Resources.Bee_animation_1, Width, Height);
cells[1] = Renderer.ResizeImage(Properties.Resources.Bee_animation_2, Width, Height);
cells[2] = Renderer.ResizeImage(Properties.Resources.Bee_animation_3, Width, Height);
cells[3] = Renderer.ResizeImage(Properties.Resources.Bee_animation_4, Width, Height);
}
Change the switch statement so that it uses the cells array, not the resources
The BeeControl’s Tick event handler has a switch statement that sets its BackgroundImage:
BackgroundImage = Properties.Resources.Bee_animation_1;
Replace Properties.Resources.Bee_animation_1 with cells[0]. Now replace the rest of the
case lines, so that case 2 uses cells[1], case 3 uses cells[2], case 4 uses cells[3], case 5 uses
cells[2], and the default case uses cells[1]. That way only the resized image is displayed.
3
Add calls to ResizeCells() to the BeeControl
You’ll need to add two calls to the new ResizeCells() method. First, add it to the bottom of the
constructor. Then go back to the IDE designer by double-clicking on the BeeControl in the Properties
window. Go over to the Events page in the Properties window (by clicking on the lightning-bolt icon), scroll
down to Resize, and double-click on it to add a Resize event handler. Make the new Resize event
handler call ResizeCells(), too—that way it’ll resize its animation pictures every time the form is
resized.
4
These lines take each of the Bitmap objects that store the bee pictures
and shrink them down using the ResizeImage() method we wrote.
618 Chapter 13
You resized your Bitmaps using a Graphics object
Let’s take a closer look at that ResizeImage() method you added to the
renderer. The first thing it does is create a new Bitmap object that’s the size that
the picture will be resized to. Then it uses Graphics.FromImage() to create
a new Graphics object. It uses that Graphics object’s DrawImage()
method to draw the picture onto the Bitmap. Notice how you passed the width
and height parameters to DrawImage()—that’s how you tell it to scale the
image down to the new size. Finally you returned the new Bitmap you created, so
it can be used as the form’s background image or one of the four animation cells.
public static Bitmap ResizeImage(Bitmap picture, int width, int height) {
Bitmap resizedPicture = new Bitmap(width, height);
using (Graphics graphics = Graphics.FromImage(resizedPicture)) {
graphics.DrawImage(picture, 0, 0, width, height);
}
return resizedPicture;
}
private void button1_Click(object sender, EventArgs e)
{
PictureBox beePicture = new PictureBox();
beePicture.Location = new Point(10, 10);
beePicture.Size = new Size(100, 100);
beePicture.BorderStyle = BorderStyle.FixedSingle;
beePicture.Image = Renderer.ResizeImage(
Properties.Resources.Bee_animation_1, 80, 40);
Controls.Add(beePicture);
}
Let’s see image resizing in action
Drag a button onto the Field form and add this code. It creates a new
PictureBox control that’s 100 ×100 pixels, setting its border to a black line so
you can see how big it is. Then it uses ResizeImage() to make a bee picture
that’s squished down to 80×40 pixels and assigns that new picture to its Image
property. Once the PictureBox is added to the form, the bee is displayed.
You can see the image resizing in
action—the squished bee image is
much smaller than the PictureBox.
ResizeImage() squished it down.
Just do this temporarily.
Delete the button and
code when you’re done.
You pass a picture into the
method, along with a new
width and height that it’ll
be resized to.
The FromImage() method returns a new Graphics object that lets
you draw graphics onto that image. Take a minute and use the IDE’s
IntelliSense to look at the methods in the Graphics class. When you call
DrawImage(), it copies the image into the resizedPicture bitmap at the
location (0, 0) and scaled to the width and height parameters.
Forms and controls have a
CreateGraphics() method
that returns a new Graphics
object. You’ll see a lot more
about that shortly.
The ResizeImage()
method creates a
Graphics object to
draw on an invisible
Bitmap object.
It returns that
Bitmap so it can be
displayed on a form
or in a PictureBox.
digging deeper into graphics
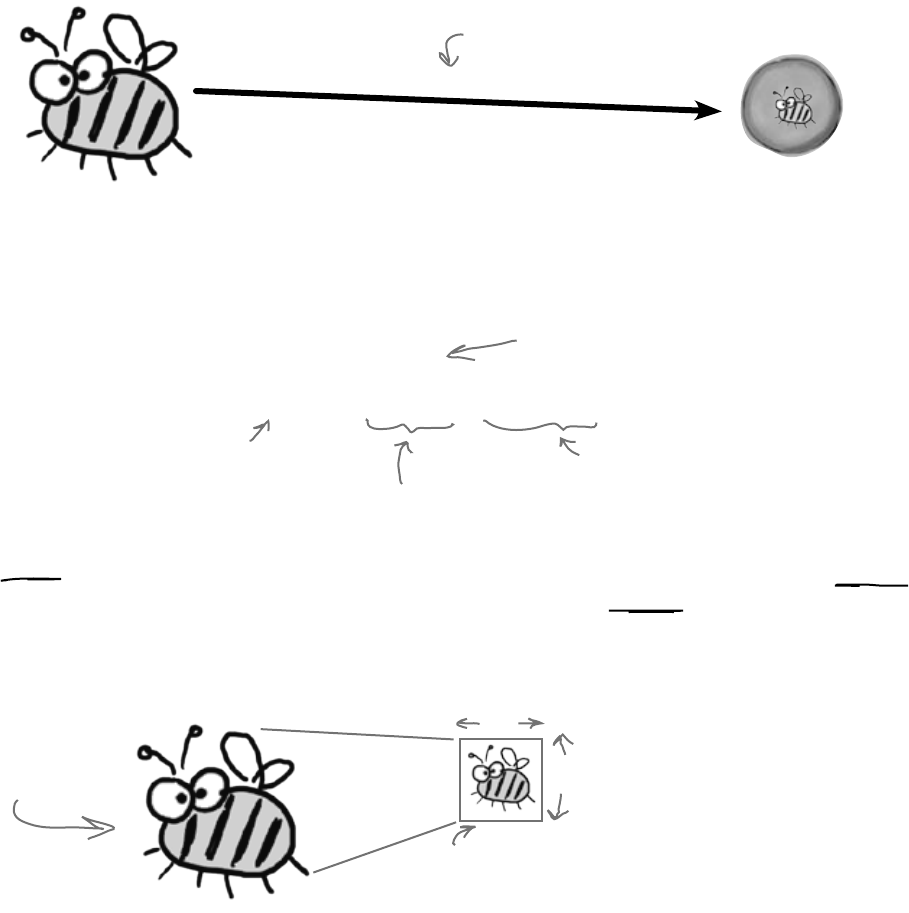
you are here 4 619
controls and graphics
Your image resources are stored in Bitmap objects
When you import graphics files into your project’s resources,
what happens to them? You already know that you can access
them using Properties.Resources. But what, exactly, is
your program doing with them once they’re imported?
.NET turns your image into a new Bitmap object:
Bitmap bee = new Bitmap(“Bee animation 1.png”)
Bee animation 1.png
B
i
t
m
a
p
o
b
j
e
c
t
The Bitmap class has several overloaded
constructors. This one loads a graphics file
from disk. You can also pass it integers
for width and height—that’ll create a new
Bitmap with no picture.
Then each Bitmap is drawn to the screen
Once your images are in Bitmap objects, your form
draws them to the screen with a call like this:
using (Graphics g = CreateGraphics()) {
g.DrawImage(myBitmap, 30, 30, 150, 150);
}
This call gets a Graphics object
to draw on the form. We use a
using statment to make sure the
Graphics object is disposed.
DrawImage() takes a Bitmap,
the image to draw…
…a starting X, Y coordinate…
…and a size, 150x150 pixels.
The bigger they are…
Did you notice those last two parameters to DrawImage()?
What if the image in the Bitmap is 175 by 175? The
graphics library must then resize the image to fit 150 by 150.
What if the Bitmap contains an image that’s 1,500 by 2,025?
Then the scaling becomes even slower.…
This image, which is
300x300 pixels…
…gets shrunk to this size, which is (for
example) 150x150 pixels. And that slows
your simulator down!
150
150
Resizing images takes a
lot of processing power! If
you do it once, it’s no big
deal. But if you do it EVERY
FRAME, your program will
slow down. We gave you
REALLY BIG images for the
bees and the hive. When
the renderer moves the
bees around (especially
in front of the inside hive
picture), it has to resize
them over and over again.
And that was causing the
performance problems!
If you don’t see any
performance problems,
keep adding bees until
the program slows down!

620 Chapter 13
Use System.Drawing to TAKE CONTROL
of graphics yourself
The Graphics object is part of the System.Drawing namespace. The
.NET Framework comes with some pretty powerful graphics tools that go a lot
further than the simple PictureBox control that’s in the toolbox. You can
draw shapes, use fonts, and do all sorts of complex graphics…and it all starts
with a Graphics object. Any time you want to add or modify any object’s
graphics or images, you’ll create a Graphics object that’s linked to the
object you want to draw on, and then use the Graphics object’s methods
to draw on your target.
System.Drawing
The graphics methods in the System.
Drawing namespace are sometimes
referred to as GDI+, which stands for
Graphics Device Interface. When you
draw graphics with GDI+, you start
with a Graphics object that’s hooked
up to a Bitmap, form, control, or
another object that you want to draw
on using the Graphics object’s methods.
S
y
s
t
e
m
.
W
i
n
d
o
w
s
.
F
o
r
m
s
.
F
o
r
m
G
r
a
p
h
i
c
s
o
b
j
e
c
t
this.CreateGraphics()
The form can call its own
CreateGraphics() method,
or another object can call
it. Either way, the method
returns a reference to a
Graphics object whose methods
will draw on it.
G
r
a
p
h
i
c
s
o
b
j
e
c
t
S
y
s
t
e
m
.
W
i
n
d
o
w
s
.
F
o
r
m
s
.
F
o
r
m
g.DrawLines()
The DrawLines() method,
for example, draws a bunch
of lines on whatever object
created the Graphics instance.
Use the Graphics object’s methods to draw on your object
Every Graphics object has methods that let you draw on the object that
created it. When you call methods in the Graphics object to draw lines, circles,
rectangles, text, and images, they appear on the form.
2
Start with the object you want to draw on
For instance, think about a form. When you call the form’s
CreateGraphics() method, it returns an instance of
Graphics that’s set up to draw on itself.
1
Even though you’re
calling methods in
this Graphics object,
the actual graphics
appear on the object
that created it.
Calls on this instance of
Graphics affect the form that
created the Graphics object.
You don’t draw on the
Graphics object itself.
You only use it to draw
on other objects.
you’re in control when you don’t use controls

you are here 4 621
controls and graphics
A 30-second tour of GDI+ graphics
There are all sorts of shapes and pictures that you can draw once you’ve
created a Graphics object. All you need to do is call its methods, and it’ll
draw directly onto the object that created it.
The first step is always to grab yourself a Graphics object. Use a form’s CreateGraphics()
method, or have a Graphics object passed in. Remember, Graphics implements the
IDisposable() interface, so if you create a new one, use a using statement:
using (Graphics g = this.CreateGraphics()) {
1
If you want to draw a line, call DrawLine() with a starting point and ending point, each
represented by X and Y coordinates:
g.DrawLine(Pens.Blue, 30, 10, 100, 45);
or you can do it using a couple of Points:
g.DrawLine(Pens.Blue, new Point(30, 45), new Point(100, 10));
2
Here’s code that draws a filled slate gray rectangle, and then gives it a sky blue border. It uses a
Rectangle to define the dimensions—in this case, the upper left-hand corner is at (150, 15),
and it’s 140 pixels wide and 90 pixels high.
g.FillRectangle(Brushes.SlateGray, new Rectangle(150, 15, 140, 90));
g.DrawRectangle(Pens.SkyBlue, new Rectangle(150, 15, 140, 90));
3
You can draw an ellipse or a circle using the DrawCircle() or FillCircle() methods,
which also use a Rectangle to specify how big the shape should be. This code draws two
ellipses that are slightly offset to give a shadow effect:
g.FillEllipse(Brushes.DarkGray, new Rectangle(45, 65, 200, 100));
g.FillEllipse(Brushes.Silver, new Rectangle(40, 60, 200, 100));
4
Use the DrawString() method to draw text in any font and color. To do that, you’ll need to
create a Font object. It implements IDisposable, so use a using statement:
using (Font arial24Bold = new Font(“Arial”, 24, FontStyle.Bold)) {
g.DrawString(“Hi there!”, arial24Bold, Brushes.Red, 50, 75);
}
5
You’ll need to make sure you’ve got a
using System.Drawing; line at the top
of your class to use these methods.
Or, when you add a form to your
project, the IDE adds that line to
your form class automatically.
23
4
5
If the above statements are
executed in order, this is what will
end up on the form. Each of the
statements above matches up with
the numbers here. The upper left-
hand corner is coordinate (0, 0).
Remember, this draws on the object
that created this instance.
There’s no step 1 on
this picture, since that
was creating the actual
Graphics object.
The start coordinate…
…and the end coordinate.
There are a whole
lot of colors you
can use—just type
“Color”, “Pens”, or
“Brushes” followed
by a dot, and the
IntelliSense window
will display them.

622 Chapter 13
Start the event handler with a using line to create the Graphics
object. When you work with GDI+, you use a lot of objects that
implement IDisposable. If you don’t dispose of them, they’ll slowly
suck up your computer’s resources until you quit the program. So you’ll
end up using a lot of using statements:
using (Graphics g = CreateGraphics()) {
Use graphics to draw a picture on a form
Let’s create a new Windows application that draws a
picture on a form when you click on it.Draw this
Start by adding a Click event to the form
Go to the Events page in the Properties window (by clicking on the
lightning-bolt icon), scroll down to the Click event, and double-click on it.
1
Pay attention to the order you draw things on our form
We want a sky blue background for this picture, so you’ll draw a big blue rectangle first—then
anything else you draw afterward will be drawn on top of it. You’ll take advantage of one of
the form’s properties called ClientRectangle. It’s a Rectangle that defines the boundaries
of the form’s drawing area. Rectangles are really useful—you can create a new rectangle by
specifying a Point for its upper left-hand corner, and its width and height. Once you do that,
it’ll automatically calculate its Top, Left, Right, and Bottom properties for you. And it’s got
useful methods like Contains(), which will return true if a given point is inside it.
g.FillRectangle(Brushes.SkyBlue, ClientRectangle);
2
Draw the bee and the flower
You already know how the DrawImage() method works. Make sure you add the image resources.
g.DrawImage(Properties.Resources.Bee_animation_1, 50, 20, 75, 75);
g.DrawImage(Properties.Resources.Flower, 10, 130, 100, 150);
3
Add a pen that you can draw with
Every time you draw a line, you use a Pen object to determine its color and thickness. There’s a
built-in Pens class that gives you plenty of pens (Pens.Red is a thin red pen, for example). But
you can create your own pen using the Pen class constructor, which takes a Brush object and a
thickness (it’s a float, so make sure it ends with F). Brushes are how you draw filled graphics (like
filled rectangles and ellipses), and there’s a Brushes class that gives you brushes in various colors.
using (Pen thickBlackPen = new Pen(Brushes.Black, 3.0F)) {
4
Here’s the first line in your Form1_Click()
event handler method. We’ll give you all
the lines for the event handler—put them
together to draw the picture.
Pens are for drawing lines, and they have a
width. If you want to draw a filled shape or
some text, you’ll need a Brush.
This will come in really handy
later on in the book! What
do you think you’ll be doing
with Contains()?
draw a picture
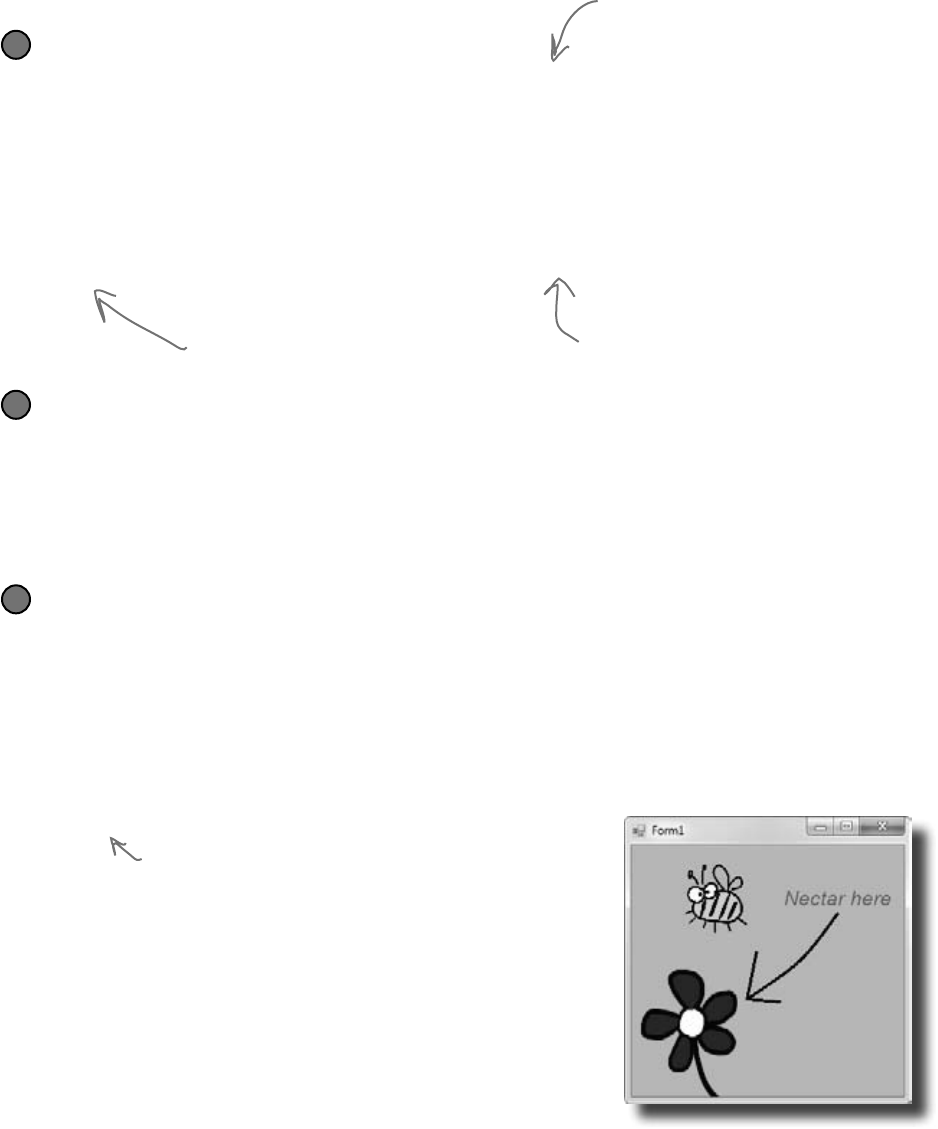
you are here 4 623
controls and graphics
Add an arrow that points to the flower
There are some Graphics methods that take an array of Points, and connect them using a
series of lines or curves. We’ll use the DrawLines() method to draw the arrow head, and the
DrawCurve() method to draw its shaft. There are other methods that take point arrays, too (like
DrawPolygon(), which draws a closed shape, and FillPolygon(), which fills it in).
g.DrawLines(thickBlackPen, new Point[] {
new Point(130, 110), new Point(120, 160), new Point(155, 163)});
g.DrawCurve(thickBlackPen, new Point[] {
new Point(120, 160), new Point(175, 120), new Point(215, 70) });
}
5
This goes inside the inner using
statement that created the Pen.
Here’s where the using block ends—we
don’t need the thickBlackPen any more,
so it’ll get disposed.
Add a font to draw the text
Whenever you work with drawing text, the first thing you need to do is create a Font object.
Again, use a using statement because Font implements IDisposable. Creating a font is
straightforward. There are several overloaded constructors—the simplest one takes a font name, font
size, and FontStyle enum.
using (Font font = new Font(“Arial”, 16, FontStyle.Italic)) {
6
Add some text that says “Nectar here”
Now that you’ve got a font, you can figure out where to put the string by measuring how big it will be
when it’s drawn. The MeasureString() method returns a SizeF that defines its size. (SizeF is
just the float version of Size—and both of them just define a width and height.) Since we know
where the arrow ends, we’ll use the string measurements to position its center just above the arrow.
SizeF size = g.MeasureString(“Nectar here”, font);
g.DrawString(“Nectar here”, font, Brushes.Red, new Point(
215 - (int)size.Width / 2, 70 - (int)size.Height));
}
}
7
Make sure you close out both using blocks.
You can create a Rectangle by giving it a point
and a Size (or width and height). Once you’ve
got it, you can find its boundaries and check its
Contains() method to see if it contains a Point.
When you pass an array of
points to DrawCurve(), it
draws a smooth curve that
connects them all in order.
624 Chapter 13
using (Graphics g = this.CreateGraphics())
using (Font f = new Font(“Arial”, 6, FontStyle.Regular)) {
for (int x = 0; x < this.Width; x += 20) {
}
for (int y = 0; y < this.Height; y += 20) {
}
}
2. Can you figure out what happens when you run the code
below? Draw the output onto the form, using the grid you
just rendered for locating specific points.
using (Pen pen =
new Pen(Brushes.Black, 3.0F)) {
g.DrawCurve(pen, new Point[] {
new Point(80, 60),
new Point(200,40),
new Point(180, 60),
new Point(300,40),
});
g.DrawCurve(pen, new Point[] {
new Point(300,180), new Point(180, 200),
new Point(200,180), new Point(80, 200),
});
g.DrawLine(pen, 300, 40, 300, 180);
g.DrawLine(pen, 80, 60, 80, 200);
g.DrawEllipse(pen, 40, 40, 20, 20);
g.DrawRectangle(pen, 40, 60, 20, 300);
g.DrawLine(pen, 60, 60, 80, 60);
g.DrawLine(pen, 60, 200, 80, 200);
}
1. Most of your work with Graphics will involve thinking
about your forms as a grid of X, Y coordinates. Here’s the
code to build the grid shown below; your job is to fill in
the missing parts.
what’s it look like?
you are here 4 625
controls and graphics
g.FillPolygon(Brushes.Black, new Point[] {
new Point(60,40), new Point(140,80), new Point(200,40),
new Point(300,80), new Point(380,60), new Point(340,140),
new Point(320,180), new Point(380,240), new Point(320,300),
new Point(340,340), new Point(240,320), new Point(180,340),
new Point(20,320), new Point(60, 280), new Point(100, 240),
new Point(40, 220), new Point(80,160),
});
using (Font big = new Font(“Times New Roman”, 24, FontStyle.Italic)) {
g.DrawString(“Pow!”, big, Brushes.White, new Point(80, 80));
g.DrawString(“Pow!”, big, Brushes.White, new Point(120, 120));
g.DrawString(“Pow!”, big, Brushes.White, new Point(160, 160));
g.DrawString(“Pow!”, big, Brushes.White, new Point(200, 200));
g.DrawString(“Pow!”, big, Brushes.White, new Point(240, 240));
}
3. Here’s some more graphics code, dealing with irregular
shapes. Figure out what’s drawn using the grid we’ve given
you below.
FillPolygon(), DrawLines(), and a few other graphics
methods have a constructor that takes an array of Points
that define the vertices of a series of connected lines.
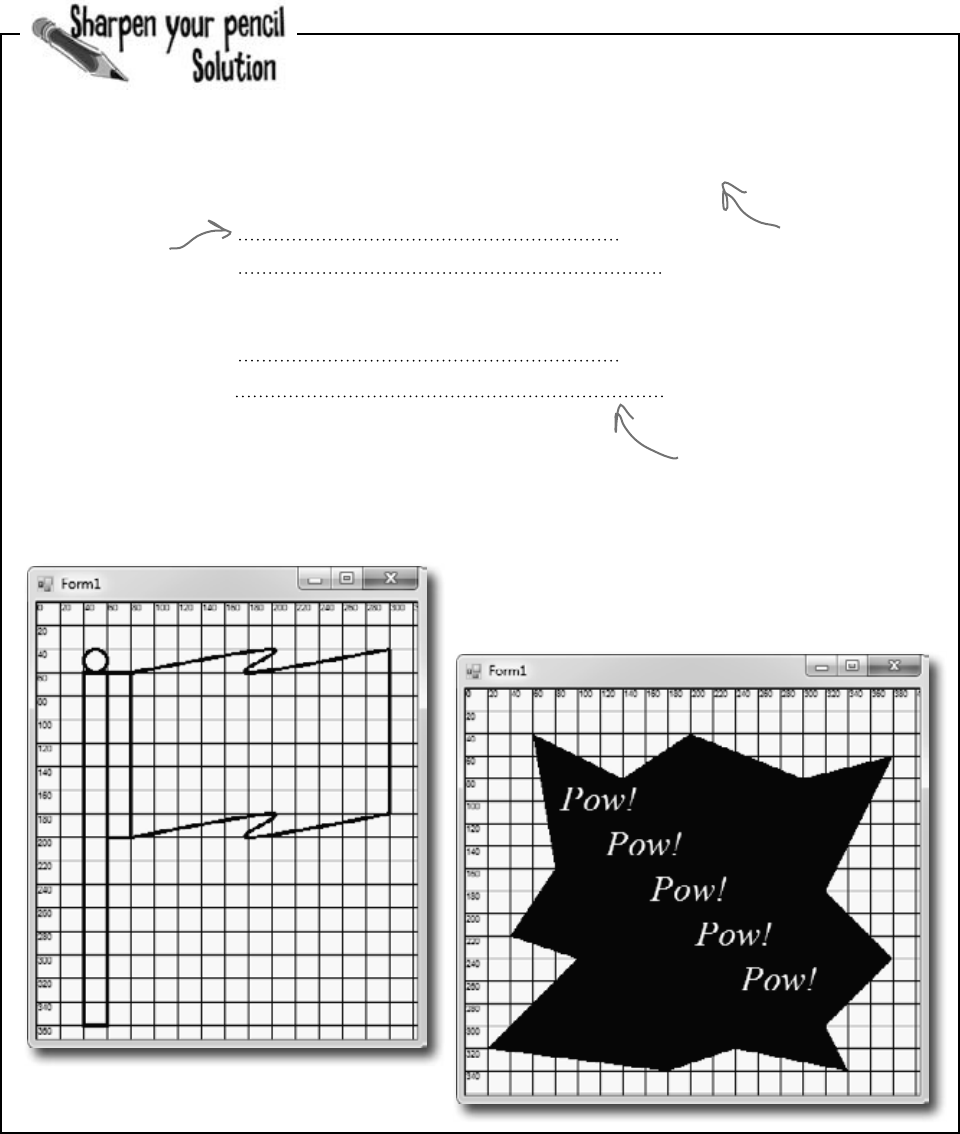
626 Chapter 13
Your job was to fill in the missing code to draw a grid, and plot
two chunks of code on the grids.
using (Graphics g = this.CreateGraphics())
using (Font f = new Font(“Arial”, 6, FontStyle.Regular)) {
for (int x = 0; x < this.Width; x += 20) {
g.DrawLine(Pens.Black, x, 0, x, this.Height);
g.DrawString(x.ToString(), f, Brushes.Black, x, 0);
}
for (int y = 0; y < this.Height; y += 20) {
g.DrawLine(Pens.Black, 0, y, this.Width, y);
g.DrawString(y.ToString(), f, Brushes.Black, 0, y);
}
}
Next we draw the horizontal
lines and X axis numbers. To
draw a horizontal line, you
choose a Y value and draw a
line from (0, y) on the left-
hand side of the form to (0,
this.Width) on the right-hand
side of the form.
First we draw
the vertical lines
and the numbers
along the Y axis.
There’s a vertical
line every 20
pixels along the X
axis.
We used using
statements to
make sure the
Graphics and
Font objects get
disposed after the
form’s drawn.
looks good, except…
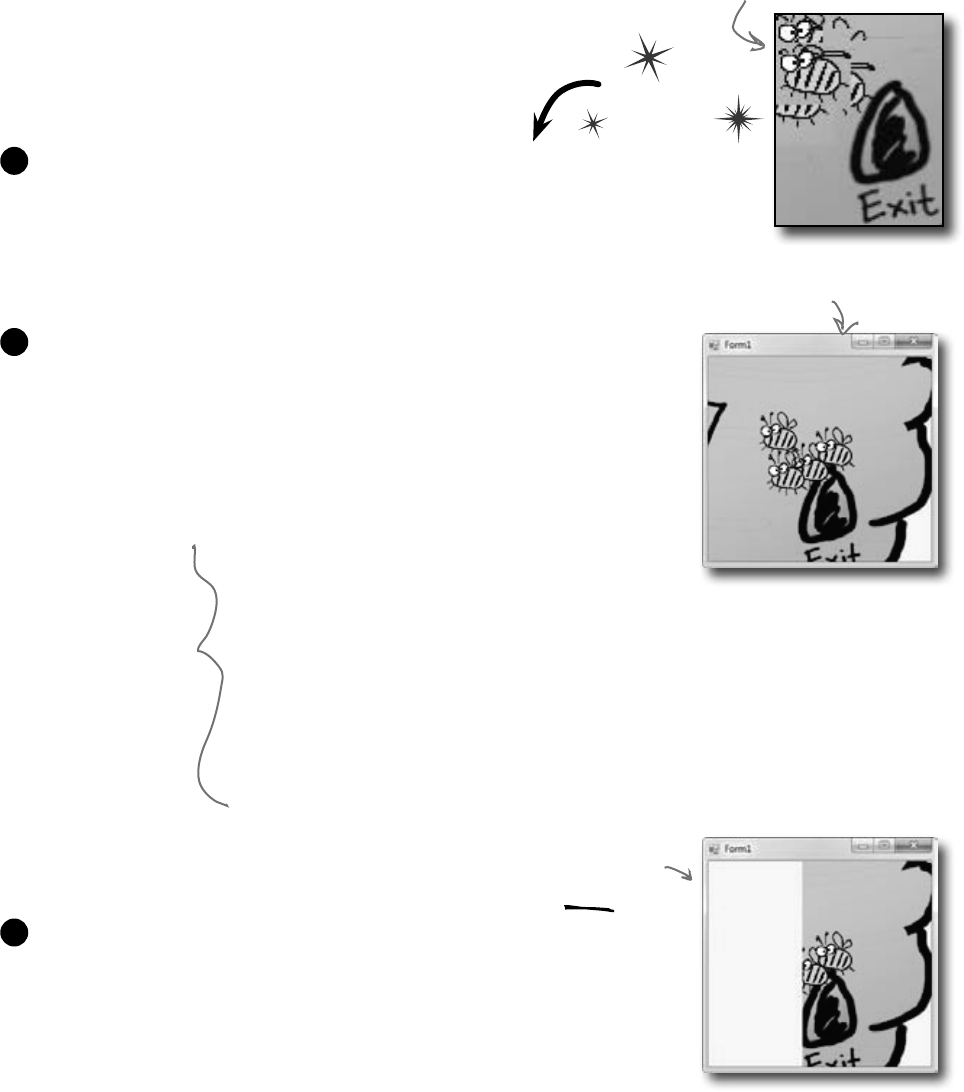
you are here 4 627
controls and graphics
private void Form1_Click(object sender, EventArgs e) {
using (Graphics g = CreateGraphics()) {
g.DrawImage(Properties.Resources.Hive__inside_,
-Width, -Height, Width * 2, Height * 2);
Size size = new Size(Width / 5, Height / 5);
DrawBee(g, new Rectangle(
new Point(Width / 2 - 50, Height / 2 - 40), size));
DrawBee(g, new Rectangle(
new Point(Width / 2 - 20, Height / 2 - 60), size));
DrawBee(g, new Rectangle(
new Point(Width / 2 - 80, Height / 2 - 30), size));
DrawBee(g, new Rectangle(
new Point(Width / 2 - 90, Height / 2 - 80), size));
}
}
}
Graphics can fix our transparency problem…
Remember those pesky graphics glitches? Let’s tackle them! DrawImage()
is the key to fixing the problem in the renderer where the images were
drawing those boxes around the bees and flowers that caused the overlap
issues. We’ll start out by going back to our Windows application with the
picture and changing it to draw a bunch of bees that overlap each other
without any graphics glitches.
public void DrawBee(Graphics g, Rectangle rect) {
g.DrawImage(Properties.Resources.Bee_animation_1, rect);
}
Add a DrawBee() method that draws a bee on any Graphics object. It uses
the overloaded DrawImage() constructor that takes a Rectangle to determine
where to draw the image, and how big to draw it.
1
Here’s the new Click event handler for the form. Take a close look at
how it works—it draws the hive so that its upper left-hand corner is way off
the form, at location (-Width, -Height), and it draws it at twice the
width and height of the form—so you can resize the form and it’ll still draw
OK. Then it draws four bees using the DrawBee() method.
2
Do this
The renderer drew the bees
so that they looked weird
when they overlapped.
Run your program and click on the form, and watch it draw the bees! But
something’s wrong. When you drag the form off the side of the screen and
back again, the picture disappears! Now go back and check the “Nectar
here” program you wrote a few pages ago—it’s got the same problem!
What do you think happened?
3
Much better—click on the form
and the bees overlap just fine.
But look what happens if you
drag it off the side of the
screen and back! Oh no!
First we’ll draw the hive
background, with its
corner far off the page
so we only see a small
piece of it. Then we’ll
draw four bees so that
they overlap—if they
don’t, make your form
bigger and then click on
it again so they do.
…but there’s a catch
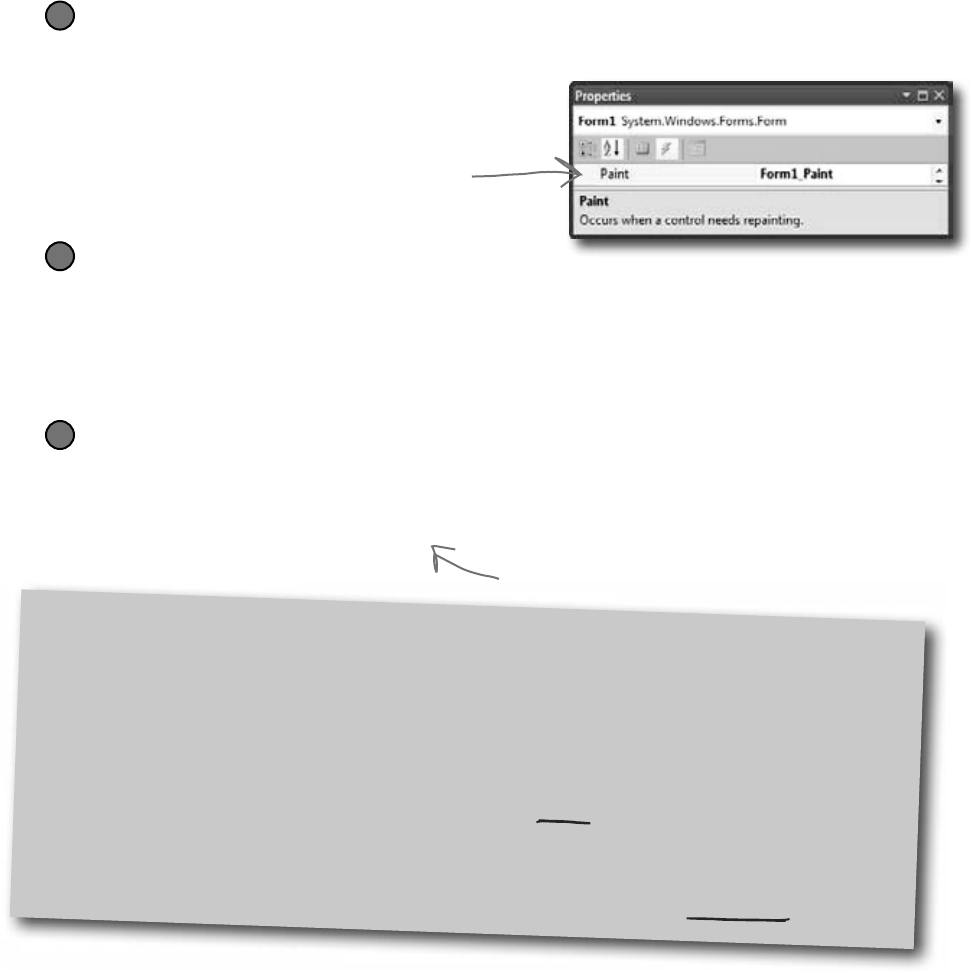
628 Chapter 13
Use the Paint event to make your graphics stick
What good are graphics if they disappear from your form as soon as part of your
form gets covered up? They’re no good at all. Luckily, there’s an easy way to make
sure your graphics stay on your form: just write a Paint event handler. Your
form fires a Paint event every time it needs to redraw itself—like when it’s dragged
off the screen. One of the properties of its PaintEventArgs parameter is a
Graphics object called Graphics, and anything that you draw with it will “stick.”
Forms and controls redraw themselves all the time
It may not look like it, but your forms have to redraw themselves all the time. Any time you have controls on
a form, they’re displaying graphics—labels display text, buttons display a picture of a button, checkboxes draw
a little box with an X in it. You work with them as controls that you drag around, but each control actually
draws its own image. Any time you drag a form off the screen or under another form and then drag it back
or uncover it, the part of the form that was covered up is now invalid, which means that it no longer shows
the image that it’s supposed to. That’s when .NET sends a message to the form telling it to redraw itself.
The form fires off a Paint event any time it’s “dirty” and needs to be redrawn. If you ever want your form
or user control to redraw itself, you can tell .NET to make it “dirty” by calling its Invalidate() method.
Add a Paint event handler
Double-click on “Paint” in the Events page in the Properties window to add a Paint event handler.
The Paint event is fired any time the image on your form gets “dirty.” So drawing your graphics
inside of it will make your image stick around.
1
Use the Graphics object from the Paint event’s EventArgs
Instead of starting with a using statement, make your event handler start like this:
private void Form1_Paint(object sender, PaintEventArgs e) {
Graphics g = e.Graphics;
You don’t have to use a using statement—since you didn’t create it, you don’t have to dispose it.
2
Forms and controls
have a Paint event
that gives you a
Graphics object.
Anything you draw
on it is repainted
automatically.
Copy the code that draws the overlapping bees and hive
Add the new DrawBee() method from the previous page into your new user control. Then copy
the code from the Click event into your new Paint event—except for the first line with the
using statement, since you already have a Graphics object called g. (Since you don’t have
the using statement anymore, make sure you take out its closing curly bracket.) Now run your
program. The graphics stick!
3
Double-click on Paint to add a Paint event handler. Its
PaintEventArgs has a property called Graphics—and
anything you draw with it will stick to your form.
Do the same with your “Nectar here”
drawing to make it stick, too.
back to events
you are here 4 629
controls and graphics
Seeifyoucancombineyourknowledgeofformsandusercontrols—andgetalittlemore
practiceusingBitmapobjectsandtheDrawImage()method—bybuildingausercontrol
thatusesTrackBarstozoomanimageinandout.
Add two TrackBar controls to a new user control
Create a new Windows Application project. Add a UserControl—call it Zoomer—and set its
Size property to (300, 300). Drag two TrackBar controls out of the toolbox and onto it. Drag
trackBar1 to the bottom of the control. Then drag trackBar2 to the right-hand side of
the control and set its Orientation property to Vertical. Both should have the Minimum
property set to 1, Maximum set to 175, Value set to 175, and TickStyle set to None. Set
each TrackBar’s background color to white. Finally, double-click on each TrackBar to add a
Scroll event handler. Make both event handlers call the control’s Invalidate() method.
1
Load a picture into a Bitmap object and draw it on the control
Add a private Bitmap field called photo to your Zoomer user control. When you create the instance
of Bitmap, use its constructor to load your favorite image file—we used a picture of a fluffy dog.
Then add a Paint event to the control. The event handler should create a graphics object to draw
on the control, draw a white filled rectangle over the entire control, and then use DrawImage() to
draw the contents of your photo field onto your control so its upper left-hand corner is at (10, 10), its
width is trackBar1.Value, and its height is trackBar2.Value. Then drag your control onto
the form—make sure to resize the form so the trackbars are at the edges.
2
Give the two trackbars
white backgrounds
because you’ll be drawing
a white rectangle behind
everything, and you want
them to blend in.
When you move the
trackbars, the picture
will shrink and grow!
Whenever the user scrolls one of the
TrackBars, they call the user control’s
Invalidate() method. That will cause
the user control to fire its Paint event and
resize the photo. Remember, since you
didn’t create the Graphics object—it was
passed to you in PaintEventArgs—you
don’t need to dispose it. So you don’t have
to use a using statement with it. Just draw
the image inside the Paint event handler.
Your user control has a Paint
event, and it works just like the one
you just used in the form. Just use
its PaintEventArgs parameter e.
It has a property called Graphics,
and anything that you draw with that
Graphics object will be painted
onto any instance of the user
control you drag out of the toolbox.
630 Chapter 13
v
Each drag here is causing another image
resize from DrawImage().
???
???
g.DrawImage(myBitmap, 30, 30, 150, 150);
GetalittlemorepracticeusingBitmapobjects
andtheDrawImage()methodbybuildinga
formthatusesthemtoloadapicturefromafile
andzoomitinandout.
public partial class Zoomer : UserControl {
Bitmap photo = new Bitmap(”c:\Graphics\fluffy_dog.jpg”);
public Zoomer() {
InitializeComponent();
}
private void Zoomer_Paint(object sender, PaintEventArgs e) {
Graphics g = e.Graphics;
g.FillRectangle(Brushes.White, 0, 0, Width, Height);
g.DrawImage(photo, 10, 10, trackBar1.Value, trackBar2.Value);
}
private void trackBar1_Scroll(object sender, EventArgs e) {
Invalidate();
}
private void trackBar2_Scroll(object sender, EventArgs e) {
Invalidate();
}
}
First we draw a big white rectangle so it fills up the whole control, then we
draw the photo on top of it. The last two parameters determine the size of
the image being drawn—trackBar1 sets the width, trackBar2 sets the height.
Every time the user slides one of the trackbar controls, it fires off a
Scroll event. By making the event handlers call the control’s Invalidate()
method, we cause the form to repaint itself…and when it does, it draws
a new copy of the image with a different size.
This particular Bitmap constructor loads
its picture from a file. It’s got other
overloaded constructors, including one that
lets you specify a width and height—that
one creates an empty bitmap.
how the paint event works
Substitute your own file—the Bitmap constructor can
take many file formats. Even better, see if you can
use an OpenFileDialog to zoom any image you want!
you are here 4 631
controls and graphics
Behind
the Scenes
Invalidate() essentially
says that some part
of the form might be
“invalid,” so redraw that
part to make sure it’s
got the right things
showing.
The form’s Refresh() method is Invalidate() plus Update()
Forms and controls give you a shortcut. They have a Refresh() method that first
calls Invalidate() to invalidate the whole client area (the area of the form where
graphics appear), and then calls Update() to make sure that message moves to the
top of the list.
4
A closer look at how forms and
controls repaint themselves
Earlier, we said that when you start working with Graphics objects, you’re really taking
control of graphics. It’s like you tell .NET, “Hey, I know what I’m doing, I can handle the extra
responsibility.” In the case of drawing and redrawing, you may not want to redraw when a form
is minimized and maximized…or you may want to redraw more often. Once you know what’s
going on behind the scenes with your form or control, you can take control of redrawing yourself:
Invalidate() controls when to redraw, and WHAT to redraw
.NET fires the Paint event when something on a form is interfered with, covered up,
or moved offscreen, and then shown again. It calls Invalidate(), and passes the
method a Rectangle. The Rectangle tells the Invalidate() method what
part of the form needs to be redrawn…i.e., what part of the form is “dirty.” Then
.NET calls OnPaint to tell your form to fire a Paint event and repaint the dirty area.
2
Every form has a Paint event that draws the graphics on the form
Go to the event list for any form and find the event called Paint. Whenever the form has to repaint itself,
this event is fired. Every form and control uses a Paint event internally to decide when to redraw itself. But
what fires that event? It’s called by a method called OnPaint that the form or user control inherits from the
Control class. (That method follows the pattern you saw in Chapter 11, where methods that fire an event are
named “On” followed by the event name.) Go to any form and override OnPaint:
protected override void OnPaint(PaintEventArgs e) {
Console.WriteLine(“OnPaint {0} {1}”, DateTime.Now, e.ClipRectangle);
base.OnPaint(e);
}
Drag your form around—drag it halfway off the screen, minimize it, hide it behind other windows. Look closely
at the output that it writes. You’ll see that your OnPaint method fires off a Paint event any time part of it
is “dirty”—or invalid—and needs to be redrawn. And if you look closely at the ClipRectangle, you’ll see
that it’s a rectangle that describes the part of the form that needs to be repainted. That gets passed to the Paint
event’s PaintEventArgs so it can improve performance by only redrawing the portion that’s invalid.
1
Override OnPaint
on any form and
add this line.
The Update() method gives your Invalidate request top priority
You may not realize it, but your form is getting messages all the time. The same
system that tells it that it’s been covered up and calls OnPaint has all sorts of other
messages it needs to send. See for yourself: type override and scroll through all the
methods that start with “On”—every one of them is a message your form responds to.
The Update() method moves the Invalidate message to the top of the message list.
3
So when you call it
yourself, you’re telling
.NET that your whole form
or control is invalid, and
the whole thing needs to
be redrawn. You can pass
it your own clip rectangle
if you want—that’ll get
passed along to the Paint
event’s PaintEventArgs.
Do this just like you did
earlier with Dispose()

632 Chapter 13
Q: It still seems like just resizing
the graphics in a program like Paint or
PhotoShop would be better. Why can’t I
do that?
A:Youcan,ifyou’reincontrolofthe
imagesyouworkwithinyourapplications,
andifthey’llalwaysstaythesamesize.But
that’snotoftenthecase.Lotsoftimes,you’ll
getimagesfromanothersource,whetherit’s
onlineoraco-workerinthedesigngroup.Or,
youmaybepullinganimagefromaread-
onlysource,andyou’llhavetosizeitincode.
Q: But if I can resize it outside of .NET,
that’s better, right?
A:Ifyou’resureyou’llneverneedalarger
size,itcouldbe.Butifyourprogrammight
needtodisplaytheimageinmultiplesizes
duringtheprogram,you’llhavetoresizeat
somepointanyway.Plus,ifyourimageever
needstobedisplayedlargerthantheresize,
you’llendupinrealtrouble.It’smucheasier
tosizedownthanitistosizeup.
Moreoftenthannot,it’sbettertobeableto
resizeanimageprogrammatically,thantobe
limitedbyanexternalprogramorconstraints
likeread-onlyfiles.
Q:I get that CreateGraphics()
gets the Graphics object for
drawing on a form, but what was
that FromImage() call in the
ResizeImage() method about?
A:FromImage()retrievesthe
GraphicsobjectforaBitmapobject.
AndjustasCreateGraphics()
calledonaformreturnstheGraphics
objectfordrawingonthatform,
FromImage()retrievesaGraphics
objectfordrawingontheBitmapthe
methodwascalledon.
Q: So a Graphics object isn’t just
for drawing on a form?
A:Actually,aGraphicsobjectisfor
drawingon,well,anythingthatgivesyoua
Graphicsobject.TheBitmapgives
youaGraphicsobjectthatyoucanuse
todrawontoaninvisibleimagethatyoucan
uselater.Andyou’llfindGraphicsobjects
onalotmorethanforms.Dragabuttononto
aform,thengointoyourcodeandtypeits
namefollowedbyaperiod.Checkoutthe
IntelliSensewindowthatpoppedup—it’sgot
aCreateGraphics()methodthat
returnsaGraphicsobject.Anything
youdrawonitwillshowuponthebutton!
SamegoesforLabel,PictureBox,
StatusStrip…almosteverytoolbox
controlhasaGraphicsobject.
Q: Wait, I thought using was just
something I used with streams. Why am I
using using with graphics?
A:Theusingkeywordcomesin
handywithstreams,butit’ssomethingthat
youusewithanyclassthatimplements
theIDisposableinterface.When
youinstantiateaclassthatimplements
IDisposable,youshouldalwayscall
itsDispose()methodwhenyou’re
donewiththeobject.Thatwayitknows
tocleanupafteritself.Withstreams,the
Dispose()methodmakessurethatany
filethatwasopenedgetsclosed.
Graphics,Pen,andBrushobjects
arealsodisposable.Whenyoucreateany
ofthem,theytakeupsomesmallamount
ofmemoryandotherresources,andthey
don’talwaysgivethembackimmediately.
Ifyou’rejustdrawingsomethingonce,you
won’tnoticeadifference.Butmostofthe
time,yourgraphicscodewillbecalled
overandoverandoveragain—likeina
Painteventhandler,whichcouldget
calledmanytimesasecondforaparticularly
busyform.That’swhyyoushouldalways
Dispose()ofyourgraphics-related
objects.Andtheeasiestwaytomakesure
thatyoudoistouseausingline,andlet
.NETworryaboutdisposal.Anyobjectyou
createwithusingwillautomaticallyhave
itsDispose()methodcalledattheend
oftheblockfollowingtheusingstatement.
Thatwillguaranteethatyourprogramwon’t
slowlytakeupmoreandmorememoryifit
runsforalongtime.
Q:If I’m creating a new control, should
I use a UserControl or should I
create a class that inherits from one of
the toolbox controls?
A:Thatdependsonwhatyouwantyour
newcontroltodo.Ifyou’rebuildingacontrol
that’sreallysimilartoonethat’salready
inthetoolbox,thenyou’llprobablyfindit
easiesttoinheritfromthatcontrol.Butmost
ofthetime,whenprogrammerscreatenew
controlsinC#,theyuseusercontrols.One
advantageofausercontrolisthatyoucan
drag toolbox controls onto it.Itworksa
lotlikeaGroupBoxoranothercontainer
control—youcandragabuttonorcheckbox
ontoyourusercontrol,andworkwiththem
justlikeyou’dworkwithcontrolsonaform.
TheIDE’sformdesignerbecomesapowerful
tooltohelpyoudesignusercontrols.
A user control can
host other controls.
The IDE’s form
designer lets you
drag controls out of
the toolbox and onto
your new user control.
what’s with the flickering?

you are here 4 633
controls and graphics
Even without resizing, it takes time
to draw an image onto a form.
Suppose you’ve got every image in the simulator
resized. It still takes time to draw all those bees and
flowers and the hive. And right now, we’re drawing
right to the Graphics object on the form. So if
your eye catches the tail end of a render, you’re
going to perceive it as a little flicker.
The problem is that a lot of drawing is happening,
so there’s a good chance that some flickering will
occur, even with our resizing. And that’s why you
run into problems with some amateur computer
games, for example: the human eye catches the
end of a rendering cycle, and perceives it as a little
bit of flickering on the screen.
I noticed a whole lot of flickering in my Zoomer
control. With all this talk of taking control of
graphics, I’ll bet there’s something we can do
about that! But why does it happen?
How could you get rid of this flicker? If drawing lots
of images onto the form causes flickering, and you
have to draw lots of images, how do you think you
might be able to avoid all the flickering?
634 Chapter 13
Double buffering makes animation look a lot smoother
Go back to your image zoomer and fiddle with the trackbars. Notice how there’s a
whole lot of flickering when you move the bars? That’s because the Paint event
handler first has to draw the white rectangle and then draw the image every time the
trackbar moves a tiny little bit. When your eyes see alternating white rectangles and
images many times a second, they interpret that as a flicker. It’s irritating…and it’s
avoidable using a technique called double buffering. That means drawing each
frame or cell of animation to an invisible bitmap (a “buffer”), and only displaying the
new frame once it’s been drawn entirely. Here’s how it would work with a Bitmap:
G
r
a
p
h
i
c
s
o
b
j
e
c
t
using (graphics g =
Graphics.FromImage(bitmap)) {
DrawOneFrame(g); }
By drawing each frame to
an invisible bitmap, the users
won’t see the flicker any more.
They’ll only see the finished
frame when we copy it from
the bitmap back to the form.
To do double buffering, we can add a Bitmap object to the program to act as a buffer.
Every time our form or control needs to be repainted, instead of drawing the graphics
directly on the form, we draw on the buffer instead.
2
Now that the frame is completely drawn out to the invisible Bitmap object, we can
use DrawImageUnscaled() to copy the object back to the form’s Graphics. It
all gets copied at once, and that eliminates the flicker.
3
R
e
n
d
e
r
e
r
o
b
j
e
c
t
S
y
s
t
e
m
.
W
i
n
d
o
w
s
.
F
o
r
m
s
.
F
o
r
m
R
e
n
d
e
r
e
r
o
b
j
e
c
t
R
e
n
d
e
r
e
r
o
b
j
e
c
t
S
y
s
t
e
m
.
W
i
n
d
o
w
s
.
F
o
r
m
s
.
F
o
r
m
Here’s a typical program that draws some graphics on a form using its Graphics object.
1
The users saw a lot of
flickering because each frame
was drawn in pieces.
using (graphics g =
Form.CreateGraphics()) {
DrawOneFrame(g); }
using (graphics g =
Form.CreateGraphics()) {
g.DrawImageUnscaled(bitmap, 0, 0); }
G
r
a
p
h
i
c
s
o
b
j
e
c
t
make your animation smoother
you are here 4 635
controls and graphics
Double buffering is built into forms and controls
You can do double buffering yourself using a Bitmap, but C# and .NET make it
even easier with built-in support for double buffering. All you need to do is set its
DoubleBuffered property to true. Try it out on your Zoomer user control—go
to its Properties window, set DoubleBuffered to true, and your control will stop
flickering! Now go back to your BeeControl and do the same. That won’t fix all
of the graphics problems—we’ll do that in a minute—but it will make a difference.
Now you’re ready to fix the graphics problems in the simulator!
When you use
the Paint event
for all your
graphics, you
can turn on
double buffered
painting simply
by changing one
property.
Overhaul the beehive simulator
In the next exercise, you’ll take your beehive simulator and completely overhaul
it. You’ll probably want to create a whole new project and use “Add >> Existing
Item…” to add the current files to it so you have a backup of your current
simulator. (Don’t forget to change their namespace to match your new project.)
Here’s what you’re going to do:
You’ll start by removing the BeeControl user control
There won’t be any controls on the hive and field at all. No BeeControls, no PictureBoxes,
nothing. The bees, flowers, and hive pictures will all be drawn using GDI+ graphics. So right-
click on BeeControl.cs in the Solution Explorer and click Delete—they’ll be removed from
the project and permanently deleted.
1
You’ll need a timer to handle the bee wing flapping
The bees flap their wings much more slowly than the simulator’s frame rate, so you’ll need a
second, slower timer. This shouldn’t be too surprising, since the BeeControl had its own timer
to do the same thing.
2
The big step: overhaul the renderer
You’ll need to throw out the current renderer entirely, because it does everything with controls.
You won’t need those lookup dictionaries, because there won’t be any PictureBoxes or
BeeControls to look up. Instead, it’ll have two important methods: DrawHive(g) will draw
a Hive form on a graphics object, and DrawField(g) will draw a Field form.
3
Last of all, you’ll hook up the new renderer
The Hive and Field forms will need Paint event handlers. Each of them will call the Renderer
object’s DrawField(g) or DrawHive(g) methods. The two timers—one for telling the simulator
to draw the next frame, and the other to flap the bees’ wings—will call the two forms’ Invalidate()
methods to repaint themselves. When they do, their Paint event handlers will render the frame.
4
Let’s get started!

636 Chapter 13
Change the main form’s RunFrame() method
You’ll need to remove the call to Renderer.Render() and add two Invalidate()
statements.
public void RunFrame(object sender, EventArgs e) {
framesRun++;
world.Go(random);
end = DateTime.Now;
TimeSpan frameDuration = end - start;
start = end;
UpdateStats(frameDuration);
hiveForm.Invalidate();
fieldForm.Invalidate();
}
1
It’stimetogetridofthegraphicsglitchesinthebeehivesimulator.Usegraphicsanddouble
bufferingtomakethesimulatorlookpolished.
Add a second timer to the main form to make the bees’ wings flap
Drag a new timer onto the main form and set its Interval to 150ms and Enabled to
true. Then double-click on it and add this event handler:
private void timer2_Tick(object sender, EventArgs e) {
renderer.AnimateBees();
}
Then add this AnimateBees() method to the renderer to make the bees’ wings flap:
private int cell = 0;
private int frame = 0;
public void AnimateBees() {
frame++;
if (frame >= 6)
frame = 0;
switch (frame) {
case 0: cell = 0; break;
case 1: cell = 1; break;
case 2: cell = 2; break;
case 3: cell = 3; break;
case 4: cell = 2; break;
case 5: cell = 1; break;
default: cell = 0; break;
}
hiveForm.Invalidate();
fieldForm.Invalidate();
}
2
The whole idea here is to set a field called
Cell that you can use when you’re drawing
the bees in the renderer. Make sure you’re
always drawing BeeAnimationLarge[Cell] in
the hive form and BeeAnimationSmall[Cell] in
the field form. The timer will constantly call
the AnimateBees() method, which will cause
the cell field to keep changing, which will
cause your bees to flap their wings.
As long as you keep the world up to date and both forms
have a reference to the renderer object, all you need
to do to animate them is call their Invalidate() methods.
Their Paint event handlers will take care of the rest.
You’ll need to remove the call to renderer.Render(),
since that method will go away.
rebuild the renderer
If your bees are flying to the wrong places,
make sure your locations are correct Use the
MouseClick event trick from earlier in the
chapter to find the right coordinates.
you are here 4 637
controls and graphics
Set up the hive and field forms for double-buffered animation
Remove the code from the hive form’s constructor that sets the background image. Then remove all controls
from both forms and set their DoubleBuffered properties to true. Finally, add a Paint event
handler to each of them. Here’s the handler for the hive form—the field form’s Paint event handler is
identical, except that it calls Renderer.PaintField() instead of Renderer.PaintHive():
private void HiveForm_Paint(object sender, PaintEventArgs e) {
Renderer.PaintHive(e.Graphics);
}
4
The hive form and field form both need a public Renderer property
Add a public Renderer property to the hive form and the field form:
public Renderer Renderer { get; set; }
To make this work, you’ll need to change the declaration of your Renderer to add the public
modifier: public class Renderer. You’ll also need to do the same for the World, Hive, Bee, and
Flower classes and the BeeState enum—add the public access modifier to each of their declarations.
(See Leftover #2 in the Appendix to understand why!)
There are two places where you create a new Renderer(): in the open button (underneath a call to
renderer.Reset() and in the ResetSimulator() method. Remove all calls to renderer.
Reset(). Then update your Renderer’s constructor to set each form’s Renderer property:
hiveForm.Renderer = this;
fieldForm.Renderer = this;
3
Overhaul the renderer by removing control-based code and adding graphics
Here’s what you need to do to fix the renderer:
≥Remove the two dictionaries, since there aren’t any more controls. And while you’re at it, you don’t
need the BeeControl anymore, or the Render(), DrawBees(), or DrawFlowers() methods.
≥Add some Bitmap fields called HiveInside, HiveOutside, and Flower to store the images.
Then create two Bitmap[] arrays called BeeAnimationLarge and BeeAnimationSmall.
Each of them will hold four bee pictures—the large ones are 40×40 and the small are 20x20. Create
a method called InitializeImages() to resize the resources and store them in these fields, and
call it from the Renderer class constructor.
≥Add the PaintHive() method that takes a Graphics object as a parameter and paints the hive
form onto it. First draw a sky blue rectangle, then use DrawImageUnscaled() to draw the inside
hive picture, then use DrawImageUnscaled() to draw each bee that is inside the hive.
≥Finally, add the PaintField() method. It should draw a sky blue rectangle on the top half of
the form, and a green rectangle on the bottom half. You’ll find two form properties helpful for this:
ClientSize and ClientRectangle tell you how big the drawing area is, so you can find
half of its height using ClientSize.Height / 2. Then use FillEllipse() to draw a
yellow sun in the sky, DrawLine() to draw a thick line for a branch the hive can hang from, and
DrawImageUnscaled() to draw the outside hive picture. Then draw each flower onto the form.
Finally, draw each bee (using the small bee pictures)—draw them last so they’re in front of the flowers.
≥When you’re drawing the bees, remember that AnimateBees() sets the cell field.
5
Make sure you turn on double buffering,
or your forms will flicker!
All the Reset() method did was remove the controls from the
forms, and there won’t be any controls to remove.
Add this to both forms.
Don’t
forget to
add these
access
modifiers!

638 Chapter 13
using System.Drawing;
public class Renderer {
private World world;
private HiveForm hiveForm;
private FieldForm fieldForm;
public Renderer(World TheWorld, HiveForm hiveForm, FieldForm fieldForm) {
this.world = TheWorld;
this.hiveForm = hiveForm;
this.fieldForm = fieldForm;
fieldForm.Renderer = this;
hiveForm.Renderer = this;
InitializeImages();
}
public static Bitmap ResizeImage(Image ImageToResize, int Width, int Height) {
Bitmap bitmap = new Bitmap(Width, Height);
using (Graphics graphics = Graphics.FromImage(bitmap)) {
graphics.DrawImage(ImageToResize, 0, 0, Width, Height);
}
return bitmap;
}
Bitmap HiveInside;
Bitmap HiveOutside;
Bitmap Flower;
Bitmap[] BeeAnimationSmall;
Bitmap[] BeeAnimationLarge;
private void InitializeImages() {
HiveOutside = ResizeImage(Properties.Resources.Hive__outside_, 85, 100);
Flower = ResizeImage(Properties.Resources.Flower, 75, 75);
HiveInside = ResizeImage(Properties.Resources.Hive__inside_,
hiveForm.ClientRectangle.Width, hiveForm.ClientRectangle.Height);
BeeAnimationLarge = new Bitmap[4];
BeeAnimationLarge[0] = ResizeImage(Properties.Resources.Bee_animation_1, 40, 40);
BeeAnimationLarge[1] = ResizeImage(Properties.Resources.Bee_animation_2, 40, 40);
BeeAnimationLarge[2] = ResizeImage(Properties.Resources.Bee_animation_3, 40, 40);
BeeAnimationLarge[3] = ResizeImage(Properties.Resources.Bee_animation_4, 40, 40);
BeeAnimationSmall = new Bitmap[4];
BeeAnimationSmall[0] = ResizeImage(Properties.Resources.Bee_animation_1, 20, 20);
BeeAnimationSmall[1] = ResizeImage(Properties.Resources.Bee_animation_2, 20, 20);
BeeAnimationSmall[2] = ResizeImage(Properties.Resources.Bee_animation_3, 20, 20);
BeeAnimationSmall[3] = ResizeImage(Properties.Resources.Bee_animation_4, 20, 20);
}
It’stimetogetridofthegraphicsglitchesinthebeehivesimulator.Usegraphicsanddouble
bufferingtomakethesimulatorlookpolished.
Here’s the complete Renderer class, including the
AnimateBees() method that we gave you. Make
sure you make all the modifications to the three
forms—especially the Paint event handlers in
the hive and field forms. Those event handlers
call the renderer’s PaintHive() and PaintField()
methods, which do all of the animation.
The InitializeImages() method resizes all of
the image resources and stores them in Bitmap
fields inside the Renderer object. That way the
PaintHive() and PaintForm() methods can draw
the images unscaled using the forms’ Graphics
objects’ DrawImageUnscaled() methods.
exercise solution
* Don’t forget to change the class declaration in Renderer.cs from
class Renderer to public class Renderer, and then do the same for
World, Hive, Flower, and Bee; otherwise, you’ll get a build error about
field and type accessibility. Flip to Leftover #2 in the Appendix to
learn about why you need to do this.
you are here 4 639
controls and graphics
public void PaintHive(Graphics g) {
g.FillRectangle(Brushes.SkyBlue, hiveForm.ClientRectangle);
g.DrawImageUnscaled(HiveInside, 0, 0);
foreach (Bee bee in world.Bees) {
if (bee.InsideHive)
g.DrawImageUnscaled(BeeAnimationLarge[cell],
bee.Location.X, bee.Location.Y);
}
}
public void PaintField(Graphics g) {
using (Pen brownPen = new Pen(Color.Brown, 6.0F)) {
g.FillRectangle(Brushes.SkyBlue, 0, 0,
fieldForm.ClientSize.Width, fieldForm.ClientSize.Height / 2);
g.FillEllipse(Brushes.Yellow, new RectangleF(50, 15, 70, 70));
g.FillRectangle(Brushes.Green, 0, fieldForm.ClientSize.Height / 2,
fieldForm.ClientSize.Width, fieldForm.ClientSize.Height / 2);
g.DrawLine(brownPen, new Point(593, 0), new Point(593, 30));
g.DrawImageUnscaled(HiveOutside, 550, 20);
foreach (Flower flower in world.Flowers) {
g.DrawImageUnscaled(Flower, flower.Location.X, flower.Location.Y);
}
foreach (Bee bee in world.Bees) {
if (!bee.InsideHive)
g.DrawImageUnscaled(BeeAnimationSmall[cell],
bee.Location.X, bee.Location.Y);
}
}
}
private int cell = 0;
private int frame = 0;
public void AnimateBees() {
frame++;
if (frame >= 6)
frame = 0;
switch (frame) {
case 0: cell = 0; break;
case 1: cell = 1; break;
case 2: cell = 2; break;
case 3: cell = 3; break;
case 4: cell = 2; break;
case 5: cell = 1; break;
default: cell = 0; break;
}
hiveForm.Invalidate();
fieldForm.Invalidate();
}
}
The PaintField() method looks at the bees and
flowers in the world and draws a field using
their locations. First it draws the sky and the
ground, then it draws the sun, and then the
beehive. After that, it draws the flowers and the
bees. It’s important that everything is drawn in
the right order—if it were to draw the flowers
before the bees, then the bees would look like
they were flying behind the flowers.
Here’s the same AnimateBees() method from the
exercise. It cycles through the animations using the
Frame field—first it shows cell 0, then cell 1, then
2, then 3, and then back to 2, then 1 again. That
way the wing flapping animation is smooth.
A form’s ClientSize property is a Rectangle
that tells you how big its drawing area is.
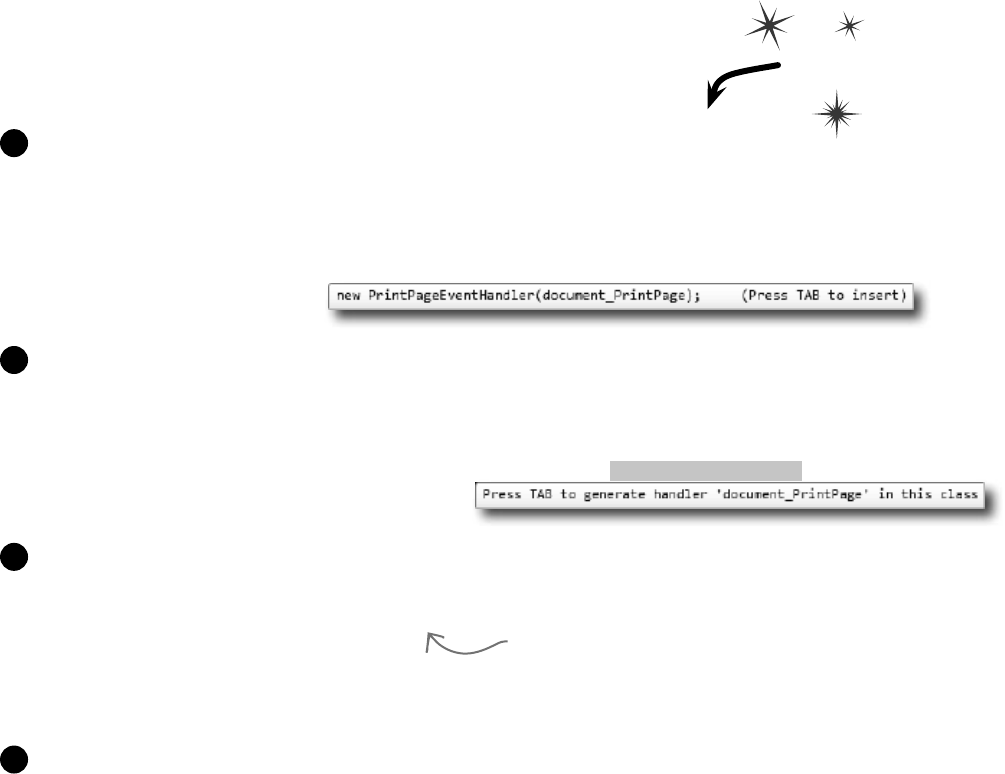
640 Chapter 13
Use a Graphics object and an event handler for printing
The Graphics methods you’ve been using to draw on your forms are the same
ones you use to print. .NET’s printing objects in System.Drawing.Printing
make it really easy to add printing and print preview to your applications. All
you need to do is create a PrintDocument object. It’s got an event called
PrintPage, which you can use exactly like you use a timer’s Tick event. Then call
the PrintDocument object’s Print() method, and it prints the document. And
remember, the IDE makes it especially easy to add the event handler. Here’s how:
Start a new Windows application and add a button to the form. Go to the form code
and add a using System.Drawing.Printing; line to the top. Double-click on the button
and add the event handler. Watch what happens as soon as you type +=:
private void button1_Click(object sender, EventArgs e) {
PrintDocument document = new PrintDocument();
document.PrintPage +=
1
Press Tab and the IDE automatically fills in the rest of the line. This is just like how you added
event handlers in Chapter 11:
private void button1_Click(object sender, EventArgs e) {
PrintDocument document = new PrintDocument();
document.PrintPage += new PrintPageEventHandler(document_PrintPage);
2
As soon as you press Tab, the IDE generates an event handler method and adds it to the form.
void document_PrintPage(object sender, PrintPageEventArgs e) {
throw new NotImplementedException();
}
The PrintPageEventArgs parameter e has a Graphics property. Just replace the throw
statement with code that calls the e.Graphics object’s drawing methods.
3
Now finish off the button1_Click event handler by calling document.Print(). When that
method is called, the PrintDocument object creates a Graphics object and then fires off a
PrintPage event with the Graphics object as a parameter. Anything that the event handler draws
onto the Graphics object will get sent to the printer.
private void button1_Click(object sender, EventArgs e) {
PrintDocument document = new PrintDocument();
document.PrintPage += new PrintPageEventHandler(document_PrintPage);
document.Print();
}
4
Now you can put ANY graphics code here—just
replace the throw line and use e.Graphics for all of
the drawing. We’ll show you how in a minute….
Print this
printing uses graphics too
you are here 4 641
controls and graphics
PrintDocument works with the print
dialog and print preview window objects
Adding a print preview window or a print dialog box is a lot like adding an open or save
dialog box. All you need to do is create a PrintDialog or PrintPreviewDialog
object, set its Document property to your Document object, and then call the dialog’s
Show() method. The dialog will take care of sending the document to the printer—no
need to call its Print() method. So let’s add this to the button you created in Step 1:
Use e.HasMorePages to print multipage documents
If you need to print more than one page, all you need to do is have your
PrintPage event handler set e.HasMorePages to true. That tells
the Document that you’ve got another page to print. It’ll call the event
handler over and over again, once per page, as long as the event handler
keeps setting e.HasMorePages to true. So modify your Document’s
event handler to print two pages:
private void button1_Click(object sender, EventArgs e) {
PrintDocument document = new PrintDocument();
document.PrintPage += new PrintPageEventHandler(document_PrintPage);
PrintPreviewDialog preview = new PrintPreviewDialog();
preview.Document = document;
preview.ShowDialog(this);
}
void document_PrintPage(object sender,
PrintPageEventArgs e) {
DrawBee(e.Graphics, new Rectangle(0, 0, 300, 300));
}
Once you’ve got a
PrintDocument and an
event handler to print
the page, you can pop up
a print preview window
just by creating a new
PrintPreviewDialog object.
bool firstPage = true;
void document_PrintPage(object sender, PrintPageEventArgs e) {
DrawBee(e.Graphics, new Rectangle(0, 0, 300, 300));
using (Font font = new Font(“Arial”, 36, FontStyle.Bold)) {
if (firstPage) {
e.Graphics.DrawString(“First page”, Font, Brushes.Black, 0, 0);
e.HasMorePages = true;
firstPage = false;
} else {
e.Graphics.DrawString(“Second page”, Font, Brushes.Black, 0, 0);
firstPage = true;
}
}
}
If you set e.HasMorePages to true, the Document object will call
the event handler again to print the next page.
5
6
Now run your program again, and make sure it’s
displaying two pages in the print preview.
We’ll reuse our DrawBee() method from a few pages ago.
642 Chapter 13
private int PrintTableRow(Graphics printGraphics, int tableX,
int tableWidth, int firstColumnX, int secondColumnX,
int tableY, string firstColumn, string secondColumn) {
Font arial12 = new Font(“Arial”, 12);
Size stringSize = Size.Ceiling(printGraphics.MeasureString(firstColumn, arial12));
tableY += 2;
printGraphics.DrawString(firstColumn, arial12, Brushes.Black,
firstColumnX, tableY);
printGraphics.DrawString(secondColumn, arial12, Brushes.Black,
secondColumnX, tableY);
tableY += (int)stringSize.Height + 2;
printGraphics.DrawLine(Pens.Black, tableX, tableY, tableX + tableWidth, tableY);
arial12.Dispose();
return tableY;
}
private void document_PrintPage(object sender, PrintPageEventArgs e) {
Graphics g = e.Graphics;
Size stringSize;
using (Font arial24bold = new Font(“Arial”, 24, FontStyle.Bold)) {
stringSize = Size.Ceiling(
g.MeasureString(“Bee Simulator”, arial24bold));
g.FillEllipse(Brushes.Gray,
new Rectangle(e.MarginBounds.X + 2, e.MarginBounds.Y + 2,
stringSize.Width + 30, stringSize.Height + 30));
g.FillEllipse(Brushes.Black,
new Rectangle(e.MarginBounds.X, e.MarginBounds.Y,
stringSize.Width + 30, stringSize.Height + 30));
g.DrawString(“Bee Simulator”, arial24bold,
Brushes.Gray, e.MarginBounds.X + 17, e.MarginBounds.Y + 17);
g.DrawString(“Bee Simulator”, arial24bold,
Brushes.White, e.MarginBounds.X + 15, e.MarginBounds.Y + 15);
}
int tableX = e.MarginBounds.X + (int)stringSize.Width + 50;
int tableWidth = e.MarginBounds.X + e.MarginBounds.Width - tableX - 20;
int firstColumnX = tableX + 2;
int secondColumnX = tableX + (tableWidth / 2) + 5;
int tableY = e.MarginBounds.Y;
// Your job: fill in the rest of the method to make it print this
WritethecodeforthePrintbuttoninthesimulatorsothatitpopsupaprintpreviewwindow
showingthebeestatsandpicturesofthehiveandthefield.
Make the button pop up a print preview window
Add an event handler for the button’s click event that pauses the simulator, pops up the print
preview dialog, and then resumes the simulator when it’s done. (If the simulator is paused when
the button is clicked, make sure it stays paused after the preview is shown.)
1
Create the document’s PrintPage event handler
It should create a page that looks exactly like the one on the facing page. We’ll start you off:
2
This PrintTableRow() method will come in handy
You’ll find this method useful when you create the table of bee stats at the top of the page.
3
We created the oval
with text in it using the
MeasureString() method,
which returns a Size that
contains the size of a
string. We drew the oval
and text twice to give it
a shadow effect.
You’ll need
these to build
the table.
Each time you call PrintTableRow(), it adds the height of
the row it printed to tableY and returns the new value.
print the world
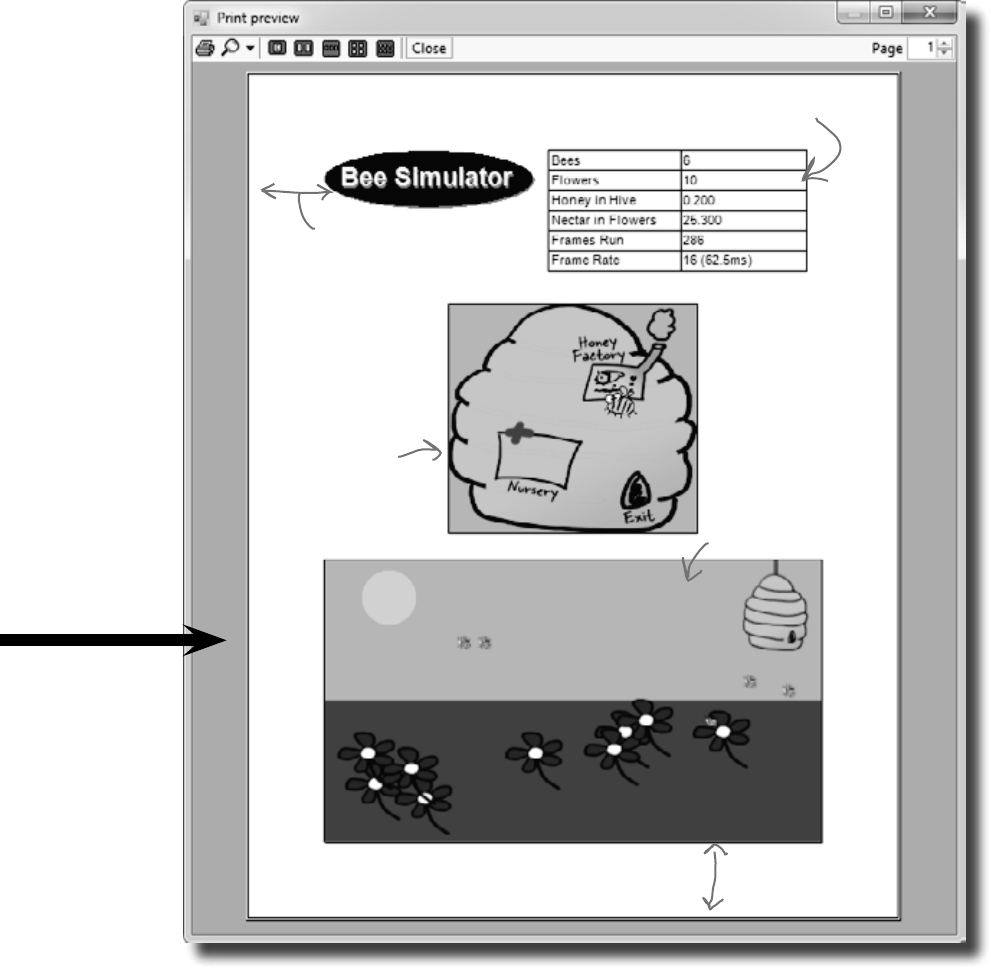
you are here 4 643
controls and graphics
We used e.MarginBounds to keep
a left margin. This ellipse starts
at e.MarginBounds.X + 2.
Use the PrintTableRow() method
to print the rows of the table.
Use the renderer
to draw the hive
form. Draw a black
rectangle around
it with a width
of 2. Use the
Width property in
e.MarginBounds to
make it half the
width of the page.
Then use the
renderer to do the
same for the field
form—make it the
full page width using
the X and Y fields
in e.MarginBounds.
See if you can give
them the same
proportions as the
two forms.
Once you figure out how tall to make the hive
picture, align it to the bottom of the page.
Here’s a hint: To find the height of each form, find the ratio of its height divided by its width and
multiply that by the final width. You can locate the top of the field form by subtracting its height
from the bottom margin of the page: (e.MarginBounds.Y + e.MarginBounds.Height - fieldHeight).
Take a close look at the notes we wrote on the printout. This is a little complex—take your time!
644 Chapter 13
using System.Drawing.Printing;
private void document_PrintPage(object sender, PrintPageEventArgs e) {
Graphics g = e.Graphics;
Size stringSize;
using (Font arial24bold = new Font(“Arial”, 24, FontStyle.Bold)) {
stringSize = Size.Ceiling(
g.MeasureString(“Bee Simulator”, arial24bold));
g.FillEllipse(Brushes.Gray,
new Rectangle(e.MarginBounds.X + 2, e.MarginBounds.Y + 2,
stringSize.Width + 30, stringSize.Height + 30));
g.FillEllipse(Brushes.Black,
new Rectangle(e.MarginBounds.X, e.MarginBounds.Y,
stringSize.Width + 30, stringSize.Height + 30));
g.DrawString(“Bee Simulator”, arial24bold,
Brushes.Gray, e.MarginBounds.X + 17, e.MarginBounds.Y + 17);
g.DrawString(“Bee Simulator”, arial24bold,
Brushes.White, e.MarginBounds.X + 15, e.MarginBounds.Y + 15);
}
int tableX = e.MarginBounds.X + (int)stringSize.Width + 50;
int tableWidth = e.MarginBounds.X + e.MarginBounds.Width - tableX - 20;
int firstColumnX = tableX + 2;
int secondColumnX = tableX + (tableWidth / 2) + 5;
int tableY = e.MarginBounds.Y;
tableY = PrintTableRow(g, tableX, tableWidth, firstColumnX,
secondColumnX, tableY, “Bees”, Bees.Text);
tableY = PrintTableRow(g, tableX, tableWidth, firstColumnX,
secondColumnX, tableY, “Flowers”, Flowers.Text);
tableY = PrintTableRow(g, tableX, tableWidth, firstColumnX,
secondColumnX, tableY, “Honey in Hive”, HoneyInHive.Text);
tableY = PrintTableRow(g, tableX, tableWidth, firstColumnX,
secondColumnX, tableY, “Nectar in Flowers”, NectarInFlowers.Text);
tableY = PrintTableRow(g, tableX, tableWidth, firstColumnX,
secondColumnX, tableY, “Frames Run”, FramesRun.Text);
tableY = PrintTableRow(g, tableX, tableWidth, firstColumnX,
secondColumnX, tableY, “Frame Rate”, FrameRate.Text);
g.DrawRectangle(Pens.Black, tableX, e.MarginBounds.Y,
tableWidth, tableY - e.MarginBounds.Y);
g.DrawLine(Pens.Black, secondColumnX, e.MarginBounds.Y,
secondColumnX, tableY);
We gave you this
part already. It
draws the oval
header, and
sets up variables
that you’ll use to
draw the table
of bee stats.
Did you figure out how the
PrintTableRow() method works?
All you need to do is call it
once per row, and it prints
whatever text you want in
the two columns. The trick is
that it returns the new tableY
value for the next row.
Don’t forget to draw
the rectangle around the
table and the line between
the columns.
WritethecodeforthePrintbuttoninthesimulatorsothatitpopsupaprintpreview
windowshowingthebeestatsandpicturesofthehiveandthefield.
Here’s the event handler for the Document’s
PrintPage event. It goes in the form.
exercise solution
you are here 4 645
controls and graphics
using (Pen blackPen = new Pen(Brushes.Black, 2))
using (Bitmap hiveBitmap = new Bitmap(hiveForm.ClientSize.Width,
hiveForm.ClientSize.Height))
using (Bitmap fieldBitmap = new Bitmap(fieldForm.ClientSize.Width,
fieldForm.ClientSize.Height))
{
using (Graphics hiveGraphics = Graphics.FromImage(hiveBitmap))
{
renderer.PaintHive(hiveGraphics);
}
int hiveWidth = e.MarginBounds.Width / 2;
float ratio = (float)hiveBitmap.Height / (float)hiveBitmap.Width;
int hiveHeight = (int)(hiveWidth * ratio);
int hiveX = e.MarginBounds.X + (e.MarginBounds.Width - hiveWidth) / 2;
int hiveY = e.MarginBounds.Height / 3;
g.DrawImage(hiveBitmap, hiveX, hiveY, hiveWidth, hiveHeight);
g.DrawRectangle(blackPen, hiveX, hiveY, hiveWidth, hiveHeight);
using (Graphics fieldGraphics = Graphics.FromImage(fieldBitmap))
{
renderer.PaintField(fieldGraphics);
}
int fieldWidth = e.MarginBounds.Width;
ratio = (float)fieldBitmap.Height / (float)fieldBitmap.Width;
int fieldHeight = (int)(fieldWidth * ratio);
int fieldX = e.MarginBounds.X;
int fieldY = e.MarginBounds.Y + e.MarginBounds.Height - fieldHeight;
g.DrawImage(fieldBitmap, fieldX, fieldY, fieldWidth, fieldHeight);
g.DrawRectangle(blackPen, fieldX, fieldY, fieldWidth, fieldHeight);
}
}
private void printToolStripButton1_Click(object sender, EventArgs e) {
bool stoppedTimer = false;
if (timer1.Enabled) {
timer1.Stop();
stoppedTimer = true;
}
PrintPreviewDialog preview = new PrintPreviewDialog();
PrintDocument document = new PrintDocument();
preview.Document = document;
document.PrintPage += new PrintPageEventHandler(document_PrintPage);
preview.ShowDialog(this);
if (stoppedTimer)
timer1.Start();
}
You’ll need a black pen that’s 2 pixels wide to
draw the lines around the screenshots.
The PaintHive() method needs a
Graphics object to draw on, so this
code creates an empty Bitmap object
and passes it to PaintHive().
e.MarginBounds.Width has the width of the
printable area of the page. That’s how wide
the field screenshot should be drawn.
Here’s where the height of the screenshot is
calculated using the form’s height-width ratio.
Here’s the code for the print button. It pauses the
simulator (if it’s running), creates a PrintDocument,
hooks it up to the PrintPage event handler, shows
the dialog, and then restarts the simulator.
Since the
pen and the
two bitmaps
need to be
disposed, we
put them all
in one big
using block.
The bitmaps need to
be the same size as
the form’s drawing
area, so ClientSize
comes in handy.

646 Chapter 13
There’s so much more to be done…
You’ve built a pretty neat little simulator, but why stop now?
There’s a whole lot more that you can do on your own. Here are
some ideas—see if you can implement some of them.
Did you come up with a cool modification to the simulator? Show off
your skills—upload your project’s source code to the Head First C#
forums at www.headfirstlabs.com/books/hfcsharp/.
Add a control panel
Convert the constants in the World and Hive classes to properties. Then
add a new form with a control panel that has sliders to control them.
Add enemies
Add enemies that attack the hive. The more owers there are, the more
enemies are attracted to the hive. Then add Sting Patrol bees to defend
against the enemies, and Hive Maintenance bees to defend and repair
the hive. Those bees take extra honey.
Add hive upgrades
If the hive gets enough honey, it gets bigger. A bigger hive can hold more
bees, but takes more honey and attracts more enemies. If enemies cause
too much damage, the hive gets smaller again.
Add a queen bee who lays eggs
The eggs need Baby Bee Care worker bees to take care of them. More
honey in the hive causes the queen to lay more eggs, which need more
workers to care for them, who consume more honey.
Add animation
Animate the background of the Hive form so the sun slowly travels
across the sky. Make it get dark at night, and draw stars and a moon.
Add some perspective—make the bees get smaller the further they get
from the hive in the eld of owers.
Use your imagination!
Try to think of other ways you can make the simulation more interesting
or more interactive.
A good
simulation will
have lots of
tradeoffs, and
will give the
user ways to
decide which
tradeoffs
to make to
influence the
progress of
the hive.
mini lab

CAPTAIN AMAZING
THE DEATH
OF THE OBJECT
Head First Labs
$2.98 Chapter
14

648
Captain Amazing, Objectville’s most
amazing object, pursues his arch-nemesis...

649
AND
Is this the end of Captain Amazing...?
Captain Amazing backs Swindler into a corner...
...but ends up trapped himself.
650 Chapter 14
Below is the code detailing the fight between Captain Amazing and Swindler (not to
mention his clone army). Your job is to draw out what’s going on in memory when
the FinalBattle class is instantiated.
class FinalBattle {
public CloneFactory Factory = new CloneFactory();
public List<Clone> Clones = new List<Clone>() { ... };
public SwindlersEscapePlane escapePlane;
public FinalBattle() {
Villain swindler = new Villain(this);
using (Superhero captainAmazing = new Superhero()) {
Factory.PeopleInFactory.Add(captainAmazing);
Factory.PeopleInFactory.Add(swindler);
captainAmazing.Think(“I’ll take down each clone’s reference,
one by one”);
captainAmazing.IdentifyTheClones(Clones);
captainAmazing.RemoveTheClones(Clones);
swindler.Think(“A few minutes from now, you AND my army will be garbage”);
swindler.Think(“(collected, that is!)”);
escapePlane = new SwindlersEscapePlane(swindler);
swindler.TrapCaptainAmazing(Factory);
MessageBox.Show(“The Swindler escaped”);
}
}
}
[Serializable]
class Superhero : IDisposable {
private List<Clone> clonesToRemove = new List<Clone>();
public void IdentifyTheClones(List<Clone> clones) {
foreach (Clone clone in clones)
clonesToRemove.Add(clone);
}
public void RemoveTheClones(List<Clone> clones) {
foreach (Clone clone in clonesToRemove)
clones.Remove(clone);
...
}
...
}
class Villain {
private FinalBattle finalBattle;
public Villain(FinalBattle finalBattle) {
this.finalBattle = finalBattle;
}
public void TrapCaptainAmazing(CloneFactory factory) {
factory.SelfDestruct.Tick += new EventHandler(SelfDestruct_Tick);
factory.SelfDestruct.Interval = 600;
factory.SelfDestruct.Start();
}
private void SelfDestruct_Tick(object sender, EventArgs e) {
finalBattle.Factory = null;
}
}
1
3
2
There’s more code here (including the Dispose() method
to implement IDisposable) that we aren’t showing you,
but you don’t need it to answer this.
Draw a picture of what the heap will look like exactly
one second after the FinalBattle constructor runs.
Draw what’s going on
right here, when the
SwindlersEscapePlane
object is instantiated.
We’ve gotten you started here,
with what’s going on in the
factory object.
reenacting the crime
You can assume that Clones was
set using a collection initializer.
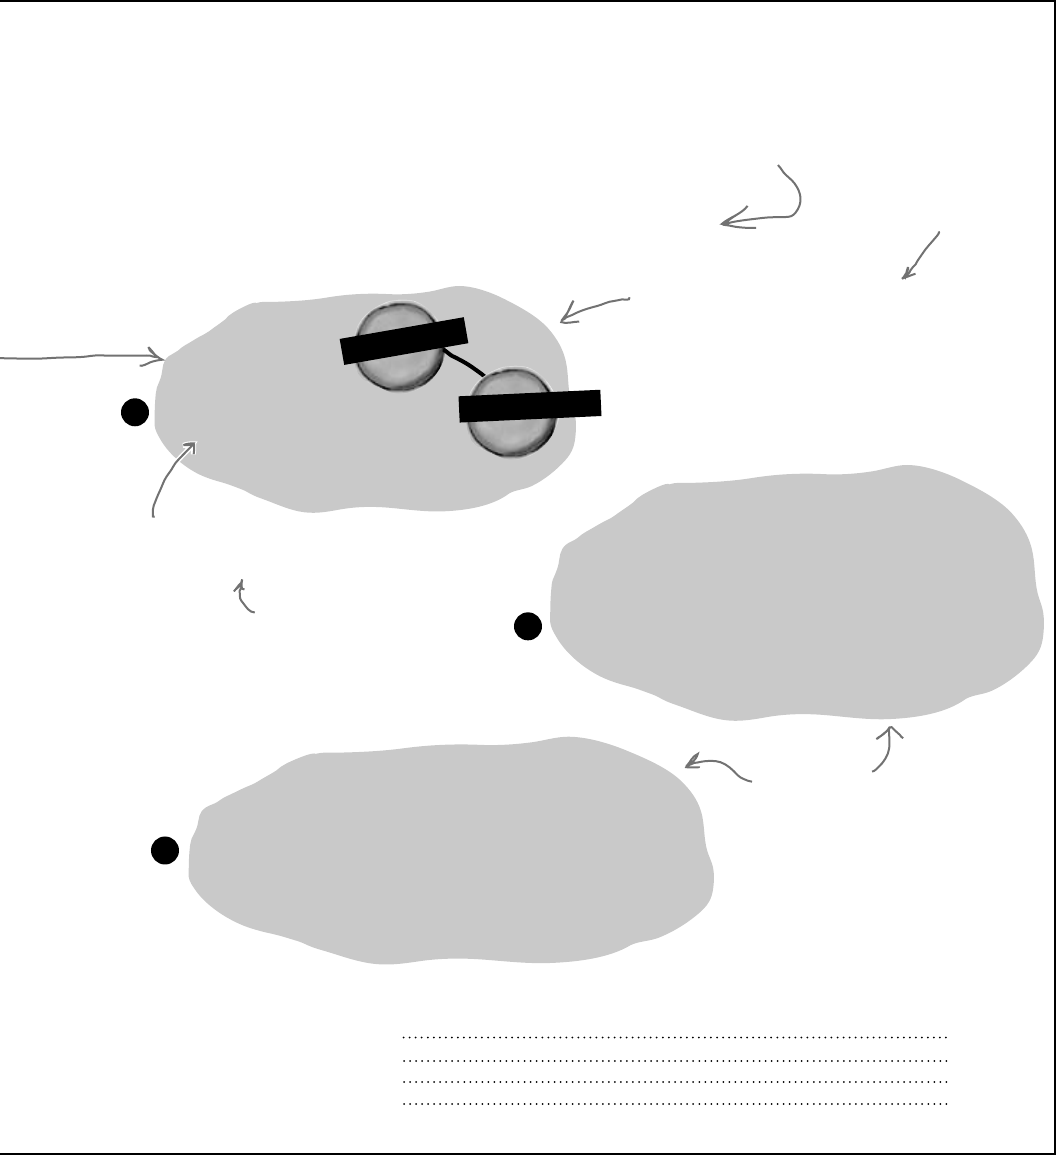
you are here 4 651
the death of an object
Based on your diagrams, where in the code did Captain Amazing die?
Be sure and annotate that on your diagram, too.
2
3
class SwindlersEscapePlane {
public Villain PilotsSeat;
public SwindlersEscapePlane(Villain escapee) {
PilotsSeat = escapee;
}
}
class CloneFactory {
public Timer SelfDestruct = new Timer();
public List<object> PeopleInFactory = new List<object>();
...
}
1
C
l
o
n
e
F
a
c
t
o
r
y
We started the first one for you. Make sure you
draw in lines showing the architecture—we drew a
line from the clone factory to the Villain object,
because the factory has references to it (via its
PeopleInFactory field).
factory
We’ve left space, as there is
more to be drawn at this stage.
Make sure you add
labels to your objects
to show the reference
variables that are
pointing to them.
Don’t worry about drawing the
Clone and List objects—just add
the objects for the Captain, the
Swindler, the clone factory, and
Swindler’s escape plane.
Your job is to draw what’s
going on in these two bits
of memory, too.
V
i
l
l
a
i
n
o
b
j
e
c
t
swindler
There’s a Clone
class that we’re not
showing you in this
code, too. You don’t
need it to answer the
questions.
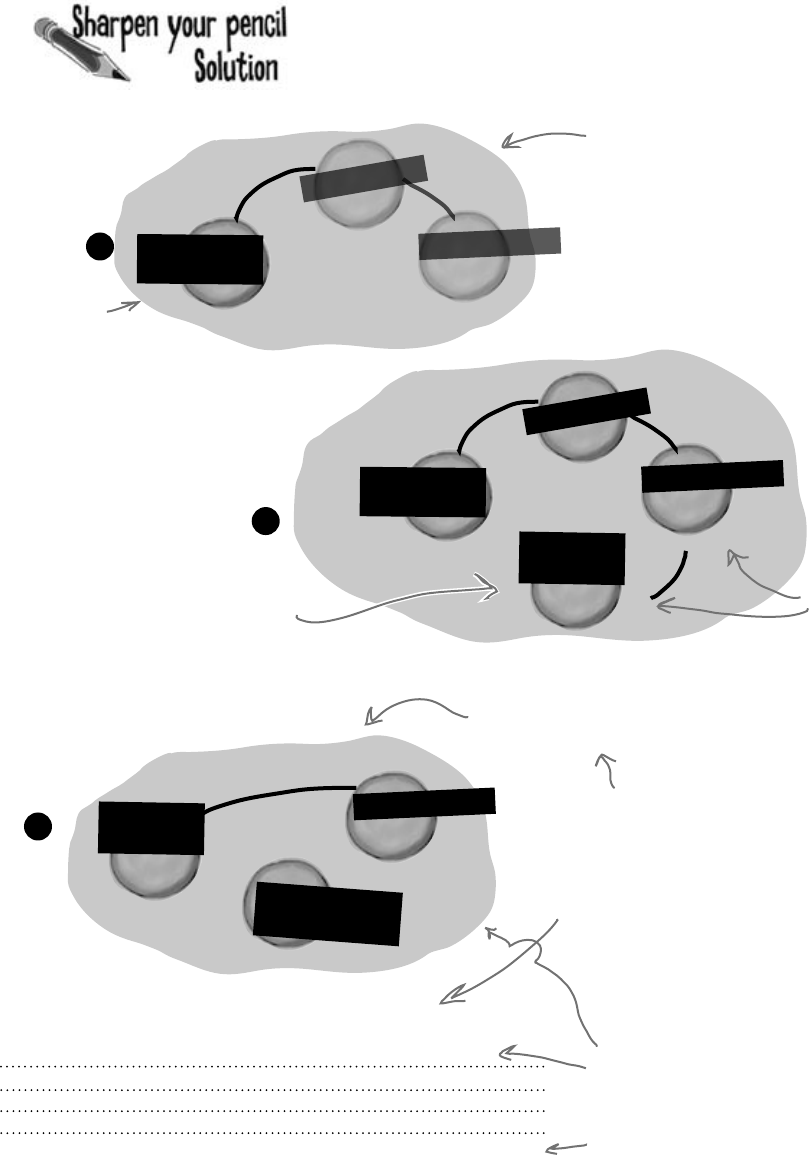
652 Chapter 14
Draw what’s happening in memory with the FinalBattle
program.
T
i
m
e
r
V
i
l
l
a
i
n
3
2
1
When the selfDestruct fires, the factory reference
variable is set to null, and eligible for garbage
collection. So it’s gone in this drawing.
The captainAmazing reference points to a
Superhero object, and the swindler reference
points to a Villain object, and the clone
factory’s PeopleInFactory list contains
references to both of them.
As long as there’s a
reference to swindler
from the escapePlane,
he won’t get
garbage-collected.
V
i
l
l
a
i
n
o
b
j
e
c
t
S
u
p
e
r
h
e
r
o
o
b
j
e
c
t
C
l
o
n
e
F
a
c
t
o
r
y
factory
captain
amazing
swindler
V
i
l
l
a
i
n
o
b
j
e
c
t
S
u
p
e
r
h
e
r
o
o
b
j
e
c
t
C
l
o
n
e
F
a
c
t
o
r
y
factory
captain
amazing
swindler
Self
Destruct
swindler
One second after the
FinalBattle constructor ran,
the hero was gone.
Here’s the
object you
should have
added to this
diagram.
The escapePlane
reference now
points to a new
instance of the
SwindlersEscapePlane
object, and its
PilotSeat field
points to the
Villain object.
Based on your diagrams, where in the code did Captain Amazing die?
Once finalBattleFactory was set to null, it was ready for garbage
collection. And it took the last reference to the Captain with it!
void SelfDestruct_Tick(object sender, EventArgs e) {
finalBattle.factory = null;
}
As soon as the factory reference was gone, it
took the CloneFactory object with it—and
that caused the List object referenced by its
PeopleInFactory field to disappear…and that
was the only thing keeping the SuperHero object
alive. Now he’ll be destroyed the next time the
garbage collector runs.
Once the Superhero instance had no
clone factory referencing it, it was
marked for garbage collection too.
hmm…i wonder what those numbers say
S
w
i
n
d
l
e
r
s
E
s
c
a
p
e
P
l
a
n
e
escape
Plane
S
w
i
n
d
l
e
r
s
E
s
c
a
p
e
P
l
a
n
e
escape
Plane
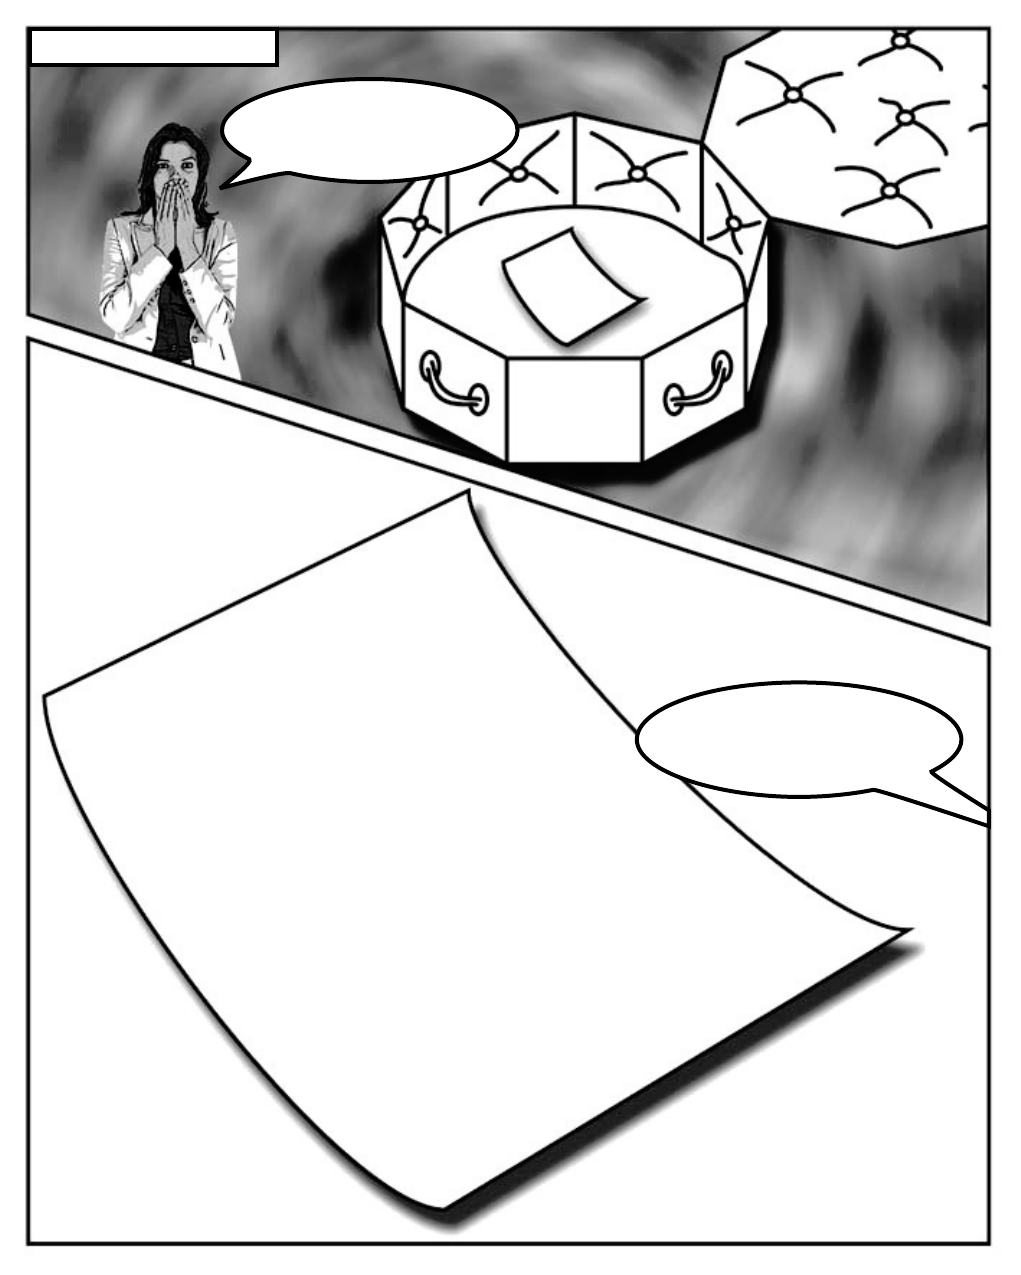
653
Later, at the funeral home
6e 61 6d 65 73 70 61 63 65 20 51 7b 0d 0a 5b 53
65 72 69 61 6c 69 7a 61 62 6c 65 5d 70 75 62 6c
69 63 20 63 6c 61 73 73 20 4d 73 67 7b 0d 0a 70
75 62 6c 69 63 20 73 74 72 69 6e 67 20 61 3b 70
75 62 6c 69 63 20 73 74 72 69 6e 67 20 62 3b 70
75 62 6c 69 63 20 73 74 72 69 6e 67 20 63 3b 70
75 62 6c 69 63 20 69 6e 74 20 69 3b 0d 0a 70 75
62 6c 69 63 20 76 6f 69 64 20 53 68 6f 77 28 29
7b 4d 65 73 73 61 67 65 42 6f 78 2e 53 68 6f 77
28 63 2e 53 75 62 73 74 72 69 6e 67 28 31 2c 32
29 2b 69 2b 22 40 22 2b 61 2b 63 2b 22 2e 22 2b
62 29 3b 7d 7d 7d 00 01 00 00 00 ff ff ff ff 01
00 00 00 00 00 00 00 0c 02 00 00 00 38 51 2c 20
56 65 72 73 69 6f 6e 3d 31 2e 30 2e 30 2e 30 2c
20 43 75 6c 74 75 72 65 3d 6e 65 75 74 72 61 6c
2c 20 50 75 62 6c 69 63 4b 65 79 54 6f 6b 65 6e
3d 6e 75 6c 6c 05 01 00 00 00 05 51 2e 4d 73 67
04 00 00 00 01 61 01 62 01 63 01 69 01 01 01 00
08 02 00 00 00 06 03 00 00 00 04 6f 62 6a 65 06
04 00 00 00 03 6e 65 74 06 05 00 00 00 07 63 74
76 69 6c 6c 65 17 00 00 00 0b
654 Chapter 14
Some of this code is for learning
purposes only, not for your real programs.
Throughout the book we’ve made reference to
how objects “eventually” get garbage-collected,
but we never really specified exactly when that
happens…just that it happens sometime after the reference to
the object disappears. We’re about to show you some code that
automatically triggers garbage collection using GC.Collect()
and pops up a MessageBox in a finalizer. These things mess
with the “guts” of the CLR. We’re doing this to teach you about
garbage collection. Never do this outside of toy programs.
[Serializable]
class Clone {
string Location;
int CloneID;
public Clone (int cloneID, string location){
this.CloneID = cloneID;
this.Location = location;
}
public void TellLocation(string location, int cloneID){
Console.WriteLine(“My Identification number is {0} and ” +
“you can find me here: {1}.”, cloneID, location);
}
public void WreakHavoc(){...}
~Clone() {
TellLocation(this.Location, this.CloneID);
Console.WriteLine (“{0} has been destroyed”, CloneID);
}
}
Sometimes you need to be sure something happens before your object
gets garbage-collected, like releasing unmanaged resources.
A special method in your object called the finalizer allows you to write
code that will always execute when your object is destroyed. Think of
it as your object’s personal finally block: it gets executed last, no
matter what.
Here’s an example of a finalizer in the Clone class:
Your last chance to DO something…
your object’s finalizer
Here’s the constructor. It looks like
the CloneID and Location fields are
populated any time a Clone gets created.
This is the finalizer.
It sends a message to
the villain telling the
ill-fated clone’s location
and ID. But it will only
run when the object is
garbage-collected.
You write a finalizer method just like
a constructor, but instead of an access
modifier, you put a ~ in front of the
class name. That tells .NET that the
code in the finalizer block should be
run right before it garbage-collects the
object.
Also, finalizers can’t have parameters,
because .NET doesn’t need to tell it
anything other than “you’re done!”
This ~ (or “tilde”) character says
that the code in this block gets run
when the object is garbage-collected.
is that your final answer?
In general, you’ll never write a finalizer for
an object that only owns managed resources.
Everything you’ve encountered so far in
this book has been managed—meaning
managed by the CLR (including any object
that ends up on the heap). But occasionally
programmers need to access an underlying
Windows resource that isn’t part of the .NET
Framework. If you find code on the Internet
that uses the [DllImport] attribute, you
might be using an unmanaged resource. And
some of those non-.NET resources might
leave your system unstable if they’re not
“cleaned up” somehow (maybe by calling a
method). And that’s what finalizers are for.
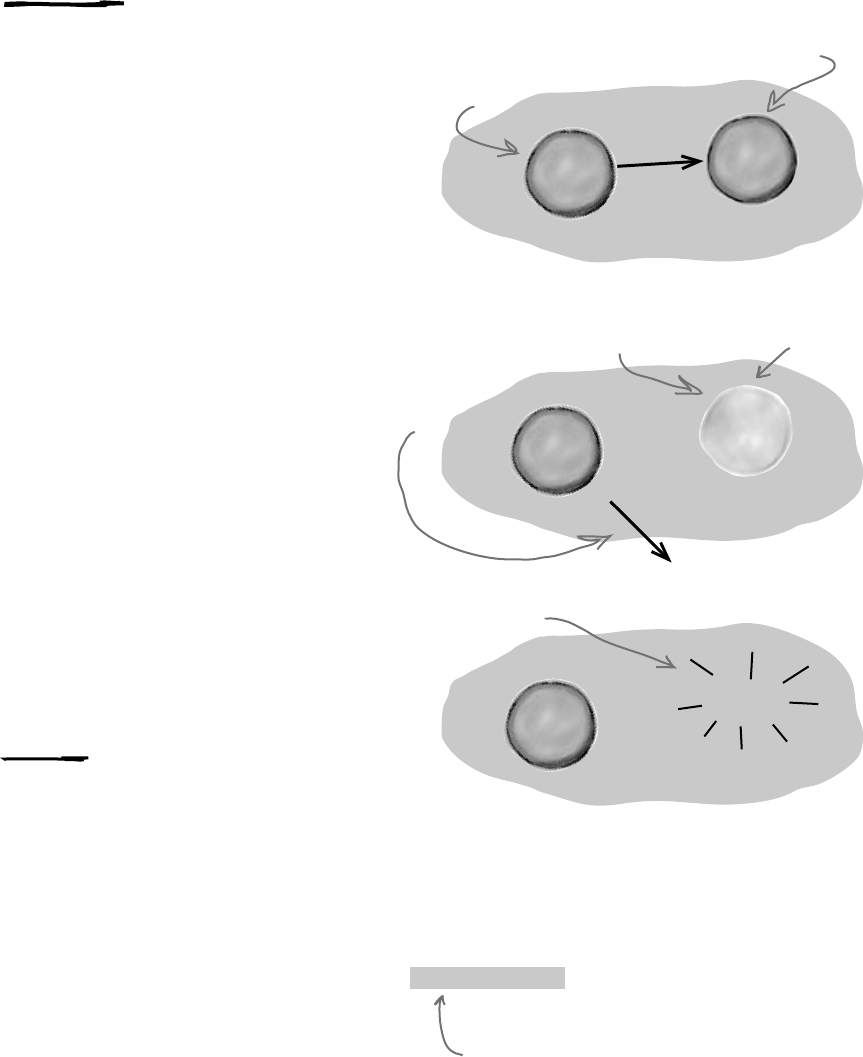
you are here 4 655
the death of an object
The finalizer for your object runs after all references
are gone, but before that object gets garbage-collected.
And garbage collection happens after all references
to your object go away. But garbage collection doesn’t
always happen right after the references are gone.
Suppose you have an object with a reference to it.
.NET sends the garbage collector to work, and it checks
out your object. But since there are references to your
object, the garbage collector ignores it and moves along.
Your object keeps living on in memory.
Then, something happens. That last object holding a
reference to your object decides to move on. Now, your
object is sitting in memory, with no references. It can’t
be accessed. It’s basically a dead object.
But here’s the thing. Garbage collection is
something that .NET controls, not your objects. So
if the garbage collector isn’t sent out again for, say, a
few seconds, or maybe even a few minutes, your object
still lives on in memory. It’s unusable, but it hasn’t been
garbage-collected. And any finalizer your object
has does not (yet) get run.
Finally, .NET sends the garbage collector out again.
Your finalizer runs…possibly several minutes after the
last reference to the object was removed or changed.
Now that it’s been finalized, your object is dead, and
the collector tosses it away.
When EXACTLY does a finalizer run?
M
y
O
b
j
e
c
t
poof!
.NET does let you suggest that garbage collection would
be a good idea. Most times, you’ll never use this
method, because garbage collection is tuned to
respond to a lot of conditions in the CLR and
calling it isn’t really a good idea. But just to see how
a finalizer works, you could call for garbage collection
on your own. If that’s what you want to do, just call
GC.Collect().
Be careful, though. That method doesn’t force .NET
to garbage-collect things immediately. It just says, “Do
garbage collection as soon as possible.”
You can SUGGEST to .NET that it’s
time to collect the garbage
public void RemoveTheClones(
List<Clone> clones) {
foreach (Clone clone in clonesToRemove)
clones.Remove(clone);
GC.Collect();
}
Here’s your object,
living in memory.
This other object
references your object.
Your object is still
on the heap…
…but now there
aren’t any
references to it.
O
t
h
e
r
O
b
j
e
c
t
O
t
h
e
r
O
b
j
e
c
t
Now this other
object changed its
reference.
Eventually the garbage
collector comes along,
and trashes your object.
The Heap
The Heap
The Heap
O
t
h
e
r
O
b
j
e
c
t
M
y
O
b
j
e
c
t
We can’t emphasize enough just how bad an idea
it is to use GC.Collect() in a program that’s not
just a toy, because it can really confuse the CLR’s
garbage collector. It’s an excellent tool for learning
about garbage collection and finalizers, so we’ll build
a toy to play with it.
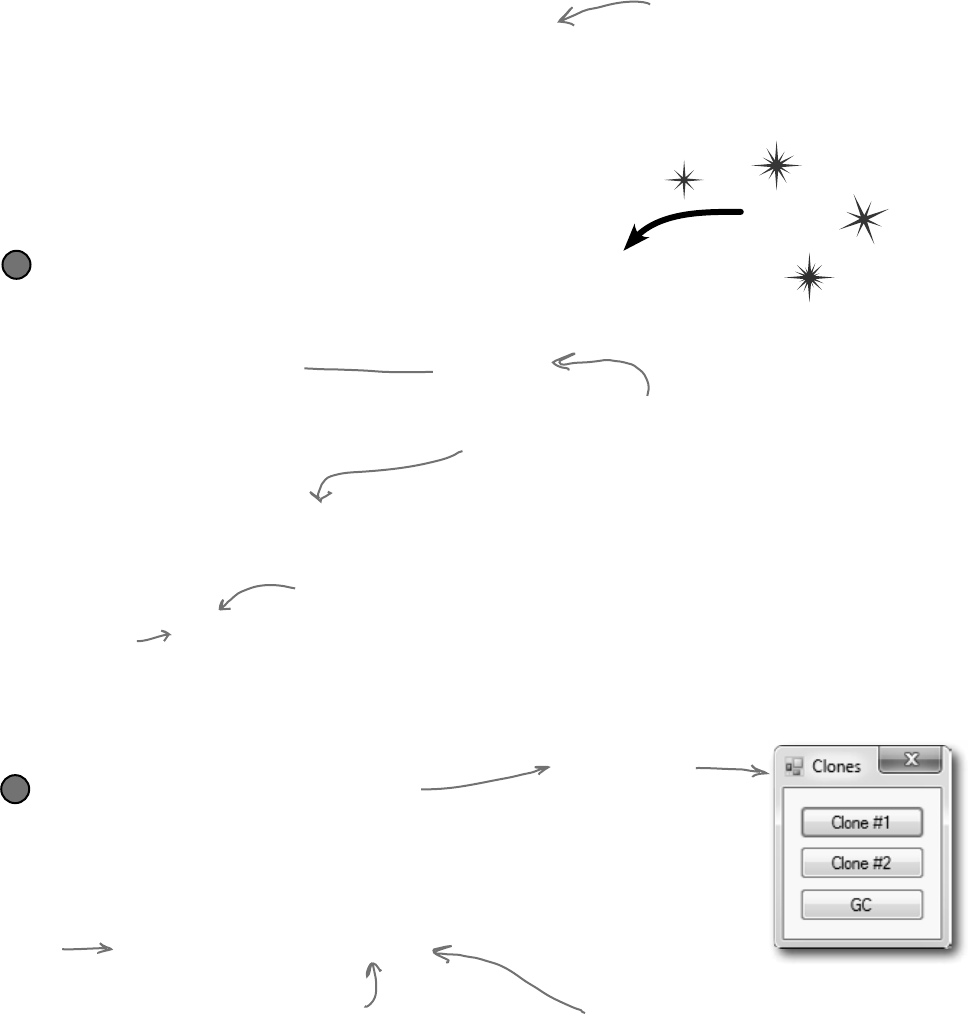
656 Chapter 14
Dispose() runs whenever an object that is created in a using statement is set
to null or loses all of its references. If you don’t use a using statement, then just
setting the reference to null won’t cause Dispose() to be called—you’ll need to
call it directly. An object’s finalizer runs at garbage collection for that particular
object. Let’s create a couple of objects, and see how these two methods differ:
Dispose() works with using,
finalizers work with garbage collection
Create a Clone class and make sure it implements IDisposable
The class should have one int automatic property called Id. It has a
constructor, a Dispose() method, and a finalizer:
1
Do this!
Create a Form with three buttons
Create one instance of Clone inside the Click handler for the first button
with a using statement. Here’s the first part of the code for the button:
2
As soon as the using block is done
and the Clone object’s Dispose()
method is called, there’s no more
reference to it and it gets marked
for garbage collection.
private void clone1_Click(object sender, EventArgs e) {
using (Clone clone1 = new Clone(1)) {
// Do nothing!
}
}
Here’s the form you
should create.
The method
creates a
new Clone
and then
immediately
kills it by
taking away
its reference.
out.
collect the garbage
class Clone : IDisposable {
public int Id { get; private set; }
public Clone(int Id) {
this.Id = Id;
}
public void Dispose() {
MessageBox.Show(“I’ve been disposed!”,
“Clone #” + Id + “ says...”);
}
~Clone() {
MessageBox.Show(“Aaargh! You got me!”,
“Clone #” + Id + “ says...”);
}
}
Here’s the finalizer. It will run when the
object gets garbage-collected.
Since the class implements
IDisposable, it has to have a
Dispose() method.
Since we declared clone1
with a using statement, its
Dispose() method gets run.
And like you saw earlier, Dispose()
works without using as well. When you
write a Dispose() method, it shouldn’t
have any side effects that cause
problems if it’s run many times.
Just a reminder: popping up
a MessageBox in a finalizer
can mess with the “guts”
of the CLR. Don’t do it
outside of a toy program
for learning about garbage
collection.
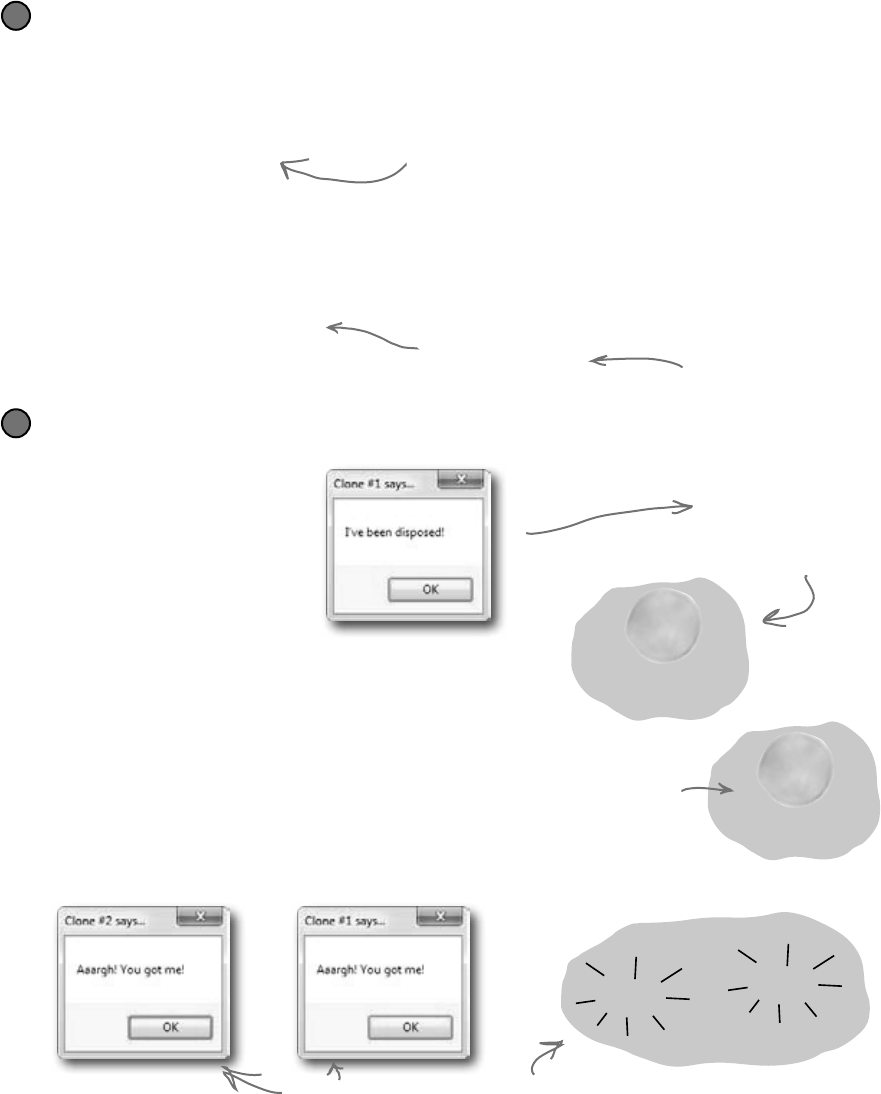
you are here 4 657
the death of an object
private void gc_Click(object sender, EventArgs e) {
GC.Collect();
}
private void clone2_Click(object sender, EventArgs e) {
Clone clone2 = new Clone(2);
clone2 = null;
}
This suggests that
garbage collection run.
Since this doesn’t use a using
statement, Dispose() won’t ever get
run, but the finalizer will.
Run the program and play with Dispose() and finalizers
Click on the first button and check out the message box: Dispose() runs first.
4
Garbage is collected…eventually. In most cases, you won’t
see the garbage collection message box, because your object
is set to null, but garbage collection hasn’t run yet.
Now click on the second button…nothing happens, right?
That’s because we didn’t use a using statement, so there’s
no Dispose() method. And until the garbage collector
runs, you won’t see the message boxes from the finalizer.
Now click the third button, to suggest garbage collection.
You should see the finalizer from both Clone1 and Clone2
fire up and display message boxes.
Even though the Clone1
object has been set to null
and its Dispose method has
run, it’s still on the heap
waiting for garbage collection.
poof!
The Heap
poof!
When GC.Collect() is run, both objects run
their finalizers and disappear.
Implement the other two buttons
Create another instance of Clone in the second button’s Click handler,
and set it to null manually:
3
For the third button, add a call to GC.Collect() to suggest
garbage collection occur.
The Heap
C
l
o
n
e
1
The Heap
C
l
o
n
e
2
Now Clone2
is on the
heap, too, but
without any
references
to it.
Play around with the program. Click the Clone #1 button, then the Clone #2 button, then the GC
button. Do it a few times. Sometimes Clone #1 is collected first, and sometimes Clone #2 is. And once in
a while, the garbage collector runs even though you didn’t ask it to using GC.Collect().
Remember, normally it’s not
a great idea to do this. But
it’s fine here, because it’s
a good way to learn about
garbage collection.
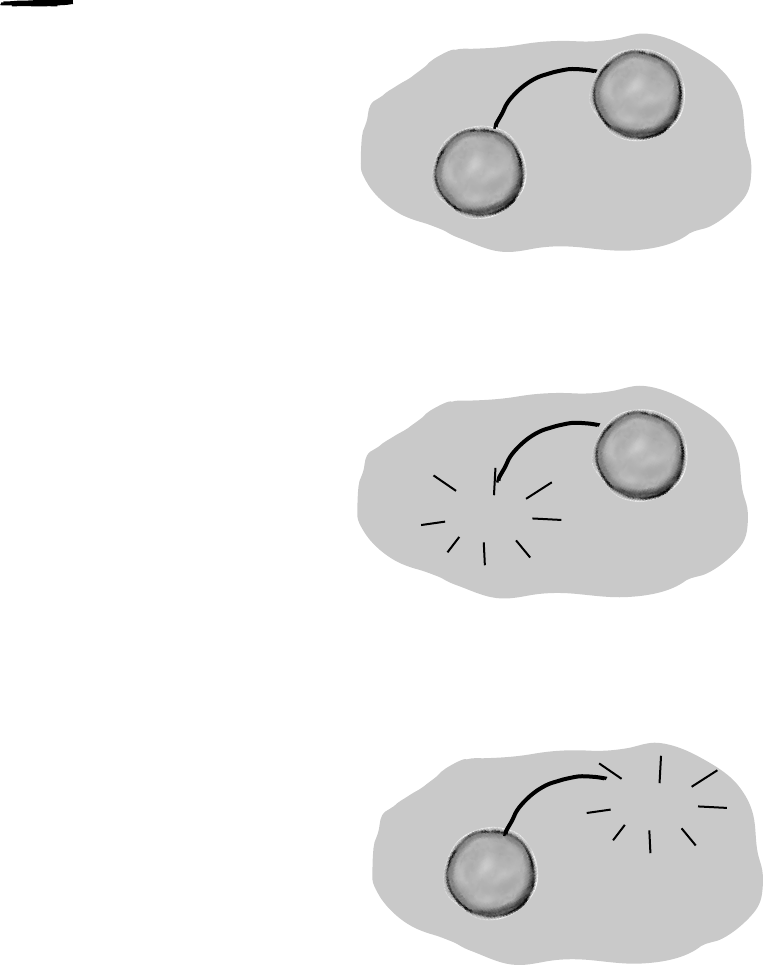
658 Chapter 14
Finalizers can’t depend on stability
When you write a finalizer, you can’t depend
on it running at any one time. Even if you call
GC.Collect()—which you should avoid, unless
you have a really good reason to do it—you’re only
suggesting that the garbage collector is run. It’s not a
guarantee that it’ll happen right away. And when it does,
you have no way of knowing what order the objects will
be collected in.
So what does that mean, in practical terms? Well, think
about what happens if you’ve got two objects that have
references to each other. If object #1 is collected first,
then object #2’s reference to it is pointing to an object
that’s no longer there. But if object #2 is collected
first, then object #1’s reference is invalid. So what that
means is that you can’t depend on references in
your object’s finalizer. Which means that it’s a really
bad idea to try to do something inside a finalizer that
depends on references being valid.
Serialization is a really good example of something that
you shouldn’t do inside a finalizer. If your object’s
got a bunch of references to other objects, serialization
depends on all of those objects still being in memory…
and all of the objects they reference, and the ones those
objects reference, and so on. So if you try to serialize
when garbage collection is happening, you could end
up missing vital parts of your program because some
objects might’ve been collected before the finalizer ran.
Luckily, C# gives us a really good solution to this:
IDisposable. Anything that could modify your core
data or that depends on other objects being in memory
needs to happen as part of a Dispose() method, not
a finalizer.
Some people like to think of a finalizers as a kind of
fail-safe for the Dispose() method. And that makes
sense—you saw with your Clone object that just
because you implement IDisposable, that doesn’t
mean the object’s Dispose() method will get called.
But you need to be careful—if your Dispose()
method depends on other objects that are on the heap,
then calling Dispose() from your finalizer can cause
trouble. The best way around this is to make sure you
always use a using statement any time you’re
creating an IDisposable object.
an unstable environment
O
b
j
e
c
t
#
1
O
b
j
e
c
t
#
1
O
b
j
e
c
t
#
2
poof!
Let’s say you’ve got
two objects that have
references to each other…
…if they’re both marked for garbage
collection at the same time, then
object #1 could disappear first…
O
b
j
e
c
t
#
2
poof!
…on the other hand, object #2 could
disappear before object #1. You’ve
got no way of knowing the order…
…and that’s why one object’s
finalizer can’t rely on any other
object still being on the heap.
you are here 4 659
the death of an object
Once you understand the difference between Dispose() and a
finalizer, it’s pretty easy to write objects that serialize themselves out
automatically when they’re disposed of.
Make an object serialize itself in its Dispose()
Make the Clone class (from page 656) serializable
Just add the Serializeable attribute on top of the class so that we can save the file
1
[Serializable]
class Clone : IDisposable
Do this!
Modify Clone’s Dispose() method to Serialize itself out to a file
Let’s use a BinaryFormatter to write Clone out to a file in Dispose():
2
using System.IO;
using System.Runtime.Serialization.Formatters.Binary;
// existing code
public void Dispose() {
string filename = @“C:\Temp\Clone.dat”;
string dirname = @“C:\Temp\”;
if (File.Exists(filename) == false) {
Directory.CreateDirectory(dirname);
}
BinaryFormatter bf = new BinaryFormatter();
using (Stream output = File.OpenWrite(filename)) {
bf.Serialize(output, this);
}
MessageBox.Show(“Must...serialize...object!”,
“Clone #” + ID + “ says...”);
}
Run the application.
You’ll see the same behavior you saw on the last few pages…but before the Clone1
object is garbage-collected, it’s serialized to a file. Look inside the file and you’ll see the
binary representation of the object.
3
You’ll need a
few more using
directives to
access the I/O
classes we’ll use.
The Clone will create the
C:\Temp directory and
serialize itself out to a
file called Clone.dat.
We hardcoded the filename—
we included them as string
literals in the code. That’s
fine for a small toy program
like this, but it’s not problem-
free. Can you think of
problems this might cause, and
how you could avoid them?
What do you think the rest of the SuperHero
object’s code looked like? We showed you part of it
on page 650. Could you write the rest now?
And is this Dispose()
method really side-effect
free? What happens if it’s
called more than once?
These are all things you
need to think about when
you implement IDisposable.
660 Chapter 14
Tonight’s talk: The Dispose() method and a nalizer spar
over who’s more valuable.
Dispose():
To be honest, I’m a little surprised I was invited here.
I thought the programming world had come to a
consensus. I mean, I’m way more valuable than you
are. Really, you’re pretty feeble. You can’t even serialize
yourself out, alter core data, anything. Pretty unstable,
aren’t you?
There’s an interface specifically because I’m so
important. In fact, I’m the only method in it!
OK, you’re right, programmers need to know they’re
going to need me and either call me directly or use a
using statement to call me. But they always know when
I’m gonna run, and they can use me to do whatever they
need to do to clean up after their object. I’m powerful,
reliable, and easy to use. I’m a triple threat. And you?
Nobody knows exactly when you’ll run or what the state
of the application will be when you finally do decide to
show up.
So there’s basically nothing you can do that I can’t do.
But you think you’re a big shot because you run when
garbage collection happens.
Finalizer:
Excuse me? That’s rich. I’m feeble…OK. Well, I didn’t
want to get into this, but since we’re already stooping
this low…at least I don’t need an interface to get started.
Without IDisposable, you’re just another useless
method.
Right, right…keep telling yourself that. And what
happens when someone forgets to use a using
statement when they instantiate their object? Then
you’re nowhere to be found.
OK, but if you need to do something at the very last
moment when an object is garbage-collected, there’s no
way to do it without me. I can free up network resources
and Windows handles and streams and anything else
that might cause a problem for the rest of the program
if you don’t clean it up. I can make sure that your
objects deal with being trashed more gracefully, and
that’s nothing to sneeze at.
I’ll take that over your flash and attitude any day, pal.
what happened to the captain?
Handles are what your programs use when
they go around .NET and the CLR and
interact directly with Windows. Since
.NET doesn’t know about them, it can’t
clean them up for you.
661
Q: Can a finalizer use all of an object’s fields and methods?
A:Sure.Whileyoucan’tpassparameterstoafinalizermethod,
youcanuseanyofthefieldsinanobject,eitherdirectlyorusing
this—butbecareful,becauseifthosefieldsreferenceother
objects,thentheotherobjectsmayhavealreadybeengarbage-
collected.Butyoucandefinitelycallothermethodsintheobject
beingfinalized(aslongasthosemethodsdon’tdependonother
objects).
Q: What happens to exceptions that get thrown in a finalizer?
A:Goodquestion.It’stotallylegaltoputatry/catchblock
insideafinalizermethod.Giveitatryyourself.Createadivide-by-
zeroexceptioninsideatryblockintheCloneprogramwejust
wrote.Catchitandthrowupamessageboxthatsays“Ijustcaught
anexception.”rightbeforethe“…I’vebeendestroyed.”boxwe’d
alreadywritten.Nowruntheprogramandclickonthefirstbutton
andthentheGCbutton.You’llseeboththeexceptionboxandthe
destroyedboxpopup.(Ofcourse,it’sgenerallyareally bad idea
topopupmessageboxesinfinalizersforobjectsthataremorethan
justtoys…andthosemessageboxesmayneveractuallypopup.)
Q: How often does the garbage collector run automatically?
A:There’snogoodanswertothatone.Itdoesn’trunonaneasily
predictablecycle,andyoudon’thaveanyfirmcontroloverit.Youcan
besureitwillberunwhenyourprogramexits.Butifyouwanttobe
sureit’llrun,youhavetouseGC.Collect()tosetitoff…and
eventhen,timingisanissue.
Q: How soon after I call GC.Collect() will .NET start
garbage collection?
A:WhenyourunGC.Collect(),you’retelling.NETto
garbagecollectassoonaspossible.That’susually assoonas.NET
finisheswhateverit’sdoing.Thatmeansit’llhappenprettysoon,but
youcan’tactuallycontrolwhen.
Q: If I absolutely need something to run, I put it in a finalizer,
right?
A:It’spossiblethatyourfinalizerwon’trun.It’spossibleto
suppressfinalizerswhengarbagecollectionhappens.Ortheprocess
couldendentirely.Butasageneralrule,yourfinalizershouldrun.
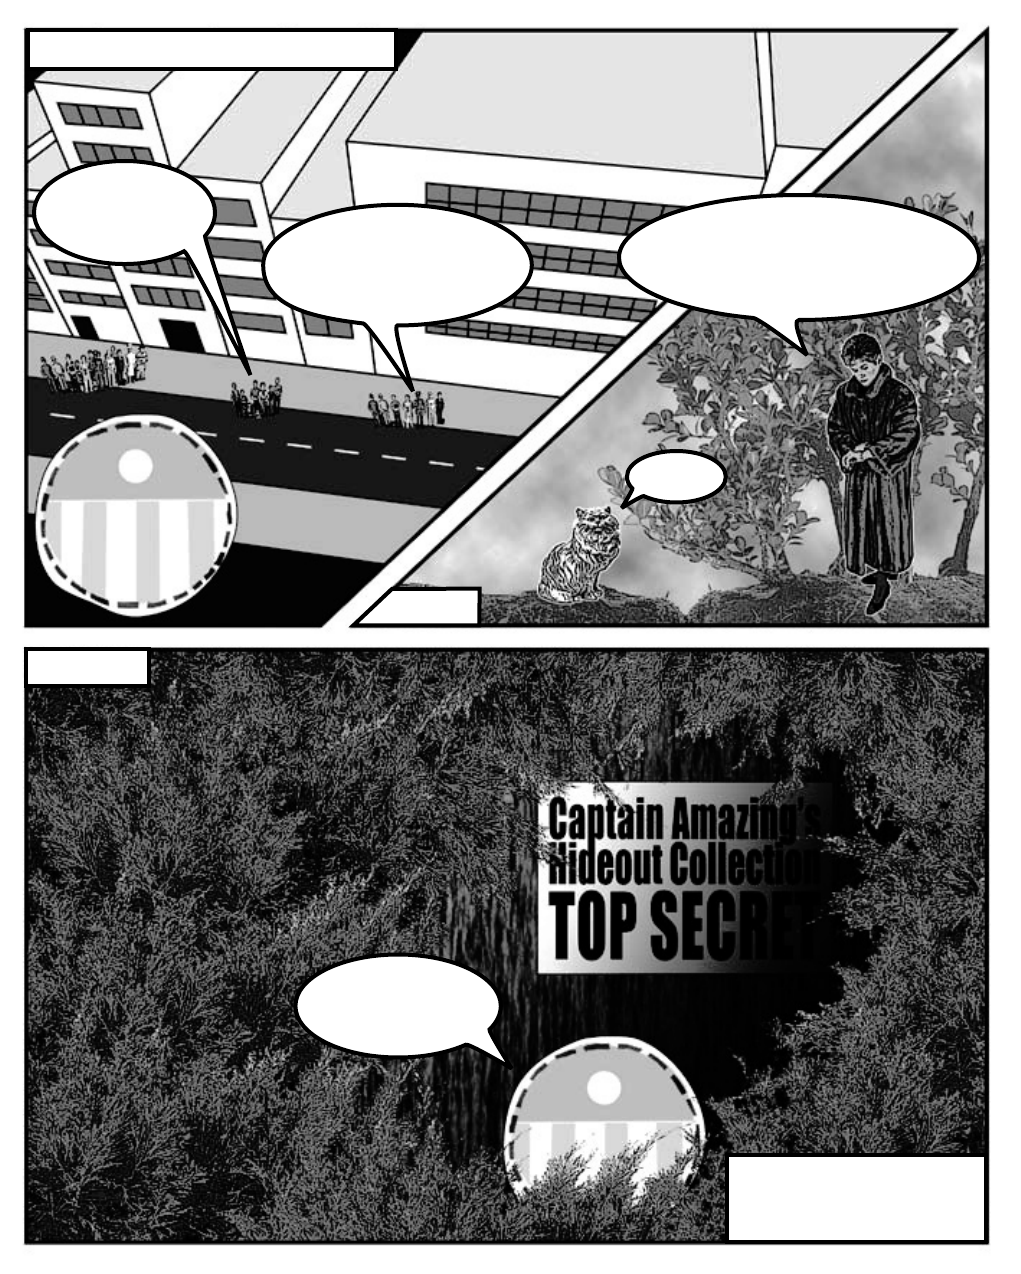
662
Even later...
What’s wrong? Why are the
Captain’s powers behaving
differently? Is this the end?
Later...
Meanwhile, on the streets of Objectville…
you are here 4 663
the death of an object
One of the types in .NET we haven’t talked about much is the struct.
struct is short for structure, and structs look a lot like objects.
They have fields and properties, just like objects. And you can even pass
them into a method that takes an object type parameter:
A struct looks like an object…
…but isn’t an object
public struct AlmostSuperhero : IDisposable {
public int SuperStrength;
public int SuperSpeed { get; private set; }
public void RemoveVillain(Villain villain)
{
Console.WriteLine(“OK, ” + villain.Name +
“ surrender and stop all the madness!”);
if (villain.Surrendered)
villain.GoToJail();
else
villain.Kill();
}
public void Dispose() { ... }
}
But structs aren’t objects. They can have methods and fields, but
they can’t have finalizers. They also can’t inherit from other classes or
structs, or have classes or structs inherit from them.
S
u
p
e
r
H
e
r
o
struct
Structs can’t
inherit from
other objects.
You can mimic a standalone
object with a struct, but
structs don’t stand in very
well for complex inheritance
hierarchies.
The power of objects
lies in their ability
to mimic real‑world
behavior, through
inheritance and
polymorphism.
Structs are best
used for storing
data, but the lack
of inheritance and
references can be a
serious limitation.
…and define methods.
Structs can implement
interfaces but can’t
subclass other classes.
And structs are sealed, so
they can’t be subclassed.
A struct can have
properties and fields…
All structs inherit from
System.ValueType, which in
turn inherits from System.
Object. That’s why every
struct has a ToString()
method – it gets it from
Object. But that’s all the
inheriting that structs are
allowed to do.
That’s why you use classes a lot more than
structs. But that doesn’t mean they don’t
have their uses!
But the thing that sets structs apart from objects more than almost anything else is that
you copy them by value, not by reference. Flip the page to see what this means....
664 Chapter 14
L
i
s
t
<
d
o
u
b
l
e
>
You already have a sense of how some types are different than others. On one hand
you’ve got value types like int, bool, and decimal. On the other hand, you’ve
got objects like List, Stream, and Exception. And they don’t quite work
exactly the same way, do they?
When you use the equals sign to set one value type variable to another, it makes a
copy of the value, and afterward the two variables aren’t connected to each other.
On the other hand, when you use the equals sign with references, what you’re doing is
pointing both references at the same object.
Variable declaration and assignment works the same with
value types or object types:
≥
Differences creep in when you start to assign values, though. Value types all are
handled with copying. Here’s an example:
≥
temperatures
differentlist
This line sets the
differentList
reference to point
to the same object
as the temperatures
reference.
This line copies the value that’s stored
in the fifteenMore variable into the
howMany variable and adds 15 to it.
Changing the
fifteenMore
variable has
no effect on
howMany, and
vice versa.
When you called differentList.Add(),
it added a new temperature to the
object that both differentList and
temperatures point to.
Values get copied; references get assigned
int and bool are value types, List
and Exception are object types.
Here’s a quick refresher on
value types vs. objects.
int howMany = 25;
bool Scary = true;
List<double> temperatures = new List<double>();
Exception ex = new Exception(“Does not compute”);
These are all
initialized in the
same basic way.
int fifteenMore = howMany;
fifteenMore += 15;
Console.WriteLine(“howMany has {0}, fifteenMore has {1}”,
howMany, fifteenMore);
The output here shows that fifteenMore and howMany are not connected:
howMany has 25, fifteenMore has 40
With object assignments, though, you’re assigning references, not actual values:
≥
temperatures.Add(56.5D);
temperatures.Add(27.4D);
List<float> differentList = temperatures;
differentList.Add(62.9D);
Both references
point at the same
actual object.
So changing the List means both references see the
update…since they both point to a single List object.
Console.WriteLine(“temperatures has {0}, differentlist has {1}”,
temperatures.Count(), differentList.Count());
temperatures has 3, differentList has 3
The output here demonstrates that differentList and
temperatures are actually pointing to the same object:
makin’ copies
Remember when we
said that methods and
statements ALWAYS
live in classes? Well, it
turns out that’s not
100% accurate -- they
can also live in structs.
you are here 4 665
the death of an object
Structs are value types; objects are reference types
When you create a struct, you’re creating a value type. What that
means is when you use equals to set one struct variable equal to
another, you’re creating a fresh copy of the struct in the new variable. So
even though a struct looks like an object, it doesn’t act like one. Do this
Create a struct called Dog
Here’s simple struct to keep track of a dog. It looks just like an object, but it’s not. Add it
to a new console application.
1
public struct Dog {
public string Name;
public string Breed;
public Dog(string name, string breed) {
this.Name = name;
this.Breed = breed;
}
public void Speak() {
Console.WriteLine(“My name is {0} and I’m a {1}.”, Name, Breed);
}
}
Create a class called Canine
Make an exact copy of the Dog struct, except replace struct with class and then
replace Dog with Canine. (Don’t forget to rename Dog’s constructor.) Now you’ll have a
Canine class that you can play with, which is almost exactly equivalent to the Dog struct.
2
Add a button that makes some copies of Dogs and Canines
Here’s the code for the Main() method:
Canine spot = new Canine(“Spot”, “pug”);
Canine bob = spot;
bob.Name = “Spike”;
bob.Breed = “beagle”;
spot.Speak();
Dog jake = new Dog(“Jake”, “poodle”);
Dog betty = jake;
betty.Name = “Betty”;
betty.Breed = “pit bull”;
jake.Speak();
Console.ReadKey();
3
Yes, this is not good encapsulation.
Bear with us—we’re making a point.
Before you press that button…
Write down what you think will be written to the console when you run this code:
4
You’ve already used
structs in your programs.
Remember Point from
Chapters 12 and 13 or
DateTime from chapter
9 Those are structs
666 Chapter 14
My name is Spike and I’m a beagle.
My name is Jake and I’m a poodle.
Here’s what happened…
The bob and spot references both point to the same object, so
both changed the same fields and accessed the same Speak()
method. But structs don’t work that way. When you created
betty, you made a fresh copy of the data in jake. The two
structs are completely independent of each other.
Dog jake = new Dog(“Jake”, “poodle”);
Dog betty = jake;
betty.Name = “Betty”;
betty.Breed = “pit bull”;
jake.Speak();
Canine spot = new Canine(“Spot”, “pug”);
Canine bob = spot;
bob.Name = “Spike”;
bob.Breed = “beagle”;
spot.Speak();
jake
4
5
1
2
C
a
n
i
n
e
o
b
j
e
c
t
1
spot
C
a
n
i
n
e
o
b
j
e
c
t
2
spot
3
6
A new Canine object was
created and the spot
reference points to it.
The new reference variable bob was
created, but no new object was added
to the heap—the bob variable points to
the same object as spot.
Spot
pug
C
a
n
i
n
e
o
b
j
e
c
t
3
spot
bob
Spike
beagle
Spot
pug
bob
Since spot and bob both point to the same object,
spot.Speak() and bob.Speak() both call the same
method, and both of them produce the same output
with “Spike” and “beagle”.
Jake
poodle
jake
Jake
poodle
betty
Jake
poodle
betty
Betty
pit bull
jake
Jake
poodle
4
5
6
When you set one struct
equal to another, you’re
creating a fresh COPY of
the data inside the struct.
That’s because struct is a
VALUE TYPE.
When you create a new struct,
it looks really similar to creating
an object—you’ve got a variable
that you can use to access its
fields and methods.
Here’s the big difference. When
you added the betty variable,
you created a whole new value.
Since you created a fresh
copy of the data, jake
was unaffected when you
changed betty’s fields.
What did you think would get written to the console?
stack versus heap
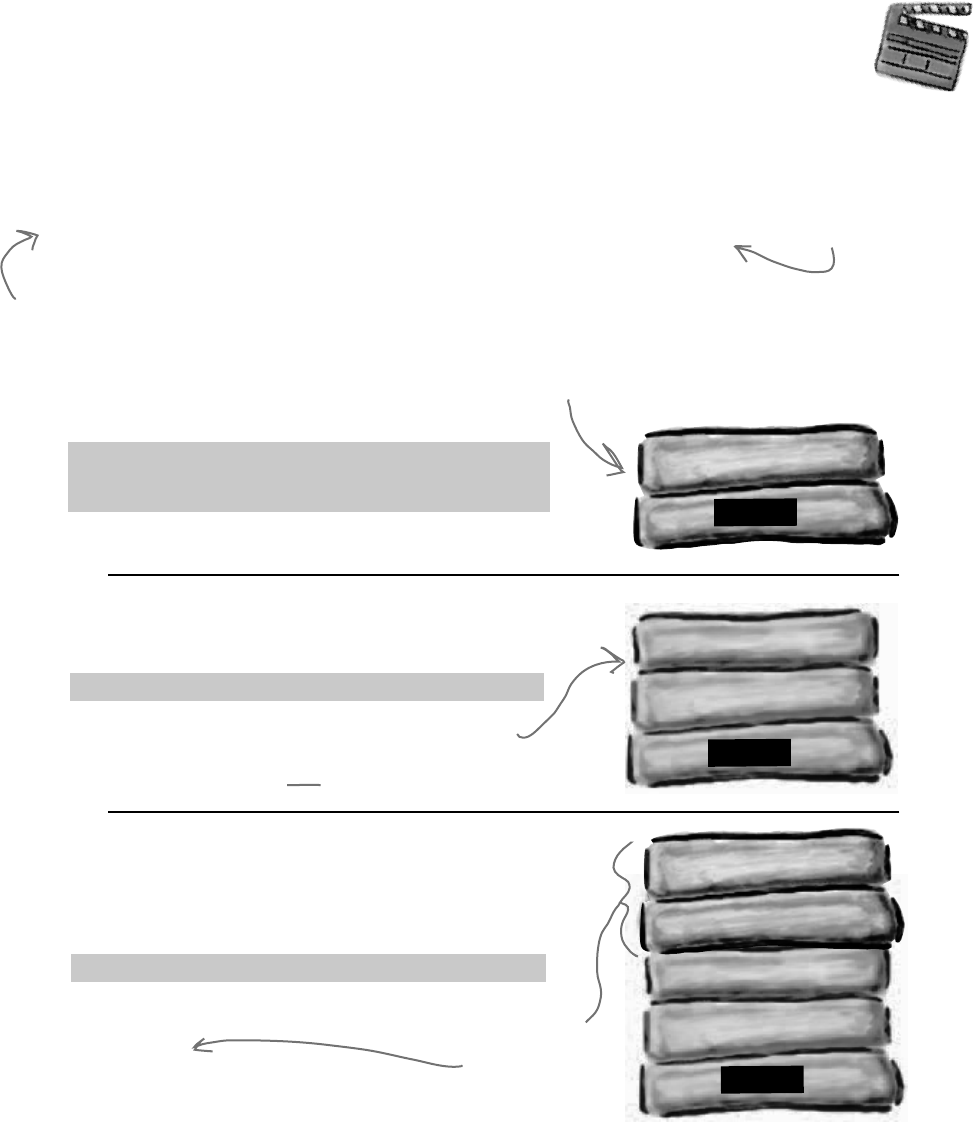
you are here 4 667
the death of an object
It’s easy to understand how a struct differs from an object—you can make a fresh
copy of a struct just using equals, which you can’t do with an object. But what’s really
going on behind the scenes?
The .NET CLR divides your data into two places in memory. You already know that
objects live on the heap. It also keeps another part of memory called the stack to store
all of the local variables you declare in your methods, and the parameters that you pass
into those methods. You can think of the stack as a bunch of slots that you can stick
values in. When a method gets called, the CLR adds more slots to the top of the stack.
When it returns, its slots are removed.
The stack vs. the heap: more on memory
The Code
Here’s code that you might
see in a program.
Behind
the Scenes
The Stack
This is where structs and local
variables hang out.
Dog jake
spot
Dog betty
Dog jake
spot
Canine spot = new Canine(“Spot”, “pug”);
Dog jake = new Dog(“Jake”, “poodle”);
Canine spot = new Canine(“Spot”, “pug”);
Dog jake = new Dog(“Jake”, “poodle”);
Dog betty = jake;
public SpeakThreeTimes(Dog dog) {
int i;
for (i = 0; i < 5; i++)
dog.Speak();
}
Dog betty
Dog jake
spot
Dog myDog
int i
Dog dog
Canine spot = new Canine(“Spot”, “pug”);
Dog jake = new Dog(“Jake”, “poodle”);
Dog betty = jake;
SpeakThreeTimes(jake);
When you call a
method, the CLR
puts its local
variables on the
top of the stack.
It takes them off
when it’s done.
Here’s what the stack
looks like after these
two lines of code run.
When you create a new struct—or any other value
type variable—a new “slot” gets added onto the
stack. That slot is a copy of the value in your type.
Remember, when your
program’s running, the CLR
is actively managing memory,
dealing with the heap, and
collecting garbage.
Even though you can
assign a struct to
an object variable,
structs and objects
are different.
668 Chapter 14
Dog sid (boxed)
Wait a minute. Why do I even need to know this
stuff? I can’t control any of it directly, right?
You definitely want to understand how a struct you copy by
value is different from an object you copy by reference.
There are times when you need to be able to write a method that can take either a
value type or a reference type—perhaps a method that can work with either a Dog
struct or a Canine object. If you find yourself in that situation, you can use the
object keyword:
public void WalkDogOrCanine(object getsWalked) { ... }
If you send this method a struct, the struct gets boxed into a special object
“wrapper” that allows it to live on the heap. While the wrapper’s on the heap, you
can’t do much with the struct. You have to “unwrap” the struct to work with it.
Luckily, all of this happens automatically when you set an object equal to a value type,
or pass a value type into a method that expects an object.
Sid
husky
Here’s what the stack and heap look like after you create an object
variable and set it equal to a Dog struct.
Dog sid = new Dog(“Sid”, “husky”);
Object obj = sid;
1
Dog sid (boxed)
Sid
husky
If you want to unbox the object, all you need to do is cast it to the right type, and
it gets unboxed automatically. You can’t use the as keyword with value
types, so you’ll need to cast to Dog.
Dog happy = (Dog) obj;
2
obj
obj
obj
obj
Dog sid
Dog sid
Dog happy
You can also use the “is”
keyword to see if an
object is a struct, or
any other value type,
that’s been boxed and
put on the heap.
These are structs, so unless
they’re boxed, they don’t live
on the heap.
don’t box me in
After a struct
is boxed, there
are two copies
of the data: on
the stack, and
the copy boxed
on the heap.
After this line
runs, you’ve got
a third copy of
the data in a
new struct called
happy, which gets
its own slot on
the stack.
you are here 4 669
the death of an object
When a method is called, it looks for its arguments on the stack
The stack plays an important part in how the CLR runs your programs. One thing we take for granted is the fact
that you can write a method that calls another method, which in turn calls another method. In fact, a method
can call itself (which is called recursion). The stack is what gives your programs the ability to do that.
public void FeedDog(Canine dogToFeed, Bowl dogBowl) {
double eaten = Eat(dogToFeed.MealSize, dogBowl);
return eaten + .05d; // A little is always spilled
}
public void Eat(double mealSize, Bowl dogBowl) {
dogBowl.Capacity -= mealSize;
CheckBowl(dogBowl.Capacity);
}
public void CheckBowl(double capacity) {
if (capacity < 12.5d) {
string message = “My bowl’s almost empty!”;
Console.WriteLine(message);
}
}
Here are a couple of methods from
a dog simulator program. They’re
pretty simple: FeedDog() calls
Eat(), which calls CheckBowl().
dogToFeed
dogBowl
dogToFeed
mealSize value
dogBowl
dogBowl
Dog myDog
capacity value
dogToFeed
mealSize value
dogBowl
dogBowl
dogToFeed
mealSize value
dogBowl
dogBowl
capacity value
message
1 2 3 4
The FeedDog()
method takes two
parameters, a Canine
reference and a Bowl
reference. So when
it’s called, the two
arguments passed to it
are on the stack.
FeedDog() needs to
pass two arguments to
the Eat() method, so
they’re pushed onto
the stack as well.
Remember the terminology
here: a parameter is what you
call the part of the method
declaration that specifies the
values it needs; an argument is
the actual value or reference
that you pass into a method
when you call it.
Here’s what the stack looks like as the
FeedDog() method calls Eat(),
which calls CheckBowl(), which
calls Console.WriteLine():
As the method calls
pile up and the
program goes deeper
into methods that call
methods that call other
methods, the stack
gets bigger and bigger.
When Console.
WriteLine() exits,
its arguments will
be popped off of the
stack. That way, Eat()
can keep going as if
nothing had happened.
That’s why the stack is
so useful
Behind
the Scenes
670 Chapter 14
references upon request
Speaking of parameters and arguments, there are a few more ways that you can get values in
and out of your programs, and they all involve adding modifiers to your method declarations.
One of the most common ways of doing this is by using the out modifier to specify an
output parameter. Here’s how it works. Create a new Windows Forms application and add this
empty method declaration to the form. Note the out modifiers on both parameters:
Use out parameters to make a
method return more than one value
public int ReturnThreeValues(out double half, out int twice)
{
return 1;
}
Do this!
When you try to build your code, you’ll see two errors: The out parameter ‘half ’ must
be assigned a value before control leaves the current method (and you’ll get an
identical message for the ‘twice’ parameter). Any time you use an out parameter, you always
need to set it before the method returns—just like you always need to use a return statement if
your method is declared with a return value. Here’s the whole method:
Random random = new Random();
public int ReturnThreeValues(out double half, out int twice) {
int value = random.Next(1000);
half = ((double)value) / 2;
twice = value * 2;
return value;
}
private void button1_Click(object sender, EventArgs e) {
int a;
double b;
int c;
a = ReturnThreeValues(b, c);
Console.WriteLine("value = {0}, half = {1}, double = {2}", a, b, c);
}
Now that you’ve set the two out parameters, it compiles. So let’s use them. Add a button with this event handler:
Uh oh! There are more build errors: Argument 1 must be passed with the out keyword. Every time
you call a method with an out parameter, you need to use the out keyword when you pass the argument
to it. Here’s what that line should look like:
a = ReturnThreeValues(out b, out c);
Now your program will build. When you run it, the ReturnThreeValues() methods sets the three
values and returns all three of them: a gets the method’s return value, b gets the value returned by the
half parameter, and c gets the value returned by the twice parameter.
A method
can return
more
than one
value by
using out
parameters.
This method needs to set all of its
out parameters before it returns,
otherwise it won’t compile.
Did you notice how you didn’t need to initialize b
and c? You don’t need to initialize a variable before
you use it as an argument to an out parameter.

you are here 4 671
the death of an object
One thing you’ve seen over and over again is that every time you pass an int, double, struct,
or any other value type into a method, you’re passing a copy of that value to that method. There’s a
name for that: pass by value, which means that the entire value of the argument is copied.
But there’s another way to pass arguments into methods, and it’s called pass by reference. You can
use the ref keyword to allow a method to work directly with the argument that’s passed to it. Just
like the out modifier, you need to use ref when you declare the method and also when you call it. It
doesn’t matter if it’s a value type or a reference type, either—any variable that you pass to a method’s
ref parameter will be directly altered by that method.
You can see how it works—add this method to your program:
Pass by reference using the ref modifier
Built-in value types’ TryParse() method uses out parameters
There’s a great example of out parameters built right into some of the built-in value types. There are a
lot of times that you’ll want to convert a string like “35.67” into a double. And there’s a method to do
exactly that: double.Parse(“35.67”) will return the double value 35.67. But double.Parse(“xyz”) will throw a
FormatException. Sometimes that’s exactly what you want, but other times you want to check if a string
can be parsed into a value. That’s where the TryParse() method comes in: double.TryParse(“xyz”, out d) will
return false and set i to 0, but double.TryParse(“35.67”, out d) will return true and set d to 35.67.
Also, remember back in Chapter 9 when we used a switch statement to convert “Spades” into Suits.Spades?
Well, there are static methods Enum.Parse() and Enum.TryParse() that do the same thing, except for enums!
public void ModifyAnIntAndButton(ref int value, ref Button button) {
int i = value;
i *= 5;
value = i - 3;
button = button1;
}
private void button2_Click(object sender, EventArgs e) {
int q = 100;
Button b = button3;
ModifyAnIntAndButton(ref q, ref b);
Console.WriteLine(“q = {0}, b.Text = {1}”, q, b.Text);
}
And add a button with this event handler to call the method:
When button2_Click() calls the ModifyAnIntAndButton() method, it passes its q and b variables
by reference. The ModifyAnIntAndButton() method works them just like any other variable. But since
they were passed by reference, the method was actually updating the q and b variables all along, and not just a
copy of them. So when the method exits, the q and b variables are updated with the modified value.
Run the program and debug through it, adding a watch for the q and b variables to see how this works.
Under the hood, an
out argument is just
like a ref argument,
except that it doesn’t
need to be assigned
before going into the
method, and must be
assigned before the
method returns.
This prints “q = 497, b.Text = button1”
because the method actually altered the
q and b variables.
When this method sets value and button
parameters, what it’s really doing is
changing the values of the q and b
variables in the button2_Click() method
that called it.

672 Chapter 14
arguments optional
A lot of times, your methods will be called with the same arguments over and over again, but the
method still needs the parameter because sometimes it’s different. It would be useful if you could set a
default value, so you only needed to specify the argument when calling the method if it was different.
That’s exactly what optional parameters do. You can specify an optional parameter in a method
declaration by using an equals sign followed by the default value for that parameter. You can have
as many optional parameters as you want, but all of the optional parameters have to come after the
required parameters.
Here’s an example of a method that uses optional parameters to check if someone has a fever:
Use optional parameters to set default values
void CheckTemperature(double temperature, double tooHigh = 99.5, double tooLow = 96.5)
{
if (temperature < tooHigh && temperature > tooLow)
Console.WriteLine("Feeling good!");
else
Console.WriteLine("Uh-oh -- better see a doctor!");
}
private void button3_Click(object sender, EventArgs e)
{
// Those values are fine for your average person
CheckTemperature(101.3);
// A dog's temperature should be between 100.5 and 102.5 Fahrenheit
CheckTemperature(101.3, 102.5, 100.5);
// Bob's temperature is always a little low, so set tooLow to 95.5
CheckTemperature(96.2, tooLow: 95.5);
}
This method has two optional parameters: tooHigh has a default value of 99.5, and tooLow has
a default value of 96.5. Calling CheckTemperature() with one argument uses default values for
both tooHigh and tooLow. If you call it with two arguments, it will use the second argument for the
value of tooHigh, but still use the default value for tooLow. You can specify all three arguments to
pass values for all three parameters.
There’s another option as well. If you want to use some (but not all) of the default values, you can use
named arguments to pass values for just those parameters that you want to pass. All you need to
do is give the name of each parameter followed by a colon and its values. If you use more than one
named argument, make sure you separate them with commas, just like any other argument.
Add the CheckTemperature() method to your form, and then add a button with the following
event handler. Debug through it to make sure you understand exactly how this works: Use optional
parameters
and named
arguments
when you
want your
methods to
have default
values.
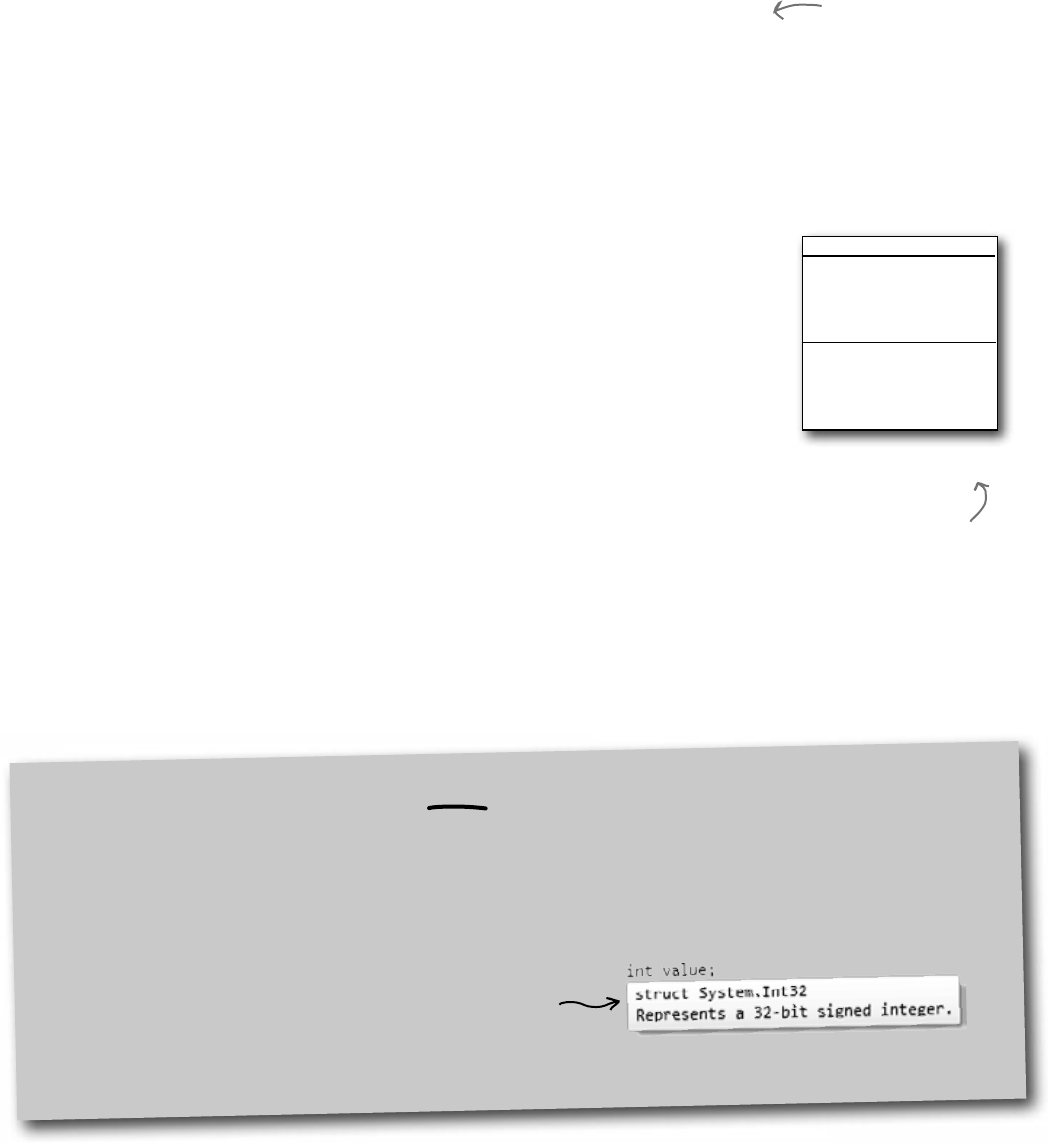
you are here 4 673
the death of an object
Take a minute and flip back to the contact cards you converted to a database way back in
Chapter 1. Remember how you set up your table to allow nulls for each of its columns? That
way, if someone left out a value or wrote something illegible, the database could use null to
represent that it doesn’t have a value. Normally, you could just use null. But for structs
(and ints, booleans, and other value types), you can’t set them to null. These statements:
bool myBool = null;
DateTime myDate = null;
will cause errors when you try to compile your program!
Let’s say your program needs to work with a date and time value. Normally you’d use a
DateTime variable. But what if that variable doesn’t always have a value? That’s where
nullable types comes in really handy. All you need to do is add a question mark (?) to the end
of any value type, and it becomes a nullable type that you can set to null.
Use nullable types when you need nonexistent values
Did it seem odd that even
the Client column was set
to allow nulls? Someone’s
either a client or not,
right? But there was
no guarantee that every
card has the Client blank
filled in, and the database
needed a way to represent
that we might not know if
someone’s a client or not.
bool? myNulableInt = null;
DateTime? myNullableDate = null;
Nullable<DateTime>
Value:DateTime
HasValue:bool
...
GetValueOrDefault():DateTime
...
The question mark T? is an alias for Nullable<T>
When you add a question mark to any value type (like int? or decimal?), the compiler translates that to the
Nullable<T> struct (Nullable<int> or Nullable<decimal>). You can see this for yourself: add a Nullable<DateTime>
variable to a program, put a breakpoint on it, and add a watch for it in the debugger. You’ll see System.DateTime?
displayed in the watch window in the IDE. This is an example of an alias, and it’s not the first one you’ve
encountered. Hover your cursor over any int. You’ll see that it translates to a struct called System.Int32:
int.Parse() and int.TryParse() are members of this struct
Take a minute and do that for each of the types at the beginning of Chapter 4. Notice how all of them are
aliases for structs—except for string, which is a class called System.String (it’s a reference type, not a value type).
Every nullable type has a property called Value that gets or sets the value. A DateTime? will
have a Value of type DateTime, an int? will have one of type int, etc. They’ll also have a
property called HasValue that returns true if it’s not null.
You can always convert a value type to a nullable type:
DateTime myDate = DateTime.Now;
DateTime? myNullableDate = myDate;
But you need to cast the nullable type in order to assign it back to a value type:
myDate = (DateTime) myNullableDate;
If HasValue is false, the Value property will throw an InvalidOperationException,
and so will the cast (because that cast is equivalent to using the Value property).
Nullable<T> is a struct
that lets you store a
value type OR a null value.
Here are some of the
methods and properties on
Nullable<DateTime>.
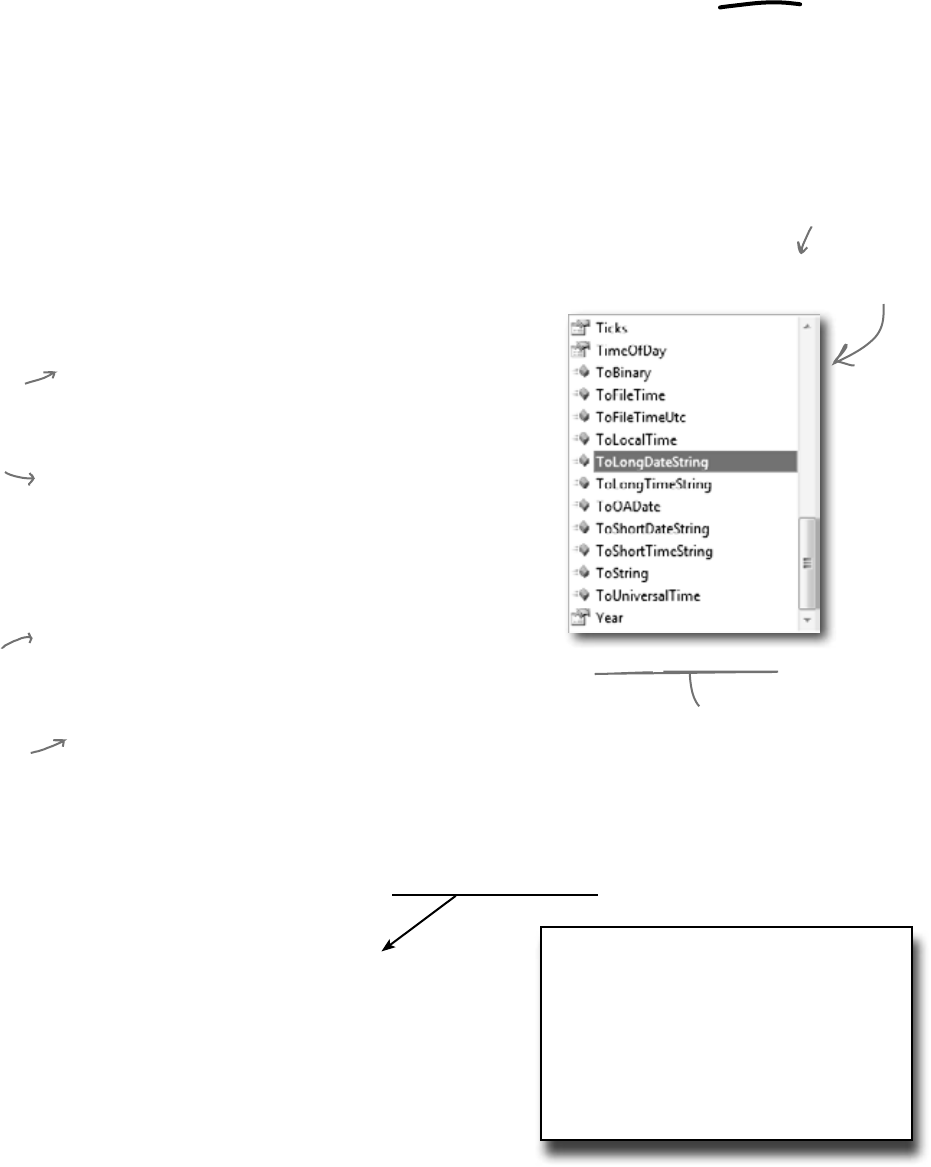
674 Chapter 14
taste the robust flavor
Users do all sorts of crazy things. You think you know how people will use a program you’re
writing, but then someone clicks buttons in an unexpected order, or enters 256 spaces in a text
box, or uses the Windows Task Manager to quit your program halfway through writing data
to a file, and suddenly it’s popping up all manner of errors. Remember in chapter 10 when we
talked about how a program that can gracefully handle badly formatted, unexpected, or just
plain bizarre input is called robust? Well, when you’re processing raw input from your users,
nullable types can be very useful in making your programs more robust. Now see for yourself—
create a new console application and add this RobustGuy class to it:
Nullable types help you make your programs more robust
class RobustGuy {
public DateTime? Birthday { get; private set; }
public int? Height { get; private set; }
public RobustGuy(string birthday, string height) {
DateTime tempDate;
if (DateTime.TryParse(birthday, out tempDate))
Birthday = tempDate;
else
Birthday = null;
int tempInt;
if (int.TryParse(height, out tempInt))
Height = tempInt;
else
Height = null;
}
public override string ToString() {
string description;
if (Birthday != null)
description = “I was born on ” + Birthday.Value.ToLongDateString();
else
description = “I don’t know my birthday”;
if (Height != null)
description += “, and I’m ” + Height + “ inches tall”;
else
description += “, and I don’t know my height”;
return description;
}
}
And here’s the Main() method for the program. It uses Console.ReadLine() to get input from the user:
static void Main(string[] args) {
Console.Write(“Enter birthday: ”);
string birthday = Console.ReadLine();
Console.Write(“Enter height in inches: ”);
string height = Console.ReadLine();
RobustGuy guy = new RobustGuy(birthday, height);
Console.WriteLine(guy.ToString());
Console.ReadKey();
}
When you run the program,
see what happens when you
enter different values for dates.
DateTime.TryParse() can figure
out a lot of them. When you
enter a date it can’t parse, the
RobustGuy’s Birthday property
will have no value.
When you add RobustGuy.
ToString(), take a look at
the IntelliSense window
when you enter Birthday.
Value. Since the Value
property is a DateTime,
you’ll see all the usual
DateTime members.
Use the ToLongDateString() method to
convert it to a human-readable string.
If the user entered
garbage, the
Nullable types
won’t have values,
so their HasValue()
methods will return
false.
Use the DateTime
and int TryParse()
methods to
attempt to
convert the user
input into values.
Try experimenting with the
other DateTime methods
that start with “To” to
see how they affect your
program’s output.
Console.ReadLine() lets the user enter text
into the console window. When the user hits
enter, it returns the input as a string.
you are here 4 675
the death of an object
Pool Puzzle
Your job is to take snippets from the
pool and place them into the blank
lines in the code. You may use
the same snippet more than once,
and you won’t need to use all the
snippets. Your goal is to make
the code write this output to the
console when a new instance of the
Faucet class is created:
Note: Each
thing from
the pool can
be used more
than once.
public class Faucet {
public Faucet() {
Table wine = new Table();
Hinge book = new Hinge();
wine.Set(book);
book.Set(wine);
wine.Lamp(10);
book.garden.Lamp(“back in”);
book.bulb *= 2;
wine.Lamp(“minutes”);
wine.Lamp(book);
}
}
public _______ Table {
public string stairs;
public Hinge floor;
public void Set(Hinge b) {
floor = b;
}
public void Lamp(object oil) {
if (oil ____ int)
_______.bulb = (int)oil;
else if (oil ____ string)
stairs = (string)oil;
else if (oil ____ Hinge) {
_______ vine = oil ____ _______;
Console.WriteLine(vine.Table()
+ “ ” + ______.bulb + “ ” + stairs);
}
}
}
public _______ Hinge {
public int bulb;
public Table garden;
public void Set(Table a) {
garden = a;
}
public string Table() {
return _______.stairs;
}
}
Output when you create a
new Faucet object:
back in 20 minutes
public
private
class
new
abstract
interface
struct
string
int
float
single
double
if
or
is
on
as
oop
+
-
++
--
=
==
garden
floor
Window
Door
Hinge
Brush
Lamp
bulb
Table
stairs
Bonus points: Circle the lines
where boxing happens.
Here’s the goal…to
get this output.
Answers on page 684.
676 Chapter 14
Q: OK, back up a minute. Why do I
care about the stack?
A:Becauseunderstandingthedifference
betweenthestackandtheheaphelpsyou
keepyourreferencetypesandvaluetypes
straight.It’seasytoforgetthatstructsand
objectsworkverydifferently—whenyouuse
theequalssignwithbothofthem,theylook
reallysimilar.Havingsomeideaofhow.NET
andtheCLRhandlethingsunderthehood
helpsyouunderstandwhyreferenceand
valuetypesaredifferent.
Q: And boxing? Why is that important
to me?
A:Becauseyouneedtoknowwhen
thingsenduponthestack,andyouneed
toknowwhendata’sbeingcopiedbackand
forth.Boxingtakesextramemoryandmore
time.Whenyou’reonlydoingitafewtimes
(orafewhundredtimes)inyourprogram,
thenyouwon’tnoticethedifference.Butlet’s
sayyou’rewritingaprogramthatdoesthe
samethingoverandoveragain,millionsof
timesasecond.That’snottoofar-fetched,
sincethat’sexactlywhatyourbeehive
simulatordid.Ifyoufindthatyourprogram’s
takingupmoreandmorememory,orgoing
slowerandslower,thenit’spossiblethatyou
canmakeitmoreefficientbyavoidingboxing
inthepartoftheprogramthatrepeats.
Q: I get how you get a fresh copy of
a struct when you set one struct variable
equal to another one. But why is that
useful to me?
A:Oneplacethat’sreallyhelpfuliswith
encapsulation.Takealookatthisfamiliar
codefromaclassthatknowsitslocation:
private Point location;
public Point Location {
get { return location; }
}
IfPointwereaclass,thenthiswouldbe
terribleencapsulation.Itwouldn’tmatterthat
locationisprivate,becauseyoumade
apublicread-onlypropertythatreturnsa
referencetoit,soanyotherobjectwouldbe
abletoaccessit.
Luckyforus,Pointisactuallyastruct.
AndthatmeansthatthepublicLocation
propertyreturnsafreshcopyofthepoint.
Theobjectthatusesitcandowhateverit
wantstothatcopy—noneofthosechanges
willmakeittotheprivatelocationfield.
Q: If Point is a struct, does that
mean there are other structs that I’ve
been working with all along?
A:Yes!Onestructthat’sreallyuseful
andverycommonwhenyou’reworkingwith
graphicsandformsisRectangle.It’s
gotsomeveryusefulmethodsthatcomein
reallyhandywhenyouneedtofigureout
boundariesandcheckwhetherpointsare
insideoroutsideoftherectangle.Allyou
needtodoissetitslocationandsize,and
it’llautomaticallycomputeitstop,bottom,
left,right,width,andheight.
Anotherusefulstructthatyou’llrun
intoisSize.You’vealreadyseenit
inaction—youuseditwhenyouwere
determiningthesizeofastringusingthe
MeasureString()method.It’sa
struct,too.
Q: How do I know whether to use a
struct or a class?
A:Mostofthetime,programmersuse
classes.Structshavealotoflimitationsthat
canreallymakeithardtoworkwiththemfor
largejobs.Theydon’tsupportinheritance,
abstraction,orpolymorphism,andyou
alreadyknowhowimportantthosethingsare
forbuildingprogramseasily.
Wherestructscomeinreallyhandyisifyou
haveasmall,limitedtypeofdatathatyou
needtoworkwithrepeatedly.Rectangles
andpointsaregoodexamples—there’snot
muchyou’lldowiththem,butyou’lluse
themoverandoveragain.Structstendtobe
relativelysmallandlimitedinscope.Ifyou
findthatyouhaveasmallchunkofafew
differentkindsofdatathatyouwanttostore
inafieldinaclassorpasstoamethodasa
parameter,that’sprobablyagoodcandidate
forastruct.
A struct can be very
valuable when you
want to add good
encapsulation to
your class, because a
read‑only property
that returns a struct
always makes a
fresh copy of it.
structs are safe
Pop quiz, hotshot!
Answer’s on page 678.
This method is supposed to kill a Clone object, but it
doesn’t work. Why not?
private void SetCloneToNull(Clone clone) {
clone = null;
}

you are here 4 677
the death of an object
Back at the Lab
With all this talk of boxing, you should have a pretty good
idea of what was going on with the less-powerful, more-
tired Captain Amazing. In fact, it wasn’t Captain Amazing
at all, but a boxed struct:
Captain Amazing…not so much
struct
S
u
p
e
r
H
e
r
o
vs.
Structs can’t inherit from
classes or implement interfaces
No wonder the Captain’s superpowers
seemed a little weak! He didn’t get any
inherited behavior.
1You can’t create a fresh copy of
an object
When you set one object variable equal
to another, you’re copying a reference to
the same variable.
1
Structs are copied by value
This is one of the most useful things
about them. It’s especially useful for
encapsulation.
2You can use the “as” keyword
with an object
Objects allow for polymorphism by
allowing an object to function as any of
the objects it inherits from.
2
That’s one big
advantage of structs
(and other value
types)—you can easily
make copies of them.
678 Chapter 14
sealed class OrdinaryHuman {
private int age;
int weight;
public OrdinaryHuman(int weight){
this.weight = weight;
}
public void GoToWork() { /* code to go to work */ }
public void PayBills() { /* code to pay bills */ }
}
static class SuperSoldierSerum {
public static string BreakWalls(this OrdinaryHuman h, double wallDensity) {
return (“I broke through a wall of ” + wallDensity + “ density.”);
}
}
Sometimes you need to extend a class that you can’t inherit from, like a sealed class (a lot of the .NET classes
are sealed, so you can’t inherit from them). And C# gives you a powerful tool for that: extension methods.
When you add a class with extension methods to your project, it adds new methods that appear on
classes that already exist. All you have to do is create a static class, and add a static method that accepts an
instance of the class as its first parameter using the this keyword.
So let’s say you’ve got a sealed OrdinaryHuman class (remember, that means you can’t extend it):
Extension methods add new
behavior to EXISTING classes
Extension methods are always
static methods, and they have
to live in static classes.
Since we want to extend the
OrdinaryHuman class, we make the first
parameter this OrdinaryHuman.
The OrdinaryHuman class is
sealed, so it can’t be subclassed.
But what if we want to add a
method to it?
When the program creates an
instance of the OrdinaryHuman
class, it can access the BreakWalls()
method directly—as long as it has
access to the SuperSoldierSerum class.
extend this
All this method does is set its own parameter to null, but that parameter’s just a
reference to a Clone. It’s like sticking a label on an object and peeling it off again.
So the clone parameter
is just on the stack, so
setting it to null doesn’t do
anything to the heap.
The SuperSoldierSerum method adds an extension method to OrdinaryHuman:
As soon as the SuperSoldierSerum class is added to the project,
OrdinaryHuman gets a BreakWalls method. So now a form can use it:
static void Main(string[] args){
OrdinaryHuman steve = new OrdinaryHuman(185);
Console.WriteLine(steve.BreakWalls(89.2));
}
You use an extension method
by specifying the first
parameter using the “this”
keyword.
This method is supposed to kill a Clone object, but it doesn’t work. Why not?
private void SetCloneToNull(Clone clone) {
clone = null;
}
Remember the sealed access
modifier from Chapter 7? It’s
how you set up a class that
can’t be extended.
Go ahead, try it out! Create a new
console application and add the two
classes and the Main() method to it.
Debug into the BreakWalls() method
and see what’s going on.

you are here 4 679
the death of an object
Q: Tell me again why I wouldn’t add the new methods I
need directly to my class code, instead of using extensions?
A:Youcoulddothat,andyouprobablyshouldifyou’rejust
talkingaboutaddingamethodtooneclass.Extensionmethods
shouldbeusedprettysparingly,andonlyincaseswhereyou
absolutelycan’tchangetheclassyou’reworkingwithforsome
reason(likeit’spartofthe.NETFrameworkoranotherthirdparty).
Whereextensionmethodsreallybecomepowerfuliswhenyou
needtoextendthebehaviorofsomethingyouwouldn’t normally
have access to,likeatypeoranobjectthatcomesforfreewith
the.NETFrameworkoranotherlibrary.
Q:Why use extension methods at all? Why not just extend
the class with inheritance?
A:Ifyoucanextendtheclass,thenyou’llusuallyendupdoing
that—extensionmethodsaren’tmeanttobeareplacementfor
inheritance.Buttheycomeinreallyhandywhenyou’vegotclasses
thatyoucan’textend.Withextensionmethods,youcanchangethe
behaviorofwholegroupsofobjects,andevenaddfunctionalityto
someofthemostbasicclassesinthe.NETFramework.
Extendingaclassgivesyounewbehavior,butrequiresthatyou
usethenewsubclassifyouwanttousethatnewbehavior.
Q:Does my extension method affect all instances of a
class, or just a certain instance of the class?
A:Itwillaffectallinstancesofaclassthatyouextend.In
fact,onceyou’vecreatedanextensionmethod,thenewmethod
willshowupinyourIDEalongsidetheextendedclass’snormal
methods.
Oh, I get it! So you’d use extension methods
to add new behavior to one of the built-in
.NET Framework classes, right?
Exactly! There are some classes that you can’t inherit from.
Pop open any project, add a class, and try typing this:
class x : string { }
Try to compile your code—the IDE will give you an error. The reason is that some .NET
classes are sealed, which means that you can’t inherit from them. (You can do this with
your own classes, too! Just add the sealed keyword to your class after the public
access modifier, and no other class will be allowed to inherit from it.) Extension methods
give you a way to extend it, even if you can’t inherit from it.
But that’s not all you can do with extension methods. In addition to extending classes,
you can also extend interfaces. All you have to do is use an interface name in place of
the class, after the this keyword in the extension method’s first parameter. When you
do, the extension method is added to every class that implements that interface.
Remember that LINQ code you added to your simulator in Chapter 12? LINQ was built
entirely with extension methods, extending the IEnumerable<T> interface. (You’ll
learn a lot more about LINQ in Chapter 15.)
That’s another thing
you just can’t do with
inheritance—there’s no
way to inherit from an
interface.
One more point to remember about
extension methods: you don’t gain
access to any of the class’s internals
by doing an extension method, so
it’s still acting as an outsider!
680 Chapter 14
You don’t often get to change the behavior of a language’s
most fundamental types, like strings. But with extension
methods, you can do just that! Create a new project, and
add a file called HumanExtensions.cs.
Extending a fundamental type: string
Put all of your extension methods in a separate namespace
It’s a good idea to keep all of your extensions in a different namespace than the rest of
your code. That way, you won’t have trouble finding them for use in other programs. Set
up a static class for your method to live in, too.
1
namespace MyExtensions {
public static class HumanExtensions {
Do this!
Create the static extension method, and define its first parameter as
this and then the type you’re extending
The two main things you need to know when you declare an extension method are that
the method needs to be static and it takes the class it’s extending as its first parameter.
2
Put the code to evaluate the string in the method
3
Create a form and add a string
Now go to your form code and add using MyExtensions; to the top, and add a button to the form so
you can try out your new extension method inside its event handler. Now, when you use a string, you get the
extension methods for free. You can see this for yourself by typing the name of a string variable and a period:
4
string message = “Clones are wreaking havoc at the factory. Help!”;
message.
public static class HumanExtensions {
public static bool IsDistressCall(this string s){
if (s.Contains(“Help!”))
return true;
else
return false;
}
}
public static bool IsDistressCall (this string s){
Comment out the using line, and the
extension method will disappear from
the IntelliSense window.
This checks the string for a certain value…something
definitely not in the default string class.
Using a separate namespace is a good
organizational tool.
The class your extension method is
defined in must be static.
The extension method must
be static, too.
“this string” says we’re
extending the string class.
As soon as you type
the dot, the IDE
pops up a helper
window with all of
string’s methods…
including your
extension method.
better faster stronger
This toy example just shows you the
syntax of extension methods. To get
a real sense of how useful they are,
just wait until the next chapter. It’s
all about LINQ, which is implemented
entirely with extension methods.
You want this class to be
accessed by code in the
other namespace, so make
sure you mark it public!
you are here 4 681
the death of an object
}
}
Extension Magnets
Arrange the magnets to produce this output:
a buck begets more bucks
namespace Upside {
using Upside;
namespace Sideways {
public static class Margin {
public static void SendIt
}
Console.Write(s);
public static string ToPrice
if (n == 1)
return “a buck ”;
else
return “ more bucks”;
}
public static string Green
(this bool b) {
if (b == true)
return “be”;
else
return “gets”;
}
}
}
int i = 1;
string s = i.ToPrice();
s.SendIt();
bool b = true;
b = false;
i = 3;
b.Green().SendIt();
i.ToPrice()
.SendIt();
(this string s) { (this int n) {
b.Green().SendIt();
class Program {
static void Main(string[] args) {
Console.ReadKey();
}
682 Chapter 14
Extension Magnets
Your job was to arrange the magnets to produce this output:
a buck begets more bucks
namespace Upside {
using Upside;
namespace Sideways {
public static class Margin {
public static void SendIt
(this string s) {
}
Console.Write(s);
public static string ToPrice
(this int n) {
if (n == 1)
return “a buck ”;
else
return “ more bucks”;
}
public static string Green
(this bool b) {
if (b == true)
return “be”;
else
return “gets”;
}
}
}
static void Main(string[] args) {
int i = 1;
string s = i.ToPrice();
s.SendIt();
bool b = true;
b.Green().SendIt();
b = false;
i = 3;
i.ToPrice()
.SendIt();
Console.ReadKey();
}
}
}
The Upside namespace
has the extensions. The
Sideways namespace has
the entry point.
The Green method extends a
bool—it returns the string “be”
if the bool is true, and “gets”
if it’s false.
The entry point method
uses the extensions that
you added in the Margin
class.
The Margin class extends string by adding
a method called SendIt() that just writes
the string to the console, and it extends int
by adding a method called ToPrice() that
returns “a buck” if the int’s equal to 1, or
“more bucks” if it’s not.
Here’s where the Margin class extends
bool by adding a Green() method to it.
If the bool is true, Green returns “be”,
otherwise it returns “gets”.
the captain’s alive!
b.Green().SendIt();
class Program {
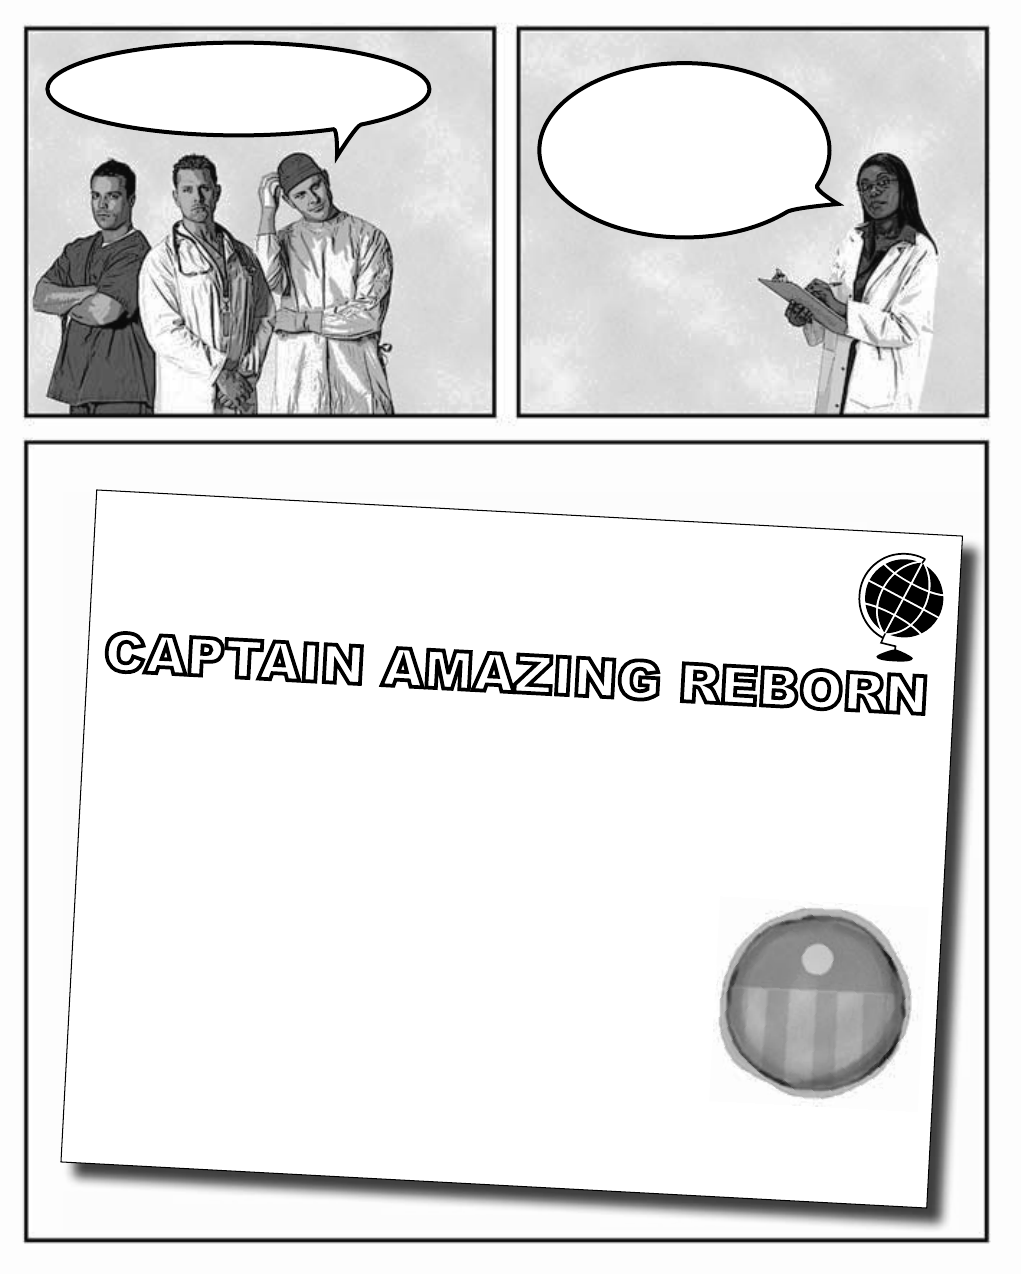
683
TheUNIVERSE
CAPTAIN AMAZING REBORN
Death was not the end!
By Bucky Barnes
UNIVERSE STAFF WRITER
OBJECTVILLE
Captain Amazing deserializes himself, makes stunning comeback
In a stunning turn of events, Captain Amazing has returned to Objectville. Last
month, Captain Amazing’s coffin was found empty, and only a strange note
left where his body should have been. Analysis of the note revealed Captain
Amazing’s object DNA—all his last fields and values, captured faithfully in
binary format.
Today, that data has sprung to life. The Captain is back, deserialized from his
own brilliant note. When asked how he conceived of such a plan, the Captain
merely shrugged and mumbled, “Chapter 9.” Sources close to the Captain
refused to comment on the meaning of his cryptic reply, but did admit that prior
to his failed assault on Swindler, the Captain had spent a lot of time reading
books, studying Dispose methods and persistence. We expect Captain Amazing…
…see AMAZING on A-5
Captain Amazing is back
684 Chapter 14
Pool Puzzle Solution
public class Faucet {
public Faucet() {
Table wine = new Table();
Hinge book = new Hinge();
wine.Set(book);
book.Set(wine);
wine.Lamp(10);
book.garden.Lamp(“back in”);
book.bulb *= 2;
wine.Lamp(“minutes”);
wine.Lamp(book);
}
}
public struct Table {
public string stairs;
public Hinge floor;
public void Set(Hinge b) {
floor = b;
}
public void Lamp(object oil) {
if (oil is int)
floor.bulb = (int)oil;
else if (oil is string)
stairs = (string)oil;
else if (oil is Hinge) {
Hinge vine = oil as Hinge;
Console.WriteLine(vine.Table()
+ “ ” + floor.bulb + “ ” + stairs);
}
}
}
public class Hinge {
public int bulb;
public Table garden;
public void Set(Table a) {
garden = a;
}
public string Table() {
return garden.stairs;
}
}
Output when you create a
new Faucet object:
back in 20 minutes
Here’s why Table has to be a struct. If it
were a class, then wine would point to the
same object as book.Garden, which would
cause this to overwrite the “back in” string.
The Lamp() method sets the various
strings and ints. If you call it with
an int, then it sets the Bulb field
in whatever object Hinge points to.
If you pass a
string to Lamp,
it sets the Stairs
field to whatever
is in that string.
Remember, the as
keyword only works with
classes, not structs.
Both Hinge and Table
have a Set() method.
Hinge’s Set() sets
its Table field called
Garden, and Table’s
Set() method sets
its Hinge field called
Floor.
Bonus question: Circle the
lines where boxing happens.
Since the Lamp() method takes an object
parameter, boxing automatically happens
when it’s passed an int or a string.
puzzle solution

this is a new chapter 685
LINQ
15
Get control of your data
It’s a data-driven world…you better know how to live in it.
Gone are the days when you could program for days, even weeks, without dealing with
loads of data. But today, everything is about data. In fact, you’ll often have to work
with data from more than one place…and in more than one format. Databases, XML,
collections from other programs…it’s all part of the job of a good C# programmer. And
that’s where LINQ comes in. LINQ not only lets you query data in a simple, intuitive way,
but it lets you group data, and merge data from different data sources.
So if you take the first word from this
article, and the second word in that list, and
add it to the fifth word over here…you get
secret messages from the government!

686 Chapter 15
An easy project…
All of Objectville Paper’s
customers who are Starbuzz
regulars get a free mug. Just tell us
who the mugs need to go to and what
their favorite drinks are, OK?
Objectville Paper Company wants to do a cross-promotion with Starbuzz Coffee.
Starbuzz has a frequent-customer program where they keep track of which
customers buy which drink and how often they buy it. Objectville Paper wants to
figure out which of their customers are also Starbuzz regulars and send
them a free mug and a coupon for their favorite coffee drink…and it’s up to you to
combine the data and generate the list of customers to send mugs and coupons to.
devil’s in the details
you are here 4 687
LINQ
Starbuzz keeps all their data in classes, grouped together in a big List.
But the Objectville data is in a database (from way back in Chapter
1). We want to find any Starbuzz customers who spent more than $90,
match them to the Objectville Paper contact list, and make a final list
of people: we want each person’s name, the company they
work for, and their favorite Starbuzz drink.
…but the data’s all over the place
L
i
s
t
<
S
t
a
r
b
u
z
z
D
a
t
a
>
How would you combine the data
from Starbuzz and the data from
Objectville Paper Company to get a
complete contact list?
class StarbuzzData
{
public string Name { get; set; }
public Drink FavoriteDrink { get; set; }
public int MoneySpent { get; set; }
public int Visits { get; set; }
}
enum Drink {
BoringCoffee,
ChocoRockoLatte,
TripleEspresso,
ZestyLemonChai,
DoubleCappuccino,
HalfCafAmericano,
ChocoMacchiato,
BananaSplitInACup,
}
You’ve already got the customer data
You built the Objectville Paper Company contact list
back in Chapter 1—it’s got part of the data you need.
The Starbuzz data’s in a List<T>
The Starbuzz people provided a program that
connects to their website and pulls all the data
into a List<StarbuzzData>.
ContactDB
database
Here’s the class
and enum from
Starbuzz’s code.
All of the Objectville Paper Company
customer data is in a database.
You need to get the list of
Starbuzz data, and find
the customers that match
Objectville customers.

688 Chapter 15
LINQ can pull data from multiple sources
LINQ to the rescue! You used LINQ (or Language Integrated Query )
in the hive simulator to track what groups of bees were doing. You took
advantage of the power of LINQ to write simple queries to pull data out
of a collection. LINQ can work with the Starbuzz data just like it worked
with the bees, helping you use queries to pull out customer data. As long
as a collection implements the IEnumerable<T> interface, you can use
LINQ queries with it.
But LINQ also lets you work with more than just collections. You can use
the same queries to pull data from a database, or even an XML document.
So once we get collections under control, we can use LINQ on the
Objectville Paper Company database.
LINQ works with pretty much every kind of data source you could
use in .NET. Your code needs a using System.Linq; line at the
top of your file, but that’s it. Even better, the IDE automatically puts
a reference to LINQ in the header of the class files it creates.
LINQ to the rescue
L
i
s
t
o
f
B
e
e
o
b
j
e
c
t
s
Bee
Bees Bee
Bee
ID = 987
currentState = MakingHoney
ID = 12
currentState = FlyingToFlower
ID = 1982
currentState = GatheringNectar
Database
Bees table
ID = 987 currentState = MakingHoney
ID = 12 currentState = FlyingToFlower
ID = 1982 currentState = GatheringNectar
XML
<bee id=”987” currentState=”MakingHoney” />
<bee id=”12” currentState=”FlyingToFlower” />
<bee id=”1982” currentState=”GatheringNectar” />
var beeGroups =
from bee in world.Bees
group bee by bee.CurrentState
into beeGroup
orderby beeGroup.Key
select beeGroup;
LINQ
Here was the query we used in
the bee simulator to group and
order bees by their state.
We need a similar query to pull data
from the Starbuzz customer data,
which is also in a collection.
The nice thing about LINQ is
that the same query works on a
database or XML document, of
bees or customers or anything else.
We gave you Ready Bake
Code for the LINQ query in
Chapter 12. We’ll see exactly
how it works in a few pages.
you are here 4 689
LINQ
LINQ uses extension methods to let you query, sort, and update data. Check it out
for yourself. Create an int array called linqtest, put some numbers in the array, and
then type this line of code (don’t worry, you’ll learn what it does in a minute):
IEnumerable<int> result = from i in linqtest where i < 3 select i;
Now comment out the using System.Linq; line up in the header of the file you’ve
created. When you try to rebuild the solution, you’ll see that this line doesn’t compile
anymore. The methods you’re calling when you use LINQ are just extension methods
that are being used to extend the array.
All of the collection types in .NET implement the IEnumerable<T> interface,
which you learned about in Chapter 8. But take a minute to get a refresher: type
System.Collections.Generic.IEnumerable<int> into your IDE
window, right-click on the line, and select Go To Definition (or press F12). You’ll
see that the IEnumerable interface defines a GetEnumerator() method:
namespace System.Collections.Generic {
interface IEnumerable<T> : IEnumerable {
// Summary:
// Returns an enumerator that iterates through the collection.
//
// Returns:
// A System.Collections.Generic.IEnumerator<T> that can be
// used to iterate through the collection.
IEnumerator<T> GetEnumerator();
}
}
This is the only method in the interface. Each
collection implements this method. You could
create your own kind of object that implemented
IEnumerable<T> too…and if you did, you could use
LINQ with your object.
.NET collections are already set up for LINQ
This method requires your object to define a way to move
through the elements in it, one element at a time. That’s
all LINQ requires as a prerequisite. If you can move
through a list of data, item by item, then you can implement
IEnumerable<T>, and LINQ can query the collection.
Now you can see why
extension methods
were so important in
Chapter 14…they let
.NET (and you) add all
kinds of cool behavior
to existing types.
Behind
the Scenes
Notice how IEnumerable<T> extends
an interface called IEnumerable? Use
Go to Definition to explore it, too.
690 Chapter 15
LINQ makes queries easy
int[] values = new int[] {0, 12, 44, 36, 92, 54, 13, 8};
var result = from v in values
where v < 37
orderby v
select v;
foreach(int i in result)
Console.Write(“{0} ”, i);
Console.ReadKey();
Here’s a simple example of LINQ syntax. It selects all the numbers in an
int array that are under 37 and puts those numbers in ascending order. It
does that using four clauses that tell it what object to query, what criteria to
use to determine which of its members to select, how to sort the results, and
how the results should be returned.
This assigns the letter “v” to stand in for
each of the array values in the query. So v is
0, then 12, then 44, then 36…etc. It’s called
the range variable.
var
var is a keyword that tells the compiler to figure out the type of a variable at compilation time.
.NET detects the type from the type of the local variable that you’re using LINQ to query. When
you build your solution, the compiler will replace var with the right type for the data you’re working
with.
In the example above, when this line is compiled:
var result = from v in values
The compiler replaces “var” with this:
IEnumerable<int>
And while we’re on the subject of interfaces for collections, remember how we talked about how
IEnumerable<T> is the interface that supports iteration? A lot of these great LINQ queries are
implemented using extension methods that extend IEnumerable<T>, so you’ll see that interface a lot.
This says, select each v in the
array that is less than 37.
Then, put those values in order
(lowest to highest).
If you’ve used SQL before, it may
seem weird to put the select at
the end, but that’s how things
work in LINQ.
Now you can iterate through the
sequence that LINQ returned to
print the output.
This LINQ query has
four clauses: the from
clause, a where clause, an
orderby clause, and the
select clause.
some queries are simple
Output:
0 8 12 13 36
Flip back to Chapter 8 to get a refresher on the IEnumerable<T>
interface. Plus, you can read more about it in Leftover #6 in the Appendix.
you are here 4 691
LINQ
Jimmy just sold his start-up company to a big investor, and wants to take some
of his profits and buy the most expensive issues of Captain Amazing that he can
find. How can LINQ help him scour his data and figure out which comics are
the most expensive?
LINQ is simple, but your queries don’t have to be
Luckily, there’s a thriving marketplace for Captain Amazing comics on Greg’s List. Jimmy knows
that issue #57, “Hippie Madness,” was misprinted and that almost all of the run was destroyed by
the publisher, and he found a rare copy recently sold on Greg’s List for $13,525. After a few hours
of searching, Jimmy was able to build a Dictionary<> that mapped issue numbers to values.
private static Dictionary<int, decimal> GetPrices()
{
return new Dictionary<int, decimal> {
{ 6, 3600M },
{ 19, 500M },
{ 36, 650M },
{ 57, 13525M },
{ 68, 250M },
{ 74, 75M },
{ 83, 25.75M },
{ 97, 35.25M },
};
}
2
Look closely at the LINQ query
on page 690. What do you think
Jimmy has to put in his query to
find the most expensive issues?
Jimmy downloaded a list of Captain Amazing issues from a Captain Amazing fan page. He put them in a
List<T> of Comic objects that have two fields, Name and Issue.
class Comic {
public string Name { get; set; }
public int Issue { get; set; }
}
Jimmy used object initializers and a collection initializer to build his catalog:
private static IEnumerable<Comic> BuildCatalog()
{
return new List<Comic> {
new Comic { Name = “Johnny America vs. the Pinko”, Issue = 6 },
new Comic { Name = “Rock and Roll (limited edition)”, Issue = 19 },
new Comic { Name = “Woman’s Work”, Issue = 36 },
new Comic { Name = “Hippie Madness (misprinted)”, Issue = 57 },
new Comic { Name = “Revenge of the New Wave Freak (damaged)”, Issue = 68 },
new Comic { Name = “Black Monday”, Issue = 74 },
new Comic { Name = “Tribal Tattoo Madness”, Issue = 83 },
new Comic { Name = “The Death of an Object”, Issue = 97 },
};
}
1
Issue #57 is worth $13,525.
Issue #74 of Captain Amazing
is called “Black Monday”.
There’s no special reason
this method is static, other
than to make it easy to call
from a console application’s
entry point method.
Remember
this syntax
for collection
initializers for
dictionaries from
Chapter 8?
Take a minute and flip to Leftover #6 to learn about a really
useful bit of syntax that could come in handy here. This is a
great opportunity to experiment
We left the ()
parentheses off
of the collection
and object
initializers after
<Comic>, because
you don’t need ‘em.
692 Chapter 15
IEnumerable<Comic> comics = BuildCatalog();
Dictionary<int, decimal> values = GetPrices();
var mostExpensive =
from comic in comics
where values[comic.Issue] > 500
orderby values[comic.Issue] descending
select comic;
foreach (Comic comic in mostExpensive)
Console.WriteLine(“{0} is worth {1:c}”,
comic.Name, values[comic.Issue]);
The LINQ query pulls Comic
objects out of the comics list,
using the data in the values
dictionary to decide which
comics to select.
The first clause in the query is the from clause. This one tells
LINQ to query the comics collection, and that the name
comic will be used in the query to specify how to treat each
individual piece of data in the collection.
The where and orderby
clauses can include ANY C#
statement, so we can use the
values
dictionary to select
only those comics worth
more than $500, and we can
sort the results so the most
expensive ones come first.
When you add “{1:c}” to the
WriteLine output, that tells it
to print the second parameter
in the local currency format.
The name
comic
was defined in the from
clause specifically so it could be used in
the where and orderby clauses.
The query returned its results into an IEnumerable<T>
called mostExpensive. The select clause determines what
goes into the results—since it selected comic, the query
returned Comic objects.
it’s not sql
Anatomy of a query
Jimmy could analyze his comic book data with one LINQ query. The where clause tells
LINQ which items from the collection should be included in the results. But that clause
doesn’t have to be just a simple comparison. It can include any valid C# expression—like
using the values dictionary to tell it to return only comics worth more than $500. And the
orderby clause works the same way—we can tell LINQ to order the comics by their value.
You can
choose any
name you
want when
you use a
from clause.
We chose
“comic”.
Output:
Hippie Madness (misprinted) is worth $13,525.00
Johnny America vs. the Pinko is worth $3,600.00
Woman’s Work is worth $650.00
you are here 4 693
LINQ
I don’t buy this. I know SQL already—isn’t
writing a LINQ query just like writing SQL?
LINQ may look like SQL, but it doesn’t work like SQL.
If you’ve done a lot of work with SQL, it may be tempting to dismiss
all this LINQ stuff as intuitive and obvious—and you wouldn’t be alone,
because a lot of developers make that mistake. It’s true that LINQ
uses the select, from, where, descending, and join keywords,
which are borrowed from SQL. But LINQ is very different from SQL,
and if you try to think about LINQ the way you think about SQL you’ll
end up with code that doesn’t do what you expect.
One big difference between the two is that SQL operates on tables,
which are very different from enumerable objects. One really
important difference is that SQL tables don’t have an order, but
enumerable objects do. When you execute a SQL select against a
table, you can be sure that the table is not going to be updated. SQL has
all sorts of built-in data security that you can trust.
If you want to get to the nuts and bolts: SQL queries are set operations,
which means they don’t examine the rows in the table in any predictable
order. A collection, on the other hand, can store anything—values, structs,
objects, etc.—and collections have a specific order. (A table’s rows aren’t
in any particular order until you make a SQL query that orders them;
items inside a list, on the other hand, are in order.) And LINQ lets you
perform any operation that’s supported by whatever happens to be in
the collection—it can even call methods on the objects in the collection.
And LINQ loops through the collection, which means that it does its
operations in a specific order. That may not seem all that important, but
if you’re used to dealing with SQL, it means your LINQ queries will
surprise you if you expect them to act like SQL.
Don’t worry if you’ve
never used SQL—you
don’t need to know
anything about it to
work with LINQ. But if
you’re curious, check out
“Head First SQL.”
There are a lot of other
differences between LINQ
and SQL too, but you don’t
need to delve into them just
yet in order to start working
with LINQ right now! Just
approach it with an open
mind, and don’t expect it to
work the way SQL works.
694 Chapter 15
LINQ is versatile
You can do a lot more than just pull a few items out of a
collection. You can modify the items before you return them.
And once you’ve generated a set of result sequences, LINQ gives
you a bunch of methods that work with them. Top to bottom,
LINQ gives you the tools you need to manage your data.
Modify every item returned from the query
This code will add a string onto the end of each string in an array. It doesn’t
change the array itself—it creates a new sequence of modified strings.
string[] sandwiches = { “ham and cheese”, “salami with mayo”,
“turkey and swiss”, “chicken cutlet” };
var sandwichesOnRye =
from sandwich in sandwiches
select sandwich + “ on rye”;
foreach (var sandwich in sandwichesOnRye)
Console.WriteLine(sandwich);
This adds the string “ on rye” to every
item in the results from the query.
Notice that all the items returned have
“ on rye” added to the end.
Output:
ham and cheese on rye
salami with mayo on rye
turkey and swiss on rye
chicken cutlet on rye
This change is
made to the items
in the results of
your query…but
not to the items
in the original
collection or
database.
Perform calculations on collections
Remember, we said LINQ provides extension methods for your
collections (and database access objects, and anything else that
implements IEnumerable<T>). And some of those are pretty handy
on their own, without actually requiring a query:
Random random = new Random();
List<int> listOfNumbers = new List<int>();
int length = random.Next(50, 150);
for (int i = 0; i < length; i++)
listOfNumbers.Add(random.Next(100));
Console.WriteLine(“There are {0} numbers”,
listOfNumbers.Count());
Console.WriteLine(“The smallest is {0}”,
listOfNumbers.Min());
Console.WriteLine(“The biggest is {0}”,
listOfNumbers.Max());
Console.WriteLine(“The sum is {0}”,
listOfNumbers.Sum());
Console.WriteLine(“The average is {0:F2}”,
listOfNumbers.Average());
None of these methods
are part of the .NET
collections classes…they’re
all defined by LINQ.
that’s why jimmy loves LINQ
These are all extension methods for
IEnumerable<T> in the System.Linq
namespace using a static class called
Enumerable. But don’t take our
word for it! Click on any of them
and use “Go to Definition” to see
for yourself.
≥
≥
All collections are enumerable—they
implement IEnumerable<T>—but not
everything that’s enumerable is technically
a collection unless it implements the
ICollection<T> interface, which
means implementing Add(), Clear(),
Contains(), CopyTo(), and Remove()…
and, of course, ICollection<T>
extends IEnumerable<T>. LINQ deals
with sequences of values or objects, not
collections, and all you need for a sequence is
an object that implements IEnumerable<T>.
you are here 4 695
LINQ
Store all or part of your results in a new sequence
Sometimes you’ll want to keep your results from a LINQ query
around. You can use the ToList() command to do just that:
var under50sorted =
from number in listOfNumbers
where number < 50
orderby number descending
select number;
List<int> newList = under50sorted.ToList();
ToList() converts a LINQ var into a List<T>
object, so you can keep results of a query around.
There’s also ToArray() and ToDictionary()
methods, which do just what you’d expect.
This time, we’re
sorting a list
of numbers in
descending order,
from highest to
lowest.
You can even take just a subset of the results, using
the Take() method:
var firstFive = under50sorted.Take(6);
List<int> shortList = firstFive.ToList();
foreach (int n in shortList)
Console.WriteLine(n);
Take() pulls out the supplied number of items,
from the first set of the results from a
LINQ query. You can put these into another
var, and then convert that into a list.
Q: That’s a lot of new keywords—from,
where, orderby, select…it’s like a
whole different language. Why does it look
so different from the rest of C#?
A:Becauseitservesadifferentpurpose.
MostoftheC#syntaxwasbuilttodoone
smalloperationorcalculationatatime.You
canstartaloop,orsetavariable,ordoa
mathematicaloperation,orcallamethod…
thoseareallsingleoperations.
LINQquerieslookdifferentbecauseasingle
LINQqueryusuallydoesawholebunchof
thingsatonce.Let’stakeacloserlookata
straightforwardquery:
var under10 =
from number in numberArray
where number < 10
select number;
Itlooksreallysimple—notalotofstuffthere,
right?Butthisisactuallyaprettycomplex
pieceofcode.Thinkaboutwhat’sgotto
happenfortheprogramtoactuallyselectall
thenumbersfromnumberArraythat
arelessthan10.First,youneedtoloop
throughtheentirearray.Then,eachnumber
iscomparedto10.Thenthoseresultsneed
tobegatheredtogethersoyourcodecan
usethem.
Andthat’swhyLINQlooksalittleodd:
becauseC#hastocramawholelotof
behaviorintoaverysmallspace.
LINQ lets you write
queries that do very
complex things using
very little code.
Check out Microsoft’s official “101 LINQ Samples” page
There’s way more that LINQ can do. Luckily, Microsoft gives you a great little reference to help you along.
http://msdn2.microsoft.com/en-us/vcsharp/aa336746.aspx
LINQ queries
aren’t run until
you access
their results!
It’s called “deferred
evaluation”—the LINQ query
doesn’t actually do any looping
until a statement is executed
that uses the results of the
query. That’s why ToList()
is important: it tells LINQ to
evaluate the query immediately.
≥
≥
A sequence is an ordered set of objects
or values, which is what LINQ returns in
an IEnumerable<T>.

696 Chapter 15
¢from is how you specify the IEnumerable<T>
that you’re querying. It’s always followed by the
name of a variable, followed by in and the name
of the input (from value in values).
¢where generally follows the from clause. That’s
where you use normal C# conditions to tell LINQ
which items to pull (where value < 10).
¢orderby lets you order the results. It’s followed
by the criteria that you’re using to sort them, and
optionally descending to tell it to reverse the
sort (orderby value descending).
¢select is how you specify what goes into the
results (select value).
¢Take lets you pull the first items out of the results
of a LINQ query (results.Take(10)).
LINQ gives you other methods for each sequence:
Min(), Max(), Sum(), and Average().
¢You can select anything—you’re not limited to
selecting the name that you created in the from
clause. Here’s an example: if your LINQ query
pulls a set of prices out of an array of int values
and names them value in the from clause,
you can return a sequence of price strings like
this: select String.Format(“{0:c}”,
value.
This is just like the {0:x} you used in Chapter 9
when you built the hex dumper. There’s also {0:d}
and {0:D} for short and long dates, and {0:P} or
{0:Pn} to print a percent (with n decimal places).
a little review
Q: How does the from clause work?
A:It’salotlikethefirstlineofa
foreachloop.Onethingthatmakes
thinkingaboutLINQqueriesalittletrickyis
thatyou’renotjustdoingoneoperation.
.
ALINQquerydoesthesamethingoverand
overagainforeachiteminacollection.The
fromclausedoestwothings:ittellsLINQ
whichcollectiontouseforthequery,andit
assignsanametouseforeachmemberof
thecollectionthat’sbeingqueried.
Thewaythefromclausecreatesanew
nameforeachiteminthecollectionisreally
similartohowaforeachloopdoesit.
Here’sthefirstlineofaforeachloop:
foreach (int i in values)
Thatforeachlooptemporarilycreates
avariablecalledi,whichitassigns
sequentiallytoeachiteminthevalues
collection.Nowlookatafromclauseina
LINQqueryonthesamecollection:
from i in values
Thatclausedoesprettymuchthesamething.
Itcreatesatemporaryvariablecallediand
assignsitsequentiallytoeachiteminthe
valuescollection.Theforeachloop
runsthesameblockofcodeforeachitemin
thecollection,whiletheLINQqueryapplies
thesamecriteriainthewhereclause
toeachiteminthecollectiontodetermine
whetherornottoincludeitintheresults.But
onethingtokeepinmindhereisthatLINQ
queriesarejustextensionmethods.They
callmethodsthatdoalltherealwork.You
couldcallthosesamemethodswithoutLINQ.
Q: How does LINQ decide what goes
into the results?
A:That’swhattheselectclauseis
for.EveryLINQqueryreturnsasequence,
andeveryiteminthatsequenceisof
thesametype.IttellsLINQexactlywhat
thatsequenceshouldcontain.When
you’requeryinganarrayorlistofa
singletype—likeanarrayofintsora
List<string>—it’sobviouswhat
goesintotheselectclause.Butwhat
ifyou’reselectingfromalistofComic
objects?YoucoulddowhatJimmydid
andselectthewholeclass.Butyoucould
alsochangethelastlineofthequeryto
select comic.Nametotellitto
returnasequenceofstrings.Oryou
coulddoselect comic.Issue
andhaveitreturnasequenceofints.
you are here 4 697
LINQ
);
LINQ Magnets
Rearrange the magnets so they produce
the output at the bottom of the page.
Console.WriteLine(“Get your kicks on route {0}”,
{ 36, 5, 91, 3, 41, 69, 8 };
int[] badgers =
var skunks =
pigeon in badgers
orderby
where
select
pigeon descending
pigeon + 5;
(pigeon != 36 && pigeon < 50)
var bears =
var weasels =
from
from
sparrow in bears
select
sparrow - 1;
skunks
.Take(3);
weasels.Sum()
Output:
Get your kicks on route 66
698 Chapter 15
);
Console.WriteLine(“Get your kicks on route {0}”,
{ 36, 5, 91, 3, 41, 69, 8 };
var skunks =
pigeon in badgers
orderby
where
select
pigeon descending
pigeon + 5;
(pigeon != 36 && pigeon < 50)
var bears =
var weasels =
from
from
sparrow in bears
select
sparrow - 1;
skunks
.Take(3);
weasels.Sum()
int[] badgers =
LINQ Magnets Solution
Rearrange the magnets so they produce
the output at the bottom of the page.
LINQ starts with some sort
of sequence, collection, or
array—in this case, an array
of integers.
This LINQ statement pulls all
the numbers that are below
50 and not equal to 36 out
of the array, adds 5 to each
of them, sorts them from
biggest to smallest, puts them
in a new object, and points
the skunks reference at it.
Here’s where we take the first three
numbers in skunks and put them into a
new sequence called bears.
This statement just subtracts 1 from
each number in bears and puts them
all into weasels.
The numbers in weasels add up to 66.
After this statement,
skunks contains four
numbers: 46, 13, 10, and 8.
After this statement,
weasels contains three
numbers: 45, 12, and 9.
45 + 12 + 9 = 66
Output:
Get your kicks on route 66
are you a LINQ groupie?
“from pigeon in badgers” makes for a good puzzle, but
an unreadable LINQ query. “from badger in badgers” is
more readable.
you are here 4 699
LINQ
LINQ can combine your results into groups
You already know that you can use LINQ to build
your results into groups, because that’s what we did
with the beehive simulator. Let’s take a closer look at
that query and see how it works.
C
o
l
l
e
c
t
i
o
n
o
f
g
r
o
u
p
s
results
var beeGroups =
from bee in world.Bees
group bee by bee.CurrentState
into beeGroup
orderby beeGroup.Key
select beeGroup;
The query starts out just like the other queries you’ve
seen—by pulling individual bee objects out of the
world.Bees collection, a List<Bee> object.
1
The next line in the query has a new keyword:
group. This tells the query to return groups
of bees. What that means is that rather than
returning one single sequence, the query will
return a sequence of sequences. group
bee by bee.CurrentState tells
LINQ to return one group for each unique
CurrentState property that it finds in the
bees that it selects. Finally, we need to give
LINQ a name for the group. That’s what the
next line is for: into beeGroup says that the
name “beeGroup” refers to the new groups.
2
Now that we’ve got groups, we can manipulate them.
Since we’re returning a sequence of groups, we can
use the orderby keyword to put the groups in the
order of the CurrentState enum values (Idle,
FlyingToFlower, etc.). orderby beeGroup.
Key tells the query to put the sequence of groups
in order, sorting them by the group key. Since we
grouped the bees by their CurrentState, that’s
what being used as a key.
3
Since the bees were grouped by their state,
we call that state the “key”. A group’s key
is the criteria it was grouped by.
Now we just have to use the select
keyword to indicate what’s being returned
by the query. Since we’re returning
groups, we select the group name:
select beeGroup;
4
Note that this query returns groups of
bees, not individual bees.
beeGroup
currentState = MakingHoney
C
o
l
l
e
c
t
i
o
n
o
f
B
e
e
s
currentState = FlyingToFlower
beeGroup
currentState = GatheringNectar
700 Chapter 15
Combine Jimmy’s values into groups
Jimmy buys a lot of cheap comic books, some midrange comic books, and a few expensive ones, and he wants to know
what his options are before he decides what comics to buy. He’s taken those prices he got from Greg’s List and put them
into a Dictionary<int, int> using his GetPrices() method. Let’s now use LINQ to group them into three
groups: one for cheap comics that cost under $100, one for midrange comics that cost between $100 and $1,000, and
one for expensive comics that cost over $1,000. We’ll create a PriceRange enum that we’ll use as the key for the
groups, and a method called EvaluatePrice() that’ll evaluate a price and return a PriceRange.
Now we can group the comics by their price categories
The LINQ query returns a sequence of sequences. Each of the sequences inside the results has
a Key property, which matches the PriceRange that was returned by EvaluatePrice(). Look
closely at the group by clause—we’re pulling pairs out of the dictionary, and using the name pair
for each of them: pair.Key is the issue number, and pair.Value is the price from Greg’s List.
Adding group pair.Key tells LINQ to create groups of issue numbers, and then bundles all of those
groups up based on the price category that’s returned by EvaluatePrice():
Dictionary<int, decimal> values = GetPrices();
var priceGroups =
from pair in values
group pair.Key by EvaluatePrice(pair.Value)
into priceGroup
orderby priceGroup.Key descending
select priceGroup;
foreach (var group in priceGroups) {
Console.Write(“I found {0} {1} comics: issues ”, group.Count(), group.Key);
foreach (var price in group)
Console.Write(price.ToString() + “ ”);
Console.WriteLine();
}
2
Every group needs a key—we’ll use an enum for that
The group’s key is the thing that all of its members have in common. The key can be anything: a
string, a number, even an object reference. We’ll be looking at the prices that Jimmy got from Greg’s
List. Each group that the query returns will be a sequence of issue numbers, and the group’s key
will be a PriceRange enum. The EvaluatePrice() method takes a price as a parameter and
returns a PriceRange:
enum PriceRange { Cheap, Midrange, Expensive }
static PriceRange EvaluatePrice(decimal price) {
if (price < 100M) return PriceRange.Cheap;
else if (price < 1000M) return PriceRange.Midrange;
else return PriceRange.Expensive;
}
1
The query figures out which group a
particular comic belongs to by sending
its price to EvaluatePrice(). That
returns a PriceRange enum, which it
uses as the group’s key.
Each of the groups is a sequence, so we
added an inner foreach loop to pull each
of the prices out of the group.
the key to success
Output:
I found 2 Expensive comics: issues 6 57
I found 3 Midrange comics: issues 19 36 68
I found 3 Cheap comics: issues 74 83 97
you are here 4 701
LINQ
Pool Puzzle
Your job is to take snippets from the
pool and place them into the blank
lines in the program. You can use
the same snippet more than once,
and you won’t need to use all the
snippets. Your goal is to make the
code produce this output:
Note: Each snippet
from the pool can be
used more than once!
var ______ =
from ______ in ______
______ line by line.______
into wordGroups
orderby ________.______
select ________;
____ _________ = words.______(2);
foreach (var group in twoGroups)
{
int i = 0;
foreach (______ inner in ______) {
i++;
if (i == ______.Key) {
var poem =
______ word in ______.______
________ word descending
______ word + ____;
foreach (var word in ______)
Console.Write(word);
}
}
}
class Line {
public string[] Words;
public int Value;
public Line(string[] Words, int Value) {
this.Words = Words; this.Value = Value;
}
}
Line[] lines = {
new Line( new string[] { “eating”, “carrots,”,
“but”, “enjoy”, “Horses” } , 1),
new Line( new string[] { “zebras?”, “hay”,
“Cows”, “bridge.”, “bolted” } , 2),
new Line( new string[] { “fork”, “dogs!”,
“Engine”, “and” }, 3 ) ,
new Line( new string[] { “love”, “they”,
“apples.”, “eating” }, 2 ) ,
new Line( new string[] { “whistled.”, “Bump” }, 1 ) };
from
to
select
inside
outside
orderby
into
output
Horses enjoy eating carrots, but they love eating apples.
+
-
+=
-=
“”
“ ”
int
string
var
[]
[1]
[2]
in
by
Key
Value
Line[]
lines
new
line
group
groups
wordGroups
twoGroups
Value
Key
Words
words
this
inner
Hint: LINQ sorts strings in
alphabetical order.
702 Chapter 15
class Line {
public string[] Words;
public int Value;
public Line(string[] Words, int Value) {
this.Words = Words; this.Value = Value;
}
}
Line[] lines = {
new Line( new string[] { “eating”, “carrots,”, “but”, “enjoy”, “Horses” } , 1),
new Line( new string[] { “zebras?”, “hay”, “Cows”, “bridge.”, “bolted” } , 2),
new Line( new string[] { “fork”, “dogs!”, “Engine”, “and” }, 3 ) ,
new Line( new string[] { “love”, “they”, “apples.”, “eating” }, 2 ) ,
new Line( new string[] { “whistled.”, “Bump” }, 1 )
};
var words =
from line in lines
group line by line.Value
into wordGroups
orderby wordGroups.Key
select wordGroups;
var twoGroups = words.Take(2);
foreach (var group in twoGroups)
{
int i = 0;
foreach (var inner in group) {
i++;
if (i == group.Key) {
var poem =
from word in inner.Words
orderby word descending
select word + “ ”;
foreach (var word in poem)
Console.Write(word);
}
}
}
Output: Horses enjoy eating carrots, but they love eating apples.
This first LINQ query divides the Line
objects in the lines[] array into groups,
grouped by their Value, in ascending order
of the Value key.
The first two groups are the
lines with Values 1 and 2.
Did you figure out that the
two phrases “Horses enjoy eating
carrots, but” and “they love
eating apples” are in descending
alphabetical order?
This loop does a LINQ query
on the first Line object in the
first group and the second Line
object in the second group.
that’s the last pool puzzle in the book
Pool Puzzle Solution
you are here 4 703
LINQ
Use join to combine t wo collections into one query
L
i
s
t
<
P
u
r
c
h
a
s
e
s
>
on comic.Issue
equals purchase.Issue
L
I
N
Q
S
e
q
u
e
n
c
e
results
L
i
s
t
<
C
o
m
i
c
>
Issue = 6 name = “Johnny America”
Issue = 19 name = “Rock and Roll”
Issue = 57
Price = 3600
Price = 375
name = “Hippie Madness” Price = 13215
from comic
in comics
join purchase
in purchases
select new { comic.Name,
comic.Issue, purchase.Price }
Jimmy’s got a whole collection of comics he’s purchased, and he wants to compare them with the prices
he found on Greg’s List to see if the prices he’s been paying are better or worse. He’s been tracking his
purchases using a Purchase class with two automatic properties, Issue and Price. And he’s got
a List<Purchase> called purchases that’s got all the comics he’s bought. But now he needs to
match up the purchases he’s made with the prices he found on Greg’s List. How’s he going to do it?
LINQ to the rescue! Its join keyword lets you combine data from two collections into a
single query. It does it by comparing items in the first collection with their matching items in the
second collection. (LINQ is smart enough to do this efficiently—it doesn’t actually compare every
pair of items unless it has to.) The final result combines every pair that matches.
Start off your query with the usual from clause.
But instead of following it up with the criteria it’ll
use to determine what goes into the results, you add:
join name in collection
The join clause tells LINQ to loop through both
collections to match up pairs of one member from
each collection. It assigns name to the member it’ll
pull out of the joined collection in each iteration.
You’ll use that name in the where clause.
1
You’ll continue the LINQ query
with where and orderby
clauses as usual. You could finish
it with a normal select clause,
but you usually want to return
results that pull some data from
one collection and other data
from the other. That’s where
you use select new to create
a custom set of results using an
anonymous type.
3
Next you’ll add the on clause, which
tells LINQ how to match the two
collections together. You’ll follow it
with the name of the member of
the first collection you’re matching,
followed by equals and the name of
the member of the second collection to
match it to.
2
class Purchase {
public int Issue
{ get; set; }
public decimal Price
{ get; set; }
}
The select new is
followed by curly brackets
that contain the data to
return in the results.
Jimmy’s joining his comics
to purchases, a list
of comics he’s bought.
Jimmy’s got his data in a collection of
Purchase objects called purchases.
Flip to Leftover #8 in the Appendix to
learn more about anonymous types!
704 Chapter 15
Now he can do the join!
You’ve seen all the parts of this query already…now here they are, put together in one piece.
IEnumerable<Comic> comics = BuildCatalog();
Dictionary<int, decimal> values = GetPrices();
IEnumerable<Purchase> purchases = FindPurchases();
var results =
from comic in comics
join purchase in purchases
on comic.Issue equals purchase.Issue
orderby comic.Issue ascending
select new { comic.Name, comic.Issue, purchase.Price };
decimal gregsListValue = 0;
decimal totalSpent = 0;
foreach (var result in results) {
gregsListValue += values[result.Issue];
totalSpent += result.Price;
Console.WriteLine(“Issue #{0} ({1}) bought for {2:c}”,
result.Issue, result.Name, result.Price);
}
Console.WriteLine(“I spent {0:c} on comics worth {1:c}”,
totalSpent, gregsListValue);
2
Jimmy saved a bunch of dough
It looks like Jimmy drives a hard bargain. He created a list of
Purchase classes that contained his purchases, and compared them
with the prices he found on Greg’s List.
First Jimmy created his collection to join.
Jimmy already had his first collection—he just used his BuildCatalog() method from before. So
all he had to do was write a FindPurchases() method to build his list of Purchase classes.
static IEnumerable<Purchase> FindPurchases() {
List<Purchase> purchases = new List<Purchase>() {
new Purchase() { Issue = 68, Price = 225M },
new Purchase() { Issue = 19, Price = 375M },
new Purchase() { Issue = 6, Price = 3600M },
new Purchase() { Issue = 57, Price = 13215M },
new Purchase() { Issue = 36, Price = 660M },
};
return purchases;
}
1
Jimmy’s real happy
that he knows LINQ,
because it let him
see just how hard a
bargain he can drive!
When Jimmy used a join clause, LINQ
compared every item in the comics collection
with each item in purchases to see which ones
have comic.Issue equal to purchase.Issue.
The select clause creates a result set with Name
and Issue from the comic member, and Price
from the purchase member.
jimmy’s a joiner
Jimmy paid $13,215
for issue #57.
Output:
Issue #6 (Johnny America vs. the Pinko) bought for $3,600.00
Issue #19 (Rock and Roll (limited edition)) bought for $375.00
Issue #36 (Woman’s Work) bought for $660.00
Issue #57 (Hippie Madness (misprinted)) bought for $13,215.00
Issue #68 (Revenge of the New Wave Freak (damaged)) bought for $225.00
I spent $18,075.00 on comics worth $18,525.00
you are here 4 705
LINQ
OK, so now I know Jimmy played with his
comic books using LINQ queries to query
his collections…but what about the Starbuzz
promotion problem? I still don’t see how
LINQ works with databases.
LINQ uses the same syntax with
databases as it does with collections.
You’ve already seen in Chapter 1 how easy .NET makes
it to work with a database. The IDE gives you a really
convenient way to connect with databases, add tables, and
even link data in those tables to your forms.
Now, you can take that same database you already
connected to and query it with LINQ. Not only that,
LINQ lets you combine your data from your database with
data from your objects seamlessly.
In fact, you can use the same exact query syntax…all you
need is to get access to your database so you can run a
LINQ query against it.
L
i
s
t
<
S
t
a
r
b
u
z
z
D
a
t
a
>
ContactDB
database
LINQ
L
I
N
Q
S
e
q
u
e
n
c
e
The Starbuzz
frequent customer
data’s here.
The Objectville
contact database
has the addresses.
We can use LINQ to
compare and combine
data from more than
one source and create a
sequence of results.
Even though LINQ
to SQL is very
different under the
hood, when you write
your code it looks
really similar to other
LINQ queries.
706 Chapter 15
Connect LINQ to a SQL database
LINQ operates on objects that implement the IEnumerable<T> interface, right? So it
should make sense that you access your SQL database using an object that implements
IEnumerable. And C# makes it easy to add that object to your project.
Add the Objectville contact database to a new console application project
Back in Chapter 1, you created a SQL Server Compact database of contacts for the Objectville Paper Company
and saved it in a file called ContactDB.sdf. Start a new Windows Application project, right-click on your
project in the Solution Explorer, select “Add Existing Item”, and add the database. Make sure you select “Data
Files” from the file type filter drop-down, navigate to the file with the SQL database, and add it to your project.
(The IDE will pop up the Data Source Configuration wizard, but you can cancel out of it.)
1
Use the SqlMetal.exe program to generate LINQ to SQL classes
There’s one more step you need to do to connect the dots between your SQL database and your code, and
you’ll do it using a program called SqlMetal.exe. It’s a command-line tool that’s installed along with
Visual Studio 2010 (it doesn’t matter which edition you install, it comes with all of them). You can find it in a
folder called “Microsoft SDKs”, which lives inside your “Program Files” folder (or, if you’re running a 64-bit
version of Windows, your “Program Files (x86)” folder). Bring up a command prompt and run a command
to add the Microsoft SDKs folder to your path. If you’re using a 64-bit version of Windows, type this:
PATH=%PATH%;%ProgramFiles(x86)%\Microsoft SDKs\Windows\v7.0A\Bin\
Or if you’re using a 32-bit version, type this:
PATH=%PATH%;%ProgramFiles%\Microsoft SDKs\Windows\v7.0A\Bin\
Next, change directory to your project folder (cd folder-name) and type this command:
SqlMetal.exe ContactDB.sdf /dbml:ContactDB.dbml
Here’s what it should look like when your command is running:
Microsoft (R) Database Mapping Generator 2008 version 1.00.30729
for Microsoft (R) .NET Framework version 3.5
Copyright (C) Microsoft Corporation. All rights reserved.
After it’s done, your folder should contain three new files: ContactDB.dbml, ContactDB.
designer.cs, and ContactDB.dbml.layout.
Use “Add Existing Item” to add ContactDB.dbml to your project (again, select “Data Files” from
the file type filter drop-down). When you add that file, the IDE automatically adds the others, too.
2
You can learn more about SqlMetal.exe here:
http://msdn.microsoft.com/en-us/library/bb386987.aspx
And if for some strange reason the Visual Studio installer didn’t install it for you,
that page has a link to the Microsoft SDK download page.
Do this
bring it all together
It might also be
in a folder called
“NETFX 4.0
Tools” under the
Bin\ folder. If it
is, add “NETFX
4.0 Tools” to
the end of the
PATH= command.
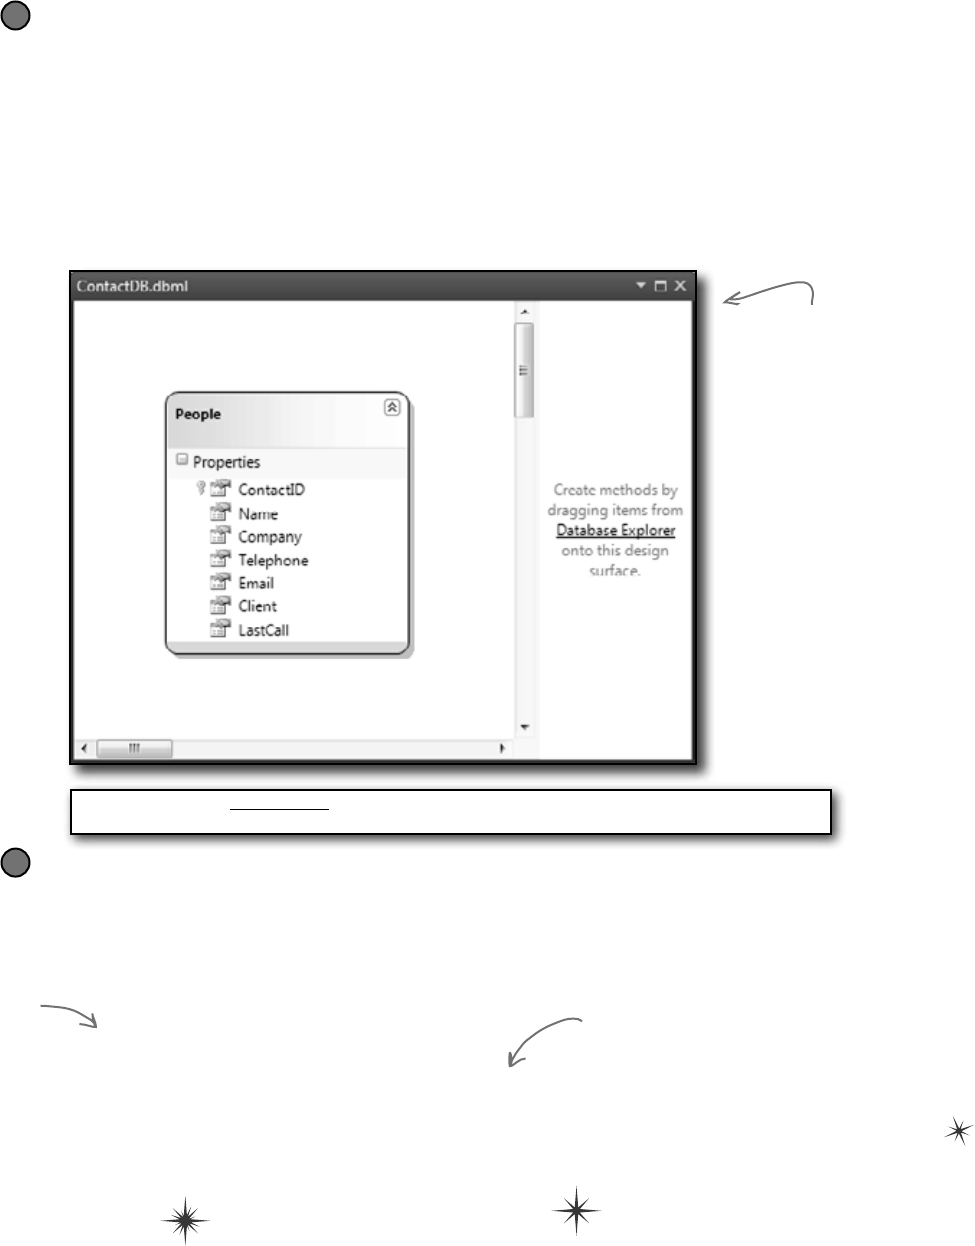
you are here 4 707
LINQ
Open up the LINQ to SQL classes in the Object Relational Designer
When you ran SqlMetal.exe to create ContactDB.dbml and the other files and added
them to your project, you created LINQ to SQL classes. Remember, LINQ queries are built to
operate on objects that implement the IEnumerable<T> interface. But a SQL Server Compact
database isn’t an object at all! That’s where the LINQ to SQL classes come in. They contain classes
that know how to query the tables in your database, but also implement IEnumerable<T> with
an enumerator that returns the data in that table.
The IDE has a great tool called the Object Relational Designer that shows you exactly what classes
you generated with SqlMetal.exe. Once ContactDB.dbml is added to your project, double-
click on it to bring it up the Object Relational Designer. Here’s what you should see:
3
You’re all set to write LINQ queries that pull data out of the database
Add this code to the Main() method. Notice how we used the select new keyword to
create custom results that only contain the Name and Company.
string connectionString = “Data Source=|DataDirectory|\\ContactDB.sdf”;
ContactDB context = new ContactDB(connectionString);
var peopleData =
from person in context.People
select new { person.Name, person.Company };
foreach (var person in peopleData)
Console.WriteLine(“{0} works at {1}”, person.Name, person.Company);
4
The Object Relational
Designer is showing
you the People class,
which is a data class
that you generated
with SqlMetal.exe.
It connects to the
People table in your
database and returns
the data using the
IEnumerable<T>
interface so it can be
queried using LINQ.
How neat is that?
Get some practice using select new. It’ll pull
just the values from the Name and Company
columns from the database.
The ContactDB
class is called a
data context
class. Use its
People property
in a LINQ
query to get
data out of
the People table.
Quick note: In the non-Express versions of Visual Studio, you can skip SqlMetal.exe and drag
your SQL Server Compact Edition data source straight into the Object Relational Designer.

708 Chapter 15
Q: Can you rewind a minute and explain what var is again?
A:Yes,definitely.Thevarkeywordsolvesatrickyproblemthat
LINQbringswithit.Normally,whenyoucallamethodorexecutea
statement,it’sabsolutelyclearexactlywhattypesyou’reworkingwith.
Ifyou’vegotamethodthatreturnsastring,forinstance,thenyou
canonlystoreitsresultsinastringvariableorfield.
ButLINQisn’tquitesosimple.WhenyoubuildaLINQstatement,itmight
returnananonymoustypethatisn’t defined anywhere in your program.
Yes,youknowthatit’sgoingtobeasequenceofsomesort.Butwhat
kindofsequencewillitbe?Youdon’tknow—becausetheobjectsthat
arecontainedinthesequencedependentirelyonwhatyouputinyour
LINQquery.Takethisquery,forexample,fromJimmy’sprogram:
var mostExpensive =
from comic in comics
where values[comic.Issue] > 500
orderby values[comic.Issue] descending
select comic;
Whatifyouchangedthelastlinetothis:
select new
{ Name = comic.Name,
IssueNumber = “#” + comic.Issue };
Thatreturnsaperfectlyvalidtype:ananonymoustypewithtwo
members,astringcalledNameandastringcalledIssueNumber.
Butwedon’thaveaclassdefinitionforthattypeanywhereinour
program!Sure,youdon’tactuallyneedtoruntheprogramtosee
exactlyhowthattypeisdefined.ButthemostExpensive
variablestillneedstobedeclaredwithsometype.
Andthat’swhyC#givesusthevarkeyword,whichtellsthecompiler,
“OK,weknowthatthisisavalidtype,butwecan’texactlytellyouwhat
itisrightnow.Sowhydon’tyoujustfigurethatoutyourselfandnot
botheruswithit?Thankssomuch.”
¢ThegroupclausetellsLINQtogroupthe
resultstogether—whenyouuseit,LINQcreatesa
sequenceofgroupsequences.
¢Everygroupcontainsmembersthathaveone
memberincommon,calledthegroup’skey.Use
thebykeywordtospecifythekeyforthegroup.
EachgroupsequencehasaKeymemberthat
containsthegroup’skey.
¢UseajoinclausetotellLINQtocombinetwo
collectionsintoasinglequery.Whenyoudo,LINQ
compareseverymemberofthefirstcollectionwith
everymemberofthesecondcollection,including
thematchingpairsintheresults.
¢joinqueriesuseanon…equalsclauseto
tellLINQhowtomatchthepairsofitems.
¢Whenyou’redoingajoinquery,youusually
wantasetofresultsthatincludessomemembers
fromthefirstcollectionandothermembersfromthe
secondcollection.Theselectclauseletsyou
buildcustomresultsfrombothofthem.
¢LINQcanqueryaSQLdatabaseusingtheLINQ
to SQL classes.Thoseclassesprovideobjectsfor
yourprogramthatworkwithLINQ(whichmeans
youcanaccessthemethodsonthoseobjects
directlyifyouwant—tryitoutyourself!).
¢TheIDE’sObjectRelationalDesignerletsyou
choosethetablesthatyouwanttoaccessvia
LINQ.Whenyouspecifythetablesyouwantto
access,itaddsaDataContextclasstoyour
project.Whenit’sinstantiated,additsmembersto
yourLINQqueriestoaccesstheSQLtables.
two collections walk into a var
you are here 4 709
LINQ
Q: I don’t quite get how join works.
A:joinworkswithanytwosequences.
Let’ssayyou’vegotacollectionoffootball
playerscalledplayers—itsitemsare
objectsthathaveaNameproperty,a
PositionpropertyandaNumber
property.Sowecouldpullouttheplayers
whosejerseyshaveanumberbiggerthan
10withthisquery:
var results =
from player in players
where player.Number > 10
select player;
Let’ssaywewantedtofigureouteach
player’sshirtsize,andwe’vegota
jerseyscollectionwhoseitemshavea
NumberpropertyandaSizeproperty.A
joinwouldworkreallywellforthat:
var results =
from player in players
where player.Number > 10
join shirt in jerseys
on player.Number
equals shirt.Number
select shirt;
Q: Hold on, that query will just give
me a bunch of shirts. What if I want to
connect each player to his shirt size, and
I don’t care about his number at all?
A:That’swhatanonymous typesare
for—youcanconstructananonymoustype
thatonlyhasthedatayouwantinit.Andit
letsyoupickandchoosefromthevarious
collectionsthatyou’rejoiningtogether,too.
Soyoucanselecttheplayer’snameandthe
shirt’ssize,andnothingelse:
var results =
from player in players
where player.Number > 10
join shirt in jerseys
on player.Number
equals shirt.Number
select new {
player.Name,
shirt.Size
};
TheIDEissmartenoughtofigureoutexactly
whatresultsyou’llbecreatingwithyour
query.Ifyoucreatealooptoenumerate
throughtheresults,assoonasyoutype
thevariablenametheIDEwillpopupan
IntelliSenselist.
foreach (var r in results)
r.
NoticehowthelisthasNameandSizein
it.Ifyouaddedmoreitemstotheselect
clause,they’dshowupinthelisttoo.That’s
becausethequerywouldcreateadifferent
anonymoustypewithdifferentmembers.
Q: Do I always have to add that
.dbml file that was generated by
SqlMetal.exe? I still don’t quite get
what’s going on there.
A:Yes,youdefinitelyneedthatfileifyou
wanttouseLINQwithyourSQLServer
Compactdatabase.
Remember,LINQrequiresanobjectthat
implementstheIEnumerable<T>
interface.ASQLdatabasedoesn’tnormally
implementthatinterface…oranyinterface,
really,becauseit’snotanobject.Soifyou
wantLINQtoworkwithSQL—oranyother
sourceofdatathatyoucanquery—then
youneedanobjectthatinteractswithitand
implementsIEnumerable<T>.
Butdon’ttakeourwordforit.Gotothecode
youjustwrote,right-clickon“People”and
choose“GotoDefinition”(orpressF12).
ThattakesyouintoaContactDB.
designer.csgetaccessorthat
returnsaTable<People>.Click
on“Table”andgotodefinitionagain.
ClassTable<TEntity>extends
IQueryable<TEntity>.Click
on“IQueryable”andgotodefinitionone
moretime,andyou’llseethatitimplements
IEnumerable<T>.
Sothe.dbmlfile(andthe.csclassfile
itbringsalongwithit)providesobjectsthat
implementIEnumerable.AndtheIDEis
smartenoughtoknowexactlywhattodowith
that.dbmlfile:whenyougenerateit,add
ittoyourproject,andopenitupintheObject
RelationalDesigner,youcanseethemembers
ofthePeopledataclassthatmapdirectly
tothePeopletableinyourSQLdatabase.
Thatdataclasstakescareofconnectingto
SQLforyou,anditautomaticallyreadsyour
database’stablesandprovidesthedataneatly
wrappedupinanIEnumerable<T>so
thatLINQcanaccessit.
You can use “select new” to construct custom LINQ query results
that include only the items that you want in your result sequence.
710 Chapter 15
Use a join query to connect
Starbuzz and Object ville
Now you have all the tools that you need to combine the data from
Starbuzz and Objectville Paper Company into one final result set. Do this
Build the Starbuzz objects
Here’s the list that contains the Starbuzz customer data. Add it to your project:
class StarbuzzData {
public string Name { get; set; }
public Drink FavoriteDrink { get; set; }
public int MoneySpent { get; set; }
public int Visits { get; set; }
}
enum Drink {
BoringCoffee, ChocoRockoLatte, TripleEspresso,
ZestyLemonChai, DoubleCappuccino, HalfCafAmericano,
ChocoMacchiato, BananaSplitInACup,
}
You’ll also need a method to generate some sample data:
static IEnumerable<StarbuzzData> GetStarbuzzData() {
return new List<StarbuzzData> {
new StarbuzzData {
Name = “Janet Venutian”, FavoriteDrink = Drink.ChocoMacchiato,
MoneySpent = 255, Visits = 50 },
new StarbuzzData {
Name = “Liz Nelson”, FavoriteDrink = Drink.DoubleCappuccino,
MoneySpent = 150, Visits = 35 },
new StarbuzzData {
Name = “Matt Franks”, FavoriteDrink = Drink.ZestyLemonChai,
MoneySpent = 75, Visits = 15 },
new StarbuzzData {
Name = “Joe Ng”, FavoriteDrink = Drink.BananaSplitInACup,
MoneySpent = 60, Visits = 10 },
new StarbuzzData {
Name = “Sarah Kalter”, FavoriteDrink = Drink.BoringCoffee,
MoneySpent = 110, Visits = 15 }
};
}
2
We built this method so that it has some names that also
appear in the Objectville contact list. If you used different
names, make sure you’ve got matching data here.
Add the SQL data to your project
If you haven’t already done it, create a new console application project and add the ContactDB SQL
database to it. Then use SqlMetal.exe to create the Object Relational Designer with the LINQ to SQL
classes to the project, add it to the project, and write a simple test query just to make sure it’s all working.
1
The Starbuzz data comes as a collection
of StarbuzzData objects. It’s got a lot
of data—you won’t need it all for the
promotion, so you’ll have to select only the
data you need in the LINQ query.
Starbuzz has plenty of great drinks, and
each customer has his or her favorite.
that’s all folks
GetStarbuzzData()
uses a collection
initializer and object
initializers to set up
the Starbuzz objects.
Again, you can leave
the ()’s off of the
collection and object
Initializers.

you are here 4 711
LINQ
Now join the SQL database to the Starbuzz collection
Here’s the code for the query. Put it in your Main() entry point method:
IEnumerable<StarbuzzData> starbuzzList = GetStarbuzzData();
string connectionString =
“Data Source=|DataDirectory|\\ContactDB.sdf”;
ContactDB context = new ContactDB(connectionString);
var results =
from starbuzzCustomer in starbuzzList
where starbuzzCustomer.MoneySpent > 90
join person in context.People
on starbuzzCustomer.Name equals person.Name
select new { person.Name, person.Company,
starbuzzCustomer.FavoriteDrink };
foreach (var row in results){
Console.WriteLine(“{0} at {1} likes {2}”,
row.Name, row.Company, row.FavoriteDrink);
Console.ReadKey();
3
Check your results—make
sure it works the way you
expect it to.
Nice work…with this
new promotion, I’ll bet we’ll
get tons of repeat business. I’ll
definitely be calling you again.
We’ll need to do a join
to combine the Starbuzz
data with the customer
data in the People table.
The People member
in the DataContext
is a collection that
gives you access to the
People table in the
database.
Here’s where the
select clause
pulls the name
and company
from the
database and
the favorite
drink from the
Starbuzz data
into one single
result sequence.
Edit queries with LINQPad
There’s a great learning tool for exploring
and using LINQ. It’s called LINQPad, and
it’s available for free from Joe Albahari
(one of our superstar “Head First C#”
technical reviewers who kept a lot of bugs
out of this book). You can download it here:
http://www.linqpad.net/

C# Lab 713
Name: Date:
C# Lab 713
C# Lab
Invaders
This lab gives you a spec that describes a program
for you to build, using the knowledge you’ve gained
throughout this book.
This project is bigger than the ones you’ve seen so
far. So read the whole thing before you get started,
and give yourself a little time. And don’t worry if
you get stuck—there’s nothing new in here, so you
can move on in the book and come back to the lab
later.
We’ve lled in a few design details for you, and
we’ve made sure you’ve got all the pieces you
need…and nothing else.
It’s up to you to nish the job. You can download
an executable for this lab from the website…but we
won’t give you the code for the answer.
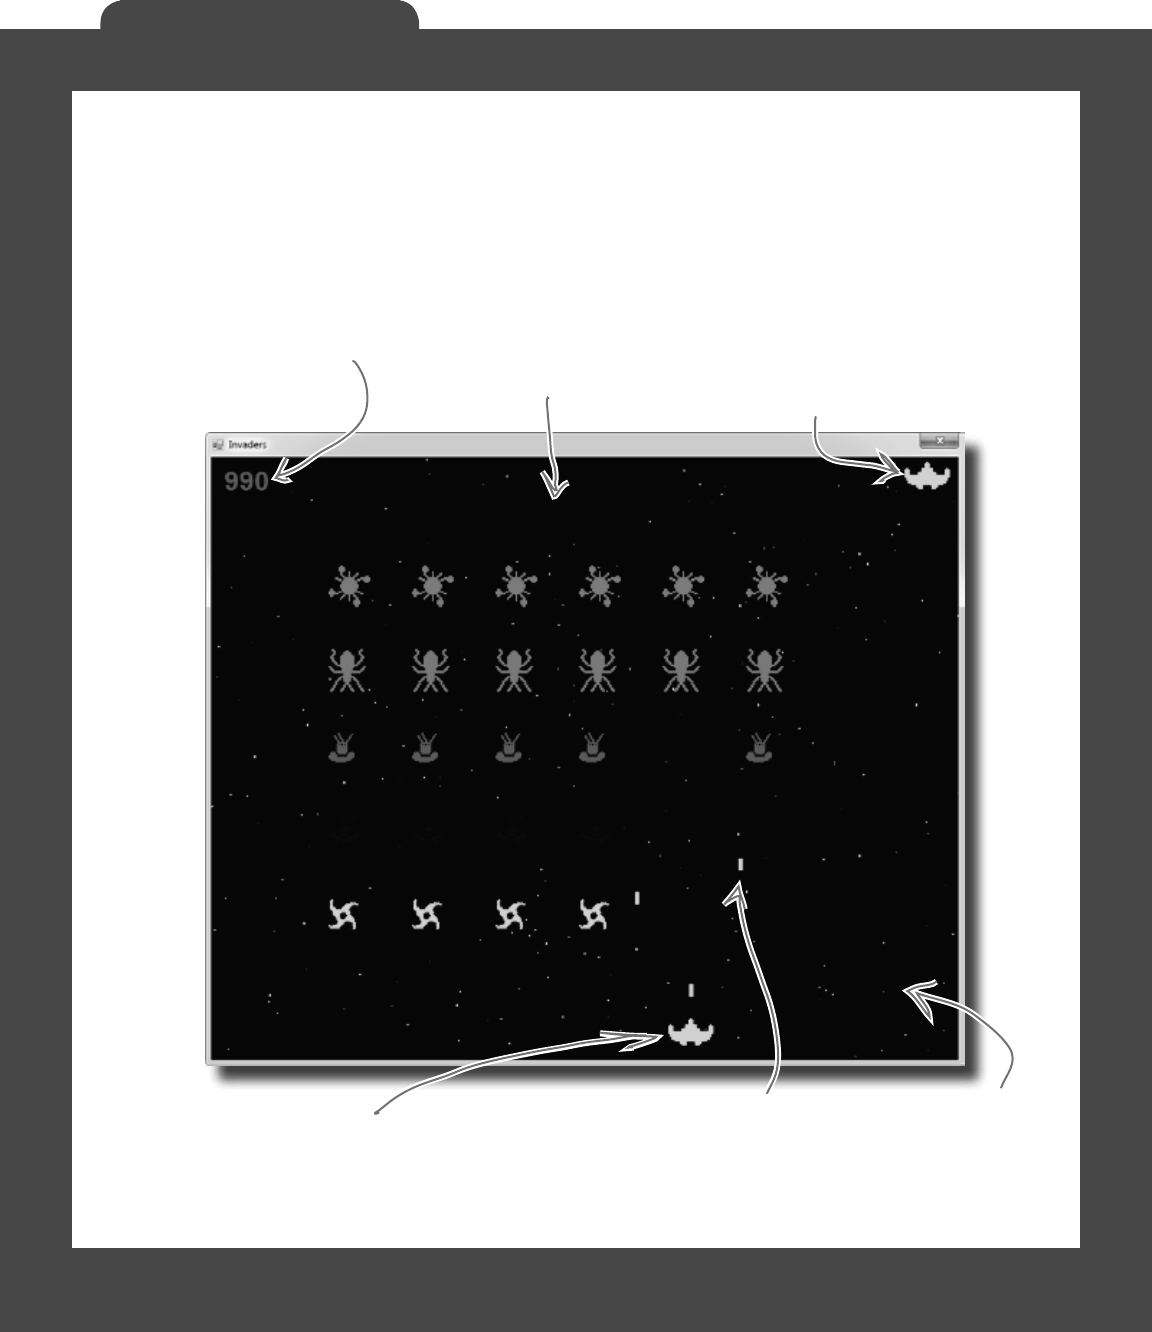
714 Head First Lab #1
Invaders
The grandfather of video games
In this lab you’ll pay homage to one of the most popular, revered,
and replicated icons in video game history, a game that needs no
further introduction. It’s time to build Invaders.
As the player destroys the
invaders, the score goes up.
It’s displayed in the upper
left-hand corner.
The player starts out with three
ships. The first ship is in play,
and the other two are kept in
reserve. His spare ships are shown
in the upper right-hand corner.
The multicolored
stars in the
background twinkle
on and off, but
don’t affect
gameplay at all.
The invaders return fire. If one of the shots hits
the ship, the player loses a life. Once all lives are
gone, or if the invaders reach the bottom of the
screen, the game ends and a big “GAME OVER” is
displayed in the middle of the screen.
The player moves the ship left
and right, and fires shots at
the invaders. If a shot hits an
invader, the invader is destroyed
and the player’s score goes up.
The invaders attack in waves of 30.
The first wave moves slowly and fires
a few shots at a time. The next wave
moves faster, and fires more shots more
frequently. If all 30 invaders in a wave
are destroyed, the next wave attacks.
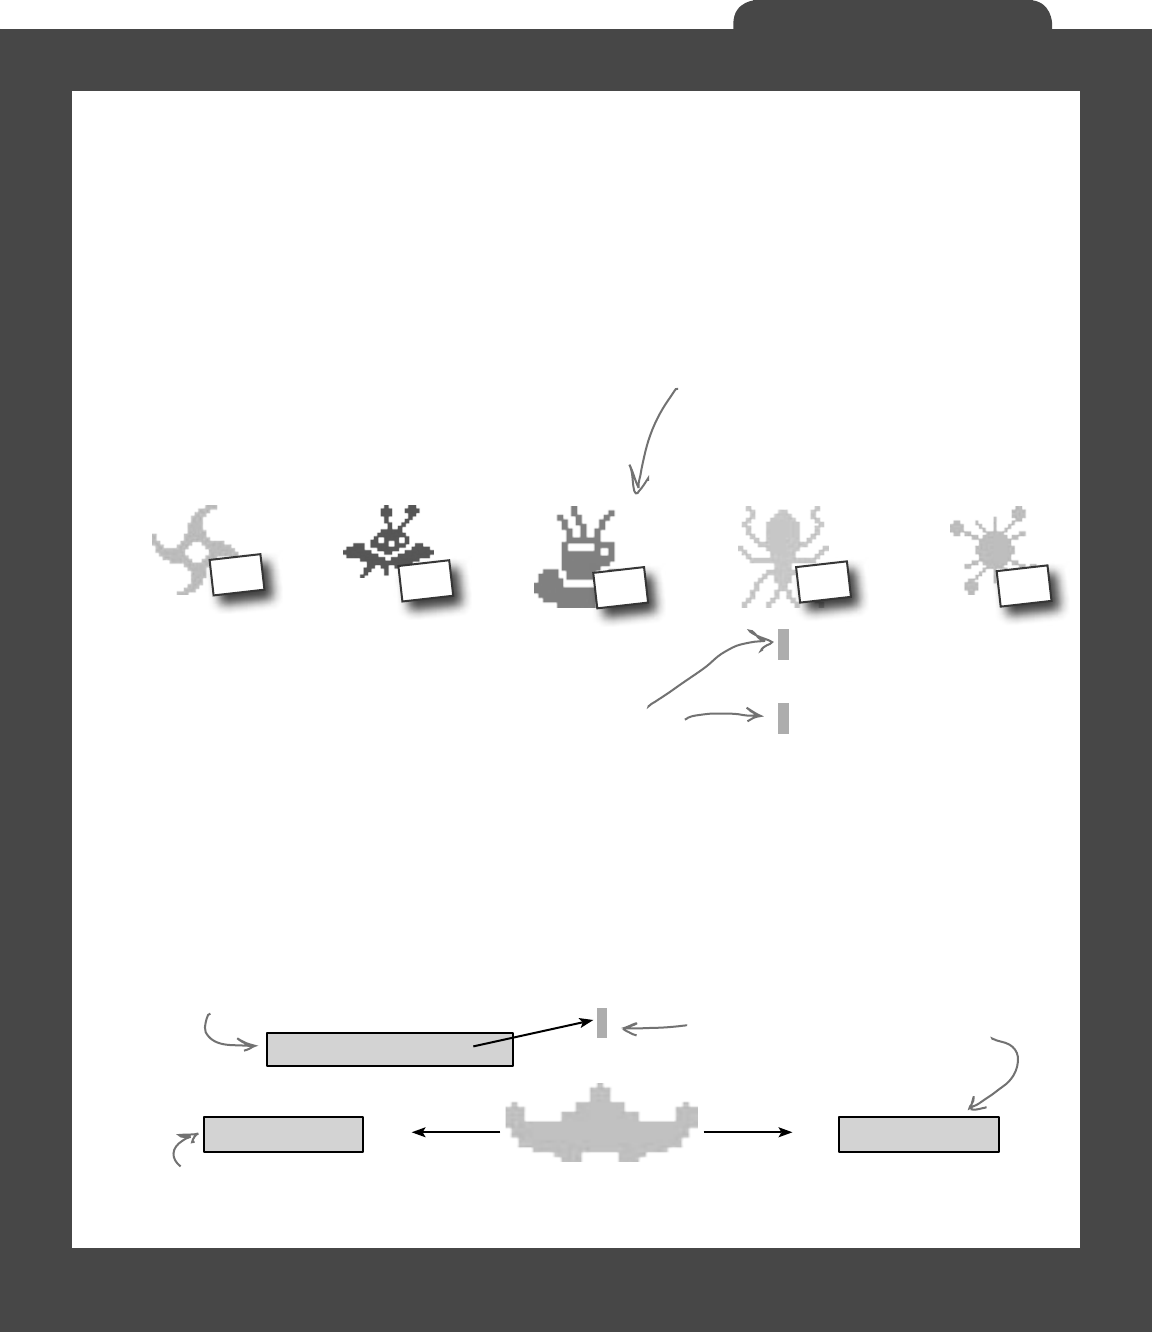
you are here 4 715
Invaders
RIGHT
SPACE
Your mission: defend the planet
against wave after wave of invaders
The invaders attack in waves, and each wave is a tight formation
of 30 individual invaders. As the player destroys invaders, his score
goes up. The bottom invaders are shaped like stars and worth 10
points. The spaceships are worth 20, the saucers are worth 30, the
bugs are worth 40, and the satellites are worth 50. The player starts
with three lives. If he loses all three lives or the invaders reach the
bottom of the screen, the game’s over.
The left arrow moves the
ship toward the left-hand
edge of the screen.
The right arrow key moves
the ship to the right.
The game should keep
track of which keys
are currently being held
down. So pressing right
and spacebar would
cause the ship to move
to the right and fire
(if two shots aren’t
already on the screen).
The spacebar shoots, but
there can only be two
player shots on the screen
at once. As soon as a shot
hits something or disappears,
another shot can be fired.
Fire
If a shot hits
an invader, both
disappear. Otherwise,
the shot disappears
when it gets to the
top of the screen.
There are five different types of invaders,
but they all behave the same way. They start
at the top of the screen and move left until
they reach the edge. Then they drop down
and start moving right. When they reach the
right-hand boundary, they drop down and
move left again. If the invaders reach the
bottom of the screen, the game’s over.
The first wave of
invaders can fire two
shots at once—the
invaders will hold their
fire if there are more
than two shots on the
screen. The next wave
fires three, the next
fires four, etc.
LEFT
10 20
30 40 50
716 Head First Lab #1
Invaders
The architecture of Invaders
Invaders needs to keep track of a wave of 30 invaders
(including their location, type, and score value), the player’s
ship, shots that the player and invaders fire at each other, and
stars in the background. As in the Quest lab, you’ll need a
Game object to keep up with all this and coordinate between
the form and the game objects.
Here’s an overview of what you’ll need to create:
G
a
m
e
o
b
j
e
c
t
F
o
r
m
o
b
j
e
c
t
The form is pretty simple. It’s got
timers to tell the game to go, it
passes on key presses, and it animates
the invaders and twinkling stars. And
it’s got a Paint event handler to
draw the graphics, which just calls
the Game object’s Draw() method.
The Game object manages the gameplay.
It keeps track of how many lives the
player has left and how many waves of
invaders have attacked. When the game’s
over, it raises a GameOver event to tell
the form to stop its timers.
you are here 4 717
Invaders
P
l
a
y
e
r
S
h
i
p
o
b
j
e
c
t
L
i
s
t
<
I
n
v
a
d
e
r
>
L
i
s
t
<
S
h
o
t
>
S
t
a
r
s
o
b
j
e
c
t
All of the invaders on the screen are
stored in a List. When an invader is
destroyed, it’s removed from the list
so the game stops drawing it.
The object that represents the
ship keeps track of its position
and moves itself left and right,
making sure it doesn’t move off
the side of the screen.
The game keeps two
lists of Shot objects:
a list of shots the
player fired at the
invaders, and a list
of shots the invaders
fired back.
The Stars object keeps a List of Star structs
(each of which contains a Point and a Pen).
Stars also has a Twinkle() method that removes
five stars at random and adds five new ones—
the game calls Twinkle() several times a second
to make the stars twinkle in the background.
L
i
s
t
<
S
h
o
t
>
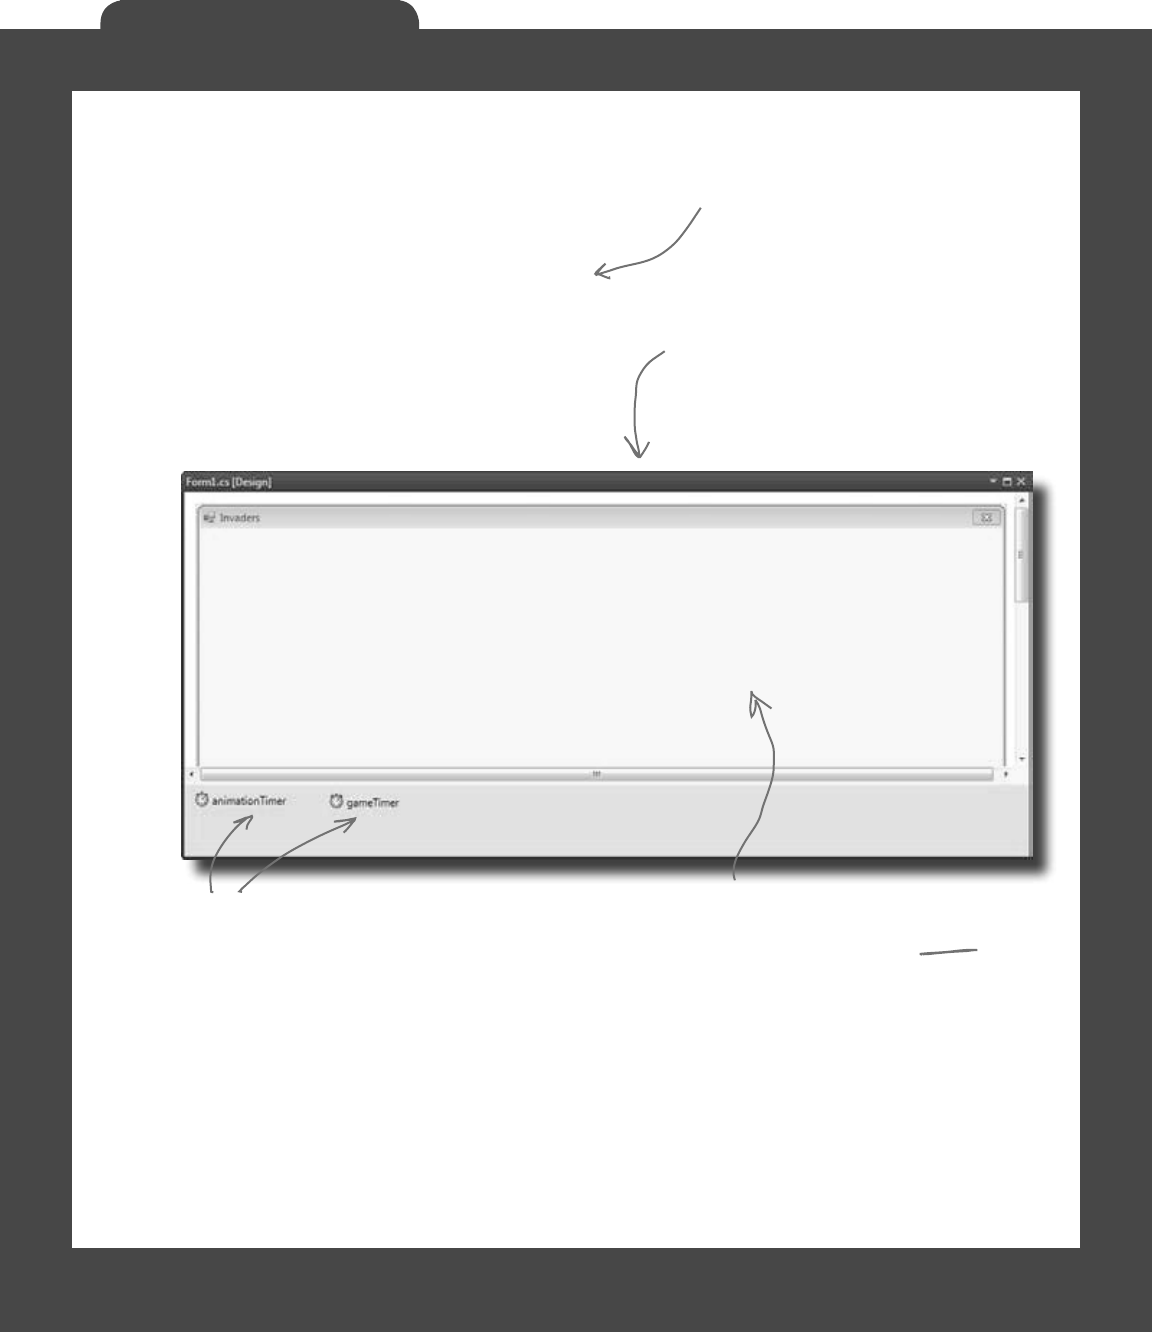
718 Head First Lab #1
Invaders
Design the Invaders form
The Invaders form has only two controls: a timer to trigger
animation (making the stars twinkle and the invaders animate
by changing each invader picture to a different frame), and
a timer to handle gameplay (the invaders marching left and
right, the player moving, and the player and invaders shooting
at each other). Other than that, the only intelligence in the
form is an event handler to handle the game’s GameOver
event, and KeyUp and KeyDown event handlers to manage
the keyboard input.
Set the form’s FormBorderStyle property to FixedSingle and
its DoubleBuffered property to true, turn off its MinimizeBox
and MaximizeBox properties, set its title, and then stretch it
out to the width you want the game area to be.
When the form initializes its Game object,
it passes its ClientRectangle to it so it
knows the boundaries of the form. So you
can change the size of the battlefield
just by changing the size of the form.
You should add two timers:
animationTimer and gameTimer.
The form fires a KeyDown event any
time a key is pressed, and it fires a
KeyUp event whenever a key is released.

you are here 4 719
Invaders
The animation timer handles the eye candy
The stars in the game’s background and the invader animation
don’t affect gameplay, and they continue when the game is
paused or stopped. So we need a separate timer for those.
Add code for the animation timer’s tick event
Your code should have a counter that cycles from 0 to 3 and then back down
to 0. That counter is used to update each of the four-cell invader animations
(creating a smooth animation). Your handler should also call the Game
object’s Twinkle() method, which will cause the stars to twinkle. Finally, it
needs to call the form’s Refresh() method to repaint the screen.
Try a timer interval of 33ms, which will give you about 30 frames per second.
Make sure you set the game timer to a shorter interval, though. The ship
should move and gameplay should occur more quickly than the stars twinkle.
If the animation timer is
set to 33ms, but the Game
object’s Go() method takes
longer than that to run,
then animation will occur
once Go() completes.
We tried things out on a slow machine, and
found that setting the animation interval
to 100ms and the gameplay timer interval
to 50ms gave us a frame rate of about
10 frames per second, which was definitely
playable. Try starting there and reducing
each interval until you’re happy.
Adjust the timers for smooth animation
With a 33ms interval for animation, set the game timer to 10ms. That way, the
main gameplay will occur more quickly than the animation (which is really just
background eye candy). At the same time, the Go() method in Game (fired
by the game timer, which we’ll talk about in a little bit) can take a lot of CPU
cycles. If the CPU is busy handling gameplay, the animation timer will just wait
until the CPU gets to it, and then fire (and animate the stars and invaders).
Alternately, you can just set both timers to an interval of 5ms, and the game
will run and animate about as fast as your system can handle (although on fast
machines, animation could get annoyingly quick).
Animation occurs even
when gameplay doesn’t.
That means that the
stars twinkle and the
invaders animate even if
the game is over, paused,
or hasn’t been started.
An invader starts with cell 0,
goes to cell 1, then 2, then 3…
…and then reverses, going back
to 2, then 1, then 0.
720 Head First Lab #1
Invaders
Respond to keyboard input
Before we can code the game timer, we need to write event
handlers for the KeyDown and KeyUp events. KeyDown is
triggered when a key is pressed, and KeyUp when a key is
released. For most keys, we can simply take action by firing a
shot or quitting the game.
For some keys, like the right or left arrow, we’ll want to store
those in a list that our game timer can then use to move the
player’s ship. So we’ll also need a list of pressed keys in the form
object:
List<Keys> keysPressed = new List<Keys>();
private void Form1_KeyDown(object sender, KeyEventArgs e) {
if (e.KeyCode == Keys.Q)
Application.Exit();
if (gameOver)
if (e.KeyCode == Keys.S) {
// code to reset the game and restart the timers
return;
}
if (e.KeyCode == Keys.Space)
game.FireShot();
if (keysPressed.Contains(e.KeyCode))
keysPressed.Remove(e.KeyCode);
keysPressed.Add(e.KeyCode);
}
private void Form1_KeyUp(object sender, KeyEventArgs e) {
if (keysPressed.Contains(e.KeyCode))
keysPressed.Remove(e.KeyCode);
}
We need a list of keys so we can
track which keys have been pressed.
Our game timer will need that list
for movement in just a bit.
The ‘Q’ key quits the game.
If the game has ended, reset
the game and start over.
You’ll need to fill in this code.
The spacebar fires a shot.
The Keys
enum
defines all
the keys
you might
want to
check key
codes
against.
By removing the key and then re-adding
it, the key becomes the last (most
current) item in the list.
The key that’s pressed gets added to
our key list, which we’ll use in a second.
When a key is released, we remove it
from our list of pressed keys.
We want the most
current key pressed to be
at the very top of the
list, so that if the player
mashes a few keys at
the same time, the game
responds to the one that
was hit most recently.
Then, when he lets up one
key, the game responds to
the next one in the list.
So if the player’s holding down
the left arrow and spacebar at
the same time, the list will contain
Keys.Left and Keys.Space.
But we only want this to work
if the game’s over. Pressing S
shouldn’t restart a game that’s
already in progress.
Flip back to the KeyGame project
you built in Chapter 4. You used a
KeyDown event handler there, too!
you are here 4 721
Invaders
private void gameTimer_Tick(object sender, EventArgs e)
{
game.Go();
foreach (Keys key in keysPressed)
{
if (key == Keys.Left)
{
game.MovePlayer(Direction.Left);
return;
}
else if (key == Keys.Right)
{
game.MovePlayer(Direction.Right);
return;
}
}
}
One more form detail: the GameOver event
Add a private bool field called gameOver to the form that’s true only when
the game is over. Then add an event handler for the Game object’s GameOver
event that stops the game timer (but not the animation timer, so the stars still
twinkle and the invaders still animate), sets gameOver to true, and calls the
form’s Invalidate() method.
When you write the form’s Paint event handler, have it check gameOver. If
it’s true, have it write GAME OVER in big yellow letters in the middle of the
screen. Then have it write “Press S to start a new game or Q to quit” in the
lower right-hand corner. You can start the game out in this state, so the user has
to hit S to start a new game.
The KeyUp and KeyDown
events use the Keys enum
to specify a key. We’ll use
Keys.Left and Keys.Right
to move the ship.
keysPressed is your List<Keys>
object managed by the KeyDown
and KeyUp event handlers. It
contains every key the player
currently has pressed.
The keysPressed
list has the keys
in the order that
they’re pressed.
This foreach loop
goes through them
until it finds a
Left or Right key,
then moves the
player and returns.
The game timer handles movement and gameplay
The main job of the form’s game timer is to call Go() in the
Game class. But it also has to respond to any keys pressed, so it
has to check the keysPressed list to find any keys caught by
the KeyDown and KeyUp events:
This timer makes the game advance by one frame.
So the first thing it does is call the Game
object’s Go() method to let gameplay continue.
Here’s an example of adding
another event to a form
without using the IDE. This is
all manual coding.
The game over event and its
delegate live in the Game class,
which you’ll see in just a minute.
enum Direction {
Left,
Right,
Up,
Down,
}
Shots move up and down,
the player moves left and
right, and the invaders
move left, right, and
down. You’ll need this
enum to keep all those
directions straight.
Players “mash” a bunch of keys
at once. If we want the game to
be robust, it needs to be able to
handle that. That’s why we’re using
the keysPressed list.
The KeyDown event handler just handles the
space, S, and Q keystrokes without adding them
to the keysPressed list. What would happen if
you moved the code for firing the shot when
the space key is pressed to this event handler?
722 Head First Lab #1
Invaders
The form’s game timer tells the game to Go()
In addition to handling movement left and right, the main job of the game timer is to
call the Game object’s Go() method. That’s where all of the gameplay is managed.
The Game object keeps track of the state of the game, and its Go() method advances
the game by one frame. That involves:
Checking to see if the player died, using its Alive property. When the player dies,
the game shows a little animation of the ship collapsing (using DrawImage() to squish
the ship down to nothing). The animation is done by the PlayerShip class, so Go() just
needs to check to see if it’s dead. If it is, it returns—that way, it keeps the invaders from
moving or shooting while the player gets a small break (and watches his ship get crushed).
1
Moving each of the shots. Shots fired by the invaders move down, and shots fired by the
player move up. Game keeps two List<Shot> objects, one for the invaders’ shots and one
for the player’s. Any shot that’s moved off the screen needs to be removed from the list.
2
Moving each of the invaders. Game calls each Invader object’s Move() method,
and tells the invaders which way to move. Game also keeps up with where the invaders are
in case they need to move down a row or switch directions. Then, Game checks to see if it’s
time for the invaders to return fire, and if so, it adds new Shot objects to the List<>.
3
Checking for hits. If a player’s shot hit any invaders, Game removes the invaders from the
appropriate List<>. Then Game checks to see if any of the invader shots have collided with
the player’s ship, and if so, it kills the player by setting its Alive property to false. If the
player’s out of lives, then Game raises the GameOver event to tell the form that the game’s
over. The form’s GameOver event handler stops its game timer, so Go() isn’t called again.
4
G
a
m
e
o
b
j
e
c
t
g
a
m
e
.
G
o
(
)
F
o
r
m
o
b
j
e
c
t
The game timer fires more often
than the animation timer, making
gameplay happen quickly.
Go() in the Game object handles
everything from movement to
shots to checking to see if ships or
invaders have been hit.
Here’s where that
GameOver event from the
last page comes into play.
you are here 4 723
Invaders
G
a
m
e
o
b
j
e
c
t
g
a
m
e
.
D
r
a
w
(
g
,
a
n
i
m
a
t
i
o
n
C
e
l
l
)
;
The invaders have a four-cell
animation sequence, so the
form passes an int telling the
game which cell to draw.
The game tells each
invader which cell to
draw based on the
animationCell passed
by the form.
The Game object’s Draw() method
calls the Draw() methods on all of
the other objects. You’ll see how
each of the other classes’ Draw()
methods work in the next few pages.
F
o
r
m
o
b
j
e
c
t
stars.Draw(g);
foreach (Invader invader in invaders)
invader.Draw(g, animationCell);
playerShip.Draw(g);
foreach (Shot shot in playerShots)
shot.Draw(g);
foreach (Shot shot in invaderShots)
shot.Draw(g);
~
Paint event
fires
Everything that happens visually
in the game happens in the
form’s Paint event handler.
Taking control of graphics
In earlier labs, the form used controls for the graphics. But now
that you know how to use Graphics and double-buffering, the
Game object should handle a lot of the drawing.
So the form should have a Paint event handler (make sure you
set the form’s DoubleBuffered property to true!). You’ll
delegate the rest of the drawing to the Game object by calling its
Draw() method every time the form’s Paint event fires.
L
i
s
t
<
S
h
o
t
>
P
l
a
y
e
r
S
h
i
p
o
b
j
e
c
t
L
i
s
t
<
I
n
v
a
d
e
r
>
L
i
s
t
<
S
h
o
t
>
S
t
a
r
s
o
b
j
e
c
t
724 Head First Lab #1
Invaders
Building the Game class
class Game {
private int score = 0;
private int livesLeft = 2;
private int wave = 0;
private int framesSkipped = 0;
private Rectangle boundaries;
private Random random;
private Direction invaderDirection;
private List<Invader> invaders;
private PlayerShip playerShip;
private List<Shot> playerShots;
private List<Shot> invaderShots;
private Stars stars;
public event EventHandler GameOver;
// etc...
}
Game
Draw(g: Graphics, animationCell: int)
Twinkle()
MovePlayer(direction: Direction)
FireShot()
Go()
GameOver: event
The score, livesLeft, and wave fields
keep track of some basic information
about the state of the game.
You’ll use the frame field to slow down the
invaders early on in the game—the first wave
should skip 6 frames before they move to the
left, the next wave should skip 5, the next
should skip 4, etc.
This List<> of Invader objects keeps track of all of
the invaders in the current wave. When an invader is
destroyed, it’s removed from the list. The game checks
periodically to make sure the list isn’t empty—if it is, it
sends in the next wave of invaders.
This Stars object keeps track of the
multicolored stars in the background.
The Game object raises its GameOver
event when the player dies and doesn’t
have any more lives left. You’ll build
the event handler method in the form,
and hook it into the Game object’s
GameOver event.
The Game class is the controller for the Invaders game. Here’s a
start on what this class should look like, although there’s lots of
work still for you to do.
Remember, these are the
public methods. You may need
a lot more private methods to
structure your code in a way
that makes sense to you.
Most of these
methods combine
methods on other
objects to make a
specific action occur.
you are here 4 725
Invaders
The Game class methods
The Game class has five public methods that get triggered
by different events happening in the form.
The Draw() method draws the game on a Graphics object
The Draw() method takes two parameters: a Graphics object and an integer that contains
the animation cell (a number from 0 to 3). First, it should draw a black rectangle that fills up
the whole form (using the display rectangle stored in boundaries, received from the form).
Then the method should draw the stars, the invaders, the player’s ship, and then the shots.
Finally, it should draw the score in the upper left-hand corner, the player’s ships in the upper
right-hand corner, and a big “GAME OVER” in yellow letters if gameOver is true.
1
The Twinkle() method twinkles the stars
The form’s animation timer event handler needs to be able to twinkle the stars, so the Game
object needs a one-line method to call stars.Twinkle().
2
The MovePlayer() method moves the player
The form’s keyboard timer event handler needs to move the player’s ship, so the Game object
also needs a two-line method that takes a Direction enum as a parameter, checks whether
or not the player’s dead, and calls playerShip.Move() to affect that movement.
3
The FireShot() method makes the player fire a shot at the invaders
The FireShot() method checks to see if there are fewer than two player shots on screen. If
so, the method should add a new shot to the playerShots list at the right location.
4
The Go() method makes the game go
The form’s animation timer calls the Game object’s Go() method anywhere between 10
and 30 times a second (depending on the computer’s CPU speed). The Go() method does
everything the game needs to do to advance itself by a frame:
≥The game checks if the player’s dead using its Alive property. If he’s still alive, the
game isn’t over yet—if it were, the form would have stopped the animation timer with
its Stop() method. So the Go() method won’t do anything else until the player is
alive again—it’ll just return.
≥Every shot needs to be updated. The game needs to loop through both List<Shot>
objects, calling each shot’s Move() method. If any shot’s Move() returns false, that
means the shot went off the edge of the screen—so it gets deleted from the list.
≥The game then moves each invader, and allows them to return fire.
≥Finally, it checks for collisions: first for any shot that overlaps an invader (and removing
both from their List<T> objects), and then to see if the player’s been shot. We’ll add
a Rectangle property called Area to the Invader and PlayerShip classes—so
we can use the Contains() method to see if the ship’s area overlaps with a shot.
5
We’ll write code for the Stars
object in a few more pages.
726 Head First Lab #1
Invaders
The constructor sets everything up
The Game object needs to create all of the other objects—the Invader
objects, the PlayerShip object, the List objects to hold the shots, and the
Stars object. The form passes in an initialized Random object and its own
ClientRectangle struct (so the Game can figure out the boundaries of
the battlefield, which it uses to determine when shots are out of range and
when the invaders reach the edge and need to drop and reverse direction). Then,
your code should create everything else in the game world.
Build a NextWave() method
A simple method to create the next wave of invaders will come in handy. It should
assign a new List of Invader objects to the invaders field, add the 30 invaders
in 6 columns so that they’re in their starting positions, increase the wave field by 1,
and set the invaderDirection field to start them moving toward the right-
hand side of the screen. You’ll also change the framesSkipped field.
A few other ideas for private methods
Here are a few of the private method ideas you might play with, and see if these
would also help the design of your Game class:
We’ll talk about most of these
individual objects over the next
several pages of this lab.
Here’s an example of a private
method that will really help out
your Game class organization.
A method to see if the player’s been hit (CheckForPlayerCollisions())
A method to see if any invaders have been hit (CheckForInvaderCollisions())
A method to move all the invaders (MoveInvaders())
A method allowing invaders to return fire (ReturnFire())
Filling out the Game class
The problem with class diagrams is that they usually leave out
any non-public properties and methods. So even after you’ve
got the methods from page 725 done, you’ve still got a lot of
work to do. Here are some things to think about:
It’s possible to show protected and private properties
and methods in a class diagram, but you’ll rarely see
that put into practice. Why do you think that is?
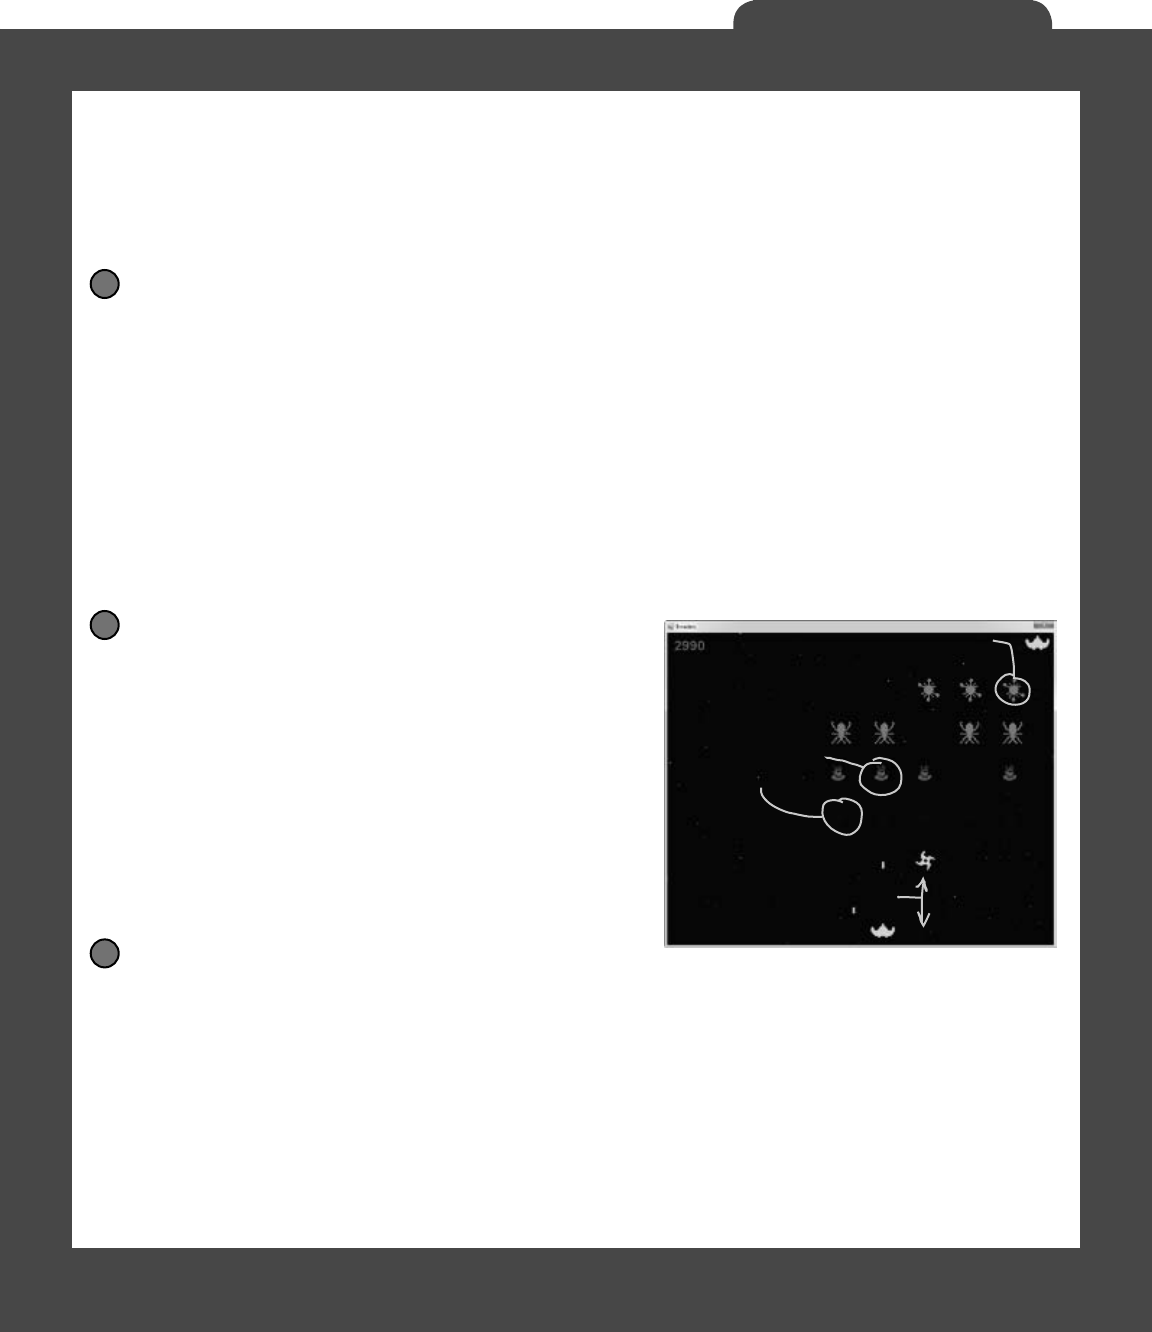
you are here 4 727
Invaders
LINQ makes collision detection much easier
You’ve got collections of invaders and shots, and you need to search through those
collections to find certain invaders and shots. Any time you hear collections and
searching in the same sentence, you should think LINQ. Here’s what you need to do:
Figure out if the invaders’ formation has reached the edge of the battlefield
The invaders need to change direction if any one invader is within 100 pixels of the edge of the battlefield.
When the invaders are marching to the right, once they reach the right-hand side of the form the game
needs to tell them to drop down and start marching to the left. And when the invaders are marching to
the left, the game needs to check if they’ve reached the left edge. To make this happen, add a private
MoveInvaders() method that gets called by Go().The first thing it should do is check and update the
private framesSkipped field, and return if this frame should be skipped (depending on the level).
Then it should check which direction the invaders are moving. If the invaders are moving to the right,
MoveInvaders() should use LINQ to search the invaderCollection list for any invader whose
location’s X value is within 100 pixels of the right-hand boundary. If it finds any, then it should tell the
invaders to march downward and then set invaderDirection equal to Direction.Left; if not, it
can tell each invader to march to the right. On the other hand, if the invaders are moving to the left, then
it should do the opposite, using another LINQ query to see if the invaders are within 100 pixels of the
left-hand boundary, marching them down and changing direction if they are.
1
Determine which invaders can return fire
Add a private method called ReturnFire() that gets
called by Go(). First, it should return if the invaders’
shot list already has wave + 1 shots. It should also
return if random.Next(10) < 10 - wave.
(That makes the invaders fire at random, and not all
the time.) If it gets past both tests, it can use LINQ to
group the invaders by their Location.X and sort them
descending. Once it’s got those groups, it can choose
a group at random, and use its First() method to
find the invader at the bottom of the column. All right,
now you’ve got the shooter—you can add a shot to the
invader’s shot list just below the middle of the invader
(use the invader’s Area to set the shot’s location).
2
Only the invaders
at the bottom of
the formation fire
shots at the player.
If any invader reaches
the bottom of the screen,
the game’s over.
When any invader reaches the edge,
the formation turns around.
Check for invader and player collisions
You’ll want to create a method to check for collisions. There are three collisions to check for, and the
Rectangle struct’s Contains() method will come in really handy—just pass it any Point, and it’ll return
true if that point is inside the rectangle.
≥Use LINQ to find any dead invaders by looping through the shots in the player’s shot list and selecting
any invader where invader.Area contains the shot’s location. Remove the invader and the shot.
≥Add a query to figure out if any invaders reached the bottom of the screen—if so, end the game.
≥You don’t need LINQ to look for shots that collided with the player, just a loop and the player’s Area
property. (Remember, you can’t modify a collection inside a foreach loop. If you do, you’ll get
an InvalidOperationException with a message that the collection was modified.)
3
This seems really complex
when you first read it,
but each LINQ query is
just a couple of lines of
code. Here’s a hint: don’t
overcomplicate it!
728 Head First Lab #1
Invaders
class Invader {
private const int HorizontalInterval = 10;
private const int VerticalInterval = 40;
private Bitmap image;
public Point Location { get; private set; }
public ShipType InvaderType { get; private set; }
public Rectangle Area { get {
return new Rectangle(location, image.Size); }
}
public int Score { get; private set; }
public Invader(ShipType invaderType, Point location, int score) {
this.InvaderType = invaderType;
this.Location = location;
this.Score = score;
image = InvaderImage(0);
}
// Additional methods will go here
}
Crafting the Invader class
Invader
Draw(g: Graphics, animationCell: int)
Move(direction: Direction)
Location: Point
InvaderType: ShipType
Area: Rectangle
Score: int
Check out what we did with the
Area property. Since we know the
invader’s location and we know
its size (from its image field),
we can add a get accessor that
calculates a Rectangle for the
area it covers…
An Invader object uses
the ShipType enum to
figure out what kind of
enemy ship it is.
The Invader class keeps track of a single invader. So when the Game
object creates a new wave of invaders, it adds 30 instances of Invader to
a List<Invader> object. Every time its Go() method is called, it calls
each invader’s Move() method to tell it to move. And every time its Draw()
method is called, it calls each invader object’s Draw() method. So you’ll need
to build out the Move() and Draw() methods. You’ll want to add a private
method called InvaderImage(), too—it’ll come in really handy when
you’re drawing the invader. Make sure you call it inside the Draw() method to
keep the image field up to date:
The HorizontalInterval constant
determines how many pixels an invader
moves every time it marches left or
right. VerticalInterval is the number of
pixels it drops down when the formation
reaches the edge of the battlefield.
enum ShipType {
Bug,
Saucer,
Satellite,
Spaceship,
Star,
}
…which means you can use
the Rectangle’s Contains()
method inside a LINQ query
to detect any shots that
collided with an invader.
you are here 4 729
Invaders
Build the Invaders’ methods
The three core methods for Invader are Move(), Draw(), and
InvaderImage(). Let’s look at each in turn.
Move the invader ships
First, you need a method to move the invader ships. The Game object should
send in a direction, using the Direction enum, and then the ship should
move. Remember, the Game object handles figuring out if an invader needs to
move down or change direction, so your Invader class doesn’t have to worry
about that.
public void Move(Direction direction) {
// This method needs to move the ship in the
// specified direction
}
Draw the ship—and the right animation cell
Each Invader knows how to draw itself. Given a Graphics object to draw
to, and the animation cell to use, the invader can display itself onto the game
board using the Graphics object the Game gives it.
public void Draw(Graphics g, int animationCell) {
// This method needs to draw the image of
// the ship, using the correct animation cell
}
Get the right invader image
You’re going to need to grab the right image based on the animation
cell a lot, so you may want to pull that code into its own method.
Build an InvaderImage() method that returns a specific Bitmap
given an animation cell.
private Bitmap InvaderImage(int animationCell) {
// This is mostly a convenience method, and
// returns the right bitmap for the specified cell
}
There are five types of invaders,
and each of them has four
different animation cell pictures.
Each invader knows its
type. So if you give its
InvaderImage() method a
number for its animation
cell, it can return a
Bitmap that’s got the
right graphic in it.
Remember, you can download these graphics from
http://www.headfirstlabs.com/hfcsharp/.

730 Head First Lab #1
Invaders
The player’s ship can move and die
The PlayerShip class keeps track of the
player’s ship. It’s similar to the Invaders class,
but even simpler.
Animate the player ship when it’s hit
The Draw() method should take a Graphics object as a parameter. Then it checks
its Alive property. If it’s alive, it draws itself using its Location property. If it’s
dead, then instead of drawing the regular bitmap on the graphics, the PlayerShip
object uses its private deadShipHeight field to animate the player ship slowly
getting crushed by the shot. After three seconds of being dead, it should flip its Alive
property back to true.
public void Draw(Graphics g) {
if (!Alive) {
Reset the deadShipHeight field and draw the ship.
} else {
Check the deadShipHeight field. If it's greater than zero, decrease it by 1
and use DrawImage() to draw the ship a little flatter.
}
}
Draw(g: Graphics)
Move(direction: Direction)
Location: Point
Area: Rectangle
Alive: bool
PlayerShip
The Location and Area
properties are exactly like
the ones in the Invader class.
The Move() method takes
one parameter, a Direction
enum, and moves the player
in that direction.
The Draw() method just draws
the player’s ship in the right
location–unless the player
died, in which case it draws an
animation of the ship getting
crushed by the shot.
PlayerShip needs to take
in a Rectangle with the
game’s boundaries in its
constructor, and make
sure the ship doesn’t get
moved out of the game’s
boundaries in Move().
Waiting three seconds is easy—just use the Alive property’s set accessor to set a
private DateTime field to DateTime.Now. The first thing the ship’s Go() method
does is use a TimeSpan to check if three seconds have elapsed. If three seconds
haven’t elapsed, continue doing the crushing ship animation. As soon as three
seconds have elapsed, set Alive back to true so the game knows it should continue
gameplay. (You used a similar trick in the beehive simulator.)
When the ship’s hit with a shot,
the game sets the ship’s Alive
property to false. The game
then keeps the invaders from
moving until the ship resets its
Alive property back to true.
you are here 4 731
Invaders
class Shot {
private const int moveInterval = 20;
private const int width = 5;
private const int height = 15;
public Point Location { get; private set; }
private Direction direction;
private Rectangle boundaries;
public Shot(Point location, Direction direction,
Rectangle boundaries) {
this.Location = location;
this.direction = direction;
this.boundaries = boundaries;
}
// Your code goes here
}
“Shots fired!”
Game has two lists of Shot objects: one for the player’s shots moving
up the screen, and one for enemy shots moving down the screen.
Shot only needs a few things to work: a Point location, a method
to draw the shot, and a method to move. Here’s the class diagram:
You can adjust these to make the game
easier or harder…smaller shots are easier
to dodge, faster shots are harder to avoid.
The shot updates its own location in
the Move() method, so location can
be a read-only automatic property.
The game passes the form’s display rectangle
into the constructor’s boundaries parameter so
the shot can tell when it’s off of the screen.
Draw() handles drawing the little rectangle
for this shot. Game will call this every time
the screen needs to be updated.
Move() moves the shot up
or down, and keeps up with
whether the shot is within the
game’s boundaries.
Here’s a start on the Shot class:
Your job is to make sure Draw() takes in a Graphics object
and draws the shot as a yellow rectangle. Then, Move() should
move the shot up or down, and return true if the shot is still
within the game boundaries.
Shot
Draw(g: Graphics)
Move(): bool
Location: Point
Direction is the enum with Up
and Down defined.
732 Head First Lab #1
Invaders
Stars
Draw(g: Graphics)
Twinkle(random: Random)
private struct Star {
public Point point;
public Pen pen;
public Star(Point point, Pen pen) {
this.point = point;
this.pen = pen;
}
}
±
±
±
±
±
Twinkle, twinkle…it’s up to you
The last class you’ll need is the Stars class. There are 300 stars, and this
class keeps up with all of them, causing 5 to display and 5 to disappear every
time Twinkle() is called.
First, though, you’ll need a struct for each star:
Each star has a point (its location)
and a pen (for its color).
All Star does is hold this
data…no behavior.
The Stars class should keep a List<Star> for storing 300 of these Star
structs. You’ll need to build a constructor for Stars that populates that
list. The constructor will get a Rectangle with the display boundaries, and
a Random instance for use in creating the random Points to place each star
in a random location.
Here’s the class diagram for Stars, with the other methods you’ll need:
Draw() should draw all the stars in the list, and Twinkle() should
remove five random stars and add five new stars in their place.
You might also want to create a RandomPen() method so you can get
a random color for every new star you create. It should return one of
the five possible star colors, by generating a number between 0 and 4,
and selecting the matching Pen object.
Draw() draws all
300 stars…
…and Twinkle()
pulls 5 stars and
adds 5 new ones.
Game maintains an
instance of Random
that all the objects
can use.
You can define the Star
struct inside Stars.cs, as only
Stars needs to use that struct.
Here’s another hint: start out
the project with just a form,
a Game class, and Stars class.
See if you can get it to draw
a black sky with twinkling
stars. That’ll give you a solid
foundation to add the other
classes and methods.
you are here 4 733
Invaders
And yet there’s more to do…
Think the game’s looking pretty good? You can take it to the
next level with a few more additions:
Add animated explosions
Make each invader explode after it’s hit, then briey display a number to
tell the player how many points the invader was worth.
Add a mothership
Once in a while, a mothership worth 250 points can travel across the top
of the battleeld. If the player hits it, he gets a bonus.
Add shields
Add oating shields the player can hide behind. You can add simple
shields that the enemies and player can’t shoot through. Then, if you
really want your game to shine, add breakable shields that the player and
invaders can blast holes through after a certain number of hits.
Add divebombers
Create a special type of enemy that divebombs the player. A divebombing
enemy should break formation, take off toward the player, y down
around the bottom of the screen, and then resume its position.
Add more weapons
Start an arms race! Smart bombs, lasers, guided missiles…there are all
sorts of weapons that both the player and the invaders can use to attack
each other. See if you can add three new weapons to the game.
Add more graphics
You can go to www.headrstlabs.com/books/hfcsharp/ to nd more
graphics les for simple shields, a mothership, and more. We provided
blocky, pixelated graphics to give it that stylized ’80s look. Can you come
up with your own graphics to give the game a new style?
This is your chance to show off! Did you come up with a cool new
version of the game? Join the Head First C# forum and claim your
bragging rights: www.headfirstlabs.com/books/hfcsharp/
A good class design
should let you change
out graphics with
minimal code changes.
Try making the
shields last for
fewer hits at higher
levels of the game.


this is an appendix 735
I’m still hungry for more!
appendix i: leftovers
The top 10 things we wanted
to include in this book
The fun’s just beginning
We’ve shown you a lot of great tools to build some really powerful software with C#. But
there’s no way that we could include every single tool, technology, or technique in this
book—there just aren’t enough pages. We had to make some really tough choices about
what to include and what to leave out. Here are some of the topics that didn’t make the
cut. But even though we couldn’t get to them, we still think that they’re important and
useful, and we wanted to give you a small head start with them.
1
1

736 Appendix i
some basic stuff you want to know
#1. The Basics
Before we get started, here’s a Guy class that we’ll be using throughout this appendix. Take a look at how it’s
commented. Notice how the class, its methods, and its properties are all commented with triple-slash (///)
comments? Those are called XML comments, and the IDE will help you add them. Just type “///” right before a
class, method, property, or field declaration (and a few other places, too), and the IDE will fill in the skeleton of the
XML comment for it. Then later, when you go to use the property, method, etc., the IDE will display information
from the XML comments in its IntelliSense window.
/// <summary>
/// A guy with a name, age and a wallet full of bucks
/// </summary>
class Guy
{
/*
* Notice how Name and Age are properties with backing fields that are
* marked readonly. That means those backing fields can only be set when
* the object is initialized (in their declarations or in the constructor).
*/
/// <summary>
/// Read-only backing field for the Name property
/// </summary>
private readonly string name;
/// <summary>
/// The name of the guy
/// </summary>
public string Name { get { return name; } }
/// <summary>
/// Read-only backing field for the Name property
/// </summary>
private readonly int age;
/// <summary>
/// The guy's age
/// </summary>
public int Age { get { return age; } }
/*
* Cash is not readonly because it might change during the life of the Guy.
*/
/// <summary>
/// The number of bucks the guy has
/// </summary>
public int Cash { get; private set; }
The XML comment for a class consists
of a <summary> block. Notice how it
starts with <summary> and ends with
</summary>.
Marking a field readonly is a useful
tool for encapsulation, because it
means that field can never be changed
once the object is instantiated.
We wish we could give this material the same kind of
thorough treatment we were able to provide throughout
the book, but we just didn’t have enough pages to do it!
But we still want to give you a good starting point and a
place to go for more information.
you are here 4 737
leftovers
/// <summary>
/// The constructor sets the name, age and cash
/// </summary>
/// <param name="name">The name of the guy</param>
/// <param name="age">The guy's age</param>
/// <param name="cash">The amount of cash the guy starts with</param>
public Guy(string name, int age, int cash) {
this.name = name;
this.age = age;
Cash = cash;
}
public override string ToString() {
return String.Format("{0} is {1} years old and has {2} bucks", Name, Age, Cash);
}
/// <summary>
/// Give cash from my wallet
/// </summary>
/// <param name="amount">The amount of cash to give</param>
/// <returns>The amount of cash I gave, or 0 if I don't have enough cash</returns>
public int GiveCash(int amount) {
if (amount <= Cash && amount > 0)
{
Cash -= amount;
return amount;
}
else
{
return 0;
}
}
/// <summary>
/// Receive some cash into my wallet
/// </summary>
/// <param name="amount">Amount to receive</param>
/// <returns>The amount of cash received, or 0 if no cash was received</returns>
public int ReceiveCash(int amount) {
if (amount > 0)
{
if (amount > 0)
{
Cash += amount;
return amount;
}
Console.WriteLine("{0} says: {1} isn't an amount I’ll take", Name, amount);
}
return 0;
}
}
When the IDE adds the skeleton for
a constructor or another method, it
adds <param> tags for each of the
parameters.
Here’s where we’re overriding
ToString(). This is covered in
Chapter 8.
738 Appendix i
static void Main(string[] args)
{
// We’ll use these Guy and Random instances throughout this example.
Guy bob = new Guy(“Bob”, 43, 100);
Guy joe = new Guy(“Joe”, 41, 100);
Random random = new Random();
/*
* Here are two useful keywords that you can use with loops. The “continue” keyword
* tells the loop to jump to the next iteration of a loop, and the “break” keyword
* tells the loop to end immediately.
*
* The break, continue, throw, and return statements are called “jump statements”
* because they cause your program to jump to another place in the code when they’re
* executed. (You learned about break with switch/case statements in Chapter 8, and
* the throw statement in Chapter 10.) There’s one more jump statement, goto, which
* jumps to a label. (You’ll recognize these labels as having very similar syntax
* to what you use in a case statement.)
*
* You could easily write this next loop without continue and break. That’s a good
* example of how C# lets you do the same thing many different ways. That’s why you
* don’t need break, continue, or any of these other keywords or operators to write
* any of the programs in this book.
*
* The break statement is also used with “case”, which you can see in chapter 8.
*/
while (true) {
int amountToGive = random.Next(20);
// The continue keyword jumps to the next iteration of a loop
// Use the continue keyword to only give Joe amounts over 10 bucks
if (amountToGive < 10)
continue;
// The break keyword terminates a loop early
if (joe.ReceiveCash(bob.GiveCash(amountToGive)) == 0)
break;
Console.WriteLine(“Bob gave Joe {0} bucks, Joe has {1} bucks, Bob has {2} bucks”,
amountToGive, joe.Cash, bob.Cash);
}
Console.WriteLine(“Bob’s left with {0} bucks”, bob.Cash);
some more basic stuff
A really good way to get a handle on this is to debug through it
and use watches to see what’s happening. As you go through the
book, try experimenting with some of these concepts.
The continue statement causes the program to jump over
the rest of the iteration and back to the top of the loop.
The break
statement causes
the loop to end,
and the program
to move to the
Console.WriteLine()
statement.
It’s easy to get overwhelmed when learning any computer language, and C# is no exception. That’s why we
concentrated on the parts of the language that, in our experience, are most common for novice and intermediate
developers. But there’s some basic C# and .NET syntax that’s really useful, but are a lot easier to approach at your
own speed once you’re used to things. Here’s a console application that demonstrates some of it.
…more basics…
A lot of people
say that jump
statements are
bad practice.
There are
typically other
ways that you
can achieve the
same results.
But it’s useful
to know how
they work in
case you run
across them.
you are here 4 739
leftovers
// The ?: conditional operator is an if/then/else collapsed into a single expression
// [boolean test] ? [statement to execute if true] : [statement to execute if false]
Console.WriteLine(“Bob {0} more cash than Joe”,
bob.Cash > joe.Cash ? “has” : “does not have”);
// The ?? null coalescing operator checks if a value is null, and either returns
// that value if it’s not null, or the value you specify if it is
// [value to test] ?? [value to return if it’s null]
bob = null;
Console.WriteLine(“Result of ?? is ‘{0}’”, bob ?? joe);
// Here’s a loop that uses goto statements and labels. It’s rare to see them, but
// they can be useful with nested loops. (The break statement only breaks out of
// the innermost loop)
for (int i = 0; i < 10; i++)
{
for (int j = 0; j < 3; j++)
{
if (i > 3)
goto afterLoop;
Console.WriteLine(“i = {0}, j = {1}”, i, j);
}
}
afterLoop:
// When you use the = operator to make an assignment, it returns a value that you
// can turn around and use in an assignment or an if statement
int a;
int b = (a = 3 * 5);
Console.WriteLine(“a = {0}; b = {1};”, a, b);
// When you put the ++ operator before a variable, it increments the variable
// first, and then executes the rest of the statement.
a = ++b * 10;
Console.WriteLine(“a = {0}; b = {1};”, a, b);
// Putting it after the variable executes the statement first and then increments
a = b++ * 10;
Console.WriteLine(“a = {0}; b = {1};”, a, b);
/*
* When you use && and || to do logical tests, they “short-circuit” -- which means
* that as soon as the test fails, they stop executing. When (A || B) is being
* evaluated, if A is true then (A || B) will always be true no matter what B is.
* And when (A && B) is being evaluated, then if A is false then (A && B) will always
* be false no matter what B is. In both of those cases, B will never get executed
* because the operator doesn’t need its value in order to come up with a return value.
*/
int x = 0;
int y = 10;
int z = 20;
Since bob is null, the ?? operator
returns joe instead.
A label is a string of letters, numbers,
or underscores, followed by a colon.
The goto statement causes execution
to jump directly to a label.
This statement first sets a to 3 * 5,
and then sets b to the result.
++b means that b is incremented
first, and a is set to b * 10.
b++ means that first a is set to b *
10, and then b is incremented.
We’ll use these values in the code on
the next page!
When you use /* and */ to add
comments, you don’t have to add
a * at the beginning of each line,
but it makes them easier to read.
740 Appendix i
even more basics
// y / x will throw a DivideByZeroException because x is 0. But since (y < z) is true,
// the || operator knows it will be true without ever having to execute the other
// statement, so it short-circuits and never executes (y / x == 4)
if ((y < z) || (y / x == 4))
Console.WriteLine(“this line printed because || short-circuited”);
// Since (y > z) is false, the && operator knows it will return false without
// executing the other statement, so it short-circuits and doesn’t throw the exception
if ((y > z) && (y / x == 4))
Console.WriteLine(“this line will never print because && short-circuited”);
/*
* A lot of us think of 1’s and 0’s when we think of programming, and manipulating
* those 1’s and 0’s is what logic operators are all about.
*/
// Use Convert.ToString() and Convert.ToInt32() to convert a number to or from a
// string of 1’s and 0’s in its binary form. The second argument specifies that you’re
// converting to base 2.
string binaryValue = Convert.ToString(217, 2);
int intValue = Convert.ToInt32(binaryValue, 2);
Console.WriteLine(“Binary {0} is integer {1}”, binaryValue, intValue);
// The &, |, ^, and ~ operators are logical AND, OR, XOR, and bitwise complement
int val1 = Convert.ToInt32(“100000001”, 2);
int val2 = Convert.ToInt32(“001010100”, 2);
int or = val1 | val2;
int and = val1 & val2;
int xor = val1 ^ val2;
int not = ~val1;
// Print the values -- and use the String.PadLeft() method to add leading 0’s
Console.WriteLine(“val1: {0}”, Convert.ToString(val1, 2));
Console.WriteLine(“val2: {0}”, Convert.ToString(val2, 2).PadLeft(9, ‘0’));
Console.WriteLine(“ or: {0}”, Convert.ToString(or, 2).PadLeft(9, ‘0’));
Console.WriteLine(“ and: {0}”, Convert.ToString(and, 2).PadLeft(9, ‘0’));
Console.WriteLine(“ xor: {0}”, Convert.ToString(xor, 2).PadLeft(9, ‘0’));
Console.WriteLine(“ not: {0}”, Convert.ToString(not, 2).PadLeft(9, ‘0’));
// Notice what the ~ operator returned: 11111111111111111111111011111110
// It’s the 32-bit complement of val1: 00000000000000000000000100000001
// The logical operators are operating on int, which is a 32-bit integer.
This will make a lot more sense when you run the program and look
at the output. Remember, you don’t need to type in all of this
code—you can download it all from the Head First Labs website!
http://www.headfirstlabs.com/books/hfcsharp
Convert.ToString()
returns a String
object, and
we’re calling the
PadLeft() method
on that object to
pad the result out
with zeroes.
Using the logical “or” and “and” operators’ short-circuiting
properties is another way you can effectively write an if/else
statement. This is the same as saying “only execute (y / x == 4)
if (y < z) is true.
The logical operators &, |, and ^ are built-in on all the
integral numeric types, all enums, and bool. The only
difference between & and && (and | and ||) on bool is
that these don’t short-circuit.
~ is logical negation on integral numeric types and
enums, which, in a way, is an analog to ! for bool.
you are here 4 741
leftovers
// The << and >> operators shift bits left and right. And you can combine any
// logical operator with =, so >>= or &= is just like += or *=.
int bits = Convert.ToInt32(“11”, 2);
for (int i = 0; i < 5; i++)
{
bits <<= 2;
Console.WriteLine(Convert.ToString(bits, 2).PadLeft(12, ‘0’));
}
for (int i = 0; i < 5; i++)
{
bits >>= 2;
Console.WriteLine(Convert.ToString(bits, 2).PadLeft(12, ‘0’));
}
// You can instantiate a new object and call a method on it without
// using a variable to refer to it.
Console.WriteLine(new Guy(“Harry”, 47, 376).ToString());
// We’ve used the + operator for string concatenation throughout the book, and that
// works just fine. However, a lot of people avoid using + in loops that will have
// to execute many times over time, because each time + executes it creates an extra
// object on the heap that will need to be garbage collected later. That’s why .NET
// has a class called StringBuilder, which is great for efficiently creating and
// concatenating strings together. Its Append() method adds a string onto the end,
// AppendFormat() appends a formatted string (using {0} and {1} just like
// String.Format() and Console.WriteLine() do), and AppendLine() adds a string
// with a line break at the end. To get the final concatenated string, call
// its ToString() method.
StringBuilder stringBuilder = new StringBuilder(“Hi ”);
stringBuilder.Append(“there, ”);
stringBuilder.AppendFormat(“{0} year old guy named {1}. “, joe.Age, joe.Name);
stringBuilder.AppendLine(“Nice weather we’re having.”);
Console.WriteLine(stringBuilder.ToString());
Console.ReadKey();
/*
* This is a good start, but it’s by no means complete. Luckily, Microsoft gives you
* a reference that has a complete list of all of the C# operators, keywords, and
* other features of the language. Take a look through it -- and if you’re just getting
* started with C#, don’t worry if it seems a little difficult to understand. MSDN
* is a great source of information, but it’s meant to be a reference, not a learning
* or teaching guide.
*
* C# Programmer Reference: http://msdn.microsoft.com/en-us/library/618ayhy6.aspx
* C# Operators: http://msdn.microsoft.com/en-us/library/6a71f45d.aspx
* C# Keywords: http://msdn.microsoft.com/en-us/library/x53a06bb.aspx
*/
}
This doesn’t have anything
to do with logic, it’s just
something useful that you
see reasonably often.
One thing to note here: in this particular example,
StringBuilder performs worse than +, because + will
pre-compute the length of the string and figure
out exactly how much memory to allocate.
You typically use StringBuilder when you
don’t know in advance the number of
concatenations you want to perform.
742 Appendix i
some assembly required
#2. Namespaces and assemblies
We made the decision to focus this book on the really practical stuff you need to know in order to build and run
applications. Throughout every chapter, you create your projects in Visual Studio and run them in the debugger. We
showed you where your compiled code ended up in an executable, and how to publish that executable so that other
people can install it on their machines. That’s enough to get you through every exercise in this book, but it’s worth
taking a step back and looking a little closer at what it is that you’re building.
When you compile your C# program, you’re creating an assembly. An assembly is a file that contains the compiled code.
There are two kinds of assemblies. Executables (occasionally called “process assemblies”) have the EXE file extension. All of
the programs you write in this book are compiled as executables. Those are the assemblies that you can execute (you know,
EXE files you can double-click and run). There are also library assemblies, which have the DLL file extension. They contain
classes that you can use in your programs, and, as you’ll see shortly, namespaces play a big role in how you use them.
You can get a handle on the basics of assemblies by first creating a class library, and then building a program that uses it.
Start by creating a new Class Library project in Visual Studio called Headfirst.Csharp.Leftover2. When the
library is first created, it contains the file Class.cs. Delete that file and add a new class called Guy.cs. Open up the
new Guy.cs file:
namespace Headfirst.Csharp.Leftover2
{
class Guy
{
}
}
Notice how Visual Studio made the namespace match your class library name? That’s a very standard pattern.
Go ahead and fill in the Guy class with the code from Leftover #1—we’ll use it in a minute. Next, add two more
classes called HiThereWriter and LineWriter. Here’s the code for HiThereWriter:
namespace Headfirst.Csharp.Leftover2
{
public static class HiThereWriter
{
public static void HiThere(string name)
{
MessageBox.Show("Hi there! My name is " + name);
}
}
}
And here’s the code for LineWriter (it’s also in the Headfirst.Csharp.Leftover2 namespace):
internal static class LineWriter {
public static void WriteALine(string message)
{
Console.WriteLine(message);
}
}
We named the class library Headfirst.Csharp.
Leftover2 because that’s a pretty standard way of naming
assemblies. Read more about assembly naming here:
http://msdn.microsoft.com/en-us/library/ms229048.aspx
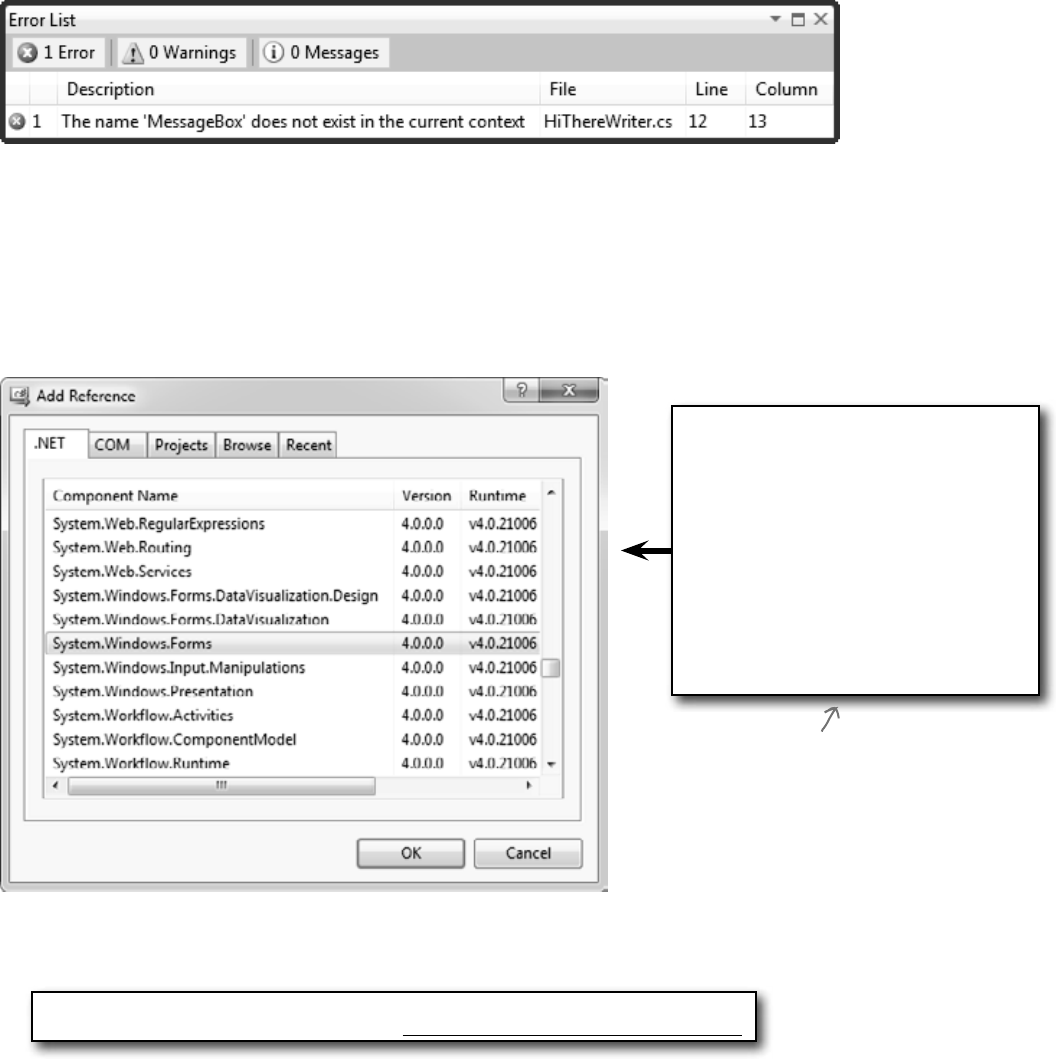
you are here 4 743
leftovers
Now try to compile your program. You’ll get an error:
OK, no problem—we know how to fix this. Add a line to the top of your class:
using System.Windows.Forms;
Wait, it still doesn’t compile! And something’s weird here. When you typed in that line, did you notice that when you
got as far as “using System.Win” the IntelliSense window stopped giving you suggestions? That’s because your project
hasn’t referenced the System.Windows.Forms assembly.
Let’s fix this by referencing the correct assembly. Go to the Solution Explorer and expand the “References” folder in
your project. Right-click on it and choose “Add Reference…”; a window should pop up:
On the .NET tab, start typing “System.Windows.Forms”—it should jump down to that assembly. Make sure it’s
highlighted and click OK. Now System.Windows.Forms should show up under the References folder in the
Solution Explorer—and your program compiles!
This window is showing you the
assemblies your program can access.
Some of them are stored in the Global
Assembly Cache (GAC), but not every
assembly in the GAC shows up in this
window. The GAC is a central, machine-
wide set of assemblies that all of the
.NET programs on the computer can
access. You can see all of the assemblies
in it by typing
%systemroot%\assembly
into the Start menu (or Start/Run for
older versions of Windows).
Take a minute and do this now. Notice
how there are many different versions
of some assemblies? Your programs
can reference a specific assembly
version, so they won’t break even if
a newer, incompatible version gets
installed on the computer.
The “Add References” window figures out which assemblies to display by checking
a registry key, not the GAC. For more info: http://support.microsoft.com/kb/306149
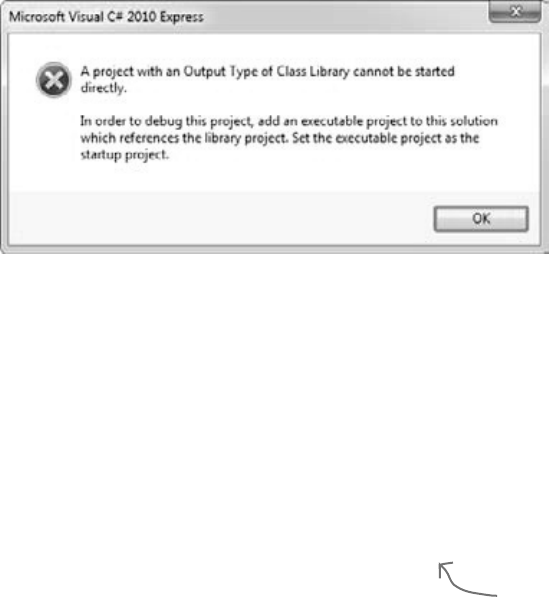
744 Appendix i
so that’s why we did that!
Take a close look at the declarations for LineWriter and HiThereWriter:
public class HiThereWriter
internal static class LineWriter
There are access modifiers on the class declarations: HiThereWriter is declared with the public access
modifier, and LineWriter is declared with the internal one. In a minute, you’ll write a console application that
references this class library. A program can only directly access another class library’s public classes—although they can
be accessed indirectly, like when one method calls another or returns an instance of an internal object that implements
a public interface.
Now go back to your Guy class and look at its declaration:
class Guy
Since there’s no access modifier, it defaults to internal. We’ll want to declare a Guy from another class, so change
the declaration to be public:
public class Guy
Next, try running your program in the debugger. You’ll see this error:
That makes sense when you think about it, because a class library doesn’t have an entry point. It’s just a bunch of
classes that other programs can use. So let’s add an executable program that uses those classes—that way the debugger
has something to run. Visual Studio has a really useful feature that we’ll take advantage of next: it can load multiple
projects into a single solution. Right-click on the Solution Explorer and choose Add >> New Project… to
bring up the usual Add Project window. Add a new console application called MyProgram.
Once your new program’s added, it should appear in the Solution Explorer right under the class library. Right-click on
References underneath MyProgram, and choose “Add reference...” from the menu. This time, open the Projects tab.
You should see your class library project listed—select it and click OK. It should now appear in the References window.
Go to the top of your new project’s Program.cs file and start adding this using line:
using Headfirst.Csharp.Leftover2;
…so what did I just do?
Notice how the IntelliSense
picks up “Csharp” and
“Leftover2” as you’re
typing?
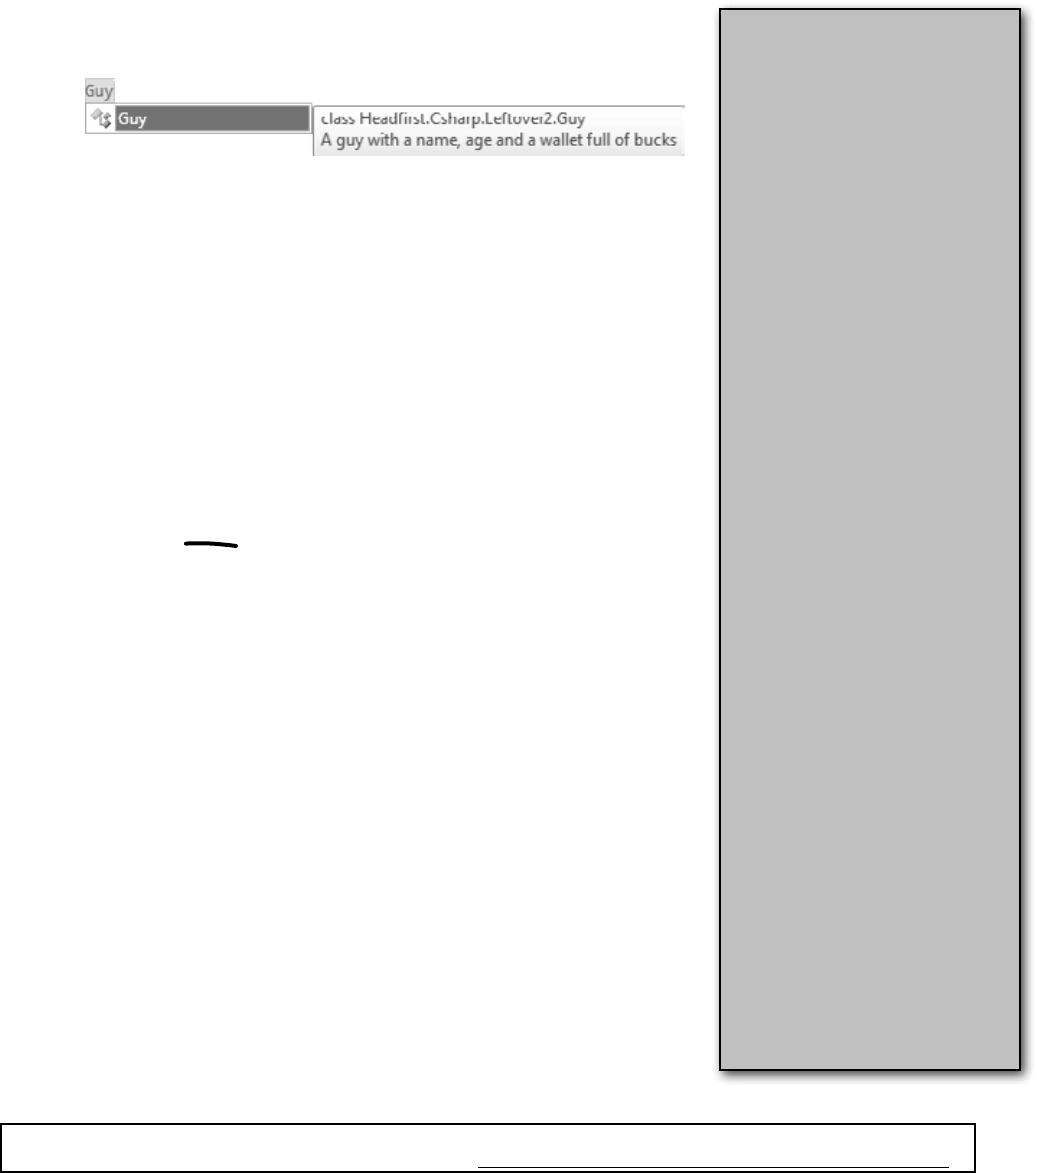
you are here 4 745
leftovers
Throughout the book we tell you
that you compile your code. When
you do, it’s compiled to Common
Intermediate Language (IL), the
low-level language used by .NET.
It’s a human-readable assembly
language, and all .NET languages
(including C# and Visual Basic)
are compiled into it. The IL code
is compiled into native machine
language when you run your
program using the CLR’s just-in-
time compiler, so named because
it compiles the IL into native code
just in time to execute it (rather than
pre-compiling it before it’s run).
That means your EXEs and
DLLs contain IL, and not native
assembly code, which is important
because it means many languages
can compile to IL that the CLR
can run—including Visual Basic
.NET, F#, J#, managed C++/CLI,
JScript .NET, Windows PowerShell,
IronPython, Iron Ruby, and more.
This is really useful: since VB.NET
code compiles to IL, you can build
an assembly in C# and use it in a
VB.NET program (or vice versa).
If you have a Macintosh or Linux
box, try installing Mono. It’s an
open source implementation of
IL that runs EXE files that you’ve
built on the PC (typically by typing
“mono MyProgram.exe”—but this
only works on some .NET assemblies).
We’re not going to talk any more
about that, though, because this
book is focused on Microsoft
technology. But we do have to admit
that it is pretty cool to see the Go
Fish game or beehive simulator
running natively on Mac or Linux!
Now we can write a new program. Start by typing Guy. Watch what pops up:
static void Main(string[] args)
{
The IntelliSense window lists the entire namespace for Guy, so you can see that you’re
actually using the class that you defined in the other assembly. Finish the program:
static void Main(string[] args)
{
Guy guy = new Guy(“Joe”, 43, 125);
HiThereWriter.HiThere(guy.Name);
}
Now run your program. Oh, wait—you get the same error message as before, because
you can’t run a class library! No problem. Right-click on your new MyProgram
project in the Solution Explorer and choose “Set as Startup Project”. Your
solution can have many different projects, and this is how you tell it which one to start
when you run it in the debugger. Now run your program again—this time it runs!
Why you added public to the class declarations in Chapter 13
In chapter 13, you changed the Renderer, World, Hive, Flower, and Bee class
declarations to add the public access modifier. Why did you do that?
Try removing public from the Renderer declaration. You’ll get an error message
when you try to build your program that says this:
Inconsistent accessibility: property type ‘Beehive_Simulator.Renderer’ is
less accessible than property ‘Beehive_Simulator.HiveForm.Renderer’
Here’s what’s happening. Take a look at the HiveForm’s class declaration:
public partial class HiveForm : Form
You’ve seen this declaration so many times that you probably don’t even notice it
anymore. But take a careful look—when the IDE adds a form to your project, it
automatically adds the public access modifier. But your Renderer class is declared
without an access modifier, so it defaults to internal. Your build broke when you
tried to add a public property of type Renderer to the public HiveForm class. But
since Renderer wasn’t public, that caused the inconsistent accessibility error.
And that should make sense when you think about it. After all, a program is an assembly,
too, and another assembly can access its classes. What would happen if another assembly
tried to reference the HiveForm class? It would see the public property of type
Renderer—but since the Renderer class is internal, it wouldn’t be able to access
it. That’s why there’s a rule: if you have a public class in your assembly, then any public
property, method, or any other member can only use public types.
We’re just scratching the surface of assemblies. There’s a lot more (including versioning and signing them for
security). You can read more about assemblies here: http://msdn.microsoft.com/en-us/library/k3677y81.aspx

746 Appendix i
response requested
#3. Use BackgroundWorker to make your UI responsive
Throughout the book, we’ve shown you two ways that you can make your programs do more than one thing at a time. In
Chapter 2, you learned about how to use the Application.DoEvents() method to let your form respond to button
clicks while still in a loop. But that’s not a good solution (for a bunch of reasons we didn’t get into), so we showed you
a much better solution in Chapter 4: using a timer to trigger an event at a regular interval. But even when you know how
to use timers, there will be times when your program will still be busy and will become nonresponsive. Luckily, .NET
gives you a really useful component that makes it very easy to let your program do work in the background. It’s called
BackgroundWorker, and we’ll show you an example to demonstrate how it works.
Start by building this form. You’ll need to drag a CheckBox onto it (name it useBackgroundWorkerCheckbox),
two buttons (named goButton and cancelButton) and a ProgressBar (named progressBar1). Then drag
a BackgroundWorker onto the form. It’ll show up in the gray box on the bottom of the designer. Keep its name
backgroundWorker1, and set its WorkerReportsProgress and WorkerSupportsCancellation properties
to true.
Here’s the BackgroundWorker
component. Notice how it
only has a few properties
that you can set.
Select the BackgroundWorker and go to the Events page in the Properties window (by clicking on the lightning-
bolt icon). It’s got three events: DoWork, ProgressChanged, and RunWorkerCompleted. Double-click on
each of them to add an event handler for each event.
The code for the form is on the next two pages.
you are here 4 747
leftovers
/// <summary>
/// Waste CPU cycles causing the program to slow down by doing calculations for 100ms
/// </summary>
private void WasteCPUCycles() {
DateTime startTime = DateTime.Now;
double value = Math.E;
while (DateTime.Now < startTime.AddMilliseconds(100)) {
value /= Math.PI;
value *= Math.Sqrt(2);
}
}
/// <summary>
/// Clicking the Go button starts wasting CPU cycles for 10 seconds
/// </summary>
private void goButton_Click(object sender, EventArgs e) {
goButton.Enabled = false;
if (!useBackgroundWorkerCheckbox.Checked) {
// If we're not using the background worker, just start wasting CPU cycles
for (int i = 1; i <= 100; i++) {
WasteCPUCycles();
progressBar1.Value = i;
}
goButton.Enabled = true;
} else {
cancelButton.Enabled = true;
// If we are using the background worker, use its RunWorkerAsync()
// to tell it to start its work
backgroundWorker1.RunWorkerAsync(new Guy("Bob", 37, 146));
}
}
/// <summary>
/// The BackgroundWorker object runs its DoWork event handler in the background
/// </summary>
private void backgroundWorker1_DoWork(object sender, DoWorkEventArgs e) {
// The e.Argument property returns the argument that was passed to RunWorkerAsync()
Console.WriteLine("Background worker argument: " + (e.Argument ?? "null"));
// Start wasting CPU cycles
for (int i = 1; i <= 100; i++) {
WasteCPUCycles();
// Use the BackgroundWorker.ReportProgress method to report the % complete
backgroundWorker1.ReportProgress(i);
// If the BackgroundWorker.CancellationPending property is true, cancel
if (backgroundWorker1.CancellationPending) {
Console.WriteLine("Cancelled");
break;
}
}
}
Here’s the code for the form.
The WasteCPUCycles() does a
whole bunch of mathematical
calculations to tie up the
CPU for 100 milliseconds,
and then it returns.
When the user clicks on the Go! button, the
event handler checks to see if the “Use
BackgroundWorker” checkbox is checked. If it
isn’t, the form wastes CPU cycles for 10 seconds.
If it is, the form calls the BackgroundWorker’s
RunWorkerAsync() method to tell it to start doing
its work in the background.
If the form’s
using the
background
worker, it
enables
the Cancel
button.
When the BackgroundWorker’s RunWorkerAsync() method is
called, it starts running its DoWork event handler method in the
background. Notice how it’s still calling the same WasteCPUCycles()
method to waste CPU cycles. It’s also calling the ReportProgress()
method to report a percent complete (a number from 0 to 100).
When you tell a BackgroundWorker to start work, you can give it an argument.
In this case, we’re passing it a Guy object (see leftover #1 for its definition).
Here’s a good example of how to use the ?? null coalescing operator we talked
about in leftover #1. If e.Argument is null, this returns “null”, otherwise it
returns e.Argument.
The CancellationPending method
checks if the BackgroundWorker’s
CancelAsync() method was called.
748 Appendix i
type safe
/// <summary>
/// BackgroundWorker fires its ProgressChanged event when the worker thread reports progress
/// </summary>
private void backgroundWorker1_ProgressChanged(object sender, ProgressChangedEventArgs e) {
progressBar1.Value = e.ProgressPercentage;
}
/// <summary>
/// BackgroundWorker fires its RunWorkerCompleted event when its work is done (or cancelled)
/// </summary>
private void backgroundWorker1_RunWorkerCompleted(object sender, RunWorkerCompletedEventArgs e)
{
goButton.Enabled = true;
cancelButton.Enabled = false;
}
/// <summary>
/// When the user clicks Cancel, call BackgroundWorker.CancelAsync() to send it a cancel message
/// </summary>
private void cancelButton_Click(object sender, EventArgs e) {
backgroundWorker1.CancelAsync();
}
When the DoWork event handler calls the ProgressChanged() method,
it causes the BackgroundWorker to raise its ProgressChanged event.
and set e.ProgressPercentage to the percent passed to it.
The BackgroundWorker only fires its ProgressChanged and RunWorkerCompleted events if
its WorkerReportsProgress and WorkerSupportsCancellation properties are true.
When the work is complete, the RunWorkerCompleted event handler
re-enables the Go! button and disables the Cancel button.
If the user clicks Cancel, it calls the
BackgroundWorker’s CancelAsync()
method to give it the message to cancel.
Once you’ve got your form working, run the program. It’s easy to see how BackgroundWorker makes your program
much more responsive:
≥Make sure the “Use BackgroundWorker” checkbox isn’t checked, then click the Go! button. You’ll see the
progress bar start to fill up. Try to drag the form around—you can’t. The form’s all locked up. If you’re lucky,
it might jump a bit as it eventually responds to your mouse drag.
≥When it’s done, check the “Use BackgroundWorker” checkbox and click the Go! button again. This time, the
form is perfectly responsive. You can move it around and even close it, and there’s no delay. When it finishes, it
uses the RunWorkerCompleted method to re-enable the buttons.
≥While the program is running (using BackgroundWorker), click the Cancel button. It will update its
CancellationPending property, which will tell the program to cancel and exit the loop.
Are you wondering why you need to use the ReportProgress() method rather than setting the ProgressBar’s
Value property directly? Try it out. Add the following line to the DoWork event handler:
progressBar1.Value = 10;
Then run your program again. As soon as it hits that line, it throws an InvalidOperationException with this
message: “Cross-thread operation not valid: Control ‘progressBar1’ accessed from a thread other than the thread it was
created on.” The reason it throws that exception is that BackgroundWorker starts a separate thread and executes the
DoWork method on it. So there are two threads: the GUI thread that’s running the form and the background thread. One
of the .NET threading rules is that only the GUI thread can update form controls; otherwise, that exception is thrown.
This is just one of the many threading pitfalls that can trap a new developer—that’s
why we didn’t talk about threading anywhere in this book. If you’re looking to get
started with threads, we highly recommend Joe Albahari’s excellent e-book about
threading in C# and .NET: http://www.albahari.com/threading
you are here 4 749
leftovers
#4. The Type class and GetType()
One of the most powerful aspects of the C# programming language is its rich type system. But until you’ve got
some experience building programs, it’s difficult to appreciate it—in fact, it can be a little baffling at first. But we
want to give you at least a taste of how types work in C# and .NET. Here’s a console application that gives you an
introduction to some of the tools you have at your disposal to work with types.
class Program {
class NestedClass {
public class DoubleNestedClass {
// Nested class contents ...
}
}
static void Main(string[] args) {
Type guyType = typeof(Guy);
Console.WriteLine(“{0} extends {1}”,
guyType.FullName,
guyType.BaseType.FullName);
// output: TypeExamples.Guy extends System.Object
Type nestedClassType = typeof(NestedClass.DoubleNestedClass);
Console.WriteLine(nestedClassType.FullName);
// output: TypeExamples.Program+NestedClass+DoubleNestedClass
List<Guy> guyList = new List<Guy>();
Console.WriteLine(guyList.GetType().Name);
// output: List`1
Dictionary<string, Guy> guyDictionary = new Dictionary<string, Guy>();
Console.WriteLine(guyDictionary.GetType().Name);
// output: Dictionary`2
Type t = typeof(Program);
Console.WriteLine(t.FullName);
// output: TypeExamples.Program
Type intType = typeof(int);
Type int32Type = typeof(Int32);
Console.WriteLine(“{0} - {1}”, intType.FullName, int32Type.FullName);
// System.Int32 - System.Int32
Console.WriteLine(“{0} {1}”, float.MinValue, float.MaxValue);
// output:-3.402823E+38 3.402823E+38
Console.WriteLine(“{0} {1}”, int.MinValue, int.MaxValue);
// output:-2147483648 2147483647
Console.WriteLine(“{0} {1}”, DateTime.MinValue, DateTime.MaxValue);
// output: 1/1/0001 12:00:00 AM 12/31/9999 11:59:59 PM
Console.WriteLine(12345.GetType().FullName);
// output: System.Int32
Console.ReadKey();
}
}
float is an alias for
System.Single and int is
an alias for System.Int32.
They’re both structs
(which you learned all
about in Chapter 14).
There’s so much more to learn about types Read more about them
here: http://msdn.microsoft.com/en-us/library/ms173104.aspx
We only mentioned it briefly, but
here’s a reminder that you can nest
classes inside of each other. Program
contains NestedClass, which contains
DoubleNestedClass.
Here’s
the entry
point…
This is the
System.Type
class. The
GetType()
method returns
a Type object.
The FullName property we
used in the first part of
this program is a member of
System.Type.
Numeric value types and DateTime have
MinValue and MaxValue properties that
return the lowest and highest valid value.
Literals have types, too! And you can use
GetType() to get those types.
You can use the typeof keyword to turn a
type (like Guy, int, or DateTime) into a Type
object. Then you can find out its full name
and base type (and if it didn’t inherit from
anything, its base type is System.Object).
When you get the type of a
generic, its name is the type
name followed by a backward
quote and the number of its
generic parameters.
750 Appendix i
all things being equal
#5. Equality, IEquatable, and Equals()
Throughout the book, when you’ve wanted to compare values in two variables, you’d use the == operator. But you
already know that all things being equal, some values are more “equal” than others. The == operator works just fine for
value types (like ints, doubles, DateTimes, or other structs), but when you use it on reference types you just end
up comparing whether two reference variables are pointing to the same object (or if they’re both null). That’s fine for
what it is, but it turns out that C# and .NET provide a rich set of tools for dealing with value equality in objects.
To start out, every object has a method Equals(), which by default returns true only if you pass it a reference to itself.
And there’s a static method, Object.ReferenceEquals(), which takes two parameters and returns true if they both
point to the same object (or if they’re both null). Here’s an example, which you can try yourself in a console application:
Guy joe1 = new Guy(“Joe”, 37, 100);
Guy joe2 = joe1;
Console.WriteLine(Object.ReferenceEquals(joe1, joe2)); // True
Console.WriteLine(joe1.Equals(joe2)); // True
Console.WriteLine(Object.ReferenceEquals(null, null)); // True
joe2 = new Guy(“Joe”, 37, 100);
Console.WriteLine(Object.ReferenceEquals(joe1, joe2)); // False
Console.WriteLine(joe1.Equals(joe2)); // False
But that’s just the beginning. There’s an interface built into .NET called IEquatable<T> that you can use to add
code to your objects so they can tell if they’re equal to other objects. An object that implements IEquatable<T>
knows how to compare its value to the value of an object of type T. It has one method, Equals(), and you implement
it by writing code to compare the current object’s value to that of another object. There’s an MSDN page that has
more information about it (http://msdn.microsoft.com/en-us/library/ms131190.aspx). Here’s an important excerpt:
“If you implement Equals, you should also override the base class implementations of Object.Equals(Object) and GetHashCode
so that their behavior is consistent with that of the IEquatable<T>.Equals method. If you do override Object.Equals(Object),
your overridden implementation is also called in calls to the static Equals(System.Object, System.Object) method on your class.
This ensures that all invocations of the Equals method return consistent results, which the example illustrates.”
Here’s a class called EquatableGuy, which extends Guy and implements IEquatable<Guy>:
/// <summary>
/// A guy that knows how to compare itself with other guys
/// </summary>
class EquatableGuy : Guy, IEquatable<Guy> {
public EquatableGuy(string name, int age, int cash)
: base(name, age, cash) { }
/// <summary>
/// Compare this object against another EquatableGuy
/// </summary>
/// <param name=”other”>The EquatableGuy object to compare with</param>
/// <returns>True if the objects have the same values, false otherwise</returns>
public bool Equals(Guy other) {
if (ReferenceEquals(null, other)) return false;
if (ReferenceEquals(this, other)) return true;
return Equals(other.Name, Name) && other.Age == age && other.Cash == Cash;
}
Again, we’re using the
same Guy class from
leftover #1.
The Equals() method compares the
actual values in the other Guy object’s
fields, checking his Name, Age, and
Cash to see if they’re the same and
only returning true if they are.
If you don’t
do this, the
compiler will
give you a
warning.
you are here 4 751
leftovers
/// <summary>
/// Override the Equals method and have it call Equals(Guy)
/// </summary>
/// <param name=”obj”>The object to compare to</param>
/// <returns>True if the value of the other object is equal to this one</returns>
public override bool Equals(object obj) {
if (!(obj is Guy)) return false;
return Equals((Guy)obj);
}
/// <summary>
/// Part of the contract for overriding Equals is that you need to override
/// GetHashCode() as well. It should compare the values and return true
/// if the values are equal.
/// </summary>
/// <returns></returns>
public override int GetHashCode() {
const int prime = 397;
int result = age;
result = (result * prime) ^ (Name != null ? Name.GetHashCode() : 0);
result = (result * prime) ^ Cash;
return result;
}
}
And here’s what it looks like when you use Equals() to compare two EquatableGuy objects:
joe1 = new EquatableGuy(“Joe”, 37, 100);
joe2 = new EquatableGuy(“Joe”, 37, 100);
Console.WriteLine(Object.ReferenceEquals(joe1, joe2)); // False
Console.WriteLine(joe1.Equals(joe2)); // True
joe1.GiveCash(50);
Console.WriteLine(joe1.Equals(joe2)); // False
joe2.GiveCash(50);
Console.WriteLine(joe1.Equals(joe2)); // True
And now that Equals() and GetHashCode() are implemented to check the values of the fields and properties, the
method List.Contains() now works. Here’s a List<Guy> that contains several Guy objects, including a new
EquatableGuy object with the same values as the one referenced by joe1.
List<Guy> guys = new List<Guy>() {
new Guy(“Bob”, 42, 125),
new EquatableGuy(joe1.Name, joe1.Age, joe1.Cash),
new Guy(“Ed”, 39, 95)
};
Console.WriteLine(guys.Contains(joe1)); // True
Console.WriteLine(joe1 == joe2); // False
We’re also overriding the Equals()
method that we inherited from
Object, as well as GetHashCode
(because of the contract mentioned
in that MSDN article).
Since our other Equals() method already
compares guys, we’ll just call it.
This is a pretty standard pattern
for GetHashCode(). Note the use
of the bitwise XOR (^) operator, a
prime number, and the conditional
operator (?:).
List.Contains() will go through its
contents and call each object’s
Equals() method to compare it with
the reference you pass to it.
Even though joe1 and joe2 point to objects
with the same values, == and != still compare
the references, not the values themselves.
Guy.Equals() will only
return true if the
actual values of the
objects are the same.
Isn’t there something we can do about that?
Flip the page and find out!
752 Appendix i
some classes are more equal than others
If you try to compare two EquatableGuy references with the == or != operators, they’ll just check if both references are
pointing to the same object or if they’re both null. But what if you want to make them actually compare the values of the
objects? It turns out that you can actually overload an operator—redefining it to do something specific when it operates
on references of a certain type. You can see an example of how it works in the EquatableGuyWithOverload class,
which extends EquatableGuy and adds overloading of the == and =! operators:
/// <summary>
/// A guy that knows how to compare itself with other guys
/// </summary>
class EquatableGuyWithOverload : EquatableGuy
{
public EquatableGuyWithOverload(string name, int age, int cash)
: base(name, age, cash) { }
public static bool operator ==(EquatableGuyWithOverload left,
EquatableGuyWithOverload right)
{
if (Object.ReferenceEquals(left, null)) return false;
else return left.Equals(right);
}
public static bool operator !=(EquatableGuyWithOverload left,
EquatableGuyWithOverload right)
{
return !(left == right);
}
public override bool Equals(object obj) {
return base.Equals(obj);
}
public override int GetHashCode() {
return base.GetHashCode();
}
}
Here’s some code that uses EquatableGuyWithOverload objects:
joe1 = new EquatableGuyWithOverload(joe1.Name, joe1.Age, joe1.Cash);
joe2 = new EquatableGuyWithOverload(joe1.Name, joe1.Age, joe1.Cash);
Console.WriteLine(joe1 == joe2); // False
Console.WriteLine(joe1 != joe2); // True
Console.WriteLine((EquatableGuyWithOverload)joe1 ==
(EquatableGuyWithOverload)joe2); // True
Console.WriteLine((EquatableGuyWithOverload)joe1 !=
(EquatableGuyWithOverload)joe2); // False
joe2.ReceiveCash(25);
Console.WriteLine((EquatableGuyWithOverload)joe1 ==
(EquatableGuyWithOverload)joe2); // False
Console.WriteLine((EquatableGuyWithOverload)joe1 !=
(EquatableGuyWithOverload)joe2); // True
If we don’t override Equals() and
GetHashCode(), the IDE will give this warning:
‘EquatableGuyWithOverload’ defines operator ==
or operator != but does not override Object.
GetHashCode().
Since EquatableGuyWithOverload acts
just like EquatableGuy and Guy, we
can just call the base methods.
Wait, what happened?
It’s calling Guy’s == and
=! operators. Cast to
EquatableGuyWithOverload to
call the correct == and =!
If we used == to check for null
instead of Object.ReferenceEquals(),
we’d get a StackOverflowException.
Can you figure out why?
Since we’ve
already defined
==, we can
just invert it
for !=.
you are here 4 753
leftovers
#6. Using yield return to create enumerable objects
In Chapter 8 we learned about the IEnumerable interface and how it’s used by the foreach loop. C# and .NET give
you some useful tools for building your own collections, starting with the IEnumerable interface. Let’s say you want
to create your own enumerator that returns values from this Sport enum in order:
enum Sport
{
Football, Baseball,
Basketball, Hockey,
Boxing, Rugby, Fencing,
}
You could manually implement IEnumerable yourself, building the Current property and MoveNext() method:
class SportCollection : IEnumerable<Sport> {
public IEnumerator<Sport> GetEnumerator() {
return new ManualSportEnumerator();
}
System.Collections.IEnumerator System.Collections.IEnumerable.GetEnumerator() {
return GetEnumerator();
}
class ManualSportEnumerator : IEnumerator<Sport> {
int current = -1;
public Sport Current { get { return (Sport)current; } }
public void Dispose() { return; } // Nothing to dispose
object System.Collections.IEnumerator.Current { get { return Current; } }
public bool MoveNext() {
int maxEnumValue = Enum.GetValues(typeof(Sport)).Length - 1;
if ((int)current >= maxEnumValue)
return false;
current++;
return true;
}
public void Reset() { current = 0; }
}
}
Here’s a foreach loop that loops through ManualSportCollection. It returns the sports in order (Football,
Baseball, Basketball, Hockey, Boxing, Rugby, Fencing):
Console.WriteLine(“SportCollection contents:”);
SportCollection sportCollection = new SportCollection();
foreach (Sport sport in sportCollection)
Console.WriteLine(sport.ToString());
That’s a lot of work to build an enumerator—it has to manage its own state, and keep track of which sport it returned.
Luckily, C# gives you a really useful tool to help you easily build enumerators. It’s called yield return, and you’ll
learn about it when you flip the page.
The MoveNext() method increments
current and uses it to return the
next sport in the enum.
The enumerator implements
IEnumerator<Sport>. The foreach
loop uses its Current property
and MoveNext() method.
IEnumerable just contains one method,
GetEnumerator(), but we also need to build
the class for the enumerator it returns.
Just a reminder of something from Chapter 15: all collections are enumerable, but not everything
that’s enumerable is technically a collection unless it implements the ICollection<T> interface. We
didn’t show you how to build collections from the ground up, but understanding enumerators is
definitely enough to get you started down that road.

754 Appendix i
enumerate this!
The yield return statement is a kind of all-in-one automatic enumerator creator. This SportCollection class
does exactly the same thing as the one on the previous page, but its enumerator is only three lines long.:
class SportCollection : IEnumerable<Sport> {
System.Collections.IEnumerator System.Collections.IEnumerable.GetEnumerator() {
return GetEnumerator();
}
public IEnumerator<Sport> GetEnumerator() {
int maxEnumValue = Enum.GetValues(typeof(Sport)).Length - 1;
for (int i = 0; i < maxEnumValue; i++) {
yield return (Sport)i;
}
}
}
That looks a little odd, but if you actually debug through it you can see what’s going on. When the compiler sees a
method with a yield return statement that returns an IEnumerator or IEnumerator<T>, it automatically
adds the MoveNext() and Current methods. When it executes, the the first yield return that it
encounters causes it to return the first value to the foreach loop. When the foreach loop continues (by calling the
MoveNext() method), it resumes execution with the statement immediately after the last yield return that it
executed. Its MoveNext() method returns false if the enumerator method returns. This may be a little hard to follow
on paper, but it’s much easier to follow if you load it into the debugger and step through it using Step Into (F11). To
make it a little easier, here’s a really simple enumerator called NameEnumerator() that iterates through four names:
static IEnumerable<string> NameCollection() {
yield return “Bob”; // The method exits after this statement ...
yield return “Harry”; // ... and resumes here the next time through
yield return “Joe”;
yield return “Frank”;
}
And here’s a foreach loop that iterates through it. Use Step Into (F11) to see exactly what’s going on:
IEnumerable<string> names = NameEnumerator(); // Put a breakpoint here
foreach (string name in names)
Console.WriteLine(name);
There’s another thing that you typically see in a collection: an indexer. When you use brackets [] to retrieve an object
from a list, array, or dictionary (like myList[3] or myDictionary[“Steve”]), you’re using an indexer. An
indexer is actually just a method. It looks a lot like a property, except it’s got a single named parameter.
The IDE has an especially useful code snippet. Type indexer followed by two tabs, and the IDE will add the skeleton
of an indexer for you automatically.
Here’s an indexer for the SportCollection class:
public Sport this[int index] {
get { return (Sport)index; }
}
Passing that indexer 3 will return the enum value Hockey.
Like we said earlier, this is just the start for a
SportCollection class. You’d still want to implement
the ICollection<Sport> interface.
you are here 4 755
leftovers
Here’s an IEnumerable<Guy> that keeps track of a bunch of guys, with an indexer that lets you get or set guys’ ages.
class GuyCollection : IEnumerable<Guy> {
private static readonly Dictionary<string, int> namesAndAges = new Dictionary<string, int>()
{
{“Joe”, 41}, {“Bob”, 43}, {“Ed”, 39}, {“Larry”, 44}, {“Fred”, 45}
};
public IEnumerator<Guy> GetEnumerator() {
Random random = new Random();
int pileOfCash = 125 * namesAndAges.Count;
int count = 0;
foreach (string name in namesAndAges.Keys) {
int cashForGuy = (++count < namesAndAges.Count) ? random.Next(125) : pileOfCash;
pileOfCash -= cashForGuy;
yield return new Guy(name, namesAndAges[name], cashForGuy);
}
}
System.Collections.IEnumerator System.Collections.IEnumerable.GetEnumerator() {
return GetEnumerator();
}
/// <summary>
/// Gets or sets the age of a given guy
/// </summary>
/// <param name=”name”>Name of the guy</param>
/// <returns>Age of the guy</returns>
public int this[string name] {
get {
if (namesAndAges.ContainsKey(name))
return namesAndAges[name];
throw new IndexOutOfRangeException(“Name ” + name + “ was not found”);
}
set {
if (namesAndAges.ContainsKey(name))
namesAndAges[name] = value;
else
namesAndAges.Add(name, value);
}
}
}
And here’s some code that uses the indexers to update one guy’s age and add two more guys, and then loop through them:
Console.WriteLine(“Adding two guys and modifying one guy”);
guyCollection[“Bob”] = guyCollection[“Joe”] + 3;
guyCollection[“Bill”] = 57;
guyCollection[“Harry”] = 31;
foreach (Guy guy in guyCollection)
Console.WriteLine(guy.ToString());
The enumerator uses this private Dictionary
to keep track of the guys it’ll create, but
it doesn’t actually create the Guy objects
themselves until its enumerator is used.
It creates Guy objects with random amounts of cash. We’re just doing this to show
that the enumerator can create objects on the fly during a foreach loop.
When an invalid index is passed to
an indexer, it typically throws an
IndexOutOfRangeException.
This indexer has a set accessor
that either updates a guy’s age or
adds a new guy to the Dictionary.

756 Appendix i
#7. Refactoring
Refactoring means changing the way your code is structured without changing its behavior. Whenever you write a
complex method, you should take a few minutes to step back and figure out how you can change it so that you make it
easier to understand. Luckily, the IDE has some very useful refactoring tools built in. There are all sorts of refactorings
you can do—here are some we use often.
Extract a method
When we were writing the control-based renderer for Chapter 13, we originally included this foreach loop:
foreach (Bee bee in world.Bees) {
beeControl = GetBeeControl(bee);
if (bee.InsideHive) {
if (fieldForm.Controls.Contains(beeControl)) {
fieldForm.Controls.Remove(beeControl);
beeControl.Size = new Size(40, 40);
hiveForm.Controls.Add(beeControl);
beeControl.BringToFront();
} else if (hiveForm.Controls.Contains(beeControl)) {
hiveForm.Controls.Remove(beeControl);
beeControl.Size = new Size(20, 20);
fieldForm.Controls.Add(beeControl);
beeControl.BringToFront();
}
beeControl.Location = bee.Location;
}
One of our tech reviewers, Joe Albahari, pointed out that this was a little hard to read. He suggested that
we extract those two four-line blocks into methods. So we selected the first block, right-clicked on
it, and selected “Refactor >> Extract Method…”. This window popped up:
Then we did the same thing for the other four-line block, extracting it into a method that we named
MoveBeeFromHiveToField(). Here’s how that foreach loop ended up—it’s a lot easier to read:
foreach (Bee bee in world.Bees) {
beeControl = GetBeeControl(bee);
if (bee.InsideHive) {
if (fieldForm.Controls.Contains(beeControl))
MoveBeeFromFieldToHive(beeControl);
} else if (hiveForm.Controls.Contains(beeControl))
MoveBeeFromHiveToField(beeControl, bee);
beeControl.Location = bee.Location;
}
These four
lines move a
BeeControl from
the Field form
to the Hive form.
And these four
lines move a
BeeControl from
the Hive form to
the Field form.
The IDE examined
the code that we
selected and figured
out that it uses a
BeeControl variable
called beeControl,
so it added it as a
parameter to the
method.
We typed in a name
for the new method.
We decided to call it
MoveBeeFromFieldToHive()
because that pretty much
describes what the code
does.
refactoring is a great programming habit
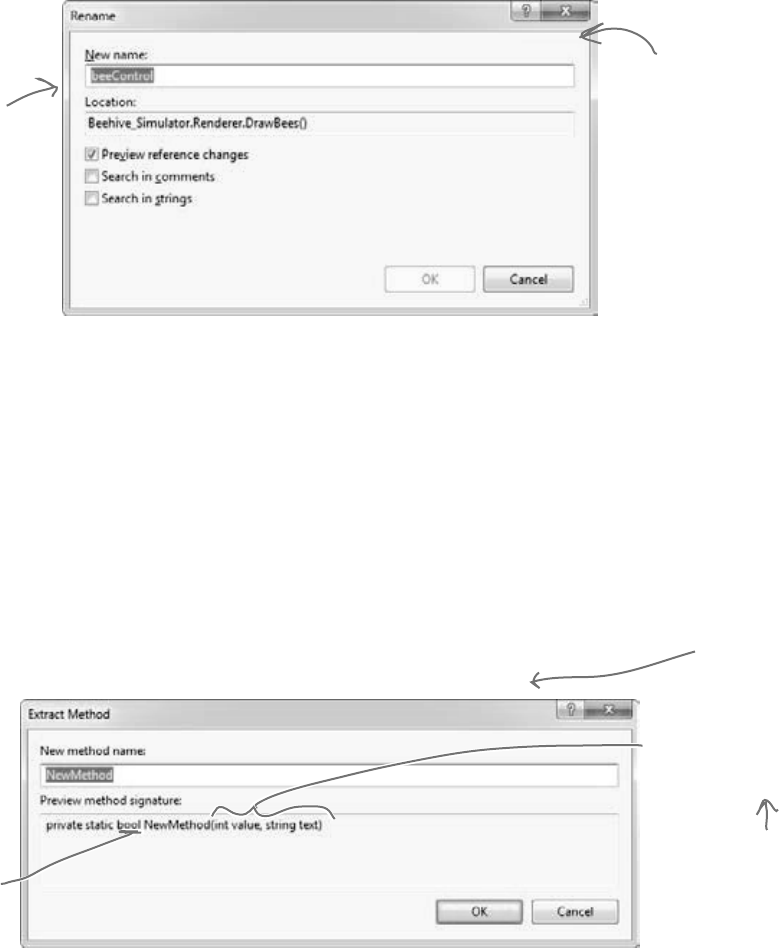
you are here 4 757
leftovers
Rename a variable
Back in Chapter 3, we explained how choosing intuitive names for your classes, methods, fields, and variables
makes your code a lot easier to understand. The IDE can really help you out when it comes to naming things in
your code. Just right-click on any class, variable, field, property, namespace, constant—pretty much anything that
you can name—and choose “Refactor >> Rename”. You can also just use F2, which comes in handy because
once you start renaming things, you find yourself doing it all the time.
We selected “beeControl” in the code from the simulator and renamed it. Here’s what popped up:
Consolidate a conditional expression
Here’s a neat way to use the “Extract Method” feature. Open up any program, add a button, and add
this code to its event handler:
private void button1_Click(object sender, EventArgs e) {
int value = 5;
string text = “Hi there”;
if (value == 36 || text.Contains(“there”))
MessageBox.Show(“Pow!”);
}
Select everything inside the if statement: value == 36 || text.Contains(“there”). Then
right-click on it and select “Refactor >> Extract Method…”. Here’s what pops up:
This window lets you
choose a new name
for the item. If we
renamed this, say, to
“Bobbo”, then the IDE
would go through the
code and change every
single occurrence of it
to “Bobbo”.
The IDE does a really
thorough job of renaming.
If you rename a class, it’ll
change every statement
that instantiates it or uses
it. You can click on any
occurrence of the name,
anywhere in the code, and
the IDE will make the
change everywhere in your
program.
Every conditional
expression evaluates to
a bool, so the IDE will
create a method that
returns a bool and
replace the conditional
test with a call to that
method.
The expression uses two
variables called value and
text, so the IDE added
parameters to the method
using those names.
Not only will this make
the code easier to read,
but now you’ve got a
new method that you
can reuse elsewhere!
Plus, it’ll even
figure out that
it should create
a static method,
since it doesn’t use
any fields.

758 Appendix i
we’re sure there’s a superhero metaphor in here somewhere
#8. Anonymous types, anonymous methods, and lambda expressions
C# lets you create types and methods without using explicitly named declarations. A type or method that’s declared
without a name is called anonymous. These are very powerful tools—for example, LINQ wouldn’t be possible
without them. But it’s a lot easier to master anonymous types, anonymous methods, and lambda expressions once you
have a firm grasp on the language, so they didn’t make the cut for including in the book. But here’s a quick introduction,
so you can get started learning about them.
class Program {
delegate void MyIntAndString(int i, string s);
delegate int CombineTwoInts(int x, int y);
static void Main(string[] args) {
/*
* In Chapter 15, you saw how the var keyword let the IDE determine the
* type of an object at compile time.
*
* You can also create objects with anonymous types using var and new.
*
* You can learn more about anonymous types here:
* http://msdn.microsoft.com/en-us/library/bb397696.aspx
*/
// Create an anonymous type that looks a lot like a guy:
var anonymousGuy = new { Name = “Bob”, Age = 43, Cash = 137 };
// When you type this in, the IDE’s IntelliSense automatically picks up
// the members -- Name, Age and Cash show up in the IntelliSense window.
Console.WriteLine(“{0} is {1} years old and has {2} bucks”,
anonymousGuy.Name, anonymousGuy.Age, anonymousGuy.Cash);
// Output: Bob is 43 years old and has 137 bucks
// An instance of an anonymous type has a sensible ToString() method.
Console.WriteLine(anonymousGuy.ToString());
// Output: { Name = Bob, Age = 43, Cash = 137 }
/*
* In Chapter 11, you learned about how you can use a delegate to reference
* a method. In all of the examples of delegates that you’ve seen so far,
* you assigned an existing method to a delegate.
*
* Anonymous methods are methods that you declare in a statement -- you
* declare them using curly brackets { }, just like with anonymous types.
*
* You can learn more about anonymous methods here:
* http://msdn.microsoft.com/en-us/library/0yw3tz5k.aspx
*/

you are here 4 759
leftovers
// Here’s an anonymous method that writes an int and a string to the console.
// Its declaration matches our MyIntAndString delegate (defined above), so
// we can assign it to a variable of type MyIntAndString.
MyIntAndString printThem = delegate(int i, string s)
{ Console.WriteLine(“{0} - {1}”, i, s); };
printThem(123, “four five six”);
// Output: 123 - four five six
// Here’s another anonymous method with the same signature (int, string).
// This one checks if the string contains the int.
MyIntAndString contains = delegate(int i, string s)
{ Console.WriteLine(s.Contains(i.ToString())); };
contains(123, “four five six”);
// Output: False
contains(123, “four 123 five six”);
// Output: True
// You can dynamically invoke a method using Delegate.DynamicInvoke(),
// passing the parameters to the method as an array of objects.
Delegate d = contains;
d.DynamicInvoke(new object[] { 123, “four 123 five six” });
// Output: True
/*
* A lambda expression is a special kind of anonymous method that uses
* the => operator. It’s called the lambda operator, but when you’re
* talking about lambda expressions you usually say “goes to” when
* you read it. Here’s a simple lambda expression:
*
* (a, b) => { return a + b; }
*
* You could read that as “a and b goes to a plus b” -- it’s an anonymous
* method for adding two values. You can think of lambda expressions as
* anonymous methods that take parameters and can return values.
*
* You can learn more about lambda expressions here:
* http://msdn.microsoft.com/en-us/library/bb397687.aspx
*/
// Here’s that lambda expression for adding two numbers. Its signature
// matches our CombineTwoInts delegate, so we can assign it to a delegate
// variable of type CombineTwoInts. Notice how CombineTwoInts’s return
// type is int -- that means the lambda expression needs to return an int.
CombineTwoInts adder = (a, b) => { return a + b; };
Console.WriteLine(adder(3, 5));
// Output: 8
// Here’s another lambda expression -- this one multiplies two numbers.
CombineTwoInts multiplier = (int a, int b) => { return a * b; };
Console.WriteLine(multiplier(3, 5));
// Output: 15
// You can do some seriously powerful stuff when you combine lambda
// expressions with LINQ. Here’s a really simple example:
var greaterThan3 = new List<int> { 1, 2, 3, 4, 5, 6 }.Where(x => x > 3);
foreach (int i in greaterThan3) Console.Write(“{0} ”, i);
// Output: 4 5 6
Console.ReadKey();
}
}

760 Appendix i
another way to serialize
#9. Serializing data using DataContractSerializer
When we put together the parts of Chapter 9 that cover serialization, our goal was to give you a good feel for the main
concepts behind how serialization works, and the BinaryFormatter class is perfect for that. But that’s not the only
way to serialize objects…which should make sense, because there are many different ways that the data in an object can
be represented. Let’s take a look at another, really useful way to serialize data: using the Data Contract Serializer.
Data Contract Serializer uses a class called DataContractSerializer. It’s part of Windows Communication
Foundation (WCF), Microsoft’s unified programming model for building service-oriented applications. Here’s an
example of how we can use it to serialize and deserialize our Guy object to and from XML.
/* Before you can serialize an object using the Data Contract Serializer, you need
* to set up a data contract. The easiest way to do this is by marking the class with
* the [Serializable] attribute. By default, the DataContractSerializer will write all
* public read/write properties and fields. But what’s really useful about the Data
* Contract Serializer is that you can be a lot more specific about exactly what does
* and doesn’t get serialized. You can associate data with this particular class by
* giving the contact a name and a namespace using named parameters.
*/
[DataContract(Name = “Guy”, Namespace = “http://www.headfirstlabs.com”)]
class SerializableGuy {
// When you set up a specific data contract for a type -- like our
// Guy class -- you mark each field or property that you want to
// serialize with the [DataMember] attribute.
[DataMember]
public string Name { get; private set; }
[DataMember]
public int Age { get; private set; }
[DataMember]
public int Cash { get; private set; }
// You can decide what members you want to serialize. We added two private int fields
// called secretNumberOne and secretNumberTwo to our SerliazableGuy and initialized
// them both to random numbers. secretNumberOne is marked with the [DataMember]
// attribute, so it will be serialized as part of the data contract. But we didn’t
// mark secretNumberTwo, so it won’t be. They’re both returned as part of ToString().
[DataMember]
private int secretNumberOne = new Random().Next();
// Since the secretNumberTwo field isn’t marked with the [DataMember]
// attribute, it’s not part of the contract and won’t be serialized.
private int secretNumberTwo = new Random().Next();
public SerializableGuy(string name, int age, int cash) {
Name = name;
Age = age;
Cash = cash;
}
public override string ToString() {
return String.Format(“{0} is {1} years old and has {2} bucks [{3},{4}]”,
Name, Age, Cash, secretNumberOne, secretNumberTwo);
}
}
You can serialize any [Serializable] class with
the Data Contract Serializer. But if you set
up a data contract using the [DataContract]
and [DataMember] attributes, you have a lot
more control over what gets serialized.
The [DataContract] and [DataMember] attributes are in the
System.Runtime.Serialization namespace, so the Guy class needs a
“using System.RuntimeSerialization” directive at the top.
you are here 4 761
leftovers
using System;
using System.Text;
using System.Runtime.Serialization;
using System.IO;
using System.Xml;
class Program
{
static void Main(string[] args)
{
/* Data contract serialization typically reads and writes XML data. You use a
* DataContractSerializer object for data contract serialization. Its
* WriteObject() method can write to a stream, or it can write to an object that
* extends XmlDictionaryWriter, an abstract class that controls XML output and
* can be extended to change the way the XML output is written. Objects are
* deserialized using the ReadObject() method, which can read XML data from
* a stream or an XmlDictionaryReader.
*/
DataContractSerializer serializer = new DataContractSerializer(typeof(SerializableGuy));
// We’ll create a new SerializableGuy object and serialize it using a FileStream.
SerializableGuy guyToWrite = new SerializableGuy(“Joe”, 37, 150);
using (FileStream writer = new FileStream(“serialized_guy.xml”, FileMode.Create)) {
serializer.WriteObject(writer, guyToWrite);
}
// We can open the file we just wrote and deserialize it into a new guy using ReadObject().
// We’ll use the XmlDictionaryReader.CreateTextReader() method to create an object that
// reads XML data from a stream.
SerializableGuy guyToRead = null;
using (FileStream inputStream = new FileStream(“serialized_guy.xml”, FileMode.Open))
using(XmlDictionaryReader reader =
XmlDictionaryReader.CreateTextReader(inputStream, new XmlDictionaryReaderQuotas())) {
guyToRead = serializer.ReadObject(reader, true) as SerializableGuy;
}
Console.WriteLine(guyToRead);
// Output: Joe is 37 years old and has 150 bucks [1461194451,0]
string xmlGuy = @”
<Guy xmlns=””http://www.headfirstlabs.com”” xmlns:i=””http://www.w3.org/2001/XMLSchema-instance””>
<Age>43</Age>
<Cash>225</Cash>
<Name>Bob</Name>
<secretNumberOne>54321</secretNumberOne>
</Guy>”;
byte[] buffer = UnicodeEncoding.UTF8.GetBytes(xmlGuy);
using (XmlDictionaryReader reader =
XmlDictionaryReader.CreateTextReader(buffer, new XmlDictionaryReaderQuotas()))
{
guyToRead = serializer.ReadObject(reader, true) as SerializableGuy;
}
Console.WriteLine(guyToRead);
// Output: Bob is 43 years old and has 225 bucks [54321,0]
}
}
Notice how the secretNumberOne
field was deserialized as part
of the contract, but the
secretNumberTwo field wasn’t.
Try putting
a breakpoint
here and
adding reader
and reader.
Read() to
the Watch
window. What
happens when
you refresh
reader.Read()
a few times?
Open up the serialized_guy.xml file and you’ll see data
that looks just like this. It’s a lot easier to read than
what BinaryFormatter writes. But it’s possible to
make DataContractSerializer write binary data, too.
We took our string with XML data,
converted it into a UTF-8 encoded
byte array, and deserialized it into a
new SerializableGuy object.
You can read more about Data Contracts and Data Contract Serialization here:
http://msdn.microsoft.com/en-us/library/ms733127.aspx
And you can read more about Windows Communication Foundation here:
http://msdn.microsoft.com/en-us/library/dd456779.aspx

762 Appendix i
there’s so much more LINQ
#10. LINQ to XML
private static XDocument GetStarbuzzData() {
XDocument doc = new XDocument(
new XDeclaration(“1.0”, “utf-8”, “yes”),
new XComment(“Starbuzz Customer Loyalty Data”),
new XElement(“starbuzzData”,
new XAttribute(“storeName”, “Park Slope”),
new XAttribute(“location”, “Brooklyn, NY”),
new XElement(“person”,
new XElement(“personalInfo”,
new XElement(“name”, “Janet Venutian”),
new XElement(“zip”, 11215)),
new XElement(“favoriteDrink”, “Choco Macchiato”),
new XElement(“moneySpent”, 255),
new XElement(“visits”, 50)),
new XElement(“person”,
new XElement(“personalInfo”,
new XElement(“name”, “Liz Nelson”),
new XElement(“zip”, 11238)),
new XElement(“favoriteDrink”, “Double Cappuccino”),
new XElement(“moneySpent”, 150),
new XElement(“visits”, 35)),
new XElement(“person”,
new XElement(“personalInfo”,
new XElement(“name”, “Matt Franks”),
new XElement(“zip”, 11217)),
new XElement(“favoriteDrink”, “Zesty Lemon Chai”),
new XElement(“moneySpent”, 75),
new XElement(“visits”, 15)),
new XElement(“person”,
new XElement(“personalInfo”,
new XElement(“name”, “Joe Ng”),
new XElement(“zip”, 11217)),
new XElement(“favoriteDrink”, “Banana Split in a Cup”),
new XElement(“moneySpent”, 60),
new XElement(“visits”, 10)),
new XElement(“person”,
new XElement(“personalInfo”,
new XElement(“name”, “Sarah Kalter”),
new XElement(“zip”, 11215)),
new XElement(“favoriteDrink”, “Boring Coffee”),
new XElement(“moneySpent”, 110),
new XElement(“visits”, 15))));
return doc;
}
XML—or Extensible Markup Language—is a format for files and data streams that represents complex data as text.
The .NET Framework gives you some really powerful tools for creating, loading, and saving XML files. And once
you’ve got your hands on XML data, you can use LINQ to query it. Add “using System.Xml.Linq;” to the
top of a file and enter this method—it generates an XML document to store Starbuzz customer loyalty data.
You can use an XDocument to create
an XML file, and that includes XML
files you can read and write using
DataContractSerializer.
An XMLDocument object
represents an XML document.
It’s part of the System.Xml.Linq
namespace.
Use XElement objects to create
elements under the XML tree.
Microsoft has a lot of great documentation about LINQ
and LINQ to XML online. You can read more about LINQ to
XML and classes in the System.Xml.Linq namespace here:
http://msdn.microsoft.com/en-us/library/bb387098.aspx

you are here 4 763
leftovers
Save and load XML files
You can write an XDocument object to the console or save it to a file, and you can load an XML file into it:
XDocument doc = GetStarbuzzData();
Console.WriteLine(doc.ToString());
doc.Save(“starbuzzData.xml”);
XDocument anotherDoc = XDocument.Load(“starbuzzData.xml”);
Query your data
Here’s a simple LINQ query that queries the Starbuzz data using its XDocument:
var data = from item in doc.Descendants(“person”)
select new { drink = item.Element(“favoriteDrink”).Value,
moneySpent = item.Element(“moneySpent”).Value,
zipCode = item.Element(“personalInfo”).Element(“zip”).Value };
foreach (var p in data)
Console.WriteLine(p.ToString());
And you can do more complex queries too:
var zipcodeGroups = from item in doc.Descendants(“person”)
group item.Element(“favoriteDrink”).Value
by item.Element(“personalInfo”).Element(“zip”).Value
into zipcodeGroup
select zipcodeGroup;
foreach (var group in zipcodeGroups)
Console.WriteLine(“{0} favorite drinks in {1}”,
group.Distinct().Count(), group.Key);
Read data from an RSS feed
You can do some pretty powerful things with LINQ to XML. Here’s a simple query to read articles from our blog:
XDocument ourBlog = XDocument.Load(“http://www.stellman-greene.com/feed”);
Console.WriteLine(ourBlog.Element(“rss”).Element(“channel”).Element(“title”).Value);
var posts = from post in ourBlog.Descendants(“item”)
select new { Title = post.Element(“title”).Value,
Date = post.Element(“pubDate”).Value};
foreach (var post in posts)
Console.WriteLine(post.ToString());
The XDocument.Load() method has
several overloaded constructors. This
one pulls XML data from a URL.
The XDocument object’s Load() and
Save() methods read and write XML
files. And its ToString() method
renders everything inside it as one big
XML document.
The Descendants() method
returns a reference to an
object that you can plug
right into LINQ.
You already know that LINQ lets you call
methods and use them as part of the query, and
that works really well with the Element() method.
Element() returns an
XElement object, and
you can use its properties
to check specific values
in your XML document.
We used the URL of our blog, Building Better Software.
http://www.stellman-greene.com/
Create a new console application, make sure
you’ve got “using System.Xml.Linq;” at the
top, type this query into its event handler,
and check out what it prints to the console.
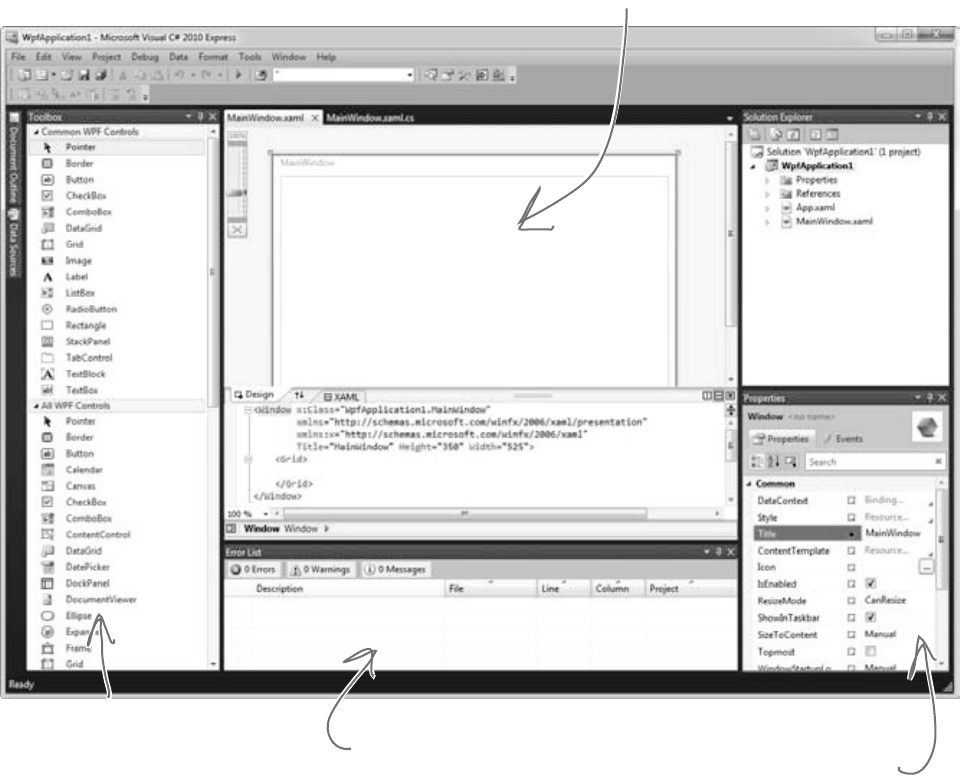
764 Appendix i
xaml rhymes with “camel”
#11. Windows Presentation Foundation
Windows Presentation Foundation, or WPF, is Microsoft’s latest-generation platform for
building visual applications. It’s pretty amazing—it has XML-declared layout, scalable
controls, a totally new system for controls, 2-D and 3-D graphics and animation, text flow
and document formatting—and there’s even a cross-platform web browser plug-in that uses it.
Unfortunately, while WPF is a really cool and highly capable technology, it’s not a particularly
good tool for teaching C#. And that was our goal—getting C# concepts into your brain as
quickly and easily as possible.
Take a second and create a new WPF application. Just create a new project using the
IDE, but don’t create a new Windows Forms Application project. Instead, choose WPF
Application. You’ll immediately notice a difference in the IDE:
Look closely at the toolbox—it’s
got a whole new set of controls.
WPF applications still use
classes, just like every
other C# and .NET
program, so the Solution
Explorer’s the same.
The biggest difference you’ll see is that the form
designer looks nothing like the one you’re used to.
We’ll take a closer look at it in a minute.
Here’s the familiar error list
and output window that you’ve
been using.
The properties window looks
totally different. You use it to
change attributes in a XAML
file, and not properties on
objects.
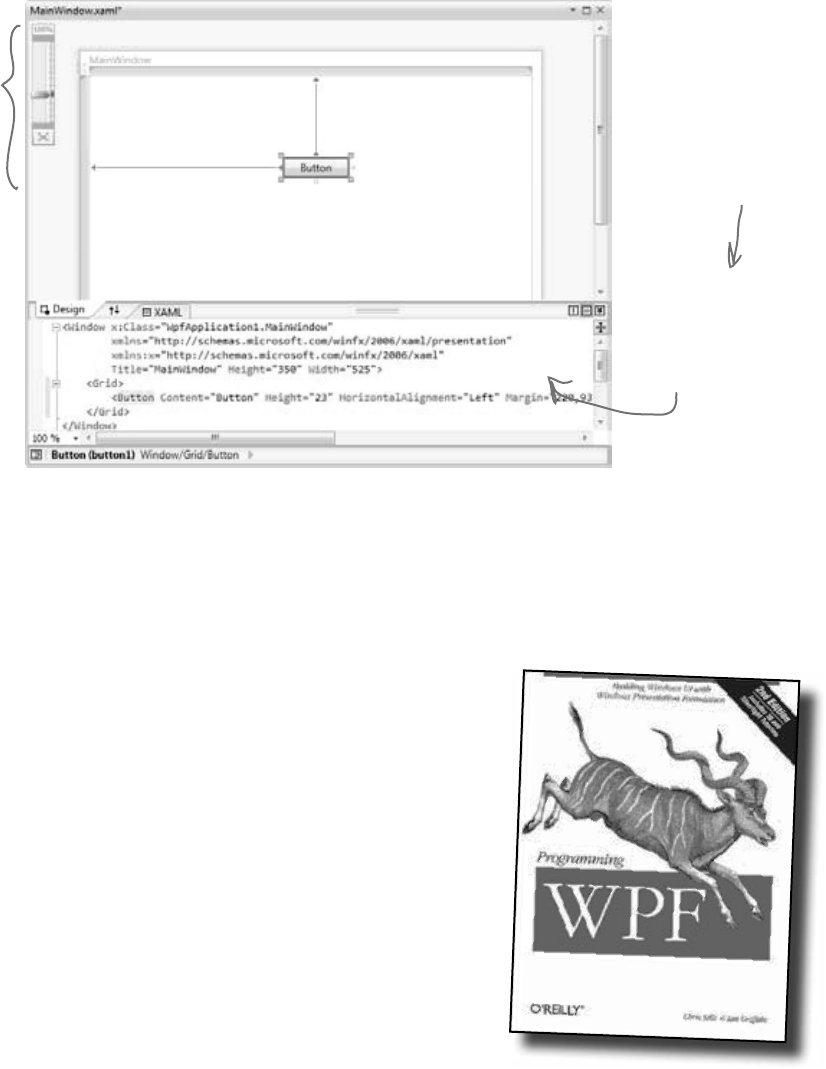
you are here 4 765
leftovers
When you get to the “Click=”button2_Click”” part of the line, don’t type
in the name of the event handler. Instead, use the IntelliSense window that pops
up to tell the IDE to add a new event handler. As soon as you finish the line,
you’ll see a new button appear in the designer. Switch over to the Window1.
xaml.cs tab, and you’ll find a new button2_Click method there.
That’s all the WPF and XAML that we can include here. But now that you’ve
got the tools to start learning about WPF, we definitely recommend that you take
a look at Programming WPF by Chris Sells and Ian Griffiths. It’s available
from the O’Reilly website: http://www.oreilly.com/.
Drag a button out of the toolbox and onto the form. If this were a Windows Forms
application, the IDE would add code to Form1.Designer.cs to add a control to the Form1
object. But WPF is different—it uses an XML-based language called XAML to define how the
user interface is laid out, how it interacts with objects, and more.
Go to the XML editor and add a second button by typing the bold line below into the XAML editor. You’ll notice
how the IDE’s IntelliSense does a good job of helping you enter all the XML tags.
<Grid>
<Button Height=”23” Margin=”98,43,105,0” Name=”button1”
VerticalAlignment=”Top” Click=”button1_Click”>Button</Button>
<Button Height=”23” Margin=”5,5,100,20” Name=”button2”
VerticalAlignment=”Top” Click=”button2_Click”>Another button</Button>
</Grid>
Drag this slider up
and down to zoom
in and out. When
you zoom in really
close, your user
interface still looks
good—it doesn’t
get pixelated.
The designer gives you a lot
of control over the layout.
The IDE has a
really powerful
XML editor that’s
optimized for
working with XAML.
XAML stands
for “Extensible
Application Markup
Language,” and it’s
the XML-based
language that WPF
applications use to
determine where all
of the controls and
other UI elements go.
Here’s a project to get your feet wet in WPF: try building the Contact application
from Chapter 1 in WPF. Most of the steps are exactly the same! Just make
sure you use an Image instead of a PictureBox, and use the Events page in the
Properties window to add a MouseDown event handler to it because it doesn’t have
a Click event. Also, don’t use the “mbox” code snippet—just use MessageBox.Show().

766 Appendix i
Did you know that C# and the .NET Framework can…
„
„
„
„
„
„
I had no idea! Where
can I learn more?
There’s a great book that explains it all!
It’s called C# 4.0 in a Nutshell by Joseph Albahari and
Ben Albahari, and it’s a thorough guide to everything
that C# has to offer. You’ll learn about advanced C#
language features, you’ll see all of the essential .NET
Framework classes and tools, and you’ll learn more
about what’s really going on under the hood of C#.
Check it out at http://www.oreilly.com/.
read this awesome book next
you are here 4 767
leftovers
When you have questions about how to use C#
4.0 or the .NET CLR, this highly acclaimed best-
seller has precisely the answers you need. Uniquely
organized around concepts and use cases, this
fourth edition includes in-depth coverage of new
C# topics such as parallel programming, code
contracts, dynamic programming, security, and
COM interoperability. You’ll also find updated
information on LINQ, including examples that
work with both LINQ to SQL and Entity Frame-
work. This handy book has all you need
to stay on track with C# 4.0.
C#/Microsoft .NET/Programming Languages
C# 4.0 in a nutshell
C# 4.0 in a nutshell
AlbAhAri & AlbAhAri
oreilly.com
Free online edition
for 45 days with
purchase of this book.
Details on last page.
y(7IA5J6*SKKTPQ( +,!&!;!}!}
ISBN: 978-0-596-80095-6
US $49.99 CAN $62.99
Joseph Albahari
& Ben Albahari
The Definitive Reference
in a nutshell
C# 4.0
Covers
CLR 4.0
Get up to speed on C# language basics, ■
including syntax, types, and variables
Explore advanced topics such as unsafe
■
code and preprocessor directives
Learn C# 4.0 features such as dynamic
■
binding, type parameter variance, and
optional and named parameters
Work with .NET 4’s rich set of features for
■
parallel programming, code contracts,
and the code security model
Understand .NET topics, including XML,
■
collections, I/O and networking, memory
management, reection, attributes,
security, and native interoperability
“C# 4.0 in a Nutshell is
one of the few books I
keep on my desk as a
quick reference. It is a
book I recommend.”
—Scott Guthrie
Corporate Vice President,
.NET Developer Platform,
Microsoft Corporation
“A must-read for a
concise but thorough
examination of the
parallel programming
features in the .NET
Framework 4.”
—Stephen Toub
Parallel Computing Platform
Program Manager, Microsoft
“This wonderful book is
a great reference for
developers of all levels.”
—Chris Burrows
C# Compiler Team, Microsoft
Joseph Albahari
helped us out a
whole lot by giving
the first edition of
this book a really
thorough tech review.
Thanks so much for
all your help, Joe!

this is the index 769
Index
Symbols
() (parentheses), 184
* (asterisk), 46
@ (at sign), 411–412, 423
// (double-slash comments), 66
" " (empty string), 62, 74
! (exclamation point), 475
? (question mark), 673
‘ (single quotes), 127
/// (triple-slash comments), 736–737
, (comma), 329, 344
?: conditional operator, 739
: operator, 234, 274, 330
?? null coalescing operator, 739
! operator, 62, 260
!= operator, 68
& operator, 740
&& operator, 68, 77, 739–740
* operator, 62, 138
*= operator, 62, 101, 138
+ operator, 62, 131, 353
++ operator, 62, 739
+= operator
= operator and, 534
event handling, 513, 515, 517, 535
functionality, 62
- operator, 132, 138
-- operator, 62
-= operator, 138
/ operator, 62
= operator
+= operator and, 534
== operator and, 67
casting support, 132
return values and, 739
== operator
= operator and, 67
conditional testing, 68, 70
examples, 77, 750–752
^ operator, 740
| operator, 740
|| operator, 68, 739
; (semicolon) (see semicolon (;))
< operator, 68, 70
<< operator, 741
<> (angle brackets), 335, 363
> operator, 68, 70
>> operator, 741
\\ (double backslash), 423
\n (line break) (see line break (\n))
\r (return character), 373, 423
\t (tab), 127, 411, 423
{} (curly brackets), 51, 56, 65–66, 73
~ (tilde), 654
~ operator, 740
770 Index
the index
A
abstract classes
building a house application, 308–322
defined, 296–297
examples, 298
generic collections, 335
Stream class, 409
abstract methods, 296, 299
abstraction, 306
access modifiers
changing visibility, 292–293
on class declarations, 744
defined, 291
adapters, 31
Add >> Class feature, 331
Add New Item window, 18
address book application, 4–5, 9–16, 20–34
adventure game application, 385–406
Albahari, Ben, 766–767
Albahari, Joe, 711, 748, 766
allocated resources, 427
angle brackets <>, 335, 363
animated beehive simulator
adding forms, 570
adding timers, 574–576
architecture, 544, 557
behavior considerations, 568–569
building, 545–560, 562–567
callback technique, 578
collections, 581–582
controls and, 592–593, 596, 599–607
delegates and, 578–579
LINQ support, 582–583
List<T> class, 581–582
opening/saving, 585–587
overhauling, 635–639
overview, 543, 554
performance considerations, 615–617
Renderer class and, 594–595, 607, 609–611
testing, 577–579, 584, 614
as turn-based system, 561
working with groups, 580
anonymous methods, 758–759
anonymous types, 703, 709, 758–759
application development
adding loops, 65, 69
adding statements, 66
adding to auto-generated code, 2, 11, 15
auto-generated code and, 2, 11, 15, 73
debugging code, 16, 469
deployment and, 35
designing for intuitive use, 32–33
developing user interface, 12–13
embedding databases, 18
modifying generated code, 11
overview, 6–7, 44–45
source code files, 44
testing programs, 34
tools supporting, 46–47
turn-based systems, 386
using classes, 89–91
using variables, 60–61
Application.DoEvents() method, 746
args parameter, 457
ArgumentException, 492, 495, 565
ArgumentOutOfRangeException, 501
arguments
command-line, 456–457
defined, 133, 669
event, 512
named, 672
type, 340
Array.Reverse() method, 448
arrays
creating deck of cards, 333–334
defined, 150
determining length, 151
exception handling, 470
foreach loops, 339
lists and, 336, 338, 343
of object references, 151
reference variables and, 151
static method for, 448
as keyword
coffeemaker example, 286
functionality, 283
value types and, 668, 677
you are here 4 771
the index
ASCII characters, 457–458
assemblies, 291, 742–743
asterisk (*), 46
at sign (@), 411–412, 423
attributes, 443
audio files, 14
auto-generated code
adding to, 15
overview, 2, 11
undoing, 73
auto-generating record IDs, 21
automatic properties
adding, 205
beehive simulator example, 546, 550–551
event arguments and, 520
functionality, 280, 549
B
BackgroundWorker component, 746–748
backing fields
accessor methods and, 209
beehive simulator example, 550
defined, 203
examples, 206
resizing, 219
this keyword and, 208
base classes
choosing, 229
constructors and, 251
extending, 233, 251
generic collections, 335
inheritance and, 226, 229–230, 234, 237, 239,
250–251
for objects, 353
subclasses and, 233, 239, 250
upcasting and, 285
virtual keyword, 238
base keyword, 250
baseball simulator application
building, 508–514, 518–521
creating event handlers, 516–517
beehive management system
building, 257–267
data storage, 328–329
exception handling, 465–467, 491–492
inheritance, 270–275
interfaces and, 279–283
(see also animated beehive simulator)
beehive simulator (see animated beehive simulator)
behavior, classes and, 17, 568–569
bin folder, 34
binary format
serializing objects in, 446
working with, 453
writing in, 449
BinaryFormatter object
Deserialize() method, 442, 445, 478, 483
exception handling, 477–478
[Serializable] attribute, 445
Serialize() method, 442, 445
BinaryReader class
functionality, 450
ReadBytes() method, 450–451
ReadChar() method, 450
ReadInt32() method, 450
ReadSingle() method, 450
ReadString() method, 450
BinaryWriter class, 449
binding navigator, 31
bit data type, 25
Bitmap class
double buffering, 634
overloaded constructors, 619
resizing bitmaps, 618
storage considerations, 617, 619
black boxes, objects as, 199–200
bool data type
defined, 61–62, 126
memory considerations, 128
break statement, 436, 738
breakpoints
adding, 64, 347, 474
beehive simulator example, 603
determining placement, 476
772 Index
the index
Brush object, 622, 632
Build menu, 35
building programs (see program builds)
built-in generic collections, 377
built-in objects, 419
buttons
adding to forms, 114, 357, 598, 602
BackColor property, 49
Click event, 513
DisplayStyle property, 570
Enabled property, 367–368
event handlers and, 524–525, 585
interacting with objects, 115
Location property, 49
Name property, 49, 367
OnClick() event, 535
Size property, 49
Text property, 49
by keyword, 708
byte data type
converting strings to, 423
converting to strings, 457
defined, 126
moving data around, 448
reading from streams, 456–457
streams and, 410
byte order mark, 458
C
C#
benefits using, 2–3
reserved words, 156, 164
call stacks, 477, 498
callback methods, 532–534
callback technique
beehive simulator example, 578
debugging, 535
defined, 532
delegates and, 532–536
events and, 536
Golden Crustacean application, 538–539
camelCase, 211
Captain Amazing application, 647–653, 677, 691–692
cards, deck of (see deck of cards application)
case statement, 435–437
casting
automatically, 131–132
defined, 130
examples, 330, 373
catch block (see try/catch blocks)
chaining
event handlers, 535
events, 524–525
objects, 515
streams, 416
char data type
converting to strings, 455
defined, 127
memory considerations, 128
StreamReader class, 455
Unicode standard, 447
Character Map, 446–447, 450
CheckBox control
event planning example, 221
name considerations, 185
Text property, 32
child windows, defined, 592
class diagrams
adding fields, 100
building, 106, 108
constants and, 546
defined, 91
grouping classes, 231
interfaces on, 281
methods and, 91
moving down in, 239, 243
parameters on, 394
return values on, 394
class hierarchy
beehive management system, 271
creating, 232
defined, 227, 233
overriding methods and, 249
upcasting, 285
class members, 291–292
you are here 4 773
the index
class skeleton, 546
classes
abstract, 296–297
adding, 54
adding components, 605
adding constants, 546
allocated resources, 427
automatic properties, 205
building overloaded methods, 357
building programs with, 89–91
collection initializers and, 365
concrete, 296
constructors and, 207, 209
controlling access, 192–193
controls and, 590
creating instances, 94, 103, 217
creating objects, 93–94
declaring, 52
defined, 50–51
defining events, 512
delegates and, 527
design ideas, 118
determining behavior, 17, 568–569
empty, 512
encapsulating, 199–201, 459, 549
enum data type and, 331
examples, 53, 112
exception handling and, 491
extension methods and, 678–679
generic collections, 335, 340
grouping, 231
hiding information, 197–200
implementing interfaces, 280–282, 288
inheritance and, 225–227, 304, 590, 679
instantiating, 295, 298
interface requirements, 272, 275
lists and, 343
members, 291
methods and, 50, 89
name considerations, 104–105, 118
namespace considerations, 59
natural structure, 106
organizing, 108
partial, 73
planning, 106
polymorphism and, 307
private fields and, 191, 193
[Serializable] attribute, 443–444
serializing, 443
sharing methods, 90
statements and, 73
structs and, 676
tracking statistics, 162
using statements and, 73, 496
XML comments, 736–737
(see also collections)
clauses (query), 690
(see also specific clauses)
CLR (Common Language Runtime)
defined, 45
finalizers and, 654, 656
functionality, 667
garbage collection and, 155
just-in-time compiler, 745
memory and, 667
code, writing (see application development)
code blocks
curly brackets and, 56, 73, 219
defined, 56, 73
methods as, 15
coffeemaker application, 284–287
collection initializers
defined, 344
examples, 345
IEnumerable<T> interface, 355
object initializers and, 344
populating classes, 365
collections
adding keys to, 365
beehive simulator example, 581–582
combining, 356, 703–704
CurrentSize property, 583
as databases, 581–582
defined, 335
foreach loops, 339
generic, 335, 340, 343, 377
IEnumerable<T> interface and, 689, 694
LINQ support, 582–583, 689, 705
performing calculations on, 694
storing, 335
collision detection, 727
colon (:) operator, 234, 274, 330
774 Index
the index
Color class
FromArgb() method, 76
Transparent property, 615
columns
adding to tables, 20, 22–24
defined, 20
forcing values, 25
ComboBox control
DropDownStyle property, 259
SelectedIndexChanged event, 365
SelectedItem property, 365
comma (,), 329, 344
command-line arguments, 456–457
comments
//, 66
///, 736–737
adding, 66, 739
debugger and, 63
exception handling and, 498
functionality, 63
XML, 736–737
Common Intermediate Language, 745
Common Language Runtime (see CLR (Common Lan-
guage Runtime))
comparison operators, 70
compilation (see program compilation)
components
adding to classes, 605
defined, 420, 605
compound operators, 138
concatenating strings, 132, 353
concrete classes, 296
concrete methods, 296, 299
conditional expressions, 757
conditional operators, 68, 739
conditional tests
comparison operators and, 70
defined, 68, 73
examples, 69
if/else statements, 67–68
Console applications
command-line arguments, 456
creating, 244–245
delegate types and, 527
forms and, 244
Main() method, 244–245
ReadKey() method, 245, 345, 347, 351–352
WriteLine() method, 204, 339, 351, 373, 447
constants
adding to classes, 546
class diagrams and, 546
defined, 182
enum data type and, 343
constructors
adding to classes, 207, 209
base classes and, 251
building, 437, 547
converting arrays to lists, 343
defined, 207, 483
exception handling, 483
initializing private fields, 207
parameters for, 207–208
return types and, 208
return values and, 207, 209
streams and, 415
subclasses and, 251
(see also overloaded constructors)
Containers toolbox, 425
continue keyword, 738
controls
accessing properties, 13
adding to forms, 12, 30–31, 590, 607
adding to toolbox, 604
beehive simulator example, 592–593, 599–607
binding to tables, 31
BringToFront() method, 607
building animated, 599–607
classes and, 590
CreateGraphics() method, 618
creating, 590
database-driven, 30–31
dialog boxes as, 420
displaying in toolbox, 160, 599
Dispose() method, 603, 609–610
editing pre-existing, 613
event handlers, 221, 535
functionality, 591
inheritance and, 600–601
initializing, 208
you are here 4 775
the index
Invalidate() method, 629
Maximum property, 629
Minimum property, 629
Name property, 358
non-visual, 161, 420
as objects, 591
Orientation property, 629
Paint event, 628
redrawing, 628
Remove() method, 609
removing from forms, 590
repainting, 631
ResizeCells() method, 617
ResizeImage() method, 617
Size property, 611
TickStyle property, 629
Value property, 127, 629
visual display suitability, 596
(see also specific controls)
Controls collection, 591, 598
converting
arrays to lists, 343
byte arrays to strings, 457
char to strings, 455
data types automatically, 131, 156
hex to decimal, 446, 450, 473
lists to stacks, 380
objects to strings, 353–354
queues to lists, 380
stacks to queues, 380
strings to byte arrays, 423
variables to strings, 132, 185
ConvertsIntToString delegate type, 527
Convert.ToDateTime() method, 431
covariance, defined, 356
CryptoStream class, 416
Ctrl-F5 key combination, 352
Ctrl-Tab key combination, 46
curly brackets {}
automatically indenting, 113
for code blocks, 56, 73, 219
collection initializers and, 344
enumerator lists, 329
matching pairs, 51, 65
methods and, 66
D
Data menu
Add New Data Source... option, 28
Show Data Sources option, 30
Data Source Configuration Wizard, 18
data sources
adding database-driven controls, 30
configuring, 29
connecting forms to databases, 28–29
defined, 28
showing, 30
data storage
about, 7
collections and, 335
enums and lists, 335, 343
generic collections and, 340
SQL databases, 18–19, 34
storing keys and values, 363
structs and, 663
Unicode standard, 447
data types
casting values, 130–132
converting automatically, 131, 156
declaring variables, 61, 66
defined, 20
Dictionary class, 363
generic collections and, 335, 340
key-value pairs and, 364
lists and, 343
method parameters/arguments, 133
overview, 126–127
Database Explorer, 18
databases
binding controls to, 30–31
collections as, 581–582
connecting forms to, 17, 28–29
creating, 3, 18–19
defined, 7
defining fields, 22
embedding into programs, 18
inserting data into, 26–27
LINQ support, 582–583, 705–708
overwriting data, 34
776 Index
the index
databases (continued)
saving records, 27
SQL databases, 18–19, 34
viewing in Solution Explorer, 18
(see also tables)
DataContractSerializer class, 760–761
DateTime class
functionality, 574
Now property, 574
TryParse() method, 674
dead objects, 655
Debug menu
Continue option, 64
Start Debugging option, 45, 47, 64
Step Over option, 64
Stop Debugging option, 77
Windows menu, 204
Debug toolbar
Break All button, 473, 476
Continue button, 473, 483
expanding, 473
Hex button, 473
Locals button, 473
Next Statement button, 473, 482–483, 485
Restart button, 473
Step Into button, 473–474, 482, 529
Step Out button, 473
Step Over button, 473–474, 482
Stop button, 473
debugging programs/debugger
adding breakpoints, 64, 347, 474
defined, 16, 45
Error List window, 47
exploring callbacks, 535
exploring delegates, 529, 535
exploring events, 535
finding exceptions, 469, 481
hovering over fields, 476
hovering over variables, 64
passing command-line arguments, 456
starting process, 64
stepping through code, 64, 339
testing programs, 34
viewing variable value changes, 63–64
(see also exception handling; Watch window)
decimal data type
converting from hex, 446, 450, 473
defined, 127
memory considerations, 128
deck of cards application
creating, 331–335
practice exercise, 358–362
serializing/deserializing, 444–445
declaration
access modifiers on, 744
allocated resources and, 427
for classes, 52
defined, 52
for dictionaries, 363
for List<T> class, 340
for methods, 52
for private fields, 191
for reference variables, 150
using statements and, 428
for variables, 60, 66, 76, 116, 150
decoding data, 423
default statement, 436
delegate types, 527, 535
delegates
adding, 528–529, 535
beehive simulator example, 578–579
callback technique, 532–536
checking for null value, 535
creating, 527
debugging, 529, 535
defined, 515, 526
events and, 526–527, 535
functionality, 528–529
Golden Crustacean application, 538–539
methods and, 526–527
deleting directories, 422
deployment packages, 7, 35–37
dequeue, defined, 378
deserializing objects, 438–439, 442, 585
design patterns, 536
dialog boxes
CheckFileExists property, 420
CheckPathExists property, 420
you are here 4 777
the index
as controls, 420
creating, 423
FileName property, 419, 421
Filter property, 420–421, 425
InitialDirectory property, 419–421
initialFolder property, 425
as objects, 421
pop-up, 419
ShowDialog() method, 419–421, 423
Title property, 419, 421, 425
dictionaries
beehive simulator example, 556, 607
cleaning out, 609
counting key-value pairs in, 364
declaring, 363
defined, 363
examples, 375
lists and, 364
renderers and, 606, 609
storing keys and values, 363
Dictionary class
Add() method, 363–364
beehive simulator example, 556
ContainsKey() method, 363, 607
Count property, 364
declaring, 363
examples, 363, 365
Keys property, 364
looking up values, 364
Remove() method, 364
Directory class
CreateDirectory() method, 422
Delete() method, 422
functionality, 424
GetFiles() method, 422
DivideByZeroException, 465, 467, 472, 488, 498, 740
[DllImport] attribute, 654
double backslash (\\), 423
double buffering, 634–639
double data type, 126–128, 131
downcasting, 286–288
downloading logos, 13
DragEventArgs delegate, 515
E
else if statement, 381, 434
empty classes, 512
empty methods, 556
empty strings, 62, 74, 475
encapsulation
automatic properties and, 205
beehive simulator example, 556, 561–562
classes and, 199–201, 459, 549
controlling access via, 192–194
defined, 189, 191, 306
dinner party application, 180–189
examples, 202
hiding information via, 197–200
OOP principles and, 306, 459
properties and, 203
structs and, 676
suggestions for, 201
encoding data
defined, 410, 423, 446
example, 457
StreamWriter class, 449
Unicode support, 446
UTF-8 encoding, 457–458
Encoding.UTF8 method, 457
encrypting data, 416
EndOfStreamException, 490
enqueue, defined, 378
entry points
changing, 54–55
creating, 54
defined, 52–53, 56
as static methods, 243
enum data type
beehive simulator example, 551–552
defined, 329
examples, 331–332, 381, 700
lists and, 343
The Quest lab exercise, 394
representing numbers with names, 330–331
storing data, 343
enumerable objects, 693, 753–755
778 Index
the index
enumeration, 328–329
(see also enum data type)
enumerator lists, 329
Enumerator objects
Current property, 355
defined, 355
MoveNext() method, 355
enumerators, 329
Enum.Parse() method, 438
Environment class
Exit() method, 457
NewLine method, 373, 379, 423
Error List window
depicted, 10, 47, 522
opening, 9
program compilation and, 56
escape sequences
@ symbol and, 411–412, 423
defined, 127
Environment.NewLine method, 373
(see also specific escape sequences)
event handler methods
adding automatically, 194, 516–517
delegates and, 526–527
event planning example, 185, 222
implicit conversions, 522
subscribing classes and, 513
event handlers
adding, 223, 515, 517
baseball simulation example, 520–521
buttons and, 524–525, 585
chaining, 535
Changed event handler, 430, 433
Click event handler, 183, 403, 523, 525
for controls, 221
creating automatically, 516–517
debugging, 474, 482
defined, 183, 509, 511
functionality, 511, 515
generic, 522
hooking up, 524–525
multiple, 524–525
naming conventions, 513
objects and, 511
parameters, 512
PictureBox control, 403
printing support, 640–641
private, 194
subscribing to events, 513, 531–533
throwing exceptions, 524
timers and, 573
types of, 515
event keyword, 512
event planning applications
birthday parties, 216–225, 252–256
dinner parties, 180–189, 252–256
EventArgs class
generic event handlers, 522
inheritance, 512, 515
EventHandler delegate
event declaration, 522
examples, 527, 573
functionality, 512, 515, 535
events
arguments for, 512
baseball simulator application, 509–514
callbacks and, 536
chaining, 524–525
checking for null value, 535
connecting senders with receivers, 526
controls support, 535
debugging, 535
defined, 163, 509
defining in classes, 512
delegates and, 526–527, 535
forms support, 523–525
Golden Crustacean application, 533, 537–540
hooking up event handlers, 524–525
IDE icons, 509
multiple handlers, 524–525
naming conventions, 514
raising, 509–510, 514–515
subscribing to, 509–510, 513, 531–533, 535
throwing exceptions, 514
triggering, 510
Exception class
Data property, 490
functionality, 489, 495
inheritance, 495, 497
you are here 4 779
the index
Message property, 472, 490
StackTrace property, 472, 490
exception handling
for arrays, 470
beehive management system, 465–467, 491–492
beehive simulator example, 585
BinaryFormatter object, 477–478
catch-all, 484, 486, 488, 498
classes and, 491
comments and, 498
constructors, 483
exception objects, 468
excuse manager program, 464, 470–471, 474–477,
482–485, 501–502
finally block, 484–485, 501–502
functionality, 486
IDisposable interface, 496–497, 500
MessageBox controls, 490
methods and, 480, 491
multiple types of exceptions, 490
overloaded constructors, 492
parameters, 492
risky methods and, 480
serialized files, 478
suggestions, 500
temporary solutions, 499
tracking down exceptions, 473
try/catch blocks, 479, 481–483, 498, 501–502
using statements, 495–497, 500
(see also unhandled exceptions; specific exceptions)
exception objects, 468, 472
exceptions
call stacks and, 498
defined, 468–469
events and, 514
fixing, 469, 471, 473, 499
preventing, 473
rethrowing, 490
ToString() method, 490
(see also throwing exceptions)
exclamation point (!), 475
excuse manager program
building, 429–433, 459–460
exception handling, 464, 470–471, 474–477, 482–485,
501–502
executing programs (see program execution)
extension methods
functionality, 678–679
LINQ support, 679, 689
namespace considerations, 680
static, 680
F
F5 key, 483
F10 key, 482
F11 key, 474, 482, 529
F12 key, 427
fields
adding to class diagrams, 100
adding to forms, 114, 162
class skeletons and, 546
controlling access to, 192–194, 201
defined, 100
defining in databases, 22
inheriting, 229, 233–234
interfaces and, 273
lining up in forms, 32
masking, 208, 211
object state and, 439
objects and, 100
private, 191, 193–194
properties and, 100, 294
protected, 253
Renderer class, 609
structs and, 663
(see also backing fields)
FIFO (first-in first-out), 377–378
File class
AppendAllText() method, 422
closing files automatically, 458
Create() method, 422, 445, 449, 451
Exist() method, 422
FileInfo class and, 458
function, 424
functionality, 422
GetLastAccessTime() method, 422
GetLastWriteTime() method, 422
Open() method, 491
OpenRead() method, 422
OpenWrite() method, 422, 451
780 Index
the index
File class (continued)
ReadAllBytes() method, 447, 458
ReadAllLines() method, 458
ReadAllText() method, 425, 458
as static class, 422
WriteAllBytes() method, 458
WriteAllLines() method, 458
WriteAllText() method, 425, 447, 458
File menu
Save All option, 15
Save option, 15
FileInfo class
Exists() method, 422
File class and, 458
functionality, 422
OpenRead() method, 422
filenames
@ prefix, 411, 423
changing, 11
exception handling, 474–475
Length property, 474
FileNotFoundException, 490–491, 497
files
allocating, 427
appending text to, 422
bundling with applications, 14
checking existence, 422
closing, 458, 495
directory listing of, 422
Dispose() method, 497
executable, 16
File class, 422
getting information about, 422
locked, 410–411
Name property, 608
namespaces and, 452
printing strings to, 423
reading from, 422
reading serialized, 451–452
switching between, 10
writing serialized, 451–452
writing to, 411, 422
FileStream class
Close() method, 410, 423
CryptoStream class and, 416
examples, 416
functionality, 409–410, 423, 458
StreamWriter class and, 411
writing binary data, 449
finalizers
defined, 654
Dispose() method, 656–660
executing, 655
garbage collection and, 654–657, 661
parameters and, 661
serialization and, 659
stability and, 658
throwing exceptions and, 661
finally block
exception handling, 501–502
finalizers as, 654
functionality, 484–486
try/finally blocks, 497
first-in first-out (FIFO), 377–378
flickering, 633
float data type, 127–128
FlowLayoutPanel control
Dock property, 425
FlowDirection property, 425
FolderBrowserDialog dialog box, 419
Font object, 623
fonts, creating, 623
for loops
beehive simulator example, 563
functionality, 71
writing, 65, 69
foreach loops
beehive simulator example, 563, 610
from clause and, 696
defined, 339–340
examples, 358, 380–381
IEnumerable<T> interface, 355
printing lists, 354
Form Designer
adding PictureBox to forms, 48
benefits, 3
expanding generated code, 48
ToolStrip icon, 585
you are here 4 781
the index
Form1.cs file
accessing, 10
changing filenames, 11
creating, 243
functionality, 8, 43
Form1.Designer.cs file
adding picture controls, 12
changing filenames, 11
Click event, 523
functionality, 8, 43
Form1.resx file, 14
FormatException, 465–466, 472
formatting strings, 185
forms
adding buttons, 114, 357, 598, 602
adding controls, 12, 30–31, 590, 607
adding fields, 114, 162
adding labels, 114, 570–571
adding PictureBox control, 48
BackgroundImage property, 388, 617
BackgroundImageLayout property, 388, 608
beehive simulator example, 570
building interactive, 114–116
changing name of, 33
Click event, 622, 627
ClientRectangle property, 622
ClientSize property, 639
connecting, 612–613
connecting to databases, 17, 28–29
Console Applications and, 244
ControlBox property, 608
CreateGraphics() method, 618, 620–621, 632
designing intuitive, 32
displaying properties, 10
Dispose() method, 605
drawing pictures, 622–623
editing, 15
event supported, 523–525
FormBorderStyle property, 160, 608
getting back to, 31
Go Fish! game, 367–368
hooking up event handlers, 524–525
InitializeComponent() method, 421
initializing controls, 208
Invalidate() method, 631, 636
lining up fields and labels, 32
linking, 606
Location property, 608
MaximizeBox property, 33
maximizing, 33
MinimizeBox property, 33
Mouse event, 612
MouseClick event, 608
MoveChildForms() method, 612
as objects, 154–155
OnDoubleClick event, 514
OnDoubleClick() method, 514
overriding OnPaint method, 631
Paint event, 628, 631
private fields, 191
raising events, 514
redrawing, 628
Refresh() method, 631
removing controls, 590
repainting, 631
Show() method, 606, 612–613
StartPosition property, 608
Text property, 33
TextBox control filling up, 425
tracking changes, 430
Update() method, 631
frame rate, defined, 571
frames
defined, 575
frame rates and, 571
resizing images and, 619
from clause
functionality, 692, 695–696
LINQ support, 690
G
GAC (Global Assembly Cache), 743
garbage collection
defined, 155
finalizers and, 654–657, 661
object references and, 142, 147, 156
GC.Collect() method, 655, 657–658, 661
GDI+ (Graphics Device Interface), 620–622
782 Index
the index
generic collections
built-in, 377
defined, 335, 340, 343
generic event handlers, 522
geocaching, 198
get accessors
debugger and, 476
defined, 203
read-only property and, 206, 209
this keyword and, 292
Global Assembly Cache (GAC), 743
Go Fish! game, 366–376
Golden Crustacean application, 533, 537–540
goto statements, 739
GPS navigation system application, 86–92, 198
graph, defined, 441
Graphical User Interface (GUI), 95
Graphics class
DrawCircle() method, 621
DrawCurve() method, 623
DrawImage() method, 618, 622, 627
DrawImageUnscaled() method, 638
DrawLine() method, 620–621
DrawLines() method, 623
DrawPolygon() method, 623
DrawString() method, 621
FillCircle() method, 621
FillPolygon() method, 623
FromImage() method, 618, 632
functionality, 620
Paint events and, 628
printing support, 640–645
resizing bitmaps, 618
Graphics Device Interface (GDI+), 620–622
graphics files, 14, 616–617
Griffiths, Ian, 765
group keyword, 699
GroupBox control, 177, 217
GUI (Graphical User Interface), 95
GZipStream class, 409
H
handles, defined, 660
heap
adding objects to, 102
defined, 102, 667
referencing objects, 142
stack versus, 667–669, 676
Hebrew characters, 446–447, 458
heisenbugs, defined, 476
hex dumps, 453–455, 571
hexadecimal format
Character Map and, 446–447
converting to decimal, 446, 450, 473
Debug toolbar and, 473
hex dumps, 453–455, 571
hiding methods, 246–247, 249
hit points, 386, 399, 404
house building application, 308–322
I
IComparable<T> interface, 347
IComparer<T> interface
complex comparisons, 350
creating instances, 349
examples, 359
sorting lists, 346–348, 351
icons, bundling with applications, 14
IDE
Add Existing Item option, 263
auto-generated code, 2, 11
Basic Settings mode, 473
behind the scenes, 14
benefits using, 3
building programs, 34–35, 45
changing generated code, 48–50
defined, 2, 44
event icons, 509
Expert mode, 473
functionality, 8–11, 42–43
Go To Definition feature, 427
you are here 4 783
the index
New Project window, 8
snippets, 47
tools supported, 46–47, 473
windows depicted, 10
IDisposable interface
control class and, 603
Dispose() method, 427–428, 496
examples, 355
exception avoidance, 496–497, 500
finalizers and, 656, 658
Font class and, 623
functionality, 427
graphics support, 632
IEnumerable<T> interface
collection initializers, 355
collections and, 689, 694
creating lists, 380
creating queues, 380
creating stacks, 380
examples, 359, 372
extension methods and, 679
foreach loops, 355
LINQ support, 689–690, 692, 707
upcasting lists, 356
IEquatable<T> interface, 750
if statement
examples, 113, 163, 350, 382
testing if true, 133
for writing files, 434
if/else statements
code blocks and, 73
examples, 78, 434, 740
functionality, 67–68
switch statement and, 435
implicit conversion, defined, 522
importing local resources, 13
index (arrays), 150–151, 340
IndexOutOfRangeException, 468, 472
infinite loops, 71
inheritance
advantages of, 226
base classes and, 226, 229–230, 234, 237, 239,
250–251
beehive management system, 257–267, 271, 274
birthday party application, 216–225, 252–256
classes and, 225–227, 304, 590, 679
CryptoStream class, 416
defined, 225, 227, 306
dinner party application, 252–256
EventArgs class, 512, 515
Exception class, 495, 497
exception objects, 472
extension methods and, 679
grouping classes, 231
hiding methods and, 246–247, 249
interface, 281
multiple, 304
from Object class, 445
OOP principles and, 306
overriding methods and, 230, 232, 238, 248–249
passing subclass instances, 243
PictureBox control, 600–601
The Quest lab exercise, 400
StreamReader class, 415
structs and, 663, 677
subclasses and, 226, 229, 234, 237, 239, 250–251
zoo simulator application, 228–234
initializing
controls on forms, 208
lists, 349
object initializers, 117, 206, 344, 602
private fields, 207
instances
creating, 101, 103, 217, 274
defined, 94
IComparer<T> interface, 349
interface references and, 279
List<T> objects, 335
passing, 243
polymorphism and, 307
private fields and, 191, 193–194
static methods and, 99
tracking data, 100
int data type
casting as enum, 330
defined, 20, 61, 126
examples, 62
Int32 struct, 673
IntelliSense feature
accessing objects, 287
color support, 621
784 Index
the index
IntelliSense feature (continued)
event support, 509, 514–515
functionality, 47
object initializers, 117
overloaded methods, 331
override methods, 603
showing .NET interfaces, 273
interface inheritance, 281
interface keyword, 273
interface references
assigning instances, 279
coffeemaker example, 287
IEnumerable<T> interface, 356
object references and, 279, 294
interfaces
abstract classes and, 296–297
beehive management system, 271–275, 279–283
on class diagrams, 281
class requirements, 272
creating, 276–277
defining, 273
downcasting, 287
enums and, 343
extending, 679
generic collections, 335, 340
implementing, 274–275, 280–282, 288
is keyword, 280, 283
as keyword, 283, 286
List<T> class and, 340
methods and, 272–273, 275, 281, 288, 294, 299
name considerations, 273
properties and, 272–273, 275, 280–281
referencing, 278–279
structs and, 663
upcasting, 285
zoo simulator application, 288
internal access modifier, 291
Invaders lab exercise, 713–733
InvalidCastException, 465–466
InvalidOperationException, 673
IOException, 488, 490
is keyword, 280, 283
iterators, defined, 69
J
join clause
examples, 704, 710–711
functionality, 703, 708–709
jump statements, 738
K
keys
adding to collections, 365
counting key-value pairs, 364
defined, 363
examples, 375, 583, 700
getting list of, 364
primary, 20–21
sequences and, 708
storing, 363
L
lab exercises
A Day at the Races, 169–178
Invaders, 713–733
The Quest, 385–406
labels
adding to forms, 114, 570–571
creating, 598
event planning example, 221
lining up in forms, 32
loops and, 739
for methods, 527
object references as, 141, 156
for objects, 527
updating, 115, 571
lambda expressions, 758–759
Language INtegrated Query (see LINQ (Language INte-
grated Query))
last-in first-out (LIFO), 377, 379
you are here 4 785
the index
LIFO (last-in first-out), 377, 379
line break (\n)
@ symbol and, 411
casting, 373
defined, 423
examples, 66, 89
functionality, 15
in quotation marks, 127
linking forms, 606
LINQ (Language INtegrated Query)
beehive simulator example, 582–583
collection support, 582–583, 689, 705
combining results into groups, 699
database support, 582–583, 705–708
defined, 582
extension methods and, 679, 689
functionality, 688
IEnumerable<T> interface, 689–690, 692, 707
query support, 690–695
SQL and, 693, 705–708
versatility of, 694–695
XML documents and, 582, 688, 762–763
LINQPad tool, 711
List<T> class
adding to, 335
Add() method, 335, 340, 344
AddRange() method, 356
beehive simulator example, 581–582
Clear() method, 339
collection initializers, 344
Contains() method, 339–340
converting arrays to lists, 343
Count property, 340
creating instances, 335
declaring, 340
defined, 335, 343
functionality, 336
GetEnumerator() method, 355
IndexOf() method, 340
RemoveAt() method, 340
Remove() method, 340
resizing dynamically, 339–340
Sort() method, 346–347
ListBox control
beehive simulator example, 580
Dock property, 160
example, 160
Font property, 160
MultiColumn property, 160
Name property, 367
RedrawList() method, 381–382
SelectedIndex property, 359, 362
lists
arrays and, 336, 338, 343
classes and, 343
data types and, 343
dictionaries and, 364
enum data type and, 343
of files in directories, 422
foreach loops, 339–340
initializing, 349
practice exercise, 358–362
printing contents, 348, 354
queues and, 377, 380
resizing dynamically, 339
sorting, 346–348, 351
stacks and, 380
storing data, 335, 343
ToArray() method, 343
upcasting, 356
value types and, 343
literals
@ symbol and, 411
data types supporting, 127
suffixes supported, 156, 182, 185
logical operators, 68
logos, downloading, 13
long data type, 126
loops
adding to programs, 65, 69
comparing binary files, 451
conditional tests and, 73
defined, 65
examples, 455
IEnumerable<T> interface, 355
infinite, 71
labels and, 739
nested, 77
reading/writing lines, 415
786 Index
the index
M
Main() method
Console Application and, 244–245
as entry point, 52–53, 56, 456
keeping program open, 345
managed resources, 654
masking fields, 208, 211
Math class
Abs() method, 551
PI member, 66
Maximize button, 33
members, class, 291–292
memory
allocating, 427
arrays and, 343
heap and, 102, 142, 667–669
stack and, 128, 667–669
value types and, 156
variables and, 128
MemoryStream class, 409
MessageBox controls
exception handling, 490
finalizers and, 656
Show() method, 54, 431
metadata, 443
methods
abstract, 296, 299
anonymous, 758–759
arguments, 133
callback, 532–534
calling other methods, 154, 183, 477
chaining onto events, 524–525
class diagrams and, 91
class skeletons and, 546
classes and, 50, 89
as code blocks, 15
concrete, 296, 299
constructors and, 207
controlling access to, 192–194, 201
curly brackets and, 66
declaring, 52
declaring variables inside, 116
defined, 15, 50–51
delegates and, 526–527
empty, 556
enums and, 343
event handlers, 183, 513
examples, 53
exception handling and, 480, 491
extension, 678–679, 689
extracting, 756
get accessors, 203, 206, 209
hiding, 246–247, 249
inheriting, 229, 233–234
interface requirements, 272–273, 275, 281, 288, 294,
299
labeling, 527
name considerations, 104–105, 118
objects and, 93, 100
overloaded, 253, 331, 357
parameters, 51, 88, 133, 211, 672
passing subclass instances, 243
polymorphism and, 307
properties and, 209
raising events, 514
recursion, 669
return types, 89
return values, 51, 88, 207, 209, 394
set accessors, 203, 209
sharing with other classes, 90
static, 99, 243, 448, 458, 676
structs and, 664
updating labels with, 115
virtual, 238, 243–244, 248–249, 353
(see also overriding methods)
Minimize button, 33
modifiers, defined, 670
multiple event handlers, 524–525
multiple inheritance, 304
N
named arguments, 672
namespaces
assemblies and, 742–745
classes and, 59
defined, 44, 50, 53
examples, 53
you are here 4 787
the index
extension methods and, 680
files and, 452
not recommended for use, 73
naming conventions
camelCase, 211
for event handlers, 513
for events, 514
PascalCase, 211
navigation system application, 86–92, 198
nested loops, 77
nested using statements, 496
.NET database objects, 6, 28–29
.NET Framework
generic collections, 377
overview, 44
System namespace, 73
using statement, 50
.NET visual objects, 6, 12–13
NetworkStream class, 409
new keyword/statement
collection initializers and, 344
creating array objects, 150
creating classes, 207
creating objects, 92–93
debugging programs and, 482
hiding methods and, 247
implicit conversion and, 522
overriding methods and, 249
passing parameters to, 207
non-visual controls, 161, 420
null keyword, 155, 465
nullable types, 673–674
Nullable<T> struct, 673
NullReferenceException, 116, 465, 467, 535
NumericUpDown control
baseball simulator example, 519
event planning example, 183, 221–222
GPS navigation system example, 90
Value property, 519
ValueChanged event, 513
O
Object class, 353, 445
object data type, 127
object declaration (see declaration)
object initializers
beehive simulator example, 602
collection initializers and, 344
functionality, 117
initializing properly, 206
object oriented programming (OOP), 306, 459
object references
arrays of, 151
callback techniques, 535
Controls collection and, 591
defined, 156
examples, 287
garbage collection and, 142, 147, 156
interface references and, 279, 294
as labels, 141, 156
multiple, 144, 149
reference variables and, 140–141
Object Relational Designer, 707–708
objects
accessing with IntelliSense, 287
adding to heap, 102
allocating, 427
base class for, 353
as black boxes, 199–200
built-in, 419
callback technique, 534–535
chaining, 515
comparing, 347
controls as, 591
converting to strings, 353–354
creating, 92–94
dead, 655
defined, 92
deserializing, 438–439, 442, 585
downcasting, 286
enqueuing/dequeuing, 378
enumerable, 693
Equals() method, 750–752
event handling, 511
exceptions as, 469
788 Index
the index
objects (continued)
fields and, 100
GPS navigation system application, 86–92, 198
initializing, 117, 206
instantiating, 741
interacting with buttons, 115
labeling, 527
methods and, 100
misusing, 190
multiple using statements, 428
NullReferenceException, 116
ordering/sorting, 346–348
polymorphism and, 307
populating classes with, 365
private fields and, 191, 193
reference variables and, 154
removing, 340
serializing, 438–442
structs and, 663
subscribing to events, 513, 531–533, 535
ToString() method, 132, 353–354
upcasting, 285, 512
value types versus, 664
variables and, 139
on...equals clause, 708
OOP (object oriented programming), 306, 459
OpenFileDialog control, 420, 425, 605
OpenFileDialog dialog box, 419
OpenFileDialog object, 421, 423
operators
comparison, 70
compound, 138
conditional, 68, 739
defined, 62
logical, 68
orderby clause
beehive simulator example, 699
functionality, 692, 695–696, 703
LINQ support, 690
Output window, accessing, 204
OverflowException, 465–466, 472
overloaded constructors
Bitmap class and, 619
examples, 359
exception handling and, 492
passing collections as parameters, 380
StreamWriter class, 411
overloaded methods, 253, 331, 357
override keyword, 238, 244, 248–249
overriding methods
converting objects to strings, 353–354
examples, 232, 248
functionality, 230, 238, 244, 248–249
hiding methods versus, 246, 249
Intellisense and, 603
P
parameters
on class diagrams, 394
for constructors, 207–208
defined, 669
event handlers, 512
exception handling, 492
finalizers and, 661
for methods, 51, 88, 133, 211, 670, 672
for overloaded constructors, 359, 380
for overloaded methods, 357
passing command-line arguments, 457
passing to new statement, 207
setting default values, 672
parentheses (), 184
partial classes, 73
PascalCase, 211
pass by reference, 671
pass by value, 671, 677
patterns, defined, 534–536
Pen object, 622, 632
performance considerations, 615–617
PictureBox control
adding pictures, 12
adding to forms, 48
BackColor property, 389
BackgroundImage property, 608
beehive simulator example, 609
BorderStyle property, 403
you are here 4 789
the index
editing, 15
event handlers, 403
inheritance, 600–601
performance issues, 615
The Quest lab exercise, 388–389, 403–405
resource files and, 14
setting to Zoom mode, 13
Size property, 13
user controls and, 605
Visible property, 405
Point struct
beehive simulator example, 607
drawing graphics, 621
functionality, 565, 665
namespace support, 547–548
polymorphism, 306–307, 335
popping out of stacks, 379
pop-up dialog boxes, 419
primary keys, 20–21
PrintDialog object, 641
PrintDocument class
functionality, 641
Print() method, 640
PrintPage event, 640–642
printing
graphics and, 640–645
lists, 348, 354
strings to files, 423
PrintPreviewDialog object, 641
private access modifier, 291, 294, 536
private fields
declaring, 191
initializing, 207
instances and, 191, 193–194
program builds
changing code and, 601
with classes, 89–91
IDE process, 34–35, 45
program compilation
assigning variable values and, 130
comments and, 63
Error List window and, 56
IDE process, 34, 45
invalid arguments error, 133
just-in-time compiler, 745
var keyword and, 690
program execution
changing entry point, 54
entry point for, 52–53
event handlers and, 509
IDE process, 34, 45
stopping, 34
unhandled exceptions and, 476
Program.cs file
accessing, 10
changing filenames, 11
creating, 243
entry point for, 52
functionality, 8, 43
Main() method, 244–245, 345, 456
project files (.csproj), 44
Project menu, 35
projects
adding classes, 90
adding databases, 18
creating, 8, 11, 113
saving, 8, 11
storing data, 27
properties
class skeletons and, 546
defined, 89, 203
encapsulation and, 203
fields and, 100, 294
hovering over, 476
inheriting, 229, 233–234
interface requirements, 272–273, 275, 280–281
methods and, 209
structs and, 663
(see also automatic properties; read-only properties)
Properties window
accessing, 33
changing filenames, 11
changing view, 163
displaying for forms, 10
Events button/page, 223, 523, 572, 612, 622, 628
functionality, 42
protected access modifier, 291, 294
790 Index
the index
protected fields, 253
public access modifier, 291, 294, 512
publish folder, 36
Publish Wizard, 35
pushing onto stacks, 379
Q
queries
combining values into groups, 700
defined, 19
editing, 711
joining data results, 703–704
LINQ support, 690–695, 763
The Quest lab exercise, 385–406
question mark (?), 673
queues
Clear() method, 378
copying to stacks, 380
Count property, 378
creating, 378
defined, 377
Dequeue() method, 378
exercises, 381–382
FIFO support, 377–378
lists and, 377, 380
Peek() method, 378
stacks and, 377, 379–380
R
racetrack simulator application, 169–178
raising events
baseball simulator example, 514
defined, 509–510
this keyword and, 515
Random class, 331, 559
random numbers, 194, 559, 563
range variables, 690
reading data
BinaryReader class, 450
bytes from streams, 456–457
excuse manager program, 429–433
File class, 422
FileStream class, 410
serialized files, 451–452
Stream class, 408–409
StreamReader class, 415
switch statement, 436–437
read-only properties
adding, 205–206
beehive simulator example, 546, 551
event arguments and, 520
functionality, 549
get accessors and, 209
Ready Bake Code, 583, 688
real numbers, 126
record IDs, 21
Rectangle struct
beehive simulator example, 638
functionality, 676
The Quest lab exercise, 392, 403
recursion, defined, 669
ref keyword, 671
refactoring, 756–757
reference types
== operator and, 750
value types and, 664–666
reference variables
arrays and, 151
code example, 526
declaring, 150
defined, 140–141
delegate types and, 527
objects and, 154
Renderer class
beehive simulator example, 594–595, 607, 609–611,
637
building, 609–611
functionality, 594
ResizeImage() method, 618
you are here 4 791
the index
reserved words (C#), 156, 164
resizing
backing fields, 219
images, 618, 632
lists dynamically, 339
Resource Designer, 608
resource files (.resx), 46
resources
allocated, 427
defined, 14
finalizers and, 654
managed, 654
storing as Bitmap objects, 619
unmanaged, 654
rethrowing exceptions, 490
return character (\r), 373, 423
return statement, 51, 88–89, 753–755
return types, 88–89, 208
return values (methods)
= operator and, 739
on class diagrams, 394
constructors and, 207, 209
defined, 51, 88
delegates and, 527
multiple, 670
robust programs, 478, 674
RSS feeds, 763
S
Save As... dialog box, 421
SaveFileDialog control, 425
SaveFileDialog object, 421
sbyte data type, 126
sealed (access) modifier, 291, 678–679
seeds, 194, 559
select clause
anonymous types, 703, 709
beehive simulator example, 699
functionality, 695–696
LINQ support, 690
Select Resource dialog box, 13
Sells, Chris, 765
semicolon (;)
interface requirements, 273
statements and, 47, 66, 73
void return type and, 88
sequences
CurrentState property, 699
defined, 695
examples, 700
keys and, 708
[Serializable] attribute, 443–444
serialization
beehive simulator example, 585
classes, 443
DataContractSerializer class, 760–761
exception handling, 478
finalizers and, 659
objects, 438–442
reading/writing files manually, 451–452
SerializationException, 477–478, 484
Server Explorer window, 18
set accessors
callback methods and, 534
defined, 203
this keyword and, 292
value parameter, 203, 209
setup programs, 36
short data type, 126
single quotes ('), 127
Size struct, 642, 676
snippets (IDE), 47
Solution Explorer window
adding SQL databases to projects, 18
changing filenames, 11
displaying files, 14
functionality, 46
opening designer code, 48
project files, 8
switching between files, 10
viewing databases, 18
solution files (.sln), 44
792 Index
the index
sorting lists, 346–348, 351
source code files, 44
SQL (Structured Query Language)
defined, 19
LINQ and, 693, 705–708
SQL databases, 18–19, 34
SQL Server Compact
database files, 18, 27
installing, 36
LINQ support, 709
SqlMetal.exe tool, 706, 709
stacks
creating, 379–380
defined, 128, 377, 667
examples, 381–382, 669
heaps versus, 667–669, 676
LIFO support, 376, 379
lists and, 380
Peek() method, 379
Pop() method, 379
popping out of, 379
pushing onto, 379
Push() method, 379
queues and, 377, 379–380
value types and, 128
statements
adding, 66
classes and, 73
defined, 19, 51, 53, 73
grouping into blocks, 56
polymorphism and, 307
semicolons and, 47, 66, 73
structs and, 664
throwing exceptions, 482, 495
(see also specific statements)
states (object)
beehive simulator example, 552–553, 583
overview, 439–440
static classes, 422, 678
static extension methods, 680
static methods
for arrays, 448
closing files automatically, 458
defined, 99
entry points as, 243
extension methods and, 678
instances and, 99
StatusStrip control
adding, 160–161, 570
functionality, 570
Name property, 161
SizingGrip property, 161
Text property, 161
Stop Debugging button, 16
stored procedures, 19
Stream class
as abstract class, 409
Dispose() method, 428
functionality, 408–409
Read() method, 456–457
subclasses supported, 409–410
StreamReader class
Close() method, 415
converting strings to byte arrays, 423
EndOfStream property, 415
FileStream class and, 423
functionality, 458
inheritance, 415
ReadBlock() method, 455
ReadLine() method, 415
streams
built-in classes, 409
chaining, 416
closing, 410–411, 415, 423, 428
constructors and, 415
defined, 408
deserializing objects, 442
Dispose() method, 428, 497
functionality, 408–409
hex dumps, 453–454
Length field, 451
multiple, 416
opening, 449
reading bytes from, 456–457
Read() method, 409
Seek() method, 409
serializing objects, 438, 442
you are here 4 793
the index
using statements and, 428
Write() method, 409–410
StreamWriter class
Close() method, 411–412, 415, 433
converting strings to byte arrays, 423
encoding data, 449
examples, 412, 415
FileStream class and, 423
functionality, 411, 458
WriteLine() method, 411–412
Write() method, 411
String class
Format() method, 353, 454–455, 457, 571
IsNullOrEmpty() method, 258
string data type
defined, 61, 126
memory considerations, 128
Unicode standard, 447
StringBuilder class
AppendFormat() method, 741
AppendLine() method, 741
Append() method, 741
strings
concatenating, 132, 353
converting byte arrays to, 457
converting char to, 455
converting objects to, 353–354
converting to byte arrays, 423
data storage and, 328
dictionaries and, 363
empty, 62, 74, 475
extending, 680
formatting, 185
Length property, 89
printing to files, 423
Split() method, 437
Substring() method, 455
ToLower() method, 381–382
ToString() method, 132, 185, 330, 353, 381–382
Unicode standard, 447
struct value type
boxing in wrappers, 668, 676
classes and, 676
creating, 665
defined, 663–665
encapsulation and, 676
inheritance and, 663, 677
ToString() method, 663
Structured Query Language (SQL)
defined, 19
LINQ and, 693, 705–708
subclasses
access modifiers and, 291
base classes and, 233, 239, 250
constructors and, 251
grouping classes, 231
hiding methods, 246–247
inheritance and, 226, 229, 234, 237, 239, 250–251
overriding methods, 230, 238, 246
passing instances, 243
protected fields, 253
upcasting from, 285
subscribing to events
chaining and, 515
defined, 509–510
event handler methods and, 513
getting notified, 511
objects, 531–533, 535
superclasses, 246–247, 356
switch statement
beehive simulator example, 551, 617
deck of cards example, 436–437
functionality, 435
System namespace, 73
System.Collections namespace, 343
System.Collections.Generic namespace, 377
System.Data namespace, 73
System.Drawing namespace, 547–548, 611, 620
System.IO namespace, 73, 410, 412
System.Linq namespace, 688, 694
System.Runtime.Serialization namespace, 484
System.Threading namespace, 476
System.Windows.Forms namespace, 54, 601–602, 611
794 Index
the index
T
tab (\t), 127, 411, 423
TabControl control, 217, 221
TableLayoutPanel control
Columns property, 425
Dock property, 425
labels and, 570
The Quest lab exercise, 388
Rows property, 425
tables
adding columns, 20, 22–24
binding controls to, 31
creating, 20–21, 25
creating primary keys, 20
defined, 19
selecting, 30
SQL support, 693
(see also databases)
tabs
TabCollection property, 221
TabPages property, 221
Text property, 221
Take() command, 696
testing
beehive simulator example, 577–579, 584, 614
conditional, 67–70, 73
deployment, 37
installation, 37
programs, 34
values, 436
text
adding fonts, 623
storing, 447
writing to files, 411
TextBox control
Changed event handler, 430
event planning example, 223
filling up forms, 425
Name property, 367
ReadOnly property, 367
ScrollToCaret() method, 368
SelectionStart property, 368
Text property, 90, 221
TextReader class, 415
this keyword
defined, 154, 156
examples, 292
extension methods and, 680
masking fields and, 208, 211
raising events, 515
Thread.Sleep() method, 476
throwing exceptions
beehive simulator example, 565
classes, 491–492
defined, 490
event handlers, 524
events, 514
finalizers and, 661
statements, 482, 495
tilde (~), 654
Timer control
adding, 160–161, 570
beehive simulator example, 574–576, 601, 636
Dispose() method, 603
Enabled property, 572
event handlers and, 573
functionality, 572
Interval property, 161
Start() method, 572
Stop() method, 572
Tick event, 572–573, 605, 640
TimeSpan class
Days property, 574
functionality, 571, 574
Hours property, 574
Milliseconds property, 574
Seconds property, 574
title bars, 33
ToArray() command, 695
ToDictionary() command, 695
ToList() command, 695
toolbars, adding, 570
Toolbox window
adding controls, 604
creating controls, 590
depicted, 10
displaying controls in, 160, 599
you are here 4 795
the index
non-visual controls, 420
opening, 9
PictureBox control, 12
ToolStrip control
CanOverflow property, 585
functionality, 570
GripStyle property, 585
insertion feature, 585
TrackBar control, 629
transparency, 615, 627
troubleshooting (see exception handling)
try/catch blocks
debugger and, 482–483
exception handling, 479, 481–483, 498, 501–502
finally block and, 484–485
function, 495
functionality, 479, 481, 486
multiple exceptions and, 490
variable names and, 489–490
try/finally blocks, 497
turn-based systems, 386, 561, 575
type arguments, 340
Type.GetType() method, 749
types (see data types)
typing game, building, 160–163
U
uint data type, 126
ulong data type, 126
unhandled exceptions
adding informative messages, 471
defined, 486, 495
excuse manager example, 464, 470
program execution and, 476
viewing, 468, 476–477
Unicode Consortium, 446
Unicode standard
character examples, 448
defined, 446
encoding functionality, 457–458
Hebrew letter examples, 446–447
viewing values in Watch window, 373
unmanaged resources, 654
upcasting
defined, 285
downcasting versus, 288
interfaces, 285
lists, 356
objects, 285, 512
user controls
building, 629–630
DoubleBuffered property, 635
functionality, 604–605
hosting other controls, 632
Paint event, 629–630
PictureBox controls and, 605
user interfaces
beehive simulator example, 592
developing, 3, 12–13
user needs, identifying, 5
ushort data type, 126
using statements
allocated resources, 427
auto-generated, 50, 54
building overloaded methods, 357
classes and, 73, 496
closing streams, 428
Dispose() method, 495, 497, 656
exception handling and, 495–497, 500
functionality, 53, 428
graphics support, 632
multiple, 428
nested, 496
serializing classes, 443
UTF-8 encoding, 457–458
V
value parameter, 203, 209
value types
== operator and, 750
enums and, 343
as keyword and, 668, 677
796 Index
the index
value types (continued)
lists and, 343
memory considerations, 156
objects versus, 664
question mark and, 673
reference types and, 664–666
stack and, 128
structs, 663–665
ToString() method, 132
TryParse() method, 671
values
combining into groups, 700
counting key-value pairs, 364
defined, 363
returning multiple, 670
setting default, 672
storing, 363
testing, 436
Unicode, 373, 446
ValueType class, 663
var keyword, 690, 708
variables
++ operator and, 739
adding watch in debugger, 64
arrays and, 150–151
assigning values, 61, 130
case sensitivity, 211
checking values, 68
comparing, 435
converting to strings, 132, 185
declaring, 60, 66, 150
declaring inside loops, 76
declaring inside methods, 116
functionality, 60
hovering over while debugging, 64
loops and, 65
memory considerations, 128
name considerations, 138, 211
objects and, 139
range, 690
renaming, 757
setting, 68
try/catch blocks and, 489–490
useful data types, 61
viewing value changes, 63–64
(see also reference variables)
View menu
Properties window, 33
Toolbox option, 12
virtual keyword, 238, 244, 248–249
virtual machines, 45
virtual methods
defined, 243
overriding, 238, 244, 248–249, 353
Visual Studio Express, 11, 35
Visual Studio IDE (see IDE)
void (return type), 88–89, 115
W
Watch window
adding watch for variables, 64
functionality, 476, 481
reproducing problems in, 475
viewing results in, 353
viewing Unicode values, 373
WCF (Windows Communication Foundation), 760
where clause
functionality, 692, 695–696, 703
LINQ support, 690
while loops, 65, 69, 73
whole numbers, 126, 128
Window menu, 9, 11
Windows calculator
converting from hex to decimal, 446, 450
Programmer mode, 127
Scientific mode, 131, 446
Windows Communication Foundation (WCF), 760
Windows Forms applications, 42, 48
Windows installer, 7, 36
you are here 4 797
the index
Windows Picture Viewer, 616
Windows Presentation Foundation (WPF), 764–765
WindowsApplication1.csproj, 43
WPF (Windows Presentation Foundation), 764–765
writing data
BinaryWriter class, 449
decision-making when, 434
encoded, 449
excuse manager program, 429–433
File class, 422
FileStream class, 410
serialized files, 451–452
Stream class, 408–409
StreamWriter class, 411–412, 415
switch statement, 436
X
XML comments, 736–737
XML documents, 582, 688, 762–763
Y
yield return statement, 753–755
Z
zoo simulator application, 228–234, 288
zooming images, 629, 631, 633–635
