Hpc Guide
User Manual:
Open the PDF directly: View PDF ![]() .
.
Page Count: 21

A BRAG Guide to HPC
Ethan Goan
Contents
Preface 3
1 Introduction and Preliminaries 5
1.1 GettingHPCAccess ............................. 5
1.1.1 MacandLinux............................ 5
1.1.2 Windows ............................... 6
1.2 OnceLoggedIn................................ 6
1.3 Transferring Files to HPC . . . . . . . . . . . . . . . . . . . . . . . . . . 7
2 Submitting Jobs 8
2.1 InteractiveJobs................................ 8
2.2 Modules.................................... 9
2.3 InstallingRPackages ............................ 11
2.4 SubmittingBatchJobs............................ 11
2.4.1 Installing More Packages . . . . . . . . . . . . . . . . . . . . . . 13
2.4.2 Quick Note on Python . . . . . . . . . . . . . . . . . . . . . . . . 14
1


CONTENTS 3
Preface
As the size of data sets increase and models become increasingly complex, the need
for High Performance Computing (HPC) systems becomes increasingly prominent.
The purpose of this document is to provide a gentle introduction to using the High
Performance Computing (HPC) cluster from a statistical perspective. Sample scripts
and examples are provided, and intended to serve as a basis for any future work people
may need. From these examples provided in this guide, you will be able to modify
them to your need to make submitting jobs to HPC as easy as possible. It is hoped
that this document can serve as a reference guide, a first port of call to those who might
not be familiar with HPC and want to benefit from the facilities. It is also important
to note that the scheduler used at QUT is used extensively at many universities and
research facilities, so knowledge of QUT’s HPC system will extend much past QUT.
This guide will start with a brief introduction to UNIX like systems, and how to
navigate a command line. The guide will also show how you can bypass much of the
command line use, to remove as much prerequisite knowledge of UNIX as possible.
The HPC scheduler is then introduced, along with modules currently installed on the
cluster and how to access them. Sample scripts are provided with instructions on how
to submit both batch and interactive jobs. Instructions on how to customise your
personal environment and install your own packages is also provided. This guide will
primarily focus on programs written in R, though instructions can be followed with
only slight modifications for other platforms and languages such as MATLAB, Python
and Mathematica.
Additional tips and tricks to help get the most out of the cluster are also provided.
The tips include suggestions on how to (hopefully) simplify your HPC experience. This
will be demonstrated through sample scripts that you can run yourself.
From my experience, others have often already encountered and solved many of the
problems. I have also noticed that more often than not, others with more experience
have developed far more elegant solutions to the same problems I have faced. It is for
this reason that I have decided to make this document, to impart some of the knowledge

4
that others with considerably more experience have passed on to me. In this spirit,
I am happy for this to be a living document that all can edit, to provide your own
tips and tricks to solve potential problems you think others might encounter. Through
collaboration, we can all benefit from each others work and streamline our development
process, by not needlessly addressing a problem others have already solved.

1 INTRODUCTION AND PRELIMINARIES 5
1 Introduction and Preliminaries
The QUT HPC facilities provide access to,
•212 compute nodes
•3780 Intel Xeon Cores
•Approx. 200G B RAM per Compute Nodes
•34 TB of main storage
•1800 TB additional storage in file store
•24 Tesla GPUs
•Visualisations services and more
1.1 Getting HPC Access
Before accessing HPC, you will first need to apply for access. This can be done via
HiQ by following the instructions on this link here. Access will usually be granted in
a couple of days at the most.
Once access has been granted, you will need a program to access HPC. If you are
using a Linux or Mac, you won’t need to install anything, though if you are using
Windows, it is recommended to use the program PuTTY [1]. Instructions on logging
in to HPC for each OS are given here.
1.1.1 Mac and Linux
To log into HPC, we will be using the Secure SHell (SSH) protocol, which we can
access through the command line on Mac and Linux devices. To login, first open a
command line prompt (terminal) in your computer. To login, you will simply need to
type in,
ssh < your_qu t_ id > @lyra . qut . edu . au
6
where you will replace <your_qut_id> with your QUT username, ie.
# if you applied for HPC access with staff acount
ssh jane . do e@lyra . qut . edu . au
# if you applied for HPC access with stude nt acount
ssh n 123 45678@ lyra . qut . edu . au
1.1.2 Windows
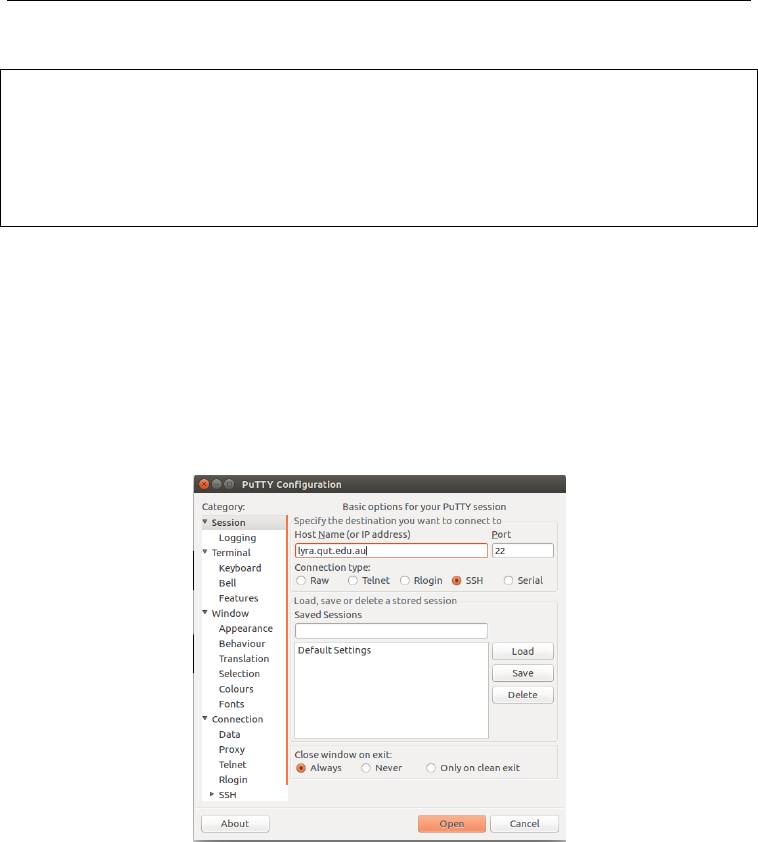
To login on windows, first install PuTTY by following the instructions here. Once
downloaded, simply open the putty window and enter lyra.qut.edu.au into the bar
as shown in Figure 1. You will then have to enter your QUT username and password.
Figure 1: Example PuTTY window
1.2 Once Logged In
After following the previous commands you will be logged into the head node of the
Lyra HPC cluster. Though you will now be logged in, you have not been allocated
any computational resources yet. The head node is available to all users once logged

1 INTRODUCTION AND PRELIMINARIES 7
in, and is designed for performing only simple tasks, such as text editing or checking
on currently running jobs.
1.3 Transferring Files to HPC
Now that you have access to HPC, you will want to transfer some code over so you
can start running some jobs. There are a few ways to do this, though this guide will
cover the easier/most prominent ways to do this.
To get your code onto HPC, I would recommend simply using Git and cloning your
repo onto HPC. If you are unsure on how to use Git, I would strongly recommend
you take some time to learn some basics and start using it for your software pro-
jects. Knowledge of Git is not required for this guide, but it will make your software
development life significantly better, and allow you to distribute your research much
easier.
You can clone your repo to HPC via the terminal that is connected to HPC by
simply running the command,
# change to the home dire ctory
git clone <remote_url_for_your_repo >
It is also helpful to be able to transfer other files to and from HPC. The easiest way
to do this is to mount a network directory, so you can copy and paste files to and from
HPC just like you would on your desktop/laptop. Instructions on how to do this for
Windows, Mac and Linux using SSHFS is provided here. After you install the required
programs, you can mount the directory creating a folder on your desktop where you
want to mount your HPC files by running the following command,
# all of this in a single line / comman d
ss hf s -o allow_other < y our_qu t_ user name > @ ly ra . qut . edu . au
:/home/<your_qut_username > <
path_to_mount_location_on_desktop >

8
2 Submitting Jobs
Whilst it may seem like ample resources are available, they are finite and accessed by
many people, thus access to these services needs to be managed. Access to computing
resources is scheduled by the Portable Batch System (PBS). Before you run any soft-
ware, you must tell the PBS manager what resources you require and how long you
will need them for. This is done by submitting jobs.
There are two main types of jobs you can submit to HPC; interactive and batch
jobs. Interactive jobs provide you with an active terminal similar to what you will
currently use on your desktop. Interactive jobs are useful for debugging and ensuring
all of your code can run.
Interactive jobs are often convenient, though you need to have your interactive
session open for the job to continue. Batch jobs are intended for jobs that will need
to run for longer, or when multiple jobs need to be submitted. Unlike interactive
jobs, after you submit a batch job, you can close your connection to HPC altogether,
go get a coffee, put your feet up and relax while your job processes on HPC in the
background.
We will first start with interactive jobs, and then show how we can move our work
to batch jobs later on.
2.1 Interactive Jobs
To submit a job to HPC, we use the qsub command, along with a few arguments to tell
the scheduler what resources we require, and how long we need them for. To submit
an interactive job, run the following command,

2 SUBMITTING JOBS 9
# submit an interactive job to HPC
# r ep la ce th e HH : MM : SS w it h the amo un t of tim e you
# expect your job to run
# Replac e XXX with the amount of RAM you need
# Replac e YYY with the number of CPUS you need
# Replac e ZZZ with the name of your job
# you can call it w hatever you like :)
qs ub -I -S / bi n / ba sh -l w allt im e = HH : MM : SS , me m = XXXg , nc pu s =
YYY -N ZZZ
Change the variables supplied here with the time and resources required for your work.
After running this command, you will have to wait for your requested resources to be
allocated to you. The time taken for your job to be accepted will depend on the
amount of resources you requested. If you asked for 8 GB of RAM, 2 CPUs for only
a couple hours, your job should be accepted within a minute or so. If you request 100
GB, 20 CPUs for 12 days, expect to wait a very long time for your interactive job to
be accepted1
2.2 Modules
Now that you have transferred your code across over to HPC and have been allocated
resources for a job, you can start loading and installing the required packages you
need. HPC has many programs already installed, though they aren’t initially loaded
when you log in. These pre-installed programs are stored as modules that need to be
first loaded before you can use them. To see the modules currently installed on HPC,
run the command,
# see what mod ules are ava il able
module avail
1You can request these resources, but will need to submit a batch job.

10
From the output of this, you may begin to appreciate why not all of the packages are
loaded on startup, there is an awful lot of them. You can search through the output
to find any modules you are interested in. Once you have found the module you are
interested in, you can load it with the module load command. An example of common
modules that might be helpful are listed here.
# load in R
mo dul e lo ad atg / R /3.4.1 - foss -2 01 6 a
# load MATLAB
# many different ver sions avail able
# only need to load one you need
module load matlab /2016 a
module load matlab /2016 b
module load matlab /2017 b
# load mathematica
module load ma thematica /11.2.0 - linux - x86_64
# load Python
# again many dif ferent vers ions availab l e
module load python /2.7.13 - foss -2017 a - foss
module load python /3.5.1 - foss -2016 a
python /3.6.4 - intel -2017 a
For this guide, we will use R as an example, though you can adapt it for other program-
ming languages with only small modification. So first we load in the R module with
module load atg/R/3.4.1-foss-2016a. Once loaded, you can start R by simply
typing Rinto the terminal.

2 SUBMITTING JOBS 11
2.3 Installing R Packages
If you try and run an R script now, you will likely find that it will throw an error saying
that a package isn’t available. The module we loaded before was the base R module,
and unfortunately there aren’t many R packages pre-installed on the Lyra cluster.
This isn’t a major limitation, we just need to install them ourselves. An pre-made R
script has already been made, install_r_packages.R, which will install many of the
common packages you will need. After you have cloned the example repository listed
earlier, you can run the script to install all of the base packages with these commands,
# change to home dir ecto ry
cd ~
git clone https :// github . com / ethangoan / h p c_guide
# change directory to the repo
cd hpc_guide
# now run the install script
Rs cript instal l _ r _package s . R
This will take a while to run (a few hours I think), so you can either leave your
terminal open and let the program run, or you can use the instructions in the next
section, where we will learn to submit a batch job that will install all of the packages
for you.
2.4 Submitting Batch Jobs
In the previous example, we saw how to submit an interactive job, load in R modules
and install some base packages in an interactive session. We can achieve this same
result by submitting a batch job, which will run on HPC without us having to intervene
and leave the terminal open. Batch jobs are useful for programs that require a long
time to run, since we can simply submit them and then forget about them (while they
running at least).
Like submitting an interactive job, we need to specify the time and computational
resources we require. Unlike interactive jobs, we specify these requirements through

12
a configuration file. In the guide repository, an example batch configurations script
called batch_jobs/install_packages_batch.sh is supplied. This is a Bash script
that is interpreted by the PBS scheduler, and specifies our requirements and which
program we want to run. Computational requirements are listed at the top of the file
in the commented out section. These are called the PBS directives.
# !/ usr / bin / env b ash
#PBS -N install_packages
# PBS - l ncp us =1
# PBS - l mem =2 GB
# PBS - l w allti me =20:0 0: 00
# PBS - o in st al l_ packa ge s_ st do ut . out
# PBS - e in st al l_ pa ck agess td er r . out
The main differences here is the first line which is called the Shebang. This MUST
be there in any batch configuration script, you will never need to change it. The
other differences is the last two lines, which specifies where standard output and error
messages will be written to.
Further down in the script you will see helper functions that will load all of the
modules we need (for this example we only need the R module) and a function which
invokes the R script to install the packages we need. These helper functions are called
at the end of the script when the job has been submitted and accepted by the scheduler.
We can submit this job using the following command,

2 SUBMITTING JOBS 13
# clone the guide repo into your home directory
# if you ha ven ’ t alr ea dy
cd ~
git clone https :// github . com / ethangoan / h p c_guide
# change into repo dire c tory
cd ~/ hpc_ guide
# change to the direc tory where the config file is
cd ./ batch_ j o bs
# submit the batch job with qsub
qs ub i ns ta ll _ pa ck ag es _b a tc h . sh
Once you have submitted the job, you can track all of your submitted jobs using the
command,
watch -n 1 qstat < your_QU T_username >
This will give you information on all the jobs you have submitted. You will be able to
see whether they have commenced running, or if they are still running and how long
they have been running for. Once the program has finished running, you can view the
output of the installation script with the cat command.
# check the output of the pro gra m
cat install_packages_stdout.out
# check the error log to see if anyt hing went wrong
cat install_packages_stderr.out
2.4.1 Installing More Packages
While running this installation script will install many of the most common packages,
it is unlikely that it will install everything you require. To install more packages,
I would suggest modifying the instal_r_packages.R script to include packages to
want to install. There is a slight difference to installing packages when compared with

14
a typical desktop machine you own. Since you won’t have root/administrator access
on HPC, you will need to install the packages locally. The install_r_packages.R
installs the packages locally and sets the relevant path variables so that R can find the
packages we installed. To install more packages, simply edit the packages vector in
that script and resubmit the batch job using the same commands as before.
2.4.2 Quick Note on Python
While there aren’t many pre-installed packages for R on HPC, there is many for
Python. Popular packages such as Numpy, Matplotlib, Scipy, Sklearn etc. are already
installed and have their own module. To find these modules, simply run the module
avail command and search for the module you require. Then load the module using
the same module load command used previously.
3 Examples
Now we are set up on HPC and have installed some of the packaged we need, we will
go through some examples on how to get the most out of HPC.
3.1 Multicore Processing - Let the OS do the Hard Work
Many times when we want to process a large data set, we want to do a single task
to each element in the data set, and sometimes this individual operation can be com-
putationally expensive. An example is preprocessing all images in a large data set
to remove certain artefacts, convert to a more convenient format etc.. It would be
beneficial to process many of these items in the many available CPU cores on HPC.
One method is to write a multi-threaded/multi-process script (not a simple task in R)
to process the data. Another and far easier way to handle this is to create a script that
processes a single item in the data set, and submit this job many times to the HPC
cluster with a different observation from the data set as an input example. The idea
is to let the OS and the scheduler do the hard part of organising multicore processing.

3 EXAMPLES 15
Another scenario when this type of processing is helpful is for model validation.
Consider a case where you are commencing work on a new project, with a new type
of data set and you want to run some experiments to bench mark the performance of
different models with different parameters. For example, say you are fitting a mixture
model, and you want to investigate the performance of the model for different number
of mixtures, or a boosted regression tree, where you want to see how the accuracy
of your predictions change when altering the parameters of the model. This type of
experimentation can greatly benefit from this type of parallel processing, where you
want to run several independent experiments with varying parameters. An example
of how to do this is supplied in the bt_examples directory of the repo for this guide,
where we will fit many different boosted regression tree models to try and predict the
presence of breast cancer based on biopsy information [2].
When looking at the contents of the bt_examples directory, you will find a single
R script breast_cancer_bt.R and ten batch scripts batch_bt_XXXX.sh. Each of
these batch scripts will invoke the breast_cancer_bt.R script, though each script
will supply a different command line argument to specify the number of trees we want
to use in the model. We can sumbit batch jobs for all of these scripts using the following
commands,
# Change to the bt_examples dire ctor y
cd ~/ hpc_guide / bt_exampl e s /
# now lets send all the batch scripts to qsub
# so we c an su bm it jobs for t hem
#
# We can use a for loop to submit all scripts
# t ha t end in . sh
for sub in $ ( ls ./*. sh ); do qsub $sub; done
After running this command, you will see that ten independent jobs have been sub-
mitted. You can track the progress of these jobs by again running the command,
watch -n 1 qstat -u < y our_QUT_u sername >

16
Once all of the jobs are completed, you will see a number of log files have been created,
a standard output and a standard error file for each job submitted. You can view the
output of these files using the cat command.
# view the output of a single job
cat b t_ 10 00 0_ stdo ut . out
cat b t_ 10 00 0_ stde rr . out
# if the out pu t fi le is long , you can di sp lay it
# in a s li gh tly ni ce r f orma t w her e you can s cr oll t hr oug h
# using enter or the space bar
cat b t_ 10 00 0_ stdo ut . out | more
After running these jobs, you may want to remove the current stash of output files.
You can do this using the rm command, though this should be used with caution.
This command will remove files for good, and unlike your desktop system, after you
remove a file in a UNIX like system, it is gone for good! This is another reason why
you should use version control systems such as Git with remote back ups. If you
accidentally delete all of your source files and you haven’t backed them up using Git
or something similar, they will be gone forever and you will have to start again from
scratch!.
I stress the importance/danger associated with using the rm command to hopefully
help you avoid disaster. In saying that, if used properly it is a simple and extremely
useful command.
If you have named output files in the standard I have used throughout my examples
(output scripts ending with stdout.out and stderr.out), then you can delete all of
these files with the following commands,
# dele te any files tha t end with st do ut . out
rm ./* st dou t . out
# dele te any files tha t end with st de rr . out
rm ./* st der r . out

3 EXAMPLES 17
3.1.1 Tips for bulk Submitting Jobs
Bulk submitting jobs in this way relies on you designing your original code to handle
command line arguments. Adopting this type of program design is extremely helpful
during experimentation, and is a part of general good coding practices. Don’t hard-
code anything you think may even have the slightest possibility of ever changing.
Command line arguments are a great way to develop software that is highly modular,
and generally easy to use (as long as you document what you have done!).
For bulk submitting jobs in this way, I would recommend using the bash scripts
I have provided as a template, and simply modifying them to suit your needs. The
components that you will need to modify include the PBS directives at the top that
define your computational requirements. Another important component to change is
the output location where the standard output and standard error files will be saved. If
every script uses the same name for these output files, they will simply be overwritten
whenever a new job is executed.
Depending on the number of jobs you are planning to submit, it can also be helpful
to write a small program that actually generated the qsub bash scripts for you. An
easy way to do this is to start with a base file that has almost all the information you
need, excluding the names of the output text files and the different input arguments
you want to supply. Then you can write a small script that simply fills these areas
with the information you require. If you want some examples on how I do this, just
let me know and I can send you some examples.
HPC will let you run roughly 100 different jobs simultaneously, though you are able
to submit many many more jobs than that. A max of 10000 job submissions would
be a reasonable limit, depending on the resources you require. If you do submit more
than 100 jobs, excess jobs will simply join the cue and commence running after some
of your other jobs have finished.

18
3.2 Multicore Processing - The Hard Way
Whilst the previous section described how to efficiently and easily parallelise your
work, the bulk submission method is only suitable when individual tasks can be run
independently. For many cases, this type of parallelisation is not possible. For these
scenarios, parallelisation may still be feasible, as a few packages support multicore
processing. In general, this a much more involved and arduous task, and one that
I don’t believe R handles nicely when compared to other programming languages
such as Python2. Given the increased complexity associated with implementing many
multiprocessing programs directly whithin R, it will not be covered in this guide, as
it is assummed that if you have the programming proficiency to implement such a
system, you should have little dramas migrating it to the HPC environment.
2Although it can also be a pain to implement multithreaded programs in Python!

4 QUICK GUIDE 19
4 Quick Guide
Command Description/Example
cat Display contents of a file
cat <path_to_file>
cd Change Directory
cd ∼#change to home directory
cd .. #move up one directory
cp Copy file
cp <path_original_file> <path_new_file>
ls List files in current directy
man Manual for a command
man ls
module avail List all of the available modules
module load Load a specific module
module load atg/R/3.4.1-foss-2016a
module purge Remove all loaded modules
mv Move a file
mv <path_original_file> <path_new_file>
rm Remove a file permanently
rm <path_to_file>
qdel Delete a specific job that was submitted to the queue
qdel <job_id_number> #find number with qstat
qstat View Running jobs
qstat -u <your_QUT_usernamer>
qsub Submit a job to the queue
# Interactive Job
qsub -I -S /bin/bash -l
walltime=HH:MM:SS,mem=XXXg,ncpus=YYY -N ZZZ
# batch job
qsub <path_to_batch_script>

20
5 Other Tips
This section will be updated every now and then with anything new I find. If you find
an interesting tip, trick or some package specific information that you think others
might benefit from, let me know and we can add it.

