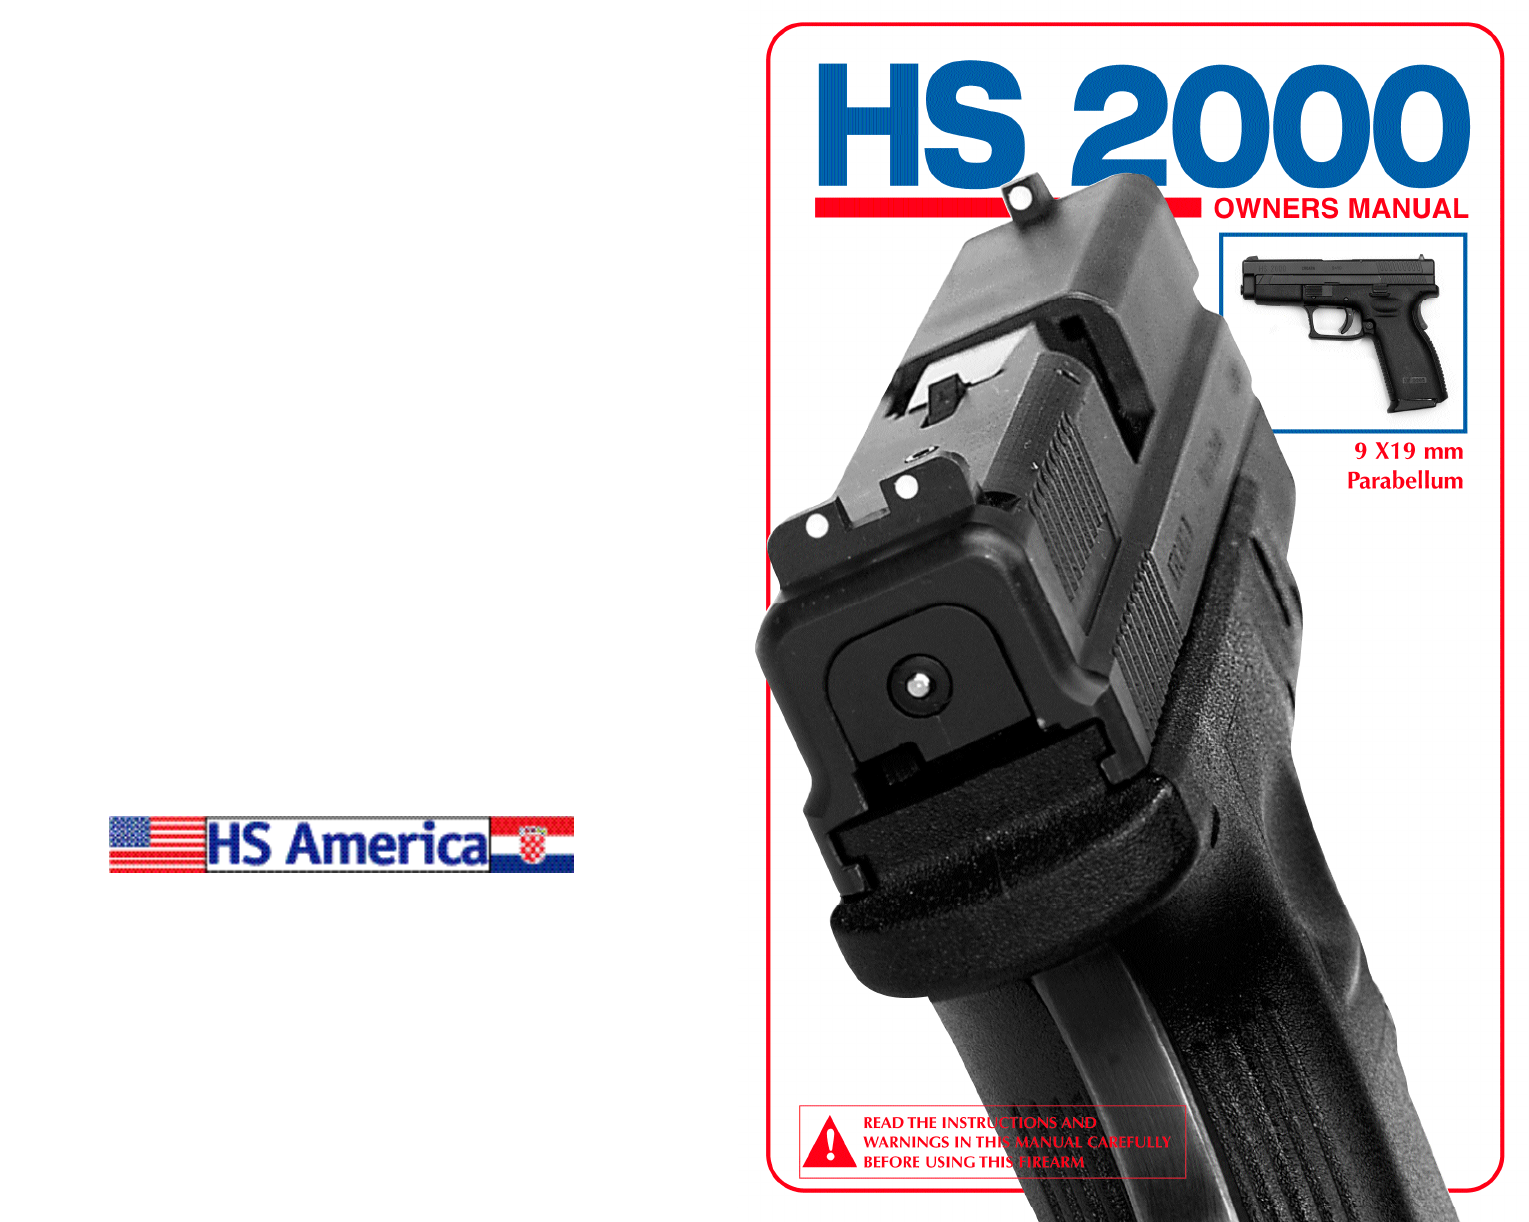
PDF Hs 2000
User Manual: PDF T E X T F I L E S
Open the PDF directly: View PDF ![]() .
.
Page Count: 18
SAFETY NOTES
Safety Notes on the use of the HS 2000. Clear the pistol before handling the
firearm. To clear it, do so by:
I • Make sure fingers are off the trigger and outside of the trigger guard and
the pistol is pointed in a safe direction at all times.
2 • REMOVE MAGAZINE - Depress the magazine button release and
remove the magazine from the magazine well.
3 • UNLOADING - Pull the slide rearward one or more times to insure the
chamber is empty. Watch for a live round or empty case to be ejected.
Pull slide rearward and lock it with the slide catch lever holding the
side open.
4• INSPECT CHAMBER - Inspect chamber for the presence of a live round
or empty case. Visually-View chamber through open ejection port.
Physically - Insert index finger in chamber and feel for the presence of a
round or cartridge case in the chamber.
5• Remove any live rounds or empty cases from the chamber or from with-
in the firearm or magazine before handling the firearm further.
This instruction manual should always accompany this pistol and be
transferred with it upon change of ownership. Service Policy If you have
questions concerning the performance or servicing of your pistol, please
write or call:
HS America, LLC
5005 Chapman Highway
Knoxville, Tennessee 37920
Phone: 865-579-0065
Fax: 865-579-0937
www.hsarms.com
e-mail: defence@tds.net
If you do not understand the instructions for operating your pistol,
it is your responsibility to call our service department:
Phone before using your firearm.

IMPORTANT:
THE SAFEST PISTOL IS THE ONE THAT IS FULLY UNLOADED.
SAFETY WA R N I N G S
•C a re f u l ly read this owners manual before handling the pistol.
•O n l y use the pistol after you have fully read and understand
these instructions.
•Observe all notes on handling and operation of the pistol. Failure to do so
may result in injury or death of the operator or bystanders.
•When passing the pistol between persons, the firearm must be
unloaded and the slide must be locked open.
•Do not use the pistol if you have pre v i o u s l y ingested alcohol,
drugs or medication.
•A l ways treat the pistol as if it w e re loaded and re a dy to fire .
•N ever point the pistol at anyone during handling.
•A l ways point the pistol in a safe dir e c t i o n .
•B e f o re handling and before cleaning, the pistol must be c h e cked to ensure
t h a t : The magazine is unloaded and re m oved from the pistol.
The slide is locked to the re a r.
The pistol is unloaded (cartridge chamber empty).
The barrel is free of obstructions.
•Keep your finger off the trigger when loading, unloading or otherwise han-
dling the pistol. A lways place the trigger finger outside of the
trigger guard when holding the pistol.
•Place your finger on the trigger only when your sights are aimed
at the target and you have decided to fir e .
•N ever use force when handling, disassembling, cleaning and
reassembling the pistol.
•Disassemble the pistol only as far as described in this manual.
•A l ways wear eye and ear protection when using the pistol.
•E n s u re bystanders are also wearing ear and eye pr o t e c t i o n .
•O n l y use factory loaded and undamaged cartridges of the correct caliber.
•A l ways ensure that the muzzle area is free of obstacles during firing.
•Take into account the fact that bystanders are also endanger e d .
•S t o re the firearm and ammunition in separate places.
•HS America does not assume any liability for events resulting from the d i s-
re g a rding this manual, improper handling, negligence, improper tr e a t m e n t ,
use of improper or reloaded ammunition, unauthorized e x change of parts
or manipulations of the pistol.
•Read this operators manual and be familiar with the safe handling of
this firearm before using it. Keep this manual with the pistol.
ALWAYS KEEP YOURSELF AND OTHERS
CLEAR OF THE EJECTION PORT, AS SPENT
CARTRIDGES ARE EJECTED WITH ENOUGH
FORCE TO CAUSE INJURY. NEVER PLACE
FINGERS IN THE EJECTION PORT OF A HOT
SLIDE OR BARREL DURING OR AFTER FIR-
ING, AS THEY COULD BE BURNED BY HOT
METAL.
ONLY USE HIGH QUALITY COMMERCIAL-
LY MANUFACTURED AMMUNITION, IN
EXCELLENT CONDITION AND IN THE CAL-
IBER OF YOUR PISTOL.
CALIBER:
9 X 19 mm
357 sig
.45ACP
.40 cal.
THE USE OF RELOADED AMMUNITION
WILL VOID THE HS WARRANTY, DUE TO
THE UNPREDICTABILITY OF THE STAN-
DARDS (SAAMI/NATO) ADHERED TO, SINCE
RELOADS OF POOR QUALITY AMMUNI-
TION MAY NOT MEET (SAAMI/NATO) SPEC-
IFICATIONS, MAY EXCEED LIMITS, AND
THEREFORE MAY BE UNSAFE.
DO NOT SHOOTTHE PISTOL NEAR YOUR
FACE AS THE SLIDE WILL SHARPLY MOVE
BACK UPON FIRING.
CAUTION: DO NOT CARRY THE PISTOL IN
THE READY TO FIRE CONDITION. THIS IS
NOT THE RECOMMENDED SAFE- CARRY-
ING METHOD FOR CIVILIAN USE.
CAUTION: TO MINIMIZE RISK OF UNIN-
TENTIONAL DISCHARGE (AND DAMAGE)
LOAD LIVE AMMUNITION INTO PISTOL
ONLY WHEN YOU ARE READY TO SHOOT-
WARNING: IF THE HS PISTOL OR ANY
OTHER FIREARM IS CARELESSLY OR
IMPROPERLY HANDLED,THE USER COULD
CAUSE AN UNINTENTIONAL DISCHARGE
WHICH COULD RESULT IN DEATH, SERI-
OUS INJURY AND/OR PROPERTY DAMAGE.
This HS AMERICA, LLC product is classified
by the ALCOHOL, TOBACCO and FIREARMS
Division, of the U. S. TREASURY DEPART-
MENT, AS A FIREARM OR DANGEROUS
WEAPON. IT IS, THEREFORE, POTENTIALLY
LETHAL!
SAFETY INSTRUCTIONS
We want you to enjoy shooting your new HS
pistol, but we want you to do so safely. You
may be an experienced, safe shooter already
familiar with the procedures in this instruc-
tion manual, or you may have never handled
a gun before. (Novice shooters should com-
plete a NRA Certified or similar safety
course.) Either way,we urge you to READ
THIS ENTIRE INSTRUCTION MANUAL
CAREFULLY. It is essential to follow the safety
Instructions for your safety and the safety of
others. WARNING: HS PISTOLS HAVE SEV-
ERAL INTERNAL DESIGN FEATURES AND
MECHANICAL SAFETIES, DESIGNED TO
PREVENT AN ACCIDENTAL DISCHARGE
SHOULD THE PISTOL BE DROPPED OR
RECEIVE A SEVERE BLOW TO THE MUZZLE,
FRONT, OR BACK OF THE PISTOL. THERE-
FORE, EXTRA CARE AND STRICT ADHER-
ENCE TO THE SAFETY INSTRUCTIONS AND
OTHER INSTRUCTIONS CONTAINED IN
THIS MANUAL BY THE GUN USER IS
MANDATORY FOR MINIMIZING THE RISK
OF ACCIDENTS. HOWEVER, LIKE ANY
OTHER MECHANICAL DEVICE, WHEN SUB-
JECTED TO EXTREME FORCES NOT NOR-
MALLY ENCOUNTERED IN SPORTING, LAW
ENFORCEMENT, OR MILITARY USE, FAIL-
URE COULD OCCUR. THE PROPER AND
SAFE FUNCTION OF THIS PISTOL IS BASED
ON THE PREMISE THAT PARTS ARE NOT
ALTERED OR MODIFIED, AND THATTHE
PISTOL IS USED FOR ITS INTENDED PUR-
POSE.
35
NEVER FIRE YOUR PISTOL NEAR AN ANIMAL UNLESS IT IS TRAINED TO ACCEPT T H E
NOISE: AN A N I M A L’S STA RTLED REACTION COULD INJURE IT OR CAUSE AN AC C I D E N T.
ADDITIONAL WA R N I N G S
S A F E T Y
I N F O R M A T I O N
Before you take your new HS 2000 out of the box,
please read the following information.
It is vital to your safety and the safety of others.
3
34
NEVER LEAVE A PISTOL UNATTENDED.
SOMEONE, ESPECIALLY A CHILD, MAY FIRE IT BELIEVING IT TO BE A TOY.
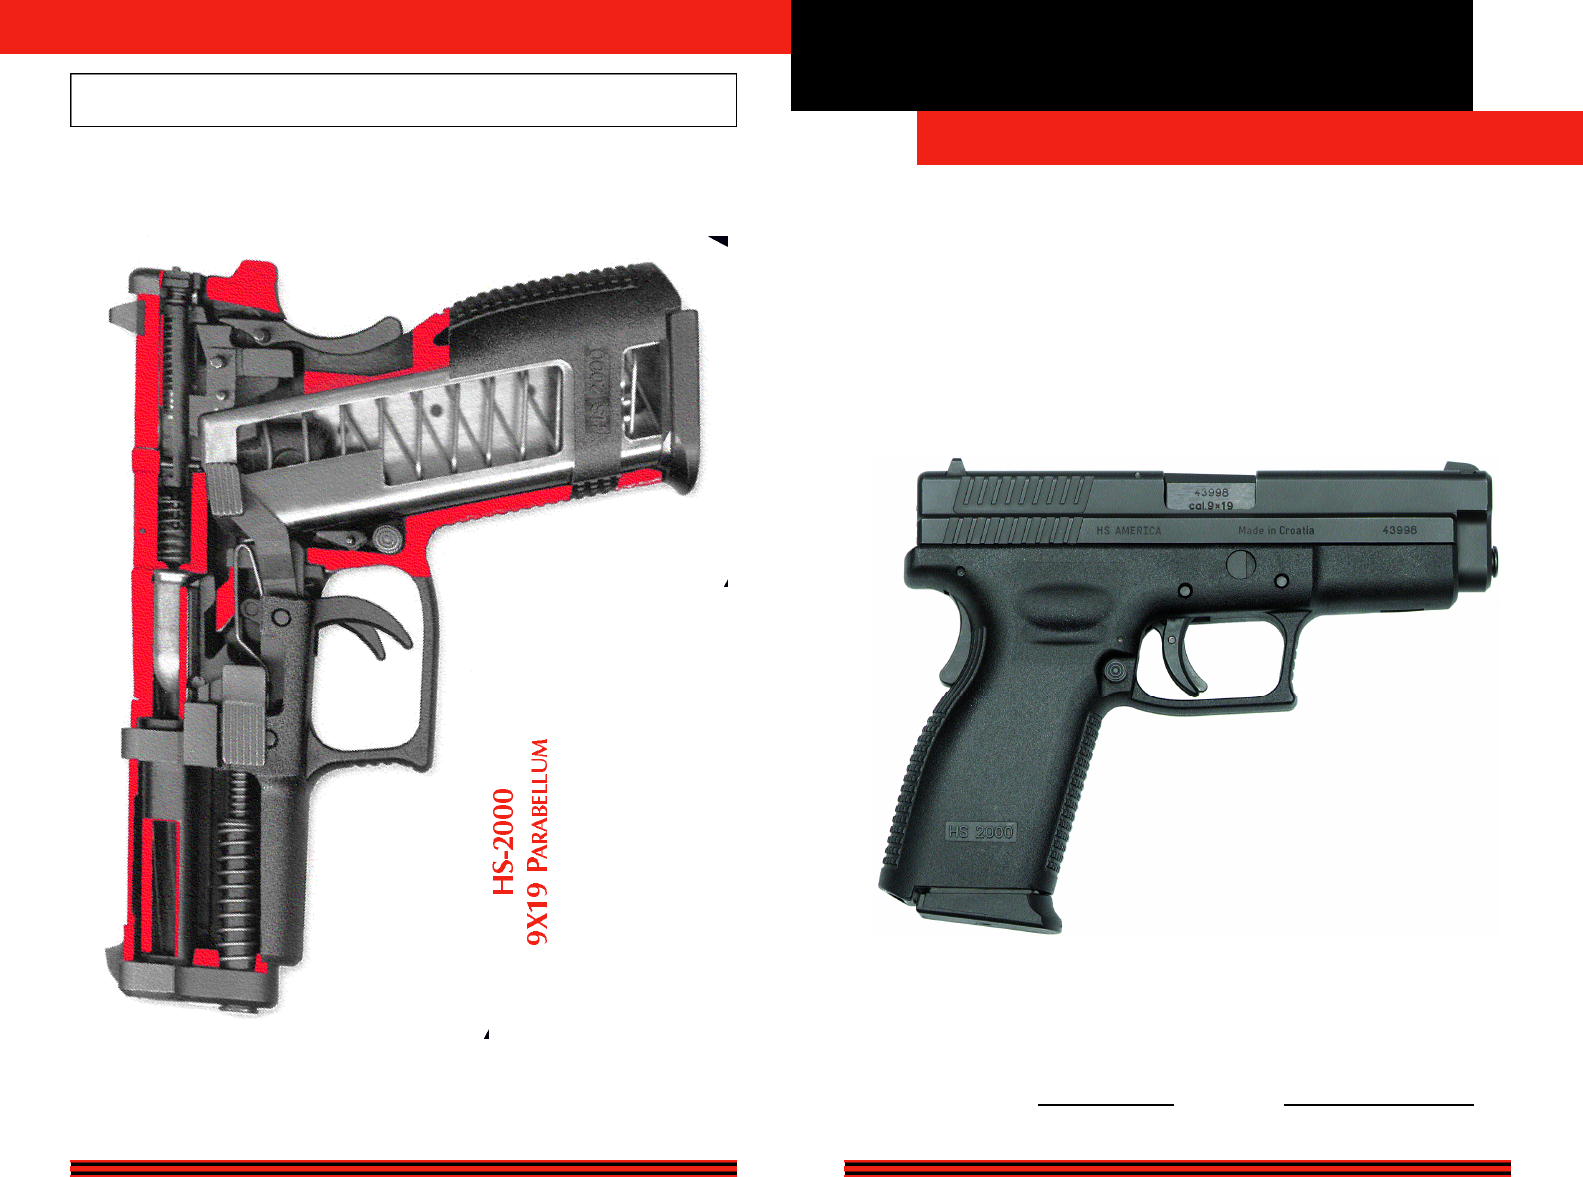
C U T AWAY

CONTENTS PAGE
Safety warnings . . . . . . . . . . . . . . . . . . . . . . . . . . . . . . . . . . . . . . . . . .2
Introduction . . . . . . . . . . . . . . . . . . . . . . . . . . . . . . . . . . . . . . . . . . . .3
Table of contents . . . . . . . . . . . . . . . . . . . . . . . . . . . . . . . . . . . . . . . . .4
General Description . . . . . . . . . . . . . . . . . . . . . . . . . . . . . . . . . . . . . . .5
Nomenclature . . . . . . . . . . . . . . . . . . . . . . . . . . . . . . . . . . . . . . . . . . .6
Assembly groups . . . . . . . . . . . . . . . . . . . . . . . . . . . . . . . . . . . . . . . . .7
10 rules of firearm safety . . . . . . . . . . . . . . . . . . . . . . . . . . . . . . . .8 & 9
Operation of safety devices . . . . . . . . . . . . . . . . . . . . . . . . . . . . . . . .10
Approved ammunition . . . . . . . . . . . . . . . . . . . . . . . . . . . . . . . . . . . .11
Loading magazines . . . . . . . . . . . . . . . . . . . . . . . . . . . . . . . . . . . . . . .12
Loading the pistol . . . . . . . . . . . . . . . . . . . . . . . . . . . . . . . . . . . . . . . .13
Sight picture / Firing the pistol . . . . . . . . . . . . . . . . . . . . . . . . . . . . . .14
9x19mm Ballistics Graph . . . . . . . . . . . . . . . . . . . . . . . . . . . . . . . . . . .15
Reloading during shooting . . . . . . . . . . . . . . . . . . . . . . . . . . . . . . . . .16
Unloading the pistol . . . . . . . . . . . . . . . . . . . . . . . . . . . . . . . . . . . . . .17
Field Stripping . . . . . . . . . . . . . . . . . . . . . . . . . . . . . . . . . . . .18,19 & 20
Magazine disassembly . . . . . . . . . . . . . . . . . . . . . . . . . . . . . . . . . . . . .21
Cleaning the field stripped pistol . . . . . . . . . . . . . . . . . . . . . . . . . . . . .22
Inspection . . . . . . . . . . . . . . . . . . . . . . . . . . . . . . . . . . . . . . . . .23 & 24
Inspection/Reassembly . . . . . . . . . . . . . . . . . . . . . . . . . . . . . . . . . . . .25
Transportation and storage . . . . . . . . . . . . . . . . . . . . . . . . . . . . . . . . .26
Troubleshooting . . . . . . . . . . . . . . . . . . . . . . . . . . . . . . . . . . . . . . . . .27
Sights . . . . . . . . . . . . . . . . . . . . . . . . . . . . . . . . . . . . . . . . . . . . . . . . .28
Warranty Statement . . . . . . . . . . . . . . . . . . . . . . . . . . . . . . . . . .29 & 30
Specifications . . . . . . . . . . . . . . . . . . . . . . . . . . . . . . . . . . . . . . . . . . .31
Parts diagram . . . . . . . . . . . . . . . . . . . . . . . . . . . . . . . . . . . . . .32 & 33
Cut away . . . . . . . . . . . . . . . . . . . . . . . . . . . . . . . . . . . . . . . . . . . . . .34
Additional warnings . . . . . . . . . . . . . . . . . . . . . . . . . . . . . . . . . . . . . .35
4
P I S T OLS are classified as FIREARMS and are sold by us with the specific understanding that we are
not responsible in any manner wh a t s o e ver for their safe handling or resale under local laws and
regulations. HS America, LLC shall not be responsible in any manner wh a t s o e ver for malfunction-
ing of the firearm, for physical injury or for property damage resulting in whole or in part from (1)
criminal or negligent discharge, (2) improper or careless handling, (3) unauthorized modifications,
(4) defective, improper, hand-loaded, or reloaded ammunition, (5) corrosion, (6) neglect, or (7)
other influences beyond our direct and immediate control. This limitation applies regardless of
whether liability is asserted on the basis of contract, negligence or strict liability (including any fail-
ure to warn). Under no circumstances shall HS America, LLC be liable for incidental or conse-
quential damages, such as loss of use of property, commercial loss and loss of earnings or profits.
F I R E A R M S SAFETY IS YOUR RESPONSIBILITY
A LWAYS STORE YOUR PISTOL AND AMMUNITION IN SEPA R ATE
LOCKED RECEPTACLES, OUT OF SIGHT AND REACH OF CHILDREN.
PISTOL “HS 2000” - US MODEL
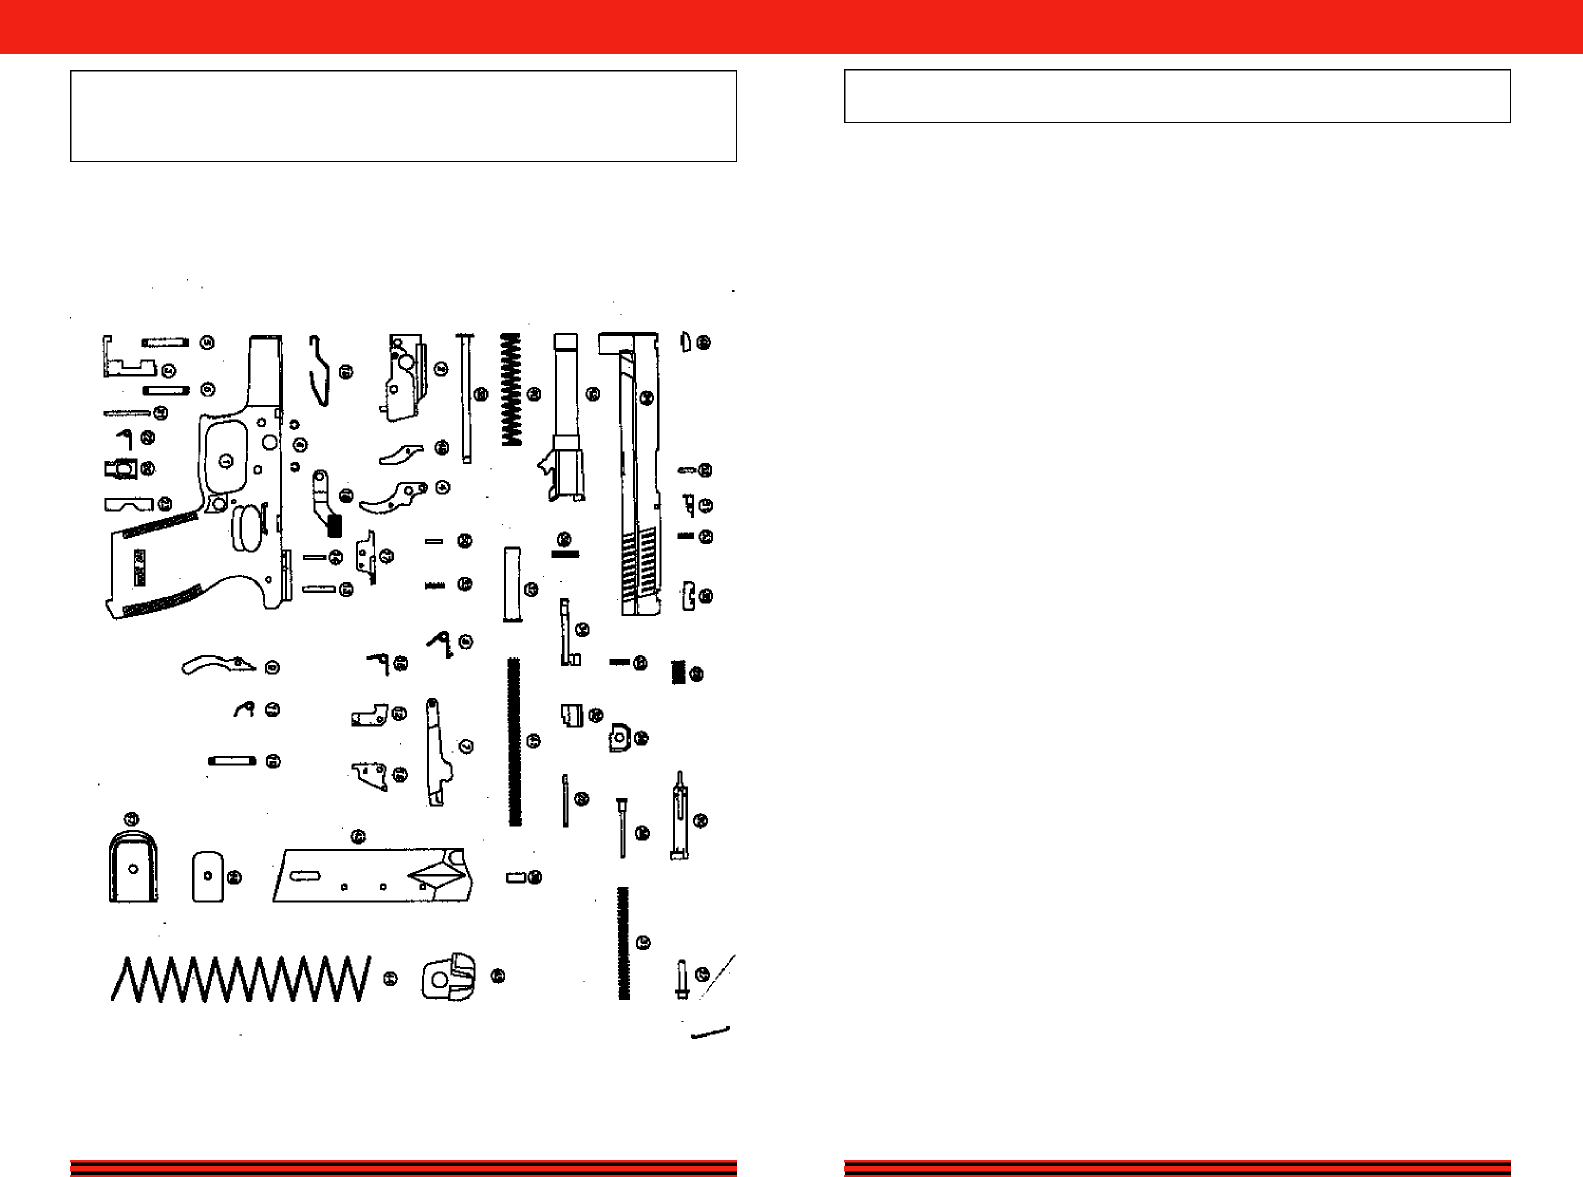
Part # Part Name Quantity
HS9-1 Receiver - 3 1
HS9-2 Locking block - 2 1
HS9-3 Disassembly lever 1
HS9-4 Trigger w/safety 1
HS9-5 Locking block pin trigger pin 2
HS9-6 Locking block trigger pin detent 2
HS9-7 Trigger bar 1
HS9-8 Trigger bar spring 1
HS9-9 Grip safety 1
HS9-10 Grip safety pin 1
HS9-11 Grip safety spring 1
HS9-12 Sear 1
HS9-13 Sear pin 1
HS9-14 Small sear pin 1
HS9-15 Sear spring 1
HS9-16 Firing pin safety lever 1
HS9-17 Ejector 1
HS9-18 Slide stop lever 1
HS9-19 Slide stop lever spring 1
HS9-20 Magazine catch 1
HS9-21 Magazine catch pin 1
HS9-22 Magazine catch spring 1
HS9-23 Magazine release button 1
HS9-24 Slide with loaded chamber indicator 1
HS9-25 Firing pin safety retaining pin 1
HS9-26 Firing pin locking plate 1
HS9-27 Firing pin spring guid 1
HS9-28 Firing pin status indicator 1
HS9-29 Firing pin dampening spring 1
HS9-30 Firing pin 1
HS9-31 Firing pin spring 1
HS9-32 Firing pin safety 1
HS9-33 Firing pin safety spring 1
HS9-34 Extractor 1
HS9-35 Rear sight 1
HS9-36 Roll pin 1
HS9-37 Recoil spring reverse plug 1
HS9-38 Recoil spring guide rod 1
HS9-39 Recoil spring guide nut 1
HS9-40 Recoil spring external 1
HS9-41 Recoil spring internal 1
HS9-42 Barrel 1
HS9-43 Magazine body 1
HS9-44 Magazine spring 1
HS9-45 Magazine follower 1
HS9-46 Magazine locking plate 1
HS9-47 Magazine floor plate 1
HS9-48 Front site 1
HS9-49 Trigger safety 1
HS9-50 Trigger safety pin 1
HS9-51 Loaded chamber indicator 1
HS9-52 Indicator small pin 1
HS9-53 Indicator spring 1 33
ALWAYS BE SURE BARREL AND ACTION ARE CLEAR OF OBSTRUCTIONS.
CLEAR OBSTRUCTIONS IMMEDIATELY SO THATTHE PISTOL WILL
FUNCTION CORRECTLY AND SAFELY.
PA RTS DIAGRAMS
TA B L E O F C O N T E N T S
32
FOR STORAGE: UNLOAD THE FIREARM AS DESCRIBED ON PAGE 17. THEN AFTER
VERIFYING THAT THE FIREARM IS EMPTY (CHAMBER EMPTY AND MAGAZINE
REMOVED), POINT THE PISTOL IN A SAFE DIRECTIONS AND PULL THE TRIGGER.
STORE THE FIREARM IN THE PROVIDED CONTAINER IN THIS CONDITION ONL Y. C O N G R AT U L AT I O N S
You are now the proud owner of one of the world’s finest and most superbly engi-
neered firearms. The HS 2000 semiautomatic pistol has been designed and crafted
to meet the stringent requirements of law enforcement agencies and the military.
Used with the proper ammunition and given reasonable maintenance, it will serve
you dependably for many years.
To make sure you get the best performance and reliability from your pistol, please
read and follow the procedures outlined in this manual. You’ll notice that we place a
heavy emphasis on safe firearms handling. Like any other mechanical devices, such
as automobiles or power tools, high quality firearms are inherently safe unless they
are handled in a careless or irresponsible manner. Always remember that you, the
owner, are the ultimate safety device.
GENERAL DESCRIPTION
The HS 2000 safety locked action pistol, with its world class design, combines all the
features demanded of the modern handgun of today - and of tomorrow.
• Extremely light weight / high strength design
• Four redundant safeties
• Excellent performance and reliability
• Manufactured using the best technology and materials available in the world
Manufactured by advanced state-of-the-art production processes, the HS 2000 is a
mechanically locked, short recoil operated pistol featuring an automatic firing pin,
block / drop safety, grip safety, trigger safety and out of battery safety. Firing takes
place with each pull of the trigger until the magazine is empty. The slide stays open
after you’ve fired the last shot. The action of the HS 2000 pistol utilizes a tilting bar-
rel design in which the barrel and slide are locked together at the moment of firing.
After firing, the barrel and slide recoil to the rear a short distance while still locked
together. After this initial movement, the barrel tilts downward from its locked posi-
tion, permitting full recoil of the slide and the extraction and ejection of the spent
cartridge case. The user of this or any auto loading pistol must always remember that
when fired, it automatically reloads and recocks itself, so that simply pulling the trig-
ger will fire the pistol again. Therefore, an auto loading pistol user must be particu-
larly, conscious to always keep the pistol pointed in a safe direction. You should
become familiar with your pistol and its operation before using any live ammunition
or actual shooting. Study the instructions carefully and make sure you understand
the pistol’s operating guidelines.
5
A LWAYS INSTRUCT CHILDREN TO RESPECT FIREARMS. IF YOU T E ACH YOUR CHILDREN TO SHOOT, T E AC H
THEM TO USE THE PISTOL PROPERLY, AND A LWAYS SUPERVISE THEM CLOSELY, STRESSING SAFETY.
I N T R O D U C T I O N
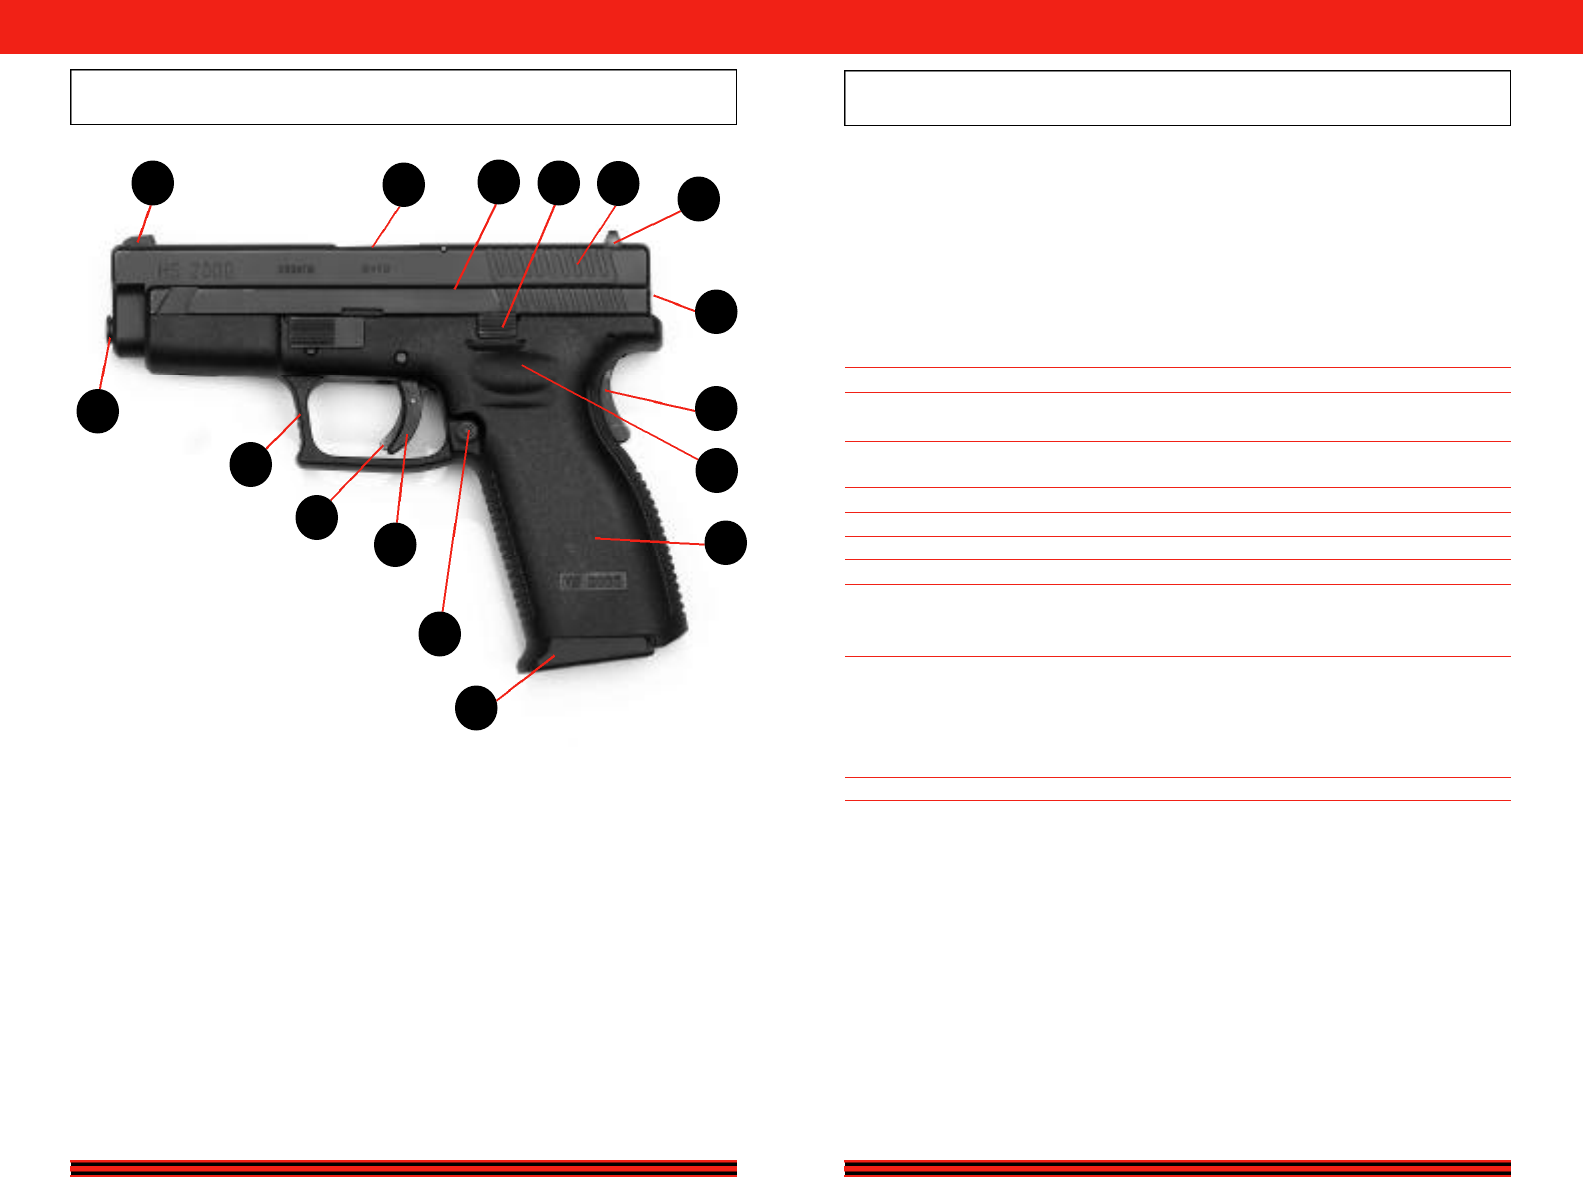
PA RTS DIAGRAM
6
NEVER LEAVE A PISTOL UNAT T E N D E D, SOMEONE,
E S P E C I A L LY A CHILD, MAY FIRE IT BELIEVING IT TO BE A TOY.
1) Night Sights Available
2) Low Profile Dove Tail Sights
3) Captive Recoil Spring
4) Grip Safety
5) Loaded Chamber Indicator
6) Firing Pin Status Indicator
7 ) Trigger Safety
8 ) G r o oved Trigger Guard
9) Ambidextrous Magazine Release
1 0 ) Safety Locked A c t i o n
1 1 ) Thumb Rest
1 2 ) Light Weight Ultra High Impact
Polymer Fra m e
1 3 ) Drop Free Magazine
1 4 ) Firing Pin Block / Drop Safety
1 5 ) Vertically Grooved Ta r g e t
Tr i g g e r
1 6 ) Slide Catch Leve r
2
3
510 16 1
14
6
4
11
12
13
9
15
7
8
SPECIFICATIONS ON THE HS 2000 PISTOL
Mechanically-Locked, Recoil-Operated, Semiautomatic Pistol, Safety
Locked Action with 4 Safeties:
1.Firing-pin block/drop safety
2.Grip Safety
3.Trigger Safety
4.Out of Battery Safety
Caliber 9 X 19 mm Para, 357 sig, 40 cal
Operation Short recoil, locked breach mechanism,
self loading, safety locked action
Frame Improved polymer with oversized
heat treated steel slide rails
Magazine capacity 15 rounds LE / 10 rounds civilian
Weight (empty) 22.88 oz / 650 g
Weight (full 15 rnd mag) 32.03 oz / 910 g
Length (overall) 7.2 in / 180 mm
Sights (Front) blade, dovetail, dot
(Rear) square notch, dovetail, two dot
Drift adjustable and replaceable
Special Features Trigger safety, Grip safety, Loaded chamber
i n d i c a t o r, Firing pin status indicator, Fires under
water up to 3.0 m, Firing pin block (drop) safety,
Ambidextrous magazine release,
Limited lifetime wa r ra n t y
Number of safeties Four (4)
OPTIONAL ACCESSORIES
Sight pusher, ex t ra magazines, cleaning kit, adjustable sights, scope mounts,
night sights, 3-Dot sights, carrying case, holster, flashlight and attac h m e n t .
See HS A m e r i c a , L LC ’s web site at www.hsarms.com for the latest in
a c c e s s o r i e s . Also contact your local HS Dealer to obtain HS approved accessories.
31
WHEN READY FOR FIRING BE SURE THAT THE AREA BEHIND THE SLIDE IS FREE
(WATCH YOUR THUMB) AS SLIDE WILL SHARPLY MOVE BACK UPON FIRING.
S P E C I F I C AT I O N S
N O M E N C L A T U R E
How to Obtain Service (continued from page 29)
If you do not return a warranty card to HS, you are required at the time you
send your firearm to HS America, LLC warranty service to provide proof of the
date that you purchased your new HS America, LLC firearm. As stated earlier, in
the event that this firearm was given as a gift at the time of original purchase,
the warranty card with the name of the donee must be sent back to HS America,
LLC, in order for the warranty to become effective.
What Is Not Covered
This wa r ranty does not cover defects or damage caused by: (1) unreasonable use;
(2) failure to provide proper care or maintenance; (3) failure to comply with
instructions in the owner's manual, including improper installation of original HS
parts by the owner or his agent; (4) normal wear and tear for the degree of use;
(5) rust or corrosion; (6) obstructions in the barrels; or (7) abusive use. HS
America, LLC reserves the right to determine what constitutes the unreasonable
or abusive use of the firearm. All aftermaket parts and all accessories are exclud-
ed from wa r ranty cove rage. This wa r ranty does not cover any claims made by the
second or subsequent owner of an HS America, LLC firearm as stated above .
Any unauthorized alteration or modification of the firearm or use of parts or
components not originally made by HS America, LLC shall void this warranty.
HS America, LLC shall not be responsible for any claims involving this firearm
that result from the use of faulty, non-standard, remanufactured, or reloaded
ammunition or ammunition not manufactured to NATO and/or SAAMI specifi-
cations. Under no circumstances shall HS America, LLC be responsible or liable
for incidental or consequential damages with respect to loss of use, loss of busi-
ness or profits, other economic loss or injury to property, whether as a result of
breach of express or implied warranty, negligence or otherwise. This Lifetime
Warranty applies only to retail purchases by individuals. HS America, LLC
firearms purchased by law enforcement, military, and security organizations for
duty issue to their personnel are covered by a limited two-year warranty.
Some states do not allow the exclusion or limitation of incidental or consequen-
tial damages, so the above limitation or exclusion may not apply to you. This
warranty gives you specific legal rights, and you may also have other rights,
which vary from state to state. This limited warranty is the only express warranty
by HS America, LLC. HS America, LLC authorizes no dealer or any other person
to vary the terms of this warranty or make any other express warranties.
Where to Get Further Help? If you have questions concerning this warranty,
please contact HS's Customer Service Department at the following address: HS
America, LLC, Customer Service, 5005 Chapman Hwy, Knoxville TN 37920
USA. Telephone: 865-573-0065
30
NEVER PLACE FINGERS IN EJECTION POR T, THEY COULD BE INJURED
BY THE SLIDE MOVING FORWARD UNINTENTIONALLY.
7
ALWAYS HANDLE YOUR PISTOL AS IF IT WERE LOADED
SO THAT YOU NEVER FIRE IT ACCIDENTALLY.
A S S E M B L Y G R O U P S
17) Heat Treated, Fully
Machined, Bruniral
Coated, Milled Slide
18) Cold Hammer Forged
Steel Barrel
19) Captive Dual Tension
Recoil Spring with
Stand-Off Device
20) Light Weight, Ultra
High-Impact Polymer
Frame
21) Over Sized Heat-
Treated Steel Slide
Rails
22) Grooved Slide Take
Down Lever
23) Chrome Plated Drop
Free 10 Round
Magazine
High Capacity Law
Enforcement
Magazines Available 23
20
22 21
19
18
17
WA R R A N T Y S TAT E M E N T

BASIC SAFETY RULES OF FIREARMS USE AND HANDLING
•KNOW YOUR FIREARM •
1. YOU MUST UNDERSTAND HOW TO PROPERLY HANDLE YOUR FIREARM AS
WELL AS UNDERSTAND ALL MECHANICAL CHARACTERISTICS OF IT.You
should be completely familiar with and understand your firearm
with regard to proper loading, handling and carrying procedures in
order to avoid accidental discharge of your firearm. You should
always consider your firearm and/or any firearm, to be loaded.
2. NEVER KEEP YOUR FIREARM LOADED WHEN NOT IN USE OR WHEN STORED.
Your firearm should be stored UNLOADED and separate from any
ammunition. Guns and ammunition should always be stored sepa-
rately in locked containers to prevent access and use by unautho-
rized adults and CHILDREN .
3. THE MUZZLE OF YOUR FIREARM SHOULD ALWAYS BE KEPT POINTED IN A SAFE
DIRECTION.Never point your firearm at yourself or another person
or at any object or hard surface which could possibly cause a rico-
chet. This includes discharging your firearm at water or any other
flat surface.
4.YOU SHOULD ALWAYS KNOW YOUR TARGET AND WHAT IS BEYOND YOUR
TARGET.If shooting at a target range, be sure that the backstop is
adequate to safely stop your bullets.
5. NEVER PUT YOUR FINGER ON THE TRIGGER OF YOUR FIREARM UNTIL YOU
ARE ABSOLUTELY READY TO DISCHARGE YOUR FIREARM.
8
HS America, LLC
Warranty Registration
5005 Chapman Hwy
Knoxville TN 37920
From HS America, LLC To You
All HS America, LLC firearms are only wa r r anted to the original retail purchaser
only for the lifetime of the said original retail purchaser. In the event that this
original retail purchaser, at the time of the original purchase, shall donate this
firearm to another person, the donee must be listed on the warranty card, and
the warranty card must be returned at that time to HS America, LLC Upon
receipt of the warranty card indicating the name of the said donee, this warranty
shall be extended to the lifetime of the said donee. This warranty applies only if
the firearm was purchased from an Authorized HS Dealer in the United States,
and if it was imported into the United States and distributed by HS America,
LLC to an Authorized HS Dealer and/or through HS America, LLC Authorized
Distributor. This lifetime warranty explicitly excludes sales to government institu-
tions or law enforcement agencies.
What Will We Do
HS America, LLC will, at its option, repair or replace without charge any HS
America, LLC firearm that fails due to a defect in materials or workmanship.
Parts and labor are included. Repairs are warranted for the duration of the war-
ranty. If HS America, LLC replaces a firearm under this warranty, you will
receive a new warranty. HS America, LLC will return your firearm or its replace-
ment to you, normal surface freight prepaid.
How to Obtain Service
You must send your firearm freight prepaid to HS America, LLC at the address
listed above (only FFL dealers may ship firearms through the U.S Mail). No
C.O.D. shipments will be accepted. Only the existing HS Service Center at our
Tennessee facility, and any other authorized HS America, LLC Service Center
that may be established by HS America, LLC, shall be authorized to make war-
ranty repairs. Return the complete, unloaded firearm and any magazines with a
detailed description of the problem. (DO NOT send any live ammunition with
the firearm. If you must send ammunition to us for proof purposes, be sure that
it is sent separately from the firearm.) You must provide HS America, LLC with
satisfactory proof of date of original purchase. We strongly recommend that you
return a properly completed warranty registration card to establish eligibility for
warranty service.
(continued on page 30) 29
NEVER WALK, CLIMB, FOLLOW A COMPANION OR HUNT WITH YOUR PISTOL
READY TO FIRE (IN B ATTERY), OUT OF ITS HOLSTER.
WA R R A N T Y S TAT E M E N T
1 0 R U L E S O F F I R E A R M S A F E T Y

S I G H T A D J U S T M E N T S
The HS 2000 Pistols are equipped with a rear sight wh i ch is adjustable for
windage only. The rear sight can be drifted laterally in its dovetail on the top of
the slide by tapping it with a wooden or nylon drift or similar implement. Move
the rear sight in the direction you want the shot to move on the target. The front
sight is fixed. Both front and rear sights are provided with white-dot inserts for
rapid target acquisition and easy alignment of the sights to obtain a correct sight
picture.
S I G H T S
The HS 2000 pistol is equipped with drift adjustable fixed sights wh i ch
h a ve proven their worth under severe conditions. The sights consist of a rear
sight and a front sight blade, designed and dimensioned to ensure rapid target
acquisition and correct sight picture even when visibility is poor. You can adjust
the sights as follow s :
Windage: Change windage by moving the rear sight either to the left or right in
its dovetail. When you do this, follow the rear sight rule: Move the rear
sight in the direction you want the group to go. Moving the rear sight 0.020”in
the dovetail changes the point of impact by approximately 3” at 25 yards. ( N o t e :
H S America has available a Combination Sight Pusher tool which makes it easier
to adjust and change sights.)
E l e va t i o n : There are different heights available for the rear sight. The sights are
numbered according to their height. You can change elevation by changing the
rear sight. Each rear sight change will move the impact of the bullet approxi-
mately 2” at 25 yards.
Re m e m b e r, a higher rear sight will raise the impact of the bullet; a lower re a r
sight will lower the impact of the bullet.
28
NEVER DRINK ALCOHOLIC BEVERAGES OR TAKE DRUGS BEFORE OR DURING
SHOOTING YOUR VISION ON JUDGEMENT COULD BE SERIOUSLY IMPAIRED
MAKING YOUR GUN HANDLING UNSAFE
SIGHT OPTIONS
FRONT SIGHT REAR SIGHT
Number Height Number Height
no mark 5.60mm G 5.80 mm
no mark 6.30 mm
D 6.80 mm
6. YOU SHOULD ALWAYS BE SURE THAT THE BARREL OF YOUR FIREARM IS COM-
PLETELY CLEAR OF ANY OBSTRUCTIONS BEFORE DISCHARGING YOUR FIREARM.
If your firearm seems to operate or function in any abnormal man-
ner CEASE FIRING, unload and inspect your firearm for obstruc-
tions or mechanical problems. NEVER try to clear a barrel
obstruction by discharging your firearm.
7. ALWAYS USE PROPER CALIBER,HIGH QUALITY NEW PRODUCTION AMMUNI-
TION IN YOUR FIREARM.NEVER use “reloaded” or “re-manufactured”
ammunition. The use of improper ammunition is dangerous and
will void the warranty of your HS pistol.
8. EYE PROTECTION AND EAR PROTECTION SHOULD ALWAYS BE WORN BY YOU
AND ANYONE NEAR YOU WHEN DISCHARGING ANY FIREARM.
9. NEVER USE OR HANDLE A FIREARM WHEN UNDER THE INFLUENCE OF ALCO-
HOL OR DRUGS.This includes any over the counter or prescribed
drugs that might affect your coordination or judgment. Use of a
firearm under the influence of alcohol or drugs is extremely dan-
gerous and constitutes a serious criminal offense.
10. NEVER TRANSPORT A LOADED FIREARM.A suitable carrying case or
scabbard should always be used when transporting your unloaded
weapon to or from your shooting range or area.
9
1 0 R U L E S O F F I R E A R M S A F E T Y
S I G H T S

SAFETY DEVICES
The HS 2000 has no traditionally and externally located manual safety leve r.
Therefore make sure that the trigger is only touched if you intend to fire.
1. GRIP SAFETY, It is located on the upper rear portion of the pistol’s grip.
Properly gripping the HS 2000 in your shooting hand will automatically
press the grip safety. Once the grip safety is depressed, the sear can dis-
engage from the firing pin if the trigger and trigger safety are pulled.
Note: While the grip safety is engaged, the entire action of the pistol is
locked.
2. TRIGGER SAFETY, It is incorporated into the trigger in the form of a lever,
and in the untouched state locks the trigger from moving backward. The
trigger can only be pulled if depressed together with the trigger safety.The
safety locked action pistol is, therefore, ready for firing at any time once
the grip safety is disengaged and the trigger with trigger safety is pulled.
3. FIRING PIN BLOCK/DROP SAFETY ,A spring loaded pin projects into
the firing pin cut-out, and blocks the movement of the firing pin. This
safety is only released when the grip safety is disengaged, the trigger safe-
ty is disengaged, and the trigger is pulled back.
4. OUT OF BATTERY SAFETY,A cut out in the slide will only allow the trig-
ger bar to disengage the sear from the firing pin only if the side is fully
forward and in battery.
THE SAFETY DEVICES 1, 2, and 3 above are designed to
prevent the weapon from unintentional discharge.
SAFETY DEVICE 4 is designed to protect the shooter
from firing the pistol in an unsafe condition.
10
BECOME FAMILIAR WITH YOUR PISTOL, UNDERSTAND
THE INSTRUCTIONS FULLY BEFORE USING IT.
What you should know about all safety mechanisms:
NEVER completely trust any safety mechanism. Your pistol is
equipped with an effecti ve, well designed safety mechanism.
NO SAFETY MECHANISM, HOWEVER, IS A SUBSTITUTE FOR PROPER
GUN HANDLING. Any safety mechanism can break down or malfunction.
YOU, AND YOU ALONE, ARE THE ULTIMATE SAFETY MECHANISM.
Remember, there is no such thing as a “childproof” safety or one whic h
can completely prevent accidental discharge from careless or irresponsible
use. The best safety is proper and applied training in safe gun handling.
Firearms work reliably if properly maintained. If there is a malfunction
during firing, here’s what to do:
1. Keep the pistol pointed in a safe direction with your finger off the trigger.
2. Remove and secure the magazine.
3. Move the slide rearward and forward to clear any cartridge that may be in
the chamber.
4. If you suspect that a bullet is lodged in the bore, field strip (page 18) your pistol
and check to see if the barrel is blocked. If there is a bullet lodged in the bore,
return the pistol to HS America. See instructions on page 30.
Follow the above procedures if:
• You notice that a cartridge is difficult to chamber, or
•A cartridge does not fire, or
• The mechanism fails to extract a fired cartridge case, or
• You discover unburned grains of propellant powder spilled in the mechanism, or
•A shot sounds or feels weak or abnormal.
27
IF A BULLET IS LODGED IN THE BORE, DO NOT ATTEMPT TO SHOOT IT OUT BY USING
A N O THER CA R TRIDGE, OR BY BLOWING IT OUT WITH A BLANK OR A CA R TRIDGE FROM
WHICH THE BULLET HAS BEEN REMOV E D . THIS CAN GENERATE EXCESSIVE PRESSURE,
DA M AGE THE FIREARM AND CAUSE SERIOUS PERSONAL INJURY.
T R O U B L E S H O O T I N G
TROUBLESHOOTING GUIDE
Malfunction Cause Correction
Failure to feed:
No round fed into the
chamber
Magazine not properly
inserted or magazine is
deformed or dirty
Insert magazine properly
or change magazine
Slide does not close
easily or completely Pistol or cartridge is
fouled (dirty) or pistol is
too heavily lubricated
Clean and lubricate
pistol and/or replace
the ammunition
Pistol requires service Return to HS America, LLC
E x t ra c t i o n / E j e c t i o n :
After firing, the case stays in
the chamber or is jammed
in the ejection port
Insufficient recoil due to
dirt
Light hold or limp wrist
Clean and lubricate the
pistol
Solid firm grip
L ow powered ammunition Change ammunition
Pistol requires service Return to HS America, LLC
Ignition:
Firing pin drops but
round does not fire
Firing pin obstructed
Check ammunition Inspect, clean and lubri-
cate the pistol
Faulty ammunition Manually cycle in next round
Pistol requires service Return to HS America, LLC
O P E R A T I O N O F S A F E T Y D E V I C E S
NEVER TAKE ANYONE’S WORD THAT A GUN IS UNLOADED: CHECK FOR YOURSELF,
WITH FINGERS OFF THE TRIGGER, AND GUN POINTED IN A SAFE DIRECTION.
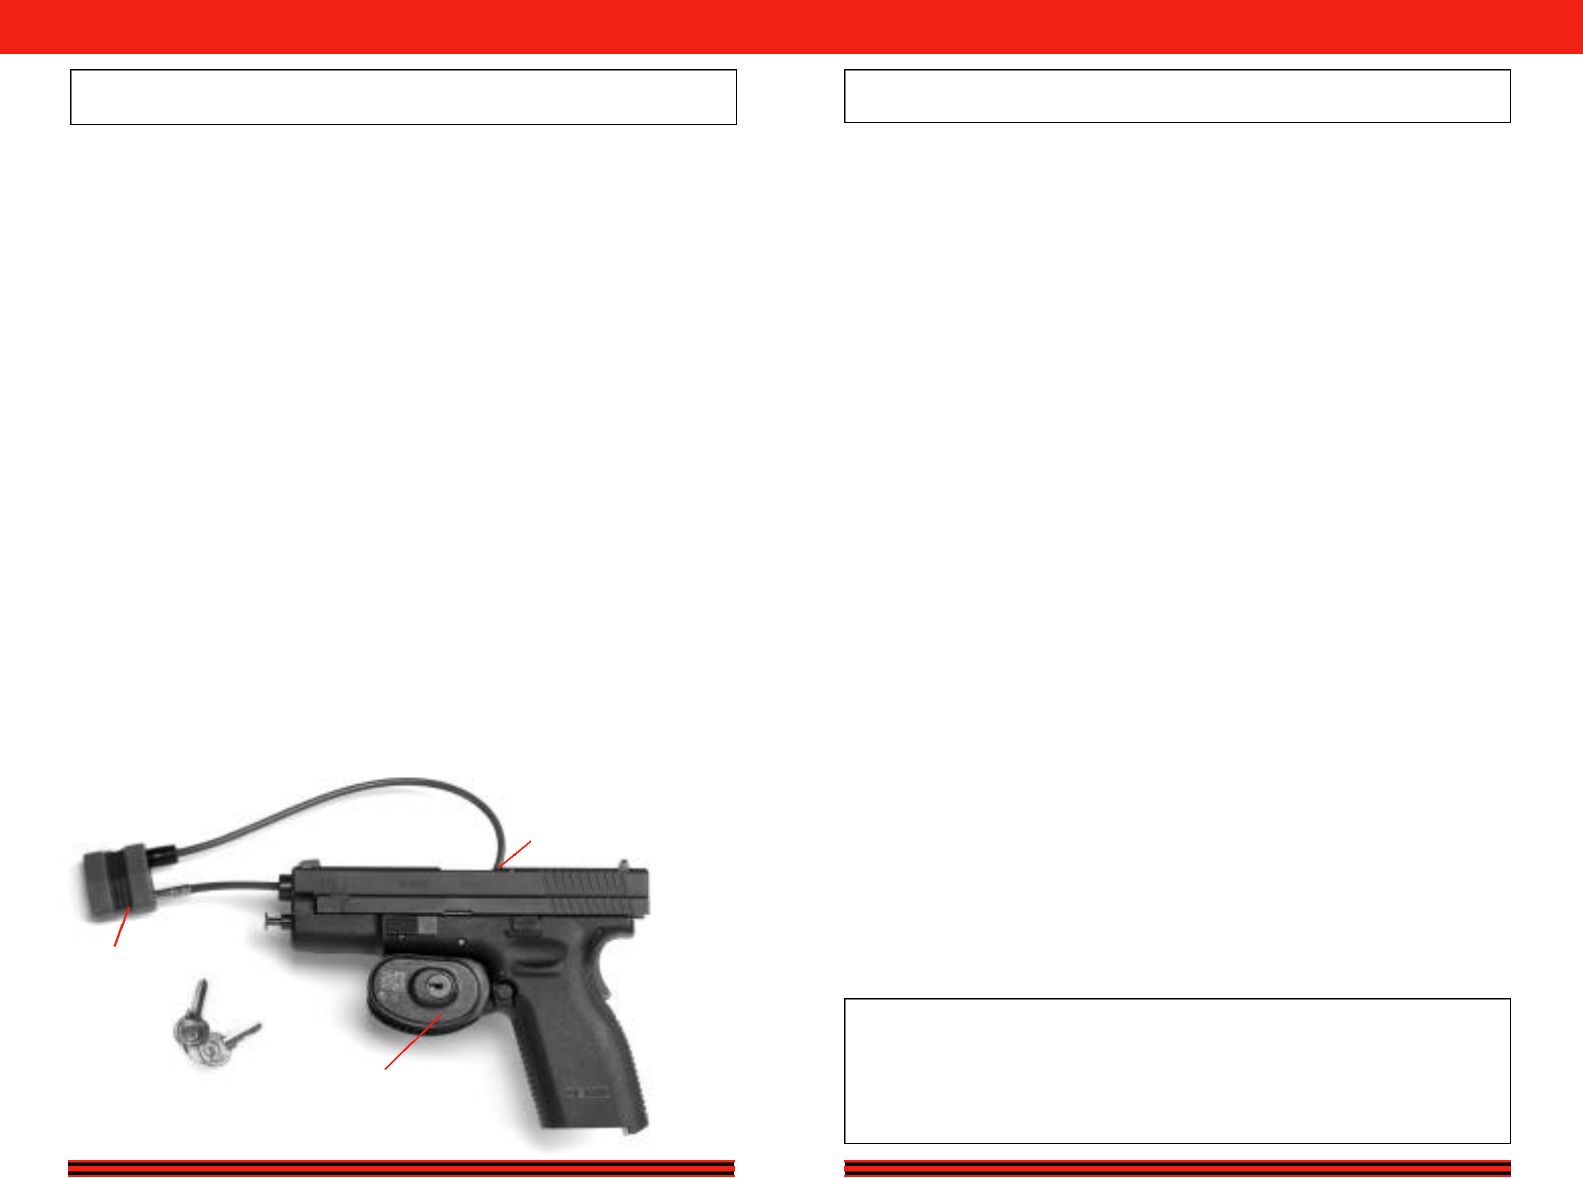
TRANSPORTATION AND STORAGE
When transporting your pistol, keep it unloaded for your safety and
for the safety of others. Know and comply with all laws governing
the transportation of firearms in your locality. When storing your pis-
tol, keep it separated from ammunition, under lock and key and out
of the reach of children and other inexperienced or unauthorized
persons. Never place or store any firearm in such a manner that it
may be dislodged or dropped. Firearms should always be stored
securely and unloaded, away from children and unauthorized per-
sons.
STORE SECURELY & UNLOADED
Before firing, remove all oil and grease from the bore. Do not keep
the pistol stored in a leather holster or case. leather attracts moisture,
even though the holster or case may appear to be perfectly dry.
PROPER PLACEMENT OF COMMON TYPES OF GUN LOCKS
TRIGGER
LOCK
CABLE
LOCK
CABLE SHOULD NOT
REST AGAINST LOADED
CHAMBER INDICATOR
26
Your HS 2000 pistol will function effectively and safely with a wide variety of
c o m m e rcial and military-standard ammunition. Here are some suggestions
that will help you keep your pistol free from ammunition-related problems:
1. Use only ammunition of the caliber for wh i ch your pistol is ch a m b e r e d .
The correct caliber is permanently engraved on your pistol.
2. Use only clean, dry, undamaged new factory-manufactured ammunition.
A l ways use ammunition that complies with the performance standards estab-
lished by the Sporting Arms and Ammunition Manufacturers’ Institute, Inc. of
the United States (SAAMI).
3. A l ways inspect your ammunition before use to be certain all cartridges
are the correct caliber. READ ANY WARNINGS OR INSTRUCTIONS T H A T
COME WITH YOUR A M M U N I T I O N .
4. Keep your cartridges free of oil. Wipe the chamber clean of any oil or
p r e s e r va t ive before you shoot. Oil in the chamber creates dangerous stresses.
5. Should your pistol experience a failure to fire, follow this procedure:
A lways hold the pistol keeping it pointed tow a rds the target and wait 30
seconds when pistol fails to fire. If a hangfire (slow ignition) has occurred,
the round will fire within 30 seconds. If the round does not fire, remove the
magazine, eject the round and examine the primer. If the firing pin indent on
primer is light, off center, or non-existent, have your pistol examined by a
competent gunsmith. If the firing pin indent on primer appears normal (in
comparison with similar previously fired round(s) you may assume you have
a faulty round of ammunition, segregate misfired round(s) from other live
ammunition and empty cases, reload and continue firing.
N OT E : Dispose of misfired rounds in accordance with ammunition
m a n u f a c t u re r’s instructions.
11
USING THE WRONG AMMUNITION COULD RESULT IN SERIOUS INJURY OR DEATH.
CATASTROPHIC DAMAGE COULD OCCUR.
A P P R O V E D A M M U N I T I O N
WA R N I N G :
“DISCHARGING FIREARMS IN POORLY V E N T I L ATED AREAS, CLEANING FIREARMS, OR
HANDLING AMMUNITION MAY RESULT IN EXPOSURE TO LEAD AND OTHER SUBSTA N C E S
K N O WN TO CAUSE BIRTH DEFECTS, REPRODUCTIVE HARM, AND OTHER SERIOUS PHYSI-
CAL INJURY. HAVE A D E QUATE V E N T I L ATION AT ALL TIMES. WASH HANDS T H O R O U G H LY
AFTER EXPOSURE.”
T R A N S P O RTATION AND STORAGE
12
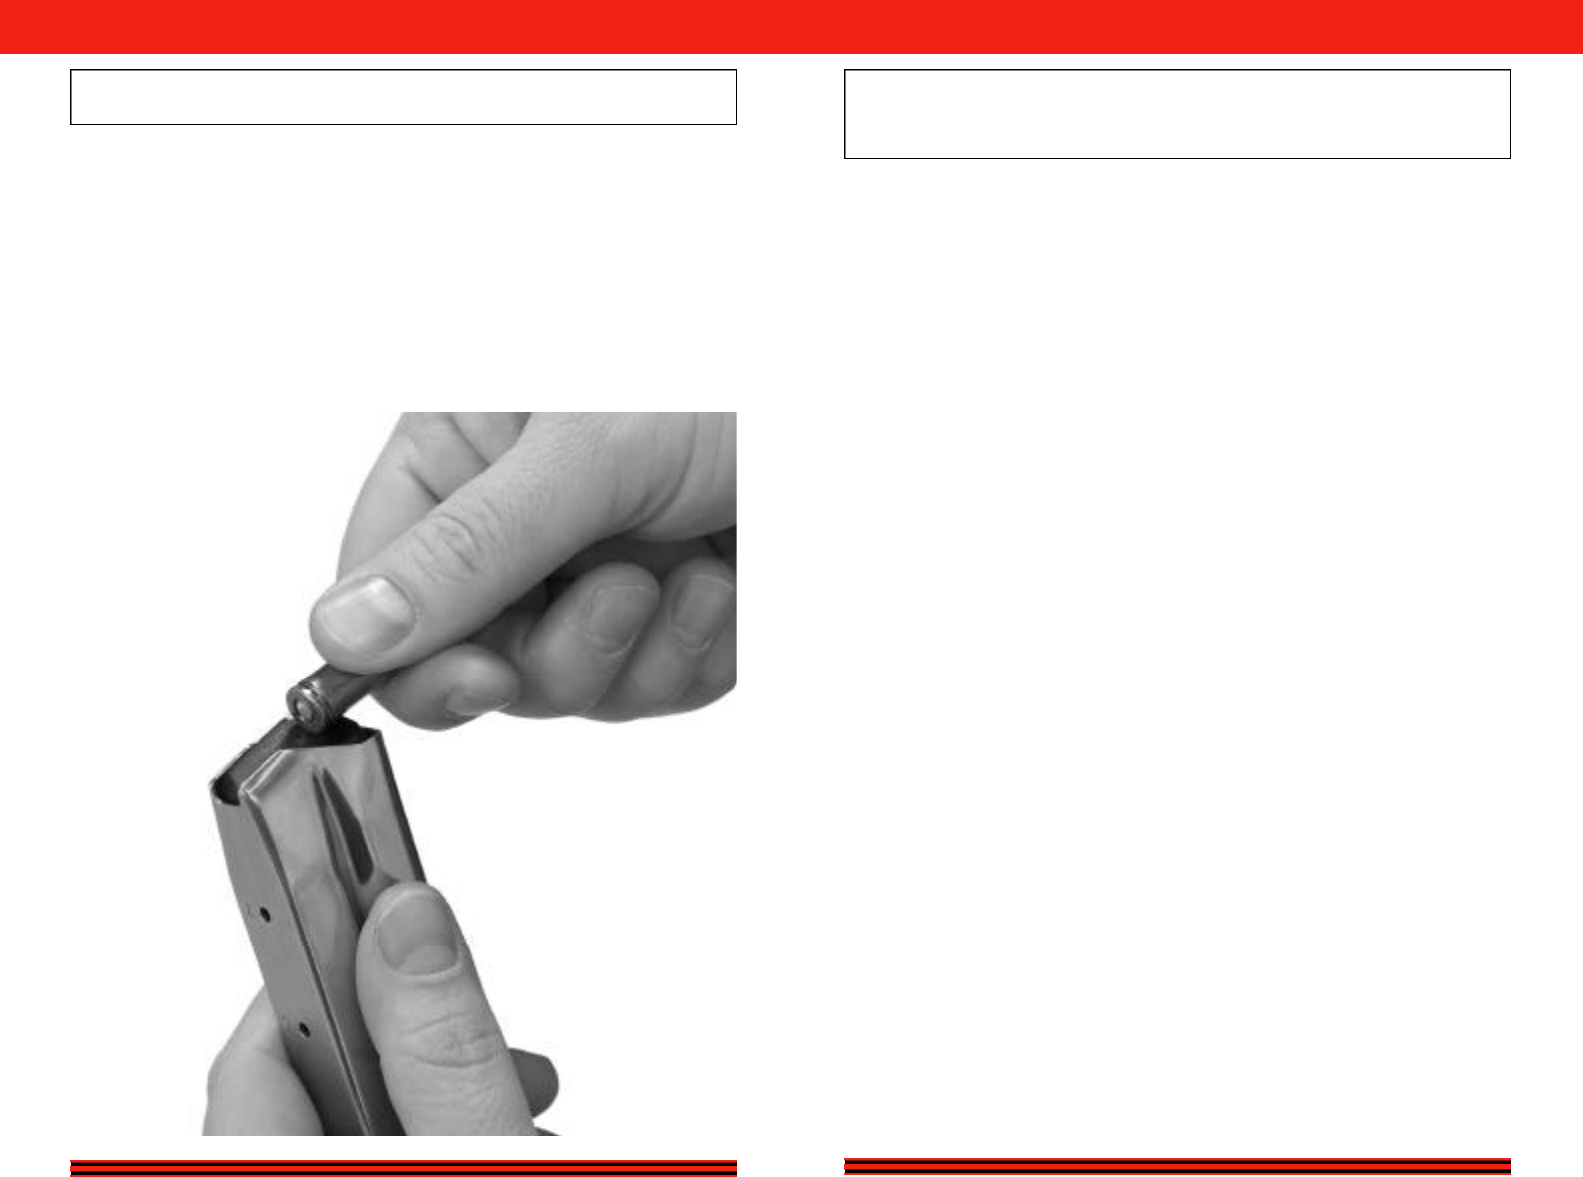
NEVER POINT YOUR PISTOL AT ANYTHING YOU DO NOT INTEND TO SHOOT.
LOADING THE MAGAZINE
1 .Press down on the magazine follower with the cartridge case rim.
2 .Push the cartridge to the rear and under the magazine lips.
3 .Continue until the magazine holds the desired number of cartridges.
4 .Number of inserted rounds can be ch e c ked through the indicator
holes on the back of the magazine.
25
A LWAYS WEAR EAR PROTECTION WHEN SHOOTING, ESPECIALLY ON A RANGE.
WITHOUT EAR PROTECTION THE NOISE FROM YOUR PISTOL AND OTHER GUNS CLOSE
TO YOU COULD LEAVE A “RINGING” IN YOUR EARS FOR SOME TIME AFTER FIRING A N D
COULD LEAD TO A CUMULATIVE AND LONG TERM PERMANENT HEARING LOSS.
I N S P E C T I O N S / R E A S S E M B LY
SAFETY CAU T I O N : If the trigger safety fails to keep the trigger from mov i n g
re a rwa r d , and the pistol dry fire s , D O N OT LOAD OR F I R E YO U R HS 2000 P I S-
TO L . I n s t e a d , h ave the pistol inspected and re p a i red by HS A m e r i ca , L LC or a
H S - c e rtified A r m o re r.
1 1 .GRIP SAFETY CHECK. Be sure that the pistol is unloaded, and cycle the slide
to reset the safety locked action. With the pistol pointed in a safe direction,
g r asp the pistol with out depressing the grip safety. Pull the trigger and trigger
safety to the rear. The pistol should not dry fire.
S A F E T Y CAU T I O N : If the grip safety fails to keep the pistol from dry firi n g ,
do not load or fire your HS 2000 pistol. I n s t e a d , h ave the pistol inspected and
re p a i red by HS A m e r i ca , L LC or a HS-Ce r tified A r m o re r.
12.TRIGGER RESET T E S T.Being sure that the pistol is U N L OA D E D and pointed
in a safe directions, pull the trigger and hold the trigger to the rear. Yo u
should hear and feel the firing pin fall. Pull the slide to the rear and release it,
a l l owing it to snap forward. Now release the trigger. The trigger should reset
to its forward position. Repeat seve ral times.
1 3 . M AG A Z I N E INSPECTION. Inspect all magazines for dirt or visible damage,
taking special care to look for spread or damaged feed lips or broken maga-
zine followers. Press down on the follower with your fingertips and release.
The follower should spring fully upward, and should not stick inside the mag-
azine tube.
1 4 .SLIDE LOCK-OPEN T E S T. Insert an E M P T Y magazine into your pistol. Pull the
slide fully to the rear. The slide should lock open. Repeat using each of yo u r
E M P T Y m a g a z i n e s .
INSPECTION BY CERTIFIED HS A R M O R E R
HS pistols carried by law enforcement, security, or military personnel, and other
HS pistols subjected to heavy usage, should be inspected periodically by a HS-
certified A r m o r e r, or by returning the pistols to HS America, LLC. for inspection.
Although the appropriate inspection intervals will depend on the conditions of
use, a reasonable rule of thumb for law enforcement, security, and military users
is that the pistols should be inspected by a HS-certified Armorer at annual inter-
va l s .
To locate a HS-certified Armorer in your area, contact your local HS dealer or HS
America, LLC.
R E A S S E M B LY
Reassembling the HS pistol is carried out by reversing the disassembly procedure.
LOADING MAGAZINES
24
ALWAYS CARRY YOUR PISTOL EMPTY AND OPEN WHILE ON THE RANGE UNTIL
PREPARING TO FIRE. KEEP IT POINTING TOWARD THE BACKSTOP DURING LOADING,
FIRING AND UNLOADING OF THE PISTOL.
(continued from page 23):
4 . F I R I N G P I N S A F E T Y C H E C K . G rasp the slide (with barrel and recoil spring
assembly removed). Pull rearward on the lug of the firing pin, Pulling the
firing pin all the way to the rear of the slide, ch e ck that the firing pin status
indicator ( 6 ) protrudes from the back of the slide, and then ease the firing
pin forward until it stops in contact with the firing pin safety. (Note: D O
N OT a l l ow the firing pin to snap forward against the firing pin safety, as
damage to the firing pin or firing pin safety could result.) Then press the
firing pin forward with your forefinger using moderate force (approximate-
ly 5-8 pounds). The firing pin should not slip forward past the firing pin
s a f e t y, and should not protrude from the breech face of the slide.
5 . F I R I N G P I N.Depress in on the firing pin/drop safety with your fingertips.
Then push the firing pin forward with your forefinger using moderate forc e
(approximately 5-8 pounds). The tip of the firing pin should protrude from
the breech face. Examine the tip of the firing pin for damage.
6 . L OADED CHAMBER INDICATO R . Look across the breech face to inspect
the loaded chamber indicator. Check for cleanliness, spring tension and
damage. The loaded chamber indicator should move up easily with slight
pressure from your finger.
7 . E X T R AC T OR. Look across the breech face to inspect the extractor for
cleanliness and to be sure the extractor claw is not broken.
8 . E J E C TOR. The ejector in the rear of the pistol should appear intact (not
b r o k e n ) .
9 . S L I D E S TO P LEVER T E S T. Pull upward on the slide stop lever and release.
The lever should snap down sharply into the frame. If the lever is sluggish
or remains in the upward position, refer the pistol to HS America, LLC or a
HS-certified A r m o r e r.
10. REASSEMBLY A N D T R I G G E R S A F E T Y CHECK. Reassemble the pistol. B E
S U R E T H ATT H E P I S TO L I S U N L OA D E D, and cycle the slide to reset the
safety locked action. Depress the grip safety. With the pistol pointed in a
safe direction, grasp the sides of the trigger (without touching or depress-
ing the trigger safety) and attempt to pull the trigger to the rear. The trigger
safety should prevent rearward movement of the trigger, and the pistol
should not dry fire.
13
NEVER SQUEEZE THE TRIGGER OR PUT YOUR FINGER IN THE TRIGGER GUARD
UNTIL YOU ARE AIMING AT THE TARGET YOU INTEND TO SHOOT
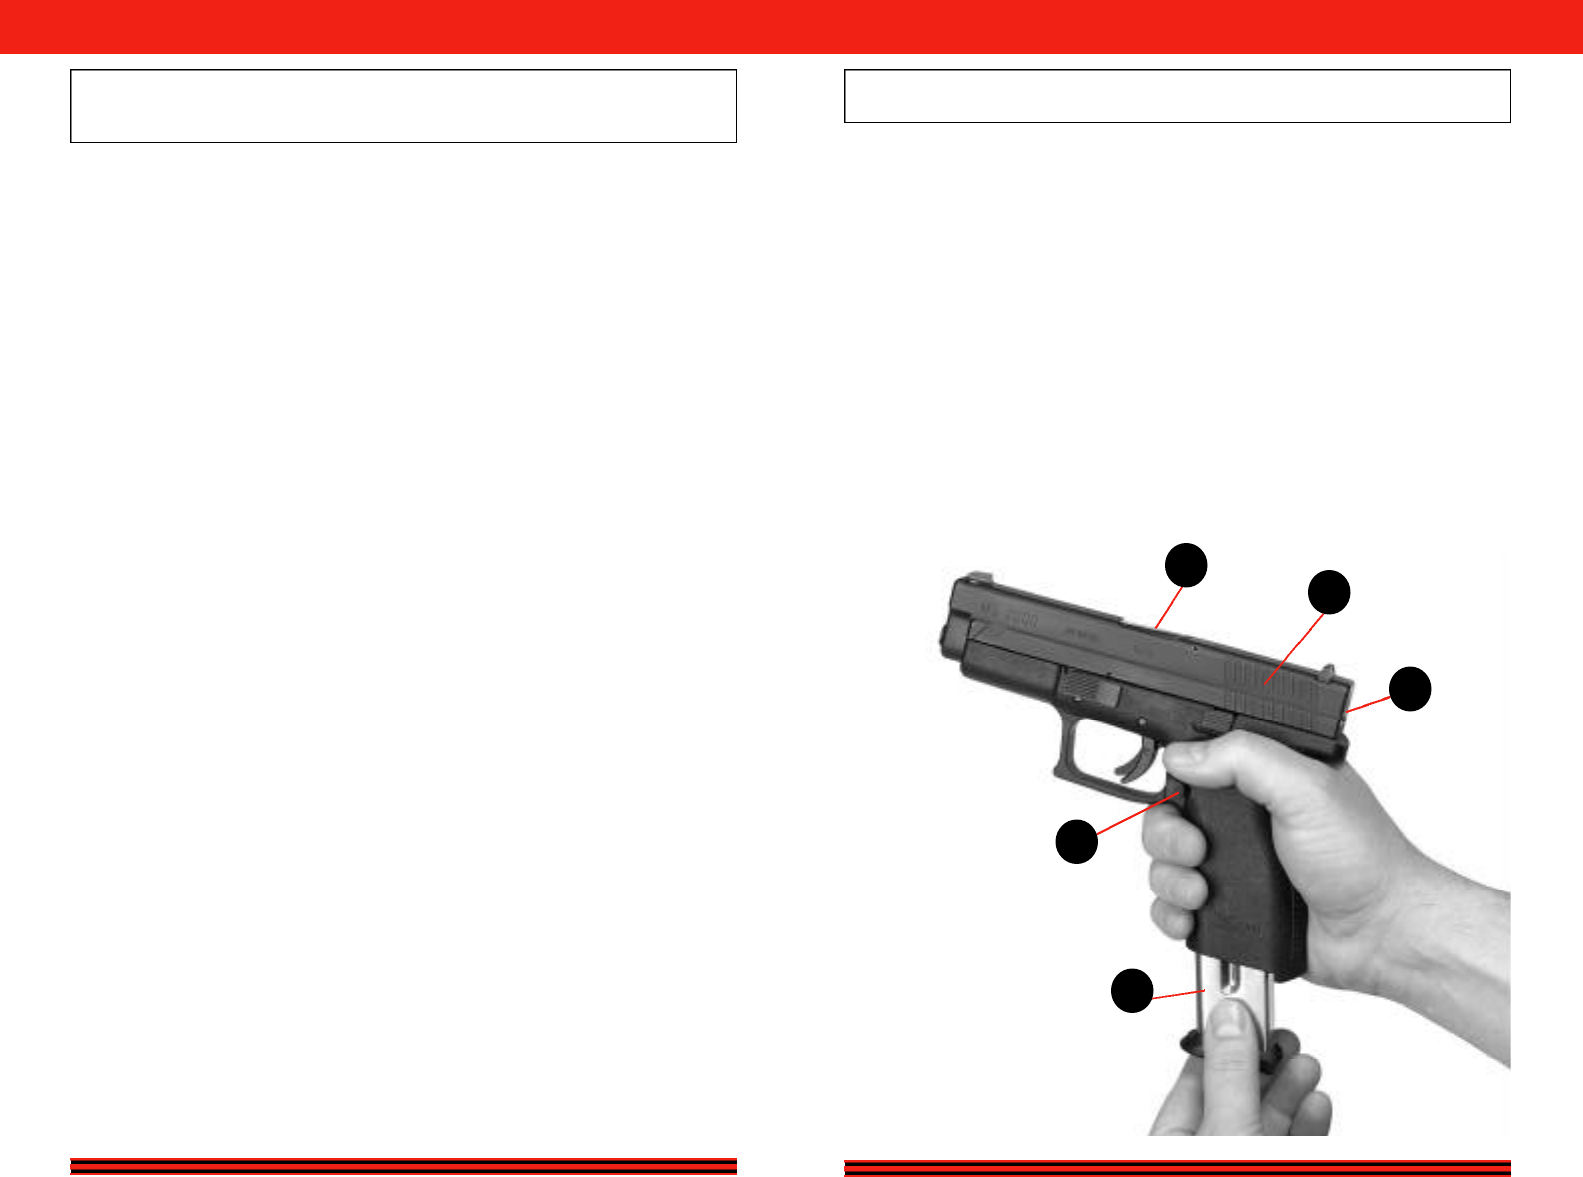
L O A D I N G T H E P I S T O L
LOADING THE PISTOL
1 .Point the pistol in a safe direction.
2 .Insert loaded magazine ( 2 3 ) and ch e ck that the magazine catch ( 9 )
e n g a g e s .
3 .With your finger outside the trigger guard, and pointing the pistol in a
safe direction, draw the slide ( 1 7 ) b a ck to the rear stop and allow it to
fly forward. The pistol is now re a dy to fire .
4 .The loaded chamber indicator ( 5 ) will be in the up position.
5 .The firing pin status ( 6 ) indicator will be in the “out” position.
517
6
9
23
I N S P E C T I O N S
INSPECTION OF YOUR PISTOL
Performed at regular intervals, a limited (user- l e vel) inspection of yo u r
HS 2000 pistol can help to confirm that it is functioning properly.
Failure of any of the following ch e cks, wh i ch cannot be remedied by
cleaning, should be referred to HS America, LLC, your local HS deal-
e r, or a HS-certified A r m o r e r. To inspect your HS 2000 pistol, follow
these steps:
SAFETY CAU T I O N :
ALL OF THE FOLLOWING CHECKS AND INSPECTIONS ARE
PERFORMED WITH AN UNLOADED PISTO L :
1 .U N L OA D.Be certain that your HS 2000 pistol is UNLOADED by
f o l l owing the steps of the unloading procedure (on page 17).
2 .E X T E R NAL INSPECTION. Inspect the outside of your pistol for dirt,
corrosion, or any visible damage. Pay special attention to the sights,
t r i g g e r, trigger safety, grip safety, slide stop leve r, magazine catch ,
and loaded chamber indicator.
3 .F I E L D S T R I P A N D BA R R E L I N S P E C T I O N . Field strip the pistol,
r e m o ving and inspecting the barrel for dirt, leading, bulges, cra ck s ,
or obstructions.
S A F E T Y CAU T I O N :
A cra cked, bulged, or obstructed barrel should not be used, but
should be re f e r red to HS America, LLC or HS-certified A r m o rer for
repair or re p l a c e m e n t .
23
ALWAYS WEAR PROTECTIVE SHOOTING GLASSES FOR EYE PROTECTION.
DO NOT FIRE THE PISTOL NEAR YOUR EYES AS THE SLIDE
WILL SHARPLY MOVE BACK UPON FIRING.
I N S P E C T I O N
WARNING DO NOT ATTEMPT TO DISASSEMBLE YOUR
PISTOL BEYOND THE POINT EXPLAINED IN THIS MANUAL
THIS SHOULD BE DONE ONLY BY A QUALIFIED GUNSMITH
OR A CERTIFIED HS ARMORER.
14
NEVER SHOOT AT A HARD SURFACE, SUCH AS A ROCK, OR A LIQUID SURFACE,
SUCH AS WATER. A BULLET MAY RICOCHET AND TRAVEL IN ANY DIRECTION
TO STRIKE YOU, OR AN OBJECT YOU CANNOT SEE.
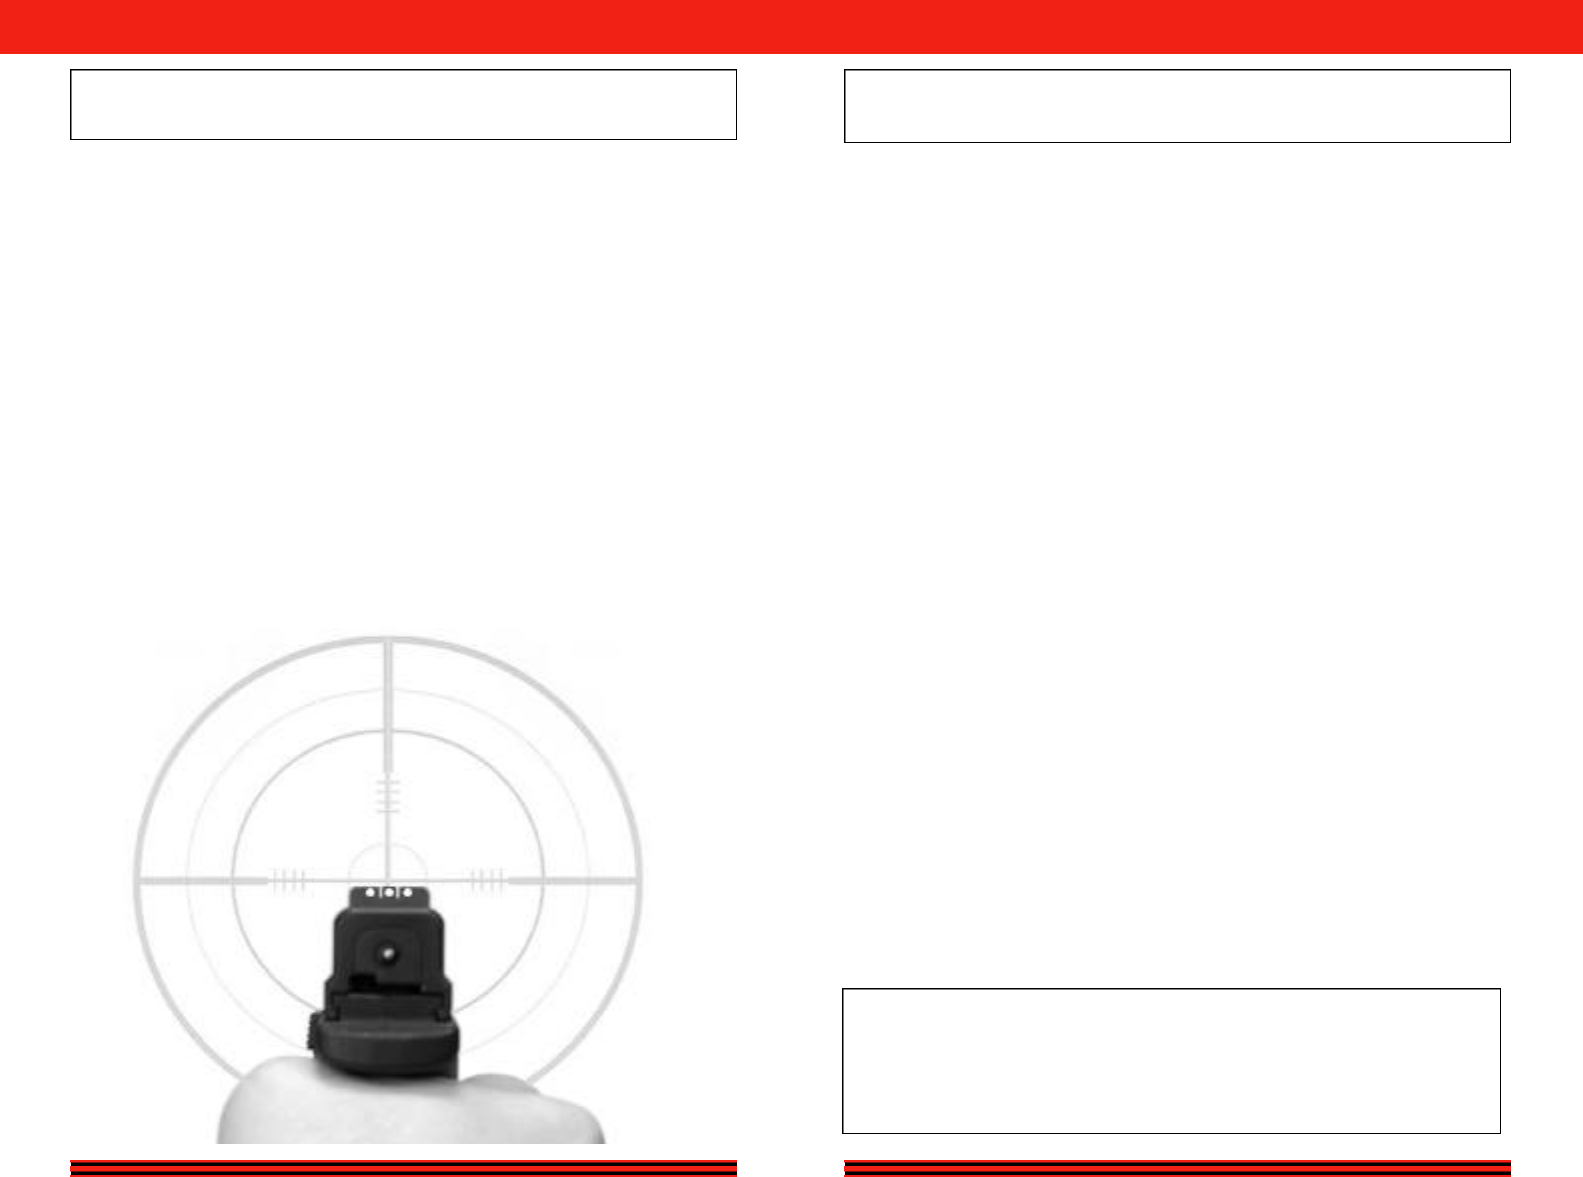
S I G H T P I C T U R E / F I R I N G T H E P I S T O L
SHOOTING THE PISTOL
1 .Ensure that the shooter and bystanders are wearing proper ear and
e ye protection.
2 .Aim the pistol at a safe target.
3 .Place finger on trigger ( 1 5 ) and pull back trigger ( 1 5 ) to disch a r g e
the round.
4 .Keep the pistol aimed at the target and fire further rounds as desired.
5 .While pointed in a safe direction, remove the magazine and unload
the pistol. If the pistol has been fired until the magazine is empty,
the slide ( 1 7 ) will be caught in the open position. If firing is to con-
tinue, reload the pistol (page 16).
PROPER
SIGHT ALIGNMENT
BARREL AND CHAMBER
Clean the barrel and the chamber from the rear with a quality clean-
ing solvent, using a cleaning rod and brush of the correct caliber.
Never clean the barrel from the muzzle end. Wipe the interior and
exterior of the barrel free of all residue. Lightly lubricate the barrel,
inside and out, with a quality lubricant designed for firearms.
BREECH FACE AND LOCKING INSERT
Use a small nylon bristle brush to thoroughly clean the breech face
and locking insert.
EXTERNAL METAL SURFACES
After each use, wipe all metal surfaces with a cloth lightly dampened
with a lubricant preservative. This will remove any foreign material
and preserve the finish of the pistol. Before reassembling the pistol,
lightly lubricate, with one drop of oil, the dual tension recoil spring
(19) and frame rails (21) .
FRAME
The frame should be checked for cleanliness. Exposed parts in the
frame may be wiped with a clean, soft cloth that has been slightly
dampened with a quality firearm cleaning solvent. All solvent should
then be wiped from the parts so that they are clean and dry.
NOTE: Some cleaning solvents may be harmful to the finish of your
pistol. Read the solvent manufacturer’s product use instructions and
warning labels before using.
Do not over lubricate your HS pistol. Large quantities of oil or grease
will collect unburnt powder and dirt which will accelerate wear.
22
ALWAYS MAKE SURE YOUR PISTOL IS UNLOADED BEFORE CLEANING. STORING,
TRAVELING, OR HANDING IT TO ANOTHER PERSON, AND MAKE SURE THE SLIDE
IS LOCKED OPEN WITH THE MAGAZINE REMOVED.
IMPORTANT:
IT IS YOUR RESPONSIBILITY TO MAINTAIN YOUR PISTOL,
IF RUST APPEARS IN THE BORE, THE BARREL SHOULD BE REPLACED.
PRIOR TO SHOOTING MAKE SURE THE BORE IS DRY.
15
ALWAYS KNOW YOUR TARGET, AND THE MAXIMUM RANGE OF
THE AMMUNITION THATYOU ARE USING.
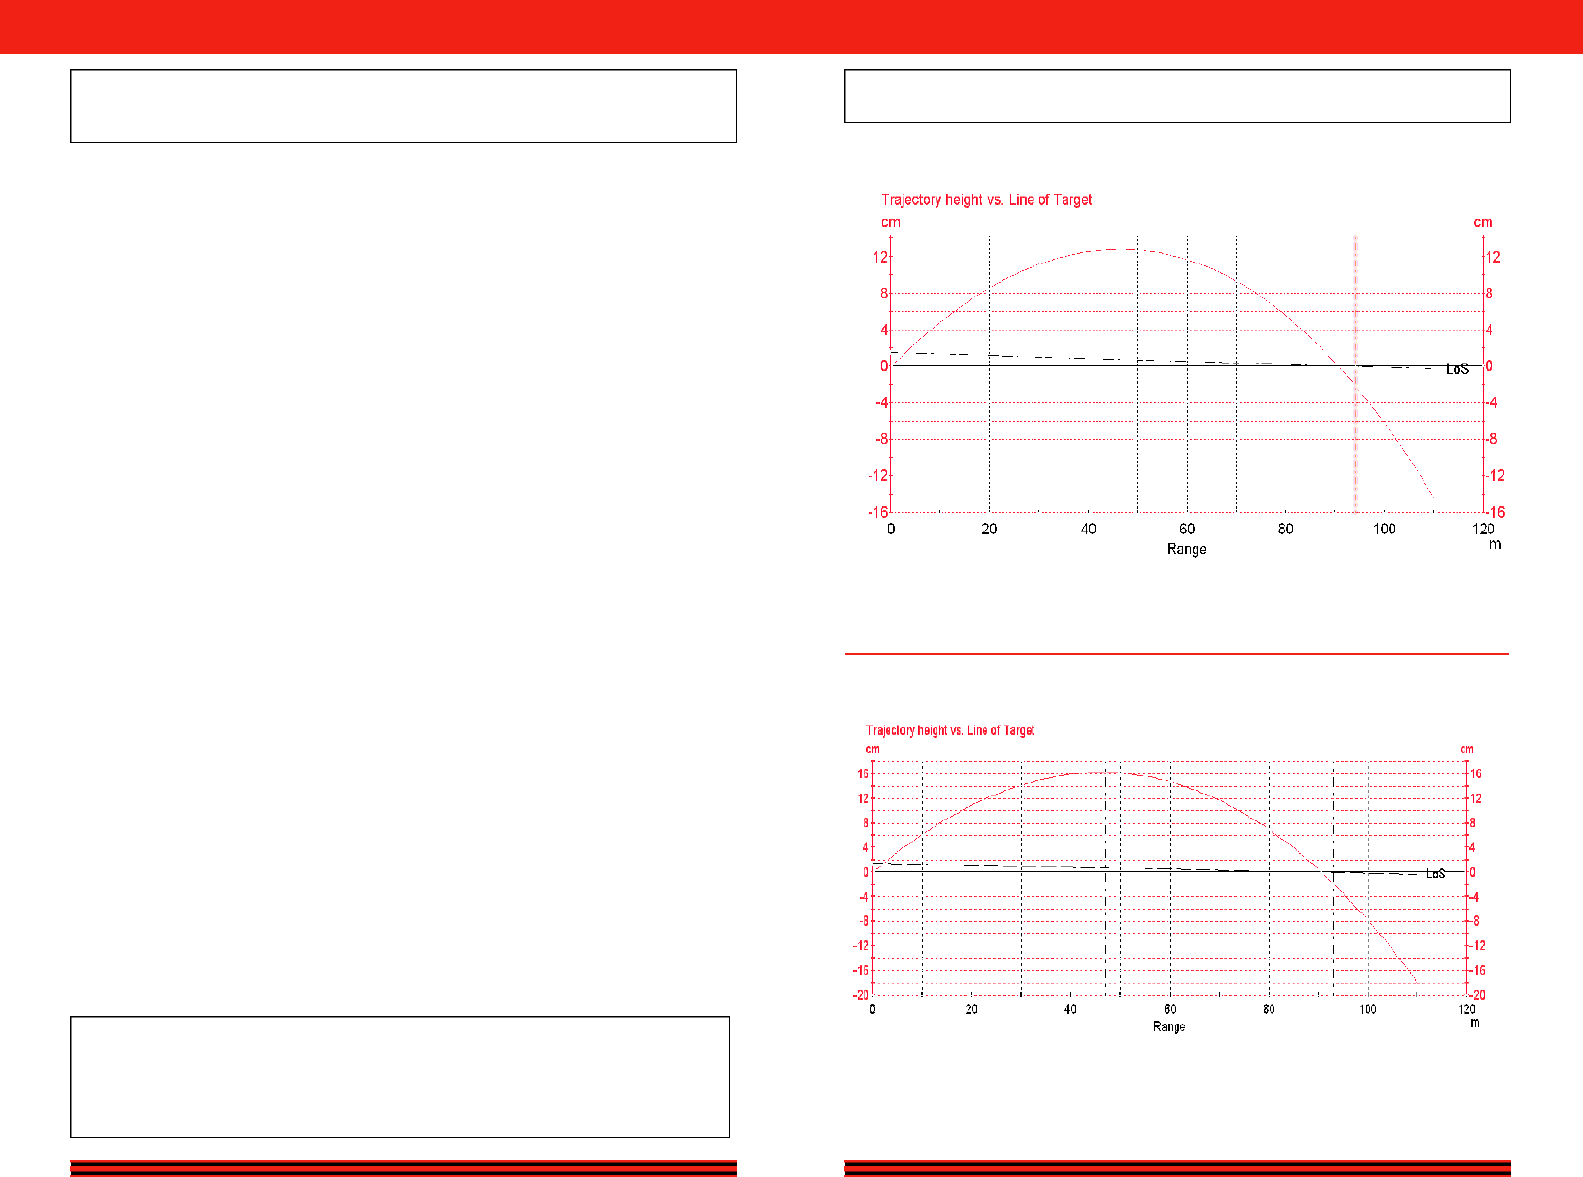
9 x 1 9 M M B A L L I S T I C S G R A P H
9 X 19MM PARABELLUM 115 GRAIN FMJ
9 X 19MM PARABELLUM 124 GRAIN FMJ
CLEANING THE FIELD STRIPPED PISTOL
21
ALWAYS BE ABSOLUTELY SURE OF YOUR TARGET AND THE AREA BEHIND IT
BEFORE YOU SQUEEZE THE TRIGGER. A BULLET COULD TRAVEL THROUGH OR
PAST YOUR TARGET UP TO 1 1/2 MILES. IF IN DOUBT, DO NOT SHOO T.
MAGAZINE DISASSEMBLY
Magazines do not normally need to be disassem-
bled for cleaning each time your HS pistol is
cleaned. Disassembling and cleaning magazines at
less frequent intervals (perhaps every 3-4 months)
is normally sufficient, unless the magazines have
been exposed to dirt or other adverse conditions or
inspection indicates the need for cleaning.
When it is necessary to disassemble magazines for
cleaning, proceed as follow s :
S A F E T Y CAU T I O N :
The magazine spring, followe r , and inner floor
plate are under spring tension, and can cause eye
or other injury if not controlled during r e m ova l .
Wear pro t e c t ive safety glasses to reduce the risk
of eye injuries. Be sure to maintain do w n wa rd
p re s s u re on the magazine spring, with yo u r
thumb, while disassembling.
D i s a s s e m b ly of the HS magazines is accomplished
by depressing the magazine locking plate and
sliding the floor plate forw a rd
U N L OA D E D M AG A Z I N E I N S P E C T I O N
1 .Inspect condition of magazine body
for signs of damage or dirt (feed lips
and floor plate).
2 .Inspect free movement and spring
action of follow e r.
3 .Inspect that the magazine floor plate is
properly lock e d .
4 .Inspect for smooth insertion of maga-
zine into pistol and proper engage-
ment of floor plate magazine
l o ck / r e l e a s e .
FOLLOWER
FEED LIPS
FLOOR PLATE
MAGAZINE
BODY
LOCKING PLATE
RELOADING DURING SHOOTING
When the magazine is empty, the slide catch lever ( 1 6 ) holds the slide
open. Press the magazine release ( 9 ) to remove the empty magazine
( 2 3 ) and insert a loaded one. Push down the slide catch lever ( 1 6 ) w i t h
the thumb of the shooting hand, or draw back the slide (17) and allow
it to fly forward. The pistol is again loaded and ready to fire in the safe-
ty locked action mode.
16
NEVER USE YOUR PISTOL IF IT FAILS TO FUNCTION PROPERLY. NEVER FORCE
A JAMMED ACTION, AS THE JAMMED ROUND MAY EXPLODE.
RELOADING DURING SHOOTING
SLIDE
CATCH
LEVER
16
9
MAGAZINE
RELEASE
20
ALWAYS BE SURE YOUR BACKSTOP IS ADEQUATE TO STOP AND CONTAIN
BULLETS BEFORE BEGINNING TARGET PRACTICE SO THAT YOU DO NOT HIT
ANYTHING OUTSIDE THE RANGE SHOOTING AREA.
7 . R e m ove the dual tension recoil spring ( 1 9 ),from the slide ( 1 7 ). Take care to
control the release of the spring tension.
The pistol is now fully field stripped and
re a d y for cleaning. Further dismantling is not
n e c e s s a ry for cleaning and should only be
done by a qualified gunsmith or HS A r m o re r.
19
17
8 . R e m o ve the barrel ( 1 8 ) from the slide ( 1 7 ).
18
17
17
ALWAYS TRANSPORT YOUR PISTOL UNLOADED.
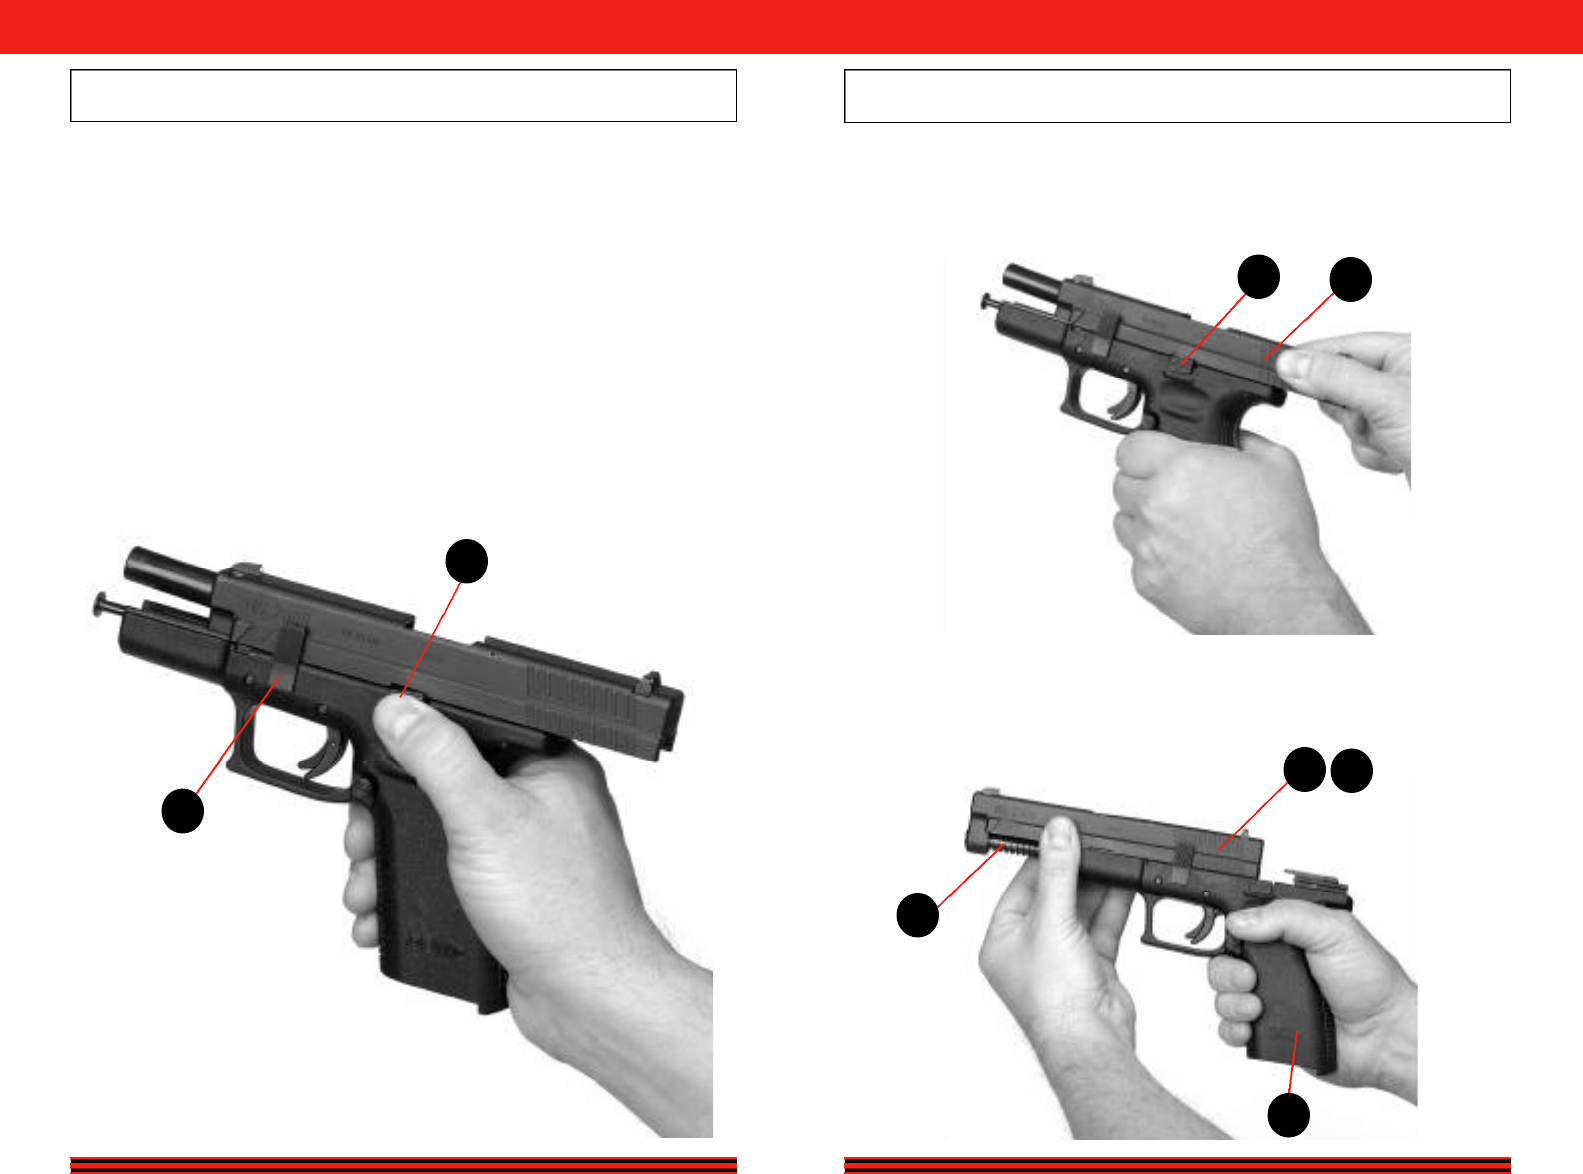
U N L O A D I N G T H E P I S T O L
VISUAL AND
PHYSICALLY
INSPECT CHAMBER
UNLOADING THE PISTOL
1 . Pointing the pistol in a safe direction.
2 . Keep your finger off the trigger ( 1 5 ) and remove the magazine ( 2 3 ).
3 . Pull the side ( 1 7 ) r e a r w ard one or more times to insure the chamber is empty.
wa t ch for a live round or empty case to be ejected. Pull side ( 1 7 ) r e a r ward and
l o c k it with the slide catch lever ( 1 6 ) holding the slide open.
4 . Make sure the last round in the chamber has been extracted and ejected.
Visually and physically ch e ck the chamber and the magazine well to make sure
the pistol has been unloaded. Physically insert your index finger in the ch a m b e r
and feel for the presence of a round or cartridge case in ch a m b e r. The pistol is
n o w unloaded and safe.
5 . Depress the slide catch lever (16 ) the slide ( 17) will be released forwa r d .
6 . Unload and store the magazine ( 2 3 ).
7 . P i c k up and store all loose rounds and empty cartridge cases.
8 . The pistol must be cleaned after every shooting session.
WARNING:
NEVER PLACE YOUR
HAND OVER THE
EJECTION PORT
WHEN UNLOADING
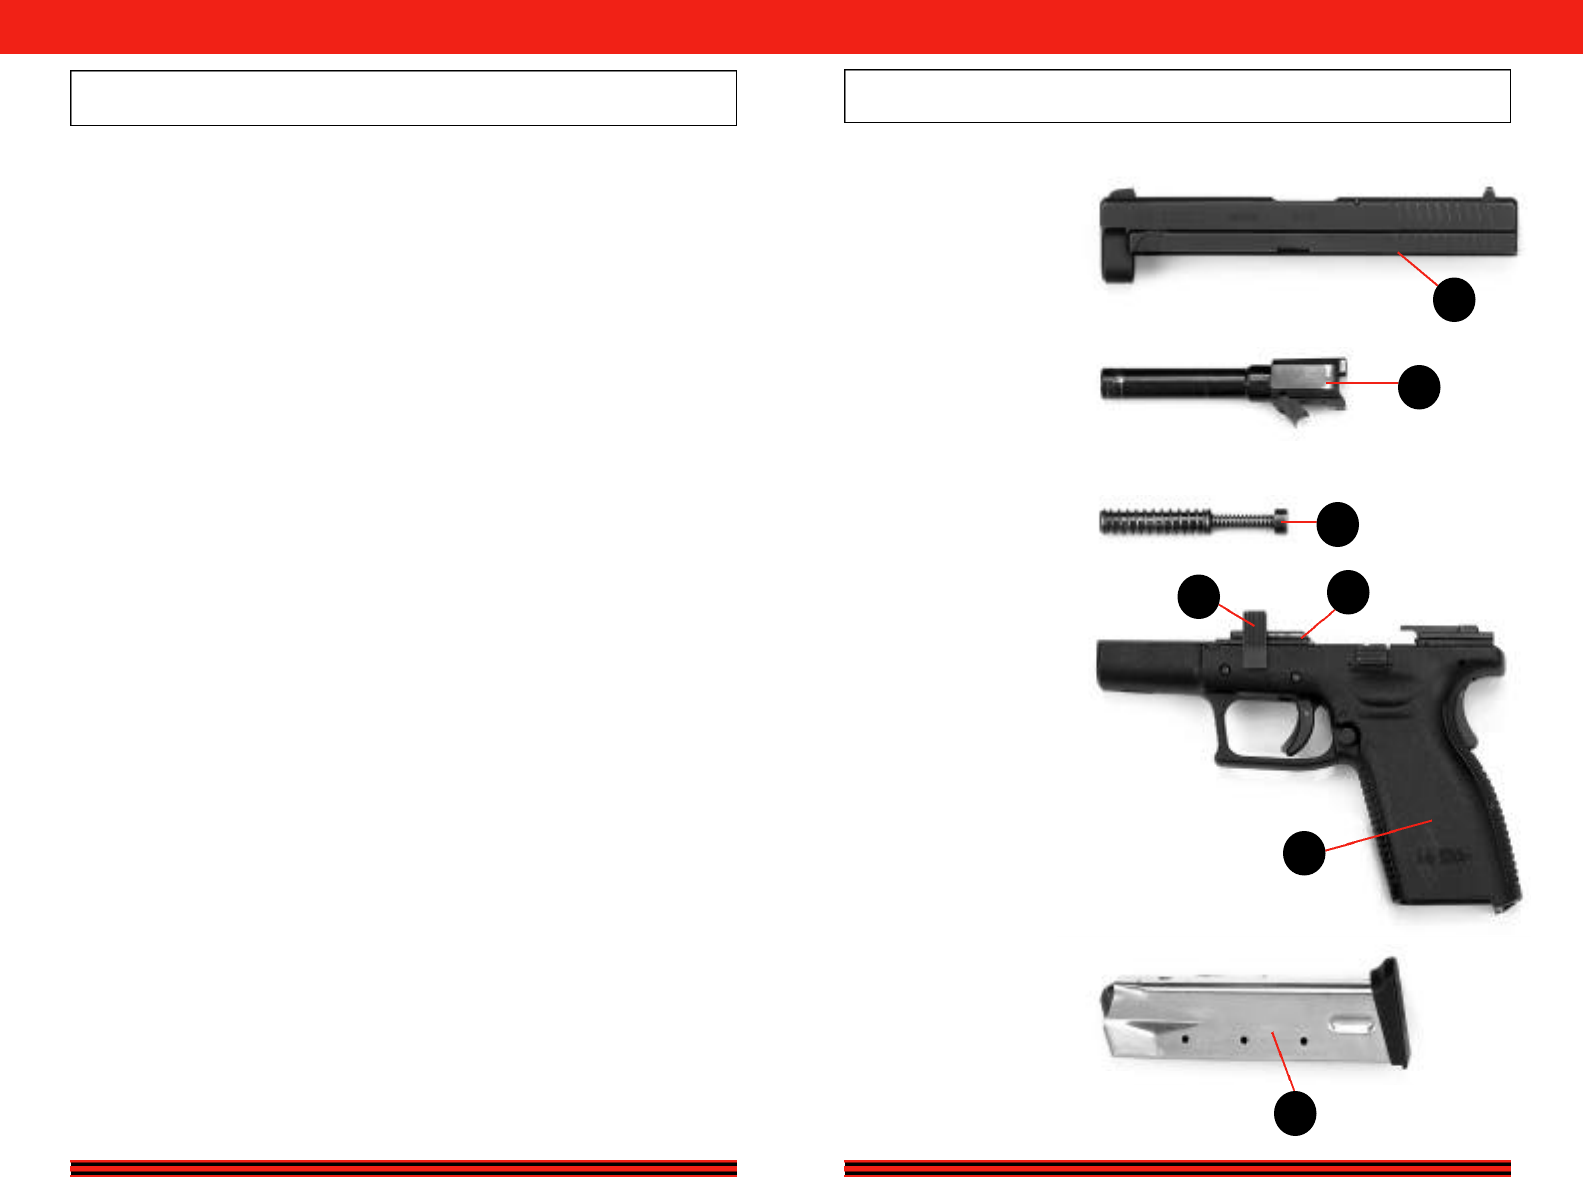
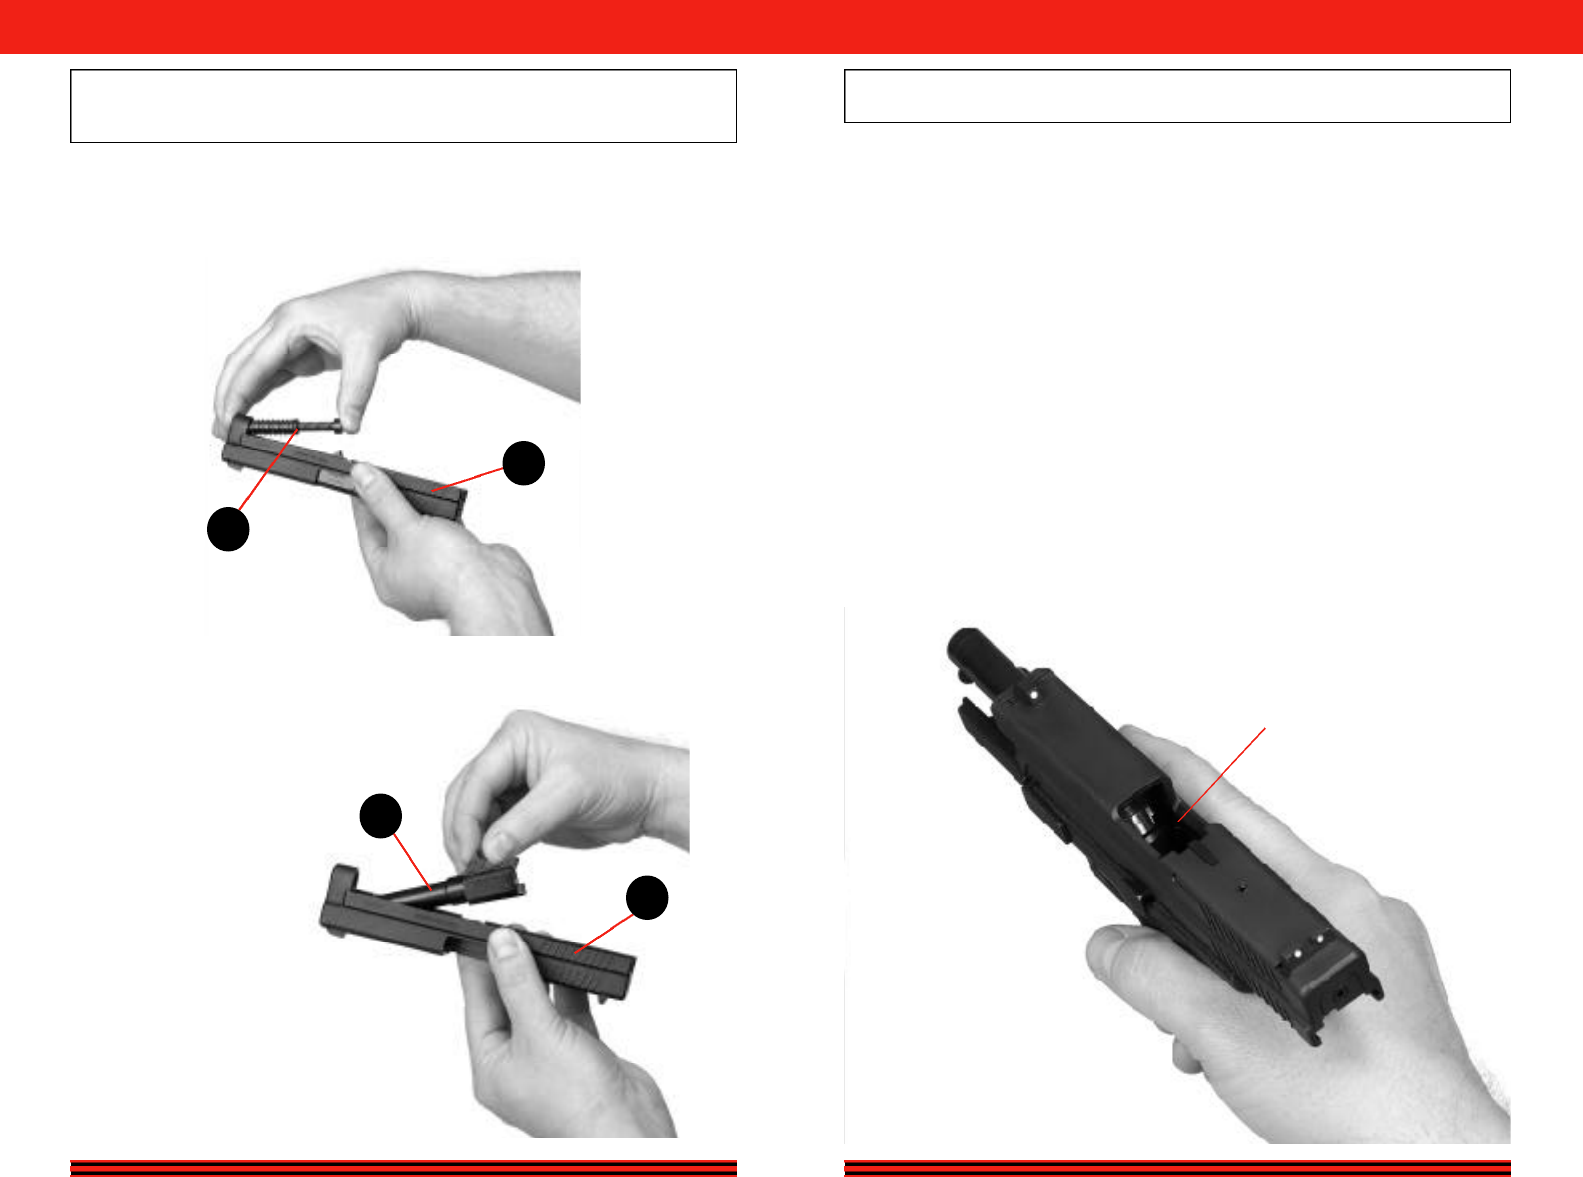
F I E L D S T R I P P I N G
Follow these instructions and your HS 2000 pistol will remain in
excellent condition even after years of hard service.
18
BEFORE PERFORMING ANY CLEANING OR MAINTENANCE, MAKE SURE THE PISTOL IS
COMPLETELY UNLOADED (THIS INCLUDES THE MAGAZINE AND CHAMBER).
FIELD STRIPPING THE PISTOL
1 . Unload the pistol (page 17).
2 . D raw back the slide ( 1 7 ) to the rear stop position and lock it open , thumb-
ing up the slide catch lever ( 1 6 ).
3 . Visually inspect the chamber to confirm the pistol is unloaded (page 17).
4 . Rotate the slide take down lever (22) to a vertical 12 o’clock position.
16 SLIDE
CATCH
LEVER
22
GROOVED SLIDE
TAKE DOWN LEVER
19
BEFORE PERFORMING ANY DISASSEMBLY, MAKE SURE YOU ARE WEARING
EYE PROTECTION.
F I E L D S T R I P P I N G
5 . Pull the slide ( 1 7 ) slightly to release the slide catch lever ( 1 6 ).Then allow
the slide to slowly move forward until the spring tension is released. Pull
the trigger to fully unlock the side from the fra m e .
6 . N ow slip the complete assembly {slide ( 1 7 ), barrel ( 1 8 ) and dual tension
recoil spring ( 1 9 )} forward and off the frame ( 2 0 ).
16 17
17 18
19
20
F I E L D S T R I P P I N G
