PORTATONE PSR S500 .cfm?go=homeowners View&file=Tip Guide Web
User Manual: PORTATONE PSR-S500
Open the PDF directly: View PDF  .
.
Page Count: 20

Compliments of
HOMEOWNER’S
Tip GUIDE
SM
To get the most miles out of your car
and prevent breakdowns, you probably
take it in for scheduled maintenance, oil
changes, and tune-ups.
To get the most miles out of your home’s
expensive systems and appliances,
they also need scheduled maintenance
and tune-ups.
But what service will they need, how
often, and how much work can you do
yourself? It’s not like you can drive your
home to the nearest service station.
If only someone would write an
“Owner’s Manual” for your home like
the one that came with your car.
Oh, wait… we did!
Our Homeowner’s Tip Guide helps you
with home-related tasks including:
• Developing and scheduling an annual
maintenance plan for your home’s
systems and appliances.
• Maintenance information that helps
you care for your equipment and
avoid costly repairs.
• Troubleshooting and resolving certain
malfunctions on your own, saving
you the time and expense of hiring a
professional (and often for less than
a home warranty trade call fee!).
Old Republic Home Protection
takes pride in being
SM
SM
Table of Contents
MAINTENANCE SCHEDULE ..........................1
Monthly ............................................................................ 1
Annually or Semi-Annually • Spring ................................. 1
Annually or Semi-Annually • Summer ............................. 1
Annually or Semi-Annually • Fall ..................................... 2
Annually or Semi-Annually • Winter ................................. 2
Monthly Maintenance Schedule Checklist ....................... 2
EMERGENCIES ......................................................3
Overview.......................................................................... 3
Plumbing Emergencies.................................................... 3
Electrical Emergencies .................................................... 3
Gas Leaks ....................................................................... 4
Fire Precautions .............................................................. 4
EXTERIOR MAINTENANCE ...........................5
Roof Maintenance ........................................................... 5
Home Exterior.................................................................. 6
Exterior Caulking ............................................................. 7
Foundations ..................................................................... 7
Garage Doors .................................................................. 8
Driveways, Walkways and Steps ..................................... 8
Wood Decks .................................................................... 8
SYSTEM/APPLIANCE
MALFUNCTION TROUBLESHOOTING ...9
Plumbing Fixture/Faucets and Pipes ............................... 9
Toilets .............................................................................. 9
Septic Tank ...................................................................... 9
Water Heater ................................................................... 9
Garbage Disposal .......................................................... 10
Dishwasher .....................................................................11
Electric Cooktop/Range/Oven ....................................... 12
Gas Cooktop/Range/Oven ............................................ 12
Microwave Oven ............................................................ 13
Trash Compactor ........................................................... 13
Refrigerator and Freezer ............................................... 14
Clothes Washer ............................................................. 15
Clothes Dryer................................................................. 15
Heating System ............................................................. 16
Air Conditioning System ................................................ 16
Electrical System ........................................................... 17
Pool/Spa Equipment ...................................................... 17

1
Maintenance Schedule
MONTHLY
Safety
• Make sure your re extinguishers are fully charged
• Test your:
◦Garage door opener(s)
◦GFCI receptacles and breakers
◦Smoke detectors to ensure you have fresh batteries
◦Carbon monoxide detectors to ensure you have
fresh batteries
Plumbing
• Check plumbing xtures and “water-using” appliances
for leaks
• Grind a cut-up lemon and then 2-3 cups of ice in the
garbage disposal (the lemon keeps your disposal fresh
and odor-free while the ice helps keep the blades
sharp)
• Clean pop-up sink and tub strainers
• Pour a cup of baking soda followed by a cup of white
vinegar and a pot of boiling water down drains to keep
them running freely
• Pour water down seldom-used drains
• Drain a few gallons of water from the valve at the base
of the water heater to remove sediment and extend the
life of the water heater
• Clean faucet aerators and shower heads with a soft
brush to remove mineral build-up
Appliances
• Clean refrigerator drain pan
• Clean dishwasher food lters and check that openings
in spray arms are clear; check dishwasher for leaks
• Clean kitchen exhaust fan lters
Heating and Cooling
• Check furnace or cooling lter, replace if necessary
ANNUALLY OR SEMI-ANNUALLY • Spring
Plumbing
• Inspect septic eld and tank area for ooding or odor
• Have septic tank inspected and pumped as needed
• Inspect water heater temperature pressure relief valve
for signs of leaks or discharge
• Flush the water heater
Heating and Cooling
• Clean around air conditioner compressor
• Have heat pump or air conditioning system cleaned
and tuned-up before cooling season begins
• Have evaporator coil inspected and cleaned, if necessary
• Have chimney(s) cleaned and inspected
Electrical
• Replace the batteries in smoke detectors twice a
year. An easy way to remember this is to change the
batteries when the time changes. It’s also a good
idea to vacuum out the smoke detectors when you
change the batteries so they stay clean and operate
at peak efciency
Exterior
• Clean and inspect gutters and downspouts after trees
have seeded; repair as needed
• Hose off house exterior; scrub off any mildew
• Clean gaps between deck boards, under decks and
porches and treat for fungus and mildew as needed
• Check paint, siding, or masonry for deterioration.
Deteriorated paint can lead to widespread rot. One top-
coat of paint should last four or ve years, but two coats
can last twice that long
• Inspect weather stripping around windows and doors;
replace as needed
• Inspect window screens; repair as needed
• Clean out basement window wells
• Clean sliding door tracks and lubricate with white lithi-
um compound
• Inspect basement/crawl space and attic for signs of
pests such as termites, carpenter ants, wasps, and
hornets
ANNUALLY OR SEMI-ANNUALLY • Summer
Plumbing
• Check the apper on your toilets at least once a year.
If it is an older one, you may want to replace it since it
could allow water through, causing your toilet to “run”
continuously
Heating and Cooling
• Examine windows; re-glaze as needed
• Ensure all east, west and south facing windows are
shaded to decrease cooling costs
Garage Door
• Clean and lubricate garage door tracks, rollers, springs
and hinges; tighten screws
• Inspect paint and sealant on exterior and garage door,
particularly along the bottom edge
Interior
• Inspect walls and ceiling for cracks, sags, bowing
or leaning
• Clean and seal tile grout

2
ANNUALLY OR SEMI-ANNUALLY • Fall
Plumbing
• Close and drain hose bibs, drain and store hoses
• Check septic eld and tank area for ooding or odor
• Inspect water heater temperature pressure relief valve
for signs of leaks or discharge
Heating and Cooling
• Clean around air conditioner condenser, then cover to
protect during the fall/winter months
• Have replace and ues inspected and cleaned, repair
as needed
• Schedule heating system tune-up and cleaning
• Clean ceiling fan blades
Exterior
• Check paint, siding, or masonry for deterioration
• Trim foundation plantings to leave a foot of clear space
between plantings and house
• Clean gutters and downspouts; repair as needed
• Check roof for leaks
• Check exterior house siding
• Trim any tree branches near or touching roof or gutters
• Check all exterior caulk; repair as needed
• Insulate for winter – on a windy day, feel around the
edges of doors, windows and replaces for any air
leaks. Look for dust piles as clues to leaks. Caulk and
repair weather stripping as needed
• Rake debris away from side of house and other
structures
• Clear storm window weep holes of debris
• Clean under decks and porches as well as the space
between the deck boards
• Clean out basement window wells
ANNUALLY OR SEMI-ANNUALLY • Winter
Plumbing
• Clean and seal grout
• Exercise (turn off and on) plumbing shutoff valves and
inspect for leaks
• Inspect water heater temperature pressure relief valve
for signs of leaks or discharge
Electrical
• Ensure your supply of ashlights has fresh batteries in
case of a winter storm power outage
Exterior
• Inspect roof after large winter storms
• Inspect gutters and downspouts for leaks during a
rainstorm
• Keep gutters free from debris and ice
• On a windy day, feel around the edges of doors, win-
dows and replaces for any air leaks. Look for dust
piles as clues to leaks. Caulk and repair weather
stripping as needed
Monthly Maintenance Schedule Checklist
Jan. Feb. March April May June July August Sept. Oct. Nov. Dec.
Safety
Check
Plumbing
Check
Appliances
Check
Heating &
Cooling
Check

3
Emergencies
OVERVIEW
Despite your best precautions, emergencies can still occur.
You can prevent an emergency from becoming a catastro-
phe by learning what to do. This section discusses how to
react to:
• Plumbing emergencies
• Electrical emergencies
• Gas leaks
• A re
Read this section and discuss it with all members of your
household, reviewing annually, so that everyone is prepared
for an emergency. Make copies of these pages for your
babysitters so they will be prepared if an emergency strikes
while you are away.
The rst step during an electrical problem, water leak or gas
leak is to shut off the ow of electricity, water or gas to your
home. Every member of your household should know how
to nd these shutoff valves and switches.
You should keep a basic emergency kit that includes:
• A battery powered transistor radio
• A ashlight
• Extra batteries
• Candles and matches
• A rst-aid kit
• A rst-aid manual
These supplies will be welcomed if a natural disaster occurs.
In addition, the rst-aid kit and rst-aid manual are good to
have on hand for household use.
PLUMBING EMERGENCIES
Main Water Shutoff Valve
Main water shutoff valves are frequently located near water
meters. Your water meter is likely outside near the street.
Main water shutoff valves can also be located inside your
home beneath a oor access panel or in a basement. Floor
access panels are commonly found in closet oors. Look for
a large valve in the middle of a pipe.
ELECTRICAL EMERGENCIES
Electrical emergencies such as an appliance malfunction, a
power failure in your home or a neighborhood power outage
can occur at any time.
You should know how to turn off the electrical power to your
home and turn off and reset individual circuit breakers.
Main Disconnect
The main electrical disconnect should be located in or near
the circuit panel box. The circuit panel box is usually in the
garage, utility room, or utility closet.
Turn off the electrical power to your house by shutting off the
main disconnect. The main disconnect is one or more main
fuses or circuit breakers located on the circuit panel.
If the circuit panel is located in a laundry room or some
other place where there could be water on the oor, use
rubber gloves when shutting off the main disconnect. Keep
a pair of rubber gloves near the circuit panel at all times for
this purpose.
Be sure everyone in your household knows where the circuit
breaker panel is located and can shut off the power.
Power Outage
If the power goes out suddenly in your home, determine
whether the outage affects just your home or the entire
neighborhood. If it is a neighborhood outage, notify your
electric utility company.
If the electrical outage affects your home only, check for and
reset tripped circuit breakers. If a breaker immediately trips
again, call a professional electrician to test your electrical
system.
Turn off or disconnect all motor-driven and electronic ap-
pliances to avoid possible damage from either inadequate
power or a sudden electrical surge when power is restored.
The furnace blower motor can be turned off by turning off
the circuit breaker for the furnace.
Motors for dishwashers, clothes washers, clothes dryers,
garbage disposals, range fans, sump pumps, refrigerators
and other appliances can be disconnected by turning off or
unplugging the appliance. Computers, televisions, video re-
corders, stereos and other electronic equipment should also
be turned off. Turn on a radio and a lamp to alert you when
service is restored.
After power has been restored, it should be safe to turn on
all appliances. You can slow food spoilage by not opening
refrigerators or freezers during the outage unless absolutely
necessary. Food in a tightly packed freezer will stay frozen
for up to 48 hours if the door has been kept closed. Food in
a partially lled freezer may keep for 24 hours. If you are in
doubt about the safety of frozen food after a power outage,
throw it out.
Sparking Appliance
Do not touch a smoking or sparking appliance. Instead,
cut off power to the appliance by unplugging the appli-
ance, turning off the wall switch controlling the appliance
or turning off the circuit breaker for the appliance. Allow
the appliance to cool, then take it to a repair shop or
call a professional service representative to repair the
appliance.
If the appliance catches re, get everyone out of the house,
meet at your designated area and call the re department
from a neighbor’s home.

4
Do not use water on an electrical re, it can be fatal. If you
discover an electrical re early, use a multipurpose re ex-
tinguisher on the ames.
If an appliance’s electrical plug smokes or sparks, unplug
the appliance by pulling its cord. Do not touch the plug itself.
After the plug cools, inspect the plug and cord for damage.
If they are damaged, replace the plug and cord or have them
replaced by a professional service representative. Reset
any tripped circuit breakers.
If the plug and cord appear to be OK and there are no
tripped circuit breakers, the electrical outlet may be at fault.
Test the outlet by plugging another appliance you know
works properly into the receptacle. If that plug sparks too,
replace the outlet or have it replaced by a professional
electrician. If the new appliance does not cause sparks,
then the original appliance is probably faulty and should be
repaired or replaced.
GAS LEAKS
Your home may be serviced with natural or bottled gas. Gas
is a safe, clean, economical energy source for appliances
such as furnaces, boilers, water heaters, dryers, cooktops,
replaces and barbecues. Although gas appliances are
wonderful conveniences, gas must be treated with respect.
If you smell gas inside or outside your home, hear gas escap-
ing from a broken line or see a broken gas line, you should:
• Get everyone out of and away from your home immediately
• Call your local gas company or your re department
from a neighbor’s house
• Do not light a match, turn a light on or off, use a tele-
phone (portable, cellular or regular) or operate any
electrical switch or electronic device – ames or electric
sparks can ignite the leaking gas
• Leave as many windows and doors open as possible –
the gas will rise and dissipate harmlessly outside
If the gas leak is inside your home, you can turn off your gas
supply at the gas shutoff valve after everyone is out of the
house. If you prefer, you can have your utility company turn
off the gas.
The gas shutoff valve should be located on the pipe leading
into the gas meter. Turn the valve a quarter-turn in either
direction with an adjustable-end or “crescent” wrench. The
gas is off when the valve is perpendicular to the pipe.
If the gas leak is outside your home, keep away from the
leak area and away from your house.
Do not attempt to shut off the gas supply. Your utility compa-
ny will turn off the gas.
Once your gas is off, wait for the local gas company to re-
store your service.
FIRE PRECAUTIONS
Precautions and plans made today can prevent a re-relat-
ed tragedy tomorrow.
Smoke detectors are your rst line of defense if a re breaks
out at night. Test your detectors on the rst day of each
month. Replace the batteries in the spring and fall when you
change your clocks.
“Plan of Escape”
The rst step during a re is to get everyone out of the
house. Planning your escape routes now can prevent need-
less loss of life during a re.
1. With your family, map out escape routes from each
room in your home. Pay particular attention to escape
routes from bedrooms.
2. Agree on a central area outside your house to meet
after evacuation so that everyone can be accounted
for. This may be a neighbor’s front door or a neighbor-
hood landmark. The meeting place should be a place
that children or injured people can reach without undue
difculty and yet still be safe from danger.
3. Have safety ladders near windows when ladders are
necessary.
4. Keep stairs, doorways and hallways free from obstruc-
tions. In dense smoke, it may be difcult to see items
blocking an escape route.
In the Event of a Small ”Contained“ Fire
If you discover a small re that is still contained to its source,
you can do the following:
• Cooking pan re
◦ Cover a small oil or grease re in a cooking pan with
a lid to smother the ames and remove the pan from
heat
◦ Do not use water on an oil or grease re. Water will
spread the ames
◦Turn off the kitchen exhaust fan. The fan can suck
re through the fan and ignite the outside of your
home
• Oven re
◦ Turn off the oven and allow the re to burn itself out
◦ Do not open the oven door - fresh air will feed the re
and cause it to continue to burn
• Electrical re
◦If you discover an electrical re early, use a multi-
purpose re extinguisher
◦ Do not use water on an electrical re. Water and
electricity can be fatal
Fire Extinguisher
Cooking is a leading cause of re. If a re breaks out in the
kitchen, you will want an extinguisher close at hand. If there
is a re in another part of the home, you will know that an
extinguisher can be found in the kitchen.
Read the operating instructions on the side of the extin-
guisher now so that you will know how to use it if needed.
Finally, have the extinguisher serviced at the time recom-
mended by the manufacturer. The manufacturer’s service
recommendations should be printed on the side of your
re extinguisher.

5
Exterior Maintenance
ROOF MAINTENANCE
It’s easy to ignore your roof unless it begins to leak, de-
manding immediate attention. If you inspect your roof
periodically, you can correct minor problems before they
cause major damage.
Do not go up on your roof unless you:
• Feel comfortable working from heights
• Know how to safely use an extension ladder
• Have the necessary tools and equipment
If you have a tile or slate roof, do not go on your roof for any
reason. These types of roof shingles can be easily broken
from your body weight.
Many roong materials come with manufacturer’s warran-
ties. However, in order to make a claim on a warranty, you
may need to know:
• The manufacturer’s name
• The place purchased
• The installer’s name
Roof Inspection
You should inspect your roof:
• Each fall before the winter weather begins
• After heavy wind or snow storms – to inspect
for damage
• In the spring to look for winter damage
If you discover any problems, call a roong professional.
Inspecting from the Inside:
1. Begin your roof inspection in the attic. Examine the
main roof ridge, rafters and sheathing for moisture.
Look for:
a. Water stains
b. Dark-colored areas of wet wood
c. Soft spots that may indicate dry rot
2. Use a strong ashlight to inspect visually, then use a
knife or thin screwdriver to probe for dry rot.
3. Mark any problem areas with chalk so you can nd the
areas later.
4. If it is necessary to remove berglass insulation to
examine the sheathing wear loose clothing, gloves,
goggles and a respirator for protection.
5. Turn off the lights and look for light coming through the
roof. This is a sign of holes, cracks or other problems.
Small shafts of light coming in at an angle indicate
cracks that may swell shut when shingles are wet.
6. If you see any holes above you, drive nails or poke
wire through the holes so they will be visible from the
roof’s surface.
Inspecting from the Outside (all roof types)
1. Inspect the ashing in the following areas:
a. Roof valleys
b. Roof and plumbing vents
c. Around chimneys
d. Along eaves
e. Anywhere water can seep through open joints into
the roof sheathing
2. Look for any ashing that has buckled or pulled away
from the joints it is supposed to protect.
3. Look for holes and rust spots along the ashing surface.
a. Small holes and rust patches can be patched or
sealed
b. Replace the ashing if you nd large holes or exten-
sive corrosion
4. Examine the ashing seams for dried or cracked roof-
ing cement. Re-seal as necessary.
5. Look for loose nails and exposed nail heads. They should
be re-nailed and covered with caulk or roong cement.
6. Check gutters for any loose spikes or support straps
and repair as necessary.
7. Gutters should slope gently towards the downspouts.
Reset gutters that sag or slope improperly.
8. Inspect gutter seams, corner joints and downspout
joints for proper t. These joints should be repaired or
sealed with caulk if they allow water to leak.
9. Inspect downspouts. Check for:
a. Disconnected downspouts
b. Corrosion
c. Clogged sections
d. Improper connections
e. Loose straps
f. Missing sections
10. Make sure the downspouts direct water away from
your home.
Inspecting from the Outside (sloped or pitched roofs)
1. Step away from your home until you are able to see all
exposed sections of your roof.
2. Use binoculars to visually inspect all portions of your
roof. Binoculars allow you to get a close-up view of
your roof without climbing up and moving around on a
sloped surface.
3. Check the roof structure rst by looking at the lines of
the ridge and rafters.
a. The ridge line should be perfectly horizontal.
b. Inspect the line of the rafters by looking along the plane
of each roof section. The plane should be straight.

6
c. If either the ridge line or the plane of a roof section
sags, call a professional contractor. You may have a
structural problem.
4. Inspect the roof’s surface. Look for the signs of wear
and damage.
Inspecting from the Outside (at roofs)
1. Flat roofs are not visible from the ground. If you have a
at roof, you must inspect it from the roof itself.
a. If your roof is higher than a single story, look for a
way to access the roof from a door, window, access
panel or other interior access
b. If the roof is higher than one story and does not have
interior access, then it is best to have the roof in-
spected by a professional roong contractor
2. Look for puddles of water. Although some people used
to believe standing water on a at roof would help keep
the home cool during the summer, the disadvantages
far outweigh any cooling benets.
a. Insects, plants and fungi can breed and grow in the
water
b. Roots from growing plants can puncture your roof-
ing material
c. During the winter, freezing water can cause serious
roof damage
d. If you see standing water or signs of past water pud-
dles, discuss this matter with a professional roong
contractor
3. Your at roof should drain along the roof edges and
into downspouts or through drains located in the roof
itself.
4. If your roof has one or more interior drains, inspect
the drains to make sure they ow freely and are not
clogged with debris.
Roof Flashing
Flashing is the sheet metal or other durable material
that protects roof joints and other protrusions from water
penetration.
You will nd ashing in the following locations:
• Roof valleys
• Roof and plumbing vents
• Around chimneys
• Along eaves
• Anywhere else water can seep through open joints into
the roof sheathing
The ashing’s edges are sometimes sealed with caulk or
roof cement. Flashing is key to keeping your roof watertight.
You can avoid repair to and replacement of your entire roof
when you stop a leak by re-caulking a dried out ashing
seam.
Gutters and Downspouts
Gutters and downspouts collect water from the roof and
carry it away from the house. This prevents:
• Topsoil erosion around concrete footings
• Basement ooding
• Siding and woodwork decay
• Paint damage
• Wall damage
• Serious foundation problems
Gutters and downspouts that leak or that are clogged with
debris cannot perform their vital task. Gutters collect leaves,
sticks, seed pods, mineral granules from roong products
and other debris. They should be cleaned:
• In the fall after most of the leaves have fallen
• In the spring after the trees have bloomed
If you have low gutters and know how to safely use exten-
sion ladders, you may feel comfortable performing this task
yourself. If you have a multi-story home, don’t like working
from heights or don’t like handling extension ladders, you
may want to hire a contractor to clean your gutters.
HOME EXTERIOR
Your home is protected from the sun, wind, and rain by an
exterior skin of wooden, masonry or manufactured siding.
This siding should last the life of your home if properly
maintained. However, even the most durable sidings can
fail if the homeowner does not follow through with a regu-
lar maintenance program.
Exterior Cleaning
Cleaning your home’s exterior surfaces once or twice a
year will improve its appearance and will help preserve your
paint, stain or siding nish.
Wash from the bottom up with a solution of soap and warm
water. Washing from the bottom up prevents streaking. Pay
particular attention to the areas around door handles and
window catches where dirt and grease will be heaviest.
Rinse with fresh water from top to bottom to prevent runs of
dirty liquid on a newly cleaned surface. You can use a pres-
sure washer or a garden hose and scrub brush for this job.
If you nd mildew on your siding, apply a household bleach
solution directly to any affected areas and rinse with a
garden hose.
Siding Inspection
Paint
1. Protect your siding by inspecting for paint problems
twice a year and repainting every two to ve years, or
as necessary.
2. Peeling or blistering paint is usually caused by warm,
moist vapor from the house owing through the walls,
reaching the cold sheathing and condensing.
a. Just a few drops of water between the siding and the
lm of paint will cause paint to blister and peel
b. It may be necessary to install vents in the siding to
remedy the moisture problem
c. The defective areas should be properly prepared
and repainted

7
3. If you observe other paint problems, such as worn,
aking, wrinkling or “alligatoring” paint, properly pre-
pare and repaint the affected area.
Ground Clearance
1. Untreated wood must not be in contact with the ground.
Moisture from the soil can cause decay as well as allow
insects to gain entry to your siding.
2. Examine along the base of your home to make sure
you have at least 6-8 inches of clearance between the
ground and any wood siding or wood trim.
3. If necessary, re-grade your soil away from any wood.
Stain
1. Stain protects wood siding from moisture and insects.
2. Re-stain your siding every ve to seven years, or as
necessary, to restore color and preserve your siding.
Dry Rot and Termite Damage
Dry rot is a fungus that causes wood to crumble and ter-
mites destroy wood by chewing its interior.
1. Probe the edges of the wood siding with a knife or thin
screw driver and look for soft, spongy spots. Pay par-
ticular attention to any part of the siding that was close
to or in contact with the ground.
2. Check for visible evidence of termites. Look for their
translucent one-half-inch-long wings or the mud tubes
they sometimes build. If you nd evidence of dry rot
or termites, consult a licensed termite or pest control
professional.
Holes and Split, Warped or Loose Siding
Simple surface problems such as holes in the wood, split or
cracked boards, warped or buckled boards and loose siding
should be repaired as soon as they appear.
Water will work its way through these defects into the in-
terior wall where rotting can take place undetected. Find
the source by checking for deteriorating roong, leaking
gutters or downspouts and poor drainage.
EXTERIOR CAULKING
Caulking is used to seal joints, gaps and seams in exterior
walls. Without caulking, cool air, water and insects could
enter your home through these openings. Typically, your
home should be re-caulked every ve years or less.
Where to Inspect
Roof:
• Where one ashing meets another ashing
• Where the ashing and a roof or dormer surface meet
• Where a chimney, ue, plumbing or electrical pipe, attic
fan or skylight protrudes through the roof surface
Exterior Walls:
• Where siding and trim meet at corners
• Where siding meets the foundation, patio, deck or any
other part of your home
• Around window and door frames
• Between poorly tted pieces of siding
• Where pipes, framing members and other materials
protrude through siding
FOUNDATIONS
Your foundation supports your home and keeps it from
shifting. You should inspect your foundation twice a year
to ensure it lasts for the life of your home.
The type of foundation you have depends on your home’s
design and your particular soil conditions.
In areas where flooding or weak soil is a problem,
houses are often built on piers or pilings. In some areas,
pressure- treated wood foundations have become popu-
lar. The most common foundation, however, is a concrete
or masonry perimeter enclosing a crawl space, full cellar
or basement.
Foundation Inspection
Cracks:
1. Begin your inspection by looking for cracks along the
foundation’s outside wall.
a. Normal curing of concrete and mortar joints can
cause cracks. Most cracks are normal and are
structurally insignicant.
b. Cracks wider than 1/16 inch should be investigated,
possibly with the assistance of an engineer or qual-
ied inspector, to determine whether the cracks are
a cause for concern.
2. Check the slope of the ground around your
foundation.
a. The ground should slope away from your home
so rain water will flow away from, not toward the
foundation.
b. Back filled soil along the house can settle over
time. This can create a depression that will
collect water near the foundation. Correct any
depressions by raising the grade with topsoil
(not sand or gravel) so that the ground slopes
2 inches per horizontal foot for 8 to 10 feet from
the foundation.
3. Settling along the foundation can also cause con-
crete patios and walkways to break and direct water
towards your home. A contractor can add a new layer
of concrete to reverse the slope.
Moisture
You should watch for:
• Condensation
• Basement leaks
• Crawl space moisture
These problems can cause wood structural members to
decay.

8
Condensation
1. Condensation is caused when warm, moist air
comes in contact with a colder surface such as a
window, exposed pipe or bare concrete basement
wall. It can look as if the window, pipe or wall is
leaking. Condensation can be worse in new homes
as water from concrete walls evaporates as part of
the normal curing process.
2. Proper ventilation can control condensation.
Crawl Space Moisture
Soil under a crawl space can cause beams, oor joists,
sub-oors and even roof sheathing to decay. Inspect all
crawl spaces with a ashlight.
1. If it is necessary to go into the crawl space to view
the entire area, wear a face mask. You can stir up
insecticides and other chemicals that settled on the
ground.
2. Look for a moisture barrier.
a. All bare soil should be covered with a moisture
barrier of 6-mil polyethylene plastic
b. The plastic should go up the foundation walls to
a point higher than the outside grade line and
be weighted down with bricks, gravel or other
non-organic material
3. Look for standing water. There should never be stand-
ing water under your home. If there is, consult a profes-
sional contractor for drainage options
4. Inspect the foundation vents.
a. Foundation vents help control moisture in the crawl
space
b. Make sure the vents are open and not blocked by
soil, leaves or other debris
c. If the crawl space smells musty, you need more
ventilation
GARAGE DOORS
You can prevent many garage door problems with regular
maintenance:
1. Periodically clean the tracks, hinges and rollers.
2. Lubricate the tracks, hinges and rollers with penetrat-
ing oil or silicone spray.
3. Lubricate the locks with graphite powder.
4. Tighten the garage door screws every 12 months. They
fasten the hardware to the door and will loosen over
time as the door settles or as wood doors shrink.
5. Inspect the springs regularly. Replace any springs that
develop bulges or are unevenly spaced.
6. Inspect the tracks for proper alignment, crimps in the
track and other damage. If the door binds or drags, it is
likely the tracks are poorly aligned or need lubrication.
7. Keep wood doors sealed and painted, particularly
along the bottom edge, to prevent swelling and mois-
ture damage.
Garage Door Opener
An improperly adjusted garage door opener can cause a
serious accident. Your openers should have an automatic
return switch so that the doors will reverse automatically if
they meet an obstacle.
1. Test your garage door openers by blocking the door
with your hands while the door is closing. If the door
does not reverse when it encounters your hands,
adjust the automatic reverse adjustment screws.
2. Height adjustment nuts control how far the doors open
and close. If your doors do not open or close properly,
you can reset the adjustment nuts.
3. If the drive unit works but the door won’t open, the
belt connecting the pulley with the motor may need
adjusting.
DRIVEWAYS,
WALKWAYS AND STEPS
Concrete driveways, walkways and steps usually have ex-
pansion joints to minimize cracking. However, cracking is a
natural characteristic of concrete that cannot be eliminated
and should not create serious problems.
Snow and ice can damage concrete driveways, walk-
ways and steps. Remove snow and ice promptly to pro-
tect your concrete. If you cannot remove a thin layer of
ice, sprinkle sand or cat litter on the ice for traction. Do
not use salt or chemicals to melt the ice. Salt and chemicals
can damage your concrete and kill nearby grass, trees
and shrubs.
WOOD DECKS
Cedar or redwood boards, treated wood and stained or
painted wood are common materials for wood decks.
Cedar and redwood are more expensive than other deck-
ing materials but do not need to be painted or pressure
treated. As the cedar weathers, it will turn a distinctive
driftwood gray color. Redwood darkens to a natural color
as it weathers.
Your wood decking will expand and contract with changes
in the weather. This will cause nails to pull away from the
boards and could cause some boards to warp.
1. Reset any pulled nails and re-nail any warped boards
with a nishing hammer.
2. Do not use a regular hammer. The head of a regular
carpenter’s hammer will dent the wood around the
nail.
There should be gaps between the deck boards so that
water can drain from the deck. These gaps, however, can
collect dirt, leaves and other debris. The obstructions can
then soak up water and cause the wood to decay. Places
where deck boards rest on joists underneath the deck are
particularly prone to collecting obstructions. Your deck will
last longer if you clean between the deck boards with a
pressure washer once a year.

9
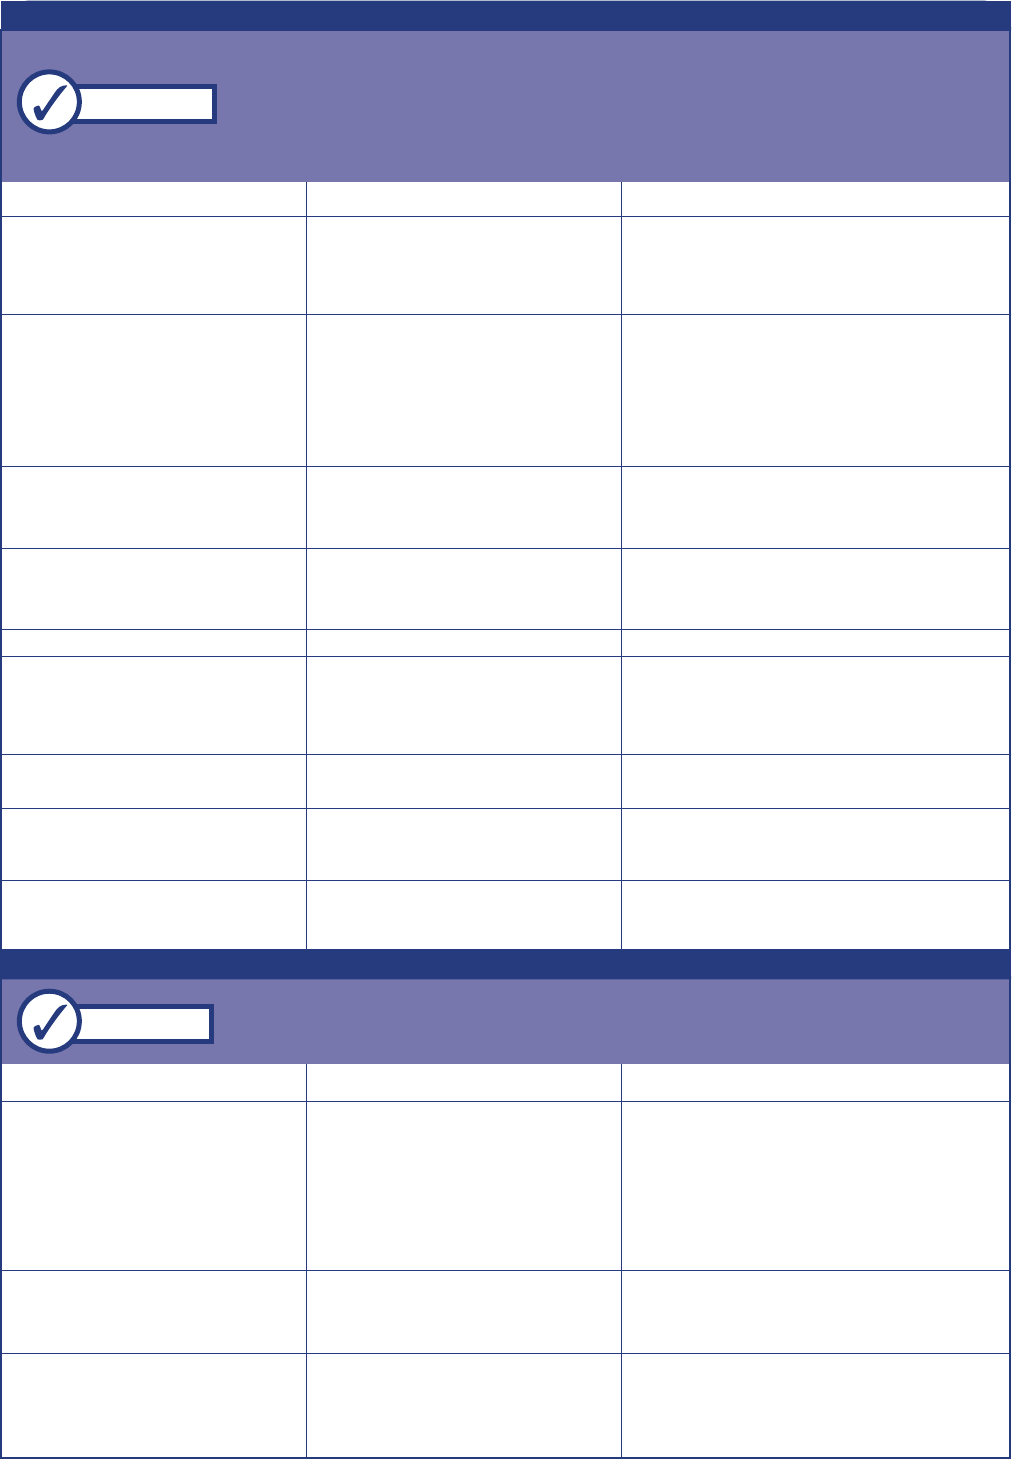
The aerator on the faucet is broken or has a
deteriorating finish.
The showerhead and faucet are not allowing
the water to flow smoothly and quickly.
A new kitchen faucet drips after shut off.
The sink drain takes longer than usual to drain.
Age and mineral deposits have caused damage.
Mineral deposits on the fixtures.
There is air left in the lines from installation.
There may be a build-up of soap scum, hair and
grease in the pipes.
Replace the aerator.
Put one cup of vinegar in a plastic bag and place it over the showerhead or
fixture. Secure it in place with a twist tie and let stand overnight. In the
morning, remove the bag and the mineral deposits should come off by
wiping with a damp cloth.
If there is NOT a handspray, turn the handle off and on approximately 15-20
times. If there IS a handspray, hold it in the sink and turn the handle off and
on very quickly 15-20 times. This will remove the air left in your supply lines.
Try using drain maintenance products that can be purchased at your local
hardware store. These products are designed to remove the usual buildup
of soap scum, grease and hair.
Problem Possible Cause Solution
Water is “running” in the toilet.
The toilet leaks water onto the floor.
The toilet may be leaking internally.
There is a leak in the supply line.
There is a leak between the tank and bowl.
Replace the flapper.
Check the supply line for leaks. Also, ensure the supply tube nut (coupling
nut) is tightened.
Replace the gasket between the tank and bowl.
Problem Possible Cause Solution
The waste lines are backing up throughout the house.
The bathroom sink is clogged.
The septic tank is full.
There is a stoppage in the bathroom branch line.
After lifting the lid to confirm the tank is full, have the tank pumped.
Use either a plunger or snake to clear the stoppage.
Problem Possible Cause Solution
Plumbing Fixtures/Faucets and Pipes
System/Appliance Malfunction Troubleshooting
• Flush only toilet paper down a toilet and avoid all other paper products.
Toilets
Water Heater
Helpful Hint!
Septic Tank
Helpful Hints!
Helpful Hint!
• Septic tanks should be inspected and pumped every three to five years to help prevent costly replacement
of the leach field.
• Don’t deposit coffee grounds, cooking fats, disposable diapers, facial tissues, cigarette butts and other
non-decomposable materials into the house sewer. These materials will plug the system.
• Use toilet tissue that breaks up easily when wet. Put a handful of toilet tissue in a jar half full of water.
Shake the jar and if the tissue breaks up easily, the product is suitable for the septic tank.
• Using too much soap or detergent when doing laundry can cause problems with the septic system. If there
are lots of suds in your laundry tub when the washer discharges, cut back on the amount of detergent for
the next similar load.
There is no hot water. The pilot light (gas unit) is not lit.
The pilot light (gas unit) will not stay lit.
The gas is not coming out (gas unit).
There is a malfunction in the thermocouple.
Relight the pilot. (Call the gas company if assistance is needed.)
Turn the gas valves on and be sure the thermocouple is near the pilot flame
and connected to the gas control. (Call the gas company if assistance is
needed.)
Check the gas shutoff valve for the water heater and the house to make sure
they are open. (Call the gas company if assistance is needed.)
Replace the thermocouple.
Problem Possible Cause Solution
• Flush out the water heater at least once a year to keep sediment from accumulating at the bottom of the tank.
Check owner’s manual for recommended frequency. Be sure to turn off the power to the unit first.

10
There is no hot water.
There is not enough hot water.
The water is too hot.
The water heater is leaking.
The water heater makes unusual noises.
Sediment or rust colored water is coming though
the faucets.
The water heater has no power (electric unit).
The safety thermostat has stopped working.
There is a malfunction in the heating thermostats.
There is a malfunction in the heating elements.
Rust, calcium or other sediment has accumulated in
the tank or pipes.
The thermostat is set incorrectly.
Heat is getting lost in the pipes.
The hot water faucets leak.
There is a malfunction in the heating elements.
Rust, calcium or other sediment has accumulated in
the tank.
The orifices on the burner are clogged.
The thermostat is set incorrectly.
There is not enough insulation around the thermostats.
There is a malfunction in the heating thermostats.
There is a malfunction in the heating elements.
The exhaust vent is clogged (gas unit).
There is a leak in the drain cock, element seal or
element gasket.
The safety valve is leaking.
Rust, calcium or other sediment has accumulated in
the tank.
Scale has formed on the heating elements (electric
units only).
Rust or sediment has accumulated in the tank.
Scale has formed on the heating elements (electric
units only).
Ensure the unit is plugged in. Check for a blown fuse and reset.
Push the rest button (electric units only) and be sure the thermostat and
heating elements are working.
Test the thermostats and replace if necessary.
Test the elements and replace if necessary.
Flush the tank and pipes to remove the sediment build-up.
Adjust the thermostat to a higher setting.
Insulate the hot water pipes.
Repair or replace the leaky faucets.
Test the elements and replace if necessary.
Turn off the power. Flush the tank to remove the sediment.
Turn off the heater, wait for it to cool and clean out the clogged orifices.
Turn down the thermostat.
Tighten the insulation around the thermostats.
Test the thermostats and replace if necessary.
Test the elements and replace if necessary.
Clean the vent to remove the clog.
Tighten or replace the seal or gasket.
If the water is too hot, steam will be released through the safety valve.
Turn down the thermostat. If the safety valve is defective, replace it.
Flush the tank to remove the sediment.
Remove the heating elements. Soak them in vinegar and gently remove
the scale.
Flush the tank to remove the sediment.
Remove the heating elements. Soak them in vinegar and gently remove
the scale.
Problem Possible Cause Solution
Problem Possible Cause Solution
Garbage Disposal
• Always run cool water during use and for at least two minutes after you finish to help prevent stoppages.
• Avoid putting potato and carrot peels or stringy vegetables down the disposal.
• Once a week, grind several lemon or orange rinds in your disposal to help eliminate odors.
• Never put your hand in the disposal to clear a jam. Turn off power to the unit and use tongs or pliers to clear the debris.
• Always use cold water in your disposal to avoid liquefying the grease.
The motor will not work or turn on.
The breaker trips when the disposal is turned on.
The motor makes a humming noise.
The disposal is making an unusual amount of noise.
The disposal is leaking.
The disposal takes too long to grind all the food.
There is no power to the unit.
The on/off switch may be defective.
The overload protector (reset) switch on the unit has
tripped.
Too many appliances are plugged into the circuit.
The impeller/blades are jammed.
There is a metallic or other hard object in the unit.
The mounting screws are loose.
The sink/drain connection is loose.
There is not enough water.
There is improper waste in the disposal.
Ensure the unit is plugged in. Check for a blown fuse and reset.
Check the stopper switch (batch feed model) or the wall switch
(continuous feed model). Repair or replace as needed.
Ensure the unit is not jammed and push the reset button (usually located
on the bottom of the unit) to restore power to the unit.
The disposal needs its own 15-amp circuit outlet.
After turning off the power to the disposal, use tongs or pliers to clear all
items that are jamming the blades. Insert an allen wrench that fits into the
bottom of the unit and turn the allen wrench back and forth several times
until the motor is free. Push the reset button when you are done to restore
power to the unit.
Inspect the unit and remove the object with tongs or pliers.
Tighten the mounting screws at the top of the disposal, where it mounts to
the bottom of the sink flange.
Secure the flanges surrounding the gasket (between the disposal and the
sink) or replace the rubber gasket if necessary.
When using the disposal, run more cold water.
After turning off the power to the disposal, use tongs or pliers to clear all
items that are not acceptable for a disposal (for example, potato and carrot
peels or stringy vegetables).
Water Heater (con’t)
Helpful Hints!

11
Helpful Hints!
Garbage Disposal (con’t)
The disposal runs slowly or drains slowly.
The disposal has a foul odor.
There is not enough water.
The drain line is clogged.
The disposal is not grinding finely enough.
Food has been sitting in the disposal too long before
being disposed.
When using the disposal, run more cold water.
Run hot water to clear any clogged grease. Remove the drainpipe if
it needs to be unclogged (NOTE: Do not use harsh chemicals to
clear the drain.)
Replace any dull or damaged parts.
To eliminate the odor, pour baking soda down the drain or grind up a
citrus rind.
Problem Possible Cause Solution
The dishwasher will not turn on.
The dishwasher does not fill with water.
Water continually runs.
The dishes are still dirty at the end of the wash.
The soap dispenser will not open.
The dishes are wet.
The dishwasher is leaking water.
The dishwasher is making unusual noises.
The door is not locked/latched.
The unit is plugged into the wrong receptacle.
The timer or selector button is in the wrong position.
Power is not reaching the unit.
The door switch is malfunctioning.
The timer is defective.
The water valve is not turned on.
The water filter is clogged.
The overflow switch is malfunctioning.
The timer is defective.
The water intake valve is stuck.
The overflow switch is malfunctioning.
The timer is defective.
The water is not hot enough.
Heavy debris and food were not removed from the
dishes prior to loading.
The dishes are not loaded properly.
The detergent is old.
The spray arms are blocked.
There is soap build-up in the soap cup.
The soap dispenser lid is blocked.
There are mineral deposits on the heating element.
The heating element wire is loose.
The heating element has burned out.
The timer is defective
The door seal is damaged.
The overflow switch is defective.
The heating element nuts are loose.
The hose clamps are loose.
The door hinges are broken.
You are using liquid soap.
The spray arm is hitting the dishes.
The water intake valve is damaged causing a
knocking sound when the unit fills.
There is not enough water in the unit.
Be sure the door is securely shut and latched.
If the unit is plugged into a receptacle shared with the disposal, make
sure the plugs are not reversed.
Adjust timer and/or selector buttons to the correct positions.
Ensure the unit is plugged in and reset the breaker, if necessary.
Inspect the door switch for damage. Repair or replace as needed.
Replace the timer.
Make sure the water valve is in the “ON” position (it may be located
under the sink, under the floor in the basement or in a closet behind the
wall).
If the unit has one, clean the water intake valve filter.
Check the switch. The unit will not fill if the switch sticks in the “FILL”
position.
Replace the timer.
Inspect the valve and make sure it is shut.
Check the switch. The unit will not fill if the switch sticks in the “EMPTY”
position.
Replace the timer.
Run the water in the kitchen sink until it gets hot. Then turn on the
dishwasher. This will ensure that it fills up with hot water. Verify that the
water is between 140ºF and 150ºF.
Pre-rinse dishes before loading into the dishwasher.
Dishes should be faced towards the water spray and should not be
touching each other.
Replace with new detergent.
Be sure nothing is blocking the spray arms.
Remove hardened detergent from the soap cup and clean with vinegar.
Remove any obstructions blocking the lid.
Wash the element gently with vinegar.
Secure all electrical connections around the heating element.
Replace the heating element.
Replace the timer.
Replace the door seal.
Check for damage to the switch and replace if necessary.
Check for loose nuts that attach the tub to the element and tighten them.
Check for loose hoses and tighten clamps (you may need to move the
dishwasher).
Replace the door hinges.
Stop using liquid soap and switch to powder soap.
Adjust the dishes to ensure they do not obstruct the spray arms.
Replace the water intake valve.
Avoid using other faucets while the dishwasher is running.
Problem Possible Cause Solution
• Avoid liquid soap, which can over-sud and cause water to drip from the door.
• Regularly clean debris from the spray arms.
• If your dishwasher is stained, fill the detergent cup with powdered orange or lemon drink and let the washer
run through its normal cycle.
• Add a rinse agent to cut down on film.
• When loading dishes, be sure the dishes do not block and/or damage the spray arm and face the dishes
toward the spray for the best cleaning results.
Dishwasher

12
The dishwasher is not draining and leaves standing
water in the tub. (Note: One to two cups of
remaining water is normal.)
Water is leaking out of the air gap.
There is a kink or clog in the drain hose.
There is a clog in the air gap (small cap located
on the countertop or sink deck).
The pump is blocked.
The kitchen sink drain is clogged.
There is a clog in the hose that runs from the air
gap to the disposal.
Clear the drain hose by disconnecting and blowing through it.
Take the air gap cover off and remove any debris from the air gap.
Check the pump area in the rear of the tub for paper or large objects.
Since the dishwasher drains into the kitchen sink and often the disposal,
run the disposal to clear any food and unclog the drain if necessary.
Detach the line and remove any clogs. Replace the hose.
Problem Possible Cause Solution
Dishwasher (con’t)
Helpful Hints!
• To avoid damaging the burners, do not use extra-large and heavy cooking pans.
• Regularly remove any grease or food build-up around the burners and connections.
• If you have a self-clean oven, DO NOT use any other method to clean.
The range will not turn on.
One of the burners does not turn on.
A burner does not cook well.
The timer is not working.
The oven overheats.
The oven does not hold the temperature that was set.
There is a lot of condensation/moisture in the oven.
The light in the oven does not work.
The oven door does not close properly.
Features on the control panel are not working.
The oven’s self-clean function is not working.
Power is not reaching the unit.
If the unit has an electronic control, it may need to
be reset.
The element is not properly plugged in.
The burner is defective.
Oven is in the self-clean cycle.
The wiring, terminal block or switch is defective.
The cooking pan is the wrong size.
The element is damaged.
The timer has not been set correctly.
The timer fuse has blown.
There are loose connections.
The timer has a malfunction.
A vent is clogged.
The door gasket is damaged.
The thermostat is not calibrated correctly.
The vent is clogged.
The door does not close properly.
The bulb is burnt out.
There is a defective switch or poor wiring to the
bulb socket.
A hinge or spring is malfunctioning.
A fuse has blown.
The door is not locked.
Ensure the unit is plugged in. Check for a blown fuse and reset.
If there is power to the unit and it has an electronic control, disconnect
the power for 15-30 minutes and re-try.
Unplug the burner and reinstall to a fully seated position to ensure
it is securely plugged in.
Remove the burner and plug it into another burner receptacle of the
same size. Turn on that element. If it still does not work, replace
the element.
This cycle requires a high amount of power. The stove may not be able
to work at the same time as the self-clean cycle.
Check each part and replace if necessary.
Use flat-bottomed pans that just cover the element.
Replace the element.
See the owner’s manual for specific instructions.
Check the fuse in the timer circuit.
Turn the power off and tighten all loose electrical connections.
Replace the timer.
Clear the vent to eliminate the clog. If necessary, replace the air filter.
Replace the door gasket.
Call the manufacturer who will help you re-calibrate the unit over the phone.
Clear the vent to eliminate the clog. If necessary, replace the air filter.
Inspect the door hinges and gasket. Repair or replace as needed.
Turn off the oven and replace the bulb with the correct type and size.
Test the switch and wiring. Replace parts as needed.
Replace the defective part.
Check the fuse in the accessory circuit.
Securely shut and re-latch the door and then restart the self-clean cycle.
Electric Cooktop/Range/Oven
Helpful Hints!
• To avoid damaging the burners, do not use extra-large and heavy cooking pans.
• Regularly remove any grease or food build-up around the burners and connections.
• If you have a self-clean oven, DO NOT use any other method to clean it.
The oven or burners will not ignite. The pilot light is out.
Gas is not on.
Relight the pilot. (Call the gas company if assistance is needed.)
Ensure the gas valve is open. If necessary, contact the local gas
company.
Gas Cooktop/Range/Oven
Problem Possible Cause Solution
Problem Possible Cause Solution

13
The oven or burners will not ignite.
The burner will not stay on.
The flame is not steady.
The burners leave soot or make an unusual noise.
The oven overheats or bakes unevenly.
The oven door will not open.
There is a gas odor at the unit.
The burner cap is not properly set
(sealed burner unit).
The pilot port is clogged.
The unit is located in a drafty area.
The burner is clogged.
There is an incorrect mixture of gas and air.
There is an incorrect mixture of gas and air.
The oven was not pre-heated.
Circulation in the oven is affected by placement of
aluminum foil in the oven.
The exhaust vent is clogged.
The calibration needs to be adjusted.
The door gasket is damaged.
The self-clean dials are in the “ON” position.
The pilot is not lit.
The gas line is leaking.
Make sure the cap is seated properly, is not tilted and does not rock or
wobble. Ensure the cap matches the burner size. Your unit may have one
or more burners that are different sizes and you want to make sure a small
cap is not on a large burner.
Clear the port with a toothpick, small wire or pipe cleaner.
Try to avoid drafts near the range.
Clean the burner surface and ports.
Contact the local gas company.
Contact the local gas company.
Allow your oven to preheat before baking. Since many items have a short
cooking time, failure to preheat dramatically affects cooking results.
If you use aluminum foil on your oven shelf, never cover the entire shelf.
This will block the circulation of the heat in the oven. Allow two inches
around the back and sides of the oven shelf for proper heat circulation.
Clean the vent to eliminate the clog. If necessary, replace the air filter.
Call the manufacturer who will help you re-calibrate the unit over the
phone.
Replace the door gasket.
Reset the self-clean dials to the “OFF” position.
Ventilate the room and relight the pilot.
Extinguish all flames. Do not turn on any electrical switches. Immediately
notify the local gas company.
Problem Possible Cause Solution
Problem Possible Cause Solution
Problem Possible Cause Solution
Gas Cooktop/Range/Oven (con’t)
There are small spots/holes in the interior lining.
The touch pad does not operate correctly.
The turntable is not turning.
There is a popping noise or arcing in the unit.
Food particles are stuck to the walls and need to be
removed regularly, before damage begins.
Power is not reaching the unit.
The clock is not set.
Improper programming or a program sequence
was entered.
The turntable is not set in properly.
The turntable was placed upside-down.
A “timer” function was selected.
The unit was turned on when it was empty.
Metal or metallic trimmed items were placed in
the microwave.
The metal cooking rack that comes with the unit is
not set in place correctly.
Boil a cup of water mixed with two tablespoons of lemon juice or baking
soda for 3-5 minutes. The steam will loosen the food that can then be
wiped away.
Ensure the unit is plugged in. Check for a blown fuse and reset.
Set the clock.
Press “CLEAR” and start over. Sometimes, improper programming or a
program sequence, such as delay start, can cause the touch pads to be
non-responsive.
Set the turntable securely on the turntable motor and ensure it is
centered, or it will not turn.
Turn the turntable right side up. If the turntable is upside-down it will
drag on the floor of the microwave.
Ensure a “cook” function is selected.
Always have something in the microwave when in use.
Never use metal or metal trimmed utensils and serving pieces in the
microwave cavity.
Be sure the rack is firmly in place and not upside-down.
Helpful Hints!
• Do not use pans or dishes that are metal or have metallic trim.
• Use only mild soap and/or baking soda to clean the interior of the microwave.
Microwave Oven
The compactor will not turn on.
The load does not compact completely.
Power is not reaching the unit.
The safety lock is not on.
The drawer is open.
The ram has seized up.
The chain drive, gears or pulley are loose or broken.
Ensure the unit is plugged in. Check for a blown fuse or tripped
breaker and reset.
Turn on the safety lock.
Be sure the door is shut securely and remove anything that keeps it
from closing.
Oil the ram screws or replace the screws if they are stripped.
Check the chain and tighten or replace if necessary.
Helpful Hints!
• Replace the deodorant regularly to prevent odors.
• Before use, check that the bag is in the proper position and that the retainer ring
and clips are securely in place.
Trash Compactor

14
A breaker trips or a fuse blows during the
compactor’s cycle.
The compactor makes loud noises.
The compactor door is stuck shut.
The compactor will not stop running.
Trash spills out of the compactor.
The compactor has an unusual odor.
There are too many appliances on one circuit.
There is a short in the cord, plug, or switch.
The drive chain is loose.
The unit needs to be greased.
There are loose parts.
The ram stalled.
The top-limit switch is malfunctioning.
There is a defect in the start/stop switch.
The bag is not installed properly.
The deodorant is empty.
The aerosol nozzle on the deodorant is clogged.
The unit may need its own circuit.
Be sure the cord, plug and switch work.
Tighten the drive chain.
Oil the unit.
Tighten all screw and bolts.
Be sure the unit is closed and plugged into the outlet. If necessary,
inspect for a broken chain, belt, pulley or drive screw.
Unplug the unit and be sure the switch works.
Inspect and replace the switch, as necessary.
Be sure the bag and clips are secure.
Replace the deodorant.
Clear the clog using a thin wire or by running the nozzle under
warm water.
Problem Possible Cause Solution
Problem Possible Cause Solution
Trash Compactor (con’t)
Helpful Hints!
• Clean the interior shelves, shell and gaskets quarterly.
• Clean the coils on the back or underneath annually.
• Remove odors from your fridge by placing a cotton ball soaked in vanilla extract,
a cup of baking soda or a slice of lemon in the fridge at all times.
No power and/or motor is not turning on, interior
light(s) not working.
The unit has power, the motor is clicking occasionally
and the light is on, yet it is not cooling.
The unit cools poorly, cycles off and on, or is
constantly on.
The unit makes unusual noises.
The unit ices up quickly or will not defrost.
The refrigerator leaks water underneath or inside.
The refrigerator has an unusual odor.
There is no power at the outlet or the unit has come
unplugged.
The condenser coils are dirty.
The condenser fan is malfunctioning (frost-free type).
The thermostat is on the wrong setting.
The condenser coils are dirty.
The door gasket is damaged, allowing air to escape.
There is heavy frost accumulation.
The weather is hot and humid.
Heat is coming from the light because it is not turning
off when the door is closed.
The unit is not sitting level.
The drain pan rattles.
The fan blades are blocked by something.
The door gasket is damaged.
Foods are left uncovered.
The drains are clogged.
The defrost, timer, heater or thermostat is damaged.
The drain hose or drain pan is cracked.
The drains are clogged or the drain pan is full.
The drains are clogged.
The drain pan is dirty.
Food has fallen under “crisper” or “meat” drawers.
Check to see if the unit is still plugged in. If it is plugged in, use a
hair dryer or radio to test the outlet to be sure the outlet is working.
Check for a blown fuse and reset. If it continues to blow the fuse,
the unit may need its own designated circuit.
Clean the coils by gently vacuuming.
Inspect the fan. Repair or replace as needed.
Adjust the temperature setting. If the thermostat is adjusted to 34ºF
or under, try keeping the refrigerator at 40ºF instead.
Clean the coils by gently vacuuming.
Inspect the gasket and replace, as necessary.
Defrost the unit regularly.
If the unit runs continuously but cools correctly, there is no
malfunction with your unit. Try to cool the room.
Push each switch button (one at the light and one near the door).
Make sure they are not stuck.
Level the unit.
Center the pan so it does not touch the sides and is clear of the
compressor.
Be sure the evaporator and compressor fans are not obstructed.
Replace the door gasket, as necessary.
Cover and seal all food and liquids.
Clean all drains.
Check the timer, heater and thermostat for defects.
Replace any broken parts.
Clear all drains and be sure the drain pan is empty.
Flush and clear all drains.
Clean and disinfect the drain pan.
Remove the drawers and clean.
Refrigerator and Freezer
15
• Clean the lint screen after each load of clothes.
Helpful Hint!
The drum is stuck, though the motor still runs.
The clothes don’t dry, though the drum turns.
The drum is blocked.
The drive belt is broken.
The support wheel or idler wheel assembly is broken.
There is a clog in the lint trap or exhaust vent.
The safety thermostat, heating element or timer
is defective.
Free the drum from any obstructions.
Replace the drive belt.
Inspect all parts and replace as necessary.
Clear the trap and vent.
Inspect all parts and replace as necessary.
Helpful Hints!
• Adjust the level of your washing machine by turning the legs clockwise to lower them or counter-clockwise to raise them.
• To clean your washing machine, fill it with warm water and pour a gallon of distilled vinegar into it. Run the machine
through an entire cycle. The vinegar will clean the hoses and unclog the soap scum.
• To remove odors inside of the washer, fill it with hot water, then set for regular speed and longest time. Add a cup of
baking soda. Allow washer to complete entire wash and rinse cycle. If odor lingers, repeat entire process.
The unit will not turn on.
The machine does not fill with water.
The unit is not draining.
The unit fills with water but does not run.
The motor runs, but the unit does not agitate or spin.
The water is not hot enough.
The water runs continuously.
The unit is leaking water.
The unit shakes or vibrates across the floor.
The outlet does not have power.
The safety switch has tripped.
The house inlet valve may not be open.
There is no water supply.
The filters are clogged.
There is a kink in one of the water hoses.
The timer is not set.
The control button for the water is not pushed in
all the way.
The drain hose is kinked.
The position of the drain hose is too high.
The lid is not closed completely.
The lid safety switch is tripped.
There is too much laundry in the tub.
The timer is defective.
The drive belt is loose or broken.
The water heater setting is too low.
The water supply hoses are misconnected.
There is a defect in the mixing valve or timer.
The overflow switch hose is disconnected.
The overflow switch, timer or mixing valve is defective.
The hose connection is loose.
The gasket, mixing valve, hoses, overflow switch or
sensor is defective.
The machine or load is not level.
There is a loose/defective hose connection.
Ensure unit is plugged in. Reset the fuse box or circuit breaker.
Distribute the clothes evenly in the machine and be sure the lid is
completely closed.
Open the valve.
Make sure the water valve is turned on.
Clean the inlet hose filters.
Straighten all water hoses.
Slightly turn the timer, ensuring all buttons are set correctly.
Push in the button to make sure it is fully depressed.
Straighten the drain hose.
Do not position drain hoses higher than 4 feet above the floor.
The washer drains and spins at the same time, so the lid must be down.
Make sure the lid is firmly attached and closed. Test the switch.
Take some items out and give the machine 15 minutes to reset the cycle.
Replace the timer.
Tighten or replace the drive belt as necessary.
Set the thermostat on the water heater to between 140ºF and 160ºF.
Reconnect the hot water hose to the hot water side and the cold water
hose to the cold water side.
Replace the valve or timer.
Replace the water hose.
Replace the overflow switch, timer or mixing value as necessary.
Tighten the connection.
Replace the defective part or parts as necessary.
Level the machine and distribute clothes evenly in the tub.
Tighten or replace the connection.
Problem Possible Cause Solution
Clothes Washer
The unit will not turn on. The door is open.
No power is reaching the unit.
The motor wiring is loose.
There is a defect in the door switch, centrifugal
switch or timer.
Shut the door securely.
Ensure the unit is plugged in.
Reset the fuse box or circuit breaker.
Tighten all loose electrical connections.
Inspect all parts and replace as necessary.
Problem Possible Cause Solution
Clothes Dryer

16
The load takes a long time to dry.
The unit does not stop drying at the end of the cycle.
The dryer is making a squeaking noise.
Front Loader won’t unlock.
There is a clog in the lint trap or exhaust vent.
The dryer is overloaded.
The clothes are too wet.
The fan is loose.
The door gasket is damaged.
The timer is defective.
Loose cabinet screws may cause squeaks.
Foreign objects are causing squeaks.
Cycle not complete.
Water not draining.
Clothes blocking.
Clear the trap and vent.
Remove some items and dry the load again.
Ensure the spin cycle is completed in the washer and remove
some clothes to dry the load again.
Check the fan and tighten if necessary.
Replace the door gasket.
Replace the timer.
Check all exposed screws and make sure they are tight.
Check for foreign objects in the drum and below the lint filter.
Complete time cycle.
Drain manually.
Push in before opening to clear clothes.
Check owner’s manual for steps to unlock manually.
Problem Possible Cause Solution
Problem Possible Cause Solution
Problem Possible Cause Solution
Clothes Dryer (con’t)
Helpful Hints!
• Clean and/or replace filters once a month.
• One month before the start of heating season, have maintenance performed on your heating system.
• Open window shades and awnings to increase direct sunlight entering your home and lower heating costs.
There is no heat.
The rooms are not warm enough.
.
Soot gathers in the house.
The blower makes unusual noises.
There is no power to the unit.
The blower belt is broken.
The filter is dirty.
The registers are dirty.
There are air leaks in the ducts.
The ducts are blocked.
A register is closed.
The duct damper is in an incorrect position.
The blower belt is loose.
The filter is dirty.
The ducts are dirty.
The pulley is loose.
A belt is worn out or the tension is too tight.
The blower bearings need oil.
Ensure unit is plugged in. Check for a blown fuse and reset.
Replace the belt.
Replace the filter.
Clean and vacuum the registers and ensure they are open.
Seal the leaks with duct tape.
Remove any objects that are blocking the duct.
Open all registers.
Adjust the dampers to correct.
Tighten the blower belt.
Replace the filter.
Have the ducts professionally cleaned.
Tighten the pulley screws.
Replace the worn belt or loosen the tension.
Oil the bearings.
Heating System
Helpful Hints!
• Clean and/or replace the filters once a month.
• Keep the condensing unit free of debris by vacuuming dust and lint from the registers regularly.
• One month before air conditioning season, have maintenance service done on your system.
• Use window shades and awnings in the summer to reduce the amount of sunlight
entering your home and lower cooling costs.
The unit will not turn on.
The air is not cool enough.
The unit constantly cycles off and on.
Water is leaking into the walls or ceiling (attic installation.)
There is a blown fuse or tripped breaker.
The condenser coil is dirty.
There is direct sun on the evaporator unit.
The insulation has fallen off the feed line.
There may be a clog in the evaporator unit or
something blocking the fan.
The filter is dirty.
The drain hose from the condenser pan is clogged.
Check the circuit breaker and replace the fuses in the disconnect box.
(Always turn off the circuit breaker before replacing the fuses.)
Remove all debris from and around the unit so that air can properly
circulate through the fans and replace/clean the filters.
Create shade for the unit.
Reattach any loose insulation and replace any worn-out insulation.
Clean out the evaporator unit.
Replace or clean the filter.
Unclog the hose so water can empty through it.
Air Conditioning System

17
• To prevent power outages, be sure to avoid overloading circuits with too many appliances or fixtures.
Electrical System
Helpful Hint!
The lights or outlets do not work.
There is no power to the entire house or half of
the house.
There is no power to the outlet or fixture.
The outlet or switch is defective.
There is a tripped circuit breaker.
Be sure all switches at the fuse box are in the “ON” position and
no fuses have blown. Unplug all appliances and reset the breaker.
Reset the GFI outlet if it has been tripped.
Replace the outlet or switch.
Reset the circuit breaker and replace any fuses, as necessary.
Problem Possible Cause Solution
Helpful Hints!
• Maintain proper water level at all times.
• Keep the pool chemically balanced. Most pool supply stores will test a sample of your pool water for free.
• Consult your pool and spa company for specific suggestions on maintaining your particular system.
The pump has no power.
The pump will not prime.
The heater is not working.
The water pressure is too low or too high.
The filter is not working.
The motor is not receiving power.
The water level is too low and the prime has been lost.
The valves are not in the correct position.
There are leaks in the suction line.
The pilot is not lit.
The gas valve is on the pilot setting (gas heater).
The unit is not receiving gas.
There is no power to the unit.
Pressure switch tripped due to a dirty filter.
The filter is dirty or blocked.
The skimmer and pump basket are clogged.
The valves are in the wrong position.
There is a water leak.
The circuit breaker has tripped.
The motor is not plugged in or the timer is not
set properly.
The filter is clogged.
Reset the fuse box or circuit breaker. Be sure the timer is set
correctly. Oil the motor as necessary.
Add water to the pool/spa.
Correct the valve position.
Locate and repair the leaks.
Light the pilot.
Turn the pilot setting to the “ON” position.
Be sure the gas cock is in the correct position.
Reset the circuit breaker or relight the pilot.
Backwash the filter.
Backwash the filter and clean the cartridge.
Clean the skimmer and pump basket.
Correct the valve position.
Locate and repair the leaks.
Reset the circuit breaker.
Plug in the motor and reset the timer.
D.E. Filter - Backwash or replace.
Sand Filter - Replace sand.
Cartridge Filter - Remove and clean cartridge.
Problem Possible Cause Solution
Pool/Spa Equipment
Know someone who is buying or selling a home?
I appreciate your referrals!
Old Republic Home Protection Service: (800) 972-5985 or visit www.orhp.com - Homeowner Central
Old Republic Home Protection Plan #:
Phone Company:
Gas Company:
Electric Company:
Water Company:
Cable Company:
Fire Station:
Police Station:
Homeowner’s Insurance Agent:
Homeowner’s Policy #:
Poison Control Center:
Important Information
