OneMediaHub Version 14.5 Installation And Operation Guide 14 5 0
User Manual:
Open the PDF directly: View PDF ![]() .
.
Page Count: 251 [warning: Documents this large are best viewed by clicking the View PDF Link!]
- OneMediaHub Version 14.5 Installation and Operation Guide
- Table of Contents
- Chapter 1. Introduction
- Chapter 2. System overview
- 2.1 OneMediaHub architecture
- 2.2 The Synchronization Engine
- 2.3 Execution flow of a request
- 2.4 OneMediaHub push
- 2.5 OneMediaHub clustering
- 2.6 Media synchronization
- Chapter 3. Installation and configuration
- 3.1 Installing the OneMediaHub
- 3.2 The config directory
- 3.3 Quick configuration
- 3.4 Database configuration
- 3.5 IPv6 Support
- 3.6 Adding new nodes to a OneMediaHub cluster
- 3.7 Data Synchronization Service configuration
- 3.8 PIM Listener Service configuration
- 3.9 Data Synchronization Service cluster configuration
- 3.10 Enabling default users
- 3.11 Starting/stopping OneMediaHub services
- 3.12 Portal configuration
- 3.12.1 Configuring the login with or without country code
- 3.12.2 ROOT.xml
- 3.12.3 portal-ext.properties
- 3.12.3.1 sp.syncportal.messages.url and sp.syncportal.url
- 3.12.3.2 admin.email.from.address and admin.email.from.name
- 3.12.3.3 sp.mediaserver.url
- 3.12.3.4 sync.slow.min-interval
- 3.12.3.5 sync.blocked-sources
- 3.12.3.6 sync.min-interval
- 3.12.3.7 sync.max-session-allowed
- 3.12.3.8 sync.response-time-threshold
- 3.12.3.9 sp.syncportal.device.url.automaticRedirect, sp.syncportal.device.url.androidApp, sp.syncportal.device.url.iPhoneApp, and sp.syncportal.device.url.windowsPhoneApp
- 3.12.3.10 sp.syncportal.url.download.page
- 3.12.3.11 storage.provider, storage.identity, storage.credential and storage.container-name
- 3.12.3.12 ets.pipeline-id, ets.client-region and ets.s3-container-name
- 3.12.3.13 audio.enabled
- 3.12.3.14 passwords.toolkit and passwords.regexptoolkit.pattern
- 3.12.3.15 passwords.allow.username
- 3.12.3.16 push.apple.keystore.file, push.apple.keystore.password, push.apple.production and push.apple.connection-pool-size
- 3.12.3.17 subscription.enabled
- 3.12.3.18 subscription.warning-before-renewal-in-minutes, subscription.insufficient-funds-delay-in-minutes, subscription.service-error-delay-in-minutes, subscription.deletion-delay-in-minutes, subscription.keep-trying-to-charge-in-minutes, subscription.allow-downgrade-overquota, subscription.allow-immediate-downgrade
- 3.12.3.19 subscription.notification-sender-class, subscription.notification-builder-class, subscription.payment-service-class, subscription.manager-class, subscription.currency
- 3.12.3.20 subscription.payment.web
- 3.12.3.21 subscription.paymentverifier.apple.sandbox
- 3.12.3.22 subscription.paymentverifier.web.validationurl
- 3.12.3.23 media.account-pre-population
- 3.12.3.24 ui.media.upload-file-size-limit and ui.media.multiple-upload-size-limit
- 3.12.3.25 sapi.upload.max-concurrent-uploads
- 3.12.3.26 sapi.upload.danger-zone.concurrent-uploads
- 3.12.3.27 sapi.upload.danger-zone.device.max-concurrent-uploads
- 3.12.3.28 user-import-tool.device.countrya2, user-import-tool.device.carrierid and user-import-tool.device.modelid
- 3.12.3.29 user-communication.default-channel
- 3.12.3.30 sapi.login.persistent-login-token-max-age-in-days
- 3.12.3.31 sharing.email-counter.max-messages
- 3.12.4 Restricting access to administrative Server API calls
- 3.12.5 How to configure the OAuth 2.0 client
- 3.12.6 How to enable user subscriptions
- 3.12.7 How to view and edit current subscription plans
- 3.12.8 How to enable user validation in Mobile signup
- 3.12.9 How to enable user validation in Portal signup
- 3.12.10 How to enable gzip compression
- 3.12.11 How to configure the disk quota for media
- 3.12.12 How to configure quota notification
- 3.12.13 How to configure the Portal to store items on the local file system
- 3.12.14 Serving media files using the Apache web server
- 3.12.15 How to configure the Portal to store items on an online file storage provider
- 3.12.16 How to configure the max item size allowed by the DS Server
- 3.12.17 How to configure the Server API base URL
- 3.12.18 Help link
- 3.12.19 Contact Us link
- 3.12.20 How to configure Google Analytics
- 3.12.21 How to enable iOS Push
- 3.12.22 How to enable/disable music management
- 3.12.23 How to enable media transcoding
- 3.12.24 How to customize the Privacy Policy and Term of Use pages redirecting the OneMediaHub links to external pages.
- 3.12.25 How to configure user-level communication channel
- 3.13 Server URL configuration
- 3.14 Email configuration
- 3.15 Reminder Emails
- 3.16 SMS Sender configuration
- 3.17 OTA settings provisioning configuration
- 3.18 Forgot password
- 3.19 Push policy configuration
- 3.20 OneMediaHub SNMP Appender configuration
- 3.21 Location from IP address and Accept-Language header
- 3.22 Collecting client logs
- 3.23 Client log cleanup service
- 3.24 Antivirus service
- Chapter 4. OneMediaHub Portal administration
- Chapter 5. Operation tasks
- 5.1 Monitoring OneMediaHub services
- 5.2 Storage cleanup
- 5.3 Remove orphan media files from file system storage provider
- 5.4 How to adjust the startup memory of the JVM
- 5.5 Synchronizing node clocks
- 5.6 Configuring OneMediaHub load balancing with Apache HTTP Server (httpd) and mod_cluster
- 5.7 How to change the sync URL
- 5.8 Setting the Portal URL in device configuration pages
- 5.9 How to install a patch
- 5.10 How to install clients
- 5.11 How to install a new Portal User Interface
- 5.12 Using the Device Simulator Tool
- 5.13 Gathering information about the OneMediaHub environment
- 5.14 Performance statistics
- 5.15 Event tracking and reporting
- 5.16 Configuring the Stuck Thread Detection valve
- 5.17 How to enable and disable devices
- 5.18 How to disable clients offered in mobile portal
- 5.19 Marketing KPI
- 5.20 Import users tool
- 5.21 User reporting tool
- 5.22 How to enable OneMediaHub proxy support
- Chapter 6. Database partitioning
- Chapter 7. Logging
- Chapter 8. Configuring External Services
- Chapter 9. OneMediaHub Server URL configuration
- Appendix A. Default Ports used by OneMediaHub
- Appendix B. Device IDs
- Appendix C. OneMediaHub error messages
- Appendix D. FUNAMBOL-LOGGING-MIB.txt
- Appendix E. Database Schema
- E.1 OneMediaHub Core
- E.1.1 Contact_
- E.1.2 Country
- E.1.3 fnbl_bucket
- E.1.4 Partitioning Schema
- E.1.5 fnbl_connector
- E.1.6 fnbl_connector_source_type
- E.1.7 fnbl_country_language
- E.1.8 fnbl_country_timezones
- E.1.9 fnbl_deleted_sync_user_role
- E.1.10 fnbl_deleted_user
- E.1.11 fnbl_device
- E.1.12 fnbl_device_caps
- E.1.13 fnbl_device_datastore
- E.1.14 fnbl_email_account
- E.1.15 fnbl_email_enable_account
- E.1.16 fnbl_external_service
- E.1.17 fnbl_external_service_account
- E.1.18 fnbl_family
- E.1.19 fnbl_family_user
- E.1.20 fnbl_file_data_object_user_lock
- E.1.21 fnbl_id
- E.1.22 fnbl_import_csv_commands
- E.1.23 fnbl_last_deleted_msisdn
- E.1.24 fnbl_last_sync
- E.1.25 fnbl_module
- E.1.26 fnbl_module_connector
- E.1.27 fnbl_partition
- E.1.28 fnbl_pim_listener_registry
- E.1.29 PIM Push Tables Schema
- E.1.30 fnbl_principal
- E.1.31 fnbl_public_mailservers
- E.1.32 fnbl_push_listener_registry
- E.1.33 fnbl_push_sender_notification
- E.1.34 fnbl_role
- E.1.35 fnbl_storage
- E.1.36 fnbl_subscription_family
- E.1.37 fnbl_subscription_payment
- E.1.38 fnbl_subscription_plan
- E.1.39 fnbl_sync_history
- E.1.40 fnbl_sync_source
- E.1.41 fnbl_sync_source_type
- E.1.42 fnbl_temp_paying_users
- E.1.43 fnbl_timezone
- E.1.44 fnbl_user
- E.1.45 fnbl_user_alias
- E.1.46 fnbl_user_picture
- E.1.47 fnbl_user_preference
- E.1.48 fnbl_user_properties
- E.1.49 fnbl_user_role
- E.1.50 fnbl_user_subscription
- E.1.51 fp_carrier
- E.1.52 fp_device
- E.1.53 fp_manufacturer
- E.1.54 fp_model
- E.1.55 User_
- E.1.56 Other Liferay tables
- E.2 OneMediaHub User
- E.2.1 fnbl_client_mapping
- E.2.2 fnbl_comment
- E.2.3 fnbl_device_config
- E.2.4 fnbl_email_folder
- E.2.5 fnbl_email_inbox
- E.2.6 fnbl_email_sentpop
- E.2.7 fnbl_exported_file_data_object
- E.2.8 fnbl_file_data_object
- E.2.9 fnbl_file_data_object_label_items
- E.2.10 fnbl_file_data_object_property
- E.2.11 fnbl_file_data_object_set
- E.2.12 fnbl_file_data_object_set_item
- E.2.13 fnbl_file_data_object_tag
- E.2.14 fnbl_file_data_object_thumbnail
- E.2.15 fnbl_folder
- E.2.16 fnbl_label
- E.2.17 fnbl_last_activity
- E.2.18 fnbl_last_activity_item
- E.2.19 fnbl_pending_notification
- E.2.20 fnbl_pim_address
- E.2.21 fnbl_pim_calendar
- E.2.22 fnbl_pim_calendar_alarm
- E.2.23 fnbl_pim_calendar_attendee
- E.2.24 fnbl_pim_calendar_exception
- E.2.25 fnbl_pim_contact
- E.2.26 fnbl_pim_contact_item
- E.2.27 fnbl_pim_contact_photo
- E.2.28 fnbl_pim_note
- E.2.29 fnbl_pim_organization
- E.2.30 fnbl_temp_paying_users
- E.3 OneMediaHub Reporting
- E.1 OneMediaHub Core
- Appendix F. Examples of sent SNMP traps
- Appendix G. Xuggle Xuggler FAQs
- Appendix H. Capptain integration on Android App
- Glossary
- References
OneMediaHub Version 14.5
Installation and Operation Guide

OneMediaHub Version 14.5 Installation and Operation Guide
Version 14.5.0 - Revision 175192 [2014-12-12]
Copyright © 2012-2014 Funambol, Inc.
This document is provided for informational purposes and should be used for reference only.

iii
1 Introduction ........................................................................................................................ 1
1.1 Audience .................................................................................................................. 1
1.2 Prerequisites ............................................................................................................. 1
2 System overview .................................................................................................................. 2
2.1 OneMediaHub architecture .......................................................................................... 2
2.1.1 Roles and responsibilities ................................................................................. 2
2.2 The Synchronization Engine ........................................................................................ 5
2.3 Execution flow of a request ......................................................................................... 5
2.4 OneMediaHub push ................................................................................................... 6
2.4.1 Cloud push using APNS ................................................................................... 7
2.4.2 SMS push ...................................................................................................... 7
2.4.3 Push compatibility table ................................................................................... 8
2.5 OneMediaHub clustering ............................................................................................ 8
2.5.1 Data Synchronization Service cluster .................................................................. 9
2.5.2 PIM Listener Service cluster ........................................................................... 10
2.6 Media synchronization .............................................................................................. 11
2.6.1 File system structure ...................................................................................... 11
2.6.2 -ext subdirectories ....................................................................................... 12
2.6.3 Deleting media files ....................................................................................... 12
2.6.4 Temporary items management ......................................................................... 13
2.6.5 Scaling the file system ................................................................................... 13
2.6.6 Encryption ................................................................................................... 13
2.6.6.1 How encryption works ......................................................................... 13
2.6.6.2 How to configure the server to use encryption .......................................... 13
2.6.7 Storing files on an online file storage provider .................................................... 14
2.6.7.1 How to create an Amazon S3 bucket ...................................................... 14
2.6.8 Transcoding .................................................................................................. 16
2.6.8.1 How to configure Amazon Simple Notification Service .............................. 17
2.6.8.2 How to create a pipeline on Amazon Elastic Transcoder ............................. 19
2.6.9 Deleting transcoding jobs ................................................................................ 20
3 Installation and configuration ............................................................................................... 21
3.1 Installing the OneMediaHub ...................................................................................... 21
3.2 The config directory ............................................................................................. 22
3.2.1 OneMediaHub configuration files ..................................................................... 22
3.3 Quick configuration .................................................................................................. 22
3.4 Database configuration .............................................................................................. 27
3.4.1 MySQL database creation ............................................................................... 27
3.4.2 Further database configuration ......................................................................... 28
3.4.3 Limiting the maximum number of open connections ............................................ 30
3.4.4 Database partitioning ...................................................................................... 30
3.4.5 MySQL events .............................................................................................. 30
3.5 IPv6 Support ........................................................................................................... 31
3.6 Adding new nodes to a OneMediaHub cluster ............................................................... 31
3.6.1 Adding a new Data Synchronization Service node to the cluster ............................. 31
3.6.2 Adding a new PIM Listener Service node to the cluster ........................................ 32
3.7 Data Synchronization Service configuration .................................................................. 32
3.7.1 Funambol.xml .......................................................................................... 32
3.8 PIM Listener Service configuration ............................................................................. 34
3.8.1 PIMListenerConfiguration.xml ........................................................... 34
3.9 Data Synchronization Service cluster configuration ........................................................ 35
3.10 Enabling default users ............................................................................................. 35
3.11 Starting/stopping OneMediaHub services .................................................................... 36
3.11.1 Starting/stopping all services together .............................................................. 37
3.11.2 Starting/stopping the Data Synchronization service ............................................ 37

OneMediaHub Version 14.5
Installation and Operation Guide
iv
3.11.3 Starting/stopping the PIM Listener service ........................................................ 37
3.12 Portal configuration ................................................................................................ 37
3.12.1 Configuring the login with or without country code ............................................ 37
3.12.2 ROOT.xml ................................................................................................. 38
3.12.3 portal-ext.properties ....................................................................... 39
3.12.3.1 sp.syncportal.messages.url and sp.syncportal.url .......... 39
3.12.3.2 admin.email.from.address and admin.email.from.name ...... 39
3.12.3.3 sp.mediaserver.url .................................................................. 39
3.12.3.4 sync.slow.min-interval .......................................................... 40
3.12.3.5 sync.blocked-sources .............................................................. 40
3.12.3.6 sync.min-interval .................................................................... 40
3.12.3.7 sync.max-session-allowed ...................................................... 40
3.12.3.8 sync.response-time-threshold ............................................... 40
3.12.3.9 sp.syncportal.device.url.automaticRedirect,
sp.syncportal.device.url.androidApp,
sp.syncportal.device.url.iPhoneApp, and
sp.syncportal.device.url.windowsPhoneApp .................................. 41
3.12.3.10 sp.syncportal.url.download.page ....................................... 41
3.12.3.11 storage.provider, storage.identity,
storage.credential and storage.container-name ........................ 41
3.12.3.12 ets.pipeline-id, ets.client-region and ets.s3-
container-name ...................................................................................... 41
3.12.3.13 audio.enabled ........................................................................... 42
3.12.3.14 passwords.toolkit and
passwords.regexptoolkit.pattern .................................................... 42
3.12.3.15 passwords.allow.username ..................................................... 42
3.12.3.16 push.apple.keystore.file,
push.apple.keystore.password, push.apple.production and
push.apple.connection-pool-size .................................................... 43
3.12.3.17 subscription.enabled ............................................................. 43
3.12.3.18 subscription.warning-before-renewal-in-minutes,
subscription.insufficient-funds-delay-in-minutes,
subscription.service-error-delay-in-minutes,
subscription.deletion-delay-in-minutes,
subscription.keep-trying-to-charge-in-minutes,
subscription.allow-downgrade-overquota,
subscription.allow-immediate-downgrade ...................................... 43
3.12.3.19 subscription.notification-sender-class,
subscription.notification-builder-class,
subscription.payment-service-class, subscription.manager-
class, subscription.currency ............................................................ 44
3.12.3.20 subscription.payment.web ..................................................... 44
3.12.3.21 subscription.paymentverifier.apple.sandbox ................. 44
3.12.3.22 subscription.paymentverifier.web.validationurl ......... 44
3.12.3.23 media.account-pre-population ............................................. 44
3.12.3.24 ui.media.upload-file-size-limit and
ui.media.multiple-upload-size-limit ............................................ 44
3.12.3.25 sapi.upload.max-concurrent-uploads ................................. 45
3.12.3.26 sapi.upload.danger-zone.concurrent-uploads ................. 45
3.12.3.27 sapi.upload.danger-zone.device.max-concurrent-
uploads .................................................................................................... 45
3.12.3.28 user-import-tool.device.countrya2, user-import-
tool.device.carrierid and user-import-tool.device.modelid
................................................................................................................... 45

OneMediaHub Version 14.5
Installation and Operation Guide
v
3.12.3.29 user-communication.default-channel ................................. 45
3.12.3.30 sapi.login.persistent-login-token-max-age-in-days
................................................................................................................... 46
3.12.3.31 sharing.email-counter.max-messages ................................. 46
3.12.4 Restricting access to administrative Server API calls .......................................... 46
3.12.5 How to configure the OAuth 2.0 client ............................................................ 47
3.12.6 How to enable user subscriptions .................................................................... 49
3.12.7 How to view and edit current subscription plans ................................................ 51
3.12.8 How to enable user validation in Mobile signup ................................................ 51
3.12.9 How to enable user validation in Portal signup .................................................. 51
3.12.10 How to enable gzip compression ................................................................... 52
3.12.11 How to configure the disk quota for media ..................................................... 53
3.12.12 How to configure quota notification .............................................................. 55
3.12.13 How to configure the Portal to store items on the local file system ....................... 55
3.12.13.1 How to configure the Portal to store media on the local file system ............ 55
3.12.14 Serving media files using the Apache web server ............................................. 56
3.12.15 How to configure the Portal to store items on an online file storage provider .......... 57
3.12.15.1 How to configure the Portal to store Media items on an online file storage
provider ...................................................................................................... 57
3.12.16 How to configure the max item size allowed by the DS Server ............................ 58
3.12.16.1 How to configure the max picture size allowed by the DS Server .............. 58
3.12.16.2 How to configure the max video size allowed by the DS Server ................ 59
3.12.16.3 How to configure the max file and music size allowed by the DS Server ..... 59
3.12.17 How to configure the Server API base URL .................................................... 59
3.12.18 Help link .................................................................................................. 60
3.12.19 Contact Us link ......................................................................................... 60
3.12.20 How to configure Google Analytics ............................................................... 61
3.12.21 How to enable iOS Push ............................................................................. 61
3.12.22 How to enable/disable music management ...................................................... 61
3.12.23 How to enable media transcoding .................................................................. 61
3.12.24 How to customize the Privacy Policy and Term of Use pages redirecting the
OneMediaHub links to external pages. ...................................................................... 62
3.12.25 How to configure user-level communication channel ........................................ 62
3.13 Server URL configuration ........................................................................................ 63
3.13.1 Changing the default server port ..................................................................... 63
3.13.2 Supporting multiple server URL ..................................................................... 63
3.14 Email configuration ................................................................................................ 64
3.14.1 New user messages ...................................................................................... 64
3.14.2 Email counter configuration for messages containing the app download URL .......... 64
3.15 Reminder Emails .................................................................................................... 65
3.16 SMS Sender configuration ....................................................................................... 65
3.17 OTA settings provisioning configuration .................................................................... 66
3.18 Forgot password ..................................................................................................... 67
3.19 Push policy configuration ........................................................................................ 68
3.19.1 The PushSender configuration file .................................................................. 68
3.20 OneMediaHub SNMP Appender configuration ............................................................ 70
3.20.1 Configuration parameters .............................................................................. 70
3.20.2 Configuration file ........................................................................................ 71
3.20.3 Log records filtering ..................................................................................... 74
3.20.4 OneMediaHub SNMP error trap ..................................................................... 74
3.21 Location from IP address and Accept-Language header ........................................... 74
3.21.1 IP address and IP2Location ........................................................................... 75
3.21.2 Accept-Language header ......................................................................... 75
3.22 Collecting client logs .............................................................................................. 75

OneMediaHub Version 14.5
Installation and Operation Guide
vi
3.22.1 Configuration parameters .............................................................................. 75
3.23 Client log cleanup service ........................................................................................ 76
3.23.1 Configuration file ........................................................................................ 76
3.24 Antivirus service .................................................................................................... 76
3.24.1 Installing McAfee VirusScan ......................................................................... 77
3.24.2 Updating virus definitions of McAfee VirusScan ............................................... 77
3.24.3 Configuring the OneMediaHub server ............................................................. 78
4 OneMediaHub Portal administration ...................................................................................... 79
4.1 Changing the admin user password ............................................................................. 79
4.2 Handling user roles .................................................................................................. 79
4.3 Creating new administrative users ............................................................................... 81
5 Operation tasks .................................................................................................................. 82
5.1 Monitoring OneMediaHub services ............................................................................. 82
5.1.1 Monitoring the Data Synchronization Service ..................................................... 82
5.1.2 Monitoring the PIM Listener Service ................................................................ 87
5.2 Storage cleanup ....................................................................................................... 89
5.3 Remove orphan media files from file system storage provider .......................................... 89
5.4 How to adjust the startup memory of the JVM .............................................................. 90
5.4.1 Data Synchronization Service .......................................................................... 90
5.4.2 PIM Listener Service ..................................................................................... 90
5.5 Synchronizing node clocks ........................................................................................ 91
5.5.1 Installing NTP .............................................................................................. 91
5.5.2 Checking that NTP is synchronized .................................................................. 91
5.5.3 Configuring NTP ........................................................................................... 91
5.6 Configuring OneMediaHub load balancing with Apache HTTP Server (httpd) and
mod_cluster ................................................................................................................. 92
5.6.1 httpd requirements ...................................................................................... 92
5.6.2 Installing mod_cluster httpd modules ............................................................. 92
5.6.3 Configuring OneMediaHub instances for running in a cluster ................................. 93
5.6.3.1 Enabling mod_cluster .......................................................................... 93
5.6.4 Simple deployment architectures ...................................................................... 94
5.6.4.1 Case 1 .............................................................................................. 94
5.6.4.2 Case 2 .............................................................................................. 96
5.6.5 How to migrate OneMediaHub from mod_cluster v1.2.0 to mod_cluster v1.2.6 ......... 97
5.6.5.1 Update of the httpd .......................................................................... 98
5.6.5.2 Update of the OneMediaHub installation ................................................. 98
5.6.5.3 How to redirect HTTP traffic to HTTPS .................................................. 99
5.7 How to change the sync URL .................................................................................... 99
5.8 Setting the Portal URL in device configuration pages .................................................... 100
5.9 How to install a patch ............................................................................................. 101
5.9.1 Rollback procedure ...................................................................................... 101
5.10 How to install clients ............................................................................................ 102
5.11 How to install a new Portal User Interface ................................................................ 102
5.12 Using the Device Simulator Tool ............................................................................ 102
5.13 Gathering information about the OneMediaHub environment ........................................ 103
5.14 Performance statistics ............................................................................................ 103
5.14.1 Examples .................................................................................................. 104
5.15 Event tracking and reporting ................................................................................... 107
5.15.1 Antivirus .................................................................................................. 108
5.15.2 Media ...................................................................................................... 108
5.15.3 Push flow ................................................................................................. 108
5.15.4 Sync ........................................................................................................ 109
5.15.5 Sync session .............................................................................................. 109
5.15.6 Transcoding .............................................................................................. 109

OneMediaHub Version 14.5
Installation and Operation Guide
vii
5.15.7 Events information by database columns ........................................................ 110
5.16 Configuring the Stuck Thread Detection valve ........................................................... 110
5.17 How to enable and disable devices .......................................................................... 111
5.18 How to disable clients offered in mobile portal .......................................................... 112
5.19 Marketing KPI ..................................................................................................... 112
5.19.1 How to use ............................................................................................... 115
5.20 Import users tool .................................................................................................. 116
5.20.1 Pre-conditions ............................................................................................ 116
5.20.2 User command batch file ............................................................................. 116
5.20.3 Usage ....................................................................................................... 118
5.20.4 Commands ................................................................................................ 118
5.20.5 Configuration ............................................................................................ 119
5.20.6 Status codes .............................................................................................. 119
5.21 User reporting tool ................................................................................................ 120
5.21.1 How to use ............................................................................................... 121
5.22 How to enable OneMediaHub proxy support ............................................................. 121
6 Database partitioning ......................................................................................................... 123
6.1 Creating core and user databases ............................................................................... 124
6.2 Separating the user database ..................................................................................... 124
6.3 Separating the reporting database .............................................................................. 126
6.4 Partitioning the user database ................................................................................... 126
6.5 MySQL replication ................................................................................................. 128
6.5.1 What does MySQL replication mean? .............................................................. 129
6.5.2 MySQL Connector/J ..................................................................................... 129
7 Logging .......................................................................................................................... 130
7.1 Changing the log rotation frequency and size .............................................................. 130
7.1.1 Daily log rotation ........................................................................................ 132
7.1.2 Hourly log rotation ...................................................................................... 132
7.2 Changing the logging level ...................................................................................... 132
7.3 Understanding log files ........................................................................................... 133
7.3.1 Example ..................................................................................................... 134
7.4 Customizing DS Service's log settings ....................................................................... 135
7.4.1 Customizing log files on a per-user basis ......................................................... 135
7.5 Syslog configuration ............................................................................................... 136
7.6 SNMP errors ......................................................................................................... 138
8 Configuring External Services ............................................................................................. 140
8.1 Introduction ........................................................................................................... 140
8.2 General requirements .............................................................................................. 140
8.3 Application keys .................................................................................................... 140
8.3.1 Google external services authorization (Picasa, YouTube, and Gmail contacts/
calendar import) .................................................................................................. 140
8.3.2 Flickr ......................................................................................................... 146
8.3.3 Facebook .................................................................................................... 149
8.3.3.1 Review and submission ...................................................................... 152
8.3.3.2 Native login and save authorization tokens support .................................. 156
8.3.4 Twitter ....................................................................................................... 158
8.4 Configuring the Portal ............................................................................................. 161
8.5 Troubleshooting ..................................................................................................... 162
9 OneMediaHub Server URL configuration .............................................................................. 163
9.1 Introduction ........................................................................................................... 163
9.1.1 Conventions ................................................................................................ 163
9.2 Server available on two different URLs ...................................................................... 163
9.3 Server with a new URL (same IP address) .................................................................. 163
9.4 Server with a new IP address (same URL) .................................................................. 164

OneMediaHub Version 14.5
Installation and Operation Guide
viii
9.5 Changing external service settings ............................................................................. 164
Appendix A Default Ports used by OneMediaHub ..................................................................... 165
Appendix B Device IDs ....................................................................................................... 166
Appendix C OneMediaHub error messages .............................................................................. 167
Appendix D FUNAMBOL-LOGGING-MIB.txt ........................................................................ 174
Appendix E Database Schema ............................................................................................... 178
E.1 OneMediaHub Core ............................................................................................... 178
E.1.1 Contact_ .................................................................................................... 178
E.1.2 Country ..................................................................................................... 178
E.1.3 fnbl_bucket ................................................................................................ 179
E.1.4 Partitioning Schema ..................................................................................... 179
E.1.5 fnbl_connector ............................................................................................ 179
E.1.6 fnbl_connector_source_type .......................................................................... 180
E.1.7 fnbl_country_language ................................................................................. 180
E.1.8 fnbl_country_timezones ................................................................................ 180
E.1.9 fnbl_deleted_sync_user_role .......................................................................... 180
E.1.10 fnbl_deleted_user ....................................................................................... 181
E.1.11 fnbl_device ............................................................................................... 181
E.1.12 fnbl_device_caps ....................................................................................... 182
E.1.13 fnbl_device_datastore ................................................................................. 182
E.1.14 fnbl_email_account .................................................................................... 183
E.1.15 fnbl_email_enable_account .......................................................................... 184
E.1.16 fnbl_external_service .................................................................................. 184
E.1.17 fnbl_external_service_account ...................................................................... 184
E.1.18 fnbl_family ............................................................................................... 185
E.1.19 fnbl_family_user ........................................................................................ 185
E.1.20 fnbl_file_data_object_user_lock .................................................................... 185
E.1.21 fnbl_id ..................................................................................................... 185
E.1.22 fnbl_import_csv_commands ......................................................................... 186
E.1.23 fnbl_last_deleted_msisdn ............................................................................. 186
E.1.24 fnbl_last_sync ........................................................................................... 187
E.1.25 fnbl_module .............................................................................................. 187
E.1.26 fnbl_module_connector ............................................................................... 188
E.1.27 fnbl_partition ............................................................................................ 188
E.1.28 fnbl_pim_listener_registry ........................................................................... 188
E.1.29 PIM Push Tables Schema ............................................................................ 189
E.1.30 fnbl_principal ............................................................................................ 189
E.1.31 fnbl_public_mailservers .............................................................................. 189
E.1.32 fnbl_push_listener_registry .......................................................................... 190
E.1.33 fnbl_push_sender_notification ...................................................................... 190
E.1.34 fnbl_role .................................................................................................. 191
E.1.35 fnbl_storage .............................................................................................. 191
E.1.36 fnbl_subscription_family ............................................................................. 191
E.1.37 fnbl_subscription_payment .......................................................................... 191
E.1.38 fnbl_subscription_plan ................................................................................ 192
E.1.39 fnbl_sync_history ....................................................................................... 193
E.1.40 fnbl_sync_source ....................................................................................... 194
E.1.41 fnbl_sync_source_type ................................................................................ 194
E.1.42 fnbl_temp_paying_users .............................................................................. 194
E.1.43 fnbl_timezone ........................................................................................... 195
E.1.44 fnbl_user .................................................................................................. 195
E.1.45 fnbl_user_alias .......................................................................................... 195
E.1.46 fnbl_user_picture ....................................................................................... 196
E.1.47 fnbl_user_preference .................................................................................. 196

OneMediaHub Version 14.5
Installation and Operation Guide
ix
E.1.48 fnbl_user_properties ................................................................................... 197
E.1.49 fnbl_user_role ........................................................................................... 197
E.1.50 fnbl_user_subscription ................................................................................ 198
E.1.51 fp_carrier ................................................................................................. 199
E.1.52 fp_device ................................................................................................. 199
E.1.53 fp_manufacturer ........................................................................................ 199
E.1.54 fp_model .................................................................................................. 200
E.1.55 User_ ....................................................................................................... 201
E.1.56 Other Liferay tables ................................................................................... 202
E.2 OneMediaHub User ................................................................................................ 202
E.2.1 fnbl_client_mapping ..................................................................................... 202
E.2.2 fnbl_comment ............................................................................................. 203
E.2.3 fnbl_device_config ...................................................................................... 203
E.2.4 fnbl_email_folder ........................................................................................ 203
E.2.5 fnbl_email_inbox ......................................................................................... 204
E.2.6 fnbl_email_sentpop ...................................................................................... 204
E.2.7 fnbl_exported_file_data_object ....................................................................... 204
E.2.8 fnbl_file_data_object .................................................................................... 205
E.2.9 fnbl_file_data_object_label_items ................................................................... 207
E.2.10 fnbl_file_data_object_property ..................................................................... 208
E.2.11 fnbl_file_data_object_set ............................................................................. 208
E.2.12 fnbl_file_data_object_set_item ..................................................................... 208
E.2.13 fnbl_file_data_object_tag ............................................................................. 209
E.2.14 fnbl_file_data_object_thumbnail ................................................................... 209
E.2.15 fnbl_folder ................................................................................................ 209
E.2.16 fnbl_label ................................................................................................. 210
E.2.17 fnbl_last_activity ....................................................................................... 210
E.2.18 fnbl_last_activity_item ................................................................................ 210
E.2.19 fnbl_pending_notification ............................................................................ 211
E.2.20 fnbl_pim_address ....................................................................................... 211
E.2.21 fnbl_pim_calendar ...................................................................................... 212
E.2.22 fnbl_pim_calendar_alarm ............................................................................ 214
E.2.23 fnbl_pim_calendar_attendee ......................................................................... 215
E.2.24 fnbl_pim_calendar_exception ....................................................................... 217
E.2.25 fnbl_pim_contact ....................................................................................... 217
E.2.26 fnbl_pim_contact_item ................................................................................ 219
E.2.27 fnbl_pim_contact_photo .............................................................................. 220
E.2.28 fnbl_pim_note ........................................................................................... 220
E.2.29 fnbl_pim_organization ................................................................................ 221
E.2.30 fnbl_temp_paying_users .............................................................................. 221
E.3 OneMediaHub Reporting ......................................................................................... 222
E.3.1 fnbl_client_download_stats ............................................................................ 222
E.3.2 fnbl_event .................................................................................................. 222
E.3.3 fnbl_marketing_kpi ...................................................................................... 223
Appendix F Examples of sent SNMP traps .............................................................................. 227
Appendix G Xuggle Xuggler FAQs ........................................................................................ 230
Appendix H Capptain integration on Android App .................................................................... 233
Glossary ............................................................................................................................ 239
References ......................................................................................................................... 240

1
Chapter 1. Introduction
This document details how to install, configure, operate, and maintain the OneMediaHub; it also describes
the system architecture and the role and usage of the different components.
Funambol also offers a set of Server APIs that can be used as extensions to OneMediaHub features and
to build third party applications into it; one example is the AJAX Portal, available out of the box in the
OneMediaHub, and completely built on top of the Server API layer.
For developers' specific documentation on Server APIs, please refer to [26].
1.1 Audience
This guide is addressed to system administrators.
1.2 Prerequisites
Important
OneMediaHub is supported only on GNU/Linux 32/64-bit distributions.
The OneMediaHub installation depends on the installation of certain software packages on the target
system. The following packages must be installed and can all be downloaded for free from the Internet.
Please make sure that the package version is correct; if it is not or if a package is not installed, please
download the correct package from the URL provided:
• MySQL 5.5 or 5.6 (see [5])
• MySQL Connector/J (see [6])
• Java Platform (JDK) 7 (see [3])
Note
If you wish to run the OneMediaHub on a 64-bit architecture, you must use the 64-bit JDK.
Warning
OneMediaHub does not support OpenJDK.
• Xuggle Xuggler (see [29] and Appendix G, Xuggle Xuggler FAQs)

2
Chapter 2. System overview
The following sections describe the OneMediaHub architecture and the various OneMediaHub
components. To get started with the installation procedure, skip to Chapter 3, Installation and
configuration.
2.1 OneMediaHub architecture
The system deployment architecture in the OneMediaHub is logically made up of the components
illustrated in Figure 2.1, “OneMediaHub system architecture”. For the sake of clarity, each component
in the figure is represented by a single box, but as explained later, all systems can be made redundant to
increase availability and support a greater load.
The overall goal of the system is to offer cloud-based synchronization of Media (Pictures, Videos, and
Files) and PIM (Contacts, Calendar, Tasks, and Notes) across mobile phones, tablets, computers, and other
devices.
2.1.1 Roles and responsibilities
This section describes the role and the main responsibilities of the components illustrated in Figure 2.1,
“OneMediaHub system architecture”.
Figure 2.1. OneMediaHub system architecture
Device
Any physical device (phone, tablet, computer, connected device) that can communicate with the
OneMediaHub server for Media and/or PIM Sync, either natively or through a downloadable client.
Examples are:
• smartphones or tablets (e.g. iPhone/iPad, Android, BlackBerry, etc.) running OneMediaHub
• mobile phones with a native SyncML client
• computers running OneMediaHub for Windows
Devices are the main interface through which users access OneMediaHub.
Main responsibilities include:
• providing the graphical user interface
• initiating the communication with the server

System overview
3
• hosting the local data (address book, pictures, etc.)
• hosting the sync engine (for Media only)
• collecting/detecting the changes
The communication between the device and the OneMediaHub Server is based on the TCP/IP protocol.
HTTP Load Balancer
Both for Media and for PIM, device-server communication is built on protocols transported over HTTP.
As for common HTTP traffic, a load balancer (see Figure 2.1, “OneMediaHub system architecture”) can
therefore be used to balance the incoming load by distributing it amongst different nodes of a server cluster.
The main responsibilities of the HTTP load balancer include:
• providing the front-end of the OneMediaHub system
• distributing the device requests amongst the nodes of the server-side cluster
• detecting failures on the cluster's nodes, redirecting traffic to the active nodes if one of the nodes fails
Note
The HTTP load balancer is not provided as part of the default installation or deployment. Many
different solutions, both hardware and software, can be adopted and organizations may have
different best practices already in place. A common solution is to use Apache and mod_cluster as
described in Section 5.6, “Configuring OneMediaHub load balancing with Apache HTTP Server
(httpd) and mod_cluster”.
OneMediaHub Server
The Server is the core of the OneMediaHub PIM synchronization. As illustrated in Figure 2.1,
“OneMediaHub system architecture”, it comprises several components, described in detail in the following
sections.
Data Synchronization Service
The role of the Data Synchronization (DS) Service is to provide the synchronization services and to
communicate directly with the devices using the OMA DS protocol, formerly known as SyncML (see
Section 2.3, “Execution flow of a request”). The main responsibilities of the Data Synchronization Service
are:
• hosting the synchronization engine (see Section 2.2, “The Synchronization Engine”)
• accepting and serving synchronization requests
• handling low level device information
• providing an interface towards the back-end services
Media Connector
The Media Connector is the counterpart of the PIM Connector for Media synchronization. It is deployed
together with the DS synchronization engine. It has the following responsibilities:
• searching for the Media items that the user has modified on the server
• storing the Media items on the Media Storage

System overview
4
See Section 2.6, “Media synchronization” for more details.
PIM Connector
The PIM Connector allows the OneMediaHub server to sync PIM data such as contacts, events, and notes.
It consists of two main components: the connector itself and the PIM Listener Service.
The PIM Connector is deployed together with the DS synchronization engine. It has the following
responsibilities:
• searching the PIM items that the user has modified on the server
• keeping the client updated with the PIM data stored on the server
PIM Listener Service
The PIM Listener Service is a separate process from the Data Synchronization Service and Portal process;
it has the following responsibilities:
• polling the user PIM database regularly to check for updates
• triggering an action in the Data Synchronization Service if there are any changes to the user's PIM data
to be delivered to the device
Portal
The OneMediaHub Portal implements the main interface through which users and administrators interact
with the OneMediaHub platform over the Internet. The Portal component consists of
• a web-based consumer portal, built with AJAX technology, through which users can sign up for the
service, set up their devices, download the OneMediaHub apps, access and manage their Media data,
PIM data, and profile
• a web-based customer service representative (CSR) interface, which allows an operator to access
user information and perform maintenance of user accounts
Server API
Funambol also offers a set of Server APIs that can be used to extend the OneMediaHub and to build
third party applications on top of it; one example is the AJAX Portal, available out of the box within the
OneMediaHub, and completely built on top of the Server API layer.
The OneMediaHub client Apps use the Server APIs to perform Media synchronization without basing on
the SyncML protocol, while PIM synchronization remains SyncML-based.
For developers' documentation specific to the Server APIs, refer to [26].
Media Storage
The Media Storage is the final repository where the Media Connector stores the user's media and files. In
the current version, the OneMediaHub can use a local filesystem and an online store provider as well.
See Section 2.6, “Media synchronization” for more details.
SMS Service
This is the service used to send SMS messages to user devices. The OneMediaHub platform uses an
external SMS gateway for this, which translates the HTTP-based messages sent by the server into SMS
messages, and injects them into the network servicing the target user.

System overview
5
SMS messages are used to
• send users the download link for OneMediaHub client Apps
• configure over-the-air the native clients embedded in the phones
• notify the device that a synchronization is needed because something has changed server-side: this is
SMS push, as alternative to TCP-based push (see Section 2.4.2, “SMS push”)
Note
The SMS Service is not provided out of the box. OneMediaHub, by default, supports SubitoSMS.
Support for other SMS service providers is configurable. For more information, see Important.
SMTP Server
This is the server used by the OneMediaHub to send Emails to external recipients.
Email can be used for
• inviting users to join the service
• activating user accounts
• supporting users (e.g. forgot password)
• any other communication to users
Database
This is the database server. OneMediaHub supports the MySQL database system.
2.2 The Synchronization Engine
The Synchronization Engine is the component that implements the synchronization logic, i.e.
• identify the sources and the destinations of the data sets to be synchronized
• identify the data that needs to be updated/added/deleted
• determine how updates must be applied
• detect conflicts
• resolve conflicts
In other words, the Synchronization Engine is the core of any data synchronization server. The basic
framework interfaces and classes are grouped in the package sync4j.framework.engine.
2.3 Execution flow of a request
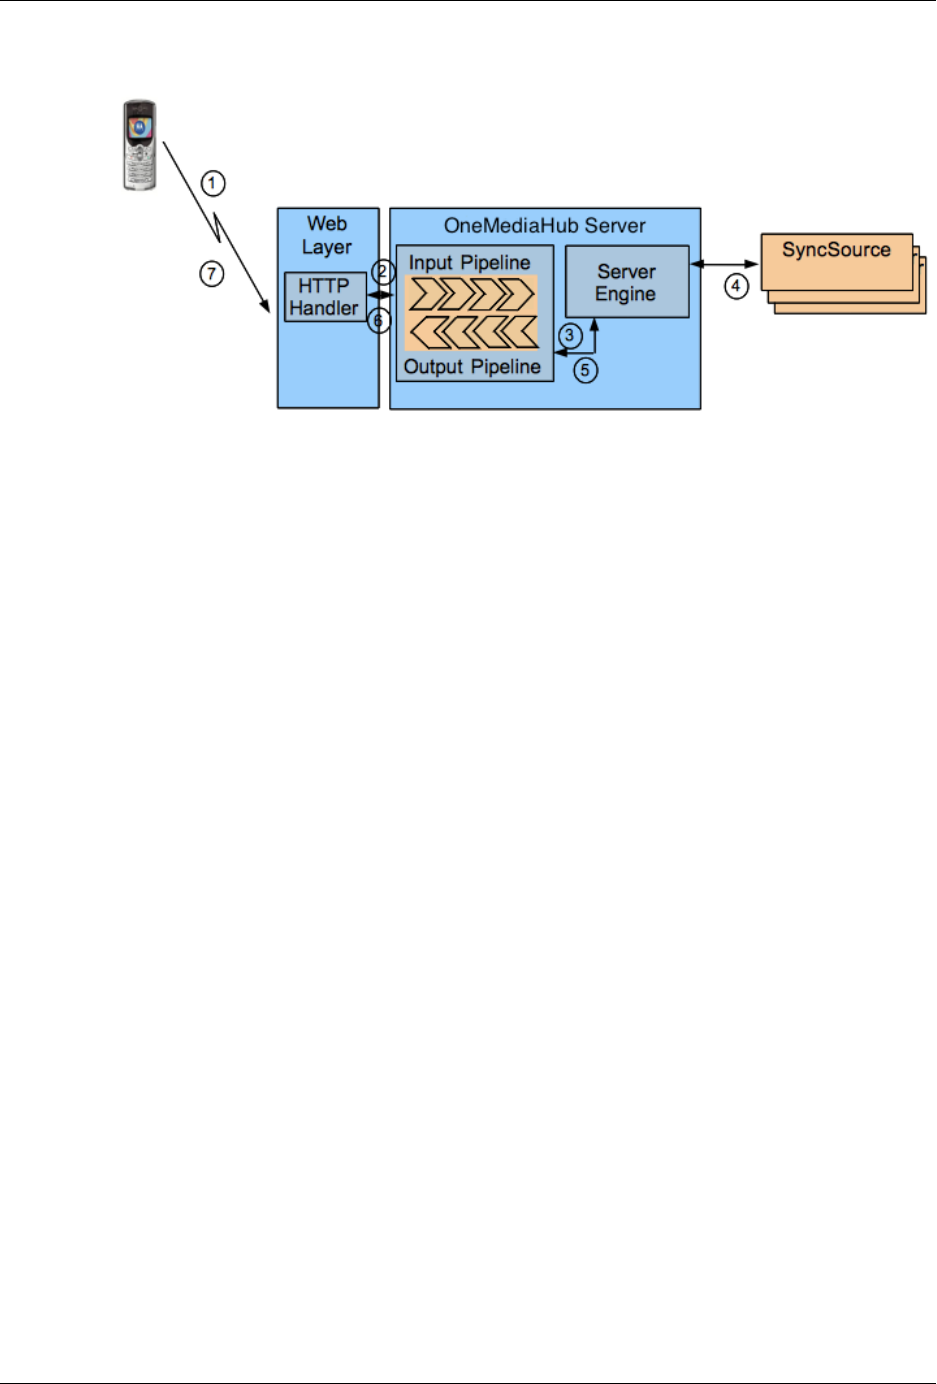
The execution flow of an OMA DS request is illustrated in Figure 2.2, “Execution flow of an OMA DS
request”.
System overview
6
Figure 2.2. Execution flow of an OMA DS request
A synchronization session starts with the client device sending a first SyncML message to the server. The
request then follows the flow described below:
1. When a new request comes from the client, the HTTP handler takes care of it. After some processing,
for example the transformation of the binary message into a more manageable form or the association of
the incoming message to an existing synchronization session, the HTTP handler passes the request to the
synchronization server.
2. The message first goes through the input message processing pipeline according to the application
needs.
3. The manipulated message comes out of the input pipeline and goes into the server engine for
synchronization processing.
4. When needed, the server engine calls the services of the external (and custom) SyncSources in order
to access the real data stores.
5. After processing the incoming message, the server engine builds the response message, which goes
through the output message processing pipeline for post-processing.
6. The response message is then returned to the HTTP handler, which packs the SyncML message into the
HTTP response and sends it back to the device.
2.4 OneMediaHub push
This section describes the OneMediaHub push technology. OneMediaHub push is based on the delivery
of a so called push notification. A push notification is a small packet of data that OneMediaHub sends to
a device in order to trigger a new synchronization. The notification package is technically called PKG#0
and contains information about the server that is requesting a synchronization, which data source must be
synchronized, which type of synchronization should be performed. The PKG#0 can be delivered in many
different ways.
OneMediaHub supports the following delivery mechanisms:
1. Server-to-client Push
• TCP/IP Push
•Cloud push using Apple Push Notification Service (APNS)
System overview
7
• SMS Push
2. Client-to-server Push
Note
New data is not automatically sent to the device; it is always the device that starts the
communication for the exchange of data.
Note
Out-of-the-box, OneMediaHub detects the most appropriate push mechanism for the device and
uses it.
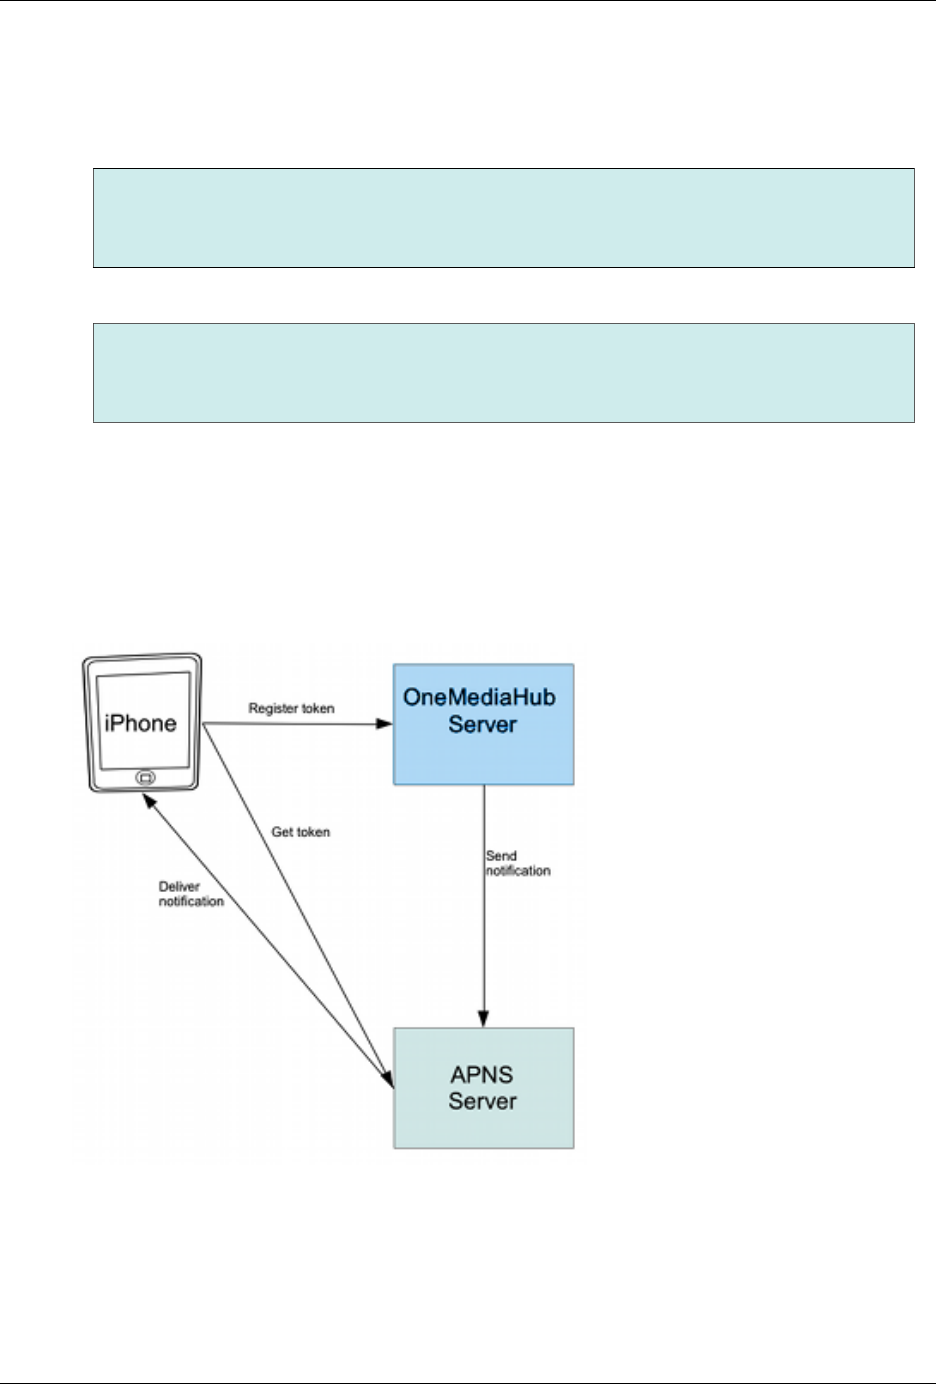
2.4.1 Cloud push using APNS
As illustrated in Figure 2.3, “Cloud push using APNS”, the iPhone obtains a token from the APNS server
and registers the token on OneMediaHub. OneMediaHub then uses the registered token to send push
notifications to a particular device.
Figure 2.3. Cloud push using APNS
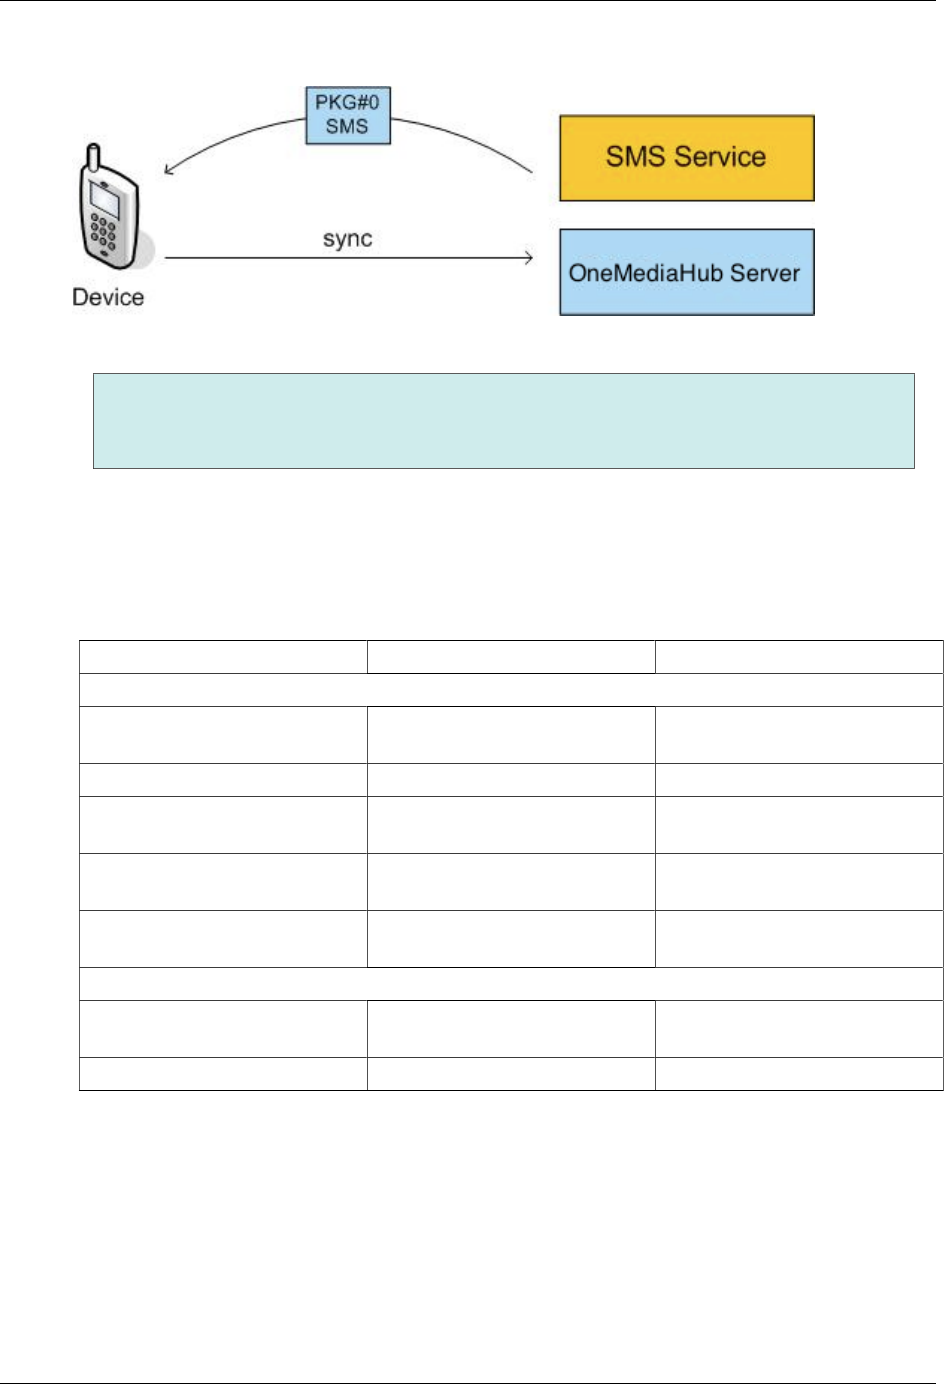
2.4.2 SMS push
As illustrated in Figure 2.4, “SMS push”, in the case of SMS push, PKG#0 is delivered with one or more
SMS messages. The basic flow is the same as in the other two techniques: once the device receives an SMS
containing a push notification, it starts a new synchronization for the specified data sources.
System overview
8
Figure 2.4. SMS push
Note
This mechanism requires an integration with an SMS service that is able to deliver binary SMS
messages (see the section called “SMS Service” for more details).
2.4.3 Push compatibility table
Not all devices have the same capabilities in terms of push or even synchronization. Certain devices have a
built-in PIM SyncML client, others do not.
The table below shows which push technology can be used with particular classes of devices.
Device class APNS SMS push
PIM
BlackBerry devices (with
OneMediaHub for BlackBerry) N N
iPhone (with OneMediaHub) N N
Symbian devices (with
OneMediaHub for Symbian) N N
Android devices (with
OneMediaHub for Android) N N
Desktop clients (with
OneMediaHub for Windows) N N
MEDIA
Desktop clients (with
OneMediaHub for Windows) N N
iPhone (with OneMediaHub) Y N
2.5 OneMediaHub clustering
OneMediaHub clustering has been designed with the following principles in mind:
• high availability: it must be possible to have redundant architectures for all components so that users will
not experience a permanent error if a problem arises in one of the components in the system
• high load support: the redundant components must work in a load balanced architecture
• low maintenance: it must be easy to modify the configuration of each cluster
System overview
9
• automatic recovery: no administrative action must be needed when a cluster node goes down in order for
the load to be redistributed amongst the remaining nodes
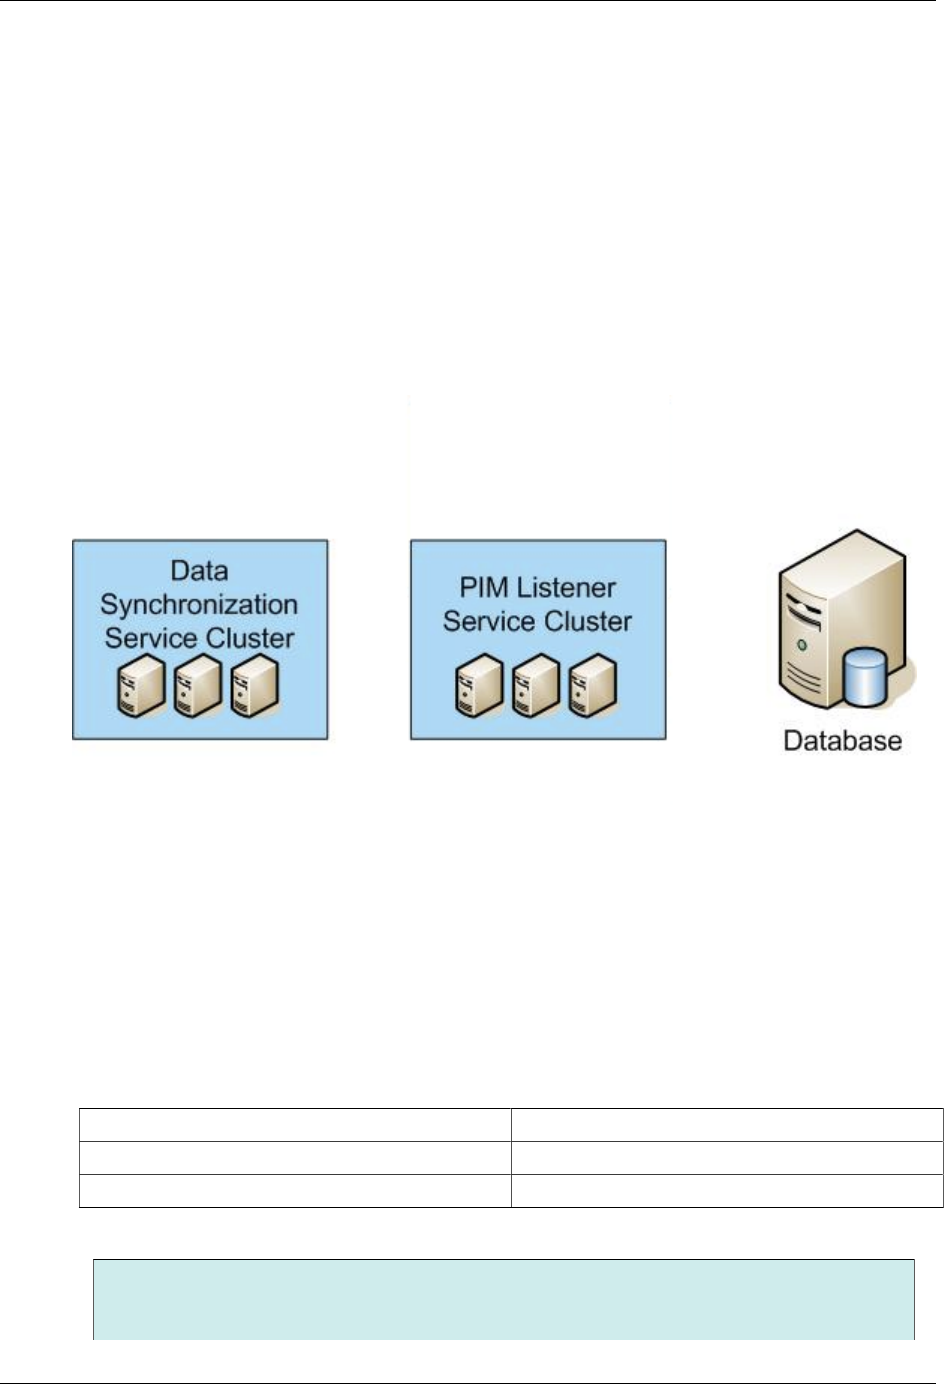
As illustrated in Figure 2.5, “OneMediaHub clustering”, which should be seen as an alternative
representation of the elements in Figure 2.1, “OneMediaHub system architecture”, OneMediaHub can be
split into three clusters:
• Data Synchronization Service cluster
• PIM Listener Service cluster
Additional clustering techniques for improving high availability, performance and reliability of the
Database are described in Chapter 6, Database partitioning.
Figure 2.5. OneMediaHub clustering
2.5.1 Data Synchronization Service cluster
A Data Synchronization Service cluster is made up of one or more Data Synchronization Service nodes.
Each node has the same properties and configuration as the others so that all nodes are identical from a
SyncML client perspective.
All nodes of the cluster must be installed on a network that allows IP multicast traffic. The multicast group
of the Data Synchronization Service cluster has the following properties:
Multicast group name ds-server
Multicast address 228.10.58.01
Multicast port 47101
Note
All Data Synchronization Service nodes in a cluster are dynamically aware of other nodes. This
means that each node is dynamically updated with the changes in the cluster when a new node is
System overview
10
added or removed. No administrative tasks are required when, for example, a new node is added in
order to improve the number of users to support.
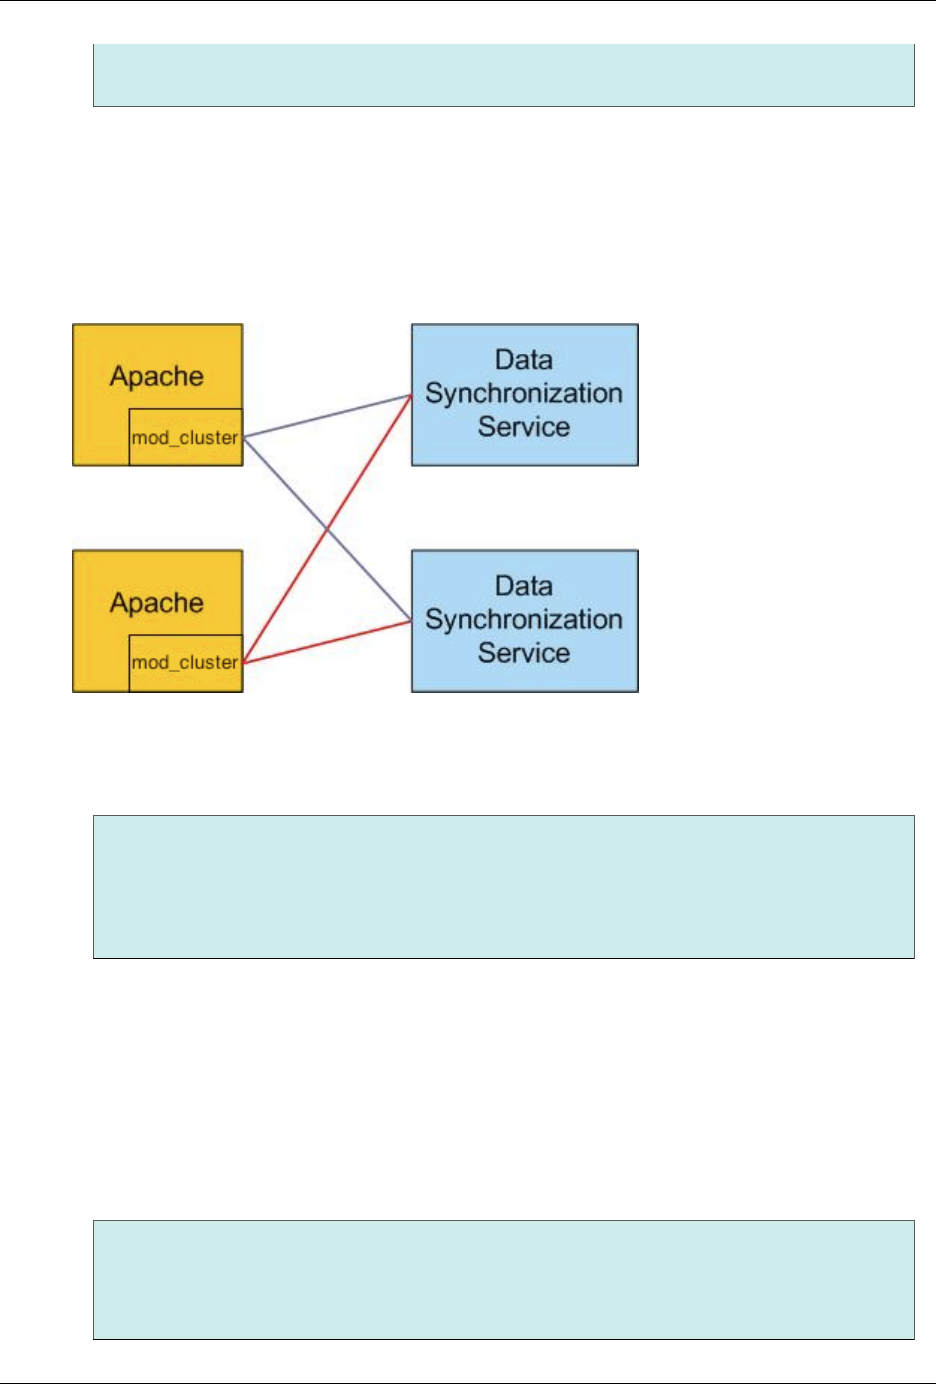
Load balancing of SyncML and HTTP traffic is achieved by simply using any HTTP load balancing
technique commonly used in this space.
A common practice is to do this with an Apache load balancer battery, connected to the Data
Synchronization Services through the mod_cluster module (see Figure 2.6, “Data Synchronization Service
cluster”).
Figure 2.6. Data Synchronization Service cluster
See Section 5.6, “Configuring OneMediaHub load balancing with Apache HTTP Server (httpd) and
mod_cluster” on how to configure Apache with mod_cluster in a clustered environment.
Note
The Data Synchronization Service stores its main configuration files in the file system under
<root directory of your OneMediaHub installation>/config. If a cluster
is installed, all nodes in this directory must have the same content. This can be achieved using a
shared file system or keeping the node in sync with rsync.
2.5.2 PIM Listener Service cluster
A PIM Listener Service cluster is made of one or more PIM Listener Service nodes; each node has the
same properties and configuration as the others so that all nodes are completely interchangeable. The
load of these listeners is measured in terms of how many users each PIM Listener Service monitors for
changes; this load is automatically balanced by being distributed amongst all available nodes. This means
that every time the cluster changes, all active nodes re-compute the subset of users they have to monitor,
automatically redistributing the users.
Note
This distribution is based on a hashing algorithm which spreads users equally across the nodes of
the cluster. Still, there is no guarantee that each node monitors exactly 1/N (where N is the number
of nodes in the cluster) of the users at all times.
System overview
11
All nodes of the cluster must be installed on a network that allows IP multicast traffic. The multicast group
of the PIM Listener Service cluster has the following properties:
Multicast group name pimlistener
Multicast address 228.10.31.01
Multicast port 43101
Note
All PIM Listener Service nodes in a cluster are dynamically aware of other nodes. This means that
each node is dynamically updated with the changes in the cluster when a new node is added or
removed. No administrative tasks are required when, for example, a new node is added in order to
improve the number of users to support.
2.6 Media synchronization
The OneMediaHub is able to synchronize media such as normal files, pictures and videos (from now on all
of these will be simply referred to as media).
Media files are stored on the Media Store - whereas media meta data is stored in the database.
In the current version, OneMediaHub can use the local filesystem or an online storage provider as media
storage.
2.6.1 File system structure
For each user, the media sync sources define a subdirectory where all media files belonging to the user are
stored.
The entry points for the media types are:
Picture <root directory of your OneMediaHub
installation>/ds-server/db/picture
File <root directory of your OneMediaHub
installation>/ds-server/db/file
Video <root directory of your OneMediaHub
installation>/ds-server/db/video
Note
In a cluster environment, the above mentioned directories must be shared between all server
nodes.
To rationalize the file system, user directories are organized in a tree structure, where each user's directory
path is structured in eight nested sub-directories, which may be located on different disks to split the disk
load.
The name of each subdirectory is composed of two characters, chosen from a pseudo-random string of 16
characters, e.g. <root directory of your OneMediaHub installation>/ds-server/
db/picture/ab/cd/ef/gh/il/mn/op/qr.

System overview
12
The reason behind this complicated structure is that each directory can have 676 subdirectories (26 × 26),
so for 8 levels the maximum number of subdirectories is 26^16; the great number of possible combinations
makes the picture folder location difficult to guess. The nested tree structure avoids having too many
subdirectories in any given directory.
The string is computed as a hash of the username (using the MD5 algorithm), in order to make the directory
location unpredictable and to have a balanced tree, where user folders are equally distributed.
The actual user folder is located in the last subdirectory of the tree; in order to make it less comprehensible,
the folder name is computed as the username encoded in Base64.
Security considerations
Even if it is difficult to guess, the directory tree is not secure, since it is computed starting from the
username. This means that, given the user name and knowing the algorithm used, you are always able to
derive the directory path.
For example, if the hash for the user johndoe is hgkvnviumvngrdpo, the user's pictures are stored in
the directory <root directory of your OneMediaHub installation>/ds-server/db/
picture/hg/kv/nv/iu/mv/ng/rd/po/am9obmRvZQ==.
Security is guaranteed by the file name, a random string of thirteen alphanumeric characters, followed by
the real file extension (added to guarantee the correct content type in the HTTP response.) So even if you
know the path where the file is stored, you cannot guess the file name and retrieve the picture.
The hash function guarantees that the distribution of hashes in the hash space is adequate, and that, for a
large number of files, they are evenly distributed inside the hierarchy, thus splitting the load.
2.6.2 -ext subdirectories
For each picture (or video) stored in the user directory there is also a subdirectory with the name equals
to the file name followed by -ext, where additional files related to the picture (or video) are stored, such
as thumbnails, transcoded video or any other useful data. For example, when a new picture with name
1pbo6y7xoyjr1 is saved (how files are named on the local file system is explained in Section 2.6.1,
“File system structure”), the folder 1pbo6y7xoyjr1-ext is also created.
The -ext subdirectory is created when the file is saved into the user directory, and it is removed when the
corresponding file is deleted.
Note
Files stored in the -ext directories and temporary files are not computed in the user quota.
2.6.3 Deleting media files
The OneMediaHub provides a scheduled job (executed every one hour) that manages the media binaries
deletion. If a user deletes some media files, first of all the tuples will be set to deleted in the database,
then, by execution of the scheduled job, the binaries will be deleted from the file system (or from the media
storage).
This behavior also impacts the deletion of users via Server API (SAPI): when a user is deleted, all the
tuples in the fnbl_file_data_object table owned by that user will be marked as deleted and the
owner will be changed into admin, while the original user will be saved in the column deleted_owner.
As mentioned above, the binaries will be deleted by the scheduled job.

System overview
13
Note
All media items marked as soft deleted won't be removed by the scheduled job.
2.6.4 Temporary items management
Temporary items are used to allow the resumable upload for media. They should be considered valid for
24 hours; in that time frame the server reserves disk memory quota to finish the upload. In no case will the
temporary items be considered by the server as part of the user quota.
After the 24 hours, the task that manages the media deletion (see Section 2.6.3, “Deleting media files”)
deletes the database tuples older than one day for temporary items and their related binaries, if they exist. It
deletes also the items older than one day for which only the metadata are saved.
2.6.5 Scaling the file system
Since there is a single mount point for pictures, <root directory of your OneMediaHub
installation>/ds-server/db/picture, OneMediaHub supports the following systems for
scaling the file system:
• DAS (Direct Attached Storage) for small deployments.
• NAS (Network Attached Storage) for medium deployments.
• SAN (Storage Area Network) for very large deployments.
2.6.6 Encryption
Media may be encrypted once it is moved to the final storage destination. A media item is encrypted when
the whole item is received on the server, so the encryption process is completely managed by the server
itself.
2.6.6.1 How encryption works
If the server is configured to use encryption (see Section 2.6.6.2, “How to configure the server to use
encryption”), OneMediaHub encrypts your data as it writes it to its media storage and decrypts it when you
access it using the authenticated download API. This means that if you would directly access stored media,
you would see encrypted objects. However, all the APIs are trasparent regarding media encryption, so that
if your server has encryption enabled all the API calls will work properly.
Two different algorithms can be used to encrypt media: AES128 and AES256. They are block cipher
symmetric-key algorithms, so the same key is used for both encrypting and decrypting the data. They differ
in the key size (128 and 256 bits respectively).
2.6.6.2 How to configure the server to use encryption
To enable encryption, in the configuration file <root directory of your OneMediaHub
installation>/config/portal/portal-ext.properties these properties have to be
modified:
#
# Set property to true for enabling the encryption, false otherwise.
#

System overview
14
encryption.enabled=true
encryption.keyfactory-
class=com.funambol.framework.tools.encryption.AES128EncryptionKeyFactory
encryption.keyfactory.salt=cGFzc3dvcmQ=
To enable AES128 use the AES128EncryptionKeyFactory class - for AES256 the class
AES256EncryptionKeyFactory has to be used. For both a Base64-encoded salt has to be specified.
The salt should be a random value - and it MUST not change once media has been uploaded. For AES256
strength encryption the Unlimited Strength Java(TM) Cryptography Extension Policy Files have to be
installed. They may be freely downloaded from the Oracle Java SE website (see [4]).
Warning
If encryption is disabled, the media items are served by the storage system (e.g. S3) directly, with
no additional load on the server.
If instead encryption is enabled, all requests pass through the server, so that the increased load
needs to be considered in sizing the system and tuning its performance. Encryption causes also
additional storage usage and costs more computational power.
2.6.7 Storing files on an online file storage provider
Media and files may be stored on an online file storage provider instead of being stored on the server's local
file system. Online file storage providers are Internet hosting services specifically designed to host static
content, typically large files that are not web pages.
OneMediaHub supports only the Amazon S3 file storage provider.
There are few basic concepts behind online file storage providers (the names used by Amazon S3 are
emphasized):
Provider
the specific online file storage provider
Blobs (objects)
are the fundamental entities. They consist of object data and metadata (set of name-value pairs)
Container (bucket)
blobs are stored in containers. For Amazon S3 there are no limits to the number of objects you can
store in a bucket, and each user can have up to 100 buckets. The namespace for bucket names is global
- this means that there could be only one bucket name for the provider for all accounts. The bucket
name is in fact part of the URL used to download objects. For instance, all objects in a 'mydocs' bucket
can be downloaded using http://mydocs.s3.amazonaws.com (you may use a different URL by setting a
CNAME entry for your domain in the DNS server settings)
Keyis the unique identifier for a blob in a container. Together, a container name and a key uniquely
identify an object on the online storage provider
2.6.7.1 How to create an Amazon S3 bucket
In order to use Amazon S3 as media storage provider for the OneMediaHub, a bucket must be created on
S3.
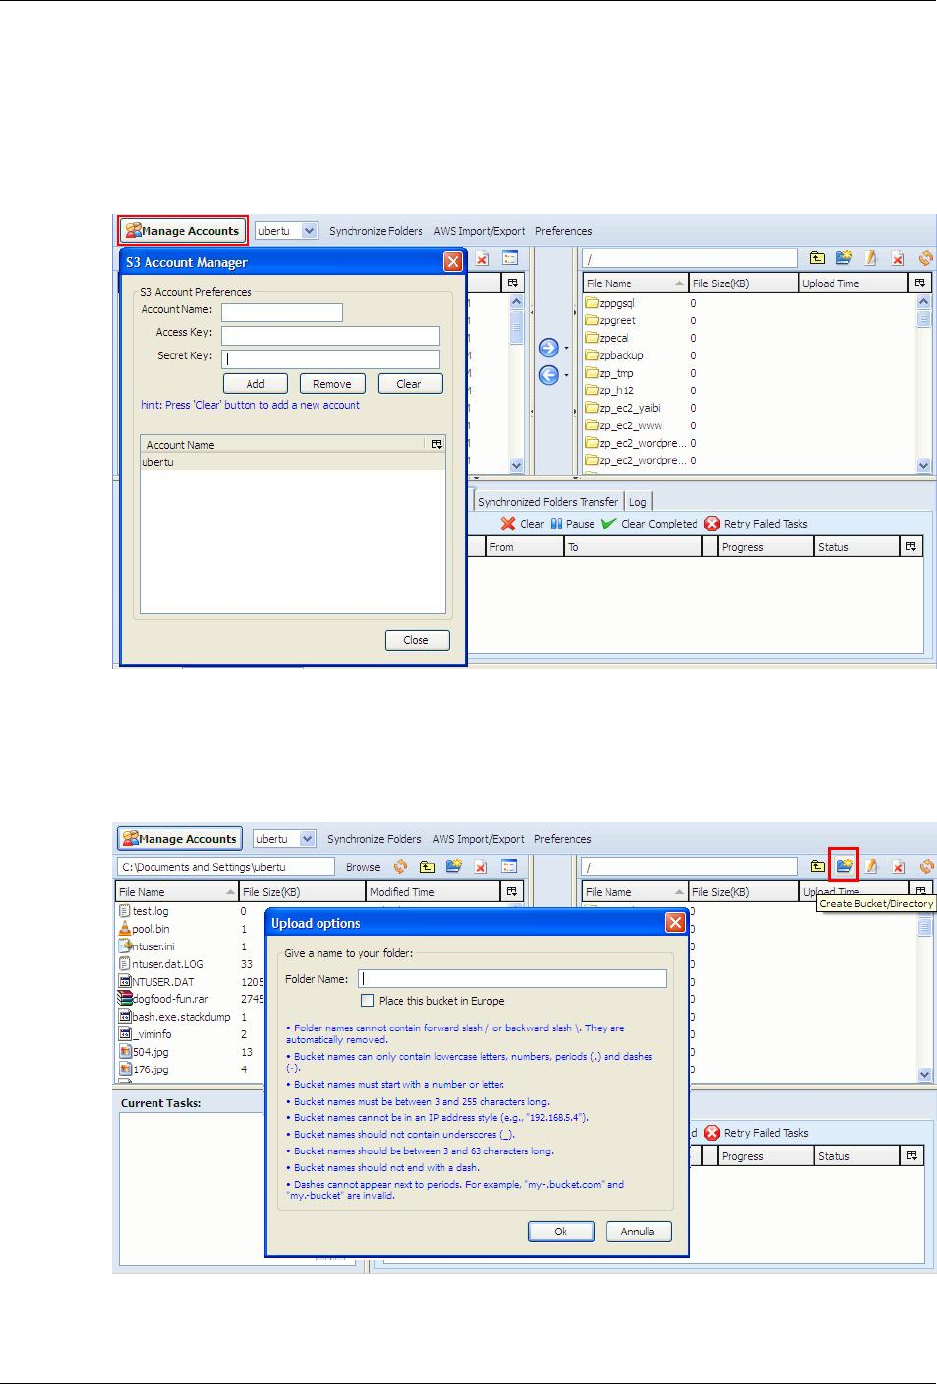
System overview
15
Go through the following steps to create a bucket:
1. Use a plug-in for your web browser (e.g. S3 Organizer, available for Firefox) and connect to your
Amazon S3 account:
Figure 2.7. Connecting to your Amazon S3 account
2. Click on Create Bucket/Directory or right click on the bucket panel and select the Create
Directory option:
Figure 2.8. Create a directory on Amazon S3
3. Enter the bucket name and then click Ok. The bucket will be created at the specified location, and your
bucket will be visible in the buckets list.

System overview
16
Note
Don't use a dot (.) in the bucket's name, because in this case SSL over HTTP (HTTPS) will
not work, as users will end up with S3-related certificate errors caused by bucket names
containing a dot.
4. The bucket Access Control List (ACL) should be configured in order to grant access for the owner
only, but in any case all the contents will always be private even if the bucket is public.
2.6.8 Transcoding
The video transcoding feature allows the user to play from the Portal and the iOS and Android mobile
apps any of her videos uploaded to the cloud. It allows to play a wide range of video formats. When a
user uploads a video, a transcoding service is running asynchronously, and when the transcoded video is
available, its URL (called "playbackurl") will be included in the response of the Retrieve videos API call
(see Section 3.5.8, “Retrieve videos” in OneMediaHub Version 14.5 Server API Developer's Guide). The
transcoded video is called playback.mp4 and it is saved in the user -ext folder like the thumbnails.
The service used for video transcoding is the Amazon Elastic Transcoder (see http://
aws.amazon.com/elastictranscoder.) This service manages all aspects of the transcoding
process in a transparent way for OneMediaHub and is designed to be highly scalable. Amazon Elastic
Transcoder is built to work with the content stored on the Amazon S3 service and it uses the Amazon
Simple Notification Service (Amazon SNS) to notify when a transcoded video is available (OneMediaHub
uses HTTP notifications.)
Note
To enable media transconding on OneMediaHub, see Section 3.12.23, “How to enable media
transcoding”.
Warning
If the transcoding feature is not enabled, the Portal is not able to play the following video formats:
3g2, AVI, MOV, MP2, MP4, MPEG, MPEG4, MPG, WMV.
To use Amazon Elastic Transcoder, you need an Amazon Web Services (AWS) account (see http://
docs.aws.amazon.com/elastictranscoder/latest/developerguide/getting-
started.html.) If you don't have an account yet, you'll be prompted to create one when you sign up.
There are few basic concepts behind Amazon Elastic Transcoder:
• A transcoding pipeline is a queue that manages the transcoding jobs. It specifies the input Amazon S3
bucket, the output Amazon S3 bucket, and an AWS Identity and Access Management (IAM) role that is
used by the transcoder to access the videos.
• A transcoding preset is a template that contains the settings that the transcoder should apply during the
transcoding process (i.e. the codec or the resolution.) When a job is created, the preset to be used must
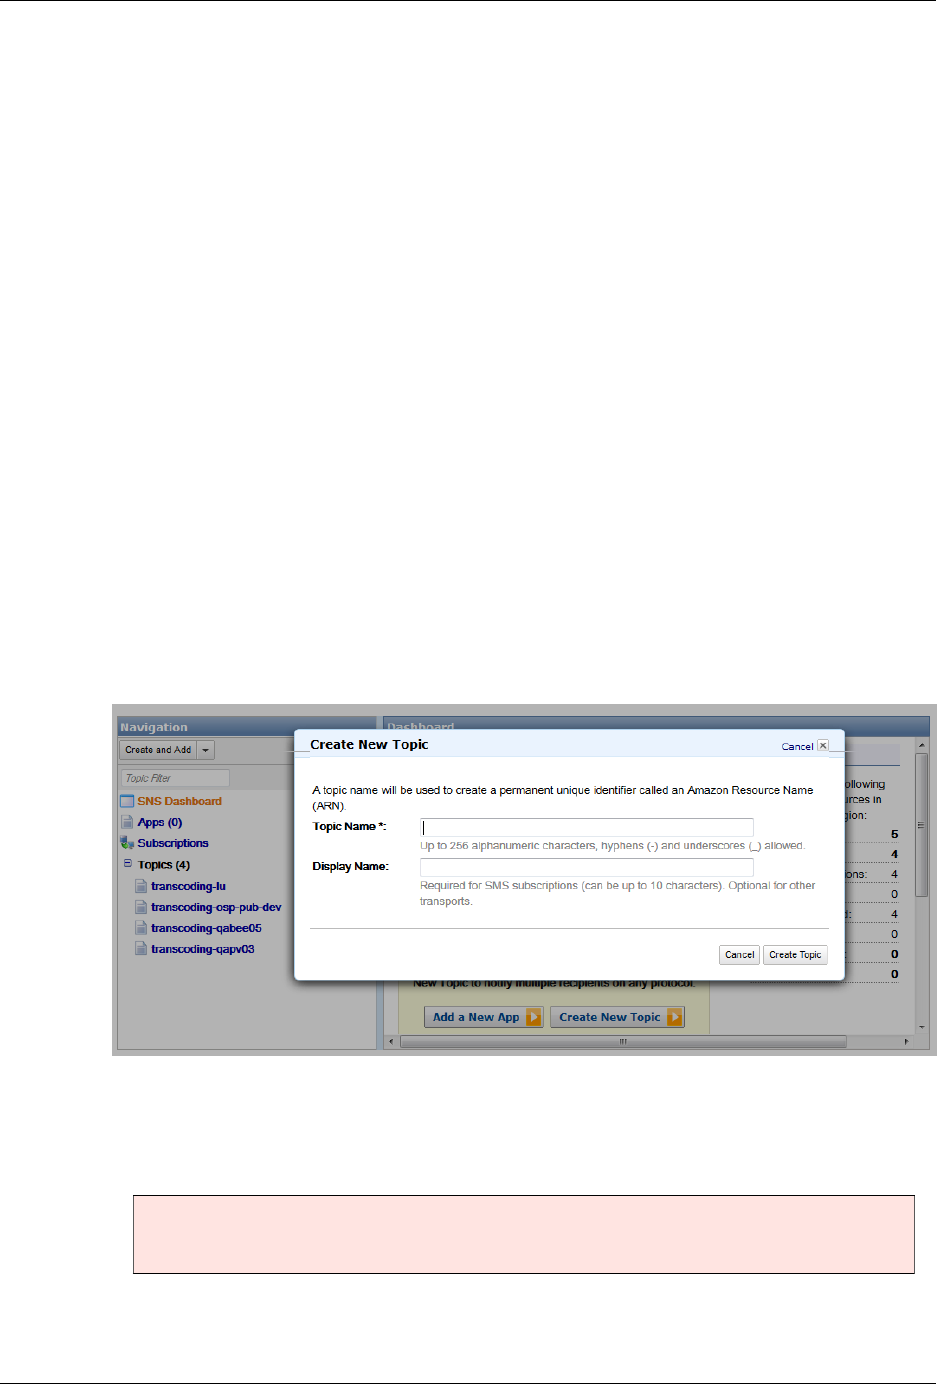
System overview
17
be specified. In this way, it's possible to specify the details of the transcoded video. The preset used by
OneMediaHub is called System preset: Generic 480p 4:3 and allows to generate a 480p
transcoded video in mp4 format, with video codec H264 and bitrate 900 kbps (refer to the Amazon
Elastic Transcoder Management Console for further details.)
• A transcoding job transcodes the video on the Amazon S3 output bucket specified in the pipeline.
The steps for using Amazon Elastic Transcoder are the following:
1. Create a bucket on Amazon S3 (see Section 2.6.7.1, “How to create an Amazon S3 bucket”). If
OneMediaHub is configured to use S3 as media storage repository, you don't need to create a bucket
for this goal, since you will use the one used as media repository
2. Configure Amazon SNS for sending HTTP notifications
3. Create a pipeline on Amazon Elastic Transcoder
2.6.8.1 How to configure Amazon Simple Notification Service
For more details, see Amazon documentation at [1].
1. Access the AWS Console and select SNS. You will be redirected to the SNS Console
2. Click on Create New Topic
Figure 2.9. Amazon SNS: Create New Topic
3. Associate to the topic the subscription http://<server_url>:<port>/sapi/media/
video?action=set-transcoding-status
Important
The server must be up and running since it will receive a notification.
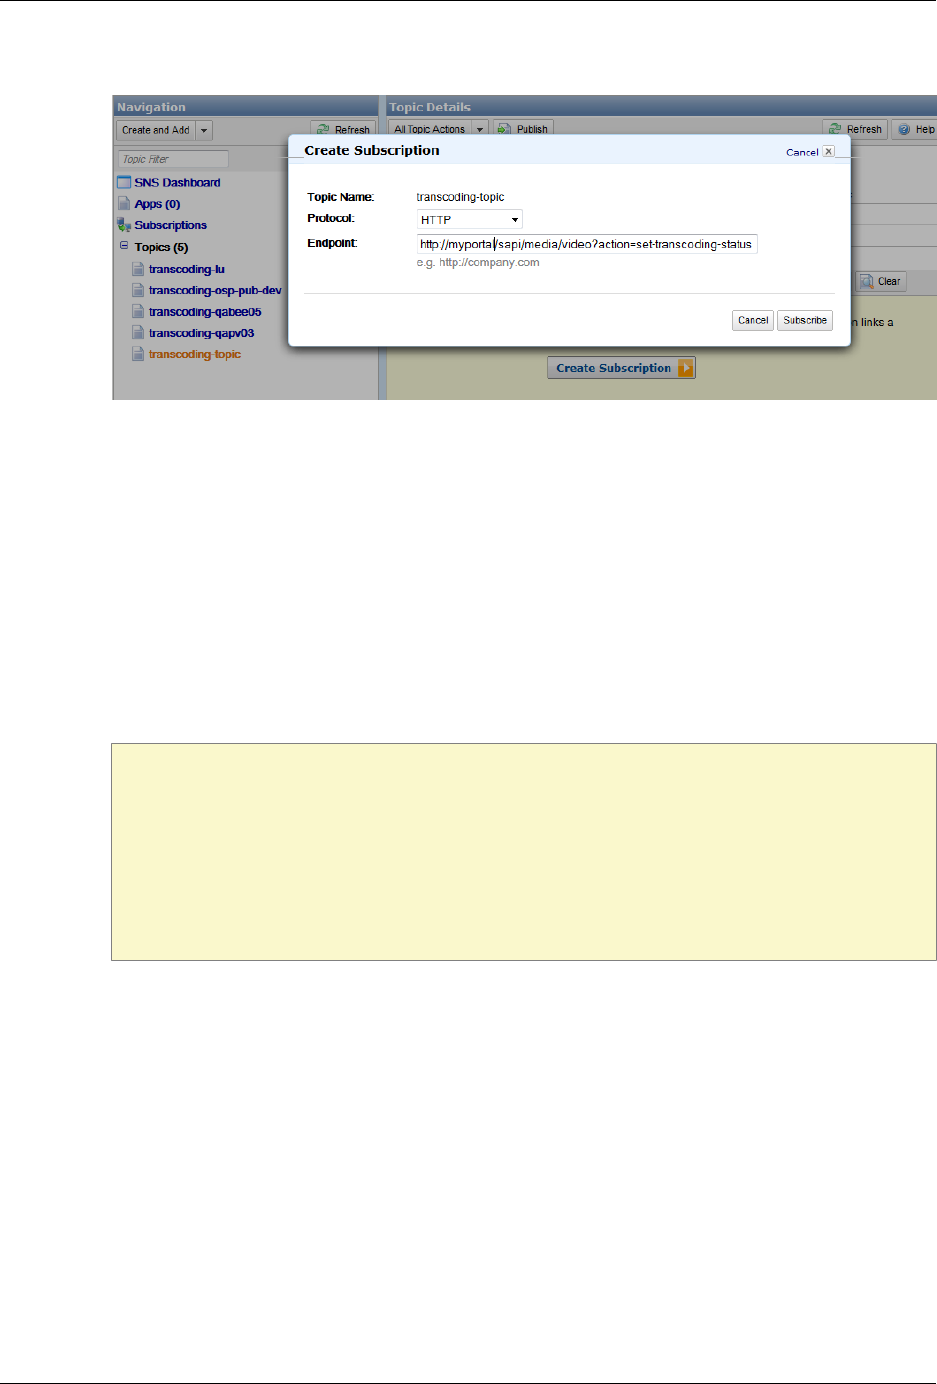
System overview
18
Figure 2.10. Amazon SNS: Create Subscription
The subscription is created with a "SubscriptionID" as "PendingConfirmation" until the subscription is
confirmed.
4. Search in the file portal.log for the string "Type":"SubscriptionConfirmation" and
retrieve the value for SubscribeURL
5. Open this URL in a browser
6. Check from within the SNS Console that the Subscription ID field will change from
PendingConfirmation into a specific string value
7. Select the created subscription and click on Delivery Policy. Configure the policy with:
Number of retries: 60
Retries with no delay: 0
Minimum delay: 60
Minimum Delay Retries: 60
Maximum Delay: 60
Maximum delay retries: 0
Maximum receive rate: EMPTY
Retry backoff function: Linear
(see Figure 2.11, “Amazon SNS: Delivery Policy”.) At this point the subscription is enabled.

System overview
19
Figure 2.11. Amazon SNS: Delivery Policy
2.6.8.2 How to create a pipeline on Amazon Elastic Transcoder
For more details, see Amazon documentation at [2].
1. Open the AWS Elastic Transcoder Console at https://console.aws.amazon.com/
elastictranscoder/
2. Click Create New Pipeline
3. Fill in the form as follows:
1. Pipeline name: the name of the pipeline you want to create
2. Input Bucket: the name of the bucket on S3
3. IAM Role: choose Elastic_Transcoder_Default_Role

System overview
20
Note
The first time you work with Amazon Elastic Transcoder this role could be not available.
Keep the default value in such a case
4. In the Configure Amazon S3 Bucket for Transcoded Files and Playlists
section:
a. Bucket: the name of the bucket on S3 (it's the same used in Input Bucket)
b. Storage class: leave it empty
c. Click on Add permissions: choose the permissions for Open/Download, View, and Edit the
bucket's content to the AWS user or group that you want to have access to transcoded files and
playlists
5. In the Configure Amazon S3 Bucket for Thumbnails section:
a. Bucket: the name of the bucket on S3 (it's the same used in Input Bucket)
b. Storage class: leave it empty
6. In the Notifications section: turn on all the events notifications selecting Use an
existing SNS Topic and selecting the SNS topic you created on SNS
7. Click on the Create Pipeline botton at the end of the form
At the end of this procedure, you will have a Pipeline ID and this value should be added to the file
portal-ext.properties as value of the property ets.pipeline-id.
2.6.9 Deleting transcoding jobs
OneMediaHub provides a scheduled job (executed every 7 days) that manages the deletion of the
transcoding jobs stored in the database that are older than 7 days. When the scheduled job is executed, the
records in the table fnbl_trascoding_job with creation date older than 7 days are removed. And, if
the media item associated to the transcoding job, has transcoding status (field transcoding_status
in table fnbl_file_data_object) set to Q (in queue) or P (in progress), this status must be set to E
(error), since no notification about the result of the transcoding has been received.
The execution frequency of the scheduled job is set in the property intervalInDays contained in the
file TranscodingJobDeleteScheduledTask.xml.

21
Chapter 3. Installation and configuration
This section explains how to install and configure the OneMediaHub on your system from your distribution
medium.
Due to the highly modular architecture of the OneMediaHub platform, there are many configuration
parameters that the system needs in order to integrate all the different parts. Instead of providing a large
and complex single configuration file, OneMediaHub configuration parameters are stored in small XML
files organized in a tree structure under the file system. This allows easy look up of changes that need to be
made and is an easy way to change the configuration of the servers: in fact all that is really needed is a text
editor.
Note
OneMediaHub makes use of third-party software which may require their own configuration files.
These files will also be described in the following sections.
In general, the OneMediaHub configuration is composed of:
• OneMediaHub configuration files
• Apache Tomcat (see [13]) configuration files
• JGroups (see [14]) configuration files
• log4j (see [15]) configuration files
3.1 Installing the OneMediaHub
Download the archive for the OneMediaHub on your server:
•onemediahub-x.x.x.tgz
and extract it in a directory of choice (for example: /opt) using the following command:
tar -xzvf onemediahub-x.x.x.tgz
Important
Take care to set appropriate file permissions for the files involved, so that the system user in
charge to start the OneMediaHub server will be able to access them. For example, if the archive is
extracted using the root user, without appropriate file permissions a user funambol will not be
able to start all the needed processes or to access libraries.
Double check that the environment variable JAVA_HOME is properly set to the Java Development Kit
(JDK) home. For example:
export JAVA_HOME=/opt/jdk1.7.0
Install the JDBC driver, by copying the jar file under
$JAVA_HOME/jre/lib/ext

Installation and configuration
22
3.2 The config directory
In OneMediaHub, all the configuration files for all components are stored under <root directory of
your OneMediaHub installation>/config.
3.2.1 OneMediaHub configuration files
OneMediaHub configuration files are simple XML files that configure a specific aspect or component of
the OneMediaHub system. The XML schema used by these files is flexible so that it is not necessary to
change it even when a new set of configuration parameters is introduced. Together with this flexibility the
syntax of the file is simple enough to be easily understood.
This is an example of a server JavaBean:
<?xml version="1.0" encoding="UTF-8"?>
<java version="1.4.1_01" class="java.beans.XMLDecoder">
<object
class="com.funambol.framework.server.store.PersistentStoreManager">
<void property="jndiDataSourceName">
<string>java:/jdbc/fnblds</string>
</void>
<void property="stores">
<array class="java.lang.String" length="2">
<void index="0">
<string>com.funambol.server.store.SyncPersistentStore</string>
</void>
<void index="1">
<string>com.funambol.server.store.EnginePersistentStore</string>
</void>
</array>
</void>
</object>
</java>
3.3 Quick configuration
OneMediaHub provides a way to quickly configure some of the most common settings through a single
configuration file.
To quickly configure a OneMediaHub installation, go to the directory <root directory of your
OneMediaHub installation>/bin and edit the file config.properties, customizing the
properties listed in the table below to reflect your deployment:
Property Description
${api.baseurl} The base URL of the server API. Used by the AJAX
UI as well. Default value is 'sapi'
${customer.app.name} The application name used in the markets, such as
App Store, Android Market or App World (use only
printable characters)
${customer.name.long} The extended name of the customer running the
portal (use only printable characters)
${customer.name.short} The short name of the customer (use only printable
characters, no spaces)

Installation and configuration
23
Property Description
${ds.admin.password} User admin password
${encryption.algorithm} The encryption algorithm's name (may be empty if
encryption is disabled)
${encryption.enabled} Use or not encryption for media files
${encryption.salt} The encryption key for the algorithm defined above
(may be empty if encryption is disabled)
${ets.client-region} The Region where the AWS account has been
created. It should be one of the following:
us-east-1, us-west-1, us-west-2,
eu-west-1, ap-northeast-1, ap-
southeast-1, ap-southeast-2, sa-
east-1
${ets.pipeline-id} The pipeline identifier where your transcoding jobs
will be added
${ets.s3-container-name} The bucket name to be used on Amazon
S3 (if the storage is S3, this bucket name
should be the same as set in the property
${storage.container.name})
${facebook.id} The "Application ID" of your Facebook application
${facebook.secret} The "Secret" of your Facebook application
${flickr.key} The "Key" of your Flickr application
${flickr.secret} The "Secret" of your Flickr application
${google-analytics.account} Google Analytics web property ID
${jdbc.driver} The JDBC driver to use
${jdbc.password} The database user password
${jdbc.url} The URL to use in database connection.
Note
The JDBC URL must include
the parameter specification
characterEncoding=UTF-8; for
example: mysql://172.16.11.24/
funambol?
characterEncoding=UTF-8
${jdbc.user} The database user
${limit.items} The max number of items that can be contained in a
JSON array
${mail.from} The mail address used as "from" in the sent Email
${mail.smtp.auth} Whether the mail server requires authentication or
not (true or false)
${mail.smtp.host} Mail server host name
${mail.smtp.password} Mail server user password

Installation and configuration
24
Property Description
${mail.smtp.port} Mail server port (e.g. 25)
${mail.smtp.ssl} Specifies if the SMTP server to be used requires
SSL. Can be true or false
${mail.smtp.user} Mail server user name
${media.server} The storage provider domain for media and file
${media.transcoding-
service.enabled}
Used for enabling/disabling the media transcoding
${ota.account.name} Name of the sync profile created by the OTA
configuration message (use only printable
characters)
${portal.server} Public hostname:port of the server (e.g.
my.server.com:80)
Note
The specified URL must be exactly the
same as the one used to access the service.
Failure in doing so may cause errors
in various phases including signup. If
you need to support multiple servers see
Section 3.13.2, “Supporting multiple server
URL” for additional information.
${quota.roles} The list of the available quota roles
${quota.demo} The storage space quota for Demo users
${quota.premiumplus} The storage space quota for Premium Plus users
${quota.premium} The storage space quota for Premium users
${quota.standard} The storage space quota for Standard users
${quota.ultimate} The storage space quota for Ultimate users
${sms.password} SMS provider user password
${sms.sender} Name of the SMS sender (max 11 characters, use
only printable characters)
${sms.user} SMS provider user account
${storage.container.name} The bucket name. If the storage provider is
filesystem, there is no need this to be set. If the
storage provider is s3, it must be configured with
the bucket name to be used on Amazon S3
${storage.credential} The secret key. To be set when the storage provider
is Amazon S3; otherwise to be left empty
${storage.identity} The access key. To be set when the storage provider
is Amazon S3; otherwise to be left empty
${storage.provider} The storage provider name. Values allowed:
filesystem to use filesystem storage, or s3 to
use Amazon S3

Installation and configuration
25
Property Description
${subscription.enabled} Used for enabling/disabling the user subscriptions
feature
${twitter.key} The "Consumer Key" of your Twitter application
${twitter.secret} The "Consumer Secret" of your Twitter application
${udp.binding.addr} UDP traffic binding address (usually the local IP
address of the server)
${ws.server} The server host to be used use by the PIM Listener
Service to call the web services exposed by the Data
Synchronization Service
${youtube.key} The "API Key" of your YouTube application
${antivirus.enabled} Enable the antivirus service, default is false. For
more information, see Section 3.24, “Antivirus
service”
When done, run the command:
./configure-portal
Here is an example of the config.properties file for quick configuration:
${jdbc.user}=syncuser
${jdbc.password}=changeme
${jdbc.url}=jdbc:mysql://localhost/funambol?
characterEncoding=UTF-8&connectTimeout=10000&socketTimeout=60000
${jdbc.driver}=com.mysql.jdbc.Driver
${portal.server}=myserver.com
${ws.server}=localhost:8080
${ds.admin.password}=adminpass
${udp.binding.addr}=localhost
${sms.user}=sms
${sms.password}=smspwd
${sms.sender}=onemediahub
${mail.smtp.host}=smtp.gmail.com
${mail.smtp.port}=465
${mail.smtp.auth}=true
${mail.smtp.user}=user@server.com
${mail.smtp.password}=mypwd
${mail.from}=portal@server.com
${mail.smtp.ssl}=true
${customer.name.long}=Funambol
${customer.name.short}=Funambol
${customer.app.name}=OneMediaHub

Installation and configuration
26
${ota.account.name}=onemediahub
${api.baseurl}=sapi
${facebook.secret}=b28b383c51971112384422359b3at56
${facebook.id}=546540546197143
${flickr.key}=b128b383c19719112322412359b3at56
${flickr.secret}=546540546197143e
${youtube.key}=AI39si6KC1971QFGUa-
cL9HMsOKdJJ56h8fgdziY09jeF9ZkzRF501J0sJCCxcaCbazcxhW-
nfwW-5Gg3XbrsLX_UUYOHVaz4g
${twitter.key}=aa999b9cc19719
${twitter.secret}=82Z5VBtIZ1971kwCBLYrPbzIMx6NMxSddaLkys3MnUI
#
# Set it to 'filesystem' for on local file system or to's3' for on
Amazon S3
#
${storage.provider}=filesystem
#
# Set it to the storage provider for media and file content
# (for instance media-container.s3.amazonaws.com)
#
# Using 'filesystem' this property can be empty
#
${media.server}=
#
# The following properties are not needed using 'filesystem'
#
#
# Set it to the bucket name using 's3'
# (for instance media-container)
#
${storage.container.name}=
${storage.identity}=AHHAISAPOB1
${storage.credential}=ixXaHH1TPLABIwWEaHyx
# The portal Mobile sign-up path
${portal.server.msupath}=m
# The available quota roles
${quota.roles}=demo,standard,premium,premiumplus,ultimate,noquota
# The storage space quotas
${quota.demo}=150M
${quota.standard}=1G
${quota.premium}=5G
${quota.premiumplus}=10G
${quota.ultimate}=50G
# The limit of items managed by JSON array

Installation and configuration
27
${limit.items}=15000
${encryption.enabled}=false
${encryption.algorithm}=AES128
${encryption.salt}=cGFzc1971mQ=
# Google Analytics UA ID
${google-analytics.account}=
${media.transcoding-service.enabled}=true
${ets.pipeline-id}=1135067402107-71a0b1
${ets.client-region}=us-west-1
${ets.s3-container-name}=container-playlist
Tip
In order to prevent to erroneously run the quick configuration, you can set the environment
variable FUNAMBOL_QUICK_CONFIGURATION_NOT_ALLOWED to true. In this way, if you
try to run the configure-portal command, a message saying that the quick configuration is
not allowed is shown and the script exits.
Note
If you wish to further customize your OneMediaHub installation, the following sections provide
detailed instructions for configuring the various components.
3.4 Database configuration
The OneMediaHub Portal requires a database (e.g. "funambol") and a user (e.g. "syncuser") that has select/
insert/update/delete grants on the database tables. In the following sections, you will find instructions on
how to create them using MySQL.
If you wish to use a partitioned database, refer to Chapter 6, Database partitioning for further details.
3.4.1 MySQL database creation
Here we will assume that MySQL has been installed successfully, is up and running, and is listening on
port 3306 (default).
To enable the execution of scheduled events, the value of the MySQL global system variable
event_scheduler must be set to true.
Since MySQL server can operate in different Server SQL Modes [10], the System Administrator confirms
that the MySQL server is running with the default configuration or a not strict mode.
Warning
Since MySQL server can operate with ACID compliance or without ACID compliance for commit
operations [11], the System Administrator confirms that the MySQL server is running without
ACID compliance. So innodb_flush_log_at_trx_commit is either 0 or 2. The default
value for innodb_flush_log_at_trx_commit is not supported.

Installation and configuration
28
Below is a simple example on how to create the required user and database. You can run the following
commands on the database server or on a different client machine; in this case, additional parameters (such
as the hostname) could be required - see [5] for more details.
1. Create the database funambol:
mysql -u root -e "create database funambol character set 'UTF8';"
2. Create the database user "syncuser":
mysql -u root -e "create user syncuser identified by 'changeme';"
3. Grant all privileges on the database "funambol" to the user "syncuser":
mysql -u root -e "grant all privileges on funambol.* to
'syncuser'@'localhost' identified by 'changeme';"
mysql -u root -e "flush privileges;"
4. Import the initial database data using UTF-8 encoding:
mysql -h localhost -D funambol –u root --default_character_set utf8 <
<root directory of your OneMediaHub installation>/portal/database/
mysql/cared-mysql.sql
5. Limit user "syncuser"'s privileges:
mysql -u root -e "revoke create, grant option, alter on funambol.*
from syncuser@localhost;"
Security consideration
The aforementioned commands create tables and required objects using "syncuser" as the user. This is not
a good practice in a production environment where the user used by the application should be different
than the one used to create the database and the tables. You should use your own database (super)user to
create the database, run the cared-mysql.sql script and then give select/insert/update/delete rights to
"syncuser" and, in case of future patches containing SQL scripts, execute the scripts themselves. If your
MySQL server is running on a different server from the OneMediaHub services, you need to grant remote
access to "syncuser" (see MySQL Documentation for more details about user remote access.)
3.4.2 Further database configuration
OneMediaHub is configured to use the following values by default:
• host name: localhost
• database name: funambol
If a different configuration is required, update the following file:
•<root directory of your OneMediaHub installation>/config/com/funambol/
server/db/db.xml
This is an example of the configuration file to use MySQL as database server running on
172.16.11.24.

Installation and configuration
29
Note
The JDBC URL must include the parameter specification characterEncoding=UTF-8.
<?xml version="1.0" encoding="UTF-8"?>
<java version="1.6.0" class="java.beans.XMLDecoder">
<object class="com.funambol.server.db.DataSourceConfiguration">
<void method="setProperty">
<string>username</string>
<string>syncuser</string>
</void>
<void method="setProperty">
<string>password</string>
<string>changeme</string>
</void>
<void method="setProperty">
<string>url</string>
<string>jdbc:mysql://172.16.11.24/funambol?characterEncoding=UTF-8</
string>
</void>
<void method="setProperty">
<string>driverClassName</string>
<string>com.mysql.jdbc.Driver</string>
</void>
</object>
</java>
All the OneMediaHub components use the db.xml configuration file located in the <root directory
of your OneMediaHub installation>/config/com/funambol/server/db directory;
you can modify all the configuration parameters by editing this file.
The main parameters are:
Property Description
username The database user
password The database user password
url The URL to use in database connection
driverClassName The JDBC driver to use
In addition, the following parameters can be set for advanced tuning:
Property Description
initialSize The initial number of connections that are created
when the pool is started.
maxActive The maximum number of active connections that
can be allocated from this pool at any one time, or
negative for no limit.
maxIdle The maximum number of connections that can
remain idle in the pool, without extra ones being
released, or negative for no limit.

Installation and configuration
30
Property Description
minIdle The minimum number of connections that can
remain idle in the pool, without extra ones being
created, or zero to create none.
maxWait The maximum number of milliseconds that the pool
will wait (when there are no available connections)
for a connection to be returned before throwing an
exception, or -1 to wait indefinitely.
connectionProperties The connection properties that will be sent
to our JDBC driver when establishing new
connections. The format of the string must be
[propertyName=property;]*
Note
The user and password properties will
be passed explicitly, so they do not need to
be included here.
3.4.3 Limiting the maximum number of open connections
By default, the server can open a maximum number of 100 connections. Your database server will have
difficulty with too many open connections, therefore you will need to increase the maximum number of
connections allowed, or to change the OneMediaHub database configuration in order to reduce the number
of connections used (see Section 3.4.2, “Further database configuration” for more information on the
initialSize, maxActive, minIdle and maxIdle parameters).
Note
OneMediaHub uses a pool of connections, therefore having 100 connections open does not mean
that the server is using all of them concurrently, but rather that almost all of them are idle and
ready to be used.
In order to change the maximum number of connections allowed, refer to [9].
3.4.4 Database partitioning
OneMediaHub supports database partitioning; see Chapter 6, Database partitioning for further details.
3.4.5 MySQL events
To enable the execution of scheduled events, the value of the MySQL global system variable
event_scheduler must be set to true.
The default value INTERVAL_VALUE in the mysql.event table is different according to the specific
event, and can be tuned depending on the load of the given database (see [8]).
You can find more information about the Event Scheduler and MySQL events in the official database
documentation (see [7]).

Installation and configuration
31
Event name Description
delete_monitor_used_storage Delete media storage information older than 30 days
delete_old_client_download_stats Delete download statistics for the clients older than
60 days
delete_old_contacts Delete contacts in status D since more than 30 days
delete_old_events Delete events in status D since more than 30 days
delete_old_fnbl_events Delete reporting events older than 7 days
delete_old_folders Delete folders in status D since more than 30 days
delete_old_history Delete synchronization activities older than 180
days
delete_old_media Delete media items in status D since more than 30
days
delete_old_notes Delete notes in status D since more than 30 days
delete_old_notifications Delete undelivered push messages older than 7 days
disable_pim_push_account Disable PIM push for users without a sync in the
last 60 days
3.5 IPv6 Support
IPv6 clients are fully supported out-of-the-box without any change if OneMediaHub is installed on IPv4
hosts and if in front of the OneMediaHub server an IPv6 HTTP proxy or load balancer (like the Apache
HTTP Server) is used, since in such configuration the proxy translates IPv6 addresses into IPv4 addresses.
Otherwise, if OneMediaHub is installed on IPv6 hosts, the scripts
<root directory of your OneMediaHub installation>/bin/funambol-server
<root directory of your OneMediaHub installation>/bin/pim-listener
must be changed by removing (or commenting out) the following line:
JAVA_OPTS="$JAVA_OPTS -Djava.net.preferIPv4Stack=true"
3.6 Adding new nodes to a OneMediaHub cluster
This section describes how to add new nodes in a OneMediaHub cluster. The sections cover the scenarios
where only one service per box is deployed. If more than one service is deployed on a box, information in
the different sections can be combined.
Warning
In a cluster environment, the directories where all media files belonging to the user are stored must
be shared between all server nodes. See Section 2.6.1, “File system structure” for more details.
3.6.1 Adding a new Data Synchronization Service node to the cluster
To add a new node to the Data Synchronization Service cluster, simply install OneMediaHub on a new
machine as explained in Section 3.1, “Installing the OneMediaHub” and configure the load balancer to
make it aware of the new system.

Installation and configuration
32
3.6.2 Adding a new PIM Listener Service node to the cluster
To add a new node to the PIM Listener Services cluster just install OneMediaHub on a new machine as
explained in Section 3.1, “Installing the OneMediaHub” and start the PIM Listener Service.
3.7 Data Synchronization Service configuration
Most of the configuration files are forged at build time and do not need to be changed at all. The following
configuration files, found in the <root directory of your OneMediaHub installation>/
config directory, are of interest to system administrators:
File Description
Funambol.xml This is the root of all Data Synchronization Service
configuration files; see the dedicated section below
for further details.
com/funambol/server/sms/
SMSProvider.xml
Configuration file for the SMS service provider used
to send SMSs. Out of the box, OneMediaHub uses
SubitoSMS (see the section called “SMS Service”)
com/funambol/server/notification/
PIMPushSender.xml
Push configuration file for SyncML devices which
support PIM push.
3.7.1 Funambol.xml
This is the main Data Synchronization Service configuration file. It also serves as a directory of links to
other configuration files for specific components. The properties contained in Funambol.xml are divided
into two sections and generally do not require any changes.
Table 3.1. engineConfiguration
Property Description
officer Represents the component that controls how users
are authenticated and granted access to the system.
serverURI Specifies the URI to be used by the client when
responding to server messages. Note that this
value doesn't affect the URL or port used by the
application server that runs the OneMediaHub
application.
sessionHandler Represents the component (instantiated using
the contents of an XML file) that manages the
synchronization session.
strategy Represents the component that handles the
synchronization process.
userManager Represents the component that handles all the users.
minMaxMsgSize This option specifies the minimum value to be used
by the client for MaxMsgSize. This value is the
maximum size that all messages sent by the server
must have (specified by the SyncML protocol). If
a client specifies a value for MaxMsgSize that is

Installation and configuration
33
Property Description
smaller than minMaxMsgSize, the server refuses
the synchronization and will log an error.
deviceInventory Represents the component that manages all the
device records.
dataTransformerManager Represents the component that allows you to
customize the encryption applied to incoming and
outgoing messages.
checkForUpdates Enables the Data Synchronization Service to check
the Funambol website daily for updates. [Active by
default]
Warning
Be careful when applying changes to the properties in this section as it may result in the server
malfunctioning.
Table 3.2. serverInfo
Property Description
man The manufacturer. [Default: 'funambol']
mod The model. [Default: 'DS Server CarEd']
oem The OEM. [Default: empty]
fwV The firmware version. [Default: empty]
hwV The hardware version. [Default: empty]
swV The server version.
devID The device ID. [Default: 'funambol']
devType The device type. [Default: 'server']
utc Does the server support UTC? [Default: 'yes']
supportLargeObjs Does the server support large object? [Default: 'yes']
supportNumberOfChanges Does the server support number of changes?
[Default: 'yes']
X-funambol-smartslow The server supports the smart slow sync that allows
the OneMediaHub client Apps and the server to
optimize traffic during slow syncs (present since
v8.5)
X-funambol-media-http-upload The server supports improved file data object
synchronization: as pictures may be large and the
bandwidth small, the server supports HTTP upload
of media files (present since v8.7)
X-funambol-msu The server supports mobile signup. If the property
is not present, the latest OneMediaHub client Apps
will not display the signup option (present since
v9.0)

Installation and configuration
34
Note
These options include all the settings that determine what is initially sent to the SyncML device or
client, to describe important server characteristics.
3.8 PIM Listener Service configuration
Most of the configuration files are forged at build time and do not need to be changed at all. The following
configuration files, found in the <root directory of your OneMediaHub installation>/
config directory, are of interest to system administrators.
File Description
com/funambol/pimlistener/
PIMListenerConfiguration.xml
PIM Listener Service configuration file. The
following sections should be updated:
<void property="serverInformation">
<object
class="com.funambol.server.admin.
ws.client.ServerInformation">
<void property="url">
<string>http://server:port/
funambol/services/admin</string>
</void>
<void property="username">
<string>admin</string>
</void>
<void property="password">
<string>password</string>
</void>
</object>
</void>
For more see the section below.
jgroups-pimlistener.xml JGroups configuration file used by the PIM Listener
Service cluster.
bind_addr="${jgroups.udp.bind_addr.
ctp-nofitication-
group:192.168.1.15}"
3.8.1 PIMListenerConfiguration.xml
This file contains the following configuration parameters.
Property Description
maxThreadPoolSize Specifies the maximum number of threads that can
be used. This should be a function of the number of
users to monitor.
healthThreadPollingTime Sets the interval (in seconds) between executions of
the HealthThread, a thread that assesses the PIM
Listener Service status at regular intervals.

Installation and configuration
35
Property Description
registryMonitorPollingTime Sets the interval (in seconds) between
RegistryMonitor executions, a thread that
regularly checks the database for changes to
monitored accounts.
taskPeriodTolerance Sets the tolerance accepted on the period between
two data checks. If a user is scheduled to be checked
every x seconds (period), a warning is triggered if
the data check occurs after x + periodTolerance/x.
registryTableName Defines the table that contains the PIM
Listener push registry entries. By default
fnbl_push_listener_registry.
pluginDirectory The directory from which the PIM Listener Service
loads plug-ins.
serverInformation Records the information used to call any
webservices exposed by the Data Synchronization
Service, as noted below:
• url: the OneMediaHub engine administration
URL
• username: the OneMediaHub engine
administrator username
• password: the OneMediaHub engine
administrator password
clusterConfiguration Contains the information used to create a cluster
between two or more PIM Listener Services.
3.9 Data Synchronization Service cluster configuration
Most of the configuration files are forged at build time and do not need to be changed at all. The following
configuration files, found in the <root directory of your OneMediaHub installation>/
config directory, are of interest to system administrators.
File Description
jgroups-dsserver.xml JGroups configuration file used by the Data
Synchronization Service cluster
cluster.bind_addr=
"${jgroups.udp.bind_addr.ds-server-
group:192.168.0.15}"
3.10 Enabling default users
Before starting for the first time the OneMediaHub services, it is mandatory to enable the default users
and choose a password for them. These users are required for using the customer service representative
(CSR) interface and running the OneMediaHub services. Any user available by default in OneMediaHub is
disabled as a security measure.

Installation and configuration
36
To enable the default users, run the command: <root directory of your OneMediaHub
installation>/bin/enable-default-users
To enable a single default user, run the command: <root directory of your OneMediaHub
installation>/bin/enable-default-users <userid>
Note
The password of the default user 'admin' must be the same value of the property
${ds.admin.password} in the file <root directory of your OneMediaHub
installation>/bin/config.properties
3.11 Starting/stopping OneMediaHub services
This section describes how to start and stop the different OneMediaHub services.
Note
You can verify whether the server services started successfully by looking at the server logs; see
Chapter 7, Logging for more information on logging.
The following table details which services can autonomously be started/stopped, the script to use, and the
TCP ports involved:
OneMediaHub service Script TCP ports used
All services together <root directory of
your OneMediaHub
installation>/bin/
funambol
(all ports listed here below)
Data Synchronization Service <root directory of
your OneMediaHub
installation>/bin/
funambol-server
8005 (shutdown port)
8080 (connector port)
8101 (JMX port)
PIM Listener Service <root directory of
your OneMediaHub
installation>/bin/pim-
listener
3101 (JMX port)
Warning
You must not change the timezone settings in the funambol-server script. The Data
Synchronization service must start in GMT. At the moment there is no chance to have this service
working with a timezone different from GMT. This is because the current implementation expects
the Java Virtual Machine running in GMT, since in handling different timezones a timezone to be
used as reference is needed, and GMT is the most generic one.
When run, these scripts inform the user via a warning message if the default TCP ports are already in use.
In this case, the start-up procedure is terminated.

Installation and configuration
37
This could mean that:
1. the service is already up and running (therefore ports are already used)
2. TCP ports are being used by another application
3.11.1 Starting/stopping all services together
To start all services together, go to the directory <root directory of your OneMediaHub
installation>/bin and run the command:
./funambol start
To stop all the services, use the command:
./funambol stop
3.11.2 Starting/stopping the Data Synchronization service
To start the Data Synchronization service, go to the directory <root directory of your
OneMediaHub installation>/bin and run the command:
./funambol-server start
To stop the service, use the command:
./funambol-server stop
3.11.3 Starting/stopping the PIM Listener service
To start the PIM Listener service, go to the directory <root directory of your OneMediaHub
installation>/bin and run the command:
./pim-listener start
To stop the service, use the command:
./pim-listener stop
3.12 Portal configuration
Portal configuration files are stored under the root directory of your OneMediaHub installation. The table
below lists the portal configuration files that a system administrator can be interested in changing.
File Description
tools/tomcat/conf/Catalina/
localhost/ROOT.xml
Mail session configuration file. Change the SMTP
server settings according to system deployment. See
below for details.
config/portal/portal-ext.properties Main portal configuration file. See below for details.
3.12.1 Configuring the login with or without country code
The OneMediaHub can be configured to allow the users to login with or without the country code. When
they registered with a phone number as username, the server should be configured in this way when all the
users are from the same country (and share the same phone country code).

Installation and configuration
38
In order to configure the server to allow this type of login, a new property must be set into the file
<root directory of your OneMediaHub installation>/config/portal/portal-
ext.properties:
unique-country-code=49
In the example above, the value of the element unique-country-code (49) is the country code of
Germany.
Warning
This feature should be configured before having users in the database. If there are already users in
the database, those will not be able to login with or without country code, but only with the actual
number used as username when they registered.
3.12.2 ROOT.xml
In order to be able to send Emails, the following mail service must be configured:
<root directory of your OneMediaHub installation>/tools/tomcat/conf/
Catalina/localhost/ROOT.xml
Edit the file and set appropriate values for the SMTP server of choice and the from address that should
appear in the Emails. The parameters that need to be customized are highlighted in the following example:
<Resource name="mail/MailSession"
auth="Container"
type="javax.mail.Session"
mail.smtp.host="${mail.smtp.host}"
mail.smtp.auth="${mail.smtp.auth}"
mail.smtp.user="${mail.smtp.user}"
mail.smtp.password="${mail.smtp.password}"
mail.smtp.port="${mail.smtp.port}"
mail.smtp.debug="false"
mail.from="${mail.from}"
mail.smtp.starttls.enable="${mail.smtp.ssl}"
mail.smtp.socketFactory.class="${mail.smtp.socketfactory}"
mail.smtp.connectiontimeout="10000"
mail.smtp.timeout="10000"
/>
Below is a practical customization example:
<Resource name="mail/MailSession"
auth="Container"
type="javax.mail.Session"
mail.smtp.host="localhost"
mail.smtp.auth="false"
mail.smtp.user=""
password=""
mail.from="portal@funambol.com"
mail.smtp.connectiontimeout="10000"
mail.smtp.timeout="10000"
/>

Installation and configuration
39
This SMTP server is the same as the one specified in the Email account configuration.
The configuration parameters that must be specified for the SMTP server are:
• mail server (i.e., mail.smtp.host)
• whether it requires authentication or not (mail.smtp.auth= ["true"/"false"])
• username (mail.smtp.user) and password (mail.smtp.password) that are used for all Email
accounts registered in the table fnbl_email_account for authentication.
When a portal user registers a private Email account, the username and password combination for
that SMTP server will be saved in fnbl_email_account, under the columns: out_login and
out_password.
After these changes, you will need to restart the server; go to the directory <root directory of
your OneMediaHub installation>/bin and run the command:
./funambol-server start
3.12.3 portal-ext.properties
Change the following properties in the file <root directory of your OneMediaHub
installation>/config/portal/portal-ext.properties:
3.12.3.1 sp.syncportal.messages.url and sp.syncportal.url
Set the properties used to create the link in SMS and invitation mail:
# This property is used for the mail body and when
# an SMS message is sent
sp.syncportal.messages.url=<your-host>:<your-port>
...
# OneMediaHub Server URL
sp.syncportal.url=http://<your-host>:<your-port>
3.12.3.2 admin.email.from.address and admin.email.from.name
Set the properties used to send mail:
# Set signature (for example, 'The Funambol Team') and email address for
# registration, invitation and forgot password email
admin.email.from.address=<your-email-address>
admin.email.from.name=<your-email-signature>
3.12.3.3 sp.mediaserver.url
Set the property used to specify the storage provider URL for media and file content:
# This property is used to specify the storage provider for media and

Installation and configuration
40
# file content as they can be stored on a remote repository by default
# using the configure-portal is the same as portal URL
sp.mediaserver.url=http://<your-host>:<your-port>
3.12.3.4 sync.slow.min-interval
Set the minimum interval in minutes between two slow syncs for a specific principal:
# "-1" means always allowed,
# "never" means always rejected.
# If the engine rejects a slow sync, the status returned to the client
# is 407 - Retry
sync.slow.min-interval=-1
3.12.3.5 sync.blocked-sources
Set the list of sync sources a client should be prevented to sync against:
# List of sync source names blocked on this server, separeted by ","
# eg: card,cal,task
# The status returned to the client is 407 - Retry
# Note: Currently this does not block SAPI paths (picture, video, file,
# etc.)
sync.blocked-sources=cal
3.12.3.6 sync.min-interval
Set the minimum interval in minutes between two syncs (of any type) for a specific principal:
# minimum interval in minutes between a sync and another of any kind for
# a user, "-1" means always allowed, "never" means that the syncs are
# blocked at all
sync.min-interval=-1
3.12.3.7 sync.max-session-allowed
Set the maximum number of SyncML sessions allowed by the DS Server:
# maximum number of SyncML sessions allowed by the DS Server.
# "-1" means always allowed
sync.max-session-allowed=-1
3.12.3.8 sync.response-time-threshold
Set max allowed threshold in milliseconds for sync requests. If the average sync response time is higher
than this threshold, all new sync sessions will be rejected until the average response time will be under the
threshold. If the value of the property is empty, the threshold is not considered:
# Set max allowed threshold in milliseconds for sync requests.
# If the value of the property is empty, the threshold is not

Installation and configuration
41
# considered.
sync.response-time-threshold=
3.12.3.9 sp.syncportal.device.url.automaticRedirect,
sp.syncportal.device.url.androidApp,
sp.syncportal.device.url.iPhoneApp, and
sp.syncportal.device.url.windowsPhoneApp
Set the properties to automatically download the proper mobile client:
# Automatic mobile download redirect
sp.syncportal.device.url.automaticRedirect=true
sp.syncportal.device.url.androidApp=<android_market_url>
sp.syncportal.device.url.iPhoneApp=<iphone_market_url>
sp.syncportal.device.url.windowsPhoneApp=<windowsphone_market_url>
If the property sp.syncportal.device.url.automaticRedirect is set to false, a download
page is shown to the user and the other properties can be left empty.
3.12.3.10 sp.syncportal.url.download.page
Set the property to specify the download page URL. This is the URL that is sent to the user when the send-
download-link Server API is called:
sp.syncportal.url.download.page=${sp.public.portal.url}/d
3.12.3.11 storage.provider, storage.identity, storage.credential
and storage.container-name
#
# Set property to 'filesystem' for local file system or to 's3' for
# Amazon S3
#
storage.provider=
#
# Set properties with identity and credential specific for the storage.
# They are not needed when using 'filesystem' as provider.
#
storage.identity=
storage.credential=
#
# Set property to the container name on S3; leave it empty if the
# storage provider is file system
#
storage.container-name=
3.12.3.12 ets.pipeline-id, ets.client-region and ets.s3-container-
name
#

Installation and configuration
42
# Set the pipeline identifier and the Region's name (it should be one
# of the following: us-east-1, us-west-1, us-west-2, eu-west-1,
# ap-northeast-1, ap-southeast-1, ap-southeast-2, sa-east-1) where
# the pipeline has been created.
# Set the S3 bucket where to store the transcoded media.
# This property must be set both in the case the storage is S3
# and file system.
# In case the storage is S3, this bucket should be the same set
# in the property storage.container-name
#
ets.pipeline-id=
ets.client-region=
ets.s3-container-name=
3.12.3.13 audio.enabled
#
# Set the property audio.enabled to true for enabling the music feature.
# Otherwise the music items will be managed as file and no metadata
# will be stored into db.
#
audio.enabled=true
3.12.3.14 passwords.toolkit and passwords.regexptoolkit.pattern
This property indicates which Password Toolkit will be used to validate user passwords. Default toolkit is
RegExpToolkit, which is configurable with a regular expression (see below) to validate the password.
A custom toolkit can be used as well. To use a custom password validator, provide a class that extends the
Liferay BasicToolkit abstract class and put in the system classpath.
# Input a class name that extends
# com.liferay.portal.security.pwd.BasicToolkit. This class will be
called to
# generate and validate passwords.
#
passwords.toolkit=com.liferay.portal.security.pwd.RegExpToolkit
# If you choose to use com.liferay.portal.security.pwd.RegExpToolkit as
# your password toolkit, set the regular expression pattern that will be
# used to generate and validate passwords.
#
# Note that \ is replaced with \\ to work in Java.
#
# default only letters (a-z, A-Z) or numbers (0-9) or dash and they
# must be at least 4 characters and at most 16 characters long.
#
passwords.regexptoolkit.pattern=^[\\w\\d\\-]{4,16}$
3.12.3.15 passwords.allow.username
This property indicates if the username is allowed to be part of the password. If the property is set to
false, any possible occurrence of the username within the password will not be accepted by the system.
# Allow that the username appears in the password.
passwords.allow.username=true

Installation and configuration
43
3.12.3.16 push.apple.keystore.file, push.apple.keystore.password,
push.apple.production and push.apple.connection-pool-size
These properties configure the apple push notification services.
# Set property to the name of the file containing the key used for
authenticating the
# server with the Apple Push Server. The file has to be placed in the
config directory
push.apple.keystore.file=push_keystore_file.p12
# Set property to the password used for protecting the key store file
push.apple.keystore.password=password
# Set property to false if the sandbox Apple Push Server should be used
push.apple.production=true
# Set property to the number of threads to be reserved for connections
to the Apple Push Server
push.apple.connection-pool-size=1
3.12.3.17 subscription.enabled
Set the property to true for enabling the user subscriptions feature.
3.12.3.18 subscription.warning-before-renewal-in-
minutes, subscription.insufficient-funds-delay-in-
minutes, subscription.service-error-delay-in-minutes,
subscription.deletion-delay-in-minutes, subscription.keep-trying-
to-charge-in-minutes, subscription.allow-downgrade-overquota,
subscription.allow-immediate-downgrade
Set the properties according to the requirements of the subscription strategy.
Set the property subscription.warning-before-renewal-in-minutes for specifying the
delay in minutes of the notification warning sent before the renewal of the current user's subscription plan.
Set the property subscription.insufficient-funds-delay-in-minutes for specifying the
delay in minutes for which payment has failed because of insufficient funds.
Set the property subscription.service-error-delay-in-minutes for specifying the delay in
minutes for the retry in case the payment service is not reachable.
Set the property subscription.deletion-delay-in-minutes for specifying the delay in
minutes for the deletion of the subscription plan.
Set the property subscription.keep-trying-to-charge-in-minutes with the time for
keeping trying to charge.
Set the property subscription.allow-downgrade-overquota to enable the downgrade of a
subscription without checking the quota of the user.
Set the property subscription.allow-immediate-downgrade to enable the immediate
downgrade of subscription without waiting the termination of the old (greater) one.

Installation and configuration
44
3.12.3.19 subscription.notification-sender-class,
subscription.notification-builder-class, subscription.payment-
service-class, subscription.manager-class, subscription.currency
Set the properties for specifying the Java classes that implements Notification Sender, Notification Builder,
Payment Service, Subscription Manager, and Currency to be used by the subscription engine.
3.12.3.20 subscription.payment.web
Set the URL that will be used to trigger the payments.
3.12.3.21 subscription.paymentverifier.apple.sandbox
Set the property to true for using the Apple sandbox (i.e. https://
sandbox.itunes.apple.com/verifyReceipt) to verify payments, otherwise https://
buy.itunes.apple.com/verifyReceipt will be used.
3.12.3.22 subscription.paymentverifier.web.validationurl
Set the server URL that will be used to verify payments.
3.12.3.23 media.account-pre-population
This property allows the administrator to specify a certain number of files that should appear in the user
account when the user first logs in. These files can be of any of the supported types: videos, pictures, audio,
or generic files.
Configuration
This feature can be enabled by setting the property media.account-pre-population
in <root directory of your OneMediaHub installation>/config/
portal.properties to true, and the files to be added to the user's account have to be placed
in the <root directory of your OneMediaHub installation>/default-media
directory. The files placed here will appear in the user's account.
Requirements
The videos used for the account pre-population should be already transcoded in a format that can be
played in the browsers, e.g. encoded in MPEG4.
Note
The thumbnails for pictures and videos are created only once and cached for future usage, and
when Amazon S3 is used as the backend the files are copied to Amazon S3 once and for each new
user they are simply copied inside Amazon S3.
When encryption is enabled and Amazon S3 is used as storage provider, each file will be
encrypted and uploaded to Amazon S3 when the user signs-up. For this reason the amount of files
should be limited in this scenario.
3.12.3.24 ui.media.upload-file-size-limit and ui.media.multiple-
upload-size-limit
Set the maximum limit for one or for multiple media upload operations:
# Size limit for one media upload operation

Installation and configuration
45
ui.media.upload-file-size-limit=2GB
# Size limit for a media upload operation of a set of files
ui.media.multiple-upload-size-limit=2GB
3.12.3.25 sapi.upload.max-concurrent-uploads
Define the maximum number of concurrent uploads this server instance can handle.
Note
Default value is -1, which allows all upload requests.
3.12.3.26 sapi.upload.danger-zone.concurrent-uploads
Define the threshold at which the server enters the danger zone for concurrent uploads.
Note
Default value is -1, which allows all upload requests.
3.12.3.27 sapi.upload.danger-zone.device.max-concurrent-uploads
Define the maximum number of concurrent uploads a single device is allowed to perform while the server
is in danger zone mode.
Note
Default value is -1, which allows all upload requests.
3.12.3.28 user-import-tool.device.countrya2, user-import-
tool.device.carrierid and user-import-tool.device.modelid
Set the device properties for the default device when provisioning users with the import users tool:
# Country A2 code used by the user import tool when inserting a new
device to a user
user-import-tool.device.countrya2=
# Carrier identifier used by the user import tool when inserting a new
device to a user
user-import-tool.device.carrierid=
# Model identifier used by the user import tool when inserting a new
device to a user
user-import-tool.device.modelid=
3.12.3.29 user-communication.default-channel
Set the default communication channel to contact users. Possible values are "email" and "sms".

Installation and configuration
46
# Default communication channel for sending user notifications
user-communication.default-channel=email
3.12.3.30 sapi.login.persistent-login-token-max-age-in-days
Set the maximum age for the persistent login token, returned to the HTTP client as a cookie, when
requested.
# Defines the persistent login token maximum age, in days
sapi.login.persistent-login-token-max-age-in-days=90
3.12.3.31 sharing.email-counter.max-messages
Set the max number of sharing Email messages a user can send.
# set the max number of sharing email a user can send
sharing.email-counter.max-messages=100
3.12.4 Restricting access to administrative Server API calls
It is possible to limit the access to administrative Server API calls to specific IP addresses by setting the
sapi.admin.allowedips property in the portal-ext.property file. The property must be set
to a comma-separated list of IP addresses or IP address masks. Three different types of masks are allowed:
• simple IP addresses (e.g. 123.12.34.56,123.12.34.60)
• IP addresses containing the * wildcard (e.g. 123.12.34.*)
• range of IP addresses (e.g. 123.12.34.1-123.12.34.100)
When a request from an administrative account is performed, the IP address from which the request is
made is compared with the allowed IP addresses. If the IP address matches one of the allowed IP addresses,
the request is accepted; otherwise, an HTTP status code 401 (unauthorized) is returned and the SAPI call is
not executed.
Warning
The default value of the sapi.admin.allowedips property is 127.0.0.1, which means
that administrative Server API calls are allowed from localhost only. Removing the property
from the file has the same effect as setting it to *.*.*.*, i.e. allowing calls from any IP address.
Note
If OneMediaHub is running behind a load balancer (for example, ELB from Amazon Web
Services), the default remote IP addresses in Tomcat are going to be the ones of the load balancer
itself, as it's not trusted by Tomcat out of the box. To identify the latest IP before the load balancer
and restrict access to administrative Server API calls, the following valve should be enabled in the
file <root directory of your OneMediaHub installation>/tools/tomcat/
conf/server.xml:
<!-- The request FunambolRemoteIpValve valve helps in having the
remote IP address of a user when the service is running behind a

Installation and configuration
47
Load Balancer that does not provide a static list of IP address,
for example the ELB from AWS.
The standard RemoteIpValve of Tomcat relies on a list of IP
addresses or ranges, the FunambolRemoteIpValve drops the last IP
address from the LB only.
-->
<!--
<Valve
className="org.apache.catalina.valves.FunambolRemoteIpValve"
internalProxies=""remoteIpHeader="x-forwarded-for"
remoteIpProxiesHeader="x-forwarded-by" trustedProxies=""/>
-->
3.12.5 How to configure the OAuth 2.0 client
In order to configure the HTTP OAuth 2.0 client change the following properties in the file <root
directory of your OneMediaHub installation>/config/portal/portal-
ext.properties:
# generic configuration of the http oauth client
# (timeout and max connection)
oauth.http-client.connection-timeout-in-seconds=30
oauth.http-client.max-total-connections=10
# web app and officer configuration
# URL of the login page
oauth.authorize.code.url=
#oauth.authorize.code.url=https://accounts.google.com/o/oauth2/auth
# URL to get the oauth access and refresh tokens (aka oauth tokens)
oauth.access.token.url=
# oauth.access.token.url=https://accounts.google.com/o/oauth2/token
# URL to refresh the oauth tokens
oauth.refresh.token.url=
# oauth.refresh.token.url=https://accounts.google.com/o/oauth2/token
# URL to get the user info
# (e.g. unique identifier, first name, last name....)
oauth.user.info.url=
# oauth.user.info.url=https://www.googleapis.com/oauth2/v3/userinfo
# unique identifier label in the oAuth server that will be
# used also in the OMH server
# this makes the feature more flexible because
# it could depend on the oAuth server implementation
oauth.user.info.id.mapping=
# URL that the web app will use to open the OMH main page
# this has been added in order to increase the security
# of the system in fact the back end can use it to

Installation and configuration
48
# validate the URL send by the web app; this is a OMH URL
# and it doesn't depend on oauth server
oauth.response.redirect.url=
# URL that the web app will use to open the error page
# this has been added in order to increase the security
# of the system in fact the back end can use it to
# validate the URL send by the web app; this is a OMH URL
# and it doesn't depend on oauth server
oauth.response.redirect-error.url=
# URL that the web app client will use in case of error
# during the authentication flow; this is a OMH URL
# and it doesn't depend on oauth server
oauth.client.web.logout.redirect.url=
# logout URL to invalidate the tokens on the oauth server
oauth.client.web.logout.url=
#oauth.client.web.logout.url=https://accounts.google.com/logout
# property to control the set of resources and operations
# that an access token permits
# it could depend on the oAuth server implementation
oauth.client.web.scope=
#oauth.client.web.scope=profile
# this section has the keys of the client apps
# since the Officer component will impersonate the apps
# this info depends on the oauth server side
#
# these are the 3 main parameters of the web app;
oauth.client.web.id=
oauth.client.web.secret=
oauth.client.web.redirect.url=
# windows PC
oauth.client.windows.id=
oauth.client.windows.secret=
oauth.client.windows.redirect.url=urn:ietf:wg:oauth:2.0:oob
# mac
oauth.client.macos.id=
oauth.client.macos.secret=
oauth.client.macos.redirect.url=urn:ietf:wg:oauth:2.0:oob
# android
oauth.client.android.id=
oauth.client.android.secret=
oauth.client.android.redirect.url=urn:ietf:wg:oauth:2.0:oob
# ios
oauth.client.ios.id=
oauth.client.ios.secret=

Installation and configuration
49
oauth.client.ios.redirect.url=urn:ietf:wg:oauth:2.0:oob
# blackberry
oauth.client.bb.id=
oauth.client.bb.secret=
oauth.client.bb.redirect.url=urn:ietf:wg:oauth:2.0:oob
# windows phone
oauth.client.winph.id=
oauth.client.winph.secret=
oauth.client.winph.redirect.url=
# This section configures the custom ssl context for oauth client
connections,
# this custom context will be used when all properties are configured
#
# Location of the keystore file to be used by the OAUTH requests
oauth.keystore.file=
# Keystore password to be used by the OAUTH requests
oauth.keystore.password=
# Location of the truststore file to be used by the OAUTH requests
oauth.truststore.file=
# Truststore password to be used by the OAUTH requests
oauth.truststore.password=
3.12.6 How to enable user subscriptions
If you want to enable the user subscriptions, follow these steps:
1. Set the property subscription.enabled to true in the configuration file <root
directory of your OneMediaHub installation>/config/portal/portal-
ext.properties
2. Set all the other properties with prefix subscription. according to your subscription strategy (see
Section 3.12.3, “portal-ext.properties”)
3. To enable the task for renewing subscriptions, edit the configuration file <root directory of
your OneMediaHub installation>/config/com/funambol/server/plugin/
SubscriptionRenewalTask.xml setting the enabled property to true
<?xml version="1.0" encoding="UTF-8"?>
<java class="java.beans.XMLDecoder" version="1.5.0_11">
<object
class="com.funambol.subscriptions.tasks.SubscriptionRenewalTask">
<void property="enabled">
<boolean>true</boolean>
</void>
<void property="intervalInMs">
<long>600000</long>
</void>
<void property="maximumNumberOfItems">
<int>100</int>
</void>
</object>

Installation and configuration
50
</java>
4. To enable the task for migrating users from a subscription plan to another, edit the configuration
file <root directory of your OneMediaHub installation>/config/com/
funambol/server/plugin/SubscriptionMigrationTask.xml setting the enabled
property to true
<?xml version="1.0" encoding="UTF-8"?>
<java class="java.beans.XMLDecoder" version="1.5.0_11">
<object
class="com.funambol.subscriptions.tasks.SubscriptionMigrationTask">
<void property="enabled">
<boolean>true</boolean>
</void>
<void property="intervalInMs">
<long>600000</long>
</void>
<void property="maximumNumberOfItems">
<int>100</int>
</void>
</object>
</java>
5. To enable the task for deleting a user subscription, edit the configuration file <root directory
of your OneMediaHub installation>/config/com/funambol/server/plugin/
AccountTerminationTask.xml setting the enabled property to true
<?xml version="1.0" encoding="UTF-8"?>
<java class="java.beans.XMLDecoder" version="1.5.0_11">
<object
class="com.funambol.subscriptions.tasks.AccountTerminationTask">
<void property="enabled">
<boolean>true</boolean>
</void>
<void property="intervalInMs">
<long>600000</long>
</void>
<void property="maximumNumberOfItems">
<int>100</int>
</void>
</object>
</java>
6. To enable the task for verifying if the payment has been done by a user, edit the configuration
file <root directory of your OneMediaHub installation>/config/com/
funambol/server/plugin/PaymentVerificationTask.xml setting the enabled
property to true
<?xml version="1.0" encoding="UTF-8"?>
<java class="java.beans.XMLDecoder" version="1.5.0_11">
<object
class="com.funambol.subscriptions.tasks.PaymentVerificationTask">
<void property="enabled">
<boolean>true</boolean>
</void>

Installation and configuration
51
<void property="intervalInMs">
<long>600000</long>
</void>
</object>
</java>
3.12.7 How to view and edit current subscription plans
The set of the currently available subscription plans is retrievable and editable in the database, as per table
described at Section E.1.38, “fnbl_subscription_plan”.
3.12.8 How to enable user validation in Mobile signup
During the signup phase it is possible to validate the user by setting in a proper way the property
sp.syncportal.mobilesignup.validation.
If it is empty, no user validation will be performed.
If it is set to sms, an SMS with the activation link is sent to the phone number specified by the user.
If it is set to captcha, the user is validated by checking the captcha code.
A CAPTCHA image is displayed by default to the new user during the mobile signup. To remove the
CAPTCHA, the sp.syncportal.mobilesignup.validation property should be changed to
sms or let empty. The CAPTCHA will not be displayed to mobile clients and during in-browser signup.
To edit the CAPTCHA image (number of characters, complexity), the following fragment should be
modified in the <root directory of your OneMediaHub installation>/tools/
tomcat/webapps/ROOT/web-inf/web.xml file. For more information on valid configurations,
refer to [27].
<servlet>
<servlet-name>MobileCaptcha</servlet-name>
<servlet-class>nl.captcha.servlet.CaptchaServlet</servlet-class>
<init-param>
<param-name>cap.font.arr</param-name>
<param-value>Courier</param-value>
</init-param>
<init-param>
<param-name>cap.char.arr</param-name>
<param-value>2,3,4,8,9</param-value>
</init-param>
<init-param>
<param-name>cap.char.arr.l</param-name>
<param-value>4</param-value>
</init-param>
</servlet>
3.12.9 How to enable user validation in Portal signup
During the signup phase it is possible to validate the user by setting in a proper way the property
sp.syncportal.signup.validation.

Installation and configuration
52
If it is empty, no user validation will be performed.
If it is set to sms, an SMS with the activation link is sent to the phone number specified by the user.
If it is set to captcha, the user is validated by checking the captcha code.
A CAPTCHA image is displayed by default to the new user during the portal signup. To remove the
CAPTCHA, the sp.syncportal.signup.validation property should be changed to sms or
let empty. The CAPTCHA on the signup page will then be ignored by the Server API and can accordingly
be removed from the AJAX signup page.
To edit the CAPTCHA image (number of characters, complexity), the following fragment should be
modified in the <root directory of your OneMediaHub installation>/tools/
tomcat/webapps/ROOT/web-inf/web.xml file. For more information on valid configurations,
refer to [27].
<servlet>
<servlet-name>Captcha</servlet-name>
<servlet-class>nl.captcha.servlet.CaptchaServlet</servlet-class>
<init-param>
<param-name>cap.font.arr</param-name>
<param-value>Courier</param-value>
</init-param>
<init-param>
<param-name>cap.char.arr</param-name>
<param-value>2,3,4,8,9</param-value>
</init-param>
<init-param>
<param-name>cap.char.arr.l</param-name>
<param-value>4</param-value>
</init-param>
</servlet>
3.12.10 How to enable gzip compression
Gzip compression is used on the AJAX user interface to lower the amount of data sent to browsers that
support this type of compression as per RFC 2616 (see [19]).
Note
All modern browsers and all browsers supported by OneMediaHub handle zip compression.
Running an Apache server is mandatory in order to take advantage of gzip compression with
OneMediaHub. To configure it, follow these steps:
1. Open the Apache httpd.conf configuration file
2. Check that the module rewrite is loaded:
LoadModule rewrite_module modules/mod_rewrite.so

Installation and configuration
53
3. After the DefaultType, add the content type and encoding for jgz and cgz:
AddType text/javascript .jgz
AddEncoding gzip .jgz
AddType text/css .cgz
AddEncoding gzip .cgz
4. Add the following rules to the VirtualHost section:
RewriteEngine on
RewriteCond %{HTTP:Accept-Encoding} gzip
RewriteRule (.*)-single\.js$ $1\-single.js.jgz [PT]
RewriteCond %{HTTP:Accept-Encoding} gzip
RewriteRule (.*)-single\.css$ $1\-single.css.cgz [PT]
RewriteCond %{HTTP:Accept-Encoding} gzip
RewriteRule (.*)portal-([a-z-]+)\.js$ $1\portal-$2.js.jgz [PT]
To test that gzip compression is correctly configured and is working you can:
• Add logs to the Apache server:
RewriteLog /tmp/rewrite.log
RewriteLogLevel 2
Note
According to Apache documentation, using a high value for RewriteLogLevel will slow
down your Apache server dramatically. Remove it once the testing is over.
• Check response headers using a tool for Firefox such as Firebug. If the Content-Encoding is
"gzip", the response from Apache is compressed using gzip. Or, you can use wget/curl with a list
of URLs.
3.12.11 How to configure the disk quota for media
The media sync sources (picture, video, and file) are used to store pictures, videos, and other files on the
server's file system (see Section 2.6.1, “File system structure”).
The disk quota assigned to each user depends on the user role. Once a user has reached the limit, they
cannot upload any more files. By default there are five roles for which a specific quota is assigned.
See the table below for the corresponding disk quota assigned to each role.
Role Role Description Quota
demo Demo user 150M
standard Standard user 1G
premium Premium user 5G
premiumplus Premium Plus user 10G
ultimate Ultimate user 50G

Installation and configuration
54
Therefore a 'Premium' user can upload up to 5 GB of media.
Note
Thumbnails and other information generated by the OneMediaHub server and stored on the file
system in the -ext subdirectories (see Section 2.6.2, “-ext subdirectories”) are not considered
when computing the user quota, even though they use some disk space.
New users is assigned the 'standard' role by default. The default role assigned to each new user can be
changed by modifying the UserManager configuration. If you want to change the default role, follow these
steps:
1. Open the file CaredUserManager.xml found in the directory:
<root directory of your OneMediaHub installation>/config/com/funambol/
server/admin
2. Locate the defaultRoles property
3. Change the default value standard with one of the following: demo, premium, premiumplus,
ultimate.
For example:
<void property="defaultRoles">
<array class="java.lang.String" length="1">
<void index="0">
<string>demo</string>
</void>
</array>
</void>
In CaredUserManager.xml there is also a mandatoryRoles property, defining the 'sync_user'
role as mandatory. Users who want to sync must have the 'sync_user' role. The 'sync_user' role is therefore
configured as mandatory and assigned by default to each new user. This configuration should not be
changed.
The maximum file system quota assigned to each role can be changed by modifying the file portal-
ext.properties.
To change the quota, follow these steps:
1. Open the file portal-ext.properties found in the directory: <root directory of your
OneMediaHub installation>/config/portal/
2. Locate the quota.roles property. Here are all the allowed quota roles for the users.
3. Locate the role for which you want to change the quota.
4. Change the default value (expressed in bytes)
For example, if you want to change the quota assigned to the 'standard' role to 10 MB:
..
quota.standard=10M
..

Installation and configuration
55
Note
The value for the quota may be followed by 'M' if it is expressed in MB or 'G' if it is expressed in
GB. For example: 100M stands for '100 Megabytes'; 2G stands for '2 Gigabytes'.
3.12.12 How to configure quota notification
Users may receive a notification whenever their occupied storage quota exceeds a configurable percentage.
Notifications are disabled by default - to enable them, set the following properties in the file portal-
ext.properties:
quota.notification.enabled=true
quota.notification.percentage=80
quota.notification.sender-
class=com.funambol.portal.quota.SMSNotificationSender
The property quota.notification.percentage defines the quota threshold in %.
Users will receive an SMS with the contents of the template
quota_percentage_reached_notification.txt under <root directory of your
OneMediaHub installation>/tools/tomcat/webapps/ROOT/template/sms/.
3.12.13 How to configure the Portal to store items on the local file
system
Note
If you want to serve media files and thumbnails stored on the file system using the Apache web
server in order to reduce the load on the application server, refer to Section 3.12.14, “Serving
media files using the Apache web server” here below.
3.12.13.1 How to configure the Portal to store media on the local file system
By default the Portal stores media items (pictures, videos, music and files) on the server's local file system.
If you wish to change the path where the files are stored, follow these steps:
1. Open the configuration file <root directory of your OneMediaHub installation>/
config/portal/portal-ext.properties
2. Change the value of the storage.filesystem-path property from ../../../ds-server/
db to the new path:
storage.filesystem-path=../../../ds-server/db
3. Change the symbolic link <root directory of your OneMediaHub installation>/
tools/tomcat/webapps/ROOT/picture:
rm <root directory of your OneMediaHub installation>/tools/tomcat/
webapps/ROOT/picture
ln -s path_to_the_storage_file_system_root_path <root directory of
your OneMediaHub installation>/tools/tomcat/webapps/ROOT/picture

Installation and configuration
56
4. Change the symbolic link <root directory of your OneMediaHub installation>/
tools/tomcat/webapps/ROOT/file:
rm <root directory of your OneMediaHub installation>/tools/tomcat/
webapps/ROOT/file
ln -s path_to_the_storage_file_system_root_path <root directory of
your OneMediaHub installation>/tools/tomcat/webapps/ROOT/file
5. Change the symbolic link <root directory of your OneMediaHub installation>/
tools/tomcat/webapps/ROOT/video:
rm <root directory of your OneMediaHub installation>/tools/tomcat/
webapps/ROOT/video
ln -s path_to_the_storage_file_system_root_path <root directory of
your OneMediaHub installation>/tools/tomcat/webapps/ROOT/video
In fact, the root path from which the user's nested directories are created is given by the concatenation
of the storage.filesystem-path the media source type, e.g. ../../../ds-server/db/
picture
3.12.14 Serving media files using the Apache web server
Media files and thumbnails are stored on the file system (see Section 2.6.1, “File system structure”) and
serving them using the Apache web server reduces the load on the application server.
Warning
Serving the files using the Apache web server also avoids remote code execution vulnerabilities.
This is therefore mandatory if files are stored on the local file system.
The Content-Disposition header should be set in the response to support the download of the file
and set a different filename for the picture, video, or file items. This step is not required if the media files
are stored on Amazon S3. To configure it, follow these steps:
1. Open the Apache httpd.conf configuration file
2. Check that the module rewrite is loaded:
LoadModule rewrite_module modules/mod_rewrite.so
3. Add the following rules to the VirtualHost section:
Alias /picture <root directory of your OneMediaHub installation>/ds-
server/db/picture
Alias /video <root directory of your OneMediaHub installation>/ds-
server/db/video
Alias /file <root directory of your OneMediaHub installation>/ds-
server/db/file
RewriteCond %{QUERY_STRING} (^|&)filename=([^&]*)
RewriteRule .* - [E=FILENAME:%2]

Installation and configuration
57
Header set "Content-disposition" "attachment; filename=%{FILENAME}e"
env=FILENAME
UnsetEnv FILENAME
4. Add the following directives at the end of <HTTPD>/conf/omh-modcluster.conf:
ProxyPassMatch ^/picture !
ProxyPassMatch ^/video !
ProxyPassMatch ^/file !
To test that serving pictures with Apache is correctly configured you can:
• Add logs to the Apache server:
RewriteLog /tmp/rewrite.log
RewriteLogLevel 2
Warning
According to Apache documentation, using a high value for RewriteLogLevel will slow
down your Apache server dramatically. Remove it once testing is over.
• Try to download a picture or a video from the Portal user interface and check response headers using a
tool for Firefox such as Firebug. If the Content-Disposition is set with the correct filename, the
configuration is working.
Important
Be sure to disable autoindex for the media files. You can simply do it disabling mod_autoindex in
your httpd installation commenting the following line in your httpd configuration file:
LoadModule autoindex_module modules/mod_autoindex.so
3.12.15 How to configure the Portal to store items on an online file
storage provider
3.12.15.1 How to configure the Portal to store Media items on an online file
storage provider
If you wish to store media files (pictures, videos, music and files) on an online storage provider, follow
these steps:
1. Open the configuration file <root directory of your OneMediaHub installation>/
config/portal/porta-ext.properties
2. Change the value of the storage.provider property from filesystem to s3:
#
# Set it to 'filesystem' for local file system or to 's3' for Amazon
S3

Installation and configuration
58
#
storage.provider=s3
3. Assign a value to the storage.container-name property: note that this property is not present
when using the filesystem as storage provider, so it is possible that you need to add it. The value
should be the container name assigned to the customer (e.g. fdo-container-funambol):
storage.container-name=fdo-container-funambol
4. Add the value provided by your storage provider to the storage.identity property:
#
# Set properties with identity and credential specific for the
storage.
# They are not needed using 'filesystem' provider.
#
storage.identity=68E6NMRPOF673B4R09FN
5. Add the value provided by your storage provider to the storage.credential property:
storage.credential=hgG56ds7JGHJDF5T65G6gU77h8JHUT6gj78N45dh7iIU
6. Change the value of the sp.mediaserver.url property from http://
<your#host>:<your-port> to http://<container-name>.s3.amazonaws.com,
where <container-name> is the container name chosen by the customer and unique to Amazon
S3, e.g. http://fdo#container-funambol.s3.amazonaws.com. The container must be
created in advance and must already be present on the provider before the Portal can start using it:
sp.mediaserver.url=http://fdo-container#funambol.s3.amazonaws.com
7. Change the value of the sapi.picture.path property from picture to empty:
sapi.picture.path=
8. Change the value of the sapi.video.path property from video to empty:
sapi.video.path=
9. Change the value of the sapi.file.path property from file to empty:
sapi.file.path=
3.12.16 How to configure the max item size allowed by the DS Server
3.12.16.1 How to configure the max picture size allowed by the DS Server
The DS Server allows pictures coming from a client or as result of an API call with a size limit. This limit
is configurable and is set by default to 2 GB.
To change the size limit, edit the picture sync source configuration file <root directory of your
OneMediaHub installation>/config/foundation/foundation/fdo#foundation/
PictureSource.xml and modify the value of the maxSize property:
<void property="maxSize">
<string>250M</string>
</void>

Installation and configuration
59
Note
For the upload via Portal user interface this limit is the same (2 GB) and is configurable, but the
maximum value guaranteed is 2 GB.
3.12.16.2 How to configure the max video size allowed by the DS Server
The DS Server allows videos coming from a client or as result of an API call with a size limit. This limit is
configurable and is set by default to 2 GB.
To change the size limit, edit the video sync source configuration file <root directory of your
OneMediaHub installation>/config/foundation/foundation/fdo#foundation/
VideoSource.xml and modify the value of the maxSize property:
<void property="maxSize">
<string>250M</string>
</void>
Note
For the upload via Portal user interface this limit is the same (2 GB) and is configurable, but the
maximum value guaranteed is 2 GB.
3.12.16.3 How to configure the max file and music size allowed by the DS Server
The DS Server allows music items and generic files coming from a client or as result of an API call with a
size limit. This limit is configurable and is set by default to 2 GB.
To change the size limit, edit the file sync source configuration file <root directory of your
OneMediaHub installation>/config/foundation/foundation/fdo#foundation/
FileSource.xml and modify the value of the maxSize property:
<void property="maxSize">
<string>250M</string>
</void>
Note
For the upload via Portal user interface this limit is the same (2 GB) and is configurable, but the
maximum value guaranteed is 2 GB.
3.12.17 How to configure the Server API base URL
If a system administrator wants to configure the base URL of the Server API (by default /sapi) so
that a customer can differentiate the URL from other customers or services (for example, /myapi), the
following two files should be modified:
•<root directory of your OneMediaHub installation>/conf/portal/portal-
ext.properties
# configurable base url for SAPI. It must match the servlet-mapping
value in web.xml

Installation and configuration
60
sapi.baseurl=myapi
•<root directory of your OneMediaHub installation>/tools/tomcat/
webapps/ROOT/web-inf/web.xml
The following lines should be added as mappings for the SAPI servlet and the Impersonate filter:
<servlet-mapping>
<servlet-name>SAPIServlet</servlet-name>
<url-pattern>/myapi/*</url-pattern>
</servlet-mapping>
...
<filter-mapping>
<filter-name>Impersonate Filter</filter-name>
<url-pattern>/myapi/*</url-pattern>
</filter-mapping>
A simpler way to achieve the same result is to change the ${api.baseurl}=sapi in the Quick
Configuration as described in Section 3.3, “Quick configuration”.
Note
Even if SAPI default URL (/sapi) is not used by the AJAX UI or the customer does not
implement any API call using the /sapi path, the default /sapi url-pattern for the API servlet
in web.xml should not be disabled: doing so will compromise some core client functionalities,
such as the media and files sync. OneMediaHub client Apps rely on Server API as well for certain
advanced features.
Note
The name of the new base URL cannot match one of the already existing web applications in the
product (so it cannot be for example /funambol, /ROOT, /content) or any already defined
path in the ROOT webapp or in the web.xml such as /c, /me or /bb.
3.12.18 Help link
OneMediaHub does not provide the content for the Help section out of the box. Every Portal installation
should point to an external site or page where the content for the Help section is provided.
The easiest way to achieve this is mapping the /help path used in the Portal to an external resource,
adding a corresponding directive in the configuration file of the Apache HTTP Server. For example, to
redirect /help to http://help.onemediahub.com:
RedirectMatch /help http://help.onemediahub.com/
3.12.19 Contact Us link
OneMediaHub doesn't provide a landing page for the contact us link, so every installation needs to open
an external page that contains contact information. It is possible to map the /contactus path used by

Installation and configuration
61
the Portal to an external page, adding a directive in the configuration file of the Apache HTTP Server. For
example, to redirect /contactus to http://funambol.com/contact.html:
RedirectMatch /contactus http://funambol.com/contact.html
3.12.20 How to configure Google Analytics
It is possible to include Google Analytics in both the Portal and Mobile portal to generate detailed statistics
about the visitors. The <root directory of your OneMediaHub installation>/conf/
portal/portal-ext.properties file should be modified:
# Google Analytics web property ID
# if not provided, no Google Analytics code in the Portal and Mobile
Portal
sp.google-analytics.account=
To generate a Google Analytics web property ID, check the Google Analytics website at [37]
3.12.21 How to enable iOS Push
If a system administrator wants to enable the iOS Push, the following file should be modified:
•<root directory of your OneMediaHub installation>/config/com/funambol/
server/plugin/IOSFeedbackServiceTask.xml
<void property="enabled">
<boolean>true</boolean>
</void>
3.12.22 How to enable/disable music management
In order to enable or disable the music management in the portal (by default is enabled), it's possible to
modify the file <root directory of your OneMediaHub installation>/config/
portal/portal-ext.properties editing the value of the following property:
# Set to true to enable the audio. Otherwise, the audio items will be
# managed as file and no metadata will be stored into db.
audio.enabled=
3.12.23 How to enable media transcoding
If you want to enable the media transcoding, follow these steps:
1. Set the property media.transcoding-service-class to
com.funambol.transcoding.impl.ets.ETSTranscodingServiceImpl in the
configuration file <root directory of your OneMediaHub installation>/
config/portal/portal-ext.properties
2. If the storage is an S3 service, you should set the properties ets.pipeline-id, ets.client-
region, and ets.s3-container-name according to the AWS setup. The properties
storage.container-name and ets.s3-container-name must have the same value
3. If the storage is a filesystem, the properties storage.identity, storage.credential,
ets.pipeline-id, ets.client-region, and ets.s3-container-name must be set
according to the AWS setup

Installation and configuration
62
4. Enable the task for deleting the transcoding jobs table, editing the configuration file <root
directory of your OneMediaHub installation>/config/com/funambol/
server/plugin/TranscodingJobDeleteScheduledTask.xml and setting the property
enabled to true:
<?xml version="1.0" encoding="UTF-8"?>
<java class="java.beans.XMLDecoder" version="1.5.0_11">
<object
class="com.funambol.foundation.util.TranscodingJobDeleteScheduledTa
sk">
<!-- enable the task to manage the deletion of old
transcoding job -->
<void property="enabled">
<boolean>true</boolean>
</void>
<!-- the interval time, in days, from an execution of the
task to another -->
<void property="intervalInDays">
<long>7</long>
</void>
</object>
</java>
3.12.24 How to customize the Privacy Policy and Term of Use pages
redirecting the OneMediaHub links to external pages.
1. Open the Apache httpd.conf configuration file
2. Check that the mod_rewrite module is loaded:
LoadModule rewrite_module modules/mod_rewrite.so
3. In the VirtualHost section check that the RewriteEngine is on:
RewriteEngine on
4. Add the following lines setting the desired URL:
RedirectMatch /ui/jsp/privacy.jsp https://www.example.com/
privacy_policy
RedirectMatch /ui/jsp/terms.jsp https://www.example.com/
terms_of_use
RedirectMatch /ui/mobile/jsp/pp.jsp https://www.example.com/
privacy_policy
RedirectMatch /ui/mobile/jsp/toc.jsp https://www.example.com/
terms_of_use
3.12.25 How to configure user-level communication channel
The user-level communication channel allows the configuration of the desired communication channel to
sent user communications, at a user level, where two distinct users can receive notifications via E-Mail or
SMS.
This feature requires a correct configuration of the OneMediaHub E-Mail and SMS providers.

Installation and configuration
63
If you wish to use this feature, you must configure the subscription notification sender and builder, by
modifying the file <root directory of your OneMediaHub installation>/config/
portal/portal-ext.properties:
subscription.notification-sender-
class=com.funambol.subscriptions.notifications.
usercommunicationchannel.UserCommunicationChannelNotificationSender
subscription.notification-builder-
class=com.funambol.subscriptions.notifications.
usercommunicationchannel.UserCommunicationChannelNotificationBuilder
The default user communication channel is configurable in the file <root directory of your
OneMediaHub installation>/config/portal/portal-ext.properties. You can use
the values email or sms.
# Default communication channel for sending
user notifications user-communication.default-channel=
3.13 Server URL configuration
Change the serverURI property in the <root directory of your OneMediaHub
installation>/config/Funambol.xml file:
<void property="serverURI">
<string>http://<!-- your-host -->:<!-- your-port -->/sync</string>
</void>
3.13.1 Changing the default server port
The default port is 8080, but you may choose to use a different port. In that case, you must modify the
following files, substituting your preferred port number to 8080:
•<root directory of your OneMediaHub installation>/tools/tomcat/conf/
server.xml
•<root directory of your OneMediaHub installation>/config/portal/
portal-ext.properties (see Section 3.12.3, “portal-ext.properties”)
•<root directory of your OneMediaHub installation>/tools/tomcat/
webapps/ROOT/html/devices/content.properties
•<root directory of your OneMediaHub installation>/config/com/funambol/
pimlistener/PIMListenerConfiguration.xml
3.13.2 Supporting multiple server URL
If you need to support multiple server URLs, follow these steps:
1. edit the <root directory of your OneMediaHub installation>/config/portal/
portal-ext.properties file and set the property ${portal.server} to one of the desired
URLs (see Section 3.3, “Quick configuration”),
or:

Installation and configuration
64
edit the <root directory of your OneMediaHub installation>/config/
Funambol.xml file (see Section 3.13, “Server URL configuration”)
2. configure your web server (e.g. Apache) to forward the other URLs that you wish to support to the
previously defined URL
3.14 Email configuration
The OneMediaHub Portal can send several types of Email notifications, provided that an SMTP server is
configured. This section describes how to customize the notification messages and how to configure the
portal to send Emails.
3.14.1 New user messages
It is possible to customize the text of the Email messages sent to the users. To configure
the registration Email messages, edit the files active_user_mail_body.txt or
create_user_mail_subject.txt under <root directory of your OneMediaHub
installation>/tools/tomcat/webapps/ROOT/template/mail/.
Note
The files are under different folders according to the languages defined in the portal-
ext.config file, e.g.
<root directory of your OneMediaHub installation>/tools/tomcat/
webapps/ROOT/template/mail/it
<root directory of your OneMediaHub installation>/tools/tomcat/
webapps/ROOT/template/mail/en
The changes are applied at runtime, so there is no need to restart the server.
3.14.2 Email counter configuration for messages containing the app
download URL
It is possible to limit the number of Email messages for download links sent by the OneMediaHub Portal to
a predefined value.
You can customize this behavior by editing the following properties in the file <root directory of
your OneMediaHub installation>/config/portal/portal-ext.properties:
sp.syncportal.email-counter=true
sp.syncportal.email-counter.messages=10
To disable the counter:
sp.syncportal.email-counter=false
In the OneMediaHub Portal you cannot set a different number of download messages for each user. The
counter controls all the email messages used for sending the download link on a monthly basis. The
configuration of the Email counter is immediately effective, with no need to restart the server.

Installation and configuration
65
Important
The configuration defined in portal-ext.properties for the Email counter applies to new
users only, or when existing users are reset, or automatically every month.
3.15 Reminder Emails
The OneMediaHub periodically sends, to all users who have not opted out of receiving reminders, a
summary of all the digital content they have secured to OneMediaHub. This feature can be configured by
editing the following file:
<root directory of your OneMediaHub installation>/config/com/funambol/
server/plugin/ReminderEmailScheduledTask.xml
It is possible to customize the layout of the Email messages sent to the users. To configure the reminder
Email messages, edit the files reminder_body.ftl or reminder_thumbnails.ftl under
<root directory of your OneMediaHub installation>/tools/tomcat/webapps/
ROOT/ui/notifications.
3.16 SMS Sender configuration
To receive the SMS notification message, configure the SMS Service by editing the following file:
<root directory of your OneMediaHub installation>/config/com/funambol/
server/sms/SMSProvider.xml
with the user and password to access the service provider:
<void property="username">
<string><!-- your-push-user --></string>
</void>
<void property="password">
<string><!-- your-push-pwd --></string>
</void>
By default, the option to limit the OneMediaHub Portal to a predefined number of SMS messages
for download links or for OTA configuration messages is enabled. You can customize this behavior
by editing the following properties in the file <root directory of your OneMediaHub
installation>/config/portal/portal-ext.properties:
sp.syncportal.sms-counter=true
sp.syncportal.sms-counter.messages=10
To disable the counter, change the sp.syncportal.sms-counter property to false:
sp.syncportal.sms-counter=false
Note
In the OneMediaHub Portal you cannot set a different number of download messages for each
user. The counter controls all the SMS messages (text SMS and OTA configuration SMS) for the
given user in a month.

Installation and configuration
66
The configuration of the SMS counter in the product is automatically reloaded, there is no need to
restart the service.
The configuration defined in portal-ext.properties for the SMS counter applies to new
users only or when existing users are reset either automatically (monthly), or by an administrator.
The administrator can reset the SMS counter from the user interface. The number of SMS's left for
existing users is recorded in the database and changes according to usage.
The product tracks the number of SMS requests sent to the SMS service (OneMediaHub, by
default, supports SubitoSMS, see below.) The number of SMS's used can be different if any text or
OTA message requires concatenated SMS.
Important
OneMediaHub, by default, supports SubitoSMS, which is an SMS provider (for more information,
please see [30]). OneMediaHub uses SubitoSMS's APIs for all services that require sending SMS
messages: OTA configuration, SMS push, Clients download, etc.
Unless you received SubitoSMS credentials from OneMediaHub, you will need to sign up for the
service at [30], purchase some credit and configure your username and password.
If you prefer to use a different SMS provider, please contact the Funambol support [31], since it
will require further customization and configuration.
3.17 OTA settings provisioning configuration
Edit the file <root directory of your OneMediaHub installation>/config/
portal/portal-ext.properties; OTA works with the following settings by default:
#
# Funambol OTA settings
#
sp.syncportal.ota.account.name=onemediahub
sp.syncportal.ota.account.pin=1010
# set sp.syncportal.sms-counter to 'true' to limit the number of SMS
messages per month
sp.syncportal.sms-counter=false
sp.syncportal.sms-counter.messages=10
The option to limit OTA to a predefined number of SMS messages for each user/device is disabled by
default:
sp.syncportal.sms-counter=false
sp.syncportal.sms-counter.messages=10
To enable the counter, change the sp.syncportal.sms-counter property to:
sp.syncportal.sms-counter=true

Installation and configuration
67
and set the desired value. The counter controls all monthly SMS messages (text SMS's and OTA
configuration SMS's) for the given user.
To change the name of the OTA profile, change the value of sp.syncportal.ota.account.name
in the file <root directory of your OneMediaHub installation>/config/portal/
portal-ext.properties:
#
# Funambol OTA settings
#
sp.syncportal.ota.account.name=funambol
To change the name of the sender change the value of the property sender in the file <root
directory of your OneMediaHub installation>/config/com/funambol/server/
sms/SMSService.xml:
<?xml version="1.0" encoding="UTF-8"?>
<java version="1.6.0" class="java.beans.XMLDecoder">
<object class="com.funambol.syncserver.sms.CaredSMSService">
<void property="sender">
<string>funambol</string>
</void>
</object>
</java>
Note
In the OneMediaHub Portal you cannot set a different number of OTA messages for each user.
3.18 Forgot password
The forgot password can be sent to the user via Email or via SMS.
It is possible to customize the texts of both the SMS and Email message sent to the user. To configure
the “forgot password” SMS message, edit the file send_password_sms_body.txt under
<root directory of your OneMediaHub installation>/tools/tomcat/
webapps/ROOT/template/sms/. To configure the “forgot password” Email message, edit the files
send_password_mail_subject.txt and send_password_mail_body.txt under <root
directory of your OneMediaHub installation>/tools/tomcat/webapps/ROOT/
template/mail/.
Note
The files are under different folders according to the languages defined in the portal-
ext.config file, e.g.
<root directory of your OneMediaHub installation>/tools/tomcat/
webapps/ROOT/template/mail/it
<root directory of your OneMediaHub installation>/tools/tomcat/
webapps/ROOT/template/mail/en
or

Installation and configuration
68
<root directory of your OneMediaHub installation>/tools/tomcat/
webapps/ROOT/template/sms/pt
<root directory of your OneMediaHub installation>/tools/tomcat/
webapps/ROOT/template/sms/de
The changes are applied at runtime, so it is not needed to restart the server.
By default, the sending is set to use the Email. You can force the sending via SMS by editing
the sp.syncportal.pwd-via-sms property in the file <root directory of your
OneMediaHub installation>/config/portal/portal-ext.properties:
sp.syncportal.pwd-via-sms=true
3.19 Push policy configuration
With OneMediaHub it is possible to configure different push policies for different device types. In
particular, the following policies are defined and can be customized editing the configuration files listed
below (currently just one policy does apply):
1. SMS service configuration (see the section called “SMS Service”):
<root directory of your OneMediaHub installation>/config/com/funambol/
server/sms/SMSProvider.xml
This file is used to configure the SMS service.
The following sections describe the format of a *PushSender.xml configuration file and the default
values for an out-of-the-box installation of the OneMediaHub.
3.19.1 The PushSender configuration file
A PushSender configuration file is an XML file that allows the customization of the properties listed below,
together with the configuration file's relevant fragment.
Note
More than one source can be specified. The available source names are: card, scard, cal,
scal, event, task, and picture.
Enabling/disabling TCP push
<void property="enableTCPIP">
<boolean>[true|false]</boolean>
</void>
Note
This applies to both connection-less and connection-oriented push.
Enabling/disabling SMS push
<void property="enableSMS">
<boolean>[true|false]</boolean>

Installation and configuration
69
</void>
Notification archiving (for both TCP and SMS push)
Push notifications can be archived in the database (in the table fnbl_push_sender_notification)
if specified. This is enabled by the properties archiveTCPIPNotification and
archiveSMSNotification:
<void property="archiveTCPIPNotification">
<boolean>[true|false]</boolean>
</void>
<void property="archiveSMSNotification">
<boolean>[true|false]</boolean>
</void>
By default, archiveTCPIPNotification is set to false and archiveSMSNotification to
true.
Resending interval for SMS push
In the case of SMS push, a situation that should be avoided is the continuous sending of SMS messages
when these are not being received by the device. In fact, GSM/CDMA networks queue SMS messages until
a phone joins the network again. A phone could be disconnected from a network if for example it is turned
off or in an area without GSM/CDMA coverage. Since the phone will receive the SMS later on, the system
should not send other notifications until the previous one is received by the phone.
However, if the system stops sending SMS notifications until the previous notification has been received
and for some reason one of the SMS notifications is lost, the server will simply not push the device any
more. For this reason, if the OneMediaHub does not receive a status indicating that a notification has been
received, after a while it sends another notification anyway.
This tolerance can be configured by changing the property maxDeliveryDelayHours:
<void property="maxDeliveryDelayHours">
<double>[number of hours]</double>
</void>
Note
If the parameter archiveSMSNotification is set to false, SMS messages are sent without
checking whether the previous one was received.
Filtering
Different types of filtering are available. For example, device filtering allows you to specify a particular
device or group of devices that should be excluded by the push, while source filtering lets you specify
which data sources should be pushed.
In certain situations it is useful to ban some phone numbers so that no SMS messages are sent to them. For
example, in case of test phones or to selectively avoid some phones being pushed. This can be done by
banning one or more phone numbers with the deviceFilter.bannedMsisdn property:
<void property="deviceFilter">
<object class="com.funambol.server.notification.sender.DeviceFilter">

Installation and configuration
70
<void property="bannedMsisdn">
<array class="java.lang.String" length="[n]">
<void index="[i]">
<string>[regular expression]</string>
</void>
</array>
</void>
</object>
</void>
Note
You can change the length attribute and have more <void index="[i]">...</void>
sections to specify multiple regular expressions that will be matched. If the phone number to
which the notification should be sent matches one of the given regular expressions, the push is
discarded. For more information on the regular expression grammar used by this property, see
[21].
A sender is also configured to notify changes to specific sources only. This is done by the property
syncsourceFilter:
<void property="syncsourceFilter">
<object
class="com.funambol.server.notification.sender.SyncsourceFilter">
<void property="enabledSyncsource">
<array class="java.lang.String" length="[n]">
<void index="[i]">
<string>[source name]</string>
</void>
...
</array>
</void>
</object>
</void>
Note
More than one source can be specified. The available source names are: card, scard, cal,
scal, event, stask, picture.
3.20 OneMediaHub SNMP Appender configuration
The OneMediaHub SNMP Appender enables the Data Synchronization Service to send SNMP notifications
(traps) as part of the server logging facility.
3.20.1 Configuration parameters
The OneMediaHub SNMP Appender sends its traps using SNMPv2c and according to the MIB defined
in FUNAMBOL-LOGGING-MIB.txt (see Appendix D, FUNAMBOL-LOGGING-MIB.txt). All SNMP
parameters and OIDs are highly configurable; the parameters are described in the following table:

Installation and configuration
71
Property Default values Description
managerAddress 127.0.0.1 The manager's IP address
managerPort 162 The UDP port the manager listens to for
traps
trapOID 1.3.6.1.4.1.27219.2.2.0.1 Enterprise OID to be specified in the
SNMP trap
community public Community string ("public", "private")
thresholdLevel ERROR Logging level over which a log record
should be notified (including the
specified level
variables {1.3.6.1.4.1.27219.2.1.1=%t,
1.3.6.1.4.1.27219.2.1.2=%L,
1.3.6.1.4.1.27219.2.1.3=%l,
1.3.6.1.4.1.27219.2.1.4=%s,
1.3.6.1.4.1.27219.2.1.5=%d,
1.3.6.1.4.1.27219.2.1.6=%u,
1.3.6.1.4.1.27219.2.1.7=%S,
1.3.6.1.4.1.27219.2.1.8=%m}
Hash map of OID-format entries. Each
format entry specifies the layout for
the associated OID. The following
substitutions are performed:
•%t – timestamp in DateAndTime
format (see [22])
•%tt – timestamp in the yyyy-MM-dd
HH:mm:ss format
•%L – log level as integer value (0:
FATAL, 1: ERROR, 2: WARN, 3:
INFO, 4: DEBUG, 5: TRACE)
•%LL – log level as string (FATAL,
ERROR, WARN, INFO, DEBUG,
TRACE)
•%l – logger name
•%s – session id
•%d – device id
•%u – user name
•%S – source
•%m – log message
3.20.2 Configuration file
OneMediaHub SNMP Appender's configuration file is funambol.snmp-appender.xml, copied by
the installation procedure in the server appender config path:
<root directory of your OneMediaHub installation>/config/com/funambol/
server/logging/appender
Below is an example of the configuration file:
<?xml version="1.0" encoding="UTF-8"?>
<java version="1.5.0_10" class="java.beans.XMLDecoder">

Installation and configuration
72
<object class="com.funambol.server.logging.SNMPAppender">
<void property="trapOID">
<string>1.3.6.1.4.1.27219.2.2.0.1</string>
</void>
<void property="managerAddress">
<string>127.0.0.1</string>
</void>
<void property="managerPort">
<int>162</int>
</void>
<void property="name">
<string>funambol.snmp-appender</string>
</void>
<void property="thresholdLevel">
<string>ERROR</string>
</void>
<void property="community">
<string>public</string>
</void>
<void property="variables">
<object class="java.util.LinkedHashMap">
<void method="put">
<string>1.3.6.1.4.1.27219.2.1.1</string>
<string>%t</string>
</void>
<void method="put">
<string>1.3.6.1.4.1.27219.2.1.2</string>
<string>%L</string>
</void>
<void method="put">
<string>1.3.6.1.4.1.27219.2.1.3</string>
<string>%l</string>
</void>
<void method="put">
<string>1.3.6.1.4.1.27219.2.1.4</string>
<string>%s</string>
</void>
<void method="put">
<string>1.3.6.1.4.1.27219.2.1.5</string>
<string>%d</string>
</void>

Installation and configuration
73
<void method="put">
<string>1.3.6.1.4.1.27219.2.1.6</string>
<string>%u</string>
</void>
<void method="put">
<string>1.3.6.1.4.1.27219.2.1.7</string>
<string>%S</string>
</void>
<void method="put">
<string>1.3.6.1.4.1.27219.2.1.8</string>
<string>%m</string>
</void>
</object>
</void>
<void property="filterCriticalMessages">
<boolean>true</boolean>
</void>
<void property="criticalMessages">
<object class="java.util.HashSet">
<void method="add">
<string>java.lang.StackOverflowError</string>
</void>
<void method="add">
<string>java.lang.OutOfMemoryError</string>
</void>
<void method="add">
<string>java.net.ConnectException</string>
</void>
<void method="add">
<string>java.net.NoRouteToHostException</string>
</void>
<void method="add">
<string>java.net.UnknownHostException</string>
</void>
<void method="add">
<string>com.mysql.jdbc.CommunicationsException</string>
</void>
<void method="add">
<string>java.sql.SQLException</string>
</void>
</object>
</void>

Installation and configuration
74
</object>
</java>
The OneMediaHub SNMP Appender can be attached to any OneMediaHub logger by simply adding it to
the list of the appenders associated with the logger.
In order to enable it, you can add the following lines to the configuration file <root directory
of your OneMediaHub installation>/config/com/funambol/server/logging/
logger/funambol.xml:
<void method="add">
<string>funambol.snmp-appender</string>
</void>
If you do not have an SNMP server, it is still possible to verify that the SNMP Appender is working
properly using the Unix command snmptrapd. For an example, please see Appendix F, Examples of sent
SNMP traps.
3.20.3 Log records filtering
The OneMediaHub SNMP Appender only notifies log records that have a logging level higher than the
specified threshold.
It is possible to apply an additional filter to the given logging event, based on the property
filterCriticalMessages and on the set of criticalMessages.
The property filterCriticalMessages can be set to true in order to verify if the log event is
included in the set of criticalMessages.
The property criticalMessages contains a list of exception class names considered critical.
When the filterCriticalMessages is true, the SNMP Appender parses all incoming log
events to see if the stack trace contained in the event description matches any of the exceptions listed in
criticalMessages. In this case, a new logging event is created.
If the level of the event is FATAL and the event is not critical, a logging event will be generated with a
message starting with "Unknown fatal error".
Note
The criticalMessages and filterCriticalMessages parameters can be configured
in the Appender configuration file (see Section 3.20.2, “Configuration file”).
3.20.4 OneMediaHub SNMP error trap
For more details on SNMP errors, please see Section 7.6, “SNMP errors”.
3.21 Location from IP address and Accept-Language
header
OneMediaHub uses multiple services to determine the country from which the request originates, and, for
example, to automatically set the country in the AJAX Portal or Mobile Portal signup.

Installation and configuration
75
3.21.1 IP address and IP2Location
IP2Location offers an external service supported by OneMediaHub, used to determine the country from
which the request originates based on the user's IP address, so that the appropriate country and timezone
can automatically be set. If you have a valid IP2Location IP-Country Database license (see [32]) for your
server, please contact their support for information on how to use this service.
3.21.2 Accept-Language header
If an IP2Location IP-Country Database license is not present and the ipcountry table is not populated
or the user's country cannot be decoded from the IP address, OneMediaHub uses the Accept-Language
header as a fallback for determining the country from which the request originates. The feature can be
disabled, modified or extended, tuning the content of the fnbl_country_language table where
different locales from the Accept-Language header are mapped to their countries. To disable the
feature, delete every record in the table.
3.22 Collecting client logs
The server is able to receive client log files and save them on the file system for future issues, for
investigation/troubleshooting purposes.
The URL used by the client for sending the request is http://server:port/client-log
The client should send the log as text/plain or in a compressed format, but in any case, the server will
store it as a compressed file in order to save file system space.
By default, client logs are stored in <root directory of your OneMediaHub
installation>/logs/clients using the following structure and naming convention:
<USERNAME>/<DEVICE_ID>_<DATE>_<TIME>.zip
For instance log files for user 'usertest' and device 'fwm-159875312' received at 2010/10/20 11:50 UTC
will be stored in:
<root directory of your OneMediaHub installation>/logs/clients/usertest/
fwm-159875312_20101020_115000.zip
In a cluster environment, the client logs will not be stored in a unique directory but under the <root
directory of your OneMediaHub installation>/logs/clients directories for each
installed server.
3.22.1 Configuration parameters
<root directory of your OneMediaHub installation>/tools/tomcat/webapps/
funambol/WEB-INF/web.xml contains the main parameters that can be used to configure server
behavior regarding client logs.
The parameters are the following:
•CLIENTS_LOG_BASEDIR: the directory used as a root directory to store the client log files. The
default value is ../../../logs/clients which corresponds to <root directory of
your OneMediaHub installation>/logs/clients. Please remember to change the value
of this parameter accordingly to the clientsLogArchivationDir parameter as described in
Section 3.23.1, “Configuration file”

Installation and configuration
76
•CLIENTS_LOG_MAX_SIZE: is the maximum log file size (in bytes) accepted by server. The default
value is 10M. This parameter can be set using different formats like 100k, 1M, 5G or 2.5m.
3.23 Client log cleanup service
In order to limit and monitor the file system resources used when collecting client logs (see Section 3.22,
“Collecting client logs”), a new service will be deployed under the OneMediaHub as a plugin, the
ClientLogCleanUpPlugin.
This plugin is configured via the XML files whose path is <root directory of your
OneMediaHub installation>/config/com/funambol/server/plugin/
ClientLogCleanUpPlugin.xml, please see Section 3.23.1, “Configuration file” for further
information about the parameters you are allowed to edit.
Therefore, any standard installation of the OneMediaHub will have this new component running as a server
plugin, i.e. a background process that is periodically alerted and checks whether the number of directories
stored in the OneMediaHub client log directory exceeds the correct threshold.
In this case, the plugin process starts and moves all the log files and directories into a zip archive,
stored into a proper filing directory. You may just want to delete log files when the maximum number
of log files is reached, in this case you are just required to omit the filing directory parameter in the
plugin configuration file. When log files are moved to a zip archive, a new file is created in the filing
directory with the naming convention that follows the pattern yyyymmdd_hhmmss.zip (e.g.
20101111_130455.zip).
3.23.1 Configuration file
As we said in the previous section, the ClientLogCleanUpPlugin is configured via an XML file that
you can find through the following path:
<root directory of your OneMediaHub installation>/config/com/funambol/
server/plugin/ClientLogCleanUpPlugin.xml
You can edit this file, if you want to provide custom values for any of the following parameters:
•clientsLogBaseDir: is the directory that contains the user directories where client log files have
been uploaded. This parameter is mandatory and the standard value is ../../../logs/clients.
Remember to change this parameter according to the CLIENTS_LOG_BASEDIR parameter used by the
send log feature as described in Section 3.22.1, “Configuration parameters”
•clientsLogArchivationDir: is the directory where zip archives are stored each time the
ClientLogCleanUp process is run. This parameter is optional and if you omit it, client log files are
not moved into a zip archive but simply deleted. The standard value is ../../../logs/clients-
archive
•clientsLogTimeToRest: is the time the ClientLogCleanUp process sleeps before checking
how many directories exist in the clientsLogBaseDir folder. This parameter is optional and the
default value is 3600000, the equivalent of 1 hour, expressed in milliseconds.
3.24 Antivirus service
The antivirus service allows to scan files to discover viruses. The files that are found as infected will be
removed from the server. In order to enable this feature, a new service is deployed in OneMediaHub as a
plugin, called AntiVirusScheduledTask.

Installation and configuration
77
This plugin is configured through the XML file <root directory of your
OneMediaHub installation>/config/com/funambol/server/plugin/
AntiVirusScheduledTask.xml. See Section 3.24.3, “Configuring the OneMediaHub server” for
further informations about the parameters you are allowed to edit.
As the antivirus service will check only the not yet validated files (pictures, videos, and audio files won't
be checked), a new Validator must be configured by editing the file portal-ext.properties
(see Section 3.24.3, “Configuring the OneMediaHub server”.) This Validator will set the files content
status to to be validated and move the files to another directory, <root directory of your
OneMediaHub installation>/ds-server/db/antivirus, to be checked later. The files are
kept in the antivirus directory only until they are analyzed.
3.24.1 Installing McAfee VirusScan
1. Download the McAfee VirusScan package provided by Funambol.
2. Decompress the file to a temporary directory:
mkdir /tmp/mcafee
tar -xzf distribution-file -C /tmp/mcafee
3. Execute the installation script:
/tmp/mcafee/install-uvscan installation-directory
If you do not specify an installation directory, the software is installed in /usr/local/uvscan. If
the installation directory does not exist, the installation script asks whether you want to create it.
The installation script also asks whether you want to create symbolic links to the executable file, the
shared library, and the man page. Type Y to create each link, to make sure that the uvscan command
is available for the OneMediaHub server.
4. Download the DAT files (antivirus definitions): in order to do this, configure the script <root
directory of your OneMediaHub installation>/bin/update-mcafee setting
the install_dir variable, and execute it. This step must be executed by a Unix user with writing
permissions on the directory where McAfee VirusScan is installed.
Important
Since the update file for McAfee is available on a remote FTP server, the ftp client command is
required where OneMediaHub is installed.
3.24.2 Updating virus definitions of McAfee VirusScan
In order to upgrade the McAfee VirusScan's antivirus definitions, the script to be used is <root
directory of your OneMediaHub installation>/update-mcafee. This script can be
invoked by a cron job for regular updates.
Note
If not yet done, this script has to be changed to set install_dir to the current installation
directory of McAfee VirusScan (/usr/local/uvscan by default.) It must be executed by a
Unix user with writing permissions on the directory where McAfee VirusScan is installed.

Installation and configuration
78
3.24.3 Configuring the OneMediaHub server
As mentioned above, the AntiVirusScheduledTask plugin is configured through the XML file <root
directory of your OneMediaHub installation>/config/com/funambol/server/
plugin/AntiVirusScheduledTask.xml. Edit this file if you want to provide custom values for
the following parameter:
•enable: when true the task will be enabled; false by default.
The other file that must be configured is <root directory of your OneMediaHub
installation>/config/portal/portal-ext.properties:
•media.content-validator-class: must be
com.funambol.foundation.validator.impl.AntiVirusValidator
•antivirus.scan-interval: the interval of the antivirus runs (in milliseconds)
•antivirus.max-files-to-scan: the number of files that can be scanned at each time by the
antivirus
•antivirus.provider-class: must be
com.funambol.foundation.antivirus.McafeeAntiVirusProvider

79
Chapter 4. OneMediaHub Portal administration
4.1 Changing the admin user password
In OneMediaHub, all user passwords are encrypted in the database.
To change the password for the admin user, run the script passwd in the <root directory of
your OneMediaHub installation>/bin directory:
cd <root directory of your OneMediaHub installation>/bin
./passwd admin
The script will then prompt you to enter the current password and, if correct, the new password followed by
a confirmation of the new password (similarly to the Unix command passwd.)
For legacy reasons, OneMediaHub does offer the possibility to the admin user to change the password
of every other user, given the current password is known. This is the only way to change the password of
system standard users like csr (for the Customer Support Representative graphical user iterface):
cd <root directory of your OneMediaHub installation>/bin
./passwd
Warning
Be sure to invoke exactly this command, since it is exactly spelled as the Unix command
passwd.
Changing the password for the admin user in the database will block all the functionalities of
OneMediaHub, unless you update the Push Connection Service and PIM Listener Service configuration
files specifying the new password (in plain text) in the following files:
1. <root directory of your OneMediaHub installation>/config/com/funambol/
ctp/server/CTPServerConfiguration.xml
2. <root directory of your OneMediaHub installation>/config/com/funambol/
pimlistener/PIMListenerConfiguration.xml
4.2 Handling user roles
In the OneMediaHub, user roles have been extended in order to provide information about the storage
quota available to each user. Besides default roles such as sync_user and sync_administrator,
some further roles have been added to provide information about the storage quota available, these are:
Role Role Description Quota
demo Demo user 150M
standard Standard user 1G
premium Premium user 5G
premiumplus Premium Plus user 10G

OneMediaHub Portal administration
80
Role Role Description Quota
ultimate Ultimate user 50G
According to the picture sync sources configuration, there is a quota amount for each role. In order to make
it easier to inspect roles bound to each user and to set/unset roles for a user, a script was provided under the
<root directory of your OneMediaHub installation>/bin directory called manage-
roles.
In order to run this script you need to set the JAVA_HOME environment. A proper JDBC driver should be
available in the class path. If you run the manage-roles script without providing further info, a number
of help messages are shown that will help you understand how you can use it.
In order to retrieve all available roles, you can run the following command (assuming you are in the root
directory of your OneMediaHub installation):
bin/manage-roles -g
The output of this command is something like:
Retrieving roles
Roles are:
demo Demo user
premium Premium user
premiumplus Premium Plus user
standard Standard user
sync_administrator Administrator
sync_user User
ultimate Ultimate user
Where each item in the list represents the role name and the role description. If you want to retrieve all
roles set for a user, you can run the following command:
bin/manage-roles -g -u username
Taking into consideration that if the user does not exist, no error is shown but no role is returned. Once you
checked all the roles you are allowed to use for the installation, you can change the roles set for each user.
In order to set user roles, you need to run the following command:
bin/manage-roles -s -u username -r role1,role2,role3
The 'r' argument requires a comma to separate the list of roles without spaces between each role. Please use
the role name when you refer to a particular role, as the script is not able to recognize the role description
when setting up new user roles. Keep in mind that when performing this operation, all existing roles bound
to the user will be overwritten with the new roles in addition of the default ones.
The following errors may occur while invoking the script:

OneMediaHub Portal administration
81
• roles cannot be modified to users with admin privileges
• all unrecognizable command line arguments cause the script to fail
• if the comma separated roles list contains blanks, they are not parsed properly and the script invocation
aborts.
4.3 Creating new administrative users
This section describes how to create new administrators.
To create a new administrator, run the script <root directory of your OneMediaHub
installation>/bin/create-admin-user:
cd <root directory of your OneMediaHub installation>/bin
./create-admin-user -c admin -u admin1 -p test
(the script will create a new admin user with username admin1 and password test.)
Note
Invoking the script with not supported or missing arguments will trigger it to display a usage
message:
usage: create-admin-user [-c <arg>] [-p <arg>] [-u <arg>]
Available commands: [admin]
-c,--command <arg> specifies the command to be invoked
-p,--password <arg> specifies the user's password
-u,--username <arg> specifies the username for the new
administrator

82
Chapter 5. Operation tasks
This section describes the most common tasks helpful while operating a OneMediaHub Server.
For installation and post installation configuration instructions refer to Chapter 3, Installation and
configuration.
Note
Once the software is installed and configured, the full directory of your OneMediaHub installation
(e.g. /opt/onemediahub) can be archived and used as an installation package for other boxes,
for example in a clustered environment.
5.1 Monitoring OneMediaHub services
This section describes the tools available for monitoring and checking the healthiness of the OneMediaHub
services.
5.1.1 Monitoring the Data Synchronization Service
A OneMediaHub Data Synchronization Service node can be monitored in two different ways:
1. checking that the node is responding to SyncML requests properly
2. retrieving status and load information regarding the server
Node responsiveness check
To check if a OneMediaHub Data Synchronization Service node responds correctly to SyncML requests,
use the following command:
<root directory of your OneMediaHub installation>/tools/management/bin/
check <URL> [options]
Where:
• URL is the server's synchronization URL (e.g. http://myserver/sync)
•options can be one or more of the following:
•-help: print this message
•-response: perform the check and print the service response
•-ct, --connect-timeout: specify connect timeout in seconds
•-rt, --read-timeout: specify read timeout in seconds
•-nc, --no-check-certificate: don't check the server certificate
The check command prints the message OK on the standard output if the service is responding correctly;
otherwise, it prints KO along with detailed information about the error condition encountered. The script

Operation tasks
83
exits with a non-zero status code in case of errors. In both cases, the time needed to perform the check is
also printed in seconds and in milliseconds.
Node status and load monitoring
To retrieve status information about a Data Synchronization Service node, use the following command:
<root directory of your OneMediaHub installation>/tools/management/bin/
status <IP>:8101 [options]
where <IP> is the IP address of the node to check. The possible options are:
-db <datasource>
print which threads are using a database connection
-deadlock
print the thread dump of any thread involved in a deadlock condition
-help
print this message
-memory
print memory statistics
-memoryusage
print memory usage
-processing
print status of processing thread pools
-requests <time-threshold>
print processing time and stack trace of current requests
-sessions <webapp-name>
print number of active sessions
-status
print status
-stopthread <thread-name>
stop a thread (not safe)
-thread <thread-name>
print thread dump
-threadlist
print full thread list
-threads
print thread statistics
-v, --verbose
print verbose information
-version
print the server version

Operation tasks
84
The options listed above provide the following status information:
OPTION DETAIL
-db <datasource> Connections usage status, with verbose option, stack
trace for current thread. If the optional parameter
<datasource> is specified, only the threads
belonging the specified datasource are printed.
For example:
jdbc/fnblds
Num Idle: 8
Num Active: 0
Threads: -
jdbc/fnblreporting
Num Idle: 8
Num Active: 0
Threads: -
jdbc/fnblcore
Num Idle: 6
Num Active: 2
Threads:
http-8080-3 []
[bernardo]: 122 ms
http-8080-1 []
[bernardo]: 4 s
jdbc/fnbluser (partition-0)
Num Idle: 6
Num Active: 2
Threads:
http-8080-31 []
[bernardo]: 32 ms
http-8080-11 []
[bernardo]: 1.4 m
jdbc/fnbluser (partition-1)
Num Idle: 8
Num Active: 0
Threads: -
-deadlock Deadlock information. For example:
Deadlock information:
No deadlock detected.
-memory Memory statistics. For example:

Operation tasks
85
OPTION DETAIL
java.lang:type=Memory
heap memory
init=0
used=4132160
committed=4788224
max=66650112
free=61861888
non heap memory
init=29523968
used=23131456
committed=32669696
max=121634816
free=88965120
total memory
init=29523968
used=27263616
committed=37457920
max=188284928
free=150827008
-memoryusage Memory usage. For example:
Memory usage:
Used memory: 11 Mb (12249680 bytes)
Committed memory: 13 Mb (14131200
bytes)
-processing It shows number of threads, number of busy threads,
and number of current requests for HTTP and jk
thread pools.
Example:
Processing thread status:
ThreadPool name: http-8081
number of threads:
30
number of busy
threads: 10
number of requests:
2
ThreadPool name: jk-8001
number of threads:
53
number of busy
threads: 11
number of requests:
5

Operation tasks
86
OPTION DETAIL
-requests <time-threshold> Processing time and, with verbose option, stack
trace for current requests.
If the optional parameter <time-threshold> is
specified, only the requests with process time
greater than the given value are printed. Accepted
values are:
• X: X milliseconds
• Xms: X milliseconds
• Xs: X seconds
• Xm: X minutes
• Xh: X hours
For example:
1. TP-Processor82 [fwm-0xA0073B]
[smith]: 1.17 s
2. TP-Processor254 [fol-
Q1JBSc6Rg==] [john]: 18.83 s
3. TP-Processor279: 46 ms
4. TP-Processor278: 12.98 s
5. TP-Processor18: 16.21 m
6. TP-Processor122: 3.43 s
7. TP-Processor271: 12.89 s
8. TP-Processor217: 61 ms
9. TP-Processor277: 7.94 s
10. TP-Processor282
[fmz-9ZBdU36t=] [bob]: 20.0 s
11. TP-Processor284: 184 ms
-sessions <webapp-name> Web application: /
number of active
sessions: 1
Web application: /content
number of active
sessions: 0
Web application: /funambol

Operation tasks
87
OPTION DETAIL
number of active
sessions: 0
Total number of active
sessions: 1
-status Not available
-stopthread <thread-name> Stop the specified thread. Note that this is an unsafe
operation and may destabilize the service
-thread <thread-name> Print the thread dump of the given thread.
-threadlist List of all threads
-threads Thread statistics. For example:
java.lang:type=Threading
thread count
daemon=21
peak=30
live=28
-version Not available
5.1.2 Monitoring the PIM Listener Service
A PIM Listener Service node can be monitored by checking the status and load information regarding the
service.
Node status and load monitoring
In order to retrieve status information about a PIM Listener Service node, use the following command:
<root directory of your OneMediaHub installation>/tools/management/bin/
status <IP>:3101 [options]
Where IP is the IP address of the node to check. The possible options are:
-deadlock
print the thread dump of any thread involved in a deadlock condition
-help
print this message
-memory
print memory statistics
-memoryusage
print memory usage
-requests <time-threshold>
print processing time and stack trace of current requests
-status
print status

Operation tasks
88
-stopthread <thread-name>
stop a thread (unsafe)
-thread <thread-name>
print thread dump
-threadlist
print full thread list
-threads
print thread statistics
-v, --verbose
print verbose information
-version
print the server version
The options listed above provide the following status information:
OPTION DETAIL
-deadlock Deadlock information. For example:
Deadlock information:
No deadlock detected.
-memory Memory statistics. For example:
java.lang:type=Memory
heap memory
init=0
used=4132160
committed=4788224
max=66650112
free=61861888
non heap memory
init=29523968
used=23131456
committed=32669696
max=121634816
free=88965120
total memory
init=29523968
used=27263616
committed=37457920
max=188284928
free=150827008
-memoryusage Memory usage. For example:
Funambol PIM Listener v.11.0.0
Memory usage:
Used memory: 11 Mb (12249680
bytes)

Operation tasks
89
OPTION DETAIL
Committed memory: 13 Mb
(14131200 bytes)
-requests <time-threshold> Not available
-status A string containing the status of the server and its
load factor
-stopthread <thread_name> Stop the specified thread. Note that this is an unsafe
operation and may destabilize the service
-thread <thread_name> Print the thread dump of the given thread.
-threadlist List of all threads
-threads Thread statistics. For example:
java.lang:type=Threading
thread count
daemon=21
peak=30
live=28
-version Version of the server. For example:
Funambol PIMListener v.11.0.0
5.2 Storage cleanup
OneMediaHub stores media and temporary files under <root directory of your OneMediaHub
installation>/ds-server/db (if OneMediaHub is configured to use Amazon S3, that directory is
used only for temporary files.)
The time-to-live of temporary files is 24 hours, so files older than 24 hours must be deleted since they are
useless. The same applies to empty directories not used in the last 24 hours.
OneMediaHub provides the script <root directory of your OneMediaHub
installation>/bin/cleanup-storage for this purpose.
This script should be executed at least once a day (typically as cronjob), but basing on how long the
execution takes, it might be run more frequently.
Important
In a cluster environment, with storage directories shared between all OneMediaHub instances,
the cleanup script should be executed on an instance only or, alternatively, on all instances but at
different times.
5.3 Remove orphan media files from file system
storage provider
OneMediaHub provides the script <root directory of your OneMediaHub
installation>/bin/media-storage-cleanup to check if in your file system storage some

Operation tasks
90
orphan items (without related row on database) exists in the media folder (<root directory of
your OneMediaHub installation>/ds-server/db) and eventually delete them.
Important
The script is available at the moment for file system only, an error will be shown in case of S3
storage provider.
The script can take long time to be executed.
In a cluster environment, with storage directories shared between all OneMediaHub instances,
the script should be executed on an instance only or, alternatively, on all instances but at different
times without overlapping the executions.
5.4 How to adjust the startup memory of the JVM
The heap memory is the part of memory used by Java processes to store the created objects. If an
OutOfMemory issue occurs, you may want to increase its max value.
Use the status tool to check the amount of heap memory, running it with the -memory option.
5.4.1 Data Synchronization Service
By default, the Data Synchronization Service is configured to use 512 MB of RAM as heap memory.
You can increase this value by setting the environment variable FUNAMBOL_DSSERVER_MEM_OPTS to
the desired value.
Example:
FUNAMBOL_DSSERVER_MEM_OPTS="-Xms1G -Xmx4G -XX:PermSize=64m -
XX:MaxPermSize=192m"
for using between 1 GB and 4 GB of memory.
The parameters
"-XX:PermSize=64m -XX:MaxPermSize=192m"
must not be changed if you don't know the effects they can have.
5.4.2 PIM Listener Service
By default, the PIM Listener Service is configured to use 256 MB of RAM as heap memory.
You can increase this value by setting the environment variable FUNAMBOL_CTP_MEM_OPTS to the
desired value.
Example:
FUNAMBOL_CTP_MEM_OPTS="-Xms256M -Xmx1G"
for using between 256 MB and 1 GB of memory.

Operation tasks
91
5.5 Synchronizing node clocks
In a cluster environment it is important that all nodes in the cluster have their system time synchronized. A
common way to do this is by using Network Time Protocol (NTP, see [22]).
5.5.1 Installing NTP
To check if your Linux distribution already includes an NTP software package, execute the following
command:
rpm -qa | grep -i ntp
If your distribution does not include NTP, you must first install it.
5.5.2 Checking that NTP is synchronized
NTP is pre-configured in some Linux distributions. If there is no firewall filtering your NTP traffic, then
the NTP daemon may work out of the box, and no modifications to the configuration are needed. To check
that the NTP daemon is running, execute the following command:
ntpq -c 'readvar 0'
Check the command line output for sync_ntp, which indicates that NTP is synchronized.
5.5.3 Configuring NTP
If NTP is not configured by default on the controller machine, edit the NTP configuration file etc/
ntp.conf as instructed below to ensure that the node clocks have the same time value.
Note
There are many different ways to configure NTP: these instructions represent only the simplest
possible solution. Refer, for example, to [22] and the official NTP documentation [23] for more
details on the advanced configuration options.
Configure ntp.conf
1. Locate at least two NTP servers on your network
2. Save a copy of the original etc/ntp.conf configuration file:
cd /etc
cp ntp.conf ntp.conf.orig
3. Open the etc/ntp.conf configuration file for editing
4. Comment out all the following lines: server, peer, broadcast, and manycast client
5. Add a server line for each NTP server you are using
server first.ntp.server
server second.ntp.server

Operation tasks
92
6. Save the configuration
7. The ntp.conf file is read when the NTP daemon is started: thus, you must restart NTP every time the
configuration file is modified.
/etc/init.d/ntpd restart
Note
The synchronization process normally takes a couple of minutes. You can check the current
state using the ntpq command.
When configuring NTP, use at least two individual NTP servers to ensure failure tolerance.
5.6 Configuring OneMediaHub load balancing with
Apache HTTP Server (httpd) and mod_cluster
Here following is described how to set up OneMediaHub in a cluster environment with a load balancing
mechanism using the Apache HTTP Server (httpd) and a software component called mod_cluster (see
http://www.jboss.org/mod_cluster for more details) that is an httpd module working as load-balancer.
mod_cluster is composed by a set of httpd modules and a set of Java libraries. The latter are already
available in the OneMediaHub package, but the former, since they are not Java-based, must be downloaded
from the mod_cluster website according to your server architecture, and installed in your httpd
installation.
The instructions below apply to OneMediaHub v14 (or later). For previous versions refer to Section 5.6.5,
“How to migrate OneMediaHub from mod_cluster v1.2.0 to mod_cluster v1.2.6”.
5.6.1 httpd requirements
The usage of the latest version of the httpd 2.2 stable branch is recommended, and the following modules
must be enabled:
•mod_proxy
•mod_proxy_ajp
•mod_proxy_http
All these modules are available compiling httpd with the option --enable-proxy.
Also make sure to have set the directives for loading proxy modules. Usually they look like this:
LoadModule proxy_module modules/mod_proxy.so
LoadModule proxy_ajp_module modules/mod_proxy_ajp.so
LoadModule proxy_http_module modules/mod_proxy_http.so
5.6.2 Installing mod_cluster httpd modules
httpd modules can be obtained downloading dynamic libraries (mod_cluster modules for httpd) from
http://mod-cluster.jboss.org/downloads/1-2-6-Final-bin (be sure to download the ones that match your
httpd host architecture).

Operation tasks
93
Important
mod_cluster v1.2.6 is the latest supported and certified version.
In order to install mod_cluster modules (considering <httpd> the directory where httpd is installed):
1. create the directory <httpd>/mod-cluster-modules
2. copy the following files (available in the dynamic libraries package) to <httpd>/mod-cluster-
modules:
•mod_advertise.so
•mod_manager.so
•mod_proxy_cluster.so
•mod_slotmem.so
Note
The dynamic libraries package may contain other .so modules that must not be copied
5.6.3 Configuring OneMediaHub instances for running in a cluster
Any OneMediaHub instance in a cluster environment must be uniquely identifiable. In order to accomplish
this goal, you have to set the environment variable FUNAMBOL_NODE_ID.
For example, you can run
export FUNAMBOL_NODE_ID="DS-01"
before starting the server. (Alternatively, you can set it in the .bashrc file of the user in charge of starting
the server process, if the bash shell is in use).
Node identifiers must be uppercase and unique in all the OneMediaHub instances in your cluster and must
has max lenght of 10 characters. For instance, you can use DS01, DS02, DS03, and so on.
As an other option, it is possible to set the attribute jvmRoute of the Engine element in <root
directory of your OneMediaHub installation>/tools/tomcat/conf/
server.xml. For instance:
<Engine name="Catalina" defaultHost="localhost" jvmRoute="DS01">
Note
Though this approach is suggested if you are running more than one instance of OneMediaHub on
the same host, it causes your installation directories to be different.
5.6.3.1 Enabling mod_cluster
In order to enable mod_cluster in OneMediaHub, you have to edit <root directory of your
OneMediaHub installation>/tools/tomcat/conf/server.xml commenting out the
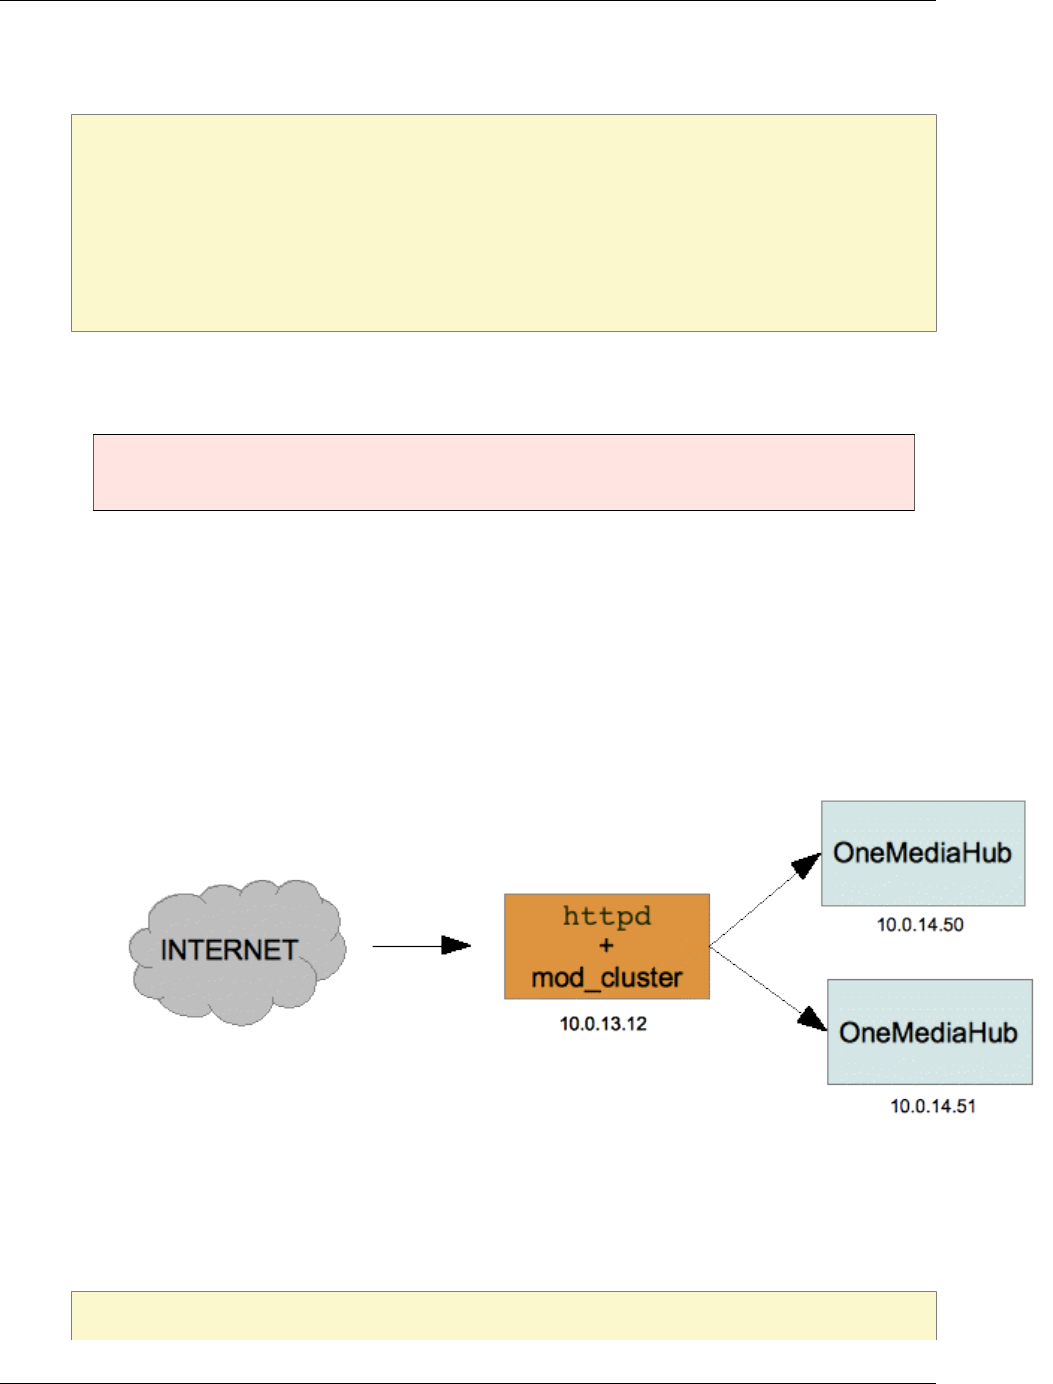
Operation tasks
94
section about mod_cluster configuration (look for mod-cluster configuration). The section will
look like this:
<Listener
className="org.jboss.modcluster.container.catalina.standalone.ModCluste
rListener"
advertise="false"
proxyList="host1:6666,host2:6666,host3:6666"
…
…
…
/>
In the proxyList attribute, you have to set the address and port number of your httpd installation(s).
Important
OneMediaHub must be restarted after this change.
5.6.4 Simple deployment architectures
5.6.4.1 Case 1
This section describes how to configure httpd and OneMediaHub for working as in the architecture
depicted in Figure 5.1, “Single httpd with two OneMediaHub instances” (the IP addresses reported in the
picture are just for example):
Figure 5.1. Single httpd with two OneMediaHub instances
Configuring httpd
In your httpd main configuration directory (usually <httpd>/conf) create the file omh-mod-
cluster.conf with the following content:
LoadModule slotmem_module mod-cluster-modules/mod_slotmem.so
LoadModule manager_module mod-cluster-modules/mod_manager.so

Operation tasks
95
LoadModule proxy_cluster_module mod-cluster-modules/mod_proxy_cluster.so
LoadModule advertise_module mod-cluster-modules/mod_advertise.so
Listen *:6666
<VirtualHost *:6666>
<Directory />
Order deny,allow
Deny from all
Allow from 10.0.14
</Directory>
KeepAliveTimeout 60
MaxKeepAliveRequests 0
ManagerBalancerName mycluster
ServerAdvertise Off
EnableMCPMReceive
</VirtualHost>
<Location /cluster-manager>
SetHandler mod_cluster-manager
Order deny,allow
Deny from all
Allow from 127.0.0.1
</Location>
ProxyStatus On
ProxyPassMatch /help !
ProxyPassMatch /server-status !
ProxyPassMatch /server-info !
In your httpd main configuration file (usually <httpd>/conf/httpd.conf) you have to add this
directive to load the file described here above:
Include conf/omh-mod-cluster.conf
Configuring OneMediaHub to enable mod_cluster
In <root directory of your OneMediaHub installation>/tools/tomcat/conf/
server.xml comment out the section about the mod_cluster configuration (look for mod-cluster
configuration) and set the proxyList attribute:
<Listener
className="org.jboss.modcluster.container.catalina.standalone.ModCluste
rListener"
advertise="false"
proxyList="10.0.13.12:6666"
…
…
…
/>
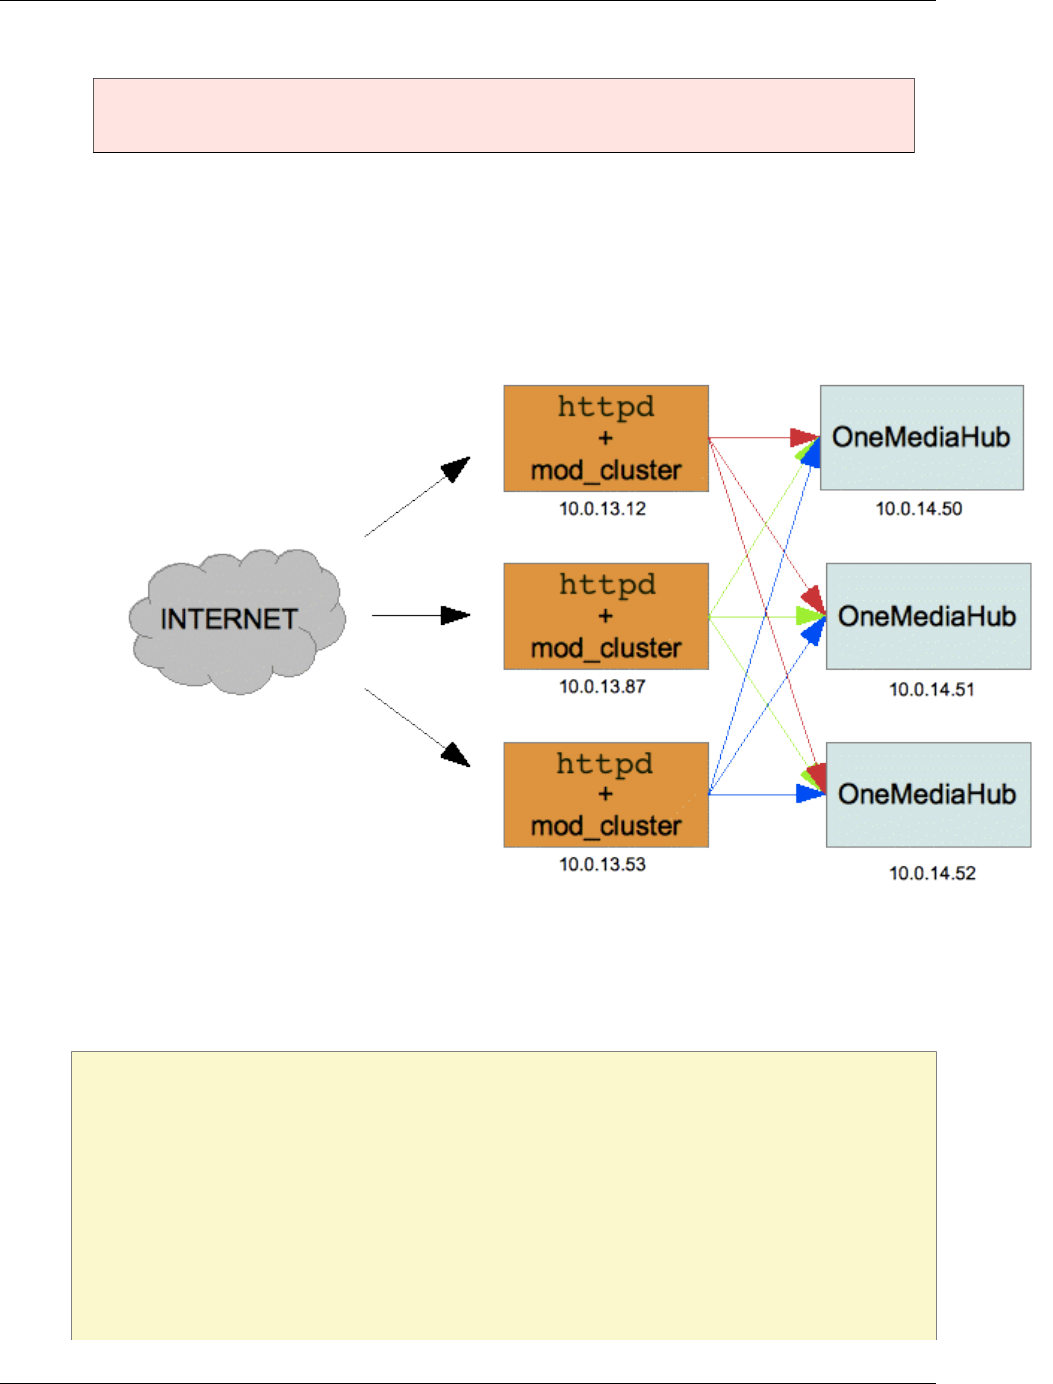
Operation tasks
96
Important
OneMediaHub must be restarted after this change
5.6.4.2 Case 2
This section describes how to configure httpd and OneMediaHub for working as in the architecture
depicted in Figure 5.2, “Three httpd with three OneMediaHub instances” (the IP addresses reported in
the picture are just for example):
Figure 5.2. Three httpd with three OneMediaHub instances
Configuring httpd
In your httpd main configuration directory (usually <httpd>/conf) create the file omh-mod-
cluster.conf with the following content:
LoadModule slotmem_module mod-cluster-modules/mod_slotmem.so
LoadModule manager_module mod-cluster-modules/mod_manager.so
LoadModule proxy_cluster_module mod-cluster-modules/mod_proxy_cluster.so
LoadModule advertise_module mod-cluster-modules/mod_advertise.so
Listen *:6666
<VirtualHost *:6666>
<Directory />
Order deny,allow
Deny from all
Allow from 10.0.14

Operation tasks
97
</Directory>
KeepAliveTimeout 60
MaxKeepAliveRequests 0
ManagerBalancerName mycluster
ServerAdvertise Off
EnableMCPMReceive
</VirtualHost>
<Location /cluster-manager>
SetHandler mod_cluster-manager
Order deny,allow
Deny from all
Allow from 127.0.0.1
</Location>
ProxyStatus On
ProxyPassMatch /help !
ProxyPassMatch /server-status !
ProxyPassMatch /server-info !
Note
The same configuration file is applicable to all the httpd nodes without any change. Moreover,
the file does not contain any information about the OneMediaHub nodes of the system. This
means that you can add or remove a OneMediaHub node without changing anything in the httpd
configuration.
Configuring OneMediaHub to enable mod_cluster
In <root directory of your OneMediaHub installation>/tools/tomcat/conf/
server.xml comment out the section about the mod_cluster configuration (look for mod-cluster
configuration) and set the proxyList attribute:
<Listener
className="org.jboss.modcluster.container.catalina.standalone.ModCluste
rListener"
advertise="false"
proxyList="10.0.13.12:6666,10.0.13.87:6666,10.0.13.53:6666"
…
…
…
/>
5.6.5 How to migrate OneMediaHub from mod_cluster v1.2.0 to
mod_cluster v1.2.6
OneMediaHub v14 supports out of the box mod_cluster v1.2.6 that is the recommended version also for
previous version of OneMediaHub (> v11.2.1). In order to migrate your installation, you have to update
some libraries and the httpd modules.

Operation tasks
98
5.6.5.1 Update of the httpd
httpd modules can be obtained downloading dynamic libraries (mod_cluster modules for httpd) from
http://mod-cluster.jboss.org/downloads/1-2-6-Final-bin (be sure to download the ones that match your
httpd host architecture).
In order to upgrade mod_cluster modules (considering <httpd> the directory where httpd is installed)
copy the following files available in the dynamic libraries package to <httpd>/mod-cluster-
modules:
Important
Make sure to stop httpd before copying the files
•mod_advertise.so
•mod_manager.so
•mod_proxy_cluster.so
•mod_slotmem.so
You should replace the existing ones.
5.6.5.2 Update of the OneMediaHub installation
In order to upgrade the mod_cluster libraries:
1. delete these files from <root directory of your OneMediaHub installation>/
tools/tomcat/lib/
• mod_cluster-container-catalina-1.2.0.Final.jar
• mod_cluster-container-catalina-standalone-1.2.0.Final.jar
• mod_cluster-container-spi-1.2.0.Final.jar
• mod_cluster-container-tomcat7-1.2.0.Final.jar
• mod_cluster-core-1.2.0.Final.jar
• jboss-logging-jdk-2.1.1.GA.jar
• jboss-logging-spi-2.1.1.GA.jar
2. download from http://www.jboss.org/mod_cluster/downloads/1-2-6-Final-bin the package java
bundles
3. extract the package in a temporary directory and copy the following files (they are available in the
JbossWeb-Tomcat/lib directory) to <root directory of your OneMediaHub
installation>/tools/tomcat/lib:
•mod_cluster-container-catalina-1.2.6.Final.jar
•mod_cluster-container-catalina-standalone-1.2.6.Final.jar

Operation tasks
99
•mod_cluster-container-spi-1.2.6.Final.jar
•mod_cluster-container-tomcat7-1.2.6.Final.jar
•mod_cluster-core-1.2.6.Final.jar
• jboss-logging.jar
4. in the file <root directory of your OneMediaHub installation>/bin/
funambol-server replace
JAVA_OPTS="$JAVA_OPTS -Dorg.jboss.logging.Logger.pluginClass=
org.jboss.logging.jdk.JDK14LoggerPlugin"
with
JAVA_OPTS="$JAVA_OPTS -Dorg.jboss.logging.provider=jdk"
5.6.5.3 How to redirect HTTP traffic to HTTPS
You might want to force a redirect from HTTP to HTTPS so that nothing is accidentally sent unencrypted
when communicating with the OneMediaHub server. To configure the Apache web server, follow these
steps:
1. Check in the Apache httpd.conf configuration file that the module rewrite is loaded:
LoadModule rewrite_module modules/mod_rewrite.so
2. Add the following rules to the VirtualHost section (this also covers the case where no load
balancer is deployed in front of the web server):
# to force https only
RewriteCond %{HTTP:X-Forwarded-Proto}=http
RewriteRule ^/?(.*) https://%{HTTP_HOST}/$1 [L,R]
RewriteCond %{HTTP:X-Forwarded-Proto}!.
RewriteCond %{HTTPS} !=on
RewriteRule ^/?(.*) https://%{HTTP_HOST}/$1 [L,R]
5.7 How to change the sync URL
If you wish to change the synchronization URL from http://{your-host}:{your-port}/sync
to http://{your-host}:{your-port}/{your-name}, follow these 4 steps:
1. In <root directory of your OneMediaHub installation>/config/
Funambol.xml, change:
<void property="serverURI">
<string>http://{your-host}:{your-port}/sync</string>
</void>
to:
<void property="serverURI">

Operation tasks
100
<string>http://{your-host}:{your-port}/{your-name}</string> </void>
2. In <root directory of your OneMediaHub installation>/portal/webapps/
ROOT/WEB-INF/web.xml, change:
<filter-mapping>
<filter-name>Sync Filter</filter-name>
<url-pattern>/sync/*</url-pattern>
</filter-mapping>
to:
<filter-mapping>
<filter-name>Sync Filter</filter-name>
<url-pattern>/{your-name}/*</url-pattern>
</filter-mapping>
3. In <root directory of your OneMediaHub installation>/portal/webapps/
ROOT/html/devices/content.properties, change:
portal-uri=http://{your-host}:{your-port}/sync
to:
portal-uri=http://{your-host}:{your-port}/{your-name}
4. Sync Clients that have the /sync path built-in need to be substituted.
Note
Not all names are a valid choice for {your-name}, as certain words are reserved (for
example, you cannot choose /me, /c, /devinfo etc.) For a complete listing, please contact
the Funambol Customer Support.
5.8 Setting the Portal URL in device configuration
pages
Once the Portal is installed, it will be possible for users to download the OneMediaHub client App on their
device. The link that will be provided needs to be configured according to the Portal URL.
To configure all the device configuration pages, edit the following file:
<root directory of your OneMediaHub installation>/tools/tomcat/webapps/
ROOT/html/devices/content.properties
In this file, change the value of the {your-host} property and set the correct Portal URI:

Operation tasks
101
portal-uri=http://{your-host}:{your-port}/sync
Then, launch the script that updates the device configuration pages with the correct URI from the from the
<root directory of your OneMediaHub installation>/bin directory:./update-
content
5.9 How to install a patch
In order to install a patch to your OneMediaHub installation, follow these steps:
Warning
If you want to be able to rollback a patch installation, follow the steps described at Section 5.9.1,
“Rollback procedure” before proceeding.
1. Unpack the .tgz archive of the patch you wish to install, e.g. patch-<patch
identifier>.tgz, in the root directory of your OneMediaHub installation
2. Go to the <root directory of your OneMediaHub installation>/patch/<patch
identifier>/ directory
3. Read the instructions provided in the readme.txt file carefully
4. Stop all OneMediaHub services
5. Launch installation of the patch using the command ./install
6. Restart all OneMediaHub services
Note
Some patches have an impact on the database and include SQL scripts which must be applied
manually; please refer to the readme.txt file for detailed instructions
Note
Patches need to be installed in ascending order; e.g. if you wish to install patch #3 for
OneMediaHub, you need to first make sure that patches #1 and #2 have already been installed.
5.9.1 Rollback procedure
Important
Before installing the patch, some steps must be executed to be able to later rollback the patch
installation:
1. Make a backup of your current installation.

Operation tasks
102
2. Make a dump of your database(s) or just of some tables, accordingly to the README file of the
patch. If this step is not explicitly foreseen in the README file, it can be skipped.
Once the patch has been installed, to rollback it stop the services, delete the current installation, and restore
the installation saved before as explained here above. Drop the current database(s)/tables and restore the
old one(s) from the dump (this last point must be done only in case point 2 above was necessary.)
5.10 How to install clients
In order to install a new version of OneMediaHub client in your OneMediaHub installation, run this
command:
<root directory of your OneMediaHub installation>/bin/install-
client <client-package-name.zip>
Please note that you may need to accept to overwrite existing files. No restart of OneMediaHub services is
needed.
For example:
bin/install-client onemediahub-for-windows-x.y.z.zip
5.11 How to install a new Portal User Interface
In order to install a new version of OneMediaHub Portal User Interface in your OneMediaHub deployment,
run this command:
<root directory of your OneMediaHub installation>/bin/install-portal-
ui <portal-ui-package-name.zip>
Note
Restart of OneMediaHub services is needed.
For example:
bin/install-portal-ui funambol-ajax-portal-X.Y.Z.zip
Warning
The old version of the Portal User Interface is deleted.
5.12 Using the Device Simulator Tool
The OneMediaHub Device Simulator Tool allows you to test the server simulating SyncML devices. It can
be found inside the OneMediaHub-SDK package.
With this tool, it is possible to run one of the test suites provided and add new tests. It is also possible
to configure the Device Simulator tool to run a whole set of tests without having to sync each of them
manually, which could be very time-consuming.

Operation tasks
103
5.13 Gathering information about the OneMediaHub
environment
In order to collect information about the OneMediaHub environment running on a GNU/Linux system (e.g.
current server version, list of installed patches) you can run the script:
<root directory of your OneMediaHub installation>/bin/gather-funambol-
info
which provides a list of useful information that can be used for debug purposes.
The output can be redirected to a file using the standard Unix output redirection path, for example:
<root directory of your OneMediaHub installation>/bin/gather-funambol-
info > /tmp/funambol_info.txt
5.14 Performance statistics
OneMediaHub collects and provides performance statistics according to the 3GPP TS 32.104 V4 technical
specification (see [28]).
The performance values retrieved are described in the following table.
Property name Description
Performance statistics
AverageResponseTime Average HTTP response time in milliseconds
AverageSyncTime Average sync time (including the time spent in the
client) in milliseconds
NumberOfRequests Total number of HTTP requests
NumberOfCurrentRequests Total number of requests the server is processing
NumberOfSyncs Total number of performed syncs
AverageSyncLatency Average time spent in the server during a sync (excl
time spent in the client) in ms
MaxResponseTime Max response time in milliseconds
Memory statistics
TotalMemoryInit Initial allocation of memory for the SW
TotalMemoryUsed The amount of memory currently used. Used
memory includes the memory occupied by all
objects including both reachable and unreachable
objects.
TotalMemoryCommited The amount of memory guaranteed to be available
for use by the JVM. The amount of committed
memory may change over time. The Java virtual
machine may release memory to the system and
committed could be less than the amount of memory
initially allocated at startup. Committed will always
be greater than or equal to that used.

Operation tasks
104
Property name Description
TotalMemoryMax Max memory available to the JVM
TotalMemoryFree Free available memory
Thread statistics
ThreadCountPeak Max number of simultaneous active threads
ThreadCountLive Current number of active threads
These values are retrieved by the OneMediaHub management tool perf-tool and written in an XML log file
as outlined in the 3GPP specifications.
The perf-measure tool has the following syntax:
<root directory of your OneMediaHub installation>/tools/management/bin/
perf-measure [--install min] JMX_PORT [MEASURES_DIR]
where:
JMX_PORT is the port that the OneMediaHub service is listening to for the JMX interface (e.g. 8101). Note
that the instrumented server will be on the local host (e.g. localhost:8101).
MEASURES_DIR is an optional directory where the performance stats files will be stored. It defaults to
<root directory of your OneMediaHub installation>/logs/3GPP. When invoked,
the tool connects to the server on the given port, retrieves the statistics and generates a file in the measures
directory containing the values read from the server. At each invocation a new file is generated (in other
words, each file contains only one sample).
See below for the –install option.
Performance statistics can be generated on a regular basis. To do so, the script must be installed as a
crontab entry with the user running the OneMediaHub service.
To install the crontab entry launch the command:
<root directory of your OneMediaHub installation>/tools/management/bin/
perf-measure --install MIN JMX_PORT [MEASURES_DIR]
Where:
MIN is the number of minutes of the granularity period.
5.14.1 Examples
Perfomance measurement example
<?xml version="1.0"?>
<?xml-stylesheet type="text/xsl" href="MeasDataCollection.xsl" ?>
<!DOCTYPE MeasDataCollection SYSTEM "MeasDataCollection.dtd" >
<mdc xmlns:HTML="http://www.w3.org/TR/REC-xml">

Operation tasks
105
<mfh>
<ffv>1</ffv>
<sn>System=Funambol,RNC=123</sn>
<st>RNC</st>
<vn>Funambol Inc.</vn>
<cbt>20100528140211</cbt>
</mfh>
<md>
<neid>
<neun>RNC Funambol</neun>
<nedn>System=Funambol,RNC=123</nedn>
</neid>
<mi>
<mts>20100528140711</mts>
<gp>300</gp>
<mt>NumberOfRequests</mt>
<mt>NumberOfCurrentRequests</mt>
<mt>NumberOfSyncs</mt>
<mt>AverageSyncLatency</mt>
<mt>AverageSyncTime</mt>
<mt>MaxResponseTime</mt>
<mt>AverageResponseTime</mt>
<mt>TotalMemoryInit</mt>
<mt>TotalMemoryUsed</mt>
<mt>TotalMemoryCommited</mt>
<mt>TotalMemoryMax</mt>
<mt>TotalMemoryFree</mt>

Operation tasks
106
<mt>ThreadCountPeak</mt>
<mt>ThreadCountLive</mt>
<mv>
<moid>Cell=1</moid>
<r>11038</r>
<r>0</r>
<r>2348</r>
<r>4870.6</r>
<r>24658.82</r>
<r>71566</r>
<r>1176.41</r>
<r>97323264</r>
<r>211044816</r>
<r>365158400</r>
<r>703528960</r>
<r>492484144</r>
<r>85</r>
<r>83</r>
<sf>FALSE</sf>
</mv>
</mi>
</md>
<mff>20100528140711</mff>
</mdc>
Crontab example
Set granularity period to 5 minutes:
*/5 * * * * /opt/Funambol.comed/tools/management/bin/perf-measure 8101
2>&1 >/dev/null

Operation tasks
107
5.15 Event tracking and reporting
The following is the definition of the data that is saved in the database in order to produce statistical
reports. Events are stored in the OneMediaHub database, in the fnbl_event table.
The data saved in the fnbl_event table has the following form:
eventTime
The time when the Event object has been triggered
eventType
A string describing the event type
loggerName
The name of the logger used to trigger the event
userName
The name of the user the event refers to
deviceId
the device ID
sessionId
The ID of the session this event is triggered within
source
The URI of the sync source handling which the event has been triggered
message
A short description of this event
syncType
A value describing the type of the performed sync (200, 201, and so on)
numTransferredItems
The total number of transferred items (both at client and server side)
numAddedItems
The total number of added items (both at client and server side)
numDeletedItems
The total number of deleted items (both at client and server side)
numUpdatedItems
The total number of updated items
duration
A value representing how long the synchronization process took
originator
The source component that caused this event to be triggered
statusCode
The status code that will be returned to the client as status of the synchronization process
error
A flag that is set to true if the event represents an error, and to false otherwise

Operation tasks
108
The keys for searching the data in the database will be:
username
matches the username as currently used in the user database
event type
matches the event type as described below
5.15.1 Antivirus
Antivirus events occur after that a new file is uploaded to the OneMediaHub server with antivirus enabled.
Antivirus event types
•START_ANTIVIRUS_CHECK
Triggers when everything is correctly configured and the antivirus task starts
•END_ANTIVIRUS_CHECK
Triggers when everything completed correctly
•AV_VIRUS_FOUND
Triggers for each infected item found
•AV_MAX_FILES_SCANNED
Triggers when the threshold of maximum number of files to be scanned is reached (will be triggered
before start)
•AV_FAILURE
Triggers when something goes wrong or is not properly configured (antivirus provider not set, not all
items validated, incorrect provider class, database access exceptions, antivirus execution exceptions)
•AV_FILE_NOT_SCANNED
Triggers when an item was not scanned (should be followed by AV_FAILURE)
5.15.2 Media
Media events occur when new files are uploaded to the OneMediaHub server.
Media event types
•START_MEDIA_UPLOAD
Triggers when a new item is uploaded to the Portal (will result in an error if the upload is rejected)
•END_MEDIA_UPLOAD
Triggers when an item finished to be uploaded to the Portal (will result in an error if something goes
wrong)
5.15.3 Push flow
Push flow events occur when the OneMediaHub server generates notifications for the devices.

Operation tasks
109
Push flow event types
•DS_PUSH_REQ
Triggers when a notification to all devices is sent (can result in an error)
•DS_PUSH_SENT
Triggers when a notifiable device is found prior to an initiated DS_PUSH_REQ. Otherwise, it results in
an error
5.15.4 Sync
Sync events occur when the OneMediaHub server performs synchronizations.
Sync event types
•START_SYNC
Triggers whenever a principal requests a synchronization (can result in an error if the database source is
not found)
•END_SYNC
Triggers when the synchronization has successfully completed (can result in an error if something goes
wrong with the synchronization)
5.15.5 Sync session
Sync session events occur when the OneMediaHub server processes a correct SyncML session.
Sync session even types
•START_SYNC_SESSION
Triggers when a synchronization session starts (can result in an error if the authentication fails)
•END_SYNC_SESSION
Triggers when a synchronization session ends (can result in an error if the session does not end
successfully)
5.15.6 Transcoding
Transcoding events occur when a new video file is uploaded to a OneMediaHub server with transcoding
enabled.
Transcoding event types
•CREATE_TRANSCODING_JOB
Triggers when a new transcoding job is created (can result in an error if something goes wrong with the
creation or queuing of the job)
•START_TRANSCODING_JOB
Triggers when a queued job starts

Operation tasks
110
•END_TRANSCODING_JOB
Triggers when a queued job ends (can result in an error if the job fails)
5.15.7 Events information by database columns
Table 5.1. Events and columns
Event →
Column ↓
Antivirus Media Push flow Sync Sync
session Transcoding
event_time X - X - - X
event_type XXXXX X
logger_name X - X - - X
username XXXXX X
device XXXXX -
sessionid - X X X X -
source X X X X - X
message XXXXX X
sync_type - - - X - -
num_transferred_items ----- -
num_added_items - - - X - -
num_deleted_items - - - X - -
num_updated_items - - - X - -
originator XXXXX X
status_code - - - X X -
error XXXXX X
duration X X - X X -
5.16 Configuring the Stuck Thread Detection valve
This is an internal Tomcat component (valve) that allows to detect requests that take a long time to process
and which might indicate that the thread that is processing it is stuck.
If accordingly configured, the valve can automatically kill requests that are taking too much time to be
processed.
If a different configuration is required, locate the file <root directory of your OneMediaHub
installation>/tools/tomcat/conf/server.xml and edit the following row:
<Valve className="org.apache.catalina.valves.StuckThreadDetectionValve"
thresholdInMins="30" kill="true" useStop="false" />
Configuration parameters
•thresholdInMins: threshold in minutes beyond which the thread is marked as stuck (default: 30)
•kill: automatically kill stuck threads (default: true)

Operation tasks
111
•useStop: (not safe) use Thread.stop() (default: false)
Configure core logging for Email notification
It is possible to receive an Email when the Stuck Thread Detection valve notifies or kills a request.
Edit the <root directory of your OneMediaHub installation>/tools/
tomcat/conf/logging.properties file and uncomment the SMTPHandler section. The
logging.properties file contains a handlers property. The handlers property specifies a list of
comma-separated handler classes.
The following example declares two handlers, a ConsoleHandler and an SMTPHandler:
handlers=java.util.logging.ConsoleHandler,smtphandler.SMTPHandler.level=
FINEST
java.util.logging.ConsoleHandler.level=FINEST
java.util.logging.ConsoleHandler.formatter=java.util.logging.SimpleForma
tter
smtphandler.SMTPHandler.level=WARNING
smtphandler.SMTPHandler.smtpHost=smtp.foobar.com
smtphandler.SMTPHandler.to=neo@foobar.com
smtphandler.SMTPHandler.from=appserver@server3
smtphandler.SMTPHandler.subject=[SMTPHandler] Application message
smtphandler.SMTPHandler.bufferSize=512
smtphandler.SMTPHandler.formatter=java.util.logging.SimpleFormatter
The SMTPHandler has seven customizable parameters
•level
•smtpHost
•to
•from
•subject
•bufferSize
•formatter
You should tailor their values as needed for your application environment. For more information about
java.util.logging configuration, look up Oracle Java SE platform documentation ([4]).
5.17 How to enable and disable devices
In order to enable or disable a specific device, the system administrator must execute the following
database queries:
• To enable a device:
update fp_model set active=true where id=<device id>
• To disable a device:
update fp_model set active=false where id=<device id>

Operation tasks
112
where <device id> is the unique identifier for each device, and can be obtained by running a database
query based on the device name and manufacturer. For example, if searching for the BlackBerry Storm's
device ID, the query string would be:
select id from fp_model where name like '%Storm'
5.18 How to disable clients offered in mobile portal
In <root directory of your OneMediaHub installation>/config/portal/
portal-ext.properties, it is possible to disable the clients that are offered after device detection in
the mobile portal:
Property Client to deactivate
sp.syncportal.device.url.bbPlugin BlackBerry (OS version < 4.7) Sync Client
sp.syncportal.device.url.bbPlugin47 BlackBerry (OS version 4.7) Sync Client
sp.syncportal.device.url.bbPlugin6 BlackBerry (OS version 6) Sync Client
sp.syncportal.device.url.iPhoneApp iOS app for iPhone
sp.syncportal.device.url.androidApp Android app
In order to disable the clients, the properties above should be empty or removed.
5.19 Marketing KPI
OneMediaHub provides a simple script for creating and delivering via email some marketing Key
Performance Indicator (KPI) values.
KPI can be collected weekly or monthly, the values are stored in the fnbl_marketing_kpi table in the
reporting database and are defined as follows:
Report date
the date when the reporting record has been generated
New users
users registered (and activated) since previous report date
Sync users
users who interacted with the server using a client (excluding the Web Portal) since previous report
date
Deleted users
number of deleted users since previous report date
Total number of media users
overall number of users with at least one media file
Registered users
overall number of registered users
Paying users
overall number of users with no free subscription
Free users
overall number of users with free subscription

Operation tasks
113
SyncML synchronisations
number of SyncML synchronisations
API synchronisations
number of API synchronisations
Mobile users
users who interacted with the server using a mobile device since previous report date
Desktop users
users who interacted with the server using a desktop client since previous report date
Web users
users who interacted with the server using a web client since previous report date
Contact Users
users who added, modified or deleted at least one contact since previous report date
Calendar Users
users who added, modified or deleted at least one event since previous report date
Media Users
users who added, modified or deleted at least one media item since previous report date
Total used storage
total used storage
Avg storage per user
average storage per media user
Total used storage of paying users
total storage used by paying users
Avg storage per paying user
average storage per paying media user
Total used storage of free users
total storage used by not paying media users
Avg storage per free user
average storage per not paying media user
Mac OS app downloads
number of Mac OS app client downloads since previous report date
Windows app downloads
number of Windows PC app client downloads since previous report date
Total users in Families
total number of users with a family
Users with posted items in Families
number of users that have posted to the family cloud since previous report date
New Sync Users (set 2)
number of new active users since previous report date

Operation tasks
114
Android users (set 2)
number of users of Android OS since previous report date
Ios users (set 2)
number of users of iOS OS since previous report date
Blackberry users (set 2)
number of users of Blackberry OS since previous report date
Windows Phone users (set 2)
number of users of Windows 8 OS since previous report date
Windows Desktop users (set 2)
number of Windows desktop client users since previous report date
Mac users (set 2)
number of MAC desktop client users since previous report date
Total storage per picture (set 2)
total used storage for pictures
Total storage per video (set 2)
total used storage for videos
Total storage per music (set 2)
total used storage for music
Total storage per file (set 2)
total used storage for documents
Total media items per paying users (set 2)
total number (quantity) of stored data items (pics/video/music/docs) by paying users
Total media items per free users (set 2)
total number (quantity) of stored data items (pics/video/music/docs) by free users
Total storage per mobile apps (set 2)
total volume [Gb] of uploaded files by mobile apps
Total storage per desktop clients (set 2)
total volume [Gb] of uploaded files by desktop clients
Total storage per Web (set 2)
total volume [Gb] of uploaded files by web clients
Total shared items (set 2)
total number of items successfully shared
Total shared items for mobile (set 2)
total number of items of items shared from mobile app
Total shared items for web (set 2)
total number of items of items shared from the web portal
Total users using sharing (set 2)
total number of items of unique users sharing items

Operation tasks
115
Total shared items for facebook (set 2)
total number of items uploaded to Facebook
Total shared items for filckr (set 2)
total number of items uploaded to Filckr
Total shared items for mail (set 2)
total number of items sent by email
Total shared items for picasa (set 2)
total number of items uploaded to Picasa
Total shared items for twitter (set 2)
total number of items uploaded to Twitter
Total shared items for youtube (set 2)
total number of items uploaded to Youtube
5.19.1 How to use
The script for collecting and sending KPI values is marketing-kpi and it is located under <root
directory of your OneMediaHub installation>/bin directory.
It should be run once per week (with option -w) for generating weekly stats and once per month (with
option -m) for generating monthly stats.
Each time is run, KPI values are stored in the database and a comma-separated values (CSV) file is sent to
the specified recipients.
Script:
marketing-kpi <-w|-m> -r recipients [-s mail_subject] [-set set_number]
The possible options are:
-w collects and sends weekly KPI
-m collects and sends monthly KPI
-r recipients
email report recipients (comma separated)
-s mail_subject
the subject of the email. By default is 'Marketing KPI (weekly)' for weekly KPI and 'Marketing KPI
(monthly)' for monthly KPI. Note that '(weekly)' or '(monthly)' is always added to the specified subject.
-set set_number
selects the data set to show in the report. Default is set 1.
Example 1: email subject is "Cloud Production KPI (weekly)"; 'weekly' is always added to the subject.
./marketing-kpi -r my@address.com,other@address.com -w -s "Cloud
Production KPI"
Example 2: email subject is "Cloud Production KPI (monthly)"; 'monthly' is always added to the subject.

Operation tasks
116
./marketing-kpi -r my@address.com,other@address.com -m -s "Cloud
Production KPI"
Example 3: the report will contain the set 2 columns too.
./marketing-kpi -r my@address.com,other@address.com -m -s "Cloud
Production KPI" -set 2
The specified recipients will be put in BCC to the sent email.
Examples of cronjobs definition (weekly every Sunday and monthly every first day of each month):
0 0 * * 0 /opt/onemediahub/bin/marketing-kpi -w -r
my@address.com,other@address.com -s "Cloud Production KPI"
0 0 1 * * /opt/onemediahub/bin/marketing-kpi -m -r
my@address.com,other@address.com -s "Cloud Production KPI"
5.20 Import users tool
OneMediaHub provides a tool for importing and performing maintenance batch tasks on users, based on an
input batch file.
This tool uses web service invocations to communicate with a OneMediaHub server, executing the
necessary calls to perform the maintenance action. Each command will have an output status code
determining the processing result.
The command to run the tool can be found at <root directory of your OneMediaHub
installation>/bin/import-users
5.20.1 Pre-conditions
The tool expects two precondition configurations on the OneMediaHub server: user subscriptions are
enabled, and user phone number are unique. This is achieved by configuring the following keys in
<root directory of your OneMediaHub installation>/config/portal/portal-
ext.properties:
•subscription.enabled=true
•phone-number-uniqueness=true
Also, the tool communicates with OneMediaHub via Server API, using the system realm. Therefore, the
tool requires an enabled portal administrator user with valid credentials to operate successfully.
5.20.2 User command batch file
The tool reads a CSV file containing the user commands to process. This file must obey the following
rules:
• The first row of the new .CSV file must be filled with the column names as defined in the table below;
• The order of the columns is fixed and also as defined in the table below;
• Columns in .CSV file are separated by semicolon (;) and semicolon is also used for the end of each row;
All the column are mandatory;
• Each row ends with a CRLF;

Operation tasks
117
• Use UTF-8 code page without BOM;
The batch file has the following structure:
Field Name Description Example Data Type
OrderType User command
operation type. See
OrderType table for more
information
1 Number(2)
ContractNumber Unique user identifier 54321 VARCHAR(255)
Event_Date Date of occurring event.
This field isn't validated
by the tool
2013-02-05-132555 Date (yyyy-mm-dd-
hh24miss)
PhoneNumber Phone number associated
to the user 390382213141 VARCHAR(75)
EMAIL Email address associated
to the user test@acme.com VARCHAR(75)
Brand_ID Unique server brand
identifier; this field will
be used to verify the
correct source of the data
omh VARCHAR(75)
Product_ID Subscription IDa
demo 150 MB
standard 2 GB
premium 5GB
...
demo Possibly 3 comma-
separated values
UserType User-level
communication channel
preference for the user.
The communication
method should only be
used when the user-level
communication channel
is configured.
Valid values:
SMS – The user
will receive all
communications by SMS
EMAIL – The user
will receive all
communications by e-
mail
MIXED – The user will
receive the initial "reset
EMAIL VARCHAR(5)

Operation tasks
118
Field Name Description Example Data Type
password" message
by SMS, and all other
communications by e-
mail
aThe list of the subscriptions is configurable in the server portal-ext.properties configuration file.
5.20.3 Usage
The import users tool must be executed using the following command:
<root directory of your OneMediaHub installation>/bin/import-users -
u <ws_admin_username> -p <ws_admin_secret> -i <input_directory> -o
<output_directory>
Options:
-u :
OneMediaHub administrator user name
-p :
OneMediaHub administrator secret
-i :
input directory with the CSV files containing user orders to process will be read from
-o :
output directory where the processing reports will be written to
The input directory is scanned for CSV files containing import commands, and all files that were found are
moved into the output directory. The tool will create a copy in the output folder for each CSV input file
found, appending .result to the input file name and a status code at the end of each line.
5.20.4 Commands
The following table contains the information on available order types the tool is able to process:
ID OrderType Description Notes
1 Activate Account is created The system sends a notification
to the end user with a link to
reset her password
2 Deactivate Disable the user The user will be disabled; the
user cannot access to the service
3 Suspend Account is in the
payment_required status during the grace period the user
has sort of “read-only” mode:
he can access to the server and
download content but he cannot
upload any media content
4 Unsuspend Account is to be unblocked for
service access. (active status)
5 Reset Account is deleted; and then
recreated

Operation tasks
119
ID OrderType Description Notes
6 Change User changes MSISDN or phone
number Subscriber changes MSISDN or
phone number (login); subscriber
is requested to use his new
MSISDN for further login
7 Delete User is deleted
8 Migrate User changes Subscription User is migrated to a new
subscription
5.20.5 Configuration
There is a logging configuration file for the import tool, located in the <root directory of your
OneMediaHub installation>/config directory, named log4j-import-users-tool.xml.
The relevant logging level can be updated to expose a higher level of logging. The log is stored in <root
directory of your OneMediaHub installation>/logs/import-users-tool/
import-users-tool.log file.
Apart from this, the tool requires the server to be configured in order to be executed, that is, a valid
portal-ext.properties file with the following properties set:
•user-import-tool.device.countrya2
•user-import-tool.device.carrierid
•user-import-tool.device.modelid
•user-import-tool-preprocessor-class
•sp.syncportal.url
•sapi.baseurl
5.20.6 Status codes
After processing an input CSV file, the resulting output file will contain a copy of the input file, with an
appended StatusCode column, containing a code that represents the result of the command processing. The
following table defines the status codes.
code description
0OK
100 Generic error
101 User does not exist
103 User msisdn already exists
200 Invalid OrderTypeId
201 OrderTypeId not supported yet
202 Invalid BrandId
204 The unsuspension can only be done if the user was suspended before.
206 An activated user cannot be activated again.
208 Operation cannot be performed on a deactivated user.
209 Operation cannot be performed on a suspended user.

Operation tasks
120
code description
301 Invalid Product_ID
302 Invalid contract number
303 Invalid event date
304 Invalid msisdn
305 Invalid email address
306 Invalid user type
400 Network error
401 Empty response from server
402 HTTP error response from server
403 HTTP invalid response from server
404 Received a SAPI error code response from server
500 User provisioned, notification not sent
5.21 User reporting tool
OneMediaHub provides a script for extracting all the registered users present in the system. The data are
structured as a CSV file defined as follows:
userId
User identifier
msisdn
User's phone number, if present
email
User's email address
userStatus
User's satus (active or canceled)
planName
Currently associated subscription plan
planStatus
Status of the currently associated subscription plan
creationDate
User creation date
lastMigrationDate
Date of the last migration of the subscription plan
firstActiveDate
User creation date
lastActiveDate
Date of last login
numberOfDaysActive
Number of days between firstActiveDate and lastActiveDate

Operation tasks
121
5.21.1 How to use
The script is users-reporting and it is located under <root directory of your OneMediaHub
installation>/bin directory.
The script requires that the program 'Mutt' is installed on the machine.
The script can send the report by email, specifying an email address or a list separeted with comma of
email adrresses and the data can be encrypted in a protected by password zip file.
Script:
user-reporting -r recipients [-s mail_subject] [-p] [-z password]
Options:
-r mail report recipients (comma separated)
-s the subject of the mail. By default is 'users-report.csv'
-p print report to standard output
-z zip and password protect report
Example 1: Sends the plain CSV report via email to admin@funambol.com
./bin/users-reporting -r admin@funambol.com -s "registered users report"
Example 2: Sends the zip encrypted CSV report via email to admin@funambol.com,
support@funambol.com
./bin/users-reporting -r admin@funambol.com,support@funambol.com -s
"registered users report" -z mysecret
5.22 How to enable OneMediaHub proxy support
To enable proxy support for OneMediaHub you need to set the following environment properties according
to the proxy details:
•PROXY_HOST - the http proxy host domain
•PROXY_PORT - the proxy port
•PROXY_CHUNKING_SUPPORT - true or false values, if the proxy you are using supports chunking
Important
At the moment, OneMediaHub does not support a proxy with authentication.
Example:

Operation tasks
122
PROXY_HOST=192.168.0.10
PROXY_PORT=3128
PROXY_CHUNKING_SUPPORT=true
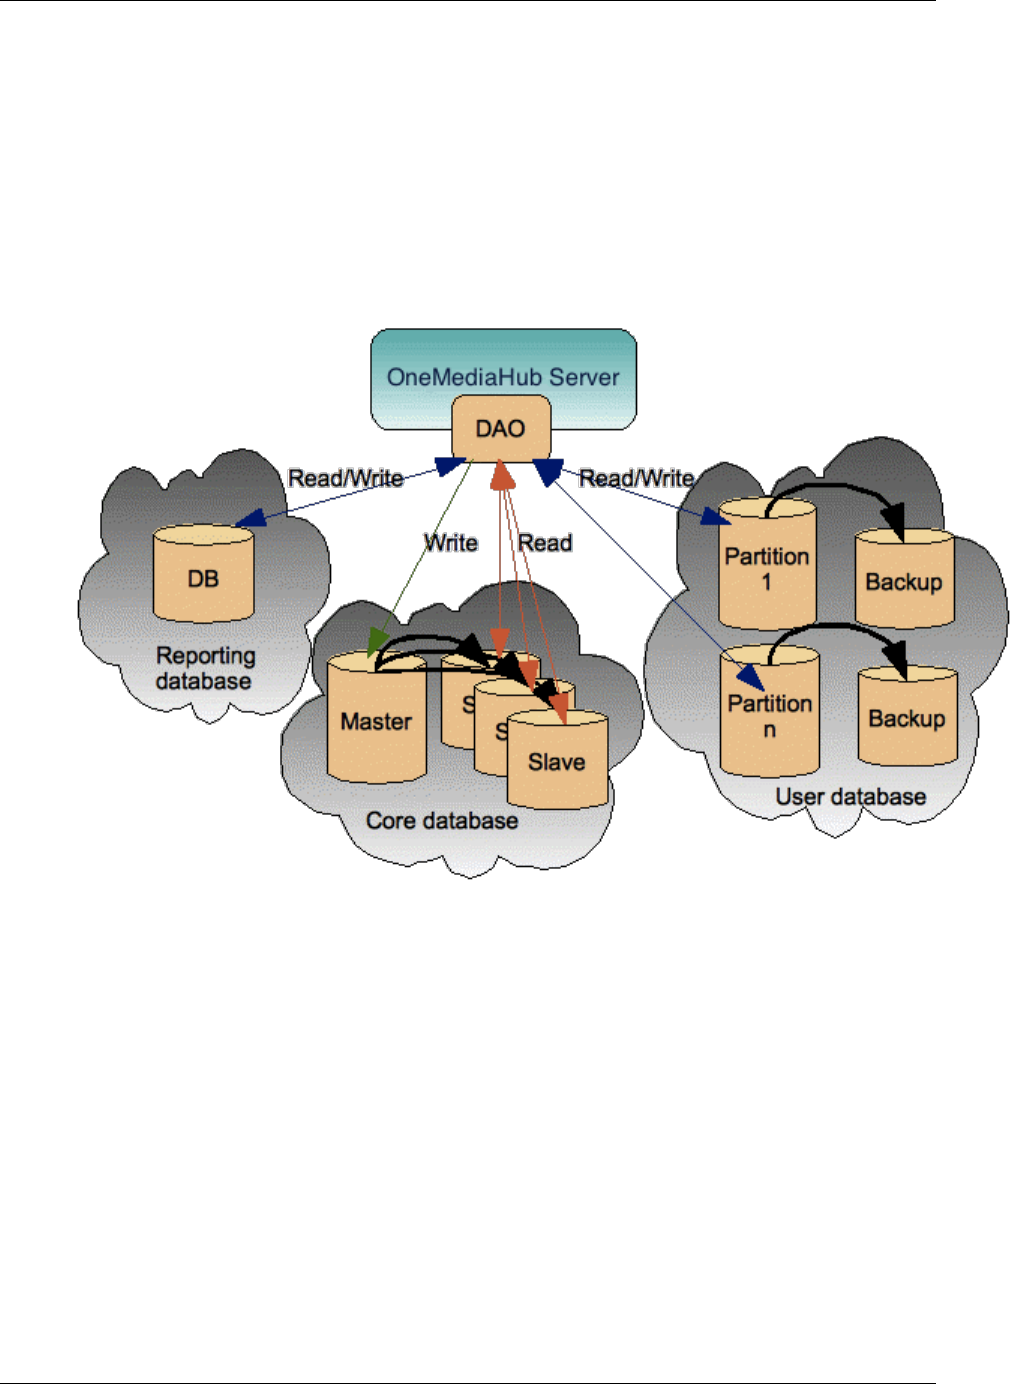
123
Chapter 6. Database partitioning
The OneMediaHub is designed to avoid single points of failure and to provide high availability at the
database level. In order to guarantee these features, the OneMediaHub's data layer is structured as
illustrated in Figure 6.1, “Database access layer”.
Figure 6.1. Database access layer
The database is logically split in three: the Core database, the Reporting database, and the User database.
The Core database contains the subset of information required for the correct functioning of the server; the
User database contains user related information; the Reporting database contains information about events
triggered by different components (like the Data Synchronization Service and so on) for reporting purposes.
The Core database stores data that must not be scaled according to the number of users; the data is scaled
using a master/slave architecture where a master is asynchronously replicated on many slaves. Write
operations in the Core database are done on the master while read operations are done on the slaves.
The User database stores data that needs to be scaled according to the number of users and that is
partitioned in multiple databases. Each partition stores data relating to a subset of users. Each partition
could be backed up through asynchronous replication on a backup slave machine but the readings are not
spread out on the slave; this means that all connections will be read/write.
The tables in the User database are described at Section E.2, “OneMediaHub User”.

Database partitioning
124
6.1 Creating core and user databases
The procedure for creating core, user and reporting databases is similar to the one described inSection 3.4,
“Database configuration”, but different SQL scripts must be used. The SQL files to use are listed below:
File location Description
<root directory of your OneMediaHub
installation>/portal/database/
mysql/cared-coredb-mysql.sql
Script for core database creation
<root directory of your OneMediaHub
installation>/portal/database/
mysql/cared-userdb-mysql.sql
Script for user database creation
<root directory of your OneMediaHub
installation>/portal/database/
mysql/cared-reportingdb-mysql.sql
Script for reporting database creation
6.2 Separating the user database
If you want to separate the user database from the core, you have two different possibilities:
1. edit the file <root directory of your OneMediaHub installation>/config/com/
funambol/server/db/jdbc/fnbluser.xml setting the property url. This is done adding this
code:
<!-- The connection URL -->
<void method="setProperty">
<string>url</string>
<string>jdbc:mysql://db-server/userdb?characterEncoding=UTF-8</
string>
</void>
At the end, the fnbluser.xml could look like:
<?xml version="1.0" encoding="UTF-8"?>
<java version="1.6.0" class="java.beans.XMLDecoder">
<object
class="com.funambol.server.db.RoutingDataSourceConfiguration">
<!-- The connection URL -->
<void method="setProperty">
<string>url</string>
<string>jdbc:mysql://db-server/userdb?characterEncoding=UTF-8</
string>

Database partitioning
125
</void>
<void property="partitioningCriteria">
<object class="com.funambol.server.db.BucketPartitioningCriteria"
>
<void property="hasher">
<object class="com.funambol.server.db.BoundedHasher">
<void property="maxValue">
<int>10000000</int>
</void>
</object>
</void>
</object>
</void>
<void property="partitionConfigurationLoader">
<object
class="com.funambol.server.db.DBPartitionConfigurationLoader" >
</object>
</void>
</object>
</java>
2. change the information in the fnbl_partition table (stored in the core database.) For instance you
can simply perform this update:
update fnbl_partition set url='jdbc:mysql://db-server/userdb?
characterEncoding=UTF-8' where name='partition-0';
Note
User database configuration inherits all the parameters (like username, password and connection
pool configuration) defined in the main database configuration file (<root directory of
your OneMediaHub installation>/config/com/funambol/server/db/
db.xml). In case you need to specify different values, you can set them in the fnbluser.xml
or in the fnbl_partition table.

Database partitioning
126
6.3 Separating the reporting database
If you want to separate the reporting database from the core, you have to edit the file <root directory
of your OneMediaHub installation>/config/com/funambol/server/db/jdbc/
fnblreporting.xml setting the property 'url'. This is done adding this code:
<!-- The connection URL -->
<void method="setProperty">
<string>url</string>
<string>jdbc:mysql://db-server/reportingdb?characterEncoding=UTF-8</
string>
</void>
At the end, the fnblreporting.xml could look like:
<?xml version="1.0" encoding="UTF-8"?>
<java version="1.6.0" class="java.beans.XMLDecoder">
<object class="com.funambol.server.db.DataSourceConfiguration">
<void method="setProperty">
<string>url</string>
<string>jdbc:mysql://db-server/reportingdb?characterEncoding=UTF-8</
string>
</void>
</object>
</java>
Note
Reporting database configuration inherits all the parameters (like username, password and
connection pool configuration) defined in the main database configuration file (<root
directory of your OneMediaHub installation>/config/com/funambol/
server/db/db.xml). In case you need to specify different values, you can set them in the
fnblreporting.xml file.
6.4 Partitioning the user database
By default, the user database is configured to use one partition only.
The way user data is partitioned is determined by the tables fnbl_bucket and fnbl_partition (see
description at Section E.1.3, “fnbl_bucket” and Section E.1.27, “fnbl_partition”).

Database partitioning
127
Given the username, the steps to identify the partition to use are:
1. compute the bucket of the username. The bucket is a positive integer value between 0 and 9999999 and
it is computed as abs(hashcode(username)) % 10000000
2. given the bucket, the fnbl_bucket table is used to identify the name of the partition to use; this is
done by searching for the entry whose bucket range contains the specified bucket value
3. given the partition name from the previous step, the fnbl_partition table is used to retrieve
partition information such as the URL, username, password to use in creating the connection
Note
To avoid impacting on performance, the information contained in the previous tables is read only
once during the initialization phase.
By default OneMediaHub is configured to have all the users in the bucket interval 0-9999999 on partition-0
(defined in fnbl_partition).
To have more than one partition, you have to split the bucket interval in the fnbl_bucket table and to
create new partitons in the fnbl_partition table.
For instance, to have 3 different partitions, you can split the buckets in three intervals setting in
fnbl_bucket these values:
Table 6.1. Partitioning the user database - example of 3 partitions, how to set
fnbl_bucket
low_bucket high_bucket partition_name active migrating
0 3333332 partition-0 Y N
3333333 6666665 partition-1 Y N
6666666 9999999 partition-2 Y N
Then, you have to define the partitions in fnbl_partition:
Table 6.2. Partitioning the user database - example of 3 partitions, how to set
fnbl_partition
name url
partition-0 jdbc:mysql://db-server-1/userdb_01?
characterEncoding=UTF-8
partition-1 jdbc:mysql://db-server-2/userdb_02?
characterEncoding=UTF-8
partition-2 jdbc:mysql://db-server-3/userdb_03?
characterEncoding=UTF-8
Note that there are not constraints on the partition url so that for instance you can have three different
partitons on the same database server:

Database partitioning
128
Table 6.3. Partitioning the user database - example of 3 partitions, how to set
fnbl_partition
name url
partition-0 jdbc:mysql://db-server/userdb_01?
characterEncoding=UTF-8
partition-1 jdbc:mysql://db-server/userdb_02?
characterEncoding=UTF-8
partition-2 jdbc:mysql://db-server/userdb_03?
characterEncoding=UTF-8
This configuration gives the advantage of moving easily the databases on different MySQL server instances
when the load grows. For instance, in the case you need to have partition-2 on a different box, you can just
move the database 'userdb_03' on a new MySQL instance (how to move a single database on a different
instance is out of the scope of this guide) and change fnbl_partition in this way:
Table 6.4. Partitioning the user database - example of 3 partitions, how to set
fnbl_partition
name url
partition-0 jdbc:mysql://db-server/userdb_01?
characterEncoding=UTF-8
partition-1 jdbc:mysql://db-server/userdb_02?
characterEncoding=UTF-8
partition-2 jdbc:mysql://db-server-abc/userdb_03?
characterEncoding=UTF-8
Tip
Basing on the number of users you expect on the system, if you create the expected number of
partitions during the installation phase, you can easily move databases as previously described
when needed. For example, if your system needs 20 partitions, install OneMediaHub with 20
partitions hosted on the same MySQL server instance; once the load grows you can move the
partitions on more than one MySQL server instances and incrementally you could have 20
partitons on 20 different hosts.
6.5 MySQL replication
OneMediaHub is designed to support MySQL replication and split the read queries on slave databases.
OneMediaHub takes advantage of the features provided by the MySQL database engine.
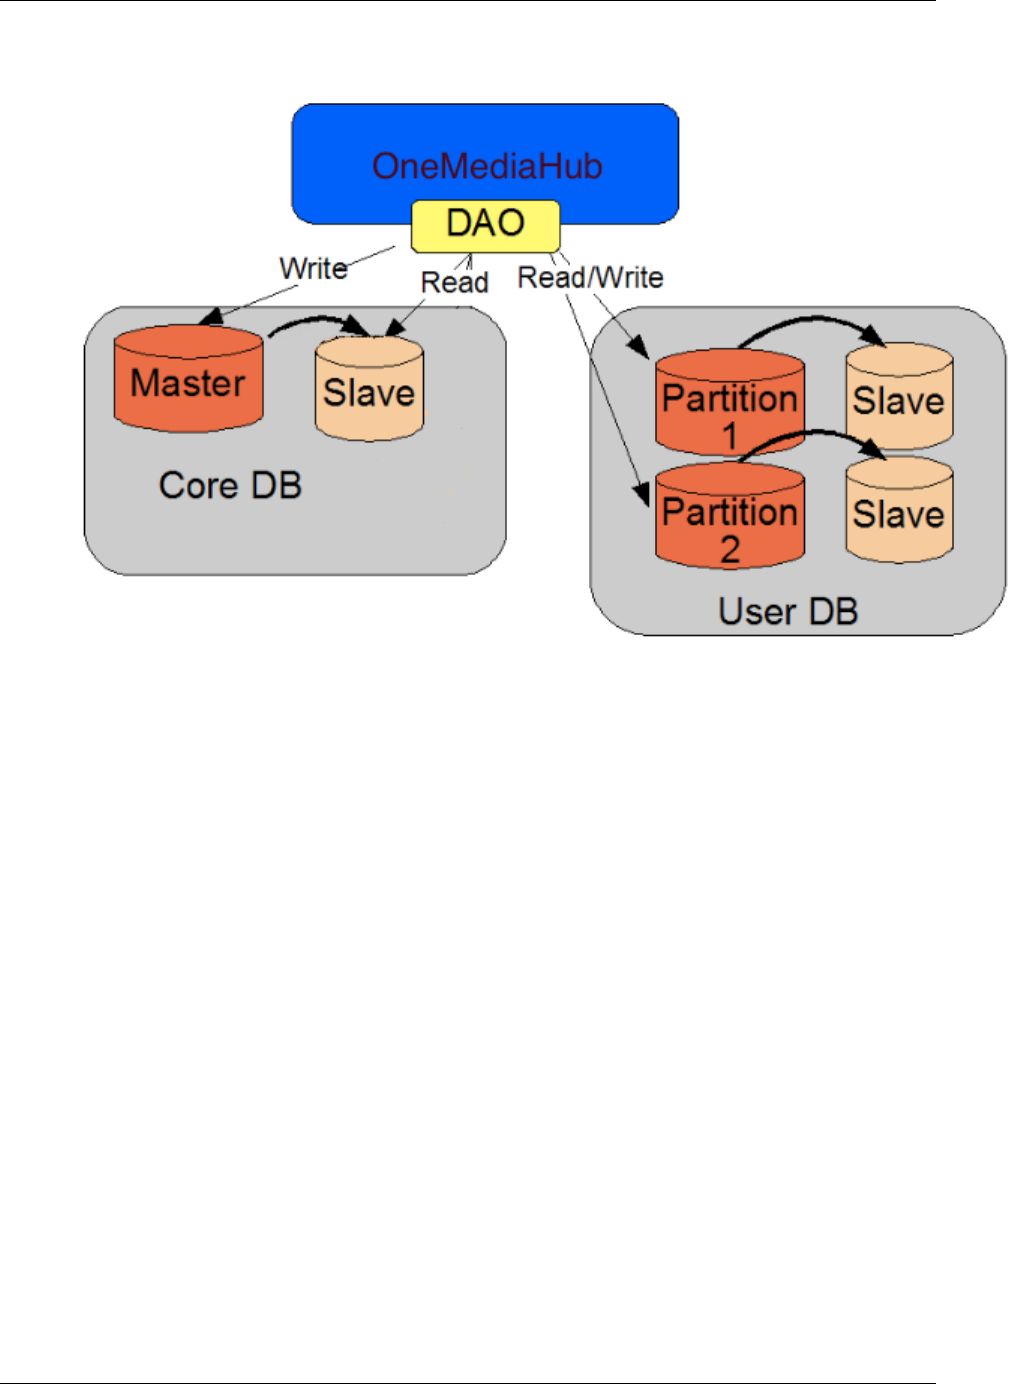
Database partitioning
129
Figure 6.2. OneMediaHub-MySQL database replication
•Read-only connections will be sent to the slaves (just SELECT operations can be performed). They are
load-balanced using a round-robin scheme
•Non-read-only connections will be sent to the master
6.5.1 What does MySQL replication mean?
MySQL replication enables statements and data from one MySQL server instance to be replicated to
another MySQL server instance. All modification queries are replicated on all the database servers
asynchronously. The system being replicated does not wait for the data to have been recorded on the
duplicate system, before to be available.
6.5.2 MySQL Connector/J
MySQL Connector/J is the official JDBC driver for MySQL and it supports MySQL replication out-of-the-
box. The connection URL must be like:
jdbc.url=jdbc:mysql://master,slave1,slave2,slave3/db-name
The JDBC driver will automatically send non-read-only queries to the master and read-only query to the
slaves.

130
Chapter 7. Logging
OneMediaHub has the following main log files:
• Data Synchronization Service
• PIM Listener Service
• Portal
• Subscription management
• Tracking (IP tracking of several regular and CSR users' actions)
which are detailed in the next subsections.
The directory where all the logs are stored is <root directory of your OneMediaHub
installation>/logs, which contains different subdirectories for each component:
•ds-server
•http
•pim-listener
•portal
•subscription
7.1 Changing the log rotation frequency and size
To change the log rotation frequency and size, edit the file:
<root directory of your OneMediaHub installation>/config/com/funambol/
server/logging/appender/funambol.logfile.xml
and change the maxBackupIndex value to the number of stored log files and maximumFileSize to
the max log file size before rotation. You can use a byte count or a size string (i.e. 100 MB, 1 GB, 2000
kB). If you use a string, you must change the property type from long to string.
For example:
<void property="maximumFileSize">
<long>104857600</long>
</void>
or:
<void property="maxFileSize">

Logging
131
<string>100MB</string>
</void>
Here is an example of the file funambol.logfile.xml:
<?xml version="1.0" encoding="UTF-8"?>
<java version="1.5.0_12" class="java.beans.XMLDecoder">
<object class="org.apache.log4j.RollingFileAppender">
<void property="file">
<string>/var/log/funambol/ds-server.log</string>
</void>
<void property="layout">
<object class="org.apache.log4j.PatternLayout">
<void property="conversionPattern">
<string>[%d{yyyy-MM-dd HH:mm:ss,SSS}] [%c] [%p] [%X{sessionId}]
[%X{deviceId}] [%X{userName}] [%X{sourceURI}] %m%n</string>
</void>
</object>
</void>
<void property="maxBackupIndex">
<int>50</int>
</void>
<void property="maximumFileSize">
<long>104857600</long>
</void>
<void property="name">
<string>funambol.logfile</string>
</void>
</object>
</java>

Logging
132
7.1.1 Daily log rotation
In order to change the default Data Synchronization Service log to a daily log, edit the file <root
directory of your OneMediaHub installation>/config/com/funambol/server/
logging/logger/funambol.xml modifying the following element to use the funambol.daily-
logfile appender instead of the default one:
<void method="add">
<string>funambol.logfile</string>
</void>
to:
<void method="add">
<string>funambol.daily-logfile</string>
</void>
7.1.2 Hourly log rotation
In order to change the default Data Synchronization Service log to an hourly log, edit the file <root
directory of your OneMediaHub installation>/config/com/funambol/
server/logging/logger/funambol.xml modifying the following element to use the
funambol.hourly-logfile appender instead of the default one:
<void method="add">
<string>funambol.logfile</string>
</void>
to:
<void method="add">
<string>funambol.hourly-logfile</string>
</void>
7.2 Changing the logging level
The logging level of the various OneMediaHub components can be configured by editing the following
Log4j files:
• Data Synchronization Service
<root directory of your OneMediaHub installation>/config/com/funambol/
server/logging/logger/funambol.xml
• PIM Listener Service
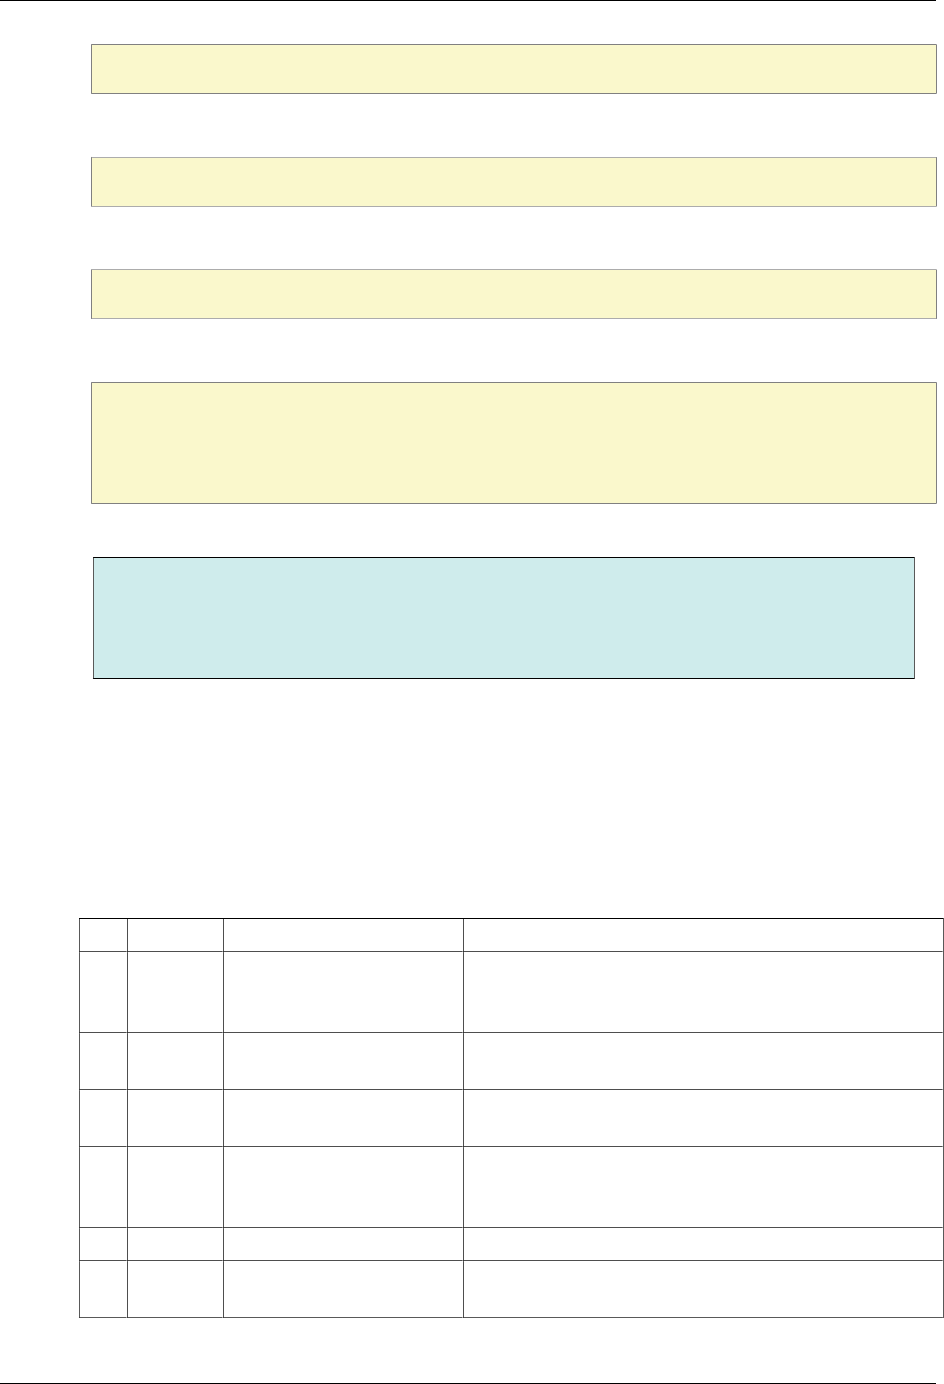
Logging
133
<root directory of your OneMediaHub installation>/config/log4j-
pimlistener.xml
• Portal
<root directory of your OneMediaHub installation>/config/log4j-
portal.xml
• Subscription management
<root directory of your OneMediaHub installation>/config/com/funambol/
server/logging/logger/funambol.subscriptions.xml
• Tracking
<root directory of your OneMediaHub installation>/config/log4j-
portal.xml
category name="funambol.tracking"
Note
The available severity levels are: FATAL, ERROR, WARN, INFO, DEBUG, TRACE. For
reporting reasons, only levels of severity from INFO up should be considered. It is also possible to
set the level to OFF to disable logging altogether, and to ALL to obtain complete log information.
7.3 Understanding log files
Statistics can be extracted from log files using several post-processing methods. The simplest of all, which
can extract a good amount of statistical information, is the use of the grep command on a log file, possibly
after some cutting, in order to reduce it to a fixed time period.
In order to understand the structure of OneMediaHub log files, please refer to the following table. Fields
are in square brackets and separated by a space.
#What Description Example
1 Timestamp To the millisecond, in UTC
timezone (timezone can not
be changed)
[2008-08-05 18:18:13,527]
2 Module
ID The internal module name [funambol.engine]
3 Severity The event severity
according to Log4j [INFO]
4 Session
ID The session ID assigned by
the server during the initial
sync request
[2BDAC1A3F6C4927177326484D6976AED]
5 Client ID Unique client ID [fol-QVRITE9OWFA6QW5kaQ==]
6 Remote
Address Client IP Address [85.23.15.124]

Logging
134
#What Description Example
7 Username The unique username in the
OneMediaHub database [john]
8 Type of
sync Contacts, notes, ... [scard]
9 DescriptionA free text description of the
event Preparing fast synchronization since 2008-08-05
18:03:01.134
Note
If you wish to convert the format to csv, you need to substitute ',' with '.' in the Timestamp field
Note
If the client is downloaded from OneMediaHub, the Client ID field uses a naming convention
that distinguishes the various types of client. For instance, the prefix fol- identifies the
OneMediaHub for Windows.
7.3.1 Example
Below is an example of a OneMediaHub log file snippet:
[2008-08-05 19:43:20,782] [funambol.transport.http] [INFO]
[F9A9A75E9B5CA2FB1BBF4A66549C2036] [85.23.15.124] [fwm-358786011398361]
[mike] [] Handling
incoming request
[2008-08-05 19:43:20,783] [funambol.transport.http] [INFO]
[F9A9A75E9B5CA2FB1BBF4A66549C2036] [85.23.15.124] [fwm-358786011398361]
[mike] [] Request
URL: http://my.funambol.com/funambol/ds
[2008-08-05 19:43:20,783] [funambol.transport.http] [INFO]
[F9A9A75E9B5CA2FB1BBF4A66549C2036] [85.23.15.124] [fwm-358786011398361]
[mike] [] Requested
sessionId: F9A9A75E9B5CA2FB1BBF4A66549C2036
[2008-08-05 19:43:20,785] [funambol.transport.http] [INFO]
[49F8F3AEE86ABBD97DEC6508AB02743D] [145.14.11.56] [fbb-833253433]
[sarah] [] Handling incoming
request
[2008-08-05 19:43:20,786] [funambol.transport.http] [INFO]
[49F8F3AEE86ABBD97DEC6508AB02743D] [145.14.11.56] [fbb-833253433]
[sarah] [] Request URL:
http://my.funambol.com/funambol/ds
[2008-08-05 19:43:20,786] [funambol.transport.http] [INFO]
[49F8F3AEE86ABBD97DEC6508AB02743D] [145.14.11.56] [fbb-833253433]
[sarah] [] Requested
sessionId: 49F8F3AEE86ABBD97DEC6508AB02743D
[2008-08-05 19:43:20,793] [funambol.engine] [INFO]
[49F8F3AEE86ABBD97DEC6508AB02743D] [145.14.11.56] [fbb-833253433]
[sarah] [] Starting
synchronization ...

Logging
135
[2008-08-05 19:43:20,794] [funambol.transport.http] [INFO]
[F9A9A75E9B5CA2FB1BBF4A66549C2036] [85.23.15.124] [fwm-358786011398361]
[mike] [] Request
processed.
[2008-08-05 19:43:20,795] [funambol.engine.strategy] [INFO]
[49F8F3AEE86ABBD97DEC6508AB02743D] [145.14.11.56] [fbb-833253433]
[sarah] [snote] Preparing
fast synchronization since 2008-08-05 19:12:39.309
[2008-08-05 19:43:20,795] [funambol.engine.strategy] [INFO]
[49F8F3AEE86ABBD97DEC6508AB02743D] [145.14.11.56] [fbb-833253433]
[sarah] [snote] Last call
[2008-08-05 19:43:20,796] [funambol.engine.strategy] [INFO]
[49F8F3AEE86ABBD97DEC6508AB02743D] [145.14.11.56] [fbb-833253433]
[sarah] [snote] Preparation
completed.
[2008-08-05 19:43:20,796] [funambol.engine.strategy] [INFO]
[49F8F3AEE86ABBD97DEC6508AB02743D] [145.14.11.56] [fbb-833253433]
[sarah] [snote]
Synchronizing...
[2008-08-05 19:43:20,798] [funambol.transport.http] [INFO]
[49F8F3AEE86ABBD97DEC6508AB02743D] [145.14.11.56] [fbb-833253433]
[sarah] [] Request
processed.
7.4 Customizing DS Service's log settings
7.4.1 Customizing log files on a per-user basis
It is possible to add individual users to the log files maintained by the Data Synchronization Service.
In addition to system status and activities, log files can now be directed to record all the activities of
individual users.
This enables you to check the activities and any potential problems experienced by users, from the point of
view of the server. All you need is the exact OneMediaHub username.
Note
This currently applies only to PIM data, so this feature does not address media data and does not
include the OneMediaHub Server API (SAPI).
To set up a log file for an individual user, follow these steps:
1. Add to the file config/com/funambol/server/logging/logger/funambol.xml at the
bottom a section like this, just before </object>:
<void property="usersWithLevelALL">
<object class="java.util.ArrayList">
<void method="add">
<string>user_1</string>
</void>
</object>
</void>

Logging
136
Following the same pattern you can add as many users as you want. Here following is an example of
funambol.xml with two users with logging level set to ALL:
<?xml version="1.0" encoding="UTF-8"?>
<java version="1.6.0_25" class="java.beans.XMLDecoder">
<object class="com.funambol.framework.config.LoggerConfiguration">
<void property="appenders">
<object class="java.util.ArrayList">
<void method="add">
<string>funambol.logfile</string>
</void>
</object>
</void>
<void property="level">
<string>INFO</string>
</void>
<void property="name">
<string>funambol</string>
</void>
<void property="usersWithLevelALL">
<object class="java.util.ArrayList">
<void method="add">
<string>user_1</string>
</void>
<void method="add">
<string>user_2</string>
</void>
</object>
</void>
</object>
</java>
2. Save the funambol.xml file.
Note
The change will be detected automatically by the server, so that no restart is needed.
7.5 Syslog configuration
In order to send the Data Synchronization Service logs to the syslog server, configure the <root
directory of your OneMediaHub installation>/config/com/funambol/server/
logging/logger/funambol.xml file in order to use the syslog appender.
For example, if you wish to save the logs to a file and also send them to syslog:
<void method="add">
<string>funambol.logfile</string>
</void>

Logging
137
<void method="add">
<string>funambol.syslog-appender.xml</string>
</void>
By default, the syslog log appender funambol.syslog-appender.xml found under <root
directory of your OneMediaHub installation>/config/com/funambol/server/
logging/appender/ is configured with 'localhost' as syslog server (i.e. the server where the syslog
deamon is running) and is configured to send all messages with facility 'user'. It is possible to change
this behavior; refer to official syslog documentation for additional information.
In order to send the Portal, Push Connection Service, or PIM Listener Service logs to the syslog server, you
will need to configure the following files, respectively:
•<root directory of your OneMediaHub installation>/config/log4j-
portal.xml (for the Portal)
•<root directory of your OneMediaHub installation>/config/log4j-
pimlistener.xml (for the PIM Listener Service)
• You need to define a new appender in the files listed above, adding the following code:
<appender name="syslog" class="org.apache.log4j.net.SyslogAppender">
<param name="syslogHost" value="localhost"/>
<param name="facility" value="user"/>
<layout class="org.apache.log4j.PatternLayout">
<param name="ConversionPattern"
value="[%d{yyyy-MM-dd HH:mm:ss,SSS}] [%c] [%p] [%t] %m
%n" />
</layout>
</appender>
As for the Data Synchronization Service, you should configure the syslog server (by default, set to
'localhost') and the facility (by default, set to 'user').
Lastly, you need to add the new appender to the appender list under the 'root' node:
<root>
<level value="error" />
<!-- <appender-ref ref="console" /> -->
<!-- <appender-ref ref="rolling-log-file" /> -->
<!-- <appender-ref ref="daily-log-file" />

Logging
138
<!-- <appender-ref ref="hourly-log-file" />
<appender-ref ref="syslog" />
</root>
Note
That in the previous example, 'root' is configured with 'ERROR' level; in order to have more
verbose logging, you may want to set it to 'INFO' or to 'ALL'. See Section 7.2, “Changing the
logging level” for further details.
7.6 SNMP errors
SNMP errors are recorded by the SNMP logging utility. You can recognize which kind of error has been
trapped matching the Message column of the following table with the first row contained in the received
notification.
Message Description Corrective action
java.lang.OutOfMemoryEr
ror
This alarm is generated when
no memory is available to the
JVM running a server, i.e. all
the available memory has been
used. This condition should not
occur when the server has been
correctly sized and under normal
conditions.
Check how much memory has
been used up by the component
process (see Chapter 5, Operation
tasks).
Consider increasing the available
memory and restart the server
after the proper parameters have
been updated.
Make sure the server is not under
unexpected load. If the server
becomes unresponsive, restart it.
If the problem persists or is
frequent, contact support.
java.net.ConnectExcepti
on
java.net.NoRouteToHostE
xception
or
java.net.UnknownHostExc
eption
These alarms are generated if
a component in the server is
experiencing trouble with network
connectivity.
Check if the server is able to
establish the requested network
connections to external/internal
hosts.
Fix network issues.
com.mysql.jdbc.Communic
ationsException
This alarm is generated when the
server loses network connection to
a MySQL database.
Check if the database process is
running properly and if there is
connectivity between the server
and the database.
Fix network issues.

Logging
139
Message Description Corrective action
java.sql.SQLException This alarm can be generated under
two circumstances:
1. database use errors (inserting
rows with duplicate primary
key, wrong queries, ...)
2. when using certain databases
(i.e. Oracle), this may represent
a connectivity issue
First check that the database is
running properly and that it is
healthy and accessible from the
server.
If the database server and
connectivity are OK, report the
exception together with the stack
trace to support.
java.lang.StackOverflow
Error
This alarm represents an
unexpected error that may occur
on rare occasions due to software
issues.
Save the log and restart the server.
Report the log to support.
Unknown fatal error This alarm is generated when the
server experiences a generic fatal
error.
Save the log and restart the server.
Report the log to support.

140
Chapter 8. Configuring External Services
Note
The screenshots below are provided for your convenience. However, the external services these
screenshots are referring to may change their graphical interface from time to time and it may not
match the screenshots below exactly. Anyway, by carefully following the instructions you will be
able to configure the external services without the need of a screenshot.
8.1 Introduction
This chapter describes the steps to follow in order to allow the integration of the OneMediaHub with
external services. The OneMediaHub interfaces with:
• Picasa (by Google), to upload pictures;
• YouTube (by Google), to upload videos;
• Flickr (by Yahoo!), to upload pictures;
• Facebook, to upload pictures or videos, and to import profile pictures from Facebook friends and
integrate them into the OneMediaHub address book;
• Twitter, to share pictures or videos;
• Google, to import contacts and calendar.
8.2 General requirements
1. The Portal instance must be accessible from the Internet: external services redirect to pages on the
Portal, so these pages have to be available and reachable;
2. The Portal instance must have direct access to the Internet as HTTP requests to third party servers
are performed. Note that the list of servers used by Google, Yahoo!, etc. to upload content might be
dynamic so a list of URLs called is not available, and that using a proxy is not a supported workaround:
some of the external services will not work.
3. The Portal instance address must be the same address for the Internet, therefore the
${portal.server} property from the <root directory of your OneMediaHub
installation>/bin/config.properties has to be the same address that the external services
redirect to; in other words, the address in the browser's address bar should be the same as the one you
specify in the external application configuration (see configuration settings in Section 3.3, “Quick
configuration”.)
4. You need to already have the related application accounts to be able to create the application keys
below.
8.3 Application keys
8.3.1 Google external services authorization (Picasa, YouTube, and
Gmail contacts/calendar import)
The services Picasa, YouTube, and Google (the latter for contacts and calendar import operations) are
configured in one central place, the Google APIs console (https://code.google.com/apis/console):
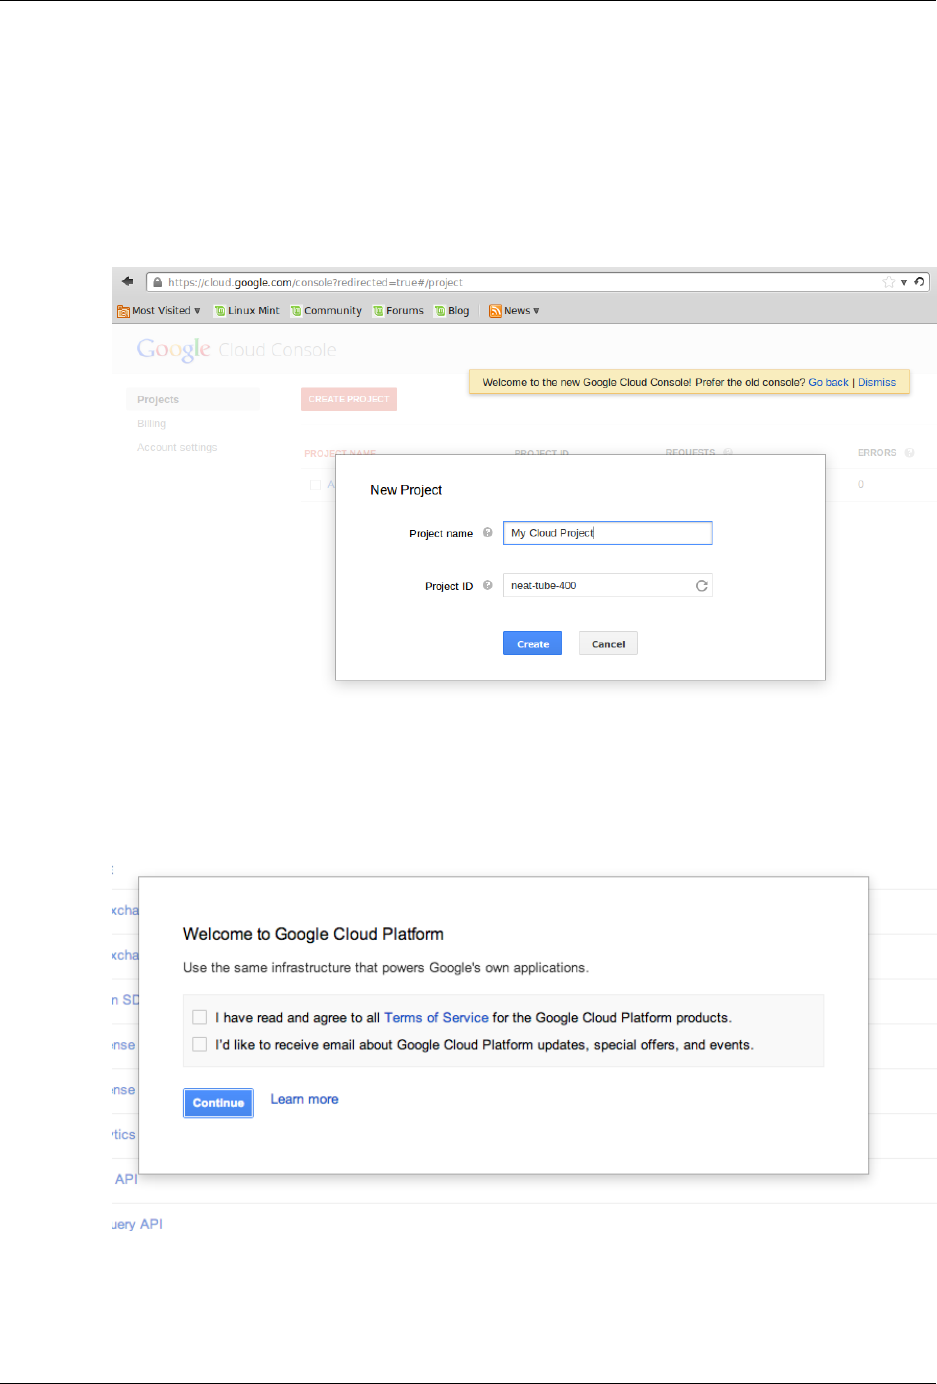
Configuring External Services
141
1. Go to the Google APIs console
2. Log in with your Google account
3. Create a new project (see Figure 8.1, “New Project”) and accept the Terms of Service (see Figure 8.2,
“Terms of Service”), ore use an existing one.
Figure 8.1. New Project
Figure 8.2. Terms of Service
4. Register a new web application inside the project (APIs & auth → Credentials+CREATE
NEW CLIENT ID):
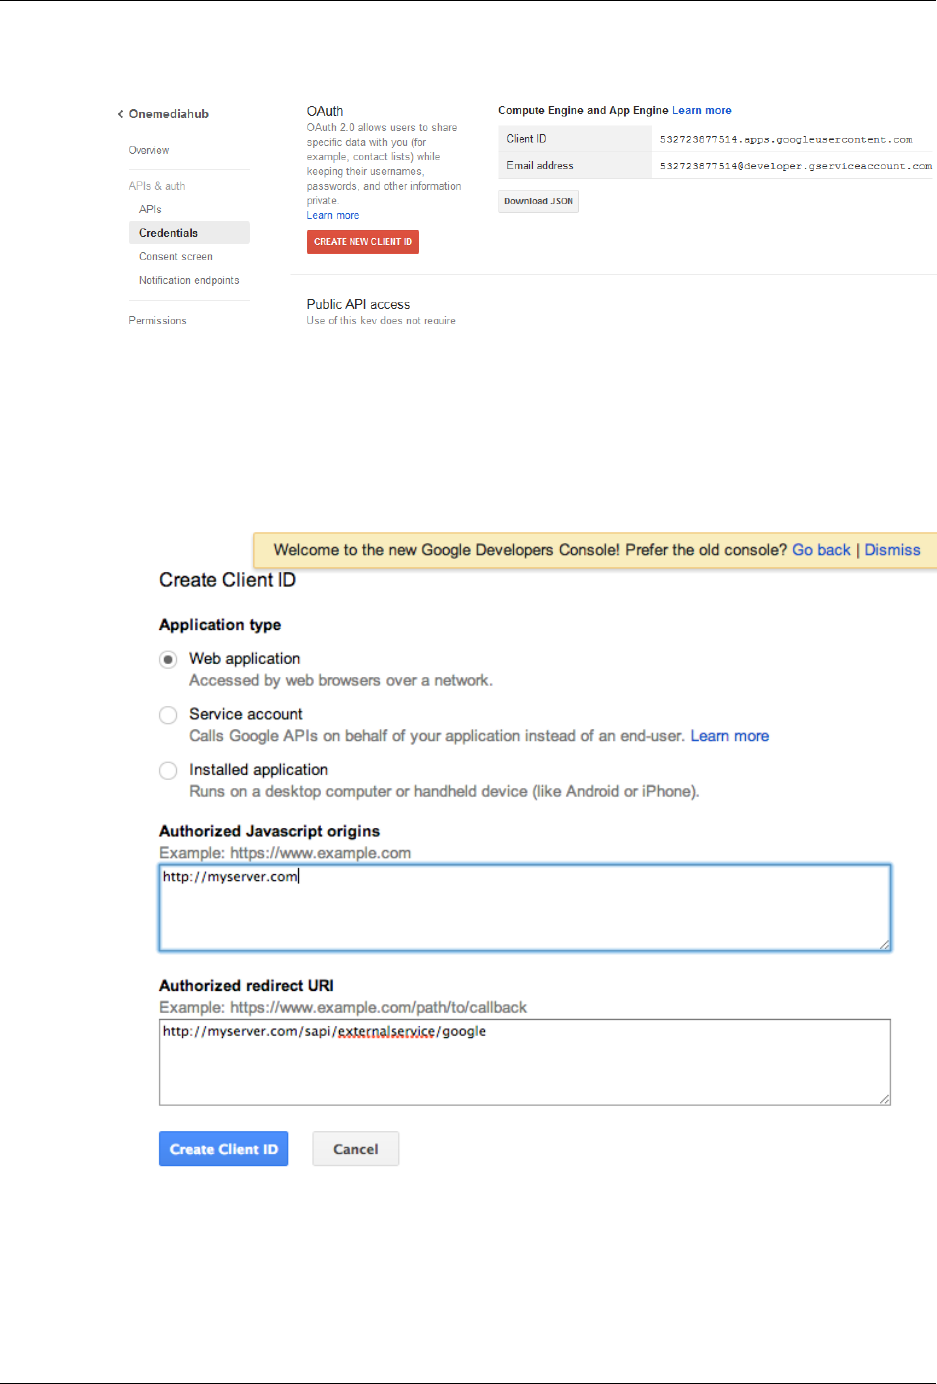
Configuring External Services
142
Figure 8.3. Register new application
5. Chek the Web application radio button in the Appliction type list, configure
the Authorized Javascript origins with the OneMediaHub server URL, and
under Authorized redirect URI enter <OneMediaHub Server URL>/sapi/
externalservice/google. Eventually, click the Create Client ID button:
Figure 8.4. Create client ID
6. In order to create an ID also for YouTube, click the CREATE NEW KEY button under Public API
access (APIs & auth → Credentials):
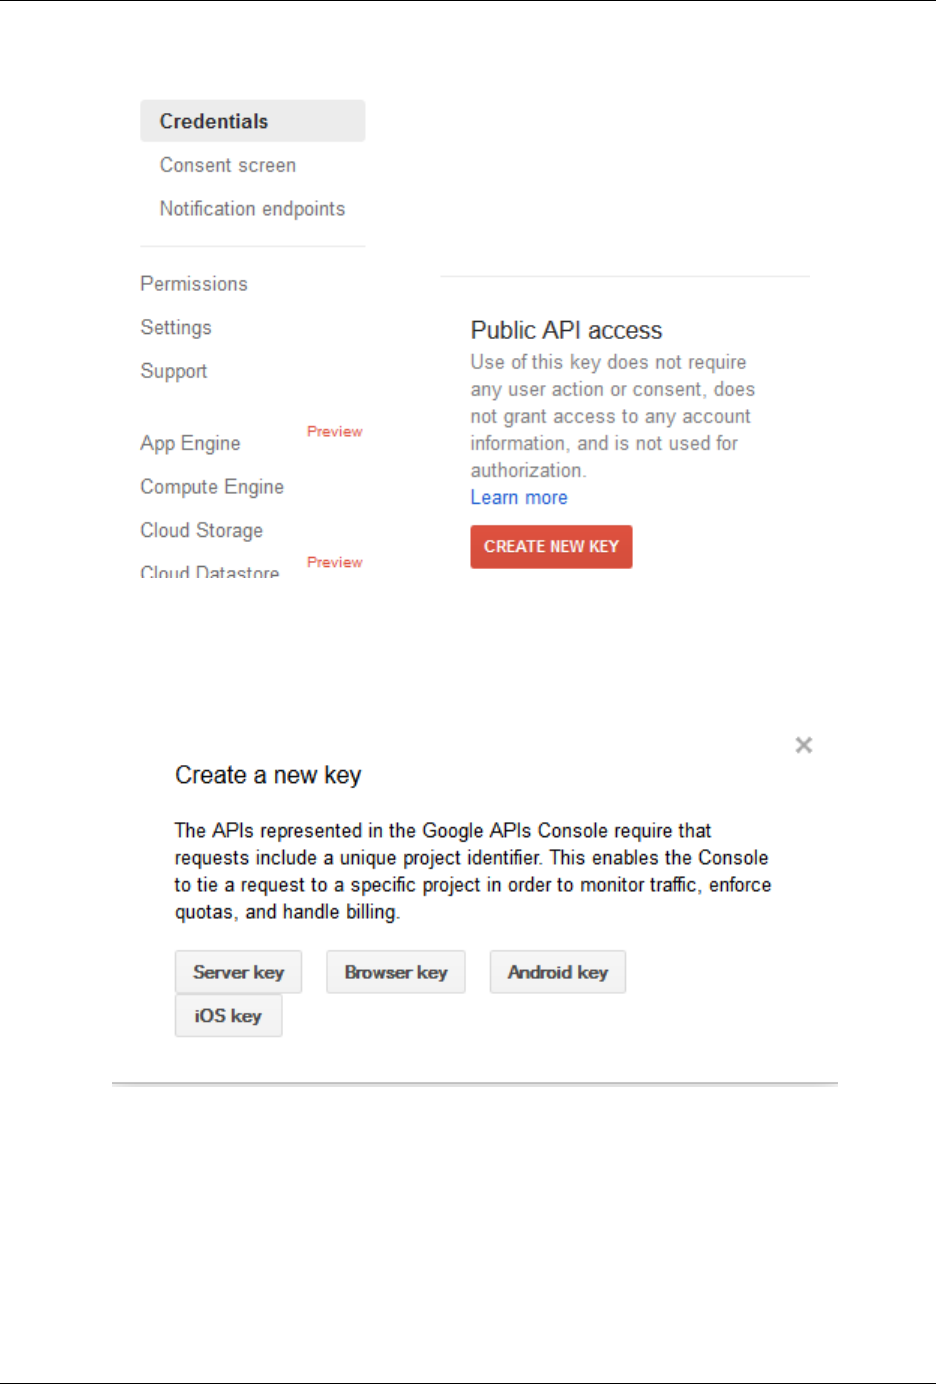
Configuring External Services
143
Figure 8.5. Public API access
Select Server key:
Figure 8.6. Create a new key
Then create server keys for your machine:
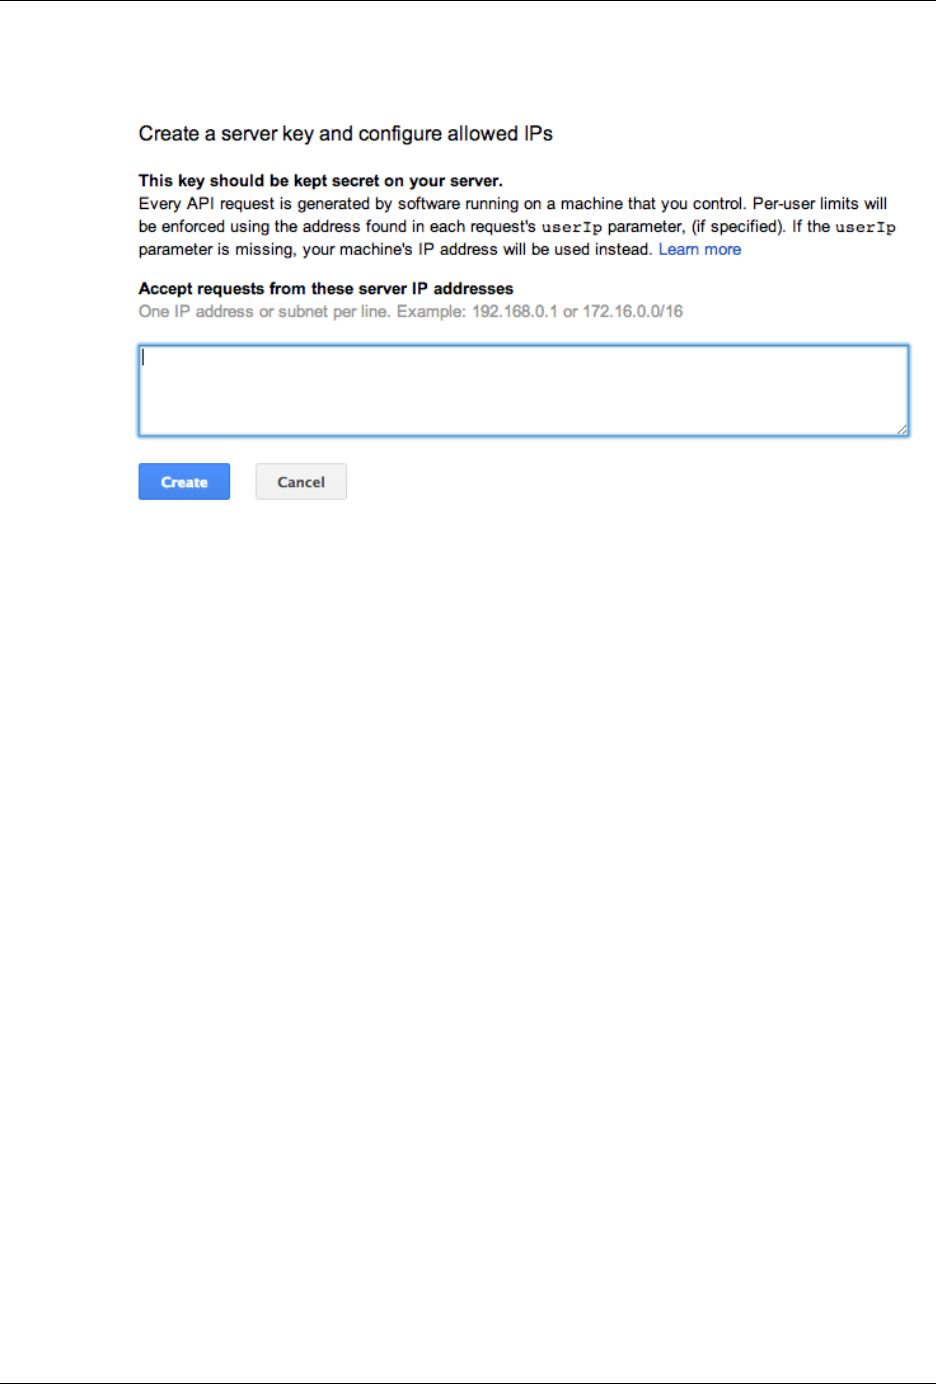
Configuring External Services
144
Figure 8.7. Create server keys
There is no need to enter any IP address. Just press the Create button and leave the field empty.
7. Make sure that under APIs & auth → Consent screen values for the fields EMAIL
ADDRESS, PRODUCT NAME, and HOMEPAGE URL are provided:
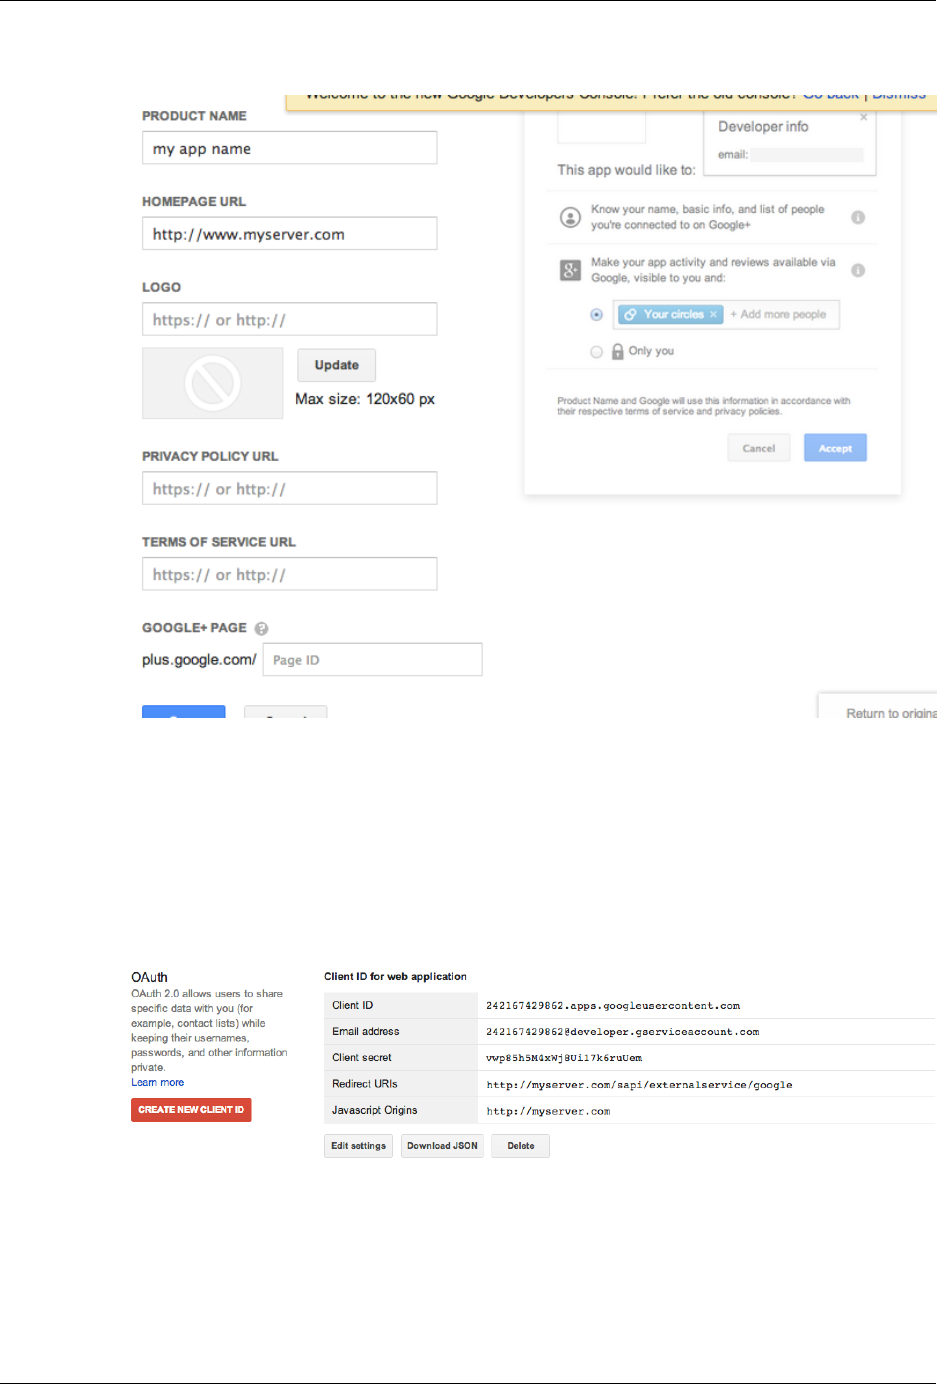
Configuring External Services
145
Figure 8.8. Consent screen
8. Go to APIs and enable at least Contacts API, Calendar API, and YouTube Data API
v3 (Picasa is not listed yet)
9. Go to APIs & auth → Credentials and get the Client ID and Client secret under
the OAuth section:
Figure 8.9. Client ID and Client secret
The API key under Public API access is needed for the YouTube service:
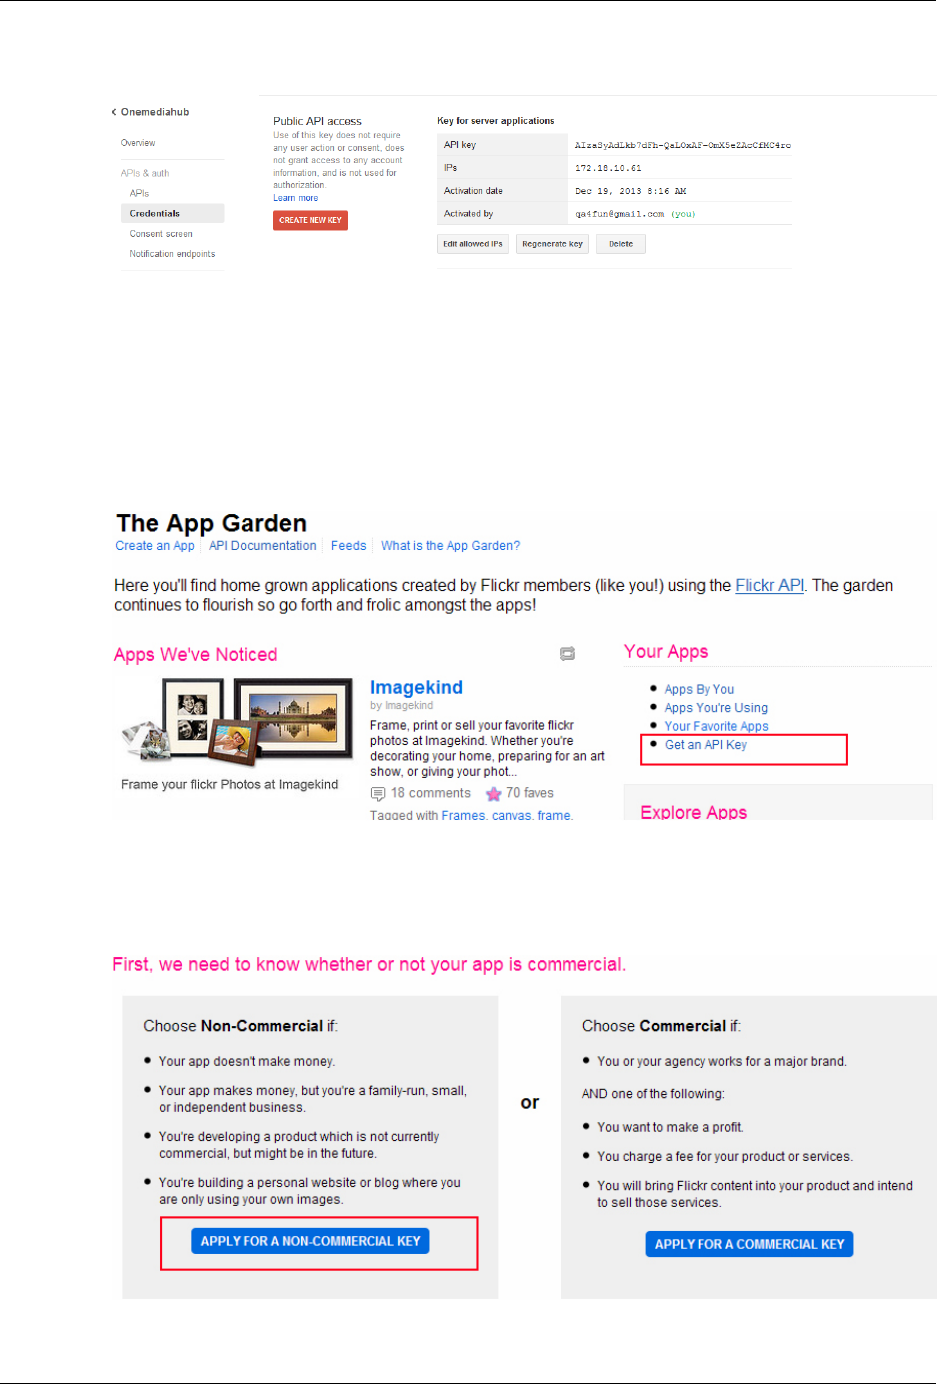

Configuring External Services
147
Note
If the primary purpose of the application is to make revenue, you may be required to apply
for a commercial API key.
4. Fill-in the form with the relevant information and submit (see Figure 8.13, “Submit the app form”).
Figure 8.13. Submit the app form
5. At this point two values are provided: key and secret value; they should be used in the portal
configuration phase (see Section 8.4, “Configuring the Portal”).
6. Click Edit auth flow for this app (see Figure 8.14, “Edit auth flow for this app”).

Configuring External Services
148
Figure 8.14. Edit auth flow for this app
7. Choose under App Type - Web Application (see Figure 8.15, “Add App Type and Callback
URL”).
8. Enter the URL to your application in the Callback URL field. In this example it is: https://
mydomain.myserver.com/sapi/externalservice/flickr.
The /sapi/externalservice/flickr part is mandatory and constant.
Figure 8.15. Add App Type and Callback URL
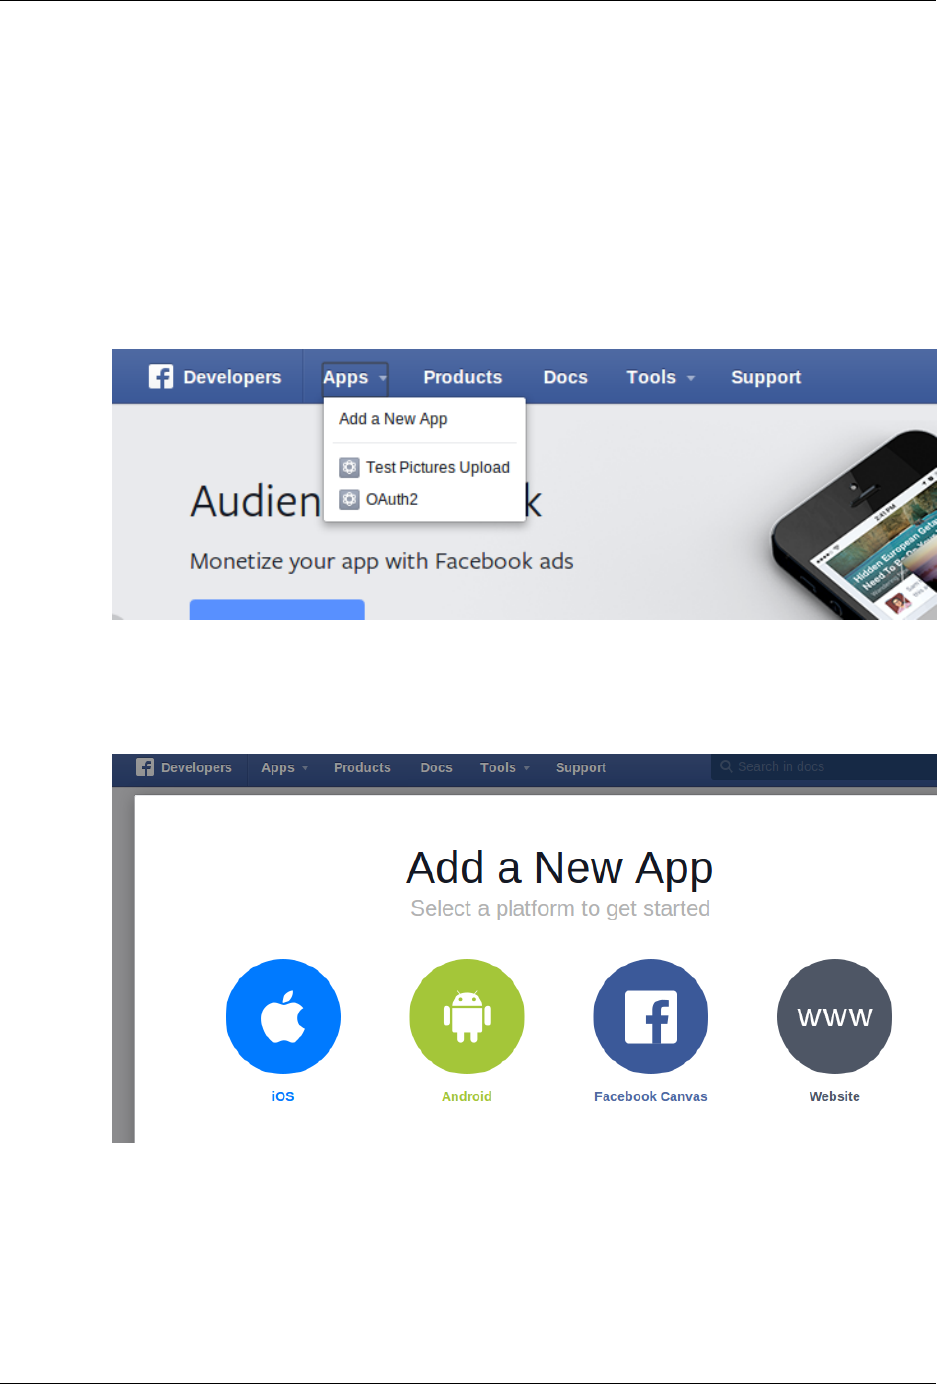
Configuring External Services
149
9. Save changes.
10. The Flickr application is now ready for integration
8.3.3 Facebook
1. Go to Facebook Developers (see [34]) and log in with your Facebook account.
2. Click Add a New App (see Figure 8.16, “Add a New App”).
Figure 8.16. Add a New App
3. Select Website (see Figure 8.17, “Add a New Website App”).
Figure 8.17. Add a New Website App
4. Select Skip and Create App ID.
5. Fill in the form with Display Name and Namespace (see Figure 8.18, “Create New
Application”).
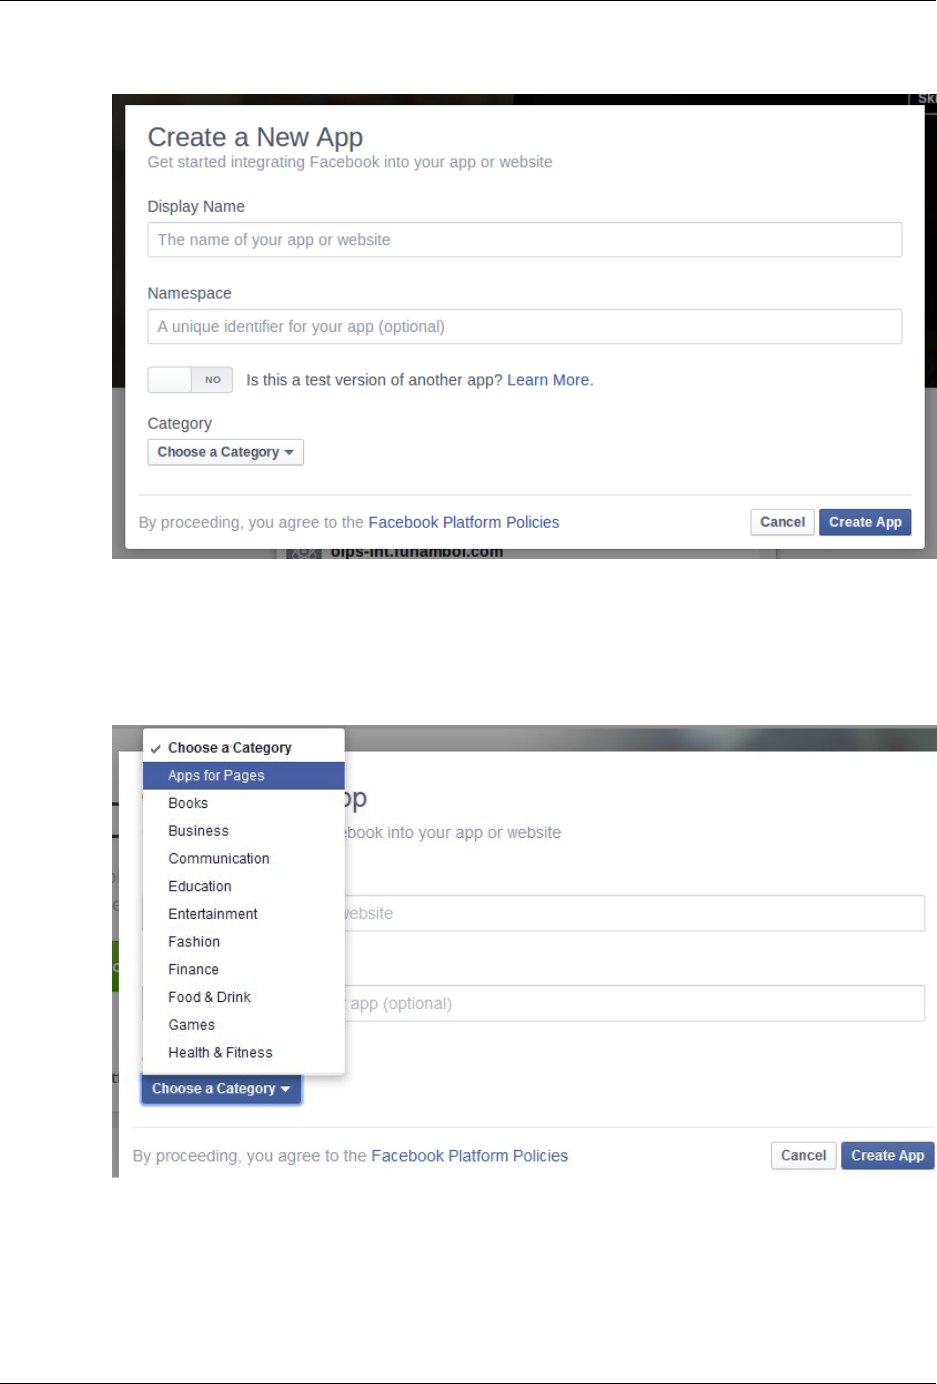
Configuring External Services
150
Figure 8.18. Create New Application
6. Choose a Category → Apps for Pages (see Figure 8.19, “Choose your category”) and click
Create App.
Figure 8.19. Choose your category
7. Enter the CAPTCHA from the Security Check window and click Submit.
8. Go to Settings: under Basic add your Contact Email, then click Save Changes.
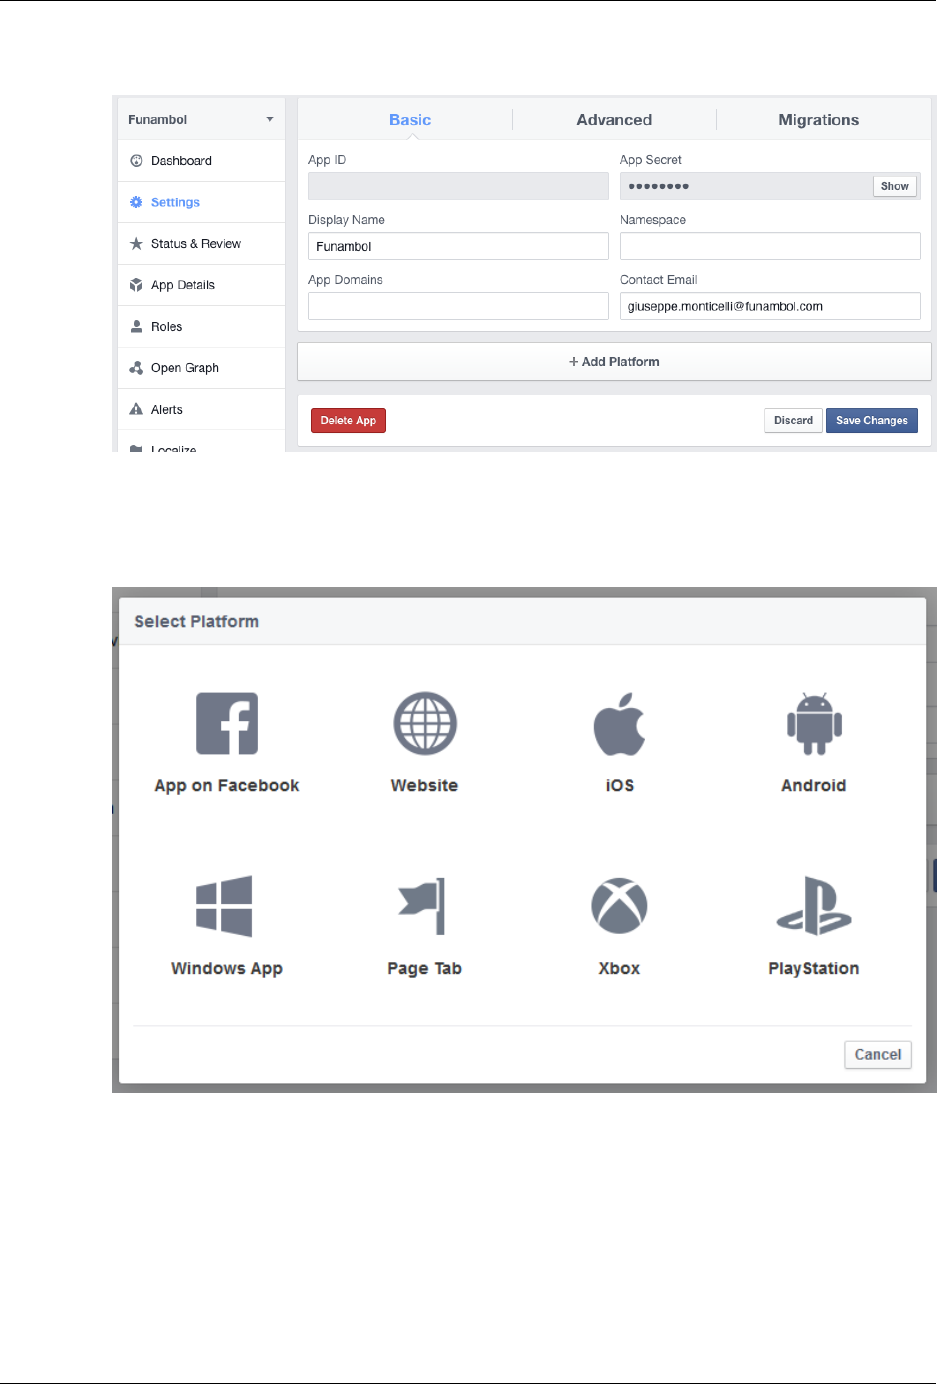
Configuring External Services
151
Figure 8.20. Settings
9. Click + Add Platform and select Website.
Figure 8.21. Select Platform
10. Enter your site URL into the corresponding edit field and click Save Changes.
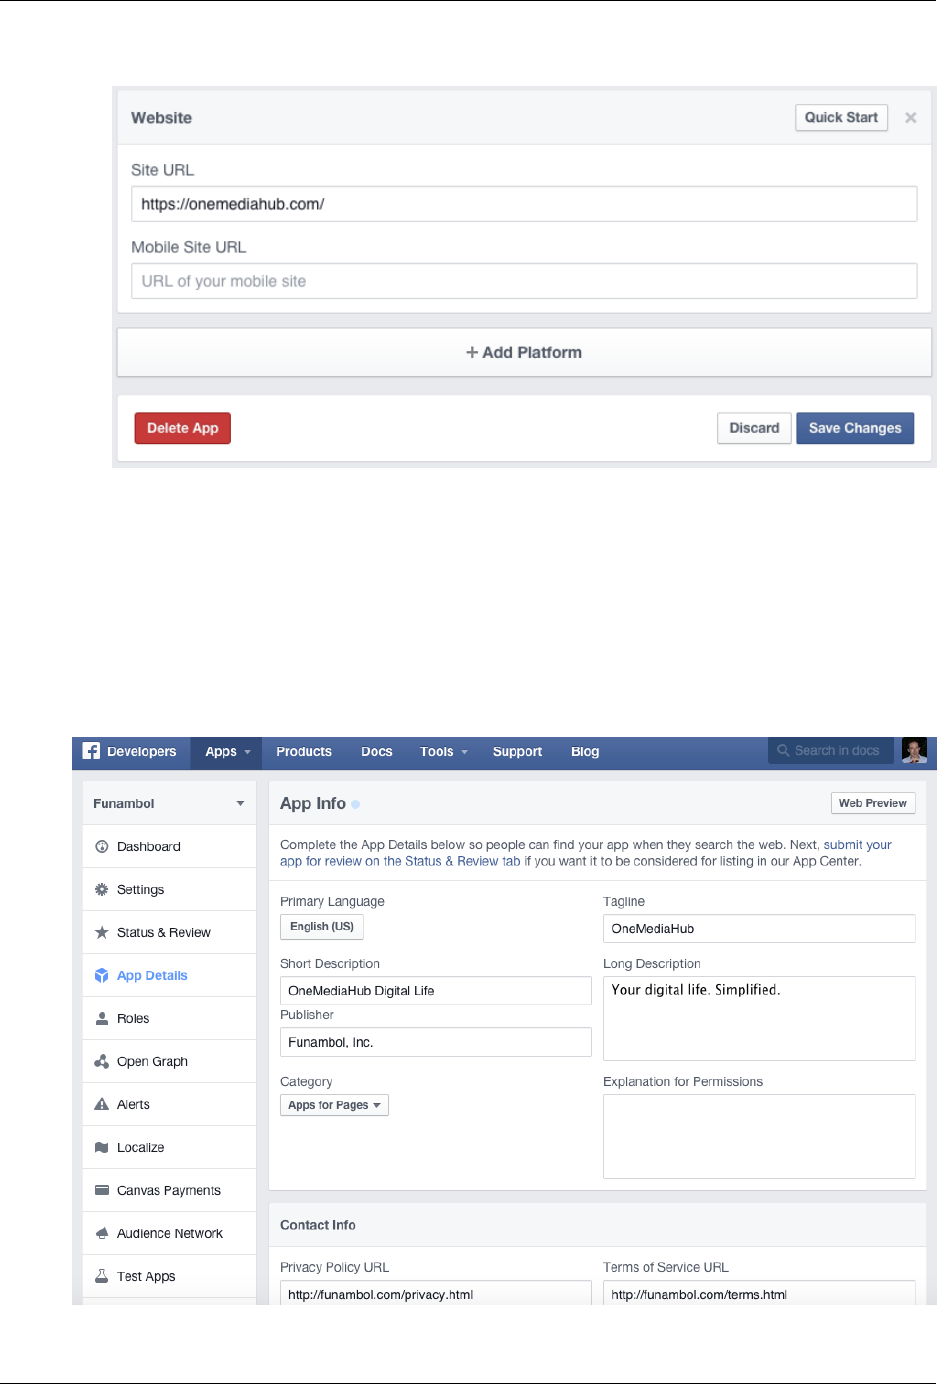
Configuring External Services
152
Figure 8.22. Add site URL
11. You can see a summary of your settings on the page Settings under Basic. Click Show to see the
App Secret (the App ID is already shown). App ID and App Secret are ready to be used in
your Portal configuration.
8.3.3.1 Review and submission
From the Developers Facebook panel, click on the App Details menu entry and fill the App Info.
Add also a 1024 × 1024 pixels icon.
Figure 8.23. App Info

Configuring External Services
153
Start Submission
From the Developer Facebook panel, click on the Status & Review menu entry and Start
Submission:
1. Select the user_photos and publish_actions permissions, and provide a description for both.
In the step-by-step instructions the information on how the permissions are used should be provided
for both the permissions. For example:
OneMediaHub allows the user to upload one or more pictures to their Facebook account (using
publish_actions) and to create new albums (using user_photos.)
1. Go to https://onemediahub.com
2. Login as <user> / <password>
3. You are now on the homepage
4. Select one picture, right click, and select Share
5. Select Facebook
6. You are now at Facebook login configuration
7. Configure the Facebook account and select Continue
8. Select New album (usage of the user_photos permission)
9. Post the picture to Facebook (usage of the publish_actions permission)
2. Add a minimum of four screenshots to highlight where Facebook will be used. They should
follow what you described above. To enable Facebook on the Portal, configure the file <root
directory of your OneMediaHub installation>/config/portal/portal-
ext.properties with the App ID and the App Secret:
sapi.external-service.facebook.id=<App ID>
sapi.external-service.facebook.secret=<App Secret>
Screenshots for the different steps should be provided as for below. It's suggested to highlight in the
step-by-step instructions which screenshot refers to which step. For example:

Configuring External Services
154
Figure 8.24. Share
Figure 8.25. Share Pictures

Configuring External Services
155
Figure 8.26. Send Pictures to Facebook
3. Provide a test user previously created and populated with some pictures, and also some explanations
of how to use the sharing feature.
4. Complete the subscription for review. Usually it takes up to seven business days.
5. After the review by Facebook, go to the Status & Review page and turn on the button to make
the app and all its live features available to the general public.
Figure 8.27. Status & Review
After that, confirm as per Figure 8.28, “Make App Public”.
Configuring External Services
156
Figure 8.28. Make App Public
8.3.3.2 Native login and save authorization tokens support
Clients can log in directly on the Facebook website and save the authorization tokens on the server. In order
for the user to be able to share the tokens between multiple clients (Portal, iOS, Android), it is necessary
to edit the application settings accordingly. These steps need to be performed, for both Android and iOS
clients, after the publication process of the applications in their respective markets. Clients must have
already the Facebook application installed in order to take advantage of this feature.
Android
It is mandatory to provide the Android key hash to Facebook. The OneMediaHub Android app needs to be
signed, and the app key hash needs to be registered with Facebook as a security check for authenticity.
Note
For testing purposes you can use the debug.keystore available in the Android SDK home
directory, with default password android.
This process will generate a 30 characters long key hash. Once you have the key hash, follow the steps
below to save it on Facebook:
1. Generate the key hash on the local computer by running the Java keytool utility against the Android
keystore used to sign the application. On Linux and OS X run: keytool -exportcert -
alias myandroidkey -keystore %path_to_key_store_file | openssl sha1
-binary | openssl base64.
This will prompt for the keystore password.
2. From the Settings page click + Add platform and select Android (see Figure 8.21, “Select
Platform”.) Enter the following information (see Figure 8.29, “Android”):
• the package name of the Android application;
• the class name com.funambol.android.activities.AndroidHomeScreen;
• the key hash that represents your Android application.
More information on this subject is available at [35].
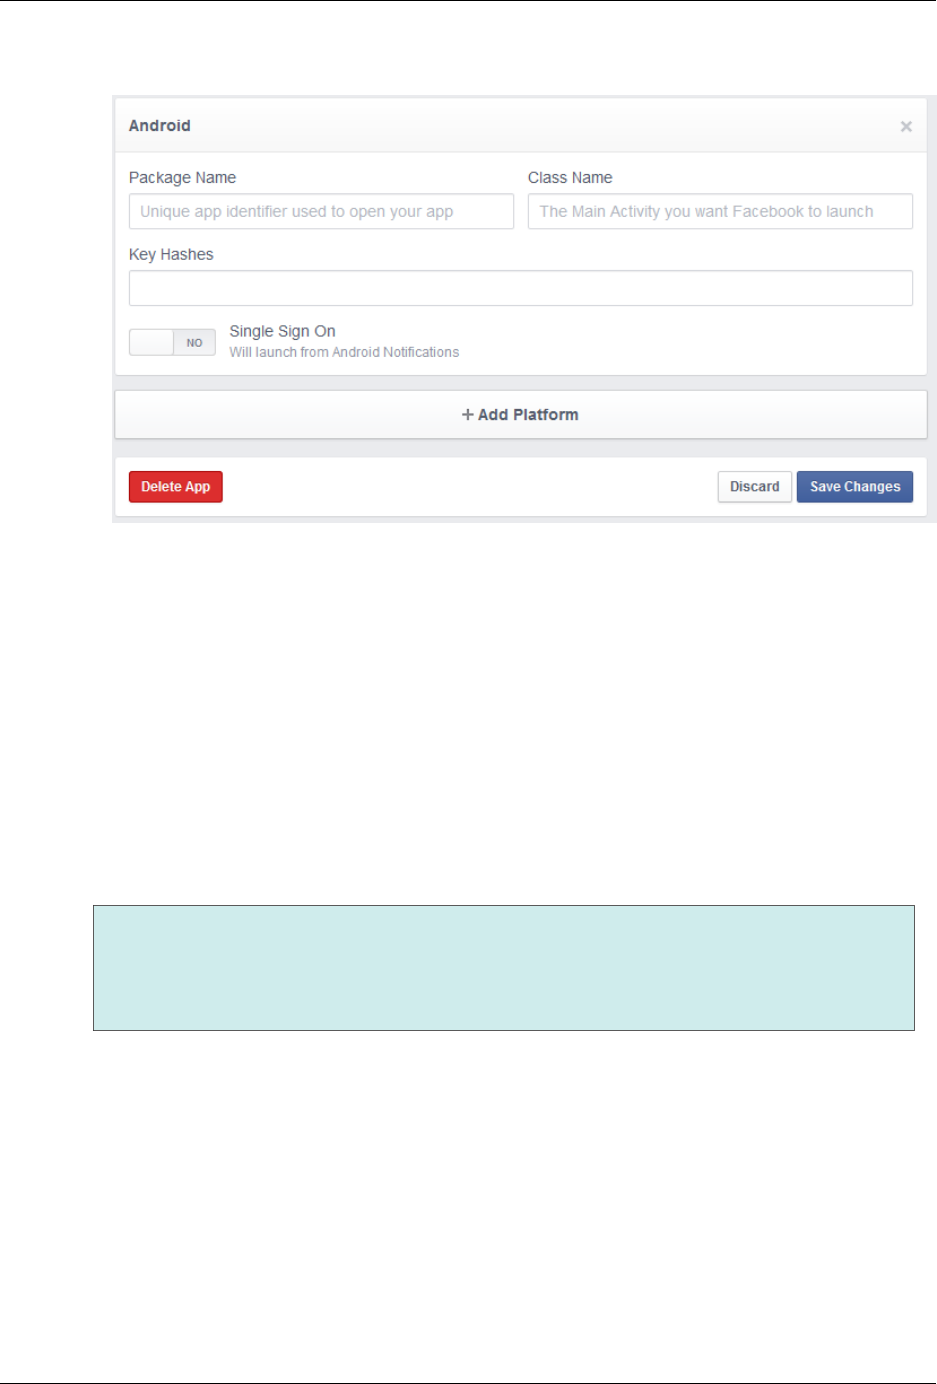
Configuring External Services
157
Figure 8.29. Android
iOS
The App ID/API Key created as described above are required at build time for the OneMediaHub iOS App.
Once the build with the embedded App ID/API Key has been submitted to the App Store, a further change
in the Facebook configuration is required:
1. On the Settings page click + Add Platform and select iOS (see Figure 8.21, “Select
Platform”.) Enter the Bundle ID of the iOS app (see Figure 8.30, “iOS”.)
2. Enter the iPhone App Store ID and the iPad App Store ID under the same tab.
3. Also as URL scheme suffix always use omh.
Note
When submitting an iOS app to the App Store you need to provide the product identifier (Bundle
ID), which is also stored in the project's info.plist file. Once the app has been accepted on
the store, you receive back a valid App Store ID.
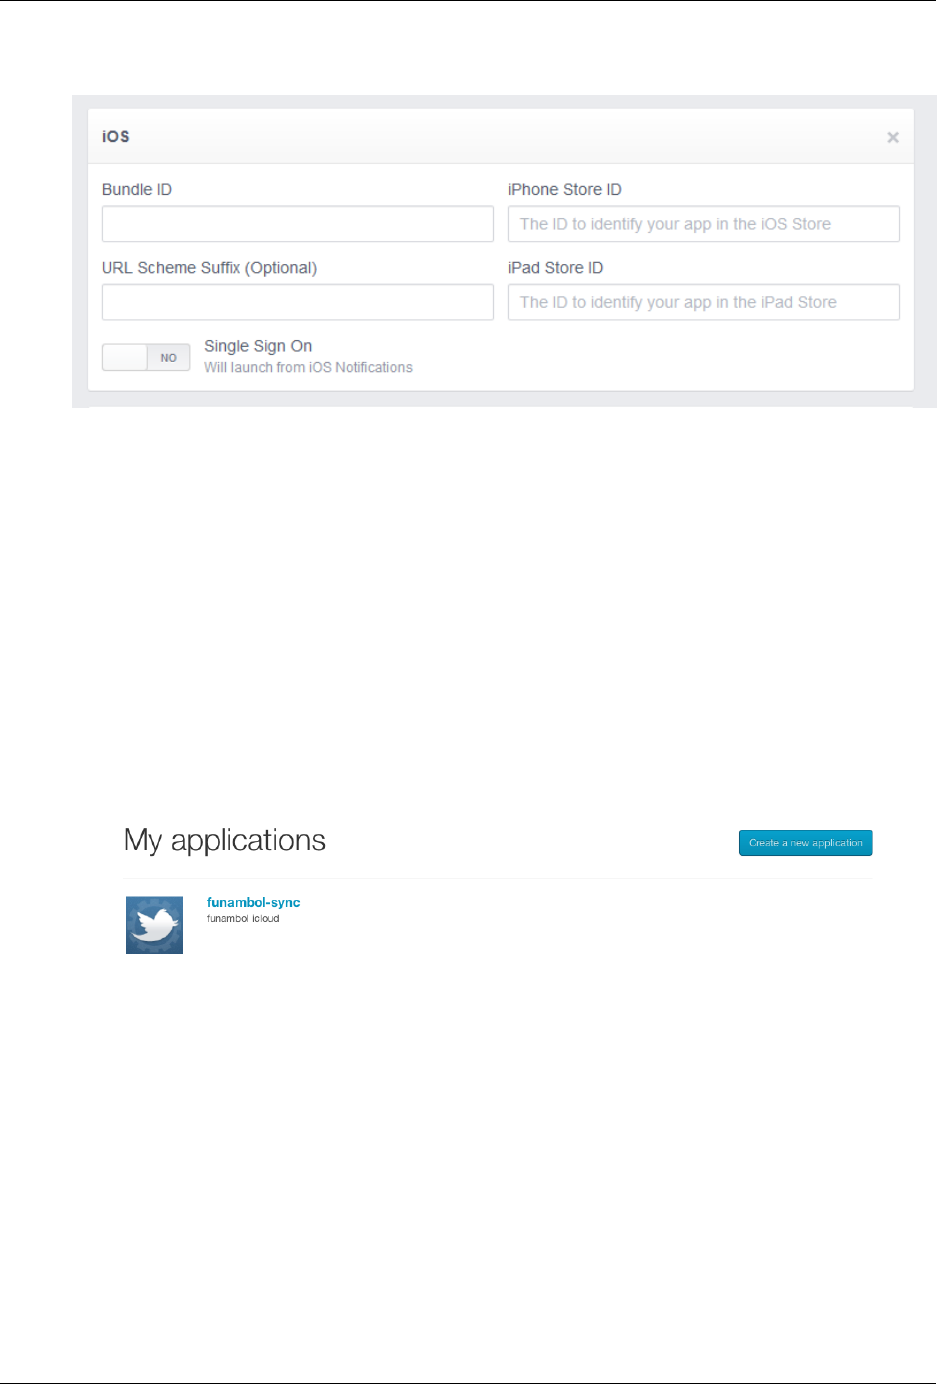
Configuring External Services
158
Figure 8.30. iOS
8.3.4 Twitter
Here following the steps required to create a new Twitter application, and how to obtain a key and secret
for the quick configuration:
1. If you have not already created a Twitter account, then create a new one.
2. Go to https://dev.twitter.com/apps
3. If you have not already signed in to Twitter, then sign in using your account
4. Click on Create a new application:
Figure 8.31. Create a new application
5. Fill-in the form:
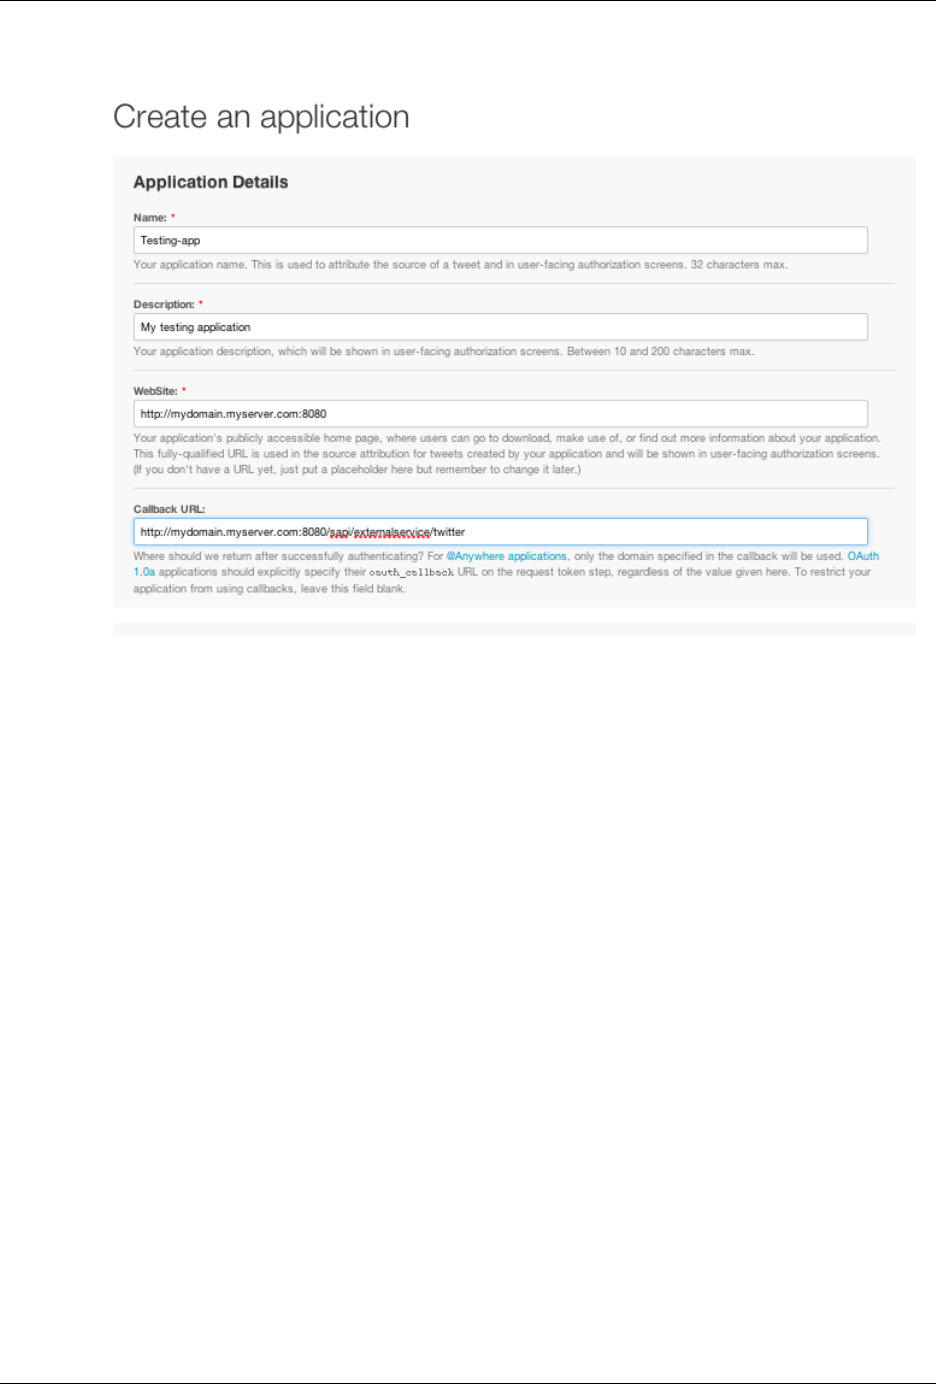
Configuring External Services
159
Figure 8.32. Application Details
6. Agree to the Rules of the road, insert the CAPTCHA, then click on Create your
Twitter application:
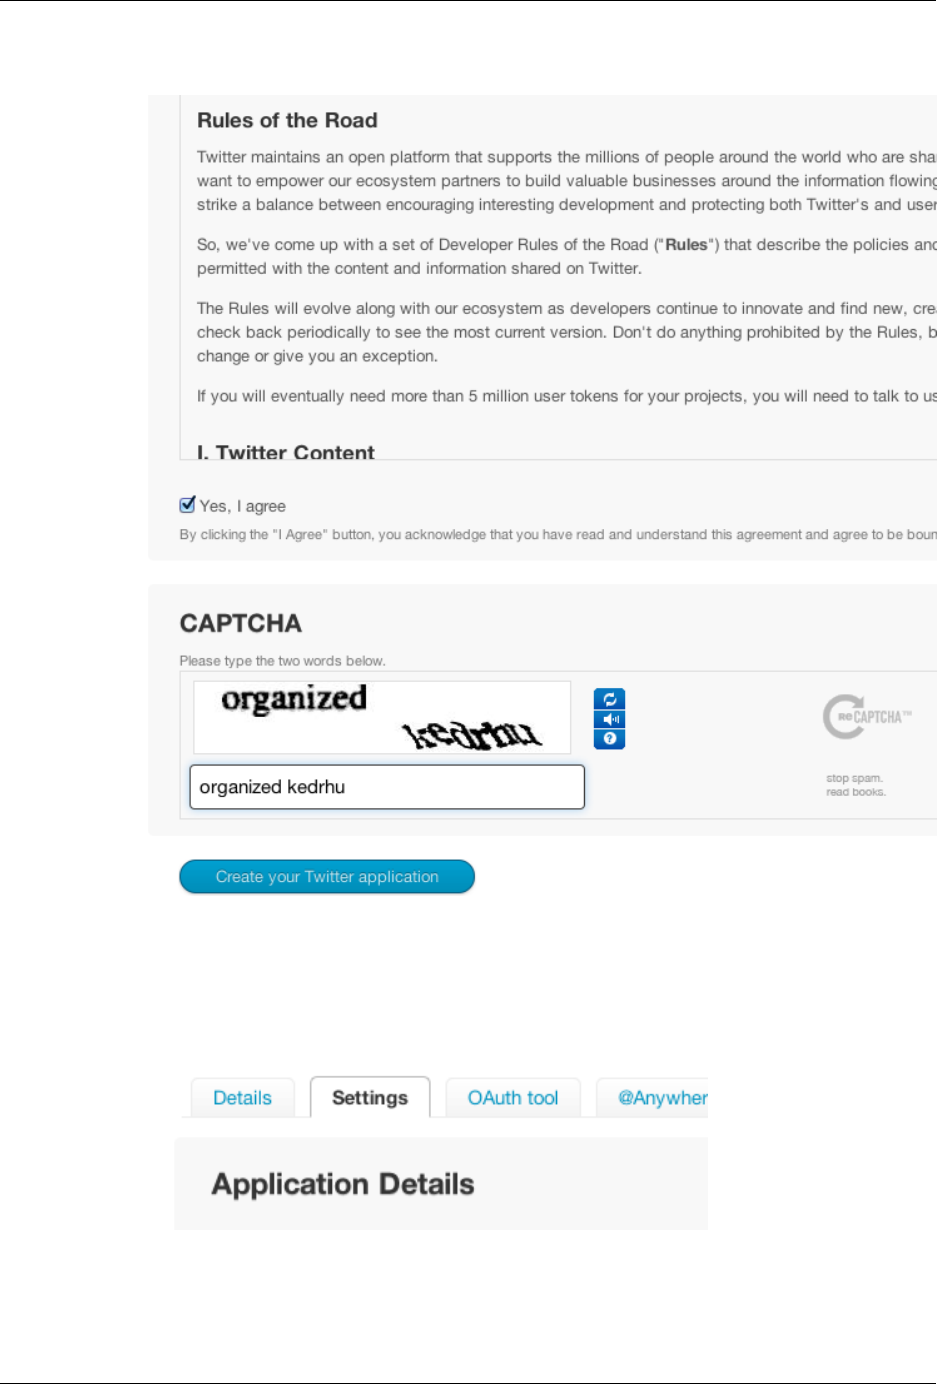
Configuring External Services
160
Figure 8.33. Rules of the Road
7. Activate the Settings tab:
Figure 8.34. Settings tab
8. Change the Application Type to Read and write and change the Callback URL, then
click on Update this Twitter application's settings:
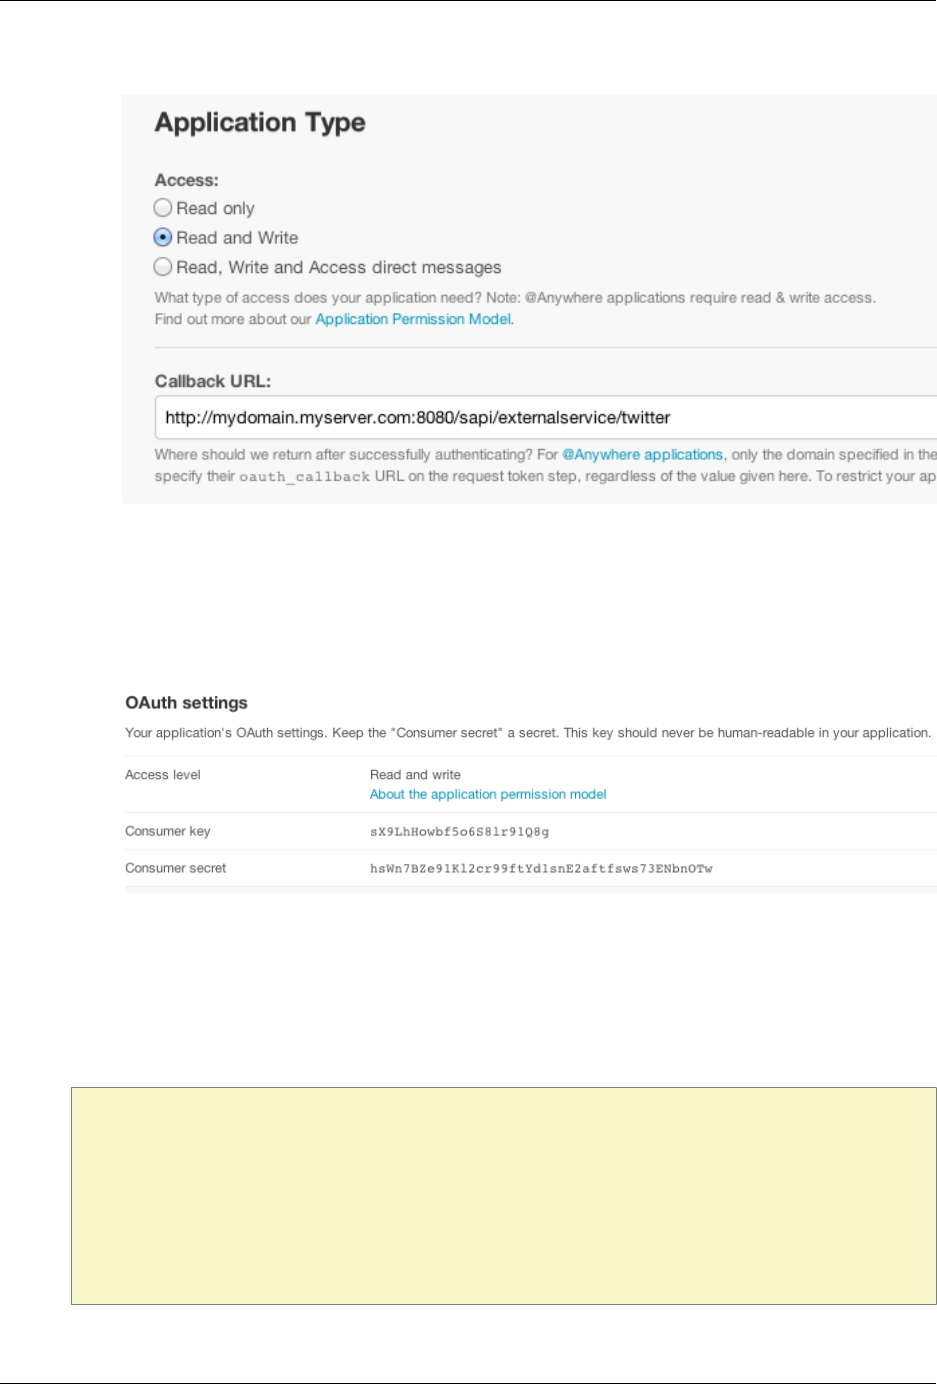
Configuring External Services
161
Figure 8.35. Application Type
9. Activate the application's Details tab and take note of the Consumer key and Consumer
secret. These are the values you have to put into the quick configuration config.properties
as twitter.key and twitter.secret:
Figure 8.36. Details tab
8.4 Configuring the Portal
In order for the above steps to be effective, you are required to add or change the following lines in
the configuration file <root directory of your OneMediaHub installation>/bin/
config.properties:
${facebook.secret}=<Your Facebook application "Secret">
${facebook.id}=<Your Facebook application "Application ID">
${flickr.key}=<Your Flickr application "Key">
${flickr.secret}=<Your Flickr application "Secret">
${google.id}=<Your Google application "client_id">
${google.secret}=<Your Google application "client_secret">
${twitter.key}=<The "Consumer Key" of your Twitter application>
${twitter.secret}=<The "Consumer Secret" of your Twitter application>
${youtube.key}=<Your Google application "API key">

Configuring External Services
162
Run the <root directory of your OneMediaHub installation>/bin/configure-
portal script and restart the Portal.
Note
Make sure all spaces before and after the app key and the secret are removed when inserting them
into the configuration file.
8.5 Troubleshooting
The configuration of the external services is not simple and can be affected by many external deployment
issues. Typically, most of the issues are related to some misconfiguration of the service properties (the
keys), or to some network problem. Assuming that you already generated all the new keys for the new
URL, the best way to narrow down the issue is to configure all the services and then test which ones do not
work, as there are some usually standard patterns:
One service only does not work
Check the configuration of the specific service following the latest documentation available and pay
special attention to the advanced settings or backward compatibility properties (and to their default
values that sometimes change.) As all other services work, incoming/outgoing HTTP calls to/from the
server are not usually the issue.
Picasa, YouTube, and Google import do not work, but all other services do
You need to make sure that the Google external services authorization keys were correctly defined
on the Google cloud console as explained in this chapter. Also check the corresponding property
entries in the <root directory of your OneMediaHub installation>/bin/
config.properties file.
Picasa and Google contacts/calendar import works, but YouTube does not
Check the configuration for the YouTube service, according to the explanation given in this chapter. It
is likely that the configuration property for the particular service is wrong.
Facebook and Twitter do not work, but Picasa does
Review the configuration explanation for these services in this chapter. Check the corresponding client
ID and client secret in the <root directory of your OneMediaHub installation>/
bin/config.properties file, as mentioned at Section 8.4, “Configuring the Portal”.
None of the services works
Check that the application server has direct access to the Internet and if there is any proxy configured
(a curl request might help.) So this is likely a configuration issue on incoming/outgoing HTTP
requests.
Facebook works from the Portal, but not from the mobile device
Make sure that the iPhone App Store ID and Android App key hash are correctly set up in the
Facebook configuration page.
There are other corner cases or you might have an overlap (the domain name/machine is not reachable
from the outside, or the callback URL is blocked by a proxy or firewall), but the ones above are the most
common scenarios.

163
Chapter 9. OneMediaHub Server URL
configuration
9.1 Introduction
This section reviews how some possible URL configurations of the OneMediaHub Server instance affect
the functionality of the external services integrated into the portal.
The considered scenarios are:
• server available on two (or more) different URLs,
• server with a new URL but with the same IP address, and
• server with the same URL but with a new IP address.
Regarding external services integration, OneMediaHub makes it possible to:
• authenticate on external services (Picasa, Flickr, Facebook),
• upload a picture to external services (Picasa, Flickr, Facebook),
• get/create albums on external services (Picasa, Flickr, Facebook),
• import friends' profile photos from Facebook.
9.1.1 Conventions
In this section, the portal configuration means the set of configuration files that are used server side on
OneMediaHub. For details, see Section 3.12, “Portal configuration”.
The external configuration means the configuration of external services applications that is set up on the
external services side. For details, see Chapter 8, Configuring External Services.
9.2 Server available on two different URLs
Consider a server configured to work with the URL my.server.com; now consider a new URL
new.newserver.com pointing to the same location as my.server.com.
In general, it is not possible to have the same server responding to different URLs. If needed, you can work
around this by having a proxy redirecting any request to the main URL (the one used in the external service
configuration).
9.3 Server with a new URL (same IP address)
Consider a server configured to work with the URL my.newserver.com; now consider changing the
URL to new.server.com. The old URL my.newserver.com is no longer responding, while the
portal configuration has changed to work with the new URL.
It is possible to change the server URL by ensuring you change the URL used in the external service
configuration:
portal configuration: new.server.com

OneMediaHub Server
URL configuration
164
external configuration: new.server.com
9.4 Server with a new IP address (same URL)
Consider a server configured to work with the URL my.newserver.com, which points to an IP address;
now consider changing the IP address, which the URL points to. The old IP is not responding anymore.
Changing the server IP without changing the URL does not affect the external services functionality.
9.5 Changing external service settings
The configuration for the different services might need changes in the callback URL or domain validation.
In order to modify your settings, refer to Chapter 8, Configuring External Services.

165
Appendix A. Default Ports used by
OneMediaHub
The following table lists all the default ports used by OneMediaHub and the configuration files in which
they appear.
Note
All the listed ports are inbound ports.
Port
number Used in file Code snippet
3101 bin/pim-listener JMX_PORT=3101
8005 portal/conf/server.xml <Server port="8005"
shutdown="SHUTDOWN">
8080 com/funambol/pimlistener/
PIMListenerConfiguration.xml
<string>http://localhost:8080/
funambol/services/admin</
string>
8080 portal/portal-ext.properties sp.syncportal.email.guess.webser
ver.url=http://localhost:8080/
funambol/services/email
8080 portal/portal-ext.properties sp.syncportal.url=http://
xx.xx.xx.xx:8080
8080 portal/portal-ext.properties sp.syncportal.messages.url=xx.xx
.xx.xx:8080
8080 portal/conf/server.xml <Connector port="8080"
protocol="HTTP/1.1"
connectionTimeout="20000"
redirectPort="8443" />
8101 bin/funambol-server JMX_PORT=8101
43101 config/jgroups-pimlistener.xml mcast_port="${jgroups.udp.mcast_
port:43101}"

166
Appendix B. Device IDs
The following table lists all available device IDs:
Device ID prefix Device
OneMediaHub client Apps
fbb- OneMediaHub for BlackBerry
fol- OneMediaHub for Windows
iph- OneMediaHub for iPhone
ipt- OneMediaHub for iPod Touch
ipad- OneMediaHub for iPad
fac- OneMediaHub for Android
mox- OneMediaHub for Mac OS
Community Projects
fmz- Mozilla Sync Client
fgp- Google Sync Client
fyp- Yahoo Sync Client
fjp- Jajah Sync Client
fip- iPod Sync Client

167
Appendix C. OneMediaHub error messages
The following sections list the most critical error messages for each OneMediaHub component.
It is possible to recognize which kind of error has been trapped by matching the Error message column of
the following tables with the first row contained in the received notification.
If you wish to report additional error messages, please contact
<customer.support@funambol.com>.
Data Synchronization Service
This section describes the most common error messages returned by the DS Service and captured in the
log files stored in the directory <root directory of your OneMediaHub installation>/
logs/ds-server/.
Error message Description
com.funambol.framework.server.store.
NotFoundException: Source not found
for scal
The client is syncing a SyncSource URI (in this
case 'scal') whose configuration does not exist on the
server.
Check the sync source name specified for the
client and the ones available on the server (you
can also refer to the OneMediaHub database table
fnbl_sync_source).
java.lang.Exception: Content type
unknown: text/x-vcalendar
The content type associated with the SyncSource
that the client is syncing is different from the
content type of the item sent by client.
Example:
com.funambol.framework.engine.
source.SyncSourceException: Error
retrieving all item keys from
twin.
at
com.funambol.json.engine.source.
ContactSyncSource.
getSyncItemKeysFromTwin(
ContactSyncSource.java:696)
....
Caused by: java.lang.Exception:
Content type unknown:
text/x-vcalendar
In this case, the client is syncing using the Contact
SyncSource but the sent item's content is in
text/x-vcalendar format instead of text/x-
vcard.

OneMediaHub error messages
168
Error message Description
java.text.ParseException:
Unparseable date: "false"
The server is not able to handle the given date (in
this case, the date value is 'false').
Usually, the supported formats are (see ISO 8601):
• "yyyyMMdd'T'HHmmss'Z'" (zulu time)
• "yyyyMMdd'T'HHmmss" (local time)
• "yyyyMMdd" (all day local time)
• "yyyy-MM-dd"
com.funambol.json.exception.
MalformedJsonContentException: The
Json content is malformed!
The JSON parser is unable to parse the content of
the JSON returned by the backend.
The causes of this exception could be:
•net.sf.json.JSONException: null
object
The JSON object does not contain a mandatory
property (usually the property 'key').
•com.funambol.json.exception.
JsonConversionException:
Error in the
zuluToLocalConversion.Unparseable
date: "20100330T000000"
The date is not in UTC format
("yyyyMMdd'T'HHmmss'Z'") but it is already
in local time format ("yyyyMMdd'T'HHmmss").
com.funambol.json.exception.
BadRequestException
The JSON object returned by the backend contains
a Status Code 406 which means that the
backend is unable to perform the operation.
It is possible to identify the root cause by looking at
the backend response.
com.funambol.json.exception.
InternalServerErrorException
The JSON object returned by the backend contains
a Status Code 500 which means that the
backend is unable to perform the operation for an
internal issues.
It is possible to identify the root cause by looking at
the backend response.
com.funambol.json.exception.
UnauthorizedException
The JSON object returned by the backend contains
a Status Code 401 which means that the
backend cannot perform the operation because the
request has been sent by an unauthenticated client.

OneMediaHub error messages
169
OneMediaHub for BlackBerry
This section describes the most common error messages returned by the OneMediaHub for BlackBerry
in the log files stored in the directory /home/user/synclog.txt and /home/user/
synclog.txt.sav.txt.
Error message Description
[ERROR] SIFEventHelper.addEvent()
on field [PatternEndDate].
Exception ->
java.lang.NumberFormatException:
null
This error indicates that an Event in SIF format does
not have a valid PatternEndDate.
A possible cause is that the date is not formatted as
expected. Supported formats are:
•yyyyMMddTHHmmssZ
•yyyyMMddTHHmmss
•yyyyMMdd
•yyyy-MM-ddTHH:mm:ssZ
•yyyy-MM-ddTHH:mm:ss
Another possibility is that an old version of the
client is being used.
[ERROR] PIMException while adding
item to SyncSource [calendar]:
general error
This is a very generic error. In general the source of
the problem is somewhere else and the log should
contain other messages pointing to the specific
problem.
When an item is added to the device, the operation
can fail for various reasons. For example, the item
has an unrecognized format (SIF items must be
base64-encoded), or the item has at least one field
which the client cannot parse properly.
[ERROR] Unable to save updated item
in source [contact]: item not
found
The server sent an update command for a contact
that the client cannot find. This can generate
conflicts during the synchronization or a bug client/
server side where LUIDs are not properly handled.
'Com_1und1_sync_client-Blackberry:
Class'java.microedition.io.file.
FileConnection' not found'
In general, all errors where the application
cannot find a standard system class are due to an
unsupported version of the device's OS.
[ERROR] Empty content from
SyncSource for item:xxxxxxxxxxxxx
The client is trying to sync an item which is empty.
This is not necessarily an error. It is possible that
the user created an item only with fields that are not
supported by the sync, but it can also indicate a bug
in the client which is unable to format an item.
com.funambol.json.exception.
InternalServerErrorException[
HttpTransportAgent.readResponse]
Error reading server response
--> net.rim.device.api.io.
This is a network error. The client was able to write
a request, but did not receive an answer. Instead, the
network connection was closed.

OneMediaHub error messages
170
Error message Description
ConnectionClosedException:
Connection closed
[ERROR] [HttpTransportAgent -
ConnectionTimer] An IO operation
did not complete before maximum
allowed time
JVM Error 545
This is a network timeout error. Depending on OS
and carriers, the behaviors may differ. In general,
each device has a timeout value ranging from 1 to 5
minutes. After the client writes its request, it returns
an error if no answer is received before the timeout
has elapsed.
When this error is systematic it is important to
check why. It is very likely that the device's
OS is corrupted; this error is not specific to the
OneMediaHub application. Many BlackBerry
devices report this condition without the
OneMediaHub client App installed. The suggested
fix is to wipe the device and reinstall the OS.
[ERROR] calendar returned an item
that exceeds max msg size and
should be dropped
This is not an error but just a warning. The message
is at INFO.
OneMediaHub for Windows
This section describes some of the most common error messages returned by the OneMediaHub for
Windows and captured in the log file stored in the user's documents&settings directory: %APPDATA%
\Funambol\WindowsClient\synclog.txt.
Error message Description
[DEBUG] - Initialize COM library
[DEBUG] - Create
Outlook.Application instance...
[ERROR] - COM Pointer Error. Code =
xxxxxxxx
[ERROR] - Unable to instantiate
Microsoft Outlook. Please check if
Outlook is installed and correctly
configured.
The OneMediaHub for Windows is not able to
access Microsoft Outlook APIs, which are used
to read/write data in Outlook. In other words, the
Outlook application is blocking access to its data.
This may happen for different reasons; below are
some possible solutions:
• Open the Outlook UI: if a wizard window appears
prompting you to configure your profile, this was
most likely the cause. Solution: follow the wizard
until the end. When your profile is configured,
retry the sync.
• Check if Outlook is working correctly and not
stuck. In case of the latter, close Outlook and
then check if the process OUTLOOK.EXE is still
running using the Windows Task Manager (if so,
you can terminate the process from there).
• If you have an antivirus software installed,
disable it and try again. Some antivirus software
can recognize the attempt of the OneMediaHub
client App to access Outlook as a malicious
action, and block it.

OneMediaHub error messages
171
Error message Description
• If you have other Outlook add-ons installed,
disable them (or remove them) and try again.
Add-ons can access Outlook in a (wrong) way
that could block other applications trying to do
the same.
• Google Desktop Search and Nokia PC Suite may
conflict with the OneMediaHub for Windows.
This does not happen to all users, but you may
need to uninstall these applications and try again.
Note
Any software accessing Outlook
data can be a potential conflicting
application; those mentioned above have
been pointed out by several community
members.
• Microsoft Office 2010 beta may conflict
with the OneMediaHub for Windows.
This does not happen to all users. Possible
solution: check the registry keys (using
regedit): HKEY_CLASSES_ROOT/
TypeLib/{00062FFF-0000-0000-
C000-000000000046} If a key 9.4 is
present, remove it and retry syncing with the
OneMediaHub for Windows.
• Finally, try reinstalling Microsoft Outlook. It
could be that Outlook had become unstable and
has stopped working as it should.
[INFO] - Outlook session opened
successfully!
[ERROR] - COM Pointer Error. Code =
xxxxxxxx
[ERROR] - Outlook Exception. -
Unable to initialize Outlook
Folder.
Microsoft Outlook APIs are not accessible. Please
refer to the previous error in this table for possible
reasons and solutions.
[ERROR] - COM Pointer Error. Code =
xxxxxxxx
[ERROR] - Outlook Exception. -
Error setting property <prop name>
= <prop value> for item <item
type>.
[ERROR] - Error setting properties
of <item type> item "(new item)".
Item not saved.
An item could not be saved to Outlook, because
the property <prop name> received is not in
an accepted format, causing Microsoft Outlook to
throw an exception and refuse to insert the new
item.
In most cases this happens because the item's data is
corrupted; the solution is to delete and recreate this
item on the portal.
[ERROR] - Item #232 in folder
"Calendar" is not a appointment
An item that should be a Calendar item (in this case)
is not recognized by the methods used to retrieve

OneMediaHub error messages
172
Error message Description
item. Please check if Outlook is
working properly!
this type of item. The item could be corrupted and
also the integrity of Microsoft Outlook should also
be verified.
[INFO] - Network error writing data
from client: retry 3 time...
[ERROR] - HTTP request error: 3
attempts failed.
[DEBUG] - Error occurred in sync:
code 3 = HTTP request error: 3
attempts failed.
[ERROR] - Error in preparing sync:
HTTP request error: 3 attempts
failed.
13:07:04 GMT +1:00 [INFO]
- SYNCHRONIZATION REPORT
================
SYNCHRONIZATION COMPLETED WITH
ERRORS
-----------------------------------
Last error message = "HTTP request
error: 3 attempts failed."
Last error code = 2001
The client has problems connecting to the server due
to HTTP connection issues; for example, it could be
due to a temporary lack of connectivity. The client
makes three attempts to understand if it is possible
to establish the connection, and then fails.
The issue should be resolved by checking the
network.
[ERROR] - AlertStatus from server
404
[DEBUG] - Error occurred in sync:
code 3 = AlertStatus from server
404
[ERROR] - Error in preparing sync:
AlertStatus from server 404
[INFO] - SYNCHRONIZATION REPORT
================
SYNCHRONIZATION COMPLETED WITH
ERRORS
-----------------------------------
Last error message = "AlertStatus
from server 404"
Last error code = 404
Calendar:
---------
Sync failed: AlertStatus from
server 404 (code = 404)
The source you are trying to sync is not found on the
server (404 is the generic code for “Not Found”).
The cause is probably a wrong configuration of the
sync source name on the client or on the server.
Example: the calendar sync source on the client is
called “cal” and on the server it is called “scal”. The
client attempts to find “cal” but the server returns
404 “not found” because it does not exist.
The issue should be resolved by checking the
configured sync source name on the client and on
the server.
Error Signature:
EventType : BEX P1 :
OutlookPlugin.exe P2 : 1.0.0.1
P3 : 49d4d31d
P4 : winmainclientdll.dll P5 :
0.0.0.0 P6 : 49d4d2fd P7 :
0005da8b
This error may be displayed if there is a conflict
with another installed software, usually an anti-virus
application, security suite or firewall.
Possible solution: disable/uninstall the conflicting
application.

OneMediaHub error messages
173
Error message Description
P8 : c0000409 P9 : 00000000
Installing the OneMediaHub for Windows on
Windows 2000 (or 2003) I get the following error:
“Entry point not found. The procedure entry point
TzSpecificLocalTimeToSystemTime could not be
located in the dynamic link library KERNEL32.dll”
Windows 2000 and Windows 2003 are not
supported.
The OneMediaHub for Windows is compatible
with:
• Outlook XP (2002) Outlook 2003, Outlook 2007
or later
•Windows XP, Windows Vista, Windows
7 or later
Installing the OneMediaHub for Windows on a
Windows Vista 64 bit: the install wizard runs,
but there is no UI.
64 bit platforms are not currently supported.
The manual sync works fine, but the scheduled sync
fails to start when using Windows Vista. The error
message displayed is “cannot schedule”.
It may be related to the fact that Outlook is not
running with administrator privileges. Possible
solution:
• Navigate to C:\Program Files
\Microsoft Office\Office12
• Look for OUTLOOK.exe, right-click on it and
select Properties.
• Go to the Compatibility tab and check Run
this program as an administrator.
Try scheduling again.

174
Appendix D. FUNAMBOL-LOGGING-MIB.txt
FUNAMBOL-LOGGING-MIB DEFINITIONS ::= BEGIN
IMPORTS
MODULE-IDENTITY,
OBJECT-TYPE,
NOTIFICATION-TYPE,
enterprises FROM SNMPv2-SMI
TEXTUAL-CONVENTION,
DateAndTime FROM SNMPv2-TC
SnmpAdminString FROM SNMP-FRAMEWORK-MIB
MODULE-COMPLIANCE,
OBJECT-GROUP,
NOTIFICATION-GROUP FROM SNMPv2-CONF;
funambolLoggingMIB MODULE-IDENTITY
LAST-UPDATED "200610290000Z" -- November 29, 2006
ORGANIZATION "Funambol, Inc."
CONTACT-INFO "643 Bair Island Road, Suite 305
Redwood City, CA 94063 ( USA)
Tel.: +1 650 587 4570
Fax: +1 650 701 1484
Email: harrie@funambol.com"
DESCRIPTION
"The MIB module for logging SNMP Notifications"
-- Revision History
REVISION "200610290000Z" -- November 29, 2006
DESCRIPTION "This is the initial version of this MIB."
::= { enterprises funambol(27219) 2 }
funambolLoggingMIBObjects OBJECT IDENTIFIER ::= { funambolLoggingMIB 1 }
--
--
--
FunambolLogLevel ::= TEXTUAL-CONVENTION
STATUS current
DESCRIPTION
"The level of which the log message was provided by the Funambol
DS Server."
SYNTAX INTEGER { fatal(0),
error(1),
warn(2),
info(3),
debug(4),
trace(5)} - values should be changed in those of
Level class.
funambolLoggingDateAndTime OBJECT-TYPE
SYNTAX DateAndTime
MAX-ACCESS accessible-for-notify
STATUS current
DESCRIPTION
"The date and time when the log was invoked by the
Funambol DS Server."
::= { funambolLoggingMIBObjects 1 }
funambolLoggingLevel OBJECT-TYPE

FUNAMBOL-LOGGING-MIB.txt
175
SYNTAX FunambolLogLevel
MAX-ACCESS accessible-for-notify
STATUS current
DESCRIPTION
"The level of the log message."
::= { funambolLoggingMIBObjects 2 }
funambolLoggingName OBJECT-TYPE
SYNTAX SnmpAdminString
MAX-ACCESS accessible-for-notify
STATUS current
DESCRIPTION
"The name of the logger that invoked the notification."
::= { funambolLoggingMIBObjects 3 }
funambolLoggingSessionId OBJECT-TYPE
SYNTAX SnmpAdminString
MAX-ACCESS accessible-for-notify
STATUS current
DESCRIPTION
"The session id that identifies the SyncML session
that invoked the log message."
::= { funambolLoggingMIBObjects 4 }
funambolLoggingDeviceId OBJECT-TYPE
SYNTAX SnmpAdminString (SIZE(0..32))
MAX-ACCESS accessible-for-notify
STATUS current
DESCRIPTION
"The device id that identifies the device used
for the SyncML session that invoked the log message."
::= { funambolLoggingMIBObjects 5 }
funambolLoggingUser OBJECT-TYPE
SYNTAX SnmpAdminString
MAX-ACCESS accessible-for-notify
STATUS current
DESCRIPTION
"The user that started the SyncML session
causing this log message."
::= { funambolLoggingMIBObjects 6 }
funambolLoggingSourceUri OBJECT-TYPE
SYNTAX SnmpAdminString
MAX-ACCESS accessible-for-notify
STATUS current
DESCRIPTION
"The database that identifies the SyncML session
that invoked the log message."
::= { funambolLoggingMIBObjects 7 }
funambolLoggingMessage OBJECT-TYPE
SYNTAX SnmpAdminString
MAX-ACCESS accessible-for-notify
STATUS current
DESCRIPTION
"The log message."
::= { funambolLoggingMIBObjects 8 }
funambolLoggingNotificationsPrefix OBJECT IDENTIFIER ::=
{ funambolLoggingMIB 2 }

FUNAMBOL-LOGGING-MIB.txt
176
funambolLoggingNotifications OBJECT IDENTIFIER ::=
{ funambolLoggingNotificationsPrefix 0 }
funambolLoggingNotificationsObjects OBJECT IDENTIFIER ::=
{ funambolLoggingNotificationsPrefix 1 }
funambolLoggingNotification NOTIFICATION-TYPE
OBJECTS {
funambolLoggingDateAndTime,
funambolLoggingLevel,
funambolLoggingSessionId,
funambolLoggingDeviceId,
funambolLoggingUser,
funambolLoggingSourceUri,
funambolLoggingMessage
}
STATUS current
DESCRIPTION
"Notification that defines the logging invoked."
::= { funambolLoggingNotifications 1 }
funambolLoggingMIBConformance OBJECT IDENTIFIER ::= { funambolLoggingMIB
3 }
funambolLoggingMIBCompliances OBJECT IDENTIFIER ::=
{ funambolLoggingMIBConformance 1 }
funambolLoggingMIBGroups OBJECT IDENTIFIER ::=
{ funambolLoggingMIBConformance 2 }
funambolLoggingMIBCompliance MODULE-COMPLIANCE
STATUS current
DESCRIPTION "full compliance"
MODULE -- this module
MANDATORY-GROUPS {
funambolLoggingObjectGroup }
::= { funambolLoggingMIBCompliances 1 }
funambolLoggingObjectGroup OBJECT-GROUP
OBJECTS {
funambolLoggingDateAndTime,
funambolLoggingLevel,
funambolLoggingName,
funambolLoggingSessionId,
funambolLoggingDeviceId,
funambolLoggingUser,
funambolLoggingSourceUri,
funambolLoggingMessage
}
STATUS current
DESCRIPTION
"The logging group"
::= { funambolLoggingMIBGroups 1 }
funambolLoggingNotificationGroup NOTIFICATION-GROUP
NOTIFICATIONS {
funambolLoggingNotification
}
STATUS current
DESCRIPTION
"Notifications."

FUNAMBOL-LOGGING-MIB.txt
177
::= { funambolLoggingMIBGroups 2 }
END

178
Appendix E. Database Schema
E.1 OneMediaHub Core
The Core database is described at Chapter 6, Database partitioning.
E.1.1 Contact_
Contact_ stores personal information about the registered user, as first name and last name. Main fields
used by the OneMediaHub are:
Contact_
Column Type Constraints Description
contactid character varying(75) PK Incremental contact ID
userid character varying(75) FK The user ID, aka
username
firstname character varying(75) The user first name
middlename character varying(75) The user middle name
lastname character varying(75) The user last name
(...)
E.1.2 Country
Country stores information about the countries in the world. Used by the OneMediaHub to support the
carriers (fp_carrier) worldwide.
Country
Column Type Constraints Description
countryid character varying(75) NOT NULL The country ID
name character varying(75) The country name (e.g.
United States)
a2 character varying(75) UNIQUE The country code in ISO
3166-1 alpha-2 format
(e.g. US)
a3 character varying(75) UNIQUE The country code in ISO
3166-1 alpha-3 format
(e.g. USA)
number_ character varying(75) UNIQUE The country code in ISO
3166-1 numeric format
(e.g. 840)
idd_ character varying(75) The country calling code.
The Caribbean nations in
zone 1 include the area
codes.
active_ boolean false if the given
country is not active

Database Schema
179
E.1.3 fnbl_bucket
fnbl_bucket contains information about the data partitioning.
fnbl_bucket
Column Type Constraints Description
low_bucket integer NOT NULL, PK Identifies (with
high_bucket) the
bucket range for a
partition.
high_bucket integer NOT NULL Identifies (with
low_bucket) the
bucket range for a
partition.
partition_name varchar(128) NOT NULL The name of the partition
to use for the buckets in
the range.
active char(1) default 'Y' Indicates if a partition is
active. If an entry is not
active, all access requests
are rejected.
migrating char(1) default 'N' Indicates if the buckets
are migrating to another
partition.
last_update bigint The time when the last
modification was made.
migrating_to varchar(128) Indicates the partition
where the buckets are
migrating to.
E.1.4 Partitioning Schema
Figure E.1. Partitioning schema
For detailed information on the partitioning tables, please refer to the Chapter 6, Database partitioning.
E.1.5 fnbl_connector
fnbl_connector contains information about the connector configuration.

Database Schema
180
fnbl_connector
Column Type Constraints Description
id varchar(128) PK, NOT NULL Connector ID
name varchar(200) NOT NULL Connector name
description varchar(200) Connector description
admin_class varchar(255) Connector configuration
panel Java class name
(with complete path)
E.1.6 fnbl_connector_source_type
fnbl_connector_source_type contains the link between connector and sync source type.
fnbl_connector_source_type
Column Type Constraints Description
connector varchar(128) PK, NOT NULL Connector ID
sourcetype varchar(128) PK, NOT NULL Source Type ID
E.1.7 fnbl_country_language
fnbl_country_language stores the mapping between the Country table and the Accept-
Language header to be able to decode the default locale for the user.
fnbl_country_language
Column Type Constraints Description
language varchar(75) PK The language (e.g. en-
us, it-it)
countryid varchar(75) FK(Country) The ID of the country
E.1.8 fnbl_country_timezones
fnbl_country_timezones is a view to map the country's unique numeric ID with the
country_code in fnbl_timezones.
CREATE VIEW fnbl_country_timezones AS
SELECT c.countryid, c.a2 AS country_code, c.name, tz.timezone,
tz.is_default
FROM country c LEFT OUTER JOIN fp_timezone tz ON (c.a2 =
tz.country_code);
E.1.9 fnbl_deleted_sync_user_role
The table fnbl_deleted_sync_user_role keeps track of the deleted users with role sync_user.
fnbl_deleted_sync_user_role
Column Type Constraints Description
userid varchar(255) PK The username

Database Schema
181
E.1.10 fnbl_deleted_user
The table fnbl_deleted_user keeps track of the deleted users.
fnbl_deleted_user
Column Type Constraints Description
userid character varying(75) The username
delete_date timestamp (without time
zone) When the user was
deleted
is_sync_user boolean If the user has role
sync_user. Default:
true
E.1.11 fnbl_device
fnbl_device contains information about the device, like nonce for MD5 authentication, the device
timezone and charset, and the flag that tell if it is needed to convert the date sent by device to the specified
timezone, the sender and builder for notification and the capabilities ID (per default it is -1).
fnbl_device
Column Type Constraints Description
id varchar(128) PK, NOT NULL Device ID
description varchar(255) Description
type varchar(255) Device type
client_nonce varchar(255) Nonce for MD5 client
authentication
server_nonce varchar(255) Nonce for MD5 server
authentication
server_password varchar(255) Password for server
authentication
timezone varchar(32) Device timezone
convert_date char(1) Should the date sent by
the device be converted
to the specified device
timezone?
charset varchar(16) Device charset
address varchar(50) Device IP (if applicable)
msisdn varchar(50) Device MSISDN (if
applicable)
notification_builder varchar(255) Builder for notification
message
notification_sender varchar(255) Sender for notification
message
push_token varchar(255) Contains the cloud push
token registered for the
device

Database Schema
182
E.1.12 fnbl_device_caps
fnbl_device_caps contains the capabilities ID and general information about the device.
fnbl_device_caps
Column Type Constraints Description
id bigint PK, NOT NULL Capabilities ID
version varchar(16) NOT NULL Version number
man varchar(100) Manufacturer
model varchar(100) Software product/
component
fwv varchar(100) Firmware version
number
swv varchar(100) Software version number
hwv varchar(100) Hardware version
number
utc char(1) NOT NULL Does device support
UTC?
lo char(1) NOT NULL Does device support
large object handling?
noc char(1) NOT NULL Does device support
number of changes
property?
device_id varchar(128) FK(fnbl_device) The device ID this
capability refers to
E.1.13 fnbl_device_datastore
fnbl_device_datastore contains the list of datastores supported by the device.
fnbl_device_datastore
Column Type Constraints Description
id bigint PK, NOT NULL Datastore ID
caps bigint FK(fnbl_device_caps) Capabilities ID
sourceref varchar(128) NOT NULL Source URI
label varchar(128) Datastore display name
maxguidsize integer Maximum size of GUID
dsmem char(1) NOT NULL Is DSMem element
specified?
shs char(1) NOT NULL Is datastore memory
shared?
synccap varchar(32) NOT NULL Synchronization
capabilities for the
datastore

Database Schema
183
Column Type Constraints Description
rx_type varchar(64) NOT NULL Type of supported
content type received by
the device
rx_version varchar(16) NOT NULL Version of supported
content type received by
the device
E.1.14 fnbl_email_account
fnbl_email_account contains information about the user account. The users will be inserted into the
user_ table.
fnbl_email_account
Column Type Constraints Description
account_id bigint PK, NOT NULL Account ID
username varchar(50) PK, NOT NULL User ID
ms_login varchar(50) NOT NULL Username of the account
on the mail server
ms_password varchar(50) NOT NULL Password of the account
on the mail server.
The password will be
encrypted with a special
key
ms_address varchar(70) NOT NULL Email address on the
mail server
mailserver_id varchar(20) NOT NULL Mail server ID
server_public char Is the email server
public?
server_type varchar(20) Mail server type
- Exchange
- Domino
- Courier
- Other
description varchar(50) Description of the mail
server
protocol varchar(5) Protocol type (IMAP or
POP3)
sslin char Is incoming server SSL?
sslout char Is outgoing server SSL?
out_login varchar(50) SMTP username for
authentication
out_password varchar(50) SMTP password for
authentication

Database Schema
184
E.1.15 fnbl_email_enable_account
fnbl_email_enable_account contains the link between user and mail server account.
fnbl_email_enable_account
Column Type Constraints Description
account_id bigint PK, NOT NULL Account ID
username varchar(50) PK, NOT NULL User ID
E.1.16 fnbl_external_service
fnbl_external_service contains information about external portals like Facebook, Flickr, Picasa.
With these external services OneMediaHub exchanges pictures.
fnbl_external_service
Column Type Constraints Description
service_name varchar(255) NOT NULL, PK Service code
display_name varchar(255) NOT NULL Description
icon_url varchar(1024) URL with the logo of the
service
success_url varchar(1024) URL with the success
icon in the service-like
format
error_url varchar(1024) URL with the error icon
in the service-like format
E.1.17 fnbl_external_service_account
fnbl_external_service_account contains the link between the user and the external services
with the authorization tokens for the services.
fnbl_external_service_account
Column Type Constraints Description
id bigint(20) NOT NULL, PK Incremental ID
service_name varchar(255) NOT NULL, UNIQUE
with userid
Service code, for
example flickr or
picasa
userid varchar(255) NOT NULL, UNIQUE
with service_name
Username of the user
enabled on the service
token varchar(255) Token of the service
system
auth_time bigint(20) When the token was
created
expire_time bigint(20) When the token expires,
NULL if it does not
expire
account_name varchar(255) Account name on the
service system

Database Schema
185
Column Type Constraints Description
autoupload_album varchar(255) (future use)
autoupload_privacy varchar(255) (future use)
autoupload_enabled tinyint(1) (future use)
last_used_album varchar(255) Last used album for the
given service
last_used_privacy varchar(255) Privacy status of the last
used album
E.1.18 fnbl_family
fnbl_family stores informations regarding the family of users.
fnbl_family
Column Type Constraints Description
id bigint PK Incremental family ID
external_id varchar(255) UNIQUE Unique external identifier
of the family
name varchar(255) NOT NULL Name of the family
E.1.19 fnbl_family_user
fnbl_family_user stores the mapping between family and users of the family.
fnbl_family_user
Column Type Constraints Description
family_id bigint PK, FK Identifier of the family
userid varchar(255) PK, FK User ID of the user that
belongs to the family
E.1.20 fnbl_file_data_object_user_lock
fnbl_file_data_object_user_lock stores the user for handling the lock on file data objects.
fnbl_file_data_object_user_lock
Column Type Constraints Description
userid varchar(255) PK, NOT NULL,
FK(User_) The user ID, i.e. the
username
E.1.21 fnbl_id
fnbl_id contains the value of every counter and the increment step value.
fnbl_id
Column Type Constraints Description
idspace varchar(30) PK, NOT NULL Space ID
counter bigint NOT NULL Counter

Database Schema
186
Column Type Constraints Description
increment_by int default 100 Increment step value
E.1.22 fnbl_import_csv_commands
fnbl_import_csv_commands contains the batch file CSV commands for the import-users tool.
fnbl_import_csv_commands
Column Type Constraints Description
id int(11) PK The command's
incremental ID
ordertypesid integer NOT NULL The command's operation
type
contractid varchar(255) NOT NULL The command's unique
user identifier
eventdate varchar(75) The command's
occurrence date
msisdn varchar(75) NOT NULL The command's user
phone number
brandid varchar(75) NOT NULL The command's unique
server identifier
productid varchar(128) The command's
subscription plan name
email varchar(75) The command's user
email address
usertype varchar(5) The command's user type
for notification sending:
SMS – user
communications by SMS
EMAIL – user
communications by e-
mail
importdate timestamp NOT NULL The date when the
command was imported
modification_date timestamp The date when the
command was last
updated
status integer The status code resulting
from the command
processing
filename varchar(255) NOT NULL The original filename
containing the command
E.1.23 fnbl_last_deleted_msisdn
fnbl_last_deleted_msisdn keeps track of the deleted phone number (msisdn).

Database Schema
187
fnbl_last_deleted_msisdn
Column Type Constraints Description
userid varchar(255) PK The user
msisdn varchar(75) NOT NULL The deleted phone
number
delete_date timestamp NOT NULL The date of the deletion
E.1.24 fnbl_last_sync
fnbl_last_sync contains the information about the last synchronization based on the link between
principal and sync source. The type and the status of the synchronization, the last anchors, the start and end
time of the synchronization are available.
fnbl_last_sync
Column Type Constraints Description
principal bigint PK,
FK(fnbl_principal),
NOT NULL
Principal ID
sync_source varchar(16) PK,
FK(fnbl_sync_source),
NOT NULL
Source URI
sync_type integer NOT NULL Synchronization type
status integer Synchronization Status:
200 – OK
224 – SUSPEND
last_anchor_server varchar(20) Last anchor of the server
last_anchor_client varchar(20) Last anchor of the client
start_sync bigint Start time of the
synchronization
end_sync bigint End time of the
synchronization
E.1.25 fnbl_module
fnbl_module contains information about modules such as the Foundation Connector.
fnbl_module
Column Type Constraints Description
id varchar(128) PK, NOT NULL Module ID
name varchar(200) NOT NULL Module name
description varchar(200) Module description

Database Schema
188
E.1.26 fnbl_module_connector
fnbl_module_connector contains the link between module and connector.
fnbl_module_connector
Column Type Constraints Description
module varchar(128) PK, NOT NULL Module ID
connector varchar(128) PK, NOT NULL Connector ID
E.1.27 fnbl_partition
fnbl_partition contains information about the partitions.
fnbl_partition
Column Type Constraints Description
name varchar(128) NOT NULL, PK The name of the
partition.
url varchar(128) The URL to use when
creating a connection to
the partition.
driver varchar(128) The name of the driver
class to use when
creating a connection to
the partition.
username varchar(128) The username to
use when creating
a connection to the
partition.
password varchar(128) The password to
use when creating
a connection to the
partition.
parameters varchar(128) The parameters to
use when creating
a connection to
the partition (e.g.
maxActive=3&maxIdle=3)
last_update bigint The time when the last
modification was made.
E.1.28 fnbl_pim_listener_registry
fnbl_pim_listener_registry contains the options of the push for a specified user.
fnbl_pim_listener_registry
Column Type Constraints Description
id bigint FK(fnbl_push_listener_registry)Push ID
username varchar(255) User ID
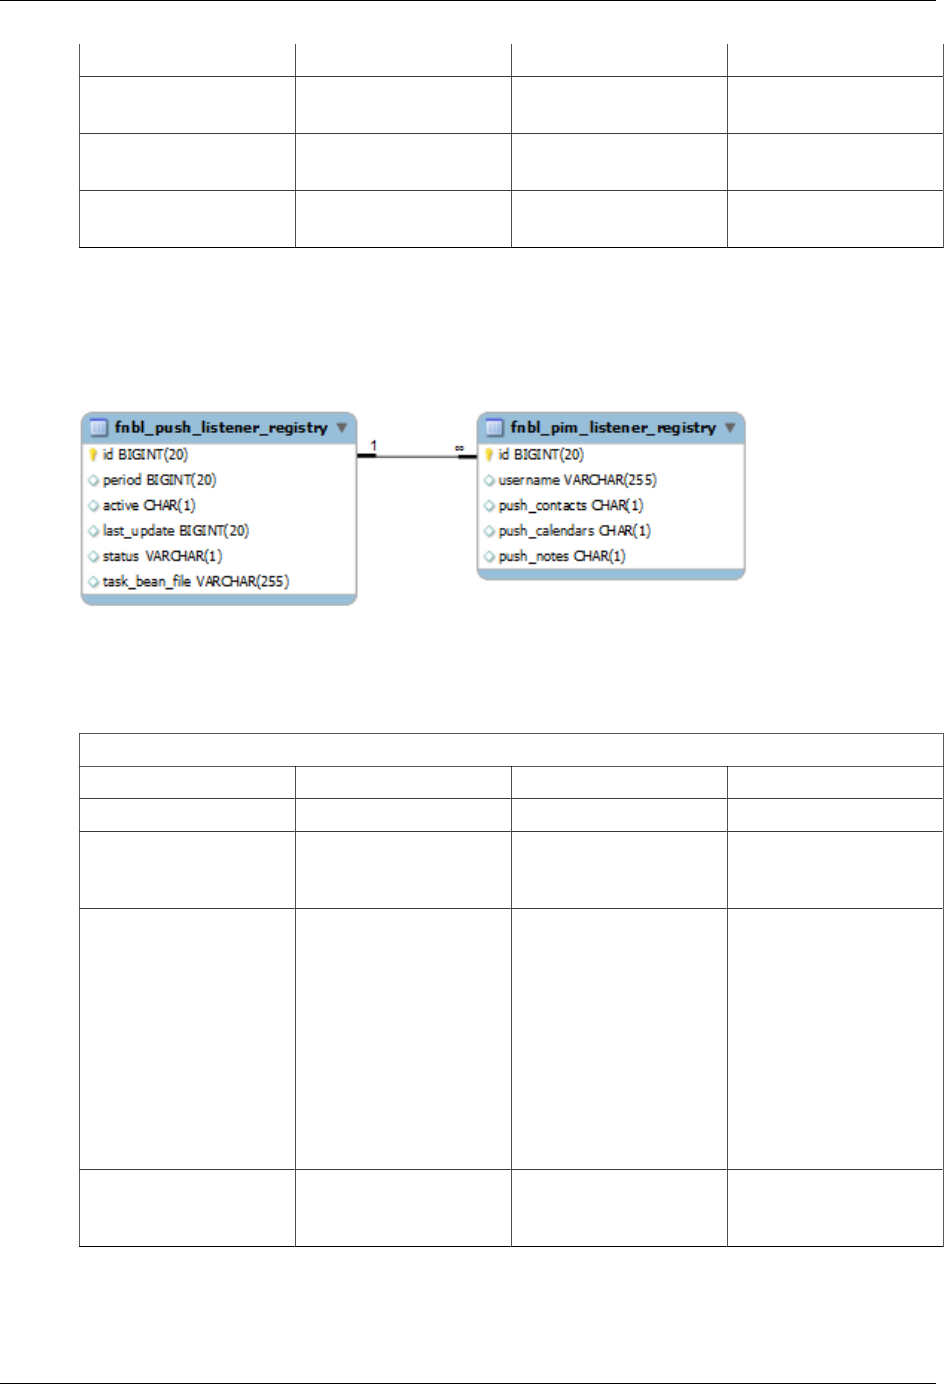
Database Schema
189
Column Type Constraints Description
push_contacts char(1) Is the push for contacts
activated?
push_calendars char(1) Is the push for calendar
activated?
push_notes char(1) Is the push for notes
activated?
E.1.29 PIM Push Tables Schema
The following tables allow the push system for the PIM entities
Figure E.2. PIM Push tables schema
E.1.30 fnbl_principal
fnbl_principal contains the principal ID that links device and username.
fnbl_principal
Column Type Constraints Description
id bigint PK, NOT NULL Principal ID
device varchar(128) FK(fnbl_device),
NOT NULL
Device ID
device_link_status char(1) NOT NULL DEFAULT
'L' Status of the device.
Possible values are
Llinked
Uunlinked
Ddisconnected
username varchar(255) NOT NULL
FK(User_)
User name
E.1.31 fnbl_public_mailservers
fnbl_public_mailservers stores the public mail server IDs.

Database Schema
190
fnbl_public_mailservers
Column Type Constraints Description
mailserver_id char(20) PK The mail server ID (e.g.
1)
E.1.32 fnbl_push_listener_registry
fnbl_push_listener_registry contains information about the task to be executed by the push
listener framework.
fnbl_push_listener_registry
Column Type Constraints Description
id bigint PK Push listener registry ID
period bigint Refresh interval of the
information on the source
active char(1) Is the task activated?
last_update bigint Last time task's execution
status varchar(1) Task's status
task_bean_file varchar(255) XML file representing
the object of which the
task is the instance
E.1.33 fnbl_push_sender_notification
fnbl_push_sender_notification contains information about the sent SMS notification messages.
fnbl_push_sender_notification
Column Type Constraints Description
id bigint NOT NULL The unique identifier
assigned by the DS
Server
id_provider varchar(255) ID provided by the
SMS provider (e.g.
SubitoSMS)
msisdn varchar(50) The device phone
number if any
address varchar(50) The device IP address if
any
device varchar(128) NOT NULL The device ID
notification_type varchar(16) NOT NULL Notification type: SMS
or TCP
status char(1) NOT NULL Status: S (sent), D
(delivered), R (refused),
E (expired)
time timestamp NOT NULL Timestamp of when the
message was sent to the
SMS provider

Database Schema
191
E.1.34 fnbl_role
fnbl_role contains the user role list and the description. Users are handled by the Liferay users, roles,
groups and permissions tables.
fnbl_role
Column Type Constraints Description
role varchar(128) PK, NOT NULL Role ID
description varchar(200) NOT NULL Role description
E.1.35 fnbl_storage
fnbl_storage contains information about the used storage size.
fnbl_storage
Column Type Constraints Description
date timestamp Date and time of when
the size has been
retrieved
used bigint(20) Used storage size
E.1.36 fnbl_subscription_family
fnbl_subscription_family contains the information regarding the families of plans defined in the
system. A family can group a list of defined plans.
fnbl_subscription_family
Column Type Constraints Description
name varchar(50) NOT NULL Name of the subscription
family
display_name varchar(255) NOT NULL The display name of the
subscription family
description varchar(255) NOT NULL A description of the
subscription family
is_default char(1) NOT NULL 0: not the default family
1: the default family
E.1.37 fnbl_subscription_payment
fnbl_subscription_payment contains the information about the payment done by a certain user
related to a certain subscription plan.
fnbl_subscription_payment
Column Type Constraints Description
id bigint PK The unique ID
userid varchar(255) NOT NULL The user identifier

Database Schema
192
Column Type Constraints Description
plan_name varchar(50) NOT NULL The name of the
subscription plan
transactionid varchar(4096) The transaction identifier
status tinyint The status of the payment
•0: new
•1: verified
•2: invalid
assessing char(1) NOT NULL •0: the payment is not
locked
•1: the payment is
locked
row_version int NOT NULL Each time an update of
a row occurs, the value
of this field increases by
one. Used to implement
optimistic concurrency
last_update bigint NOT NULL Timestamp of last update
created bigint NOT NULL Timestamp of when the
payment was created
next_assessment datetime The date and time the
payment should be
assessed
E.1.38 fnbl_subscription_plan
fnbl_subscription_plan contains information about subscription plans.
fnbl_subscription_plan
Column Type Constraints Description
name varchar(50) PK Name of the subscription
plan
display_name varchar(255) NOT NULL The display name of the
subscription plan. This
is all and only all what
users see when choosing
their plan from mobile
apps and Portal
description varchar(255) NOT NULL A description of the
subscription plan
price decimal(17,4) NOT NULL The price of the
subscription plan
valid_from datetime NOT NULL Date from when the plan
is available

Database Schema
193
Column Type Constraints Description
valid_until datetime NOT NULL Date until when the plan
is available
is_default char(1) NOT NULL • 0: not the default plan
•1: the default plan
period varchar(50) NOT NULL • month
•year
•forever
•xminutes
forever is the period
used for subscription
plans which never end.
xminutes may be used
for testing purposes to
lower the time needed
for the renewal of
subscription plans
role varchar(128) NOT NULL The corresponding
role as it has been
defined in the portal-
ext.properties file
payment_type varchar(50) The payment method
of the plan. It may be
default, apple, or
web
family varchar(50) NOT NULL The subscription family
E.1.39 fnbl_sync_history
fnbl_sync_history relies on triggers fnbl_last_sync_after_insert and
fnbl_last_sync_before_update and contains the history of the fnbl_last_sync table. The
table allows to track all the SyncML and SAPI activities of the user in a given timeframe.
fnbl_sync_history
Column Type Constraints Description
id bigint(20) PK, NOT NULL,
AUTO_INCREMENT Unique ID of the row
username varchar(255) The user ID
principal bigint(20) Principal ID
device varchar(128) The ID of the user's
device
sync_source varchar(128) SyncML sync source or
SAPI call
sync_type int(11) Synchronization type

Database Schema
194
Column Type Constraints Description
status int(11) Synchronization status
end_sync datetime End time of the
synchronization
start_sync datetime Start time of the
synchronization
duration bigint(20) Duration of the sync, (0
for SAPI requests)
E.1.40 fnbl_sync_source
fnbl_sync_source contains information about the sync source configuration.
fnbl_sync_source
Column Type Constraints Description
uri varchar(16) PK, NOT NULL Source URI
config varchar(255) NOT NULL Server Bean
configuration
name varchar(200) NOT NULL Source name
sourcetype varchar(128) NOT NULL Source type
E.1.41 fnbl_sync_source_type
fnbl_sync_source_type contains the information about the sync source type like the class name or
the configuration panel class name.
fnbl_sync_source_type
Column Type Constraints Description
id varchar(128) PK, NOT NULL Source Type ID
description varchar(200) Source Type description
class varchar(255) NOT NULL Source Type Java class
name (with complete
path)
admin_class varchar(255) Source Type
configuration panel
Java class name (with
complete path)
E.1.42 fnbl_temp_paying_users
fnbl_temp_paying_users is a temporary table used to compute the marketing key performance
indicators (KPI).
fnbl_temp_paying_users
Column Type Constraints Description
userid varchar(75) PK The username

Database Schema
195
E.1.43 fnbl_timezone
fnbl_timezone stores all existing timezones for a country and defines the default one. This is used in
the signup and profile configuration to define the default and available timezones for a defined country.
fnbl_timezone
Column Type Constraints Description
country_code char(2) NOT NULL
FK(country)
The country ID (“US”)
timezone varchar(50) NOT NULL Device's model reference
is_default bool DEFAULT false Country's standard
timezone
E.1.44 fnbl_user
fnbl_user is a view to map the User_ and Contact_ tables for the officer authentication. It replaces
the fnbl_user table available in the Funambol Community Edition.
CREATE VIEW fnbl_user AS
SELECT u.userid AS username, u.password_ AS password, u.emailaddress
AS email,
c.firstname AS first_name, c.lastname AS last_name, u.active_
AS active
FROM User_ u, Contact_ c
WHERE (u.passwordreset = false AND c.userid = u.userid AND
u.migrated='Y');
fnbl_user
Column Type Constraints Description
username User's unique ID
password User's password
email User's Email address
first_name User's first name
last_name User's last name
active If user is active or not
E.1.45 fnbl_user_alias
fnbl_user is a view to map the User_ and fp_device tables for the Officer authentication.
CREATE VIEW fnbl_user_alias AS
SELECT u.userid, u.emailAddress, d.phonenumber
FROM User_ u LEFT OUTER JOIN fp_device d
ON (u.userid=d.userid);
fnbl_user_alias
Column Type Constraints Description
userid User's unique ID

Database Schema
196
Column Type Constraints Description
emailAddress User's Email address
phonenumber Device's MSISDN
E.1.46 fnbl_user_picture
fnbl_user_picture contains the link between user and the picture of the profile.
fnbl_user_picture
Column Type Constraints Description
userid varchar(255) PK User ID
type varchar(64) Picture File Type
picture longblob Blob with the profile
picture
E.1.47 fnbl_user_preference
fnbl_user_preference stores the user preferences.
fnbl_user_preference
Column Type Constraints Description
userid varchar(255) PK, FK(user_), NOT
NULL The unique ID of the user
only_from_contacts char(1) Still not used
keep_me_informed char(1) DEFAULT 'y' Specifies if the user
wants to receive
feedback from Portal
countryid varchar(75) The country's ID
allow_email char(1) DEFAULT 'y' Specifies if the user
has the email account
disabled
referrer_id varchar(75) Specifies by whom the
user was invited
sms_counter smallint DEFAULT 10 Specifies the max
number of SMS that the
user can use during one
month
latest_sms datetime Specifies the date of
the last SMS message
received by the user
convert_tmz char(1) DEFAULT 'n' Convert to this timezone
feature:
0 – default, not specified
1 – force converting
2 – do not converting

Database Schema
197
Column Type Constraints Description
email_counter smallint DEFAULT 10 Specifies the max
number of email that the
user can use during one
month
latest_email datetime Specifies the date of the
latest email message
received by the user
last_reminder_email_date datetime Specifies the date on
which the user should get
the reminder email
sharing_email_counter smallint DEFAULT 0 Specifies the number of
shared email sent
latest_sharing_email_counter_reset_timedatetime Specified the latest date
time the counter has been
resetted
preferred_communication_channelvarchar(5) The preferred
communication channel
for receiving user
communications.
Possible values are
“email” and “sms”.
maliciousness_counter smallint DEFAULT 0 Number of requests to
reminder thumbnails
latest_maliciousness_counter_reset_timedatetime Specified the latest date
time the maliciousness
counter has been reset
E.1.48 fnbl_user_properties
fnbl_user_properties contains user preferences mainly for UI visualization, such as the user
language, the date format, etc.
fnbl_user_properties
Column Type Constraints Description
userid varchar(255) PK User ID
name varchar(128) PK Property name
value varchar(128) Property value
E.1.49 fnbl_user_role
fnbl_user_role contains the link between username and role. Users are handled by the Liferay users,
roles, groups and permissions tables.
fnbl_user_role
Column Type Constraints Description
username varchar(255) PK, User ID

Database Schema
198
Column Type Constraints Description
FK(User_),
NOT NULL
role varchar(128) PK, NOT NULL Role ID
expiry_date timestamp Expiration date of the
role
E.1.50 fnbl_user_subscription
fnbl_user_subscription contains the subscription plan active for a user. A user may only have one
subscription plan active at a given time.
fnbl_user_subscription
Column Type Constraints Description
id bigint PK Unique ID for
subscription plan
userid varchar(255) NOT NULL The user identifier
plan_name varchar(50) NOT NULL Name of the subscription
plan
status unsigned tinyint NOT NULL Current status of the
subscription plan
created bigint NOT NULL Timestamp of when the
user subscription was
created
last_update bigint NOT NULL Timestamp of last update
next_renewal datetime Date and time of next
subscription renewal
activated_on datetime Date and time of
the activation of the
subscription plan
assessing char(1) NOT NULL • 0: the subscription is
not locked
•1: the subscription is
locked
row_version int NOT NULL Each time an update of
a row occurs, the value
of this field increases by
one. Used to implement
optimistic concurrency
migrate_to_plan varchar(50) The name of the plan the
subscription should be
migrated to
next_assessment datetime The date and time the
subscription should be
assessed

Database Schema
199
Column Type Constraints Description
last_status_change datetime Date and time the last
status change occurred
(i.e. the value of the field
status changed)
E.1.51 fp_carrier
fp_carrier contains information about carriers.
fp_carrier
Column Type Constraints Description
id serial PK, NOT NULL Unique carrier ID
name varchar(75) NOT NULL Carrier name
countryid varchar(75) NOT NULL,
FK(country) Carrier's country
reference
active bool DEFAULT true Specifies if the carrier is
active
otasupport bool DEFAULT true Specifies if the carrier
supports OTA settings
trusted_jam bool DEFAULT true Specifies if the carrier is
JAM trusted
issyncml bool DEFAULT true The carrier allows
SyncML synchronization
E.1.52 fp_device
fp_device contains info about users devices.
fp_device
Column Type Constraints Description
id serial PK, NOT NULL Unique model ID
userid varchar(75) FK(user_), NOT NULL Device's user reference
modelid int4 FK(fp_model), NOT
NULL Device's model reference
phonenumber varchar(75) NOT NULL Device's MSISDN
carrierid int4 FK(fp_carrier), NOT
NULL Device's carrier reference
active bool DEFAULT true Specifies if the model is
active
last_update bigint Last time the device was
changed
E.1.53 fp_manufacturer
fp_manufacturer contains information about manufacturers

Database Schema
200
fp_manufacturer
Column Type Constraints Description
id serial PK, NOT NULL Unique manufacturer ID
name varchar(75) NOT NULL Role ID
active bool DEFAULT true Specifies if the
manufacturer is active
E.1.54 fp_model
fp_model contains info about device models
fp_model
Column Type Constraints Description
id serial PK, NOT NULL The model ID
name varchar(75) NOT NULL The model name
manufacturerid int4 FK(fp_manufacturer),
NOT NULL The manufacturer ID
otasupport bool Specifies if the model
supports OTA settings
emailsupport bool Specifies if the model has
an email client
pluginrequired int2 Specifies which
OneMediaHub plugin
(Pocket PC/Smartphone/
none) the model supports
smssync bool Specifies if the device
supports PIM push
natively. The alternative
is the no longer
supported Windows
Mobile client
imagefileid varchar(75) The name of the image
file to be displayed
infofileid varchar(75) The name of the info file
to be displayed
active bool DEFAULT true Specifies if the model is
active
support_contact bool DEFAULT true Specifies in the OTA
message if the model
supports contact
support_calendar bool DEFAULT true Specifies in the OTA
message if the model
supports calendar
support_event bool DEFAULT false Specifies in the OTA
message if the model
supports event

Database Schema
201
Column Type Constraints Description
support_todo bool DEFAULT false Specifies in the OTA
message if the model
supports todo
support_utc int2 DEFAULT 0 Future use (will replace
the “Convert to this
timezone” feature)
j2mesupport int2 Specifies which type of
the Funambol JAM client
the model supports
support_utf8 bool DEFAULT true Specifies if the model
supports UTF8
issyncml bool DEFAULT true Future use (Specifies
if the model supports
SyncML)
trusted_jam bool DEFAULT true Specifies if the model is
JAM trusted
E.1.55 User_
User_ contains information about the OneMediaHub user. Main fields used by the OneMediaHub are:
User_
Column Type Constraints Description
userid character varying(75) PK username
createdate timestamp without time
zone When the user was
created
password_ character varying(75) The user password
passwordreset boolean If true the user has to
change the password,
for example when he
receives the PIN. Sync
not available.
emailaddress character varying(75) User email address
(mandatory in sign up)
timezoneid character varying(75) User time zone
active_ boolean False if an admin user
disables the user
migrated char(1) Support column to
migrate users across
different versions
loginDate datetime The latest date and
time when the user
successfully logged in
lastLoginDate datetime The latest date and
time when the user
successfully logged in

Database Schema
202
Column Type Constraints Description
before the loginDate,
so the second latest
successful login
lastExchangeDate datetime The latest date and time
when user performed a
billable operation
resettoken varchar(90) DEFAULT null Token value to be used
in the API call described
at Section 3.3.15,
“Reset user password”
in OneMediaHub
Version 14.5 Server API
Developer's Guide
resettokenexpiretime datetime Expiration date of the
resettoken field
last_update bigint(20) DEFAULT null The last time the user's
data has been changed
E.1.56 Other Liferay tables
The following table is not directly accessed by the OneMediaHub, but was originally part of the Liferay
4.2 Framework. It is not involved in any logic in the product, but is still needed to have the OneMediaHub
working. It will be removed in future releases.
Other Liferay tables
Company Information about the company associated to all the
users (e.g. Funambol)
E.2 OneMediaHub User
The User database is described at Chapter 6, Database partitioning.
E.2.1 fnbl_client_mapping
fnbl_client_mapping contains the item mapping based on the link between principal ID, sync
source, LUID and GUID.
fnbl_client_mapping
Column Type Constraints Description
principal bigint PK,
NOT NULL
Principal ID
sync_source varchar(16) PK,
NOT NULL
Source URI
luid varchar(200) PK, NOT NULL LUID
guid varchar(200) PK, NOT NULL GUID

Database Schema
203
Column Type Constraints Description
last_anchor varchar(20) Anchor set in the last
synchronization
E.2.2 fnbl_comment
fnbl_comment represents the comments and notes that administrator and support might add about a user
and the issues she reported.
fnbl_comment
Column Type Constraints Description
id bigint(20) PK, NOT NULL The unique ID of the
comment
userid varchar(255) NOT NULL The user ID of the user
to whom the comment
refers
creation_date bigint(20) NOT NULL Creation time in UTC
milliseconds
comment text NOT NULL The comment
author varchar(255) NOT NULL The user ID of the author
of the comment
E.2.3 fnbl_device_config
fnbl_device_config contains the configuration settings related to a device.
fnbl_device_config
Column Type Constraints Description
principal bigint NOT NULL Principal ID
uri varchar(128) NOT NULL Configuration URI
value varchar(255) NOT NULL Configuration value
last_update bigint NOT NULL Last time configuration's
update
status char(1) NOT NULL Configuration item status
E.2.4 fnbl_email_folder
fnbl_email_folder is no longer used.
fnbl_email_folder
Column Type Constraints Description
guid varchar(50) PK, NOT NULL
source_uri varchar(128) PK, NOT NULL
principal bigint PK, NOT NULL
parentid varchar(50)

Database Schema
204
Column Type Constraints Description
path varchar(500)
E.2.5 fnbl_email_inbox
fnbl_email_inbox is no longer used.
fnbl_email_inbox
Column Type Constraints Description
guid varchar(50) PK, NOT NULL
username varchar(50) PK, NOT NULL
protocol varchar(4) PK, NOT NULL
last_crc bigint
invalid char(1)
internal char(1)
messageid varchar(700)
headerdate varchar(20)
received varchar(20)
subject varchar(700)
sender varchar(300)
token varchar(200)
status char(1)
E.2.6 fnbl_email_sentpop
fnbl_email_sentpop is no longer used.
fnbl_email_sentpop
Column Type Constraints Description
id varchar(200) PK, NOT NULL
source_uri varchar(128) PK, NOT NULL
principal bigint PK, NOT NULL
messageid varchar(700)
mail mediumblob
E.2.7 fnbl_exported_file_data_object
fnbl_exported_file_data_object contains information about which pictures, videos, and files
have been exported to the external services (Picasa, Facebook, Flickr, YouTube)
fnbl_exported_file_data_object
Column Type Constraints Description
id bigint(20) Not Null, PK Incremental ID
account_id bigint(20) Service account ID

Database Schema
205
Column Type Constraints Description
service_name varchar(255) Not Null Service code, for
example flikr or
picasa
file_data_object bigint(20) Not Null, FK
(fnbl_file_data_object_property)
ID of the media file
userid varchar(255) The username of the
owner of the media item
export_time bigint(20) When the media item has
been exported
external_id varchar(255) External ID of the media
item
E.2.8 fnbl_file_data_object
fnbl_file_data_object contains the metadata information of the media files stored on the file-
system, like pictures, videos, and files.
fnbl_file_data_object
Column Type Constraints Description
id bigint(20) Not Null, PK The file data object
GUID
userid varchar(255) The user ID to whom the
media files belong
last_update bigint(20) The last time when the
media file was updated
status char(1) The item status:
•D - deleted item;
•N - new item (added
and never updated);
•U - updated item.
content_status char(1) The content status of the
media files:
•N - item for which
the server has only
metadata (no binary);
•P - item partially
uploaded (not
completed, so not
available on the
server);
•U - item uploaded, it
is completed on the
server (marked as

Database Schema
206
Column Type Constraints Description
N or U in the status
column).
The entries with status N
or P are maintained in the
server for 24 hours; after
that they will be deleted.
local_name varchar(255) The name of the file used
on the server file system
repository
etag varchar(32) The etag value to identify
binary changes
true_name varchar(255) Name of the file (the
original name on the
client)
created datetime The date and time when
the file was created
modified datetime The date and time when
the body of the file object
was last changed.
accessed datetime The date and time when
the body of the file object
was last accessed
cttype varchar(255) The content type of the
file as defined by RFC
2045
object_size bigint(20) The size of the file
object’s body
size_on_storage bigint(20) The actual size of the file
on the storage system
deleted_owner varchar(255) Username of the deleted
user, if the owner of this
item has been deleted
and they binary items
are marked for deletion.
Otherwise null
favorite tinyint(4) If the picture, video, or
file is a favorite:
•0 – not favorite
•1 – favorite
latitude decimal(9,6) Latitude of a location
associated with the
picture, video, or file
longitude decimal(9,6) Longitude of a location
associated with the
picture, video, or file

Database Schema
207
Column Type Constraints Description
modified_by_device varchar(128) The ID of the last device
that modified the file data
object
media_type varchar(255) The media type of the
item. It can contain one
of the following values:
•file
•picture
•video
•audio
uploaded_on_node varchar(10) The node ID where
the binary content was
uploaded, if more than
one instance of the server
are running
folder_id bigint FK (fnbl_folder) The ID of the folder the
media item belongs to
transcoding_status char(1) The status of the
transcoding job:
•Q in queue: the
transcoding job has
been put in the queue
of transcoding jobs
•P in progress: the
transcoding job has
been created
•T transcoded: the
transcoding job has
been successfully
completed
•E error: the
transcoding job has
been completed with
error
transcoded_size bigint The size of the
transcoded file
soft_deleted boolean The soft deleted status
uploaded bigint(20) The time when the media
was completely uploaded
E.2.9 fnbl_file_data_object_label_items
fnbl_file_data_object_label_items

Database Schema
208
Column Type Constraints Description
id bigint PK, FK(fnbl_label) The unique ID of the
label
fdo_id bigint PK,
FK(fnbl_file_data_object)
The unique ID of the
media items
E.2.10 fnbl_file_data_object_property
fnbl_file_data_object_property allows to store optional information for pictures, videos, and
files such as Exif data or rotation information.
fnbl_file_data_object_property
Column Type Constraints Description
id bigint(20) NOT NULL, PK Incremental ID
fdo_id bigint(20) NOT NULL, FK
(fnbl_file_data_object) ID of the media file
name varchar(255) The name of the property
to be stored (exif,
rotation, ...)
value text The value of the property
E.2.11 fnbl_file_data_object_set
fnbl_file_data_object_set allows to store the information about a set of media items.
fnbl_file_data_object_set
Column Type Constraints Description
id bigint PK, NOT NULL The ID of the set
userid varchar(255) PK, NOT NULL The owner of the set
type varchar(255) PK, NOT NULL The type of the set
description varchar(255) A description of the set
access_counter int Number of accesses done
to the set after latest reset
created bigint Creation time
accessed bigint Access time
service_name varchar(255) The name of the service
E.2.12 fnbl_file_data_object_set_item
fnbl_file_data_object_set_item allows to store the media items contained in a set.
fnbl_file_data_object_set_item
Column Type Constraints Description
fdo_id bigint PK, NOT NULL The ID of the item
fdo_set_id bigint PK, NOT NULL The ID of the set

Database Schema
209
E.2.13 fnbl_file_data_object_tag
fnbl_file_data_object_tag includes information about tags for file data objects.
fnbl_file_data_object_tag
Column Type Constraints Description
fdo_id bigint PK The ID of the file data
object to which the tag
belongs
tag varchar(255) PK The value of the tag
E.2.14 fnbl_file_data_object_thumbnail
fnbl_file_data_object_thumbnail includes information about the thumbnails generated for
pictures and videos.
fnbl_file_data_object_thumbnail
Column Type Constraints Description
id bigint PK The unique ID of the
thumbnail
fdo_id bigint FK
(fnbl_file_data_object) The unique ID of the file
data object
name varchar(255) The name of the
generated thumbnail
width integer The width of the
thumbnail
height integer The height of the
thumbnail
size bigint The size in bytes of the
thumbnail
E.2.15 fnbl_folder
fnbl_folder is used to store the persistent media folder structure.
fnbl_folder
Column Type Constraints Description
id bigint Not Null, PK The unique ID of the
folder
userid varchar(255) The user ID to whom the
folder belongs
last_update bigint(20) The last time when the
folder was updated
status char(1) The item status
name varchar(255) The name of the folder
types smallint The media types of the
folder (one from 0 to 15)

Database Schema
210
Column Type Constraints Description
magic char(1) True if the folder is the
unique magic folder
device_name varchar(255) The name of the device
that generated the folder
parent_id bigint FK (fnbl_folder) The folder ID the folder
belongs to
E.2.16 fnbl_label
fnbl_label
Column Type Constraints Description
id bigint PK The unique ID of the
label
name varchar(255) The value of the label
userid varchar(255) The owner of the label
label_type varchar(255) The type of the label
E.2.17 fnbl_last_activity
fnbl_last_activity contains information about the last sync activity done by a device.
fnbl_last_activity
Column Type Constraints Description
id bigint PK Unique identifier of the
activity
userId varchar(255) FK (User_) The ID of the user
deviceid varchar(128) NOT NULL The ID of the device
reporting the activity
status varchar(16) The status of the sync
starttime bigint The time of when the
sync started
endtime bigint The time of when the
sync ended
E.2.18 fnbl_last_activity_item
fnbl_last_activity_item contains each record of last activities performed by devices.
fnbl_last_activity_item
Column Type Constraints Description
source varchar(255) PK Source of the sync
(card, cal, etc)
activitytype varchar(64) PK Type of activity (add,
remove, etc)
activity bigint PK The ID of the activity
this row refers to

Database Schema
211
Column Type Constraints Description
sent integer Number of items sent by
the device
received integer Number of items
received by the device
E.2.19 fnbl_pending_notification
fnbl_pending_notification contains the pending notifications to the devices
fnbl_pending_notification
Column Type Constraints Description
id bigint PK,
NOT NULL
Unique ID for the
notification
username varchar(255) NOT NULL The username of the user
device varchar(128) NOT NULL The ID of the device that
will be notified
sync_source varchar(16) NOT NULL The sync source for
which the device will be
notified
content_type varchar(128) NOT NULL The content type
sync_type integer NOT NULL The type of the
synchronization
ui_mode integer NOT NULL The UI mode
time bigint NOT NULL The time when the
notification was recorded
E.2.20 fnbl_pim_address
fnbl_pim_address contains information about address home, business, and other.
fnbl_pim_address
Column Type Constraints Description
id bigint PK Unique ID
userid varchar(255) ID of the user the address
belongs to
contact bigint FK(fnbl_pim_contact) Contact ID
type smallint Address type
1 – Home
2 – Business
3 – Other
street varchar(128) Street
city varchar(64) City
state varchar(64) State

Database Schema
212
Column Type Constraints Description
postal_code varchar(16) Postal code
country varchar(32) Country
po_box varchar(16) Post office box
preferred smallint • 0 – item is not
preferred
•1 – item is preferred
E.2.21 fnbl_pim_calendar
fnbl_pim_calendar contains information about a calendar event or task.
fnbl_pim_calendar
Column Type Constraints Description
id bigint PK Calendar ID
userid varchar(255) User ID
last_update bigint Last updating time
status char Calendar status
N – New
U – Updated
D – Deleted
type smallint Calendar's type
1 – Event
2 – Task
all_day char(1) Is the calendar an all-
day?
body varchar(255) Detailed description
busy_status smallint Availability of the user
during the calendar
categories varchar(255) Categories the calendar
belongs to
companies varchar(255) Companies related to the
calendar
duration integer Calendar's duration
dstart timestamp Starting date of the
calendar
dend timestamp Ending date of the
calendar
folder varchar(255) The folder in which the
calendar is saved
importance smallint Priority level

Database Schema
213
Column Type Constraints Description
location varchar(255) Location
meeting_status smallint Point reached by the
calendar's organization
process
0 – no meeting
1 – meeting
3 – received
5 – canceled
mileage varchar(16) Mileage
reminder_time timestamp Date and Time of when
the calendar's reminder
has to be triggered
reminder char(1) Is there a reminder for
the calendar ?
reminder_sound_file varchar(255) Sound file to be played
when the calendar's
reminder gets active
reminder_options integer Optional features
reminder_repeat_count integer Number of times the
reminder action has to be
repeated
sensitivity smallint The type of access class
subject varchar(1000) Subject
rec_type smallint Type of recurrence rule
rec_interval integer Recurrence interval
rec_month_of_year smallint Month of the year when
the calendar has to be
repeated
rec_day_of_month smallint Day of month when
the calendar has to be
repeated
rec_day_of_week_mask varchar(16) Day(s) of the week when
the calendar has to be
repeated
rec_instance smallint Instance of the days
prescribed by the
recurrence period and by
the modifiers
rec_start_date_pattern varchar(32) Starting date of the
recurrence
rec_no_end_date char(1) Does the recurrence have
the end date?

Database Schema
214
Column Type Constraints Description
rec_end_date_pattern varchar(32) Ending date of the
recurrence
rec_occurrences smallint Number of time for
which repeat the calendar
reply_time timestamp Date and Time when
the recipient replied
to the meeting request
associated with the
calendar
completed timestamp Date and Time when the
Task has been completed
percent_complete smallint Task's completion
percentage
dstart_tz varchar(255) Timezone of the start
date
dend_tz varchar(255) Timezone of the end date
reminder_tz varchar(255) Timezone of the
reminder date
latitude decimal(9,6) Latitude of the location
associated with the
calendar event
longitude decimal(9,6) Longitude of the location
associated with the
calendar event
account_type varchar(64) ID that can identify
the type of account
(currently not used by
the OneMediaHub client
Apps)
account_name varchar(64) Name of the account
in the device (currently
not used by the
OneMediaHub client
Apps)
tzid varchar(255) Timezone ID for this
event
uid varchar(64) A unique identifier
E.2.22 fnbl_pim_calendar_alarm
fnbl_pim_calendar_alarm includes information about alarms. Multiple alarms can be associated to
a single event.
fnbl_pim_calendar_alarm
Column Type Constraints Description
id bigint PK The ID of the reminder

Database Schema
215
Column Type Constraints Description
userid varchar(255) The user this reminder
belongs to
calendar bigint The ID of the calendar
this reminder belongs to
time datetime Date and time of when
the calendar's reminder
has to be triggered
timezone varchar(255) Timezone of the
reminder date
active char(1) Is the reminder active?
sound_file varchar(255) Sound file to be played
when the reminder gets
active
repeat_count integer Number of times the
reminder action has to be
repeated
options integer Optional features
E.2.23 fnbl_pim_calendar_attendee
fnbl_pim_calendar_attendee includes information about attendees. Multiple attendees can be
associated with a single event.
fnbl_pim_calendar_attendee
Column Type Constraints Description
id bigint PK The ID of the attendee
calendar bigint PK The ID of the calendar
event this attendee
belongs to
userid varchar(255) The user this attendee
belongs to
cn varchar(128) Common or displayable
name associated with the
attendee
field_value varchar(128) The actual value of the
ATTENDEE property
from the vCalendar
object, e.g. (if the value
is specified as a URL
reference to a vCard
object that contains the
information about the
attendee) http://
www.xyz.com/
~myvcard.vcf
value_type varchar(16) The content of the
VALUE parameter of the

Database Schema
216
Column Type Constraints Description
ATTENDEE property
from the vCalendar
object, e.g. URL
value_format varchar(16) The content of the
TYPE parameter of the
ATTENDEE property
from the vCalendar
object, e.g. VCARD
role smallint Role the attendee will
have:
•0 – attendee
•1 – delegate
•2 – organizer
•3 – owner
•4 – optional
participant
•5 – non participant
rsvp smallint Favor of reply is
requested:
•0 – no
•1 - yes
partstatus smallint Status of the attendee's
participation:
•0 – declined
•1 – needs action
•2 – sent
•3 – delegated
•4 – tentative
•5 – accepted
•6 – in process
•7 - completed
expect smallint Expectation of the
attendee's participation
by the originator:
•0 – non participant

Database Schema
217
Column Type Constraints Description
•1 – optional
•2 – required
•3 – required
immediately
•4 - chairman
cutype smallint Type of attendee:
•0 - individual
•1 - group
•2 - resource
•3 - room
E.2.24 fnbl_pim_calendar_exception
fnbl_pim_calendar_exception contains information about the calendar exceptions.
fnbl_pim_calendar_exception
Column Type Constraints Description
calendar bigint PK,
FK(fnbl_pim_calendar)
Calendar ID
addition char(1) PK Addition or Subtraction
of the exception
occurrence_date timestamp PK Date and Time of the
exception
E.2.25 fnbl_pim_contact
fnbl_pim_contact contains information about the contact.
fnbl_pim_contact
Column Type Constraints Description
id bigint PK Contact ID
userid varchar(255) User ID
last_update bigint Last updating time
status char Contact status
N – New
U – Updated
D – Deleted
importance smallint Priority
sensitivity smallint The type of access class

Database Schema
218
Column Type Constraints Description
subject varchar(255) Subject
folder varchar(255) The folder in which the
contact is saved
anniversary varchar(16) Anniversary date
first_name varchar(64) First name
middle_name varchar(64) Middle name
last_name varchar(64) Last name
display_name varchar(128) Display name
birthday varchar(16) Birthday date
body varchar(255) Note
categories varchar(255) Categories the contact
belongs to
children varchar(255) Name of the contact's
children
hobbies varchar(255) List of hobbies
initials varchar(16) Initials
languages varchar(255) List of languages spoken
by contact
nickname varchar(64) Nickname
spouse varchar(128) Full name of the contact's
spouse
suffix varchar(32) Suffix name
title varchar(32) Salutation (word that
precedes the full name)
gender char(1) Gender
assistant varchar(128) Full name of the contact's
assistant
company varchar(255) Name of the company in
which the contact works
department varchar(255) Name of the department
in which the contact
works
job_title varchar(128) Job title
manager varchar(128) Full name of the contact's
manager
mileage varchar(16) Mileage
office_location varchar(64) Location of the contact's
office
profession varchar(64) Professional role of the
contact
companies varchar(255) Companies the contact is
related to

Database Schema
219
Column Type Constraints Description
photo_type smallint Picture of the contact
uid varchar(64) A unique identifier
account_type varchar(64) Type of account
account_name varchar(64) Name of the account
favorite smallint If the contact is a favorite
•0 – not favorite
•1 – favorite
custom_phone varchar(64) A phone number
custom_email varchar(64) An email address
custom_address varchar(255) An address
custom_org varchar(255) An organization
custom_im varchar(255) A custom im address
revision varchar(64) Contact revision
E.2.26 fnbl_pim_contact_item
fnbl_pim_contact_item contains information about phone numbers, email addresses, web pages,
and address labels.
fnbl_pim_contact_item
Column Type Constraints Description
id bigint PK Unique ID
userid varchar(255) ID of the user the contact
item belongs to
contact bigint FK(fnbl_pim_contact) Contact ID
type smallint Item type
0 – unspecified
1 – home phone number
2 – home fax
3 – mobile
4 – general email
5 – web 1
10 – work phone number
11 – work fax
12 – work main phone
number

Database Schema
220
Column Type Constraints Description
13 – assistant phone
number
14 – pager
15 – callback
16 – home email
17 – web 2
20 – car
21 – primary
23 – work email
30 – other
value varchar(255) Item value
preferred smallint • 0 – item is not
preferred
•1 – item is preferred
E.2.27 fnbl_pim_contact_photo
fnbl_pim_contact_photo contains the information about the photo of the contact.
fnbl_pim_contact_photo
Column Type Constraints Description
contact bigint PK,
FK(fnbl_pim_contact)
ID of the contact
type varchar(64) Is the photo an image in
the DB or a URL?
photo bytea Bytes of the image
url varchar(255) URL of the image
E.2.28 fnbl_pim_note
fnbl_pim_note contains information about notes.
fnbl_pim_note
Column Type Constraints Description
id bigint PK ID of the note
userid varchar(255) User ID
last_update bigint Last time when the note
was updated
status char(1) Note status

Database Schema
221
Column Type Constraints Description
N – New
U – Updated
D – Deleted
subject varying The subject of the note
textdescription varying The description of the
note
categories varying The categories of the
note
folder varying The folder of the note
color integer The color of the note
height integer The height of the note
width integer The width of the note
top integer The top margin of the
note
leftmargin integer The left margin of the
note
E.2.29 fnbl_pim_organization
fnbl_pim_organization includes information about the organizations (companies) associated with
each contact. Multiple organizations can be associated with a single contact.
fnbl_pim_organization
Column Type Constraints Description
id bigint PK The ID of the
organization
userid varchar(255) The user this
organization belongs to
contact bigint FK(fnbl_pim_contact) ID of the contact
company varchar(255) Name of the company
department varchar(255) Name of the department
office_location varchar(64) Location of the office
preferred tinyint • 0 – not preferred
•1 – preferred
E.2.30 fnbl_temp_paying_users
The table fnbl_temp_paying_users is a temporary table used to compute the marketing key
performance indicators (KPI).
fnbl_temp_paying_users
Column Type Constraints Description
userid varchar(75) PK The username

Database Schema
222
E.3 OneMediaHub Reporting
E.3.1 fnbl_client_download_stats
fnbl_client_download_stats stores the number of daily downloads for the desktop clients.
fnbl_client_download_stats
Column Type Constraints Description
stats_date date PK The date when the
reporting record has been
generated
num_download_windows integer Number of downloads of
the Windows PC app
num_download_macos integer Number of downloads of
the Mac OS app
E.3.2 fnbl_event
fnbl_event contains the all the reporting information for the OneMediaHub.
fnbl_event
Column Type Constraints Description
event_time bigint NOT NULL The date time of the
event
event_type varchar(64) The event type
logger_name varchar(255) The logger name
username varchar(255) The user involved in the
event
device varchar(255) The device involved in
the event
sessionid varchar(255) The session ID
source varchar(32) The sync source URI
message text The log message
originator varchar(64) The Funambol service
used, for example DS-
SERVICE or SAPI
sync_type varchar(64) The synchronization type
num_transferred_items integer The number of
transferred items (used in
SyncML only)
num_added_items integer The number of added
items (used in SyncML
only)
num_deleted_items integer The number of deleted
items (used in SyncML
only)

Database Schema
223
Column Type Constraints Description
num_updated_items integer The number of updated
items (used in SyncML
only)
duration integer The duration of the
SyncML session
status_code varchar(64) The HTTP status code
error char(1) Possible values either 'N'
or 'Y'. Default 'N'
E.3.3 fnbl_marketing_kpi
fnbl_marketing_kpi contains the weekly and monthly reports of the marketing key performance
indicators (KPI).
fnbl_marketing_kpi
Column Type Constraints Description
reportDate datetime PK The date when the
reporting record has been
generated
newUsers integer Users registered (and
activated) since previous
report date
loginUsers integer Users who interacted
with the server using
a client (excluding
the Web Portal) since
previous report date
mobileUsers integer Users who interacted
with the server using
a mobile device since
previous report date
desktopUsers integer Users who interacted
with the server using
a desktop client since
previous report date
webUsers integer Users who interacted
with the server using a
web client since previous
report date
deletedUsers integer Number of deleted users
since previous report date
totalMediaUsers integer Overall number of users
with at least one media
file
totalActivatedUsers integer Total activated users
totalUsers integer Total users

Database Schema
224
Column Type Constraints Description
contactUsers integer Users who added,
modified, or deleted at
least one contact since
previous report date
calendarUsers integer Users who added,
modified, or deleted at
least one event since
previous report date
mediaUsers integer Users who added,
modified, or deleted at
least one media item
since previous report date
totalGetChanges integer Number of requests of
the API call described
at Section 3.3.1,
“Get changes” in
OneMediaHub
Version 14.5 Server API
Developer's Guide since
previous report date
totalSyncmlSync integer Number of SyncML
syncs since previous
report date
windowsDownloads integer Number of Windows
PC app downloads since
previous report date
macosDownloads integer Number of Mac OS app
downloads since previous
report date
avgStorage bigint Average storage per
media user
totalStorage bigint Total storage used by
paying users
avgStoragePaying bigint Average storage per
paying media user
totalStoragePaying bigint Total storage used by
paying media users
avgStorageNotPaying bigint Average storage per not
paying media user
totalStorageNotPaying bigint Total storage used by not
paying media users
totalPayingUsers integer Number of paying users
totalNotPayingUsers integer Number of not paying
users
totalUsersInFamilies integer Total number of users
that have a family

Database Schema
225
Column Type Constraints Description
totalUsersWithSharedFamilyItemsinteger Number of users that
shared family items since
previous report date
period char(1) NOT NULL KPI period, either W
(weekly) or M (monthly)
newSyncUsers integer Number of new active
users since previous
report date
androidUsers integer Number of users of
Android OS since
previous report date
iosUsers integer Number of users of iOS
OS since previous report
date
blackberryUsers integer Number of users of
Blackberry OS since
previous report date
windowsphoneUsers integer Number of users of
Windows 8 OS since
previous report date
windowsdesktopUsers integer Number of Windows
desktop client users since
previous report date
macUsers integer Number of MAC
desktop client users since
previous report date
totalStorageForPicture bigint Total used storage for
pictures
totalStorageForVideo bigint Total used storage for
videos
totalStorageForMusic bigint Total used storage for
music
totalStorageForFile bigint Total used storage for
documents
totalMediaItemsPaying integer Total number (quantity)
of stored data items (pics/
video/music/docs) by
paying users
totalMediaItemsNotPayinginteger Total number (quantity)
of stored data items (pics/
video/music/docs) by
free users
totalStorageMobileApps bigint Total volume [Gb] of
uploaded files by mobile
apps

Database Schema
226
Column Type Constraints Description
totalStorageDesktopClientsbigint Total volume [Gb] of
uploaded files by desktop
clients
totalStorageWeb bigint Total volume [Gb] of
uploaded files by web
clients
totalSharedItems bigint Total number of items
successfully shared
totalSharedItemsForMobileAppsinteger Total number of shared
items from mobile app
totalSharedItemsForWeb integer Total number of shared
items from the web portal
totalUsersUsingShare integer Total number of unique
users sharing items
totalSharedItemsFacebookinteger Total number of items
uploaded to Facebook
totalSharedItemsFlickr integer Total number of items
uploaded to Filckr
totalSharedItemsMail integer Total number of items
sent by email
totalSharedItemsPicasa integer Total number of items
uploaded to Picasa
totalSharedItemsTwitter integer Total number of items
uploaded to Twitter
totalSharedItemsYoutube integer Total number of items
uploaded to Youtube

227
Appendix F. Examples of sent SNMP traps
These are examples of sent traps received by snmptrapd.
Command line
[root@localhost ~]# snmptrapd -m /usr/share/snmp/mibs/SNMPv2-
MIB.txt:/usr/share/snmp/mibs/FUNAMBOL-LOGGING-MIB.txt -P -n -F"\n\n
%02.2h:%02.2j TRAP%w.%q from %A (%b [%B])\ntrap type: %w\ncommunity:
%P\n%V\n%v" udp:162
Output
Warning: -P option is deprecated; use -f -Le instead
2007-02-18 11:26:22 NET-SNMP version 5.2.1.2 Started.
11:26 TRAP0.0 from 0.0.0.0 (UDP: [192.168.10.20]:1268
[192.168.10.20])
trap type: 0
community: TRAP2, SNMP v2c, community public
SNMPv2-MIB::snmpTrapOID.0 = OID: FUNAMBOL-LOGGING-
MIB::funambolLoggingNotification
FUNAMBOL-LOGGING-MIB::funambolLoggingDateAndTime = STRING:
2007-2-18,11:24:46.4,+1:0
FUNAMBOL-LOGGING-MIB::funambolLoggingLevel = INTEGER: info(3)
FUNAMBOL-LOGGING-MIB::funambolLoggingName = STRING:
funambol.transport.http
FUNAMBOL-LOGGING-MIB::funambolLoggingSessionId = STRING:
1E39E498FC3B602DACF6ACE203E8D6B4
FUNAMBOL-LOGGING-MIB::funambolLoggingDeviceId = STRING:
FUNAMBOL-LOGGING-MIB::funambolLoggingUser = STRING:
FUNAMBOL-LOGGING-MIB::funambolLoggingSourceUri = STRING:
FUNAMBOL-LOGGING-MIB::funambolLoggingMessage = STRING: Handling
incoming request
11:26 TRAP0.0 from 0.0.0.0 (UDP: [192.168.0.20]:1268 [192.168.0.20])
trap type: 0
community: TRAP2, SNMP v2c, community public
SNMPv2-MIB::snmpTrapOID.0 = OID: FUNAMBOL-LOGGING-
MIB::funambolLoggingNotification
FUNAMBOL-LOGGING-MIB::funambolLoggingDateAndTime = STRING:
2007-2-18,11:24:46.5,+1:0
FUNAMBOL-LOGGING-MIB::funambolLoggingLevel = INTEGER: info(3)
FUNAMBOL-LOGGING-MIB::funambolLoggingName = STRING:
funambol.transport.http
FUNAMBOL-LOGGING-MIB::funambolLoggingSessionId = STRING:
1E39E498FC3B602DACF6ACE203E8D6B4
FUNAMBOL-LOGGING-MIB::funambolLoggingDeviceId = STRING:
FUNAMBOL-LOGGING-MIB::funambolLoggingUser = STRING:
FUNAMBOL-LOGGING-MIB::funambolLoggingSourceUri = STRING:
FUNAMBOL-LOGGING-MIB::funambolLoggingMessage = STRING: Request URL:
http://localhost:8080/funambol/ds
11:26 TRAP0.0 from 0.0.0.0 (UDP: [192.168.0.20]:1268 [192.168.0.20])

Examples of sent SNMP traps
228
trap type: 0
community: TRAP2, SNMP v2c, community public
SNMPv2-MIB::snmpTrapOID.0 = OID: FUNAMBOL-LOGGING-
MIB::funambolLoggingNotification
FUNAMBOL-LOGGING-MIB::funambolLoggingDateAndTime = STRING:
2007-2-18,11:24:46.6,+1:0
FUNAMBOL-LOGGING-MIB::funambolLoggingLevel = INTEGER: info(3)
FUNAMBOL-LOGGING-MIB::funambolLoggingName = STRING:
funambol.transport.http
FUNAMBOL-LOGGING-MIB::funambolLoggingSessionId = STRING:
1E39E498FC3B602DACF6ACE203E8D6B4
FUNAMBOL-LOGGING-MIB::funambolLoggingDeviceId = STRING:
FUNAMBOL-LOGGING-MIB::funambolLoggingUser = STRING:
FUNAMBOL-LOGGING-MIB::funambolLoggingSourceUri = STRING:
FUNAMBOL-LOGGING-MIB::funambolLoggingMessage = STRING: Requested
sessionId: null
17:53 TRAP0.0 from 0.0.0.0 (UDP: [192.168.0.20]: 1268 [UDP:
[192.168.0.20]: 1268])
trap type: 0
community: TRAP2, SNMP v2c, community public
SNMPv2-MIB::snmpTrapOID.0 = OID: FUNAMBOL-LOGGING-
MIB::funambolLoggingNotification
FUNAMBOL-LOGGING-MIB::funambolLoggingDateAndTime = STRING:
2009-12-14,10:52:1.6,+0:0
FUNAMBOL-LOGGING-MIB::funambolLoggingLevel = INTEGER: fatal(0)
FUNAMBOL-LOGGING-MIB::funambolLoggingName = STRING:
funambol.configuration
FUNAMBOL-LOGGING-MIB::funambolLoggingSessionId = STRING:
FUNAMBOL-LOGGING-MIB::funambolLoggingDeviceId = STRING:
FUNAMBOL-LOGGING-MIB::funambolLoggingUser = STRING:
FUNAMBOL-LOGGING-MIB::funambolLoggingSourceUri = STRING:
FUNAMBOL-LOGGING-MIB::funambolLoggingMessage = STRING: Unknown fatal
error
com.funambol.framework.tools.beans.BeanInstantiationException: Error
creating bean
at com.funambol.framework.tools.beans.BeanFactory.unmarshal(
BeanFactory.java:389)
at com.funambol.framework.tools.beans.BeanFactory.unmarshal(
BeanFactory.java:415)
at
com.funambol.framework.tools.beans.BeanFactory.getBeanInstanceFromCo
nfig(
BeanFactory.java:201)
17:53 TRAP0.0 from 0.0.0.0 (UDP: [192.168.0.20]: 1268 [UDP:
[192.168.0.20]: 1268])
trap type: 0
community: TRAP2, SNMP v2c, community public
SNMPv2-MIB::snmpTrapOID.0 = OID: FUNAMBOL-LOGGING-
MIB::funambolLoggingNotification
FUNAMBOL-LOGGING-MIB::funambolLoggingDateAndTime = STRING:
2009-12-14,10:52:1.6,+0:0
FUNAMBOL-LOGGING-MIB::funambolLoggingLevel = INTEGER: fatal(0)

Examples of sent SNMP traps
229
FUNAMBOL-LOGGING-MIB::funambolLoggingName = STRING:
funambol.configuration
FUNAMBOL-LOGGING-MIB::funambolLoggingSessionId = STRING:
FUNAMBOL-LOGGING-MIB::funambolLoggingDeviceId = STRING:
FUNAMBOL-LOGGING-MIB::funambolLoggingUser = STRING:
FUNAMBOL-LOGGING-MIB::funambolLoggingSourceUri = STRING:
FUNAMBOL-LOGGING-MIB::funambolLoggingMessage = STRING: Unknown fatal
error
com.funambol.framework.config.ConfigurationException: Error creating
the ServerConfiguration object
at com.funambol.server.config.Configuration.getServerConfig(
Configuration.java:363)
at com.funambol.server.config.Configuration.getUserManager(
Configuration.java:476)
at com.funambol.server.admin.ws.axis.AdminAuthHandler.<init>(
AdminAuthHandler.java:83)

230
Appendix G. Xuggle Xuggler FAQs
Frequently Asked Questions
Q: Is Xuggler strictly necessary to use OneMediaHub?
A: Yes, since Xuggler permits to have more information about videos and audios, like duration and
thumbnails, or the ID3 metadata.
Q: How to install Xuggler?
A: In order to install Xuggler you need to compile it from the source code. There are some
prerequirements to be fullfilled in order to be able to build Xuggler; in particular, you need to have
installed on your environment:
• Java Platform (JDK) 6 (or higher)
• Apache Ant 1.7 (or higher)
• Perl 5.6 (or higher)
• gcc/g++ 3.2 (or higher)
• make 3.81 (or higher)
• yasm 1.0 (or higher)
• patch 2.6 (or higher)
• pkg-config 0.26 (or higher)
If your environment has the applications listed above, perform the following steps to build Xuggler
using the same user that runs OneMediaHub:
1. download the archive containing the source code from https://github.com/
artclarke/xuggle-xuggler/archive/master.zip:
wget 'https://github.com/artclarke/xuggle-xuggler/archive/
master.zip' -O master.zip --no-check-certificate
2. unzip the file:
unzip master.zip -d /tmp
3. change directory:
cd /tmp/xuggle-xuggler-master/
4. run:
<ANT_HOME>/bin/ant stage
5. copy the Xuggler JAR file:
cp dist/lib/xuggle-xuggler.jar <root directory of your
OneMediaHub installation>/tools/tomcat/lib

Xuggle Xuggler FAQs
231
Q: I already installed Xuggler version 3.4, how to upgrade it?
A: Follow the previous steps for building the new version, and then unset XUGGLE_HOME, unset
LD_LIBARY_PATH, and remove $XUGGLE_HOME/bin from the PATH variable.
Moreover, if you are using OneMediaHub older than v13 you have to remove the filr
xuggler-3.4.1012.jar from its directory running:
rm <root directory of your OneMediaHub installation>/tools/tomcat/
lib/xuggler-3.4.1012.jar
rm <root directory of your OneMediaHub installation>/ds-server/
default/lib/xuggler-3.4.1012.jar
Q: I have compiled Xuggler on my testing server. Can I copy the same JAR file to the production
environment?
A: No, you can't. xuggle-xuggler.jar contains some native libraries, so you can use it only if
your production environment is equal (same operating system and same architecture –32 vs 64 bit–)
to your testing server.
Q: What are the machine requisites to use Xuggler?
A: In order to use the Xuggler JAR file, you need an a environment with libc6 installed. Also make
sure that XUGGLER_HOME is not set to the path of any previous JAR file version (previous Xuggler
versions should not be present on the classpath.)
Q: I have installed all the needed packages, but ant stage fails. What can I do?
A: This can happen if you have run ant stage with some missing packages (like gcc or gcc-c++.)
After having installed them, before running ant stage again you need to clean up the Xuggler's
src directory by invoking ant clobber. After that, you can run ant stage again.
Q: How to retrieve some information about the installed Xuggle Xuggler?
A: In order to retrieve which formats and codecs are supported by Xuggle Xuggler, the script <root
directory of your OneMediaHub installation>/bin/gather-xuggler-info
can be run. The information is written to the console.
This is an example of what you should see running the script:
=======================================
Demuxable Formats
=======================================
"mp3": MPEG audio layer 2/3
"swf": Flash format
"mov,mp4,m4a,3gp,3g2,mj2": QuickTime/MPEG-4/Motion JPEG 2000
format
"rm": RealMedia format
...
=======================================
Muxable Formats
=======================================
"mp3": MPEG audio layer 3
"mov": MOV format
"m4v": raw MPEG-4 video format

Xuggle Xuggler FAQs
232
"mjpeg": raw MJPEG video
...
=======================================
Decodeable Codecs
=======================================
CODEC_TYPE_VIDEO CODEC_ID_VP6 (vp6): On2 VP6
CODEC_TYPE_VIDEO CODEC_ID_TXD (txd): Renderware TXD (TeXture
Dictionary) image
CODEC_TYPE_AUDIO CODEC_ID_MP3ON4 (mp3on4): MP3onMP4
CODEC_TYPE_SUBTITLE CODEC_ID_DVB_SUBTITLE (dvbsub): DVB subtitles
...
=======================================
Encodeable Codecs
=======================================
CODEC_TYPE_AUDIO CODEC_ID_PCM_MULAW (pcm_mulaw): PCM mu-law
CODEC_TYPE_VIDEO CODEC_ID_DNXHD (dnxhd): VC3/DNxHD
CODEC_TYPE_VIDEO CODEC_ID_QTRLE (qtrle): QuickTime Animation (RLE)
video
CODEC_TYPE_SUBTITLE CODEC_ID_DVD_SUBTITLE (dvdsub): DVD subtitles
...
=======================================
com.xuggle.xuggler.IContainer Properties
=======================================
probesize; default= 5000000; type=PROPERTY_INT;
help for probesize: set probing size
muxrate; default= 0; type=PROPERTY_INT;
help for muxrate: set mux rate
...
=======================================
com.xuggle.xuggler.IStreamCoder Properties
=======================================
b; default= 64000; type=PROPERTY_INT;
help for b: set bitrate (in bits/s)
ab; default= 64000; type=PROPERTY_INT;
help for ab: set bitrate (in bits/s)
...
=======================================
com.xuggle.xuggler.IVideoResampler Properties
=======================================
sws_flags; default= 2684354592; valid values=(-fast_bilinear; );
type=PROPERTY_FLAGS;
help for sws_flags: scaler/cpu flags
...
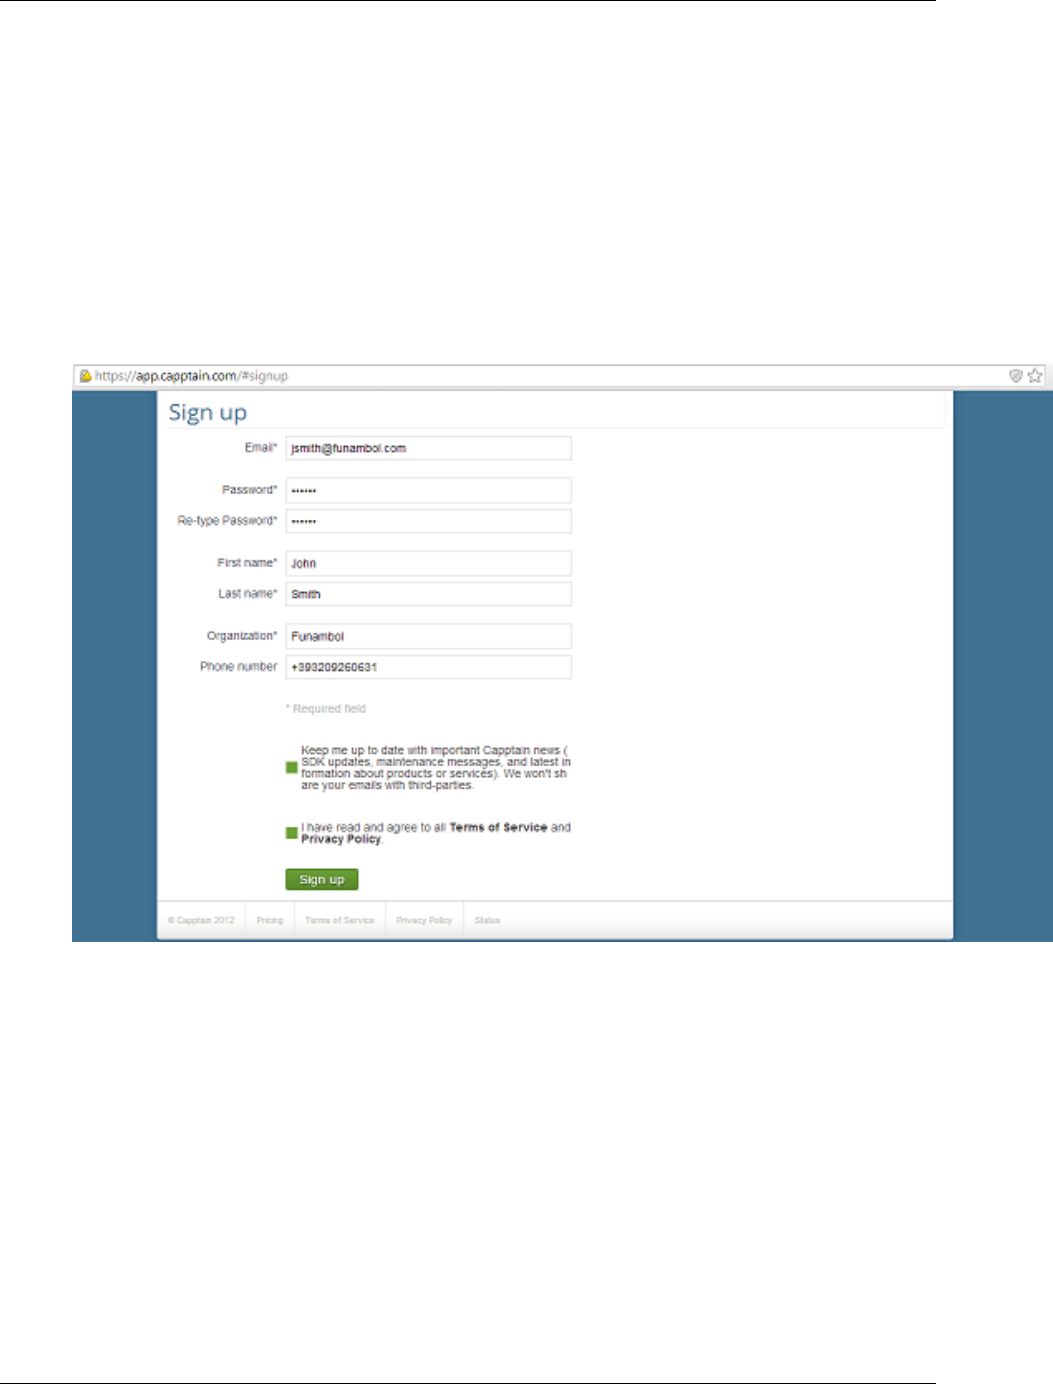
233
Appendix H. Capptain integration on Android
App
Step 1 Capptain Sign up
If you haven't signed to Capptain yet, navigate to http://www.capptain.com → Sign Up and fill the form
required.
Figure H.1. Capptain - Sign up
Then an email with the activation link is sent, press that link and login in the portal. Now should create a
new application monitored by Capptain: hit “New application” and choose Android.
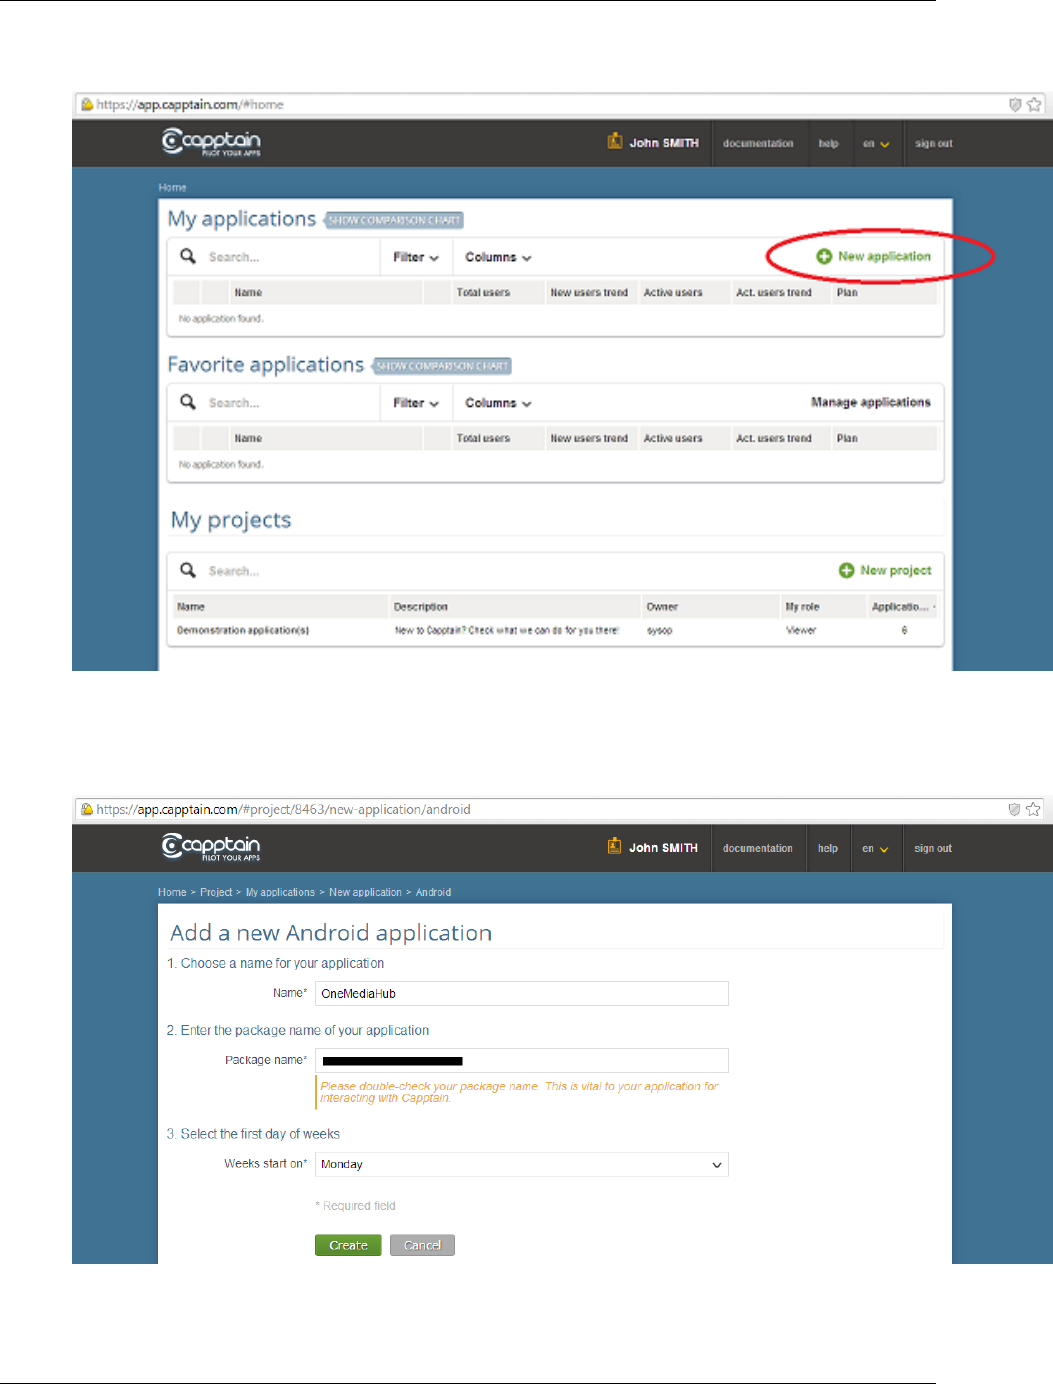
Capptain integration on Android App
234
Figure H.2. Capptain - "New Application"
Fill the field required with application name and package name and hit “Create”.
Figure H.3. Capptain - "Create"
Select a plan and subscribe accordingly to the user amount. The application is now enabled and Capptain
are ready to process its logs.
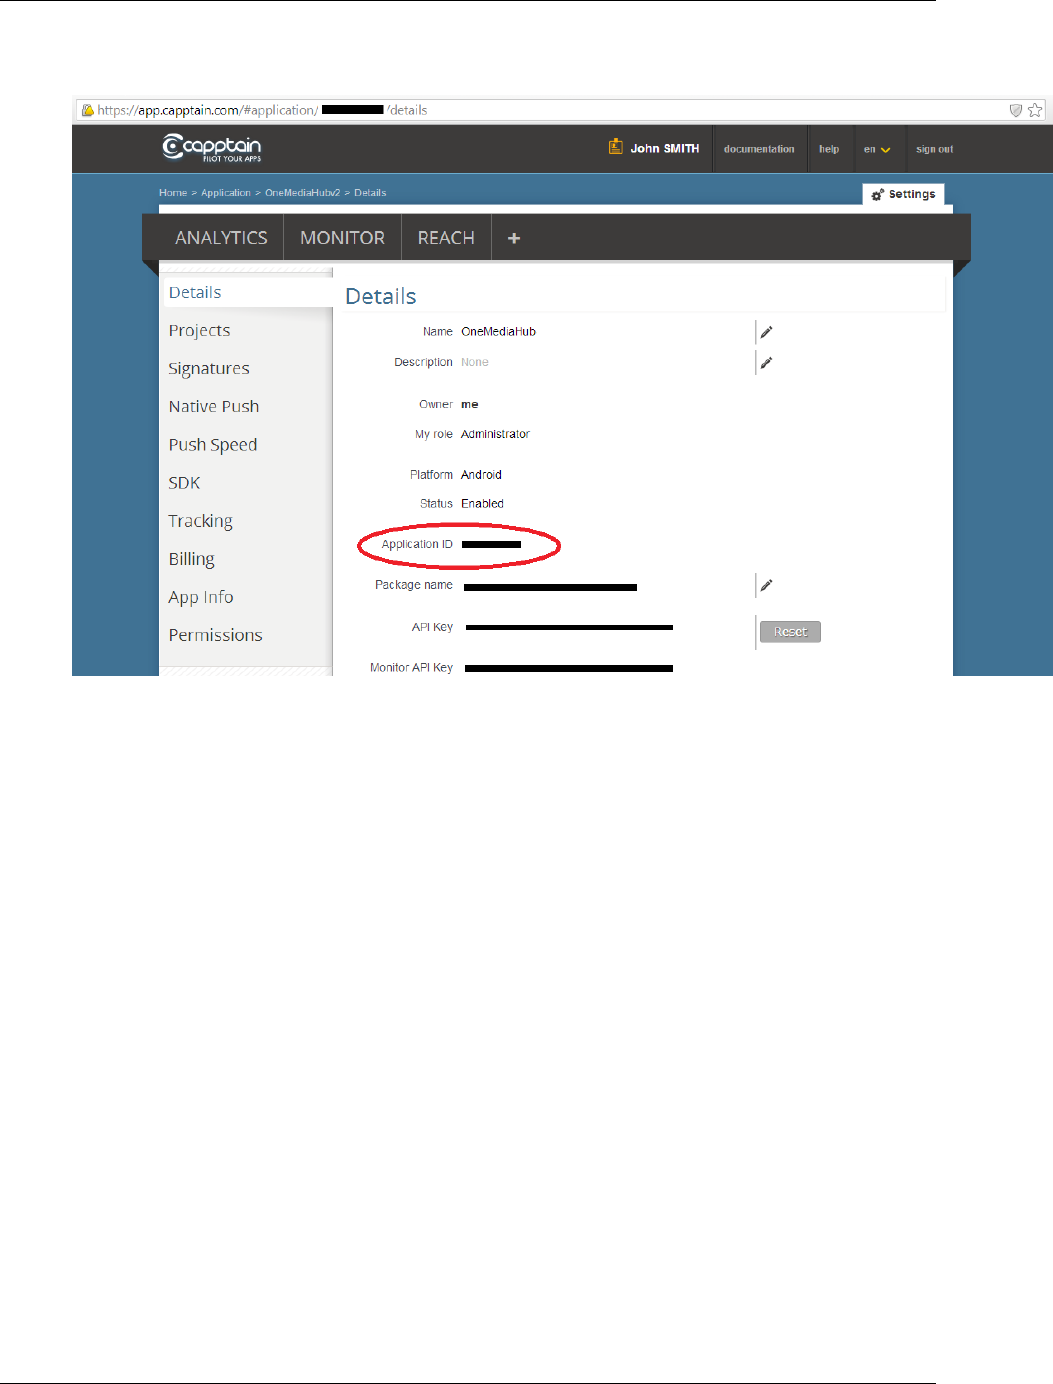
Capptain integration on Android App
235
Figure H.4. Capptain - Application Enabled
Now a dashboard with detailed information should be shown.
The ApplicationId generated it's fondamental to bind the Capptain service and should be provided to
Funambol for the Android application branding.
Step 2 Integrate GCM with Capptain
If not already done for other services, you must enable the GCM Service on your Google account used for
publish the app in Play Store to use the Capptain Reach notification feature.
Open the Google Developers Console: https://cloud.google.com/console.
If you haven't created an API project yet, click Create Project. Supply a project name and click Create.
Once the project has been created, a page appears that displays your project ID and project number. For
example, Project Number: 670330094152.
The Project Number (attention not the Project ID, that information it's relevant only for Google) should be
provided to Funambol for the Android application branding.
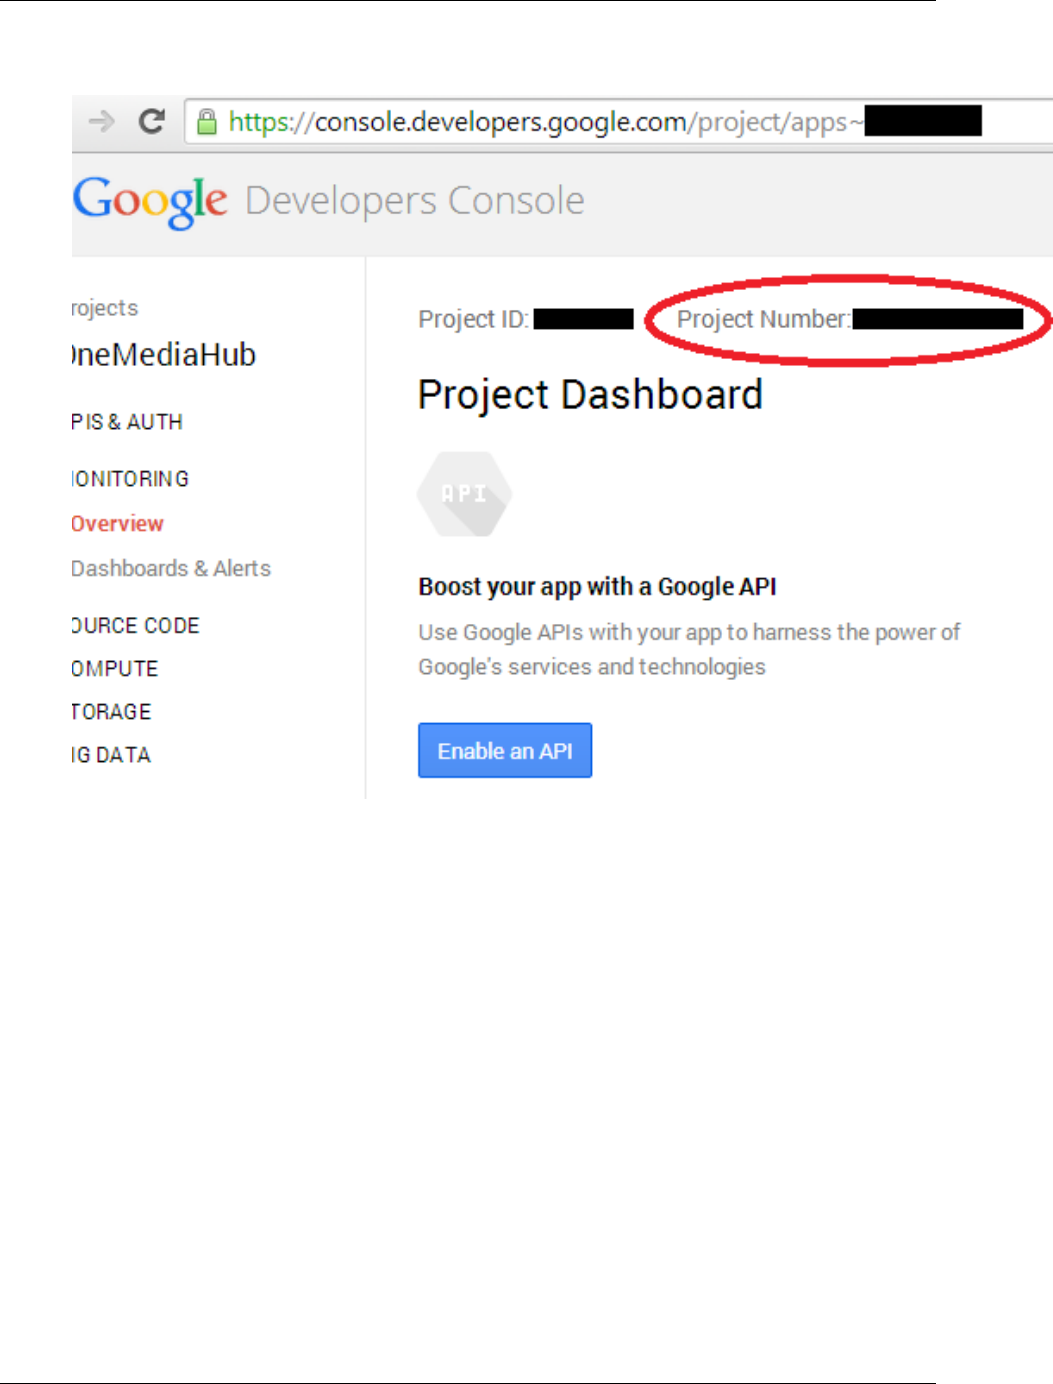
Capptain integration on Android App
236
Figure H.5. Capptain - Google Developers Console
If not already done, create a Server API Key on Google Developers Console (the Server Key MUST NOT
have IP restriction).
To do so:
1. open Google Developers Console
2. select the same project as earlier in the procedure (the one with the Project Number created moment
ago)
3. go to APIs & auth → Credentials, click on “CREATE NEW KEY” in the “Public API access” section,
select “Server key”
4. on next screen, leave it blank (no IP restriction), then click on Create
5. copy the generated API key
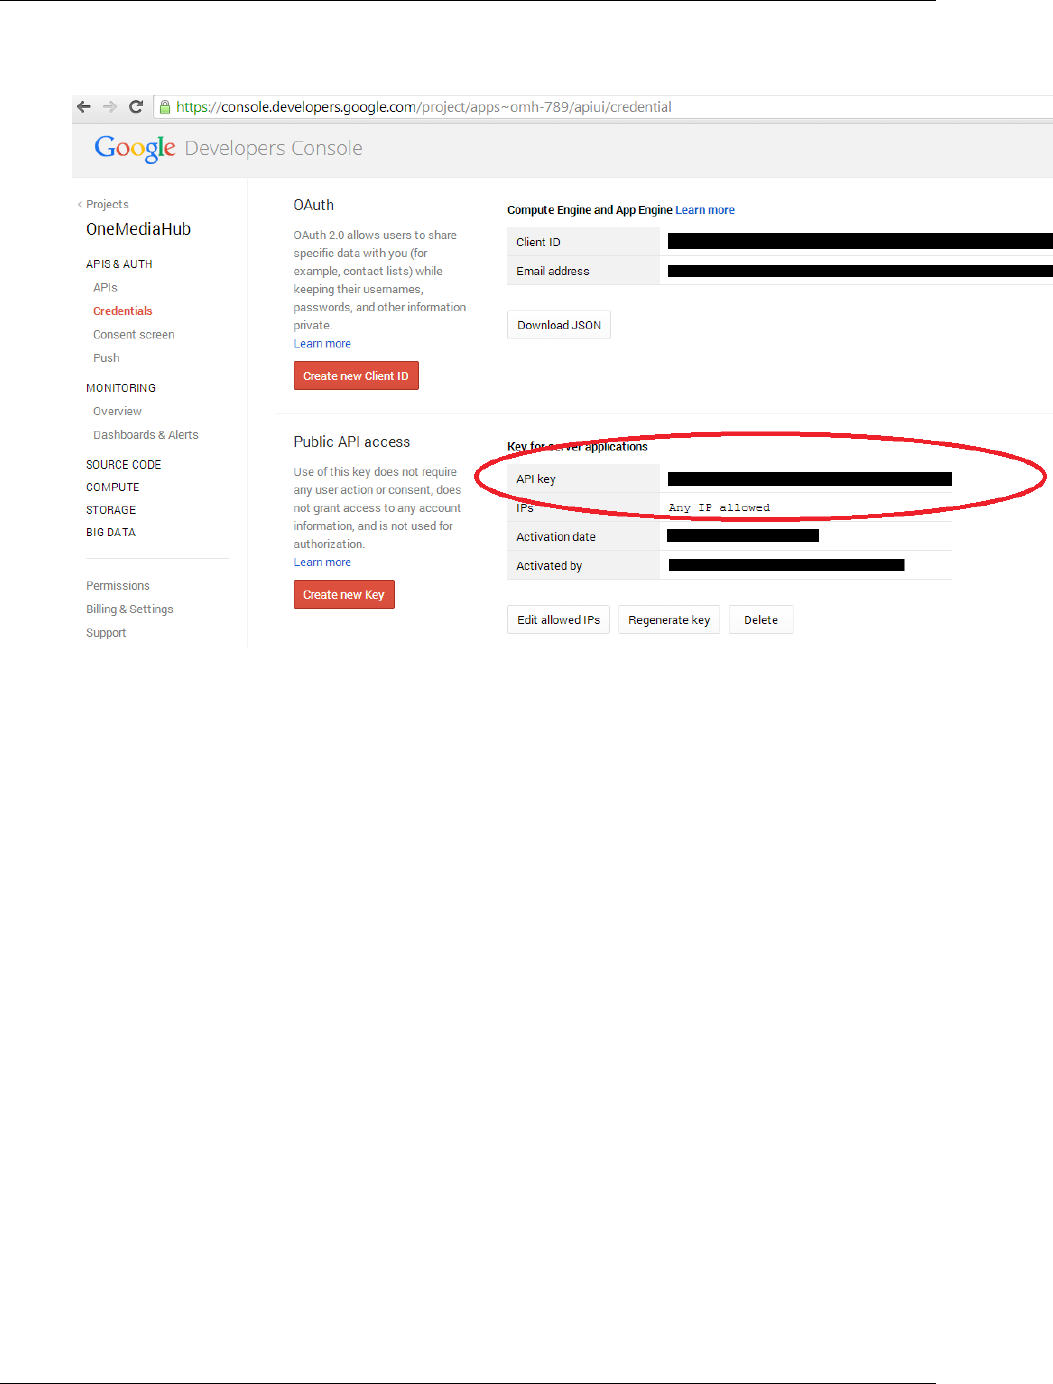
Capptain integration on Android App
237
Figure H.6. Capptain - "Server API Key Creation"
Last step should be done in Capptain dashboard with the Server Key information:
1. Go to https://app.capptain.com/#application/{YOUR_CAPPTAIN_APPID}/
native-push
2. In GCM section edit the API Key with the one you just generated and copied
You are now able to select “Any Time” when creating Reach announcements and polls.
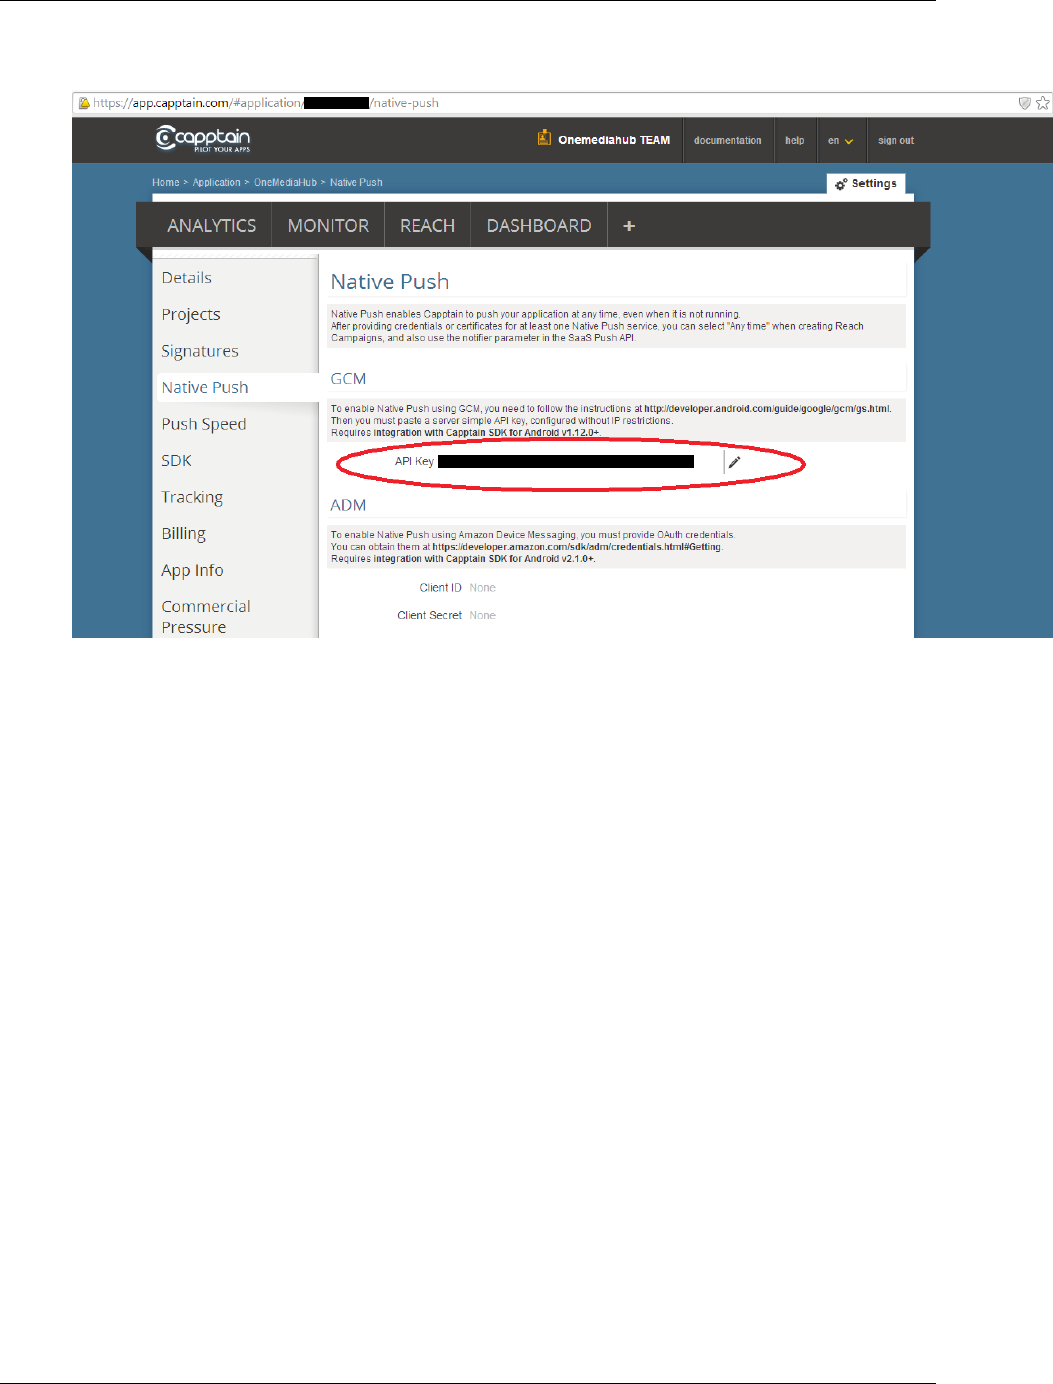
Capptain integration on Android App
238
Figure H.7. Capptain - "Edit API key"

239
Glossary
C
Cluster A logical or physical group of machines working together to accomplish the
same task.
L
Load balancing The aim of load balancing is to gain a better, equal distribution of the loads
on machines working together to accomplish the same task, i.e., machines in a
cluster.
R
Redundant architecture A system architecture in which the individual components are at least
duplicated. The purpose of this approach is to assure the availability and
reliability of the system; in addition to the two previous considerations, a load
balancing aim is also pursued. The purpose of this architecture is to reduce the
impact of system failures.
T
TCP/IP see [24]
U
UDP see [25]

240
References
[1] Amazon AWS. http://docs.aws.amazon.com/sns/latest/dg/GettingStarted.html.
[2] Amazon Elastic Transcoder. http://docs.aws.amazon.com/elastictranscoder/latest/developerguide/creating-
pipelines.html.
[3] Java Platform (JDK) 7. http://www.oracle.com/technetwork/java/javase/downloads/index.html.
[4] Oracle Java SE. http://www.oracle.com/technetwork/java/javase/downloads/index.html.
[5] MySQL. http://dev.mysql.com/downloads/.
[6] MySQL Connector/J. http://dev.mysql.com/downloads/connector/j/.
[7] MySQL Events. http://dev.mysql.com/doc/refman/5.5/en/events.html.
[8] MySQL Events Table. http://dev.mysql.com/doc/refman/5.5/en/events-table.html.
[9] MySQL Too many connections. https://dev.mysql.com/doc/refman/5.5/en/too-many-connections.html.
[10] MySQL 5.6 FAQ: Server SQL Mode. https://dev.mysql.com/doc/refman/5.6/en/faqs-sql-modes.html.
[11] MySQL 5.6: InnoDB Startup Options and System Variables. https://dev.mysql.com/doc/refman/5.6/en/innodb-
parameters.html#sysvar_innodb_flush_log_at_trx_commit.
[12] Arch Linux Bug Report 7256. https://bugs.archlinux.org/task/7256.
[13] Apache Tomcat. http://tomcat.apache.org.
[14] JGroups. http://www.jgroups.org/javagroupsnew/docs/index.html.
[15] log4j. http://logging.apache.org/log4j/index.html.
[16] Load balancing. http://kb.linuxvirtualserver.org/wiki/Load_balancing.
[17] IP multicast. http://en.wikipedia.org/wiki/IP_Multicast.
[18] Linux Virtual Server. http://www.linuxvirtualserver.org.
[19] RFC 2616. http://www.ietf.org/rfc/rfc2616.txt.
[20] RFC 2045. http://www.ietf.org/rfc/rfc2045.txt.
[21] Regular expressions grammar. http://java.sun.com/javase/6/docs/api/java/util/regex/Pattern.html.
[22] NTP. http://ntp.isc.org/bin/view/Main/DocumentationIndex.
[23] Official NTP documentation. http://www.eecis.udel.edu/~mills/ntp/html/index.html.
[24] TCP/IP. http://www.faqs.org/rfcs/rfc793.html.
[25] UDP. http://www.faqs.org/rfcs/rfc768.html.
[26] OneMediaHub Server API Developer's Guide. OneMediaHub Version 14.5 Server API Developer's Guide.
[27] SimpleCaptcha. http://simplecaptcha.sourceforge.net/installing.html.

References
241
[28] 3GPP TS 32.104 V4.0.0 (2001-03) Technical Specification. http://www.3gpp.org/ftp/Specs/html-
info/32104.htm.
[29] Xuggle Xuggler. http://www.xuggle.com.
[30] SubitoSMS Services. http://www.subitosms.it/services.html.
[31] Funambol Contact. http://www.funambol.com/contact/.
[32] IP2Location IP-Country Database. http://www.ip2location.com/ip-country.aspx.
[33] The App Garden. http://www.flickr.com/services/.
[34] Facebook Developers. http://www.facebook.com/developers.
[35] Getting Started with the Facebook SDK for Android. https://developers.facebook.com/docs/getting-started/
facebook-sdk-for-android/3.0/#sso.
[36] YouTube Dashboard. http://code.google.com/apis/youtube/dashboard/.
[37] Google Analytics. http://www.google.com/analytics.
[38] SyncML Device Information, version 1.2. http://openmobilealliance.org/Technical/release_program/docs/DS/
V1_2_2-20090319-A/OMA-TS-DS_DevInf-V1_2-20060710-A.pdf.

242
Colophon
This book is written in DocBook XML, version 5 of the RELAX NG scheme. The XSL-FO and HTML files are
generated using xsltproc (compiled against libxml version 20632, libxslt version 10124, and libexslt
version 813) and two stylesheet customization layers. The PDF file was generated using Apache FOP version 1.0.
The validation of the XML source code (based on XML Inclusions) was accomplished using xmllint (based on
libxml version 20632) and Jing version 20091111.
In the printed version, the book uses Times as the body font, Helvetica as the title font, and Courier as the
monospace font.
The size of the XML source code of the whole book is 848 KB. Pictures are inserted in PNG and JPEG format. The
five most frequent elements in this book are: para, entry, row, productname, and listitem.
