Instructions
User Manual:
Open the PDF directly: View PDF ![]() .
.
Page Count: 75
1
Project 3
Bugs!
For questions about this project, first consult your TA.
If your TA can’t help, ask Professor Nachenberg.
Time due:
Part 1: 9 PM, Thursday, February 23
Part 2: 9 PM, Thursday, March 2
WHEN IN DOUBT ABOUT A REQUIREMENT, YOU WILL NEVER LOSE CREDIT IF YOUR
SOLUTION WORKS THE SAME AS OUR POSTED SOLUTION.
SO PLEASE DO NOT ASK ABOUT ITEMS WHERE YOU CAN DETERMINE THE PROPER
BEHAVIOR ON YOUR OWN FROM OUR SOLUTION!
PLEASE THROTTLE THE RATE YOU ASK QUESTIONS
TO 1 EMAIL PER DAY! IF YOU’RE SOMEONE WITH
LOTS OF QUESTIONS, SAVE THEM UP AND ASK ONCE.
ALSO, MAKE SURE TO GO TO TAU BETA PI AND ETA KAPPA NU FOR ADVICE AND
HELP!

2
Table of Contents
Introduction
Simulation Details
So how does a video game (or simulation) work?
What Do You Have to Do?
You Have to Create the StudentWorld Class
init() Details
move() Details
Give Each Actor a Chance to Do Something
Remove Dead Actors after Each Tick
Updating the Display Text
cleanUp() Details
The Field class and field data file
The Field class
The Compiler Class (see our provided Compiler.h)
Command Details
goto_command
if_command
generateRandomNumber
You Have to Create the Classes for All Actors
Ant Class
What the Ant Must Do When It Is Created
What the Ant Must Do During a Tick
What the Ant Must Do When It Is Bitten, Poisoned or Stunned
Hints
Pebble Class
What a Pebble Must Do When It Is Created
What a Pebble Must Do During a Tick
What a Pebble Must Do When It Is Bitten, Poisoned or Stunned
Hints
Food Class
What a Food Object Must Do When It Is Created
What a Food Object Must Do During a Tick
What the Food Must Do When Picked up or Dropped
What a Food Object Must Do When It Is Bitten, Poisoned or Stunned

3
Hints
Pheromone Class
What Pheromone Must Do When It Is Created
What a Pheromone Must Do During a Tick
What a Pheromone Must Do When It Is Bitten, Poisoned or Stunned
Hints
Anthill Class
What an Anthill Must Do When It Is Created
What an AntHill Must Do During a Tick
What an AntHill Must Do When It Is Bitten, Poisoned or Stunned
Hints
Pool of Water Class
What a Pool of Water Must Do When It Is Created
What a Pool of Water Must Do During a Tick
What a Pool of Water Must Do When It Is Bitten, Poisoned or Stunned
Hints
Poison Class
What Poison Object Must Do When It Is Created
What a Poison Object Must Do During a Tick
What a Poison Object Must Do When It Is Bitten, Poisoned or Stunned
Hints
Baby Grasshopper Class
What a Baby Grasshopper Must Do When It Is Created
What a Baby Grasshopper Must Do During a Tick
What a baby grasshopper Must Do When It Is Bitten, Poisoned or Stunned
Hints
Adult Grasshopper Class
What an Adult Grasshopper Must Do When It Is Created
What an Adult Grasshopper Must Do During a Tick
What an Adult Grasshopper Must Do When It Is Bitten, Poisoned or Stunned
Hints
How to Tell Who’s Who
Don’t know how or where to start? Read this!
Building the Simulation
For Windows
For Mac OS X
What to Turn In
Part #1 (20%)
What to Turn In For Part #1
4
Part #2 (80%)
What to Turn In For Part #2
FAQ
END OF PROJECT 3 SPEC
Bugs! Programming Competition Instructions
Command Reference
The Field Data File
Trying out Your Ants - Running The Competition
Hints
5
Introduction
This year, instead of building the traditional video game for CS32 Project #3, you’re going to do
something a little different. Not only are you going to build a cool graphical program and learn
important Object Oriented Programming (OOP) skills, but you’re also going to create
programming competition platform that you can take back to your high-school (should you want
to do so) and use to run a simple programming competition. That’s right – your Project #3 is
actually a programming competition system, and once you complete it, you can use it to host a
programming competition of your own (a hackathon of sorts) where high-school students have
to build little programs to control simulated ants that compete against each other. So don’t just
think of this Project #3 as a programming project – think of it as an opportunity to excite more
folks about the joy of programming, and perhaps change someone’s life trajectory to our
exciting field.
In Project #3, you’re going to build a graphical ant simulation. In your simulation, you’ll place up
to four different colonies of simulated ants within a virtual field and allow them to wander
around, forage for food, bring the food back to their anthills (where the queen ant will consume
the food and then produce more ants), battle with competitor ants and baby and adult
grasshoppers, emit pheromones for navigation, and avoid deadly poison. The simulated ant that
produces the largest ant colony (by effectively foraging for food and bringing this food back to its
anthill, where it can be used to produce more ants) wins the competition.
Each simulated ant is controlled by its own unique ant program, which the contest entrants can
write in a simple language called “Bugs!” that we’ve invented. Your Project #3 program will load
one or more of these ant programs (written by the high-school students during the competition),
and then use these Bugs programs to run the simulation. The high-school students can watch
as their ants try to achieve dominance by growing the biggest colony of ants in the simulation.
The ant program that generates the largest number of total ants across the simulation’s two-
thousand time units (aka ticks) wins.
Here is an example of what the Bugs simulation looks like:
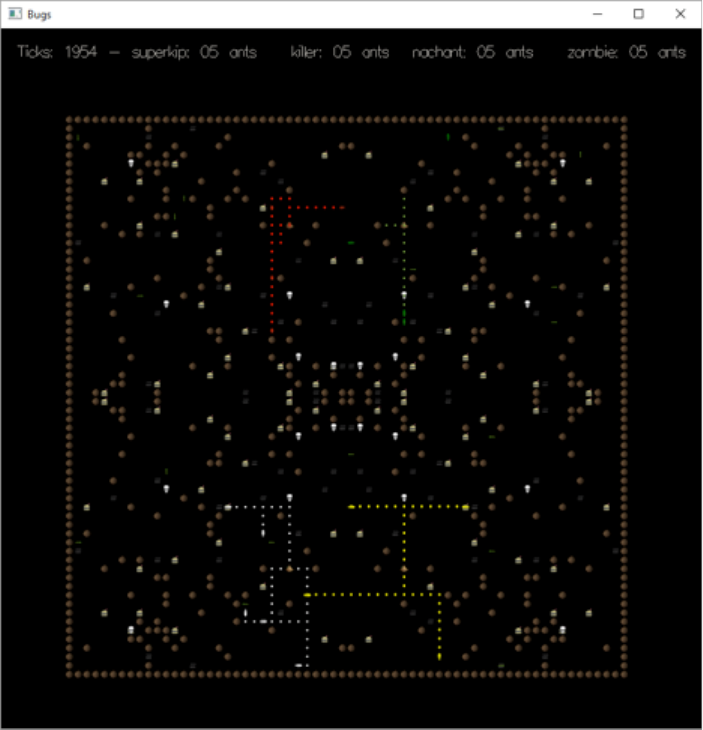
6
Figure #1: A screenshot of the Bugs competition. You can see four different colonies of ants (red, green, yellow and
white) walking around trailing pheromones behind them. You can also see baby grasshoppers (dark green), a bunch
of pebbles, ant-hills for each ant colony, pools of water, food sources (hamburgers), and poison (skulls).
So what does a Bugs! program that controls an ant’s brain look like? Well, here’s a simple (and
pretty uncompetitive) example ant program written in the Bugs! programming language. It might
be stored in a data file called USCAnt.bug:
colony: USCAnt // first line specifies the ant’s name
// This program controls a single ant and causes it to move
// around the field and do things.
// This ant moves around randomly, picks up food if it
// happens to stumble upon it, eats when it gets hungry,
// and will drop food on its anthill if it happens to
// stumble back on its anthill while holding food.
// here’s the ant’s programming instructions, written
// in our “Bugs” language
7
start:
faceRandomDirection
moveForward
if i_am_standing_on_food then goto on_food
if i_am_hungry then goto eat_food
if i_am_standing_on_my_anthill then goto on_hill
goto start // jump back to the “start:” line
on_food:
pickUpFood
goto start // jump back to the “start:” line
eat_food:
eatFood // assumes our ant has already picked up food
goto start // jump back to the “start:” line
on_hill:
dropFood // feed the anthill’s queen so she
// can produce more ants for the colony
goto start // jump back to the “start:” line
Now, while each ant in an ant colony is controlled by a program like the one above, all of the
other entities in the simulation (baby and adult grasshoppers, anthills, pheromones, poison, etc.)
are hard-wired – you (the CS32 student) will build all of their logic in C++. So the only part of the
competition that the high-school competitors can control are the ants themselves. The rest of
the simulation’s logic is fixed, and must meet the specifications set out in this document.
Simulation Details
In the Bugs competition, you can enter between one and four ant programs into the competition
and allow them to battle for dominance.
For each competition trial, you must specify the names of the ant programs (e.g., sillyant.bug,
gobruins.bug, USCAnt.bug, etc.) and a field data file (e.g., field.txt) that defines the layout of the
virtual field that the ants will compete in during the simulation.
Each contest entrant provides their own Bugs! program, like the one shown above. This .bug file
is used to control each ant that is part of the entrant’s ant colony. You’re going to have to build
an interpreter to interpret these Bugs! programs and use them to control the ants in the
simulation (there’s more on what an interpreter is, later in the document).
8
The field data file specifies things like the initial locations of the anthills, pebbles, pools of water,
grasshoppers, poison, food, etc. Here’s an example field data file, called easyField.txt:
9
****************************************************************
* g w * pf w w fp * w g *
* w w *
* p w * * w p *
* f * f w* ** ** *w f * f *
* * ww * *
* w f p p f w *
* *
* f * * p p * * f *
* * f w * * w f * *
* f * ff * f *
* * * *
* 0 1 *
* * w ww w * *
** p p **
* * * *
* * ** ** * *
* * * *
* f f w w f f *
*f * * w w * * f*
* fw f * * f wf *
* * w * * w * *
*gf w * * w fg*
* * f w g * * g w f * *
** f f **
* * w g * * g w * *
* * * * * *
* * * * * *
* * * ff f ww f ff * * *
* f w w f *
* * g * * * * g * *
* w w *
* w w *
* * g * * * * g * *
* f w w f *
* * * ff f ww f ff * * *
* * * * * *
* * * * * *
* * w g * * g w * *
** f f **
* * f w g * * g w f * *
*gf w * * w fg*
* * w * * w * *
* fw f * * f wf *
*f * * w w * * f*
* f f w w f f *
* * * *
* * ** ** * *
* * * *
** p p **
* * w ww w * *
* 3 2 *
* * * *
* f * ff * f *
* * f w * * w f * *
* f * * p p * * f *
* *
* w f p p f w *
* * ww * *
* f * f w* ** ** *w f * f *
* p w * * w p *
* w w *
* g w * pf w w fp * w g *
****************************************************************

10
The contents of the field data file must be 64x64 characters in size. The ‘*’ characters designate
pebbles which block movement of the ants, ‘g’ characters specifies the starting locations of baby
grasshoppers, ‘0’, ‘1’, ‘2’ and ‘3’ specify the location of the four colonies’ anthills, ‘w’ characters
specify pools of water, the ‘f’ characters specify piles of food, and the ‘p’ characters specify the
locations of poison.
Here are some examples of how you’d run the competition program from the (Windows)
command shell:
C:\CS32\PROJ3> BUGS.EXE field.txt sillyant.bug killer.bug silly.bug anthrax.bug
C:\CS32\PROJ3> BUGS.EXE fieldOfDreams.txt myOnlyAnt.bug
C:\CS32\PROJ3> BUGS.EXE reallyInterestingField.txt ant1.bug ant2.bug ant3.bug
where the BUGS.EXE file is your compiled competition program (your compiled C++ Project 3
program), the next item is the filename of the data file that holds the layout of the field where
your ants will compete, and the following one to four filenames are the Bugs program files that
will be used to control the ants in the different colonies in the competition. For example,
sillyant.bug might contain the programming logic for the first team’s ants, killer.bug contains the
programming logic for the second team’s ants, and so on. The field and ant data files must be in
the same folder as your BUGS.EXE executable so it can find and load them.
[Tip: If you want to use the Visual Studio or Xcode debugger to debug your code and test your
ants, then instead of launching your program from the command line, you'll run it like you've
usually done in the past. However, you'll need to use your development environment's way of
specifying what would otherwise have been command line arguments (the names of the field file
and the ant program files, but NOT the command name BUGS.EXE or whatever.
For Visual Studio, you can learn how to do so at https://msdn.microsoft.com/en-
us/library/1ktzfy9w.aspx. For Xcode, from the top menu bar select Product / Scheme / Edit
Scheme... and in the dialog box that appears, click Run in the left panel and the Arguments tab
in the right panel. Under Arguments Passed On Launch, click the plus sign to add each
argument: first the field file, then one to four ant files. You'll probably have the least trouble if
you give the full path name to each file, e.g., /Users/fred/cs32/p3/antenna.bug.]
Once the simulation begins, your program will load up the field data file (e.g., field.txt) to
determine what the virtual field looks like. As mentioned above, each field must be 64 squares
by 64 squares in size, and must be surrounded by pebbles. Each field may be populated with
between one and four anthills (you can have just one anthill if you’re testing your own ant’s logic
and don’t want to confuse things by having multiple colonies), food, pebbles, pools of water,
baby grasshoppers (who may eventually grow up into adult grasshoppers), and poison. Each
simulation object (e.g., an anthill or food) in the field data file occupies a single square in the
64x64 grid.
The code you write in Project #3 will use this field data file to determine the initial location of all
of the entities in your 64x64 virtual world. You’ll then allocate (using the new command) C++
11
objects like anthill objects, poison objects, baby grasshopper objects, food objects, pools of
water objects, etc., initializing each so that their starting locations match the locations specified
in the field data file. You’ll then keep track of all of these objects in a data structure that you
come up with (like a vector of pointers to simulation objects). But more on that later.
Once the field has been loaded up (and you’ve created C++ objects for each of the simulations
participants), the simulation begins and runs for 2,000 units or “ticks” of time, with each tick
occupying roughly 1/10th of a second. (The ticks go faster on a Mac; we're investigating why.)
During each tick of the simulation, all of the objects in the simulation are given an opportunity to
do something. For example, during a tick, each ant might move to an adjacent square, pick up
some food, or do some computations to help it decide what to do next; an anthill might give birth
to a new ant; an adult grasshopper might jump from one square to another; a poison object
might attempt to poison any insects standing on its square, etc.
During each of the first five ticks of a competition simulation, each anthill will produce one new
ant. Each anthill produces a different type of ant, and is controlled by the entrant’s designated
Bugs! program. For example, if we ran the command line:
C:\CS32\PROJ3> BUGS.EXE field.txt sillyant.bug killer.bug silly.bug anthrax.bug
Anthill #0 will produce ants that are controlled by the sillyant.bug program. The second anthill,
#1, will produce ants that are controlled by the killer.bug program, and so on.
Once an anthill has given birth to an ant, the ant’s behavior is entirely controlled by its Bugs!
program (e.g., the instructions found inside of sillyant.bug), and this program’s unique
instructions cause it to forage around the virtual field looking for food. When an ant finds food, it
can pick it and bring it back to its anthill for consumption by the anthill/queen ant. The moment
the ant drops food upon the same square as an anthill, the anthill will eat the food, increasing its
own hit point count, and removing the food from the virtual field. Once the anthill/queen ant
consumes enough food, it will then produce yet another new ant (and that ant will also use the
exact same Bugs program), which can forage for even more food.
Every anthill starts with enough food to produce five initial ants, but to produce additional ants,
an anthill needs to be provided with more food by its ant colony. That’s where the ant programs
(written in the Bugs! language) come in – their instructions ideally direct each individual ant to
find and pick up this food and bring it back to the hill. The more efficient an ant’s Bugs! program
is at foraging for food and bringing it back to its anthill, the more ants will be added to the
colony, and the more likely the entrant is to win the competition.
Entrants are judged based on the total number of ants their colony produces over the course of
the entire simulation. For an entrant to win the competition, its colony must meet three
requirements:
12
1. Its anthill must produce at least 6 total ants (each anthill starts with enough food to
produce 5 ants, but if the colony’s ants can bring food back to feed the hill/queen, then
the anthill/queen can produce even more ants. The anthill must produce at least 6 ants
for an entrant to qualify to win.).
2. The anthill must produce more total new ants across the complete simulation’s 2,000
ticks than the competitors’ anthills.
3. If two or more colonies produce the same total number of ants by the end of the
simulation, then the colony that reached this count earliest in the simulation wins.
Each insect (ants, baby grasshoppers, and adult grasshoppers) has a health level, measured in
“hit points”. Ants start out with 1500 hit points, baby grasshoppers start out with 500 hit points,
and adult grasshoppers start out with 1600 hit points. Each insect uses up one hit point of health
during each tick of the simulation. Each insect can gain more hit points by eating food, which is
dispersed throughout the field. Insects can also lose hit points if they are bitten by other insects
or they step onto a square with poison. When an insect reaches zero or fewer hit points, it dies,
is removed from the virtual world, and is replaced by 100 units of food (after all, another insect
might want to come around and eat the dead carcass).
A given ant can eat and eat and eat, and there is no bound to the maximum hit points an ant
can have. Similarly, adult grasshoppers can eat and eat and eat, and have an unbounded
number of hit points. However, baby grasshoppers have a limited capacity to eat. The moment
they reach 1600 or more total hit points, they instantly transform into an adult grasshopper with
exactly 1600 hit points (that is, the baby grasshopper dies and is replaced by a newly minted
adult grasshopper).
Each anthill has a health level as well. Each anthill starts with 8999 hit points, and loses one hit
point during each tick of the game. If an anthill has 2000 or more hit points, it will give birth to a
new ant. Giving birth causes the anthill to lose 1500 hit points, since when a new ant is born, it
starts with 1500 hit points. Anthills gain hit points only when food is dropped onto them. If food is
dropped onto a square with an anthill, the anthill will immediately consume the food and
increase its hit points. If an anthill reaches zero hit points, it will immediately die and be removed
from the field, and therefore not be able to produce any new ants.
If an ant or a baby grasshopper steps onto poison, it will cause 150 hit points of damage to the
insect. Adult grasshoppers, however, are immune to the effects of poison, and it will do no
damage to them.
Ants and adult grasshoppers are capable of biting other insects if they are on the same square.
When ants bite another insect, they cause 15 hit points of damage. Adult grasshoppers are
much nastier, and when they bite another insect they cause 50 hit points of damage. Baby
grasshoppers can’t bite, so they can never cause any damage to other insects.
If an ant or a baby grasshopper steps on a pool of water, the pool of water will temporarily stun
it, making it do nothing for two whole ticks before the insect can act again. Once an insect has
13
been stunned by a pool of water, it will not be stunned again by the same pool of water unless it
moves off of the square containing the pool, then moves back to this square again.
Ants are able to release pheromones (a scent produced by a gland in the ant) into the virtual
world - release of such pheromones is controlled, like all other ant behaviors, by the ant’s
programming instructions. Each pheromone has a starting strength of 256 units (Hint: a unit is
like a hit point), and will lose one unit of strength during each tick. After a pheromone reaches 0
units, it disappears from the virtual field. Ants can increase the total strength of their colony’s
pheromones in a square up to 768 units by releasing pheromones in that square more than one
time. Every ant from within a given colony can smell the pheromones released by every other
ant within the same colony. However ants are unable to smell the pheromones produced by
ants of other colonies. An ant can only smell a pheromone if the pheromone is in the square
directly in front of the ant. Pheromones are useful tools for ants, as they can be used to help the
ants find their antill, or potentially help them to avoid locations where they’ve sensed danger in
the past. While real ants can release multiple different types of pheromones, each colony of our
ants can only release a single type of pheromone.
Food is distributed throughout the virtual field, and each food object initially contains 6,000 units
of energy (Hint: a unit of energy is like a hit point), enough to provide insects that eat all of it up
to 6,000 hit points. If an ant steps onto the same square as food, it may pick up to 400 units of
food up at a time, and can hold up to a total of 1800 units of food. Once an ant is holding one or
more units of food, it can eat this food at any time (to increase its own hit points by an amount
proportional to the units of food eaten). It can also carry this food back to its anthill, then drop it
to feed the anthill/queen. Once the anthill eats enough, as mentioned above, it will then give
birth to a new ant.
Grasshoppers, as mentioned above, come in two different varieties: babies and adults. All
grasshoppers only move once every two ticks - they’re slower than ants, who can do something
every single tick of the simulation. So, in essence, grasshoppers sleep two out of every three
ticks. Unlike the ants, all grasshoppers have hard-coded logic that controls their behavior that
you’ll implement as part of this project. During their active ticks, baby grasshoppers simply walk
around randomly and eat when they land on the same square as food. Adult grasshoppers are
far nastier. In addition to wandering randomly and eating (during their active ticks), if they land
up on the same square as one or more enemy insects (which includes all ants and all other
baby and adult grasshoppers) there’s a 1 in 3 chance that they’ll bite one random enemy on the
same square. And when adult grasshoppers are bit, there’s a 50% chance that they’ll
immediately bite back. Finally, in addition to simply walking around like baby grasshoppers,
there’s a 1 in 10 chance that adult grasshoppers will jump to another square within a 10-square
radius during an active tick.
The above sections give an overview of the Bugs! simulation, but on their own don’t provide you
with enough information to implement its detailed logic. As such, we’ll provide all of the specific
details in the sections below. Read on!
14
So how does a video game (or simulation)
work?
Fundamentally, a video game is composed of a bunch of objects; in Bugs!, those objects
include ants, anthills, grasshoppers (baby and adult), poison, pools of water, food, pheromones,
and pebbles. Let’s call these objects “actors,” since each object is an actor in our simulation.
Each actor has its own x,y location in the virtual field, its own internal state (e.g., each ant
knows its own location, what direction it’s facing, etc.) and its own special algorithm that controls
its actions in the simulation based on its own state and the state of the other objects in the
virtual field. In the case of an ant, the algorithm that controls the ant actor object is the
programming instructions provided by the competition entrant. In the case of other actors (e.g.,
grasshoppers), each object has an internal autonomous algorithm and state that dictates how
the object behaves in the simulation world.
Once a simulation begins, it is divided into ticks. A tick is a unit of time, for example, 50
milliseconds (that’s 20 ticks per second).
During a given tick, the simulation calls upon each actor object’s behavioral algorithm and asks
the object to perform its behavior. When asked to perform its behavior, each object’s behavioral
algorithm must decide what to do and then make a change to the object’s state (e.g., move the
actor 1 square to the left), or change other objects’ states (e.g., when a grasshopper algorithm
is called by the simulation, it may determine that the grasshopper has moved onto the same
square as an enemy (e.g., an ant or another grasshopper), and it may attempt to bite the
enemy. Typically the behavior exhibited by an actor during a single tick is limited in order to
ensure that the simulation’s animation is smooth and that things don’t move too quickly.The
exception to this rule in the Bugs! simulation are adult grasshoppers, who can jump up to 10
squares away during a single tick.
After the current tick is over and all actors have had a chance to adjust their state (and possibly
adjust other actors’ states), the graphical framework that we provide animates the actors onto
the screen in their new configuration. So if an ant changed its location from 10,5 to 11,5 (moved
one square right), then our simulation framework would erase the graphic of the ant from
location 10,5 on the screen and draw the ant graphic at 11,5 instead. Since this process
(asking actors to do something, then animating them to the screen) happens 10-20 times per
second, the user will see somewhat smooth animation.
Then, the next tick occurs, and each actor object’s algorithm is again allowed to do something,
our framework displays the updated actors on-screen, and so on.
Assuming the ticks are quick enough (a fraction of a second), and the actions performed by the
objects are subtle enough (i.e., an ant doesn’t move 3 inches away from where it was during the
last tick, but instead moves 1 millimeter away), when you display each of the objects on the
15
screen after each tick, it looks as if each object is performing a continuous series of fluid
motions.
A simulation like Bugs!, and for that matter, most video games, can be broken into three
different phases:
Initialization: The simulation world is initialized and prepared for play. This involves allocating
one or more actors (which are C++ objects) and placing them in the simulation world so that
they can later be tracked, perform actions, and be animated to the screen.
Simulation: The simulation (or gameplay) is broken down into a bunch of ticks. During each
tick, all of the actor objects in the simulation have a chance to do something, and perhaps die.
During a tick, new actors may be added to the simulation and actors who die must be removed
from the simulation world and deleted.
Cleanup: The simulation is over (e.g., after 2,000 ticks have elapsed). This phase frees all of
the objects in the World (e.g., ants, pebbles, pheromones, grasshoppers, pools of water, poison,
etc.). In a video game with multiple levels, there would be a cleanup phase after each level,
followed by an Initialization phase for the next level. But in our Bugs! simulation there’ll be only
a single Initialization Phase, a single Simulation phase, and a single Cleanup phase.
Here is what the main logic of a simulation looks like, in pseudocode (we provide some similar
code for you in our provided GameController.cpp):
Prompt_the_user_to_start_the_simulation(); // "press a key to start"
Initialize_the_game_world(); // you’re going to write this
while (the simulation has not finished)
{
// each pass through this loop is a tick (1/20th of a sec)
// you’re going to write code to do the following
Ask_all_actors_to_do_something();
Delete_any_dead_actors_from_the_world();
// we write this code to handle the animation for you
Animate_all_of_the_actors_to_the_screen();
Sleep_for_50ms_to_give_the_user_time_to_see_what_happened();
}
Cleanup_all_game_world_objects(); // you’re going to write this
Tell_the_user_who_won_the_competition(); // we provide this
And here is what the Ask_all_actors_to_do_something() function might look like:
void Ask_all_actors_to_do_something()
16
{
for each actor in the world:
if (the actor is still alive)
tell the actor to doSomething();
}
You will typically use a container (an array, vector, or list) to hold pointers to each of your live
actors (although in Bugs!, you will probably want to use a more advanced STL data structure to
make the simulation more efficient - more on that later).
Each actor (a C++ object) has a doSomething( ) member function in which the actor decides
what to do. For example, here is some pseudocode showing what a (simplified) adult
grasshopper might decide to do each time it gets asked to do something:
class AdultGrasshopper: public SomeOtherClass
{
public:
void doSomething()
{
If I’m on the same square as an enemy and I feel like biting him (⅓ chance) then
Bite the enemy insect
return;
If I feel like jumping (1/10 chance) then
Jump to a square within a radius of 10 of my current location
return;
If there’s food on the current square then
Eat the food
...
}
...
};
What Do You Have to Do?
You must create a number of different classes to implement the Bugs! simulation. Your classes
must work properly with our provided classes, and you MUST not modify our provided
classes or our provided source files in any way to get your classes to work properly. Doing
so will result in a score of zero on the entire project! Here are the specific classes that you
must create:
1. You must create a class called StudentWorld which is responsible for keeping track of
your simulation world, including the virtual field and all of the actors/objects (ants, baby
and adult grasshoppers, pheromones, pebbles, pools of water, poison, food, etc.) that
are inside the field.
17
2. You must create classes for ants, baby and adult grasshoppers, pheromones, pebbles,
pools of water, poison, food, as well as any additional base classes (e.g., an insect base
class if you find it convenient) that help you implement the simulation.
You Have to Create the StudentWorld Class
Your StudentWorld class is responsible for orchestrating virtually all execution of the simulation
– it keeps track of the whole virtual world (the virtual field and all of its inhabitants such as ants,
grasshoppers, poison, pheromones, etc.). It is responsible for initializing the simulation world at
the start of the simulation, asking all the actors to do something during each tick of the
simulation, destroying an actor when it disappears (e.g., an ant dies, a food object’s contents
are completely picked up), and destroying all of the actors in the world when the simulation is
over.
Your StudentWorld class MUST be derived from our GameWorld class (found in GameWorld.h)
and MUST implement at least these three methods (which are defined as pure virtual in our
GameWorld class):
virtual int init() = 0;
virtual int move() = 0;
virtual void cleanUp() = 0;
The code that you write must never call any of these three functions. Instead, our provided
simulation framework will call these functions for you. So you have to implement them correctly,
but you won’t ever call them yourself in your code.
When a new simulation starts, our simulation framework will call the init() method that you
defined in your StudentWorld class. You don’t call this function; instead, our provided framework
code calls it for you.
The init() method is responsible for loading the simulation’s field layout from a data file (we’ll
show you how below), and constructing a representation of the virtual field in your StudentWorld
object, using one or more data structures that you come up with. If the field data file exists but is
not in the proper format (the field loader class we provide will return an error to you if this is the
case), the init() method must return GWSTATUS_LEVEL_ERROR. Otherwise, the init() method
must return GWSTATUS_CONTINUE_GAME.
Once a new virtual world has been fully built up with a call to the init() method, our simulation
framework will repeatedly call the StudentWorld’s move() method, at a rate of roughly 10-20
times per second. Each time the move() method is called, it must run a single tick of the
simulation. This means that it is responsible for asking each of the simulation’s actor objects
(e.g., each of the ants, grasshoppers, pheromones, etc.) to try to do something: e.g., move
themselves and/or perform their specified behavior. Finally, this method is responsible for
disposing of (i.e., deleting) actors that need to disappear during a given tick (e.g., an exhausted
18
pheromone, a dead ant, a fully-depleted food object, etc.). For example, if an ant is bitten by an
adult grasshopper and its “hit points” (life force) drains to zero, then its state should be set to
dead, and then after all of the actors in the simulation get a chance to do something during the
tick, the move() method should remove that ant from the simulation world (by deleting its object
and removing any reference to the object from StudentWorld’s data structures). The move()
method will automatically be called once during each tick of the simulation by our provided
simulation framework. You will never call the move() method yourself.
The cleanup() method is called by our framework when the simulation ends, after 2,000 ticks.
The cleanup() method is responsible for freeing all actors (e.g., all ant objects, all grasshopper
objects, all pebble objects, all pheromone objects, all anthill objects, etc.) that are currently in
the simulation. This includes all actor objects created during either the init() method or
introduced later in the simulation by its actors (e.g., an adult grasshopper that was added to the
field by a baby grasshopper that grew up) that have not yet been removed from the simulation.
You may add as many other public/private member functions or private data members to your
StudentWorld class as you like (in addition to the above three member functions, which you
must implement).
Your StudentWorld class must be derived from our GameWorld class. Our GameWorld class
provides the following methods for your use:
void setGameStatText(string text);
string assetDirectory() const;
string getFieldFilename() const;
void setWinner(string name);
vector<string> getFilenamesOfAntPrograms() const;
The setGameStatText() method is used to specify the simulation status text that is displayed at
the top of the simulation screen, e.g.:
Ticks: 1027 - Jim: 16 ants Natalie*: 42 ants Ann: 31 ants Billy: 05 ants
The assetDirectory() method returns the name of the directory that contains the simulation
assets (image, sound, and field data files).
The getFieldFilename() method returns the name of the field data file that contains the
description of the field to be used for the current competition (e.g.,
C:\CS32\PROJ3\FIELD.TXT).
The setWinner() method enables you to specify the name of the winning ant program (e.g.,
“NiftyAnt”) in the event that a given colony wins a simulation.
19
The getFilenamesOfAntPrograms() method provides you with a vector containing the filenames
of all contestant Bugs! source files, e.g. “amyant.bug”, “killer.bug”, “nachen.bug", "small.bug”.
You can use these names to then compile the ant programs using our provided Compiler class
(more on this below).
init() Details
Your StudentWorld’s init() member function must:
1. Initialize the data structures used to keep track of your simulation’s virtual world.
2. Load the current field details from the specified field data file.
3. Allocate and insert all anthill objects, pebble objects, baby grasshopper objects, water
pool objects, food objects, poison objects, etc. into the simulation world’s data structure,
ensuring that the locations of these objects is as specified in the loaded field data file.
To load the layout of a field from a field data file, you can use the provided Field class
(described later) that we wrote for you, which can be found in the provided Field.h header file.
Once you load a field’s layout using our Field class, your init() method must then construct a
representation of your world and store this in your StudentWorld object. It is required that you
keep track of all of the actor objects (e.g., ants, anthills, pebbles, pheromones, pools of water,
food, poison, etc.) in a single STL data structure; you must not have, say, one data structure
that holds only all the ants, one that holds only all the poison, etc.
The data structure that you choose to hold your simulation objects is critical, as a poor data
structure can dramatically slow down your simulation. For example, let’s say that you’re storing
pointers to all N of your actor objects within a single STL linked list. Further, let’s assume that
during each tick, an ant wants to determine if there’s food on the same square that it’s on, so it
can pick it up. Doing this check for food would require your code to traverse through all other N-
1 objects in the STL list, checking each one’s x,y location to see if it’s on the same square as
the ant, and then checking to see if the object is edible. If you had a large number of active ants
in the simulation (e.g., N/2 of all the simulation objects were ants) looking for food, you’d have
close to O(N^2) total checks during each tick of the simulation, which could drastically slow
down your simulation and make it unbearable to run.
A better data structure that you might use would be a two-dimensional array of linked lists, with
slot[y][x] holding pointers to all simulation objects at location x,y. This approach will enable an
ant at location 5, 10 to quickly locate all of the other actor objects at location 5,10 and process
them, without considering objects on other squares. Of course, this data structure has its
drawbacks too. To iterate through all of your actors, you have to iterate through all 64^2 cells of
the array, even if all of your actors are just in one single square. And, of course, when an actor
moves from slot x,y to slot x,y+1, for example, you need to remove the actor’s pointer from
slot[y][x] and move it to slot[y+1][x].
20
See if you can find out a more efficient data structure to hold your actor pointers (but if you can’t
figure one out, you can use our two-dimensional array approach). Doing so will dramatically
improve the performance of your simulation, and make it much more fun to watch. Just make
sure, whatever you do, your container MUST hold pointers to the actor objects, not the
actual actor objects themselves — this enables polymorphism.
In addition to loading the definition of the field and dynamically allocating actor objects for each
of the items in the field, you’ll also want to reset the current tick count to zero.
You must not call the init() method yourself. Instead, this method will be called by our framework
code when it’s time for a new simulation to start.
move() Details
The move() method must perform the following activities:
1. Increase the number of ticks that have elapsed so far by one tick.
2. Enumerate all of the actors that are currently active in the simulation world, and:
a. Ask each actor object to something through a pointer, e.g., obj->doSomething();
b. Check if the actor moved squares during the tick. If so, you may need to update
your data structure that holds all of the actor pointers to reflect this move. For
example, if you stored your actor pointers in a 2-d array, and the actor moved
from location x,y to x+1,y, you’d have to remove the actor pointer from slot[y][x]
and re-add the pointer to slot[y][x+1].
3. After all actor objects have been given a chance to do something, you must then delete
any actors that have died during this tick (e.g., an ant that was killed by starving and so
should be removed from the simulation world, or a pheromone that disappeared
because it’s scent faded away, or a food object that should disappear because its
contents were completely picked up by a grasshopper).
4. It must update the status text on the top of the screen with the latest information (e.g.,
the number of ticks elapsed, the number of total ants birthed by each anthill, etc.).
5. If the number of ticks has reached 2,000, then the simulation is over:
a. If there was a winner ant colony (one that produced more ants than its
competitors, or if there is a tie, the colony that produced the most ants first), then:
i. Your move() function must call the setWinner() method in GameWorld to
set the colony name of the winning ant. You can get the name of the
winning ant from the ant Compiler. More on this in the Compiler section
below.
ii. Your function must return GWSTATUS_PLAYER_WON.
b. If there was not a winning ant colony (i.e., no colonies produced more than 5 total
ants), then your function must return GWSTATUS_NO_WINNER.
6. Otherwise, the number of ticks is less than 2,000 and the simulation is not yet over, so
you must return with a result of GWSTATUS_CONTINUE_GAME.
21
All three of the return constants (GWSTATUS_PLAYER_WON, GWSTATUS_NO_WINNER and
GWSTATUS_CONTINUE_GAME) are defined in GameConstants.h.
If your move() method returns either GWSTATUS_PLAYER_WON or GWSTATUS_NO_WINNER then
the simulation is over, and our framework will call your cleanup() method to destroy all of the
allocated field objects.
Here’s pseudocode for how the move() method might be implemented:
int StudentWorld::move()
{
updateTickCount(); // update the current tick # in the simulation
// The term "actors" refers to all ants, anthills, poison, pebbles,
// baby and adult grasshoppers, food, pools of water, etc.
// Give each actor a chance to do something
for (each actor q in the simulation)
{
// get the actor’s current location
int oldX = q->getX(), oldY = q->getY();
if (q is still active/alive)
{
// ask each actor to do something (e.g. move)
q->doSomething();
}
if (q has moved from its old square to a new square)
updateTheDataStructureThatTracksWhereEachActorIs(q,oldX,oldY);
}
// Remove newly-dead actors after each tick
removeDeadSimulationObjects(); // delete dead simulation objects
// Update the simulation Status Line
updateDisplayText(); // update the ticks/ant stats text at screen top
// If the simulation’s over (ticks == 2000) then see if we have a winner
if (theSimulationIsOver())
{
if (weHaveAWinningAnt())
{
setWinner(getWinningAntsName());
return GWSTATUS_PLAYER_WON;
}
else
return GWSTATUS_NO_WINNER;
}
// the simulation is not yet over, continue!
return GWSTATUS_CONTINUE_GAME;
22
}
Give Each Actor a Chance to Do Something
During each tick of the simulation each active actor must have an opportunity to do something
(e.g., move around, shoot, etc.). Actors include the ants, anthills, baby and adult grasshoppers,
pools of water, pheromones, food, etc.
Your move() method must enumerate each active actor in the field (i.e., held by your
StudentWorld object) and ask it to do something by calling a member function in the actor’s
object named doSomething(). In each actor’s doSomething() method, the object will have a
chance to perform some activity based on the nature of the actor and its current state: e.g., an
ant might move one step forward, a pheromone might decrement its strength (since
pheromones dissipate over time), a poison object might attempt to poison all insects on its
square, etc.
It is possible that one actor (e.g., an adult grasshopper) may destroy another actor (e.g., an ant)
during the current tick, or an actor may run out of hit points/energy. If an actor has died earlier in
the current tick, then the dead actor must not be given a chance to do something during the
current tick (since it’s dead).
To help you with testing, if you press the f key during the course of the simulation, our
simulation controller will stop calling move() every tick; it will call move() only when you hit a key
(except the r key). Freezing the activity this way gives you time to examine the screen, and
stepping one move at a time when you're ready helps you see if your actors are moving
properly. To resume the simulation, press the r key.
Remove Dead Actors after Each Tick
At the end of each tick, your move() method must determine which of your actors are no longer
alive, remove them from your container of active actors, and delete their objects (so you don’t
have a memory leak). So if, for example, an ant’s hit points go to zero (due to it being bit or
running out of hit points due to starvation) and it dies, then it should be noted as dead, and at
the end of the tick, its pointer should be removed from the StudentWorld’s object’s container of
active objects, and the ant object should be deleted (using the C++ delete expression) to free up
memory for future actors that will be introduced later in the simulation. (Hint: Each of your actors
could have a data member indicating whether or not it is still alive!)
23
Updating the Display Text
Your move() method must update the simulation statistics at the top of the screen during every
tick by calling the setGameStatText() method that we provide in our GameWorld class. You
could do this by having the move() method call a function like the one below:
void setDisplayText()
{
int ticks = getCurrentTicks();
int antsAnt0, antsAnt1, antsAnt2, antsAnt3;
int winningAntNumber;
antsAnt0 = getNumberOfAntsForAnt(0);
antsAnt1 = getNumberOfAntsForAnt(1);
antsAnt2 = getNumberOfAntsForAnt(2);
antsAnt3 = getNumberOfAntsForAnt(3);
winningAntNumber = getWinningAntNumber();
// Create a string from your statistics, of the form:
// Ticks: 1134 - AmyAnt: 32 BillyAnt: 33 SuzieAnt*: 77 IgorAnt: 05
string s = someFunctionToFormatThingsNicely(ticks,
antsAnt0,
antsAnt1,
antsAnt2,
antsAnt3,
winningAntNumber
);
// Finally, update the display text at the top of the screen with your
// newly created stats
setGameStatText(s); // calls our provided GameWorld::setGameStatText
}
Your status line must meet the following requirements:
1. It must start with the text “Ticks:”
2. Then it must contain the number of elapsed ticks. This quantity must be right-justified
and 5 characters wide, e.g. “ 2000” or “ 199”
3. Each ant colony’s name must be displayed, followed by an asterisk if they are the
current in-the-lead colony, followed by a colon, followed by a space, and then by a two-
digit, zero-prefixed number indicating the number of ants their colony has produced so
far, e.g. “05” or “52”.
4. Each ant colony’s details must be separated from the previous colony’s data by two
spaces. For example, between the “AmyAnt: 32” and “BillyAnt: 33” there must be
exactly two spaces.
You may find the Stringstreams writeup on the class web site to be helpful.
24
cleanUp() Details
When your cleanUp() method is called by our simulation framework, it means that the simulation
is over. In this case, every actor in the entire field (every ant, grasshopper, poison, pebble,
pheromone, pools of water, etc.) must be deleted and removed from StudentWorld’s container
of active objects, resulting in an empty virtual world.
You must not call the cleanUp() method yourself when the simulation ends. Instead, this method
will be called by our code.
The Field class and field data file
As mentioned, when you run a Bugs competition, you can come up with your own field layouts.
You may, for example, wish to start the competition by placing all competitor ants within a
simple field with lots of food, and no grasshoppers, pebbles (except for those required around
the perimeter of the field), or poison.
After you’ve identified the strongest competitors, you can then have them compete in a more
advanced field with a few grasshoppers, and less food.
And once you find the final four strongest ants, you can compete them in a truly nasty field with
lots of poison, lots of grasshoppers, and tons of pebbles and pools of water to get in the way.
Each field layout is stored in a data file, e.g., C:\CS32\PROJ3\firstField.txt. You can determine
the name of the field to be used by calling the getFieldFilename() method in our GameWorld
class. This filename is passed in when the user runs the simulation from the command line.
Here’s an example field data file (you can modify our field data files to create wacky new levels,
or add your own new field data files to add new levels, if you like):
25
****************************************************************
* g w * pf w w fp * w g *
* w w *
* p w * * w p *
* f * f w* ** ** *w f * f *
* * ww * *
* w f p p f w *
* *
* f * * p p * * f *
* * f w * * w f * *
* f * ff * f *
* * * *
* 0 1 *
* * w ww w * *
** p p **
* * * *
* * ** ** * *
* * * *
* f f w w f f *
*f * * w w * * f*
* fw f * * f wf *
* * w * * w * *
*gf w * * w fg*
* * f w g * * g w f * *
** f f **
* * w g * * g w * *
* * * * * *
* * * * * *
* * * ff f ww f ff * * *
* f w w f *
* * g * * * * g * *
* w w *
* w w *
* * g * * * * g * *
* f w w f *
* * * ff f ww f ff * * *
* * * * * *
* * * * * *
* * w g * * g w * *
** f f **
* * f w g * * g w f * *
*gf w * * w fg*
* * w * * w * *
* fw f * * f wf *
*f * * w w * * f*
* f f w w f f *
* * * *
* * ** ** * *
* * * *
** p p **
* * w ww w * *
* 3 2 *
* * * *
* f * ff * f *
* * f w * * w f * *
* f * * p p * * f *
* *
* w f p p f w *
* * ww * *
* f * f w* ** ** *w f * f *
* p w * * w p *
* w w *
* g w * pf w w fp * w g *
****************************************************************

26
As you can see, the data file contains a 64x64 grid of different characters that represent the
different objects in the simulation. Valid characters for your field data file are:
‘*’ characters designate pebbles which block movement of all insects1. Every field must have its
perimeter consist entirely of pebbles.
‘g’ characters specify the starting locations of baby grasshoppers.
‘0’, ‘1’, ‘2’ and ‘3’ specify the location of the four ant colonies’ anthills.
‘w’ characters specify pools of water.
‘f’ characters specify piles of food.
‘p’ characters specify poison.
Space characters represent empty locations.
The Field class
We have graciously :) decided to provide you with a class that can load field data files for you.
The class is called Field and may be found in our provided Field.h file. Here’s how this class
might be used:
#include "Field.h" // you must include this file to use our Field class
…
int StudentWorld::someFunctionYouWriteToLoadTheField()
{
Field f;
string fieldFile = getFieldFilename();
string error;
if (f.loadField(fieldFile, error) != Field::LoadResult::load_success)
{
setError(fieldFile + " " + error);
return false; // something bad happened!
}
// otherwise the load was successful and you can access the
// contents of the field – here’s an example
int x = 0;
int y = 5;
Field::FieldItem item = f.getContentsOf(x,y); // note it’s x,y and not y,x!!!
if (item == Field::FieldItem::rock)
cout << "A pebble should be placed at 0,5 in the field\n";
1 Note: adult grasshoppers can jump over pebbles, but may not move onto the same square as a pebble.
27
x = 10;
y = 7;
item = f.getContentsOf(x, y);
if (item == FieldItem::anthill0)
cout << "The anthill for the first Ant should be at 10,7 in the field\n":
… // etc.
}
Notice that the getContentsOf() method takes the column parameter (x) first, then the row
parameter (y) second. This is different than the order one normally uses when indexing a 2-
dimensional array, which would be array[row][col]. Be careful!
Hint: You will presumably want to use our Field class in your StudentWorld’s init() method.
The Compiler Class (see our provided Compiler.h)
We have provided a simple Compiler class that can take a Bugs! source file provided by a
contestant (e.g., “c:\ucla\cs32\proj3\maryant.bug”) that holds a bunch of ant instructions, and
compile it into a simpler in-memory data structure that you can use in your anthill and ant
classes.
When asked to compile a Bugs! source file, our Compiler class parses the file, checks for errors,
and assuming everything is syntactically OK, extracts all of the actual commands (e.g.,
moveForward, emitPheromone, goto commands, if commands, etc.) and places them into an
STL vector of Command structs, as described below.
Here’s what a Command struct looks like (we provide the definition in Compiler.h):
struct Command
{
OpCode opcode; // a command like moveForward,
// rotateClockwise, etc.
// OpCode is a just an enum type.
std::string operand1, operand2; // arguments for the command, e.g.,
// generateRandomNumber 10 would have
// an operand1 value of “10”
std::string text; // the original text line from the source file
// e.g., “generateRandomNumber 10”
// this can be used for debug purposes
int lineNum; // the line number of the source file
28
// that this command came from
// this can be used for debug purposes
};
And here’s a simple Bugs program in file dumbant.bug (with line numbers shown for illustration):
1: colony: DumbAnt
2:
3: start:
4: moveForward
5: if i_am_standing_on_food then goto on_food
6: generateRandomNumber 5
7: if last_random_number_was_zero then goto face_new_direction
8: goto start
9:
10: face_new_direction:
11: faceRandomDirection
12: goto start
13:
14: on_food:
15: pickUpFood
16: eatFood
17: goto start
And here’s how you might compile the source file with our provided Compiler:
#include "Compiler.h"
...
void SomeClass::someFunctionYouWrite()
{
Compiler c;
if (c.compile("dumbant.bug"))
{
// Successfully compiled! Woot!
cout << “Compiled ant named: “ << c.getColonyName() << endl;
}
...
}
After the compilation of dumbant.bug, your Compiler object would hold the following STL vector
of Commands (notice that the vector has only valid commands like moveForward, if, goto, etc.
The vector has no labels or blank lines, as these were removed by the compiler during
compilation):

29
Vector
index
opcode
(from the enum type in
Compiler.h)
operand1
operand2
lineNum/text
(lineNum is the original
line number where this
command was found in
dumbant.bug file. text is
the actual text data from
that line. This is just to
help you debug your
program)
0
moveForward
“”
“”
4/”moveForward”
1
if_command
“6”
(Specifies what if check to
perform - a value of 6 is the
same as
i_am_standing_on_food’s
enum value; see Compiler.h)
“7” (This is the vector index of
the command to jump to. This
indicates that when the
if_command is true, then the
next command to run is at
index 7 in the vector.)
5/”if
i_am_standing_on_food
then goto on_food”
2
generateRandomNumber
“5”
“”
6/”generateRandomNum
ber 5”
3
if_command
“9” (Specifies what if check to
perform - a value of 9 is the
same as
last_random_number_was_z
ero’s enum value; see
Compiler.h)
“5” (This is the vector index of
the command to jump to. This
indicates that when the
if_command is true, then the
next command to run is at
index 5 in the vector.)
7/”if
last_random_number_w
as_zero then goto
face_new_direction”
4
goto_command
“0” (This is the vector index of
the command to jump to. In
this case, this goto jumps
back to the first command in
the program)
“”
8/”goto start”
5
faceRandomDirection
“”
“”
11/”faceRandomDirectio
n”
6
goto_command
“0” (This is the vector index of
the command to jump to. In
this case, this goto jumps
back to the first command in
the program)
“”
12/”goto start”
7
pickupFood
“”
“”
15/”pickupFood”
8
eatFood
“”
“”
16/”eatFood”
9
goto_command
“0” (This is the vector index of
the command to jump to. In
this case, this goto jumps
back to the first command in
the program)
“”
17/”goto start”
In addition to providing a compile() method, our Compiler class also provides a method to get
the Command from any row of the vector. To do so, you can use the getCommand() method:
Compiler c;
if (c.compile("dumbant.bug"))
30
{
// successfully compiled! Woot!
Compiler::Command cmd;
int rowNumber = 2;
if (c.getCommand(rowNumber,cmd))
{
// this would fill the cmd variable up with the 3rd entry
// in the vector above: generateRandomNumber, "5", "", ...
}
else
{
// there was an error getting this instruction
}
}
Given the ability to retrieve any Command you like, you can now create a simple interpreter that
interprets these instructions. An interpreter is an algorithm that repeatedly fetches a command,
performs the specified behavior of that command, advances to the next command, fetches the
next command, etc.
Finally, you can call the Compiler object’s getColonyName() method in order to get the name of
the colony (specified at the top line of each Bugs! source file):
Compiler c;
if (c.compile("dumbant.bug"))
{
cout << "This ant's name is: " << c.getColonyName() << endl;
}
This code would print:
This ant's name is: DumbAnt
Ok, now let’s see how to make a simple interpreter.
Our interpreter will need to have an instruction counter (let’s call it “ic”), which specifies which
row of the vector we’re currently “interpreting.” We’ll start our ic value at 0, so that we start by
executing our program from the first instruction in the vector.
bool simpleInterpreter()
{
Compiler c;
31
if ( ! c.compile("dumbant.bug") )
return false; // there was an error!
// successfully compiled! Woot!
Compiler::Command cmd;
int ic = 0; // start at the beginning of the vector
for (;;) // keep running forever for now
{
// get the command from element ic of the vector
if ( ! c.getCommand(ic, cmd) )
return false; // error - no such instruction!
switch (cmd.opcode)
{
case moveForward:
// cause the ant to move forward by
// updating its x,y coordinates
moveTheAntForward();
++ic; // advance to next instruction
break;
case generateRandomNumber:
generateRandomNumberUpTo(cmd.operand1);
++ic; // advance to next instruction
break;
case if_command:
// if the condition of the if command is
// is true, then go to the target position
// in the vector; otherwise fall through to
// the next position
if (conditionTriggered(cmd))
ic = convertToInteger(cmd.operand2);
else
++ic; // just advance to the next line
break;
case goto:
// just set ic the specified position
// in operand1
ic = convertToInteger(cmd.operand1);
break;
... // and so on
}
}
}
32
See how it works? The interpreter fetches a command, does something to execute the
specified command’s behavior (e.g., moves the ant forward), and then genrally advances to the
next instruction. After most instructions (like generateRandomNumber, moveForward, etc.) the
instruction counter, ic, just advances to the next element of the vector (++ic). After goto
statements, the ic is set to the target position, which is specified in cmd.operand1. And in the
case of if statements, the interpreter needs to determine whether the if statement’s condition is
true or false. If the if condition is true, then we update ic to the specified target position in
cmd.operand2; if not, we just increment ic by one, advancing it to the next line
Your ant class will have to implement a slightly more complex interpreter than the one above,
and use it to drive the ant’s behavior. During each tick of the simulation, your ant class’s
doSomething() method will need to run between 1 and 10 instructions (just enough to get the
ant to exhibit a limited behavior like moving to an adjacent square or picking up some food - you
will find more details on this in the ant section of this document) and then return. Your ant object
will need to track the instruction counter (ic) across doSomething() calls so that the ant has
consistent behavior across ticks (Hint: Put it in a data member). In this way, each ant gets an
opportunity to exhibit a simple behavior during each tick of the simulation, and a more complex
series of behaviors across the length of the simulation.
OK, but where do you use the Compiler class? Do you compile the ant’s programs inside the
ant class? Or in the anthill? Or in the StudentWorld class? Our suggestions are below.
Here is how you might use the Compiler class in your StudentWorld to compile one or more
entrant source files:
int StudentWorld::init()
{
...
Compiler *compilerForEntrant0, *compilerForEntrant1,
*compilerForEntrant2, *compilerForEntrant3;
AntHill *ah0, *ah1, *ah2, *ah3;
// get the names of all of the ant program source files
// we provide the getFilenamesOfAntPrograms() function for
// you in our GameWorld class.
std::vector<std::string> fileNames = getFilenamesOfAntPrograms();
compilerForEntrant0 = new Compiler;
std::string error;
// compile the source file… If the compile function returns
// false, there was a syntax error during compilation!
if ( ! compilerForEntrant0->compile(fileNames[0], error) )
33
{
// entrant 0’s source code had a syntax error!
// send this error to our framework to warn the user.
// do it JUST like this!
setError(fileNames[0] + " " + error);
// return an error to tell our simulation framework
// that something went wrong, and it’ll inform the user
return GWSTATUS_LEVEL_ERROR;
}
// otherwise, the entrant’s file compiled correctly!
// now allocate our first anthill object and make sure it has
// a pointer to the Compiler object for ant type #0,
// so it can determine what set of instructions to use to control
// ants in colony #0.
// You have to figure out what to put for ... in the line below.
ah0 = new AntHill(..., compilerForEntrant0);
// now add our new anthill object to our simulation data
// structure so it can be tracked and asked to do something by
// our virtual world during each tick of the simulation
addObjectToSimulation(ah0);
// now do the same thing for anthills 1, 2 and 3, assuming there
// is more than one competitor ant. The user may just want to
// test out her one ant without any competitors, in which case
// there would just be one ant (or two, or three).
...
}
Now, later on, when your zero’th anthill object gives birth to a new ant object, it can pass in the
a pointer to the Compiler object (e.g., originally pointed to by compilerForEntrant0 and
passed into the anthill during construction) to the ant object, so the ant knows what set of
instructions to use.
void AntHill::giveBirth() // used to give birth to a new ant
{
// allocate a new ant, and pass in a pointer to the
// Compiler object for this AntHill. The
// m_pointerToMyCompilerObject below points to the Compiler
// object that created in the StudentWorld::init() function
// above. By passing this into each ant as it’s born, the ant
// knows how to get hold of its instructions that govern it and
34
// other members of its colony
Ant* newAnt = new Ant(..., m_pointerToMyCompilerObject);
// now add our new ant to our simulation data structures
// so it can be tracked and asked to do something during each
// tick by our virtual world
addObjectToSimulation(newAnt);
…
}
Finally, your ant object must use its Compiler object (passed into it via pointer during
construction) to obtain the proper Commands to run in its interpreter. You can build a simple
interpreter, like the one we showed above, inside your ant class.
COMMAND Details
Most Bugs! commands are simple and don’t have any operands (arguments). Here are all of the
simple commands (all defined in enum OpCode in Compiler.h):
emitPheromone
faceRandomDirection
rotateClockwise
rotateCounterClockwise
moveForward
bite
pickupFood
dropFood
eatFood
Each of the above commands needs no arguments. As such, the operand1 and operand2 fields
in the Command structure may be ignored for these commands.
void Ant::runCommand(const Compiler::Command& c)
{
if (c.opcode == moveForward)
moveTheAntForward();
else if (c.opcode == rotateClockwise)
rotateTheAntClockwise();
else ... // and so on
}
35
The following commands, however, have one or more operands which must be taken into
account when interpreting the command within your ant class.
goto_command
Remember, the Compiler class holds a vector of Command structs which it fills in as it compiles
the contestant’s source file. The first Command struct (in slot 0 of its vector) corresponds to the
first instruction in the contestant’s source file. The second Command struct (in slot 1 of its
vector) corresponds to the second instruction in the entrant’s Bugs source file, and so on.
The goto_command has a single argument, stored within the operand1 field of the Command
struct. The value of operand1 is a string that contains the command number to jump to. So if
the value were “13”, you’d need to set your instruction counter (m_ic) equal to 13, and the next
instruction to be fetched would be the Command in slot 13 of the Compiler object’s vector.
void Ant::runCommand(const Compiler::Command& c)
{
...
else if (c.opcode == goto_command)
m_ic = stoi(c.operand1);
else ... // and so on
}
Implementation note: The standard library function stoi takes a std::string of digits and returns
an int with the value indicated by that string.
if_command
The if_command has two arguments, stored within the operand1 and operand2 fields of the
Command struct. The value of operand1 is a string holding a number representing which
condition to test for:
0: i_smell_danger_in_front_of_me
1: i_smell_pheromone_in_front_of_me
2: i_was_bit
3: i_am_carrying_food
4: i_am_hungry
5: i_am_standing_on_my_anthill
6: i_am_standing_on_food
7: i_am_standing_with_an_enemy
8: i_was_blocked_from_moving
9: last_random_number_was_zero
36
The second operand, operand2, holds a string that contains the command number to jump to IF
AND ONLY IF the condition evaluated by the if_command is found to be true. So if operand2
were “3”, then you’d need to set your instruction counter (m_ic) equal to 3, and the next
instruction to be fetched would be the Command in slot 3 of Compiler’s vector.
void Ant::runCommand(const Compiler::Command& c)
{
...
else if (c.opcode == if_command)
{
if (thisConditionIsTrue(c.operand1))
m_ic = stoi(c.operand2);
else ... // and so on
}
generateRandomNumber
The generateRandomNumber command has a single argument, which is provided in operand1
of the Command struct. It holds a positive integer (in C++ string format):
void Ant::runCommand(const Compiler::Command& c)
{
...
else if (c.opcode == generateRandomNumber)
m_lastRandomNumberGenerated =
generateRandomNumber(stoi(c.operand1));
else ... // and so on
}
Implemenation note: The GameConstants.h file defines a function you may use whenever your
code needs to generate a random number. The call randInt(a, b) returns a uniformly
distributed random integer from a to b inclusive.
You Have to Create the Classes for All Actors
The Bugs! competition has a number of different simulation objects, including:
· ants
· anthills
· baby and adult grasshoppers
37
· poison
· pools of water
· pheromones
· pebbles
Each of these simulation objects can occupy the virtual field and interact with other simulation
objects within the field.
Now of course, many of your simulation objects will share things in common – for instance,
every one of the objects in the simulation (ants, baby grasshoppers, adult grasshoppers, poison,
etc.) has x,y coordinates. Many simulation objects have the ability to perform an action (e.g.,
move, eat, or bite) during each tick of the simulation. Many of them can potentially be bit (e.g.,
ants and grasshoppers) and could “die” during a tick. All of them need some attribute that
indicates whether or not they are still alive or they died during the current tick, etc.
It is therefore your job to determine the commonalities between your different simulation actors
and make sure to factor out common behaviors and traits and move these into appropriate base
classes, rather than duplicate these items across your derived classes – this is in fact one of the
tenets of object oriented programming.
Your grade on this project will depend upon your ability to intelligently create a set of
classes that follow good object-oriented design principles. Your classes MUST NEVER
duplicate code or data members – if you find yourself writing the same (or largely similar) code
across multiple classes, then this is an indication that you should define a common base class
and migrate this common functionality/data to the base class. Duplication of code is a so-called
code smell, a weakness in a design that often leads to bugs, inconsistencies, code bloat, etc.
Hint: When you notice this specification repeating the same text nearly identically in the
following sections (e.g., in the ant and grasshoppers sections) you must make sure to identify
common behaviors and move these into proper base classes. NEVER duplicate behaviors
across classes that can be moved into a base class!
You MUST derive all of your simulation objects directly or indirectly from a base class that we
provide called GraphObject, e.g.:
class Actor: public GraphObject
{
public:
…
};
class GrassHopper: public Actor
{
public:
…
};
38
class BabyGrasshopper: public GrassHopper
{
public:
…
};
GraphObject is a class that we have defined that helps hide the ugly logic required to
graphically display your actors on the screen. If you don’t derive your classes from our
GraphObject base class, then you won’t see anything displayed on the screen! :)
The GraphObject class provides the following methods that you may use:
GraphObject(int imageID, int startX, int startY, Direction startDirection = none, int depth = 0);
void setVisible(bool shouldIDisplay);
void getX() const;
void getY() const;
void moveTo(int x, int y);
Direction getDirection() const; // Directions: none, up, down, left, right
void setDirection(Direction d); // Directions: none, up, down, left, right
You may use any of these member functions in your derived classes, but you must not use any
other member functions found inside of GraphObject in your other classes (even if they are
public in our class). You must not redefine any of these methods in your derived classes since
they are not defined as virtual in our base class.
GraphObject(int imageID, int startX, int startY, Direction startDirection, int depth) is the
constructor for a new GraphObject. When you construct a new GraphObject, you must specify
an image ID that indicates how the GraphObject should be displayed on screen (e.g., as an ant
of colony 0, an ant of colony 1, an adult grasshopper, a pile of food, a pebble, etc.). You must
also specify the initial x,y location of the object. The x value may range from 0 to
VIEW_WIDTH-1 inclusive, and the y value may range from 0 to VIEW_HEIGHT-1 inclusive.
Notice that you pass the coordinates as x,y (i.e., column, row starting from bottom left, and NOT
row, column). You must specify the initial direction that each object is facing, (i.e., left, right, up,
or down – these constants are defined in the GraphObject.h file). The depth parameter is the
graphical depth of the object, specified in the descriptions below of each kind of object (e.g., 1
for ants and pebbles, 2 for food, etc.). Our framework will display objects of lower depth closer
to the foreground, covering objects of greater depth.
One of the following IDs, found in GameConstants.h, must be passed in for the imageID value:
IID_ANT_TYPE0
IID_ANT_TYPE1
IID_ANT_TYPE2
IID_ANT_TYPE3
39
IID_ANT_HILL
IID_POISON
IID_FOOD
IID_WATER_POOL
IID_ROCK
IID_BABY_GRASSHOPPER
IID_ADULT_GRASSHOPPER
IID_PHEROMONE_TYPE0
IID_PHEROMONE_TYPE1
IID_PHEROMONE_TYPE2
IID_PHEROMONE_TYPE3
getX() and getY() are used to determine a GraphObject’s current location in the field. Since
each GraphObject maintains its x,y location, this means that your derived classes MUST NOT
also have x,y member variables, but instead use these functions and moveTo() from the
GraphObject base class.
moveTo(int x, int y) is used to update the location of a GraphObject within the field. For
example, if an ant’s movement logic dictates that it should move to the right, you could do the
following:
moveTo(getX()+1, y); // move one square to the right
You MUST use the moveTo() method to adjust the location of a simulation object if you want
that object to be properly animated by our framework. As with the GraphObject constructor,
note that the order of the parameters to moveTo is x,y (col,row) and NOT y,x (row,col).
getDirection() is used to determine the direction a GraphObject is facing.
setDirection(Direction d) is used to change the direction a GraphObject is facing. For example,
when an ant decides to turn to face right, you can use this method to cause the Ant’s avatar to
be displayed facing right.
Ant Class
Here are the requirements you must meet when implementing the Ant class.
What the Ant Must Do When It Is Created
When it is first created:
40
1. An Ant must have an image ID of IID_ANT_TYPE0 (if it’s an ant of colony 0),
IID_ANT_TYPE1 (if it’s an ant of colony 1), IID_ANT_TYPE2 (if it’s an ant of colony 2),
IID_ANT_TYPE3 (if it’s an ant of colony 3).
2. The Ant’s graphical depth must be 1 (this is eventually passed into GraphObject’s depth
field during construction, and indicates that the ant graphic should be in the foreground,
covering other objects with a greater depth, like an anthill or food).
3. The Ant must always start at the same location as the anthill that produced it.
4. The Ant must know its colony number, which is the same as the anthill that produced it.
5. The Ant must be provided a pointer to its Compiler object so it can get the instructions
that govern its behavior.
6. The Ant, in its initial state:
a. Has 1,500 hit points.
b. Faces in a random direction.
c. Is not in a stunned state.
d. Holds 0 food.
e. Was not previously bitten.
f. Was not previously blocked from moving.
g. Has a last random number value of 0.
h. Has a starting instruction counter value of 0, indicating that the first command a
new ant must execute during its first tick is the first command in its Compiler
object’s vector of commands.
What the Ant Must Do During a Tick
The Ant must be given an opportunity to do something during every tick (in its doSomething()
method). When given an opportunity to do something, the Ant must do the following:
1. The ant must lose one hit point (because it burns energy during each tick and gets
hungrier).
2. The ant must check to see if its hit points have reached zero. If so, it must:
a. Add 100 units of food to the simulation world in its current x,y location (the ant
can ask the StudentWorld object to do this on its behalf)
b. Set its state to dead.
c. Immediately return.
3. Otherwise, the ant must check to see if it is currently stunned (e.g., because it stepped
into a pool of water). If so, then the ant must:
a. Decrement the count of ticks left for it to be stunned
b. When the count reaches zero, the ant is no longer stunned while on this square.
c. Immediately return.
4. Otherwise, the ant must interpret between one and ten commands:
a. It must fetch the next command referred to by its instruction counter from its
Compiler object.
41
b. If there is an error fetching this command for whatever reason, then the ant’s
doSomething() method must:
i. Set the ant’s status to dead.
ii. Immediately return.
c. Otherwise, the ant must interpret/execute the command. Note, while executing
each command, you must take care to adjust the ant’s state:
i. moveForward:
1. If an ant moves successfully, then it needs to:
a. Remember that it was not blocked from moving.
b. Remember that it was not bit while on its current square
(since it’s now on a new square, it hasn’t been bitten there
yet, by definition).
2. If an ant tries to move but is blocked by a pebble, then it needs to
remember that it was blocked from movement.
ii. eatFood: An ant will try to eat 100 units of food at a time, assuming it is
holding food (an ant can only eat food that it previously picked up). If it is
holding less than 100 units of food, it will eat as much as it has left.
iii. dropFood: An ant will drop all of its food at once onto its current square. If
a square already holds a food object, the ant should simply increase the
units of that food in that object rather than creating another food object in
the same square. (Better: The ant asks the StudentWorld to figure this
out, and StudentWorld either creates a new food object or adds units to
an existing food object)
iv. bite: An ant will bite an enemy on the current square, if an enemy is
present. If there is more than one enemy on the square, then the ant will
choose a random enemy to bite. An ant considers all grasshoppers as
well as ants from all other colonies its enemy. An ant bite does 15 points
of damage to the enemy.
v. pickupFood: An ant will try to pick up 400 units of food at a time from its
current location. Ants may only hold a total of 1800 units of food. So if the
ant tries to pick up more than this, it will be limited to picking up an
amount of food that causes it to hold no more than 1800 total units. If
less than 400 units of food are left on the square, then the ant will pick up
the remaining food on the square, up to its 1800 total unit capacity.
vi. emitPheromone: Increases the pheromone scent of the current square of
the grid by 256 points, up to a maximum of 768. If the pheromone
strength already in the square were 700, and the ant emitted a new
pheromone, the square’s pheromone strength would jump from 700 to
768. Note: Each ant colony has its own pheromones, so there may be up
to 4 different pheromone objects (each with its own strength) in each
square of the field. If a square already holds a pheromone object for a
given colony of ants, the ant should simply increase the units of that
pheromone object rather than create another pheromone object in the
same square. (Better: The ant asks the StudentWorld to figure this out,
42
and StudentWorld either creates a new pheromone object or adds units to
an existing pheromone object)
vii. faceRandomDirection: Causes the ant to face a random direction (which
could be the same as the current direction faced by the ant).
viii. rotateClockwise: Causes the ant to turn 90 degrees clockwise.
ix. rotateCounterClockwise: Causes the ant to turn 90 degrees
counterclockwise.
x. generateRandomNumber: Generates a random number between 0 and
N-1, where the value of N is specified in operand1 of the command. If
operand1 is 0, then set the random number to 0.
xi. goto_command: The command must set the instruction counter to the
position specified in operand1.
xii. if_command: The if command must check the specified condition
(specified in operand1), as follows:
1. last_random_number_was_zero: Checks to see if the last random
number generated was equal to zero. If so, sets the instruction
counter to the location specified in operand2.
2. I_am_carrying_food: If the ant is currently carrying any food, sets
the instruction counter to the location specified in operand2.
3. I_am_hungry: If the ant currently has 25 or fewer hit points (which
means it’s hungry), then set the instruction counter to the location
specified in operand2.
4. I_am_standing_with_an_enemy: If the ant is currently on the
same square as either an ant from a different colony or a
grasshopper, then set the instruction counter to the location
specified in operand2.
5. I_am_standing_on_food: If the ant is currently on the same square
as a food object with at least 1 unit of food left, then set the
instruction counter to the location specified in operand2.
6. I_am_standing_on_my_anthill: If the ant is currently on the same
square as its own anthill (and the anthill is still alive), then set the
instruction counter to the location specified in operand2. Note:
This must not trigger if an ant is standing on a competitor ant’s
anthill.
7. I_smell_pheromone_in_front_of_me: If there is a pheromone with
a strength of at least 1 in the square in front of where the ant is
facing (not the square the ant is on, but the square in front of the
ant), then set the instruction counter to the location specified in
operand2.
8. I_smell_danger_in_front_of_me: If there is danger (e.g., an enemy
ant, poison, water, or a grasshopper of any type) in the square in
front of where the ant is facing (not the square the ant is on, but
the square in front of the ant), then set the instruction counter to
the location specified in operand2.
43
9. I_was_bit: If the ant was bitten by another insect while on its
current square (since it last moved onto this square), then set the
instruction counter to the location specified in operand2. (Note:
The moment the ant moves successfully to a new square where it
has not yet been bitten, this state is cleared and it would no longer
considered itself bitten)
10. I_was_blocked_from_moving: If, during its last attempt to move,
the ant was blocked from moving forward by a pebble, then set
the instruction counter to the location specified in operand2. (Note:
The moment the ant moves successfully to a new square, this
state is cleared and it would not longer be considered blocked)
d. The ant must then update its instruction counter appropriately:
i. If the command is anything other than a goto or if statement, then the ant
will simply increment the instruction counter by one, advancing to the next
instruction.
ii. If the command is a goto statement, then the command will update the
instruction counter to the specified target (as described above).
iii. If the command is an if statement, then the code must determine if the if
statement triggers:
1. If so, the code must adjust the instruction counter to refer to the
specified target instruction (as described above).
2. If not, then the code will simply increment the instruction counter
by one, advancing to the next instruction.
e. If the command is anything other than goto, if, or generateRandomNumber, then
the ant’s doSomething() method must immediately return. The intent is that
during a tick, the ant executes at most one command that attempts to change the
external state of the simulation (e.g., move, pick up food, etc., whether or not the
attempt succeeds).
f. If the ant has executed ten commands during this tick (regardless of whether it
issued a command that changed the state of the simulation), then it must
immediately return.
g. Otherwise the ant must keep executing commands until either it changes the
simulation state or runs ten total commands.
Hint: Any time your ant wants to introduce new objects into the virtual world (e.g., pheromones
or food), have it ask the StudentWorld object to do this for your ant object. The StudentWorld
object can allocate the new object (if necessary) and then add it to the data structure it uses to
track actor objects in the simulation.
What the Ant Must Do When It Is Bitten, Poisoned or Stunned
When the Ant is bitten by an ant from another colony or an adult grasshopper it will reduce its hit
points appropriately (by the amount specified by the damaging party). The ant must also
44
remember that it was bitten on the current square - this bitten state can be reset once the ant
moves to a new square. If the ant has zero or less hit points after being bit, it must set its state
to dead. A dead ant must be replaced by 100 units of food in the current square where the ant
died (or if there is already an existing food object on the square, its amount must be increased
by 100).
An ant is poisoned when it steps onto the same square as a poison object (the poison object
should be responsible for triggering and poisoning the ant). When an ant is poisoned, it will
reduce its own hit points by 150 points. If the ant has zero or less hit points after this, it must set
its state to dead. A dead ant must be replaced by 100 units of food in the current square where
the ant died.
An ant is stunned when it steps onto the same square as a pool-of-water object (the pool-of-
water object should be responsible for triggering and stunning the ant). The ant will be stunned
(sleep) for a total of 2 ticks. An ant that’s already on top of a water pool will not be re-stunned by
the same water pool until it moves away from the current square, and then back onto the water
pool square. In other words, ants can’t be re-stunned over and over by the same water pool
(unless it moves away from, and then revisits the same square again).
Hints
Note: Ant objects are basically energy-holders. They hold energy (hit points) that can be added
to (when the ant eats) or decreased (when the ant is bitten or poisoned, or simply burned away
during each tick of the simulation).
Note: Ant objects, like baby and adult grasshoppers spend some of their time sleeping/stunned
(when they step onto water).
Pebble Class
Pebbles don’t really do much. They just sit still in place. Here are the requirements you must
meet when implementing the pebble class.
What a Pebble Must Do When It Is Created
When it is first created:
1. A Pebble object must have an image ID of IID_ROCK.
2. A Pebble must always start at the proper location as specified by the field's data file.
3. A Pebble must start out facing right.
4. A Pebble object must start out with a depth of 1.
45
What a Pebble Must Do During a Tick
A Pebble must be given an opportunity to do something during every tick (in its doSomething()
method). When given an opportunity to do something, the Pebble must do nothing. After all, it’s
just a Pebble! (What would you think it would do?)
What a Pebble Must Do When It Is Bitten, Poisoned or Stunned
Pebbles can’t be Bitten, Poisoned or Stunned.
Hints
Do you really need a hint? It’s a pebble.
Food Class
You must create a class to represent a pile of Food. Here are the requirements you must meet
when implementing the Food class.
What a Food Object Must Do When It Is Created
When it is first created:
1. A Food object must have an image ID of IID_FOOD.
2. A Food object must have its x,y location specified for it.
3. All Food objects that are created at the start of the simulation must hold 6000 units of
food. All Food objects that are created due to an insect dying must hold 100 units of
food.
4. A Food object must always start out facing right.
5. A Food object must start out with a depth of 2.
What a Food Object Must Do During a Tick
Food does the following during each tick:
46
1. Nothing.
What the Food Must Do When Picked up or Dropped
If an ant or grasshopper picks up N units of food, the food object should reduce the number of
units it holds by N units. The food must then check to see if it has been completely depleted
(has 0 units left), and if so, set its state to dead so it can be removed from the simulation after
the current tick.
If an ant drops N units of food onto a square that already has a food object, or if an ant or
grasshopper dies and deposits 100 units of food (its carcass) onto a square that already has a
food object, then those N or 100 units must be added to the existing food object, to ensure that
there are no more than 1 food object per square of the field. If there is no food object on the
current square, then a new one should be created and initialized to hold the specified number of
units of food.
What a Food Object Must Do When It Is Bitten, Poisoned or Stunned
Food can’t be Bitten, Poisoned or Stunned.
Hints
Note: Food objects are basically energy-holders. They hold energy (food units) that can be
added to or decreased.
Pheromone Class
You must create a class to represent a Pheromone scent. Here are the requirements you must
meet when implementing the Pheromone class.
What Pheromone Must Do When It Is Created
When it is first created:
1. A Pheromone object must have an image ID of IID_PHEROMONE_TYPE0 (if generated
by ants of colony 0), IID_PHEROMONE_TYPE1 (if generated by ants of colony 1),
47
IID_PHEROMONE_TYPE2 (if generated by ants of colony 2),
IID_PHEROMONE_TYPE3 (if generated by ants of colony 3)
2. A Pheromone object must have its x,y location specified for it.
3. All new Pheromone objects must have a strength of 256 units.
4. A Pheromone object must always start out facing right.
5. A Pheromone object must start out with a depth of 2.
What a Pheromone Must Do During a Tick
Pheromones do the following during each tick:
1. They decrease their strength by 1 unit.
2. If their strength reaches zero units, then they must set their status to dead so they can
be removed from the simulation after the current tick.
What a Pheromone Must Do When It Is Bitten, Poisoned or Stunned
Pheromones can’t be Bitten, Poisoned or Stunned.
Hints
Note: Pheromone objects are basically energy-holders. They hold energy (pheromone scent
units) that can be added to, and that decay over time (with each tick).
Anthill Class
You must create a class to represent an anthill. Here are the requirements you must meet when
implementing the Anthill class.
What an Anthill Must Do When It Is Created
When it is first created:
1. An AntHill object must have an image ID of IID_ANTHILL (all ant colonies share the
same anthill graphic).
2. An AntHill object must have its x,y location specified for it.
3. All new AntHill objects must have a starting hit points of 8,999 units.
48
4. An AntHill object must always start out facing right.
5. An AntHill object must start out with a depth of 2.
6. Each AntHill object must have its colony number passed in, so it knows which colony of
ants it represents.
7. Each AntHill object must have a Compiler object passed in (by the StudentWorld::init()
method), where the Compiler object holds the compiled Bugs Commands that will
govern the behavior of ants born from that anthill.
What an AntHill Must Do During a Tick
An anthill does the following during each tick:
1. It decreases its (queen’s) hit points by 1 unit.
2. If the anthill’s (queen’s) hit points reaches zero units, then:
a. The anthill must set its status to dead so it can be removed from the simulation
after the current tick.
b. The anthill must immediately return.
3. The anthill checks to see if there is any food on its square. If so:
a. It will eat up to 10,000 units of food from the square, and this amount will directly
increase its hit points.
b. The anthill must immediately return.
4. The anthill checks to see if it has enough energy - at least 2,000 hit points - to produce a
new ant. If so:
a. It adds a new ant of the same colony number to its square in the simulation.
b. It reduces its own hit points by 1,500.
c. It asks StudentWorld to increase the count of the total number of ants that this
colony has produced. This needs to be tracked in order to determine the winner
ant colony.
What an AntHill Must Do When It Is Bitten, Poisoned or Stunned
Anthills can’t be Bitten, Poisoned or Stunned.
Hints
Note: Anthill objects are basically energy-holders. They hold energy (hit-points) that can be
added to (when ants drop food onto their square), and that decay over time (with each tick, or
when the anthill’s queen gives birth to a new ant).
49
Pool of Water Class
You must create a class to represent a Pool of Water. Here are the requirements you must meet
when implementing the Pool of Water class.
What a Pool of Water Must Do When It Is Created
When it is first created:
1. A Pool of Water object must have an image ID of IID_WATER_POOL.
2. A Pool of Water must always start at the proper location as specified by the field's data
file.
3. A Pool of Water always starts out facing right.
4. A Pool of Water always has a depth of 2.
What a Pool of Water Must Do During a Tick
Each time a Pool of Water object is asked to do something (during a tick):
1. The Pool of Water must attempt to stun all Insects on the same square as it. Stunning an
insect (if the insect can be stunned), causes it to sleep for 2 additional ticks (above and
beyond any existing sleeping the insect is doing).
What a Pool of Water Must Do When It Is Bitten, Poisoned or Stunned
Pools of Water can’t be Bitten, Poisoned or Stunned.
Hints
Pools of water activate when an insect or insects step on top of them, then perform an action on
the insect(s). It’s very similar to poison.
Poison Class
You must create a class to represent Poison. Here are the requirements you must meet when
implementing the Poison class.
50
What Poison Object Must Do When It Is Created
When it is first created:
1. A Poison object must have an image ID of IID_POISON.
2. A Poison object must always start at the proper location as specified by the field's data
file.
3. A Poison object always starts out facing right.
4. A Poison object always has a depth of 2.
What a Poison Object Must Do During a Tick
Each time a Poison object is asked to do something (during a tick):
1. The Poison object must attempt to poison all Insects on the same square as it.
What a Poison Object Must Do When It Is Bitten, Poisoned or Stunned
Poison can’t be Bitten, Poisoned or Stunned.
Hints
Poison activates when an insect or insects step on top of it, then performs an action on the
insect(s). It’s very similar to a pool of water.
Baby Grasshopper Class
You must create a class to represent a baby grasshopper. Here are the requirements you must
meet when implementing the BabyGrasshopper class.
What a Baby Grasshopper Must Do When It Is Created
When it is first created:
51
1. The BabyGrasshopper object must have an image ID of IID_BABY_GRASSHOPPER.
2. The BabyGrasshopper’s graphical depth must be 1.
3. The BabyGrasshopper object must always start at a starting location as specified by the
field's data file.
4. The BabyGrasshopper must start out facing a random direction.
5. The BabyGrasshopper must pick a random distance to walk in this random direction.
The distance must be between [2,10], inclusive.
6. The BabyGrasshopper must start out with 500 hit points.
7. The BabyGrasshopper must start out in a non-sleeping/stunned state, so it gets a
chance to move during the first tick of the simulation.
What a Baby Grasshopper Must Do During a Tick
Each time a baby grasshopper is asked to do something (during a tick):
1. The baby grasshopper loses one hit point (as it gets hungrier).
2. The baby grasshopper must check to see if its hit points have reached zero. If so, it
must:
a. Add 100 units of food to the simulation world in its current x,y location (the baby
grasshopper can ask the StudentWorld object to do this on its behalf)
b. Set its state to dead.
c. Immediately return.
3. Otherwise, the baby grasshopper must check to see if it is currently sleeping/stunned
(e.g., because it sleeps 2 out of 3 ticks, or because it might have been additionally
stunned by stepping onto a Pool of Water). If the baby grasshopper is sleeping/stunned,
then the baby grasshopper must:
a. Decrement the count of ticks left for it to be sleeping.
b. Immediately return.
4. Otherwise, the baby grasshopper is going to do something this round.
5. The baby grasshopper checks its hit points. If its hit points are greater than or equal to
1,600, then it will moult and turn into an adult grasshopper. It must:
a. Create and add a new adult grasshopper object to the simulation in the same
square as the baby.
b. Set the baby’s status status to dead, resulting in a pile of 100 units of food being
dropped in the current square.
c. Return immediately
6. The baby grasshopper then attempts to eat any food on the current square. It will
attempt to eat 200 units of food at a time (or however much food is available, if the
amount of food on the current square is less than 200 units). If the baby grasshopper
does find food, the eaten number of units must be deducted from the food object on the
52
square (possibly causing it to disappear) and this energy is given to the baby
grasshopper as hit points.
7. If the baby grasshopper did eat, then there is a 50% chance it will want to immediately
rest, in which case it proceeds to step 12.
8. Otherwise, check if the baby grasshopper has finished walking the desired distance in
the current direction. If so:
a. The baby grasshopper must pick a new random direction (which could be the
same as the current direction)
b. The baby grasshopper must pick a random distance to walk in this new random
direction. The distance must be between [2,10], inclusive.
9. The baby grasshopper attempts to move one square in its currently-facing direction.
10. If the baby grasshopper was blocked from moving (e.g., by a pebble) then it must:
a. Set the desired distance to continue walking in the current direction to zero
(which will cause it to pick a new direction to move during the next tick)
b. Proceed to step 12.
11. Otherwise, the baby grasshopper decreases its desired distance to walk in the current
direction by one. (Note: If the desired distance reaches zero, this will cause it to pick a
new direction to move during the next awake tick)
12. Set the number of ticks to sleep to 2, so that the baby grasshopper sleeps two ticks
before doing something meaningful again.
What a Baby Grasshopper Must Do When It Is Bitten, Poisoned or Stunned
When the baby grasshopper is bitten by an ant or an adult grasshopper it will reduce its hit
points appropriately (by the amount specified by the damaging party). If the baby grasshopper
has zero or less hit points after being bit, it must set its state to dead. A dead baby grasshopper
must be replaced by 100 units of food in the current square where the baby grasshopper died.
A baby grasshopper is poisoned when it steps onto the same square as a poison object (the
poison object should be responsible for triggering and poisoning the baby grasshopper). When
a baby grasshopper is poisoned, it will reduce its hit points by 150 points. If the baby
grasshopper has zero or less hit points after this, it must set its state to dead. A dead baby
grasshopper must be replaced by 100 units of food in the current square where the baby
grasshopper died.
A baby grasshopper is stunned when it steps onto the same square as a pool-of-water object
(the pool-of-water object should be responsible for triggering and stunning the baby
grasshopper). The baby grasshopper will be stunned (sleep) for a total of 2 ticks. A baby
grasshopper that’s already on top of a water pool will not be re-stunned by the same water pool
until it moves away from the current square, and then back onto the water pool square. In other
words, baby grasshoppers can’t be re-stunned over and over by the same water pool (unless it
moves away from, and then revisits the same square again).
53
Hints
Note: Baby grasshopper objects are basically energy-holders. They hold energy (hit-points) that
can be added to (when they eat food from their square), and that decay over time (they lose a
hit point with each tick due to hunger, or being bit).
Note: Baby grasshopper objects, like Ants and adult grasshoppers spend some of their time
sleeping/stunned. Ants and baby grasshoppers can also get stunned/made to sleep by stepping
onto Pools of Water. And baby grasshoppers also spend 2 out of 3 ticks sleeping.
Adult Grasshopper Class
You must create a class to represent an adult grasshopper. Here are the requirements you must
meet when implementing the AdultGrasshopper class.
What an Adult Grasshopper Must Do When It Is Created
When it is first created:
1. The AdultGrasshopper object must have an image ID of IID_ADULT_GRASSHOPPER.
2. The AdultGrasshopper’s graphical depth must be 1.
3. The AdultGrasshopper object’s starting location must be passed into its constructor.
4. The AdultGrasshopper must start out facing a random direction.
5. The AdultGrasshopper must pick a random distance to walk in this random direction.
The distance must be between [2,10], inclusive.
6. The AdultGrasshopper must start out with 1,600 hit points.
7. The AdultGrasshopper must start out in a non-sleeping/stunned state, so it gets a
chance to move during the first tick of the simulation.
What an Adult Grasshopper Must Do During a Tick
Each time an adult grasshopper is asked to do something (during a tick):
1. The adult grasshopper loses one hit point (as it gets hungrier).
2. The adult grasshopper must check to see if its hit points have reached zero. If so, it
must:
a. Add 100 units of food to the simulation world in its current x,y location (the adult
grasshopper can ask the StudentWorld object to do this on its behalf)
54
b. Set its state to dead.
c. Immediately return.
3. Otherwise, the adult grasshopper must check to see if it is currently sleeping (e.g.,
because it sleeps 2 out of 3 ticks). If the adult grasshopper is sleeping, then the adult
grasshopper must:
a. Decrement the count of ticks left for it to be sleeping.
b. Immediately return.
4. Otherwise, the adult grasshopper is going to do something this round.
5. There is a one in three chance that the adult grasshopper will try to bite another insect
on the same square during the current tick. If the adult grasshopper does decide to bite
an enemy during the tick (⅓ chance), and there are one or more enemies (all other baby
and adult grasshoppers and all ants) on the current square that can be bit, then:
a. The adult grasshopper will randomly choose one of the enemies and bite them,
doing 50 hit points of damage.
b. Proceed to step 13.
6. Otherwise, there is a one in ten chance that the adult grasshopper will decide to jump to
another square. If it decides to jump AND there is an open square for it to jump to (one
without a pebble), then it will:
a. Select a random open square within a circular radius of 10 squares of itself, and
moveTo() to that square (Hint: use cos() and sin() from <cmath> for this)
b. Proceed to step 13.
7. The adult grasshopper then attempts to eat any food on the current square. It will
attempt to eat 200 units of food at a time (or however much food is available, if the
amount of food on the current square is less than 200 units). If the adult grasshopper
does find food, the eaten number of units must be deducted from the food object on the
current square (possibly causing it to disappear) and this energy is given to the adult
grasshopper as hit points.
8. If the adult grasshopper did eat, then there is a 50% chance it will want to immediately
rest, in which case it goes to step 13.
9. Otherwise, see if the adult grasshopper has finished walking its desired distance in the
current direction. If so:
a. The adult grasshopper must pick a new random direction (which could be the
same as the current direction)
b. The adult grasshopper must pick a random distance to walk in this new random
direction. The distance must be between [2,10], inclusive.
10. The adult grasshopper attempts to move one square in its currently facing direction.
11. If the adult grasshopper was blocked from moving (e.g., by a pebble) then it must:
a. Set the desired distance to continue walking in the current direction to zero
(which will cause it to pick a new direction to move during the next awake tick)
b. Proceed to step 13.
12. Otherwise, the adult grasshopper decreases its desired distance to walk in the current
direction by one. (Note: If the desired distance reaches zero, this will cause it to pick a
new direction to move during the next tick)
55
13. Set the number of ticks to sleep to 2, so that the adult grasshopper sleeps two ticks
before doing something meaningful again.
What an Adult Grasshopper Must Do When It Is Bitten, Poisoned or
Stunned
When the adult grasshopper is bitten by an ant or another adult grasshopper it will reduce its hit
points appropriately (by the amount specified by the damaging party). If the adult grasshopper
has zero or less hit points after being bit, it must set its state to dead. A dead adult grasshopper
must be replaced by 100 units of food in the current square where the adult grasshopper died.
If the adult grasshopper is still alive after being bitten, then there is a 50% chance that it will
immediately retaliate and attempt to bite some random insect on the same square (not
necessarily the insect that bit it). The bite-back must happen at the time of the bite, not on the
next tick.
Poison has no effect on adult grasshoppers. So if a poison object attempts to poison an adult
grasshopper, nothing should happen.
Pools of water have no effect on adult grasshoppers. So if a pool of water object attempts to
stun/sleep an adult grasshopper, nothing should happen.
Hints
Note: Adult grasshopper objects are basically energy-holders. They hold energy (hit-points) that
can be added to (when they eat food from their square), and that decay over time (they lose a
hit point with each tick due to hunger, or being bit).
Note: Adult grasshopper objects, like Ants and baby grasshoppers spend some of their time
sleeping/stunned. And adult grasshoppers also spend 2 out of 3 ticks sleeping.
How to Tell Who’s Who
Depending on how you design your classes, you may find that you need to determine what type
of object one of your pointers points to. For example, suppose the ant is directed to move right
and needs to decide whether that's prevented by a Pebble:
56
Actor* ap = getAnActorAtTheProposedLocation(...);
if (ap != nullptr)
{
Determine if ap points to a Pebble
...
}
In the code above, the ant calls a function getAnActorAtTheProposedLocation() that you might
write, which returns a pointer to an actor, if any, that occupies the destination square. The ant is
allowed to occupy the same square as a Poison object or a Pheromone object, for example, but
not a Pebble. But how can we determine whether ap points to a Pebble? Here’s a possible
way:
Actor* ap = getAnActorAtTheProposedLocation(...);
if (ap != nullptr)
{
Pebble* pp = dynamic_cast<Pebble*>(ap);
if (pp != nullptr)
{
cerr << "pp points to a Pebble" << endl;
...
}
}
A C++ dynamic_cast expression can be used to determine whether the object pointed to by a
pointer of a general type may also be pointed to by an pointer of a more specific type (e.g.,
whether a Pebble object pointed to by an Actor pointer can in fact be pointed to by a Pebble
pointer, or whether an Ant pointed to by an Actor pointer can in fact be pointed to by an Insect
pointer, assuming Insect is a base class of Ant). In the example above, if ap pointed to a
Pebble object, then dynamic casting ap to a Pebble pointer (the target type in the angle
brackets) succeeds, and the returned pointer that is used to initialize pp will point to that Pebble
object. If ap pointed to an Ant object, then since a Pebble pointer could not point to such an
object, the dynamic cast yields a null pointer.
Here’s another example in a different problem domain:
class Person { ... };
class Faculty : public Person { ... };
class Student : public Person { ... };
class GradStudent : public Student { ... };
class Undergrad : public Student { ... };
class ExchangeStudent : public Undergrad { ... };
Person* p = new Undergrad(...); // The object is an Undergrad
...
Faculty* f = dynamic_cast<Faculty*>(p); // f is nullptr; an Undergrad is
// not a kind of Faculty
57
Student* s = dynamic_cast<Student*>(p); // s is not nullptr; an Undergrad
// is a kind of Student
Undergrad* u = dynamic_cast<Undergrad*>(p); // u is not nullptr; an
// Undergrad is an Undergrad
ExchangeStudent* e = dynamic_cast<ExchangeStudent*>(p);
// e is nullptr; an Undergrad is
// not a kind of ExchangeStudent
Note: dynamic_cast works only for classes with at least one virtual function. A base class
should always have a virtual destructor, so that's an easy requirement to meet.
Stylistic note: Uses of dynamic_cast should be rare. In most cases, when you have a base
pointer and you want to do different things depending on which kind of derived object it points
to, you'd just call a virtual function declared in the base class and implemented in different ways
in the derived classes. For example, let’s hypothetically say that we have both Pebble and
Boulder objects in our simulation, both of which are supposed to block ants from moving onto
their square. Before an ant moves to a destination square, it must first check to see if it’s being
blocked. The obvious but frowned-upon solution to this would be to have the ant use
dynamic_cast to first determine if an object in the destination square is a Pebble and then to use
dynamic_cast to determine if it’s a Boulder. Instead, your base Actor class should have a
blocksAnt() method that derived classes can implement in their own way (e.g., Pebble’s and
Boulder’s versions would return true, Food’s, and Poison’s versions would return false, etc.)
Don’t know how or where to start? Read
this!
When working on your first large object oriented program, you’re likely to feel overwhelmed and
have no idea where to start; in fact, it’s likely that many students won’t be able to finish their
entire program. Therefore, it’s important to attack your program piece by piece rather than trying
to program everything at once.
Students who try to program everything at once rather than program incrementally
almost always fail to solve CS32’s project 3, so don’t do it!
Instead, try to get one thing working at a time. Here are some hints:
1. When you define a new class, try to figure out what public member functions it should
have. Then write dummy “stub” code for each of the functions that you’ll fix later:
class Foo
{
public:
58
int chooseACourseOfAction() { return 0; } // dummy version
};
Try to get your project compiling with these dummy functions first, then you can worry
about filling in the real code later.
2. Once you’ve got your program compiling with dummy functions, then start by replacing
one dummy function at a time. Update the function, rebuild your program, test your new
function, and once you’ve got it working, proceed to the next function.
3. Make backups of your working code frequently. Any time you get a new feature
working, make a backup of all your .cpp and .h files just in case you screw
something up later.
BACK UP YOUR .CPP AND .H FILES TO A REMOVABLE DEVICE OR TO ONLINE
STORAGE JUST IN CASE YOUR COMPUTER CRASHES!
If you use this approach, you’ll always have something working that you can test and improve
upon. If you write everything at once, you’ll end up with hundreds of errors and just get
frustrated! So don’t do it.
Building the Simulation
The simulation assets (i.e., image and sound data files) are in a folder named Assets. The way
we’ve written the main routine, your program will look for this folder in a standard place
(described below for Windows and Mac OS X). A few students may find that their environment
is set up in a way that prevents the program from finding the folder. If that happens to you,
change the string literal "Assets" in main.cpp to the full path name of wherever you choose to
put the folder (e.g., "Z:/Bugs/Assets" or "/Users/fred/Bugs/Assets").
To build the simulation, follow these steps:
For Windows
Unzip the Bugs-skeleton-windows.zip archive into a folder on your hard drive. Double-click on
Bugs.sln to start Visual Studio.
If you build and run your program from within Visual Studio, the Assets folder should be in the
same folder as your .cpp and .h files. On the other hand, if you launch the program by double-
clicking on the executable file, the Assets folder should be in the same folder as the executable.
59
For Mac OS X
Unzip the Bugs-skeleton-mac.zip archive into a folder on your hard drive.
Double-click on our provided Bugs.xcodeproj to start Xcode.
If you build and run your program from within Xcode, the Assets directory should be in the
directory yourProjectDir/DerivedData/yourProjectName/BuildProducts/Debug (e.g.,
/Users/fred/Bugs/DerivedData/Bugs/Build/Products/Debug). On the other hand, if you launch
the program by double-clicking on the executable file, the Assets directory should be in your
home directory (e.g., /Users/fred).
What to Turn In
Part #1 (20%)
Ok, so we know you’re scared to death about this project and don’t know where to start. So,
we’re going to incentivize you to work incrementally rather than try to do everything all at once.
For the first part of Project 3, your job is to build a really simple version of the Bugs simulation
that implements maybe 15% of the overall project. You must program:
1. A class that can serve as the base class for all of your simulation’s actors (e.g., ants,
baby and adult grasshoppers, poison, food, pebbles, anthills, etc.):
a. It must have a simple constructor.
b. It must be derived from our GraphObject class.
c. It must have a member function named doSomething() that can be called to
cause the actor to do something.
d. You may add other public/private member functions and private data members to
this base class, as you see fit.
2. A Pebble class, derived in some way from the base class described in 1 above:
a. It must have a some sort of constructor.
b. It must have an Image ID of IID_ROCK.
c. You may add other public/private member functions and private data members to
your Pebble class as you see fit, so long as you use good object oriented
programming style (e.g., you must not duplicate functionality across classes).
60
3. A limited version of your baby grasshopper class, derived in some way from the base
class described in 1 just above (either directly derived from the base class, or derived
from some other class that is somehow derived from the base class):
a. It must have a constructor that initializes the baby grasshopper – see the Baby
Grasshopper section for more details on how to initialize the baby grasshopper.
b. It must have an Image ID of IID_BABY_GRASSHOPPER.
c. It must have a limited version of a doSomething() method that should move the
grasshopper around as described in the spec (you do not need to make it eat,
convert into an adult grasshopper, etc.). All this doSomething() method has to do
is properly adjust the grasshopper’s x,y coordinates and direction, and our
graphics system will automatically animate its movement it around the field!
d. You may add other public/private member functions and private data members to
your baby grasshopper class as you see fit, so long as you use good object
oriented programming style (e.g., you must not duplicate functionality across
classes).
4. A limited version of the StudentWorld class.
a. Add any private data members to this class required to keep track of pebble
objects as well as the baby grasshopper objects. You may ignore all other items
in the field such as anthills, food, poison, etc. for Project 3 Part #1.
b. Implement a constructor for this class that initializes your data members.
c. Implement a destructor for this class that frees any remaining dynamically
allocated data that has not yet been freed at the time the StudentWorld object is
destroyed.
d. Implement the init() method in this class. It must load the Field data file and
construct a virtual representation of the virtual field. It must create new pebble
and baby grasshopper objects, as specified by the field layout, and insert them
into your virtual representation at the right starting locations (see the Field Class
section of this document for details on how to determine starting locations for
each simulation object).
e. Implement the move() method in your StudentWorld class. During each tick, it
must ask your baby grasshoppers and pebbles to do something. Your move()
method need not check to see if the baby grasshoppers have died or not; you
may assume at this point that insects cannot die. Your move() method does not
have to deal with any actors other than the baby grasshoppers and pebbles.
f. Implement a cleanup() method that frees any dynamically allocated data that was
allocated during calls to the init() method or the move() method (e.g., it should
delete all your allocated pebbles and baby grasshoppers). Note: Your
StudentWorld class must have both a destructor and the cleanUp() method even
though they likely do the same thing (in which case the destructor could just call
cleanup()).
As you implement these classes, repeatedly build your program – you’ll probably start out with
lots of errors… Relax and try to remove them and get your program to run. (Historical note: A
UCLA student taking CS 131 once got 1,800 compilation errors when compiling a 900-line class
61
project written in the Ada programming language. His name was Carey Nachenberg. Somehow
he still finished the class and graduated.)
You’ll know you’re done with part 1 when your program builds and does the following: When it
runs and the user hits Enter to begin the simulation, it displays a field with baby grasshoppers
and pebbles in their proper starting positions. If your classes work properly, you should be able
to watch the baby grasshoppers roam around the field, without walking through any pebbles
(which should block their movement).
Your Part #1 solution may actually do more than what is specified above; for example, if you are
further along in the project, and what you have builds and has at least as much functionality as
what’s described above, then you may turn that in instead.
Note, the Part #1 specification above doesn’t require you to implement any ants, adult
grasshoppers, food, poison, anthills, or pools of water (unless you want to). You may do these
unmentioned items if you like but they’re not required for Part 1. However, if you add
additional functionality, make sure that your baby grasshopper, pebble, and
StudentWorld classes still work properly and that your program still builds and meets the
requirements stated above for Part #1!
If you can get this simple version working, you’ll have done a bunch of the hard design work.
You’ll probably still have to change your classes a lot to implement the full project, but you’ll
have done most of the hard thinking.
What to Turn In For Part #1
You must turn in your source code for the simple version of your simulation, which must build
without errors under either Visual Studio or Xcode. You do not have to get it to run under more
than one compiler. You will turn in a zip file containing nothing more than these four files:
Actor.h // contains base, baby grasshopper, and pebble class declarations
// as well as constants required by these classes
Actor.cpp // contains the implementation of these classes
StudentWorld.h // contains your StudentWorld class declaration
StudentWorld.cpp // contains your StudentWorld class implementation
You will not be turning in any other files – we’ll test your code with our versions of the the other
.cpp and .h files. Therefore, your solution MUST NOT modify any of our files or you will receive
zero credit! (Exception: You may modify the string literal "Assets" in main.cpp.) You will not
turn in a report for Part #1; we will not be evaluating Part #1 for program comments, test cases,
or documentation; all that matters for Part #1 is correct behavior for the specified subset of the
requirements.
62
Part #2 (80%)
After you have turned in your work for Part #1 of Project 3, we will discuss one possible design
for this assignment. For the rest of this project, you are welcome to continue to improve the
design that you came up with for Part #1, or you can use the design we provide.
In Part #2, your goal is to implement a fully working version of the Bugs simulation, which
adheres exactly to the functional specification provided in this document.
What to Turn In For Part #2
You must turn in your source code for your simulation, which must build without errors under
either Visual Studio or Xcode. You do not have to get it to run under more than one compiler.
You will turn in a zip file containing nothing more than these five files:
Actor.h // contains declarations of your actor classes
// as well as constants required by these classes
Actor.cpp // contains the implementation of these classes
StudentWorld.h // contains your StudentWorld class declaration
StudentWorld.cpp // contains your StudentWorld class implementation
report.doc, report.docx, or report.txt // your report (10% of your grade)
You will not be turning in any other files – we’ll test your code with our versions of the the other
.cpp and .h files. Therefore, your solution must NOT modify any of our files or you will receive
zero credit! (Exception: You may modify the string literal "Assets" in main.cpp.)
You must turn in a report that contains the following:
1. A high-level description of each of your public member functions in each of your classes,
and why you chose to define each member function in its host class; also explain why
(or why not) you decided to make each function virtual or pure virtual. For example, “I
chose to define a pure virtual version of the sneeze() function in my base Actor class
because all actors in Bugs! are able to sneeze, and each type of actor sneezes in a
different way.”
2. A list of all functionality that you failed to finish as well as known bugs in your classes,
e.g. “I didn’t implement the poison class.” or “My adult grasshopper doesn’t work
correctly yet so I treat it like a baby grasshopper right now.”
63
3. A list of other design decisions and assumptions you made; e.g., “It was not specified
what to do in situation X, so this is what I decided to do.”
4. A description of how you tested each of your classes (1-2 paragraphs per class).
FAQ
Q: The specification is silent about what to do in a certain situation. What should I do?
A: Play with our sample program and do what it does. Use our program as a reference. If
neither the specification nor our program makes it clear what to do, do whatever seems
reasonable and document it in your report. If the specification is unclear, but your program
behaves like our demonstration program, YOU WILL NOT LOSE POINTS!
Q: What should I do if I can’t finish the project?!
A: Do as much as you can, and whatever you do, make sure your code builds and runs some
subset of the spec correctly! If we can sort of run your simulation, but it’s not complete or
perfect, that’s better than it not even building, or crashing whenever we run it!
Q: Where can I go for help?
A: Try UPE/TBP/HKN – they provide free tutoring and can help your with your project!
Q: Can I work with my classmates on this?
A: You can discuss general ideas about the project, but don’t share source code with your
classmates. Also don’t help them write their source code.
END OF PROJECT 3 SPEC
The following material is meant to be handed out to contestants when running a programming
competition. You may read them for background, but they are not part of the official project 3
spec.
1
Bugs! Programming Competition Instructions
Welcome to the Bugs! Programming Competition!
In this programming competition, your job is to program an artificial species of ant using our
specially-built programming language, called “Bugs!” Once you program your ant species, you’ll
then be able to have it compete against other students' species within a virtual world to see
which ant colony is the most prolific.
During each round of the competition, four different ant species (each species written by a
different student or team of students) will compete against each other. At the start of the round,
each species’ anthill will produce five initial ants for the colony. These ants must then forage for
food and bring it back to the anthill so the queen ant in the anthill can produce more ants. The
ant species that produces the most total ants (at least 6 total) by the end of the round wins that
round. If two ant species produce the same number of ants, then the colony that did so first wins
that round. The winning species will then advance to the next round, competing against other
winning species, until there is a single victorious species and the competition is over.
To win a round of the competition, each of your ants must forage for food, pick it up, bring it
back to your anthill, and drop it there so your queen can eat it and have enough energy to
produce more ants. The more food your ants bring back to the anthill, the more baby ants your
queen ant can produce, and the more likely you are to win the round.
But beware, in addition to enemy ants from other contestants, there are also other dangers
within the 64x64 square virtual field. Evil grasshoppers will devour food up and may bite your
ants. There are also patches of poison that have been spread around the virtual field by mean
humans; it’ll cause nasty damage to your ants. And there are pools of water which when
stepped on, will slow an ant down. And finally, pebbles block your ants’ movement, making it
more difficult for them to find their anthill.
In addition, as each second of the simulation passes, each ant burns a little of its energy, and so
it needs to occasionally eat some food to stay healthy. If an ant doesn’t eat any food, it’ll
eventually die of starvation. Similarly, if an ant is bitten by an enemy ant or a grasshopper, it will
lose lots of energy. Therefore, each ant will need to occasionally eat some food to restore its
health when it’s bitten.
Like real ants, your ants have the ability to emit pheromones and then smell these pheromones
at a later time. Just like bread crumbs dropped by Hansel and Gretel, pheromones are
temporary scent markers that can be used to help your ants find their way back home. But
beware, pheromones disappear over time. Each ant colony has its own pheromone scent, and
your colony’s ants can only smell pheromones emitted by its own ants. If any ant in your colony
2
releases a pheromone scent on a square, then all of its brothers and sisters can smell that
pheromone scent on the square as well.
So what can an ant do? It can:
● Move forward
● Adjust the direction that it’s facing
● Pick up food that is on its same square
● Drop food that it’s holding, for instance, on top of the ant’s anthill
● Eat food that it’s holding to gain energy/health
● Bite an enemy insect that’s standing on the same square, to damage the enemy’s health
● Emit a pheromone in the current square
● Smell if there’s a pheromone or an danger (e.g., poison or an enemy) in the square
directly in front of the ant
● Smell if it’s standing on the same square as food, its anthill, or an enemy
● Determine if it was just just blocked from moving forward, for instance because a pebble
was in the way
You program your ant by using different combinations of the above behaviors to construct its
artificial brain. You’ll place your program’s instructions in a text file and name it. For example,
you might name your ant’s program janes-ant.bug or larrynguyen.bug. All ant programs must
have a .bug file extension, just like Java source files have a .java extension, and C++ source
files have a .cpp extension.
Below is an example of a Bugs! Program, which might be stored in a file called dumbant.bug. It
has two parts:
1. The very first line specifies the name of your ant colony, for example “DumbAnt”. Your
ant colony’s name must have 8 or fewer letters in its name (e.g., CareyAnt, Shmoopy,
etc.).
2. The remaining lines are the actual programming instructions that control the ant’s brain
colony: DumbAnt
// this program controls a single ant and causes it to move
// around the field and do things.
// this ant moves around randomly, picks up food if it
// happens to stumble upon it, eats when it gets hungry,
// and will drop food on its anthill if it happens to be
// stumble back on its anthill while holding food.
// here are the ant’s programming instructions, written
// in our "Bugs!" language
3
start:
faceRandomDirection // face some random direction
moveForward // move forward
if i_am_standing_on_food then goto on_food
if i_am_hungry then goto eat_food
if i_am_standing_on_my_anthill then goto on_hill
goto start // jump back to the "start:" line
on_food:
pickUpFood
goto start // jump back to the "start:" line
eat_food:
eatFood // assumes we have food – I hope we do!
goto start // jump back to the "start:" line
on_hill:
dropFood // feed the anthill’s queen ant so she
// can produce more ants for the colony
goto start // jump back to the "start:" line
As you can see above, each ant program is comprised of a set of simple instructions like
faceRandomDirection (to make the ant face a new, random direction), moveForward (to make
the ant move one square forward), pickupFood (to pick up food from the current square if there
is food there), eatFood (to eat food if it’s being carried by the ant), dropFood (to drop food that
the ant was carrying on its current square). There must only be one such command per line in
the Bugs! programming language.
Each ant his its own ant brain and is provided with its own copy of your Bugs! Program. So each
ant’s program operates entirely on its own.
Each ant executes one instruction after another, following your Bugs! program from top to
bottom. So, in the ant program above, when a new ant is born, the ant will start by executing
the first instruction and it will face a random direction (faceRandomDirection). Then the ant’s
brain will advance to the next instruction, and will attempt to move forward (moveForward).
Then the ant will advance to the next instruction, and check to see if it is standing on food, and
so on.
You can see that the program has many comments, which are started by two forward slashes:
// I just picked up some food! Now I can eat it!
4
These comments can help you, the programmer, keep track of details that you might otherwise
forget. Your programs may have as many comments as you like.
A line of your Bugs! program might have a single word, followed by a colon, e.g.:
Start:
or
on_hill:
This is called a label. A label is just a name that identifies a particular line of your program. Your
programming instructions may then reference such a label with a goto command or an if
statement (described below). For example, this line:
goto start // jump back to the “start:” line
will cause the ant’s brain to immediately jump to the line of the program labeled start: The ant
will then continue executing instructions from that line onward.
As you can see, the ant can examine its surroundings and determine its own internal “state of
being” using if statements.
if i_am_standing_on_food then goto on_food
if i_am_standing_on_my_anthill then goto on_hill
Each if statement may check a single condition, e.g., i_am_standing_on_food, and if that
condition is met (true), then the if statement will transfer control to the line of the Bugs! program
with the specified “label:”. For example, the following code will cause the ant to pick up food if
it’s standing on the same square as the food:
if i_am_standing_on_food then goto do_something_when_on_food
faceRandomDirection
moveForward
... // other instructions
... // other instructions
... // other instructions
do_something_when_on_food: // this is a label
pickUpFood // I just picked up some food! Now I can eat it!
eatFood // Nom nom nom
If an if statement’s condition is not met (e.g., the ant is not standing on food), then the if
statement has no effect and the ant’s brain simply advances to the next instruction. In this
5
example, that would result in the ant facing a new random direction and then attempting to
move forward.
Command Reference
Here is a list of all the commands you can use:
bite
If an ant is on the same square as either an enemy ant (from another colony/species) or a
grasshopper (either a baby or adult grasshopper), then this command will cause your ant to bite
the enemy. If there are multiple enemies on the same square as your ant, then this command
picks one of those enemies randomly and causes your ant to bite them. Biting the enemy does
damage to the enemy, lowering its health and possibly killing it. If your ant is bitten, it can
restore its health by eating food.
dropFood
An ant that is carrying food in its mouth can drop that food. Using the dropFood command drops
all of the food currently carried by the ant. Typically, an ant will drop food on top of its anthill, so
that it can feed the queen ant. She can then produce more baby ants.
eatFood
Allows your ant to eat a unit of food, assuming your ant actually is holding food. Your ant needs
to eat food or it will eventually starve. An ant can’t eat food that is just sitting on the ground; it
can only eat food that it’s already picked up in its jaws. An ant can eat multiple times if it desires,
to increase its overall health. However, every bit that an ant eats takes away from food that
could otherwise be provided to the anthill, so be careful.
emitPheromone
This allows the ant to drop a pheromone scent on its current square. This pheromone will
dissipate over time and eventually disappear altogether. A pheromone dropped by any ant in
your colony can be smelled by all other ants in your colony, but not by ants from other colonies.
faceRandomDirection
This command causes your ant to face a random direction (e.g., up, down, left or right).
goto someLineOfYourProgram
6
Your ant can use the goto command to jump to a different line of your program. This command,
when executed, will immediately transfer control to the specified line. For the goto command to
work, your program must have a line with the specified label:
… // other instructions
goto someLineOfYourProgram
… // other instructions
someLineOfYourProgram: // this line must be somewhere in your program
… // do something useful
generateRandomNumber someNumber
An ant can generate a random number in its brain, between 0 and the specified numeric value
minus 1. For example, to generate a number between 0 and 10, the ant would use this
command:
generateRandomNumber 11
Or to generate a random number between 0 and 99, the ant could do this:
generateRandomNumber 100
Once an ant generates a random number, it can use this value to alter its behavior. See the if
statement section below for more details on how to do so.
moveForward
This command causes your ant to move forward one square in the direction it’s currently facing.
If that direction is blocked by a pebble, then the ant will not be able to move forward.
pickUpFood
If your ant is standing on the same square as some food, it can pick this food up into its jaws.
An ant can pick up more than one unit of food at a time if it likes.
rotateClockwise and rotateCounterClockwise
These commands can be used to rotate the direction an ant is facing either 90° clockwise or 90°
counterclockwise.
7
If Statements
Your ant can check its current state as well as the state of the virtual field environment by using
if statements. All if statements have the following format:
if someCondition then goto someLabel
Where someCondition is one of the following conditions:
i_smell_danger_in_front_of_me
i_smell_pheromone_in_front_of_me
i_was_bit
i_am_carrying_food
i_am_hungry
i_am_standing_on_my_anthill
i_am_standing_on_food
i_am_standing_with_an_enemy
i_was_blocked_from_moving
last_random_number_was_zero
For example, the statement:
if i_smell_danger_in_front_of_me then goto changeDirection
will check if the ant smells either an enemy ant (from a different colony), a grasshopper or
poison in the square directly in front of it. If so, it will cause the ant’s program to jump to the
specified label:
changeDirection:
faceNewRandomDirection // change my direction to a new random one
moveForward // run, run, run!
Here are details on the full list of valid if conditions:
if i_smell_danger_in_front_of_me then goto someLabel
Checks if an ant smells either an enemy ant, a grasshopper, or poison in the square in front of
it. If so, the program will goto the specified label.
if I_smell_pheromone_in_front_of_me then goto someLabel
Checks if an ant smells a pheromone released by itself or another ant in its colony, in the
square directly in front of it. If so, the program will goto the specified label. Ants cannot smell the
pheromones emitted by ants of other colonies.
8
if I_was_bit then goto someLabel
Checks if an ant was recently bit by an enemy ant/grasshopper while on the current square. If
so, the program will goto the specified label.
if i_am_carrying_food then goto someLabel
Checks if an ant is carrying food. If so, the the program will goto the specified label.
if i_am_hungry then goto someLabel
Checks if an ant is hungry (i.e., it needs to eat food quickly to replenish its energy, or it will die).
If so, the program will goto the specified label.
if I_am_standing_on_my_anthill then goto someLabel
Checks if an ant is standing on the same square as its anthill. If so, the program will goto the
specified label.
if i_am_standing_on_food then goto someLabel
Checks if an ant is standing on the same square as food, which can be picked up. If so, the
program will goto the specified label.
if i_am_standing_with_an_enemy then goto someLabel
Checks if an ant is standing on the same square as an enemy ant (from a different colony) or a
grasshopper. If so, the program will goto the specified label.
if i_was_blocked_from_moving then goto someLabel
Checks if an ant was just blocked from moving (e.g., by a pebble that was in the way). If so, the
program will goto the specified label.
if last_random_number_was_zero then goto someLabel
Checks if the last random number that was generated by the generateRandomNumber
command is equal to zero. If so, the program will goto the specified label.
This can be used to cause an ant to exhibit interesting, random behaviors. For example, the
program below will cause the ant to continue to move in the same direction until the ant
happens to generate a random value of zero. There’s a one in ten chance of the ant doing so
(with a command of generateRandomNumber 10), so an ant that uses this approach will
9
generally walk an average of ten steps in the same direction before switching directions
randomly and walking in a new direction.
moveAnt:
generateRandomNumber 10
if last_random_number_was_zero then goto changeDirection
moveForward
goto moveAnt
changeDirection:
faceRandomDirection
moveForward
goto moveAnt
The Field Data File
You can test your ant program in multiple different virtual fields, each with different amounts of
grasshoppers, poison, pools of water, pebbles, etc. Feel free to create many different field data
files as you like to test your ant’s logic.
Each field data file is a simple text file. (You can edit it with Notepad on Windows, or TextEdit on
a Mac. Use a fixed-width font so the columns appear properly aligned when you're editing.)
The field data file must be exactly 64 characters wide, by 64 characters high. The top and
bottom rows and the left and right columns of the field must contain a pebble at each position.
See the example below.
The ‘*’ characters designate pebbles which block movement of the ants, ‘g’ characters specifies
the starting locations of baby grasshoppers, ‘0’, ‘1’, ‘2’ and ‘3’ specify the location of the four
colonies’ anthills, ‘w’ characters specify pools of water, the ‘f’ characters specify piles of food,
and the ‘p’ characters specify the locations of poison.
Each field must contain at least one anthill, designated by a 0. If you want a field to have more
than one anthill, you can add a 1, 2, and 3 to the data file as well.
10
****************************************************************
* g w * pf w w fp * w g *
* w w *
* p w * * w p *
* f * f w* ** ** *w f * f *
* * ww * *
* w f p p f w *
* *
* f * * p p * * f *
* * f w * * w f * *
* f * ff * f *
* * * *
* 0 1 *
* * w ww w * *
** p p **
* * * *
* * ** ** * *
* * * *
* f f w w f f *
*f * * w w * * f*
* fw f * * f wf *
* * w * * w * *
*gf w * * w fg*
* * f w g * * g w f * *
** f f **
* * w g * * g w * *
* * * * * *
* * * * * *
* * * ff f ww f ff * * *
* f w w f *
* * g * * * * g * *
* w w *
* w w *
* * g * * * * g * *
* f w w f *
* * * ff f ww f ff * * *
* * * * * *
* * * * * *
* * w g * * g w * *
** f f **
* * f w g * * g w f * *
*gf w * * w fg*
* * w * * w * *
* fw f * * f wf *
*f * * w w * * f*
* f f w w f f *
* * * *
* * ** ** * *
* * * *
** p p **
* * w ww w * *
* 3 2 *
* * * *
* f * ff * f *
* * f w * * w f * *
* f * * p p * * f *
* *
* w f p p f w *
* * ww * *
* f * f w* ** ** *w f * f *
* p w * * w p *
* w w *
* g w * pf w w fp * w g *
****************************************************************
11
Trying out Your Ants - Running The Competition
You can run the competition program like this from the (Windows/Mac) command shell like this:
BUGS.EXE field.txt sillyant.bug killer.bug silly.bug anthrax.bug
where the BUGS.EXE file is the competition program. The next item is the filename of the data
file that holds the name of the field data file that contains the layout of the virtual world where
your ants will compete, and the following one to four filenames are the Bugs programs that will
be used to control the ants in the different colonies in the competition. For example, sillyant.bug
would contain the programming logic for anthill #0, killer.bug contains the programming logic for
anthill #1, and so on. The field and ant data files must be in the same folder as your BUGS.EXE
executable so it can find and load them, or you may specify a full pathname to these files if you
like.
If you don’t know how to use the Windows or Mac command shell, ask your Computer Science
teacher for help.
Hints
1. Build your ant incrementally: Don’t try to build the perfect, complex ant all at once.
Instead, build simple Bugs! programs (10-20 lines) that exercise just a few simple
features and see how they work. Then make your complete ant from the little pieces,
once you know the pieces work properly.
2. Don’t forget to check if your ants are hungry and, if so, eat: Make sure your ants eat
or they’ll die of starvation (or from being bitten by enemies). Ants can only eat once
they’ve already picked up and are holding food in their jaws. So an ant can’t just eat
food if it’s on the same square as the food.
3. Use pheromones to help your ants navigate back to their anthill: You can only win
the competition if your ants actually bring food back to your anthill to feed the queen ant,
so she produces more ants. Your ants can emit pheromones to help them find their way
back to their anthill. Be creative! Use Google search to find out how real ants use
pheromones to navigate, or perhaps come up with your own creative method.
4. Try different fields: Your ant program will be tested in a number of different
environments (some with more poison than others, some with more pebbles than others,
etc.). So try creating many different fields and see how your ants do in each type of
environment. Then optimize your ants so they work well in many different environments.
5. Make frequent backups: Once you have an ant working, make a backup copy of its
program so you have it just in case you introduce a bug (pun intended) into your
program. Always have a backup handy so you have something to enter into the
competition.
12
6. Try to have fun: Remember, this competition is meant to be fun, so try to work well with
other people, try to learn new things, and enjoy yourself! Programming is as much about
working together as it is about solving hard problems, so use this as an opportunity to
learn to work well with others.
GOOD LUCK!
