Jenkins The Definitive Guide
User Manual:
Open the PDF directly: View PDF ![]() .
.
Page Count: 417 [warning: Documents this large are best viewed by clicking the View PDF Link!]
- Jenkins: The Definitive Guide
- Table of Contents
- Copyright
- Foreword
- Preface
- Chapter 1. Introducing Jenkins
- 1.1. Introduction
- 1.2. Continuous Integration Fundamentals
- 1.3. Introducing Jenkins (née Hudson)
- 1.4. From Hudson to Jenkins—A Short History
- 1.5. Should I Use Jenkins or Hudson?
- 1.6. Introducing Continuous Integration into Your Organization
- 1.6.1. Phase 1—No Build Server
- 1.6.2. Phase 2—Nightly Builds
- 1.6.3. Phase 3—Nightly Builds and Basic Automated Tests
- 1.6.4. Phase 4—Enter the Metrics
- 1.6.5. Phase 5—Getting More Serious About Testing
- 1.6.6. Phase 6—Automated Acceptance Tests and More Automated Deployment
- 1.6.7. Phase 7—Continuous Deployment
- 1.7. Where to Now?
- Chapter 2. Your First Steps with Jenkins
- Chapter 3. Installing Jenkins
- 3.1. Introduction
- 3.2. Downloading and Installing Jenkins
- 3.3. Preparing a Build Server for Jenkins
- 3.4. The Jenkins Home Directory
- 3.5. Installing Jenkins on Debian or Ubuntu
- 3.6. Installing Jenkins on Redhat, Fedora, or CentOS
- 3.7. Installing Jenkins on SUSE or OpenSUSE
- 3.8. Running Jenkins as a Stand-Alone Application
- 3.9. Running Jenkins Behind an Apache Server
- 3.10. Running Jenkins on an Application Server
- 3.11. Memory Considerations
- 3.12. Installing Jenkins as a Windows Service
- 3.13. What’s in the Jenkins Home Directory
- 3.14. Backing Up Your Jenkins Data
- 3.15. Upgrading Your Jenkins Installation
- 3.16. Conclusion
- Chapter 4. Configuring Your Jenkins Server
- 4.1. Introduction
- 4.2. The Configuration Dashboard—The Manage Jenkins Screen
- 4.3. Configuring the System Environment
- 4.4. Configuring Global Properties
- 4.5. Configuring Your JDKs
- 4.6. Configuring Your Build Tools
- 4.7. Configuring Your Version Control Tools
- 4.8. Configuring the Mail Server
- 4.9. Configuring a Proxy
- 4.10. Conclusion
- Chapter 5. Setting Up Your Build Jobs
- 5.1. Introduction
- 5.2. Jenkins Build Jobs
- 5.3. Creating a Freestyle Build Job
- 5.4. Configuring Source Code Management
- 5.4.1. Working with Subversion
- 5.4.2. Working with Git
- 5.4.2.1. Installing the plugin
- 5.4.2.2. Using the plugin
- 5.4.2.2.1. Advanced per-project source code management configuration
- 5.4.2.2.2. Branches to build
- 5.4.2.2.3. Excluded regions
- 5.4.2.2.4. Excluded users
- 5.4.2.2.5. Checkout/merge to local branch
- 5.4.2.2.6. Local subdirectory for repo
- 5.4.2.2.7. Merge before build
- 5.4.2.2.8. Prune remote branches before build
- 5.4.2.2.9. Clean after checkout
- 5.4.2.2.10. Recursively update submodules
- 5.4.2.2.11. Use commit author in changelog
- 5.4.2.2.12. Wipe out workspace
- 5.4.2.2.13. Choosing strategy
- 5.4.2.2.14. Git executable
- 5.4.2.2.15. Repository browser
- 5.4.2.3. Build triggers
- 5.4.2.4. Post-build actions
- 5.4.2.5. GitHub plugin
- 5.5. Build Triggers
- 5.6. Build Steps
- 5.7. Post-Build Actions
- 5.8. Running Your New Build Job
- 5.9. Working with Maven Build Jobs
- 5.10. Using Jenkins with Other Languages
- 5.11. Conclusion
- Chapter 6. Automated Testing
- 6.1. Introduction
- 6.2. Automating Your Unit and Integration Tests
- 6.3. Configuring Test Reports in Jenkins
- 6.4. Displaying Test Results
- 6.5. Ignoring Tests
- 6.6. Code Coverage
- 6.7. Automated Acceptance Tests
- 6.8. Automated Performance Tests with JMeter
- 6.9. Help! My Tests Are Too Slow!
- 6.10. Conclusion
- Chapter 7. Securing Jenkins
- Chapter 8. Notification
- 8.1. Introduction
- 8.2. Email Notification
- 8.3. More Advanced Email Notification
- 8.4. Claiming Builds
- 8.5. RSS Feeds
- 8.6. Build Radiators
- 8.7. Instant Messaging
- 8.8. IRC Notification
- 8.9. Desktop Notifiers
- 8.10. Notification via Notifo
- 8.11. Mobile Notification
- 8.12. SMS Notification
- 8.13. Making Noise
- 8.14. Extreme Feedback Devices
- 8.15. Conclusion
- Chapter 9. Code Quality
- 9.1. Introduction
- 9.2. Code Quality in Your Build Process
- 9.3. Popular Java and Groovy Code Quality Analysis Tools
- 9.4. Reporting on Code Quality Issues with the Violations Plugin
- 9.5. Using the Checkstyle, PMD, and FindBugs Reports
- 9.6. Reporting on Code Complexity
- 9.7. Reporting on Open Tasks
- 9.8. Integrating with Sonar
- 9.9. Conclusion
- Chapter 10. Advanced Builds
- 10.1. Introduction
- 10.2. Parameterized Build Jobs
- 10.2.1. Creating a Parameterized Build Job
- 10.2.2. Adapting Your Builds to Work with Parameterized Build Scripts
- 10.2.3. More Advanced Parameter Types
- 10.2.4. Building from a Subversion Tag
- 10.2.5. Building from a Git Tag
- 10.2.6. Starting a Parameterized Build Job Remotely
- 10.2.7. Parameterized Build Job History
- 10.3. Parameterized Triggers
- 10.4. Multiconfiguration Build Jobs
- 10.5. Generating Your Maven Build Jobs Automatically
- 10.6. Coordinating Your Builds
- 10.7. Build Pipelines and Promotions
- 10.8. Conclusion
- Chapter 11. Distributed Builds
- Chapter 12. Automated Deployment and Continuous Delivery
- Chapter 13. Maintaining Jenkins
- Appendix A. Automating Your Unit and Integration Tests
- Index

John Ferguson Smart
Hudson
Continuous Integration for the Masses
Creative Commons Edition
Jenkins
The Definitive Guide

Copyright .................................................................................................................... xix
Foreword ..................................................................................................................... xxi
Preface ...................................................................................................................... xxiii
1. Audience ....................................................................................................... xxiii
2. Book Layout .................................................................................................. xxiii
3. Jenkins or Hudson? ......................................................................................... xxiii
4. Font Conventions ............................................................................................ xxiv
5. Command-Line Conventions ............................................................................. xxiv
6. Contributors .................................................................................................... xxv
7. The Review Team ........................................................................................... xxvi
8. Book Sponsors ................................................................................................ xxvi
8.1. Wakaleo Consulting .............................................................................. xxvi
8.2. CloudBees .......................................................................................... xxvii
8.3. Odd-e ................................................................................................ xxvii
9. Using Code Examples .................................................................................... xxviii
10. Safari® Books Online ................................................................................... xxviii
11. How to Contact Us ........................................................................................ xxix
12. Acknowledgments .......................................................................................... xxix
1. Introducing Jenkins ...................................................................................................... 1
1.1. Introduction ..................................................................................................... 1
1.2. Continuous Integration Fundamentals .................................................................... 1
1.3. Introducing Jenkins (née Hudson) ........................................................................ 2
1.4. From Hudson to Jenkins—A Short History ............................................................ 3
1.5. Should I Use Jenkins or Hudson? ......................................................................... 4
1.6. Introducing Continuous Integration into Your Organization ....................................... 5
1.6.1. Phase 1—No Build Server ....................................................................... 5
1.6.2. Phase 2—Nightly Builds .......................................................................... 5
1.6.3. Phase 3—Nightly Builds and Basic Automated Tests ..................................... 5
1.6.4. Phase 4—Enter the Metrics ...................................................................... 6
1.6.5. Phase 5—Getting More Serious About Testing ............................................. 6
1.6.6. Phase 6—Automated Acceptance Tests and More Automated Deployment ......... 6
1.6.7. Phase 7—Continuous Deployment ............................................................. 6
1.7. Where to Now? ................................................................................................ 7
2. Your First Steps with Jenkins ........................................................................................ 9
2.1. Introduction ..................................................................................................... 9
2.2. Preparing Your Environment ............................................................................... 9
2.2.1. Installing Java ...................................................................................... 10
2.2.2. Installing Git ........................................................................................ 11
2.2.3. Setting Up a GitHub Account .................................................................. 11
2.2.4. Configuring SSH Keys ........................................................................... 12
2.2.5. Forking the Sample Repository ................................................................ 12
2.3. Starting Up Jenkins .......................................................................................... 14
2.4. Configuring the Tools ...................................................................................... 17

iv
2.4.1. Configuring Your Maven Setup ............................................................... 18
2.4.2. Configuring the JDK ............................................................................. 19
2.4.3. Notification .......................................................................................... 20
2.4.4. Setting Up Git ...................................................................................... 20
2.5. Your First Jenkins Build Job ............................................................................. 21
2.6. Your First Build Job in Action .......................................................................... 26
2.7. More Reporting—Displaying Javadocs ................................................................ 33
2.8. Adding Code Coverage and Other Metrics ........................................................... 35
2.9. Conclusion ..................................................................................................... 41
3. Installing Jenkins ....................................................................................................... 43
3.1. Introduction .................................................................................................... 43
3.2. Downloading and Installing Jenkins .................................................................... 43
3.3. Preparing a Build Server for Jenkins ................................................................... 46
3.4. The Jenkins Home Directory ............................................................................. 47
3.5. Installing Jenkins on Debian or Ubuntu ............................................................... 48
3.6. Installing Jenkins on Redhat, Fedora, or CentOS ................................................... 49
3.7. Installing Jenkins on SUSE or OpenSUSE ........................................................... 50
3.8. Running Jenkins as a Stand-Alone Application ..................................................... 51
3.9. Running Jenkins Behind an Apache Server .......................................................... 54
3.10. Running Jenkins on an Application Server .......................................................... 55
3.11. Memory Considerations .................................................................................. 56
3.12. Installing Jenkins as a Windows Service ............................................................ 56
3.13. What’s in the Jenkins Home Directory ............................................................... 60
3.14. Backing Up Your Jenkins Data ........................................................................ 64
3.15. Upgrading Your Jenkins Installation .................................................................. 64
3.16. Conclusion ................................................................................................... 65
4. Configuring Your Jenkins Server .................................................................................. 67
4.1. Introduction .................................................................................................... 67
4.2. The Configuration Dashboard—The Manage Jenkins Screen .................................... 67
4.3. Configuring the System Environment .................................................................. 70
4.4. Configuring Global Properties ............................................................................ 71
4.5. Configuring Your JDKs .................................................................................... 72
4.6. Configuring Your Build Tools ........................................................................... 74
4.6.1. Maven ................................................................................................. 74
4.6.2. Ant ..................................................................................................... 76
4.6.3. Shell-Scripting Language ........................................................................ 77
4.7. Configuring Your Version Control Tools ............................................................. 77
4.7.1. Configuring Subversion .......................................................................... 77
4.7.2. Configuring CVS .................................................................................. 77
4.8. Configuring the Mail Server .............................................................................. 78
4.9. Configuring a Proxy ........................................................................................ 79
4.10. Conclusion ................................................................................................... 80
5. Setting Up Your Build Jobs ......................................................................................... 81

v
5.1. Introduction .................................................................................................... 81
5.2. Jenkins Build Jobs ........................................................................................... 81
5.3. Creating a Freestyle Build Job ........................................................................... 82
5.3.1. General Options .................................................................................... 82
5.3.2. Advanced Project Options ...................................................................... 84
5.4. Configuring Source Code Management ................................................................ 85
5.4.1. Working with Subversion ....................................................................... 86
5.4.2. Working with Git .................................................................................. 88
5.5. Build Triggers ............................................................................................... 100
5.5.1. Triggering a Build Job Once Another Build Job Has Finished ...................... 101
5.5.2. Scheduled Build Jobs ........................................................................... 101
5.5.3. Polling the SCM ................................................................................. 102
5.5.4. Triggering Builds Remotely .................................................................. 103
5.5.5. Manual Build Jobs ............................................................................... 105
5.6. Build Steps ................................................................................................... 105
5.6.1. Maven Build Steps .............................................................................. 105
5.6.2. Ant Build Steps .................................................................................. 107
5.6.3. Executing a Shell or Windows Batch Command ........................................ 107
5.6.4. Using Jenkins Environment Variables in Your Builds ................................. 109
5.6.5. Running Groovy Scripts ....................................................................... 111
5.6.6. Building Projects in Other Languages ..................................................... 113
5.7. Post-Build Actions ......................................................................................... 113
5.7.1. Reporting on Test Results ..................................................................... 113
5.7.2. Archiving Build Results ....................................................................... 114
5.7.3. Notifications ....................................................................................... 117
5.7.4. Building Other Projects ........................................................................ 118
5.8. Running Your New Build Job .......................................................................... 118
5.9. Working with Maven Build Jobs ...................................................................... 118
5.9.1. Building Whenever a SNAPSHOT Dependency Is Built .............................. 119
5.9.2. Configuring the Maven Build ................................................................ 120
5.9.3. Post-Build Actions ............................................................................... 121
5.9.4. Deploying to an Enterprise Repository Manager ........................................ 122
5.9.5. Deploying to Commercial Enterprise Repository Managers .......................... 125
5.9.6. Managing Modules .............................................................................. 126
5.9.7. Extra Build Steps in Your Maven Build Jobs ............................................ 127
5.10. Using Jenkins with Other Languages ............................................................... 127
5.10.1. Building Projects with Grails ............................................................... 127
5.10.2. Building Projects with Gradle .............................................................. 129
5.10.3. Building Projects with Visual Studio MSBuild ........................................ 132
5.10.4. Building Projects with NAnt ................................................................ 133
5.10.5. Building Projects with Ruby and Ruby on Rails ....................................... 134
5.11. Conclusion .................................................................................................. 136
6. Automated Testing ................................................................................................... 137

vi
6.1. Introduction .................................................................................................. 137
6.2. Automating Your Unit and Integration Tests ....................................................... 138
6.3. Configuring Test Reports in Jenkins .................................................................. 139
6.4. Displaying Test Results .................................................................................. 141
6.5. Ignoring Tests ............................................................................................... 144
6.6. Code Coverage .............................................................................................. 146
6.6.1. Measuring Code Coverage with Cobertura ............................................... 147
6.6.2. Measuring Code Coverage with Clover .................................................... 156
6.7. Automated Acceptance Tests ........................................................................... 157
6.8. Automated Performance Tests with JMeter ......................................................... 160
6.9. Help! My Tests Are Too Slow! ........................................................................ 168
6.9.1. Add More Hardware ............................................................................ 168
6.9.2. Run Fewer Integration/Functional Tests ................................................... 169
6.9.3. Run Your Tests in Parallel .................................................................... 169
6.10. Conclusion .................................................................................................. 170
7. Securing Jenkins ...................................................................................................... 171
7.1. Introduction .................................................................................................. 171
7.2. Activating Security in Jenkins .......................................................................... 171
7.3. Simple Security in Jenkins .............................................................................. 172
7.4. Security Realms—Identifying Jenkins Users ....................................................... 173
7.4.1. Using Jenkins’s Built-in User Database ................................................... 173
7.4.2. Using an LDAP Repository ................................................................... 176
7.4.3. Using Microsoft Active Directory ........................................................... 178
7.4.4. Using Unix Users and Groups ............................................................... 179
7.4.5. Delegating to the Servlet Container ......................................................... 179
7.4.6. Using Atlassian Crowd ......................................................................... 180
7.4.7. Integrating with Other Systems .............................................................. 181
7.5. Authorization—Who Can Do What ................................................................... 183
7.5.1. Matrix-based Security .......................................................................... 183
7.5.2. Project-based Security .......................................................................... 187
7.5.3. Role-based Security ............................................................................. 189
7.6. Auditing—Keeping Track of User Actions ......................................................... 191
7.7. Conclusion ................................................................................................... 194
8. Notification ............................................................................................................. 197
8.1. Introduction .................................................................................................. 197
8.2. Email Notification .......................................................................................... 197
8.3. More Advanced Email Notification ................................................................... 198
8.4. Claiming Builds ............................................................................................ 202
8.5. RSS Feeds .................................................................................................... 203
8.6. Build Radiators ............................................................................................. 204
8.7. Instant Messaging .......................................................................................... 206
8.7.1. IM Notification with Jabber .................................................................. 206
8.7.2. IM Notification using IRC .................................................................... 210

vii
8.8. IRC Notification ............................................................................................ 211
8.9. Desktop Notifiers ........................................................................................... 214
8.10. Notification via Notifo .................................................................................. 217
8.11. Mobile Notification ...................................................................................... 219
8.12. SMS Notification ......................................................................................... 220
8.13. Making Noise .............................................................................................. 222
8.14. Extreme Feedback Devices ............................................................................ 224
8.15. Conclusion .................................................................................................. 226
9. Code Quality ........................................................................................................... 227
9.1. Introduction .................................................................................................. 227
9.2. Code Quality in Your Build Process .................................................................. 228
9.3. Popular Java and Groovy Code Quality Analysis Tools ......................................... 229
9.3.1. Checkstyle ......................................................................................... 229
9.3.2. PMD/CPD .......................................................................................... 232
9.3.3. FindBugs ........................................................................................... 236
9.3.4. CodeNarc ........................................................................................... 238
9.4. Reporting on Code Quality Issues with the Violations Plugin ................................. 239
9.4.1. Working with Freestyle Build Jobs ......................................................... 240
9.4.2. Working with Maven Build Jobs ............................................................ 243
9.5. Using the Checkstyle, PMD, and FindBugs Reports ............................................. 245
9.6. Reporting on Code Complexity ........................................................................ 248
9.7. Reporting on Open Tasks ................................................................................ 249
9.8. Integrating with Sonar .................................................................................... 251
9.9. Conclusion ................................................................................................... 255
10. Advanced Builds .................................................................................................... 257
10.1. Introduction ................................................................................................. 257
10.2. Parameterized Build Jobs ............................................................................... 257
10.2.1. Creating a Parameterized Build Job ....................................................... 257
10.2.2. Adapting Your Builds to Work with Parameterized Build Scripts ................. 259
10.2.3. More Advanced Parameter Types ......................................................... 261
10.2.4. Building from a Subversion Tag ........................................................... 262
10.2.5. Building from a Git Tag ..................................................................... 263
10.2.6. Starting a Parameterized Build Job Remotely .......................................... 264
10.2.7. Parameterized Build Job History ........................................................... 265
10.3. Parameterized Triggers .................................................................................. 265
10.4. Multiconfiguration Build Jobs ........................................................................ 268
10.4.1. Setting Up a Multiconfiguration Build ................................................... 268
10.4.2. Configuring a Slave Axis .................................................................... 269
10.4.3. Configuring a JDK Axis ..................................................................... 270
10.4.4. Custom Axis ..................................................................................... 271
10.4.5. Running a Multiconfiguration Build ...................................................... 271
10.5. Generating Your Maven Build Jobs Automatically ............................................. 274
10.5.1. Configuring a Job .............................................................................. 275

viii
10.5.2. Reusing Job Configuration with Inheritance ............................................ 277
10.5.3. Plugin Support .................................................................................. 278
10.5.4. Freestyle Jobs ................................................................................... 281
10.6. Coordinating Your Builds .............................................................................. 281
10.6.1. Parallel Builds in Jenkins .................................................................... 282
10.6.2. Dependency Graphs ........................................................................... 282
10.6.3. Joins ................................................................................................ 283
10.6.4. Locks and Latches ............................................................................. 284
10.7. Build Pipelines and Promotions ...................................................................... 285
10.7.1. Managing Maven Releases with the M2Release Plugin .............................. 286
10.7.2. Copying Artifacts .............................................................................. 289
10.7.3. Build Promotions ............................................................................... 292
10.7.4. Aggregating Test Results .................................................................... 300
10.7.5. Build Pipelines .................................................................................. 301
10.8. Conclusion .................................................................................................. 304
11. Distributed Builds ................................................................................................... 305
11.1. Introduction ................................................................................................. 305
11.2. The Jenkins Distributed Build Architecture ....................................................... 305
11.3. Master/Slave Strategies in Jenkins ................................................................... 306
11.3.1. The Master Starts the Slave Agent Using SSH ......................................... 306
11.3.2. Starting the Slave Agent Manually Using Java Web Start .......................... 310
11.3.3. Installing a Jenkins Slave as a Windows Service ...................................... 313
11.3.4. Starting the Slave Node in Headless Mode ............................................. 314
11.3.5. Starting a Windows Slave as a Remote Service ........................................ 315
11.4. Associating a Build Job with a Slave or Group of Slaves ..................................... 315
11.5. Node Monitoring .......................................................................................... 317
11.6. Cloud Computing ......................................................................................... 318
11.6.1. Using Amazon EC2 ........................................................................... 318
11.7. Using the CloudBees DEV@cloud Service ....................................................... 322
11.8. Conclusion .................................................................................................. 323
12. Automated Deployment and Continuous Delivery ......................................................... 325
12.1. Introduction ................................................................................................. 325
12.2. Implementing Automated and Continuous Deployment ........................................ 326
12.2.1. The Deployment Script ....................................................................... 326
12.2.2. Database Updates .............................................................................. 326
12.2.3. Smoke Tests ..................................................................................... 329
12.2.4. Rolling Back Changes ........................................................................ 329
12.3. Deploying to an Application Server ................................................................. 330
12.3.1. Deploying a Java Application .............................................................. 330
12.3.2. Deploying Scripting-based Applications Like Ruby and PHP ...................... 339
12.4. Conclusion .................................................................................................. 342
13. Maintaining Jenkins ................................................................................................ 345
13.1. Introduction ................................................................................................. 345

ix
13.2. Monitoring Disk Space .................................................................................. 345
13.2.1. Using the Disk Usage Plugin ............................................................... 346
13.2.2. Disk Usage and the Jenkins Maven Project Type ..................................... 348
13.3. Monitoring the Server Load ........................................................................... 349
13.4. Backing Up Your Configuration ..................................................................... 351
13.4.1. Fundamentals of Jenkins Backups ......................................................... 351
13.4.2. Using the Backup Plugin ..................................................................... 353
13.4.3. More Lightweight Automated Backups .................................................. 354
13.5. Archiving Build Jobs .................................................................................... 355
13.6. Migrating Build Jobs .................................................................................... 356
13.7. Conclusion .................................................................................................. 359
A. Automating Your Unit and Integration Tests ................................................................ 361
A.1. Automating Your Tests with Maven ................................................................. 361
A.2. Automating Your Tests with Ant ..................................................................... 366
Index ......................................................................................................................... 371

List of Figures
2.1. Installing Java ......................................................................................................... 10
2.2. Signing up for a GitHub account ................................................................................ 12
2.3. Forking the sample code repository ............................................................................ 13
2.4. Running Jenkins using Java Web Start from the book’s website ....................................... 14
2.5. Java Web Start will download and run the latest version of Jenkins ................................... 15
2.6. Java Web Start running Jenkins ................................................................................. 15
2.7. The Jenkins start page .............................................................................................. 16
2.8. The Manage Jenkins screen ....................................................................................... 17
2.9. The Configure Jenkins screen .................................................................................... 18
2.10. Configuring a Maven installation .............................................................................. 19
2.11. Configuring a JDK installation ................................................................................. 20
2.12. Managing plugins in Jenkins .................................................................................... 21
2.13. Installing the Git plugin .......................................................................................... 21
2.14. Setting up your first build job in Jenkins .................................................................... 23
2.15. Telling Jenkins where to find the source code ............................................................. 24
2.16. Scheduling the build jobs ........................................................................................ 25
2.17. Adding a build step ................................................................................................ 25
2.18. Configuring JUnit test reports and artifact archiving ..................................................... 26
2.19. Your first build job running ..................................................................................... 27
2.20. The Jenkins dashboard ............................................................................................ 27
2.21. A failed build ....................................................................................................... 30
2.22. The list of all the broken tests .................................................................................. 31
2.23. Details about a failed test ........................................................................................ 31
2.24. Now the build is back to normal .............................................................................. 33
2.25. Adding a new build step and report to generate Javadoc ................................................ 34
2.26. Jenkins will add a Javadoc link to your build results ..................................................... 35
2.27. Jenkins has a large range of plugins available ............................................................. 36
2.28. Adding another Maven goal to generating test coverage metrics ...................................... 37
2.29. Configuring the test coverage metrics in Jenkins .......................................................... 38
2.30. Jenkins displays code coverage metrics on the build home page ...................................... 39
2.31. Jenkins lets you display code coverage metrics for packages and classes ........................... 40
2.32. Jenkins also displays a graph of code coverage over time .............................................. 41
3.1. You can download the Jenkins binaries from the Jenkins website ...................................... 44
3.2. Jenkins setup wizard in Windows ............................................................................... 45
3.3. The Jenkins start page .............................................................................................. 46
3.4. Starting Jenkins using Java Web Start ......................................................................... 57
3.5. Installing Jenkins as a Windows service ...................................................................... 58
3.6. Configuring the Jenkins Windows Service ................................................................... 59
3.7. The Jenkins home directory ....................................................................................... 61
3.8. The Jenkins jobs directory ........................................................................................ 62

xii
3.9. The builds directory ................................................................................................. 63
3.10. Upgrading Jenkins from the web interface .................................................................. 65
4.1. You configure your Jenkins installation in the Manage Jenkins screen ............................... 68
4.2. System configuration in Jenkins ................................................................................. 70
4.3. Configuring environment variables in Jenkins ............................................................... 72
4.4. Using a configured environment variable ..................................................................... 72
4.5. JDK configuration in Jenkins ..................................................................................... 73
4.6. Installing a JDK automatically ................................................................................... 74
4.7. Configuring Maven in Jenkins ................................................................................... 75
4.8. Configuring system-wide MVN_OPTS ........................................................................ 76
4.9. Configuring Ant in Jenkins ....................................................................................... 77
4.10. Configuring an email server in Jenkins ...................................................................... 78
4.11. Configuring an email server in Jenkins to use a Google Apps domain .............................. 79
4.12. Configuring Jenkins to use a proxy ........................................................................... 80
5.1. Jenkins supports four main types of build jobs .............................................................. 82
5.2. Creating a new build job .......................................................................................... 83
5.3. Keeping a build job forever ....................................................................................... 83
5.4. To display the Advanced Options, you need to click on the Advanced button ...................... 84
5.5. The “Block build when upstream project is building” option is useful when a single commit
can affect several related projects ..................................................................................... 85
5.6. Jenkins provides built-in support for Subversion ............................................................ 86
5.7. Source code browser showing what code changes caused a build ...................................... 87
5.8. System-wide configuration of the Git plugin ................................................................. 89
5.9. Entering a Git repo URL .......................................................................................... 91
5.10. Advanced configuration of a Git repo URL ................................................................ 91
5.11. Advanced configuration of the Git branches to build .................................................... 92
5.12. Branches and regions ............................................................................................. 93
5.13. Choosing strategy .................................................................................................. 95
5.14. Git executable global setup ...................................................................................... 95
5.15. Repository browser ................................................................................................ 96
5.16. Polling log ............................................................................................................ 96
5.17. Results of Git polling ............................................................................................. 97
5.18. Gerrit Trigger ........................................................................................................ 97
5.19. Git Publisher ......................................................................................................... 98
5.20. Merge results ........................................................................................................ 99
5.21. GitHub repository browser ..................................................................................... 100
5.22. GitHub repository browser ..................................................................................... 100
5.23. There are many ways that you can configure Jenkins to start a build job .......................... 100
5.24. Triggering another build job even if the current one is unstable ..................................... 101
5.25. Triggering a build via a URL using a token .............................................................. 104
5.26. Adding a build step to a freestyle build job ............................................................... 106
5.27. Configuring an Ant build step ................................................................................ 107
5.28. Configuring an Execute Shell step ........................................................................... 108

xiii
5.29. Adding a Groovy installation to Jenkins ................................................................... 111
5.30. Running Groovy commands as part of a build job ...................................................... 112
5.31. Running Groovy scripts as part of a build job ............................................................ 113
5.32. Reporting on test results ........................................................................................ 114
5.33. Configuring build artifacts ..................................................................................... 114
5.34. Build artifacts are displayed on the build results page and on the build job home page ........ 115
5.35. Archiving source code and a binary package ............................................................. 117
5.36. Email notification ................................................................................................. 118
5.37. Creating a new Maven build job ............................................................................. 119
5.38. Specifying the Maven goals ................................................................................... 120
5.39. Maven build jobs—advanced options ....................................................................... 120
5.40. Deploying artifacts to a Maven repository ................................................................. 122
5.41. After deployment the artifact should be available on your Enterprise Repository Manager
.................................................................................................................................. 123
5.42. Redeploying an artifact ......................................................................................... 124
5.43. Deploying to Artifactory from Jenkins ..................................................................... 124
5.44. Jenkins displays a link to the corresponding Artifactory repository ................................. 125
5.45. Viewing the deployed artifact in Artifactory .............................................................. 125
5.46. Viewing the deployed artifact and the corresponding Jenkins build in Artifactory .............. 126
5.47. Managing modules in a Maven build job .................................................................. 126
5.48. Configuring extra Maven build steps ....................................................................... 127
5.49. Adding a Grails installation to Jenkins ..................................................................... 128
5.50. Configuring a Grails build step ............................................................................... 129
5.51. Configuring the Gradle plugin ................................................................................ 130
5.52. Setting up a Gradle build job ................................................................................. 132
5.53. Incremental Gradle job .......................................................................................... 132
5.54. Configuring .NET build tools in Jenkins ................................................................... 133
5.55. A build step using MSBuild ................................................................................... 133
5.56. A build step using NAnt ....................................................................................... 134
5.57. A build step using Rake ........................................................................................ 135
5.58. Publishing code quality metrics for Ruby and Rails .................................................... 136
6.1. You configure your Jenkins installation in the Manage Jenkins screen .............................. 139
6.2. Configuring Maven test reports in a freestyle project .................................................... 140
6.3. Installing the xUnit plugin ....................................................................................... 140
6.4. Publishing xUnit test results .................................................................................... 141
6.5. Jenkins displays test result trends on the project home page ........................................... 142
6.6. Jenkins displays a summary of the test results ............................................................. 142
6.7. The details of a test failure ...................................................................................... 143
6.8. Build time trends can give you a good indicator of how fast your tests are running .............. 144
6.9. Jenkins also lets you see how long your tests take to run ............................................... 145
6.10. Jenkins displays skipped tests as yellow ................................................................... 146
6.11. Installing the Cobertura plugin ............................................................................... 152
6.12. Your code coverage metrics build needs to generate the coverage data ............................ 152

xiv
6.13. Configuring the test coverage metrics in Jenkins ........................................................ 153
6.14. Test coverage results contribute to the project status on the dashboard ............................ 154
6.15. Configuring the test coverage metrics in Jenkins ........................................................ 155
6.16. Displaying code coverage metrics ........................................................................... 155
6.17. Configuring Clover reporting in Jenkins ................................................................... 157
6.18. Clover code coverage trends .................................................................................. 157
6.19. Using business-focused, behavior-driven naming conventions for JUnit tests .................... 158
6.20. Installing the HTML Publisher plugin ...................................................................... 159
6.21. Publishing HTML reports ...................................................................................... 159
6.22. Jenkins displays a special link on the build job home page for your report ....................... 159
6.23. The DocLinks plugin lets you archive both HTML and non-HTML artifacts .................... 160
6.24. Preparing a performance test script in JMeter ............................................................ 162
6.25. Preparing a performance test script in JMeter ............................................................ 164
6.26. Setting up the performance build to run every night at midnight .................................... 165
6.27. Performance tests can require large amounts of memory .............................................. 165
6.28. Configuring the Performance plugin in your build job ................................................. 166
6.29. The Jenkins Performance plugin keeps track of response time and errors ......................... 166
6.30. You can also view performance results per request ..................................................... 168
7.1. Enabling security in Jenkins .................................................................................... 172
7.2. The Jenkins Sign up page ....................................................................................... 173
7.3. The list of users known to Jenkins ............................................................................ 174
7.4. Displaying the builds that a user participates in ........................................................... 174
7.5. Creating a new user account by signing up ................................................................. 175
7.6. Synchronizing email addresses ................................................................................. 175
7.7. You can also manage Jenkins users from the Jenkins configuration page ........................... 176
7.8. The Jenkins user database ....................................................................................... 176
7.9. Configuring LDAP in Jenkins .................................................................................. 177
7.10. Using LDAP Groups in Jenkins .............................................................................. 178
7.11. Selecting the security realm ................................................................................... 179
7.12. Using Atlassian Crowd as the Jenkins Security Realm ................................................. 180
7.13. Using Atlassian Crowd as the Jenkins Security Realm ................................................. 181
7.14. Using Atlassian Crowd groups in Jenkins ................................................................. 181
7.15. Using custom scripts to handle authentication ............................................................ 182
7.16. Matrix-based security configuration ......................................................................... 184
7.17. Setting up an administrator .................................................................................... 184
7.18. Setting up other users ........................................................................................... 184
7.19. Project-based security ........................................................................................... 187
7.20. Configuring project-based security .......................................................................... 188
7.21. Viewing a project ................................................................................................. 188
7.22. Setting up Extended Read Permissions ..................................................................... 189
7.23. Setting up Role-based security ................................................................................ 189
7.24. The Manage Roles configuration menu .................................................................... 190
7.25. Managing global roles ........................................................................................... 190

xv
7.26. Managing project roles .......................................................................................... 191
7.27. Assigning roles to users ........................................................................................ 191
7.28. Configuring the Audit Trail plugin .......................................................................... 192
7.29. Setting up Job Configuration History ....................................................................... 193
7.30. Viewing Job Configuration History ......................................................................... 194
7.31. Viewing differences in Job Configuration History ...................................................... 194
8.1. Configuring email notification .................................................................................. 197
8.2. Configuring advanced email notification .................................................................... 199
8.3. Configuring email notification triggers ....................................................................... 201
8.4. Customized notification message .............................................................................. 202
8.5. Claiming a failed build ........................................................................................... 203
8.6. RSS Feeds in Jenkins ............................................................................................. 204
8.7. Creating a build radiator view .................................................................................. 205
8.8. Displaying a build radiator view ............................................................................... 206
8.9. Installing the Jenkins IM plugins .............................................................................. 207
8.10. Jenkins needs its own dedicated IM user account ....................................................... 207
8.11. Setting up basic Jabber notification in Jenkins ........................................................... 208
8.12. Advanced Jabber configuration ............................................................................... 208
8.13. Jenkins Jabber messages in action ........................................................................... 210
8.14. Install the Jenkins IRC plugins ............................................................................... 211
8.15. Advanced IRC notification configuration .................................................................. 212
8.16. Advanced build job IRC notification configuration ..................................................... 213
8.17. IRC notification messages in action ......................................................................... 214
8.18. Jenkins notifications in Eclipse ............................................................................... 215
8.19. Launching the Jenkins Tray Application ................................................................... 216
8.20. Running the Jenkins Tray Application ...................................................................... 216
8.21. Creating a Notifo service for your Jenkins instance ..................................................... 218
8.22. Configuring Notifo notifications in your Jenkins build job ........................................... 218
8.23. Receiving a Notifo notification on an iPhone ............................................................. 219
8.24. Using the Hudson Helper iPhone app ....................................................................... 220
8.25. Sending SMS notifications via an SMS Gateway Service ............................................. 221
8.26. Receiving notification via SMS .............................................................................. 222
8.27. Configuring Jenkins Sounds rules in a build job ......................................................... 223
8.28. Configuring Jenkins Sounds ................................................................................... 223
8.29. Configuring Jenkins Speaks ................................................................................... 224
8.30. A Nabaztag ......................................................................................................... 225
8.31. Configuring your Nabaztag .................................................................................... 226
9.1. It is easy to configure Checkstyle rules in Eclipse ........................................................ 230
9.2. Configuring PMD rules in Eclipse ............................................................................ 233
9.3. Generating code quality reports in a Maven build ........................................................ 239
9.4. Configuring the violations plugin for a Freestyle project ................................................ 240
9.5. Violations over time ............................................................................................... 241
9.6. Violations for a given build ..................................................................................... 241

xvi
9.7. Configuring the violations plugin for a Freestyle project ................................................ 243
9.8. Configuring the violations plugin for a Maven project .................................................. 243
9.9. Jenkins Maven build jobs understand Maven multimodule structures ............................... 244
9.10. Activating the Violations plugin for an individual module ............................................ 245
9.11. Installing the Checkstyle and Static Analysis Utilities plugins ....................................... 246
9.12. Configuring the Checkstyle plugin .......................................................................... 247
9.13. Displaying Checkstyle trends ................................................................................. 247
9.14. A coverage/complexity scatter plot .......................................................................... 248
9.15. You can click on any point in the graph to investigate further ....................................... 249
9.16. Configuring the Task Scanner plugin is straightforward ............................................... 250
9.17. The Open Tasks Trend graph ................................................................................. 250
9.18. Code quality reporting by Sonar ............................................................................. 251
9.19. Jenkins and Sonar ................................................................................................ 252
9.20. Configuring Sonar in Jenkins ................................................................................. 253
9.21. Configuring Sonar in a build job ............................................................................. 254
9.22. Scheduling Sonar builds ........................................................................................ 254
10.1. Creating a parameterized build job .......................................................................... 258
10.2. Adding a parameter to the build job ........................................................................ 258
10.3. Adding a parameter to the build job ........................................................................ 259
10.4. Demonstrating a build parameter ............................................................................. 259
10.5. Adding a parameter to a Maven build job ................................................................. 260
10.6. Many different types of parameters are available ........................................................ 261
10.7. Configuring a Choice parameter .............................................................................. 261
10.8. Configuring a Run parameter ................................................................................. 262
10.9. Configuring a File parameter .................................................................................. 262
10.10. Adding a parameter to build from a Subversion tag ................................................... 263
10.11. Building from a Subversion tag ............................................................................. 263
10.12. Configuring a parameter for a Git tag ..................................................................... 264
10.13. Building from a Git tag ....................................................................................... 264
10.14. Jenkins stores what parameter values where used for each build .................................. 265
10.15. Jenkins stores what parameter values where used for each build .................................. 266
10.16. Adding a parameterized trigger to a build job .......................................................... 266
10.17. The build job you trigger must also be a parameterized build job ................................. 267
10.18. Passing a predefined parameter to a parameterized build job ....................................... 268
10.19. Creating a multiconfiguration build job ................................................................... 269
10.20. Adding an axis to a multiconfiguration build ........................................................... 269
10.21. Defining an axis of slave nodes ............................................................................ 270
10.22. Defining an axis of JDK versions .......................................................................... 270
10.23. Defining a user-defined axis ................................................................................. 271
10.24. Multiconfiguration build results ............................................................................. 272
10.25. Setting up a combination filter .............................................................................. 273
10.26. Build results using a combination filter ................................................................... 274
10.27. A job generated by the Maven Jenkins plugin .......................................................... 276

xvii
10.28. jenkins-master job generated ................................................................................. 277
10.29. Artifactory Jenkins plugin configuration ................................................................. 280
10.30. Triggering several other builds after a build job ....................................................... 282
10.31. A build job dependency graph .............................................................................. 283
10.32. Configuring a join in the phoenix-web-tests build job ................................................ 284
10.33. A more complicated build job dependency graph ...................................................... 284
10.34. Adding a new lock ............................................................................................. 285
10.35. Configuring a build job to use a lock ..................................................................... 285
10.36. Configuring a Maven release using the M2Release plugin .......................................... 287
10.37. The Perform Maven Release menu option ............................................................... 287
10.38. Performing a Maven release in Jenkins ................................................................... 288
10.39. Adding a “Copy artifacts from another project” build step .......................................... 289
10.40. Running web tests against a copied WAR file .......................................................... 291
10.41. Copying from a multiconfiguration build ................................................................ 292
10.42. Build jobs in the promotion process ....................................................................... 293
10.43. Configuring a build promotion process ................................................................... 294
10.44. Configuring a manual build promotion process ........................................................ 295
10.45. Viewing the details of a build promotion ................................................................ 296
10.46. Using fingerprints in the build promotion process ..................................................... 297
10.47. Fetching the WAR file from the upstream build job .................................................. 297
10.48. Archiving the WAR file for use in the downstream job .............................................. 298
10.49. Fetching the WAR file from the integration job ........................................................ 298
10.50. We need to determine the fingerprint of the WAR file we use ..................................... 298
10.51. Fetching the latest promoted WAR file ................................................................... 299
10.52. Promoted builds are indicated by a star in the build history ......................................... 299
10.53. Reporting on aggregate test results ........................................................................ 300
10.54. Viewing aggregate test results ............................................................................... 301
10.55. Configuring a manual step in the build pipeline ........................................................ 302
10.56. Creating a Build Pipeline view .............................................................................. 302
10.57. Configuring a Build Pipeline view ......................................................................... 303
10.58. A Build Pipeline in action .................................................................................... 304
11.1. Managing slave nodes ........................................................................................... 306
11.2. Creating a new slave node ..................................................................................... 307
11.3. Creating a Unix slave node .................................................................................... 307
11.4. Taking a slave off-line when idle ............................................................................ 309
11.5. Configuring tool locations ..................................................................................... 310
11.6. Your new slave node in action ............................................................................... 310
11.7. Creating a slave node for JNLP .............................................................................. 311
11.8. Launching a slave via Java Web Start ...................................................................... 312
11.9. The Jenkins slave agent in action ............................................................................ 312
11.10. The Jenkins slave failing to connect to the master ..................................................... 313
11.11. Configuring the Jenkins slave port ......................................................................... 313
11.12. Installing the Jenkins slave as a Windows service ..................................................... 314

xviii
11.13. Managing the Jenkins Windows service .................................................................. 314
11.14. Letting Jenkins control a Windows slave as a Windows service ................................... 315
11.15. Running a build job on a particular slave node ......................................................... 316
11.16. Jenkins proactively monitors your build agents ........................................................ 318
11.17. You manage your EC2 instances using the Amazon AWS Management Console ............. 319
11.18. Configuring an Amazon EC2 slave ........................................................................ 320
11.19. Configuring an Amazon EC2 slave ........................................................................ 321
11.20. Creating a new Amazon EC2 image ....................................................................... 322
11.21. Bringing an Amazon EC2 slave online manually ...................................................... 322
12.1. A simple automated deployment pipeline .................................................................. 331
12.2. Copying the binary artifact to be deployed ................................................................ 331
12.3. Deploying to Tomcat using the Deploy Plugin ........................................................... 332
12.4. Adding a “Build selector for Copy Artifact” parameter ................................................ 333
12.5. Configuring a build selector parameter ..................................................................... 333
12.6. Specify where to find the artifacts to be deployed ...................................................... 334
12.7. Choosing the build to redeploy ............................................................................... 334
12.8. Using the “Specified by permalink” option ............................................................... 335
12.9. Using a specific build ........................................................................................... 335
12.10. Using a Maven Enterprise Repository .................................................................... 336
12.11. Deploying an artifact from a Maven repository ........................................................ 339
12.12. Preparing the WAR to be deployed ........................................................................ 339
12.13. Configuring a remote host .................................................................................... 340
12.14. Deploying files to a remote host in the build section ................................................. 341
12.15. Deploying files to a remote host in the post-build actions ........................................... 342
13.1. Discarding old builds ............................................................................................ 345
13.2. Discarding old builds—advanced options .................................................................. 346
13.3. Viewing disk usage .............................................................................................. 347
13.4. Displaying disk usage for a project .......................................................................... 347
13.5. Displaying project disk usage over time ................................................................... 348
13.6. Maven build jobs—advanced options ....................................................................... 348
13.7. Jenkins Load Statistics .......................................................................................... 350
13.8. The Jenkins Monitoring plugin ............................................................................... 351
13.9. The builds directory ............................................................................................. 352
13.10. The Jenkins Backup Manager Plugin ...................................................................... 353
13.11. Configuring the Jenkins Backup Manager ............................................................... 354
13.12. Configuring the Thin Backup plugin ...................................................................... 355
13.13. Restoring a previous configuration ......................................................................... 355
13.14. Reloading the configuration from disk .................................................................... 356
13.15. Jenkins will inform you if your data is not compatible with the current version ............... 357
13.16. Managing out-of-date build jobs data ..................................................................... 358
A.1. A project containing freely-named test classes ............................................................ 364

Copyright
Copyright © 2011 John Ferguson Smart
Printed version published by O'Reilly Media, 1005 Gravenstein Highway North, Sebastopol, CA 95472.
Online version published by Wakaleo Consulting, 111 Donald Street, Karori, Wellington 6012, New
Zealand.
This work is licensed under a Creative Commons Attribution-Noncommercial-No Derivative Works
3.0 United States license. For more information about this license, see http://creativecommons.org/
licenses/by-nc-nd/3.0/us/. You are free to share, copy, distribute, display, and perform the work under
the following conditions:
• You must attribute the work to John Ferguson Smart
• You may not use this work for commercial purposes.
• You may not alter, transform, or build upon this work.
Java™ and all Java-based trademarks and logos are trademarks or registered trademarks of Sun
Microsystems, Inc., in the United States and other countries.
Eclipse™ is a trademark of the Eclipse Foundation, Inc., in the United States and other countries.
Apache and the Apache feather logo are trademarks of The Apache Software Foundation.
Linux® is the registered trademark of Linus Torvalds in the U.S. and other countries.
Many of the designations used by manufacturers and sellers to distinguish their products are claimed
as trademarks. Where those designations appear in this book, and Wakaleo Consulting was aware of a
trademark claim, the designations have been printed in caps or initial caps.
While every precaution has been taken in the preparation of this book, the publisher and authors assume
no responsibility for errors or omissions, or for damages resulting from the use of the information
contained herein.

Foreword
Kohsuke Kawaguchi
Seven years ago, I wrote the first line of code that started this whole project that is now known as Jenkins,
and was originally called Hudson. I used to be the guy who broke the build, so I needed a program to
catch my mistakes before my colleagues did. It was just a simple tool that did a simple thing. But it
rapidly evolved, and now I’d like to think that it’s the most dominant CI server on the market bar none,
encompassing a broad plugin ecosystem, commercial distributions, hosted Jenkins-as-a-Service, user
groups, meet-ups, trainings, and so on.
As with most of my other projects, this project was open-sourced since its inception. Over its life it
critically relied on the help and love of other people, without which the project wouldn’t be in the current
state. During this time I’ve also learned a thing or two about running open source projects. From that
experience, I think people often overlook that there are many ways to help an open source project, of
which writing code is just one of many. There’s spreading words, helping other users, organizing meet-
ups, and yes, there’s writing documentation.
In this sense, John is an important part of the Jenkins community, even though he hasn’t contributed code
—instead, he makes Jenkins more approachable to new users. For example, he has a popular blog that’s
followed by many, where he regularly talks about continuous integration practices and other software
development topics. He is good at explaining things so that people new to Jenkins can still understand
them, which is something often hard for people like me who develop Jenkins day in day out. He is also
well-known for his training courses, of which Jenkins is a part. This is another means by which he makes
Jenkins accessible for more people. He clearly has a passion for evangelizing new ideas and teaching
fellow developers to be more productive.
These days I spend my time at CloudBees where I focus my time on Open Source Jenkins, the CloudBees
pro version of Jenkins where we build plugins on top of Jenkins, and taking Jenkins to the private and
public cloud with CloudBees DEV@cloud service. In this role I now have more interaction with John
than before, and my respect for his passion has only grown.
So I was truly delighted that he took on the daunting task of writing a book about Jenkins. It gives
a great overview of the typical main ingredients of continuous integration. And for me personally, I
always get asked if there’s a book about Jenkins, and I can finally answer this question positively! But
more importantly, this book reflects his passion, and his long experience in teaching people how to use
Jenkins, in combination with other things. But don’t take my words for it. You’ll just need to read on
to see it for yourself.

Preface
1. Audience
This book is aimed at relatively technical readers, though no prior experience with Continuous
Integration is assumed. You may be new to Continuous Integration, and would like to learn about the
benefits it can bring to your development team. Or, you might be using Jenkins or Hudson already, and
want to discover how you can take your Continuous Integration infrastructure further.
Much of this book discusses Jenkins in the context of Java or JVM-related projects. Nevertheless, even
if you are using another technology stack, this book should give you a good grounding in Continuous
Integration with Jenkins. We discuss how to build projects using several non-Java technologies,
including as Grails, Ruby on Rails and .NET. In addition, many topics, such as general configuration,
notification, distributed builds and security are applicable no matter what language you are using.
2. Book Layout
Continuous Integration is like a lot of things: the more you put in, the more value you will get out. While
even a basic Continuous Integration setup will produce positive improvements in your team process,
there are significant advantages to gradually assimilating and implementing some of the more advanced
techniques as well. To this end, this book is organized as a progressive trek into the world of Continuous
Integration with Jenkins, going from simple to more advanced. In the first chapter, we start off with a
sweeping overview of what Jenkins is all about, in the form of a high-level guided tour. From there,
we progress into how to install and configure your Jenkins server and how to set up basic build jobs.
Once we have mastered the basics, we will delve into more advanced topics, including automated testing
practices, security, more advanced notification techniques, and measuring and reporting on code quality
metrics. Next, we move on to more advanced build techniques such as matrix builds, distributed builds
and cloud-based CI, before discussing how to implement Continuous Deployment with Jenkins. Finally,
we cover some tips on maintaining your Jenkins server.
3. Jenkins or Hudson?
As we discuss in the introduction, Jenkins was originally, and up until recently, known as Hudson. In
2009, Oracle purchased Sun and inherited the code base of Hudson. In early 2011, tensions between
Oracle and the open source community reached rupture point and the project forked into two separate
entities: Jenkins, run by most of the original Hudson developers, and Hudson, which remained under
the control of Oracle.
As the title suggests, this book is primarily focused on Jenkins. However, much of the book was initially
written before the fork, and the products remain very similar. So, although the examples and illustrations
do usually refer to Jenkins, almost all of what is discussed will also apply to Hudson.

xxiv
4. Font Conventions
This book follows certain conventions for font usage. Understanding these conventions up-front makes
it easier to use this book.
Italic
Used for filenames, file extensions, URLs, application names, emphasis, and new terms when
they are first introduced.
Constant width
Used for Java class names, methods, variables, properties, data types, database elements, and
snippets of code that appear in text.
Constant width bold
Used for commands you enter at the command line and to highlight new code inserted in a running
example.
Constant width italic
Used to annotate output.
5. Command-Line Conventions
From time to time, this book discusses command-line instructions. When we do, output produced by
the console (e.g., command prompts or screen output) is displayed in normal characters, and commands
(what you type) are written in bold. For example:
$ ls -al
total 168
drwxr-xr-x 16 johnsmart staff 544 21 Jan 07:20 .
drwxr-xr-x+ 85 johnsmart staff 2890 21 Jan 07:10 ..
-rw-r--r-- 1 johnsmart staff 30 26 May 2009 .owner
-rw-r--r--@ 1 johnsmart staff 1813 16 Apr 2009 config.xml
drwxr-xr-x 181 johnsmart staff 6154 26 May 2009 fingerprints
drwxr-xr-x 17 johnsmart staff 578 16 Apr 2009 jobs
drwxr-xr-x 3 johnsmart staff 102 15 Apr 2009 log
drwxr-xr-x 63 johnsmart staff 2142 26 May 2009 plugins
-rw-r--r-- 1 johnsmart staff 46 26 May 2009 queue.xml
-rw-r--r--@ 1 johnsmart staff 64 13 Nov 2008 secret.key
-rw-r--r-- 1 johnsmart staff 51568 26 May 2009 update-center.json
drwxr-xr-x 3 johnsmart staff 102 26 May 2009 updates
drwxr-xr-x 3 johnsmart staff 102 15 Apr 2009 userContent
drwxr-xr-x 12 johnsmart staff 408 17 Feb 2009 users
drwxr-xr-x 28 johnsmart staff 952 26 May 2009 war
Where necessary, the backslash character at the end of the line is used to indicate a line break: you can
type this all on one line (without the backslash) if you prefer. Don’t forget to ignore the “>” character
at the start of the subsequent lines—it’s a Unix prompt character:

xxv
$ wget -O - http://jenkins-ci.org/debian/jenkins-ci.org.key \
> | sudo apt-key add -
For consistency, unless we are discussing a Windows-specific issue, we will use Unix-style command
prompts (the dollar sign, “$”), as shown here:
$ java -jar jenkins.war
or:
$ svn list svn://localhost
However, unless we say otherwise, Windows users can safely use these commands from the Windows
command console:
C:\Documents and Settings\Owner> java -jar jenkins.war
or:
C:\Documents and Settings\Owner> svn list svn://localhost
6. Contributors
This book was not written alone. Rather, it has been a collaborative effort involving many people playing
different roles. In particular, the following people generously contributed their time, knowledge and
writing skill to make this a better book:
• Evgeny Goldin is a Russian-born software engineer living in Israel. He is a lead developer at
Thomson Reuters where he’s responsible for a number of activities, some of which are directly
related to Maven, Groovy, and build tools such as Artifactory and Jenkins. He has a vast experience
in a range of technologies, including Perl, Java, JavaScript and Groovy. Build tools and dynamic
languages are Evgeny’s favorite subjects about which he often writes, presents or blogs. These
days he is writing for GroovyMag, Methods & Tools and runs two open source projects of his own:
Maven-plugins1 and GCommons2. He blogs at http://evgeny-goldin.com/blog and can be found on
Twitter as @evgeny_goldin.
Evgeny contributed a section on generating your Maven build jobs automatically in Chapter 10,
Advanced Builds.
• Matthew McCullough is an energetic 15 year veteran of enterprise software development, open
source education, and co-founder of Ambient Ideas, LLC, a Denver consultancy. Matthew currently
is a trainer for GitHub.com, author of the Git Master Class series for O’Reilly, speaker at over 30
national and international conferences, author of 3 of the top 10 DZone RefCards, and President
of the Denver Open Source Users Group. His current topics of research center around project
automation: build tools (Maven, Leiningen, Gradle), distributed version control (Git), Continuous
Integration (Jenkins) and Quality Metrics (Sonar). Matthew resides in Denver, Colorado with his

xxvi
beautiful wife and two young daughters, who are active in nearly every outdoor activity Colorado
has to offer.
Matthew wrote the section on integrating Git with Jenkins in Chapter 5, Setting Up Your Build
Jobs.
• Juven Xu is a software engineer from China who works for Sonatype. An active member of the open
source community and recognized Maven expert, Juven was responsible for the Chinese translation
of Maven: The Definitive Guide as well as an original Chinese reference book on Maven. He is
also currently working on the Chinese translation of the present book.
Juven wrote the section on IRC notifications in Chapter 8, Notification.
• Rene Groeschke is a software engineer at Cassidian Systems, formerly known as EADS
Deutschland GmbH, as well as an open source enthusiast. A certified ScrumMaster with about 7
years experience as a programmer in several enterprise Java projects, he is especially focused on
Agile methodologies like Continuous Integration and Test-Driven Development. Besides his daily
business, the University of Corporate Education in Friedrichshafen allows him to spread the word
about scrum and scrum related topics by giving lectures for the bachelor students of information
technology.
Rene contributed the section on building projects with Gradle in Chapter 5, Setting Up Your Build
Jobs.
7. The Review Team
The technical review process for this book was a little different to the approach taken for most books.
Rather than having one or two technical reviewers read the entire book near the end of the book writing
process, a team of volunteers from the Jenkins community, including many key Jenkins developers,
were able to read chapters as they were written. This review team was made up of the following
people: Alan Harder, Andrew Bayer, Carlo Bonamico, Chris Graham, Eric Smalling, Gregory Boissinot,
Harald Soevik, Julien Simpson, Juven Xu, Kohsuke Kawaguchi, Martijn Verberg, Ross Rowe, and Tyler
Ballance.
8. Book Sponsors
This book would not have been possible without the help of several organizations who were willing to
assist with and fund the book-writing process.
8.1. Wakaleo Consulting
Wakaleo Consulting3 is a consulting company that helps organizations optimize their software
development process. Lead by John Ferguson Smart, author of this book and Java Power Tools4,
3 http://www.wakaleo.com

xxvii
Wakaleo Consulting provides consulting, training and mentoring services in Agile Java Development
and Testing Practices, Software Development Life Cycle optimization, and Agile Methodologies.
Wakaleo helps companies with training and assistance in areas such as Continuous Integration, Build
Automation, Test-Driven Development, Automated Web Testing and Clean Code, using open source
tools such as Maven, Jenkins, Selenium 2, and Nexus. Wakaleo Consulting also runs public and on-site
training around Continuous Integration and Continuous Deployment, Build Automation, Clean Code
practices, Test-Driven Development and Behavior-Driven Development, including Certified Scrum
Developer (CSD) courses.
8.2. CloudBees
CloudBees5 is the only cloud company focused on servicing the complete develop-to-deploy life cycle
of Java web applications in the cloud. The company is also the world’s premier expert on the Jenkins/
Hudson continuous integration tool.
Jenkins/Hudson creator Kohsuke Kawaguchi leads a CloudBees team of experts from around the world.
They’ve created Nectar, a supported and enhanced version of Jenkins that is available on-premise by
subscription. If you depend on Jenkins for mission-critical software processes, Nectar provides a highly-
tested, stable, and fully-supported version of Jenkins. It also includes Nectar-only functionality such as
automatic scaling to VMWare virtual machines.
If you’re ready to explore the power of continuous integration in the cloud, CloudBees makes Jenkins/
Hudson available as part of its DEV@cloud build platform. You can get started with Jenkins instantly
and can scale as needed—no big up-front investment in build servers, no more limited capacity for
builds, and no maintenance hassles. Once an application is ready to go live, you can deploy on
CloudBees’s RUN@cloud Platform as a Service in just a few clicks.
With CloudBees’s DEV@cloud and RUN@cloud services, you don’t have to worry about servers,
virtual machines or IT staff. And with Nectar, you enjoy the most powerful, stable, supported Jenkins
available.
8.3. Odd-e
Odd-e6 is an Asian-based company that builds products in innovative ways and helps others achieve
the same. The team consists of experienced coaches and product developers who work according to
the values of scrum, agile, lean, and craftsmanship, and the company is structured the same way. For
example, Odd-e doesn’t have an organizational hierarchy or managers making decisions for others.
Instead, individuals self-organize and use all their skills to continuously improve their competence. The
company provides training and follow-up coaching to help others collaboratively seek and develop a
better way of working.
4 http://oreilly.com/catalog/9780596527938
5 http://www.cloudbees.com
6 http://www.odd-e.com

xxviii
It is not the job but the values that binds Odd-e together. Its members love building software, value
learning and contribution over maximizing profit, and are committed to supporting open source
development in Asia.
9. Using Code Examples
This book is an open source book, published under the Creative Commons License. The book was
written in DocBook, using XmlMind. The book’s source code can be found on GitHub at http://
www.github.org/wakaleo/jenkins-the-definitive-guide.
The sample Jenkins projects used in this book are open source and freely available online—see the
book’s web page at http://www.wakaleo.com/books/jenkins-the-definitive-guide for more details.
This book is here to help you get your job done. In general, you may use the code in this book in your
programs and documentation. You do not need to contact us for permission unless you’re reproducing
a significant portion of the code. For example, writing a program that uses several chunks of code from
this book does not require permission. Selling or distributing a CD-ROM of examples from O’Reilly
books does require permission. Answering a question by citing this book and quoting example code
does not require permission. Incorporating a significant amount of example code from this book into
your product’s documentation does require permission.
We appreciate, but do not require, attribution. An attribution usually includes the title, author, publisher,
and ISBN. For example: “Jenkins: The Definitive Guide by John Ferguson Smart (O’Reilly). Copyright
2011 John Ferguson Smart, 978-1-449-30535-2.”
If you feel your use of code examples falls outside fair use or the permission given above, feel free to
contact us at <permissions@oreilly.com>.
10. Safari® Books Online
Note
Safari Books Online is an on-demand digital library that lets you easily search over 7,500
technology and creative reference books and videos to find the answers you need quickly.
With a subscription, you can read any page and watch any video from our library online. Read books
on your cell phone and mobile devices. Access new titles before they are available for print, and get
exclusive access to manuscripts in development and post feedback for the authors. Copy and paste code
samples, organize your favorites, download chapters, bookmark key sections, create notes, print out
pages, and benefit from tons of other time-saving features.
7 http://my.safaribooksonline.com/?portal=oreilly

xxix
O’Reilly Media has uploaded this book to the Safari Books Online service. To have full digital access
to this book and others on similar topics from O’Reilly and other publishers, sign up for free at http://
my.safaribooksonline.com7.
11. How to Contact Us
Please address comments and questions concerning this book to the publisher:
O’Reilly Media, Inc.
1005 Gravenstein Highway North
Sebastopol, CA 95472
800-998-9938 (in the United States or Canada)
707-829-0515 (international or local)
707-829-0104 (fax)
We have a web page for this book, where we list errata, examples, and any additional information. You
can access this page at:
http://www.oreilly.com/catalog/9781449305352
To comment or ask technical questions about this book, send email to:
<bookquestions@oreilly.com>
For more information about our books, courses, conferences, and news, see our website at http://
www.oreilly.com.
Find us on Facebook: http://facebook.com/oreilly
Follow us on Twitter: http://twitter.com/oreillymedia
Watch us on YouTube: http://www.youtube.com/oreillymedia
12. Acknowledgments
First and foremost, my wonderful wife, Chantal, and boys, James and William, without whose love,
support, and tolerance this book would not have been possible.
I would like to thank Mike Loukides for working with me once again on this book project, and the whole
O’Reilly team for their high standards of work.
Thank you to Kohsuke Kawaguchi for having created Jenkins, and for still being the driving force behind
this brilliant product. Thanks also to Francois Dechery, Sacha Labourey, Harpreet Singh, and the rest
of the CloudBees team for their help and support.
I am also very grateful to those who took the time and energy to contribute work to the book: Evgeny
Goldin, Matthew McCullough, Juven Xu, and Rene Groeschke.

xxx
A great thanks goes out to the following reviewers, who provided valuable feedback throughout the
whole writing process: Alan Harder, Andrew Bayer, Carlo Bonamico, Chris Graham, Eric Smalling,
Gregory Boissinot, Harald Soevik, Julien Simpson, Juven Xu, Kohsuke Kawaguchi, Martijn Verberg,
Ross Rowe, and Tyler Ballance.
Thank you to Andrew Bayer, Martijn Verburg, Matthew McCullough, Rob Purcell, Ray King, Andrew
Walker, and many others, whose discussions and feedback provided me with inspiration and the ideas
that made this book what it is.
And many other people have helped in various ways to make this book much richer and more complete
than it would have been otherwise: Geoff and Alex Bullen, Pete Thomas, Gordon Weir, Jay Zimmerman,
Tim O’Brien, Russ Miles, Richard Paul, Julien Simpson, John Stevenson, Michael Neale, Arnaud
Héritier, and Manfred Moser.
And finally a great thank you to the Hudson/Jenkins developer and user community for the ongoing
encouragement and support.

Chapter 1. Introducing Jenkins
1.1. Introduction
Continuous Integration, also know as CI, is a cornerstone of modern software development. In fact it is
a real game changer—when Continuous Integration is introduced into an organization, it radically alters
the way teams think about the whole development process. It has the potential to enable and trigger
a series of incremental process improvements, going from a simple scheduled automated build right
through to continuous delivery into production. A good CI infrastructure can streamline the development
process right through to deployment, help detect and fix bugs faster, provide a useful project dashboard
for both developers and non-developers, and ultimately, help teams deliver more real business value to
the end user. Every professional development team, no matter how small, should be practicing CI.
1.2. Continuous Integration Fundamentals
Back in the days of waterfall projects and Gantt charts, before the introduction of CI practices,
development team time and energy was regularly drained in the period leading up to a release by what
was known as the Integration Phase. During this phase, the code changes made by individual developers
or small teams were brought together piecemeal and forged into a working product. This was hard work,
sometimes involving the integration of months of conflicting changes. It was very hard to anticipate the
types of issues that would crop up, and even harder to fix them, as it could involve reworking code that
had been written weeks or months before. This painful process, fraught with risk and danger, often lead
to significant delivery delays, unplanned costs and, as a result, unhappy clients. Continuous Integration
was born to address these issues.
Continuous Integration, in its simplest form, involves a tool that monitors your version control system
for changes. Whenever a change is detected, this tool automatically compiles and tests your application.
If something goes wrong, the tool immediately notifies the developers so that they can fix the issue
immediately.
But Continuous Integration can do much more than this. Continuous Integration can also help you keep
tabs on the health of your code base, automatically monitoring code quality and code coverage metrics,
and helping keep technical debt down and maintenance costs low. The publicly-visible code quality
metrics can also encourage developers to take pride in the quality of their code and strive to improve
it. Combined with automated end-to-end acceptance tests, CI can also act as a communication tool,
publishing a clear picture of the current state of development efforts. And it can simplify and accelerate
delivery by helping you automate the deployment process, letting you deploy the latest version of your
application either automatically or as a one-click process.
In essence, Continuous Integration is about reducing risk by providing faster feedback. First and
foremost, it is designed to help identify and fix integration and regression issues faster, resulting in
smoother, quicker delivery, and fewer bugs. By providing better visibility for both technical and non-

2
technical team members on the state of the project, Continuous Integration can open and facilitate
communication channels between team members and encourage collaborative problem solving and
process improvement. And, by automating the deployment process, Continuous Integration helps you
get your software into the hands of the testers and the end users faster, more reliably, and with less effort.
This idea of automated deployment is important. Indeed, if you take automating the deployment process
to its logical conclusion, you could push every build that passes the necessary automated tests into
production. The practice of automatically deploying every successful build directly into production is
generally known as Continuous Deployment.
However, a pure Continuous Deployment approach is not always appropriate for everyone. For example,
many users would not appreciate new versions falling into their laps several times a week, and prefer a
more predictable (and transparent) release cycle. Commercial and marketing considerations might also
play a role in when a new release should actually be deployed.
The notion of Continuous Delivery is a slight variation on the idea of Continuous Deployment that takes
into account these considerations. With Continuous Delivery, any and every successful build that has
passed all the relevant automated tests and quality gates can potentially be deployed into production
via a fully automated one-click process, and be in the hands of the end-user within minutes. However,
the process is not automatic: it is the business, rather than IT, that decides the best time to deliver the
latest changes.
So Continuous Integration techniques, and in particular Continuous Deployment and Continuous
Delivery, are very much about providing value to the end user faster. How long does it take your team
to get a small code change out to production? How much of this process involves problems that could
have been fixed earlier, had you known about the code changes that Joe down the corridor was making?
How much is taken up by labor-intensive manual testing by QA teams? How much involves manual
deployment steps, the secrets of which are known only to a select few? CI is not a silver bullet by any
means, but it can certainly help streamline many of these problems.
But Continuous Integration is a mindset as much as a toolset. To get the most out of CI, a team needs to
adopt a CI mentality. For example, your projects must have a reliable, repeatable, and automated build
process, involving no human intervention. Fixing broken builds should take an absolute priority, and
not be left to stagnate. The deployment process should be automated, with no manual steps involved.
And since the trust you place in your CI server depends to a great extent on the quality of your tests, the
team needs to place a very strong emphasis on high quality tests and testing practices.
In this book we will be looking at how to implement a robust and comprehensive Continuous Integration
solution using Jenkins or Hudson.
1.3. Introducing Jenkins (née Hudson)
Jenkins, originally called Hudson, is an open source Continuous Integration tool written in Java.
Boasting a dominant market share, Jenkins is used by teams of all sizes, for projects in a wide variety

3
of languages and technologies, including .NET, Ruby, Groovy, Grails, PHP and more, as well as Java.
So what has made Jenkins such a success? And why use Jenkins for your CI infrastructure?
Firstly, Jenkins is easy to use. The user interface is simple, intuitive, and visually appealing, and Jenkins
as a whole has a very low learning curve. As we will see in the next chapter, you can get started with
Jenkins in a matter of minutes.
However Jenkins does not sacrifice power or extensibility: it is also extremely flexible and easy to adapt
to your own purposes. Hundreds of open source plugins are available, with more coming out every week.
These plugins cover everything from version control systems, build tools, code quality metrics, build
notifiers, integration with external systems, UI customization, games, and much more. And installing
them is quick and easy.
Last, but certainly not least, much of Jenkins’s popularity comes from the size and vibrancy of
its community. The Jenkins community is a large, dynamic, reactive and welcoming bunch, with
passionate champions, active mailing lists, IRC channels and a very vocal blog and twitter account. The
development pace is fast, with releases coming out weekly with the latest new features, bug fixes, and
plugin updates.
However Jenkins also caters to users who are not comfortable with upgrading on a weekly basis. For
those who prefer a less-hectic release pace, there is also a Long-term Support, or LTS, release line that
lags behind the latest release in favor of more stability and a slower rate of change. New LTS releases
come out every three months or so, with important bug fixes being backported. This concept is similar
to the Ubuntu LTS releases.
1.4. From Hudson to Jenkins—A Short History
Jenkins is the result of one visionary developer, Kohsuke Kawaguchi, who started the project as a hobby
project under the name of Hudson in late 2004 whilst working at Sun. As Hudson evolved over the
years, it was adopted by more and more teams within Sun for their own projects. By early 2008, Sun
recognized the quality and value of the tool, and ask Kohsuke to work on Hudson full-time, starting to
provide professional services and support around Hudson. By 2010, Hudson had become the leading
Continuous Integration solution with a market share of over 70%.
In 2009, Oracle purchased Sun. Towards the end of 2010, tensions arose between the Hudson developer
community and Oracle, initially triggered by problems with the Java.net infrastructure, and aggravated
by issues related to Oracle’s claim to the Hudson trademark. These tensions also reflected strong
underlying disagreements about the way the project was being managed by Oracle. Indeed, Oracle
wanted to move towards a more strictly controlled development process with a slower release schedule,
whereas most of the core Hudson developers, led by Kohsuke, preferred to continue with the open,
flexible, and fast-paced community-focused model that had worked so well for Hudson in the past.
1 https://github.com/jenkinsci

4
In January 2011, the Hudson developer community decisively voted to rename the project to Jenkins.
They subsequently migrated the original Hudson code base to a new GitHub project1 and continued
their work there. The vast majority of core and plugin developers upped camp and followed Kohsuke
Kawaguchi and other core contributors to the Jenkins camp, where the bulk of the development activity
can be seen today.
After the fork, a majority of users also followed the Jenkins developer community and switched to
Jenkins. At the time of writing, polls show that some 75% of Hudson users had switched to Jenkins,
while 13% were still using Hudson, and another 12% were using both Hudson and Jenkins or in the
process of migrating to Jenkins.
Nevertheless, Oracle and Sonatype (the company behind Maven and Nexus) have continued to work
on the Hudson code base (now also hosted on GitHub at https://github.com/hudson), but with a very
different focus. Indeed, the Sonatype developers have concentrating on major underlying infrastructure
changes around, among other areas, Maven integration, the dependency injection framework and the
plugin architecture.
1.5. Should I Use Jenkins or Hudson?
So should you use Jenkins or Hudson? Since this is a book on Jenkins, here are a few reasons why you
might want to opt for Jenkins:
• Jenkins is the new Hudson. In fact, Jenkins is simply the old Hudson with a new name, so if you
liked Hudson, you’ll like Jenkins! Jenkins uses the Hudson code base, and the development team
and project philosophy remain the same. In a nutshell, the original developers, who wrote the vast
majority of the Hudson core, simply resumed business as usual after the fork working on the Jenkins
project.
• The Jenkins community. Like many of the more successful Open Source projects, much of
Hudson’s strength came from its large and dynamic community, and its massive adoption. Bugs
are identified (and generally fixed) much more rapidly, and, if you have a problem, chances are
someone else will have had it too! If you run into trouble, post a question on the mailing list or
IRC channel—there’s sure to be someone who can help.
• The fast development pace. Jenkins continues the rapid release cycles that typified Hudson, which
many developers love. New features, new plugins and bug fixes come out weekly, and the turn-
around time for bug fixes can be very short indeed. And, if you prefer more stability, there are
always the LTS releases
And, in the interest of balance, here are some reasons you might prefer to stick with Hudson:
• If it ain’t broke, don’t fix it. You already have a Hudson installation that you are happy with, and
don’t feel the need to upgrade to the latest version.
• Enterprise integration and Sonatype tools. Hudson is likely to place a strong emphasis on
integration with enterprise tools such as LDAP/Active Directory, and the Sonatype products such

5
as Maven 3, Nexus and M2Ecipse, whereas Jenkins is more open to other competing tools such
as Artifactory and Gradle.
• Plugin architecture. If you intend to write your own Jenkins/Hudson plugins, you should be aware
that Sonatype is working on providing JSR-330 dependency injection for Hudson plugins. New
developers may find this approach easier to use, though it does raise issues about future plugin
compatibility between Jenkins and Hudson.
The good news is, no matter whether you are using Jenkins or Hudson, the products remain very similar,
and the vast majority of techniques and tips discussed in this book will apply equally well to both.
Indeed, to illustrate this point, many screenshots in this book refer to Hudson rather than Jenkins.
1.6. Introducing Continuous Integration into Your
Organization
Continuous Integration is not an all-or-nothing affair. In fact, introducing CI into an organization takes
you on a path that progresses through several distinct phases. Each of these phases involves incremental
improvements to the technical infrastructure as well as, perhaps more importantly, improvements in the
practices and culture of the development team itself. In the following paragraphs, I have tried to paint
an approximate picture of each phase.
1.6.1. Phase 1—No Build Server
Initially, the team has no central build server of any kind. Software is built manually on a developer’s
machine, though it may use an Ant script or similar to do so. Source code may be stored in a central
source code repository, but developers do not necessarily commit their changes on a regular basis. Some
time before a release is scheduled, a developer manually integrates the changes, a process which is
generally associated with pain and suffering.
1.6.2. Phase 2—Nightly Builds
In this phase, the team has a build server, and automated builds are scheduled on a regular (typically
nightly) basis. This build simply compiles the code, as there are no reliable or repeatable unit tests.
Indeed, automated tests, if they are written, are not a mandatory part of the build process, and may well
not run correctly at all. However developers now commit their changes regularly, at least at the end of
every day. If a developer commits code changes that conflict with another developer’s work, the build
server alerts the team via email the following morning. Nevertheless, the team still tends to use the build
server for information purposes only—they feel little obligation to fix a broken build immediately, and
builds may stay broken on the build server for some time.
1.6.3. Phase 3—Nightly Builds and Basic Automated Tests
The team is now starting to take Continuous Integration and automated testing more seriously. The build
server is configured to kick off a build whenever new code is committed to the version control system,

6
and team members are able to easily see what changes in the source code triggered a particular build,
and what issues these changes address. In addition, the build script compiles the application and runs
a set of automated unit and/or integration tests. In addition to email, the build server also alerts team
members of integration issues using more proactive channels such as Instant Messaging. Broken builds
are now generally fixed quickly.
1.6.4. Phase 4—Enter the Metrics
Automated code quality and code coverage metrics are now run to help evaluate the quality of the code
base and (to some extent, at least) the relevance and effectiveness of the tests. The code quality build also
automatically generates API documentation for the application. All this helps teams keep the quality
of the code base high, alerting team members if good testing practices are slipping. The team has also
set up a “build radiator,” a dashboard view of the project status that is displayed on a prominent screen
visible to all team members.
1.6.5. Phase 5—Getting More Serious About Testing
The benefits of Continuous Integration are closely related to solid testing practices. Now, practices
like Test-Driven Development are more widely practiced, resulting in a growing confidence in the
results of the automated builds. The application is no longer simply compiled and tested, but if the tests
pass, it is automatically deployed to an application server for more comprehensive end-to-end tests and
performance tests.
1.6.6. Phase 6—Automated Acceptance Tests and More Automated
Deployment
Acceptance-Test Driven Development is practiced, guiding development efforts and providing high-
level reporting on the state of the project. These automated tests use Behavior-Driven Development
and Acceptance-Test Driven Development tools to act as communication and documentation tools
and documentation as much as testing tools, publishing reports on test results in business terms that
non-developers can understand. Since these high-level tests are automated at an early stage in the
development process, they also provide a clear idea of what features have been implemented, and which
remain to be done. The application is automatically deployed into test environments for testing by the QA
team either as changes are committed, or on a nightly basis; a version can be deployed (or “promoted”)
to UAT and possibly production environments using a manually-triggered build when testers consider it
ready. The team is also capable of using the build server to back out a release, rolling back to a previous
release, if something goes horribly wrong.
1.6.7. Phase 7—Continuous Deployment
Confidence in the automated unit, integration and acceptance tests is now such that teams can apply the
automated deployment techniques developed in the previous phase to push out new changes directly
into production.

7
The progression between levels here is of course somewhat approximate, and may not always match
real-world situations. For example, you may well introduce automated web tests before integrating code
quality and code coverage reporting. However, it should give a general idea of how implementing a
Continuous Integration strategy in a real world organization generally works.
1.7. Where to Now?
Throughout the remainder of this book, as we study the various features Jenkins has to offer, as well
as the practices required to make the most of these features, we will see how we can progress through
each of these levels with Jenkins. And remember, most of the examples used in the book are available
online (see http://www.wakaleo.com/books/jenkins-the-definitive-guide for more details), so you can
get your hands dirty too!

Chapter 2. Your First Steps with
Jenkins
2.1. Introduction
In this chapter, we are going to take a quick guided tour through some of Jenkins’s key features. You’ll
get to see first-hand just how easy it is to install Jenkins and set up your first Jenkins automated build
job. We won’t dwell on the details too much—there are more details to come in the following chapters,
as well as a detailed chapter on Jenkins Administration at the end of the book (Chapter 13, Maintaining
Jenkins). This chapter is just an introduction. Still, by the end of the chapter, you will also be keeping
tabs on test results, generating javadoc and publishing code coverage reports! We’ve got a lot of ground
to cover, so let’s get started!
2.2. Preparing Your Environment
There are two ways you can tackle this chapter. You can read through it without touching a keyboard,
just to get an overview of what Jenkins is about. Or you can get your hands dirty, and follow along on
your own machine.
If you do want to follow along at home, you may need to set up some software on your local machine.
Remember, the most basic function of any Continuous Integration tool is to monitor source code in
a version control system and to fetch and build the latest version of your source code whenever any
changes are committed. So you’ll need a version control system. In our case, we’ll be using Git1. The
central source code repository for our simple project is stored on GitHub2. Don’t worry about messing
up this repository with your own changes, though: you’ll be creating your own fork of the repository
that you can use as you wish. If you haven’t used Git and/or don’t have an account on GitHub yet,
don’t worry, we’ll walk through the basics, and the whole installation process is well documented on
the GitHub website. We’ll explain how to set it all up in great detail further on.
In this chapter, we’ll be using Jenkins to build a Java application using Maven. Maven is a widely-used
build tool in the Java world, with many powerful features such as declarative dependency management,
convention over configuration, and a large range of plugins. For our build, we will also be using recent
versions of the Java Development Kit (JDK) and Maven, but if you don’t have these installed on your
machine, don’t fret! As we will see, Jenkins will install them for you.
1 http://git-scm.com
2 https://github.com
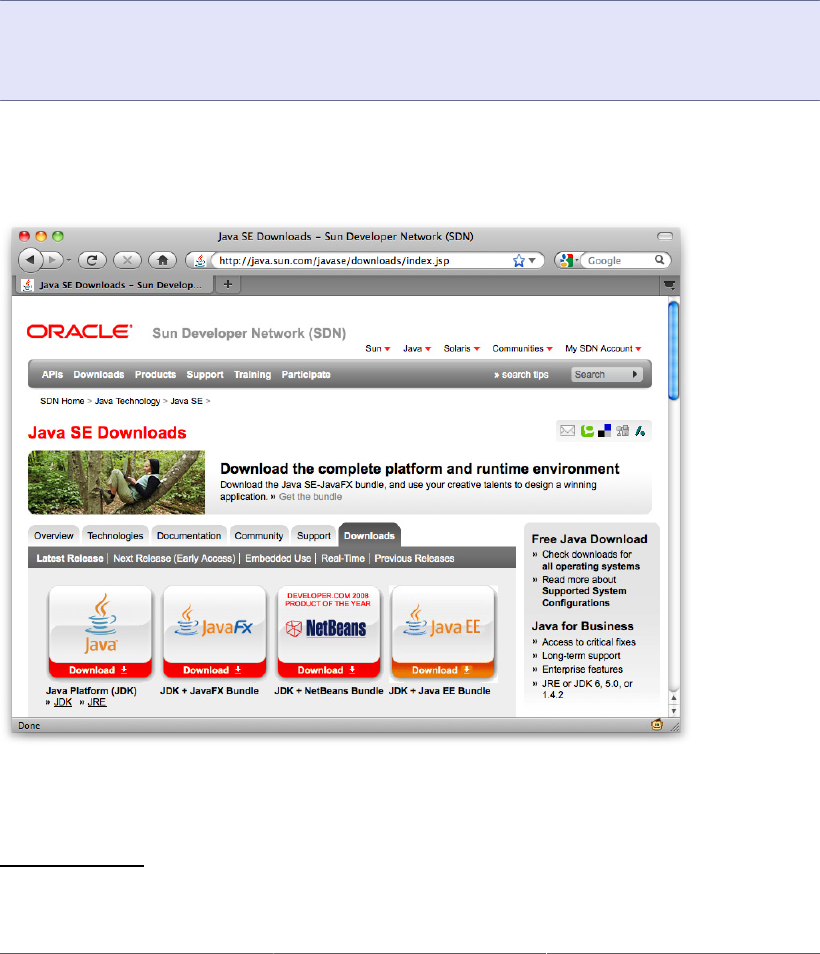
10
2.2.1. Installing Java
The first thing you will need to install on your machine is Java. Jenkins is a Java web application, so
you will need at least the Java Runtime Environment, or JRE to run it. For the examples in this chapter,
you will need a recent version of Java 6 (these examples were written with Java 6 update 17, and the
latest release at the time of writing was Java 6 update 19). If you are not sure, you can check this from
the command line (by opening a DOS console on Windows), and running java -version. If Java is
installed on your machine should get something like this:
$ java -version
java version "1.6.0_17"
Java(TM) SE Runtime Environment (build 1.6.0_17-b04-248-10M3025)
Java HotSpot(TM) 64-Bit Server VM (build 14.3-b01-101, mixed mode)
If you don’t have a version already installed, or if your version is an older one, download and install the
latest JRE installer from the Java website3, as shown in Figure 2.1, “Installing Java”.
Figure 2.1. Installing Java
3 http://java.sun.com/javase/downloads/index.jsp
11
2.2.2. Installing Git
Since we will be using Git, you will need to install and configure Git on your machine. If you are new
to Git, you might want to run through the basics on the Git Reference website4. And if you get lost, the
whole process is well documented on the GitHub help pages5.
First of all, you need to install Git on your machine. This involves downloading the appropriate installer
for your operating system from the Git website6. There are packaged installers for both Windows and
Mac OS X. If you are using Linux, you are in Git’s home ground: most Linux distributions. On Ubuntu
or some other Debian-based distribution, you could run something like:
$ sudo apt-get install git-core
On Fedora or another RPM-based distribution, you could use yum instead:
$ sudo yum install git-core
And, being Linux, you also have the option of installing the application from source. There are
instructions on how to do this on the Git website.
Once you are done, check that Git is installed and available by invoking it from the command line:
$ git --version
git version 1.7.1
2.2.3. Setting Up a GitHub Account
Next, if you don’t already have one, you will need to create a GitHub account. This is easy and (for our
purposes, at least) free of charge, and all the cool kids have one. Go to the GitHub signup page7 and
choose the “Create a free account” option. You will just need to provide a username, a password, and
your email address (see Figure 2.2, “Signing up for a GitHub account”).
4 http://gitref.org
5 http://help.github.com
6 http://git-scm.com
7 https://github.com/plans
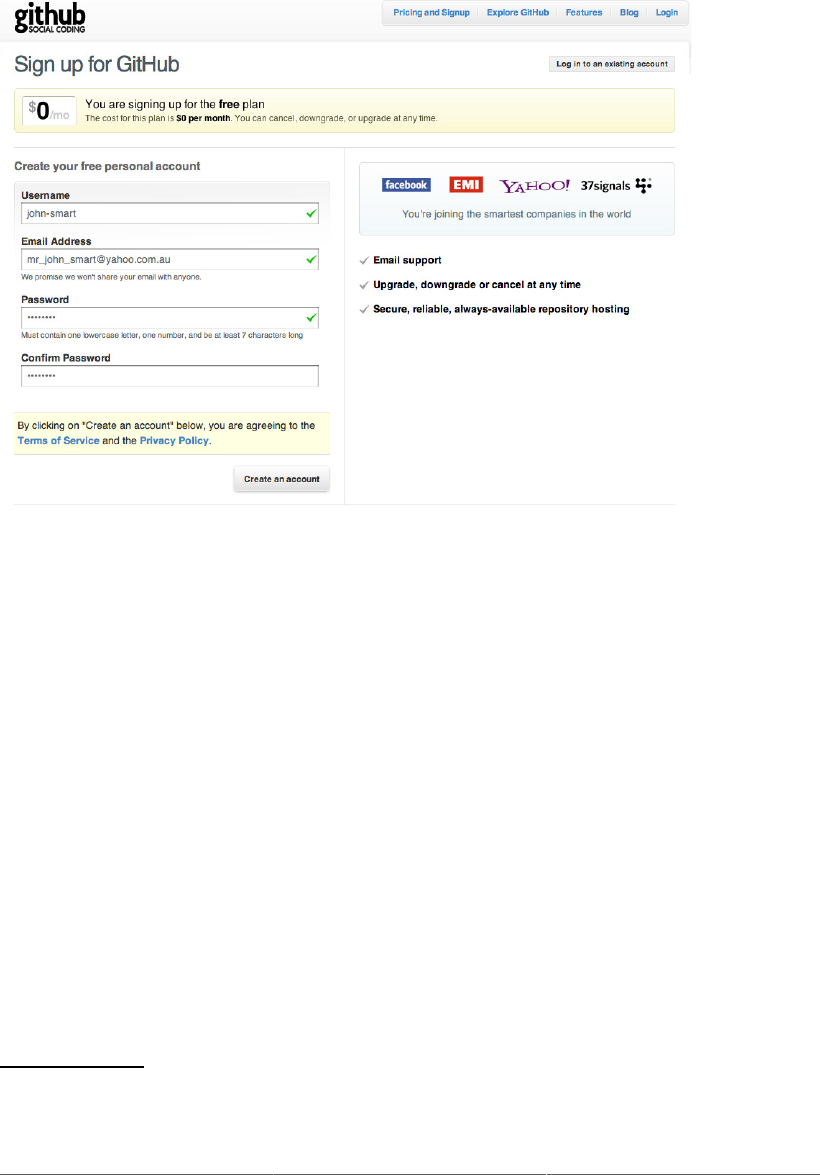
12
Figure 2.2. Signing up for a GitHub account
2.2.4. Configuring SSH Keys
GitHub uses SSH keys to establish a secure connection between your computer and the GitHub servers.
Setting these up is not hard, but involves a bit of work: fortunately there are clear and detailed instructions
for each operating system on the GitHub website8.
2.2.5. Forking the Sample Repository
As we mentioned earlier, all the sample code for this book is stored on GitHub, at the following URL:
https://github.com/wakaleo/game-of-life. This is a public repository, so you can freely view the source
code online and check out your own working copy. However, if you want to make changes, you will
need to create your own fork. A fork is a personal copy of a repository that you can use as you wish.
To create a fork, login to your GitHub account and navigate to the repository URL9. Then click on the
Fork button (see Figure 2.3, “Forking the sample code repository”). This will create your own personal
copy of the repository.
Once you have forked the repository, you should clone a local copy to make sure everything is set up
correctly. Go to the command line and run the following command (replacing <username> with your
own GitHub username):
8 http://help.github.com/set-up-git-redirect
9 https://github.com/wakaleo/game-of-life

13
$ git clone git@github.com:<username>/game-of-life.git
This will “clone” (or check out, in Subversion terms) a copy of the project onto your local drive:
git clone git@github.com:john-smart/game-of-life.git
Initialized empty Git repository in /Users/johnsmart/.../game-of-life/.git/
remote: Counting objects: 1783, done.
remote: Compressing objects: 100% (589/589), done.
remote: Total 1783 (delta 1116), reused 1783 (delta 1116)
Receiving objects: 100% (1783/1783), 14.83 MiB | 119 KiB/s, done.
Resolving deltas: 100% (1116/1116), done.
You should now have a local copy of the project that you can build and execute. We will be using this
project later on to trigger changes in the repository.
Figure 2.3. Forking the sample code repository

14
2.3. Starting Up Jenkins
There are several ways to run Jenkins on your machine. One of the easiest ways to run Jenkins for the
first time is to use Java Web Start. Java Web Start is a technology that lets you start up a Java application
on your local machine via a URL on a web page—it comes bundled with the Java JRE. In our case,
this will start a Jenkins server running on your machine, and let you experiment with it as if it were
installed locally. All you need for this to work is a recent (Java 6 or later) version of the Java Runtime
Environment (JRE), which we installed in the previous section.
For convenience, there is a link to the Jenkins Java Web Start instance on the book resources page10.
Here you will find a large orange Launch button in the Book Resources section (see Figure 2.4, “Running
Jenkins using Java Web Start from the book’s website”). You can also find this link on the Meet Jenkins
page on the Jenkins website11, where, if you scroll down far enough, you should find a Test Drive section
with an identical Launch button.
Figure 2.4. Running Jenkins using Java Web Start from the book’s website
10 http://www.wakaleo.com/books/jenkins-the-definitive-guide
11 http://wiki.jenkins-ci.org/display/JENKINS/Meet+Jenkins
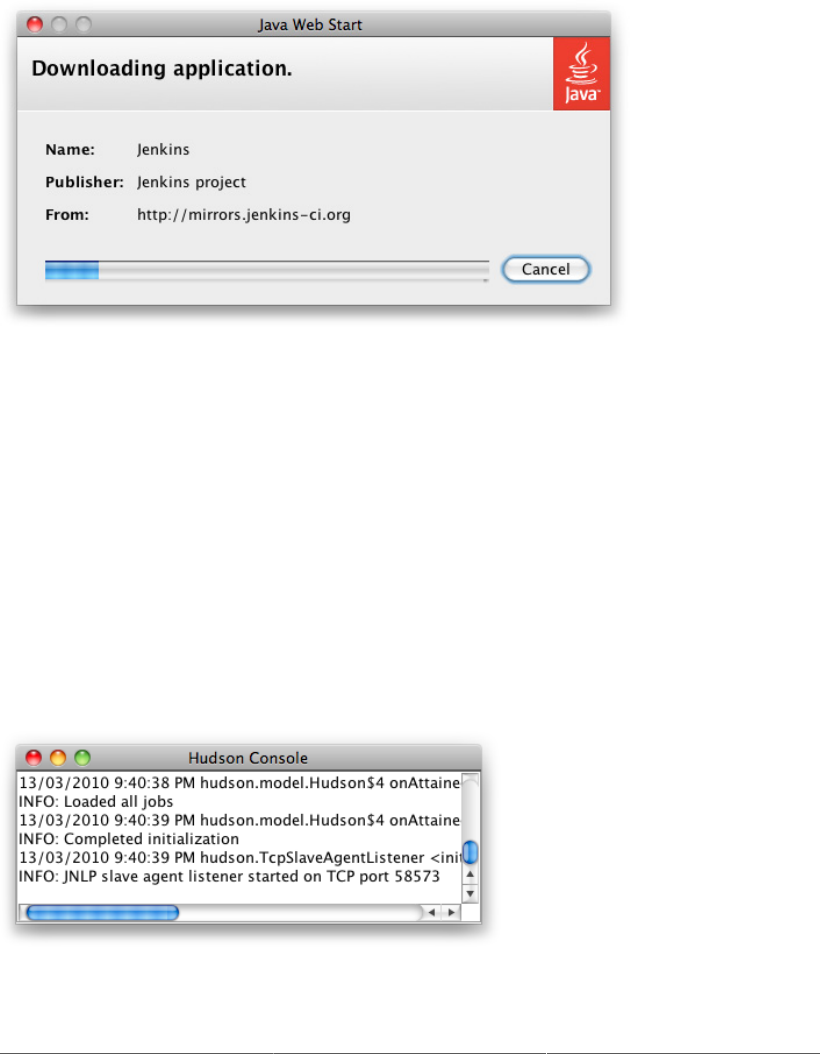
15
Java Web Start seems to work best on Firefox. When you click on the Launch button on either of these
sites in Firefox, the browser will ask if you want to open a file called jenkins.jnlp using Java Web
Start. Click on OK—this will download Jenkins and start it up on your machine (see Figure 2.5, “Java
Web Start will download and run the latest version of Jenkins”).
Figure 2.5. Java Web Start will download and run the latest version of Jenkins
In other browsers, clicking on this button may simply download the JNLP file. In Internet Explorer, you
may even need to right click on the link and select “Save Target As” to save the JNLP file, and then run
it from Windows Explorer. However, in both of these cases, when you open the JNLP file, Java Web
Start will download and start Jenkins.
Java Web Start will only need to download a particular version of Jenkins once. From then on, when
you click on the “Launch” button again, Java Web Start will use the copy of Jenkins it has already
downloaded (that is, until the next version comes out). Ignore any messages your operating system or
anti-virus software may bring up—it is perfectly safe to run Jenkins on your local machine.
Once it has finished downloading, it will start up Jenkins on your machine. You will be able to see it
running in a small window called “Jenkins Console” (see Figure 2.6, “Java Web Start running Jenkins”).
To stop Jenkins at any time, just close this window.
Figure 2.6. Java Web Start running Jenkins

16
There are also installers available for the principal operating systems available on the Jenkins website12.
Or, if you are an experienced Java user versed in the ways of WAR files, you may prefer to simply
download the latest version of Jenkins and run it from the command line. Jenkins comes in the form of
an executable WAR file—you can download the most recent version from the Jenkins website home
page13. For convenience, there is also a link to the latest version of Jenkins in the Resources section
of this book’s website14.
Once downloaded, you can start Jenkins from the command line as shown here:
$ java -jar jenkins.war
Whether you have started Jenkins using Java Web Start or from the command line, Jenkins should now
be running on your local machine. By default, Jenkins will be running on port 8080, so you can access
Jenkins in your web browser on http://localhost:8080.
Alternatively, if you are familiar with Java application servers such as Tomcat, you can simply deploy
the Jenkins WAR file to your application server—with Tomcat, for example, you could simply place the
jenkins.war file in Tomcat’s webapps directory. If you are running Jenkins on an application server,
the URL that you use to access Jenkins will be slightly different. On a default Tomcat installation, for
example, you can access Jenkins in your web browser on http://localhost:8080/jenkins.
When you open Jenkins in your browser, you should see a screen like the one shown in Figure 2.7, “The
Jenkins start page”. You are now ready to take your first steps with Jenkins!
Figure 2.7. The Jenkins start page
12 http://jenkins-ci.org
13 http://http://jenkins-ci.org
14 http://www.wakaleo.com/books/jenkins-the-definitive-guide
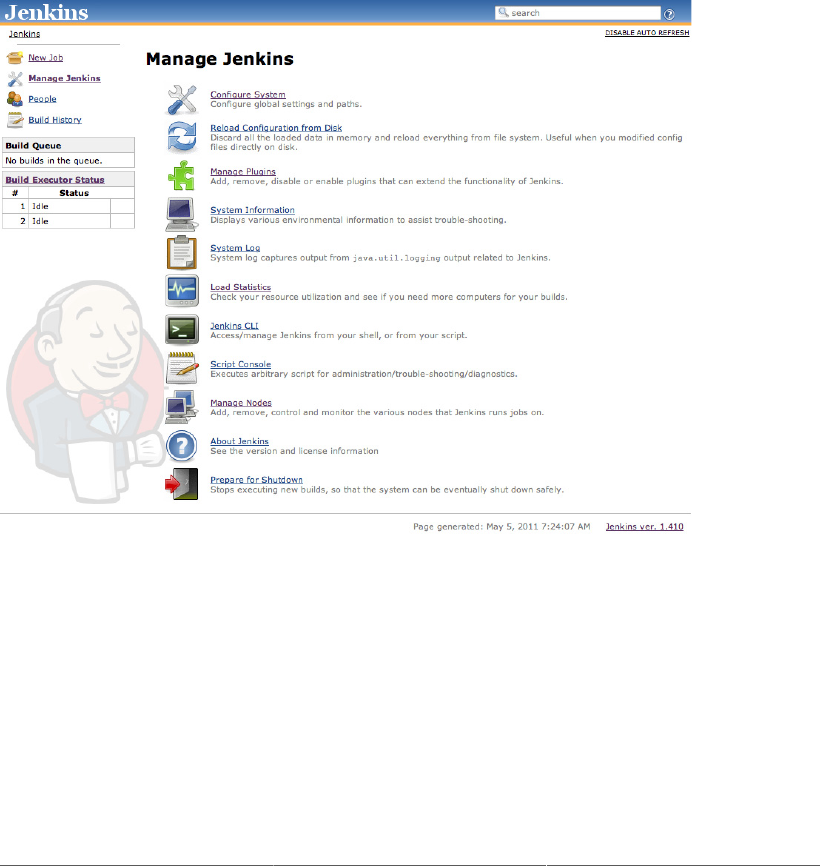
17
2.4. Configuring the Tools
Before we get started, we do need to do a little configuration. More precisely, we need to tell Jenkins
about the build tools and JDK versions we will be using for our builds.
Click on the Manage Jenkins link on the home page (see Figure 2.7, “The Jenkins start page”). This will
take you to the Manage Jenkins page, the central one-stop-shop for all your Jenkins configuration. From
this screen, you can configure your Jenkins server, install and upgrade plugins, keep track of system
load, manage distributed build servers, and more! For now, however, we’ll keep it simple. Just click on
the Configuring System link at the top of the list (see Figure 2.8, “The Manage Jenkins screen”).
Figure 2.8. The Manage Jenkins screen
This will take you to Jenkins’s main configuration screen (see Figure 2.9, “The Configure Jenkins
screen”). From here you can configure everything from security configuration and build tools to email
servers, version control systems and integration with third-party software. The screen contains a lot of
information, but most of the fields contain sensible default values, so you can safely ignore them for now.
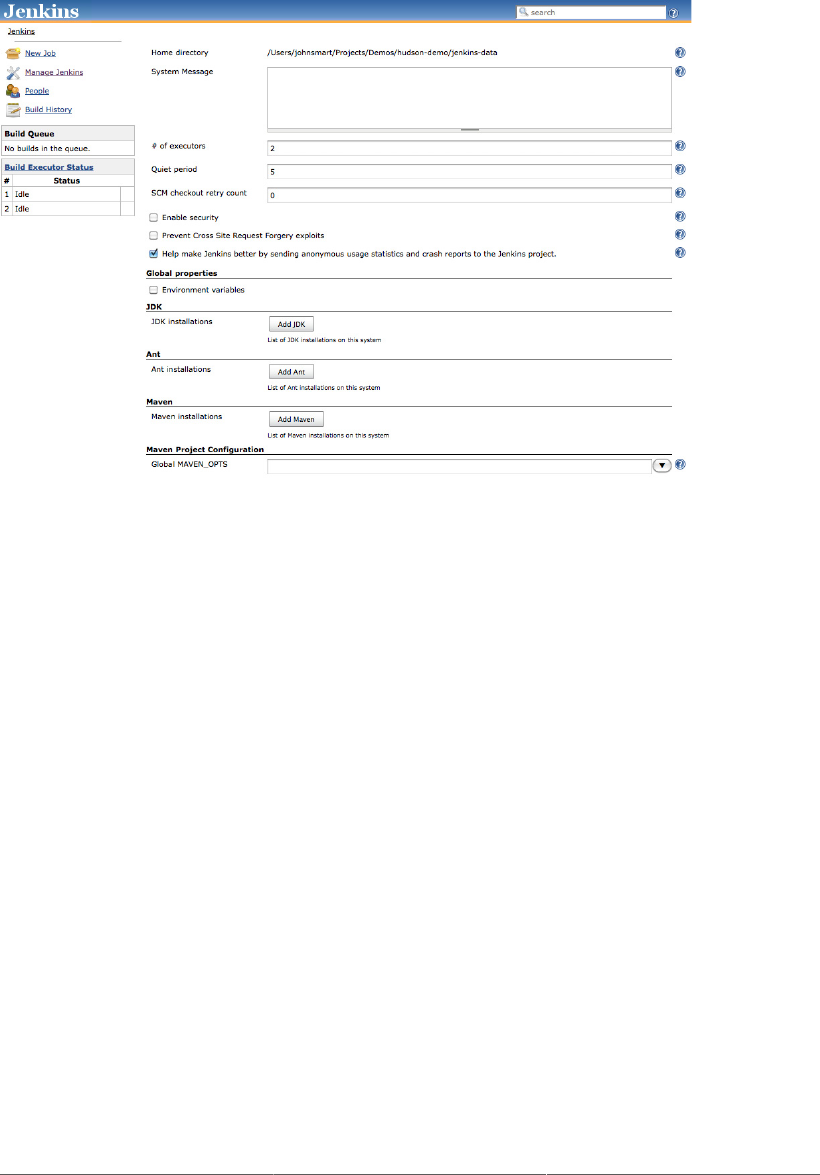
18
Figure 2.9. The Configure Jenkins screen
For now, you will just need to configure the tools required to build our sample project. The application
we will be building is a Java application, built using Maven. So in this case, all we need to do is to set
up a recent JDK and Maven installation.
However before we start, take a look at the little blue question mark icons lined to the right of the screen.
These are Jenkins’s contextual help buttons. If you are curious about a particular field, click on the help
icon next to it and Jenkins will display a very detailed description about what it is and how it works.
2.4.1. Configuring Your Maven Setup
Our sample project uses Maven, so we will need to install and configure Maven first. Jenkins provides
great out-of-the-box support for Maven. Scroll down until you reach the Maven section in the Configure
System screen (see Figure 2.10, “Configuring a Maven installation”).
Jenkins provides several options when it comes to configuring Maven. If you already have Maven
installed on your machine, you can simply provide the path in the MAVEN_HOME field. Alternatively,
you can install a Maven distribution by extracting a zip file located in a shared directory, or execute a
home-rolled installation script. Or you can let Jenkins do all the hard work and download Maven for you.
To choose this option, just tick the Install automatically checkbox. Jenkins will download and install
Maven from the Apache website the first time a build job needs it. Just choose the Maven version you
want to install and Jenkins will do the rest. You will also need to give a name for your Maven version
(imaginatively called “Maven 2.2.1” in the example), so that you can refer to it in your build jobs.
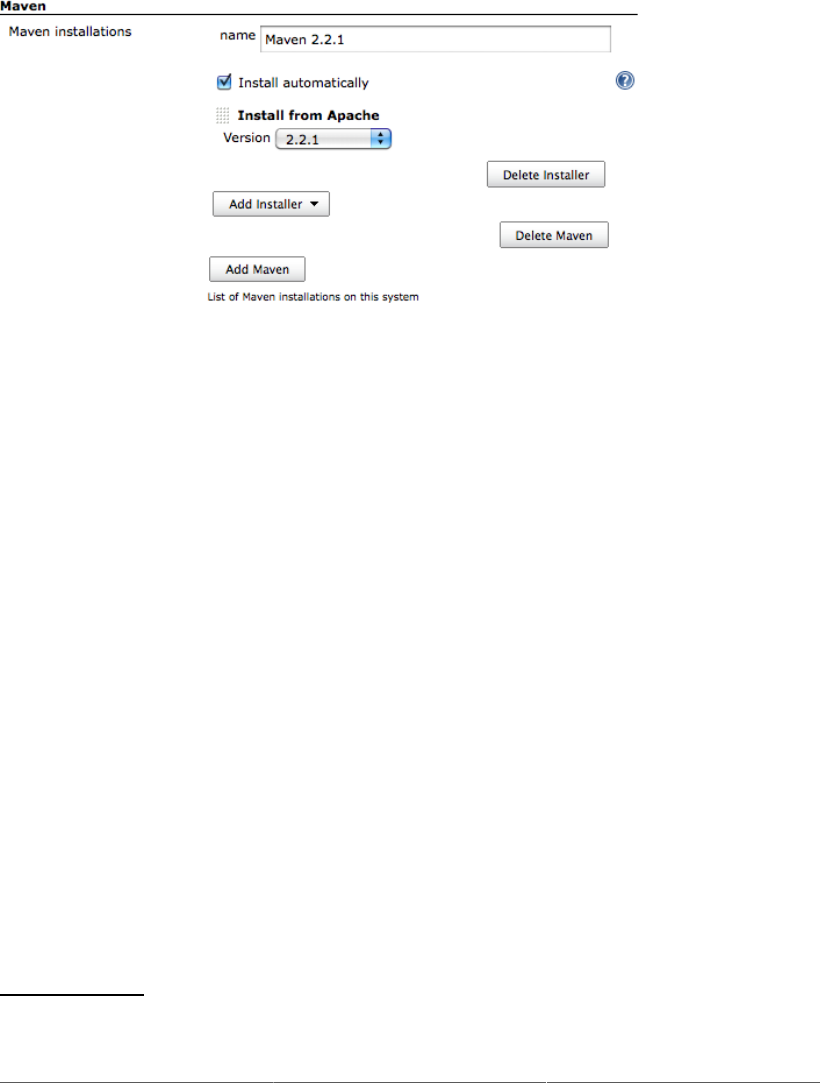
19
For this to work, you need to have an Internet connection. If you are behind a proxy, you’ll need to
provide your proxy information—we discuss how to set this up in Section 4.9, “Configuring a Proxy”.
Figure 2.10. Configuring a Maven installation
One of the nice things about the Jenkins Maven installation process is how well it works with remote
build agents. Later on in the book, we’ll see how Jenkins can also run builds on remote build servers.
You can define a standard way of installing Maven for all of your build servers (downloading from the
Internet, unzipping a distribution bundle on a shared server, etc.)—all of these options will work when
you add a new remote build agent or set up a new build server using this Jenkins configuration.
2.4.2. Configuring the JDK
Once you have configured your Maven installation, you will also need to configure a JDK installation
(see Figure 2.11, “Configuring a JDK installation”). Again, if you have a Java JDK (as opposed to a Java
Runtime Environment—the JDK contains extra development tools such as the Java compiler) already
installed on your workstation, you can simply provide the path to your JDK in the JAVA_HOME field.
Otherwise, you can ask Jenkins to download the JDK from the Oracle website15 the first time a build
job requires it. This is similar to the automatic Maven installation feature—just pick the JDK version
you need and Jenkins will take care of all the logistics. However, for licensing reasons, you will also
need to tick a checkbox to indicate that you agree with the Java SDK License Agreement.
15 http://www.oracle.com/technetwork/java/index.html
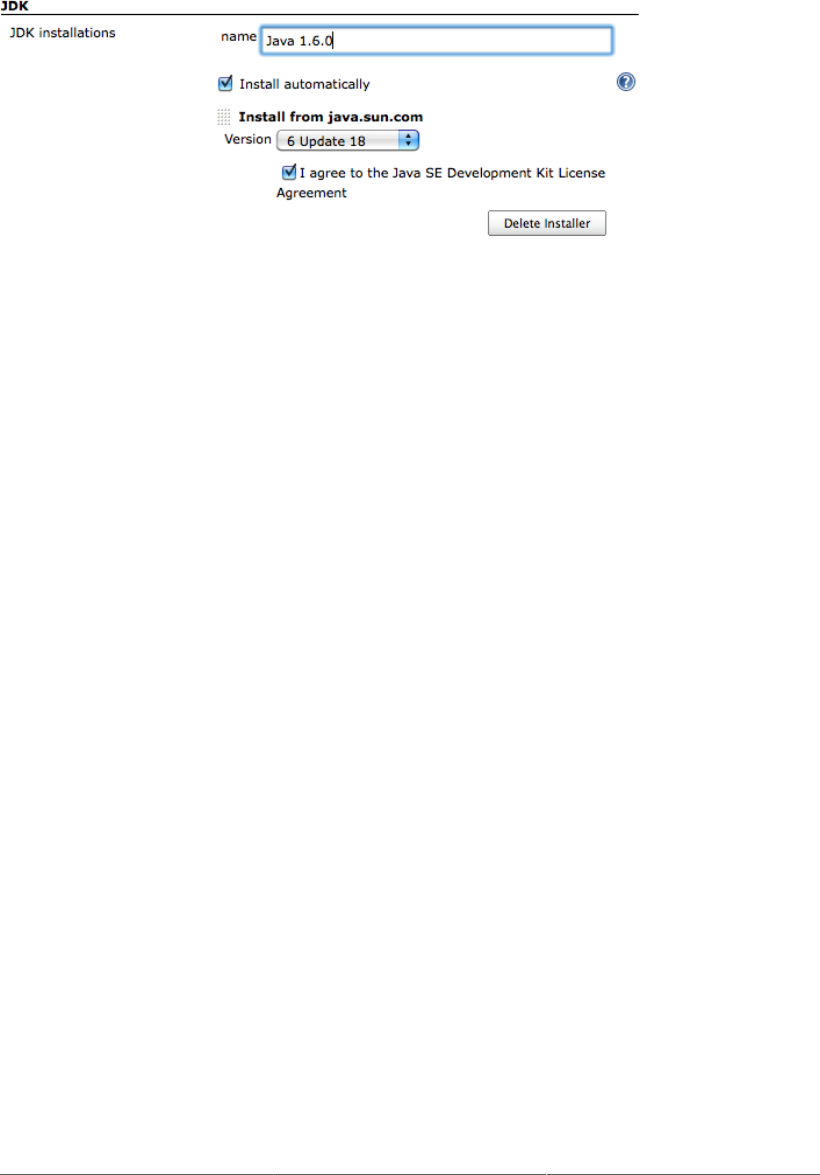
20
Figure 2.11. Configuring a JDK installation
Now go to the bottom of the screen and click on the Save button.
2.4.3. Notification
Another important aspect you would typically set up is notification. When a Jenkins build breaks, and
when it works again, it can send out email messages to the team to spread the word. Using plugins, you
can also get it to send instant messages or SMS messages, post entries on Twitter, or get people notified
in a few other ways. It all depends on what works best for your organizational culture. Email notification
is easy enough to set up if you know your local SMTP server address—just provide this value in the
Email Notification section towards the bottom of the main configuration page. However, to keep things
simple, we’re not going to worry about notifications just yet.
2.4.4. Setting Up Git
The last thing we need to configure for this demo is to get Jenkins working with Git. Jenkins comes with
support for Subversion and CVS out of the box, but you will need to install the Jenkins Git plugin to be
able to complete the rest of this tutorial. Don’t worry, the process is pretty simple. First of all, click on the
Manage Jenkins link to the left of the screen to go back to the main configuration screen (see Figure 2.8,
“The Manage Jenkins screen”). Then click on Manage Plugins. This will open the plugin configuration
screen, which is where you manage the extra features you want to install on your Jenkins server. You
should see four tabs: Updates, Available, Installed, and Advanced (see Figure 2.12, “Managing plugins
in Jenkins”).
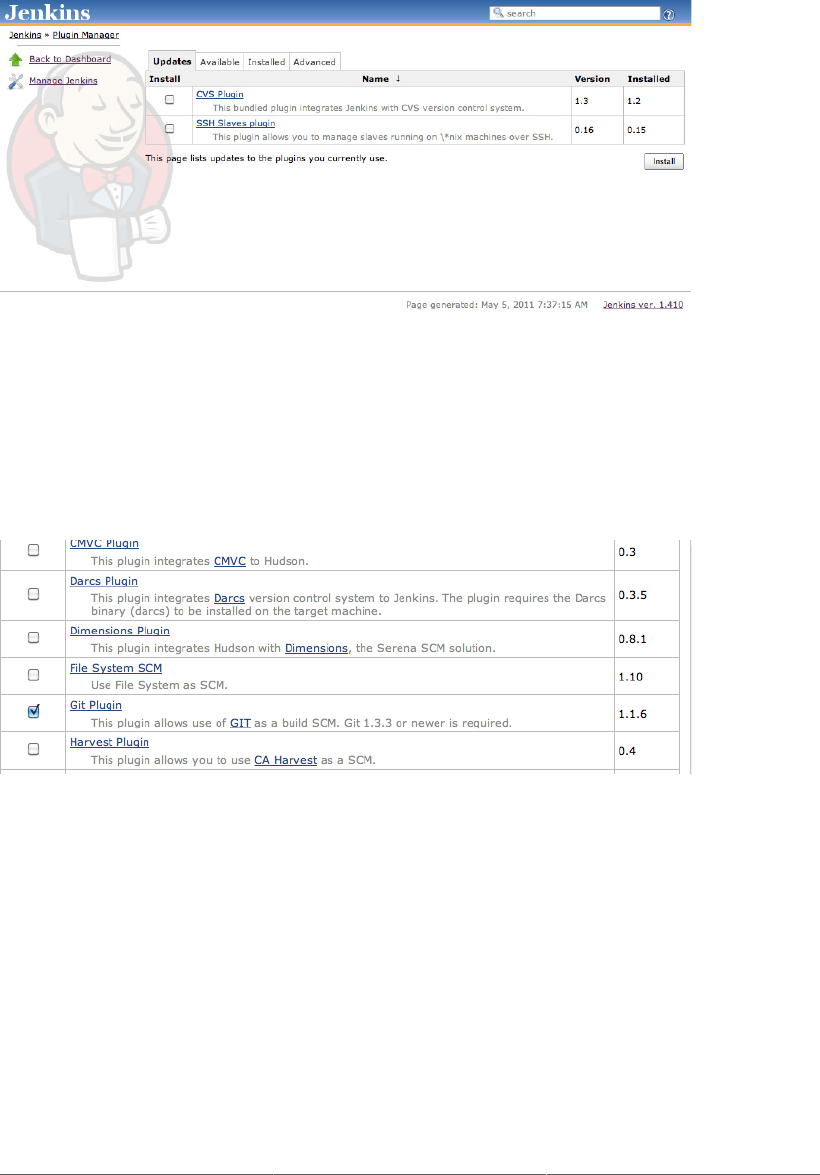
21
Figure 2.12. Managing plugins in Jenkins
For now, just click on the Available tab. Here you will see a very long list of available plugins. Find
the Git Plugin entry in this list and tick the corresponding checkbox (see Figure 2.13, “Installing the Git
plugin”), and then scroll down to the bottom of the screen and click on Install. This will download and
install the Jenkins Git plugin into your local Jenkins instance.
Figure 2.13. Installing the Git plugin
Once it is done, you will need to restart Jenkins for the changes to take effect. To do this, you can simply
click on the “Restart Jenkins when no jobs are running” button displayed on the installation screen, or
alternatively shut down and restart Jenkins by hand.
That is all we need to configure at this stage. You are now ready to set up your first Jenkins build job!
2.5. Your First Jenkins Build Job
Build jobs are at the heart of the Jenkins build process. Simply put, you can think of a Jenkins build job
as a particular task or step in your build process. This may involve simply compiling your source code

22
and running your unit tests. Or you might want a build job to do other related tasks, such as running your
integration tests, measuring code coverage or code quality metrics, generating technical documentation,
or even deploying your application to a web server. A real project usually requires many separate but
related build jobs.
Our sample application is a simple Java implementation of John Conway’s “Game of Life.”16 The Game
of Life is a mathematical game which takes place on a two dimensional grid of cells, which we will
refer to as the Universe. Each cell can be either alive or dead. Cells interact with their direct neighbors
to determine whether they will live or die in the next generation of cells. For each new generation of
cells, the following rules are applied:
• Any live cell with fewer than two live neighbors dies of underpopulation.
• Any live cell with more than three live neighbors dies of overcrowding.
• Any live cell with two or three live neighbors lives on to the next generation.
• Any dead cell with exactly three live neighbors becomes a live cell.
Our application is a Java module, built using Maven, that implements the core business logic of the
Game of Life. We’ll worry about the user interfaces later on. For now, let’s see how we can automate
this build in Jenkins. If you are not familiar with Maven, or prefer Ant or another build framework—
don’t worry! The examples don’t require much knowledge of Maven, and we’ll be looking at plenty of
examples of using other build tools later on in the book.
For our first build job, we will keep it simple: we are just going to compile and test our sample
application. Click on the New Job link. You should get to a screen similar to Figure 2.14, “Setting up
your first build job in Jenkins”. Jenkins supports several different types of build jobs. The two most
commonly-used are the freestyle builds and the Maven 2/3 builds. The freestyle projects allow you to
configure just about any sort of build job: they are highly flexible and very configurable. The Maven
2/3 builds understand the Maven project structure, and can use this to let you set up Maven build jobs
with less effort and a few extra features. There are also plugins that provide support for other types of
build jobs. Nevertheless, although our project does use Maven, we are going to use a freestyle build job,
just to keep things simple and general to start with. So choose “Build a freestyle software project”, as
shown in Figure 2.14, “Setting up your first build job in Jenkins”.
You’ll also need to give your build job a sensible name. In this case, call it gameoflife-default, as it will
be the default CI build for our Game of Life project.
16See http://en.wikipedia.org/wiki/Conway%27s_Game_of_Life.

23
Figure 2.14. Setting up your first build job in Jenkins
Once you click on OK, Jenkins will display the project configuration screen (see Figure 2.15, “Telling
Jenkins where to find the source code”).
In a nutshell, Jenkins works by checking out the source code of your project and building it in its own
workspace. So the next thing you need to do is to tell Jenkins where it can find the source code for your
project. You do this in the Source Code Management section (see Figure 2.15, “Telling Jenkins where
to find the source code”). Jenkins provides support for CVS and Subversion out of the box, and many
others such as Git, Mercurial, ClearCase, Perforce and many more via plugins.
For this project, we will be getting the source code from the GitHub repository we set up earlier.
On the Jenkins screen, choose “Git” and enter the Repository URL we defined in Section 2.2.5,
“Forking the Sample Repository” (see Figure 2.15, “Telling Jenkins where to find the source code”).
Make sure this is the URL of your fork, and not of the original repository: it should have the form
git@github.com:<username>/game-of-life.git, where <username> is the username for your own
GitHub account. You can leave all of the other options up until here with their default values.
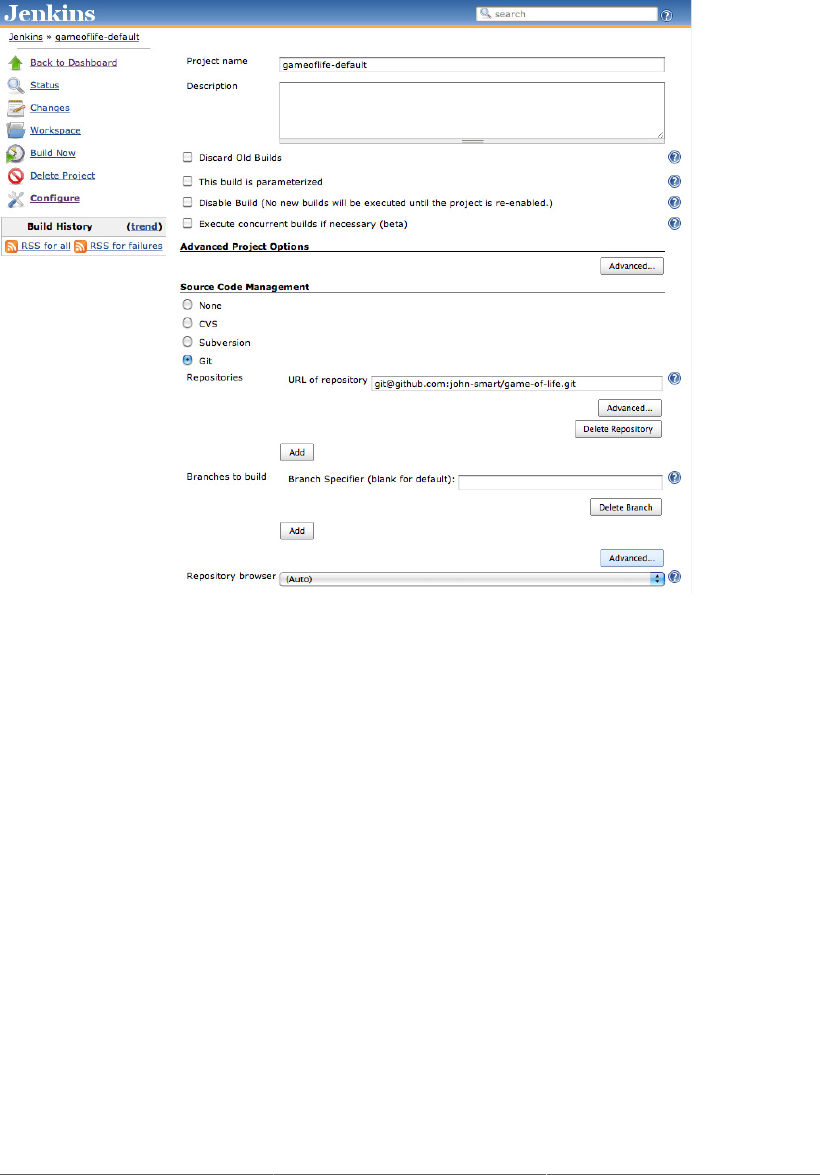
24
Figure 2.15. Telling Jenkins where to find the source code
Once we have told Jenkins where to find the source code for our application, we need to tell it how often
it should check for updates. We want Jenkins to monitor the repository and start a build whenever any
changes have been committed. This is a common way to set up a build job in a Continuous Integration
context, as it provides fast feedback if the build fails. Other approaches include building on regular
intervals (for example, once a day), requiring a user to kick of the build manually, or even triggering a
build remotely using a “post-commit” hook in your SCM.
We configure all of this in the Build Triggers section (see Figure 2.16, “Scheduling the build jobs”).
Pick the Poll SCM option and enter “* * * * *” (that’s five asterisks separated by spaces) in the Schedule
box. Jenkins schedules are configured using the cron syntax, well-known in the Unix world. The cron
syntax consists of five fields separated by white space, indicating respectively the minute (0–59), hour
(0–23), day of the month (1–31), month (1–12) and the day of the week (0–7, with 0 and 7 being Sunday).
The star is a wildcard character which accepts any valid value for that field. So five stars basically means
“every minute of every hour of every day.” You can also provide ranges of values: “* 9-17 * * *” would
mean “every minute of every day, between 9am and 5pm.” You can also space out the schedule using
intervals: “*/5 * * * *” means “every 5 minutes,” for example. Finally, there are some other convenient
short-hands, such as “@daily” and “@hourly”.
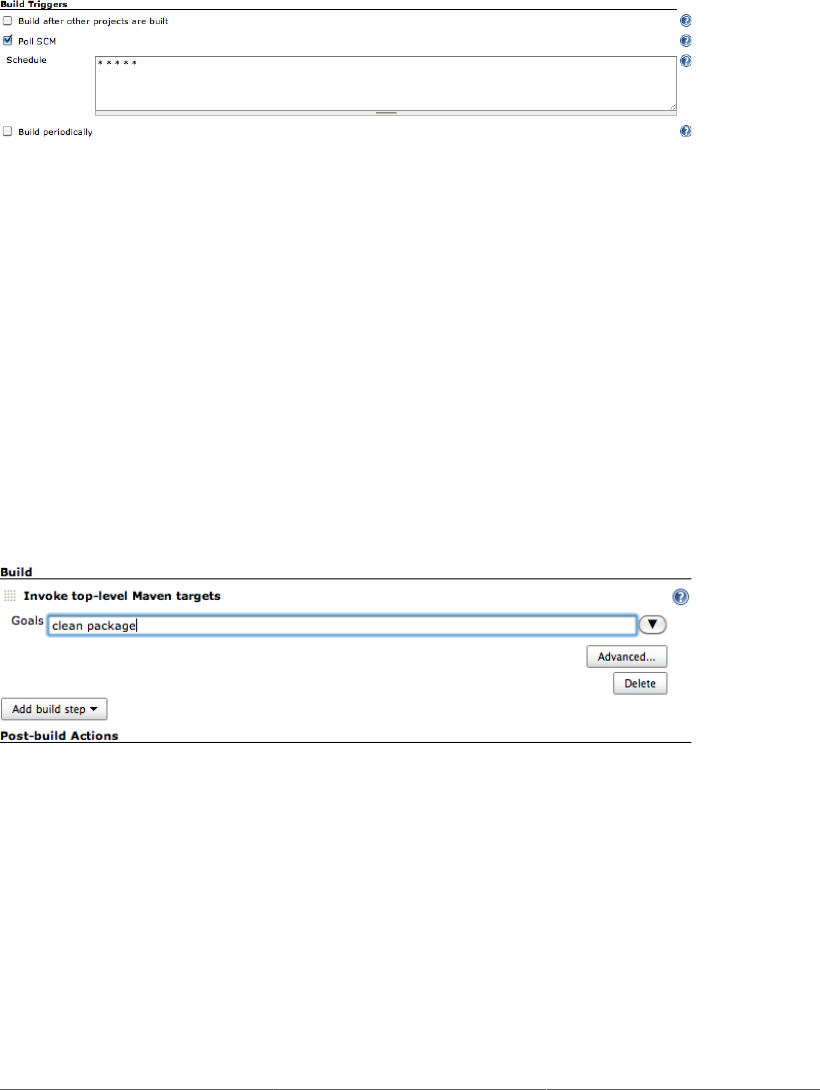
25
Don’t worry if your Unix skills are a little rusty—if you click on the blue question mark icon on the side
of the schedule box, Jenkins will bring up a very complete refresher.
Figure 2.16. Scheduling the build jobs
The next step is to configure the actual build itself. In a freestyle build job, you can break down your
build job into a number of build steps. This makes it easier to organize builds in clean, separate stages.
For example, a build might run a suite of functional tests in one step, and then tag the build in a second
step if all of the functional tests succeed. In technical terms, a build step might involve invoking an
Ant task or a Maven target, or running a shell script. There are also Jenkins plugins that let you use
additional types of build steps: Gant, Grails, Gradle, Rake, Ruby, MSBuild and many other build tools
are all supported.
For now, we just want to run a simple Maven build. Scroll down to the Build section and click on the
“Add build step” and choose “Invoke top-level Maven targets” (see Figure 2.17, “Adding a build step”).
Then enter “clean package” in the Goals field. If you are not familiar with Maven, this will delete any
previous build artifacts, compile our code, run our unit tests, and generate a JAR file.
Figure 2.17. Adding a build step
By default, this build job will fail if the code does not compile or if any of the unit tests fail. That’s
the most fundamental thing that you’d expect of any build server. But Jenkins also does a great job of
helping you display your test results and test result trends.
The de facto standard for test reporting in the Java world is an XML format used by JUnit. This format is
also used by many other Java testing tools, such as TestNG, Spock and Easyb. Jenkins understands this
format, so if your build produces JUnit XML test results, Jenkins can generate nice graphical test reports
and statistics on test results over time, and also let you view the details of any test failures. Jenkins also
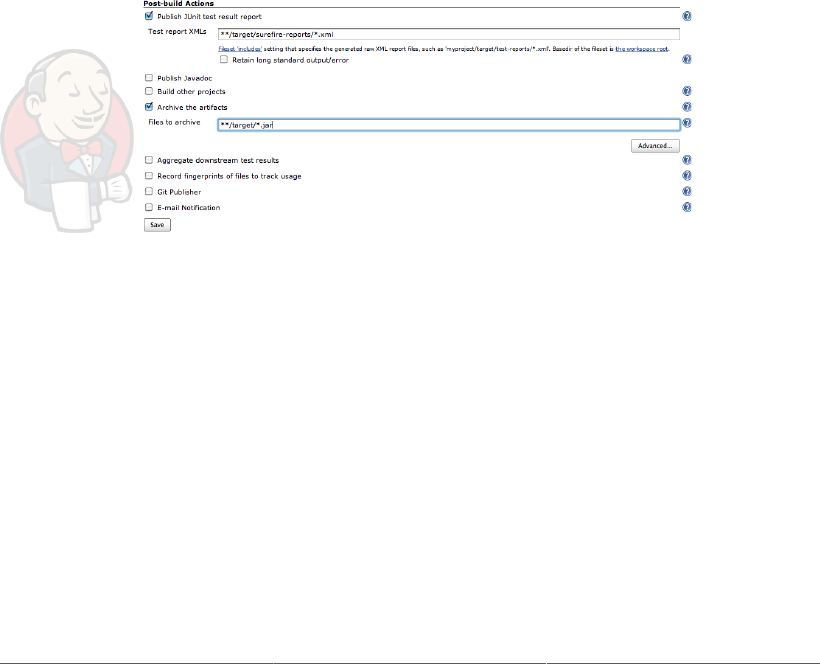
26
keeps track of how long your tests take to run, both globally, and per test—this can come in handy if
you need to track down performance issues.
So the next thing we need to do is to get Jenkins to keep tabs on our unit tests.
Go to the Post-build Actions section (see Figure 2.18, “Configuring JUnit test reports and artifact
archiving”) and tick “Publish JUnit test result report” checkbox. When Maven runs unit tests in a project,
it automatically generates the XML test reports in a directory called surefire-reports in the target
directory. So enter “**/target/surefire-reports/*.xml” in the “Test report XMLs” field. The two asterisks
at the start of the path (“**”) are a best practice to make the configuration a bit more robust: they allow
Jenkins to find the target directory no matter how we have configured Jenkins to check out the source
code.
Another thing you often want to do is to archive your build results. Jenkins can store a copy of the binary
artifacts generated by your build, allowing you to download the binaries produced by a build directly
from the build results page. It will also post the latest binary artifacts on the project home page, which is
a convenient way to distribute the latest and greatest version of your application. You can activate this
option by ticking the “Archive the artifacts” checkbox and indicating which binary artifacts you want
Jenkins to archive. In Figure 2.18, “Configuring JUnit test reports and artifact archiving”, for example,
we have configured Jenkins to store all of the JAR files generated by this build job.
Figure 2.18. Configuring JUnit test reports and artifact archiving
Now we’re done—just click on the Save button at the bottom of the screen. Our build job should now
be ready to run. So let’s see it in action!
2.6. Your First Build Job in Action
Once you save your new build job, Jenkins will display the home page for this job (see Figure 2.19,
“Your first build job running”). This is where Jenkins displays details about the latest build results and
the build history.
If you wait a minute or so, the build should kick off automatically—you can see the stripy progress bar
in the Build History section in the bottom left hand corner of Figure 2.19, “Your first build job running”.
Or, if you are impatient, you can also trigger the build manually using the Build Now button.
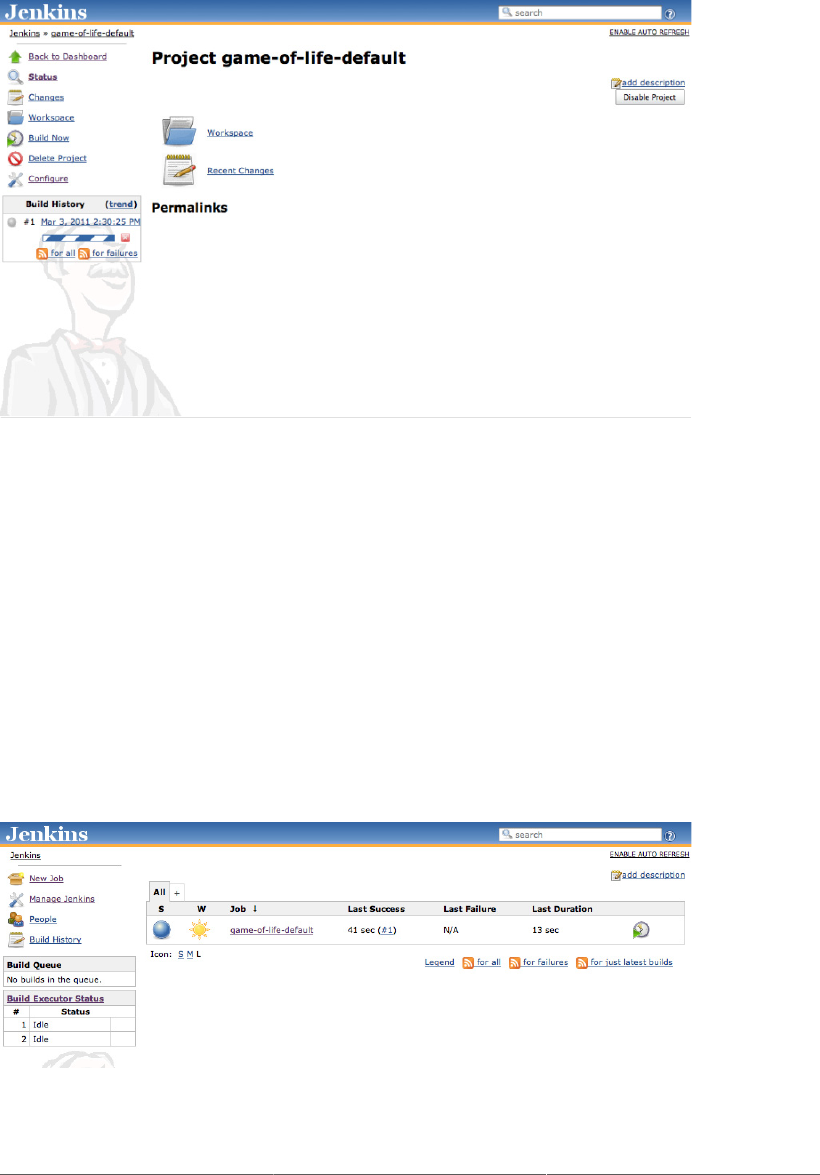
27
Figure 2.19. Your first build job running
The build will also now figure proudly on your Jenkins server’s home page (see Figure 2.20, “The
Jenkins dashboard”). This page shows a summary of all of your build jobs, including the current build
status and general state of heath of each of your builds. It tells you when each build ran successfully for
the last time, and when it last failed, and also the result of the last build.
Once of Jenkins’s specialities is the way it lets you get an idea of build behavior over time. For example,
Jenkins uses a weather metaphor to help give you an idea of the stability of your builds. Essentially,
the more your builds fail, the worse the weather gets. This helps you get an idea of whether a particular
broken build is an isolated event, or if the build is breaking on a regular basis, in which case it might
need some special attention.
You can also manually trigger a build job here, using the build schedule button (that’s the one that looks
a bit like a green play button on top of a clock).
Figure 2.20. The Jenkins dashboard

28
When the build finishes, the ball in the Build History box becomes solid blue. This means the build was
a success. Build failures are generally indicated by a red ball. For some types of project, you can also
distinguish between a build error (such as a compiler error), indicated by a red ball, and other sorts of
build failures, such as unit test failures or insufficient code coverage, which are indicated by a yellow
ball. There are also some other details about the latest test results, when the last build was run, and so on.
But before we look at the details, let’s get back to the core business model of a Continuous Integration
server—kicking off builds when someone changes the code!
We are going to commit a code change to GitHub and see what happens, using the source code we
checked out in Section 2.2.5, “Forking the Sample Repository”. We now have Jenkins configured to
monitor our GitHub fork, so if we make any changes, Jenkins should be able to pick them up.
So let’s make a change. The idea is to introduce a code change that will cause the unit tests to fail. If
your Java is a bit rusty, don’t worry, you won’t need to know any Java to be able to break the build—
just follow the instructions!
Now in normal development, you would first modify the unit test that describes this behaviour. Then
you would verify that the test fails with the existing code, and implement the code to ensure that the test
passes. Then you would commit your changes to your version control system, allowing Jenkins to build
them. However this would be a poor demonstration of how Jenkins handles unit test failures. So in this
example, we will, against all best practices, simply modify the application code directly.
First of all, open the Cell.java file, which you will find in the gameoflife-core/src/main/java/
com/wakaleo/gameoflife/domain directory. Open this file in your favorite text editor. You should
see something like this:
package com.wakaleo.gameoflife.domain;
public enum Cell {
LIVE_CELL("*"), DEAD_CELL(".");
private String symbol;
private Cell(String symbol) {
this.symbol = symbol;
}
@Override
public String toString() {
return symbol;
}
static Cell fromSymbol(String symbol) {
Cell cellRepresentedBySymbol = null;
for (Cell cell : Cell.values()) {
if (cell.symbol.equals(symbol)) {
cellRepresentedBySymbol = cell;
break;
}

29
}
return cellRepresentedBySymbol;
}
public String getSymbol() {
return symbol;
}
}
The application can print the state of the grid as a text array. Currently, the application prints our live
cells as an asterisk (*), and dead cells appear as a minus character (–). So a five-by-five grid containing
a single living cell in the center would look like this:
-----
--*--
-----
Now users have asked for a change to the application—they want pluses (+) instead of stars! So we are
going to make a slight change to the Cell class method, and rewrite it as follows (the modifications
are in bold):
package com.wakaleo.gameoflife.domain;
public enum Cell {
LIVE_CELL("+"), DEAD_CELL(".");
private String symbol;
private Cell(String symbol) {
this.symbol = symbol;
}
@Override
public String toString() {
return symbol;
}
static Cell fromSymbol(String symbol) {
Cell cellRepresentedBySymbol = null;
for (Cell cell : Cell.values()) {
if (cell.symbol.equals(symbol)) {
cellRepresentedBySymbol = cell;
break;
}
}
return cellRepresentedBySymbol;
}
public String getSymbol() {
return symbol;
}
}
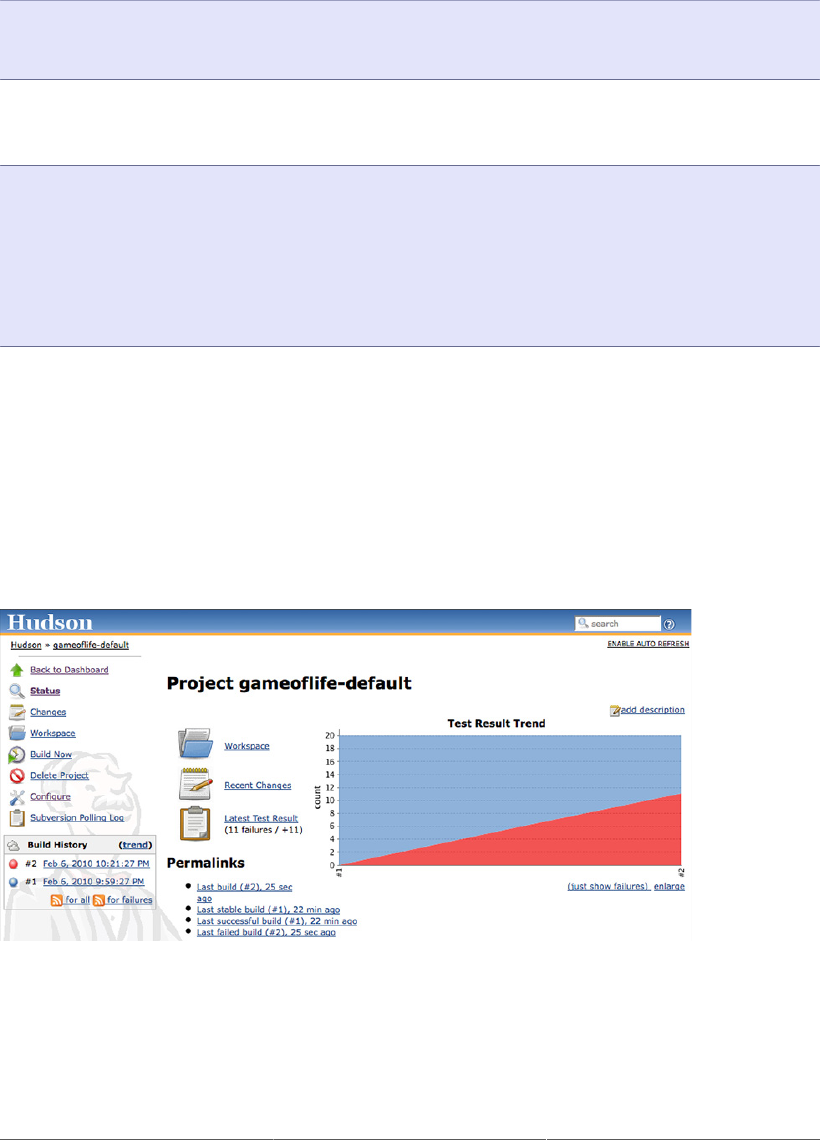
30
Save this change, and then commit them to the local Git repository by running git commit:
$ git commit -a -m "Changes stars to pluses"
[master 61ce946] Changes stars to pluses
1 files changed, 1 insertions(+), 1 deletions(-)
This will commit the changes locally, but since Git is a distributed repository, you now have to push
these changes through to your fork on GitHub. You do this by running git push:
$ git push
Counting objects: 21, done.
Delta compression using up to 4 threads.
Compressing objects: 100% (7/7), done.
Writing objects: 100% (11/11), 754 bytes, done.
Total 11 (delta 4), reused 0 (delta 0)
To git@github.com:john-smart/game-of-life.git
7882d5c..61ce946 master -> master
Now go back to the Jenkins web page. After a minute or so, a new build should kick off, and fail. In fact,
there are several other places which are affected by this change, and the regression tests related to these
features are now failing. On the build job home page, you will see a second build in the build history with
an ominous red ball (see Figure 2.21, “A failed build”)—this tells you that the latest build has failed.
You might also notice some clouds next to the Build History title—this is the same “weather” icon that
we saw on the home page, and serves the same purpose—to give you a general idea of how stable your
build is over time.
Figure 2.21. A failed build
If you click on the new build history entry, Jenkins will give you some more details about what went
wrong (see Figure 2.22, “The list of all the broken tests”). Jenkins tells us that there were 11 new test
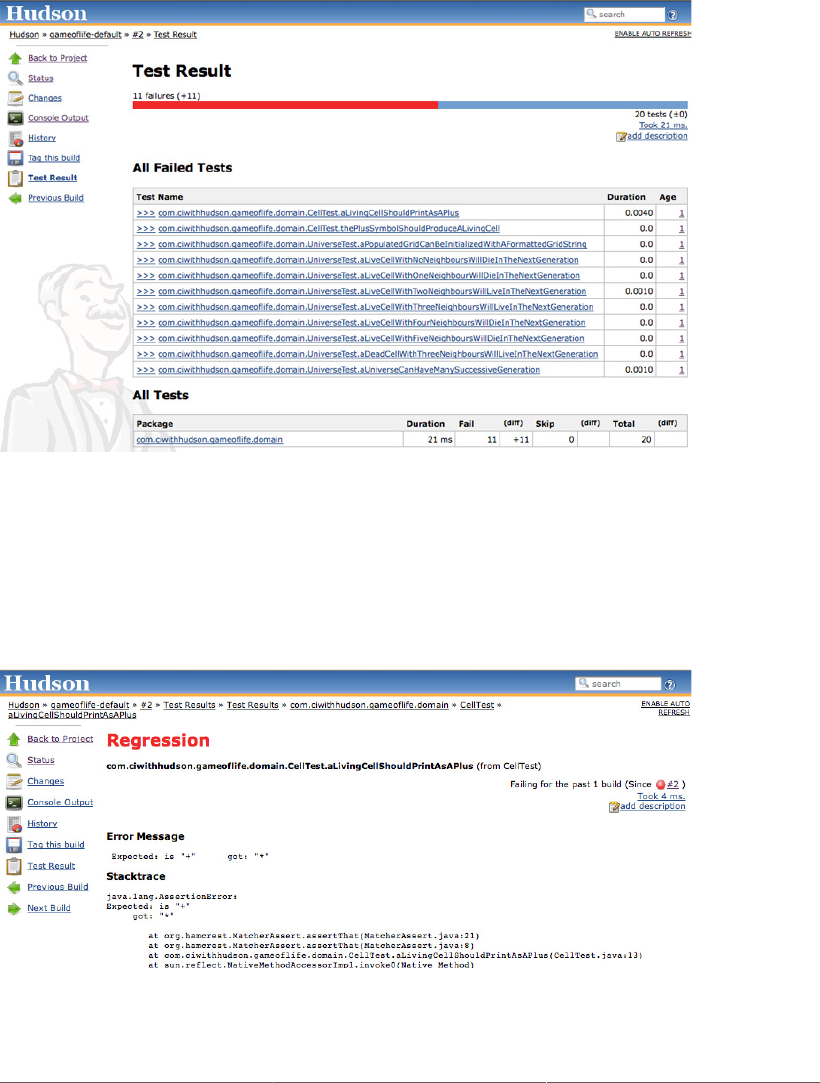
31
failures in this build, something which can be seen at a glance in the Test Result Trend graph—red
indicates test failures. You can even see which tests are failing, and how long they have been broken.
Figure 2.22. The list of all the broken tests
If you want to know exactly what went wrong, that’s easy enough to figure out as well. If you click on
the failed test classes, Jenkins brings up the actual details of the test failures (see Figure 2.23, “Details
about a failed test”), which is a great help when it comes to reproducing and fixing the issue.
Figure 2.23. Details about a failed test

32
Jenkins displays a host of information about the failed test in a very readable form, including the error
message the test produced, the stack trace, how long the test has been broken, and how long it took to
run. Often, this in itself is enough to put a developer on the right track towards fixing the issue.
Now let’s fix the build. To make things simple, we’ll just back out our changes and recommit the code
in its original state (the end users just changed their mind about the asterisks, anyway). So just undo the
changes you made to the Cell class (again, the changes are highlighted in bold):
package com.wakaleo.gameoflife.domain;
public enum Cell {
LIVE_CELL("*"), DEAD_CELL(".");
private String symbol;
private Cell(String symbol) {
this.symbol = symbol;
}
@Override
public String toString() {
return symbol;
}
static Cell fromSymbol(String symbol) {
Cell cellRepresentedBySymbol = null;
for (Cell cell : Cell.values()) {
if (cell.symbol.equals(symbol)) {
cellRepresentedBySymbol = cell;
break;
}
}
return cellRepresentedBySymbol;
}
public String getSymbol() {
return symbol;
}
}
When you’ve done this, commit your changes again:
$ git commit -a -m "Restored the star"
[master bc924be] Restored the star
1 files changed, 1 insertions(+), 1 deletions(-)
$ git push
Counting objects: 21, done.
Delta compression using up to 4 threads.
Compressing objects: 100% (7/7), done.
Writing objects: 100% (11/11), 752 bytes, done.
Total 11 (delta 4), reused 6 (delta 0)
To git@github.com:john-smart/game-of-life.git
61ce946..bc924be master -> master
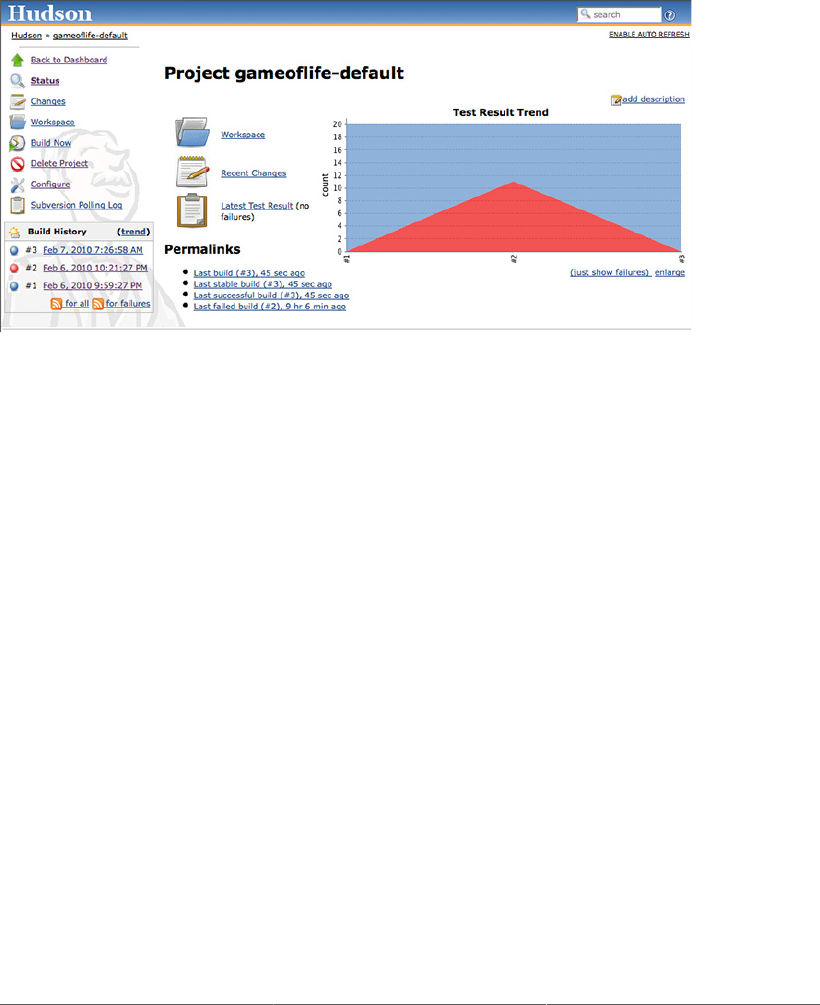
33
Once you’ve committed these changes, Jenkins should pick them up and kick off a build. Once this is
done, you will be able to see the fruit of your work on the build job home page (see Figure 2.24, “Now
the build is back to normal”)—the build status is blue again and all is well. Also notice the way we are
building up a trend graph showing the number of succeeding unit tests over time—this sort of report
really is one of Jenkins’s strong points.
Figure 2.24. Now the build is back to normal
2.7. More Reporting—Displaying Javadocs
For many Java projects, Javadoc comments are an important source of low-level technical
documentation. There are even tools, such as UmlGraph, that let you produce Javadoc with embedded
UML diagrams to give you a better picture of how the classes fit together in the application. This sort of
technical documentation has the advantage of being cheap to produce, accurate and always up-to-date.
Jenkins can integrate Javadoc API documentation directly into the Jenkins website. This way, everyone
can find the latest Javadoc easily, in a well known place. Often, this sort of task is performed in a separate
build job, but for simplicity we are going to add another build step to the gameoflife-default build job
to generate and display Javadoc documention for the Game of Life API.
Start off by going into the “gameoflife-default” configuration screen again. Click on “Add build step”,
and add a new build step to “Invoke top level Maven targets” (see Figure 2.25, “Adding a new build step
and report to generate Javadoc”). In the Goals field, place javadoc:javadoc—this will tell Maven to
generate the Javadoc documentation.
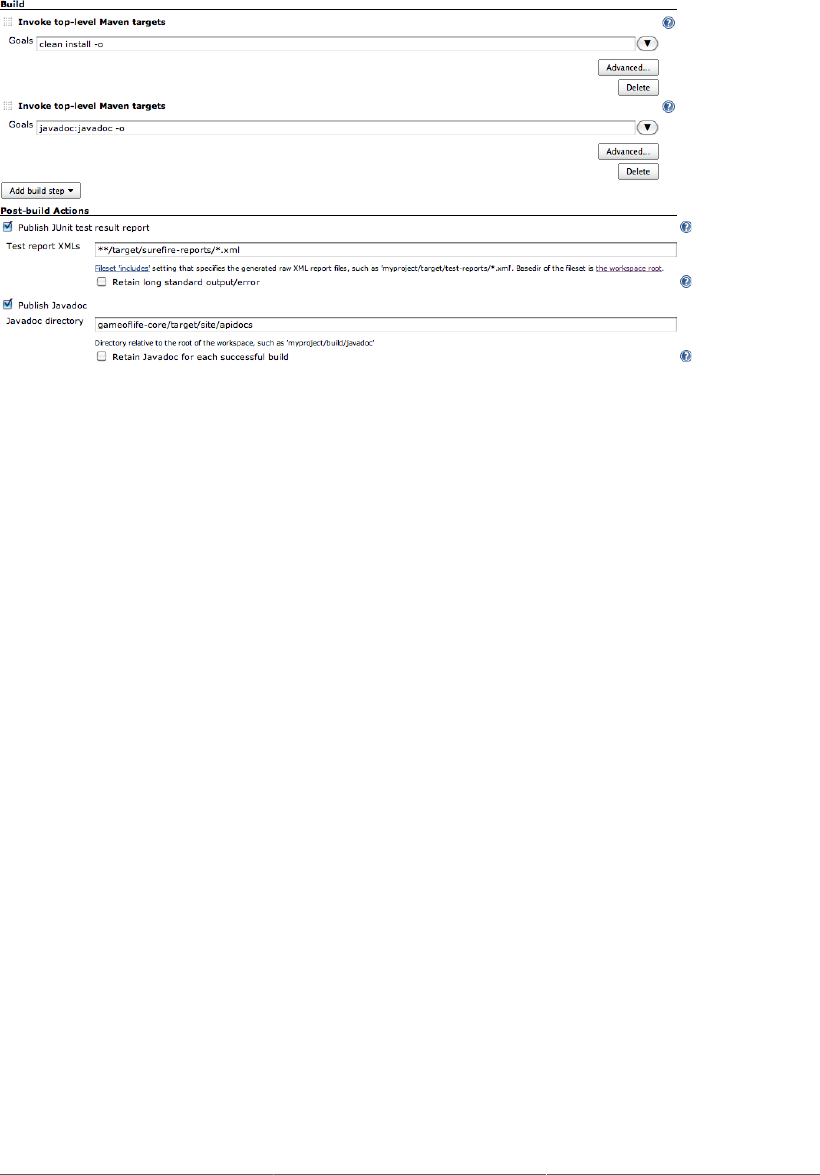
34
Figure 2.25. Adding a new build step and report to generate Javadoc
Now go to the “Post-build Action” and tick the “Publish Javadoc” checkbox. This project is a
multimodule project, so a separate subdirectory is generated for each module (core, services, web and
so forth). For this example, we are interested in displaying the documentation for the core module. In
the Javadoc directory field, enter gameoflife-core/target/site/apidocs—this is where Maven
will place the Javadocs it generates for the core module. Jenkins may display an error message saying
that this directory doesn’t exist at first. Jenkins is correct—this directory won’t exist until we run the
javadoc:javadoc goal, but since we haven’t run this command yet we can safely ignore the message
at this stage.
If you tick “Retain Javadoc for each successful build”, Jenkins will also keep track of the Javadocs for
previous builds—not always useful, but it can come in handy at times.
Now trigger a build manually. You can do this either from the build job’s home page (using the Build
Now link), or directly from the server home page. Once the build is finished, open the build job summary
page. You should now see a Javadoc link featuring prominently on the screen—this link will open the
latest version of the Javadoc documentation (see Figure 2.26, “Jenkins will add a Javadoc link to your
build results”). You will also see this link on the build details page, where it will point to the Javadoc
for that particular build, if you have asked Jenkins to store Javadoc for each build.
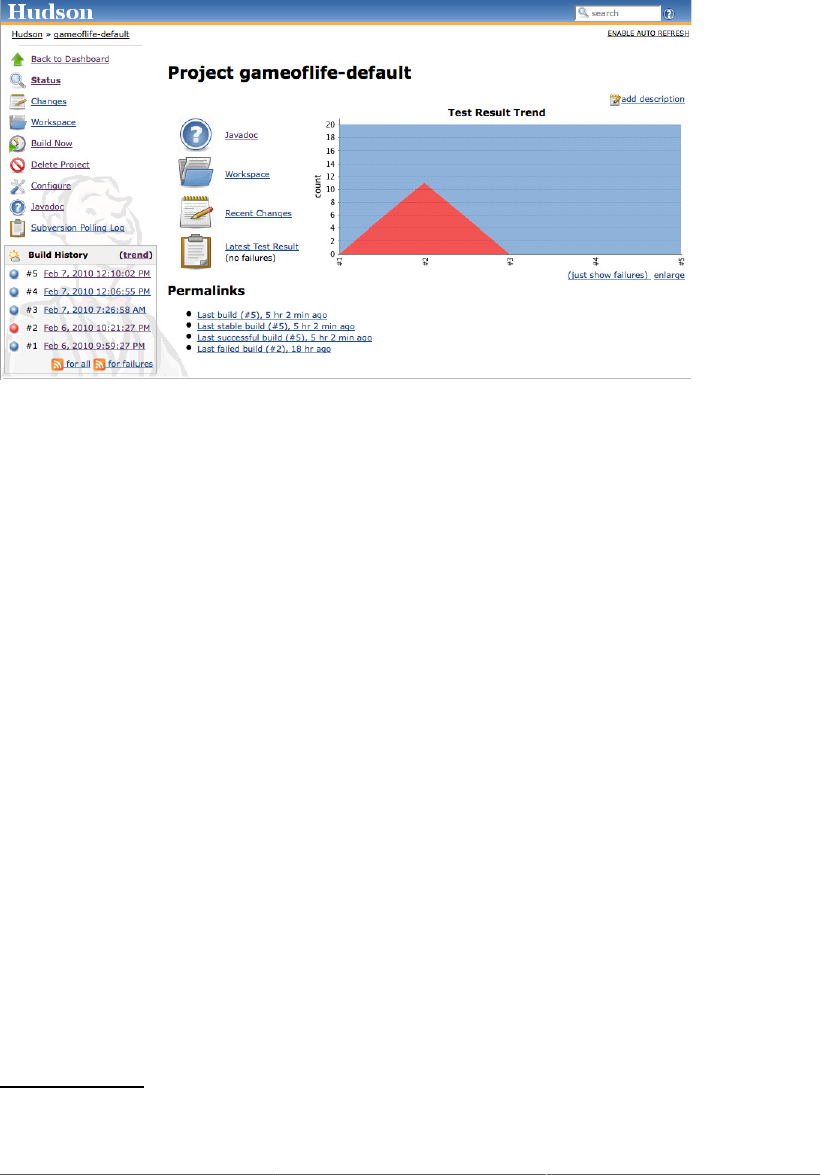
35
Figure 2.26. Jenkins will add a Javadoc link to your build results
2.8. Adding Code Coverage and Other Metrics
As we mentioned earlier, reporting is one of Jenkins’s strong points. We have seen how easy it is to
display test results and to publish Javadocs, but you can also publish a large number of other very useful
reports using Jenkins’s plugins.
Plugins are another one of Jenkins’s selling points—there are plugins for doing just about anything,
from integrating new build tools or version control systems to notification mechanisms and reporting.
In addition, Jenkins plugins are very easy to install and integrate smoothly into the existing Jenkins
architecture.
To see how the plugins work, we are going to integrate code coverage metrics using the Cobertura
plugin. Code coverage is an indication of how much of your application code is actually executed during
your tests—it can be a useful tool in particular for finding areas of code that have not been tested by
your test suites. It can also give some indication as to how well a team is applying good testing practices
such as Test-Driven Development or Behavior-Driven Development.
Cobertura17 is an open source code coverage tool that works well with both Maven and Jenkins. Our
Maven demonstration project is already configured to record code coverage metrics, so all we need
to do is to install the Jenkins Cobertura plugin and generate the code coverage metrics for Jenkins to
record and display.
17 http://cobertura.sourceforge.net

36
Figure 2.27. Jenkins has a large range of plugins available
To install a new plugin, go to the Manage Jenkins page and click on the Manage Plugins entry. This
will display a list of the available plugins as well as the plugins already installed on your server (see
Figure 2.27, “Jenkins has a large range of plugins available”). If your build server doesn’t have an
Internet connection, you can also manually install a plugin by downloading the plugin file elsewhere and
uploading it to your Jenkins installation (just open the Advanced tab in Figure 2.27, “Jenkins has a large
range of plugins available”), or by copying the plugin to the $JENKINS_HOME/plugins directory.
In our case, we are interested in the Cobertura plugin, so go to the Available tab and scroll down until
you find the Cobertura Plugin entry in the Build Reports section. Click on the checkbox and then click
on the Install button at the bottom of the screen.
This will download and install the plugin for you. Once it is done, you will need to restart your Jenkins
instance to see the fruits of your labor. When you have restarted Jenkins, go back to the Manage Plugins
screen and click on the Installed tab—there should now be a Cobertura Plugin entry in the list of installed
plugins on this page.
Once you have made sure the plugin was successfully installed, go to the configuration page for the
gameoflife-default build job.
To set up code coverage metrics in our project, we need to do two things. First we need to generate the
Cobertura coverage data in an XML form that Jenkins can use; then we need to configure Jenkins to
display the coverage reports.
Our Game of Life project already has been configured to generate XML code coverage reports if we
ask it. All you need to do is to run mvn cobertura:cobertura to generate the reports in XML form.
Cobertura can also generate HTML reports, but in our case we will be letting Jenkins take care of the
reporting, so we can save on build time by not generating the For this example, for simplicity, we will
just add the cobertura:cobertura goal to the second build step (see Figure 2.28, “Adding another
Maven goal to generating test coverage metrics”). You could also add a new build step just for the code
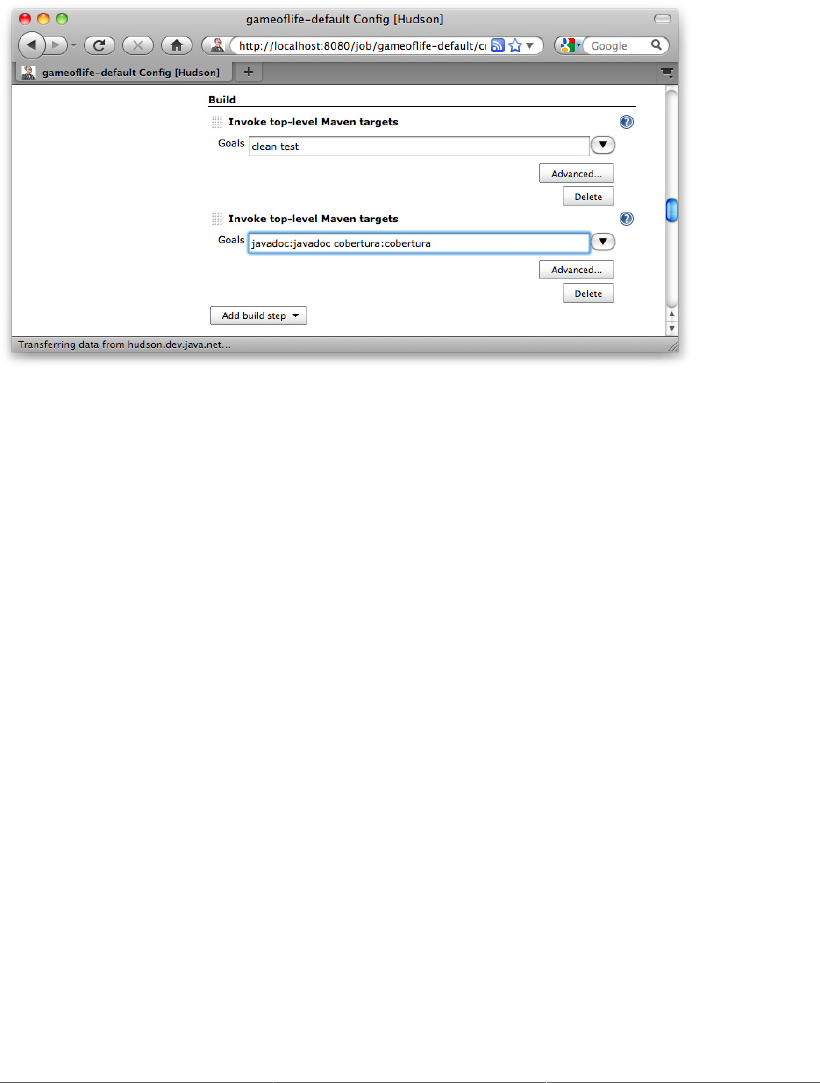
37
coverage metrics. In a real-world project, code quality metrics like this are typically placed in a distinct
build job, which is run less frequently than the default build.
Figure 2.28. Adding another Maven goal to generating test coverage metrics
Next, we need to tell Jenkins to keep track of our code coverage metrics. Scroll down to the “Post-build
Actions” section. You should see a new checkbox labeled Publish Cobertura Reports. Jenkins will often
add UI elements like this when you install a new plugin. When you tick this box, Jenkins will display the
configuration options for the Cobertura plugin that we installed earlier (see Figure 2.29, “Configuring
the test coverage metrics in Jenkins”).
Like most of the code-quality related plugins in Jenkins, the Cobertura plugin lets you fine-tune not only
the way Jenkins displays the report data, but also how it interprets the data. In the Coverage Metrics
Targets section, you can define what you consider to be the minimum acceptable levels of code coverage.
In Figure 2.29, “Configuring the test coverage metrics in Jenkins”, we have configured Jenkins to list
any builds with less than 50% test coverage as “unstable” (indicated by a yellow ball), and notify the
team accordingly.
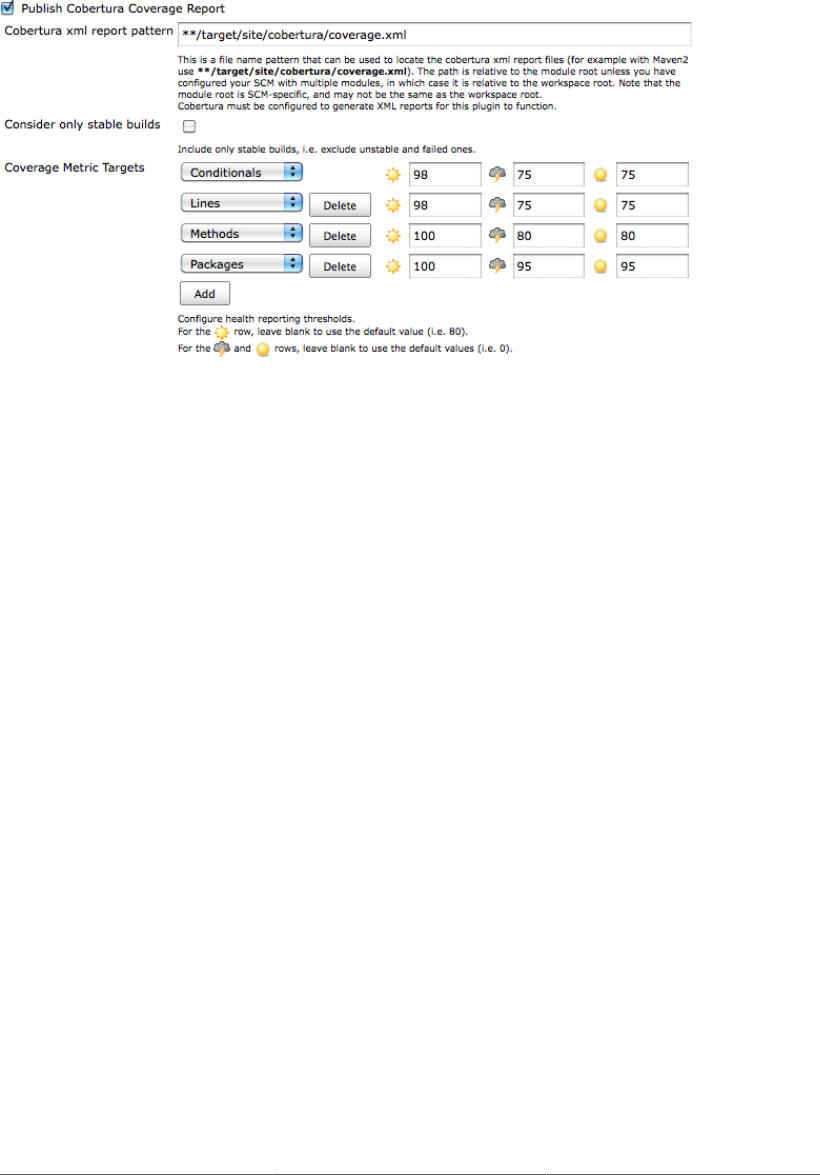
38
Figure 2.29. Configuring the test coverage metrics in Jenkins
This fine-tuning often comes in handy in real-world builds. For example, you may want to impose a
special code coverage constraint in release builds, to ensure high code coverage in release versions.
Another strategy that can be useful for legacy projects is to gradually increase the minimum tolerated
code coverage level over time. This way you can avoid having to retro-fit unit tests on legacy code just
to raise the code coverage, but you do encourage all new code and bug fixes to be well tested.
Now trigger a build manually. The first time you run the build job with Cobertura reporting activated,
you will see coverage statistics for your build displayed on the build home page, along with a Coverage
Report link when you can go for more details (see Figure 2.30, “Jenkins displays code coverage metrics
on the build home page”). The Cobertura report shows different types of code coverage for the build
we just ran. Since we have only run the test coverage metrics once, the coverage will be displayed as
red and green bars.
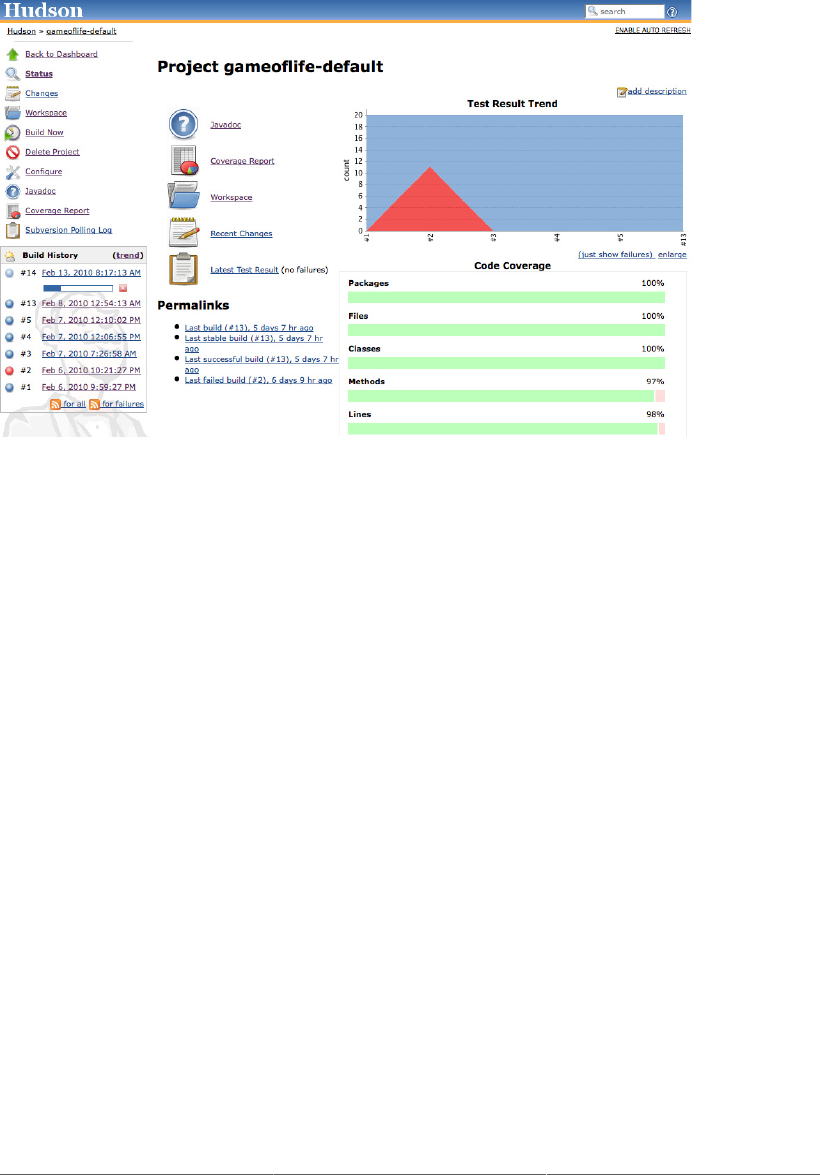
39
Figure 2.30. Jenkins displays code coverage metrics on the build home page
If you click on the Coverage Report icon, you will see code coverage for each package in your
application, and even drill down to see the code coverage (or lack thereof) for an individual class (see
Figure 2.31, “Jenkins lets you display code coverage metrics for packages and classes”). When you get
to this level, Jenkins displays both the overall coverage statistics for the class, and also highlights the
lines that were executed in green, and those that weren’t in red.
This reporting gets better with time. Jenkins not only reports metrics data for the latest build, but also
keeps track of metrics over time, so that you can see how they evolve throughout the life of the project.
For example, if you drill down into the coverage reports, you will notice that certain parts of this code
are not tested (for example the Cell.java class in Figure 2.31, “Jenkins lets you display code coverage
metrics for packages and classes”).
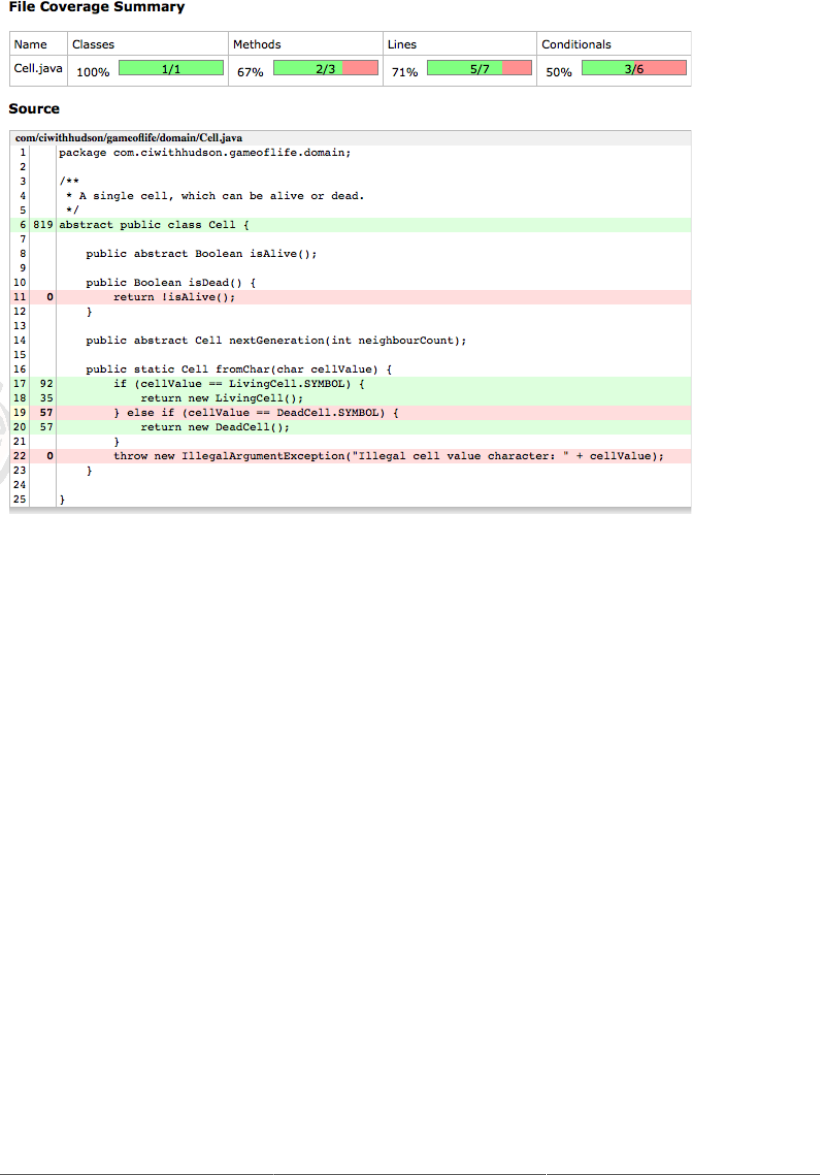
40
Figure 2.31. Jenkins lets you display code coverage metrics for packages and classes
Code coverage metrics are a great way to isolate code that has not been tested, in order to add extra
tests for corner cases that were not properly tested during the initial development, for example. The
Jenkins code coverage graphs are also a great way of keeping track of your code coverage metrics as
the project grows. Indeed, as you add new tests, you will notice that Jenkins will display a graph of
code coverage over time, not just the latest results (see Figure 2.32, “Jenkins also displays a graph of
code coverage over time”).

41
Figure 2.32. Jenkins also displays a graph of code coverage over time
Note that our objective here is not to improve the code coverage just for the sake of improving code
coverage—we are adding an extra test to verify some code that was not previously tested, and as a result
the code coverage goes up. There is a subtle but important difference here—code coverage, as with any
other metric, is very much a means to an end (high code quality and low maintenance costs), and not
an end in itself.
Nevertheless, metrics like this can give you a great insight into the health of your project, and Jenkins
presents them in a particularly accessible way.
This is just one of the code quality metrics plugins that have been written for Jenkins. There are many
more (over fifty reporting plugins alone at the time of writing). We’ll look at some more of them in
Chapter 9, Code Quality.
2.9. Conclusion
In this chapter, we have gone through what you need to know to get started with Jenkins. You should
be able to set up a new build job, and setting up reporting on JUnit test results and javadocs. And you
have seen how to add a reporting plugin and keep tabs on code coverage. Well done! But there’s still a
lot more to learn about Jenkins—in the following chapters, we will be looking at how Jenkins can help
you improve your build automation process in many other areas as well.

Chapter 3. Installing Jenkins
3.1. Introduction
One of the first things you will probably notice about Jenkins is how easy it is to install. Indeed, in
less than five minutes, you can have a Jenkins server up and running. However, as always, in the real
world, things aren’t always that simple, and there are a few details you should take into account when
installing your Jenkins server for production use. In this chapter, we look at how to install Jenkins onto
both your local machine and onto a fully fledged build server. We will also look at how to take care
of your Jenkins installation once it’s up and running, and how to perform basic maintenance tasks such
as backups and upgrades.
3.2. Downloading and Installing Jenkins
Jenkins is easy to install, and can run just about anywhere. You can run it either as a stand-alone
application, or deployed on a conventional Java application server such as Tomcat or JBoss. This first
option makes it easy to install and try out on your local machine, and you can be up and running with
a bare-bones installation in a matter of minutes.
Since Jenkins is a Java application, you will need a recent version of Java on your machine. More
precisely, you will need at least Java 5. In fact, on your build server, you will almost certainly need the
full features of the Java Development Kit (JDK) 5.0 or better to execute your builds. If you’re not sure,
you can check the version of Java on your machine by executing the java -version command:
$ java -version
java version "1.6.0_17"
Java(TM) SE Runtime Environment (build 1.6.0_17-b04-248-10M3025)
Java HotSpot(TM) 64-Bit Server VM (build 14.3-b01-101, mixed mode)
Jenkins is distributed in the form of a bundled Java web application (a WAR file). You can download
the latest version from the Jenkins website (http://jenkins-ci.org—see Figure 3.1, “You can download
the Jenkins binaries from the Jenkins website”) or from the book website. Jenkins is a dynamic project,
and new releases come out at a regular rate.
For Windows users, there is a graphical Windows installation package for Jenkins. The installer comes
in the form of a ZIP file containing an MSI package for Jenkins, as well as a setup.exe file that
can be used to install the .NET libraries if they have not already been installed on your machine. In
most cases, all you need to do is to unzip the zip file and run the jenkins-x.x.msi file inside (see
Figure 3.2, “Jenkins setup wizard in Windows”). The MSI installer comes bundled with a bundled JRE,
so no separate Java installation is required.
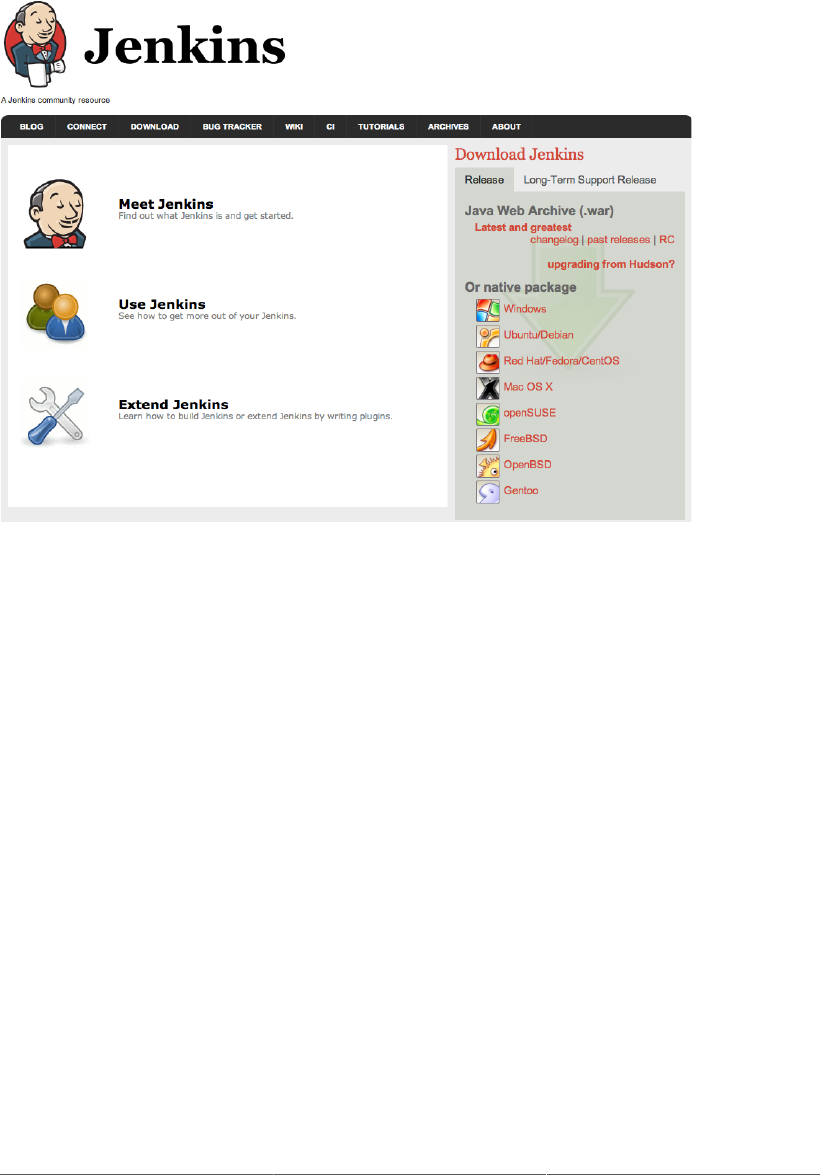
44
Figure 3.1. You can download the Jenkins binaries from the Jenkins website
Once you have run the installer, Jenkins will automatically start on port 8080 (see Figure 3.3, “The
Jenkins start page”). The installer will have created a new Jenkins service for you, that you can start
and stop just like any other Windows service.
There are also excellent native packages for Mac OS X and most of the major Linux distributions,
including Ubuntu, RedHat (including CentOS and Fedora) and OpenSolaris. We discuss how to install
Jenkins on Ubuntu and Redhat below.
If you are not installing Jenkins using one of the native packages, you can simply download the latest
binary distribution from the Jenkins website. Once you have downloaded the latest and greatest Jenkins
release, place it in an appropriate directory on your build server. On a Windows environment, you might
put it in a directory called C:\Tools\Jenkins (it’s a good idea not to place Jenkins in a directory
containing spaces in the path, such as C:\Program Files, as this can cause problems for Jenkins in
some circumstances). On a Linux or Unix box, it might go in /usr/local/jenkins, /opt/jenkins,
or in some other directory, depending on your local conventions and on the whim of your system
administrator.
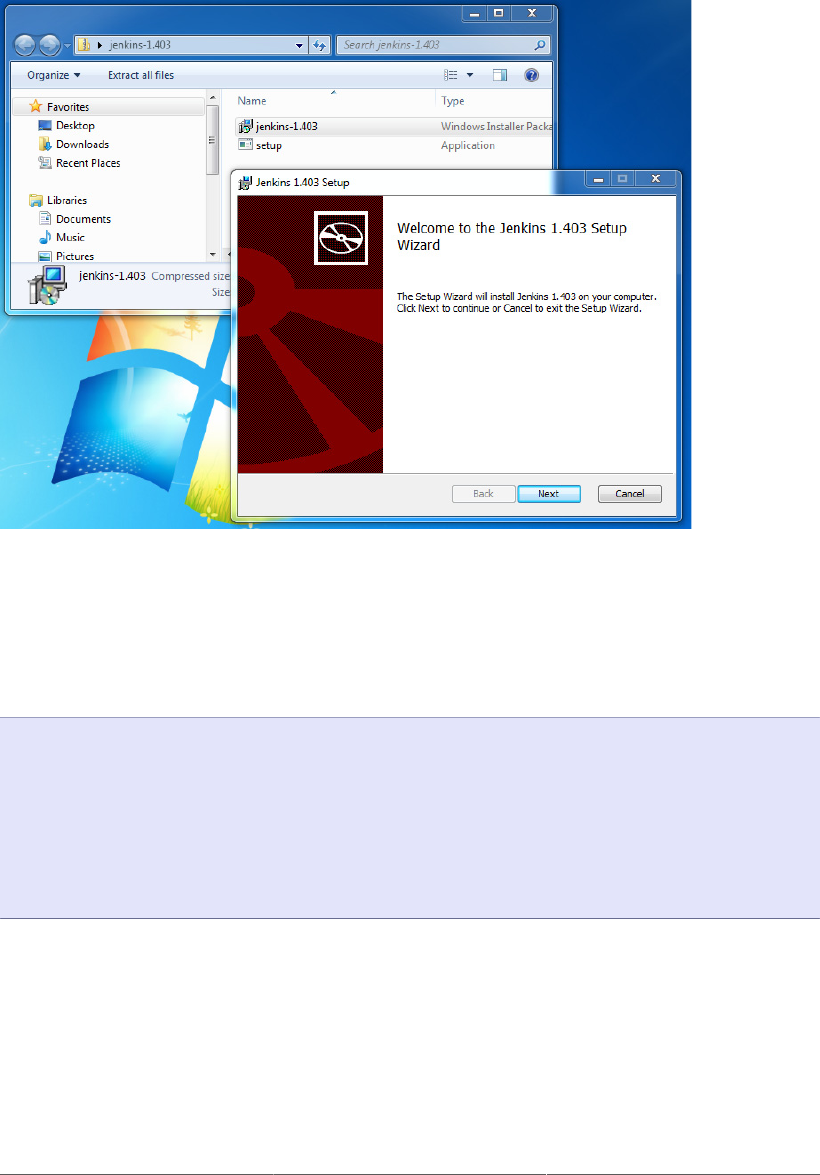
45
Figure 3.2. Jenkins setup wizard in Windows
Before we go any further, let’s just start up Jenkins and take a look. If you didn’t try this out in the
previous chapter, now is the time to get your hands dirty. Open a console in the directory containing the
jenkins.war file and run the following command:
$ java -jar jenkins.war
[Winstone 2008/07/01 20:54:53] - Beginning extraction from war file
...
INFO: Took 35 ms to load
...
[Winstone 2008/07/01 20:55:08] - HTTP Listener started: port=8080
[Winstone 2008/07/01 20:55:08] - Winstone Servlet Engine v0.9.10 running:
controlPort=disabled
[Winstone 2008/07/01 20:55:08] - AJP13 Listener started: port=8009
Jenkins should now be running on port 8080. Open your browser at http://localhost:8080 and take a
look. (see Figure 3.3, “The Jenkins start page”).

46
Figure 3.3. The Jenkins start page
3.3. Preparing a Build Server for Jenkins
Installing Jenkins on your local development machine is one thing, but installing Jenkins on a proper
build server deserves a little more forethought and planning.
Before you start your installation, the first thing you will need is a build server. To work well, Jenkins
needs both processor power and memory. Jenkins itself is a relatively modest Java web application.
However, in most configurations, at least some of the builds will be run on the principal build server.
Builds tend to be both memory and processor-intensive operations, and Jenkins can be configured to run
several builds in parallel. Depending on the number of build jobs you are managing, Jenkins will also
need memory of its own for its own internal use. The amount of memory required will depend largely
on the nature of your builds, but memory is cheap these days (at least in non-hosted environments), and
it’s best not to be stingy.
A build server also needs CPU horsepower. As a rule of thumb, you will need one processor per parallel
build, though, in practice, you can capitalize on I/O delays to do a little better than this. It is also in your
best interest to dedicate your build server as much as possible to the task of running continuous builds.
In particular, you should avoid memory or CPU-intensive applications such as test servers, heavily-used
enterprise applications, enterprise databases such as Oracle, enterprise mail servers, and so on.
One very practical option available in many organizations today is to use a virtual machine. This way,
you can choose the amount of memory and number of processors you think appropriate for your initial
installation, and easily add more memory and processors later on as required. However, if you are using a
virtual machine, make sure that it has enough memory to support the maximum number of parallel builds
you expect to be running. The memory usage of a Continuous Integration server is best described as
spiky—Jenkins will be creating additional JVMs as required for its build jobs, and these need memory.

47
Another useful approach is to set up multiple build machines. Jenkins makes it quite easy to set up
“slaves” on other machines that can be used to run additional build jobs. The slaves remain inactive until
a new build job is requested—then the main Jenkins installation dispatches the build job to the slave
and reports on the results. This is a great way to absorb sudden spikes of build activity, for example
just before a major release of your principal product. It is also a useful strategy if certain heavy-weight
builds tend to “hog” the main build server—just put them on their own dedicated build agent! We will
look at how to do this in detail later on in the book.
If you are installing Jenkins on a Linux or Unix build server, it is a good idea to create a special user
(and user group) for Jenkins. This makes it easier to monitor at a glance the system resources being
used by the Jenkins builds, and to troubleshoot problematic builds in real conditions. The native binary
installation packages discussed below do this for you. If you did not use one of these, you can create a
dedicated Jenkins user from the command line as shown here:
$ sudo groupadd build
$ sudo useradd --create-home --shell /bin/bash --groups build jenkins
The exact details may vary depending on your environment. For example, you may prefer to use a
graphical administration console instead of the command line, or, on a Debian-based Linux server (such
as Ubuntu), you might use the more user-friendly adduser and addgroup commands.
In most environments, you will need to configure Java correctly for this user. For example, you can do
this by defining the JAVA_HOME and PATH variables in the .bashrc file, as shown here:
export JAVA_HOME=/usr/local/java/jdk1.6.0
export PATH=$JAVA_HOME/bin:$PATH
You will now be able to use this user to run Jenkins in an isolated environment.
3.4. The Jenkins Home Directory
Before we install Jenkins, however, there are some things you need to know about how Jenkins stores its
data. Indeed, no matter where you store the Jenkins WAR file, Jenkins keeps all its important data in a
special separate directory called the Jenkins home directory. Here, Jenkins stores information about your
build server configuration, your build jobs, build artifacts, user accounts, and other useful information, as
well as any plugins you may have installed. The Jenkins home directory format is backward compatible
across versions, so you can freely update or reinstall your Jenkins executable without affecting your
Jenkins home directory.
Needless to say, this directory will need a lot of disk space.
By default, the Jenkins home directory will be called .jenkins, and will be placed in your home
directory. For example, if you are running a machine under Windows 7, if your username is “john”,
you would find the Jenkins home directory under C:\Users\john\.jenkins. Under Windows XP,

48
it would be C:\Documents and Settings\John\.jenkins. On a Linux machine, it would most
likely be under /home/john/.jenkins. And so on.
You can force Jenkins to use a different directory as its home directory by defining the JENKINS_HOME
environment variable. You may need to do this on a build server to conform to local directory
conventions or to make your system administrator happy. For example, if your Jenkins WAR file is
installed in /usr/local/jenkins, and the Jenkins home directory needs to be in the /data/jenkins
directory, you might write a startup script along the following lines:
export JENKINS_BASE=/usr/local/jenkins
export JENKINS_HOME=/var/jenkins-data
java -jar ${JENKINS_BASE}/jenkins.war
If you are running Jenkins in a Java EE container such as Tomcat or JBoss, you can configure the webapp
to expose its own environments variables. For example, if you are using Tomcat, you could create a file
called jenkins.xml in the $CATALINA_BASE/conf/localhost directory:
<Context docBase="../jenkins.war">
<Environment name="JENKINS_HOME" type="java.lang.String"
value="/data/jenkins" override="true"/>
</Context>
In a previous life, Jenkins was known as Hudson. Jenkins remains compatible with previous Hudson
installations, and upgrading from Hudson to Jenkins can be as simple as replacing the old hudson.war
file with jenkins.war. Jenkins will look for its home directory in the following places (by order of
precedence):
1. A JNDI environment entry called JENKINS_HOME
2. A JNDI environment entry called HUDSON_HOME
3. A system property named JENKINS_HOME
4. A system property named HUDSON_HOME
5. An environment variable named JENKINS_HOME
6. An environment variable named HUDSON_HOME
7. The .hudson directory in the user’s home directory, if it already exists
8. The .jenkins directory in the user’s home directory
3.5. Installing Jenkins on Debian or Ubuntu
If you are installing Jenkins on Debian and Ubuntu, it is convenient to install the native binary package
for these platforms. This is easy enough to do, though these binaries are not provided in the standard

49
repositories because of the high frequency of updates. First, you need to add the key to your system
as shown here:
$ wget -q -O - http://pkg.jenkins-ci.org/debian/jenkins-ci.org.key \
| sudo apt-key add -
$ sudo echo "deb http://pkg.jenkins-ci.org/debian binary/" > \
/etc/apt/sources.list.d/jenkins.list
Now, update the Debian package repository:
$ sudo aptitude update
Once this is done, you can install Jenkins using the aptitude tool:
$ sudo aptitude install -y jenkins
This will install Jenkins as a service, with a correctly configured startup script in /etc/init.d/
jenkins and a corresponding system user called “jenkins”. If you didn’t already have Java installed on
your server, it will also install the OpenJDK version of Java. By default, you will find the Jenkins WAR
file in the/usr/share/jenkins directory, and the Jenkins home directory in /var/lib/jenkins.
The installation process should have started Jenkins. In general, to start Jenkins, simply invoke this
script:
$ sudo /etc/init.d/jenkins start
Jenkins will now be running on the default port of 8080 (http://localhost:8080/).
You can stop Jenkins as follows:
$ sudo /etc/inid.d/jenkins stop
Jenkins will write log files to /var/log/jenkins/jenkins.log. You can also fine-tune the
configuration parameters in the /etc/default/jenkins file. This is useful if you need to modify
the Java startup arguments (JAVA_ARGS). You can also use this file to configure arguments that will
be passed to Jenkins in this file, such as the HTTP port or web application context (see Section 3.8,
“Running Jenkins as a Stand-Alone Application”).
3.6. Installing Jenkins on Redhat, Fedora, or CentOS
There are also native binary packages available for Redhat, Fedora, and CentOS. First you need to set
up the repository as follows:
$ sudo wget -O /etc/yum.repos.d/jenkins.repo \
http://jenkins-ci.org/redhat/jenkins.repo
$ sudo rpm --import http://pkg.jenkins-ci.org/redhat/jenkins-ci.org.key

50
On a fresh installation, you may need to install the JDK:
$ sudo yum install java-1.6.0-openjdk
Next, you can install the package as shown here:
$ sudo yum install jenkins
This will install the latest version of Jenkins into the /usr/lib/jenkins directory. The default Jenkins
home directory will be in /var/lib/jenkins.
Now you can start Jenkins using the service command:
$ sudo service jenkins start
Jenkins will now be running on the default port of 8080 (http://localhost:8080/).
Jenkins’s configuration parameters are placed in the /etc/sysconfig/jenkins file. However at the
time of writing the configuration options are more limited than those provided by the Ubuntu package:
you can define the HTTP port using the JENKINS_PORT parameter, for example, but to specify an
application context you need to modify the startup script by hand. The principal configuration options
are listed here:
JENKINS_JAVA_CMD
The version of Java you want to use to run Jenkins
JENKINS_JAVA_OPTIONS
Command-line options to pass to Java, such as memory options
JENKINS_PORT
The port that Jenkins will to run on
3.7. Installing Jenkins on SUSE or OpenSUSE
Binary packages are also available for SUSE and OpenSUSE, so the installation process on these
platforms is straightforward. First, you need to add the Jenkins repository to the SUSE repository list:
$ sudo zypper addrepo http://pkg.jenkins-ci.org/opensuse/ jenkins
Finally, you simply install Jenkins using the zypper command:
$ sudo zypper install jenkins
As you can gather from the console output, this will install both Jenkins and the latest JDK from Sun, if
the latter is not already installed. OpenSuse installations typically have the OpenJDK version of Java,
51
but Jenkins prefers the Sun variety. When it downloads the Sun JDK, it will prompt you to validate the
Sun Java license before continuing with the installation.
This installation process will also create a jenkins user and install Jenkins as a service, so that it
will start up automatically whenever the machine boots. To start Jenkins manually, you can invoke the
jenkins startup script in the /etc/init.d directory:
$ sudo /etc/init.d/jenkins jenkins start
Jenkins will now be running on the default port of 8080 (http://localhost:8080/).
The configuration options are similar to the Redhat installation (see Section 3.6, “Installing Jenkins on
Redhat, Fedora, or CentOS”). You can define a limited number of configuration variables in the /etc/
sysconfig/jenkins file, but for any advanced configuration options, you need to modify the startup
script in /etc/init.d/jenkins.
The zypper tool also makes it easy to update your Jenkins instance:
$ sudo zypper update jenkins
This will download and install the latest version of Jenkins from the Jenkins website.
3.8. Running Jenkins as a Stand-Alone Application
You can run the Jenkins server in one of two ways: either as a stand-alone application, or deployed as a
standard web application onto a Java Servlet container or application server such as Tomcat, JBoss, or
GlassFish. Both approaches have their pros and cons, so we will look at both here.
Jenkins comes bundled as a WAR file that you can run directly using an embedded servlet container.
Jenkins uses the lightweight Winstone servlet engine to allow you to run the server out of the box,
without having to configure a web server yourself. This is probably the easiest way to get started,
allowing you to be up and running with Jenkins in a matter of minutes. It is also a very flexible option,
and provides some extra features unavailable if you deploy Jenkins to a conventional application server.
In particular, if you are running Jenkins as a stand-alone server, you will be able to install plugins and
upgrades on the fly, and restart Jenkins directly from the administration screens.
To run Jenkins using the embedded servlet container, just go to the command line and type the following:
C:\Program Files\Jenkins>
java -jar jenkins.war
[Winstone 2011/07/01 20:54:53] - Beginning extraction from war file
[Winstone 2011/07/01 20:55:07] - No webapp classes folder found - C:\Users\john\
.jenkins\war\WEB-INF\classes
jenkins home directory: C:\Users\john\.jenkins
...
INFO: Took 35 ms to load

52
...
[Winstone 2011/07/01 20:55:08] - HTTP Listener started: port=8080
[Winstone 2011/07/01 20:55:08] - Winstone Servlet Engine v0.9.10 running:
controlPort=disabled
[Winstone 2011/07/01 20:55:08] - AJP13 Listener started: port=8009
In a Linux environment, the procedure is similar. Note how we start the Jenkins server from with the
“jenkins” user account we created earlier:
john@lambton:~$ sudo su - jenkins
jenkins@lambton:~$ java -jar /usr/local/jeknins/jenkins.war
[Winstone 2011/07/16 02:11:24] - Beginning extraction from war file
[Winstone 2011/07/16 02:11:27] - No webapp classes folder found - /home/jenkins/
.jenkins/war/WEB-INF/classes
jenkins home directory: /home/jenkins/.jenkins
...
[Winstone 2011/07/16 02:11:31] - HTTP Listener started: port=8080
[Winstone 2011/07/16 02:11:31] - AJP13 Listener started: port=8009
[Winstone 2011/07/16 02:11:31] - Winstone Servlet Engine v0.9.10 running:
controlPort=disabled
This will start the embedded servlet engine in the console window. The Jenkins web application will now
be available on port 8080. When you run Jenkins using the embedded server, there is no web application
context, so you access Jenkins directly using the server URL (e.g., http://localhost:8080).
To stop Jenkins, just press Ctrl-C.
By default, Jenkins will run on the 8080 port. If this doesn’t suit your environment, you can specify the
port manually, using the --httpPort option:
$ java -jar jenkins.war --httpPort=8081
In a real-world architecture, Jenkins may not be the only web application running on your build server.
Depending on the capacity of your server, Jenkins may have to cohabit with other web applications
or Maven repository managers, for example. If you are running Jenkins along side another application
server, such as Tomcat, Jetty, or GlassFish, you will also need to override the ajp13 port, using the --
ajp13Port option:
$ java -jar jenkins.war --httpPort=8081 --ajp13Port=8010
Some other useful options are:
--prefix
This option lets you define a context path for your Jenkins server. By default Jenkins will run on
the port 8080 with no context path (http://localhost:8080). However, if you use this option, you
can force Jenkins to use whatever context path suits you, for example:
$ java -jar jenkins.war --prefix=jenkins

53
In this case, Jenkins will be accessible on http://localhost:8080/hudson.
This option is often used when integrating a stand-alone instance of Jenkins with Apache.
--daemon
If you are running Jenkins on a Unix machine, you can use this option to start Jenkins as a
background task, running as a unix daemon.
--logfile
By default, Jenkins writes its logfile into the current directory. However, on a server, you often
need to write your log files into a predetermined directory. You can use this option to redirect
your messages to some other file:
$ java -jar jenkins.war --logfile=/var/log/jenkins.log
Stopping Jenkins using Ctrl-C is a little brutal, of course—in practice, you would set up a script to start
and stop your server automatically.
If you are running Jenkins using the embedded Winstone application server, you can also restart and
shutdown Jenkins elegantly by calling the Winstone server directly. To do this, you need to specify the
controlPort option when you start Jenkins, as shown here:
$ java -jar jenkins.war --controlPort=8001
A slightly more complete example in a Unix environment might look like this:
$ nohup java -jar jenkins.war --controlPort=8001 > /var/log/jenkins.log 2>&1 &
The key here is the controlPort option. This option gives you the means of stopping or restarting
Jenkins directly via the Winstone tools. The only problem is that you need a matching version of the
Winstone JAR file. Fortunately, one comes bundled with your Jenkins installation, so you don’t have
to look far.
To restart the server, you can run the following command:
$ java -cp $JENKINS_HOME/war/winstone.jar winstone.tools.WinstoneControl reload: \
--host=localhost --port=8001
And to shut it down completely, you can use the following:
$ java -cp $JENKINS_HOME/war/winstone.jar winstone.tools.WinstoneControl shutdown \
--host=localhost --port=8001
Another way to shut down Jenkins cleanly is to invoke the special “/exit” URL, as shown here:
$ wget http://localhost:8080/exit

54
On a real server, you would typically have set up security, so that only a system administrator could
access this URL. In this case, you will need to provide a username and a password:
$ wget --user=admin --password=secret http://localhost:8080/exit
Note that you can actually do this from a different server, not just the local machine:
$ wget --user=admin --password=secret http://buildserver.acme.com:8080/exit
Note that while both these methods will shut down Jenkins relatively cleanly (more so than killing the
process directly, for example), they will interrupt any builds in progress. So it is recommended practice
to prepare the shutdown cleanly by using the Prepare for Shutdown button on the Manage Jenkins screen
(see Section 4.2, “The Configuration Dashboard—The Manage Jenkins Screen”).
Running Jenkins as a stand-alone application may not be to everyone’s taste. For a production server,
you might want to take advantage of the more sophisticated monitoring and administration features of
a full blown Java application server such as JBoss, GlassFish, or WebSphere Application Server. And
system administrators may be wary of the relatively little-known Winstone server, or may simply prefer
Jenkins to fit into a known pattern of Java web application development. If this is the case, you may
prefer to, or be obliged to, deploy Jenkins as a standard Java web application. We look at this option
in the following section.
3.9. Running Jenkins Behind an Apache Server
If you are running Jenkins in a Unix environment, you may want to hide it behind an Apache HTTP
server in order to harmonize the server URLs and simplify maintenance and access. This way, users
can access the Jenkins server using a URL like http://myserver.myorg.com/jenkins rather than http://
myserver.myorg.com:8081.
One way to do this is to use the Apache mod_proxy and mod_proxy_ajp modules. These modules let
you use implement proxying on your Apache server using the AJP13 (Apache JServer Protocol version
1.3). Using this module, Apache will transfer requests to particular URL patterns on your Apache server
(running on port 80) directly to the Jenkins server running on a different port. So when a user opens
a URL like http://www.myorg.com/jenkins, Apache will transparently forward traffic to your Jenkins
server running on http://buildserver.myorg.com:8081/jenkins.Technically, this is known as “Reverse
Proxying,” as the client has no knowledge that the server is doing any proxying, or where the proxied
server is located. So you can safely tuck your Jenkins server away behind a firewall, while still providing
broader access to your Jenkins instance via the public-facing URL.
The exact configuration of this module will vary depending on the details of your Apache version and
installation details, but one possible approach is shown here.
First of all, if you are running Jenkins as a stand-alone application, make sure you start up Jenkins using
the --prefix option. The prefix you choose must match the suffix in the public-facing URL you want
55
to use. So if you want to access Jenkins via the URL http://myserver.myorg.com/jenkins, you will need
to provide jenkins as a prefix:
$ java -jar jenkins.war --httpPort=8081 --ajp13Port=8010 --prefix=jenkins
If you are running Jenkins on an application server such as Tomcat, it will already be running under a
particular web context (/jenkins by default).
Next, make sure the mod_proxy and mod_proxy_ajp modules are activated. In your httpd.conf
file (often in the /etc/httpf/conf directory), you should have the following line:
LoadModule proxy_module modules/mod_proxy.so
The proxy is actually configured in the proxy_ajp.conf file (often in the /etc/httpd/conf.d
directory). Note that the name of the proxy path (/jenkins in this example) must match the prefix or
web context that Jenkins is using. An example of such a configuration file is given here:
LoadModule proxy_ajp_module modules/mod_proxy_ajp.so
ProxyPass /jenkins http://localhost:8081/jenkins
ProxyPassReverse /jenkins http://localhost:8081/jenkins
ProxyRequests Off
Once this is done, you just need to restart your Apache server:
$ sudo /etc/init.d/httpd restart
Stopping httpd: [ OK ]
Starting httpd: [ OK ]
Now you should be able to access your Jenkins server using a URL like http://myserver.myorg.com/
jenkins.
3.10. Running Jenkins on an Application Server
Since Jenkins is distributed as an ordinary WAR file, it is easy to deploy it on any standard Java
application server such as Tomcat, Jetty, or GlassFish. Running Jenkins on an application server is
arguably more complicated to setup and to maintain. You also loose certain nice administration features
such as the ability to upgrade Jenkins or restart the server directly from within Jenkins. On the other
hand, your system administrators might be more familiar with maintaining an application running on
Tomcat or GlassFish than on the more obscure Winstone server.
Let’s look at how you would typically deploy Jenkins onto a Tomcat server. The easiest approach is
undoubtedly to simply unzip the Tomcat binary distribution onto your disk (if it is not already installed)
and copy the jenkins.war file into the Tomcat webapps directory. You can download the Tomcat
binaries from the Tomcat website1.
1 http://tomcat.apache.org

56
You start Tomcat by running the startup.bat or startup.sh script in the Tomcat bin directory.
Jenkins will be available when you start Tomcat. You should note that, in this case, Jenkins will be
executed in its own web application context (typically “jenkins”), so you will need to include this in the
URL you use to access your Jenkins server (e.g., http://localhost:8080/jenkins).
However, this approach is not necessarily the most flexible or robust option. If your build server is a
Windows box, for example, you probably should install Tomcat as a Windows service, so that you can
ensure that it starts automatically whenever the server reboots. Similarly, if you are installing Tomcat
in a Unix environment, it should be set up as a service.
3.11. Memory Considerations
Continuous Integration servers use a lot of memory. This is the nature of the beast—builds will consume
memory, and multiple builds being run in parallel will consume still more memory. So you should
ensure that your build server has enough RAM to cope with however many builds you intend to run
simultaneously.
Jenkins naturally needs RAM to run, but if you need to support a large number of build processes, it is
not enough just to give Jenkins a lot of memory. In fact Jenkins spans a new Java process each time it
kicks off a build, so during a large build, the build process needs the memory, not Jenkins.
You can define build-specific memory options for your Jenkins build jobs—we will see how to do this
later on in the book. However if you have a lot of builds to maintain, you might want to define the
JAVA_OPTS, MAVEN_OPTS and ANT_OPTS environment variables to be used as default values for your
builds. The JAVA_OPTS options will apply for the main Jenkins process, whereas the other two options
will be used when Jenkins kicks off new JVM processes for Maven and Ant build jobs respectively.
Here is an example of how these variables might be configured on a Unix machine in the .profile file:
export JAVA_OPTS=-Djava.awt.headless=true -Xmx512m -DJENKINS_HOME=/data/jenkins
export MAVEN_OPTS="-Xmx512m -XX:MaxPermSize=256m"
export ANT_OPTS="-Xmx512m -XX:MaxPermSize=256m"
3.12. Installing Jenkins as a Windows Service
If you are running a production installation of Jenkins on a Windows box, it is essential to have it running
as a Windows service. This way, Jenkins will automatically start whenever the server reboots, and can
be managed using the standard Windows administration tools.
One of the advantages of running Jenkins on an application server such as Tomcat is that it is generally
fairly easy to configure these servers to run as a Windows service. However, it is also fairly easy to
install Jenkins as a service, without having to install Tomcat.
Jenkins has a very convenient feature designed to make it easy to install Jenkins as a Windows servers.
There is currently no graphical installer that does this for you, but you get the next best thing—a web-
based graphical installer.
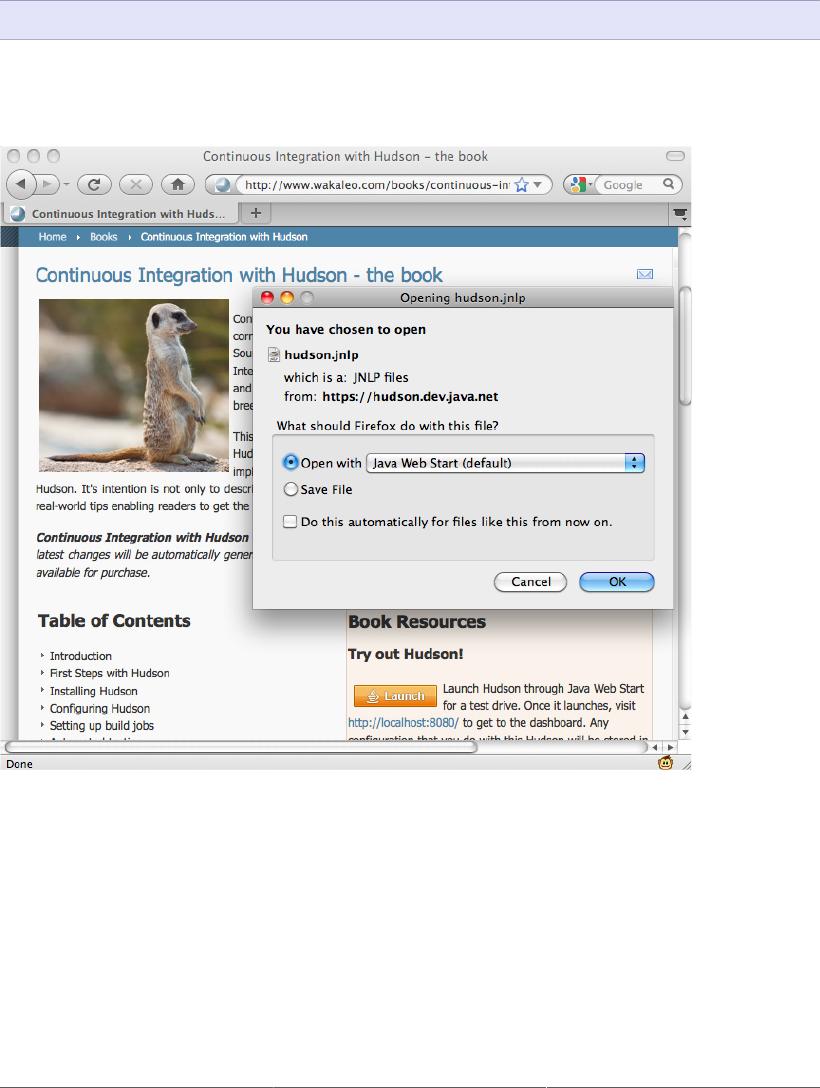
57
First, you need to start the Jenkins server on your target machine. The simplest approach is to run Jenkins
using Java Web Start (see Figure 3.4, “Starting Jenkins using Java Web Start”). Alternatively, you can
do this by downloading Jenkins and running it from the command line, as we discussed earlier:
C:\jenkins> java -jar jenkins.war
This second option is useful if the default Jenkins port (8080) is already being used by another
application. It doesn’t actually matter which port you use—you can change this later.
Figure 3.4. Starting Jenkins using Java Web Start
Once you have Jenkins running, connect to this server and go to the Manage Jenkins screen. Here you
will find an Install as Windows Service button. This will create a Jenkins service on the server that
will automatically start and stop Jenkins in an orderly manner (see Figure 3.5, “Installing Jenkins as a
Windows service”).
Jenkins will prompt you for an installation directory. This will be the Jenkins home directory
(JENKINS_HOME). The default value is the default JENKINS_HOME value: a directory called .jenkins
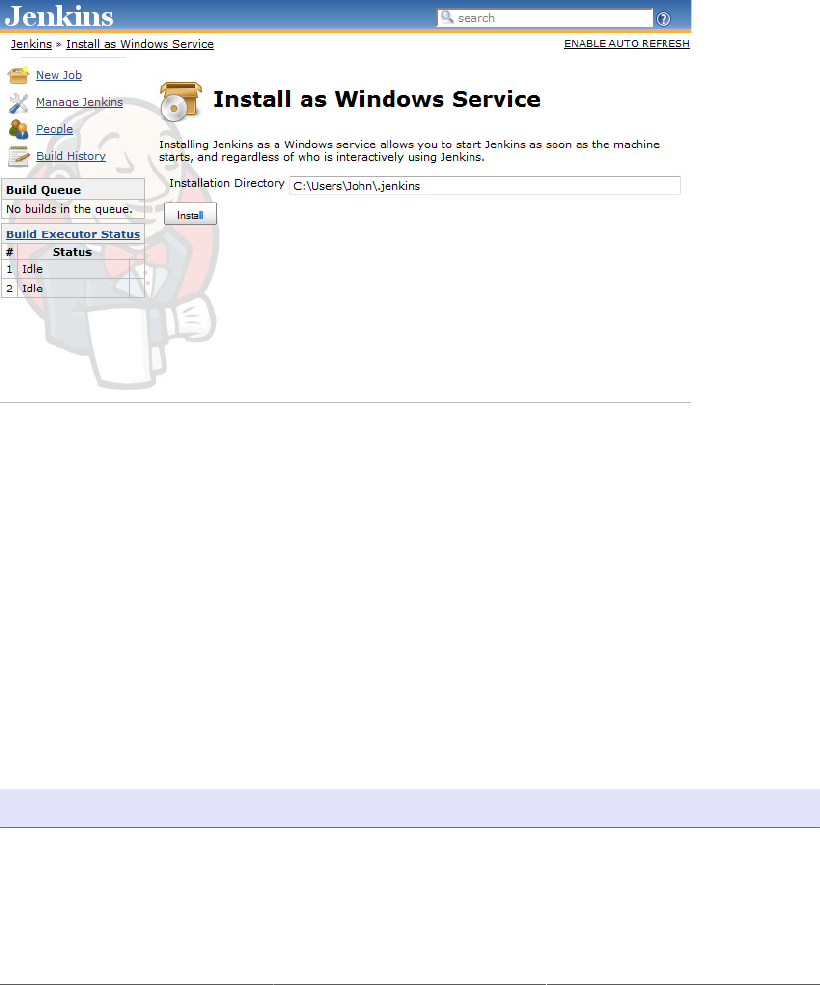
58
in the current user’s home directory. This is often not a good choice for a Windows installation. When
running Jenkins on Windows XP, you should avoid installing your Jenkins home directory anywhere
near your C:\\Documents And Settings directory—not only is it a ridiculously long name, the
spaces can wreak havoc with your Ant and Maven builds and any tests using classpath-based resources.
It is much better to use a short and sensible name such as C:\Jenkins. The Vista and Windows 7 home
directory paths like C:\Users\john will also work fine.
Figure 3.5. Installing Jenkins as a Windows service
A short home directory path is sometimes required for other reasons, too. On many versions of Windows
(Windows XP, Windows Server 2003, etc.), file path lengths are limited to around 260 characters. If
you combine a nested Jenkins work directory and a deep class path, you can often overrun this, which
will result in very obscure build errors. To minimize the risks of over-running the Windows file path
limits, you need to redefine the JENKINS_HOME environment variable to point to a shorter path, as we
discussed above.
This approach won’t always work with Windows Vista or Windows 7. An alternative strategy is
to use the jenkins.exe program that the Web Start installation process will have installed in the
directory you specified above. Open the command line prompt as an administrator (right-click, “Run as
administrator”) and run the jenkins.exe executable with the install option:
C:\Jenkins> jenkins.exe install
This basic installation will work fine in a simple context, but you will often need to fine-tune your
service. For example, by default, the Jenkins service will be running under the local System account.
However, if you are using Maven, Jenkins will need an .m2 directory and a settings.xml file in the
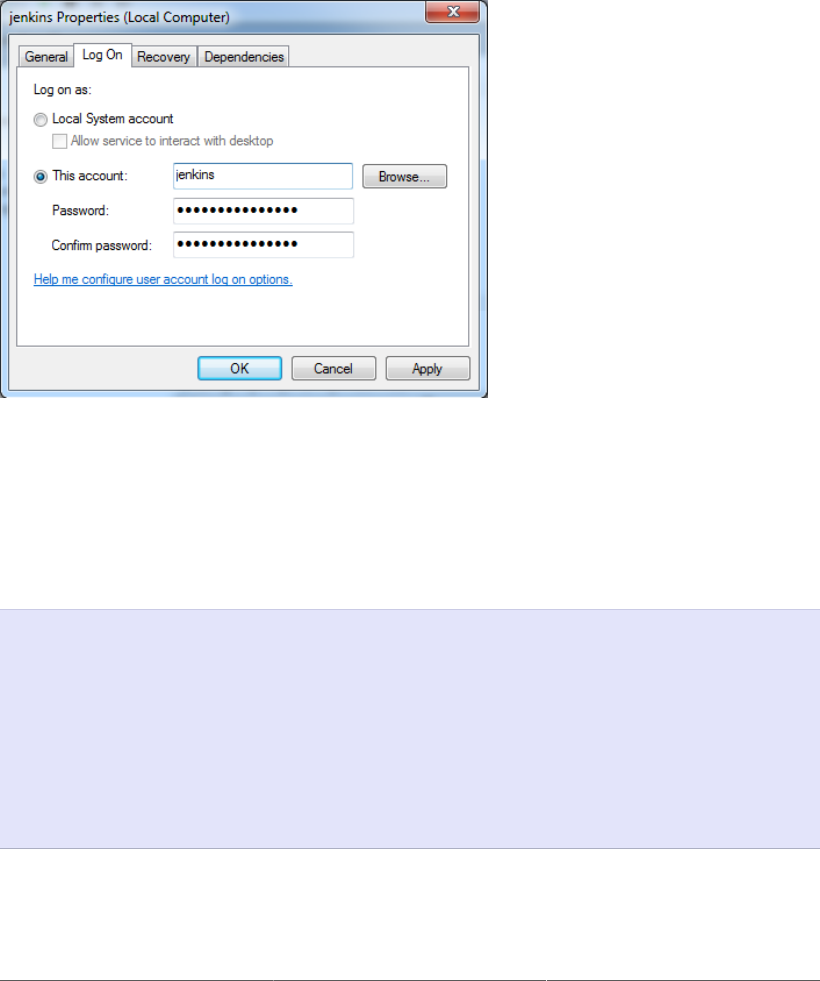
59
home directory. Similarly, if you are using Groovy, you might need a .groovy/lib directory. And so
on. To allow this, and to make testing your Jenkins install easier, make sure you run this service under
a real user account with the correct development environment set up (see Figure 3.6, “Configuring the
Jenkins Windows Service”). Alternatively, run the application as the system user, but use the System
Information page in Jenkins to check the /Users/johnsmart/Projects/Books/jenkins-the-
definitive-guide directory, and place any files that must be placed in the user home directory here.
Figure 3.6. Configuring the Jenkins Windows Service
You configure the finer details of the Jenkins service in a file called jenkins.xml, in the same directory
as your jenkins.war file. Here you can configure (or reconfigure) ports, JVM options, an the Jenkins
work directory. In the following example, we give Jenkins a bit more memory and get it to run on port
8081:
<service>
<id>jenkins</id>
<name>Jenkins</name>
<description>This service runs the Jenkins continuous integration system
</description>
<env name="JENKINS_HOME" value="D:\jenkins" />
<executable>java</executable>
<arguments>-Xrs -Xmx512m
-Dhudson.lifecycle=hudson.lifecycle.WindowsServiceLifecycle
-jar "%BASE%\jenkins.war" --httpPort=8081 --ajp13Port=8010</arguments>
</service>
Finally, if you need to uninstall the Jenkins service, you can do one of two things. The simplest is to
run the Jenkins executable with the uninstall option:

60
C:\jenkins> jenkins.exe uninstall
The other option is to use the Windows service tool sc:
C:> sc delete jenkins
3.13. What’s in the Jenkins Home Directory
The Jenkins home directory contains all the details of your Jenkins server configuration, details that
you configure in the Manage Jenkins screen. These configuration details are stored in the form of a set
of XML files. Much of the core configuration, for example, is stored in the config.xml file. Other
tools-specific configuration is stored in other appropriately-named XML files: the details of your Maven
installations, for example, are stored in a file called hudson.tasks.Maven.xml. You rarely need to
modify these files by hand, though occasionally it can come in handy.
The Jenkins home directory also contains a number of subdirectories (see Figure 3.7, “The Jenkins
home directory”). Not all of the files and directories will be present after a fresh installation, as some
are created when required by Jenkins. And if you look at an existing Jenkins installation, you will see
additional XML files relating to Jenkins configuration and plugins.
The main directories are described in more detail in Table 3.1, “The Jenkins home directory structure”.
Table 3.1. The Jenkins home directory structure
Directory Description
.jenkins The default Jenkins home directory (may be .hudson in older
installations).
fingerprints This directory is used by Jenkins to keep track of artifact
fingerprints. We look at how to track artifacts later on in the book.
jobs This directory contains configuration details about the build jobs
that Jenkins manages, as well as the artifacts and data resulting from
these builds. We look at this directory in detail below.
plugins This directory contains any plugins that you have installed. Plugins
allow you to extend Jenkins by adding extra feature. Note that,
with the exception of the Jenkins core plugins (subversion, cvs,
ssh-slaves, maven, and scid-ad), plugins are not stored with the
jenkins executable, or in the expanded web application directory.
This means that you can update your Jenkins executable and not
have to reinstall all your plugins.
updates This is an internal directory used by Jenkins to store information
about available plugin updates.

61
Directory Description
userContent You can use this directory to place your own custom content onto
your Jenkins server. You can access files in this directory at http://
myserver/hudson/userContent (if you are running Jenkins on an
application server) or http://myserver/userContent (if you are
running in stand-alone mode).
users If you are using the native Jenkins user database, user accounts will
be stored in this directory.
war This directory contains the expanded web application. When you
start Jenkins as a stand-alone application, it will extract the web
application into this directory.
Figure 3.7. The Jenkins home directory
The jobs directory is a crucial part of the Jenkins directory structure, and deserves a bit more attention.
You can see an example of a real Jenkins jobs directory in Figure 3.8, “The Jenkins jobs directory”.
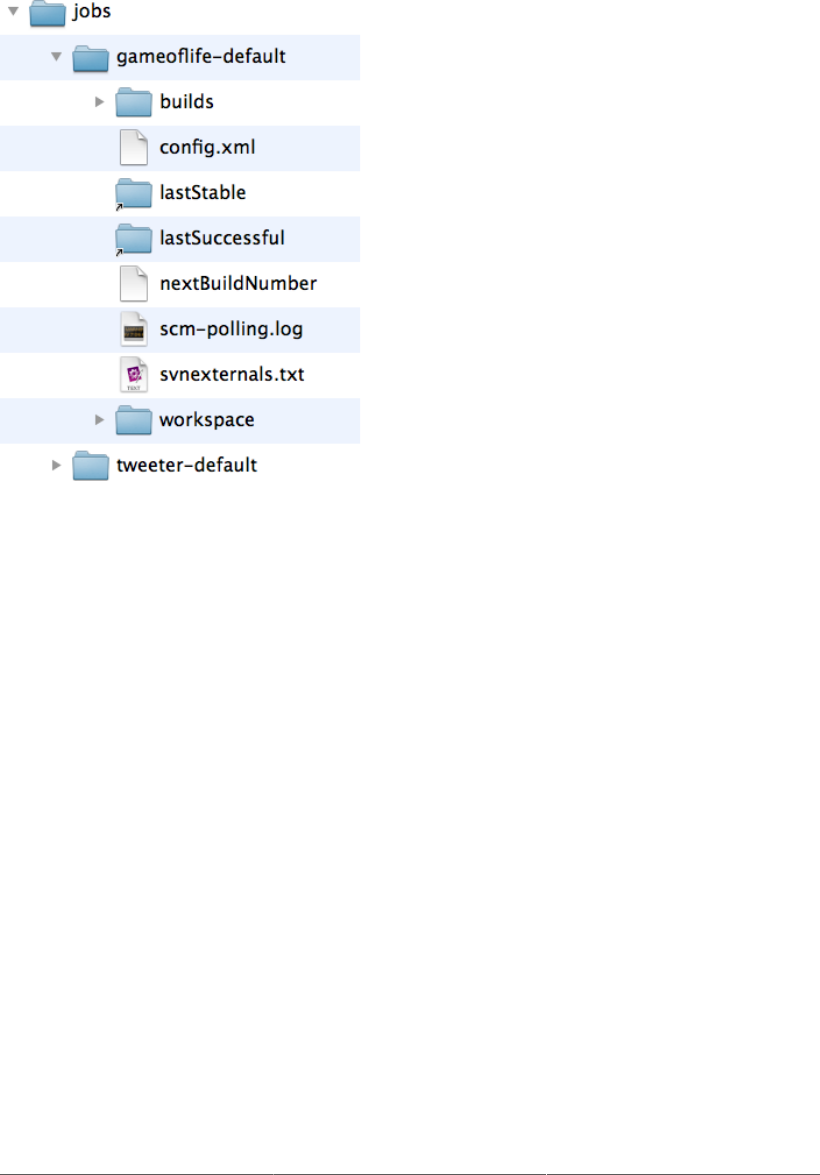
62
Figure 3.8. The Jenkins jobs directory
This directory contains a subdirectory for each Jenkins build job being managed by this instance of
Jenkins. Each job directory in turn contains two subdirectories: builds and workspace, along with
some other files. In particular, it contains the build job config.xml file, which contains, as you might
expect, the configuration details for this build job. There are also some other files used internally by
Jenkins, that you usually wouldn’t touch, such as the nextBuildNumber file (which contains the
number that will be assigned to the next build in this build job), as well as symbolic links to the
most recent successful build and the last stable one. A successful build is one that does not have any
compilation errors. A stable build is a successful build that has passed whatever quality criteria you may
have configured, such as unit tests, code coverage and so forth.
Both the build and the workspace directories are important. The workspace directory is where
Jenkins builds your project: it contains the source code Jenkins checks out, plus any files generated by
the build itself. This workspace is reused for each successive build—there is only ever one workspace
directory per project, and the disk space it requires tends to be relatively stable.
The builds directory contains a history of the builds executed for this job. You rarely need to intervene
directly in these directories, but it can be useful to know what they contain. You can see a real example
of the builds directory in Figure 3.9, “The builds directory”, where three builds have been performed.
Jenkins stores build history and artifacts for each build it performs in a directory labeled with a timestamp
(“2010-03-12_20-42-05” and so forth in Figure 3.9, “The builds directory”). It also contains symbolic
links with the actual build numbers that point to the build history directories.
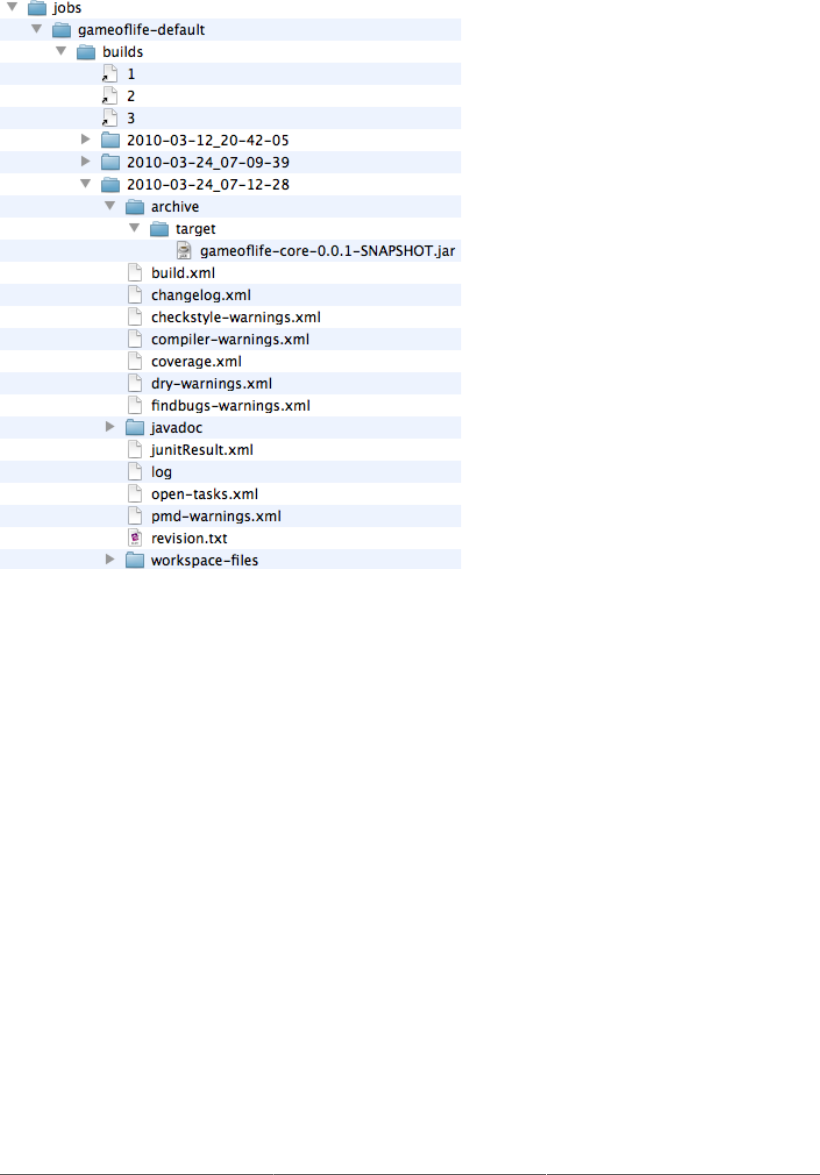
63
Figure 3.9. The builds directory
Each build directory contains information such as the build result log file, the Subversion revision
number used for this build (if you are using Subversion), the changes that triggered this build, and any
other data or metrics that you have asked Jenkins to keep track of. For example, if your build job keeps
track of unit test results or test coverage metrics, this data will be stored here for each build. The build
directory also contains any artifacts you are storing—binary artifacts, but also other generated files such
as javadoc or code coverage metrics. Some types of build jobs, such as the Jenkins Maven build jobs,
will also archive binary artifacts by default.
The size of the build directory will naturally grow over time, as the build history cumulates. You will
probably want to take this into account when designing your build server directory structure, especially
if your build server is running in a Unix-style environment with multiple disk partitions. A lot of this
data takes the form of text or XML files, which does not consume a large amount of extra space for each
build. However, if your build archives some of your build artifacts, such as JAR or WAR files, they
too will be stored here. The size of these artifacts should be factored into your disk space requirements.
We will see later on how to limit the number of builds stored for a particular build job if space is an
issue. Limiting the number of build jobs that Jenkins stores is always a trade-off between disk space
and keeping useful build statistics, as Jenkins does rely on this build history for its powerful reporting
features.

64
Jenkins uses the files in this directory extensively to display build history and metrics data, so you should
be particularly careful not to delete any of the build history directories without knowing exactly what
you are doing.
3.14. Backing Up Your Jenkins Data
It is important to ensure that your Jenkins data is regularly backed up. This applies in particular to the
Jenkins home directory, which contains your server configuration details as well as your build artifacts
and build histories. This directory should be backed up frequently and automatically. The Jenkins
executable itself is less critical, as it can easily be reinstalled without affecting your build environment.
3.15. Upgrading Your Jenkins Installation
Upgrading Jenkins is easy—you simply replace your local copy of the jenkins.war file and restart
Jenkins. However you should make sure there are no builds running when you restart your server. Since
your build environment configuration details, plugins, and build history are stored in the Jenkins home
directory, upgrading your Jenkins executable will have no impact on your installation. You can always
check what version of Jenkins you are currently running by referring to the version number in the bottom
right corner of every screen.
If you have installed Jenkins using one of the Linux packages, Jenkins can be upgraded using the same
process as the other system packages on the server.
If you are running Jenkins as a stand-alone instance, you can also upgrade your Jenkins installation
directly from the web interface, in the Manage Jenkins section. Jenkins will indicate if a more recent
version is available, and give you the option to either download it manually or upgrade automatically
(see Figure 3.10, “Upgrading Jenkins from the web interface”).
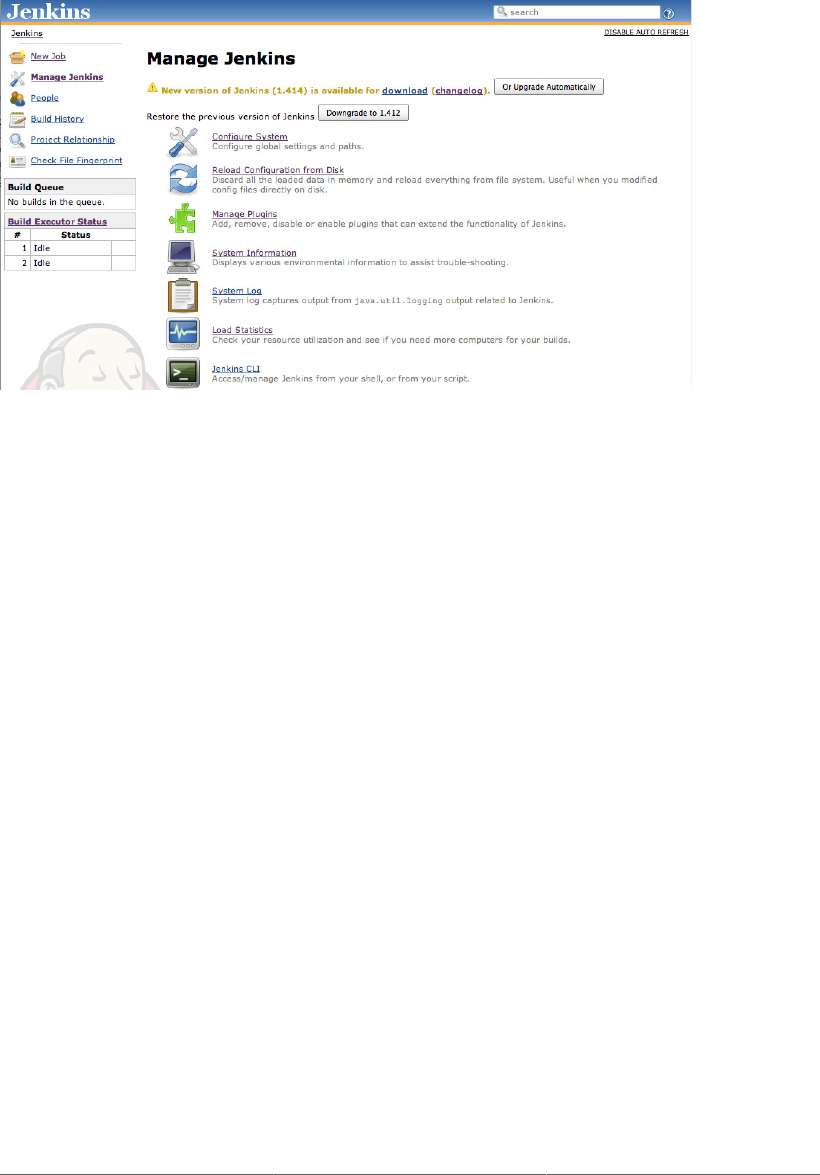
65
Figure 3.10. Upgrading Jenkins from the web interface
Once Jenkins has downloaded the upgrade, you can also tell it to restart when no jobs are running. This
is probably the most convenient way to upgrade Jenkins, although it will not work in all environments.
In particular, you need to be running Jenkins as a stand-alone application, and the user running Jenkins
needs to have read-write access to the jenkins.war file.
If you are running Jenkins on an application server such as Tomcat or JBoss, you might need to do a
bit more tidying up when you upgrade your Jenkins instance. Tomcat, for example, places compiled
JSP pages in the CATALINA_BASE/work directory. When you upgrade your Jenkins version, these files
need to be removed to prevent the possibility of any stale pages being served.
Any plugins you have installed will be unaffected by your Jenkins upgrades. However, plugins can also
be upgraded, independently of the main Jenkins executable. You upgrade your plugins directly in the
Jenkins web application, using the Jenkins Plugin Manager. We discuss plugins in more detail further
on in this book.
3.16. Conclusion
In this chapter, we have seen how to install and run Jenkins in different environments, and learned a few
basic tips on how to maintain your Jenkins installation once running. Jenkins is easy to install, both as a
stand-alone application and as a WAR file deployed to an existing application server. The main things
you need to consider when choosing a build server to host Jenkins are CPU, memory, and disk space.

Chapter 4. Configuring Your Jenkins
Server
4.1. Introduction
Before you can start creating your build jobs in Jenkins, you need to do a little configuration, to ensure
that your Jenkins server works smoothly in your particular environment. Jenkins is highly configurable,
and, although most options are provided with sensible default values, or are able to find the right build
tools in the system path and environment variables, it is always a good idea to know exactly what your
build server is doing.
Jenkins is globally very easy to configure. The administration screens are intuitive, and the contextual
online help (the blue question mark icons next to each field) is detailed and precise. In this chapter, we
will look at how to configure your basic server setup in detail, including how to configure Jenkins to
use different versions of Java, build tools such as Ant and Maven, and SCM tools such as CVS and
Subversion. We will look at more advanced server configuration, such as using other version control
systems or notification tools, further on in the book.
4.2. The Configuration Dashboard—The Manage Jenkins
Screen
In Jenkins, you manage virtually all aspects of system configuration in the Manage Jenkins screen (see
Figure 4.1, “You configure your Jenkins installation in the Manage Jenkins screen”). You can also get
to this screen directly from anywhere in the application by typing “manage” in the Jenkins search box.
This screen changes depending on what plugins you install, so don’t be surprised if you see more than
what we show here.
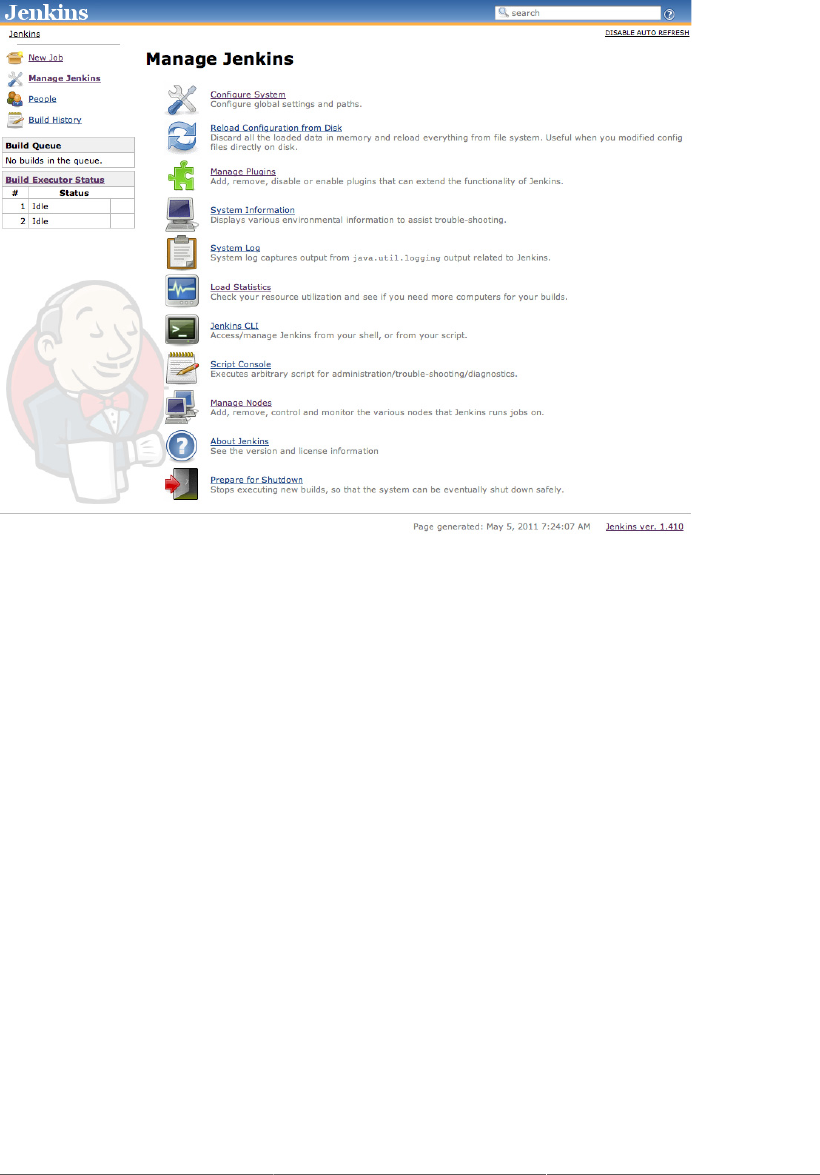
68
Figure 4.1. You configure your Jenkins installation in the Manage Jenkins screen
This screen lets you configure different aspects of your Jenkins server. Each link on this page takes you
to a dedicated configuration screen, where you can manage different parts of the Jenkins server. Some
of the more interesting options are discussed here:
Configure System
This is where you manage paths to the various tools you use in your builds, such as JDKs, and
versions of Ant and Maven, as well as security options, email servers, and other system-wide
configuration details. Many of the plugins that you install will also need to be configured here—
Jenkins will add the fields dynamically when you install the plugins.
Reload Configuration from Disk
As we saw in the previous chapter, Jenkins stores all its system and build job configuration
details as XML files stored in the Jenkins home directory (see Section 3.4, “The Jenkins Home
Directory”). It also stores all of the build history in the same directory. If you are migrating build
jobs from one Jenkins instance to another, or archiving old build jobs, you will need to add or
remove the corresponding build job directories to Jenkins’s builds directory. You don’t need
to take Jenkins offline to do this—you can simply use the “Reload Configuration from Disk”
option to reload the Jenkins system and build job configurations directly. This process can be a
little slow if there is a lot of build history, as Jenkins loads not only the build configurations but
also all of the historical data as well.

69
Manage Plugins
One of the best features of Jenkins is its extensible architecture. There is a large ecosystem of
third-party open source plugins available, enabling you to add extra features to your build server,
from support for different SCM tools such as Git, Mercurial or ClearCase, to code quality and
code coverage metrics reporting. We will be looking at many of the more popular and useful
plugins throughout this book. Plugins can be installed, updated and removed through the Manage
Plugins screen. Note that removing plugins needs to be done with some care, as it can sometimes
affect the stability of your Jenkins instance—we will look at this in more detail in Section 13.6,
“Migrating Build Jobs”.
System Information
This screen displays a list of all the current Java system properties and system environment
variables. Here, you can check exactly what version of Java Jenkins is running in, what user it
is running under, and so forth. You can also check that Jenkins is using the correct environment
variable settings. Its main use is for troubleshooting, so that you can make sure that your server
is running with the system properties and variables you think it is.
System Log
The System Log screen is a convenient way to view the Jenkins log files in real time. Again, the
main use of this screen is for troubleshooting.
You can also subscribe to RSS feeds for various levels of log messages. For example, as a Jenkins
administrator, you might want to subscribe to all the ERROR and WARNING log messages.
Load Statistics
Jenkins keeps track of how busy your server is in terms of the number of concurrent builds and
the length of the build queue (which gives an idea of how long your builds need to wait before
being executed). These statistics can give you an idea of whether you need to add extra capacity
or extra build nodes to your infrastructure.
Script Console
This screen lets you run Groovy scripts on the server. It is useful for advanced troubleshooting:
since it requires a strong knowledge of the internal Jenkins architecture, it is mainly useful for
plugin developers and the like.
Manage Nodes
Jenkins handles parallel and distributed builds well. In this screen, you can configure how many
builds you want. Jenkins runs simultaneously, and, if you are using distributed builds, set up
build nodes. A build node is another machine that Jenkins can use to execute its builds. We will
look at how to configure distributed builds in detail in Chapter 11, Distributed Builds.
Prepare for Shutdown
If you need to shut down Jenkins, or the server Jenkins is running on, it is best not to do so when
a build is being executed. To shut down Jenkins cleanly, you can use the Prepare for Shutdown

70
link, which prevents any new builds from being started. Eventually, when all of the current builds
have finished, you will be able to shut down Jenkins cleanly.
We will come back to some of these features in more detail later on in the book. In the following sections,
we will focus on how to configure the most important Jenkins system parameters.
4.3. Configuring the System Environment
The most important Jenkins administration page is the Configure System screen (Figure 4.2, “System
configuration in Jenkins”). Here, you set up most of the fundamental tools that Jenkins needs to do its
daily work. The default screen contains a number of sections, each relating to a different configuration
area or external tool. In addition, when you install plugins, their system-wide configuration is also often
done in this screen.
Figure 4.2. System configuration in Jenkins
The Configure System screen lets you define global parameters for your Jenkins installation, as well as
external tools required for your build process. The first part of this screen lets you define some general
system-wide parameters.
The Jenkins home directory is displayed, for reference. This way, you can check at a glance that you are
working with the home directory that you expect. Remember, you can change this directory by setting
the JENKINS_HOME environment variable in your environment (see Section 3.4, “The Jenkins Home
Directory”).

71
The System Message field is useful for several purposes. This text is displayed at the top of your Jenkins
home page. You can use HTML tags, so it is a simple way to customize your build server by including
the name of your server and a short blurb describing its purpose. You can also use it to display messages
for all users, such as to announce system outages and so on.
The Quiet Period is useful for SCM tools like CVS that commit file changes one by one, rather than
grouped together in a single atomic transaction. Normally, Jenkins will trigger a build as soon as it
detects a change in the source repository. However, this doesn’t suit all environments. If you are using
an SCM tool like CVS, you don’t want Jenkins kicking off a build as soon as the first change comes
in, as the repository will be in an inconsistent state until all of the changes have been committed. You
can use the Quiet Period field to avoid issues like this. If you set a value here, Jenkins will wait until
no changes have been detected for the specified number of seconds before triggering the build. This
helps to ensure that all of the changes have been committed and the repository is in a stable state before
starting the build.
For most modern version control systems, such as Subversion, Git or Mercurial, commits are atomic.
This means that changes in multiple files are submitted to the repository as a single unit, and the source
code on the repository is guaranteed to be in a stable state at all times. However, some teams still use an
approach where one logical change set is delivered in several commit operations. In this case, you can
use the Quiet Period field to ensure that the build always uses a stable source code version.
The Quiet Period value specified here is in fact the default system-wide value—if required, you can
redefine this value individually for each project.
You also manage user accounts and user rights here. By default, Jenkins lets any user do anything. If
you want a more restrictive approach, you will need to activate Jenkins security here using the Enable
Security field. There are many ways to do this, and we look at this aspect of Jenkins later on (see
Chapter 7, Securing Jenkins).
4.4. Configuring Global Properties
The Global Properties (see Figure 4.3, “Configuring environment variables in Jenkins”) section lets you
define variables that can be managed centrally but used in all of your build jobs. You can add as many
properties as you want here, and use them in your build jobs. Jenkins will make them available within
your build job environment, so you can freely use them within your Ant and Maven build scripts. Note
that you shouldn’t put periods (“.”) in the property names, as they won’t be processed correctly. So
ldapserver or ldap_server is fine, but not ldap.server.
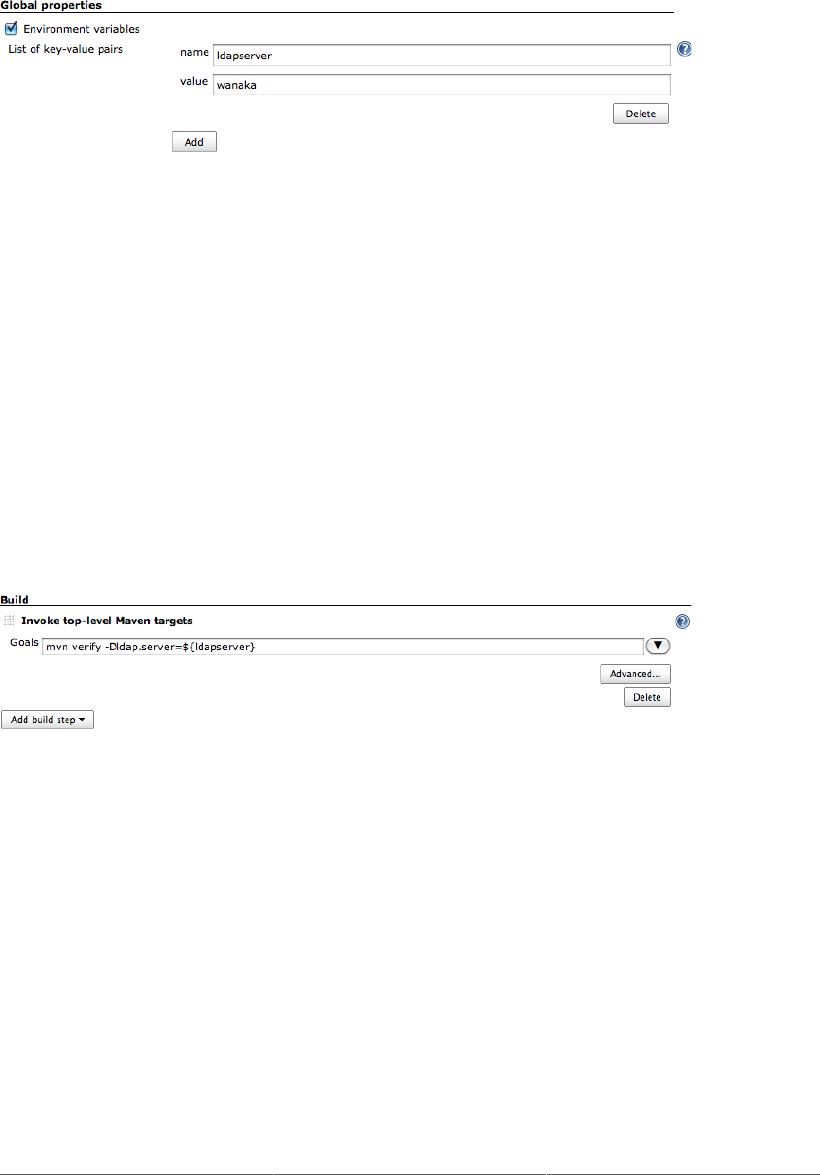
72
Figure 4.3. Configuring environment variables in Jenkins
There are two ways you typically use these variables. Firstly, you can use them directly in your build
script, using the ${key} or $key notation (so ${ldapserver} or $ldapserver in the example give
above. This is the simplest approach, but means that there is a tight coupling between your build job
configuration and your build scripts.
If your script uses a different property name (one containing dots, for example), you can also pass the
value to your build script in the build job configuration. In Figure 4.4, “Using a configured environment
variable” we pass the ldapserver property value defined in Figure 4.3, “Configuring environment
variables in Jenkins” to a Maven build job. Using the -D option means that this value will be accessible
from within the build script. This is a flexible approach, as we can assign the global properties defined
within Jenkins to script-specific variables in our build scripts. In Figure 4.4, “Using a configured
environment variable”, for example, the ldapserver property will be available from within the Maven
build via the internal ${ldap.server} property.
Figure 4.4. Using a configured environment variable
4.5. Configuring Your JDKs
Historically, one of the most common uses of Jenkins has been to build Java applications. So Jenkins
naturally provides excellent built-in support for Java.
By default, Jenkins will build Java applications using whatever version of Java it finds on the system
path, which is usually the version that Jenkins itself is running under. However, for a production build
server, you will probably want more control than this. For example, you may be running your Jenkins
server under Java 6, for performance reasons. However, your production server might be running under
Java 5 or even Java 1.4. Large organizations are often cautious when it comes to upgrading Java versions
in their production environments, and some of the more heavyweight application servers on the market
are notoriously slow to be certified with the latest JDKs.
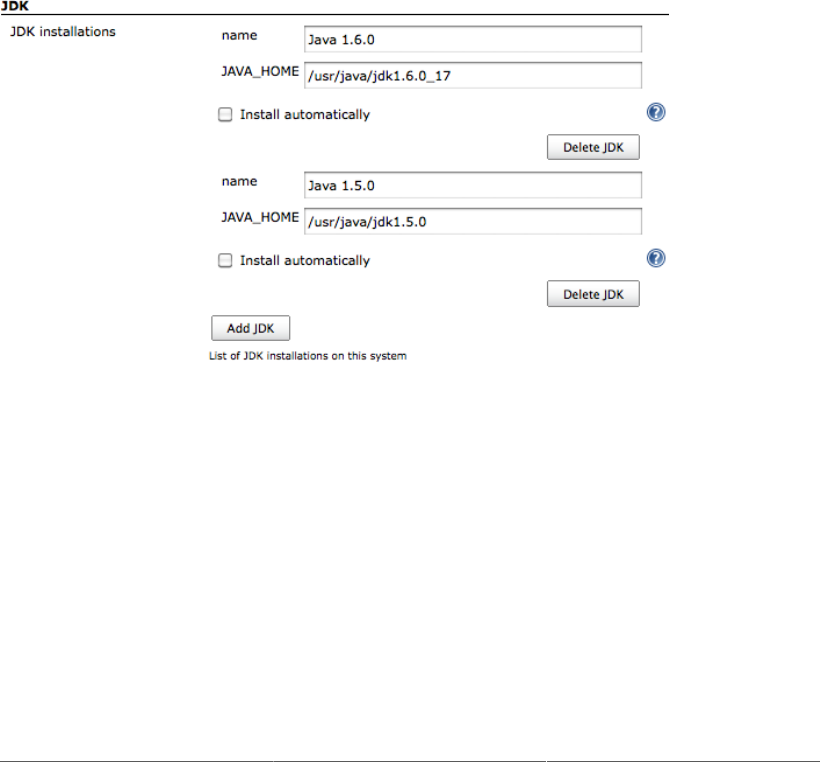
73
In any case, it is always a wise practice to build your application using a version of Java that is close
to the one running on your production server. While an application compiled with Java 1.4 will usually
run fine under Java 6, the inverse is not always true. Or you may have different applications that need
to be built using different versions of Java.
Jenkins provides good support for working with multiple JVMs. Indeed, Jenkins makes it very easy
to configure and use as many versions of Java as you want. Like most system-level configuration, we
do this in the Configure System screen (see Figure 4.2, “System configuration in Jenkins”). Here, you
will find a section called JDK which allows you to manage the JDK installations you need Jenkins to
work with.
The simplest way to declare a JDK installation is simply to supply an appropriate name (which will be
used to identify this Java installation later on when you configure your builds), along with the path to
the Java installation directory (the same path you would use for the JAVA_HOME variable), as shown in
Figure 4.5, “JDK configuration in Jenkins”. Although you need to type the path manually, Jenkins will
check in real time both that the directory exists and that it looks like a valid JDK directory.
Figure 4.5. JDK configuration in Jenkins
You can also ask Jenkins to install Java for you. In this case, Jenkins will download the JDK installation
and install a copy on your machine (see Figure 4.6, “Installing a JDK automatically”). The first time
a build needs to use this JDK, Jenkins will download and install the specified version of Java into the
tools directory in the Jenkins home directory. If the build is running on a new build agent that doesn’t
have this JDK installed, it will download and install it onto the build agent machine as well.
This is also a great way to configure build agents. As we’ll see later on in the book, Jenkins can delegate
build jobs to other machines, or build agents. A build agent (or “slave”) is simply another computer that
Jenkins can use to run some of its builds. If you use Jenkins’s Install automatically option, you don’t
need to manually install all the JDK versions you need on the build agent machines—Jenkins will do
it for you the first time it needs to.
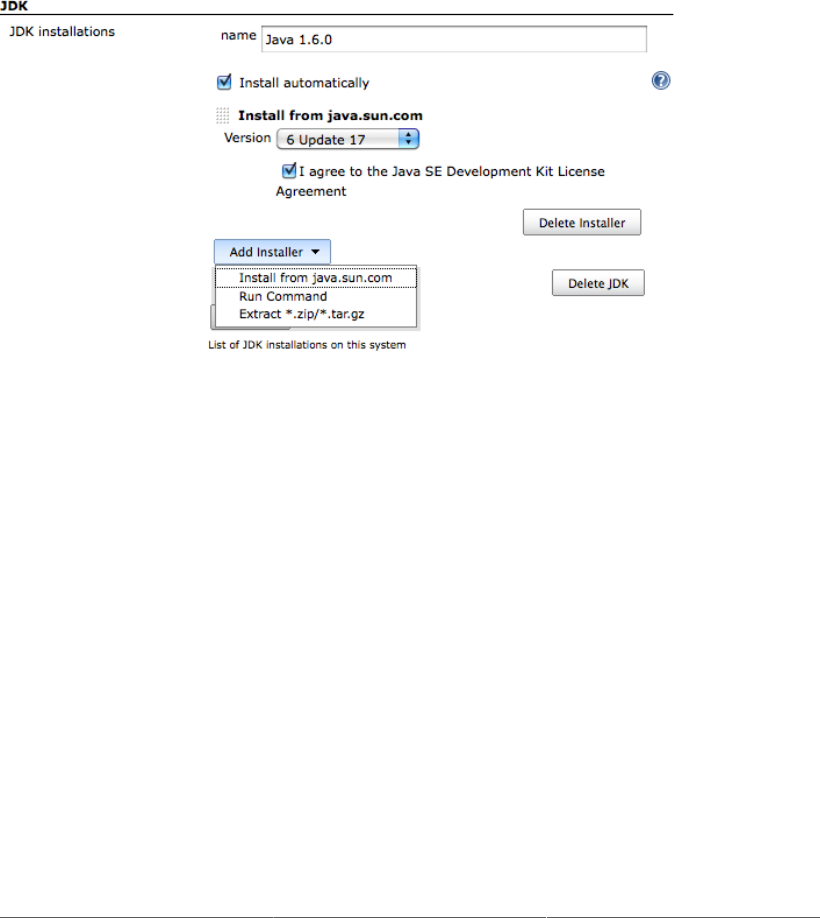
74
By default, Jenkins proposes to download the JDK from the Oracle website. If your Jenkins installation
is behind a proxy server, you may need to configure your proxy settings to ensure that Jenkins can access
the external download sites (see Section 4.9, “Configuring a Proxy”). Another option is to provide a
URL pointing to your own internal copy of the JDK binaries (either in the form of a ZIP or a GZip-
compressed TAR file), stored on a local server within your organization. This lets you provide standard
installations on a local server and makes for faster automatic installations. When you use this option,
Jenkins also lets you specify a label, which will restrict the use of this installation to the build notes with
this label. This is a useful technique if you need to install a specific version of a tool on certain build
machines. The same approach can also be used for other build tools (such as Maven and Ant).
Figure 4.6. Installing a JDK automatically
The automatic installer will not work in all environments (if it can’t find or identify your operating
system to its satisfaction, for example, the installation will fail), but it is nevertheless a useful and
convenient way to set up new build servers or distributed build agents in a consistent manner.
4.6. Configuring Your Build Tools
Build tools are the bread-and-butter of any build server, and Jenkins is no exception. Out of the box,
Jenkins supports three principal build tools: Ant, Maven, and the basic shell-script (or Batch script in
Windows). Using Jenkins plugins, you can also add support for other build tools and other languages,
such as Gant, Grails, MSBuild, and many more.
4.6.1. Maven
Maven is a high-level build scripting framework for Java that uses notions such as a standard directory
structure and standard life cycles, Convention over Configuration, and Declarative Dependency
Management to simplify a lot of the low-level scripting that you find in a typical Ant build script. In
Maven, your project uses a standard, well-defined build life cycle—compile, test, package, deploy, and
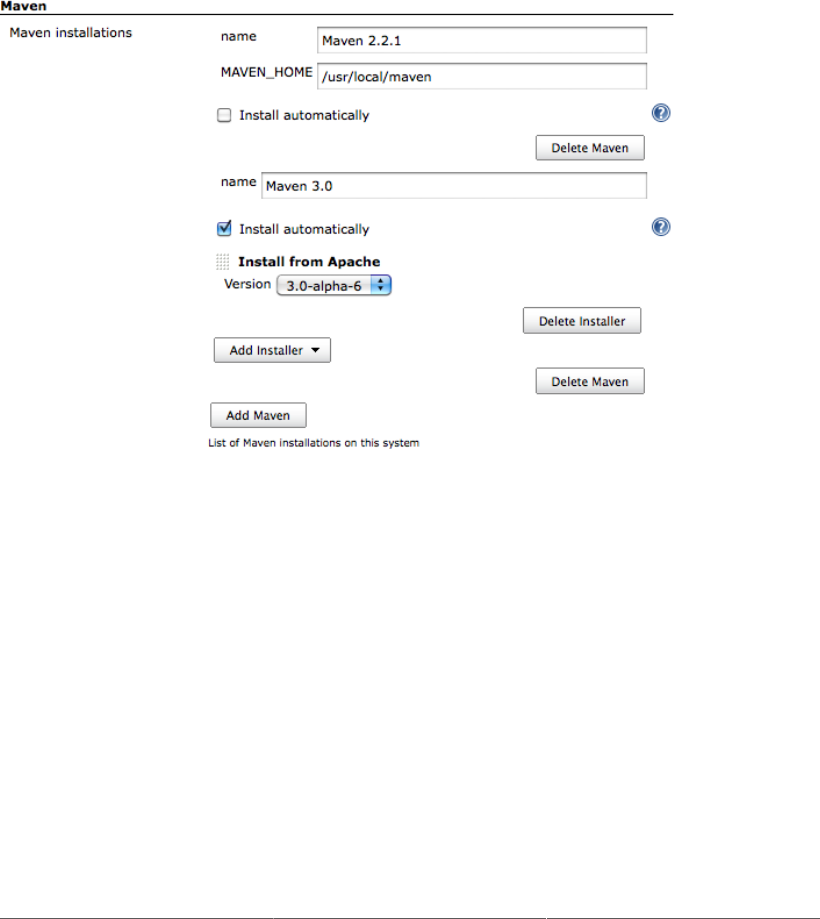
75
so forth. Each life cycle phase is associated with a Maven plugin. The various Maven plugins use the
standard directory structure to carry out these tasks with a minimum of intervention on your part. You
can also extend Maven by overriding the default plugin configurations or by invoking additional plugins.
Jenkins provides excellent support for Maven, and has a good understanding of Maven project structures
and dependencies. You can either get Jenkins to install a specific version of Maven automatically (as we
are doing with Maven 3 in the example), or provide a path to a local Maven installation (see Figure 4.7,
“Configuring Maven in Jenkins”). You can configure as many versions of Maven for your build projects
as you want, and use different versions of Maven for different projects.
Figure 4.7. Configuring Maven in Jenkins
If you tick the Install automatically checkbox, Jenkins will download and install the requested version
of Maven for you. You can either ask Jenkins to download Maven directly from the Apache site, or from
a (presumably local) URL of your choice. This is an excellent choice when you are using distributed
builds, and, since Maven is cross-platform, it will work on any machine. You don’t need to install Maven
explicitly on each build machine—the first time a build machine needs to use Maven, it will download
a copy and install it to the tools directory in the Jenkins home directory.
Sometimes you need to pass Java system options to your Maven build process. For instance it is
often useful to give Maven a bit of extra memory for heavyweight tasks such as code coverage or
site generation. Maven lets you do this by setting the MAVEN_OPTS variable. In Jenkins, you can set
a system-wide default value, to be used across all projects (see Figure 4.8, “Configuring system-wide
MVN_OPTS”). This comes in handy if you want to use certain standard memory options (for example)
across all projects, without having to set it up in each project by hand.
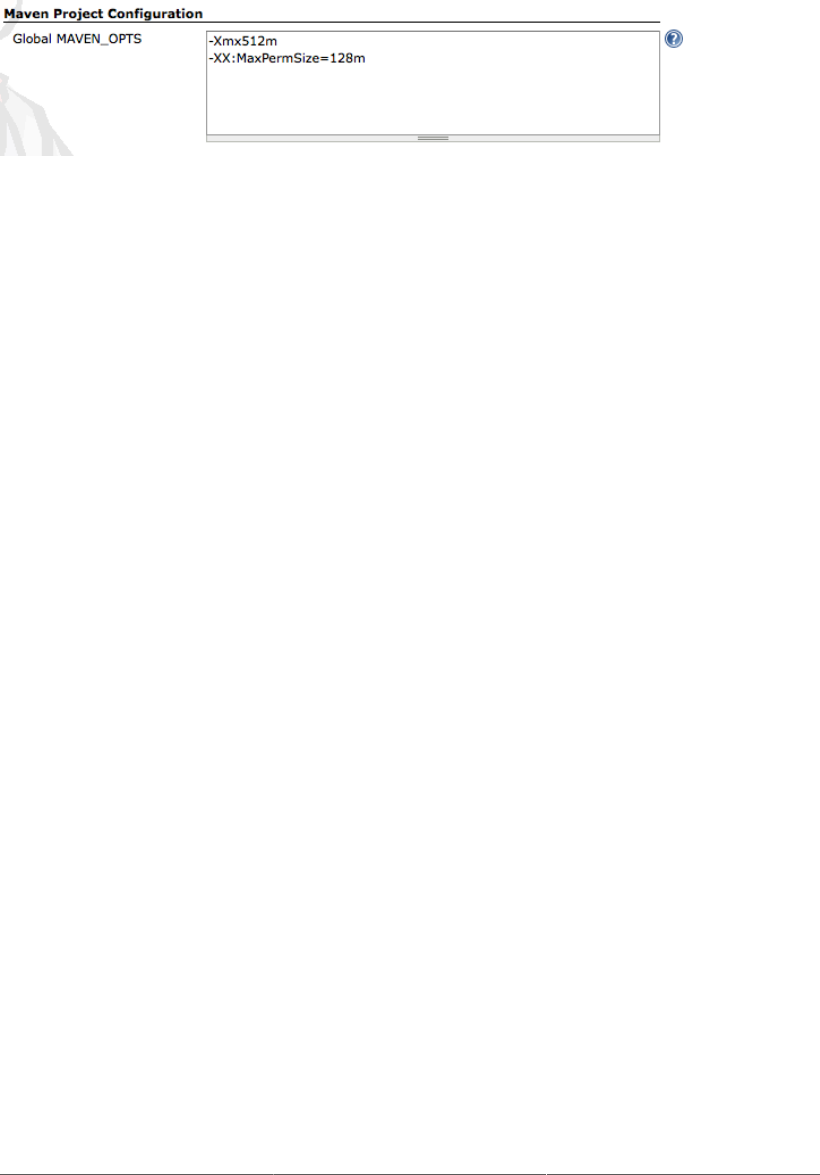
76
Figure 4.8. Configuring system-wide MVN_OPTS
4.6.2. Ant
Ant is a widely-used and very well-known build scripting language for Java. It is a flexible, extensible,
relatively low-level scripting language, used in a large number of open source projects. An Ant build
script (typically called build.xml) is made up of a number of targets. Each target performs a particular
job in the build process, such as compiling your code or running your unit tests. It does so by executing
tasks, which carry out a specific part of the build job, such as invoking javac to compile your code, or
creating a new directory. Targets also have dependencies, indicating the order in which your build tasks
need to be executed. For example, you need to compile your code before you can run your unit tests.
Jenkins provides excellent build-in support for Ant—you can invoke Ant targets from your build job,
providing properties to customize the process as required. We look at how to do this in detail later on
in this book.
If Ant is available on the system path, Jenkins will find it. However, if you want to know precisely what
version of Ant you are using, or if you need to be able to use several different versions of Ant on different
build jobs, you can configure as many installations of Ant as required (see Figure 4.9, “Configuring Ant
in Jenkins”). Just provide a name and installation directory for each version of Ant in the Ant section
of the Configure System screen. You will then be able to choose what version of Ant you want to use
for each project.
If you tick the Install automatically checkbox, Jenkins will download and install Ant into the tools
directory of your Jenkins home directory, just like it does for Maven. It will download an Ant installation
the first time a build job needs to use Ant, either from the Apache website or from a local URL. Again,
this is a great way to standardize build servers and make it easier to add new distributed build servers
to an existing infrastructure.

77
Figure 4.9. Configuring Ant in Jenkins
4.6.3. Shell-Scripting Language
If you are running your build server on Unix or Linux, Jenkins lets you insert shell scripts into your
build jobs. This is handy for performing low-level, OS-related tasks that you don’t want to do in Ant
or Maven. In the Shell section, you define the default shell that will be used when executing these
shell scripts. By default, this is /bin/sh, but there are times you may want to modify this to another
command interpreter such as bash or Perl.
In Windows, the Shell section does not apply—you use Windows batch scripting instead. So, on a
Windows build server, you should leave this field blank.
4.7. Configuring Your Version Control Tools
Jenkins comes preinstalled with plugins for CVS and Subversion. Other version control systems are
supported by plugins that you can download from the Manage Plugins screen.
4.7.1. Configuring Subversion
Subversion needs no special configuration, since Jenkins uses native Java libraries to interact with
Subversion repositories. If you need to authenticate to connect to a repository, Jenkins will prompt you
when you enter the Subversion URL in the build job configuration.
4.7.2. Configuring CVS
CVS needs little or no configuration. By default, Jenkins will look for tools like CVS on the system
path, though you can provide the path explicitly if it isn’t on the system path. CVS keeps login and
password details in a file called .cvspass, which is usually in your home directory. If this is not the
case, you can provide a path where Jenkins can find this file.
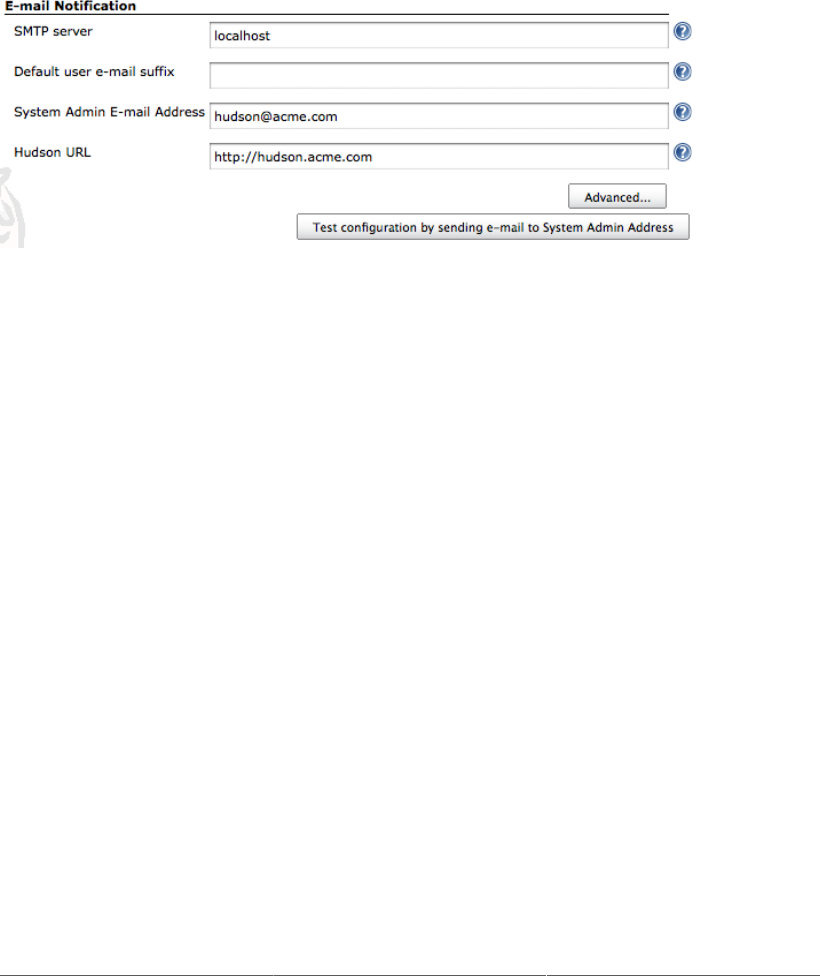
78
4.8. Configuring the Mail Server
The last of the basic configuration options you need to set up is the email server configuration. Email is
Jenkins’s more fundamental notification technique—when a build fails, it will send an email message
to the developer who committed the changes, and optionally to other team members as well. So Jenkins
needs to know about your email server (see Figure 4.10, “Configuring an email server in Jenkins”).
Figure 4.10. Configuring an email server in Jenkins
The System Admin email address is the address from which the notification messages are sent. You can
also use this field to check the email setup—if you click on the Test configuration button, Jenkins will
send a test email to this address.
In many organizations, you can derive a user’s email address from their login by adding the organization
domain name. For example, at ACME, user John Smith will have a login of “jsmith" and an email
address of “jsmith@acme.com”. If this extends to your version control system, Jenkins can save you
a lot of configuration effort in this area. In the previous example, you could simply specify the default
user email suffix of acme.com and Jenkins will figure out the rest.
You also need to provide a proper base URL for your Jenkins server (one that does not use localhost).
Jenkins uses this URL in the email notifications so that users can go directly from the email to the build
failure screen on Jenkins.
Jenkins also provides for more sophisticated email configuration, using more advanced features such
as SMTP authentication and SSL. If this is your case, click on the Advanced button to configure these
options.
For example, many organizations use Google Apps for their email services. You can configure Jenkins
to work with the Gmail service as shown in Figure 4.11, “Configuring an email server in Jenkins to use
a Google Apps domain”. All you need to do in this case is to use the Gmail SMTP server, and provide
your Gmail username and password in the SMTP Authentication (you also need to use SSL and the
non-standard port of 465).
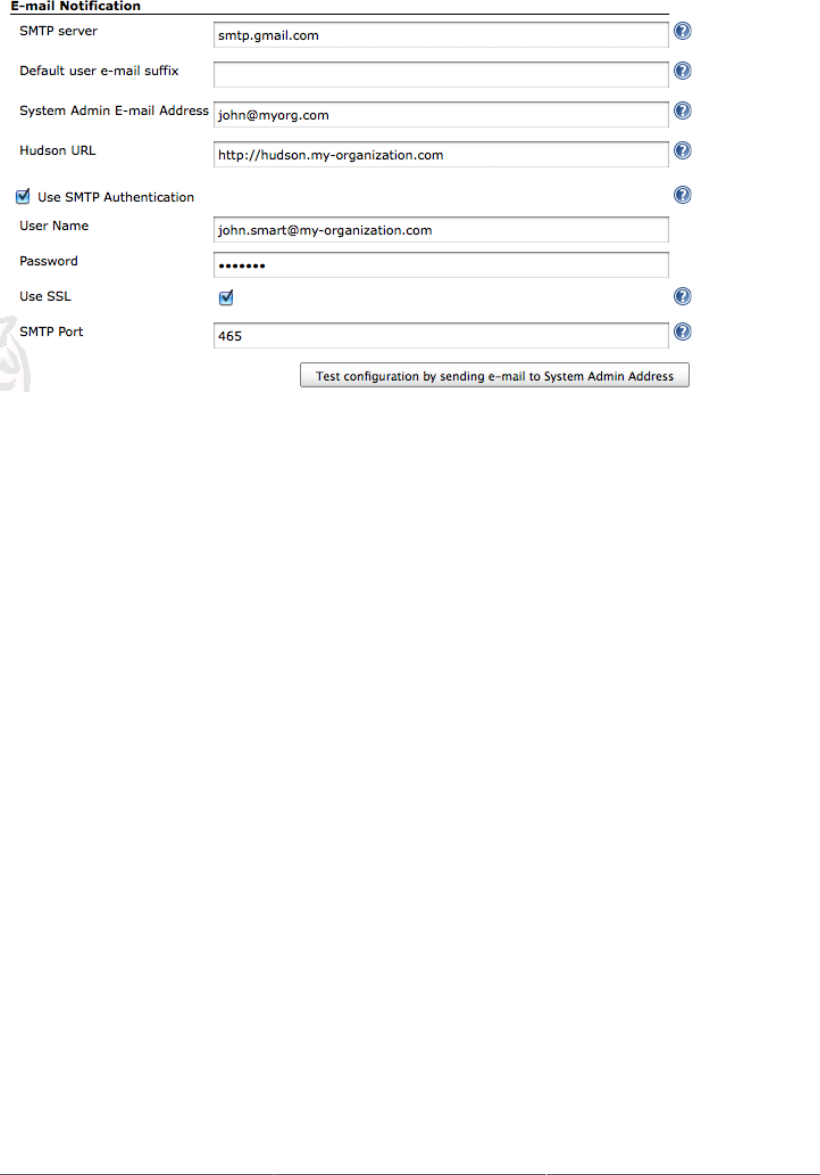
79
Figure 4.11. Configuring an email server in Jenkins to use a Google Apps domain
4.9. Configuring a Proxy
In most enterprise environments, your Jenkins server will be situated behind a firewall, and will not
have direct access to the Internet. Jenkins needs Internet access to download plugins and updates, and
also to install tools such as the JDK, Ant and Maven from remote sites. If you need to go through an
HTTP proxy server to get to the Internet, you can configure the connection details (the server and port,
and if required the username and password) in the Advanced tab on the Plugin Manager screen (see
Figure 4.12, “Configuring Jenkins to use a proxy”).
If your proxy is using Microsoft’s NTLM authentication scheme, then you will need to provide a domain
name as well as a username. You can place both in the User name field: just enter the domain name,
followed by a back-slash (\), followed by the username, such as “MyDomain\Joe Bloggs”.
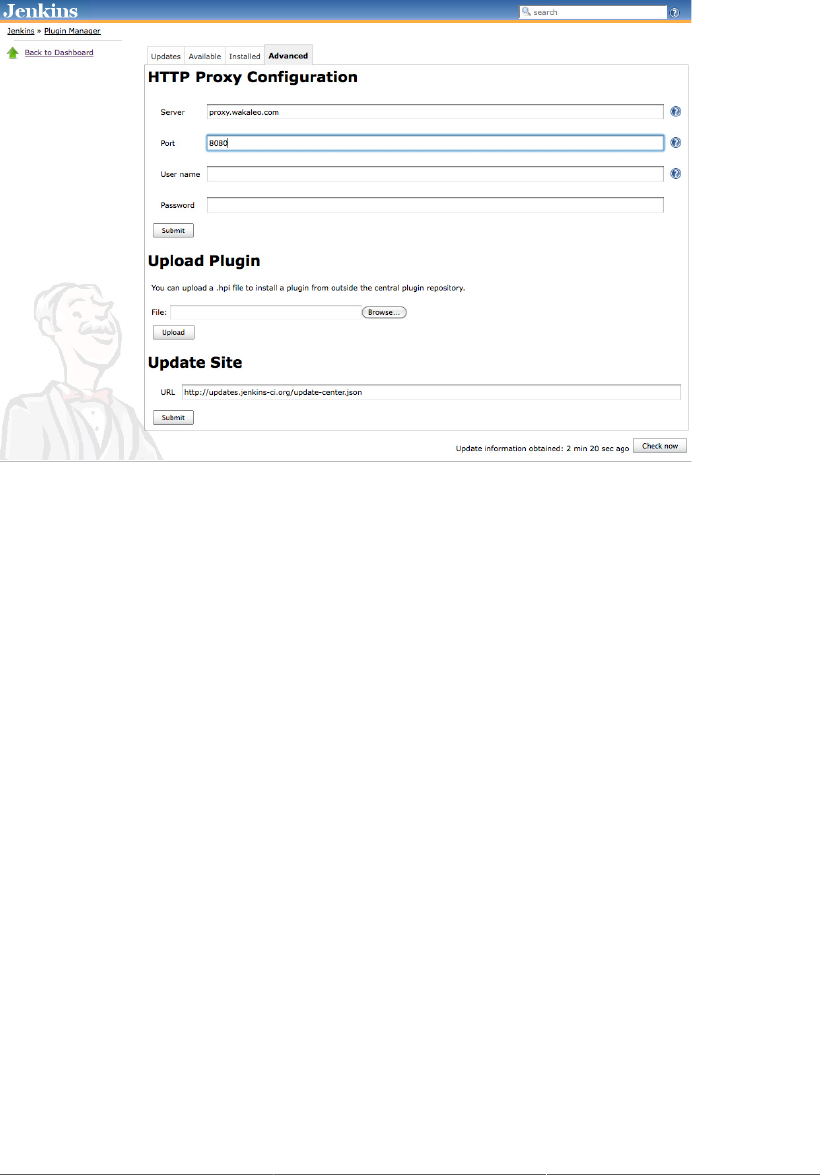
80
Figure 4.12. Configuring Jenkins to use a proxy
Finally, if you are setting up Proxy access on your Jenkins build server, remember that all of the other
tools running on this server will need to know about the proxy as well. In particular, this may include
tools such as Subversion (if you are accessing an external repository) and Maven (if you are not using
an Enterprise Repository Manager).
4.10. Conclusion
You don’t need a great deal of configuration to get started with Jenkins. The configuration that is required
is fairly straightforward, and is centralised in the Configure System screen. Once this is done, you are
ready to create your first Jenkins build job!

Chapter 5. Setting Up Your Build Jobs
5.1. Introduction
Build jobs are the basic currency of a Continuous Integration server.
A build job is a particular way of compiling, testing, packaging, deploying or otherwise doing something
with your project. Build jobs come in a variety of forms; you may want to compile and unit test your
application, report on code quality metrics related to the source code, generate documentation, bundle
up an application for a release, deploy it to production, run an automated smoke test, or do any number
of other similar tasks.
A software project will usually have several related build jobs. For example, you might choose to start
off with a dedicated build job that runs all of your unit tests. If these pass, you might proceed to a
build job that executes longer-running integration tests, runs code quality metrics, or generates technical
documentation, before finally bundling up your web application and deploying it to a test server.
In Jenkins, build jobs are easy to set up. In this chapter, we will look at the main types of build jobs and
how to configure them. In later chapters, we will take things further, looking at how to organize multiple
build jobs, how to set up build promotion pipelines, and how to automate the deployment process. But,
for now, let’s start off with how to set up your basic build jobs in Jenkins.
5.2. Jenkins Build Jobs
Creating a new build job in Jenkins is simple: just click on the “New Job” menu item on the Jenkins
dashboard. Jenkins supports several different types of build jobs, which are presented to you when you
choose to create a new job (see Figure 5.1, “Jenkins supports four main types of build jobs”).
Freestyle software project
Freestyle build jobs are general-purpose build jobs, which provides a maximum of flexibility.
Maven project
The “maven2/3 project” is a build job specially adapted to Maven projects. Jenkins understands
Maven pom files and project structures, and can use the information gleaned from the pom file to
reduce the work you need to do to set up your project.
Monitor an external job
The “Monitor an external job” build job lets you keep an eye on non-interactive processes, such
as cron jobs.
Multiconfiguration job
The “multiconfiguration project” (also referred to as a “matrix project”) lets you run the same
build job in many different configurations. This powerful feature can be useful for testing an
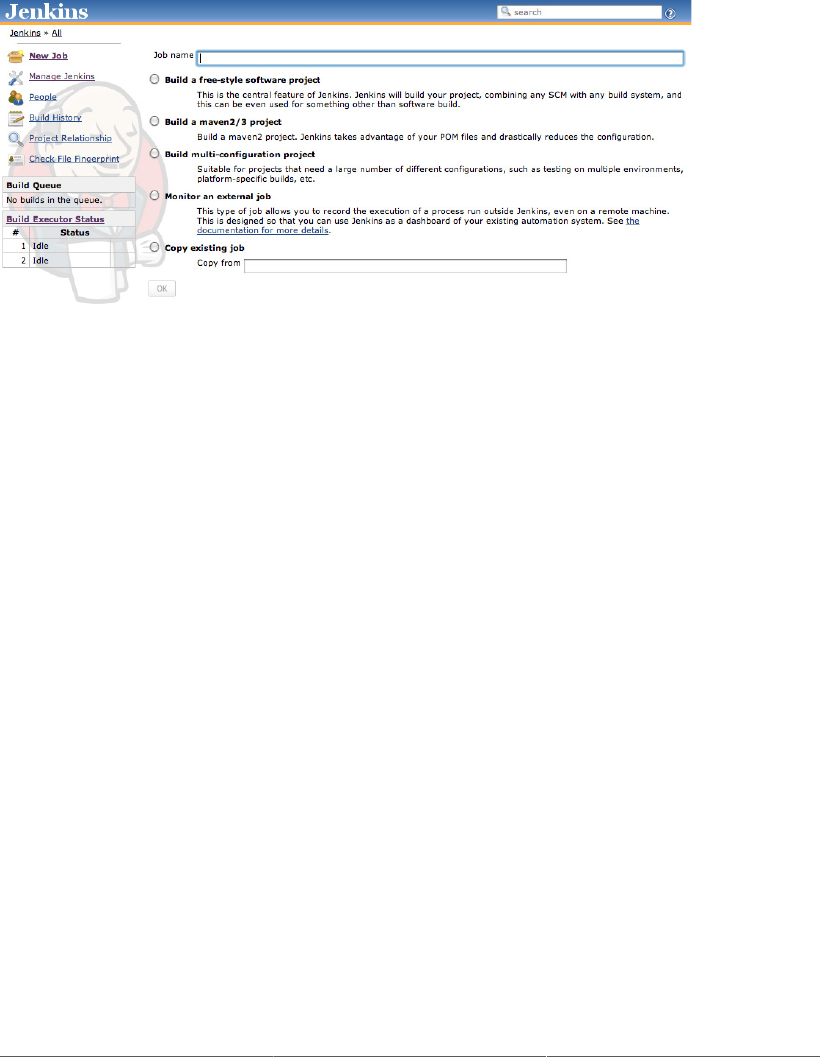
82
application in many different environments, with different databases, or even on different build
machines. We will be looking at how to configure multiconfiguration build jobs later on in the
book.
Figure 5.1. Jenkins supports four main types of build jobs
You can also copy an existing job, which is a great way to create a new job that is very similar to an
existing build job, except for a few configuration details.
In this chapter, we will focus on the first two types of build jobs, which are the most commonly used.
We will discuss the others later on. Let’s start with the most flexible option: the freestyle build job.
5.3. Creating a Freestyle Build Job
The freestyle build job is the most flexible and configurable option, and can be used for any type of
project. It is relatively straightforward to set up, and many of the options we configure here also appear
in other build jobs.
5.3.1. General Options
The first section you see when you create a new freestyle job contains general information about the
project, such as a unique name and description, and other information about how and where the build
job should be executed (see Figure 5.2, “Creating a new build job”).
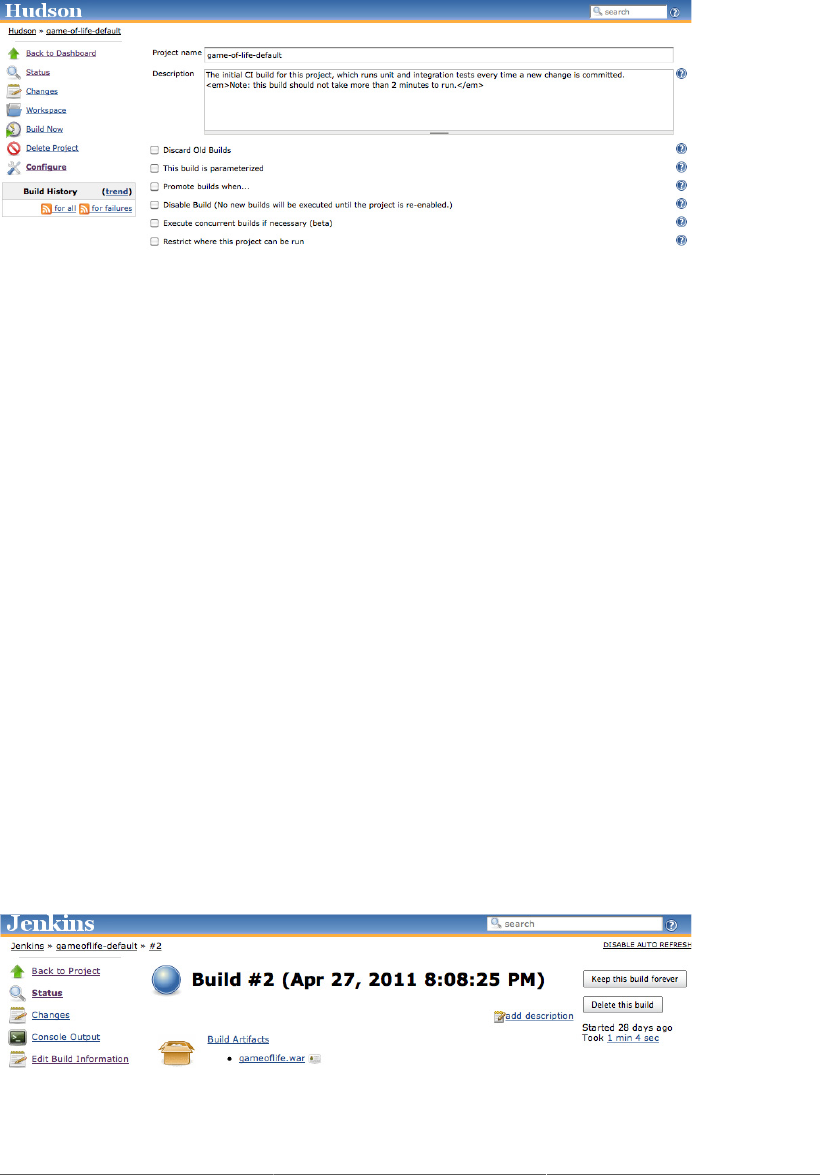
83
Figure 5.2. Creating a new build job
The project name can be anything you like, but it is worth noting that it will be used for the project
directory and the build job URL, so I generally avoid names with spaces. The project description will go
on the project home page—use this to provide an overview of the build job’s goals and context. HTML
tags will work fine in this field.
The other options are more technical, and we will be looking at some of them in detail later on in the
book.
One important aspect that you should think about upfront is how you want to handle build history. Build
jobs can consume a lot of disk space, especially if you store the build artifacts (the binary files, such
as JARs, WARs, TARs, etc., generated by your build job). Even without artifacts, keeping a record
of every build job consumes additional disk space and memory, which may or may not be justified,
depending on the nature of your build job. For example, for a code quality metrics build that reports on
static analysis and code coverage metrics over time, you might want to keep a record of the builds for
the duration of the project, whereas, for a build job that automatically deploys an application to a test
server, keeping the build history and artifacts for posterity might be less important.
The Discard Old Builds option lets you limit the number of builds you record in the build history. You
can either tell Jenkins to only keep recent builds (Jenkins will delete builds after a certain number of
days), or to keep no more than a specified number of builds. If a certain build has particular sentimental
value, you can always tell Jenkins to keep it forever by using the Keep forever button on the build details
page (see Figure 5.3, “Keeping a build job forever”). Note that this button will only appear if you have
asked Jenkins to discard old builds.
Figure 5.3. Keeping a build job forever
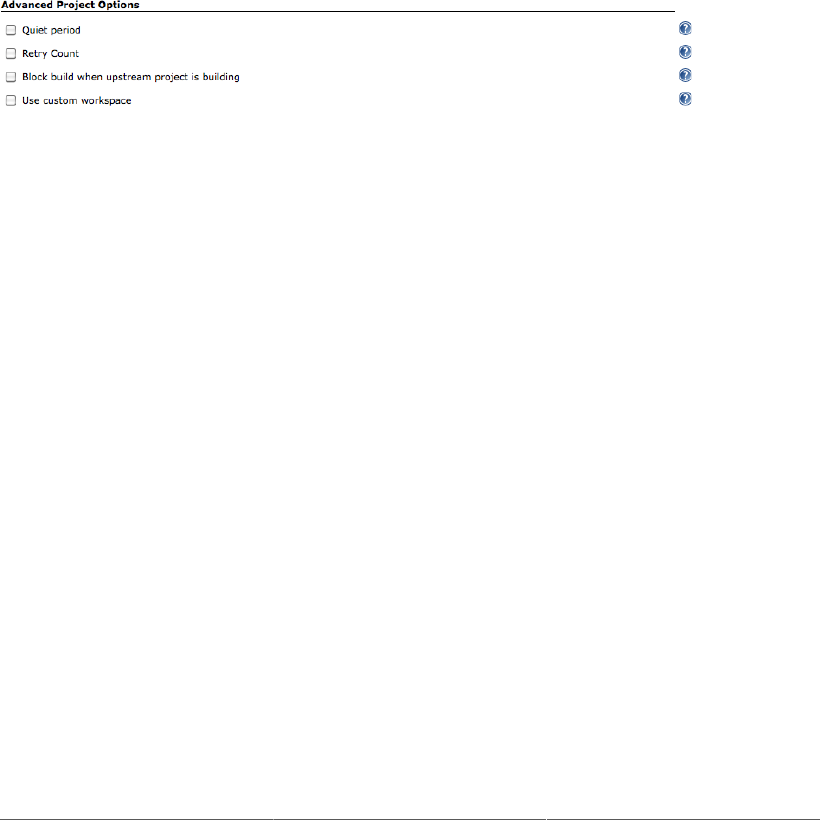
84
In addition, Jenkins will never delete the last stable and successful builds, no matter how old they are.
For example, if you limit Jenkins to only keep the last twenty builds, and your last successful build was
thirty builds ago, Jenkins will still keep the successful build job as well as the last twenty failing builds.
You also have the option to disable the build. A disabled build will not be executed until you enable it
again. Using this option when you create a new build job is quite rare. On the other hand, this option
often comes in handy to temporarily suspend a build during maintenance work or major refactoring,
when notification of the build failures will not be useful for the team.
5.3.2. Advanced Project Options
The Advanced Project options contains, as the name suggests, configuration options that are less
frequently required. You need to click on the Advanced button for them to appear (see Figure 5.4, “To
display the Advanced Options, you need to click on the Advanced button”).
Figure 5.4. To display the Advanced Options, you need to click on the Advanced button
The Quiet Period option in the build job configuration simply lets you override the system-wide
quiet period defined in the Jenkins System Configuration screen (see Section 4.3, “Configuring the
System Environment”). This option is mainly used for version control systems that don’t support atomic
commits, such as CVS, but it is also sometimes used in teams where developers have the habit of
committing their work in several small commits.
The “Block build when upstream project is building” option is useful when several related projects are
affected by a single commit, but they must be built in a specific order. If you activate this option, Jenkins
will wait until any upstream build jobs (see Section 5.5, “Build Triggers”) have finished before starting
this build.
For instance, when you release a new version of a multimodule Maven project, version number updates
will happen in many, if not all, of the project modules. Suppose, for example, that we have added a web
application to the Game of Life project we used in Chapter 2, Your First Steps with Jenkins, setting it up
as a separate Maven project. When we release a new version of this project, both the core and the web
application version numbers will be updated (see Figure 5.5, “The “Block build when upstream project
is building” option is useful when a single commit can affect several related projects”). Before we can
build the web application, we need to build a new version of the original Game of Life core module.
However if you had a separate freestyle build job for each module, then the build jobs for both the core
and the web application would start simultaneously. The web application build job will fail if the core
build job hasn’t produced a new version of the core module for it, even if there are no test failures.
To avoid this issue, you could set up the web application build job to only start once the core build
has successfully terminated. However this would mean that the web application would never be built if
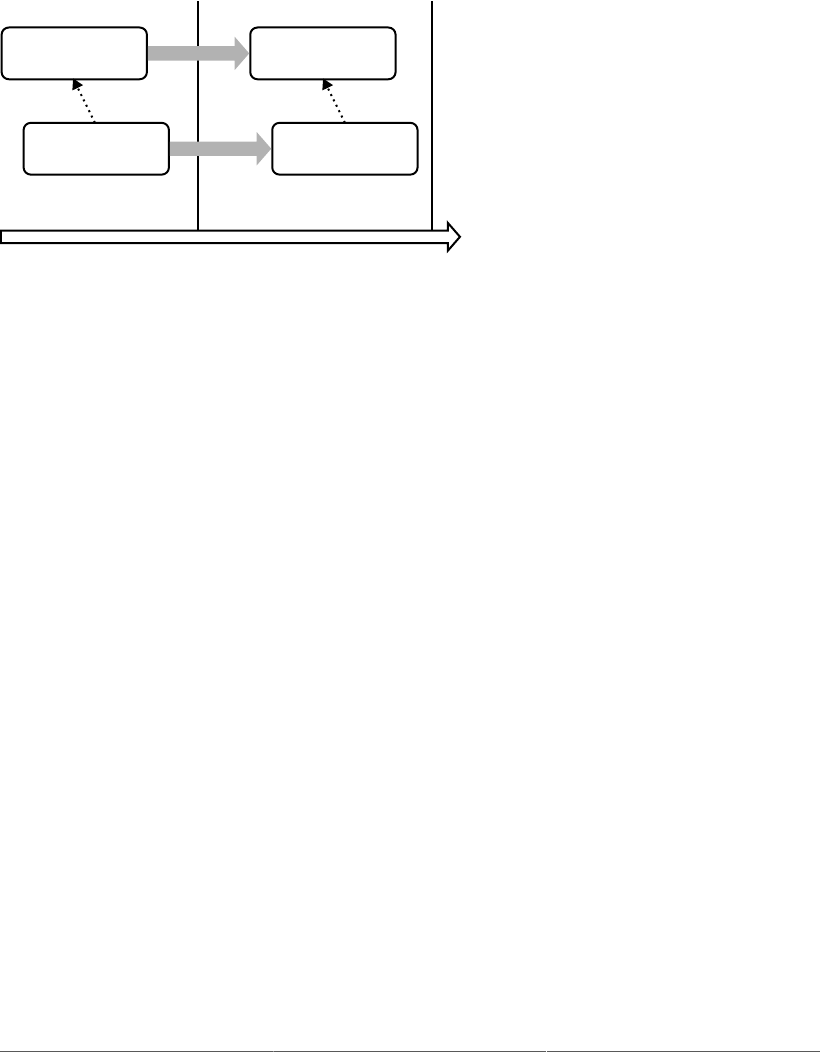
85
changes were made that only affected it, and not the core module. A better approach is to use the “Block
build when upstream project” option. In this case, when the version numbers are updated in version
control, Jenkins will schedule both builds to be executed. However it will wait until the core build has
finished before starting the web application build.
game-of-life-core
version 1.0.0-SNAPSHOT
revision 101revision 100
game-of-life-core
version 1.0.0
game-of-life-web
version 1.0.0-SNAPSHOT
game-of-life-web
version 1.0.0
Subversion revisions
Figure 5.5. The “Block build when upstream project is building” option is useful when a single commit
can affect several related projects
You can also override the default workspace used by Jenkins to check out the source code and build
your project. Normally, Jenkins will create a special workspace directory for your project, which can be
found in the project’s build job directory (see Section 3.13, “What’s in the Jenkins Home Directory”).
This works fine in almost all cases. However, there are times when you need to override this option,
and force Jenkins to use a special directory. One common example of this is if you want several build
jobs to all work successively in the same directory. You can override the default directory by ticking
the “Use custom workspace” option, and providing the path yourself. The path can be either absolute,
or relative to Jenkins’s home directory.
We will look at some of the other more advanced options that appear in this section later on in the book.
5.4. Configuring Source Code Management
In its most basic role, a Continuous Integration server monitors your version control system, and checks
out the latest changes as they occur. The server then compiles and tests the most recent version of the
code. Alternatively, it may simply check out and build the latest version of your source code on a regular
basis. In either case, tight integration with your version control system is essential.
Because of its fundamental role, SCM configuration options in Jenkins are identical across all sorts
of build jobs. Jenkins supports CVS and Subversion out of the box, with built-in support for Git, and
also integrates with a large number of other version control systems via plugins. At the time of writing,
SCM plugin support includes Accurev, Bazaar, BitKeeper, ClearCase, CMVC, Dimensions, Git, CA
Harvest, Mercurial, Perforce, PVCS, StarTeam, CM/Synergy, Microsoft Team Foundation Server, and
even Visual SourceSafe. In the rest of this section, we will look at how to configure some of the more
common SCM tools.
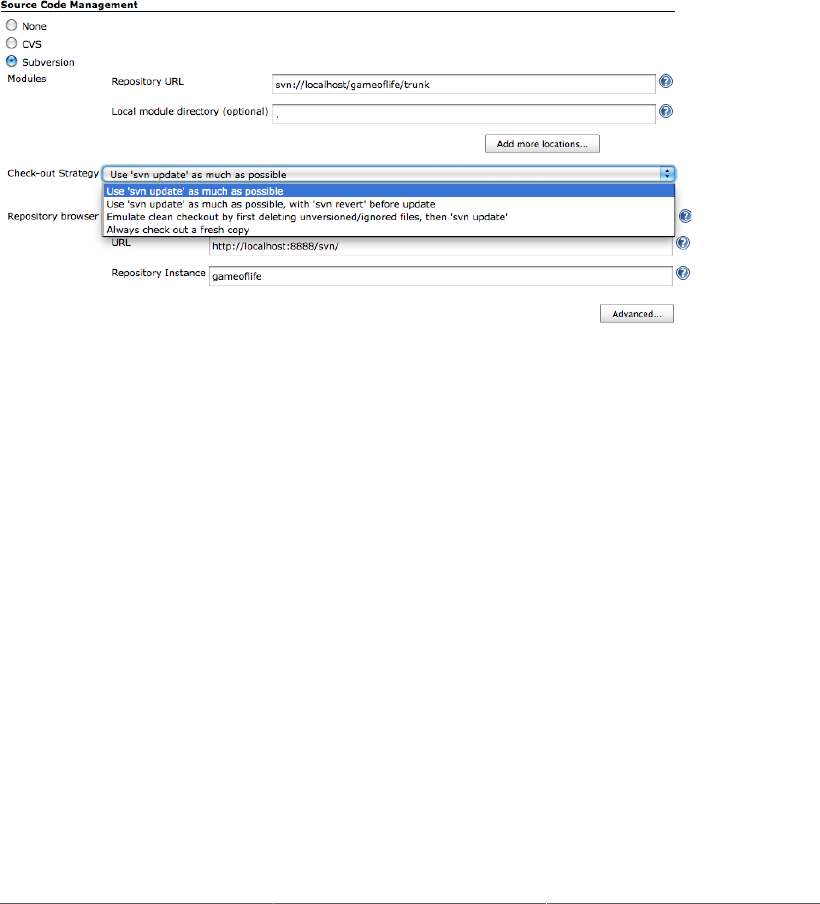
86
5.4.1. Working with Subversion
Subversion is one of the most widely used version control systems, and Jenkins comes bundled with
full Subversion support (see Figure 5.6, “Jenkins provides built-in support for Subversion”). To use
source code from a Subversion repository, you simply provide the corresponding Subversion URL—it
will work fine with any of the three Subversion protocols of (http, svn, or file). Jenkins will check that
the URL is valid as soon as you enter it. If the repository requires authentication, Jenkins will prompt
you for the corresponding credentials automatically, and store them for any other build jobs that access
this repository.
Figure 5.6. Jenkins provides built-in support for Subversion
By default, Jenkins will check out the repository contents into a subdirectory of your workspace, whose
name will match the last element in the Subversion URL. So if your Subversion URL is svn://localhost/
gameoflife/trunk, Jenkins will check out the repository contents to a directory called trunk in the build
job workspace. If you would prefer another directory name, just enter the directory name you want in
the Local module directory field. Place a period (“.”) here if you want Jenkins to check the source
code directly into the workspace.
Occasionally you may need to get source code from more than one Subversion URL. In this case, just
use the “Add more locations...” button to add as many additional repository sources as you need.
A well-designed build process should not modify the source code, or leave any extra files that might
confuse your version control system or the build process. Both generated artifacts and temporary files
(such as log files, reports, test data or file-based databases) should go in a directory set aside for this
purpose (such as the target directory in Maven builds), and/or be configured to be ignored by your
version control repository. They should also be deleted as part of the build process, once the build has
finished with them. This is also an important part of ensuring a clean and reproducible build process
—for a given version of your source code, your build should behave in exactly the same way, no matter
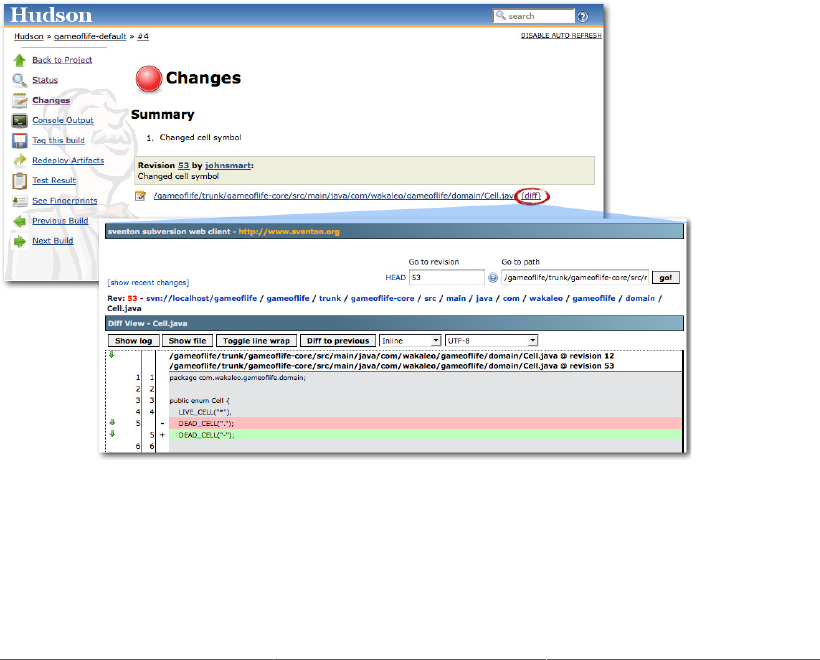
87
where or when it is run. Locally changed source code files, and the presence of temporary files, both
have the potential of compromising this.
You can fine-tune the way Jenkins obtains the latest source code from your Subversion repository by
selecting an appropriate value in the Check-out Strategy drop-down list. If your project is well-behaved,
however, you may be able to speed things up substantially by selecting “Use ‘svn update’ as much
as possible”. This is the fastest option, but may leave artifacts and files from previous builds in your
workspace. To be on the safe side, you may want to use the second option (“Use ‘svn update’ as much as
possible, with ‘svn revert’ before update”), which will systematically run svn revert before running
svn update. This will ensure that no local files have been modified, though it will not remove any
new files that have been created during the build process. Alternatively, you can ask Jenkins to delete
any unversioned or ignored files before performing an svn update, or play it safe by checking out a
full clean copy for each build.
Another very useful feature is Jenkins’s integration with source code browsers. A good source code
browser is an important part of your Continuous Integration setup. It lets you see at a glance what
changes triggered a given build, which is very useful when it comes to troubleshooting broken builds
(see Figure 5.7, “Source code browser showing what code changes caused a build”). Jenkins integrates
with most of the major source code browsers, including open source tools such as WebSVN and Sventon,
and commercial ones like Atlassian’s FishEye.
Figure 5.7. Source code browser showing what code changes caused a build
Jenkins also lets you refine the changes that will trigger a build. In the Advanced section, you can use
the Excluded Regions field to tell Jenkins not to trigger a build if only certain files were changed. This
field takes a list of regular expressions, which identify files that should not trigger a build. For example,

88
suppose you don’t want Jenkins to start a new build if only images have been changed. To do this, you
could use a set of regular expressions like the following:
/trunk/gameoflife/gameoflife-web/src/main/webapp/.*\.jpg
/trunk/gameoflife/gameoflife-web/src/main/webapp/.*\.gif
/trunk/gameoflife/gameoflife-web/src/main/webapp/.*\.png
Alternatively, you can specify the Included Regions, if you are only interested in changes in part of the
source code directory structure. You can even combine the Excluded Regions and Included Regions
fields—in this case a modified file will only trigger a build if it is in the Included Regions but not in
the Excluded Regions.
You can also ignore changes coming from certain users (Excluded Users), or with certain commit
messages (Excluded Commit Messages). For example, if your project uses Maven, you may want to
use the Maven Release Plugin to promote your application from snapshot versions to official releases.
This plugin will automatically bump up the version number of your application from a snapshot version
used during development (such as 1.0.1-SNAPSHOT) to a release (1.0.1), bundles up and deploys a
release of your application with this version number, and then moves the version on to the next snapshot
number (e.g., 1.0.2-SNAPSHOT) for ongoing development. During this process Maven takes care of
many SCM bookkeeping tasks, such as committing the source code with the release version number and
creating a tag for the released version of your application, and then committing the source code with
the new snapshot version number.
Now suppose you have a special build job for generating a new release using this process. The many
commits generated by the Maven Release Plugin would normally trigger off build jobs in Jenkins.
However, since the release build job is already compiling and testing this version of your application,
you don’t need Jenkins to do it again in a separate build job. To ensure that Jenkins does not trigger a
build for this case, you can use the Excluded Commit Messages field with the following value:
[maven-release-plugin] prepare release.*
This will ensure that Jenkins skips the changes corresponding to the new release version, but not those
corresponding to the next snapshot version.
5.4.2. Working with Git
Contributed by Matthew McCullough
Git1 is a popular distributed version control system that is a logical successor to Subversion2 and a
mind-share competitor to Mercurial3. Git support in Jenkins is both mature and full-featured. There are
a number of plugins that can contribute to the overall story of Git in Jenkins. We will begin by looking
at the Git plugin, which provides core Git support in Jenkins. We’ll discuss the supplemental plugins
shortly.
1 http://git-scm.com/
2 http://subversion.tigris.org/
3 http://mercurial.selenic.com/
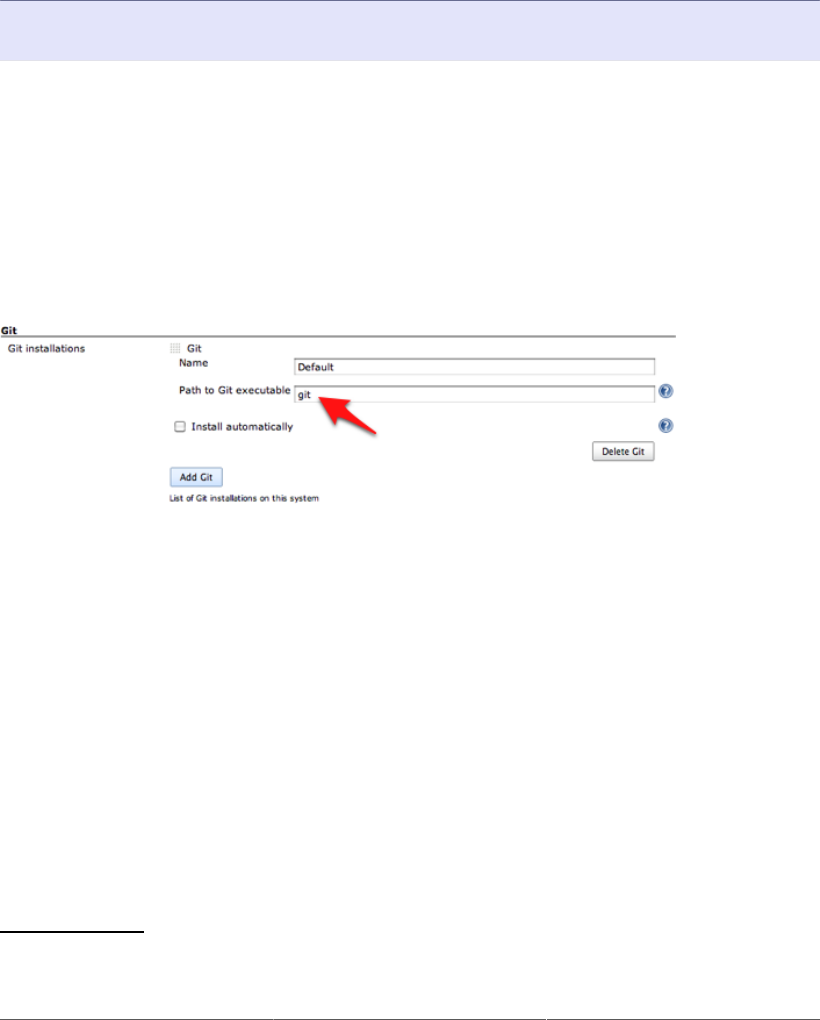
89
5.4.2.1. Installing the plugin
The Git plugin is available in the Jenkins Plugin Manager and is documented on its own wiki page4.
The plugin assumes that Git (version 1.3.3 or later) has already been installed on your build server, so
you will need to make sure that this is the case. You can do this by running the following command
on your build server:
$ git --version
git version 1.7.1
Next, go back to Jenkins, check the corresponding check box in the Jenkins Plugin Manager page and
click the Install button.
5.4.2.1.1. System-wide configuration of the plugin
After installing the Git plugin, a small new set of configuration options will be available on the Manage
Jenkins#Configure System page (see Figure 5.8, “System-wide configuration of the Git plugin”). In
particular, you need to provide the path to your Git executable. If Git is already installed on the system
path, just put “git” here.
Figure 5.8. System-wide configuration of the Git plugin
5.4.2.1.2. SSH key setup
If the Git repository you are accessing uses SSH passphrase-less authentication—for example, if the
access address is similar to git@github.com:matthewmccullough/some-repo.git—you’ll need
to provide the private half of the key as file ~/.ssh/id_rsa where ~ is the home directory of the user
account under which Jenkins is running.
The fingerprint of the remote server will additionally need to be placed in ~/.ssh/known_hosts to
prevent Jenkins from invisibly prompting for authorization to access this Git server for the first time.
Alternatively, if logging-in is enabled for the jenkins user, SSH into the Jenkins machine as jenkins
and manually attempt to Git clone a remote repository. This will test your private key setup and establish
the known_hosts file in the ~/.ssh directory. This is probably the simplest option for users unfamiliar
with the intricacies of SSH configuration.
4 http://wiki.hudson-ci.org/display/HUDSON/Git+Plugin

90
5.4.2.2. Using the plugin
On either an existing or a new Jenkins project, a new Source Code Management option for Git will be
displayed. From here, you can configure one or more repository addresses (see Figure 5.9, “Entering
a Git repo URL”). One repository is usually enough for most projects: adding a second repository can
be useful in more complicated cases, and lets you specify distinct named locations for pull and push
operations.
5.4.2.2.1. Advanced per-project source code management configuration
In most cases, the URL of the Git repository you are using should be enough. However, if you need
more options, click on the Advanced button (see Figure 5.10, “Advanced configuration of a Git repo
URL”). This provides more precise control of the pull behavior.
The Name of repository is a shorthand title (a.k.a. remote in Git parlance) for a given repository, that
you can refer to later on in the merge action configuration.
The Refspec is a Git-specific language5 for controlling precisely what is retrieved from remote servers
and under what namespace it is stored locally.
5.4.2.2.2. Branches to build
The branch specifier (Figure 5.11, “Advanced configuration of the Git branches to build”) is the wildcard
pattern or specific branch name that should be built by Jenkins. If left blank, all branches will be built.
At the time of this writing, after the first time saving a job with a blank branches to build setting, it is
populated with **, which means “build all branches.”
5 http://progit.org/book/ch9-5.html
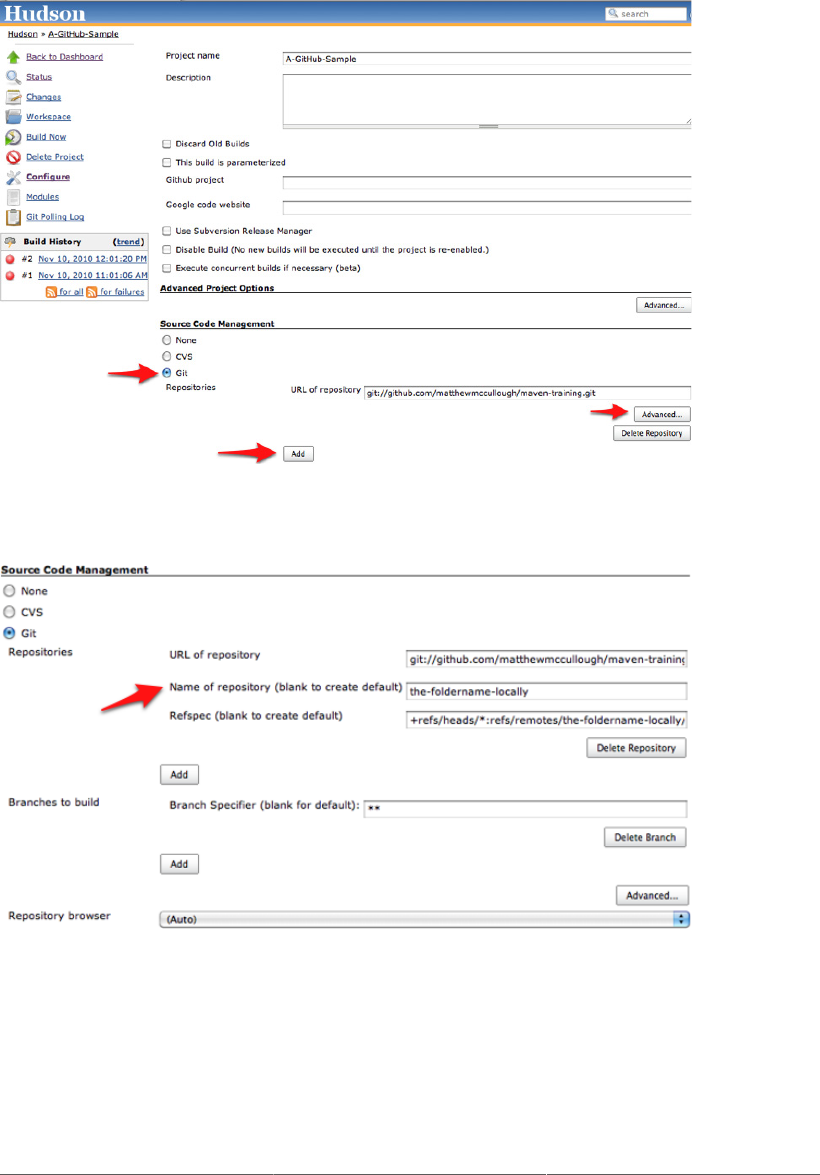
91
Figure 5.9. Entering a Git repo URL
Figure 5.10. Advanced configuration of a Git repo URL
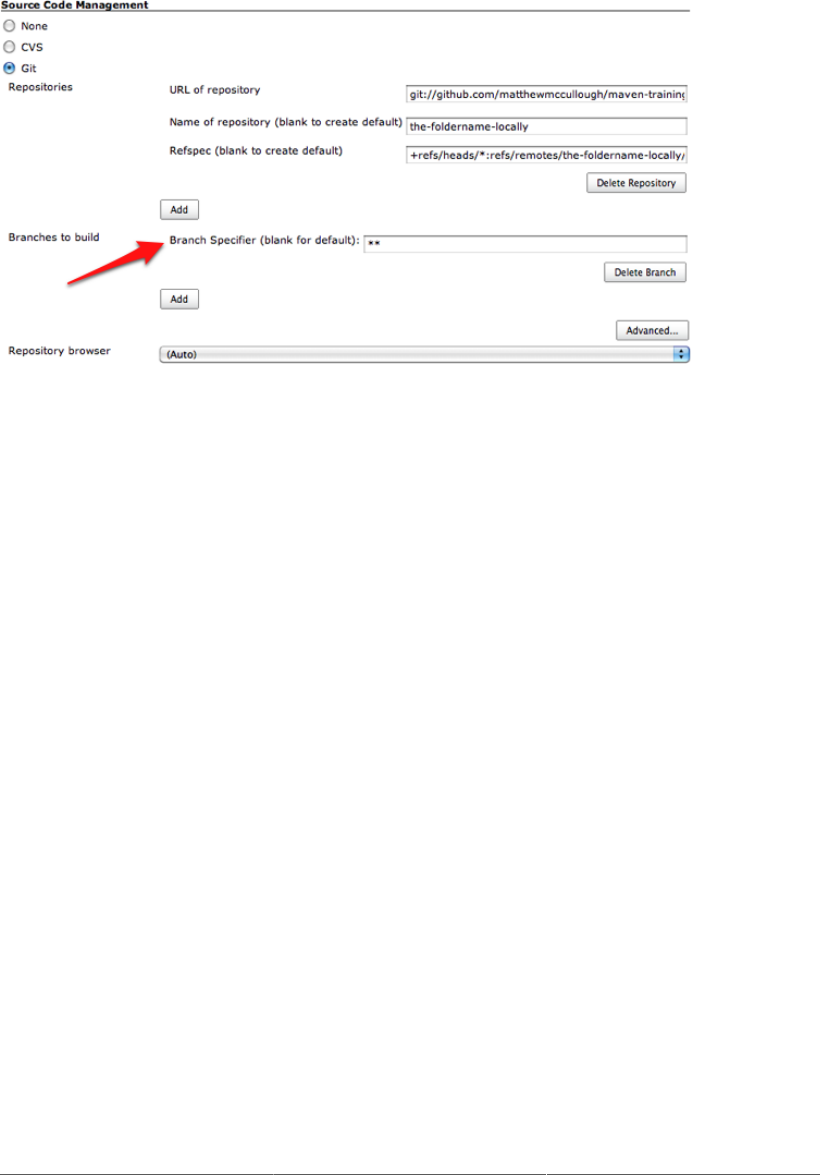
92
Figure 5.11. Advanced configuration of the Git branches to build
5.4.2.2.3. Excluded regions
Regions (seen in Figure 5.12, “Branches and regions”) are named specific or wildcard paths in the
codebase that, even when changed, should not trigger a build. Commonly these are noncompiled files
such as localization bundles or images, which, understandably might not have an effect on unit or
integration tests.
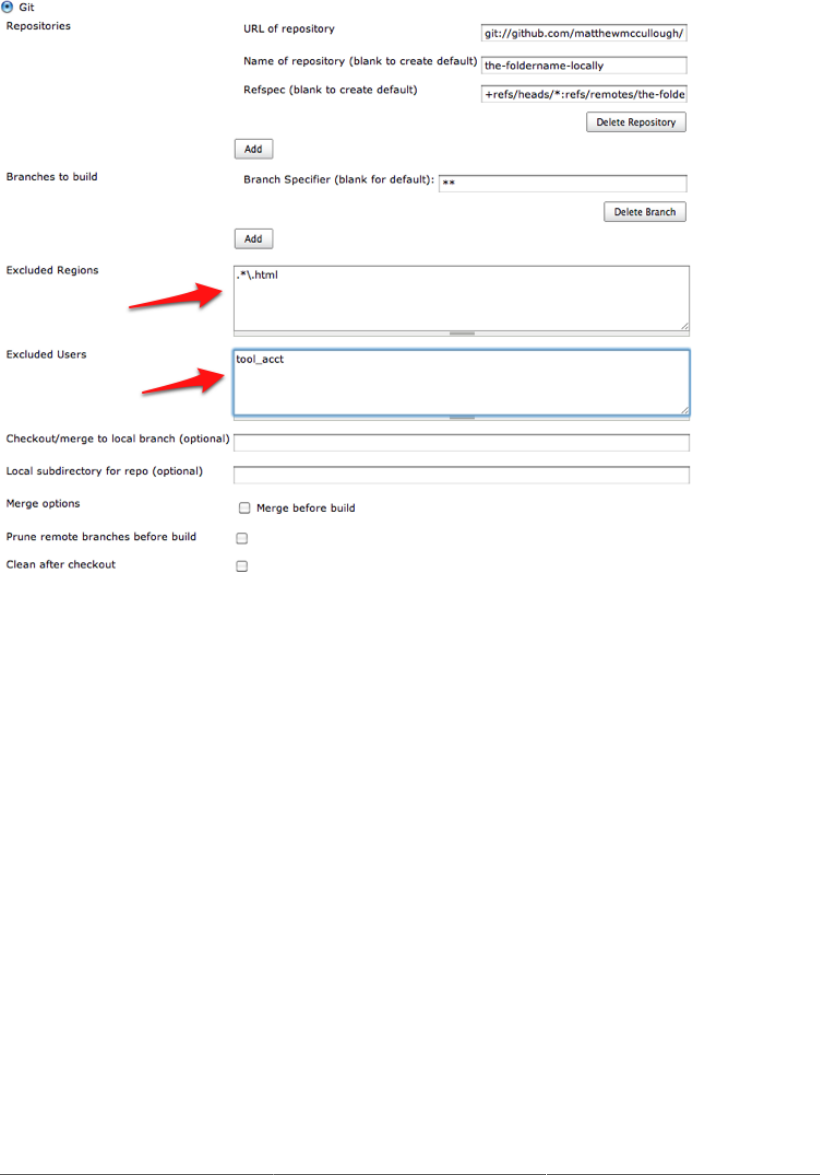
93
Figure 5.12. Branches and regions
5.4.2.2.4. Excluded users
The Git plugin also lets you ignore certain users, even if they make changes to the codebase that would
typically trigger a build.
This is not as spiteful as it sounds: excluded users are typically automated users, not human developers,
that happen to have distinct accounts with commit rights in the source control system. These automated
users often are performing small numeric changes such as bumping up version numbers in a pom.xml
file, rather than making actual logic changes. If you want to exclude several users, just place them on
separate lines.
5.4.2.2.5. Checkout/merge to local branch
There are times when you may want to create a local branch from the tree you’ve specified, rather than
just using a direct detached HEAD checkout of the commit’s hash. In this case, just specify your local
branch in the “Checkout/merge to a local branch” field.
This is a little easier to illustrate with an example. Without specifying a local branch, the plugin would
do something like this:

94
git checkout 73434e4a0af0f51c242f5ae8efc51a88383afc8a
On the other hand, if you use a local branch named mylocalbranch, Jenkins would do the following:
git branch -D mylocalbranch
git checkout -b mylocalbranch 73434e4a0af0f51c242f5ae8efc51a88383afc8a
5.4.2.2.6. Local subdirectory for repo
By default, Jenkins will clone the Git repository directly into the build job workspace. If you prefer to
use a different directory, you can specify it here. Note that the directory you specify is relative to the
build job workspace.
5.4.2.2.7. Merge before build
The typical recipe for using this option is to fold an integration branch into a branch more similar to
master. Keep in mind that only conflict-less merges will happen automatically. More complex merges
that require manual intervention will fail the build.
The resultant merged branch will not automatically be pushed to another repository unless the later push
post-build action is enabled.
5.4.2.2.8. Prune remote branches before build
Pruning removes local copies of remote branches that exist as a remnant of the previous clone, but are
no longer present on the remote. In short, this is cleaning the local clone to be in perfect sync with its
remote siblings.
5.4.2.2.9. Clean after checkout
Activate Git’s facilities for purging any untracked files or folders, returning your working copy to a
pristine state.
5.4.2.2.10. Recursively update submodules
If you are using Git’s submodule facilities in the project, this option lets you ensure that every submodule
is up-to-date with an explicit call to update, even if submodules are nested within other submodules.
5.4.2.2.11. Use commit author in changelog
Jenkins tracks and displays the author of changed code in a summarized view. Git tracks both the
committer and author of code distinctly, and this option lets you toggle which of those two usernames
is displayed in the changelog.
5.4.2.2.12. Wipe out workspace
Typically Jenkins will reuse the workspace, merely freshening the checkout as necessary and, if you
activated the “Clean after checkout” option, cleaning up untracked files. However, if you prefer to have
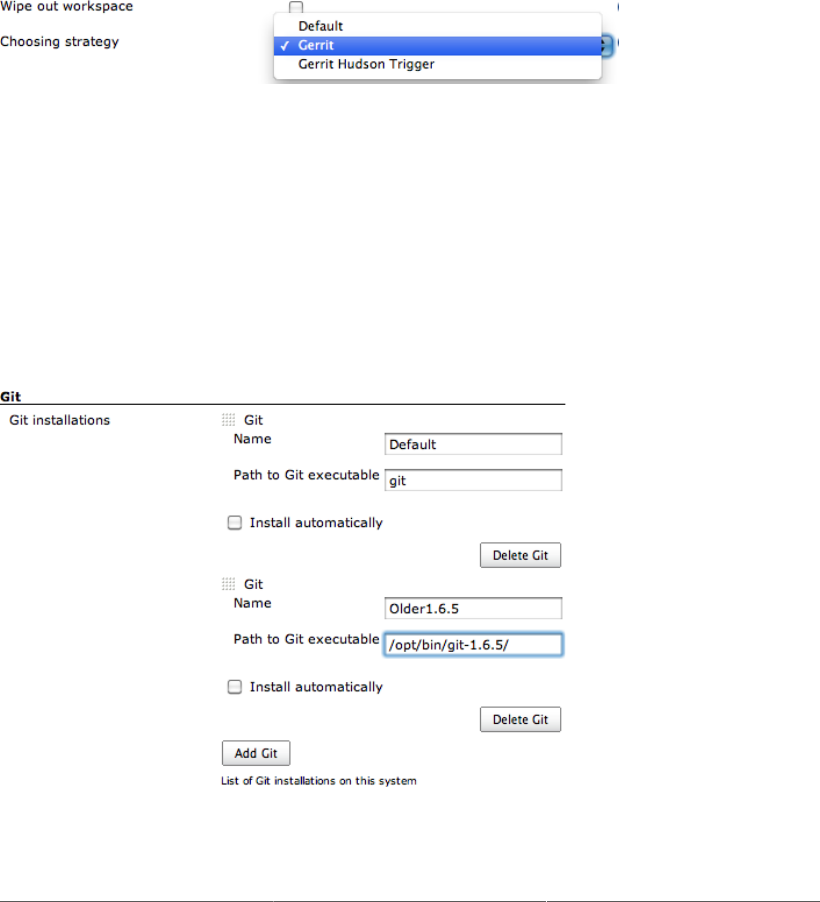
95
a completely clean workspace, you can use the “Wipe out workspace” option to delete and rebuild the
workspace from the ground up. Bear in mind that this may significantly lengthen the time it takes to
initialize and build the project.
5.4.2.2.13. Choosing strategy
Jenkins decides which branches to build based on a strategy (see Figure 5.13, “Choosing strategy”).
Users can influence this branch-search process. The default choice is to search for all branch HEADs. If
the Gerrit plugin is installed, additional options for building all Gerrit-notified commits are displayed.
Figure 5.13. Choosing strategy
5.4.2.2.14. Git executable
In the global options of Jenkins (see Figure 5.14, “Git executable global setup”), different Git
executables can be set up and used on a per-build basis. This is infrequently used, and only when the
clone or other Git operations are highly sensitive to a particular version of Git. Git tends to be very
version-flexible; slightly older repositories can easily be cloned with a newer version of Git and vice-
versa.
Figure 5.14. Git executable global setup
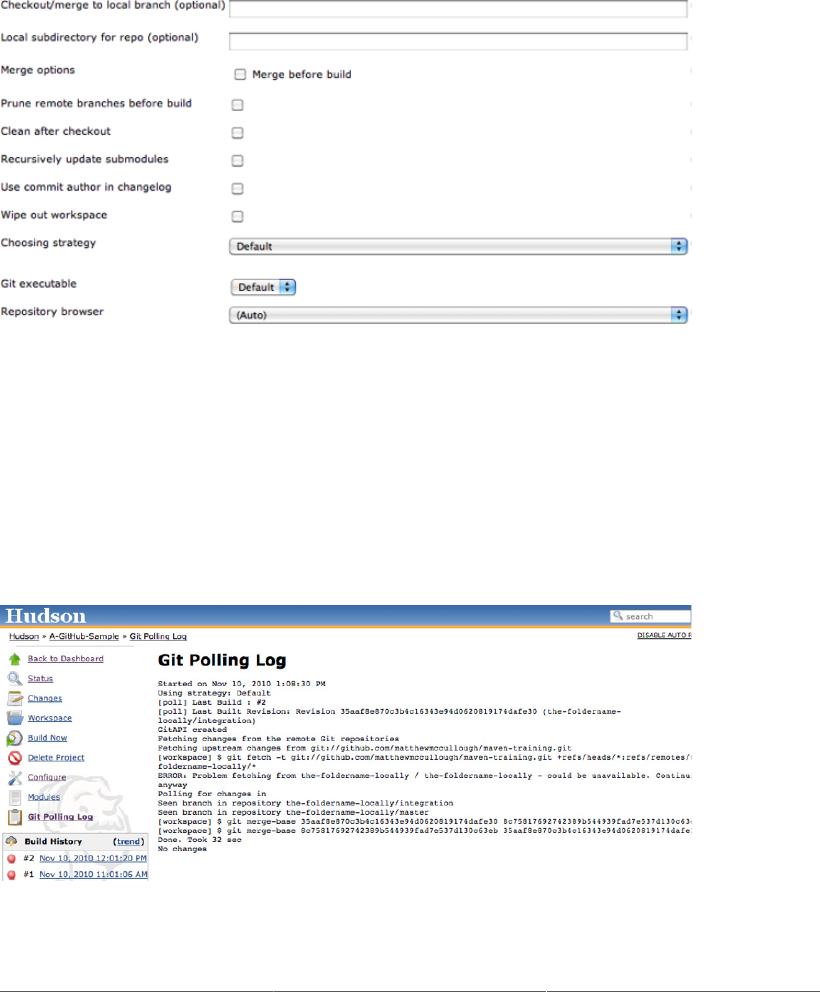
96
5.4.2.2.15. Repository browser
Like Subversion, Git has several source code browsers that you can use. The most common ones
are Gitorious, Git Web, or GitHub. If you provide the URL to the corresponding repository browser,
Jenkins will be able to display a link to the source code changes that triggered a build (see Figure 5.15,
“Repository browser”).
Figure 5.15. Repository browser
5.4.2.3. Build triggers
The basic Git plugin offers the ability to Poll SCM on a timed basis, looking for changes since the last
inquiry. If changes are found, a build is started. The polling log (shown in Figure 5.16, “Polling log”) is
accessible via a link on the left hand side of the page in the navigation bar when viewing a specific job.
It offers information on the last time the repository was polled and if it replied with a list of changes
(see Figure 5.17, “Results of Git polling”).
Figure 5.16. Polling log
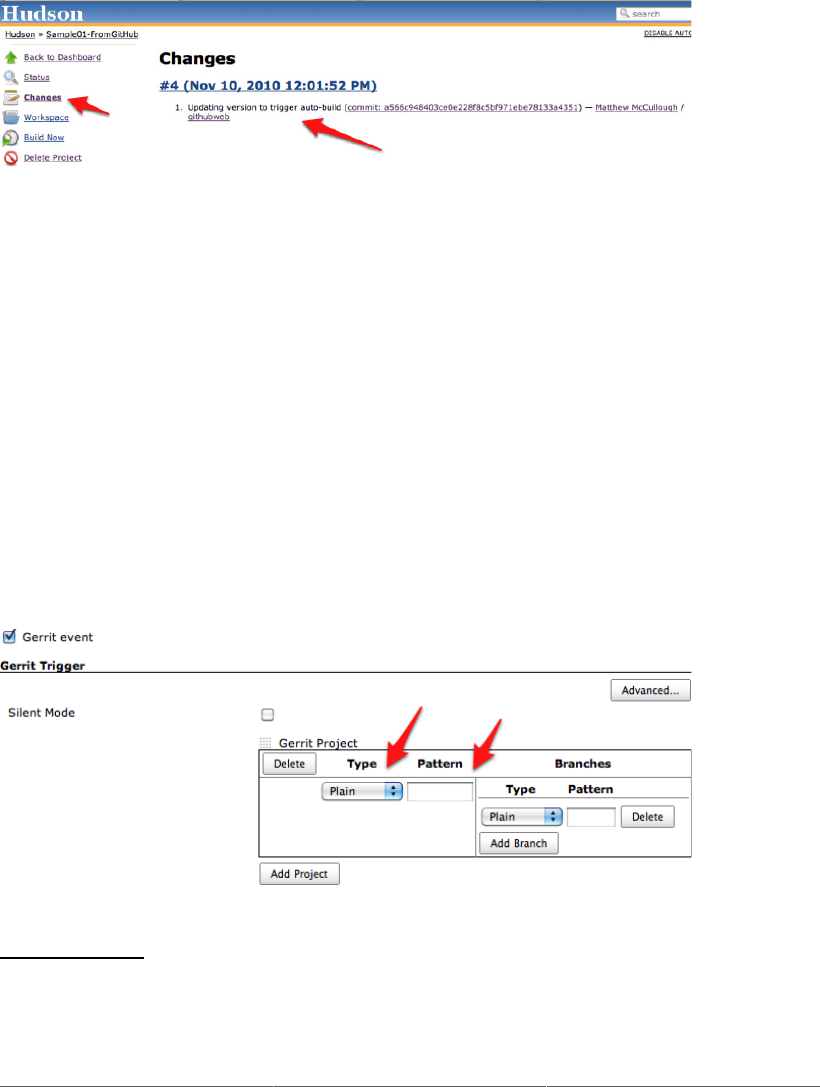
97
The Git polling is distilled into a more developer-useful format that shows commit comments as well
as hyperlinking usernames and changed files to more detailed views of each.
Figure 5.17. Results of Git polling
Installing the Gerrit Build Trigger adds a Gerrit event option that can be more efficient and precise than
simply polling the repository.
5.4.2.3.1. Gerrit Trigger
Gerrit6 is an open source web application that facilitates code reviews7 for project source hosted on a
Git version control system. It reads a traditional Git repository, and provides a side-by-side comparison
of changes. As the code is reviewed, Gerrit provides a location to comment and move the patch to an
open, merged, or abandoned status.
The Gerrit Trigger8 is a Jenkins plugin that can trigger a Jenkins build of the code when any user-
specified activity happens in a user-specified project in the Git repository (see Figure 5.18, “Gerrit
Trigger”). It is a alternative to the more typically-used Build periodically or Poll SCM.
Figure 5.18. Gerrit Trigger
6 http://code.google.com/p/gerrit/
7 https://review.source.android.com/#q,status:open,n,z
8 http://wiki.hudson-ci.org/display/HUDSON/Gerrit+Trigger
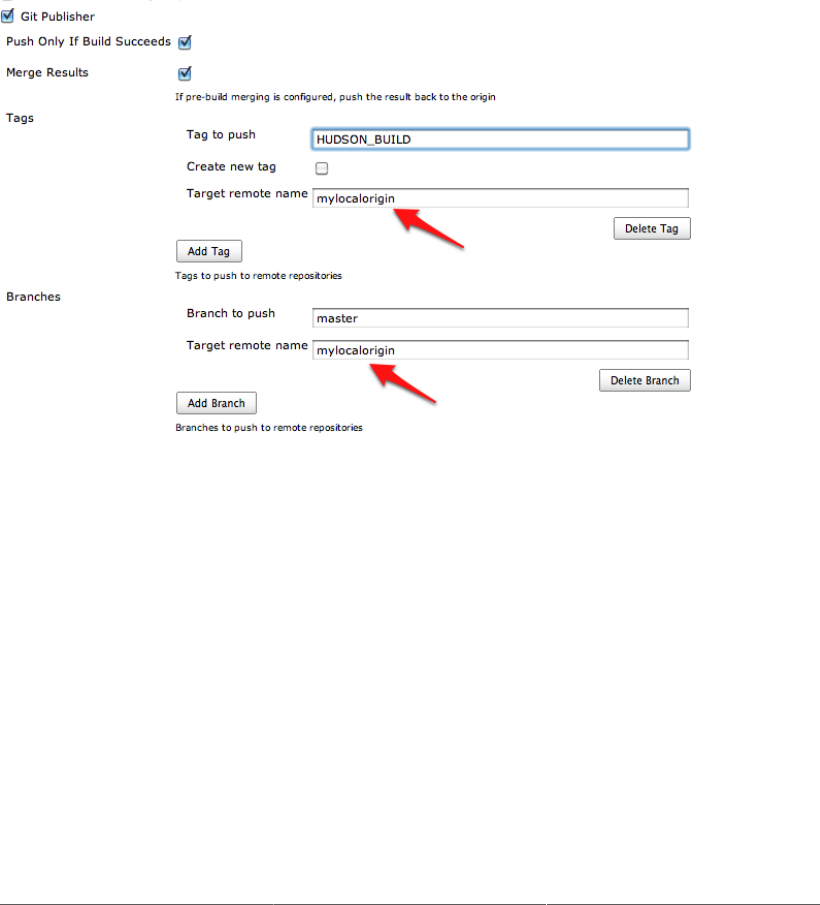
98
The configuration for this plugin is minimal and focused on the Project Type and Pattern and Branch
Type and Pattern. In each pair, the type can be Plain, Path, or RegExp—pattern flavors of what to watch
—and then the value (pattern) to evaluate using the type as the guide.
5.4.2.4. Post-build actions
The Git plugin for Jenkins adds Git-specific capabilities to the post-processing of the build artifacts.
Specifically, the Git Publisher (shown in Figure 5.19, “Git Publisher”) offers merging and pushing
actions. Check the Git Publisher checkbox to display four options.
Figure 5.19. Git Publisher
5.4.2.4.1. Push only if build succeeds
If a merge or other commit-creating action has been taken during the Jenkins build, it can be enabled
to push to a remote.
5.4.2.4.2. Merge results
If prebuild merging is configured, push the merge-resultant branch to its origin (see Figure 5.20, “Merge
results”).
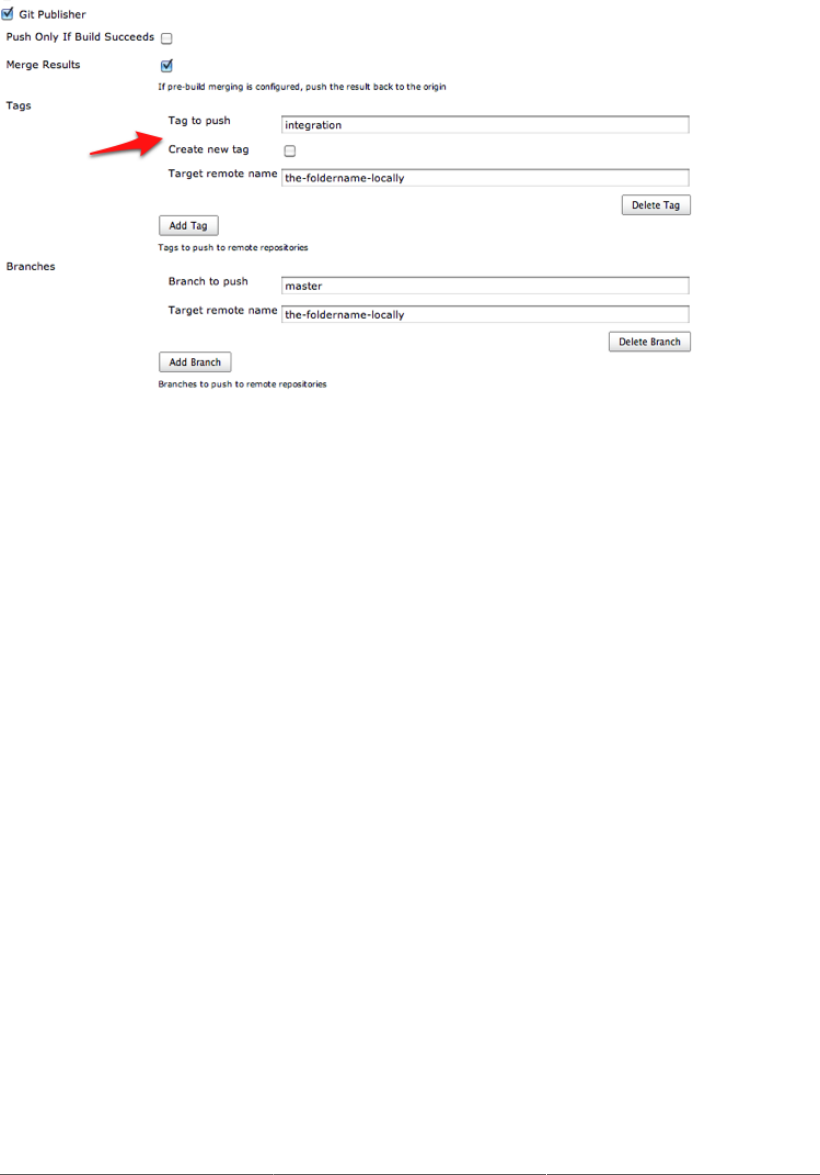
99
Figure 5.20. Merge results
5.4.2.4.3. Tags
When pushing tags, each tag can be named and chosen to be created if it does not exist (which fails
if it does already exist). Environment variables can be embedded in the tag name. Examples include
the process ID such as HUDSON_BUILD_$PPID or even a build number, if that is provided by a Jenkins
plugin, such as $HUDSON_AUTOTAG_$BUILDNUM. Tags can be targeted to a specific remote such as
origin or integrationrepo.
5.4.2.4.4. Branches
The current HEAD used in the Jenkins build of the application can be pushed to other remotes as an
after-step of the build. You only need to provide the destination branch name and remote name.
Names of remotes are validated against the earlier configuration of the plugin. If the remote doesn’t
exist, a warning is displayed.
5.4.2.5. GitHub plugin
The GitHub plugin offers two integration points. First, it offers an optional link to the project’s GitHub
home page. Just enter the URL for the project (without the tree/master or tree/branch part). For example,
http://github.com/matthewmccullough/git-workshop.
Secondly, the GitHub plugin offers per-file-changed links that are wired via the Repository browser
section of a job’s Source Code Management configuration (see Figure 5.21, “GitHub repository
browser”).
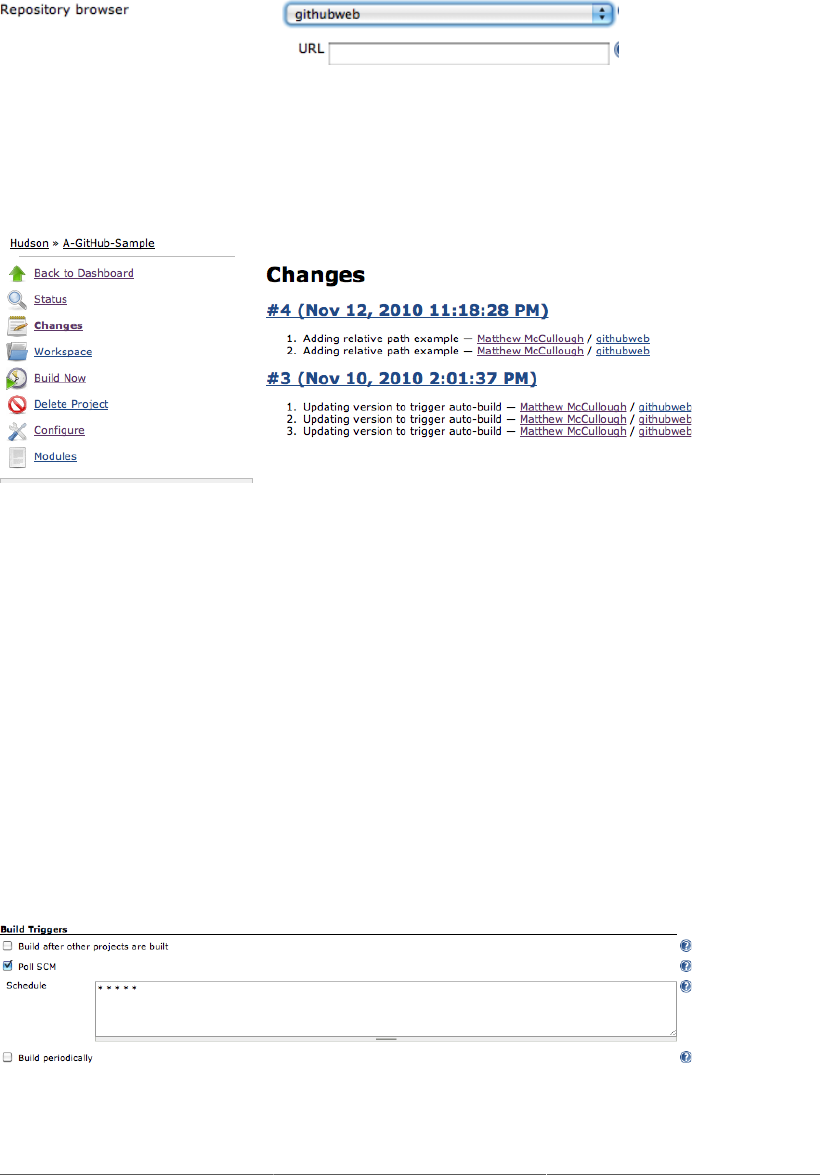
100
Figure 5.21. GitHub repository browser
With the githubweb repository browser chosen, all changed-detected files will be linked to the
appropriate GitHub source-viewing web page (Figure 5.22, “GitHub repository browser”).
Figure 5.22. GitHub repository browser
5.5. Build Triggers
Once you have configured your version control system, you need to tell Jenkins when to kick off a build.
You set this up in the Build Triggers section.
In a Freestyle build, there are three basic ways a build job can be triggered (see Figure 5.23, “There are
many ways that you can configure Jenkins to start a build job”):
• Start a build job once another build job has completed
• Kick off builds at periodical intervals
• Poll the SCM for changes
Figure 5.23. There are many ways that you can configure Jenkins to start a build job
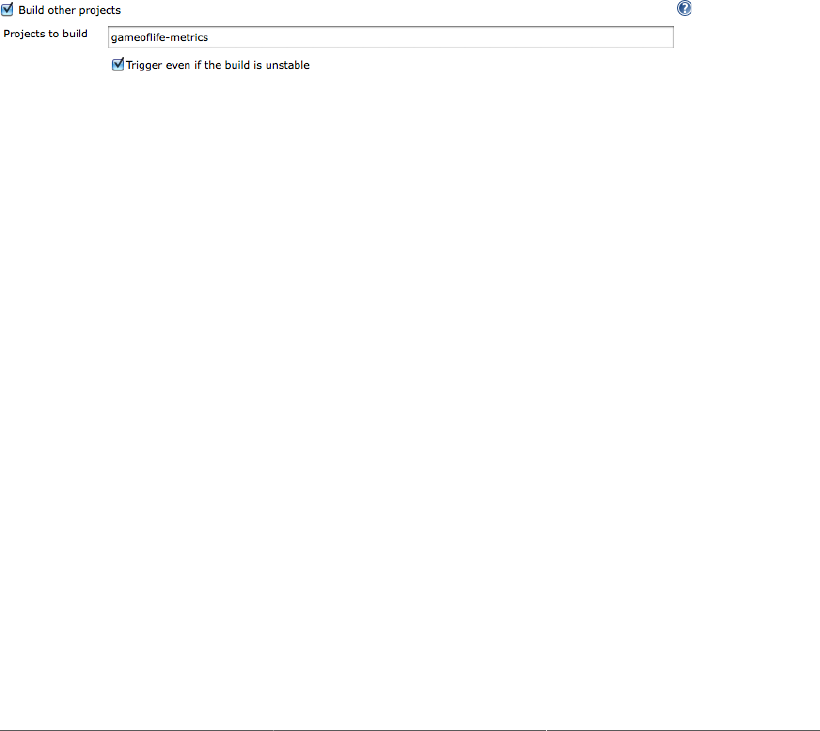
101
5.5.1. Triggering a Build Job Once Another Build Job Has Finished
The first option lets you set up a build that will be run whenever another build has finished. This is an
easy way to set up a build pipeline. For example, you might set up an initial build job to run unit and
integration tests, followed by another separate build job to run more CPU-intensive code quality metrics.
You simply enter the name of the preceding build job in this field. If the build job can be triggered by
several other build jobs, just list their names here, separated by commas. In this case, the build job will
be triggered once any of the build jobs in the list finish.
There is a symmetrical field in the Post-build actions section of the preceding build job called
(appropriately enough) “Build other projects”. This field will be automatically updated in the
corresponding build jobs whenever you modify the “Build after other projects are built” field. However,
unlike the “Build after other projects are built” field, this field gives you the option to trigger a build
even if the build is unstable (see Figure 5.24, “Triggering another build job even if the current one is
unstable”). This is useful, for example, if you want to run a code quality metrics build job even if there
are unit test failures in the default build job.
Figure 5.24. Triggering another build job even if the current one is unstable
5.5.2. Scheduled Build Jobs
Another strategy is simply to trigger your build job at regular intervals. It is important to note that this
is not actually Continuous Integration—it is simply scheduled builds, something you could also do, for
example, as a Unix cron job. In the early days of automated builds, and even today in many shops,
builds are not run in response to changes committed to version control, but simply on a nightly basis.
However, to be effective, a Continuous Integration server should provide feedback much more quickly
than once a day.
There are nevertheless a few cases where scheduled builds do make sense. This includes very long
running build jobs, where quick feedback is less critical. For example, intensive load and performance
tests which may take several hours to run, or Sonar build jobs. Sonar is an excellent way to keep tabs
on code quality metrics across your projects and over time, but the Sonar server only stores one set of
data per day, so running Sonar builds more frequently than this is not useful.
For all scheduling tasks, Jenkins uses a cron-style syntax, consisting of five fields separated by white
space in the following format:
MINUTE HOUR DOM MONTH DOW
with the following values possible for each field:

102
MINUTE
Minutes within the hour (0–59)
HOUR
The hour of the day (0–23) DOM
DOM
The day of the month (1–31)
MONTH
The month (1–12)
DOW
The day of the week (0–7) where 0 and 7 are Sunday.
There are also a few short-cuts:
• “*” represents all possible values for a field. For example, “* * * * *” means “once a minute.”
• You can define ranges using the “M–N” notation. For example “1-5” in the DOW field would
mean “Monday to Friday.”
• You can use the slash notation to defined skips through a range. For example, “*/5” in the MINUTE
field would mean “every five minutes.”
• A comma-separated list indicates a list of valid values. For example, “15,45” in the MINUTE field
would mean “at 15 and 45 minutes past every hour.”
• You can also use the shorthand values of “@yearly”, “@annually”, “@monthly”, “@weekly”,
“@daily”, “@midnight”, and “@hourly”.
Typically, you will only have one line in this field, but for more complicated scheduling setups, you
may need multiple lines.
5.5.3. Polling the SCM
As we have seen, scheduled build jobs are usually not the best strategy for most CI build jobs. The
value of any feedback is proportional to the speed in which you receive that feedback, and Continuous
Integration is no exception. That is why polling the SCM is generally a better option.
Polling involves asking the version control server at regular intervals if any changes have been
committed. If any changes have been made to the source code in the project, Jenkins kicks off a build.
Polling is usually a relatively cheap operation, so you can poll frequently to ensure that a build kicks off
rapidly after changes have been committed. The more frequent the polling is, the faster the build jobs
will start, and the more accurate the feedback about what change broke the build will be.

103
In Jenkins, SCM polling is easy to configure, and uses the same cron syntax we discussed previously.
The natural temptation for SCM polling is to poll as often as possible (for example, using “* * * *
*”, or once every minute). Since Jenkins simply queries the version control system, and only kicks off
a build if the source code has been modified, this approach is often reasonable for small projects. It
shows its limits if there are a very large number of build jobs, as this may saturate the SCM server and
the network with queries, many of them unnecessary. In this case, a more precise approach is better,
where the Jenkins build job is triggered by the SCM when it receives a change. We discuss this option
in Section 5.5.4, “Triggering Builds Remotely”.
If updates are frequently committed to the version control system, across many projects, this may cause
many build jobs to be queued, which can in turn slow down feedback times further. You can reduce the
build queue to some extent by polling less frequently, but at the cost of less precise feedback.
If you are using CVS, polling may not be a good option. When CVS checks for changes in a project, it
checks each file one by one, which is a slow and tedious process. The best solution here is to migrate to
a modern version control system such as Git or Subversion. The second-best solution is to use polling
at very sparse intervals (for example, every 30 minutes).
5.5.4. Triggering Builds Remotely
Polling can be an effective strategy for smaller projects, but it does not scale particularly well—with
large numbers of build jobs, it is wasteful of network resources, and there is always a small delay between
the code change being committed and the build job starting. A more precise strategy is to get the SCM
system to trigger the Jenkins build whenever a change is committed.
It is easy to start a Jenkins build job remotely. You simply invoke a URL of the following form:
http://SERVER/jenkins/job/PROJECTNAME/build
For example, if my Jenkins server was running on http://myserver:8080/jenkins, I could start the
gameoflife build job by invoking the following URL using a tool like wget or curl:
$ wget http://myserver:8080/jenkins/job/gameoflife/build
The trick, then, is to get your version control server to do this whenever a change is committed. The
details of how to do this are different for each version control system. In Subversion, for example, you
would need to write a post-commit hook script, which would trigger a build. You could, for example,
write a Subversion hook script that parses the repository URL to extract the project name, and performs
a wget operation on the URL of the corresponding build job:
JENKINS_SERVER=http://myserver:8080/jenkins
REPOS="$1"
PROJECT=<Regular Expression Processing Goes Here>❶
/usr/bin/wget $JENKINS_SERVER/job/${PROJECT}/build
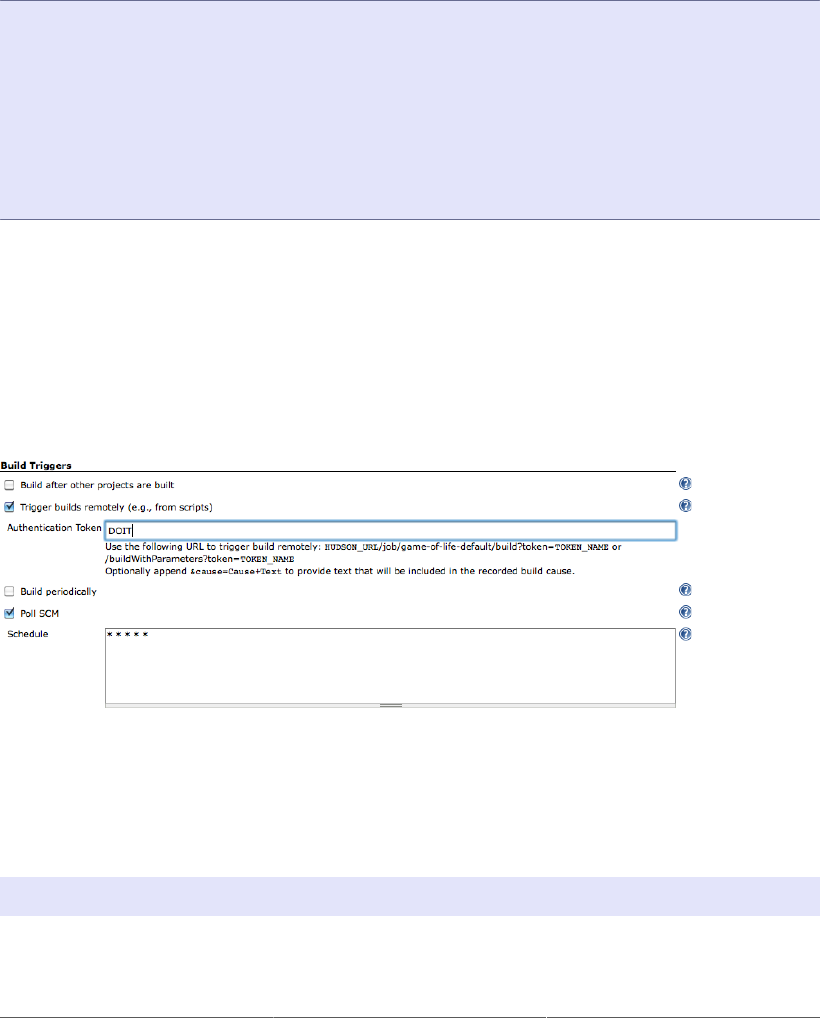
104
❶Use regular expression processing here to extract your project name from the Subversion repository
URL.
However, this approach will only trigger one particular build, and relies on a convention that the default
build job is based on the repository name in Subversion. A more flexible approach with Subversion is
to use the Jenkins Subversion API directly, as shown here:
JENKINS_SERVER=http://myserver:8080/jenkins
REPOS="$1"
REV="$2"
UUID=`svnlook uuid $REPOS`
/usr/bin/wget \
--header "Content-Type:text/plain;charset=UTF-8" \
--post-data "`svnlook changed --revision $REV $REPOS`" \
--output-document "-" \
--timeout=2 \
$JENKINS_SERVER/subversion/${UUID}/notifyCommit?rev=$REV
This would automatically start any Jenkins build jobs monitoring this Subversion repository.
If you have activated Jenkins security, things become a little more complicated. In the simplest case
(where any user can do anything), you need to activate the “Trigger builds remotely” option (see
Figure 5.25, “Triggering a build via a URL using a token”), and provide a special string that can be
used in the URL:
http://SERVER/jenkins/job/PROJECTNAME/build?token=DOIT
Figure 5.25. Triggering a build via a URL using a token
This won’t work if users need to be logged on to trigger a build (for example, if you are using matrix
or project-based security). In this case, you will need to provide a user name and password, as shown
in the following example:
$ wget http://scott:tiger@myserver:8080/jenkins/job/gameoflife/build
or:

105
$ curl -u scott:tiger http://scott:tiger@myserver:8080/jenkins/job/gameoflife/build
5.5.5. Manual Build Jobs
A build does not have to be triggered automatically. Some build jobs should only be started manually,
by human intervention. For example, you may want to set up an automated deployment to a UAT
environment, that should only be started on the request of the QA folks. In this case, you can simply
leave the Build Triggers section empty.
5.6. Build Steps
Now Jenkins should know where and how often to obtain the project source code. The next thing you
need to explain to Jenkins is what it what to do with the source code. In a freestyle build, you do this
by defining build steps. Build steps are the basic building blocks for the Jenkins freestyle build process.
They are what let you tell Jenkins exactly how you want your project built.
A build job may have one step, or more. It may even occasionally have none. In a freestyle build, you can
add as many build steps as you want to the Build section of your project configuration (see Figure 5.26,
“Adding a build step to a freestyle build job”). In a basic Jenkins installation, you will be able to add
steps to invoke Maven and Ant, as well as running OS-specific shell or Windows batch commands. And
by installing additional plugins, you can also integrate other build tools, such as Groovy, Gradle, Grails,
Jython, MSBuild, Phing, Python, Rake, and Ruby, just to name some of the more well-known tools.
In the remainder of this section, we will delve into some of the more common types of build steps.
5.6.1. Maven Build Steps
Jenkins has excellent Maven support, and Maven build steps are easy to configure and very flexible.
Just pick “Invoke top-level Maven targets” from the build step lists, pick a version of Maven to run
(if you have multiple versions installed), and enter the Maven goals you want to run. Jenkins freestyle
build jobs work fine with both Maven 2 and Maven 3.
Just like on the command line, you can specify as many individual goals as you want. You can also
provide command-line options. A few useful Maven options in a CI context are:
-B, --batch-mode
This option tells Maven not to prompt for any input from the user, just using the default values
if any are required. If Maven does prompt for any input during the Jenkins build, the build will
get stuck indefinitely.
-U, --update-snapshots
Forces Maven to check for updated releases and snapshot dependencies on the remote repository.
This makes sure you are building with the latest and greatest snapshot dependencies, and not just
using older local copies which may not by in sync with the latest version of the source code.
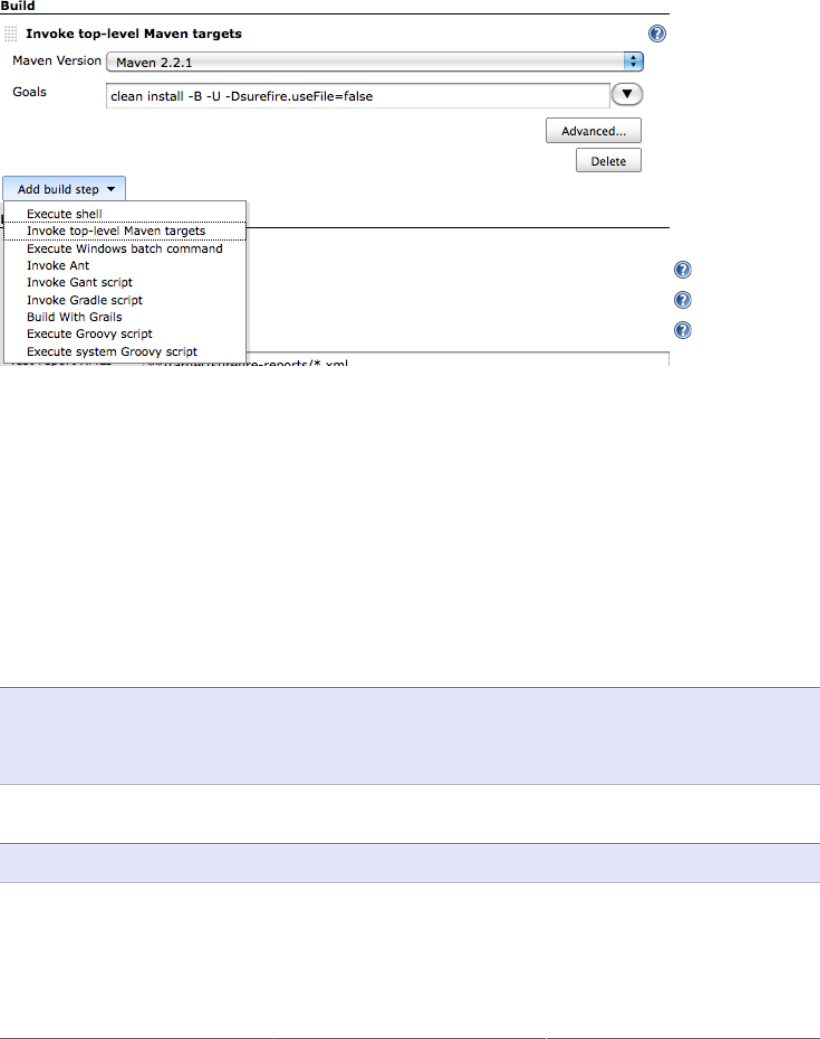
106
-Dsurefire.useFile=false
This option forces Maven to write JUnit output to the console, rather than to text files in the target
directory as it normally would. This way, any test failure details are directly visible in the build
job console output. The XML files that Jenkins needs for its test reporting will still be generated.
Figure 5.26. Adding a build step to a freestyle build job
The advanced options are also worth investigating (click on the Advanced button).
The optional POM field lets you override the default location of the Maven pom.xml file. This is the
equivalent of running Maven from the command line with the -f or --file option. This is useful
for some multimodule Maven projects where the aggregate pom.xml file (the one containing the
<modules> section) is located in a subdirectory rather than at the top level.
The Properties field lets you set property values that will be passed into the Maven build process, using
the standard property file format illustrated here:
# Selenium test configuration
selenium.host=testserver.acme.com
selenium.port=8080
selenium.broswer=firefox
These properties are passed to Maven as command-line options, as shown here:
$ mvn verify -Dselenium.host=testserver.acme.com ...
The JVM Options field lets you set any of the standard Java Virtual Machine options for your build job.
So if your build process is particularly memory intensive, you might add some extra heap space with
the -Xmx option (for example, -Xmx512m would set the maximum heap size to 512 MB).
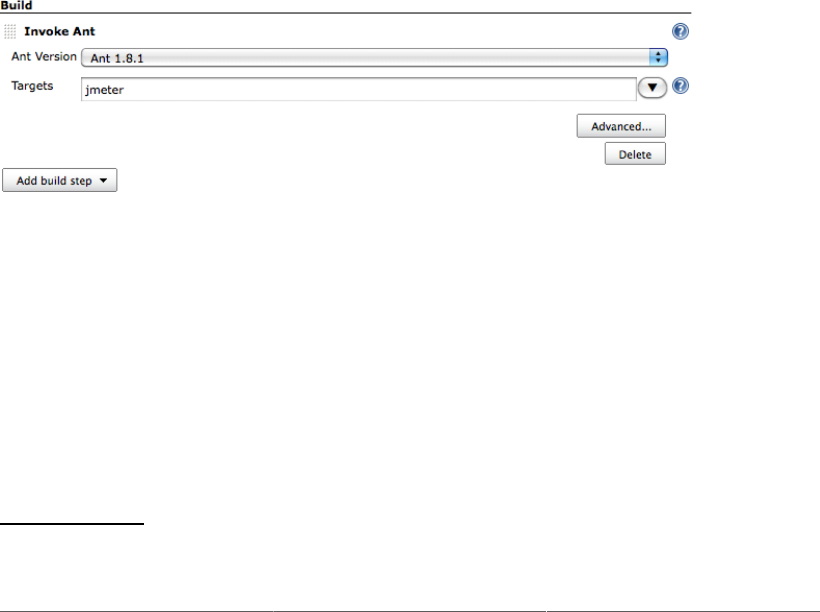
107
The final option lets you configure a private Maven repository for this build job. Normally, Maven
will just use the default Maven repository (usually in the .m2/repository folder in the user’s home
directory). Occasionally, this can lead to build jobs interfering with each other, or use inconsistent
snapshot versions from one build to another. To be sure that your build is run in clean laboratory
conditions, you can activate this option. Your build job will get its own private repository, reserved for
its own exclusive use. On the downside, the first time the build job runs a build, this may take some time
to download all of the Maven artifacts, and private repositories can take up a lot of space. However, it
is the best way of guaranteeing that your build is run in a truly isolated environment.
5.6.2. Ant Build Steps
Freestyle build jobs work equally well with Ant. Apache Ant9 is a widely-used and very well-known
Java build scripting tool. Indeed, a very large number of Java projects out there rely on Ant build scripts.
Ant is not only used as a primary build scripting tool—even if your project uses Maven, you may resort
to calling Ant scripts to do more specific tasks. There are Ant libraries available for many development
tools and low-level tasks, such as using SSH, or working with proprietary application servers.
In its most basic form, configuring an Ant build step very is simple indeed—you just provide the version
of Ant you want to use and the name of the target you want to invoke. In Figure 5.27, “Configuring an
Ant build step”, for example, we are invoking an Ant script to run a JMeter test script.
Figure 5.27. Configuring an Ant build step
As with the Maven build step, the “Advanced...” button provides you with more detailed options, such as
specifying a different build script, or a build script in a different directory (the default will be build.xml
in the root directory). You can also specify properties and JVM options, just as you can for Maven.
5.6.3. Executing a Shell or Windows Batch Command
Occasionally you may need to execute a command directly at the Operating System level. Some legacy
build processes rely on OS-specific scripts, for example. In other cases, you may need to perform a low-
level operation that is most easily done with an OS-level command.
9 http://ant.apache.org/
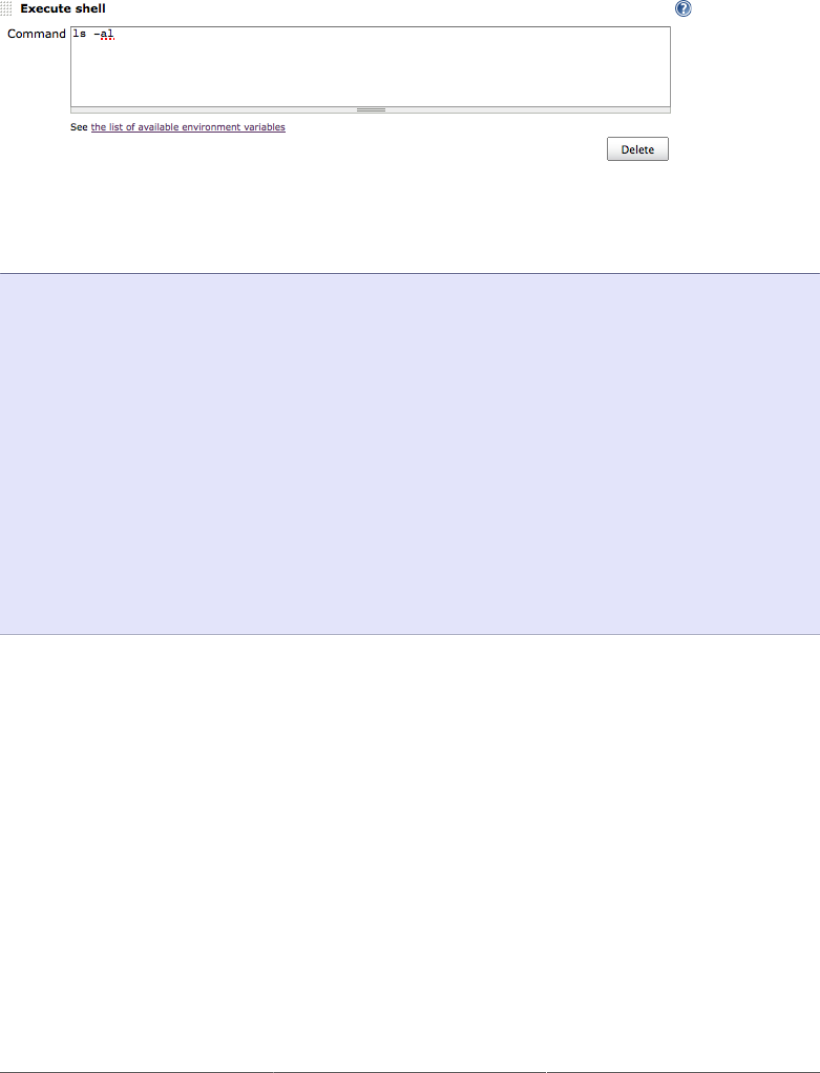
108
You can do this in Jenkins with the Execute Shell (for Unix) or Execute Windows Batch command
(for Windows). As an example, in Figure 5.28, “Configuring an Execute Shell step” we have added a
step to execute the Unix ls command.
Figure 5.28. Configuring an Execute Shell step
The output from this build step is shown here:
[workspace] $ /bin/sh -xe /var/folders/.../jenkins2542160238803334344.s
+ ls -al
total 64
drwxr-xr-x 14 johnsmart staff 476 30 Oct 15:21 .
drwxr-xr-x 9 johnsmart staff 306 30 Oct 15:21 ..
-rw-r--r--@ 1 johnsmart staff 294 22 Sep 01:40 .checkstyle
-rw-r--r--@ 1 johnsmart staff 651 22 Sep 01:40 .classpath
-rw-r--r--@ 1 johnsmart staff 947 22 Sep 01:40 .project
drwxr-xr-x 5 johnsmart staff 170 22 Sep 01:40 .settings
-rw-r--r--@ 1 johnsmart staff 437 22 Sep 01:40 .springBeans
drwxr-xr-x 9 johnsmart staff 306 30 Oct 15:21 .svn
-rw-r--r--@ 1 johnsmart staff 1228 22 Sep 01:40 build.xml
-rw-r--r--@ 1 johnsmart staff 50 22 Sep 01:40 infinitest.filters
-rw-r--r-- 1 johnsmart staff 6112 30 Oct 15:21 pom.xml
drwxr-xr-x 5 johnsmart staff 170 22 Sep 01:40 src
drwxr-xr-x 3 johnsmart staff 102 22 Sep 01:40 target
drwxr-xr-x 5 johnsmart staff 170 22 Sep 01:40 tools
You can either execute an OS-specific command (e.g., ls), or store a more complicated script as a file
in your version control system, and execute this script. If you are executing a script, you just need to
refer to the name of your script relative to the work directory.
Shell scripts are executed using the -ex option—the commands are printed to the console, as is the
resulting output. If any of the executed commands return a nonzero value, the build will fail.
When Jenkins executes a script, it sets a number of environment variables that you can use within the
script. We discuss these variable in more detail in the next section.
In fact, there are some very good reasons why you should avoid using OS-level scripts in your build jobs
if you can possibly avoid it. In particular, it makes your build job in the best of cases OS-specific, and
at worst dependant on the precise machine configuration. One more portable alternative to executing
OS scripts include writing an equivalent script in a more portable scripting language, such as Groovy
or Gant.

109
5.6.4. Using Jenkins Environment Variables in Your Builds
One useful trick that can be used in virtually any build step is to obtain information from Jenkins about
the current build job. In fact, when Jenkins starts a build step, it makes the following environment
variables available to the build script:
BUILD_NUMBER
The current build number, such as “153”.
BUILD_ID
A timestamp for the current build id, in the format YYYY-MM-DD_hh-mm-ss.
JOB_NAME
The name of the job, such as game-of-life.
BUILD_TAG
A convenient way to identify the current build job, in the form of jenkins-${JOB_NAME}-
${BUILD_NUMBER} (e.g., jenkins-game-of-life-2010-10-30_23-59-59).
EXECUTOR_NUMBER
A number identifying the executor running this build among the executors of the same machine.
This is the number you see in the “build executor status”, except that the number starts from
0, not 1.
NODE_NAME
The name of the slave if the build is running on a slave, or "" if the build is running on master.
NODE_LABELS
The list of labels associated with the node that this build is running on.
JAVA_HOME
If your job is configured to use a specific JDK, this variable is set to the JAVA_HOME of the
specified JDK. When this variable is set, PATH is also updated to have $JAVA_HOME/bin.
WORKSPACE
The absolute path of the workspace.
HUDSON_URL
The full URL of the Jenkins server, for example http://ci.acme.com:8080/jenkins/.
JOB_URL
The full URL for this build job, for example http://ci.acme.com:8080/jenkins/game-
of-life.
BUILD_URL
The full URL for this build, for example http://ci.acme.com:8080/jenkins/game-of-
life/20.

110
SVN_REVISION
For Subversion-based projects, this variable contains the current revision number.
CVS_BRANCH
For CVS-based projects, this variable contains the branch of the module. If CVS is configured
to check out the trunk, this environment variable will not be set.
These variables are easy to access. In an Ant script, you can access them using the <property> tag
as shown here:
<target name="printinfo">
<property environment="env" />
<echo message="${env.BUILD_TAG}"/>
</target>
In Maven, you can access the variables either in the same way (using the “env.” prefix), or directly
using the Jenkins environment variable. For example, in the following pom.xml file, the project URL
will point to the Jenkins build job that ran the mvn site build:
<project...>
...
<groupId>com.wakaleo.gameoflife</groupId>
<artifactId>gameoflife-core</artifactId>
<version>0.0.55-SNAPSHOT</version>
<name>gameoflife-core</name>
<url>${JOB_URL}</url>
Alternatively, if you are building a web application, you can also use the maven-war-plugin to insert
the build job number into the web application manifest, e.g.:
<project>
...
<build>
...
<plugins>
<plugin>
<artifactId>maven-war-plugin</artifactId>
<configuration>
<manifest>
<addDefaultImplementationEntries>true</addDefaultImplementationEntries>
</manifest>
<archive>
<manifestEntries>
<Specification-Title>Continuous Integration with Hudson (Content)</Specification-Title>
<Specification-Version>1.0.0-SNAPSHOT</Specification-Version>
<Implementation-Version>${BUILD_TAG}</Implementation-Version>
</manifestEntries>
</archive>
</configuration>
</plugin>
...
</plugins>
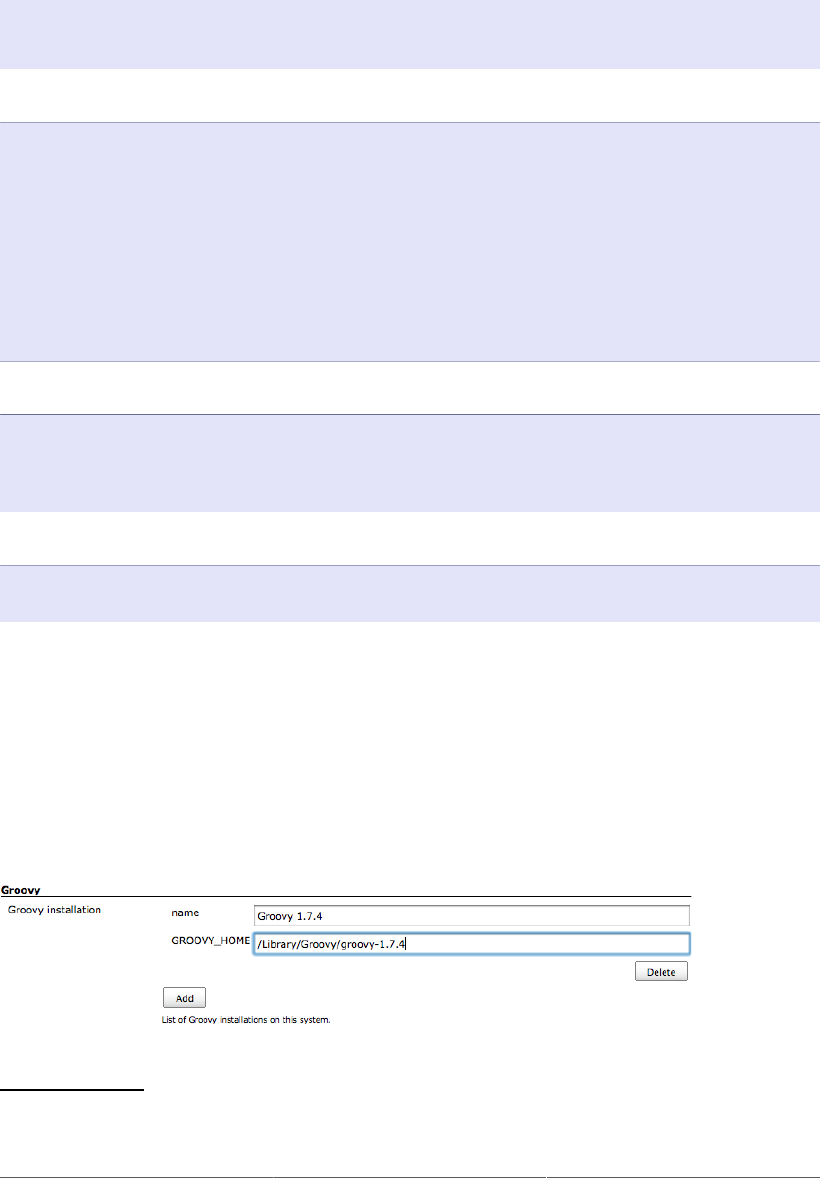
111
</build>
...
</project>
This will produce a MANIFEST.MF file along the following lines:
Manifest-Version: 1.0
Archiver-Version: Plexus Archiver
Created-By: Apache Maven
Built-By: johnsmart
Build-Jdk: 1.6.0_22
Jenkins-Build-Number: 63
Jenkins-Project: game-of-life
Jenkins-Version: 1.382
Implementation-Version: jenkins-game-of-life-63
Specification-Title: gameoflife-web
Specification-Version: 0.0.55-SNAPSHOT
And in a Groovy script, they can be obtained via the System.getenv() method:
def env = System.getenv()
env.each {
println it
}
or:
def env = System.getenv()
println env['BUILD_NUMBER']
5.6.5. Running Groovy Scripts
Groovy is not only a popular JVM dynamic language, it is also a convenient language for low-level
scripting. The Jenkins Groovy Plugin10 lets you run arbitrary Groovy commands, or invoke Groovy
scripts, as part of your build process.
Once you have installed the Groovy plugin in the usual way, you need to add a reference to your
Groovy installation in the system configuration page (see Figure 5.29, “Adding a Groovy installation
to Jenkins”).
Figure 5.29. Adding a Groovy installation to Jenkins
10 http://wiki.jenkins-ci.org//display/HUDSON/Groovy+Plugin
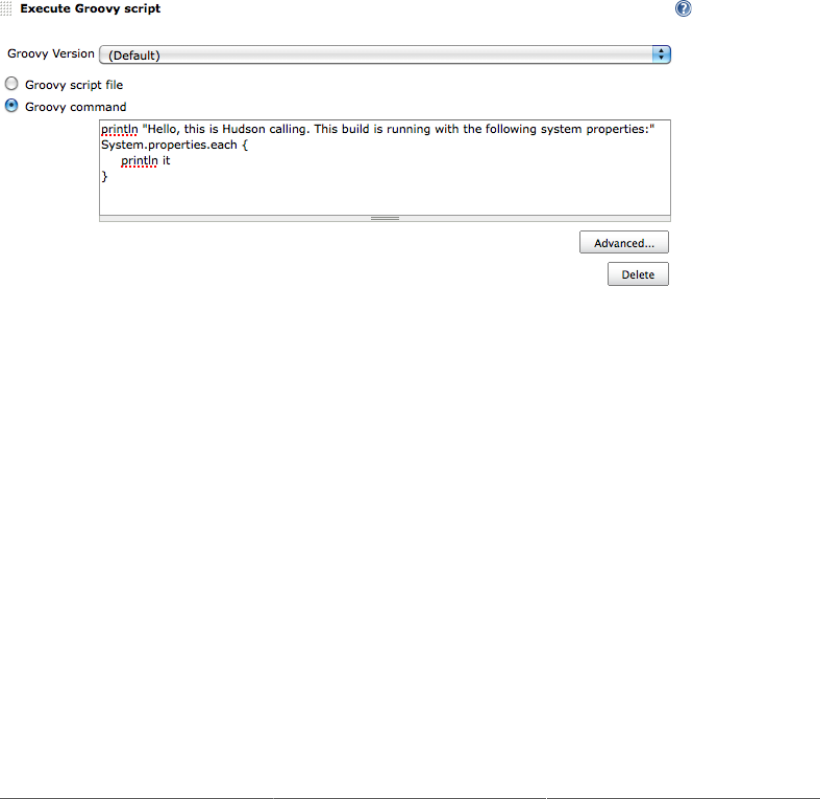
112
Now you can add some Groovy scripting to your build job. When you click on “Add build step”, you
will see two new entries in the drop-down menu: “Execute Groovy script” and “Execute system Groovy
script”. The first option is generally what you want—this will simply execute a Groovy script in a
separate JVM, as if you were invoking Groovy from the command line. The second option runs Groovy
commands within Jenkins’s own JVM, with full access to Jenkins’s internals, and is mainly used to
manipulate the Jenkins build jobs or build process itself. This is a more advanced topic that we will
discuss later on in the book.
A Groovy build step can take one of two forms. For simple cases, you can just add a small snippet
of Groovy, as shown in Figure 5.30, “Running Groovy commands as part of a build job”. For more
involved or complicated cases, you would probably write a Groovy script and place it under version
control. Once your script is safely in your SCM, you can run it by selecting the “Groovy script file”
option and providing the path to your script (relative to your build job workspace).
Figure 5.30. Running Groovy commands as part of a build job
In Figure 5.31, “Running Groovy scripts as part of a build job”, you can see a slightly more complicated
example. Here we are running a Groovy script called run-fitness-tests.groovy, which can be
found in the scripts directory. This script takes the test suites to be executed as its parameters—we
provide these in the Script parameters field. If we want to provide any options for Groovy itself, we can
put these in the Groovy Parameters field. Alternatively, we can also provide command-line properties
in the Properties field—this is simply a more convenient way of using the -D command-line option to
pass property values to the Groovy script.
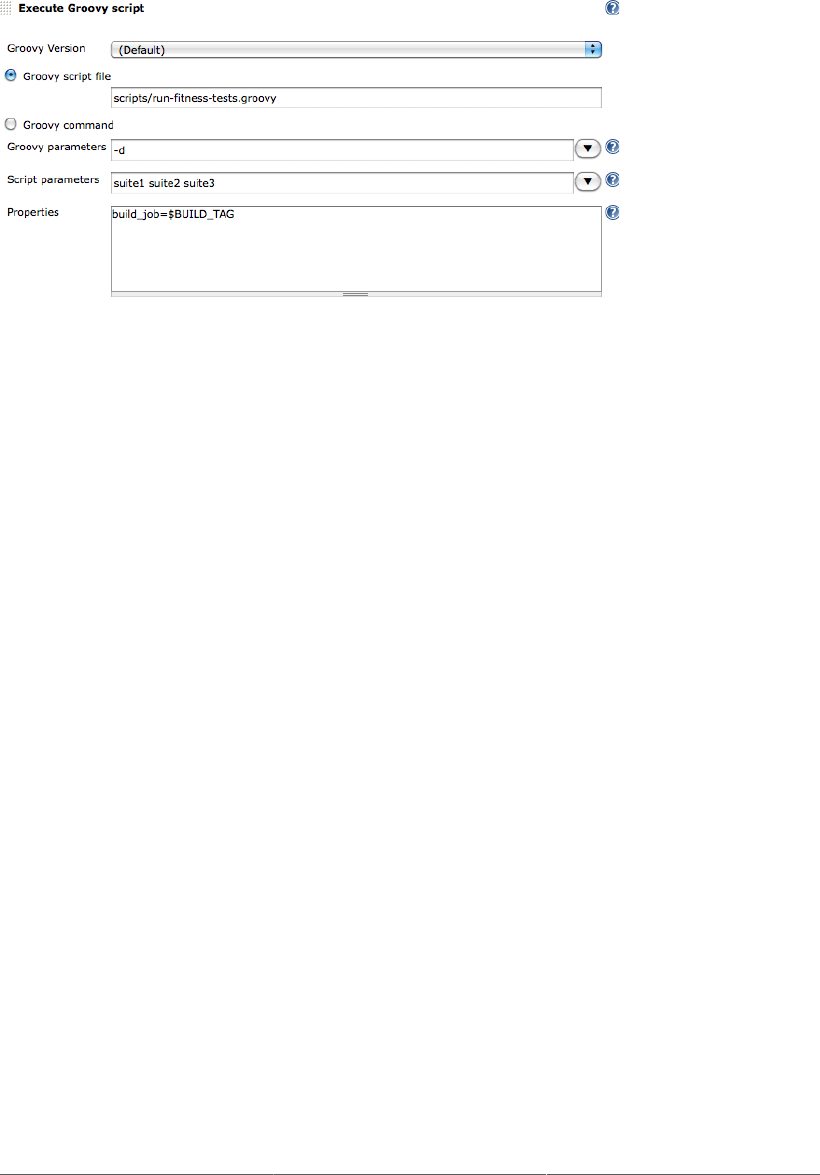
113
Figure 5.31. Running Groovy scripts as part of a build job
5.6.6. Building Projects in Other Languages
Jenkins is a flexible tool, and it can be used for much more than just Java and Groovy. For example,
Jenkins also works well with Grails, .Net, Ruby, Python and PHP, just to name a few. When using other
languages, you generally need to install a plugin to support your favorite language, which will add a
new build step type for this language. We will look at some examples in Section 5.10, “Using Jenkins
with Other Languages”.
5.7. Post-Build Actions
Once the build is completed, there are still a few things you need to look after. You might want to archive
some of the generated artifacts, to report on test results, and to notify people about the results. In this
section, we look at some of the more common tasks you need to configure after the build is done.
5.7.1. Reporting on Test Results
One of the most obvious requirements of a build job is to report on test results. Not only whether there
are any test failures, but also how many tests were executed, how long they took to execute, and so on.
In the Java world, JUnit is the most commonly-used testing library around, and the JUnit XML format
for test results is widely used and understood by other tools as well.
Jenkins provides great support for test reporting. In a freestyle build job, you need to tick the “Publish
JUnit test result report” option, and provide a path to your JUnit report files (see Figure 5.32, “Reporting
on test results”). You can use a wildcard expression (such as **/target/surefire-reports/*.xml
in a Maven project) to include JUnit reports from a number of different directories—Jenkins will
aggregate the results into a single report.
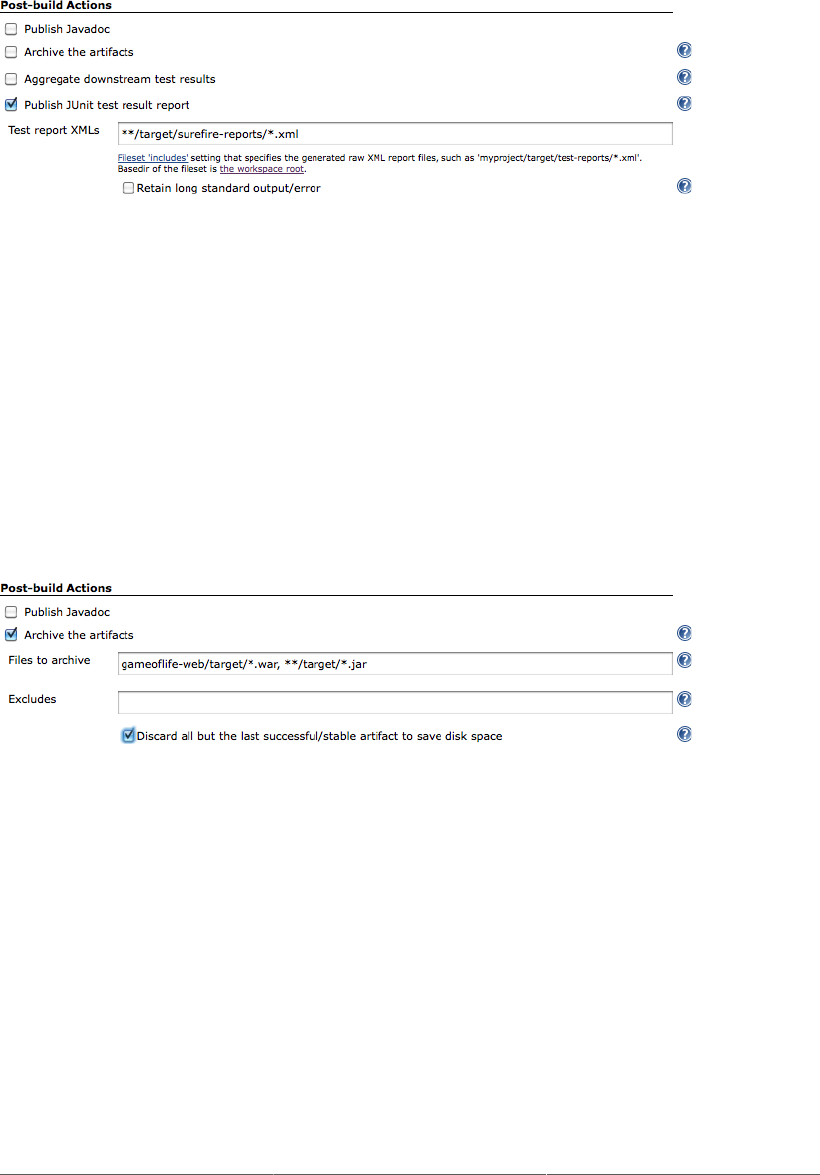
114
Figure 5.32. Reporting on test results
We look at automated tests in much more detail in Chapter 6, Automated Testing.
5.7.2. Archiving Build Results
With a few exceptions, the principal goal of a build job is generally to build something. In Jenkins, we
call this something an artifact. An artifact might be a binary executable (a JAR or WAR file for a Java
project, for example), or some other related deliverable, such as documentation or source code. A build
job can store one or many different artifacts, keeping only the latest copy or every artifact ever built.
Configuring Jenkins to store your artifacts is easy—just tick the “Archive the artifacts” checkbox in
the Post-build Actions, and specify which artifacts you want to store (see Figure 5.33, “Configuring
build artifacts”).
Figure 5.33. Configuring build artifacts
In the “Files to archive” field, you can provide the full paths of the files you want to archive (relative
to the job workspace), or, use Ant-like wild cards (e.g., **/*.jar, for all the JAR files, anywhere in
the workspace). One advantage of using wild cards is that it makes your build less dependent on your
version control set up. For example, if you are using Subversion (see Section 5.4, “Configuring Source
Code Management”), Jenkins will check out your project either directly in your workspace, or into a
subdirectory, depending on how you set it up. If you use a wild card expression like **/target/*.war,
Jenkins will find the file no matter what directory the project is located in.
As usual, the Advanced button give access to a few extra options. If you are using wild cards to find
your artifacts, you might need to exclude certain directories from the search. You can do this by filling
in the Excludes field. You enter a pattern to match any files that you don’t want to archive, even if they
would normally be included by the “Files to archive” field.
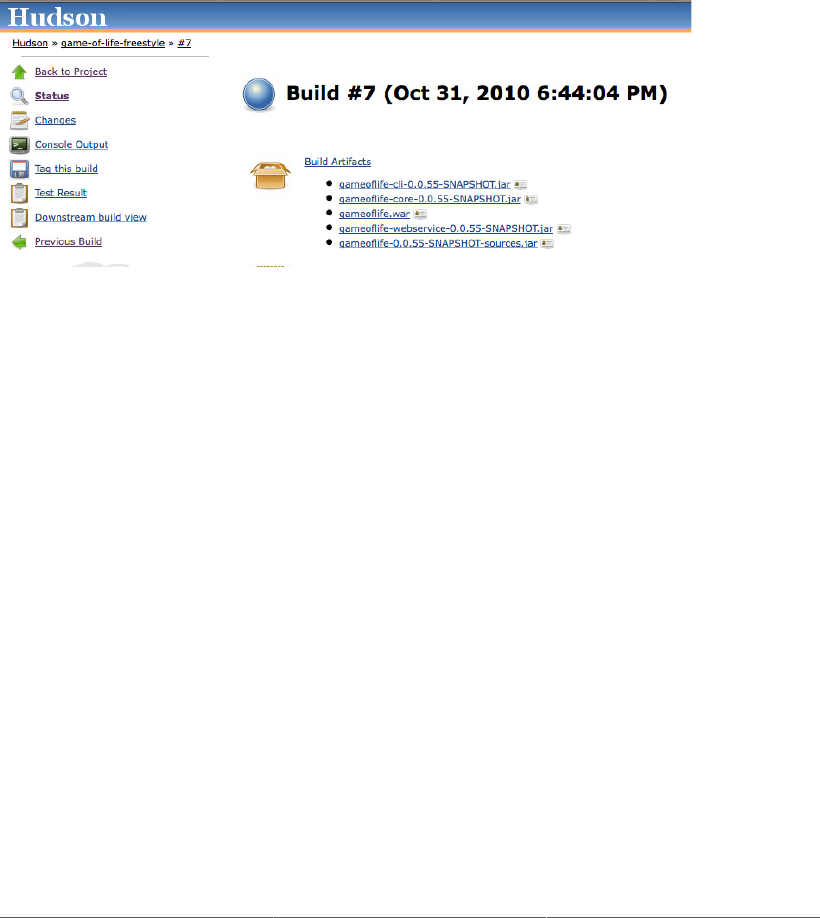
115
Archived artifacts can take a lot of disk space, especially if builds are frequent. For this reason, you may
want to only keep the last successful one. To do this, just tick the “Discard all but the last successful/
stable artifact” option. Jenkins will keep artifacts from the last stable build (if there where any). It will
also keep the artifacts of the latest unstable build following the stable build (if any), and also from the
last failed build that happened.
Archived build artifacts appear on the build results page (see Figure 5.34, “Build artifacts are displayed
on the build results page and on the build job home page”). The most recent build artifacts are also
displayed on the build job home page.
Figure 5.34. Build artifacts are displayed on the build results page and on the build job home page
You can also use permanent URLs to access the most recent build artifacts. This is a great way to reuse
the latest artifacts from your builds, either in other Jenkins build jobs or in external scripts, for example.
Three URLs are available: last stable build, last successful build and last completed build.
Before we look at the URLs, we should discuss the concept of stable and successful builds.
A build is successful when the compilation reported no errors.
A build is considered stable if it was built successfully, and no publisher reports it as unstable. For
example, depending on your project configuration, unit test failures, insufficient code coverage, or other
code quality metrics issues, could cause a build to be marked as unstable. So a stable build is always
successful, but the opposite is not necessarily true—a build can be successful without being stable.
A completed build is simply a build that has finished, no matter what its result. Note that the archiving
step will take place no matter what the outcome of the build was.
The format of the artifact URLs is intuitive, and takes the following form:
Latest stable build
<server-url>/job/<build-job>/lastStableBuild/artifact/<path-to-
artifact>

116
Latest successful build
<server-url>/job/<build-job>/lastSuccessfulBuild/artifact/<path-to-
artifact>
Latest completed build
<server-url>/job/<build-job>/lastCompletedBuild/artifact/<path-to-
artifact>
This is best illustrated by some examples. Suppose your Jenkins server is running on http://
myserver:8080, your build job is called game-of-life, and you are storing a file called
gameoflife.war, which is in the target directory of your workspace. The URLs for this artifact would
be the following:
Latest stable build
http://myserver:8080/job/gameoflife/lastStableBuild/artifact/target/
gameoflife.war
Latest successful build
http://myserver:8080/job/gameoflife/lastSuccessfulBuild/artifact/
target/gameoflife.war
Latest completed build
http://myserver:8080/job/gameoflife/lastCompletedBuild/artifact/
target/gameoflife.war
Artifacts don’t just have to be executable binaries. Imagine, for example, that your build process involves
automatically deploying each build to a test server. For convenience, you want to keep a copy of the
exact source code associated with each deployed WAR file. One way to do this would be to generate the
source code associated with a build, and archive both this file and the WAR file. We could do this by
generating a JAR file containing the application source code (for example, by using the Maven Source
Plugin for a Maven project), and then including this in the list of artifacts to store (see Figure 5.35,
“Archiving source code and a binary package”).
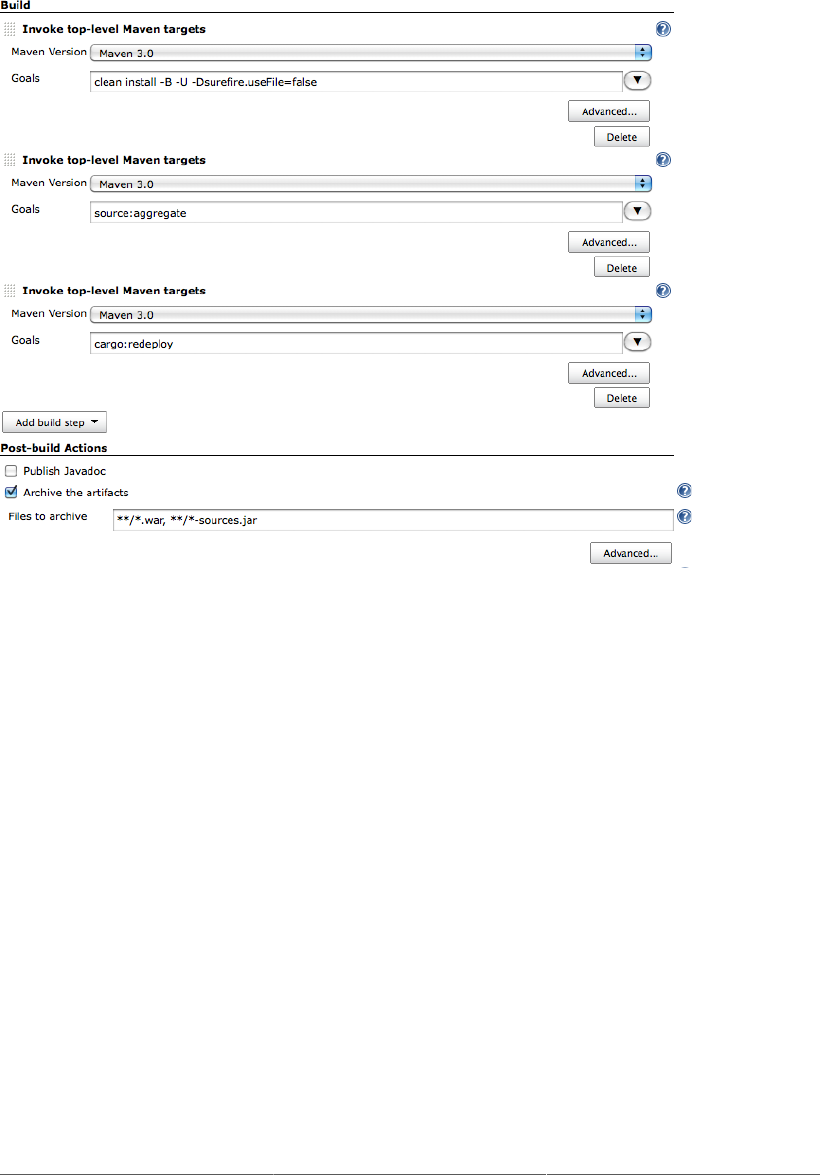
117
Figure 5.35. Archiving source code and a binary package
Of course, this example is a tad academic: it would probably be simpler just to use the revision number
for this build (which is displayed on the build result page) to retrieve the source code from your version
control system. But you get the idea.
Note that if you are using an Enterprise Repository Manager such as Nexus or Artifactory to store
your binary artifacts, you may not need to keep them on the Jenkins server. You may prefer simply to
automatically deploy your artifacts to your Enterprise Repository Manager as part of the build job, and
retrieve them from here when required.
5.7.3. Notifications
The point of a CI server is to let people know when a build breaks. In Jenkins, this comes under the
heading of Notification.
Out of the box, Jenkins provides support for email notification. You can activate this by ticking the
“E-mail Notification” checkbox in the Post-build Actions (see Figure 5.36, “Email notification”). Then
enter the email addresses of the team members who will need to know when the build breaks. When
the build does break, Jenkins will send a friendly email message to the users in this list containing a
link to the broken build.

118
Figure 5.36. Email notification
You can also opt to send a separate email to the user who’s commit (presumably) broke the build. For this
to work, you need to have activated Security on your Jenkins server (see Chapter 7, Securing Jenkins).
Normally, Jenkins will send an email notification out whenever a build fails (for example, because of
a compilation error). It will also send out a notification when the build becomes unstable for the first
time (for example, if there are unit test failures). Unless you configure it to do so, Jenkins will not send
emails for every unstable build, but only for the first one.
Finally, Jenkins will send a message when a previously failing or unstable build succeeds, to let everyone
know that the problem has been resolved.
5.7.4. Building Other Projects
You can also start other build jobs in the Post-build Actions, using the “Build other projects” option.
This is useful if you want to organize your build process in several, smaller steps, rather than one long
build job. Just list the projects you want to start after this one. Normally, these projects will only be
triggered if the build was stable, but you can optionally trigger another build job even if the current build
is unstable. This might be useful, for example, if you wanted to run a code quality metrics reporting
build job after a project’s main build job, even if there are test failures in the main build.
5.8. Running Your New Build Job
Now all you need to do is save your new build job. You can then trigger the first build manually, or
just wait for it to kick off by itself. Once the build is finished, you can click on the build number to
see the results of your work.
5.9. Working with Maven Build Jobs
In this section, we will have a look at the other most commonly used build job: Maven 2/3 build jobs.
Maven build jobs are specifically adapted to Maven 2 and Maven 3 builds. Creating a Maven build
job requires considerably less work than configuring the equivalent freestyle build job. Maven build
jobs support advanced Maven-related features such as incremental builds on multimodule projects and
triggering builds from changes in snapshot dependencies, and make configuration and reporting much
simpler.
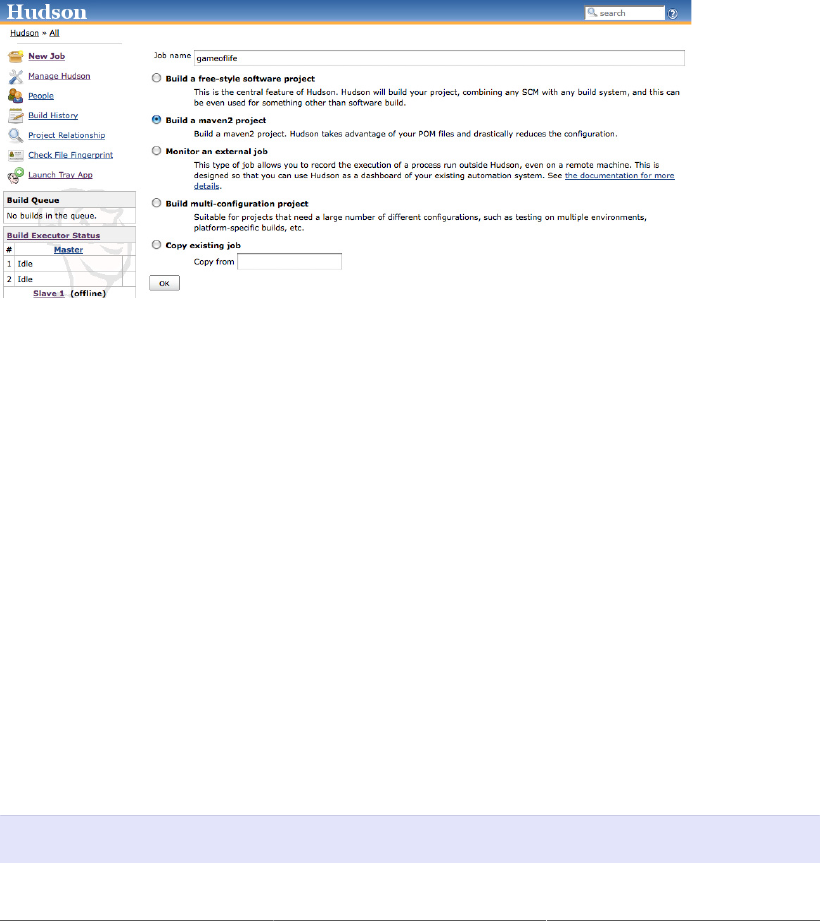
119
However, there is a catch: Maven 2/3 build jobs are less flexible than freestyle build jobs, and don’t
support multiple build steps within the same build job. Some users also report that large Maven projects
tend to run more slowly and use more memory when configured as Maven build jobs rather than as
Freestyle ones.
In this section, we will investigate how to configure Maven 2/3 builds, when you can use them, as well
as their advantages and limitations.
To create a new Maven build job, just choose the “”Build a maven2/3 project” option in the New Job
page (see Figure 5.37, “Creating a new Maven build job”).
Figure 5.37. Creating a new Maven build job
5.9.1. Building Whenever a SNAPSHOT Dependency Is Built
At first glance, the Maven 2/3 build job configuration screen is very similar to the one we saw for
freestyle builds in the previous section. The first difference you may notice is in the Build Triggers
section. In this section, an extra option is available: “Build whenever a SNAPSHOT dependency
is built”. If you select this option, Jenkins will examine your pom.xml file (or files) to see if any
SNAPSHOT dependencies are being built by other build jobs. If any other build jobs update a
SNAPSHOT dependency that your project uses, Jenkins will build your project as well.
Typically in Maven, SNAPSHOT dependencies are used to share the latest bleeding-edge version of
a library with other projects within the same team. Since they are by definition unstable, it is not
recommended practice to rely on SNAPSHOT dependencies from other teams or from external sources.
For example, imagine that you are working on a new game-of-life web application. You are using Maven
for this project, so you can use a Maven build job in Jenkins. Your team is also working on a reusable
library called cooltools. Since these two projects are being developed by the same team, you are using
some of the latest cooltools features in the game-of-life web application. So you have a SNAPSHOT
dependency in the <dependencies> section of your game-of-life pom.xml file:
<dependencies>
<dependency>
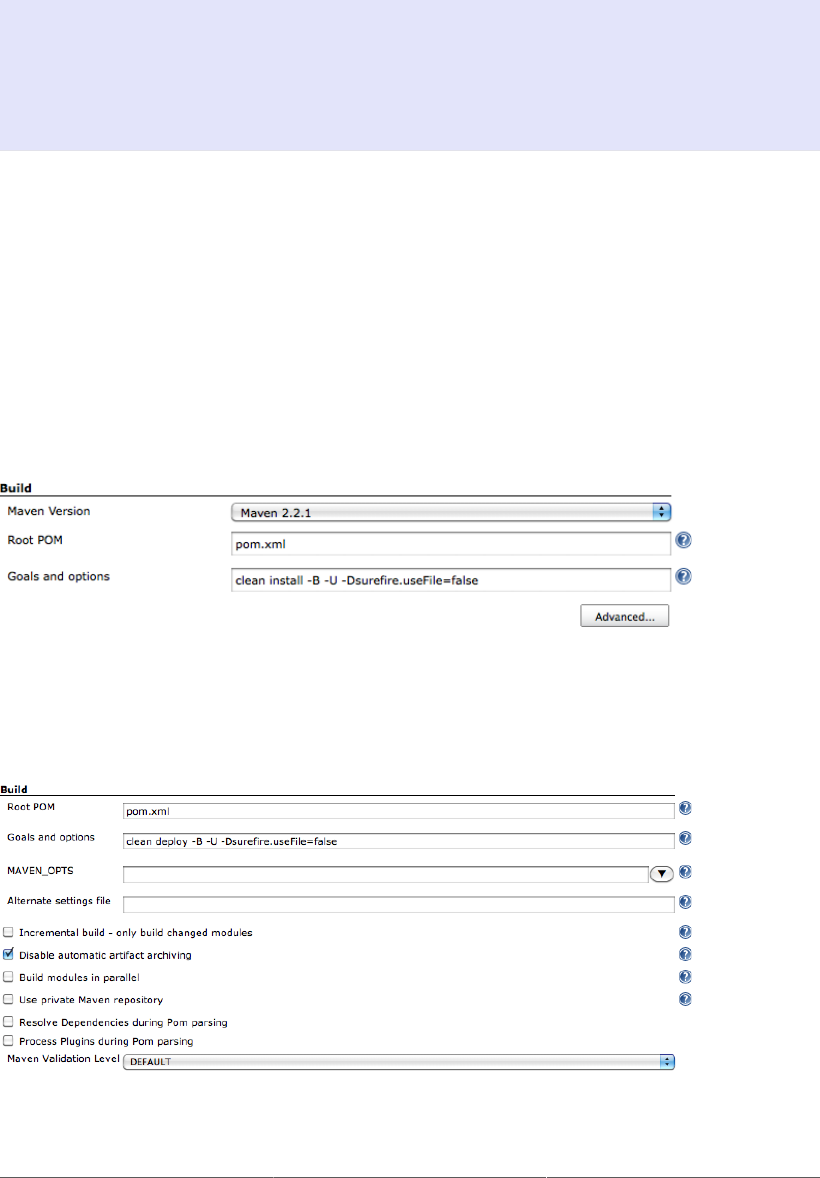
120
<groupId>com.acme.common</groupId>
<artifactId>cooltools</artifactId>
<version>0.0.1-SNAPSHOT</version>
<scope>test</scope>
</dependency>
...
</dependencies>
On your Jenkins server, you have set up Maven build jobs for both the cooltools and the game-of-life
applications. Since your game-of-life project needs the latest cooltools SNAPSHOT version, you tick
the “Build whenever a SNAPSHOT dependency is built” option. This way, whenever the cooltools
project is rebuilt, the game-of-life project will automatically be rebuilt as well.
5.9.2. Configuring the Maven Build
The next area where you will notice a change is in the Build section. In a Maven build job, the build
section is entirely devoted to running a single Maven goal (see Figure 5.38, “Specifying the Maven
goals”). In this section, you specify the version of Maven you want to execute (remember, at the time
of Maven, this will only work with Maven), the location of the pom.xml file, and the Maven goal (or
goals) to invoke. You can also add any command-line options you need here.
Figure 5.38. Specifying the Maven goals
In many cases, this is all you need to get your Maven build job configured. However, if you click on the
“Advanced...” button, you can take your pick of some more advanced features (Figure 5.39, “Maven
build jobs—advanced options”).
Figure 5.39. Maven build jobs—advanced options
121
The Incremental Build option comes in very handy for large, multimodule Maven builds. If you tick this
option, when a change is made to one of the project modules, Jenkins will only rebuild that module and
any modules that use the changed module. It performs this magic by using some new Maven features
introduced in Maven 2.1 (so it won’t work if you are using Maven 2.0.x). Jenkins detects which modules
have been changed, and then uses the -pl (--project-list) option to build only the updated modules,
and the -amd (--also-make-dependents) option to build the modules that use the updated modules.
If nothing has been changed in the source code, all of the modules are built.
By default, Jenkins will archive all of the artifacts generated by a Maven build job. This can come in
handy at times, but it can also be very expensive in disk storage. If you want to turn off this option, just
tick the “Disable automatic artifact archiving” option. Alternatively, you can always limit the artifacts
stored by using the “Discard Old Builds” option at the top of the configuration page.
The “Build modules in parallel” option tells Jenkins to run each individual module in parallel as a
separate build. In theory, this could speed up your builds quite a bit. In practice, it will only really work
if your modules are totally independent (that is, you aren’t using aggregation), which is rarely the case.
If you think building your modules in parallel could really speed up your multimodule project, you may
want to try a freestyle build with Maven 3 and its new parallel build feature.
Another useful option is “Use [a] private Maven repository”. Normally, when Jenkins runs Maven, it
will behave in exactly the same way as Maven on the command line: it will store artifacts in, and retrieve
artifacts from the local Maven repository (found in ~/.m2/repository if you haven’t reconfigured it
in the settings.xml file). This is efficient in terms of disk space, but not always ideal for CI builds.
Indeed, if several build jobs are working on and with the same snapshot artifacts, the builds may end
up interfering with each other.
When this option is checked, Jenkins will tell Maven to use $WORKSPACE/.repository as the local
Maven repository. This means each job will get its own isolated Maven repository just for itself. It fixes
the above problems, at the expense of additional disk space consumption.
With this option, Maven will use a dedicated Maven repository for this build job, located in the
$WORKSPACE/.repository directory. This takes more disk space, but guarantees a better isolation
between build jobs.
Another way of addressing this problem is to override the default repository location by using the
maven.repo.local property, as shown here:
$ mvn install -Dmaven.repo.local=~/.m2/staging-repository
This approach has the advantage of being able to share a repository across several build jobs, which is
useful if you need to do a series of related builds. It will also work with freestyle jobs.
5.9.3. Post-Build Actions
The Post-Build actions in a Maven build job are considerably simpler to configure than in a freestyle
job. This is simply because, since this is a Maven build, Jenkins knows where to look for a lot of the
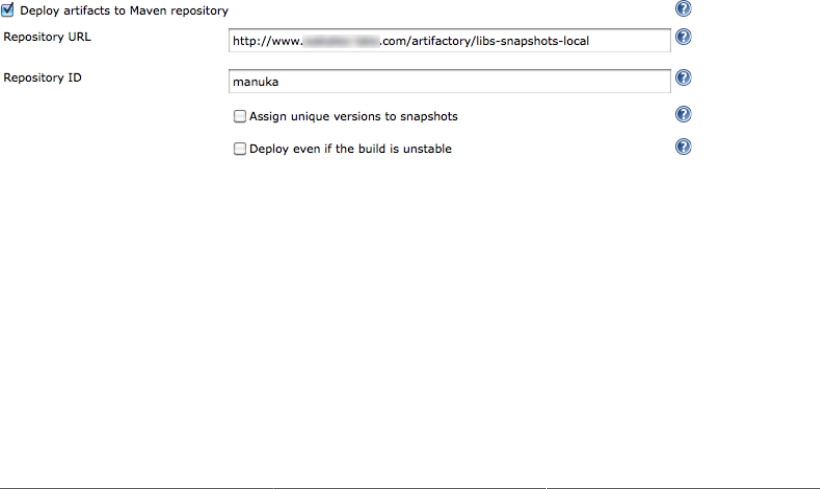
122
build output. Artifacts, test reports, Javadoc, and so forth, are all generated in standard directories, which
means you don’t have to tell Jenkins where to find things. So Jenkins will find, and report on, JUnit
test results automatically, for example. Later on in the book, we will see how the Maven projects also
simplify the configuration of many code quality metrics tools and reports.
Most of the other Post-build Actions are similar to those we saw in the freestyle build job.
5.9.4. Deploying to an Enterprise Repository Manager
One extra option does appear in the Maven build jobs is the ability to deploy your artifacts to a Maven
repository (see Figure 5.40, “Deploying artifacts to a Maven repository”). An Enterprise Repository
Manager is a server that acts as both a proxy/cache for public Maven artifacts, and as a central storage
server for your own internal artifacts. Open Source Enterprise Repository Managers like Nexus (from
Sonatype) and Artifactory (from JFrog) provide powerful maintenance and administration features
that make configuring and maintaining your Maven repositories a lot simpler. Both these products
have commercial versions, with additional features aimed at more sophisticated or high-end build
infrastructures.
The advantage of getting Jenkins to deploy your artifacts (as opposed to simply running mvn deploy) is
that, if you have a multimodule Maven build, the artifacts will only be deployed once the entire build has
finished successfully. For example, suppose you have a multimodule Maven project with five modules.
If you run mvn deploy, and the build fails after three modules, the first two modules will have been
deployed to your repository, but not the last three, which leaves your repository in an instable state.
Getting Jenkins to do the deploy ensures that the artifacts are only deployed as a group once the build
has successfully finished.
Figure 5.40. Deploying artifacts to a Maven repository
To do this, just tick the “Deploy artifacts to Maven repository” option in the “Post-Build actions”. You
will need to specify the URL of the repository you want to deploy to. This needs to be the full URL
to the repository (e.g., http://nexus.acme.com/nexus/content/repositories/snapshots, and not just http://
nexus.acme.com/nexus)
Most repositories need you to authenticate before letting you deploy artifacts to them. The standard
Maven way to do this is to place a <server> entry in your local settings.xml file, as shown here:
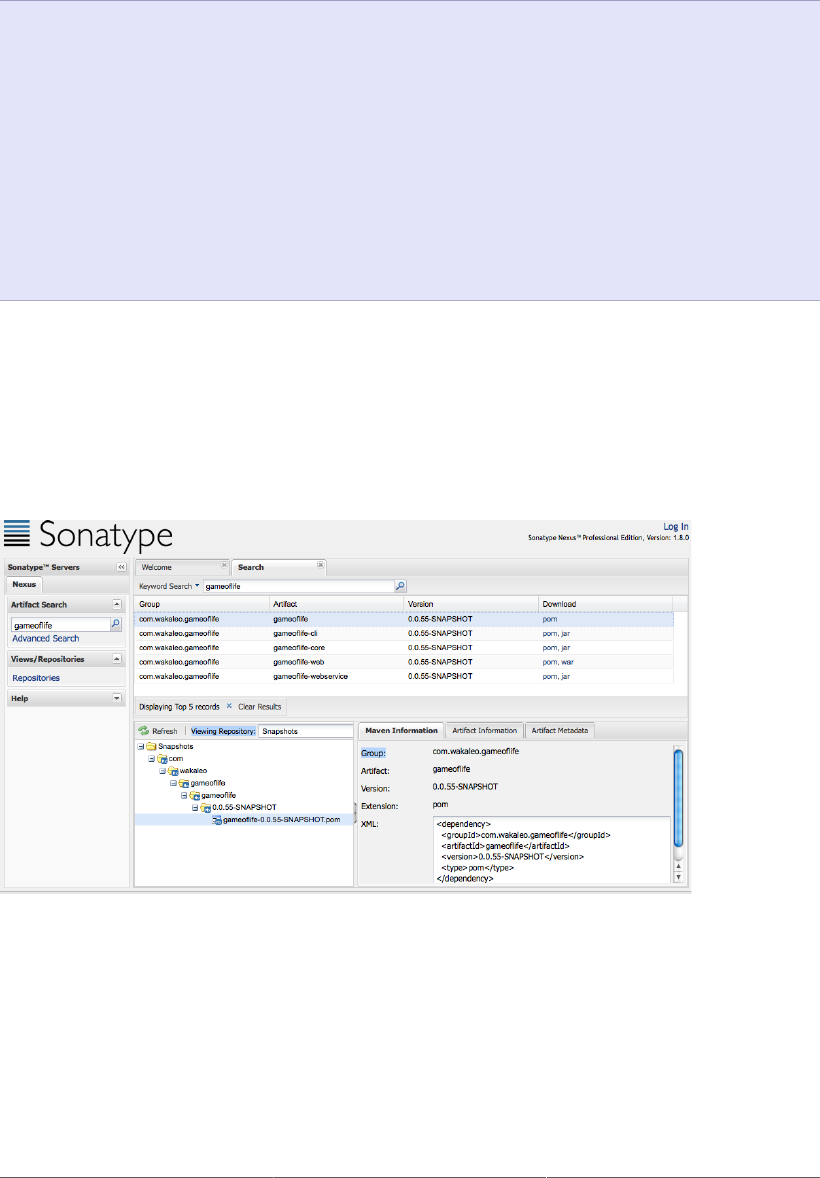
123
<settings...>
<servers>
<server>
<id>nexus-snapshots</id>
<username>scott</username>
<password>tiger</password>
</server>
<server>
<id>nexus-releases</id>
<username>scott</username>
<password>tiger</password>
</server>
</servers>
</settings>
For the more security-minded, you can also encrypt these passwords if required.
Then, enter the corresponding ID value in the Repository ID field in Jenkins. Jenkins will then be able
to look up the right username and password, and deploy your artifacts. Once the build is finished, your
artifacts should be available in your Maven Enterprise Repository (see Figure 5.41, “After deployment
the artifact should be available on your Enterprise Repository Manager”).
Figure 5.41. After deployment the artifact should be available on your Enterprise Repository Manager
Using this option, you always don’t have to deploy straight away—you can always come back and
deploy the artifacts from a previous build later. Just click on the “Redeploy Artifacts” menu on the left
and specify the repository URL you want to deploy your artifact to (see Figure 5.42, “Redeploying an
artifact”). As in the previous example, the Advanced button lets you provide the ID for the <server>
entry in your local settings.xml file. As we will see later on in the book, you can also use this
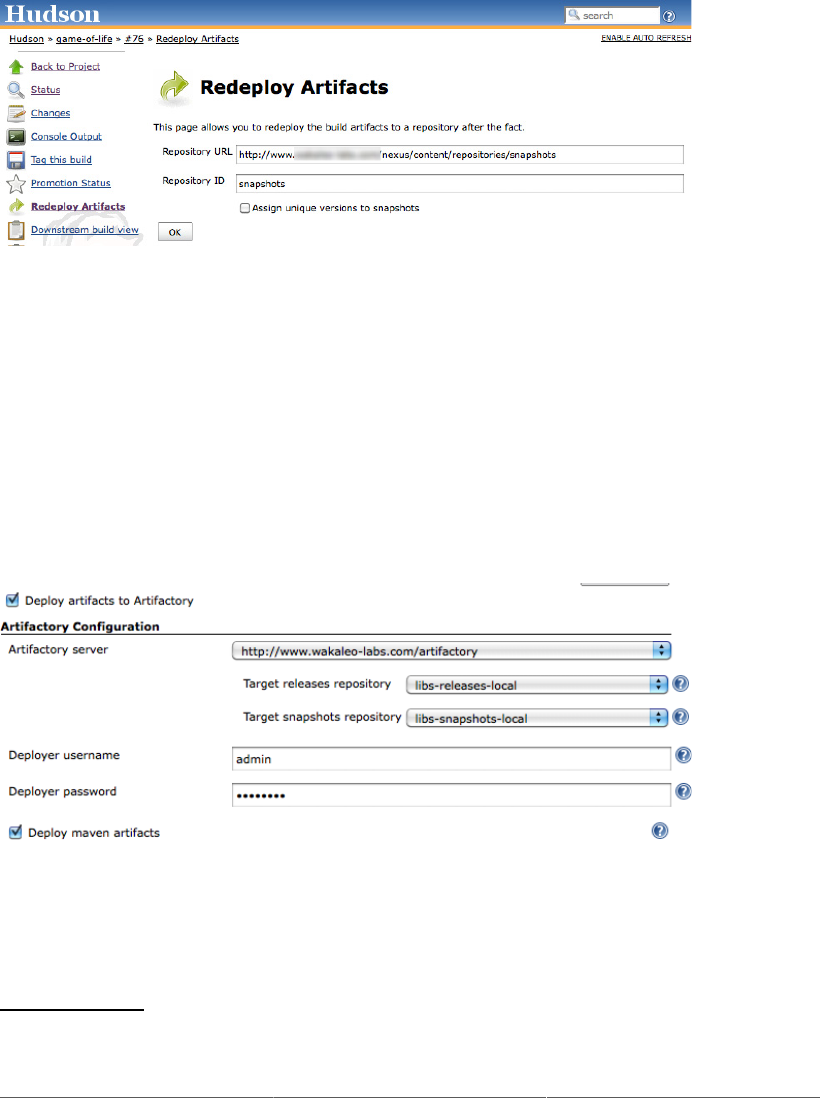
124
deployment as part of a build promotion process, configuring an automatic deployment to a different
repository when certain quality metrics have been satisfied, for example.
Figure 5.42. Redeploying an artifact
This approach will work fine for any Enterprise Repository manager. However, if you are using
Artifactory, you may prefer to install the Jenkins Artifactory Plugin11, which provides tighter two-
way integration with the Artifactory Enterprise Repository Manager. It works by sending additional
information to the Artifactory server during the deployment, allowing the server to refer back to the
precise build that generated a given artifact. Once you have installed the plugin, you can activate it in
your Maven build job by ticking the “Deploy artifacts to Artifactory” option in the Post-build Actions.
Then you choose what repositories your project should deploy to from a list of repositories on the server,
along with the username and password required to perform the deployment (see Figure 5.43, “Deploying
to Artifactory from Jenkins”).
Figure 5.43. Deploying to Artifactory from Jenkins
Your build job will now automatically deploy to Artifactory. In addition, a link to the artifact on the
server will now be displayed on the build job home and build results pages (see Figure 5.44, “Jenkins
displays a link to the corresponding Artifactory repository”).
11 http://wiki.jenkins-ci.org/display/JENKINS/Artifactory+Plugin
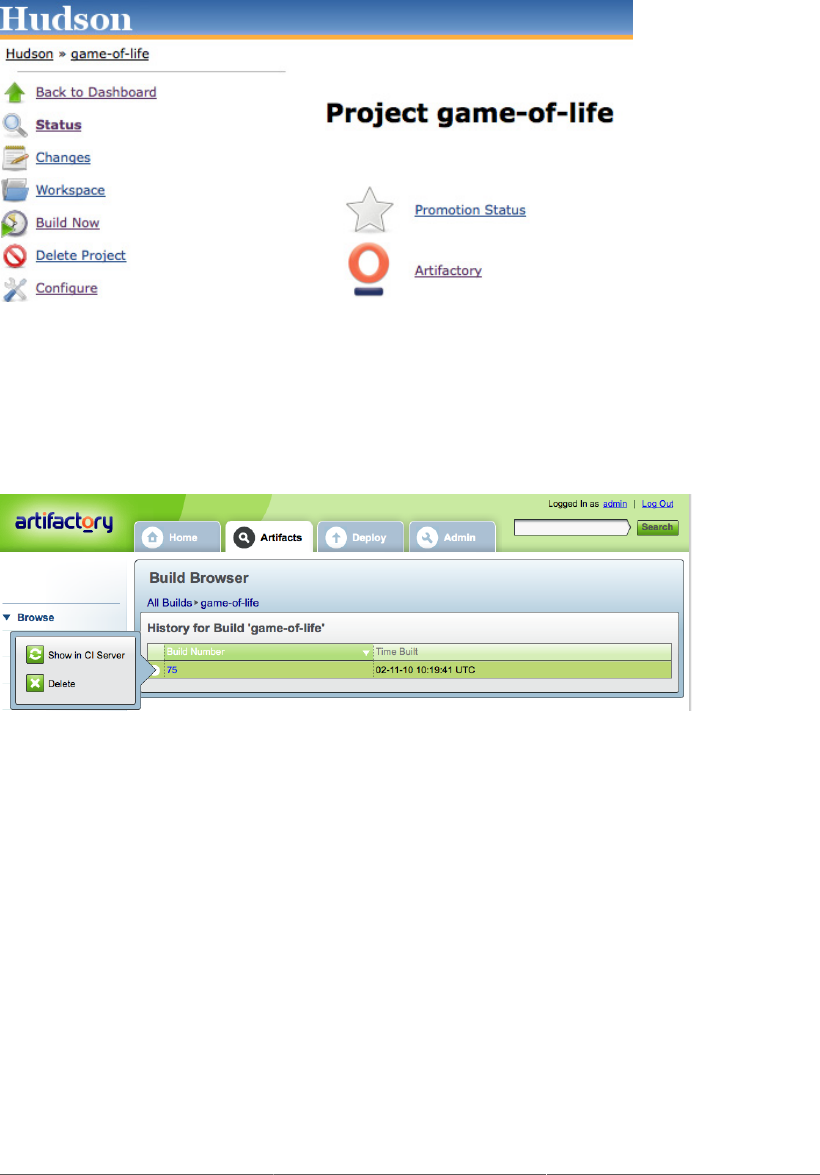
125
Figure 5.44. Jenkins displays a link to the corresponding Artifactory repository
This link takes you to a page on the Artifactory server containing the deployed artifact (see Figure 5.45,
“Viewing the deployed artifact in Artifactory”). From this page, there is also a link that takes you back
to the build that built the artifact.
Figure 5.45. Viewing the deployed artifact in Artifactory
5.9.5. Deploying to Commercial Enterprise Repository Managers
An Enterprise Repository Manager is an essential part of any Maven-based software development
infrastructure. They also play a key role for non-Maven projects using tools like Ivy and Gradle, both
of which rely on standard Maven repositories.
Both of the principal Enterprise Repository Managers, Nexus and Artifactory, offer professional
versions which come with extra integration features with Jenkins. Later on in the book, we will discuss
how you can use advanced features such as Nexus Pro’s staging and release management to implement
sophisticated build promotion strategies. On the deployment side of things, the commercial edition of
Artifactory (Artifactory Pro Power Pack) extends the two-way integration we saw earlier. When you
view an artifact in the repository browser, a “Builds” tab displays details about the Jenkins build that
created the artifact, and a link to the Jenkins build page (see Figure 5.46, “Viewing the deployed artifact
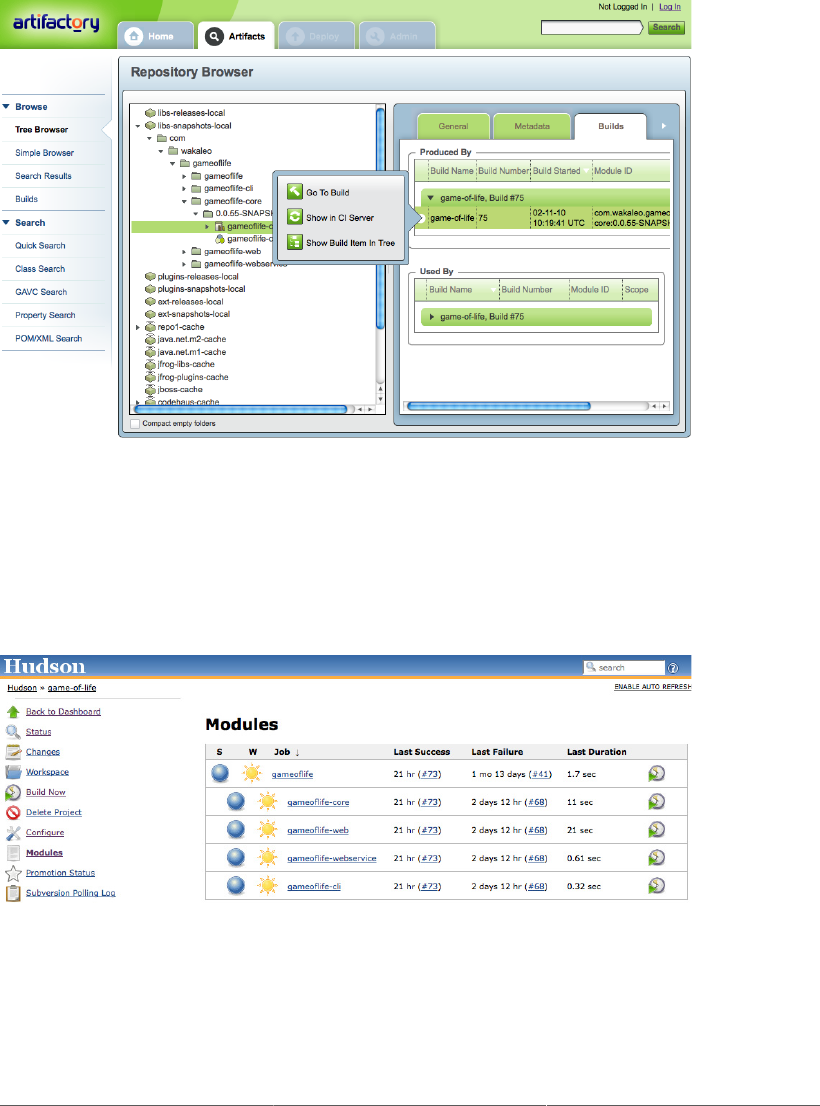
126
and the corresponding Jenkins build in Artifactory”). Artifactory also keeps track of the dependencies
that were used in the Jenkins build, and will warn you if you try to delete them from the repository.
Figure 5.46. Viewing the deployed artifact and the corresponding Jenkins build in Artifactory
5.9.6. Managing Modules
When using Maven, it is common to split a project into several modules. Maven build jobs have an
intrinsic understand of multimodule projects, and adds a Modules menu item that lets you display the
structure of the project at a glance (see Figure 5.47, “Managing modules in a Maven build job”).
Figure 5.47. Managing modules in a Maven build job
Clicking on any of the modules will take you to the build page for that module. From here, you can view
the detailed build results for each module, trigger a build of that module in isolation, and if necessary
fine tune the configuration of individual module, overriding the configuration of the overall project.
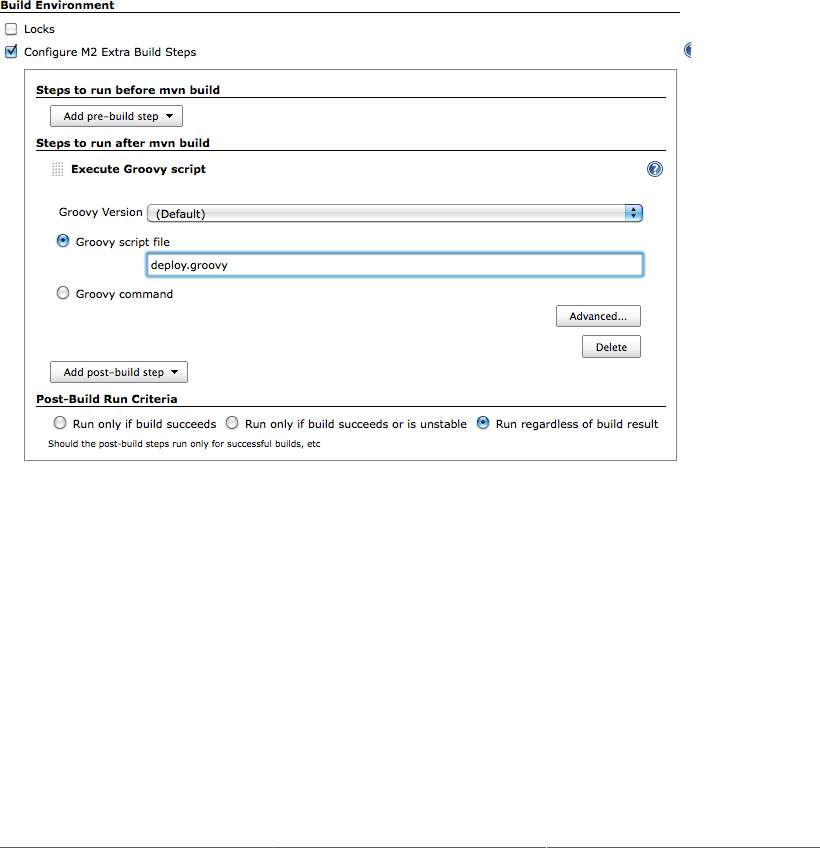
127
5.9.7. Extra Build Steps in Your Maven Build Jobs
By default, the Maven build job only allows for a single Maven goal. There are times when this is a
little limiting, and you would like to add some extra steps before or after the main build. You can do this
with the Jenkins M2 Extra Steps Plugin. This plugin lets you add normal build steps before and after
the main Maven goal, giving you the flexibility of a freestyle build while still having the convenience
of the Maven build job configuration.
Install this plugin and go to the Build Environment section of your build job. Tick the “Configure Extra
M2 Build Steps” option. You should now be able to add build steps that will be executed before and/or
after your main Maven goal is executed (see Figure 5.48, “Configuring extra Maven build steps”).
Figure 5.48. Configuring extra Maven build steps
5.10. Using Jenkins with Other Languages
As we mentioned earlier, Jenkins provides excellent support for other languages. In this section, we will
look at how to use Jenkins with a few of the more common ones.
5.10.1. Building Projects with Grails
Grails is an open source dynamic web application framework built on Groovy and many well-established
open source Java frameworks such as Spring and Hibernate.

128
Jenkins provides excellent support for Grails builds. First, you need to install the Jenkins Grails plugin12.
Once you have installed this and restarted Jenkins, you will need to provide at least one version of Grails
for Jenkins to use in the Grails Builder section of the Configure System screen (see Figure 5.49, “Adding
a Grails installation to Jenkins”).
Figure 5.49. Adding a Grails installation to Jenkins
Now you can set up a freestyle build job to build your Grails project. The Grails plugin adds the
“Build with Grails” build step, which you can use to build your Grails application (see Figure 5.50,
“Configuring a Grails build step”). Here, you provide the Grails target, or targets, you want to execute.
Unlike the command line, you can execute several targets in the same command. However, if you need
to pass any arguments to a particular target, you should enclose the target and its arguments in double
quotes. In Figure 5.50, “Configuring a Grails build step”, for example, we run grails clean, followed
by grails test-app -unit -non-interactive. To get this to work properly, we enclose the
options of the second command in quotes, which gives us grails clean "test-app -unit -
non-interactive".
12 http://wiki.jenkins-ci.org/display/HUDSON/Grails+Plugin
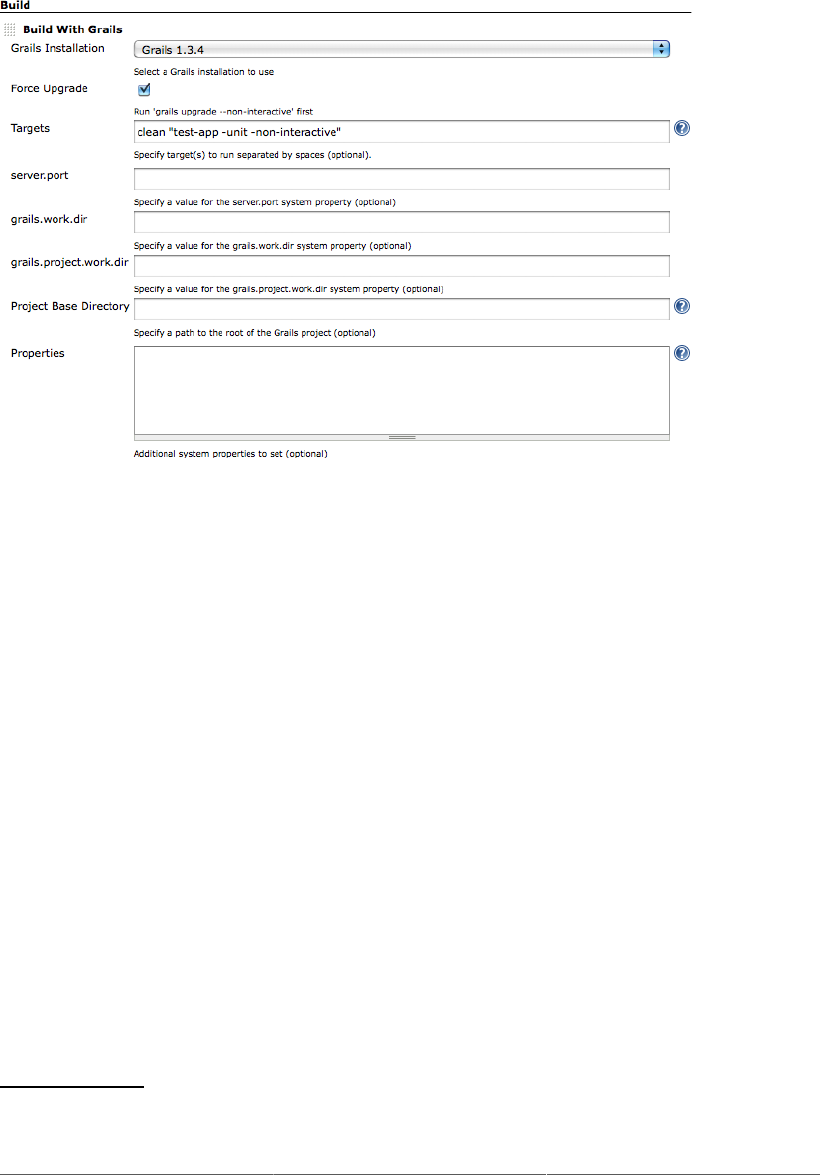
129
Figure 5.50. Configuring a Grails build step
The Grails build step takes many optional parameters. For example, Grails is finicky about versions—
if your project was created by an older version, Grails will ask you to upgrade it. To be on the safe side,
for example, you may want to tick the Force Upgrade checkbox, which makes sure that runs a grails
upgrade --non-interactive before it runs the main targets.
You can also specify the server port (useful if you are executing web tests), and any other properties
you want to pass to the build.
5.10.2. Building Projects with Gradle
Contributed by Rene Groeschke
In comparison to the build tool veterans Ant and Maven, Gradle13 is a relatively new open source build
tool for the Java Virtual Machine. Build scripts for Gradle are written in a Domain Specific Language
(DSL) based on Groovy. Gradle implements convention over configuration, allows direct access to Ant
tasks, and uses Maven-like declarative dependency management. The concise nature of Groovy scripting
lets you write very expressive build scripts with very little code, albeit at the cost of loosing the IDE
support that exists for established tools like Ant and Maven.
There are two different ways to run your Gradle builds with Jenkins. You can either use the Gradle
plugin for Jenkins or the Gradle wrapper functionality.
13 http://gradle.org

130
5.10.2.1. The Gradle plugin for Jenkins
You can install the Gradle plugin in the usual way—just go to the Manage Plugins screen and select the
Jenkins Gradle plugin. Click Install and restart your Jenkins instance.
Once Jenkins has restarted, you will need to configure your new Gradle plugin. You should now find a
new Gradle section in your Configure System screen. Here you will need to add the Gradle installation
you want to use. The process is similar to that used for the other tool installations. First, click the
Add Gradle button to add a new Gradle installation, and enter an appropriate name (see Figure 5.51,
“Configuring the Gradle plugin”). If Gradle has already been installed on your build server, you can
point to the local Gradle home directory. Alternatively, you can use the “Install automatically” feature
to download a Gradle installation, in the form of a ZIP or GZipped TAR file, directly from a URL. You
can use a public URL (see http://gradle.org/downloads.html), or may prefer to make these installations
available on a local server instead.
Figure 5.51. Configuring the Gradle plugin
You typically use Freestyle build jobs to configure your Gradle builds. When you add a build step to a
Freestyle build job, you will now have a new option called “Invoke Gradle script”, which lets you add
Gradle specific settings to your build job.
As an example, here is a very simple Gradle build script. It is a simple Java project that uses a
Maven directory structure and a Maven repository manager. There is a customizable task, called
uploadArchives, to deploy the generated archive to the local Enterprise repository manager:
apply plugin:'java'
apply plugin:'maven'
version='1.0-SNAPSHOT'
group = "org.acme"
repositories{
mavenCentral()
mavenRepo urls: 'http://build.server/nexus/content/repositories/public'
}

131
dependencies{
testCompile "junit:junit:4.8.2"
}
uploadArchives {
repositories.mavenDeployer {
configuration = configurations.archives
repository(url: "http://build.server/nexus/content/repositories/snapshots") {
authentication(userName: "admin", password: "password")
}
}
}
In Figure 5.52, “Setting up a Gradle build job”, we use the just configured “Gradle-0.9RC2” instance
to run this Gradle build. In this case, we want to run the JUnit tests and upload the build artifacts to our
local Maven repository. Furthermore we configure our job to collect the test results from **/build/
test-results, the default directory for storing test results in Gradle.
5.10.2.2. Incremental builds
While running a Gradle build job with unchanged sources, Gradle runs its builds incremental. If the
output of a Gradle task is still available and the sources haven’t changed since the last build, Gradle
is able to skip the task execution and marks the according task as up-to-date. This incremental build
feature can decrease the duration of a running build job considerably.
If Gradle evaluates the test task as up-to-date even the execution of your unit tests is skipped. This
can cause problems when running your Gradle build with Jenkins. In our sample build job above we
configured a post build action to publish the JUnit reports of our build. If the test task is skipped by
Gradle, the Jenkins job will be marked as failed with the following message:
Test reports were found but none of them are new. Did tests run?
You can easily fix this by invalidating the output and force a re-execution of your tests by adding the
following snippet to your Gradle file:
test {
outputs.upToDateWhen { false }
}
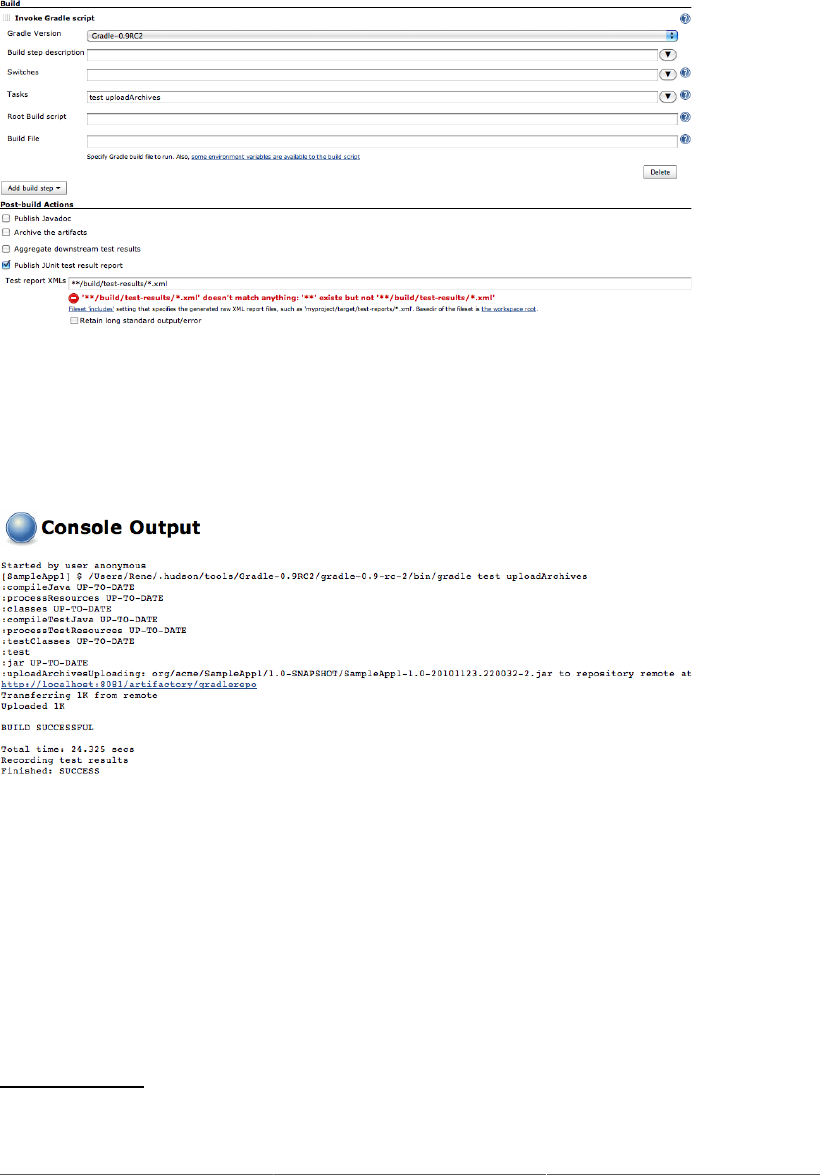
132
Figure 5.52. Setting up a Gradle build job
After adding the snippet above to your build file, your job console output should look like the one in
Figure 5.53, “Incremental Gradle job”.
Figure 5.53. Incremental Gradle job
As you can see, all of the tasks except test and uploadArchives have been marked as up-to-date and
not executed.
5.10.3. Building Projects with Visual Studio MSBuild
Jenkins is a Java application, but it also provides excellent support for .NET projects.
To build .NET projects in Jenkins, you need to install the MSBuild plugin14.
14 http://wiki.jenkins-ci.org/display/HUDSON/MSBuild+Plugin
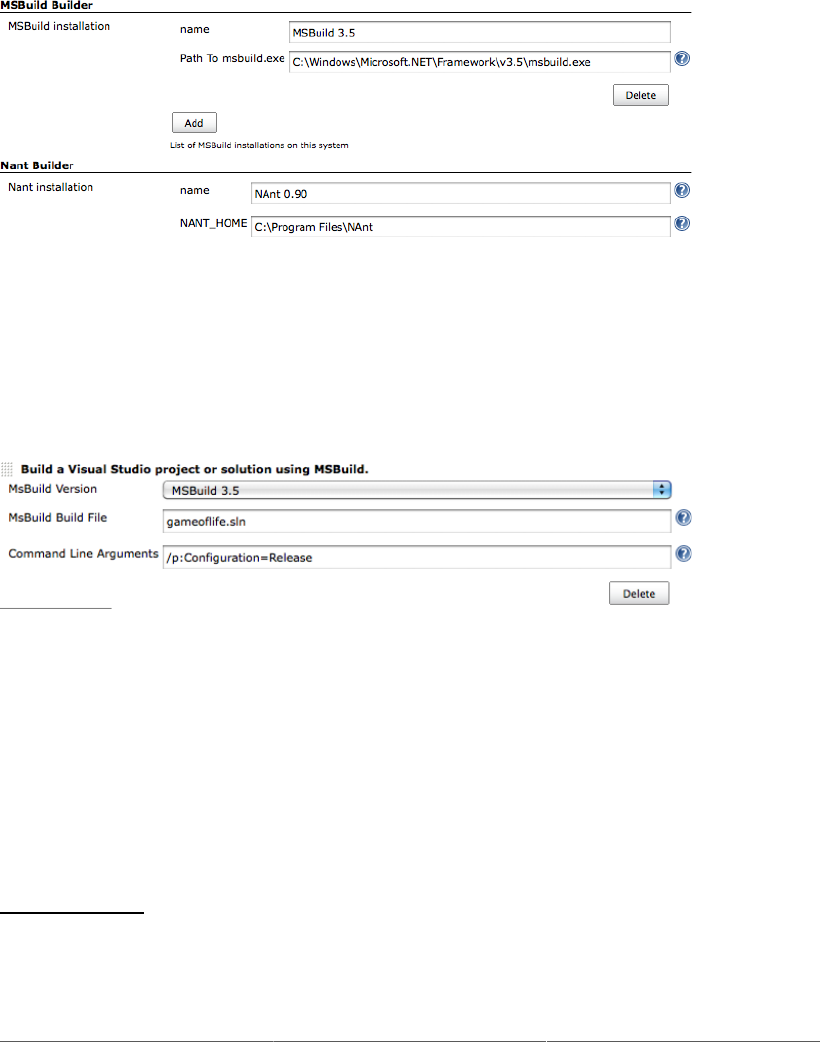
133
You may also want to install the MSTest plugin15 and the NUnit plugin16, to display your test results.
Once you have installed the .NET plugins and restarted Jenkins, you need to configure your .NET build
tools. Go to the Configure System page and specify the path of the MSBuild executable (see Figure 5.54,
“Configuring .NET build tools in Jenkins”).
Figure 5.54. Configuring .NET build tools in Jenkins
Once you have this set up, you can return to your freestyle project and add your .NET build step
configuration.
Go to the Build section and choose “Build a Visual project or solution using MSBuild” option in the
Add Build Step menu. Then enter the path to your MSBuild build script (a .proj or .sln file), along
with any command-line options your build requires (see Figure 5.55, “A build step using MSBuild”).
Figure 5.55. A build step using MSBuild
5.10.4. Building Projects with NAnt
Another way to build your .NET projects is to use NAnt. NAnt is a .NET version of the Ant build
scripting tool widely used in the Java world. NAnt build scripts are XML files (typically with a .build
extension), with a very similar format to Ant build scripts.
To build with NAnt in Jenkins, you need to install the Jenkins NAnt plugin17. Once you have installed
the plugin and restarted Jenkins, go to the Configure System page and specify the NAnt installation
directory in the Nant Builders section (see Figure 5.54, “Configuring .NET build tools in Jenkins”).
15 http://wiki.jenkins-ci.org//display/HUDSON/MSTest+Plugin
16 http://wiki.jenkins-ci.org//display/HUDSON/NUnit+Plugin
17 http://wiki.jenkins-ci.org/display/HUDSON/NAnt+Plugin
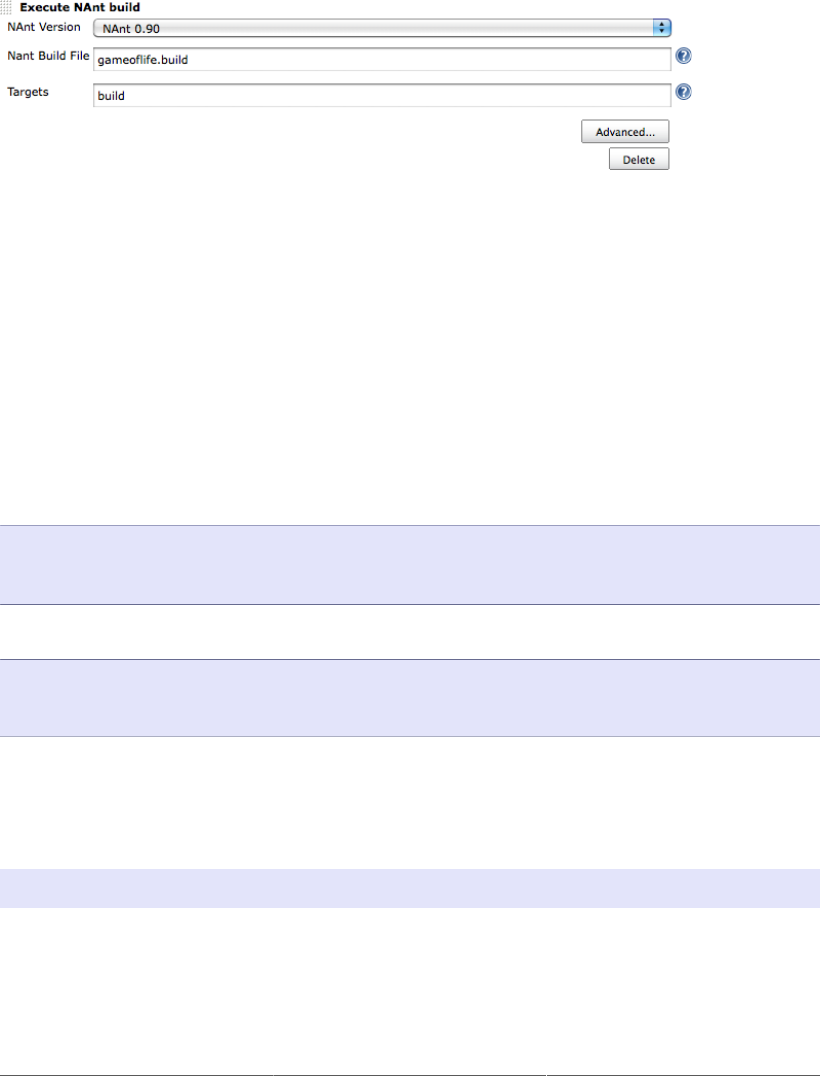
134
Now go to the Build section of your freestyle project and choose “Execute NAnt build” (see Figure 5.56,
“A build step using NAnt”). Here you specify your build script and the target you want to invoke. If you
click on the “Advanced...” option, you can also set property values to be passed into the NAnt script.
Figure 5.56. A build step using NAnt
5.10.5. Building Projects with Ruby and Ruby on Rails
Jenkins makes an excellent choice when it comes to integrating CI into your Ruby and Ruby on Rails
projects. The Rake Plugin lets you add Rake build steps to your build jobs. You can also use the Ruby
Plugin lets you run Ruby scripts directly in your build job. Finally, the Ruby Metrics Plugin provides
support for Ruby code quality metrics tools such as RCov, Rails stats, and Flog.
Another invaluable tool in this area is CI:Reporter. This library is an add-on to Test::Unit, RSpec,
and Cucumber that generates JUnit-compatible XML reports for your tests. As we will see, JUnit-
compatible test results can be used directly by Jenkins to report on your test results. You would install
CI:Reporter using Gem as illustrated here:
$ sudo gem install ci_reporter
Successfully installed ci_reporter-1.6.4
1 gem installed
Next, you will need to set this up in your Rakefile, by adding the following:
require 'rubygems'
gem 'ci_reporter'
require 'ci/reporter/rake/test_unit' # use this if you're using Test::Unit
In Chapter 9, Code Quality, we discuss integrating code quality metrics into your Jenkins builds. Jenkins
also provides support for code coverage metrics in Ruby. The Ruby Metrics Plugin supports code
coverage metrics using rcov as well as general code statistics with Rails stats. To install the rcov-
plugin, you will first need to run something along the following lines:
$ ./script/plugin install http://svn.codahale.com/rails_rcov
Once this is set up, you will be able to display your test results and test result trend in Jenkins.
Finally, you can configure a Rake build simply by using a Rake build step, as illustrated in Figure 5.57,
“A build step using Rake”.
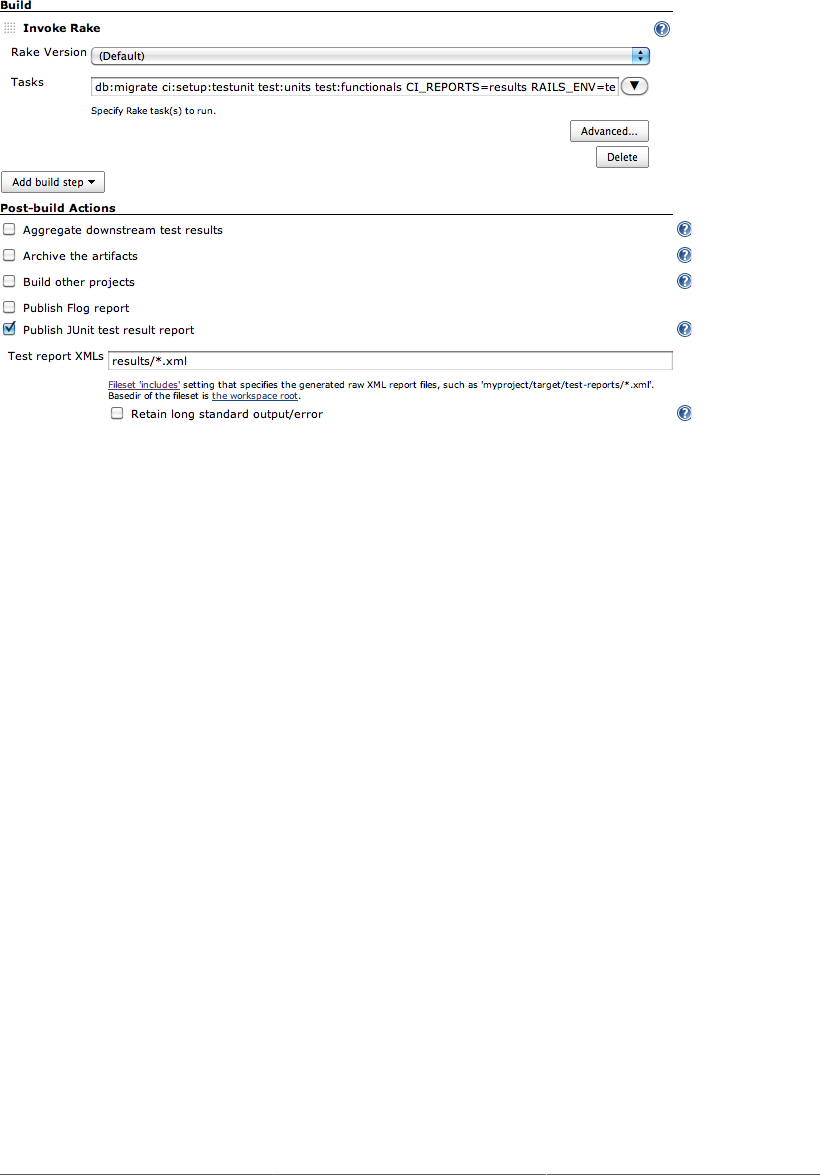
135
Figure 5.57. A build step using Rake
You also need to configure Jenkins to report on the test and quality metrics results. You can do this by
activating the “Publish JUnit test result report”, “Publish Rails stats report”, and “Public Rcov report”
options (see Figure 5.58, “Publishing code quality metrics for Ruby and Rails”). The JUnit XML reports
will be found in the results directory (enter results/*.xml in the “Test report XMLs” field), and
the Rcov date in the coverage/units directory.
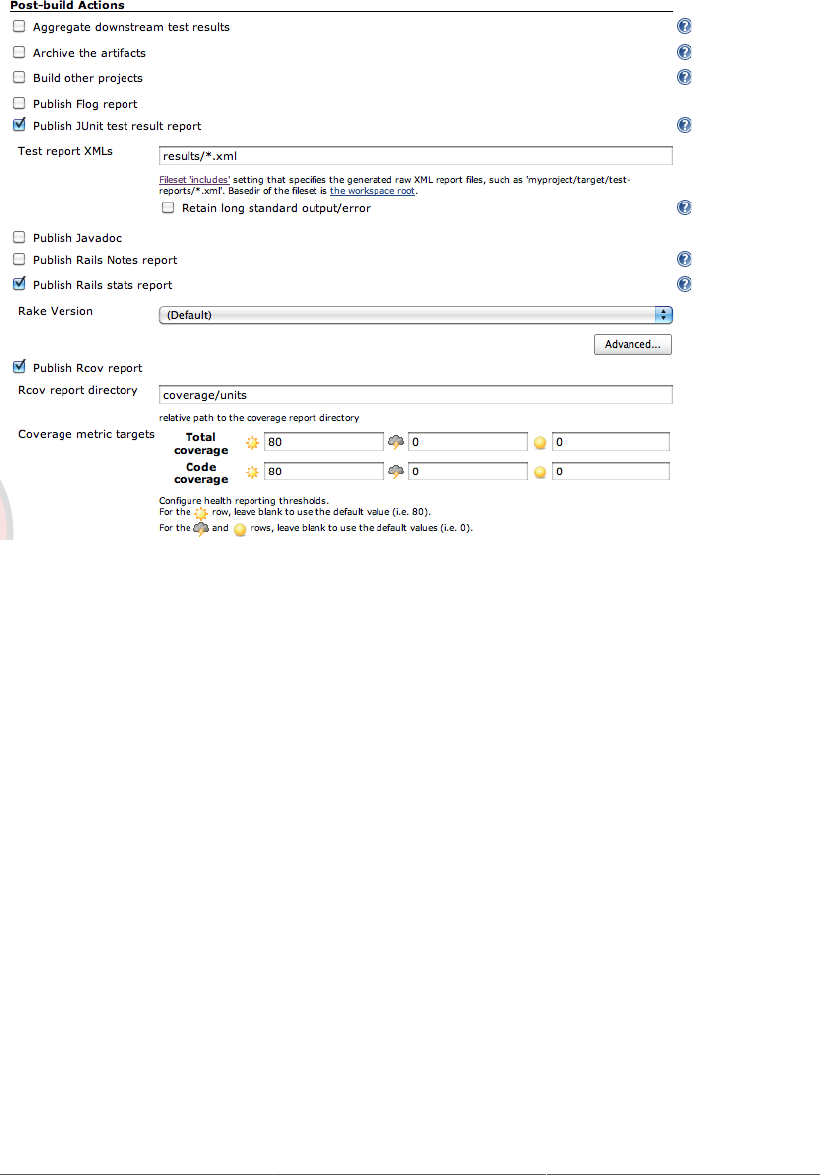
136
Figure 5.58. Publishing code quality metrics for Ruby and Rails
5.11. Conclusion
In this chapter we have covered the basics of creating new build jobs for the most common cases you are
likely to encounter. Later on in the book, we will build on these foundations to discuss more advanced
options such as parameterized builds, matrix builds, and build promotion strategies.

Chapter 6. Automated Testing
6.1. Introduction
If you aren’t using automated tests with your Continuous Integration setup, you’re really missing out
on something big. Believe me—CI without automated tests is really just a small improvement on
automatically scheduled builds. Now don’t get me wrong, if you’re coming from nothing, that’s already a
great step forward—but you can do much better. In short, if you are using Jenkins without any automated
tests, you are not getting anywhere near as much value out of your Continuous Integration infrastructure
as you should.
One of the basic principles of Continuous Integration is that a build should be verifiable. You have to be
able to objectively determine whether a particular build is ready to proceed to the next stage of the build
process, and the most convenient way to do this is to use automated tests. Without proper automated
testing, you find yourself having to retain many build artifacts and test them by hand, which is hardly
in the spirit of Continuous Integration.
There are many ways you can integrate automated tests into your application. One of the most efficient
ways to write high quality tests is to write them first, using techniques such as Test-Driven Development
(TDD) or Behavior-Driven Development (BDD). In this approach, commonly used in many Agile
projects, the aim of your unit tests is to both clarify your understanding of the code’s behavior and
to write an automated test that the code does indeed implement this behavior. Focusing on testing the
expected behavior, rather than the implementation, of your code also makes for more comprehensive
and more accurate tests, and thus helps Jenkins to provide more relevant feedback.
Of course, more classical unit testing, done once the code has been implemented, is also another
commonly-used approach, and is certainly better than no tests at all.
Jenkins is not limited to unit testing, though. There are many other types of automated testing that
you should consider, depending on the nature of your application, including integration testing, web
testing, functional testing, performance testing, load testing and so on. All of these have their place in
an automated build setup.
Jenkins can also be used, in conjunction with techniques like Behavior-Driven Development and
Acceptance Test Driven Development, as a communications tool aimed at both developers and other
project stakeholders. BDD frameworks such as easyb, fitnesse, jbehave, rspec, Cucumber, and many
others, try to present acceptance tests in terms that testers, product owners, and end users can understand.
With the use of such tools, Jenkins can report on project progress in business terms, and so facilitate
communication between developers and non-developers within a team.
For existing or legacy applications with little or no automated testing in place, it can be time-consuming
and difficult to retro-fit comprehensive unit tests onto the code. In addition, the tests may not be very
effective, as they will tend to validate the existing implementation rather than verify the expected

138
business behavior. One useful approach in these situations is to write automated functional tests
(“regression”) tests that simulate the most common ways that users manipulate the application. For
example, automated web testing tools such as Selenium and WebDriver can be effectively used to test
web applications at a high level. While this approach is not as comprehensive as a combination of good
quality unit, integration and acceptance tests, it is still an effective and relatively cost-efficient way to
integrate automated regression testing into an existing application.
In this chapter, we will see how Jenkins helps you keep track of automated test results, and how you
can use this information to monitor and dissect your build process.
6.2. Automating Your Unit and Integration Tests
The first thing we will look at is how to integrate your unit tests into Jenkins. Whether you are practicing
Test-Driven Development, or writing unit tests using a more conventional approach, these are probably
the first tests that you will want to automate with Jenkins.
Jenkins does an excellent job of reporting on your test results. However, it is up to you to write the
appropriate tests and to configure your build script to run them automatically. Fortunately integrating
unit tests into your automated builds is generally relatively easy.
There are many unit testing tools out there, with the xUnit family holding a predominant place. In
the Java world, JUnit is the de facto standard, although TestNG is another popular Java unit testing
framework with a number of innovative features. For C# applications, the NUnit testing framework
proposes similar functionalities to those provided by JUnit, as does Test::Unit for Ruby. For C/C+
+, there is CppUnit, and PHP developers can use PHPUnit. And this is not an exhaustive list!
These tools can also serve for integration tests, functional tests, web tests and so forth. Many web testing
tools, such as Selenium, WebDriver, and Watir, generate xUnit-compatible reports. Behaviour-Driven
Development and automated Acceptance-Test tools such as easyb, Fitnesse, Concordion are also xUnit-
friendly. In the following sections we make no distinction between these different types of test, as, from
a configuration point of view, they are treated by Jenkins in exactly the same manner. However, you
will almost certainly need to make the distinction in your build jobs. In order to get the fastest possible
feedback loop, your tests should be grouped into well-defined categories, starting with the fast-running
unit tests, and then proceeding to the integration tests, before finally running the slower functional and
web tests.
A detailed discussion of how to automate your tests is beyond the scope of this book, but we do cover
a few useful techniques for Maven and Ant in the Appendix A, Automating Your Unit and Integration
Tests.
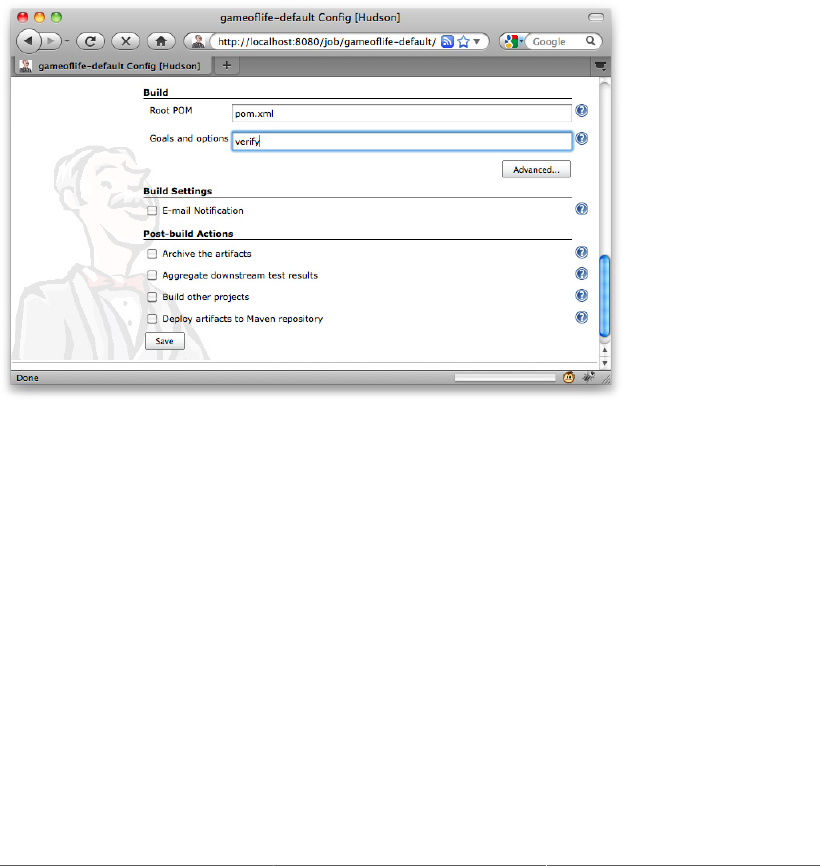
139
6.3. Configuring Test Reports in Jenkins
Once your build generates test results, you need to configure your Jenkins build job to display them.
As mentioned above, Jenkins will work fine with any xUnit-compatible test reports, no matter what
language they are written in.
For Maven build jobs, no special configuration is required—just make sure you invoke a goal that will
run your tests, such as mvn test (for your unit tests) or mvn verify (for unit and integration tests).
An example of a Maven build job configuration is shown in Figure 6.1, “You configure your Jenkins
installation in the Manage Jenkins screen”.
Figure 6.1. You configure your Jenkins installation in the Manage Jenkins screen
For freestyle build jobs, you need to do a little more configuration work. In addition to ensuring that
your build actually runs the tests, you need to tell Jenkins to publish the JUnit test report. You configure
this in the “Post-build Actions” section (see Figure 6.2, “Configuring Maven test reports in a freestyle
project”). Here, you provide a path to the JUnit or TestNG XML reports. Their exact location will
depend on a project—for a Maven project, a path like **/target/surefire-reports/*.xml will
find them for most projects. For an Ant-based project, it will depend on how you configured the Ant
JUnit task, as we discussed above.
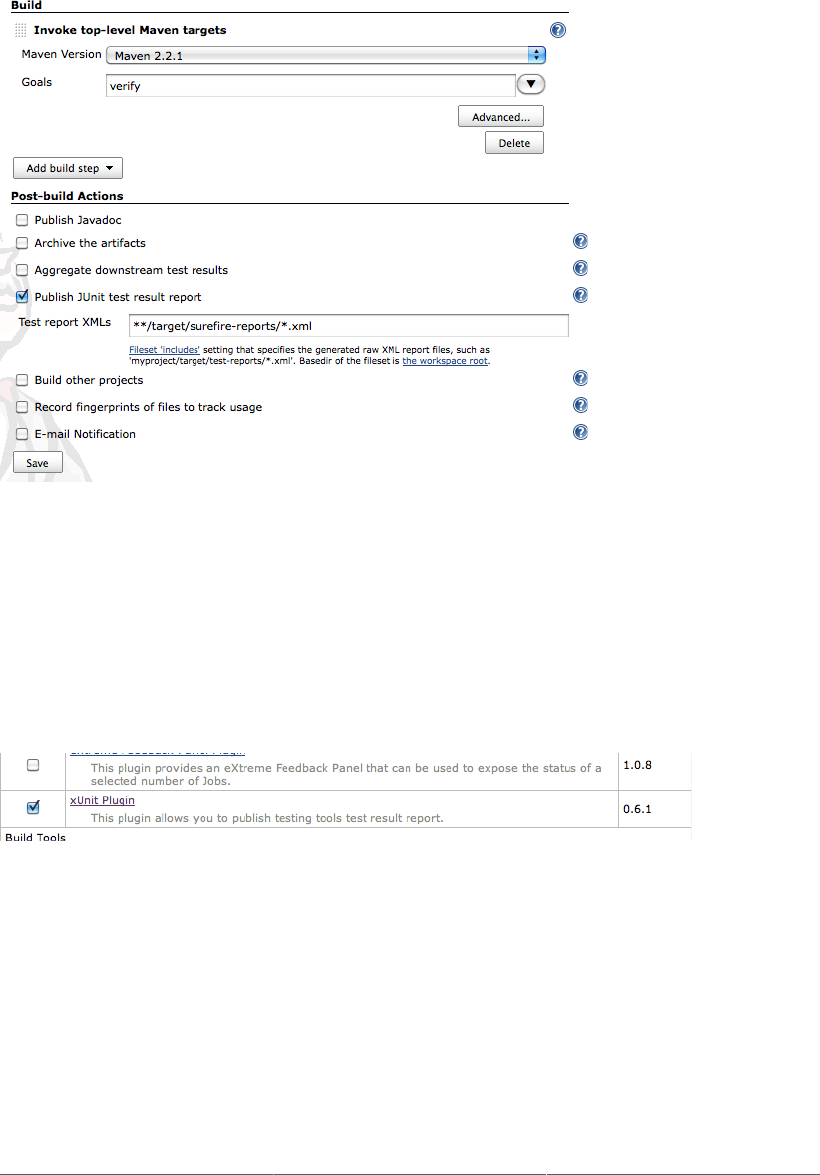
140
Figure 6.2. Configuring Maven test reports in a freestyle project
For Java projects, whether they are using JUnit or TestNG, Jenkins does an excellent job out of the box.
If you are using Jenkins for non-Java projects, you might need the xUnit Plugin. This plugin lets Jenkins
process test reports from non-Java tools in a consistent way. It provides support for MSUnit and NUnit
(for C# and other .NET languages), UnitTest++ and Boost Test (for C++), PHPUnit (for PHP), as well
as a few other xUnit libraries via additional plugins (see Figure 6.3, “Installing the xUnit plugin”).
Figure 6.3. Installing the xUnit plugin
Once you have installed the xUnit Plugin, you will need to configure the reporting for your particular
xUnit reports in the “Post-build Actions” section. Check the “Publish testing tools result report”
checkbox, and enter the path to the XML reports generated by your testing library (see Figure 6.4,
“Publishing xUnit test results”). When the build job runs, Jenkins will convert these reports to JUnit
reports so that they can be displayed in Jenkins.

141
Figure 6.4. Publishing xUnit test results
6.4. Displaying Test Results
Once Jenkins knows where to find the test reports, it does a great job of reporting on them. Indeed, one
of Jenkins’s main jobs is to detect and to report on build failures. And a failing unit test is one of the
most obvious symptoms.
As we mentioned earlier, Jenkins makes the distinction between failed builds and unstable builds. A
failed build (indicated by a red ball) indicates test failures, or a build job that is broken in some brutal
manner, such as a compilation error. An unstable build, on the other hand, is a build that is not considered
of sufficient quality. This is intentionally a little vague: what defines “quality” in this sense is largely
up to you, but it is typically related to code quality metrics such as code coverage or coding standards,
that we will be discussing later on in the book. For now, let’s focus on the failed builds.
In Figure 6.5, “Jenkins displays test result trends on the project home page” we can see how Jenkins
displays a Maven build job containing test failures. This is the build job home page, which should be
your first port of call when a build breaks. When a build results in failing tests, the Latest Test Result
link will indicate the current number of test failures in this build job (“5 failures” in the illustration), and
also the change in the number of test failures since the last build (“+5” in the illustration—five new test
failures). You can also see how the tests have been faring over time—test failures from previous builds
will also appear as red in the Test Result Trend graph.

142
Figure 6.5. Jenkins displays test result trends on the project home page
If you click on the Latest Test Result link, Jenkins will give you a rundown of the current test results (see
Figure 6.6, “Jenkins displays a summary of the test results”). Jenkins understands Maven multimodule
project structures, and for a Maven build job, Jenkins will initially display a summary view of test results
per module. For more details about the failing tests in a particular module, just click on the module you
are interest in.
Figure 6.6. Jenkins displays a summary of the test results
For freestyle build jobs, Jenkins will directly give you a summary of your test results, but organized by
high-level packages rather than modules.
In both cases, Jenkins starts off by presenting a summary of test results for each package. From here,
you can drill down, seeing test results for each test class and then finally the tests within the test classes
themselves. And if there are any failed tests, these will be prominently displayed at the top of the page.
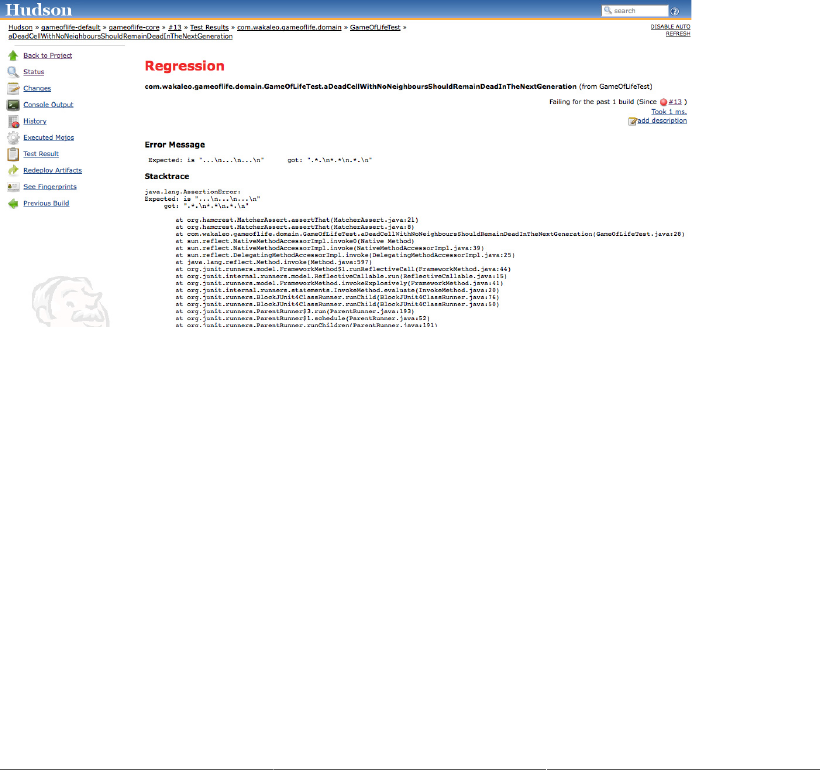
143
This full view gives you both a good overview of the current state of your tests, and an indication of
their history. The Age column tells you how for how long a test has been broken, with a hyperlink that
takes you back to the first build in which this test failed.
You can also add a description to the test results, using the Edit Description link in the top right-hand
corner of the screen. This is a great way to annotate a build failure with some additional details, in order
to add extra information about the origin of test failures or some notes about how to fix them.
When a test fails, you generally want to know why. To see the details of a particular test failure, just click
on the corresponding link on this screen. This will display all the gruesome details, including the error
message and the stack trace, as well as a reminder of how long the test has been failing (see Figure 6.7,
“The details of a test failure”). You should be wary of tests that have been failing for more than just a
couple of builds—this is an indicator of either a tricky technical problem that might need investigating,
or a complacent attitude to failed builds (developers might just be ignoring build failures), which is more
serious and definitely should be investigated.
Figure 6.7. The details of a test failure
Make sure you also keep an eye on how long your tests take to run, and not just whether they pass or fail.
Unit tests should be designed to run fast, and overly long-running tests can be the sign of a performance
issue. Slow unit tests also delay feedback, and in CI, fast feedback is the name of the game. For example,
running one thousand unit tests in five minutes is good—taking an hour to run them is not. So it is a
good idea to regularly check how long your unit tests are taking to run, and if necessary investigate why
they are taking so long.
Luckily, Jenkins can easily tell you how long your tests have been taking to run over time. On the build
job home page, click on the “trend” link in the Build History box on the left of the screen. This will give
you a graph along the lines of the one in Figure 6.8, “Build time trends can give you a good indicator
of how fast your tests are running”, showing how long each of your builds took to run. Now tests are
not the only thing that happens in a build job, but if you have enough tests to worry about, they will
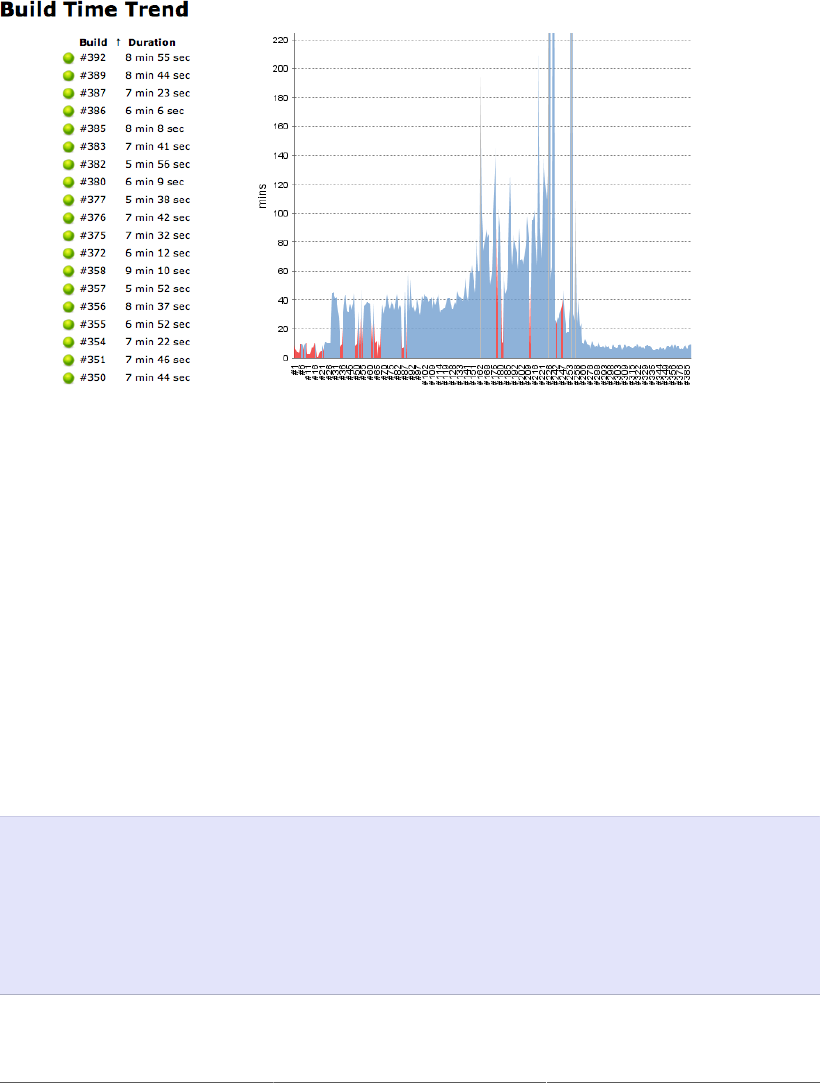
144
probably take a large proportion of the time. So this graph is a great way to see how well your tests
are performing as well.
Figure 6.8. Build time trends can give you a good indicator of how fast your tests are running
When you are on the Test Results page (see Figure 6.6, “Jenkins displays a summary of the test results”),
you can also drill down and see how long the tests in a particular module, package or class are taking
to run. Just click on the test duration in the test results page (“Took 31 ms” in Figure 6.6, “Jenkins
displays a summary of the test results”) to view the test history for a package, class, or individual test
(see Figure 6.9, “Jenkins also lets you see how long your tests take to run”). This makes it easy to isolate
a test that is taking more time than it should, or even decide when a general optimization of your unit
tests is required.
6.5. Ignoring Tests
Jenkins distinguishes between test failures and skipped tests. Skipped tests are ones that have been
deactivated, for example by using the @Ignore annotation in JUnit 4:
@Ignore("Pending more details from the BA")
@Test
public void cashWithdrawalShouldDeductSumFromBalance() throws Exception {
Account account = new Account();
account.makeDeposit(100);
account.makeCashWithdraw(60);
assertThat(account.getBalance(), is(40));
}
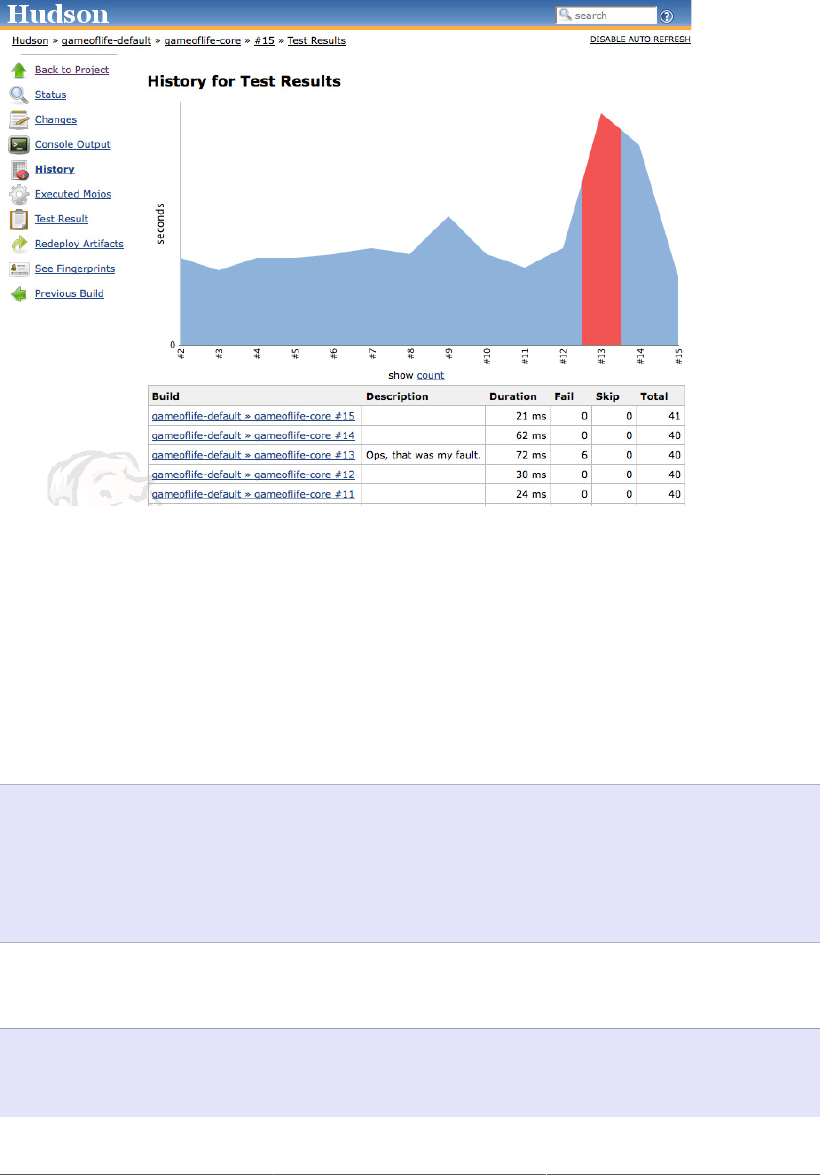
145
Figure 6.9. Jenkins also lets you see how long your tests take to run
Skipping some tests is perfectly legitimate in some circumstances, such as to place an automated
acceptance test, or higher-level technical test, on hold while you implement the lower levels. In such
cases, you don’t want to be distracted by the failing acceptance test, but you don’t want to forget that the
test exists either. Using techniques such as the @Ignore annotation are better than simply commenting
out the test or renaming it (in JUnit 3), as it lets Jenkins keep tabs on the ignored tests for you.
In TestNG, you can also skip tests, using the enabled property:
@Test(enabled=false)
public void cashWithdrawalShouldDeductSumFromBalance() throws Exception {
Account account = new Account();
account.makeDeposit(100);
account.makeCashWithdraw(60);
assertThat(account.getBalance(), is(40));
}
In TestNG, you can also define dependencies between tests, so that certain tests will only run after
another test or group of tests has run, as illustrated here:
@Test
public void serverStartedOk() {...}
@Test(dependsOnMethods = { "serverStartedOk" })
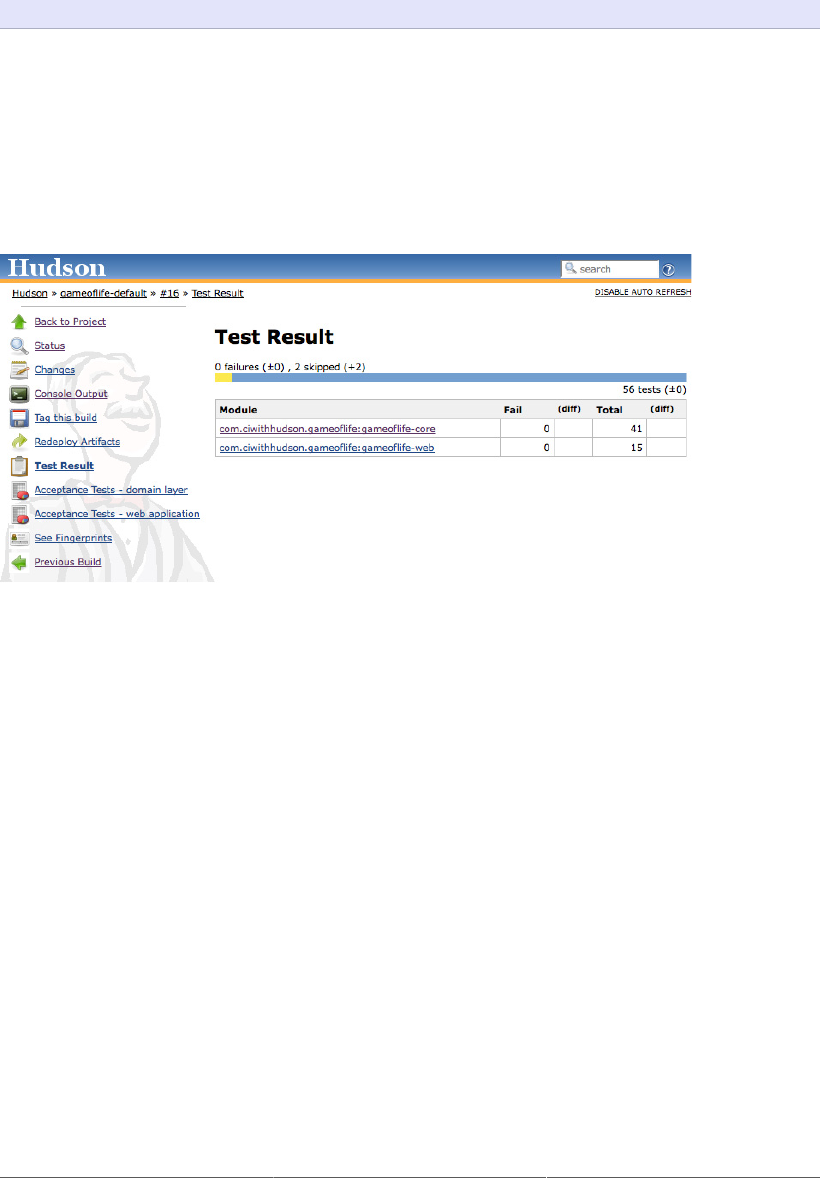
146
public void whenAUserLogsOnWithACorrectUsernameAndPasswordTheHomePageIsDisplayed(){..}
Here, if the first test (serverStartedOk()) fails, the following test will be skipped.
In all of these cases, Jenkins will mark the tests that were not run as yellow, both in the overall test results
trend, and in the test details (see Figure 6.10, “Jenkins displays skipped tests as yellow”). Skipped tests
are not as bad as test failures, but it is important not to get into the habit of neglecting them. Skipped tests
are like branches in a version control system: a test should be skipped for a specific reason, with a clear
idea as to when they will be reactivated. A skipped test that remains skipped for too long is a bad smell.
Figure 6.10. Jenkins displays skipped tests as yellow
6.6. Code Coverage
Another very useful test-related metric is code coverage. Code coverage gives an indication of what
parts of your application were executed during the tests. While this in itself is not a sufficient indication
of quality testing (it is easy to execute an entire application without actually testing anything, and
code coverage metrics provide no indication of the quality or accuracy of your tests), it is a very good
indication of code that has not been tested. And, if your team is introducing rigorous testing practices
such as Test-Driven-Development, code coverage can be a good indicator of how well these practices
are being applied.
Code coverage analysis is a CPU and memory-intensive process, and will slow down your build job
significantly. For this reason, you will typically run code coverage metrics in a separate Jenkins build
job, to be run after your unit and integration tests are successful.
There are many code coverage tools available, and several are supported in Jenkins, all through dedicated
plugins. Java developers can pick between Cobertura and Emma, two popular open source code coverage
tools, or Clover, a powerful commercial code coverage tool from Atlassian. For .NET projects, you can
use NCover.

147
The behavior and configuration of all of these tools is similar. In this section, we will look at Cobertura.
6.6.1. Measuring Code Coverage with Cobertura
Cobertura1 is an open source code coverage tool for Java and Groovy that is easy to use and integrates
well with both Maven and Jenkins.
Like almost all of the Jenkins code quality metrics plugins,2 the Cobertura plugin for Jenkins will not
run any test coverage metrics for you. It is left up to you to generate the raw code coverage data as part
of your automated build process. Jenkins, on the other hand, does an excellent job of reporting on the
code coverage metrics, including keeping track of code coverage over time, and providing aggregate
coverage across multiple application modules.
Code coverage can be a complicated business, and it helps to understand the basic process that Cobertura
follows, especially when you need to set it up in more low-level build scripting tools like Ant. Code
coverage analysis works in three steps. First, it modifies (or “instruments”) your application classes, to
make them keep a tally of the number of times each line of code has been executed.3 They store all this
data in a special data file (Cobertura uses a file called cobertura.ser).
When the application code has been instrumented, you run your tests against this instrumented code.
At the end of the tests, Cobertura will have generated a data file containing the number of times each
line of code was executed during the tests.
Once this data file has been generated, Cobertura can use this data to generate a report in a more usable
format, such as XML or HTML.
6.6.1.1. Integrating Cobertura with Maven
Producing code coverage metrics with Cobertura in Maven is relatively straightforward. If all you are
interested in is producing code coverage data, you just need to add the cobertura-maven-plugin to
the build section of your pom.xml file:
<project>
...
<build>
<plugins>
<plugin>
<groupId>org.codehaus.mojo</groupId>
<artifactId>cobertura-maven-plugin</artifactId>
<version>2.5.1</version>
<configuration>
<formats>
<format>html</format>
<format>xml</format>
1 http://cobertura.sourceforge.net
2With the notable exception of Sonar, which we will look at later on in the book.
3This is actually a slight over-simplification; in fact, Cobertura stores other data as well, such as how many times each possible
outcome of a boolean test was executed. However this does not alter the general approach.

148
</formats>
</configuration>
</plugin>
...
</plugins>
<build>
...
</project>
This will generate code coverage metrics when you invoke the Cobertura plugin directly:
$ mvn cobertura:cobertura
The code coverage data will be generated in the target/site/cobertura directory, in a file called
coverage.xml.
This approach, however, will instrument your classes and produce code coverage data for every build,
which is inefficient. A better approach is to place this configuration in a special profile, as shown here:
<project>
...
<profiles>
<profile>
<id>metrics</id>
<build>
<plugins>
<plugin>
<groupId>org.codehaus.mojo</groupId>
<artifactId>cobertura-maven-plugin</artifactId>
<version>2.5.1</version>
<configuration>
<formats>
<format>html</format>
<format>xml</format>
</formats>
</configuration>
</plugin>
</plugins>
</build>
</profile>
...
</profiles>
</project>
In this case, you would invoke the Cobertura plugin using the metrics profile to generate the code
coverage data:
$ mvn cobertura:cobertura -Pmetrics
Another approach is to include code coverage reporting in your Maven reports. This approach is
considerably slower and more memory-hungry than just generating the coverage data, but it can make

149
sense if you are also generating other code quality metrics and reports at the same time. If you want to
do this using Maven 2, you need to also include the Maven Cobertura plugin in the reporting section,
as shown here:
<project>
...
<reporting>
<plugins>
<plugin>
<groupId>org.codehaus.mojo</groupId>
<artifactId>cobertura-maven-plugin</artifactId>
<version>2.5.1</version>
<configuration>
<formats>
<format>html</format>
<format>xml</format>
</formats>
</configuration>
</plugin>
</plugins>
</reporting>
</project>
Now the coverage data will be generated when you generate the Maven site for this project:
$ mvn site
If your Maven project contains modules (as is common practice for larger Maven projects), you just need
to set up the Cobertura configuration in a parent pom.xml file—test coverage metrics and reports will
be generated separately for each module. If you use the aggregate configuration option, the Maven
Cobertura plugin will also generate a high-level report combining coverage data from all of the modules.
However, whether you use this option or not, the Jenkins Cobertura plugin will take coverage data from
several files and combine them into a single aggregate report.
At the time of writing, there is a limitation with the Maven Cobertura plugin—code coverage will only
be recorded for tests executed during the test life cycle phase, and not for tests executed during the
integration-test phase. This can be an issue if you are using this phase to run integration or web
tests that require a fully packaged and deployed application—in this case, coverage from tests that are
only performed during the integration test phase will not be counted in the Cobertura code coverage
metrics.
6.6.1.2. Integrating Cobertura with Ant
Integrating Cobertura into your Ant build is more complicated than doing so in Maven. However it does
give you a finer control over what classes are instrumented, and when coverage is measured.
Cobertura comes bundled with an Ant task that you can use to integrate Cobertura into your Ant builds.
You will need to download the latest Cobertura distribution, and unzip it somewhere on your hard disk.

150
To make your build more portable, and therefore easier to deploy into Jenkins, it is a good idea to place
the Cobertura distribution you are using within your project directory, and to save it in your version
control system. This way it is easier to ensure that the build will use the same version of Cobertura no
matter where it is run.
Assuming you have downloaded the latest Cobertura installation and placed it within your project in a
directory called tools, you could do something like this:
<property name="cobertura.dir" value="/Users/johnsmart/Projects/Books/jenkins-the-definitive-guide/hudsonbook-content/tools/cobertura" />❶
<path id="cobertura.classpath">❷
<fileset dir="${cobertura.dir}">
<include name="cobertura.jar" />❸
<include name="lib/**/*.jar" />❹
</fileset>
</path>
<taskdef classpathref="cobertura.classpath" resource="tasks.properties" />
❶Tell Ant where your Cobertura installation is.
❷We need to set up a classpath that Cobertura can use to run.
❸The path contains the Cobertura application itself.
❹And all of its dependencies.
Next, you need to instrument your application classes. You have to be careful to place these instrumented
classes in a separated directory, so that they don’t get bundled up and deployed to production by accident:
<target name="instrument" depends="init,compile">❶
<delete file="cobertura.ser"/>❷
<delete dir="${instrumented.dir}" />❸
<cobertura-instrument todir="${instrumented.dir}">❹
<fileset dir="${classes.dir}">
<include name="**/*.class" />
<exclude name="**/*Test.class" />
</fileset>
</cobertura-instrument>
</target>
❶We can only instrument the application classes once they have been compiled.
❷Remove any coverage data generated by previous builds.
❸Remove any previously instrumented classes.
❹Instrument the application classes (but not the test classes) and place them in the
${instrumented.dir} directory.
At this stage, the ${instrumented.dir} directory contains an instrumented version of our application
classes. Now all we need to do to generate some useful code coverage data is to run our unit tests against
the classes in this directory:
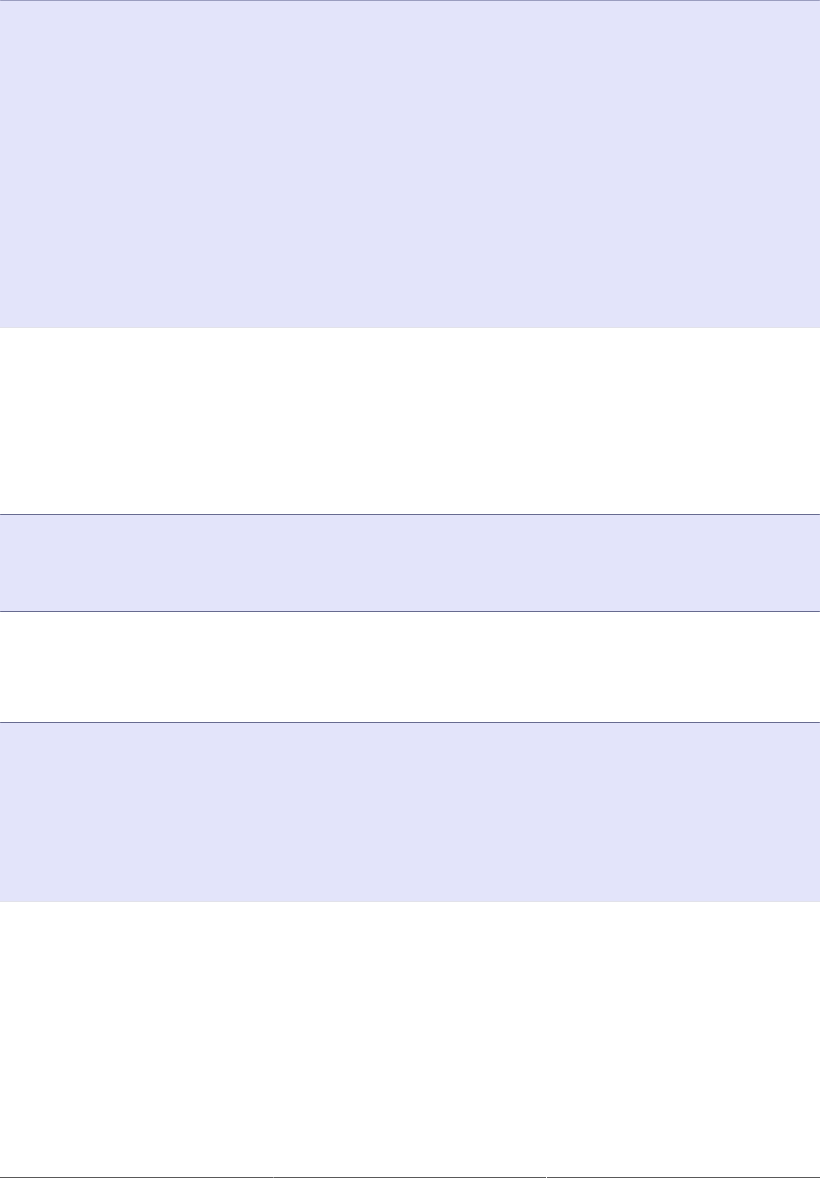
151
<target name="test-coverage" depends="instrument">
<junit fork="yes" dir="/Users/johnsmart/Projects/Books/jenkins-the-definitive-guide/hudsonbook-content">❶
<classpath location="${instrumented.dir}" />
<classpath location="${classes.dir}" />
<classpath refid="cobertura.classpath" />❷
<formatter type="xml" />
<test name="${testcase}" todir="${reports.xml.dir}" if="testcase" />
<batchtest todir="${reports.xml.dir}" unless="testcase">
<fileset dir="${src.dir}">
<include name="**/*Test.java" />
</fileset>
</batchtest>
</junit>
</target>
❶Run the JUnit tests against the instrumented application classes.
❷The instrumented classes use Cobertura classes, so the Cobertura libraries also need to be on the
classpath.
This will produce the raw test coverage data we need to produce the XML test coverage reports that
Jenkins can use. To actually produce these reports, we need to invoke another task, as shown here:
<target name="coverage-report" depends="test-coverage">
<cobertura-report srcdir="${src.dir}" destdir="${coverage.xml.dir}"
format="xml" />
</target>
Finally, don’t forget to tidy up after your done: the clean target should delete not only the generated
classes, but also the generated instrumented classes, the Cobertura coverage data, and the Cobertura
reports:
<target name="clean"
description="Remove all files created by the build/test process.">
<delete dir="${classes.dir}" />
<delete dir="${instrumented.dir}" />
<delete dir="${reports.dir}" />
<delete file="cobertura.log" />
<delete file="cobertura.ser" />
</target>
Once this is done, you are ready to integrate your coverage reports into Jenkins.
6.6.1.3. Installing the Cobertura code coverage plugin
Once code coverage data is being generated as part of your build process, you can configure Jenkins
to report on it. This involves installing the Jenkins Cobertura plugin. We went through this process
in Section 2.8, “Adding Code Coverage and Other Metrics”, but we’ll run through it again to refresh
your memory. Go to the Manage Jenkins screen, and click on Manage Plugins. This will take you to

152
the Plugin Manager screen. If Cobertura has not been installed, you will find the Cobertura Plugin in
the Available tab, in the Build Reports section (see Figure 6.11, “Installing the Cobertura plugin”). To
install it, just tick the checkbox and press enter (or scroll down to the bottom of the screen and click
on the “Install” button). Jenkins will download and install the plugin for you. Once the downloading is
done, you will need to restart your Jenkins server.
Figure 6.11. Installing the Cobertura plugin
6.6.1.4. Reporting on code coverage in your build
Once you have installed the plugin, you can set up code coverage reporting in your build jobs. Since
code coverage can be slow and memory-hungry, you would typically create a separate build job for
this and other code quality metrics, to be run after the normal unit and integration tests. For very large
projects, you may even want to set this up as a build that only runs on a nightly basis. Indeed, feedback
on code coverage and other such metrics is usually not as time-critical as feedback on test results, and
this will leave build executors free for build jobs that can benefit from snappy feedback.
As we mentioned earlier, Jenkins does not do any code coverage analysis itself—you need to configure
your build to produce the Cobertura coverage.xml file (or files) before you can generate any nice
graphs or reports, typically using one of the techniques we discussed previously (see Figure 6.12, “Your
code coverage metrics build needs to generate the coverage data”).
Figure 6.12. Your code coverage metrics build needs to generate the coverage data
Once you have configured your build to produce some code coverage data, you can configure Cobertura
in the “Post-build Actions” section of your build job. When you tick the “Publish Cobertura Coverage
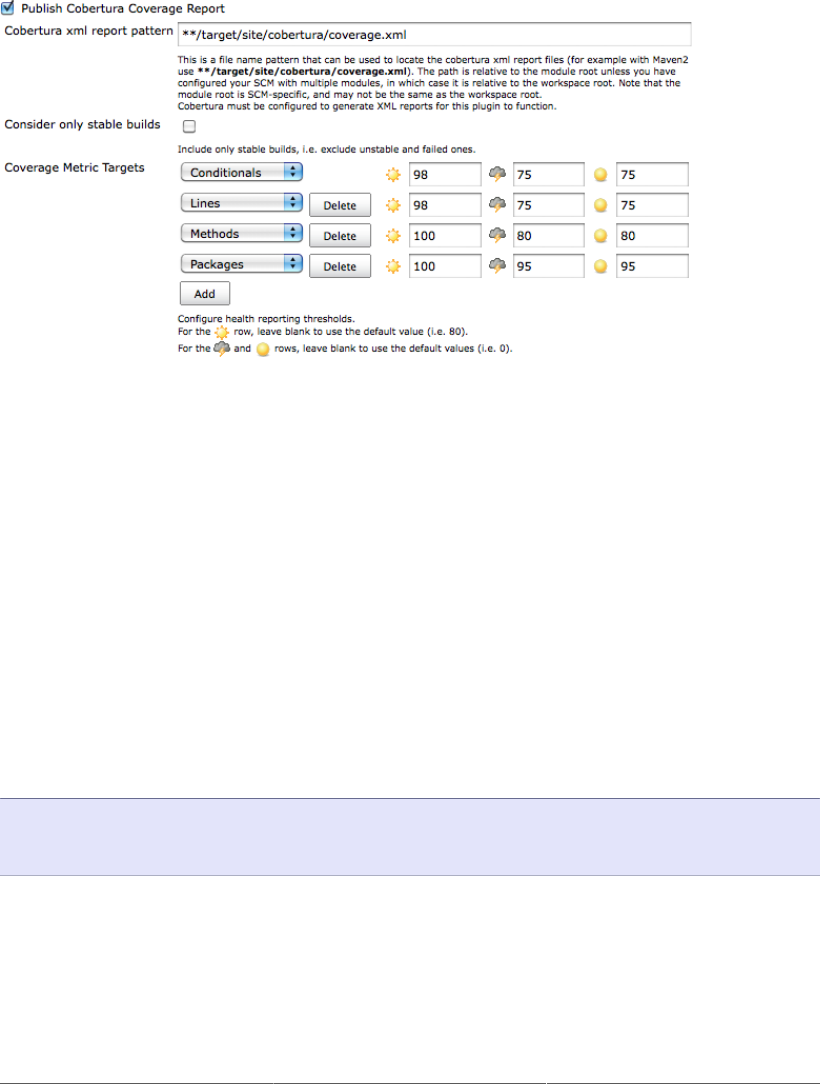
153
Report” checkbox, you should see something like Figure 6.13, “Configuring the test coverage metrics
in Jenkins”.
Figure 6.13. Configuring the test coverage metrics in Jenkins
The first and most important field here is the path to the Cobertura XML data that we generated. Your
project may include a single coverage.xml file, or several. If you have a multimodule Maven project,
for example, the Maven Cobertura plugin will generate a separate coverage.xml file for each module.
The path accepts Ant-style wildcards, so it is easy to include code coverage data from several files. For
any Maven project, a path like **/target/site/cobertura/coverage.xml will include all of the
code coverage metrics for all of the modules in the project.
There are actually several types of code coverage, and it can sometimes be useful to distinguish between
them. The most intuitive is Line Coverage, which counts the number of times any given line is executed
during the automated tests. “Conditional Coverage” (also referred to as “Branch Coverage”) takes into
account whether the boolean expressions in if statements and the like are tested in a way that checks all
the possible outcomes of the conditional expression. For example, consider the following code snippet:
if (price > 10000) {
managerApprovalRequired = true;
}
To obtain full Conditional Coverage for this code, you would need to execute it twice: once with a value
that is more than 10,000, and one with a value of 10,000 or less.
Other more basic code coverage metrics include methods (how many methods in the application were
exercised by the tests), classes and packages.
154
Jenkins lets you define which of these metrics you want to track. By default, the Cobertura plugin will
record Conditional, Line, and Method coverage, which is usually plenty. However it is easy to add other
coverage metrics if you think this might be useful for your team.
Jenkins code quality metrics are not simply a passive reporting process—Jenkins lets you define how
these metrics affect the build outcome. You can define threshold values for the coverage metrics that
affect both the build outcome and the weather reports on the Jenkins dashboard (see Figure 6.14, “Test
coverage results contribute to the project status on the dashboard”). Each coverage metric that you track
takes three threshold values.
Figure 6.14. Test coverage results contribute to the project status on the dashboard
The first (the one with the sunny icon) is the minimum value necessary for the build to have a sunny
weather icon. The second indicates the value below which the build will be attributed a stormy weather
icon. Jenkins will extrapolate between these values for the other more nuanced weather icons.
The last threshold value is simply the value below which a build will be marked as “unstable”—the
yellow ball. While not quite as bad as the red ball (for a broken build), a yellow ball will still result in
a notification message and will look bad on the dashboard.
This feature is far from simply a cosmetic detail—it provides a valuable way of setting objective code
quality goals for your projects. Although it cannot be interpreted alone, falling code coverage is generally
not a good sign in a project. So if you are serious about code coverage, use these threshold values to
provide some hard feedback about when things are not up to scratch.
6.6.1.5. Interpreting code coverage metrics
Jenkins displays your code coverage reports on the build job home page. The first time it runs, it produces
a simple bar chart (see Figure 2.30, “Jenkins displays code coverage metrics on the build home page”).
From the second build onwards, a graph is shown, indicating the various types of coverage that you are
tracking over time (see Figure 6.15, “Configuring the test coverage metrics in Jenkins”). In both cases,
the graph will also show the code coverage metrics for the latest build.
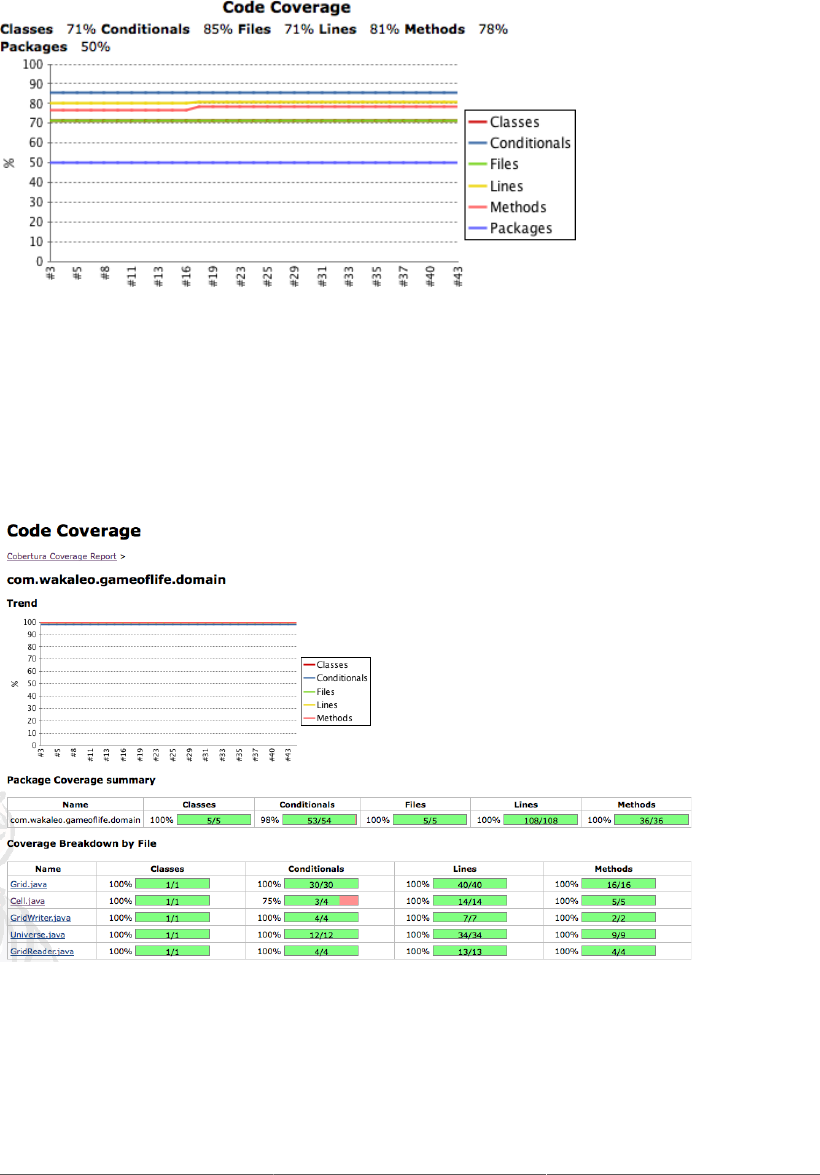
155
Figure 6.15. Configuring the test coverage metrics in Jenkins
Jenkins also does a great job letting you drill down into the coverage metrics, displaying coverage
breakdowns for packages, classes within a package, and lines of code within a class (see Figure 6.16,
“Displaying code coverage metrics”). No matter what level of detail you are viewing, Jenkins will
display a graph at the top of the page showing the code coverage trend over time. Further down, you
will find the breakdown by package or class.
Figure 6.16. Displaying code coverage metrics
Once you get to the class details level, Jenkins will also display the source code of the class, with the lines
color-coded according to their level of coverage. Lines that have been completely executed during the
tests are green, and lines that were never executed are marked in red. A number in the margin indicates

156
the number of times a given line was executed. Finally, yellow shading in the margin is used to indicate
insufficient conditional coverage (for example, an if statement that was only tested with one outcome).
6.6.2. Measuring Code Coverage with Clover
Clover is an excellent commercial code coverage tool from Atlassian4. Clover works well for projects
using Ant, Maven, and even Grails. The configuration and use of Clover is well documented on the
Atlassian website, so we won’t describe these aspects in detail. However, to give some context, here is
what a typically Maven 2 configuration of Clover for use with Jenkins would look like:
<build>
...
<plugins>
...
<plugin>
<groupId>com.atlassian.maven.plugins</groupId>
<artifactId>maven-clover2-plugin</artifactId>
<version>3.0.4</version>
<configuration>
<includesTestSourceRoots>false</includesTestSourceRoots>
<generateXml>true</generateXml>
</configuration>
</plugin>
</plugins>
</build>
...
This will generate both an HTML and XML coverage report, including aggregated data if the Maven
project contains multiple modules.
To integrate Clover into Jenkins, you need to install the Jenkins Clover plugin in the usual manner using
the Plugin Manager screen. Once you have restarted Jenkins, you will be able to integrate Clover code
coverage into your builds.
Running Clover on your project is a multistep project: you instrument your application code, run your
tests, aggregate the test data (for multimodule Maven projects) and generate the HTML and XML
reports. Since this can be a fairly slow operation, you typically run it as part of a separate build job, and
not with your normal tests. You can do this as follows:
$ clover2:setup test clover2:aggregate clover2:clover
Next, you need to set up the Clover reporting in Jenkins. Tick the Publish Clover Coverage Report
checkbox to set this up. The configuration is similar to that of Cobertura—you need to provide the path
to the Clover HTML report directory, and to the XML report file, and you can also define threshold
values for sunny and stormy weather, and for unstable builds (see Figure 6.17, “Configuring Clover
reporting in Jenkins”).
4 http://www.atlassian.com/software/clover

157
Figure 6.17. Configuring Clover reporting in Jenkins
Once you have done this, Jenkins will display the current level of code coverage, as well as a graph
of the code coverage over time, on your project build job home page (see Figure 6.18, “Clover code
coverage trends”).
Figure 6.18. Clover code coverage trends
6.7. Automated Acceptance Tests
Automated acceptance tests play an important part in many agile projects, both for verification and
for communication. As a verification tool, acceptance tests perform a similar role to integration tests,
and aim to demonstrate that the application effectively does what is expected of it. But this is almost
a secondary aspect of automated Acceptance Tests. The primary focus is actually on communication
—demonstrating to nondevelopers (business owners, business analysts, testers, and so forth) precisely
where the project is at.
Acceptance tests should not be mixed with developer-focused tests, as both their aim and their audience
is very different. Acceptance tests should be working examples of how the system works, with an
emphasis on demonstration rather than exhaustive proof. The exhaustive tests should be done at the
unit-testing level.

158
Acceptance Tests can be automated using conventional tools such as JUnit, but there is a growing
tendency to use Behavior-Driven Development (BDD) frameworks for this purpose, as they tend to be a
better fit for the public-facing nature of Acceptance Tests. Behavior-driven development tools used for
automated Acceptance Tests typically generate HTML reports with a specific layout that is well-suited
to nondevelopers. They often also produce JUnit-compatible reports that can be understood directly by
Jenkins.
Behavior-Driven Development frameworks also have the notion of “Pending tests,” tests that are
automated, but have not yet been implemented by the development team. This distinction plays an
important role in communication with other non-developer stakeholders: if you can automated these tests
early on in the process, they can give an excellent indicator of which features have been implemented,
which work, and which have not been started yet.
As a rule, your Acceptance Tests should be displayed separately from the other more conventional
automated tests. If they use the same testing framework as your normal tests (e.g., JUnit), make sure
they are executed in a dedicated build job, so that non-developers can view them and concentrate on
the business-focused tests without being distracted by low-level or technical ones. It can also help to
adopt business-focused and behavioural naming conventions for your tests and test classes, to make
them more accessible to non-developers (see Figure 6.19, “Using business-focused, behavior-driven
naming conventions for JUnit tests”). The way you name your tests and test classes can make a huge
difference when it comes to reading the test reports and understanding the actual business features and
behavior that is being tested.
Figure 6.19. Using business-focused, behavior-driven naming conventions for JUnit tests
If you are using a tool that generates HTML reports, you can display them in the same build as your
conventional tests, as long as they appear in a separate report. Jenkins provides a very convenient plugin
for this sort of HTML report, called the HTML Publisher plugin (see Figure 6.20, “Installing the HTML
Publisher plugin”). While it is still your job to ensure that your build produces the right reports, Jenkins
can display the reports on your build job page, making them easily accessible to all team members.
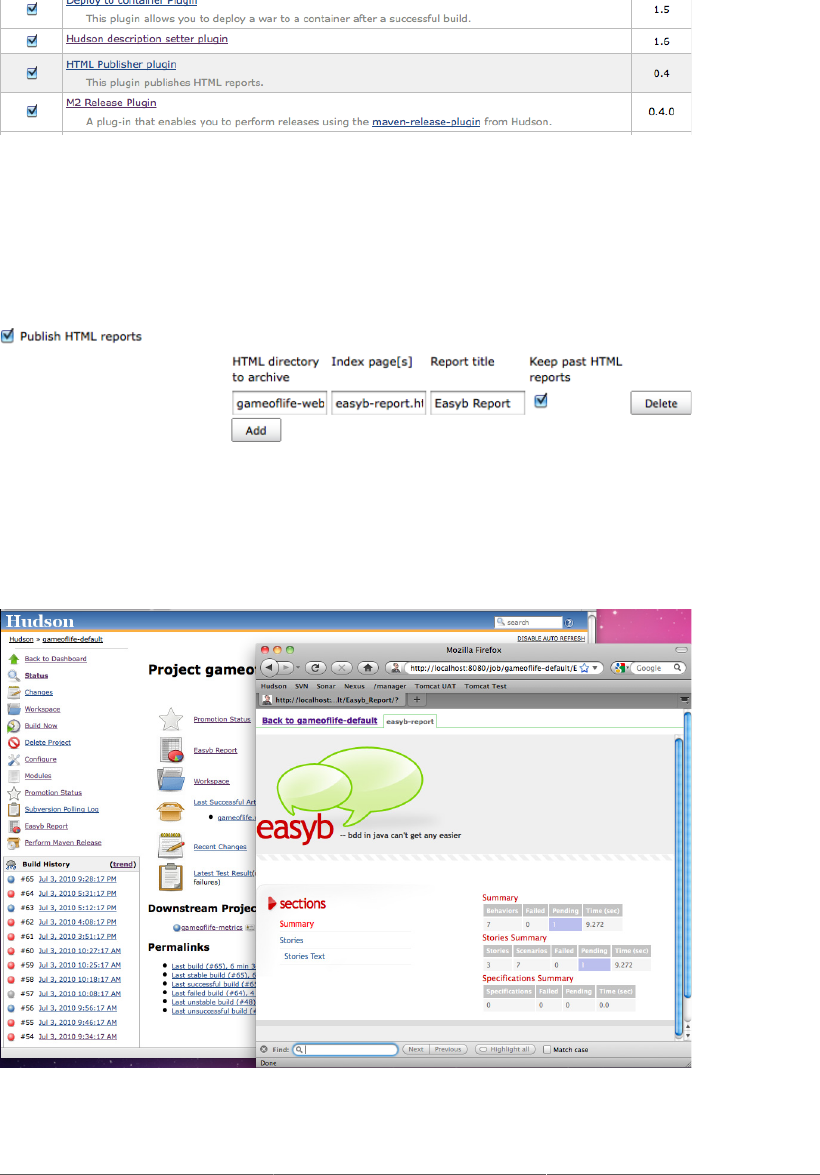
159
Figure 6.20. Installing the HTML Publisher plugin
This plugin is easy to configure. Just go to the “Post-build Actions” section and tick the “Publish HTML
reports” checkbox (see Figure 6.21, “Publishing HTML reports”). Next, give Jenkins the directory your
HTML reports were generated to, an index page, and a title for your report. You can also ask Jenkins
to store the reports generated for each build, or only keep the latest one.
Figure 6.21. Publishing HTML reports
Once this is done, Jenkins will display a special icon on your build job home page, with a link to your
HTML report. In Figure 6.22, “Jenkins displays a special link on the build job home page for your
report”, you can see the easyb reports we configured previously in action.
Figure 6.22. Jenkins displays a special link on the build job home page for your report
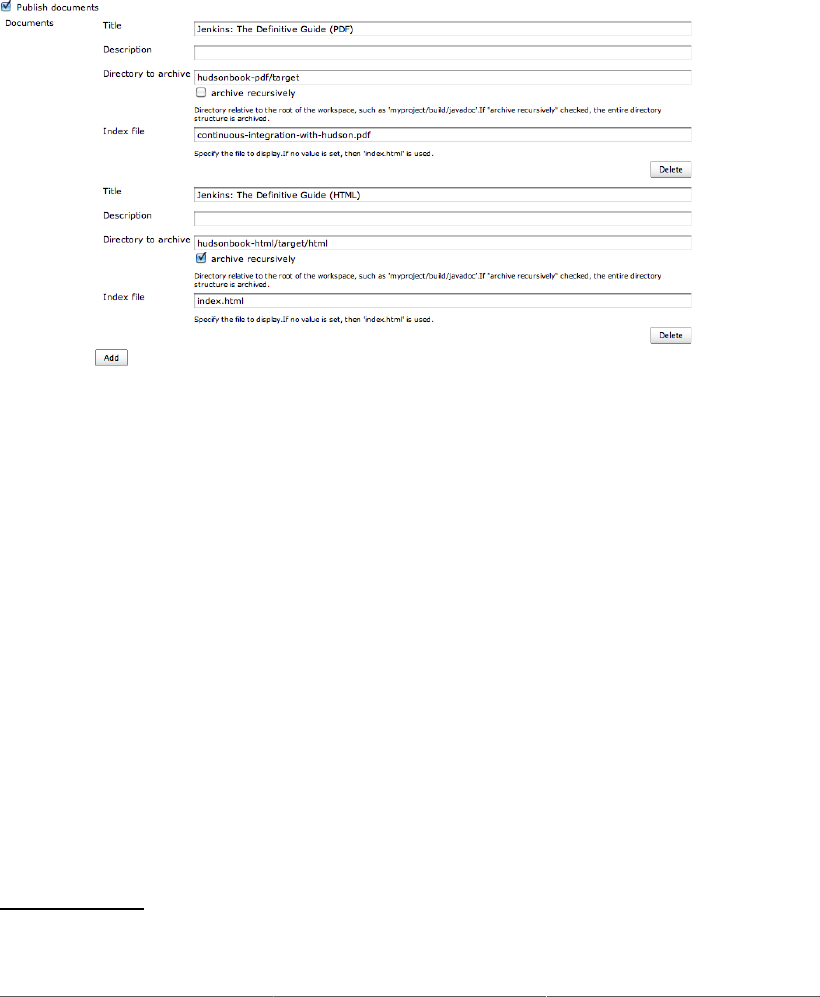
160
The HTML Publisher plugin works perfectly for HTML reports. If, on the other hand, you want to (also)
publish non-HTML documents, such as text files, PDFs, and so forth, then the DocLinks plugin is for
you. This plugin is similar to the HTML Publisher plugin, but lets you archive both HTML reports as
well as documents in other formats. For example, in Figure 6.23, “The DocLinks plugin lets you archive
both HTML and non-HTML artifacts”, we have configured a build job to archive both a PDF document
and an HTML report. Both these documents will now be listed on the build home page.
Figure 6.23. The DocLinks plugin lets you archive both HTML and non-HTML artifacts
6.8. Automated Performance Tests with JMeter
Application performance is another important area of testing. Performance testing can be used to
verify many things, such as how quickly an application responds to requests with a given number
of simultaneous users, or how well the application copes with an increasing number of users. Many
applications have Service Level Agreements, or SLAs, which define contractually how well they should
perform.
Performance testing is often a one-off, ad-hoc activity, only undertaken right at the end of the project
or when things start to go wrong. Nevertheless, performance issues are like any other sort of bug—the
later on in the process they are detected, the more costly they are to fix. It therefore makes good of sense
to automate these performance and load tests, so that you can spot any areas of degrading performance
before it gets out into the wild.
JMeter5 is a popular open source performance and load testing tool. It works by simulating load on your
application, and measuring the response time as the number of simulated users and requests increase.
It effectively simulates the actions of a browser or client application, sending requests of various sorts
(HTTP, SOAP, JDBC, JMS and so on) to your server. You configure a set of requests to be sent to
5 http://jakarta.apache.org/jmeter/

161
your application, as well as random pauses, conditions and loops, and other variations designed to better
imitate real user actions.
JMeter runs as a Swing application, in which you can configure your test scripts (see Figure 6.24,
“Preparing a performance test script in JMeter”). You can even run JMeter as a proxy, and then
manipulate your application in an ordinary browser to prepare an initial version of your test script.
A full tutorial on using JMeter is beyond the scope of this book. However, it is fairly easy to learn, and
you can find ample details about how to use it on the JMeter website. With a little work, you can have
a very respectable test script up and running in a matter of hours.
What we are interested in here is the process of automating these performance tests. There are several
ways to integrate JMeter tests into your Jenkins build process. Although at the time of writing, there
was no official JMeter plugin for Maven available in the Maven repositories, there is an Ant plugin. So
the simplest approach is to write an Ant script to run your performance tests, and then either call this
Ant script directly, or (if you are using a Maven project, and want to run JMeter through Maven) use
the Maven Ant integration to invoke the Ant script from within Maven. A simple Ant script running
some JMeter tests is illustrated here:
<project default="jmeter">
<path id="jmeter.lib.path">
<pathelement location="/Users/johnsmart/Projects/Books/jenkins-the-definitive-guide/hudsonbook-content/tools/jmeter/extras/ant-jmeter-1.0.9.jar"/>
</path>
<taskdef name="jmeter"
classname="org.programmerplanet.ant.taskdefs.jmeter.JMeterTask"
classpathref="jmeter.lib.path" />
<target name="jmeter">
<jmeter jmeterhome="/Users/johnsmart/Projects/Books/jenkins-the-definitive-guide/hudsonbook-content/tools/jmeter"
testplan="/Users/johnsmart/Projects/Books/jenkins-the-definitive-guide/hudsonbook-content/src/test/jmeter/gameoflife.jmx"
resultlog="/Users/johnsmart/Projects/Books/jenkins-the-definitive-guide/hudsonbook-content/target/jmeter-results.jtl">
<jvmarg value="-Xmx512m" />
</jmeter>
</target>
</project>
This assumes that the JMeter installation is available in the tools directory of your project. Placing
tools such as JMeter within your project structure is a good habit, as it makes your build scripts more
portable and easier to run on any machine, which is precisely what we need to run them on Jenkins.
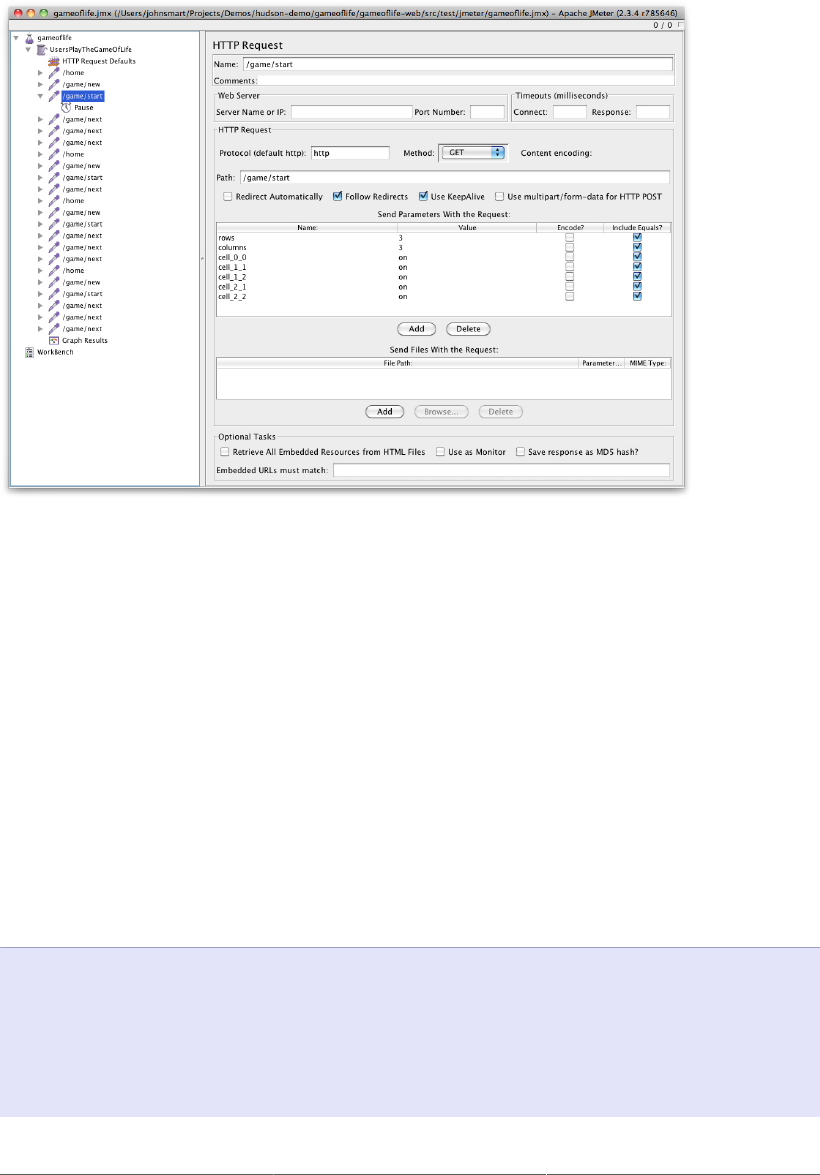
162
Figure 6.24. Preparing a performance test script in JMeter
Note that we are also using the optional <jvmarg> tag to provide JMeter with an ample amount of
memory—performance testing is a memory-hungry activity.
The script shown here will execute the JMeter performance tests against a running application. So you
need to ensure that the application you want to test is up and running before you start the tests. There
are several ways to do this. For more heavy-weight performance tests, you will usually want to deploy
your application to a test server before running the tests. For most applications this is not usually too
difficult—the Maven Cargo plugin, for example, lets you automate the deployment process to a variety
of local and remote servers. We will also see how to do this in Jenkins later on in the book.
Alternatively, if you are using Maven for a web application, you can use the Jetty or Cargo plugin to
ensure that the application is deployed before the integration tests start, and then call the JMeter Ant
script from within Maven during the integration test phase. Using Jetty, for example, you could so
something like this:
<project...>
<build>
<plugins>
<plugin>
<groupId>org.mortbay.jetty</groupId>
<artifactId>jetty-maven-plugin</artifactId>
<version>7.1.0.v20100505</version>
<configuration>

163
<scanIntervalSeconds>10</scanIntervalSeconds>
<connectors>
<connector
implementation="org.eclipse.jetty.server.nio.SelectChannelConnector">
<port>${jetty.port}</port>
<maxIdleTime>60000</maxIdleTime>
</connector>
</connectors>
<stopKey>foo</stopKey>
<stopPort>9999</stopPort>
</configuration>
<executions>
<execution>
<id>start-jetty</id>
<phase>pre-integration-test</phase>
<goals>
<goal>run</goal>
</goals>
<configuration>
<scanIntervalSeconds>0</scanIntervalSeconds>
<daemon>true</daemon>
</configuration>
</execution>
<execution>
<id>stop-jetty</id>
<phase>post-integration-test</phase>
<goals>
<goal>stop</goal>
</goals>
</execution>
</executions>
</plugin>
...
</plugins>
</build>
</project>
This will start up an instance of Jetty and deploy your web application to it just before the integration
tests, and shut it down afterwards.
Finally, you need to run the JMeter performance tests during this phase. You can do this by using the
maven-antrun-plugin to invoke the Ant script we wrote earlier on during the integration test phase:
<project...>
...
<profiles>
<profile>
<id>performance</id>
<build>
<plugins>
<plugin>
<artifactId>maven-antrun-plugin</artifactId>
<version>1.4</version>
<executions>
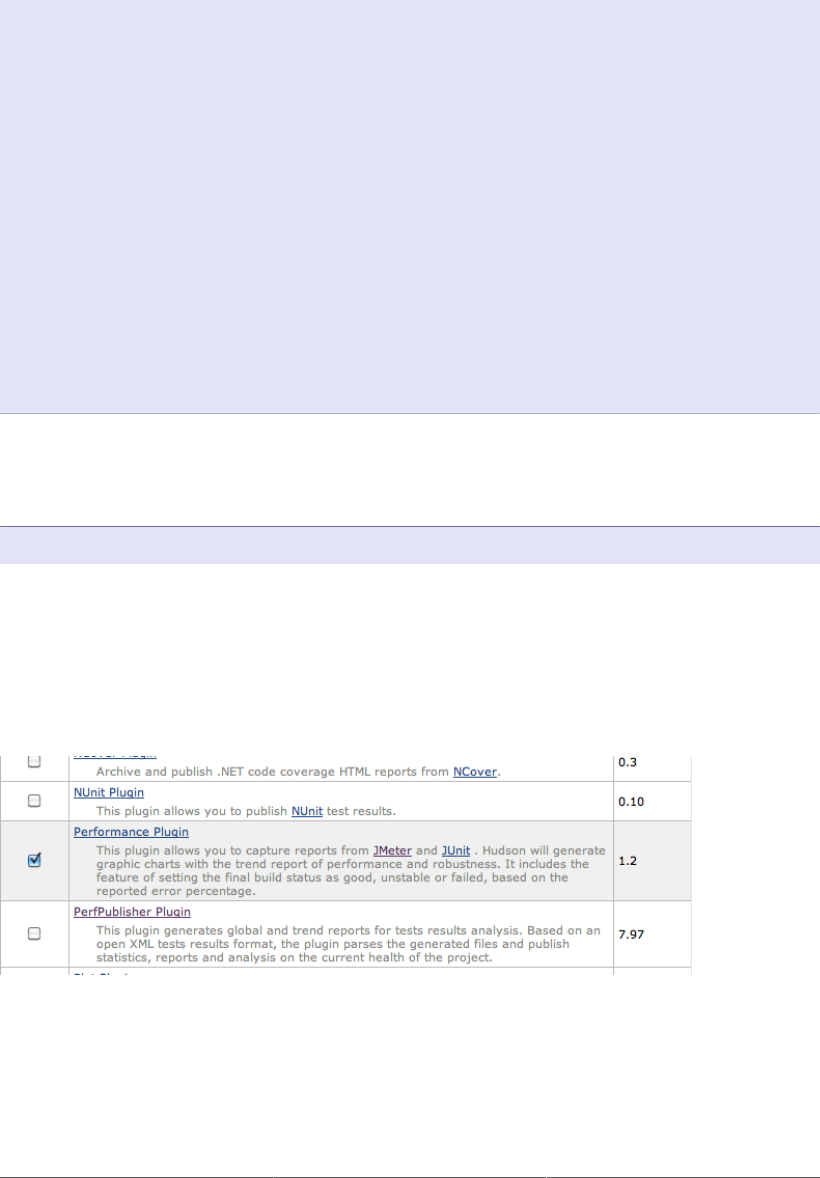
164
<execution>
<id>run-jmeter</id>
<phase>integration-test</phase>
<goals>
<goal>run</goal>
</goals>
<configuration>
<tasks>
<ant antfile="build.xml" target="jmeter" >
</tasks>
</configuration>
</execution>
</executions>
</plugin>
</plugins>
</build>
</profile>
</profiles>
...
</project>
Now, all you need to do is to run the integration tests with the performance profile to get Maven to
run the JMeter test suite. You can do this by invoking the integration-test or verify Maven life
cycle phase:
$ mvn verify -Pperformance
Once you have configured your build script to handle JMeter, you can set up a performance test build
in Jenkins. For this, we will use the Performance Test Jenkins plugin, which understands JMeter logs
and can generate nice statistics and graphs using this data. So go to the Plugin Manager screen on your
Jenkins server and install this plugin (see Figure 6.25, “Preparing a performance test script in JMeter”).
When you have installed the plugin, you will need to restart Jenkins.
Figure 6.25. Preparing a performance test script in JMeter
Once you have the plugin installed, you can set up a performance build job in Jenkins. This build job
will typically be fairly separate from your other builds. In Figure 6.26, “Setting up the performance
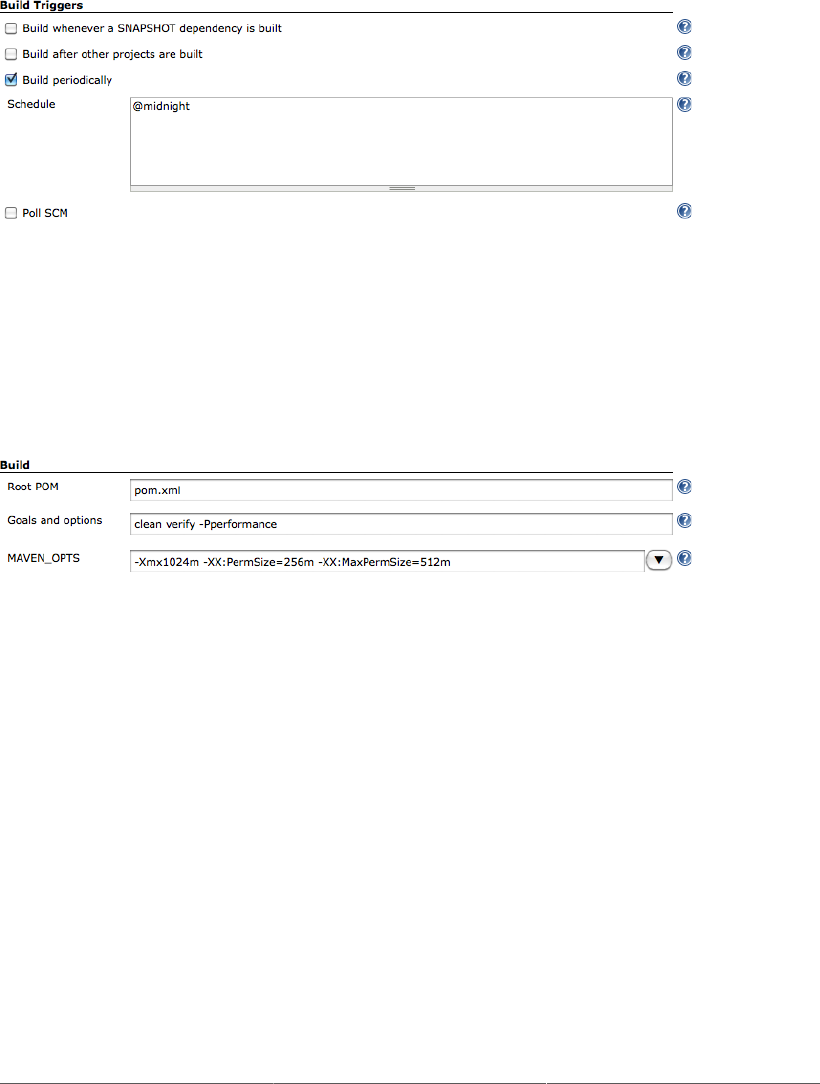
165
build to run every night at midnight”, we have set up the performance build to run on a nightly basis,
which is probably enough for a long-running load or performance test.
Figure 6.26. Setting up the performance build to run every night at midnight
All that remains is to configure the build job to run your performance tests. In Figure 6.27, “Performance
tests can require large amounts of memory”, we are running the Maven build we configured earlier on.
Note that we are using the MAVEN_OPTS field (accessible by clicking on the Advanced button) to
provide plenty of memory for the build job.
Figure 6.27. Performance tests can require large amounts of memory
To set up performance reporting, just tick the “Publish Performance test result report” option in the Post-
build Actions section (see Figure 6.28, “Configuring the Performance plugin in your build job”). You
will need to tell Jenkins where to find your JMeter test results (the output files, not the test scripts). The
Performance plugin is happy to process multiple JMeter results, so you can put wildcards in the path to
make sure all of your JMeter reports are displayed.
If you take your performance metrics seriously, then the build should fail if the required SLA is not met.
In a Continuous Integration environment, any sort of metrics build that does not fail if minimum quality
criteria are not met will tend to be ignored.
You can configure the Performance plugin to mark a build as unstable or failing if a certain percentage of
requests result in errors. By default, these values will only be raised in the event of real application errors
(i.e., bugs) or server crashes. However you really should configure your JMeter test scripts to place a
ceiling on the maximum acceptable response time for your requests. This is particularly important if
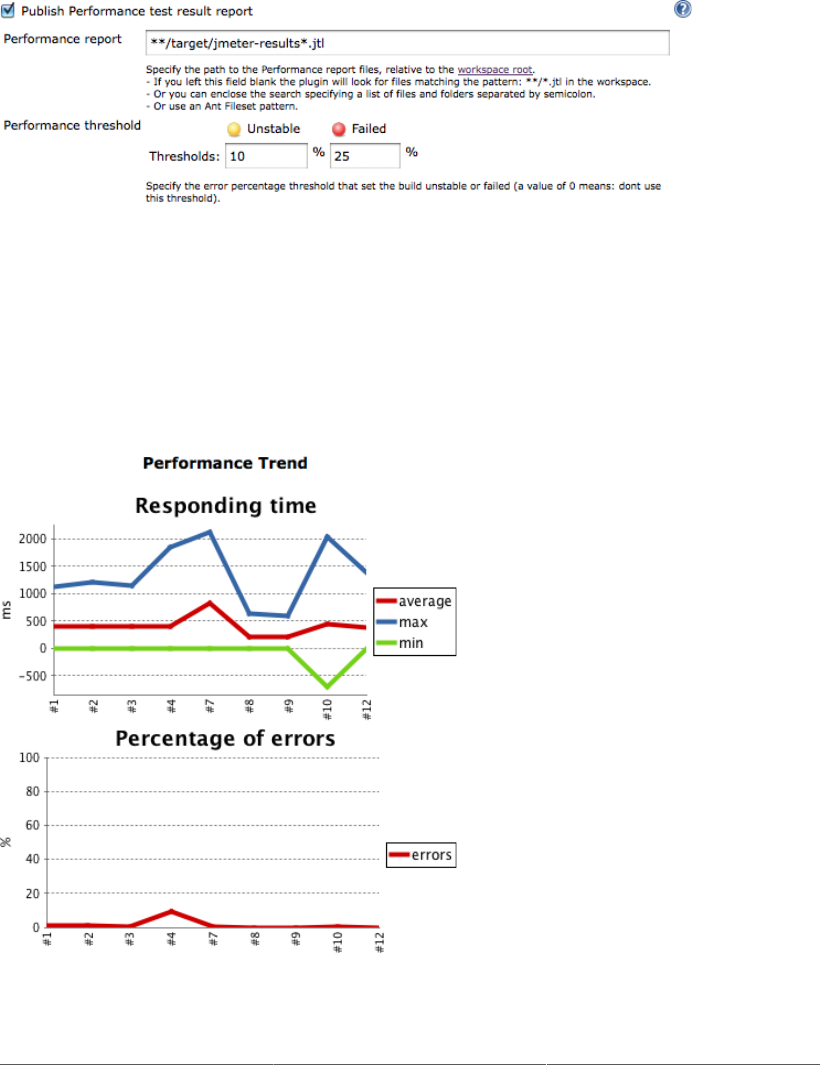
166
your application has contractual obligations in this regard. One way to do this in JMeter is by adding
a Duration Assertion element to your script. This will cause an error if any request takes longer than
a certain fixed time to execute.
Figure 6.28. Configuring the Performance plugin in your build job
Now, when the build job runs, the Performance plugin will produce graphs keeping track of overall
response times and of the number of errors (see Figure 6.29, “The Jenkins Performance plugin keeps
track of response time and errors”). There will be a separate graph for each JMeter report you have
generated. If there is only one graph, it will appear on the build home page; otherwise you can view
them on a dedicated page that you can access via the Performance Trend menu item.
Figure 6.29. The Jenkins Performance plugin keeps track of response time and errors

167
This graph gives you an overview of performance over time. You would typically use this graph to
ensure that your average response times are within the expected limits, and also spot any unusually
high variations in the average or maximum response times. However if you need to track down and
isolate performance issues, the Performance Breakdown screen can be more useful. From within the
Performance Trend report, click on the Last Report link at the top of the screen. This will display a
breakdown of response times and errors per request (see Figure 6.30, “You can also view performance
results per request”). You can do the same thing for previous builds, by clicking on the Performance
Report link in the build details page.
With some minor variations, a JMeter test script basically works by simulating a given number of
simultaneous users. Typically, however, you will want to see how your application performs for different
numbers of users. The Jenkins Performance plugin handles this quite well, and can process graphs for
multiple JMeter reports. Just make sure you use a wildcard expression when you tell Jenkins where to
find the reports.
Of course, it would be nice to be able to reuse the same JMeter test script for each test run. JMeter
supports parameters, so you can easily reuse the same JMeter script with different numbers of simulated
users. You just use a property expression in your JMeter script, and then pass the property to JMeter when
you run the script. If your property is called request.threads, then the property expression in your
JMeter script would be ${__property(request.threads)}. Then, you can use the <property>
element in the <jmeter> Ant task to pass the property when you run the script. The following Ant
target, for example, runs JMeter three times, for 200, 500 and 1000 simultaneous users:
<target name="jmeter">
<jmeter jmeterhome="/Users/johnsmart/Projects/Books/jenkins-the-definitive-guide/hudsonbook-content/tools/jmeter"
testplan="/Users/johnsmart/Projects/Books/jenkins-the-definitive-guide/hudsonbook-content/src/test/jmeter/gameoflife.jmx"
resultlog="/Users/johnsmart/Projects/Books/jenkins-the-definitive-guide/hudsonbook-content/target/jmeter-results-200-users.jtl">
<jvmarg value="-Xmx512m" />
<property name="request.threads" value="200"/>
<property name="request.loop" value="20"/>
</jmeter>
<jmeter jmeterhome="/Users/johnsmart/Projects/Books/jenkins-the-definitive-guide/hudsonbook-content/tools/jmeter"
testplan="/Users/johnsmart/Projects/Books/jenkins-the-definitive-guide/hudsonbook-content/src/test/jmeter/gameoflife.jmx"
resultlog="/Users/johnsmart/Projects/Books/jenkins-the-definitive-guide/hudsonbook-content/target/jmeter-results-500-users.jtl">
<jvmarg value="-Xmx512m" />
<property name="request.threads" value="500"/>
<property name="request.loop" value="20"/>
</jmeter>
<jmeter jmeterhome="/Users/johnsmart/Projects/Books/jenkins-the-definitive-guide/hudsonbook-content/tools/jmeter"
testplan="/Users/johnsmart/Projects/Books/jenkins-the-definitive-guide/hudsonbook-content/src/test/jmeter/gameoflife.jmx"
resultlog="/Users/johnsmart/Projects/Books/jenkins-the-definitive-guide/hudsonbook-content/target/jmeter-results-1000-users.jtl">
<jvmarg value="-Xmx512m" />
<property name="request.threads" value="1000"/>
<property name="request.loop" value="20"/>
</jmeter>
</target>
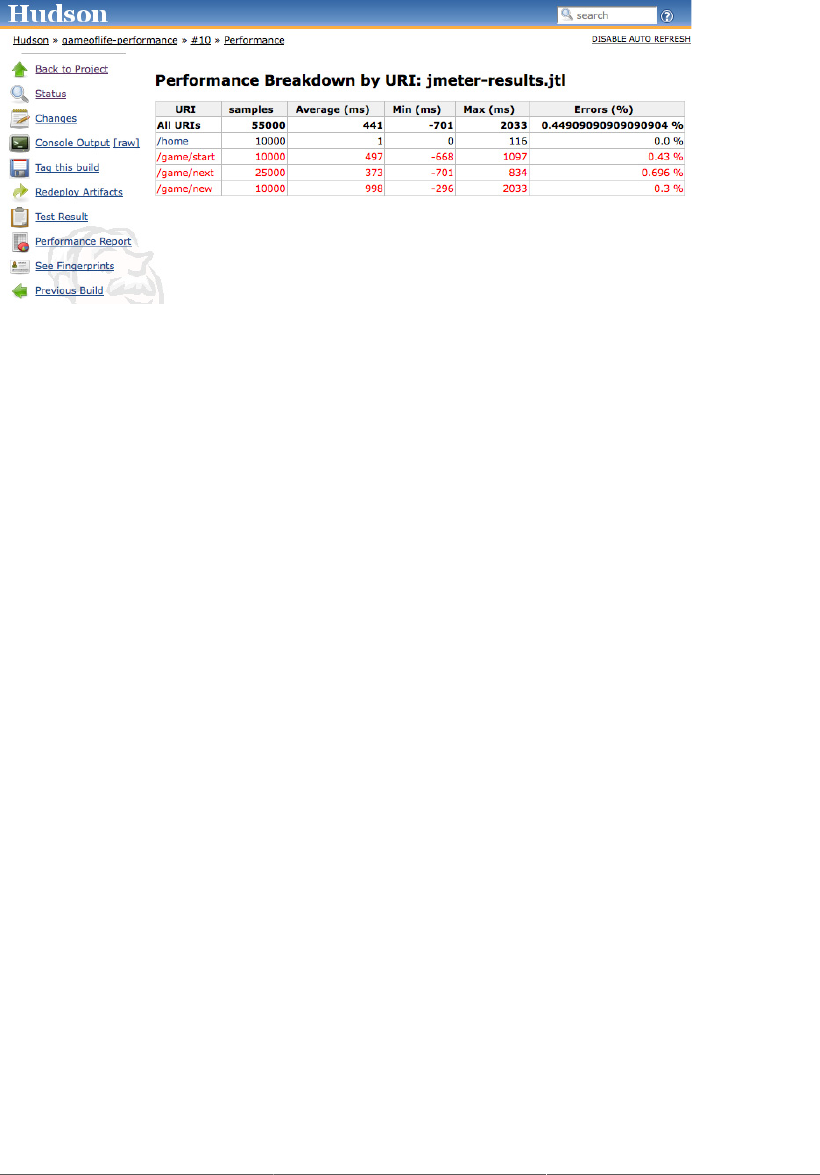
168
Figure 6.30. You can also view performance results per request
6.9. Help! My Tests Are Too Slow!
One of the underlying principles of designing your CI builds is that the value of information about a
build failure diminishes rapidly with time. In other words, the longer the news of a build failure takes
to get to you, the less it is worth, and the harder it is to fix.
Indeed, if your functional or integration tests are taking several hours to run, chances are they won’t be
run for every change. They are more likely to be scheduled as a nightly build. The problem with this
is that a lot can happen in twenty-four hours, and, if the nightly build fails, it will be difficult to figure
out which of the many changes committed to version control during the day was responsible. This is a
serious issue, and penalizes your CI server’s ability to provide the fast feedback that makes it useful.
Of course some builds are slow, by their very nature. Performance or load tests fall into this category,
as do some more heavyweight code quality metrics builds for large projects. However, integration and
functional tests most definitely do not fall into this category. You should do all you can to make these
tests as fast as possible. Under ten minutes is probably acceptable for a full integration/functional test
suite. Two hours is not.
So, if you find yourself needing to speed up your tests, here are a few strategies that might help, in
approximate order of difficulty.
6.9.1. Add More Hardware
Sometimes the easiest way to speed up your builds is to throw more hardware into the mix. This could
be as simple as upgrading your build server. Compared to the time and effort saved in identifying and
fixing integration-related bugs, the cost of buying a shiny new build server is relatively modest.
Another option is to consider using virtual or cloud-based approach. Later on in the book, we will see
how you can use VMWare virtual machines or cloud-based infrastructure such as Amazon Web Services

169
(EC2) or CloudBees to increase your build capacity on an “as-needed” basis, without having to invest
in permanent new machines.
This approach can also involve distributing your builds across several servers. While this will not in
itself speed up your tests, it may result in faster feedback if your build server is under heavy demand,
and if build jobs are constantly being queued.
6.9.2. Run Fewer Integration/Functional Tests
In many applications, integration or functional tests are used by default as the standard way to test
almost all aspects of the system. However integration and functional tests are not the best way to detect
and identify bugs. Because of the large number of components involved in a typical end-to-end test, it
can be very hard to know where something has gone wrong. In addition, with so many moving parts,
it is extremely difficult, if not completely unfeasible, to cover all of the possible paths through the
application.
For this reason, wherever possible, you should prefer quick-running unit tests to the much slower
integration and functional tests. When you are confident that the individual components work well, you
can complete the picture by a few end-to-end tests that step through common use cases for the system,
or use cases that have caused problems in the past. This will help ensure that the components do fit
together correctly, which is, after all, what integration tests are supposed to do. But leave the more
comprehensive tests where possible to unit tests. This strategy is probably the most sustainable approach
to keeping your feedback loop short, but it does require some discipline and effort.
6.9.3. Run Your Tests in Parallel
If your functional tests take two hours to run, it is unlikely that they all need to be run back-to-back. It is
also unlikely that they will be consuming all of the available CPU on your build machine. So breaking
your integration tests into smaller batches and running them in parallel makes a lot of sense.
There are several strategies you can try, and your mileage will probably vary depending on the nature
of your application. One approach, for example, is to set up several build jobs to run different subsets
of your functional tests, and to run these jobs in parallel. Jenkins lets you aggregate test results. This is
a good way to take advantage of a distributed build architecture to speed up your builds even further.
Essential to this strategy is the ability to run subsets of your tests in isolation, which may require some
refactoring.
At a lower level, you can also run your tests in parallel at the build scripting level. As we saw earlier, both
TestNG and the more recent versions of JUnit support running tests in parallel. Nevertheless, you will
need to ensure that your tests can be run concurrently, which may take some refactoring. For example,
common files or shared instance variables within test cases will cause problems here.
In general, you need to be careful of interactions between your tests. If your web tests start up an
embedded web server such as Jetty, for example, you need to make sure the port used is different for
each set of concurrent tests.

170
Nevertheless, if you can get it to work for your application, running your tests in parallel is one of the
more effective way to speed up your tests.
6.10. Conclusion
Automated testing is a critical part of any Continuous Integration environment, and should be taken
very seriously. As in other areas on CI, and perhaps even more so, feedback is king, so it is important
to ensure that your tests run fast, even the integration and functional ones.

Chapter 7. Securing Jenkins
7.1. Introduction
Jenkins supports several security models, and can integrate with several user repositories. In smaller
organizations, where developers work in close proximity, security on your Jenkins machine may
not be a large concern—you may simply want to prevent unidentified users tampering with your
build job configurations. For larger organizations, with multiple teams, a stricter approach might be
required, where only team members and system administrators are allowed to modify their build job
configurations. And in situations where the Jenkins server may be exposed to a broader audience, such
as on an internal corporate website, or even on the Internet, certain build jobs may be visible to all users
whereas others will need to be hidden to unauthorized users.
In this chapter, we will look at how to configure different security configurations in Jenkins, for different
environments and circumstances.
7.2. Activating Security in Jenkins
Setting up basic security in Jenkins is easy enough. Go to the main configuration page and check the
Enable security checkbox (see Figure 7.1, “Enabling security in Jenkins”). This will display a number of
options, that we will investigate in detail in this chapter. The first section, Security Realms, determines
where Jenkins will look for users during authentication, and includes options such as using users stored
in an LDAP server, using the underlying Unix user accounts (assuming, of course, that Jenkins is running
on a Unix machine), or using a simple built-in user database managed by Jenkins.
The second section, Authorization, determines what users can do once they are logged in. This ranges
from simple options like “Anyone can do anything” or “Logged-in users can do anything,” to more
sophisticated role and project-based authorization policies.
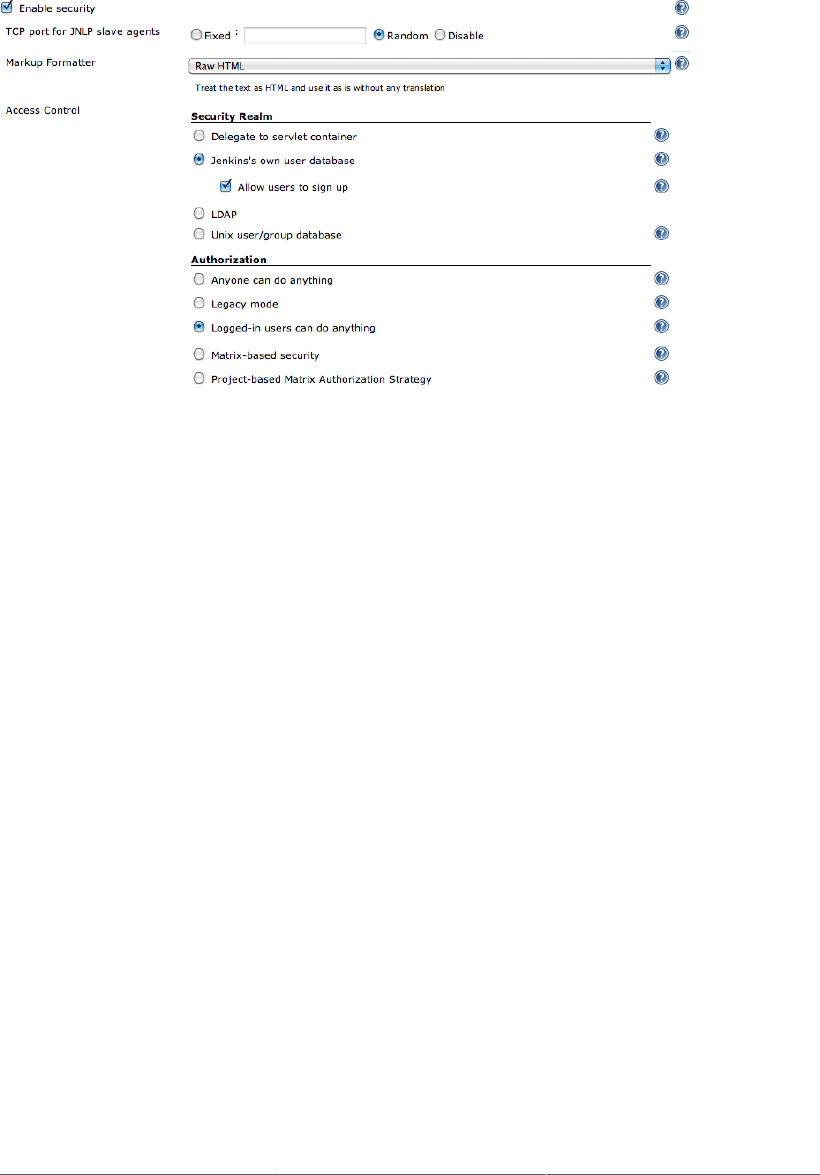
172
Figure 7.1. Enabling security in Jenkins
In the remainder of this chapter, we will look at how to configure Jenkins security for a number of
common scenarios.
7.3. Simple Security in Jenkins
The most simple usable security model in Jenkins involves allowing authenticated users to do anything,
whereas non-authenticated users will just have a read-only view of the build jobs. This is great for small
teams—developers can manage the build jobs, whereas other users (testers, BAs, project managers and
so on) can view the build jobs as required to view the status of the project. Indeed, certain build jobs
may be set up just for this purpose, displaying the results of automated acceptance tests or code quality
metrics, for example.
You can set up this sort of configuration to choose “Logged-in users can do anything” in the
Authorization section. There are several ways that Jenkins can authenticate users (see Section 7.4,
“Security Realms—Identifying Jenkins Users”), but for this example, we will be using the simplest
option, which is to use Jenkins’s own built in database (see Section 7.4.1, “Using Jenkins’s Built-in
User Database”). This is the configuration illustrated in Figure 7.1, “Enabling security in Jenkins”.
Make sure you tick the “Allow users to sign up” option. This option will display a Sign up link at the top
of the screen to let users create their own user account as required (see Figure 7.2, “The Jenkins Sign
up page”). It is a good idea for developers to use their SCM username here: in this case, Jenkins will be
able to work out what users contributed to the SCM changes that triggered a particular build.

173
Figure 7.2. The Jenkins Sign up page
This approach is obviously a little too simple for many situations—it is useful for small teams working
in close proximity, where the aim is to know who’s changes caused (or broke) a particular build, rather
than to manage access in any more restrictive way. In the following sections, we will discuss the two
orthogonal aspects of Jenkins security: identifying your users (Security Realms) and determining what
they are allowed to (Authorization).
7.4. Security Realms—Identifying Jenkins Users
Jenkins lets you identify and manage users in a number of ways, ranging from a simple, built-in user
database suitable for small teams to integration with enterprise directories, with many other options in
between.
7.4.1. Using Jenkins’s Built-in User Database
The easiest way to manage user accounts in Jenkins is to use Jenkins’s internal user database. This is a
good option if you want to keep things simple, as very little setup or configuration is required. Users who
need to log on to the Jenkins server can sign up and create an account for themselves, and, depending
on the security model chosen, an administrator can then decide what these users are allowed to do.
Jenkins automatically adds all SCM users to this database whenever a change is committed to source
code monitored by Jenkins. These user names are used mainly to record who is responsible for each
build job. You can view the list of currently known users by clicking on the People menu entry (see
Figure 7.3, “The list of users known to Jenkins”). Here, you can visualize the users that Jenkins currently
knows about, and also see the last project they committed changes to. Note that this list contains all of
the users who have ever committed changes to the projects that Jenkins monitors—they may not be (and
usually aren’t) all active Jenkins users who are able to log on to the Jenkins server.
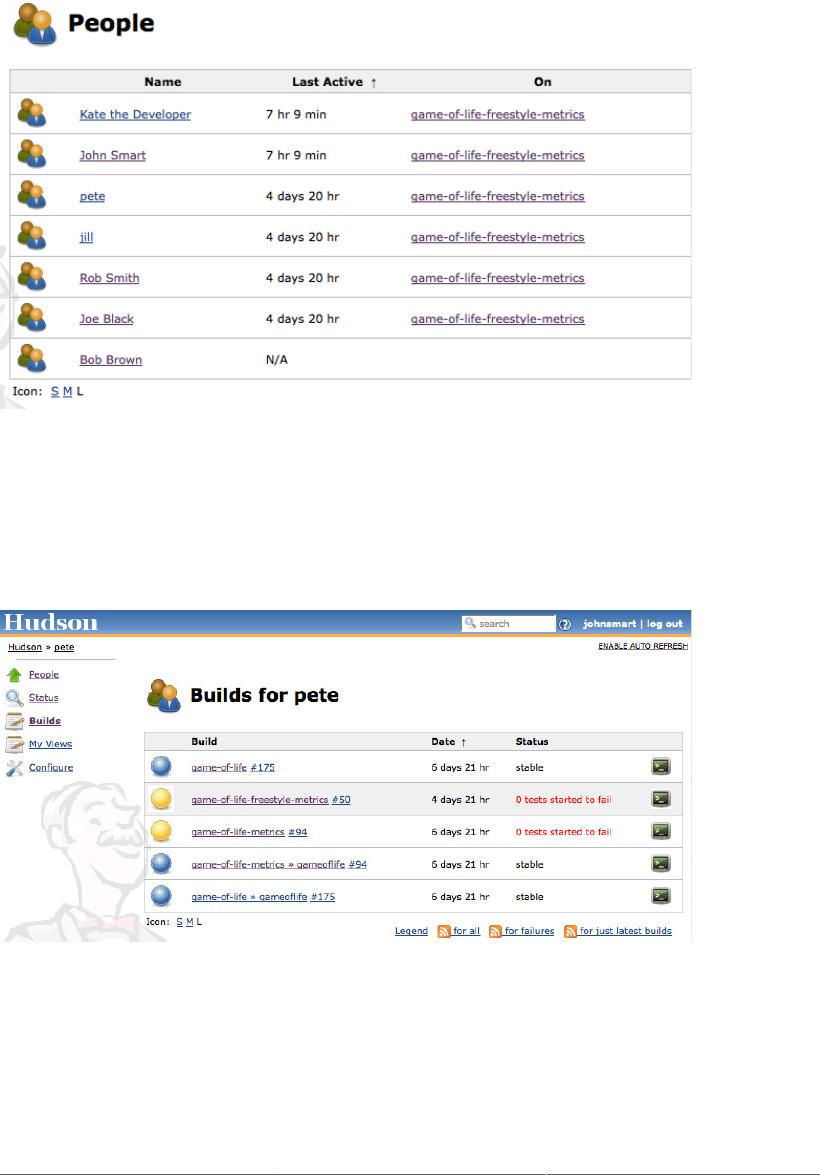
174
Figure 7.3. The list of users known to Jenkins
If you click on a user in this list, Jenkins takes you to a page displaying various details about this user,
including the user’s full name and the build jobs they have contributed to (see Figure 7.4, “Displaying
the builds that a user participates in”). From here, you can also modify or complete the details about
this user, such as their password or email address.
Figure 7.4. Displaying the builds that a user participates in
A user appearing in this list cannot necessarily log on to Jenkins. To be able to log on to Jenkins, the
user account needs to be set up with a password. There are essentially two ways to do this. If you
have activated the “Allow users to sign up” option, users can simply sign up with their SCM user
name and provide their email address and a password (see Section 7.3, “Simple Security in Jenkins”).
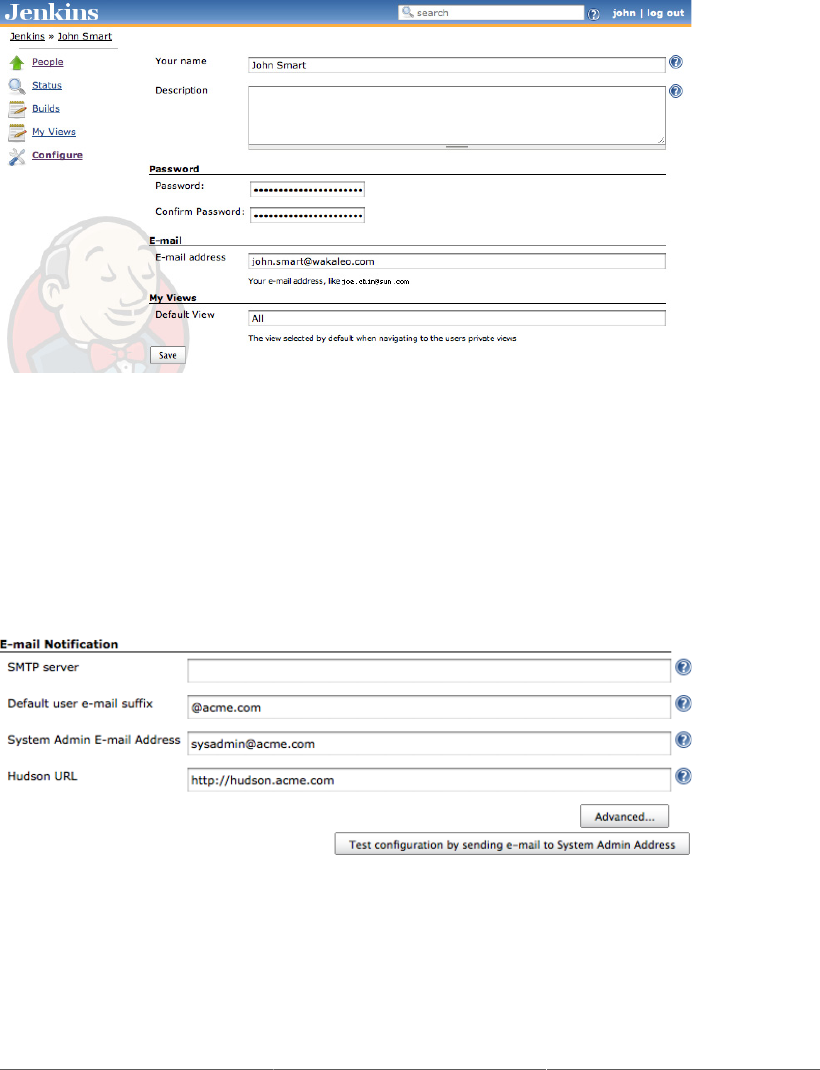
175
Alternatively, you can activate a user by clicking on the Configure menu option in the user details screen,
and provide an email address and password yourself (see Figure 7.5, “Creating a new user account by
signing up”).
Figure 7.5. Creating a new user account by signing up
It is worth noting that, if your email addresses are synchronized with your version control user names (for
example, if you work at acme.com, and user “joe” in your version control system has an email address
of joe@acme.com), you can get Jenkins to derive the email address from a user name by adding a suffix
that you configure in the Email Notification section (see Figure 7.6, “Synchronizing email addresses”).
If you have set up this sort of configuration, you don’t need to specify the email address for new users
unless it does not respect this convention.
Figure 7.6. Synchronizing email addresses
Another way to manage the current active users (those who can actually log on to Jenkins) is by clicking
on the Manage Users link in the main Jenkins configuration page (see Figure 7.7, “You can also manage
Jenkins users from the Jenkins configuration page”).
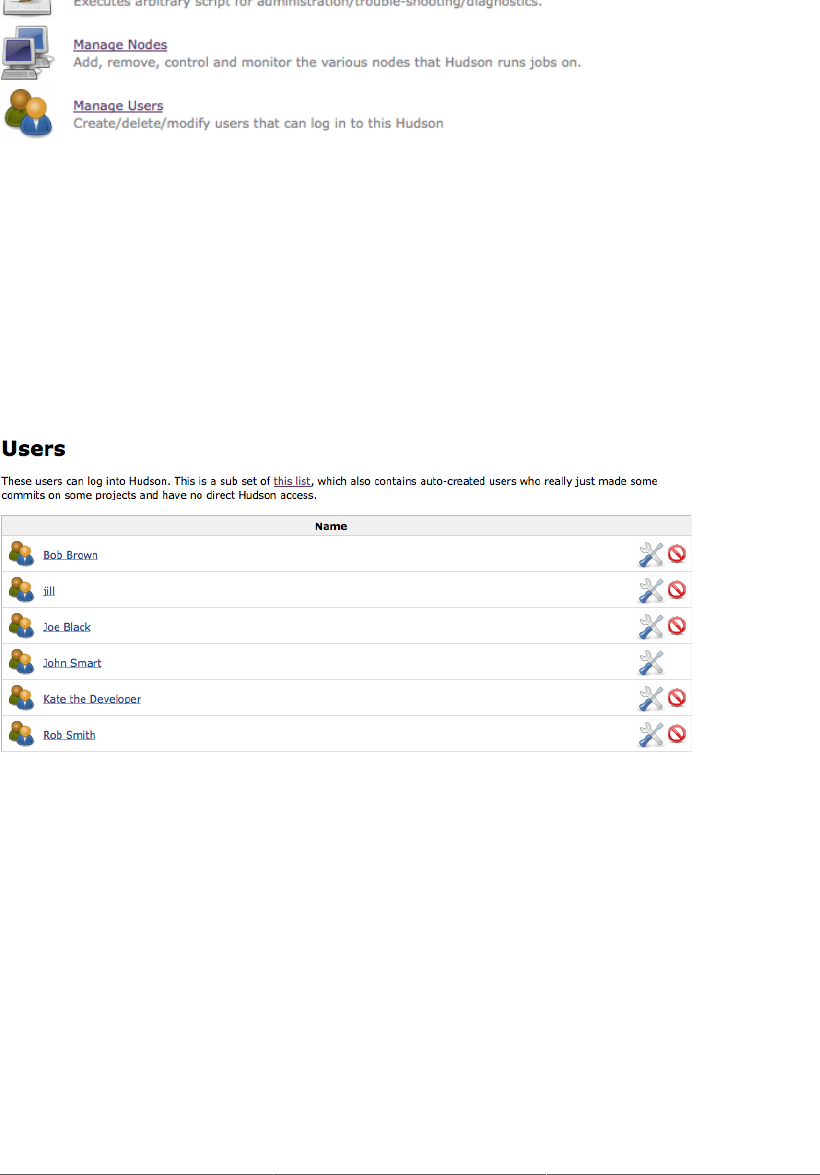
176
Figure 7.7. You can also manage Jenkins users from the Jenkins configuration page
From here, you can view and edit the users who can log in to Jenkins (see Figure 7.8, “The Jenkins user
database”). This includes both users that have signed up manually (if this option has been activated)
and SCM users that you have activated by configuring them with a password. You can also edit a user’s
details (for example modifying their email address or resetting their password), or even remove them
from the list of active users. Doing this will not remove them from the overall user list (their name will
still appear in the build history, for example), but they will no longer be able to log on to the Jenkins
server.
Figure 7.8. The Jenkins user database
The internal Jenkins database is sufficient for many teams and organizations. However, for larger
organizations, it may become tedious and repetitive to manage large numbers of user accounts by hand,
especially if this information already exists elsewhere. In the following sections, we will look at how
to hook Jenkins up to other user management systems, such as LDAP repositories and Unix users and
groups.
7.4.2. Using an LDAP Repository
Many organizations use LDAP directories to store user accounts and passwords across applications.
Jenkins integrates well with LDAP, with no special plugins required. It can authenticate users using the
LDAP repository, check group membership, and retrieve the email address of authenticated users.
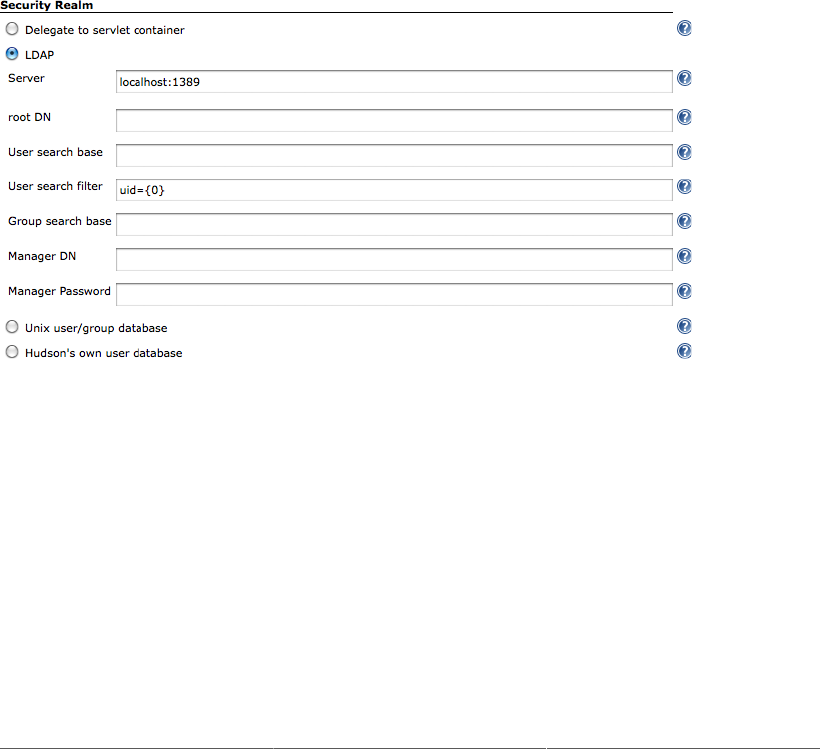
177
To integrate Jenkins with your LDAP repository, Just select “LDAP” in the Security Realm section, and
fill in the appropriate details about your LDAP server (see Figure 7.9, “Configuring LDAP in Jenkins”).
The most important field is the repository server. If you are using a non-standard port, you will need to
provide this as well (for example, ldap.acme.org:1389). Or, if you are using LDAPS, you will need
to specify this as well (for example, ldaps://ldap.acme.org)
If your server supports anonymous binding, this will probably be enough to get you started. If not, you
can use the Advanced options to fine-tune your configuration.
Most of the Advanced fields can safely be left blank unless you have a good reason to change them. If
your repository is extremely large, you may want to specify a root DN value (e.g., dc=acme, dc=com)
and/or a User and Group search base (e.g., ou=people) to narrow down the scope of user queries.
This is not usually required unless you notice performance issues. Or, if your server does not support
anonymous binding, you will need to provide a Manager DN and a Manager DN password, so that
Jenkins can connect to the server to perform its queries.
Figure 7.9. Configuring LDAP in Jenkins
Once you have set up LDAP as your Security Realm, you can configure your favorite security model
as described previously. When users log on to Jenkins, they will be authenticated against the LDAP
repository.
You can also use LDAP groups, though the configuration is not immediately obvious. Suppose you have
defined a group called JenkinsAdmin in your LDAP repository, with a DN of cn=JenkinsAdmin, ou-
Groups, dc=acme, dc=com. To refer to this group in Jenkins, you need to take the common name (cn)
in uppercase, and prefix it with ROLE_. So cn=JenkinsAdmin becomes ROLE_JENKINSADMIN. You
can see an example of LDAP groups used in this way in Figure 7.10, “Using LDAP Groups in Jenkins”.

178
Figure 7.10. Using LDAP Groups in Jenkins
7.4.3. Using Microsoft Active Directory
Microsoft Active Directory is a directory service product widely used in Microsoft architectures.
Although Active Directory does provide an LDAP service, it can be a little tricky to set up, and it is
simpler to get Jenkins to talk directly to the Active Directory server. Fortunately, there’s a plugin for that.
The Jenkins Active Directory plugin lets you configure Jenkins to authenticate against a Microsoft
Active Directory server. You can both authenticate users, and retrieve their groups for Matrix and
Project-based authorization. Note that, unlike the conventional LDAP integration (see Section 7.4.2,
“Using an LDAP Repository”), there is no need to prefix group names with ROLE_—you can use Active
Directory groups (such as “Domain Admins”) directory.
To configure the plugin, you need to provide the full domain name of your Active Directory server.
If you have more than one domain, you can provide a comma-separated list. If you provide the forest
name (say “acme.com” instead of “europe.acme.com”), then the search will be done against the global
catalog. Note that if you do this without specifying the bind DN (see below), the user would have to
login as “europe\joe” or “joe@europe”.
The advanced options let you specify a site name (to improve performance by restricting the domain
controllers that Jenkins queries), and a Binding DN and password, which come in handy if you are
connecting to a multidomain forest. You need to provide a valid Binding DN and password values,
that Jenkins can use to connect to your server so that it can establish the full identity of the user being
authenticated. This way, the user can simply type in “jack” or “jill”, and have the system automatically
figure out that they are jack@europe.acme.com or jack@asia.acme.com. You need to provide the full
user principal name with domain name, like admin@europe.acme.com, or a LDAP-style distinguished
name, such as CN=Administrator,OU=europe,DC=acme,DC=com.
Another nice thing about this plugin is that it works both in a Windows environment and in a Unix
environment. So if Jenkins is running on a Unix server, it can still authenticate against a Microsoft
Active Directory service running on another machine.
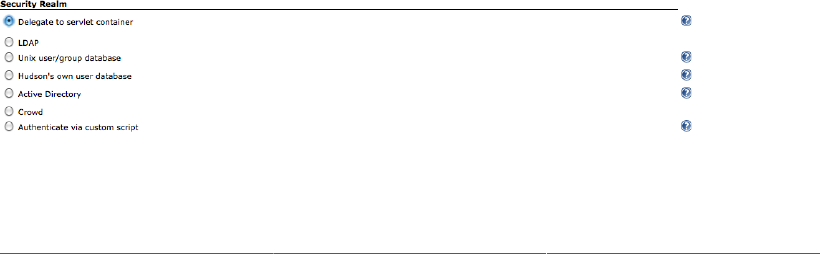
179
More precisely, if Jenkins is running on a Windows machine and you do not specify a domain, that
machine must be a member of the domain you wish to authenticate against. Jenkins will use ADSI to
figure out all the details, so no additional configuration is required.
On a non-Windows machine (or you specify one or more domains), you need to tell Jenkins the name
of Active Directory domain(s) to authenticate with. Jenkins then uses DNS SRV records and LDAP
service of Active Directory to authenticate users.
Jenkins can determine which groups in Active Directory that the user belongs to, so you can use these
as part of your authorisation strategy. For example, you can use these groups in matrix-based security,
or allow “Domain Admins” to administer Jenkins.
7.4.4. Using Unix Users and Groups
If you are running Jenkins on a Unix machine, you can also ask Jenkins to use the user and group
accounts defined on this machine. In this case, users will log into Jenkins using their Unix account logins
and passwords. This uses Pluggable Authentication Modules (PAM), and also works fine with NIS.
In its most basic form, this is somewhat cumbersome, as it requires new user accounts to be set up and
configured for each new Jenkins user. It is only really useful if these accounts need to be set up for
other purposes.
7.4.5. Delegating to the Servlet Container
Another way to identify Jenkins users is to let your Servlet container do it for you. This approach is
useful if you are running Jenkins on a Servlet container such as Tomcat or GlassFish, and you already
have an established way to integrate the Servlet container with your local enterprise user directory.
Tomcat, for example, allows you to authenticate users against a relational database (using direct JDBC
or a DataSource), JNDI, JAAS, or an XML configuration file. You can also use the roles defined in the
Servlet container’s user directory for use with Matrix and Project-based authorization strategies.
In Jenkins, this is easy to configure—just select this option in the Security Realm section (see
Figure 7.11, “Selecting the security realm”). Once you have done this, Jenkins will let the server take
care of everything.
Figure 7.11. Selecting the security realm
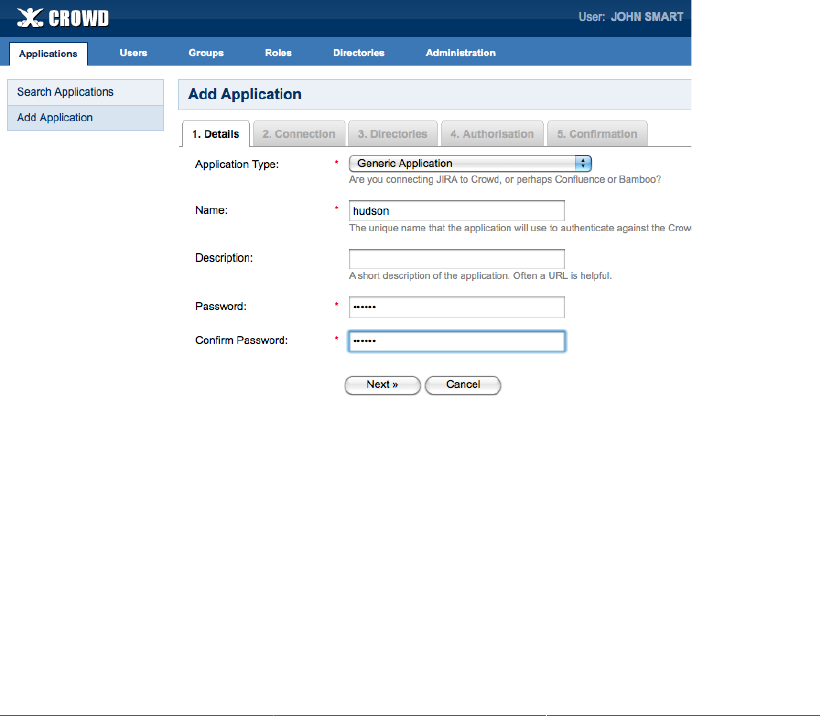
180
7.4.6. Using Atlassian Crowd
If your organization is using Atlassian products such as JIRA and Confluence, you may also be using
Crowd. Crowd is a commercial Identity Management and Single-Sign On (SSO) application from
Atlassian that lets you manage single user accounts across multiple products. It lets you manage both
an internal database of users, groups and roles, and integrate with external directories such as LDAP
directories or custom user stores.
Using the Jenkins Crowd plugin, you can use Atlassian Crowd as the source of your Jenkins users
and groups. Before you start, you need to set up a new application in Crowd (see Figure 7.12,
“Using Atlassian Crowd as the Jenkins Security Realm”). Just set up a new Generic Application called
“hudson” (or something similar), and step through the tabs. In the Connections tab, you need to provide
the IP address of your Jenkins server. Then map the Crowd directories that you will be using to retrieve
Jenkins user accounts and group information. Finally, you will need to tell Crowd which users from these
directories can connect to Jenkins. One option is to allow all users to authenticate, and let Jenkins sort
out the details. Alternatively, you can list the Crown user groups who are allowed to connect to Jenkins.
Figure 7.12. Using Atlassian Crowd as the Jenkins Security Realm
Once you have set this up, you need to install the Jenkins Crowd plugin, which you do as usual via the
Jenkins Plugin Manager. Once you have installed the plugin and restarted Jenkins, you can define Crowd
as your Security Realm in the main Jenkins configuration screen (see Figure 7.13, “Using Atlassian
Crowd as the Jenkins Security Realm”).
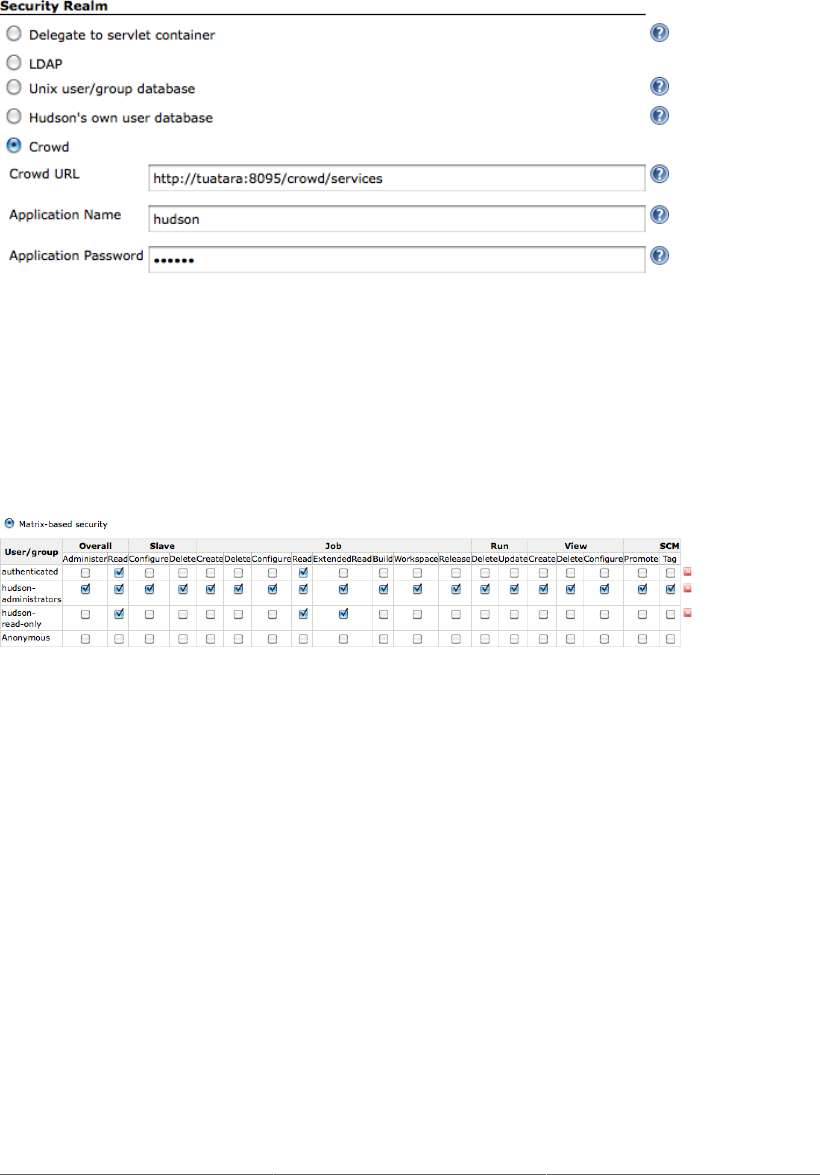
181
Figure 7.13. Using Atlassian Crowd as the Jenkins Security Realm
With this plugin installed and configured, you can use users and groups from Crowd for any of the
Jenkins Authorization strategies we discussed earlier on in the chapter. For example, in Figure 7.14,
“Using Atlassian Crowd groups in Jenkins”, we are using user groups defined in Crowd to set up Matrix-
based security in the main configuration screen.
Figure 7.14. Using Atlassian Crowd groups in Jenkins
7.4.7. Integrating with Other Systems
In addition to the authentication strategies discussed here, there are a number of other plugins that
allow Jenkins to authenticate against other systems. At the time of writing, these include Central
Authentication Service (CAS)—an open source single sign-on tool—and the Collabnet Source Forge
Enterprise Edition (SFEE) server.
If no plugin is available, you can also write your own custom authentication script. To do this, you need to
install the Script Security Realm plugin. Once you have installed the script and restarted Jenkins, you can
write two scripts in your favorite scripting language. One script authenticates users, whereas the other
determines the groups of a given user (see Figure 7.15, “Using custom scripts to handle authentication”).

182
Figure 7.15. Using custom scripts to handle authentication
Before invoking the authentication script, Jenkins sets two environment variables: U, containing the
username, and P, containing the password. This script uses these environment variables to authenticate
using the specified username and password, returning 0 if the authentication is successful, and some
other value otherwise. If authentication fails, the output from the process will be reported in the error
message displayed to the user. Here is a simple Groovy authentication script:
def env = System.getenv()
def username = env['U']
def password = env['P']
println "Authenticating user $username"
if (authenticate(username, password)) {
System.exit 0
} else {
System.exit 1
}
def authenticate(def username, def password) {
def userIsAuthenticated = true
// Authentication logic goes here
return userIsAuthenticated
}
This script is enough if all you have to deal with is basic authentication without groups. If you want to
use groups from your custom authentication source in your Matrix-based or Project-based authorizations

183
(see Section 7.5, “Authorization—Who Can Do What”), you can write a second script, which determines
the groups for a given user. This groups uses the U environment variable to determine which user is
trying to log on, and prints a comma-separated list of groups for this user to the standard output. If you
don’t like commas, you can override the separating character in the configuration. A simple Groovy
script to do this job is shown here:
def env = System.getenv()
def username = env['U']
println findGroupsFor(username)
System.exit 0
def findGroupsFor(def username) {
return "admin,game-of-life-developer"
}
Both these scripts must return 0 when called for a user to be authenticated.
7.5. Authorization—Who Can Do What
Once you have defined how to identify your users, you need to decide what they are allowed to do.
Jenkins supports a variety of strategies in this area, ranging from a simple approach where a logged-in
user can do anything to more involved roles and project-based authentication strategies.
7.5.1. Matrix-based Security
Letting signed-in users do anything is certainly flexible, and may be all you need for a small team. For
larger or multiple teams, or cases where Jenkins is being used outside the development environment, a
more sophisticated approach is generally required.
Matrix-based security is a more sophisticated approach, where different users are assigned different
rights, using a role-based approach.
7.5.1.1. Setting up matrix-based security
The first step in setting up matrix-based security in Jenkins is to create an administrator. This is an
essential step, and must be done before all others. Now your administrator can be an existing user, or
one created specially for the purpose. If you want to create a dedicated administrator user, simply create
one by signing up in the usual way (see Figure 7.2, “The Jenkins Sign up page”). It doesn’t have to be
associated with an SCM user.
Once you have your admin user ready, you can activate matrix-based security by selecting “Matrix-
based security” in the Authorization section of the main configuration page. Jenkins will display a table
containing authorized users, and checkboxes corresponding to the various permissions that you can
assign to these users (see Figure 7.16, “Matrix-based security configuration”).
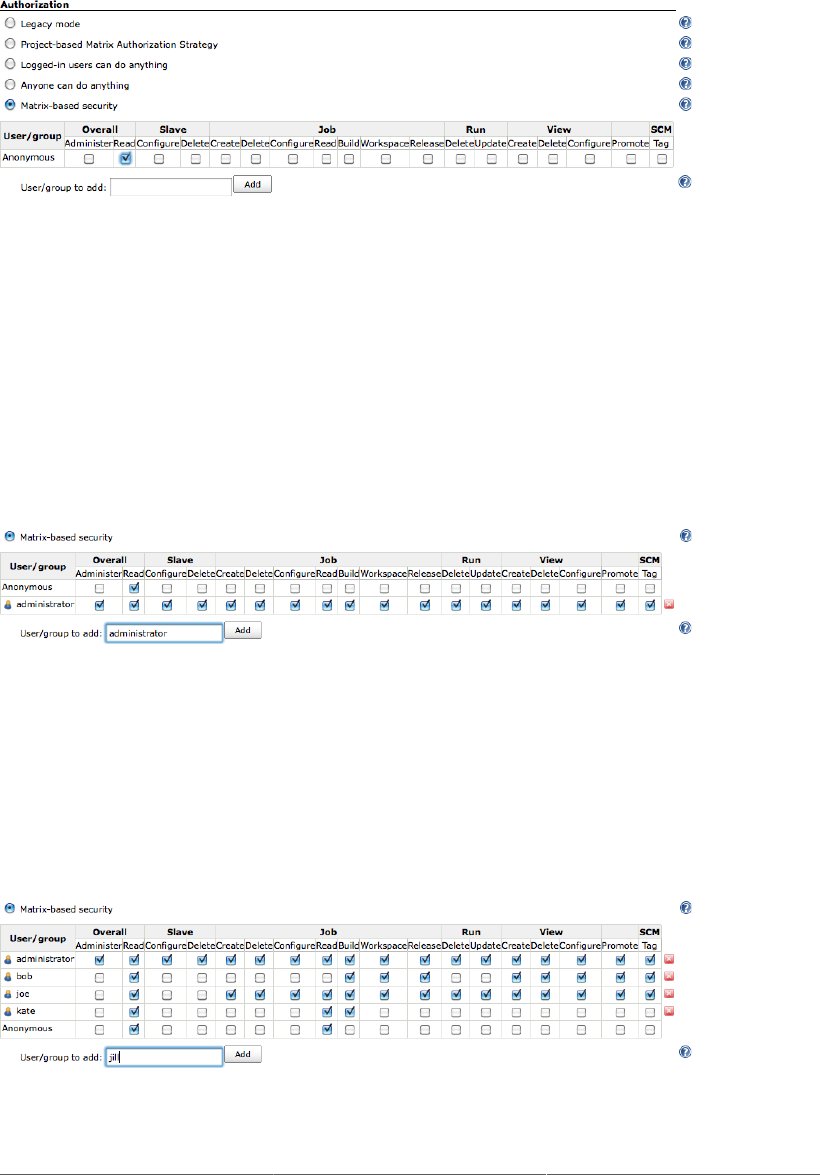
184
Figure 7.16. Matrix-based security configuration
The special “anonymous” user is always present in the table. This user represents unauthenticated users.
Typically, you only grant very limited rights to unauthenticated users, such as read-only access, or no
access at all (as shown in Figure 7.16, “Matrix-based security configuration”).
The first thing you need to do now is to grant administration rights to your administrator. Add your
administration user in the “User/group to add” field and click on Add. Your administrator will now
appear in the permissions matrix. Now make sure you grant this user every permission (see Figure 7.17,
“Setting up an administrator”), and save your configuration. You should now be able to log in with
your administrator account (if you aren’t already logged in with this account) and continue to set up
your other users.
Figure 7.17. Setting up an administrator
7.5.1.2. Fine-tuning user permissions
Once you have set up your administrator account, you can add any other users that need to access your
Jenkins instance. Simply add the user names and tick the permissions you want to grant them (see
Figure 7.18, “Setting up other users”). If you are using an LDAP server or Unix users and groups as
the underlying authentication schema (see Section 7.4.2, “Using an LDAP Repository”), you can also
configure permissions for groups of users.
Figure 7.18. Setting up other users

185
You can grant a range of permissions, which are organized into several groups: Overall, Slave, Job, Run,
View and SCM. Most of the permissions are fairly obvious, but some need a little more explanation.
The individual permissions are as follows:
Overall
This group covers basic system-wide permissions:
Administer
Lets a user make system-wide configuration changes and other sensitive operations, for
example in the main Jenkins configuration pages. This should be reserved for the Jenkins
administrator.
Read
This permission provides read-only access to virtually all of the pages in Jenkins. If you
want anonymous users to be able to view build jobs freely, but not to be able to modify or
start them, grant the Read role to the special “anonymous” user. If not, simply revoke this
permission for the Anonymous user. And if you want all authenticated users to be able to
see build jobs, then add a special user called “authenticated”, and grant this user Overall/
Read permission.
Slave
This group covers permissions about remote build nodes, or slaves:
Configure
Create and configure new build nodes.
Delete
Delete build nodes.
Job This group covers job-related permissions:
Create
Create a new build job.
Delete
Delete an existing build job.
Configure
Update the configuration of an existing build jobs.
Read
View build jobs.
Build
Start a build job.

186
Workspace
View and download the workspace contents for a build job. Remember, the workspace
contains source code and artifacts, so if you want to protect these from general access, you
should revoke this permission.
Release
Start a Maven release for a project configured with the M2Release plugin.
RunThis group covers rights related to particular builds in the build history:
Delete
Delete a build from the build history.
Update
Update the description and other properties of a build in the build history. This can be useful
if a user wants to leave a note about the cause of a build failure, for example.
View
This group covers managing views:
Create
Create a new view.
Delete
Delete an existing view.
Configure
Configure an existing view.
SCM
Permissions related to your version control system:
Tag Create a new tag in the source code repository for a given build.
Others
There can also be other permissions available, depending on the plugins installed. One useful
one is:
Promote
If the Promoted Builds plugin is installed, this permission allows users to manually promote
a build.
7.5.1.3. Help! I’ve locked myself out!
Now it may happen that, during this process, you may end up locking yourself out of Jenkins. This
can happen if, for example, you save the matrix configuration without having correctly set up your
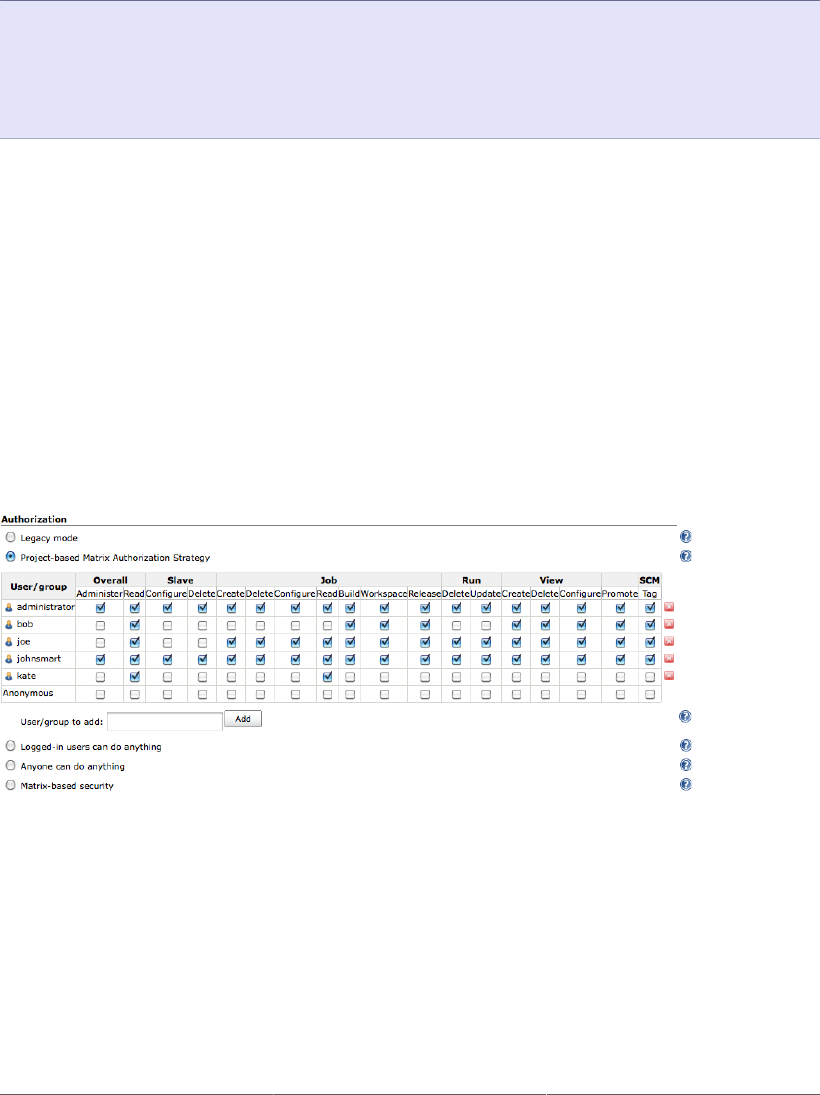
187
administrator. If this happens, do not panic—there is an easy fix, as long as you have access to Jenkins’s
home directory. Simply open up the config.xml file at the root of the Jenkins home directory. This
will contain something like this:
<hudson>
<version>1.391</version>
<numExecutors>2</numExecutors>
<mode>NORMAL</mode>
<useSecurity>true</useSecurity>
...
The thing to look for is the <useSecurity> element. To restore your access to Jenkins, change this
value to false, and restart your server. You will now be able to access Jenkins again, and set up your
security configuration correctly.
7.5.2. Project-based Security
Project-based security lets you build on the matrix-based security model we just discussed, and apply it
to individual projects. Not only can you assign system-wide roles for your users, you can also configure
more specific rights for certain individual projects.
To activate project-level security, select “Project-based Matrix Authorization Strategy” in the
Authorization section of the main configuration screen (see Figure 7.19, “Project-based security”).
Here, you set up the default rights for users and groups, as we saw with Matrix-based security (see
Section 7.5.1, “Matrix-based Security”).
Figure 7.19. Project-based security
These are the default permissions that apply to all projects that have not been specially configured.
However, when you use project-based security, you can also set up special project-specific permissions.
You do this by selecting “Enable project-based security” in the project configuration screen (see
Figure 7.20, “Configuring project-based security”). Jenkins will display a table of project-specific
permissions. You can configure these permissions for different users and groups just like on the system-
wide configuration page. These permissions will be added to the system-wide permissions to produce
a project-specific set of permissions applicable for this project.

188
Figure 7.20. Configuring project-based security
The way this works is easiest to understand with a few practical examples. In Figure 7.19, “Project-based
security”, for instance, no permissions have been granted to the anonymous user, so by default all build
jobs will remain invisible until a user signs on. However, we are using project-based security, so we
can override this on a project-by-project basis. In Figure 7.20, “Configuring project-based security”, for
example, we have set up the game-of-life project to have read-only access for the special “anonymous”
user.
When you save this configuration, unauthenticated users will be able to see the game-of-life project
in read-only mode (see Figure 7.21, “Viewing a project”). This same principle applies with all of the
project-specific permissions.
Figure 7.21. Viewing a project
Note that Jenkins permissions are cumulative—at the time of writing, there is no way to revoke a system-
wide permission for a particular project. For example, if the anonymous user has read-access to build
jobs at the system level, you can’t revoke read-only access for an individual project. So when using
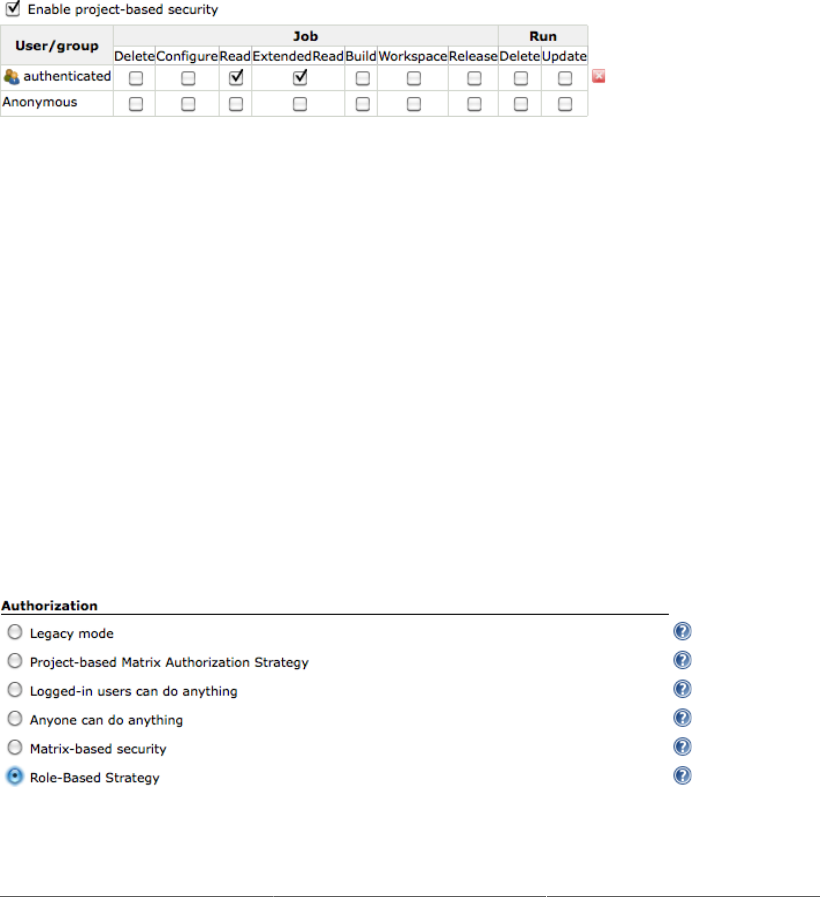
189
project-based security, use the system level matrix to define minimum default permissions applicable
across all of your projects, and set up projects with additional project-specific authorizations.
There are many approaches to managing project permissions, and they depend as much on organizational
culture as on technical considerations. One common strategy approach is to allow team members to have
full access to their own projects, and read-only access to other projects. The Extended Read Permission
plugin is a useful extension to have for this scenario. This plugin lets you let users from other teams see
a read-only view of your project configuration, without being able to modify anything (see Figure 7.22,
“Setting up Extended Read Permissions”). This is a great way to share build configuration practices and
tips with other teams without letting them tamper with your builds.
Figure 7.22. Setting up Extended Read Permissions
It is worth noting that, whenever large and/or multiple teams are involved, the internal Jenkins database
reaches its limits quite quickly, and it is worth considering integrating with a more specialized directory
service such as an LDAP server, Active Directory or Atlassian Crowd, or possibly a more sophisticated
permission system such as role-based security, discussed in the following section.
7.5.3. Role-based Security
Sometimes managing user permissions individually can be cumbersome, and you may not want to
integrate with an LDAP server to set up groups that way. A more recent alternative option is to use
the Role Strategy plugin, which allows you to define global and project-level roles, and assign these
roles to users.
You install the plugin in the usual way, via the Plugin Manager. Once installed, you can activate
this authorization strategy in the main configuration page (see Figure 7.23, “Setting up Role-based
security”).
Figure 7.23. Setting up Role-based security
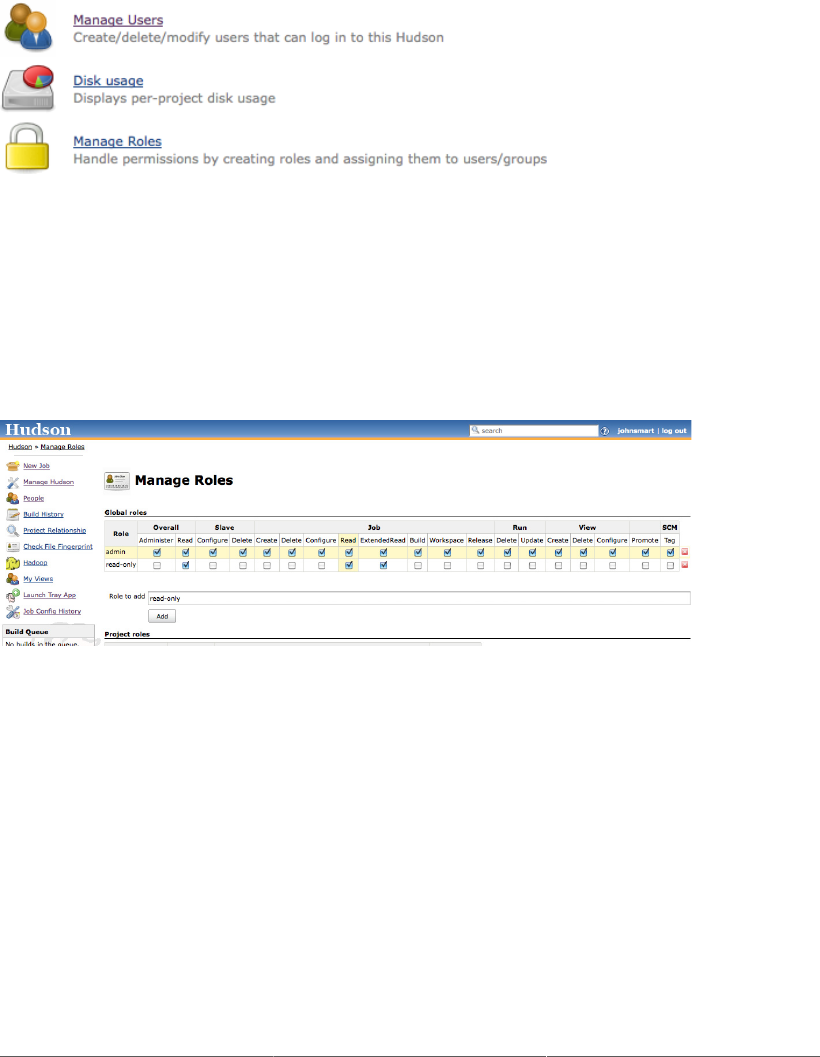
190
Once you have set this up, you can define roles that regroup sets of related permissions. You set up and
configure your roles, and assign these roles to your users, in the Manage Roles screen, which you can
access in the Manage Jenkins screen (see Figure 7.24, “The Manage Roles configuration menu”).
Figure 7.24. The Manage Roles configuration menu
In the Manage Roles screen, you can set up global and project-level permissions. Global permissions
apply across all projects, and are typically system-wide administration or general access permissions
(see Figure 7.25, “Managing global roles”). Setting these roles up is intuitive and similar to setting up
user permissions in the other security models we have seen.
Figure 7.25. Managing global roles
Project roles are slightly more complicated. A project role regroups a set of permissions that are
applicable to one or more (presumably related) projects. You define the relevant projects using a
regular expression, so it helps to have a clear and consistent set of naming conventions in place for
your project names (see Figure 7.26, “Managing project roles”). For example, you may wish to create
roles distinguishing developers with full configuration rights on their own project from users who can
simply trigger a build and view the build results, or create roles where developers can configure certain
automated deployment build jobs, but only production teams are allowed to execute these jobs.
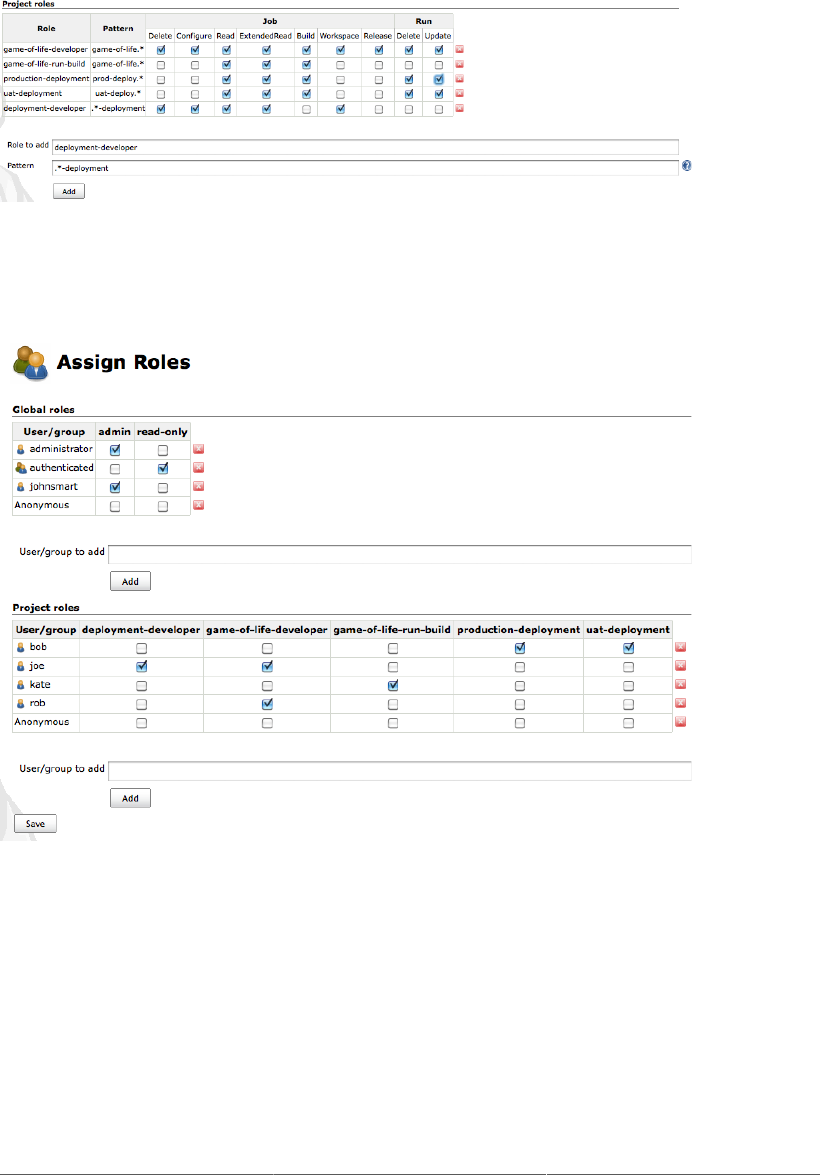
191
Figure 7.26. Managing project roles
Once you have defined these roles, you can go to the Assign Roles screen to set up individual users or
groups with these roles (see Figure 7.27, “Assigning roles to users”).
Figure 7.27. Assigning roles to users
Role-based strategy is relatively new in Jenkins, but it is an excellent way to simplify the task of
managing permissions in large, multiteam and multiproject organizations.
7.6. Auditing—Keeping Track of User Actions
In addition to configuring user accounts and access rights, it can also be useful to keep track of the
individual user actions: in other words, who did what to your server configuration. This sort of audit
trail facility is even required in many organizations.
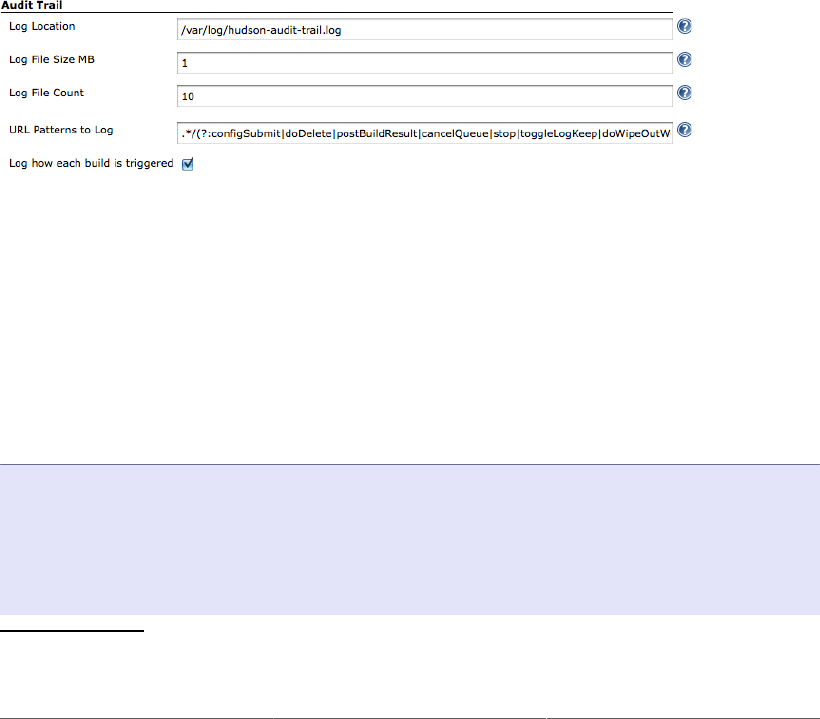
192
There are two Jenkins plugins that can help you do this. The Audit Trail plugin keeps a record of user
changes in a special log file. And the JobConfigHistory plugin lets you keep a copy of previous versions
of the various system and job configuration files that Jenkins uses.
The Audit Trail Plugin keeps track of the main user actions in a set of rolling log files. To set this up,
go to the Plugin Manager page and select the Audit Trail plugin in the list of available plugins. Then,
as usual, click on Install and restart Jenkins once the plugin has been downloaded.
You can set up the audit trail configuration in the Audit Trail section of the main Jenkins configuration
page (see Figure 7.28, “Configuring the Audit Trail plugin”). The most important field is the Log
Location, which is where you indicate the directory in which the log files are to be written. The audit trail
is designed to produce system-style log files, which are often placed in a special system directory such
as /var/log. You can also configure the number of log files to be maintained, and the (approximate)
maximum size of each file. The simplest option is to provide an absolute path (such as /var/log/
hudson.log), in which case Jenkins will write to log files with names like /var/log/hudson.log.1,
/var/log/hudson.log.2, and so forth. Of course, you need to ensure that the user running your
Jenkins instance is allowed to write to this directory.
Figure 7.28. Configuring the Audit Trail plugin
You can also use the format defined in the Java logging FileHandler1 class for more control over the
generated log files. In this format, you can insert variables such as %h, for the current user’s home
directory, and %t, for the system temporary directory, to build a more dynamic file path.
By default, the details recorded in the audit logs are fairly sparse—they effectively record key actions
performed, such as creating, modifying or deleting job configurations or views, and the user who
performed the actions. The log also shows how individual build jobs started. An extract of the default
log is shown here:
Dec 27, 2010 9:16:08 AM /job/game-of-life/configSubmit by johnsmart
Dec 27, 2010 9:16:42 AM /view/All/createItem by johnsmart
Dec 27, 2010 9:16:57 AM /job/game-of-life-prod-deployment/doDelete by johnsmart
Dec 27, 2010 9:24:38 AM job/game-of-life/ #177 Started by user johnsmart
Dec 27, 2010 9:25:57 AM job/game-of-life-acceptance-tests/ #107 Started by upstream
project "game-of-life" build number 177
Dec 27, 2010 9:25:58 AM job/game-of-life-functional-tests/ #7 Started by upstream
1 http://download.oracle.com/javase/1.5.0/docs/api/java/util/logging/FileHandler.html

193
project "game-of-life" build number 177
Dec 27, 2010 9:28:15 AM /configSubmit by johnsmart
This audit trail is certainly useful, especially from a system administration perspective. However, it
doesn’t provide any information about the exact changes that were made to the Jenkins configuration.
Nevertheless, one of the most important reasons to keep track of user actions in Jenkins is to keep tabs
on exactly what changes were made to build job configurations. When something goes wrong, it can
be useful to know what changes were done and so be able to undo them. The JobConfigHistory plugin
lets you do just this.
The JobConfigHistory plugin is a powerful tool that lets you keep a full history of changes made to
both job and system configuration files. You install it from the Plugin Manager in the usual way. Once
installed, you can fine-tune the job history configuration in the Manage Jenkins screen (see Figure 7.29,
“Setting up Job Configuration History”).
Figure 7.29. Setting up Job Configuration History
Here, you can configure a number of useful nonstandard options. In particular, you should specify
a directory where Jenkins can store configuration history, in the “Root history folder” field. This is
the directory where Jenkins will store a record of both system-related and job-related configuration
changes. It can be either an absolute directory (such as /var/hudson/history), or a relative directory,
calculated from the Jenkins home directory (see Section 3.4, “The Jenkins Home Directory”). If you
don’t do this, job configuration history will be stored with the jobs, and will be lost if you delete a job.
There are a few other useful options in the Advanced section. The “Save system configuration changes”
checkbox lets you keep track of system-wide configuration updates, and not just job-specific ones. And
the “Do not save duplicate history” checkbox allows you to avoid recording configuration updates if no
actual changes have been made. If not, a new version of the configuration will be recorded, even if you
have only pressed the Save button without making any changes. Jenkins can also cause this to happen
internally—for example, system configuration settings are all saved whenever the main configuration
page is saved, even if no changes have been made.
Once you have set up this plugin, you can access the configuration history both for the whole server,
including system configuration updates, as well as the changes made to the configuration of each project.
In both cases, you can view these changes by clicking on the Job Config History icon to the right of the
screen. Clicking on this icon from the Jenkins dashboard will display a view of all of your configuration
history, including job changes and system-wide changes (see Figure 7.30, “Viewing Job Configuration
History”).
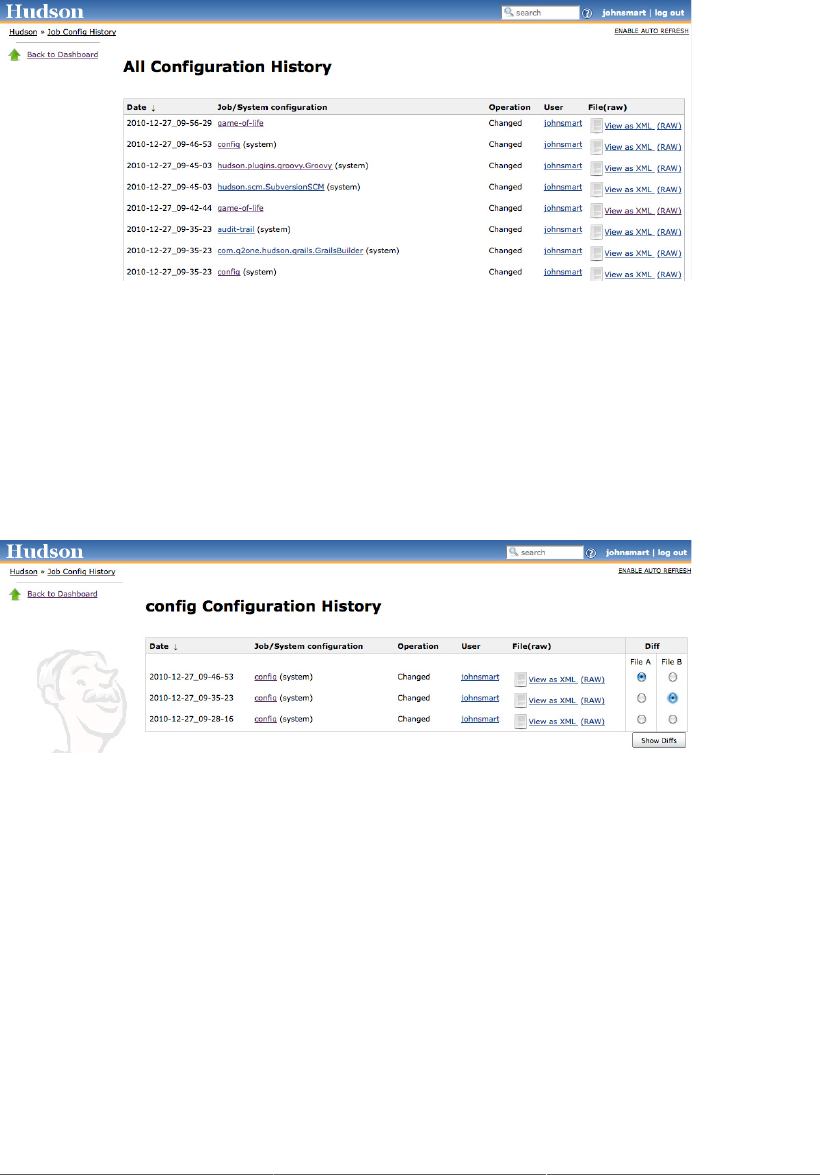
194
Figure 7.30. Viewing Job Configuration History
If you click on a system-wide change (indicated by the “(system)” suffix in the list), Jenkins takes you
to a screen that lists all of the versions of that file, and allows you to view the differences between
the different versions (see Figure 7.31, “Viewing differences in Job Configuration History”). The
differences are displayed as diff files, which is not particularly readable in itself. However, for small
changes, the readable XML format of most of the Jenkins configuration files makes this sufficient to
understand what changes were made.
Figure 7.31. Viewing differences in Job Configuration History
The JobConfigHistory plugin is a powerful tool. However, at the time of writing, it does have its limits.
As mentioned, the plugin only displays the differences in raw diff format, and you can’t restore a
previous version of a configuration file (those doing this out of context could be dangerous in some
circumstances, particularly for system-wide configuration files). Nevertheless, it gives a very clear
picture of the changes that have been made, both to your build jobs and to your system configuration.
7.7. Conclusion
In this chapter we have looked at a variety of ways to configure security in Jenkins. The Jenkins security
model, with the two orthogonal concepts of Authentication and Authorization, is flexible and extensible.
For a Jenkins installation of any size, you should try to integrate your Jenkins security strategy with the

195
organization as a whole. This can go from simply integrating with your local LDAP repository to setting
up or using a full-blown SSO solution such as Crown or CAS. In either case, it will make the system
considerably easier to administrate in the long run.
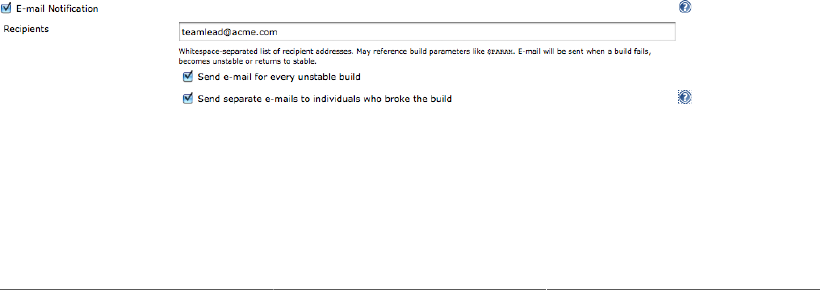
Chapter 8. Notification
8.1. Introduction
While it is important to get your build server building your software, it is even more important to get
your build server to let people know when it can’t do so. A crucial part of the value proposition of
any Continuous Integration environment is to improve the flow of information about the health of your
project, be it failing unit tests or regressions in the integration test suite, or other quality related issues
such as a drop in code coverage or code quality metrics. In all cases, a CI server must let the right people
know about any new issues, and it must be able to do so fast. This is what we call Notification.
There are two main classes of notification strategies, which I call passive and active (or pull/push).
Passive notification (pull) requires the developers to consciously consult the latest build status, and
includes RSS feeds, build radiators, and (to a certain extent) emails. Active notification (push) will pro-
actively alert the developers when a build fails, and includes methods such as desktop notifiers, chat,
and SMS. Both approaches have their good and bad points. Passive notification strategies such as build
radiators can raise general awareness about failed builds, and help install a team culture where fixing
broken builds takes a high priority. More direct forms of notification can actively encourage developers
to take matters into their own hands and fix broken builds more quickly.
8.2. Email Notification
Email notification is the most obvious and most common form of CI notification. Email is well-known,
ubiquitous, easy to use and easy to configure (see Section 4.8, “Configuring the Mail Server”). So,
when teams set up their first Continuous Integration environment, it is usually the most common initial
notification strategy they try.
You activate email notification in Jenkins by ticking the E-mail Notification checkbox and providing
the list of email addresses of the people who need to be notified (see Figure 8.1, “Configuring email
notification”). By default, Jenkins will send an email for every failed or unstable build. Remember, it
will also send a new email for the first successful build after a series of failed or unstable builds, to
indicate that the issue has been fixed.
Figure 8.1. Configuring email notification
Normally a build should not take too many tries to get working again—developers should diagnose and
reproduce the issue locally, fix it locally, and only then commit their fix to version control. Repeated

198
build failures usually indicate either a chronic configuration issue or poor developer practices (for
example, developers committing changes without checking that it works locally first).
You can also opt to send a separate email to any developers who have committed changes to the broken
build. This is generally a good idea, as developers who have committed changes since the last build are
naturally the people who should be the most interested in the build results. Jenkins will get the email
address of the user from the currently-configured security realm (see Section 7.4, “Security Realms—
Identifying Jenkins Users”), or by deriving the email address from the SCM username if you have set
this up (see Section 4.8, “Configuring the Mail Server”).
If you use this option, it may be less useful to include the entire team in the main distribution list. You
may want to simply include people who will be interested in monitoring the result of every build (such
as technical leads), and let Jenkins inform contributing developers directly.
This assumes of course that the changes caused the build failure, which is generally (but not always)
the case. However, if the builds are infrequent (for example, nightly builds, or if a build is queued for
several hours before finally kicking off), many changes may have been committed, and it is hard to
know which one was actually responsible for the build failure.
Not all builds are alike when it comes to email notification. Developers committing changes are
particularly interested in the results of the unit and integration test builds (especially those triggered by
their own changes), whereas BAs and testers might be more interested in keeping tabs on the status of the
automated acceptance tests. So the exact email notification setup for each build job will be different. In
fact, it is useful to define an email notification strategy. A sample of such an email notification strategy
is outlined here:
• Fast builds (unit/integration tests, runs in less than 5 minutes): notification is sent to the team lead
and to developers having committed changes.
• Slow builds (acceptance tests builds, run after the fast builds): notification is sent to team lead,
testers and developers having committed changes.
• Nightly builds (QA metrics, performance tests and so on; only run if the other builds work): all
team members—these provide a snapshot picture of project health before the daily status meeting.
Indeed, you should consider what notification strategy is appropriate for each build job on a case-by-
case basis, rather than applying a blanket policy for all build jobs.
8.3. More Advanced Email Notification
By default, Jenkins email notification is a rather blunt tool. Notification messages are always sent to
basically the same group of people. You cannot send messages to different people depending on what
went wrong, or implement any sort of escalation policy. It would be useful, for example, to be able to
notify the developers who committed changes the first time a build breaks, and send a different message
to the team lead or the entire team if the build breaks a second time
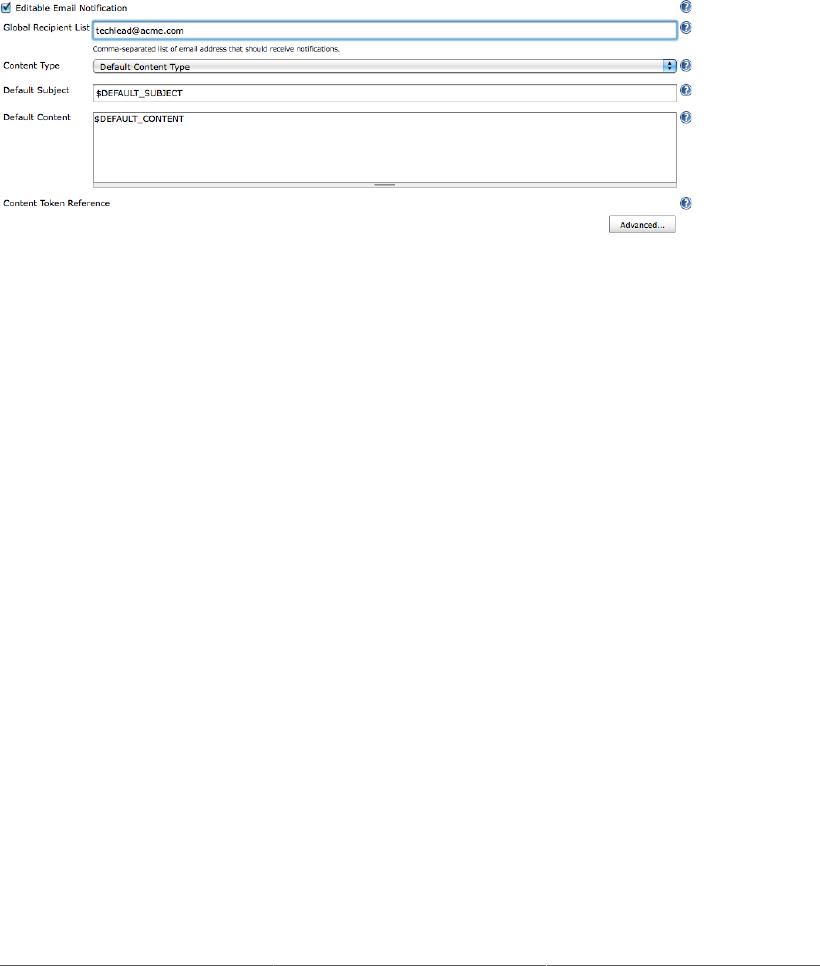
199
The Email-ext plugin lets you define a more refined email notification strategy. This plugin adds an
Editable Email Notification checkbox (see Figure 8.2, “Configuring advanced email notification”),
which effectively replaces the standard Jenkins email notification. Here, you can define a default
recipient list and fine-tune the contents of the email message, and also define a more precise notification
strategy with different messages and recipient lists for different events. Note that once you have installed
and configured this plugin for your build job, you can deactivate the normal E-mail Notification
configuration.
Figure 8.2. Configuring advanced email notification
This plugin has two related but distinct functionalities. Firstly, it lets you customize the email notification
message. You can choose from a large number of predefined tokens to create your own customized
message title and body. You include a token in your message template using the familiar dollar
notation (e.g., ${BUILD_NUMBER} or $BUILD_NUMBER). Some of the tokens accept parameters, which
you can specify using a name=value format (e.g., ${BUILD_LOG, maxLines=100} or ${ENV,
var="PATH"}). Among the more useful tokens are:
${DEFAULT_SUBJECT}
The default email subject configured in the Jenkins system configuration page
${DEFAULT_CONTENT}
The default email content configured in the Jenkins system configuration page
${PROJECT_NAME}
The project’s name
${BUILD_NUMBER}
Current build number
${BUILD_STATUS}
Current build status (failing, success, etc.)
${CAUSE}
The cause of the build

200
${BUILD_URL}
A link to the corresponding build job page on Jenkins
${FAILED_TESTS}
Shows information about failing unit tests, if any have failed
${CHANGES}
Displays the changes made since the last build
${CHANGES_SINCE_LAST_SUCCESS}
All the changes made since the last successful build
You can get a full list of the available tokens, and the options for those that accept parameters, by clicking
on the Help icon opposite the Context Token Reference label.
The Advanced button lets you define a more sophisticated notification strategy, based on the concept
of triggers (see Figure 8.3, “Configuring email notification triggers”). Triggers determine when email
notification messages should be sent out. The supported triggers include the following:
Failure
Any time the build fails.
Still Failing
Any successive build failures.
Unstable
Any time a build is unstable.
Still Unstable
Any successive unstable builds.
Success
Any successful build.
Fixed
When the build changes from Failure or Unstable to Successful.
Before Build
Sent before every build begins.
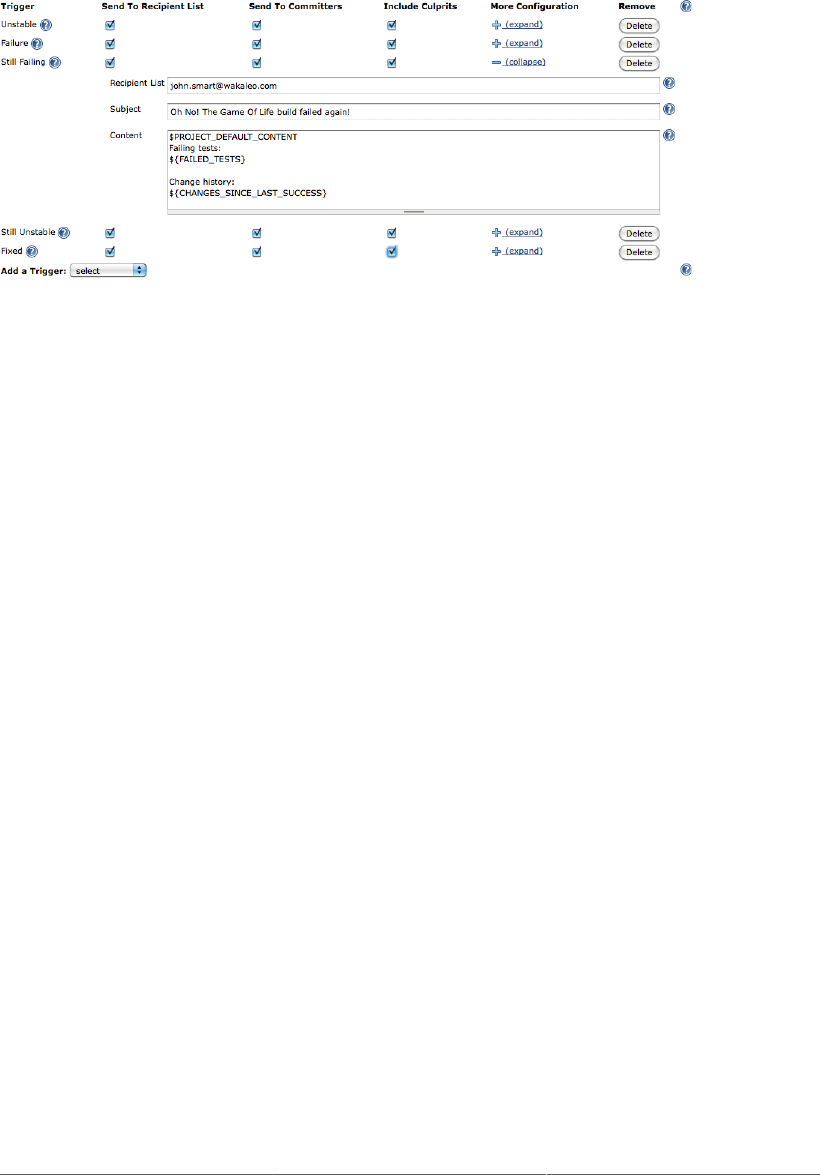
201
Figure 8.3. Configuring email notification triggers
You can set up as many (or as few) triggers as you like. The recipients list and message template can
be customized for each trigger—for example, by using the Still Failing and Still Unstable triggers, you
can set up a notification strategy that only notifies developer having committed changes the first time a
build job fails, but proceeds to notify the team leader if it fails a second time. You can choose to send
the message only to the developers who have committed to this build (“Send to committers”), or to also
include everyone who has committed since the last successful build. This helps ensures that everyone
who may be involved in causing the build to break will be notified appropriately.
You can also customize the content of the message by clicking on the More Configuration option (as
shown for the Still Failing trigger in Figure 8.3, “Configuring email notification triggers”). This way,
you can customize different messages to be sent for different occasions.
The triggers interact intelligently. So if you configure both the Failing and the Still Failing triggers, only
the Still Failing trigger will be activated on the second build failure.
An example of such a customized message is illustrated in Figure 8.4, “Customized notification
message”.
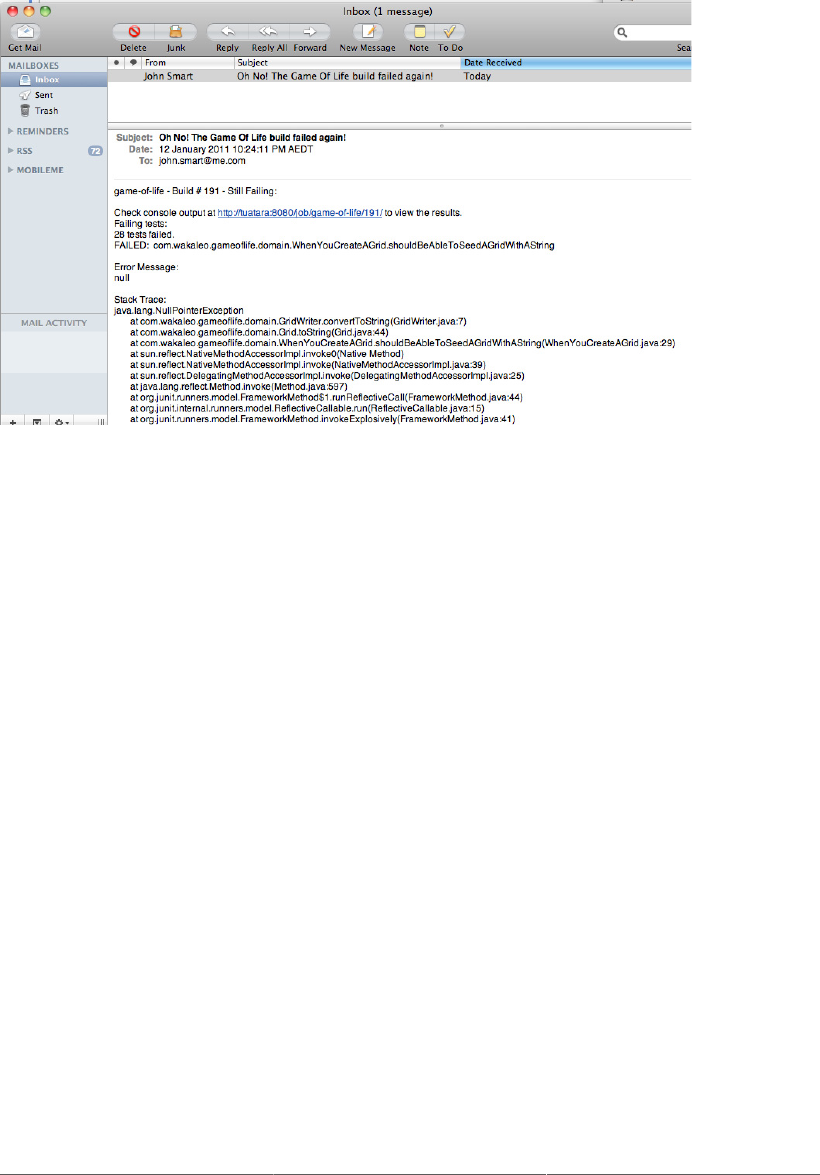
202
Figure 8.4. Customized notification message
Overall, however, as a notification strategy, email is not without its faults. Some developers shut down
their email clients at times to avoid being interrupted. In large organizations, the number of email
messages arriving each day can be considerable, and build failure notifications can be hidden among a
host of other less important messages. So build failures may not always get the high-priority attention
they require in a finely-tuned CI environment. In the following sections, we will look at some other
notification strategies that can be used to raise team awareness of failed builds and encourage developers
to get them fixed faster.
8.4. Claiming Builds
When a build does fail, it can be useful to know that someone has spotted the issue and is working on it.
This avoids having more than one developer waste time by trying to fix the same problem separately.
The Claim plugin lets developers indicate that they have taken ownership of the broken build, and are
attempting to fix it. You can install this plugin in the usual way. Once installed, developers can claim a
failed build as their own, and optionally add a comment to explain the suspected cause of the build and
what the developer intends to do about it. The claimed build will then be marked as such in the build
history, so that fellow developers can avoid wasting time with unnecessary investigation.
To activate claiming for a build job, you need to tick the “Allow broken build claiming” option in the
build job configuration page. From this point on, you will be able to claim a broken build in the build
details page (see Figure 8.5, “Claiming a failed build”). Claimed builds will display an icon in the build
history indicating that they have been claimed. You can also make a build claim “sticky,” so that all
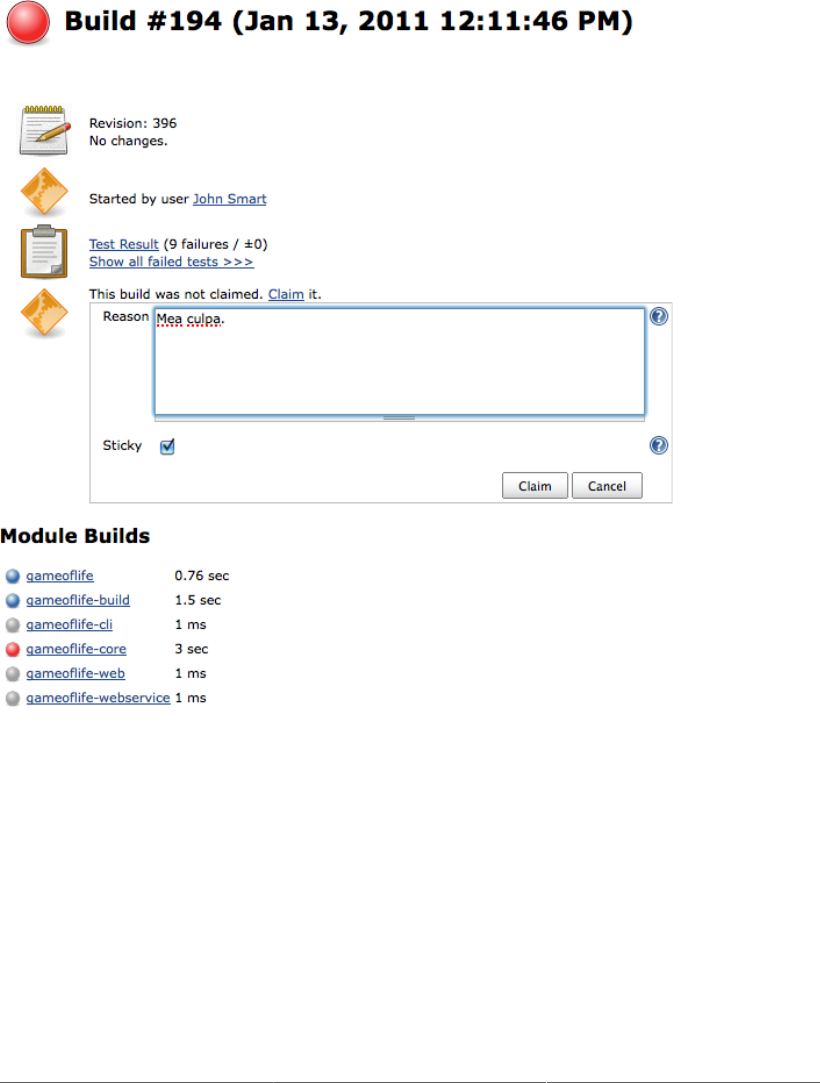
203
subsequent build failures for this job will also be automatically claimed by this developer, until the issue
is resolved.
Figure 8.5. Claiming a failed build
8.5. RSS Feeds
Jenkins also provides convenient RSS feeds for its build results, both for overall build results across all
of your builds (or just the builds on a particular view), or build results for a specific build. RSS Feed
icons are available at the bottom of build dashboards (see Figure 8.6, “RSS Feeds in Jenkins”) and at
the bottom of the build history panel in the individual build jobs, giving you access to either all of the
build results, or just the failing builds.
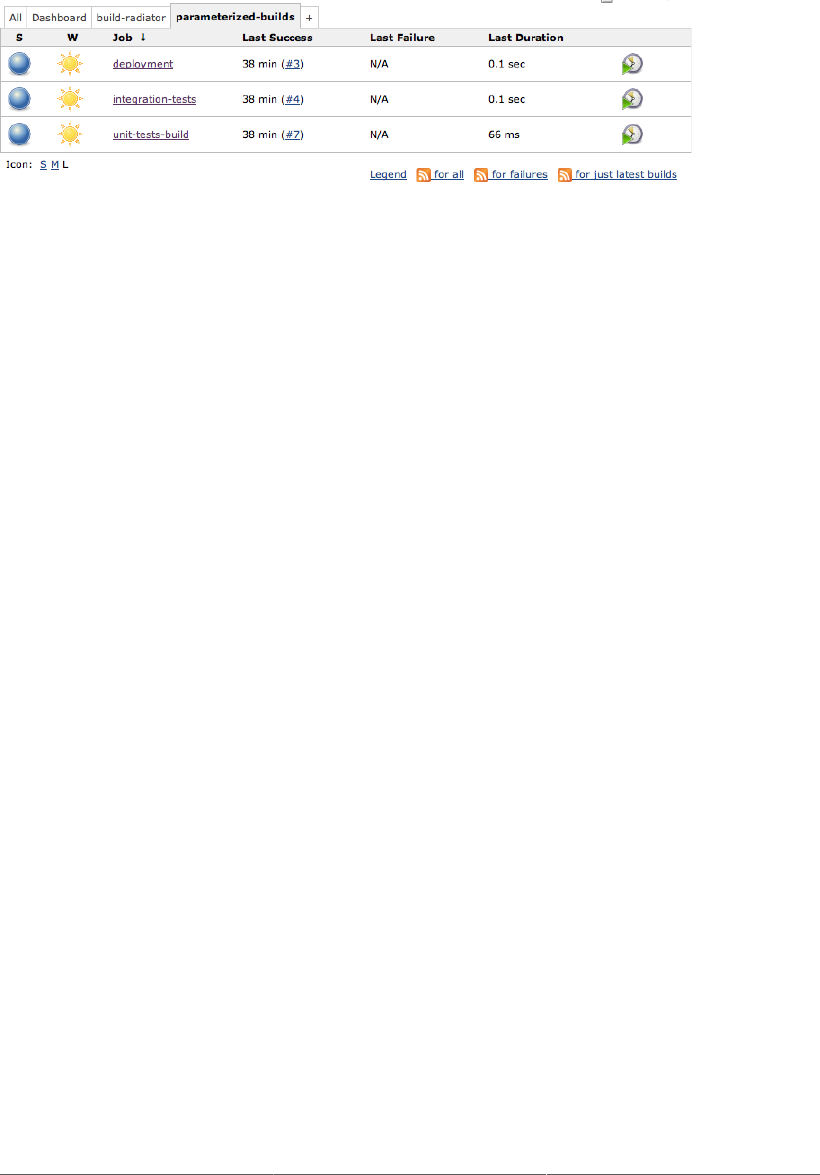
204
Figure 8.6. RSS Feeds in Jenkins
The URLs for RSS feeds are simple, and work for any Jenkins page displaying a set of build results. You
just need to append /rssAll to get an RSS feed of all of the build results on a page, or /rssFailed
to only get the failing builds. And /rssLatest will provide you with a feed containing only the latest
build results. But the simplest way to obtain the URL is just to click on the RSS icon in the corresponding
Jenkins screen.
There are an abundance of RSS readers out there, both commercial and open source, available for
virtually every platform and device, so this can be a great choice to keep tabs on build results. Many
common browsers (Firefox in particular) and email clients also support RSS feeds. Some readers have
trouble with authentication, however, so if your Jenkins instance is secured, you may need to do a little
extra configuration to see your build results.
RSS feeds can be a great information source on overall build results, and let you see the state of your
builds at a glance without having to connect to the server. Nevertheless, most RSS Readers are by nature
passive devices—you can consult the state of your builds, but the RSS reader will usually not be able
to prompt you if a new build failure occurs.
8.6. Build Radiators
The concept of information radiators is commonly used in Agile circles. According to Agile guru Alistair
Cockburn:
An Information radiator is a display posted in a place where people can see it as they
work or walk by. It shows readers information they care about without having to ask
anyone a question. This means more communication with fewer interruptions.
In the context of a CI server, an information radiator is a prominent device or display that allows team
members and others to easily see if any builds are currently broken. It typically shows either a summary
of all the current build results, or just the failing ones, and is displayed on a large, prominently located
wall-mounted flat screen. This sort of specialized information radiator is often known as a build radiator.
When used well, build radiators are among the most effective of the passive notification strategies. They
are very effective at ensuring that everyone is aware of failing builds. In addition, unlike some of the
Extreme Feedback Devices that we discuss later on in this chapter, a build radiator can cater for many
build jobs, including many failing build jobs, and so can still be effectively used in a multiteam context.
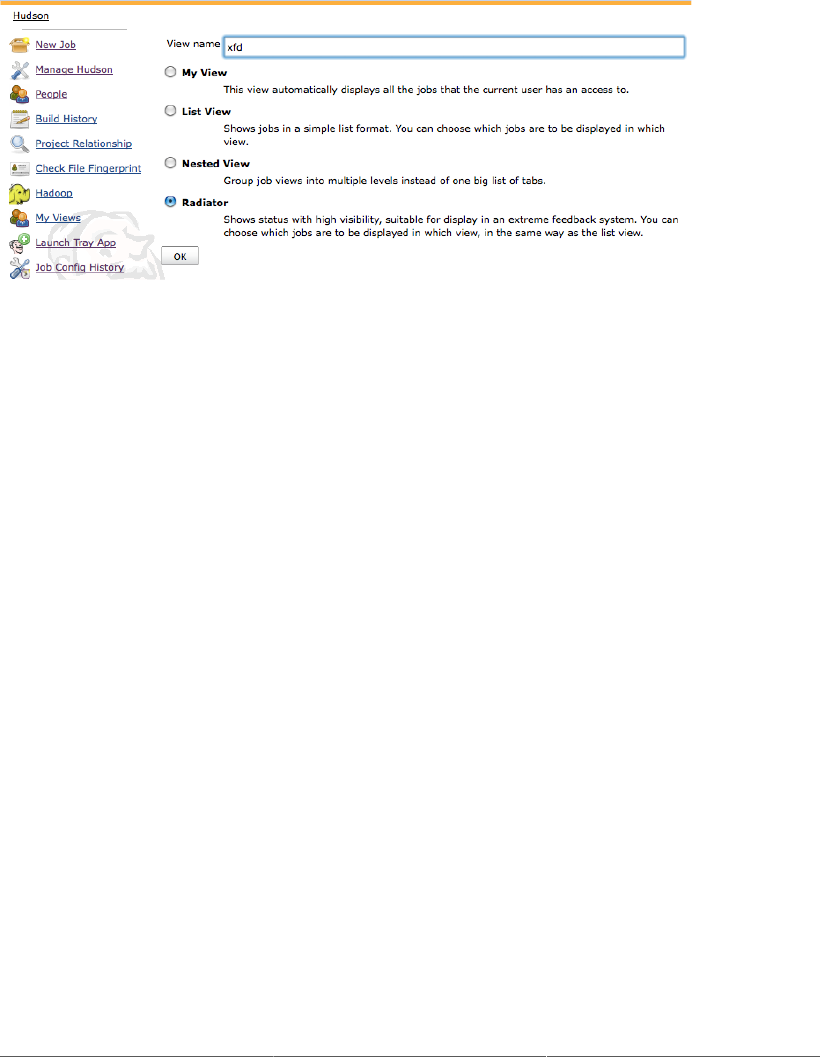
205
There are several build radiator solutions for Jenkins. One of the easiest to use is the Jenkins Radiator
View plugin. This plugin adds a new type of job that you can create: the (see Figure 8.7, “Creating a
build radiator view”).
Figure 8.7. Creating a build radiator view
Configuring the build radiator view is similar to configuring the more conventional list views—you just
specify the build jobs you want included in the view, either by choosing them individually or by using
a regular expression.
Since the build radiator view takes up the entire screen, modifying or deleting a build radiator is a bit
tricky. In fact, the only way to open the view configuration screen is to append /configure to the view
URL: so if your build radiator is called “build-radiator,” you can edit the view configuration by opening
http://my.hudson.server/view/build-radiator/configure.
The build radiator view (see Figure 8.8, “Displaying a build radiator view”) displays a large red or
yellow box for each failing or unstable build, with the build job name in prominent letters, as well as
some other details. You can configure the build radiator view to display passing builds as well as failing
ones (they will be displayed in small green boxes). However a good build radiator should really only
display the failing builds, unless all the builds are passing.
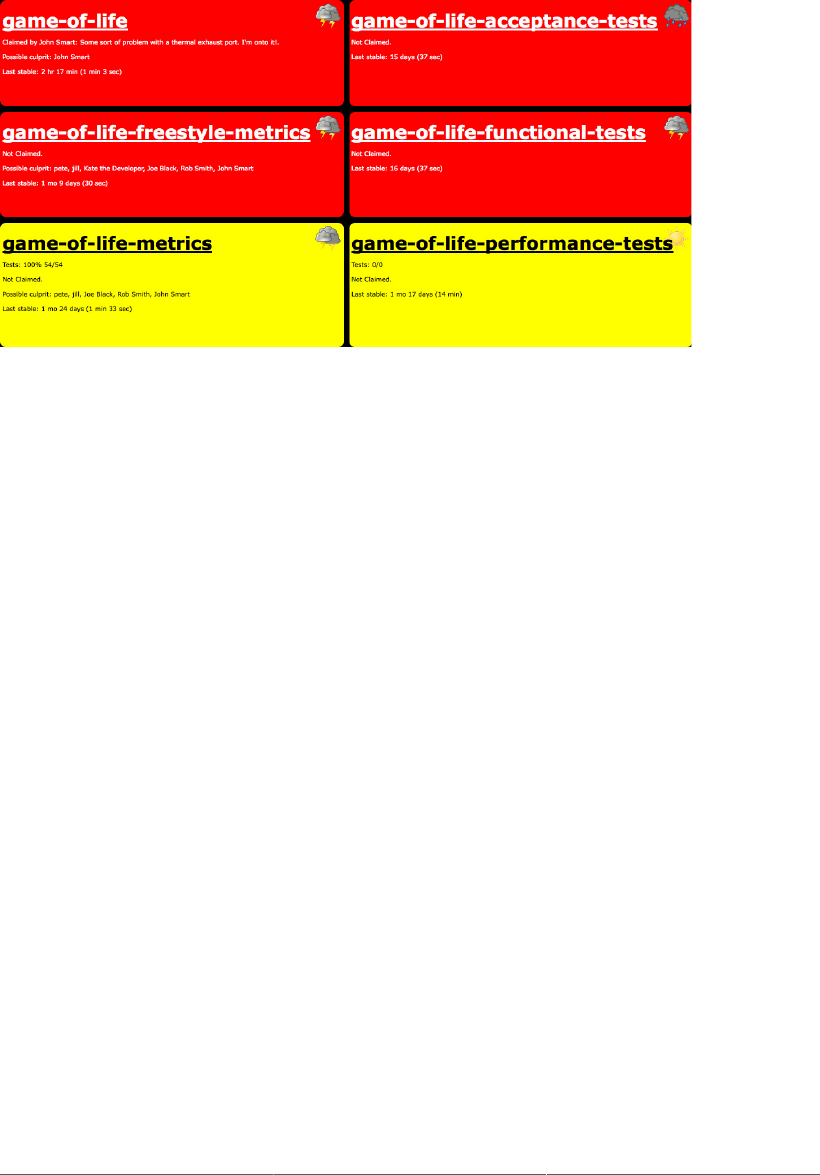
206
Figure 8.8. Displaying a build radiator view
8.7. Instant Messaging
Instant Messaging (or IM) is widely used today as a fast, lightweight medium for both professional and
personal communication. Instant messaging is, well, instant, which gives it an edge over email when
it comes to fast notification. It is also “push” rather than “pull”—when you receive a message, it will
pop up on your screen and demand your attention. This makes it a little harder to ignore or put off than
a simple email message.
Jenkins provides good support for notification via Instant Messaging. The Instant Messaging plugin
provides generic support for communicating with Jenkins using IM. Protocol-specific plugins can then
be added for the various IM protocols such as Jabber and IRC.
8.7.1. IM Notification with Jabber
Many instant messaging servers today are based on Jabber, an open source, XML-based instant
messaging protocol. Jenkins provides good support for Jabber instant messaging, so that developers can
receive real-time notification of build failures. In addition, the plugin runs an IM bot that listens to the
chat channels and lets developers run commands on the Jenkins server via chat messages.
Setting up IM support in Jenkins is straightforward. First, you need to install both the Jenkins instant-
messaging plugin and the Jenkins Jabber notifier plugin using the standard plugin manager page and
restart Jenkins (see Figure 8.9, “Installing the Jenkins IM plugins”).
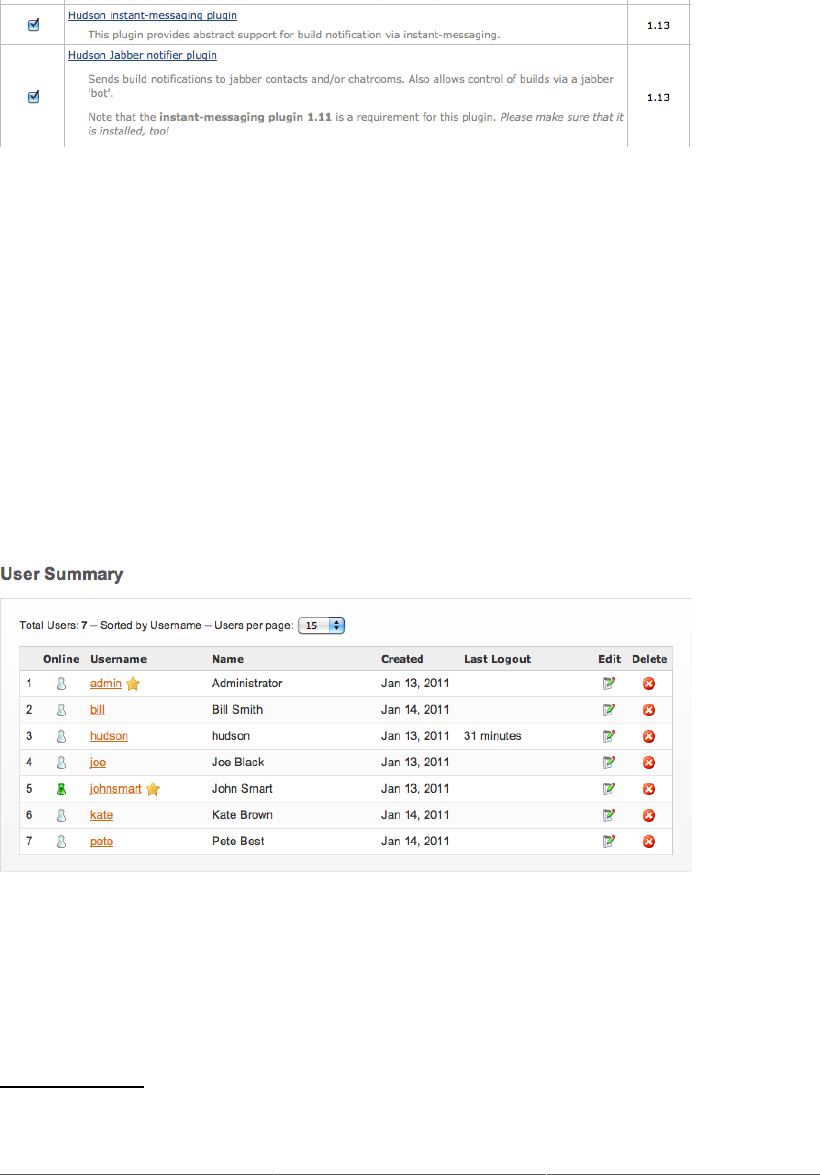
207
Figure 8.9. Installing the Jenkins IM plugins
Once this is done, you need to configure your Instant Messaging server. Any Jabber server will do.
You can use a public service like Google Chat, or set up your own internal messaging server locally
(the Java-based open source chat server OpenFire1 is a good choice). Using a public service for
internal communications may be frowned upon by system administrators, and you may have difficulty
getting through corporate fire walls. Setting up your own internal chat service, on the other hand,
makes great sense for a development team or organization in general, as it provides another channel of
communication that works well for technical questions or comments between developers. The following
examples will be using a local OpenFire server, but the general approach will work for any Jabber-
compatible server.
The first step involves creating a dedicated account on your Jabber server for Jenkins. This is just an
ordinary chat account, but it needs to be distinct from your developer accounts (see Figure 8.10, “Jenkins
needs its own dedicated IM user account”).
Figure 8.10. Jenkins needs its own dedicated IM user account
Once you have set up an IM account, you need to configure Jenkins to send IM notifications via this
account. Go to the main configuration page and tick the Enable Jabber Notification checkbox (see
Figure 8.11, “Setting up basic Jabber notification in Jenkins”). Here, you provide the Jabber ID and
password for your IM account. Jenkins can usually figure out the IM server from the Jabber ID (if it is
different, you can override this in the Advanced options). If you are using group chat rooms (another
1 http://www.igniterealtime.org/projects/openfire/index.jsp
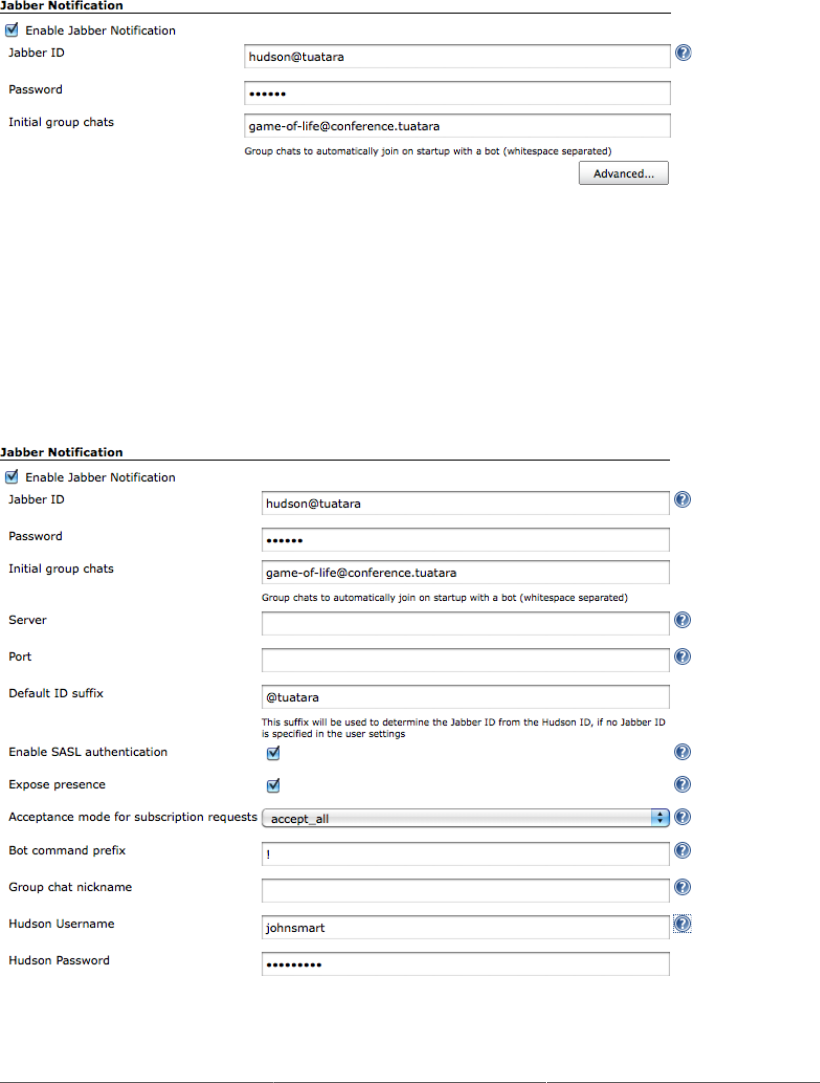
208
useful communication strategy for development teams), you can provide the name of these chat rooms
here too. This way, Jenkins will be able to process instructions posted into the chat rooms as well as
those received as direct messages.
Figure 8.11. Setting up basic Jabber notification in Jenkins
This is all you need for a basic setup. However, you may need to provide some extra details in the
Advanced sector for details that are specific to your installation (see Figure 8.12, “Advanced Jabber
configuration”). Here, you can specify the name and port of your Jabber server, if these cannot be derived
from the Jenkins Jabber ID. You can also provide a default suffix that can be applied to Jenkins user IDs
to generate the corresponding Jabber IDs. Most importantly, if you have secured your Jenkins server,
you will need to provide a proper Jenkins username and password so that the IM bot can respond to
instructions correctly.
Figure 8.12. Advanced Jabber configuration

209
Once this is configured, you need to set up a Jabber notification strategy for each of your build jobs.
Open the build job configuration page and click on the Jabber Notification option.
First of all, you define a recipient list for the messages. You can send messages to individuals (just
use the corresponding Jabber ID, such as joe@jabber.acme.com) or to chat rooms that you have
set up. For chat rooms, you normally need to add a “*” to the start of the chat room ID (e.g.,
“*gameoflife@conference.jabber.acme.org”). However, if the chat room ID contains “@conference.”,
Jenkins will work out that it is a chat room and append the “*” automatically. The chat room approach
is more flexible, though you do have to trust developers to be connected permanently to the chat room
for this strategy to be truly effective.
You also need to define a notification strategy. This determines which build results will cause a message
to be sent out. Options include:
all Send a notification for every build.
failure
Only send notifications for failed or unstable builds.
failure and fixed
Send notifications for every failed or unstable builds, and the first successful build following a
failed or unstable one.
change
Send notification whenever the build outcome changes.
If you are using chat rooms, you can also ask Jenkins to send notifications to the chat rooms whenever
a build starts (using the “Notify on build starts” option).
For SCM-triggered builds, Jenkins can also notify additional recipients, using the default suffix
discussed earlier to build the Jabber ID from the SCM username. You can opt to notify:
SCM committers
All users having committed changes for the current build, and therefore suspected of breaking
the build.
SCM culprits
SCM committers of all builds since the last successful one.
SCM fixers
Commiters to the first successful build after a failed or unstable one.
Upstream committers
Also notifiers committers to upstream builds as well as the current one. This works automatically
for Maven build jobs, but needs fingerprinting to be activated for other build types.
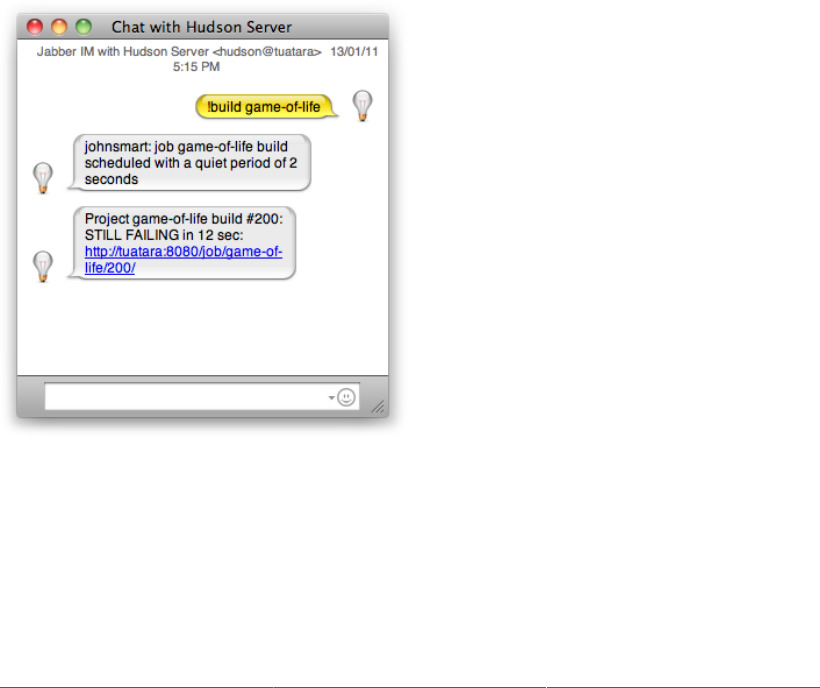
210
At the time of writing, you can only have one notification strategy, so some of the advanced options we
saw in Section 8.3, “More Advanced Email Notification” are not yet possible with IM.
Developers will be notified via their favorite IM client (see Figure 8.13, “Jenkins Jabber messages in
action”). Developers can also interact with the build server via the chat session, using a set of simple
commands. Some examples of a few of the more useful commands are shown here:
•!build game-of-life—Start the game-of-life build immediately.
•!build game-of-life 15m—Start the game-of-life build in 15 minutes.
•!comment game-of-life 207 'oops'—Add a build description to a given build.
•!status game-of-life—display the status of the latest build for this build job.
•!testresult game-of-life—display the full test results for the latest build.
•!health game-of-life—display a more complete summary of the health status of the latest
build.
You can get a full list of commands by sending the !help message to the Jenkins user.
Figure 8.13. Jenkins Jabber messages in action
8.7.2. IM Notification using IRC
Another popular form of Internet-based Instant Messaging is Internet Relay Chat, or IRC. IRC is
traditionally focused on group discussions (though direct messaging is also supported), and is a very
popular form of communication for developers, particularly in the Open Source world.
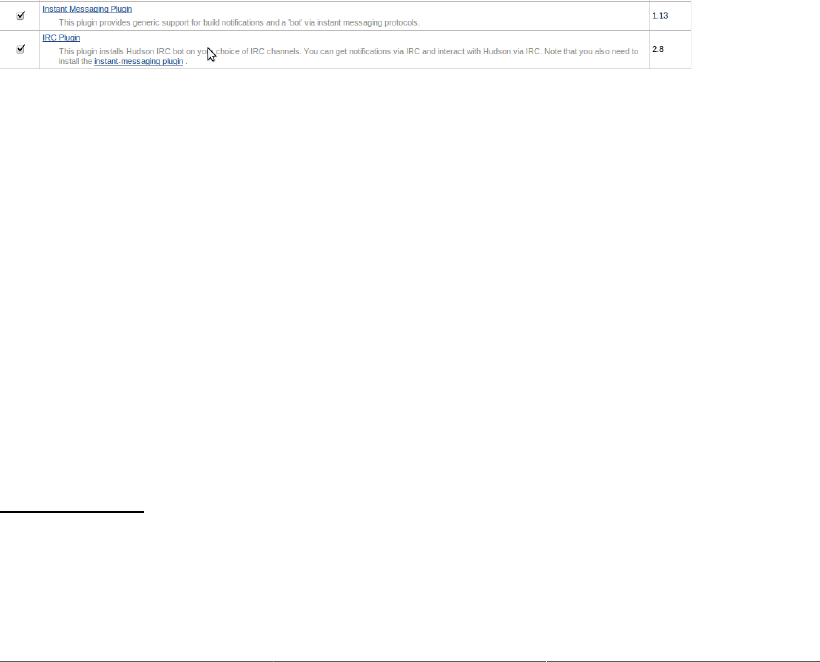
211
The Jenkins IRC plugin lets you interact with your Jenkins server via an IRC channel, both to receive
notification messages and to issue commands to the server. Like the Jabber plugin, you also need to
install the Instant Messaging plugin for this to work.
8.8. IRC Notification
Contributed by Juven Xu
Internet Relay Chat (or IRC) is a popular form of instant messaging, primarily designed for group
communication in channels. For example, Jenkins has a channel set up on Freenode2 so users and
developers can discuss Jenkins related topics. You will see many users ask questions and most of the
time more experienced users will be prompt in providing useful answers.
Just like instant messaging through Jabber, you can configure Jenkins to “push” notification through
IRC. Some IRC clients such as xchat3 support alert configuration so that when the message arrives, it
can blink the tray icon or make a beep sound. To set up IRC support on Jenkins, first you need to install
the IRC plugin4 and the Instance Messaging plugin5. Simply go to the standard plugin manager, tick
their checkbox and then restart Jenkins (see Figure 8.14, “Install the Jenkins IRC plugins”).
Figure 8.14. Install the Jenkins IRC plugins
Once it’s done, you need to enable the IRC plugin and configure it to fit into your own environment.
Basically, this involves providing the hostname and port of the IRC server you are using, a dedicated
IRC channel, and a nickname for the IRC plugin. It’s a good practice to set up a dedicated channel for
CI notification, so as people chat in other channels, they won’t be disturbed. You may also want to
configure extra details in the Advanced sector. All of these are available in the Configure System page
(see Figure 8.15, “Advanced IRC notification configuration”).
2 http://jenkins-ci.org/content/chat
3 http://xchat.org/
4 http://wiki.jenkins-ci.org/display/JENKINS/IRC+Plugin
5 http://wiki.jenkins-ci.org/display/JENKINS/Instant+Messaging+Plugin
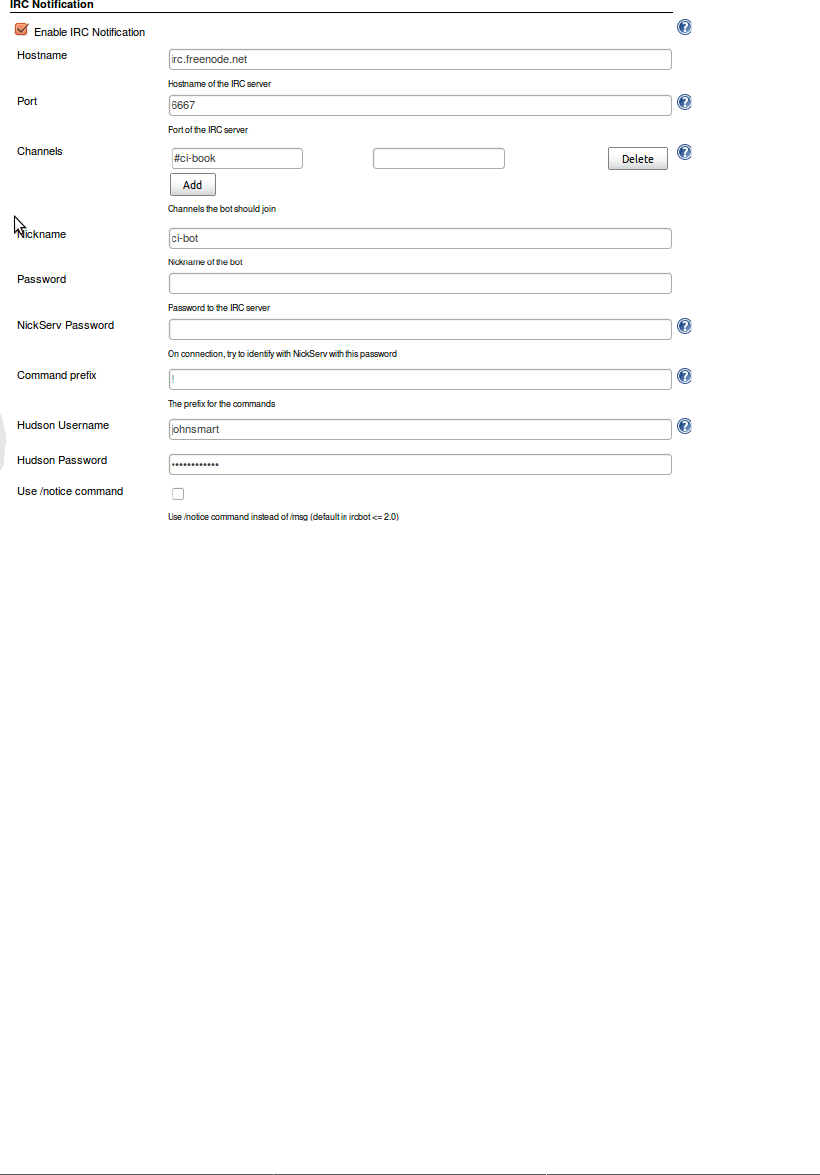
212
Figure 8.15. Advanced IRC notification configuration
In addition to the hostname, port, channel, and nickname we mentioned earlier, you can also configure
IRC server password or NIckServ password if your environment requires them. Command prefixes need
to be configured if you want to interact with the server via IRC messages. This is basically the same as
using Jabber (see Section 8.7, “Instant Messaging”). Finally, you may want to let the IRC plugin use the
/notice command instead of the default /msg command. /notice is the same as /msg except that
the message will be contained in dashes, which will prevent a response from most robots.
Once the global configuration is ready, you can enable IRC notification for each build job and set up
a notification strategy. Open the build job configuration page, go to the Post-build Actions section and
click on the IRC Notification option. If you want to set up a notification strategy rather than using
the default one, click the “Advanced...” button (see Figure 8.16, “Advanced build job IRC notification
configuration”).

213
Figure 8.16. Advanced build job IRC notification configuration
Notification strategies (when to send notification messages, and to whom) are discussed in Section 8.7,
“Instant Messaging”. Both the Jabber plugin and the IRC plugin depend on the Instant Messaging Plugin,
so they share a number of common core features. Some options are specific to IRC plugin, however.
Here, for example, you can define a customized channel if you don’t like the global default. Finally, for
a channel notification message, you can choose what information to send in the notification messages.
Your options are build summary, SCM changes, and failed tests.
Once you save the configuration, you should be good to go. Based on what you’ve configured, this
plugin will join the appropriate IRC channels and send notification messages for build jobs.
In Figure 8.17, “IRC notification messages in action”, for example, the IRC plugin joins the #ci-book
channel on freenode. First, user juven committed some change with scm message “feature x added”
and IRC plugin let everyone on the channel know that the build was successful. Then juven committed
another change for feature y, but this time the build failed. John noticed it and fixed the build error. The
IRC plugin now happily said “Yippie, build fixed!” Note that some lines in this screen are highlighted,
this is because I logged in as user “juven” and I configured my XChat IRC client to highlight messages
containing my nickname.
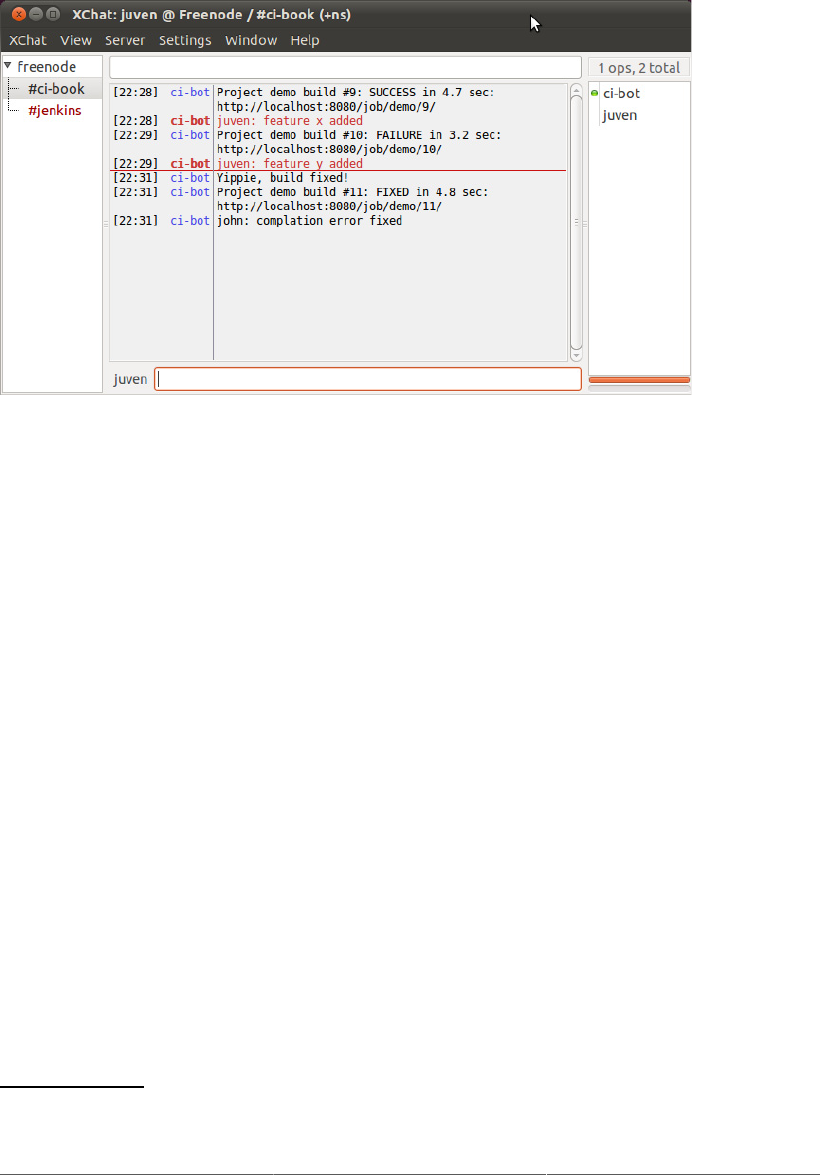
214
Figure 8.17. IRC notification messages in action
8.9. Desktop Notifiers
The best push notification strategies integrate smoothly into the developer’s daily work environment.
This is why instant messaging can be an effective strategy if developers are already in the habit of using
instant messaging for other work-related activities.
Desktop notification tools also fall into this category. Desktop notification tools are tools that run locally
on the developer machine, either as an independent application or widget, or as part of the developer’s
IDE.
If you are using Eclipse, the Jenkins Eclipse plugin6 displays a health icon at the bottom of the Eclipse
window. If you click on the icon, you can see a detailed view of the Jenkins projects (see Figure 8.18,
“Jenkins notifications in Eclipse”). In the Eclipse preferences, you provide the URL of your Jenkins
server along with any required authentication details. The configuration is fairly simple, however, and
you can only connect to a single Jenkins instance for a given Eclipse workspace.
6 http://code.google.com/p/hudson-eclipse/
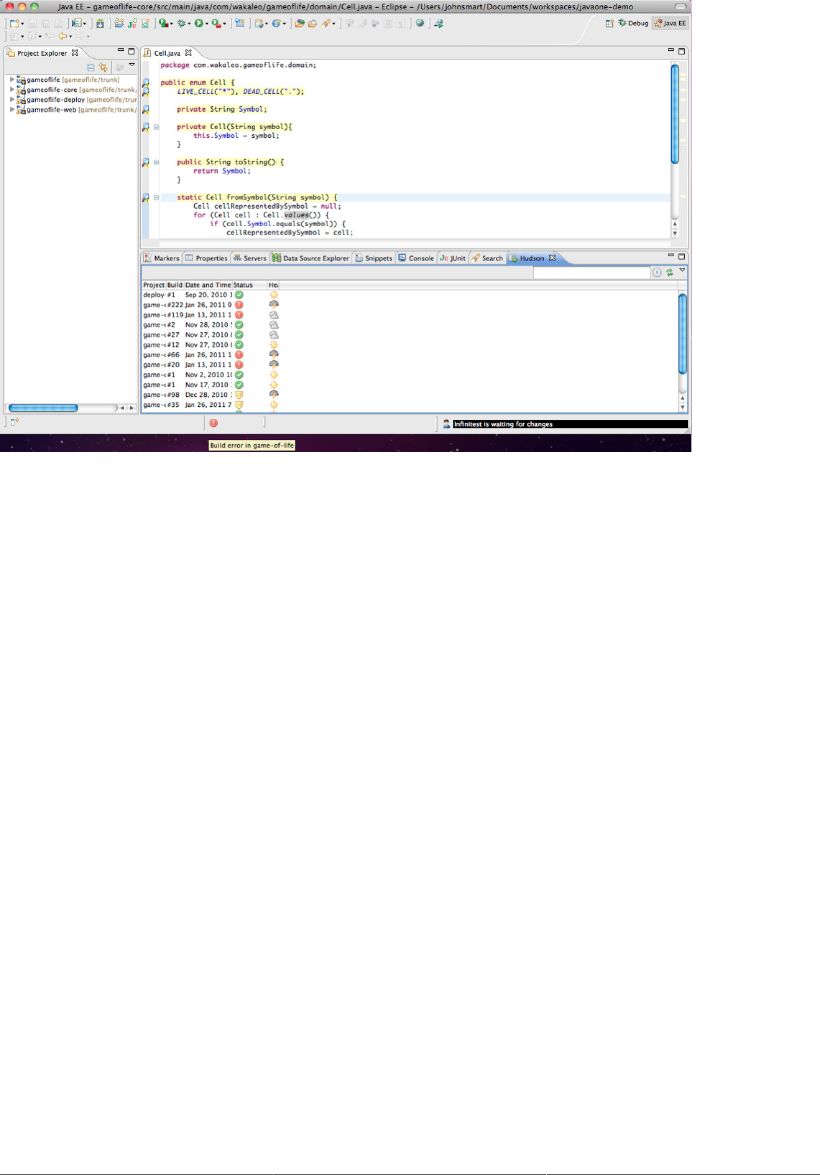
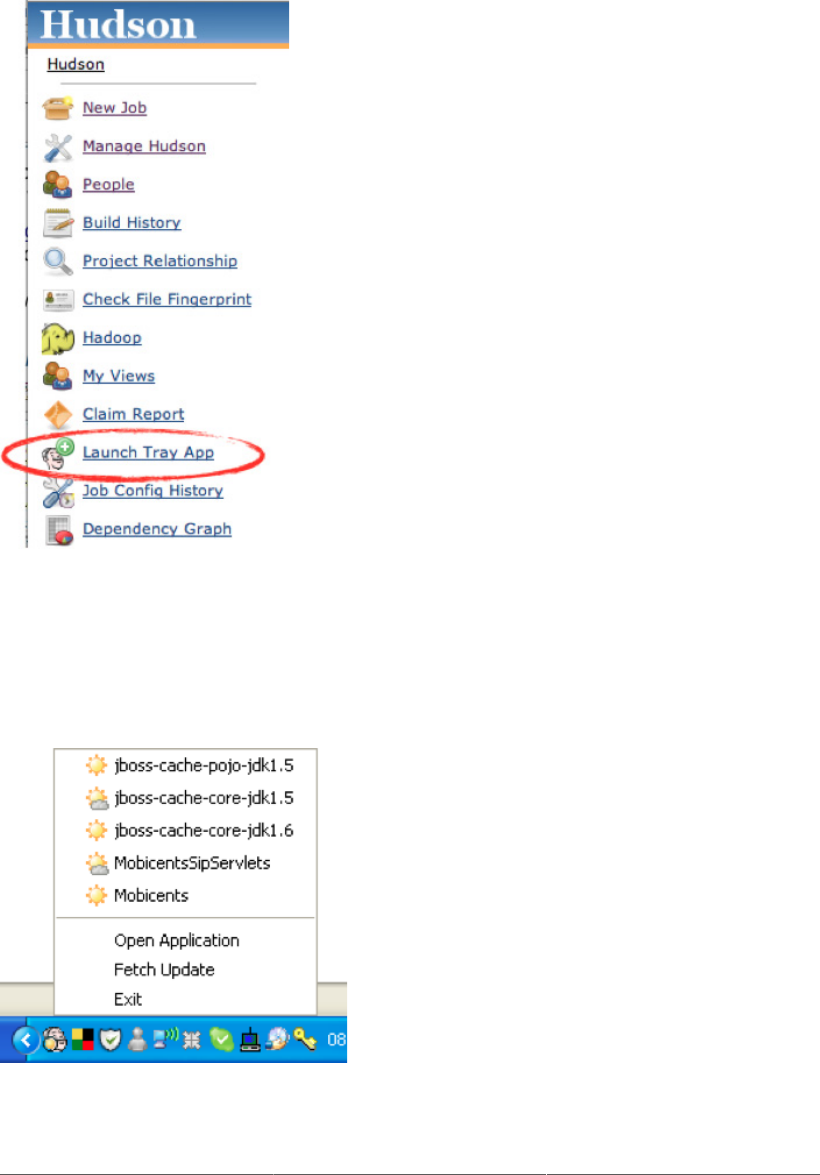
216
Figure 8.19. Launching the Jenkins Tray Application
This application sits in your system tray, lets you view the current state of your builds at a glance,
and also brings up pop-up windows notifying you of new build failures (see Figure 8.20, “Running the
Jenkins Tray Application”).
Figure 8.20. Running the Jenkins Tray Application

217
This is certainly a useful application, but it suffers from a few limitations. At the time of writing, the
Jenkins Tray Application did not support accessing secured Jenkins servers. In addition, the developer
needs to remember to restart it each morning. This may seem a minor issue, but in general, when it
comes to notification strategies, the less you have to ask of your developers the better.
One of the best options for Jenkins desktop notification is to use a service like Notifo (see Section 8.10,
“Notification via Notifo”), which provides both desktop and mobile clients. We will see how this works
in detail in the next section.
8.10. Notification via Notifo
Notifo7 is a fast and economical service to send real-time notifications to your smartphone or desktop.
In the context of a Jenkins server, you can use it to set up free or low-cost real-time notification for
your Jenkins build results. Individual accounts (which you need to be able to receive notifications) are
free. You need to set up a service account to send notification messages from your Jenkins server. This
is where Notifo earn their keep, though at the time of writing a service account can send up to 10,000
notifications per month free of charge, which is usually plenty for an average Jenkins instance. One of
the strong points of a real-time notification service like Notifo is that notification messages can be sent
to the same users on different devices: smartphones and desk top clients, in particular.
Setting up Jenkins notification with Notifo is relatively straightforward. First, go to the Notifio website
and sign up to create an account. Each team member who wants to be notified will need their own Notifo
account. They will also need to install the Notifo client on each device on which they need to receive
notification messages. At the time of writing, Notifo clients were available for Windows and Mac OS
X desktops, and iPhones, with support for Linux and other smartphones on the way.
Next, you need to set up a Notifo service account for your Jenkins server. You can do this with one of
your developer accounts, or create a new account for the purpose. Log on to the Notifo website, and
go to the My Services menu. Here, click on Create Service (see Figure 8.21, “Creating a Notifo service
for your Jenkins instance”), and fill in the fields. The most important is the Service Username, which
needs to be unique. You can also specify the Site URL and the Default Notification URL to point to your
Jenkins instance, so that users can open the Jenkins console by clicking on the notification message.
7 http://www.notifo.com
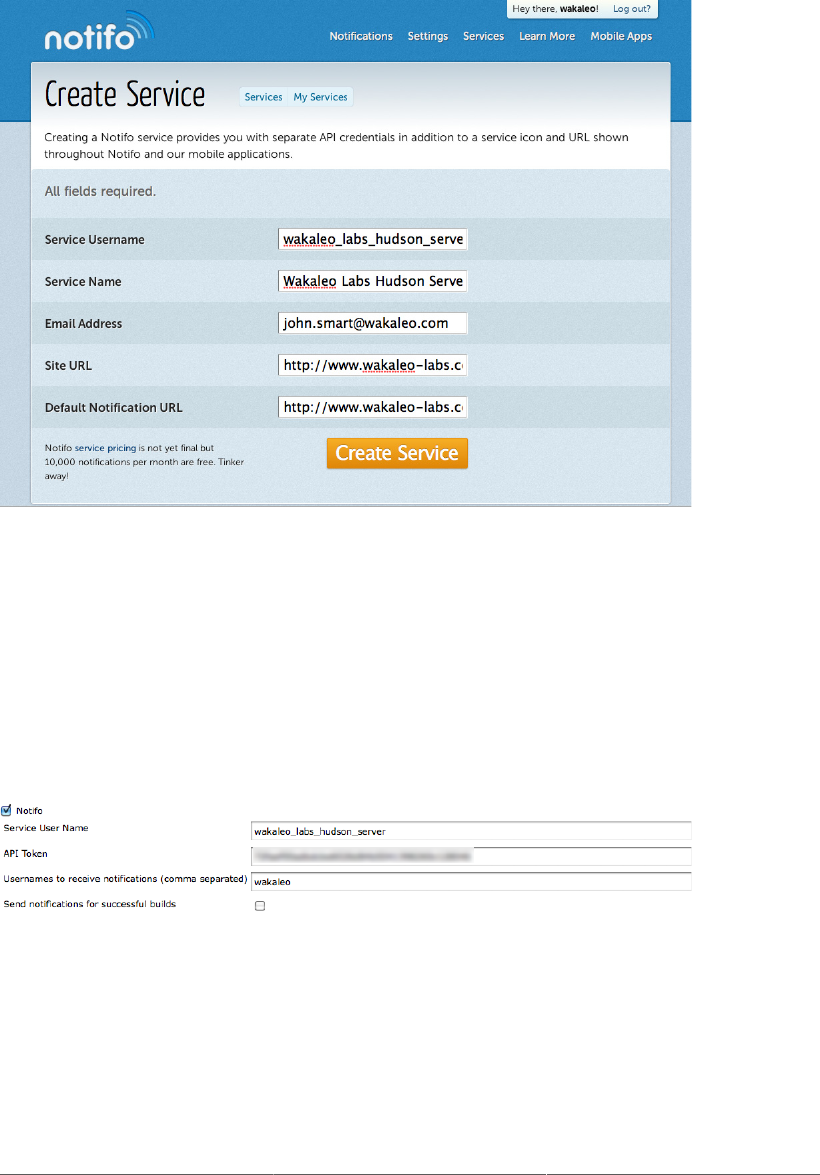
218
Figure 8.21. Creating a Notifo service for your Jenkins instance
To receive notification messages from the Jenkins server, developers now need to subscribe to this
service. You can then add developers to the list of subscribers in the service Subscribers page, by
sending them subscription requests. Once the service has been created and the users are all subscribed,
you can configure your project to send out Notifo notifications (see Figure 8.22, “Configuring Notifo
notifications in your Jenkins build job”). You need the provide the API username of the Jenkins service
you set up, as well as the API Secret, both of which you can see in the Notifo Service Dashboard.
Figure 8.22. Configuring Notifo notifications in your Jenkins build job
Once this is set up, Jenkins will send almost real-time notifications of build failures to any Notifo clients
the developer is running, whether it is on a desktop or on a mobile device (see Figure 8.23, “Receiving
a Notifo notification on an iPhone”).

219
Figure 8.23. Receiving a Notifo notification on an iPhone
At the time of writing, sophisticated notification strategies are not supported—you just provide a list
of Notifo usernames who need to be notified. Nevertheless, this remains a very effective notification
tool for frontline developers.
8.11. Mobile Notification
If your Jenkins server is visible on the Internet (even if you have set up authentication on your Jenkins
server), you can also monitor your builds via your iPhone or Android mobile device. The free Hudson
Helper application (see Figure 8.24, “Using the Hudson Helper iPhone app”), for example, lets you list
your current build jobs (either all of the build jobs on the server, or only the build jobs in a particular
view). You can also view the details of a particular build job, including the current status, failing tests
and build time, and even start and stop builds.

220
Figure 8.24. Using the Hudson Helper iPhone app
For Android phones, you can also install the Hudson Mood widget will also provide updates and alerts
about build failures.
Note that these mobile applications rely on a data connection, so while they will typically work well
locally, you should not rely on them if the developer in question is out of the country.
8.12. SMS Notification
These days, SMS is another ubiquitous communication channel which has the added advantage of
reaching people even when they are out of the office. For a build engineer, this can be a great way to
monitor critical builds, even when developers or team leads are away from their desks.
SMS gateways8 are services that let you send SMS notifications via specially-formatted email addresses
(for example, 123456789@mysmsgateway.com might send an SMS message to 123456789). Many
mobile vendors provide this service, as do many third-party service providers. There is no built-in
support for SMS Gateways in Jenkins, but the basic functionality of these gateways makes integration
relatively easy: you simply add the special email addresses to the normal notification list. Alternatively,
using the advanced email configuration, you can set up a separate rule containing only the SMS email
8 http://en.wikipedia.org/wiki/SMS_gateway
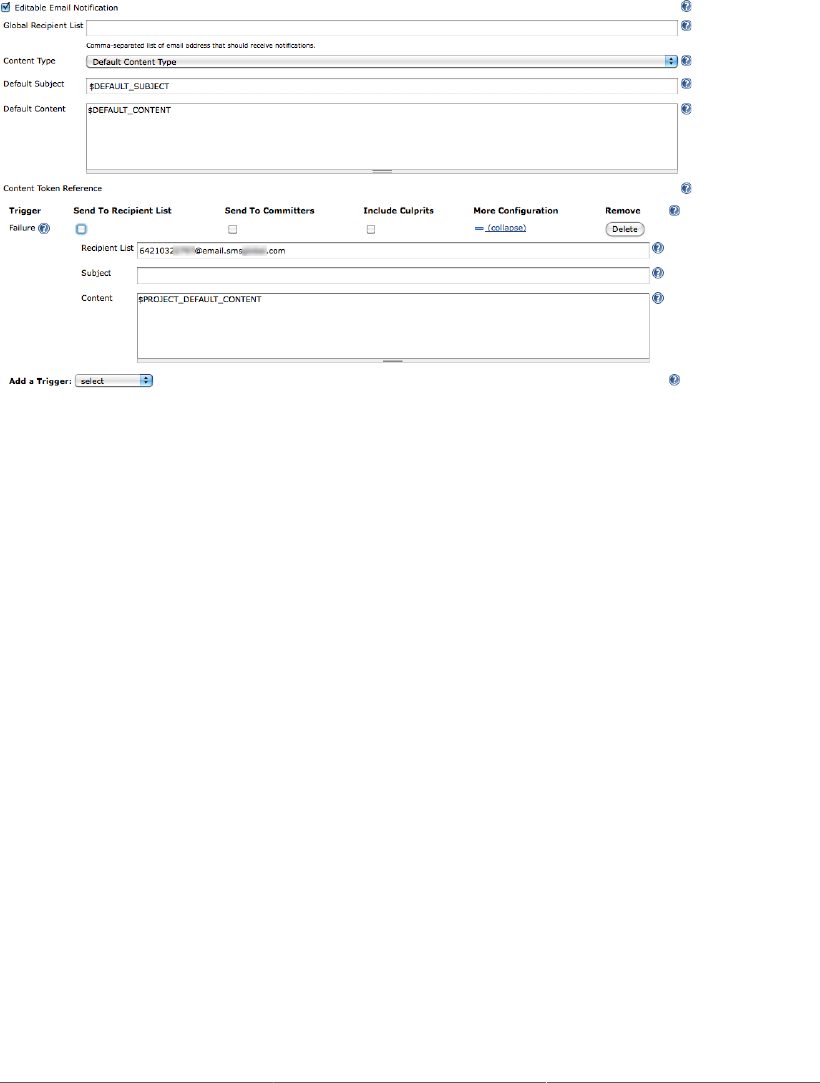
221
addresses (see Figure 8.25, “Sending SMS notifications via an SMS Gateway Service”). Doing this
makes it easier to fine-tune the message contents to suit an SMS message format.
Figure 8.25. Sending SMS notifications via an SMS Gateway Service
Once you have done this, your users will receive prompt notification of build results in the form of SMS
messages (see Figure 8.26, “Receiving notification via SMS”). The main disadvantage of this approach
is arguably that it is not free, and requires the use of a third-party commercial service. That said, it
is really the only notification technique capable of reaching developers when they are out of Internet
range or who do not have a data-enabled smartphone. Indeed, this technique is popular among system
administrators, and can be very useful for certain critical build jobs.

222
Figure 8.26. Receiving notification via SMS
8.13. Making Noise
If you have your Jenkins instance running on a machine that is physically located in proximity to the
development team, you may also want to add sounds into the mix of notification strategies. This can be
an effective strategy for small co-located teams, though it becomes trickier if the build server is set up
on a virtual machine or elsewhere in the building.
There are two ways to integrate audio feedback into your build process in Jenkins: the Jenkins Sounds
plugin and the Jenkins Speaks plugin. Both can be installed via the Plugin Manager page in the usual
manner.
The Jenkins Sounds plugin is the most flexible of the two. It allows you to build a detailed notification
strategy based on the latest build result and also (optionally) on the previous build result as well (see
Figure 8.27, “Configuring Jenkins Sounds rules in a build job”). For example, you can configure Jenkins
to play one sound the first time a build fails, a different sound if the build fails a second time, and yet
another sound when the build is fixed.
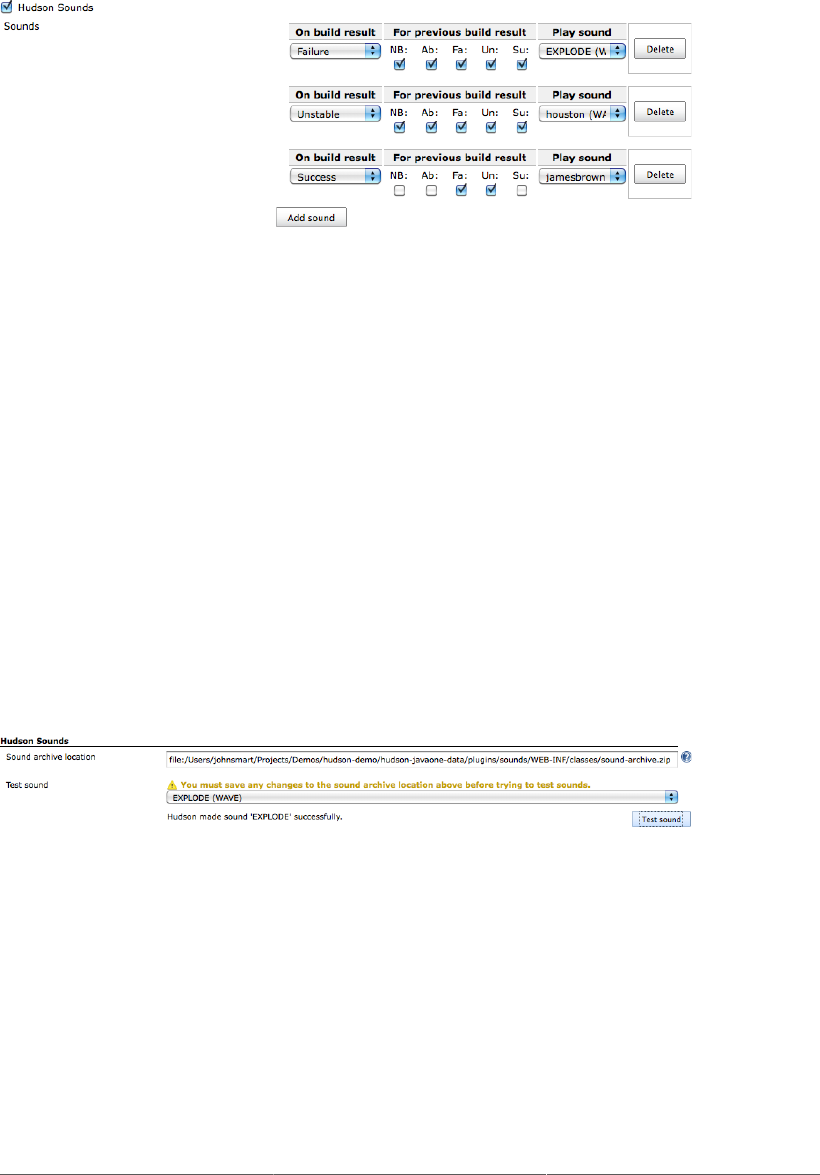
223
Figure 8.27. Configuring Jenkins Sounds rules in a build job
To set this up, you need to tick the Jenkins Sounds checkbox in the Post-build Actions section of your
build job configuration page. You can add as many sound configuration rules as you like. Adding a rule
is simple enough. First, you need to choose which build result will trigger the sound. You also need
to specify the previous build results for which this rule is applicable: Not Build (NB), Aborted (Ab),
Failed (Fa), Unsuccessful (Un) or Successful (Su).
The Jenkins Sounds plugin proposes a large list of pre-defined sounds, which usually offer plenty of
choice for even the most discerning build administrator, but you can add your own to the list if you
really want to. Sounds are stored as a ZIP or JAR file containing sound files in a flat directory structure
(i.e., no subdirectories). The list of sounds proposed by the plugin is simply the list of filenames, minus
the extensions. The plugin supports AIFF, AU, and WAV files.
In the System Configuration page, you can give Jenkins a new sound archive file, using the http://
notation if your sound archive file is available on a local web server, or the file:// notation if
it is available locally (see Figure 8.28, “Configuring Jenkins Sounds”). Once you have saved the
configuration, you can test the sounds in your sound archive via the Test Sound button in the Advanced
section.
Figure 8.28. Configuring Jenkins Sounds
The Jenkins Sounds plugin is an excellent choice if you want to complement your more conventional
notification techniques. Short, recognizable sounds are a great way to grab a developer’s attention and
let the team know that something needs fixing. They will then be a bit more receptive when the more
detailed notifications follow.
Another option is the Jenkins Speaks plugin. With this plugin, you can get Jenkins to broadcast a
customized announcement (in a very robotic voice) when your build fails (see Figure 8.29, “Configuring
Jenkins Speaks”). You can configure the exact message using Jelly. Jelly is an XML-based scripting
language used widely in the lower levels of Jenkins.
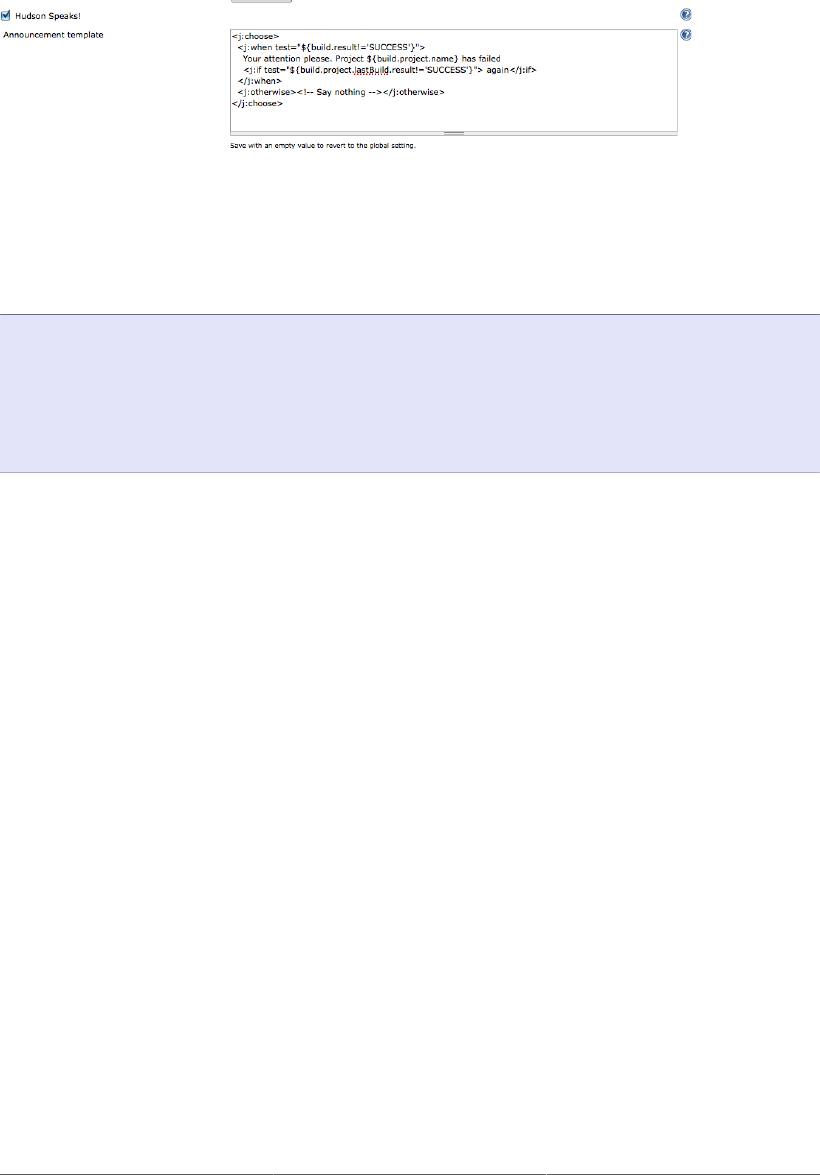
224
Figure 8.29. Configuring Jenkins Speaks
The advantage of this approach lies in it’s precision: since you can use Jenkins variables in the Jelly
script, you can get Jenkins to say just about anything you want about the state of the build. Here is a
simple example:
<j:choose>
<j:when test="${build.result!='SUCCESS'}">
Your attention please. Project ${build.project.name} has failed
<j:if test="${build.project.lastBuild.result!='SUCCESS'}"> again</j:if>
</j:when>
<j:otherwise><!-- Say nothing --></j:otherwise>
</j:choose>
If you leave this field blank, the plugin will use a default template that you can configure in the System
Configuration page. In fact, it is usually a good idea to do this, and only to use a project-specific script
if you really need to.
The disadvantage is that the robotic voice can make it a little hard to understand. For this reason, it
is a good idea to start your announcement with a generic phrase such as “Your attention please,” or
to combine it with the Jenkins Sounds plugin, so that you have developers’ attention before the actual
message is broadcast. Using hyphens in your project names (e.g., game-of-life rather then gameoflife)
will also help the plugin know how to pronounce your project names.
Both these approaches are useful for small teams, but can be limited for larger ones, when the server is
not physically located in close proximity to the development team. Future versions may support playing
sounds on a separate machine, but at the time of writing this feature was not available.
8.14. Extreme Feedback Devices
Many more imaginative notification tools and strategies exist, and there is plenty of scope for
improvisation if you are willing to improvise with electronics a little. This includes devices such as
Ambient Orbs, Lava Lamps, traffic lights, or other more exotic USB-controlled devices. The Build
Radiator (see Section 8.6, “Build Radiators”) also falls into this category if you project it onto a big
enough screen.
One device that integrates very nicely with Jenkins is the Nabaztag. The Nabaztag (see Figure 8.30, “A
Nabaztag”) is a popular WiFi-enabled robotic rabbit that can flash colored lights, play music, or even
speak. Once advantage of the Nabaztag is that, since it works via WiFi, it is not constrained to be located

225
near the build server, and so will work even if your Jenkins instance is in a server room or on a virtual
machine. As far as extreme feedback devices go, these little fellows are hard to beat.
Figure 8.30. A Nabaztag
And best of all, there is a Jenkins plugin available for the Nabaztag. Once you have installed the Nabaztag
plugin and restarted Jenkins, it is easy to configure. In Jenkins’s main Configuration page, go to the
Global Nabaztag Settings section and enter the serial number and secret token for your electronic bunny
(see Figure 8.31, “Configuring your Nabaztag”). You can also provide some default information about
how your build bunny should react to changes in build status (should it report on starting and successful
builds, for example), what voice it should use, and what message it should say when a build fails,
succeeds, is fixed, or fails again. Then, to activate Nabaztag notification for a particular build job,
you need to tick the Nabaztag Publisher option in your build job configuration. Depending on your
environment, for example, you may or may not want all of your builds to send notifications to your
Nabaztag.
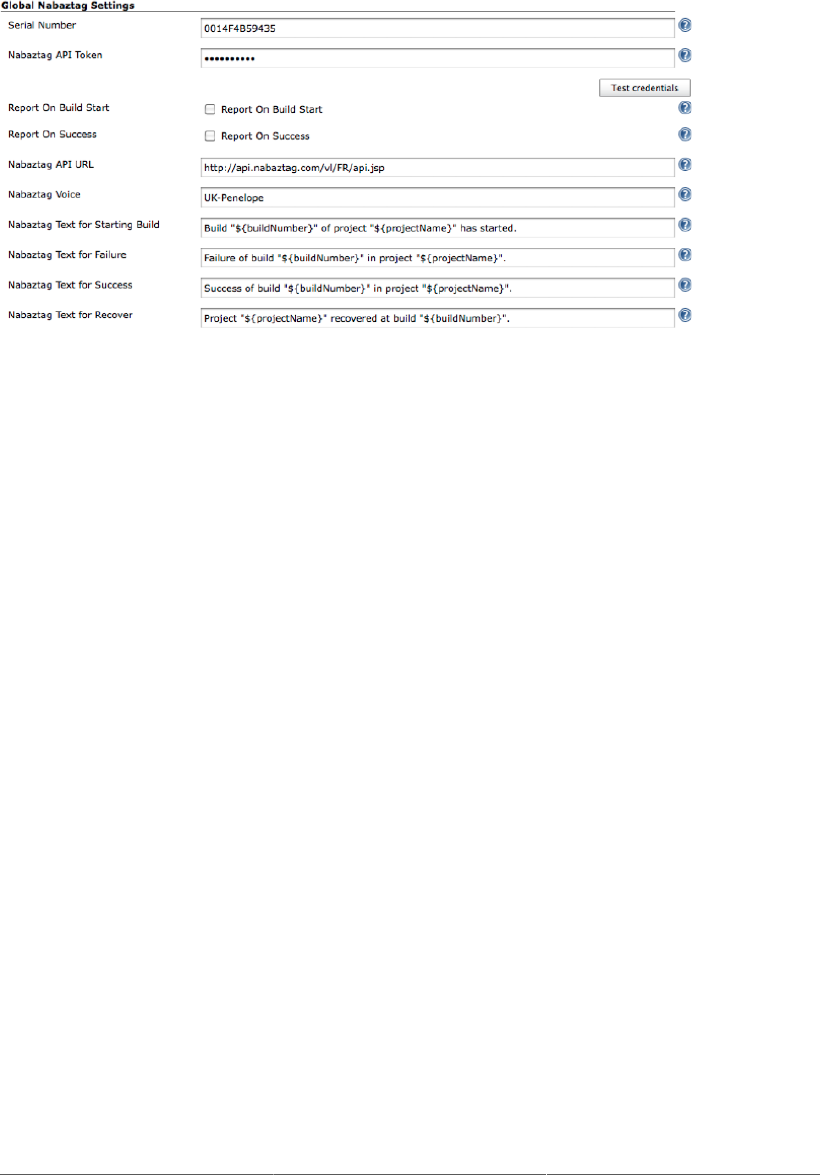
226
Figure 8.31. Configuring your Nabaztag
With the notable exception of the build radiator, many of these devices have similar limitations to the
Jenkins Speaks and Jenkins Sounds plugins (see Section 8.13, “Making Noise”)—they are best suited
for small, co-located teams, working on a limited number of projects. Nevertheless, when they work,
they can be a useful addition to your general notification strategy.
8.15. Conclusion
Notification is a vital part of your overall CI strategy. After all, a failed build is of little use if there is no
one listening. Nor is notification a one-size-fits-all affair. You need to think about your organization,
and tailor your strategy to suite the local corporate culture and predominant tool set.
Indeed, it is important to define and implement a well thought-out notification strategy that suits your
environment. Email, for example, is ubiquitous, so this will form the backbone of many notification
strategies, but if you work in a larger team or with a busy technical lead, you may want to consider
setting up an escalation strategy based on the advanced email options (see Section 8.3, “More Advanced
Email Notification”). But you should complement this with one of the more active strategies, such as
instant messaging or a desktop notifier. If your team already uses a chat or IRC channel to communicate,
try to integrate this into your notification strategy as well. And SMS notification is a great strategy for
really critical build jobs.
You should also ensure that you have both passive and active (or pull and push) notification strategies.
A prominent build radiator or an extreme feedback device, for example, sends a strong message to the
team that fixing builds is a priority task, and can help install a more agile team culture.

Chapter 9. Code Quality
9.1. Introduction
Few would deny the importance of writing quality code. High quality code contains less bugs, and is
easier to understand and easier to maintain. However, the precise definitions of code quality can be more
subjective, varying between organizations, teams, and even individuals within a team.
This is where coding standards come into play. Coding standards are rules, sometimes relatively
arbitrary, that define the coding styles and conventions that are considered acceptable within a team or
organization. In many cases, agreeing on a set of standards, and applying them, is more important than
the standards themselves. Indeed, one of the most important aspects of quality code is that it is easy to
read and to understand. If developers within a team all apply the same coding standards and practices,
the code will be more readable, at least for members of that team. And if the standards are commonly
used within the industry, the code will also be more readable for new developers arriving on the team.
Coding standards include both aesthetic aspects such as code layout and formatting, naming
conventions, and so forth, as well as potentially bad practices such as missing curly brackets after a
condition in Java. A consistent coding style lowers maintenance costs, makes code clearer and more
readable, and makes it easier to work on code written by other team members.
Only an experienced developer can really judge code quality in all its aspects. That is the role of code
reviews and, among other things, practices like pair programming. In particular, only a human eye can
decide if a piece of code is truly well written, and if it actually does what the requirements ask of it.
However, code quality metrics tools can help a great deal. In fact it is unrealistic to try to enforce coding
standards without the use of such tools.
These tools analyze your application source code or byte code, and check whether the code respects
certain rules. Code quality metrics can encompass many aspects of code quality, from coding standards
and best practices right through to code coverage, with everything from compiler warnings to TODO
comments in between. Certain metrics concentrate on measurable characteristics of your code base,
such as the number of lines of code (NLOC), average code complexity, or the number of lines per class.
Others focus on more sophisticated static analysis, or on looking for potential bugs or poor practices
in your code.
There are a wide range of code quality reporting plugins available for Jenkins. Many are for Java static
analysis tools, such as Checkstyle, PMD, FindBugs, Cobertura, and JDepend. Others, such as fxcop and
NCover, are focused on .NET applications.
With all of these tools, you need to configure your build job to generate the code quality metrics data
before Jenkins can produce any reports.
The notable exception to this rule is Sonar. Sonar can extract code quality metrics from any Maven
project, with no additional configuration required in your Maven project. This is great when you have

228
large numbers of existing Maven projects that you need to integrate into Jenkins, and you want to
configure consistent code quality reporting across all of your projects.
In the rest of this chapter, we will see how to set up code quality reporting in your Jenkins builds, and
also how you can use it as an effective part of your build process.
9.2. Code Quality in Your Build Process
Before we look at how to report on code quality metrics in Jenkins, it can be useful to take a step back
and look at the larger picture. Code Quality metrics are of limited value in isolation—they need to be
part of a broader process improvement strategy.
The first level of code quality integration should be the IDE. Modern IDEs have great support for
many code quality tools—Checkstyle, PMD, and FindBugs all have plugins for Eclipse, NetBeans, and
IntelliJ, which provide rapid feedback for developers on code quality issues. This is a much faster and
more efficient way to provide feedback for individual developers, and to teach developers about the
organizational or project coding standards.
The second level is your build server. In addition to your normal unit and integration test build jobs, set
up a dedicated code quality build, which runs after the normal build and test. The aim of this process is
to produce project-wide code quality metrics, to keep tabs on how the project is doing as a whole, and
to address any issues from a high level. The effectiveness of these reports can be increased by a weekly
code quality review, in which code quality issues and trends are discussed within the team.
It is important to run this job separately, because code coverage analysis and many static analysis tools
can be quite slow to run. It is also important to keep any code coverage tests well away from builds, as
the code coverage process produces instrumented code which should never be deployed to a repository
for production use.
Code quality reporting is, by default, a relatively passive process. No one will know the state of the
project if they don’t seek out the information on the build server. While this is better than nothing, if
you are serious about code quality, there is a better way. Rather than simply reporting on code quality,
set up a dedicated code quality build, which runs after the normal build and test, and configure the build
to fail if code quality metrics are not at an acceptable level. You can do this in Jenkins or in your build
script, although one advantage of configuring this outside of your build script is that you can change
code quality build failing criteria more easily without changing the project source code.
As a final word, remember that coding standards are guidelines and recommendations, not absolute rules.
Use failing code quality builds and code quality reports as indicators of a possible area of improvement,
not as measurements of absolute value.

229
9.3. Popular Java and Groovy Code Quality Analysis
Tools
There are many open source tools that can help identify poor coding practices.
In the Java world, three static analysis tools have stood the test of time, and are widely used in
very complementary ways. Checkstyle excels at checking coding standards and conventions, coding
practices, as well as other metrics such code complexity. PMD is a static analysis tool similar to
Checkstyle, more focused on coding and design practices. And FindBugs is an innovative tool issued
from the ongoing research work of Bill Pugh and his team at the University of Maryland that focuses
on identifying potentially dangerous and buggy code. And if you are working with Groovy or Grails,
you can use CodeNarc, which checks Groovy coding practices and convention.
All of these tools can be easily integrated into your build process. In the following sections, we will look
at how to set up these tools to generate the XML reports that Jenkins can then use for its own reporting.
9.3.1. Checkstyle
Checkstyle1 is a static analysis tool for Java. Originally designed to enforce a set of highly-configurable
coding standards, Checkstyle now also lets you check for poor coding practices, as well as overly
complex and duplicated code. Checkstyle is a versatile and flexible tool that should have its place in
any Java-based code quality analysis strategy.
Checkstyle supports a very large number of rules, including ones relating to naming conventions,
annotations, javadoc comments, class and method size, code complexity metrics, poor coding practices,
and many others.
Duplicated code is another important code quality issue—duplicated or near-duplicated code is harder
to maintain and to debug. Checkstyle provides some support for the detection of duplicated code, but
more specialized tools such as CPD do a better job in this area.
One of the nice things about Checkstyle is how easy it is to configure. You can start off with the Sun
coding conventions and tweak them to suit your needs, or start from scratch. Using the Eclipse plugin (or
even directly in XML), you can pick and choose from several hundred different rules, and fine-tune the
settings of the rules you do choose (see Figure 9.1, “It is easy to configure Checkstyle rules in Eclipse”).
This is important, as different organizations, teams and even projects have different requirements and
preferences with regards to coding standards, and it is better to have a precise set of rules that can be
adhered to, rather than a broad set of rules that will be ignored. It is especially important where large
legacy code bases are involved—in these cases, it is often better to start off with a more limited set of
rules than to be overwhelmed with a large number of relatively minor formatting issues.
1 http://checkstyle.sourceforge.net
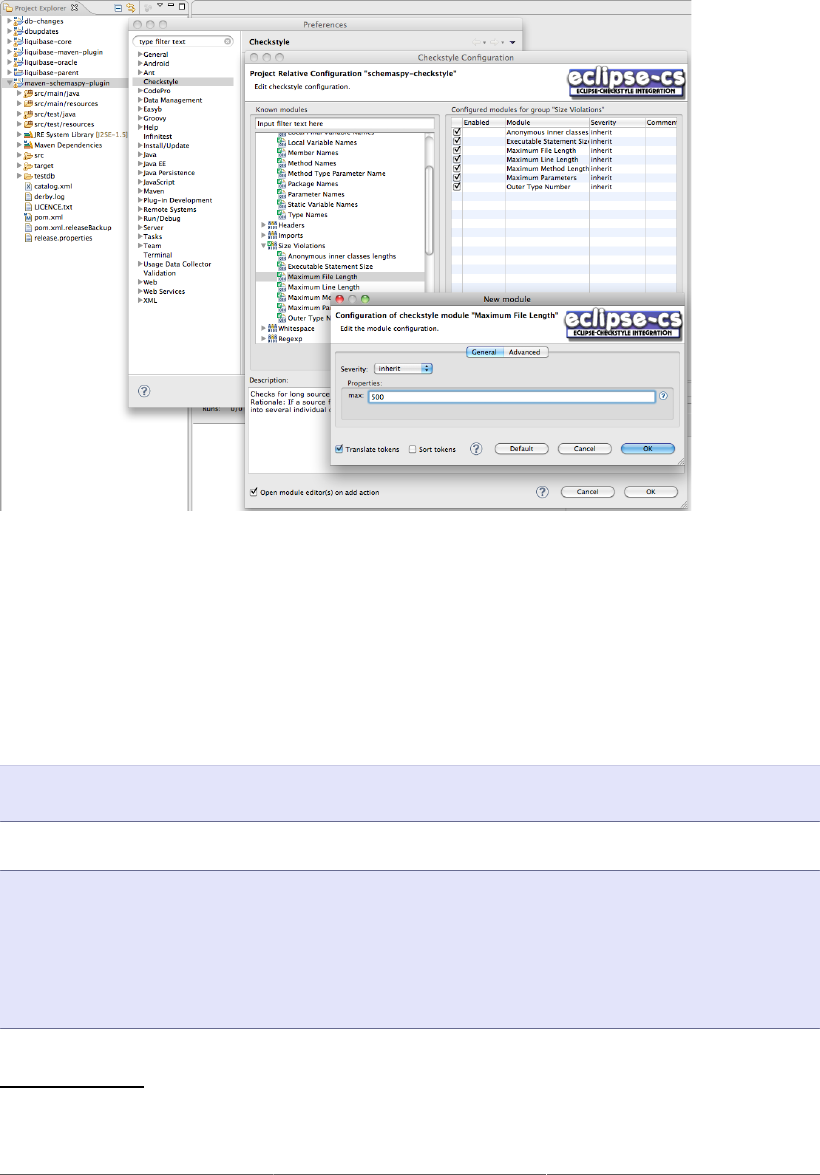
230
Figure 9.1. It is easy to configure Checkstyle rules in Eclipse
Configuring Checkstyle in your build is usually straightforward. If you are using Ant, you need to
download the checkstyle JAR file from the website2 and make it available to Ant. You could place it
in your Ant lib directory, but this would mean customizing the Ant installation on your build server
(and any slave nodes), so it is not a very portable solution. A better approach would be to place the
Checkstyle JAR file in one of your project directories, or to use Ivy or the Maven Ant Task library
to declare a dependency on Checkstyle. If you opt for keeping the Checkstyle JAR file in the project
directories, you could declare the Checkstyle task as shown here:
<taskdef resource="checkstyletask.properties"
classpath="lib/checkstyle-5.3-all.jar"/>
Then, to generate Checkstyle reports in an XML format that Jenkins can use, you could do the following:
<target name="checkstyle">
<checkstyle config="src/main/config/company-checks.xml">
<fileset dir="src/main/java" includes="**/*.java"/>
<formatter type="plain"/>
<formatter type="xml"/>
</checkstyle>
</target>
Now, just invoke this task (e.g., ant checkstyle) to generate the Checkstyle reports.
2 http://checkstyle.sourceforge.net

231
In Maven 2, you could add something like the following to the <reporting> section:
<reporting>
<plugins>
<plugin>
<groupId>org.apache.maven.plugins</groupId>
<artifactId>maven-checkstyle-plugin</artifactId>
<version>2.4</version>
<configuration>
<configLocation>
src/main/config/company-checks.xml
</configLocation>
</configuration>
</plugin>
</plugins>
</reporting>
For a Maven 3 project, you need to add the plugin to the <reportPlugins> element of the
<configuration> section of the maven-site-plugin:
<project>
<properties>
<sonar.url>http://buildserver.acme.org:9000</sonar.url>
</properties>
<build>
...
<plugins>
...
<plugin>
<groupId>org.apache.maven.plugins</groupId>
<artifactId>maven-site-plugin</artifactId>
<version>3.0-beta-2</version>
<configuration>
<reportPlugins>
<plugin>
<groupId>org.apache.maven.plugins</groupId>
<artifactId>maven-checkstyle-plugin</artifactId>
<version>2.4</version>
<configuration>
<configLocation>
${sonar.url}/rules_configuration/export/java/My_Rules/checkstyle.xml
</configLocation>
</configuration>
</plugin>
</reportPlugins>
</configuration>
</plugin>
</plugins>
</build>
</project>
Now, running mvn checkstyle:checkstyle or mvn site will analyse your source code and
generate XML reports that Jenkins can use.

232
Note that in the last example, we used a Checkstyle ruleset that we have uploaded to a Sonar server
(defined by the ${sonar.url} property). This strategy makes it easy to use the same set of Checkstyle
rules for Eclipse, Maven, Jenkins, and Sonar.
Recent versions of Gradle also offer some integrated Checkstyle support. You can set up Checkstyle
for your builds as shown here:
apply plugin: 'code-quality'
This will use the checkstyle ruleset in config/checkstyle/checkstyle.xml by default. You can
override this with the checkstyleConfigFileName property: at the time of writing, however, you
can’t get the Gradle code quality plugin to obtain the Checkstyle rules from a URL.
You can generate the Checkstyle reports here by running gradle checkstyleMain or gradle
check.
9.3.2. PMD/CPD
PMD3 is another popular static analysis tool. It focuses on potential coding problems such as unused
or suboptimal code, code size and complexity, and good coding practices. Some typical rules include
“Empty If Statement,” “Broken Null Check,” “Avoid Deeply Nested If Statements,” “Switch Statements
Should Have Default,” and “Logger Is Not Static Final.” There is a fair amount of overlap with some
of the Checkstyle rules, though PMD does have some more technical rules, and more specialized ones
such as rules related to JSF and Android.
PMD also comes with CPD, a robust open source detector of duplicated and near-duplicated code.
PMD is a little less flexible than Checkstyle, though you can still pick and choose the rules you want
to use in Eclipse, and then export them as an XML file (see Figure 9.2, “Configuring PMD rules in
Eclipse”). You can then import this rule set into other Eclipse projects, into Sonar, or use it in your Ant
or Maven builds.
3 http://pmd.sourceforge.net
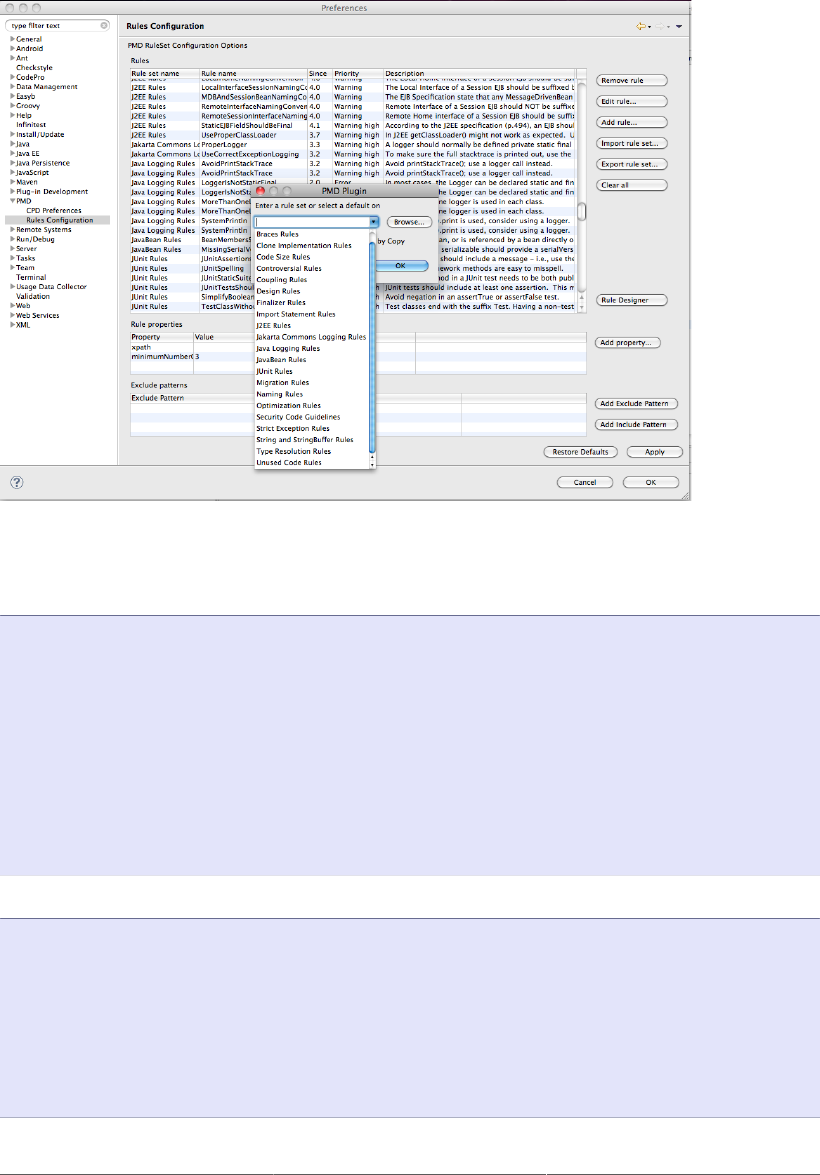
233
Figure 9.2. Configuring PMD rules in Eclipse
PMD comes with an Ant task that you can use to generate the PMD and CPD reports. First, though, you
need to define these tasks, as shown in the following example:
<path id="pmd.classpath">
<pathelement location="org.apache.maven.model.Build@552297d7"/>
<fileset dir="lib/pmd">
<include name="*.jar"/>
</fileset>
</path>
<taskdef name="pmd" classname="net.sourceforge.pmd.ant.PMDTask"
classpathref="pmd.classpath"/>
<taskdef name="cpd" classname="net.sourceforge.pmd.cpd.CPDTask"
classpathref="pmd.classpath"/>
Next, you can generate the PMD XML report by invoking the PMD task as illustrated here:
<target name="pmd">
<taskdef name="pmd" classname="net.sourceforge.pmd.ant.PMDTask"
classpathref="pmd.classpath"/>
<pmd rulesetfiles="basic" shortFilenames="true">
<formatter type="xml" toFile="target/pmd.xml" />
<fileset dir="src/main/java" includes="**/*.java"/>
</pmd>
</target>

234
And, to generate the CPD XML report, you could do something like this:
<target name="cpd">
<cpd minimumTokenCount="100" format="xml" outputFile="/target/cpd.xml">
<fileset dir="src/main/java" includes="**/*.java"/>
</cpd>
</target>
You can place this XML ruleset in your project classpath (for example, in src/main/resources for
a Maven project), or in a separate module (if you want to share the configuration between projects).
An example of how to configure Maven 2 to generate PMD and CPD reports using an exported XML
ruleset as shown here:
<reporting>
<plugins>
<plugin>
<groupId>org.apache.maven.plugins</groupId>
<artifactId>maven-pmd-plugin</artifactId>
<version>2.5</version>
<configuration>
<!-- PMD options -->
<targetJdk>1.6</targetJdk>
<aggregate>true</aggregate>
<format>xml</format>
<rulesets>
<ruleset>/pmd-rules.xml</ruleset>
</rulesets>
<!-- CPD options -->
<minimumTokens>20</minimumTokens>
<ignoreIdentifiers>true</ignoreIdentifiers>
</configuration>
</plugin>
</plugins>
</reporting>
If you are using Maven 3, you would place the plugin definition in the <maven-site-plugin>
configuration section. This example also shows how to use a ruleset in another dependency (in this case
the pmd-rules.jar file):
<project>
...
<build>
...
<plugins>
...
<plugin>
<groupId>org.apache.maven.plugins</groupId>
<artifactId>maven-site-plugin</artifactId>
<version>3.0-beta-2</version>
<configuration>
<reportPlugins>
<plugin>
<groupId>org.apache.maven.plugins</groupId>

235
<artifactId>maven-pmd-plugin</artifactId>
<version>2.5</version>
<configuration>
<!-- PMD options -->
<targetJdk>1.6</targetJdk>
<aggregate>true</aggregate>
<format>xml</format>
<rulesets>
<ruleset>/pmd-rules.xml</ruleset>
</rulesets>
<!-- CPD options -->
<minimumTokens>50</minimumTokens>
<ignoreIdentifiers>true</ignoreIdentifiers>
</configuration>
</plugin>
</reportPlugins>
</configuration>
<dependencies>
<dependency>
<groupId>com.wakaleo.code-quality</groupId>
<artifactId>pmd-rules</artifactId>
<version>1.0.1</version>
</dependency>
</dependencies>
</plugin>
</plugins>
</build>
</project>
Now, you can run either mvn site or mvn pmd:pmd pmd:cpd to generate the PMD and CPD reports.
Unfortunately there is currently no built-in Gradle support for PMD or CPD, so you have to fall back
on invoking the PMD Ant plugin directly, as shown here:
configurations {
pmdConf
}
dependencies {
pmdConf 'pmd:pmd:4.2.5'
}
task pmd << {
println 'Running PMD static code analysis'
ant {
taskdef(name:'pmd', classname:'net.sourceforge.pmd.ant.PMDTask',
classpath: configurations.pmdConf.asPath)
taskdef(name:'cpd', classname:'net.sourceforge.pmd.cpd.CPDTask',
classpath: configurations.pmdConf.asPath)
pmd(shortFilenames:'true', failonruleviolation:'false',
rulesetfiles:'conf/pmd-rules.xml') {
formatter(type:'xml', toFile:'build/pmd.xml')

236
fileset(dir: "src/main/java") {
include(name: '**/*.java')
}
fileset(dir: "src/test/java") {
include(name: '**/*.java')
}
}
cpd(minimumTokenCount:'50', format: 'xml',
ignoreIdentifiers: 'true',
outputFile:'build/cpd.xml') {
fileset(dir: "src/main/java") {
include(name: '**/*.java')
}
fileset(dir: "src/test/java") {
include(name: '**/*.java')
}
}
}
}
This configuration will use the PMD rule set in the src/config directory, and generate a PMD XML
report called pmd.xml in the build directory. It will also run CPD and generate a CPD XML report
called cpd.xml in the build directory.
9.3.3. FindBugs
FindBugs is a powerful code quality analysis tool that checks your application byte code for potential
bugs, performance problems, or poor coding habits. FindBugs is the result of research carried out at the
University of Maryland lead by Bill Pugh, that studies byte code patterns coming from bugs in large
real-world projects, such as the JDKs, Eclipse, and source code from Google applications. FindBugs can
detect some fairly significant issues such as null pointer exceptions, infinite loops, and unintentionally
accessing the internal state of an object. Unlike many other static analysis tools, FindBugs tends to find
a smaller number of issues, but of those issues, a larger proportion will be important.
FindBugs is less configurable than the other tools we have seen, though in practice you generally don’t
need to fine-tune the rules as much as the other tools we’ve discussed. You can list the individual rules
you want to apply, but you can’t configure a shared XML file between your Maven builds and your
IDE, for example.
FindBugs comes bundled with an Ant task. You can define the FindBugs task in Ant as shown below.
FindBugs needs to refer to the FindBugs home directory, which is where the binary distribution of
FindBugs has been unzipped. To make the build more portable, we are storing the FindBugs installation
in our project directory structure, in the tools/findbugs directory:
<property name="findbugs.home" value="tools/findbugs" />
<taskdef name="findbugs" classname="edu.umd.cs.findbugs.anttask.FindBugsTask" >
<classpath>
<fileset dir="${findbugs.home}/lib" includes="**/*.jar"/>

237
</classpath>
</taskdef>
Then, to run FindBugs, you could set up a “findbugs” target as shown in the following example. Note
that FindBugs runs against your application byte-code, not your source code, so you need to compile
your source code first:
<target name="findbugs" depends="compile">
<findbugs home="${findbugs.home}" output="xml" outputFile="target/findbugs.xml">
<class location="${classes.dir}" />
<auxClasspath refId="dependency.classpath" />
<sourcePath path="src/main/java" />
</findbugs>
</target>
If you are using Maven 2, you don’t need to keep a local copy of the FindBugs installation. You just
need to configure FindBugs in the reporting section as shown here:
<reporting>
<plugins>
<plugin>
<groupId>org.codehaus.mojo</groupId>
<artifactId>findbugs-maven-plugin</artifactId>
<version>2.3.1</version>
<configuration>
<effort>Max</effort>
<xmlOutput>true</xmlOutput>
</configuration>
</plugin>
</plugins>
</reporting>
Or for a Maven 3 project:
<project>
...
<build>
...
<plugins>
...
<plugin>
<groupId>org.apache.maven.plugins</groupId>
<artifactId>maven-site-plugin</artifactId>
<version>3.0-beta-2</version>
<configuration>
<reportPlugins>
<plugin>
<groupId>org.codehaus.mojo</groupId>
<artifactId>findbugs-maven-plugin</artifactId>
<version>2.3.1</version>
<configuration>
<effort>Max</effort>
<xmlOutput>true</xmlOutput>
</configuration>

238
</plugin>
</reportPlugins>
</configuration>
</plugin>
</plugins>
</build>
</project>
In both cases, you can generate the XML reports by running mvn site or mvn findbugs:findbugs.
The XML reports will be placed in the target directory.
At the time of writing there is no special support for FindBugs in Gradle, so you need to invoke the
FindBugs Ant plugin.
9.3.4. CodeNarc
CodeNarc is a static analysis tool for Groovy code, similar to PMD for Java. It checks Groovy source
code for potential defects, poor coding practices and styles, overly complex code, and so on. Typical
rules include “Constant If Expression,” “Empty Else Block,” “GString As Map Key,” and “Grails
Stateless Service.”
For Ant or Maven-based projects, the CodeNarc Ant plugin is the simplest option (a Maven plugin is
under development at the time of writing). A typical Ant configuration for use with Jenkins would look
like this:
<taskdef name="codenarc" classname="org.codenarc.ant.CodeNarcTask"/>
<target name="runCodeNarc">
<codenarc ruleSetFiles="rulesets/basic.xml,rulesets/imports.xml"
maxPriority1Violations="0">
<report type="xml">
<option name="outputFile" value="reports/CodeNarc.xml" />
</report>
<fileset dir="src">
<include name="**/*.groovy"/>
</fileset>
</codenarc>
</target>
You can integrate CodeNarc into a Grails project simply by installing the CodeNarc plugin:
$ grails install-plugin codenarc
This will configure CodeNarc to analyse the Groovy files in your Grails application code, as well as in
the src/groovy and test directories.
Gradle 0.8 also provides support for CodeNarc in the code-quality plugin, that you can configure in
your builds as shown here:
apply plugin: 'code-quality'
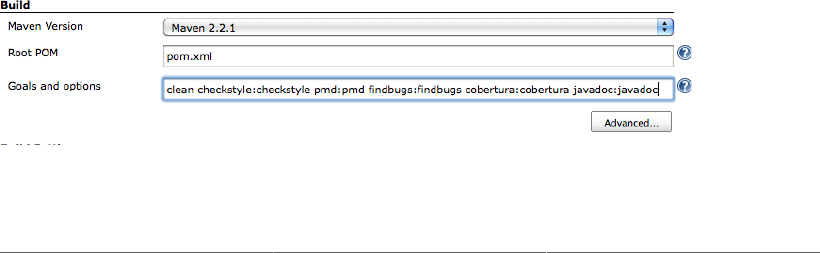
239
This will use the CodeNarc configuration file in config/codenarc/codenarc.xml by default. You
can override this with the codeNarcConfigFileName property.
You can generate the CodeNarc reports here by running gradle codenarcMain or, more simply,
gradle check.
9.4. Reporting on Code Quality Issues with the Violations
Plugin
One of the most useful code quality plugins for Jenkins is the Violations plugin. This plugin will not
analyse your project source code (you need to configure your build to do that), but it does a great job on
reporting on the code quality metrics generated for individual builds and trends over time. The plugin
caters for reports on code quality metrics coming from a large range of static analysis tools, including:
For Java
Checkstyle, CPD, PMD, FindBugs, and jcreport
For Groovy
codenarc
For JavaScript
jslint
For .Net
gendarme and stylecop
Installing the plugin is straightforward. Just go to the Plugin Manager screen and select the Jenkins
Violations plugin. Once you have installed the plugin and restarted Jenkins, you will be able to use it
for your projects.
The Violations plugin does not generate the code quality metrics data itself—you need to configure
your built to do that, as shown in the previous section. An example of doing this for a Maven build
job is illustrated in Figure 9.3, “Generating code quality reports in a Maven build”. Notice that here we
are invoking the Maven plugin goals directly. We could also just run mvn site, but if we are only
interested in the code quality metrics, and not the other elements of the Maven-generated site, calling
the plugins directly will result in faster builds.
Figure 9.3. Generating code quality reports in a Maven build
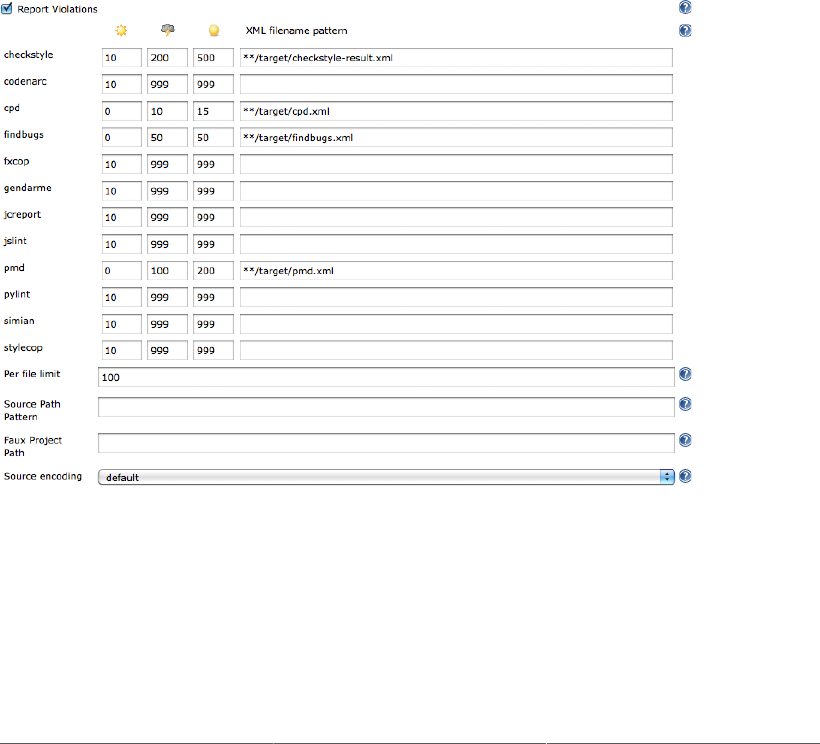
240
Once you have set this up, you can configure the violations plugin to generate reports and, if required,
trigger notifications, based on the report results. Just go to the Post-build Actions and check the Report
Violations checkbox. The details of the configuration vary depending on the project type. Lets look at
Freestyle build jobs first.
9.4.1. Working with Freestyle Build Jobs
Freestyle build jobs allow you the most configuration flexibility, and are your only option for non-Java
projects.
When you use the Violations plugin with a Freestyle build job, you need to specify the paths to each of
the XML reports generated by the static analysis tools you have used (see Figure 9.4, “Configuring the
violations plugin for a Freestyle project”). The plugin can cater for several reports from the same tool,
which is useful for Maven multimodule projects—just use a wildcard expression to identify the reports
you want (for example, **/target/checkstyle.xml).
Figure 9.4. Configuring the violations plugin for a Freestyle project
The Violations plugin will generate a graph tracking the number of each type of issue over time
(see Figure 9.5, “Violations over time”). The graph displays a different-colored line for each type of
violations your are tracking, as well as a summary of the latest results.
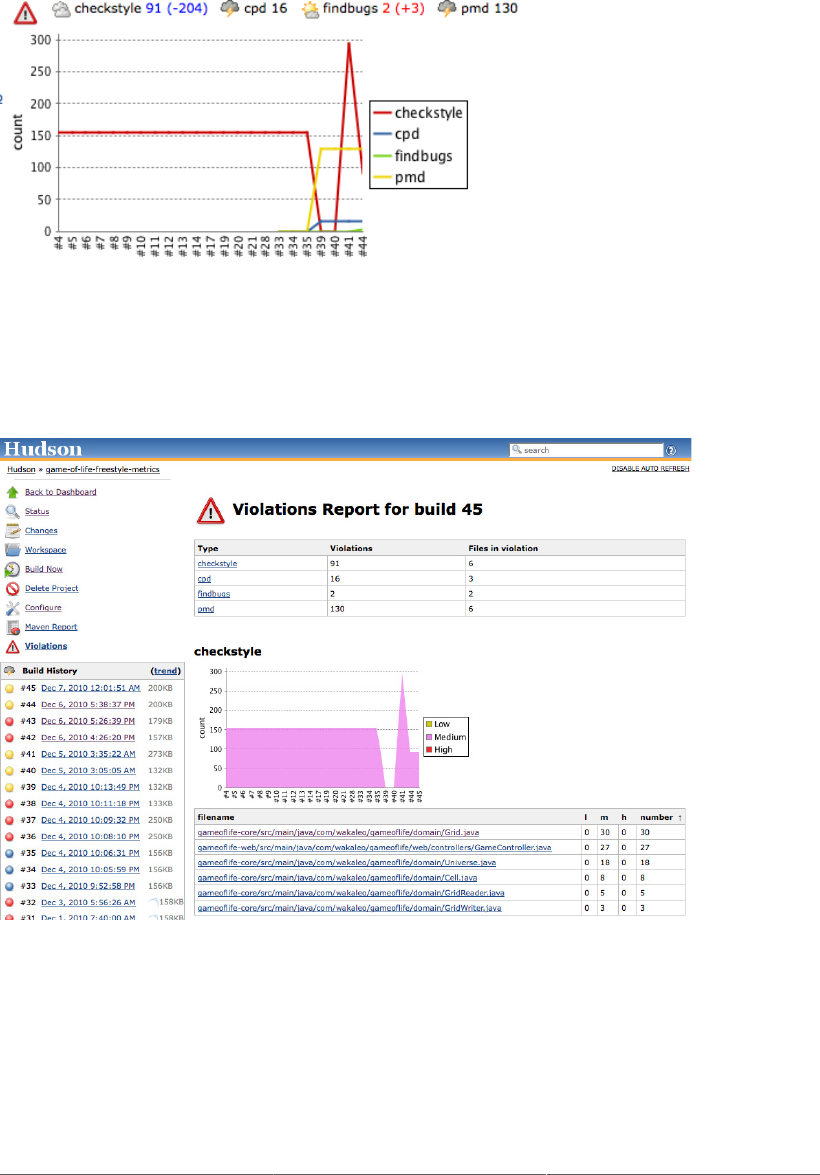
241
Figure 9.5. Violations over time
You can also click on this graph to drill down into a particular build. Here, you can see the number
of issues raised for that particular build (see Figure 9.6, “Violations for a given build”), with various
breakdowns by violation type, severity, and file.
Figure 9.6. Violations for a given build
Finally, you can drill down into a particular class, to display the detailed list of issues, along with where
they appear in the source code.
But the Violations plugin also allows for a more proactive management of code quality. You can use the
results of the code quality analysis reports to influence the weather icon on the Jenkins dashboard. This

242
weather icon is normally related to the number of failing builds in the previous five builds, but Jenkins
can also take into account other factors, such as code quality results. Displaying a cloudy or stormy icon
for a project on the dashboard is a much better way of raising awareness about code quality issues that
simply relying on graphs and reports on the build job page.
To set this up, you need to go back to the Report Violations section in the Post-build Actions. The first
three columns in Figure 9.4, “Configuring the violations plugin for a Freestyle project” show a sunny
icon, a stormy icon, and a yellow ball. The one with the sunny icon is the maximum number of violations
tolerated in order to keep the sunny weather icon on the dashboard page. The second column, with the
stormy weather icon, is the number of violations that will cause a stormy icon to appear on the dashboard.
If you have a number of violations between these two extremes, you will get one of the cloudy icons.
You can set different values for different tools. The exact thresholds will vary between teams and
between projects, and also between tools. For example, Checkstyle will typically raise a lot more issues
than FindBugs or CPD, with PMD being somewhere in between. You need to adjust the values you use
to reflect how these tools work on your code base, and your expectations.
You can take this even further with the third column (the one with the yellow ball). This column lets you
set a number of violations that will cause the build to be declared unstable. Remember, when a build
becomes unstable Jenkins will send out notification messages, so this is an even more proactive strategy.
For example, in Figure 9.4, “Configuring the violations plugin for a Freestyle project”, we have
configured the minimum number of Checkstyle violations to 10, which means that the sunny weather
icon will only appear if there are 10 or fewer Checkstyle violations. If there are more than 10, the weather
will degrade progressively, until at the 200 violations mark, it will become stormy. And if there are 500
or more Checkstyle violations, the project will be flagged as unstable.
Now look at the configuration for CPD, the duplicated code detector that comes with PMD. In this
project, we have adopted a zero-tolerance policy for duplicated code, so the sunny icon value is set to
zero. The stormy icon is set to 10, so if there are 10 or more copy-paste violations, the project weather
indicator will appear as stormy. And if the project has 15 or more copy-paste violations, it will be
declared unstable.
Now, on the Dashboard page, this project will appear both with a stormy weather icon and as unstable,
even though there are no test failures (see Figure 9.7, “Configuring the violations plugin for a Freestyle
project”). This particular build is unstable because there are 16 CPD violations. In addition, if you place
your mouse over the weather icon, Jenkins will display some more details about how it calculated this
particular status.
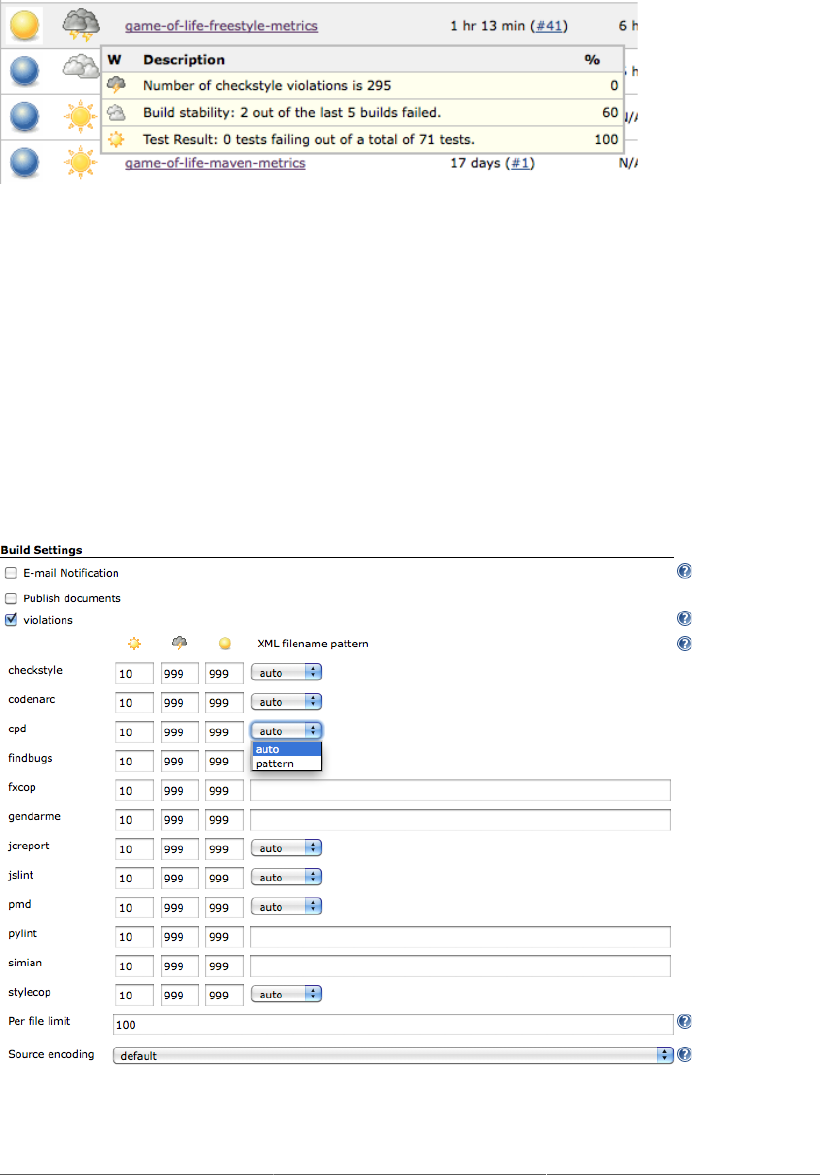
243
Figure 9.7. Configuring the violations plugin for a Freestyle project
9.4.2. Working with Maven Build Jobs
Maven build jobs in Jenkins use the Maven conventions and information in the project pom.xml file
to make configuration easier and more lightweight. When you use the Violations plugin with a Maven
build job, Jenkins uses these conventions to reduce the amount of work you need to do to configure the
plugin. You don’t need to tell Jenkins where to find the XML reports for many of the static analysis
tools (for example, Checkstyle, PMD, FindBugs, and CPD), as Jenkins can figure this out based from
the Maven conventions and plugin configurations (see Figure 9.8, “Configuring the violations plugin
for a Maven project”). If you do need to override these conventions, you can choose the Pattern option
in the “XML filename pattern” drop-down list, and enter a path as you do for freestyle build jobs.
Figure 9.8. Configuring the violations plugin for a Maven project
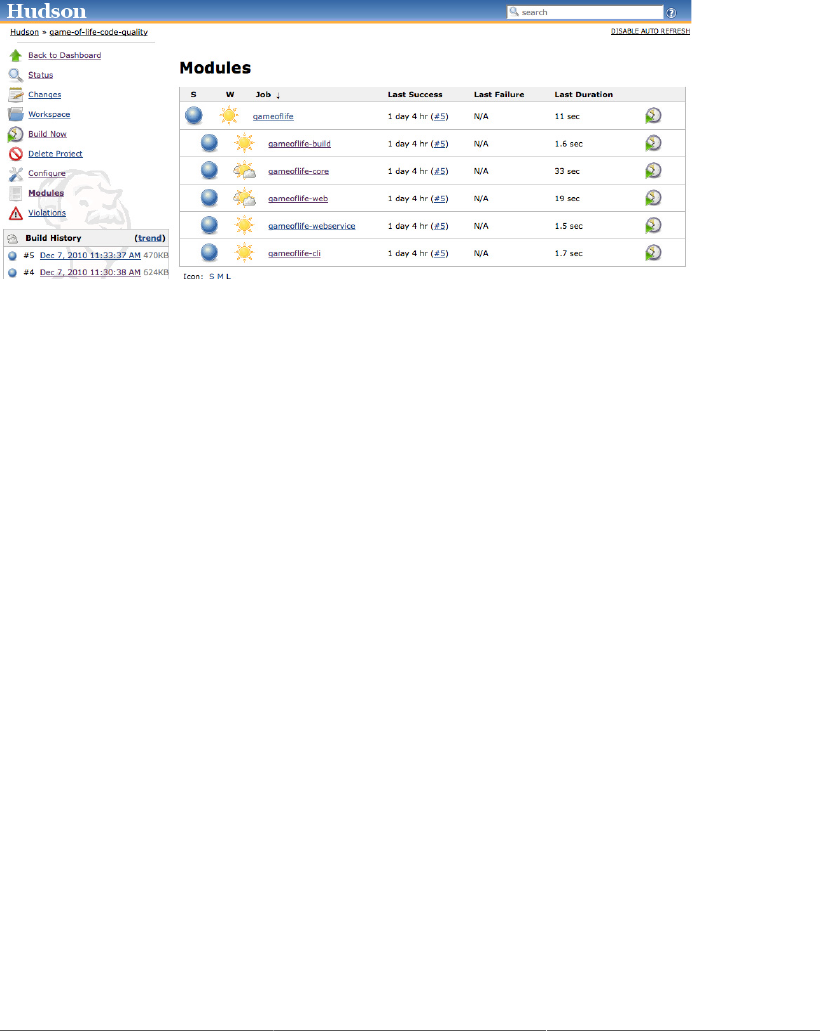
244
The Violations plugin works well with multimodule Maven projects, but at the time of writing it needs a
little tweaking to obtain best results. Maven build jobs understand the structure of multimodule projects
(see Figure 9.9, “Jenkins Maven build jobs understand Maven multimodule structures”); furthermore,
you can drill down into any module and get a detailed view of the build results for that build job.
Figure 9.9. Jenkins Maven build jobs understand Maven multimodule structures
This is a very useful feature, but it means you need to do a little extra work to get all of the benefits out
of the Violations plugins for the individual modules. By default, the violations plugin will display an
aggregated view of the code quality metrics like the one in Figure 9.5, “Violations over time”. You can
also click on the violations graph, and view the detailed reports for each module.
However, for this to work correctly, you need to activate the violations plugin individually for each
module in addition to the main project. To do this, click on the module you want to configure in the
Modules screen, and then click on the “Configure” menu. Here, you will see a small subset of the usual
configuration options (see Figure 9.10, “Activating the Violations plugin for an individual module”).
Here, you just need to activate the Violations option, and configure the thresholds if required. On the
positive side, this means that you can define different threshold values for different modules.

245
Figure 9.10. Activating the Violations plugin for an individual module
Once you have done this, when you click on the violations aggregate graph on the project build job
home page, Jenkins will list the individual violations graphs for each module.
9.5. Using the Checkstyle, PMD, and FindBugs Reports
You can also report individually on results from Checkstyle, PMD, and FindBugs. In addition to the
Violations plugin, there are also Jenkins plugins that produce trend graphs and detailed reports for each
of these tools individually. We will look at how to do this for Checkstyle, but the same approach also
applies for PMD and FindBugs. You can even use the Analysis Collector Plugin to display the combined
results in a graph similar to the one produced by the Violations plugin.
You can install these plugins through the Plugin Manager in the usual way. The plugins in question are
called, unsurprisingly, Checkstyle plugin, PMD plugin, and FindBugs plugin. All of these plugins use
the Static Analysis Utilities plugin, which you need to install as well (see Figure 9.11, “Installing the
Checkstyle and Static Analysis Utilities plugins”).

246
Figure 9.11. Installing the Checkstyle and Static Analysis Utilities plugins
Once you have installed these plugins, you can set up the reporting in your project configuration. Tick
the “Publish Checkstyle analysis results” checkbox. In a freestyle build, you will need to specify a path
pattern to find the Checkstyle XML reports; in a Maven 2 build, Jenkins will figure out where to look
for them by itself.
This will provide basic Checkstyle reporting, but as usual you can fine-tune things further by clicking
on the Advanced button. In a Maven 2 build, you can configure the health threshold values (how many
violations will cause the build to go from sunny to stormy), and also filter the priority violations you
want to include in this calculation. For example, you may only want high priority issues to be taken into
account for the weather icon status.
The Freestyle builds have a few more options you can configure: in particular, you can cause the build
to become unstable (yellow ball) or even to fail (red ball) if there are more than a given number of
violations, or if there are more than a given number of new violations (see Figure 9.12, “Configuring the
Checkstyle plugin”). So, in the configuration in the illustration, if there are more than 50 new checkstyle
violations of any priority in a build, the build will be flagged as unstable. This certainly has its uses for
Checkstyle, but it can also come in very handy with FindBugs, where high priority issues often represent
dangerous and potentially show-stopping bugs.
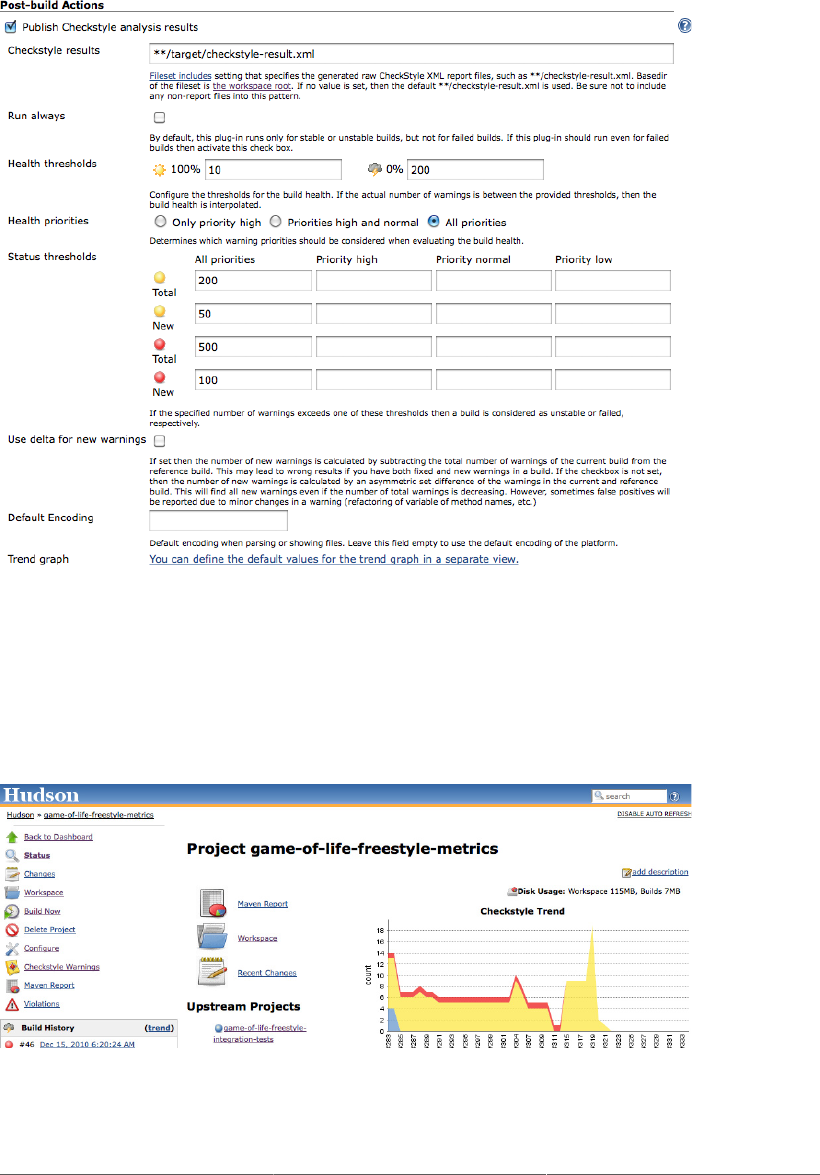
247
Figure 9.12. Configuring the Checkstyle plugin
Now, when the build runs, Jenkins will now generate a trend graph and detailed reports for the
Checkstyle violations (see Figure 9.13, “Displaying Checkstyle trends”). From here, you can drill down
to see violations per priority, per category, per run type, per package, and so on.
Figure 9.13. Displaying Checkstyle trends
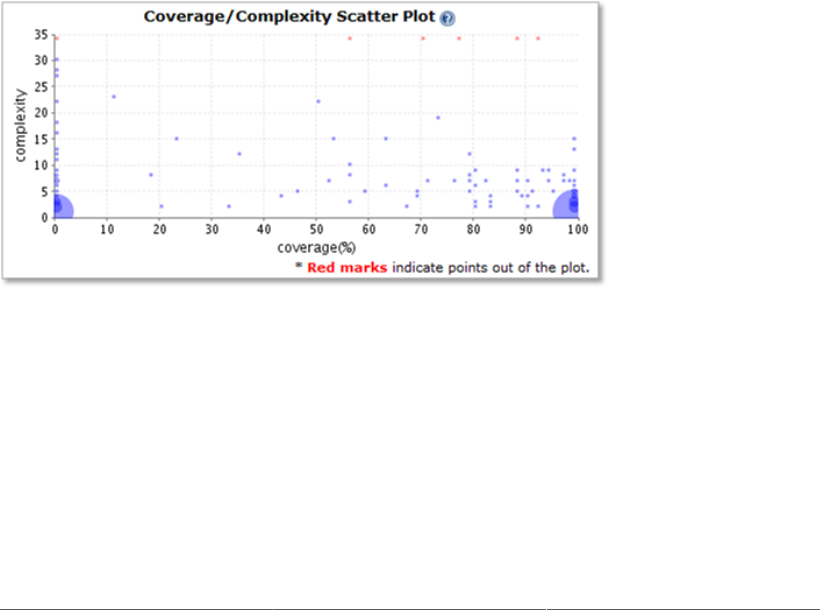
248
As we mentioned earlier, the same approach also works with the PMD plugin and the FindBugs plugin.
These plugins are a great way to provide more focused reporting on the results of a particular tool, and
also give you more control over the impact that these violations will have on the build results.
9.6. Reporting on Code Complexity
Code complexity is another important aspect of code quality. Code complexity is measured in a
number of ways, but one commonly used (and easy-to-understand) complexity metric is Cyclometric
Complexity, which involves measuring the number of different paths through a method. Using this
metric, complex code typically has large numbers of nested conditional statements and loops, which
make the code harder to understand and to debug.
There is also a code quality theory that correlates code complexity and code coverage, to give a general
idea of how reliable a particular piece of code is. This is based on the (very understandable) idea that
code that is both complex and poorly tested is more likely to contain bugs than simple, well-tested code.
The Coverage Complexity Scatter Plot plugin is designed to let you visualize this information in your
Jenkins builds (see Figure 9.14, “A coverage/complexity scatter plot”). Dangerously complex and/or
untested methods will appear high on the graph, where as the more well-written and well-tested methods
will appear lower down.
Figure 9.14. A coverage/complexity scatter plot
The scatter graph gives you a good overview of the state of your code in terms of complexity and test
coverage, but you can also drill down to investigate further. If you click on any point in the graph, you
can see the corresponding methods, with their test coverage and complexity (see Figure 9.15, “You can
click on any point in the graph to investigate further”).
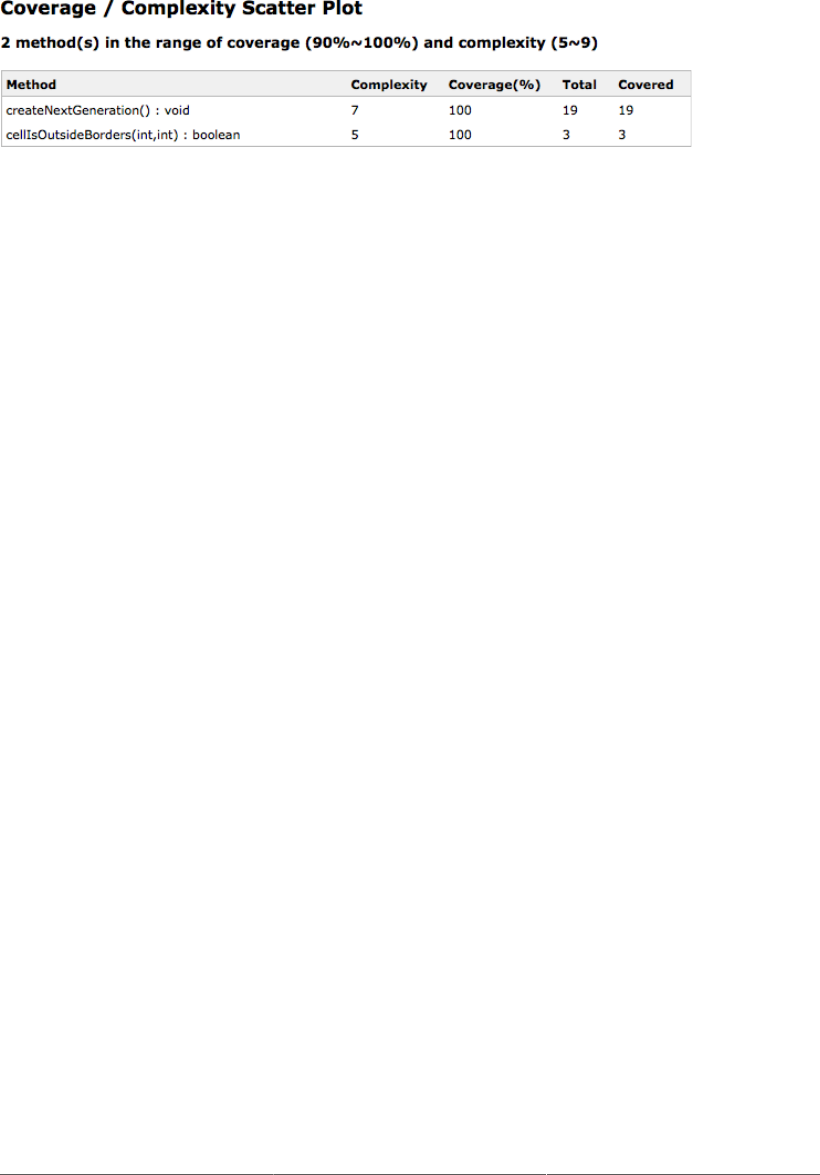
249
Figure 9.15. You can click on any point in the graph to investigate further
At the time of writing, this plugin requires Clover, so your build needs to have generated a Clover
XML coverage report, and you need to have installed and configured the Clover Jenkins plugin (see
Section 6.6.2, “Measuring Code Coverage with Clover”). However support for Cobertura and other
tools is planned.
9.7. Reporting on Open Tasks
When it comes to code quality, static analysis is not the only tool you can use. Another indicator of the
general health of your project can be found in the number of FIXME, TODO, @deprecated, and similar
tags scattered through the source code. If there are a lot of these, it can be a sign that your code base has
a lot of unfinished work, and is therefore not in a very finalized state.
The Jenkins Task Scanners plugin lets you keep track of these sorts of tags in your source code, and
optionally flag a build with a bad weather icon on the dashboard if there are too many open tasks.
To set this up, you need to install both the Static Analysis Utilities plugin and the Task Scanner plugin.
Once installed, you can activate the plugin in your project by checking the “Scan workspace for open
tasks” checkbox in the Build Settings section of your project job configuration.
Configuring the Task Scanner plugin is pretty straightforward (see Figure 9.16, “Configuring the Task
Scanner plugin is straightforward”). You simply enter the tags you want to track, with different priorities
if you consider certain tags to be more important than others. By default, the plugin will scan all the
Java source code in the project, but you can redefine this behavior by entering the Files to scan field.
In Figure 9.16, “Configuring the Task Scanner plugin is straightforward”, for example, we also check
XML and JSP files for tags.
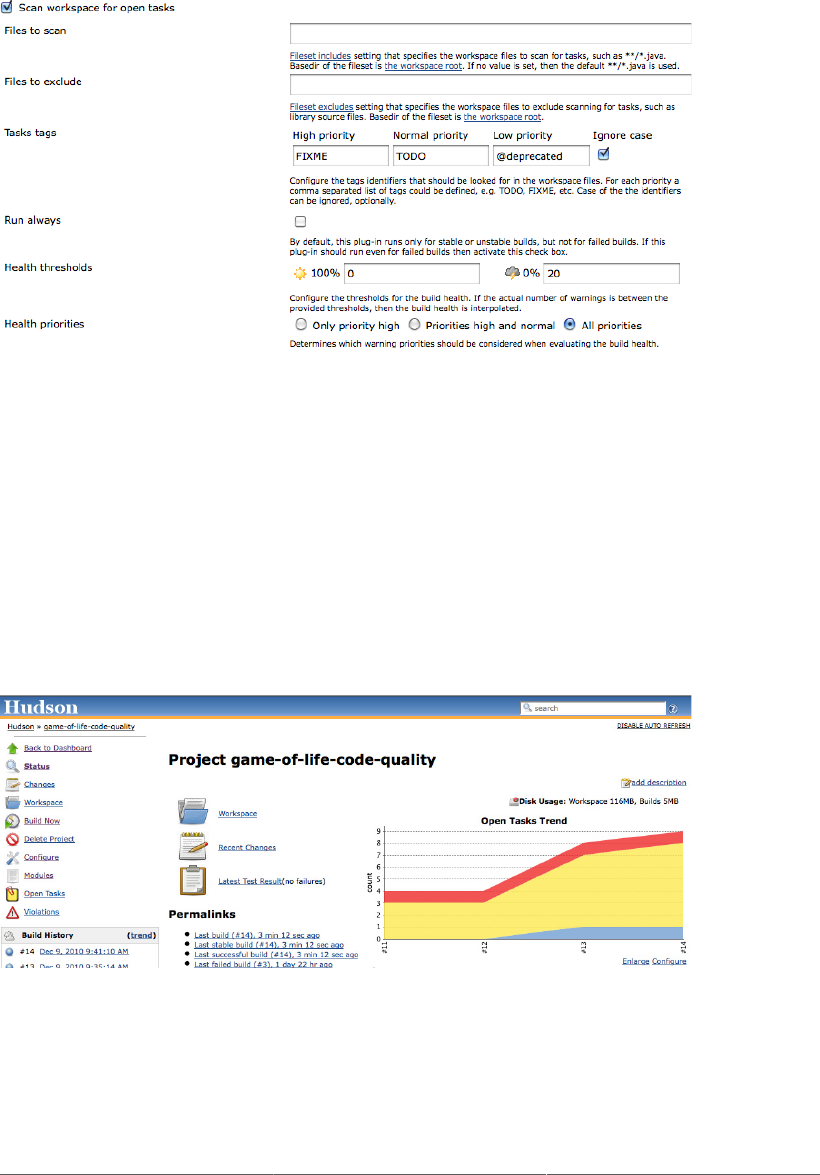
250
Figure 9.16. Configuring the Task Scanner plugin is straightforward
The Advanced button gives you access to a few more sophisticated options. Probably the most useful
are the Health thresholds, which let you define the maximum number of issues tolerated before the
build can no longer be considered “sunny,” and the minimum number of issues required for “stormy
weather” status.
The plugin generates a graph that shows tag trends by priority (see Figure 9.17, “The Open Tasks Trend
graph”). If you click on the Open Tasks report, you can also see a breakdown of tasks by Maven module,
package or file, or even list the open tasks.
Figure 9.17. The Open Tasks Trend graph
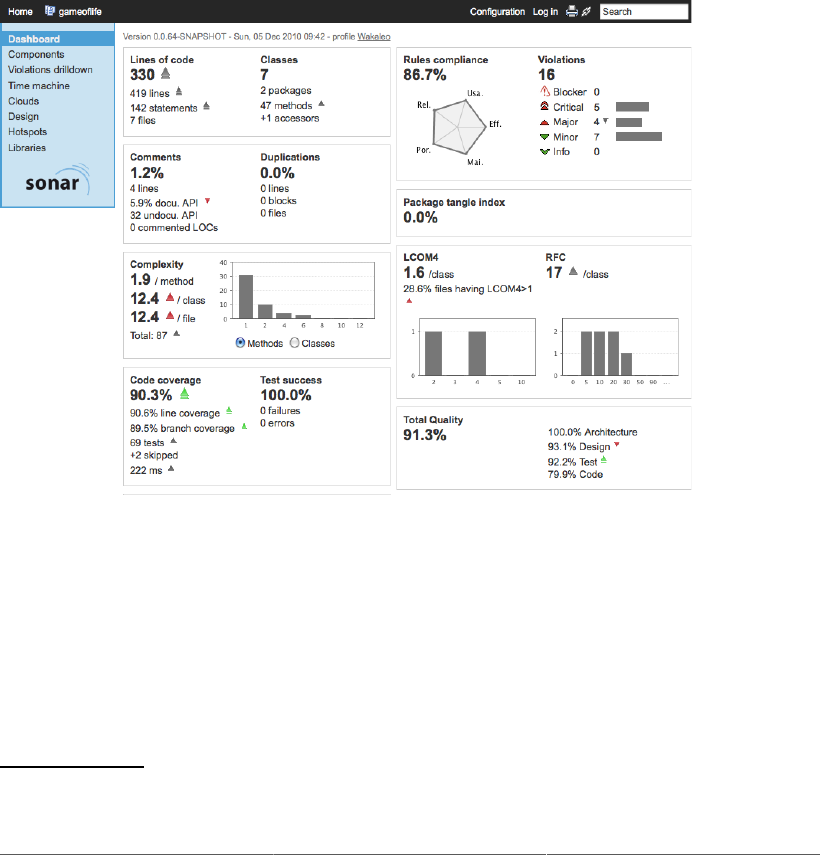
251
9.8. Integrating with Sonar
Sonar4 is a tool that centralizes a range of code quality metrics into a single website (see Figure 9.18,
“Code quality reporting by Sonar”). It uses several Maven plugins (Checkstyle, PMD, FindBugs,
Cobertura or Clover, and others) to analyse Maven projects and generate a comprehensive set of code
quality metrics reports. Sonar reports on code coverage, rule compliance, and documentation, but also
on more high-level metrics such as complexity, maintainability and even technical debt. You can use
plugins to extend its features and add support for other languages (such as support for CodeNarc for
Groovy source code). The rules used by the various tools are managed and configured centrally on the
Sonar website, and the Maven projects being analyzed don’t require any particular configuration. This
makes Sonar a great fit for working on Maven projects where you have limited control over the pom files.
Figure 9.18. Code quality reporting by Sonar
In one of the most common usages of Sonar, Sonar automatically runs a set of Maven code quality
related plugins against your Maven project, and stores the results into a relational database. The Sonar
server, which you run separately, then analyzes and displays the results as shown in Figure 9.18, “Code
quality reporting by Sonar”.
Jenkins integrates well with Sonar. The Jenkins Sonar Plugin lets you define Sonar instances for all of
your projects, and then activate Sonar in particular builds. You can run your Sonar server on a different
4 http://www.sonarsource.org
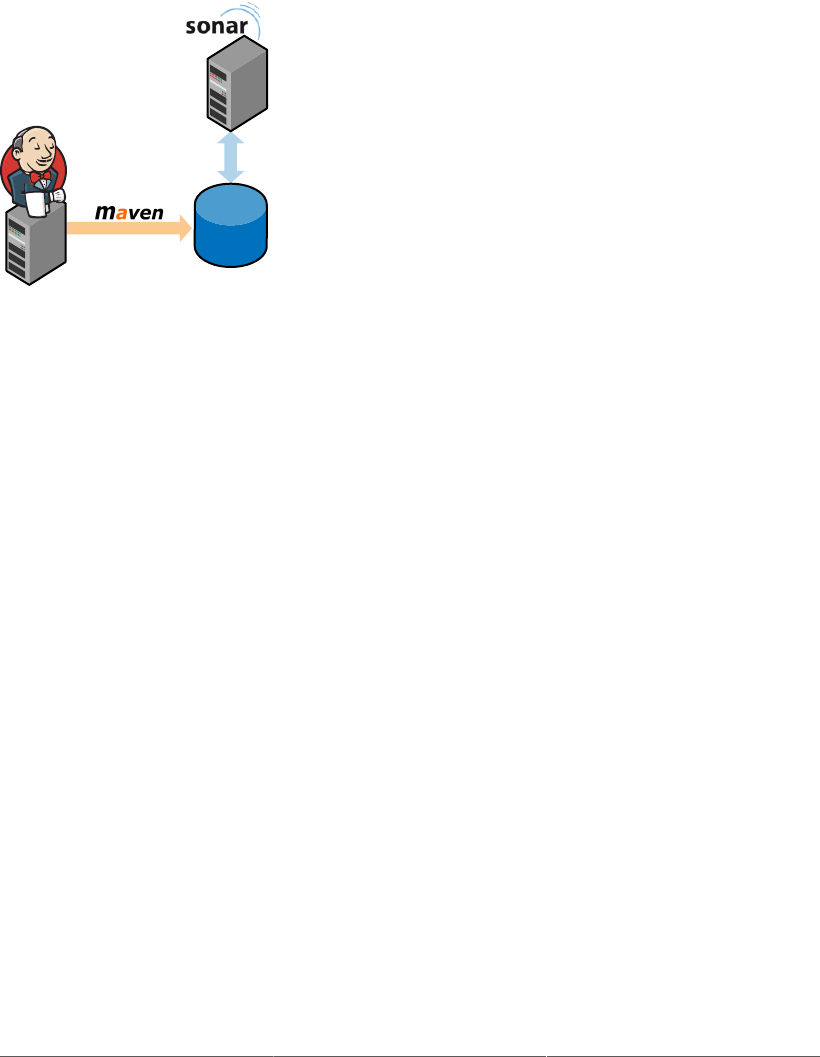
252
machine to your Jenkins instance, or on the same. The only constraint is that the Jenkins instance must
have JDBC access to the Sonar database, as it injects code quality metrics directly into the database,
without going through the Sonar website (see Figure 9.19, “Jenkins and Sonar”).
Jenkins Sonar database
Figure 9.19. Jenkins and Sonar
Sonar also has an Ant bootstrap (with a Gradle bootstrap in the making at the time of writing) for non-
Maven users.
You install the plugin in the usual way, via the Plugin Manager. Once installed, you configure the
Jenkins Sonar plugin in the Configure System screen, in the Sonar section. This involves defining your
Sonar instances—you can configure as many instances of Sonar as you need. The default configuration
assumes that you are running a local instance of Sonar with the default embedded database. This is useful
for testing purposes but not very scalable. For a production environment, you will typically run Sonar
on a real database such as MySQL or Postgres, and you will need to configure the JDBC connection to
the production Sonar database in Jenkins. You do this by clicking on the Advanced button and filling
in the appropriate fields (see Figure 9.20, “Configuring Sonar in Jenkins”).
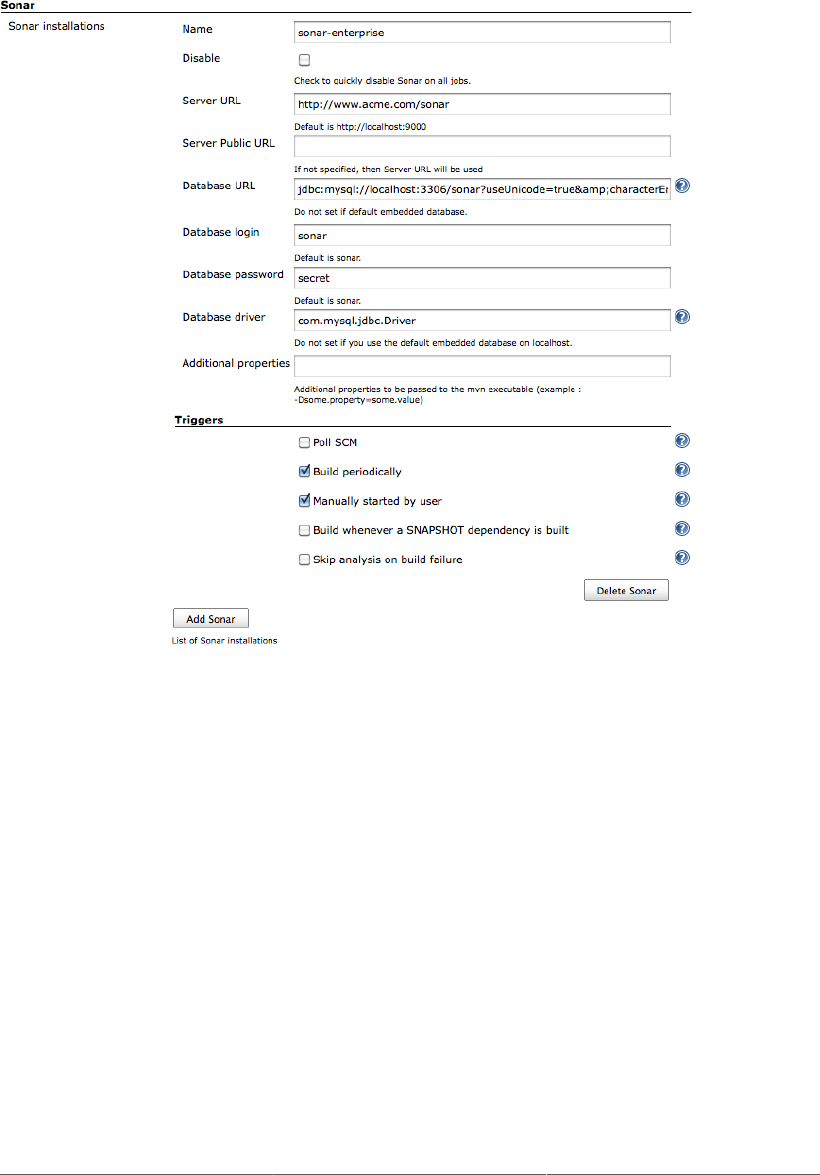
253
Figure 9.20. Configuring Sonar in Jenkins
The other thing you need to configure is when the Sonar build will kick off in a Sonar-enabled build job.
You usually configure Sonar to run with one of the long-running Jenkins build jobs, such as the code
quality metrics build. It is not very useful to run the Sonar build more than once a day, as Sonar stores
metrics in 24-hour slices. The default configuration will kick off a Sonar build in a Sonar-enabled build
job whenever the job is triggered by a periodically scheduled build or by a manual build.
To activate Sonar in your build job with the system-wide configuration options, just check the Sonar
option in the Post-build Actions (see Figure 9.21, “Configuring Sonar in a build job”). Sonar will run
whenever your build is started by one of the trigger mechanisms defined above.
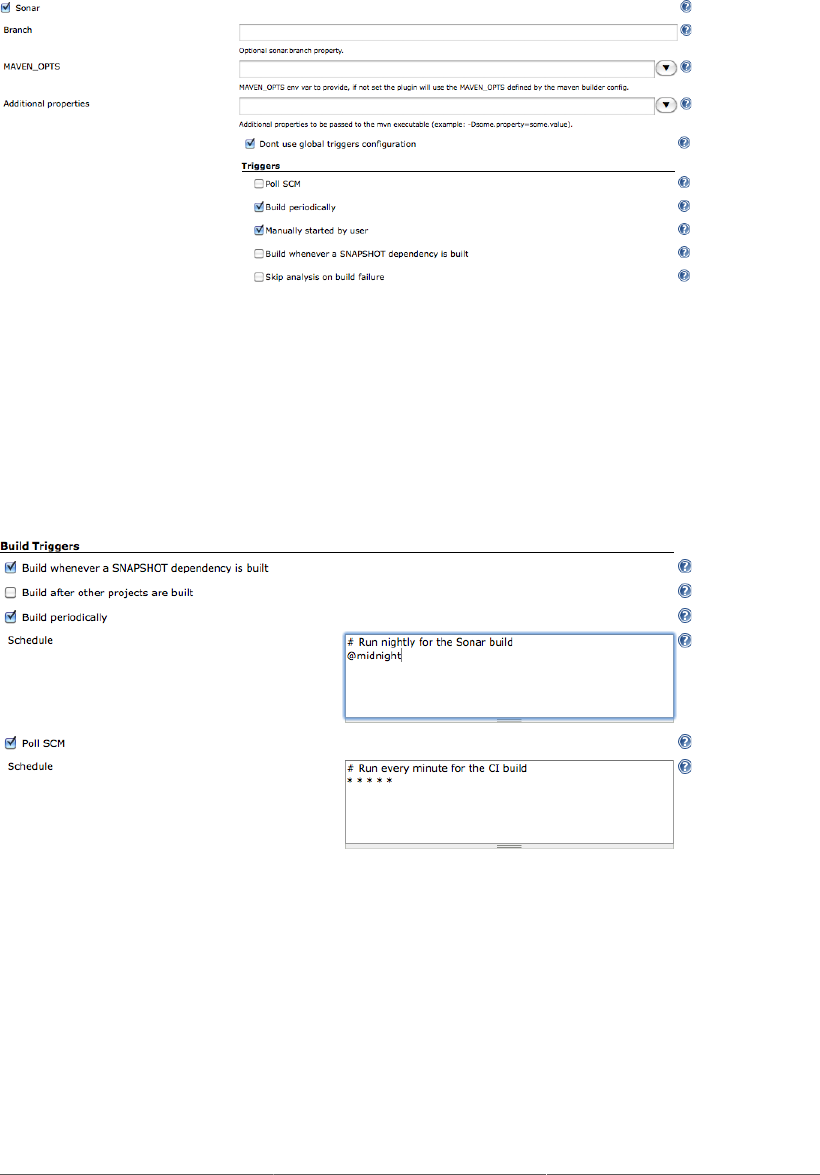
254
Figure 9.21. Configuring Sonar in a build job
You typically set up Sonar to run on a regular basis, for example every night or once a week. So you
can activate Sonar on your normal unit/integration test build job, simply by adding a schedule (see
Figure 9.22, “Scheduling Sonar builds”). This avoids duplicated configuration details between jobs. Or,
if you already have a scheduled build job that runs with an appropriate frequency (such as a dedicated
code quality metrics build), you can activate Sonar on this build job.
Figure 9.22. Scheduling Sonar builds
If you click on the Advanced button, you can specify other more sophisticated options, such as running
your Sonar build on a separate branch, passing Maven additional command-line options (such as extra
memory), or overriding the default trigger configuration.
By default, Sonar will run even if the normal build fails. This is usually what you want, as Sonar should
record build and test failures as well as successful results. However, if required, you can deactivate this
option too in the Advanced options.

255
9.9. Conclusion
Code quality is an important part of the build process, and Jenkins provides excellent support for the
wide range of code quality-related tools out there. As a result, Jenkins should be a key part of your code
quality strategy.

Chapter 10. Advanced Builds
10.1. Introduction
In this chapter, we will look at some more advanced build job setups. We will discuss parameterized
builds, which allows Jenkins to prompt the user for additional parameters that will be passed into the
build job, and multiconfiguration build jobs, which let you run a single build job though a large number
of variations. We will look at how to run build jobs in parallel, and wait for the outcome of one or more
build jobs before continuing. And we will see how to implement build promotion strategies and build
pipelines so that Jenkins can be used not only as a build server, but also as a deployment server.
10.2. Parameterized Build Jobs
Parameterized builds are a powerful concept that enable you to add another dimension to your build jobs.
The Parameterized Build plugin lets you configure parameters for your build job, that can be either
entered by the user when the build job is triggered, or (as we will see later) from another build job.
For example, you might have a deployment build job, where you want to choose the target environment
in a drop-down list when you start the build job. Or you may want to specify the version of the application
you want to deploy. Or, when running a build job involving web tests, you might want to specify the
browser to run your Selenium or WebDriver tests in. You can even upload a file to be used by the build
job.
Note that it is the job of the build script to analyze and process the parameter values correctly—Jenkins
simply provides a user interface for users to enter values for the parameters, and passes these parameters
to the build script.
10.2.1. Creating a Parameterized Build Job
You install the Parameterized Build plugin as usual, via the Plugin Manager screen. Once you have done
this, configuring a parameterized build job is straightforward. Just tick the “This build is parameterized”
option and click Add Parameter to add a new build job parameter (see Figure 10.1, “Creating a
parameterized build job”). You can add parameters to any sort of build, and you can add as many
parameters as you want for a given build job.
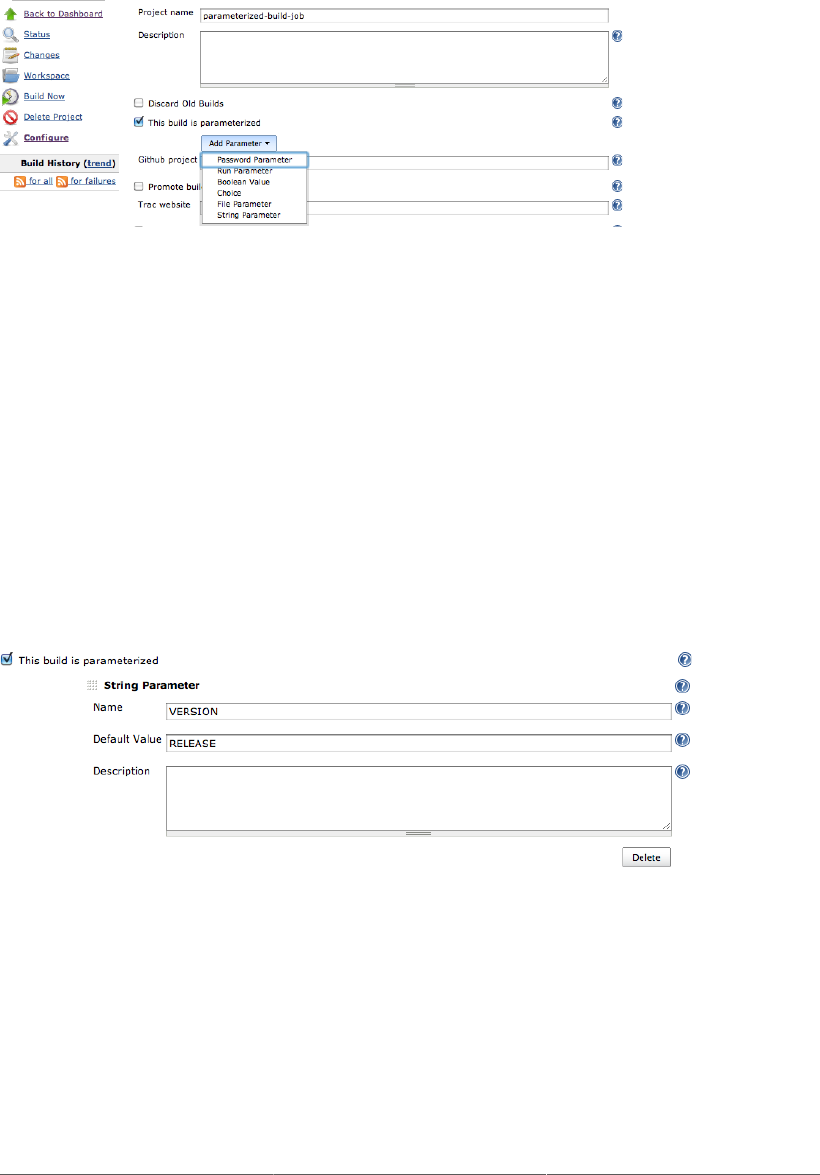
258
Figure 10.1. Creating a parameterized build job
To add a parameter to your build job, just pick the parameter type in the drop-down list. This will let
you configure the details of your parameter (see Figure 10.2, “Adding a parameter to the build job”).
You can choose from several different parameter types, such as Strings, Booleans, and drop-down lists.
Depending on the type you choose, you will have to enter slightly different configuration values, but the
basic process is identical. All parameter types, with the exception of the File parameter, have a name
and a description, and most often a default value.
In Figure 10.3, “Adding a parameter to the build job”, for example, we are adding a parameter called
version to a deployment build job. The default value (RELEASE) will be initially displayed when
Jenkins prompts the user for this parameter, so if the user doesn’t change anything, this value will be
used.
Figure 10.2. Adding a parameter to the build job
When the user starts a parameterized build job (parameterized build jobs are very often started
manually), Jenkins will propose a page where the user can enter values for each of the build job’s
parameters (see Figure 10.3, “Adding a parameter to the build job”).
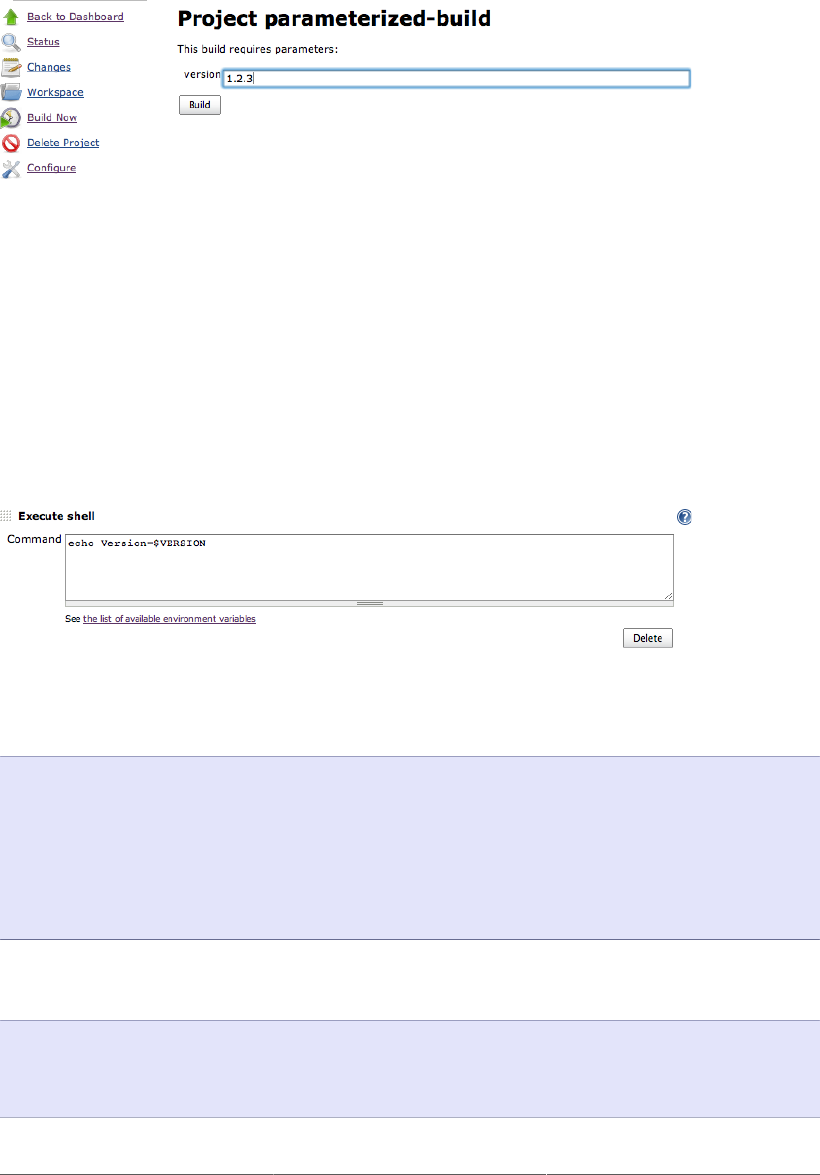
259
Figure 10.3. Adding a parameter to the build job
10.2.2. Adapting Your Builds to Work with Parameterized Build
Scripts
Once you have added a parameter, you need to configure your build scripts to use it. Choosing the
parameter name well is important here, as this is also the name of the variable that Jenkins will pass
through as an environment variable when it runs the build job. To illustrate this, consider the very basic
build job configuration in Figure 10.4, “Demonstrating a build parameter”, where we are simply echoing
the build parameter back out to the console. Note that, to make the environment variables more portable
across operating systems, it is good practice to put them all in upper case.
Figure 10.4. Demonstrating a build parameter
When we run this, we get a console output along the following lines:
Started by user anonymous
Building on master
[workspace] $ /bin/sh -xe /var/folders/y+/y+a+wZ-jG6WKHEm9KwnSvE+++TI/-Tmp-/
jenkins5862957776458050998.sh
+ echo Version=1.2.3
Version=1.2.3
Notifying upstream projects of job completion
Finished: SUCCESS
You can also use these environment variables from within your build scripts. For example, in an Ant or
Maven build, you can use the special env property to access the current environment variables:
<target name="printversion">
<property environment="env" />
<echo message="${env.VERSION}"/>
</target>
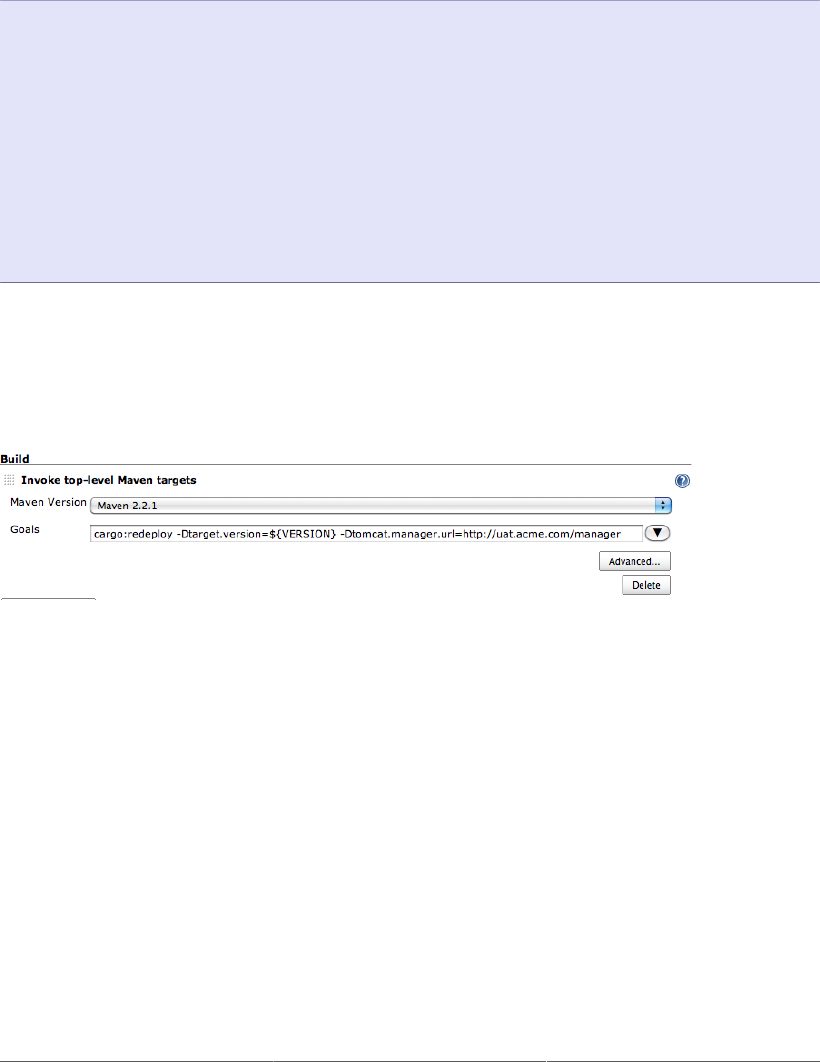
260
Another option is to pass the parameter into the build script as a property value. The following is a more
involved example from a Maven POM file. In this example, Maven is configured to deploy a specific
WAR file. We provide the version of the WAR file to be deployed in the target.version property,
which is used in the dependency declaration, as shown below:
...
<dependencies>
<dependency>
<groupId>com.wakaleo.gameoflife</groupId>
<artifactId>gameoflife-web</artifactId>
<type>war</type>
<version>${target.version}</version>
</dependency>
</dependencies>
<properties>
<target.version>RELEASE</target.version>
...
</properties>
When we invoke Maven, we pass in the parameter as one of the build properties (see Figure 10.5,
“Adding a parameter to a Maven build job”). We can then use a tool like Cargo to do the actual
deployment—Maven will download the requested version of the WAR file from the local Enterprise
Repository Manager, and deploy it to an application server.
Figure 10.5. Adding a parameter to a Maven build job
That, in a nutshell, is how you can integrate build job parameters into your build. In addition to plain
old String parameters, however, there are a few more sophisticated parameter types, that we will look
at in the following paragraphs (see Figure 10.6, “Many different types of parameters are available”).
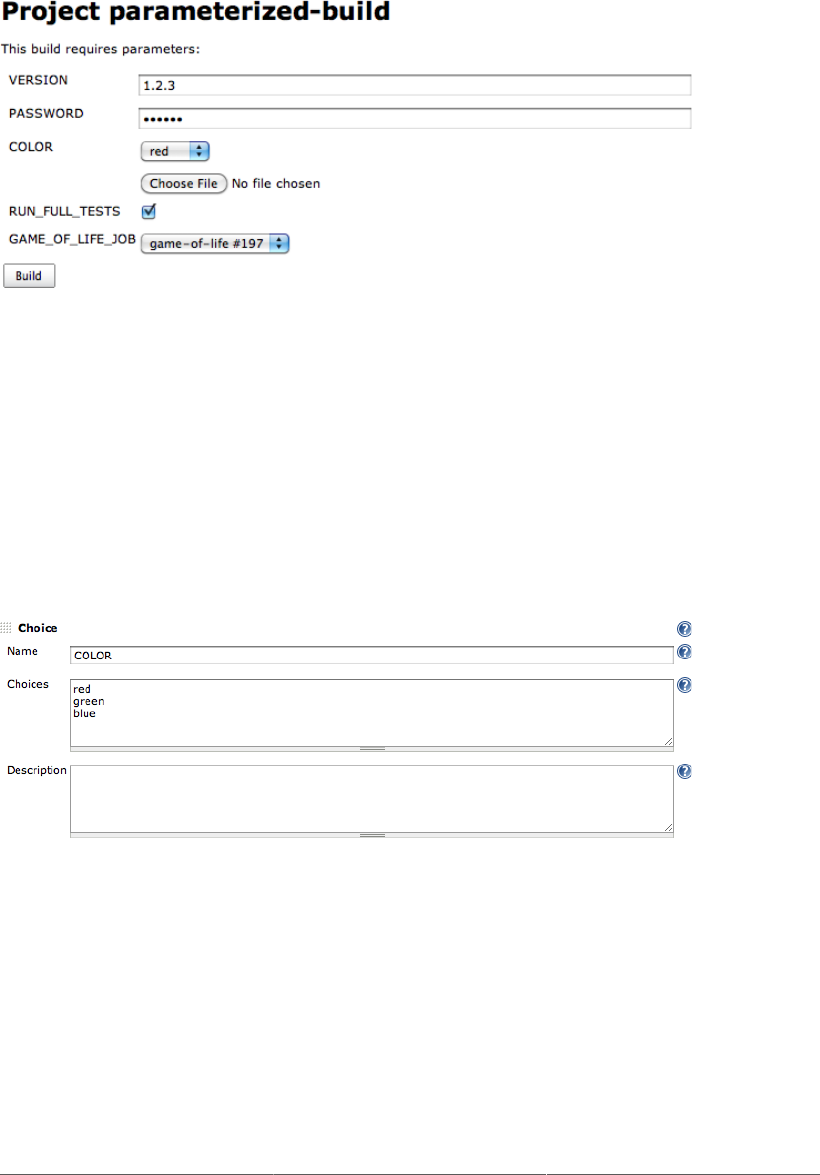
261
Figure 10.6. Many different types of parameters are available
10.2.3. More Advanced Parameter Types
Password parameters are, as you would expect, very similar to String parameters, except that they are
displayed as a password field.
There are many cases where you which to present a limited set of parameter options. In a deployment
build, you might want to let the user choose one of a number of target servers. Or you may want to
present a list of supported browsers for a suite of acceptance tests. Choice parameters let you define a set
of values that will be displayed as a drop-down list (see Figure 10.7, “Configuring a Choice parameter”).
You need to provide a list of possible values, one per line, starting with the default value.
Figure 10.7. Configuring a Choice parameter
Boolean parameters are, as you would expect, parameters that take a value of true or false. They
are presented as checkboxes.
Two more exotic parameter types, which behave a little differently to the others, are Run parameters
and File parameters.
Run parameters let you select a particular run (or build) of a given build job (see Figure 10.8,
“Configuring a Run parameter”). The user picks from a list of build run numbers. The URL of the
corresponding build run is stored in the specified parameter.
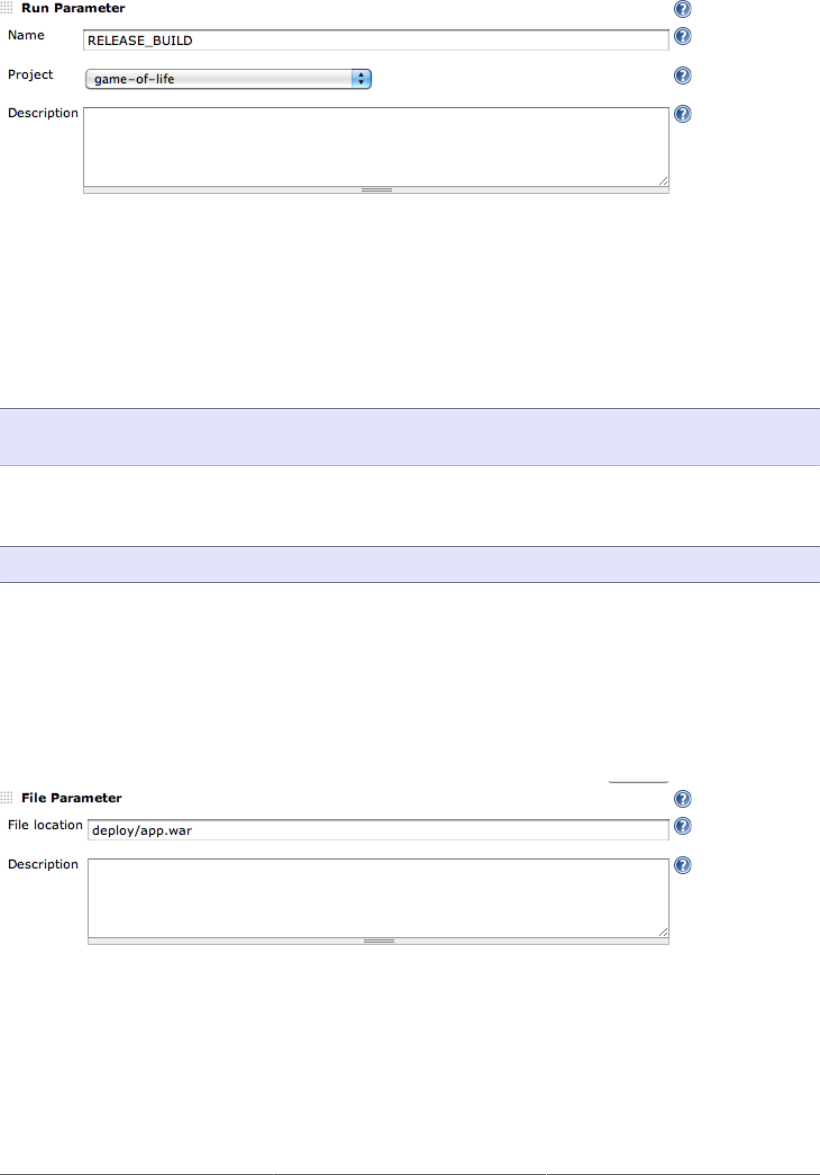
262
Figure 10.8. Configuring a Run parameter
The URL (which will look something like http://jenkins.myorg.com/job/game-of-life/197/) can be used
to obtain information or artifacts from that build run. For example, you could obtain the JAR or WAR
file archived in a previous build and run further tests with this particular binary in a separate build job.
For example, to access the WAR file of a previous build in a multimodule Maven project, the URL
would look something like this:
http://buildserver/job/game-of-life/197/artifact/gameoflife-web/target/
gameoflife.war
So, using the parameter configured in Figure 10.8, “Configuring a Run parameter”, you could access
this WAR file using the following expression:
${RELEASE_BUILD}gameoflife-web/target/gameoflife.war
File parameters let you upload a file into the build job workspace, so that it can then be used by
the build script (see Figure 10.9, “Configuring a File parameter”). Jenkins will store the file into the
specified location in the project workspace, where you can access it in your build scripts. You can use
the WORKSPACE variable to refer to the current Jenkins workspace directory, so you could manipulate the
file uploaded in Figure 10.9, “Configuring a File parameter” by using the expression ${WORKSPACE}/
deploy/app.war.
Figure 10.9. Configuring a File parameter
10.2.4. Building from a Subversion Tag
The parameterized trigger has special support for Subversion, allowing you to build against a specific
Subversion tag. This is useful if you want to run a release build using a tag generated by a previous build
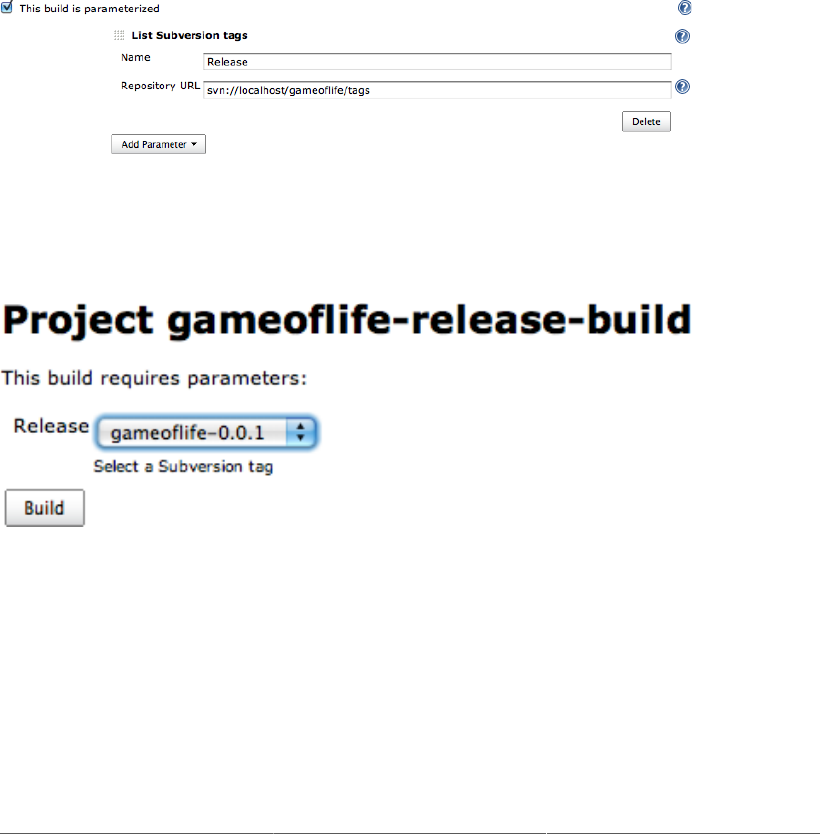
263
job. For example, an upstream build job may tag a particular revision. Alternatively, you might use the
standard Maven release process (see Section 10.7.1, “Managing Maven Releases with the M2Release
Plugin”) to generate a new release. In this case, a tag with the Maven release number will automatically
be generated in Subversion.
This approach is useful for projects that need to be partially or entirely rebuilt before they can be
deployed to a given platform. For example, you may need to run the Ant or Maven build using
different properties or profiles for different platforms, so that platform-specific configuration files can
be embedded in the deployed WAR or EAR files.
You can configure a Jenkins build to run against a selected tag by using the “List Subversion Tag”
parameter type (see Figure 10.10, “Adding a parameter to build from a Subversion tag”). You just need
to provide the Subversion repository URL pointing to the tags directory of your project.
Figure 10.10. Adding a parameter to build from a Subversion tag
When you run this build, Jenkins will propose a list of tags to choose from (see Figure 10.11, “Building
from a Subversion tag”).
Figure 10.11. Building from a Subversion tag
10.2.5. Building from a Git Tag
Building from a Git tag is not as simple as doing so from a Subversion tag, though you can still use a
parameter to indicate which tag to use. Indeed, because of the very nature of Git, when Jenkins obtains
a copy of the source code from Git, it clones the Git repository, including all of the tags. Once you have
the latest version of the repository on your Jenkins server, you can then proceed to checkout a tagged
version using git checkout <tagname>.
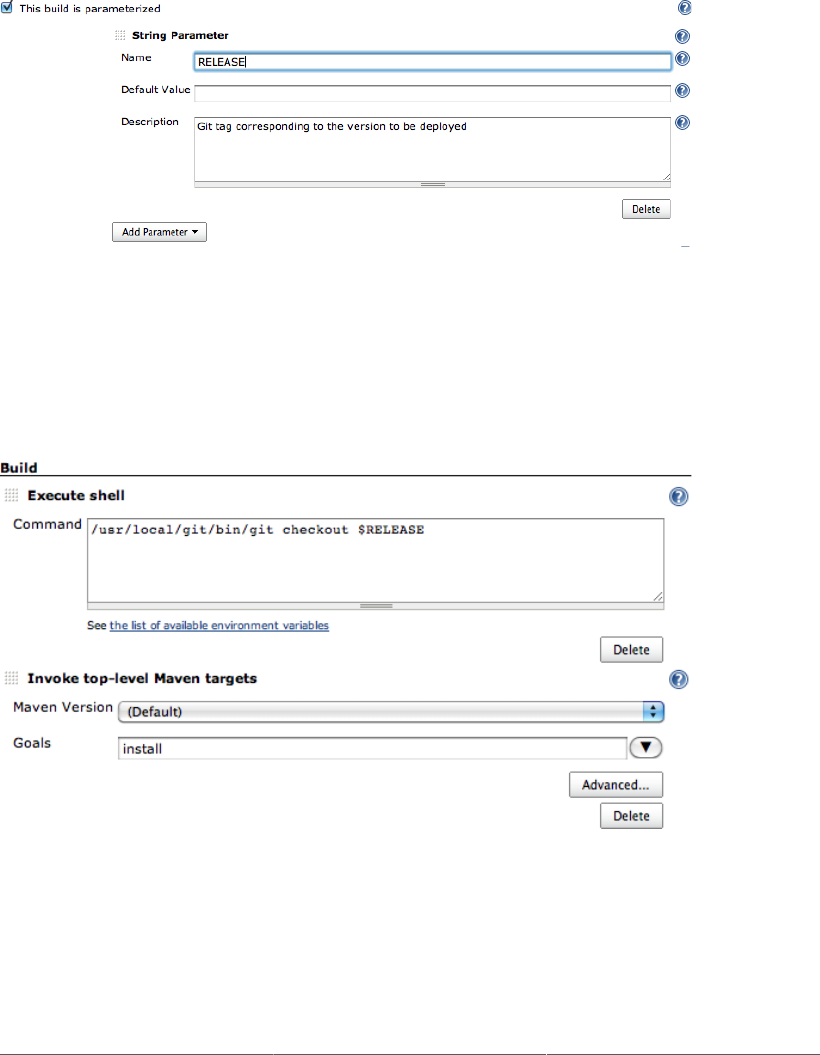
264
To set this up in Jenkins, you first need to add a String parameter to your build job (called RELEASE
in this example—see Figure 10.12, “Configuring a parameter for a Git tag”). Unlike the Subversion
support, there is no way to list the available Git tags in a drop-down list, so users will need to know
the name of the tag they want to release.
Figure 10.12. Configuring a parameter for a Git tag
Once you have added this parameter, you need to checkout the corresponding tag once the repository
has been cloned locally. So if you have a freestyle build, the first build step would be a command-line
call to Git to check out the tag referenced by the RELEASE parameter (see Figure 10.13, “Building from
a Git tag”). Of course a more portable way to do this would be to write a simple Ant or Groovy script
to do the same thing in a more OS-neutral way.
Figure 10.13. Building from a Git tag
10.2.6. Starting a Parameterized Build Job Remotely
You can also start a parameterized build job remotely, by invoking the URL of the build job. The typical
form of a parameterized build job URL is illustrated here:
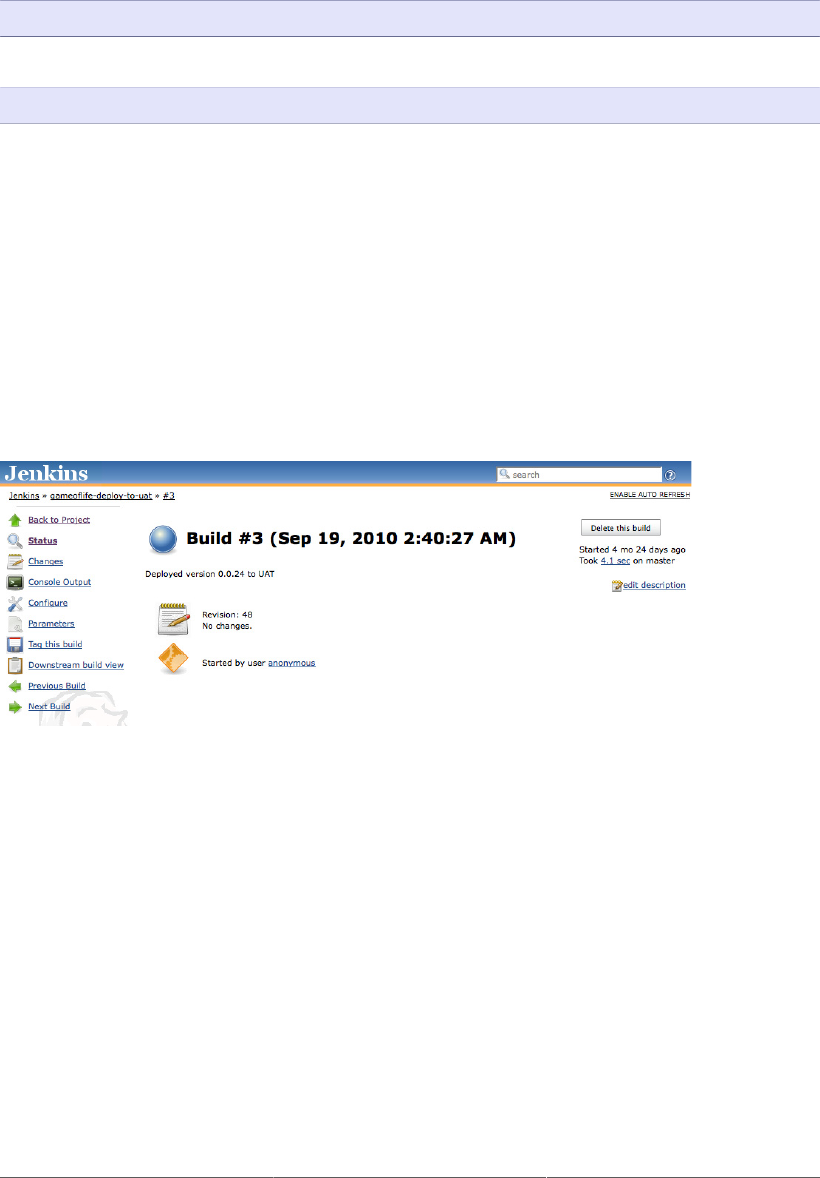
265
http://jenkins.acme.org/job/myjob/buildWithParameters?PARAMETER=Value
So, in the example shown above, you could trigger a build like this:
http://jenkins.acme.org/job/parameterized-build/buildWithParameters?VERSION=1.2.3
When you use a URL to start a build job in this way, remember that the parameter names are case-
sensitive, and that the values need to be escaped (just like any other HTTP parameter). And if you are
using a Run parameter, you need to provide the name of the build job and the run number (e.g., game-
of-life#197) and not just the run number.
10.2.7. Parameterized Build Job History
Finally, it is indispensable to know what parameters were used to run a particular parameterized build.
For example, in an automated deployment build job, it is useful to know exactly what version was
actually deployed. Fortunately, Jenkins stores these values in the build history (see Figure 10.14,
“Jenkins stores what parameter values where used for each build”), so you can always go back and take
a look.
Figure 10.14. Jenkins stores what parameter values where used for each build
10.3. Parameterized Triggers
When you trigger another build job from within a parameterized build job, it is often useful to be able
to pass the parameters of the current build job to the new one. Suppose, for example, that you have an
application that needs to be tested against several different databases. As we have seen, you could do
this by setting up a parameterized build job that accepts the target database as a parameter. You may
want to kick of a series of builds, all of which will need this parameter.
If you try to do this using the conventional “Build other projects” option in the Post-Build Actions
section, it won’t work. In fact, you can’t trigger a parameterized build in this way.
However, you can do this using the Jenkins Parameterized Trigger plugin. This plugin lets you configure
your build jobs to both trigger parameterized builds, and to pass arbitrary parameters to these builds.
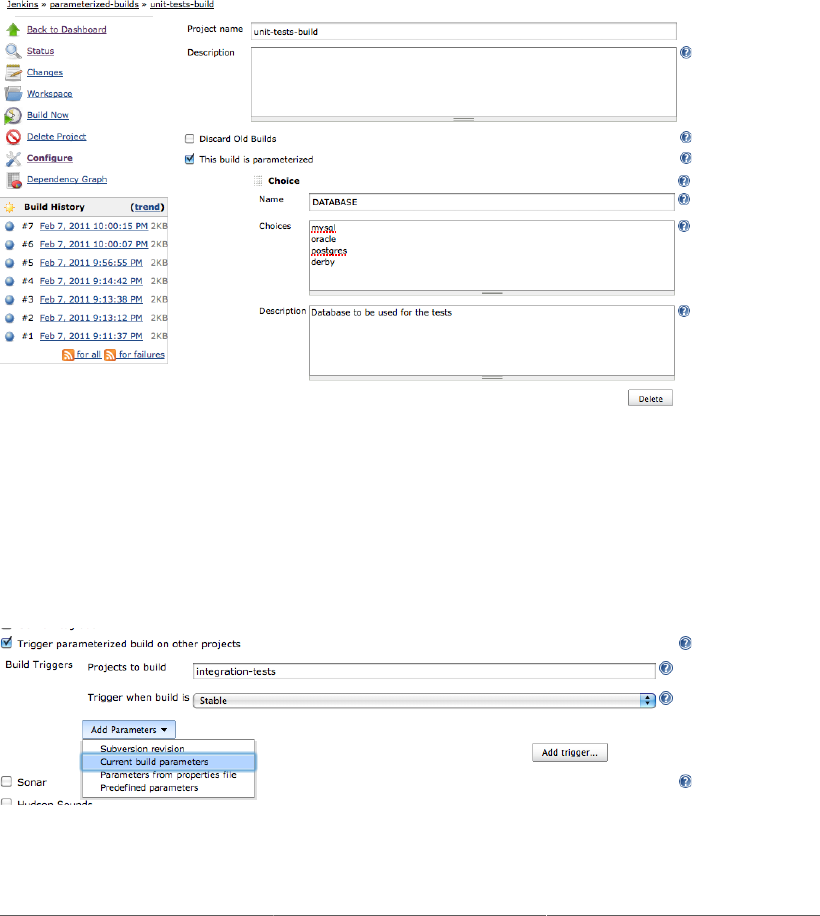
266
Once you install this plugin, you will find the option of “Triggering parameterized builds on other
projects” in your build job configuration page (see Figure 10.16, “Adding a parameterized trigger to a
build job”). This lets you start another build job in a number of ways. In particular, it lets you kick off
a subsequent build job, passing the current parameters to this new build job, which is impossible to do
with a normal triggered build. The best way to see how this works is through an example.
In Figure 10.15, “Jenkins stores what parameter values where used for each build” we have an initial
build job. This build job takes a single parameter, DATABASE, which specifies the database to be used
for the tests. As we have seen, the user will be prompted to enter this value whenever the build is started.
Figure 10.15. Jenkins stores what parameter values where used for each build
Now suppose we want to trigger a second build job to run more comprehensive integration tests once
this first build job has finished. However we need it to run the tests against the same database. We can
do this by setting up a parameterized trigger to start this second build job (see Figure 10.16, “Adding
a parameterized trigger to a build job”).
Figure 10.16. Adding a parameterized trigger to a build job
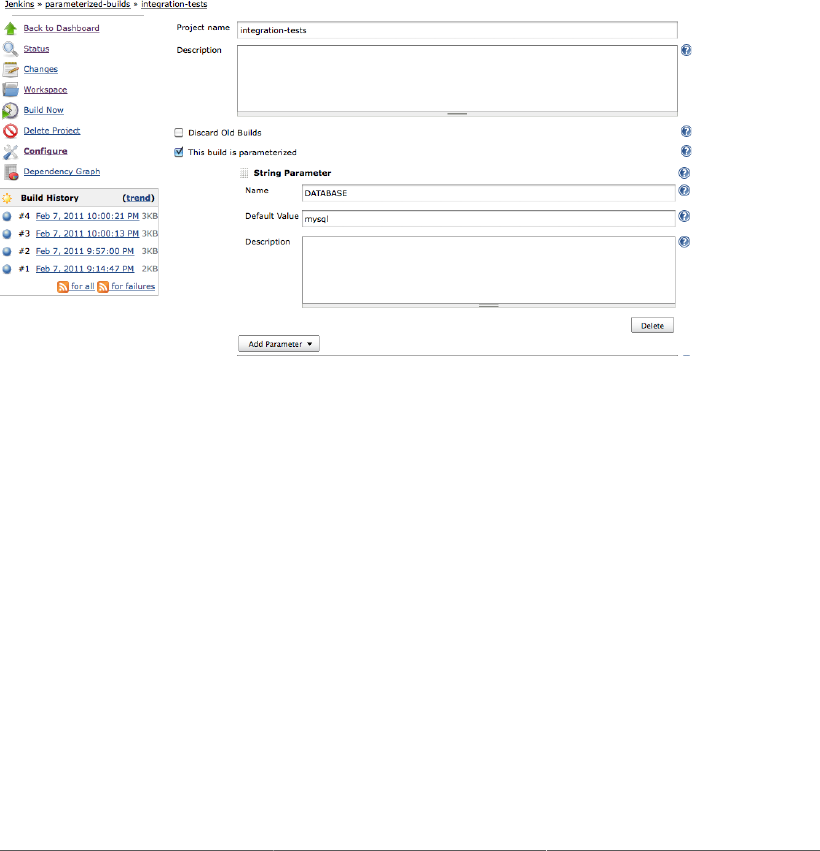
267
In this case, we are simple passing through the current build parameters. This second build job will
automatically be started after the first one, with the DATABASE parameter value provided by the user.
You can also fine-tune the triggering policy, by telling Jenkins when the build should be triggered.
Typically, you would only trigger a downstream build after your build has completed successfully, but
with the Parameterized Trigger plugin you can also configure builds to be triggered even if the build is
unstable, only when the build fails or ask for it to be triggered no matter what the outcome of the first
build. You can even set up multiple triggers for the same build job.
Naturally, the build job that you trigger must be a parameterized build job (as illustrated in Figure 10.17,
“The build job you trigger must also be a parameterized build job”), and you must pass through all of
the parameters it requires.
Figure 10.17. The build job you trigger must also be a parameterized build job
This feature actually has much broader applications than simply passing through the current build
parameters. You can also trigger a parameterized build job with an arbitrary set of parameters, or use
a combination of parameters that were passed to the current build, and your own additional ones. Or,
if you have a lot of parameters, you can load them from a properties file. In Figure 10.18, “Passing a
predefined parameter to a parameterized build job”, we are passing both the current build parameters
(the DATABASE variable in this case), and an additional parameter called TARGET_PLATFORM.
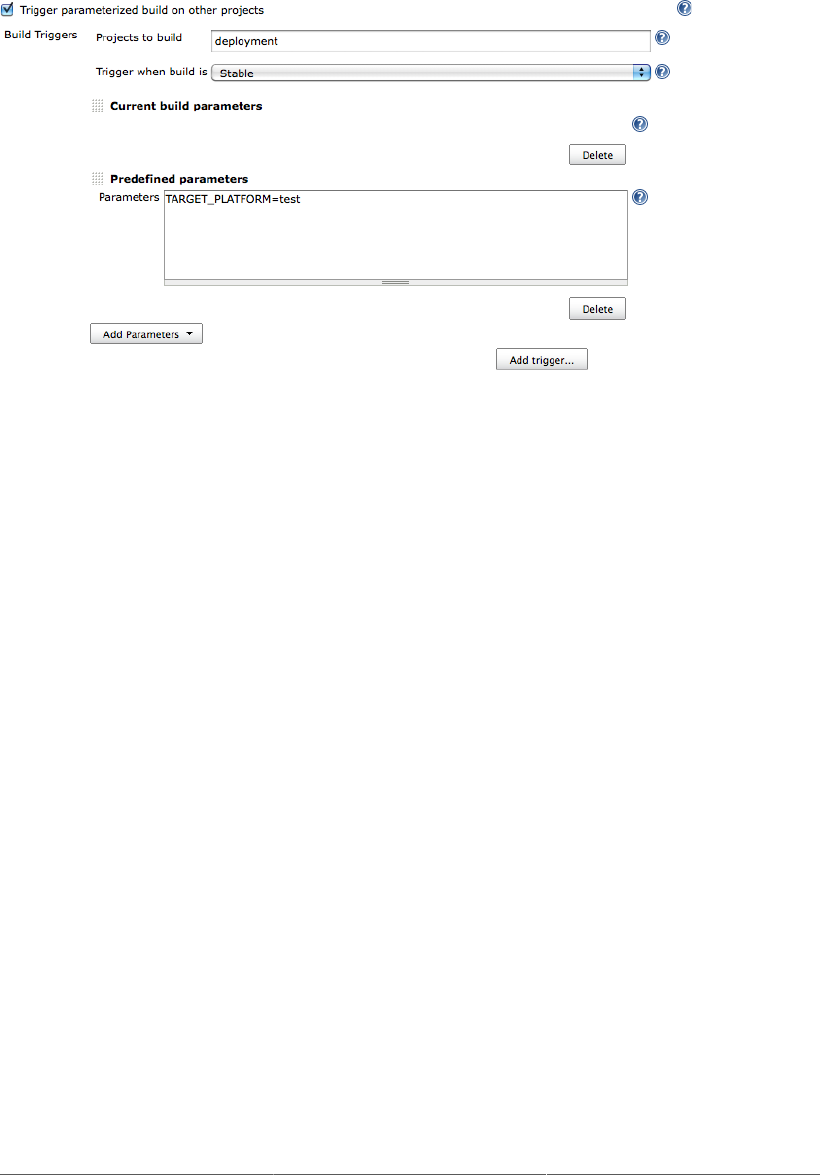
268
Figure 10.18. Passing a predefined parameter to a parameterized build job
10.4. Multiconfiguration Build Jobs
Multiconfiguration build jobs are an extremely powerful feature of Jenkins. A multiconfiguration build
job can be thought of as a parameterized build job that can be automatically run with all the possible
combinations of parameters that it can accept. They are particularly useful for tests, where you can test
your application using a single build job, but under a wide variety of conditions (browsers, databases,
and so forth).
10.4.1. Setting Up a Multiconfiguration Build
To create a new multiconfiguration build job, simply choose this option on the New Job page (see
Figure 10.19, “Creating a multiconfiguration build job”).
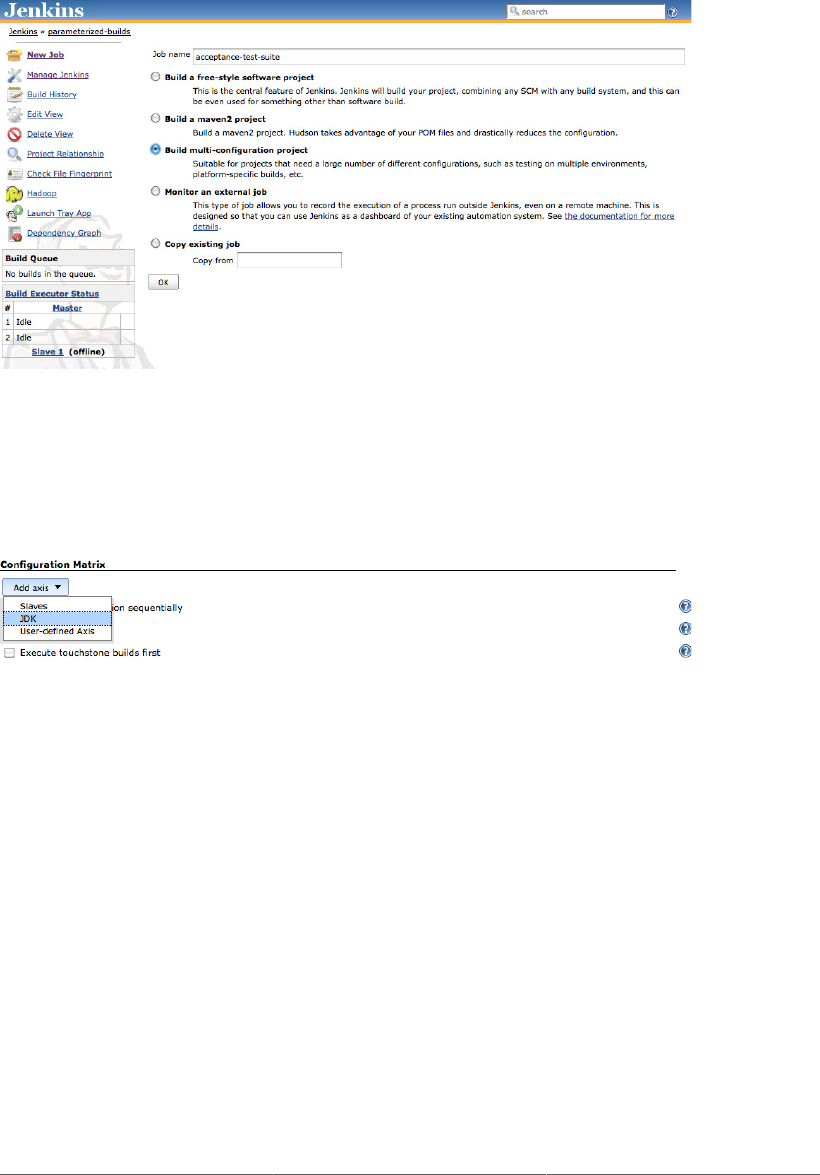
269
Figure 10.19. Creating a multiconfiguration build job
A multiconfiguration build job is just like any other build job, but with one very important additional
element: the Configuration Matrix (see Figure 10.20, “Adding an axis to a multiconfiguration build”).
This is where you define the different configurations that will be used to run your builds.
Figure 10.20. Adding an axis to a multiconfiguration build
You can define different axes of configuration options, including running the build job on different
slaves or on different JDKs, or providing your own custom properties to the build. For example, in the
build jobs discussed earlier, we might want to test our application for different databases and different
operating systems. We could define one axis defining slave machines with different operating systems
we wanted our build to run on, and another axis defining all the possible database values. Jenkins will
then run the build job for each possible database and each possible operating system.
Let’s look at the types of axis you can define.
10.4.2. Configuring a Slave Axis
The first option is to configure your build to run simultaneously on different slave machines (see
Chapter 11, Distributed Builds). Now of course, the idea of having a set of slave machines is usually that
you can run your build job on any of them. But there are cases where it makes sense to be a little more
choosy. For example, you might want your tests to run on Windows, Mac OS X, and Linux. In this case,
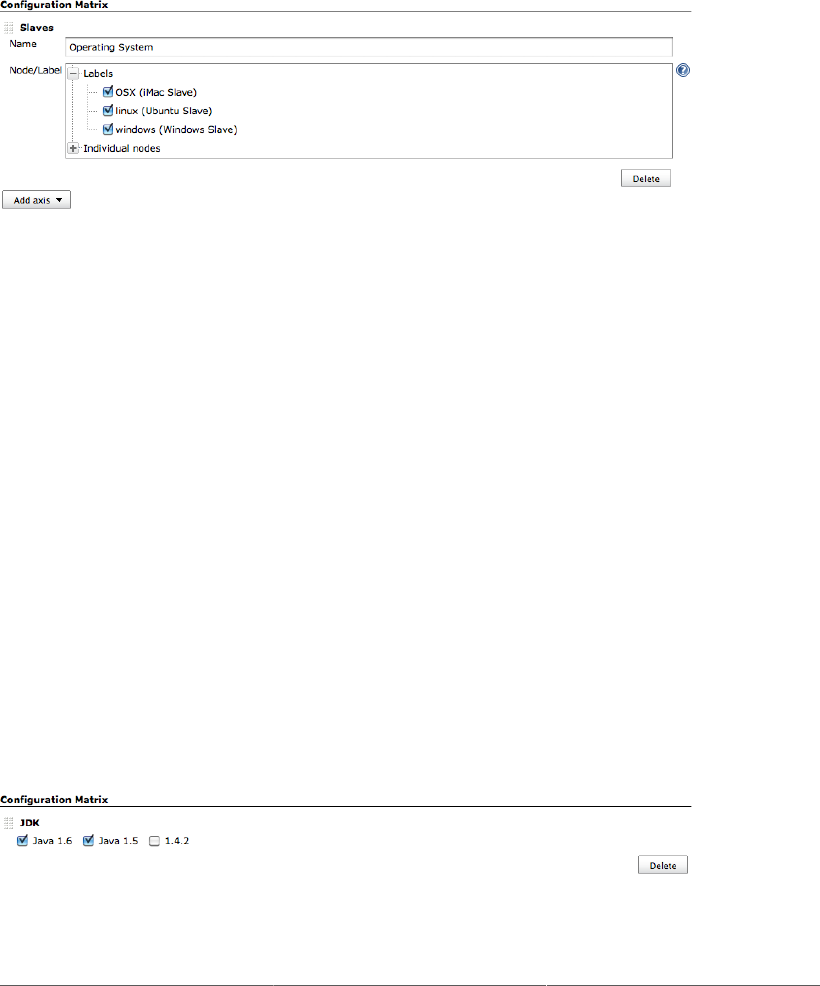
270
you create a new axis for your slave nodes, as shown in Figure 10.21, “Defining an axis of slave nodes”.
You can choose the nodes you want to use in two ways: by label or by individual node. Using labels
lets you identify categories of build nodes (for example, Windows machines), without tying the build
to any one machine. This is a more flexible option, and makes it easier to expand your build capacity as
required. Sometimes, however, you may really want to run a build on a specific machine. In this case,
you can use the “Individual nodes” option, and choose the machine in this list.
Figure 10.21. Defining an axis of slave nodes
If you need more flexibility, you can also use a Label Expression, which lets you define which slave
nodes should be used for builds on a particular axis using boolean expressions and logical operators to
combine labels. For example, suppose you have defined labels for slave machines based on operating
system (“windows”, “linux”) and installed databases (“oracle”, “mysql”, “db2”). To define an axis
running tests only on Windows machines installed with MySQL, you could use an expression like
windows && mysql.
We discuss working with slave nodes and distributed builds in more detail in Chapter 11, Distributed
Builds.
10.4.3. Configuring a JDK Axis
If you are deploying your application to a broad client base where you have limited control over the
target environment, you may need to test your application using different versions of Java. In cases like
this it is useful to be able to set up a JDK axis in a multiconfiguration build. When you add a JDK
axis, Jenkins will automatically propose the list of JDK versions that it knows about (see Figure 10.22,
“Defining an axis of JDK versions”). If you need to use additional JDKs, just add them to your Jenkins
configuration page.
Figure 10.22. Defining an axis of JDK versions
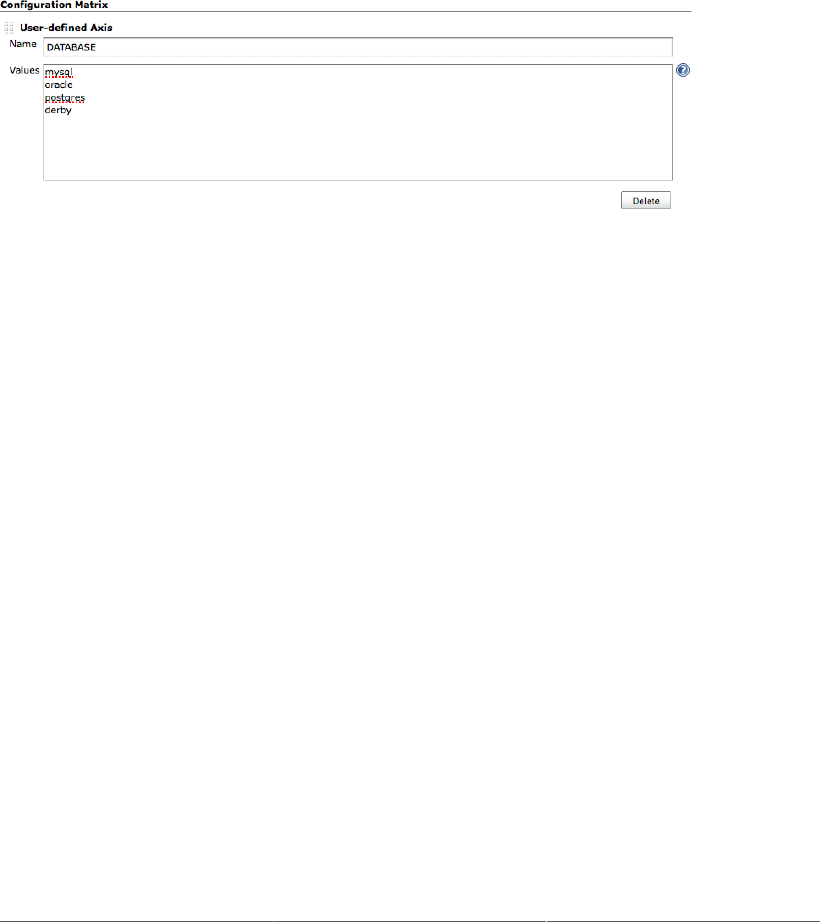
271
10.4.4. Custom Axis
The third type of axis lets you define different ways to run your build job, based on arbitrary variables
that you define. For example, you might provide a list of databases you need to test against, or a list
of browsers to use in your web tests. These are like parameters for a parameterized build job, except
that you provide the complete list of possible values, and rather than prompting for you to enter a value,
Jenkins will run the build with all of the values you provide (Figure 10.23, “Defining a user-defined
axis”).
Figure 10.23. Defining a user-defined axis
10.4.5. Running a Multiconfiguration Build
Once you have set up the axes, you can run your multiconfiguration build just like any other. However,
Jenkins will treat each combination of variables as a separate build job. Jenkins displays the aggregate
results in a table, where all of the combinations are shown (see Figure 10.24, “Multiconfiguration build
results”). If you click on any of the balls, Jenkins will take you to the detailed results for that particular
build.
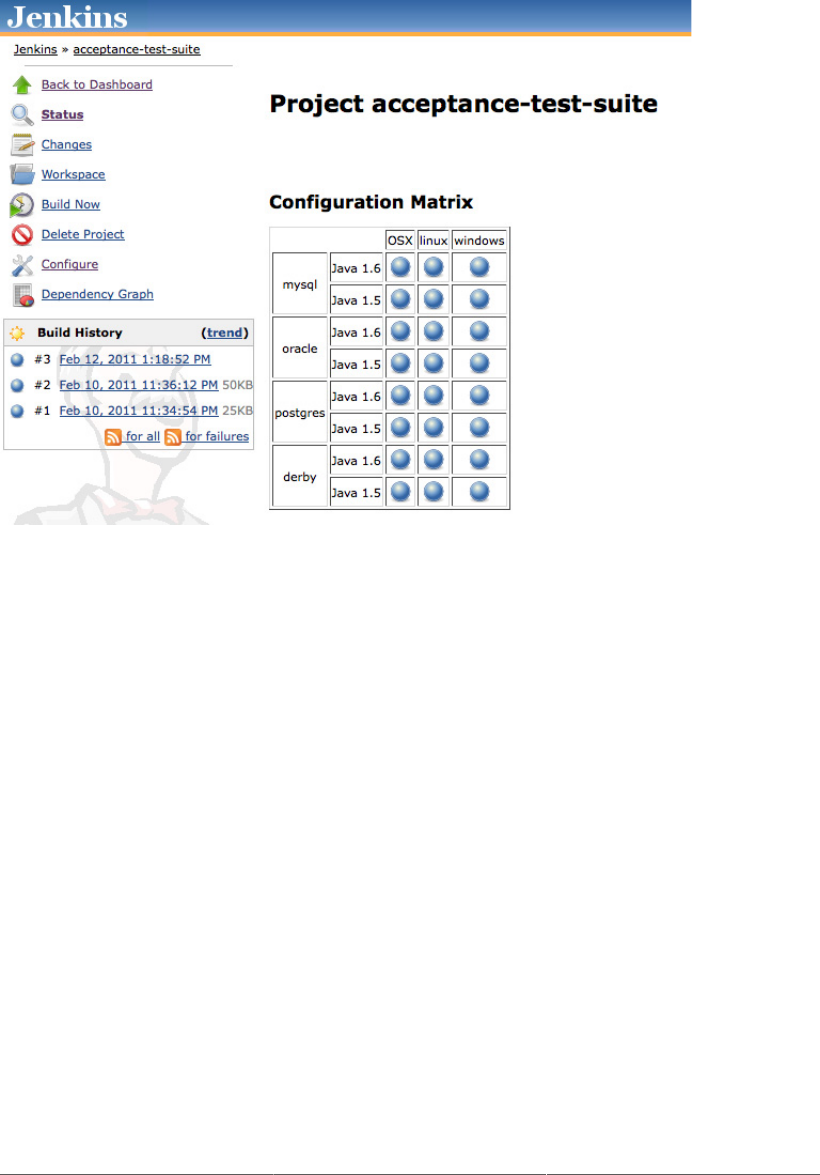
272
Figure 10.24. Multiconfiguration build results
By default, Jenkins will run the build jobs in parallel. However there are some cases where this is not a
good idea. For example, many Java web applications use Selenium or WebDriver tests running against
a local instance of Jetty that is automatically started by the build job. Build scripts like this need to be
specially configured to be able to run in parallel on the same machine, to avoid port conflicts. Concurrent
database access during tests can be another source of problems if concurrency is not designed into the
tests. If your builds are not designed to run in parallel, you can force Jenkins to run the tests sequentially
by ticking the Run each configuration sequentially checkbox at the bottom of the Configuration Matrix
section.
By default, Jenkins will run all possible combinations of the different axes. So, in the above example, we
have three environments, two JDKs, and four databases. This results in a total of 24 builds. However, in
some cases, it may not make sense (or be possible) to run certain combinations. For example, suppose
you have a build job that runs automated web tests. If one axis contains the web browsers to be tested
(Firefox, Internet Explorer, Chrome, etc.) and another the Operating Systems (Linux, Windows, Mac
OS), it would make little sense to run Internet Explorer with Linux or Mac OS.
The Combination Filter option lets you set up rules about which combinations of variables are valid.
This field is a Groovy boolean expression that uses the names of the variables you defined for each axis.
The expression must evaluate to true for the build to execute. For example, suppose you have a build job
running web tests in different browsers on different operating systems (see Figure 10.25, “Setting up a
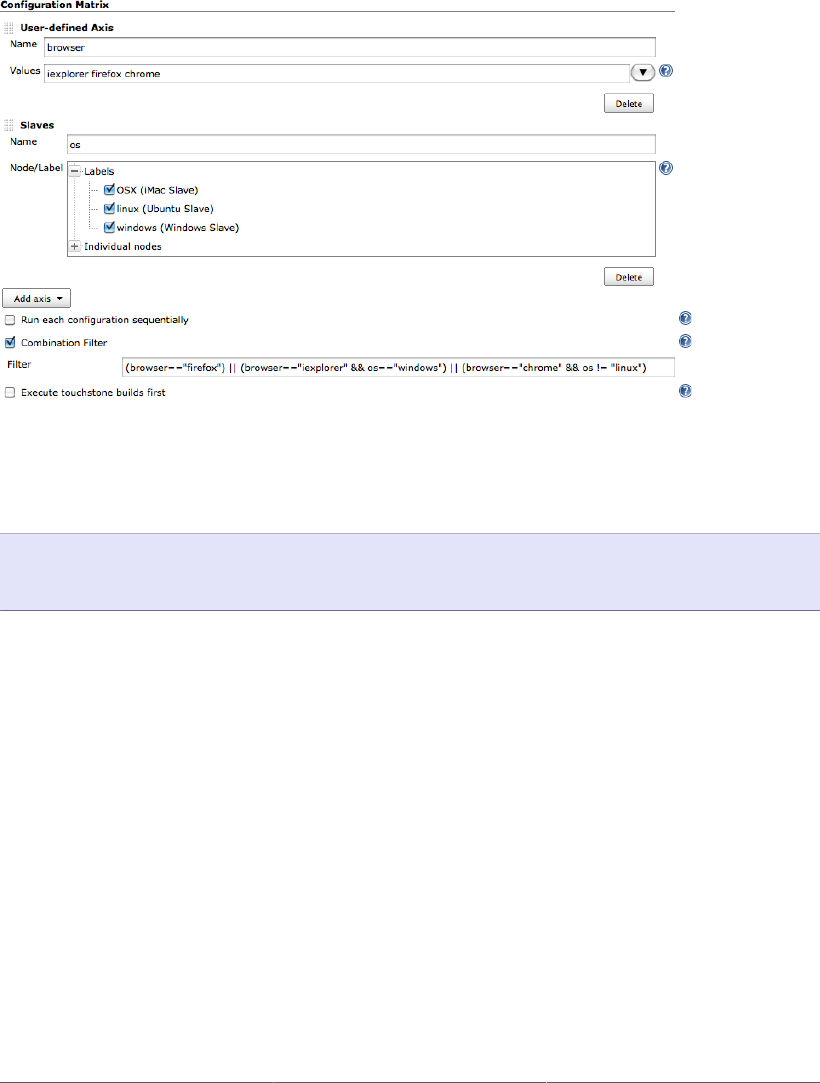
273
combination filter”). The tests need to run Firefox, Internet Explorer and Chrome, on Windows, Mac OS
X, and Linux. However Internet Explorer only runs on Windows, and Chrome does not run on Linux.
Figure 10.25. Setting up a combination filter
To set this up with a Combination Filter, we could use an expression like the following:
(browser=="firefox")
|| (browser=="iexplorer" && os=="windows")
|| (browser=="chrome" && os != "linux")
This would result in only the correct browser/operating system combinations being executed (see
Figure 10.26, “Build results using a combination filter”). Executed builds are displayed in the usual
colors, whereas skipped builds are shown in gray.
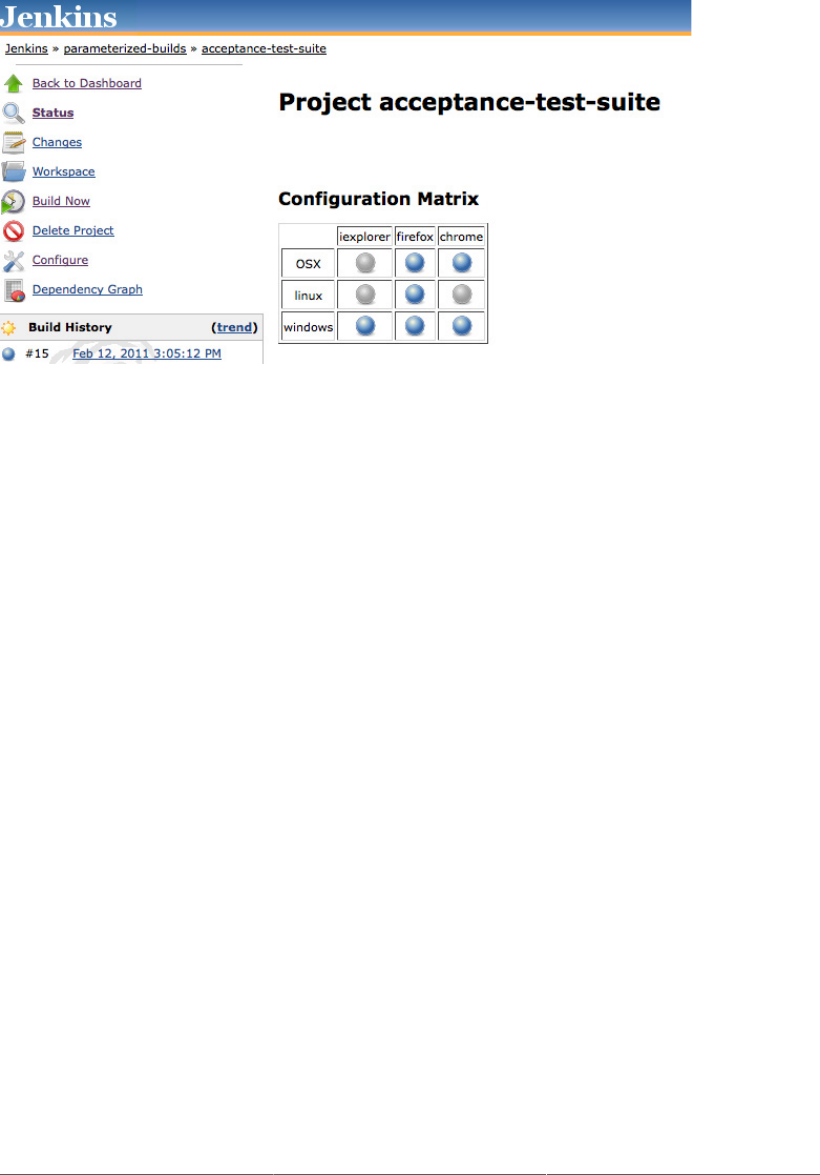
274
Figure 10.26. Build results using a combination filter
Another reason to use a build filter is that there are simply too many valid combinations to run in a
reasonable time. In this case, the best solution may be to upscale your build server. The second-best
solution, on the other hand, might be to only run a subset of the combinations, possibly running the
full set of combinations on a nightly basis. You can do this by using the special index variable. If you
include the expression (index%2 == 0), for example, will ensure that only one build job in two is
actually executed.
You may also want certain builds to be executed before the others, as a sanity check. For example, you
might want to run the default (and, theoretically, the most reliable) configuration for your application
first, before continuing on to more exotic combinations. To do this, you can use the “Execute touchstone
builds first” option. Here, you enter a filter value (like the one seen above) to define the first build or
builds to be executed. You can also specify if the build should proceed only if these builds are successful,
or even if they are unsuccessful. Once these builds have completed as expected, Jenkins will proceed
with the other combinations.
10.5. Generating Your Maven Build Jobs Automatically
Contributed by Evgeny Goldin
As mentioned in the previous section, the number of build jobs that your Jenkins server will host can
vary. As the number of build jobs grows, it becomes harder not only to view them in Jenkins dashboard,
but to configure them as well. Imagine what would it take to configure 20 to 50 Jenkins jobs one-by-
one! In addition, many of those jobs may have common configuration elements, such as Maven goals
or build memory settings, which results in duplicated configuration and higher maintenance overhead.

275
For example, if you decide to run mvn clean install instead of mvn clean deploy for your release
jobs and switch to alternative deployment methods, such as those provided by Artifactory plugin1, you’ll
have no choice but to visit all relevant jobs and update them manually.
Alternatively, you could take an advantage of the fact that Jenkins is a simple and straightforward tool
that keeps all of its definitions in plain files on the disk. Indeed you can update the config.xml files
of your jobs directly in the .jenkins/jobs directory where they are kept. While this approach will
work, it is still far from ideal as it involves quite a lot of manual picking and fragile replacements in
Jenkins XML files.
There is a third way to achieve the nirvana of massive job updates: generate your configuration files
automatically using some sort of definition file. The Maven Jenkins Plugin2 does exactly that, generating
config.xml files for all jobs using standard Maven definitions kept in a single pom.xml file.
10.5.1. Configuring a Job
When configuring a single job with the Maven Jenkins Plugin, you can define all the usual Jenkins
configuration elements, such as Maven goals, POM location, repository URLs, e-mail addresses, number
of days to keep the logs, and so on. The plugin tries to bring you as close to possible to Jenkins’ usual
way of configuring a job manually.
Let’s take a look on a Google Guice3 build job:
<job>
<id>google-guice-trunk</id>
<description>Building Google Guice trunk.</description>
<descriptionTable>
<row>
<key>Project Page</key>
<value>
<a href="http://code.google.com/p/google-guice/">
<b><code>code.google.com/p/google-guice</code></b>
</a>
</value>
<escapeHTML>false</escapeHTML>
<bottom>false</bottom>
</row>
</descriptionTable>
<jdkName>jdk1.6.0</jdkName>
<mavenName>apache-maven-3</mavenName>
<mavenOpts>-Xmx256m -XX:MaxPermSize=128m</mavenOpts>
<daysToKeep>5</daysToKeep>
<useUpdate>false</useUpdate>
<mavenGoals>-e clean install</mavenGoals>
<trigger>
<type>timer</type>
1 http://wiki.jenkins-ci.org/display/JENKINS/Artifactory+Plugin
2 http://evgeny-goldin.com/wiki/Maven-jenkins-plugin
3 http://code.google.com/p/google-guice/
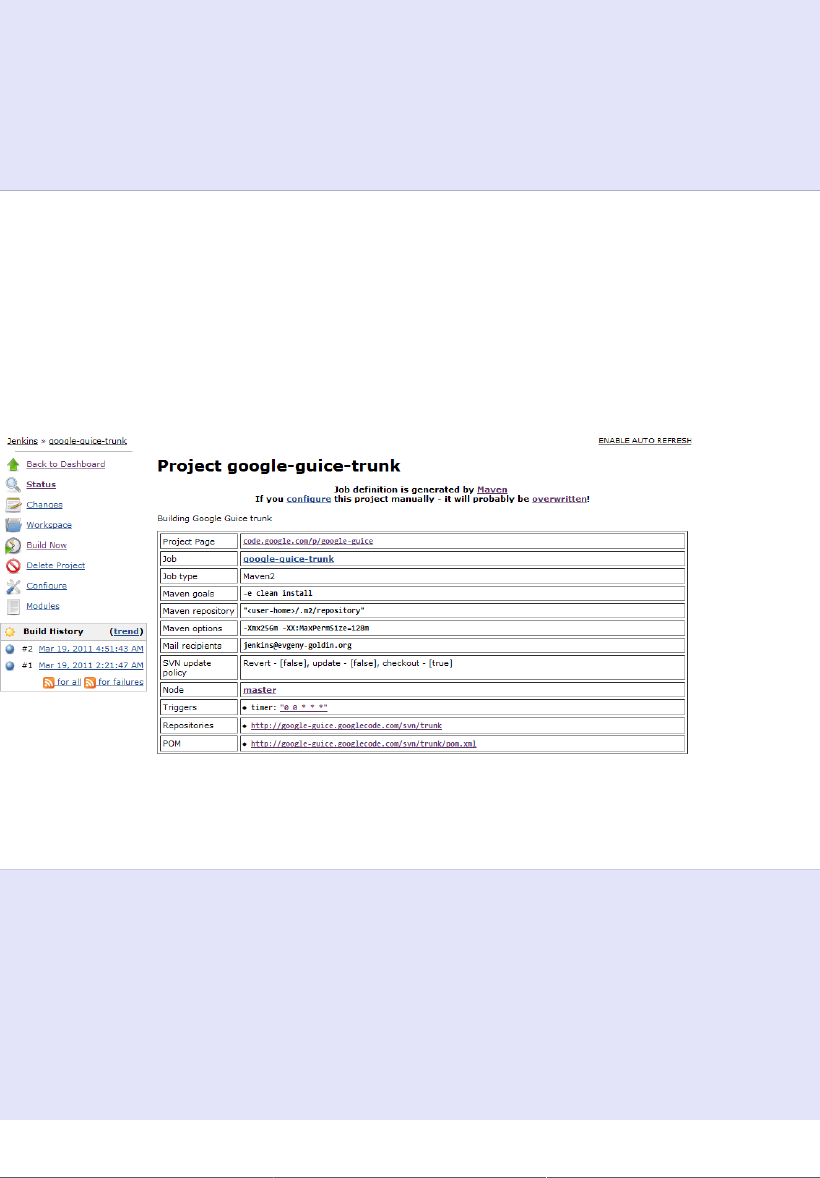
276
<expression>0 0 * * *</expression>
</trigger>
<repository>
<remote>http://google-guice.googlecode.com/svn/trunk/</remote>
</repository>
<mail>
<recipients>jenkins@evgeny-goldin.org</recipients>
</mail>
</job>
This job uses a number of standard configurations such as <jdkName>, <mavenName>, and
<mavenOpts>. The code is checked out from a Subversion repository (defined in the <repository>
element), and a cron <trigger> runs the job nightly at 00:00. Email notifications are sent to people
specified with the <mail> element. This configuration also adds a link back to the project’s page in the
description table that is generated automatically for each job.
The generated job is displayed in your Jenkins server as illustrated in Figure 10.27, “A job generated
by the Maven Jenkins plugin”.
Figure 10.27. A job generated by the Maven Jenkins plugin
Here’s another job building the Jenkins master branch at GitHub:
<job>
<id>jenkins-master</id>
<jdkName>jdk1.6.0</jdkName>
<numToKeep>5</numToKeep>
<mavenName>apache-maven-3</mavenName>
<trigger>
<type>timer</type>
<expression>0 1 * * *</expression>
</trigger>
<scmType>git</scmType>
<repository>
<remote>git://github.com/jenkinsci/jenkins.git</remote>
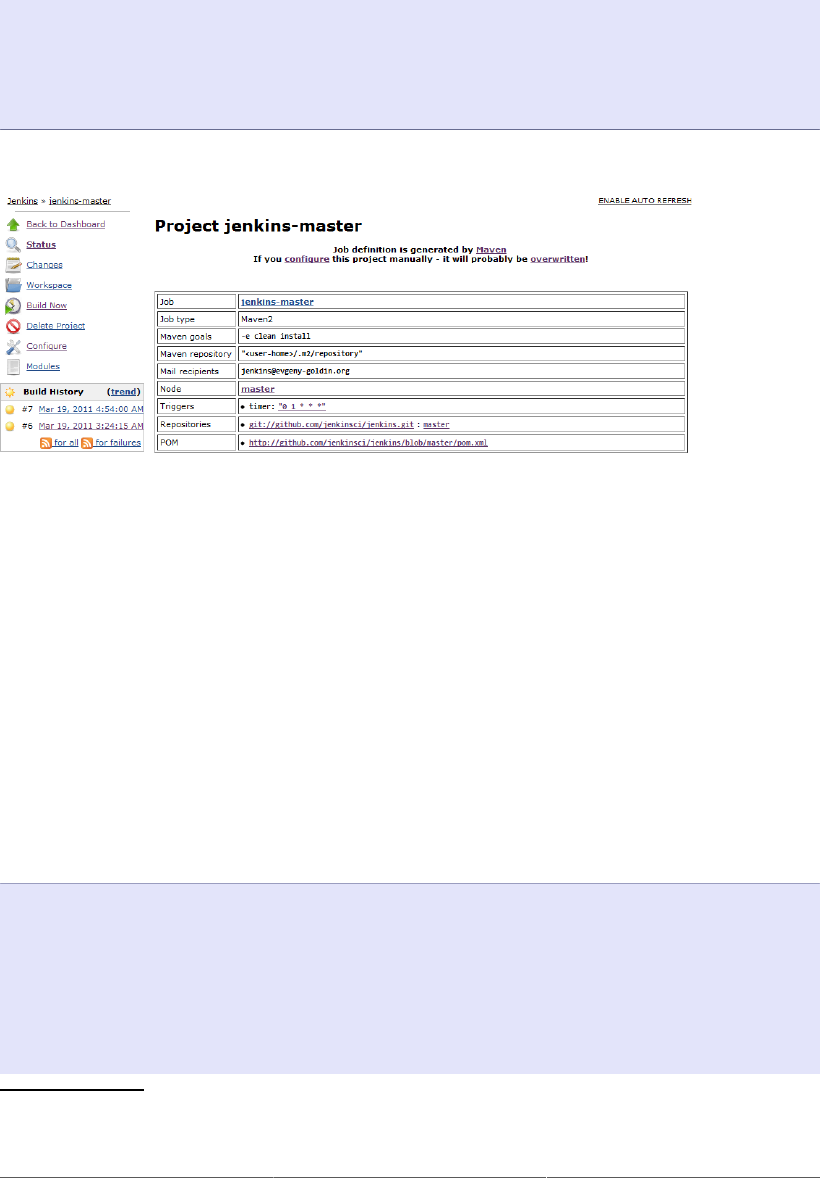
277
</repository>
<mail>
<recipients>jenkins@evgeny-goldin.org</recipients>
<sendForUnstable>false</sendForUnstable>
</mail>
</job>
This would generate the job shown in Figure 10.28, “jenkins-master job generated”.
Figure 10.28. jenkins-master job generated
The plugin’s documentation4 provides a detailed reference of all settings that can be configured.
10.5.2. Reusing Job Configuration with Inheritance
Being able to generate Jenkins jobs using centralized configuration, such as Maven POM, solves the
problem of creating and updating many jobs at once. All you has to do now is to modify the job
definitions, re-run the plugin and load definitions updated with Manage Jenkins#“Reload Configuration
from Disk”. This approach also has the advantage of making it easy to store your job configurations in
your version control system, which in turn makes it easier to keep track of changes made to the build
configurations.
But we still didn’t solve the problem of maintaining jobs that share a number of identical properties, such
as Maven goals, email recipients or code repository URL. For that, the Maven Jenkins Plugin provides
jobs inheritance, demonstrated in the following example:
<jobs>
<job>
<id>google-guice-inheritance-base</id>
<abstract>true</abstract>
<jdkName>jdk1.6.0</jdkName>
<mavenName>apache-maven-3</mavenName>
<daysToKeep>5</daysToKeep>
<useUpdate>true</useUpdate>
<mavenGoals>-B -e -U clean install</mavenGoals>
4 http://evgeny-goldin.com/wiki/Maven-jenkins-plugin#.3Cjob.3E

278
<mail><recipients>jenkins@evgeny-goldin.org</recipients></mail>
</job>
<job>
<id>google-guice-inheritance-trunk</id>
<parent>google-guice-inheritance-base</parent>
<repository>
<remote>http://google-guice.googlecode.com/svn/trunk/</remote>
</repository>
</job>
<job>
<id>google-guice-inheritance-3.0-rc3</id>
<parent>google-guice-inheritance-base</parent>
<repository>
<remote>http://google-guice.googlecode.com/svn/tags/3.0-rc3/</remote>
</repository>
</job>
<job>
<id>google-guice-inheritance-2.0-maven</id>
<parent>google-guice-inheritance-base</parent>
<mavenName>apache-maven-2</mavenName>
<repository>
<remote>http://google-guice.googlecode.com/svn/branches/2.0-maven/
</remote>
</repository>
</job>
</jobs>
In this configuration, google-guice-inheritance-base is an abstract parent job holding all common
properties: JDK name, Maven name, days to keep the logs, SVN update policy, Maven goals, and mail
recipients. The three following jobs are very short, merely specifying that they extend a <parent> job
and add any missing configurations (repository URLs in this case). When generated, they inherit all of
the properties from the parent job automatically.
Any inherited property can be overridden, as demonstrated in google-guice-inheritance-2.0-maven job
where Maven 2 is used instead of Maven 3. If you want to “cancel” an inherited property, you will need
to override it with an empty value.
Jobs inheritance is a very powerful concept that allows jobs to form hierarchical groups of any kind and
for any purpose. You can group your CI, nightly or release jobs this way, centralizing shared execution
triggers, Maven goals or mail recipients in parent jobs. This approach borrowed from an OOP world
solves the problem of maintaining jobs sharing a number of identical properties.
10.5.3. Plugin Support
In addition to configuring a job and reusing its definitions, you can apply special support for a number
of Jenkins plugins. Right now, a simplified usage of Parameterized Trigger and Artifactory plugins is
provided, with support for other popular plugins planned for future versions.

279
Below is an example of invoking jobs with the Parameterized Trigger plugin. Using this option assumes
you have this plugin installed already:
<job>
<id>google-guice-inheritance-trunk</id>
...
<invoke>
<jobs>
google-guice-inheritance-3.0-rc3,
google-guice-inheritance-2.0-maven
</jobs>
</invoke>
</job>
<job>
<id>google-guice-inheritance-3.0-rc3</id>
...
</job>
<job>
<id>google-guice-inheritance-2.0-maven</id>
...
</job>
The <invoke> element lets you invoke other jobs each time the current job finishes successfully. You
can create a pipeline of jobs this way, making sure each job in a pipeline invokes the following one. Note
that if there are more than one Jenkins executors available at the moment of invocation, the specified
jobs will start running in parallel. For serial execution you’ll need to connect each upstream job to a
downstream one with <invoke>.
By default invocation happens only when the current job is stable. This can be modified, as shown in
the following examples:
<invoke>
<jobs>jobA, jobB, jobC</jobs>
<always>true</always>
</invoke>
<invoke>
<jobs>jobA, jobB, jobC</jobs>
<unstable>true</unstable>
</invoke>
<invoke>
<jobs>jobA, jobB, jobC</jobs>
<stable>false</stable>
<unstable>false</unstable>
<failed>true</failed>
</invoke>
The first invocation in the example above always invokes the downstream jobs. It can be used for a
pipeline of jobs that should always be executed even if some of them or their tests fail.
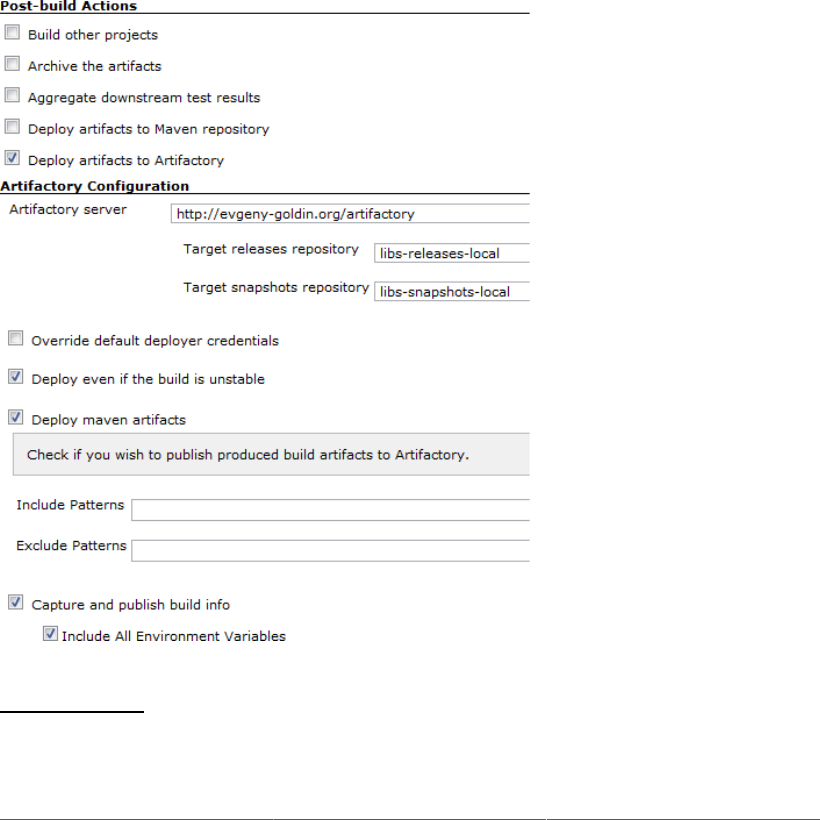
280
The second invocation in the example above invokes downstream jobs even if an upstream job is
unstable: the invocation happens regardless of test results. It can be used for a pipeline of jobs that are
less sensitive to tests and their failures.
The third invocation in the example above invokes downstream jobs only when an upstream job fails
but not when it is stable or unstable. You can find this configuration useful when a failing job needs to
perform additional actions beyond traditional email notifications.
Artifactory5 is a general purpose binaries repository that can be used as a Maven repository manager. The
Jenkins Artifactory plugin6, shown in Figure 10.29, “Artifactory Jenkins plugin configuration”, provides
a number of benefits for Jenkins build jobs. We have already reviewed some of them in Section 5.9.4,
“Deploying to an Enterprise Repository Manager”, including an ability to deploy artifacts upon job
completion or to send builds environment info together with artifacts for their better traceability.
Figure 10.29. Artifactory Jenkins plugin configuration
5 http://jfrog.org
6 http://wiki.jenkins-ci.org/display/JENKINS/Artifactory+Plugin

281
You can also use the Artifactory Jenkins plugin in conjunction with the Maven Jenkins Plugin to deploy
artifacts to Artifactory, as shown in the following example:
<job>
...
<artifactory>
<name>http://artifactory-server/</name>
<deployArtifacts>true</deployArtifacts>
<includeEnvVars>true</includeEnvVars>
<evenIfUnstable>true</evenIfUnstable>
</artifactory>
</job>
Default deployment credentials are specified when Jenkins is configured in the Manage
Jenkins#Configure System screen. They can be also specified for each Jenkins job. The default Maven
repositories are libs-releases-local and libs-snapshots-local. You can find more details in
the plugin’s documentation at http://wiki.jenkins-ci.org/display/JENKINS/Artifactory+Plugin.
10.5.4. Freestyle Jobs
In addition to Maven jobs, the Maven Jenkins Plugin allows you to configure Jenkins freestyle jobs.
An example is shown here:
<job>
<id>free-style</id>
<jobType>free</jobType>
<scmType>git</scmType>
<repository>
<remote>git://github.com/evgeny-goldin/maven-plugins-test.git</remote>
</repository>
<tasks>
<maven>
<mavenName>apache-maven-3</mavenName>
<jvmOptions>-Xmx128m -XX:MaxPermSize=128m -ea</jvmOptions>
<properties>plugins-version = 0.2.2</properties>
</maven>
<shell><command>pwd; ls -al; du -hs .</command></shell>
</tasks>
</job>
Freestyle jobs let you execute a shell or batch command, run Maven or Ant, and invoke other jobs. They
provide a convenient run-time environment for system scripts or any other kind of activity not readily
available with Jenkins or one of its plugins. Using this approach, you can generate Freestyle build job
configuration files in a similar way to the approach we have seen for Maven build jobs, which can help
make your build environment more consistent and maintainable.
10.6. Coordinating Your Builds
Triggering downstream build jobs is easy enough. However, when setting up larger and more
complicated build job setups, you sometimes would like builds to be able to run concurrently, or possibly
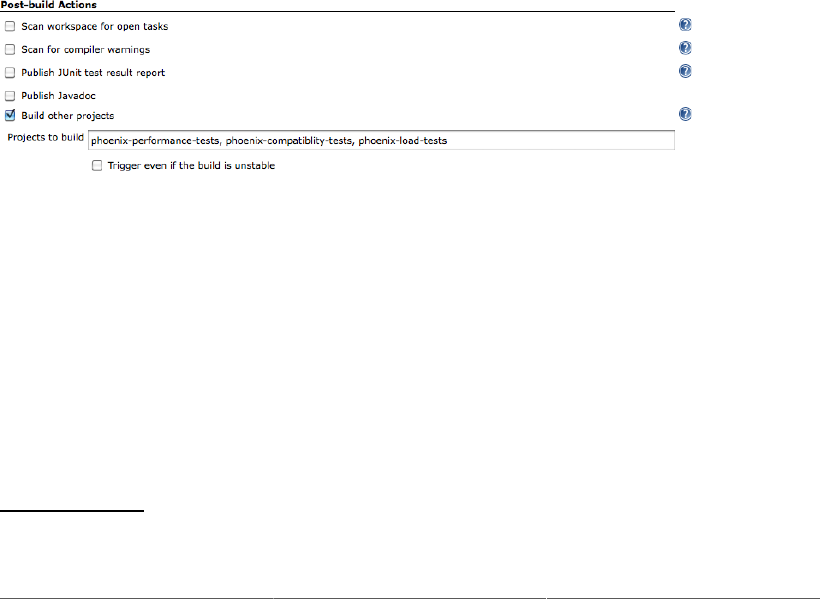
282
wait for certain build jobs to finish before proceeding. In this section, we will look at techniques and
plugins that can help you do this.
10.6.1. Parallel Builds in Jenkins
Jenkins has built-in support for parallel builds—when a build job starts, Jenkins will assign it to the
first available build node, so you can potentially have as many parallel builds running as you have build
nodes available.
If you need to run slight variations of the same build job in parallel, multiconfiguration build jobs (see
Section 10.4, “Multiconfiguration Build Jobs”) are an excellent option. This can come in handy as a way
of accelerating your build process. A typical application of multiconfiguration build jobs in this context
is to run integration tests in parallel. One strategy is to set up an integration test build job that can be run
in different ways to execute different subsets of the integration tests. You could define separate Maven
profiles, for example, or configure your build to use a command-line parameter to decide which tests
to run. Once you have set up your build script in this way, it is easy to configure a multiconfiguration
build job to run the subsets of your integration tests in parallel.
You can also get Jenkins to trigger several downstream builds in parallel, simply by listing them all in
the “Build other projects” field (see Figure 10.30, “Triggering several other builds after a build job”).
The subsequent build jobs will be executed in parallel as much as possible. However, as we will see
further on, this may not always be exactly what you need.
Figure 10.30. Triggering several other builds after a build job
10.6.2. Dependency Graphs
Before we investigate the finer points of parallel builds, it is useful to be able to visualize the relationships
between your build jobs. The Dependency Graph View plugin analyzes your build jobs and displays
a graph describing the upstream and downstream connections between your jobs. This plugin uses
graphviz7, which you will need to install on your server if you don’t already have it.
This plugin adds a Dependency Graph icon in the main menu, which displays a graph showing the
relationships between all the build jobs in your project (at the dashboard level), or all of the build jobs
related to the current build job (when you are inside a particular project [see Figure 10.31, “A build
7 http://www.graphviz.org

283
job dependency graph”]). What’s more, if you click on a build job in the graph, Jenkins will take you
directly to the project page of that build job.
Figure 10.31. A build job dependency graph
10.6.3. Joins
When setting up more complicated build pipelines, you frequently come across situations where a
build job cannot proceed until a number of other build jobs have been completed, but that these
upstream build jobs do not need to be executed sequentially. For example, in Figure 10.31, “A build job
dependency graph”, imagine that the phoenix-deploy-to-uat build job actually requires three jobs
to succeed before it can be executed: phoenix-compatibility-tests, phoenix-load-tests, and
phoenix-performance-tests.
We can set this up by using the Joins plugin, which you will need to install in the usual way via the
Update center. Once installed, you configure a join in the build job that initiates the join process (in our
example, this would be phoenix-web-tests). In our example, we need to modify the phoenix-web-
tests build job so that it triggers the phoenix-compatibility-tests, phoenix-load-tests,
and phoenix-performance-tests first, and then, if these three succeed, the phoenix-deploy-
to-uat build job.
We do this by simply configuring the Join Trigger field with the name of the phoenix-deploy-to-uat
build job (see Figure 10.32, “Configuring a join in the phoenix-web-tests build job”). The “Build other
projects” field is not modified, and still lists the build jobs to be triggered immediately after the current
one. The Join Trigger field contains the build jobs to be built once all of the immediate downstream
build jobs have finished.
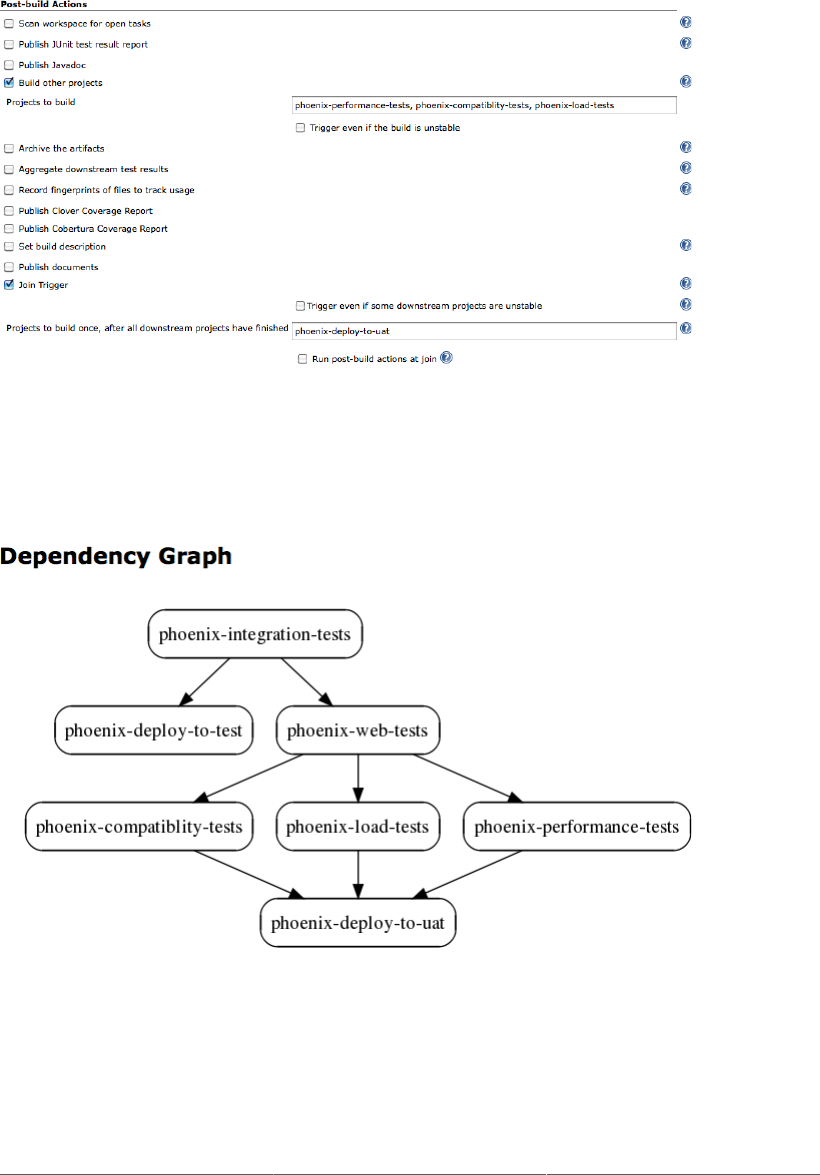
284
Figure 10.32. Configuring a join in the phoenix-web-tests build job
As a result, you no longer need the original build trigger for the final build job, as it is now redundant.
This new flow shows up nicely in the dependency graphs as illustrated in Figure 10.33, “A more
complicated build job dependency graph”.
Figure 10.33. A more complicated build job dependency graph
10.6.4. Locks and Latches
In other situations, you might be able to run a series of builds in parallel to some degree, but certain build
jobs cannot be run in parallel because they access concurrent resources. Of course, well-designed build
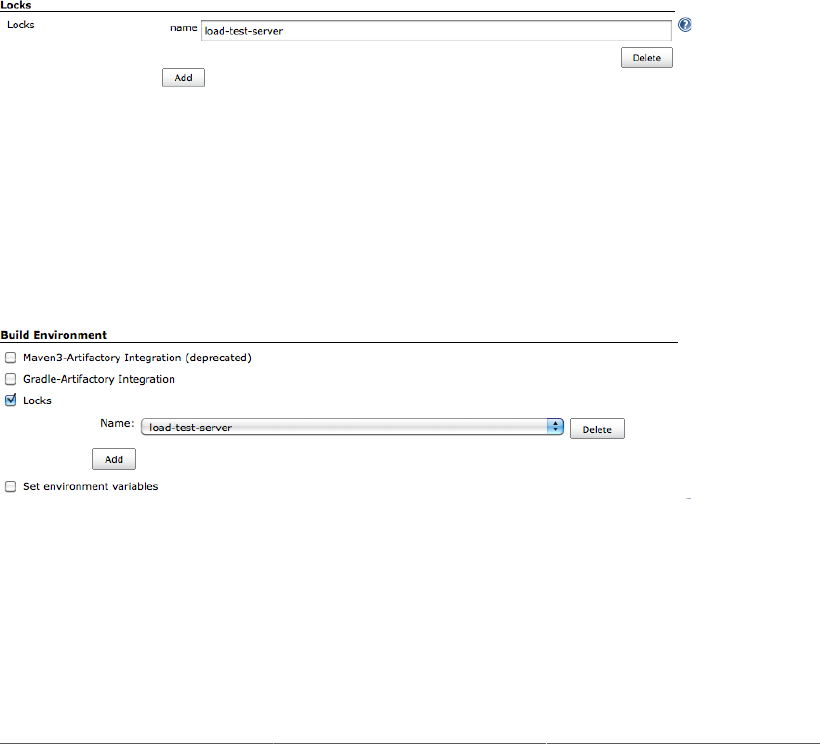
285
jobs should strive to be as independent as possible, but sometimes this can be difficult. For example,
different build jobs may need to access the same test database or files on the hard disk, and doing so
simultaneously could potentially compromise the results of the tests. Or a performance build job may
need exclusive access to the test server, in order to have consistent results each time.
The Locks and Latches plugin lets you get around this problem to some extent. This plugin lets you set
up “locks” for certain resources, in a similar way to locks in multithreaded programming. Suppose, for
example, in the build jobs depicted in Figure 10.33, “A more complicated build job dependency graph”,
that the load tests and the performance tests run against a dedicated server, but only one build job can
run against this server at any one time. Imagine furthermore that the performance tests for other projects
also run against this server.
To avoid contention over the performance server, you could use the Locks and Latches plugin to set up
a “lock” reserving access to this server to a single build job at a time. First, in the System Configuration
page, you need to add a new lock in the Locks section (see Figure 10.34, “Adding a new lock”). This
lock will then be available to all build jobs on the server.
Figure 10.34. Adding a new lock
Next, you need to set up each build job that will be using the contended resource. In the Build
Environment section, you will find a Locks field. Tick the checkbox and select the lock you just created
(see Figure 10.35, “Configuring a build job to use a lock”). Once you do this for each of the build jobs
that need to access the resource in question, only one of these build jobs will ever be able to run at a
given time.
Figure 10.35. Configuring a build job to use a lock
10.7. Build Pipelines and Promotions
Continuous Integration is not just about automatically building and testing software, but can also help in
the broader context of the software product development and release life cycle. In many organizations,

286
the life of a particular version of an application or product starts out in development. When it is deemed
ready, it is passed on to a QA team for testing. If they consider the version acceptable, they pass it on to
selected users for more testing in a User Acceptance Testing (UAT) environment. And if the users are
happy, it is shipped out into production. Of course, there are almost as many variations on this as there
are software development teams, but one common principle is that specific versions of your software
are selected, according to certain quality-related criteria, to be “promoted” to the next stage of the life
cycle. This is known as build promotion, and the broader process is known as a build pipeline. In this
section, we will look at how you can implement build pipelines using Jenkins.
10.7.1. Managing Maven Releases with the M2Release Plugin
An important part of any build pipeline is a well-defined release strategy. This involves, among other
things, deciding how and when to cut a new release, and how to identify it with a unique label or version
number. If you are working with Maven projects, using the Maven Release plugin to handle version
numbers comes as a highly recommended practice.
Maven projects use well-defined and well-structured version numbers. A typical version number is made
up of three digits (e.g., “1.0.1”). Developers work on SNAPSHOT versions (e.g.,“1.0.1-SNAPSHOT”),
which, as the name would indicate, are not designed to be definitive. The definitive releases (e.g.,
“1.0.1”) are built once and deployed to the local enterprise repository (or the central Maven repository
for open source libraries), where they can be used in turn by other projects. The version numbers used
in Maven artifacts are a critical part of Maven’s dependency management system, and it is strongly
advised to stick to the Maven conventions.
The Maven Release plugin helps automates the process of updating Maven version numbers in your
projects. In a nutshell, it verifies, builds and tests your application, bumps up the version numbers,
updates your version control system with the appropriate tags, and deploys the released versions of your
artifacts to your Maven repository. This is a tedious task to do by hand, so the Maven Release plugin
is an excellent way to automate things.
However the Maven Release plugin can be fickle, too. Uncommitted or modified local files can cause the
process to fail, for example. The process is also time-consuming and CPU intensive, especially for large
projects: it builds the application and runs the entire set of unit and integration tests several times, checks
out a fresh copy of the source code from the repository, and uploads many artifacts to the Enterprise
repository. Indeed, this is not the sort of thing you want running on a developer machine.
So it makes good sense to run this process on your build server.
One way to do this is to set up a special manual build job to invoke the Maven Release plugin. However,
the M2Release plugin proposes a simpler approach. Using this plugin, you can add the ability to
build a Maven release version in an existing build job. This way you can avoid duplicating build jobs
unnecessarily, making build job maintenance easier.
Once you have installed this plugin, you can define any build job to also propose a manual Maven
Release step. You do this by ticking the “Maven release build” checkbox in the Build Environment
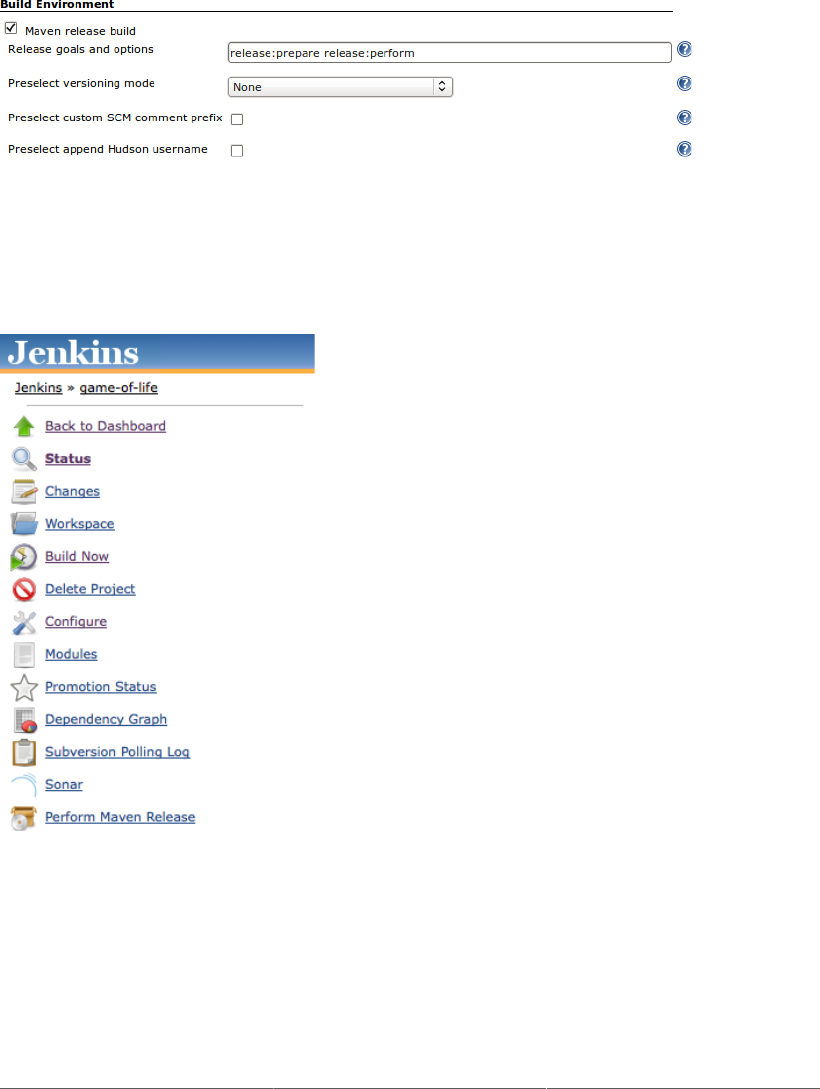
287
section (see Figure 10.36, “Configuring a Maven release using the M2Release plugin”). Here, you define
the goals you want to execute to trigger the build (typically release:prepare release:perform).
Figure 10.36. Configuring a Maven release using the M2Release plugin
Once you have set this up, you can trigger a Maven release manually using a new menu option called
“Perform Maven Release” (see Figure 10.37, “The Perform Maven Release menu option”).
Figure 10.37. The Perform Maven Release menu option
This will kick off a special build job using the goals you provided in the plugin configuration (see
Figure 10.38, “Performing a Maven release in Jenkins”). Jenkins gives you the option to either use the
default version numbers provided by Maven (for example, version 1.0.1-SNAPSHOT will be released
as version 1.0.1, and the development version number bumped up to 1.0.2-SNAPSHOT), or to provide
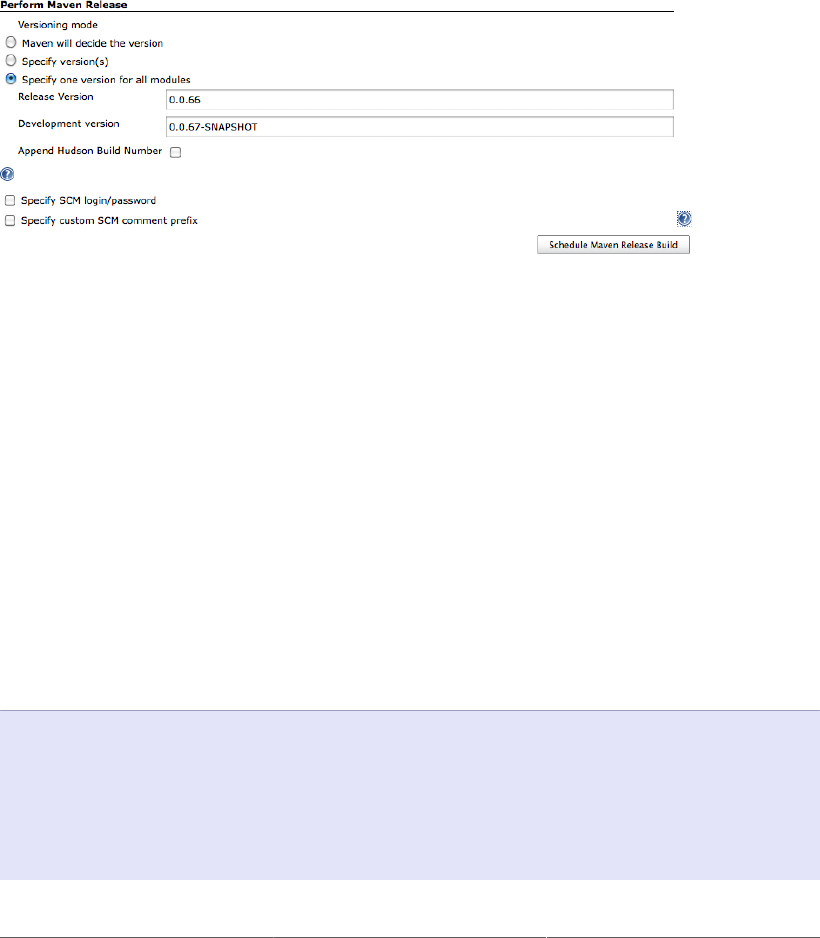
288
your own custom numbers. If you want to release a major version, for example, you might choose to
manually specify 1.1.0 as the release version number and 1.1.1-SNAPSHOT as the next development
version number.
If you have a multimodule Maven project, you can choose to provide a single version number
configuration for all modules, or provide a different version number update for each module. Note that
it is generally not recommended practice to provide different version numbers for different modules in
a multimodule project.
Figure 10.38. Performing a Maven release in Jenkins
Depending on your SCM configuration, you may also need to provide a valid SCM username and
password to allow Maven to create tags in your source code repository.
The professional edition of the Nexus Enterprise Repository provides a feature called Staging
Repositories, which is a way of deploying artifacts to a special staging area for further tests before
releasing them officially. If you are using this feature, you need to fine-tune your build server
configuration for best results.
Nexus Professional works by creating a new staging area for each unique IP Address, deploy users
and HTTP User agent. A given Jenkins build machine will always have the same IP address and user.
However, you will typically want to have a separate staging area for each build. The trick, then, is to
configure Maven to use a unique HTTP User-Agent for the deployment process. You can do this by
configuring the settings.xml file on your build server to contain something along the following lines
(the ID must match the ID for the release repository in the deployment section of your project):
<server>
<id>nexus</id>
<username>my_login</username>
<password>my_password</password>
<configuration>
<httpHeaders>
<property>
<name>User-Agent</name>
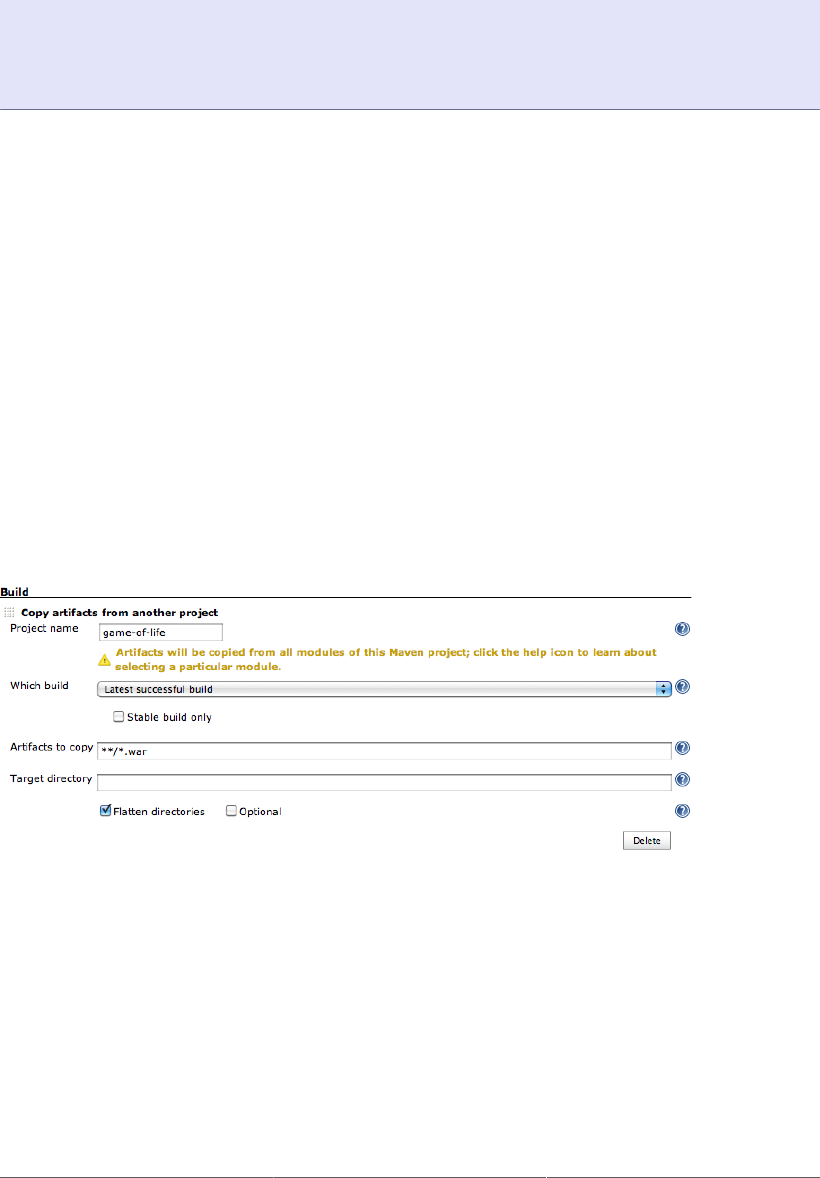
289
<value>Maven m2Release (java:20.1-b02-383 ${env.BUILD_TAG }</value>
</property>
</httpHeaders>
</configuration>
</server>
10.7.2. Copying Artifacts
During a build process involving several build jobs, such as the one illustrated in Figure 10.33, “A more
complicated build job dependency graph”, it can sometimes be useful to reuse artifacts produced by one
build job in a subsequent build job. For example, you may want to run a series of web tests in parallel
on separate machines, using local application servers for improved performance. In this case, it makes
sense to retrieve the exact binary artifact that was produced in the previous build, rather than rebuilding
it each time or, if you are using Maven, relying on a SNAPSHOT build deployed to your enterprise
repository. Indeed, both these approaches may run the risk of inconsistent build results: if you use a
SNAPSHOT from the enterprise repository, for example, you will be using the latest SNAPSHOT build,
which may not necessarily be the one built in the upstream build job.
The Copy Artifact plugin lets you copy artifacts from an upstream build and reuse them in your current
build. Once you have installed this plugin and restarted Jenkins, you will be able to add a new type of
build step called “Copy artifacts from another project” to your freestyle build jobs (see Figure 10.39,
“Adding a “Copy artifacts from another project” build step”).
Figure 10.39. Adding a “Copy artifacts from another project” build step
This new build step lets you copy artifacts from another project into the workspace of the current project.
You can specify any other project, though most typically it will be one of the upstream build jobs. And
of course you can specify, with a great deal of flexibility and precision, the exact artifacts that you want
to copy.
You need to specify where to find the files you want in the other build job’s workspace, and where
Jenkins should put them in your current project’s workspace. This can be a flexible regular expression

290
(such as **/*.war, for any WAR file produced by the build job), or it can be much more precise
(such as gameoflife-web/target/gameoflife.war). Note that by default, Jenkins will copy the
directory structure along with the file you retrieve, so if the WAR file you are after is nested inside
the target directory of the gameoflife-web module, Jenkins will place it inside the gameoflife-
web/target directory in your current workspace. If this is not to your tastes, you can tick the “Flatten
directories” option to tell Jenkins to put all of the artifacts at the root of the directory you specify (or,
by default, in your project workspace).
In many cases, you will simply want to retrieve artifacts from the most recent successful build. However,
sometimes you may want more precision. The “Which builds” field lets you specify where to look for
artifacts in a number of other ways, including the latest saved build (builds which have been marked to
“keep forever”), the latest successful build, or even a specific build number.
If you have installed the Build Promotion plugin (see Section 10.7.3, “Build Promotions”), you can
also select the latest promoted artifact in a particular promotion process. To do this, choose “Specify by
permalink”, then choose the appropriate build promotion process. This is an excellent way of ensuring
a consistent and reliable build pipeline. For example, you can configure a build promotion process to
trigger a build that copies a generated WAR file from the latest promoted build and deploys it to a
particular server. This ensures that you deploy precisely the right binary file, even if other builds have
occurred since.
If you are copying artifacts from a multimodule Maven build job, Jenkins will, by default, copy all of
the artifacts from that build. However often times you are only interested in one specific artifact (such
as the WAR artifact in a web application, for example.
This plugin is particularly useful when you need to run functional or performance tests on your web
application. It is often a useful strategy to place these tests in a separate project, and not as part of your
main build process. This makes it easier to run these tests against different servers or run the subsets of
the tests in parallel, all the while using the same binary artifact to deploy and test.
For example, imagine that you have a default build job called gameoflife that generates a WAR file, and
you would like to deploy this WAR file to a local application server and run a series of functional tests.
Furthermore, you want to be able to do this in parallel on several distributed machines.
One way to do this would be to create a dedicated Maven project designed to run the functional tests
against an arbitrary server. Then, you would set up a build job to run these functional tests. This build
job would use the Copy Artifact plugin to retrieve the latest WAR file (or even the latest promoted WAR
file, for more precision), and deploy it to a local Tomcat instance using Cargo. This build job could
then be set up as a configurable (“matrix”) build job, and run in parallel on several machines, possibly
with extra configuration parameters to filter the tests run by each build. Each build run would then be
using its own copy of the original WAR file. An example of a configuration like this is illustrated in
Figure 10.40, “Running web tests against a copied WAR file”.
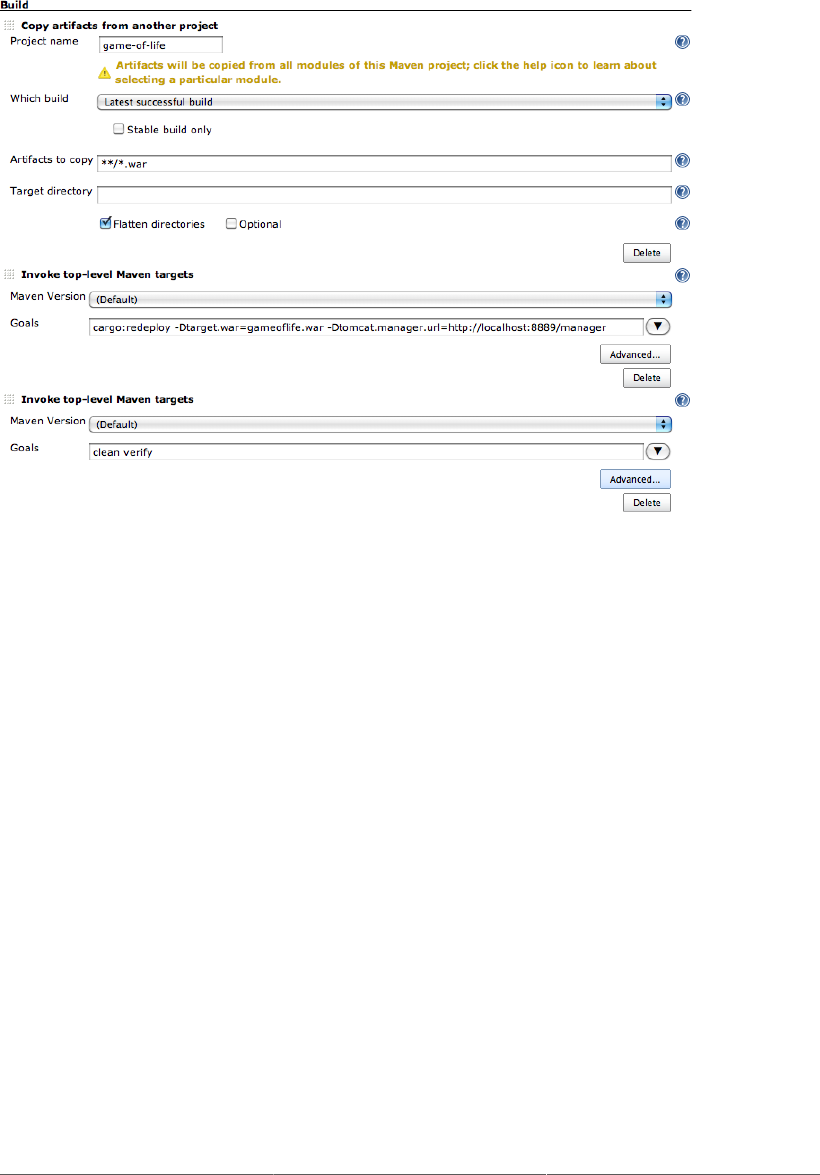
291
Figure 10.40. Running web tests against a copied WAR file
The Copy Artifact plugin is not limited to fetching files from conventional build jobs. You can also
copy artifacts from multiconfiguration build jobs (see Section 10.4, “Multiconfiguration Build Jobs”).
Artifacts from each executed configuration will be copied into the current workspace, each in its own
directory. Jenkins will build a directory structure using the axes that were used in the multiconfiguration
build. For example, imagine we need to produce a highly-optimized version of our product for a number
of different targeted databases and application servers. We could do this with a multiconfiguration build
job like the one illustrated in Figure 10.41, “Copying from a multiconfiguration build”.
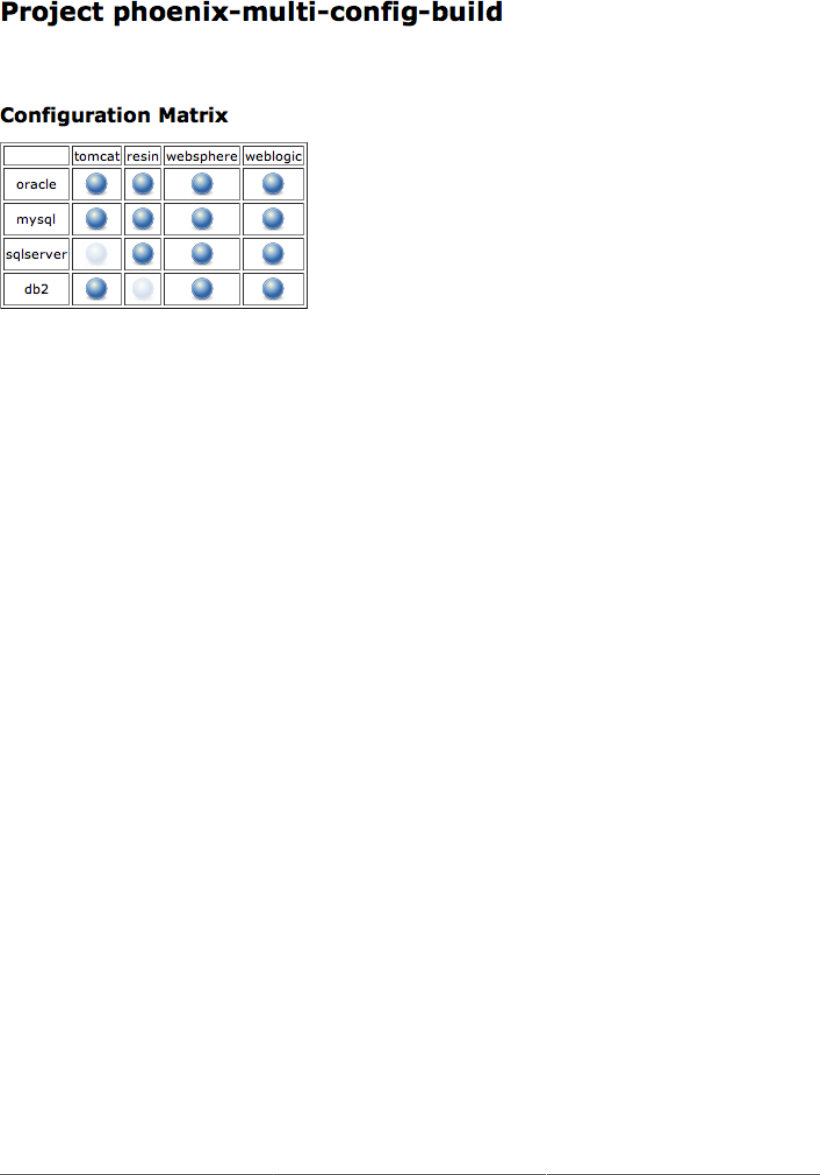
292
Figure 10.41. Copying from a multiconfiguration build
The Copy Artifacts plugin can duplicate any and all of the artifacts produced by this build job. If you
specify a multiconfiguration build as the source of your artifacts, the plugin will copy artifacts from all
of the configurations into the workspace of the target build job, using a nested directory structure based
on the multiconfiguration build axes. For example, if you define the target directory as multi-config-
artifacts, Jenkins will copy artifacts into a number of subdirectories in the target directory, each with
a name corresponding to the particular set of configuration parameters. So, using the build job illustrated
in Figure 10.41, “Copying from a multiconfiguration build”, the JAR file customized for Tomcat and
MySql would be copied to the $WORKSPACE/multi-config-artifacts/APP_SERVER/tomcat/
DATABASE/mysql directory.
10.7.3. Build Promotions
In the world of Continuous Integration, not all builds are created equal. For example, you may want to
deploy the latest version of your web application to a test server, but only after it has passed a number
of automated functional and load tests. Or you may want testers to be able to flag certain builds as being
ready for UAT deployment, once they have completed their own testing.
The Promoted Builds plugin lets you identify specific builds that have met additional quality criteria,
and to trigger actions on these builds. For example, you may build a web application in on build job,
run a series of automated web tests in a subsequent build, and then deploy the WAR file generated to
the UAT server for further manual testing.
Let’s see how this works in practice. In the project illustrated above, a default build job (phoenix-
default) runs unit and some integration tests, and produces a WAR file. This WAR file is then reused
for more extensive integration tests (in the phoenix-integration-tests build job) and then for a
series of automated web tests (in the phoenix-web-test build job). If the build passes the automated
web tests, we would like to deploy the application to a functional testing environment where it can be
tested by human testers. The deployment to this environment is implemented in the phoenix-test-
deploy build job. Once the testers have validated a version, it can be promoted into UAT, and then
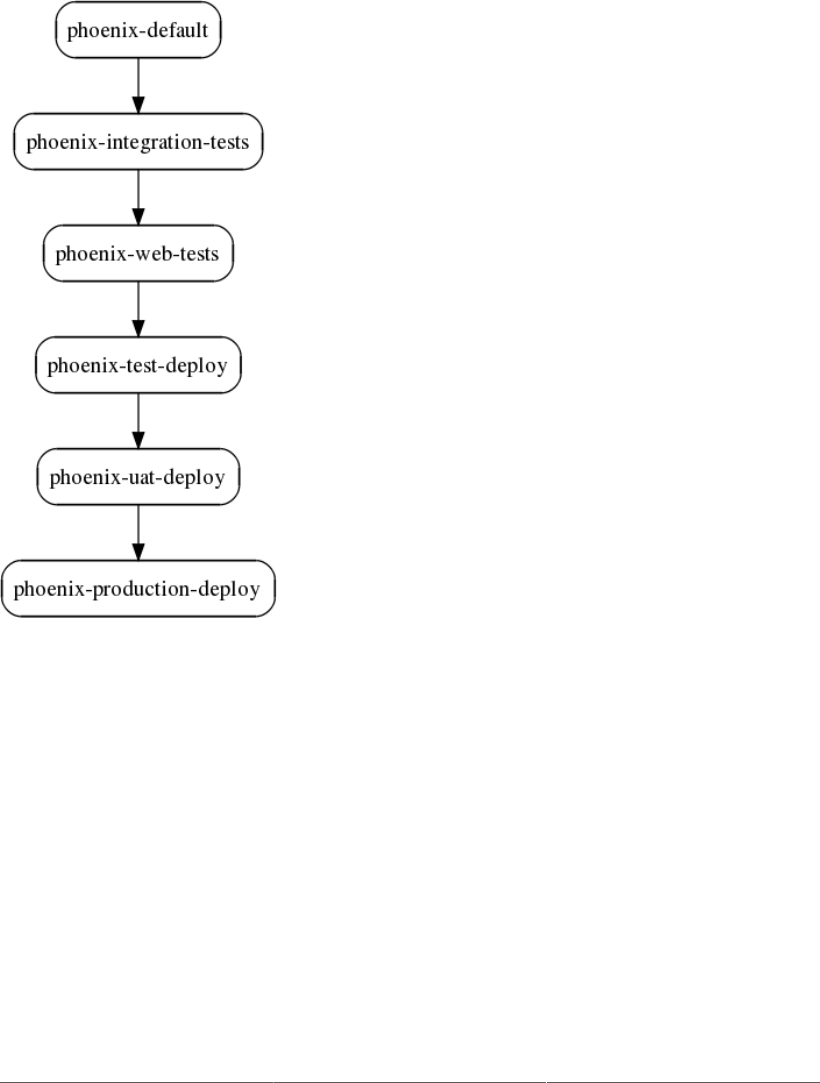
293
into production. The full promotion strategy is illustrated in Figure 10.42, “Build jobs in the promotion
process”.
Figure 10.42. Build jobs in the promotion process
This strategy is easy to implement using the Promoted Builds plugin. Once you have installed this in
the usual way, you will find a new “Promote builds when” checkbox on the job configuration page.
You use this option to set up build promotion processes. You define one or more build promotion
processes in the initial build job of process (phoenix-default in this example), as illustrated in
Figure 10.43, “Configuring a build promotion process”. A build job may be the starting point of several
build promotion processes, some automated, and some manual. In Figure 10.43, “Configuring a build
promotion process”, for example, there is an automated build promotion process called promote-to-
test and a manual one called promote-to-uat. Automated build promotion processes are triggered by the
results of downstream build jobs. Manual promotion processes (indicated by ticking the ‘Only when
manually approved’ checkbox) can only be triggered by user intervention.

294
Figure 10.43. Configuring a build promotion process
Let’s look at configuring the automated promote-to-test build process.
The first thing you need to define is how this build promotion process will be triggered. Build promotion
can be either automatic, based on the result of a downstream build job, or manually activated by a user.
In Figure 10.43, “Configuring a build promotion process”, the build promotion for this build job will
be automatically triggered when the automated web tests (executed by the phoenix-web-tests build
job) are successful.
You can also have certain build jobs that can only be promoted manually, as illustrated in Figure 10.44,
“Configuring a manual build promotion process”. Manual build promotion is used for cases where
human intervention is needed to approve a build promotion. Deployment to UAT or production are
common examples of this. Another example is where you want to temporarily suspend automatic build
promotions for a short period, such as nearing a release.
Manual builds, as the name suggests, need to be manually approved to be executed. If the promotion
process is to trigger a parameterized build job, you can also provide parameters that the approver will
need to enter when approving. In some cases, it can also be useful to designate certain users who are
allowed to activate the manual promotion. You can do this by specifying a list of users or groups in
the Approvers list.
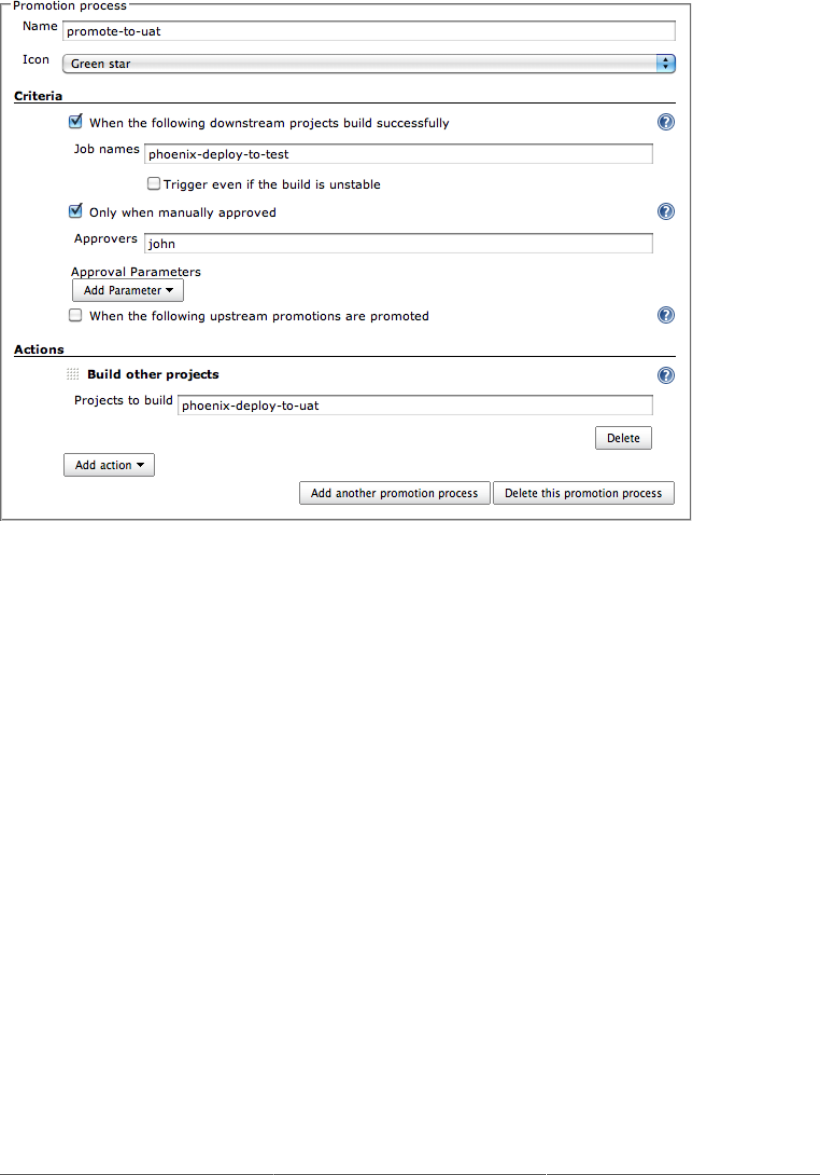
295
Figure 10.44. Configuring a manual build promotion process
Sometimes, it is useful to give some context to the person approving a promotion. When you set up
a manual promotion process, you can also specify other conditions which must be met, in particular
downstream (or upstream) build jobs which must have been built successfully (see Figure 10.45,
“Viewing the details of a build promotion”). These will appear in the “Met Qualifications” (for the
successful build jobs) and in “Unmet Qualifications” (for the build jobs that failed or have not been
executed yet).
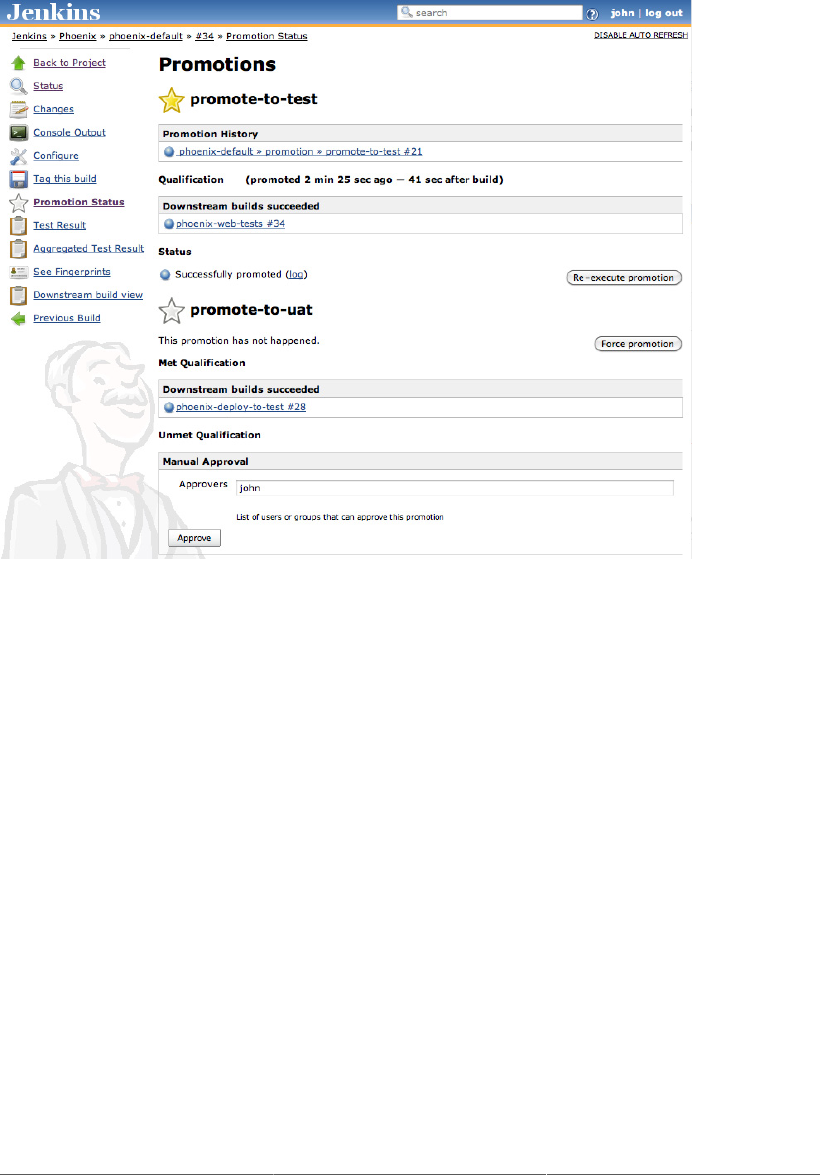
296
Figure 10.45. Viewing the details of a build promotion
Next you need to tell Jenkins what to do when the build is promoted. You do this by adding actions, just
like in a freestyle build job. This makes build promotions extremely flexible, as you can add virtually
any action available to a normal freestyle build job, including any additional steps made available by
the plugins installed on your Jenkins instance. Common actions include invoking Maven or Ant scripts,
deploying artifacts to a Maven repository, or triggering another build job.
One important thing to remember here is that you cannot rely on files in the workspace when promoting
your build. Indeed, by the time you promote the build, either automatically or manually, other build jobs
may have deleted or rewritten the files you need to use. For this reason, it is unwise, for example, to
deploy a WAR file directly from the workspace to an application server from within a build promotion
process. A more robust solution is to trigger a separate build job and to use the Copy Artifacts plugin
(see Section 10.7.2, “Copying Artifacts”) to retrieve precisely the right file. In this case, you will be
copying artifacts that you have configured Jenkins to conserve, rather than copying the files directly
from the workspace.
For build promotion to work correctly, Jenkins needs to be able to precisely link downstream build jobs
to upstream ones. The more accurate way to do this is by using fingerprints. In Jenkins, a fingerprint is
the MD5 checksum a file produced by or used in a build job. By matching fingerprints, Jenkins is able
to identify all of the builds which use a particular file.
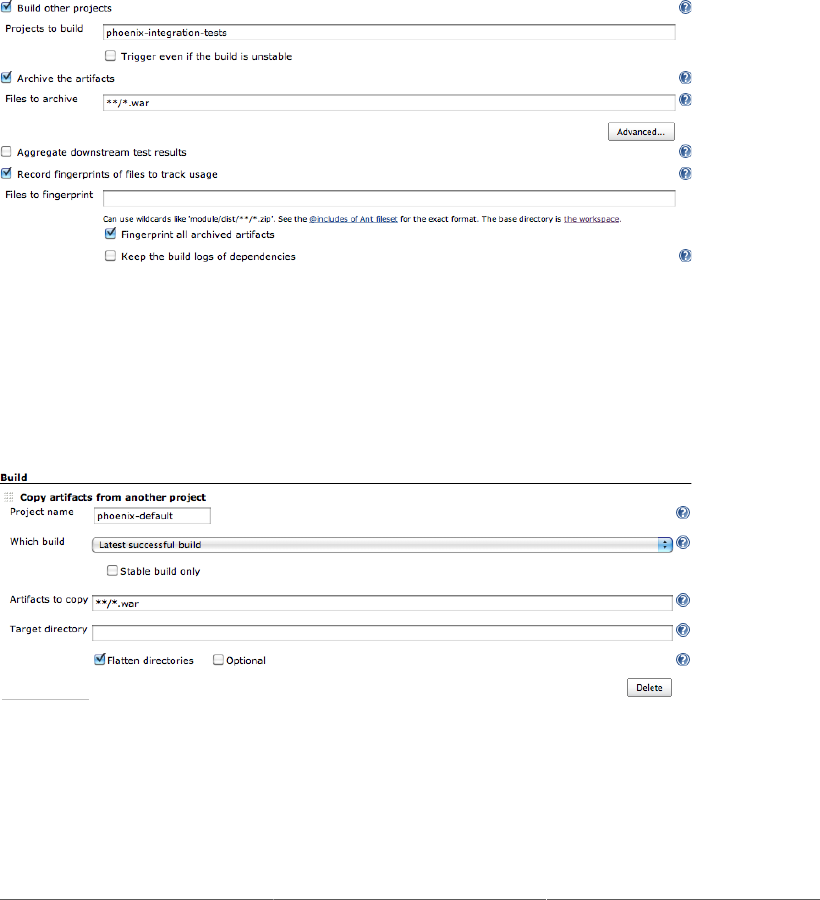
297
In the context of build promotion, a common strategy is to build your application once, and then to run
tests against the generated binary files in a series of downstream build jobs. This approach works well
with build promotion, but you need to ensure that Jenkins fingerprints the files that are shared or copied
between build jobs. In the example shown in Figure 10.43, “Configuring a build promotion process”, for
instance, we need to do two things (Figure 10.46, “Using fingerprints in the build promotion process”).
First, we need to archive the generated WAR file so that it can be reused in the downstream project.
Secondly, we need to record a fingerprint of the archived artifacts. You do this by ticking the “Record
fingerprints of files to track usage” option, and specifying the files you want to fingerprint. A useful
shortcut is simply to fingerprint all archived files, since these are the files that will typically be retrieved
and reused by the downstream build jobs.
Figure 10.46. Using fingerprints in the build promotion process
This is all you need to do to configure the initial build process. The next step is to configure the
integration tests executed in the phoenix-integration build job. Here, we use the Copy Artifact
plugin to retrieve the WAR file generated by the phoenix-default build job (see Figure 10.47,
“Fetching the WAR file from the upstream build job”). Since this build job is triggered immediately after
the phoenix-default build job, we can simply fetch the WAR file from the latest successful build.
Figure 10.47. Fetching the WAR file from the upstream build job
This is not quite all we need to do for the integration tests, however. The phoenix-integration build
job is followed by the phoenix-web build job, which executes the automated web tests. To ensure that
the same WAR file is used at each stage of the build process, we need to retrieve it from the upstream
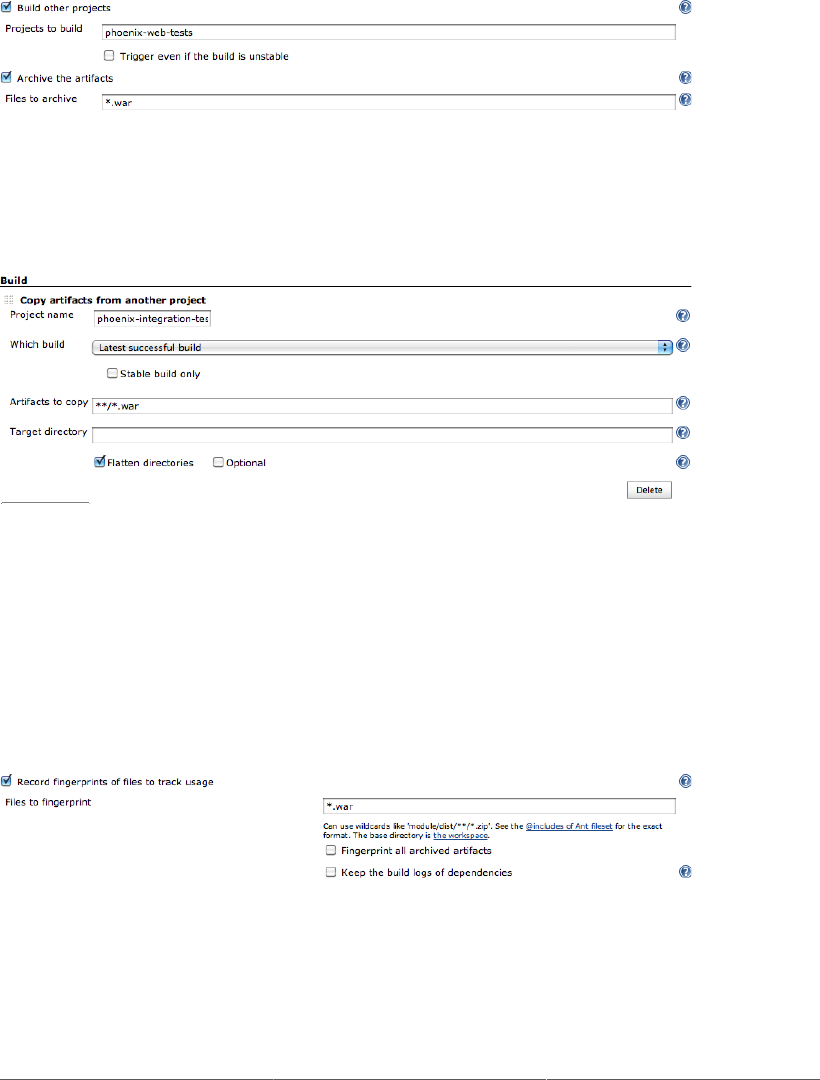
298
phoenix-integration build job, and not from the original phoenix-default build job (which may
have been executed again in the meantime). So we also need to archive the WAR file in the phoenix-
integration build job (see Figure 10.48, “Archiving the WAR file for use in the downstream job”).
Figure 10.48. Archiving the WAR file for use in the downstream job
In the phoenix-web build job, we then fetch the WAR file from the phoenix-integration build
job, using a configuration very similar to the one shown above (see Figure 10.49, “Fetching the WAR
file from the integration job”).
Figure 10.49. Fetching the WAR file from the integration job
For the build promotion process to work properly, there is one more important thing we need to
configure in the phoenix-web build job. As we discussed earlier, Jenkins needs to be able to be sure
that the WAR file used in these tests is the same one generated by the original build. We do this
by activating fingerprinting on the WAR file we fetched from the phoenix-integration build job
(which, remember, was originally built by the phoenix-default build job). Since we have copied
this WAR file into the workspace, a configuration like the one in Figure 10.50, “We need to determine
the fingerprint of the WAR file we use” will work just fine.
Figure 10.50. We need to determine the fingerprint of the WAR file we use
The final step is to configure the phoenix-deploy-to-test build job to retrieve the last promoted
WAR file (rather than just the last successful one). To do this, we use the Copy Artifact plugin again, but
this time we choose the “Specified by permalink” option. Here Jenkins will propose, among other things,

299
the build promotion processes configured for the build job you are copying from. So, in Figure 10.51,
“Fetching the latest promoted WAR file”, we are fetching the last promoted WAR file build by the
phoenix-default job, which is precisely what we want.
Figure 10.51. Fetching the latest promoted WAR file
Our promotion process is now ready for action. When the automated web tests succeed for a particular
build, the original build job will be promoted and the corresponding WAR file deployed to the test
environment. Promoted builds are indicated by a star in the build history (see Figure 10.52, “Promoted
builds are indicated by a star in the build history”). By default, the stars are yellow, but you can configure
the color of the star in the build promotion setup.
Figure 10.52. Promoted builds are indicated by a star in the build history
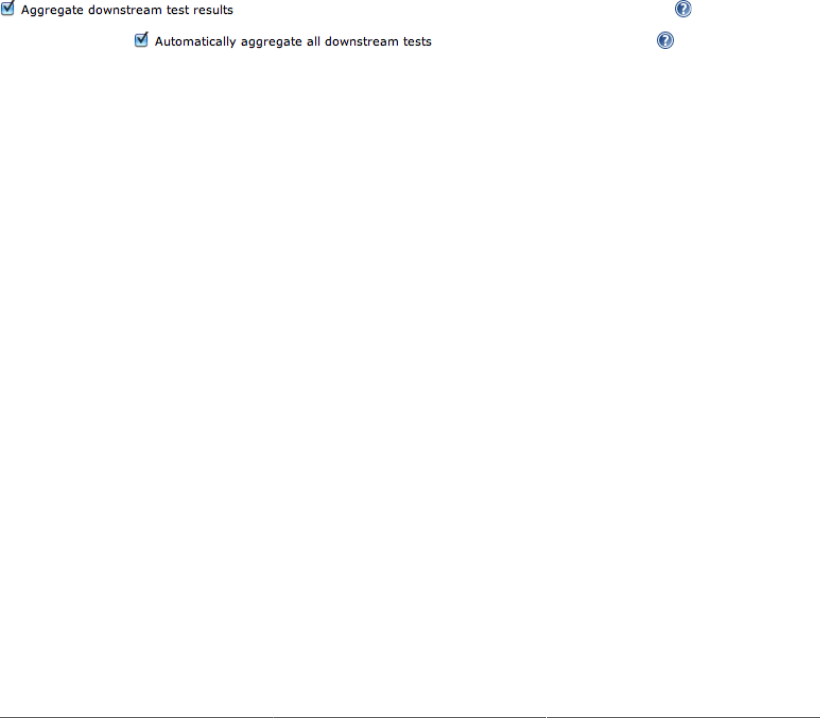
300
You can also use the “Promotion Status” menu entry (or click on the colored star in the build history)
to view the details of a particular build promotion, and even to rerun a promotion manually (see
Figure 10.45, “Viewing the details of a build promotion”). Any build promotion can be triggered
manually, by clicking on “Force promotion” (if this build job has never been promoted) or “Re-execute
promotion” (if it has).
10.7.4. Aggregating Test Results
When distributing different types of tests across different build jobs, it is easy to loose a global vision
about the overall test results. Test results are scattered among the various build jobs, without a central
place to see the total number of executed and failing tests.
A good way to avoid this problem is to use the Aggregated Test Results feature of Jenkins. This will
retrieve any test results recorded in the downstream jobs, and aggregate them in the upstream build job.
You can configure this in the initial (upstream) build job by ticking the “Aggregate downstream test
results” option (see Figure 10.53, “Reporting on aggregate test results”).
Figure 10.53. Reporting on aggregate test results
The aggregate test results can be seen in the build details page (see Figure 10.54, “Viewing aggregate
test results”). Unfortunately, these aggregate test results do not appear in the overall test results, but you
can display the full list of tests executed by clicking on the Aggregate Test Result link on the individual
build page.
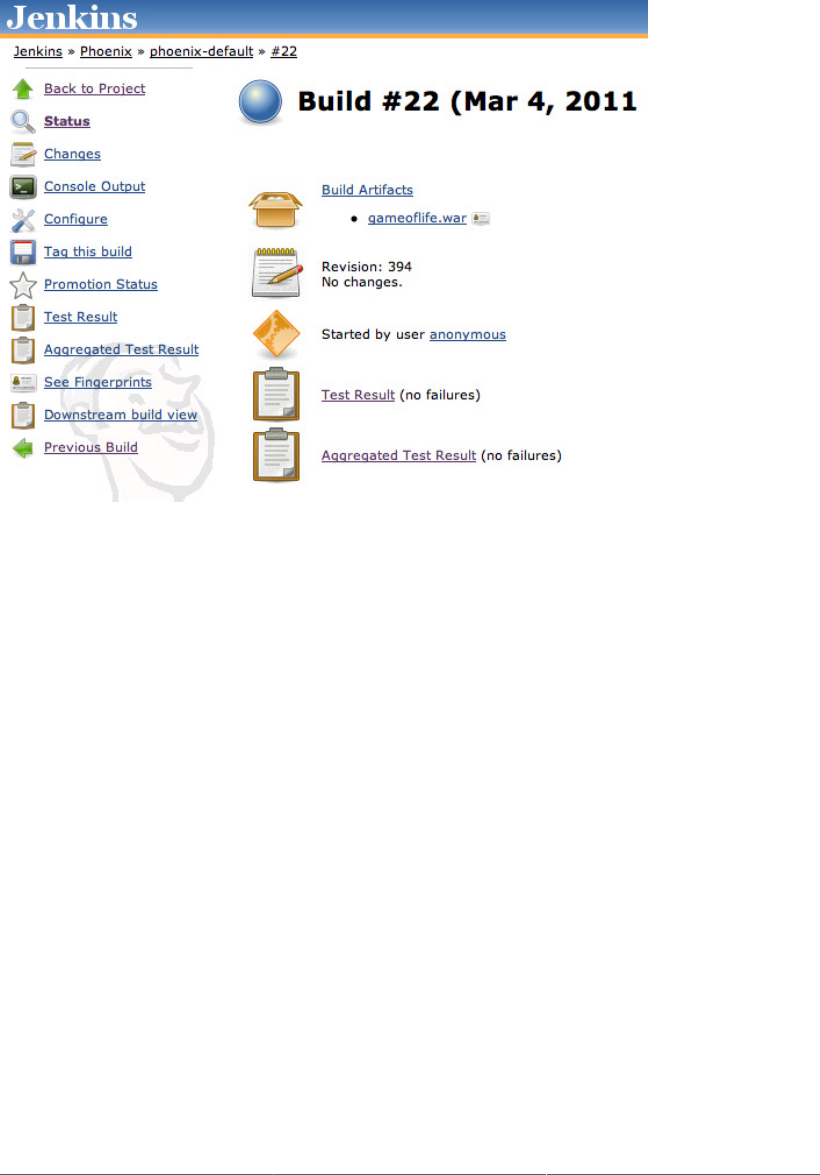
301
Figure 10.54. Viewing aggregate test results
For this to work correctly, you need to ensure that you have configured fingerprinting for the binary
files you use at each stage. Jenkins will only aggregate downstream test results from builds containing
an artifact with the same fingerprint.
10.7.5. Build Pipelines
The final plugin we will be looking at in this section is the Build Pipeline plugin. The Build Pipelines
plugin takes the idea of build promotion further, and helps you design and monitor deployment pipelines.
A deployment pipeline is a way of orchestrating your build through a series of quality gates, with
automated or manual approval processes at each stage, culminating with deployment into production.
The Build Pipeline plugin provides an alternative way to define downstream build jobs. A build pipeline,
unlike conventional downstream dependencies, is considered to be a linear process, a series of build
jobs executed in sequence.
To use this plugin, start by configuring the downstream build jobs for each build job in the pipeline,
using the “Build other projects” field just as you would normally do. The Build Pipelines plugin uses
the standard upstream and downstream build configurations, and for automatic steps this is all you need
to do. However the Build Pipeline plugin also supports manual build steps, where a user has to manually
approve the next step. For manual steps, you also need to configure In the Post-build Actions of
your upstream build job: just tick the “Build Pipeline Plugin -> Specify Downstream Project” box, select

302
the next step in your project, and tick the “Require manual build executor” option (see Figure 10.55,
“Configuring a manual step in the build pipeline”).
Figure 10.55. Configuring a manual step in the build pipeline
Once you have set up your build process to your satisfaction, you can configure the build pipeline view.
You can create this view just like any other view (see Figure 10.56, “Creating a Build Pipeline view”).
Figure 10.56. Creating a Build Pipeline view
There is a trick when it comes to configuring the view, however. At the time of writing, there is no menu
option or button that lets you configure the view directly. In fact, you need to enter the URL manually.
Fortunately, this is not difficult: just add /configure to the end of the URL shown when you are
displaying this view. For example, if you have named your view “phoenix-build-pipeline”, as shown
here, the URL to configure this view would be http://my_jenkins_server/view/phoenix-
build-pipeline. (see Figure 10.57, “Configuring a Build Pipeline view”).

303
Figure 10.57. Configuring a Build Pipeline view
The most important thing to configure in this screen is the initial job. This marks the starting point of
your build pipeline. You can define multiple build pipeline views, each with a different starting job.
You can also configure the maximum number of build sequences to appear on the screen at once.
Once you have configured the starting point, you can return to the view to see the current state of your
build pipeline. Jenkins displays the successive related build jobs horizontally, using a color to indicate
the outcome of each build (Figure 10.58, “A Build Pipeline in action”). There is a column for each build
job in the pipeline. Whenever the initial build job kicks off, a new row appears on this page. As the
build progresses through the successive build jobs in the pipeline, Jenkins will add a colored box in
the successive columns, indicating the outcome of each stage. You can click on the box to drill down
into a particular build result for more details. Finally, if a manual execution is required, a button will
be displayed where the user can trigger the job.
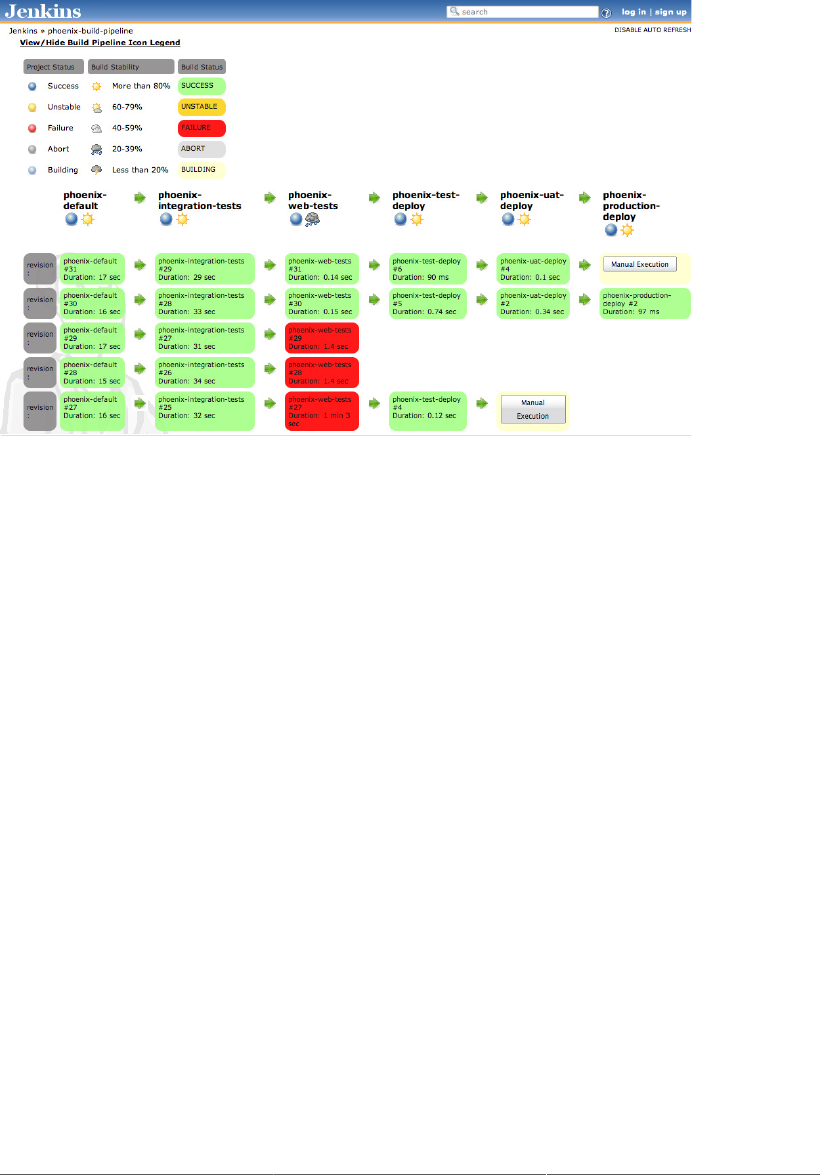
304
Figure 10.58. A Build Pipeline in action
This plugin is still relatively new, and does not integrate with all of the other plugins we have seen here.
In particular, it is really designed for a linear build pipeline, and does not cope well with branches or
parallel build jobs. Nevertheless, it does give an excellent global vision of a build pipeline.
10.8. Conclusion
Continuous Integration build jobs are much more than simply the scheduled execution of build scripts. In
this chapter we have reviewed a number of tools and techniques enabling you to go beyond your typical
build jobs, combining them so that they can work together as part of a larger process. We have seen how
parameterized and multiconfiguration build jobs add an element of flexibility to ordinary build jobs by
allowing you to run the same build job with different sets of parameters. Other tools help coordinate and
orchestrate groups of related build jobs. The Joins and Locks and Latches plugins helps you coordinate
build jobs running in parallel. And the Build Promotions and Build Pipelines plugins, with the help of
the Copy Artifacts plugin, make it relatively easy to design and configure complex build promotion
strategies for your projects.

Chapter 11. Distributed Builds
11.1. Introduction
Arguably one of the more powerful features of Jenkins is its ability to dispatch build jobs across a large
number of machines. It is quite easy to set up a farm of build servers, either to share the load across
multiple machines, or to run build jobs in different environments. This is a very effective strategy which
can potentially increase the capacity of your CI infrastructure dramatically.
Distributed builds are generally used either to absorb extra load, for example absorbing spikes in
build activity by dynamically adding extra machines as required, or to run specialized build jobs in
specific operating systems or environments. For example, you may need to run particular build jobs
on a particular machine or operating system. For example, if you need to run web tests using Internet
Explorer, you will need to be use a Windows machine. Or one of your build jobs may be particularly
resource-heavy, and need to be run on its own dedicated machine so as not to penalize your other build
jobs.
Demand for build servers can also fluctuate over time. If you are working with product release cycles,
you may need to run a much higher number of builds jobs towards the end of the cycle, for example,
when more comprehensive functional and regression test suites may be more frequent.
In this chapter, we will discuss how to set up and manage a farm of build servers using Jenkins.
11.2. The Jenkins Distributed Build Architecture
Jenkins uses a master/slave architecture to manage distributed builds. Your main Jenkins server (the one
we have been using up until present) is the master. In a nutshell, the master’s job is to handle scheduling
build jobs, dispatching builds to the slaves for the actual execution, monitor the slaves (possibly taking
them online and offline as required) and recording and presenting the build results. Even in a distributed
architecture, a master instance of Jenkins can also execute build jobs directly.
The job of the slaves is to do as they are told, which involves executing build jobs dispatched by the
master. You can configure a project to always run on a particular slave machine, or a particular type of
slave machine, or simply let Jenkins pick the next available slave.
A slave is a small Java executable that runs on a remote machine and listens for requests from the
Jenkins master instance. Slaves can (and usually do) run on a variety of operating systems. The slave
instance can be started in a number of different ways, depending on the operating system and network
architecture. Once the slave instance is running, it communicates with the master instance over a TCP/
IP connection. We will look at different setups in the rest of this chapter.
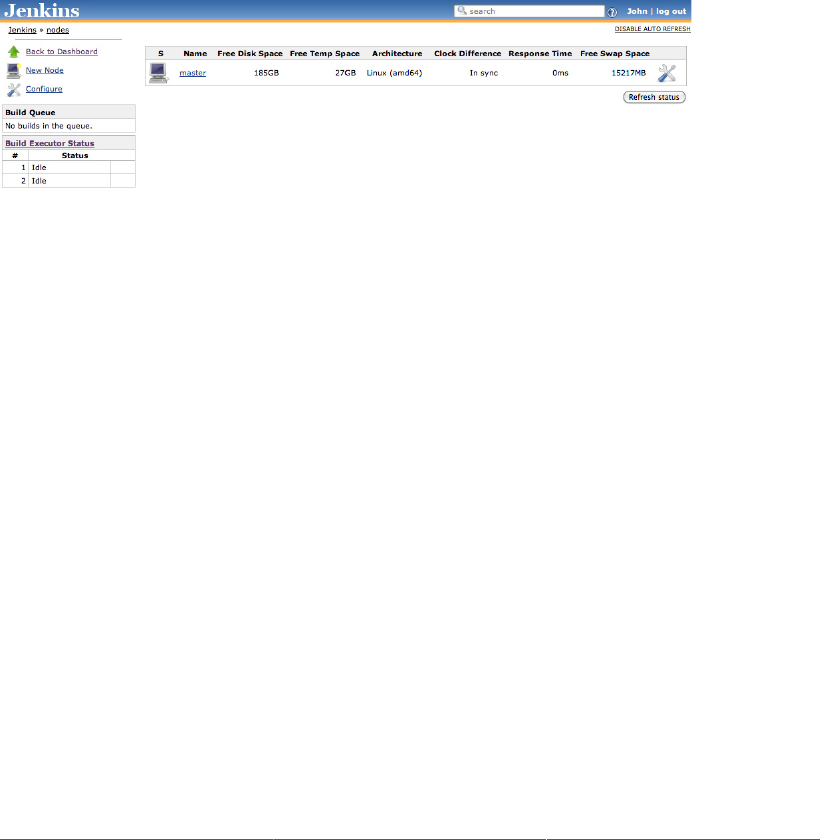
306
11.3. Master/Slave Strategies in Jenkins
There are a number of different ways that you can configure set up a distributed build farm using Jenkins,
depending on your operating systems and network architecture. In all cases, the fact that a build job is
being run on a slave, and how that slave is managed, is transparent for the end-user: the build results
and artifacts will always end up on the master server.
Creating a new Jenkins slave node is a straightforward process. First, go to the Manage Jenkins screen
and click on Manage Nodes. This screen displays the list of slave agents (also known as “Nodes” in
more politically correct terms), shown in Figure 11.1, “Managing slave nodes”. From here, you can set
up new nodes by clicking on the New Node button. You can also configure some of the parameters
related to your distributed build setup (see Section 11.5, “Node Monitoring”).
Figure 11.1. Managing slave nodes
There are several different strategies when it comes to managing Jenkins slave nodes, depending on
your target operating systems and other architectural considerations. These strategies affect the way you
configure your slave nodes, so we need to consider them separately. In the following sections, we will
look at the most frequently used ways to install and configure Jenkins slaves:
• The master starts the slave agents via ssh
• Starting the slave agent manually using Java Web Start
• Installing the slave agent as a Window service
• Starting the slave agent directly from the command line on the slave machine from the command
line
Each of these strategies has its uses, advantages, and inconveniences. Let’s look at each in turn.
11.3.1. The Master Starts the Slave Agent Using SSH
If you are working in a Unix environment, the most convenient way to start a Jenkins slave is
undoubtedly to use SSH. Jenkins has its own build-in SSH client, and almost all Unix environments
support SSH (usually sshd) out of the box.
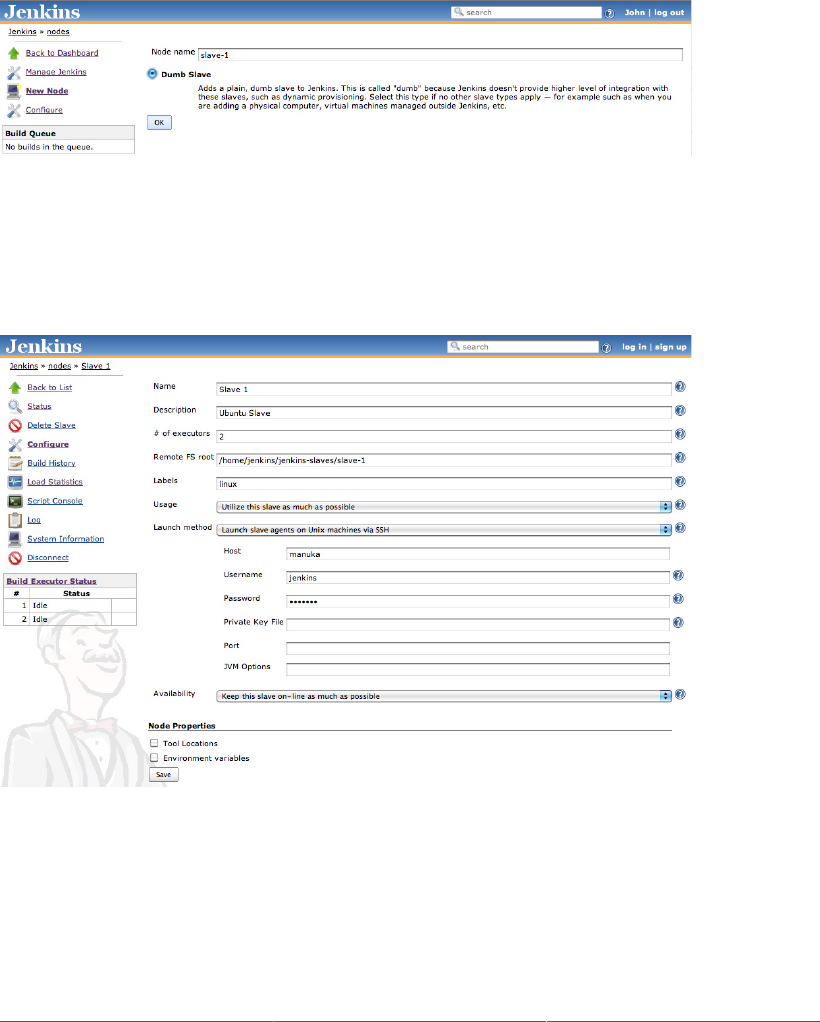
307
To create a Unix-based slave, click on the New Node button as we mentioned above. This will prompt
you to enter the name of your slave, and its type (see Figure 11.2, “Creating a new slave node”). At the
time of writing, only “dumb slaves” are supported out of the box; “dumb” slaves are passive beasts, that
simply respond to build job requests from the master node. This is the most common way to set up a
distributed build architecture, and the only option available in a default installation.
Figure 11.2. Creating a new slave node
In this screen, you simply need to provide a name for your slave. When you click on OK, Jenkins will
let you provide more specific details about your slave machine (see Figure 11.3, “Creating a Unix slave
node”).
Figure 11.3. Creating a Unix slave node
The name is simply a unique way of identifying your slave machine. It can be anything, but it may help
if the name reminds you of the physical machine it is running on. It also helps if the name is file-system
and URL-friendly. It will work with spaces, but you will make life easier for yourself if you avoid them.
So “Slave-1” is better than “Slave 1”.

308
The description is also purely for human consumption, and can be used to indicate why you would use
this slave rather than another.
Like on the main Jenkins configuration screen, the number of executors lets you define how many
concurrent build job this node can execute.
Every Jenkins slave node also needs a place that it can call home, or, more precisely, a dedicated
directory on the slave machine that the slave agent can use to run build jobs. You define this directory
in the Remote FS root field. You need to provide a local, OS-specific path, such as /var/jenkins for
a Unix machine, or C:\jenkins on Windows. Nothing mission-critical is stored in this directory—
everything important is transferred back to the master machine once the build is done. So you usually
don’t need to be so concerned with backing up these directories as you should be with the master.
Labels are a particularly useful concept when your distributed build architecture begins to grow in size.
You can define labels, or tags, to each build node, and then configure a build job to run only on a slave
node with a particular label. Labels might relate to operating systems (unix, windows, macosx, etc.),
environments (staging, UAT, development, etc.) or any criteria that you find useful. For example, you
could configure your automated WebDriver/Selenium tests to run using Internet Explorer, but only on
slave nodes with the “windows” label.
The Usage field lets you configure how intensively Jenkins will use this slave. You have the choice of
three options: use it as much as possible, reserve it for dedicated build jobs, or bring it online as required.
The first option, “Utilize this slave as much as possible”, tells Jenkins to use this slave freely as soon
as it becomes available, for any build job that it can run. This is by far the most commonly used one,
and is generally what you want.
There are times, however, when this second option comes in handy. In the project configuration, you can
tie a build job to a specific node—this is useful when a particular task, such as automated deployment
or a performance test suite, needs to be executed on a specific machine. In this case, the “Leave this
machine for tied jobs only” option makes good sense. You can take this further by setting the maximum
number of Executors to 1. In this case, not only will this slave be reserved for a particular type of job, but
it will only ever be able to run one of these build jobs at any one time. This is a very useful configuration
for performance and load tests, where you need to reserve the machine so that it can execute its tests
without interference.
The third option is “Take this slave on-line when in demand and off-line when idle” (see Figure 11.4,
“Taking a slave off-line when idle”). As the name indicates, this option tells Jenkins to bring this slave
online when demand is high, and to take it offline when demand subsides. This lets you keep some
build slaves in reserve for periods of heavy use, without having to maintain a slave agent running on
them permanently. When you choose this option, you also need to provide some extra details. The “In
demand delay” indicates how many minutes jobs must have been waiting in the queue before this slave
will be brought online. The Idle delay indicates how long the slave needs to be idle before Jenkins will
take it off-line.

309
Figure 11.4. Taking a slave off-line when idle
The launch method is where you decide how Jenkins will start the node, as we mentioned earlier. For
the configuration we are discussing here, you would choose “Launch slave agents on Unix machines
via SSH”. The Advanced button lets you enter the additional details that Jenkins needs to connect to
the Unix slave machine: a host name, a login and password, and a port number. You can also provide a
path to the SSH private key file on the master machine (e.g., id_dsa or id_rsa) to use for “password-
less” Public/Private Key authentication.
You can also configure when Jenkins starts and stops the slave. By default, Jenkins will simply keep the
slave running and use it whenever required (the “Keep this slave on-line as much as possible” option).
If Jenkins notices that the slave has gone offline (for example due to a server reboot), it will attempt
to restart it if it can. Alternatively, Jenkins can be more conservative with your system resources, and
take the slave offline when it doesn’t need it. To do this, simply choose the “Take this slave on-line
when in demand and off-line when idle” option. This is useful if you have regular spikes and lulls of
build activity, as an unused slave can be taken offline to conserve system resources for other tasks, and
brought back online when required.
Jenkins also needs to know where it can find the build tools it needs for your build jobs on the slave
machines. This includes JDKs as well as build tools such as Maven, Ant, and Gradle. If you have
configured your build tools to be automatically installed, you will usually have no extra configuration to
do for your slave machines; Jenkins will download and install the tools as required. On the other hand,
if your build tools are installed locally on the slave machine, you will need to tell Jenkins where it can
find them. You do this by ticking the Tool Locations checkbox, and providing the local paths for each
of the tools you will need for your build jobs (see Figure 11.5, “Configuring tool locations”).
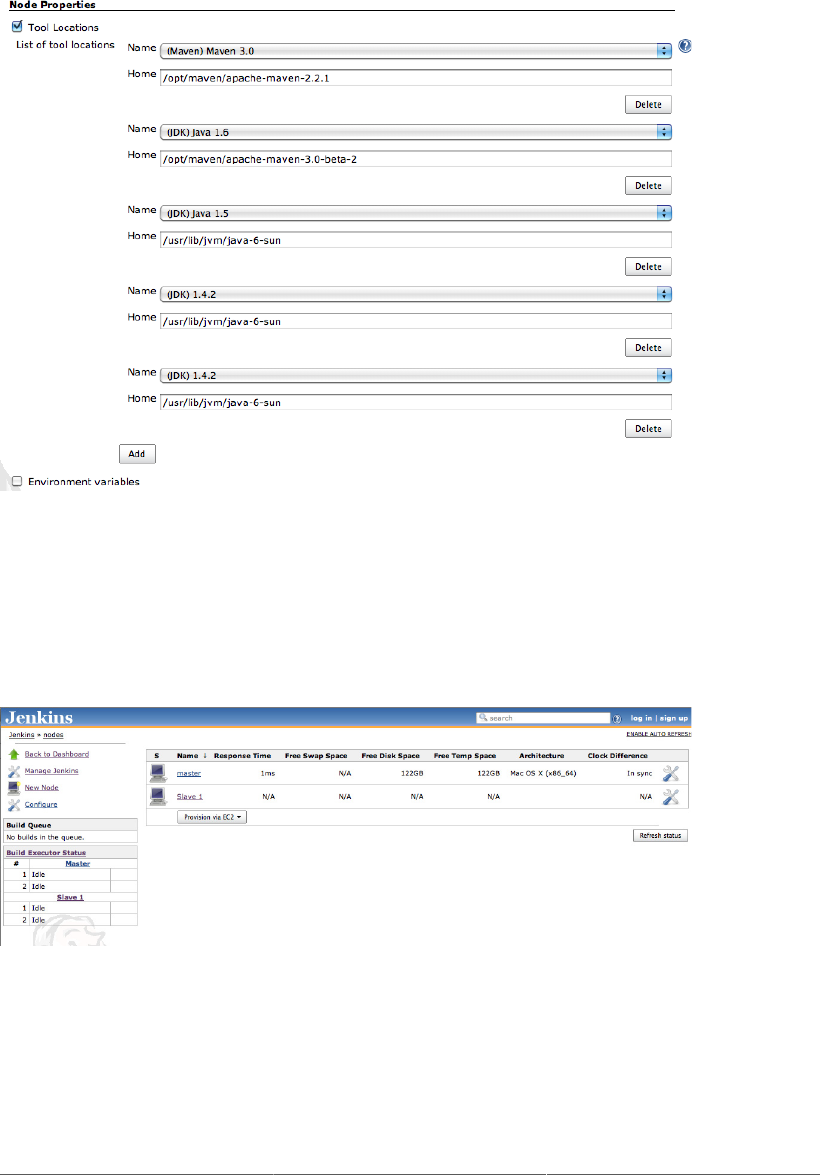
310
Figure 11.5. Configuring tool locations
You can also specify environment variables. These will be passed into your build jobs, and can be a
good way to allow your build jobs to behave differently depending on where they are being executed.
Once you have done this, your new slave node will appear in the list of computers on the Jenkins Nodes
page (see Figure 11.6, “Your new slave node in action”).
Figure 11.6. Your new slave node in action
11.3.2. Starting the Slave Agent Manually Using Java Web Start
Another option is to start a slave agent from the slave machine itself using Java Web Start (JNLP).
This approach is useful if the server cannot connect to the slave, for example if the slave machine is

311
running on the other side of a firewall. It works no matter what operating system your slave is running
on, however it is more commonly used for Windows slaves. It does suffer from a few major drawbacks:
the slave node cannot be started, or restarted, automatically by Jenkins. So, if the slave goes down, the
master instance cannot restart it.
When you do this on a Windows machine, you need to start the Jenkins slave manually at least once.
This involves opening a browser on the machine, opening the slave node page on the Jenkins master,
and launching the slave using a very visible JNLP icon. However, once you have launched the slave,
you can install it as a Windows service.
There are also times when you need to do this from the command line, in a Unix environment. You
may need to do this because of firewalls or other networking issues, or because SSH is not available
in your environment.
Lets step through both these processes.
The first thing you need to do in all cases is create a new slave. As for any other slave node, you do this
by clicking on the New Node menu entry in the Nodes screen. When entering the details concerning
your slave node, make sure you choose “Launch slave agents via JNLP” in the Launch Method field
(see Figure 11.7, “Creating a slave node for JNLP”). Also remember that if this is to be a Windows slave
node, the Remote FS root needs to be a Windows path (such as C:\jenkins-slave). This directory
does not have to exist: Jenkins will create it automatically if it is missing.
Figure 11.7. Creating a slave node for JNLP
Once you have saved this configuration, Next, log on to the slave machine and open the Slave node
screen in a browser, as shown in Figure 11.8, “Launching a slave via Java Web Start”. You will see
a large orange Launch button—if you click on this button, you should be able to start a slave agent
directly from within your browser.
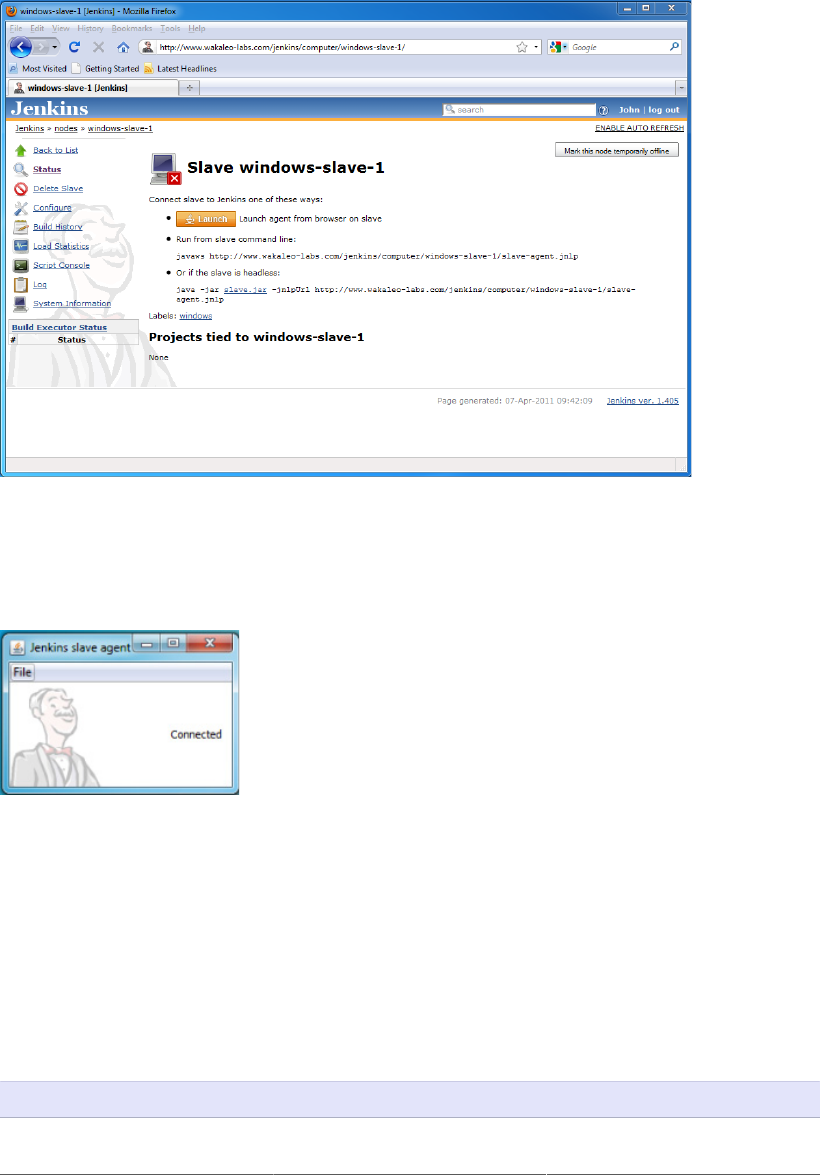
312
Figure 11.8. Launching a slave via Java Web Start
If all goes well, this will open up a small window indicating that your slave agent is now running (see
Figure 11.9, “The Jenkins slave agent in action”).
Figure 11.9. The Jenkins slave agent in action
Browsers are fickle, however, and Java Web Start is not always easy to use. This approach usually works
best with Firefox, although you must have the Java JRE installed beforehand to make Firefox Java-
aware. Using JNLP with Internet Explorer requires some (considerable) fiddling to associate *.jnlp
files with the Java Web Start executable, a file called javaws, which you will find in the Java bin
directory. In fact it is probably easier just to start it from the command line as discussed below.
A more reliable, albeit low-level, approach is to start the slave from the command line. To do this,
simply invoke the javaws executable from a command window as shown here:
C:> javaws http://build.myorg.com/jenkins/computer/windows-slave-1/slave-agent.jnlp
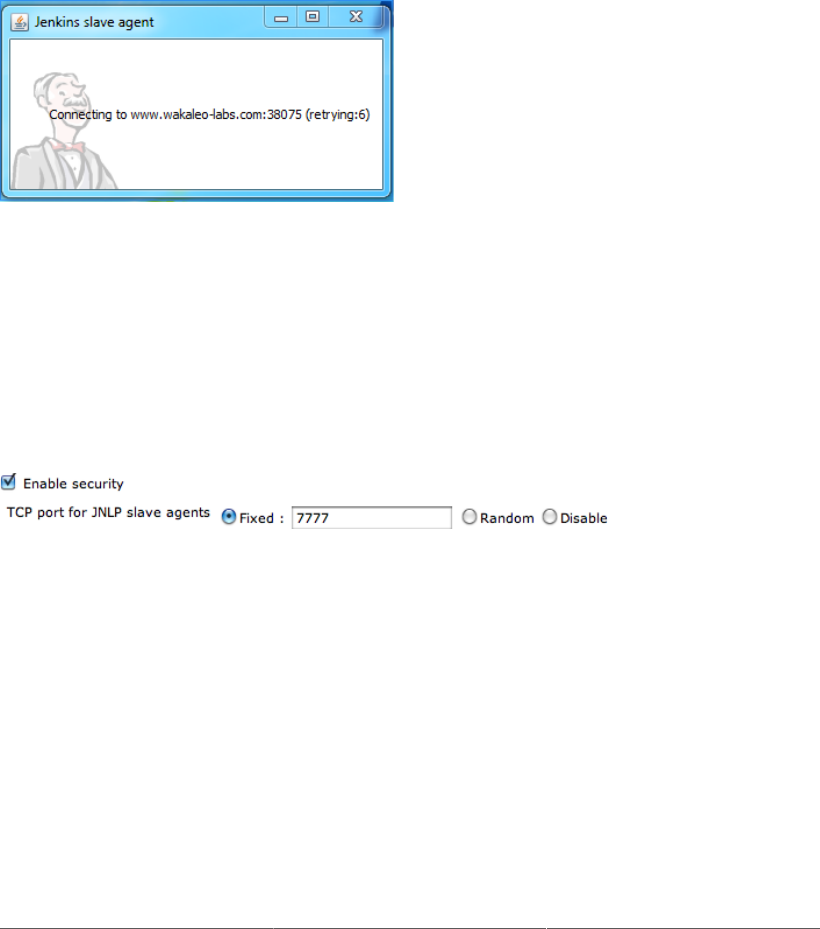
313
The exact command that you need to execute, including the correct URL, is conveniently displayed on
the Jenkins slave node window just below the JNLP launch button (see Figure 11.8, “Launching a slave
via Java Web Start”).
If security is activated on your Jenkins server, Jenkins will communicate with the slave on a specific
nonstandard port. If for some reason this port is inaccessible, the slave node will fail to start and will
display an error message similar to the one shown in Figure 11.10, “The Jenkins slave failing to connect
to the master”.
Figure 11.10. The Jenkins slave failing to connect to the master
This is usually a sign that a firewall is blocking a port. By default, Jenkins picks a random port to use
for TCP communication with its slaves. However if you need to have a specific port that your firewall
will authorize, you can force Jenkins to use a fixed port in the System configuration screen by selecting
Fixed in the “TCP port for JNLP slave agents” option, as shown in Figure 11.11, “Configuring the
Jenkins slave port”.
Figure 11.11. Configuring the Jenkins slave port
11.3.3. Installing a Jenkins Slave as a Windows Service
Once you have the slave up and running on your Windows machine, you can save yourself the bother of
having to restart it manually each time your machine reboots by installing it as a Windows service. To
do this, select the “Install as Windows Service” menu option in the File menu of the slave agent window
(see Figure 11.12, “Installing the Jenkins slave as a Windows service”).
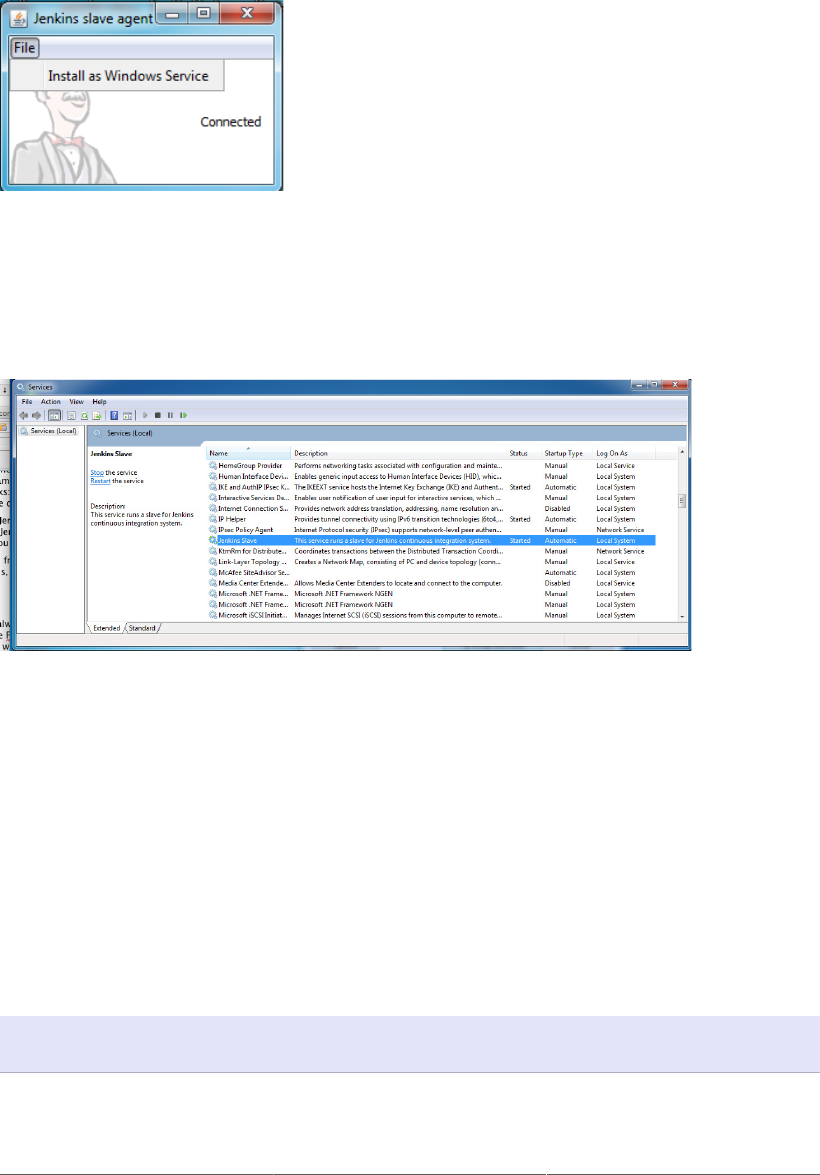
314
Figure 11.12. Installing the Jenkins slave as a Windows service
Once this is done, your Jenkins slave node will start automatically whenever the machine starts up,
and can be administered just like any other Windows service (see Figure 11.13, “Managing the Jenkins
Windows service”).
Figure 11.13. Managing the Jenkins Windows service
11.3.4. Starting the Slave Node in Headless Mode
You can also start a slave agent in headless mode, directly from the command line. This is useful if
you don’t have a user interface available, for example if you are starting a JNLP slave node on a Unix
machine. If you are working with Unix machines, it is generally easier and more flexible just to use
an SSH connection, but there are sometimes network or architecture constraints that prevent you from
using SSH. In cases like this, it is still possible to run a slave node from the command line.
To start the slave node this way, you need to use Jenkins’ slave.jar file. You can find this in
JENKINS_HOME/war/WEB-INF/slave.jar. Once you have located this file and copied it onto the
Windows slave machine, you can run it as follows:
java -jar slave.jar \
-jnlpUrl http://build.myorg.com/jenkins/computer/windows-slave-1/slave-agent.jnlp
And if your Jenkins server requires authentication, just pass in the -auth username:password option:
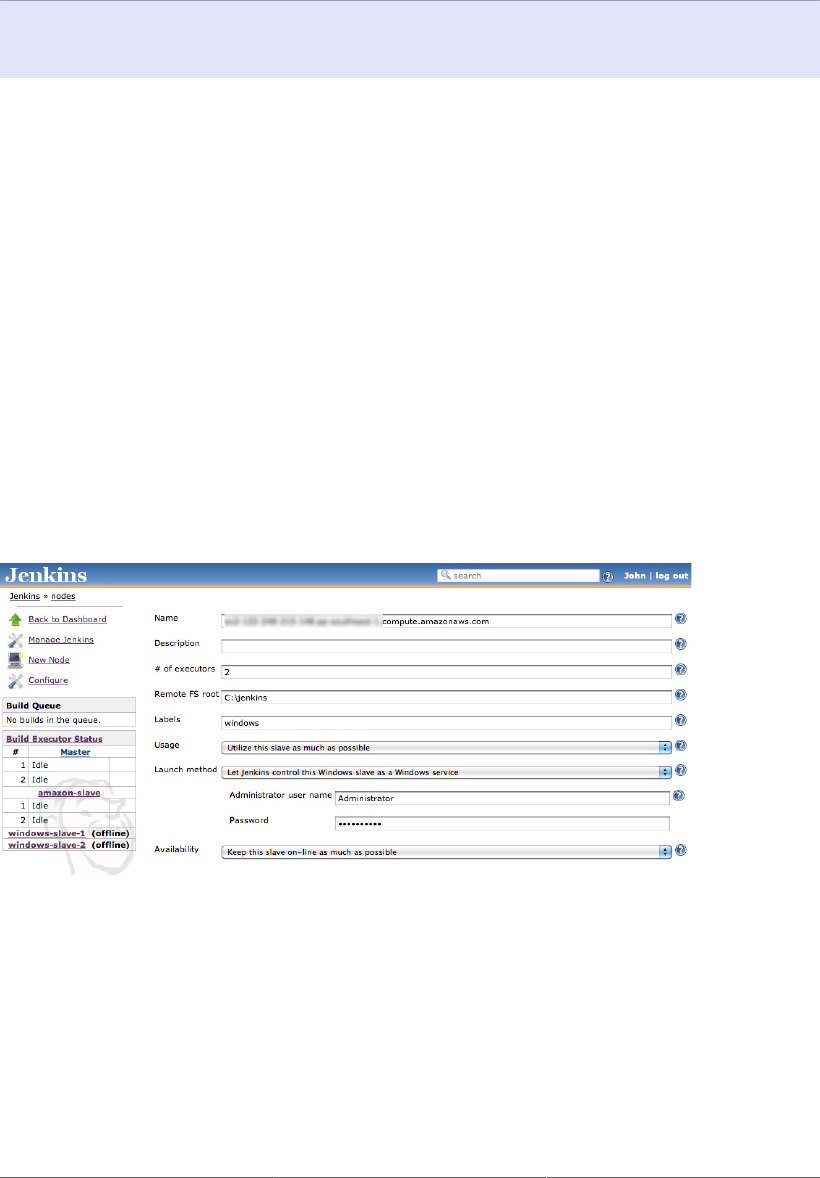
315
java -jar slave.jar \
-jnlpUrl http://build.myorg.com/jenkins/computer/windows-slave-1/slave-agent.jnlp
-auth scott:tiger
Once you have started the slave agent, be sure to install it as a Windows service, as discussed in the
previous section.
11.3.5. Starting a Windows Slave as a Remote Service
Jenkins can also manage a remote Windows slave as a Windows service, using the Windows
Management Instrumentation (WMI) service which is installed out of the box on Windows 2000 or later
(see Figure 11.14, “Letting Jenkins control a Windows slave as a Windows service”). When you choose
this option, you just need to provide a Windows username and password. The name of the node must
be the hostname of the slave machine.
This is certainly convenient, as it does not require you to physically connect to the Windows machine
to set it up. However, it does have limitations—in particular, you cannot run any applications requiring
a graphical interface, so you can’t use a slave set up this way for web testing, for example. In practice
this can be a little tricky to set up, as you may need to configure the Windows firewall to open the
appropriate services and ports. If you run into trouble, make sure that your network configuration allows
TCP connections to ports 135, 139, and 445, and UDP connections to ports 137 and 138 (see https://
wiki.jenkins-ci.org/display/JENKINS/Windows+slaves+fail+to+start+via+DCOM for more details).
Figure 11.14. Letting Jenkins control a Windows slave as a Windows service
11.4. Associating a Build Job with a Slave or Group of
Slaves
In the previous section, we saw how you can assign labels to your slave nodes. This is a convenient way
to group your slave nodes according to characteristics such as operating system, target environment,
database type, or any other criteria that is relevant to your build process. A common application of
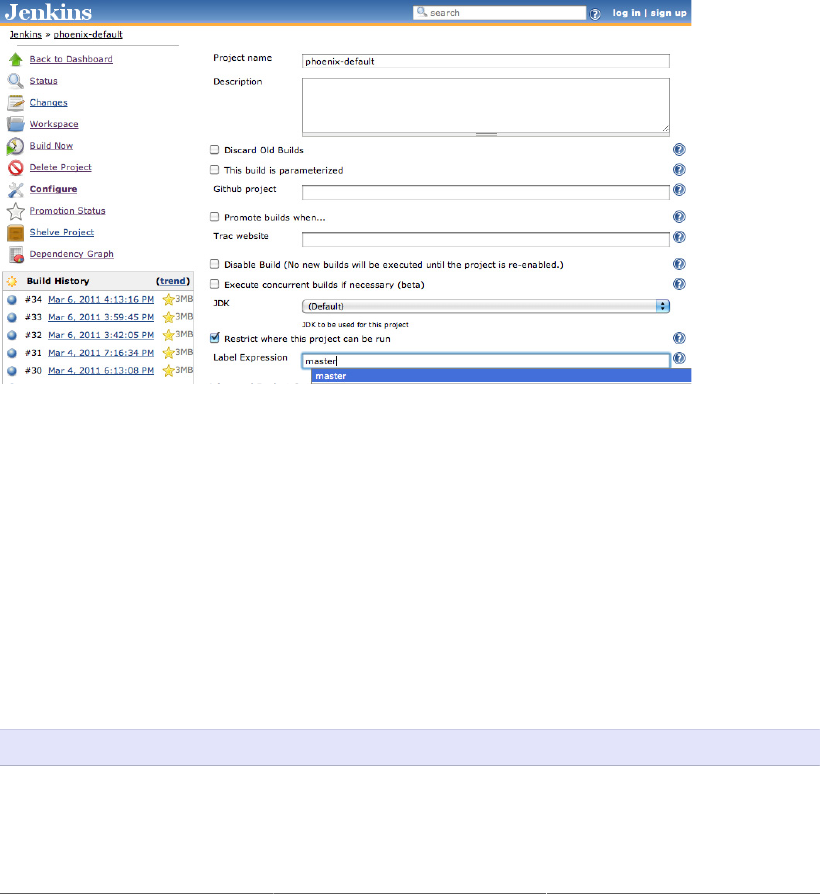
316
this practice is to run OS-specific functional tests on dedicated slave nodes, or to reserve a particular
machine exclusively to performance tests.
Once you have assigned labels to your slave nodes, you also need to tell Jenkins where it can run the build
jobs. By default, Jenkins will simply use the first available slave node, which usually results in the best
overall turn-around time. If you need to tie a build job to a particular machine or group of machines, you
need to tick the “Restrict where this project can be run” checkbox in the build configuration page (see
Figure 11.15, “Running a build job on a particular slave node”). Next, enter the name of the machine, or
a label identifying a group of machines, into the Label Expression field. Jenkins will provide a dynamic
dropdown showing the available machine names and labels as you type.
Figure 11.15. Running a build job on a particular slave node
This field also accepts boolean expressions, allowing you to define more complicated constraints about
where your build job should run. How to use these expressions is best illustrated by an example. Suppose
you have a build farm with Windows and Linux slave nodes (identified by the labels “windows” and
“linux”), distributed over three sites (“sydney”, “sanfrancisco”, and “london”). Your application also
needs to be tested against several different databases (“oracle”, “db2”, “mysql”, and “postgres”). You
also use labels to distinguish slave nodes used to deploy to different environments (test, uat, production).
The simplest use of label expressions is to determine where a build job can or cannot be executed. If
your web tests require Internet Explorer, for example, you will need them to run on a Windows machine.
You could express this by simply quoting the corresponding label:
windows
Alternatively, you might want to run tests against Firefox, but only on Linux machines. You could
exclude Windows machines from the range of candidate build nodes by using the ! negation operator:

317
!windows
You can also use the and (&&) and or (!!) operators to combine expressions. For example, suppose the
Postgres database is only tested for Linux. You could tell Jenkins to run a particular build job only on
Linux machines installed with postgres using the following expression:
linux && postgres
Or you could specify that a particular build job is only to be run on a UAT environment in Sydney or
London:
uat && (sydney || london)
If your machine names contain spaces, you will need to enclose them in double quotes:
"Windows 7" || "Windows XP"
There are also two more advanced logical operators that you may find useful. The implies operator
(=>) lets you define a logical constraint of the form “if A is true, then B must also be true.” For example,
suppose you have a build job that can run on any Linux distribution, but if it is executed on a Windows
box, it must be Windows 7. You could express this constraint as follows:
windows -> "Windows 7"
The other logical operator is the if-and-only-if (<=>) operator. This operation lets you define
stronger constraints of the form “If A is true, then B must be true, but if A is false, then B must be false.”
For example, suppose that Windows 7 tests are only to be run in a UAT environment, and that only
Windows 7 tests are to be run in the UAT environment. You could express this as shown here:
"Windows 7" <-> uat
11.5. Node Monitoring
Jenkins doesn’t just dispatch build jobs to slave agents and hope for the best: it pro-actively monitors
your slave machines, and will take a node offline if it considers that the node is incapable of safely
performing a build. You can fine-tune exactly what Jenkins monitors int the Manage Nodes screen (see
Figure 11.16, “Jenkins proactively monitors your build agents”). Jenkins monitors the slave agents in
several different ways. It monitors the response time: an overly slow response time can indicate either a
network problem or that the slave machine is down. It also monitors the amount of disk space, temporary
directory space and swap space available to the Jenkins user on the slave machine, since build jobs can
be notoriously disk-hungry. It also keeps tabs on the system clocks, as if the clocks are not correctly
synchronized, odd errors can sometimes happen. If any of these criteria is not up to scratch, Jenkins will
automatically take the server offline.

318
Figure 11.16. Jenkins proactively monitors your build agents
11.6. Cloud Computing
Cloud computing involves using hardware resources on the Internet as an extension and/or replacement
of your local computing architecture. Cloud computing is expanding into many areas of the enterprise,
including email and document sharing (Gmail and Google Apps are particularly well-known examples,
but there are many others), off-site data storage (such as Amazon S3), as well as more technical services
such as source code repositories (such as GitHub, Bitbucket, etc.) and many others.
Of course externalized hardware architecture solutions have been around for a long time. The main thing
that distinguishes the cloud computing with more traditional services is the speed and flexibility with
which a service can be brought up, and brought down when it is no longer needed. In a cloud computing
environment, a new machine can be running and available within seconds.
However, cloud computing in the context of Continuous Integration is not always as simple as it might
seem. For any cloud-based approach to work, some of your internal resources may need to be available
to the outside world. This can include opening access to your version control system, your test databases,
and to any other resources that your builds and tests require. All these aspects need to be considered
carefully when choosing a cloud-based CI architecture, and may limit your options if certain resources
simply cannot be accessed from the Internet. Nevertheless, cloud-based CI has the potential of providing
huge benefits when it comes to scalability.
In the following sections, we will look at how to use the Amazon EC2 cloud computing services to set
up a cloud-based build farm.
11.6.1. Using Amazon EC2
In addition to selling books, Amazon is one of the more well-known providers of cloud computing
services. If you are willing to pay for the service, Amazon can provide you build machines that can be
either used permanently as part of your build farm, or brought online as required when your existing
build machines become overloaded. This is an excellent and reasonably cost-efficient way to absorb
extra build load on an as-needed basis, and without the headache of extra physical machines to maintain.
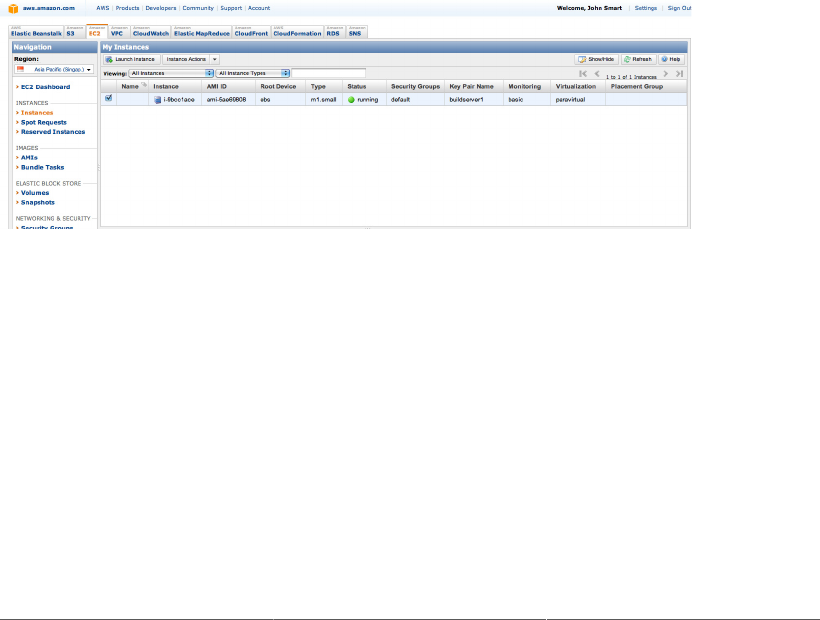
319
If you want the flexibility of a cloud-based CI architecture, but don’t want to externalize your hardware,
another option is to set up a Eucalyptus cloud. Eucalyptus is an open source tool that enables you to create
a local private cloud on existing hardware. Eucalyptus uses an API that is compatible with Amazon EC2
and S3, and works well with Jenkins.
11.6.1.1. Setting up your Amazon EC2 build farm
Amazon EC2 is probably the most popular and well-known commercial cloud computing service. To
use this service, you will need to create an EC2 account with Amazon if you do not already have one.
The process required to do this is well documented on the Amazon website, so we will not dwell on this
here. Once you have created your account, you will be able to create the virtual machines and machine
images that will make up your EC2-based build farm.
When using Amazon EC2, you create virtual machines, called instances, using the Amazon Web
Services (AWS) Management Console (see Figure 11.17, “You manage your EC2 instances using the
Amazon AWS Management Console”). This website is where you manage your running instances and
create new ones. You create these instances from predefined images, called Amazon Machine Images
(AMIs). There are many AMI images, both from Amazon and in the public domain, that you can use as
a starting point, covering most of the popular operating systems. Once you have created a new instance,
you can connect to it using either SSH (for unix machines) or Windows Remote Desktop Connection,
to configure it for your purposes.
Figure 11.17. You manage your EC2 instances using the Amazon AWS Management Console
To set up a build farm, you will also need to configure your have one, just go to the Key Pairs menu in
the Security build server to be able to access your EC2 instances. In particular, you will need to install
the Amazon EC2 API tools, set up the appropriate private/public keys, and allow SSH connections
from your server or network to your Amazon instances. Again, the details of how to do this are well
documented for all the major operating systems on the EC2 website.
You can use Amazon EC2 instances in two ways—either create slave machines on Amazon EC2 and
use them as remote machines, or have Jenkins create them for you dynamically on demand. Or you can
have a combination of the two. Both approaches have their uses, and we will discuss each of them in
the following sections.
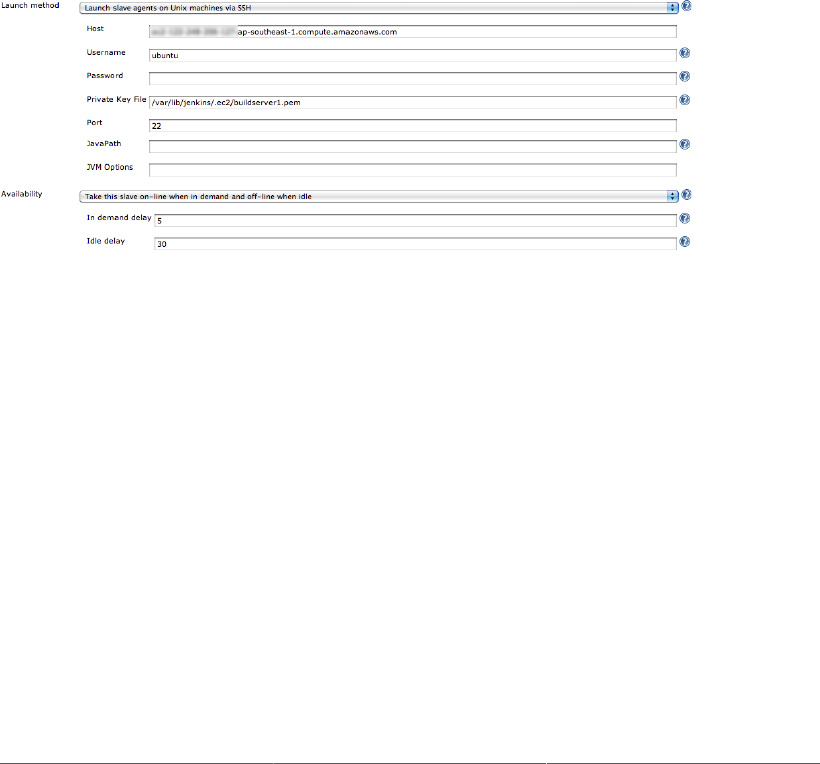
320
11.6.1.2. Using EC2 instances as part of your build farm
Creating a new EC2 instance is as simple as choosing the base image you want to use. You will just
need to provide some details about the instance, such as its size and capacity, and the private key you
want to use to access the machine. Amazon will then create a new running virtual machine based on this
image. Once you have set it up, an EC2 instance is essentially a machine like any other, and it is easy and
convenient to set up permanent or semipermanent EC2 machines as part of your build infrastructure.
You may even opt to use an EC2 image as your master server.
Setting up an existing EC2 instance as a Jenkins slave is little different to setting up any other remote
slave. If you are setting up a Unix or Linux EC2 slave, you will need to refer to the private key file
(see Figure 11.18, “Configuring an Amazon EC2 slave”) that you used to create the EC2 instance on
the AWS Management console. Depending on the flavor of Linux you are using, you may also need
to provide a username. Most distributions connect as root, but some, such as Ubuntu, need a different
user name.
Figure 11.18. Configuring an Amazon EC2 slave
11.6.1.3. Using dynamic instances
The second approach involves creating new Amazon EC2 machines dynamically, as they are required.
Setting up dedicated instances is not difficult, but it does not scale well. A better approach is to let
Jenkins create new instances as require. To do this, you will need to install the Jenkins Amazon EC2
plugin. This plugin lets your Jenkins instance start slaves on the EC2 cloud on demand, and then kill
them off when they are no longer needed. The plugin works both with Amazon EC2, and the Ubuntu
Enterprise Cloud. We will be focusing on Amazon EC2 here. Note that at the time of writing the Amazon
EC2 Plugin only supported managing Unix EC2 images.
Once you have installed the plugin and restarted Jenkins, go to the main Jenkins configuration screen and
click on Add a New Cloud (see Figure 11.19, “Configuring an Amazon EC2 slave”). Choose Amazon
EC2. You will need to provide your Amazon Access Key ID and Secret Access Key so that Jenkins
can communicate with your Amazon EC2 account. You can access these in the Key Pairs screen of
your EC2 dashboard.
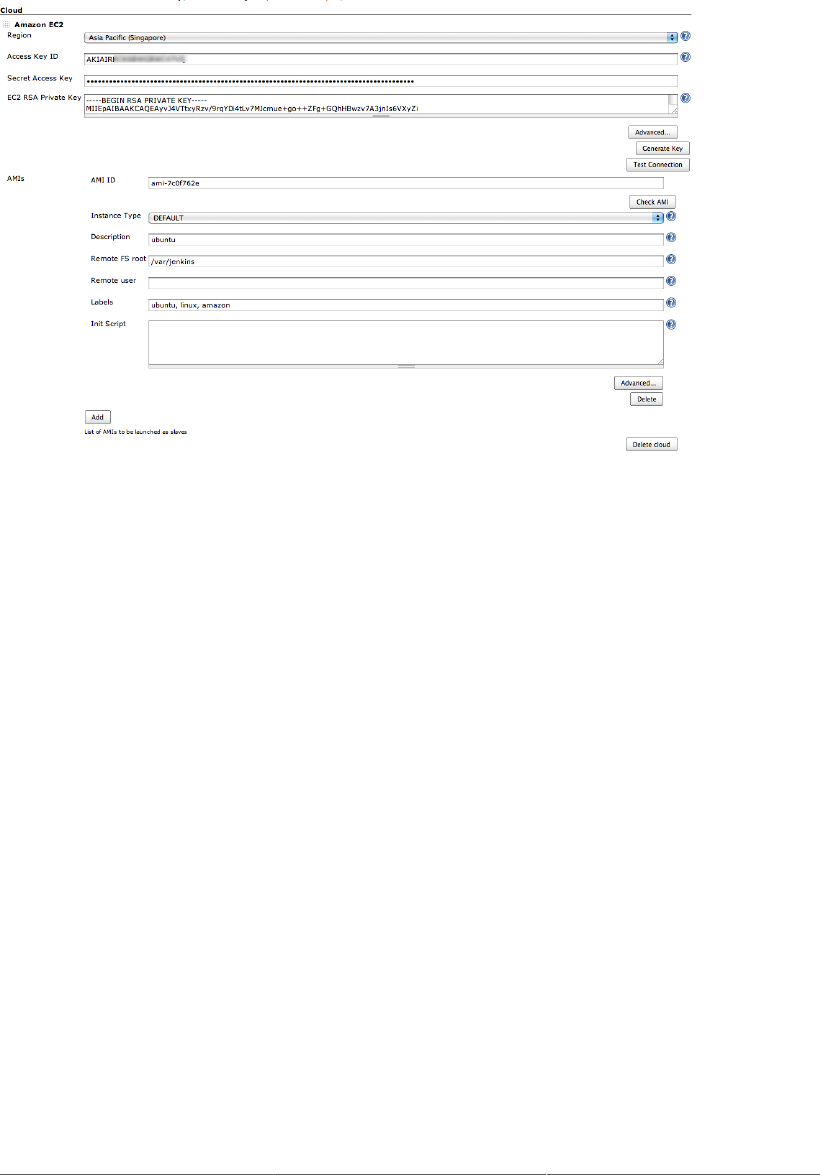
321
Figure 11.19. Configuring an Amazon EC2 slave
You will also need to provide your RSA private key. If you don’t have one, just go to the Key Pairs
menu in the Security Credentials screen and create one. This will create a new key pair for you and
download the private key. Keep the private key in a safe place (you will need it if you want to connect
to your EC2 instances via SSH).
In the advanced options, you can use the Instance Cap field to limit the number of EC2 instances that
Jenkins will launch. This limit refers to the total number of active EC2 instances, not just the ones
that Jenkins is currently running. This is useful as a safety measure, as you pay for the time your EC2
instances spend active.
Once you have configured your overall EC2 connection, you need to define the machines you will
work with. You do this by specifying the Amazon Mirror Image (AMI) identifier of the server image
you would like to start. Amazon provides some starter images, and many more are available from the
community, however not all images will work with EC2. At the time of writing, only certain images
based on 32-bit Linux distributions work correctly.
The predefined Amazon and public AMI images are useful starting points for your permanent virtual
machines, but for the purposes of implementing a dynamic EC2-based cloud, you need to define your
own AMI with the essential tools (Java, build tools, SCM configuration and so forth) preinstalled.
Fortunately, this is a simple process: just start off with a generic AMI (preferably one compatible with
the Jenkins EC2 plugin), and install everything your builds need. Make sure you use an EBS image.
This way, changes you make to your server instance are persisted on an EBS volume so that you don't
lose them when the server shuts down. Then create a new image by selecting the Create Image option
in the Instances screen on the EC2 management console (see Figure 11.20, “Creating a new Amazon
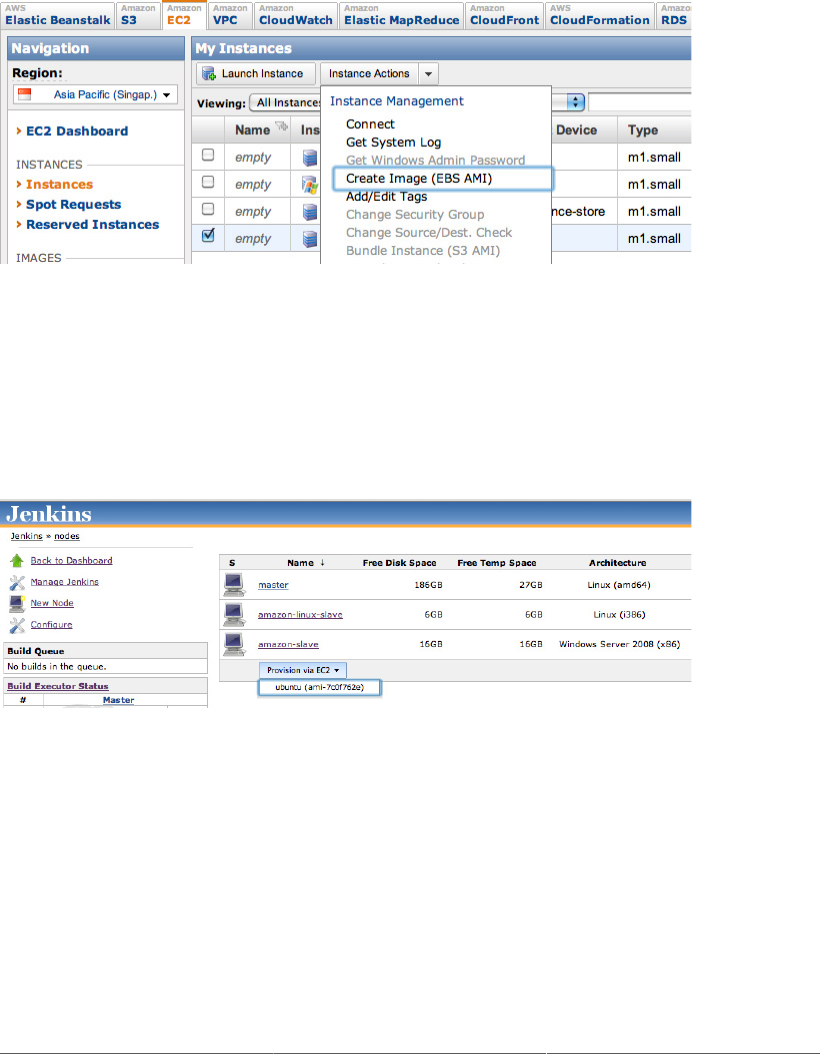
322
EC2 image”). Make sure SSH is open from your build server’s IP address in the default security group
on Amazon EC2. If you don’t do this, Jenkins will time out when it tries to start up a new slave node.
Once you have prepared your image, you will be able to use it for your EC2 configuration.
Figure 11.20. Creating a new Amazon EC2 image
Now Jenkins will automatically create a new EC2 instance using this image when it needs to, and delete
(or “terminate,” in Amazon terms) the instance once it is no longer needed. Alternatively, you can
bring a new EC2 slave online manually from the Nodes screen using the Provision via EC2 button (see
Figure 11.21, “Bringing an Amazon EC2 slave online manually”). This is a useful way to test your
configuration.
Figure 11.21. Bringing an Amazon EC2 slave online manually
11.7. Using the CloudBees DEV@cloud Service
Another option you might consider is running your Jenkins instance using a dedicated cloud-based
Jenkins architecture, such as the DEV@cloud service offered by CloudBees. CloudBees provides
Jenkins as a service as well as various development services (like Sonar) around Jenkins. Using a
dedicated Jenkins-specific service, there is no need to install (or manage) Jenkins masters or slaves on
your machines. A master instance is automatically configured for you, and when you give a job to be
built, CloudBees provisions a slave for you and takes it back when the job is done.

323
How does this approach compare with the Amazon EC2-based architecture we discussed in the previous
section? The main advantage of this approach is that there is much less work involved in managing
your CI architecture hardware. Using the Amazon EC2 infrastructure means you don't need to worry
about hardware, but you still need to configure and manage your server images yourself. The CloudBees
DEV@cloud architecture is more of a high-level, CI-centric service, which provides not only a Jenkins
server but also other related tools such as SVN or Git repositories, user management, and Sonar. In
addition, the pricing model (pay by the minute) is arguably better suited to a cloud-based CI architecture
than the pay-by-the-hour approach used by Amazon.
Amazon EC2-based services are often, though not always, used in a “hybrid cloud” environment where
you are offloading your jobs to the cloud, but a bulk of your builds remain in-house. The CloudBees
DEV@cloud service is a public cloud solution where the whole build is happening on the cloud (though
CloudBees does also offer a similar solution running on a private cloud).
Creating a CloudBees DEV@cloud account is straightforward, and you can use a free one to experiment
with the service (note that the free CloudBees service only has a limited set of plugins available; you
will need to sign up for the professional version to use the full plugin range). To signup for CloudBees,
go to the signup page1. You will need to enter some relevant information such as a user name, email
information, and an account name. Once signed up, you will have access to both DEV@cloud and
RUN@cloud (essentially the entire CloudBees platform) services.
At this point, you will have to subscribe to the DEV@cloud service. For our purposes, you can get
away with simply choosing the “free” option. You will have to wait for a few minutes as CloudBees
provisions a Jenkins master for you. The next step is to validate your account (this helps CloudBees
prevent dummy accounts from running spurious jobs on the service). Click on the validation link, and
enter your phone number. An automated incoming phone call will give your pin; enter the pin on the
form. Once this is done, you can start running builds.
Your first port of call when you connect will be the management console (called GrandCentral). Click
on the “Take me to Jenkins” button to go to your brand new Jenkins master instance.
From here, your interaction with DEV@cloud platform is exactly like in a standalone Jenkins. When you
can create a new build job, just point to your existing source code repository and hit build. DEV@cloud
will provision a slave for you and kick off a build (it may take a minute or two for the slave to be
provisioned).
11.8. Conclusion
In Continuous Integration, distributed builds are the key to a truly scalable architecture. Whether you
need to be able to add extra build capacity at the drop of a hat, or your build patterns are subject to
periodic spikes in demand, a distributed build architecture is an excellent way to absorb extra load.
Distributed builds are also a great way to delegate specialized tasks, such as OS-specific web testing,
to certain dedicated machines.
1 https://grandcentral.cloudbees.com/account/signup

324
Once you start down the path of distributed builds, cloud-based distributed build farms are a very logical
extension. Putting your build servers on the cloud makes it easier and more convenient to scale your
build infrastructure when required, as much as is required.

Chapter 12. Automated Deployment
and Continuous Delivery
12.1. Introduction
Continuous Integration should not stop once your application compiles correctly. Nor should it stop once
you can run a set of automated tests or automatically check and audit the code for potential quality issues.
The next logical step, once you have achieved all of these, is to extend your build automation process
to the deployment phase. This practice is globally known as Automated Deployment or Continuous
Deployment.
In its most advanced form, Continuous Deployment is the process whereby any code change, subject
to automated tests and other appropriate verifications, is immediately deployed into production. The
aim is to reduce cycle time and reduce the time and effort involved in the deployment process. This in
turn helps development teams reduce the time taken to deliver individual features or bug fixes, and as
a consequence significantly increase their throughput. Reducing or eliminating the periods of intense
activity leading up to a traditional release and deployment also frees up time and resources for process
improvement and innovation. This approach is comparable to the philosophy of continual improvement
promoted by lean processes such as Kanban.
Systematically deploying the latest code into production is not always suitable, however, no matter how
good your automated tests are. Many organizations are not well prepared for new versions appearing
unannounced every week; users might need to be trained, products may need to be marketed, and so
forth. A more conservative variation on this theme, often seen in larger organizations, is to have the entire
deployment process automated but to trigger the actual deployment manually in a one-click process.
This is known as Continuous Delivery, and it has all the advantages of Continuous Deployment without
the disadvantages. Variations on Continuous Delivery may also involve automatically deploying code
to certain environments (such as test and QA) while using a manual one-click deployment for the
other environments (such as UAT and Production). The most important distinguishing characteristic of
Continuous Delivery is that any and every successful build that has passed all the relevant automated
tests and quality gates can potentially be deployed into production via a fully automated one-click
process and be in the hands of the end-user within minutes. However, the process is not automatic: it is
the business, rather than IT, that decides the best time to deliver the latest changes.
Both Continuous Deployment and Continuous Delivery are rightly considered to represent a very high
level of maturity in terms of build automation and SDLC practices. These techniques cannot exist
without an extremely solid set of automated tests. Nor can they exist without a CI environment and
a robust built pipeline—indeed it typically represents the final stage and goal of the build pipeline.
However, considering the significant advantages that Continuous Deployment/Delivery can bring to an
organization, it is a worthy goal. During the remainder of this chapter, we will use the general term of
“Continuous Deployment” to refer to both Continuous Deployment and Continuous Delivery. Indeed,

326
Continuous Delivery can be viewed as Continuous Deployment with the final step (deployment into
production) being a manual one dictated by the business rather than the development team.
12.2. Implementing Automated and Continuous
Deployment
In its most elementary form, Automated Deployment can be as simple as writing your own scripts to
deploy your application to a particular server. The main advantage of a scripted solution is simplicity and
ease of configuration. However, a simple scripted approach may run into limits if you need to perform
more advanced deployment activities, such as installing software on a machine or rebooting the server.
For more advanced scenarios, you may need to use a more sophisticated deployment/configuration
management solution such as Puppet or Chef.
12.2.1. The Deployment Script
An essential part of any Automated Deployment initiative is a scriptable deployment process. While
this may seem obvious, there are still many organizations where deployment remains a cumbersome,
complicated and labor-intensive process, including manual file copying, manual script execution, hand-
written deployment notes, and so forth. The good news is that, in general, it does not have to be this
way, and, with a little work, it is usually possible to write a script of some sort to automate most, if
not all, of the process.
The complexity of a deployment script varies enormously from application to application. For a simple
website, a deployment script may be as simple as resyncing a directory on the target server. Many Java
application servers have Ant or Maven plugins that can be used to deploy applications. For a more
complicated infrastructure, deployment may involve deploying several applications and services across
multiple clustered servers in a precisely coordinated manner. Most deployment processes tend to fall
somewhere between these extremes.
12.2.2. Database Updates
Deploying your app to the application server is often only one part of the puzzle. Databases, relational
or otherwise, almost always play a central role in any application architecture. Of course, ideally, your
database would be perfect from the start, but this is rarely the case in the real world. Indeed, when you
update your application, you will generally also need to update one or more databases as well.
Database updates are usually more difficult to manage smoothly than application updates, as both the
structure and the contents of the database may be impacted. However, managing database updates is
a critical part of both the development and the deployment process, and deserves some reflection and
planning.
Some application frameworks, such as Ruby on Rails and Hibernate, can manage structural database
changes automatically to some extent. Using these frameworks, you can typically specify if you want to
create a new database schema from scratch at each update, or whether you which to update the database

327
schema while conserving the existing data. While this sounds useful in theory, in fact it is very limited
for anything other than noncritical development environments. In particular, these tools do not handle
data migration well. For example, if you rename a column in your database, the update process will
simply create a new column: it will not copy the data from the old column into the new column, nor
will it remove the old column from the updated table.
Fortunately, this is not the only approach you can use. Another tool that attempts to tackle the thorny
problem of database updates is Liquibase1. Liquibase is an open source tool that can help manage and
organize upgrade paths between versions of a database using a high-level approach.
Liquibase works by keeping a record of database updates applied in a table in the database, so that it is
easy to bring any target database to the correct state for a given version of the application. As a result,
you don’t need to worry about running the same update script twice—Liquibase will only apply the
update scripts that have not already been applied to your database. Liquibase is also capable of rolling
back changes, at least for certain types of changes. However, since this will not work for every change
(for example, data in a deleted table cannot be restored), it is best not to place too much faith in this
particular feature.
In Liquibase, you keep track of database changes as a set of “change sets,” each of which represents
the database update in a database-neutral XML format. Change sets can represent any changes you
would make in a database, from adding and deleting tables, to creating or updating columns, indexes
and foreign keys:
<databaseChangeLog
xmlns="http://www.liquibase.org/xml/ns/dbchangelog/1.6"
xmlns:xsi="http://www.w3.org/2001/XMLSchema-instance"
xsi:schemaLocation="http://www.liquibase.org/xml/ns/dbchangelog/1.6
http://www.liquibase.org/xml/ns/dbchangelog/dbchangelog-1.6.xsd">
<changeSet id="1" author="john">
<createTable tableName="department">
<column name="id" type="int">
<constraints primaryKey="true" nullable="false"/>
</column>
<column name="name" type="varchar(50)">
<constraints nullable="false"/>
</column>
<column name="active" type="boolean" defaultValue="1"/>
</createTable>
</changeSet>
</databaseChangeLog>
Change sets can also reflect modifications to existing tables. For example, the following change set
represents the renaming of a column:
<changeSet id="1" author="bob">
<renameColumn tableName="person" oldColumnName="fname" newColumnName="firstName"/>
</changeSet>
1 http://www.liquibase.org/

328
Since this representation records the semantic nature of the change, Liquibase is capable of handling
both the schema updates and data migration associated with this change correctly.
Liquibase can also handle updates to the contents of your database, as well as to its structure. For
example, the following change set inserts a new row of data into a table:
<changeSet id="326" author="simon">
<insert tableName="country">
<column name="id" valueNumeric="1"/>
<column name="code" value="AL"/>
<column name="name" value="Albania"/>
</addColumn>
</changeSet>
Each changeset has an ID and an author, which makes it easier to keep track of who made a particular
change and reduces the risk of conflict. Developers can test their change sets on their own database
schema, and then commit them to version control once they are ready. The next obvious step is to
configure a Jenkins build to run the Liquibase updates against the appropriate database automatically
before any integration tests or application deployment is done, usually as part of the ordinary project
build script.
Liquibase integrates well into the build process—it can be executed from the command line, or integrated
into an Ant or Maven build script. Using Maven, for example, you can configure the Maven Liquibase
Plugin as shown here:
<project>
<build>
<plugins>
<plugin>
<groupId>org.liquibase</groupId>
<artifactId>liquibase-plugin</artifactId>
<version>1.9.3.0</version>
<configuration>
<propertyFileWillOverride>true</propertyFileWillOverride>
<propertyFile>src/main/resources/liquibase.properties</propertyFile>
</configuration>
</plugin>
</plugins>
</build>
...
</project>
Using Liquibase with Maven this way, you could update a given target database to the current schema
using this plugin:
$ mvn liquibase:update
The default database connection details are specified in the src/main/resources/
liquibase.properties file, and might look something like this:
changeLogFile = changelog.xml

329
driver = com.mysql.jdbc.Driver
url = jdbc:mysql://localhost/ebank
username = scott
password = tiger
verbose = true
dropFirst = false
However you can override any of these properties from the command line, which makes it easy to set
up a Jenkins build to update different databases.
Other similar commands let you generate an SQL script (if you need to submit it to your local DBA for
approval, for example), or rollback to a previous version of the schema.
This is of course just one example of a possible approach. Other teams prefer to manually maintain
a series of SQL update scripts, or write their own in-house solutions. The important thing is to have
a solution that you can use reliably and reproducibly to update different databases to the correct state
when deploying your applications.
12.2.3. Smoke Tests
Any serious automated deployment needs to be followed up by a series of automated smoke tests. A
subset of the automated acceptance tests can be a good candidate for smoke tests. Smoke tests should
be unobtrusive and relatively fast. They should be safe to run in a production environment, which may
restrict the number of modifications the test cases can do in the system.
12.2.4. Rolling Back Changes
Another important aspect to consider when setting up Automated Deployment is how to back out
if something goes wrong, particularly if you are thinking of implementing Continuous Deployment.
Indeed, it is critical to be able to roll back to the previous version if required.
How you will do this depends a lot on your application. While it is relatively straight-forward to redeploy
a previous version of an application using Jenkins (we will look at a technique to do this further on in
this chapter), the application is often not the only player in the game. In particular, you will need to
consider how to restore your database to a previous state.
We saw how it is possible to use Liquibase to manage database updates, and of course many other
strategies are also possible. However rolling back a database version presents its own challenges.
Liquibase, for example, lets you revert some, but not all changes to the database structure. However
data lost (in dropped tables, for example) cannot be recovered using Liquibase alone.
The most reliable way to revert your database to a previous state is probably to take a snapshot of the
database just before the upgrade, and use this snapshot to restore the database to its previous state. One
effective strategy is to automate this process in Jenkins in the deployment build job, and then to save
both the database snapshot and the deployable binary file as artifacts. This way, you can easily restore
the database using the saved snapshot and then redeploy the application using the saved binary. We will
look at an example of this strategy in action further on in this chapter.

330
12.3. Deploying to an Application Server
Jenkins provides plugins to help you deploy your application to a number of commonly-used application
servers. The Deploy plugin lets you deploy to Tomcat, JBoss, and GlassFish. And the Deploy Websphere
plugin tries to cater for the particularities of IBM WebSphere Application Server.
For other application servers, you will typically have to integrate the deployment process into your build
scripts, or resort to custom scripts to deploy your application. For other languages, too, your deployment
process will vary, but it will often involve some use of shell scripting. For example, for a Ruby on Rails
application, you may use a tool like Capistrano or Chef, or simply a shell script. For a PHP application,
an FTP or SCP file transfer may suffice.
Let’s first look at some strategies for deploying your Java applications to an application server.
This is known as a hot-deploy, where the application is deployed onto a running server. This is generally
a fast and efficient way of getting your application online. However, depending on your application and
on your application server, this approach has been known to result in memory leaks or resource locking
issues—older versions of Tomcat, for example, were particularly well-known for this. If you run into
this sort of issue, you may have to force the application to restart after each deployment, or possibly
schedule a nightly restart of the application server on your test machine.
12.3.1. Deploying a Java Application
In this section we will look at an example of how to deploy your Java web or JEE application to an
application server such as Tomcat, JBoss, or GlassFish.
One of the fundamental principles of automated deployment is to reuse your binaries. It is inefficient,
and potentially unreliable, to rebuild your application during the deployment process. Indeed, imagine
that you run a series of unit and integration tests against a particular version of your application, before
deploying it to a test environment for further testing. If you rebuild the binary before deploying it to the
test environment, the source code may have changed since the original revision, which means you may
not know exactly what you are deploying.
A more efficient process is to reuse the binaries generated by a previous build. For example, you may
configure a build job to run unit and integration tests before generating a deployable binary file (typically
a WAR or EAR file). You can do this very effectively using the Copy Artifact plugin (see Section 10.7.2,
“Copying Artifacts”). This plugin lets you copy an artifact from another build job workspace into
the current build job workspace. This, when combined with a normal build trigger or with the Build
Promotion plugin, lets you deploy precisely the binary file that you built and tested in the previous phase.
This approach does put some constraints on the way you build your application. In particular, any
environment-specific configuration must be externalized to the application; JDBC connections or other
such configuration details should not be defined in configuration files embedded in your WAR file, for
example, but rather be defined using JDNI or in an externalized properties file. If this is not the case, you
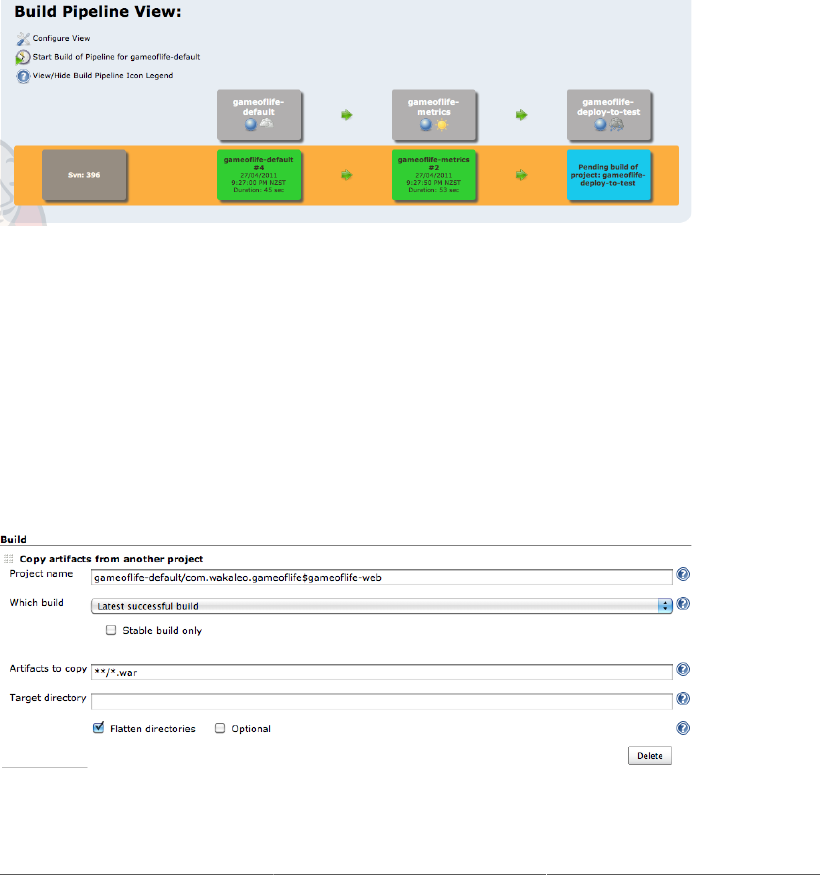
331
may need to build from a given SCM revision, as discussed for Subversion in Section 10.2.4, “Building
from a Subversion Tag”.
12.3.1.1. Using the Deploy plugin
If you are deploying to a Tomcat, JBoss, or GlassFish server, the most useful tool at your disposition will
probably be the Deploy plugin. This plugin makes it relatively straightforward to integrate deployment
to these platforms into your Jenkins build process. If you are deploying to IBM Websphere, you can
use the Websphere Deploy plugin to similar ends.
Let’s see how this plugin works in action, using the simple automated build and deployment pipeline
illustrated in Figure 12.1, “A simple automated deployment pipeline”.
Figure 12.1. A simple automated deployment pipeline
Here, the default build (gameoflife-default) runs the unit and integration tests, and builds a
deployable binary in the form of a WAR file. The metrics build (gameoflife-metrics) runs
additional checks regarding coding standards and code coverage. If both these builds are successful,
the application will be automatically deployed to the test environment by the gameoflife-deploy-
to-test build job.
In the gameoflife-deploy-to-test build job, we use the Copy Artifact plugin to retrieve the WAR file
generated in the gameoflife-default build job and copies it into the current build job’s workspace
(see Figure 12.2, “Copying the binary artifact to be deployed”).
Figure 12.2. Copying the binary artifact to be deployed

332
Next, we use the Deploy plugin to deploy the WAR file to the test server. Of course it is generally
possible, and not too difficult, to write a hand-rolled deployment script to get your application on to
your application server. In some cases, this may be your only option. However, if a Jenkins plugin
exists for your application server, it can simplify things considerably to use it. If you are deploying to
Tomcat, JBoss, or GlassFish, the Deploy plugin may work for you. This plugin uses Cargo to connect
to your application server and deploy (or redeploy) your application. Just select the target server type,
and specify the server’s URL along with the username and password of a user with deployment rights
(see Figure 12.3, “Deploying to Tomcat using the Deploy Plugin”).
Figure 12.3. Deploying to Tomcat using the Deploy Plugin
This is known as a hot-deploy, where the application is deployed onto a running server. This is generally
a fast and efficient way of getting your application online, and should be the preferred solution because
of its speed convenience. However, depending on your application and on your application server,
this approach has been known to result in memory leaks or resource locking issues—older versions of
Tomcat, for example, were particularly well-known for this. If you run into this sort of issue, you may
have to force the application to restart after each deployment, or possibly schedule a nightly restart of
the application server on your test machine.
12.3.1.2. Redeploying a specific version
When you deploy your application automatically or continually, it becomes of critical importance to
precisely identify the version of the application currently deployed. There are a several ways you can
do this, which vary essentially in the role Jenkins plays in the build/deployment architecture.
Some teams use Jenkins as the central place of truth, where artifacts are both built and stored for future
reference. If you store your deployable artifacts on Jenkins, then it may make perfect sense to deploy
your artifacts directly from your Jenkins instance. This is not hard to do: in the next section we will look
at how to do this using a combination of the Copy Artifacts, Deploy, and Parameterized Trigger plugins.
Alternatively, if you are using an Enterprise repository such as Nexus or Artifactory to store your
artifacts, then this repository should act as the central point of reference: Jenkins should build and deploy
artifacts to your central repository, and then deploy them from there. This is typically the case if you
are using Maven as your build tool, but teams using tools like Gradle or Ivy may also use this approach.
Repository managers such as Nexus and Artifactory, particularly in their commercial editions, make
this strategy easier to implement by providing features such as build promotion and staging repositories
that help you manage the release state of your artifacts.
Let’s look at how you might implement each of these strategies using Jenkins.
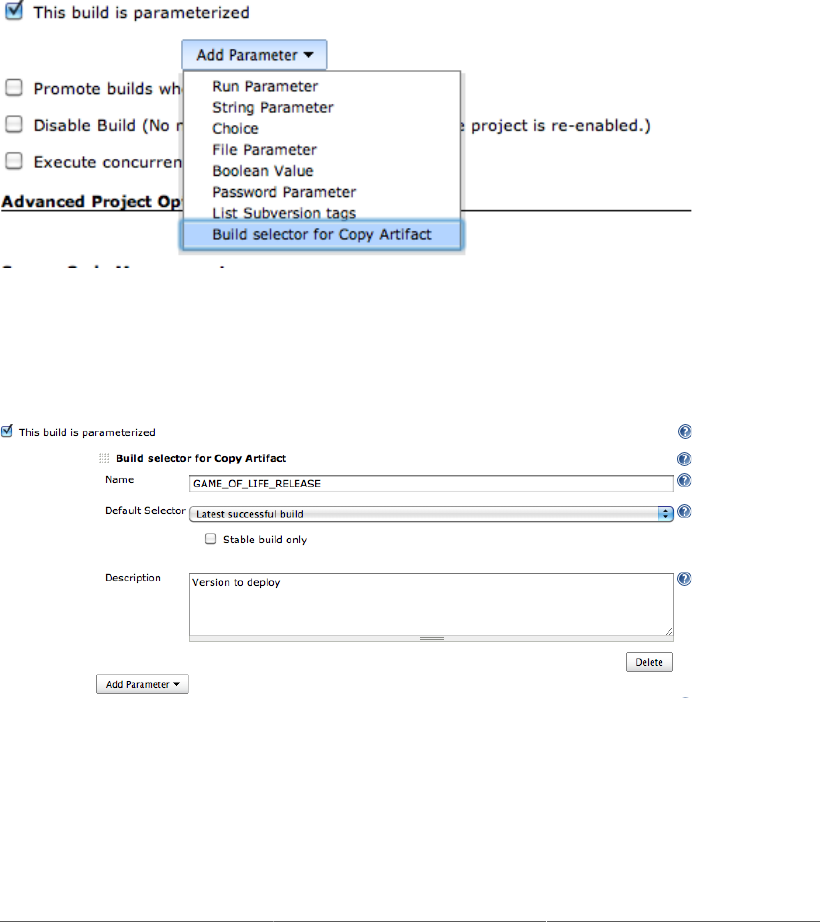
333
12.3.1.3. Deploying a version from a previous Jenkins build
Redeploying a previously-deployed artifact in Jenkins is relatively straightforward. In Section 12.3.1.1,
“Using the Deploy plugin”, we saw how to use the Copy Artifacts and Deploy plugins to deploy a WAR
file built by a previous build job to an application server. What we need to do now is to let the user
specify the version to be deployed, rather than just deploying the latest build.
We can do this using the Parameterized Trigger plugin (see Section 10.2, “Parameterized Build Jobs”).
First, we add a parameter to the build job, using the special “Build selector for Copy Artifact” parameter
type (see Figure 12.4, “Adding a “Build selector for Copy Artifact” parameter”).
Figure 12.4. Adding a “Build selector for Copy Artifact” parameter
This adds a new parameter to your build job (see Figure 12.5, “Configuring a build selector parameter”).
Here you need to enter a name and a short description. The name you provide will be used as an
environment variable passed to the subsequent build steps.
Figure 12.5. Configuring a build selector parameter
The build selector parameter type lets you pick a previous build in a number of ways, including the latest
successful build, the upstream build that triggered this build job, or a specific build. All of these options
will be available to the user when he or she triggers a build. The Default Selector lets you specify which
of these options will be proposed by default.
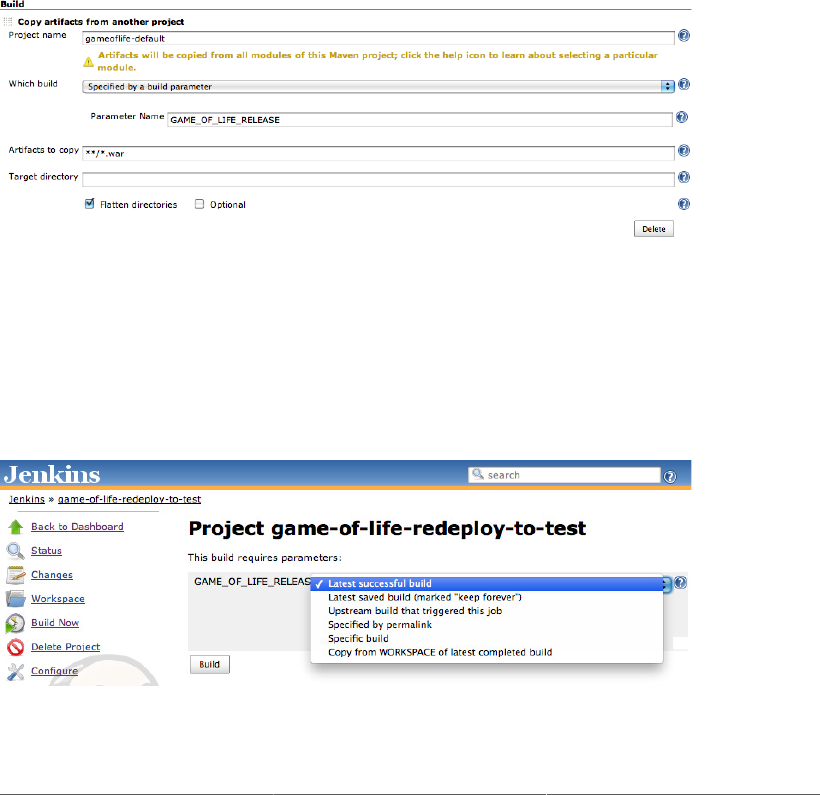
334
When the user selects a particular build job, the build number will also be stored in
the environment variables for use in the build steps. The environment variable is called
COPYARTIFACT_BUILD_NUMBER_MY_BUILD_JOB, where MY_BUILD_JOB is the name of the original
build job (in upper case and with characters other than A–Z converted to underscores). For
example, if we copy an artifact from build number 4 of the gameoflife-default project, the
COPYARTIFACT_BUILD_NUMBER_GAMEOFLIFE_DEFAULT environment variable would be set to 4.
The second part of the configuration is to tell Jenkins what to fetch, and from which build job. In the
Build section of our project configuration, we add a “Copy artifacts from another project” step. Here
you specify the project where the artifact was built and archived (gameoflife-default in our example).
You also need to make Jenkins use the build specified in the parameter we defined earlier. You do this
by choosing “Specified by a build parameter” in the “Which build” option, and providing the variable
name we specified earlier in the build selector name field (see Figure 12.6, “Specify where to find the
artifacts to be deployed”). Then, just configure the artifacts to copy as we did in the previous example.
Figure 12.6. Specify where to find the artifacts to be deployed
Finally, we deploy the copied artifact using the Deploy plugin, as illustrated in Figure 12.3, “Deploying
to Tomcat using the Deploy Plugin”.
So let’s see how this build works in practice. When we kick off a build manually, Jenkins will propose a
list of options letting you select the build to redeploy (see Figure 12.7, “Choosing the build to redeploy”).
Figure 12.7. Choosing the build to redeploy
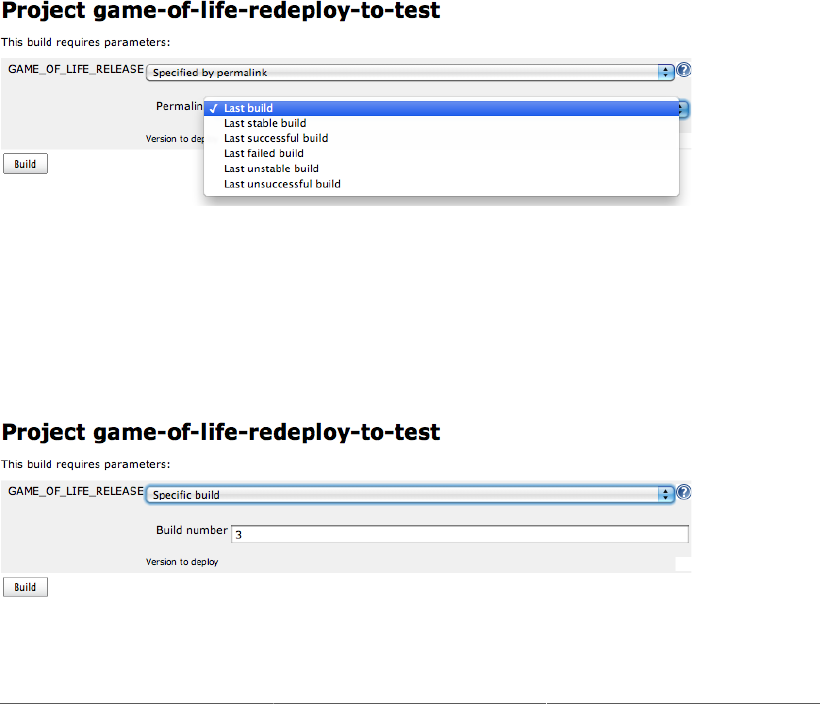
335
Most of these options are fairly self-explanatory.
The “latest successful build” is the most recent build excluding any failing builds. So this option will
typically just redeploy the latest version again. If you use this option, you will probably want to select
the “Stable builds only” checkbox, which will exclude any unstable builds as well.
If you have opted to discard old builds, you will be able to flag certain build jobs to be kept forever (see
Section 5.3.1, “General Options”). In this case, you can choose to deploy the “Latest saved build”.
A sensible option for an automated build job at the end of a build pipeline is “Upstream build that
triggered this job”. This way, you can be sure that you are deploying the artifact that was generated by
(or promoted through) the previous build job, even if other builds have happened since. It is worth noting
that, although this sort of parameterized build job is often used to manual deploy a specific artifact, it
can also be effectively used as part of an automated build process. If it is not triggered manually, it will
simply use whatever value you define in the “default selector” field.
You can also choose the “Specified by permalink” option (see Figure 12.8, “Using the “Specified by
permalink” option”). This lets you choose from a number of shortcut values, such as the last build, the
last stable build, the last successful build, and so on.
Figure 12.8. Using the “Specified by permalink” option
However if you want to redeploy a particular version of your application, a more useful option is
“Specific build” (see Figure 12.9, “Using a specific build”). This option lets you provide a specific build
number to be deployed. This is the most flexible way to redeploy an application—you will just need to
know the number of the build you need to redeploy, but this usually isn’t too hard to find by looking
at the build history of the original build job.
Figure 12.9. Using a specific build
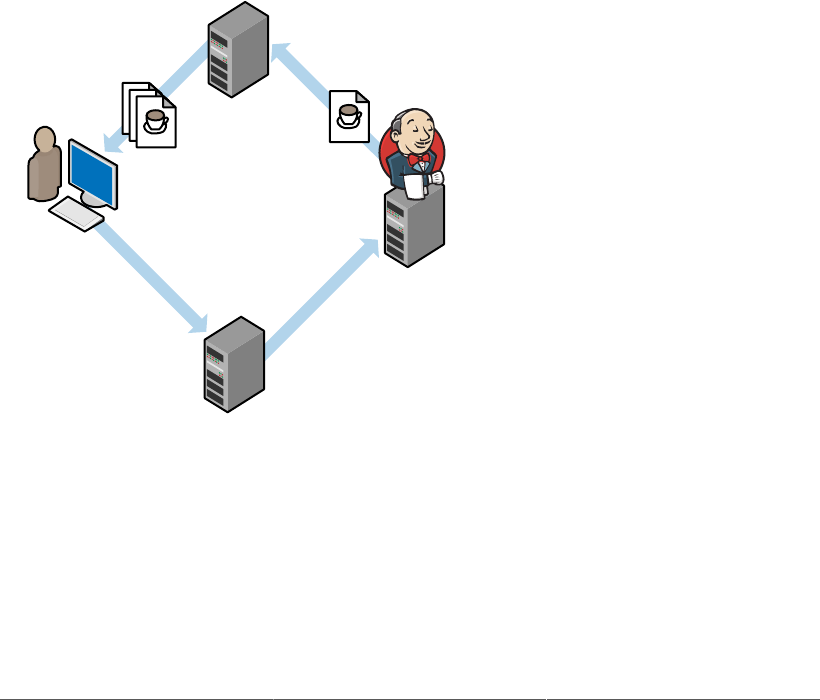
336
This is a convenient way to deploy or to redeploy artifacts from previous Jenkins build jobs. However, in
some cases you may prefer to use an artifact stored in an enterprise repository like Nexus or Artifactory.
We will look at an example of how to do this in the next section.
12.3.1.4. Deploying a version from a Maven repository
Many organizations use an Enterprise repository manager such as Nexus and Artifactory to store and
share binary artifacts such as JAR files. This strategy is commonly used with Maven, but also with
other build tools such as Ant (with Ivy or the Maven Ant Tasks) and Gradle. Using this approach
in a CI environment, both snapshot and release dependencies are built on your Jenkins server, and
then deployed to your repository manager (see Figure 12.10, “Using a Maven Enterprise Repository”).
Whenever a developer commits source code changes to the version control system, Jenkins will pick
up the changes and build new snapshot versions of the corresponding artifacts. Jenkins then deploys
these snapshot artifacts to the local Enterprise Repository Manager, where they can be made available
to other developers on the team or on other teams within the organization. We discussed how to get
Jenkins to automatically deploy Maven artifacts to an enterprise repository in Figure 12.10, “Using a
Maven Enterprise Repository”. A similar approach can also be done using Gradle or Ivy.
CI build
server
Snapshot
deployments
Maven enterprise
repository
Automated
updates and builds
SCM server
Source
code changes
Developers
Snapshot
updates
Figure 12.10. Using a Maven Enterprise Repository
Maven conventions use a well-defined system of version numbers, distinguishing between SNAPSHOT
and RELEASE versions. SNAPSHOT versions are considered to be potentially unstable builds of the
latest code base, whereas RELEASE versions are official releases having undergone a more formal
release process. Typically, SNAPSHOT artifacts are reserved for use within a development team,
whereas RELEASE versions are considered ready for further testing.

337
A similar approach can be used for deployable artifacts such as WAR or EAR files—they are built
and tested on the CI server, then automatically deployed to the Enterprise Repository, often as part of
a build pipeline involving automated tests and quality checks (see Section 10.7, “Build Pipelines and
Promotions”). SNAPSHOT versions are typically deployed to a test server for automated and/or manual
testing, in order to decide whether a version is ready to be officially released.
The exact strategy used to decide when a release version is to be created, and how it is deployed, varies
greatly from one organization. For example, some teams prefer a formal release at the end of each
iteration or sprint, with a well-defined version number and corresponding set of release notes that is
distributed to QA teams for further testing. When a particular version gets the go-ahead from QA, it
can then be deployed into production. Others, using a more lean approach, prefer to cut a new release
whenever a new feature or bug fix is ready to be deployed. If a team is particularly confident in their
automated tests and code quality checks, it may even be possible to automate this process completely,
generating and releasing a new version either periodically (say every night) or whenever new changes
are committed.
There are many ways to implement this sort of strategy. In the rest of this section, we will see how
to do it using a conventional multimodule Maven project. Our sample project is a web application
called gameoflife, consisting of three modules: gameoflife-core, gameoflife-services and
gameoflife-web. The gameoflife-web module produces a WAR file that includes JAR files from
the other two modules. It is this WAR file that we want to deploy:
tuatara:gameoflife johnsmart$ ls -l
total 32
drwxr-xr-x 16 johnsmart staff 544 16 May 09:58 gameoflife-core
drwxr-xr-x 8 johnsmart staff 272 4 May 18:12 gameoflife-deploy
drwxr-xr-x 8 johnsmart staff 272 16 May 09:58 gameoflife-services
drwxr-xr-x 15 johnsmart staff 510 16 May 09:58 gameoflife-web
-rw-r--r--@ 1 johnsmart staff 12182 4 May 18:07 pom.xml
Earlier on in this chapter we saw how to use the Deploy plugin to deploy a WAR file generated by the
current build job to an application server. What we want to do now is to deploy an arbitrary version of
the WAR file to an application server.
In Section 10.7.1, “Managing Maven Releases with the M2Release Plugin”, we discussed how to
configure Jenkins to invoke the Maven Release Plugin to generate a formal release version of an
application. The first step of the deployment process starts here, so we will assume that this has been
configured and that a few releases have already been deployed to our Enterprise Repository Manager.
The next step involves creating a dedicated project to manage the deployment process. This project will
be a standard Maven project.
The first thing you need to do is to set up a dedicated deployment project. In its simplest form, this
project will simply fetch the requested version of your WAR file from your enterprise repository to
be deployed by Jenkins. In the following pom.xml file, we use the maven-war-plugin to fetch a
specified version of the gameoflife-web WAR file from our enterprise repository. The version we
want is specified in the target.version property:

338
<project xmlns="http://maven.apache.org/POM/4.0.0" xmlns:xsi="http://www.w3.org/2001/
XMLSchema-instance"
xsi:schemaLocation="http://maven.apache.org/POM/4.0.0 http://
maven.apache.org/maven-v4_0_0.xsd">
<modelVersion>4.0.0</modelVersion>
<groupId>com.wakaleo.gameoflife</groupId>
<artifactId>gameoflife-deploy-with-jenkins</artifactId>
<version>0.0.1-SNAPSHOT</version>
<packaging>war</packaging>
<dependencies>
<dependency>
<groupId>com.wakaleo.gameoflife</groupId>
<artifactId>gameoflife-web</artifactId>
<type>war</type>d
<version>${target.version}</version>
</dependency>
</dependencies>
<build>
<plugins>
<plugin>
<artifactId>maven-war-plugin</artifactId>
<configuration>
<warName>gameoflife</warName>
<overlays>
<overlay>
<groupId>com.wakaleo.gameoflife</groupId>
<artifactId>gameoflife-web</artifactId>
</overlay>
</overlays>
</configuration>
</plugin>
</plugins>
</build>
<properties>
<target.version>RELEASE</target.version>
</properties>
</project>
Next, we configure a Jenkins build job to invoke this pom.xml file using a property value provided by
the user (see Figure 12.11, “Deploying an artifact from a Maven repository”). Note that we have set
the default value to RELEASE so that, by default, the most recent release version will be deployed.
Otherwise, the user can provide the version number of the version to be deployed or redeployed.
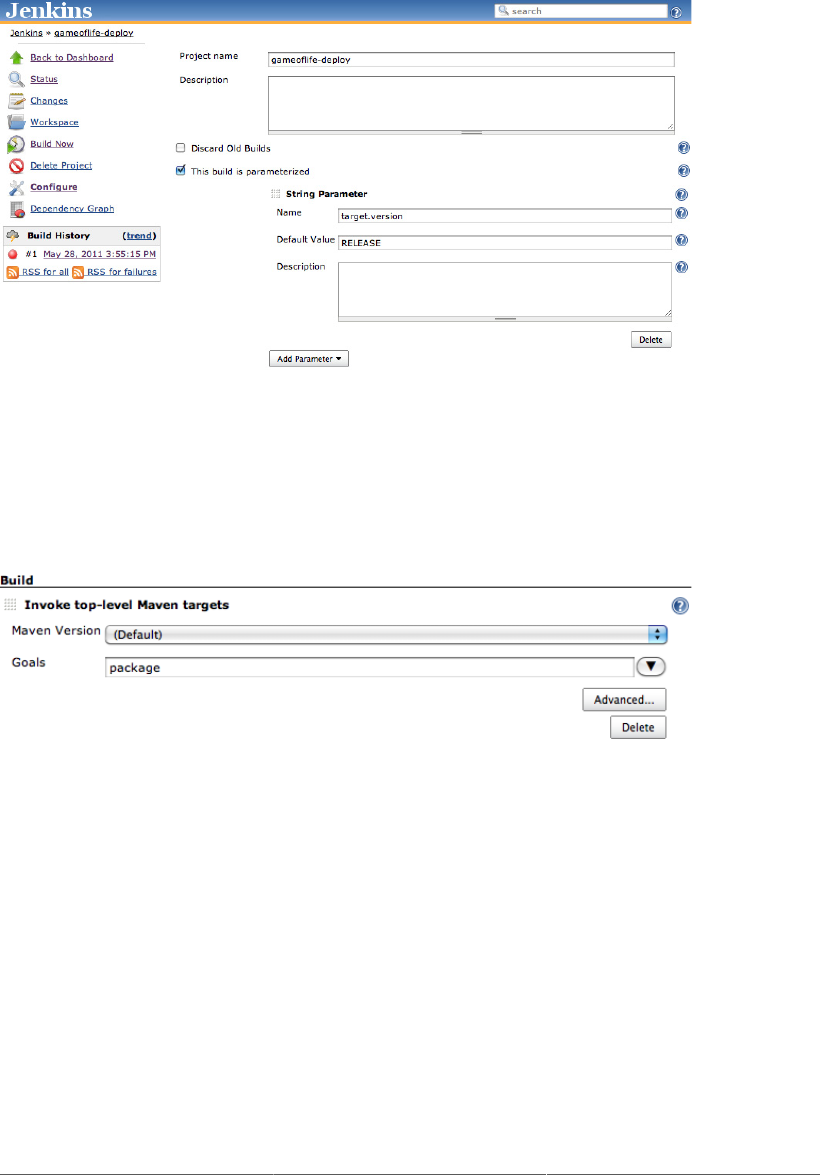
339
Figure 12.11. Deploying an artifact from a Maven repository
The rest of this build job simply checks out the deployment project and invokes the mvn package goal,
and then deploys the WAR file using the Deploy plugin (see Figure 12.12, “Preparing the WAR to be
deployed”). The target.version property will be automatically passed into the build job and used
to deploy the correct version.
Figure 12.12. Preparing the WAR to be deployed
Similar techniques can be used for other project types. If you are deploying to an application server that
is not supported by the Deploy plugin, you also have the option of writing a custom script in whatever
language is most convenient, and getting Jenkins to pass the requested version number as a parameter
as described above.
12.3.2. Deploying Scripting-based Applications Like Ruby and PHP
Deploying projects using scripting languages such as PHP and Ruby is generally simpler than deploying
Java applications, though the issues related to database updates are similar. Indeed, very often these
deployments essentially involve copying files onto a remote server. To obtain the files in the first place,
you have the choice of either copying them from another build job’s workspace using the Copy Artifacts
option, or checking the source code out directly from the source code repository, if necessary using a
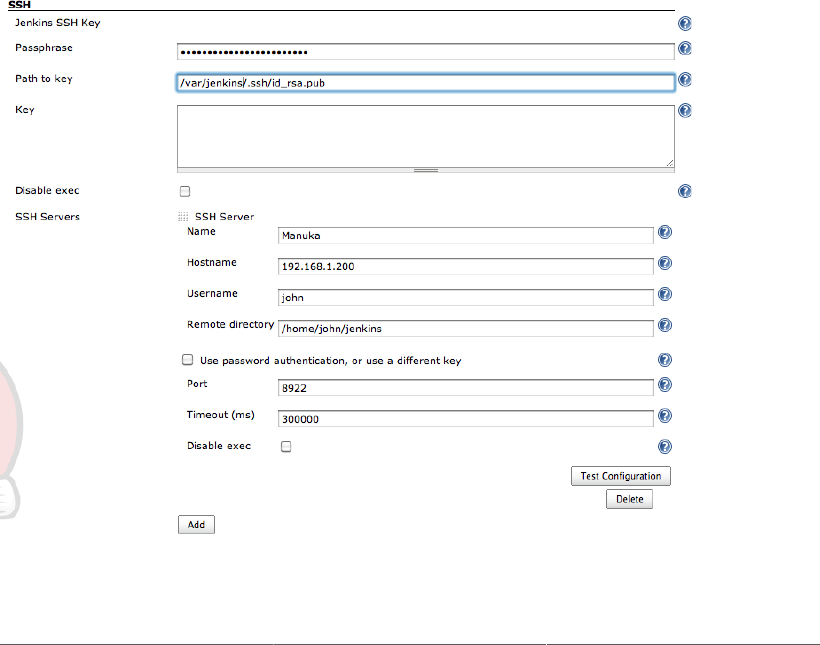
340
specific revision or tag as described for Subversion in Section 10.2.4, “Building from a Subversion Tag”
and for Git in Section 10.2.5, “Building from a Git Tag”. Then, once you have the source code in your
Jenkins workspace, you simply need to deploy it onto the target server.
A useful tool for this sort of deployment is the Publish Over series of plugins for Jenkins (Publish Over
FTP, Publish Over SSH, and Publish Over CIFS). These plugins provide a consistent and flexible way
to deploy your application artifacts to other servers over a number of protocols, including CIFS (for
Windows shared drives), FTP, and SSH/SFTP.
The configuration for each of these plugins is similar. Once you have installed the plugins, you need
to set up the host configurations, which are managed centrally in the main configuration screen. You
can create as many host configurations as you like—they will appear in a drop-down list in the job
configuration page.
Configuration of the hosts is fairly self-explanatory (see Figure 12.13, “Configuring a remote host”).
The name is the name that will appear in the drop-down list in the build job configurations. You can
configure authentication using a username and password for FTP, or either an SSH key or a username
and password for SSH. You also need to provide an existing directory on the remote server that will act
at the root directory for this configuration. In the Advanced options, you can also configure the SSH
port and timeout options.
Figure 12.13. Configuring a remote host

341
Once you have configured your hosts, you can set up your build jobs to deploy artifacts to these hosts.
You can do this either as a build step (see Figure 12.14, “Deploying files to a remote host in the build
section”) or as a post-build action (see Figure 12.15, “Deploying files to a remote host in the post-build
actions”). In both cases, the options are similar.
Figure 12.14. Deploying files to a remote host in the build section
First of all, you select the target host from the list of hosts you configured in the previous section. Next,
you configure the files you want to transfer. You do this by defining one or more “Transfer sets.” A
Transfer set is a set of files (defined by an Ant fileset expression) that you deploy to a specified directory
on the remote server. You can also provide a prefix to be removed—this lets you strip off unnecessary
directories that you do not want to appear on the server (such as the target/site directory path in
the example). You can add as many transfer sets as you need to get the files you want onto the remote
server. The plugin also provides options to execute commands on the remote server once the transfer is
complete (“Exec command”) or to exclude certain files or flatten the directories.
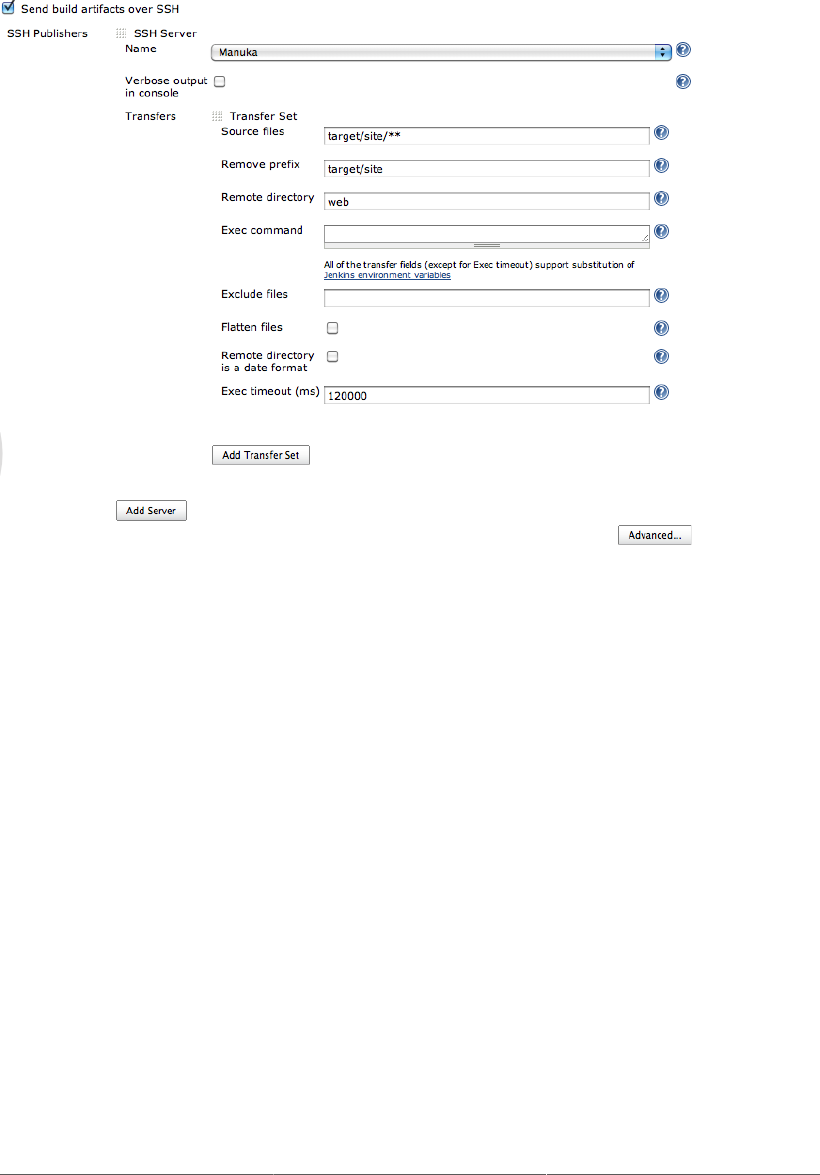
342
Figure 12.15. Deploying files to a remote host in the post-build actions
12.4. Conclusion
Automated Deployment, and in its most advanced form, Continuous Deployment or Continuous
Delivery, can be considered the culminating point of a modern Continuous Integration infrastructure.
In this chapter we have reviewed several Automated Deployment techniques, mostly centered around
Java-based deployments. However, the general principles discussed here apply for any technology.
Indeed, the actual deployment process in many other technologies, in particular scripting languages such
as Ruby and PHP, are considerably simpler than when using Java, and essentially involve copying files
onto the production server. Ruby also benefits from tools such as Heroku and Capistrano to facilitate
the task.
There are several important aspects you need to consider when setting up an Automated Deployment.
First of all, Automated Deployment is the end-point of your CI architecture: you need to define a build
pipeline to take your build from the initial compilation and unit tests, though more comprehensive
functional and automated acceptance tests and code quality checks, culminating in deployment to one
or more platforms. The degree of confidence you can have in your build pipeline depends largely on the
degree of confidence you have in your tests. Or, in other terms, the less reliable and comprehensive your
tests, the earlier in the build process you will have to fall back to manual testing and human intervention.

343
Finally, if at all possible, it is important to build your deployable artifact once and once only, and then
reuse it in subsequent steps for functional tests and deployment to different platforms.
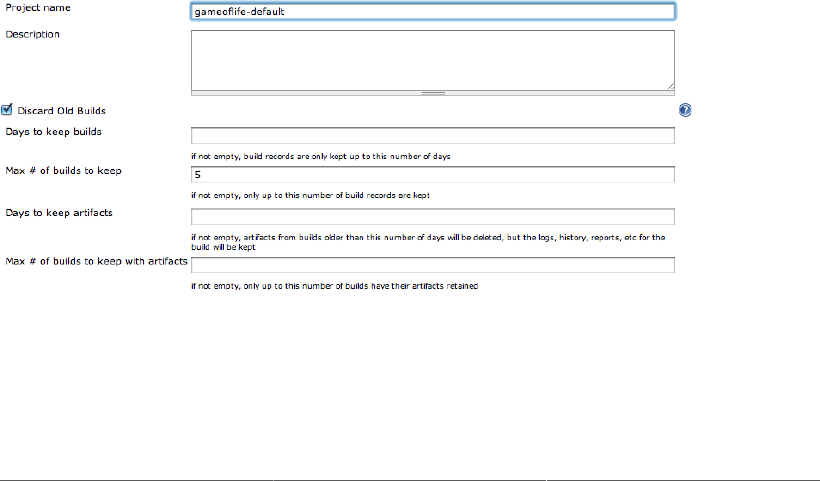
Chapter 13. Maintaining Jenkins
13.1. Introduction
In this chapter, we will be discussing a few tips and tricks that you might find useful when maintaining
a large Jenkins instance. We will look at things like how to limit, and keep tabs on, disk usage, how to
give Jenkins enough memory and how to archive build jobs or migrate them from one server to another.
Some of these topics are discussed elsewhere in the book, but here we will be looking at things from
the point of view of the system administrator.
13.2. Monitoring Disk Space
Build History takes disk space. In addition, Jenkins analyzes the build records when it loads a project
configuration, so a build job with a thousand archived builds is going to take a lot longer to load than
one with only fifty. If you have a large Jenkins server with tens or hundreds of build jobs, multiply
this accordingly.
Probably the simplest way to keep a cap on disk usage is to limit the number of builds a project maintains
in its history. You can configure this by ticking the Discard Old Builds checkbox at the top of the project
configuration page (see Figure 13.1, “Discarding old builds”). If you tell Jenkins to only keep the last
20 builds, it will start discarding (and deleting) older build jobs once it reaches this number. You can
limit them by number (i.e., no more than 20 builds) or by date (i.e., builds no older than 30 days). It does
this intelligently, though: if there has ever been a successful build, Jenkins will always keep at least the
latest successful build as part of its build history, so you will never loose your last successful build.
Figure 13.1. Discarding old builds
The problem with discarding old builds is that you loose the build history at the same time. Jenkins uses
the build records to produce graphs of test results and build metrics. If you limit the number of builds to
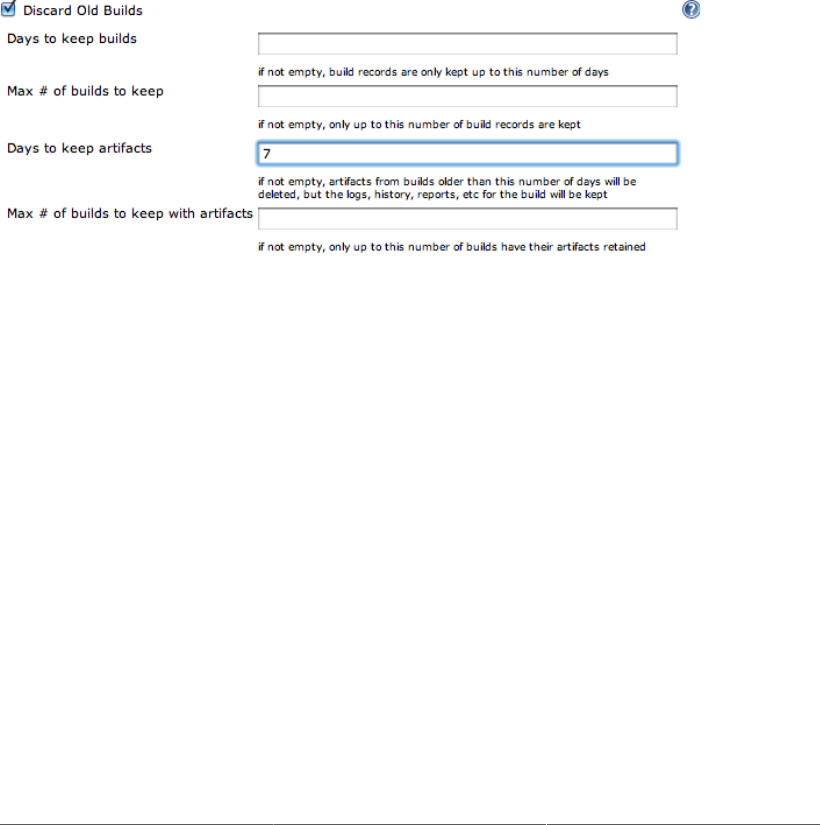
346
be kept to twenty, for example, Jenkins will only display graphs containing the last twenty data points,
which can be a bit limited. This sort of information can be very useful to the developers, but it is often
good to be able to see how the project metrics are doing throughout the whole life of the project, not
just over the last week or two.
Fortunately, Jenkins has a work-around that can keep both developers and system administrators happy.
In general, the items that take up the most disk space are the build artifacts: JAR files, WAR files, and
so on. The build history itself is mostly XML log files, which don’t take up too much space. If you
click on the “Advanced...” button, Jenkins will let you discard the artifacts, but not the build data. In
Figure 13.2, “Discarding old builds—advanced options”, for example, we have configured Jenkins to
keep artifacts for a maximum of 7 days. This is a great option if you need to put a cap on disk usage,
but still want to provide a full scope of build metrics for the development teams.
Figure 13.2. Discarding old builds—advanced options
Don’t hesitate to be ruthless, keeping the maximum number of builds with artifacts quite low.
Remember, Jenkins will always keep the last stable and the last successful builds, no matter what you
tell it, so you will always have at least one working artifact (unless of course the project has yet to
successfully build). Jenkins also lets you mark an individual build as “Keep this log forever”, to exclude
certain important builds from being discarded automatically.
13.2.1. Using the Disk Usage Plugin
One of the most useful tools in the Jenkins administrator’s tool box is the Disk Usage plugin. This plugin
records and reports on the amount of disk space used by your projects. It lets you isolate and fix projects
that are using too much disk space.
You can install the Disk Usage plugin in the usual way, from the Plugin Manager screen. Once you have
installed the plugin and restarted Jenkins, the Disk Usage plugin will record the amount of disk space
used by each project. It will also add a Disk Usage link on the Manage Jenkins screen, which you can
use to display the overall disk usage for your projects (see Figure 13.3, “Viewing disk usage”).
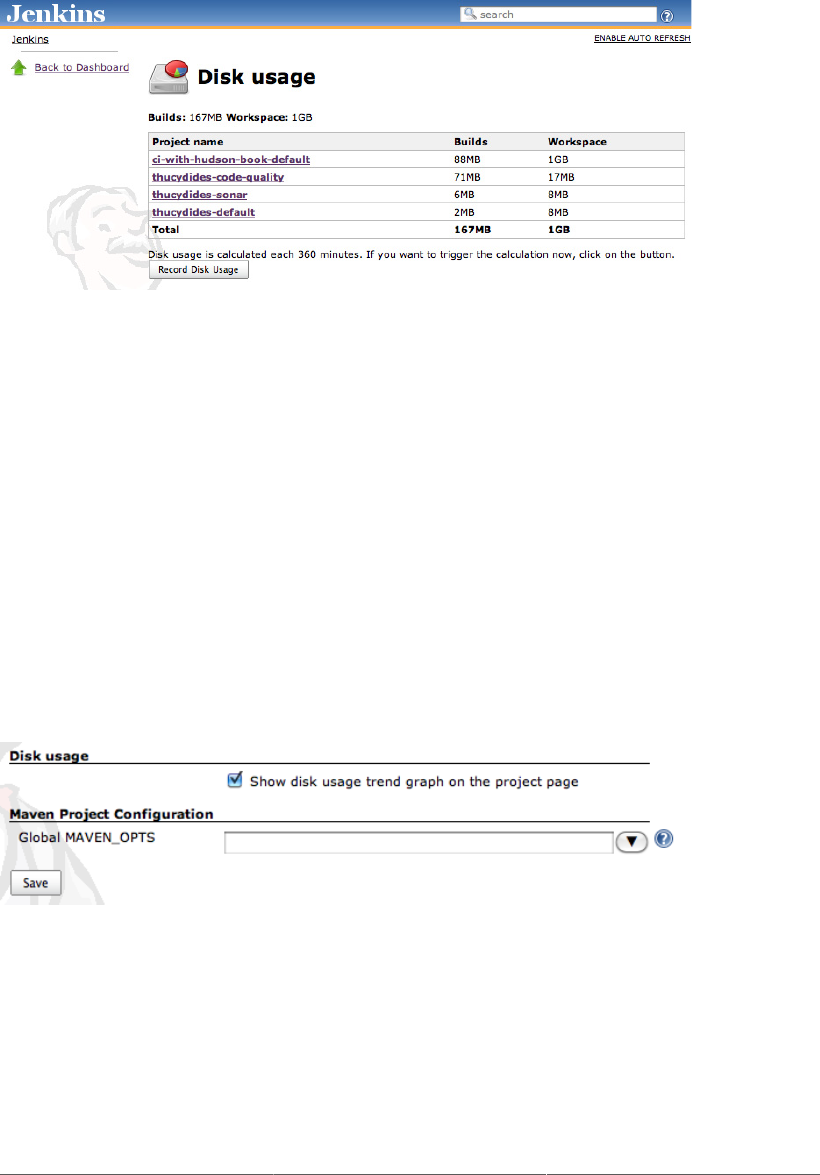
347
Figure 13.3. Viewing disk usage
This list is sorted by overall disk usage, so the projects using the most disk space are at the top. The list
provides two values for each project—the Builds column indicates the total amount of space used by
all of the project’s build history, whereas the Workspace column is the amount of space used to build
the project. For ongoing projects, the Workspace value tends to be relatively stable (a project needs
what it needs to build correctly), whereas the Builds column will increase over time, sometimes at a
dramatic rate, unless you do something about it. You can keep the space needed by a project’s history
under control by limiting the number of builds being kept for a project, and by being careful about what
artifacts are being stored.
To get an idea of how fast the disk space is being used up, you can also display the amount of disk space
used in each project over time. To do this, you need to activate the plugin in the System Configuration
screen (see Figure 13.4, “Displaying disk usage for a project”).
Figure 13.4. Displaying disk usage for a project
This will record and display how much space your projects are using over time. The Disk Usage plugin
displays a graph of disk usage over time (see Figure 13.5, “Displaying project disk usage over time”),
which can give you a great view of how fast your project is filling up the disk, or, on the contrary, if
the disk usage is stable over time.
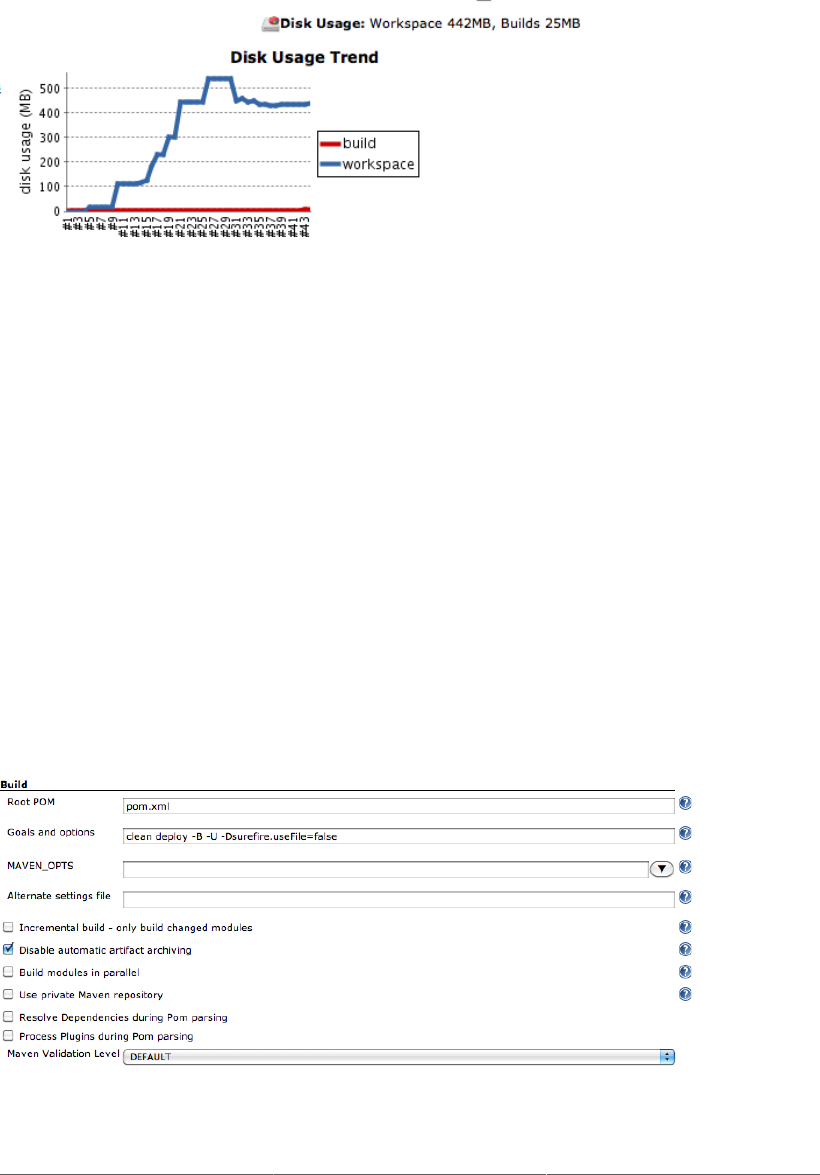
348
Figure 13.5. Displaying project disk usage over time
13.2.2. Disk Usage and the Jenkins Maven Project Type
If you are using the Jenkins Maven build jobs, there are some additional details you should know about.
In Jenkins, Maven build jobs will automatically archive your build artifacts by default. This may not
be what you intend.
The problem is that these SNAPSHOT artifacts take up space—a lot of it. On an active project, Jenkins
might be running several builds per hour, so permanently storing the generated JAR files for each build
can be very costly. The problem is accentuated if you have multimodule projects, as Jenkins will archive
the artifacts generated for each module.
In fact, if you need to archive your Maven SNAPSHOT artifacts, it is probably a better idea to deploy
them directly to your local Maven repository manager. Nexus Pro, for example, can be configured to
do this and Artifactory can be configured to delete old snapshot artifacts.
Fortunately, you can configure Jenkins to this, go to the “Build” section of your build job configuration
screen and click on the Advanced button. This will display some extra fields, as shown in Figure 13.6,
“Maven build jobs—advanced options”.
Figure 13.6. Maven build jobs—advanced options

349
If you tick the “Disable automatic artifact archiving” checkbox here, Jenkins will refrain from storing the
jar files your project build generates. This is a good way of making your friendly system administrator
happy.
Note that sometimes you do need to store the Maven artifacts. For example, they often come in handy
when implementing a build pipeline (see Section 10.7, “Build Pipelines and Promotions”). In this case,
you can always choose to archive the artifacts you need manually, and then use the “Discard old builds”
option to refine how long you keep them for.
13.3. Monitoring the Server Load
Jenkins provides build-in monitoring of server activity. On the Manage Jenkins screen, click on the
Load Statistics icon. This will display a graph of the server load over time for the master node (see
Figure 13.7, “Jenkins Load Statistics”). This graph keeps track of three metrics: the total number of
executors, the number of busy executors, and queue length.
The total number of executors (the blue line) includes the executors on the master and on the
slave nodes. This can vary when slaves are brought on and offline, and can be a useful indicator of how
well your dynamic provisioning of slave nodes is working.
The number of busy executors (the red line) indicates how many of your executors are occupied
executing builds. You should make sure you have enough spare capacity here to absorb spikes in
build jobs. If all of your executors are permanently occupied running build jobs, you should add more
executors and/or slave nodes.
The queue length (the gray line) is the number of build jobs awaiting executing. Build jobs are queued
when all of the executors are occupied. This metric does not include jobs that are waiting for an upstream
build job to finish, so it gives a reasonable idea of when your server could benefit from extra capacity.
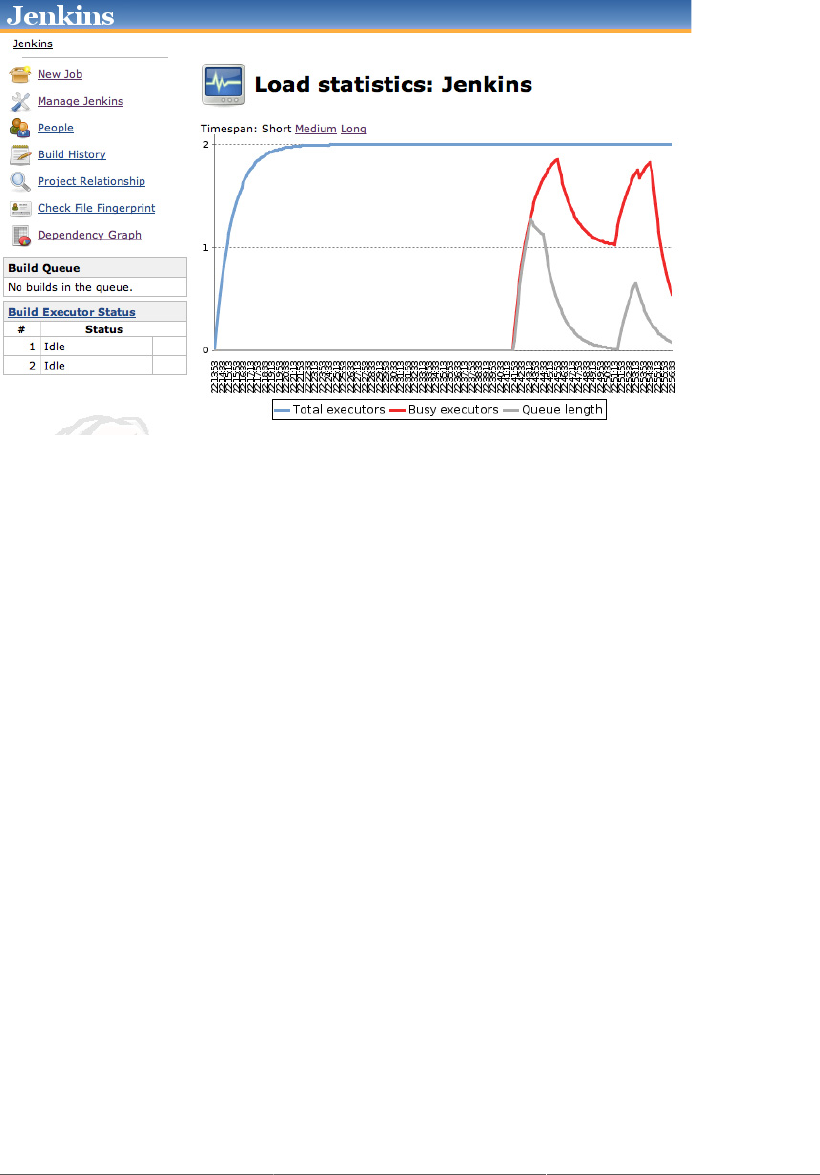
350
Figure 13.7. Jenkins Load Statistics
You can get a similar graph for slave nodes, using the Load Statistics icon in the slave node details page.
Another option is to install the Monitoring plugin. This plugin uses JavaMelody to produce
comprehensive HTML reports about the state of your build server, including CPU and system load,
average response time, and memory usage (see Figure 13.8, “The Jenkins Monitoring plugin”). Once
you have installed this plugin, you can access the JavaMelody graphs from the Manage Jenkins screen,
using the “Monitoring of Jenkins/Jenkins master” or “Jenkins/Jenkins nodes” menu entries.
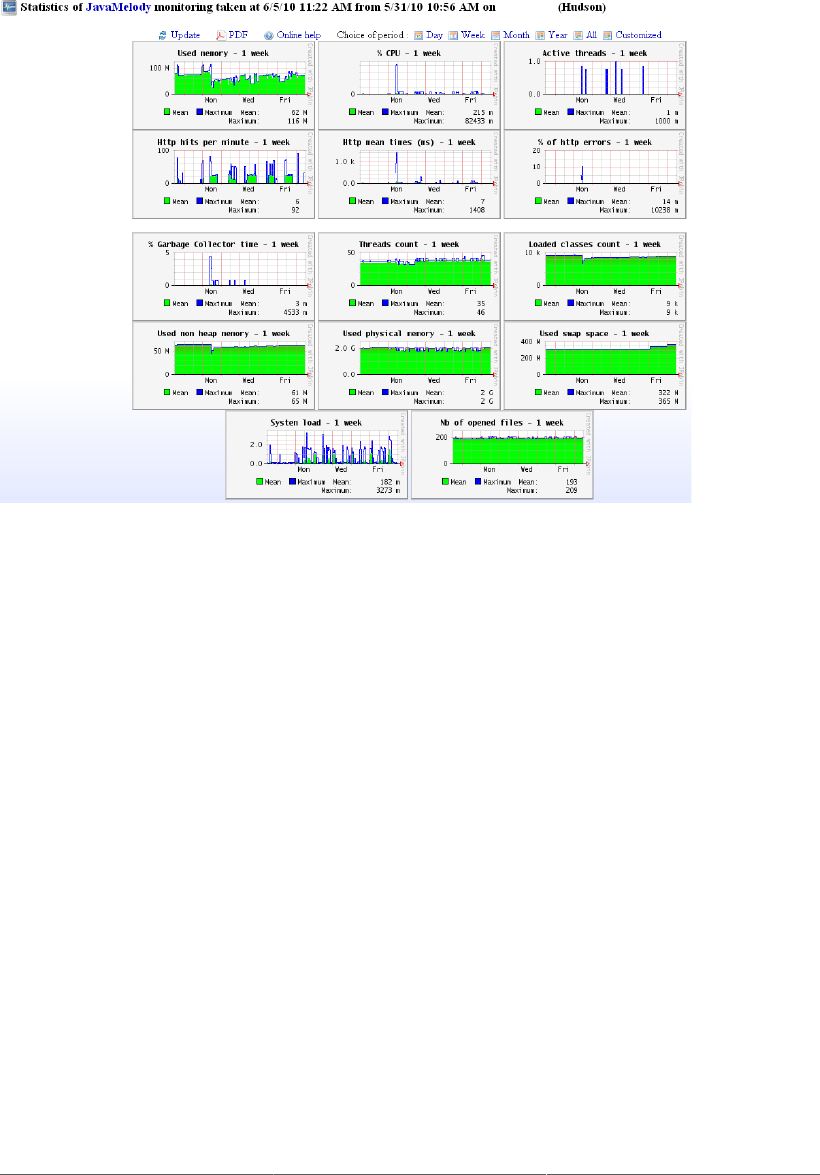
351
Figure 13.8. The Jenkins Monitoring plugin
13.4. Backing Up Your Configuration
Backing up your data is a universally recommended practice, and your Jenkins server should be no
exception. Fortunately, backing up Jenkins is relatively easy. In this section, we will look at a few ways
to do this.
13.4.1. Fundamentals of Jenkins Backups
In the simplest of configurations, all you need to do is to periodically back up your JENKINS_HOME
directory. This contains all of your build jobs configurations, your slave node configurations, and your
build history. This will also work fine while Jenkins is running—there is no need to shut down your
server while doing your backup.
The downside of this approach is that the JENKINS_HOME directory can contain a very large amount
of data (see Section 3.13, “What’s in the Jenkins Home Directory”). If this becomes an issue, you can
save a little by not backing up the following directories, which contain data that can be easily recreated
on-the-fly by Jenkins:
$JENKINS_HOME/war
The exploded WAR file
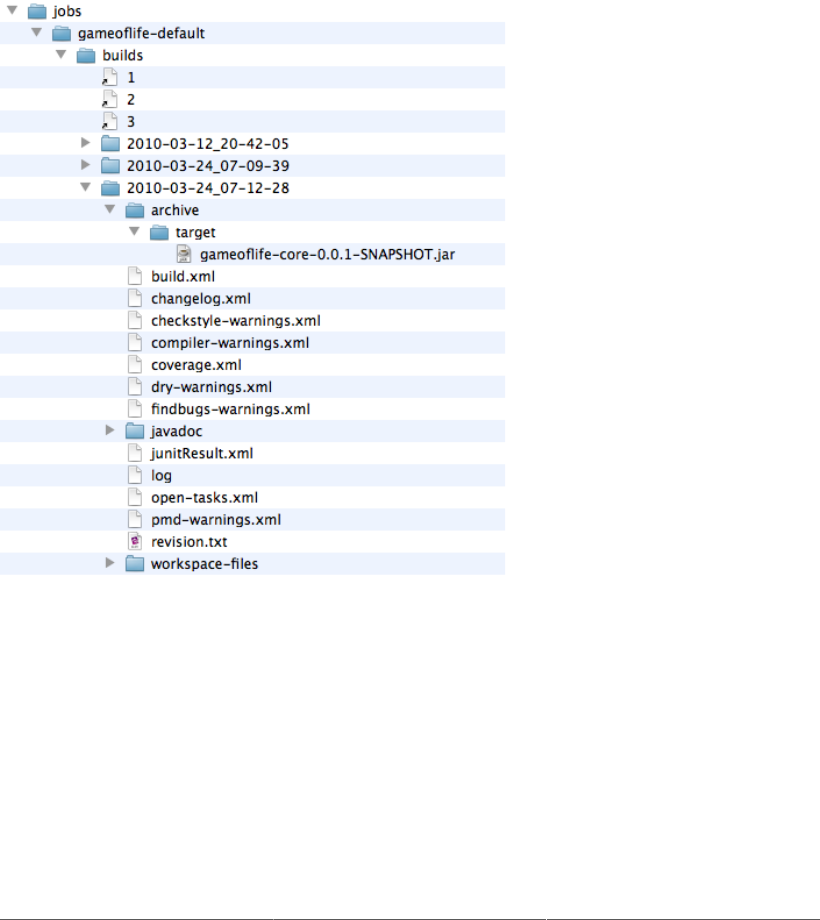
352
$JENKINS_HOME/cache
Downloaded tools
$JENKINS_HOME/tools
Extracted tools
You can also be selective about what you back up in your build jobs data. The $JENKINS_HOME/jobs
directory contains job configuration, build history and archived files for each of your build jobs. The
structure of a build job directory is illustrated in Figure 13.9, “The builds directory”.
Figure 13.9. The builds directory
To understand how to optimize your Jenkins backups, you need to understand how the build job
directories are organized. Within the jobs directory there is a subdirectory for each build job. This
subdirectory contains two subdirectories of its own: builds and workspace. There is no need to
backup the workspace directory, as it will simply be restored with a clean checkout if Jenkins finds
it missing.
The builds directory, on the other hand, needs more attention. This directory contains the history of
your build results and previously-generated artifacts, with a time-stamped directory for each previous
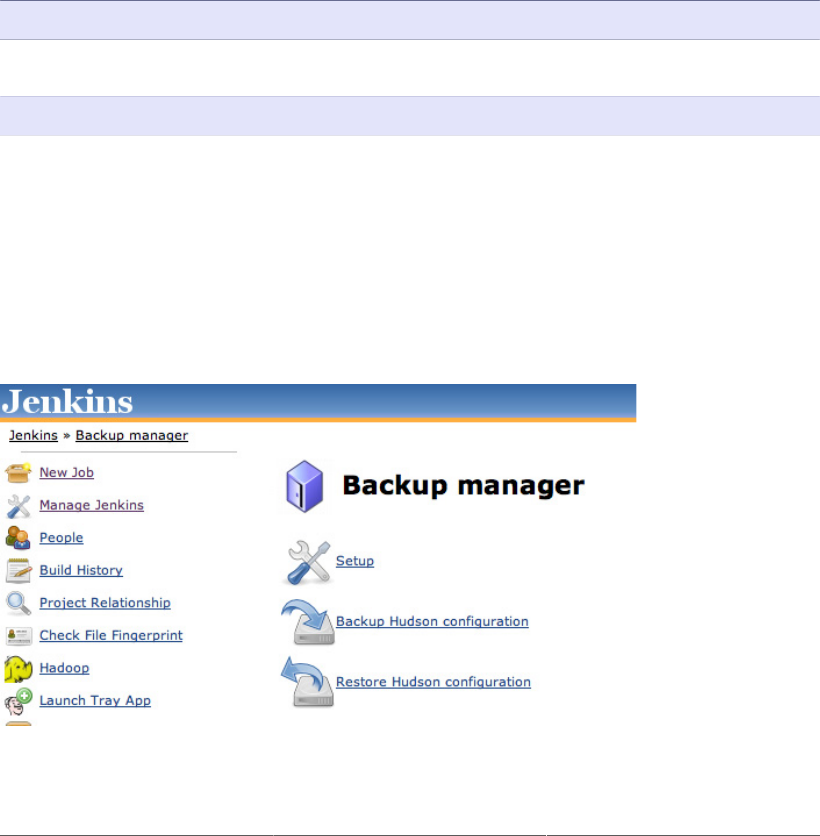
353
build. If you are not interested in restoring build history or past artifacts, you don’t need to store this
directory. If you are, read on! In each of these directories, you will find the build history (stored in the
form of XML files such as JUnit test results) and archived artifacts. Jenkins uses the XML and text
files to produce the graphs it displays on the build job dashboard, so if these are important to you, you
should store these files. The archive directory contains binary files that were generated and stored by
previous builds. These binaries may or may not be important to you, but they can take up a lot of space,
so if you exclude them from your backups, you may be able to save a considerable amount of space.
Just as it is wise to make frequent backups, it is also wise to test your backup procedure. With Jenkins,
this is easy to do. Jenkins home directories are totally portable, so all you need to do to test your backup is
to extract your backup into a temporary directory and run an instance of Jenkins against it. For example,
imagine we have extracted our backup into a temporary directory called /tmp/jenkins-backup. To
test this backup, first set the JENKINS_HOME directory to this temporary directory:
$ export JENKINS_HOME=/tmp/jenkins-backup
Then simply start Jenkins on a different port and see if it works:
$ java -jar jenkins.war --httpPort=8888
You can now view Jenkins running on this port and make sure that your backup worked correctly.
13.4.2. Using the Backup Plugin
The approach described in the previous section is simple enough to integrate into your normal backup
procedures, but you may prefer something more Jenkins-specific. The Backup plugin (see Figure 13.10,
“The Jenkins Backup Manager Plugin”) provides a simple user interface that you can use to back up
and restore your Jenkins configurations and data.
Figure 13.10. The Jenkins Backup Manager Plugin
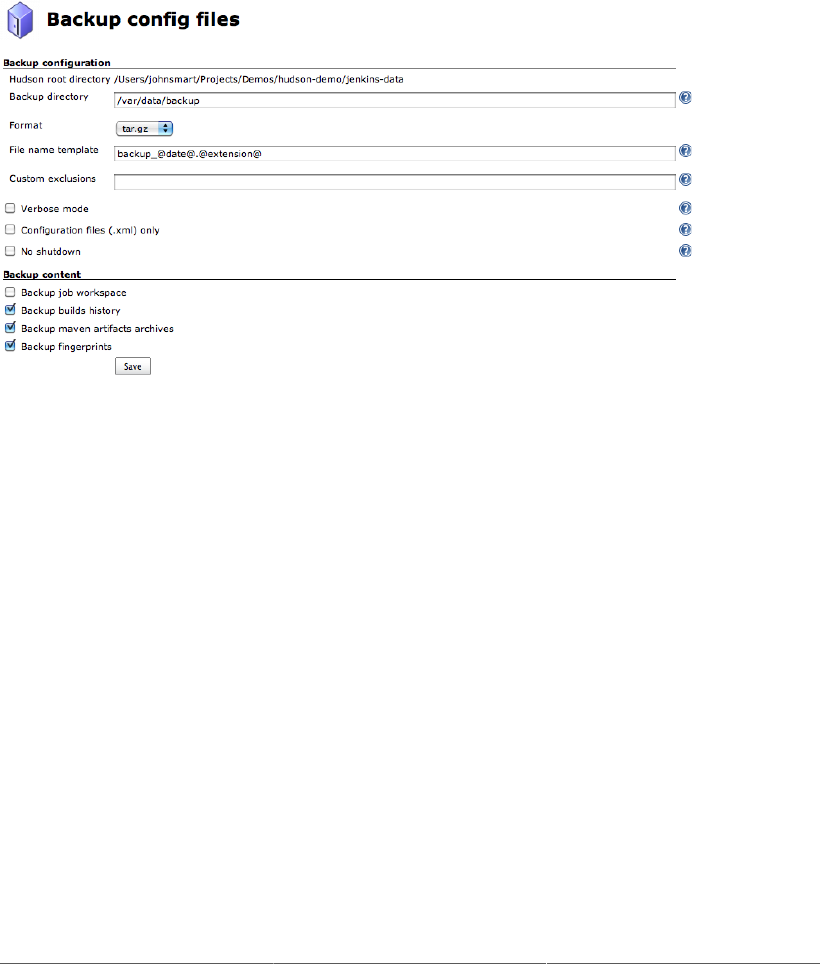
354
This plugin lets you configure and run backups of both your build job configurations and your build
history. The Setup screen gives you a large degree of control over exactly what you want backed up
(see Figure 13.11, “Configuring the Jenkins Backup Manager”). You can opt to only back up the XML
configuration files, or back up both the configuration files and the build history. You can also choose
to backup (or not to backup) the automatically-generated Maven artifacts (in many build processes,
these will be available on your local Enterprise Repository Manager). You can also back up the job
workspaces (typically unnecessary, as we discussed above) and any generated fingerprints.
Figure 13.11. Configuring the Jenkins Backup Manager
You can trigger a backup manually from the Backup Manager screen (which you can access from the
Manage Jenkins screen). The backup takes some time, and will shut down Jenkins during the process
(unless you deactivate this option in the backup configuration).
At the time of writing, there is no way to schedule this operation from within Jenkins, but you can start
the backup operation externally by invoking the corresponding URL (e.g., http://localhost:8080/backup/
backup if your Jenkins instance is running locally on port 8080). In a unix environment, for example,
this would typically be scheduled as a cron job using a tool like wget or curl to start the backup.
13.4.3. More Lightweight Automated Backups
If all you want to back up is your build job configuration, the Backup Manager plugin might be
considered overkill. Another option is to use the Thin Backup plugin, which lets you schedule full and
incremental backups of your configuration files. Because they don’t save your build history or artifacts,
these backups are very fast, and there is no need to shut down the server to do them.
Like the Backup plugin, this plugin adds an icon to the Jenkins System Configuration page. From here,
you can configure and schedule your configuration backups, force an immediate backup, or restore your
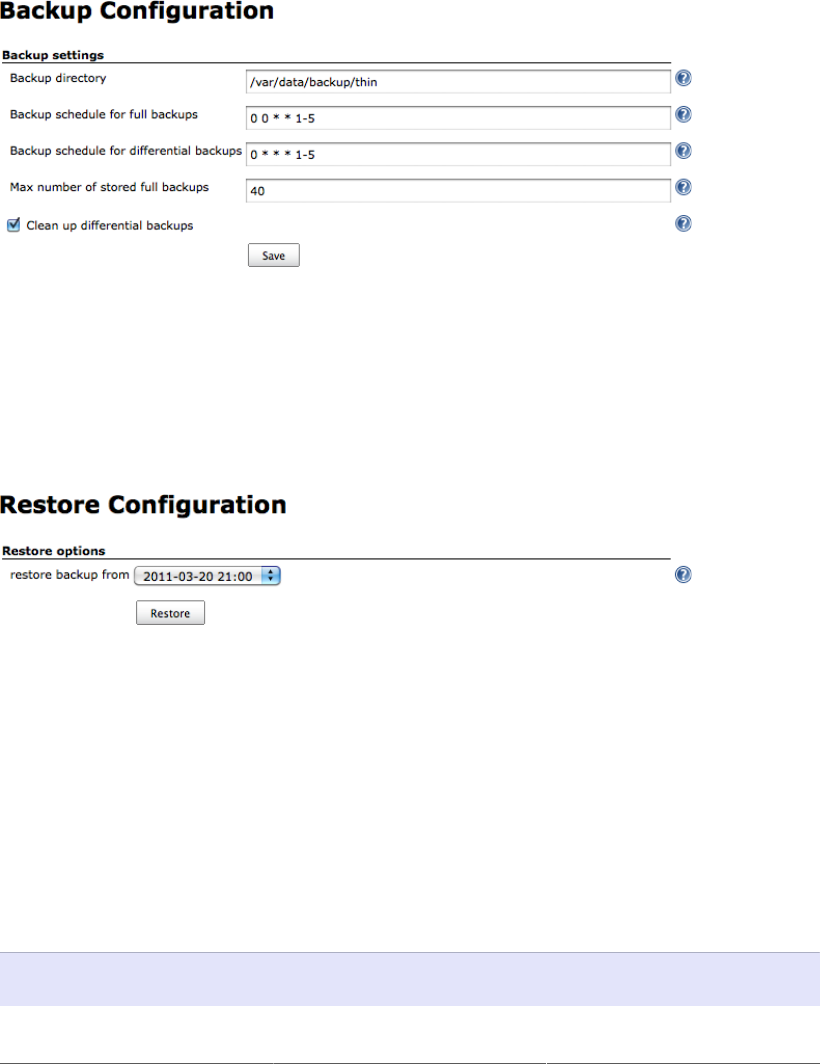
355
configuration files to a previous state. Configuration is straightforward (see Figure 13.12, “Configuring
the Thin Backup plugin”), and simply involves scheduling full and incremental backups using a cron
job syntax, and providing a directory in which to store the backups.
Figure 13.12. Configuring the Thin Backup plugin
To restore a previous configuration, just go to the Restore page and choose the date of the configuration
you wish to reinstate (see Figure 13.13, “Restoring a previous configuration”). Once the configuration
has been restored to the previous state, you need to reload the Jenkins configuration from disk or restart
Jenkins.
Figure 13.13. Restoring a previous configuration
13.5. Archiving Build Jobs
Another way to address disk space issues is to delete or archive projects that are no longer active.
Archiving a project allows you to easily restore it later if you need to consult the project data or artifacts.
Archiving a project is simple: just move the build project directory out of the job directory. Of course,
typically, you would compress it into a ZIP file or a tarball first.
In the following example, we want to archive the tweeter-default project. So first we go to the Jenkins
jobs directory and create a tarball (compressed archive) of the tweeter-default build job directory:
$ cd $JENKINS_HOME/jobs
$ ls
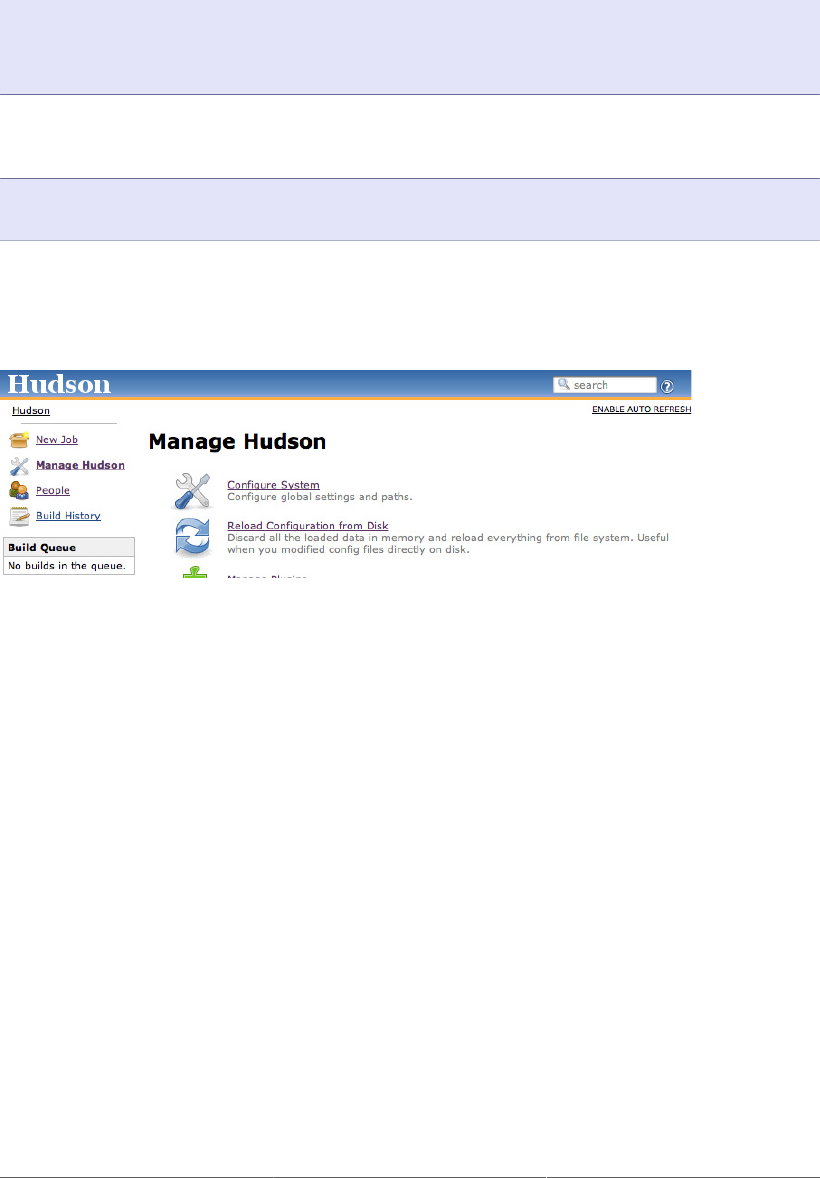
356
gameoflife-default tweeter-default
$ tar czf tweeter-default.tgz tweeter-default
$ ls
gameoflife-default tweeter-default tweeter-default.tgz
As long as the project you want to archive is not running, you can now safely delete the project directory
and move the archive into storage:
$ rm -Rf tweeter-default
$ mv tweeter-default.tgz /data/archives/jenkins
Once you have done this, you can simply reload the configuration from the disk in the Manage Jenkins
screen (see Figure 13.14, “Reloading the configuration from disk”). The archived project will promptly
disappear from your dashboard.
Figure 13.14. Reloading the configuration from disk
On a Windows machine, you can do exactly the same thing by creating a ZIP file of the project directory.
13.6. Migrating Build Jobs
There are times when you need to move or copy Jenkins build jobs from one Jenkins instance to another,
without copying the entire Jenkins configuration. For example, you might be migrating your build jobs
to a Jenkins instance on a brand new box, with system configuration details that vary from the original
machine. Or you might be restoring an old build job that you have archived.
As we have seen, Jenkins stores all of the data it needs for a project in a subdirectory of the jobs
directory in your Jenkins home directory. This subdirectory is easy to identify—it has the same name
as your project. Incidentally, this is one reason why your project names really shouldn’t contain spaces,
particularly if Jenkins is running under Unix or Linux—it makes maintenance and admin tasks a lot
easier if the project names are also well-behaved Unix filenames.
You can copy or move build jobs between instances of projects simply enough by copying or moving the
build job directories to the new Jenkins instance. The project job directory is self-contained—it contains
both the full project configuration and all the build history. It is even safe enough to copy build job
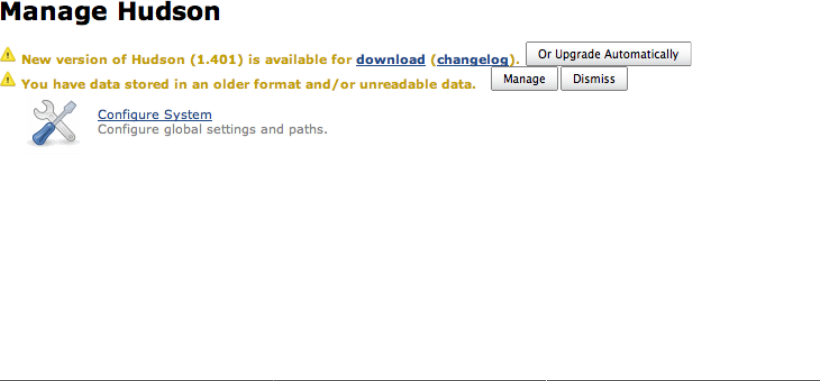
357
directories to a running Jenkins instance, though if you are also deleting them from the original server,
you should shut this one down first. You don’t even need to restart the new Jenkins instance to see the
results of your import—just go to the Manage Jenkins screen and click on Reload Configuration From
Disk. This will load the new jobs and make them immediately visible on the Jenkins dashboard.
There are a few gotchas, however. If you are migrating your jobs to a brand new Jenkins configuration,
remember to install, or migrate, the plugins from your original server. The plugins can be found in
the plugins directory, so you can simply copy everything from this directory to the corresponding
directory in your new instance.
Of course, you might be migrating the build jobs to a new instance precisely because the plugin
configuration on the original box is a mess. Some Jenkins plugins can be a bit buggy sometimes, and
you may want to move to a clean installation with a well-known, well-defined set of vetted plugins. In
this case, you may need to rework some of your project configurations once they have been imported.
The reason for this is straightforward. When you use a plugin in a project, the project’s config.xml
will be updated with plugin-specific configuration fields. If for some reason you need to migrate projects
selectively to a Jenkins installation without these plugins installed, Jenkins will no longer understand
these parts of the project configuration. The same thing can also sometimes happen if the plugin versions
are very different on the machines, and the data format used by the plugin has changed.
If you are migrating jobs to a Jenkins instance with a different configuration, it also pays to keep an
eye on the system logs. Invalid plugin configurations will usually let you know through warnings or
exceptions. While not always fatal, these error messages often mean that the plugin will not work as
expected, or at all.
Jenkins provides some useful features to help you migrate your project configurations. If Jenkins finds
data that it thinks is out of date or invalid, it will tell you so. On the Manage Jenkins screen, you will
get a message like the one in Figure 13.15, “Jenkins will inform you if your data is not compatible with
the current version”.
Figure 13.15. Jenkins will inform you if your data is not compatible with the current version
From here, you can choose to either leave the configuration as it is (just in case you roll back to a
previous version of your Jenkins instance, for example), or let Jenkins discard the fields it cannot read.
If you choose this option, Jenkins will bring up a screen containing more details about the error, and
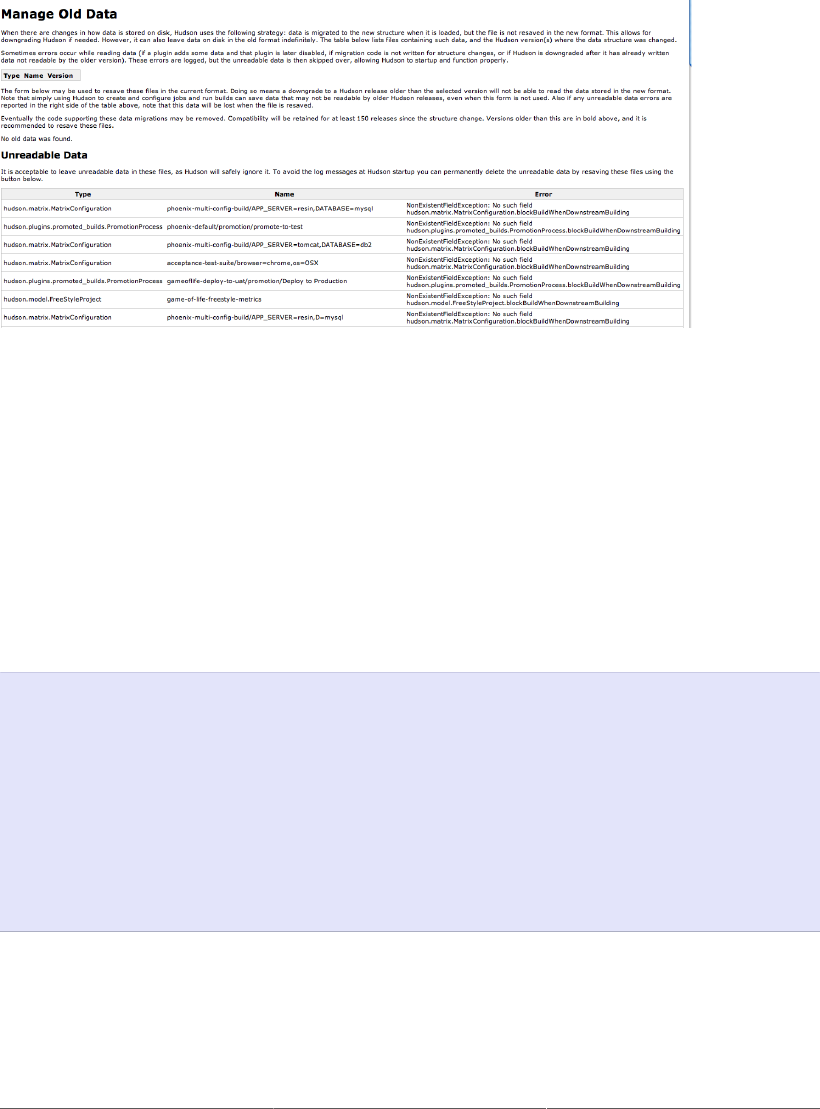
358
can even help tidy up your project configuration files if you wish (see Figure 13.16, “Managing out-
of-date build jobs data”).
Figure 13.16. Managing out-of-date build jobs data
This screen gives you more details about the project containing the dodgy data, as well as the exact error
message. This gives you several options. If you are sure that you no longer need the plugin that originally
created the data, you can safely remove the redundant fields by clicking on the Discard Unreadable
Data button. Alternatively, you may decide that the fields belong to a useful plugin that hasn’t yet been
installed on the new Jenkins instance. In this case, install the plugin and all should be well. Finally, you
can always choose to leave the redundant data and live with the error message, at least until you are sure
that you won’t need to migrate the job back to the old server some day.
However, Jenkins doesn’t always detect all of the errors or inconsistencies—it still pays to keep one
eye on the system logs when you migrate your build jobs. For example, the following is a real example
from a Jenkins log file showing what can happen during the migration process:
Mar 16, 2010 2:05:06 PM hudson.util.CopyOnWriteList$ConverterImpl unmarshal
WARNING: Failed to resolve class
com.thoughtworks.xstream.mapper.CannotResolveClassException: hudson.plugins.ciga
me.GamePublisher : hudson.plugins.cigame.GamePublisher
at com.thoughtworks.xstream.mapper.DefaultMapper.realClass(DefaultMapper
.java:68)
at com.thoughtworks.xstream.mapper.MapperWrapper.realClass(MapperWrapper
.java:38)
at com.thoughtworks.xstream.mapper.DynamicProxyMapper.realClass(DynamicP
roxyMapper.java:71)
at com.thoughtworks.xstream.mapper.MapperWrapper.realClass(MapperWrapper
.java:38)
The error is essentially telling us that it can’t find a class called
hudson.plugins.cigame.GamePublisher. In fact, the target installation is missing the CI Game
plugin. And in this case (as sometimes happens), no warning messages where appearing on the Manage
Jenkins page, so Jenkins was unable to correct the configuration files itself.

359
The simplest solution in this case would be to install the CI Game plugin on the target server. But what
if we don’t want to install this plugin? We could leave the configuration files alone, but this might mask
more significant errors later on—it would be better to tidy them up.
In that case, we need to inspect and update the project configuration files by hand. On this Unix box, I
just used grep to find all the configuration files containing a reference to “cigame”:
$ cd $JENKINS_HOME/jobs
$ grep cigame */config.xml
project-a/config.xml: <hudson.plugins.cigame.GamePublisher/>
project-b/config.xml: <hudson.plugins.cigame.GamePublisher/>
project-c/config.xml: <hudson.plugins.cigame.GamePublisher/>
In these config.xml files, I found the reference to the CI Game plugin in the <publishers> sect1
(which is where the configuration for the reporting plugins generally goes):
<maven2-moduleset>
...
<publishers>
<hudson.plugins.cigame.GamePublisher/>
<hudson.plugins.claim.ClaimPublisher/>
</publishers>
...
</maven2-moduleset>
To fix the issue, all I have to do is to remove the offending line:
<maven2-moduleset>
...
<publishers>
<hudson.plugins.claim.ClaimPublisher/>
</publishers>
...
</maven2-moduleset>
The exact location of the plugin configuration data will vary depending on the plugin, but in general the
config.xml files are quite readable, and updating them by hand isn’t too hard.
So, all in all, migrating build jobs between Jenkins instances isn’t all that hard—you just need to know
a couple of tricks for the corner cases, and if you know where to look Jenkins provides some nice tools
to make the process smoother.
13.7. Conclusion
In this chapter, we looked at a number of considerations that you should be aware of if your job is to
maintain your Jenkins server, including how to monitor disk and server usage, how to back up your build
jobs and Jenkins configuration files, and also how to migrate build jobs and upgrade build data safely.

Appendix A. Automating Your Unit
and Integration Tests
A.1. Automating Your Tests with Maven
Maven is a popular open source build tool of the Java world, that makes use of practices such as
declarative dependencies, standard directories and build life cycles, and convention over configuration
to encourage clean, maintainable, high level build scripts. Test automation is strongly supported in
Maven. Maven projects use a standard directory structure: it will automatically look for unit tests in a
directory called (by default) src/test/java. There is little else to configure: just add a dependency
to the test framework (or frameworks) your tests are using, and Maven will automatically look for and
execute the JUnit, TestNG, or even Plain Old Java Objects (POJO) tests contained in this directory
structure.
In Maven, you run your unit tests by invoking the test life cycle phase, as shown here:
$ mvn test
[INFO] Scanning for projects...
[INFO] ------------------------------------------------------------------------
[INFO] Building Tweeter domain model
[INFO] task-segment: [test]
[INFO] ------------------------------------------------------------------------
...
-------------------------------------------------------
T E S T S
-------------------------------------------------------
Running com.wakaleo.training.tweeter.domain.TagTest
Tests run: 13, Failures: 0, Errors: 0, Skipped: 0, Time elapsed: 0.093 sec
Running com.wakaleo.training.tweeter.domain.TweeterTest
Tests run: 3, Failures: 0, Errors: 0, Skipped: 0, Time elapsed: 0.021 sec
Running com.wakaleo.training.tweeter.domain.TweeterUserTest
Tests run: 4, Failures: 0, Errors: 0, Skipped: 0, Time elapsed: 0.055 sec
Running com.wakaleo.training.tweeter.domain.TweetFeeRangeTest
Tests run: 10, Failures: 0, Errors: 0, Skipped: 0, Time elapsed: 0.051 sec
Running com.wakaleo.training.tweeter.domain.HamcrestTest
Tests run: 8, Failures: 0, Errors: 0, Skipped: 0, Time elapsed: 0.023 sec
Results :
Tests run: 38, Failures: 0, Errors: 0, Skipped: 0
In addition to executing your tests, and failing the build if any of the tests fail, Maven will produce a
set of test reports (again, by default) in the target/surefire-reports directory, in both XML and
text formats. For our CI purposes, it is the XML files that interest us, as Jenkins is able to understand
and analyze these files for its CI reporting:
$ ls target/surefire-reports/*.xml

362
target/surefire-reports/TEST-com.wakaleo.training.tweeter.domain.HamcrestTest.xml
target/surefire-reports/TEST-com.wakaleo.training.tweeter.domain.TagTest.xml
target/surefire-reports/TEST-com.wakaleo.training.tweeter.domain.TweetFeeRangeTest.xm
target/surefire-reports/TEST-com.wakaleo.training.tweeter.domain.TweeterTest.xml
target/surefire-reports/TEST-com.wakaleo.training.tweeter.domain.TweeterUserTest.xml
Maven defines two distinct testing phases: unit tests and integration tests. Unit tests should be fast and
lightweight, providing a large amount of test feedback in as little time as possible. Integration tests are
slower and more cumbersome, and often require the application to be built and deployed to a server
(even an embedded one) to carry out more complete tests. Both these sorts of tests are important, and for
a well-designed Continuous Integration environment, it is important to be able to distinguish between
them. The build should ensure that all of the unit tests are run initially—if a unit test fails, developers
should be notified very quickly. Only if all of the unit tests pass is it worthwhile undertaking the slower
and more heavyweight integration tests.
In Maven, integration tests are executed during the integration-test life cycle phase, which you
can invoke by running mvn integration-test or (more simply) mvn verify. During this phase,
it is easy to configure Maven to start up your web application on an embedded Jetty web server, or to
package and deploy your application to a test server, for example. Your integration tests can then be
executed against the running application. The tricky part however is telling Maven how to distinguish
between your unit tests and your integration tests, so that they will only be executed when a running
version of the application is available.
There are several ways to do this, but at the time of writing there is no official standard approach
used across all Maven projects. One simple strategy is to use naming conventions: all integration tests
might end in “IntegrationTest”, or be placed in a particular package. The following class uses one such
convention:
public class AccountIntegrationTest {
@Test
public void cashWithdrawalShouldDeductSumFromBalance() throws Exception {
Account account = new Account();
account.makeDeposit(100);
account.makeCashWithdraw(60);
assertThat(account.getBalance(), is(40));
}
}
In Maven, tests are configured via the maven-surefire-plugin plugin. To ensure that Maven only
runs these tests during the integration-test phase, you can configure this plugin as shown here:
<project>
...
<build>
<plugins>
<plugin>
<artifactId>maven-surefire-plugin</artifactId>

363
<configuration>
<skip>true</skip>❶
</configuration>
<executions>
<execution>❷
<id>unit-tests</id>
<phase>test</phase>
<goals>
<goal>test</goal>
</goals>
<configuration>
<skip>false</skip>
<excludes>
<exclude>**/*IntegrationTest.java</exclude>
</excludes>
</configuration>
</execution>
<execution>❸
<id>integration-tests</id>
<phase>integration-test</phase>
<goals>
<goal>test</goal>
</goals>
<configuration>
<skip>false</skip>
<includes>
<include>**/*IntegrationTest.java</include>
</includes>
</configuration>
</execution>
</executions>
</plugin>
...
❶Skip all tests by default—this deactivates the default Maven test configuration.
❷During the unit test phase, run the tests but exclude the integration tests.
❸During the integration test phase, run the tests but only include the integration tests.
This will ensure that the integration tests are skipped during the unit test phase, and only executed during
the integration test phase.
If you don’t want to put unwanted constraints on the names of your test classes, you can use package
names instead. In the project illustrated in Figure A.1, “A project containing freely-named test classes”,
all of the functional tests have been placed in a package called webtests. There is no constraint on the
names of the tests, but we are using Page Objects to model our application user interface, so we also
make sure that no classes in the pages package (underneath the webtests package) are treated as tests.
364
Figure A.1. A project containing freely-named test classes
In Maven, we could do this with the following configuration:
<plugin>
<artifactId>maven-surefire-plugin</artifactId>
<configuration>
<skip>true</skip>
</configuration>
<executions>
<execution>
<id>unit-tests</id>
<phase>test</phase>
<goals>
<goal>test</goal>
</goals>
<configuration>
<skip>false</skip>
<excludes>
<exclude>**/webtests/*.java</exclude>
</excludes>
</configuration>
</execution>
<execution>
<id>integration-tests</id>
<phase>integration-test</phase>
<goals>
<goal>test</goal>
</goals>
<configuration>
<skip>false</skip>
<includes>

365
<include>**/webtests/*.java</include>
</includes>
<excludes>
<exclude>**/pages/*.java</exclude>
</excludes>
</configuration>
</execution>
</executions>
</plugin>
TestNG currently has more flexible support for test groups than JUnit. If you are using TestNG, you
can identify your integration tests using TestNG Groups. In TestNG, test classes or test methods can be
tagged using the groups attribute of the @Test annotation, as shown here:
@Test(groups = { "integration-test" })
public void cashWithdrawalShouldDeductSumFromBalance() throws Exception {
Account account = new Account();
account.makeDeposit(100);
account.makeCashWithdraw(60);
assertThat(account.getBalance(), is(40));
}
Using Maven, you could ensure that these tests were only run during the integration test phase using
the following configuration:
<project>
...
<build>
<plugins>
<plugin>
<artifactId>maven-surefire-plugin</artifactId>
<configuration>
<skip>true</skip>
</configuration>
<executions>
<execution>
<id>unit-tests</id>
<phase>test</phase>
<goals>
<goal>test</goal>
</goals>
<configuration>
<skip>false</skip>
<excludedGroups>integration-tests</excludedGroups>❶
</configuration>
</execution>
<execution>
<id>integration-tests</id>
<phase>integration-test</phase>
<goals>
<goal>test</goal>
</goals>
<configuration>
<skip>false</skip>

366
<groups>integration-tests</groups>❷
</configuration>
</execution>
</executions>
</plugin>
...
❶Do not run the integration-tests group during the test phase.
❷Run only the tests in the integration-tests group during the integration-test phase.
It often makes good sense to run your tests in parallel where possible, as it can speed up your tests
significantly (see Section 6.9, “Help! My Tests Are Too Slow!”). Parallel tests are particularly intensive
with slow-running tests that use a lot of IO, disk or network access (such as web tests), which is
convenient, as these are precisely the sort of tests we usually want to speed up.
TestNG provides good support for parallel tests. For instance, using TestNG, you could configure your
test methods to run in parallel on ten concurrent threads like this:
<plugin>
<groupId>org.apache.maven.plugins</groupId>
<artifactId>maven-surefire-plugin</artifactId>
<version>2.5</version>
<configuration>
<parallel>methods</parallel>
<threadCount>10</threadCount>
</configuration>
</plugin>
As of JUnit 4.7, you can also run your JUnit tests in parallel using a similar configuration. In fact, the
configuration shown above will work for JUnit 4.7 onwards.
You can also set the <parallel> configuration item to classes instead of methods, which will try to
run the test classes in parallel, rather than each method. This might be slower or faster, depending on the
number of test classes you have, but might be safer for some test cases not designed with concurrency
in mind.
Mileage will vary, so you should experiment with the numbers to get the best results.
A.2. Automating Your Tests with Ant
Setting up automated testing in Ant is also relatively easy, though it requires a bit more plumbing than
with Maven. In particular, Ant does not come packaged with the JUnit libraries or Ant tasks out of the
box, so you have to install them somewhere yourself. The most portable approach is to use a Dependency
Management tool such as Ivy, or to place the corresponding JAR files in a directory within your project
structure.
To run your tests in Ant, you call the <junit> task. A typical Jenkins-friendly configuration is shown
in this example:

367
<property name="build.dir" value="target" />
<property name="java.classes" value="${build.dir}/classes" />
<property name="test.classes" value="${build.dir}/test-classes" />
<property name="test.reports" value="${build.dir}/test-reports" />
<property name="lib" value="${build.dir}/lib" />
<path id="test.classpath">❶
<pathelement location="/Users/johnsmart/Projects/Books/jenkins-the-definitive-guide/hudsonbook-content/tools/junit/*.jar" />
<pathelement location="${java.classes}" />
<pathelement location="${lib}" />
</path>
<target name="test" depends="test-compile">
<junit haltonfailure="no" failureproperty="failed">❷
<classpath>❸
<path refid="test.classpath" />
<pathelement location="${test.classes}" />
</classpath>
<formatter type="xml" />❹
<batchtest fork="yes" forkmode="perBatch"❺ todir="${test.reports}">
<fileset dir="${test.src}">❻
<include name="**/*Test*.java" />
</fileset>
</batchtest>
</junit>
<fail message="TEST FAILURE" if="failed" />❼
</target>
❶We need to set up a classpath containing the junit and junit-ant JAR files, as well as the
application classes and any other dependencies the application needs to compile and run.
❷The tests themselves are run here. The haltonfailure option is used to make the build fail
immediately if any tests fail. In a Continuous Integration environment, this is not exactly what we
want, as we need to get the results for any subsequent tests as well. So we set this value to no and
use the failureproperty option to force the build to fail once all of the tests have finished.
❸The classpath needs to contain the JUnit libraries, your application classes and their dependencies,
and your compiled test classes.
❹The Junit Ant task can produce both text and XML reports, but for Jenkins, we only need the
XML ones.
❺The fork option runs your tests in a separate JVM. This is generally a good idea, as it can avoid
classloader issues related to conflicts with Ant’s own libraries. However, the default behaviour of
the JUnit Ant task is to create a new JVM for each test, which slows down the tests significantly.
The perBatch option is better, as it only creates one new JVM for each batch of tests.
❻You define the tests you want to run in a fileset element. This provides a great deal of flexibility,
and makes it easy to define other targets for different subsets of tests (integration, web, and so on).
❼Force the build to fail after the tests have finished, if any of them failed.
If you prefer TestNG, Ant is of course well supported here as well. Using TestNG with the previous
example, you could do something like this:

368
<property name="build.dir" value="target" />
<property name="java.classes" value="${build.dir}/classes" />
<property name="test.classes" value="${build.dir}/test-classes" />
<property name="test.reports" value="${build.dir}/test-reports" />
<property name="lib" value="${build.dir}/lib" />
<path id="test.classpath">
<pathelement location="${java.classes}" />
<pathelement location="${lib}" />
</path>
<taskdef resource="testngtasks" classpath="lib/testng.jar"/>
<target name="test" depends="test-compile">
<testng classpathref="test.classpath"
outputDir="${testng.report.dir}"
haltonfailure="no"
failureproperty="failed">
<classfileset dir="${test.classes}">
<include name="**/*Test*.class" />
</classfileset>
</testng>
<fail message="TEST FAILURE" if="failed" />
</target>
TestNG is a very flexible testing library, and the TestNG task has many more options than this. For
example, to only run tests defined as part of the “integration-test” group that we saw earlier, we could
do this:
<target name="integration-test" depends="test-compile">
<testng classpathref="test.classpath"
groups="integration-test"
outputDir="${testng.report.dir}"
haltonfailure="no"
failureproperty="failed">
<classfileset dir="${test.classes}">
<include name="**/*Test*.class" />
</classfileset>
</testng>
<fail message="TEST FAILURE" if="failed" />
</target>
Or to run your tests in parallel, using four concurrent threads, you could do this:
<target name="integration-test" depends="test-compile">
<testng classpathref="test.classpath"
parallel="true"
threadCount=4
outputDir="${testng.report.dir}"
haltonfailure="no"
failureproperty="failed">
<classfileset dir="${test.classes}">
<include name="**/*Test*.class" />

369
</classfileset>
</testng>
<fail message="TEST FAILURE" if="failed" />
</target>

Index
A
acceptance tests, automated, 6, 137, 157-160
Acceptance-Test Driven Development, 6
active (push) notifications, 197
Active Directory, Microsoft, as security realm,
178
administrator
for Jenkins internal user database, 173
for matrix-based security, 183
aggregate test results, 300-301
Amazon EC2 cloud computing service, 318-322
Amazon EC2 plugin, 320
Amazon Machine Image (AMI), 319
Amazon Web Services (AWS), 319
AMI (Amazon Machine Image), 319
analysis (see code coverage metrics; code quality
metrics; tests)
Ant, 76-76
automating tests, 366-368
code coverage metrics with Cobertura, 149-151
code quality metrics
with Checkstyle, 230
with CodeNarc, 238
with FindBugs, 236
with PMD and CPD, 233
configuring, 76-76
environment variables, accessing from, 110
in freestyle build steps, 107-107
installing, 76
ANT_OPTS environment variable, 56
application server
automated deployment to, 330-341
Java applications, 330-339
scripting-based applications, 339-341
deploying Jenkins to, 16, 55-56
upgrading Jenkins on, 65
archives of binary artifacts, 26
deploying to Enterprise Repository Manager,
122-126
disabling, 121
in freestyle build jobs, 114-117
archiving build jobs, 355-356
Artifactory
Enterprise Repository Manager, 124, 125
Jenkins support for, 5
Artifactory plugin, 280
artifacts (see binary artifacts)
Atlassian Crowd, as security realm, 180-181
Audit Trail plugin, 192-193
auditing user actions, 191-194
authorization, 171, 171
(see also security)
matrix-based security, 183-187
no restrictions on, 172-173
project-based security, 187-189
role-based security, 189-191
automated deployment, 325-329
to application server, 330-341
database updates with, 326-329
deployment script for, 326
rolling back changes in, 329
smoke tests for, 329
automated nightly builds, 5
automated tests (see tests)
AWS (Amazon Web Services), 319
B
Backup plugin, 353
backups, 64, 351-355
batch scripts, 77, 107-108
BDD (Behavior-Driven Development), 137
BDD (Behaviour Driven Development), 158
binary artifacts
archiving, 26
deploying to Enterprise Repository
Manager, 122-126
disabling, 121
in freestyle build jobs, 114-117
reusing in build pipeline, 289-292
Boolean parameters, 261
build agents
configuring for multiple JDK versions, 73

372
monitoring, 317
build history
in builds directory, 62-64
details regarding, 30-32
disk usage of, 345-349
number of builds to keep, 83
parameterized, 265
permissions for, 186
results summary for, 27, 30
build jobs, 81, 81
(see also freestyle build jobs; Maven build jobs)
archiving, 355-356
binary artifacts from (see binary artifacts)
code coverage metrics in (see code coverage
metrics)
code quality metrics in (see code quality
metrics)
copying, 82
creating, 21-26, 81-82
delaying start of, 71
dependencies between, 282
distributed across build servers, 305-305
associating slave nodes to jobs, 315-317
cloud-based build farm for, 318-322
creating slave nodes, 306
master/slave architecture for, 305-315
monitoring slave nodes, 317
starting slave nodes, 306-315
external, monitoring, 81
failed
claiming, 202
details regarding, 141-143
example of, 28-32
indicator for, 28, 30
notifications for, 197, 200
global properties for, 71-72
history of (see build history)
Javadocs generation in, 33-34
joins in, 283-284
locking resources for, 284-285
migrating, 356-359
multiconfiguration, 268-274
combination filter for, 272
configuration matrix for, 272
creating, 268-269
custom axis for, 271
JDK axis for, 270
running, 271-274
slave axis for, 269-270
naming, 22
parameterized, 257-265
build scripts for, 259-260
creating, 257
history of, 265
run against a Git tag, 263-264
run against a Subversion tag, 262-263
starting remotely, 264-265
types of parameters, 258, 261-262
reports resulting from (see reporting)
run numbers for, as parameters, 261
running in parallel, 282-285
scheduling (see build triggers)
source code location for, 23
status of, while running, 26
steps in, adding, 25-26, 33, 36
success of, indicator for, 28
tests in (see tests)
triggering manually, 26, 27, 105
types of, 22, 81
unstable build from, 141
criteria for, 115, 154, 242, 246
indicator for, 37
notifications for, 118, 197, 200
triggering another build after, 101, 118
Build Pipeline plugin, 301
build pipelines, 285-304
aggregating test results for, 300-301
deployment pipelines from, 301-304
Maven version numbers for, 286-288
promotions in, 286, 292-300
reusing artifacts in, 289-292
Build Promotion plugin, 330
build radiators, 204-205
build scripts (see scripts)
build server, 5
installing Jenkins on, 46-47

373
memory requirements for, 46
monitoring load of, 349-350
multiple, running builds on (see distributed
builds)
processor requirements for, 46
upgrading, 168
virtual machine for, 46, 168
build tools, configuring, 74-77
build triggers
configuring, 24-25
for freestyle build jobs, 100-105
manual, 26, 27, 105
parameterized, 265-267
polling SCM for version control changes, 102
at regular intervals, 101-102
remotely triggering from version control
system, 103-104
when another build has finished, 101
BUILD_ID environment variable, 109
BUILD_NUMBER environment variable, 109
BUILD_TAG environment variable, 109
BUILD_URL environment variable, 109
builds directory, 62-64
C
CAS (Central Authentication Service), 181
Checkstyle, 229-232, 245
Checkstyle plugin, 245
CI (Continuous Integration), 1-2, 5-7
claiming failed builds, 202
cloud computing, for builds, 168, 318-322
CloudBees (sponsor), xxvii
Clover, 156-157
Clover plugin, 156
Cobertura, 35-41, 147-156
with Ant, 149-151
configuring in build jobs, 152-154
with Maven, 147-149
reports from, 154-156
Cobertura plugin, 151
code complexity, 248-249
code coverage metrics, 6, 146-157
with Clover, 156-157
with Cobertura, 35-41, 147-156
software for, 146
code examples, using, xxviii
code quality metrics, 6, 227-228
in build jobs, 228
with Checkstyle, 229-232, 245
code complexity, 248-249
with CodeNarc, 238-239
with CPD, 232-236
with FindBugs, 236-238, 245
with IDE, 228
open tasks, 249-250
plugins for, 227
with PMD, 232-236, 245
software for, 228, 229
with Sonar, 227, 251-254
with Violations plugin, 239-245
code reviews, 227
CodeNarc, 238-239
coding standards, 227
commit messages, excluding from triggering build
jobs, 88
config.xml file, 62
configuration, 17-21, 67-70
Ant, 76-76
build tools, 74-77
Configure System screen, 68, 70-71
CVS, 77
email server, 78-78
Git, 20-21
global properties, 71-72
JDK, 19, 72-74
Load Statistics screen, 69
Manage Nodes screen, 69
Manage Plugins screen, 69
Maven, 18-19, 74-75
notifications, 20
Prepare for Shut down screen, 69
proxy, 79-80
quiet period before build starts, 71
Reload Configuration from Disk screen, 68
Script Console, 69
Subversion, 77

374
System Information screen, 69
System Log screen, 69
system message on home page, 71
version control systems, 77-77
Configure System screen, 68, 70-71
contact information for this book, xxix
continuous delivery, 2
continuous deployment, 2, 6, 325-329
to application server, 330-341
database updates with, 326-329
deployment script for, 326
rolling back changes in, 329
smoke tests for, 329
Continuous Integration (see CI)
contributors for this book, xxv
conventions used in this book, xxiv
Copy Artifact plugin, 289, 330, 333
Coverage Complexity Scatter Plot plugin, 248
CPD, 232-236
CppUnit, 138
CPUs, build server requirements for, 46
cron jobs (see external jobs)
Crowd, Atlassian, as security realm, 180
CVS
configuring, 77
delaying build jobs, 71, 84
Jenkins supporting, 20
polling with, 103
CVS_BRANCH environment variable, 110
D
database
rolling back changes to, 329
updating with automated deployment, 326-329
user database, 172, 173-176
Dependency Graph View plugin, 282
Deploy plugin, 330, 331-332, 333
Deploy Websphere plugin, 330, 331
deployment (see automated deployment;
continuous deployment)
deployment pipelines, 301-304
deployment script, 326
desktop notifiers, 214-219
disk space
for build directory, 63
monitoring, 345-349
Disk Usage plugin, 346-347
distributed builds, 47, 305-305
with cloud-based build farm, 318-322
master/slave architecture for, 305-315
slave nodes for
associating with build jobs, 315-317
creating, 306
installing as Windows service, 313-314
monitoring, 317
starting as remote service, 315
starting in headless mode, 314
starting using SSH, 306-310
starting with Java Web Start, 310-313
DocLinks plugin, 160
documentation (see Javadocs)
E
Eclipse
code quality metrics with Checkstyle, 229
code quality metrics with PMD, 232
desktop notifiers with, 214
Eclipse plugin, 214
email notifications, 20, 175, 197-202, 202
(see also notifications)
email server, configuring, 78-78
Email-ext plugin, 199-202
Enterprise Repository Manager, 122-126
environment variables, 109
(see also specific environment variables)
build parameters as, 259
using in build steps, 109-111
Eucalyptus cloud, 319
EXECUTOR_NUMBER environment variable,
109
Extended Read Permission plugin, 189
external jobs, monitoring, 81
F
File parameters, 262

375
FindBugs, 236-238, 245
FindBugs plugin, 245
fingerprints, 296, 301
fingerprints directory, 60
fonts used in this book, xxiv
freestyle build jobs, 22, 81, 82-85
archiving binary artifacts, 114-117
blocking for upstream projects, 84
build history for, number of builds to keep, 83
build steps in, 105-113
Ant build scripts, 107-107
batch scripts, 107-108
environment variables in, 109-111
Groovy scripts, 111-112
Maven build steps, 25, 105-107
shell scripts, 107-108
build triggers for, 100-105
code quality metrics in, with Violations, 240-
242
creating, 22-26
delaying start of, 84
description of, for project home page, 83
disabling, 84
failed, 142
generating automatically, 281
Git used with, 88-100
branches to build, 90, 95
build triggers, 96-98
checking out to local branch, 93
cleaning after checkout, 94
commit author, including in changelog, 94
excluding regions from triggering, 92
excluding users from triggering, 93
Git executable, specifying, 95
merging before build, 94
post-build merging and pushing actions, 98-
99
pruning branches before build, 94
recursively update submodules, 94
repository address, 90
source code browsers for, 96
SSH keys, 89
workspace location, overriding, 94
workspace, wiping out before build, 94
Gradle projects in, 129-132
Grails projects in, 127-129
naming, 83
NAnt build scripts in, 133
.NET projects in, 132-133
notifications sent after, 117-118
post-build actions, 113-118, 139
reporting on test results, 113-114, 139
Ruby and Ruby on Rails projects in, 134-135
running, 118
starting other build jobs in, 118
Subversion used with, 86-88
excluding commit messages from
triggering, 88
excluding regions from triggering, 87
excluding users from triggering, 88
source code browsers for, 87
workspace for, overriding, 85
functional (regression) tests, 138, 138
number of, 169
performance of, 168
running in parallel, 169
G
Game of Life example application, 22-39
Gerrit Trigger plugin, 97
Git, 9
branches to build, 90, 95
build triggers, 96-98
checking out to local branch, 93
cleaning after checkout, 94
commit author, including in changelog, 94
excluding regions from triggering builds, 92
excluding users from triggering builds, 93
with freestyle build jobs, 88-100
installing, 11
merging before build, 94
post-build merging and pushing actions, 98-99
pruning branches before build, 94
recursively update submodules, 94
repository address, 90
source code browsers for, 96

376
SSH keys, 89
tags, building against, 263-264
workspace location, overriding, 94
workspace, wiping out before build, 94
Git plugin, 20-21, 89-89
GitHub plugin, 99
GitHub project, 4
GitHub repository, 9, 96, 99
account for, setting up, 11
cloning a local copy of, 12
forking, 12-13
GlassFish application server, deploying Java
applications to, 330-339
GlassFish Servlet container, 179
global properties, 71-72
Gmail, configuring, 78
Goldin, Evgeny (contributor), xxv
Gradle
builds in, running with Jenkins, 129-132
code quality metrics
with Checkstyle, 232
with CodeNarc, 238
Jenkins support for, 5
Grails
builds in, running with Jenkins, 127-129
code quality metrics with CodeNarc, 238
Groeschke, Rene (contributor), xxvi
Groovy scripts
authentication script, 182-183
code quality metrics with CodeNarc, 238-239
environment variables in, 111
running in build jobs, 111-112
running on Script Console, 69
groups
Active Directory, 178, 179
Atlassian Crowd, 181
LDAP, 177
Unix, 179
H
headless mode, starting slave nodes in, 314
Hibernate, database updates with, 326
home directory for Jenkins, 47-48, 60-64, 70
home page, 16, 71
hot-deploy, 330, 332
HTML Publisher plugin, 158-160
HTTP proxy server, 79
Hudson, xxiii, 2, 3, 4
(see also Jenkins)
HUDSON_HOME environment variable, 48
HUDSON_URL environment variable, 109
I
IDE, code quality metrics with, 228
IM (see instant messaging)
information radiators, 204-205
installation
Ant, 76
Git, 11
JDK, 73
Jenkins, 43-45
from binary distribution, 44
on build server, 46-47
on CentOS, 49-50
on Debian, 48-49
on Fedora, 49-50
with Java Web start, 14-15
on Linux, 44
on OpenSUSE, 50-51
on Redhat, 49-50
on SUSE, 50-51
on Ubuntu, 48-49
on Unix, 44
from WAR file, 16, 43
on Windows, 43, 44
as Windows service, 56-60
JRE, 10
Maven, 18-19, 75
plugins, 35, 35
(see also specific plugins)
upgrading, 64-65
instant messaging (IM), 206-211
IRC for, 210-213
Jabber protocol for, 206-210
Instant Messaging plugin, 206
integration tests, 137, 138

377
number of, 169
performance of, 168
IRC (Internet Relay Chat), 210-213
IRC plugin, 211, 211
J
Jabber Notifier plugin, 206
Jabber protocol, 206-210
Java applications
deploying from Maven repository, 336-339
deploying to application server, 330-339
redeploying a specific version, 332
redeploying from previous build, 333-336
test reports from, 140
Java Development Kit (see JDK)
Java Runtime Environment (JRE), installing, 10
Java version installed, checking, 43
Java Web Start
installing and starting Jenkins using, 14-15
starting slave nodes using, 310-313
JAVA_ARGS parameter, 49
JAVA_HOME environment variable, 73, 109
JAVA_OPTS environment variable, 56
Javadocs, 33-34
JBoss application server, deploying Java
applications to, 330-339
JDK (Java Development Kit), 9
configuring, 19
configuring multiple versions of, 72-74
installing, 73
requirements for, 43
versions of, for multiconfiguration build jobs,
270
JEE applications (see Java applications)
Jenkins, 2-4
community for, 4
configuring (see configuration)
CVS supported by, 20
dedicated user for, 47
environment, requirements for, 9-13
help icons in, 18
history of, xxiii, 3-4
home directory for, 47-48, 60-64, 70
home page for, 16, 71
installing (see installation)
Java requirements for, 43
maintenance of, 345-359
archiving build jobs, 355-356
backups, 64, 351-355
migrating build jobs, 356-359
monitoring disk space, 345-349
monitoring server load, 349-350
memory requirements for, 46, 56-56
as Open Source project, 4
port running on, 44, 45
rapid release cycle of, 4
reasons to use, 4
running
on Apache server, 54-55
from application server, 16, 55-56
from command line, 16, 45
from Java Web Start, 14
as stand-alone application, 51-54
stopping, 15
upgrading, 64-65
version control systems supported by, 20, 23,
85
Jenkins Console, 15
Jenkins M2 Extra Steps plugin, 127
JENKINS_HOME environment variable, 48-48,
70
JENKINS_JAVA_CMD parameter, 50
JENKINS_JAVA_OPTIONS parameter, 50
JENKINS_PORT parameter, 50
JMeter, 160-167
JOB_NAME environment variable, 109
JOB_URL environment variable, 109
JobConfigHistory plugin, 193-194
jobs directory, 60-64
joins, in build jobs, 283-284
JRE (Java Runtime Environment), installing, 10
JUnit reports, 138
for acceptance tests, 158
configuring in freestyle build job, 26, 140
format for, 25

378
K
Kawaguchi, Kohsuke (developer of Hudson), 3
L
LDAP repository, as security realm, 176-177
LDAP/Active Directory, 4
lightweight backups, 354
Linux, 48
(see also specific Linux platforms)
upgrading Jenkins on, 64
Liquibase, 327-329
Load Statistics screen, 69
locking resources for build jobs, 284-285
Locks and Latches plugin, 285
LTS (Long-Term Support) releases, 3
M
M2Eclipse, 5
mail server, configuring, 78-78
maintenance, 345-359
archiving build jobs, 355-356
backups, 64, 351-355
migrating build jobs, 356-359
monitoring disk space, 345-349
monitoring server load, 349-350
Manage Jenkins screen, 17, 67-70
Manage Nodes screen, 69
Manage Plugins screen, 69
master/slave architecture for distributed builds,
305-315
matrix build jobs (see multiconfiguration build
jobs)
matrix-based security, 183-187
Maven, 9
automating tests, 361-366
build steps in freestyle build jobs, 25, 105-107
Cobertura with, 147-149
code quality metrics
with Checkstyle, 231
with CodeNarc, 238
with FindBugs, 237
with PMD and CPD, 234
configuring, 18-19, 74-75
environment variables in, 110
Hudson support for, 5
installing, 18-19, 75
SNAPSHOT dependencies, 105, 119-120
SNAPSHOT versions, 88
version numbers for, 286-288
Maven build jobs, 22, 81, 118-127
archiving binary artifacts, disabling, 121
build steps in, 120, 127
code quality metrics in, with Violations, 243-
245
creating, 119
deploying artifacts to Enterprise Repository
Manager, 122-126
disk usage of, 348-349
generating automatically, 274-281
Artifactory plugin with, 280
configuring, 275-277
inheritance of configuration, 277-278
Parameterized Trigger plugin with, 279
incremental builds, 121
modules for, managing, 126
Post-build Actions, 121
private repository for, 121
reporting on test results, 139
running modules in parallel, 121
test results of, 141
Maven Jenkins plugin, 275, 281
Maven Release plugin, 286
MAVEN_OPTS environment variable, 56
McCullough, Matthew (contributor), xxv
memory, requirements for, 46, 56-56
metrics (see reporting)
Microsoft Active Directory, as security realm,
178-179
migrating build jobs, 356-359
mobile devices, notifications to, 219
MSBuild plugin, 132
MSTest plugin, 133
multiconfiguration build jobs, 81, 268-274
combination filter for, 272
configuration matrix for, 272

379
creating, 268-269
custom axis for, 271
JDK axis for, 270
running, 271-274
slave axis for, 269-270
N
Nabaztag plugin, 225
NAnt build scripts, 133
NAnt plugin, 133
.NET projects, 132-133
Nexus
Enterprise Repository Manager, 125, 288
Hudson support for, 5
nightly builds (see automated nightly builds)
NODE_LABELS environment variable, 109
NODE_NAME environment variable, 109
notifications, 197
active (push) notifications, 197
build radiators, 204-205
configuring, 20
desktop notifiers, 214-219
email, 175, 197-202
from freestyle build job, 117-118
instant messaging, 206-211
to mobile devices, 219
using Nabaztag, 224
passive (pull), 197
RSS feeds, 203-204
to smartphones, 217-220
SMS messages, 220-221
sounds in, 222
spoken, 223
Notifo, 217-219
NTLM proxy authentication, 79
NUnit, 138
O
Odd-e (sponsor), xxvii
open tasks, reporting on, 249-250
P
P environment variable, 182
parameterized build jobs, 257-265, 268
(see also multiconfiguration build jobs)
build scripts for, 259-260
creating, 257
history of, 265
run against a Git tag, 263-264
run against a Subversion tag, 262-263
starting remotely, 264-265
types of parameters, 258, 261-262
Parameterized Build plugin, 257
Parameterized Trigger plugin, 265, 279, 333
parameterized triggers, 265-267
passive (pull) notifications, 197
Password parameters, 261
performance
of code coverage analysis, 146
of application, 160-167
of tests, 143-144, 168-170
permissions (see authorization)
PHP applications, deploying to application server,
339-341
PHPUnit, 138
pipelines (see build pipelines)
plugins
Active Directory, 178
Amazon EC2, 320
architecture of, Jenkins compared to Hudson, 5
Artifactory, 124, 280
Audit Trail, 192-193
Backup, 353
Build Pipeline, 301
Build Promotion, 330
CAS, 181
Checkstyle, 245
Clover, 156
Cobertura, 151
Copy Artifact, 289, 330, 333
Coverage Complexity Scatter Plot, 248
Crowd, for Atlassian Crowd, 180
Dependency Graph View, 282

380
Deploy, 330, 331-332, 333
Deploy Websphere, 330, 331
Disk Usage, 346-347
DocLinks, 160
Eclipse, 214
Email-ext, 199-202
Extended Read Permission, 189
FindBugs, 245
Gerrit Trigger, 97
Git, 20-21, 89-89
GitHub, 99
HTML Publisher, 158-160
installing, 35-36
Instant Messaging, 206
IRC, 211, 211
Jabber Notifier, 206
Jenkins M2 Extra Steps, 127
JobConfigHistory, 193-194
Locks and Latches, 285
managing, 69
Maven Jenkins, 275, 281
Maven Release, 286
MSBuild, 132
MSTest, 133
Nabaztag, 225
NAnt, 133
Parameterized Build, 257
Parameterized Trigger, 265, 279, 333
PMD, 245
Promoted Builds, 292
Publish Over, 340
Role Strategy, 189
Script Security Realm, 181-183
SFEE, 181
Sounds, 222
Speaks, 223
Task Scanners, 249
Thin Backup, 354
Tray Application plugin, 215-217
upgrading, 65
Violations, 239-245
xUnit, 140
plugins directory, 60
PMD, 232-236, 245
PMD plugin, 245
Prepare for Shutdown screen, 69
processors, build server requirements for, 46
project-based security, 187-189
project-level permissions, in role-based security,
190
Promoted Builds plugin, 292
promotions, 286, 292-300
properties
build parameters as, 260
global, 71-72
proxy, configuring, 79-80
Publish Over plugins, 340
Q
quiet period before build starts, 71, 84
R
radiators, information, 204-205
regression tests (see functional (regression) tests)
Reload Configuration from Disk screen, 68
remote service, starting slave nodes as, 315
reporting
acceptance test results, 158-160
code coverage metrics, 6, 35-41
from Clover, 157
from Cobertura, 154-156
code quality metrics, 6
with Checkstyle, 245
with FindBugs, 245
open tasks, 249-250
with PMD, 245
Violations plugin for, 239-245
Javadocs API documentation, 33-34
performance test results, 165-167
test results, 30-32
aggregating, 300-301
configuring, 139-140
displaying, 141-144
JUnit reports, 25, 113-114
in RSS feeds, 203-204

381
Role Strategy plugin, 189
role-based security, 189-191
RSS feeds, of build results, 203-204
Ruby applications, 134-135, 339-341
Ruby on Rails projects, 134-135, 326
Run parameters, 261
S
SCM (Source Code Management), 23, 85-100
(see also version control systems)
Script Console screen, 69
Script Security Realm plugin, 181-183
scripting-based applications, deploying to
application server, 339-341
scripts, 107
(see also Ant; Maven)
batch scripts, 77, 107-108
custom authentication scripts, 181
deployment script, 326
Groovy scripts, 111-112
languages supported, 113
parameterized, 259-260
shell scripts, 77, 107-108
security, 171-173
authorization, 171
matrix-based security, 183-187
no restrictions on, 172-173
project-based security, 187-189
role-based security, 189-191
enabling, 171
security realms, 171
Atlassian Crowd, 180-181
CAS, 181
customizing, 181-183
enabling sign-ups, 172
enabling user sign-ups, 174
Jenkins internal user database, 172, 173-176
LDAP repository, 176-177
Microsoft Active Directory, 178-179
Servlet container, 179
SFEE, 181
Unix users and groups, 179
Servlet container
as security realm, 179
running Jenkins stand-alone using, 51
SFEE (Source Forge Enterprise Edition), 181
shell scripts, 77, 107-108
slave machines
for distributed builds, 47, 305-315
for multiconfiguration build jobs, 269-270
smartphones, notifications to, 217-219
smoke tests, 329
SMS messages, notifications using, 220-221
SNAPSHOT dependencies, 105, 119-120
SNAPSHOT versions, 88
Sonar
code quality metrics with, 227, 251-254
frequency of builds, 101
Sonatype tools, 4, 4
Sounds plugin, 222
sounds, in notifications, 222
source code browsers
with Git, 96
with Subversion, 87
Source Code Management (see SCM; version
control systems)
Source Forge Enterprise Edition (see SFEE)
Speaks plugin, 223
sponsors for this book, xxvi
SSH keys, 12, 89
SSH, starting slave node using, 306-310
stand-alone application
running Jenkins as, 51-54
upgrading Jenkins as, 64
start page (see home page)
String parameters, 258
Subversion
configuring, 77
excluding commit messages from triggering
builds, 88
excluding regions from triggering builds, 87
excluding users from triggering builds, 88
with freestyle build jobs, 86-88
Jenkins supporting, 20
source code browsers for, 87
tags, building against, 262-263

382
SVN_REVISION environment variable, 110
System Information screen, 69
System Log screen, 69
T
Task Scanners plugin, 249
TDD (Test Driven Development), 137
Test Result Trend graph, 31
Test-Driven development, 6
Test::Unit, 138
TestNG, 138, 140, 145
tests
acceptance tests, 6, 137, 157-160
automating, 5, 6, 137-138
with Ant, 366-368
with Maven, 361-366
in freestyle build jobs, 139
functional (regression) tests, 138, 138
ignoring, 144-146
integration tests, 137, 138
in Maven build jobs, 139
performance of, 143-144, 168-170
performance tests, 160-167
reports from, 30-32
aggregating, 300-301
configuring, 139-140
displaying, 141-144
JUnit reports, 25, 113-114
smoke tests, 329
Test-Driven development, 6
unit tests, 137, 138
web tests, 138, 138
Thin Backup plugin, 354
Tomcat application server
deploying Java applications to, 330-339
deploying Jenkins using, 16
Tomcat Servlet container, 179
Tray Application plugin, 215-217
U
U environment variable, 182
Ubuntu Enterprise Cloud, 320
unit tests, 137, 138
Unix, 44
(see also specific Unix platforms)
users and groups, as security realm, 179
unstable builds, 141
criteria for, 115, 154, 242, 246
indicator for, 37
notifications for, 118, 197, 200
triggering another build job after, 101, 118
updates directory, 60
upgrades, 64-65
user database, 172, 172, 173-176
(see also security, security realms)
userContent directory, 61
users
administrator
for Jenkins internal user database, 173
for matrix-based security, 183
auditing actions of, 191-194
authorization for (see authorization)
claiming failed builds, 202
excluding from triggering builds, 88, 93
for Jenkins, on build server, 47
users directory, 61
V
version control systems, 9, 77
(see also CVS; Git; Subversion)
configuring, 23, 77-77
polling for changes to trigger build, 102
remotely triggering builds from, 103-104
supported by Jenkins, 77-77, 85
version numbers, Maven, 286-288
Violations plugin, 239-245
virtual machine, for build server, 46, 168
Visual Studio MSBuild, 132-133
W
Wakaleo Consulting (sponsor), xxvi
war directory, 61
WAR file, installing Jenkins from, 16
web tests, 138, 138

383
WebSphere Application Server, 330, 331
Windows
installation package for Jenkins, 43
Windows services
installing Jenkins as, 56-60
installing slave node as, 313-314
starting slave nodes as, 315
WMI (Windows Management Instrumentation),
315
workspace directory, 62
WORKSPACE environment variable, 109
X
XML format for test reports (see JUnit reports)
Xu, Juven (contributor), xxvi
xUnit, 138, 140
xUnit plugin, 140

Colophon
The animal on the cover of Jenkins: The Definitive Guide is an ornate chorus frog (Pseudacris ornata).
These small amphibians, only 1–1.5 inches long, can be found on the coastal plains of North America
from North Carolina to central Florida and eastern Louisiana. They prefer areas of shallow water without
dense vegetation, such as ponds, roadside ditches, and flooded meadows.
The coloration of ornate chorus frogs varies depending on locale, and individuals can be predominantly
black, white, brown, red, green, or some variation thereof. All specimens, though, display a dark stripe
or collection of spots running from the nostril to the shoulder through the eye, and most have various
other spots or stripes as well. The species breeds from November to March, and the calls of males can
be heard from in or near areas of shallow water.
Ornate chorus frogs also owe their name to the sound of their mating call: Pseudacris comes from the
ancient Greek for “false locust.” The name was assigned in 1836 by American naturalist John Edwards
Holbrook after he observed that the rapid shrill sound resembled that made by the infamous insect.
The cover image is from Cassell’s Natural History. The cover font is Adobe ITC Garamond. The text
font is Linotype Birka; the heading font is Adobe Myriad Condensed; and the code font is LucasFont’s
TheSansMonoCondensed.
