The Lightning Experience Guide
User Manual:
Open the PDF directly: View PDF ![]() .
.
Page Count: 147 [warning: Documents this large are best viewed by clicking the View PDF Link!]
- Welcome to Lightning Experience
- What's New in Lightning Experience
- Navigation and Setup in Lightning Experience
- Opportunities, Leads, and Selling in Lightning Experience
- Explore More of Lightning Experience
- Reports and Dashboards in Lightning Experience
- Report and Dashboard Home Pages
- Create Beautiful Dashboards Using a New, Feature-Rich Editor
- Present and Share Information in Interactive Dashboards
- Get More Information from Interactive Charts and Filters on the New Report Run Page
- Reports and Dashboards: Compatibility Between Lightning Experience and Salesforce Classic
- How Your Existing Customizations Affect Lightning Experience
- Roll Out Lightning Experience
- Welcome to Your Lightning Experience Rollout
- What It Takes to Go Live
- Educate Yourself About Lightning Experience
- Getting Hands-On with Lightning Experience
- Identify Stakeholders and an Executive Sponsor
- Educate Your Company About Lightning Experience
- How to Demonstrate Lightning Experience
- Revisit Your Processes
- Perform a Gap Analysis
- Present Your Findings
- When the Show Is a Go
- All Systems Go
- Where to Start
- Plan Your Rollout
- Decide Who Gets Lightning Experience
- Unleash the Power of Super Users
- Create a Chatter Group for the Rollout Team
- Pick a Launch Date
- Create a Project Schedule
- Define Measures for Success
- Create a Marketing and Communication Strategy
- Create a Training Plan
- Test Your Customizations and Iterate
- Ready to Start
- Go Live
- Welcome to Your Lightning Experience Rollout
- Lightning Experience Development
- Visualforce & Lightning Experience
- Using Visualforce in Lightning Experience
- Developing Visualforce Pages for Lightning Experience
- Exploring the Visualforce App Container
- Sharing Visualforce Pages Between Classic and Lightning Experience
- Managing Navigation
- Understanding Important Visual Design Considerations
- Knowing Which Features to Avoid in Lightning Experience
- Lightning Experience Header and Navigation Menu Can’t Be Suppressed
- Salesforce Classic Header and Sidebar are Always Suppressed
- Page Title Can’t Be Set
- <apex:relatedList> and Blacklisted Related Lists
- Avoid <apex:iframe>
- No, Really, Don’t Set window.location Directly
- sforce.one Is No Longer Salesforce1-Only
- Changes With Action Overrides
- Home Page Doesn’t Support Visualforce
- Visualforce Tabs and Apps Can’t Be Added to Lightning Experience Navigation Menu
- Index
© Copyright 2000–2015 salesforce.com, inc. All rights reserved. Salesforce is a registered trademark of salesforce.com, inc.,
as are other names and marks. Other marks appearing herein may be trademarks of their respective owners.

CONTENTS
WELCOME TO LIGHTNING EXPERIENCE ..............................1
Chapter 1: What Your Sales Reps Need ....................................1
Welcome to Lightning Experience ...........................................2
What About the Previous User Experience? ....................................3
Chapter 2: What Makes Lightning Experience So Special .......................5
Take a Tour of Lightning Experience .........................................6
So How Do I Decide if Lightning Experience is Right for Me? .........................10
Chapter 3: Understanding Lightning Experience and Salesforce Classic ...........12
Comparing Lightning Experience and Salesforce Classic ...........................13
But What About Visualforce and Apex? ......................................18
How to Assess the Impact ...............................................18
Chapter 4: Enabling Lightning Experience .................................19
Get Your Org Ready for Lightning Experience ..................................20
Set Up Users for Lightning Experience .......................................20
Turn Lightning Experience On! .............................................21
Switching Between Lightning Experience and Salesforce Classic ......................21
WHAT'S NEW IN LIGHTNING EXPERIENCE ...........................23
Chapter 5: Navigation and Setup in Lightning Experience .....................23
The Lightning Experience Navigation Menu ...................................24
The App Launcher in Lightning Experience ....................................24
Meet the New and Improved Setup .........................................26
Object Manager .....................................................30
Global Search .......................................................31
Lightning Experience Help Menu ..........................................33
Chapter 6: Opportunities, Leads, and Selling in Lightning Experience .............34
Explore the Opportunity Workspace ........................................35
Opportunity Home ....................................................37
Explore the Lead Workspace .............................................38
Chapter 7: Explore More of Lightning Experience ............................40
The Home Page ......................................................41
Object Home and List Views .............................................42
Accounts, Contacts, and Other Objects ......................................43
User Profile .........................................................46
Tasks, Calendar, and Events .............................................46
Feeds in Lightning Experience ............................................48
Chapter 8: Reports and Dashboards in Lightning Experience ...................50
Report and Dashboard Home Pages ........................................51
Create Beautiful Dashboards Using a New, Feature-Rich Editor ......................51
Present and Share Information in Interactive Dashboards ..........................52
Get More Information from Interactive Charts and Filters on the New Report Run Page ......53
Reports and Dashboards: Compatibility Between Lightning Experience and Salesforce
Classic ............................................................56
HOW YOUR EXISTING CUSTOMIZATIONS AFFECT LIGHTNING
EXPERIENCE ......................................................58
Chapter 9: Your Layouts Can Customize Lightning Experience Records ...........58
Page Layouts in Lightning Experience .......................................59
Compact Layouts in Lightning Experience .....................................60
Chapter 10: Actions and Lightning Experience ..............................62
Actions in Lightning Experience ...........................................63
How Actions Are Ordered in Lightning Experience ...............................66
ROLL OUT LIGHTNING EXPERIENCE .................................67
Chapter 11: Welcome to Your Lightning Experience Rollout .....................67
What It Takes to Go Live .................................................68
Educate Yourself About Lightning Experience ..................................68
Getting Hands-On with Lightning Experience ..................................69
Identify Stakeholders and an Executive Sponsor ................................69
Educate Your Company About Lightning Experience .............................70
How to Demonstrate Lightning Experience ....................................70
Revisit Your Processes ..................................................70
Perform a Gap Analysis .................................................71
Present Your Findings ..................................................72
When the Show Is a Go .................................................73
Chapter 12: All Systems Go ............................................74
Where to Start .......................................................75
Plan Your Rollout .....................................................75
Decide Who Gets Lightning Experience ......................................75
Unleash the Power of Super Users .........................................76
Create a Chatter Group for the Rollout Team ...................................77
Pick a Launch Date ....................................................78
Create a Project Schedule ...............................................78
Contents
Define Measures for Success .............................................79
Create a Marketing and Communication Strategy ...............................79
Create a Training Plan .................................................80
Test Your Customizations and Iterate ........................................81
Ready to Start ........................................................81
Chapter 13: Go Live ..................................................82
Engage with Super Users ...............................................83
Measure Results .....................................................84
Survey Your Users ....................................................84
Use Reports and Dashboards in Salesforce ...................................85
Deliver an Executive Summary ............................................86
The Show Must Go On .................................................87
LIGHTNING EXPERIENCE DEVELOPMENT ............................88
Chapter 14: User Interface Development Considerations ......................88
Raising the Bar for Web App User Interfaces ...................................89
Classic Visualforce ....................................................89
Visualforce as a JavaScript Application Container ...............................90
Lightning Components .................................................91
Choosing the Right Tool for the Job .........................................91
Choosing the Right Tool for Your Organization .................................93
Migrating to Lightning Components ........................................93
Chapter 15: Visualforce and Lightning Experience ...........................95
What Works ........................................................96
What Works, But Needs Updating and Testing .................................96
What Doesn’t Work ....................................................97
That Look-and-Feel Thing ...............................................98
Chapter 16: Lightning Components in Lightning Experience ....................99
Considerations for Use ................................................100
Chapter 17: ISVs, Packaging, and AppExchange ............................101
ISV Tools in Lightning Experience ..........................................102
Packaging Your Applications in Lightning Experience ............................102
AppExchange and Lightning Experience .....................................102
Chapter 18: Understanding Changes to Other Development Tools ..............103
Installed Packages in Lightning Experience ...................................104
The API and Apex in Lightning Experience ....................................104
Authentication and Security in Lightning Experience .............................104
Canvas for Lightning Experience ..........................................104
Salesforce1 for Lightning Experience ........................................104
Contents
Mobile SDK for Lightning Experience .......................................105
VISUALFORCE & LIGHTNING EXPERIENCE ..........................106
Chapter 19: Using Visualforce in Lightning Experience .......................106
Where You Can Use Visualforce in Lightning Experience ..........................107
Chapter 20: Developing Visualforce Pages for Lightning Experience .............111
Set Up Your Editor ....................................................112
Viewing Visualforce Pages During Development ................................112
Reviewing Visualforce Pages in Multiple Environments ...........................115
Testing Your Visualforce Pages ...........................................116
Chapter 21: Exploring the Visualforce App Container .........................117
The Outer Lightning Experience Container ....................................118
The Visualforce iframe .................................................118
Impact of the New Container .............................................118
Visualforce Defaults and Environment Changes in Lightning Experience ................120
<apex:page> showHeader and showSidebar Attributes Are Always false ..............120
The sforce.one JavaScript Utility Object ......................................120
Chapter 22: Sharing Visualforce Pages Between Classic and Lightning Experience ..121
Detecting the User Experience Context ......................................122
Querying for Lightning Experience via SOQL and API Access .......................123
Chapter 23: Managing Navigation .....................................124
Navigation in Lightning Experience ........................................125
Classic Visualforce Navigation ...........................................125
Modern Visualforce Navigation ...........................................125
Navigation Gotchas, and How to Fix Them ...................................126
Chapter 24: Understanding Important Visual Design Considerations ............128
Affecting the Styling of Standard Components .................................129
Styling Strategies and Recommendations ....................................130
The Salesforce Lightning Design System .....................................131
Adapting the Lightning Design System for Standard Components ....................131
Chapter 25: Knowing Which Features to Avoid in Lightning Experience ...........134
Lightning Experience Header and Navigation Menu Can’t Be Suppressed ..............135
Salesforce Classic Header and Sidebar are Always Suppressed .....................135
Page Title Can’t Be Set .................................................135
<apex:relatedList> and Blacklisted Related Lists ................................135
Avoid <apex:iframe> .................................................135
No, Really, Don’t Set window.location Directly .................................136
sforce.one Is No Longer Salesforce1-Only ....................................136
Contents
Changes With Action Overrides ...........................................136
Home Page Doesn’t Support Visualforce .....................................137
Visualforce Tabs and Apps Can’t Be Added to Lightning Experience Navigation Menu ......137
INDEX ..........................................................138
Contents

WELCOME TO LIGHTNING EXPERIENCE
CHAPTER 1 What Your Sales Reps Need
Your sales reps have needs. They need good data in Salesforce so they can find just-in-time information
about their customers and prospects. They need to work in Salesforce with as few clicks as possible, so
In this chapter ...
•Welcome to Lightning
Experience they can sell faster and smarter. And they need the ability to do things themselves, without having to
come to you, the Salesforce admin, for every request.
•What About the
Previous User
Experience?
Your sales reps need these things so they can spend their time where it matters most: Selling your
company’s product and crushing their numbers.
So how do you help your sales reps get what they need?
1

Welcome to Lightning Experience
Welcome to Lightning Experience! Lightning Experience is a modern, productive user experience designed to help you do more and
be more efficient.
With the launch of Lightning Experience, we’ve focused on your sales reps, with a re-envisioned desktop experience to support your
sales process. The result is a more productive interface, designed to support how sales reps work on a daily basis.
Although we’ve started with sales, Lightning Experience won’t end there. It’s really just the beginning! Lightning Experience will transform
Salesforce CRM and extend to service, apps, platform, and more. No matter what department you're in, we understand that the way
people work is changing.
All this change is greatly influenced by the rise of mobile. Sales reps at your company are already using mobile to research prospective
customers, get directions to client meetings, connect socially with customers, and more. We get that. That’s why Lightning takes the
cool stuff from the mobile experience and brings it to the desktop.
…becomes what sales reps love about desktopWhat sales reps love about mobile…
When we’re talking about Lightning Experience, we’re talking about pages in Salesforce optimized for sales use. We’re talking about
new features that help your sales reps focus on the right deals and the right activities, every time they log in. We’re talking about flexible,
interactive tools that sales reps can use to visualize data and work deals in flight.
But before we go any further, let’s talk about how Lightning Experience got its name, and why we built it in the first place.
Why We Built Lightning Experience
Let’s start with the name, and while we’re at it, the correct spelling of the name.
Or LightingNot LighteningIt’s Lightning!
The method by which something is
illuminated, like the soft glow of a lamp, by
the light of which you read the release notes
The act of becoming lighter, like when you
put down that swag-stuffed backpack you’re
carrying at Dreamforce
A modern, productivity-boosting user
experience designed to help sales reps close
deals lightning fast (see what I did there?)
So why the name “Lightning?” Well, think for a moment about actual lightning, the kind you see during a storm. Think about how fast
it strikes; if you blink, you might miss it. Think about how beautiful it is; lightning can be stunning to behold. Finally, think about how
unique each lightning bolt is; no two are the same.
2
Welcome to Lightning ExperienceWhat Your Sales Reps Need
That’s a lot like Lightning Experience. It’s fast, it’s beautiful, and it’s unique to each sales rep. It’s a simpler user experience, designed to
help sales reps sell faster, with personalized alerts and an interactive assistant to help each sales rep focus on what’s important. All of
this drives improved productivity for your sales team.
Ultimately, we built Lightning Experience because of you, our customer. Lightning Experience is the result of everything we’ve learned
from you over the past years and releases. Lightning Experience is the killer sales app you can deliver to your sales reps.
What About the Previous User Experience?
It’s still here, and for the purposes of clarity, let’s give this user experience a name: Salesforce Classic.
Salesforce Classic refers to the Salesforce user experience immediately predating Lightning Experience. It’s the one with the row of tabs
across the top. If you haven’t customized your logo, you also see the seasonal Salesforce logo in the upper left corner when you’re looking
at Salesforce Classic.
So that’s Salesforce Classic, and again, it’s still here. It has to still be here, because not all features are available in Lightning Experience,
and besides, you might not be ready to move off Salesforce Classic yet. Depending on your company culture, change can take time, and
we get that, too. We’ll talk more about change management and migration in another module, since that’s an important topic all on its
own.
Back to Salesforce Classic and Lightning Experience. The first thing you need to know is how to tell when you’re in one or the other. If
you see a row of tabs across the top, you’re in Salesforce Classic. If you see a vertical navigation menu, you’re in Lightning Experience.
The row of tabs across the top means you’re in
Salesforce Classic
The vertical navigation menu on the left means you’re
in Lightning Experience
3
What About the Previous User Experience?What Your Sales Reps Need
It’s important that you get comfortable with identifying which one you’re in. If you decide to enable Lightning Experience, you need to
prepare for helping users with questions. As a Salesforce admin who has enabled Lightning Experience, one of the first things you’ll
need to identify on a troubleshooting call with a user is, are you in Lightning or in Classic?
We mentioned earlier that some features are not yet available in Lightning Experience, and right about now you’re probably wondering
exactly how that works. Let’s talk about that next.
4
What About the Previous User Experience?What Your Sales Reps Need

CHAPTER 2 What Makes Lightning Experience So Special
With over 25 new features and 50 redesigned pages, there are several key benefits to using Lightning
Experience. We won’t cover everything here, but for each area of the product, we’ll highlight some of
the neatest things.
In this chapter ...
•Take a Tour of
Lightning Experience To kick things off, let’s talk about some of the highlights:
•So How Do I Decide
if Lightning •New record layouts that focus on what you can do instead of what you can view
Experience is Right
for Me?
•Beautiful dashboards in a flexible layout with spanning columns that let you add more components
in a row
•Sleek report views that you can filter quickly, to slice and see the data that's most important to you
5

Take a Tour of Lightning Experience
Why is Lightning Experience so special? We’ll show you!
Home
We’ve reimagined the way you start your day with a brand new, intelligent page. Now your sales reps can monitor their performance
to goal and get insights on their key accounts. Plus, we’ve added an Assistant, which is your users’ action list of things to do and places
to be.
•Start your day fast with a new, intelligent page
•Use the Performance Chart to monitor how close you are to crushing your numbers
•Get insights fast with Account Insights and social highlights
•Use the Assistant to identify exactly what you need to be doing today
•Focus your selling activities on your Top Deals
Opportunity Workspace
We’ve taken your sales process and put it into an action-first workspace, designed to help your sales reps work their deals faster and
smarter. You can customize coaching scripts for each step in the sales process, create records quickly with fewer clicks, and ultimately
close deals faster.
•Showcase key record details in the new highlights panel at the top of the page
•Use the handy composer to quickly log calls, create tasks, send emails, and more
•Get key coaching details with a customizable sales path to support your sales process
•See a wealth of related information on hover using quick view, without ever leaving the opportunity page
•Add related records—like contacts—in context with minimal clicks
6
Take a Tour of Lightning ExperienceWhat Makes Lightning Experience So Special
Accounts and Contacts
Like with opportunities and leads, we’ve optimized the layout for accounts and contacts, organizing the content by their primary use
case: reference. Now your sales reps can find information and gather insight at a glance.
•Get the latest news for your customers with integrated Twitter and Account Insights
•Work smarter and keep your data clean with field-level duplicate matching
•Locate important data efficiently with the redesigned Lightning page layout
•Review past and upcoming activities at a glance
7
Take a Tour of Lightning ExperienceWhat Makes Lightning Experience So Special
List Views
Now your sales reps can visualize any list view graphically with a handy chart.
•Visualize your data in seconds with list view charts
•Use type-ahead search to find a favorite list view fast
•Automatically open your list views created in Salesforce Classic using Lightning Experience
8
Take a Tour of Lightning ExperienceWhat Makes Lightning Experience So Special
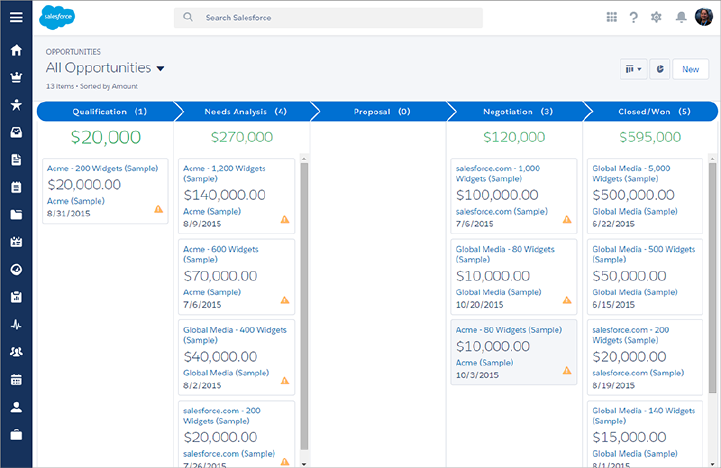
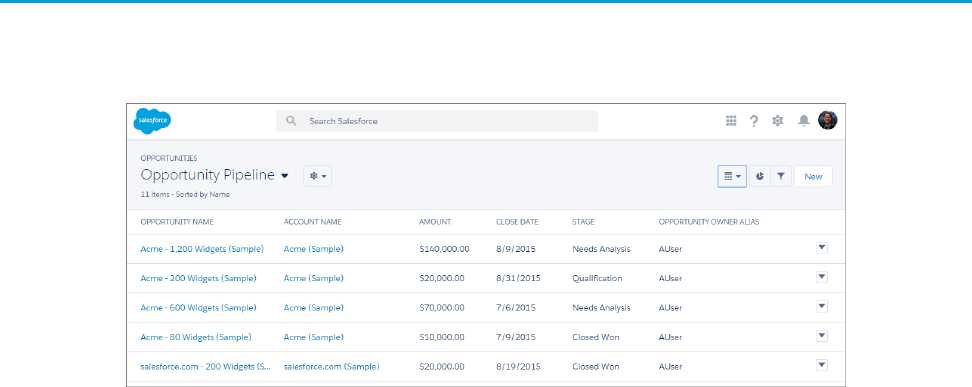
The Opportunity Board
Introducing the Opportunity Board, a visualization tool for opportunities, where sales reps can visually review deals organized by each
stage in the pipeline. With drag-and-drop functionality, sales reps can move deals from one stage to another, and get personalized alerts
on key deals in flight.
•Visualize your deals at each stage in the sales cycle
•Move deals between stages using drag-and-drop functionality
•See alerts that notify you when action is needed on a key deal
Reports and Dashboards
Sales reps will love the ability to create their own filters on reports, and you will appreciate the updated dashboard editor, with spanning
columns and a new, flexible layout.
•Create filters for reports
•Make visually awesome dashboards using flexible layout and spanning columns
•Enjoy sales rep-focused enhancements, including auto-hidden details on matrix reports and the ability to hide totals and subgroups
on the report run page
•Easy migration from Salesforce Classic to Lightning Experience, with reports and dashboards automatically viewable and inheriting
all permissions and sharing already defined
9
Take a Tour of Lightning ExperienceWhat Makes Lightning Experience So Special
Other Highlights
•Navigate through pages more easily with the space-saving, collapsible left navigation menu
•Take better notes with the new Notes feature, which includes autosave, rich text capabilities, and the ability to relate a note to
multiple records
•Find your tasks on a new page for tasks, including the new Master-Detail view, which lets you see a single task and your entire list
of tasks side by side
•Find records faster with improved search, allowing you to view recent records and top results
So How Do I Decide if Lightning Experience is Right for Me?
At this point, you’re probably starting to think about whether or not your company is a good fit for Lightning Experience. This is good,
and part of the point of this content is to help you make that choice.
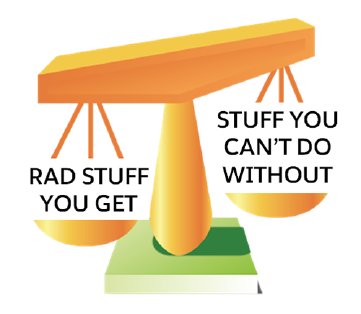
Ultimately, your decision comes down to this: does the rad stuff you get with Lightning Experience outweigh what you can’t do without
Salesforce Classic?
10
So How Do I Decide if Lightning Experience is Right for Me?What Makes Lightning Experience So Special
So, let’s help you decide. Next, we’ll take you through the key differences between the two interfaces and help you figure out how to
make that decision.
11
So How Do I Decide if Lightning Experience is Right for Me?What Makes Lightning Experience So Special

CHAPTER 3 Understanding Lightning Experience and Salesforce
Classic
Lightning Experience is a new, modern user interface for your sales reps to help them sell faster and
smarter. Lightning Experience features 25 new features and 50 redesigned pages, but not every feature
In this chapter ...
•Comparing Lightning
Experience and
Salesforce Classic
is supported in Lightning Experience. So the experience you’ve come to know in Salesforce, called
Salesforce Classic, is still available for you, and the users you enable for Lightning Experience can switch
between the two at will.
•But What About
Visualforce and
Apex?
As your company’s trusted advisor for Salesforce, you need to help your company decide when to enable
Lightning Experience. So, we’ve got to start getting you educated on Lightning Experience features
versus Salesforce Classic.
•How to Assess the
Impact
12
Comparing Lightning Experience and Salesforce Classic
Let’s start with differences for specific products and features.
Note: This isn’t a comprehensive list of supported and unsupported features. For a more detailed list, please see the Salesforce
Help.
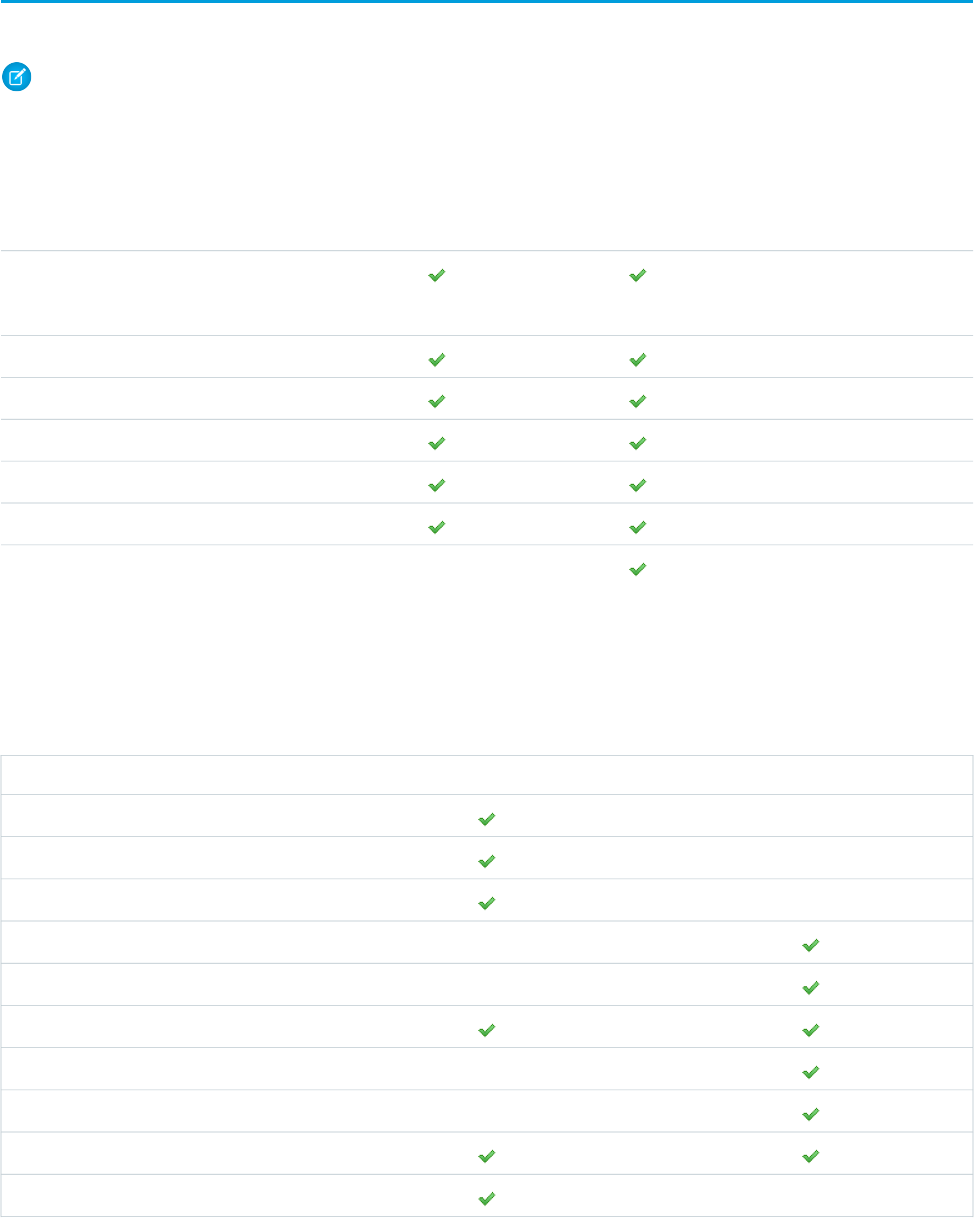
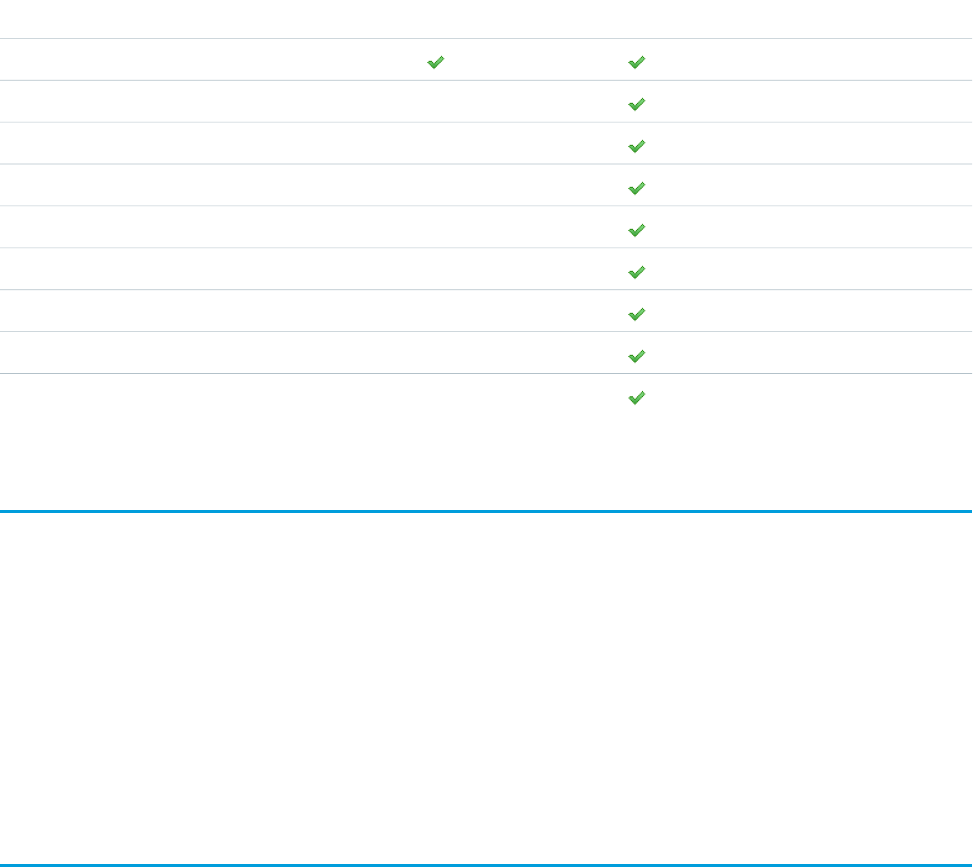
Salesforce Data
Salesforce ClassicLightning ExperienceFeature
Accounts, Contacts, Leads,
Opportunities, Price books, Products
Calendar, Events, Tasks
Cases (basic support)
Custom objects
Chatter feeds, groups, and people
Salesforce Files
Other Sales and Service objects
Home
In Lightning Experience, Home is a new, intelligent page filled with insights, a slick performance chart, and a helpful assistant feature,
highlighting what’s most important each day.
Salesforce ClassicLightning ExperienceFeature
Performance Chart
Assistant
Account Insights
Feed and publisher
Customizable dashboards
Tasks
Items to Approve
Calendar and Events*
Recent Records
Top Deals
13
Comparing Lightning Experience and Salesforce ClassicUnderstanding Lightning Experience and Salesforce Classic
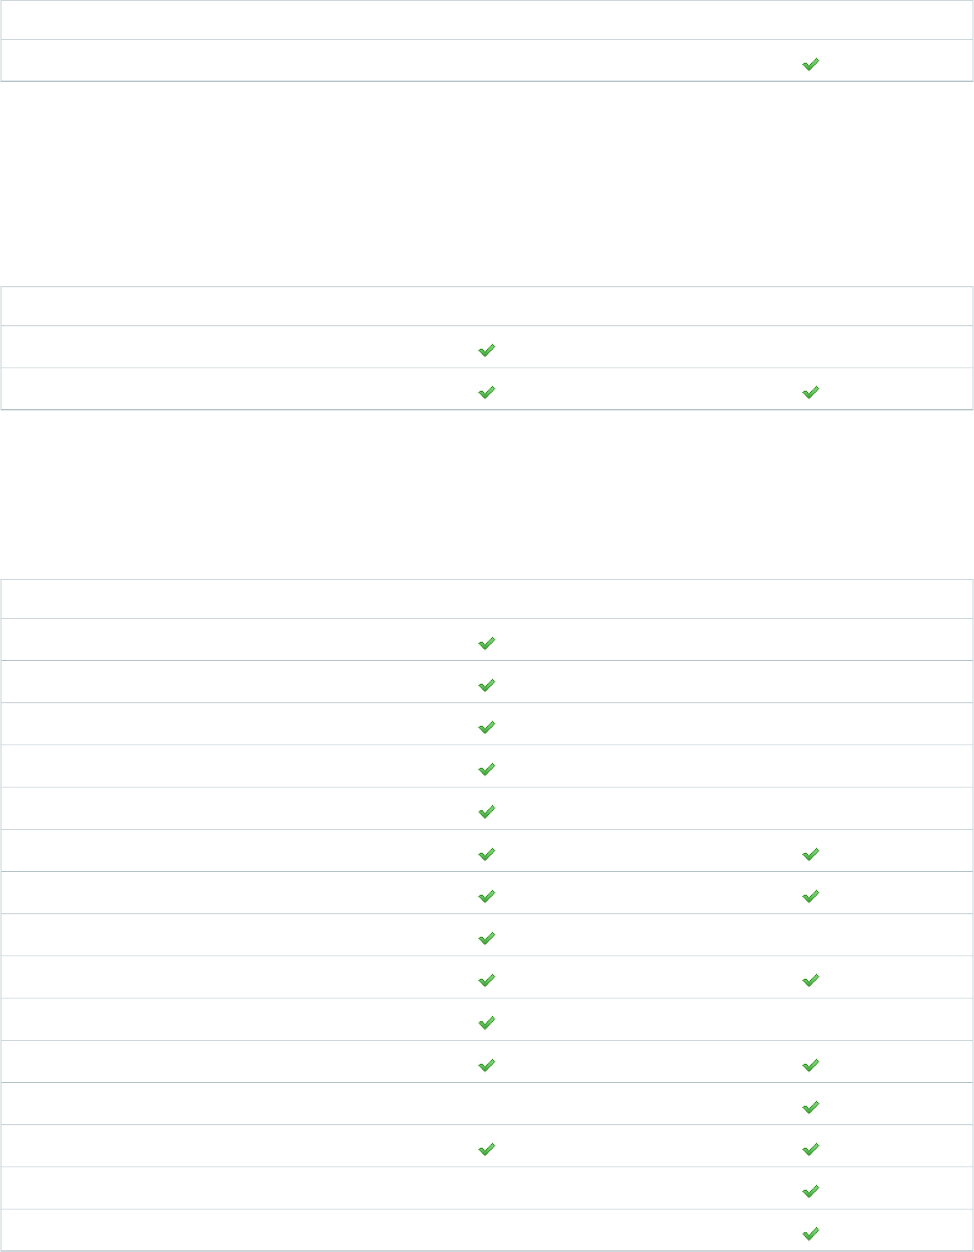
Salesforce ClassicLightning ExperienceFeature
Customizable home page components
* Applies to Home only.
Calendar & Events
Calendar and events now have their own object home page in Lightning Experience with a streamlined look and feel.
Salesforce ClassicLightning ExperienceFeature
Enhanced calendar
Events
Accounts and Contacts
Accounts and contacts in Lightning Experience have gotten a complete makeover, with a brand new layout designed to help sales reps
find the information they need, fast.
Salesforce ClassicLightning ExperienceFeature
Account Insights
Contact Insights (Closed Pilot in Winter ’16)
Highlights panel
Activity Timeline
Distinct ‘reference’ page layout
Related lists
Enhanced Notes
New Files
Twitter highlights
Quick View (hover)
Integrated email and templates
Accounts and contacts hierarchy
Collaborate
Person Accounts
Account Teams
14
Comparing Lightning Experience and Salesforce ClassicUnderstanding Lightning Experience and Salesforce Classic
Opportunities and Leads
Sales reps in Lightning Experience will find a turbo-charged workspace for managing opportunities and leads. View related information
in the Quick View. Create tasks and events, log calls, and send emails, and track all those activities in the Activity Timeline.
Salesforce ClassicLightning ExperienceFeature
Opportunities
Opportunity Teams
Opportunity Splits
Add similar opportunities
Big deal alerts
Leads
Find and merge duplicate leads
Change lead owner to a queue
Lead campaign history
Create leads
Assign leads to campaigns
Customize lead conversions via API
Both Opportunities and Leads
Customizable highlights panel
Sales path
Create related records in context
Quick view (hover)
*
Composer
Integrated email and templates
Workspace template page layout
Activity timeline
Enhanced Notes
New Files
Collaborate
*Similar capabilities available in Classic with actions in the publisher.
15
Comparing Lightning Experience and Salesforce ClassicUnderstanding Lightning Experience and Salesforce Classic
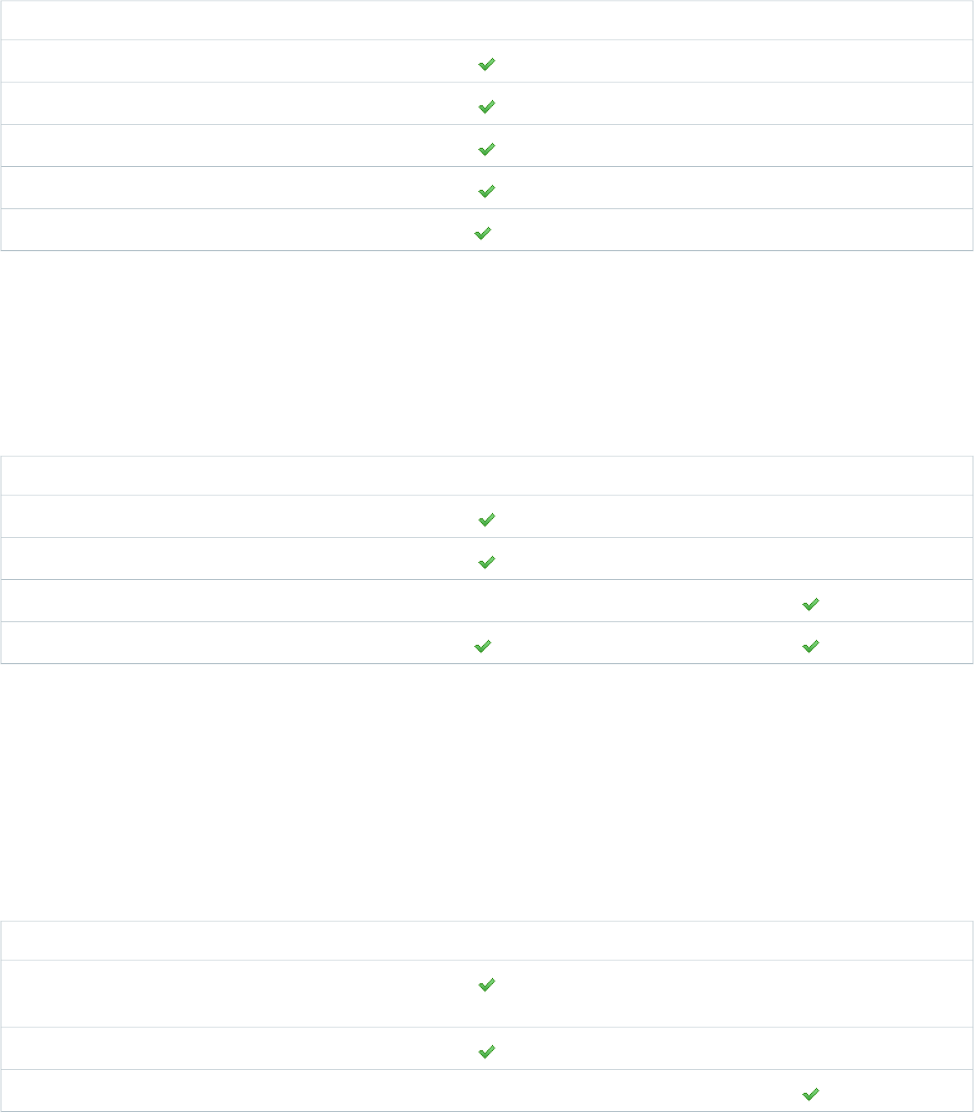
Opportunity Board
Sales reps can use the Opportunity Board, a visualization tool for opportunities, to review deals organized by each stage in the pipeline.
With drag-and-drop functionality, sales reps can move deals from one stage to another, and get personalized alerts on key deals in flight.
Salesforce ClassicLightning ExperienceFeature
Charts
Drag and drop
Intelligent Alerts
Type-ahead list view search
*
Sharing settings
* Only list views marked as “Visible only to me” or “Visible to all users” are supported. Sharing with certain groups of users isn’t supported.
List Views
List Views have gotten an upgrade in Lightning Experience.
Salesforce ClassicLightning ExperienceFeature
Charts
Type-ahead list view search
Resizable columns
*
Sharing settings
* Only list views marked as “Visible only to me” or “Visible to all users” are supported. Sharing with certain groups of users isn’t supported.
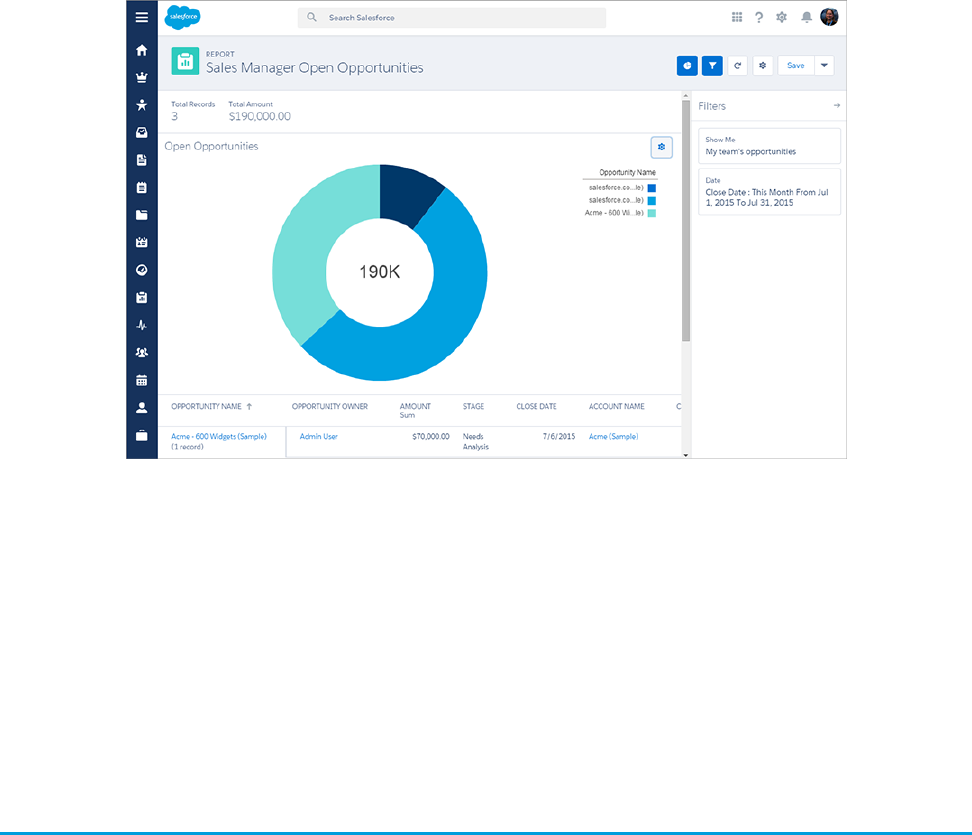
Reports
Sales reps who use reports in Lightning Experience will find a greatly improved user interface, including the ability to easily create filters
and add enhanced charts. And Salesforce admins will find new features on the dashboard editor, including flexible layouts and spanning
columns. However, some report features aren’t yet available in Lightning Experience, including feeds and scheduled reports.
Salesforce ClassicLightning ExperienceFeature
Create interactive filters while viewing a
report
Enhanced report charts
See details of matrix reports
16
Comparing Lightning Experience and Salesforce ClassicUnderstanding Lightning Experience and Salesforce Classic
Salesforce ClassicLightning ExperienceFeature
Hide totals and subgroups from report view
page
Table, funnel, and scatter chart types
Schedule report refreshes
Follow reports
*
Report folder sharing
Create report folders
Report notifications
Bucket fields
Custom summary formulas
Joined reports
Report editing
* You can’t set up folder sharing in Lightning Experience; however, folders viewed in Lightning Experience that were created in Salesforce
Classic inherit all permissions assigned in Salesforce Classic.
Dashboards
Salesforce ClassicLightning ExperienceFeature
More than 3 columns supported
Flexible layout
*
Schedule dashboard refresh
Dynamic dashboards
Post dashboard components to feeds
Follow dashboards
Dashboard filters
Enhanced dashboard list views
Some visualization components
* Dashboards that are already scheduled in Salesforce Classic will run as scheduled.
17
Comparing Lightning Experience and Salesforce ClassicUnderstanding Lightning Experience and Salesforce Classic
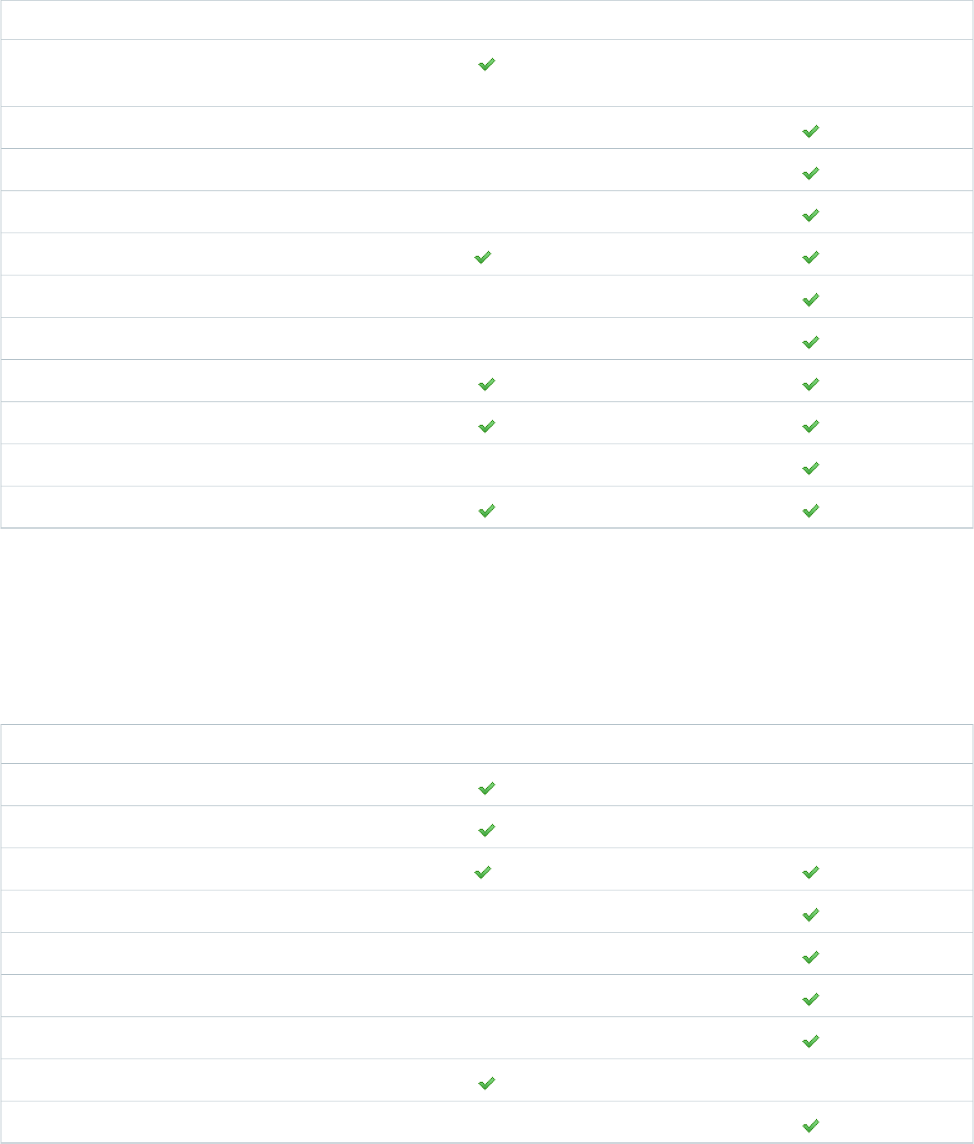
Other Features and Products
Salesforce ClassicLightning ExperienceFeature
Create and edit records
Inline editing of fields (lists, records)
Forecasting
Territory Management
Salesforce Communities
Partner Portals
Service Cloud
Data.com
Work.com
But What About Visualforce and Apex?
When we talk about customizing Salesforce “programmatically” we’re talking about using code to add new features. Most of the time,
like when you’re using the API or writing Apex triggers, there isn’t an actual user interface to the feature. Guess what? All of that stuff
just works whether you’re in Salesforce Classic or Lightning Experience. Woohoo!
Other features do have a user interface. In that case, we’re mostly talking about Visualforce. Again, usually, Visualforce just works, although
you may have to point your users at the new locations for custom actions, tabs, and so on.
There are some considerations for all Visualforce pages and apps, though, and we recommend that you review those. We created an
entire Trailhead module just for Visualforce developers, and an entire trail for developing Lightning Experience apps. If you’re using
Visualforce or other programmatic customizations in your organization, check those trails out as part of your Lightning Experience
assessment process.
How to Assess the Impact
Now that you have a sense of the new features you gain by enabling Lightning Experience, and what isn’t supported, you can start to
assess the impact of enabling it for your company. We recommend going through your Salesforce organization and assessing each
potential area of impact as you prepare to decide when to enable Lightning Experience.
We’ve put together an enablement pack with sample documents you can download and customize, and it contains a sample gap analysis
checklist. You can use this checklist to help guide your assessment.
18
But What About Visualforce and Apex?Understanding Lightning Experience and Salesforce Classic

CHAPTER 4 Enabling Lightning Experience
At this point, you’ve evaluated the benefits of Lightning Experience and are ready to deploy to some or
all of your users. Next, we’ll walk you through the technical steps to enable Lightning Experience for
your users.
In this chapter ...
•Get Your Org Ready
for Lightning
Experience This chapter doesn’t cover your overall rollout strategy. We’ll cover that in depth in Welcome to Your
Lightning Experience Rollout on page 67.
•Set Up Users for
Lightning Experience Let’s dive into the details.
•Turn Lightning
Experience On! Does My Organization Qualify for Lightning
Experience?
These criteria prevent you from enabling Lightning Experience in your org:
•Switching Between
Lightning Experience
and Salesforce
Classic
•Person Accounts: Person Accounts aren’t supported in Lightning Experience. If your org uses Person
Accounts, you can’t enable Lightning Experience.
•Editions: Contact Manager Edition, Personal Edition, Database.com Edition, and Chatter.com Edition
aren’t supported for Lightning Experience. Customers on these editions can’t enable Lightning
Experience.
19

Get Your Org Ready for Lightning Experience
If you haven’t already, consider enabling and setting up these supporting features before turning on Lightning Experience. These features
ensure that the new user interface is fully optimized to help your sales reps sell faster and smarter. We’ll look at some of them in more
depth later on.
All of these recommended features can be enabled from one place: the Lightning Setup page, which you can find in Salesforce Classic
Setup by clicking Lightning Experience.
Related Files
Leverage the rich features and flexibility of Salesforce Files from standard Salesforce objects and your custom objects. Add the new
Files related list to page layouts, so users can upload files to records, see files associated with records, and quickly page through files
in the modern, visually rich preview player.
Enhanced Notes
Helps your users stay organized with our enhanced note-taking tool. It’s a breeze to create rich-text notes and quickly relate them
to specific records. When you turn on Notes, remember to add the Notes related list to the appropriate page layouts.
Sales Path
Make it easy for sales reps to follow your organization’s sales process and get deals to closed. Customize opportunity stages and
lead statuses, and the order you want them to appear in the sales path on the opportunity and lead workspaces. Then take it up
another notch and add your own coaching steps for each stage or status in the sales path.
Duplicate Management
Create duplicate rules so users are alerted if they’re about to create a duplicate record. Craft your duplicate rules to control whether
and when users can create duplicate records in Salesforce.
Lead Conversion
Keep your sales process moving by allowing your sales reps to convert qualified leads to contacts, accounts, or opportunities. Add
the Lead Convert action to the Lead page layout.
Account Insights
Give your reps instant access to relevant, timely news articles about their accounts. This feature is available in English only, so if your
organization uses a different primary language, you may not want this option. Industries sensitive to privacy issues should consider
whether or not to implement this feature. For more information about the privacy issue around Account Insights, see the Salesforce
Help.
Social Accounts, Contacts, and Leads
Keep the team up to date by letting reps link their accounts, contacts, and leads to matching Twitter profiles. Users can see Twitter
user profiles and people in common in Salesforce and quickly access their tweets.
Shared Activities
Represent activity relationships more accurately by letting your sales reps relate multiple contacts to individual events and tasks.
Shared Activities are forever. After they’re enabled, they can’t be disabled. For more information, see the Salesforce Help.
Set Up Users for Lightning Experience
Depending on the size of your rollout, you need to decide how to enable Lightning Experience for your users. If you’re piloting with a
small group of users, or if you’re not sure whether you’ll keep Lightning Experience on for good, consider using Permission Sets. If you’re
planning a mass rollout, consider updating Profiles.
New to permission sets? There’s a walkthrough for that! Walk Through It: Permission Sets
Worried about grumpy users? All users can switch back to Salesforce Classic if they’re having trouble in Lightning Experience.
20
Get Your Org Ready for Lightning ExperienceEnabling Lightning Experience
If you’re in Professional Edition or Group Edition, Lightning Experience is “all or nothing” for you. Once you turn it on, it’s on for all of your
users.
If you’re in Enterprise Edition or above, consider these options:
•If you have users with standard profiles, consider moving them to custom profiles, because enabling Lightning Experience auto-enables
it for any standard profile users.
•Create a permission set with the Lightning Experience permission. Apply the permission set directly to the pilot users, then enable
Lightning Experience.
•Looking to mass enable? Adding the Lightning Experience user permission to the desired profiles is the fastest way to mass enable
Lightning Experience. If you’re a data loader ninja, you can save time by updating many profiles at once, but remember, with great
power comes great responsibility. Mistakes can inadvertently enable or disable other features.
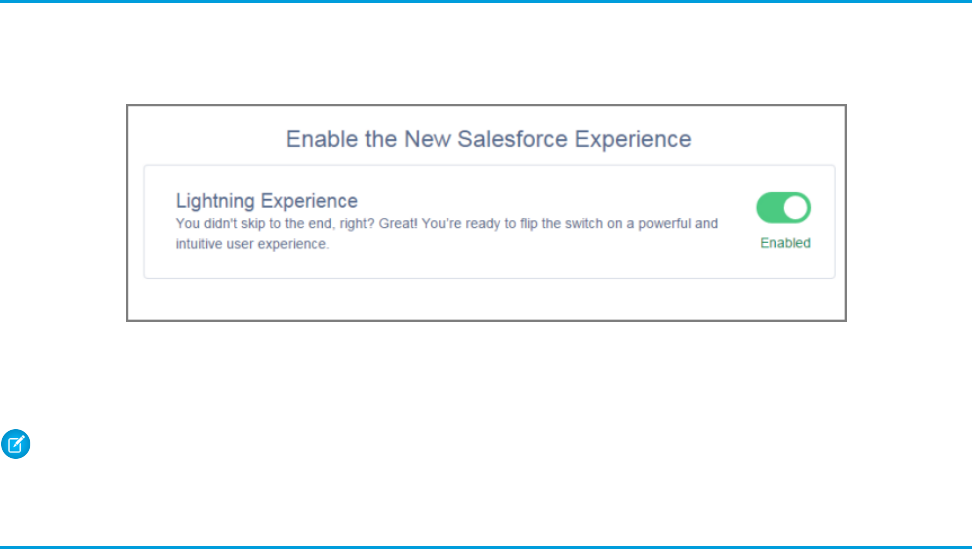
Turn Lightning Experience On!
Are you ready? It’s easy. To enable Lightning Experience, go to the Lightning Setup page, which is accessible in Setup by clicking
Lightning Experience. The slider button at the bottom of the Lightning Setup page enables Lightning Experience for your org.
Flip that switch, and your journey begins! The next time the users you’ve enabled log in, they automatically start enjoying Lightning
Experience.
Note: Remember that access by specific users can be controlled with permission sets and profiles, depending on your edition.
Switching Between Lightning Experience and Salesforce Classic
Meet the Switcher. If you have Lightning Experience enabled, you can use this feature to switch back and forth between Lightning
Experience and Salesforce Classic.
The Switcher is smart. Anytime you switch, it remembers that user experience as your new default preference. So if you switch to Lightning
Experience, it is your default user experience until you switch back to Salesforce Classic.
How do you get to the Switcher? In Salesforce Classic, click your name in the upper right corner, and select Switch to Lightning
Experience from the menu.
21
Turn Lightning Experience On!Enabling Lightning Experience
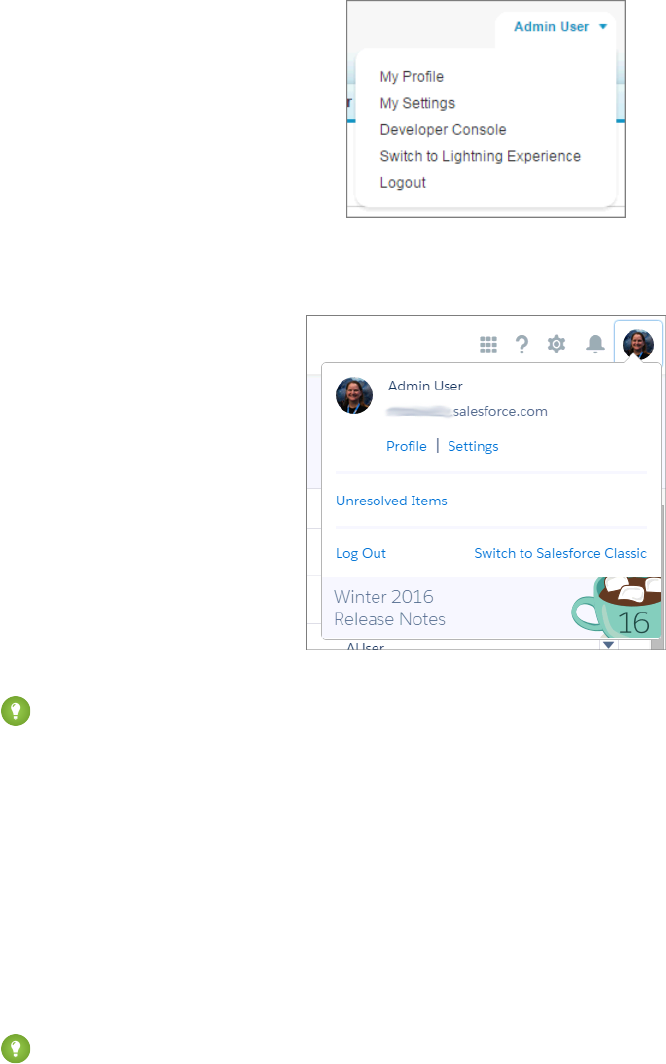
In Lightning Experience, click your profile picture in the upper right corner and select Switch to Salesforce Classic from the menu.
Tip: See that image there at the bottom? Click it to go right to the release notes!
A Few Switcher Gotchas
Although the Switcher is smart when navigating in Salesforce, direct URL links can cause issues when shared between team members.
This means you can run into snags if you enable Lightning Experience for only some members of a functional team, especially if those
team members share direct links with each other.
If a user clicks a link to something that’s not supported in Lightning Experience, Salesforce switches to Salesforce Classic in a new tab
while the original Lightning Experience window stays open.
Users who aren’t enabled for Lightning Experience can’t access Lightning Experience links, including links posted to Chatter or emailed
from a Lightning Experience user.
Tip: Keep all members of a functional team on the same experience. If you have team members who often share links and work
closely together, include them all in the pilot. You can roll out Lightning Experience to a specific set of users using profiles or
permission sets.
22
Switching Between Lightning Experience and Salesforce
Classic
Enabling Lightning Experience

WHAT'S NEW IN LIGHTNING EXPERIENCE
CHAPTER 5 Navigation and Setup in Lightning Experience
Setup is where you make the magic happen. As a Salesforce admin or developer, you spend a lot of time
using Setup. It’s where you customize and configure your organization, support users, build functionality,
and more.
In this chapter ...
•The Lightning
Experience
Navigation Menu One of the huge productivity upgrades that comes with the new Lightning Experience is the improved
Setup. We’ve done a lot of usability testing and refactoring to revamp the Setup tree. We simplified it to
•The App Launcher in
Lightning Experience have a logical and easy-to-navigate structure, using broad categories to make things more discoverable.
In addition, child nodes are now in alphabetical order.
•Meet the New and
Improved Setup The navigation menu in Lightning Experience provides a streamlined and compact interface to navigate
through your organization’s various apps and tabs. The Force.com App Menu and the tab bar that you’re
used to in Salesforce Classic have been combined into one view to make navigation simpler and faster.
•Object Manager
•Global Search
Ready to see them in action?
•Lightning Experience
Help Menu
23
The Lightning Experience Navigation Menu
Users working in Salesforce Classic are used to seeing tabs across the top of their screen in Salesforce. In Lightning Experience, the primary
navigation is now on the left, with a vertical bar and icons representing objects.
The navigation menu contains a set of standard objects predefined by Salesforce. The icons you see in the navigation menu are associated
with the object’s or app’s tab. You can view the menu item’s name by hovering over its icon.
You can expand and collapse the menu by clicking . The Home menu item ( ), which you may recognize if you use Salesforce1,
is the default home page for Lightning Experience. We’ll learn more about the Home page later.
Note: Coming Soon: Navigation Menu Customization
You can’t customize the navigation menu in Winter ’16, but with Spring ’16, that will all change. Not only will you be able to modify
the navigation to include both standard and custom tabs, you’ll also be able to add apps!
You and your users can still get to custom apps and objects via the App Launcher, which we’ll look at next.
The App Launcher in Lightning Experience
In Salesforce Classic, your users commonly switch between apps in one of two ways: through the Force.com App Menu or the App
Launcher.
24
The Lightning Experience Navigation MenuNavigation and Setup in Lightning Experience
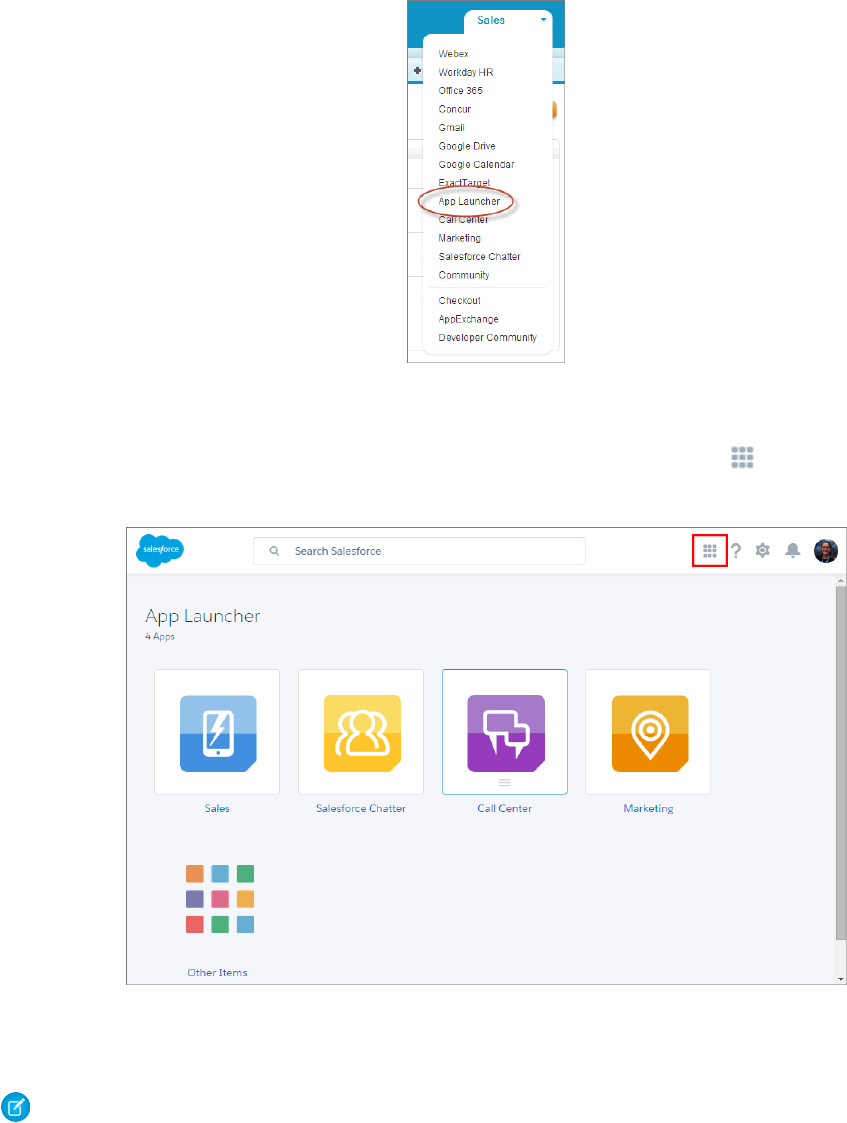
However, in Lightning Experience, there is no Force.com App Menu.
Your users can find apps by searching for the app name or by using the App Launcher. You can click from any page to access it.
Apps show up as large tiles, and you can find custom objects under the Other Items tile.
All your custom apps, connected apps, and custom object tabs are available through the App Launcher. You and your users can personalize
the order of the apps on this page by dragging the tiles wherever you want.
Note: The apps that a user sees in the App Launcher varies depending on each app’s visibility settings and the user’s permissions.
When you click into an app, you see all the items associated with it, separated into two sections. The top of the list contains items that
are supported in Lightning Experience. The bottom of the list contains items that aren’t supported in Lightning Experience. Unsupported
items open in Salesforce Classic in a new browser window.
25
The App Launcher in Lightning ExperienceNavigation and Setup in Lightning Experience

As an administrator, you can use the App Launcher to set the default sort order and visibility for the apps in your organization. From
Setup, enter App Menu in the Quick Find box, then select App Menu.
This page shows all the organization’s apps. You can drag the apps into the order you want them and set each app’s visibility.
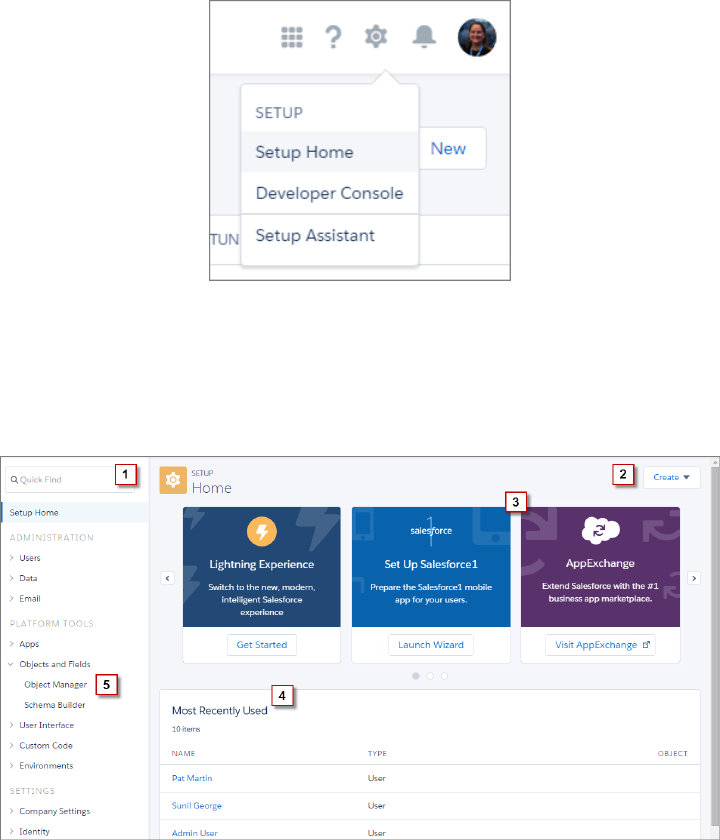
Meet the New and Improved Setup
A nip here? A tuck there? No, we’ve given Setup a whole new face!
You can navigate to Setup from the top of any page in Lightning Experience by clicking > Setup Home.
26
Meet the New and Improved SetupNavigation and Setup in Lightning Experience
The Setup tree has been completely reorganized and recategorized. In Salesforce Classic, the Setup tree had a lot of specific node
categories, often with several nodes as nested subcategories. Sometimes there were many different ways to get to a destination. You
might have mastered the click paths after a while, but to new users, this structure was often an overwhelming hurdle. The new Setup
provides a streamlined interface for viewing and managing your administrative setup tasks.
The new Setup includes these enhancements.
•The Quick Find (1) lets you quickly navigate to any node using a keyword. Quick Find is the best way to find what you’re looking for
if you know its name. Quick Find is your power tool for getting where you need to go!
•The Create menu (2) gives you quick access to common Setup creation functions—including users, custom objects, custom tabs,
apps, email templates, and processes—without having to drill down through the Setup tree to get the page. You can get to the
Create menu from any page in Setup.
•A carousel of quick-access tiles (3) gives you instant access to important setup tools and information, as well as the release notes.
The Lightning Experience tile and Setup Salesforce1 tile help you enable your company for the new and improved UI, and mobile
data access. There’s also a link to download SalesforceA—which lets you do Salesforce administration from a mobile app—and a
link to the System Status screen so you can view your organization’s performance and usage data.
•The Most Recently Used list (4) on the Setup Home page shows your most recently used records or customization features in Setup.
You can quickly link back to what you were working on by clicking its name.
•The Object Manager (5) provides a one-stop shop for managing all objects in your organization, both standard and custom. We’ll
look at the object manager in more detail shortly.
27
Meet the New and Improved SetupNavigation and Setup in Lightning Experience
Users can access their personal settings at the top of any page by clicking their profile image, then clicking Settings.
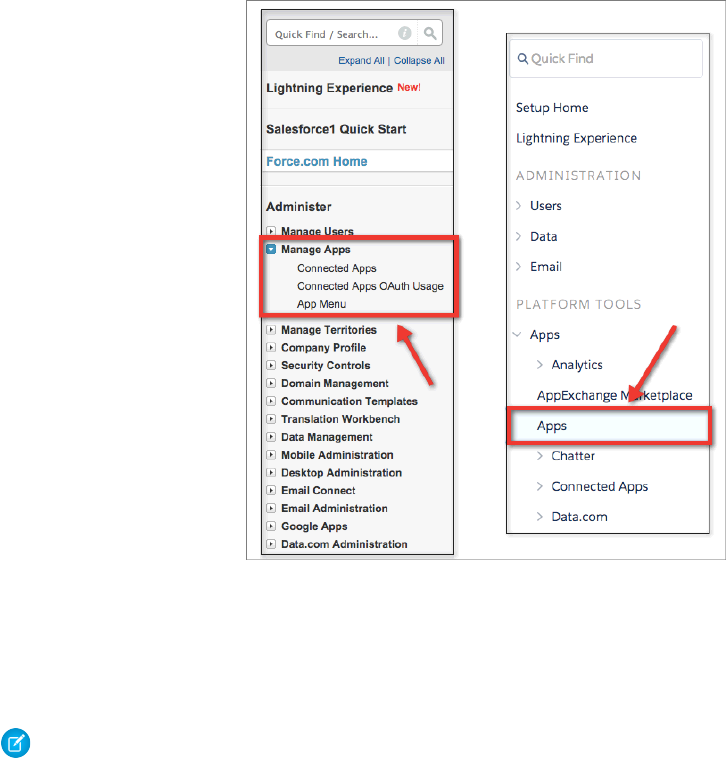
Administration, Platform Tools, and Settings, Oh My!
In the improved Setup, we’ve changed the five Setup tree sections from Administer, Build, Deploy, and Checkout to three sections:
Administration, Platform Tools, and Settings. We completely reorganized all the child nodes to fit into these sections where appropriate,
and added broader subcategories to make finding nodes easier, even if you don’t know the exact name you’re looking for.
Not only that, there are fewer child nodes to choose from, as many repetitive nodes in the tree have been removed. For example, there
is no trace of the Manage Apps node from Salesforce Classic under the Administration section in the Lightning Experience Setup tree.
Why? Because it is redundant to the settings you can customize under the Apps node in the platform section.
We reorganized the platform tools into a more process-oriented organizational structure rather than being feature-oriented. Now you
can see pieces of the application life cycle broken up into subcategories: Apps, Objects and Fields, Process Automation, User Interface,
Custom Code, and Environments.
At the bottom of the tree, in the Settings section, you can view company information or configure security.
Note: As you’re getting familiar with the Setup area, it’s important to keep in mind that navigating through Setup is not about
memorizing click paths; it’s about understanding what you're looking for in order to get to your destination. Depending on your
users’ profile and permissions, one user might see a different set of items in Setup than another. As a System Administrator, however,
you see everything.
28
Meet the New and Improved SetupNavigation and Setup in Lightning Experience

Where Did Some of the Nodes Go?
You might have noticed that some of the nodes are missing altogether. Only nodes that are related to customizing the new Lightning
Experience are included in the Setup tree. For example, the Service Cloud related nodes are gone, as well as some of the Sales Cloud
features. And, we moved all the object-related nodes to the Object Manager, which we’ll look at shortly.
Don’t worry! From a customization and development standpoint, all of the tools are still there. And as the other features become supported
in Lightning Experience, you’ll see them in Setup too.
Five Things You Shouldn’t Miss in the Improved Setup
Setup Lightning Experience •Your one stop for Lightning Experience customizations
•Learn best practices
•Enable/disable Lightning Experience and new features
•Setup permissions to give users access to Lightning Experience
Create Menu •On every page in Setup
•Quick access to create common items
Object Manager •All standard and custom objects now live in the Object Manager
•All objects now have a standard detail page
•You can filter the list of objects and also filter the contents of the
detail page to find things quickly
Customization node in the Setup tree. Use it to:App Menu
•Reorder apps in the App Launcher
•Make apps visible or invisible in the App Launcher
View Release Notes •Links to the most recent version of the release notes
•Great point of reference for new and existing features
Limitations
Advanced Setup Search isn’t available in Lightning Experience.
The Setup tree in Lightning Experience is limited to:
•Pages that support Lightning Experience features
•Administration pages that apply across your organization, such as user management, security, and company settings
Use Salesforce Classic to access administration pages for features that aren’t in Lightning Experience.
29
Meet the New and Improved SetupNavigation and Setup in Lightning Experience
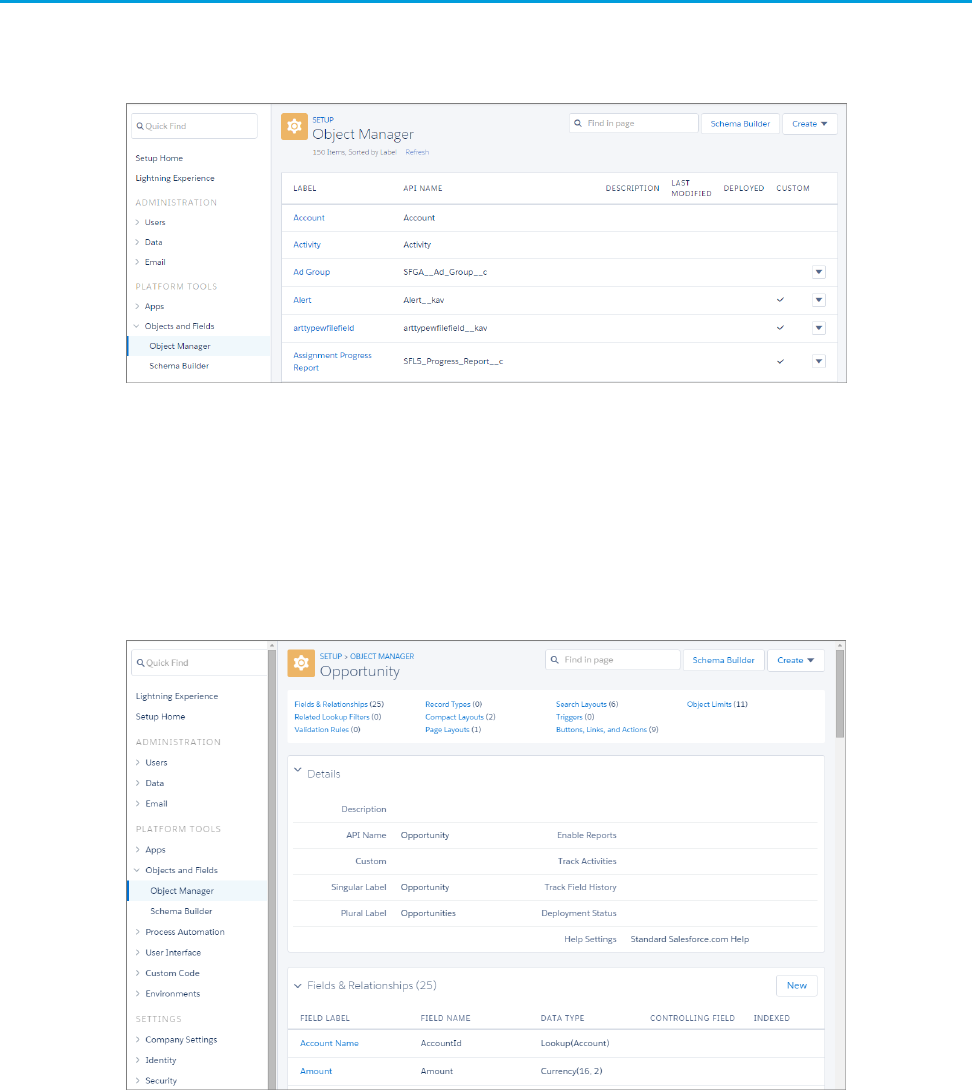
Object Manager
The Object Manager is a one-stop shop for managing all objects in your organization, both standard and custom. Access all objects and
their related functions—fields, validation rules, page layouts, and so on—from a single entry point.
To access the Object Manager, from Setup, enter Object Manager in the Quick Find box, then select Object Manager.
•To find an object, enter the first few characters of its label or name in the Find in page box.
•To edit a custom object, in the Actions column, select ... > Edit.
•To view more details about an object or to access its related functions, click the object label.
From the object detail page, you can view the object details and access all related functions, such as fields, validation rules, and page
layouts.
•To quickly jump to a function or control, use the links at the top of the page.
•To find a function or control by name, enter it in the Find in page box.
•If an ellipsis (...) appears in the Actions column for an item, click it to perform an action, such as edit or delete, on that item.
30
Object ManagerNavigation and Setup in Lightning Experience
Limitations
The Object Manager is limited to objects that support Lightning Experience features.
These object functions aren’t listed in the Object Manager. You can access them from elsewhere in Setup.
•Case Comment Triggers
•Feed Comment Triggers
•Feed Item Triggers
•Feed Item Layouts
•Group Layouts
•Group Triggers
•Group Member Triggers
•Group Record Triggers
•Publisher Layouts
•Topic Triggers
•Topic Assignment Triggers
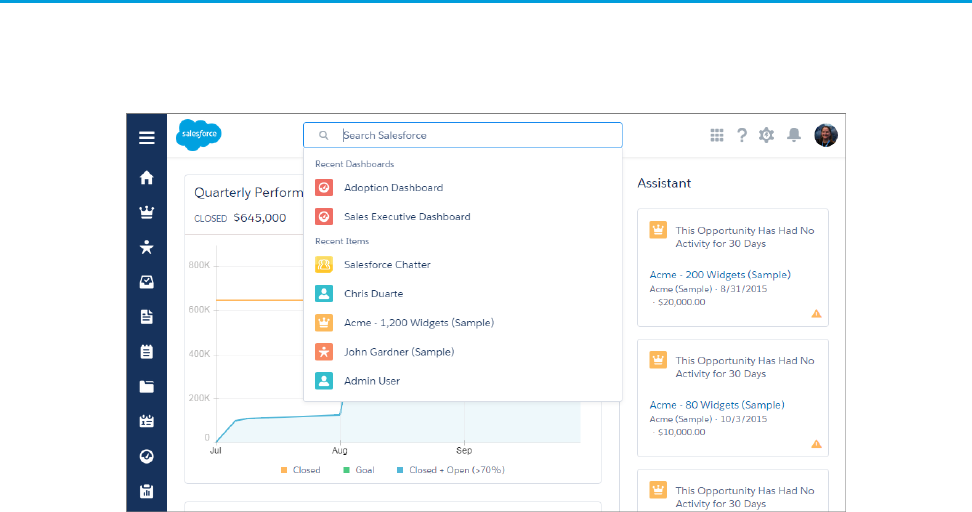
Global Search
You’ve got so much data stored in Salesforce, sometimes the quickest way to your destination is through search. You can find the global
search box at the top of any page in Lightning Experience.
When you click in the global search bar, you see a drop-down of all your recent items. This used to be in the navigation menu, but is
now easily accessible from global search anywhere!
As you type, you see potential matches for your search.
31
Global SearchNavigation and Setup in Lightning Experience
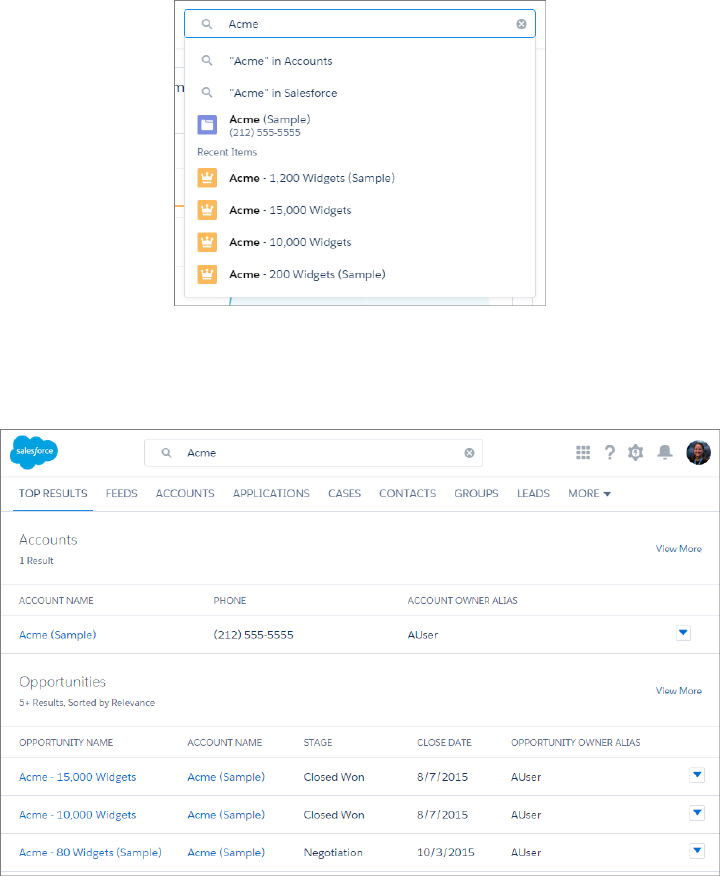
If none of these are what you’re looking for, press ENTER to see the full list of results. The result list returns your most frequently used
objects and the top results for those objects at the top of the list, and less frequently used objects at the bottom of the list.
If you click into global search from an object-specific view, like from an Account page, global search looks for Accounts based on your
search string. You can switch to Top Results for a federated search across your entire organization.
And, if you know the kind of record you’re looking for but aren’t on that object’s tab, you can search for that type of record by choosing
an item from the list below the search bar. The items in this list are ordered by how frequently you use them.
If you don’t see the object you’re looking for in the list but you’re positive it exists, don’t panic! Click More at the end of the list to see
all the objects. Currently the list is limited to Lightning Experience-supported objects.
Three Reasons You Might Not Find What You’re Looking for In Global Search
•It’s still getting added to the index. When you create or update a record, all the searchable content gets added to the index, which
can take about 15 minutes—or longer if a lot of edits have been made to the record.
•You’re trying to find a record with a field that isn’t searchable, or an object that isn’t searchable. Make sure the object and field you’re
searching for are stored in the index.
32
Global SearchNavigation and Setup in Lightning Experience
•You don’t have access to the record. Global search only returns results you have permission to view.
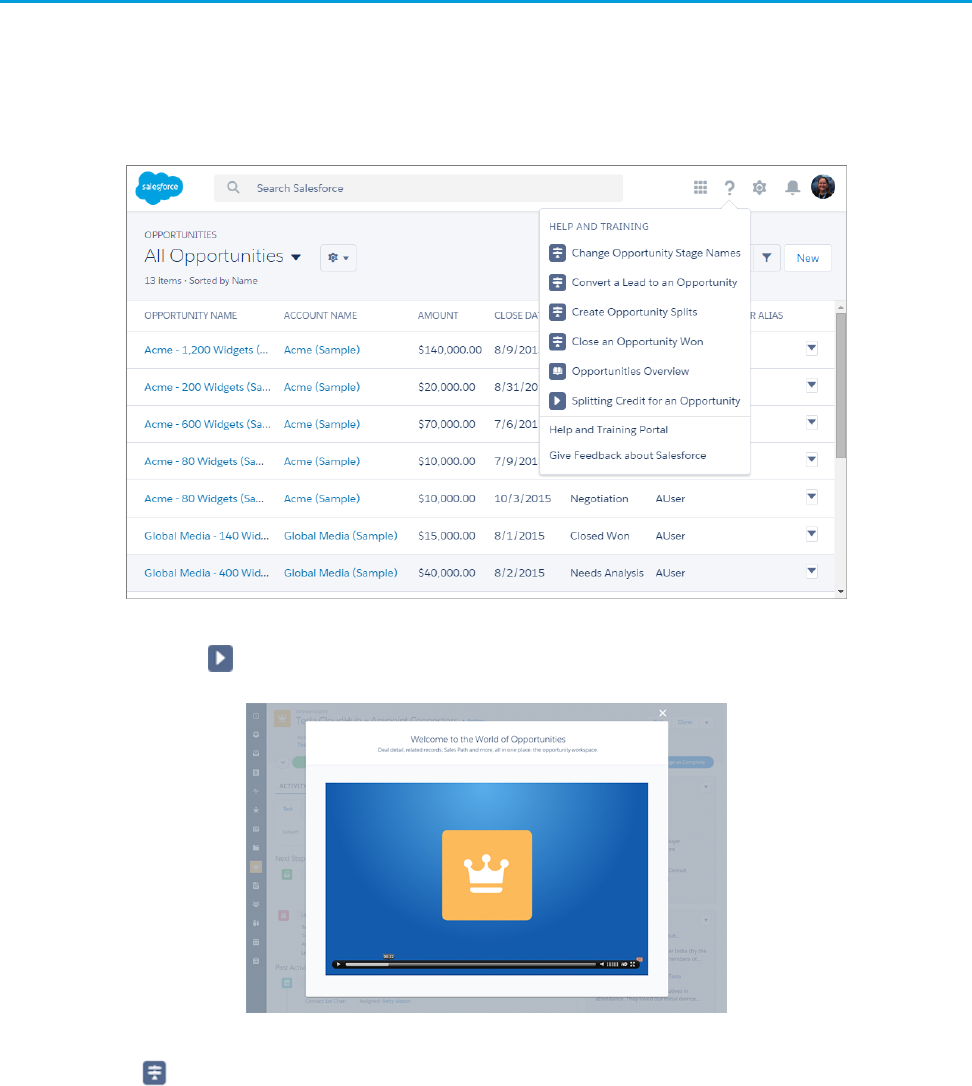
Lightning Experience Help Menu
In Lightning Experience, each page has a contextual help menu with links to resources—help topics, walkthroughs, videos, developer
guides, and PDFs—related to the specific tasks on that page.
On object pages, the menu replaces the “Help for this Page” link that you’re used to seeing in Salesforce Classic. The “Help for this Page”
link still appears on many Setup pages, but we encourage you to use the help menu instead for a broader selection of useful information.
When you click a video link ( ), a video player appears, allowing you to watch without leaving Salesforce.
Walkthrough links ( ) take you to the first step of the walkthrough in your organization. Help, developer guide, and PDF links open
in a new browser tab.
You can’t customize the items in the help menu. If you’ve created custom help links, those links still work from the “Help for this Page”
links in the framed Salesforce Classic pages. However, your custom help links don’t appear in the new Help menu.
33
Lightning Experience Help MenuNavigation and Setup in Lightning Experience

CHAPTER 6 Opportunities, Leads, and Selling in Lightning
Experience
We’ve taken your sales process and put it into an action-first workspace, designed to help your sales
reps work their deals faster and smarter. You can customize coaching scripts for each step in the sales
process, create records quickly with fewer clicks, and ultimately close deals faster.
In this chapter ...
•Explore the
Opportunity
Workspace
•Opportunity Home
•Explore the Lead
Workspace
34

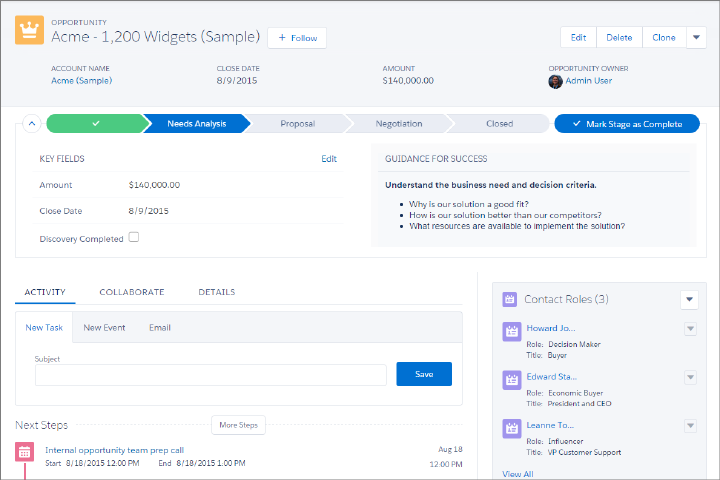
Explore the Opportunity Workspace
Opportunities have been given a makeover! When you visit an opportunity record in Lightning Experience, you’ll see some great new
enhancements that will help your sales users get the most out of their opportunities.
Here are just a few things your users can do from the Opportunity Workspace:
•Create and update tasks and meetings, log calls, and send email
•View key information for a deal, like its key players, account, close date, amount, owner, and stage
•Update an opportunity’s stage, close date, and amount
You don’t have to do anything to get opportunity workspace working for your users. However, as an administrator, you can enhance
your sales users’ workflow by customizing the sales path and the activity timeline to match their needs.
Sales Path
If you haven’t used sales paths before, like in Salesforce1, you may not be familiar with what they do. Sales paths guide your sales users
through each stage of your company’s sales process and help them stay focused on important sales tasks so they can close their deals
quickly.
35
Explore the Opportunity WorkspaceOpportunities, Leads, and Selling in Lightning Experience
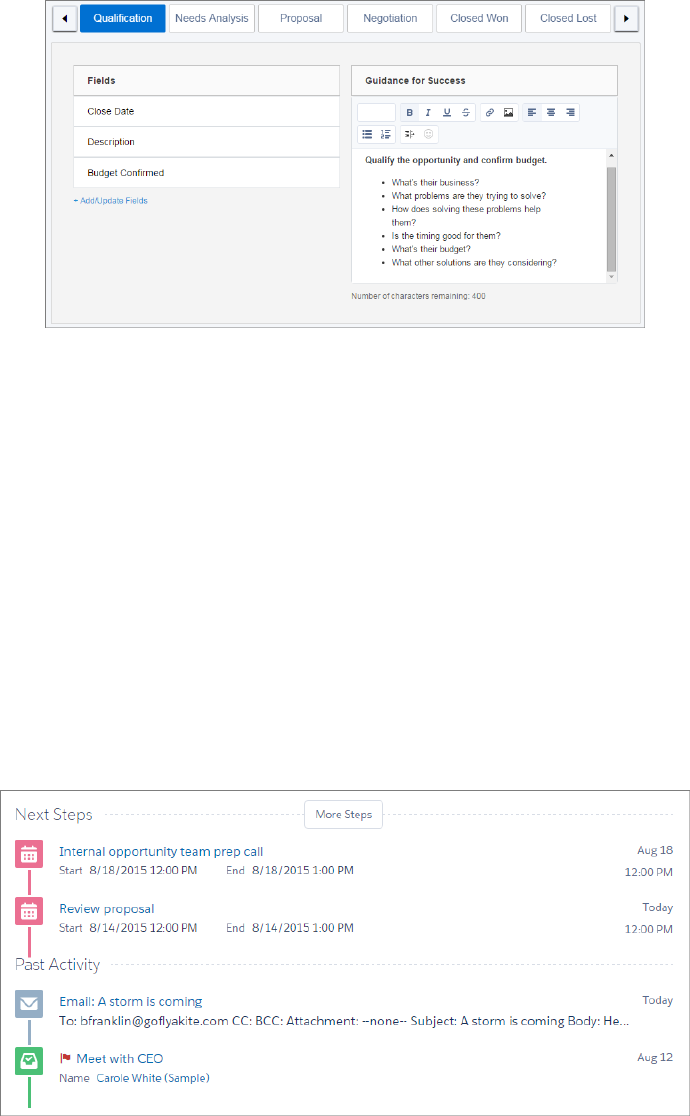
From Setup, enter Sales Path in the Quick Find box, then select Sales Path. You can modify the default sales path or create
a new one.
You can enter sales stages, the key fields that sales reps must complete at each stage, and configure the Guidance for Success area to
deliver relevant information for each stage, such as links to chatter posts and files, tips, or policy notes.
Sales Path Best Practices
•Provide guidance for success content, like links to Chatter posts and videos, tips, or policy reminders—anything that can help sales
reps get closer to sealing the deal.
•Keep your system performance optimal by creating sales paths that have 20 or fewer stages.
•Consider labeling sales paths for regions or industries, like “North American Sales Path” or “Steel Industry Sales Path”.
•If you set up record types, you can have one sales path for each record type. For example, the record type New Business might
include more prospecting-related fields, whereas the record type Existing Customer might include a field or stage for renewals.
Activity Timeline
With the activity timeline, your sales reps can keep a finger on the pulse of their deals. The timeline tracks meetings, tasks, calls, and
emails. Reps can see what they’ve done and what they still have left to do for each opportunity, lead, account, and contact.
36
Explore the Opportunity WorkspaceOpportunities, Leads, and Selling in Lightning Experience
Activity Timeline Considerations
When working with the activity timeline, keep in mind that:
The configuration of page layouts and record types affects the tabs in the activity composer
Don’t see the tabs for calls, tasks, events, or emails in the activity composer? See Configure the Call, Task, and Event Tabs in the
Activity Composer in Lightning Experience and Configure the Email Tab in the Activity Composer in Lightning Experience for help
configuring page layouts, record types, and user permissions so that the tabs are displayed.
The activity timeline replaces the Open Activities and Activity History related lists
On the detail page for objects that support activities, Lightning Experience doesn’t display Open Activities or Activity History along
with other related lists. It displays the activity timeline instead. Objects that support activities include opportunities, leads, accounts,
contacts, and any custom objects on which you enable activities. If you delete either activity related list from page layouts, Salesforce
doesn’t display the corresponding timeline sections—Next Steps or Past Activity—on those pages.
You can customize the display and order of fields in the Activity Timeline
In the activity timeline, you can customize the display and order of fields for events, tasks, and logged calls using event and task
compact layouts. However, even if you remove certain fields from a layout, they remain in the timeline because they contain critical
activity information. For example, suppose that you remove the due date, the date and time, or the task status fields from the compact
layouts. The event start date and time, the task checkbox, the task due date, and the call logging date still appear on activities in the
timeline. The description field on events and the comments field on tasks also always appear in the timeline, although they aren’t
available in the compact layout. The remaining fields visible in the timeline reflect the fields you include in the compact layout.
The activity timeline icons aren’t customizable
You can’t customize the icons for activity types (events, tasks, calls, and email) in the timeline.
Opportunity Home
The Opportunity home page in Lightning Experience looks a lot like other object home pages at first glance. You might not notice it at
first, but an awesome feature is waiting to be discovered there.
The Opportunity Board
The Opportunity Board is a visual representation of all of a sales rep’s deals, organized by each stage in the pipeline. You can get to the
Board view by selecting it from the Displays menu on all list views except Recently Viewed.
37
Opportunity HomeOpportunities, Leads, and Selling in Lightning Experience
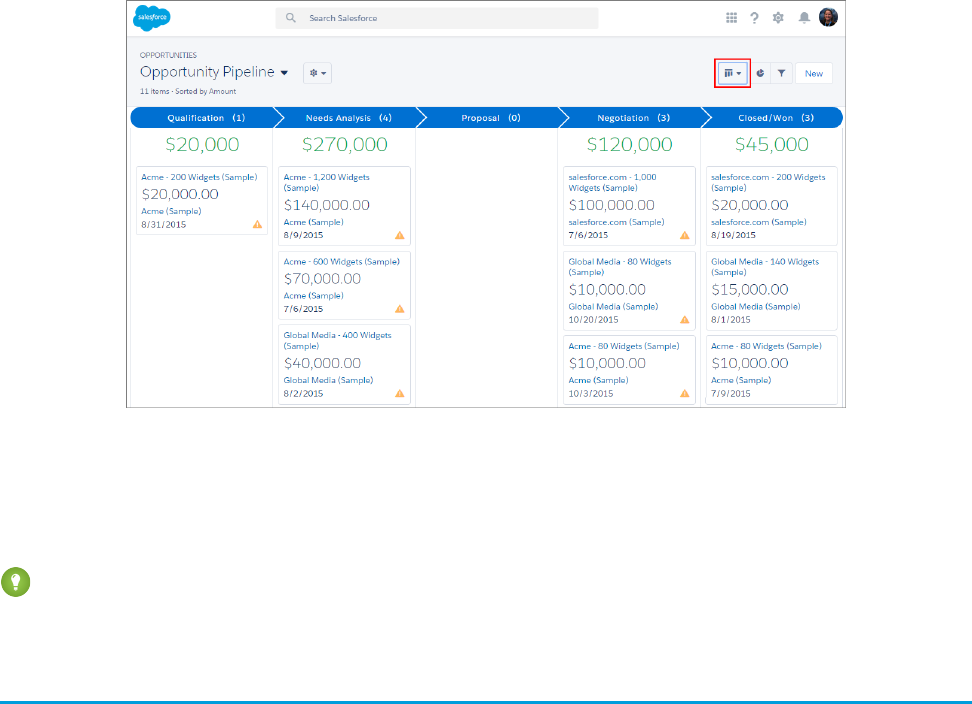
Here, your users can manage their opportunities through all phases of the pipeline, dragging and dropping opportunities from one
column to another. A yellow triangle on an opportunity card can indicate three types of alerts: overdue tasks, no open activities, or no
activity for 30 days. Users can click the triangle to create tasks and events right from the card. Items on the board vary based on which
list view is open.
Tip: The Opportunity Board can only show one record type at a time, so if your organization uses multiple record types, we
recommend that you create different list views for each record type.
Explore the Lead Workspace
Qualifying and converting leads just got easier for your users. Lightning Experience includes a lead workspace—command central where
your users can track, update, and convert leads into opportunities.
Just like with opportunities, the workspace for leads contains Sales Path. As an administrator, you can set up sales paths to include specific
fields and guidance for success in each stage of the leads process.
38
Explore the Lead WorkspaceOpportunities, Leads, and Selling in Lightning Experience
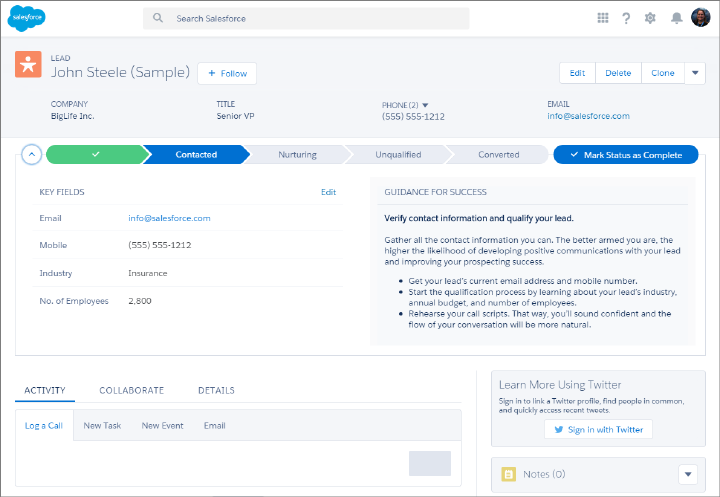
To convert a lead, your users click the Converted stage in the sales path. Then, they either select an account or create a new one. They
can also create an opportunity.
39
Explore the Lead WorkspaceOpportunities, Leads, and Selling in Lightning Experience

CHAPTER 7 Explore More of Lightning Experience
Opportunities and leads aren’t the only places we’ve made improvements. There are slick new features
to discover elsewhere, like the Home page, calendar, enhanced list views, and revamped home pages
for objects like acccounts, contacts, and cases.
In this chapter ...
•The Home Page
•Object Home and List
Views
•Accounts, Contacts,
and Other Objects
•User Profile
•Tasks, Calendar, and
Events
•Feeds in Lightning
Experience
40
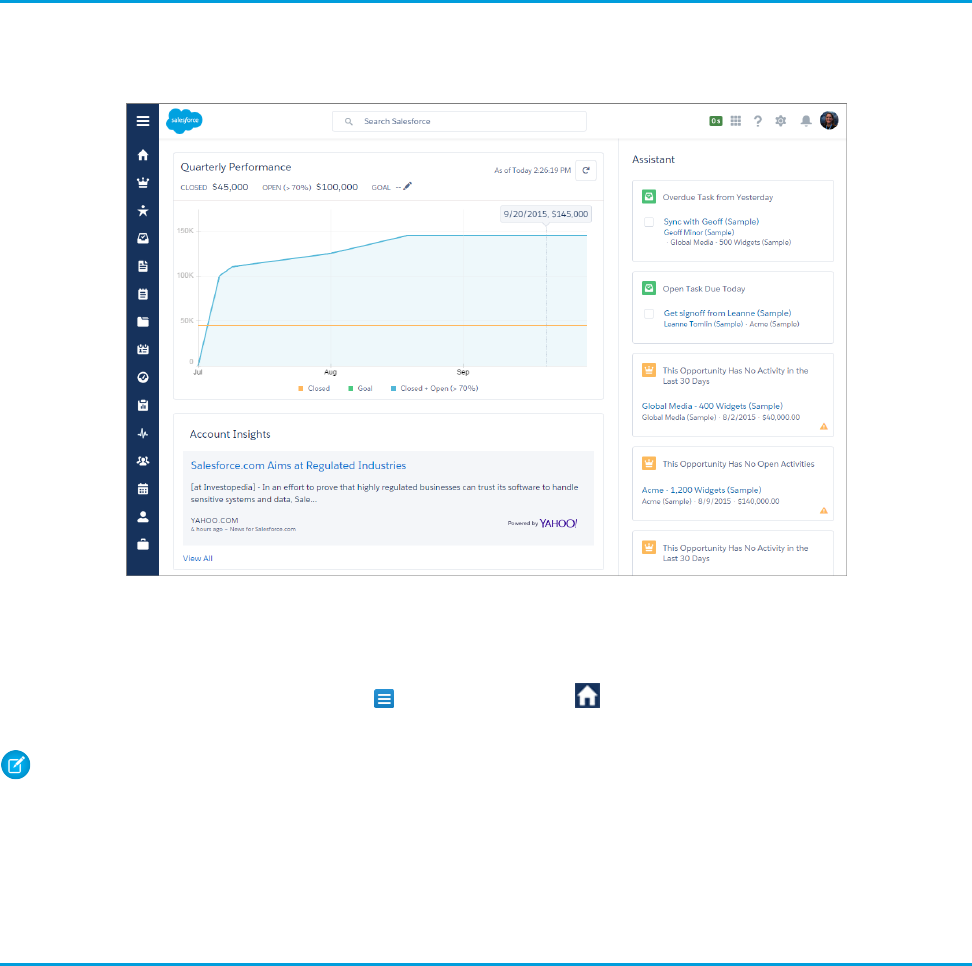
The Home Page
The Home page displays key items for each user’s day. From the Home page, your users can manage their day, including viewing their
quarterly performance summary and the most relevant tasks and updates.
Give your users access to opportunity details so that they can get the most out of the Home page.
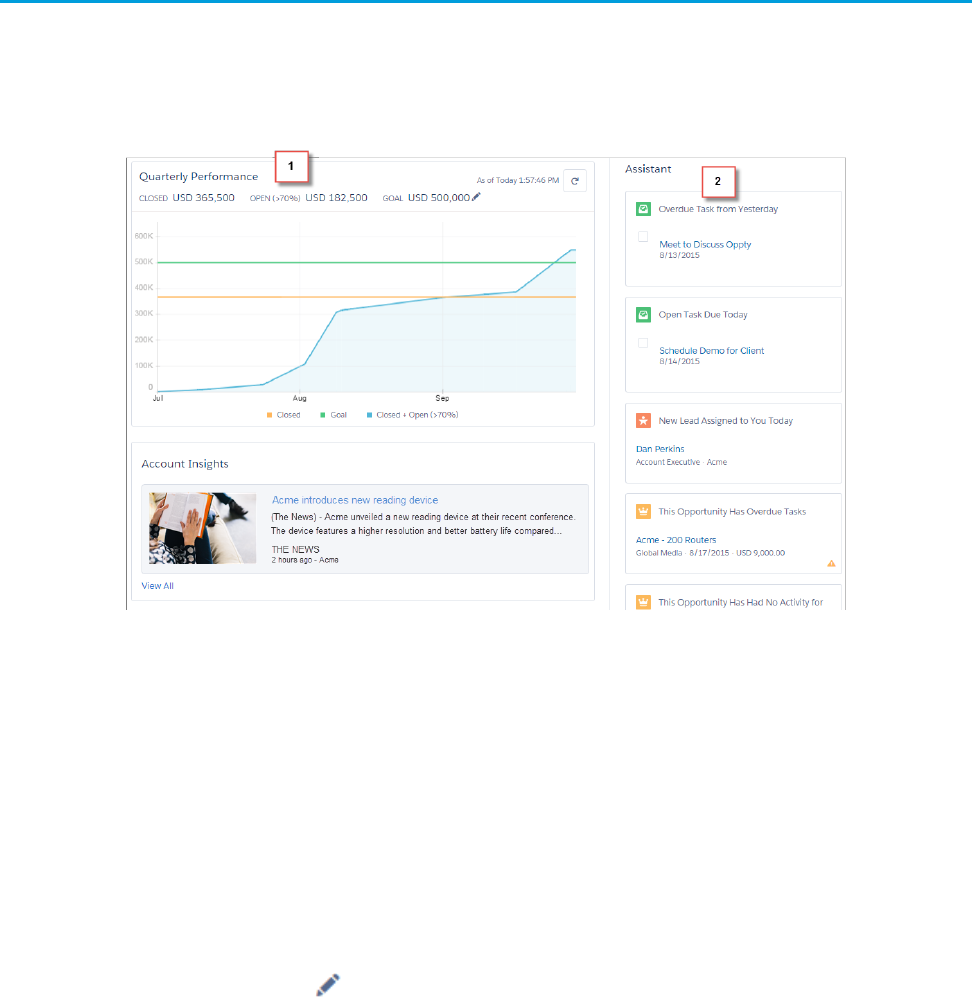
Performance Chart (1)
The performance chart displays data based on opportunities belonging to the user or the user’s sales team. Only opportunities for the
current sales quarter that are closed or open with a probability over 70% are displayed. Multicurrency is supported in the performance
chart.
Curious about the numbers at the top of the chart? Here’s what they mean.
•Closed—The sum of a user’s closed opportunities.
•Open (>70%)—The sum of a user’s open opportunities with a probability over 70%. The blue line in the chart is the combined total
of the closed opportunities and open opportunities with a probability over 70%.
•Goal—A user’s customizable sales goal for the quarter. This field is specific to the performance chart and has no impact on forecast
quotas or any other type of goals. Click to set the goal.
Assistant (2)
The Assistant shows your users things they need to address, including upcoming and overdue tasks, new leads, and activities related to
opportunities.
Items in the Assistant appear in the following order:
•Tasks that are overdue
•Tasks due today
41
The Home PageExplore More of Lightning Experience
•Leads assigned to you today
•Opportunities with overdue tasks
•Opportunities with no activity in 30 days
•Opportunities with no open activity
If your users don’t have access to activities on opportunities or if the opportunity pipeline is off, they instead see opportunities that have
close dates over the next 90 days.
Note: In Salesforce Classic, the Home page has a Chatter feed. In Lightning Experience, that feed isn't there. Instead, Chatter (the
"Feed") is on the navigation menu, under the "Feed" icon. When you want to access Chatter on a record, go to the Collaborate
tab.
To populate the performance chart, Top Deals, and the Assistant, users must have:
Table 1: Required Permissions for Home Features
AssistantTop DealsPerformance ChartPermission or Setting
Read access to the Opportunity object and sharing access
to relevant opportunities
Read access to the Opportunity object’s Amount field
Read access to the Opportunity object’s Probability field
“Run Reports” user permission enabled for users
Closed opportunities or open opportunities with a
probability over 70% during the current fiscal quarter
Read access to the Lead object
Note: You can’t customize the layout of the Home page, add custom components, or move related lists.
Object Home and List Views
Salesforce Classic has a separate page for an object’s home and another for its list views. In Lightning Experience, we’ve combined them!
42
Object Home and List ViewsExplore More of Lightning Experience
In the charts panel ( ), you can change the type of chart or create a new one.
The name of the recent records list that displays by default on the home page for standard and custom objects is different in Lightning
Experience. It’s called Recently Viewed. There’s another list view available for most standard objects that has the object type specified
in the name. For example, the list view for accounts is called Recently Viewed Accounts. These two list views, Recently Viewed and
Recently Viewed Object, show the same records. Neither list is deletable, filterable, or editable.
As an administrator, you can configure an object’s Recently Viewed search layout for your users. The search layout controls what all users
see when they land on that object’s home page. In Lightning Experience, from Setup, find the object in the Object Manager, then scroll
to its Search Layout related list and edit the Search Results search layout.
Limitations and Differences
Some features and links that are available on object home pages in Salesforce Classic aren’t available on comparable pages in Lightning
Experience. Here are a few examples. The rest can be found in Lightning Experience Considerations.
•Navigation through list views has changed. Because list views have infinite scrolling, you can’t specify the number of records to show
per page. Also, you can’t navigate through pages with arrow buttons, and you can’t jump to a specific page of results. There’s no
alphabet rolodex for list views.
•Your users can reorder the columns of the Recently Viewed Object list in Salesforce Classic and the changes are reflected in
Lightning Experience.
•Custom buttons and custom actions aren’t supported for list views or list view items.
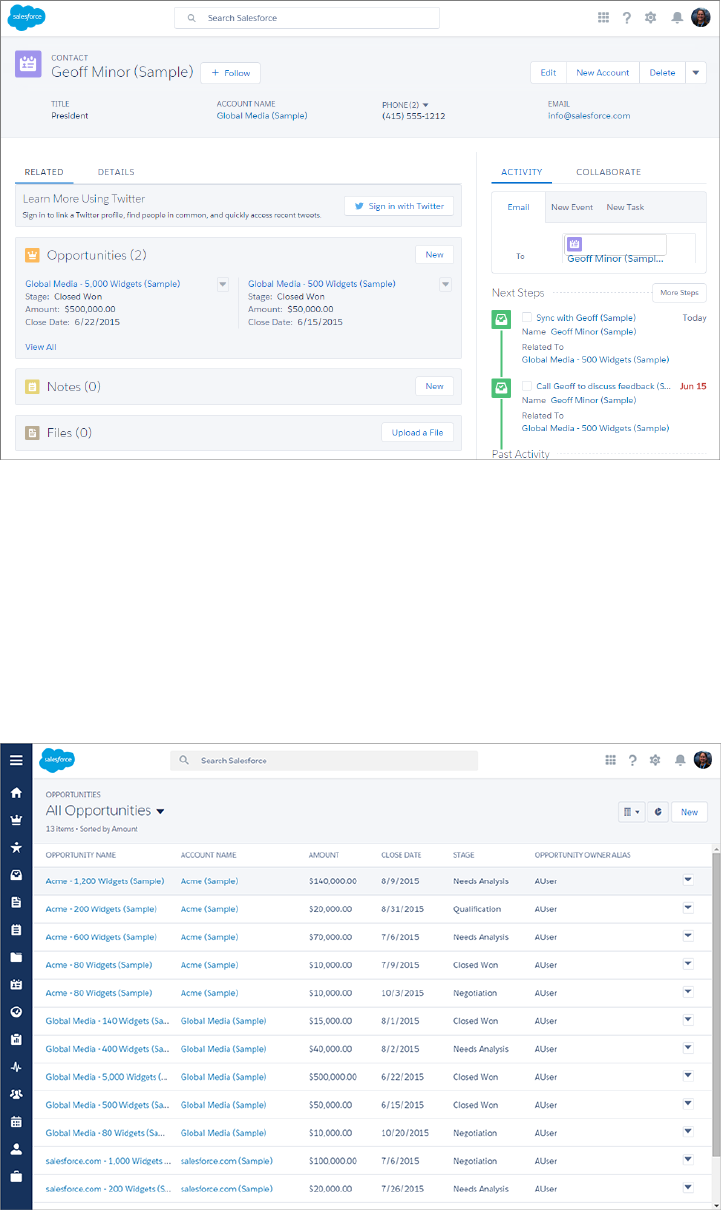
Accounts, Contacts, and Other Objects
Opportunities and leads have special workspaces. The other objects have a different structure. Some elements, like related lists and the
Activity and Collaborate tabs, appear in different places than we saw on opportunities and leads.
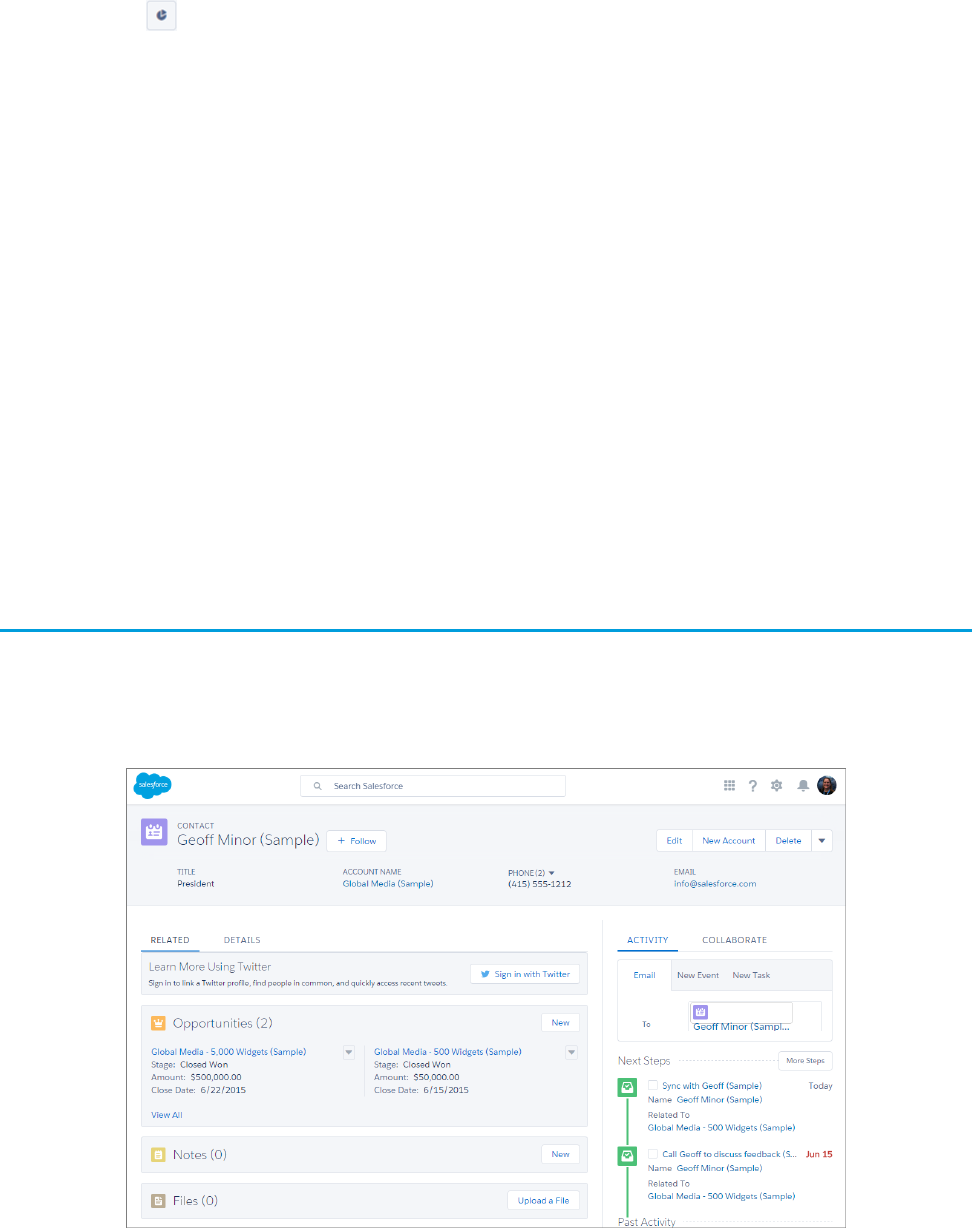
For example, here’s a contact page.
43
Accounts, Contacts, and Other ObjectsExplore More of Lightning Experience
The highlights panel is in the same place across all objects. But here there’s no Sales Path, and the Activity and Collaborate tabs are
together in the right hand column. Related lists are in their own tab in the main part of the page, alongside the Details tab.
Some objects have special components that appear on their pages, but the overall structure remains the same across all of them.
Accounts
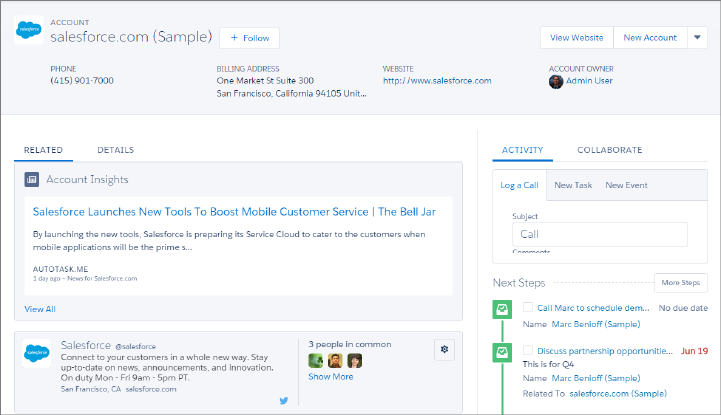
Accounts have the Account Insights feature, which also appears on the Home page. Account Insights displays up to 10 unique news
articles per account, based on the account’s name and industry. Articles are selected based on recently viewed accounts and the accounts
that are associated with attendees on a user’s upcoming calendar events.
Accounts, contacts, and leads have the Twitter component, which lets you associate a Twitter profile to an account, contact, or lead. The
Twitter card shows the Twitter profile information and a count of how many "people in common" the Salesforce user has in common
with the linked Twitter user.
Cases
Cases look a little bit different than other records. Cases display a feed first rather than record details or related information, because
support agents mainly collaborate and work with activities in a feed. Details appear next to the feed. You don’t see Activities and
Collaboration because they display directly in the feed.
44
Accounts, Contacts, and Other ObjectsExplore More of Lightning Experience
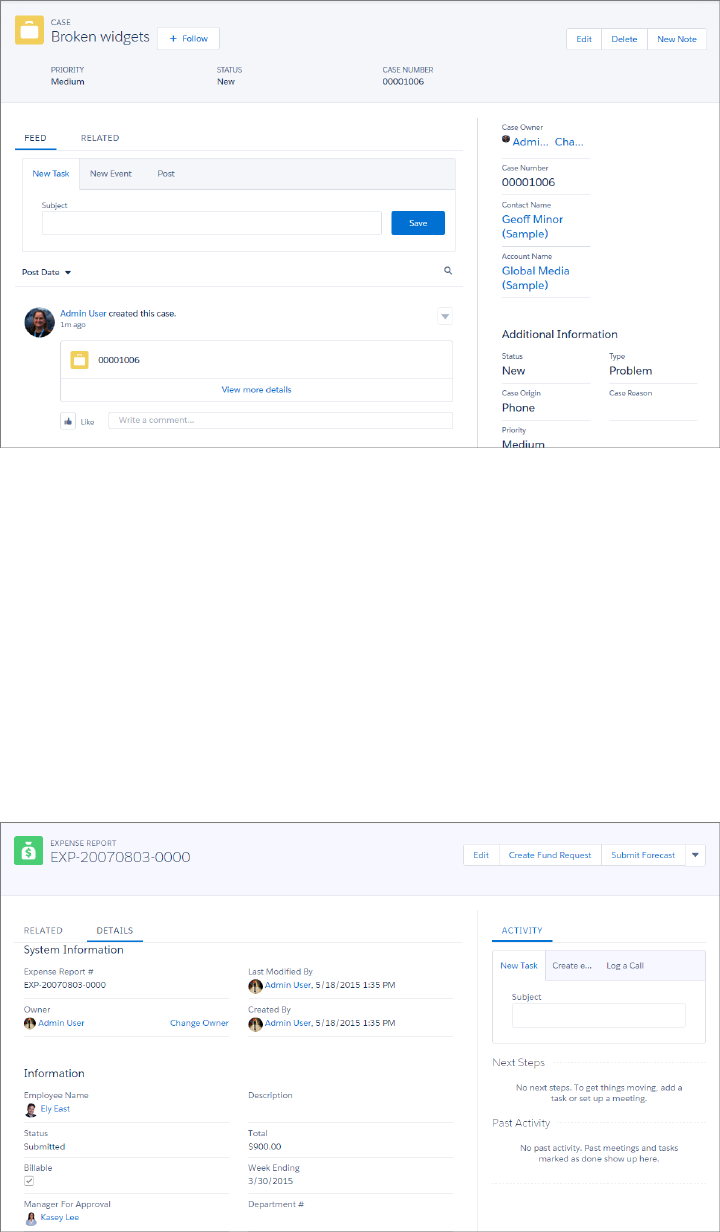
If you turn off Case Feed, cases look like other records. Activities and collaboration appear, but the feed-first design disappears and adds
more clicks and context-switching to cases. You can use collaboration (Chatter) instead of feed, but collaboration doesn’t include useful
case feed publishers, such as email, log a call, or change status.
To fully benefit from new feed-first design on cases, recreate the standard case feed publishers. The standard publishers aren’t available,
but you can quickly recreate them as quick actions on the Case object. One benefit of recreating the publishers as quick actions is that
they appear on mobile devices, whereas standard case feed publishers don’t.
Custom Objects
Custom objects are supported in Lightning Experience, and custom object home pages contain the same standard elements as other
objects, such as details, related lists, highlights panel, activities and a feed (Collaborate).
45
Accounts, Contacts, and Other ObjectsExplore More of Lightning Experience
On this particular custom object, Expense Report, feed tracking hasn’t been enabled. So, the Collaborate tab, which you’d normally see
next to Activity, doesn’t appear.
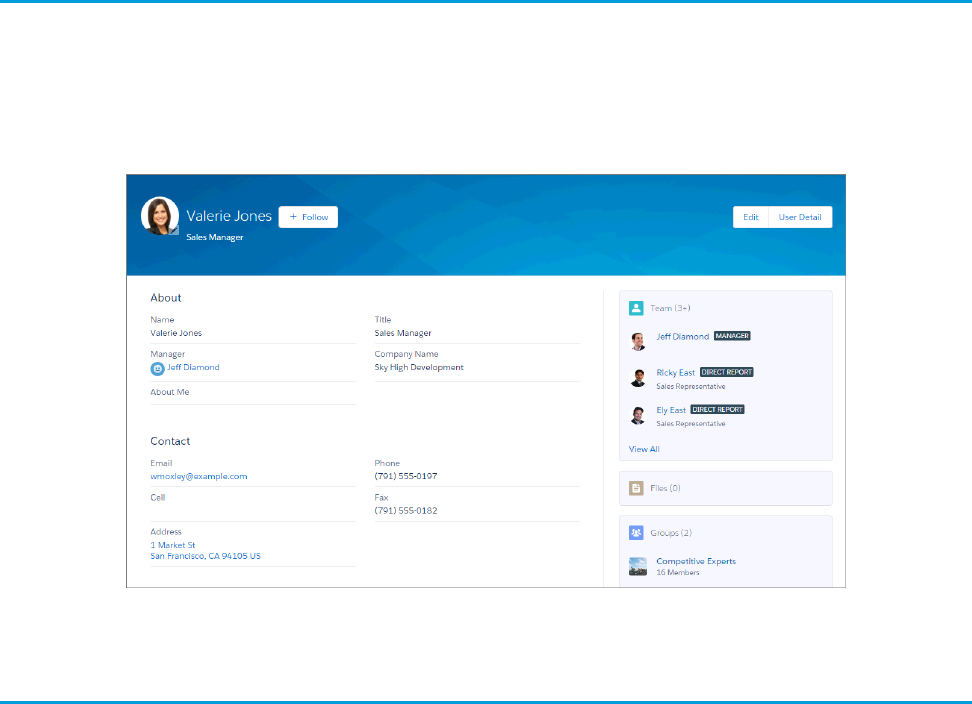
User Profile
The user profile page has been streamlined in Lightning Experience. From here, you can follow a user, see their details, edit their
information (if you have permission) and see team members, files, groups, and other related information.
As with other objects, the pertinent details are in the main part of the page and the related lists are in the right-hand column. One unique
thing about the user profile page is that the Google map that you see by default on address fields for other objects is disabled for users.
Tasks, Calendar, and Events
Now there’s a better way to track the work you need to do to move deals ahead. We’ve put some nifty enhancements to tasks into
Lightning Experience.
46
User ProfileExplore More of Lightning Experience
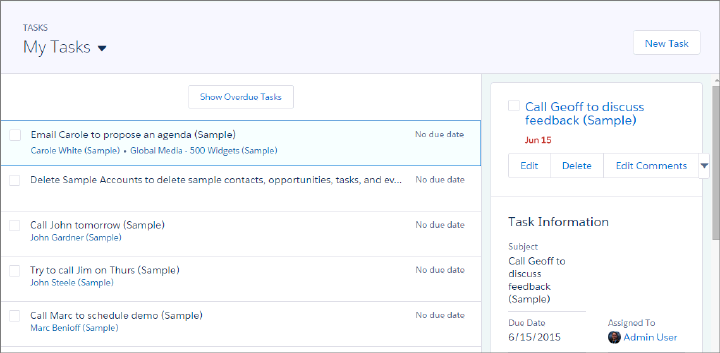
•View a list of all your open tasks, showing the opportunities, accounts, and other records they’re related to. Details are right there
on the same page.
•Switch to views of tasks due today, completed tasks, and tasks you’ve delegated.
•To close or reopen a task, just check it off your list. No need to open the record, edit, and save.
•If you have 10 or more overdue tasks, they’re collapsed under Show More Overdue Tasks.
In the task list, you can customize the display and order of fields for individual tasks using task compact layouts. However, even if you
remove certain fields from a layout, they remain in the task list because they contain critical task information. For example, suppose that
you remove the status and due date fields from a compact layout. The task checkbox and the due date still appear on tasks in the list.
The remaining fields visible in the list reflect the fields you include in the compact layout.
Calendar
Enjoy a streamlined calendar look and feel when you view, create, and edit Salesforce events in Lightning Experience. The calendar
displays all events owned by a user, including events outside a user’s business hours.
Calendar week view:
47
Tasks, Calendar, and EventsExplore More of Lightning Experience
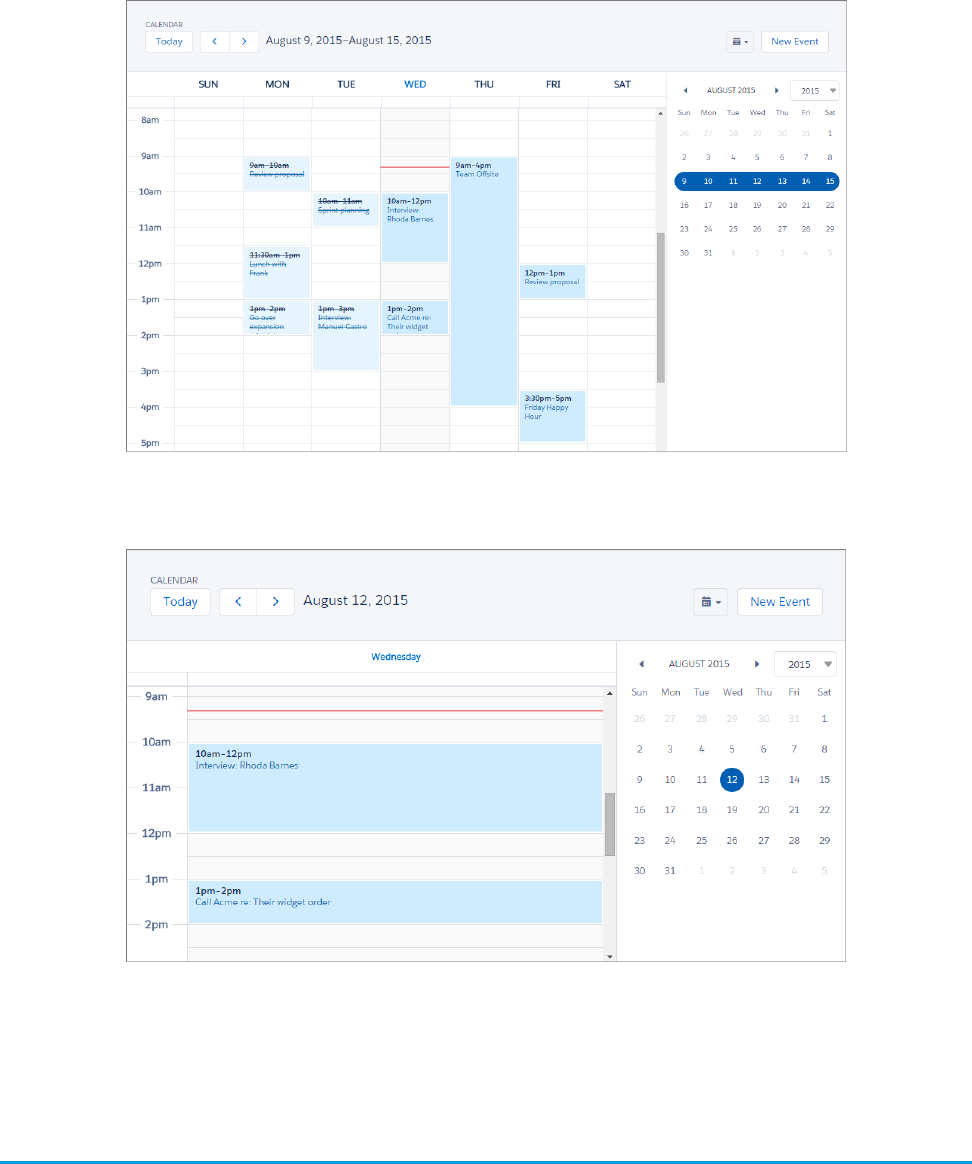
Calendar day view:
You can’t set or view event reminders; create or edit recurring events; or create, edit, accept, or decline meeting invites. However, suppose
that a Salesforce Classic user creates a series of recurring events. Lightning Experience users see the individual events on their calendars.
Similarly, Lightning Experience users can see individual events that they’ve been invited to by Salesforce Classic users.
Feeds in Lightning Experience
Wondering what’s up with Chatter in Lightning Experience? We moved the Chatter tab and added a Collaborate tab on record pages.
And we made everything look spiffier too!
48
Feeds in Lightning ExperienceExplore More of Lightning Experience
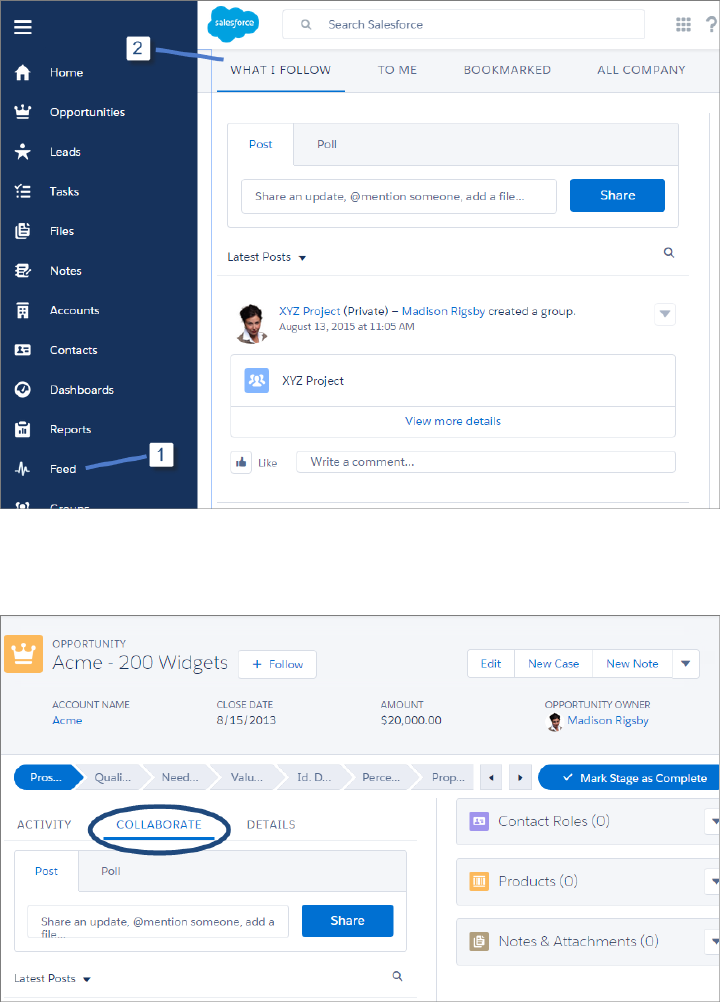
In Lightning Experience, users access their feeds from the navigation menu (1) and switch between the different feeds using the links
at the top (2) of the page.
In the opportunity workspace and on records, the feed displays on the Collaborate tab. Chatter actions are available in the composer.
49
Feeds in Lightning ExperienceExplore More of Lightning Experience

CHAPTER 8 Reports and Dashboards in Lightning Experience
We’ve redesigned reports and dashboards for Lightning Experience, making them more interactive, easy
to navigate and easy to edit. Dig a little deeper with us and see what reports and dashboards in Lightning
Experience can do!
In this chapter ...
•Report and
Dashboard Home
Pages Here are several of the cool new features for reports and dashboards in Lightning Experience.
•Redesigned report and dashboard home pages
•Create Beautiful
Dashboards Using a •New dashboard editor, featuring a dynamic, flexible layout that’s mobile-ready
New, Feature-Rich
Editor •Interactive dashboards
•New report run page with interactive charts and filters
•Present and Share
Information in •Sales rep-focused enhancements, including auto-hidden details on matrix reports and the ability to
hide totals and subgroups on the report run page
Interactive
Dashboards •Easy navigation via quick tabs and search
•Get More Information
from Interactive
•Real-time data from your standard and custom objects
•Best practice Sales dashboards pre-installed for you
Charts and Filters on
•Easy migration from Salesforce Classic to Lightning Experience, with reports and dashboards
automatically viewable and inheriting all permissions and sharing already defined
the New Report Run
Page
•Reports and
Dashboards:
Compatibility
Between Lightning
Experience and
Salesforce Classic
50
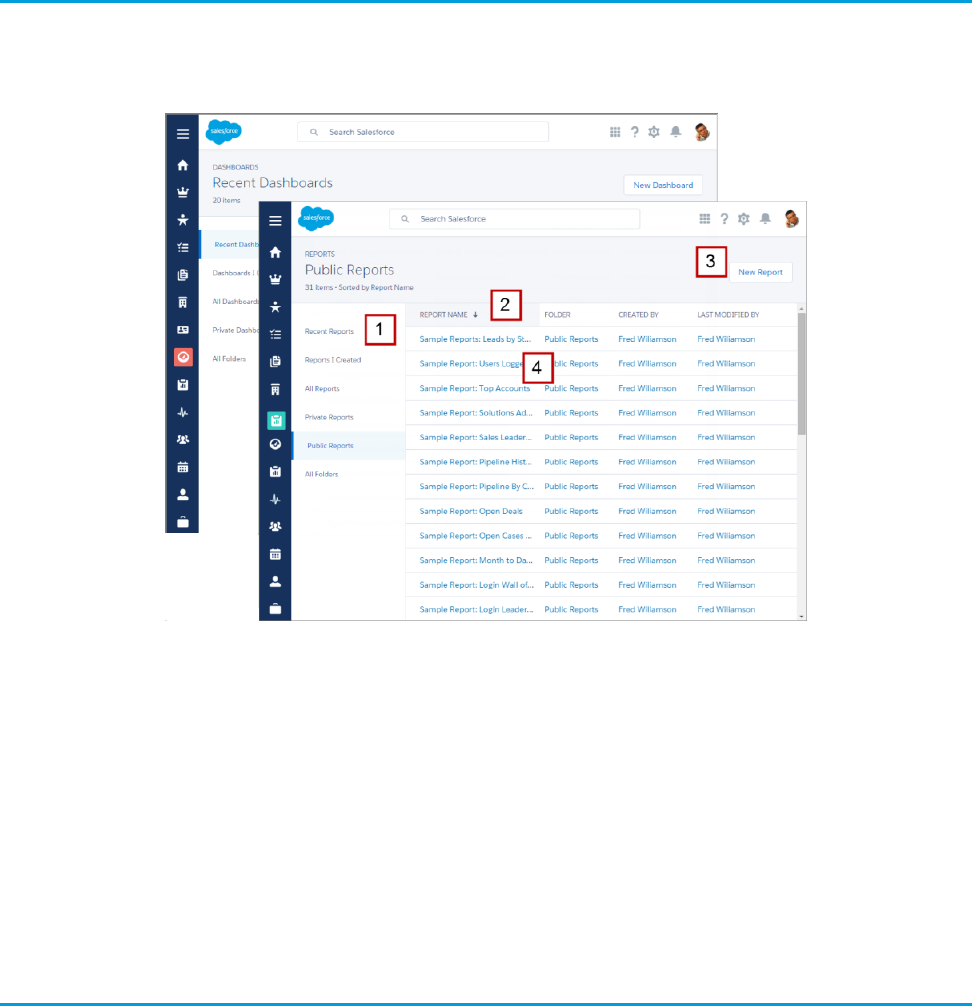
Report and Dashboard Home Pages
We’ve redesigned the Reports and Dashboards home pages in Lightning Experience so that your users can find and create reports and
dashboards more easily.
You can find a report or dashboard using filtered lists and folders (1). Filtered lists are the fastest way to find the report or dashboard
you’re looking for. For example, you can quickly find the Open Deals report you were reading last Friday in Recent Reports. Folders let
you group related reports or dashboards, so they’re easy to find again later.
Click a column heading (2) to sort by name, folder, creator, or whoever last modified a report or dashboard. Click again to reverse the
sort order.
You can build a new report or dashboard (3) right from this page. In Lightning Experience, you build reports just like you did in Salesforce
Classic using the report builder. On the Dashboards home page, clicking New Dashboard launches the brand new dashboard editor,
which we’ll look at in more depth next.
To run and view a report or open a dashboard, click its name (4).
Create Beautiful Dashboards Using a New, Feature-Rich Editor
Lightning Experience introduces a new dashboard editor that’ll usher in a whole new generation of dashboards.
51
Report and Dashboard Home PagesReports and Dashboards in Lightning Experience
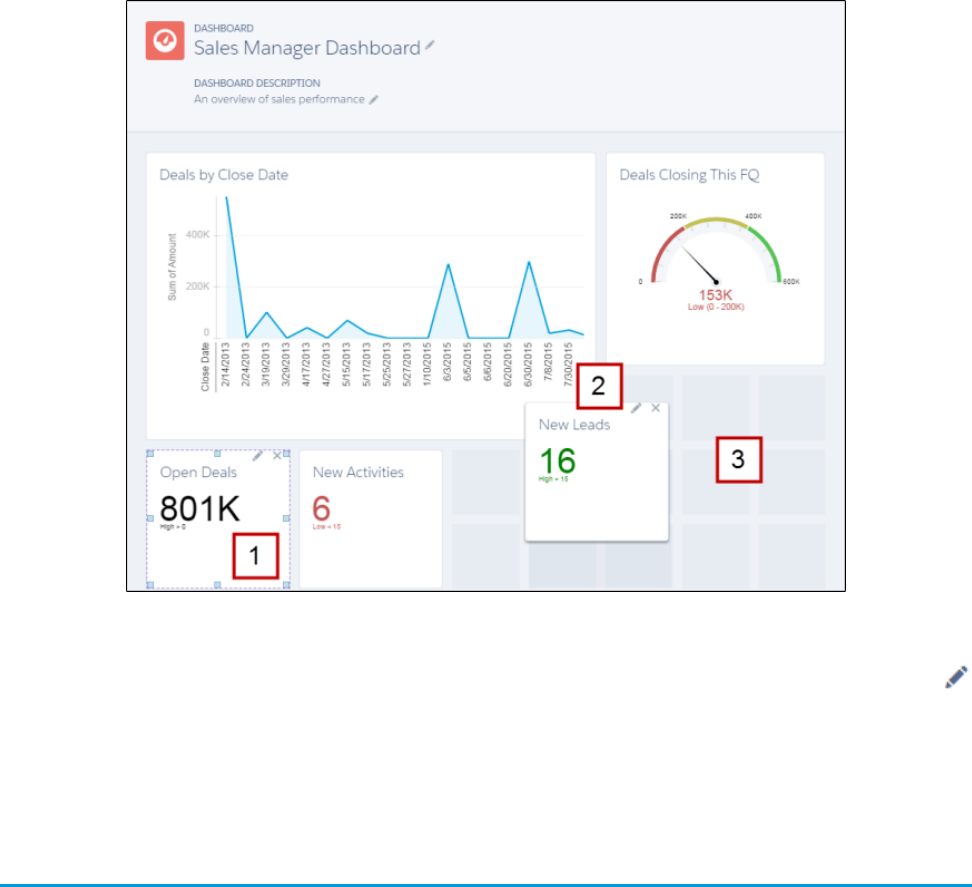
Drag the corners and sides of dashboard components to make them bigger or smaller (1). Components can span multiple columns and
rows, so you can show more fields on a graph without needing to scroll. Charts automatically resize to match component size. Click
to choose the report that provides data for the component, chart type, the report data drawn in the chart, chart title, or range.
You can arrange dashboard components more easily than ever by dragging them anywhere on the flexible grid layout (2). Not only that,
but you can create dashboards with more than three columns (3)! The foundation of each dashboard is a responsive grid, so you can
compare metrics side-by-side-by-side.
Present and Share Information in Interactive Dashboards
Interactive dashboard components give viewers more information and link to data-supplying reports.
52
Present and Share Information in Interactive DashboardsReports and Dashboards in Lightning Experience
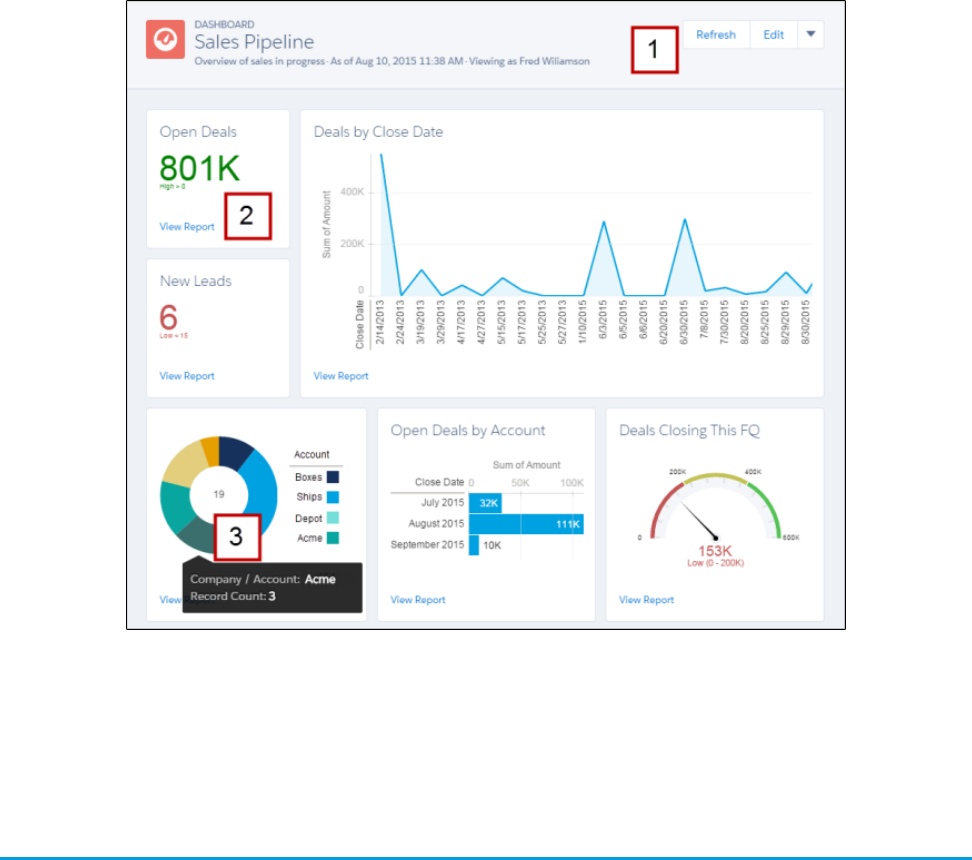
The buttons and drop-down menu (1) provide one-click access to administrative tasks, such as refresh, edit, clone, save, and delete.
Have more questions about a metric or chart? Click View Report (2) to drill into the data. Hover over a chart (3) to learn more about it.
Get More Information from Interactive Charts and Filters on the New
Report Run Page
In Lightning Experience, new features on the report run page ensure that reports answer even your toughest questions.
53
Get More Information from Interactive Charts and Filters on
the New Report Run Page
Reports and Dashboards in Lightning Experience
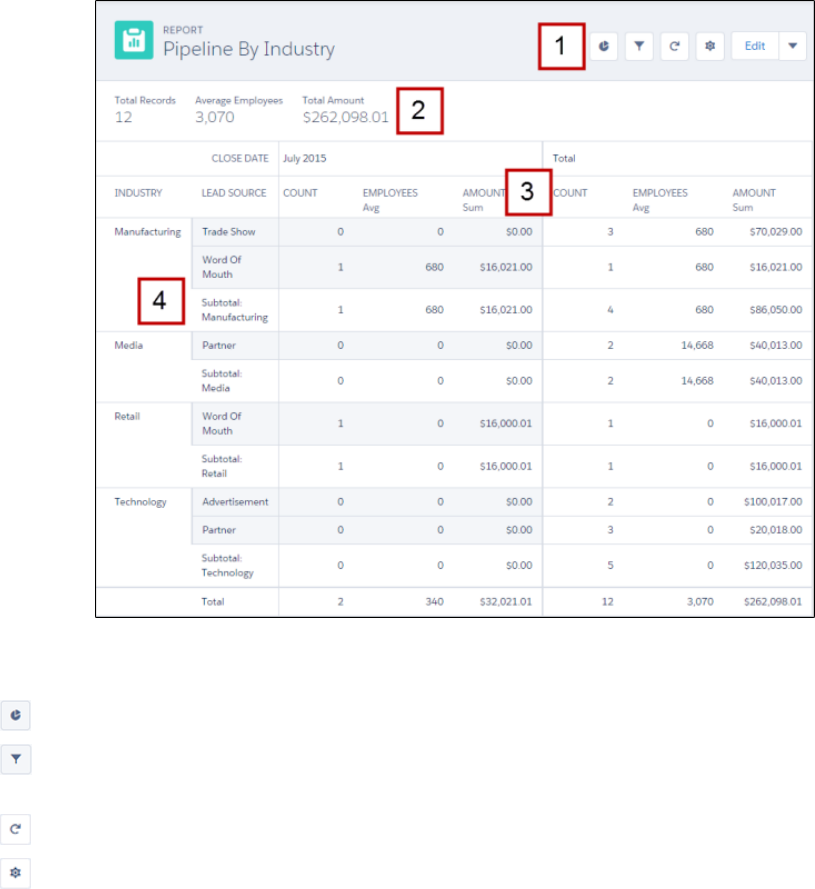
Get more from your report with the tools in the header (1).
• — Show or hide a report chart.
• — Add, remove, or change report filters. After applying a filter, the report automatically refreshes to show filtered data. You
no longer have to open the report builder to filter a report.
• — Refresh your report to show the latest data.
• — Show or hide subtotals, grand totals, and record counts from your report.
Clicking Edit launches the report builder. The action menu provides one-click access to saving, cloning, and deleting the report.
You can view key metrics at the top of every report (2). Report headers float on both the X and Y axes (3), so you always know what field
you’re reviewing without needing to scroll. And, we’ve redesigned the report format so groupings are easier to read (4).
54
Get More Information from Interactive Charts and Filters on
the New Report Run Page
Reports and Dashboards in Lightning Experience
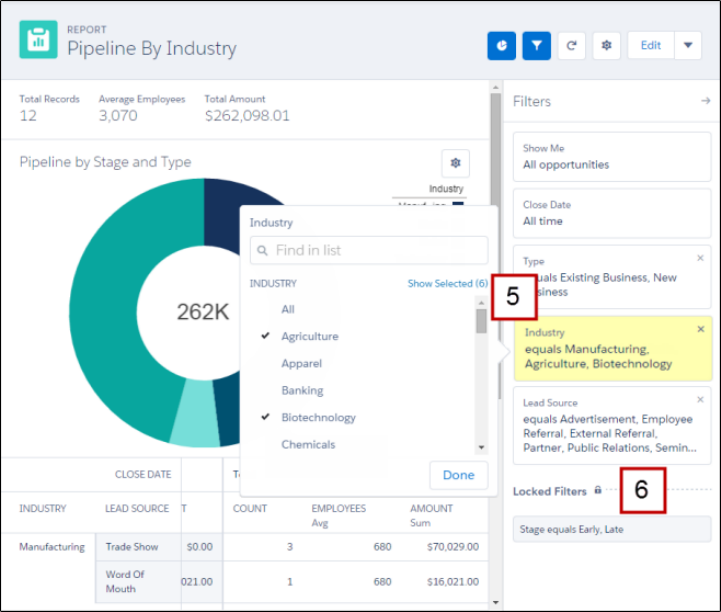
You can add, remove, and edit report filters (5) right from the report’s page. You no longer have to open the report builder to filter the
report you’re reading. If you want to see your sales pipeline for the apparel industry, edit the Industry filter accordingly and your
report refreshes.
You can also lock filters (6). If you want to share a report about your late-stage sales pipeline and don’t want to share early-stage data,
lock the Stage filter. Locked filters can’t be edited on the report run page. You lock and unlock filters in the report builder.
55
Get More Information from Interactive Charts and Filters on
the New Report Run Page
Reports and Dashboards in Lightning Experience

You may be wondering: “But can I customize it?” Yes, you can (7)! Change the chart type, title, and more from the chart options menu
( ).
Reports and Dashboards: Compatibility Between Lightning Experience
and Salesforce Classic
Wondering how reports or dashboards created in one user interface work in the other? Here is a breakdown of what to expect.
For reports and dashboards created in Salesforce Classic:
•You can view and edit both in Lightning Experience.
•Lightning Experience obeys sharing rules set on report and dashboard folders in Salesforce Classic. Users can’t set sharing rules by
folder in Lightning Experience.
•You can view and open folders that you created in Salesforce Classic in Lightning Experience.
•Joined reports aren’t supported in Lightning Experience.
For reports and dashboards created in Lightning Experience:
•You can view and edit reports created in Lightning Experience in Salesforce Classic.
•You can’t edit dashboards created in Lightning Experience in Salesforce Classic.
•Dashboards that you create in Lightning Experience that have more than three columns automatically display in Salesforce Classic
with three columns (retaining all dashboard components).
56
Reports and Dashboards: Compatibility Between Lightning
Experience and Salesforce Classic
Reports and Dashboards in Lightning Experience
Some Salesforce data and features aren’t available in the new user interface. And some features don’t have full parity with what’s available
in Salesforce Classic. For more information on the limitations for reports and dashboards, see the Salesforce Help.
57
Reports and Dashboards: Compatibility Between Lightning
Experience and Salesforce Classic
Reports and Dashboards in Lightning Experience

HOW YOUR EXISTING CUSTOMIZATIONS AFFECT
LIGHTNING EXPERIENCE
CHAPTER 9 Your Layouts Can Customize Lightning Experience
Records
You can customize the content of your record pages in Lightning Experience using tools you’re already
familiar with: page layouts and compact layouts.
In this chapter ...
•Page Layouts in
Lightning Experience
•Compact Layouts in
Lightning Experience
58
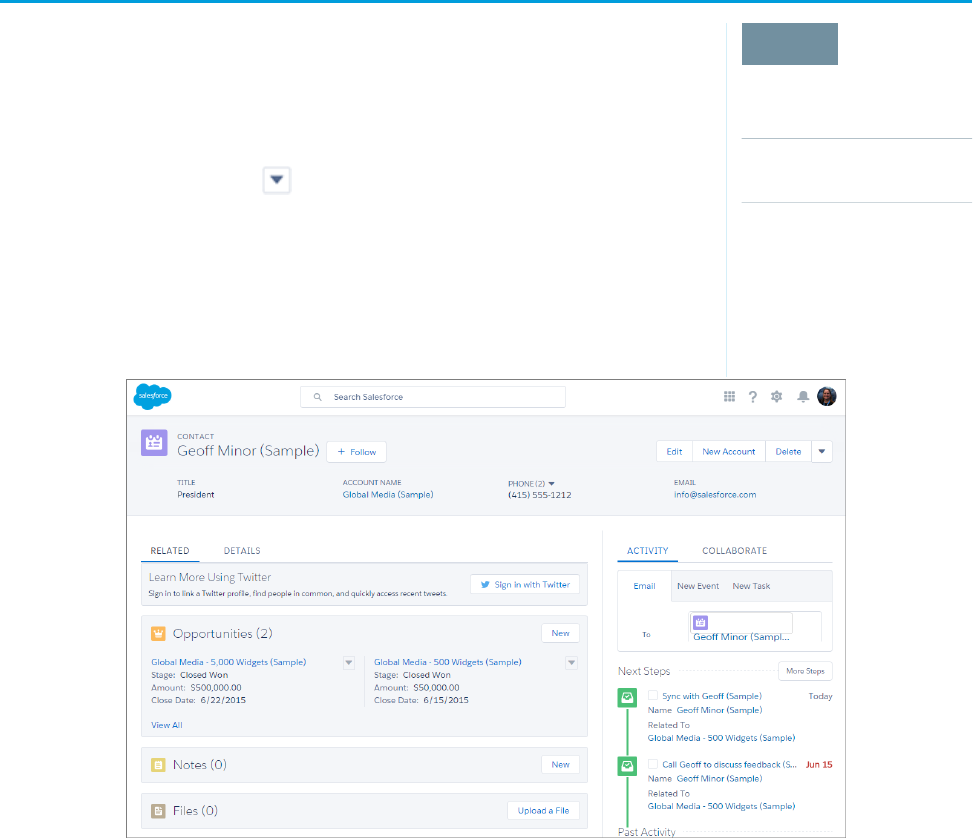
Page Layouts in Lightning Experience
EDITIONS
Available in: Lightning
Experience
Page layouts are available
in: All Editions
Creation and deletion of
page layouts is available in:
Enterprise, Performance,
Unlimited, and Developer
Editions
When you customize your object record pages in Salesforce Classic, they affect the content of object
record pages in Lightning Experience. However, in Lightning Experience, the page elements display
differently, and some aren’t supported.
If you’re in an organization that supports multiple page layouts, you can create page layouts directly
from the Page Layouts related list on any object in the Object Manager. You can also edit or delete
an object’s page layouts by clicking on a page layout in the Page Layouts related list.
Here’s a sample contact record in Lightning Experience. The highlights panel, which contains key
fields for the record, is the only part of a record page that you can’t customize using the page layout
editor. The fields in the highlights panel are customized using a compact layout.
These page layout elements are supported in Lightning Experience.
Actions
Actions display in different places, such as the highlights panel, Activity tab, and the Collaborate tab. The actions are derived from
the list of actions in the Salesforce1 and Lightning Experience Actions section of the page layout. Some actions aren’t supported in
Lightning Experience.
For more information, see Actions in Lightning Experience on page 63.
Canvas Apps
Canvas apps are supported in Lightning Experience.
Custom Links
Custom links display under the Details tab.
Fields
Fields display under the Details tab. You can remove or reorder fields on a page layout only via the page layout editor.
59
Page Layouts in Lightning ExperienceYour Layouts Can Customize Lightning Experience Records
Related Lists
Related lists are included as Lightning components in Lightning Experience. The first eight related lists show related list buttons, the
first several records from the list, and a link to open the full list of records. For any additional related lists, only the list name appears
in the card. Users can still work with these related lists—simply click the related list name to access the full list. Here, users can see
records in the list and use related list buttons (such as New) or row-level record actions. Not all related lists are supported in Lightning
Experience. For example, the Object History related list isn’t supported.
Standard and Custom Buttons
Standard and custom buttons are treated as actions in Lightning Experience, just like in Salesforce1.
Important: Custom buttons that point to a URL or call JavaScript aren’t supported in Lightning Experience.
Visualforce Pages
Visualforce pages that you’ve added to the page layout appear under the Details tab. Only Visualforce pages with Available
for Salesforce mobile apps and Lightning Pages enabled display in Lightning Experience.
Visualforce pages that have been put into the Mobile Cards section as components don’t appear in Lightning Experience.
These page layout elements aren’t supported in Lightning Experience:
•Blank spaces
•Expanded lookups
•Mobile cards
Note: The Twitter card that you see on account, contact, and lead record pages in Lightning Experience isn’t the same as the
Twitter component available as a mobile card in the page layout editor. The Twitter card in Lightning Experience is a Lightning
component. You must have Social Accounts and Contacts enabled for it to appear.
•S-controls
•Sections
•Tags
Note: You can’t use the enhanced page layout editor to customize the layout of Lightning Experience record home pages. All
users see the same record layout in Lightning Experience, regardless of profile or record type.
Compact Layouts in Lightning Experience
If you’ve completed the Salesforce1 Mobile Basics module, you’re familiar with compact layouts and how they work in Salesforce1.
Compact layouts play the same role in Lightning Experience: displaying a record’s key fields in the highlights panel of a record page.
Compact layouts let you put the most important fields at the top of a record page where your users can easily see them. If your organization
supports record types, you can assign compact layouts to different record types, just like you can with page layouts.
In Lightning Experience, the first five fields that you add to a compact layout display in an object’s record highlights panel. The field you
put first displays at the top in bold.
60
Compact Layouts in Lightning ExperienceYour Layouts Can Customize Lightning Experience Records

Tip: Put the object’s Name field first to provide context for your users when they view a record.
You can create and edit compact layouts from the Compact Layouts related list on any object in the Object Manager in Lightning
Experience.
Changes you make to a compact layout are reflected in both Salesforce1 and Lightning Experience.
61
Compact Layouts in Lightning ExperienceYour Layouts Can Customize Lightning Experience Records

CHAPTER 10 Actions and Lightning Experience
Actions enable users to do more in Salesforce, such as create or update records and log calls.
In this chapter ...
If you’ve already created and used actions in your organization, you’re familiar with how they work in
Salesforce Classic. If you’ve used our mobile apps, you’ve seen how they work in Salesforce1. In Lightning
•Actions in Lightning
Experience Experience, instead of showing up in one place—like the Chatter publisher or the Salesforce1 action
bar—actions are split into different areas.
•How Actions Are
Ordered in Lightning
Experience Next, we go over where you can find actions, which actions are and aren’t supported, and how the
customizations you’ve made to actions on a page layout affect how they display in Lightning Experience.
62
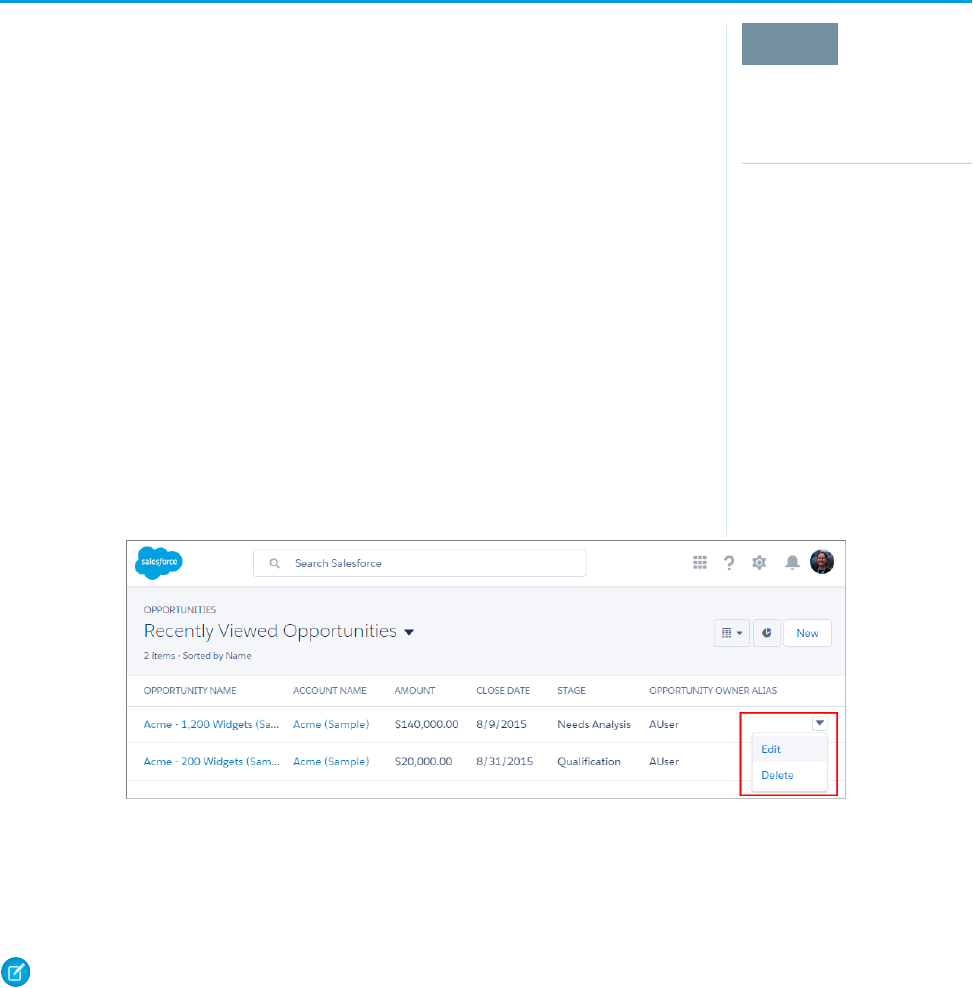
Actions in Lightning Experience
EDITIONS
Available in: both Salesforce
Classic and Lightning
Experience
Quick actions available in:
Group, Professional,
Enterprise, Performance,
Unlimited, Contact
Manager, Database.com,
and Developer Editions
Custom canvas actions
available in: Professional
(with Force.com Canvas
enabled), Enterprise,
Performance, Unlimited,
and Developer Editions
In Lightning Experience, actions display on list view items and in several places on a record home
page. Where they display on a record home page depends on the action’s type.
Actions on List View Items
Except for the Tasks object, only standard button actions are supported on list view items. Items in
Tasks list views contain the full list of actions available for tasks.
Actions on Record Home Pages
Here’s a sample contact page in Lightning Experience.
Note: The opportunity and leads workspaces have different structures, but actions appear in the same way on those pages.
63
Actions in Lightning ExperienceActions and Lightning Experience
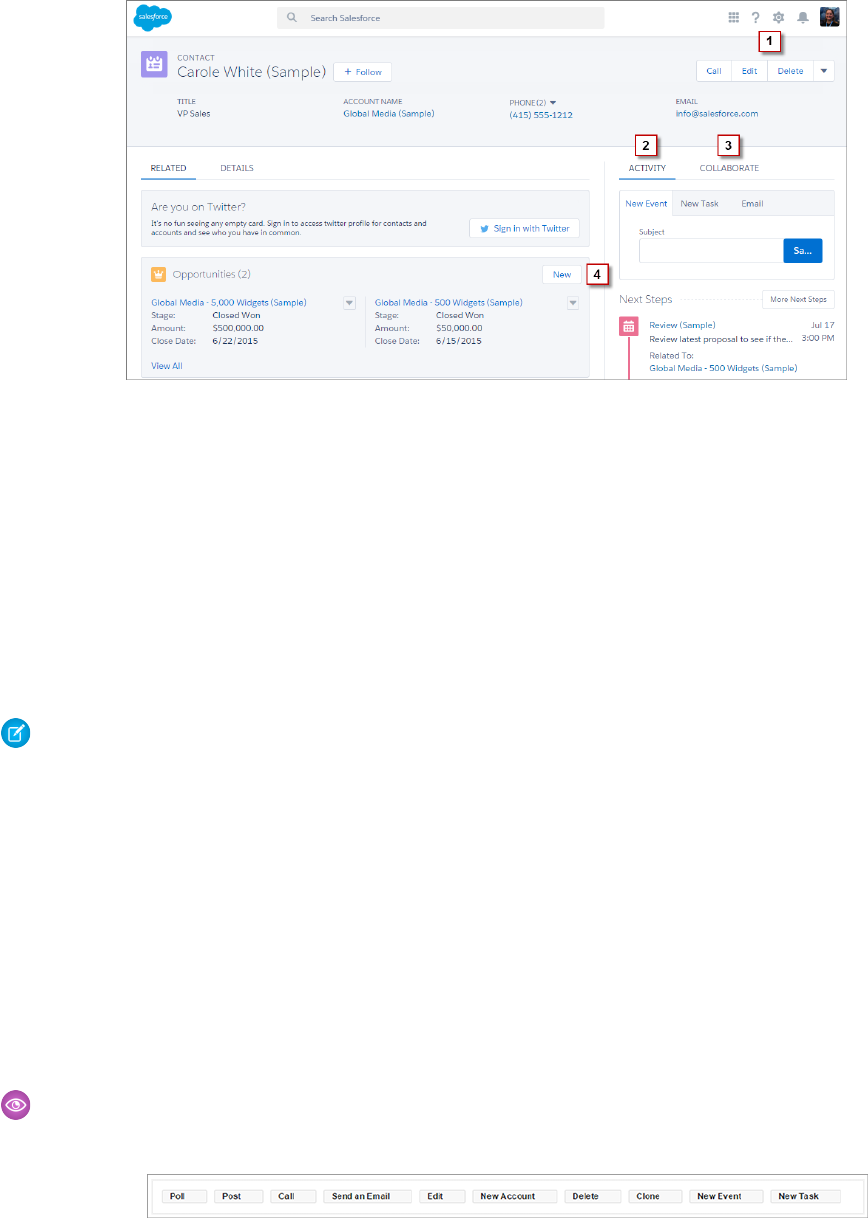
The page-level action menu (1) contains:
•Productivity actions
•Global and object-specific quick actions, except for those related to creating tasks, creating events, and logging calls
•Standard buttons
•Custom Visualforce quick actions
•Custom Visualforce buttons
•Canvas actions
The actions that appear in the page-level action menu display in the order that they are listed in the Salesforce1 and Lightning Experience
Actions section of the page layout.
Note: Custom buttons that point to a URL or call JavaScript aren’t supported in Lightning Experience.
The Activity tab (2) contains Log A Call actions and Create a Record quick actions that point to the Event and Task objects. It also contains
the Email standard button.
The Collaborate tab (3) contains standard Chatter actions. By default, only the Post and Poll actions are supported, and if you have Groups,
the Announcement action. Some objects support other standard Chatter actions predefined by Salesforce.
Actions on Related Lists
Related lists (4) contain the standard buttons normally found on related lists. Usually, it’s simply the New button.
The first eight related lists show related list buttons, the first several records from the list, and a link to open the full list of records. For
any additional related lists, only the list name appears in the card. Users can still work with these related lists—simply click the related
list name to access the full list. Here, users can see records in the list and use related list buttons (such as New) or row-level record actions.
Example: Let’s say you have these actions on your Contact page layout in the Salesforce1 and Lightning Experience Actions
section.
64
Actions in Lightning ExperienceActions and Lightning Experience
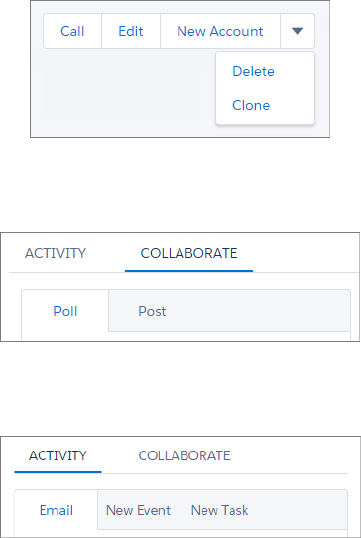
You have quick actions (New Account, New Event, New Task), a productivity action (Call), standard buttons (Edit, Delete, Clone,
Send an Email), and Chatter actions (Poll, Post). Here’s how those actions display on a contact record page in Lightning Experience.
•The actions in the page-level action menu are a combination of the quick actions, productivity actions, and standard buttons
in the order that they’re listed on the page layout. Although they’re quick actions, New Event and New Task don’t show up
here.
•The Chatter actions from the front of the action list are on the Collaborate tab.
•The Activities-related actions—Email, New Event, New Task— display on the Activity tab.
65
Actions in Lightning ExperienceActions and Lightning Experience

How Actions Are Ordered in Lightning Experience
EDITIONS
Available in: both Salesforce
Classic and Lightning
Experience
Quick actions available in:
Group, Professional,
Enterprise, Performance,
Unlimited, Contact
Manager, Database.com,
and Developer Editions
Custom canvas actions
available in: Professional
(with Force.com Canvas
enabled), Enterprise,
Performance, Unlimited,
and Developer Editions
In Lightning Experience, the actions on record pages are derived from the list of actions in the
Salesforce1 and Lightning Experience Actions section of the page layout for that object.
If you haven’t customized the Salesforce1 and Lightning Experience Actions section of the page
layout, the quick actions on the page come from the global publisher layout.
The actions in each section of the record page respect the ordering of its types of actions on the
page layout.
Note: Changes to the Salesforce1 and Lightning Experience Actions section of the page
layout are reflected in both Salesforce1 and Lightning Experience.
66
How Actions Are Ordered in Lightning ExperienceActions and Lightning Experience

ROLL OUT LIGHTNING EXPERIENCE
CHAPTER 11 Welcome to Your Lightning Experience Rollout
Welcome! Lightning Experience is a new user experience designed to help your sales reps sell faster and
smarter. With the launch of Lightning Experience, we’ve focused on your sales reps, with a re-envisioned
In this chapter ...
•What It Takes to Go
Live desktop experience to support your sales process. The result is a more productive interface designed to
support how sales reps work on a daily basis.
•Educate Yourself
About Lightning
Experience
Although we’ve started with sales, Lightning Experience won’t end there. It’s really just the beginning!
Lightning Experience will transform Salesforce CRM and extend to service, apps, platform, and more.
Lightning Experience is available for new and existing Salesforce customers. Whether you’re a new
customer, or you’re an existing customer still evaluating the features and the level of effort to enable
•Getting Hands-On
with Lightning
Experience Lightning Experience for users, this module will help you plan your rollout strategy from start to finish.
And developing a strategy is important for any project you undertake with Salesforce. Paying close
•Identify Stakeholders
and an Executive
Sponsor
attention to how your users will transition to the new experience will increase adoption and boost
success.
Make no mistake, you play a critical role in this process. As a Salesforce administrator, you are more than
just a builder of reports, a creator of fields, or a resetter of passwords. You are, in fact, your company’s
•Educate Your
Company About
Lightning Experience trusted advisor for Salesforce. And when it comes to Lightning Experience, your company’s rollout
strategy starts with you.
•How to Demonstrate
Lightning Experience So let’s get this show on the road!
•Revisit Your
Processes
•Perform a Gap
Analysis
•Present Your Findings
•When the Show Is a
Go
67
What It Takes to Go Live
Rolling out a project is a lot like putting on a great show. You have to plan it, market it, communicate about it, and execute it. And then
the reviews come in. You want rave reviews, which is why you sometimes do previews to work out the kinks before you take your show
to the big stage.
As the Salesforce admin, you’re the Director of the show. You make it awesome. For the show we’re organizing right now (“Lightning
Experience Rollout: The Musical,” anyone?), you’ll plan your rollout, find an executive sponsor, develop and execute a communication
strategy, and put on the show. You’ll decide whether to run a pilot for a set of users (like a preview) or go big and enable for all users at
once (head straight to Broadway).
Depending on the size of your organization, you might have a Project Manager assigned to the rollout, or you may be working with a
Change Management department at your company. Or you could be charged with organizing and executing the rollout from start to
finish. Regardless, your role in getting Lightning Experience live is critical, and it starts with learning everything you can about Lightning
Experience.
Let’s begin there.
Educate Yourself About Lightning Experience
As you start your strategy for rolling out Lightning Experience, the first thing to do is learn about Lightning Experience. It’s easy to do
that right here. Complete these three Trailhead modules to get details on the new experience:
•Lightning Experience Basics
•Lightning Experience Features
•App Customization Lite
Already got the badges, but want a quick reminder of the top features? Here’s a top features chart for Lightning Experience:
What it isFeature
Reference-oriented template, with Account Insights, Activity
Timeline, and Twitter integration
Accounts and Contacts Templates
Visualization tool that lets you see your opportunities organized
by stage, drag opportunities between stages, and get alerts on
deals that need your attention
Opportunity Board
Flexible layout and spanning columns for dashboard componentsDashboards
New intelligent page, including Assistant, Performance Chart, and
Account Insights
Home
68
What It Takes to Go LiveWelcome to Your Lightning Experience Rollout
What it isFeature
Add charts and access any list view with a type-ahead searchList Views
Improved notes feature with autosave, rich text, and the ability to
relate a note to multiple records, all searchable in Salesforce
Notes
Action-optimized workspace, with a handy composer to quickly
log calls and more, Sales Path to drive the right behaviors at every
stage of the sales process, and details on hover with Quick View
Opportunity Workspace
Enhanced features include the ability to create filters, auto-hide
details on matrix reports, and hide totals and subgroups on the
report run page
Reports
Now includes recent records and top resultsSearch
Dedicated tasks tab with Master-Detail view, letting you see a
detailed view of a single task next to your full list of tasks
Tasks
Getting Hands-On with Lightning Experience
One of the best ways to learn about new features is by getting hands-on experience with them. If you’d like to try out Lightning Experience
before you enable it in your organization, you’ve got options.
•If you have a sandbox, that’s the ideal place to enable Lightning Experience and preview how it works.
•If you have Enterprise Edition or above and you’re using custom profiles, create a permission set to preview Lightning Experience
right in your production environment with a handful of select users, or even just for yourself.
•If neither of those apply, get a free Developer Edition or Admin Playground and enable Lightning Experience to give it a test drive.
For steps to enable Lightning Experience, visit How to Enable Lightning Experience.
Once you’ve got a handle on Lightning Experience, it’s time to share it with your company. But who should you share it with?
Identify Stakeholders and an Executive Sponsor
It takes a team to roll out any Salesforce project, and there’s no better time to involve your team than right at the beginning. Identify
key stakeholders at your company from across all affected departments and form a steering committee, helmed by an executive sponsor
who is invested in Salesforce.
69
Getting Hands-On with Lightning ExperienceWelcome to Your Lightning Experience Rollout
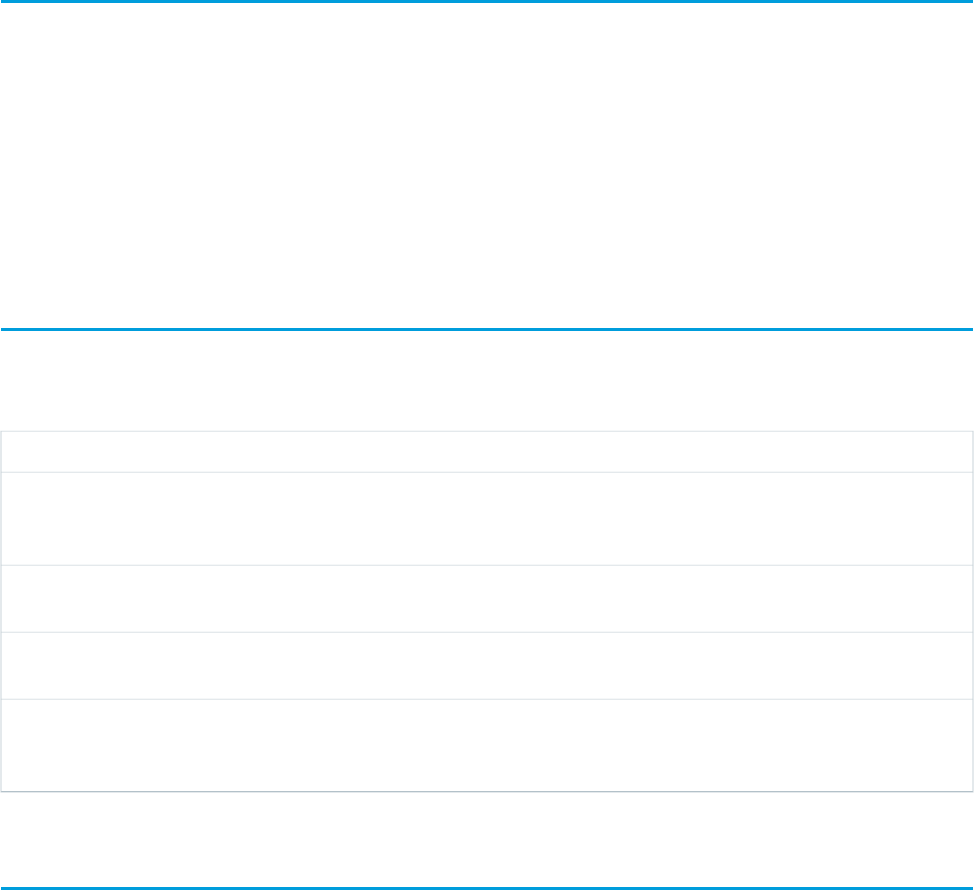
This step is critical. Whether you’ve already committed to rolling out Lightning Experience or you’re still evaluating the features, you
need executive support to ensure you’ve got resources and alignment to succeed. In addition, you need the right people from across
the company to join your project team, to ensure that every department has their needs met and increase user adoption once you go
live.
As you form your project team, keep in mind that depending on the size of your company, you might have people who fill multiple roles
(or “wear multiple hats”).
Find an executive sponsor and stakeholders, and involve them in your project early and often. Once you identify them, share with them
everything you’ve learned about Lightning Experience.
Educate Your Company About Lightning Experience
One of the most important questions your executive sponsor and stakeholders will have is, “How will Lightning Experience help my
team sell more?” Start by showcasing the benefits of Lightning Experience. To help you share Lightning Experience with your company,
get the presentation deck included in this enablement pack, which highlights features and benefits. Share the presentation with your
stakeholders to help them learn about Lightning Experience.
If you’re an existing customer, explain what isn’t supported today to help your company make an educated decision on when to enable
Lightning Experience for your different groups of users. To make it easy for you, the presentation also has an appendix with helpful
comparison charts.
In addition to sharing the presentation, consider providing a demonstration for your team.
How to Demonstrate Lightning Experience
As your company’s trusted advisor, one of the best ways to educate your company on Lightning Experience is to demo it.
Let’s go over a few best practices:
Make sure you’ve got sample records for all the features you demo.Make sure what you demo has data
Use your sales team’s real life examples as the stories to drive your
demo. For example, consider adding their photos to the user
profiles.
Tell your user’s stories when you showcase the app
If you’re planning to show any customizations you’ve added, make
sure to test them first.
Test everything beforehand
Run through your demo in advance to make sure you’re ready, and
to practice the flow of how you’ll demo features.
Practice makes perfect
If you record your demo, you can easily share it with people who
couldn’t attend in person. The recording can also be a great training
asset later!
Record your demo!
Revisit Your Processes
When your stakeholders see a demo of Lightning Experience, there will likely be a lot of questions that sound like this: “That’s cool, but
can it do this? What about that—can it do that?”
70
Educate Your Company About Lightning ExperienceWelcome to Your Lightning Experience Rollout

These types of questions mean that your users are thinking about how they can take their process and make it work in the new user
experience. This is good, but sometimes revisiting a process and improving it is a better next step. In other words, maybe “the way we’ve
always done it” isn’t the best path forward. As trusted advisor, you can help your users see that changing their process to adopt new
features can actually make them more productive.
So how do you do that? It’s easier said than done, but here are some ideas:
•Ask directly, “Can we change the way we do it?” The value proposition of new, improved functionality might be worth updating
existing process.
•Share the presentation we provided, which highlights some of the benefits.
•Walk key members of your sales teams and super users through the features, showing them how easy they are, how they work, and
why they’re helpful.
•Above all, work with your executive sponsor to drive the right behaviors from the top down.
After you demo Lightning Experience, it is time for existing customers to highlight any gaps. This is a critical step to help your company
understand what isn’t currently supported. The presentation we provided earlier features comparison charts, but as your company’s
trusted advisor, you should complete a full gap analysis to share with stakeholders.
If you’re brand new to Salesforce, you can skip this next step and head down to the end of the unit.
Perform a Gap Analysis
Performing a gap analysis is where you get into the nitty gritty details of your Salesforce implementation and compare it against the
features supported and unsupported by Lightning Experience. Conduct a full analysis of what will and won’t work once you move to
Lightning Experience.This analysis will help you determine what workarounds you might need to put in place, and also which teams
are the best fit for a possible pilot of Lightning Experience (for Enterprise Edition and above). Then, educate your company on what
they’ll gain and what they’ll miss once you make the transition.
Of all the steps for your rollout, this one is probably the most critical. Don’t rush this step.
We’ve included a sample gap analysis checklist in the enablement pack for you to use, highlighting many of the key areas which you
should investigate when conducting your analysis. Your analysis should cover these areas.
Note: This isn’t a comprehensive list of supported and unsupported features. For a more detailed list, please see the Salesforce
Help.
Areas to AnalyzeFeature Area
Salesforce Console for ServiceService Cloud
General •Person Accounts
•Javascript and URL custom buttons
•Custom tabs
Reports & Dashboards •Joined reports
•Scheduled reports & dashboards
•Report notifications
•Reports & dashboards followed in Chatter
•Dashboards with dashboard filters
71
Perform a Gap AnalysisWelcome to Your Lightning Experience Rollout

Areas to AnalyzeFeature Area
•Dashboards with funnel, chart, and table dashboard
components
Opportunities & Sales Process •Salesforce Console for Sales
•Quotes
•Forecasting
•Territory Management
•Products
•Orders
•Campaigns
List Views •List Views with filter logic
•List Views shared with groups
Home •Visualforce components on the home page layout
•Dashboards on the home page layout
•Approval process related list on the home page layout
AppExchange apps*Other
*Many apps from the AppExchange feature customizations, including custom objects, custom buttons, Visualforce pages. In preparation
for the Lightning Experience release, Salesforce partners are testing their apps and applying for Lightning Ready certification. If an app
is supported in Lightning Experience, a "Lightning Ready" sash appears on its AppExchange listing.
Present Your Findings
After you conduct your gap analysis, assess the impact. This is one of those areas where it pays to have a team! Work with your stakeholders
to identify the severity of each gap. You can use several methodologies when assessing impact, including assigning a numeric value to
each gap, or plotting the gaps on a simple chart.
For example, you could use a risk severity matrix like this one to categorize any gaps you’ve found in your analysis. (There’s a sample in
the enablement pack.) If you’re not using joined reports and have limited use of funnel dashboard components, those would plot low.
Conversely, if you have several URL buttons and all of your users use Salesforce Console for Sales, those would plot high.
72
Present Your FindingsWelcome to Your Lightning Experience Rollout
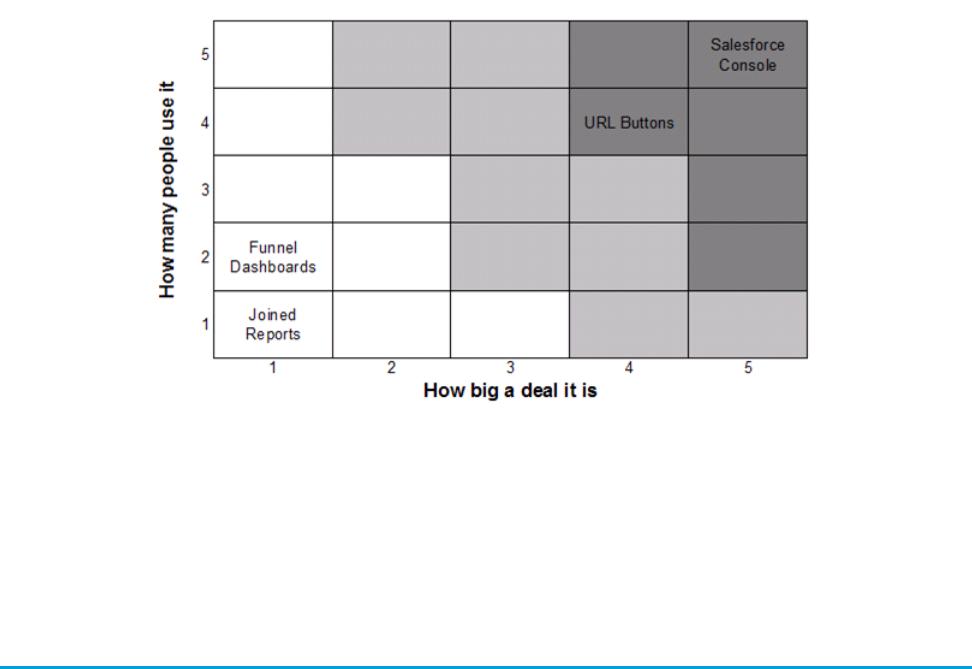
After you and your stakeholders have assessed the impact of each gap, you are ready to present your findings to the entire steering
committee and your executive sponsor. This meeting is where you showcase all the benefits of Lightning Experience one more time,
and highlight the gaps you’ve found. Ultimately, as the trusted advisor for Salesforce, come prepared to advise when you think your
company should move to Lightning Experience, the amount of time and resources required for the move, and your proposed launch
date.
When the Show Is a Go
When you get the green light to proceed, get started on the next steps right away. Executing on a project is as much about preparing
your users for the new experience as it is about the technical steps to implement. In the next unit, we’ll help you craft a rollout strategy
and then execute it in style. It’s time to go live with greatness!
73
When the Show Is a GoWelcome to Your Lightning Experience Rollout

CHAPTER 12 All Systems Go
Planning and executing your Lightning Experience project should involve process, discipline, and yes,
a sense of fun! What’s the point of introducing game-changing new features if your users aren’t excited
about the rollout?
In this chapter ...
•Where to Start
•Plan Your Rollout In this unit, we’ll talk about how to schedule and plan your rollout effectively, but we’ll also share ideas
for turning your launch into an awesome event at your company.
•Decide Who Gets
Lightning Experience
•Unleash the Power
of Super Users
•Create a Chatter
Group for the Rollout
Team
•Pick a Launch Date
•Create a Project
Schedule
•Define Measures for
Success
•Create a Marketing
and Communication
Strategy
•Create a Training
Plan
•Test Your
Customizations and
Iterate
•Ready to Start
74
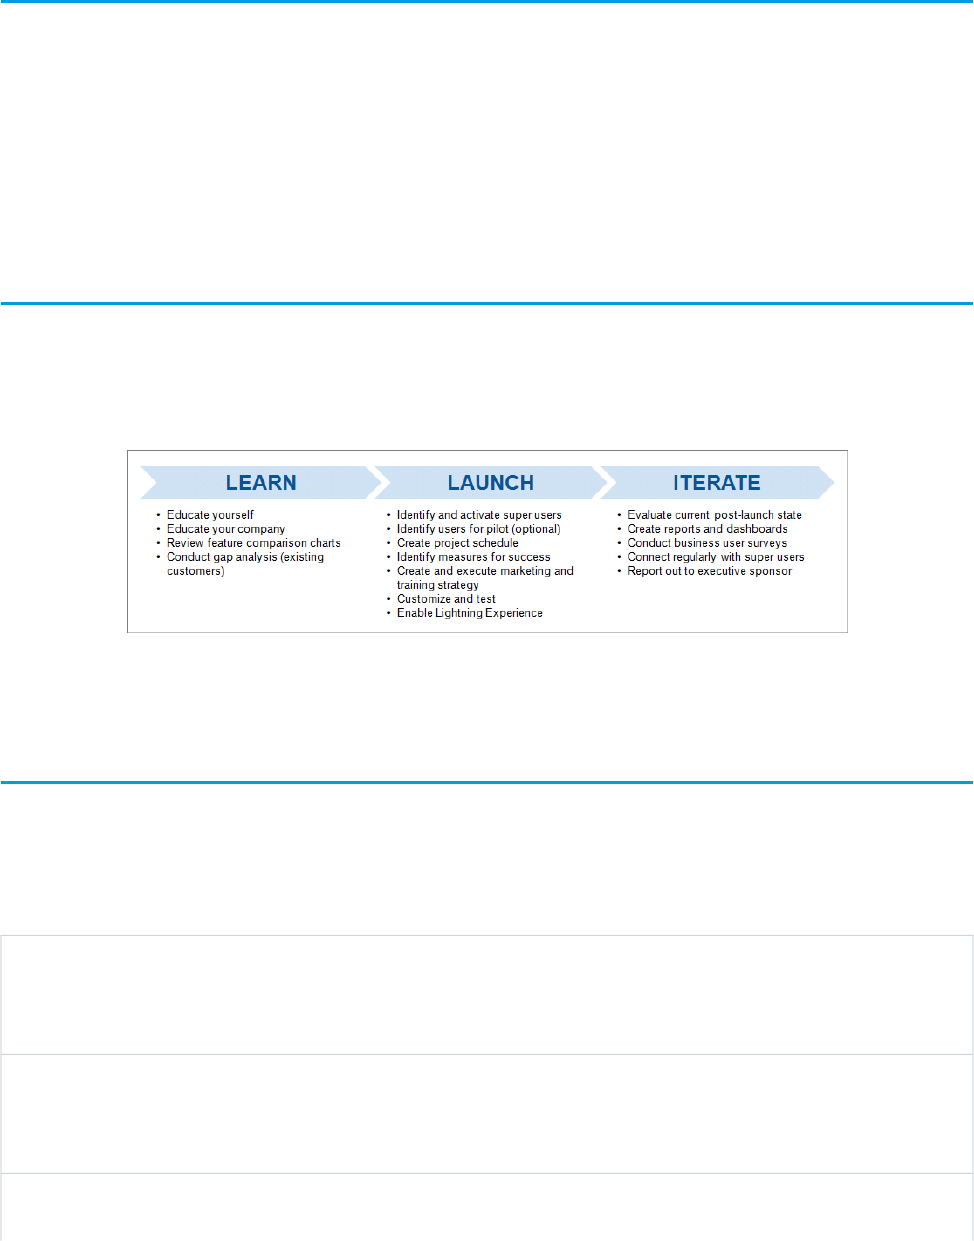
Where to Start
Remember our Broadway musical analogy? You’re the Director, and your show just got greenlighted. So now what? Now it’s time to
get busy.
Start by listing everything you need to do before you go live, and then estimate the time and resources needed for those activities. Then
select a launch date, get your team, and go do all of it. Doesn’t that sound easy?
Doing all of that takes time and coordination. There are a number of methodologies for project management, too many for us to cover
here. Each one has different strategies for delivering projects. Pick whichever method you like. Ultimately, the important part isn’t the
way you do it; it’s what you do. That’s what we’ll talk about here.
Plan Your Rollout
There are several tasks to consider when rolling out Lightning Experience. Depending on your company, you don’t have to do all of
them, but consider them regardless. Check the enablement pack for a sample Lightning Experience rollout checklist.
Your rollout will likely be organized into these main buckets. Some of these steps you’ve already learned about in the last unit.
In this chapter, we’ll be diving into the “Launch” step above. Let’s dive in.
Decide Who Gets Lightning Experience
Depending on your edition, you may have the option to enable Lightning Experience for a set of your users, using profiles and permission
sets. If you’re an existing customer, this allows you to pilot Lightning Experience for one or more teams in your company to try out the
new functionality before you go all in.
If you’re thinking about going this route, consider the following:
Permission sets are a flexible way to roll out Lightning Experience
permissions to a particular sales team or group of users. Rather
Consider using permission sets
than updating your profiles, you can create a single Lightning
Experience permission set and add users to it.
Put people who work closely together in the pilot together. You
want people who work together seeing the same screens. If people
Keep teams together
collaborate often, they should have the same user experience,
including team leaders.
If you have teams who are heavily impacted by gaps that you
identified in your gap analysis, avoid those teams in your pilot
Be mindful of gaps
75
Where to StartAll Systems Go
group. Even if the number of gaps is small, if the impact is large,
consider carefully if they should be in the pilot.
Learn more about enabling Lightning Experience for a specific set of users in Set Up Users for Lightning Experience on page 20.
Unleash the Power of Super Users
Super users are employees who understand the vision and value of your implementation, want to help you optimize and improve what’s
in place, and are passionate about helping others adopt Salesforce. Often closely engaged with your employee community, super users
know how well systems and processes are being adopted, and which pain points are preventing adoption. Super users are also the first
people your employees go to for help, and they can be incredible in helping you answer questions and provide support.
Super users are often natural leaders, well-respected by their peers, and can be your evangelists in the field. And when it comes to rolling
out Lightning Experience, they can help make your project a success!
Work with your Executive Sponsor and stakeholders to identify a group of super users. Involve your super users in the rollout by giving
them sneak peeks at Lightning Experience and early opportunities to train on the new technology. Seek their feedback on your marketing
and communication plans, and consider asking them to train users, with a train-the-trainer approach.
76
Unleash the Power of Super UsersAll Systems Go
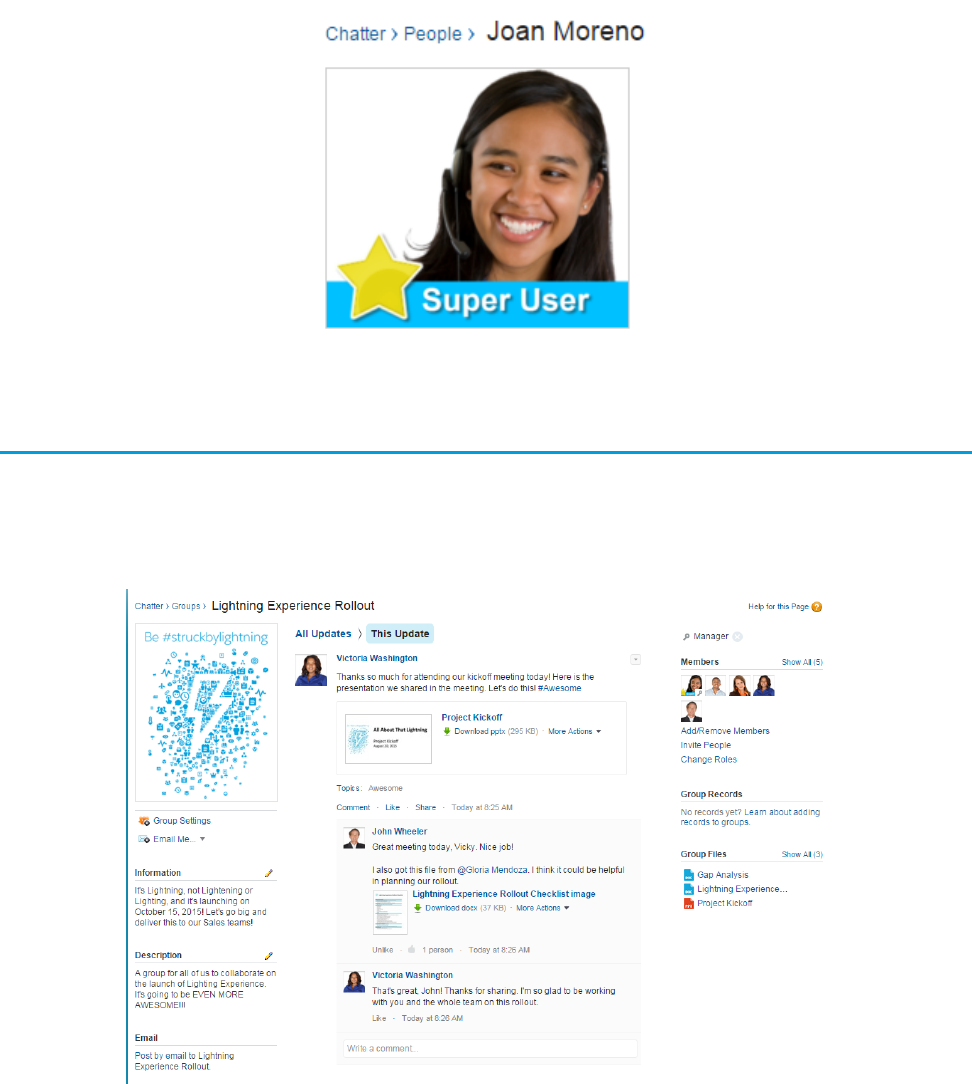
Officially recognize their super user status through a special designation, like a custom icon on their Chatter profile photo, a button, or
a t-shirt—or all three! Make them moderators or managers of public Chatter groups for Lightning Experience. All of this helps validate
their role as leaders in your employee community and empowers them to help others.
Create a Chatter Group for the Rollout Team
After you identify your super users, stakeholders, and executive sponsor, you need a place where you can all work together on the rollout.
Create a Chatter group and invite in all of your team members involved with the rollout. Using Chatter, you can share files, collaborate
in context, and share relevant updates with the whole team.
One of the key files to share in your Chatter group is a project schedule. The project schedule is a living document that you’ll want to
keep updated and make accessible to your whole team, so it’s ideal to store it in the cloud in your team’s Chatter group.
77
Create a Chatter Group for the Rollout TeamAll Systems Go

Pick a Launch Date
Pick your launch date wisely! Think about aligning your launch to coincide with your company’s sales kickoff meeting or another large
company event where you can get organic exposure for your rollout. Avoid holidays and confirm stakeholder availability in advance. If
a key stakeholder is on vacation for three weeks leading up to your launch date, consider revisiting your selected date!
Not So MuchCould Be Good Timing
Holidays
End of quarter/fiscal year
Sales kickoff
Company meeting
When key stakeholders are on vacationLow season (if applicable)
Take this opportunity to review your existing Salesforce roadmap and clear any projects that might compete with your rollout. Work
with your executive sponsor to clear any roadblocks, such as competing non-Salesforce projects that require resources you need for
your rollout. If your rollout looks especially complex, you may need to advise your company to put other projects on hold until this
project is complete.
Create a Project Schedule
There are apps on the AppExchange or software programs designed to help you manage all the milestones and tasks associated with
your project. You may already have a favorite program or app that you like to use. Ultimately, you need a place to track these details:
•Task name
•Task owner
•Task dependencies (Does the task depend on any other task or resource?)
•Task duration
•Task start date
•Task end date
•Task status
You might also want a place to add notes or comments.
Rolling out Lightning Experience could take you anywhere from a couple of weeks to a couple of months. The time it takes can depend
on several factors, including the complexity of your organization, the size of your user population, your company’s approach to change
management, or if you’re a new customer implementing Salesforce.
In any project, you need to be flexible either on the go-live date, the scope, or the resources allocated. Here’s the first part of a sample
project schedule with a fixed go-live date and scope, for a company with a straightforward migration path and a small group of users.
Check out the enablement pack for the full sample schedule. In the example, the time to go live is one month from the start date, with
a launch date of October 15, 2015. There are two weeks of post-launch activities following the launch before the project officially closes,
at which point you move into maintaining and iterating on the solution provided.
EndStartDurationDependenciesStatusOwnerTask name#
Educate
yourself
1.0
78
Pick a Launch DateAll Systems Go

EndStartDurationDependenciesStatusOwnerTask name#
09/1609/151 dayN/ACompleteJohnComplete
Trailhead
modules
1.1
09/1609/151 dayN/ACompleteJohnSign up for
Developer
1.2
Edition
organization
09/1809/162 daysN/ACompleteJohnRead Lightning
Experience
book
1.3
09/1709/161 daysN/ACompleteJohnReview
comparison
charts
1.4
One of the key items in phase three of the schedule is to identify measures for success. This is how you’ll ultimately know if your project
was successful, based on the criteria you define for what success looks like. Let’s talk about that next.
Define Measures for Success
Work with your executive sponsor and stakeholders to determine how you want to measure success. Document current pain points
and look for ways to measure improvements in these areas. For example, you could look for productivity gains, data quality gains, or
financial goals, such as:
•20% reduction in opportunities with no follow-up tasks
•15% increase in calls logged
•5% increase in lead conversion rate
You could also measure success based on employee or customer sentiment, using a survey app from the AppExchange to collect
feedback, or simple Chatter polls to survey employees quickly.
In each instance, conduct a baseline survey or take an analytic snapshot in order to measure any increase or decrease following your
go-live.
We’ll discuss methods for measuring success in the next unit. At this stage, work with your project team to outline the specific measures
you want to monitor.
Create a Marketing and Communication Strategy
This is the part of the rollout where you can inject some fun into the project, and where you can go live with greatness. Consider making
your go-live into a true event and use simple marketing strategies to build buzz and excitement about the coming launch for weeks in
advance.
No matter your budget, you can use your creativity to market your go-live. Don’t forget to ask for help from internal teams, including
customer care, training, and support teams. Launch ideas include:
•Send a weekly email drip campaign highlighting the coming launch and a “feature of the week” (enablement pack)
79
Define Measures for SuccessAll Systems Go

•Create a topic in Chatter for all your communication updates to drive momentum and buzz
•Have a raffle with prizes, such as gift cards, a free day off, or lunch with an executive
•Host a launch party with cupcakes or cake
•Order swag and branded items to distribute on the day of your go-live
Include key communication milestones in your marketing strategy. For example, make sure that the entire company gets an official
communication on the day of the launch, as a Chatter post or email from your executive sponsor, VP of Sales, or CEO.
Here’s a sample communication plan:
Email from executive sponsor4 weeks prior
Chatter group created4 weeks prior
Email drip campaign #13 weeks prior
Super users identified and announced3 weeks prior
Email drip campaign #22 weeks prior
Raffle announced2 weeks prior
Email drip campaign #31 week prior
Email from company President1 week prior
Email with reminders, instructions, and where to get help1 day prior
Chatter post from company CEO & launch partyDay of Go-Live
Create a Training Plan
As part of your rollout, prepare your users for the changes in their user experience.
First, direct your users to Trailhead!
Depending on how customized your user interface is or how complex your processes are, you may also want to conduct end user
training.
When you’re developing your training plan, consider these questions:
What is the specific outcome you want to achieve with this
training?
Training goals
Who will conduct the training?Trainer
Who needs to be trained?Trainees
What will you use to conduct the training? What materials need
to be developed?
Training methods
Will you train remotely or in-person?Training location
How will you determine if the training was successful?Training metrics
80
Create a Training PlanAll Systems Go

Consider using a train-the-trainer model with your super users to help you extend your reach. Rather than training all of your users
personally, you can train your super users and have them conduct user training. This train-the-trainer model also helps reinforce to users
that they should go to the super users with any questions post-launch.
Also consider follow-up training sessions or office hours after your launch to help reinforce the right behaviors and keep your users
current. If you have a support team, involve them in the training too, so they can be prepared for user questions.
Test Your Customizations and Iterate
For existing customers, if you already have customizations in place, enable Lightning Experience in a sandbox and test their behavior.
For unsupported features, like URL and Javascript buttons, analyze what the underlying function is of each. Here’s a set of questions you
can use in your analysis:
•What does the customized feature do?
•What objects are affected or accessed?
•What are the resulting actions of using the customized feature?
•What is the user experience?
•Where can your user access the customized feature?
After you have the answers to these questions, you can start to map the customized feature to a possible replacement. For example:
Consider using this instead:If the customized feature does this:
Process BuilderCreates a related record
ActionsUpdates an existing record
Process Builder and Visual WorkflowCreates related records and updates existing records, with complex
logic
Visual WorkflowLaunches a screen for user input
Process BuilderSends an email or creates a task
Workflow RulesLaunches a time-triggered process
As you work through updating these processes, work closely with your super users and users to test the replacement solutions you build.
Create test plans and conduct User Acceptance Testing (UAT) to ensure features work as expected. Get a sample test plan document in
the enablement pack.
Ready to Start
After you’ve created these plans, work with your project team, stakeholders, executive sponsor, and super users to execute them. And
once you’ve checked all the items off your list, it’s time to go live! In the next unit, you’ll enable Lightning Experience and find out how
you can boost your success post-launch.
81
Test Your Customizations and IterateAll Systems Go

CHAPTER 13 Go Live
There comes a time in every successful project where you’ve planned everything, executed on all those
plans, and then the launch date arrives. This means it’s time to go big and go live with greatness. If this
is your Broadway musical, then it’s opening night, and Salesforce admin, this is your time to shine!
In this chapter ...
•Engage with Super
Users Depending on the project, the go-live step can be simple, complex, or somewhere in between. With
Lightning Experience, we make it easy by giving you a single page where you can access all the steps
•Measure Results
•Survey Your Users that need to be completed to move to Lightning Experience. Access this page in Setup by clicking
Lightning Experience.
•Use Reports and
Dashboards in
Salesforce This single page is your guide to enabling Lightning Experience. Keep in mind that there are other
features we recommend that you enable before turning on Lightning Experience. All the details are
•Deliver an Executive
Summary covered on the Setup page, and you can also review Get Your Org Ready for Lightning Experience on
page 20 for details.
•The Show Must Go
On
82
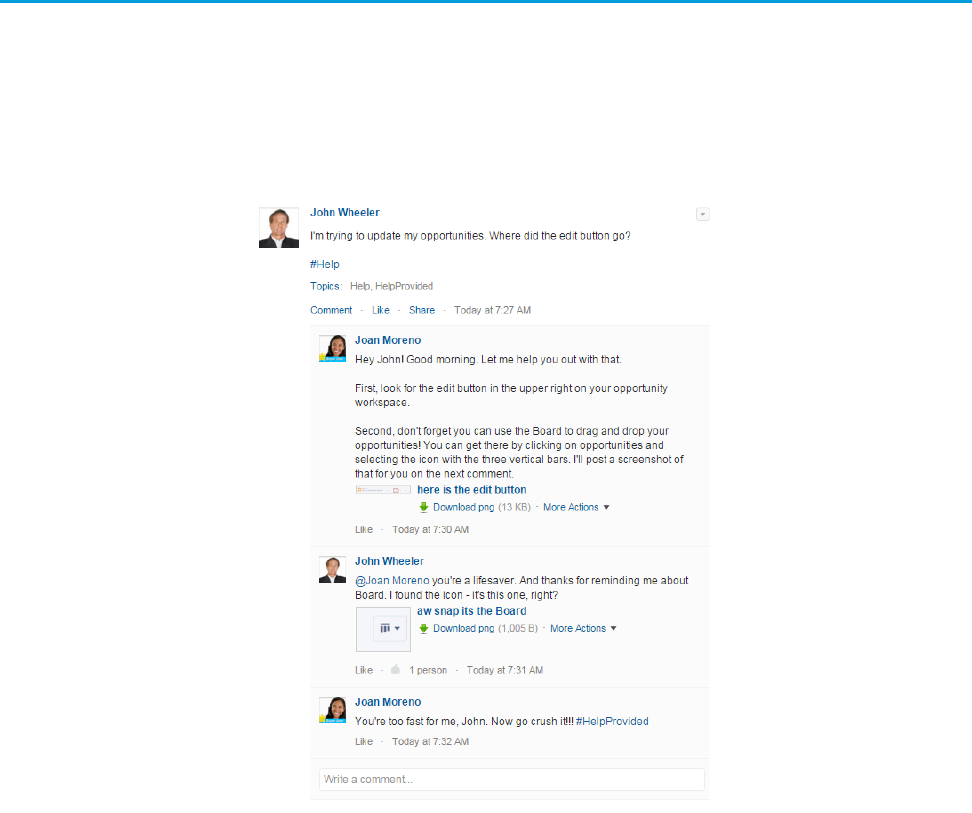
Engage with Super Users
Your super users are key to the success of your rollout. Leading up to your go-live, engage with your super users often. Depending on
your training approach, you might be partnering with them as they lead user training in the field.
On the day of your go-live, super users play an essential role. Even with the most successful projects, your users are going to have
questions. Those questions can come in the form of in-person conversations or questions asked on Chatter. Your super users can help
you swarm on those questions, and escalate any bugs or critical issues that are discovered.
But your engagement with super users doesn’t end with your go-live. That’s just the beginning. Consider setting up a monthly or quarterly
super user forum meeting where you gather all your super users together and talk about the roadmap, feedback, and overall adoption.
Create a private Chatter group with your super users to facilitate conversation year-round. And work with your super users to host weekly
office hours to answer user questions.
If you’re not yet convinced, here’s a short list of some of the ways these incredible team members put the “super” in super user:
•Play the role of Salesforce evangelist in the field
•Swarm on questions from users, in-person and on Chatter
•Help you boost adoption
•Train users
•Share valuable insight from the field
•Report bugs and issues
•Weigh in on the roadmap
83
Engage with Super UsersGo Live

•Test new features before they go live
•Provide feedback in forums, meetings, and focus groups
As you’ll see, super users provide tremendous value, especially when it comes to sharing feedback, which is critical for measuring the
success of your project. Let’s talk about that next.
Measure Results
When you were planning your rollout strategy, you worked with your executive sponsor and stakeholders to determine your success
metrics. Those metrics might have included things like:
•20% reduction in opportunities with no follow-up tasks
•15% increase in calls logged
•5% increase in lead conversion
Or, the metrics might have been based on employee or customer satisfaction, or even a mixture of both. For either approach, you need
a baseline to work from to track changes in the numbers, so don’t forget to take a snapshot or conduct a survey before you go live.
Let’s discuss each approach in detail.
Survey Your Users
You can use several methods to survey your employees and customers.
Use a survey app to conduct a formal written survey, measuring
overall satisfaction and any pain points.
Survey
Bring together a group of customers or employees and ask a set
of specific questions.
Focus Groups
Create an informal Chatter poll to gather quick insights. Users can
also provide written feedback in the poll’s comment thread.
Poll
Using these methods, you can obtain metrics about overall satisfaction and any pain points. Following your go-live, after users are
comfortably working with the new experience, you can survey again and report on any changes in the metrics.
Not sure what to ask? Here are some ideas. We’re including questions that are open-ended and appropriate for focus groups, forums,
and shadowing, and also questions more appropriate for a written survey:
Survey questionsOpen-ended questions
How long have you been using Salesforce?How do you use Salesforce?
Rate your overall productivity using Salesforce.What do you like best about Salesforce?
Rate your overall satisfaction with Salesforce.What would you change about Salesforce?
I have the tools I need to do my job.What is most frustrating about Salesforce?
It’s easy to work in Salesforce.What information do you need that you can’t find?
84
Measure ResultsGo Live
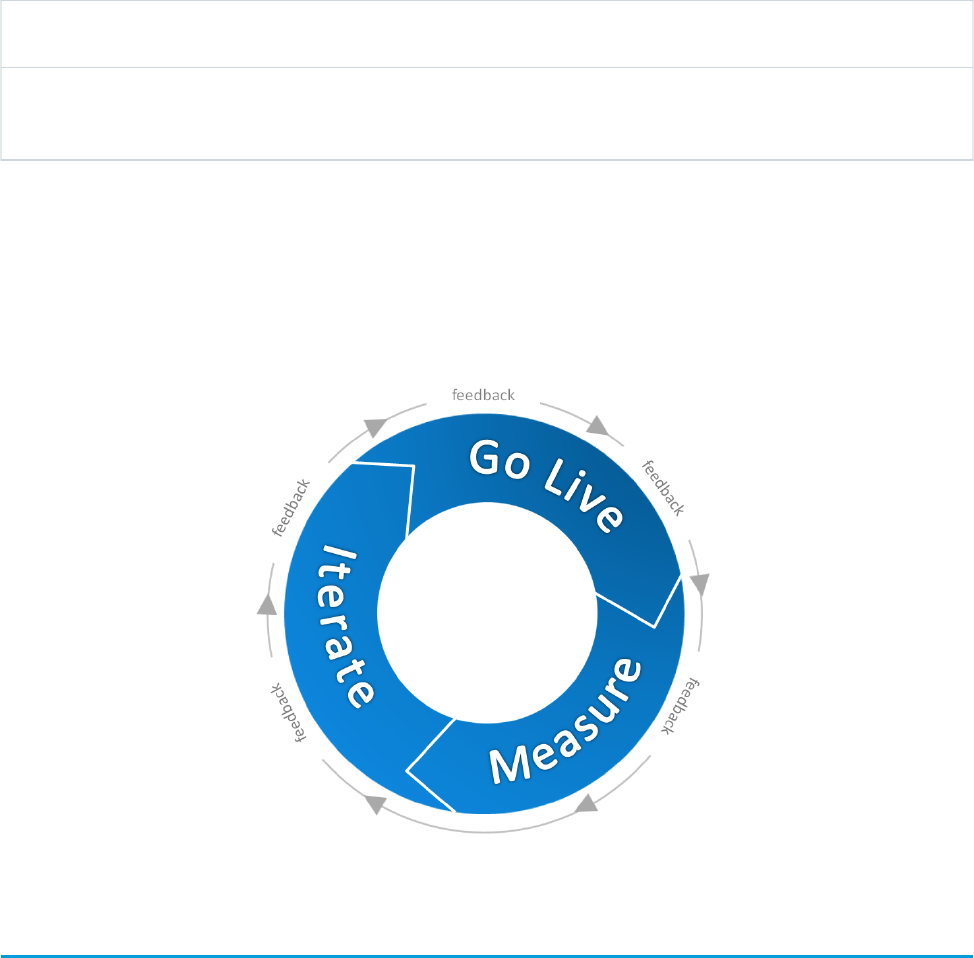
In addition to conducting surveys, cultivate an environment where feedback can flourish. Listening to your users boosts adoption. Here
are some ideas for how to encourage your users to give regular feedback:
Host an open question and answer session, online via Chatter or
in-person, to get feedback and hear concerns.
Open Forum
Use a Chatter Topic (“feedback”) to collect responses from your
users organically over time. Review all the posts monthly or
quarterly.
Chatter
When you’re receiving feedback, it’s important that your users feel heard, even though you can’t address all feedback. Consider starting
a “You Asked, We Listened” program where you address some employee feedback items every quarter.
Whether you’re doing a limited pilot or rolling out to your whole company at once, the goal is to go live, measure your results, and then
iterate. Then repeat.
Use Reports and Dashboards in Salesforce
If you’ve decided to use Salesforce metrics for your success measures, then you can create reports and dashboards within Salesforce to
track those metrics. For example, this dashboard shows closed deals, month over month:
85
Use Reports and Dashboards in SalesforceGo Live
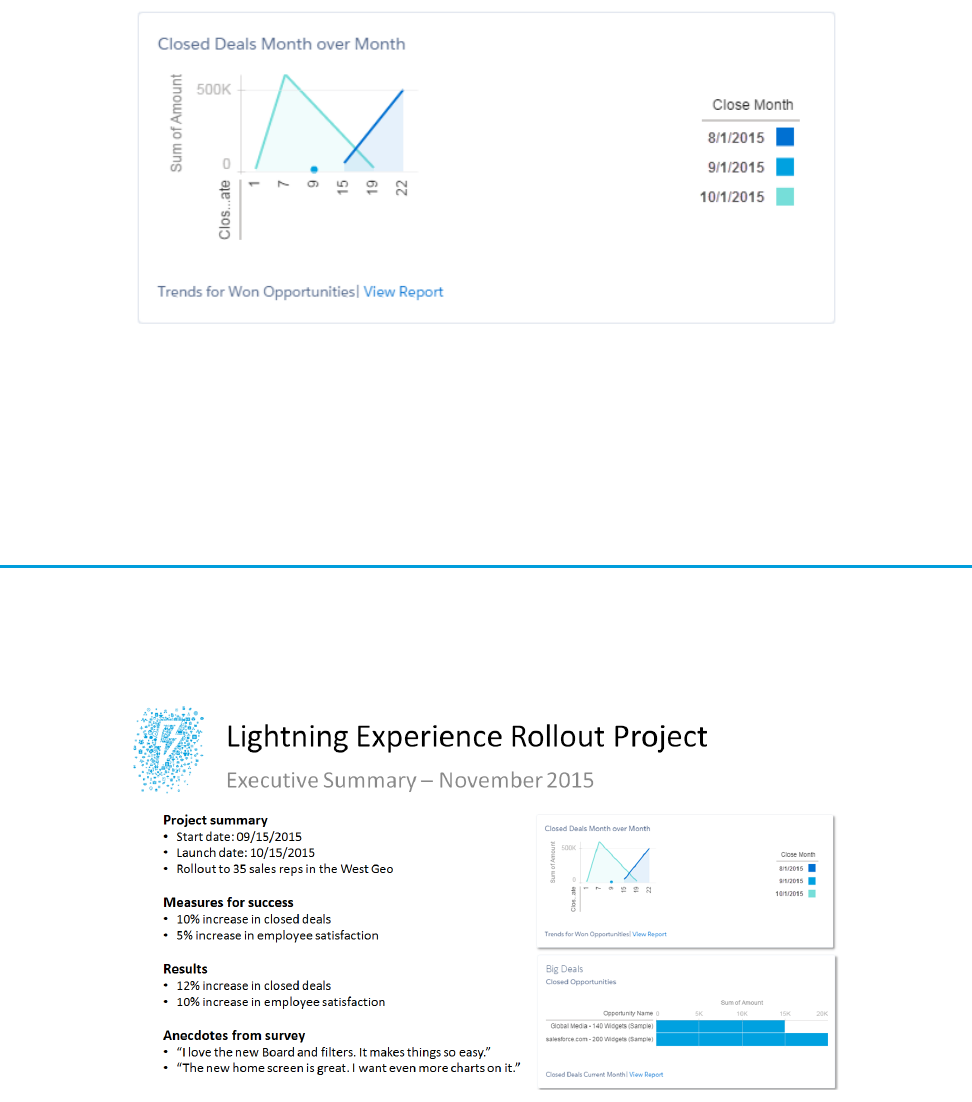
Reporting Snapshots are a way to analyze trends over time, right in Salesforce. Search for “Reporting Snapshots” in the Salesforce Help
to learn more.
One of the benefits of using reports and dashboards is that they’re all built within Salesforce, which makes it easy to share with your
executive sponsor. Speaking of which…
Deliver an Executive Summary
Your Executive Sponsor has been your project champion from the start. Now it’s time to prepare a summary for your sponsor on the
overall project status and any results you’re able to share. This is important for your Executive Sponsor to be able to showcase Return
on Investment (ROI) for the resources that were allocated to complete the project.
When you’re preparing an executive summary, follow these best practices:
•Keep it to 1-2 pages maximum
•Showcase metrics and results
•Highlight any noteworthy anecdotes
86
Deliver an Executive SummaryGo Live

•Share lessons learned
•Note any next steps still planned
Looking for a sample Executive Summary document? Sorry, we didn’t make one. Just kidding! Check the enablement pack.
The Show Must Go On
Congratulations! You now have the tools you need to roll out Lightning Experience. Hopefully, you’ve also picked up some tips along
the way to help you with other rollouts beyond Lightning Experience.
Whether you’re piloting with a group of users or rolling out to your entire company at once, this is your chance to go big. Good luck
with your rollout!
87
The Show Must Go OnGo Live

LIGHTNING EXPERIENCE DEVELOPMENT
CHAPTER 14 User Interface Development Considerations
Lightning Experience is a brand new, amazing opportunity for developers on the Force.com platform.
In this module we’re going to look at many of the aspects that make Lightning Experience different for
In this chapter ...
•Raising the Bar for
Web App User
Interfaces
developers. Before we get to that, though, we want to have a quick chat about a couple higher-level
concerns.
Let’s start with something we want to be completely honest with you about: Lightning Experience isn’t
finished yet. If you’ve visited some of the other Lightning Experience Trailhead modules, you already
•Classic Visualforce
•Visualforce as a
JavaScript
Application Container
know there is plenty of work for us to do just building out the basic Salesforce application. On the
Force.com side of things, we have plenty to do as well. Many things are working great, some things work
well enough but we feel compelled to call them “beta,” and there are a number of things we just haven’t
gotten to yet.
•Lightning
Components About this we want you to know two things: First, we’re very hard at work turning Lightning Experience
into a complete development platform for your apps. And—Safe Harbor, yadda yadda yadda—you’ll
be getting important missing features in the next release, and the next, and so on.
•Choosing the Right
Tool for the Job
•Choosing the Right
Tool for Your
Organization
Second, we very much want your feedback. Tell us what’s working great to make us feel good, and tell
us about what’s not, to keep us working hard, to shape priorities, and to help us make sure Lightning
Experience becomes the best cloud-based development platform you can imagine.
•Migrating to
Lightning
Components
Finally, we want to answer some really important questions that you’re asking us about where you should
put your efforts as you grow your existing apps and build new ones. Put simply, what’s the future of user
interface development and custom apps on the Force.com Platform?
We’re glad you asked! We’re so excited about the answer, we’re going to take the rest of this unit to go
beyond just answering the question, and try to give you insights into our thinking.
88

Raising the Bar for Web App User Interfaces
The last few years have dramatically raised the bar for user experience in web applications. Users expect highly interactive and immersive
experiences literally at their fingertips.
We first saw this in isolated components. Services like Google Maps introduced direct manipulation of user interface elements. Analytics
applications brought dynamic, interactive chart drill-downs. Online forms now come with immediate error feedback when users enter
invalid data. This interactivity is no longer a novelty, it’s the norm.
And the scale has grown. The expectation for individual components has quickly spread to the core application experience. Web
applications now feature things like sliding menus, animated page transitions, and dynamic master-details. There’s also been an uptick
in things like overlays and modal windows.
So what does this mean for Salesforce?
The traditional Salesforce experience, lovingly known as Salesforce Classic, is an example of a page-centric web application model. It’s
great for basic functionality, but it’s challenging to deliver the new, more dynamic experience that users expect. Fundamentally, this is
because it relies on the server to generate a new page every time you interact with the application.
To deliver a more interactive experience, you need help from JavaScript on the client-side. In this new app-centric model, JavaScript is
used to create, modify, transform, and animate the user interface rather than completely replacing it a page at a time. This model is
exciting, interactive, and fluid. This is the new Lightning Experience.
Both the page-centric and app-centric models are here to stay. A quick look around the web is enough to realize that most web
applications take advantage of both approaches. Combining the models lets applications deliver the right type of experience for the
right use case.
Let’s take some time to explore the different options that the Salesforce Platform offers for these models.
Classic Visualforce
The Visualforce framework provides a robust set of tags that are resolved at the server-side and that work alongside standard or custom
controllers to make database and other operations simple to implement.
Let’s review some basics.
UI Generation
Server-side
Data and Business Logic
Apex standard or custom controller
Workflow
1. User requests a page
2. The server executes the page’s underlying code and sends the resulting HTML to the browser
3. The browser displays the HTML
4. When the user interacts with the page, return to step one.
Pros
•Tried and true model
•Easy to implement for greater productivity
•Naturally splits large applications into small, manageable pages
•Has built-in metadata integration
89
Raising the Bar for Web App User InterfacesUser Interface Development Considerations

Caveats
•Limited interactivity (aside from added JavaScript functionality)
•Higher latency
Visualforce is conceptually similar to other page-centric technologies like PHP, ASP, JSP, and Ruby on Rails. Salesforce’s rich metadata
infrastructure makes Visualforce a productive solution. The standard controller makes it easy to access objects directly and via relationships
without executing a single query. Other metadata-aware components are similarly plug-and-play: add markup to a page and you’re
done. These capabilities are alive and well on the platform, and they’re still suitable for many use cases.
Visualforce as a JavaScript Application Container
If we’re putting it simply, Visualforce pages are just HTML pages with extra tags resolved by the server. As a result, you can use an empty
Visualforce page as a container for a JavaScript application. In this scenario, you don’t use Visualforce tags to build your user interface.
Instead, you load your JavaScript application in an empty page. Then the user interface is generated on the client-side by the JavaScript
application. These applications are generally referred to as single-page applications, or SPAs, and are often built using third-party frameworks
like AngularJS or React.
Let’s review some basics.
UI Generation
Client-side
Data and Business Logic
Remote Objects or JavaScript Remoting
Workflow
1. The user requests the “empty” Visualforce page containing only JavaScript includes
2. The page is returned to the browser
3. The browser loads the JavaScript application
4. The JavaScript application generates the UI
5. When a user interacts with the application, the JavaScript modifies the user interface as needed (return to the previous step).
Pros
•Enables highly interactive and immersive user experiences
Caveats
•Complex
•No built-in metadata integration
•Lack of an integrated developer experience. The Force.com Developer Console doesn’t explicitly support these JavaScript
applications. Typically, you have to load them as static resources, and that’s a cumbersome experience.
We want to be clear. If you can live with the caveats we’ve described, this is a perfectly good way to build interactive applications today.
It’s the reason we originally built toolkits like Remote Objects and JavaScript remoting. If you’re a confident AngularJS or React or other
JavaScript framework developer, your expertise will take you a long way developing apps for Salesforce with the tools you know.
But, if you’re open to new things, we think we have some great ideas for what the next level is in web-based application development.
90
Visualforce as a JavaScript Application ContainerUser Interface Development Considerations

Lightning Components
Lightning components are part of the new Salesforce user interface framework for developing dynamic web applications for desktop
and mobile devices. They use JavaScript at the client-side and Apex at the server-side to provide the data and business logic.
Let’s take a look at an overview.
UI Generation
Client-side (JavaScript)
Data and Business Logic
Apex controller
Workflow
1. The user requests an application or a component
2. The application or component bundle is returned to the client
3. The browser loads the bundle
4. The JavaScript application generates the UI
5. When the user interacts with the page, the JavaScript application modifies the user interface as needed (return to previous step)
Pros
•Enables highly interactive and immersive user experiences
•Aligns with Salesforce user interface strategy
•Built on metadata from the foundation, providing an integrated developer experience
•The Developer Console supports Lightning components, so there’s an integrated developer experience
Caveats
•Higher learning curve compared to Visualforce
•Higher complexity than Visualforce—you’re building an application, not a page
•Since Lightning components are new, there are still some features that aren’t supported
•There are a limited number of out-of-the-box components
Choosing the Right Tool for the Job
Visualforce has been around for a while, it’s a mature, well-understood platform for building your apps. It’s not going away. Lightning
components is the new kid on the block. It’s got a lot going for it, but, well, you know. It’s a stranger to you right now.
Here’s the thing: You don’t have to choose one or the other.
Think of the page-centric and app-centric models as tools in your development tool belt—one isn’t always better than the other, and
you’ll get the most out of them if you understand their strengths and their trade-offs. Use the right tool for the job at hand.
Here are some guidelines to help you decide—but remember, you’re The Decider. In the end, use the tool that feels right to you. Also,
keep in mind that tools evolve. These guidelines will evolve, too.
RecommendationJob
We recommend Lightning components. Visualforce characteristics,
especially the page-centric orientation, can be a poor match for
I’m Developing for the Salesforce1 Mobile Application
mobile apps with limited, high-latency network connections and
91
Lightning ComponentsUser Interface Development Considerations

RecommendationJob
limited compute resources. Lightning components, by contrast,
was designed specifically to handle this context.
Both Visualforce and Lightning components use similar tag-based
markup. For example, Visualforce markup for an input field is
<apex:inputText> while for Lightning components it’s
<ui:inputText>.
So what’s the difference? Well, Visualforce processes markup tags
on the Salesforce server. Lightning components process markup
on the client. The advantage of processing on the client is that the
HTML block for the entire page isn’t passed back and forth between
the client and the server with every interaction.
With a few exceptions, Lightning components are better for
Salesforce1 development. Some cases call for Visualforce as a
JavaScript application. See the Lightning Components Developer’s
Guide for more information.
Use Visualforce pages to ensure development velocity and
manageability.
I’m Building a Page-Centric Experience with Limited
Client-Side Logic
Use Lightning components but refer to limitations documentation
first.
I’m Building an Interactive Experience with JavaScript to
Meet User Experience Requirements
Use a Visualforce page as a container for your third-party
framework, such as AngularJS or React, and your application.
I’m Committed to a JavaScript Framework Such as AngularJS
or React
Use Lightning App Builder and Lightning components for custom
components. Use Visualforce if the required components aren’t
yet available.
I’m Enabling Non-Developers to Build Apps by Assembling
Standard or Custom Components
Use a Visualforce page as a container for your third-party
framework, such as AngularJS or React, and your application.
You can also use a Lightning component as a container to host
your app built with the third-party framework, but this is a less
mature solution.
I’m Building an Interactive Experience with JavaScript and I
Need a Third-Party Framework
For example, say you want to add a tab to a record home. This task
is a simple drag-and-drop in Lightning App Builder.
I’m Adding User Interface Elements
Use Community Builder to create a Lightning-based community
site leveraging Lightning components.
I’m Building a Community for Customers
Continue using Visualforce in Salesforce Classic. Explore using
Lightning components with Lightning components for Visualforce.
I’m Building a Community for Partners
Continue using Visualforce. Lightning components don’t support
an anonymous (unauthenticated) user context yet.
I’m Exposing a Public-Facing Unauthenticated Website
Use Visualforce. Lightning components don’t support rendering
as PDF output yet.
I’m Rendering Pages as PDFs in My Application
92
Choosing the Right Tool for the JobUser Interface Development Considerations

RecommendationJob
Continue to use Visualforce. Consider moving to Lightning
components using Lightning components for Visualforce.
I’m Adding to an Existing Project with Lots of Visualforce
Pages
You’re right there with us! Dive in to Lightning components. Start
with the Lightning Components Trailhead module.
I’m Committed to Investing in the Latest Technology
Use Lightning components. If you’re not familiar with them, there’s
no better time than now to learn!
I’m Starting a Brand New Project
Choosing the Right Tool for Your Organization
When you think about choosing a tool, it’s important to focus on more than just the job at hand. You also want to consider your
organization as a whole and your role within your organization. Let’s look at how some different roles can best leverage Salesforce’s
development models.
RecommendationRole
Start using Lightning components for new apps or new features
in existing apps. Package these units for subscriber use in both
Salesforce Classic and Lightning Experience.
ISV Partner
Start using Lightning components for new implementations. For
in-progress implementations, continue using Visualforce.
SI
Continue using Visualforce with your preferred JavaScript
framework. Explore Lightning components and consider switching
down the line.
Professional developers who are JavaScript gurus and experienced
with Visualforce
Continue using Visualforce, but consider checking out Lightning
App Builder.
Citizen developers who use standard Visualforce components for
pages
Use Lightning App Builder to create apps and customizations.
Buddy up with developers and partners to build custom Lightning
components.
Point-and-click admins
Migrating to Lightning Components
Here’s the good news. Despite the shift to Lightning Experience and an increased focus on Lightning components, your Visualforce
pages still work on Salesforce. It doesn’t matter if you’re using the new interface or your old friend Salesforce Classic—Visualforce is
designed to work with both. You don’t have to convert any existing Visualforce pages to keep using them for a long time.
But, because web applications are taking more advantage of the app-centric model, we encourage all Salesforce developers to learn at
least the basics of Lightning components. You’ll want to use these components in your future development work.
The Winter ’16 release is the perfect time for you to take the first steps. New features in this release let you “dip your toe in the water,”
and try using as little as a single Lightning component in a new or existing Visualforce page. You can use these embedded components
in both Lightning Experience and Salesforce Classic. It’s so easy, you’d be nuts not to give it a try.
93
Choosing the Right Tool for Your OrganizationUser Interface Development Considerations
We know that migrating to a new development framework is daunting. But we’re here for you. This trail is loaded with all the tips, tricks,
and gotchas that you need to successfully adopt Lightning Experience development.
94
Migrating to Lightning ComponentsUser Interface Development Considerations

CHAPTER 15 Visualforce and Lightning Experience
Lightning Experience is a whole new world, and we hope you think it’s exciting. Behind the Lightning
Experience user interface is a new way of delivering the Salesforce application, one that brings significant
changes to the way Visualforce apps run. This release contains a beta version of Visualforce for Lightning
Experience that is production quality but has known limitations. For the most part, your Visualforce apps
should “just work,” but there are some things you should know before you make the jump to Lightning
Experience.
In this chapter ...
•What Works
•What Works, But
Needs Updating and
Testing
The technical details of how Lightning Experience is built and how it runs Visualforce apps are really
cool, and important for actual development work. When you’re ready for those details, the Visualforce
•What Doesn’t Work
•That Look-and-Feel
Thing & Lightning Experience module will show you the way. But here we’re going to stay at a high level, and
divide things up into what works and what doesn’t, what you’ll want to update, and other issues that
will help you plan your Lightning Experience migration development effort.
95

What Works
The list of what parts of Visualforce work in Lightning Experience is pretty long. It’s very nearly as long as the entire Visualforce features
list. So before we get to the things that aren’t on the list, let’s think positive, and check off some of the many things you can count on.
First of all, the fundamental mechanisms of how Visualforce works remain the same. Whether your pages use the standard controller,
custom controllers, JavaScript remoting, or Remote Objects, your connection to Salesforce works the same.
Note: If you’re using JavaScript extensively, or if you’re using other APIs to access Salesforce, you might have some work to do.
We’ll get to that.
Second, Visualforce markup remains the same. There are a few tags and attributes that behave differently in Lightning Experience, and
a very few that we recommend against using or that just don’t work. But otherwise the way you write code for Visualforce pages and
components is unchanged.
Third, most of the ways you can use Visualforce to customize your organization work just fine in Lightning Experience—though as you
can no doubt imagine, with an all new user interface, these customizations have moved to different places.
Let’s dive just a bit into the specifics of these customizations. All of the following work just fine in Lightning Experience, simply moving
to a new location in the user interface.
•Creating custom tabs and apps with Visualforce pages.
•Creating custom buttons and links that lead to Visualforce pages.
•Creating custom actions that open with a Visualforce page.
•Overriding standard actions with Visualforce pages (with one exception that we’ll get to later).
•Creating flows that use Visualforce pages.
•Packaging Visualforce pages and components.
The changes in the user interface vary from minor to significant. Features customized with Visualforce move automatically when users
change between Lightning Experience and Salesforce Classic. You might need to give your users an initial orientation, but after that,
they’ll be happy as clams.
There are other features, such as Visualforce email templates, that use Visualforce code behind the scenes. These aren’t surfaced in the
user interface directly, and so they remain unchanged.
For a screenshot-heavy visual tour of where various features have moved to, see the Using Visualforce in Lightning Experience unit in
the Visualforce & Lightning Experience module.
What Works, But Needs Updating and Testing
The environment in which a Visualforce page runs when Lightning Experience is enabled is different than the standard Visualforce
request. The technical details get pretty complex, but the simple version is that in Lightning Experience, Visualforce pages are embedded
in an HTML iframe that’s displayed inside the Lightning Experience app.
This change has a number of consequences that mostly have to do with JavaScript and accessing external apps. You’ll want to review
your code and verify a few things before you certify your Visualforce pages for use in Lightning Experience. We’re saving the nitty gritty
details for the Visualforce & Lightning Experience module. For now, let’s just check in at a high level so you can start to scope your review.
For starters, if you have pages or apps that use JavaScript, you’ll want to review the behavior of the code. In particular, your code can’t
directly access the window global object. You can still get at it with a minor code change if you really need to, but there are probably
better ways to accomplish those tasks using Lightning Experience app APIs instead. In particular, code which sets window.location
directly should definitely be revised to integrate with the Lightning Experience navigation stack.
96
What WorksVisualforce and Lightning Experience

Similarly, code that assumes that it has access to the entire environment is in for a rude surprise. It still has access to the Visualforce part
of the document, but not the full Lightning Experience app. That will be fine for many apps, but for those that want to be totally in
charge, there’s going to be some work for you to do.
If your pages make use of iframes themselves, either with <apex:iframe> or static HTML, being embedded into another iframe
could cause some issues. In many cases “turtles all the way down” is fine. Just make sure you do extra testing here.
If your pages embed a Force.com Canvas app, and especially if you’ve used the Canvas APIs to integrate the app into Salesforce, allocate
time for thorough testing as well. Canvas apps use an iframe, and while correctly behaving code should just work, we all know how
common perfect code is in the real world.
Pages that use Remote Objects and JavaScript remoting work without requiring updates to authentication code. However, if your pages
use other Salesforce APIs you might need to adapt your authentication code to make the right cross-domain request, or otherwise adjust
to the new environment.
All of the above sounds both vague and hard to do but, in truth, the amount of code you’re likely to need to change is small. And again,
the details for developers are available in the Visualforce & Lightning Experience module.
What Doesn’t Work
And so we come to the, shall we say, less pleasant part of our conversation. Fortunately, the list of what doesn’t work in Visualforce for
Lightning Experience is short, and we can get through it quickly.
Perhaps the most significant change, in terms of things that might be hard to work around, Visualforce overrides of standard actions are
slightly different in Lightning Experience compared to Salesforce Classic. Any override for the object list action won’t be accessible in
Lightning Experience.
Specifically, there are six standard actions you can override for an object in Salesforce Classic:
•Object tab
•Object list
•Record view
•Record edit
•Record create
•Record delete
In Lightning Experience the first two actions have been combined into one page, object home. Object home is similar to object list, with
some elements of object tab, like recent items, added. Others, such as reports or tools, have moved to other parts of the user interface.
Regardless of the user interface settings in your organization, both object tab and object list are available to be overridden in Setup.
Overriding the object tab action overrides the object home page in Lightning Experience, as expected.
However, when in Lightning Experience, the object list action isn’t accessible in the user interface, so there’s no way to fire it. If your
organization has overridden the object list action for any object, that functionality won’t be available when users are using Lightning
Experience. If there are essential features in that override, you’ll need to find another way to make them available.
On a bit smaller scale, the showHeader and showSidebar attributes of <apex:page> have no effect on Visualforce pages
when displayed in Lightning Experience. The standard Salesforce Classic header and sidebar are always suppressed, and there isn’t a
way to suppress the Lightning Experience header and sidebar.
You can’t add Visualforce items to the Lightning Experience navigation sidebar. Likewise, there’s no way to customize the Home page
with Visualforce items. In Winter ’16 the items in the sidebar and on Home aren’t customizable.
A number of related lists available in Salesforce Classic aren’t supported in Lightning Experience. The <apex:relatedList>
component isn’t a way around this limitation. Good try, though!
97
What Doesn’t WorkVisualforce and Lightning Experience

And, coming down to the really minor issues, rendering Visualforce pages as PDFs works exactly as in Salesforce Classic, without any of
the Lightning Experience visual design. This is probably what you want anyway, but if you wanted to render pages into PDFs that include
the Lightning Experience design, that’s not possible today.
That Look-and-Feel Thing
The first thing you notice about Lightning Experience is the gorgeous, all new visual design. And if you’ve been developing Visualforce
pages for a while, your next thought might be, how will my Visualforce pages look in Lightning Experience. The short answer is…well,
let’s sit down for this part, OK?
The short answer is, with the exception of suppressing the Salesforce Classic header and sidebar, and of being framed by the Lightning
Experience user interface, Visualforce pages display unchanged in Lightning Experience.
Specifically, the HTML that’s rendered by the built-in Visualforce components doesn’t change when the page displays in Lightning
Experience, and the Salesforce Classic stylesheets those components use is, by default, loaded by the page. The effect is that pages that
use <apex:inputField>, <apex:outputField>, the <apex:pageBlock> components, and other coarse- and
fine-grained components that match the Salesforce Classic visual design, still match that visual design. You get a little slice of Salesforce
Classic in the middle of your Lightning Experience.
If, however, you’ve used Visualforce components that are relatively unstyled, or your own components and markup, and developed your
own stylesheets instead of using the default Salesforce styles, your pages also appear unchanged, retaining the styling you worked so
hard to develop.
In other words, in this initial release of Visualforce for Lightning Experience we’ve favored stability in the visual design of existing pages,
instead of trying to adapt them dynamically to Lightning Experience.
That said, if you’re as excited about the new visual design as we are, there are ways for you to adopt that styling to a lesser or greater
degree, depending on how much work you want to put in. We won’t cover it here, but there’s a whole unit, Understanding Important
Visual Design Considerations, that shows the range of possibilities and the techniques to use to achieve them.
98
That Look-and-Feel ThingVisualforce and Lightning Experience

CHAPTER 16 Lightning Components in Lightning Experience
By now you’ve read the word “Lightning” so many times it’s probably lost all meaning. To worsen the
storm, we’ve been talking about both “Lightning Experience” and “Lightning components.” Let’s clear
up the relationship between the two.
In this chapter ...
•Considerations for
Use Remember all that information about developing following either a page-centric or app-centric model?
Salesforce Classic uses a page-centric model, but Lightning Experience uses an app-centric model. It’s
made up of—you guessed it—components.
Starting to get the picture? Lightning components were designed with Lightning Experience in mind.
As the core Salesforce app shifts to the app-centric framework, we want you to shift along with us. We
want you to think about developing on the platform in a whole new way.
You might have developed some Lightning components in Salesforce Classic. You can still use the old
interface with Lightning components and all your existing component functionality transfers seamlessly
into Lightning Experience.
If you haven’t worked with Lightning components yet, don’t worry. There’s a Trailhead module, a quickstart
guide, and a full developer’s guide so that you can start developing in no time. Before you dive in to the
technical details, let’s take a second to review some basic advantages of Lightning components:
Out-of-the-Box Component Set
Salesforce provides a number of components to bootstrap your app development.
Performance
The component framework leverages a stateful client (using JavaScript) and a stateless server (using
Apex). This structure allows the client to call the server only when absolutely necessary. With fewer
calls to the server, your apps are more responsive and efficient.
Event-Driven Architecture
Events are key to the Lightning component framework. Components listen to application and
component events and respond accordingly.
Rapid Development
The simple markup and pre-made components mean that you can get applications out the door
faster than ever. Particularly if you’re comfortable with Visualforce markup, learning component
markup is a breeze.
Device-Aware and Cross-Browser Compatibility
A huge advantage of Lightning components is that you don’t have to worry about compatibility
across devices and browsers. The component framework handles this work for you.
99

Considerations for Use
We’ve already covered a lot of the considerations for using Lightning components. You probably don’t want to switch to Lightning
components with in-progress Visualforce projects. You also want to stick with Visualforce if you want to do things like render PDFs on
a page. Again, Visualforce still works like it used to and continues to be a foundational part of developing on the Salesforce platform.
Lightning components are still in their infancy and not all the features you’re used to in Visualforce are fully supported yet. We’ve released
several documents outlining the specific limitations of Lightning components so you can decide if they’re right for your immediate
development work.
We’ve also covered situations where you should consider making the switch to developing with Lightning components. Salesforce1
mobile development, for example, is a great place to use Lightning components. Also use Lightning components for new projects and
any project involving highly interactive applications.
Okay, so we know what to consider. But where exactly can you use Lightning components? With the Winter ’16 release, you have several
options.
Standalone Apps
If you used Lightning components in Salesforce Classic, you probably made at least one standalone Lightning app. Lightning App
Builder lets you declaratively create apps with standard components ranging from buttons to Canvas apps. Alternatively, use the
Developer Console to create apps made up of both standard and custom Lightning components. See the Lightning Component
Developer’s Guide for more information.
Salesforce1
We’re repeating this one often because it’s very important: use Lightning components for your mobile development. When you’re
using a mobile device, you don’t want to make a call to the server every time a user presses a button. Using Lightning components
vastly improves mobile app performance.
Visualforce Pages
This capability is perfect for Salesforce developers that are Visualforce veterans. If you’re not quite ready to commit to a full Lightning
app, smooth the transition by integrating components into Visualforce pages. This task only requires a few lines of markup and gives
you a huge amount of flexibility. See the Lightning Component Developer’s Guide for more information.
As much engineering effort as we’ve put into making Lightning components a framework you can use to create applications for the
next decade, we’re not done. There’s still a few places where you can use Visualforce to customize Salesforce but you can’t yet use
Lightning components. Stay tuned to this channel.
100
Considerations for UseLightning Components in Lightning Experience

CHAPTER 17 ISVs, Packaging, and AppExchange
If you’re a Salesforce ISV partner, you probably have some concerns about how your app development
and release processes are affected by Lightning Experience. Will your existing apps still work? Will you
have to make major changes in your existing procedures? How about future app releases?
In this chapter ...
•ISV Tools in Lightning
Experience These are all valid concerns, but we have good news. At the moment, most parts of the ISV experience
are the same. There are a few speed bumps to look out for along the way. But overall, we hope that
Lightning Experience opens more doors for innovative app development than it does close them.
•Packaging Your
Applications in
Lightning Experience
This unit provides a general overview of what ISVs should consider when using Lightning Experience.
•AppExchange and
Lightning Experience
101

ISV Tools in Lightning Experience
First, let’s talk tools. This conversation is bittersweet. On one hand, Lightning Experience largely doesn’t affect your standard toolkit. On
the other hand, your toolkit is unaffected because it’s not fully available in Lightning Experience.
For now, you’ll need to stick to Salesforce Classic to use these tools.
•Environment Hub
•Trialforce
•License Management App (LMA)
•Channel Order App (COA)
•Usage Metrics Visualization App
In other words, Lightning Experience experience doesn’t yet support a lot of your standard ISV tasks.
•Creating environments for development, testing, and demos
•Creating trial organizations for prospective customers
•Licensing and supporting your apps
Again, it’s not that you aren’t able to do these things in Salesforce. It’s that, for now, you need to stick with the old way of doing them.
As Lightning Experience continues to mature, more of these features will become available.
Packaging Your Applications in Lightning Experience
You also don’t have much to worry about when you’re packaging your applications. Whether you’re creating managed packages in a
Developer Edition or unmanaged packages in an Enterprise Edition, your processes haven’t changed a bit. Like your ISV tools, packaging
functionality isn’t available in Lightning Experience at this time.
For now, stick to Salesforce Classic to create packages.
AppExchange and Lightning Experience
Since AppExchange isn’t a part of the core Salesforce application, its general use isn’t impacted by the new interface. But there are still
some considerations to cover.
Let’s discuss what’s going to happen to your existing apps. If you’ve already published apps on AppExchange, you probably have concerns
about whether they’ll work in organizations using Lightning Experience. As you probably noticed in this unit, there are still some features
that Lightning Experience doesn’t support. Depending on the functionality of your apps, there’s a chance that they aren’t compatible
with Lightning Experience.
So what do you do about that? Moving forward, similar to the way that your app undergoes a security review when you list it on
AppExchange, it’s also reviewed for Lightning Experience readiness. Apps supported in Lightning Experience get a “Lightning Ready”
sash on their listing. Apps that aren’t certified as Lightning Ready can still be used in Lightning Experience but there’s no guarantee that
they’ll work as expected. They might also be visually inconsistent with Lightning Experience. It’s best to use these apps in Salesforce
Classic.
The good news here is that, as an ISV, you’re not expected to change all your listed apps so that they’re Lightning Ready. You can make
this transition over time or expect that your users continue using your apps in Salesforce Classic.
102
ISV Tools in Lightning ExperienceISVs, Packaging, and AppExchange

CHAPTER 18 Understanding Changes to Other Development Tools
This last unit is a bit of a grab bag. We’ve already covered all of the “hard” stuff, so at this point you’re in
the home stretch. Can you feel it? That’s the feeling of a new badge, eager to leap onto your profile. Let’s
do this.
In this chapter ...
•Installed Packages in
Lightning Experience
•The API and Apex in
Lightning Experience
•Authentication and
Security in Lightning
Experience
•Canvas for Lightning
Experience
•Salesforce1 for
Lightning Experience
•Mobile SDK for
Lightning Experience
103

Installed Packages in Lightning Experience
Managing your installed packages in Lightning Experience is the same as it ever was. The Installed Packages landing page is available
in the Lightning Experience setup area. It looks and works the same way it does in Salesforce Classic.
Of course, finding and using this page isn’t the only thing on your mind. You’re also wondering whether your packages installed from
AppExchange still work in Lightning Experience.
The best answer we can give is maybe. Moving forward, apps listed on AppExchange are marked with a “Lightning Ready” sash if they’re
fully compatible with Lightning Experience. Check the listing to see if an app is Lightning Ready. If it’s not, you can still try to use it in
Lightning Experience, but we recommend sticking to Salesforce Classic to prevent unexpected behavior.
The API and Apex in Lightning Experience
As a developer, one of your most important tools on any platform is the API. As a Salesforce developer, Apex is just as important to your
success.
We’ve kept our promise that we won’t do anything that breaks your dependencies on our APIs. Your Apex code and queries continue
to function as expected, regardless of whether you’re using Lightning Experience or Salesforce Classic. It really is just that simple. Breathe
a sigh of relief.
Authentication and Security in Lightning Experience
Regardless of the user experience you’re developing for, security is still Salesforce’s top priority. Lightning Experience doesn’t fall short
of our promise to keep your organization’s data safe.
Continue to treat authentication and security as you do when developing for Salesforce Classic. The only difference in access controls
between Salesforce Classic and Lightning Experience is in the App Launcher. The App Launcher is available by default to all users in your
organization. While this change is of concern mostly to administrators, it’s important to work with your Salesforce admin to ensure that
your development work is only seen by the people who are supposed to see it.
Canvas for Lightning Experience
Force.com Canvas allows you to easily integrate third party applications in Salesforce. Canvas functionality in Lightning Experience is
the same as in Salesforce Classic. You can still embed Canvas apps in Visualforce pages, Salesforce1, and everywhere else they’re
supported—with the added bonus that you can integrate Canvas apps in Lightning Components!
Salesforce1 for Lightning Experience
Lightning Experience and Salesforce1 are like peanut butter and jelly. They’re made for each other. Your mobile development practices
in Lightning Experience are the same as they were in Salesforce Classic.
When we say the two were made for each other, we mean it. You might be familiar with the sforce.one JavaScript object. In the
past, it was used as an event mechanism for navigation in Salesforce1 development. Now, you can also use it for navigation in Lightning
Experience. See the Salesforce1 Mobile App Developer’s Guide for more information.
104
Installed Packages in Lightning ExperienceUnderstanding Changes to Other Development Tools

Mobile SDK for Lightning Experience
By now you’re probably tired of reading overview information and are ready to dive in to the nitty-gritty technical details. We won’t keep
you much longer. Literally just another two sentences!
As its own client, or front end, to Salesforce the Mobile SDK isn’t impacted by Lightning Experience. If you use Mobile SDK to develop
mobile apps, you can rest easy.
105
Mobile SDK for Lightning ExperienceUnderstanding Changes to Other Development Tools

VISUALFORCE & LIGHTNING EXPERIENCE
CHAPTER 19 Using Visualforce in Lightning Experience
Lightning Experience brings an all new user interface to your Salesforce organization, but that doesn’t
mean your Visualforce apps stop working. This release contains a beta version of Visualforce for
Lightning Experience that is production quality but has known limitations. Visualforce pages
work in Lightning Experience, many without any revisions. Things have moved around, though, and
there are some chores you’ll want to complete to make sure your Visualforce pages work the way you
expect as your users switch between Lightning Experience and Salesforce Classic. And there are a very
few features that, alas, don’t work yet in Lightning Experience. We’ll get you sorted on all of it in this
module.
In this chapter ...
•Where You Can Use
Visualforce in
Lightning Experience
Let’s start with a few basic details. These are topics we’ll cover in depth later, but let’s get some essential
items into bullet points right up front.
•With some important exceptions, Visualforce “just works” in Lightning Experience. If you’ve written
Visualforce apps for your organization, you can expect that they work whether your users access
them in Lightning Experience or Salesforce Classic.
•If your Visualforce pages use the built-in standard components, their look-and-feel matches Salesforce
Classic, whether your users access them in Lightning Experience or Salesforce Classic. If you want
your pages to match the Lightning Experience styling, you have some work to do.
•If your Visualforce pages make use of JavaScript, there are things you need to check. Visualforce
doesn’t “own” the whole page when shown in Lightning Experience, and because of that your
JavaScript code needs to play by some new rules.
•There are other things that have changed about how Visualforce runs when it’s running inside
Lightning Experience. For the most part, these are turning the “just works” crank, but you’ll want to
be aware of them all the same.
And finally, did we mention that some things have moved around? Have they ever! Lightning Experience
is a complete rethinking of how to use Salesforce, and while the job’s not done yet, we’re really excited
about where we’re going. To get you oriented for where your Visualforce is in the new environment,
let’s take a quick tour of some of the places you can use Visualforce in Lightning Experience.
106
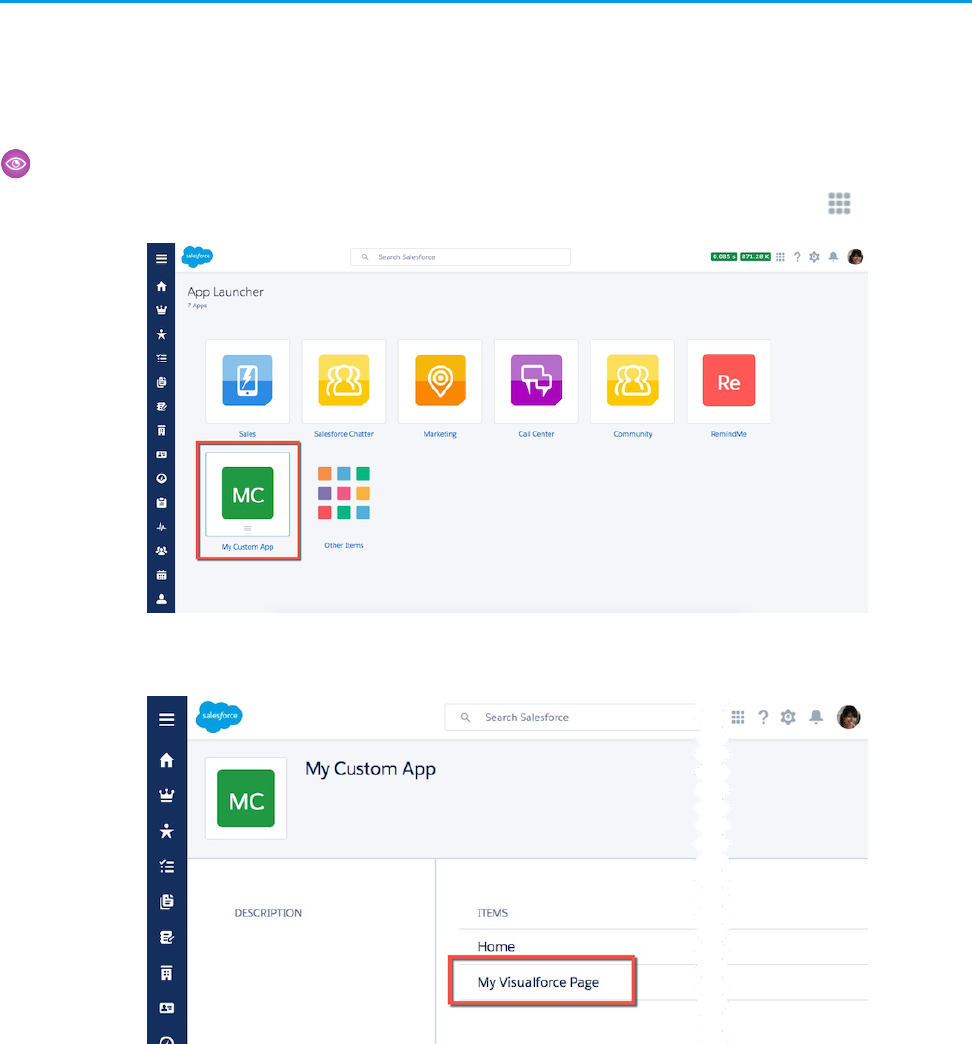
Where You Can Use Visualforce in Lightning Experience
As with Salesforce Classic, you can extend Lightning Experience with your custom Visualforce pages and apps. But where you find them
has changed, and there are still some places you can’t put Visualforce.
The following are some of the ways you can add Visualforce to your Lightning Experience organization. This is just a quick tour, though.
For more details on how to customize your organization using Visualforce pages, see the resources at the end of this unit.
Example: Run a Visualforce Page from the App Launcher
Your Visualforce apps and custom tabs are all available from the App Launcher, which you reach by clicking in the header.
Clicking a custom app displays the tabs in that app, including your Visualforce pages.
This is pretty different from Salesforce Classic, and note that you need to add your Visualforce pages to tabs, and then add the tabs
to a custom app for them to be accessible in the App Launcher. Visualforce tabs that aren’t in apps can be found in Other Items.
107
Where You Can Use Visualforce in Lightning ExperienceUsing Visualforce in Lightning Experience
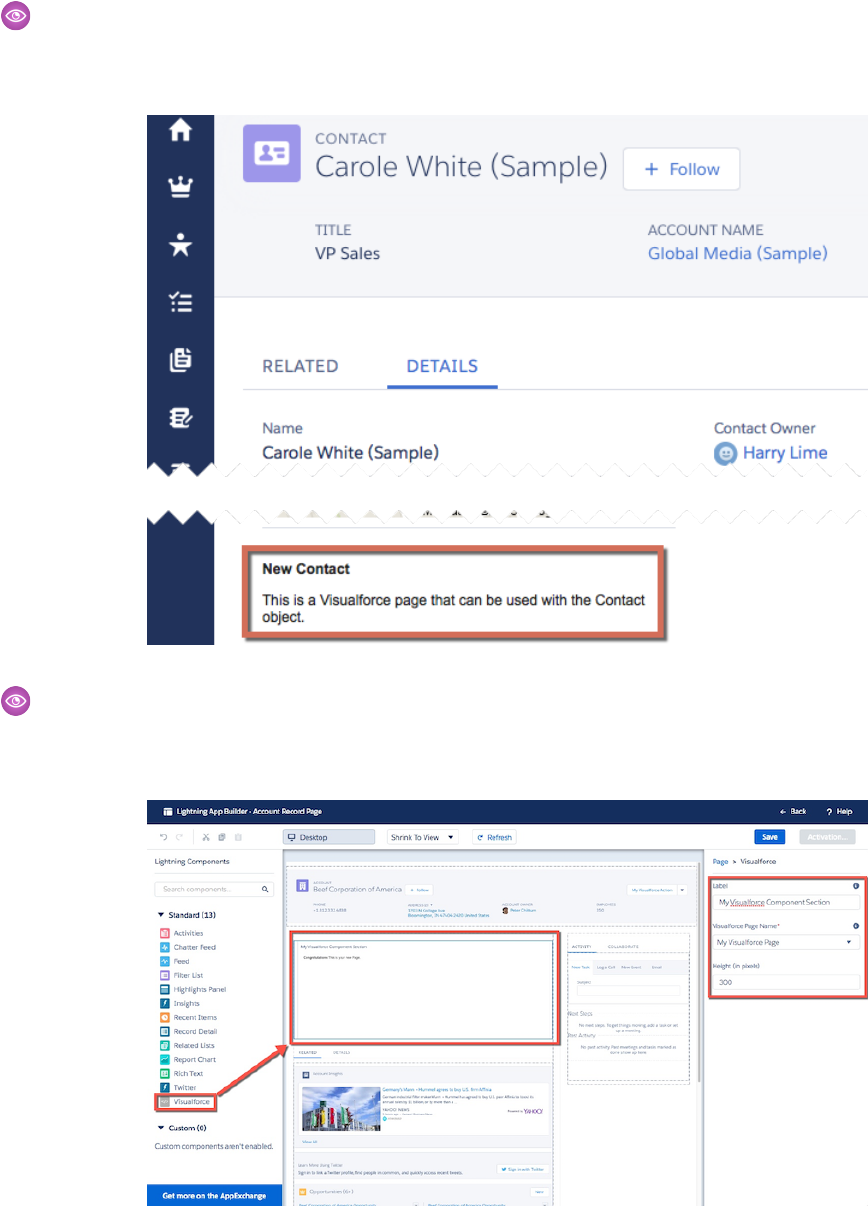
Example: Display a Visualforce Page within a Standard Page Layout
Extend your page layouts by embedding Visualforce pages on them to display completely custom content on a standard page.
The behavior here is identical to Salesforce Classic, except you need to view the record’s Details to see the page layout.
Example: Add a Visualforce Page as a Component in Lightning App Builder
When you create a custom app page in Lightning App Builder, you can add a Visualforce page to the page by using the Visualforce
component.
108
Where You Can Use Visualforce in Lightning ExperienceUsing Visualforce in Lightning Experience
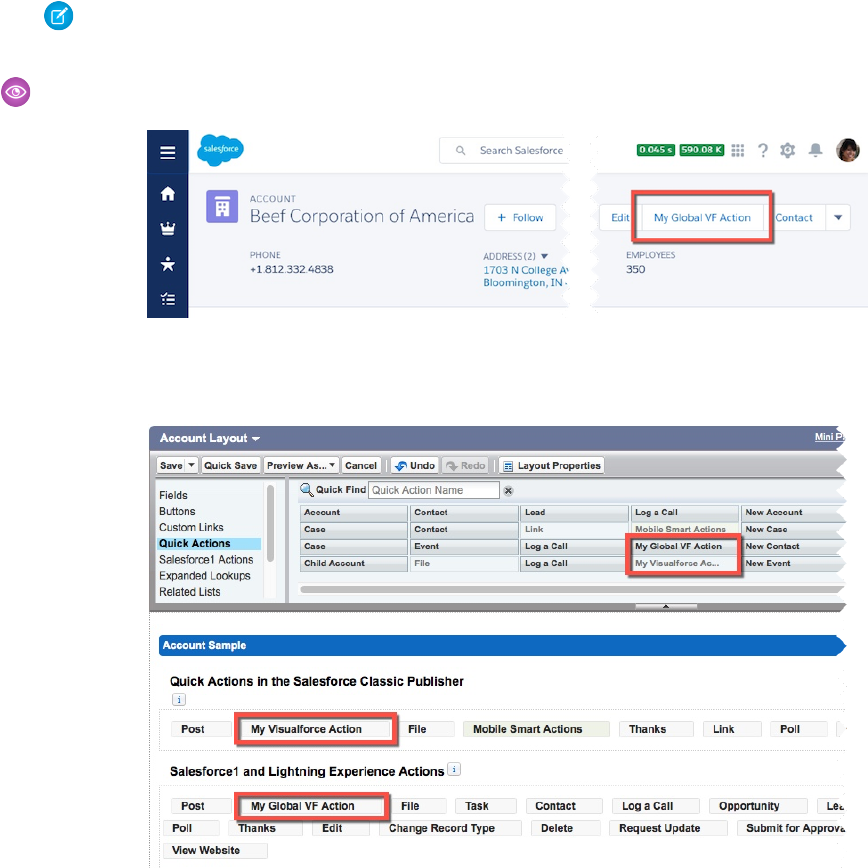
Note: You must enable Available for Salesforce mobile apps and Lightning Pages for a
Visualforce page to make it available in Lightning App Builder.
Example: Launch a Visualforce Page as a Quick Action
Although their placement in the Lightning Experience user interface is quite different from Salesforce Classic, the process of adding
quick actions is much the same. Add them to the appropriate publisher area on the object’s page layout.
109
Where You Can Use Visualforce in Lightning ExperienceUsing Visualforce in Lightning Experience
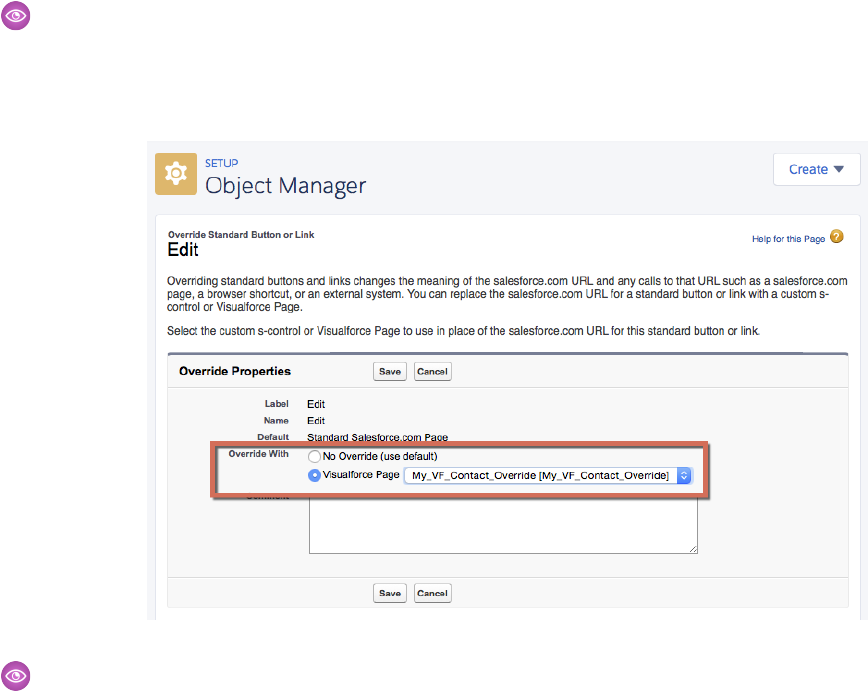
Example: Display a Visualforce Page by Overriding Standard Buttons or Links
You can override the actions available on an object with a Visualforce page. When the user clicks a button or link that has been
overridden, your page displays instead of the standard page. Setting this up is pretty much identical to Salesforce Classic. Indeed,
you’ll have a hard time telling that you’re in Lightning Experience when defining an action override!
Example: Display a Visualforce Page Using Custom Buttons or Links
You can create new actions for your objects, in the form of buttons and links, by defining them on an object. JavaScript and URL
buttons and links aren’t supported in Lightning Experience, but Visualforce items are. The process of defining Visualforce buttons
and links is identical to that in Salesforce Classic, so we won’t bother to show it here.
110
Where You Can Use Visualforce in Lightning ExperienceUsing Visualforce in Lightning Experience

CHAPTER 20 Developing Visualforce Pages for Lightning
Experience
The development process for creating Visualforce pages and apps for Lightning Experience is in some
ways considerably different from developing for Salesforce Classic. In others, you’ll find it’s just the same.
The main difference is how you view and test your pages during development.
In this chapter ...
•Set Up Your Editor
•Viewing Visualforce
Pages During
Development
In this unit we’ll cover the details of getting your development environment set up, and then get into
the details of the “right” way to test your pages while you’re in the process of building them. The good
news is that the process you need to use to develop for Lightning Experience is the same you’ll use for
developing Salesforce1 pages as well.
•Reviewing
Visualforce Pages in
Multiple
Environments
•Testing Your
Visualforce Pages
111
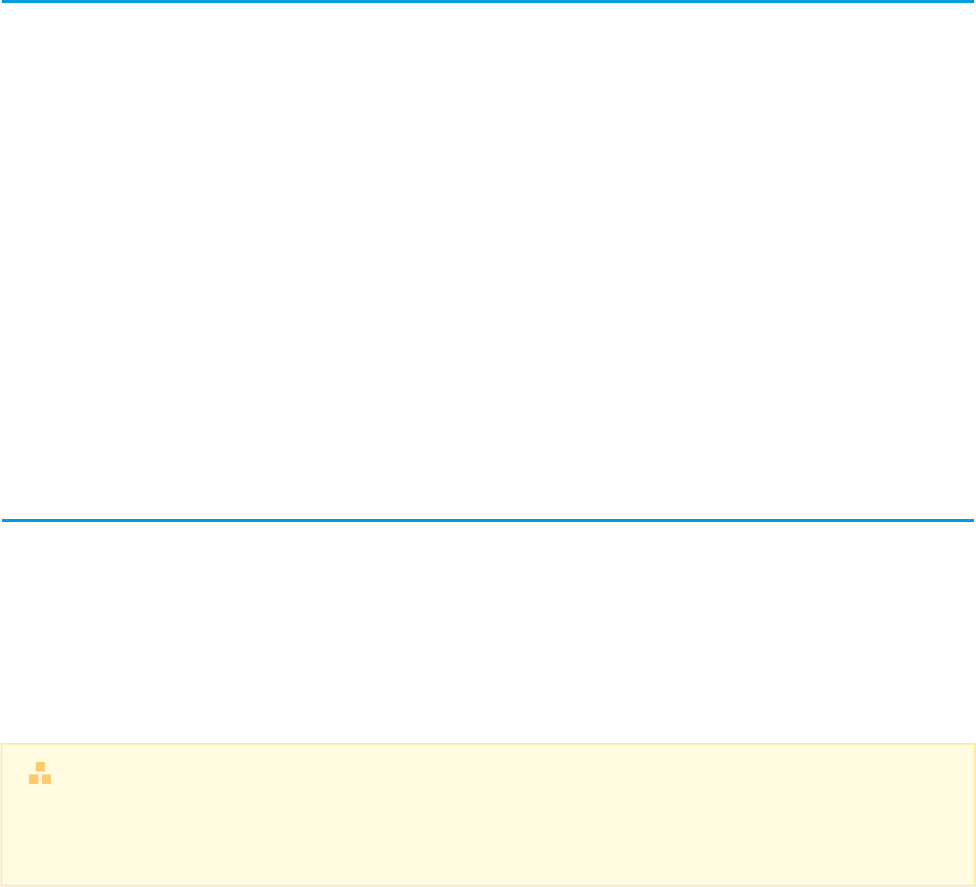
Set Up Your Editor
The first thing you’ll want to set up is the editing tool you’ll use for writing code. This process remains the same, whether you’re creating
pages for Lightning Experience, Salesforce Classic, or Salesforce1, and whether you’re using the Developer Console, the Force.com IDE,
or the good old Setup editor.
If you’ve already got a preferred Visualforce editing tool, you don’t need to do anything here. Writing and saving your Visualforce markup
remains exactly the same. The Developer Console has its own user interface, and doesn’t change between Lightning Experience and
Salesforce Classic. The editor in Setup is also unchanged, retaining the Salesforce Classic user interface in all user interface contexts. And
of course if you’re using a native tool, such as the Force.com IDE or one of the many third-party tools available, those have their own
user interfaces.
The one exception is the editor in the Visualforce Development Mode footer. If you’ve enabled Development Mode in your user settings,
and you’re using Salesforce Classic, then viewing and editing Visualforce pages with the Development Mode footer is unchanged, as
you’d expect. If you switch to Lightning Experience, and then access a page using the traditional
https://your-instance.salesforce.com/apex/PageName URL pattern, you might be somewhat surprised to find
yourself back in Salesforce Classic.
This is expected, and we’ll talk about it more when we get to viewing and testing your Visualforce pages. For now, know that Development
Mode for Visualforce is only available in Salesforce Classic.
Viewing Visualforce Pages During Development
Viewing your Visualforce pages while they’re being developed is a common task. And while it’s not “testing” in the formal sense, you
certainly want to be able to interact with functionality you’ve built to ensure it’s making progress towards correct behavior. This is
frequently accomplished by accessing the page using the https://your-instance.salesforce.com/apex/PageName
URL pattern. While this still works for reviewing pages in Salesforce Classic, it doesn’t work for checking behavior in Lightning Experience.
Pages you view using direct URL access always display in Salesforce Classic, which is to say, the “classic” Visualforce container, no matter
what your user interface settings are. If you create Visualforce pages that have Lightning Experience-specific behavior, you won’t be able
to review that behavior just by using the usual direct URL access.
Beyond the Basics
What’s going on behind the scenes that causes this? It’s pretty simple, really. In order to view your page in Lightning Experience,
you need to access the Lightning Experience container app. This means accessing /one/one.app. If you’re accessing that,
you can’t access /apex/PageName. They’re just two different URLs that don’t overlap.
So what’s a developer to do? You need to view your page from within the Lightning Experience app itself, so that it’s running inside the
Lightning Experience container. This means you’ll need to navigate to the page in Lightning Experience, and there’s a variety of ways
to do that.
The simplest way to get to a specific Visualforce page is to create a tab for it, and then navigate to that tab via Other Items in the App
Launcher. A more long-term approach would be to create an “In Development” app, and add your Visualforce tabs to it as you work on
them, and move or remove them as they roll out to production. Since the controls for doing this have moved around a bit, here are brief
instructions.
1. From Setup, enter Apps in the Quick Find box, then select Apps.
You should see the Apps Setup page.
2. Click New in the Apps section, and then create a custom app for your pages in development.
Consider restricting your app to only System Administrators, or a profile you’ve created for developers in your organization.
112
Set Up Your EditorDeveloping Visualforce Pages for Lightning Experience
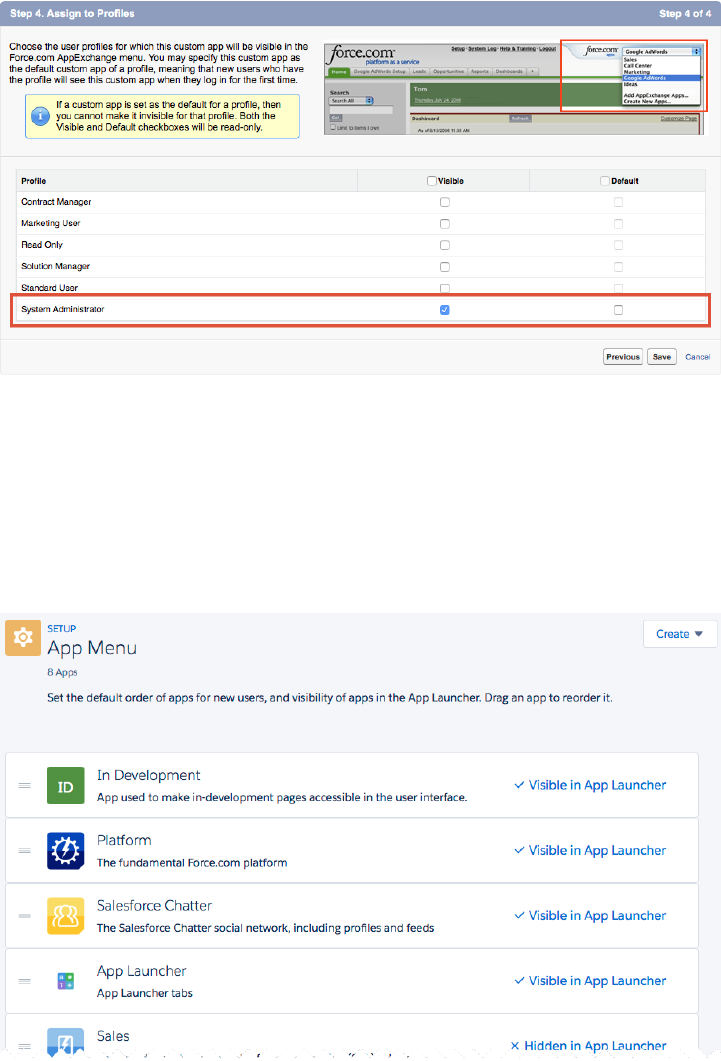
You don’t need your users to see your pages before they’re added to their permanent place in the user interface.
3. From Setup, enter App Menu in the Quick Find box, then select App Menu.
You should see the App Menu Setup page.
4. Make sure your In Development app is set to Visible in App Launcher.
While you’re at it, you might want to rearrange items, and even hide apps you don’t use.
5. From Setup, enter Tabs in the Quick Find box, then select Tabs.
You should see the Custom Tabs Setup page.
6. Click New in the Visualforce Tabs section, and then create a custom tab for the page currently in development.
Make the tab visible only to your development user profile, and add the tab only to your In Development app.
113
Viewing Visualforce Pages During DevelopmentDeveloping Visualforce Pages for Lightning Experience
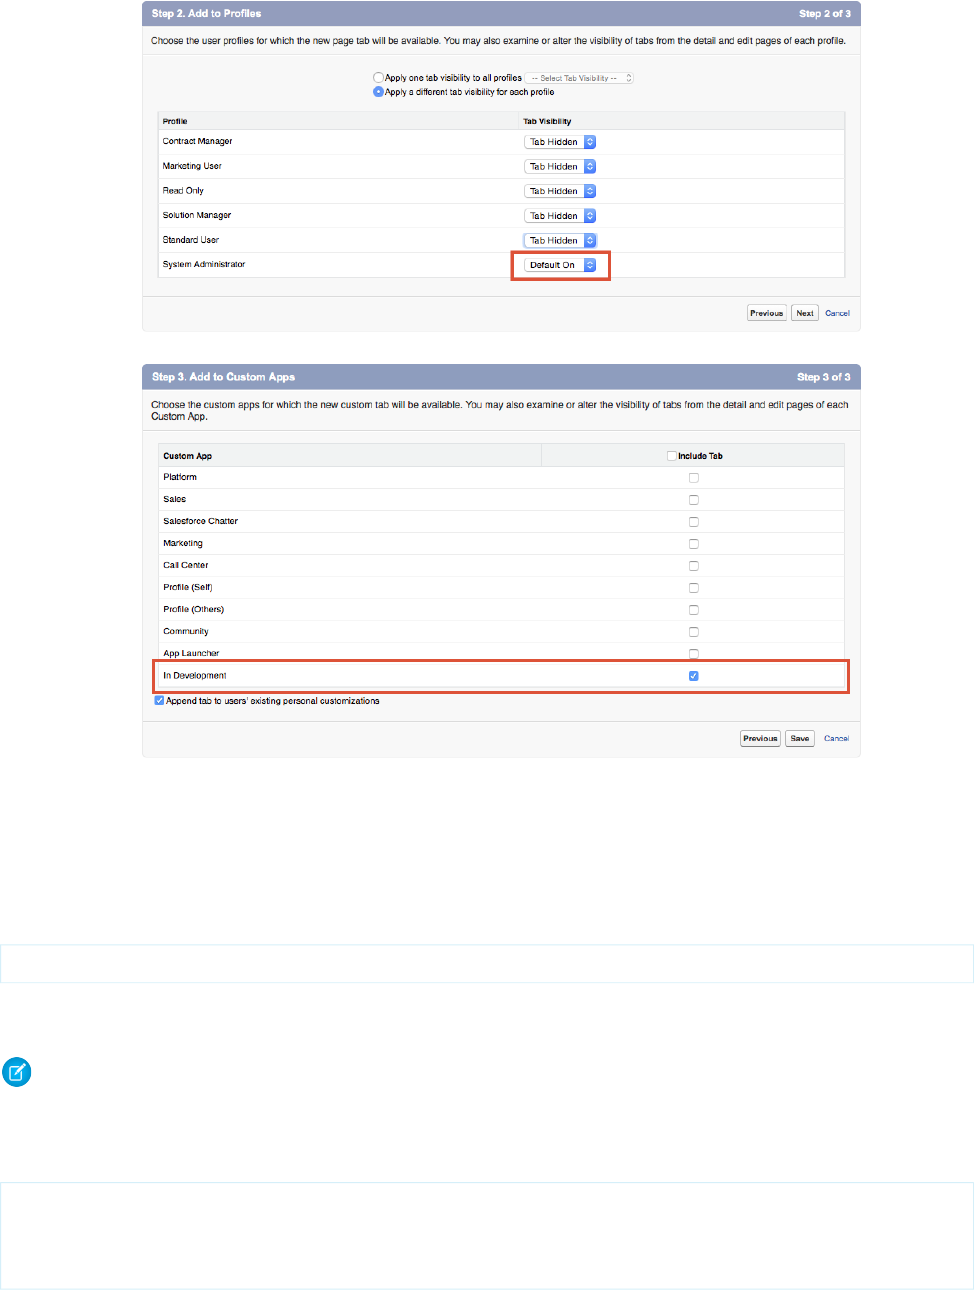
7. Repeat the previous step for each page you want to add to your In Development app. For adding new pages in the future, this is
the only step required.
For all that that’s an easy way to see your pages while you’re working on them, it doesn’t really compare to simply typing the page name
into a URL. For a similarly low-overhead way to test your page in Lightning Experience, you can type the following into your JavaScript
console:
$A.get("e.force:navigateToURL").setParams({"url":"/apex/pageName"}).fire();
This JavaScript fires the Lightning Experience navigateToURL event, and is the equivalent of entering in the classic
/apex/PageName URL—you can even see that URL pattern in the code.
Note: You need to currently be in Lightning Experience for this technique to work. If you’re in Salesforce Classic, the JavaScript
code fails.
For something a little more convenient to use, add the following bookmarklet to your browser’s menu or toolbar. (We’ve wrapped this
code for readability.)
javascript:(function(){
var pageName = prompt('Visualforce page name:');
$A.get("e.force:navigateToURL").setParams(
{"url":"/apex/" + pageName}).fire();})();
114
Viewing Visualforce Pages During DevelopmentDeveloping Visualforce Pages for Lightning Experience

This bookmarklet prompts you for a page name, and then fires the event to navigate directly to it. Useful!
Once you’ve navigated to the page you’re working on, you can simply use your browser’s reload command to refresh the page as you
make changes.
Reviewing Visualforce Pages in Multiple Environments
If you’re creating pages that will be used in Lightning Experience, Salesforce Classic, and Salesforce1, you’ll want to be able to review
them in all environments while you’re working on them. To do so, you’ll need to open the page in multiple browsers and on multiple
devices.
A Visualforce page that’s going to be used across the different Salesforce user interface contexts and form factors is tricky to review while
you’re in development. You can toggle back and forth between Salesforce Classic and Lightning Experience using the environment
selector in the profile menu, but that’s going to get old quickly. And you can similarly play with your browser’s user agent settings to
simulate the Salesforce1 environment, but that’s even more cumbersome.
Instead, you’re going to want to use multiple browsers, or even multiple devices, to view your pages. And you’ll want to have access to
at least one additional test user as well. Here’s an example of how you might set up your development environment.
Main Development Environment
This environment is where you work in Setup to make changes to your organization, like adding custom objects and fields, and
maybe where you write actual code, if you use the Developer Console.
•Browser: Chrome
•User: Your developer user
•User interface setting: Salesforce Classic
Review your page’s design and behavior in Salesforce Classic in this environment.
Lightning Experience Review Environment
This environment is where you check your page’s design and behavior in Lightning Experience.
•Browser: Safari or Firefox
•User: Your test user
•User interface setting: Lightning Experience
Salesforce1 Review Environment
This environment is for checking your page’s design and behavior in Salesforce1.
•Device: iOS or Android phone or tablet
•Browser: Salesforce1 app
•User: Your test user
•User interface setting: Lightning Experience
Note: This is just an example setup, and you can use any modern browsers or mobile devices in yours, for both Salesforce Classic
and Lightning Experience. The key is to use two different browsers so you can access both Salesforce Classic and Lightning
Experience at once, and to use a real device to test with Salesforce1.
This probably sounds pretty elaborate, and it is a bit of a chore to set up initially, especially if you’re champing at the bit to get coding.
But keep in mind two things. First, once you’re set up, it’s done. And second, this workspace doesn’t just give you a great development
environment, it also provides you with the environments you need for formal testing of your pages. Because you wouldn’t dream of
putting your pages into production without formal testing, right?
115
Reviewing Visualforce Pages in Multiple EnvironmentsDeveloping Visualforce Pages for Lightning Experience

Testing Your Visualforce Pages
Testing your Visualforce pages before deploying them into production is an essential development task. When your organization adopts
Lightning Experience the process of testing your pages becomes more complicated.
We just talked about the environments you need to set up for doing quick, informal testing while you’re developing your pages. The
need for those environments also applies to testing your pages and apps formally. Rather than repeating them, let’s talk a bit about why
you need these different environments.
The need to test your pages in both Lightning Experience and Salesforce Classic is fairly obvious, but why can’t you do that testing in
the same browser, with the same user? In fact, you can and you should. Your users can toggle back and forth between the different user
interfaces, and you should verify that your pages work when they do so.
But you also want to test pages in a more isolated and systematic fashion, so that you’re sure that what you’re testing is the page’s basic
functionality, as separated as possible from the effects of other code, whether that code is yours, ours, the browser’s, or the device’s.
This highlights another testing issue. In the past we’ve suggested that it’s reasonable to do Salesforce1 development on your desktop
or laptop, and navigating to the /one/one.app URL used by the Salesforce1 app. This method doesn’t work anymore, because
/one/one.app is shared by both Salesforce1 and Lightning Experience, depending on the device that connects to it. While you can
fool /one/one.app by changing your browser’s user agent, this is a bad idea, an anti-pattern. The reason is that desktop and mobile
browsers, even from the same vendor, behave differently—sometimes very differently. You cannot do rigorous, formal testing unless
you’re testing on every device and every browser you plan to support.
If you’re developing an individual page, or a basic app for identical devices, your “matrix” of the different factors might be simple. But
for more ambitious projects, if you’re developing functionality that you need to support across a range of possibilities, your test plan
should take into consideration the need to test across:
•Each different supported device.
•Each different supported operating system.
•Each different supported browser—including the Salesforce1 app, which embeds its own.
•Each different supported user interface context (Lightning Experience, Salesforce Classic, and Salesforce1).
Fortunately for your sanity, some of these factors collapse together, reducing the combinatorial explosion. For example, most Apple
mobile devices can be counted on to be updated to the latest version of iOS. This means that the device, operating system, and browser
are effectively only one combination. Your test plan might therefore choose to test only one iPhone and one iPad, updated to the latest
iOS and Salesforce1 app.
A final word about testing. Another reason we strongly suggest your development and test environments be similar is so that you can
start testing, full testing, early in the development process. We’ve found that it’s all too easy to put testing on secondary devices off until
late in a project. When that happens it’s inevitably a setback when problems are discovered.
Test early, test often, test everything.
116
Testing Your Visualforce PagesDeveloping Visualforce Pages for Lightning Experience

CHAPTER 21 Exploring the Visualforce App Container
The largest difference between Visualforce in Lightning Experience and Visualforce in Salesforce Classic
is the environment it runs in. In Salesforce Classic, Visualforce “owns” the page, the request, the
environment. Visualforce is the application container. But in Lightning Experience, Visualforce runs inside
an iframe that’s wrapped inside the larger Lightning Experience container.
In this chapter ...
•The Outer Lightning
Experience Container
•The Visualforce
iframe This change to the execution context has a number of effects on the way Visualforce pages can affect
the overall Salesforce application. We’ll talk about these changes in this unit, but save the full details of
a few of them for their own units.
•Impact of the New
Container
Note: You remember that disclaimer you read at the beginning of this module? Well, this unit is
even more “under construction” than the rest. The reason is simple: The impact of the issues
•Visualforce Defaults
and Environment
described here is highly dependent on your code. We’ve worked really hard to make things “just
Changes in Lightning
Experience work” for you, and in most cases little or nothing here will show on your radar. But we can’t
anticipate every way that you’re using Visualforce. Today we’re outlining some general aspects of
•<apex:page>
showHeader and how Lightning Experience affects Visualforce. As we learn more from you about actual impact,
we’ll expand our explanations to include more details about how to address specific issues.
showSidebar
Attributes Are Always
false
•The sforce.one
JavaScript Utility
Object
117

The Outer Lightning Experience Container
Let’s start with the outer container, the Lightning Experience application. The Lightning Experience container is a “single-page application,”
or SPA, which is accessed at the /one/one.app URL. The one.app page loads, its code starts up, and that application code takes
over the environment.
The process by which a single-page application loads its resources—usually a static HTML shell and a lot of JavaScript—is both interesting
and complex. If you’ve worked with JavaScript frameworks like AngularJS or React, you’re reasonably familiar with the basics of how
Lightning Experience, in the form of one.app, starts up. And to be honest, the full details don’t matter. You don’t have any control
over it, and the implementation continues to evolve.
Here’s what’s important to know: Lightning Experience, or one.app, is in charge of the request. Your Visualforce page is not. Your
page needs to work within constraints that Lightning Experience imposes upon it. Lightning Experience is the parent context, and your
Visualforce page is the child context. Children need to obey their parents.
Some of these constraints, such as the size of the frame in which your Visualforce page is displayed, are imposed directly by Lightning
Experience. They’re easier to understand and work with, and we’ll talk about them in a minute.
Other constraints are implicit, and enforced not by Lightning Experience but by the browser running it. These are mostly security and
JavaScript execution constraints. Most pages aren’t impacted by these security constraints, and those that are usually fail early and with
clear error messages. JavaScript errors are harder to discover and diagnose, but there are some general rules we’ll cover in a bit.
The Visualforce iframe
When your Visualforce page runs in Lightning Experience, it’s displayed inside an HTML iframe. An iframe creates an embedded browsing
context that’s effectively a separate browser “window” from the main Lightning Experience browsing context. The iframe creates a
boundary between the Visualforce page and its parent, the Lightning Experience application.
The advantage of running Visualforce pages inside an iframe is that, for pages that don’t need to access or change the top-level browsing
context, running inside the iframe looks almost exactly like running as a page in Salesforce Classic. This is why you don’t need to modify
all of your Visualforce pages to adapt to the wildly different behind-the-scenes request environment of Lightning Experience. It’s an
important part of the “just works” strategy for supporting Visualforce.
Of course, the flip side is that pages that do need to access the top-level browsing context, well, there’s some things that need to change.
We’ll cover some specifics in the next section.
If your page is communicating with services besides Salesforce, the iframe boundary might also result in you needing to update your
organization’s CORS settings, remote site settings, clickjack settings, or content security policy. Since these depend on security policies
and settings outside of Salesforce, we can’t provide a recipe for specific changes. We simply call it to your attention here.
Impact of the New Container
The effects of the new Visualforce container—embedding the Visualforce page into an iframe within the Lightning Experience app—can
be broadly divided into two categories, which we’ll call security and scope.
Again, we want to emphasize: many, or even most Visualforce pages won’t be affected by these issues. But for those that are, we’re
thinking “forewarned is forearmed.” You’ll find the source of the problem faster if we’ve already talked about it together.
Security Impact
Elements of security that might be affected include the following.
118
The Outer Lightning Experience ContainerExploring the Visualforce App Container
•Session maintenance and renewal
•Authentication
•Cross-domain requests
•Embedding restrictions
We discussed a few of these briefly already, the items dealing with cross-domain requests. That is, when the content in the full browser
window comes from requests to different servers and services, there’s the potential for any of those requests to balk at being displayed
in a context that it’s not prepared for. Your mission, should the need arise, is to prepare those services to handle requests intended to
be put together within the Lightning Experience context. As we said before, the details vary, so we can’t provide specific answers here.
One thing we do want to mention specifically is session maintenance. A “session” for our purposes here is basically some kind of token
that your browser re-uses from request to request so that you don’t need to enter your username and password for every request. You
often need to access the current session using the global variable $Api.Session_ID.
Here’s the thing to keep in mind. $Api.Session_ID returns different values depending on the domain of the request. This is
because the session ID varies during a session whenever you cross a hostname boundary, such as .salesforce.com to
.visual.force.com. Normally Salesforce transparently handles session hand-off between domains, but if you’re passing the
session ID around yourself, be aware that you might need to re-access $Api.Session_ID from the right domain to ensure a valid
session ID.
Lightning Experience and Visualforce pages are not only held in different browser contexts, they’re also served from different domains.
So, even though it’s all showing in one browser window, the session ID inside the Visualforce iframe will be different than the session ID
outside the iframe, in another part of Lightning Experience. Salesforce and Lightning Experience handle this transparently in normal use.
But if you’re passing around the session ID like hors d'oeuvre at a party (not usually a good idea), you might need to review how you’re
handling it.
Scope Impact
When we talk about scope we’re mainly talking about the following kinds of things.
•DOM access and modification
•JavaScript scope, visibility, and access
•JavaScript global variables such as window.location
If this list sounds complicated or confusing, don’t worry, we can boil it down to something simple and easy to remember: Don’t touch
someone else’s stuff. Specifically, your JavaScript code (and stylesheet rules, for that matter) can affect elements—DOM nodes, JavaScript
variables, and so on—in your page’s browsing context, but it can’t access elements in any other browsing context, like the parent
Lightning Experience context. Don’t touch other contexts’ stuff!
Practically speaking, the most common code pattern where you’d want to do this kind of thing is to manipulate window.location
to navigate to another page. This is such a common thing to do, we’ve written up details on this specific issue...well, by the time you’re
done with this module, you’ll be sick of hearing about it, we promise.
One last note. If you’re an experienced JavaScript developer, you’re probably already thinking you know how to deal with “I don’t have
access to the parent browsing context” issues, by using contentWindow, window.parent, or the like. Please don’t. You’ll likely
run afoul of the same-origin policy (Visualforce and Lightning Experience are served from different domains, remember?). Even if you
don’t, you’re probably replacing obvious, blocking bugs with subtle, intermittent bugs. Where do you want to spend your time: Doing
things right, or the debugger?
Doing things right means calling APIs we’ve made available in your Visualforce pages, primarily for navigation. If you really need to affect
things across frame boundaries, use window.postMessage to send a message to receiving code in the other frame.
119
Impact of the New ContainerExploring the Visualforce App Container

Visualforce Defaults and Environment Changes in Lightning Experience
When your Visualforce pages run in Lightning Experience a number of low-level changes happen behind the scenes. These changes
enable most pages to “just work” in the Lightning Experience container, and sometimes you can just be happy they’re there. But you’ll
still want to know they’re happening, especially when you’re working on advanced application flows, or troubleshooting a tricky problem.
Some of these changes are simple, and obvious once you think about them. For example, Visualforce pages that run in Lightning
Experience always have the standard Salesforce Classic header and sidebar suppressed. Other changes aren’t as visible, but have just as
large an impact.
<apex:page> showHeader and showSidebar Attributes Are Always
false
These attributes affect the Salesforce Classic header and sidebar on Visualforce pages. The Salesforce Classic header and sidebar are
always suppressed when pages run in Lightning Experience, in favor of Lightning Experience navigation elements. There are no
corresponding attributes to affect the Lightning Experience header or sidebar because they can’t be suppressed.
If your page is shared between Salesforce Classic and Lightning Experience, you can still set these attributes to the values you’d like to
use when the page runs in Salesforce Classic.
Note: The standardStylesheets attribute of <apex:page>, which determines whether to include or suppress the
standard Salesforce Classic stylesheets, is unaffected by Lightning Experience. That is, it defaults to true in Lightning Experience,
but you’re able to change it.
The sforce.one JavaScript Utility Object
Although sforce.one sounds like a robot designed to do your Salesforce development work for you, it’s actually a utility object that
provides a number of useful functions you can use in your own JavaScript code.
sforce.one is automatically injected into your page when it runs in Lightning Experience. You’ll see it in your JavaScript debugger
console and web developer resources list. There’s nothing you need to do to add it, and there’s no way to suppress it, either. (Sadly,
there’s no way to get sforce.one in your Visualforce pages in Salesforce Classic.)
sforce.one is primarily used to fire navigation events. The full details are in the Using Visualforce in Lightning Experience unit.
120
Visualforce Defaults and Environment Changes in Lightning
Experience
Exploring the Visualforce App Container

CHAPTER 22 Sharing Visualforce Pages Between Classic and
Lightning Experience
We recommend that, wherever possible, you create Visualforce pages that behave correctly whether
they run in Salesforce Classic or Lightning Experience. The benefits in terms of reduced complexity in
your organization’s code and configuration are obvious. And there are a number of contexts, such as
Visualforce overrides of standard actions, where you don’t have a choice. An action override always uses
the same page, whether you’re running in Salesforce Classic, Lightning Experience, or Salesforce1.
In this chapter ...
•Detecting the User
Experience Context
•Querying for
Lightning Experience It’s perfectly reasonable, though, to want slightly or significantly different behavior or styling that’s based
on the user experience context in which the page is running. In Winter ’16 the ability to detect the current
user experience context is extremely limited, but it should cover the essentials.
via SOQL and API
Access
121

Detecting the User Experience Context
In Winter ’16 there’s no supported method for determining the current user experience context. However, there’s a technique that has
proven reasonably reliable, and covers the most essential use case. The technique depends on detecting the presence of a JavaScript
utility object that’s unique to Lightning Experience and Salesforce1.
Wait, what? When did Salesforce1 get invited to this party?
Well, this goes back to our discussion of app containers, and especially to the concept of single-page applications. As you know from
that unit, Lightning Experience is a single-page application (or SPA), and when you look in the URL field of your browser, you can see
that SPA is named “one.app.” One.app is a bundle, or collection of resources, including HTML markup, styles, data, and especially a lot
of JavaScript.
Well guess what. If you were to look at what the Salesforce1 app is running inside the native client, it’s also a SPA named one.app. And
in fact, it’s pretty much the same as the Lightning Experience one.app. While there’s a lot of complex details under the covers, for our
purposes here you can think of the Lightning Experience and Salesforce1 apps as the same app, with different expressions for different
form factors.
Again, there’s lots of actual differences when you get into the details. We’re simplifying here—work with us!
One thing that happens to a Visualforce page when it runs inside one.app—whether Lightning Experience or Salesforce1—is that a
JavaScript utility object is added to the page. This object, sforce.one, is what provides the navigation APIs discussed in the Using
Visualforce in Lightning Experience unit. And because it’s not available on your page in Salesforce Classic, we can use its presence or
absence to know something about the current user experience context.
With me so far? Let’s do something practical, and look at some actual code. Here’s a simple JavaScript function you can use to detect if
you’re in Lightning Experience or Salesforce1, or in Salesforce Classic.
function isLightningExperienceOrSalesforce1() {
return((typeof sforce != 'undefined') && sforce && (!!sforce.one));
}
You can use this utility function to make decisions in your JavaScript code. For example:
if( isLightningExperienceOrSalesforce1() ) {
// Do something for Lightning Experience
}
else {
// Use classic Visualforce
}
With some cleverness you can use this technique and add some device detection logic, and tease apart Lightning Experience and
Salesforce1. However, these techniques are likely to be fragile. Be sure to encapsulate them into your own utility functions, so that you
can update them easily if you run into issues.
Limitations of Detecting sforce.one
There’s no sugar coating this, this solution isn’t great. If you need to build functionality that varies considerably between user experience
contexts, it’s currently tough to do that in a supportable way. We hear you and, Safe Harbor, we’re working on it.
In the meantime, let’s make sure we’re clear on some limitations that you’ll need to keep in mind as you build your pages.
This technique works in JavaScript, which means it’s happening after the Visualforce and Apex code have already run. This means you
can’t use isLightningExperienceOrSalesforce1() in a Visualforce expression—say, in the rendered attribute of a
Visualforce tag. So you can’t, for example, use an <apex:stylesheet> tag to include in a Lightning Experience-specific stylesheet.
122
Detecting the User Experience ContextSharing Visualforce Pages Between Classic and Lightning
Experience

There are ways around this. For your UX context-specific stylesheets, you can add them to the page using JavaScript. For other page
elements, you can use JavaScript to hide or show them, depending on the context.
This is work, no two ways about it. We again want to encourage you to minimize the differences in behavior that your page provides
across user interface contexts.
We also have to say that while you can count on sforce.one being around for a while, detecting its presence to determine UX
context is not a best practice, but more the opposite. Again, isolate your checks for the user interface context into utility functions that
you can update once there is a supported way to determine it.
Querying for Lightning Experience via SOQL and API Access
Although we don’t recommend this technique, you can query for the current user’s preferred user experience directly using SOQL.
The basic SOQL query is the following.
SELECT UserPreferencesLightningExperiencePreferred FROM User WHERE Id = 'CurrentUserId'
The result is a raw preference value, which you need to convert into something useable.
Here’s just about the simplest possible Visualforce page that runs the above SOQL query and displays the result on the page.
<apex:page>
<script src="/soap/ajax/35.0/connection.js" type="text/javascript"></script>
<script type="text/javascript">
// Query for the preference value
sforce.connection.sessionId = '{! $Api.Session_ID }';
var uiPrefQuery = "SELECT UserPreferencesLightningExperiencePreferred " +
"FROM User WHERE Id = '{! $User.Id }'";
var userThemePreferenceResult = sforce.connection.query(uiPrefQuery);
// Display the returned result on the page
document.addEventListener('DOMContentLoaded', function(event){
document.getElementById('userThemePreferenceResult').innerHTML =
userThemePreferenceResult;
});
</script>
<h1>userThemePreferenceResult (JSON)</h1>
<pre><span id="userThemePreferenceResult"/></pre>
</apex:page>
Querying for the user’s Lightning Experience preference directly is discouraged. The result tells you what the user’s current preference
setting is, not what user experience is actually on their screen. If the user is using an older browser, the preference value might not reflect
the user experience that’s actually being delivered.
123
Querying for Lightning Experience via SOQL and API AccessSharing Visualforce Pages Between Classic and Lightning
Experience

CHAPTER 23 Managing Navigation
App flow and navigation is in many ways the heart of application design. Visualforce provides a number
of ways to add navigation elements and to direct application flow. Lightning Experience adds its own
application flow, navigation elements, and mechanisms for affecting where users go as they use Salesforce.
In this chapter ...
•Navigation in
Lightning Experience The good news is that “classic” Visualforce navigation continues to work. The better news is that your
Visualforce pages can take advantage of the new Lightning Experience mechanisms, too.
•Classic Visualforce
Navigation
•Modern Visualforce
Navigation
•Navigation Gotchas,
and How to Fix Them
124

Navigation in Lightning Experience
Before we talk about the details of Visualforce navigation, and how you create it so that it works in Salesforce Classic and Lightning
Experience, let’s talk a little about navigation in general. What do we actually mean by “navigation”?
The first thing we might mean by navigation is user interface elements on the screen. You click something, and something happens.
For example, you click the Accounts item in the navigation menu, and you go to the Accounts object home page. You click the New
button, and a record entry form appears. You choose a custom action from a quick actions menu, and you launch a custom process.
And so on. Those buttons and menu items are navigation elements.
The design of the navigation system, the user interface in Lightning Experience, is very different from Salesforce Classic. We’re not going
to talk about those differences here, but you’ll want to be familiar with where everything moves when you switch between the two user
experiences. You can learn more about that right here in Trailhead, in the Navigating Lightning Experience and Setup unit.
Another, less visible kind of navigation is the “something happens” part of the above. Behind the scenes, Salesforce decides what’s going
to happen when you select an item in a menu, or click a link or button. Much of this navigation is built into Salesforce already, while
other aspects are customizable—for example, overriding actions with Visualforce pages. But all of this navigation is managed by code
written by Salesforce.
And then there’s navigation in your own apps—apps that use your code to control application flow. When your custom action opens
a form and the user clicks save, where do you go? When your running code makes a decision about where the user should go next, and
sends them there. This is what we’re going to talk about in this unit.
Classic Visualforce Navigation
“Classic” Visualforce navigation can be boiled down to “what happens at the end of an action method.” Action methods return a
PageReference object with the details of where the user is to be navigated to, and then the Visualforce framework handles the
details of sending the right response back to the user’s browser. And, great news, all of this still works.
Remember also that the Standard Controller returns a PageReference from its action methods. So, your existing navigation, whether
you’re using the Standard Controller or your own custom controller code, continues to work as you expect.
Modern Visualforce Navigation
So, if classic Visualforce navigation works, why are we still talking about this? What are we even having a conversation about? We just
want to say one word to you. Just one word. Are you listening? “JavaScript.”
There’s a great future in JavaScript—and that future is here today. Many Visualforce developers are using JavaScript heavily in their apps,
and that use continues to grow. Classic Visualforce works, and will continue to work for a long time. But as developers adopt Visualforce
features such as Remote Objects and JavaScript remoting, more of their apps’ behavior migrates from the server side, where
PageReference is the rule, to the browser and JavaScript, where there’s no such thing as a PageReference.
In the Lightning Experience (and Salesforce1) world, there are rules and tools for building navigation in JavaScript. We’ll cover the rules,
which are mostly about what not to do, in a little bit. Let’s talk about the right way to do things first.
Lightning Experience manages navigation using events. The navigation event framework is made available as a JavaScript utility object
that provides a number of functions that make creating programmatic navigation straightforward. The sforce.one object is
automatically added to Visualforce pages when they run in Lightning Experience. This object provides a number of functions that trigger
navigation events when the functions are called. To use these functions, you can call them directly from your page’s JavaScript code, or
you can attach calls as click (or other) handlers to elements on the page.
125
Navigation in Lightning ExperienceManaging Navigation

Important: The sforce.one object isn’t available in Salesforce Classic. Any code that uses it should test for the existence of
sforce.one first.
The sforce.one object provides the following functions. Reference the function using dotted notation from the sforce.one
object. For example: sforce.one.navigateToSObject(...).
DescriptionFunction
Navigates to the previous state that’s saved in the sforce.one history. It’s equivalent
to clicking a browser’s Back button.
back([refresh])
Navigates to an sObject record, specified by recordId.navigateToSObject(recordId
[, view])
Navigates to the specified URL.navigateToURL(url[,
isredirect])
Navigates to the feed of the specified type, scoped to the subjectId.navigateToFeed(subjectId,
type)
Navigates to the specific feed item, feedItemId, and any associated comments.navigateToFeedItemDetail(
feedItemId)
Navigates to a related list for the parentRecordId.navigateToRelatedList(
relatedListId,
parentRecordId)
Navigates to the list view that’s specified by the listViewId, which is the ID of the list
view to be displayed.
navigateToList(listViewId
, listViewName, scope)
Opens the page to create a new record for the specified entityName, for example,
“Account” or “MyObject__c”.
createRecord(entityName[,
recordTypeId])
Opens the page to edit the record specified by recordId.editRecord(recordId)
Navigation Gotchas, and How to Fix Them
The first rule for building Visualforce navigation in JavaScript is: do not set window.location directly. The second rule for building
Visualforce navigation in JavaScript is: do not set window.location directly.
Don’t Set window.location Directly
OK, gratuitous repetition and movie reference aside, what’s the big deal here? It’s pretty simple. When in Lightning Experience your
page doesn’t have a window.location to set! Remember all the earlier discussion about the Visualforce “container,” and being in
an iframe, and Lightning Experience being some kind of health club? (SPA—single-page application.) This is one of the things that falls
out of it. The Visualforce iframe doesn’t have direct access to the window.location value, so you can’t set it. If your code depends
on setting it, it’ll break. That is, actions that fire navigation by setting window.location will simply stop navigating to wherever
you were expecting to go.
There’s actually a way around this restriction, but you shouldn’t use it. The reason is if you bypass the navigation functions in
sforce.one, your navigation events won’t be tracked in the Lightning Experience navigation stack. That stack provides useful features,
126
Navigation Gotchas, and How to Fix ThemManaging Navigation
like Back buttons that account for redirects and the like. A number of features in Lightning Experience (and especially in Salesforce1)
depend on that stack containing all navigation events. It’s worth making sure you use it correctly.
The Salesforce Classic Issue
So, yeah, there’s this one…thing. Unfortunately, the sforce.one utility object isn’t available when your page runs in Salesforce
Classic. In that context, you have to use window.location. The good news is, in Salesforce Classic, window.location is
available. The bad news is, this limitation means you’ll have to add an ugly if block to your code. Consider wrapping your navigation
functions in utility methods that deal with this complexity, so that your main navigation logic can be straightforward.
Static URLs
Don’t use static URLs to Salesforce resources. That is, if you’re adding a link to edit a Contact record, don’t create the link by building a
string with a static pattern like link = '/' + accountId + '/e'. In some contexts this works, but in others it doesn’t. Instead,
try one of these approaches:
•In Visualforce markup, use {!URLFOR($Action.Contact.Edit, recordId)}
•In JavaScript, use navigateToSObject(recordId)
There are actions and functions for viewing, creating, editing, and so on. Use them, rather than URL strings.
127
Navigation Gotchas, and How to Fix ThemManaging Navigation

CHAPTER 24 Understanding Important Visual Design
Considerations
Visualforce pages look the same whether they are running in Salesforce Classic or Lightning Experience,
unless you rework them to adapt to the appropriate user interface context. Built-in Visualforce components
that display user interface elements aren’t easily restyled to match the Lightning Experience look-and-feel.
In this chapter ...
•Affecting the Styling
of Standard
Components Specifically, the HTML that’s rendered by the built-in Visualforce components doesn’t change when the
page displays in Lightning Experience, and the Salesforce Classic stylesheets those components use is,
•Styling Strategies and
Recommendations by default, loaded by the page. The effect is that pages that use <apex:inputField>,
<apex:outputField>, the <apex:pageBlock> components, and other coarse- and
•The Salesforce
Lightning Design
System
fine-grained components that match the Salesforce Classic visual design, still match that visual design.
You get a little slice of Salesforce Classic in the middle of your Lightning Experience.
It’s our general recommendation that—for now, for existing pages—you don’t try to adapt them to
match the visual design of Lightning Experience. There are two reasons for this. First, Lightning Experience
is still evolving, and matching its styling yourself means you’re chasing a moving target. That’s work.
•Adapting the
Lightning Design
System for Standard
Components Second, it’s even more work if you don’t have the tools to do it. In the current release, the tools are mostly
not there. We have a number of ideas here and, Safe Harbor, we’re already hard at work at bringing them
to you in a future release. So if you can wait, that’s our recommendation.
Nevertheless, in some cases you’ll want some pages to match more closely with Lightning Experience
visuals. For new pages, or if you’re willing to do some work, there are some great tools for creating pages
that fit in perfectly with Lightning Experience.
128

Affecting the Styling of Standard Components
Visualforce provides a range of options for adjusting or overriding the styling of the standard components. If your goal is to make modest
changes to the appearance of these components, the effort to use these options is similarly modest. Let’s look at a few of the tools you
have available for affecting styling.
Styling Individual Components
Visualforce components that produce HTML have pass-through style and styleClass attributes. These attributes allow you to
use your own styles and style classes to control the look and feel of the resulting HTML. style allows you to set styles directly on a
component, while styleClass lets you attach classes for styles defined elsewhere. For example, the following code sets the class
of the <apex:outputText> and applies a style.
<apex:page>
<style type="text/css">
.asideText { font-style: italic; }
</style>
<apex:outputText style="font-weight: bold;"
value="This text is styled directly."/>
<apex:outputText styleClass="asideText"
value="This text is styled via a stylesheet class."/>
</apex:page>
Adding a Custom Stylesheet
You can add your own custom stylesheets to any Visualforce page using static resources and the <apex:stylesheet> tag. For
example, to add a stylesheet that’s been uploaded as a static resource named “AppStylesheet”, add the following to your page.
<apex:stylesheet value="{!$Resource.AppStylesheet}"/>
You can then refer to any of the styles contained in the stylesheet, and reference them in Visualforce tag styleClass attributes, as
we did with the asideText style previously.
This is the recommended method for adding CSS style definitions to Visualforce pages, because it shares the stylesheet between pages,
and minimizes the markup you need to add to each page.
Different Styles in Lightning Experience
To load a custom stylesheet only when your page is running in Lightning Experience or Salesforce1, use the following code.
<apex:page standardController="Account">
<!-- Base styles -->
<apex:stylesheet value="{!URLFOR($Resource.AppStyles, 'app-styles.css')}" />
<!-- Lightning Desktop extra styles -->
<script type="text/javascript">
129
Affecting the Styling of Standard ComponentsUnderstanding Important Visual Design Considerations

if( (typeof sforce != 'undefined') && sforce && (!!sforce.one) ) }
link = document.createElement( "link" );
link.href = "{! URLFOR($Resource.AppStyles, 'lightning-styling.css') }";
link.type = "text/css";
link.rel = "stylesheet";
link.media = "all";
document.getElementsByTagName("head")[0].appendChild(link);
}
</script>
<!-- Rest of your page -->
</apex:page>
See the Sharing Visualforce Pages Between Classic and Lightning Experience unit for important details about detecting the user interface
context you’re in.
OK, these are tools. Let’s look at a few techniques for using them next.
Styling Strategies and Recommendations
In the current release there’s only one supported method for creating Visualforce pages that match the Lightning Experience visual
design, and that’s to create new pages using the Lightning Design System.
Before we get to specifics, let’s think at a higher level and consider the different strategies for applying Lightning Experience styling to
your pages. In particular, let’s talk about your existing pages.
There are two ways to affect the styling of existing pages to make them look more like Lightning Experience.
•Change the markup to apply new styling—make changes in your pages.
•Change the styling rules for existing markup—make changes in your stylesheets.
These aren’t either / or. You can use them individually or in combination.
The Lightning Design System is a fantastic all-new toolkit for styling your pages, and we’ll talk about it in detail shortly. Correctly using
the Lightning Design System means using the Lightning Design System stylesheets with all-new markup for your Visualforce pages.
Again, this is the only supported method for matching the Lightning Experience visual design.
However, it is possible to add the Lightning Design System stylesheets, and revise your pages to use them. How much work this is
depends on how closely you want to match Lightning Experience as well as the specific markup and components in your code. While
it’s possible to achieve decent results this way, it’s not an approach we recommend. The Lightning Design System was designed to be
applied to specific markup, and that’s simply not what Visualforce emits. There’s an “impedance mismatch” that, while not fatal, is
definitely a serious rock in your shoe when you take this path.
Finally, there’s the other approach: adding new rules and styles to your existing (or a new) stylesheet to make your existing markup look
more like Lightning Experience. If your page is already mostly styled with your own stylesheets, this approach might work well for you.
If instead you’re mostly using the built-in Visualforce components and the Salesforce Classic styling, it requires you to override the styles
from the Salesforce Classic stylesheet.
While this is technically possible, we want to discourage you from taking this approach. It introduces dependencies into your markup
and styles that you don’t want to have. These dependencies are on the structure, IDs, and classes of the HTML rendered by the built-in
Visualforce components. We want to be really clear here: the HTML rendered by the built-in Visualforce components is an internal
implementation detail, subject to change without notice. If you have dependencies on it in your own stylesheets, your styling will
eventually break.
130
Styling Strategies and RecommendationsUnderstanding Important Visual Design Considerations

The Salesforce Lightning Design System
The Lightning Design System is a design framework for building enterprise apps that look like Lightning Experience. It includes a CSS
framework, a collection of graphic assets, and the Salesforce Sans font. You can use the Lightning Design System to build pages and
apps that look gorgeous and perfectly match the Lightning Experience user interface.
The Lightning Design System was designed to make it easy for customers and partners to match the Lightning Experience look and feel.
It also includes tools that make it possible to customize the look and feel to match your own brand—colors and so on—while still
remaining consistent with overall Lightning Experience design.
The Lightning Design System is so big and so exciting that…we’re not going to go into the details of using the Lightning Design System
here. Because we’ve written a whole module about using it, Lightning Design System. It explains how to get the Lightning Design
System, the basic concepts of using it to design pages, and how to apply those concepts to building Lightning Experience apps with
Visualforce.
Lightning Design System is a big module—you’ll have to work to earn that badge. While we do want to save the details for that module,
we don’t want to leave you totally hanging here. So, let’s cover how you use the Lightning Design System with Visualforce in a general
way.
Note: The Lightning Design System is available today as a public beta. Although the code is actually better than beta quality, it’s
still evolving and there’s the possibility of incompatible changes that would require you to revise your markup. You can expect
this to settle down in another release, and for now you should take that into consideration. (Safe Harbor, but you already knew
that, right?)
The first thing to know is that the Lightning Design System assumes a new markup structure and styling classes. For this reason it’s best
used with new pages and apps. It’s built around the capabilities of modern browsers, and takes advantage of the latest best practices
for markup and styling. As much as we all love it, Visualforce has been around a while. Between the HTML it generates and static code
in customer pages, most organizations will find it challenging to apply the Lightning Design System to existing pages.
The Lightning Design System module is focused on creating new pages and apps, and scoring that badge is the best way to learn about
it. After finishing that module you’ll have an understanding of both how to use Lightning Design System and how to plan development
around it.
Adapting the Lightning Design System for Standard Components
Does this mean it’s impossible to use Lightning Design System with existing Visualforce pages? No. It varies from page to page, of course,
but if your page’s markup is straightforward and you’re not using coarse-grained components like <apex:detail> and
<apex:enhancedList>, you might find that it works reasonably well.
Note: Remember when we said use caution with Lightning Design System? This goes double for using it with built-in Visualforce
components. For now this is an unsupported use of Lightning Design System.
The process works something like this.
1. Make a copy of the page you want to try converting to the Lightning Design System. Safety first. Work on a copy, not the real page.
2. Add the static resource for the Lightning Design System to your organization, if you haven’t already.
3. Add the Lightning Design System stylesheet to the page using the techniques you’ve learned from this unit.
4. Add the Lightning Design System wrapper <div> to the page to surround the user interface.
5. Work your way through the page’s user interface elements, and add the appropriate Lightning Design System style classes to each
element.
131
The Salesforce Lightning Design SystemUnderstanding Important Visual Design Considerations

6. Augment the markup around each element as needed, so that the markup matches the recommended Lightning Design System
markup for the user interface element as much as possible.
Written like this, it doesn’t sound very hard at all! And indeed, the initial preparation steps are quite easy. It’s those last two steps, the
ones that iterate through every Visualforce and HTML tag on the page, that can turn out to be challenging.
Sometimes it’s easy. For example, adding Lightning Design System classes to an <apex:commandButton> can be straightforward:
<apex:commandButton styleClass="slds-button slds-button--neutral"
value="Save" action="{!save}"/>
But if the button has complex styling or complex behavior, you might not find it so easy. Lightning Design System buttons have 13 major
variations at this writing, and a number of additional minor variations. Not all of those map to possibilities available with
<apex:commandButton>. With others, such as the buttons with icons, it’s not clear how you add the additional markup that
Lightning Design System requires to the comparatively simple <apex:commandButton>.
The key is to work with the fine-grained components, and build up your pages from these small building blocks. You’ll never be able to
style a <apex:pageBlockTable> with Lightning Design System directly, but if you apply Lightning Design System classes to the
lower-level elements , you can get it to look reasonably like Lightning Experience. Here’s a brief example of a table-based page.
<apex:page standardController="Opportunity" recordSetVar="opportunities"
docType="html-5.0">
<apex:stylesheet value="{!URLFOR($Resource.SLDS,
'styles/salesforce-lightning-design-system-vf.css')}"/>
<div class="slds">
<apex:form styleClass="slds-form-element">
<apex:pageBlock mode="maindetail" >
<apex:pageMessages />
<apex:pageBlockButtons >
<apex:commandButton value="Save" action="{!save}"
styleClass="slds-button slds-button--neutral"/>
</apex:pageBlockButtons>
<apex:pageBlockTable value="{!opportunities}" var="opp"
styleClass="slds-table slds-table--bordered">
<apex:column styleClass="slds-form-element__label"
headerClass="slds-form-element__label" headerValue="Name">
<apex:outputLabel value="{!opp.name}"
styleClass="slds-form-element__control slds-form-element__static"/>
</apex:column>
<apex:column styleClass="slds-form-element__label"
headerClass="slds-truncate" headerValue="Stage">
<apex:inputField value="{!opp.stageName}"
styleClass="slds-form-element__control slds-select"/>
</apex:column>
<apex:column styleClass="slds-form-element__label"
headerClass="slds-truncate" headerValue="Close Date">
<apex:inputField value="{!opp.closeDate}" type="date"
styleClass="slds-input"/>
</apex:column>
132
Adapting the Lightning Design System for Standard
Components
Understanding Important Visual Design Considerations

</apex:pageBlockTable>
</apex:pageBlock>
</apex:form>
</div>
</apex:page>
You’ll have even better success if you can work with the unstyled table component, <apex:dataTable>, or even by building your
own table markup explicitly using <apex:repeat>.
Adapting pages to use the Lightning Design System gets easier the more you do it. Earn your Lightning Design System badge, and get
familiar with the Lightning Design System components. Then start with simple pages, and work your way up!
133
Adapting the Lightning Design System for Standard
Components
Understanding Important Visual Design Considerations

CHAPTER 25 Knowing Which Features to Avoid in Lightning
Experience
There are a limited number of Visualforce components that we recommend you avoid on pages used
in Lightning Experience. Additionally, a few features of Visualforce behave differently when used in
Lightning Experience. Finally, there are a few places in Lightning Experience where you can’t use
Visualforce pages or apps, or where they might not function as expected.
In this chapter ...
•Lightning Experience
Header and
Navigation Menu
Can’t Be Suppressed Lightning Experience is still evolving and growing, and—Safe Harbor alert!—we hope to shrink this list
as time goes on.
•Salesforce Classic
Header and Sidebar
are Always
Suppressed
•Page Title Can’t Be
Set
•<apex:relatedList>
and Blacklisted
Related Lists
•Avoid <apex:iframe>
•No, Really, Don’t Set
window.location
Directly
•sforce.one Is No
Longer
Salesforce1-Only
•Changes With Action
Overrides
•Home Page Doesn’t
Support Visualforce
•Visualforce Tabs and
Apps Can’t Be Added
to Lightning
Experience
Navigation Menu
134

Lightning Experience Header and Navigation Menu Can’t Be
Suppressed
Visualforce pages always display with the standard Lightning Experience user interface when they run in Lightning Experience. There’s
no way to suppress or alter the Lightning Experience header or sidebar. In particular, the showHeader and showSidebar attributes
of <apex:page> have no effect on Visualforce pages when displayed in Lightning Experience.
This behavior is intentional. Apps that display in Lightning Experience are Lightning Experience apps. If you need to provide a completely
custom interface for your app, you’ll need to run it in Salesforce Classic.
Salesforce Classic Header and Sidebar are Always Suppressed
The standard Salesforce Classic header and sidebar are always suppressed for pages when they’re displayed in Lightning Experience. In
particular, the showHeader and showSidebar attributes of <apex:page> have no effect on Visualforce pages when displayed
in Lightning Experience.
Pages behave as though the showHeader and showSidebar attributes of <apex:page> are both set to false.
Note: The standardStylesheets attribute of <apex:page>, which determines whether to include or suppress the
standard Salesforce Classic stylesheets, is unaffected by Lightning Experience. That is, it defaults to true in Lightning Experience,
but you’re able to change it.
Page Title Can’t Be Set
You can’t set the <title> for a Visualforce page that displays in Lightning Experience. Specifically, neither setting the title attribute
of the <apex:page> tag nor explicitly adding a static <title> tag has an effect when the page displays in Lightning Experience.
Instead, all Visualforce pages show the title “Salesforce1” in the browser windows and tabs, and in the Back button’s history list.
The reason for this behavior is because the Visualforce page is displayed inside an iframe, and that iframe doesn’t control the browser’s
understanding of the page’s <title>.
If you’re clever, you can set the page title using JavaScript, but this isn’t supported or encouraged.
<apex:relatedList> and Blacklisted Related Lists
There are a number of related lists that aren’t supported in Lightning Experience. These related lists are “blacklisted,” which means they
are explicitly prevented from being used. As you might expect, these same related lists are blacklisted in Visualforce with the
<apex:relatedList> tag.
See “Data Access and Views: Lightning Experience Limitations” in the online help for details of which related lists aren’t supported in
Lightning Experience.
Avoid <apex:iframe>
While it’s not impossible to use <apex:iframe> on a Visualforce page in Lightning Experience, we recommend avoiding it.
135
Lightning Experience Header and Navigation Menu Can’t Be
Suppressed
Knowing Which Features to Avoid in Lightning Experience

Visualforce pages are wrapped in their own iframe when displayed in Lightning Experience. As discussed at length in Exploring the
Visualforce App Container, this has a number significant implications for how the page behaves. Adding an additional level to the iframe
stack increases the complexity of the environment.
If you really understand iframes and how they affect the DOM and JavaScript, you can manage this complexity. But unless you’ve already
been working with nested iframes, it’s more likely that you’ll have difficult to debug problems. For this reason, we suggest you avoid
this tag on pages that are used in Lightning Experience.
No, Really, Don’t Set window.location Directly
We probably sound like a broken record at this point, but it’s important. If your page’s JavaScript code is setting the window.location
variable directly, that won’t work when the page is displayed in Lightning Experience. You must modify this code for the page to work
in Lightning Experience.
See the Using Visualforce in Lightning Experience unit for details.
sforce.one Is No Longer Salesforce1-Only
The sforce.one JavaScript utility object is available to Visualforce pages in both Salesforce1 and Lightning Experience. If you’ve
been using the presence of the sforce.one object as a way to tell if your page is running in a mobile or desktop context, you might
need to update your code with a more sophisticated detection test.
In Winter ’16 there’s no supported way in your code to distinguish between the Salesforce Classic, Salesforce1, and Lightning Experience
environments.
For additional details, see the Sharing Visualforce Pages Between Classic and Lightning Experience unit.
Changes With Action Overrides
Perhaps the most significant change, in terms of things that might be hard to work around, Visualforce overrides of standard actions are
slightly different in Lightning Experience compared to Salesforce Classic. Any override for the object list action won’t be accessible in
Lightning Experience.
Specifically, there are six standard actions you can override for an object in Salesforce Classic:
•Object tab
•Object list
•Record view
•Record edit
•Record create
•Record delete
In Lightning Experience the first two actions have been combined into one page, object home. Object home is similar to object list, with
some elements of object tab, like recent items, added. Others, such as reports or tools, have moved to other parts of the user interface.
Regardless of the user interface settings in your organization, both object tab and object list are available to be overridden in Setup.
Overriding the object tab action overrides the object home page in Lightning Experience, as expected.
However, when in Lightning Experience, the object list action isn’t accessible in the user interface, so there’s no way to fire it. If your
organization has overridden the object list action for any object, that functionality won’t be available when users are using Lightning
Experience. If there are essential features in that override, you’ll need to find another way to make them available.
136
No, Really, Don’t Set window.location DirectlyKnowing Which Features to Avoid in Lightning Experience

This table lists the standard actions you can override for an object in Setup, and the action that’s overridden in the three different user
experiences.
Salesforce1Lightning ExperienceSalesforce ClassicOverride in Setup
searchobject homeobject tabTab
object homen/aobject listList
record homerecord homerecord viewView
record editrecord editrecord editEdit
n/arecord createrecord createNew
record deleterecord deleterecord deleteDelete
Note: “n/a” doesn’t mean you can’t access the standard behavior, and it doesn’t mean you can’t override the standard behavior.
It means you can’t access the override. It’s the override’s functionality that’s not available.
Home Page Doesn’t Support Visualforce
In the current release the Lightning Experience Home page can’t be customized with Visualforce. If you’ve customized your Home page
in Salesforce Classic with Visualforce, these customizations won’t appear when you’re in Lightning Experience.
Visualforce Tabs and Apps Can’t Be Added to Lightning Experience
Navigation Menu
In the current release you can’t customize the main Lightning Experience navigation menu (the left sidebar). Since it can’t be customized,
you can’t add Visualforce tabs or apps to it. To open Visualforce tabs or apps that aren’t added to the user interface elsewhere—such
as custom buttons, actions, and so on—use the App Launcher.
137
Home Page Doesn’t Support VisualforceKnowing Which Features to Avoid in Lightning Experience
INDEX
A
Account Insights 20, 41
Accounts 6, 43
Actions
in Lightning Experience 63, 66
Activity Timeline 35
Apex 18
App Launcher 24
App Menu 24
Assessing the impact of Lightning Experience 18
Assistant 41
C
Calendar 46
Case feed 43
Cases 43
Chatter 48
Compact layouts 58, 60
Comparing the two interfaces 3, 10, 13
Considerations 19
Contacts 6, 43
Custom help links 33
Custom objects 43
Customization
programmatic 18
Customizing 24, 60
Customizing Lightning Experience 58
D
Duplicate management 20
E
Enabling by edition 20
Enabling Lightning Experience 19, 21
Enabling users 20
Enhanced Notes 20
Events 46
F
Feed 48
G
Get your organization ready 20
Global search 31
H
Help menu 33
Highlights panel 60
Home 6, 41
I
Is Lightning Experience right for me? 10
L
Lead conversion 20
Lead Workspace 38
Lightning Experience 95–98, 106–107, 111–112, 115–118, 120–
126, 128–131, 134–137
Lightning Experience Developer Edition 69
Lightning Experience features chart 68
Lightning Experience overview 1–2, 5
Lightning Setup page 21
Limitations 30, 42
List views 37, 42
List Views 6
N
Navigation menu 23
O
Object home 35, 38, 42
Object Manager 30
Opportunity Board 6, 37
Opportunity home 37
Opportunity Workspace 6, 35
Other enhancements 40
P
Page layouts
how they work in Lightning Experience 59
Performance chart 41
Permission sets 20
Person Accounts 19
Piloting Lightning Experience to your users 20
R
Recommended features 20
Reports and Dashboards
dashboard components 52
dashboard editor 51
138
Reports and Dashboards (continued)
feature comparison 56
interactive charts and filters 53
interactive dashboards 52
new home pages 51
overview 50
report run page 53
Rolling out Lightning Experience
communication plan 79
crafting a communication strategy 79
crafting a marketing strategy 79
create a Chatter group 77
creating a project schedule 78
creating a training plan 80
decide who to roll out to 75
define measures for success 79
deliver an executive summary 86
demo 70
educate your company 83
educating your company 69–72, 76
Educating your company 70
educating yourself 68–69, 71
employee survey 84
enabling Lightning Experience 75, 82
engage with super users 77, 83
engaging your super users 76
executive sponsor 69, 76–77, 86
gap analysis 71–72
go live 68, 73–75, 78–79, 81–84, 86–87
identifying stakeholders 69
Lightning Setup page 82
measure results 79
measuring results 84–85
overview 67
picking a launch date 78
planning your rollout 75
presenting your findings 72
ready to start 81
revisiting your processes 70
risk severity matrix 72
Rolling out Lightning Experience (continued)
rollout checklist 75
rollout strategy 68, 73–86
super users 76, 83
test your customizations 81
useful Trailhead modules 68
where to start 75
Rollout overview 75
S
Sales in Lightning Experience 34
Sales path 20
Sales Path 35, 38
Salesforce Classic 3, 12
Search 31
Setup 23–24, 30–31, 33
Shared Activities 20
Social Accounts, Contacts, and Leads 20
Supported Editions 19
Supported vs. unsupported features 13
Switcher 21
Switching between Lightning Experience and Salesforce Classic
21
T
Tasks 46
Turn it on! 21
U
Understanding both user interfaces 12
User profile 46
V
Visualforce 18, 95–98, 106–107, 111–112, 115–118, 120–126,
128–131, 134–137
W
What is Lightning Experience? 2
What’s new 34
139
Index
