User Guide Linux Qdma Driver
User Manual:
Open the PDF directly: View PDF ![]() .
.
Page Count: 32

QDMA Linux Kernel
Reference Driver
User Guide
v2018.3 December 13, 2018

QDMA Linux Kernel Reference Driver User Guide
v2018.3 December 13, 2018 www.xilinx.com 2
Notice of Disclaimer
The information disclosed to you here under (the "Materials") is provided solely for the selection and use of Xilinx products. To the maximum extent permitted
by applicable law: (1) Materials are made available "AS IS" and with all faults, Xilinx hereby DISCLAIMS ALL WARRANTIES AND CONDITIONS, EXPRESS,
IMPLIED, OR STATUTORY, INCLUDING BUT NOT LIMITED TO ARRANTIES OF MERCHANTABILITY, NON-INFRINGEMENT, OR FITNESS FOR ANY
PARTICULAR PURPOSE; and (2) Xilinx shall not be liable (whether in contract or tort, including negligence, or under any other theory of liability) for any loss
or damage of any kind or nature related to, arising under, or in connection with, the Materials (including your use of the Materials), including for any direct,
indirect, special, incidental, or consequential loss or damage (including loss of data, profits, goodwill, or any type of loss or damage suffered as a result of any
action brought by a third party) even if such damage or loss was reasonably foreseeable or Xilinx had been advised of the possibility of the same. Xilinx
assumes no obligation to correct any errors contained in the Materials or to notify you of updates to the Materials or to product specifications. You may not
reproduce, modify, distribute, or publicly display the Materials without prior written consent. Certain products are subject to the terms and conditions of the
Limited Warranties which can be viewed at http://www.xilinx.com/warranty.htm; IP cores may be subject to warranty and support terms contained in a license
issued to you by Xilinx.
© Copyright 2017-2018 Xilinx, Inc.
QDMA Linux Kernel Reference Driver User Guide
v2018.3 December 13, 2018 www.xilinx.com 3
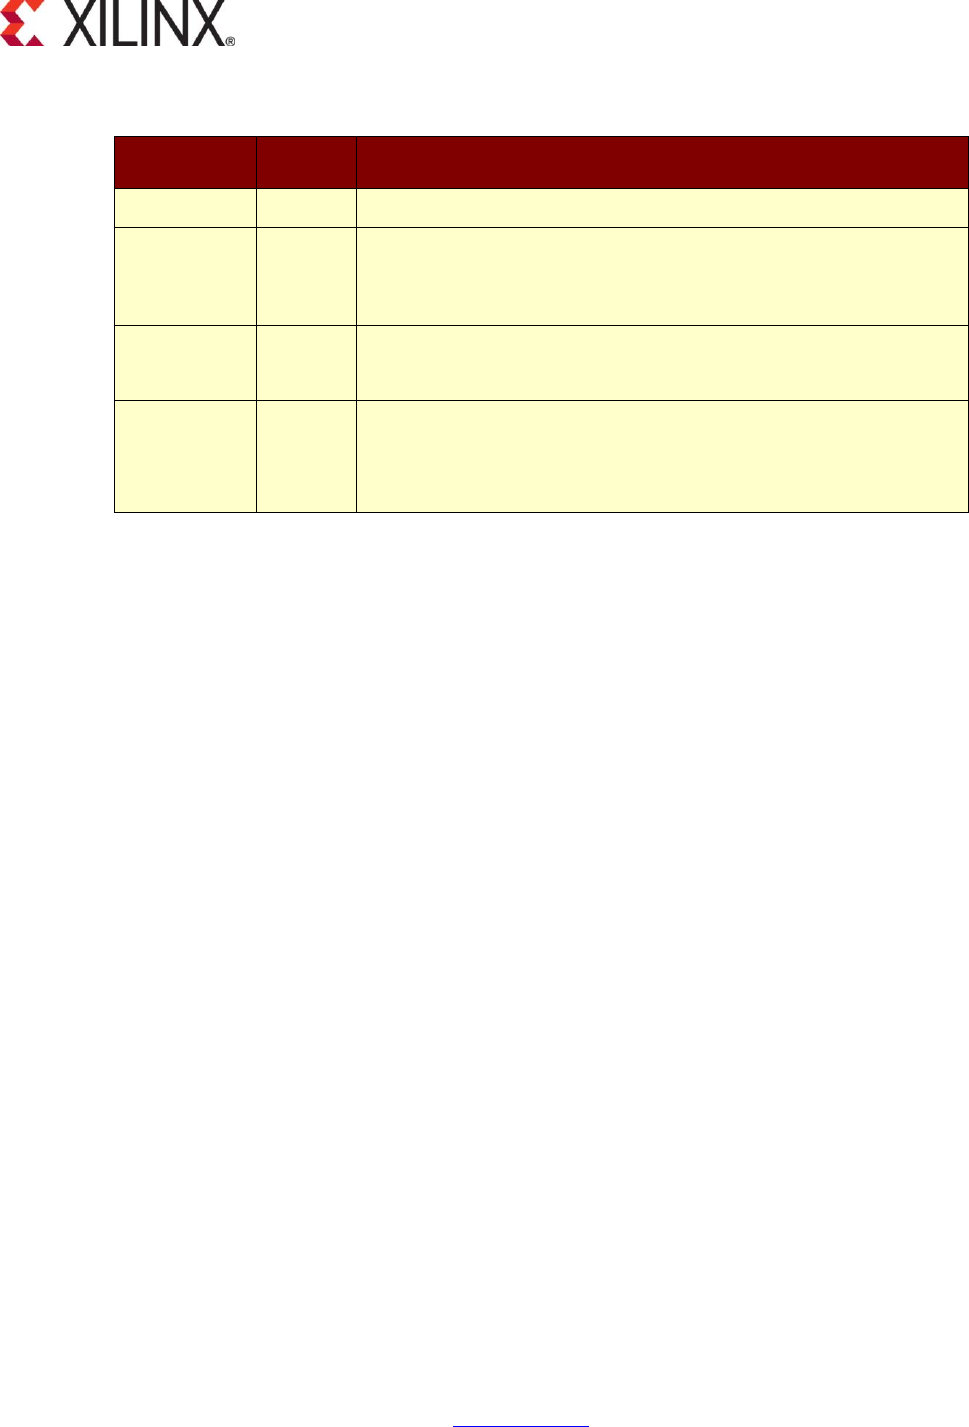
1 Revision History
Date
Version
Notes
18-Jun-2018
2018.1
Initial Version for Preliminary 2018.1 release
06-Aug-2018
2018.2
Updated the user guide for 2018.2 release:
• Added Appendix 1 to describe the dmactl command options
in details
26-Sep-2018
2018.2.1
Updated for 2018.2.1 release
• Added sec 2.9, updated 2.8.3 for VF functionalities
13-Dec-2018
2018.3
Updated for 2018.3 release
• Updated module parameter options
• Added Appendix 4 with doxygen tool usage

QDMA Linux Kernel Reference Driver User Guide
v2018.3 December 13, 2018 www.xilinx.com 4
Table of Contents
1 Revision History ........................................................................................................... 3
2 Introduction ................................................................................................................... 6
2.1 Document Overview .............................................................................................................................. 6
2.2 Document References .......................................................................................................................... 6
2.3 Glossary ................................................................................................................................................ 6
3 PCIe QDMA Driver for Linux Operating Systems ....................................................... 7
3.1 Dependencies ....................................................................................................................................... 7
3.2 Environment .......................................................................................................................................... 8
3.3 Modifying the driver for your own PCIe device ID ................................................................................. 8
3.4 Building the QDMA Driver Software ...................................................................................................... 8
3.5 Installing the Compiled QDMA Driver binaries ...................................................................................... 9
3.6 Loading the QDMA Driver modules ...................................................................................................... 9
3.7 Controlling and Configuring the QDMA IP .......................................................................................... 12
3.8 Running the VF on Virtual Machines .................................................................................................. 20
3.9 Un-installing the QDMA Driver modules ............................................................................................. 24
4 Appendix 1 – User Application “dmactl” command options .................................. 25
5 Appendix 2 – dmautils tool ........................................................................................ 27
6 Appendix 3 – Release Directory Structure ............................................................... 31
6.1 SW Directory ....................................................................................................................................... 31
7 Appendix 4 – Doxygen tool usage for document generation ................................. 32
7.1 Steps for document generation ........................................................................................................... 32

QDMA Linux Kernel Reference Driver User Guide
v2018.3 December 13, 2018 www.xilinx.com 5
LIST OF TABLES
Table 1-1: Document References ....................................................................................................................... 6
Table 1-2: Glossary ............................................................................................................................................ 6
Table 2-1: System Configuration ........................................................................................................................ 7
Table 2-2: QDMA Driver Supported Linux OS list .............................................................................................. 7
Table 4-1: dmautils tool configuration options .................................................................................................. 30
Table 5-1: SW Directory ................................................................................................................................... 31
QDMA Linux Kernel Reference Driver User Guide
v2018.3 December 13, 2018 www.xilinx.com 6
2 Introduction
2.1 Document Overview
The Xilinx PCI Express Multi Queue DMA (QDMA) IP provides high-performance direct memory
access (DMA) via PCI Express. The PCIe QDMA can be implemented in UltraScale devices. This
User Guide provide drivers and software that can be run on a PCI Express root port host PC to
interact with the QDMA endpoint IP via PCI Express.
The drivers and software referenced in this User Guide are designed for Linux operating systems
and can be used for lab testing or as a reference for driver and software development.
Through the use of the PCIe QDMA IP and the associated drivers and software you will be able
to generate high-throughput PCIe memory transactions between a host PC and a Xilinx FPGA.
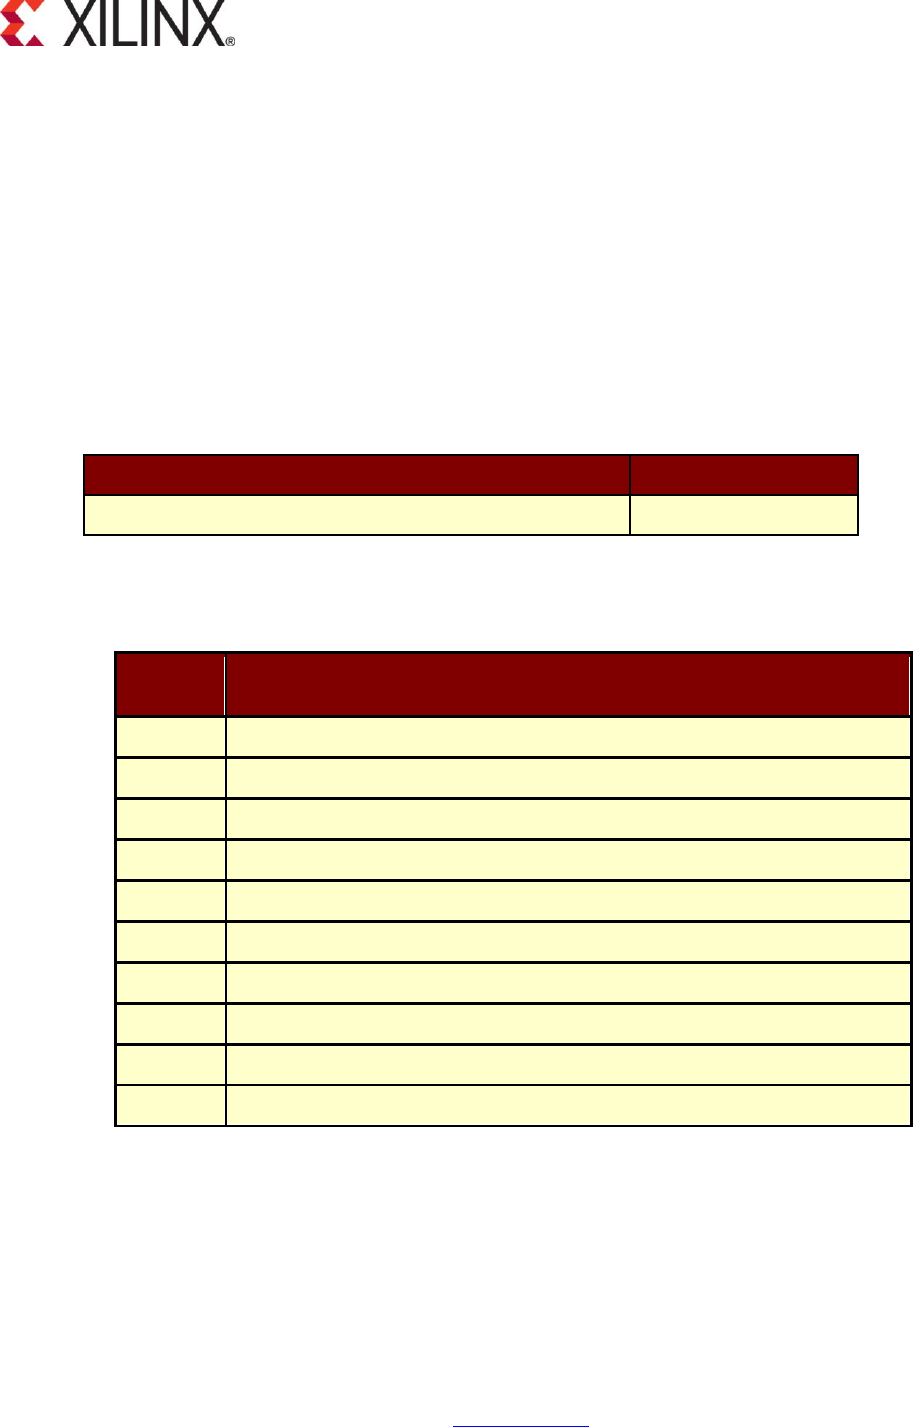
2.2 Document References
Document References
Version
[1] QDMA Subsystem for PCI Express (PG302)
2.0
Table 2-1: Document References
2.3 Glossary
Acronym
/ Term
Description
C2H
Card to Host
CLI
Command Line Interface
FPGA
Field Programmable Gate Array
H2C
Host to Card
IP
Intellectual Property
MM
Memory Mapped Mode
PF
Physical Function
QDMA
Multi Queue Direct Memory Access
ST
Streaming Mode
VF
Virtual Function
Table 2-2: Glossary
QDMA Linux Kernel Reference Driver User Guide
v2018.3 December 13, 2018 www.xilinx.com 7
3 PCIe QDMA Driver for Linux Operating Systems
This User Guide document describes the following for QDMA Linux Driver that will be generally
available for customers:
• Dependencies to be met for using the driver and environment to execute the driver
• Compiling and loading the driver
• Sample commands to use the driver
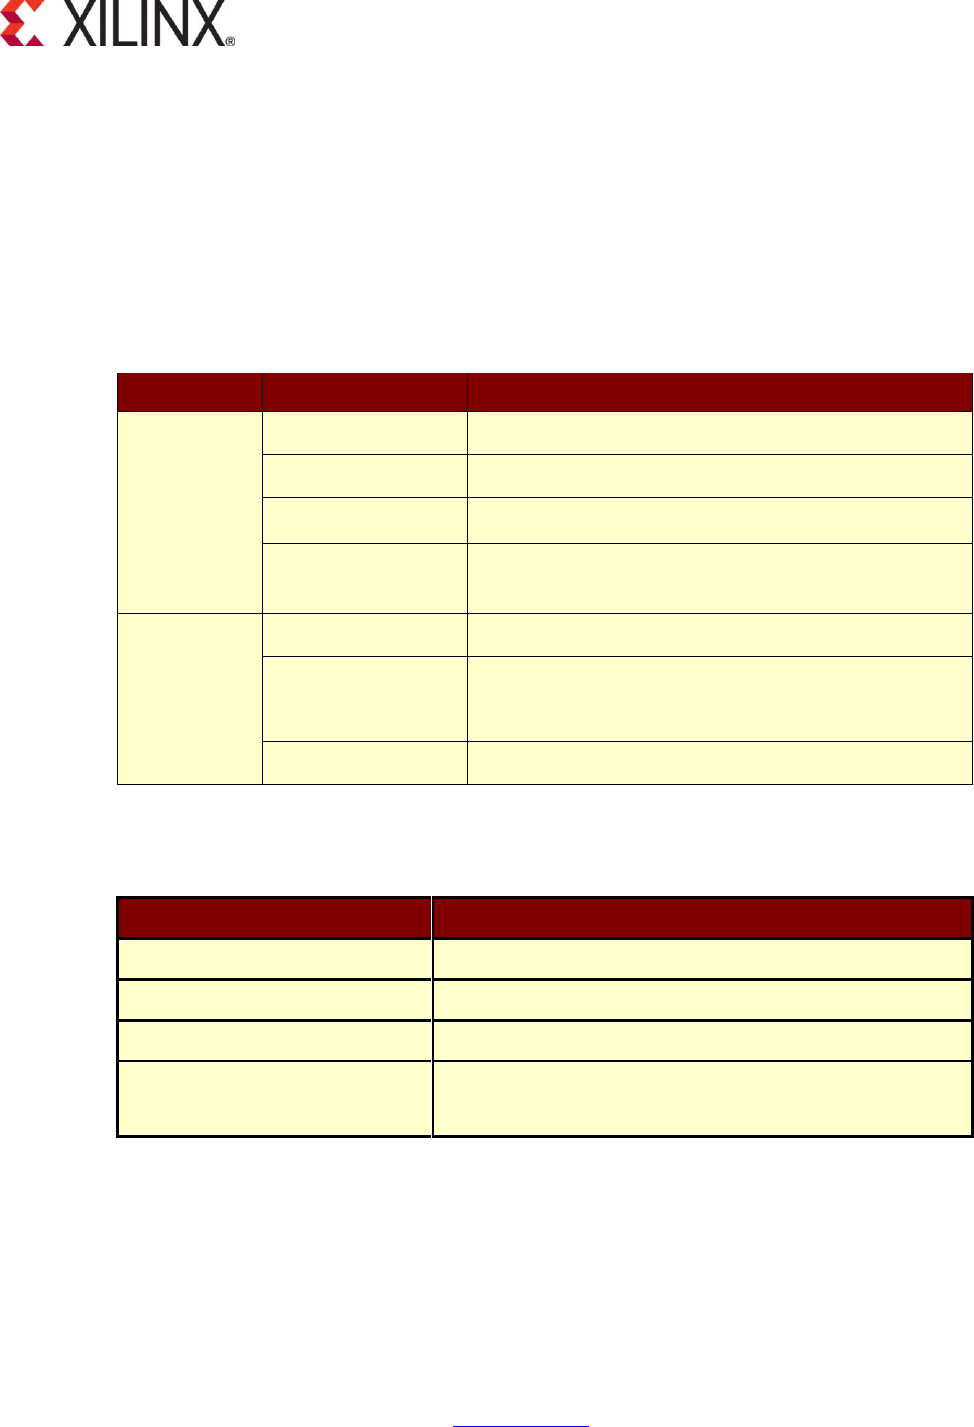
3.1 Dependencies
The release was tested with the following system configurations.
Directory
Description
Host System
Configuration
Operating System
Ubuntu 16.04.3 LTS
Linux Kernel
4.4.0-93-generic
RAM
32GB
Qemu version
QEMU emulator version 2.5.0 (Debian 1:2.5+dfsg-
5ubuntu10.15)
Guest System
(VM)
Configuration
Operating System
Ubuntu 18.04 LTS
Linux Kernel
4.15.1-20-generic
RAM
4GB
Cores
4
Table 3-1: System Configuration
Linux driver is supported on following OS and kernel versions.
Name
Version
CentOS
7.2.1511, 7.3.1611, 7.5.1804
RedHat
7.1
Ubuntu
16.04, 17.10.1, 18.04
Linux Kernel.org kernels
All long-term
3.16.56, 3.18.108, 4.1.51,4.4.131, 4.9.99, 4.14,40,
4.15.18, 4.16.8
Table 3-2: QDMA Driver Supported Linux OS list
The following kernel functions shall be included in the OS kernel being used. Make sure that these
functions are included in the kernel.
• Timer Functions
• PCIe Functions
• Kernel Memory functions

QDMA Linux Kernel Reference Driver User Guide
v2018.3 December 13, 2018 www.xilinx.com 8
• Kernel threads
• Memory and GFP Functions
3.2 Environment
To execute the QDMA driver on example design, following system requirements are to be met:
1. For best performance, use a Host System with at least one Gen 3 x16 PCIe slot and minimum
32GB RAM on same CPU node for 2K queues. For VM testing, host system must support
virtualization and it must be enabled in the BIOS.
2. Any one of the Linux OS listed in Table 3-1
3. TULVU9P or VCU1525 FPGA Board
4. USB digilent cables to connect to the chosen board to the Host System.
5. Xilinx 2018.3 Vivado tools for programming the FPGA.
3.3 Modifying the driver for your own PCIe device ID
During the PCIe DMA IP customization in Vivado you can specify a PCIe Device ID. This Device
ID must be recognized by the driver in order to properly recognize the PCIe QDMA device. The
current driver is designed to recognize the PCIe Device IDs that get generated with the PCIe
example design when this value has not been modified. If you have modified the PCIe Device ID
during IP customization you will need to modify the PCIe driver to recognize this new ID.
You may also want to modify the driver to remove PCIe Device IDs that will not be used by your
solution. To modify the PCIe Device ID in the driver you should open the drv/pci_ids.h file and
search for the pcie_device_id struct. This struct identifies the PCIe Device IDs that are recognized
by the driver in the following format:
{PCI_DEVICE (0x10ee, 0x9034),},
Add, remove, or modify the PCIe Device IDs in this struct as desired for your application. The PCIe
DMA driver will only recognize device IDs identified in this struct as PCIe QDMA devices. Once
modified, the driver must be uninstalled and recompiled.
3.4 Building the QDMA Driver Software
This driver supports both Physical Functions (PF) and Virtual Functions (VF).
In order to compile the Xilinx QDMA software, a configured and compiled Linux kernel source tree
is required. The source tree may be only header files, or a complete tree. The source tree needs
to be configured and the header files need to be compiled. And, the Linux kernel must be
configured to use modules.
Appendix 3 describes the Linux QDMA Driver software database structure and its contents on the
Xilinx github (https://github.com/Xilinx/dma_ip_drivers, subdirectory QDMA/linux-kernel).
Compile the driver:
• cd into “QDMA/linux-kernel”
[xilinx@] # cd QDMA/linux-kernel

QDMA Linux Kernel Reference Driver User Guide
v2018.3 December 13, 2018 www.xilinx.com 9
• Build the driver
[xilinx@] # make clean && make
From now on “linux-kernel” is assumed as the top-level directory and all the subsequent folders
are mentioned relative this directory.
A sub-directory build/ will be created in “linux-kernel” after running "make". By default, both PF
driver (qdma.ko) and VF driver (qdma_vf.ko) will be compiled along with the example application
“dmactl”.
• If only PF driver is required, run make as
[xilinx@] # make pf
• If only VF driver is required, run make as
[xilinx@] # make vf
• If only example application needs to be compiled, run make as
[xilinx@] # make user
• For compiling the dma_to/from_device tools, run make as
[xilinx@] # make tools
3.5 Installing the Compiled QDMA Driver binaries
To install the QDMA driver software, the installer must have the root permission.
Install the driver:
• Enter into “linux-kernel”
[xilinx@] # make install
• The QDMA module will be installed in
/lib/modules/<linux_kernel_version>/updates/kernel/drivers/qdma directory.
• The “dmactl”, “dma_from_device” and “dma_to_device” tools will be installed in
/user/local/sbin.
3.6 Loading the QDMA Driver modules
Before loading the QDMA driver, make sure that an intended board is connected to the Host
System and required bitstream is flashed on to the board.

QDMA Linux Kernel Reference Driver User Guide
v2018.3 December 13, 2018 www.xilinx.com 10
Load the QDMA driver:
QDMA driver can be loaded in poll mod, direct interrupt mode or indirect interrupt mode. QDMA
driver supports the following module parameters.
Module Parameter Name
Description
mode
mode module parameter is used to enable the
qdma driver functionality in different modes.
Kernel module cane be loaded in following
different modes
0 - Auto Mode, driver decides to process the
request in poll or interrupt mode
1 - Poll Mode
2 - Direct Interrupt Mode
3 - Interrupt Aggregation Mode or Indirect
Interrupt Mode
4 - Legacy Interrupt Mode
By default, mode is set to 3 and driver is loaded
in indirect interrupt mode
To load the driver in poll mode, use the below
command.
Ex: insmod qdma.ko mode=1
To load the driver in direct interrupt mode, use
the below command.
Ex: insmod qdma.ko mode=2
To load the driver in indirect interrupt mode, use
the below command.
Ex: insmod qdma.ko mode=3
master_pf
master_pf module parameter is used to set the
master pf for qdma driver
By default, master_pf is set to PF0(First device
in the PF list)
To set any other PF as master_pf, use the
module parameter as below
insmod qdma.ko master_pf=<pf_bdf_number>
lspci | grep Xilinx
01:00.1 Memory controller: Xilinx Corporation
Device 913f
Ex: insmod qdma.ko master_pf=0x01001

QDMA Linux Kernel Reference Driver User Guide
v2018.3 December 13, 2018 www.xilinx.com 11
When multiple cards are inserted in the same
host system and master_pf needs to be updated
for each card, us the command as below.
lspci | grep Xilinx
01:00.1 Memory controller: Xilinx Corporation
Device 913f
lspci | grep Xilinx
02:00.1 Memory controller: Xilinx Corporation
Device 913f
Ex: insmod qdma.ko master_pf=0x01001,
0x02001
tm_mode_en
tm_mode_en parameter is used to enable
Traffic Manager mode in driver to test desc
bypass functionality with Traffic Manager
example design for ST H2C queue.
By default, tm_mode_en is set to 0.
To load driver with Traffic Manager mode
enabled, use below command:
Ex. insmod qdma,ko tm_mode_en=1
NOTE: This parameter is experimental and
should only be used only with Traffic Manager
example design.
tm_one_cdh_en
tm_one_cdh_en is used to test 1 CDH (Custom
Defined Header) functionality with Traffic
Manager example design when driver is loaded
with tm_mode_en set to 1.
By default, tm_one_cdh_en is set to 0 indicating
that driver will send pkts with Zero CDH.
To load driver with 1 CDH enabled, use below
command:
Ex. insmod qdma.ko tm_mode_en=1
tm_one_cdh_en=1
NOTE: This parameter is experimental and
should only be used only with Traffic Manager
example design.
QDMA Linux Kernel Reference Driver User Guide
v2018.3 December 13, 2018 www.xilinx.com 12
• Load the driver in poll mode as
[xilinx@] # modprobe qdma mode=1
• Load the driver in direct interrupt mode as
[xilinx@] # modprobe mode=2
• Load the driver in indirect interrupt mode as
[xilinx@] # modprobe qdma mode=3
• Load the driver on a VM
Auto mode: [xilinx@] # modprobe qdma_vf mode=0
Poll mode: [xilinx@] # modprobe qdma_vf mode=1
Direct interrupt mode: [xilinx@] # modprobe qdma_vf mode=2
Indirect interrupt mode: [xilinx@] # modprobe qdma_vf mode=3
Now the QDMA software is ready for use.
3.7 Controlling and Configuring the QDMA IP
3.7.1 Configuration through sysfs
Once the qdma pf module is inserted and until any queue is added into the system and FMAP
programming is not done, sysfs provides an interface to configure some parameters for the module
configuration.
[xilinx@] # lspci | grep -i Xilinx
81:00.0 Memory controller: Xilinx Corporation Device 903f
81:00.1 Memory controller: Xilinx Corporation Device 913f
81:00.2 Memory controller: Xilinx Corporation Device 923f
81:00.3 Memory controller: Xilinx Corporation Device 933f
Based on the above lspci output, traverse to “/sys/bus/pci/devices/<device node>/qdma” to find
the list of configurable parameters for each PF.
Below table describes the various configurable parameters through sysfs.
Parameter
name
Description
Example
qmax
Maximum number of queues
associated for the current pf
are displayed here.
Currently 2048 queues are
dedicated for PFs and each
Display the current value:
[xilinx@] # cat
/sys/bus/pci/devices/0000:81:00.0/qdma/qmax

QDMA Linux Kernel Reference Driver User Guide
v2018.3 December 13, 2018 www.xilinx.com 13
PF gets 512 queues each by
default.
If the queue allocation needs
to be different for any PF,
access the qmax sysfs entry
and set the required number.
Once the number of queues
for any PF is changed from
the default value, the
remaining set of queues
among the 2048 queues are
evenly distributed for the
remaining PFs.
Set a new value:
[xilinx@] # echo 1024 >
/sys/bus/pci/devices/0000:81:00.0/qdma/qmax
Ex: Default queue sets for all PFs
[xilinx@] # dmactl dev list
qdma81000 0000:01:00.0 max QP: 449, 0~448
qdma81001 0000:01:00.1 max QP: 449, 449~897
qdma81002 0000:01:00.2 max QP: 449, 898~1346
qdma81003 0000:01:00.3 max QP: 449, 1347~1795
xilinx@] #echo 1770 >
/sys/bus/pci/devices/0000\:81\:00.0/qdma/qmax
[xilinx@] # dmactl dev list
qdma81000 0000:01:00.0 max QP: 1770, 0~1769
qdma81001 0000:01:00.1 max QP: 8, 1770~1777
qdma81002 0000:01:00.2 max QP: 8, 1778~1785
qdma81003 0000:01:00.3 max QP: 8, 1786~1793
qmax_vf
QDMA IP supports 2048
queues and all the queues
are allocated to PFs by
default.
qmax_vf sysfs entry is used
to allocate the queues to VF.
This entry is available only for
master_pf.
Before instantiating the VFs,
allocate required number of
queues for VFs from the
available pool.
Assume that PF0 is the master PF.
Display the current value:
[xilinx@] # cat
/sys/bus/pci/devices/0000:81:00.0/qdma/qmax_vfs
Set a new value:
[xilinx@] # echo 1024 >
/sys/bus/pci/devices/0000:81:00.0/qdma/qmax_vfs
intr_rngsz
Interrupt ring size is
associated with indirect
interrupt mode.
When the module is inserted
in indirect interrupt mode, by
default the interrupt
aggregation ring size is set 0
i.e 512 entries
User can configure he
interrupt ring entries in
multiples of 512 hence set the
intr_ring_size with
multiplication factor
Display the current value:
[xilinx@] # cat
/sys/bus/pci/devices/0000:81:00.0/qdma/intr_rngsz
Set a new value:
[xilinx@] # echo 2 >
/sys/bus/pci/devices/0000:81:00.0/qdma/intr_rngsz

QDMA Linux Kernel Reference Driver User Guide
v2018.3 December 13, 2018 www.xilinx.com 14
0 - INTR_RING_SZ_4KB,
Accommodates 512 entries
1 - INTR_RING_SZ_8KB,
Accommodates 1024 entries
2 - INTR_RING_SZ_12KB,
Accommodates 1536 entries
3 - INTR_RING_SZ_16KB,
Accommodates 2048 entries
4 - INTR_RING_SZ_20KB,
Accommodates 2560 entries
5 - INTR_RING_SZ_24KB,
Accommodates 3072 entries
6 - INTR_RING_SZ_24KB,
Accommodates 3584 entries
7 - INTR_RING_SZ_24KB,
Accommodates 4096 entries
wrb_acc
Completion interval if
Completions are enabled for
a queue configured for
internal mode.
3'h0: 4
3'h1: 8
3'h2: 16
3'h3: 32
3'h4: 64
3'h5: 128
3'h6: 256
3'h7: 512
Completion accumulation
value is calculated as
2^(register bit [2:0]).
Maximum accumulation is
512.
Accumulation can be disabled
via queue context
Display the current value:
[xilinx@] # cat
/sys/bus/pci/devices/0000:81:00.0/qdma/ wrb_acc
Set a new value:
[xilinx@] # echo 2 >
/sys/bus/pci/devices/0000:81:00.0/qdma/ wrb_acc
sriov_numvfs
QDMA IP supports 252 VFs.
Identify the number of VFs
supported for each PF using
the sriov_totalvfs sysfs entry.
Assume that PF0 is the master PF.
Display the currently supported max VFs:
[xilinx@] # cat
/sys/bus/pci/devices/0000:81:00.0/sriov_totalvfs
Instantiate the required number of VFs for a PF:
[xilinx@] # echo 3 >
/sys/bus/pci/devices/0000:81:00.0/sriov_numvfs

QDMA Linux Kernel Reference Driver User Guide
v2018.3 December 13, 2018 www.xilinx.com 15
Once the VFS are instantiated, required number of
queues can be allocated the VF using qmax sysfs
entry available in VF at
/sys/bus/pci/devices/<VF function
number>/qdma/qmax
3.7.2 Control and configuration through “dmactl”
QDMA driver comes with a command-line configuration utility called “dmactl” to manage the driver.
The Xilinx QDMA control tool, dmactl, is a Command Line utility which is installed in /usr/local/sbin/
and allows administration of the Xilinx QDMA queues. Make sure that the installation path
“/usr/local/sbin/” is added to the “PATH” variable.
It can perform the following functions:
• Query the QDMA functions/devices the driver has bind into
• Query control and configuration
✓ List all the queues on a device/function
✓ Add/configure a new queue on a device/function
✓ Start an already added/configured queue (i.e., bring the queue online)
✓ Stop a started queue (i.e., bring the queue offline)
✓ Delete an already added/configured queue
• register access
✓ Read a register
✓ Write a register
✓ Dump the qdma config bar and user bar registers
• debug helper
• Display a queue's configuration parameters
• Display a queue's descriptor ring entries
• Display a c2h queue's completion ring entries
• Display the interrupt ring entries
• For help run
• dmactl –h
For more details on the dmactl tool commands and options for each command, refer to dmactl
man page.
• For dmactl man page, run
• man dmactl
dma_to_device: This utility is used to transfer the data from Host to Card(H2C). It requires input
as the name of the device node and the size of the transfer as mandatory parameters. User
“dma_to_device –help” to see the various options supported for this utility.

QDMA Linux Kernel Reference Driver User Guide
v2018.3 December 13, 2018 www.xilinx.com 16
dma_from_device: This utility is used to transfer the data from Card to Host(C2H). It requires
input as the name of the device node and the size of the transfer as mandatory parameters. User
“dma_from_device –help” to see the various options supported for this utility.
3.7.2.1 Example: Get the list of devices the driver has bind with
List the devices using lspci to cross check the devices are detected as PCIe devices
[xilinx@] # lspci | grep -i Xilinx
81:00.0 Memory controller: Xilinx Corporation Device 903f
81:00.1 Memory controller: Xilinx Corporation Device 913f
81:00.2 Memory controller: Xilinx Corporation Device 923f
81:00.3 Memory controller: Xilinx Corporation Device 933f
[xilinx@] # dmactl dev list
qdma81000 0000:01:00.0 max QP: 448, 0~447
qdma81001 0000:01:00.1 max QP: 448, 512~959
qdma81002 0000:01:00.2 max QP: 448, 1024~1471
qdma81003 0000:01:00.3 max QP: 448, 1536~1983
3.7.2.2 Example: Configure and control a queue in Memory Mapped(MM) Mode
✓ Add a queue on qdma0
[root@] # dmactl qdma81000 q add idx 0 mode mm dir h2c
qdma81000: 01:00.00 config bar: 0, user bar: 2, max #. QP: 448
qdma81000 -MM-0 H2C added.
Added 1 Queues.
Note: Change the dir t0 “c2h” for Card-to-Host direction
✓ Start an already added queue
[root@] # dmactl qdma81000 q start idx 0 dir h2c
qdma81000: 01:00.00 config bar: 0, user bar: 2, max #. QP: 448
Started Queues 0 -> 0.
Note: Change the dir t0 “c2h” for Card-to-Host direction
*After the queue is started the normal read and write operation can be performed on
the character device /dev/qdma81000-MM-C2H-0.
✓ Perform a dma transfer from Host to Card (H2C)

QDMA Linux Kernel Reference Driver User Guide
v2018.3 December 13, 2018 www.xilinx.com 17
[root@] # dma_to_device -d /dev/qdma81000-MM-0 -s 512
** Average BW = 512, 4.289041
✓ Perform a dma transfer from or Card to Host (C2H)
[root@] # dma_from_device -d /dev/ qdma81000-MM-0 -s 512
** Average BW = 512, 4.289041
✓ Stop a queue
[root@] # dmactl qdma81000 q stop idx 0 dir h2c
qdma81000: 01:00.00 config bar: 0, user bar: 2, max #. QP: 448
Stopped Queues 0 -> 0.
Note: Change the dir t0 “c2h” for Card-to-Host direction
✓ Delete a queue
[root@] # dmactl qdma81000 q del idx 0 dir h2c
qdma81000: 01:00.00 config bar: 0, user bar: 2, max #. QP: 448
Deleted Queues 0 -> 0.
Note: Change the dir t0 “c2h” for Card-to-Host direction
3.7.2.3 Example: Configure and control a queue in Streaming (ST) H2C Mode
✓ Add a queue on qdma0
[root@] # dmactl qdma81000 q add idx 0 mode st dir h2c
qdma81000: 01:00.00 config bar: 0, user bar: 2, max #. QP: 448
qdma81000-ST-0 H2C added.
Added 1 Queues.
✓ Start an already added queue
[root@] # dma dmactl qdma81000 q start idx 0 dir h2c
qdma81000: 01:00.00 config bar: 0, user bar: 2, max #. QP: 448
Started Queues 0 -> 0.
✓ Perform a dma transfer from Host-to-Card (H2C)
[root@] # dma_to_device -d /dev/ qdma81000-ST-0 -s 512
** Average BW = 512, 4.289041

QDMA Linux Kernel Reference Driver User Guide
v2018.3 December 13, 2018 www.xilinx.com 18
✓ Stop a queue
[root@] # dmactl qdma81000 q stop idx 0 dir h2c
qdma81000: 01:00.00 config bar: 0, user bar: 2, max #. QP: 448
Stopped Queues 0 -> 0.
Note: Change the dir t0 “c2h” for Card-to-Host direction
✓ Delete a queue
[root@] # dmactl qdma81000q del idx 0 dir h2c
qdma81000: 01:00.00 config bar: 0, user bar: 2, max #. QP: 448
Deleted Queues 0 -> 0.
3.7.2.4 Example: Configure and control a queue in Streaming (ST) C2H Mode
NOTE: the following example with user bar register access is based on the Streaming Mode (ST)
example design.
✓ Add a MM H2C queue on qdma81000
[root@] # dmactl qdma81000 q add idx 0 mode st dir h2c
qdma81000: 01:00.00 config bar: 0, user bar: 2, max #. QP: 448
qdma81000-ST-0 C2H added.
Added 1 Queues.
✓ Start an already added queue
[root@] # dma dmactl qdma81000 q start idx 0 dir c2h
qdma81000: 01:00.00 config bar: 0, user bar: 2, max #. QP: 448
Started Queues 0 -> 0.
✓ Write the HW Qid number in user bar register 0x0
[root@] # dmactl qdma81000 reg write bar 2 0x0 0
qdma0: 01:00.00 config bar: 0, user bar: 2, max #. QP: 448
qdma0, 01:00.00, bar#2, reg 0x0 -> 0x0, read back 0x0.
✓ Program the size and number of packets in to user bar registers 0x4 and 0x20
respectively

QDMA Linux Kernel Reference Driver User Guide
v2018.3 December 13, 2018 www.xilinx.com 19
[root@] # dmactl qdma81000 reg write bar 2 0x4 512
qdma81000: 01:00.00 config bar: 0, user bar: 2, max #. QP: 448
qdma81000, 01:00.00, bar#2, reg 0x4 -> 0x200, read back 0x200.
[root@] # dmactl qdma81000 reg write bar 2 0x20 1
qdma81000: 01:00.00 config bar: 0, user bar: 2, max #. QP: 448
qdma81000, 01:00.00, bar#2, reg 0x20 -> 0x1, read back 0x1.
✓ Perform a dma transfer from Card-to-Host (C2H)
[root@] # dma_from_device -d /dev/ qdma81000-ST-0 -s 512
** Average BW = 512, 4.289041
✓ Stop a queue
[root@] # dmactl qdma81000 q stop idx 0 dir h2c
qdma81000: 01:00.00 config bar: 0, user bar: 2, max #. QP: 448
Stopped Queues 0 -> 0.
Note: Change the dir to “c2h” for Card-to-Host direction
✓ Delete a queue
[root@] # dmactl qdma81000 q del idx 0 dir h2c
qdma81000: 01:00.00 config bar: 0, user bar: 2, max #. QP: 448
Deleted Queues 0 -> 0.
3.7.3 Adding VFs to PFs
This section provides the details on assigning VFs to the PFs.
Design supports 252 VFs in total and based on the HW design, VFs can be assigned to PFs as
below using sysfs
✓ Display the current available VFs for a PF:
[xilinx@] # lspci | grep -i Xilinx
81:00.0 Memory controller: Xilinx Corporation Device 903f
81:00.1 Memory controller: Xilinx Corporation Device 913f
81:00.2 Memory controller: Xilinx Corporation Device 923f
81:00.3 Memory controller: Xilinx Corporation Device 933f
[xilinx@] # cat /sys/bus/pci/devices/0000:81:00.0/sriov_totalvfs
This command provided the maximum number of VFs, the current PF can be assigned
with.

QDMA Linux Kernel Reference Driver User Guide
v2018.3 December 13, 2018 www.xilinx.com 20
✓ Assign the VFs to a PF:
[xilinx@] # echo x > /sys/bus/pci/devices/0000:81:00.0/sriov_numvfs
This command allows x number of VFs to get assigned to the current PF.
Once the VFs are assigned to the PF, lspci lists the newly instantiated VF devices.
✓ Attaching the VFs to VM:
The newly instantiated VFs can now be attached to the VMs, if VM is installed on the
Host
3.8 Running the VF on Virtual Machines
• Create a new VM using virt-manager or any similar tools
• Insert qdma driver in host machine
[xilinx@] # insmod qdma.ko
• Allocate the number of Qs for VF by writing into qmax_vfs on the master_pf device
[xilinx@] # echo 1000 > /sys/bus/pci/devices/<master_pf_device>/qdma/qmax_vfs
• Instantiate VFs on host side
[xilinx@] # echo 1 > /sys/bus/pci/devices/<master_pf_device>/sriov_numvfs
• Remove any qdma_vf driver if present in host side
[xilinx@] # rmmod qdma_vf
• Attach the required VF device to VM the using virt-manager Add Hardware > PCI Host
Device > Xilinx Corporation device. For configuration using virsh commands, please refer
section 2.9.1
• Start the VM
• Once the system is booted, Insert the vf driver on VM
[xilinx@] # insmod qdma_vf
• Set the required number of Qs for the VF using vf qmax interface
[xilinx@] # echo 10 > /sys/bus/pci/devices/<vf_id>/qdma/qmax
• Now the system is ready to perform the transfers.
3.8.1 Setting up the VM using virsh commands
The virsh program is the main interface for managing virsh guest domains. The program can be
used to manage the VMs in a domain, including tasks like create, pause, shutdown, list etc. It can
also be used for attaching/detaching host side peripherals to the VMs.

QDMA Linux Kernel Reference Driver User Guide
v2018.3 December 13, 2018 www.xilinx.com 21
Once the VM is created, attach the device using virsh attach command
Find out the bus/slot/function for the VF device to attach
[ root ] lspci |grep -i xilinx
05:00.0 Memory controller: Xilinx Corporation Device 903f
05:00.1 Memory controller: Xilinx Corporation Device 913f
05:00.2 Memory controller: Xilinx Corporation Device 923f
05:00.3 Memory controller: Xilinx Corporation Device 933f
05:00.4 Memory controller: Xilinx Corporation Device a03f
05:00.5 Memory controller: Xilinx Corporation Device a03f
05:00.6 Memory controller: Xilinx Corporation Device a03f
05:00.7 Memory controller: Xilinx Corporation Device a03f
Get the corresponding virsh nodes for the Xilinx VF devices using the bus/slot/function obtained
in the lspci command
[ root ] virsh nodedev-list --cap pci | grep 05
pci_0000_05_00_0
pci_0000_05_00_1
pci_0000_05_00_2
pci_0000_05_00_3
pci_0000_05_00_4
pci_0000_05_00_5
pci_0000_05_00_6
pci_0000_05_00_7
The nodedev-dumpxml command list the corresponding xml for the virsh node and get the
related information for the node using
[ root ] virsh nodedev-dumpxml pci_0000_05_00_5
<device>
<name>pci_0000_05_00_5</name>
<path>/sys/devices/pci0000:00/0000:00:03.0/0000:03:00.0/0000:04:10.0/0000:05:00.5</path>
<parent>pci_0000_04_10_0</parent>
<capability type='pci'>
<domain>0</domain>
<bus>5</bus>
<slot>0</slot>
<function>5</function>
<product id='0xa03f' />

QDMA Linux Kernel Reference Driver User Guide
v2018.3 December 13, 2018 www.xilinx.com 22
<vendor id='0x10ee'>Xilinx Corporation</vendor>
<capability type='phys_function'>
<address domain='0x0000' bus='0x05' slot='0x00' function='0x0'/>
</capability>
<iommuGroup number='44'>
<address domain='0x0000' bus='0x05' slot='0x00' function='0x5'/>
</iommuGroup>
<numa node='0'/>
<pci-express>
<link validity='cap' port='0' speed='8' width='16'/>
<link validity='sta' width='0'/>
</pci-express>
</capability>
</device>
Once the details of the node are available, edit the configuration of the VM using virsh edit
command. We can either manually edit the file or use virsh compatible xml files to attach/detach
the device. This document is assuming the manual editing of the virsh XML configuration file for a
VM.
In the virsh XML configuration file, address domain and address type fields represents the
following information
Address domain - In host what is the bus/slot/function of the device which must be assigned to
the VM. Use ‘lspci’ output to figure out the bus/slot/function to use in the respective fields
Address type – In the target VM, what should be the bus/slot/function for the device. Make sure
that it doesn’t conflict with other entries in the configuration. If it conflicts, VM instantiation will fail
with respective error messages.
[ root ] virsh edit vm2-ubuntu18.04
<hostdev mode='subsystem' type='pci' managed='yes'>
<source>
<address domain='0x0000' bus='0x05' slot='0x00' function='0x4'/>
</source>
<address type='pci' domain='0x0000' bus='0x00' slot='0x08' function='0x0'/>
</hostdev>
For adding one more VF to VM, edit the configuration file and add the new entry, ensuring the
address type bus/slot/function is properly configured
[ root ] virsh edit vm2-ubuntu18.04
<hostdev mode='subsystem' type='pci' managed='yes'>

QDMA Linux Kernel Reference Driver User Guide
v2018.3 December 13, 2018 www.xilinx.com 23
<source>
<address domain='0x0000' bus='0x05' slot='0x00' function='0x4'/>
</source>
<address type='pci' domain='0x0000' bus='0x00' slot='0x08' function='0x0'/>
</hostdev>
<hostdev mode='subsystem' type='pci' managed='yes'>
<source>
<address domain='0x0000' bus='0x05' slot='0x00' function='0x5'/>
</source>
<address type='pci' domain='0x0000' bus='0x00' slot='0x19' function='0x0'/>
</hostdev>
Start the VM using virsh start <VM name>
[ root ] virsh start vm2-ubuntu18.04
Verify the running status of the VM using virsh list command
[ root ] virsh list --all
Id Name State
----------------------------------------------------
3 vm2-ubuntu18.04 running
Once started, you can login to the VM using the ssh command
[ root ] ssh xilinx@$vm2
Once logged into the VM, ensure that the device is properly attached.
xilinx@vm4-ubuntu:~$ lspci |grep -i xilinx
00:08.0 Memory controller: Xilinx Corporation Device a03f
00:19.0 Memory controller: Xilinx Corporation Device a03f


QDMA Linux Kernel Reference Driver User Guide
v2018.3 December 13, 2018 www.xilinx.com 25
4 Appendix 1 – User Application “dmactl” command options
dmactl support device management commands and queue management commands. This section
describes the details of each option provided for dmactl commands.
Format
Parameter
Range
q add idx <N>
Queue index
default for pf: 0 – 511
default for vf: 0 -7
If in case the number of
queues per pf/vf are
configured differently, the
range will be changed such
that 0 – (max range
configured-1)
q add list <start_index>
<num_Qs>
start_index: starting
queue number in the
range
<num_Qs>: Ending
queue number in the
range
Same as above
[mode <mm|st>]
mm or st
mm: memory mapped
mode
st: streaming mode
[dir <h2c|c2h|bi>]
h2c or c2h or bi
h2c: host to card
c2h: card to host
bi: both h2c and c2h
[idx_ringsz <0:15>]
Ring size
Ring size is an enum
number which allows
values from 0 -15. 16
different ring sizes can be
configured for QDMA sub
system
[idx_bufsz <0:15>]
Buffer Size
Buffer size is an enum
number which allows
values from 0 -15. 16
different buffer sizes can be
configured for QDMA sub
system
[idx_tmr <0:15>]
Timer index
The reference timer is
based on the timer tick
which is an enum number
and allows 0 -15 values.
The timer_idx in the WRB
Context is
the index to the 16
QDMA_C2H_TIMER_CNT
registers. Each queue can
choose its own

QDMA Linux Kernel Reference Driver User Guide
v2018.3 December 13, 2018 www.xilinx.com 26
timer_idx.
[idx_cntr <0:15>]
Counter index
Counter index from 0 to 15
[trigmode
<every|usr_cnt|usr|usr_tmr|dis>]
Trigger mode
Trigger Mode:
Disable:0
Any:1
Timer:2
Counter:3
Combo:4
User:5
[cmptsz <0|1|2|3>]
Completion entry size
Completion Descriptor
Size:
8B:0
16B:1
32B:2
64B:3
[sw_desc_sz <3>]
Software descriptor
size
Software Descriptor Size:
64B:3
[desc_bypass_en]
Enable the descriptor
bypass mode
In cache bypass mode, a
queue fetched descriptor is
sent to user logic. User
logic is then responsible
for delivering the packet
and associated descriptors
in simple bypass interface.
This option is applicable
for Streaming C2H only.
[pfetch_bypass_en]
Enable the simple
bypass mode.
Enable the simple bypass
mode
[pfetch_en]
Enable Prefetch
When the prefetch is
enabled, the prefetch
engine will prefetch the
descriptors from the
descriptor fetch engine at
the first time it fetches the
descriptors for that queue.
The number of descriptors
that it can prefetch is
defined in the registers
[dis_cmpl_status]
Disable completion
status
This option allows the user
to disable the completions
[dis_cmpl_status_acc]
Disable completion
status accumulation
Completion status
accumulation allows the
completions to be triggered
back after certain number
of descriptors being
processed. Default value is
4 descriptors. By disabling
this, completions are
triggered for every
descriptor being processed

QDMA Linux Kernel Reference Driver User Guide
v2018.3 December 13, 2018 www.xilinx.com 27
[dis_cmpl_status_pend_chk]
Disable completion
status pending check
This option disables the
completion status pending
check.
[c2h_udd_en]
Enable user defined
data
This option allows the user
to enable the user defined
data to be embedded in
streaming C2H mode.
[dis_fetch_credit]
Disable fetch credit
The number of descriptors
fetched will be qualified by
the number of credits
given to the queue.
Set to 1 for C2H ST by
default. This option allows
to disable the fetch credit.
[dis_cmpl_status]
Disable completion
status
Disable completion status
[cmpl_ovf_dis]
Disable completion
ring overflow check
Disable completion ring
overflow check
[c2h_cmpl_intr_en]
Enable ST C2H
completion interrupts
This option allows to
enable the completion
interrupts
[desc <x> <y>]
Descriptor indexes
from <x> to <y>
This option allows to dump
the descriptors from index
<x> to index <y>
[cmpt <x> <y>]
Completion indexes
from <x> to <y>
This option allows to dump
the completion descriptors
from index <x> to index <y>
[dmap <Q> <N>]
dump dmap registers
dump dmap registers if
dmap is specified.
specify dmap range to
dump: Q=queue, N=num of
queues
udd idx <N>
User define data
index
dump the user defined data
received. This is applicable
for ST C2H only
bar <N>
Bar index
QDMA IP has 3 bars
0: config bar
1: bypass bar
2: user bar
vector <N>
Vector index
QDMA IP supports 2K
interrupt vectors and <N> is
an index of the interrupt
vector to be used.
5 Appendix 2 – dmautils tool

QDMA Linux Kernel Reference Driver User Guide
v2018.3 December 13, 2018 www.xilinx.com 28
QDMA Linux driver provides character device interface for standalone IP testing. A char device is
created by Linux driver for each queue pair of QDMA IP that is added to a function
It provides IO interface using following function pointers provided in f_ops structure of kernel char
device driver.
• read
• write
• aio_read
• aio_write
• aio_read_iter
• aio_write_iter’
Standard IO tools like ‘fio’ can be used for performing IO operations using the char device
interface. These standard tools pose a challenge of not being able to keep the driver/ HW busy
enough while doing performance testing as they are limited to sending / receiving 1 packet at a
time and wait for the processing of the packet to complete. This limitation cannot be overcome
with standard tools because, if an application provides a buffer for read/write DMA operation,
unless the driver confirms the completion the application cannot free the allocated buffer. The true
potential of HW and driver can only be tested when application is able to send / receive enough
data at higher throughput to keep the driver and HW busy.
To overcome the above said limitation, an asynchronous IO capable tool is required to provide the
buffers for DMA operation continuously and free the buffers only when driver notifies the
application of the completion corresponding to the IO submitted.
This can also be achieved with fio tool, but, if we want to keep the dirver and HW busy, application
needs to continuously submit IO requests while polling for the completion parallelly, which is not
done in fio.
This can be achieved by leveraging the asynchronous functionality provided by libaio library. Using
libaio, application can submit IO request to the driver and driver returns the call immediately and
notify of completion separately. Application can then poll for the completion and free the buffer
upon receiving the completion.
‘dmautils’ tool developed by Xilinx, specifically for QDMA, tries to accomplish this by continuously
submitting IO requests while another thread continuously polls for completion events of IOs
submitted. This tool is capable of following features:
• Highly configurable
It enables the user to configure the following
o Number of PFs and queues to do IO testing on
o Number of threads that poll on each char device
o Duration for which continuous IOs need to be done on each char device
o Dump queue context and registers on completion of IO
o Set number of packets to be sent per IO
o Set packet size
o Do q add/start/stop/delete on all queues on which IOs are required to be done
o Set queue mode (ST/MM) and direction (H2C/C2H) of each queue for IO
operations

QDMA Linux Kernel Reference Driver User Guide
v2018.3 December 13, 2018 www.xilinx.com 29
o Set some of queue configurations (pre-fetch/ring size/ST C2H completion size,
timer threshold, counter threshold and trigger mode) while doing ‘q start’.
o Set zero copy for ST C2H performance testing
• Performs read and write unidirectional calls and bidirectional simultaneous calls
• Supports the interface to submit IO requests from multiple threads on a single char device
interface
• Calculates the number of packets for which completion is received in the time duration
specified though configuration file. This gives us the number of packets per second and
in turn the throughput.
Note: dmautils tool uses zero buffers and does not do any data validation as this tool is currently
targeted mainly for performance testing only.
Usage of dmautils tool
[xilinx@] # dmautils -c “config_file”
Sample config files are available in “linux-kernel/tools/config/dmautils_config”.
Below table covers all the available configuration parameters that can be provided to dmautils tool
is given below:

QDMA Linux Kernel Reference Driver User Guide
v2018.3 December 13, 2018 www.xilinx.com 30
Config Parameter
Example Value
Description
mode
st
Queue mode
dir
c2h
Queue direction
pf_range
0:0
Range of PFs to be used
q_range
0:7
Range of queues to be used
wb_acc
5
Writeback accumulation value. The writeback accumulation will
happen for 2^(value + 1)
dump_en
0
Enable logging of queue context, register dump and lspci output
for every queue for each IO size performed
tmr_idx
5
Timer index to be selected for ST C2H writeback accumulation
cntr_idx
6
Counter index to be selected for ST C2H writeback
accumulation
trig_mode
cntr_tmr
Trigger mode for ST C2H writeback update
pfetch_en
1
Flag to enable prefetch on the queues
wrbsz
1
Completion entry size
rngidx
5
Ring size index selection
runtime
30
Time duration for which the IO should be performed for each IO
size
num_threads
4
Number of threads that should do IOs on each queue
simultaneously
num_pkt
64
Number of packets to be IO’ed at once
pkt_sz
64
Packet size
pci_bus
17
PCI bus number
pci_device
00
PCI device number
Table 5-1: dmautils tool configuration options
QDMA Linux Kernel Reference Driver User Guide
v2018.3 December 13, 2018 www.xilinx.com 31
6 Appendix 3 – Release Directory Structure
6.1 SW Directory
The entire software source is under https://github.com/Xilinx/dma_ip_drivers subdirectory
QDMA/linux-kernel/ folder
Directory
Description
linux-kernel
Top-level directory for QDMA Linux SW driver,
example application, documents and tools
software
docs/
Documentation for the QDMA Linux Driver
drv/
Provides the interfaces to manage the
underlined PCIe device and provide character
interface to control the QDMA IP
libqdma/
QDMA library, used by the source in drv/
user/
User space application to configure and control
the QDMA IP
tools/
Tools to perform DMA operations
Makefile
Make file to compile the Linux QDMA Driver
Table 6-1: SW Directory

QDMA Linux Kernel Reference Driver User Guide
v2018.3 December 13, 2018 www.xilinx.com 32
7 Appendix 4 – Doxygen tool usage for document generation
For generating the pdf documentation from the source code using Doxygen tool, the following
software is required to install on the host system
• Doxygen
• texlive-latex-base
Doxygen configuration file(Doxyfile) is provided in the release package which has the necessary
settings for document generation.
7.1 Steps for document generation
• Open Linux terminal & change directory to QDMA/linux-kernel/docs/
[xilinx@] # cd QDMA/linux-kernel/docs
• run the below command
[xilinx@docs] # doxygen Doxyfile
• Tool generates the documentation in latex format at qdma/latex. Change to the directory
[xilinx@docs] # cd qdma/latex
• Execute make command to build and generate pdf document
[xilinx@latex] # make
• PDF document gets generated in the same directory with name “refman.pdf”
