Magento Php Developers Guide
User Manual:
Open the PDF directly: View PDF ![]() .
.
Page Count: 256 [warning: Documents this large are best viewed by clicking the View PDF Link!]
- Cover
- Copyright
- Credits
- About the Author
- About the Reviewers
- www.PacktPub.com
- Table of Contents
- Preface
- Chapter 1: Understanding and Setting up Our Development Environment
- Chapter 2: Magento Fundamentals for Developers
- Chapter 3: ORM and Data Collections
- Chapter 4: Frontend Development
- Chapter 5: Backend Development
- Chapter 6: The Magento API
- Chapter 7: Testing and Quality Assurance
- Chapter 8: Deployment and Distribution
- Appendix: Hello Magento
- Index


Magento PHP Developer's
Guide
Get started with the exible and powerful e-commerce
framework, Magento
Allan MacGregor
BIRMINGHAM - MUMBAI

Magento PHP Developer's Guide
Copyright © 2013 Packt Publishing
All rights reserved. No part of this book may be reproduced, stored in a retrieval
system, or transmitted in any form or by any means, without the prior written
permission of the publisher, except in the case of brief quotations embedded in
critical articles or reviews.
Every effort has been made in the preparation of this book to ensure the accuracy
of the information presented. However, the information contained in this book is
sold without warranty, either express or implied. Neither the author, nor Packt
Publishing, and its dealers and distributors will be held liable for any damages
caused or alleged to be caused directly or indirectly by this book.
Packt Publishing has endeavored to provide trademark information about all of the
companies and products mentioned in this book by the appropriate use of capitals.
However, Packt Publishing cannot guarantee the accuracy of this information.
First published: April 2013
Production Reference: 1250313
Published by Packt Publishing Ltd.
Livery Place
35 Livery Street
Birmingham B3 2PB, UK.
ISBN 978-1-78216-306-0
www.packtpub.com
Cover Image by Sandeep Babu (sandyjb@gmail.com)

Credits
Author
Allan MacGregor
Reviewers
Jay El-Kaake
Michael K. Kreitzer
Corey Slavnik
Acquisition Editor
Edward Gordon
Lead Technical Editor
Azharuddin Sheikh
Technical Editors
Devdutt Kulkarni
Kaustubh S. Mayekar
Ankita R. Meshram
Project Coordinator
Anugya Khurana
Proofreader
Jonathan Todd
Indexer
Tejal Soni
Graphics
Aditi Gajjar
Production Coordinator
Arvindkumar Gupta
Cover Work
Arvindkumar Gupta

About the Author
Allan MacGregor is a Magento Certied Developer Plus with four years of
Magento experience. He also has a certication in Linux System Administration
by IBM.
He started working with Magento as a freelance looking for a better framework to
build e-commerce solutions, and he is now the Magento Lead Developer at Demac
Media (www.demacmedia.com). He's very passionate about software development
in general. He is constantly working with new technologies and frameworks.
At Demac Media, he has participated in building core solutions for a wide
range of clients; this has given him the experience and knowledge to solve
many Magento challenges.
As part of an internal project at Demac Media, he worked on Triplecheck.io
(www.triplecheck.io), a unique service for monitoring and auditing the
code health of a Magento store. You can also follow him on Twitter at
http://www.twitter.com/allanmacgregor.
Writing this book has been a demanding experience but full of
rewards. While writing, I have discovered more of Magento and a
little bit more of myself, both as a person and a developer.
First and foremost, I want to thank my amazing wife for her
unconditional support and understanding while working on
these projects.
To Matthew Bertulli and Dimitri Colomvakos, co-founders of Demac
Media, for all their support.
To my co-workers and friends, Michael Krietzer and Corey Slavnik,
who kindly volunteered their time and effort to review this book.
And special thanks to the whole Demac Media family.
This wouldn't be possible without any of you.
About the Reviewers
Jay El-Kaake started his rst tech entrepreneurship adventure at the age of
10 when he developed and launched his rst website. Now, as a Co-founder
and CEO of Sweet Tooth Inc, Jay oversees up to 1,000 Magento stores per year
as Sweet Tooth's client base of over 3,000 Magento e-commerce clients grows.
Through his role at Sweet Tooth Inc., Jay was the lead in developing some of the
most popular extensions of Magento: Sweet Tooth Rewards, a full-featured loyalty
and rewards program extension; Better Store Search, a turn-key product search
optimizer; Better Store CMS, a Magento CMS improver; and Enhanced Grid, the
second most downloaded community-written extension for Magento with over
70,000 installations.
Jay's GitHub account can be found at https://github.com/jayelkaake.
You can also follow Jay on Twitter at http://www.twitter.com/jayelkaake.
Michael K. Kreitzer, born in Chatham, Ontario, and raised in the small
town of Thamesville, began his journey in the IT industry at an early age from
the moment he wrote his rst Hello World program. He studied Computer
Programming at Sheridan College in Oakville, Ontario and is now a Magento
Certied Plus Developer at Demac Media Inc. He lives in Mississauga, Ontario
with his wife Megan and dog Padme.
I would like to thank my family for their love and support, as well as
my co-workers who help me continue to learn every day.

Corey Slavnik is a Certied Magento Developer from Toronto, Ontario. He
understood his afnity for programming at a young age when he built games in
RPG Maker 2000. He attended McMaster University for his undergraduate degree
and continued to learn (and love) Magento at Demac Media. Corey also enjoys craft
beer and yoga.
I would like to thank my parents for always pushing me to pursue
great opportunities, and my co-workers, who have helped me learn
all things about Magento.

www.PacktPub.com
Support les, eBooks, discount offers and more
You might want to visit www.PacktPub.com for support les and downloads related
to your book.
Did you know that Packt offers eBook versions of every book published, with PDF
and ePub les available? You can upgrade to the eBook version at www.PacktPub.
com and as a print book customer, you are entitled to a discount on the eBook copy.
Get in touch with us at service@packtpub.com for more details.
At www.PacktPub.com, you can also read a collection of free technical articles, sign
up for a range of free newsletters and receive exclusive discounts and offers on Packt
books and eBooks.
http://PacktLib.PacktPub.com
Do you need instant solutions to your IT questions? PacktLib is Packt's online
digital book library. Here, you can access, read and search across Packt's entire
library of books.
Why Subscribe?
• Fully searchable across every book published by Packt
• Copy and paste, print and bookmark content
• On demand and accessible via web browser
Free Access for Packt account holders
If you have an account with Packt at www.PacktPub.com, you can use this to access
PacktLib today and view nine entirely free books. Simply use your login credentials
for immediate access.


Table of Contents
Preface 1
Chapter 1: Understanding and Setting Up Our Development
Environment 7
LAMP from scratch 7
Getting VirtualBox 8
Booting our virtual machine 11
Installing Apache2 16
Installing PHP 16
Installing MySQL 17
Putting everything together 18
Up and running with Vagrant 21
Installing Vagrant 22
Choosing an IDE 24
Working with a version control system 24
Summary 25
Chapter 2: Magento Fundamentals for Developers 27
Zend Framework – the base of Magento 27
Magento folder structure 29
Modular architecture 30
Autoloader 30
Code pools 32
Routing and request ow 33
Magento version of MVC 38
Models 42
Views 43
Dissecting a layout le 43
Controllers 46

Table of Contents
[ ii ]
Websites and store scopes 46
Factory names and functions 48
Events and observers 52
Event dispatch 52
Observer bindings 55
Summary 56
Chapter 3: ORM and Data Collections 57
Magento Model Anatomy 58
It's magic – methods 61
EAV Model 64
What is EAV? 65
Retrieving the data 70
Working with Magento collections 74
Get product collection only from a specic category 76
Get new products added since X date 76
Get Bestseller products 78
Filter product collection by visibility 78
Filter products without images 79
Add multiple sort orders 79
Using Direct SQL 80
Reading 81
Writing 81
Summary 82
Chapter 4: Frontend Development 83
Extending Magento 83
Scenario 83
Features 84
Further improvements 84
Hello Magento 84
XML module conguration 88
Models and saving data 91
Creating the models 91
Setup resources 97
Dening a setup resource 98
Creating the Installer Script 99
What have we learned? 107
Setting up our routes 107
The index controller 108
The search controller 115
The view controller 117
Table of Contents
[ iii ]
Block and layouts 118
IndexController blocks and views 119
SearchController blocks and views 127
ViewController block and views 131
Adding products to the registry 132
Summary 132
Chapter 5: Backend Development 133
Extending the Adminhtml 133
Back to the conguration 137
The grid widget 141
Managing the registries 145
Permissions and the ACL 146
Updating in bulk with Massactions 151
The form widget 153
Loading the data 157
Saving the data 158
Summary 160
Chapter 6: The Magento API 161
The Core API 161
XML-RPC 162
SOAP 163
RESTful API 166
Using the API 167
Setting up the API credentials for XML-RPC/SOAP 167
Setting up the REST API credentials 169
Loading and reading data 171
Updating data 173
Deleting a product 174
Extending the API 175
Extending the REST API 185
Securing the API 188
Summary 189
Chapter 7: Testing and Quality Assurance 191
Testing Magento 192
Unit testing 192
Regression testing 192
Functional tests 193
TDD 193

Table of Contents
[ iv ]
Tools and testing frameworks 194
Unit testing with PHPUnit 194
Installing Ecomdev_PHPUnit 194
Setting up the conguration for our extension 196
Anatomy of a Test case 197
Creating a unit test 199
Functional tests with Mink 208
Magento Mink installation and setup 208
Creating our rst test 209
Summary 212
Chapter 8: Deployment and Distribution 213
The road towards zero-downtime deployment 213
Make it right from scratch 214
Be sure that what you see is what you get 214
Ready means ready 215
Version control system and deployment 215
SVN 216
Git 216
Distribution 217
Packing our extension 218
Package Info 219
Release Info 220
Authors 220
Dependencies 221
Contents 222
Load Local Package 223
Publishing our extension 223
Summary 226
Appendix: Hello Magento 227
The conguration 227
The controller 228
Testing the route 229
Index 231

Preface
The Magento PHP Developer's Guide will help new and not so new developers
to understand and work with Magento's fundamental concepts and standard
practices for developing and testing code in Magento.
This book is my attempt to write a guide that answers questions that many
developers, including myself, had when we started to develop for Magento:
What is EAV? How does the ORM in Magento work? What are observers
and events? Which design patterns were used to create Magento?
Most importantly, this book also answers questions that many developer still have to
this day: What is the standard for developing modules and extending the frontend
and backend? How can I properly test my code? What is the best method to deploy
and distribute custom modules?
What this book covers
Chapter 1, Understanding and Setting Up Our Development Environment, will help you
set up a complete environment for Magento development with MySQL and Apache.
Additionally, we will go over the tools available to facilitate the development,
several IDEs, and version control systems.
Chapter 2, Magento Fundamentals for Developers, will be about the fundamental
concepts of Magento, such as the system architecture, MVC implementation,
and its relation with Zend Framework. All the concepts in this chapter will
set the foundation for developers starting with Magento.
Chapter 3, ORM and Data Collections, covers collections and models in Magento that
are the bread and butter of everyday Magento development. In this chapter, we will
introduce the reader to the Magento ORM system, and we will learn how to properly
work with data collections and the EAV system.

Preface
[ 2 ]
Chapter 4, Frontend Development, will explain the practical use of the skills and
knowledge we have acquired so far, and we'll be building a fully functional Magento
Module step by step. The custom module will allow readers to apply a variety of
important concepts, such as working with collections, routing, sessions, and caching.
Chapter 5, Backend Development, will extend what we built in the previous chapter and
create an interface in the Magento backend for interacting with our application data.
We will learn about extending the backend, the admin HTML theme, setting data
sources, and controlling our extension behavior through conguration.
Chapter 6, The Magento API, will explain the Magento API and how we can extend it
for providing access to the custom data that we captured using our extension.
Chapter 7, Testing and Quality Assurance, will help the reader learn critical skills
for testing our Magento modules and custom, which form an integral part of
development. We will learn about the different types of tests and the tools
available for each particular type of test.
Chapter 8, Deployment and Distribution, will help the reader learn about the
multiple tools available for deploying our code to a production environment
and how to properly pack our extensions for distribution through channels
such as Magento Connect.
Appendix, Hello Magento, will give new developers a quick and easy to follow
introduction for creating our rst Magento Extension.
What you need for this book
You will need an installation of Magento 1.7, either on a local machine or on a remote
server, your favorite code editor, and permissions to install and modify les.
Who this book is for
If you are a PHP developer getting started with Magento or if you already have some
experience with Magento and want to understand the Magento architecture and how
to extend the frontend and backend of Magento, this is the book for you!
You are expected to be condent with PHP5. No experience with Magento
Development is expected, although you should be familiar with basic Magento
operations and concepts.
Preface
[ 3 ]
Conventions
In this book, you will nd a number of styles of text that distinguish between
different kinds of information. Here are some examples of these styles and an
explanation of their meaning.
Code words in text are shown as follows: "GitHub now includes a .gitignore le
specically for Magento, which will ignore all the les in the Magento core and only
keep track of our own code."
A block of code is set as follows:
{
"id": "default",
"host": "magento.localhost.com",
"repo": [
"url": "svn.magentocommerce.com/source/branches/1.7",
Any command-line input or output is written as follows:
$ vagrant box add lucid32 http://files.vagrantup.com/lucid32.box
$ vagrant init lucid32
$ vagrant up
New terms and important words are shown in bold. Words that you see on
the screen, in menus or dialog boxes for example, appear in the text like this:
"You should now see Apache's default web page with the message It Works!".
Warnings or important notes appear in a box like this.
Tips and tricks appear like this.

Preface
[ 4 ]
Reader feedback
Feedback from our readers is always welcome. Let us know what you think about
this book—what you liked or may have disliked. Reader feedback is important for
us to develop titles that you really get the most out of.
To send us general feedback, simply send an e-mail to feedback@packtpub.com,
and mention the book title via the subject of your message.
If there is a topic that you have expertise in and you are interested in either writing
or contributing to a book, see our author guide on www.packtpub.com/authors.
Customer support
Now that you are the proud owner of a Packt book, we have a number of things to
help you to get the most from your purchase.
Downloading the example code
You can download the example code les for all Packt books you have purchased
from your account at http://www.packtpub.com. If you purchased this book
elsewhere, you can visit http://www.packtpub.com/support and register to have
the les e-mailed directly to you.
Errata
Although we have taken every care to ensure the accuracy of our content, mistakes
do happen. If you nd a mistake in one of our books—maybe a mistake in the text or
the code—we would be grateful if you would report this to us. By doing so, you can
save other readers from frustration and help us improve subsequent versions of this
book. If you nd any errata, please report them by visiting http://www.packtpub.
com/submit-errata, selecting your book, clicking on the errata submission form link,
and entering the details of your errata. Once your errata are veried, your submission
will be accepted and the errata will be uploaded on our website, or added to any list of
existing errata, under the Errata section of that title. Any existing errata can be viewed
by selecting your title from http://www.packtpub.com/support.

Preface
[ 5 ]
Piracy
Piracy of copyright material on the Internet is an ongoing problem across all media.
At Packt, we take the protection of our copyright and licenses very seriously. If you
come across any illegal copies of our works, in any form, on the Internet, please
provide us with the location address or website name immediately so that we can
pursue a remedy.
Please contact us at copyright@packtpub.com with a link to the suspected
pirated material.
We appreciate your help in protecting our authors, and our ability to bring you
valuable content.
Questions
You can contact us at questions@packtpub.com if you are having a problem with
any aspect of the book, and we will do our best to address it.

Understanding and Setting
Up Our Development
Environment
In this chapter, we will go over the stack of technologies involved in running
Magento and how to set up a proper environment for development. The following
topics will be covered in this chapter:
• LAMP virtual machine
• Setting up and using VirtualBox
• Setting up and using Vagrant
• IDEs and version control systems
We will also learn how to set up a LAMP virtual machine from scratch and how to
automate this process entirely using Vagrant and Chef.
LAMP from scratch
LAMP (Linux, Apache, MySQL, and PHP) is a solution stack of open source
technologies, which is used for building a web server and is also the current
standard for running Magento.
For a more detailed list of requirements, please visit www.magentocommerce.com/
system-requirements.
Although Nginx has seen a wider range of adoption among Magento
developers at the time of writing this book, Apache2 is still the
community-accepted standard. We will focus on working with it.
Understanding and Setting Up Our Development Environment
[ 8 ]
As developers, there are multiple challenges and nuances of setting and maintaining
our development environment, such as:
• Matching your development and production environments
• Keeping a consistent environment between different platforms and
team members
• Setting up a new environment that takes several hours
• Not all developers have the knowledge or experience for setting up a LAMP
server on their own
We can resolve the rst two points with the help of Oracle's VirtualBox
(www.virtualbox.org). VirtualBox is a powerful and widely popular virtualization
engine that will allow us to create virtual machines (VMs). VMs can also be shared
between developers and across all major operating systems.
Getting VirtualBox
VirtualBox is open source, and it is supported across all platforms. It can be
downloaded directly from www.virtualbox.org/wiki/Downloads.
Now, we will proceed to setting up a Linux virtual machine. We have selected
Ubuntu Server 12.04.2 LTS for its ease of use and widely available support. First,
download the ISO le from www.ubuntu.com/download/server; both 64-bit and
32-bit versions will work.
To create a new Linux virtual machine, perform the following steps:
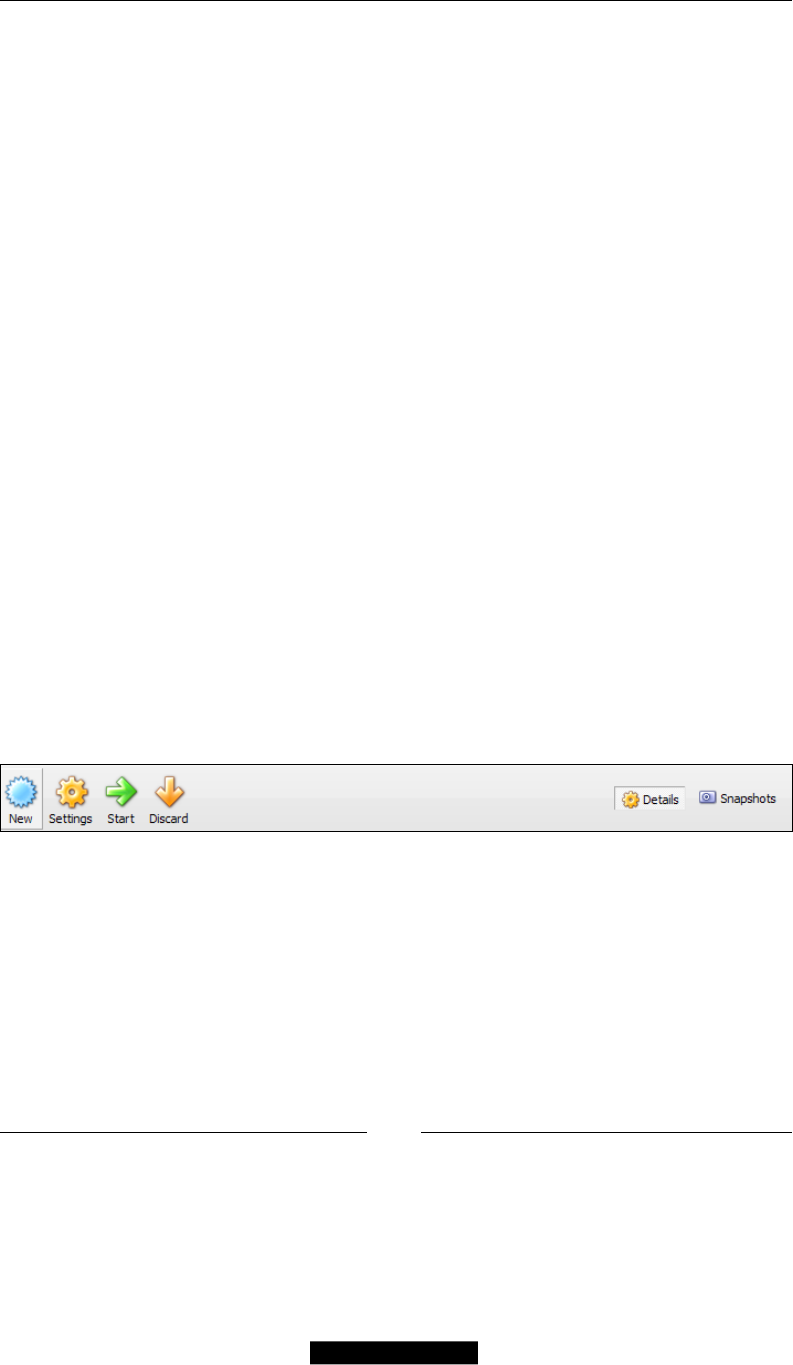
1. Start VirtualBox Manager and click on the New button in the upper-left
corner, as shown in the following screenshot:
2. A wizard dialog will pop up and will guide us through the steps for creating
a bare virtual machine. The wizard will ask us for the basic information for
setting up the virtual machine:
°VM Name: How shall we name our virtual machine? Let's name it
Magento_dev 01.
°Memory: This is the value of system memory that will be assigned
to the guest operating system when our VM starts; for running a full
LAMP server, 1 GB or more is recommended.

Chapter 1
[ 9 ]
°Operating System Type: This is the type of OS that we will be
installing later; in our case, we want to select Linux/Ubuntu, and
depending on our selection, VirtualBox will enable or disable certain
VM options.
3. Next, we need to specify a virtual hard disk. Select Create a virtual hard
drive now, as shown in the following screenshot:
4. There are many hard disk options available, but for most purposes, selecting
VirtualBox Disk Image (VDI) will sufce. This will create a single le on our
host operating system.
5. We now need to select the type of storage on the physical drive. We are
provided with the following two options:
°Dynamically Allocated: The disk image will grow automatically as
the number of files and usage on our guest operating system grows
°Fixed Size: This option will limit the size of the virtual disk from
the start
6. Next, we will need to specify the size of our virtual hard disk. We want
to adjust the size depending on how many Magento installations we
plan to use.

Understanding and Setting Up Our Development Environment
[ 10 ]
In general, we want to keep at least 2 GB per Magento installation,
and another 3 GB if we are running the database server on the same
installation. This is not to say that all that space will be used at once or
even at all, but Magento installations can use a lot of disk space once
product images and cache files are factored in.
7. Finally, we just need to click on the Create button.
The main difference is that the fixed-size hard disk will reserve
the space on the physical hard drive right from the start, whereas
the dynamically allocated hard disk will grow incrementally until
it acquires the specified size.
The newly created box will appear on the left-hand side navigation menu,
but before starting our recently created VM, we need to make some changes,
as follows:
i. Select our newly created VM and click on the Settings button at
the top.
ii. Open the Network menu and select Adapter 2. We will set
Attached to to Bridged Adapter as we want to set this up as a
bridged adapter to our main network interface. This will allow us
to connect remotely using SSH.
Chapter 1
[ 11 ]
iii. Go to the System menu and change the boot order so that the
CD/DVD-ROM boots first.
iv. On the Storage menu, select one of the empty IDE controllers and
mount our previously downloaded Ubuntu ISO image.
Booting our virtual machine
At this point, we have successfully installed and congured our VirtualBox instance,
and we are now ready to boot our new virtual machine for the rst time. To do this,
just select the VM in the left sidebar and click on the Start button at the top.
A new window will pop up with an interface to the VM. Ubuntu will take a few
minutes to boot up.

Understanding and Setting Up Our Development Environment
[ 12 ]
Once Ubuntu has nished booting up, we will see two menus. The rst menu
will allow us to select the language, and the second one is the main menu, which
provides several options. In our case, we just want to proceed with the Install
Ubuntu Server option.
We should now see the Ubuntu installation wizard, which will ask for our language
and keyboard settings; after selecting the appropriate settings for our country and
language, the installer will proceed to load all the necessary packages in memory.
This can take up a few minutes.
Ubuntu will proceed to congure our main network adapter, and once the automatic
conguration is done, we will be asked to set up the hostname for the virtual
machine. We can leave the hostname to default settings.
Chapter 1
[ 13 ]
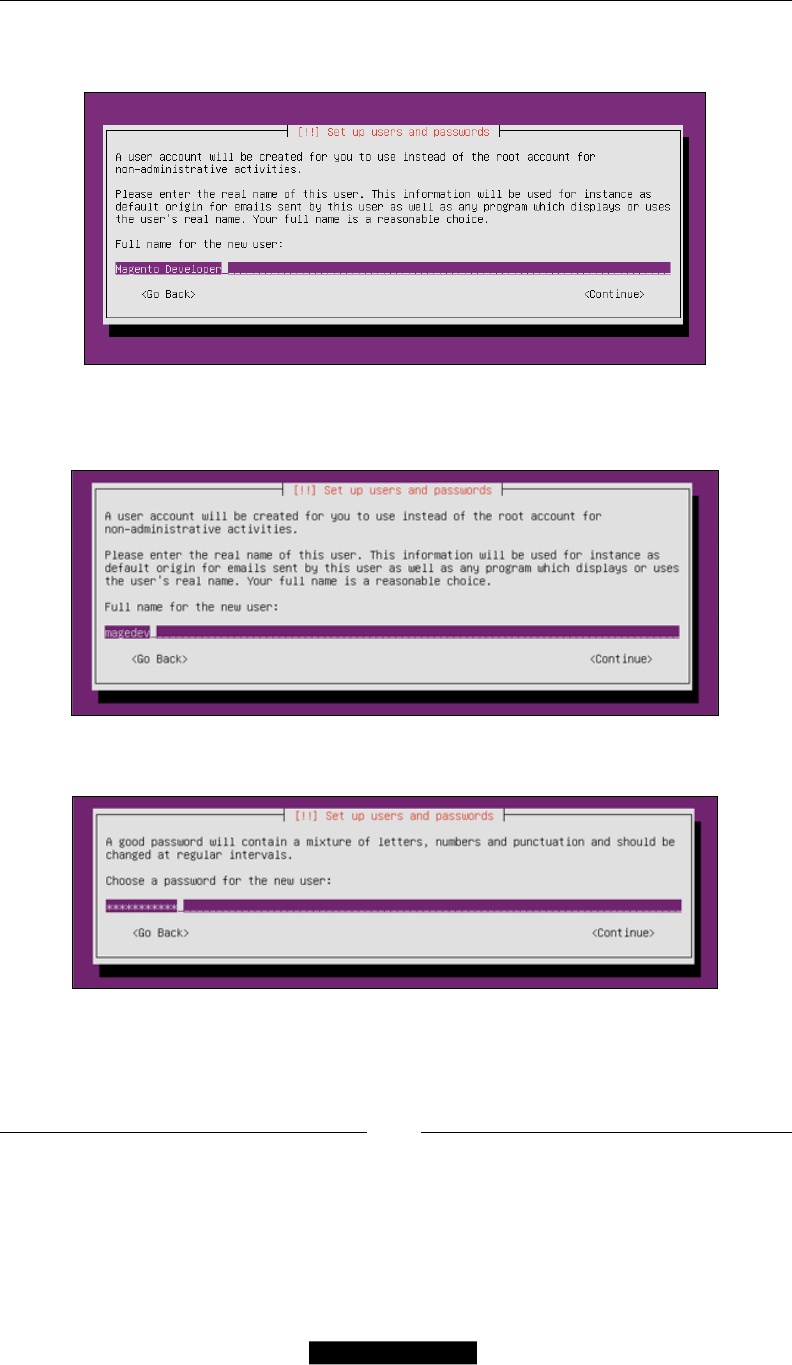
The next screen will request us to enter the full name of our user; for this example,
let's use Magento Developer:
Next, we will be asked to create a username and password. Let's use magedev as
our username:
And let's use magento2013 as our password:

Understanding and Setting Up Our Development Environment
[ 14 ]
On the next screens, we will be asked to conrm our password and set up the
correct time zone; after entering the right values, the installation wizard will
show the following screen asking about our partition settings:
In our case, we select Guided – use entire disk and set up LVM; let's now conrm
that we are partitioning our virtual disk:
We will be asked to conrm our changes a nal time; select Finish partitioning and
write changes to disk, as shown in the following screenshot:
Chapter 1
[ 15 ]
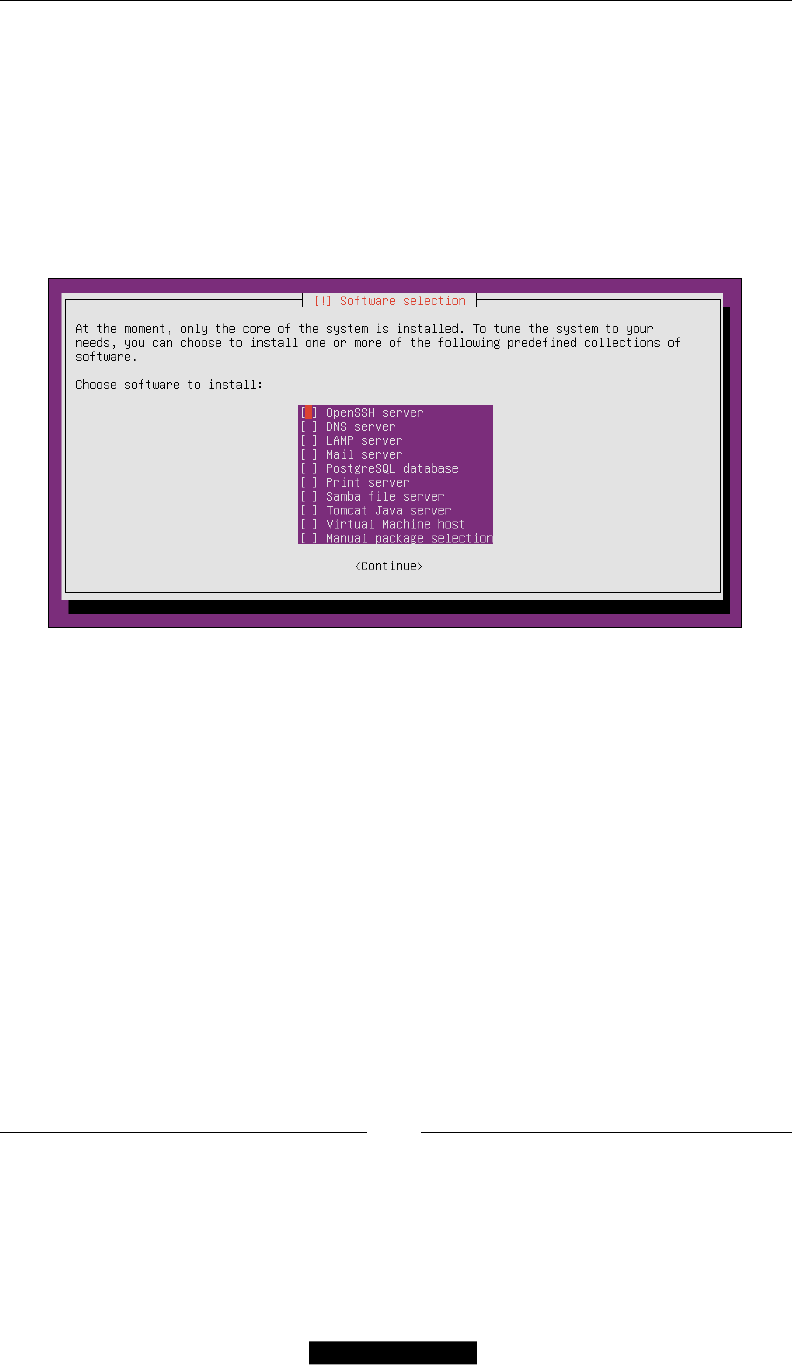
The installation wizard will ask us to select predened packages to install; one of the
options available is LAMP server.
Although this is highly convenient, we don't want to install the LAMP server that
comes pre-packaged with our Ubuntu CD; we will be installing all the LAMP
components manually to guarantee that they are set up according to specic needs
and are up to date with the latest patches.
Next, for this, we will need an SSH server; select OpenSSH server from the list and
click on Continue:
Now, installation of Ubuntu is complete and it will reboot into our newly installed
virtual box.
We are almost ready to proceed with the installation of the rest of our environment,
but rst we need to update our package manager repository denitions, log in to the
console and run the following command:
$ sudo apt-get update
APT stands for Advanced Packaging Tool and is one of the core libraries included
with most Debian GNU/Linux distributions; apt greatly simplies the process of
installing and maintaining software on our systems.
Once apt-get has nished updating all the repository sources, we can proceed with
the installation of the other components of our LAMP server.

Understanding and Setting Up Our Development Environment
[ 16 ]
Installing Apache2
Apache is an HTTP server. Currently, it is used to host over 60 percent of the
websites on the Web and is the accepted standard for running Magento stores.
There are many guides and tutorials available online for ne-tuning and tweaking
Apache2 for increasing Magento performance.
Installing Apache is as simple as running the following command:
$ sudo apt-get install apache2 -y
This will take care of installing Apache2 and all the required dependencies for us. If
everything has been installed correctly, we can now test by opening our browser and
entering http://192.168.36.1/.
Apache by default runs as a service and can be controlled with the following commands:
$ sudo apache2ctl stop
$ sudo apache2ctl start
$ sudo apache2ctl restart
You should now see Apache's default web page with the message It Works!.
Installing PHP
PHP is a server-side scripting language and stands for PHP Hypertext Processor.
Magento is implemented on PHP5 and Zend Framework, and we would need to
install PHP and some additional libraries in order to run it.
Let's use apt-get again and run the following commands to get php5 and all the
necessary libraries installed:
$ sudo apt-get install php5 php5-curl php5-gd php5-imagick php5-imap
php5-mcrypt php5-mysql -y
$ sudo apt-get install php-pear php5-memcache -y
$ sudo apt-get install libapache2-mod-php5 -y
The rst command installed, not only php5, but also additional packages required by
Magento to connect with our database and manipulate images.
Chapter 1
[ 17 ]
The second command will install PEAR, a PHP package manager and a PHP
memcached adapter.
Memcached is a high-performance, distributed memory caching
system; this is an optional caching system for Magento.
The third command installs and sets up the php5 module for Apache.
We can nally test that our PHP installation is working by running the
following command:
$ php -v
Installing MySQL
MySQL is a popular choice of database for many web applications, and Magento is
no exception. We will need to install and set up MySQL as part of development stack
using the following command:
$ sudo apt-get install mysql-server mysql-client -y
During installation, we will be asked to enter a root password; use magento2013.
Once the installer has nished, we should have a mysql service instance running
in the background. We can test it by trying to connect to the mysql server using the
following command:
$ sudo mysql -uroot -pmagento2013
If everything has been installed correctly, we should see the following mysql
server prompt:
mysql>
At this point, we have a fully functional LAMP environment that can be used not
only for developing and working on Magento websites but also for any other kind
of PHP development.

Understanding and Setting Up Our Development Environment
[ 18 ]
Putting everything together
At this point, we have a basic LAMP set up and running. However, for working with
Magento, we would need to do some conguration changes and additional setup.
The rst thing that we will need to do is to create a location to store our development
site's les, so we will run the following commands:
$ sudo mkdir -p /srv/www/magento_dev/public_html/
$ sudo mkdir /srv/www/magento_dev/logs/
$ sudo mkdir /srv/www/magento_dev/ssl/
This will create the necessary folder structure for our rst Magento site. Now
we need to check out the latest version of Magento. We can quickly get the les
by using SVN.
We would rst need to install SVN on our server with the following command:
$ sudo apt-get install subversion -y
Once the installer has nished, open the magento_dev directory and run the svn
command to get the latest version les:
$ cd /srv/www/magento_dev
$ sudo svn export --force http://svn.magentocommerce.com/source/
branches/1.7 public_html/
We will also need to x some of the permissions on our new Magento copy:
$ sudo chown -R www-data:www-data public_html/
$ sudo chmod -R 755 public_html/var/
$ sudo chmod -R 755 public_html/media/
$ sudo chmod -R 755 public_html/app/etc/
Next, we need to create a new database for our Magento installation. Let's open our
mysql shell:
$ sudo mysql -uroot -pmagento2013
Once in the mysql shell, we can use the create command, which should be followed
by the type of entity (database, table) we want to create and the database name to
create a new database:
mysql> create database magento_dev;

Chapter 1
[ 19 ]
Although we could use the root credentials for accessing our development database,
this is not a recommended practice to follow because it could compromise not only a
single site but also the full database server. MySQL accounts are restricted based on
privileges. We want to create a new set of credentials that has limited privileges to
only our working database:
mysql> GRANT ALL PRIVILEGES ON magento_dev.* TO 'mage'@'localhost'
IDENTIFIED BY 'dev2013$#';
Now, we need to properly set up Apache2 and enable some additional modules;
fortunately, this version of Apache comes with a set of useful commands:
• a2ensite: This creates symlinks between the vhost les in the
sites-available and the sites-enabled folders to allow the
Apache Server to read those les.
• a2dissite: This removes the symlinks created by the a2ensite command.
This effectively disables the site.
• a2enmod: This is used to create symlinks between the mods-enabled
directory and the module conguration les.
• a2dismod: This will remove the symlinks from mods-enabled directory. This
command will prevent the module from being loaded by Apache.
Magento uses the mod_rewrite module for generating the URLs. mod_rewrite uses
a rule-based rewriting engine to rewrite request URLs on the y.
We can enable mod_rewrite with the a2enmod command:
$ sudo a2enmod rewrite
The next step will require that we create a new virtual host le under the
sites-available directory:
$ sudo nano /etc/apache2/sites-available/magento.localhost.com
The nano command will open a shell text editor where we can set up the
conguration for our virtual domain:
<VirtualHost *:80>
ServerAdmin magento@locahost.com
ServerName magento.localhost.com
DocumentRoot /srv/www/magento_dev/public_html
<Directory /srv/www/magento_dev/public_html/>
Options Indexes FollowSymlinks MultiViews
AllowOverride All
Order allow,deny
Understanding and Setting Up Our Development Environment
[ 20 ]
allow from all
</Directory>
ErrorLog /srv/www/magento_dev/logs/error.log
LogLevel warn
</VirtualHost>
To save the new virtual host le, press Ctrl + O and then Ctrl + X. The virtual host
le will tell Apache where it can nd the site les and what permissions to give
them. In order for the new conguration changes to take effect, we need to enable
the new site and restart Apache. We can use the following commands to do so:
$ sudo a2ensite magento.localhost.com
$ sudo apache2ctl restart
We are nearly ready to install Magento. We just need to set up a local mapping into
our host system host le by using any of the following:
• Windows
i. Open C:\system32\drivers\etc\hosts in notepad
ii. Add the following line at the end of the file:
192.168.36.1 magento.localhost.com
• Unix/Linux/OSX
i. Open /etc/hosts using nano:
$ sudo nano /etc/hosts
ii. Add the following line at the end of the file:
192.168.36.1 magento.localhost.com
If you are having problems making the necessary changes to your host
files, please Visit http://www.magedevguide.com/hostfile-help.
Chapter 1
[ 21 ]
We can now install Magento by opening http://magento.localhost.com in our
browser. At last, we should see the installation wizard. Follow the steps as indicated
by the wizard, and you will be set to go!
Up and running with Vagrant
Previously, we created a Magento install using a VM. Although using a VM gives
us a reliable environment, setting our LAMP for each of our Magento staging
installations can still be very complicated. This is especially true for developers
without experience working on a Unix/Linux environment.
What if we could get all the benets of running a VM, but with a completely
automated setup process? What if we were able to have new VM instances
created and congured on the y for each of our staging websites?
This is possible by using Vagrant in combination with Chef. We can create
automated VMs without the need of having an extensive knowledge about
Linux or the different LAMP components.
Vagrant currently supports VirtualBox 4.0.x, 4.1.x, and 4.2.x.

Understanding and Setting Up Our Development Environment
[ 22 ]
Installing Vagrant
Vagrant can be downloaded directly from downloads.vagrantup.com. Furthermore,
its packages and installers are available for multiple platforms. Once you download
Vagrant, run the installation.
Once we have installed both Vagrant and VirtualBox, starting a base VM is as simple
as typing the following lines in the terminal or command prompt depending on the
OS you use:
$ vagrant box add lucid32 http://files.vagrantup.com/lucid32.box
$ vagrant init lucid32
$ vagrant up
These commands will start a new Vagrant box with Ubuntu Linux installed. From
this point onward, we could start installing our LAMP as normal. But why should
we spend an hour to congure and set up a LAMP server for each project when we
can use Chef to automatically do it? Chef is a conguration management tool written
in Ruby that integrates into Vagrant.
To make it easier for developers who start working with Magento, I have created a
Vagrant repository on Github called magento-vagrant that includes all the necessary
cookbooks and recipes for Chef. The magento-vagrant repository also includes a new
cookbook that will take care of the specic Magento setup and conguration.
In order to start working with magento-vagrant, you will need a working copy
of Git.
If you are using Ubuntu, run the following command:
$ sudo apt-get install git-core -y
For Windows, we can use the native tool at http://windows.github.com/ to
download and manage our repositories.
Regardless of the operating system that you are using, we will need to check out a
copy of this repository into our local lesystem. We will use C:/Users/magedev/
Documents/magento-vagrant/ to download and save our repository; inside
magento-vagrant we will nd the following les and directories:
• cookbooks
• data_bags

Chapter 1
[ 23 ]
• Public
• .vagrant
• Vagrantfile
The magento-vagrant repository includes cookbooks for each of the components of
our development environment, which will be installed automatically as soon as we
start our new Vagrant box.
The only thing now left to do is to set up our development sites. The process of
adding new Magento sites to our Vagrant installation has been simplied through
the use of Vagrant and Chef.
Inside the data_bags directory, we have one le for each Magento installation
inside our Vagrant box; the default repository comes with an example installation
of Magento CE 1.7.
For each site, we will need to create a new JSON le containing all the settings
that Chef will need. Let's take a look at the magento-vagrant default le, which
can be found at the location C:/Users/magedev/Documents/magento-vagrant/
data_bags/sites/default.json:
{
"id": "default",
"host": "magento.localhost.com",
"repo": [
"url": "svn.magentocommerce.com/source/branches/1.7",
"revision": "HEAD"
],
"database": [
"name": "magento_staging",
"username": "magento",
"password": "magento2013$"
]
}
This will automatically set up a Magento installation using the latest les from the
Magento repository.
Adding new sites to our Vagrant box is just a matter of adding a new JSON le for
the corresponding site and restarting the Vagrant box.
Now that we have a running Magento installation, let's look into choosing a proper
integrated development environment (IDE).
Understanding and Setting Up Our Development Environment
[ 24 ]
Choosing an IDE
Choosing the right IDE is mostly a matter of a personal developer's taste. However,
choosing the right IDE can be critical for a Magento developer.
The challenge for the IDEs comes mostly from Magento's extensive usage of factory
names. This makes the implementation of certain features such as code completion
(also known as intellisense) difcult. Currently, there are two IDEs that excel on their
native support of Magento – NetBeans and PhpStorm.
Although NetBeans is open source and has been around for a long time, PhpStorm has
been taking the upper hand and gaining more support from the Magento community.
Furthermore, a recent release of Magicento, a plugin specically created to extend
and integrate Magento into PhpStorm, has made it the best option among currently
available options.
Working with a version control system
The Magento code base is very extensive, comprising of over 7,000 les and close to a
million and half lines of code. For this reason, working with a version control system
is not only a good practice but also a necessity.
Version control systems are used to keep track of changes across multiple les and
by multiple developers; by using a version control system we gain access to very
powerful tools.
Of the several version control systems available (Git, SVN, Mercurial), Git deserves
special attention due to its simplicity and exibility. By releasing the upcoming version
2 of Magento on Github, a Git hosting service, the Magento core development team has
recognized the importance that Git has among the Magento community.
For more information on Magento2, please visit
https://github.com/magento/magento2.
Github now includes a .gitignore le specically for Magento, which will ignore
all the les in the Magento core and only keep track of our own code.

Chapter 1
[ 25 ]
That said, there are several version control concepts that we need to keep in mind
when working with our Magento projects:
• Branching: This allows us to work on new features without affecting our
trunk (stable release).
• Merging: This is used to move code from one place to another. Usually, this
is done from a development brand to our trunk once the code is ready to be
moved into production.
• Tagging: This is used for creating snapshots of a release.
Summary
In this rst chapter, we learned about setting up and working with LAMP
environments, setting development environments across multiple platforms,
creating and provisioning Vagrant virtual machines, working with Chef recipes,
and using version control systems for Magento development.
Having a proper environment is the rst step for starting developing for Magento,
and it is an integral part of our Magento toolbox.
Now that we have a development environment set up and ready to use, it is time to
dive deep into the Magento fundamental concepts; these concepts will give us the
necessary tools and knowledge for developing with Magento.

Magento Fundamentals
for Developers
In this chapter, we will cover the fundamental concepts for working with Magento.
We will learn how Magento is structured, and we will go over the source of
Magento's exibility, that is, its modular architecture.
Magento is a exible and powerful system. Unfortunately, this adds some level of
complexity too. Currently, a clean installation of Magento has around 30,000 les
and over 1.2 million lines of code.
With all that power and complexity, Magento can be daunting for new developers;
but don't worry. This chapter is designed to teach new developers all the
fundamental concepts and tools they will need to use and extend Magento, and in
the next chapter, we will be diving deep into Magento models and data collections.
Zend Framework – the base of Magento
As you probably know, Magento is the most powerful e-commerce platform in the
market; what you might not know about Magento is that it is also an object-oriented
(OO) PHP framework developed on top of Zend Framework.
Zend's ofcial site describes the framework as:
Zend Framework 2 is an open source framework for developing web applications
and services using PHP 5.3+. Zend Framework 2 uses 100% object-oriented code
and utilises most of the new features of PHP 5.3, namely namespaces, late static
binding, lambda functions and closures.
Magento Fundamentals for Developers
[ 28 ]
The component structure of Zend Framework 2 is unique; each component is
designed with few dependencies on other components. ZF2 follows the SOLID
object oriented design principle. This loosely coupled architecture allows developers
to use whichever components they want. We call this a "use-at-will" design.
But what is Zend Framework exactly? Zend Framework is an OO framework
developed on PHP that implements the Model-View-Controller (MVC) paradigm.
When Varien, now Magento Inc., started developing Magento it decided to do it on
top of Zend because of the following components:
• Zend_Cache
• Zend_Acl
• Zend_Locale
• Zend_DB
• Zend_Pdf
• Zend_Currency
• Zend_Date
• Zend_Soap
• Zend_Http
In total, Magento uses around 15 different Zend components. The Varien library
directly extends several of the Zend components mentioned previously, for example
Varien_Cache_Core extends from Zend_Cache_Core.
Using Zend Framework, Magento was built with the following principles in mind:
• Maintainability: It occurs using code pools to keep the core code separate
from local customizations and third-party modules
• Upgradability: Magento modularity allows extensions and third-party
modules to be updated independently from the rest of the system
• Flexibility: Allows seamless customization and simplies the development
of new features
Although having used Zend Framework or even understanding it are not the
requirements for developing with Magento, having at least a basic understanding of
the Zend components, usage, and interaction can be invaluable information when we
start digging deeper into the core of Magento.
You can learn more about Zend Framework at
http://framework.zend.com/.
Chapter 2
[ 29 ]
Magento folder structure
Magento folder structure is slightly different from other MVC applications; let's take
a look at the directory tree, and each directory and its functions:
• app: This folder is the core of Magento and is subdivided into three
importing directories:
°code: This contains all our application code divided into three code
pools such as core, community, and local
°design: This contains all the templates and layouts for our application
°locale: This contains all the translation and e-mail template files
used for the store
• js: This contains all the JavaScript libraries that are used in Magento
• media: This contains all the images and media les for our products and
CMS pages as well as the product image cache
• lib: This contains all the third-party libraries used in Magento such as Zend
and PEAR, as well as the custom libraries developed by Magento, which
reside under the Varien and Mage directories
• skin: This contains all CSS code, images, and JavaScript les used by the
corresponding theme
• var: This contains our temporary data such as cache les, index lock les,
sessions, import/export les, and in the case of the Enterprise edition the full
page cache folders
Magento is a modular system. This means that the application, including the core, is
divided into smaller modules. For this reason, the folder structure plays a key role
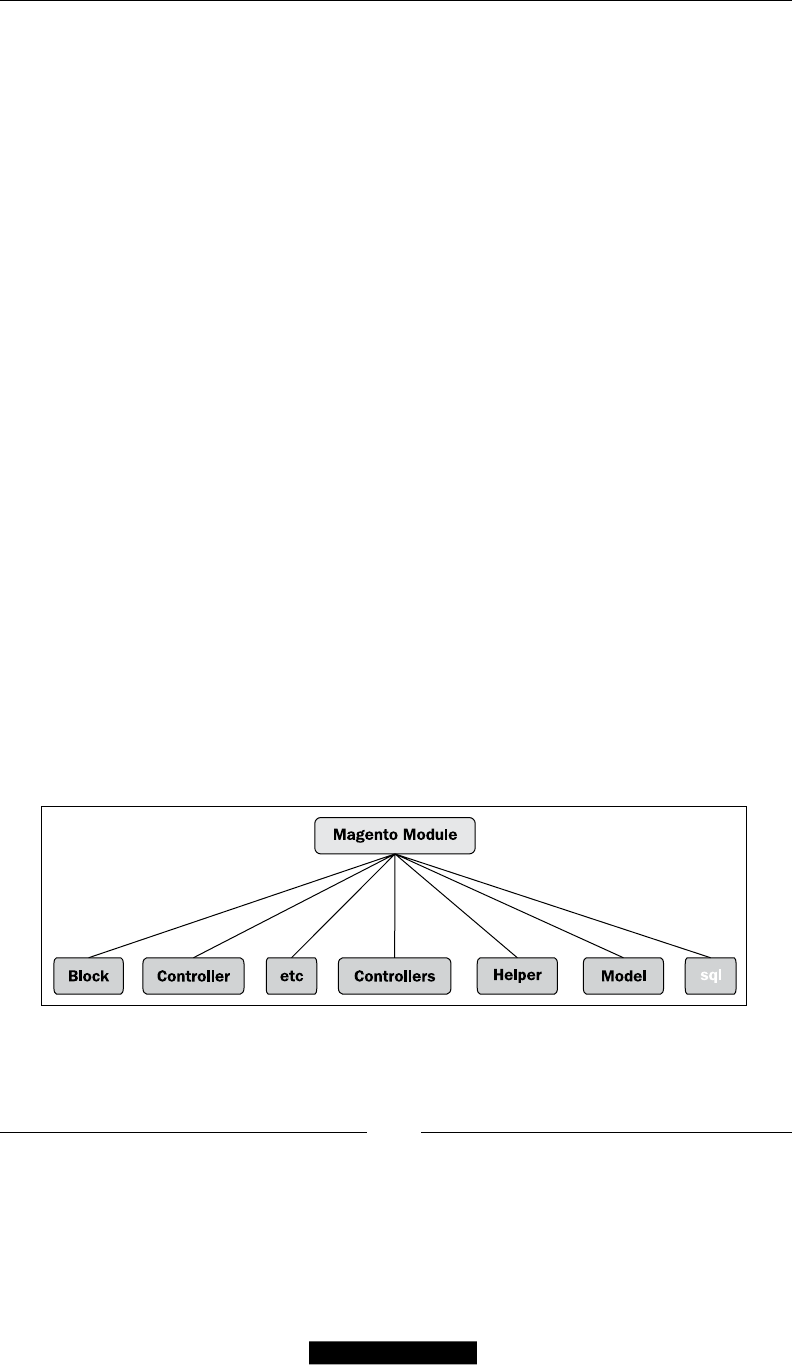
in the organization of each module core; a typical Magento module folder structure
would look something like the following gure:

Magento Fundamentals for Developers
[ 30 ]
Let's review each folder in more detail:
• Block: This folder contains blocks in Magento that form an additional layer
of logic between the controllers and views
• controllers: controllers folders are formed by actions that process web
server requests
• Controller: The classes in this folder are meant to be abstract classes and
extended by the controller class under the the controllers folder
• etc: Here we can nd the module-specic conguration in the form of XML
les such as config.xml and system.xml
• Helper: This folder contains auxiliary classes that encapsulate a
common-module functionality and make it available to a class of
the same module and to other modules' classes as well
• Model: This folder contains models that support the controllers in the module
for interacting with data
• sql: This folder contains the installation and upgrade les for each
specic module
As we will see later on in this chapter, Magento makes heavy use of factory names
and factory methods. This is why the folder structure is so important.
Modular architecture
Rather than being a large application, Magento is built by smaller modules, each
adding specic functionality to Magento.
One of the advantages of this approach is the ability to enable and disable
specic module functionality with ease, as well as add new functionality by
adding new modules.
Autoloader
Magento is a huge framework, composed of close to 30,000 les. Requiring every
single le when the application starts would make it incredibly slow and heavy. For
this reason, Magento makes use of an autoloader class to nd the required les each
time a factory method is called.
So, what exactly is an autoloader? PHP5 includes a function called __autoload().
When instantiating a class, the __autoload() function is automatically called; inside
this function, custom logic is dened to parse the class name and the required le.

Chapter 2
[ 31 ]
Let's take a closer look at the Magento bootstrap code located at app/Mage.php:
…
Mage::register('original_include_path', get_include_path());
if (defined('COMPILER_INCLUDE_PATH')) {
$appPath = COMPILER_INCLUDE_PATH;
set_include_path($appPath . PS .
Mage::registry('original_include_path'));
include_once "Mage_Core_functions.php";
include_once "Varien_Autoload.php";
} else {
/**
* Set include path
*/
$paths[] = BP . DS . 'app' . DS . 'code' . DS . 'local';
$paths[] = BP . DS . 'app' . DS . 'code' . DS . 'community';
$paths[] = BP . DS . 'app' . DS . 'code' . DS . 'core';
$paths[] = BP . DS . 'lib';
$appPath = implode(PS, $paths);
set_include_path($appPath . PS .
Mage::registry('original_include_path'));
include_once "Mage/Core/functions.php";
include_once "Varien/Autoload.php";
}
Varien_Autoload::register();
The bootstrap le takes care of dening the include paths and initializing the
Varien autoloader, which will in turn dene its own autoload function as the
default function to call. Let's take a look under the hood and see what the Varien
autoload function is doing:
/**
* Load class source code
*
* @param string $class
*/
public function autoload($class)
{
if ($this->_collectClasses) {
$this->_arrLoadedClasses[self::$_scope][] = $class;
}
if ($this->_isIncludePathDefined) {

Magento Fundamentals for Developers
[ 32 ]
$classFile = COMPILER_INCLUDE_PATH .
DIRECTORY_SEPARATOR . $class;
} else {
$classFile = str_replace(' ', DIRECTORY_SEPARATOR,
ucwords(str_replace('_', ' ', $class)));
}
$classFile.= '.php';
//echo $classFile;die();
return include $classFile;
}
The autoload class takes a single parameter called $class, which is an alias
provided by the factory method. This alias is processed to generate a matching
class name that is then included.
As we mentioned before, Magento's directory structure is important due to
the fact that Magento derives its class names from the directory structure. This
convention is the core principle behind factory methods that we will be reviewing
later on in this chapter.
Code pools
As we mentioned before, inside our app/code folder we have our application code
divided into three different directories known as code pools. They are as follows:
• core: This is where the Magento core modules that provide the base
functionality reside. The golden rule among Magento developers is that
you should never, by any circumstance, modify any les under the core
code pool.
• community: This is the location where third-party modules are placed. They
are either provided by third parties or installed through Magento Connect.
• local: This is where all the modules and code developed specically for this
instance of Magento reside.
The code pools identify where the module came from and on which order they
should be loaded. If we take another look at the Mage.php bootstrap le, we can see
the order on which code pools are loaded:
$paths[] = BP . DS . 'app' . DS . 'code' . DS . 'local';
$paths[] = BP . DS . 'app' . DS . 'code' . DS . 'community';
$paths[] = BP . DS . 'app' . DS . 'code' . DS . 'core';
$paths[] = BP . DS . 'lib';
Chapter 2
[ 33 ]
This means that for each class request, Magento will look in local, then community,
then core, and nally inside the lib folder.
This also leads to an interesting behavior that can easily be used for overriding core
and community classes, by just copying the directory structure and matching the
class name.
Needless to say that this is a terrible practice, but it is still useful
to know about just in case you someday have to take care of a
project that exploits this behavior.
Routing and request ow
Before going into more detail about the different components that form a part
of Magento, it is important that we understand how these components interact
together and how Magento processes requests coming from the web server.
As with any other PHP application, we have a single le as an entry point for every
request; in the case of Magento this le is index.php, which is in charge of loading
the Mage.php bootstrap class and starting the request cycle. It then goes through the
following steps:
1. The web server receives the request and Magento is instantiated by calling
the bootstrap le, Mage.php.
2. The frontend controller is instantiated and initialized; during this controller
initialization Magento searches for the web routes and instantiates them.
3. Magento then iterates through each of the routers and calls the match. The
match method is responsible for processing the URL and generating the
corresponding controller and action.
4. Magento then instantiates the matching controller and takes the
corresponding action.
Routers are especially important in this process. The Router objects are used by the
frontend controller to match a requested URL (route) to a module controller and
action. By default, Magento comes with the following routers:
• Mage_Core_Controller_Varien_Router_Admin
• Mage_Core_Controller_Varien_Router_Standard
• Mage_Core_Controller_Varien_Router_Default
The action controller will then load and render the layout, which in turn will load the
corresponding blocks, models, and templates.

Magento Fundamentals for Developers
[ 34 ]
Let's analyze how Magento will handle a request to a category page; we will use
http://localhost/catalog/category/view/id/10 as an example. Magento
URIs are comprised of three parts – /FrontName/ControllerName/ActionName.
This means that for our example URL, the breakdown would be as follows:
• FrontName: catalog
• ControllerName: category
• ActionName: view
If I take a look at the Magento router class, I can see the Mage_Core_Controller_
Varien_Router_Standard match function:
public function match(Zend_Controller_Request_Http $request)
{
…
$path = trim($request->getPathInfo(), '/');
if ($path) {
$p = explode('/', $path);
} else {
$p = explode('/', $this->_getDefaultPath());
}
…
}
From the preceding code, we can see that the rst thing the router tries to do is to
parse the URI into an array. Based on our example URL, the corresponding array
would be something like the following code snippet:
$p = Array
(
[0] => catalog
[1] => category
[2] => view
)
The next part of the function will rst try to check if the request has the module
name specied; if not, then it tries to determine the module name based on the rst
element of our array. And if a module name can't be provided, then the function will
return false. Let's take a look at that part of the code:
// get module name
if ($request->getModuleName()) {
$module = $request->getModuleName();
} else {

Chapter 2
[ 35 ]
if (!empty($p[0])) {
$module = $p[0];
} else {
$module = $this->getFront()->getDefault('module');
$request->setAlias(Mage_Core_Model_Url_Rewrite::
REWRITE_REQUEST_PATH_ALIAS, '');
}
}
if (!$module) {
if (Mage::app()->getStore()->isAdmin()) {
$module = 'admin';
} else {
return false;
}
}
Next, the match function will iterate through each of the available modules and try
to match the controller and action, using the following code:
…
foreach ($modules as $realModule) {
$request->setRouteName
($this->getRouteByFrontName($module));
// get controller name
if ($request->getControllerName()) {
$controller = $request->getControllerName();
} else {
if (!empty($p[1])) {
$controller = $p[1];
} else {
$controller =
$front->getDefault('controller');
$request->setAlias(
Mage_Core_Model_Url_Rewrite::REWRITE_REQUEST_
PATH_ALIAS,
ltrim($request->
getOriginalPathInfo(), '/')
);
}
}
// get action name
if (empty($action)) {
if ($request->getActionName()) {

Magento Fundamentals for Developers
[ 36 ]
$action = $request->getActionName();
} else {
$action = !empty($p[2]) ? $p[2] :
$front->getDefault('action');
}
}
//checking if this place should be secure
$this->_checkShouldBeSecure($request,
'/'.$module.'/'.$controller.'/'.$action);
$controllerClassName = $this->_validate
ControllerClassName($realModule, $controller);
if (!$controllerClassName) {
continue;
}
// instantiate controller class
$controllerInstance = Mage::getControllerInstance
($controllerClassName,
$request, $front->getResponse());
if (!$controllerInstance->hasAction($action)) {
continue;
}
$found = true;
break;
}
...
Now that looks like an awful lot of code, so let's break it down even further. The rst
part of the loop will check if the request has a controller name; if it is not set, it will
check our parameter array's ($p) second value and try to determine the controller
name, and then it will try to do the same for the action name.
If we got this far in the loop, we should have a module name, a controller name, and
an action name, which Magento will now use to try and get a matching controller
class name by calling the following function:
$controllerClassName = $this->_validateControllerClassName($realModu
le, $controller);
This function will not only generate a matching class name but it will also validate
its existence; in our example case this function should return Mage_Catalog_
CategoryController.

Chapter 2
[ 37 ]
Since we now have a valid class name, we can proceed to instantiate our controller
object; if you were paying attention up to this point, you have probably noticed that
we haven't done anything with our action yet, and that's precisely the next step in
our loop.
Our new instantiated controller comes with a very handy function called
hasAction(); in essence, what this function does is to call a PHP function
called is_callable(), which will check if our current controller has a public
function matching the action name; in our case this will be viewAction().
The reason behind this elaborate matching process and the use of a foreach loop is
that it is possible for several modules to use the same FrontName.
Now, http://localhost/catalog/category/view/id/10 is not a very user-friendly
URL; fortunately, Magento has its own URL rewrite system that allows us to use
http://localhost/books.html.
Let's dig a little deeper into the URL rewrite system and see how Magento gets the
controller and action names from our URL alias. Inside our Varien/Front.php
controller dispatch function, Magento will call:
Mage::getModel('core/url_rewrite')->rewrite();

Magento Fundamentals for Developers
[ 38 ]
Before actually looking into the inner workings of the rewrite function, let's take a
look at the structure of the core/url_rewrite model:
Array (
["url_rewrite_id"] => "10"
["store_id"] => "1"
["category_id"] => "10"
["product_id"] => NULL
["id_path"] => "category/10"
["request_path"] => "books.html"
["target_path"] => "catalog/category/view/id/10"
["is_system"] => "1"
["options"] => NULL
["description"] => NULL
)
As we can see, the rewrite module is comprised of several properties, but only two of
them are of particular interest to use – request_path and target_path. Simply put,
the job of the rewrite module is to modify the request object path information with
the matching values of target_path.
Magento version of MVC
If you are familiar with the traditional MVC implementations such as CakePHP
or Symfony, you may know that the most common implementation is called a
convention-based MVC. With a convention-based MVC, to add a new model or
let's say a controller, you only need to create the le/class (following the framework
conventions) and the system will pick it up automatically.
Magento, on the other hand, uses a conguration-based MVC pattern, meaning
that creating our le/class is not enough; we explicitly have to tell Magento that
we added a new class.
Each Magento module has a config.xml le, which is located under the module
etc/ directory and contains all the relevant module conguration. For example, if
we want to add a new module that includes a new model, we would need to dene a
node in the conguration le that tells Magento where to nd our model, such as:
<global>
…
<models>
<group_classname>
<class>Namespace_Modulename_Model</class>
<group_classname>

Chapter 2
[ 39 ]
</models>
...
</global>
Although this might look like additional work, it also gives us a huge amount
of exibility and power. For example, we can rewrite another class by using the
rewrite node:
<global>
…
<models>
<group_classname>
<rewrite>
<modulename>Namespace_Modulename_Model</modulename>
</rewrite>
<group_classname>
</models>
...
</global>
Magento will then load all the config.xml les and merge them at runtime, creating
a single conguration tree.
Additionally, modules can also have a system.xml le, which is used to specify
conguration options in the Magento backend, which in turn can be used by end
users to congure the module functionality. A snippet of a system.xml le would
look like the following code:
<config>
<sections>
<section_name translate="label">
<label>Section Description</label>
<tab>general</tab>
<frontend_type>text</frontend_type>
<sort_order>1000</sort_order>
<show_in_default>1</show_in_default>
<show_in_website>1</show_in_website>
<show_in_store>1</show_in_store>
<groups>
<group_name translate="label">
<label>Demo Of Config Fields</label>
<frontend_type>text</frontend_type>
<sort_order>1</sort_order>
<show_in_default>1</show_in_default>
<show_in_website>1</show_in_website>

Magento Fundamentals for Developers
[ 40 ]
<show_in_store>1</show_in_store>
<fields>
<field_name translate="label comment">
<label>Enabled</label>
<comment>
<![CDATA[Comments can contain
<strong>HTML</strong>]]>
</comment>
<frontend_type>select</frontend_type>
<source_model>adminhtml/system_config_source_yesno</
source_model>
<sort_order>10</sort_order>
<show_in_default>1</show_in_default>
<show_in_website>1</show_in_website>
<show_in_store>1</show_in_store>
</field_name>
</fields>
</group_name>
</groups>
</section_name>
</sections>
</config>
Let's break down each node function:
• section_name: This is just an arbitrary name that we use to identify our
conguration section; inside this node we will specify all the elds and
groups for the conguration section.
• group: Groups, as the name implies, are used to group conguration options
and display them inside an accordion section.
• label: This denes the title or label to be used on the eld/section/group.
• tab: This denes the tab on which the section should be displayed.
• frontend_type: This node allows us to specify which render to use for our
custom option eld. Some of the available options are:
°button
°checkboxes
°checkbox
°date

Chapter 2
[ 41 ]
°file
°hidden
°image
°label
°link
°multiline
°multiselect
°password
°radio
°radios
°select
°submit
°textarea
°text
°time
• sort_order: It species the position of the eld, group, or section.
• source_model: Certain type of elds such as a select eld can take options
from a source model. Magento already provides several useful classes under
Mage/Adminhtml/Model/System/Config/Source. Some of the classes we
can nd are:
°YesNo
°Country
°Currency
°AllRegions
°Category
°Language
By just using XML, we can build complex conguration options for our modules
right on the Magento backend, without having to worry about setting up templates
for populating elds or validating data.
Magento Fundamentals for Developers
[ 42 ]
Magento is also kind enough to provide a comprehensive amount of form eld
validation models, which we can use with the <validate> tag. Among the following
eld validators we have:
• validate-email
• validate-length
• validate-url
• validate-select
• validate-password
As with any other part of Magento we can extend the source_model, frontend_
type, and validator functions and even create new ones. We will be tackling this
task in a later chapter where we will create a new type of each. But for now, we will
explore the concepts of models, views, le layouts, and controllers.
Models
Magento makes use of the ORM approach; although we can still use Zend_Db to
access the database directly, we will be using models to access our data most of the
time. For this type of task, Magento provides the following two types of models:
• Simple models: This model implementations are a simple mapping of one
object to one table, meaning our object attributes match each eld and our
table structure
• Entity Attribute Value (EAV) models: This type of models are used to
describe entities with a dynamic number of attributes
Magento splits the model layer up into two parts: a model handling the business
logic and a resource handling the database interaction. This design decision allows
Magento to eventually support multiple database platforms without having to
change any of the logic inside the models.
Magento ORM uses one of PHP's magic class methods to provide dynamic access to
object properties. In the next chapter we will look into models, the Magento ORM,
and the data collections in more detail.
Magento models don't necessarily have to be related to any type of
table in the database or an EAV entity. Observers, who we will be
reviewing later, are perfect examples of this type of Magento models.

Chapter 2
[ 43 ]
Views
The view layer is one of the areas where Magento truly sets itself apart from other
MVC applications. Unlike traditional MVC systems, Magento's view layer is divided
into the following three different components:
• Layouts: Layouts are XML les that dene the block structure and properties
such as name and the template le we can use. Each Magento module has its
own set of layout les.
• Blocks: Blocks are used in Magento to reduce the burden on the controller by
moving most of the logic into blocks.
• Templates: Templates are PHTML les that contain the required HTML code
and PHP tags.
Layouts give the Magento frontend an amazing amount of exibility. Each module
has its own layout XML les, which tell Magento what to include and render on
each page request. Through the use of the layouts, we can move, add, or remove
blocks from our store without worrying about changing anything else other than
our XML les.
Dissecting a layout le
Let's examine one of the core layout les of Magento, in this case catalog.xml:
<layout version="0.1.0">
<default>
<reference name="left">
<block type="core/template" name="left.permanent.callout"
template="callouts/left_col.phtml">
<action method="setImgSrc">
<src>images/media/col_left_callout.jpg</src></action>
<action method="setImgAlt" translate="alt"
module="catalog"><alt>
Our customer service is available 24/7.
Call us at (555) 555-0123.</alt></action>
<action method="setLinkUrl">
<url>checkout/cart</url></action>
</block>
</reference>
<reference name="right">
<block type="catalog/product_compare_sidebar"
before="cart_sidebar" name="catalog.compare.sidebar"
template="catalog/product/compare/sidebar.phtml"/>
<block type="core/template" name="right.permanent.callout"
template="callouts/right_col.phtml">

Magento Fundamentals for Developers
[ 44 ]
<action method="setImgSrc">
<src>images/media/col_right_callout.jpg</src></action>
<action method="setImgAlt" translate="alt"
module="catalog"><alt>
Visit our site and save A LOT!</alt></action>
</block>
</reference>
<reference name="footer_links">
<action method="addLink" translate="label title"
module="catalog" ifconfig="catalog/seo/site_map">
<label>Site Map</label><url
helper="catalog/map/getCategoryUrl" />
<title>Site Map</title></action>
</reference>
<block type="catalog/product_price_template"
name="catalog_product_price_template" />
</default>
Layout blocks are comprised of three main XML nodes, as follows:
• handle: Each page request will have several unique handles; the layout
uses these handles to tell Magento which blocks to load and render on
a per page basis. The most commonly used handles are default and
[frontname]_[controller]_[action].
The default handle is especially useful for setting global blocks, for example
adding a CSS or JavaScript to all pages on the header block.
• reference: A <reference> node is used to make references to a block. It is
useful for specifying nested blocks or modifying an already existing block.
In our example we can see a new children block being specied inside
<reference name="left">.
• block: The <block> node is used to load our actual blocks. Each block node
can have the following properties:
°type: This is the identifier for the actual block class. For example,
catalog/product_list makes reference to the Mage_Catalog_
Block_Product_List.
°name: This is the name used by other blocks to make reference to
this block.
°before/after: These properties can be used to position the blocks
relative to other blocks' position. Both these properties can use a
hyphen as a value to specify if the module should appear at the very
top or the very bottom.

Chapter 2
[ 45 ]
°template: This property determines the .phtml template file, which
will be used for rendering the block.
°action: Each block type has specific actions that affect the frontend
functionality. For instance, the page/html_head block, which has
actions for adding CSS and JavaScript (addJs and addCss).
°as: This is used to specify the unique identifier that we will be using
for calling the block from the template, for example calling a child
block by using getChildHtml('block_name').
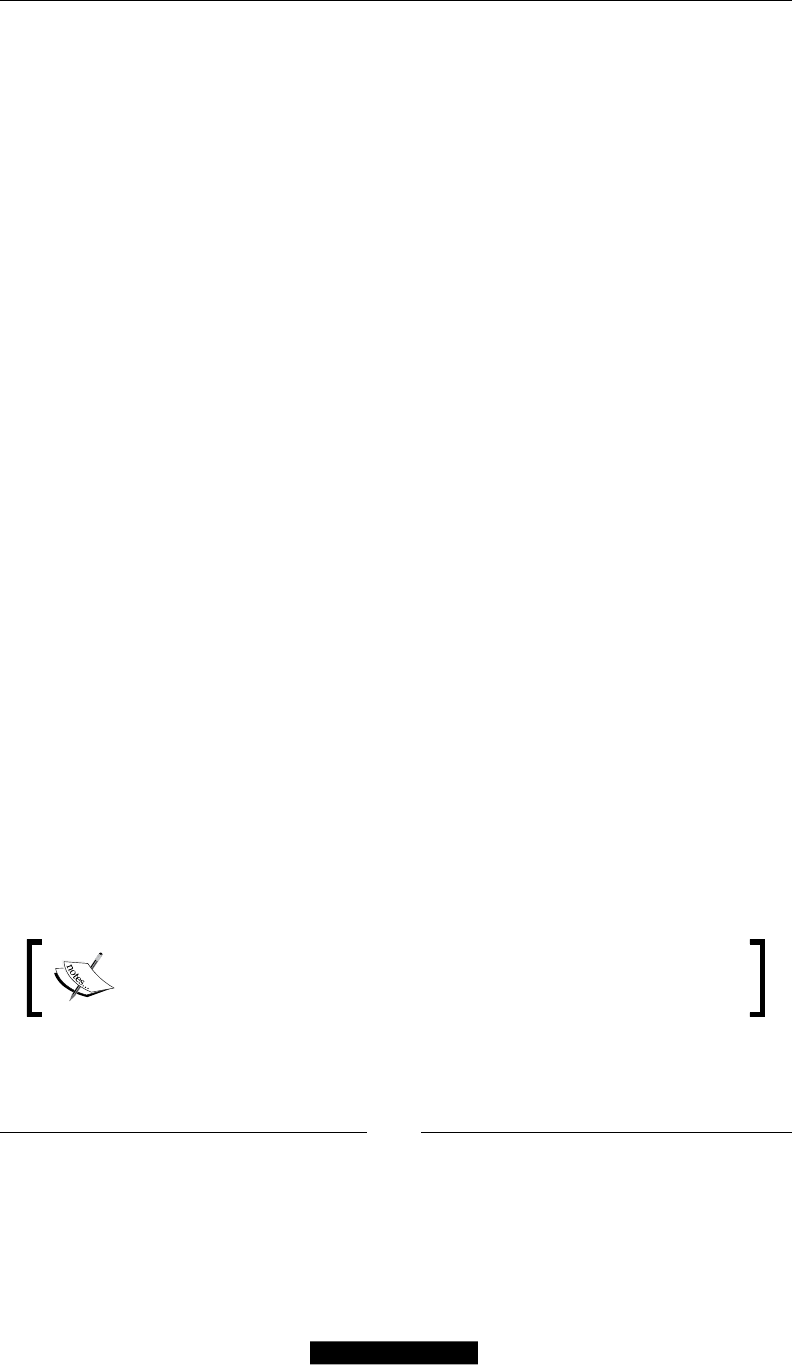
Blocks are a new concept that Magento implements in order to reduce the controller
load. They are basically data resources that communicate directly with the models,
which manipulate the data, if needed, and then pass it to the views.
Finally, we have our PHTML les; the templates contain the html and php tags and
are in charge of formatting and displaying the data from our models. Let's take a
look at a snippet from the product view template:
<div class="product-view">
...
<div class="product-name">
<h1><?php echo $_helper->productAttribute
($_product, $_product->getName(), 'name') ?></h1>
</div>
...
<?php echo $this->getReviewsSummaryHtml
($_product, false, true)?>
<?php echo $this->getChildHtml('alert_urls') ?>
<?php echo $this->getChildHtml('product_type_data') ?>
<?php echo $this->getTierPriceHtml() ?>
<?php echo $this->getChildHtml('extrahint') ?>
...
<?php if ($_product->getShortDescription()):?>
<div class="short-description">
<h2><?php echo $this->__('Quick Overview') ?></h2>
<div class="std"><?php echo $_helper->
productAttribute($_product, nl2br($_product->
getShortDescription()), 'short_description') ?></div>
</div>
<?php endif;?>
...
</div>
Magento Fundamentals for Developers
[ 46 ]
The following is the block diagram of MVC:
Controllers
In Magento, MVC controllers are designed to be thin controllers; thin controllers
have little business logic and are mostly used for driving the application requests.
A basic Magento controller action would just load and render the layout:
public function viewAction()
{
$this->loadLayout();
$this->renderLayout();
}
From here it is the job of the blocks to handle the display logic, get the data from our
models, prepare the data, and send it to the views.
Websites and store scopes
One of the core features of Magento is the ability to handle multiple websites and
stores with a single Magento installation; internally, Magento refers to each of these
instances as scopes.
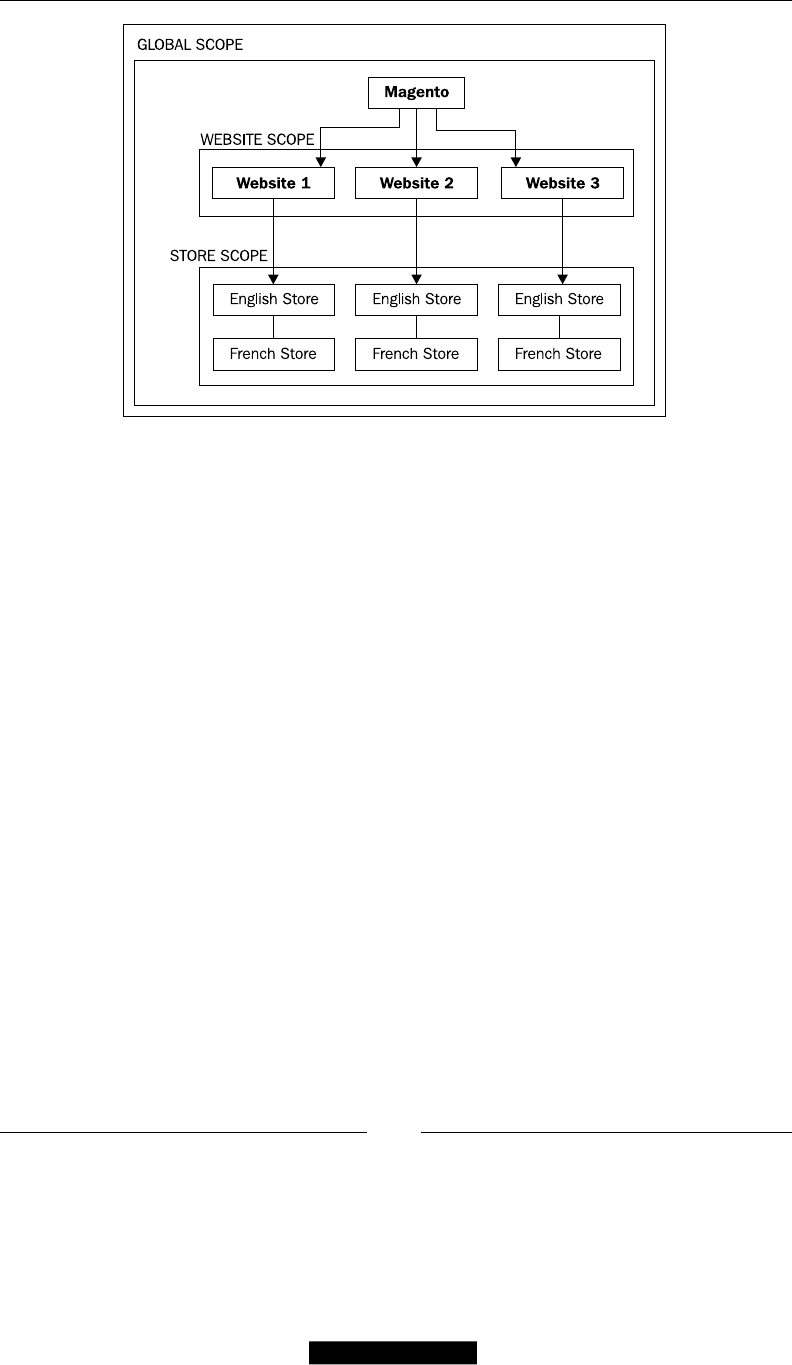
Chapter 2
[ 47 ]
Values for certain elements such as products, categories, attributes, and congurations
are scope specic and can differ on different scopes; this gives Magento tremendous
exibility, for example, a product can be set up on two different websites with different
prices but can still share the rest of the attribute conguration.
As developers, one of the areas where we will be using scopes the most is when
working with conguration. The different conguration scopes available in
Magento are:
• Global: As the name implies, this applies across all scopes.
• Website: These are dened by a domain name and are composed by
one or more stores. Websites can be set up to share customer data or
be completely isolated.
• Store: Stores are used to manage products and categories, and to group
store views. Stores also have a root category that allows us to have separated
catalogs per store.
• Store view: By using store views we can set up multiple languages on our
store frontend.

Magento Fundamentals for Developers
[ 48 ]
Conguration options in Magento can store values on three scopes (global, website,
and store view); by default, all the values are set on the global scope. By using
system.xml on our modules, we can specify the scopes on which the conguration
options can be set; let's revisit our previous system.xml:
…
<field_name translate="label comment">
<label>Enabled</label>
<comment>
<![CDATA[Comments can contain <strong>HTML</strong>]]>
</comment>
<frontend_type>select</frontend_type>
<source_model>adminhtml/system_config_source_yesno</source_model>
<sort_order>10</sort_order>
<show_in_default>1</show_in_default>
<show_in_website>1</show_in_website>
<show_in_store>1</show_in_store>
</field_name>
…
Factory names and functions
Magento makes use of factory methods to instantiate Model, Helper, and Block
classes. A factory method is a design pattern that allows us to instantiate an object
without using the exact class name and using a class alias instead.
Magento implements several factory methods, as follows:
• Mage::getModel()
• Mage::getResourceModel()
• Mage::helper()
• Mage::getSingleton()
• Mage::getResourceSingleton()
• Mage::getResourceHelper()
Each of these methods takes a class alias that is used to determine the real class name
of the object that we are trying to instantiate; for example, if we wanted to instantiate
a product object, we can do so by calling the getModel() method:
$product = Mage::getModel('catalog/product');

Chapter 2
[ 49 ]
Notice that we are passing a factory name composed of group_classname/model_
name; Magento will resolve this to the actual class name of Mage_Catalog_Model_
Product. Let's take a closer look at the inner workings of getModel():
public static function getModel($modelClass = '', $arguments =
array())
{
return self::getConfig()->getModelInstance
($modelClass, $arguments);
}
getModel calls the getModelInstance from the Mage_Core_Model_Config
class.
public function getModelInstance($modelClass='',
$constructArguments=array())
{
$className = $this->getModelClassName($modelClass);
if (class_exists($className)) {
Varien_Profiler::start('CORE::create_object_of::'.$className);
$obj = new $className($constructArguments);
Varien_Profiler::stop('CORE::create_object_of::'.$className);
return $obj;
} else {
return false;
}
}
getModelInstance()in return calls the getModelClassName() method, which takes
our class alias as a parameter. Then it tries to validate the existence of the returned
class, and if the class exists, it will create a new instance of that class and return it to
our getModel() method:
public function getModelClassName($modelClass)
{
$modelClass = trim($modelClass);
if (strpos($modelClass, '/')===false) {
return $modelClass;
}
return $this->getGroupedClassName('model', $modelClass);
}
getModelClassName() calls the getGroupedClassName() method, which is actually
in charge of returning the real class name of our model.

Magento Fundamentals for Developers
[ 50 ]
getGroupedClassName() takes two parameters – $groupType and $classId;
$groupType refers to the type of object that we are trying to instantiate (currently
only models, blocks, and helpers are supported) and $classId, which we are trying
to instantiate.
public function getGroupedClassName($groupType, $classId,
$groupRootNode=null)
{
if (empty($groupRootNode)) {
$groupRootNode = 'global/'.$groupType.'s';
}
$classArr = explode('/', trim($classId));
$group = $classArr[0];
$class = !empty($classArr[1]) ? $classArr[1] : null;
if (isset($this->_classNameCache
[$groupRootNode][$group][$class])) {
return $this->_classNameCache
[$groupRootNode][$group][$class];
}
$config = $this->_xml->global->{$groupType.'s'}->{$group};
$className = null;
if (isset($config->rewrite->$class)) {
$className = (string)$config->rewrite->$class;
} else {
if ($config->deprecatedNode) {
$deprecatedNode = $config->deprecatedNode;
$configOld = $this->_xml->global->
{$groupType.'s'}->$deprecatedNode;
if (isset($configOld->rewrite->$class)) {
$className = (string) $configOld->rewrite->$class;
}
}
}
if (empty($className)) {
if (!empty($config)) {
$className = $config->getClassName();
}
if (empty($className)) {
$className = 'mage_'.$group.'_'.$groupType;
}
if (!empty($class)) {
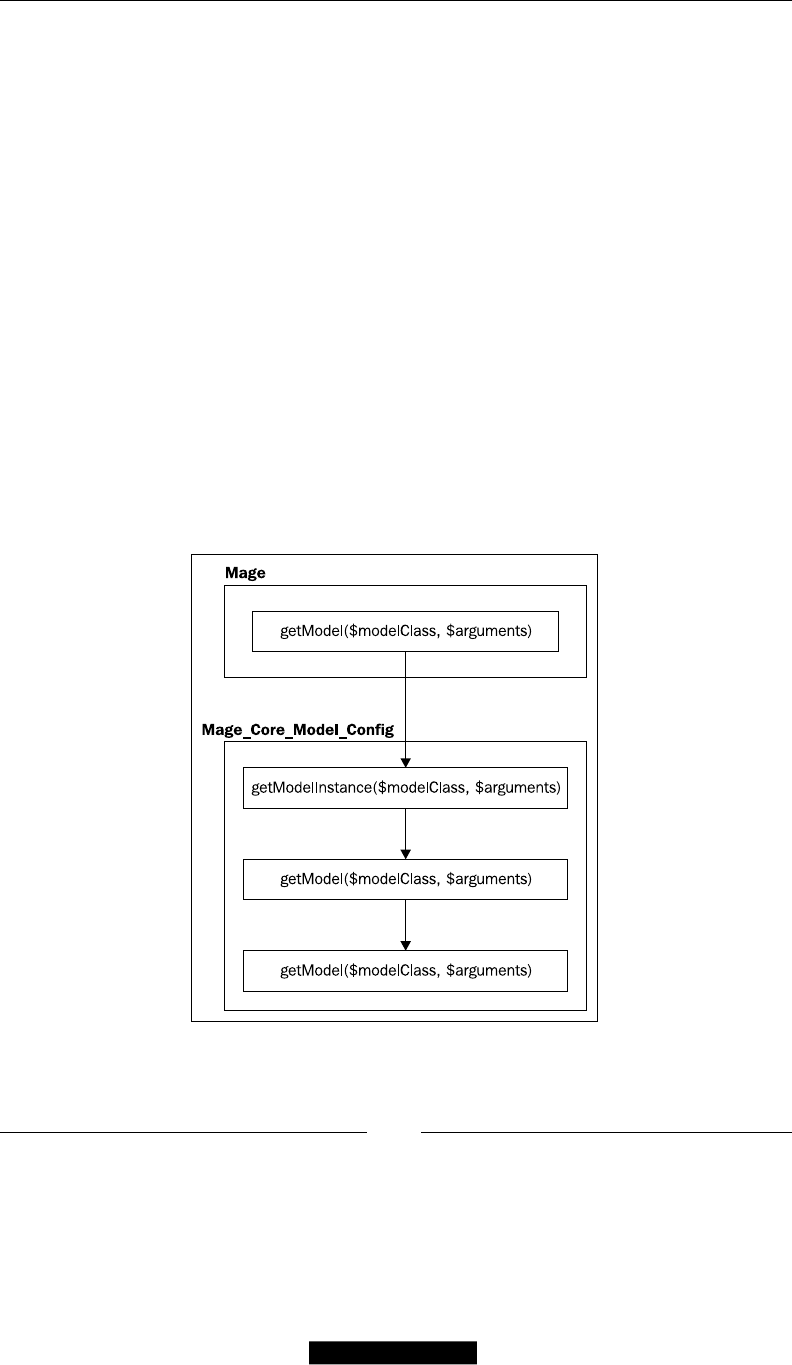
Chapter 2
[ 51 ]
$className .= '_'.$class;
}
$className = uc_words($className);
}
$this->_classNameCache
[$groupRootNode][$group][$class] = $className;
return $className;
}
As we can see, getGroupedClassName() is actually doing all the work; it grabs our
class alias catalog/product and creates an array by exploding the string on the
slash character.
Then, it loads an instance of VarienSimplexml_Element and passes the rst value in
our array (group_classname). It will also check if the class has been rewritten, and if
it has, we will use the corresponding group name.
Magento also uses a custom version of the uc_words() function, which will
capitalize the rst letters and convert separators of the class alias if needed.
Finally, the function will return the real class name to the getModelInstance()
function; in our example case it will return Mage_Catalog_Model_Product.
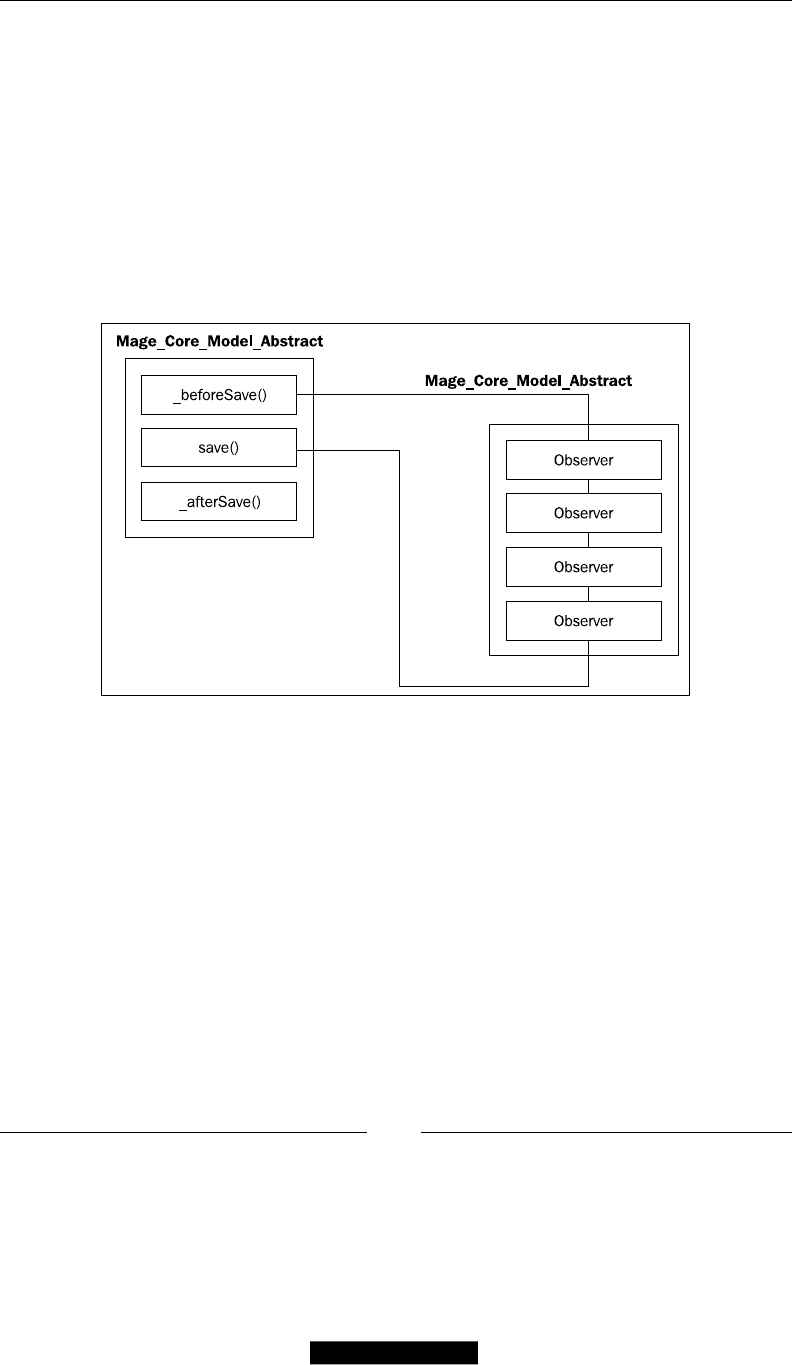
Magento Fundamentals for Developers
[ 52 ]
Events and observers
The event and observer pattern is probably one of Magento's more interesting
features, since it allows developers to extend Magento in critical parts of the
application ow.
In order to provide more exibility and facilitate the interaction between the
different modules, Magento implements an event/observer pattern; this pattern
allows for modules to be loosely coupled.
There are two parts of this system – an event dispatch with the object and event
information, and an observer listening to a particular event.
Event dispatch
Events are created or dispatched using the Mage::dispatchEvent() function.
The core team has already created several events on critical parts of the core. For
example, the model abstract class Mage_Core_Model_Abstract calls two protected
functions every time a model is saved – _beforeSave() and _afterSave(); on each
of these methods two events are red:
protected function _beforeSave()
{
if (!$this->getId()) {
$this->isObjectNew(true);
}
Mage::dispatchEvent('model_save_before',
array('object'=>$this));

Chapter 2
[ 53 ]
Mage::dispatchEvent($this->_eventPrefix.'_save_before',
$this->_getEventData());
return $this;
}
protected function _afterSave()
{
$this->cleanModelCache();
Mage::dispatchEvent('model_save_after',
array('object'=>$this));
Mage::dispatchEvent($this->_eventPrefix.'_save_after',
$this->_getEventData());
return $this;
}
Each function res a generic mode_save_after event, and then a dynamic version
based on the type of object being saved. This gives us a wide range of possibilities
for manipulating objects through observers.
The Mage::dispatchEvent() method takes two parameters: the rst is the event
name and the second is an array of data that is received by the observer. We can
pass values or objects in this array. This comes in handy if we want to manipulate
the objects.
In order to understand the details of the event system, let's take a look at the
dispatchEvent() method:
public static function dispatchEvent($name, array $data = array())
{
$result = self::app()->dispatchEvent($name, $data);
return $result;
}
This function is actually an alias to the dispatchEvent() function inside the app
core class located in Mage_Core_Model_App:
public function dispatchEvent($eventName, $args)
{
foreach ($this->_events as $area=>$events) {
if (!isset($events[$eventName])) {
$eventConfig = $this->getConfig()->
getEventConfig($area, $eventName);
if (!$eventConfig) {
$this->_events[$area][$eventName] = false;
continue;
}

Magento Fundamentals for Developers
[ 54 ]
$observers = array();
foreach ($eventConfig->observers->
children() as $obsName=>$obsConfig) {
$observers[$obsName] = array(
'type' => (string)$obsConfig->type,
'model' => $obsConfig->class ?
(string)$obsConfig->
class : $obsConfig->getClassName(),
'method'=> (string)$obsConfig->method,
'args' => (array)$obsConfig->args,
);
}
$events[$eventName]['observers'] = $observers;
$this->_events
[$area][$eventName]['observers'] = $observers;
}
if (false===$events[$eventName]) {
continue;
} else {
$event = new Varien_Event($args);
$event->setName($eventName);
$observer = new Varien_Event_Observer();
}
foreach ($events[$eventName]
['observers'] as $obsName=>$obs) {
$observer->setData(array('event'=>$event));
Varien_Profiler::start('OBSERVER: '.$obsName);
switch ($obs['type']) {
case 'disabled':
break;
case 'object':
case 'model':
$method = $obs['method'];
$observer->addData($args);
$object = Mage::getModel($obs['model']);
$this->_callObserverMethod
($object, $method, $observer);
break;
default:
$method = $obs['method'];
$observer->addData($args);
$object = Mage::getSingleton($obs['model']);
$this->_callObserverMethod
($object, $method, $observer);

Chapter 2
[ 55 ]
break;
}
Varien_Profiler::stop('OBSERVER: '.$obsName);
}
}
return $this;
}
The dispatchEvent() method is actually doing all the work on the
event/observer model:
1. It gets the Magento conguration object.
2. It walks through the observer's node children, checking if the dened
observer is listening to the current event.
3. For each of the available observers, the dispatch event will try to instantiate
the observer object.
4. Lastly, Magento will try to call the corresponding observer function mapped
to this particular event.
Observer bindings
Now, dispatching an event is the only part of the equation. We also need to tell
Magento which observer is listening to each event. Not to our surprise, observers are
specied through config.xml. As we saw before, the dispatchEvent() function
queries the conguration object for available observers. Let's take a look at an
example config.xml le:
<events>
<event_name>
<observers>
<observer_identifier>
<class>module_name/observer</class>
<method>function_name</method>
</observer_identifier>
</observers>
</event_name>
</events>
The event node can be specied in each of the conguration sections (admin, global,
frontend, and so on) and we can specify multiple event_name children nodes; the
event_name has to match the event name used in the dispatchEvent() function.
Inside each event_name node, we have a single observer node that can contain
multiple observers, each with a unique identier.
Magento Fundamentals for Developers
[ 56 ]
Observer nodes have two properties such as <class>, which points to our observer
model class and <method>, which in turn points to the actual method inside the
observer class. Let's analyze an example observer class denition:
class Namespace_Modulename_Model_Observer
{
public function methodName(Varien_Event_Observer $observer)
{
//some code
}
}
One interesting thing about observer models is that they don't
extend any other Magento class.
Summary
In this chapter, we covered many important and fundamental topics about Magento
such as its architecture, folder structure, routing system, MVC patterns, events and
observers, and conguration scopes.
And while this might seem overwhelming at rst sight, it is just the tip of the
iceberg. There is a lot more to learn about each of these topics and Magento.
The purpose of this chapter is to make developers aware of all the important
components of the platform from the conguration object up to the way the
event/object pattern is implemented.
Magento is a powerful and exible system, and it is much more than an
e-commerce platform. The core team has put a lot of effort in making
Magento a powerful framework.
In later chapters, we will not only review all these concepts in more detail, but we
will also apply them in a practical manner by building our own extensions.
ORM and Data Collections
Collections and models are the bread and butter of everyday Magento development.
In this chapter, we will introduce the reader to the Magento ORM system, and we will
learn how to properly work with data collections and the EAV system. As with most
modern systems, Magento implements an Object Relational Mapping (ORM) system.
Object-relational mapping (ORM, O/RM, and O/R mapping) in computer
software is a programming technique for converting data between incompatible
type systems in object-oriented programming languages. This creates, in effect, a
"virtual object database" that can be used from within the programming language.
In this chapter, we will cover the following topics:
• Magento Models
• Anatomy of a Magento Data Model
• EAV and EAV models
• Working with Direct SQL queries
We will also be working with several snippets of code to provide an easy framework
to experiment and play around with Magento.
Note that the interactive examples in this chapter assume you
are working with either the default Magento installation inside
the VagrantBox or a Magento installation with sample data.
ORM and Data Collections
[ 58 ]
For this purpose, I have created the Interactive Magento Console (IMC), which is
a shell script specially created for this book and inspired by Ruby's own Interactive
Ruby Console (IRB). Follow these steps:
1. The rst thing we will need to do is to install the IMC. To do so, download
the source les from https://github.com/amacgregor/mdg_imc and
extract them under your Magento test installation. The IMC is a simple
Magento shell script that will allow us to test our code in real time.
2. Once you extracted the script, log in to the shell of your virtualbox.
3. Next, we will need to navigate to our Magento root folder. If you are using
the default vagrant box, the installation is already provided; the root folder
is located under /srv/www/ce1720/public_html/, and we navigate to it by
running the following command line:
$ cd /srv/www/ce1720/public_html
4. Finally, we can start the IMC by running the following command line:
$ php shell/imc.php
5. If everything is installed successfully, we should see a new line starting with
magento >.
Magento Model Anatomy
As we learned in the previous chapter, Magento Data Models are used to manipulate
and access the data. The model layer is divided into two fundamental types, simple
models and EAV, where:
• Simple Models: These model implementations are simple mappings of one
object to one table, meaning that our object attributes match each eld and
our table structure
• Entity Attribute Value Models (EAV): These type of models are used to
describe entities with a dynamic number of attributes
Note that it is important to clarify that not all Magento Models
extend or Mage use the ORM. Observers are a clear example of
simpler Model classes that are not mapped to a specific database
table or entity.
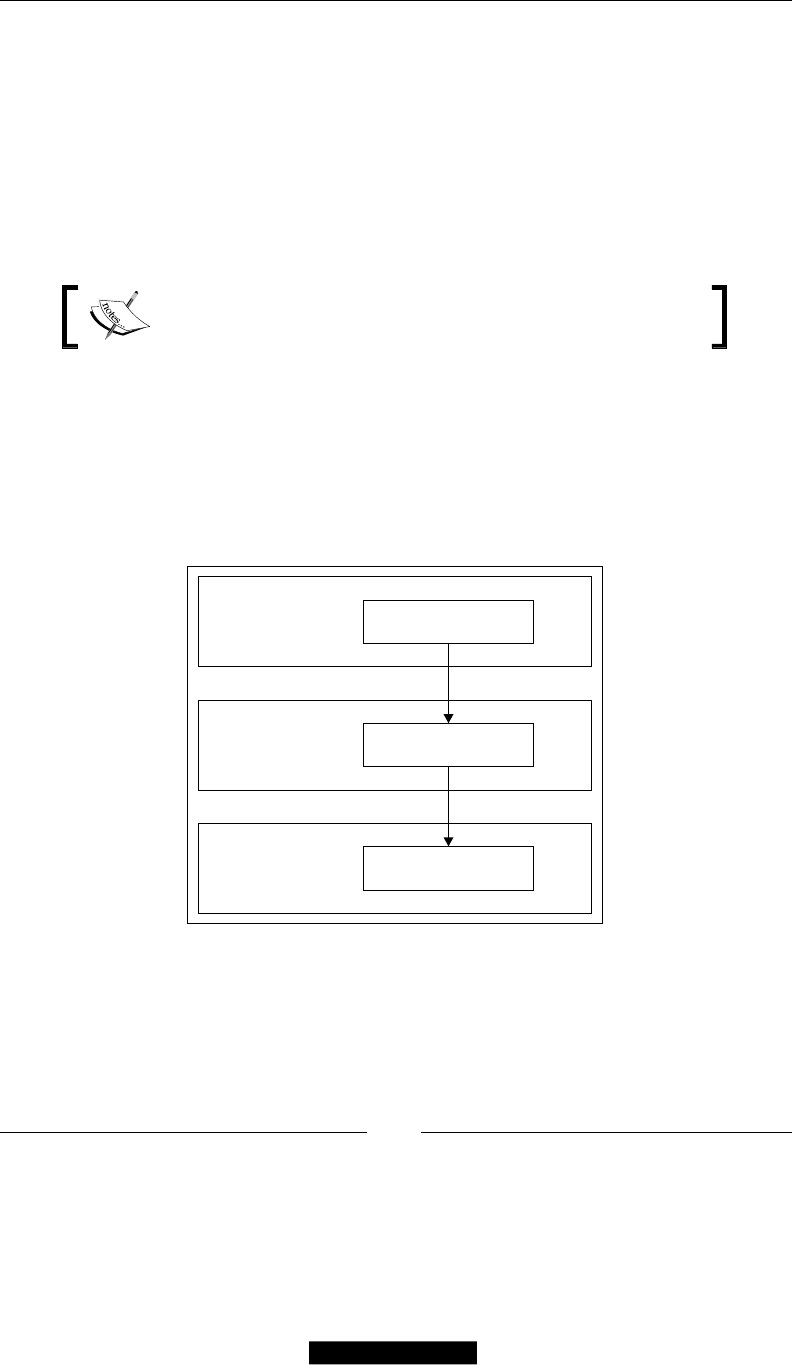
Chapter 3
[ 59 ]
In addition to that, each Model type is formed by the following layers:
• Model class: Here is where most of our business logic resides. Models are
used to manipulate the data, but they don't access it directly.
• Resource Model class: Resource Models are used to interact with
the database on behalf of our models. They are in charge of the actual
CRUD operations.
• Model Collection class: Each Data Model has a collection class; collections
are objects that hold a number of individual Magento Model instances.
CRUD stands for the four basic types of database operations:
create, read, update, and delete.
Magento Models don't contain any logic for communicating with the database; they
are database agnostic. Instead, this code resides in the Resource Model layer.
This gives Magento the capacity to support different types of databases and
platforms. Although currently only MySQL is ofcially supported, it is entirely
possible to write a new resource class for a new database without touching any
of the Model logic ones.
Resource Model
Database adapter
Model Layer
Resource Layer
Adapter Layer
Model

ORM and Data Collections
[ 60 ]
Let's experiment now by instantiating a product object and setting some of its
properties by following these steps:
1. Start the Magento interactive console running under your Magento staging
installation root:
php shell/imc.php
2. Our rst step is going to create a new product object instance by typing:
magento> $product = Mage::getModel('catalog/product');
3. We can conrm whether this is a blank instance of the product class
by running:
magento> echo get_class($product);
4. We should see the following as a successful output:
magento> Magento_Catalog_Model_Product
5. If we want to know more about the class methods, we can run the following
command line:
magento> print_r(get_class_methods($product));
This will return an array with all the available methods inside the class. Let's try to
run the following snippet of code and modify a product price and name:
$product = Mage::getModel('catalog/product')->load(2);
$name = $product->getName() . '-TEST';
$price = $product->getPrice();
$product->setPrice($price + 15);
$product->setName($name);
$product->save();
On the rst line of code, we are instantiating a specic object, then we are proceeding
to retrieve the name attribute from the object. Next, we are setting the price and
name, and nally are saving the object.
If we open our Magento Product class Mage_Catalog_Model_Product, the rst thing
that we will notice is that while both getName() and getPrice() are dened inside
our class, the setPrice() and setName() functions are not dened anywhere.
But why and more importantly, how is Magento magically dening each of the
product object setter and getter methods? While getPrice() and getName() are
indeed dened, there is no denition for any of the getter and setter methods for
product attributes, such as color or manufacturer.
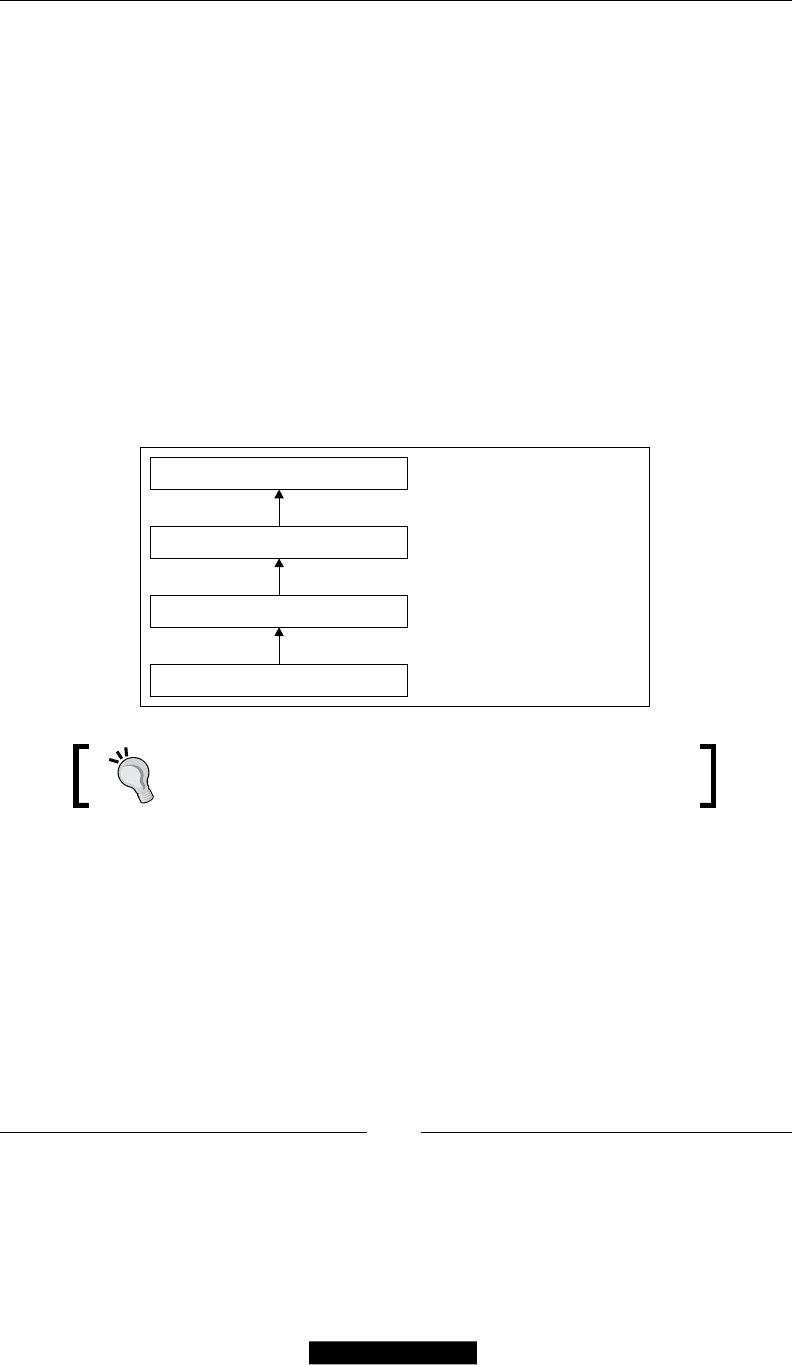
Chapter 3
[ 61 ]
It's magic – methods
Well, it happens that the Magento ORM system is indeed using magic; or to be
precise, one of the PHP's more powerful features for implementing its getters
and setters, the magic __call() method. Magento methods that are used inside
Magento are used to set, unset, check, or retrieve data.
When we try to call a method, which does not actually exist in our corresponding
class, PHP will look into each of the parent classes for a declaration of that method.
If we can't nd the function on any of the parent classes, it will use its last resort and
try to use a __call() method, and if found, Magento (or PHP for that matter) will
call the magic method, thus passing the requested method name and its arguments.
Now, the Product model doesn't have a __call() method dened, but it gets
one from the Varien_Object class from which all Magento models inherit from.
The inheritance tree for the Mage_Catalog_Model_Product class is given in the
following owchart:
Varien_Object
Mage_Core_Model_Abstract
Mage_Catalog_Model_Abstract
Mage_Catalog_Model_Product getName(), getPrice(),getStatus()
_call() magic methods
Every Magento Model inherits from the Varien_Object
class.
Let's take a closer look at the Varien_Object class:
1. Open the le located in magento_root/lib/Varien/Object.php.
2. The Varien_Object class not only has a __call() method but also two
deprecated methods, __set() and __get(); these two are replaced by the
__call() method and thus are no longer used.
public function __call($method, $args)
{
switch (substr($method, 0, 3)) {
case 'get' :

ORM and Data Collections
[ 62 ]
//Varien_Profiler::start('GETTER: '.get_
class($this).'::'.$method);
$key = $this->_underscore(substr($method,3));
$data = $this->getData($key, isset($args[0]) ? $args[0]
: null);
//Varien_Profiler::stop('GETTER: '.get_
class($this).'::'.$method);
return $data;
case 'set' :
//Varien_Profiler::start('SETTER: '.get_
class($this).'::'.$method);
$key = $this->_underscore(substr($method,3));
$result = $this->setData($key, isset($args[0]) ?
$args[0] : null);
//Varien_Profiler::stop('SETTER: '.get_
class($this).'::'.$method);
return $result;
case 'uns' :
//Varien_Profiler::start('UNS: '.get_
class($this).'::'.$method);
$key = $this->_underscore(substr($method,3));
$result = $this->unsetData($key);
//Varien_Profiler::stop('UNS: '.get_
class($this).'::'.$method);
return $result;
case 'has' :
//Varien_Profiler::start('HAS: '.get_
class($this).'::'.$method);
$key = $this->_underscore(substr($method,3));
//Varien_Profiler::stop('HAS: '.get_
class($this).'::'.$method);
return isset($this->_data[$key]);
}
throw new Varien_Exception("Invalid method" . get_
class($this)."::".$method."(".print_r($args,1).")");
}
Inside the __call() method, we have a switch that will handle not only getters and
setters but also the unset and has functions.
If we start a debugger and follow the calls of our snippet code to the __call()
method, we can see that it receives two arguments: the method name for example
setName() and the arguments from the original call.

Chapter 3
[ 63 ]
Interestingly, Magento tries to match the corresponding method type based on
the rst three letters of the method being called; this is done when the switch case
argument calls the substring function:
substr($method, 0, 3)
The rst thing that is called inside each case is the _underscore() function, which
takes as parameter anything after the rst three characters in the method name;
following our example, the argument passed would be Name.
The __underscore() function returns a data key. This key is then used by each of
the cases to manipulate the data. There are four basic data operations, each used on
the corresponding switch case:
• setData($parameters)
• getData($parameters)
• unsetData($parameters)
• isset($parameters)
Each of these functions will interact with the Varien_Object data array and will
manipulate it accordingly. In most cases, a magic set/get method will be used
to interact with our object attributes; only in a few exceptions where additional
business logic is required, getters and setters will be dened. In our example, they
are getName() and getPrice().
public function getPrice()
{
if ($this->_calculatePrice || !$this->getData('price')) {
return $this->getPriceModel()->getPrice($this);
} else {
return $this->getData('price');
}
}
We will not enter details of what the price function is actually doing, but it clearly
illustrates that additional logic might be required for certain parts of the models.
public function getName()
{
return $this->_getData('name');
}
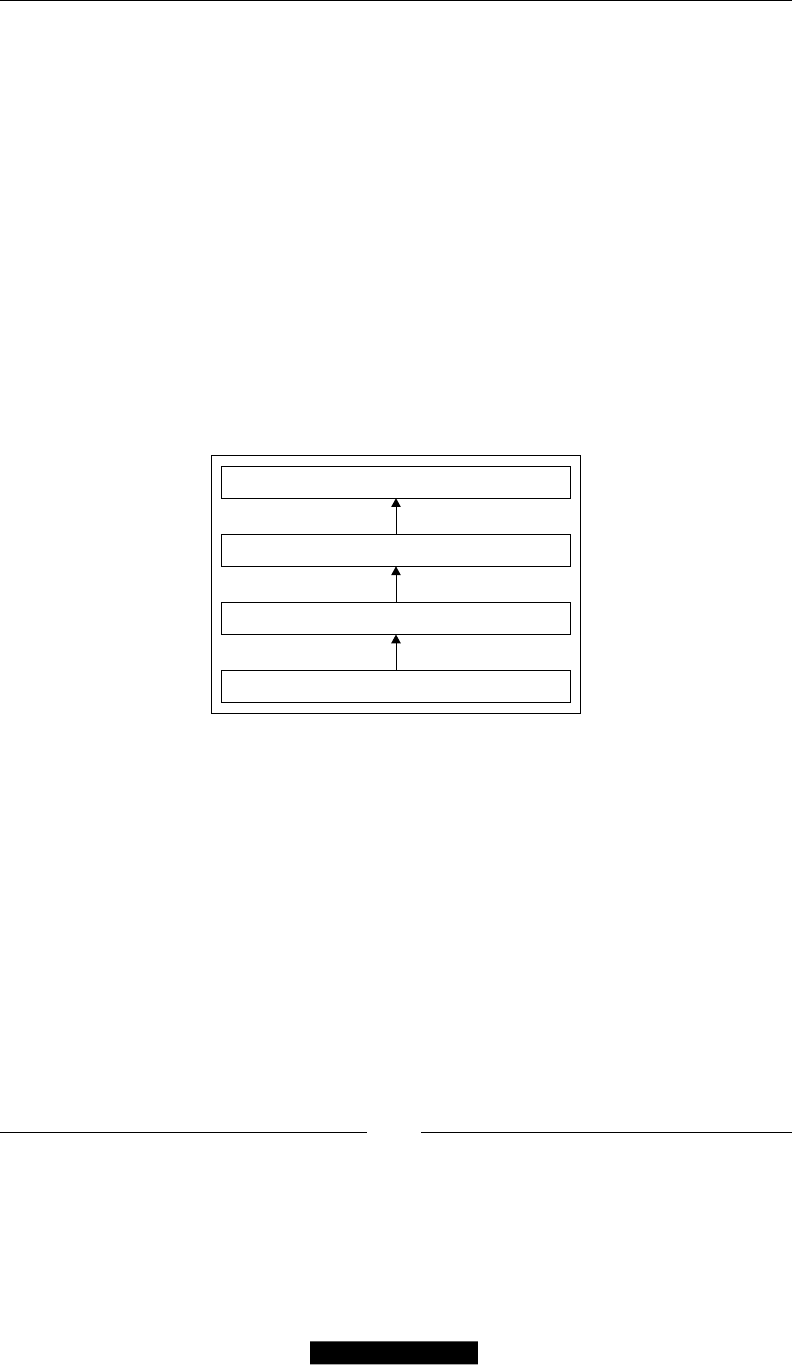
ORM and Data Collections
[ 64 ]
On the other hand, the getName() getter wasn't declared because of the need of
implementing special logic but by the need of optimizing a crucial part of Magento.
The Mage_Catalog_Model_Product getName() function can be potentially called
hundreds of times per page load and is one of the most commonly used functions
across Magento; after all, what kind of e-commerce platform would it be if it was not
centered around products?
Frontend and backend alike will call the getName() function at one point or another.
For example, if we load a category page with 24 products, that is, 24 separate calls to
the getName() function, each of these calls will look for a getName() method on each
of the parent classes, and then, when we try to use magic __call() method, it will
result in losing precious milliseconds.
Resource Models contain all the database-specic logic, and they instantiate the
specic read and write adapters for their corresponding data source. Let's go back to
our example working with products and take a look at the product Resource Model
located at Mage_Catalog_Model_Resource_Product.
Mage_Catalog_Model_Resource_Product
Mage_Catalog_Model_Resource_Abstract
Mage_Catalog_Model_Resource_Abstract
Mage_Catalog_Model_Resource_Abstract
Resource models come in two different types: Entity and MySQL4. The latter
being a pretty standard one-table/one-model association, while the former is
far more complicated.
EAV Model
EAV stands for entity, attribute, and value, it is probably the most difcult concept
for new Magento developers to grasp. While the EAV concept is not unique to
Magento, it is rarely implemented on modern systems, on top of that, Magento
implementation is not a simple one.
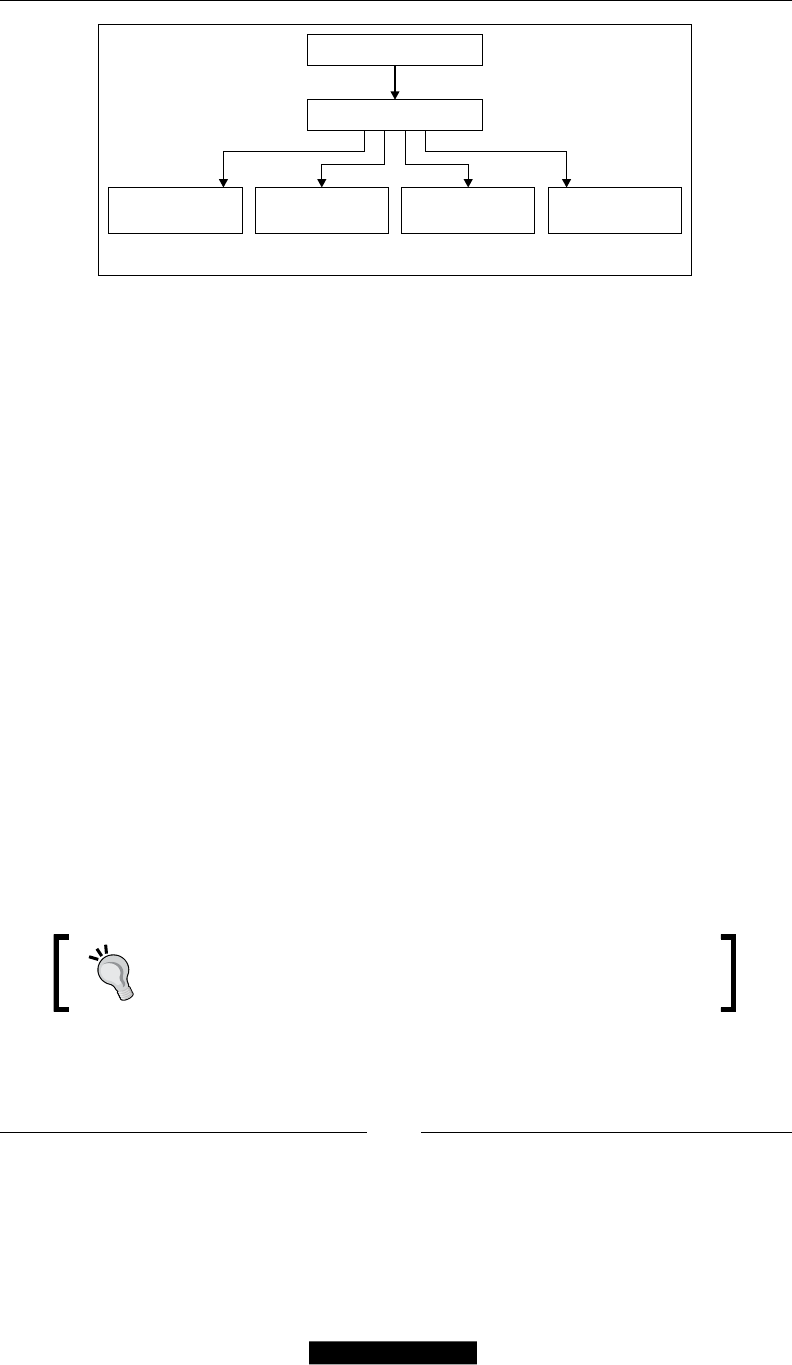
Chapter 3
[ 65 ]
Entity Model
EAV Attribute
Value Table
(varchar)
Value Table
(text)
Value Table
(Int)
Value Table
(etc)
Magento Stores each value type in different tables
What is EAV?
In order to understand what EAV is and what its role within Magento is, we need to
break down it into the parts of the EAV model.
• Entity: The entity represents the data items (objects) inside Magento
products, customers, categories, and orders. Each entity is stored in the
database with a unique ID.
• Attribute: These are our object properties. Instead of having one column per
attribute on the product table, attributes are stored on separates sets of tables.
• Value: As the name implies, it is simply the value link to a particular attribute.
This design pattern is the secret behind Magento's exibility and power, allowing
entities to add and remove new properties without having to do any changes to the
code or templates.
Whereas model can be seen as a vertical way of growing our database (new
attributes add more rows), the traditional model would involve a horizontal grow
pattern (new attributes add more columns) that would result in a schema redesign
every time new attributes are added.
The EAV model not only allows the fast evolution of our database, but also, it is
more efcient, because it only works with non-empty attributes, avoiding the need
to reserve additional space in the database for null values.
If you are interested in exploring and learning more about the
Magento database structure, I highly recommend you to visit
www.magereverse.com.
ORM and Data Collections
[ 66 ]
Adding a new product attribute is as simple as going to the Magento backend
and specifying the new attribute type, be it color, size, brand, and so on. The
opposite is also true, because we can get rid of unused attributes on our products
or customer models.
For more information on managing attributes, visit http://www.
magentocommerce.com/knowledge-base/entry/how-do-
attributes-work-in-magento.
Magento Community Edition currently has eight different types of EAV objects:
• Customer
• Customer address
• Products
• Product categories
• Orders
• Invoices
• Credit memos
• Shipments
Magento Enterprise Edition has one additional type called RMA item,
which is part of the Return Merchandise Authorization (RMA) system.
All this exibility and power is not free, and there is a price to pay; implementing the
EAV model results in having our entity data distributed on a large number of tables,
for example, just the Product Model is distributed on around 40 different tables.
The following diagram only shows a few of the tables involved in saving the
information of Magento products:
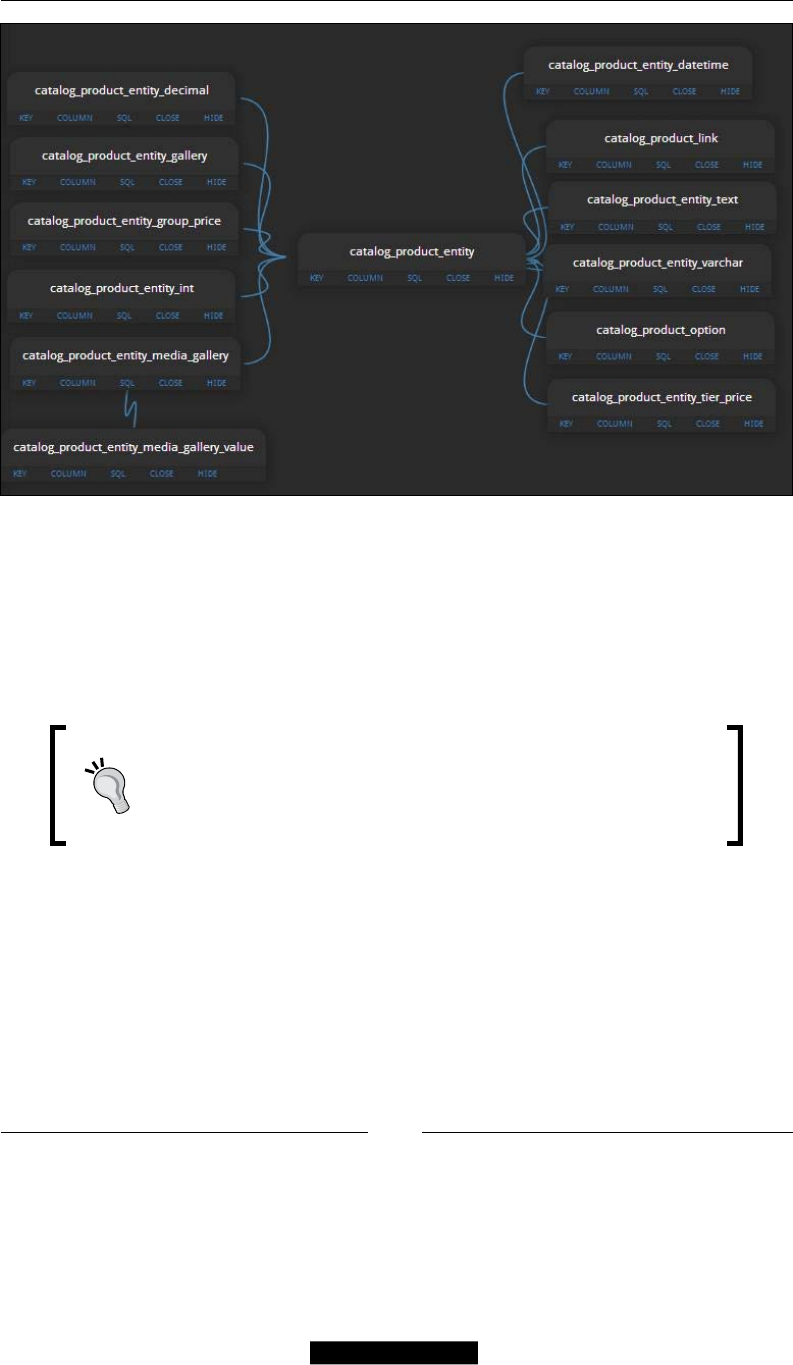
Chapter 3
[ 67 ]
Another major downside of EAV is the loss of performance when retrieving large
collections of EAV objects and an increase on the database query complexity.
Since the data is more fragmented (stored in more tables), selecting a single record
involves several joins.
Let's continue using Magento products as our example and manually build the query
for retrieving a single product.
If you have PHPMyAdmin or MySQL Workbench installed on
your development environment, you can experiment with the
following queries. Each can be downloaded from PHPMyAdmin
(http://www.phpmyadmin.net/) and MySQL Workbench
(http://www.mysql.com/products/workbench/).
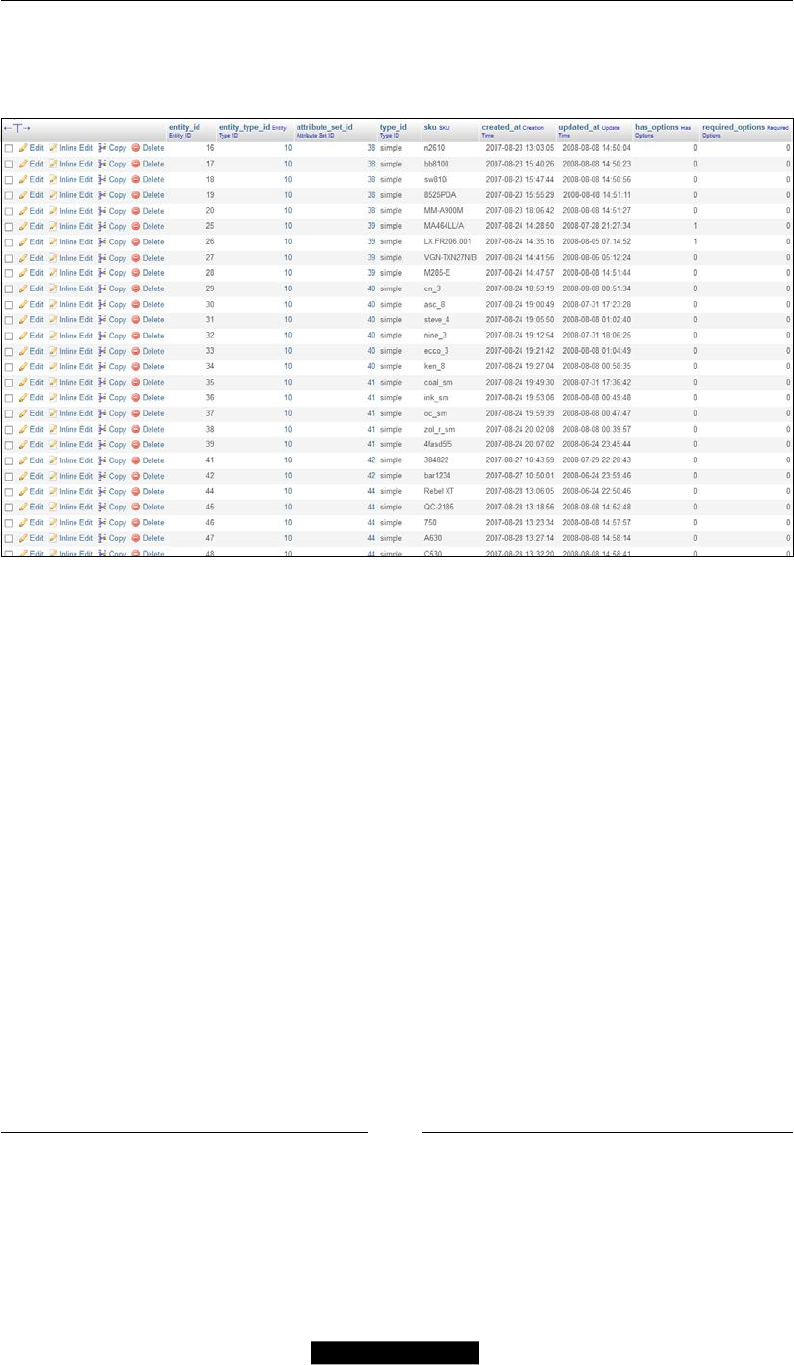
ORM and Data Collections
[ 68 ]
The rst table that we will need to use is the catalog_product_entity. We can
consider this as our main product EAV table since it contains the main entity records
for our products:
Let's query the table by running the following SQL query:
SELECT * FROM `catalog_product_entity`;
The table contains the following elds:
• entity_id: This is our product unique identier and is used internally
by Magento.
• entity_type_id: Magento has several different types of EAV models,
products, customers, and orders, and these are just some of them. Identifying
each by type allows Magento to retrieve the attributes and values from the
appropriate tables.
• attribute_set_id: Products attributes can be grouped locally into attribute
sets. Attribute sets allow even further exibility on the product structure
since products are not forced to use all available attributes.
• type_id: There are several different types of products in Magento: simple,
congurable, bundled, downloadable, and grouped products, each with
unique settings and functionality.
• sku: Stock Keeping Unit (SKU) is a number or code used to identify each
unique product or item for sale in a store. This is a user-dened value.

Chapter 3
[ 69 ]
• has_options: This is used to identify if a product has custom options.
• required_options: This is used to identify if any of the custom options
are required.
• created_at: This is a row creation date.
• updated_at: This shows the last time the row was modied.
Now we have a basic understanding of the product entity table, and we also know
that each record represents a single product in our Magento store, but we don't have
much information about that product beyond the SKU and the product type.
So, where are the attributes stored? And how does Magento know the difference
between a product attribute and a customer attribute?
For that, we need to take a look at the eav_attribute table by running the following
SQL query:
SELECT * FROM `eav_attribute`;
As a result, we will not only see the product attributes but also attributes
corresponding to the customer model, order model, and so on. Fortunately,
we already have a key for ltering the attributes from this table. Let's run the
following query:
SELECT * FROM `eav_attribute`
WHERE entity_type_id = 4;
This query is telling the database to only retrieve the attributes where the
entity_type_id columns are equal to the product entity_type_id(4). Before
moving on, let's analyze the most important elds inside the eav_attribute table:
• attribute_id: This is the unique identier for each attribute and primary
key of the table.
• entity_type_id: This eld relates each attribute to a specic EAV
model type.
• attribute_code: This eld is the name or key of our attribute and is used to
generate the getters and setters for our magic methods.
• backend_model: The backend model manages loading and storing data into
the database.
• backend_type: This eld species the type of value stored into the
backend (database).
• backend_table: This eld is used to specify if the attribute should be stored
on a special table instead of the default EAV tables.

ORM and Data Collections
[ 70 ]
• frontend_model: The frontend model handles the rendering of the attribute
element into a web browser.
• frontend_input: Similar to the frontend model, the frontend input species
the type of input eld the web browser should render.
• frontend_label: This eld is the label/name of the attribute as it should be
rendered by the browser.
• source_model: The source models are used to populate an attribute with
possible values. Magento comes with several predened source models for
countries, yes or no values, regions, and so on.
Retrieving the data
At this point, we have successfully retrieved a product entity and the specic
attributes that apply to that entity, and now it is time to start retrieving the actual
values. In order to simply execute the example (and the query), we will only try to
retrieve the name attribute of our products.
But how do we know on which table our attribute values are stored? Well,
thankfully, Magento is following a naming convention for naming the tables.
If we inspect our database structure, we will notice that there are several tables
using the catalog_product_entity prex:
• catalog_product_entity
• catalog_product_entity_datetime
• catalog_product_entity_decimal
• catalog_product_entity_int
• catalog_product_entity_text
• catalog_product_entity_varchar
• catalog_product_entity_gallery
• catalog_product_entity_media_gallery
• catalog_product_entity_tier_price
But, wait, how do we know which is the right table to query for our name attribute
values? If you were paying attention, we've already seen the answer. Do you
remember that the eav_attribute table had a column called backend_type?
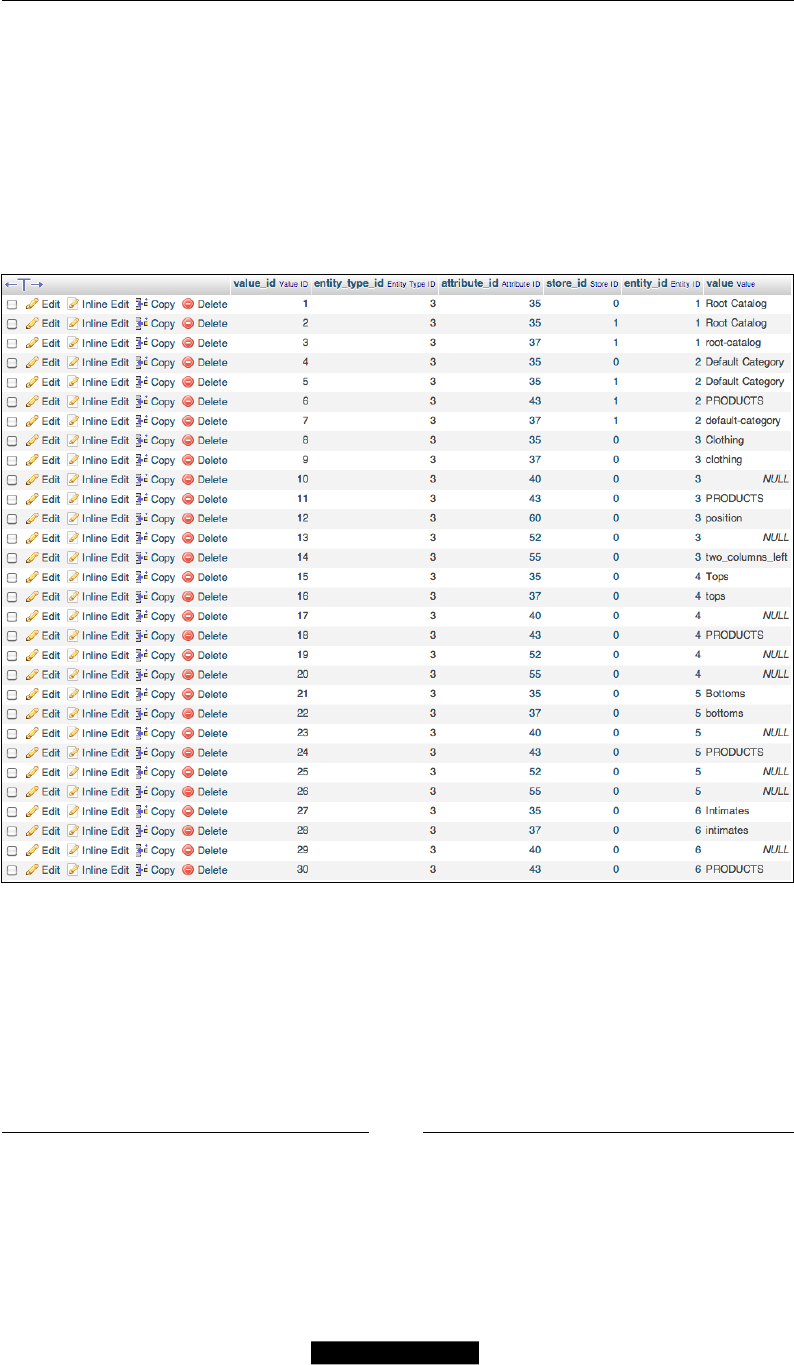
Chapter 3
[ 71 ]
Magento EAV stores each attribute on a different table based on the backend type of
that attribute. If we want to conrm the backend type of our name, we can do so by
running the following code:
SELECT * FROM `eav_attribute`
WHERE `entity_type_id` =4 AND `attribute_code` = 'name';
And we should see, as a result, that the backend type is varchar and that the values
for this attribute are stored in the catalog_product_entity_varchar table. Let's
inspect this table:
The catalog_product_entity_varchar table is formed by only six columns:
• value_id: The attribute value is the unique identier and a primary key
• entity_type_id: This value belongs to the entity type ID
• attribute_id: This is a foreign key that relates the value with our
eav_entity table
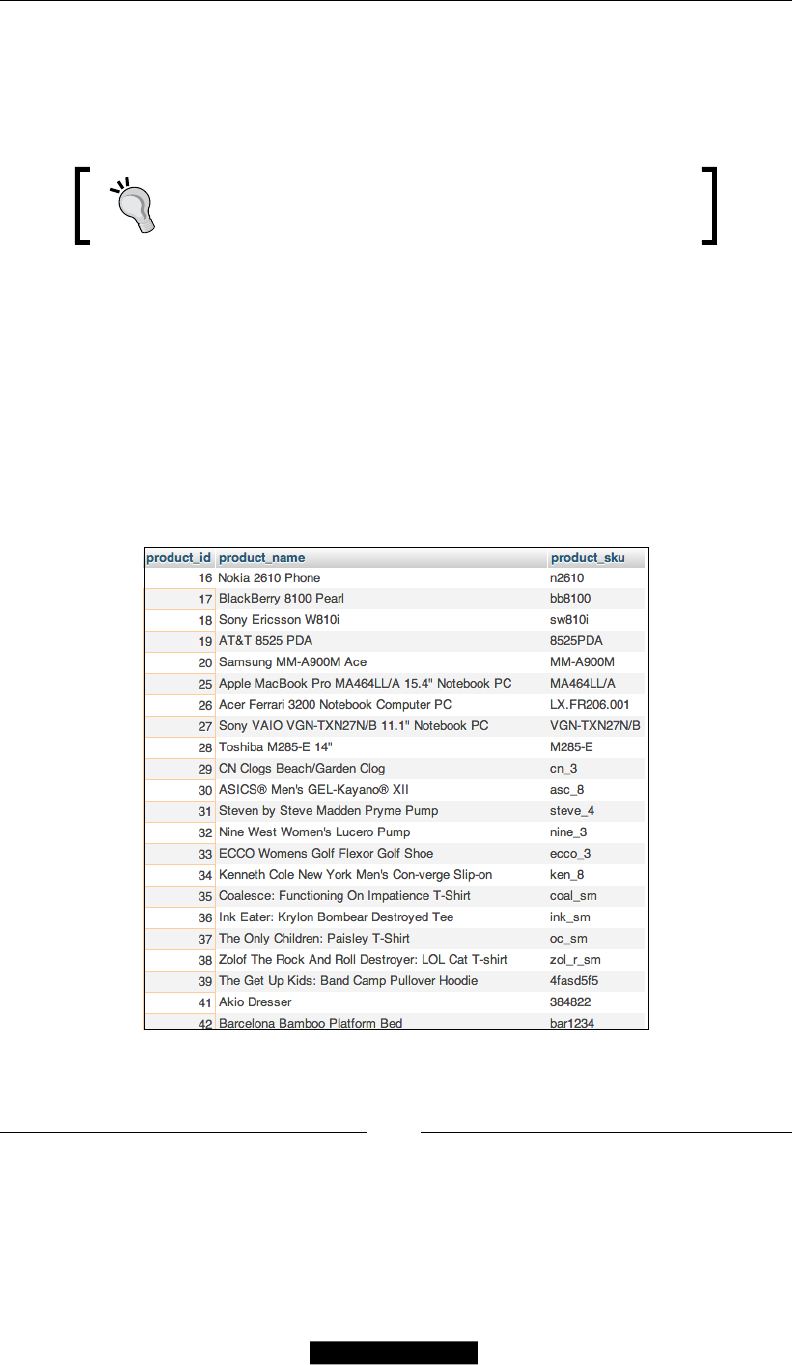
ORM and Data Collections
[ 72 ]
• store_id: This is a foreign key matching an attribute value with a storeview
• entity_id: This is a foreign key to the corresponding entity table; in this
case, it is catalog_product_entity
• value: This is the actual value that we want to retrieve
Depending on the attribute conguration, we can have it
as a global value, meaning it applies across all store views
or a value per storeview.
Now that we nally have all the tables that we need to retrieve the product
information, we can build our query:
SELECT p.entity_id AS product_id, var.value AS product_name, p.sku AS
product_sku
FROM catalog_product_entity p, eav_attribute eav, catalog_product_
entity_varchar var
WHERE p.entity_type_id = eav.entity_type_id
AND var.entity_id = p.entity_id
AND eav.attribute_code = 'name'
AND eav.attribute_id = var.attribute_id
Chapter 3
[ 73 ]
As result of our query, we should see a result set with three columns: product_id,
product_name, and product_sku. So, let's step back for a second in order to get
product names with SKUs. With raw SQL, we would have to write a ve-line SQL
query, and we would only be retrieving two values from our products: from one
single EAV value table if we wanted to retrieve a numeric eld, such as price, or
from a text value, such as product.
If we didn't have an ORM in place, maintaining Magento would be almost
impossible. Fortunately, we do have an ORM in place, and most likely, you will
never need to deal with raw SQL for working with Magento.
That said, let's see how can we retrieve the same product information by using the
Magento ORM:
1. Our rst step is going to instantiate a product collection:
$collection = Mage::getModel('catalog/product')->getCollection();
2. Then, we will specically tell Magento to select the name attribute:
$collection->addAttributeToSelect('name');
3. Now sort the collection by name:
$collection->setOrder('name', 'asc');
4. And, nally, we will tell Magento to load the collection:
$collection->load();
5. The end result is a collection of all products in the store sorted by name; we
can inspect the actual SQL query by running:
echo $collection->getSelect()->__toString();
With the help of only three lines of code, we are able to tell Magento to grab all the
products in the store to specically select the name, and nally, order the products
by the name.
The last line, $collection->getSelect()->__toString(), allows
us to see the actual query that Magento is executing on our behalf.
The actual query being generated by Magento is:
SELECT `e`.*. IF( at_name.value_id >0, at_name.value, at_name_default.
value ) AS `name`
FROM `catalog_product_entity` AS `e`
LEFT JOIN `catalog_product_entity_varchar` AS `at_name_default` ON
(`at_name_default`.`entity_id` = `e`.`entity_id`)
ORM and Data Collections
[ 74 ]
AND (`at_name_default`.`attribute_id` = '65')
AND `at_name_default`.`store_id` =0
LEFT JOIN `catalog_product_entity_varchar` AS `at_name` ON ( `at_
name`.`entity_id` = `e`.`entity_id` )
AND (`at_name`.`attribute_id` = '65')
AND (`at_name`.`store_id` =1)
ORDER BY `name` ASC
As we can see, the ORM and the EAV models are wonderful tools that not only put
a lot of power and exibility on hands of the developers, but they also do it in a way
that is comprehensive and easy to use.
Working with Magento collections
If you look back to the previous code example, you might notice that we've not only
instantiated a Product model, but also we've called the getCollection() method.
The getCollection() method is part of the Mage_Core_Model_Abstract class,
meaning that every single model inside Magento can call this method.
All collections inherit from Varien_Data_Collection.
A Magento collection is basically a model that contains other models. So, instead of
using an array for holding a collection of products, we could use a Product collection
instead. Collections not only provide a convenient data structure for grouping
models but also provide special methods that we can use to manipulate and work
with collection of entities.
Some of the most useful collection methods are:
• addAttributeToSelect: To add an attribute to entities in a collection, * can
be used as a wildcard to add all available attributes
• addFieldToFilter: To add an attribute lter to a collection, this function is
used on regular, non-EAV models
• addAttributeToFilter: This method is used to lter a collection of
EAV entities
• addAttributeToSort: This method is used to add an attribute to sort order
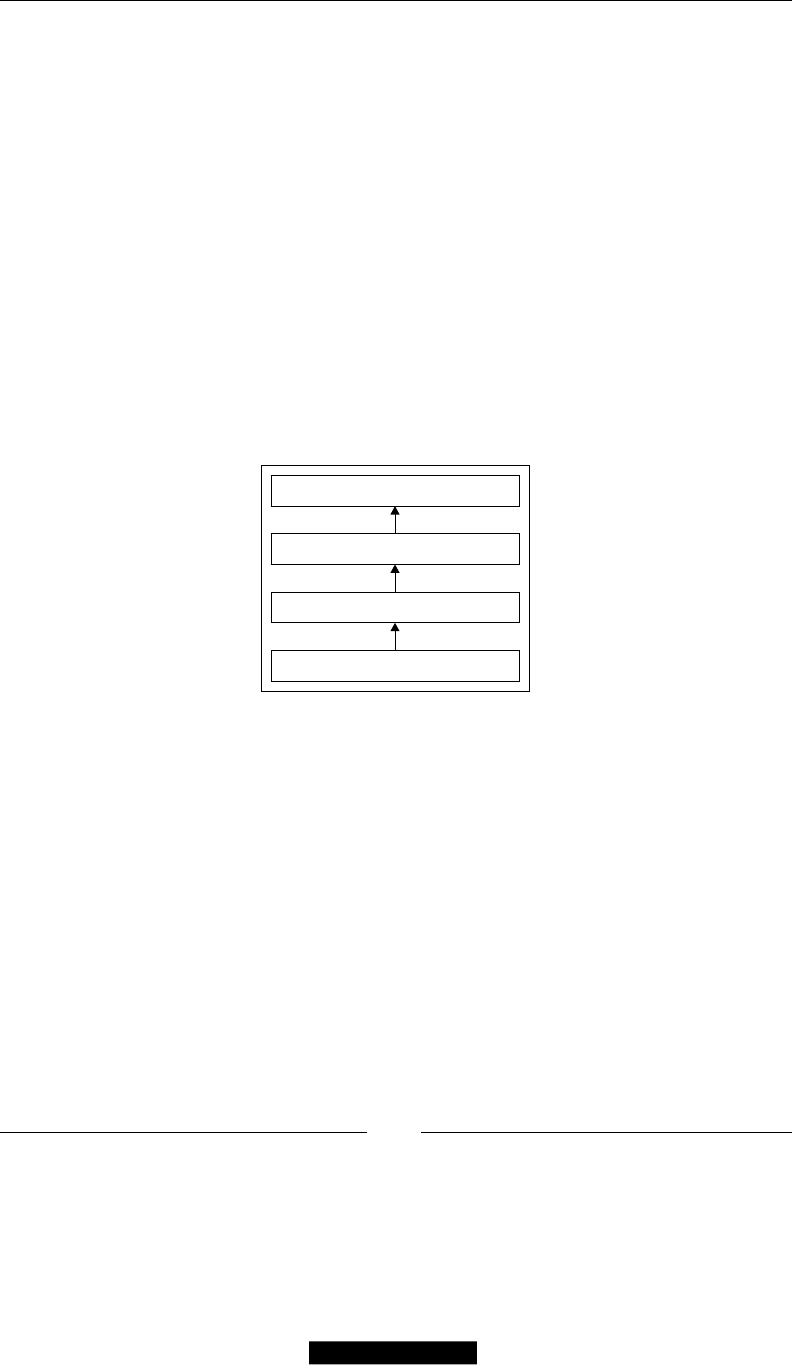
Chapter 3
[ 75 ]
• addStoreFilter: This method is used to store an availability lter; it
includes the availability product
• addWebsiteFilter: This method is used to add a website lter to a collection
• addCategoryFilter: This method is used to specify a category lter for a
product collection
• addUrlRewrite: This method is used to add URL rewrites data to a product
• setOrder: This method is used to set the sorting order of a collection
Those are just a few of the collection methods available; each collection implements
different unique methods depending on the entity type they correspond to. For
example, the customer collection Mage_Customer_Model_Resource_Customer_
Collection has a unique method called groupByEmail(), which has the name
that correctly implies and groups the entities inside of a collection by e-mail.
As with previous examples, we will continue working with the product models, and
in this case, the product collection.
Mage_Catalog_Model_Product
Mage_Catalog_Model_Abstract
Mage_Core_Model_Abstract
Varien_Object
In order to illustrate better how we can use collection, we will be working on the
following common product scenarios:
1. Get product collection only from a specic category.
2. Get new products since X date.
3. Get Bestseller products.
4. Filter product collection by visibility.
5. Filter products without image.
6. Add multiple sort orders.

ORM and Data Collections
[ 76 ]
Get product collection only from a specic
category
The rst thing most developers try to do when starting with Magento is to load a
product collection with products from only a specic category, and while I have seen
many approaches by using addCategoryFilter() or addAttributeToFilter(),
the reality is that, for most cases, the approach is much simpler and a bit
counter-intuitive to what we have learned so far.
The easiest way of doing it is not by getting a product collection rst and then
ltering by a category but actually instantiating our target category and getting
the product collection from there. Let's run the following snippet of code on IMC:
$category = Mage::getModel('catalog/category')->load(5);
$productCollection = $category->getProductCollection();
We can nd the getProductCollection() method declaration inside the Mage_
Catalog_Model_Category class. Let's take a better look at this method:
public function getProductCollection()
{
$collection = Mage::getResourceModel('catalog/product_collection')
->setStoreId($this->getStoreId())
->addCategoryFilter($this);
return $collection;
}
As we can see, the function does nothing more than instantiating a Resource Model
for the product collection, that is, setting the store to the current store ID and passing
the current category to the addCategoryFilter() method.
This is one of those decisions that was taken to optimize Magento performance, and
frankly to simplify the life of the developers working with it, since in most cases a
category is going to be available one way or the other.
Get new products added since X date
So, now that we know how to get a product collection from a specic category, let's see
whether we are able to apply lters to the resulting products and only to the retrieved
ones matching our conditions; in this particular case, we will request all the products
that were added after December 2012. Following our previous example code, we can
lter our collection by product creation date by running the following code on IMC:
// Product collection from our previous example
$productCollection->addFieldToFilter('created_at', array('from' =>
'2012-12-01));

Chapter 3
[ 77 ]
It is simple, isn't it? We could even add an additional condition and get the products
added between two dates. Let's say we only want to retrieve the products that were
created in the month of December:
$productCollection->addFieldToFilter('created_at', array('from' =>
'2012-12-01));
$productCollection->addFieldToFilter('created_at', array('to' =>
'2012-12-30));
Magento's addFieldToFilter supports the following conditions:
Attribute code SQL condition
eq =
neq !=
like LIKE
nlike NOT LIKE
in IN ()
nin NOT IN ()
is IS
notnull NOT NULL
null NULL
moreq >=
gt >
lt <
gteq >=
lteq <=
We can try other types of lters, for example, let's use the following code on IMC
after adding our creating date lter, so we can retrieve only visible products:
$productCollection->addAttributeToFilter('visibility', 4);
The visibility attribute is a special attribute used by products to control where
products are shown; it has the following values:
• Not visible individually: It has a value 1
• Catalog: It has a value 2
• Search: It has a value 3
• Catalog and Search: It has a value 4

ORM and Data Collections
[ 78 ]
Get Bestseller products
To try to get the Bestseller products for a specic category, we would need to step up
our game and do a join with the sales_order table. Retrieving Bestseller products
will come in handy later on for creating a special category or custom reporting; we
can run the following code on IMC:
$category = Mage::getModel('catalog/category')->load(5);
$productCollection = $category->getProductCollection();
$productCollection->getSelect()
->join(array('o'=> 'sales_flat_order_item'), 'main_table.
entity_id = o.product_id', array('o.row_total','o.product_id'))-
>group(array('sku'));
Let's analyze what's happening on the third line of our snippet. getSelect() is a
method inherited directly from Varien_Data_Collection_Db, which returns the
variable where the Select statement is stored in addition to the collections that
provide methods for specifying a join and a group without having to write any SQL.
This is not the only way of adding a join to a collection. There is, in fact, a cleaner
way of doing it by using the joinField() function. Let's rewrite our previous code
to make use of this function:
$category = Mage::getModel('catalog/category')->load(5);
$productCollection = $category->getProductCollection();
$productCollection->joinField('o', 'sales_flat_order_item', array('o.
row_total','o.product_id'), 'main_table.entity_id = o.product_id')
->group(array('sku'));
Filter product collection by visibility
This is extremely easy to do with the help of the addAttributeToFilter. Magento
products have a system attribute called visibility, which has four possible number
values ranging from 1 to 4. We are interested only in showing products whose
visibility is 4; meaning, it can be seen both in the search results and the catalog. Let's
run the following code in IMC:
$category = Mage::getModel('catalog/category')->load(5);
$productCollection = $category->getProductCollection();
$productCollection->addAttributeToFilter('visibility', 4);
If we change the visibility code, we can compare the different collections results.

Chapter 3
[ 79 ]
Filter products without images
Filtering products without images comes in handy when you are dealing with a
third-party import system, which can sometimes be unreliable. As with everything
we have done so far, product images are the attributes of our product.
$category = Mage::getModel('catalog/category')->load(5);
$productCollection = $category->getProductCollection();
$productCollection->addAttributeToFilter('small_image',array('notnull'
=>'','neq'=>'no_selection'));
By adding that extra lter, we require products to have a small image specied; by
default, Magento has three products: image types, thumbnail, and small_image and
image. These three types are used on different parts of the application. We could
even set up a stricter rule for products if we wanted to.
$productCollection->addAttributeToFilter('small_image',
array('notnull'=>'','neq'=>'no_selection'));
->addAttributeToFilter('thumbnail, array('notnull'=>'','neq'=>'no_
selection'))
->addAttributeToFilter('image', array('notnull'=>'','neq'=>'no_
selection'));
Only products that have all the three types of images will be included in our
collection. Try experimenting by ltering with the different image types.
Add multiple sort orders
Finally, let's take our collection and sort it rst by stock status and then by
price, from highest to lowest. In order to retrieve the stock status information,
we will use a method unique to the stock status resource model called
addStockStatusToSelect(), which will take care of generating the corresponding
SQL for our collection query:
$category = Mage::getModel('catalog/category')->load(5);
$productCollection = $category->getProductCollection();
$select = $productCollection->getSelect();
Mage::getResourceModel('cataloginventory/stock_status')->addStockStatu
sToSelect($select, Mage::app()->getWebsite());
$select->order('salable desc');
$select->order('price asc');
Inside this query, Magento will sort products by the salable status that is either
true or false, and by price; the end result is that all the available products will show
the rst ordered ones from the most expensive to the cheapest ones, and then, the
out-of-stock products will be shown from the most expensive to the cheapest.

ORM and Data Collections
[ 80 ]
Experiment with different sort order combinations to see how Magento organizes
and orders the product collections.
Using Direct SQL
So far, we have learned how Magento data models and the ORM system provide a
clean and simple way to access, store, and manipulate our data. Before we jump right
into this section, learn about the Magento database adapters, and how to run raw
SQL queries, I feel it is important that we understand why you should avoid as much
as possible to use what you are about to learn in this section.
Magento is an extremely complex system, and as we've also learned in the previous
chapter, a framework is driven in part by events; just saving a product will trigger
different events, each doing a different task. This will not happen if you decide to
just create a query and update a product directly. So, as developers, we have to be
extremely careful and sure whether there is a justiable reason for going outside
the ORM.
That said, there are, of course, scenarios when being able to work with the database
directly comes in extremely handy and is actually simpler than working with the
Magento models. For example, when updating a product attribute globally or
changing a product collection status, we could load a product collection and loop
through each of the individual products updating and saving them. While this
would work ne on a smaller collection, as soon we start growing and working with
a larger dataset, our performance would start to drop and the script would take
several seconds to execute.
On the other hand, a direct SQL query will execute much faster, usually under 1
second, depending on the dataset size and the query being executed.
Out of the box, Magento will take care of all the heavy lifting of having to establish a
connection to the database by using the Mage_Core_Model_Resource model; Magento
makes two types of connections available to us, core_read and core_write.
Let's start by instantiating a resource model and two connections, one for reading
and the other for writing:
$resource = Mage::getModel('core/resource');
$read = $resource->getConnection('core_read');
$write = $resource->getConnection('core_write');
Even if we are working with direct SQL queries, thanks to Magento, we don't have
to worry about setting up the connection to the DB beyond instantiating a resource
model and the proper type of connection.

Chapter 3
[ 81 ]
Reading
Let's test our read connection by executing the following code:
$resource = Mage::getModel('core/resource');
$read = $resource->getConnection('core_read');
$query = 'SELECT * FROM catalog_product_entity';
$results = $read->fetchAll($query);
Although this query works, it will return all the products in the catalog_product_
entity table. But what will happen if we try to run this same code on a Magento
installation that uses table prexes? Or what if Magento suddenly changes the
table name in the next upgrade? This code is not portable or easily maintainable.
Fortunately, the resource model provides another handy method called
getTableName().
getTableName() method will take a factory name as a parameter, and based on
the conguration established by the config.xml, it will not only nd out the right
table but will also verify that table exists in the DB. Let's update our code to use
getTableName():
$resource = Mage::getModel('core/resource');
$read = $resource->getConnection('core_read');
$query = 'SELECT * FROM ' . $resource->getTableName('catalog/
product');
$results = $read->fetchAll($query);
We are also using the fetchAll() method. This will return all the rows of our query
as an array, but this is not the only option available; we also have fetchCol() and
fetchOne() at our disposal. Let's have a look at the following functions:
• fetchAll: This function retrieves all the rows returned by the original query
• fetchOne: This function will return only the values from the rst database
row returned by the query
• fetchCol: This function will return all the rows returned by the query but
only the rst rows; this is useful if you only want to retrieve a single column
with unique identiers such as products IDs or SKUs
Writing
As we've mentioned before, saving a model, be it a product, category, customer, and
so on, in Magento can be relatively slow due to the amount of observers and events
triggered in the backend.

ORM and Data Collections
[ 82 ]
But if we are only looking to update simple static values, updating large collections
can be a painfully slow process if done through the Magento ORM. Let's say, for
example, we want to make all the products on the site out of stock. Instead of doing
it through the Magento backend or creating a custom script that iterates through a
collection of all the products, we can simply perform the following code snippet:
$resource = Mage::getModel('core/resource');
$read = $resource->getConnection('core_write);
$tablename = $resource->getTableName('cataloginventory/stock_status');
$query = 'UPDATE {$tablename} SET `is_in_stock` = 1';
$write->query($query);
Summary
In this chapter, we have learned about:
• Magento Models, their inheritance, and purpose
• How Magento uses resource and collection models
• The EAV model and its importance within Magento
• How the EAV works and the structure that is used inside the database
• What the Magento ORM model is and how it is implemented
• How to work with Direct SQL and the Magento resource adapter
The chapters so far have been more theoretic than practical; this has been done with
the intention of guiding you through the complexity of Magento and providing
you with the tools and knowledge that you will require for the rest of the book.
For the rest of the book, we will take a more hands-on approach and start building
extensions incrementally, applying all the concepts we have learned so far.
In the next chapter, we will start getting our feet wet and develop our rst
Magento extension.

Frontend Development
So far, we have focused on the theory behind Magento, its architecture, and getting
familiar with common and important concepts of everyday Magento development.
In this chapter, we will give a practical use to the skills and knowledge we have
acquired so far by incrementally building a Magento extension for our frontend.
We will build a fully functional Gift Registry extension.
Extending Magento
Before jumping ahead and start building our extension, let's dene an example
scenario and a scope for our extension. This way we will have a clear idea of what
we are building and more importantly, of what we are not building.
Scenario
Our scenario is simple; we want to extend Magento to allow customers to create gift
registry lists and share them with friends and family. Customers should be able to
create multiple gift registries and specify the recipients of those gift registries.
A gift registry will hold the following information:
• Event type
• Event name
• Event date
• Event location
• List of products

Frontend Development
[ 84 ]
Features
Have a look at the following features:
• Store administrator can dene multiple event types (birthdays, weddings,
and gift registries)
• Create events and assign multiple gift registry lists to each event
• Customers can add products to their registries from the cart, wish list, or
directly from the product pages
• Customers can have multiple gift registries
• People can share their registries with friends and family through e-mail
and/or direct link
• Friends and family can buy the items from the gift registry
Further improvements
The following is a list of possible features that have been left out of this example
extension due to their complexity, or in the case of social media due to the fact that
their APIs and the amount of social media platforms is ever-changing, but they are
still a good challenge for readers who want to extend this module even further:
• Social media integration
• The registry can keep track of the request and fullled quantities for each
registry item
• Specify multiple and different registry owners
• Delivery to registry owner address
Hello Magento
In previous chapters, we learned about the Magento code pools (core, community,
local). Since we don't intend to distribute our module on Magento Connect, we will
be creating it under the local directory.
All Magento modules are kept inside packages or namespaces; for example, all the
Core Magento modules are kept under the Mage namespace. For the purpose of this
book, we will use Magento Developers Guide (MDG).
The Magento naming convention for modules is Namespace_Modulename.
Chapter 4
[ 85 ]
Our next step will be to create the module structure and conguration les. We
need to create a namespace directory under app/code/local/. The namespace can
be anything you like. The accepted convention is to use the company's name or the
author's name as the namespace. So our rst step will be to create the directory
app/code/local/Mdg/. This directory will also hold not only our gift registry
module but also any future modules we develop.
Under our namespace directory, we will also need to create a new directory with the
name of our module, which will hold all the code of custom extension.
So let's go ahead and create a Giftregistry directory. Once that is done, let's create
the rest of our directory structure.
Note that Magento is a bit sensitive to the use of camel-casing due
to its use of factory methods. In general, it's a good idea to avoid
using camel—casing in our module/controller/action names. For
more information on Magento naming conventions, please see the
Appendix of this book.
The le location is /app/code/local/Mdg/Giftregistry/.
Block/
Controller/
controllers/
Helper/
etc/
Model/
sql/
As we have learned so far, Magento uses .xml les as a central part of its
conguration. In order for a module to be recognized and activated by
Magento, we need to create a single le under app/etc/modules/,
following the Namespace_Modulename.xml convention. Let's create our le.
The le location is app/etc/modules/Mdg_Giftregistry.xml.
<?xml version="1.0"?>
<config>
<modules>
<Mdg_Giftregistry>
<active>true</active>
<codePool>local</codePool>
</Mdg_Giftregistry >
</modules>
</config>
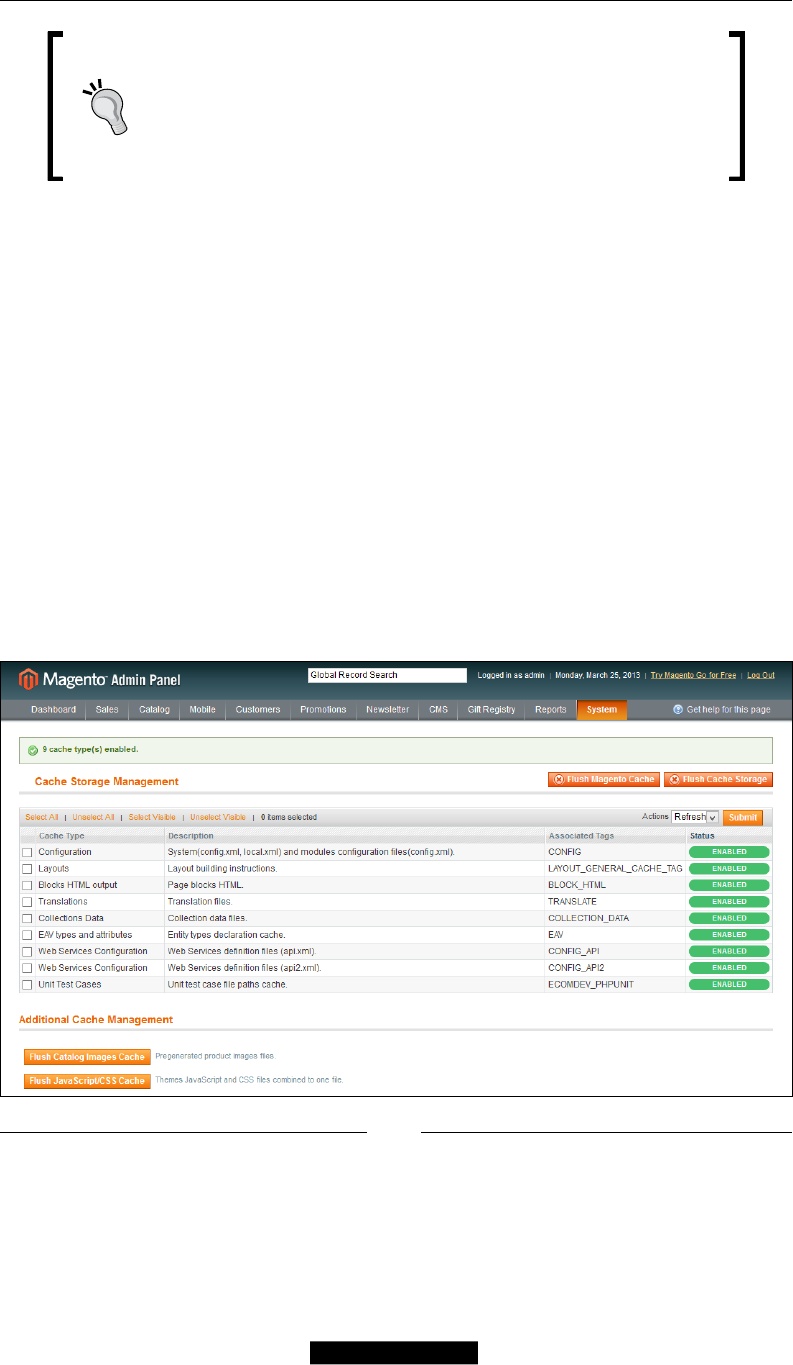
Frontend Development
[ 86 ]
Downloading the example code
You can download the example code les for all Packt books you
have purchased from your account at http://www.packtpub.
com. If you purchased this book elsewhere, you can visit
http://www.packtpub.com/support and register to have
the les e-mailed directly to you.
After creating this le or making any changes to our module conguration les, we
will need to refresh the Magento conguration cache:
1. Navigate to the Magento backend.
2. Open System | Cache Management.
3. Click on Flush Magento.
Since we are working on a development extension and we are going to be making
frequent changes to the conguration and extension code, it is a good idea to disable
the cache. Follow these steps:
1. Navigate to the Magento Backend.
2. Open System | Cache Management.
3. Select all the Cache Type checkboxes.
4. Select Disable from the Actions drop-down list.
5. Click on the Submit button.
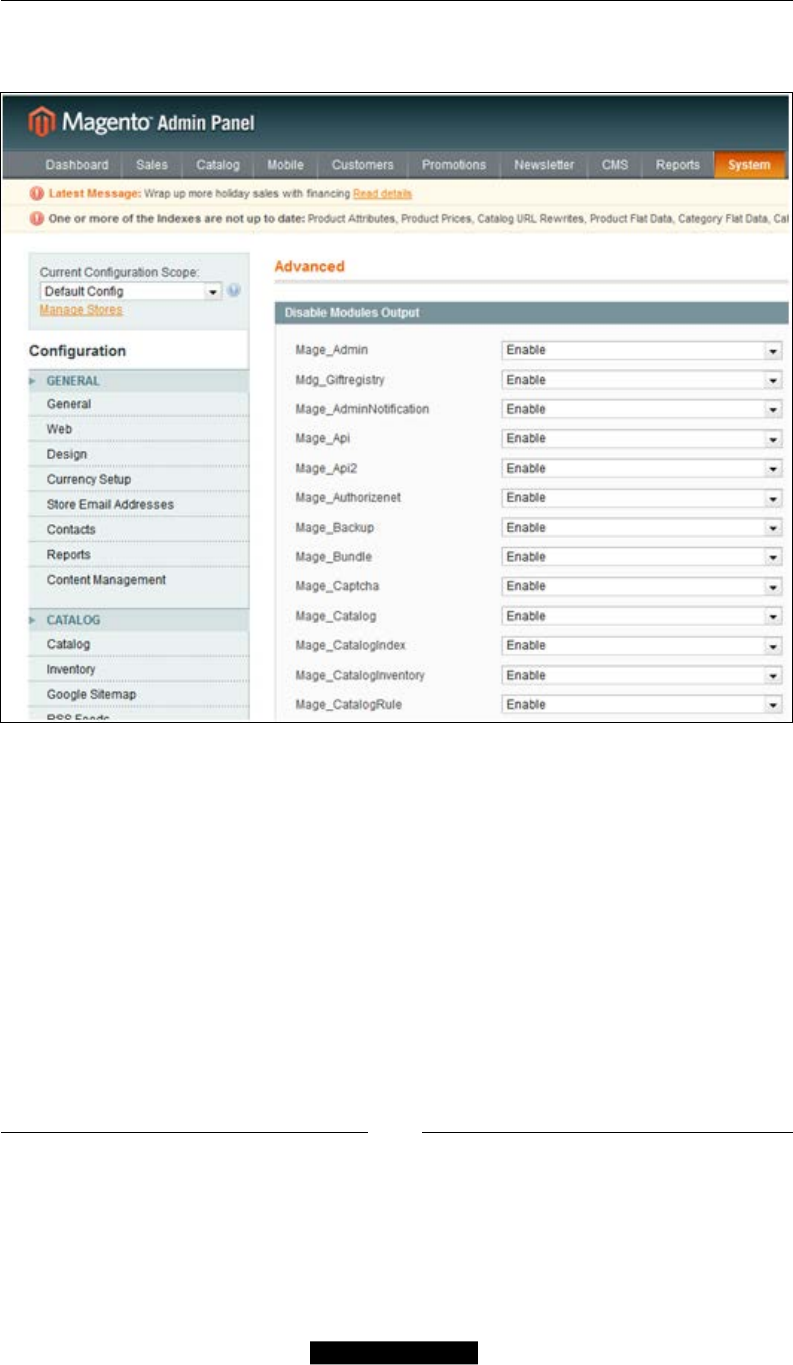
Chapter 4
[ 87 ]
Once we have cleared the cache, we can conrm that our extension is being made
active by going into System | Advanced.
Magento now knows about our module, but we haven't told Magento what our
module is supposed to do; for that, we will need to set up the module conguration.

Frontend Development
[ 88 ]
XML module conguration
There are two main les involved in a module conguration: config.xml and
system.xml. In addition to these module congurations, these are also stored in:
• api.xml
• adminhtml.xml
• cache.xml
• widget.xml
• wsdl.xml
• wsi.xml
• convert.xml
In this chapter, we will focus only on the config.xml le. Let's create our base le
and break down each of the nodes by following these steps:
1. Start by creating the config.xml le under our module etc/directory.
2. Now, copy the following code to the config.xml le (the le location is app/
code/local/Mdg/Giftregistry/etc/config.xml):
<?xml version="1.0"?>
<config>
<modules>
<Mdg_Giftregistry>
<version>0.1.0</version>
</Mdg_Giftregistry>
</modules>
<global>
<models>
<mdg_giftregistry>
<class>Mdg_Giftregistry_Model</class>
</mdg_giftregistry>
</models>
<blocks>
<mdg_giftregistry>
<class>Mdg_Giftregistry_Block</class>
</mdg_giftregistry>
</blocks>
<helpers>
<mdg_giftregistry>
<class>Mdg_Giftregistry_Helper</class>
</mdg_giftregistry>
</helpers>

Chapter 4
[ 89 ]
<resources>
<mdg_giftregistry_setup>
<setup>
<module>Mdg_Giftregistry</module>
</setup>
</mdg_giftregistry_setup>
</resources>
</global>
</config>
All module congurations are contained inside the <config> node. Inside this node,
we have the <global> and <modules> nodes.
The <modules> node is just used to specify the current module version, which is later
used to decide which installation and upgrade les to run.
There are three main conguration nodes that are most commonly used to specify
the conguration scope:
• <global>
• <adminhtml>
• <frontend>
For now, we will be working on the <global> scope. This will make any
conguration available to both, the Magento Frontend and Backend. Under
the <global> node, we have the following nodes:
• <models>
• <blocks>
• <helpers>
• <resources>
As we can see, each node follows the same conguration pattern:
<context>
<factory_alias>
<class>NameSpace_ModuleName_ClassType</class>
</factory_alias>
</context>
Each of the nodes that are used by the Magento class factories instantiate our
custom objects. The <factory_alias> node is a critical part of our extension
conguration. The <factory_alias> node is used by the factory methods,
such as Mage::getModel() or Mage::getHelper().
Frontend Development
[ 90 ]
Notice that we are not dening each specic Model, Block, or Helper, just the path
where Magento factories can nd them. Magento naming convention allows us to
have any folder structure under each of these folders, and Magento will be smart
enough to load the appropriate class in Magento's class names.
In Magento, class names and directory structures are one
and the same.
For example, we could have created a new model class under app/code/local/
Mdg/Giftregistry/Models/Folder1/Folder2/Folder3, and the factory name for
instantiating an object from this class would be:
Mage::getModel('mdg_giftregistry/folder1_folder2_folder3_classname');
Let's create our rst model, or to be more specic, a helper class. Helpers are used to
contain utility methods that are used to perform common tasks and can be shared
among different classes.
Let's go ahead and create an empty helper class; we will add the helper logic later in
this chapter.
The le location is app/code/loca/Mdg/Giftregistry/Helper/Data.php. Refer to
the following code:
<?php
class Mdg_Giftregistry_Helper_Data extends Mage_Core_Helper_Abstract {
}
?>
It might seem odd that we are naming our helper Data, but this is actually
part of Magento's standards that each module has a default helper class called
Data. Another interesting thing with helper classes is that we can just pass the
<factory_alias> node without a class-specic class name to the helper factory
method, and this will default to the Data helper class.
So if we wanted to instantiate our default helper class, we only need to perform
the following:
Mage::helper('mdg_registry');

Chapter 4
[ 91 ]
Models and saving data
Before jumping straight into creating our models, we need to dene clearly what
type of models we are going to build and how many. So let's review our example
scenario. For our gift registry, it appears that we will need two different models:
• Registry Model: This model is used to store the gift registry information,
such as gift registry type, address, and recipient information
• Registry Item: This model is used to store the information of each of the gift
registry items (quantity requested, quantity bought, product_id)
Although this approach is correct, it does not meet all the requirements of our
example scenario. By having all the registry information stored into a single table, we
cannot add more registry types without modifying the code.
So, in this case, we will want to break down our data into multiple tables:
• Registry Entity: This table is used to store the gift registry and event
information
• Registry Type: By storing the gift registry type into a separate table, we can
add or remove event types
• Registry Item: This table is used to store the information of each of the gift
registry items (quantity requested, quantity bought, product_id)
Now that we have dened our data structure, we can start building the
corresponding models that will allow us to access and manipulate our data.
Creating the models
Let's start by creating the Gift Registry type model, which is used to manage the registry
types (wedding, birthday, baby shower, and so on). To do so, follow these steps:
1. Navigate to the Model folder on our module directory.
2. Create a new le called Type.php and copy the following content into the le
(the le location is app/code/local/Mdg/Giftregistry/Model/Type.php):
<?php
class Mdg_Giftregistry_Model_Type extends Mage_Core_Model_Abstract
{
public function __construct()
{
$this->_init('mdg_giftregistry/type');
parent::_construct();
}
}

Frontend Development
[ 92 ]
We will also need to create a resource class; every Magento Data model has its own
resource class. It is also important to clarify that only models that handle the data
directly, be it a simple data model or an EAV model, will require a resource class.
To do so, follow these steps:
1. Navigate to the Model folder on our module directory.
2. Create a new folder under Model called Mysql4.
3. Create a new le called Type.php and copy the following content into the le
(the le location is app/code/local/Mdg/Giftregistry/Model/Mysql4/
Type.php):
<?php
class Mdg_Giftregistry_Model_Mysql4_Type extends Mage_Core_Model_
Mysql4_Abstract
{
public function _construct()
{
$this->_init('mdg_giftregistry/type', 'type_id');
}
}
Finally, we will also need a collection class to retrieve all available event types:
1. Navigate to the Model folder on our module directory.
2. Create a new le called Type.php and copy the following content into the le
(the le location is app/code/local/Mdg/Giftregistry/Model/Mysql4/
Type/Collection.php):
<?php
class Mdg_Giftregistry_Model_Mysql4_Type_Collection extends Mage_
Core_Model_Mysql4_Collection_Abstract
{
public function _construct()
{
$this->_init('mdg_giftregistry/type');
parent::_construct();
}
}

Chapter 4
[ 93 ]
Let's do the same by creating a model that handles the gift registry items. This model
will hold all the relevant product information for the registry items. To do so, follow
these steps:
1. Navigate to the Model folder on our module directory.
2. Create a new le called Item.php and copy the following content into the le
(the le location is app/code/local/Mdg/Giftregistry/Model/Item.php):
<?php
class Mdg_Giftregistry_Model_Item extends Mage_Core_Model_Abstract
{
public function __construct()
{
$this->_init('mdg_giftregistry/item');
parent::_construct();
}
}
Let's go ahead and create the resource class:
1. Navigate to the Model folder on our module directory.
2. Open the Mysql4 folder
3. Create a new le called Item.php and copy the following content into the le
(the le location is app/code/local/Mdg/Giftregistry/Model/Mysql4/
Item.php):
<?php
class Mdg_Giftregistry_Model_Mysql4_Item extends Mage_Core_Model_
Mysql4_Abstract
{
public function _construct()
{
$this->_init('mdg_giftregistry/item', 'item_id');
}
}
And, nally, let's create the corresponding collection class:
1. Navigate to the Model folder on our module directory.
2. Create a new le called Collection.php and copy the following content into
the le (the le location is app/code/local/Mdg/Giftregistry/Model/
Mysql4/Item/Collection.php):
<?php
class Mdg_Giftregistry_Model_Mysql4_Item_Collection extends Mage_
Core_Model_Mysql4_Collection_Abstract

Frontend Development
[ 94 ]
{
public function _construct()
{
$this->_init('mdg_giftregistry/item');
parent::_construct();
}
}
Our next step will be to create our Registry entity; this is the core of our registry and
is the model that ties everything together. To do so, follow these steps:
1. Navigate to the Model folder on our module directory.
2. Create a new le called Entity.php and copy the following content into
the le (the le location is app/code/local/Mdg/Giftregistry/Model/
Entity.php):
<?php
class Mdg_Giftregistry_Model_Entity extends Mage_Core_Model_
Abstract
{
public function __construct()
{
$this->_init('mdg_giftregistry/entity');
parent::_construct();
}
}
Let's go ahead and create the resource class:
1. Navigate to the Model folder on our module directory.
2. Open the Mysql4 folder.
3. Create a new le called Entity.php and copy the following content into
the le (the le location is app/code/local/Mdg/Giftregistry/Model/
Mysql4/Entity.php):
<?php
class Mdg_Giftregistry_Model_Mysql4_Entity extends Mage_Core_
Model_Mysql4_Abstract
{
public function _construct()
{
$this->_init('mdg_giftregistry/entity', 'entity_id');
}
}

Chapter 4
[ 95 ]
And, nally, let's create the corresponding collection class:
1. Navigate to the Model folder on our module directory.
2. Create a new le called Collection.php and copy the following content into
the le (the le location is app/code/local/Mdg/Giftregistry/Model/
Mysql4/Entity/Collection.php):
<?php
class Mdg_Giftregistry_Model_Mysql4_Entity_Collection extends
Mage_Core_Model_Mysql4_Collection_Abstract
{
public function _construct()
{
$this->_init('mdg_giftregistry/entity');
parent::_construct();
}
}
So far, we haven't done anything other than blindly creating new models by copying
code and adding model classes to our module. Let's test our newly created models
using the Interactive Magento Console (IMC).
Let's re up IMC and try out the new models by running the following command in
the root of our Magento installation:
$ php shell/imc.php
The following code assumes that you are running a Magento test installation with
sample data, and if you are using the Vagrant box installation, you already have all
the preloaded data:
1. We will start by loading the customer model:
magento > $customer = Mage::getModel('customer/customer')-
>load(1);
2. Next we need to instantiate a new registry object:
magento > $registry = Mage::getModel('mdg_giftregistry/entity');
3. One handy function that is part of all Magento models is the getData()
function, which returns an array of all the object attributes. Let's run this
function on both a, the registry and customer object and compare the output:
magento > print_r($customer->getData());
magento > print_r($registry->getData());

Frontend Development
[ 96 ]
4. As we notice, the customer has all the data set for our John Doe example
record, while the registry object returns completely empty $regiarray. Let's
change this by running the following code:
magento > $registry->setCustomerId($customer->getId());
magento > $registry->setTypeId(1);
magento > $registry->setWebsiteId(1);
magento > $registry->setEventDate('2012-12-12');
magento > $registry->setEventCountry('CA');
magento > $registry->setEventLocation('Toronto');
5. Now let's try to print the registry data one more time by running:
magento > print_r($registry->getData());
6. Finally, to make our changes permanent, we need to call the model
save function:
magento > $registry->save();
And oops! Something went wrong when saving the product; we got the following
error in the console:
Fatal error: Call to a member function beginTransaction() on a non-
object in …/app/code/core/Mage/Core/Model/Abstract.php on line 313
What happened? The save() function that is being called is part of the parent class
Mage_Core_Model_Mysql4_Abstract, which in turn calls the abstract class save()
function, but we are missing a critical part of our config.xml le.
In order for Magento to properly identify which resource class to use, we need to
specify the resource model class and the matching table for each entity. Let's go
ahead and update our conguration le by following these steps:
1. Navigate to the extension etc/ folder.
2. Open config.xml.
3. Update the <model> node with the following code (the le location is app/
code/local/Mdg/Giftregistry/Model/Entity.php):
…
<models>
<mdg_giftregistry>
<class>Mdg_Giftregistry_Model</class>
<resourceModel>mdg_giftregistry_mysql4</resourceModel>
</mdg_giftregistry>

Chapter 4
[ 97 ]
<mdg_giftregistry_mysql4>
<class>Mdg_Giftregistry_Model_Mysql4</class>
<entities>
<entity>
<table>mdg_giftregistry_entity</table>
</entity>
<item>
<table>mdg_giftregistry_item</table>
</item>
<type>
<table>mdg_giftregistry_type</table>
</type>
</entities>
</mdg_giftregistry_mysql4>
</models>
…
Now, before we can actually save a product to the database, we have to create our
database tables rst; next, we will learn how to use setup resources for creating our
table structures and setting our default data.
Setup resources
Now that we have created our model code, we need to create setup resources in
order to be able to save them. The setup resources will take care of creating the
corresponding database tables. Now, we could just use straight SQL or a tool such
as PHPMyAdmin to create all the tables, but this is not the standard practice, and by
general rule, we should never modify the Magento Database directly.
To achieve this, we will do the following:
• Dene a setup resource on our conguration le
• Create a resource class
• Create an installer script
• Create a data script
• Create an upgrade script

Frontend Development
[ 98 ]
Dening a setup resource
When we rst dened our conguration le, we dened a <resources> node:
The le location is app/code/local/Mdg/Giftregistry/etc/config.xml. Refer to
the following code snippet:
…
<resources>
<mdg_giftregistry_setup>
<setup>
<module>Mdg_Giftregistry</module>
</setup>
</mdg_giftregistry_setup>
</resources>
…
The rst thing to notice is that the <mdg_giftregistry_setup> node is used
as a unique identier for our setup resource; the standard naming convention is
<modulename_setup>, and while it is not required, it is highly recommended
to follow this naming convention.
We will also need to make a change to the <setup> node, add an additional class
node, and read and write connections:
The le location is app/code/local/Mdg/Giftregistry/etc/config.xml.
…
<resources>
<mdg_giftregistry_setup>
<setup>
<module>Mdg_Giftregistry</module>
<class>Mdg_Giftregistry_Model_Resource_Setup</class>
</setup>
<connection>
<use>core_setup</use>
</connection>
</mdg_giftregistry_setup>
<mdg_giftregistry_write>
<connection>
<use>core_write</use>
</connection>
</mdg_giftregistry_write>
<mdg_giftregistry_read>
<connection>
<use>core_read</use>

Chapter 4
[ 99 ]
</connection>
</mdg_giftregistry_read>
</resources>
…
Creating this setup resource is not required for the basic setup scripts, and
Mage_Core_Model_Resource_Setup can be used instead, but by creating our
own setup class, we are planning ahead and giving ourselves more exibility for
future improvements. Next, we will create the setup resource class under the le
location, otherwise we will be getting an error saying that Magento can't nd the
setup resource class.
Create the setup resource class under the le location, app/code/local/Mdg/
Giftregistry/Model/Resource/Setup.php. Refer to the following code snippet:
<?php
class Mdg_Giftregistry_Model_Resource_Setup extends Mage_Core_Model_
Resource_Setup
{
}
For now, we don't need to do anything else with the setup resource class.
Creating the Installer Script
Our next step will be to create an installation script. This script contains all the SQL
code for creating our tables and is run when we initialize our module. First, let's take
another quick look to our config.xml le. If we remember, the rst node dened
before our <global> node was the <modules> node.
The le location is app/code/local/Mdg/Giftregistry/etc/config.xml. Refer to
the following code snippet:
<modules>
<Mdg_Giftregistry>
<version>0.1.0</version>
</Mdg_Giftregistry>
</modules>
As we mentioned before, this node is required on all Magento modules and is used
to identify the current installed version of our module. This version number is used
by Magento to identify if and which installation and upgrade scripts to run.
Frontend Development
[ 100 ]
A word on naming conventions: Since Magento 1.6, the setup
script naming conventions have changed. Originally, the Mysql4-
install-x.x.x.php naming convention was used and is currently
deprecated but still supported.
Since Magento 1.6, the naming convention for the setup script has changed and now
developers can make use of three different script types:
• Install: This script is used when the module is rst installed and no record of
it exists on the core_resource table
• Upgrade: This script is used if the version in the core_resource table is
lower than the one in the config.xml le
• Data: This script will run after the matching version install/upgrade script
and are used to populate the tables with required data
Data script are introduced in Magento 1.6 and are stored under
the data/directory directly under our Module root. They follow a
slightly different convention than the install and upgrade scripts
by adding the prex.
Let's continue creating our registry entity table in our installation script under.
The le location is app/code/local/Mdg/Giftregistry/sql/mdg_giftregistry_
setup/install-0.1.0.php. Refer to the following code:
<?php
$installer = $this;
$installer->startSetup();
// Create the mdg_giftregistry/registry table
$tableName = $installer->getTable('mdg_giftregistry/entity');
// Check if the table already exists
if ($installer->getConnection()->isTableExists($tableName) != true) {
$table = $installer->getConnection()
->newTable($tableName)
->addColumn('entity_id', Varien_Db_Ddl_Table::TYPE_INTEGER,
null,
array(
'identity' => true,
'unsigned' => true,
'nullable' => false,
'primary' => true,
),

Chapter 4
[ 101 ]
'Entity Id'
)
->addColumn('customer_id', Varien_Db_Ddl_Table::TYPE_INTEGER,
null,
array(
'unsigned' => true,
'nullable' => false,
'default' => '0',
),
'Customer Id'
)
->addColumn('type_id', Varien_Db_Ddl_Table::TYPE_SMALLINT,
null,
array(
'unsigned' => true,
'nullable' => false,
'default' => '0',
),
'Type Id'
)
->addColumn('website_id', Varien_Db_Ddl_Table::TYPE_SMALLINT,
null,
array(
'unsigned' => true,
'nullable' => false,
'default' => '0',
),
'Website Id'
)
->addColumn('event_name', Varien_Db_Ddl_Table::TYPE_TEXT, 255,
array(),
'Event Name'
)
->addColumn('event_date', Varien_Db_Ddl_Table::TYPE_DATE,
null,
array(),
'Event Date'
)
->addColumn('event_country', Varien_Db_Ddl_Table::TYPE_TEXT,
3,
array(),
'Event Country'
)
->addColumn('event_location', Varien_Db_Ddl_Table::TYPE_TEXT,
255,

Frontend Development
[ 102 ]
array(),
'Event Location'
)
->addColumn('created_at', Varien_Db_Ddl_Table::TYPE_TIMESTAMP,
null,
array(
'nullable' => false,
),
'Created At')
->addIndex($installer->getIdxName('mdg_giftregistry/entity',
array('customer_id')),
array('customer_id'))
->addIndex($installer->getIdxName('mdg_giftregistry/entity',
array('website_id')),
array('website_id'))
->addIndex($installer->getIdxName('mdg_giftregistry/entity',
array('type_id')),
array('type_id'))
->addForeignKey(
$installer->getFkName(
'mdg_giftregistry/entity',
'customer_id',
'customer/entity',
'entity_id'
),
'customer_id', $installer->getTable('customer/entity'),
'entity_id',
Varien_Db_Ddl_Table::ACTION_CASCADE, Varien_Db_Ddl_
Table::ACTION_CASCADE)
->addForeignKey(
$installer->getFkName(
'mdg_giftregistry/entity',
'website_id',
'core/website',
'website_id'
),
'website_id', $installer->getTable('core/website'),
'website_id',
Varien_Db_Ddl_Table::ACTION_CASCADE, Varien_Db_Ddl_
Table::ACTION_CASCADE)
->addForeignKey(
$installer->getFkName(
Chapter 4
[ 103 ]
'mdg_giftregistry/entity',
'type_id',
'mdg_giftregistry/type',
'type_id'
),
'type_id', $installer->getTable('mdg_giftregistry/type'),
'type_id',
Varien_Db_Ddl_Table::ACTION_CASCADE, Varien_Db_Ddl_
Table::ACTION_CASCADE);
$installer->getConnection()->createTable($table);
}
$installer->endSetup();
Please note that due to space constraints we are not adding the full
installation script; you still need to add the installer code for the item and
type tables. The full installation le and the code les can be downloaded
directly from https://github.com/amacgregor/mdg_giftreg.
Now that might look like a lot of code, but it is only creating one output of the
tables, in order to make sense of it, lets break it down, and see what is exactly
the code doing.
The rst thing to notice is that even if we are creating and setting database tables,
we are not writing any SQL code. Magento ORM provides an adapter with the
database. All the installation, upgrade, and data scripts inherit from Mage_Core_
Model_Resource_Setup. Let's break down each of the functions being used on our
installation script.
The rst three lines of the script instantiate both resource_setup model and the
connection. The rest of the script deals with setting up a new table instance and
calling the following functions on it:
• addColumn: This function is used to dene each of the table columns and
takes the following ve parameters:
°name: This is the name of the column
°type: This is the data storage type (int, varchar, text, and so on)
°size: This is the column length
°options: This is an array of additional options for the data storage
°Comment: This is the column description
Frontend Development
[ 104 ]
• addIndex: This function is used to dene the indexes of a particular table and
takes the following three parameters:
°index: This is an index name
°columns: This can be a string with a single column name or an array
with multiple ones
°options: This is an array of additional options for the data storage
• addForeginKey: This function is used to dene foreign key relationships,
and it takes the following six parameters:
°fkName: This is a foreign key name
°column: This is a foreign key column name
°refTable: This is a reference table name
°refColumn: This is a reference table column name
°onDelete: This is an action to take on delete row
°onUpdate: This is an action to take on update of row
The code creating each of our tables is basically composed of those three functions,
and after each table denition, the following code is executed:
$installer->getConnection()->createTable($table);
This is telling our database adapter to convert our code into SQL and run it against
the database. There is one important thing to notice; that is, instead of providing or
hard-coding the database names, the following code is called:
$installer->getTable('mdg_giftregistry/entity')
This is the table alias that we dened before inside our config.xml les. To nish
our installer, we need to create a newTable instance for each of our entities.
Here's a challenge for you. Create the missing tables by using
your Installer Script. To see the answer with the complete code
and full breakdown, visit http://www.magedevguide.com/
challenge/chapter4/1.
The data scripts can be used to populate our tables; in our case, this will come in
handy to set up some base event types.

Chapter 4
[ 105 ]
We will rst need to create a data installation script under the data folder; as we
mentioned before, the structure is very similar to the SQL folder, and the only
difference is that we append the data prex to the matching installation/upgrade
script. To do so, follow these steps:
1. Navigate to the module data folder app/code/local/Mdg/Giftregistry/
data/.
2. Create a new directory based on resource; in this case, it would be
mdg_giftregistry_setup.
3. Under mdg_giftregistry_setup, create a le called data-install-
0.1.0.php.
4. Copy the following code into the data-install-0.1.0.php le (the le
location is app/code/local/Mdg/Giftregistry/data/mdg_giftregistry_
setup/data-install-0.1.0.php):
<?php
$registryTypes = array(
array(
'code' => 'baby_shower',
'name' => 'Baby Shower',
'description' => 'Baby Shower',
'store_id' => Mage_Core_Model_App::ADMIN_STORE_ID,
'is_active' => 1,
),
array(
'code' => 'wedding',
'name' => 'Wedding',
'description' => 'Wedding',
'store_id' => Mage_Core_Model_App::ADMIN_STORE_ID,
'is_active' => 1,
),
array(
'code' => 'birthday',
'name' => 'Birthday',
'description' => 'Birthday',
'store_id' => Mage_Core_Model_App::ADMIN_STORE_ID,
'is_active' => 1,
),
);
foreach ($registryTypes as $data) {
Mage::getModel('mdg_giftregistry/type')
->addData($data)
->setStoreId($data['store_id'])
->save();
}
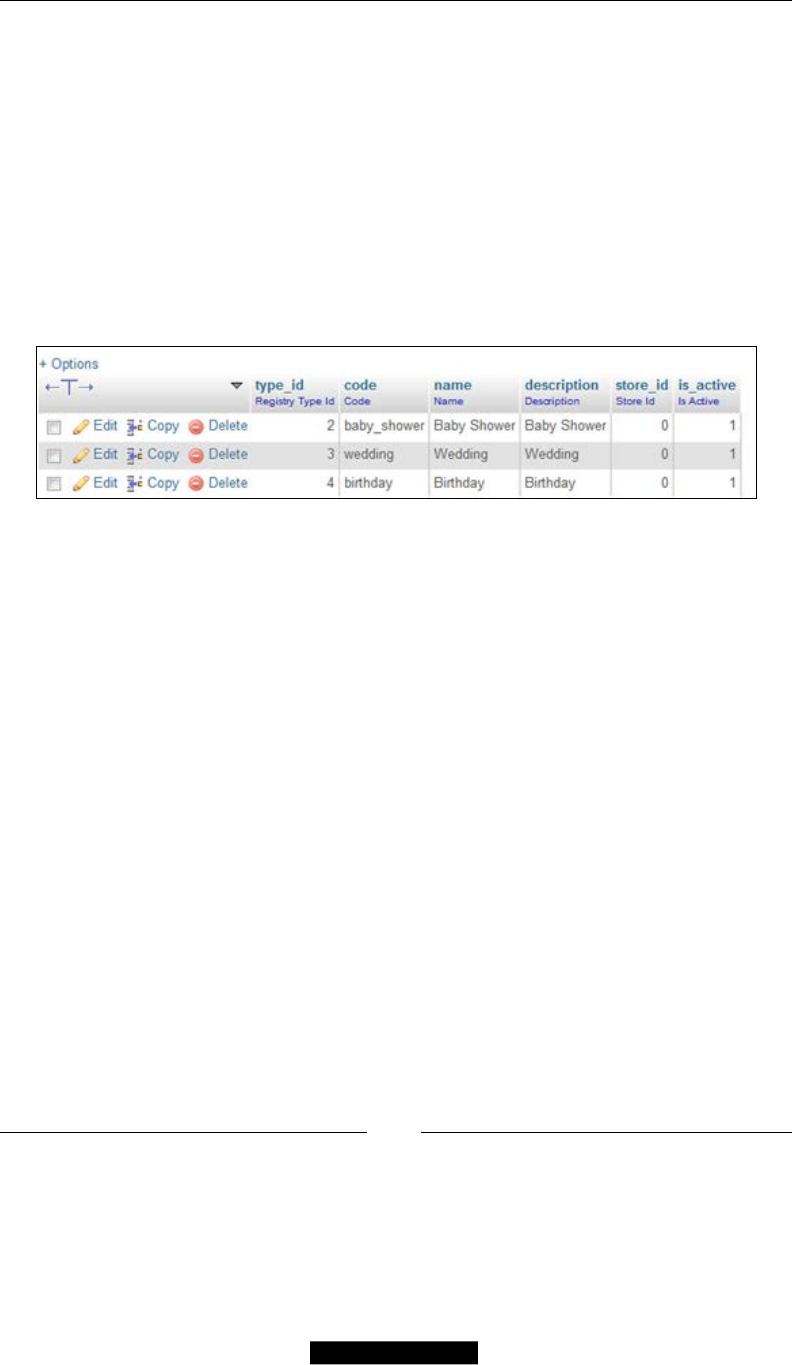
Frontend Development
[ 106 ]
Let's take a closer look at the last conditional block on the data-install-0.1.0.php
script:
foreach ($registryTypes as $data) {
Mage::getModel('mdg_giftregistry/type')
->addData($data)
->setStoreId($data['store_id'])
->save();
}
Now, if we refresh our Magento installation, the error should be gone, and if
we take a close look at the mdg_giftregistry_type table, we should see the
following records:
As we learned before, the installation and data scripts will run the rst time our
module is installed. But what happens in our case where Magento already thinks
our module is installed?
Since the module is already registered in the core_resource table, the installation
scripts will not be run again, unless Magento detects a version change in the
extension. This is great for handling multiple releases of an extension but not very
practical for development purposes.
Fortunately, it is easy to trick Magento into running our extension installation scripts
again. We only have to delete the corresponding entry in the core_resource table.
To do so, follow these steps:
1. Open your MySQL console; if you are using our Vagrant box, you can just
open it by typing mysql.
2. Once we are in the MySQL shell, we need to select our working database; in
our case, it is ce1702_magento.
3. Finally, we need to enter the core_resource table using the following query:
mysql> DELETE FROM `core_resource` WHERE `code` = 'mdg_
giftregistry_setup'
Chapter 4
[ 107 ]
What have we learned?
So far, we have learned to:
• Create the base directory structure for our Magento module
• The role and importance of the conguration les
• Creating models and setup resources
• The role and order of installation, upgrade, and data scripts
Here's a challenge for you. Try improving the model structure for our
module even further by converting the entity into an EAV model; this will
require modications to the installation scripts and to the resource model.
To see the answer with the complete code and full breakdown, visit
http://www.magedevguide.com/challenge/chapter4/2.
Setting up our routes
Now that we are capable of saving and manipulating the data by using our models,
we need to provide a way for customers to interact with the actual gift registries;
that is our rst step. We need to create valid routes or URLs in the frontend.
As with many things in Magento, this is controlled by the conguration le. A route
will convert a URL into a valid controller, action, and method.
Open our config.xml le. The le location is app/code/local/Mdg/Giftregistry/
etc/config.xml. Refer to the following code:
<config>
…
<frontend>
<routers>
<mdg_giftregistry>
<use>standard</use>
<args>
<module>Mdg_Giftregistry</module>
<frontName>giftregistry</frontName>
</args>
</mdg_giftregistry>
</routers>
</frontend>
…
</config>

Frontend Development
[ 108 ]
Let's break down the conguration code we just added:
• <frontend>: Previously, we added all the conguration inside the global
scope; since we want our routes to be only available in the frontend, we need
to declare our custom routes under the frontend scope
• <routers>: This is the container tag that holds the conguration for our
custom routes
• <mdg_giftregistry>: The naming convention for this tag is to match the
module name and is the unique identier for our route
• <frontName>: As we learned in Chapter 2, Magento Fundamentals for
Developers, Magento breaks down the URLs into http://localhost.com /
frontName/actionControllerName/actionMethod/.
Once we have dened our route conguration, we need to create an actual controller
to handle all the incoming requests.
The index controller
Our rst step is to create IndexController under our module controllers directory.
Magento will always try to load IndexController if no controller name is specied.
The le location is app/code/local/Mdg/Giftregistry/controllers/Index.php.
Refer to the following code:
<?php
class Mdg_Giftregistry_IndexController extends Mage_Core_Controller_
Front_Action
{
public function indexAction()
{
echo 'This is our test controller';
}
}
After creating our le, if we go to http://localhost.com/giftregistry/
index/index, we should see a blank page with a message saying, This is our test
controller. This is because we are not properly loading the layout of our customer
controller. The le location is app/code/local/Mdg/Giftregistry/controllers/
IndexController.php. We need to change our action code to:
<?php
class Mdg_Giftregistry_IndexController extends Mage_Core_Controller_
Front_Action
{

Chapter 4
[ 109 ]
public function indexAction()
{
$this->loadLayout();
$this->renderLayout();
}
}
Before going into the details of what is happening within the controller action; let's
create the rest of the controllers and corresponding actions.
We will need a controller that takes care of the basic operations for customers so they
are able to create, manage, and delete their registries. Also, we will require a search
controller so family and friends can locate the matching gift registries, and nally,
we will require a view controller for showing the registry details.
Our rst step will be to add the remaining actions to the index controller
(the le location is app/code/local/Mdg/Giftregistry/controllers/
IndexController.php):
<?php
class Mdg_Giftregistry_IndexController extends Mage_Core_Controller_
Front_Action
{
public function indexAction()
{
$this->loadLayout();
$this->renderLayout();
return $this;
}
public function deleteAction()
{
$this->loadLayout();
$this->renderLayout();
return $this;
}
public function newAction()
{
$this->loadLayout();
$this->renderLayout();
return $this;
}
public function editAction()

Frontend Development
[ 110 ]
{
$this->loadLayout();
$this->renderLayout();
return $this;
}
public function newPostAction()
{
$this->loadLayout();
$this->renderLayout();
return $this;
}
public function editPostAction()
{
$this->loadLayout();
$this->renderLayout();
return $this;
}
}
Before we start adding all the logic to the index controller, we need to take an extra
step to prevent not logged in customers to access the giftregistry functionality.
Magento Front Controller is already very useful for handling this; it's called the
preDispatch() function, which is executed before any other action in the controller.
Open your IndexController.php and add the following code at the beginning of
the class.
The le location is app/code/local/Mdg/Giftregistry/controllers/
IndexController.php. Refer to the following code:
<?php
class Mdg_Giftregistry_IndexController extends Mage_Core_Controller_
Front_Action
{
public function preDispatch()
{
parent::preDispatch();
if (!Mage::getSingleton('customer/session')-
>authenticate($this)) {
$this->getResponse()->setRedirect(Mage::helper('custom
er')->getLoginUrl());
$this->setFlag('', self::FLAG_NO_DISPATCH, true);
}
}
…

Chapter 4
[ 111 ]
Now, if we try to load http://localhost.com/giftregistry/index/index, we
will be redirected to the login page unless we are logged in to the frontend.
Our next step will be to add all the logic to each of the controller actions so the
controller can properly handle creation, update, and deletion.
The index, new, and edit actions are mostly used to load and render the
layout, so there is not much logic involved in controller, newPostAction(),
editPostAction(), and deleteAction(); on the other hand, they handle a
heavier and more complicated logic.
Let's get started with newPostAction(). This action is used to handle the data
received from the newAction() form. To do so, follow these steps:
1. Open IndexController.php.
2. The rst thing we will add to the action is an if statement to check if the
request is a post-request, which we can retrieve by using the following code:
$this->getRequest()->isPost()
3. In addition to that, we also want to check that the request has actual data; for
that, we can use the following code:
$this->getRequest()->getParams()
Once we have validated that, the request is a proper request, and while we are
receiving data, we need to actually create gift registry. To do so, we will add a new
function inside our registry model by following these steps:
1. Open the registry entity model.
2. Create a new function called updateRegistryData() and make sure the
function takes two parameters: $customer and $data.
3. The le location is app/code/local/Mdg/Giftregistry/Model/Entity.
php. Add the following code inside this function:
public function updateRegistryData(Mage_Customer_Model_Customer
$customer, $data)
{
try{
if(!empty($data))
{
$this->setCustomerId($customer->getId());
$this->setWebsiteId($customer->getWebsiteId());
$this->setTypeId($data['type_id']);
$this->setEventName($data['event_name']);
$this->setEventDate($data['event_date']);
$this->setEventCountry($data['event_country']);

Frontend Development
[ 112 ]
$this->setEventLocation($data['event_location']);
}else{
throw new Exception("Error Processing Request:
Insufficient Data Provided");
}
} catch (Exception $e){
Mage::logException($e);
}
return $this;
}
This function will help us out by adding the form data into the current instance of
the registry object, which means we need to create one inside our controller. Let's put
the code for our controller together:
The le location is app/code/local/Mdg/Giftregistry/controllers/
IndexController.php. Refer to the following code snippet:
public function newPostAction()
{
try {
$data = $this->getRequest()->getParams();
$registry = Mage::getModel('mdg_giftregistry/entity');
$customer = Mage::getSingleton('customer/session')-
>getCustomer();
if($this->getRequest()->getPost() && !empty($data)) {
$registry->updateRegistryData($customer, $data);
$registry->save();
$successMessage = Mage::helper('mdg_giftregistry')->__
('Registry Successfully Created');
Mage::getSingleton('core/session')-
>addSuccess($successMessage);
}else{
throw new Exception("Insufficient Data provided");
}
} catch (Mage_Core_Exception $e) {
Mage::getSingleton('core/session')->addError($e-
>getMessage());
$this->_redirect('*/*/');
}
$this->_redirect('*/*/');
}
We have created a very basic controller action that will handle the registry creation
and that will handle most of the possible exceptions.

Chapter 4
[ 113 ]
Let's continue by creating editPostAction; this action is very similar to the
newPostAction. The main difference is that in the case of editPostAction,
we are working with an already existing registry record, so we will need to
add some validation before setting the data.
The le location is app/code/local/Mdg/Giftregistry/controllers/
IndexController.php. Let's take a closer look at the following action code:
public function editPostAction()
{
try {
$data = $this->getRequest()->getParams();
$registry = Mage::getModel('mdg_giftregistry/entity');
$customer = Mage::getSingleton('customer/session')-
>getCustomer();
if($this->getRequest()->getPosts() && !empty($data) )
{
$registry->load($data['registry_id']);
if($registry){
$registry->updateRegistryData($customer, $data);
$registry->save();
$successMessage = Mage::helper('mdg_
giftregistry')->__('Registry Successfully Saved');
Mage::getSingleton('core/session')-
>addSuccess($successMessage);
}else {
throw new Exception("Invalid Registry Specified");
}
}else {
throw new Exception("Insufficient Data provided");
}
} catch (Mage_Core_Exception $e) {
Mage::getSingleton('core/session')->addError($e-
>getMessage());
$this->_redirect('*/*/');
}
$this->_redirect('*/*/');
}
As we can see, this code is pretty much the same as our newPostAction() controller
with the critical distinction that it tries to load an existing registry before updating
the data.
Frontend Development
[ 114 ]
Here's a challenge for you. Since the code between
editPostAction() and newPostAction() are very similar,
try combining both into a single post action that can be reused. To
see the answer with the complete code and full breakdown, visit
http://www.magedevguide.com/challenge/chapter4/3.
To nalize IndexController, we need to add an action that allows us to delete a
specic registry record; for that, we will use deleteAction().
Thanks to the Magento ORM system, this process is really simple, as Magento
models inherit the delete() function, which as the name implies will simply
delete that specic model instance.
The le location is app/code/local/Mdg/Giftregistry/controllers/
IndexController.php. Inside IndexController, add the following code:
public function deleteAction()
{
try {
$registryId = $this->getRequest()->getParam('registry_id');
if($registryId && $this->getRequest()->getPost()){
if($registry = Mage::getModel('mdg_giftregistry/entity')-
>load($registryId))
{
$registry->delete();
$successMessage = Mage::helper('mdg_
giftregistry')->__('Gift registry has been succesfully deleted.');
Mage::getSingleton('core/session')-
>addSuccess($successMessage);
}else{
throw new Exception("There was a problem deleting the
registry");
}
}
} catch (Exception $e) {
Mage::getSingleton('core/session')->addError($e-
>getMessage());
$this->_redirect('*/*/');
}
}

Chapter 4
[ 115 ]
The important actions to notice in our delete controller are as follows:
1. We check for the right type of request into our action.
2. We instantiate the registry object and verify if it is a valid one.
3. Finally, we call the delete() function on the registry instance.
You might notice by now that since we have made a critical omission, there is no
way to add an actual product to our cart.
We will be skipping that particular action for now, and we will create it after we
have a better understanding of the blocks and layouts involved and how it interacts
with our custom controllers.
The search controller
Now that we have a working IndexController that will handle most of the
logic for modifying actual registries, the next controller that we will create is
SearchController. To do so, follow these steps:
1. Create a new controller under the controllers directory with the name
SearchController.
2. The le location is app/code/local/Mdg/Giftregistry/controllers/
SearchController.php. Copy the following code into the search controller:
<?php
class Mdg_Giftregistry_SearchController extends Mage_Core_
Controller_Front_Action
{
public function indexAction()
{
$this->loadLayout();
$this->renderLayout();
return $this;
}
public function resultsAction()
{
$this->loadLayout();
$this->renderLayout();
return $this;
}
}
We will leave indexAction for now, and we will focus on the logic involved
in resultsAction(), which will be taking the search parameters and loading
a registry collection.

Frontend Development
[ 116 ]
The le location is app/code/local/Mdg/Giftregistry/controllers/
SearchController.php. Let's take a look at the complete action code and
break it down:
public function resultsAction()
{
$this->loadLayout();
if ($searchParams = $this->getRequest()->getParam('search_
params')) {
$results = Mage::getModel('mdg_giftregistry/entity')-
>getCollection();
if($searchParams['type']){
$results->addFieldToFilter('type_id',
$searchParams['type']);
}
if($searchParams['date']){
$results->addFieldToFilter('event_date',
$searchParams['date']);
}
if($searchParams['location']){
$results->addFieldToFilter('event_location',
$searchParams['location']);
}
$this->getLayout()->getBlock('mdg_giftregistry.search.
results')
->setResults($results);
}
$this->renderLayout();
return $this;
}
As with previous actions, we are taking the request parameters, but in this particular
case, we load a gift registry collection and apply a eld lter for each of the available
elds. One thing to stand out is that this is the rst time we are interacting with the
layout directly from a Magento controller.
$this->getLayout()->getBlock('mdg_giftregistry.search.results')
->setResults($results);
What we are doing here is making the loaded registry collection available to that
particular block instance.

Chapter 4
[ 117 ]
The view controller
Finally, we need a controller that allows displaying registry details regardless of
whether a customer is logged in or not. Follow these steps:
1. Create a new controller under the controllers directory with the name
ViewController.
2. Open the controller that we just created and refer to the following
placeholder code (the le location is app/code/local/Mdg/Giftregistry/
controllers/ViewController.php):
<?php
class Mdg_Giftregistry_ViewController extends Mage_Core_
Controller_Front_Action
{
public function viewAction()
{
$registryId = $this->getRequest()->getParam('registry_
id');
if($registryId){
$entity = Mage::getModel('mdg_giftregistry/entity');
if($entity->load($registryId))
{
Mage::register('loaded_registry', $entity);
$this->loadLayout();
$this->_initLayoutMessages('customer/session');
$this->renderLayout();
return $this;
} else {
$this->_forward('noroute');
return $this;
}
}
}
}
So here we are using a new function, Mage::register(), which is setting a
global variable that we can later retrieve into the application ow by any method.
This function is part of the Magento Registry pattern that is compromised of the
following three functions:
• Mage::register(): This function is used to set global variables
• Mage::unregister(): This function is used to unset global variables
• Mage::registry(): This function is used to retrieve global variables
Frontend Development
[ 118 ]
We are using the registry function in this case to provide access to the registry entity
further ahead the application ow and particularly in the view block that we will be
creating next.
Block and layouts
As we learned in Chapter 2, Magento Fundamentals for Developers, Magento separates
its view layer into blocks, templates, and layout les. Blocks are objects that handle
parts of the logic. Templates are phtml les that are a mix of HTML and PHP code.
Layout les are XML les that control the position of blocks.
Each module has its own layout le that is in charge of updating that specic
module layout. We need to start by creating a layout le for our module by
following these steps:
1. Navigate to app/design/frontend/base/default/layout/.
2. Create a le named mdg_giftregistry.xml.
3. Add the following code (the le location is app/design/frontend/base/
default/layout/mdg_giftregistry.xml):
<layout version="0.1.0">
<mdg_giftregistry_index_index>
</mdg_giftregistry_index_index>
<mdg_giftregistry_index_new>
</mdg_giftregistry_index_new>
<mdg_giftregistry_index_edit>
</mdg_giftregistry_index_edit>
<mdg_giftregistry_view_view>
</mdg_giftregistry_view_view>
<mdg_giftregistry_search_index>
</mdg_giftregistry_search_index>
<mdg_giftregistry_search_results>
</mdg_giftregistry_search_results>
</layout>
Note that by adding our templates and layouts to the base/default theme,
we'll make our templates and layouts available to all stores and themes.

Chapter 4
[ 119 ]
If we take a closer look at the XML we just pasted, we can see that we have a default
<xml> tag and several other sets of tags. As we mentioned earlier, in Magento, routes
are formed by a frontend name, a controller, and an action.
Each of the XML tags in the layout le represents one of our controllers and
actions; for example, <giftregistry_index_index> will control the layout of our
IndexController action; Magento assigns each page a unique handle.
In order for Magento to recognize our layout le, we need to declare the layout le
inside the config.xml le by following these steps:
1. Navigate to the extension etc/ folder.
2. Open config.xml.
3. Add the following code inside the <frontend> node (the le location is
app/design/frontend/base/default/layout/mdg_giftregistry.xml):
<frontend>
<layout>
<updates>
<mdg_giftregistry module="mdg_giftregistry">
<file>mdg_giftregistry.xml</file>
</mdg_giftregistry>
</updates>
</layout>
…
</frontend>
IndexController blocks and views
As we did before, we will start by building the index controller. Let's dene which
templates and blocks we need to dene for each of the actions:
• Index: This is the list of the current customer available registries
• New: This provides a new form to capture the registry information
• Edit: This loads a specic registry data and loads them in the form
For the index action, we will need to create a new block called List.php. Let's start
by creating the registry list block by following these steps:
1. Navigate to app/code/local/Mdg/Giftregistry/Block/.
2. Create a le named List.php.

Frontend Development
[ 120 ]
3. Copy the following code (the le location is app/code/local/Mdg/
Giftregistry/Block/List.php.):
<?php
class Mdg_Giftregistry_Block_list extends Mage_Core_Block_Template
{
public function getCustomerRegistries()
{
$collection = null;
$currentCustomer = Mage::getSingleton('customer/session')-
>getCustomer();
if($currentCustomer)
{
$collection = Mage::getModel('mdg_giftregistry/
entity')->getCollection()
->addFieldToFilter('customer_id',
$currentCustomer->getId());
}
return $collection;
}
}
The previous code declares our list block that will be used in IndexController. The
blocks declares the getCustomerRegistries() method, which will check for the
current customer and try to retrieve a collection of registries based on that customer.
Now that we created a new block, we need to add it to our layout XML le:
1. Open mdg_giftregistry.xml.
2. Add the following code inside <mdg_gifregistry_index_index>
(the le location is app/design/frontend/base/default/layout/mdg_
giftregistry.xml):
<reference name="content">
<block name="giftregistry.list" type="mdg_giftregistry/list"
template="mdg/list.phtml" as="giftregistry_list"/>
</reference>
In the layout, we are declaring our block; inside that declaration, we are setting the
block name, template, and type. If we try loading the index controller page right
now, since we have not created our template le, we should then see an error about
the missing template.

Chapter 4
[ 121 ]
Let's create the template le:
1. Navigate to design/frontend/base/default/template/.
2. Create the mdg/ folder.
3. Inside that folder, create a le called list.phtml (the le location is app/
design/frontend/base/default/template/mdg/list.phtml):
<?php
$_collection = $this->getCustomerRegistries();
?>
<div class="customer-list">
<ul>
<?php foreach($_collection as $registry): ?>
<li>
<h3><?php echo $registry->getEventName(); ?></h3>
<p><strong><?php echo $this->__('Event Date:') ?>
<?php echo $registry->getEventDate(); ?></strong></p>
<p><strong><?php echo $this->__('Event Location:')
?> <?php echo $registry->getEventLocation(); ?></strong></p>
<a href="<?php echo $this->getUrl('giftregistry/
view/view', array('_query' => array('registry_id' => $registry-
>getEntityId()))) ?>">
<?php echo $this->__('View Registry') ?>
</a>
</li>
<?php endforeach; ?>
</ul>
</div>
This is the rst time we generate a .phtml le. As we mentioned before, .phtml les
are just a combination of PHP and HTML code.
In case of the list.phtml le, the rst thing we are doing is to load a collection by
calling the getCustomerRegistries() method; one thing to notice is that we are
actually calling $this->getCustomerRegistries(), as each template is assigned to
a specic block.
We are missing a couple of important things, which are as follows:
• If there are no registries for the current customer, we would only display an
empty unordered list
• There is no link to delete or edit a specic registry
One quick way of checking if the collection has registries is to call the count function
and display an error message if the collection is actually empty.

Frontend Development
[ 122 ]
The le location is app/design/frontend/base/default/template/mdg/list.
phtml. Refer to the following code:
<?php
$_collection = $this->getCustomerRegistries();
?>
<div class="customer-list">
<?php if(!$_collection->count()): ?>
<h2><?php echo $this->__('You have no registries.') ?></h2>
<a href="<?php echo $this->getUrl('giftregistry/index/new')
?>">
<?php echo $this->__('Click Here to create a new Gift
Registry') ?>
</a>
<?php else: ?>
<ul>
<?php foreach($_collection as $registry): ?>
<li>
<h3><?php echo $registry->getEventName(); ?></h3>
<p><strong><?php echo $this->__('Event Date:') ?>
<?php echo $registry->getEventDate(); ?></strong></p>
<p><strong><?php echo $this->__('Event Location:')
?> <?php echo $registry->getEventLocation(); ?></strong></p>
<a href="<?php echo $this->getUrl('giftregistry/
view/view', array('_query' => array('registry_id' => $registry-
>getEntityId()))) ?>">
<?php echo $this->__('View Registry') ?>
</a>
<a href="<?php echo $this->getUrl('giftregistry/
index/edit', array('_query' => array('registry_id' => $registry-
>getEntityId()))) ?>">
<?php echo $this->__('Edit Registry') ?>
</a>
<a href="<?php echo $this->getUrl('giftregistry/
index/delete', array('_query' => array('registry_id' => $registry-
>getEntityId()))) ?>">
<?php echo $this->__('Delete Registry') ?>
</a>
</li>
<?php endforeach; ?>
</ul>
<?php endif; ?>
</div>

Chapter 4
[ 123 ]
We have added a new if statement to check that the collection count is not empty
and a link to the IndexController edit action. Finally, if there are no registries to
show, we are displaying an error message linking to the new action.
Let's continue by adding the block and templates for the new action:
1. Open the mdg_giftregistry.xml layout le.
2. Add the following code inside the <mdg_gifregistry_index_new> node
(the le location is app/design/frontend/base/default/layout/mdg_
giftregistry.xml):
<reference name="content">
<block name="giftregistry.new" type="core/template"
template="mdg/new.phtml" as="giftregistry_new"/>
</reference>
Since we are just displaying a form to post the registry information to
newPostAction(), we are just creating a core/template block with the custom
template le that will contain the form code. Our template le will look like the
following code.
The le location is app/design/frontend/base/default/template/mdg/new.phtml:
<?php $helper = Mage::helper('mdg_giftregistry'); ?>
<form action="<?php echo $this->getUrl('giftregistry/index/newPost/')
?>" method="post" id="form-validate">
<fieldset>
<?php echo $this->getBlockHtml('formkey')?>
<ul class="form-list">
<li>
<label for="type_id"><?php echo $this->__('Event
type') ?></label>
<select name="type_id" id="type_id">
<?php foreach($helper->getEventTypes() as $type):
?>
<option id="<?php echo $type->getTypeId(); ?>"
value="<?php echo $type->getCode(); ?>">
<?php echo $type->getName(); ?>
</option>
<?php endforeach; ?>
</select>
</li>
<li class="field">
<input type="text" name="event_name" id="event_name"
value="" title="Event Name"/>

Frontend Development
[ 124 ]
<label class="giftreg" for="event_name"><?php echo
$this->__('Event Name') ?></label>
</li>
<li class="field">
<input type="text" name="event_location" id="event_
location" value="" title="Event Location"/>
<label class="giftreg" for="event_location"><?php echo
$this->__('Event Location') ?></label>
</li>
<li class="field">
<input type="text" name="event_country" id="event_
country" value="" title="Event Country"/>
<label class="giftreg" for="event_country"><?php echo
$this->__('Event Country') ?></label>
</li>
</ul>
<div class="buttons-set">
<button type="submit" title="Save" class="button">
<span>
<span><?php echo $this->__('Save') ?></span>
</span>
</button>
</div>
</fieldset>
</form>
<script type="text/javascript">
//<![CDATA[
var dataForm = new VarienForm('form-validate', true);
//]]>
</script>
This time we are doing something new here. We are calling a helper; a helper is a
class that contains methods that can be reused from blocks, templates, controllers,
and so on. In our case, we are creating a helper that will retrieve all available registry
types. Follow these steps:
1. Navigate to app/code/local/Mdg/Giftregistry/Helper.
2. Open the Data.php class.

Chapter 4
[ 125 ]
3. Add the following code inside it (the le location is app/code/local/Mdg/
Giftregistry/Helper/Data.php):
<?php
class Mdg_Giftregistry_Helper_Data extends Mage_Core_Helper_
Abstract {
public function getEventTypes()
{
$collection = Mage::getModel('mdg_giftregistry/type')-
>getCollection();
return $collection;
}
}
Finally, we need to set up the edit template; the edit template will be exactly the
same as the new template but with one major difference. We will check for the
existence of a loaded registry and prepopulate the values of our elds.
The le location is app/design/frontend/base/default/template/mdg/edit.
phtml. Refer to the following code:
<?php
$helper = Mage::helper('mdg_giftregistry');
$loadedRegistry = Mage::getSingleton('customer/session')-
>getLoadedRegistry();
?>
<?php if($loadedRegistry): ?>
<form action="<?php echo $this->getUrl('giftregistry/index/
editPost/') ?>" method="post" id="form-validate">
<fieldset>
<?php echo $this->getBlockHtml('formkey')?>
<input type="hidden" id="type_id" value="<?php echo
$loadedRegistry->getTypeId(); ?>" />
<ul class="form-list">
<li class="field">
<label class="giftreg" for="event_name"><?php echo
$this->__('Event Name') ?></label>
<input type="text" name="event_name" id="event_
name" value="<?php echo $loadedRegistry->getEventName(); ?>"
title="Event Name"/>
</li>
<li class="field">
<label class="giftreg" for="event_location"><?php
echo $this->__('Event Location') ?></label>

Frontend Development
[ 126 ]
<input type="text" name="event_location"
id="event_location" value="<?php echo $loadedRegistry-
>getEventLocation(); ?>" title="Event Location"/>
</li>
<li class="field">
<label class="giftreg" for="event_country"><?php
echo $this->__('Event Country') ?></label>
<input type="text" name="event_country" id="event_
country" value="<?php echo $loadedRegistry->getEventCountry(); ?>"
title="Event Country"/>
</li>
</ul>
<div class="buttons-set">
<button type="submit" title="Save" class="button">
<span>
<span><?php echo $this->__('Save') ?></span>
</span>
</button>
</div>
</fieldset>
</form>
<script type="text/javascript">
//<![CDATA[
var dataForm = new VarienForm('form-validate', true);
//]]>
</script>
<?php else: ?>
<h2><?php echo $this->__('There was a problem loading the
registry') ?></h2>
<?php endif; ?>
Let's continue by adding the block and templates for the edit action:
1. Open the mdg_giftregistry.xml layout le.
2. Add the following code inside the <mdg_gifregistry_index_edit> node
(the le location is app/design/frontend/base/default/layout/mdg_
giftregistry.xml):
<reference name="content">
<block name="giftregistry.edit" type="core/template"
template="mdg/edit.phtml" as="giftregistry_edit"/>
</reference>
Once that is set, we can try creating a couple of test registries and modifying
their properties.
Chapter 4
[ 127 ]
Here's a challenge for you. As with the controller, the edit and new
form can be combined into a single reusable form. Try to combine them
to see the answer with the complete code and full breakdown, visit
http://www.magedevguide.com/challenge/chapter4/4.
SearchController blocks and views
For our search controller, we will need a search template for our index. For the
results, we can actually reuse the registry list template by simply making a change
to our controller by following these steps:
1. Navigate to the template folder.
2. Create a le called search.phtml.
3. Add the following code (the le location is app/design/frontend/base/
default/template/mdg/search.phtml):
<?php $helper = Mage::helper('mdg_giftregistry'); ?>
<form action="<?php echo $this->getUrl('giftregistry/search/
results/') ?>" method="post" id="form-validate">
<fieldset>
<?php echo $this->getBlockHtml('formkey')?>
<ul class="form-list">
<li>
<label for="type">Event type</label>
<select name="type" id="type">
<?php foreach($helper->getEventTypes() as
$type): ?>
<option id="<?php echo $type->getTypeId();
?>" value="<?php echo $type->getCode(); ?>">
<?php echo $type->getName(); ?>
</option>
<?php endforeach; ?>
</select>
</li>
<li class="field">
<label class="giftreg" for="name"><?php echo
$this->__('Event Name') ?></label>
<input type="text" name="name" id="name" value=""
title="Event Name"/>
</li>
<li class="field">
<label class="giftreg" for="location"><?php echo
$this->__('Event Location') ?></label>

Frontend Development
[ 128 ]
<input type="text" name="location" id="location"
value="" title="Event Location"/>
</li>
<li class="field">
<label class="giftreg" for="country"><?php echo
$this->__('Event Country') ?></label>
<input type="text" name="country" id="country"
value="" title="Event Country"/>
</li>
</ul>
<div class="buttons-set">
<button type="submit" title="Save" class="button">
<span>
<span><?php echo $this->__('Save') ?></
span>
</span>
</button>
</div>
</fieldset>
</form>
<script type="text/javascript">
//<![CDATA[
var dataForm = new VarienForm('form-validate', true);
//]]>
</script>
A couple of things to notice:
• We are using the helper model to populate the Event type IDs
• We are posting directly to the search/results
Now, let's make the appropriate change to our layout le:
1. Open mdg_giftregistry.xml.
2. Add the following code inside <mdg_gifregistry_search_index> (the
le location is app/design/frontend/base/default/layout/mdg_
giftregistry.xml):
<reference name="content">
<block name="giftregistry.search" type="core/template"
template="mdg/search.phtml" as="giftregistry_search"/>
</reference>
For the search results, we don't need to create a new block type since we are passing
the results collection directly to the block. In the layout, our changes will be minimal,
and we can reuse the list block for displaying the search registry results.

Chapter 4
[ 129 ]
However, we do need to make a change in the controller. We need to change the
function from setResults() to setCustomerRegistries().
The le location is app/code/local/Mdg/Giftregistry/controllers/
SearchController.php. Refer to the following code:
public function resultsAction()
{
$this->loadLayout();
if ($searchParams = $this->getRequest()->getParam('search_
params')) {
$results = Mage::getModel('mdg_giftregistry/entity')-
>getCollection();
if($searchParams['type']){
$results->addFieldToFilter('type_id',
$searchParams['type']);
}
if($searchParams['date']){
$results->addFieldToFilter('event_date',
$searchParams['date']);
}
if($searchParams['location']){
$results->addFieldToFilter('event_location',
$searchParams['location']);
}
$this->getLayout()->getBlock('mdg_giftregistry.search.
results')
->setCustomerRegistries($results);
}
$this->renderLayout();
return $this;
}
Finally, let's update the layout les by following these steps:
1. Open mdg_giftregistry.xml.
2. Add the following code inside <mdg_gifregistry_search_results>
(the le location is app/design/frontend/base/default/layout/mdg_
giftregistry.xml):
<reference name="content">
<block name="giftregistry.results" type="mdg_giftregistry/
list" template="mdg/list.phtml"/>
</reference>

Frontend Development
[ 130 ]
And that would be the end of our SearchController template; however, there is
a problem that our search results are displaying. For the delete and edit links of a
registry, we need a way to restrict these links only to the owner.
We can do that with the following Helper function:
The le location is app/code/local/Mdg/Giftregistry/Helper/Data.php. Refer
to the following code:
public function isRegistryOwner($registryCustomerId)
{
$currentCustomer = Mage::getSingleton('customer/session')-
>getCustomer();
if($currentCustomer && $currentCustomer->getId() ==
$registryCustomerId)
{
return true;
}
return false;
}
And let's update our template to use the new helper method.
The le location is app/design/frontend/base/default/template/mdg/list.
phtml. Refer to the following code:
<?php
$_collection = $this->getCustomerRegistries();
$helper = Mage::helper('mdg_giftregistry')
?>
<div class="customer-list">
<?php if(!$_collection->count()): ?>
<h2><?php echo $this->__('You have no registries.') ?></h2>
<a href="<?php echo $this->getUrl('giftregistry/index/new')
?>">
<?php echo $this->__('Click Here to create a new Gift
Registry') ?>
</a>
<?php else: ?>
<ul>
<?php foreach($_collection as $registry): ?>
<li>
<h3><?php echo $registry->getEventName(); ?></h3>
<p><strong><?php echo $this->__('Event Date:') ?>
<?php echo $registry->getEventDate(); ?></strong></p>

Chapter 4
[ 131 ]
<p><strong><?php echo $this->__('Event Location:')
?> <?php echo $registry->getEventLocation(); ?></strong></p>
<a href="<?php echo $this->getUrl('giftregistry/
view/view', array('_query' => array('registry_id' => $registry-
>getEntityId()))) ?>">
<?php echo $this->__('View Registry') ?>
</a>
<?php if($helper->isRegistryOwner($registry-
>getCustomerId())): ?>
<a href="<?php echo $this-
>getUrl('giftregistry/index/edit', array('_query' => array('registry_
id' => $registry->getEntityId()))) ?>">
<?php echo $this->__('Edit Registry') ?>
</a>
<a href="<?php echo $this-
>getUrl('giftregistry/index/delete', array('_query' =>
array('registry_id' => $registry->getEntityId()))) ?>">
<?php echo $this->__('Delete Registry') ?>
</a>
<?php endif; ?>
</li>
<?php endforeach; ?>
</ul>
<?php endif; ?>
</div>
ViewController block and views
For our view, we just need to create a new template le and a new entry in the
layout.xml le:
1. Navigate to the template directory.
2. Create a template called view.phtml.
3. Add the following code (the le location is app/design/frontend/base/
default/template/mdg/view.phtml):
<?php $registry = Mage::registry('loaded_registry'); ?>
<h3><?php echo $registry->getEventName(); ?></h3>
<p><strong><?php $this->__('Event Date:') ?> <?php echo $registry-
>getEventDate(); ?></strong></p>
<p><strong><?php $this->__('Event Location:') ?> <?php echo
$registry->getEventLocation(); ?></strong></p>
Frontend Development
[ 132 ]
4. Update the layout XML le, <mdg_gifregistry_view_view>.
<reference name="content">
<block name="giftregistry.view" type="core/template"
template="mdg/view.phtml" as="giftregistry_view"/>
</reference>
Here's a challenge for you. Improve the view form to return
an error if there is not an actual loaded registry. To see the
answer with the complete code and full breakdown, visit
http://www.magedevguide.com/challenge/chapter4/5.
Adding products to the registry
We are almost at the end of the chapter, and we are yet to cover how to add products
to our registries. Due to space concerns in this book, I decided to move this section to
http://www.magedevguide.com/chapter6/adding-products-registry.
Summary
In this chapter, we have covered a lot of ground. We have learned how to extend the
frontend of Magento and how to work with routes and controllers.
The Magento layout system allows us to modify and control blocks and display it on
our store. We also started working with Magento Data models, and we learned how
to use them, as well as how to handle and manipulate our data.
We have only touched the surface of the frontend development and of the
Data models. In the next chapter, we will expand a little bit more on the topics
of conguration, models, and data, and we will explore and create an admin
section on the Magento backend.

Backend Development
In the previous chapter, we added all the frontend functionality for the gift registry.
Now customers are able to create registries and add products to the customer
registries, and in general have full control over their own registries.
In this chapter, we are going to build all the functionalities that store owners need to
manage and control the registries through the backend of Magento.
Magento backend can be considered in many senses a separate application from
the frontend of Magento; it uses a completely separate theme, style, and a different
base controller.
For our gift registry, we want to allow store owners to see all customer registries,
modify the information, and add and remove items. In this chapter, we will cover
the following:
• Extending the Adminhtml with conguration
• Using the grid widget
• Using the form widget
• Restricting access and permissions with Access Control Lists
Extending the Adminhtml
Mage_Adminhtml is a single module that provides all the backend functionalities for
Magento through the usage of conguration. As we learned before, Magento uses
scopes for dening the conguration. In the previous chapter, we used the frontend
scope to set up the conguration for our custom module.
Backend Development
[ 134 ]
To modify the backend, we need to create a new scope in our conguration le called
admin. Perform the following steps to do so:
1. Open the config.xml le, which can be found at the location app/code/
loca/Mdg/Giftregistry/etc/.
2. Add the following code to it:
<admin>
<routers>
<giftregistry>
<use>admin</use>
<args>
<module>Mdg_Giftregistry_Adminhmtl</module>
<frontName>giftregistry</frontName>
</args>
</giftregistry>
</routers>
</admin>
This code is very similar to the one we used before to specify our frontend route;
however, by declaring the route this way we are breaking an unwritten Magento
design pattern.
In order to keep things consistent on the backend, all new modules should extend
the main admin route.
Instead of dening the route with the previous code, we are creating a completely
new admin route. Normally, you don't want to do this for the Magento backend
unless you are creating a new route that requires admin access but not the rest of the
Magento backend. A callback URL for an admin action would be a good example of
something like this.
Fortunately, there is a very easy way to share route names among Magento modules.
Sharing route names was introduced in Magento 1.3
but to this day, we still see extensions that don't use this
pattern properly.

Chapter 5
[ 135 ]
Let's update our code:
1. Open the config.xml le, which can be found at the location app/code/
loca/Mdg/Giftregistry/etc/.
2. Update the routes conguration with the following code:
<admin>
<routers>
<adminhtml>
<args>
<modules>
<mdg_giftregistry before="Mage_Adminhtml">Mdg_
Giftregistry_Adminhtml</mdg_giftregistry>
</modules>
</args>
</adminhtml>
</routers>
</admin>
After making this change, we can properly access our admin controllers
through the admin namespace; for example, http://magento.localhost.com/
giftregistry/index would now be http://magento.localhost.com/admin/
giftregistry/index.
Our next step will be to create a new controller that we can use to manage the
customer registries. We will call this controller GiftregistryController.php.
Perform the following steps to do so:
1. Navigate to your module controllers folder.
2. Create a new folder called Adminhtml.
3. Create the le called GiftregistryController.php at the location app/
code/loca/Mdg/Giftregistry/controllers/Adminhtml/.
4. Add the following code to it:
<?php
class Mdg_Giftregistry_Adminhtml_GiftregistryController extends
Mage_Adminhtml_Controller_Action
{
public function indexAction()
{
$this->loadLayout();
$this->renderLayout();
return $this;

Backend Development
[ 136 ]
}
public function editAction()
{
$this->loadLayout();
$this->renderLayout();
return $this;
}
public function saveAction()
{
$this->loadLayout();
$this->renderLayout();
return $this;
}
public function newAction()
{
$this->loadLayout();
$this->renderLayout();
return $this;
}
public function massDeleteAction()
{
$this->loadLayout();
$this->renderLayout();
return $this;
}
}
Notice something important: this new controller extends Mage_Adminhtml_
Controller_Action instead of Mage_Core_Controller_Front_Action, which
we had been using so far. The reason for this is that the Adminhtml controller has
additional validation to prevent non-admin users to access their actions.
Notice that we are placing our controller inside a new subfolder inside the
controllers/ directory; by using this subdirectory, we are keeping the frontend and
backend controllers organized. This is a widely accepted Magento standard practice.
For now, let's leave this blank controller alone, and let's extend the Magento backend
navigation and add some extra tabs to the customer edit page.

Chapter 5
[ 137 ]
Back to the conguration
As we have seen so far, most of the time Magento is controlled by XML conguration
les and the backend layout is no different. We need to create a new adminhtml
layout le. Perform the following steps to do so:
1. Navigate to the design folder.
2. Create a new folder called adminhtml and inside it create the following
folder structure:
°adminhtml/
°--default/
°----default/
°------template/
°------layout/
3. Inside the layout folder let's create a new layout le called giftregistry.xml
at the location app/code/design/adminhtml/default/default/layout/.
4. Copy the following code into the layout le:
<?xml version="1.0"?>
<layout version="0.1.0">
<adminhtml_customer_edit>
<reference name="left">
<reference name="customer_edit_tabs">
<block type="mdg_giftregistry/adminhtml_customer_
edit_tab_giftregistry" name="tab_giftregistry_main" template="mdg_
giftregistry/giftregistry/customer/main.phtml">
</block>
<action method="addTab">
<name>mdg_giftregistry</name>
<block>tab_giftregistry_main</block>
</action>
</reference>
</reference>
</adminhtml_customer_edit>
</layout>
We also need to add the new layout le into the config.xml module. Perform the
following steps to do so:
1. Navigate to the etc/ folder.
2. Open the config.xml le, which can be found at the location app/code/
loca/Mdg/Giftregistry/etc/.
Backend Development
[ 138 ]
3. Copy the following code into the config.xml le:
…
<adminhtml>
<layout>
<updates>
<mdg_giftregistry
module="mdg_giftregistry">
<file>giftregistry.xml</file>
</mdg_giftregistry>
</updates>
</layout>
</adminhtml>
…
What we are doing inside the layout is creating a new container block and declaring
a new tab that contains this block.
Let's quickly test our changes so far by logging in to the Magento backend and
opening a customer information by going into Customer Manager located at
Customers | Manage Customers.
We should get the following error in the backend:

Chapter 5
[ 139 ]
This is because we are trying to add a block that has not been declared yet; to x this,
we need to create a new block class. Perform the following steps to do so:
1. Navigate to the blocks folder and create a new block class following the
directory structure called Giftregistry.php at the location app/code/
loca/Mdg/Giftregistry/Block/Adminhtml/Customer/Edit/Tab/.
2. Add the following code to it:
<?php
class Mdg_Giftregistry_Block_Adminhtml_Customer_Edit_Tab_
Giftregistry
extends Mage_Adminhtml_Block_Template
implements Mage_Adminhtml_Block_Widget_Tab_Interface {
public function __construct()
{
$this->setTemplate
('mdg/giftregistry/customer/main.phtml');
parent::_construct();
}
public function getCustomerId()
{
return Mage::registry('current_customer')->getId();
}
public function getTabLabel()
{
return $this->__('GiftRegistry List');
}
public function getTabTitle()
{
return $this->__
('Click to view the customer Gift Registries');
}
public function canShowTab()
{
return true;
}
public function isHidden()
{
return false;
}
}

Backend Development
[ 140 ]
There are a couple of interesting things happening with this block class. For starters,
we are extending a different block class, Mage_Adminhtml_Block_Template, and
implementing a new interface, Mage_Adminhtml_Block_Widget_Tab_Interface. This
is done in order to access all the features and functionalities of the Magento backend.
We are also setting the block template inside the construct function of our class; also
under the getCustomerId, we are making use of the Magento global variables to get
the current customer.
Our next step will be to create the corresponding template le for this block,
otherwise we would get an error on the block initialization.
1. Create a template le called main.phtml at the location app/code/design/
adminhtml/default/default/template/mdg/giftregistry/customer/.
2. Copy the following code into it:
<div class="entry-edit">
<div class="entry-edit-head">
<h4 class="icon-head head-customer-view"><?php echo
$this->__('Customer Gift Registry List') ?></h4>
</div>
<table cellspacing="2" class="box-left">
<tr>
<td>
Nothing here
</td>
</tr>
</table>
</div>
For now, we are just adding placeholder content to the template so that we can
actually see our tabs in action; now, if we go to the customer section in the backend,
we should see that a new tab is available, and clicking on that tab will display our
placeholder content.
By now, we have modied the backend and added a Customers tab to the customer
section just by changing a conguration and adding some simple blocks and a
template le. But so far, this hasn't been particularly useful, so we need a way of
displaying all the customer gift registries under the Gift registry tab.

Chapter 5
[ 141 ]
The grid widget
Instead of having to write our own grid blocks from scratch, we can reuse the ones
that have been already provided by the Magento Adminhtml module.
The block that we will be extending is called grid widget; the grid widget is a
special type of block designed to render a collection of Magento objects in a
particular table grid.
A grid widget is normally rendered inside a Grid container; the combination of
both elements allow not only to display our data in a grid form but also adds search,
ltering, sorting, and mass action capabilities. Perform the following steps:
1. Navigate to the block Adminhtml/ folder and create a folder called
Giftregistry/ at the location app/code/loca/Mdg/Giftregistry/Block/
Adminhtml/Customer/Edit/Tab/.
2. Create a class called List.php inside that folder.
3. Copy the following code into the Giftregistry/List.php le:
<?php
class Mdg_Giftregistry_Block_Adminhtml_Customer_Edit_Tab_
Giftregistry_List extends Mage_Adminhtml_Block_Widget_Grid
{
public function __construct()
{
parent::__construct();
$this->setId('registryList');
$this->setUseAjax(true);
$this->setDefaultSort('event_date');
$this->setFilterVisibility(false);
$this->setPagerVisibility(false);
}
protected function _prepareCollection()
{
$collection = Mage::getModel
('mdg_giftregistry/entity')
->getCollection()
->addFieldToFilter('main_table.customer_id',
$this->getRequest()->getParam('id'));
$this->setCollection($collection);

Backend Development
[ 142 ]
return parent::_prepareCollection();
}
protected function _prepareColumns()
{
$this->addColumn('entity_id', array(
'header' => Mage::helper
('mdg_giftregistry')->__('Id'),
'width' => 50,
'index' => 'entity_id',
'sortable' => false,
));
$this->addColumn('event_location', array(
'header' => Mage::helper
('mdg_giftregistry')->__('Location'),
'index' => 'event_location',
'sortable' => false,
));
$this->addColumn('event_date', array(
'header' => Mage::helper
('mdg_giftregistry')->__('Event Date'),
'index' => 'event_date',
'sortable' => false,
));
$this->addColumn('type_id', array(
'header' => Mage::helper
('mdg_giftregistry')->__('Event Type'),
'index' => 'type_id',
'sortable' => false,
));
return parent::_prepareColumns();
}
}
Looking at the class we just created, there are only three functions involved:
• __construct()
• _prepareCollection()
• _prepareColumns()

Chapter 5
[ 143 ]
On the __construct function, we are specifying a few important options about our
grid class. We are setting the gridId; the default sort to be by eventDate, and we are
enabling pagination and ltering.
The __prepareCollection() function loads a collection of registries ltered by
current customerId. This function can be used to do more complex operations in our
collection too; for example, joining a secondary table to get more information about
the customer or another related record.
Finally, by using the __prepareColumns() function, we are telling Magento which
columns and attributes for our data collection should be shown and how we can
render them.
Now that we have created a functional grid block, we would need to do some
changes to our layout XML le in order to display it. Perform the following steps:
1. Open the giftregistry.xml le, which can be found at the location app/
design/adminhtml/default/default/layout/.
2. Make the following changes:
<?xml version="1.0"?>
<layout version="0.1.0">
<adminhtml_customer_edit>
<reference name="left">
<reference name="customer_edit_tabs">
<block type="mdg_giftregistry/
adminhtml_customer_edit_tab_giftregistry"
name="tab_giftregistry_main"
template="mdg/giftregistry/
customer/main.phtml">
<block type="mdg_giftregistry/
adminhtml_customer_edit_tab_
giftregistry_list"
name="tab_giftregistry_list"
as="giftregistry_list" />
</block>
<action method="addTab">
<name>mdg_giftregistry</name>
<block>mdg_giftregistry/adminhtml_customer_
edit_tab_giftregistry</block>
</action>
</reference>
</reference>
</adminhtml_customer_edit>
</layout>
Backend Development
[ 144 ]
What we did was to add the grid block as part of our main block, but if we go to
the customer edit page and click on the Gift registry tab, we are still seeing the old
placeholder text and the grid is not displaying.
This is because we haven't made the necessary changes to our main.phtml template
le. In order to display children blocks, we specically need to tell the templating
system to load any or a specic child; for now, we will just load our specic grid
block. Perform the following steps:
1. Open the main.phtml template le, which can be found at the location app/
design/adminhtml/default/default/template/customer/.
2. Replace the template code with the following:
<div class="entry-edit">
<div class="entry-edit-head">
<h4 class="icon-head head-customer-view">
<?php echo $this->__
('Customer Gift Registry List') ?></h4>
</div>
<?php echo $this->getChildHtml('tab_giftregistry_list'); ?>
</div>

Chapter 5
[ 145 ]
The getChildHtml() function is responsible for rendering all the child blocks.
The function getChildHtml() can be called with a specic child block name or
without parameters; when called without parameters, it will load all the available
children blocks.
In the case of our extension, we are only interested in instantiating a particular child
block, so we will be passing the block name as the function parameter. Now, if we
refresh the page, we should see our grid block loaded with all the gift registries
available for that particular customer.
Managing the registries
Now, this is handy if we want to manage the registries for a specic customer, but it
does not really help us if we want to manage all the registries available in a store. For
that, we need to create a grid that loads all the available gift registries.
Since we already created a gift registry controller for the backend, we can use the
index action to display all the available registries.
The rst thing we need to do is to modify the Magento backend navigation to show
a link to our new controller index action. Again, we can achieve this by using XML.
In this particular case, we are going to create a new XML le called adminhtml.xml.
Perform the following steps:
1. Navigate to your module etc folder, which can be found at the location app/
code/local/Mdg/Giftregistry/.
2. Create a new le called adminhtml.xml.
3. Place the following code in that le:
<?xml version="1.0"?>
<config>
<menu>
<mdg_giftregistry module="mdg_giftregistry">
<title>Gift Registry</title>
<sort_order>71</sort_order>
<children>
<items module="mdg_giftregistry">
<title>Manage Registries</title>
<sort_order>0</sort_order>
<action>adminhtml/giftregistry/index</action>
</items>
</children>
</mdg_giftregistry>
</menu>
</config>
Backend Development
[ 146 ]
While the standard is to have this conguration added inside
adminhtml.xml, you will likely encounter extensions where
this standard is not followed. This conguration can be located
inside config.xml.
This conguration code is creating a new main-level menu and a new child-level
option under it; we are also specifying which action the menu should be mapped to,
in this case, the index action of our gift registry controller.
If we refresh the backend now, we should see a new Gift registry menu added to the
top-level navigation.
Permissions and the ACL
Sometimes we need to restrict access to certain features of our module or even the
whole module based on the admin rule. Magento allows us to do this by using a
power feature called ACL or Access Control List. Each role in the Magento backend
can have different permissions and different ACLs.
The rst step of enabling ACLs with our custom module is to dene which resources
should be restricted by the ACL; not so surprisingly, this is controlled by the
conguration XML les. Perform the following steps:
1. Open the adminhtml.xml conguration le, which can be found at the
location app/code/local/Mdg/Giftregistry/etc/.
2. Add the following code after the menu path:
<acl>
<resources>
<admin>
<children>
<giftregistry translate="title"
module="mdg_giftregistry">
<title>Gift Registry</title>
<sort_order>300</sort_order>
<children>
<items translate="title"
module="mdg_giftregistry">
<title>Manage Registries</title>
<sort_order>0</sort_order>
</items>
</children>
</giftregistry>
</children>
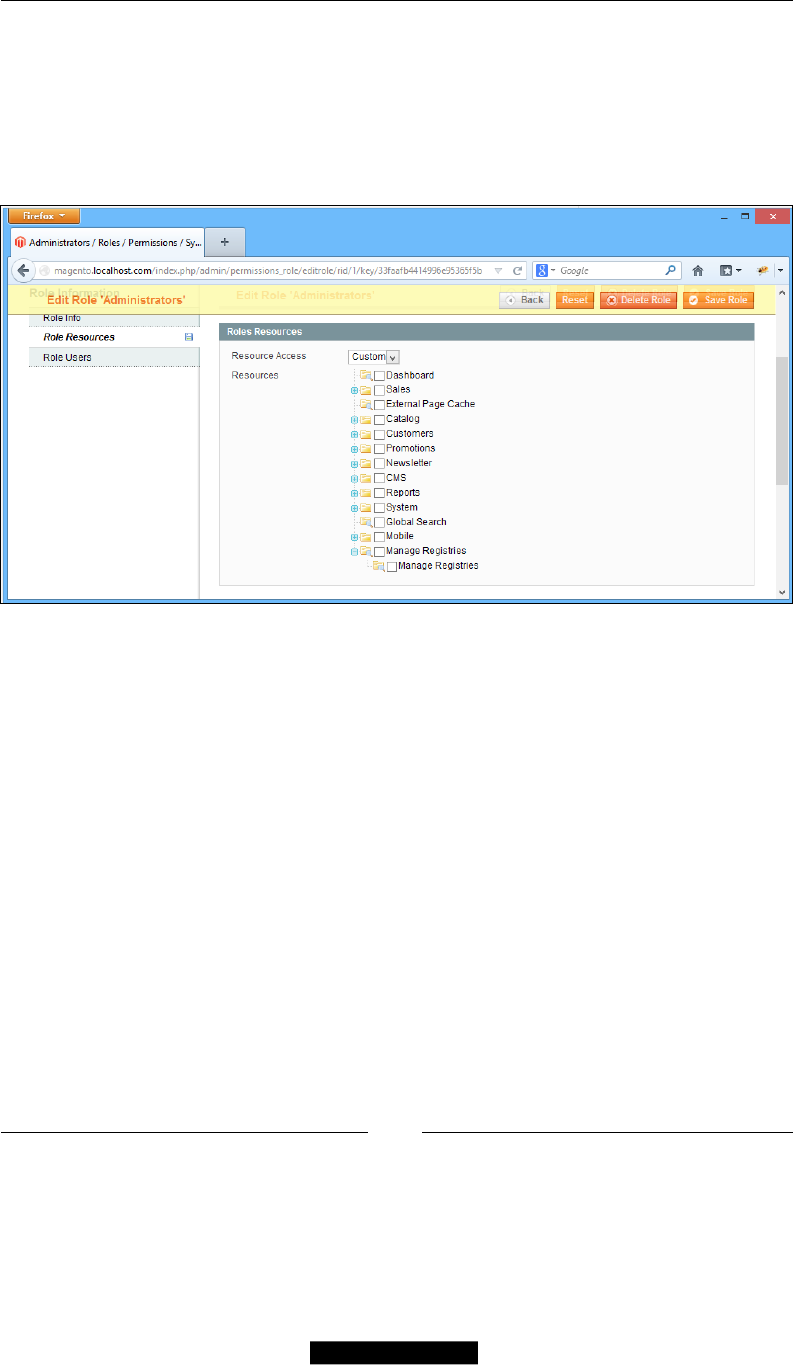
Chapter 5
[ 147 ]
</admin>
</resources>
</acl>
Now, in the Magento backend, if we navigate to System | Permissions | Roles, select
the Administrators role, and try to set Roles Resources at the bottom of the list; we can
see the new ACL resources we created, as shown in the following screenshot:
By doing this, we gain granular control over which operations each user has
access to.
If we click on the Manage Registries menu, we should get a blank page; since we
haven't created the corresponding grid block, layouts, and templates, we should see
a completely blank page.
So let's start by creating the blocks that we will need for our new grid; the way we
will create our gift registry grid will be slightly different from what we did for our
Customers tab.
We need to create a grid container block and a grid block. The grid container is used
to hold the grid header, the buttons, and the grid content, while the grid block is only
in charge of rendering the grid with pagination, ltering, and mass actions. Perform
the following steps:
1. Navigate to your block Adminhtml folder.
2. Create a new block called Registries.php at the location app/code/local/
Mdg/Giftregistry/Block/Adminhtml/:

Backend Development
[ 148 ]
3. Add the following code to it:
<?php
class Mdg_Giftregistry_Block_Adminhtml_Registries extends Mage_
Adminhtml_Block_Widget_Grid_Container
{
public function __construct(){
$this->_controller = 'adminhtml_registries';
$this->_blockGroup = 'mdg_giftregistry';
$this->_headerText = Mage::helper
('mdg_giftregistry')->__('Gift Registry Manager');
parent::__construct();
}
}
One important thing we are setting up in the construct function inside our grid
container is the usage of protected values of _controller and _blockGroup by the
Magento grid container to identify the corresponding grid block.
It is important to clarify that $this->_controller is not the actual controller name
but the block class name and $this->_blockGroup is actually the module name.
Let's continue with creating the grid block, which as we learned previously has three
main functions: _construct, _prepareCollection(), and _prepareColumns().
But in this case, we will add a new function called _prepareMassActions(), which
allows us to modify selected sets of records without having to edit each individually.
Perform the following steps:
1. Navigate to your block Adminhtml folder and create a new folder called
Registries.
2. Under the Model folder create a new block called Grid.php at the location
app/code/local/Mdg/Giftregistry/Block/Adminhtml/Registries/.
3. Add the following code to Grid.php:
File Location: Grid.php
<?php
class Mdg_Giftregistry_Block_Adminhtml_Registries_Grid extends
Mage_Adminhtml_Block_Widget_Grid
{
public function __construct(){
parent::__construct();
$this->setId('registriesGrid');
$this->setDefaultSort('event_date');
$this->setDefaultDir('ASC');
$this->setSaveParametersInSession(true);

Chapter 5
[ 149 ]
}
protected function _prepareCollection(){
$collection = Mage::getModel
('mdg_giftregistry/entity')->getCollection();
$this->setCollection($collection);
return parent::_prepareCollection();
}
protected function _prepareColumns()
{
$this->addColumn('entity_id', array(
'header' => Mage::helper
('mdg_giftregistry')->__('Id'),
'width' => 50,
'index' => 'entity_id',
'sortable' => false,
));
$this->addColumn('event_location', array(
'header' => Mage::helper
('mdg_giftregistry')->__('Location'),
'index' => 'event_location',
'sortable' => false,
));
$this->addColumn('event_date', array(
'header' => Mage::helper
('mdg_giftregistry')->__('Event Date'),
'index' => 'event_date',
'sortable' => false,
));
$this->addColumn('type_id', array(
'header' => Mage::helper
('mdg_giftregistry')->__('Event Type'),
'index' => 'type_id',
'sortable' => false,
));
return parent::_prepareColumns();
}
protected function _prepareMassaction(){
}
}
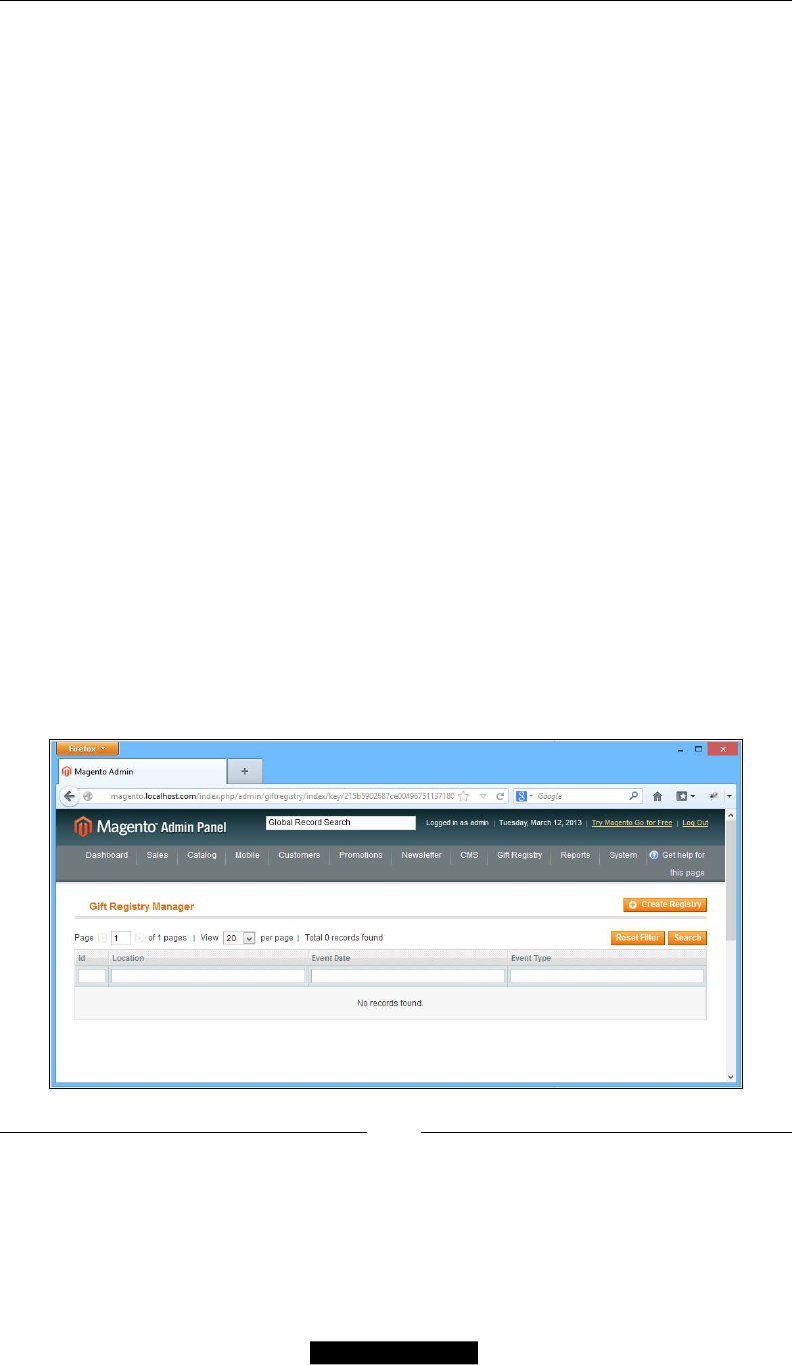
Backend Development
[ 150 ]
This grid code is very similar to what we had created before for the Customers
tab, with the exception that this time we are not specically ltering by a customer
record, and we are also creating a grid container block instead of implementing a
custom block.
Finally, in order to show the grid in our controller action we need to perform the
following steps:
1. Open the giftregistry.xml le, which can be found at the location app/
code/design/adminhtml/default/default/layout/.
2. Add the following code to it:
…
<adminhtml_giftregistry_index>
<reference name="content">
<block type="mdg_giftregistry/adminhtml_registries"
name="registries" />
</reference>
</adminhtml_giftregistry_index>
…
Since we are using a grid container, we only need to specify the grid container block,
and Magento will take care of loading the matching grid container.
There is no need to specify or create a template le for the grid or the grid container
as both blocks automatically load the base templates from the adminhtml/base/
default theme.
Now, we can check our newly added gift registry by navigating to Gift Registry |
Manage Registries in the backend.

Chapter 5
[ 151 ]
Updating in bulk with Massactions
When creating our base grid block, we dened a function called
_prepareMassactions(), which provides an easy way of manipulating
multiple records from the grid. In our case, for now, let's just implement
a mass delete action. Perform the following steps to do so:
1. Open the registry grid block Grid.php, which can be found at app/code/
local/Mdg/Giftregistry/Block/Adminhtml/Registries/.
2. Replace the _prepareMassaction() function with the following code:
protected function _prepareMassaction(){
$this->setMassactionIdField('entity_id');
$this->getMassactionBlock()->
setFormFieldName('registries');
$this->getMassactionBlock()->addItem('delete', array(
'label' => Mage::helper
('mdg_giftregistry')->__('Delete'),
'url' => $this->getUrl('*/*/massDelete'),
'confirm' => Mage::helper
('mdg_giftregistry')->__('Are you sure?')
));
return $this;
}
The way mass actions work is by passing a series of selected IDs to our specied
controller action; in this case, the massDelete() action will add code to iterate
through the registry collection and delete each of the specied registries. Perform
the following steps:
1. Open the GiftregistryController.php le, which can be found at the
location app/code/local/Mdg/Giftregistry/controllers/Adminhtml/.
2. Replace the blank massDelete() action with the following code:
…
public function massDeleteAction()
{
$registryIds = $this->
getRequest()->getParam('registries');
if(!is_array($registryIds)) {
Mage::getSingleton('adminhtml/session')->
addError(Mage::helper('mdg_giftregistry')->
__('Please select one or more registries.'));
} else {
try {
Backend Development
[ 152 ]
$registry = Mage::getModel
('mdg_giftregistry/entity');
foreach ($registryIds as $registryId) {
$registry->reset()
->load($registryId)
->delete();
}
Mage::getSingleton
('adminhtml/session')->addSuccess(
Mage::helper('adminhtml')->__
('Total of %d record(s) were deleted.',
count($registryIds))
);
} catch (Exception $e) {
Mage::getSingleton
('adminhtml/session')->
addError($e->getMessage());
}
}
$this->_redirect('*/*/index');
}
Challenge: Add two new mass actions to change the status
of the registries to enable or disable respectively. To see the
answer with the complete code and full breakdown, visit
http://www.magedevguide.com/.
Finally, we also want to be able to edit the records listed in our grid. For that,
we need to add a new function to our registries grid class; this function is called
getRowUrl(), and it is used to specify the action to be taken when clicking on a
grid row; in our particular case, we want to map that function to the editAction().
Perform the following steps:
1. Open the Grid.php le, which can be found at the location app/code/
local/Mdg/Giftregistry/Block/Adminhtml/Registries/.
2. Add the following function to it:
…
public function getRowUrl($row)
{
return $this->getUrl('*/*/edit', array
('id' => $row->getEntityId()));
}
…

Chapter 5
[ 153 ]
The form widget
So far, we have been working with the gift registry grid, but right now we aren't able
to do much more than just getting the list of all the available registries or deleting
registries in bulk. We need a way of getting the details of a specic registry; we can
map this to the edit controller action.
The edit action will display the registry-specic details and will also allow us to
modify the details and status of a registry. We will need to create a few blocks and
templates for this action.
In order to view and edit the registry information, we need to implement a
form widget block. Form widgets work in a similar fashion as the grid widget
blocks and need to have a form block and a form container block that extends
the Mage_Adminhtml_Block_Widget_Form_Container class. In order to create
the form container, let's perform the following steps:
1. Navigate to the Registries folder.
2. Create a new class le called Edit.php at the location app/code/local/Mdg/
Giftregistry/Block/Adminhtml/Registries/.
3. Add the following code to the class le:
class Mdg_Giftregistry_Block_Adminhtml_Registries_Edit extends
Mage_Adminhtml_Block_Widget_Form_Container
{
public function __construct(){
parent::__construct();
$this->_objectId = 'id';
$this->_blockGroup = 'registries';
$this->_controller = 'adminhtml_giftregistry';
$this->_mode = 'edit';
$this->_updateButton('save', 'label', Mage::helper
('mdg_giftregistry')->__('Save Registry'));
$this->_updateButton('delete', 'label',
Mage::helper('mdg_giftregistry')->
__('Delete Registry'));
}
public function getHeaderText(){
if(Mage::registry('registries_data') &&
Mage::registry('registries_data')->getId())
return Mage::helper('mdg_giftregistry')->__
("Edit Registry '%s'", $this->
htmlEscape(Mage::registry
('registries_data')->getTitle()));

Backend Development
[ 154 ]
return Mage::helper('mdg_giftregistry')->__
('Add Registry');
}
}
Similar to the grid widget, the form container widget will automatically identify and
load the matching form block.
One additional protected attribute that is being declared in the form container is
the mode attribute; this protected attribute is used by the container to specify the
location of the form block.
We can nd the code responsible for creating the form block inside the Mage_
Adminhtml_Block_Widget_Form_Container class:
$this->getLayout()->createBlock($this->_blockGroup . '/' . $this->_
controller . '_' . $this->_mode . '_form')
Now that we have created the form container block, we can proceed to create the
matching form block. Perform the following steps to do so:
1. Navigate to the Registries folder.
2. Create a new folder called Edit.
3. Create a new le called Form.php at the location app/code/local/Mdg/
Giftregistry/Block/Adminhtml/Registries/Edit/.
4. Add the following code to it:
<?php
class Mdg_Giftregistry_Block_Adminhtml_Registries_Edit_Form
extends Mage_Adminhtml_Block_Widget_Form
{
protected function _prepareForm(){
$form = new Varien_Data_Form(array(
'id' => 'edit_form',
'action' => $this->getUrl('*/*/save', array
('id' => $this->getRequest()->getParam('id'))),
'method' => 'post',
'enctype' => 'multipart/form-data'
));
$form->setUseContainer(true);
$this->setForm($form);
if (Mage::getSingleton
('adminhtml/session')->getFormData()){
$data = Mage::getSingleton
('adminhtml/session')->getFormData();

Chapter 5
[ 155 ]
Mage::getSingleton
('adminhtml/session')->setFormData(null);
}elseif(Mage::registry('registry_data'))
$data = Mage::registry
('registry_data')->getData();
$fieldset = $form->addFieldset('registry_form',
array('legend'=>Mage::helper('mdg_giftregistry')
->__('Gift Registry information')));
$fieldset->addField('type_id', 'text', array(
'label' => Mage::helper
('mdg_giftregistry')->__('Registry Id'),
'class' => 'required-entry',
'required' => true,
'name' => 'type_id',
));
$fieldset->addField('website_id', 'text', array(
'label' => Mage::helper
('mdg_giftregistry')->__('Website Id'),
'class' => 'required-entry',
'required' => true,
'name' => 'website_id',
));
$fieldset->addField
('event_location', 'text', array(
'label' => Mage::helper
('mdg_giftregistry')->__('Event Location'),
'class' => 'required-entry',
'required' => true,
'name' => 'event_location',
));
$fieldset->addField('event_date', 'text', array(
'label' => Mage::helper
('mdg_giftregistry')->__('Event Date'),
'class' => 'required-entry',
'required' => true,
'name' => 'event_date',
));
$fieldset->addField('event_country', 'text', array(
'label' => Mage::helper
('mdg_giftregistry')->__('Event Country'),
'class' => 'required-entry',
'required' => true,
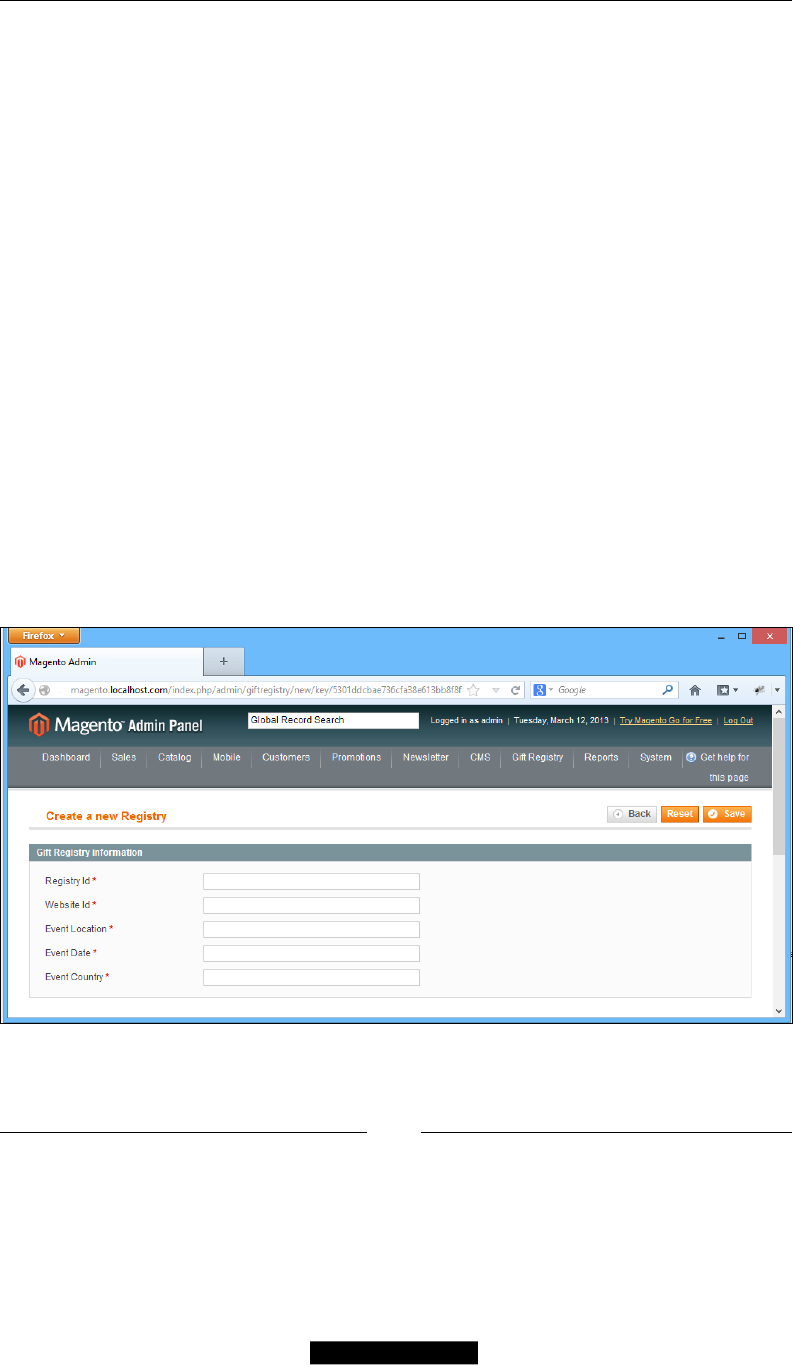
Backend Development
[ 156 ]
'name' => 'event_country',
));
$form->setValues($data);
return parent::_prepareForm();
}
}
We also need to modify our layout le and tell Magento to load our form container.
Copy the following code to the layout le giftregistry.xml, which can be found at
the location app/code/design/adminhtml/default/default/layout/:
<?xml version="1.0"?>
<layout version="0.1.0">
…
<adminhtml_giftregistry_edit>
<reference name="content">
<block type="mdg_giftregistry/adminhtml_registries_edit"
name="new_registry_tabs" />
</reference>
</adminhtml_giftregistry_edit>
…
We can check out our progress at this point by going into the Magento backend and
clicking on one of our example registries. We should see the following form:
But there seems to be an issue. None of the data is loaded; we just have an empty
form, so we have to modify our controller editAction() in order to load the data.

Chapter 5
[ 157 ]
Loading the data
Let's start by modifying editAction() inside our GiftregistryController.php
le, which can be found at the location app/code/local/Mdg/Giftregistry/
controllers/Adminhtml/:
…
public function editAction()
{
$id = $this->getRequest()->getParam('id', null);
$registry = Mage::getModel('mdg_giftregistry/entity');
if ($id) {
$registry->load((int) $id);
if ($registry->getId()) {
$data = Mage::getSingleton
('adminhtml/session')->getFormData(true);
if ($data) {
$registry->setData($data)->setId($id);
}
} else {
Mage::getSingleton('adminhtml/session')->addError
(Mage::helper('awesome')->__
('The Gift Registry does not exist'));
$this->_redirect('*/*/');
}
}
Mage::register('registry_data', $registry);
$this->loadLayout();
$this->getLayout()->getBlock('head')->setCanLoadExtJs(true);
$this->renderLayout();
}
What we are doing inside our editAction() is to check for a registry with the
same ID, and if it exists, we will load that registry entity and make it available to
our form. Previously, when adding the form code to the le app/code/local/Mdg/
Giftregistry/Block/Adminhtml/Registries/Edit/Form.php, we included
the following:
…
if (Mage::getSingleton('adminhtml/session')->getFormData()){
$data = Mage::getSingleton('adminhtml/session')->getFormData();
Mage::getSingleton('adminhtml/session')->setFormData(null);
}elseif(Mage::registry('registry_data'))
$data = Mage::registry('registry_data')->getData();
…
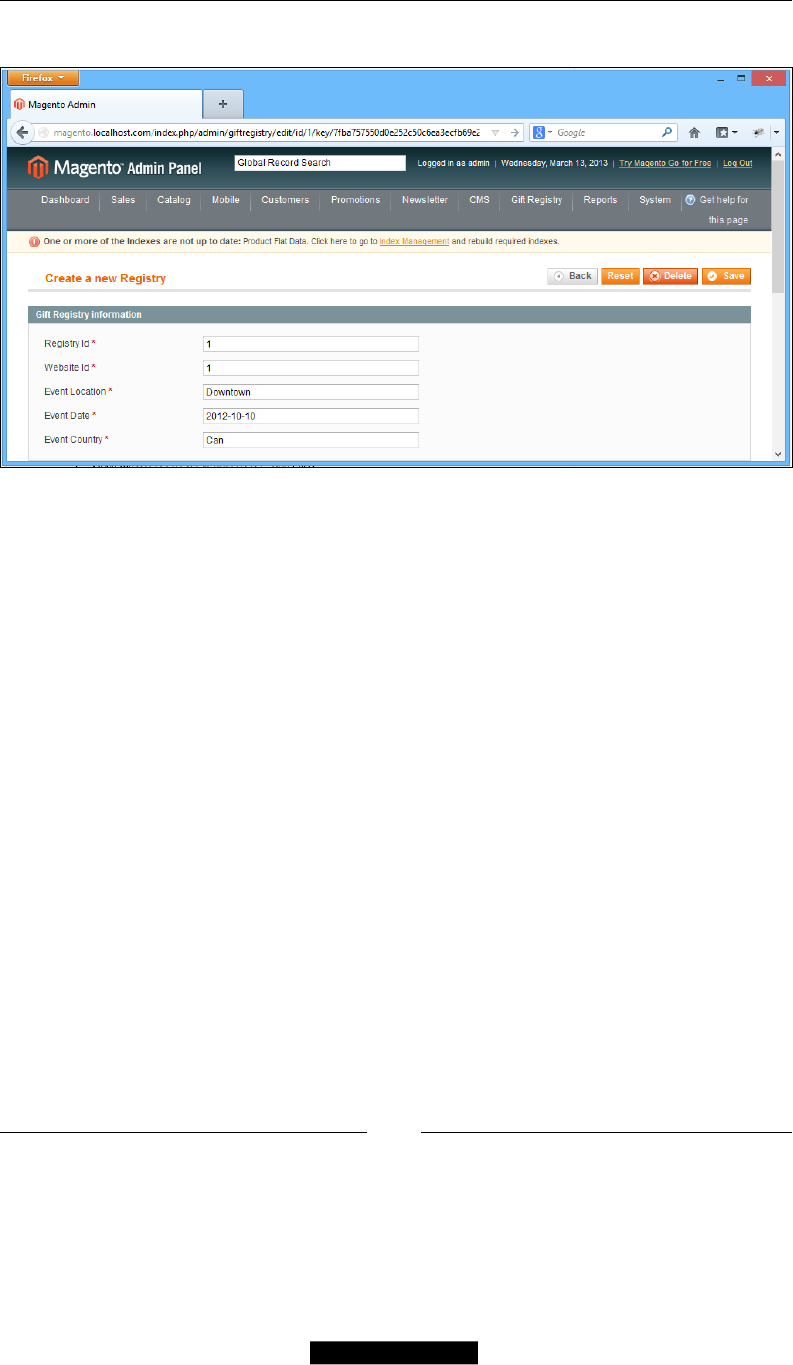
Backend Development
[ 158 ]
Now, we can test our changes by reloading the form:
Saving the data
Now that we have created the form for editing a registry, we need to create the
corresponding action to process and save the data posted by the form. We can use
the save form action to handle this. Perform the following steps:
1. Open the GiftregistryController.php class, which can be found at the
location app/code/local/Mdg/Giftregistry/controllers/Adminhtml/.
2. Replace the blank saveAction() function with the following code:
public function saveAction()
{
if ($this->getRequest()->getPost())
{
try {
$data = $this->getRequest()->getPost();
$id = $this->getRequest()->getParam('id');
if ($data && $id) {

Chapter 5
[ 159 ]
$registry = Mage::getModel
('mdg_giftregistry/entity')->load($id);
$registry->setData($data);
$registry->save();
$this->_redirect('*/*/edit', array
('id' => $this->getRequest()
->getParam('registry_id')));
}
} catch (Exception $e) {
$this->_getSession()->addError(
Mage::helper('mdg_giftregistry')->__
('An error occurred while saving the
registry data. Please review the log
and try again.')
);
Mage::logException($e);
$this->_redirect('*/*/edit', array
('id' => $this->getRequest()->
getParam('registry_id')));
return $this;
}
}
}
Let's break down what this code is doing step by step:
1. We check if the request has valid post data.
2. We check that both the $data and $id variables are set.
3. If both variables are set, we load a new registry entity and set the data.
4. Finally, we try to save the registry entity.
The rst thing we do is to check that the data posted is not empty and that we are
getting a registry ID as part of the parameters; we also check if the registry ID is a
valid instance of the registry entity.

Backend Development
[ 160 ]
Summary
In this chapter, we learned how to modify and extend the Magento backend to our
specic needs.
Whereas, the frontend extends the functionality that the customers and users can
use; extending the backend allows us to control this custom functionality and how
customers interact with it.
Grids and forms are important parts of the Magento backend, and by using them
properly, we can add a lot of functionality without having to write a lot of code or
reinvent the wheel.
Finally, we learned how to use the permissions and Magento ACL to control and
restrict the permissions of our custom extension after extension, as well as Magento
in general.
In the next chapter, we will dive deep into the Magento API, and we will learn how
to extend it to manipulate our registry data using several methods such as SOAP,
XML-RPC, and REST.

The Magento API
In the previous chapter, we extended the Magento backend and learned how to use
some of the backend components so that store owners can manage and manipulate
the gift registry data of each customer.
In this chapter we will cover the following topics:
• The Magento Core API
• The multiple API protocols available (REST, SOAP, XML-RPC)
• How to use the Core API
• How to extend the API to implement new functionality
• How to restrict parts of the API to specic web user roles
While the backend provides an interface for day-to-day operations, sometimes we
will need to access and/or transmit data from and to third-party systems. Magento
already provides API functionality for most of the core features, but for our custom
gift registry extension, we will need to extend the Mage_Api functionality.
The Core API
Often while talking about the API, I heard developers talking about the Magento
SOAP API or the Magento XML-RPC API or the RESTful API. But the important fact
is that these are not separate APIs for each of these protocols; instead, Magento has a
single Core API.
As you might notice, Magento is built mostly around abstraction and conguration
(mostly XML), and the Magento API is no exception. We have a single core API and
adapters for each of the different protocol types. This is incredibly exible, and if we
want to, we can implement our own adapter for another protocol.
The Magento API
[ 162 ]
The core Magento API gives us the ability to manage products, categories, attributes,
orders, and invoices. This is done by exposing three of the core modules:
• Mage_Catalog
• Mage_Sales
• Mage_Customer
The API supports three different types: SOAP, XML-RPC, and REST. Now, if you
have done web development outside Magento and with other APIs, it is most likely
that those APIs have been RESTful APIs.
Before we jump into the specics of the Magento API architecture, it is important
that we understand the differences between each of the supported API types.
XML-RPC
XML-RPC was one of the rst protocols supported by Magento and it is the oldest
of them all. This protocol has a single endpoint on which all the functions are called
and accessed.
XML-RPC is a remote procedure call (RPC) protocol that uses
XML to encode its calls and HTTP as a transport mechanism.
Since there is only a single endpoint, XML-RPC is easy to use and maintain; its
purpose is to be a simple and effective protocol for sending and receiving data.
The implementation uses straightforward XML to encode and decode a remote
procedure call along with the parameters.
However, this comes at a cost, and there are several problems with the whole
XML-RPC protocol:
• Lack of discoverability and documentation.
• Parameters are anonymous and XML-RPC relies on the order of the
parameters to differentiate them.
• Simplicity is the greatest strength and the greatest issue with XML-RPC.
While most of the tasks can easily be achieved with XML-RPC, some tasks
will require you to bend over backwards to achieve something that should be
straightforward to implement.
SOAP was designed to address XML-RPC limitations and provide a more
robust protocol.
Chapter 6
[ 163 ]
For more information about XML-RPC you can go to the following link:
http://en.wikipedia.org/wiki/XML-RPC
SOAP
The SOAP v1 was one of the rst protocols supported by Magento along with
XML-RPC since Magento 1.3 SOAP v2.
SOAP, originally dened as Simple Object Access Protocol, is a
protocol specication for exchanging structured information in the
implementation of web services in computer networks.
A SOAP request is basically an HTTP POST request containing a SOAP envelope,
a header, and a body.
The core of SOAP is Web Services Description Language (WSDL), which is
basically XML. WSDL is used to describe the functionality of a web service, in
this case our API methods. This is achieved by using the following series of
predetermined objects:
• Types: These are used to describe the data transmitted with the API; types
are dened using XML Schema, a special language for this purpose
• Message: This is used to specify the information needed to perform each one
of the operations; in the case of Magento, our API methods will always use
request and respond messages
• Port type: These are used to dene the operations that can be performed and
their corresponding messages
• Port: This is used to dene the connection point; in the case of Magento, a
simple string is used
• Service: This is used to specify which functions are exposed through the API
• Bindings: They are used to dene the operations and the interface with the
SOAP protocol
For more information about the SOAP protocol you can refer
to the following website:
http://en.wikipedia.org/wiki/SOAP

The Magento API
[ 164 ]
All the WSDL conguration is contained inside each module wsdl.xml le; for
example, let's take a look at an excerpt of the Catalog Product API:
The le location is app/code/local/Mdg/Giftregistry/etc/wsdl.xml.
<?xml version="1.0" encoding="UTF-8"?>
<definitions xmlns:typens="urn:{{var wsdl.name}}" xmlns:xsd="http://
www.w3.org/2001/XMLSchema"
xmlns:soap="http://schemas.xmlsoap.org/wsdl/soap/"
xmlns:soapenc="http://schemas.xmlsoap.org/soap/encoding/"
xmlns:wsdl="http://schemas.xmlsoap.org/wsdl/"
xmlns="http://schemas.xmlsoap.org/wsdl/"
name="{{var wsdl.name}}" targetNamespace="urn:{{var wsdl.
name}}">
<types>
<schema xmlns="http://www.w3.org/2001/XMLSchema"
targetNamespace="urn:Magento">
...
<complexType name="catalogProductEntity">
<all>
<element name="product_id" type="xsd:string"/>
<element name="sku" type="xsd:string"/>
<element name="name" type="xsd:string"/>
<element name="set" type="xsd:string"/>
<element name="type" type="xsd:string"/>
<element name="category_ids"
type="typens:ArrayOfString"/>
<element name="website_ids"
type="typens:ArrayOfString"/>
</all>
</complexType>
</schema>
</types>
<message name="catalogProductListResponse">
<part name="storeView" type="typens:catalogProductEntityArr
ay"/>
</message>
...
<portType name="{{var wsdl.handler}}PortType">
...

Chapter 6
[ 165 ]
<operation name="catalogProductList">
<documentation>Retrieve products list by filters</
documentation>
<input message="typens:catalogProductListRequest"/>
<output message="typens:catalogProductListResponse"/>
</operation>
...
</portType>
<binding name="{{var wsdl.handler}}Binding" type="typens:{{var
wsdl.handler}}PortType">
<soap:binding style="rpc" transport="http://schemas.xmlsoap.
org/soap/http"/>
...
<operation name="catalogProductList">
<soap:operation soapAction="urn:{{var wsdl.handler}}
Action"/>
<input>
<soap:body namespace="urn:{{var wsdl.name}}"
use="encoded"
encodingStyle="http://schemas.xmlsoap.org/
soap/encoding/"/>
</input>
<output>
<soap:body namespace="urn:{{var wsdl.name}}"
use="encoded"
encodingStyle="http://schemas.xmlsoap.org/
soap/encoding/"/>
</output>
</operation>
...
</binding>
<service name="{{var wsdl.name}}Service">
<port name="{{var wsdl.handler}}Port" binding="typens:{{var
wsdl.handler}}Binding">
<soap:address location="{{var wsdl.url}}"/>
</port>
</service>
</definitions>
By using WSDL we can document, list, and support more complex data types.
The Magento API
[ 166 ]
RESTful API
The RESTful API is the new addition to the family of protocols supported by
Magento and is only available on Magento CE 1.7 or older.
A RESTful web service (also called a RESTful web API) is a web
service implemented using HTTP and the principles of REST.
A RESTful API can be dened by the following three aspects:
• It makes usage of the standard of HTTP methods, such as GET, POST,
DELETE, and PUT
• Its exposed URIs are formatted in a directory-like structure
• It uses JSON or XML to transfer information
The REST API supports the response in two formats,
which are XML and JSON.
One of the advantages that REST has over SOAP and XML-RPC is that all interaction
with the REST API is done through the HTTP protocol, meaning it can be used by
any programming language virtually.
The Magento REST API has the following characteristics:
• Resources are accessed by making an HTTP request to the Magento
API service
• The service replies with the data for the request or a status indicator or
even both
• All resources can be accessed through https://magento.localhost.com/
api/rest/
• Resources return HTTP status codes, such as HTTP Status Code 200,
to indicate success on a response, or HTTP Status Code 400 to indicate a
bad request
• Request to a particular resource is done by adding a particular path to the
base URL (https://magento.localhost.com/api/rest/)
Chapter 6
[ 167 ]
REST uses HTTP verbs to manage the states of resources. In the Magento
implementation four verbs are available: GET, POST, PUT, and DELETE.
For this reason, using the RESTful API is trivial in most cases.
Using the API
Now that we have claried each of the available protocols, let's explore what we can
do with the Magento API and how to do it with each of the available protocols.
We will use the product endpoint as an example for accessing and working with the
different API protocols.
The examples are provided in PHP and these use three different
protocols. For complete examples in PHP and to see examples in
other programming languages visit http://magedevguide.com.
Setting up the API credentials for XML-RPC/
SOAP
Before we get started, we need to create a set of web service credentials in order to
access the API functions.
The rst thing we need to set up is the API user role. Roles control the permissions
for the API by using Access Control Lists (ACL). By implementing this design
pattern, Magento is able to restrict certain parts of its API to specic users.
Later in this chapter, we will learn how we can add our custom functions to the ACL
and secure our custom extensions' API methods. For now, we just need to create a
role with full permissions by executing the following steps:
1. Go to the Magento backend.
2. Go to System | Web Services | Roles from the main navigation menu.
3. Click on the Add New Role button.
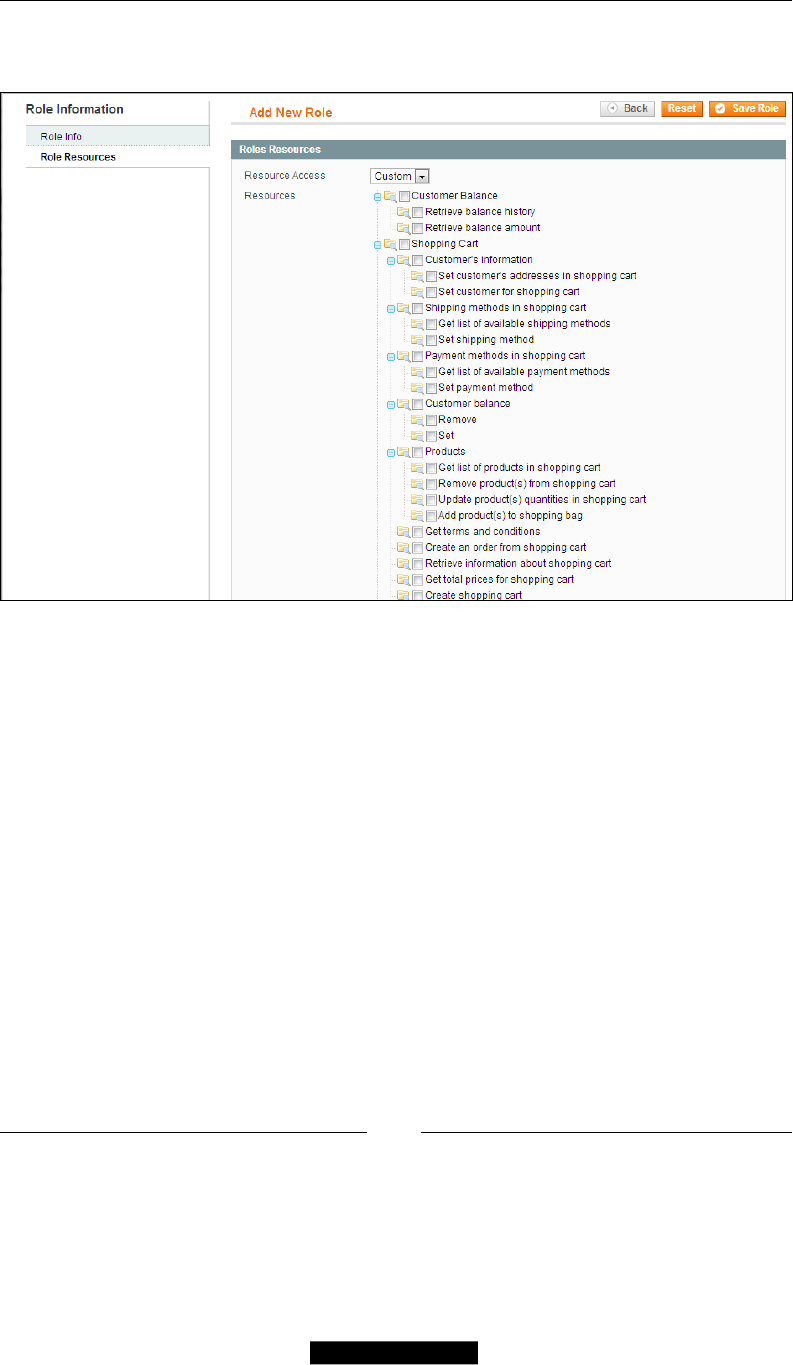
The Magento API
[ 168 ]
4. As shown in the following screenshot, you will be requested to provide a role
name and specify the role resources:
5. By default, the Resources Access option is set to Custom and no resources
are selected. In our case, we will change the Resource Access option by
selecting All from the drop-down menu.
6. Click on the Save Role button.
Now that we have a valid role in our store, let's proceed to create a web API user:
1. Go to the Magento backend.
2. Go to System | Web Services | Users from the main navigation menu.
3. Click on the Add New User button.
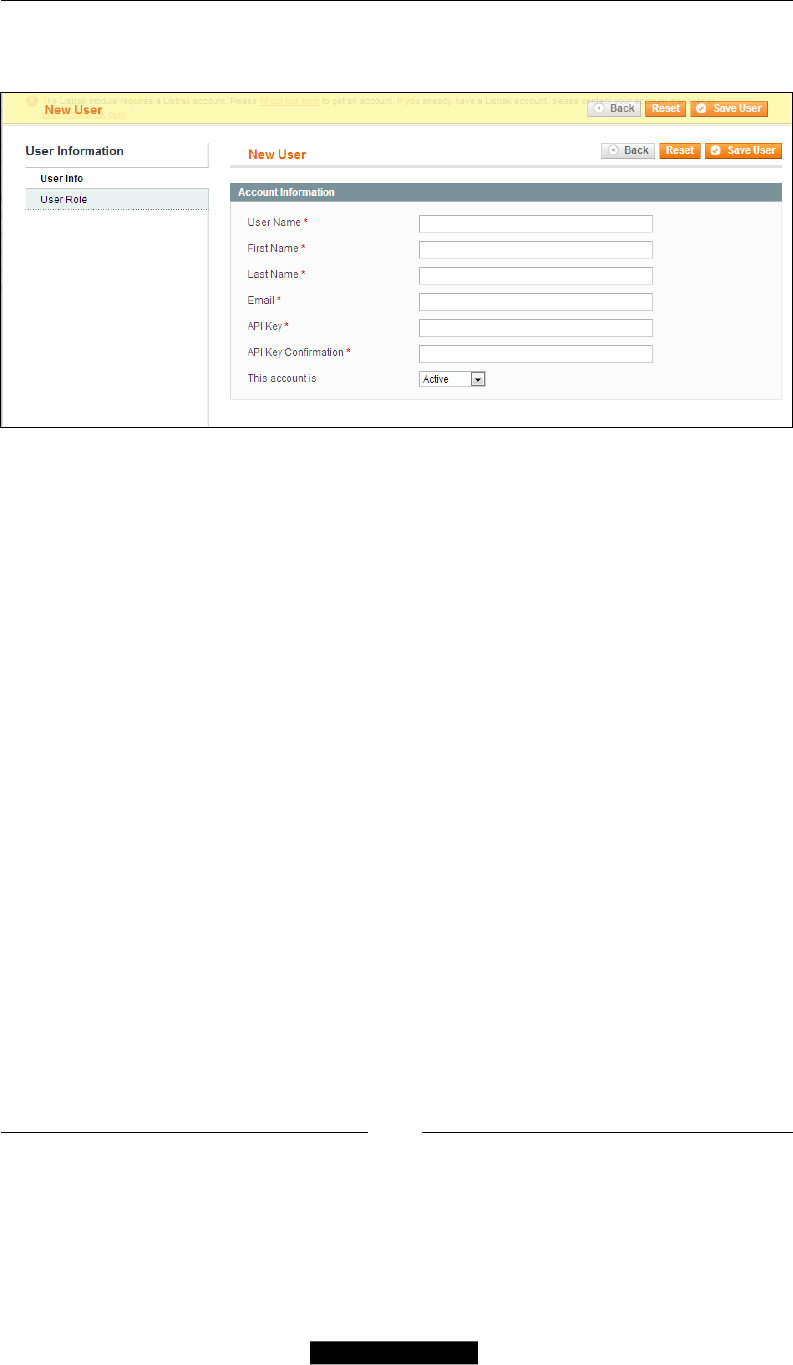
Chapter 6
[ 169 ]
4. Next, we will be asked for the user information as shown in the
following screenshot:
5. In the API Key and API Key Conrmation elds enter your desired password.
6. Click on the User Role tab.
7. Select the user role that we just created.
8. Click on the Save User button.
The reason that we need to create a username and role for accessing the API is that
every single API function requires a session token to be passed as a parameter.
For that reason, every time we need to use the API, the rst call that we have to make
is to the login function, which will return a valid session token ID.
Setting up the REST API credentials
The new RESTful API is slightly different in terms of authentication; instead of using
the traditional Magento web service users, it uses a three-legged OAuth 1.0 protocol
to provide authentication.
OAuth works by asking the user to authorize its application. When the user registers
an application, he/she needs to ll in the following elds:
• User: This is a customer, who has an account with Magento and can use the
services with the API.
• Consumer: This is a third-party application that uses OAuth to access the
Magento API.
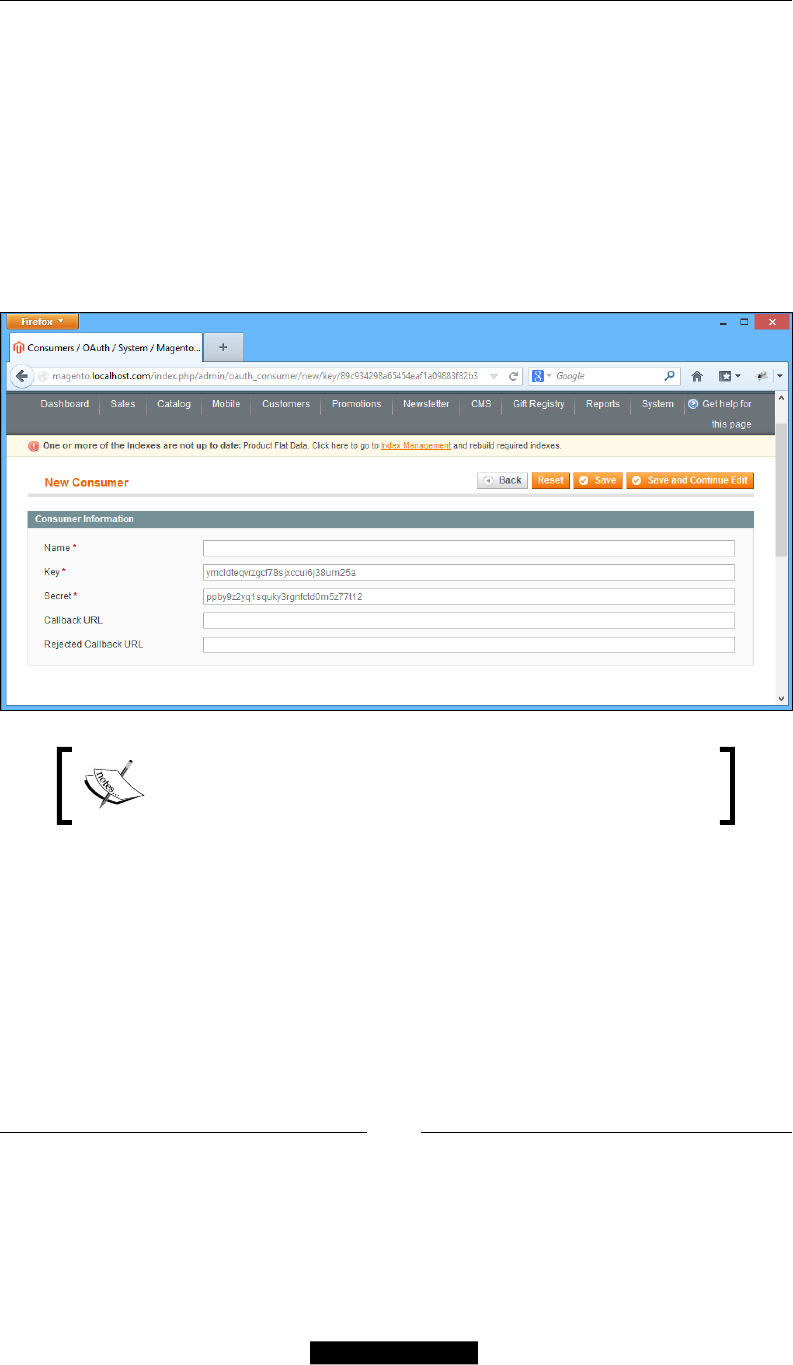
The Magento API
[ 170 ]
• Consumer Key: This is a unique value used to identify a user with Magento.
• Consumer Secret: This is a secret used by the customer to guarantee the
ownership of the consumer key. This value is never passed in the request.
• Request Token: This value is used by the consumer (application) to obtain
authorization from the user to access the API resources.
• Access Token: This is returned in exchange of the request token and on
successful authentication.
Let's proceed to register our application by going to System | Web Services |
REST - OAuth Consumers and selecting Add New in the Admin panel:
One important thing to notice is that a callback URL must be
dened, to which the user will be redirected after successfully
authorizing the application.
Our rst step is to learn how to get this session token ID on each of the available
API protocols.
To get session token ID in XML-RPC, we need to execute the following code:
$apiUser = 'username';
$apiKey = 'password';
$client = new Zend_XmlRpc_Client('http://ourhost.com/api/xmlrpc/');
// We authenticate ourselves and get a session token id
$sessionId = $client->call('login', array($apiUser, $apiKey));

Chapter 6
[ 171 ]
To get a session token ID in SOAP v2, we need to execute the following code:
$apiUser = 'username';
$apiKey = 'password';
$client = new SoapClient('http://ourhost.com/api/v2_soap/?wsdl');
// We authenticate ourselves and get a session token id
$sessionId = $client->login($apiUser, $apiKey);
To get a session token ID in REST, we need to execute the following steps:
$callbackUrl = "http://magento.localhost.com/oauth_admin.php";
$temporaryCredentialsRequestUrl = "http://magento.localhost.com/oauth/
initiate?oauth_callback=" . urlencode($callbackUrl);
$adminAuthorizationUrl = 'http://magento.localhost.com/admin/oAuth_
authorize';
$accessTokenRequestUrl = 'http://magento.localhost.com/oauth/token';
$apiUrl = 'http://magento.localhost.com/api/rest';
$consumerKey = 'yourconsumerkey';
$consumerSecret = 'yourconsumersecret';
session_start();
$authType = ($_SESSION['state'] == 2) ? OAUTH_AUTH_TYPE_AUTHORIZATION
: OAUTH_AUTH_TYPE_URI;
$oauthClient = new OAuth($consumerKey, $consumerSecret, OAUTH_SIG_
METHOD_HMACSHA1, $authType);
$oauthClient->setToken($_SESSION['token'], $_SESSION['secret']);
Loading and reading data
The Mage_Catalog module product endpoint has the following exposed methods
that we can use to manage products:
• catalog_product.currentStore: This sets/gets the current store view
• catalog_product.list: This retrieves products list using lters
• catalog_product.info: This retrieves a product
• catalog_product.create: This creates a new product
• catalog_product.update: This updates a product
• catalog_product.setSpecialPrice: This sets a special price for a product
• catalog_product.getSpecialPrice: This gets a special price for a product
• catalog_product.delete: This deletes a product

The Magento API
[ 172 ]
Right now, the functions that are of particular interest for us are catalog_product.
list and catalog_product.info. Let's see how we can use the API to retrieve
product data from our staging store.
To retrieve product data from our staging store in XML-RPC, execute the
following code:
…
$result = $client->call($sessionId, 'catalog_product.list');
print_r ($result);
…
To retrieve product data from our staging store in SOAPv2, execute the following code:
…
$result = $client->catalogProductList($sessionId);
print_r($result);
…
To retrieve product data from our staging store in REST, execute the following code:
…
$resourceUrl = $apiUrl . "/products";
$oauthClient->fetch($resourceUrl, array(), 'GET', array('Content-Type'
=> 'application/json'));
$productsList = json_decode($oauthClient->getLastResponse());
…
Regardless of the protocol, we will get back a list of all the products' SKUs, but
what if we want to lter that product list based on an attribute? Well, Magento lists
functions that allow us to lter the product list based on an attribute by passing a
parameter. Having said that, let's see how we can add lters to our product list call.
To add lters to our product list call in XML-RPC, execute the following code:
…
$result = $client->call('catalog_product.list', array($sessionId,
$filters);
print_r ($result);
…
To add lters to our product list call in SOAPv2, execute the following code:
…
$result = $client->catalogProductList($sessionId,$filters);
print_r($result);
…

Chapter 6
[ 173 ]
With REST, things are not that simple and it is not possible to retrieve a product
collection ltered by an attribute. However, we are able to retrieve all the products
that belong to a specic category by executing the following code:
…
$categoryId = 3;
$resourceUrl = $apiUrl . "/products/category_id=" . categoryId ;
$oauthClient->fetch($resourceUrl, array(), 'GET', array('Content-Type'
=> 'application/json'));
$productsList = json_decode($oauthClient->getLastResponse());
…
Updating data
Now that we are able to retrieve product information from the Magento API, we can
start updating the content of each product.
The catalog_product.update method will allow us to modify any of the product
attributes; the function call takes the following parameters.
For updating data in XML-RPC, execute the following code:
…
$productId = 200;
$productData = array( 'sku' => 'changed_sku', 'name' => 'New Name',
'price' => 15.40 );
$result = $client->call($sessionId, 'catalog_product.update',
array($productId, $productData));
print_r($result);
…
For updating data in SOAPv2, execute the following code:
…
$productId = 200;
$productData = array( 'sku' => 'changed_sku', 'name' => 'New Name',
'price' => 15.40 );
$result = $client->catalogProductUpdate($sessionId, array($productId,
$productData));
print_r($result);
…

The Magento API
[ 174 ]
For updating data in REST, execute the following code:
…
$productData = json_encode(array(
'type_id' => 'simple',
'attribute_set_id' => 4,
'sku' => 'simple' . uniqid(),
'weight' => 10,
'status' => 1,
'visibility' => 4,
'name' => 'Test Product',
'description' => 'Description',
'short_description' => 'Short Description',
'price' => 29.99,
'tax_class_id' => 2,
));
$oauthClient->fetch($resourceUrl, $productData, OAUTH_HTTP_METHOD_
POST, array('Content-Type' => 'application/json'));
$updatedProduct = json_decode($oauthClient->getLastResponseInfo());
…
Deleting a product
Deleting products by using the API is very simple and probably one of the most
common operations.
For deleting products in XML-RPC, execute the following code:
…
$productId = 200;
$result = $client->call($sessionId, 'catalog_product.delete',
$productId);
print_r($result);
…
For deleting products in SOAPv2, execute the following code:
…
$productId = 200;
$result = $client->catalogProductDelete($sessionId, $productId);
print_r($result);
…
Chapter 6
[ 175 ]
For deleting the code in REST, execute the following code:
…
$productData = json_encode(array(
'id' => 4
));
$oauthClient->fetch($resourceUrl, $productData, OAUTH_HTTP_METHOD_
DELETE, array('Content-Type' => 'application/json'));
$updatedProduct = json_decode($oauthClient->getLastResponseInfo());
…
Extending the API
Now that we have a basic understanding of how to use the Magento Core API, we
can proceed to extend and add our own custom functionality. In order to add new
API functionality, we have to modify/create the following les:
• wsdl.xml
• api.xml
• api.php
In order to make our registries accessible for third-party systems, we need to create
and expose the following functions:
• giftregistry_registry.list: This retrieves a list of all the registry IDs
and takes an optional customer ID parameter
• giftregistry_registry.info: This retrieves all the registry information
and takes a required registry_id parameter
• giftregistry_item.list: This retrieves a list of all the registry item IDs
associated to a registry and takes a required registry_id parameter
• giftregistry_item.info: This retrieves the product and detailed
information of a registry item and takes one required item_id parameter
So far, we have only added reading operations. Let's now try to include API methods
for updating, deleting, and creating registries and registry items.
To see the answer with the complete code and full breakdown,
visit http://www.magedevguide.com/.

The Magento API
[ 176 ]
Our rst step is to implement the API class and the required functions:
1. Navigate to the Model directory.
2. Create a new class called Api.php and place the following placeholder
content inside it:
The le location is app/code/local/Mdg/Giftregistry/Model/Api.php.
<?php
class Mdg_Giftregisty_Model_Api extends Mage_Api_Model_Resource_
Abstract
{
public function getRegistryList($customerId = null)
{
}
public function getRegistryInfo($registryId)
{
}
public function getRegistryItems($registryId)
{
}
public function getRegistryItemInfo($registryItemId)
{
}
}
3. Create a new directory called Api/.
4. Inside Api/ create a new class called V2.php and place the following
placeholder content inside it:
The le location is app/code/local/Mdg/Giftregistry/Model/Api/
V2.php.
<?php
class Mdg_Giftregisty_Model_Api_V2 extends Mdg_Giftregisty_Model_
Api
{
}

Chapter 6
[ 177 ]
The rst thing you might notice is that the V2.php le is extending the API class we
just created. The only difference is that the V2 class is used by the SOAP_v2 protocol,
while the regular API class is used for all other requests.
Let's update the API class with the following working code:
The le location is app/code/local/Mdg/Giftregistry/Model/Api.php.
<?php
class Mdg_Giftregisty_Model_Api extends Mage_Api_Model_Resource_
Abstract
{
public function getRegistryList($customerId = null)
{
$registryCollection = Mage::getModel('mdg_giftregistry/
entity')->getCollection();
if(!is_null($customerId))
{
$registryCollection->addFieldToFilter('customer_id',
$customerId);
}
return $registryCollection;
}
public function getRegistryInfo($registryId)
{
if(!is_null($registryId))
{
$registry = Mage::getModel('mdg_giftregistry/entity')-
>load($registryId);
if($registry)
{
return $registry;
} else {
return false;
}
} else {
return false;
}
}
public function getRegistryItems($registryId)
{
if(!is_null($registryId))
{

The Magento API
[ 178 ]
$registryItems = Mage::getModel('mdg_giftregistry/item')-
>getCollection();
$registryItems->addFieldToFilter('registry_id',
$registryId);
Return $registryItems;
} else {
return false;
}
}
public function getRegistryItemInfo($registryItemId)
{
if(!is_null($registryItemId))
{
$registryItem = Mage::getModel('mdg_giftregistry/item')-
>load($registryItemId);
if($registryItem){
return $registryItem;
} else {
return false;
}
} else {
return false;
}
}
}
As we can see from the preceding code, we are not doing anything new. Each
function is in charge of loading either a collection of Magento objects or a specic
object based on the required parameters.
In order to expose this new function to the Magento API, we need to congure the
XML les we created before. Let's start by updating the api.xml le:
1. Open the api.xml le.
2. Add the following XML code:
The le location is app/code/local/Mdg/Giftregistry/etc/api.xml.
<?xml version="1.0"?>
<config>
<api>
<resources>
<giftregistry_registry translate="title" module="mdg_
giftregistry">
<model>mdg_giftregistry/api</model>

Chapter 6
[ 179 ]
<title>Mdg Giftregistry Registry functions</title>
<methods>
<list translate="title" module="mdg_
giftregistry">
<title>getRegistryList</title>
<method>getRegistryList</method>
</list>
<info translate="title" module="mdg_
giftregistry">
<title>getRegistryInfo</title>
<method>getRegistryInfo</method>
</info>
</methods>
</giftregistry_registry>
<giftregistry_item translate="title" module="mdg_
giftregistry">
<model>mdg_giftregistry/api</model>
<title>Mdg Giftregistry Registry Items functions</
title>
<methods>
<list translate="title" module="mdg_
giftregistry">
<title>getRegistryItems</title>
<method>getRegistryItems</method>
</list>
<info translate="title" module="mdg_
giftregistry">
<title>getRegistryItemInfo</title>
<method>getRegistryItemInfo</method>
</info>
</methods>
</giftregistry_item>
</resources>
<resources_alias>
<giftregistry_registry>giftregistry_registry</
giftregistry_registry>
<giftregistry_item>giftregistry_item</giftregistry_
item>
</resources_alias>
<v2>
<resources_function_prefix>
<giftregistry_registry>giftregistry_registry</
giftregistry_registry>
<giftregistry_item>giftregistry_item</
giftregistry_item>

The Magento API
[ 180 ]
</resources_function_prefix>
</v2>
</api>
</config>
There is one more le we need to update to make sure the SOAP adapters pick up
our new API functions:
1. Open the wsdl.xml le.
2. Since the wsdl.xml le is normally very long in extent, we will break it down
in several places. Let's start by dening the skeleton of the wsdl.xml le:
The le location is app/code/local/Mdg/Giftregistry/etc/wsdl.xml.
<?xml version="1.0" encoding="UTF-8"?>
<definitions xmlns:typens="urn:{{var wsdl.name}}"
xmlns:xsd="http://www.w3.org/2001/XMLSchema" xmlns:soap="http://
schemas.xmlsoap.org/wsdl/soap/"
xmlns:soapenc="http://schemas.xmlsoap.org/soap/
encoding/" xmlns:wsdl="http://schemas.xmlsoap.org/wsdl/"
xmlns="http://schemas.xmlsoap.org/wsdl/"
name="{{var wsdl.name}}" targetNamespace="urn:{{var
wsdl.name}}">
<types>
</types>
<message name="gitregistryRegistryListRequest">
</message>
<portType name="{{var wsdl.handler}}PortType">
</portType>
<binding name="{{var wsdl.handler}}Binding" type="typens:{{var
wsdl.handler}}PortType">
<soap:binding style="rpc" transport="http://schemas.
xmlsoap.org/soap/http" />
</binding>
<service name="{{var wsdl.name}}Service">
<port name="{{var wsdl.handler}}Port"
binding="typens:{{var wsdl.handler}}Binding">
<soap:address location="{{var wsdl.url}}" />
</port>
</service>
</definitions>

Chapter 6
[ 181 ]
3. This is the basic placeholder. We have all the main nodes that we dened
at the beginning of the chapter. The rst thing that we have to dene is the
custom data types that our API will use:
The le location is app/code/local/Mdg/Giftregistry/etc/wsdl.xml.
…
<schema xmlns="http://www.w3.org/2001/XMLSchema"
targetNamespace="urn:Magento">
<import namespace="http://schemas.xmlsoap.org/soap/
encoding/" schemaLocation="http://schemas.xmlsoap.org/soap/
encoding/"/>
<complexType name="giftRegistryEntity">
<all>
<element name="entity_id" type="xsd:integer"
minOccurs="0" />
<element name="customer_id" type="xsd:integer"
minOccurs="0" />
<element name="type_id" type="xsd:integer"
minOccurs="0" />
<element name="website_id" type="xsd:integer"
minOccurs="0" />
<element name="event_date" type="xsd:string"
minOccurs="0" />
<element name="event_country"
type="xsd:string" minOccurs="0" />
<element name="event_location"
type="xsd:string" minOccurs="0" />
</all>
</complexType>
<complexType name="giftRegistryEntityArray">
<complexContent>
<restriction base="soapenc:Array">
<attribute ref="soapenc:arrayType" wsdl:ar
rayType="typens:giftRegistryEntity[]" />
</restriction>
</complexContent>
</complexType>
<complexType name="registryItemsEntity">
<all>
<element name="item_id" type="xsd:integer"
minOccurs="0" />
<element name="registry_id" type="xsd:integer"
minOccurs="0" />
<element name="product_id" type="xsd:integer"
minOccurs="0" />
</all>
The Magento API
[ 182 ]
</complexType>
<complexType name="registryItemsArray">
<complexContent>
<restriction base="soapenc:Array">
<attribute ref="soapenc:arrayType" wsdl:ar
rayType="typens:registryItemsEntity[]" />
</restriction>
</complexContent>
</complexType>
</schema>
…
Complex data types allow us to map which attributes and
objects are transmitted through the API.
4. Messages allow us to dene which of the complex types are transmitted
on each API call request and response. Let's proceed to add the respective
messages in our wsdl.xml:
The le location is app/code/local/Mdg/Giftregistry/etc/wsdl.xml.
…
<message name="gitregistryRegistryListRequest">
<part name="sessionId" type="xsd:string" />
<part name="customerId" type="xsd:integer"/>
</message>
<message name="gitregistryRegistryListResponse">
<part name="result" type="typens:giftRegistryEntityArray"
/>
</message>
<message name="gitregistryRegistryInfoRequest">
<part name="sessionId" type="xsd:string" />
<part name="registryId" type="xsd:integer"/>
</message>
<message name="gitregistryRegistryInfoResponse">
<part name="result" type="typens:giftRegistryEntity" />
</message>
<message name="gitregistryItemListRequest">
<part name="sessionId" type="xsd:string" />
<part name="registryId" type="xsd:integer"/>
</message>
<message name="gitregistryItemListResponse">
<part name="result" type="typens:registryItemsArray" />
</message>
<message name="gitregistryItemInfoRequest">

Chapter 6
[ 183 ]
<part name="sessionId" type="xsd:string" />
<part name="registryItemId" type="xsd:integer"/>
</message>
<message name="gitregistryItemInfoResponse">
<part name="result" type="typens:registryItemsEntity" />
</message>
…
5. One important thing to notice is that each request message will always
include a sessionId property that is used to validate and authenticate each
request, whereas the response is used to specify which complied data types
or values are returned:
The le location is app/code/local/Mdg/Giftregistry/etc/wsdl.xml.
…
<portType name="{{var wsdl.handler}}PortType">
<operation name="giftregistryRegistryList">
<documentation>Get Registries List</documentation>
<input message="typens:gitregistryRegistryListRequest"
/>
<output message="typens:gitregistryRegistryListRespon
se" />
</operation>
<operation name="giftregistryRegistryInfo">
<documentation>Get Registry Info</documentation>
<input message="typens:gitregistryRegistryInfoRequest"
/>
<output message="typens:gitregistryRegistryInfoRespon
se" />
</operation>
<operation name="giftregistryItemList">
<documentation>getAllProductsInfo</documentation>
<input message="typens:gitregistryItemListRequest" />
<output message="typens:gitregistryItemListResponse"
/>
</operation>
<operation name="giftregistryItemInfo">
<documentation>getAllProductsInfo</documentation>
<input message="typens:gitregistryItemInfoRequest" />
<output message="typens:gitregistryItemInfoResponse"
/>
</operation>
</portType>
…

The Magento API
[ 184 ]
6. The next thing that is required for properly adding the new API endpoints is
to dene the bindings, which are used to specify which methods are exposed:
The le location is app/code/local/Mdg/Giftregistry/etc/wsdl.xml.
…
<operation name="giftregistryRegistryList">
<soap:operation soapAction="urn:{{var wsdl.handler}}
Action" />
<input>
<soap:body namespace="urn:{{var wsdl.name}}"
use="encoded" encodingStyle="http://schemas.xmlsoap.org/soap/
encoding/" />
</input>
<output>
<soap:body namespace="urn:{{var wsdl.name}}"
use="encoded" encodingStyle="http://schemas.xmlsoap.org/soap/
encoding/" />
</output>
</operation>
<operation name="giftregistryRegistryInfo">
<soap:operation soapAction="urn:{{var wsdl.handler}}
Action" />
<input>
<soap:body namespace="urn:{{var wsdl.name}}"
use="encoded" encodingStyle="http://schemas.xmlsoap.org/soap/
encoding/" />
</input>
<output>
<soap:body namespace="urn:{{var wsdl.name}}"
use="encoded" encodingStyle="http://schemas.xmlsoap.org/soap/
encoding/" />
</output>
</operation>
<operation name="giftregistryItemList">
<soap:operation soapAction="urn:{{var wsdl.handler}}
Action" />
<input>
<soap:body namespace="urn:{{var wsdl.name}}"
use="encoded" encodingStyle="http://schemas.xmlsoap.org/soap/
encoding/" />
</input>
<output>
<soap:body namespace="urn:{{var wsdl.name}}"
use="encoded" encodingStyle="http://schemas.xmlsoap.org/soap/
encoding/" />
</output>
Chapter 6
[ 185 ]
</operation>
<operation name="giftregistryInfoList">
<soap:operation soapAction="urn:{{var wsdl.handler}}
Action" />
<input>
<soap:body namespace="urn:{{var wsdl.name}}"
use="encoded" encodingStyle="http://schemas.xmlsoap.org/soap/
encoding/" />
</input>
<output>
<soap:body namespace="urn:{{var wsdl.name}}"
use="encoded" encodingStyle="http://schemas.xmlsoap.org/soap/
encoding/" />
</output>
</operation>
…
You can see the complete wsdl.xml in one piece at
http://magedevguide.com/chapter6/wsdl.
Even after we broke it down, the WSDL code can still seem overwhelming, and to be
honest, it took me some time to get used to such a massive XML le. So if you feel or
are feeling it is too much, just take it one step at a time.
Extending the REST API
So far, we have only worked on extending the SOAP and XML-RPC parts of the API.
The process involved in extending the RESTful API is slightly different.
The REST API was introduced with Magento Community
Edition 1.7 and Enterprise Edition 1.12.
In order to expose the new API methods to the REST API, we need to create a new
le called api2.xml. The conguration on this le is a little more complex than the
normal api.xml, so we will break it down after adding the full code:
1. Create a new le called api2.xml under the etc/ folder.
2. Open api2.xml.
3. Copy the following code:
The le location is app/code/local/Mdg/Giftregistry/etc/api2.xml.
<?xml version="1.0"?>
<config>

The Magento API
[ 186 ]
<api2>
<resource_groups>
<giftregistry translate="title" module="mdg_
giftregistry">
<title>MDG GiftRegistry API calls</title>
<sort_order>30</sort_order>
<children>
<giftregistry_registry translate="title"
module="mdg_giftregistry">
<title>Gift Registries</title>
<sort_order>50</sort_order>
</giftregistry_registry>
<giftregistry_item translate="title"
module="mdg_giftregistry">
<title>Gift Registry Items</title>
<sort_order>50</sort_order>
</giftregistry_item>
</children>
</giftregistry>
</resource_groups>
<resources>
<giftregistryregistry translate="title" module="mdg_
giftregistry">
<group>giftregistry_registry</group>
<model>mdg_giftregistry/api_registry</model>
<working_model>mdg_giftregistry/api_registry</
working_model>
<title>Gift Registry</title>
<sort_order>10</sort_order>
<privileges>
<admin>
<create>1</create>
<retrieve>1</retrieve>
<update>1</update>
<delete>1</delete>
</admin>
</privileges>
<attributes translate="product_count" module="mdg_
giftregistry">
<registry_list>Registry List</registry_list>
<registry>Registry</registry>
<item_list>Item List</item_list>
<item>Item</item>
</attributes>
<entity_only_attributes>
</entity_only_attributes>

Chapter 6
[ 187 ]
<exclude_attributes>
</exclude_attributes>
<routes>
<route_registry_list>
<route>/mdg/registry/list</route>
<action_type>collection</action_type>
</route_registry_list>
<route_registry_entity>
<route>/mdg/registry/:registry_id</route>
<action_type>entity</action_type>
</route_registry_entity>
<route_registry_list>
<route>/mdg/registry_item/list</route>
<action_type>collection</action_type>
</route_registry_list>
<route_registry_list>
<route>/mdg/registry_item/:item_id</route>
<action_type>entity</action_type>
</route_registry_list>
</routes>
<versions>1</versions>
</giftregistryregistry>
</resources>
</api2>
</config>
One important thing to notice is that we are dening a route node inside this
conguration le. This is treated by Magento as a frontend route and it is used
to access the RESTful api function. Also notice that we don't need to create a
new controller for this to work.
Now, we also need to include a new class to handle the REST requests, and
implement each of the dened privileges:
1. Create a new class called V1.php under Model/Api/Registry/Rest/Admin.
2. Open the V1.php class and copy the following code:
The le location is app/code/local/Mdg/Giftregistry/Model/Api/
Registry/Rest/Admin/V1.php.
<?php
class Mdg_Giftregistry_Model_Api_Registry_Rest_Admin_V1 extends
Mage_Catalog_Model_Api2_Product_Rest {
/**
* @return stdClass
*/

The Magento API
[ 188 ]
protected function _retrieve()
{
$registryCollection = Mage::getModel('mdg_giftregistry/
entity')->getCollection();
return $registryCollection;
}
}
Securing the API
Securing our API is already a part of the process of creating our module and it
is also handled by the conguration. The way Magento restricts access to its API
is by using ACL.
As we learned before, these ACL allow us to set up roles with access to different
parts of the API. Now, what we have to do is make our new custom functions
available to the ACL:
1. Open the api.xml le.
2. Add the following code after the </v2> node:
The le location is app/code/local/Mdg/Giftregistry/etc/api.xml.
<acl>
<resources>
<giftregistry translate="title" module="mdg_giftregistry">
<title>MDG Gift Registry</title>
<sort_order>1</sort_order>
<registry translate="title" module="mdg_giftregistry">
<title>MDG Gift Registry</title>
<list translate="title" module="mdg_giftregistry">
<title>List Available Registries</title>
</list>
<info translate="title" module="mdg_giftregistry">
<title>Retrieve registry data</title>
</info>
</registry>
<item translate="title" module="mdg_giftregistry">
<title>MDG Gift Registry Item</title>
<list translate="title" module="mdg_giftregistry">
<title>List Available Items inside a
registry</title>
</list>
<info translate="title" module="mdg_giftregistry">
<title>Retrieve registry item data</title>

Chapter 6
[ 189 ]
</info>
</item>
</giftregistry>
</resources>
</acl>
Summary
In previous chapters, we learned how to extend Magento to add new functionality
for both store owners and customers; knowing how to extend and work with the
Magento API opens a world of possibilities.
By using the API, we can integrate Magento with third-party systems like ERP and
points of sale; both by importing and exporting data.
In the next chapter we will learn how to properly build a test for all the code we have
built so far, and we will also explore multiple testing frameworks.

Testing and Quality
Assurance
So far, we have covered:
• The Magento fundamentals
• Frontend development
• Backend development
• Extending and working with the API
However, we omitted a critical step of the development of any extension or custom
code: testing and quality assurance.
Despite the fact that Magento is a very complex and large platform, there is no
included/integrated unit test suite on versions previous to Magento2.
For that reason, proper testing and quality assurance is often overlooked by most
Magento developers either by lack of information or because of the large overhead of
some of the testing tools, and while there are not many tools available for running a
proper test with Magento, the ones that exist are of very high quality.
In this chapter, we will take a look at the different options available for testing our
Magento code, and we will also build some very basic tests for our custom extension.
So let's go over the topics covered in this chapter:
• The different testing frameworks and tools available for Magento
• The importance of testing our Magento code
• How to set up, install, and use Ecomdev PHPUnit extension
• How to set up, install, and use Magento Mink for running functional tests

Testing and Quality Assurance
[ 192 ]
Testing Magento
Before we start writing any test, it is important that we understand the concepts
related to testing and more particularly to each of the available methodologies.
Unit testing
The idea behind unit testing is writing tests for certain areas (units) of our code,
so we can verify that the code works as expected and that function is returning
expected values.
Unit testing is a method by which individual units of source code, sets of one or
more computer program modules together with associated control data, usage
procedures, and operating procedures, are tested to determine if they are t for use.
Another advantage of writing unit tests is that by performing the test, so we are
more likely to write code that is easier to test.
This means our code tends to be broken down into smaller but more specialized
functions as we continue to write more and more tests. We start building a test
suite that can be run against our codebase every time we introduce changes or
functionalities; this is known as regression testing.
Regression testing
Regression testing mostly refers to the practice of re-running existing test
suites after making code changes to check whether a new functionality is
not also introducing new bugs.
Regression testing is any type of software testing that seeks to uncover new
software bugs, or regressions, in existing functional and non-functional areas of
a system after changes, such as enhancements, patches, or conguration changes,
have been made to them.
In the particular case of a Magento store or any e-commerce site, we want to perform
regression testing on critical features of the store such as checkout, customer
registration, adding to the cart, and so on.
Chapter 7
[ 193 ]
Functional tests
Functional testing is more concerned with testing that the application returns the
appropriate output based on a specic input, rather than what happens internally.
Functional testing is a type of black-box testing that bases its test cases on
the specications of the software component under test. Functions are tested by
feeding them input and examining the output, and internal program structure is
rarely considered.
This is especially important for e-commerce websites like ours where we want to test
the site as the customer would experience it.
TDD
One testing methodology that has gained popularity in recent years and that is now
coming to Magento is known as Test-driven development (TDD).
Test-driven development (TDD) is a software development process that relies
on the repetition of a very short development cycle: rst the developer writes an
(initially failing) automated test case that denes a desired improvement or new
function, then produces the minimum amount of code to pass that test and nally
refactors the new code to acceptable standards.
The basic concept behind TDD is to rst write a failing test and then write code to
pass the test; this generates very short development cycles and helps to streamline
the code.
Ideally, you want to start the development of your modules and extensions by using
TDD in Magento. We omitted this in previous chapters due to the fact that it would
add unnecessary complexity and confuse the reader.
For a full tutorial on TDD with Magento from scratch, visit
http://magedevguide.com/getting-started-with-tdd.

Testing and Quality Assurance
[ 194 ]
Tools and testing frameworks
As mentioned before, there are several frameworks and tools available for testing
PHP code and Magento code. Let's get to know each one of them a little better:
• Ecomdev_PHPUnit: This extension is just amazing; the developers at
Ecomdev created an extension that integrates PHPUnit with Magento and
also adds Magento-specic assertions to PHPUnit, all without having to
modify core les or affect the database.
• Magento_Mink: Mink is a PHP library for the Behat framework that allows
you to write functional and acceptance tests; Mink allows writing tests that
simulate user behavior and browser interaction.
• Magento_TAF: Magento_TAF stands for Magento Test Automation
Framework, which is the ofcial testing tool provided by Magento. Magento_
TAF includes over 1,000 functional tests and is very powerful. Unfortunately,
it has a major drawback; it has a large overhead and steep learning curve.
Unit testing with PHPUnit
Before Ecomdev_PHPUnit, testing Magento with PHPUnit was problematic and
really not very practical from the different methods that were available. Almost all
required core code modications or developers had to jump through hoops to set up
basic PHPUnits.
Installing Ecomdev_PHPUnit
The easiest way to install Ecomdev_PHPUnit is to grab a copy directly from the
GitHub repository. Let's write the following command on our console:
git clone git://github.com/IvanChepurnyi/EcomDev_PHPUnit.git
Now copy the le over to your Magento root folder.
Composer and Modman are alternative options available
for installation. For more information on each, please visit
http://magedevguide.com/module-managers.
Finally, we need to set the conguration to instruct the PHPUnit extension which
database to use; local.xml.phpunit is a new le added by Ecomdev_PHPUnit.
This le holds all the extension-specic conguration and species the name
of the test database.

Chapter 7
[ 195 ]
The le location is app/etc/local.xml.phpunit. Refer to the following code:
<?xml version="1.0"?>
<config>
<global>
<resources>
<default_setup>
<connection>
<dbname><![CDATA[magento_unit_tests]]></dbname>
</connection>
</default_setup>
</resources>
</global>
<default>
<web>
<seo>
<use_rewrites>1</use_rewrites>
</seo>
<secure>
<base_url>[change me]</base_url>
</secure>
<unsecure>
<base_url>[change me]</base_url>
</unsecure>
<url>
<redirect_to_base>0</redirect_to_base>
</url>
</web>
</default>
<phpunit>
<allow_same_db>0</allow_same_db>
</phpunit>
</config>
You will need to create a new database for running tests and replace the example
conguration values in the local.xml.phpunit le.
By default, this extension does not allow you to run the test on the same database;
keeping the test database separate from the development and production allows
us to run our test with condence.

Testing and Quality Assurance
[ 196 ]
Setting up the conguration for our extension
Now that we have the PHPUnit extension installed and set up, we need to prepare
our gift registry extension for running unit tests. Follow these steps:
1. Open the Gift Registry extension, config.xml le
2. Add the following code (the le location is app/code/local/Mdg/
Giftregistry/etc/config.xml):
…
<phpunit>
<suite>
<modules>
<Mdg_Giftregistry/>
</modules>
</suite>
</phpunit>
…
This new conguration node allows the PHPUnit extension to recognize the
extension and run the matching tests.
We also need to create a new directory called Test that we will use to place all
our test les. One of the advantages about using Ecomdev_PHPUnit over previous
methods is that this extension follows the Magento standards.
This means we have to keep the same module directory structure inside the
Test folder:
Test/
Model/
Block/
Helper/
Controller/
Config/
Based on that, the naming convention for each Test case class would be
[Namespace]_[Module Name]_Test_[Group Directory]_[Entity Name].
Each Test class must extend one of the following three base Test classes:
• EcomDev_PHPUnit_Test_Case: This class is used for testing helpers, models,
and blocks
• EcomDev_PHPUnit_Test_Case_Config: This class is used for testing the
module conguration
• EcomDev_PHPUnit_Test_Case_Controller: This class is used for testing the
layout rendering process and the controller logic

Chapter 7
[ 197 ]
Anatomy of a Test case
Before jumping ahead and trying to create our rst test, let's break down one of the
examples provided by Ecomdev_PHPUnit:
<?php
class EcomDev_Example_Test_Model_Product extends EcomDev_PHPUnit_Test_
Case
{
/**
* Product price calculation test
*
* @test
* @loadFixture
* @doNotIndexAll
* @dataProvider dataProvider
*/
public function priceCalculation($productId, $storeId)
{
$storeId = Mage::app()->getStore($storeId)->getId();
$product = Mage::getModel('catalog/product')
->setStoreId($storeId)
->load($productId);
$expected = $this->expected('%s-%s', $productId, $storeId);
$this->assertEquals(
$expected->getFinalPrice(),
$product->getFinalPrice()
);
$this->assertEquals(
$expected->getPrice(),
$product->getPrice()
);
}
}
The rst important thing to notice in the example test class is the comment
annotations:
…
/**
* Product price calculation test
*
* @test
* @loadFixture
* @doNotIndexAll
* @dataProvider dataProvider
*/
…
Testing and Quality Assurance
[ 198 ]
These annotations are used by the PHPUnit extension to identify which of the class
functions are tests, and also, they allow us to set up specic settings for running
each test. Let's take a look at some of the available annotations:
• @test: This annotation identies a class function as a PHPUnit test
• @loadFixture: This annotation species the use of xtures
• @loadExpectation: This annotation species the use of expectations
• @doNotIndexAll: By adding this annotation, we are telling the PHPUnit tests
that they should not run any index after loading the xtures
• @doNotIndex [index_code]: By adding this annotation, we can instruct
PHPUnit not to run a specic index
So now, you are probably a bit confused. Fixtures? Expectations? What are they?
Following is a little description on Fixtures and Expectations:
• Fixtures: Fixtures are yet another markup language (YAML) les that
represent database or conguration entities
• Expectations: Expectations are useful if we don't want to have hard-coded
values in our tests and are also specied in YAML values
For more information about the YAML markup, visit
http://magedevguide.com/resources/yaml.
So, as we see, xtures provide the data for the tests to process, and the expectations
are used to check if the results returned by the test are what we are expecting to see.
Fixtures and expectations are stored inside each Test type directory. Following the
example earlier, we would have a new directory called Product/. Inside it, we need
a new directory for expectations and one for our xtures.
Let's take a look at the revised folder structure:
Test/
Model/
Product.php
Product/
expectations/
fixtures/
Block/
Helper/
Controller/
Config/
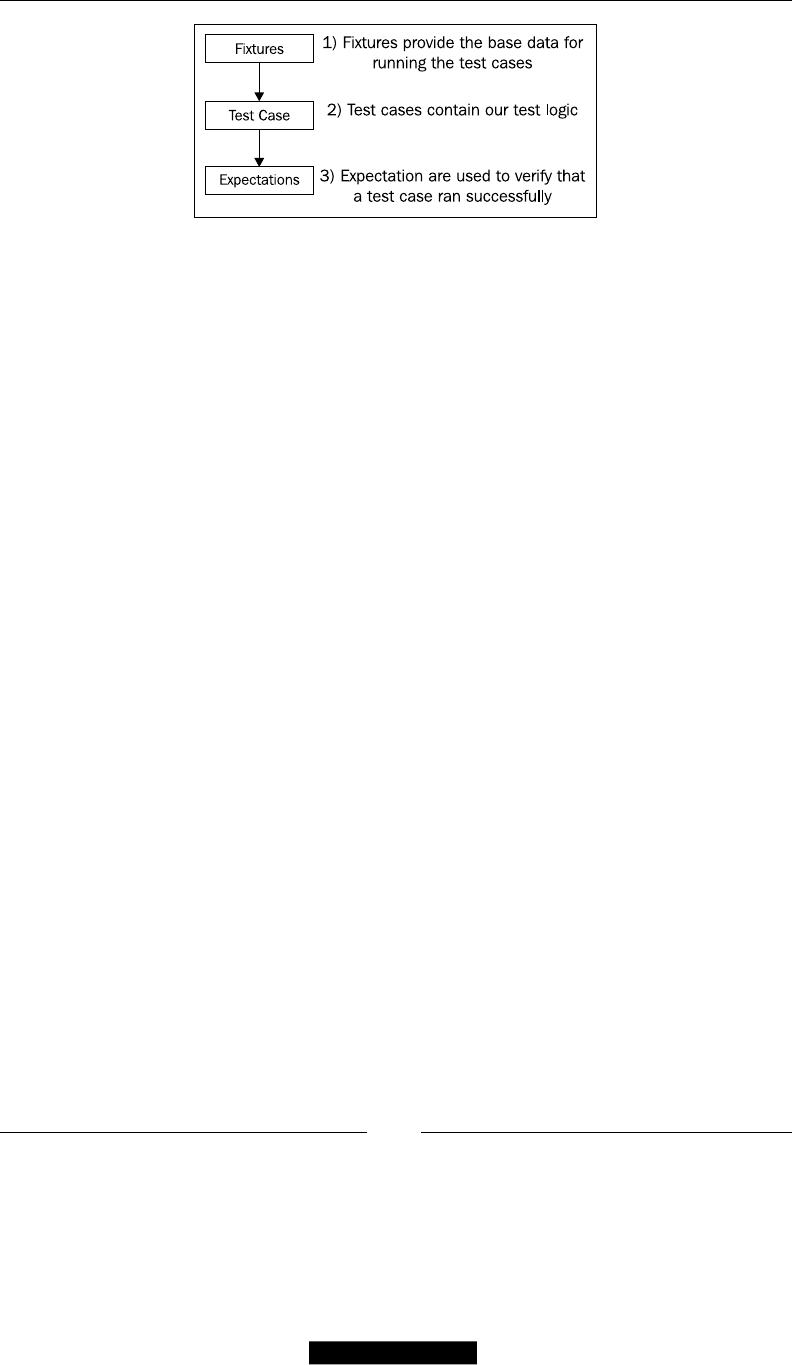
Chapter 7
[ 199 ]
Creating a unit test
For our rst UnitTest, let's create a very basic test that allows us to test the Gift
Registry Models that we previously created.
As we mentioned before, Ecomdev_PHPUnit uses a separate database for running all
the tests; for this, we need to create a new xture that will provide all the data for our
test case. Follow these steps:
1. Open the Test/Model folder.
2. Create a new folder called Registry.
3. Inside the Registry folder, create a new folder called fixtures.
4. Create a new le called registryList.yaml and paste the following code
in it (the le location is app/code/local/Mdg/Giftregistry/Test/Model/
fixtures/registryList.yaml):
website: # Initialize websites
- website_id: 2
code: default
name: Test Website
default_group_id: 2
group: # Initializes store groups
- group_id: 2
website_id: 2
name: Test Store Group
default_store_id: 2
root_category_id: 2 # Default Category
store: # Initializes store views
- store_id: 2
website_id: 2
group_id: 2
code: default
name: Default Test Store
is_active: 1

Testing and Quality Assurance
[ 200 ]
eav:
customer_customer:
- entity_id: 1
entity_type_id: 3
website_id: 2
email: test@magentotest.com
group_id: 2
store_id: 2
is_active: 1
mdg_giftregistry_entity:
- entity_id: 1
customer_id: 1
type_id: 2
website_id: 2
event_date: 12/12/2012
event_country: Canada
event_location: Dundas Square
created_at: 21/12/2012
- entity_id: 2
customer_id: 1
type_id: 3
website_id: 2
event_date: 01/01/2013
event_country: Canada
event_location: Eaton Center
created_at: 21/12/2012
It might not look like it, but we add a lot of information with this xture. We will
create the following xture data:
• A website scope
• A store group
• A store view
• A customer record
• Two gift registries
By using xtures, we are creating data on the y that will be available for our test
case. This gives us the consistency of running the test multiple times against the
same data and the exibility to easily change it.
Now, you might be wondering how the PHPUnit extension knows how to pair a
Test case with a specic xture.

Chapter 7
[ 201 ]
There are two ways the extension loads xtures: one is by specifying the xture
inside the comment annotations, or if the xture name is not specied, the extension
will search a xture with same name as the Test case function being executed.
Knowing that, let's create our rst Test case:
1. Navigate to the Test/Model folder.
2. Create a new Test class called Registry.php.
3. Add the following base code (the le location is app/code/local/Mdg/
Giftregistry/Test/Model/Registry.php):
<?php
class Mdg_Giftregistry_Test_Model_Registry extends EcomDev_
PHPUnit_Test_Case
{
/**
* Listing available registries
*
* @test
* @loadFixture
* @doNotIndexAll
* @dataProvider dataProvider
*/
public function registryList()
{
}
}
We just created the base function, but we haven't added any logic yet. Before doing
that, let's take a look at what actually constitutes a Test case.
A Test case works by using assertions to evaluate and test our code. Assertions are
special functions that our Test cases inherit from the parent TestCase class. Among
the default assertions available, we have:
• assertEquals()
• assertGreaterThan()
• assertGreaterThanOrEqual()
• assertLessThan()
• assertLessThanOrEqual()
• assertTrue()

Testing and Quality Assurance
[ 202 ]
Now, these default assertions are great if we want to check variable's values; search
for an array key, check attributes, and so on. But testing Magento code, using only
these types of assertions, can prove difcult or even impossible. This is where
Ecomdev_PHPUnit comes to the rescue.
Not only has this extension integrated PHPUnit with Magento cleanly, by following
their standards, it also adds Magento-specic assertions to the PHPUnit tests. Let's
take a look at some of the assertions added by the extension:
• assertEventDispatched()
• assertBlockAlias()
• assertModelAlias()
• assertHelperAlias()
• assertModuleCodePool()
• assertModuleDepends()
• assertConfigNodeValue()
• assertLayoutFileExists()
Those are only a few of the assertions available, and as you can see, they give a lot of
power for building comprehensive tests.
Now that we know a little more about how PHPUnit Test cases work, let's proceed
to creating our rst Magento Test case:
1. Navigate to the Registry.php test case class that we created before.
2. Add the following code inside the registryList() function (the le location
is app/code/local/Mdg/Giftregistry/Test/Model/Registry.php):
/**
* Listing available registries
*
* @test
* @loadFixture
* @doNotIndexAll
* @dataProvider dataProvider
*/
public function registryList()
{
$registryList = Mage::getModel('mdg_giftregistry/entity')-
>getCollection();
$this->assertEquals(

Chapter 7
[ 203 ]
2,
$registryList->count()
);
}
This is a very basic test; the only thing that we are doing is loading a registry
collection. In this case, all the registries are available, and then they run an assertion
to check if the collection count matches.
However, this is not very useful. It would be even better if we were able to load only
the registries that belong to a specic user (our test user) and check that collection
size. That said, let's change the code a little bit:
The le location is app/code/local/Mdg/Giftregistry/Test/Model/Registry.
php. Refer to the following code:
/**
* Listing available registries
*
* @test
* @loadFixture
* @doNotIndexAll
* @dataProvider dataProvider
*/
public function registryList()
{
$customerId = 1;
$registryList = Mage::getModel('mdg_giftregistry/entity')
->getCollection()
->addFieldToFilter('customer_id', $customerId);
$this->assertEquals(
2,
$registryList->count()
);
}
Just by changing a few lines of code, we created a test that allows checking
whether our registry collections are working properly and if they are correctly
linked to a customer record.
Run the following command in your shell:
$ phpunit
Testing and Quality Assurance
[ 204 ]
If everything went as expected, we should see the following output:
PHPUnit 3.4 by Sebastian Bergmann
.
Time: 1 second
Tests: 1, Assertions: 1, Failures 0
You can also run $phpunit—colors for a nicer output.
Now, we only need a test to verify that the registry items are working properly:
1. Navigate to the Registry.php test case class that we created before.
2. Add the following code inside the registryItemsList() function
(the le location is app/code/local/Mdg/Giftregistry/Test/Model/
Registry.php):
/**
* Listing available items for a specific registry
*
* @test
* @loadFixture
* @doNotIndexAll
* @dataProvider dataProvider
*/
public function registryItemsList()
{
$customerId = 1;
$registry = Mage::getModel('mdg_giftregistry/entity')
->loadByCustomerId($customerId);
$registryItems = $registry->getItems();
$this->assertEquals(
3,
$registryItems->count()
);
}
We will also need a new xture for our new Test case:
1. Navigate to the Test/Model folder.
2. Open the Registry folder.

Chapter 7
[ 205 ]
3. Create a new le called registryItemsList.yaml (the le location
is app/code/local/Mdg/Giftregistry/Test/Model/fixtures/
registryItemsList.yaml):
website: # Initialize websites
- website_id: 2
code: default
name: Test Website
default_group_id: 2
group: # Initializes store groups
- group_id: 2
website_id: 2
name: Test Store Group
default_store_id: 2
root_category_id: 2 # Default Category
store: # Initializes store views
- store_id: 2
website_id: 2
group_id: 2
code: default
name: Default Test Store
is_active: 1
eav:
customer_customer:
- entity_id: 1
entity_type_id: 3
website_id: 2
email: test@magentotest.com
group_id: 2
store_id: 2
is_active: 1
mdg_giftregistry_entity:
- entity_id: 1
customer_id: 1
type_id: 2
website_id: 2
event_date: 12/12/2012
event_country: Canada
event_location: Dundas Square
created_at: 21/12/2012
mdg_giftregistry_item:
- item_id: 1
registry_id: 1
product_id: 1
- item_id: 2

Testing and Quality Assurance
[ 206 ]
registry_id: 1
product_id: 2
- item_id: 3
registry_id: 1
product_id: 3
Let's run our test suite:
$phpunit --colors
We should see both tests passing:
PHPUnit 3.4 by Sebastian Bergmann
.
Time: 4 second
Tests: 2, Assertions: 2, Failures 0
Finally, let's replace our hard-coded variables with proper expectations:
1. Navigate to the Module Test/Model folder.
2. Open the Registry folder.
3. Inside the Registry folder, create a new folder called expectations.
4. Create a new le called registryList.yaml (the le location is app/code/
local/Mdg/Giftregistry/Test/Model/expectations/registryList.
yaml).
count: 2
Wasn't that easy? Well, it was so easy that we will do it again for the
registryItemsList test case:
1. Navigate to the Module Test/Model folder.
2. Open the Registry folder.
3. Create a new le called registryItemsList.yaml inside the expectations
folder (the le location is app/code/local/Mdg/Giftregistry/Test/
Model/expectations/registryItemsList.yaml):
count: 3
Finally, the last thing that we need to do is to update our Test case class to use the
expectations. Make sure the update le has the following code (the le location is
app/code/local/Mdg/Giftregistry/Test/Model/Registry.php):
<?php
class Mdg_Giftregistry_Test_Model_Registry extends EcomDev_PHPUnit_
Test_Case
{

Chapter 7
[ 207 ]
/**
* Product price calculation test
*
* @test
* @loadFixture
* @doNotIndexAll
* @dataProvider dataProvider
*/
public function registryList()
{
$customerId = 1;
$registryList = Mage::getModel('mdg_giftregistry/entity')
->getCollection()
->addFieldToFilter('customer_id', $customerId);
$this->assertEquals(
$this->_getExpectations()->getCount(),$this->_
getExpectations()->getCount(),
$registryList->count()
);
}
/**
* Listing available items for a specific registry
*
* @test
* @loadFixture
* @doNotIndexAll
* @dataProvider dataProvider
*/
public function registryItemsList()
{
$customerId = 1;
$registry = Mage::getModel('mdg_giftregistry/entity')-
>loadByCustomerId($customerId);
$registryItems = $registry->getItems();
$this->assertEquals(
$this->_getExpectations()->getCount(),
$registryItems->count()
);
}
}
The only change here is that we are replacing the hard-coded value inside our
assertions with the expectations, values. If we ever need to make any changes, we
don't need to change our code; we can just update the expectations and the xtures.
Testing and Quality Assurance
[ 208 ]
Functional tests with Mink
So far, we have learned how to run unit tests against our code, and while unit tests
are great for testing individual parts of our code and the logic, when it comes to large
applications such as Magento, it is important to test from the user's perspective.
Functional testing mostly involves black-box testing and is
not concerned about the source code of the application.
In order to do that, we can use Mink. Mink is a simple PHP library that can virtualize
a web browser. Mink works by using different drivers. Out of the box, it supports the
following drivers:
• GoutteDriver: This is a pure-PHP headless browser written by the creator of
Symfony framework
• SahiDriver: This is a new JS browser controller that is quickly
replacing Selenium
• ZombieDriver: This is a browser emulator written in Node.js and currently
is only limited to one browser (Chromium)
• SeleniumDriver: This is currently the most popular browser driver; the
original version relies on a third-party server for running the tests
• Selenium2Driver: The current version of Selenium is fully supported in
Python, Ruby, Java, and C#
Magento Mink installation and setup
Using Mink with Magento is extremely easy, thanks to Johann Reinke, who created a
Magento extension that facilitates Mink integration with Magento.
We will install this extension using Modgit, a module manager inspired by Modman.
Modgit allows us to deploy Magento extensions directly from a GitHub repository
without creating symlinks.
Installing Modgit can be achieved with three lines of code:
wget -O modgit https://raw.github.com/jreinke/modgit/master/modgit
chmod +x modgit
sudo mv modgit /usr/local/bin

Chapter 7
[ 209 ]
Wasn't that easy? Now we can proceed to install Magento Mink, for which we
should thank Modgit that it is even easier:
1. Move to the Magento root directory.
2. Run the following commands:
modgit init
modgit -e README.md clone mink https://github.com/jreinke/magento-
mink.git
That's it. Modgit will take care of installing the le for us directly from the
GitHub repository.
Creating our rst test
Mink tests are also stored inside the Test folder. Let's create the base skeleton of our
Mink test class:
1. Navigate to the Test folder on our module root.
2. Create a new directory called Mink.
3. Inside the Mink directory, create a new PHP class called Registry.php.
4. Copy the following code (the le location is app/code/local/Mdg/
Giftregistry/Test/Mink/Registry.php):
<?php
class Mdg_Giftregistry_Test_Mink_Registry extends JR_Mink_Test_
Mink
{
public function testAddProductToRegistry()
{
$this->section('TEST ADD PRODUCT TO REGISTRY');
$this->setCurrentStore('default');
$this->setDriver('goutte');
$this->context();
// Go to homepage
$this->output($this->bold('Go To the Homepage'));
$url = Mage::getStoreConfig('web/unsecure/base_url');
$this->visit($url);
$category = $this->find('css', '#nav .nav-1-1 a');
if (!$category) {
return false;

Testing and Quality Assurance
[ 210 ]
}
// Go to the Login page
$loginUrl = $this->find('css', 'ul.links li.last a');
if ($loginUrl) {
$this->visit($loginUrl->getAttribute('href'));
}
$login = $this->find('css', '#email');
$pwd = $this->find('css', '#pass');
$submit = $this->find('css', '#send2');
if ($login && $pwd && $submit) {
$email = 'user@example.com';
$password = 'password';
$this->output(sprintf("Try to authenticate '%s' with
password '%s'", $email, $password));
$login->setValue($email);
$pwd->setValue($password);
$submit->click();
$this->attempt(
$this->find('css', 'div.welcome-msg'),
'Customer successfully logged in',
'Error authenticating customer'
);
}
// Go to the category page
$this->output($this->bold('Go to the category list'));
$this->visit($category->getAttribute('href'));
$product = $this->find('css', '.category-products li.first
a');
if (!$product) {
return false;
}
// Go to product view
$this->output($this->bold('Go to product view'));
$this->visit($product->getAttribute('href'));
$form = $this->find('css', '#product_registry_form');
if ($form) {
$addToCartUrl = $form->getAttribute('action');
$this->visit($addToCartUrl);
$this->attempt(
Chapter 7
[ 211 ]
$this->find('css', '#btn-add-giftregistry'),
'Product added to gift registry successfully',
'Error adding product to gift registry'
);
}
}
}
Just at rst glance, you can tell that this functional test is quite different from the unit
tests that we built previously, and although it seems like a lot of code is quite simple.
The previous test has been down in code blocks. Let's break down what the previous
test is doing:
• Set up the browser driver and the current store
• Go to the home page and check for a valid category link
• Try to log in as a test user
• Go to a category page
• Open the rst product on that category
• Try to add the product to the customer's gift registry
This test makes few assumptions and is expecting a valid
customer within an existing gift registry.
There are some considerations that we have to keep in mind when creating
Mink tests:
• Each test class must extend JR_Mink_Test_Mink
• Each test function must start with the test keyword
Finally, the only thing that we have to perform is run our tests. We can do this by
going to the command line and running the following command:
$ php shell/mink.php
If everything was successful, we should see something similar to the following output:
---------------------- SCRIPT START ---------------------------------
Found 1 file
-------------- TEST ADD PRODUCT TO REGISTRY -------------------------
Switching to store 'default'
Now using Goutte driver
----------------------------------- CONTEXT -------------------------
-----------

Testing and Quality Assurance
[ 212 ]
website: base, store: default
Cache info:
config Disabled N/A Configuration
layout Disabled N/A Layouts
block_html Disabled N/A Blocks HTML output
translate Disabled N/A Translations
collections Disabled N/A Collections Data
eav Disabled N/A EAV types and attributes
config_api Disabled N/A Web Services Configuration
config_api2 Disabled N/A Web Services Configuration
ecomdev_phpunit Disabled N/A Unit Test Cases
Go To the Homepage [OK]
Try to authenticate user@example.com with password password [OK]
Go to the category list [OK]
Go to product view [OK]
Product added to gift registry successfully
Summary
In this chapter, we went over the basics of Magento testing. The purpose of this
chapter was not to build complex tests or go in too deep, but rather get our feet wet
and get a clear idea of what we can do to test our extensions.
We covered several important topics in this chapter, and by having proper test suites
and tools, it can save us from future headaches and improve the quality of our code.
In the next and nal chapter, we will learn how to package and distribute custom
code and extensions.

Deployment and Distribution
Welcome to the last chapter of this book; we have come far and learned a lot along
the way. By now, you should have a clear idea of everything involved in working
and developing custom extensions for Magento.
Well, almost everything, as with any other Magento developer your code will
eventually need to be promoted to production or maybe packaged for distribution;
in this chapter we will see the different techniques, tools, and strategies that are
available to us.
The nal objective of this chapter is to give you the tools and skills to do
deployments with condence and with little to no downtime.
The road towards zero-downtime
deployment
Deploying to production is probably one of the most dreaded tasks for developers,
and more often than not, it will be improperly done.
But what is zero-downtime deployment? Well, it is to production with condence,
knowing the code is properly tested and ready, this is the ideal that all Magento
developers should aspire to.
This is achieved not by a single process or tool but by a combination of techniques,
standards, and tools. In this chapter we will learn the following:
• Distributing our extension through Magento Connect
• The role of version control systems in deployment
• Proper practices for branching and merging changes

Deployment and Distribution
[ 214 ]
Make it right from scratch
In the previous chapter, we learned how testing can not only enhance our workow
but also save us from future headaches. The unit tests, integration tests, and
automated tools are all at our disposal to ensure that our code is properly tested.
Writing tests means more than just putting together a few tests and calling it done;
we are responsible for thinking about all the possible edge cases that might affect our
code and write tests for each of them.
Be sure that what you see is what you get
In the rst chapter of this book, we dived right into setting up our development
environment, which is a very important task. In order for us to guarantee that we are
delivering quality and tested code, we must be able to develop and test our code in
an environment as close to production as possible.
I'll illustrate the importance of this environment with an example on the early days
of Magento. I heard it happened several times; developers worked on their local
environments creating new extensions from scratch, they nished their development
and tested on their local staging, and everything seemed to be working properly.
One of the commonly accepted workows is:
• Starting development on the developer's local machine, which is running a
virtual machine close to the production environment
• Testing and approving changes on a staging environment that is a close as
possible copy of production
• Finally, deploying changes to the production environment
It was now time to promote their code to production and they condently did so; of
course it was working on local, hence it had to work on production, right? In these
particular situations, it wasn't the case; what happened instead was that as soon
the new code was loaded into production, the store crashed, saying the autoloader
wasn't able to nd the class.
What happened? Well, the problem was that the developers' local environment
was Windows and the name of the extension folder was in CamelCase, for example
MyExtension, but internally in the class names they were using the capitalized text
(Myextension).
Chapter 8
[ 215 ]
Now this will work just ne in Windows because the le does not distinguish between
uppercase, capitalized, or lowercase folder names; while a Unix-based system like
most of the web servers do make a distinction on the folder and le naming.
While this example may look silly, it illustrates quite well the need for a standardized
development environment; there are so many parts and "moving pieces" in a
Magento installation. A different version of PHP or an extra Apache module that is
enabled in production but not staging can make a world of difference.
Learn more about Magento naming conventions at
http://www.magedevguide.com/naming-conventions.
Ready means ready
But when we say that our code is actually ready for production, what does ready
really mean? Each developer might have a different denition of what ready and
done actually mean. When working on a new module or extending Magento, we
should always dene what ready means for this particular feature/code.
So we are now getting somewhere, and we know that in order to pass the code to
production, we have to do the following:
1. Test our code and make sure we have covered all the edge cases.
2. Make sure the code follows the standards and guidelines.
3. Make sure it has been tested and developed in an environment as close to the
production as possible.
Version control system and deployment
Version control systems (VCSs) are the lifeblood of any developer, and while the
eld might be a bit divided among Git and SVN enthusiasts (no mention for you
Mercurial guys), the basic functionalities are still the same.
Let's quickly go through the differences between each VCS, and their advantages and
disadvantages.
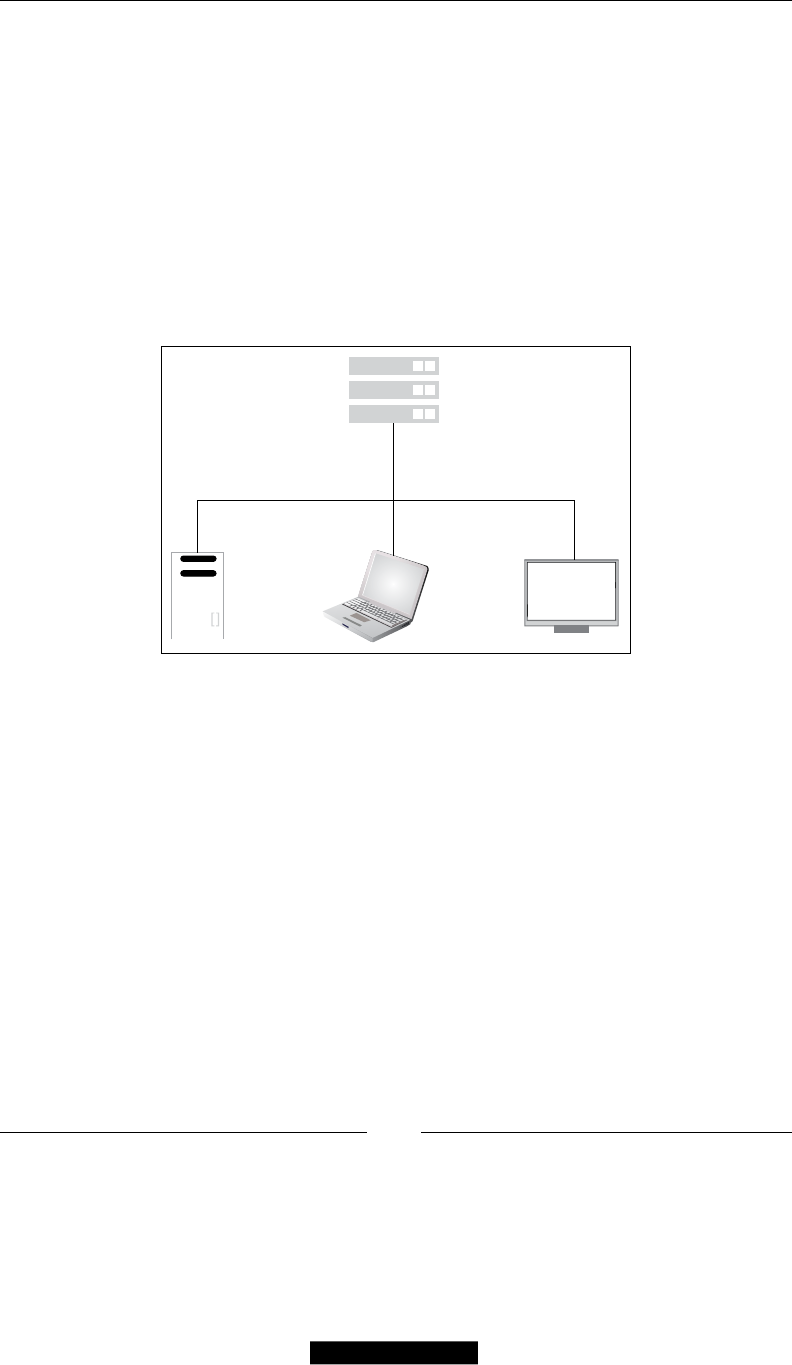
Deployment and Distribution
[ 216 ]
SVN
This is a powerful system, and it has been around for quite some time and is very
well known and widely used.
Subversion (SVN) is a centralized VCS; by this we mean that there is a single main
source that is recognized as "Good", and all developers check out and push changes
from and to this central source.
While this makes changes easier to track and maintain, it has a serious disadvantage.
Being centralized also means that we have to be in constant communication with
the central repository, so working remotely or without an Internet connection is
not possible.
Git
Git is a much younger VCS and has been rising in popularity for a few years now,
mostly due to the wide adoption by the open-source community and popularity of
Github (www.github.com).
A critical difference between SVN and Git is that Git is a decentralized version
control system, which means there is no central authority or main repository; each
developer has a full copy of the repository locally available.
Being decentralized makes Git faster in addition to having a better and more
powerful branching system than other VCSs; also, working remotely or without an
Internet connection is possible.
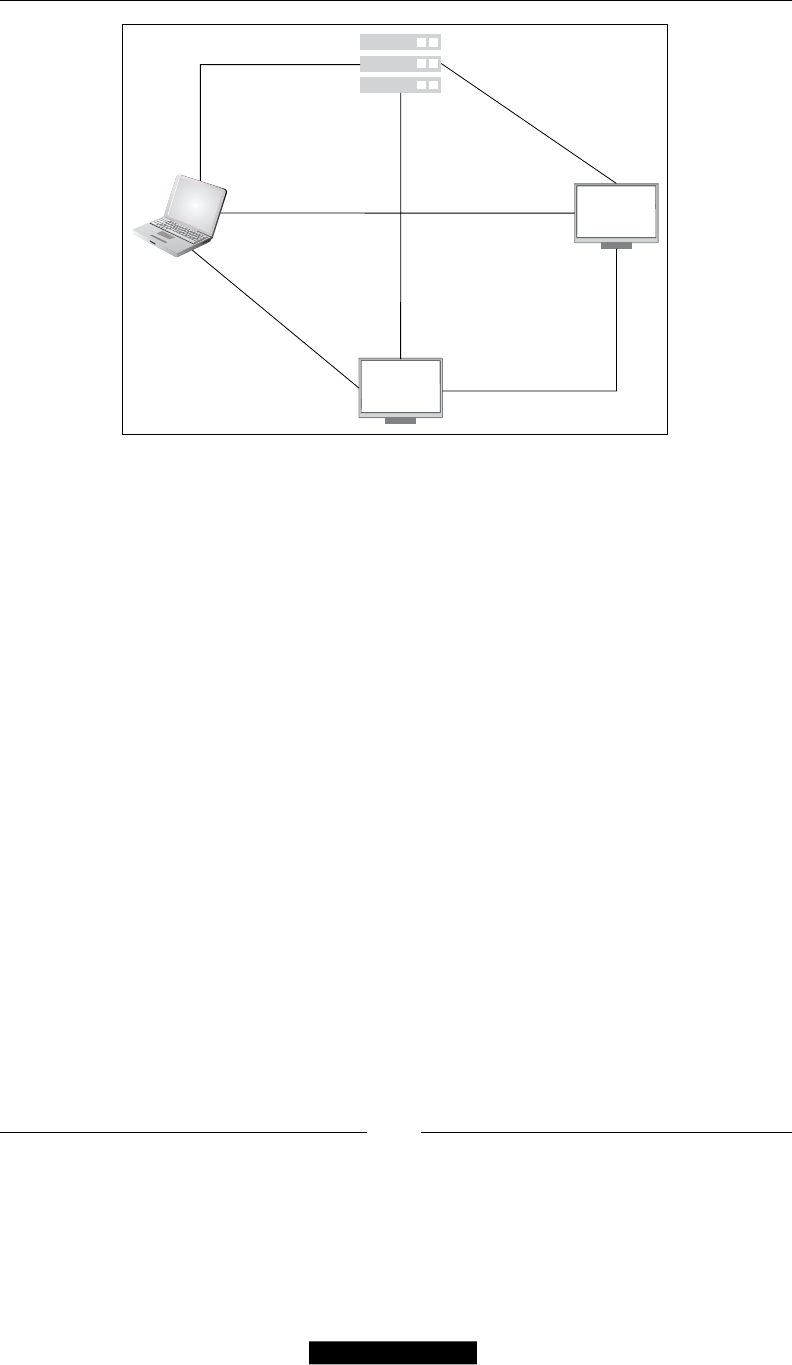
Chapter 8
[ 217 ]
Regardless of which VCS we choose, the most powerful (and sometimes overlooked)
feature of any VCS is branching or the ability to create branches.
Branching allows us to experiment and work on new features without breaking the
stable code in our trunk or master; creating a branch requires us to take a snapshot of
the current trunk/master code where we can make any changes and tests.
Now, branching is only part of the equation; once we are comfortable with our code
changes and have properly tested every edge case, we need a way of reintegrating
those changes into our main code base. Merging gives us this capability to
reintegrate all our branch modications by running a few commands.
By integrating branches and merging changes into our workow, we gain exibility
and the freedom to work on different set of changes, features, and bug xes without
interfering with experimental or work-in-progress code.
Also, as we will learn next, version control can help us to do seamless promotions
and keep our code up to date across multiple Magento installations with ease.
Distribution
You might want to freely distribute your extension or make it available
commercially, but how could you guarantee that the code is properly installed each
time without having to do it yourself? And what about the updates or upgrades? Not
all store owners are tech savvy or capable of changing les on their own.
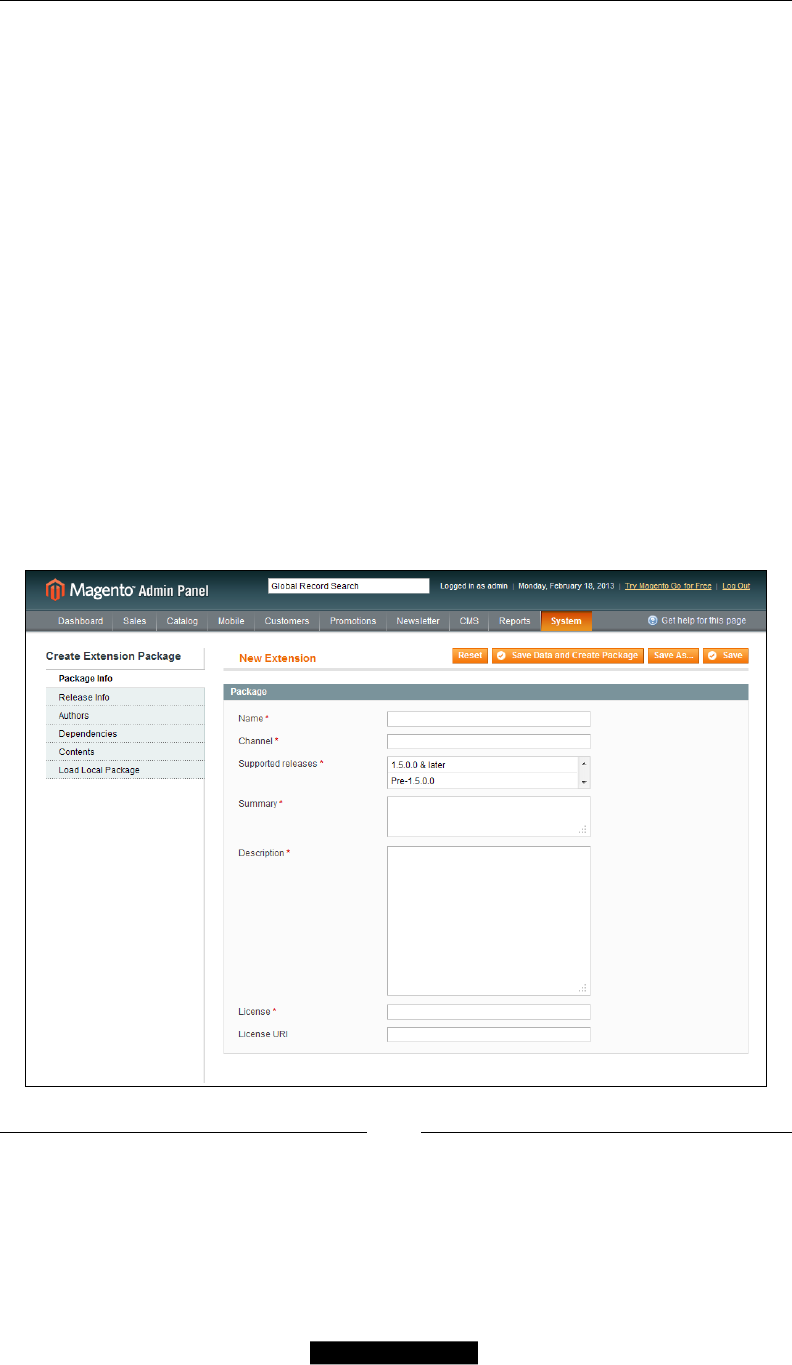
Deployment and Distribution
[ 218 ]
Fortunately, Magento comes out of the box with its own package manager and
extension marketplace called Magento Connect.
Magento Connect allows developers and solution partners to share their
open-source and commercial contributions with the community and is not
restricted to only custom modules; we can nd the following types of resources
in the Magento Connect marketplace:
• Modules
• Language packs
• Custom themes
Packing our extension
One of the core features of Magento Connect is allowing us to package our
extensions directly from the Magento backend.
To package our extension perform the following steps:
1. Log in to the Magento backend.
2. From the backend, select System | Magento Connect | Package Extensions.
Chapter 8
[ 219 ]
As we can see, the Create Extension Package section is composed of six different
subsections, which we will cover next.
Package Info
Package Info is used to specify the general extension information such as name,
description, and versions of Magento that are supported, as follows:
• Name: The standard practice is to keep the name simple and using
just words
• Channel: This refers to the code pool for the extension; as we mentioned in
the previous chapters, extensions designed for distribution should use the
"community" channel
• Supported releases: Select which version of Magento should be supported
for our extension
• Summary: This eld contains a brief description of the extension used on the
extension review process
• Description: This has a detailed description of the extension and
its functionality
• License: This has the license used for this extension; some of the available
options are:
°Open Software License (OSL)
°Mozilla Public License (MPL)
°Massachusetts Institute of Technology License (MITL)
°GNU General Public License (GPL)
°Any other license if your extension is to be distributed commercially
• License URI: This has the link to the license text
More information about the different license types can be found
at http://www.magedevguide.com/license-types.
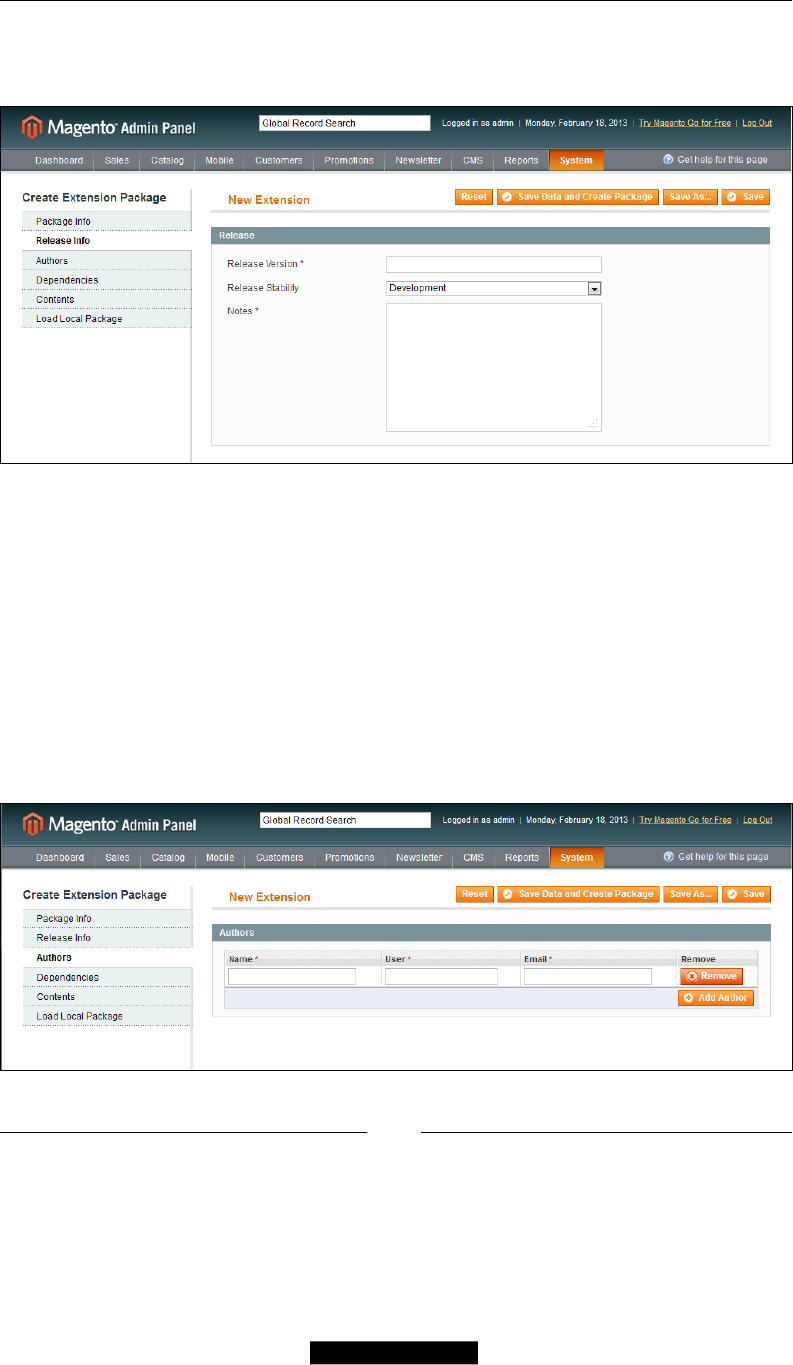
Deployment and Distribution
[ 220 ]
Release Info
The following screenshot shows the screen for Release Info:
The Release Info section contains important data about the current package release:
• Release Version: The initial release can be any arbitrary number, however,
it is important that the version is incremented with each release. Magento
Connect will not allow you to update the same version twice.
• Release Stability: Three options are available – Stable, Beta, and Alpha.
• Notes: Here we can enter all the release-specic notes, if any.
Authors
The following screenshot shows the screen for Authors:
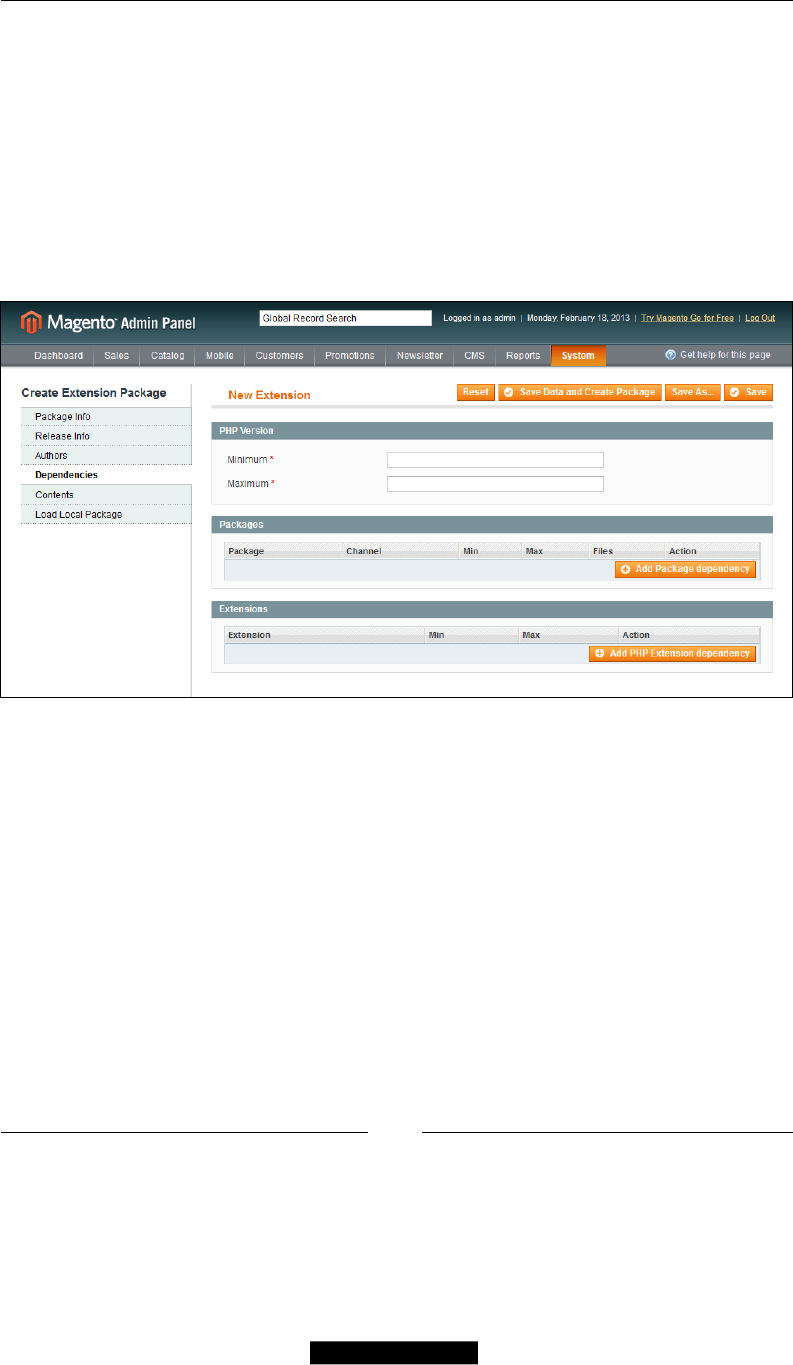
Chapter 8
[ 221 ]
In this section, the information about author(s) is specied; each author's information
has the following elds:
• Name: Author's full name
• User: Magento username
• Email: Contact e-mail address
Dependencies
The following screenshot shows the screen for Dependencies:
There are three types of dependencies that are used when packaging a
Magento extension:
• PHP Version: Here we need to specify minimum and maximum versions of
PHP that are supported for this extension in the Minimum and Maximum
elds, respectively
• Packages: This is used to specify any other packages that are required for
this extension
• Extensions: Here we can specify if a specic PHP extension is required for
our extension to work
In case a package dependency is not met, Magento Connect will allow us to install
the required extension; for PHP extensions Magento Connect will throw an error and
will stop the installation.
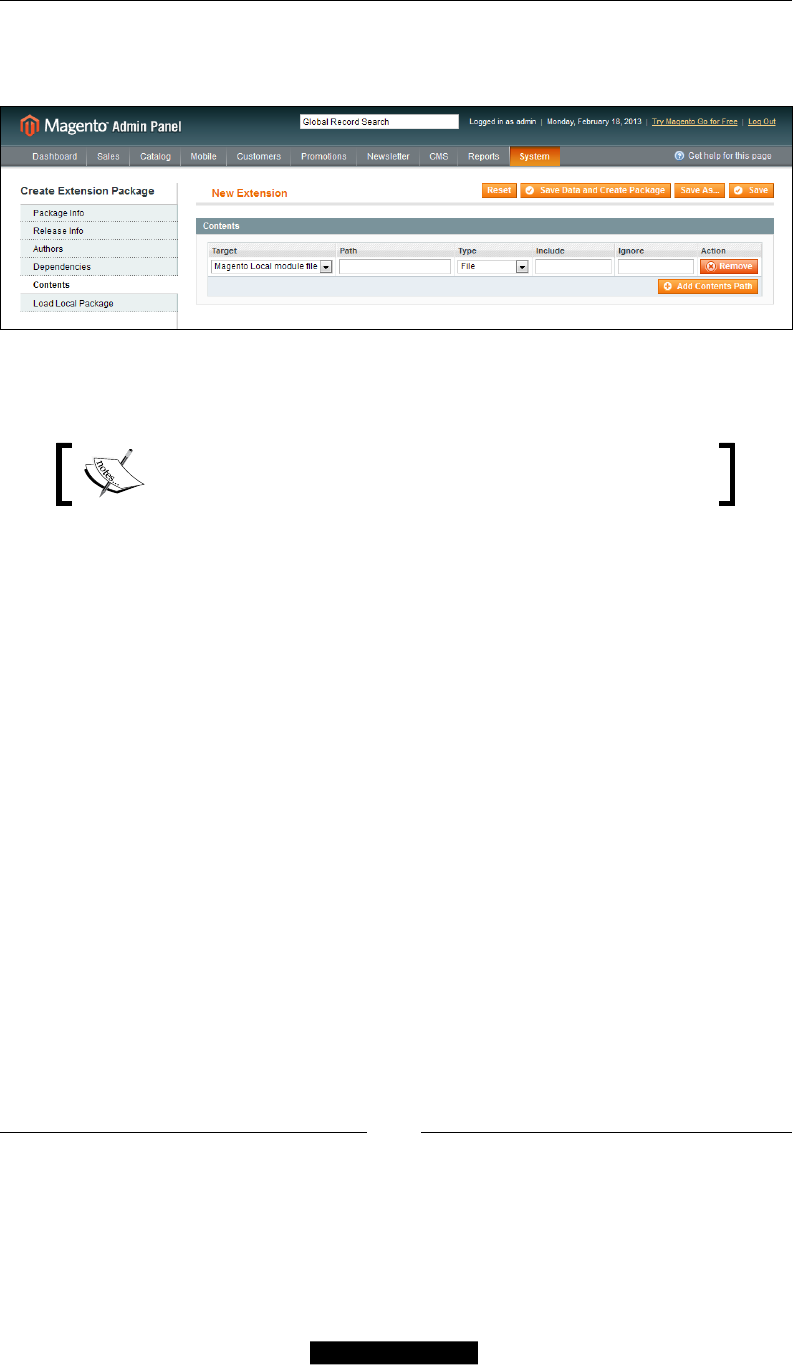
Deployment and Distribution
[ 222 ]
Contents
The following screenshot shows the screen for Contents:
The Contents section allows us to specify each le and folder that forms part of the
extension package.
This is the most important section in the extension packaging
process and it's also the easiest to mess up.
Each content entry has the following elds:
• Target: This is the target base directory and it is used to specify the base path
for searching the le. The following options are available:
°Magento Core team module file – ./app/code/core
°Magento Local module file – ./app/code/local
°Magento Community module file – ./app/code/community
°Magento Global Configuration – ./app/etc
°Magento Locale language file – ./app/locale
°Magento User Interface (layouts, templates) – ./app/design
°Magento Library file – ./lib
°Magento Media library – ./media
°Magento Theme Skin (Images, CSS, JS) – ./skin
°Magento Other web accessible file – ./
°Magento PHPUnit test – ./tests
°Magento other – ./
• Path: This is the lename and/or path relative to our specied target
• Type: For this eld, two options are available to us – File or Recursive dir

Chapter 8
[ 223 ]
• Include: This eld takes a regular expression that allows us to specify which
les to include
• Ignore: This eld takes a regular expression that allows us to specify which
les to exclude
Load Local Package
The following screenshot shows the screen for Load Local Package:
This section will allow us to load packaged extensions; since we have not packaged
any extensions, the list is currently empty.
Let's go ahead and package our gift registry extension. Be sure to ll in all the elds
and then click on Save Data and Create Package; this will package and save the
extension in the magento_root/var/connect/ folder.
The extension package le contains all the source's les and the source code needed;
additionally, a new le called package.xml is created with each package. This le
contains all the information about the extension and the detailed structure of the les
and folders.
Publishing our extension
Finally, in order to make our extension available, we have to create an extension prole
in Magento Connect. To create an extension prole, perform the following steps:
1. Log in to magentocommerce.com.
2. Click on the My Account link.
3. Click on the Developers link in the left-hand side navigation.
4. Click on Add new extension.
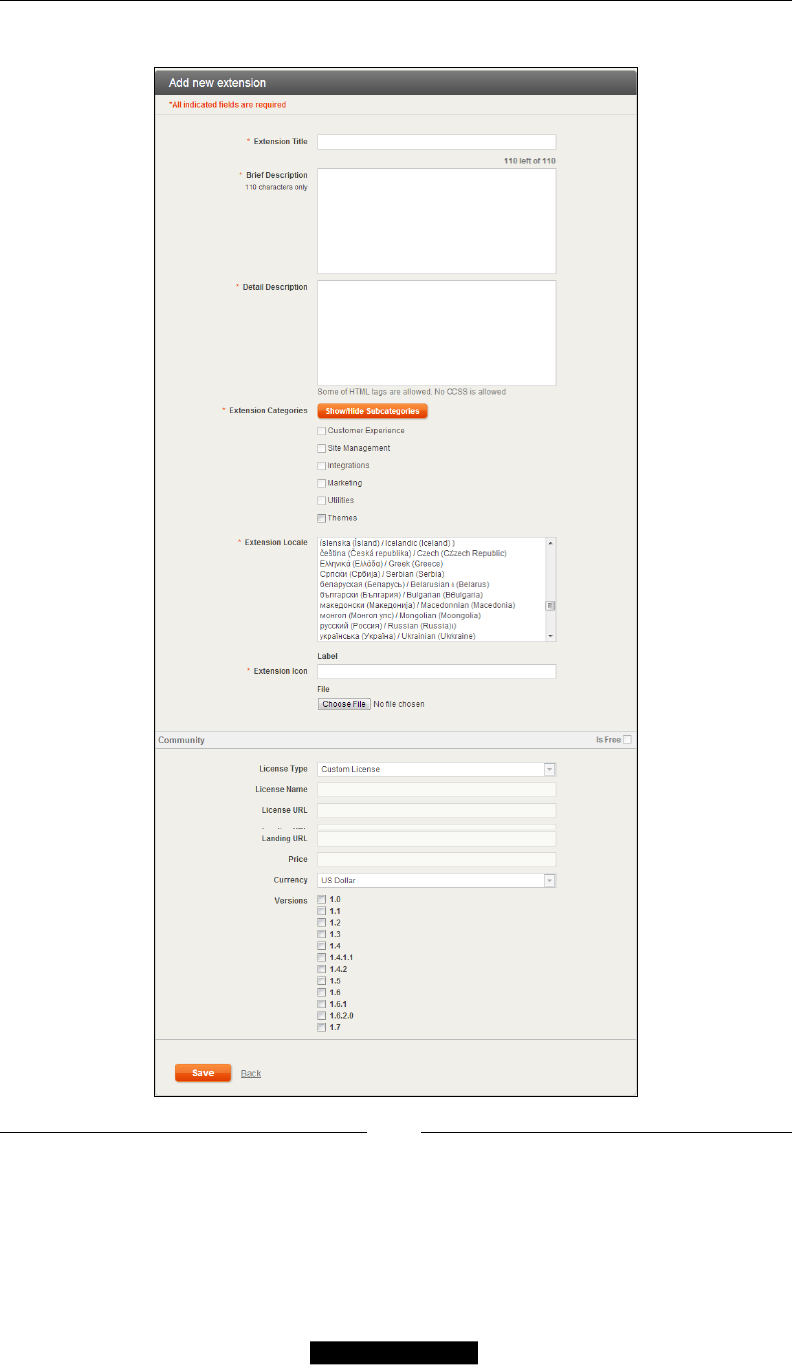
Deployment and Distribution
[ 224 ]
The Add new extension window looks something like the following screenshot:
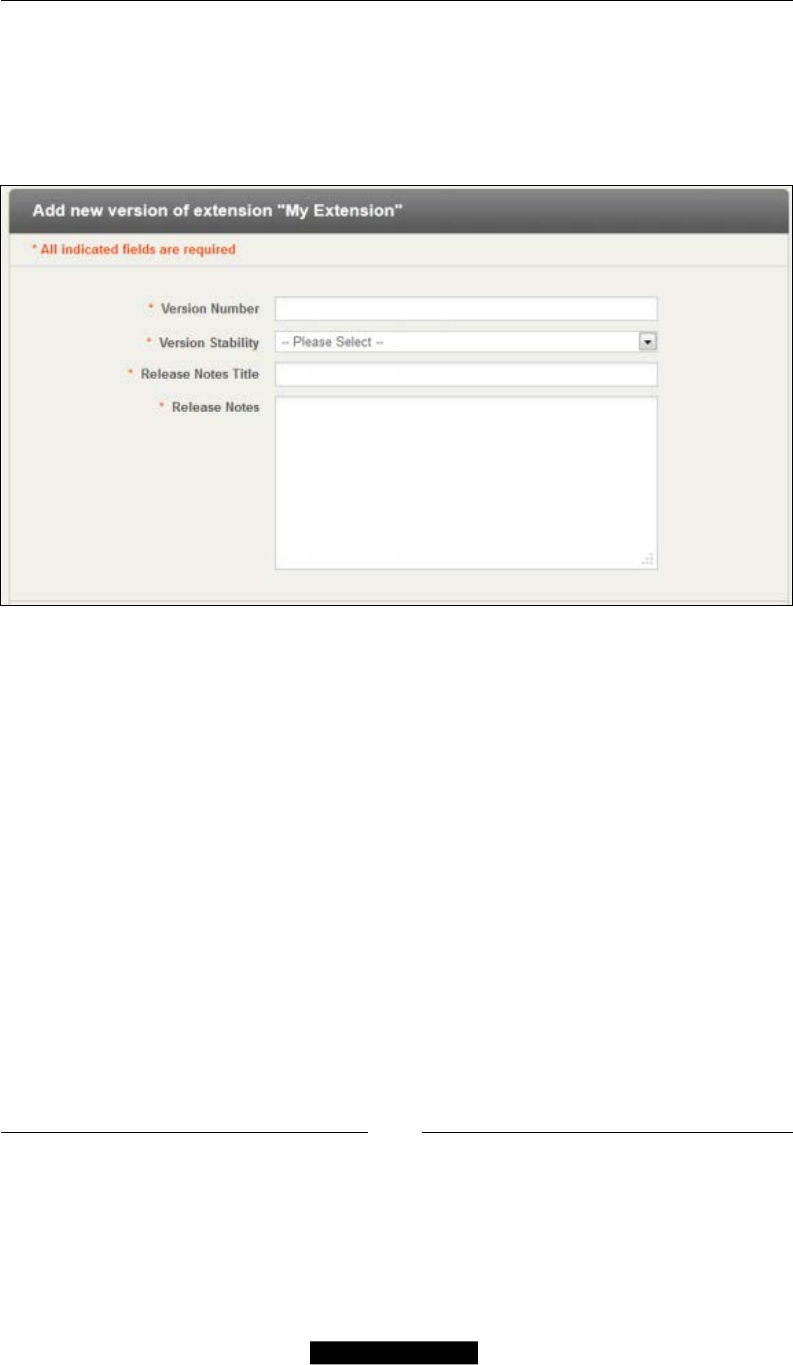
Chapter 8
[ 225 ]
It is important to note that the Extension Title eld must be the exact name you used
while generating the package.
Once the extension prole has been created, we can proceed to upload our extension
package; all the elds should match the ones specied during the extension
packaging process.
Finally, once we are done, we can click on the Submit for Approval button. An
extension can have the following status:
• Submitted: This means the extension was submitted for review
• Not Approved: This means there was a problem with the extension, and
you will also receive an e-mail explaining the reason why the extension
was not approved
• Live: This means the extension has been approved and is available through
Magento Connect
• Ofine: This means you can take your extension ofine at any time from
your account Extension Manager

Deployment and Distribution
[ 226 ]
Summary
In this chapter, we learned how to deploy and share our custom extensions. There
are many different methods that we can use for sharing and deploying our code to
production environments.
This is the nal chapter of our book; we have learned a lot about Magento
development, and though we have covered a lot of ground, this book is only
meant to be just a stepping stone of your long journey.
Magento is not an easy framework to learn, and while it can be a daunting
experience, I encourage you to keep trying and learning.

Hello Magento
The following example will give you a quick and easy introduction into the world
of creating Magento extensions. We will create a simple Hello World module that
will allow us to display a Hello World! message when we visit a specic URL in
our store.
The conguration
Creating a bare bones extension in Magento requires at least two les: config.xml
and the module declaration le. Let’s go ahead and create each one of our les.
The rst le is used to declare the module to Magento; without this le, Magento will
not be aware of any extension les.
The le location is app/etc/modules/Mdg_Hello.xml. Refer to the following code:
<?xml version=”1.0”?>
<config>
<modules>
<Mdg_Hello>
<active>true</active>
<codePool>local</codePool>
</Mdg_Hello>
</modules>
</config>
The second XML le is called config.xml; it is used to specify all the extension
congurations, such as routes, blocks, models, and helper class names. For our
example, we are only going to be working with the controllers and the routes.

Hello Magento
[ 228 ]
Let’s create the conguration le with the following code.
The le location is app/code/local/Mdg/Hello/etc/config.xml. Refer to the
following code:
<?xml version=”1.0”?>
<config>
<modules>
<Mdg_Hello>
<version>0.1.0</version>
</Mdg_Hello>
</modules>
<frontend>
<routers>
<mdg_hello>
<use>standard</use>
<args>
<module>Mdg_Hello</module>
<frontName>hello</frontName>
</args>
</mdg_hello>
</routers>
</frontend>
</config>
Our extension can now be loaded by Magento, and you can enable or disable our
extension in the Magento Backend at System | Conguration | Advanced.
The controller
Magento at its core is a Model-View-Controller (MVC) framework. So, in order to
make our new route functional, we have to create a new controller that will respond
to this specic route. To do so, follow these steps:
1. Navigate to the extension root directory.
2. Create a new folder called controllers.
3. Inside the controllers folder, create a le called IndexController.php.
4. Copy the following code (the le location is app/code/local/Mdg/Hello/
controllers/IndexController.php):
<?php
class Mdg_Hello_IndexController extends Mage_Core_Controller_
Front_Action
{
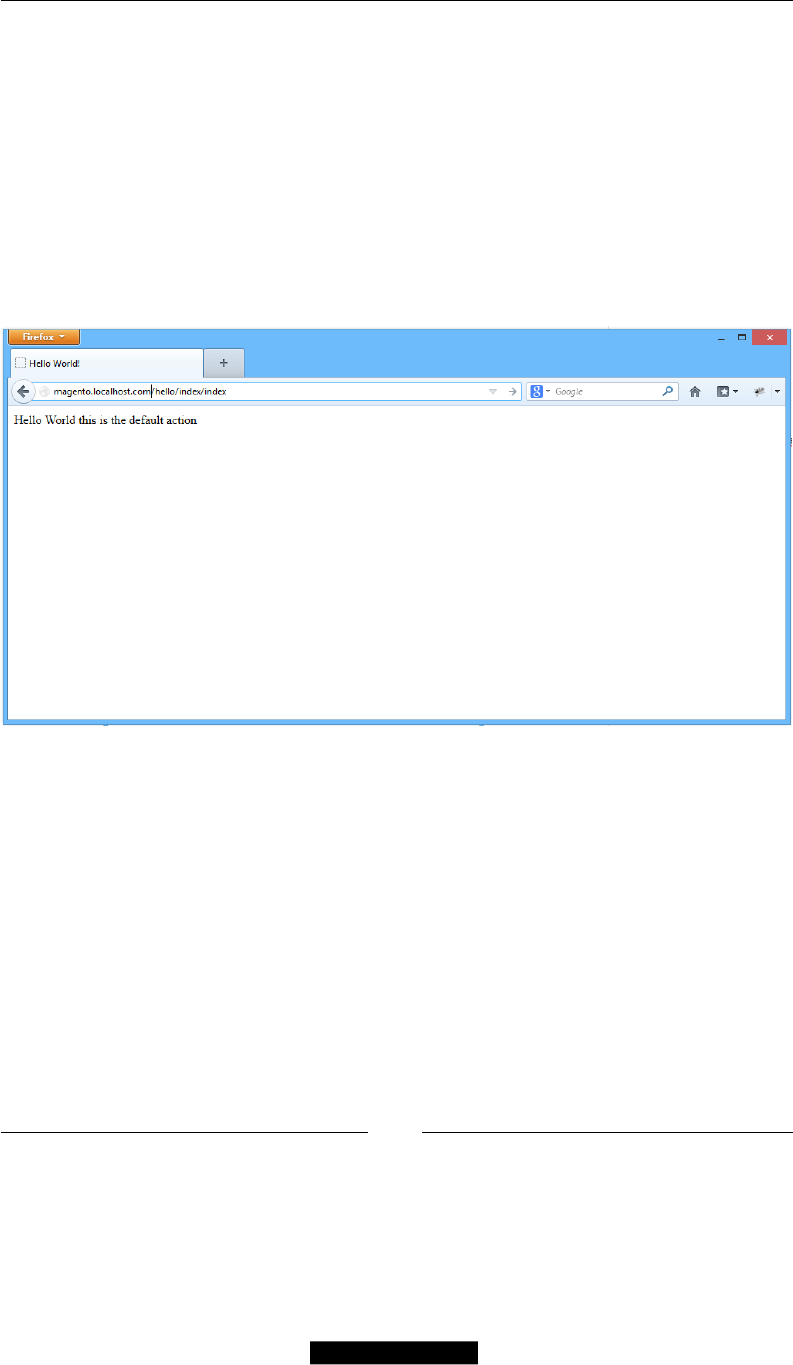
Appendix
[ 229 ]
public function indexAction()
{
echo ‘Hello World this is the default action’;
}
}
Testing the route
Now that we have created our router and controller, we can test it out by opening
http://magento.localhost.com/hello/index/index, for which we should see
the following screenshot:
By default, Magento will use both the index controller and the index action as
defaults for each extension. So, if we go to http://magento.localhost.com/
hello/, we should see the same screen.
To conclude our introduction to Magento Module, let’s add a new route to
our controller:
1. Navigate to the extension root directory.
2. Open IndexController.php.
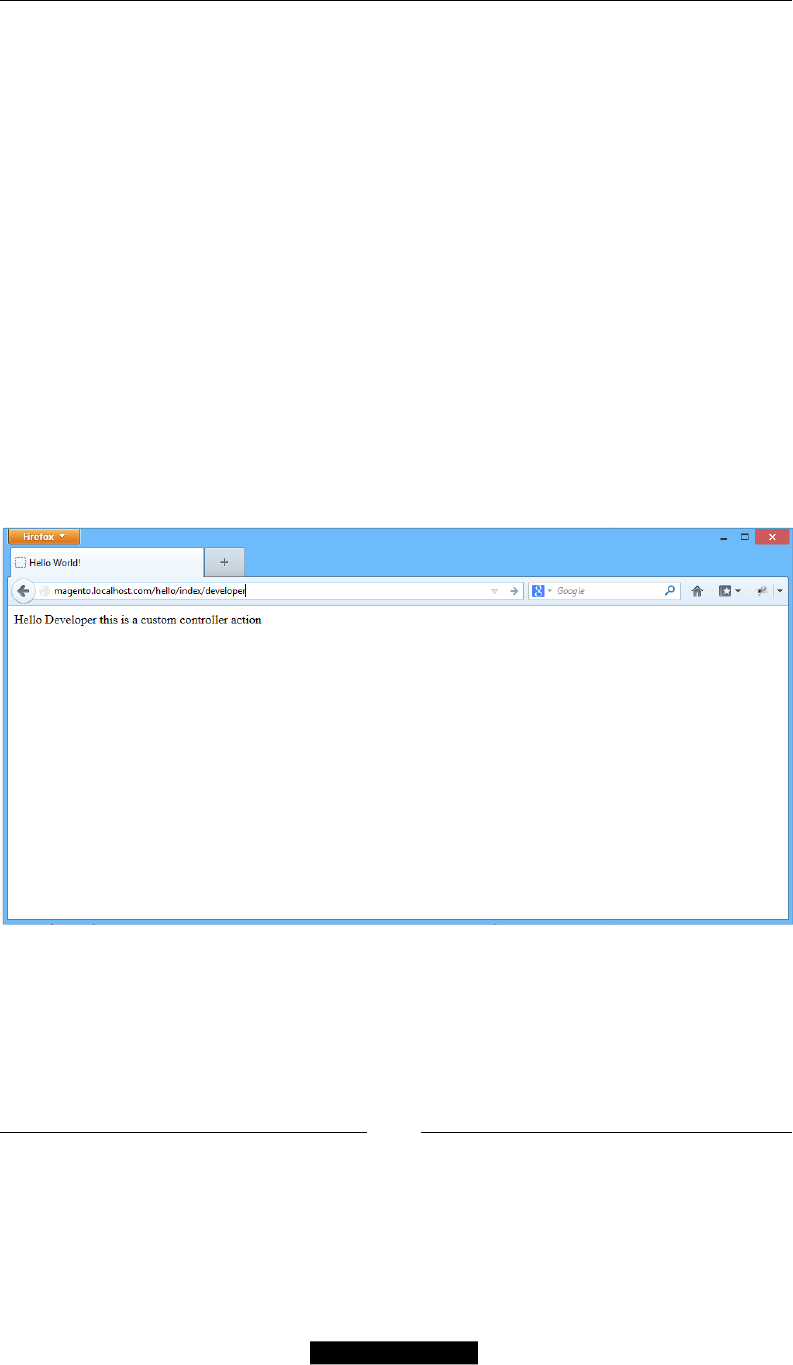
Hello Magento
[ 230 ]
3. Copy the following code (the le location is app/code/local/Mdg/Hello/
controllers/IndexController.php):
<?php
class Mdg_Hello_IndexController extends Mage_Core_Controller_
Front_Action
{
public function indexAction()
{
echo ‘Hello World this is the default action’;
}
public function developerAction()
{
echo ‘Hello Developer this is a custom controller
action’;
}
}
Finally, let’s test it out and load the new action route by going to http://magento.
localhost.com/hello/index/developer as shown in the following screenshot:

Index
Symbols
_Adminhtml module
block class, creating 140
<block> node 44
<cong> node 89
__construct function 143
@doNotIndexAll annotation 198
@doNotIndex [index_code] annotation 198
<factory_alias> node 89
<frontend> scope 108
<frontName> scope 108
<global> node 89
@loadExpectation annotation 198
@loadFixture annotation 198
<mdg_giftregistry> scope 108
<mdg_giftregistry_setup> node 98
<modules> node 89
__prepareCollection() function 143
__prepareColumns() function 143
_prepareMassactions() function 151
<reference> node 44
<routers> scope 108
@test annotation 198
A
a2dismod command 19
a2dissite command 19
a2enmod command 19
a2ensite command 19
Access Control Lists (ACL) 146, 147, 167
action, XML nodes 45
addAttributeToFilter() method 76, 78
addCategoryFilter() 76
addColumn function
about 103
comment parameter 103
name parameter 103
options parameter 103
size parameter 103
type parameter 103
addForeginKey function
about 104
column parameter 104
fkName parameter 104
onDelete parameter 104
onUpdate parameter 104
refColumn parameter 104
refTable parameter 104
addIndex function
about 104
columns parameter 104
index parameter 104
options parameter 104
Add new extension window 224
addStockStatusToSelect() method 79
Adminhtml
backend, modifying 134
block class, creating 139, 140
code, updating 135
extending 133
layout le, creating 137, 138
Apache2
about 16
installing 16
app, Magento folder structure
code 29
design 29
locale 29

[ 232 ]
APT(Advanced Packaging Tool) 15
as, XML nodes 45
authors
about 220
email 221
name 221
user 221
autoload class 32
autoloader 30, 31
autoload() function 30
B
backend, Magento
form widget 153, 154
grid widget 141
before/after, XML nodes 44
bindings, WSDL 163
blocks 118
blocks and views, index controller
adding 119
blocks and views, search controller
adding 127
blocks and views, view controller
adding 131
blocks, view layer 43
C
CakePHP 38
catalog_product.create method 171
catalog_product.currentStore method 171
catalog_product.delete method 171
catalog_product.getSpecialPrice method 171
catalog_product.info method 171
catalog_product.list method 171
catalog_product.setSpecialPrice method 171
catalog_product.update method 171, 173
channel, Package info 219
Chef 22
code pools
about 32
community directory 32
core directory 32
local directory 32
collection methods
addAttributeToFilter 74
addAttributeToSelect 74
addAttributeToSort 74
addCategoryFilter 75
addFieldToFilter 74
addStoreFilter 75
addUrlRewrite 75
addWebsiteFilter 75
setOrder 75
conguration-based MVC pattern 38
conguration scopes, Magento
global 47
stores 47
store view 47
websites 47
contents
about 222
include eld 223
path eld 222
target eld 222
type eld 222
controller
creating 228
route, adding to 229, 230
convention-based MVC 38
Core API
about 161
credentials, setting up for SOAP 167-169
credentials, setting up for
XML-RPC 167-169
extending 175-178
RESTful API 166
securing 188
SOAP 163
using 167
XML-RPC 162
core layout les, view layer
examining 43
core_resource table 106
D
data
loading 171-173
reading 171-173
updating 173
database
creating, for Magento installation 18

[ 233 ]
data, EAV model
retrieving 70
Data Script 100
deleteAction() method
using 114
delete() function 114
dependencies
about 221
extensions 221
packages 221
PHP Version 221
description, Package info 219
direct SQL
reading 81
using 80
writing 81
dispatchEvent() method 53
E
EAV model
about 58, 64, 65
attribute 65
data, retrieving 70-73
entity 65
limitations 67
value 65
EAV objects 66
EAV table
about 68
elds 68
Ecomdev_PHPUnit
installing 194, 195
Ecomdev_PHPUnit extension 194
EcomDev_PHPUnit_Test_Case class 196
EcomDev_PHPUnit_Test_Case_Cong
class 196
EcomDev_PHPUnit_Test_Case_Controller
class 196
edit action 153
editAction() 157
editPostAction()
creating 113
event and observer pattern
about 52
event dispatch 52
observer bindings 55
event dispatch 52-55
expectations 198
extension
about 217
live 225
not approved 225
ofine 225
packing 218, 219
publishing 223, 225
submitted 225
extension, packing
authors 220, 221
contents 222, 223
dependencies 221
load local package 223
Package Info 219
Release Info 220
extensions, dependencies 221
Extension Title eld 225
F
factory methods
Mage::getModel() 48
Mage::getResourceHelper() 48
Mage::getResourceModel() 48
Mage::getResourceSingleton() 48
Mage::getSingleton() 48
Mage::helper() 48
fetchAll() method 81
fetchCol() method 81
fetchOne() method 81
xtures 198
form widget
about 153-156
data, loading 157, 158
data, saving 158, 159
functional testing
about 193
with Mink 208
G
getChildHtml() function 145
getCollection() method 74
getCustomerRegistries() method 120, 121
getGroupedClassName() method 49

[ 234 ]
getModelClassName() method 49
getModelInstance() method 49
getModel() method 49
getProductCollection() method 76
getTableName() method 81
Giftregistry directory
creating 85
giftregistry_item.info function 175
giftregistry_item.list function 175
giftregistry_registry.info function 175
giftregistry_registry.list function 175
Gift registry tab 140, 144
Gift Registry type model
collection class 92
collection class, creating 93
creating 91-96
resource class 92
resource class, creating 93, 94
Git 24, 216, 217
Github
about 24
URL 216
GNU General Public License (GPL) 219
GoutteDriver 208
grid widget
__construct function 143
__prepareCollection() functio 143
__prepareColumns() function 143
about 141, 142
displaying, in controller 150
Massactions, used for bulk upload 151, 152
permissions and ACL 146-148
registries, managing 145, 146
groupByEmail() 75
H
handle, XML nodes 44
hasAction() function 37
Hello World module
conguration 227, 228
helper class 90
HTTP verbs 167
I
IDE
about 23
features 24
selecting 24
ignore eld, contents 223
include eld, contents 223
index controller
block, creating 119, 120
blocks and views, adding 119-126
creating 108-113
deleteAction(), using 114, 115
editPostAction(), creating 113
newPostAction(), creating 111
template le, creating 121
Installer Script
creating 99-106
installing
Apache2 16
MySQL 17
PHP 16
Vagrant 22
Install Script 100
intellisense 24
Interactive Magento Console (IMC) 95
about 58
installing 58
Interactive Ruby Console (IRB) 58
is_callable() function 37
J
joinField() function 78
L
LAMP
about 7
requisites 7
layout blocks, view layer 44
layout le
creating 118
recognizing 119
layouts 118
layouts, view layer 43
license, Package info 219
license URI, Package Info 219
Linux virtual machine
creating 8, 9, 11
Load Local Package 223

[ 235 ]
local mapping
setting up, into host system 20
login function 169
M
Mage_Adminhtml module 133
Mage_Catalog module 162, 171
Mage_Core_Controller_Varien_Router_
Standard match function 34
Mage_Customer module 162
Magento
about 27
additional setup 18
backend 133
conguration scopes 47
event and observer pattern 52
extending 83
factory methods 48
IDE, selecting 24
LAMP, installing 7
Mink, using with 208, 209
Modular architecture 30
MVC pattern, using 38-41
request, handling 34
routers 33
SVN, installing 18
testing 192
version control system, working with 24, 25
websites and store scopes, handling 46, 47
Zend Framework 27
Magento2
URL 24
Magento API 161
Magento collections
Bestseller products, getting 78
collection methods 74
multiple sort orders, adding 79
product collection, ltering by visibility 78
product collection, getting 76, 77
products, ltering without images 79
using 75
working with 74
Magento community 24
Magento Connect 218
Magento Core API. See Core API
Magento Developers Guide (MDG) 84
Magento extension
building 83
cache, disabling 86
conguration cache, refreshing 86
directory structure, creating 85
features 84
Giftregistry directory, creating 85
improvements 84
routes, setting up 107
scenario 83
XML module conguration 88
Magento folder structure
about 29
app 29
block 30
controller 30
controllers 30
etc 30
helper 30
js 29
lib 29
media 29
model 30
skin 29
sql 30
var 29
Magento_Mink extension 194
Magento Model Anatomy
about 58
EAV 58
Model class 59
Model Collection class 59
product object, instantiating 60
Resource Model class 59
simple models 58
Magento naming convention
Namespace_Modulename 84
Magento naming conventions
URL 215
Magento ORM 42
Magento ORM system
about 57
methods 61
Magento_TAF extension 194
magento-vagrant repository 22
Mage.php bootstrap class 33
Mage_Sales module 162

[ 236 ]
Magicento 24
Massachusetts Institute of Technology
License (MITL) 219
Massactions
used, for bulk upload 151, 152
massDelete() 151
message, WSDL 163
methods, Magento ORM system
implementing 61-64
magic __call() method 61
Mink
about 208
drivers 208
functional testing with 208
test, creating 209, 211, 212
using, with Magento 208
Mink, drivers
GoutteDriver 208
SahiDriver 208
Selenium2Driver 208
SeleniumDriver 208
ZombieDriver 208
Model class 59
Model Collection class 59
models
creating 91
Gift Registry type model, creating 91, 92
registry item 91
registry model 91
setup resources 97
models, MVC pattern
about 42
Entity Attribute Value (EAV) models 42
model handling 42
resource handling 42
simple models 42
Model-View-Controller (MVC) 28, 228
Modgit
about 208
installing 208
Modular architecture
about 30
advantages 30
autoloader 30
code pools 32
Mozilla Public License (MPL) 219
MVC block diagram 46
MVC controllers 46
MVC pattern, Magento
controllers 46
models 42
views 43
MySQL
about 17
installing 17
N
name, Package info 219
name, XML nodes 44
nano command 19
NetBeans 24
newPostAction()
creating 111
Nginx 7
node function
frontend_type 40
group 40
label 40
section_name 40
sort_order 41
source_model 41
tab 40
notes, release info 220
O
OAuth 169
object-oriented (OO) PHP framework 27
observer bindings 55, 56
Open Software License (OSL) 219
ORM(Object Relational Mapping)
system 57
P
Package Info
about 219
channel 219
description 219
license 219
license URI 219
name 219
summary 219
supported releases 219

[ 237 ]
packages, dependencies 221
path eld, contents 222
PHP
about 16
installing 16
PHP Hypertext Processor 16
PhpStorm 24
PHP Version, dependencies 221
port type, WSDL 163
port, WSDL 163
preDispatch() function 110
product
deleting 174
deleting, in SOAPv2 174
deleting, in XML-RPC 174
products
adding, to registry 132
R
registries
managing 145, 146
registry entity table 91
registry item 91
registry item table 91
registry model 91
registry type table 91
regression testing 192
Release Info
license 220
notes 220
release stability 220
release version 220
release stability, release info 220
release version, release info 220
remote procedure call (RPC) protocol 162
request ow 34
request handling 33-38
Resource Model class 59
REST
product data, retrieving from staging
store 172
REST API
extending 185, 187
RESTful API
about 166
credentials, setting up 169, 170
dening 166
features 166
RESTful web service 166
resultsAction() 115
Return Merchandise Authorization (RMA)
system 66
roles control 167
route
adding, to controller 229, 230
setting up 107
testing 229
routers 33
S
SahiDriver 208
Save Role button 168
search controller
blocks and views, adding 127-130
creating 115, 116
Selenium2Driver 208
SeleniumDriver 208
service, WSDL 163
setup resources
about 97
creating 97
dening 98, 99
Installer Script, creating 99-106
Simple Object Access Protocol (SOAP)
about 163
Core API credentials, setting up for 167-169
URL 163
SOAPv2
lters, adding to product list call 172
product, deleting 174
Submit for Approval button 225
Subversion. See SVN
summary, Package info 219
supported releases, Package info 219
SVN 216
Symfony 38
T
target eld, contents 222
TDD
about 193
with Magento, URL 193

[ 238 ]
templates 118
templates, view layer 43
template, XML nodes 45
Test-driven development. See TDD
testing, Magento
functional testing 193
regression testing 192
unit testing 192
type eld, contents 222
type, XML nodes 44
U
Ubuntu
booting up 11
unit testing 192
unit testing, with PHPUnit
about 194
conguration, setting up for extension 196
creating 199-207
Ecomdev_PHPUnit, installing 194, 195
extension conguration, setting up for
extension 196
Test case, anatomy 197, 198
Upgrade Script 100
V
Vagrant
downloading 22
installing 22, 23
using 21
Varien_Cache_Core 28
VCSs 215
version control concepts
branching 25
merging 25
tagging 25
version control system
Git 24
Mercurial 24
SVN 24
working with 24
Version control systems. See VCSs
viewAction() 37
view controller
blocks and views, adding 131, 132
creating 117
view layer
about 43
blocks 43
core layout les, examining 43
layouts 43
templates 43
VirtualBox
about 8
downloading 8
URL 8
VirtualBox Disk Image (VDI) 9
virtual machines (VMs)
about 8
booting 11-15
W
websites and store scopes
handling 46, 47
WSDL (Web Services Description
Language)
about 163
bindings 163
conguration 164, 165
message 163
port 163
port type 163
service 163
types 163
WSDL code 185
wsdl.xml
URL 185
X
XML module conguration
about 88
adminhtml.xml 88
api.xml 88
cache.xml 88
cong.xml 88
convert.xml 88
system.xml 88
widget.xml 88
wsdl.xml 88
wsi.xml 88
XML nodes
action 45

[ 239 ]
as 45
before/after 44
block 44
handle 44
name 44
reference 44
template 45
type 44
XML-RPC
about 162
Core API credentials, setting up for 167-169
lters, adding to product list call 172
product data, retrieving from staging
store 172
product, deleting 174
URL 163
Y
yet another markup language (YAML)
le 198
Z
Zend_Acl component 28
Zend_Cache component 28
Zend_Cache_Core 28
Zend components
Zend_Acl 28
Zend_Cache 28
Zend_Currency 28
Zend_Date 28
Zend_DB 28
Zend_Http 28
Zend_Locale 28
Zend_Pdf 28
Zend_Soap 28
Zend_Currency component 28
Zend_Date component 28
Zend_DB component 28
Zend Framework
about 27, 28
exibility 28
maintainability 28
upgradability 28
URL 28
Zend_Http component 28
Zend_Locale component 28
Zend_Pdf component 28
Zend_Soap component 28
zero-downtime deployment 213
ZombieDriver 208

Thank you for buying
Magento PHP Developer's Guide
About Packt Publishing
Packt, pronounced 'packed', published its rst book "Mastering phpMyAdmin for Effective
MySQL Management" in April 2004 and subsequently continued to specialize in publishing
highly focused books on specic technologies and solutions.
Our books and publications share the experiences of your fellow IT professionals in adapting
and customizing today's systems, applications, and frameworks. Our solution based books
give you the knowledge and power to customize the software and technologies you're using
to get the job done. Packt books are more specic and less general than the IT books you have
seen in the past. Our unique business model allows us to bring you more focused information,
giving you more of what you need to know, and less of what you don't.
Packt is a modern, yet unique publishing company, which focuses on producing quality,
cutting-edge books for communities of developers, administrators, and newbies alike. For
more information, please visit our website: www.packtpub.com.
About Packt Open Source
In 2010, Packt launched two new brands, Packt Open Source and Packt Enterprise, in order to
continue its focus on specialization. This book is part of the Packt Open Source brand, home
to books published on software built around Open Source licences, and offering information
to anybody from advanced developers to budding web designers. The Open Source brand
also runs Packt's Open Source Royalty Scheme, by which Packt gives a royalty to each Open
Source project about whose software a book is sold.
Writing for Packt
We welcome all inquiries from people who are interested in authoring. Book proposals
should be sent to author@packtpub.com. If your book idea is still at an early stage and you
would like to discuss it rst before writing a formal book proposal, contact us; one of our
commissioning editors will get in touch with you.
We're not just looking for published authors; if you have strong technical skills but no writing
experience, our experienced editors can help you develop a writing career, or simply get some
additional reward for your expertise.
Magento: Beginner's Guide
ISBN: 978-1-84719-594-4 Paperback: 300 pages
Create a dynamic, fully featured, online store with the
most powerful open source e-commerce software
1. Step-by-step guide to building your own online
store
2. Focuses on the key features of Magento that
you must know to get your store up and
running
3. Customize the store's appearance to make it
uniquely yours
4. Clearly illustrated with screenshots and a
working example
Mastering Magento
ISBN: 978-1-84951-694-5 Paperback: 300 pages
Maximize the power of Magento: for developers,
designers, and store owners
1. Learn how to customize your Magento store for
maximum performance
2. Exploit little known techniques for extending
and tuning your Magento installation
3. Step-by-step guides for making your store run
faster, better and more productively
Please check www.PacktPub.com for information on our titles
Magento Mobile How-to [Instant]
ISBN: 978-1-84969-366-0 Paperback: 78 pages
Create and congure your own Magento Mobile
application and publish it for the Andriod and iOS
platform
1. Learn something new in an Instant! A short,
fast, focused guide delivering immediate
results.
2. Style and theme your Magento Mobile
Application interface
3. Congure Product categories and add static
content for mobile
4. Prepare and publish your Magento mobile
application targeting iPhone/iPad and Android
platforms
Magento 1.3 Sales Tactics
Cookbook
ISBN: 978-1-84951-012-7 Paperback: 292 pages
Improve your Magento store's sales and increase your
prots with this collection of simple and effective
tactical techniques
1. Build a professional Magento sales web site,
with the help of easy-to-follow steps and ample
screenshots, to solve real-world business needs
and requirements
2. Develop your web site by using your creativity
and exploiting the sales techniques that suit
your needs
3. Provide visitors with attractive and innovative
features to make your site sell
Please check www.PacktPub.com for information on our titles
