Newlfm.dvi Manual
manual manual manual pdf - FTP File Search (5/20)
manual manual manual pdf - FTP File Search (5/20)
manual manual manual pdf - FTP File Search (5/20)
manual manual manual pdf - FTP File Search (6/20)
manual manual manual pdf - FTP File Search (6/20)
User Manual: manual manual pdf - FTP File Search (5/20)
Open the PDF directly: View PDF ![]() .
.
Page Count: 23
newlfm.cls
A New Letter, Fax, Memo Document Class for L
A
T
EX2e
Paul A. Thompson, Ph.D.
Division of Biostatistics
Washington University of St. Louis, MO, USA
paul@wubios.wustl.edu
April 11, 2009
Contents
1 The newlfm.cls class . . . . . . . . . . . . 2
1.1 Writing a simple letter . . . . . . . . 2
1.2 Option specification . . . . . . . . . 2
2 Available styles . . . . . . . . . . . . . . . . 3
2.1 Letter styles . . . . . . . . . . . . . . 3
2.2 Memo styles . . . . . . . . . . . . . . 3
2.3 A list of styles in newlfm . . . . . . 3
2.4 FAX cover pages . . . . . . . . . . . 3
3 Letter and memo options . . . . . . . . . . 4
3.1 Use of options . . . . . . . . . . . . . 4
3.2 Letter options . . . . . . . . . . . . . 4
3.3 Memo options . . . . . . . . . . . . . 5
3.4 Memo block structure . . . . . . . . 5
3.5 Fax options . . . . . . . . . . . . . . 5
3.6 Press Release style . . . . . . . . . . 5
3.7 Press Release options . . . . . . . . 6
4 Spacing commands . . . . . . . . . . . . . . 6
4.1 Structure of a L
A
T
E
X document . . . 6
4.2 Vertical spacing . . . . . . . . . . . . 6
4.3 Horizontal spacing . . . . . . . . . . 9
4.4 Ordering of elements: . . . . . . . . 9
5 Address components . . . . . . . . . . . . . 10
5.1 Address commands . . . . . . . . . . 10
5.2 Phrase commands . . . . . . . . . . 10
6 Letterhead tools . . . . . . . . . . . . . . . 10
6.1 Inclusion of logos . . . . . . . . . . . 10
6.2 Marginal material . . . . . . . . . . 11
6.3 Graphical objects . . . . . . . . . . . 11
6.4 Example use of external object: . . . 12
6.5 Including a pre-set sheet as back-
ground . . . . . . . . . . . . . . . . . 13
6.6 Blank block printing commands . . . 13
7 The letter database . . . . . . . . . . . . . 13
7.1 Letter database letrinfo.tex . . . 13
7.2 Address information . . . . . . . . . 13
7.3 Letterhead information . . . . . . . 15
7.4 Signature information . . . . . . . . 15
7.5 Closing information . . . . . . . . . 15
7.6 Setting up wrapper macros . . . . . 16
7.7 Multiple information datasets . . . . 17
7.8 Rules for use of wrapper IDs . . . . 17
8 Form letters . . . . . . . . . . . . . . . . . 17
8.1 Example form letter . . . . . . . . . 17
9 Printing envelopes and labels . . . . . . . . 18
10 Miscellaneous topics . . . . . . . . . . . . . 18
10.1 Lines . . . . . . . . . . . . . . . . . . 18
10.2 Printing information on additional
pages . . . . . . . . . . . . . . . . . 19
10.3 Setting the date . . . . . . . . . . . 19
10.4 Language option definitions: . . . . . 19
10.5 Printing the address information . . 20
10.6 Cellophane-window envelopes . . . . 20
10.7 Examples . . . . . . . . . . . . . . . 21
10.8 L
A
T
E
X vs. pdfL
A
T
E
X . . . . . . . . . 21
10.9 Usage tips . . . . . . . . . . . . . . . 21
11 Command Summary . . . . . . . . . . . . . 22
12 Code . . . . . . . . . . . . . . . . . . . . . 24
12.1 Preliminaries . . . . . . . . . . . . . 24
12.2 newlfm commands . . . . . . . . . . 29
12.3 Executing Options . . . . . . . . . . 41
12.4 fancyhdr in newlfm . . . . . . . . . 43
12.5 Wrapper code . . . . . . . . . . . . . 44
12.6 Text placement . . . . . . . . . . . . 47
12.7 Memo blocks . . . . . . . . . . . . . 48
12.8 Press Release blocks . . . . . . . . . 49
12.9 Fax blocks . . . . . . . . . . . . . . 50
12.10 Start of letter document . . . . . . . 52
12.11 Close of document section . . . . . . 54
12.12 Address information . . . . . . . . . 56
12.13 Address book handling . . . . . . . . 60
12.14 Form letters . . . . . . . . . . . . . . 61
12.15 Main section . . . . . . . . . . . . . 64
1
1 The newlfm.cls class
newlfm is a new letter, fax and memo class. It gives the user control over many elements of letter construc-
tion. It enables the user to construct a simple database of letter information for letter information storage.
It includes commands to print labels, and issue form letters to multiple recipients. Additionally, the class
includes tools to produce standard press releases.
1.1 Writing a simple letter
Here is an example of a very simple letter:
\documentclass[stdletter]{newlfm}
\nameto{George Bush} \addrto{\parbox{2in}{The White House \\ Washington, DC}}
\namefrom{Paul Thompson} \addrfrom{\parbox{2in}{The Pink House \\ Belleville, IL}}
\begin{document}
\closeline{Sincerely yours,} \greetto{Dear Mr. Bush,}
\begin{newlfm}
How are the azaleas?
\end{newlfm}
\end{document}
This produces a simple letter with very standard features. The letter produced in this way has odd-looking
spacing. Additionally, the information in the “from” specification is very likely to be repeated in letter after
letter. Although the user can copy this information, it is much more convenient to put this information in
an address database.
1.2 Option specification
The newlfm package features a wide variety of options to specify options for letters, faxes and memos.
Options may be specified in one of two ways:
1. They may be placed in the options section of the \documentclass statement. Thus, the options would
be specified as follows, with several other statements to provide context:
\documentclass[dvips,faxheaderpage,letterpaper,%
stdmemo,dateno,memoaddrto]{newlfm}
\lthOfficeA\setadrto{\adrMainCust}
\leftmarginsize{.75in}\rightmarginsize{1.385in}
\begin{document}\begin{newlfm}
Now is the time for all good men to come to the aid of the party.
\end{newlfm}\end{document}
This is called the “document-header” approach. Options may be specified in the preamble area (af-
ter the documentclass specification and before the \begin{document} specification). The terms
\lthOfficeA and \adrMainCust refer to specifications in the letter information database, which is
described in Section 7. Note the use of the “%” to set all spaces after the comma on the first line to
comments; this functions to create a single unified line.
2. Options may also be placed in a statement in the letter itself, or stored in the letter database file
letrinfo.tex. Using this approach, options are specified as follows:
\documentclass[dvips]{newlfm}
\newlfmP{letterpaper,stdmemo,dateno,letrh=OfficeA,addrt=MainCust,memoaddrto,faxheaderpage}
\begin{document}\begin{newlfm}
Now is the time for all good men to come to the aid of the party.
\end{newlfm}\end{document}
2
This is called the “keyed-value” approach. In previous versions, several distinct “keyed-value” speci-
fications were used, but currently all options are placed in the newlfmP key specification. The terms
OfficeA and MainCust refer to specifications in the letter information database, which is described in
Section 7.
The approaches may be intermingled without effect. Options are applied in order of encounter, so the last
option encountered over-rides earlier ones.
2 Available styles
2.1 Letter styles
newlfm defines several letter styles. These styles are chosen using options (in either selection method).
Letters include some or all of the following components: 1) date, 2) from-address, 3) to-address, 4) opening
salutation, 5) closing phrase, 6) signature, and 7) name and title of signer. Justification of the components
is shown in Table 1 below.
2.2 Memo styles
Memos are headed as:
To: J Smith April 11, 2009
From: P A Thom
Re: Gnu info
A number of options control whether more information is printed for the memo, including printing the
address, phone number and FAX number of both the “from” and “to” persons (after the name). There are
two forms of the memo style, as shown in Table 1 below. The user may use their own version of the memo
block.
2.3 A list of styles in newlfm
Table 1 shows the components of a letter, and indicates when they will be used in letters:
Table 1: Letter and memo structures
Class Style D F T G C S N Option name
Letter Business L L L L L L L busletter
B, No from L O L L L L L busletternofrom
Standard R R L L R R R stdletter
S, No from R O L L R R R stdletternofrom
Memo Standard R L L O O O O stdmemo
Full F F F O O O O fullmemo
Press Release Standard L L O O O O L pressrelease
Headers — D: Date; F: From-address; T: To-address; G: Greeting; C: Clos-
ing; S: Signature; N: Name. Body entries — R: Right-justified; L: Left-
justified; O: Omitted; F: Full
2.4 FAX cover pages
A FAX cover page can be used for either the letter or the memo style. This page shows the page count,
time and date of composition, and the addresses of sender and recipient. In addition, the letter can include
a FAX message in a message line.
3

3 Letter and memo options
3.1 Use of options
In newlfm, the various components of the letter can be modified. This is done using options (placed in the
“document-header” or “keyed-value” approaches).
The following example illustrates option placement in the document header line:
\documentclass[busletter,nofromaddress,dateright,dateyes]{newlfm}%
\lthMyLtr
\begin{document}
\begin{newlfm}
This prints a business letter, with no “from”-address, and date printed right-justified. Since some options
can over-ride actions of others, the options are executed in the order encountered. Long specifications which
cannot nicely fit on a single line should be terminated with the command character %, which omits spaces
in the specification list. The list may continue as long as is necessary.
The information may also be specified using the “keyed-value” approach:
\documentclass{newlfm}%
\newlfmP{letrh=MyLtr,busletter,nofromaddress,dateright,dateyes}
\begin{document}
\begin{newlfm}
The “keyed-value” method is very flexible. Values may be specified either as above (before the
\begin{document} specification) or within the letter database. Thus, the approach gives the user the flexi-
bility of storing letter characteristics within the address system, so that the selection of a certain recipient
defines a letter of a certain type.
3.2 Letter options
Letter options involve the inclusion of elements into “from-address” and “to-address” blocks (including email
and telephone numbers) and the placement of blocks on the page. Blocks may also be omitted. Options
may be defined using either options specification method:
Table 2: Letter options
Component Option Description Option Description
“From” address noaddrfrom Omit address printallfrom Print all components
addrfromleft Left-justified block addrfromright Right-justified
addrfromemail Include e-mail addrfromphone Include phone
addrfromfax Include fax
“To” address printallto Print all components addrtoleft Left-justified block
addrtoright Right-justified addrtoemail Include e-mail
addrtophone Include phone addrtofax Include fax
Date dateright Right-justified dateleft Left-justified
datecenter Centered dateno Omit
dateyes Force date to print
Order orderdatefromto Date, From, To orderfromdateto From, Date, To
orderfromtodate From, To, Date
Signature sigright Right-justified sigleft Left-justified
sigcenter Centered
4
3.3 Memo options
Memo options involve the inclusion of elements into “from-address” and “to-address” blocks (including
email and telephone numbers) and the placement of blocks on the page. Blocks may also be omitted.
These may be placed either in the “document-header” option section, or in the command \newlfmP.
Table 3: Memo options
Block Option Function Option Function
“From” block memonofrom Omit block memoaddrfrom Address
memoemailfrom E-mail memopagerfrom Pager #
memophonefrom Telephone # memofaxfrom FAX #
“To” block memonoto Omit block memoaddrto Address
memoemailto E-mail memophoneto Telephone #
memopagerto Pager # memofaxto FAX #
Other memodate Set date on memo memonore Omit “Re:” line
fullmemo Use all optional items
3.4 Memo block structure
The default memo block code was shown previously. The memo style is stored internally, but as \newlfm
is processed, it looks for a file memosec.tex, and reads the memo header block definition in that file if it is
found. If an alternative to the default memo header block structure is desired, the user may feel free to hack
the code found in smemosec.tex and save it in memosec.tex. Thus, you may alter that file to make changes
in the memo block. To simplify the process, you may wish to 1) set up the main parameters for \newlfm
successfully, and 2) alter the code in memosec.tex to look as you wish. Using this approach, you may find
that the alteration process works in a more dependable fashion. No support for modification of code is able
to be offered, unfortunately. The code for \memosec is presented and commented on Page 48.
3.5 Fax options
Fax options involve the selection of one of several fax block styles. test1.tex shows an example of the use of
faxheaderpage (separate fax page), while faxhba shows an example of the use of faxhba (fax information
in header block). The code for \faxpage is presented and commented on Page 50.
Table 4: FAX options
Option FAX item Option FAX item
faxheaderpage Print FAX page faxhba In Rheader
faxblocka Block A style faxblockb Block B style
3.6 Press Release style
There is only one press release style. A press release includes the following elements, in this order:
1. The information about the contact, address, etc. of the contact person is taken from the current
“from-address” information. So, to insert a person into the “Contact” line specified below, use the
addrf specification or the other methods of indicating the “from-information.”
2. On the upper left, below the letterhead, information about when the release may be used. Usually this
is FOR IMMEDIATE RELEASE. This phrase is modified using the command \release.
3. Contact information, drawn from the from information used in the other styles. The option PhrContact
allows the user to substitute another term for “Contact:”.
4. Headline, usually in boldface with the first letters of words capitalized. This is specified with the
\headline command. The press release style automatically inserts a header into the center block of
5

the head section for all subsequent pages. This is the same as the headline information, unless a
different value is defined with the \shorthead command.
5. Dateline, usually a city. The date is appended automatically.
6. The main body of the press release.
7. The end marker, usually # # #.
Because recipients like to scribble notes on press releases, they have 1 inch margins (that is the default
anyway) and double spacing; the command dspace will also set double spacing, while sspace retains single
spacing. 1
A press release should also try not to break paragraphs across pages (not yet implemented), and, if there
are multiple pages, put “— more —” at the bottom and the headline (or a short form of it) at the top of
subsequent pages.
If faxing a press release, remember to pick a good fax font. As this matter is not specific to press releases,
and is system dependent, this press release environment does nothing special to your fonts. Usually, sans
serif fonts work better when faxing, so you might want to specify \sffamily right after \begin{document}.
A press release does not have a signature or closing phrase at the end.
3.7 Press Release options
Press releases are inherently subjective in construction. What works for one person will not work for another.
The style defined in newlfm is servicable, but not particularily elegant. For that reason, a very easy method
of customization is set up. The file sprsrls.tex includes the default press release style. To change the style:
1. Copy the file to prsrls.tex;
2. Modify the style as needed;
3. Test using a press release of your choosing.
4 Spacing commands
newlfm has a number of commands which allow the user to define the position of items within the letter.
Some of these commands control the space for structural elements of the document, and some control spacing
within these structural elements.
4.1 Structure of a L
A
T
E
X document
A L
A
T
E
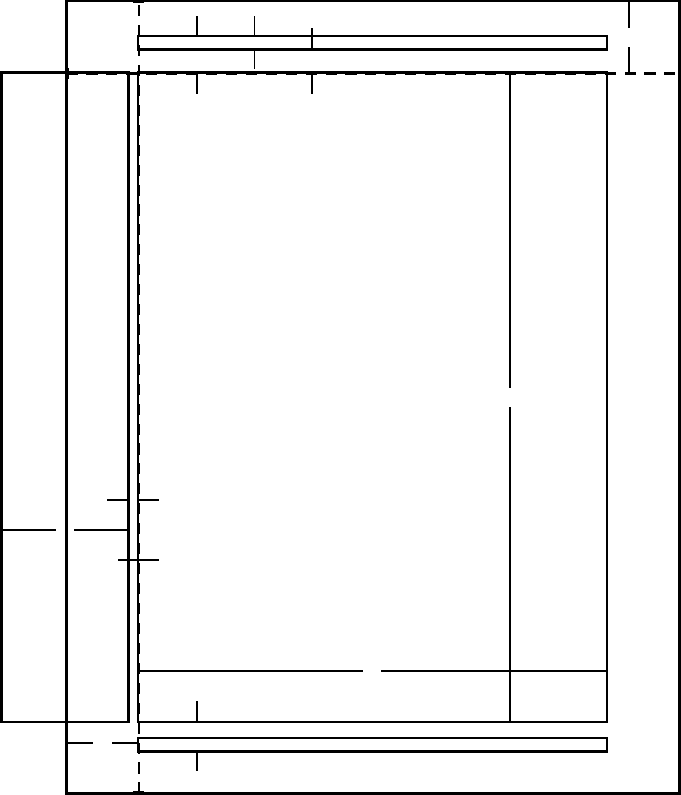
X document has a number of structural elements, summarized in Figure 1. Examining this figure,
there are three sections vertically (header, text body, footer) and three sections horizontally (left margin,
text body, right margin). Each of these sections is placed in reference to the paper boundaries. Vertically,
the header is offset from the top of the page, there is a separation to the text body, there is a separation
from the text body to the footer, and the footer is offset from the bottom of the page.
4.2 Vertical spacing
Vertical spacing commands are shown in Table 5. This table shows the various components of the L
A
T
E
X
page, along with the commands which are used to define or modify these elements in newlfm. Naturally,
since the physical page has a physical dimension, the size of one component can be defined by the other
dimensions save one. In newlfm, commands which give the structure of the overall document are amplified
and extended by commands which give the structure of the document within the text body itself. These
additional items are shown in Table 6.
1Do not put a onehalfspace environment directly inside the default doublespace. The former multiplies whatever spacing
is in effect.
Header
Body
Footer
Margin
Notes
i
8
-
i
7
?
6
i
1
-
-i
3
i
10
-
-i
9
6
?
i
11
i
2
?
6
6
?
i
4
6
?
i
5
6
?
i
6
1 one inch + \hoffset 2 one inch + \voffset
3 \oddsidemargin = 0pt 4 \topmargin = -37pt
5 \headheight = 12pt 6 \headsep = 25pt
7 \textheight = 650pt 8 \textwidth = 469pt
9 \marginparsep = 11pt 10 \marginparwidth = 126pt
11 \footskip = 30pt \marginparpush = 0pt (not shown)
\hoffset = 0pt \voffset = 0pt
\paperwidth = 614pt \paperheight = 794pt
Figure 1: Page elements. The values shown are those in effect in the current document, not the defaults.
7
For many of these terms, they may be used alone or within the newlfmP specification. If used alone, they
are specified as L
A
T
E
X commands, while if used within the newlfmP specification, they are used without the
backslash:
\topmarginskip{1in}
\newlfmP{topmarginskip=1in}
Table 5: Vertical spacing commands
Page L
A
T
E
Xnewlfm Default Included Function
Section Name Name Items Description
Top Margin \topmargin unprtop Top unprintable area
topmarginskip Top of page to header block
Header \headheight MinHead Group 1 Header section
headermarginsize 72pt Header section
Header Skip \headsep headermarginskip 20pt Skip from header to text
block top
Text Height \textheight textheightsize Group 2
Footer skip \footskip bottommarginskip 20pt Skip from bottom of text to
footer
Footer \footskip MinFoot 72pt Group 3 Footer section
footermarginsize
unprbottom Bottom unprintable area
Group 1: Cheader,Rheader,Lheader,cheader,rheader,lheader. Group 2: date, to-address,
from-address, greetto,signature. Group 3: Cfooter,Rfooter,Lfooter,cfooter,rfooter,
lfooter
Table 6: Vertical spacing commands
Function newlfm Section Space Space
Name Structure Size Before After
Date \dateset dateskipbefore dateskipafter
“From” address \adrsetfr{XXX} addrfromskipbefore addrfromskipafter
“To” address \adrsetto{XXX} addrtoskipbefore addrtoskipafter
Greeting \greetto greettoskipbefore greettoskipafter
Text Block textheight
Left Margin Block \Lmargin leftmargintopdist
Right Margin Block \Rmargin rightmargintopdist
Close line \closeline closeskipbefore closeskipafter
Signature \signature sigsize sigskipbefore sigskipafter
\siglist
Ps,PPs, etc Various postsigskipbefore postsigskipafter
Memo block Various memoskipbefore memoskipafter
Here are several rules which are used to define the sizes of items:
•If header margin specifications (\Cheader, etc.) are not used, headermarginskip and topmarginskip
are ignored. In this case, topmargin alone is sufficient to specify the size of the top margin. If unprtop
is specified, and unprtop >\topmargin,unprtop is used in place of topmargin. If \unprtop is
specified, and \unprtop >\topmarginskip,\unprtop is used in place of \topmarginskip.
•If any of the footer margin specifications (\Cfooter,\Rfooter, or \Lfooter) are used to specify a
footer margin block, \bottommarginskipbelow and \bottommarginskip are both used to position
the bottom- or footer-margin block relative to the text. Additionally, the overall height (includ-
ing depth) of the largest of the three footer-margin placement blocks is used to specify the value of
\footermarginsize. If \unprbottom is specified, and \unprbottom >\bottommargin,\unprbottom
is used in place of \bottommarginsize.
8

•\topmarginsize and \bottommarginsize are sufficient to specify the positions of blocks vertically.
If \textheight is also specified, it is used last, and over-rides the specification of text height by
subtraction.
•If a left margin text block is specified using \Lmargin,\leftmargintopdist sets the space that the
left margin block is placed from the top of the page. By default, the left margin is placed flush with
the bottom of the header section. Any choice here sets the top of the header block a certain distance
from the top of the page.
•The use of space-after commands is not recommended in the general case, as they can complicate item
placement.
4.3 Horizontal spacing
Horizontal spacing commands are shown in Table 7.
Table 7: Horizontal spacing commands
Page L
A
T
E
Xnewlfm Default Included Function
Section Name Name Items Description
Left Margin \oddsidemargin unprleft Left unprintable area
leftmarginskipleft Page left side to mar-
gin block
Left Print Area MinLeft Group 4 Left print section
leftmarginsize 72pt Header section
Left Margin Gap leftmarginskipright 10pt Dist from margin block
to text
Text Width \textwidth textwidthsize
Right margin \evensidemargin rightmarginsize Group 5
Group 4: Lmargin,lmargin Group 5: Rmargin,rmargin
Usage of these spacing commands:
•The size of the left margin text block is set by the width of the minimum of the \Lmargin block or by
the MinLeft value.
•When \Lmargin is used for a left margin block, both leftmarginskipleft and leftmarginskipright
are used to position the left-margin block relative to the text. Additionally, the width of \Lmargin
is used to specify the value of \leftmarginsize. If \unprleft is specified, and \unprleft >
\leftmarginskipleft,\unprleft is used in place of \leftmarginskipleft.
•If \Lmargin is not used, leftmarginskipleft and leftmarginskipright are ignored. In this case,
\leftmarginsize alone is sufficient to specify the size of the left margin. If \unprleft is specified,
and \unprleft >\leftmarginsize,\unprleft is used in place of \leftmarginsize.
•If \Rmargin is not used, and \unprright >\rightmarginsize,\unprright is substituted for
\rightmarginsize.
•\rightmarginsize and \leftmarginsize are sufficient to specify the positions of blocks horizon-
tally. If \textwidth is also specified, it is used last, and over-rides the specification of text width by
subtraction.
4.4 Ordering of elements:
Date, from-address and to-address are generally printed in that order. Other orders are set up using options.
•orderdatefromto: date, from-address, to-address
•orderfromdateto: from-address, date, to-address
•orderfromtodate: from-address, to-address, date
9
5 Address components
Information about the names, addresses, telephone numbers and the other types of data is specified using
these commands.
5.1 Address commands
Address information is specified using the commands in Table 8. These commands are used for both “from-
address” and “to-address.” However, the information stored using these commands must be converted to
specific “from-address” or “to-address” information, as discussed below in Section 7 below.
Table 8: Address item commands
Command Stores . . . Command Stores . . . Command Stores . . .
\addr Address \byline Byline \city City
\dept Department \email E-mail address \emailb E-mail address b
\emailc E-mail address c \fax FAX # \fname First name
\greet Greeting \institute Institution \lname Last name
\mname Middle name \name Name \pager Pager #
\phone Telephone # \phonea Telephone # a \phoneb Telephone # b
\phonec Telephone # c \phoned Telephone # d \phoneo Office #
\phoneh Home # \position Position \regarding “Regarding” line
\release “Immediate Release” \role Role \socsec Social Security #
\staddr Street address \state State \subdept Sub-department
\title Title \zip zip-code
5.2 Phrase commands
Letters and memos have certain phrases which identify sections. These include the terms for “To” and
“From” in the memo, and the phrases identifying the other sections of letters. These phrases may be
modified using the commands listed here. They are used as:
\begin{newlfm}
....
\PhrPhone{Telephone Number}
....
This term will be used whenever the phrase for “Telephone Number” should be printed.
Table 9: Phrase commands
Command Use Command Use Command Use
\PhrFAXcovp FAX Cover page \PhrFAXpgcnt FAX Page Count \PhrPager Pager
\PhrEmail E-mail \PhrDocument Document \PhrPhone Telephone
\PhrRe re \PhrSubre re \PhrCc cc
\PhrPs ps \PhrMessage Message \PhrPps pps
\PhrPpps ppps \PhrEncl Encl \PhrPage page
\PhrTo To \PhrFrom From \PhrRegard Regarding
\PhrContact Contact \PhrRelease For Immediate Release \PhrMore — more –
\PhrPREnd # # #
6 Letterhead tools
6.1 Inclusion of logos
Logos and other information, stored as encapsulated PostScript objects (for standard L
A
T
E
X production using
latex file and dvips file) or .pdf files (for L
A
T
E
X production using pdflatex file), can be placed in the
10
header and footer of letters. However, sizing the resulting letter can be challenging. newlfm automatically
adjusts letter dimensions to accomodate the inclusion of such objects, if these objects are included as boxed
text (\sbox,\fbox,\parbox,minipage, etc.). In the discussion that follows, the first page of the letter is
called the “letterhead” page, while subsequent pages are the “non-letterhead” pages.
Using fancyhdr.sty of Piet van Oostrom, newlfm handles letterhead information in a simple and straight-
forward manner. In newlfm, information for the letterhead page is entered using the commands shown in
Table 10.
Table 10: Marginal material commands
Page Location Left Center Right
Letterhead Footer \Lfooter \Cfooter \Rfooter
Header \Lheader \Cheader \Rheader
Margin \Lmargin \Rmargin
Page Location Left Center Right
Non-letterhead Footer \lfooter \cfooter \rfooter
Header \lheader \cheader \rheader
Margin \lmargin \rmargin
In order to simply use letterhead logos and other PostScript pictorial information (logos, etc.), the
program automatically calculates the heights of the header and footer and optimally places them on the
page. In order for this to work, all information for the header and footer must be included in
boxed formats. That is, to use a letterhead, logos, pictures, addresses, whatever must be placed in a L
A
T
E
X
box structure. The boxed formatted items may be included in a wrapper program.
For example, if a logo is to be included from an external file, this should be inserted into an \sbox and
used as follows:
\newsavebox{\Lpalmb}
\sbox{\Lpalmb}{\parbox[t]{1.75in}{\includegraphics[scale=.4,ext=.pdf,%
angle=101,trim=-50 245 125 125]{palm}}}%
\makelth{Homea}{\Lheader{\usebox{\Lpalms}}}%
6.2 Marginal material
The left and right margins may also contain a box of text. This is placed in \Lmargin or \Rmargin. The
size of the margin is automatically calculated from the box size. The box is placed a very small distance
from the edge of the paper (10pt), and the margin gap from the box to the text box of the letter is set to be
10pt as well.
In some cases, the header and footer margins may be too small when fitted to the boxed-up header and
footer items. For this reason, four commands allow the headers and footers to have a given minimum size.
These commands are minhead=xxpt (minimum size for header of non-letterhead page; xxpt is a dimensional
value such as 5in or 12pt), MinHead=xxpt (minimum size for header of letterhead page), minfoot=xxpt
(minimum size for footer of non-letterhead page) and MinFoot=xxpt (minimum size for footer of letterhead
page). These ensure that the headers and footers have given minimum sizes.
6.3 Graphical objects
Here is a step-by-step description of the process of incorporating a graphical object:
•Insert the object: Insert the graphical object into the document (\includegraphics).
•Check object: Ensure that the graphical object is included correctly. Prior to attempting to use
newlfm to print the object, ensure that \includegraphics has inserted the information correctly.
Using the \fbox specification to allow the box edges to be examined carefully, print the boxed infor-
mation to ensure that the object is correctly specified, and that the size is correct. If the appearance is
appropriate, use the wide range of options in the \includegraphics command (clip,view,bb,trim,
size, etc.) to make the object appear as you wish it.
11
•Use object: Use the resulting trimmed, clipped and selected object in one of the commands for
inclusion in a newlfm letter or memo.
•Usage tip: Run L
A
T
E
X twice to ensure that dimensions are correctly interpreted.
6.4 Example use of external object:
Here is an example of the inclusion of an external object and its use in constructing a letterhead page. A
\newsavebox is constructed and used to store the object. \includegraphics is used to insert the object.
If commands to produce a .ps file are used (latex file,dvips file), L
A
T
E
X will search for a file with the
.ps or .eps suffix. If commands to produce a .pdf file are used (pdflatex file), L
A
T
E
X will search for a file
with the .pdf suffix. For flexibility, omit the suffix.
\newsavebox{\Logob}%
\sbox{\Logob}{\parbox[t]{\vdim}{\includegraphics[scale=.8]{wulogo3}}}%
\makeaddress{PAT}{%
\name{Paul A. Thompson, Ph.D.}%
\addr{\parbox[b]{2.65in}{Washington University School of Medicine \\%
at Washington University Medical Center \\ Box 8067, 660 S. Euclid \\%
St. Louis, MO 63110-1093}}%
\phone{(314) 747-3793}\fax{(314) 362-2693}\email{paul@wubios.wustl.edu}%
}
\makeaddress{GRQ}{%
\name{Roger Q. Grollier}%
\addr{\parbox[b]{2.65in}{25 N. Eastwind Rd.\\Westend, OH 43431}}%
\phone{(412) 555-2324}\fax{(412) 555-6923}\email{roger@starlik.com}%
}
\makeletterhead{WULHb}{%
\setadrfr{\adrPAT}\Lheader{\usebox{\Logob}}%
\Rheader{{\large\bf Division of Biostatistics}}\rheader{\@name@fr}%
\lheader{Page \thepage}\Lfooter{\smallform}\closeline{Sincerely yours,}%
}%
The two makeaddress specificiations set up wrapper commands (see Section 7 below) which encapsulate
the relevant information. The \setadrfr specification in the example converts the address information in
\adrPAT from neutral to “from-address” formats. This can also be done using the wrapper ID specifica-
tion, where it would be stated as \setadrto{\fixadr{GRQ}}, where the \fixadr specification converts the
wrapper ID to the wrapper internally.
In a letter, this is used as:
\documentclass[dvips]{newlfm}
\lthWULHb\setadrto{\adrGRQ}
\begin{document}
\begin{newlfm}
....
For this example, the object found in wulogo3 was boxed up using the \sbox specification. It will be placed
in the left section of the header block for the letterhead page. The logo was examined earlier to ensure that
it is printed exactly as required.
Usage tip: Examine the example of the inclusion of the graphical object above carefully. Note that all lines
are terminated with the comment character “%”. All wrapper macros should be constructed in this manner,
to ensure that no blank spaces are inadvertently placed in the wrapper macro between commands, other
than those placed within a command (for instance, the \addr command has blanks). The wrapper macros
should not have blanks around commands, either before the start of a command or after the end of one.
The wrappers are “unpacked” during active text construction, and the presence of blanks can result in odd,
difficult-to-trace minor justification anomalies. In many cases, the author has found it helpful to ensure that
12

all lines in the wrapper addresses and terms are terminated with the “%” comment character, to ensure that
end-of-line characters are not translated into hard-to-detect space characters.
6.5 Including a pre-set sheet as background
In some cases, the letterhead or pre-set form is to be included as a full sheet of letterhead information. In
this case, the pre-set form may be designated using the command Background (for letterhead form for the
first page), and background (for pre-set form for subsequent pages after the first page). The form to be
included should be set up as a valid graphical object. In the case of the use of the pdflatex process, it
should be set up as a .pdf form, and in the case of latex processing, it should be set up as a valid .ps
form, using the encapsulated PostScript approach with a valid bounding box.
6.6 Blank block printing commands
In some cases, the user wishes to use the included graphical objects to size the header and footer areas
(covered in Section 6 below), and then not actually print the objects per se. For instance, the letter may be
printed on letterhead stock, using the letterhead objects included to size the letter. In that case, the options
shown in Table 11 are available to blank out the various parts of the letterhead information after it is used
to set margin sizes.
Table 11: Options for blanking
Option Blanks . . . Option Blanks . . . Option Blanks . . .
blankheader r,l,cheader blankfooter r,l,cfooter blanklmargin lmargin
blankrmargin rmargin Blankheader R,L,Cheader Blankfooter R,L,Cfooter
Blanklmargin Lmargin Blankrmargin Rmargin Blankall All upper-case
blankall All lower-case Blank All
7 The letter database
7.1 Letter database letrinfo.tex
Information for letters may be stored in a file. The default name of the file is letrinfo.tex. This file
stores information in two ways: unconditionally and conditionally. The conditional information, such as
lists of addresses associated with names, is stored in “wrappers”, which carry the information from the
file letrinfo.tex to each letter. The information stored in the letter database file letrinfo.tex is letter
information (i.e., \name{Paul Thompson},\PhrPhone{Telephone #}).
Several types of information are stored in the file letrinfo.tex. These different types of information
may be stored in several ways. It may be stored unconditionally, by placing it into the file letrinfo.tex.
All information, used in the order listed, will be available for all letters.
Most information is not unconditional, however. For this reason, the information will almost always be
stored in address “wrappers”. This includes information about the “from” person, as this information may
change based on the style of letter, etc. The information may be divided into three different types, and is
thus placed into three types of wrapper commands.
7.2 Address information
Address information is stored in an address wrapper. The address wrapper has an wrapper ID and a body.
The wrapper is set up using the command:
\makeaddress{IDENT}{stuff}.
The wrapper ID is IDENT. This makes a wrapper for addresses, \adrIDENT. Commands placed in the wrapper
are then carried into the document when the wrapper command is placed in the letter as:
\begin{document}
13
\setadrto{\adrIDENT}
\setadrfr{\adrOTHID}
\begin{newlfm}
......
Note that the wrapper command is placed after \begin{document} and before \begin{newlfm}. All items
entered into the IDENT wrapper are then activated in that particular document. This enables information
to be centrally stored in the letrinfo.tex file, and used in each actual letter.
The wrappers may also be indicated using the newlfmP key-value specification:
\begin{document}
\newlfmP{addrt=IDENT,addrf=OTHID}
\begin{newlfm}
......
This also sets up IDENT as the “to” address and OTHID as the “from” address.
Wrapper commands have two parameters.
•The wrapper ID is the first parameter in the \makeaddress specification. The wrapper ID is used to
set up a new command \adrIDENT, and is used in many other places by itself. In general, a simple
identifier is best (i.e., addressee’s initials).
•The actual items are placed in the second set of braces. The wrapper ID is case-sensitive. Whatever
is placed there is used in the command, and carried along whenever it is used. The user may choose
to place a wide variety of information in the wrapper. Commands usually used in address wrapper
commands are shown in Table 8.
The address information for a certain individual usually does not change from letter to letter, although
different persons are used in different letters. By using address info wrappers, the information can be handled
and used easily with the single wrapper command. This information may be used for either the sender or
the addressee for the letter.
Designating a sender: To use the address information for the sender or “from-person,” use the \setadrfr
command or the addrf term in the newlfmP command:
\setadrfr{\adrPAT}
\setadrfr{\fixadr{PAT}}
\newlfmP{addrf=PAT}
This sets up the information in the PAT wrapper to be placed in the “from” blanks of the letter. If the
wrapper ID is used in the \setadrfr command, the \fixadr command converts the wrapper ID to the
correct form.
Designating a recipient: To use the address information for the recipient, use the \setadrto command
or the addrt term in the newlfmP command:
\setadrto{\adrPAT}
\newlfmP{addrt=PAT}
\setadrto{\fixadr{PAT}}
This would set up the information in the PAT wrapper to be placed in the “to” blanks of the letter.
14
7.3 Letterhead information
Letterhead information is stored in a letterhead wrapper. The wrapper is prepared using the command:
\makeletterhead{LIDENT}{stuff}
The wrapper usually contains informationabout the header, footer and margin objects, which are used to
set up the letterhead. This wrapper is used like the \makeaddress command. In many cases, the return
address of the letter author is set up in the letterhead wrapper, because this does not change:
\makeletterhead{HomeA}{%
\rheader{this}%
\setadrfr{\adrPAT}%
}%
7.4 Signature information
Signature information is stored in an signature wrapper. The wrapper is prepared using the command
\makesignature{SIDENT}{stuff}
This wrapper is used like the \makeaddress command. The information shown in Table 12 is usually
included in the \makesignature wrapper.
Table 12: Signature Commands
Command Use Command Use
\signature Boxed-up signature \signame Printed name
\closeline Letter closing line
In some cases, multiple signatures are required. These are listed in a command \siglist:
\siglist{AAA,BBB,CCC}
In this case, three signatures are printed. By default, they are printed in a left-justified column. To print
them in a row, use \sigacross{2} to indicate the number of signature blocks printed in each row (the
maximum number is 4). Each signature is printed in a block of the height and width of the largest signature
block. For this approach, the letter will look odd and unbalanced if signatures are of different sizes. The
user must ensure that all signatures are of the same size, as the program cannot ensure this. Additionally,
each signature wrapper is unpacked to determine closing line and printed name. Spacing between signature
block columns is set by \sigskipcolumn, and spacing between signature block rows is set by \sigskiprow.
7.5 Closing information
Other closing items may be included in the letter itself, in the file letrinfo.tex. These include the following:
Table 13: Closing commands
Command Usage Command Usage Command Usage
\cclist Routing list \encllist Enclosures list \initials Sender initials
\faxmssg FAX cover message \psitem Ps line \ppsitem Pps line
\pppsitem ppps line \re re line \subre Second re line
15
7.6 Setting up wrapper macros
File letrinfo.tex:
\makesignature{PT}{\newsavebox{\Signature}
\sbox{\Sigx}{\includegraphics[bb=16 9 597 784,viewport=180 350 400
425,scale=6,%
height=.6in,width=1.375in,clip]{sigfile}%
}%
\signature{\usebox{\Sigx}}%
\signame{\raisebox{.5in}{\parbox[t]{5in}{Paul A. Thompson \\%
Associate Professor \\ Div. Biostatistics \\%
Washington University School of Mecicine}}}%
}%
\makeaddress{JS}{\name{Joe Smith}%
\address{12 Center Street \\ Greenville, OH 55555}%
\phone{(312) 333-4444}\greet{Dear Joe,}%
}%
\makeaddress{PAT}{\name{Paul A. Thompson, Ph.D.}%
\addr{\parbox[b]{2.75in}{Washington University School of Medicine \\%
Box 8067, 660 S. Euclid \\ St. Louis, MO 63110-1093}}%
\phone{(314) 747-3793}\fax{(314) 362-2693}%
}%
\newsavebox{\Logob}%
\sbox{\Logob}{\parbox[t]{\vdim}{\includegraphics[scale=.8]{wulogo3}}}%
%
\makeletterhead{WULHa}{%
\sigPT%
\Lheader{\usebox{\Logob}}\setadrfr{\adrPAT}%
}%
Use in a letter:
\documentclass[american]{newlfm}
\newlfmP{letrh=WULHa,addrt=JS}
\begin{document}
\begin{newlfm}
...
\end{newlfm}
\end{document}
This letter will be addressed to Joe Smith, using the letterhead stored in WULHa. The signature is taken
from signature wrapper PT, which is carried along with the letterhead wrapper WULHa. In this way, the letters
can be addressed to Joe Smith very easily, by merely including the file letrinfo.tex on the L
A
T
E
X path,
and including the wrapper as shown above in the file. Although initials for the recipient need not be used
as the wrapper identifier tag, this is convenient and makes the wrapper designation easy to do.
The wrapper commands may be used in a nested fashion. Consider this sequence:
\makeaddress{Main}{\name{Paul A. Thompson}%
\addr{WU School of Medicine}}%
\makeaddress{YouA}{\adrMain \name{Love A}
\addr{Whereever you are}}%
\makeaddress{YouB}{\adrMain \name{Love B}%
\addr{The White House}}%
In this case, the information in adrmain is carried into the wrappers adrYouA and adrYouB and is available
there. This is similar to the concept of inheritence in object-oriented programming.
16
7.7 Multiple information datasets
By default, newlfm looks for a file letrinfo.tex on the T
E
X path. If this file is found, it is read in during
the initialization process of the newlfm environment. If an alternative file is needed, it may be indicated
using the command \InfoFileName{check.tex}. This file will then be used in place of letrinfo.tex.
7.8 Rules for use of wrapper IDs
The wrapper IDs used to construct the letterhead database can be used in two different ways. First, the
address or letterhead wrappers may be used by themselves as \adrSETA or \ltrSETB. Second, the wrapper
IDs may be used in many situations without the \adr. Here are the general rules for usage:
1. The wrapper macro \adrXXX may be used at any point in a letter. To properly set up margins, it
should be used as \setadrto{\adrXXX} and \setadrfr{\adrXXX} (used to convert neutral address
information into to-address and from-address information) prior to the \begin{newlfm} command.
This will ensure that proper spacing decisions are made. The \doletter construction also uses this
form of wrapper (note: this command is now obsolete - please use \oneletter as described below).
2. Wrapper IDs can be used as \setadrto{\fixadr{XXX}} to convert neutral addresses to to-addresses
and from-addresses (again, prior to \begin{newlfm}. Additionally, \oneletter{XXX} is used
to send a form letter to address XXX,\multletter{XXX,YYY,ZZZ} to multiple addresses, and
\newlfmP{addrt=AAA,addrf=BBB} are used to convert addresses using the \newlfmP mechanism.
8 Form letters
The use of the address wrapper commands makes it very easy to set up form letters. newlfm has a simple
approach to form letters, using two commands:
•\letterbody: This command is used to set up the body of the letter. The body is the text of the letter.
When you set up the body, it is very easy to further customize the letters by setting up commands
within the letter.
•\oneletter: This is the command to print the different letters. The command has a mandatory
argument of the label of the “to” address.
•\multletter: This command allows the use of a list of address wrapper labels that will all be used
to print a form letter. The address wrapper labels must all be separated by the comma (“,”). When
printing form letters in this manner, specific tailoring can only be done if the tailoring information is
included in the address wrapper. Thus, this can be used to print any number of identical letters, or
letters which have been tailored or modified using information in the address wrappers.
8.1 Example form letter
Here is an example of the use of the form-letter commands. In this example, the two wrapper commands
\adrAA and \adrBB can be used to address letters which are both the same to the persons listed in these
wrappers:
\letterbody{This is an example of a form letter. \tailor End of the letter.}%
\newcommand{\tailor}{First special version.}
\oneletter{AA}
\letterbody{This is a second example of a form letter, but this approach does not allow for
individualization. It is being sent to \printnameto.}
\multletter{AA,BB}
\renewcommand{\tailor}
{Second special version.}
\oneletter{BB}
17

9 Printing envelopes and labels
newlfm includes a set of commands which print labels. Some invoke the functionality of the envlab package.
To use this functionality, follow these steps:
1. Ensure that envlab is properly installed in your T
E
Xinstallation, and that the installation database
has been properly refreshed. This will ensure that L
A
T
E
X can find the files.
2. Use the option useenvlab on the command line:
\documentclass[useenvlab]{newlfm}
This will issue the \makelabels command at the start of the run, issue the \startlabels command at
the end of the run, insert the “from-address” and “to-address” into appropriate structures for envlab
and otherwise complete the printing of the envelope using internal information.
3. Options which are needed for envlab may also be entered into the L
A
T
E
X command line, just as with
any normal use of envlab during any L
A
T
E
X.
4. Several types of Avery labels may be used. The specifications for Avery labels 5160, 5161, 5162, 5163
and 5164 are pre-set in newlfm. These are summarized in the table below.
Table 14: Label definitions
Option Ht Wt t l Btw Col Row
Avery5160 1 2.75 .5 .19 .16 3 10
Avery5161 1 4.19 .5 .16 .19 2 10
Avery5162 1 4.19 .83 .16 .19 2 7
Avery5163 1 4.19 .5 .16 .19 2 5
Avery5164 1 4.19 .5 .16 .19 2 3
5. Several options exist for address selection during label printing. The default is labto, in which the
“to-address” only is printed. If labrowfrto is selected, both “from-address” and “to-address” are
printed in a row:
From: Paul A. Thompson To: George W. Bush
25 Signal Hill Blvd 1400 W. Turkey Rd.
Belleville, IL 62223 Crawford, TX 49281
If labcolfrto is selected, both “from-address” and “to-address” are printed in a column:
From: Paul A. Thompson
25 Signal Hill Blvd
Belleville, IL 62223
To: George W. Bush
1400 W. Turkey Rd.
Crawford, TX 49281
The user is responsible for ensuring that the label printing options can fit on the label selected;
Avery5160 is generally suitable only for labto, but other choices can fit on other labels.
6. Other printing sizes may be selected during label printing using labsize=\size:
labsize=\small
10 Miscellaneous topics
10.1 Lines
By default, newlfm demarcates the header and footer sections with lines. These may be eliminated using
the commands noHeadline,noFootline,noLines (for the letterhead page), and noheadline,nofootline,
18
nolines (for subsequent pages). These commands eliminate lines in either the letterhead page or the non-
letterhead page. Line widths may be set as well, using the commands Headlinewd (sets head linewidth for
letterhead page), headlinewd (sets head linewidth for non-letterhead page), Footlinewd (sets foot linewidth
for letterhead page), and footlinewd (sets foot linewidth for non-letterhead page). These final four com-
mands issued either in the command line or in the newlfmP commands as:
\newlfmP{Headlinewd=.5pt,footlinewd=.75pt}
If a line width is set to 0pt, the line is not printed.
10.2 Printing information on additional pages
In many letters, the letterhead page is to be followed by additional information on additional, non-letterhead
pages. This may be done using the \restlettera{text},\restletterb{text},\restletterc{text},
\restletterd{text}, and \restlettere{text} commands. Following the issuance of the signature, a
\newpage command is issued, and the information contained in the \restlettera{text},\restletterb{text},
\restletterc{text},\restletterd{text}, and \restlettere{text} blocks are printed. These need not
be used sequentially. These blocks must not have spaces. If paragraphs are to be used, use \paragraph to
force the new paragraph without an actual blank line. In addition, extra material in each section is limited
to a single page. The letterhead rules for the extra pages follow the rules for the non-first page.
10.3 Setting the date
The date for the letter is set to be the date upon which the letter is typeset. To change the date, use
\dateset{May 20, 1974} (feel free to use other dates as needed). \dateset{\today} prints today’s date.
10.4 Language option definitions:
These options define the language for the letter. These macros are not frequently manipulated. Basically,
the strings defined here set up the printing of structural elements of a memo or letter, such as the “From”
or “To” strings.
These terms are used at various points in printing letters and memos. They are American terms; your
mileage may vary. Inclusion of other terms is encouraged, especially when another language group is served.
This may be done as follows:
1. Change the letters “am” to either “fr” for French, “gr” for German, “en” for English, “ot” for other
or “pl” for pig-Latin. If you feel that I have unfairly cast disrespect on your language, feel free to add
appropriate code in the section above for your language. Change phrases in the following terms to the
appropriate terms for the language in question:
\newcommand{\@am@phr}{%
\renewcommand*{\@fax@cover@line}
{FAX Cover Page}%
\renewcommand*{\@fax@page@count}
{FAX Page Count}%
\renewcommand*{\@fax@phr}{FAX}%
\renewcommand*{\@pager@phr}{Pager}%
\renewcommand*{\@doc@phr}{Document}%
\renewcommand*{\@phn@phr}{Phone}%
\renewcommand*{\@email@phr}{E-mail}%
\renewcommand*{\@re@phr}{Re}%
\renewcommand*{\@subre@phr}
{\ensuremath{\mathrm{Re}_2}}%
\renewcommand*{\@cc@phr}{cc}%
\renewcommand*{\@ps@phr}{Ps}%
\renewcommand*{\@m@phr}{Message}%
19

\renewcommand*{\@pps@phr}{Pps}%
\renewcommand*{\@ppps@phr}{Ppps}%
\renewcommand*{\@encl@phr}{Encl}%
\renewcommand*{\@pager@phr}{Page}%
\renewcommand*{\@hnto@phr}{To}%
\renewcommand*{\@hnfr@phr}{From}%
}
2. Use file extracd.tex to store the new commands. This file should be placed in the same subdirectory
as newlfm.cls. When the program executes, it includes the file if it is found.
3. Use the appropriate option to include the correct code.
10.5 Printing the address information
The newlfm package prints a variety of address information in specific ways which are appropriate and
standard for letters. In some cases, you may wish to print other information from the addresses in more
flexible ways. For this purpose, certain printing macros are defined. These are shown in Table 15.
Table 15: Printing address information
Select Command Item Command Item
“To” \printnameto Name \printaddrto address
\printphoneto phone \printphoneato phone A
\printphonebto phone B \printphonecto phone C
\printphonedto phone D \printphoneoto phone O
\printphonehto phone H \printpagerto pager
\printfaxto FAX \printgreetto greeting
\printemailto email \printemailbto email
\printemailcto email C \printlnameto last name
\printfnameto first name
“From” \printnamefrom name \printaddrfrom address
\printphonefrom phone \printphoneafrom phone A
\printphonebfrom phone B \printphonecfrom phone C
\printphonedfrom phone D \printphoneofrom phone O
\printphonehfrom phone H \printpagerfrom pager
\printfaxfrom FAX \printgreetfrom greet
ing \printemailfrom email \printemailbfrom email
\printemailcfrom email C \printlnamefrom last name
\printfnamefrom first name
These commands can be issued in any letter to print the information for the particular address component.
10.6 Cellophane-window envelopes
Letters are sometimes set up to be printed for a cellophane-window envelope. Using this approach, the
“to-address” must be placed into a specific orientation. In newlfm, this is particularily challenging, as the
class attempts to grant users great flexibility.
In newlfm, users can specify the use of a cellophane-window envelope. The cellowindow option specifies
this choice. The “to-address” block is positioned down from the top (using cellodown to specify the length
down; default = 2.5 inches) and left from the side (using celloleft to specify the length from the left;
default = 1 inch). If the user specifies the printing of a “from-address” and a date, it may not be possible
to print the “to-address” in the correct location; in this case, the user should carefully examine the log and
the output screen to determine if the specified locations can be used in the context of other options. The
user can also specify the height and width of the “to-address” block as cellowidth (default = 4 inches) and
celloheight (default = 1 inch).
20
10.7 Examples
newlfm includes a large number of examples specified as test1.tex through test12.tex. These examples
all specify their options using the newlfmP mechanism. Each file is also set up using the \documentclass
specification, on test1alt.tex through test8alt.tex. When preparing examples, both pdflatex and
latex are both used to prepare examples.
10.8 L
A
T
E
X vs. pdfL
A
T
E
X
pdfL
A
T
E
X is becoming more and more common in document production in the T
EX family. It is not the
standard yet, and there remain tools which work only in the L
A
T
E
X system (i.e., pstricks).
The author uses .eps files, constructed to ensure that the bounding box accurately encapsulates the
active text area of the .eps figure. Each of the figures was then converted to .pdf encoding using GSview.
However, the bounding box in the .pdf files does not seem to act to crop the image in the same manner.
Using the same code for both pdfL
A
T
E
X and L
A
T
E
X processing does not result in the same appearance of the
output page.
For this reason, functionality of H. Oberdiek’s ifpdf.sty file is included in newlfm. This tool allows
one option to be performed when pdfL
A
T
E
Xis used for processing, and another option to be executed in the
L
A
T
E
X environment. Use of this tool is illustrated in the letrinfo.tex file included in the newlfm package.
Here is an example:
\newsavebox{\Lpalme}%
\ifpdf
\savebox{\Lpalme}{\parbox[t][1in][t]{2in}%
{\includegraphics[scale=.1,viewport=135 624 360 700]{palm}\vspace{.5in} \\
\rule{2in}{2pt} \\
25 Signal Hill Blvd}
}
\else
\savebox{\Lpalme}{\parbox[t]{2in}%
{\includegraphics[scale=.1]{palm} \\
\rule{2in}{2pt} \\
25 Signal Hill Blvd}
}
\fi
Note that the \ifpdf construction includes the entire \savebox specification. Although this is not the only
manner in which this system will work, it is a reliable method. Problems can be found, which are very hard
to diagnose, when the \ifpdf-\fi construction is used to control processing of portions of a specification.
10.9 Usage tips
As with any complex program, there are certain tips which can enhance the use of the program. Here are
several. If you come up with new ones, please forward them to paul@wubios.wustl.edu; complete files
demonstrating useful ideas are the most helpful.
•geometry is no longer used for dimension setting. Rather, all dimensions are set internally. This is done
using a combination of default values, header and footer sizes and values input from the user. These
include primarily the page size commands leftmarginsize,textwidthsize and rightmarginsize.
•When size commands are used, they will be overridden by structures. Additionally, dimensional com-
mands are applied in order. Inconsistencies are resolved by attending to the most recent commands,
and ignoring earlier inconsistent ones.
21
11 Command Summary
\documentstyle[options]{newlfm}
\topmarginsize{.25in} \addrfrom{Paul A. Thompson}
\adr{PAT}
\NewlfmP{leftmarginsize=1.25in}
\begin{document}
\begin{newlfm}
text text text
\end{newlfm}
\end{document}
Letter styles: stdletter,stdletternofrom,busletter,busletternofrom (Table 2, on Page 4)
Letter options: noaddrfrom,printallfrom,printallto,dateright,dateleft,datecenter,
sigright,sigleft,sigcenter,addrtoemail,addrtophone,addrtofax,addrfromemail,
addrfromphone,addrfromfax (Table 2, on Page 4 — can be specified either in the document-header
option block or in the \newlfmP command)
Letter date information: \dateset
Back-ground information: \Background,\background
Memo styles: stdmemo,fullmemo (Table 3, on Page 5)
Memo options: memoaddrto,memoemailto,memophoneto,memofaxto,memoaddrfrom,memoemailfrom,
memophonefrom,memofaxfrom,memopagerto,memopagerfrom (Table 3, on Page 5 — can be specified
either in the letter \documentclass option block or in the \newlfmP command)
FAX styles: faxheaderpage,faxhba,faxhbb (Table 4, on Page 5)
FAX options: faxblocka,faxblockb (Table 4, on Page 5 — can be specified either in the letter
\documentclass option block or in the \newlfmP command)
Press Release Styles: stdpressrelease
Press Release Options: dspace,sspace
Cellophane-window envelopes: cellowindow
Cellophane-window options: cellodown,celloleft,cellowidth,celloheight
Address item order options: orderdatefromto,orderfromdateto,orderfromtodate (can be
specified either in the document-header option block or in the \newlfmP command)
envlab options: useenvlab
To-Address commands: \nameto,\addressto,\phoneto,\phonebto,\phonecto,\phonedto,\faxto,
\emailto,\greetto,\setadrto{\adrXXX},\setadrto{\fixadr{XXX}} \regarding,\fnameto,
\lnameto,\addrt,
From-Address commands: \namefrom,\name,\address,\addrfrom,\phone,\phonefrom,
\phonebfrom,\phonecfrom,\phonedfrom,\fax,\faxfrom,\emailfrom,\setadrfr{\adrXXX},
\setadrfr{\fixadr{XXX}},\fnamefrom,\lnamefrom,\addrf
Press Release commands: \byline,\headline,\release,\shorthead
End of letter commands: \cclist,\encllist,\initials,\faxmssg,\psitem,\ppsitem,
\pppsitem,\re,\subre (Table 13, on Page 15)
22
Signature commands: \signature,\signame,\siglist,\sigacross,\closeline,\sigtr (Table 12,
on Page 15)
Horizontal spacing and sizing commands: \unprleft,\leftmarginskipleft,\leftmarginsize,
\leftmarginskipright,\textwidth,\rightmarginsize,\unprright,MinLeft,MinRight,
minleft,minright (Table 7, on Page 9 — can be specified either in the letter itself or in the
\newlfmP command; when specified in the NewlfmP statement, they are specified without the “\”)
Vertical spacing and sizing commands: \unprtop,\topmarginskip,\headermarginsize,
\headermarginskip,\leftmargintopdist,\rightmargintopdist,\memoskipbefore,
\memoskipafter,\dateskipbefore,\dateskipafter,\addrfromskipbefore,
\addrfromskipafter,\addrtoskipbefore,\addrtoskipafter,\greettoskipbefore,
\greettoskipafter,\textheight,\closeskipbefore,\closeskipafter,\sigskipbefore,
\sigsize,\sigskipafter,\sigskipcolumn,\sigskiprow,\postsigskipbefore,
\postsigskipafter,\bottommarginskip,\footermarginsize,\unprbottom,MinHead,MinFoot,
minhead,minfoot (Table 5, on Page 8 — can be specified either in the letter itself or in the
\newlfmP command; when specified in the NewlfmP statement, they are specified without the “\”)
Wrapper commands: \makeaddress{XXX}{xxx info} creates a command \adrXXX containing the
“xxx info”, \makeletterhead{XXX}{stuff} creates a command \lthXXX containing “stuff” and
\makesignature{XXX}{sigstuff} creates a command \sigXXX with “sigstuff” (Page 13).
Form letters: \letterbody sets the body of a form letter, while \doletter{zz} prints the letter, zz is
any command to be issued before the letter, which will usually be a wrapper command name.
Letterhead commands: \Lfooter,\Cfooter,\Rfooter,\Lheader,\Cheader,\Rheader,\Lmargin,
\Rmargin,\lfooter,\cfooter,\rfooter,\lheader,\cheader,\rheader,\lmargin,\rmargin,
\letrh (Table 10, on Page 11)
Blanking options: blankheader,blankfooter,blankrmargin,blanklmargin,Blankheader,
Blankfooter,Blankrmargin,Blanklmargin,blankall,Blankall,Blank (Table 11, on Page 13)
Extended letters: \restlettera{text},\restletterb{text},\restletterc{text},
\restletterd{text}, and \restlettere{text} prints additional pages after the signature with
additional information.
Printing commands: \printnameto,\printaddrto,\printphoneto,\printphoneato,
\printphonebto,\printphonecto,\printphonedto,\printphoneoto,\printphonehto,
\printpagerto,\printfaxto,\printgreetto,\printemailto,\printemailbto,\printemailcto,
\printlnameto,\printfnameto,\printnamefrom,\printaddrfrom,\printphonefrom,
\printphoneafrom,\printphonebfrom,\printphonecfrom,\printphonedfrom,
\printphoneofrom,\printphonehfrom,\printpagerfrom,\printfaxfrom,\printgreetfrom,
\printemailfrom,\printemailbfrom,\printemailcfrom,\printlnamefrom,\printfnamefrom
(Table 15, on Page 20)
23
