The Leanpub Manual
User Manual:
Open the PDF directly: View PDF ![]() .
.
Page Count: 116 [warning: Documents this large are best viewed by clicking the View PDF Link!]
- Table of Contents
- About The Leanpub Manual
- The Leanpub Manual: The ebook!
- Help
- Getting Started
- Leanpub Book Tools
- Markdown: The Easiest Way To Format Your Text For E-Publishing
- Attributes
- Creating A New Book
- Book Styles
- Sample Books
- Images
- Your Profile, Dashboard and Account
- The Landing Page
- Publishing
- Languages and Letter Accents
- Dedication, Parts, Chapters and Sections
- Styling Text
- Blocks Of Text
- Code
- Poetry
- Links
- Footnotes and Endnotes
- Crosslinks
- Breaks
- Tables
- Selling your book
- Miscellaneous
- Sales and Analytics
- Backing Up Your Files
- Escaping Markdown Syntax Characters
- How To Exclude Lines From Your Book
- Copyright Protection
- Moving Dropbox Folders
- Fonts
- Distributing Extra Files with Your Book
- Mathematical Equations
- Cover Designers and Editors
- Information About Your Readers / Customers
- Multimedia Content
- Does Leanpub Accept Authors From Anywhere (i.e. international authors, foreign authors)?
- Coupons for Other Leanpub Authors
- Curly Quotes
- Figure Captions and Labels
- Links In Footnotes
- Viruses
- Kerning
- Full Table of Contents in Sample Books?
- On the landing page, can we feature a channel instead of an individual video on the YouTube link?
- Why can't I put section commands in Book.txt?
- Trouble With Accents? Forcing Text Editors To Save As UTF-8
- I don't understand how things get added to a Table of Contents
- What encoding should I use to write files in Markdown? Should I write in ASCII or UTF-8?
- How Can I Add Blank Lines To My Text?
- Why Can't I See My Profile When I Go To `Your Profile'?
- A General Note On Formatting
- GitHub Commits
- Downloading onto your iPad or iPhone
- Working with GitHub and Dropbox
- Adding a motto or epigraph to the beginning of a chapter
- Can I publish my book on Leanpub and KDP Select at the same time?
- Does Leanpub give me tools to help me build my own book landing page?
- Disabling Line Numbers While Nesting Code Blocks In Lists
- Can I write my Leanpub book in Markdown files, with the .md extension?
- Page Sizes and Maximum Image Sizes
- Indentation
- Hanging Indents
- How can I import a Microsoft Word document?
- Problems With Adobe Digital Editions
- Long strings of characters running off the right-hand side of the page / the right margin
- Time Zone
- How can I increase the space between paragraphs?
- Font Samples
- Using Dropbox and Git
The Leanpub Manual
A Free Leanpub Resource!
Len Epp, Scott Patten and Peter Armstrong

The Leanpub Manual
A Free Leanpub Resource!
Len Epp, Scott Patten and Peter Armstrong
This book is for sale at http://leanpub.com/manual
This version was published on 2018-08-30
This is a Leanpub book. Leanpub empowers authors and publishers with the Lean Publishing process.
Lean Publishing is the act of publishing an in-progress ebook using lightweight tools and many
iterations to get reader feedback, pivot until you have the right book and build traction once you do.
© 2012 - 2018 Len Epp, Scott Patten and Peter Armstrong
Tweet This Book!
Please help Len Epp, Scott Patten and Peter Armstrong by spreading the word about this book on
Twitter!
The suggested hashtag for this book is #leanpubmanual.
Find out what other people are saying about the book by clicking on this link to search for this hashtag
on Twitter:
#leanpubmanual
Contents
About The Leanpub Manual . . . . . . . . . . . . . . . . . . . . . . . . . . . . . . . . . . . . . . . . 1
The Leanpub Manual: The ebook! ..................................... 2
Help ....................................................... 3
Getting Started ................................................ 4
The Five Steps To A Leanpub Book . . . . . . . . . . . . . . . . . . . . . . . . . . . . . . . . . . 4
Brief Instructions . . . . . . . . . . . . . . . . . . . . . . . . . . . . . . . . . . . . . . . . . . . . . 4
Setting Up Dropbox On Your Computer . . . . . . . . . . . . . . . . . . . . . . . . . . . . . . . . 5
Your Book’s Content . . . . . . . . . . . . . . . . . . . . . . . . . . . . . . . . . . . . . . . . . . . 5
The Book.txt File . . . . . . . . . . . . . . . . . . . . . . . . . . . . . . . . . . . . . . . . . . . . . 6
Making a Sample Book for Readers to Browse for Free . . . . . . . . . . . . . . . . . . . . . . . 7
Adding Images or Pictures to Your Book . . . . . . . . . . . . . . . . . . . . . . . . . . . . . . . 8
Creating a Preview . . . . . . . . . . . . . . . . . . . . . . . . . . . . . . . . . . . . . . . . . . . . 9
Publishing Your Book . . . . . . . . . . . . . . . . . . . . . . . . . . . . . . . . . . . . . . . . . . 9
Leanpub Book Tools ............................................. 10
The Book Tools . . . . . . . . . . . . . . . . . . . . . . . . . . . . . . . . . . . . . . . . . . . . . . 10
Markdown: The Easiest Way To Format Your Text For E-Publishing . . . . . . . . . . . . . . . 27
Leanpub Flavoured Markdown and Markua . . . . . . . . . . . . . . . . . . . . . . . . . . . . . 27
Why Should You Care? . . . . . . . . . . . . . . . . . . . . . . . . . . . . . . . . . . . . . . . . . 27
How Markdown is Used in Leanpub . . . . . . . . . . . . . . . . . . . . . . . . . . . . . . . . . . 27
Attributes ................................................... 30
Creating A New Book . . . . . . . . . . . . . . . . . . . . . . . . . . . . . . . . . . . . . . . . . . . . 31
How To Create A New Book . . . . . . . . . . . . . . . . . . . . . . . . . . . . . . . . . . . . . . 31
How To Set The Book’s Structure . . . . . . . . . . . . . . . . . . . . . . . . . . . . . . . . . . . 31
Book Styles .................................................. 32
Technical Books . . . . . . . . . . . . . . . . . . . . . . . . . . . . . . . . . . . . . . . . . . . . . . 32
Business Books . . . . . . . . . . . . . . . . . . . . . . . . . . . . . . . . . . . . . . . . . . . . . . 32
Fiction Books . . . . . . . . . . . . . . . . . . . . . . . . . . . . . . . . . . . . . . . . . . . . . . . 32
Sample Books ................................................. 33
Why Sample Books? . . . . . . . . . . . . . . . . . . . . . . . . . . . . . . . . . . . . . . . . . . . 33
Consequences for Manuscripts . . . . . . . . . . . . . . . . . . . . . . . . . . . . . . . . . . . . . 33
Images ..................................................... 34
How To Insert An Image . . . . . . . . . . . . . . . . . . . . . . . . . . . . . . . . . . . . . . . . . 34
CONTENTS
Image Format And Resolution . . . . . . . . . . . . . . . . . . . . . . . . . . . . . . . . . . . . . 34
Recommended Image Resolution . . . . . . . . . . . . . . . . . . . . . . . . . . . . . . . . . . . . 34
Maximum Image Sizes . . . . . . . . . . . . . . . . . . . . . . . . . . . . . . . . . . . . . . . . . . 35
Positioning An Image On The Page . . . . . . . . . . . . . . . . . . . . . . . . . . . . . . . . . . 35
Basic Image Recommendations . . . . . . . . . . . . . . . . . . . . . . . . . . . . . . . . . . . . . 36
Maximum Image Sizes . . . . . . . . . . . . . . . . . . . . . . . . . . . . . . . . . . . . . . . . . . 37
Questions About Images and Cover Pages . . . . . . . . . . . . . . . . . . . . . . . . . . . . . . 37
Your Profile, Dashboard and Account . . . . . . . . . . . . . . . . . . . . . . . . . . . . . . . . . . 38
Dashboard . . . . . . . . . . . . . . . . . . . . . . . . . . . . . . . . . . . . . . . . . . . . . . . . . 38
View Your Profile . . . . . . . . . . . . . . . . . . . . . . . . . . . . . . . . . . . . . . . . . . . . . 40
Edit Account . . . . . . . . . . . . . . . . . . . . . . . . . . . . . . . . . . . . . . . . . . . . . . . 40
The Landing Page .............................................. 41
Table of Contents . . . . . . . . . . . . . . . . . . . . . . . . . . . . . . . . . . . . . . . . . . . . . 41
Widget . . . . . . . . . . . . . . . . . . . . . . . . . . . . . . . . . . . . . . . . . . . . . . . . . . . 41
Publishing ................................................... 42
How To Publish Your Book On Leanpub . . . . . . . . . . . . . . . . . . . . . . . . . . . . . . . 42
Notifying Readers When You Publish . . . . . . . . . . . . . . . . . . . . . . . . . . . . . . . . . 42
ISBNs . . . . . . . . . . . . . . . . . . . . . . . . . . . . . . . . . . . . . . . . . . . . . . . . . . . 42
Changing Your Title and URL . . . . . . . . . . . . . . . . . . . . . . . . . . . . . . . . . . . . . 42
Questions About Publishing on Leanpub . . . . . . . . . . . . . . . . . . . . . . . . . . . . . . . 43
Languages and Letter Accents ....................................... 44
Setting the Main Language Used in the Book . . . . . . . . . . . . . . . . . . . . . . . . . . . . . 44
Overriding Leanpub Language Defaults . . . . . . . . . . . . . . . . . . . . . . . . . . . . . . . . 44
Switching back and forth between language fonts . . . . . . . . . . . . . . . . . . . . . . . . . . 44
A note about writing Leanpub books in Japanese, Korean and Chinese . . . . . . . . . . . . . . 45
A note about writing Leanpub books in right-to-left (RTL) languages . . . . . . . . . . . . . . . 45
Dedication, Parts, Chapters and Sections . . . . . . . . . . . . . . . . . . . . . . . . . . . . . . . . 46
Dedication . . . . . . . . . . . . . . . . . . . . . . . . . . . . . . . . . . . . . . . . . . . . . . . . . 46
Parts . . . . . . . . . . . . . . . . . . . . . . . . . . . . . . . . . . . . . . . . . . . . . . . . . . . . 46
Chapters, Sections and Sub-sections . . . . . . . . . . . . . . . . . . . . . . . . . . . . . . . . . . 46
Table of Contents . . . . . . . . . . . . . . . . . . . . . . . . . . . . . . . . . . . . . . . . . . . . . 46
Front Matter, Main Matter and Back Matter . . . . . . . . . . . . . . . . . . . . . . . . . . . . . 47
Styling Text .................................................. 50
Bold, Emphasis/Italics, and Underlining . . . . . . . . . . . . . . . . . . . . . . . . . . . . . . . . 50
Superscripts . . . . . . . . . . . . . . . . . . . . . . . . . . . . . . . . . . . . . . . . . . . . . . . . 50
Monospaced Text . . . . . . . . . . . . . . . . . . . . . . . . . . . . . . . . . . . . . . . . . . . . . 50
Non-Breaking Spaces . . . . . . . . . . . . . . . . . . . . . . . . . . . . . . . . . . . . . . . . . . 50
Blocks Of Text ................................................ 52
Paragraphs . . . . . . . . . . . . . . . . . . . . . . . . . . . . . . . . . . . . . . . . . . . . . . . . 52
Centering Paragraphs Or Lines Of Text . . . . . . . . . . . . . . . . . . . . . . . . . . . . . . . . 52
Numbered/Ordered Lists . . . . . . . . . . . . . . . . . . . . . . . . . . . . . . . . . . . . . . . . 53
Unordered/Bulleted Lists . . . . . . . . . . . . . . . . . . . . . . . . . . . . . . . . . . . . . . . . 53
Definition Lists . . . . . . . . . . . . . . . . . . . . . . . . . . . . . . . . . . . . . . . . . . . . . . 55
Blockquotes . . . . . . . . . . . . . . . . . . . . . . . . . . . . . . . . . . . . . . . . . . . . . . . . 57
CONTENTS
Asides/Sidebars . . . . . . . . . . . . . . . . . . . . . . . . . . . . . . . . . . . . . . . . . . . . . . 57
More Text Block Types . . . . . . . . . . . . . . . . . . . . . . . . . . . . . . . . . . . . . . . . . . 58
Warning! . . . . . . . . . . . . . . . . . . . . . . . . . . . . . . . . . . . . . . . . . . . . . . . . . . 59
Tips . . . . . . . . . . . . . . . . . . . . . . . . . . . . . . . . . . . . . . . . . . . . . . . . . . . . . 59
Errors . . . . . . . . . . . . . . . . . . . . . . . . . . . . . . . . . . . . . . . . . . . . . . . . . . . 59
Information . . . . . . . . . . . . . . . . . . . . . . . . . . . . . . . . . . . . . . . . . . . . . . . . 60
Questions . . . . . . . . . . . . . . . . . . . . . . . . . . . . . . . . . . . . . . . . . . . . . . . . . 60
Discussions . . . . . . . . . . . . . . . . . . . . . . . . . . . . . . . . . . . . . . . . . . . . . . . . 60
Exercises . . . . . . . . . . . . . . . . . . . . . . . . . . . . . . . . . . . . . . . . . . . . . . . . . . 61
Generic Boxes . . . . . . . . . . . . . . . . . . . . . . . . . . . . . . . . . . . . . . . . . . . . . . . 61
Code ...................................................... 62
Code Samples . . . . . . . . . . . . . . . . . . . . . . . . . . . . . . . . . . . . . . . . . . . . . . . 62
Code Sample Titles . . . . . . . . . . . . . . . . . . . . . . . . . . . . . . . . . . . . . . . . . . . . 66
Marking lines as deleted or added to a code block . . . . . . . . . . . . . . . . . . . . . . . . . . 67
Some Details About Line-Wrapping . . . . . . . . . . . . . . . . . . . . . . . . . . . . . . . . . . 68
Questions About Code . . . . . . . . . . . . . . . . . . . . . . . . . . . . . . . . . . . . . . . . . . 69
Poetry ..................................................... 70
Poetry Stanzas in Regular Markdown . . . . . . . . . . . . . . . . . . . . . . . . . . . . . . . . . 70
Spacing Control for Poetry . . . . . . . . . . . . . . . . . . . . . . . . . . . . . . . . . . . . . . . 70
Line Lengths . . . . . . . . . . . . . . . . . . . . . . . . . . . . . . . . . . . . . . . . . . . . . . . 71
Links ...................................................... 72
Formatting Links . . . . . . . . . . . . . . . . . . . . . . . . . . . . . . . . . . . . . . . . . . . . . 72
Long Hyperlinks . . . . . . . . . . . . . . . . . . . . . . . . . . . . . . . . . . . . . . . . . . . . . 72
Footnotes and Hyperlinks in PDF . . . . . . . . . . . . . . . . . . . . . . . . . . . . . . . . . . . 73
Footnotes and Endnotes . . . . . . . . . . . . . . . . . . . . . . . . . . . . . . . . . . . . . . . . . . 74
Footnotes . . . . . . . . . . . . . . . . . . . . . . . . . . . . . . . . . . . . . . . . . . . . . . . . . 74
Endnotes . . . . . . . . . . . . . . . . . . . . . . . . . . . . . . . . . . . . . . . . . . . . . . . . . . 74
Remove Footnotes . . . . . . . . . . . . . . . . . . . . . . . . . . . . . . . . . . . . . . . . . . . . 75
Crosslinks ................................................... 76
Quick Explanation . . . . . . . . . . . . . . . . . . . . . . . . . . . . . . . . . . . . . . . . . . . . 76
Longer Explanation . . . . . . . . . . . . . . . . . . . . . . . . . . . . . . . . . . . . . . . . . . . 77
Crosslinking to something with an ID . . . . . . . . . . . . . . . . . . . . . . . . . . . . . . . . . 77
Some Crosslink Details . . . . . . . . . . . . . . . . . . . . . . . . . . . . . . . . . . . . . . . . . 78
Breaks ..................................................... 79
Pagebreaks . . . . . . . . . . . . . . . . . . . . . . . . . . . . . . . . . . . . . . . . . . . . . . . . 79
Line Breaks . . . . . . . . . . . . . . . . . . . . . . . . . . . . . . . . . . . . . . . . . . . . . . . . 79
Tables ...................................................... 80
Table Width . . . . . . . . . . . . . . . . . . . . . . . . . . . . . . . . . . . . . . . . . . . . . . . . 80
Multi-line rows . . . . . . . . . . . . . . . . . . . . . . . . . . . . . . . . . . . . . . . . . . . . . . 82
Alignment and footer rows . . . . . . . . . . . . . . . . . . . . . . . . . . . . . . . . . . . . . . . 83
Table Titles . . . . . . . . . . . . . . . . . . . . . . . . . . . . . . . . . . . . . . . . . . . . . . . . 84
HTML Tables . . . . . . . . . . . . . . . . . . . . . . . . . . . . . . . . . . . . . . . . . . . . . . . 84
A note on combining attributes . . . . . . . . . . . . . . . . . . . . . . . . . . . . . . . . . . . . . 84
CONTENTS
Selling your book .............................................. 85
Bundles . . . . . . . . . . . . . . . . . . . . . . . . . . . . . . . . . . . . . . . . . . . . . . . . . . 85
Coupons . . . . . . . . . . . . . . . . . . . . . . . . . . . . . . . . . . . . . . . . . . . . . . . . . . 86
Royalties . . . . . . . . . . . . . . . . . . . . . . . . . . . . . . . . . . . . . . . . . . . . . . . . . . 87
Library Purchasing . . . . . . . . . . . . . . . . . . . . . . . . . . . . . . . . . . . . . . . . . . . . 87
Maximum Sale Price . . . . . . . . . . . . . . . . . . . . . . . . . . . . . . . . . . . . . . . . . . . 88
Selling Digital Extras . . . . . . . . . . . . . . . . . . . . . . . . . . . . . . . . . . . . . . . . . . . 88
Selling Multi-reader Licenses . . . . . . . . . . . . . . . . . . . . . . . . . . . . . . . . . . . . . . 88
Buying Books on Leanpub . . . . . . . . . . . . . . . . . . . . . . . . . . . . . . . . . . . . . . . . 88
Miscellaneous ................................................. 90
Sales and Analytics . . . . . . . . . . . . . . . . . . . . . . . . . . . . . . . . . . . . . . . . . . . . 90
Backing Up Your Files . . . . . . . . . . . . . . . . . . . . . . . . . . . . . . . . . . . . . . . . . . 90
Escaping Markdown Syntax Characters . . . . . . . . . . . . . . . . . . . . . . . . . . . . . . . . 90
How To Exclude Lines From Your Book . . . . . . . . . . . . . . . . . . . . . . . . . . . . . . . . 91
Copyright Protection . . . . . . . . . . . . . . . . . . . . . . . . . . . . . . . . . . . . . . . . . . . 91
Moving Dropbox Folders . . . . . . . . . . . . . . . . . . . . . . . . . . . . . . . . . . . . . . . . 91
Fonts . . . . . . . . . . . . . . . . . . . . . . . . . . . . . . . . . . . . . . . . . . . . . . . . . . . . 92
Distributing Extra Files with Your Book . . . . . . . . . . . . . . . . . . . . . . . . . . . . . . . . 92
Mathematical Equations . . . . . . . . . . . . . . . . . . . . . . . . . . . . . . . . . . . . . . . . . 93
Cover Designers and Editors . . . . . . . . . . . . . . . . . . . . . . . . . . . . . . . . . . . . . . 93
Information About Your Readers / Customers . . . . . . . . . . . . . . . . . . . . . . . . . . . . 94
Multimedia Content . . . . . . . . . . . . . . . . . . . . . . . . . . . . . . . . . . . . . . . . . . . 94
Does Leanpub Accept Authors From Anywhere (i.e. international authors, foreign authors)? . 94
Coupons for Other Leanpub Authors . . . . . . . . . . . . . . . . . . . . . . . . . . . . . . . . . 94
Curly Quotes . . . . . . . . . . . . . . . . . . . . . . . . . . . . . . . . . . . . . . . . . . . . . . . 95
Figure Captions and Labels . . . . . . . . . . . . . . . . . . . . . . . . . . . . . . . . . . . . . . . 95
Links In Footnotes . . . . . . . . . . . . . . . . . . . . . . . . . . . . . . . . . . . . . . . . . . . . 95
Viruses . . . . . . . . . . . . . . . . . . . . . . . . . . . . . . . . . . . . . . . . . . . . . . . . . . . 95
Kerning . . . . . . . . . . . . . . . . . . . . . . . . . . . . . . . . . . . . . . . . . . . . . . . . . . 95
Full Table of Contents in Sample Books? . . . . . . . . . . . . . . . . . . . . . . . . . . . . . . . 95
On the landing page, can we feature a channel instead of an individual video on the YouTube
link? . . . . . . . . . . . . . . . . . . . . . . . . . . . . . . . . . . . . . . . . . . . . . . . . 96
Why can’t I put section commands in Book.txt? . . . . . . . . . . . . . . . . . . . . . . . . . . . 96
Trouble With Accents? Forcing Text Editors To Save As UTF-8 . . . . . . . . . . . . . . . . . . 96
I don’t understand how things get added to a Table of Contents . . . . . . . . . . . . . . . . . . 96
What encoding should I use to write files in Markdown? Should I write in ASCII or UTF-8? . 97
How Can I Add Blank Lines To My Text? . . . . . . . . . . . . . . . . . . . . . . . . . . . . . . . 97
Why Can’t I See My Profile When I Go To ‘Your Profile’? . . . . . . . . . . . . . . . . . . . . . 98
A General Note On Formatting . . . . . . . . . . . . . . . . . . . . . . . . . . . . . . . . . . . . . 98
GitHub Commits . . . . . . . . . . . . . . . . . . . . . . . . . . . . . . . . . . . . . . . . . . . . . 98
Downloading onto your iPad or iPhone . . . . . . . . . . . . . . . . . . . . . . . . . . . . . . . . 98
Working with GitHub and Dropbox . . . . . . . . . . . . . . . . . . . . . . . . . . . . . . . . . . 98
Adding a motto or epigraph to the beginning of a chapter . . . . . . . . . . . . . . . . . . . . . 99
Can I publish my book on Leanpub and KDP Select at the same time? . . . . . . . . . . . . . . 99
Does Leanpub give me tools to help me build my own book landing page? . . . . . . . . . . . . 100
Disabling Line Numbers While Nesting Code Blocks In Lists . . . . . . . . . . . . . . . . . . . . 101
Can I write my Leanpub book in Markdown files, with the .md extension? . . . . . . . . . . . 102
Page Sizes and Maximum Image Sizes . . . . . . . . . . . . . . . . . . . . . . . . . . . . . . . . . 102
CONTENTS
Indentation . . . . . . . . . . . . . . . . . . . . . . . . . . . . . . . . . . . . . . . . . . . . . . . . 103
Hanging Indents . . . . . . . . . . . . . . . . . . . . . . . . . . . . . . . . . . . . . . . . . . . . . 103
How can I import a Microsoft Word document? . . . . . . . . . . . . . . . . . . . . . . . . . . . 104
Problems With Adobe Digital Editions . . . . . . . . . . . . . . . . . . . . . . . . . . . . . . . . 104
Long strings of characters running off the right-hand side of the page / the right margin . . . 104
Time Zone . . . . . . . . . . . . . . . . . . . . . . . . . . . . . . . . . . . . . . . . . . . . . . . . . 104
How can I increase the space between paragraphs? . . . . . . . . . . . . . . . . . . . . . . . . . 105
Font Samples . . . . . . . . . . . . . . . . . . . . . . . . . . . . . . . . . . . . . . . . . . . . . . . 105
Using Dropbox and Git . . . . . . . . . . . . . . . . . . . . . . . . . . . . . . . . . . . . . . . . . 108

About The Leanpub Manual
Welcome to The Leanpub Manual! It exists as a website and as a free ebook1. We’re going to try to make
it comprehensive but keep it intuitive.
If you’re looking for an answer to a question, just try searching the manual!
You can also look for answers by scrolling through the (huge) Table of Contents.
Some sections in the manual may be a bit redundant. That’s because we want to help people who might
be looking to solve the same problem in different ways.
If you can’t find the answer you’re looking for, try posting on our Leanpub Google Group at:
https://groups.google.com/group/leanpub2.
We also have a several how-to guides and videos, which you can find on out Help page at:
http://leanpub.com/help3.
(Please note that at the moment our videos are a bit out of date; Leanpub is being built in response to
user feedback and we are always trying to make it better.)
Thanks, and if you have any suggestions for the manual or spot any errors, please let us know at hello@
leanpub.com!
1http://leanpub.com/manual
2https://groups.google.com/group/leanpub
3http://leanpub.com/help

The Leanpub Manual: The ebook!
You can grab this manual in pdf4,epub5or mobi6as well. If you want to get an email whenever the
manual gets a significant update, you can get the book for free at http://leanpub.com/manual.
4http://leanpub.com/s/0PE0TzfKDDyOZP4-VCpVK-.pdf
5http://leanpub.com/s/0PE0TzfKDDyOZP4-VCpVK-.epub
6http://leanpub.com/s/0PE0TzfKDDyOZP4-VCpVK-.mobi

Help
Stuck? There are 3 ways to get help…
• Check the helpful FAQ for Readers7and/or the FAQ for Authors8
• Join the Leanpub Google Group at http://groups.google.com/group/leanpub9and post your question
there. Our authors enjoys helping each other out!
• You can also search the Leanpub Google Group archives to see if your question has already been
answered.
• Email us at hello@leanpub.com and we’ll be happy to help you.
If your question is general in nature, please use the Google Group so that other Leanpub authors can
benefit from your question being answered. We check the group too, so we’ll see your question and we’ll
reply there.
7http://leanpub.com/help#reader_faq
8http://leanpub.com/help#author_faq
9http://groups.google.com/group/leanpub

Getting Started
The Five Steps To A Leanpub Book
These instructions are for setting up a Leanpub book to write in plain text using Dropbox for sharing
your book files with Leanpub. For instructions with on getting started in other writing modes, go
here](https://leanpub.com/help). The screenshots are currently a bit out of date but the general idea for
getting set up is the same.)
Here are the five steps to publishing your book on Leanpub:
1. Create a Leanpub account.
2. Create a new book.
3. Add content to the book’s manuscript folder.
4. Add content to your ebook and edit it using private Previews.
5. Click Publish and make your book public.
Brief Instructions
Sign Up: When you Sign Up to Leanpub, at the same time you’ll be creating the framework for a new
book. You can change these details later.
If you want to know what a Leanpub book looks like, just download one of our sample books. We
have sample books for business10,fiction11 and technical12 books. These sample books all show you how
Markdown works and other useful details.
Dropbox: Leanpub books are written in Dropbox folders that are shared by you and Leanpub (and any
coauthors). Before you can add content to your book, Leanpub will send you a Dropbox folder sharing
request. Once you have accepted the invitation, you can start working on your book by editing (and
adding to!) the contents of the manuscript folder on your computer.
Please check your spam folder if you did not get the Dropbox email with the sharing request from
Leanpub.
New Book: In the new folder for your book, you will see that your book doesn’t start out empty. It starts
with a sample chapter so you can see how the Leanpub workflow works.
You can add your content to your book by putting .txt files in your book’s manuscript folder.
Writing in Markdown: Leanpub books need to be written in a text format called Markdown, which is
the simplest way to format books so they’ll look good in multiple and competing ebook formats.
For example, if you want something to appear in italics, just put an underscore mark like this _ before
and after the words you want to be italicized. For more Markdown instructions, check out the rest of this
manual or http://daringfireball.net/projects/markdown/syntax13.
10https://leanpub.com/sample-business-book
11https://leanpub.com/sample-fiction-book
12https://leanpub.com/sample-technical-book
13http://daringfireball.net/projects/markdown/syntax

Getting Started 5
Book Structure: Your new book folder contains a file called Book.txt. The Book.txt file is the list of files
in your manuscript folder that you want to include in your book, in the order you want them to appear
in your book.
So, if you save a text called chapterone.txt in your manuscript folder, and you want it to appear in your
ebook, just write ‘chapterone.txt’ on a line in the Book.txt file.
Previews: Once you’ve added some content to your manuscript folder and listed it in Book.txt, go to the
Preview page in Leanpub’s book tools and click the button to create a new Preview. If you spot something
you want to change, just make the change in the appropriate .txt file in your manuscript folder, and
create another Preview to see the effect of your changes.
Publish: Once you’re happy with your Preview, just go over to the Publish page in Leanpub’s book tools
and click the button to Publish your book.
Other Leanpub Features: We hope you’ll have fun getting to know the additional cool features on
Leanpub, like the free web page you’ll get for your book, where you can add content and even your
own videos to tell the world about your work!
Good luck, and thanks for being a Leanpub author!
Setting Up Dropbox On Your Computer
When you create a new book, you should receive an email from Dropbox saying that Leanpub has shared
your new book folder with you.
Click on the link in the email (which might be in your junk or spam folder) and you’ll be taken to the
Dropbox website. If you already have a Dropbox account, just sign in and accept the sharing request, and
Dropbox will put the folder on your computer.
If you don’t have a Dropbox account, follow the instructions to create one (it’s free!), and then accept the
sharing request. This will take a couple of minutes, but it’s worth it!
Your Book’s Content
Your book will consist of a bunch of text files with the suffix .txt. They can be named whatever you
want, as long as they have .txt at the end. You can write them using any text editor you like; just save
the files as plain text.
(Please note that we have videos that show you how to import your work from your blog. Once you’ve
imported, we strongly suggest you just stop using Word, period. Any simple text editor will work for
writing plain text, and they are usually free or very cheap and, crucially, simple to use, so you can focus
on your writing).
To illustrate, we’re going to write an epic fantasy novel together. Let’s give it a suitably epic title: The
Cliché Chronicles.
This is the content of the file called chapter1.txt:

Getting Started 6
# Chapter 1: A Stormy Beginning
Lord Char, black cloak flapping around him in the rising storm, rubbed his hands together in anticipation
as he strode to the middle of the circle of stones. He had been years in preparation for this, his moment
of triumph.
It was time to use the knowledge he had gained through years of patient planning. Now The Unnamed
One would pay!
And this is the content of the file called chapter2.txt:
# Chapter 2: You Are Not My Father!
## A Horrible realization
Suddenly, he realized who his father had to have been. No wonder the dark riders had chased him half
way across the continent!
## The Horror Grows
With growing horror, he pulled the dark pulsing amulet from his cloak. If The Unnamed One was truly
his father, he shuddered, then the amulet must be The Jewel of Rak Crasha!
See those number #signs? They’re an example of what it’s like to write in the formatting style called
Markdown. If you want to write a chapter heading, just put a # at the start of the line, instead of hunting
for ‘styles’ like you would in Microsoft Word. And if you want a sub-heading, just type two number signs
‘##’. We chose Markdown as our formatting system (even typewriters have a formatting system!) because
it was created to make sense and let you focus on writing words instead of overly complex formatting
stuff.
Anyways, back to the book we’re writing!
When Leanpub converts this text into a book for you, the h1 (or #) headings will start new chapters,
and the h2 (or ##) headings will start new sections. So, there are two chapters here - “Chapter 1: A
Stormy Beginning” and “Chapter 2: You Are Not My Father!”. Chapter 2 contains two sections: “A Horrible
Realization” and “The Horror Grows”.
The Book.txt File
As mentioned above, the content of your book is all tied together by the Book.txt file. This is a list of all
the files you want in your book, in the correct order.
The text you’d type in the Book.txt file for The Cliché Chronicles would look like this:

Getting Started 7
chapter1.txt chapter2.txt
Yup, that’s it. It’s just a list of the names of the files in your manuscript folder that you want to appear in
your book, in the order you want them to appear. Think of it as your Table of Contents.
Book.txt and the manuscript Folder
You may have noticed that the list of files in Book.txt does not have to include all of the files in your
manuscript folder. When Leanpub creates a Preview or a published version of your book, it only uses
the files listed in Book.txt, not all the files in your manuscript folder. That way, if you think a chapter
is not ready yet, you can keep working on it in your manuscript folder, but just leave it out of the list in
Book.txt until you think it’s ready.
Making a Sample Book for Readers to Browse for Free
(Please note that if you are using our in-browser editor, it’s currently not possible to make a sample book,
sorry.)
If you want prospective customers to read a sample of your book for free, you can make a file called
Sample.txt in your manuscript folder. This file works exactly like Book.txt. Just list all of the files that
you want to be included in your book sample.
The Sample Book
Making a sample of your book available to potential customers is a great way to promote your book. It’s
the virtual equivalent of what customers do in brick-and-mortar bookstares: they browse the shelves and
take down books and read bits of what’s inside, to find the book they’re looking for.
OK, let’s let potential readers of The Cliché Chronicles browse the first chapter for free. Once they read
that, they’ll be hooked and will rush to buy the book so they can read the rest.
To do this, just type this in the Sample.txt file:
chapter1.txt
Next time your Preview or Publish your book, Leanpub will create a separate sample ebook containing
just chapter one, because that’s the only chapter listed in Sample.txt.

Getting Started 8
Adding Images or Pictures to Your Book
It’s easy to add images or pictures to your book. To do this, you need to:
1. Put the images or pictures in your images folder (it’s in your manuscript folder).
2. Tell Leanpub where you want the image to appear in your book. You do this by typing the image
name directly into your text, with a little help from Markdown formatting.
So, to add images to your book, first put them in the images folder inside your book’s manuscript folder.
Then, you need to tell Leanpub where to put the images in your book.
Let’s say we want to put an image in our book that we’ve saved as ‘Sword.png’. Just put the ‘Sword.png’
file in your images folder, and then type this in your .txt file, in a line on its own, wherever you’d like
the image to appear:

Now, the next time you create a Preview, the image will appear with the caption ‘An awesome sword’. If
you don’t want a caption, just leave that part of the instruction empty, like this:

A Note about Markdown
Markdown was created to make formatting websites simpler. In our opinion, it’s also a great way to
format your writing so you can simultaneously produce a variety of text formats from just one set of
words with the click of a button.
(Just think about how cool it is to create PDF, EPUB, and MOBI ebooks, (plus a website if you want one!),
all at the click of one button, using the same source text.)
As simple as Markdown is, like any new thing, it takes a little getting used to. For example, in Markdown,
if you are doing two things at once, you use square brackets [ ] followed by parentheses ( ).
You can see how this works in the images formatting. The caption, or the words you want associated
with the image, is put in square brackets:
![These words will appear as the image caption]
… and you put the ‘address’ of the image or picture in parentheses after it, so Leanpub knows where to
look for it:
(images/image.jpg)
In this case, the exclamation point !at the beginning of the line just tells Leanpub this is an image, not
something else.
So together, the line you type looks like this:

To link some words in your text to a website, you use the same methodology:
[This will appear in your book as a link](http://theaddressofthewebsite.com)
In this case, the square brackets [ ] tell Leanpub ‘this is a link’, and then Leanpub looks for the website
you want to link to, by looking inside the parentheses ( ).
Getting Started 9
Creating a Preview
Once you’ve added some text files to your manuscript folder and you’ve listed them in the Book.txt file,
go to the Preview page in your book tools in Leanpub and click the button to create a Preview. This will
create your new ebook! But since it’s a Preview, only you can see it, so don’t worry about everything
being perfect just yet.
When Leanpub’s done creating your Preview, go back to your book’s folder in Dropbox and open up the
ebook files in the Preview folder. Your ebook will be produced in three different ebook formats: PDF (for
all computers), EPUB (for iPads and a number of different e-readers), and MOBI (for the Amazon Kindle
e-reader).
After you’ve checked your Preview, make whatever changes you like to the content in your manuscript
folder and make more Previews until your book is ready to publish.
Publishing Your Book
When you’re ready to make your book public for the first time, or ready to release a new version of your
already published book, go to the Publish page in your Leanpub book tools and click the publish button.
This will make your book available to the public to buy from your book’s landing page, which you can
see by going to Public Page in your book tools. Ta-da, your book is published! Now it’s time to get the
word out using Twitter and your blog or whatever ‘channels’ you enjoy using. Good luck!

Leanpub Book Tools
This section sets out all of the ‘book tools’ or options and settings you can use when you’re signed into
your Leanpub account and working on a book.
Leanpub is constantly being updated, so this section may from time to time be a bit out of date!
This section was last updated on:
Wednesday, January 13, 2016
The Book Tools
How do I find the Leanpub Book Tools?
1. Log in by clicking ‘Sign In’ at the top right of a Leanpub page
2. Click on ‘Your Account’ at the top right and select ‘Dashboard’
3. Click on ‘Books’
4. Click on the link for your book’s title, or click on the book’s cover image
Then you will see tabs for your books Settings etc. at the top of the page
Once you are signed in, you can also get to your book tools by going to your book’s landing page and
clicking the blue “Edit” button that should appear to the top right of where your book’s cover image is
presented.
When you’re signed into your Leanpub account and working on a book, in a column to the left you’ll see
the following top-level menu options:
•Overview
•Getting Started
•Write
•Upload Book Cover
•Upload Your Book
•Book Info
•Writing
•Book Web Page
•Preview
•Publish Your Book
•Selling & Royalties
•Community
•Admin
Leanpub Book Tools 11
Overview
This page shows you a summary of your book’s details. What you see will be different before and after
you have published your book. This is a good place to come back to and to see if you have completed all
of the usual steps before publishing your book for the first time.
Getting Started
On this tab, you will find some instructions for getting started with your first Leanpub book.
Write
If you are using the write-in-your-browser mode, you will see the “Write” option. This is where you can
write your book online in Leanpub.
Please note that our in-browser editor under the “Write” tab is still a work-in-progress. Currently
you can’t make sample books, for example, or use the Subset Preview feature. It is also not recommended
that you use the in-browser editor if you are collaborating on a text at the same time with another author.
One day this will be really robust, but we’re not there yet!
Upload Book Cover
If you select this option from the menu on the left, you will be able to upload a book cover image by
clicking “Choose File” and selecting an image from your computer. Once you’ve uploaded the image,
click on the blue “Update Cover Page” button and the cover image will now appear in your book the next
time you create a preview or publish a new version.
The image will also appear on your book’s Leanpub landing page and will be the image they see when
they discover your book in our bookstore.
We recommend that your book cover image should be 432 pixels wide and 648 pixels high, for a 72 PPI
image. The image formats we support are PNG, JPEG and GIF.
For a 150 PPI image, the cover image should be 900 pixels wide and 1350 pixels high.
For a 300 PPI image, the cover image should be 1800 pixels wide and 2700 pixels high.
Upload Your Book
If you are using the bring-your-own-book mode, you will see the “Upload Your Book” option in the menu
on the left.
Book Info
Under “Book Info” you will find the following options:
Book Details
This is where you can change your book’s title and subtitle.
Dedication
Leanpub Book Tools 12
Here you can enter a short dedication for your book, which will appear before the Table of Contents.
Authors
This is where you can add co-authors to your book if you are the primary author. You also set the royalty
percentage each co-author will receive. If you ever want to change the royalty percentages or change who
the primary author is, please have the current primary author email us at hello@leanpub.com.
Co-authors need to already have Leanpub accounts, and they need to approve your add co-author request.
At the bottom of the page you will see a list of authors. If you click the “Edit” button next to an author,
you will be able to customize the way that author is represented in relation to this book. In other words,
you can override the information that would normally appear, based on the author’s Leanpub profile.
Your co-authors will not be able to publish new versions or delete your book, but they will be able to see
your sales page, do imports and create preview versions.
For now, after you’ve added a co-author, you need to share the Dropbox folder for the book with them
yourself at the Dropbox website if you are using the Dropbox writing mode. We may automate this later.
Co-authors can have a percentage of your royalties. The way the royalty percentages work is as follows:
whatever the royalty percentage is at the end of the quarter will be used for all purchases in the quarter.
When you add someone as a co-author you propose a royalty percentage that they will receive. You can’t
edit this once it is set; you can only remove the co-author and add them again with a new percentage.
(This way, the co-author gets to see, and approve, every new percentage they have been given.) However,
since you as the author can remove your co-authors at any time, this relationship is built on their trust
of you. Please play nice.
Note that as the primary author, your royalty percentage is automatically calculated. It is 100% minus the
royalty percentages of your co-authors. This is the percentage of the book royalties (after the Leanpub
cut), not the percentage of the revenue.
The royalty percentages are used once per quarter to split up the royalties for all purchases of the book.
They are not applied on a per-purchase basis.
Add New Co-Author
Enter the Leanpub username of the person you want to add as a co-author. They’ll need to approve the
request on their Dashboard page.
Here you can also add a Royalty Percentage, or the percentage of royalties each co-author will receive
from book sales.
Make sure to click ‘Add Co-Author’ at the bottom of the page after you’ve made any changes.
Contributors
Here you can add people as contributors to your book. Contributors don’t get a share of the royalties, but
they are credited on your book public page. This can include people like editors, reviewers, submitters of
included essays, etc.
Thank You
Here you can type in a message that will show up on the thank you page once a customer purchases your
book.
Categories
Here you can attach categories to your book. This is a good way of making your book more discoverable
on Leanpub. If you would like to ask us to add a category, please email us at hello@leanpub.com.
Leanpub Book Tools 13
Fan Fiction
If you select ‘Fan Fiction’ as a category for your book, then a ‘Fan Fiction’ tab will appear in your book’s
‘Settings’ page.
Using the drop-down list, please select the work that your book is based on, and then click ‘Update Book’.
If you do not see the the work your book is based on, please follow the ‘list of works’ link to add the work
to our list.
Coypyright
Go here to select how your copyright is shown in your book. You can choose the default or a customizable
Creative Commons copyright.
You can also customize the attribution and dates of the copyright, which will give you the following
options:
Custom Copyright Owner
If you don’t put anything here, the book will be copyright by your name. Only fill this in if you need to
override this with something else, like your company name or a list of people.
Copyright Custom Date Range
If you don’t put anything here, the book will be copyright from the year you created it on Leanpub to the
year you last publish it in. (If these years are the same, that year will only be printed once.) Only fill this
in if you need to override this with something else, say if you are including old material and you want
those years included too. An example format of the text you enter here is “2007 - 2012”.
Optional ISBN
In these fields, you can choose to assign ISBNs to your PDF, EPUB, and MOBI ebook (yes, you can assign
the same ISBN to all your books if that is your preference). Please note that you do NOT need ISBNs to
publish on Leanpub.
Also, please note that we do nothing with these ISBNs other than putting them in the Leanpub-generated
PDF, EPUB and MOBI files.
Mature Content
If your book contains mature content such as erotica and is not suitable for readers under 18, please tick
the box here. You will then see our various terms and conditions for books with mature content.
Mature Content?
Please indicate if your book as mature content.
A Note About Cover Images
ALL cover images must be non-offensive and G-rated, regardless of book category. If we receive any
complaints about a cover image, or if we notice it and determine that it is offensive or not G-rated, we
will rename it and regenerate your book so that your book reverts to the default cover image. (To add a
cover image, go to your book tools and click “Upload Book Cover”.)
Special Rules for Categories
Not only does categorizing your book help readers to discover it, but there are some additional rules and
features for certain categories. In particular, special rules apply to books categorized as Erotica or Fan
Fiction.
Leanpub Book Tools 14
SPECIAL RULES FOR BOOKS IN THE EROTICA CATEGORY
1. Books categorized as Erotica cannot contain any images in the book manuscripts themselves. Our
book generator will ignore any image tags in the body of an Erotica book. (Leanpub is not in the
business of publishing erotic or pornographic images, and since we do not read our books before
they are published this is our best attempt at a reasonable policy.)
2. Books categorized as Erotica will have their own category bestseller list instead of showing up in
the main Leanpub bestseller list.
3. The Erotica category will be kept behind an age verification form, in order to prevent inadvertent
access by minors.
SPECIAL RULES FOR BOOKS IN THE FAN FICTION CATEGORY
1. Fan Fiction books must have a $0 minimum price and a $0 suggested price.
2. Fan Fiction books must identify the original work(s) upon which they are based.
3. If the creator or copyright holder of the original work(s) objects to a derivative work of fan fiction,
we will take down the book(s) in question.
4. Books categorized as Fan Fiction will have their own category bestseller list instead of showing up
in the main Leanpub bestseller list.
5. The Fan Fiction category will be kept behind an age verification form, in order to prevent inadvertent
access by minors (as much Fan Fiction is also Erotica).
6. Books categorized as Fan Fiction cannot contain any images in the book manuscripts themselves.
Our book generator will ignore any image tags in the body of a Fan Fiction book. (This is to ensure
that none of the images are copyrighted or are erotica.)
WHY SUPPORT EROTICA AND FAN FICTION CATEGORIES AT ALL?
The reason that we support Erotica and Fan Fiction is that we want to be able to publish the next book
like Fifty Shades of Grey, both in its original form as fan fiction and in its rewritten commercial form.
Why would we want to do this? Well, there are three reasons:
1. [Dr. Evil voice] We’d be rich!
2. We like the approach: Fifty Shades of Grey was published using an approach very philosophically
similar to what we have always advocated in our manifesto. Specifically, we believe that books
should be published as they are written, evolving in public with feedback from their readers. This
is an apt description of the approach taken by the author of that book, as well as by many authors
of Erotica and Fan Fiction.
3. There’s no middle ground: we either need to support these categories appropriately or censor them.
So, we choose to support them, but to have code in place to handle them appropriately.
Think of these categories as “subreddits” on reddit.com: there are certain subreddits which are not part
of the main reddit experience, but which exist happily in their own virtual sandbox.
Writing
Under the “Writing” section of the book tools, you will see a selection of the following options, depending
on your writing mode.
Leanpub Book Tools 15
Writing Mode
On this page you can switch between the various writing modes that Leanpub offers.
Before switching modes, we suggest you create a preview, which will save a version of your manuscript.
Also, we suggest you create a copy of your book folder or repository, if you are writing in Dropbox,
GitHub or BitBucket mode.
You can switch between modes as much as you like.
Generation Settings
On this page you can do the following:
• Set the main language for your book. The default setting is English. This will help our book
generators format your book correctly, and will also set the language for your book’s web page.
• Indicate that your book is a translation of another book. This will insert some content into your book
and onto your book’s web page to show that it is a translation. For now, you must be the author of
both books. So, what you would do here if you want a book translated is create the translations and
add the translator(s) yourself as a co-author of each translation.
• Force character encoding to be UTF-8. This can help resolve occasional formatting issues where
characters do not display properly in the book.
A Note About Character Encoding
Depending on the text editor you are using and its settings, sometimes you may see weird characters
appear in your text, and some characters may fail to appear at all. If you are experiencing this issue, and
if all of your files are saved in UTF-8 format, then check this box. If this doesn’t make any sense to you,
leave it unchecked.
Make sure to click ‘Update Book’ at the bottom of the page after you’ve made any changes.
Writing Mode
On this page you can change your book’s writing mode.
Generation Settings
These settings can affect the way your book is generated. The following options are available:
• Set the default code language if you are writing a programming book.
• Set it so that the book’s authors are actually editors. If you check this checkbox you are indicating
that you and the other authors of the book are in fact its editors, and that the book is made up of
contributions from a number of contributors who are listed separately. If you are putting together
a book of a collection of essays or blog posts by different people, you should check this box.
Doing so will let you list these contributors separately, and they will show up on the book page
as Contributors. Also, you and any other authors will be referred to as editors, and the About the
Author(s) box will be called About the Editor(s). Note that the authors themselves can also be listed
as contributors if they have contributed writing to the book.
• Show an “Also By” list in the book and on the book’s web page. If you check this box, we add a page
near the front of your book which lists all the other books you have published on Leanpub under
a title ‘Also By [your name]’, with links to them. If your book has co-authors, we will add lists for
them as well. The list will only list published Leanpub books, not previews.

Leanpub Book Tools 16
• Choose to put your whole book up to be read for free on a public Leanpub web page. Here are two ex-
amples for you to check out: https://leanpub.com/lean/read14 and https://leanpub.com/thes3cookbook/read15.
• Set the input format to be either Kramdown or Markua
Markdown Dialect
If you are writing your book in plain text, you need to type out any formatting instructions so they can
be read by our book geneators. You can do this using two types of “syntax” or systems for formatting
in plain text. The first option is what we call “Leanpub Flavored Markdown”, which is our legacy book
formatting syntax that was created as a dialect of Markdown16, which was made to help web writers
convert text to HTML for web pages.
The second option is Markua17. It represents a systemic improvement over Leanpub Flavored Markdown,
and is our answer to the question: “What if Markdown had been created to write books, not blog posts?”
The specification for Markua is here18.
Please note that Markua is not fully implemented yet. We have made it available for early adopters willing
to give it a try. If you do choose to use Markua, we welcome any feedback you might have!
Book Theme
On this page you can set the formatting details for your book. There are a lot of otions here to explore.
The first time you want to change your settings, click the “Custom” button at the top.
The following are descriptions of just some of the formatting options we offer:
Page Breaks
If you want a new page after every section, check this box. This will normally be off, but it is useful for
things like cookbooks.
Book Style
Leanpub has four book styles: Fiction, Business, Technical, and Custom. Each book style comes with some
default format settings. You can change the book style at any time, and you can customize the book style
if you want.
You can play with the following formatting elements:
Links
In this section, you can choose to show links in your PDF only in the body of the text, or to also show
them as links in footnotes (this shows the URL to the reader). If you choose the latter option, then any
links to websites in your manuscript will also appear as footnotes in the PDF version of your book.
Font size
You can choose 11pt or 12pt font sizes.
Page size
You can choose from the following page sizes, shown width x height, in inches and then in centimetres:
US Letter: 8.5” x 11.0”, 21.6cm x 27.9cm
A4 Paper: 8.27” x 11.69”, 21.0cm x 29.7cm
14https://leanpub.com/lean/read
15https://leanpub.com/thes3cookbook/read
16https://daringfireball.net/projects/markdown
17http://markua.com
18https://leanpub.com/markua/read
Leanpub Book Tools 17
Technical: 7.0” x 9.1”, 17.8cm x 23.1cm
US Trade: 6.0” x 9.0”, 15.2cm x 22.9cm
A5 Paper 5.83” x 8.27”, 14.8cm x 21.0cm
Digest 5.5” x 8.0”, 14.0cm x 20.3cm
Paperback 4.25” x 6.87”, 10.8cm x 17.4cm
Paragraph Style
You can choose to indent the first line of paragraphs, or to have no indent, and at the same to include
a small vertical space between paragraphs. Please note that this only applies to PDF. Indentation of
paragraphs will always be off for epub and mobi.
Code Samples
If you’re including code in your book, you can choose from the following options:
Show line numbers on code samples
Center section headers
Left-align section headers
Section Header Style
Using the check boxes, you can choose to have your section headers (the bigger, bold letters that appear
when you format a line of text as a section) appear centered or left-aligned.
Table of Contents
You can choose from the following options for formatting your Table of Contents:
No Table of Contents
Parts and Chapters
Parts, Chapters and Sections
Everything
Section Numbering
You can choose from the following options for section numbering:
No section numbering
Number Parts and chapters (E.g.Part IV, Chapter 3)
Number Parts, chapters and sections (E.g. Chapter 3, Section 3.1, Section 3.2)
Number everything (E.g. Chapter 3, Section 3.1, Sub-Section 3.2.1, Sub-sub-section 3.2.1.4)
You can also choose ‘Do not number Parts’ to turn off the numbering of book Parts.
Import
This page lets you import content you have already written elsewhere and you want to import into
Leanpub and convert it to a book. You can import content in HTML format, and content from WordPress,
Blogger and Wattpad.
Export
On this page you can choose various export options for your book.
Leanpub Book Tools 18
Print-Ready PDF
Select this option to export a print-ready PDF for your book. This is used by people who want to make
print books from a PDF file.
Once the print-ready PDF has been generated, you can get it two different ways. For all writing modes,
you will see a link appear on this page that you can click to download the latest file. Also, we will create
a ‘published’ folder for you with the file in it, if you are using the Dropbox sync mode for your book, or
if you are using the Bitbucket or GitHub writing modes, with the output to Dropbox option selected.
We will generate a website for your book and put it in the site folder of your Leanpub Dropbox folder.
You can then copy the HTML and use it on your own site.
On this tab you can choose to produce print-ready PDFs of your book. These can be used for uploading
to sites like Lulu and CreateSpace for print-on-demand publishing.
Before You Print, Confirm Your Ebook Page Size
If you choose to enable this feature, you will see various ebook page size options. Each ebook page size
corresponds to a PDF size optimized for possible print book page sizes. These print book sizes correspond
to many of the CreateSpace and Lulu choices.
Produce a Print-Ready PDF of My Book
In this section you can set some parameters for your print-ready PDF.
The first section lets you show or remove some Leanpub features you may not want in your print book:
• Show chapter name in page headers
• Show “Tweet this book” page
• Show “Also by this author” page
To remove these features from your print-ready PDF, just untick the boxes.
Print Book Page Size
The pages sizes you can select here are dependent on the page size you use for your ebook (which you set
in the section above this one). The ebook and print pages will have the same content area, so that they
will contain the same content on each page and page breaks will be in exactly the same place.
Your book’s Print ISBN
If you have an ISBN for your book, please enter it here.
Verso Page Content
In this section you can set some of the content for your book’s ‘verso’ page, which appears on the back
of the title page of your book.
You can choose:
• A ‘for sale at’ URL
• To show or not show publisher information, if your book is associated with a Leanpub publisher
• To include a custom blurb (if you are not showing publisher information)
When you’ve made all your choices or made a change to these settings, click ‘Produce a Print-Ready PDF
of My Book!’ to generate the PDF and save your changes.
Leanpub Book Tools 19
Web Version
Here you can create an HTML version of your book.
Site Structure
You can choose to have all your content on a single web page, or to have a separate web page for each
chapter.
File Format
You can choose to have the code for the web page wrapped in HTML and body tags, or just have the bare
HTML.
InDesign*
On this tab you can choose to activate a Leanpub feature that lets you make InDesign files for your book.
Please note that this feature is fairly early in its lifespan. We want you to tell us what you want your
InDesign files to look like and how you are using the files! Please either join the Leanpub Google Group
or email hello@leanpub.com with suggestions!
Generate InDesign files for my book
Once you have activated this feature, you will see a button that lets you generate InDesign files for your
book with a single click.
How it works
Clicking the “Generate InDesign files for my book” button will generate a bunch of InCopy files and place
them in the in_design folder of your Leanpub Dropbox folder. There will be one for each chapter in your
book, and they’ll be called chap01.icml, chap02.icml, etc.
Place these files into an InDesign file. You can start with the leanpub-emptybook.indd file. This is a very
simple InDesign file with just a title page.
To place files, the process is:
1. Go to the current last page in the book.
2. On the “Pages” window, click the “Create New Page” button, and then click on the new page.
3. Place the chapter file with File ⇒Place ⇒chap01.icml
4. Repeat steps 1-3 for the rest of the files. If you forget what files you have placed, the “Links” window
will tell you.
Once you have done this, try making a change to the Markdown files in your manuscript folder and
generating the InDesign files again. On the “Links” window in InDesign, you’ll see a bunch of caution
triangles. Double clicking on these will update the content in InDesign.
Hopefully most of what you have to do is styling of the headers, text and such. If you find yourself
doing a bunch of manual work every time you re-generate your InDesign files, please let us know at
hello@leanpub.com. We’re trying our best to minimize that.
Manuscript archive
Here you can download a zip file of your content.
Publish Sample Book
Here you can publish just your sample book, if your book is currently not published (and you are not
writing using our in-browser editor).

Leanpub Book Tools 20
Book Web Page
The following options will affect your book’s web page, which is where customers go to buy it on Leanpub.
About the Book
• “Teaser Text” will show up as a short description of your book.
• “About the Book” will show up as the main description of your book.
• “Meta Description” will be displayed with results on search engines.
• “Table of Contents” lets you display your book’s table of contents (you only need this if you are in
bring-your-own-book mode; otherwise we automatically generate your table of contents from your
book).
Book Status
• “Percent Complete” lets you indicate how close you are to completing your book.
• “Installments planned” and “Installments completed” lets you show how many installments your
currently published book has and how many you plan to write. This feature is meant for people
who are publishing in serial.
Book Details
Here you can choose to show on your book’s web page any of the reader count (how many people have
purchased your book, including free purchases), page count and word count.
Media
Here you can embed a YouTube or a Vimeo video on your book’s web page.
Your book sales can be greatly helped if you record a YouTube video about your book and put its URL
here. We’ll embed this video prominently on your book landing page in the About the Book section.
To find the URL of your video, click on the Share button on YouTube. You’ll see a URL like http://youtu.be/FcNhBa7o9pM.
The part you want to copy is the FcNhBa7o9pM part; leave the http://youtu.be/ part out.
For an example of what this looks like live, see: http://leanpub.com/lean19
Here are some more details about how to add a YouTube video:
1. Record a video. It doesn’t have to be good quality; just use an iPhone :)
2. Upload it to YouTube (sorry, that’s the only choice at the moment)
3. Click the Share button.
4. Copy the URL (like http://youtu.be/FcNhBa7o9pM).
5. Go to http://leanpub.com/YOURBOOK/edit
6. Paste in the URL from YouTube, and delete the http://youtu.be/ part, leaving only the unique part
for your video (like FcNhBa7o9pM)
7. Scroll down and click the “Update Book” button.
Web Page URL
On this page you can change your book’s URL. Please note that you will have to re-publish your book if
you change the URL after the book has already been published.
19http://leanpub.com/lean
Leanpub Book Tools 21
Preview
On this page you can generate a new Preview of your book and download the most recent Preview files.
You will not see this option if you are in bring-your-own-book mode.
Some detailed info about Previews:
A Preview is a version of your book that only you can see. You generate Previews whenever you’ve made
changes to your content or formatting and you’d like to see how they look in the ebook. Essentially, a
Preview is a kind of ‘working copy’ of your book. When you’re happy to release your book to the public
for the first time, or when you’ve updated the book and want to release the latest version to the public,
that’s when you’ll go to the Publish page in the book tools - but more on that later!
Previews are created in all three ebook formats that Leanpub produces for published books, namely PDF,
MOBI and EPUB. PDF files can be read on any computer using a PDF viewer like Preview (for Macs) or
Adobe Reader (which you can download for free). EPUB format ebooks are for the iPad and a number of
specialized ebook readers. The MOBI format is used for reading ebooks on the Amazon Kindle. So your
Leanpub ebook will be available to be read on a number of different devices in a variety of formats.
You’ll note on this page that whenever Leanpub generates Previews, it makes Previews of both your ‘Full
Book’ and your ‘Book Sample’ (although currently you won’t be able to make a ‘Book Sample’ if you
are writing using our in-browser editory). The ‘Full Book’ is, naturally enough, your complete book. The
‘Book Sample’ is an ebook that Leanpub generates from just a small part of your full book, and is made
available for free download to readers who come to your book’s landing page. You can decide what to
include in the Book Sample (we’ll be showing you how to easily edit its contents below), or you can decide
not to make a sample available at all.
Subset Preview
Sometimes people working on large books only want to preview a small portion of the book they’re
working on. This speeds up the writing process, as you don’t have to generate a preview of the entire
book every time. That’s why we built the “Subset preview” feature.
To make this work, create a new file in your manuscript folder called Subset.txt. Then, type in the name
of the file or files (one filename per line) that you would like to appear in your next preview. Then, select
“Subset preview” on your book’s “Preview” page in the Leanpub book tools, and click “Create Preview”.
This will generate a new PDF preview from the files specified in Subset.txt.
Please note that this feature does not yet work for our in-browser editor.
Publish Your Book or Publish New Version
Go here to publish the latest version of your book and download the latest published version of your
book. Whether you see “Publish Your Book” or “Publish New Version” will depend on what state your
book is in.
Release Notes
This text will be included in the email to your readers. If you’re not emailing your readers, there’s no
point in writing release notes. You can also see what percentage of your readers have asked to receive
release notifications.
After you’ve published your book, you’ll see links to download the published book files at the bottom of
the page.

Leanpub Book Tools 22
Selling & Royalties
On these pages you can set and review information about your book regarding your sales and royalties.
Sales, Refunds & Royalties
Here you will see an overview of your sales and the royalties you have earned. You can also click the
relevant links to view information related to, refunds and metrics. This is also where you will see the
“Interested Readers” who indicated before your book was published that they would be interested in
buying it.
Before you have any sales, you will see information regarding Interested Readers who have used the
“Notify Me When This is Published?” form on your book’s landing page. You’ll see:
• How many people have said they’d like to buy your book
• The average price they’ve indicated they’d be willing to pay
• The median price they’ve indicated they’d be willing to pay
• Whether any one price occurred more than any other price
You will also be able to download a .csv20 file (which can be used with spreadsheet programs like Excel) of
all the data we’ve collected from interested readers (though you won’t be able to see their email addresses
if they have not opted to show them to you).
Below, you will also see some text discussing how to price your book.
After you have some sales, you’ll see information about the following:
Royalties Fine Print
TODO_LEN - This should not be here; only in TOS. Not sure if there’s other junk like this to remove.
This section summarizes the details of how Leanpub pays royalties.
1. Your royalties for purchases of this book are held for 45 days before being part of the monthly
royalty payouts. The royalty for a given purchase is paid on the first monthly royalty payout after
the hold has elapsed. The reason for this hold is that we don’t want to pay royalties on a purchase
that can still be refunded, and we have an unconditional 45-day 100% refund guarantee. This 100%
happiness guarantee means more sales for you, since it takes away all the risk that readers
feel when buying an ebook.
2. Royalties that are due are paid monthly via PayPal. We typically make these payments in the first
3 days of a given month, but our Terms of Service lets us take up to 25 days to make the payment.
(We make these royalty payments manually.)
3. If your book has bundle purchases, these are included here as well as normal standalone purchases.
For bundle purchases, the Total Paid is identical to the Book Royalty, since the 85% calculation is
done on the bundle to determine the bundle royalty, and then this bundle royalty is split among its
books as purchases.
Pricing
This page is where you set the minimum price and the suggested price for your book. By default the
minimum price is $4.99 and the suggested price is $9.99.
20http://en.wikipedia.org/wiki/Comma-separated_values
Leanpub Book Tools 23
Leanpub uses a variable pricing model which lets customers choose the price they want to pay for your
book. Customers are by default shown your suggested price, and they can choose to lower that price
down to your Minimum Book Price. And they can also pay more, which they often do!
A couple of notes about pricing:
• You can set your Minimum Book Price at zero
• The next lowest Minimum Book Price is $4.99. This way, with our amazing 85% royalty rate, an
author earns at least $4.24 per sale.
• The maximum price a customer can choose to pay is $500 (if you’re selling to an institution you
might end up charging a high price for your work)
• Prices are in US dollars
Multi-reader licenses
To sell a multi-reader license, simply create a Package, configure it similarly to the single-reader package,
offer it at a price point commensurate with the number of licenses being sold, and name it accordingly
(eg. “The Book (10 copy license)”).
Packages
If you have uploaded Extras and have created packages of extras to sell with your book, you will see a
more complex version of the Pricing tab. Here you will be able to set minimum and suggested pricing
(see the section in this manual on “Pricing” for more information) on a per-package basis, and you will
be able to specify which extras belong to which packages.
Extras
An extra is a digital good that you include with your book. Videos, photos, artwork, source files, code
samples, apps, templates, and worksheets are all examples of digital extras that you can offer for sale (or
for free!) to add value to your book.
Creating Extras
Uploading a digital extra is easy. Start by visiting the Extras tab, and fill out some information about the
extra you would like to create:
• Name (eg. “Code Samples”)
• Description (eg. “Examples from the book, in a format you can execute on your own computer.”)
Next, associate one or more files with this extra by dragging them into the dropzone (or clicking the
dropzone to choose files from your hard drive). Files will begin uploading automatically. Once we’ve
received them, a green checkmark will appear, and the “Create Extra” button will be enabled.
Including Extras With Your Book
You can choose whether to include this extra with your book right away, or whether you simply want
to create it without making it public. If you have created multiple packages of your book for sale (see
Creating Multiple Packages of Extras) then you will be able to specify which packages this extra belongs
to.
Updates to extras are available to your readers immediately, without having to republish your book. If
you would like to notify your readers that an extra has been added or updated, feel free to click the publish
button anyway, mentioning the update in the release notes.
Leanpub Book Tools 24
Creating Multiple Packages of Extras
Packages let you offer different configurations of extras at various price points. For example:
• The Book – $25
• The Book + Code Samples – $30
• The Book + Code Samples + Video Tutorials – $50
Upload your extras first, then wrap them up into any number of packages by clicking the “Create Your
First Package” button. You can edit existing packages at any time by visiting the Packages & Pricing tab.
Coupons {#coupons}
You can create coupons for your book. Coupons are a great way to promote your book, letting you sell
your book at a discount to specific customers, or even letting reviewers get free copies.
If you have any existing coupons, you’ll see them set out in a table at the top of the page.
In order to create coupons for your book, go to the Coupons page in your book tools and click ‘New
Coupon’.
This will take you to a ‘Create Coupon’ page where you can assign the settings for your coupon.
Coupon Code
At the top of the page, you’ll see the ‘Coupon Code’. Anyone who has this code can enter it on your
book’s purchase page in order to take advantage of the coupon deal you’re offering. You can change the
coupon code to whatever you like.
Discounted Minimum Price
The Discounted Price is the new minimum price of the book, not the amount of the discount. For example,
if your book has a minimum price of $9.99 and you want to sell it for a minimum price of $7.99 with this
coupon, you put 7.99 in this field, not 2.00.
Start Date and End Date
You can assign a start date and an end date for your coupon. This way you can set up a temporary
promotion of you book with a clear cutoff date.
Uses Limit
You can set a limit to the number of times the coupon code can be used before it is deactivated.
Note
This is an optional note for your own record-keeping purposes.
Temporarily Suspended
This is a “manual override” which lets you to temporarily turn off coupon by checking this checkbox.
Otherwise, leave this checkbox unchecked: the normal way to control a coupon is by the max # uses and
the start and end dates.
Leanpub Book Tools 25
Make sure to click ‘Create Coupon’ or ‘New Coupon’ at the bottom of the page after you’ve made any
changes.
Support a Cause
Here you can optionally choose a cause to split your royalties with. If you choose a cause, you can choose
a percentage from 10% to 100% of your royalties for the cause to receive. You can only choose one cause
per book.
Analytics
You can add Google Analytics and Clicky codes here.
Google Analytics Code
Optionally add your Google analytics code (for example “UA-1234567-1”, without the quotes) here. We’ll
embed this in your book page and the checkout pages. If you’re into analytics, this is for you! (On the
other hand, if you think a conversion funnel is something you use to change your oil you can safely ignore
this.)
Clicky Analytics Code
This works like the Google Analytics code feature, except it’s for Clicky.
Notifications {#notifications}
Get Notified of Purchases
This section lets you choose from the following notification settings regarding purchases of your book:
• Email me only for paid purchases (default setting)
• Email me for all paid and free purchases
• Do not email me
Message to Include on Purchases
Optionally add a message to be included in the email we send to each new reader after they’ve purchased
your book.
Community
This section focuses on your interaction with social media and the community you build around your
book. There will be a lot more community-related features coming to Leanpub in the future!
Testimonials
Here you can add testimonials from readers and reviewers of your book that will show up on your book’s
web page.
Reader Feedback
Here you can choose whether and how we show the Disqus comments for your book.
Social Media
Leanpub Book Tools 26
• “Suggested Hashtag”: Optionally add a suggested hashtag for your book. If you add a hashtag here,
we will add a ‘Tweet This Book!’ page after the copyright page, encouraging people to tweet about
your book.
• “Suggested Tweet”: After readers buy a book, we prompt them to tweet about it. If you want to
provide custom text to prefill the tweet with, you can enter it here.
• “Facebook Page To Like”: Leave this blank if you want to like your page on Leanpub. If you have a
Facebook page that you want to add likes to, enter it here.
Mailing Lists
Here is where you can view and configure your Leanpub mailing lists. These are lists of people who have
opted-in to share their email address with you.
Admin
Webhooks
This is where you can add webhooks. If you don’t know what this is all about, you can jst ignore it!
Embargo Mode
Putting your book under embargo lets your book’s web page show up publicly, but it will not show up in
any lists such as new releases, bestsellers, also by this author, your author profile page, etc. It also adds
an EMBARGO header to your book landing page.
Stealth Mode
Stealth mode makes your book page look like a Leanpub “sorry, this book was not found” page. You won’t
see this if your book is published; only books that are not published can be put into stealth mode.
While we encourage you to work in public, we understand that there are certain situations where stealth
mode make sense.
New Edition URL
If you would like to point readers to a new book, enter the URL of the new edition of your book here.
Delete Book
If you want to delete your book, click the big scary red button you will find here.

Markdown: The Easiest Way To Format
Your Text For E-Publishing
Leanpub Flavoured Markdown and Markua
Since 2010, Leanpub books have been written in a dialect of Markdown called Leanpub Flavoured
Markdown. This is Markdown, with the various extensions that we added over the years to support
some book concepts.
We are now launching an early beta of support for Markua in Leanpub. Markua is “Markdown for Books”.
It is our answer to the question “What if Markdown had been created to write books, not blog posts?”
Markua is specified here21. You can learn more about Markua at markua.org22.
Note that this is a very early beta of Markua support. Lots of the Markua specification has not yet been
implemented in Leanpub. But if you want to switch writing mode to Markua and see what works and
what doesn’t, now you can!
Markua is not the default yet for books in Leanpub. Leanpub Flavoured Markdown, as specified in this
manual, is still the default for Leanpub books.
Why Should You Care?
A Leanpub book is composed of a bunch of plain text files written with Markdown formatting
instructions.
To learn about the syntax and philosophy of Markdown, see this article by John Gruber23.
Briefly, Markdown is a nice way of writing content which is easily transformed into HTML, and at
Leanpub we use it to make ebooks in three different ebook formats.
For example, putting the number sign # at the beginning of a line becomes an h1 header (like a chapter
heading), ## becomes an h2 (like a sub-section heading), ### becomes an h3, etc. Lists, paragraphs and
other formatting is also intuitive.
How Markdown is Used in Leanpub
Even if you know Markdown, you need to learn a few things about how we use it at Leanpub.
Importing Markdown Files
To import Markdown files to Leanpub, you can just save them as .txt files, put them in your book’s
manuscript folder, and refer to them in Book.txt (the list of files to be included in your book, in the order
you’d like them to appear), and generate a new Preview of your book.
21https://leanpub.com/markua/read
22http://markua.org/
23http://daringfireball.net/projects/markdown/syntax

Markdown: The Easiest Way To Format Your Text For E-Publishing 28
Heading Levels Become Chapters and Sections
First, we use # chapters, ## for sections and ### for sub-sections. (You can also use #### for sub-sub-
sections, but don’t get carried away! Most technical books are good with just #, ## and ###, and most
business and fiction books are good with just # and possibly ##.)
So, if you look at the top of the Markdown.txt file you’ll see that it has one #, meaning it is a Chapter.
Another thing this means is that one file can contain as many chapters or sections as you want: every
# makes a new chapter; it has nothing to do with what file it is in. However, we strongly recommend
having one file per chapter (or one file per chapter section), since it makes creating sample books easier
and keeps your book directory cleaner. Since we recommend this, that’s what we’ll do in this example
book.
Links Become Footnotes
We support Markdown syntax for links, as well as normal HTML links. Both of these are converted into
functioning footnotes in the PDF. Here’s an example of a link to Leanpub24.
And here’s what it looks like in Markdown (i.e., this is what you type in the text file to get that link):
[Leanpub](http://leanpub.com)
Markdown Extensions in Leanpub
We’ve made a few additions to Markdown for use in Leanpub. Two of the most important are tables and
crosslinks. Furthermore, since Leanpub is so good for technical books, we also support extensions for
external code samples, special directives for code syntnax highlighting, etc.
We use almost all of the Kramdown25 extensions (see http://kramdown.gettalong.org/syntax.html26 for a
list of them). Two exceptions are:
1) HTML blocks – we don’t support HTML elements in our Markdown.
2) << becoming a left guillemet. We took this out when we created the external code sample syntax.
Markdown Editors
There are a lot of Markdown editors out there. Some good choices are:
• Caret - https://caret.io27
• iA Writer - http://www.iawriter.com28
• Emacs - for geeks!
•MarkdownPad29
• other text editors such as TextMate, vi, etc.
24http://leanpub.com
25http://kramdown.gettalong.org/
26http://kramdown.gettalong.org/syntax.html
27https://caret.io
28http://www.iawriter.com
29http://markdownpad.com
Attributes
You can set various ‘attributes’ directly in your book files, like setting the code language, or line
numbering. You do this by adding the syntax on their own separate lines in the text.
To be clear, each attribute should be alone on a line, with blank lines above and below it (unless it’s at
the beginning of the file, in which case you just need a blank line below it!).
In general, the syntax works like this:
{some-attribute=value}
{some-attribute=”some attribute value”}
Quotes are only necessary if there are spaces.
You can have multiple attributes too. Separate them with commas.
{language=ruby,line-numbers=off}
Spaces are not significant, so you could also write:
{language=ruby, line-numbers=off}
or
id: {#some-id}
So, for example, if you want a file or section to be front matter (like an introduction, which will have
roman numerals for page numbers), at the top of the file or section just type:
{frontmatter}
Or if you want to turn on line numbering just for that section, type:
{line-numbers=on}
Here are the attributes supported:
general: id code blocks: language, line-numbers files: encoding
special names: {pagebreak} {frontmatter} {mainmatter} {backmatter}

Creating A New Book
How To Create A New Book
[To be updated! For now check out our how-to manual and video http://leanpub.com/help#howtos30]
How To Set The Book’s Structure
To set the structure for your book - that is, what content you want to appear and in what order - you use
the Book.txt file in your book’s ‘manuscript’ folder.
‘Book.txt’ is a list of the files that you want included in your book, in the order that you want them to
appear.
So if you have .txt files in your ‘manuscript’ folder called ‘chapterone.txt’ and ‘chaptertwo.txt’ and you
want them to appear one after the other in your book, open Book.txt and type:
chapterone.txt chaptertwo.txt
This means that you can actually have content in your ‘manuscript’ folder that isn’t included in your
ebook. Only the files listed in ‘Book.txt’ will appear in your book. This is useful if you’re working on new
chapters that you don’t yet want to include in the latest version of your book, for example. You don’t
have to take the file out of ‘manuscript’; you can just take it out of the list of files in ‘Book.txt’.
30http://leanpub.com/help#howtos
Book Styles
Technical Books
A technical book defaults to 8.5” x 11” paper. Subtracting margins, you have 6.5” x 9” to work with. This
means the images in your book can be up to 468 pixels wide and up to 648 pixels high at 72PPI. The
recommended cover image size is 612 pixels wide and 792 pixels high, for a 72 PPI image.
Business Books
A business book defaults to Digest paper (5.5” x 8”). Subtracting margins, you have 3.5” x 6” to work with.
This means the images in your book can be up to 252 pixels wide and up to 432 pixels high at 72PPI. The
recommended cover image size is 432 pixels wide and 648 pixels high, for a 72 PPI image.
Fiction Books
A fiction book defaults to Digest paper (5.5” x 8”). Subtracting margins, you have 3.5” x 6” to work with.
This means the images in your book can be up to 252 pixels wide and up to 432 pixels high at 72PPI. The
recommended cover image size is 432 pixels wide and 648 pixels high, for a 72 PPI image.
Sample Books
Why Sample Books?
Leanpub lets you create a sample book, which readers can download for free to help them decide whether
they want to buy the real book.
(Please note that currently you can’t make a sample book if you are using our in-browser editor.)
To do this, you create or edit a file called Sample.txt in the ‘manuscript’ folder for your book. Note that,
like Book.txt, the Sample.txt file is just a list of files. It’s supposed to be a smaller list than what is in
Book.txt, or else you’re giving your whole book away! If you don’t want a sample book, just delete the
Sample.txt file.
Consequences for Manuscripts
One consequence of this approach to specifying a sample book is that it’s an “all or nothing” decision
to include a file. If you include a file in the list in Book.txt, all the chapters and sections in that file are
inserted in your book. Because of this, we recommend a couple things:
1. Either use a separate text file for each chapter, or
2. Never let a section span multiple text files.
These two guidelines mean that your sample book is a lot less likely to have problems. If you don’t follow
them, things can still work, but you can sometimes create a situation where your book will be created
fine but your sample book will not.
So, if you use the “separate text file for each chapter” approach, things will just work.

Images
How To Insert An Image
This section shows how you can insert images into your Leanpub book.
First, you need to put the image in the ‘images’ folder in the ‘manuscript’ folder for your book.
Second, type in a reference to the image like this:

Then you’ll see the image appear:
This is the Image Caption
That’s it! (See this web page31 for details on images in Markdown.)
Note: Captions will only appear if an image is on a line all by itself.
Image Format And Resolution
We support PNG, JPEG and GIF formats for images.
Note that it’s important to get the size and the resolution of the image right.
We recommend using 72 pixels per inch (PPI) for most images in our books.
Recommended Image Resolution
We recommend that for images in your book you use images set to a resolution of 72 pixels per inch (PPI)
and that you use the JPG format set to 80% compression. These settings should help keep the size of your
book files smaller.
31http://daringfireball.net/projects/markdown/syntax#img

Images 35
For images that are drawings, like line diagrams, PNG will look better than JPEG, and we recommend
you set the image resolution to 150 PPI or 300 PPI.
When exporting vector images to a raster format, we recommend you choose PNG, and choose either 150
PPI (the best tradeoff between clarity and file size) or 300 PPI (for the sharpest images but a larger book).
Maximum Image Sizes
You can choose different page sizes for Leanpub books. Each page size comes with a corresponding
maximum size for images (images with bigger dimensions than the maximum allowed dimensions will
be automatically resized).
You can check your book style and the page size by clicking on “Writing” in your book tools and selecting
the “Book Theme” option. You can also change and customize your book style there.
This table sets out the maximum image sizes in pixels (width x height) for each page size, if your image
resolution is set to 72 PPI:
Unit US
Letter
A4
Paper
Technical US
Trade
A5
Paper
Digest Paperback
Pixels 468 x
648
451 x
698
396 x
511
288 x
504
276 x
451
252 x
432
216 x
396
The technical book style defaults to 8.5 inch x 11 inch paper. Images in the book should be exactly 468
pixels wide and 648 pixels high at 72 PPI.
The business book style defaults to Digest paper (5.5 inches x 8 inches). Images in the book should be
exactly 252 pixels wide and 432 pixels high at 72 PPI.
The fiction book style also defaults to 5.5 inches x 8 inches. Images in the book should be exactly 252
pixels wide and 432 pixels high at 72 PPI.
Positioning An Image On The Page
You can ‘float’ your image on the page, aligning it to the right and left as your prefer. (You can also use
{float=inside} or {float=outside} rather than {float=left} and {float=right} in your Markdown).
For example, if you type this (using the name of your image and not the Leanpub logo, of course):
{width=60%,float=left}

Then you willl see the image floated to the left, with text wrapping around it, like this:
Lorem ipsum dolor sit amet, consectetur adipisicing elit, sed do eiusmod tempor incididunt ut labore et
dolore magna aliqua. Ut enim ad minim veniam, quis nostrud exercitation ullamco laboris nisi ut aliquip
ex ea commodo consequat. Duis aute irure dolor in reprehenderit in voluptate velit esse cillum dolore eu
fugiat nulla pariatur. Excepteur sint occaecat cupidatat non proident, sunt in culpa qui officia deserunt
mollit anim id est laborum.

Images 36
This is the Image Floated Left
Lorem ipsum dolor sit amet, con-
sectetur adipisicing elit, sed do eius-
mod tempor incididunt ut labore et
dolore magna aliqua. Ut enim ad
minim veniam, quis nostrud exerci-
tation ullamco laboris nisi ut aliquip
ex ea commodo consequat. Duis aute
irure dolor in reprehenderit in volup-
tate velit esse cillum dolore eu fugiat
nulla pariatur. Excepteur sint occae-
cat cupidatat non proident, sunt in
culpa qui officia deserunt mollit anim
id est laborum.
Lorem ipsum dolor sit amet, consectetur adipisicing elit, sed do eiusmod tempor incididunt ut labore et
dolore magna aliqua. Ut enim ad minim veniam, quis nostrud exercitation ullamco laboris nisi ut aliquip
ex ea commodo consequat. Duis aute irure dolor in reprehenderit in voluptate velit esse cillum dolore eu
fugiat nulla pariatur. Excepteur sint occaecat cupidatat non proident, sunt in culpa qui officia deserunt
mollit anim id est laborum.
Floating images and lists
Because of the way that we create floated images using LaTeX, floated images and lists do not
mix. If you have a floated image and place a list beside it, the float will not stop where you
would expect it to.
There’s no real fix for this, but the workaround is to avoid using lists next to floated images.
Please note that it is not currently possible to set images side-by-side.
Basic Image Recommendations
For most images:
• Use JPG not PNG (this will help keep book file size down)
• PPI (Pixels Per Inch): We recommend 72 PPI. Use as low a PPI as you are happy with to keep the
book file size down.
• JPG Compression: We recommend setting JPG compression to 80%. Use as low a quality as you are
happy with to keep the book file size down.
For line diagrams:
• Use PNG not JPG (this will help keep book file size down)
• Use 150 PPI or 300 PPI

Images 37
Maximum Image Sizes
You can choose from among seven PDF page size settings for a Leanpub book. Each setting affects the
maximimum width and height for images inside the book.
Note that the Pixels Per Inch (or PPI) setting you choose for your images affects the size, in pixels, required
for the cover. It also affects the maximum size, in pixels, for images inside the book.
For images inside the book, to determine the maximum pixel size of the image, you multiply the content
area in inches by the Pixels Per Inch setting for your images.
The table below shows the maximum size for 72 PPI images inside the book for each of the Leanpub page
size settings.
Unit US
Letter
A4
Paper
Technical US
Trade
A5
Paper
Digest Paperback
Pixels 468 x
648
451 x
698
396 x
511
288 x
504
276 x
451
252 x
432
216 x
396
Questions About Images and Cover Pages
Is there a way to scale pictures?
We know that this isn’t perfect, but here’s how it works right now. We only scale pictures if they are
too big or if their resolution is below 120 DPI. So, if you want the images to be a certain size make their
resolution above 120 DPI and their width less than the max width for the page size you are using. That
way we’ll leave it alone.
Your Profile, Dashboard and Account
When you create a Leanpub account, you can edit your personal information.
Once you’ve logged in to your Leanpub account by clicking ‘Sign In’ at the top right of the home page,
you will see your name appear in the top right. When you click on your name, you will see a drop-down
menu with the following options:
•Dashboard
•View Your Profile
•Edit Account
Dashboard
When you click on Dashboard, you will be taken to your Dashboard. There are five tabs in your
Dashboard:
•Your Books
•Your Bundles
•Edit Account
•Pending Invitations
•Your Purchases
Your Books
This is the Dashboard tab you are taken to by default. Here, you’ll see all the Leanpub books you’re
working on, and which books are in stealth mode.
If you click on the blue text for each book’s title:
a) if your book is in stealth mode, you will go to your book’s Settings page. b) if your book is not in stealth
mode, you will go to your book’s Landing page.
If you click on the author name, you will go to that author’s Profile page. (If your book has more than
one author, you will see all the author names).
Your Bundles
On this page, you’ll see information related to any bundles you’ve created.
Other Bundles Which Include Your Books
Other authors can create and propose bundles that include your books. These bundles show up in your
Pending Invitations tab above. If all the authors in a bundle accept the bundle, the bundle is published
and shows up here.
In the table, you will see information related to each bundle, including its name, state (pending or
accepted), Total Royalties (your royalties), Minimum Price and Suggested Price.
Your Profile, Dashboard and Account 39
Bundles You’ve Created
Here you’ll see similar information as described in the section above, except it’s for bundles you’ve
created.
New Bundle
After you fill in this information and create your bundle, you will be able to add books to it. The bundle
gets the same 80% royalty that Leanpub books do. This bundle royalty is then split up between the books
in the bundle according to percentages you set. If you include other authors in your bundle, make sure
you are generous with the percentages: they must approve the bundle for it to be published.
In this section, you can set the new bundle name, URL, Minimum and Suggested Prices, and add some
information About the Bundle. See the Bundles section elsewhere in this manual for more information.
Edit Account
On this page, you can edit your account information.
Full Name and Username
At any time, you can change your Full Name and your Username (though you can only have a username
someone else hasn’t taken). Your Full Name will appear as your author name on your books and on
Leanpub wherever your book is featured, including the landing pages for your books.
Email and Paypal Email
You can also change the email address you use with Leanpub, and you can enter a separate email for
receiving PayPal payments from Leanpub (otherwise we’ll use your Leanpub account email to pay you
your royalties through PayPal).
New Password
You can change your Leanpub account password here anytime.
Picture
You can upload a picture here that will be displayed in your Profile and on your landing page(s).
Twitter ID
If you have a Twitter ID, enter it here and it will appear in your Profile and on your landing page(s).
About You
Information you enter here will appear in your Profile and on your landing page(s). You can override the
About You information for the landing pages of individual books in the ‘Custom About the Author Blurb’
section on the ‘Landing Page’ tab of your book’s Settings page.
As always, make sure to click the button at the bottom of the page to register any changes you’ve made.
Pending Invitations
If someone has invited you to join a bundle including one or more of your books, you will see pending
invitations on this page.
You can check out the bundle name, your proposed percentage of the royalties, and your minimum royalty
per sale. If you like the offer, just click ‘Accept’; if you don’t, you can click ‘Reject’.
Your Profile, Dashboard and Account 40
Your Purchases
On this page you’ll find download links for all the Leanpub books you’ve bought.
You’ll also see the following features:
Download Your Books
You can click the links you’ll find here to download the latest versions of any books you’ve purchased.
You can download versions in PDF, EPUB (for iPad etc.) and MOBI (for Kindle) formats.
You can also change your email settings for each book. You can choose to be emailed about new book
releases, and/or to receive separate emails from the book’s author. By default, these options are selected.
Email Preferences
Leanpub authors are never given your name or email address. However, by default they can use the
Leanpub website to email you when new versions of their books are ready for you to download, and they
can also email you with announcements related to their books. You have the ability to configure whether
you want those emails on a per-book basis above and saving below. However, you can also just turn all
Leanpub email off by unchecking this checkbox and saving below.
Send books right to your Kindle
Every Kindle has an email address. You can find yours by going to your personal Documents Settings on
Amazon. It will be something like “your.name@kindle.com”. Enter the “your.name” part in the input box
you’ll find in this section.
While you are there, you also need to add hello@leanpub.com as an approved email address. (Look for
“Add a new approved e-mail address” near the bottom of the page).
Once you have saved these settings (click on the button below), you will see “send to Kindle” links for all
of your purchases.
To avoid costing you money, we only send to the @free.kindle.com address, which only works on models
with wi-fi.
As always, make sure to click the button at the bottom of the page to register any changes you’ve made.
View Your Profile
When you click View Your Profile, you’ll be taken to your Profile page (unless all your books are in Stealth
Mode - if they are we assume you want your Profile invisible to the public too. If you try to go to your
Profile when all your books are in Stealth Mode, you’ll just go to Leanpub’s home page.)
On your Profile page, you’ll see a list of all your books that aren’t in Stealth Mode. Your Profile page
is public, and is what other people will see if they click on your name when it appears on Leanpub in
connection with any of your books.
At the top of the page, you’ll also see any ‘About You’ information that you entered in the ‘Edit Account’
section, as well as your chosen picture and Twitter ID.
Edit Account
If you click on Edit Account in the dropdown menu that appears after you click on your name in the top
right of the page after you sign in, you’ll go to the Edit Account section (see above).
The Landing Page
When you create a new book, Leanpub creates a web page or ‘landing page’ for your book. This is a
central location where readers can find out about your book - and where they can click to buy it!
You can hide the landing page by selecting the ‘Stealth Mode’ option in the book’s settings. However,
we generally recommend having a public landing page for your project as soon as you start working on
Leanpub. Telling people what you’re working on can be a great way of drumming up and gauging interest
in your project.
Please note that while the content of the page can be customized and there are some features you can
turn on and off, as always on Leanpub we don’t want you worrying too much about design, so the overall
design of your web page is already set. Also, we want a uniform look for Leanpub - we don’t want to
make the MySpace mistake!
The following sections set out some aspects of the Leanpub landing page.
Table of Contents
The Table of Contents is added to your book’s landing page automatically when you publish, and re-
generated every time you publish.
If you want to add something before you publish, then it (currently) has to be done by hand.
Widget
We provide you and your readers with an embeddable widget to stick on other websites to promote your
books and bundles.
To get the embed code you need, go to your book’s landing page and find the “Share this book” section.
In that section there is a link icon which will give you the embed code.
You can adjust the size of the widgets by playing with the “width” and “height” parameters in the embed
code. They were designed for 160px by 400px, but should look decent at other sizes.

Publishing
How To Publish Your Book On Leanpub
When you’re edited your Preview and you’re ready to make you book available to the public, just go to
the Publish page in your book tools and click ‘Publish My Book’!
Notifying Readers When You Publish
Whenever you publish your book (that is, when you publish it for the first time, and whenever you publish
a new version), you can choose whether or not to email your existing readers (you’ll see this option on
the Publish page; by default readers are not emailed). We recommend only emailing readers once or twice
a month. (Your readers can choose whether they want to be emailed with updates from you.)
ISBNs
Here is some information about ISBNs and whether you need one or not for your book:
• For publishing on Leanpub, you do not need an ISBN.
• If you do need an ISBN for publishing with another service, the rules are that an ISBN refers to a
specific format of a book, so theoretically you should have one for epub, one for mobi and another
for PDF.
• According to the Int’l ISBN’s own position paper32, the ISO standard says:
“Each different format of an electronic publication (e.g. ‘.lit’, ‘.pdf’, ‘.html’, ‘.pdb’) that is
published and made separately available shall be given a separate ISBN.”
• As a Canadian publisher, one of the requirements for us is to send a copy of each book we get
an ISBN for to the Canadian archives. We do that when we publish to iBooks for you. There’s no
requirement to do this until you have an ISBN, and this is a strictly Canadian requirement. There
may be similar requirements for other countries, but these won’t affect you unless you get an ISBN
through them.
Changing Your Title and URL
You can change the title of your book and change the URL for your book at any time, even after you’ve
published it for the first time.
Please note that after you change your URL, you will need to re-publish your book.
Also, the name of the Dropbox folder for your book will remain unchanged – you can just use the old
one.
32http://www.isbn.org/standards/home/images/isbn_agency_e-books_position_paper.pdf

Publishing 43
Questions About Publishing on Leanpub
If I publish my book on Leanpub, can I also publish it elsewhere?
Yes! You are totally free to take the files we generate and and do what you like with them, e.g. publish
with Amazon, Apple or Kobo, or to approach a traditional publisher with your work in the traditional
way.
If I’m going to publish my book while it’s in progress, how much of my book should I have
completed before I publish for the first time?
This will be different for every author. For a discussion about this issue amongst Leanpub authors, please
go here33.
33https://groups.google.com/group/leanpub/browse_thread/thread/ee204496af78e919#
Languages and Letter Accents
Setting the Main Language Used in the Book
In the General Settings page in your book tools, you can set the main language used in the book.
When you create a book, to set the language, click on “Writing” in the menu on the left and
then click on “General Settings”. There, you will see a dropdown where you can set the main
language used in the book. Once you’ve selected a language, click the blue “Update Book”
button at the bottom of the page.
By default, the main language is English.
This helps us to set up the fonts that we use in your book. If you are writing with a mixture of languages
that includes Chinese, Japanese or Korean, then you should check out the language switcher section
(right below here). If you have troubles with characters not showing up properly, please let us know at
hello@leanpub.com.
Overriding Leanpub Language Defaults
You can tell Leanpub what encoding a file is in via a snippet of text that you put at the top of the file:
{:: encoding="utf-8" /}
This will let you over-ride our encoding guessing.
Switching back and forth between language fonts
You can switch back and forth between language fonts by indicating the font in curly brackets.
For example, you can switch to a Chinese font by typing {chinesefont} and back to latin characters again
by typing {latinfont}.
Here’s an example:
Here is some Chinese text 办事去了 and here’s some English.
Here is some Chinese text {chinesefont}����{latinfont} and here's some English.
There are also equivalent switches for Japanese {japanesefont}, Korean {koreanfont} and Thai {thaifont}.

Languages and Letter Accents 45
A note about writing Leanpub books in Japanese, Korean
and Chinese
If you are writing with a mixture of languages that includes Chinese, Japanese or Korean, then you should
select Chinese, Japanese or Korean as the main language for your book.
A note about writing Leanpub books in right-to-left (RTL)
languages
Leanpub has support for RTL languages. Currently, we support Hebrew and Arabic. If you would like
support for another right-to-left language, please contact us at hello@leanpub.com.
There are no special instructions for setting up a book to write in these languages; just use the same
process set out in the instructions above34 for setting the main language.
Please note that when switching back and forth between language fonts35 in your book as described
above, sometimes when you are switching between left-to-right and right-to-left fonts, you also need to
use {rtl} and {ltr}. So, for example, you might do something like:
{rtl}{hebrewfont} some text here {ltr}{latinfont}
Also, we support the unicode characters to switch from LTR and RTL (which are <200e> and <200f>).
34https://leanpub.com/help/manual#leanpub-auto-setting-the-main-language-used-in-the-book
35https://leanpub.com/help/manual#leanpub-auto-switching-back-and-forth-between-language-fonts
Dedication, Parts, Chapters and
Sections
Dedication
Here you can enter a short dedication for your book, which will appear before the Table of Contents.
Parts
To start a new “Part” in your book, you start a line with -# followed by the title of the Part.
-# Part 1
Chapters, Sections and Sub-sections
Chapters are started by a single #. Sections with two ##, sub-sections with three ### all the way down to
sub-sub-sub-sections #####.
# Chapter 1
## Section 1.1
### Sub-section 1.1.1
#### Sub-sub-section 1.1.1.1
##### Sub-sub-sub-section 1.1.1.1.1
Please note that only lines of text with one or more number signs will show up in the Table of Contents
(you can control what level of hierarchy you want to show up in your Table of Contents in the Settings
section for your book).
Table of Contents
Leanpub automatically generates a Table of Contents for you. It will show Chapter headings in bold in a
large font.
Dedication, Parts, Chapters and Sections 47
Front Matter, Main Matter and Back Matter
Authors often want their books to be composed of distinct front, main, and even back ‘parts’. For example,
an Introduction will be numbered separately from the main chapters of the book. So an Introduction might
be numbered (if you want numbering) 1, and then for Chapter One the numbering will start over at 1.
To format sections as front matter (like an introduction), main matter (the chapters of your book) and
back matter (an appendix, say), you just need to type the following at the point where you want the front
matter, main matter or back matter section to begin:
{frontmatter}
{mainmatter}
{backmatter}
Each instruction should be on a line by itself, with blank lines above and below it. Unless the instruction
is the first line in a .txt file, in which case you just need a blank line below it.
We do generally recommend that each instruction for a part should have its own file, so things are clear
in book.txt. That means you should have a separate file that contains only the e.g. backmatter instruction
and is called “backmatter.txt”.
Introduction & Acknowledgments
These sections are usually included at the front of the book as front matter. Files designated as front
matter will be numbered as a separate set of files and their page numbers will be roman numerals (i.e. 5
is V). This means that when you start the next section, the numbering starts over.
To designate that a section is front matter, at the beginning of the section, just type:
{frontmatter}
on a separate line, with blank lines above and below it.
When you want the ‘mainmatter’ section to start, just type:
{mainmatter}
at the start of the main matter section (or at the end of the front matter section) on a separate line, with
blank lines above and below it.
One easy way to do this is to make a separate text file that just contains the syntax indicating the start
of the section.
So you could create a new text file, and just type:
{frontmatter}
and nothing else! If you save the file as frontmatter.txt in your Book.txt file, it might look like this:
frontmatter.txt
introduction.txt
and Leanpub will know to format introduction.txt as front matter.
Front matter has no section numbering, even if you have turned on section numbering for the rest of your
book.
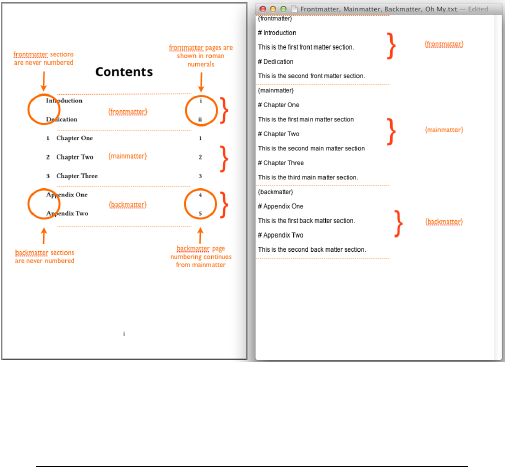
Dedication, Parts, Chapters and Sections 48
Also, you only need to give each instruction once, and that instruction applies to everything that comes
after, unless you type a new instruction. So if you type {frontmatter} in one file, everything after it will
be frontmatter until you type {mainmatter}.
Appendix, Appendices, Index
These sections are usually included at the back of the book as back matter. Back matter has no section
numbering, even if you have turned on section numbering for the rest of your book. However, page
numbering continues unchanged.
To designate that a section is back matter, at the beginning of the section, just type:
{backmatter}
on a separate line, with blank lines above and below it.
Front Matter, Main Matter, and Back Matter Example
Below is a sample Table of Contents page showing Frontmatter (the Introduction and a Dedication),
Mainmatter (Chapters One, Two and Three, with section numbering), and Backmatter (Appendix One
and Two).
(Please note that Leanpub has introduced a special Dedication feature, which is described at the
beginning of this chapter. Previously, authors who wanted a Dedication formatted it as Frontmatter,
as shown in this image.)
You could make this book using a single .txt file with the following content:
{frontmatter}
# Introduction
This is the first front matter section.
# Dedication
This is the second front matter section.

Dedication, Parts, Chapters and Sections 49
{mainmatter}
# Chapter One
This is the first main matter section
# Chapter Two
This is the second main matter section
# Chapter Three
This is the third main matter section.
{backmatter}
# Appendix One
This is the first back matter section.
# Appendix Two
This is the second back matter section.

Styling Text
Bold, Emphasis/Italics, and Underlining
You can emphasise text by putting *or _(one underscore) before and after the text.
I am *emphatic*
You can make bold text by putting ** or __ (two underscores) before and after the text.
I am **bold**
You can do bold-italic with *** or ___ (three underscores) before and after the text.
I am ***bold-italic***
You can underline text with ____ (four underscores) before and after the text.
I am ____underlined____
Please note that some ebook viewers don’t display underlining. For example, you can see underlines on
Kindle for Mac and on the Kindle Paperwhite, but Adobe Digital Editions doesn’t display them. Older
Kindles may fail to display underlines as well.
Superscripts
Surround something in carets ^to make it superscript. Like 1st or 2nd.
1^st^ or 2^nd^
Monospaced Text
Use backticks to make text monospaced (it looks red here, but won’t in your book).
I am `monospaced`!
Non-Breaking Spaces
You can add non-breaking spaces with . This is useful for e.g. numbers that would be confusing if
they were split onto more than one line. Here’s an example: 120 000 €
Styling Text 51
120 000 €
Blocks Of Text
Paragraphs
Paragraphs are consecutive lines of text. You can separate paragraphs from each other by putting a blank
line between them.
You can also separate paragraphs, or blocks of text, by adding two spaces at the end of the paragraph.
This is useful when you are going to follow a paragraph with another kind of text block, like a numbered
list, or any of the other kinds listed in this section.
Paragraphs are consecutive lines of text.
You can separate paragraphs from each other by putting a blank line between them.
You can also separate paragraphs, or blocks of text, by adding two spaces
at the end of the paragraph. This is useful when you are going to follow
a paragraph with another kind of text block, like a numbered list.
Centering Paragraphs Or Lines Of Text
You can center paragraphs or lines of text by putting C> (followed by a space) at the start of the line.
Just type this in your .txt file:
C> This is a centered sentence on its own.
…and you’ll see this in your Leanpub book:
This is a centered sentence on its own.
You can also group together blocks of centered text. Just type something like this in your .txt file:
C> This is a centered sentence.
C> Another centered sentence, in the same paragraph as sentence one.
C>
C> This sentence will be in a new paragraph.
…and you’ll see this in your Leanpub book:
This is a centered sentence. Another centered sentence, which will be in the same paragraph as sentence
one.
This sentence will be in a new paragraph.
Blocks Of Text 53
Numbered/Ordered Lists
Numbered lists are easy to make.
1. This is the first item in the numbered list.
2. Each number (plus a period) should be followed by a space.
3. Once you start a numbered list, it doesn’t matter what number you put at the beginning of the line.
This line starts with 1. as it is written, but appears in the ebook as 3.
1. This is the first item in the numbered list.
2. Each number (plus a period) should be followed by a space.
1. Once you start a numbered list, it doesn't matter what number you put at the beginning o\
f the line. This line starts with 1. as it is written, but appears in the ebook as 3.
Unordered/Bulleted Lists
To make a list without numbers, where items are separated by bullets, you add an asterisk *followed by
a space at the beginning of a line.
• This is the first item in a bulleted list.
• This is the second item in a bulleted list.
• You can also use hyphens -to indicate you are making a bulleted list
* This is the first item in a bulleted list.
* This is the second item in a bulleted list.
- You can also use hyphens - to indicate you are making a bulleted list
Nested Lists
If you want nested lists, then you indent by two spaces:
• one
• two
• three
–three.one
–three.two
Blocks Of Text 54
* one
* two
* three
* three.one
* three.two
Putting Code Blocks Inside Lists
To put a code block in a list, do something like this:
• one
#!/usr/bin/env ruby
puts "hiya"
10.times {|n| puts n}
• two
• three
Some notes:
1. The code is indented by 8 spaces, not the usual 4.
2. There must be a blank line before and after the code block
3. Tilde delimited code blocks do not work.
* one
#!/usr/bin/env ruby
puts "hiya"
10.times {|n| puts n}
* two
* three
Putting Paragraphs Into Lists
If you’d like to add a paragraph in the middle of a list, and have the list numbering continue afterwards,
you can indent the paragraph by four spaces.
1. This is the first one
2. The second
A whole lot more info about the above item.
3. This is the third item
4. This is the 4th item

Blocks Of Text 55
1. This is the first one
1. The second
A whole lot more info about the above item.
1. This is the third item
1. This is the 4th item
Putting Images Into Lists
You can put images in lists, like this:
1. One thing.
2. Second thing.
Leanpub Logo
3. Third thing.
4. Fourth thing.
1. One thing
2. Second thing.

3. Third thing
4. Fourth thing.
Definition Lists
Put the thing you want to define on a line by itself. On the next line, or after a blank line, type a colon
followed by the definition. For a more detailed example that explains how to nest definitions and have
multiple paragraphs in definitions, see http://kramdown.gettalong.org/syntax.html#definition-lists.
Ruby
A wonderful language.

Blocks Of Text 56
JavaScript
Lovely little language that really shines when you add CoffeeScript to the mix. This is a longer entry
to see what it looks like when it wraps to a second line.
Haskell
Messes with my head.
Ruby
:A wonderful language.
JavaScript
:Lovely little language that really shines when you add CoffeeScript to
the mix.This is a longer entry to see what it looks like when it wraps to
a second line.
Haskell
:Messes with my head.
Putting Footnotes Into Definition Lists
You can include a footnote text in a list by putting two spaces before the line where you define the
footnote. Here’s an example:
item1
some explanation without a footnote
item2
some explanation36.
item3
more
item1
:some explanation without a footnote
item2
:some explanation[^foot].
[^foot]:note
item3
:more
36note
Blocks Of Text 57
Blockquotes
This is a blockquote
A blockquote should be indented.
The second paragraph should be indented as well.
And the third!
You can also have blockquotes inside blockquotes
> **This is a blockquote**
>
> A blockquote should be indented.
>
> The second paragraph should be indented as well.
>
> And the third!
>
> > You can also have blockquotes in blockquotes
Nesting Lists In Blockquotes
You can put lists in blockquotes. To do this, just add two spaces before each list item, and don’t type a >
sign:
This is a blockquote
1. This is a list item.
2. This is another list item.
3. This is a third list item.
Now this is regular text in the same blockquote.
> **This is a blockquote**
>
> 1. This is a list item.
> 2. This is another list item.
> 3. This is a third list item.
>
> Now this is regular text in the same blockquote.
Asides/Sidebars
The code for the aside is:

Blocks Of Text 58
A> This is an aside.
A>
A> This is also sometimes known as a sidebar.
A>
A> To make one of these, put `A>` at the beginning of the lines of
A> the aside, similar to the `>` that you use for a blockquote.
This is what the aside will look like:
This is an aside.
This is also sometimes known as a sidebar.
To make one of these, put A> at the beginning of the lines of the aside, similar to the >that you use for a
blockquote.
If you want to title an Aside, you do it like this:
A> ## Your title goes here.
A>
A> This is also sometimes known as a sidebar.
This is what the aside with a title will look like:
Your title goes here.
This is also sometimes known as a sidebar.
If you want to cross-link to your aside, you can name your aside like this:
A> ## Your Aside title {#your-aside-title}
A>
A> This is also sometimes known as a sidebar.
Your Aside title
This is also sometimes known as a sidebar.
Please note that headers ## that are inside of quotes, asides, etc. are not included in section numbering.
More Text Block Types
In addition to asides, there are warnings (W>), tips (T>), errors (E>), information (I>), questions (Q>),
discussions (D>) and exercises (X>). There are also generic text blocks (G>) where you can pick an icon

Blocks Of Text 59
from a large selection. There’s more info below on how to do that.
Please note that these types of text blocks are meant to be short. While asides (defined with A>) carry
over multiple pages, warnings and such do not.
Below you’ll find examples of each block type.
Warning!
Here’s the code for a Warning:
W> ## This is a Warning
W>
W> Warnings are generated by using `W>` at the beginning of lines.
And here’s what it looks like:
This is a Warning
Warnings are generated by using W> at the beginning of lines.
Tips
Here’s the code for a Tip:
T> ## This is a Tip
T>
T> To make a tip, put `T>` at the beginning of the lines of
T> the tip, similar to the `>` that you use for a blockquote.
T>
T> To make paragraphs in a tip, you need to put lines
T> with just `T>` between your paragraphs.
And here’s what it looks like:
This is a Tip
To make a tip, put T> at the beginning of the lines of the tip, similar to the >that you use for a
blockquote.
To make paragraphs in a tip, you need to put lines with just T> between your paragraphs.
Errors
Here’s the code for an Error:

Blocks Of Text 60
E> ## This is an Error
E>
E> Describe a common Error here.
And here’s what it looks like:
This is an Error
Describe a common Error here.
Information
Here’s the code for an Information box:
I> ## This is an Information box
I>
I> Put some special information here.
And here’s what it looks like:
This is an Information box
Put some special information here.
Questions
Here’s the code for a Question box:
Q> ## This is a Question box
Q>
Q> Ask & answer a common question here.
And here’s what it looks like:
This is a Question box
Ask & answer a common question here.
Discussions
Here’s the code for a Discussion box:

Blocks Of Text 61
D> ## This is a Discussion box
D>
D> You can discuss aspects of the main text in a Discussion box.
And here’s what it looks like:
This is a Discussion box
You can discuss aspects of the main text in a Discussion box.
Exercises
Here’s the code for an Exercise:
X> ## This is an Exercise
X>
X> Exercises are generated by using `X>` at the beginning of lines.
And here’s what it looks like:
This is an Exercise
Exercises are generated by using X> at the beginning of lines.
Generic Boxes
If you want a different icon, you can take a look at the icons available from Font Awesome37. Find one you
like on that page, and then note the text beside it. For example, the first one has the text fa-automobile.
Leaving out the fa-, we do the following to use an automobile icon:
{icon=automobile}
G> ## Vrooom!
G>
G> The freedom of the road!
37http://fontawesome.io/icons/
Code
Lots of Leanpub authors write about computer programming. Here are some instructions and tips for
using code in your Leanpub book.
Code Samples
If you are writing a programming or technical book you may want to add code blocks.
There are three ways to insert code blocks into a Leanpub book.
First, you can just type in the code directly. To indicate that you are writing a code block, indent each
new line of code with 4 spaces.
This is the first line of code.
This is the second line of code.
And this is the third line of code!
This is the first line of code.
This is the second line of code.
And this is the third line of code!
Second, you can also make code blocks by adding a set of 8 tildes above and below the code block.
(Actually, we support any number of tildes for code blocks as long as the number of tildes before and
after the code-block is the same, but we recommend using 8 as best practice).
Third, when you’re writing you can refer to external code samples in a ‘code’ folder in the ‘manuscript’
folder for your book.
Here is a code sample:
<<(code/sample1.rb)
You can also put titles on your code samples:
<<[This Code Sample Has A Title](code/sample2.rb)
Actually there’s one more way to format lines of code. For short chunks, less than a line in length, you
can put the code between back-ticks ‘.
Here is some code between back-ticks
`Here is some code between back-ticks`

Code 63
Overriding The Default Syntax System
Leanpub attempts to guess the language for syntax highlighting. However, sometimes you will want to
specify the language yourself, for example if Leanpub guesses wrong.
When things don’t work, you can force the language by doing this:
{lang="js"}
Error: Something terrible has happened!
We use Pygments for our syntax highlighting. You can see the list of languages supported here:
http://pygments.org/languages38. It includes Java, bash, JSON and HTML.
[20 January 1016: Please note that there is a known issue with Python comments breaking syntax
highlighting.
A workaround is to force the code-block to be in Python. You can do this per code-block, like this:
{lang=python}
# Hello world
def printHello():
print "Hello!"
Or, you can set this for the whole book in the Generation Settings in the Writing menu.]
If you have a code block for which you want no syntax highlighting, you can use lang="text".
{lang="text"}
Error: Something terrible has happened!
Vim Syntax Fix for Code Markup
Here’s how to make sure your code snippets will work with the official Markdown syntax provided by
the Vim text editor.
Just create a markdown.vim file in your .vim/after/syntax dir and add the following lines:
syn match markdownLeanCode '^<<(.*)$'
hi def link markdownLeanCode markdownH1
Line Numbers in Code Samples
On the Book Theme tab for your book there is a setting called “Show line numbers on code samples” that
sets whether or not we show line numbers on your code samples.
You can also turn line-numbers on or off for an individual code-sample by setting the linenos attribute
to either on or off. This will force line-numbers to be on:
38http://pygments.org/languages
Code 64
{linenos=on}
def hello
puts "Hello, world"
end
While this will force line-numbering to be off:
{linenos=off}
def hello
puts "Hello, world"
end
Setting First Line Number
Sometimes you may want to begin a code sample with number that shows it is a continuation of a previous
code sample. You use the starting-line-number attribute to do this. Like so:
{line-numbers=on,starting-line-number=32}
…. though of course you can choose whatever number you like.
Here’s an example of how this looks, followed by the text as it is written in Markdown:
32 module Leanpub
33 module Generate
34
35 class Leanpub::Generate::BinaryLatexGenerator
36
37 attr_reader :start_chapter, :end_chapter
38 attr_accessor :results
39
40 ...
41
42 end
43 end
44 end
{line-numbers=on,starting-line-number=32}
~~~~~~~~
module Leanpub
module Generate
class Leanpub::Generate::BinaryLatexGenerator
attr_reader :start_chapter, :end_chapter
attr_accessor :results
Code 65
...
end
end
end
~~~~~~~~
Displaying only part of a code file
You can use the crop-start-line and crop-end-line attributes to set the start and end line of a code
sample to display. This is useful if you have a large file and you only want to display parts of it. For
example, if you have a large file called books_controller.rb and only wanted to show lines 15–30 of it,
you would do this:
{crop-start-line=15,crop-end-line=30}
<<[BooksController](code/books_controller.rb)
Code Samples In Asides
This will work if you put the A> before every line in the code sample. Note that you’ll have a few less
characters to work with due to the indentation in the aside.
Like this:
A> ^[r1184]^This behaviour makes it hard to execute VCL code from the
`OnStop`so revision 1184 introduced another variation of `OnStop`that
accepts a delegate with an `IOmniTask`parameter.
A>
A>{lang="pascal"}
A> ~~~~~~~~~~~~~~~
A>TOmniTaskStopDelegate =reference to procedure (const task:IOmniTask);
A>
A>IOmniParallelLoop =interface
A> ...
A>function OnStop(stopCode:TOmniTaskStopDelegate):
IOmniParallelLoop;overload;
A>end;
A> ~~~~~~~~~~~~~~~
A>
A>^[r1184]^Using this version of `OnStop`,the termination handler can use
`task.Invoke`to execute some code in the main thread.This,however,
requires the `ForEach`abstraction to stay alive until the `Invoke`-d code
is executed so you must store the `ForEach`result

Code 66
[r1184] This behaviour makes it hard to execute VCL code from the OnStop so revision 1184 introduced
another variation of OnStop that accepts a delegate with an IOmniTask parameter.
TOmniTaskStopDelegate =reference to procedure (const task:IOmniTask);
IOmniParallelLoop =interface
...
function OnStop(stopCode:TOmniTaskStopDelegate):
IOmniParallelLoop;overload;
end;
[r1184] Using this version of OnStop, the termination handler can use task.Invoke to execute some code in
the main thread. This, however, requires the ForEach abstraction to stay alive until the Invoke-d code is
executed so you must store the ForEach result
Code Sample Titles
A code block without a title looks like this:
class Book
def initialize(title, subtitle)
@title =title
@subtitle =subtitle
end
end
You can give a codeblock a title using the title attribute. Adding a title styles it a bit differently. Here is
an example of what it looks like, followed by the actual text written in Markdown that produces the title
and code block:
Example 12: Creating a class in Ruby
class Book
def initialize(title, subtitle)
@title =title
@subtitle =subtitle
end
end

Code 67
{title="Example 12: Creating a class in Ruby", lang=ruby}
~~~~~~~
class Book
def initialize(title, subtitle)
@title =title
@subtitle =subtitle
end
end
~~~~~~~
You can specify multiple attributes (like the title and the language for syntax highlighting) like this:
{title="Some Title", lang=coffeescript}
Here’s an example:
Example 13: Creating a class in CoffeeScript
class Book
constructor: (@title, @subtitle) ->
# Other initialization code goes here
Here’s the text in Markdown that produced the code sample above:
{title="Example 13: Creating a class in CoffeeScript", lang=coffeescript}
~~~~~~~
class Book
constructor:(@title,@subtitle)->
#Other initialization code goes here
~~~~~~~
Marking lines as deleted or added to a code block
If you are building up an example while writing your book, you will probably want to emphasise lines of
code that have been added to your book and strike-out lines of code that have been removed. This is done
by adding comment lines to your code. The special words that can be used are leanpub-start-delete,
leanpub-end-delete,leanpub-start-insert and leanpub-end-insert. Note that any line containing these
strings will be removed completely from your code before being inserted in the book. This should allow
you to use any comment syntax you require.
Also, please note that if you use leanpub-start-delete or leanpub-end-delete in a code sample that you
are showing in a book, then it will turn off any syntax highlighting; otherwise the bolded text gets hidden
by syntax highlighting.
For example, the following code has leanpub-start-delete before def old_stuff and leanpub-end-delete
after it, and leanpub-start-insert before def new_stuff and leanpub-end-insert after it. (It’s hard to
put this inline as we strip it out, so I’ll just have to describe it).
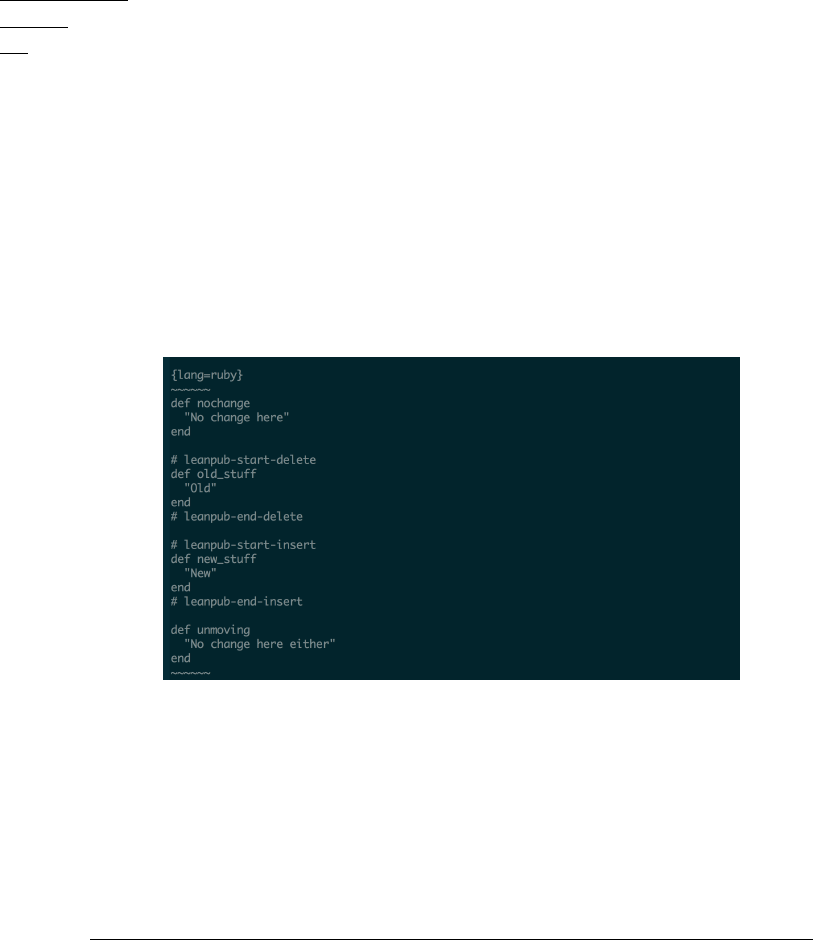
Code 68
def nochange
"No change here"
end
def old_stuff
"Old"
end
def new_stuff
"New"
end
def unmoving
"No change here either"
end
Here is an image showing the code:
Some Details About Line-Wrapping
The wrap-length of a line of code is dependent on page size and font size. It had been hard-coded to
75 characters previously. Here’s a table with some wrap-lengths; the numbers represent the number of
characters in each line.
page-size 11pt wrap length 12pt wrap length
usletter 90 81
a4paper 87 78
a5paper 53 47
digest 48 43
paperback 41 37
ustrade 55 50

Code 69
Questions About Code
I’d like to make available source code to my readers. Does leanpub
provide support for this?
We don’t provide a specific feature for making source code available to your readers. But there are a
number of ways to do this, of course!
Here are some options that came up in a discussion of this topic on the Leanpub Google Group:
• Make a downloadable zip file:
1. Make the zip file and upload it somewhere.
2. Put the link to the zip file in the About the Book description which shows up on the landing
page for the book.
3. Put the link to the zip file in the front matter of the book to tell people where they can get the
supporting material.
• Use a public GitHub repository
• Use Dropbox’s Public folder feature
Every account registered with Dropbox has a ‘Public’ folder. The Public folder lets you easily share single
files in your Dropbox. Any file you put in this folder gets its own Internet link that you can share with
others .
1. Make sure the feature is enabled. For details, go here39.
2. Put a file into the Public folder.
3. On your computer, right-click on the file, and then choose ‘Dropbox > Copy Public Link’.
39https://www.dropbox.com/help/16/en
Poetry
You can write poetry in Leanpub books. Here are a couple of tips:
Poetry Stanzas in Regular Markdown
To make stanzas, you have to put two blank spaces at the end of each line (i.e. press the space bar twice).
Then you can get poems to look like this:
In Xanadu did Kubla Khan A stately pleasure dome decree: Where Alph, the sacred river, ran Through
caverns measureless to man Down to a sunless sea.
Spacing Control for Poetry
For more powerful spacing control, for example to put letters wherever you like in the line, we have made
a special block of text for poetry. This is necessary in order to produce poetry in a reasonably uniform
way in many different e-formats with one click.
To make a block of poetry, you need to indicate where you are starting and stopping the block of poetry.
Your readers will not see the instructions to start and stop the block of poetry; they will only see the
poetry. Here is an example of what you need to do:
{style=poem}
~~~~~~
In Xanadu did Kubla Khan
A stately pleasure-dome decree:
Where Alph, the sacred river, ran
Through caverns measureless to man
Down to a sunless sea.
~~~~~~
If you type the above example into your text file, and then generate a Preview, in the ebook you will see
this:
In Xanadu did Kubla Khan
A stately pleasure-dome decree:
Where Alph, the sacred river, ran
Through caverns measureless to man
Down to a sunless sea.
Please note the poem needs to have a line of six tildes ∼above and below it. This indicates that it’s a
special block of text. And don’t forget to type {style=poem} where the poem starts, to indicate that the
following block of text is a poem. Don’t worry, the tildes and {style=poem} won’t be visible in the book!
If you write using our special poem block of text, you don’t have to worry about putting the two spaces
at the end of your lines.
Poetry 71
Line Lengths
If a line of poetry is too long to fit in the margins, you will have to manually edit the line. You can also
try changing the size of the book page, in the “Book Theme” tab under “Writing” in the book tools menu.
One last thing: you can actually copy and paste poetry from Microsoft Word in between the tilde
lines, and the spacing of your words will be retained.

Links
Formatting Links
We support Markdown syntax for links, as well as normal HTML links. Here’s an example of a link to
Leanpub:
Leanpub40
[Leanpub](http://leanpub.com)
You can also create links like this:
http://leanpub.com
<http://leanpub.com>
Please note that we do not support reference-style links. Our opinion is that while they are a great idea
for shorter texts like blog posts, they are generally a bad idea for longer texts, like books. This will be
explained explicitly when we implement Markua41 (the successor to Leanpub-flavored Markdown).
Long Hyperlinks
If you have particularly long hyperlinks in your text, you may prefer to make the long link show up only
in the footnote in the PDF.
To do this, first you should make sure you have ticked ‘Show links as footnotes in PDFs’ on the “Book
Theme” tab under “Writing” in your book tools menu (and then scrolled to the bottom of the page and
clicked ‘Update Book’ to save the change).
Then you can format the link with a custom name, so only that name shows up in the body of your text,
and the link shows up in the footnote.
For example, instead of doing this:
https://groups.google.com/group/leanpub/browse_thread/thread/9dd1391e6d9899c942
[https://groups.google.com/group/leanpub/browse_thread/thread/9dd1391e6d9899c9](https://gro\
ups.google.com/group/leanpub/browse_thread/thread/9dd1391e6d9899c9)
You can do this:
add a link name here43
40http://leanpub.com
41http://markua.com
42https://groups.google.com/group/leanpub/browse_thread/thread/9dd1391e6d9899c9
43https://groups.google.com/group/leanpub/browse_thread/thread/9dd1391e6d9899c9
Links 73
[add a link name here](https://groups.google.com/group/leanpub/browse_thread/thread/9dd1391\
e6d9899c9)
The part inside of the square brackets becomes a clickable link followed by a footnote number. The part
in parentheses becomes a footnote, which is also clickable.
Footnotes and Hyperlinks in PDF
If you select “Book Theme” under “Writing” in your book tools menu, you will see a section called “Links”.
The options here allow you to choose whether links are rendered only as links in the body of your text,
or to also show them as footnotes or html-style-links in PDFs. The latter option only affects normal links
(links where the displayed link text in the body of your book is different than the URL).

Footnotes and Endnotes
Footnotes
To add a footnote, you insert a footnote tag like this44.
Then you add the footnote content later in the text, using the same tag, with a colon and a space:
That’s it. You can keep writing your text after the footnote content.
To add a footnote, you insert a footnote tag like this[^foo].
Then you add the footnote content later in the text, using the same tag, with a colon and a\
space:
[^foo]: This is the footnote content.
That's it. You can keep writing your text after the footnote content.
Please note it is best to put the lines with footnote content at the end of the text file (this helps avoid
problems when you are e.g. using code blocks in your book).
In response to author feedback, we’d like to be very explicit about a few things:
1. There needs to be a blank line before and after the footnote content.
2. The ^caret symbol is required.
3. Each footnote will need its own unique tag. So the first one might be [^foo1], the second [^foo2],
etc.
4. The tag doesn’t have to have foo in it. It can be anything, like [^note1] or [^tag1].
5. At the moment, we don’t support periods in footnote tags, like this [^55.3].
Footnotes will format themselves correctly over multiple lines. However, if you want to continue the
footnote on a second line using a line break of your own choice, you indent the second line (and any
following lines) by 4 spaces.
Like this:45
[^foo2]: This is the footnote text. We are now going to add a second line
after typing in four spaces.
Endnotes
We don’t have specific support for endnotes, but you can achieve this with crosslinks.
44This is the footnote content.
45This is the footnote text. We are now going to add a second line after typing in four spaces.
Footnotes and Endnotes 75
Remove Footnotes
If you want to remove footnotes for a specific section, and not for your entire book, you can put the
following on a line by itself (with blank lines above and below it):
{footnotes-off}
To turn them back on, do this:
{footnotes-on}
Crosslinks
Crosslinks link one part of your book to another part of your book.
There are two steps to making a crosslink:
1. Give the thing you want to crosslink to an ID.
2. Create a crosslink to that ID.
Quick Explanation
Crosslinks are just like other links in Markdown, except that instead of linking to a web page, you link to
an ID name you’ve created.
So, if you want to link the words ‘a previous chapter’ to a chapter heading in your book, you would type
something like:
As we discussed in [a previous chapter](#chapter-32)...
… if you have already assigned an ID name to the chapter heading, like this:
# Chapter 32 {#chapter-32}
A Quick Note About Crosslinks
The ID can be on the same line as a chapter or section header, like this:
# Chapter 32 {#chapter-32}
But it can’t be on a line of text. So, for example, this won’t work:
{#SirHDavyResults} Sir H. Davy, a British chemist
To make it work, the ID should be above the text, with no blank line between the ID and the text, like
this:
{#SirHDavyResults}
Sir H. Davy, a British chemist
In order to crosslink to an image, you will need to use the following syntax:
Crosslinks 77
{id="cat-picture"}

Then crosslink to it like this:
Remember that [picture of a cat](#cat-picture)?
It’s important not to have any blank lines between the id and the image, and the image needs to be by
itself on the line.
The exact same thing works for a code-block, you just need to add an id:
{id='something-amazing',line-numbers=off,lang=ruby}
~~~~~~
def something
puts "something, something, something"
end
~~~~~~
Longer Explanation
To link from one word (or set of words) to another, you first need to identify the word (or words) you
want to link to. To do that, you need to give the word you want to link to an ID name. The ID name will
not be visible to the reader.
You can create an ID name by adding some text enclosed in {and }, plus a number sign #, like this:
{#IDname}
You can call the ID anything you like, which is why we just wrote ‘IDname’ in this example.
So, for example, if you want to link to the start of a chapter, you can add an ID to the line at the start of
the chapter, like this:
# Chapter 32 {#chapter-32}
Crosslinking to something with an ID
Now that the item you are crosslinking to has an ID, you can link to it from anywhere in your text.
To do that, surround the word or words you want to turn into a link with [and ], and then follow that
with a section in (and )which includes the ID name you made up.
To complete the example, here’s what you would type if you wanted the words ‘a previous chapter’ to
become a link to the ID {#chapter-32}:
As we discussed in [a previous chapter](#chapter-32)...
Crosslinks 78
Some Crosslink Details
Here we give an ID of shopping-list to a list.
{#shopping-list}
* Bananas
* Cream
* Pie Crust
Make sure not to put the ID within an element, like a list or a code block, however. The ID should come
before or after the element. So you can do this:
{#anchor}
- `test`
abc
but not this:
- `test`
{#anchor}
abc
Here are some further technical details:
This Markdown:
{#anchor}
- `test`
abc
Produces this HTML (and similar LaTeX):
<ul id="anchor">
<li><code>test</code>
<p>abc</p>
</li>
</ul>
Breaks
Here’s how you can create line breaks and page breaks on Leanpub.
Pagebreaks
You can force a page break by adding {pagebreak} on a line by itself, with blank lines before and after.
For example:
And the winner is....
{pagebreak}
Ta-dah!
Line Breaks
In Markdown, in order to indicate a line break, you type two spaces after a line and press return.
Also, in your book Settings you can select the option: “No indent, small vertical space between
paragraphs”.

Tables
To make a table, you use vertical bars (|) to separate the columns of your tables. Here are a few examples.
This results in a very simple table with two columns of ingredients:
| 2 cups old fashioned oats | 1 1/2 tsp vanilla |
| 1 cup sunflower seeds | 1/4 tsp salt |
| 1 cup shredded coconut | 1/2 cup chopped pitted dates |
| 1/2 cup toasted wheat germ or bran | 1/2 cup chopped dried apricots |
| 3 tbsp unsalted butter | 1/2 cup dried cranberries |
| 2/3 cup honey | |
| 1/4 cup packed brown sugar | |
2 cups old fashioned oats 1 1/2 tsp vanilla
1 cup sunflower seeds 1/4 tsp salt
1 cup shredded coconut 1/2 cup chopped pitted dates
1/2 cup toasted wheat germ or bran 1/2 cup chopped dried apricots
3 tbsp unsalted butter 1/2 cup dried cranberries
2/3 cup honey
1/4 cup packed brown sugar
If you want the first line to be formatted as a heading, then do something like this:
|Verb |Action |Idempotent?|
|-------|------------------------------------------------|-----------|
|GET |Responds with information about the resource |Yes |
|POST |Creates a sub-resource of the resource POSTed to|No |
|PUT |Creates or updates the resource being PUT to |Yes |
|DELETE |DELETES the resource |Yes |
|HEAD |Gets metadata about the resource |Yes |
Verb Action Idempotent?
GET Responds with information about the resource Yes
POST Creates a sub-resource of the resource POSTed to No
PUT Creates or updates the resource being PUT to Yes
DELETE DELETES the resource Yes
HEAD Gets metadata about the resource Yes
Table Width
Your book has a default table-width setting. By default, it’s set to “default”, which stretches tables to 80%
of the page width.
The other two settings are “narrow” and “wide”. Narrow makes the table as narrow as possible, wide

Tables 81
makes it take up the full page width.
You can set the default table-width on the “Book Theme” tab under “Writing” in your book tools menu.
The major drawback to narrow is that we do no automatic word-wrapping in PDFs, so the table may go
off the side of the page. We recommend using default or wide mode.
You can also over-ride the width of individual tables by setting a width attribute. For example, if your
book had a default table width of “wide”, the table below would be narrow:
{width="narrow"}
| one | two | three |
|-------------------|
| a | b | c |
|-------------------|
| d | e | f |
one two three
a b c
d e f
Here it is with {width="default"}:
one two three
a b c
d e f
You can use “wide”, “default” or “narrow”, or a percentage for the width parameter. The following table
would take up exactly half the page-width
{width="50%"}
| one | two | three |
|-------------------|
| a | b | c |
|-------------------|
| d | e | f |
one two three
a b c
d e f

Tables 82
Multi-line rows
Multi-line rows are only necessary if you are using the “narrow” table-width. If you find yourself
spending time manually wrapping text in tables, it’s probably better to use either the “wide” or
“default” table widths instead.
They are useful, however, if you want complete control over what text goes where or if you find
that Leanpub’s line-wrapping is making some table columns too narrow.
Here is that table from above reformatted to be narrower by using multi-line rows. The first dashed line
makes the line before it a heading. The rest of the dashed lines just result in a larger vertical gap than a
plain newline.
|Verb | Action | Idempotent? |
|-------|------------------------------------------|----------------|
|GET | Responds with information about the | Yes |
| | resource | |
|-------|------------------------------------------|----------------|
|POST | Creates a sub-resource of the resource | No |
| | being POSTed to | |
|-------|------------------------------------------|----------------|
|PUT | Creates or updates the resource being | Yes |
| | PUT to | |
|-------|------------------------------------------|----------------|
|DELETE | DELETES the resource | Yes |
|-------|------------------------------------------|----------------|
|HEAD | Gets metadata about the resource | Yes |
Verb Action Idempotent?
GET Responds with information about the Yes
resource
POST Creates a sub-resource of the resource No
being POSTed to
PUT Creates or updates the resource being Yes
PUT to
DELETE DELETES the resource Yes
HEAD Gets metadata about the resource Yes
IF you want to put line breaks in table cells, you can do the following:

Tables 83
|Verb | Action |
|--------------|----------------------------------------|
|Multiline | You can have multiple-lines in a |
| | table, and line-breaks are respected. |
| | |
| | This is a second paragraph |
|-------------------------------------------------------|
|continued! | You create new table cells with a |
|| line of dashes surrounded by pipes |
| | |
| | (Pipes are the vertical lines, "\|") |
Verb Action
Multiline You can have multiple-lines in a
table, and line-breaks are respected.
This is a second paragraph
continued! You create new table cells with a
line of dashes surrounded by pipes
(Pipes are the vertical lines, “|”)
Alignment and footer rows
You can also do fancy things with alignment and footer rows. Here is an example.
| Default aligned |Left aligned| Center aligned | Right aligned |
|-----------------|:-----------|:---------------:|---------------:|
| First body part |Second cell | Third cell | fourth cell |
| Second line |2nd line | **strong** | |
|-----------------|------------|-----------------|----------------|
| Second body | | | |
| 2 line | | | |
|=================|============|=================|================|
| Footer | footer2 | footer3 | footer4 |
Default aligned Left aligned Center aligned Right aligned
First body part Second cell Third cell fourth cell
Second line 2nd line strong
Second body
2 line
Footer footer2 footer3 footer4

Tables 84
Table Titles
You add a title to a table by adding a title attribute to the table, like this:
{title="Figure 32"}
| City | Annual Rainfall (inches) |
|------------------------------------------|
| Rome | 23 |
| London | 29 |
Here’s what that looks like:
Figure 32
City Annual Rainfall (inches)
Rome 23
London 29
If you want to set both the title and the width, it looks like this:
{title="Figure 32",width="60%"}
| City | Annual Rainfall (inches) |
|------------------------------------------|
| Rome | 23 |
| London | 29 |
HTML Tables
If you try putting an HTML table in a .txt file, you’ll find that it works in the epub and mobi version but
is missing in the PDF. Here’s why:
Markdown normally just generates HTML. So it could “support” using HTML tables and any other HTML
construct by just not parsing the HTML. But we need to actually parse the Markdown (we use a slightly
modified Kramdown parser), in order to generate LaTeX and then PDF.
A note on combining attributes
To combine attributes for a table, add a comma and a space between the attributes, like this:
{title="table title", width="wide"}

Selling your book
Bundles
You can now sell bundles of your own books and (with permission) other authors’ books. Readers love
buying bundles, and we think this will help drive a lot of sales of your books.
If you’re the author of multiple Leanpub books, this is a no-brainer: create a bundle of all your books
together. But even if you’re “only” writing one Leanpub book, you can still create and sell bundles. Just
propose a royalty split that is fair, so the other authors accept!
For more information about bundles, take a look at:
• The post in which we first announced this feature to readers - click here46.
• The Bundles section of our How To book - click here47.
• Our how-to video about making bundles on Leanpub - click here48 to see the video on YouTube or
just go to our Help page49.
Here is some text from the post in which we announced this feature:
Today we’re launching a big new Leanpub feature: Bundles. Example: http://leanpub.com/b/nodea
[Please note this example is no longer available for sale. Here is another example: https://leanpub.com/b/agilepracticestipsb]
You can now sell bundles of your own books and (with permission) other authors’ books. Readers love
buying bundles, and we think this will help drive a lot of sales of your books.
We’ve already sold a couple thousand copies of a bundle in a test on a separate website, and we’ve realized
that instead of being a separate website this needs to become a core Leanpub feature. Here’s why this
feature exists, and how it works…
== Why Bundles? ==
While most of the work we do is focused on improving the experience of writing a Leanpub book, we
also are focused on improving the experience of selling a Leanpub book. The variable price and dual price
+ royalty slider feature was a good start, and we’ve also done a site redesign to make your book pages
more attractive. This next feature is, we think, bigger than both of these combined.
Bundles lets you sell your books and other authors’ books (with their permission, of course) together as
a bundle. Buyers of the bundle pay one price and get all the books in the bundle. (These purchases are
no different than normal Leanpub purchases: they are entitled to all the updates, etc.)
Readers love buying bundles. We have tested the concept by selling a bundle of two Leanpub books, The
Node Beginner Book and Hands-on Node.js, on http://leanbundle.com. It currently has 2097 sales, most
at its previous $7.99 price, but some at its new $14.99 price. (We’ve found that these two prices are about
equivalent in terms of revenue for the authors.)
If you’re the author of multiple Leanpub books, this is a no-brainer: create a bundle of all your books
together. But even if you’re “only” writing one Leanpub book, you can still create and sell bundles. Just
46https://groups.google.com/group/leanpub/browse_thread/thread/9f829b8c411e6ebc
47http://leanpub.com/howto
48http://www.youtube.com/watch?v=BGJoDImqSqU
49http://leanpub.com/help

Selling your book 86
propose a royalty split that is fair, so the other authors accept!
== How it Works ==
There’s now a “Your Bundles” tab on your Dashboard (http://leanpub.com/dashboard). On this page you
can create a new bundle. Once you’ve created the bundle, you can add books to the bundle. You add
multiple books to it, and you set the percentage of the bundle royalties that each book gets.
The royalties work like a normal Leanpub book purchase: The bundle has a minimum and suggested price.
The bundle gets an 80% royalty. This royalty is then split among the books in the bundle according to
the percentages you set. (These percentages add up to 100%, since they are the percentage of the royalties
not the revenue.)
Once you’ve added all the books you want into the bundle and the percentages add up to 100%, you
will see a Propose Bundle button at the bottom of your bundle page. If you click this, your bundle is
proposed. Any books where you are the author get automatically accepted. For the other books, we
email the primary author to let them know about the proposed bundle, and we put the bundle invitation
in the Pending Invitations tab (http://leanpub.com/dashboard#pending) of the author’s Dashboard. Each
author (besides you) with an included book can accept or reject the proposal. (The minimum price and
royalty percentage are both told to the authors, so they know the minimum amount that they will make
on a sale of the bundle. So make sure this amount is compelling.) Also, you may want to reach out to the
other authors via email or Twitter first, before proposing the bundle!
If all authors accept the bundle proposal, the bundle is published, and is for sale on an attractive bundle
landing page at http://leanpub.com/b/yourbundle. (If the bundle only contains your books, these all auto-
accept the bundle so your bundle is published right away.) If any author rejects the bundle proposal, the
bundle is rejected. You can’t re-propose bundles; instead, just delete it and make another bundle.
For discoverability, if your book is in one or more bundles, these bundles are now shown in a “Bundles
Available” sidebar of your book landing page. You can buy the bundles directly from that sidebar, or you
can click on the bundle names to go to the bundle landing pages to learn more. For an example of this
sidebar, see the http://leanpub.com/nodebeginnercbook page.
== Feedback Please! ==
Anyway, we think this feature will work well for lots of you. (This is especially true for you agile authors:
your books would make great bundles!) Please let us know any and all feedback you have, and let us know
if you hit any issues with the workflow etc.
ahttp://leanpub.com/b/node
bhttps://leanpub.com/b/agilepracticestips
chttp://leanpub.com/nodebeginner
Coupons
You can create coupons for your book. Coupons are a great way to promote your book, letting you sell
your book at a discount to specific customers, or even letting reviewers get free copies.
If you have any existing coupons, you’ll see them set out in a table at the top of the page.
In order to create coupons for your book, go to the Coupons page in your book tools and click ‘New
Coupon’.
This will take you to a ‘Create Coupon’ page where you can assign the settings for your coupon.
Coupon Code

Selling your book 87
At the top of the page, you’ll see the ‘Coupon Code’. Anyone who has this code can enter it on your
book’s purchase page in order to take advantage of the coupon deal you’re offering. You can change the
coupon code to whatever you like.
Discounted Minimum Price
The Discounted Price is the new minimum price of the book, not the amount of the discount. For example,
if your book has a minimum price of $9.99 and you want to sell it for a minimum price of $7.99 with this
coupon, you put 7.99 in this field, not 2.00.
Start Date and End Date
You can assign a start date and an end date for your coupon. This way you can set up a temporary
promotion of you book with a clear cutoff date.
Please note the start and end date times are in UTC50.
Uses Limit
You can set a limit to the number of times the coupon code can be used before it is deactivated.
Note
This is an optional note for your own record-keeping purposes.
Temporarily Suspended
This is a “manual override” which lets you to temporarily turn off coupon by checking this checkbox.
Otherwise, leave this checkbox unchecked: the normal way to control a coupon is by the max # uses and
the start and end dates.
Make sure to click ‘Create Coupon’ at the bottom of the page after you’ve made any changes.
Royalties
Royalties are paid monthly by PayPal, no later than 25 days following the end of the calendar month. For
example, royalties from the end of March 2012 would be paid by April 25, 2012.
Library Purchasing
At Leanpub, we don’t have a purchasing program for libraries. This is for a number of reasons, the main
one being that many of our books are published while they are still in-progress.
When a library does express interest in purchasing an individual book, we forward on the request to the
author, who makes the decision to sell or not.
Please note that we do love libraries! Leanpub books belong to their authors, not to Leanpub, and we’re
simply letting our authors choose what they want to do with library sales.
50https://en.wikipedia.org/wiki/Coordinated_Universal_Time
Selling your book 88
Maximum Sale Price
Note that we have raised the maximum price that can be paid for a book to be $500. This is not our
recommendation to charge libraries (their budgets are typically shrinking), but it’s an allowance for the
fact that large institutions or corporations could possibly pay that for technical books.
Selling Digital Extras
You might have more to offer your readers beyond the page, such as videos, music, photos, artwork, source
files, code samples, apps, templates, worksheets, and more. Leanpub lets you package combinations of
digital extras with your books, and sell them at different price points, including for free. See Extras to get
started.
Selling Multi-reader Licenses
To sell a multi-reader license, simply create a Package, configure it similarly to the single-reader package,
offer it at a price point commensurate with the number of licenses being sold, and name it accordingly
(eg. “The Book (10 copy license)”).
Buying Books on Leanpub
How Readers Find Books
There are two ways to browse through books for sale on Leanpub.
1. The Bestsellers page Here you’ll find the bestselling Leanpub books sorted by money earned and
by number of copies sold.
2. The Categories Page On this page you can see Leanpub books sorted by category. Just choose the
category from the drop-down box at the top of the page.
How Readers Buy Books
When someone wants to buy a book on Leanpub, they click the green ‘Buy the ebook now!’ button on
the book’s landing page. Then they are presented with a pair of sliders that lets them choose the price
they want to pay for your book.
Payment
When someone has chosen a price they want to pay for your book, they have two choices:
1. They can click a link that takes them to PayPal where they will complete their purchase.
2. They can fill out the credit card form directly on Leanpub to pay via PayPal Website Payments Pro.
Selling your book 89
Sending Purchases to a Kindle
If readers give us the email address of their Kindle, they will see a “Send to my Kindle” link for each
purchase on their dashboard (Go to http://leanpub.com/dashboard and click on the “purchases” tab).
They will also have to do some setup on Amazon for this to work, which is explained on the bottom of
that page.
The one caveat is that we can’t send attachments that are greater than 8 MB, so if your book has a .mobi
file that is bigger than that, readers will have to send it to their Kindle manually.

Miscellaneous
Sales and Analytics
Leanpub lets you track sales and traffic to your landing page in a couple of ways.
Sales
For information about Leanpub sales data, please check out the Sales section in this manual.
Google Analytics
Leanpub lets you add Google Analytics code to your landing page, so you can use Google Analytics to
track sources of traffic to your page.
One of our authors, Visnja Zeljeznjak51, has written an amazing article for our blog on this subject. If
you’re looking for a more detailed rundown about setting up your book with Google Analytics, you
should check out this blog post52.
Please note you should also read this update, which has some information that has changed since
Visnja’s post: https://leanpub.com/blog/2015/09/google-analytics-update.html53.
Backing Up Your Files
All your files are backed up by Dropbox54. Also, every time you preview or publish your book, Leanpub
internally backs up your files using a version control system called Git.
Also, if you are technically savvy, we HIGHLY recommend you use something like Git and GitHub (a
private repository, most of the time) yourself as well. We ignore any .git directories, so you can use Git
and you won’t conflict with our use of Git.
[If that last paragraph was gibberish, just ignore it!]
Escaping Markdown Syntax Characters
Sometimes you’ll want to use a character or set of characters that is a part of the Markdown syntax. To
make the character show up in your text, instead of acting as a Markdown formatting marker, just put
the backslash \ character in front of it.
For example, if you just type “# Header” at the beginning of a line, it will appear as a header, and you
won’t see the number sign “#”.
51https://leanpub.com/u/luckyisgood
52http://blog.leanpub.com/2014/08/find-out-where-your-leanpub-book-sales-are-coming-from.html
53https://leanpub.com/blog/2015/09/google-analytics-update.html
54https://www.dropbox.com/help/122
Miscellaneous 91
If you want “# Header” to show up at the beginning of a line, type “\# Header”, and you’ll see the number
sign:
# Header
\# Header
How To Exclude Lines From Your Book
If you have some lines in your .txt files that you’re working on, but don’t want to appear in your book,
you can hide or ‘comment out’ the lines by adding two ‘%’ characters:
%% You won't see this text!
Please note the ‘comment out’ line must be preceded by a blank line.
Any line that meets these requirements will not show up in the published PDF, EPUB or MOBI files.
To ‘comment out’ like this in Book.txt, type a # at the beginning of a line.
Copyright Protection
Leanpub does not offer copyright protection or DRM for books.
The fact that you are self-publishing means you may experience less piracy, since it’s abundantly clear
that it’s you that is being ripped off, not a faceless corporation.
At one point we thought we might add optional watermarks, where we put the purchaser’s email address
at the bottom of the PDF. This would be a deterrent to accidental piracy.
Our current thinking is that soft nudge watermarks with email addresses are also not the Leanpub way.
They basically are a rude statement “you’re probably a thief” which will only offend paying readers and
not deter pirates (since they can just unzip the EPUB).
So our current thinking is that watermarking is a quaint DRM-holdover and we should just relax and
treat our readers with respect.
If this sounds radical, consider that iTunes has sold DRM-free MP3s for a long time now…
Moving Dropbox Folders
You can move your book folders in Dropbox to different Dropbox folders. After Dropbox syncs with your
computer, Leanpub will have no problem syncing with the folder.
So, for example, in Dropbox, you could create a folder called ‘Leanpub’. Every time you create a new
book, you can move that new book’s folder into your Leanpub folder in Dropbox.

Miscellaneous 92
Fonts
You can set your font from a range of options on the “Book Theme” tab under “Writing” in your book
tools menu. Make sure to click “Custom” to see the different font options and make changes.
You can set the body font and the title font separately. If you’re writing a programming book, you also
have an option for the code font.
Our requirements for fonts are that they must be open source and that they must have bold and italic
(and preferably a bold-italic as well) versions available.
Here are the fonts currently available for English-language books:
• Merriweather (Serif)
• Cousine (Mono)
• Lora (Serif)
• Droid Serif (Serif)
• Luculent (Mono)
• Clear Sans (Sans)
• Lato (Sans)
• PT Mono (Mono)
• PT Serif (Serif)
• PT Sans (Sans)
• Anonymous Pro (Mono)
• Crimson Text (Serif)
• Droid Sans (Sans)
• Linux Libertine (Serif)
• Open Sans (Sans)
• Source Sans Pro (Sans)
• Source Code Pro (Mono)
• Deja Vu Sans (Sans)
• Deja Vu Mono (Mono)
• Deja Vu Serif (Serif)
• APL 385 (Mono)
For examples of what the different fonts look like, please go here55
Please note that Droid Sans only comes with regular and bold fonts. We decided that it would probably
be fine to include it anyway, as it’s typically just used in titles.
Distributing Extra Files with Your Book
You can add one or more pieces of digital content as “Extras” and then include them for sale in a “Package”.
First, you should upload the content you want to sell in Packages. To do this, in the Book Tools menu for
your book, click on Selling & Royalties. The, select Extras and upload your content.
Once your content is uploaded, you can add it to a package and sell it with your book. To do this, select
Packages under Selling & Royalties in the Book Tools menu.
55https://leanpub.com/help/manual#leanpub-auto-font-samples

Miscellaneous 93
Then, you can add each Extra you want to the Package. It will then be for sale on your book’s landing
page. You can make multiple packages and sell them at different price points.
Here’s an example of a book that also sells videos and other content in differently priced packages:
https://leanpub.com/rprogramming.
Mathematical Equations
You can put mathematical equations in your book.
You use LaTeX math syntax, surrounded by {$$} and {/$$}. You can do both inline and block math. Here
is a full example:
Equations
You create a block equation by putting it by itself:
n
∑
i=1
aibi
≤(n
∑
i=1
a2
i)1/2 (n
∑
i=1
b2
i)1/2
{$$}
\left|\sum_{i=1}^n a_ib_i\right|
\le
\left(\sum_{i=1}^n a_i^2\right)^{1/2}
\left(\sum_{i=1}^n b_i^2\right)^{1/2}
{/$$}
Inline equations are written inline. For example:
The four kinematics equations are d=vit+1
2at2,v2
f=v2
i+ 2ad,vf=vi+at and d=1
2(vi+vf)t.
The four kinematics equations are {$$}d = v_i t + \frac{1}{2}a t^2{/$$},
{$$}v_f^2 = v_i^2 + 2 a d{/$$},{$$}v_f = v_i + a t{/$$}and {$$}d =
\frac{1}{2}(v_i + v_f) t{/$$}.
Please note that if you are going to include a percent sign % in an equation, you need to “escape” it with
a backslash, like this:
{$$}value = (1 x 4) \% 5 = 4 \% 5 = 4{/$$}
Cover Designers and Editors
If you’re looking for a cover designer for your book, or an editor, please feel free to join the Leanpub
Google Group and ask the group for any recommendations.
Miscellaneous 94
Information About Your Readers / Customers
Some Leanpub authors have asked how we can facilitate interaction between Leanpub authors and
readers.
Leanpub policy is to not disclose any personal information about readers/customers to Leanpub authors.
However, there are a number of ways Leanpub authors can facilitate interaction with their readers:
• you can turn on the Disqus comments on your book’s landing page
• you can put your email address on your landing page or somewhere in your book, and encourage
readers to contact you
• you can put your Twitter ID on your landing page
• With the new design of the post purchase page, we have a clear place to ask readers whether they
want to share their name, email, etc with the author
• Also, with the upcoming feature where a book can have a Google Group, there’s now an incentive
to the reader to provide info other than just giving the author some helpful info.
We do recognize that many authors want more info about their readers, so we should find a way to ask
nicely for it in a way that does not impact the simplicity of purchasing. The design of the reader dashboard
is a starting point down that path.
Multimedia Content
Some Leanpub authors have asked about whether we provide multimedia features in Leanpub books,
such as embedded video.
We are focused on the “words, and optionally images” types of books, not the “multimedia extravaganza”
types of books, and we intend the ebook files we produce to be simple and compliant with the standard.
So the answer is that for now, no, we don’t offer features like embedded video in Leanpub books.
Does Leanpub Accept Authors From Anywhere (i.e.
international authors, foreign authors)?
Yes, of course! Please note though that we pay royalties via PayPal.
Coupons for Other Leanpub Authors
One cool thing that has emerged from our community of authors is coupon-sharing. When an author’s
work is ready, she can email the Leanpub Google Group with a coupon code to share the book with other
Leanpub authors. Besides being nice, this can help you get readers and feedback and gives other Leanpub
authors a push to plug your book for you!
Miscellaneous 95
Curly Quotes
Ideally you should just have “straight” ‘quotes’ in the Markdown. We auto-produce curly quotes for you.
We change curly quotes into straight quotes and then make them curly again.
Figure Captions and Labels
In technical books, is common to have figures with a label and a corresponding reference in the text.
Here’s how you can do something like this in Leanpub:
# Chapter 1
See [figure 32](#figure-32) for an example.
# Chapter 2
{#figure-32}

What we don’t do (yet) is provide auto-numbering of figures and captions.
Links In Footnotes
Currently, a link mentioned within a footnote doesn’t generate a new footnote (in the PDF), and doesn’t
have a clickable URL either. We’ll implement a solution to this soon.
Viruses
Leanpub doesn’t offer an special virus protection, but we do take this issue very seriously and do our best
to ensure everything’s protected.
We interact with Dropbox via a custom Ruby library that we wrote (source code at https://github.com/kenpratt/dbox),
and the file operations we do are driven by when you preview or publish. We’re not just randomly syncing
things.
Kerning
Currently you can’t manipulate kerning (the space between letters and words) in Leanpub books. For the
near future anyway this will just be a limitation of Leanpub. (Also, it won’t work on EPUB and MOBI
anyway).
Full Table of Contents in Sample Books?
We’re currently working on a way to include the Table of Contents for the Full Book in the Book Sample.
For now, the Table of Contents in the Book Sample will only show the contents of the Book Sample.
Miscellaneous 96
On the landing page, can we feature a channel instead of
an individual video on the YouTube link?
There’s no way to do that right now, sorry!
Why can’t I put section commands in Book.txt?
After a lot of thought and experimenting, we’ve decided to make Book.txt just a list of files. That means
you can’t put section commands in the Book.txt file, like
{frontmatter} Introduction.txt {mainmatter} Chapter1.txt {backmatter} Appendix1.txt
Instead, we recommend you make a separate .txt file for each section command, and then refer to it in
Book.txt. So e.g. you’d make a frontmatter.txt file that only has this content:
{frontmatter}
… and do the same for mainmatter and backmatter. Then, your Book.txt file will look like this:
frontmatter.txt Introduction.txt mainmatter.txt Chapter1.txt backmatter.txt Appendix1.txt
… and you can still see your book’s structure in Book.txt.
This is an easier thing to explain and understand than if we’d turned Book.txt into a DSL. We had started
down that approach about a year ago, and it is confusing.
Now, since Book.txt is just a list of files, you could in theory write an entire book in one file. We don’t
recommend this, since if you did that, you couldn’t give away a subset as Sample.txt, since it’s also just
a list of files. Also, splitting your book up into different .txt files actually makes it easier to find and edit
content, and to reorganize or delete sections. So we still recommend one file per chapter, both for clarity
and for ease of creating book samples.
Trouble With Accents? Forcing Text Editors To Save As
UTF-8
Normally, to get things like letter accents to work if you’re having troubles, you can force the encoding
by putting this at the top of your text file:
{:: encoding="UTF-8" /}
However, you may still have problems if the text editor you’re using is not set to save to UTF-8. Normally
you can change this setting by doing ‘Save As’, and finding the ‘Encoding’ option.
I don’t understand how things get added to a Table of
Contents
By default, all headers are added to the Table of Contents. A header looks like this:
# Chapter One
Miscellaneous 97
… where you put the number sign # at the beginning of the line, and follow the number sign with the
text you want for the header.
Also by default, all ‘Part’ titles are added to the Table of Content. You create a Part by typing -# like this:
# Part One
You can choose to have the Table of Contents include sections as well. To do this, go to your book’s Settings
page and select the “Book Theme” tab under “Writing” in your book tools menu, and then scroll down to
the Table of Contents section. There, you can select ‘Parts, Chapters and Sections’ or ‘Everything’.
Then, sections will also appear in the Table of Contents. A section is subordinate to a heading, so you
type two or more number signs, like this:
## This is a section subordinate to a heading. ### This is a section subordinate to ## sections #### This is
a section subordinate to ### sections
What encoding should I use to write files in Markdown?
Should I write in ASCII or UTF-8?
We translate everything to UTF-8 internally, so if you start with UTF-8 everything will work smoothly.
How Can I Add Blank Lines To My Text?
While there is no official way to add a larger space between paragraphs, adding a blank table (two vertical
pipes separated by a space, like this | |) works. For example:
This is a line.
This is a second line. It has a larger space after it.
This is a third line.
This is a fourth line.
This is a line.
This is a second line. It has a larger space after it.
| |
This is a third line.
This is a fourth line.
Miscellaneous 98
Why Can’t I See My Profile When I Go To ‘Your Profile’?
This is because all of your books are in stealth mode. The idea is that while all of your projects are in
stealth mode, you won’t want your profile being visible to the public. If we let you see it within your
account when you’re signed in, some people would be worried the information was already public.
A General Note On Formatting
We do think that book formatting support is important, but we also think that our role is to make it as
easy as possible for you to focus on your words, rather than their appearance.
In terms of formatting our approach is just to relax a little and think “will the reader get the idea regardless
of the formatting”. Or, “is the reader better served by my spending an hour on more content / editing of
the content rather than formatting and layout”.
Standardized, simple formatting is also important when you’re publishing across a number of ebook
platforms, like you do with Leanpub (PDF, EPUB for iPad etc. and MOBI for Amazon’s Kindle). That
way you have more assurance that your book will be decently presented in all three formats, and on a
wide variety of ebook readers.
GitHub Commits
We do a commit on preview and publish. (If this makes no sense to you, you can just ignore it!)
Downloading onto your iPad or iPhone
To view your book on your iPad or iPhone, try the following steps:
1. Click the EPUB link.
2. The download is triggered, and you’re taken to a screen which has a picture of the book in the
middle as an epub file.
3. Click “Open in iBooks”.
4. This takes you to your iBooks library with the book shown.
5. Double-tap the book to open in iBooks.
If this doesn’t work, you can also download the book to your desktop or laptop computer and add the
book to iTunes. That way you can sync with iTunes on your IPad.
Working with GitHub and Dropbox
One of Leanpub’s authors asked:
“We’re working on our .md’s in Github’s wiki and copying updates into Dropbox. I don’t suppose it would
be advisable to clone our git folder into Dropbox?”
Miscellaneous 99
Here’s our response:
In terms of putting your Git folder in Dropbox, the best thing to do is something slightly similar, like this:
yourgitrepo .git stuff otherstuff yourbook manuscript images
Make the Dropbox folder be a subfolder inside yourgitrepo. Then you can push yourgitrepo to GitHub,
etc.
The reason I recommend this is that this way, your .git directory will not get sync’d with Leanpub’s
Dropbox, so your book generation will be slightly faster. (We ignore .git directories, but they still can
slow things down.)
Adding a motto or epigraph to the beginning of a chapter
There is no special feature for adding a motto or epigraph to the beginning of a chapter, but one nice way
to do this is to use text centering.
So, if you type this:
C> *It was the best of times, it was the worst of times*
C>
C> -- Charles Dickens
It was a dark and stormy night...
Suddenly, a shot rang out!
You’ll see this:
It was the best of times, it was the worst of times
– Charles Dickens
It was a dark and stormy night…
Suddenly, a shot rang out!
Can I publish my book on Leanpub and KDP Select at the
same time?
Specifics:
If you are going to put your book into KDP Select, you’ll need to retire it on Leanpub during that period.
Now, we may need to have a “temporary retirement” concept or something for situations like this where
you want a book to be back for sale on Leanpub after a period. As far as I know, exclusive means exclusive,
and KDP Select has no specific Leanpub exemption.
General:
One thing about Leanpub is that we are the least jealous or exclusive “publisher” ever.
Miscellaneous 100
Our core strength is to be the best way in the world to write, publish and sell in-progress books.
Amazon is the best storefront in the world in terms of the traffic they bring you to market finished books.
And Apple is #2, and they are competing against each other.
Where Amazon and Apple are non-exclusive, we expect that authors will also continue to sell their
finished books on Leanpub: a) our royalty rates are better b) distributing updates is easier c) variable
pricing d) bundles e) more reader info
Now, where Amazon or Apple does something with temporary exclusivity (like KDP Select), our goal is
to make it as easy as possible for a Leanpub author to take full advantage of that program.
We want Leanpub to be the best way to get a book into KDP Select. So, if there are any other features
like temporary retirement etc, we will build them.
Does Leanpub give me tools to help me build my own
book landing page?
Yes! Besides the embed code which you can copy from your book’s Leanpub landing page at any time,
here are some other Leanpub tools you can use to build your own landing page:
We know that some of you want to experiment with different ways of marketing your books, and we
want to give you that flexibility. So, we’ve made a few changes so that you can make landing pages on
your own site. For a great example of this in use, check out http://grumpy-phpunit.com/
There are three things you can use:
1. a “Buy Now” button
2. a link to your sample PDF
3. a link to your cover page image (in various sizes).
All three things are just plain HTML elements. There’s no Javascript and no need to sign up for an API
key or anything like that. All you need is your book’s “slug”. This is the part of the URL for your book after
https://leanpub.com/. So, for “The S3 Cookbook”, which is found at https://leanpub.com/thes3cookbook,
the slug is thes3cookbook.
The “Buy Now” button can be a simple link pointing at https://leanpub.com/thes3cookbook/purchases/
new, like so:
<a href="https://leanpub.com/thes3cookbook/purchases/new">Buy it now</a>
You can also build a form, but make sure it does a GET request:
<form action="https://leanpub.com/thes3cookbook/purchases/new" method="get">
<input type="submit" name="commit" value="Buy Now!" />
</form>
A couple of other things you might want are links to your sample PDF and your cover page image. The
sample PDF is found at
Miscellaneous 101
http://samples.leanpub.com/<slug>-sample.pdf
For example:
http://samples.leanpub.com/thes3cookbook-sample.pdf
The cover pages are found at
http://titlepages.leanpub.com/<slug>/<size>
Here’s an example of how you would implement this, if you wanted to use the ‘bookpage’ size:
http://titlepages.leanpub.com/thes3cookbook/bookpage
Size can be one of the following (the numbers after each size are the max width and height in pixels.
Aspect ratios are preserved so the image might not be exactly this size)
• bookpage 270x405
• bundlepage 213x320
• medium 240x360
• small 120x180
• tiny 34x50
Note the lack of extension.
Disabling Line Numbers While Nesting Code Blocks In
Lists
For the indentation method:
1. There must be a blank line between the list item and the code.
2. The {line-numbers=off} line should be indented by four characters.
3. The code should be indented by 3 more characters than the {line-numbers=off} line.
* with no line numbers:
{line-numbers=off}
def foo
"foo"
end
* with line-numbers on:
def foo
"foo"
end
Miscellaneous 102
For the tildes method
1. There must be a blank line between the list item and the first line of the code block
2. The tildes and the code should be indented to match the indentation of the list.
* with no line numbers:
{line-numbers=off}
def foo “foo” end
• with line-numbers on:
def foo
"foo"
end
Can I write my Leanpub book in Markdown files, with the
.md extension?
Yes!
If you are a not a programmer, and this makes no sense to you, please ignore it. Our documentation, in
the manual and elsewhere, focuses on .txt files because they work for everyone, easily.
Page Sizes and Maximum Image Sizes
This table sets out the available Leanpub page sizes and the corresponding maximum internal image sizes.
Sizes are shown width x height and assume the image resolution is set to 72 PPI (pixels per inch).
Type Page Size Max Image Size
Inches Pixels
US Letter 8.50” x 11” 468 x 648
A4 Paper 8.27” x 11.69” 451 x 698
Technical 7.00” x 9.10” 396 x 511
US Trade 6.00” x 9” 288 x 504
A5 Paper 5.83” x 8.27” 276 x 451
Digest 5.50” x 8” 252 x 432
Paperback 4.25” x 6.87” 216 x 396

Miscellaneous 103
Indentation
If you are looking to indent some text you can use the Unicode character ‘figure space’ (U+2007)56 to add
as many spaces as you need. You can add this character to your clipboard by selecting the blank space
between the following quotes and copying it.
“ ”
Hanging Indents
Scholarly works sometimes need bibliographical entries to be formatted with hanging indents. So, we’ve
added this to Leanpub.
To use it, you use the directives {begin-hanging-paragraphs} to start using hanging paragraphs, and {end-
hanging-paragraphs} to end it. These should be on lines by themselves, with blank lines above and below
them. Here’s a quick example, showing first what you would type in your text file, and second how this
would look when published:
This is a normal paragraph.
{begin-hanging-paragraphs}
Lorem ipsum dolor sit amet, consectetuer adipiscing elit. Donec hendrerit tempor tellus. Do\
nec pretium posuere tellus.
Aliquam erat volutpat. Nunc eleifend leo vitae magna.
Pellentesque dapibus suscipit ligula. Donec posuere augue in quam. Etiam vel tortor sodales\
tellus ultricies commodo. Suspendisse potenti. Aenean in sem ac leo mollis blandit. Donec \
neque quam, dignissim in, mollis nec, sagittis eu, wisi. Phasellus lacus.
Pellentesque dapibus suscipit ligula. Donec posuere augue in quam. Etiam vel tortor sodales\
tellus ultricies commodo. Suspendisse potenti. Aenean in sem ac leo mollis blandit. Donec \
neque quam, dignissim in, mollis nec, sagittis eu, wisi. Phasellus lacus.
{end-hanging-paragraphs}
This is a normal paragraph again.
This is a normal paragraph.
Lorem ipsum dolor sit amet, consectetuer adipiscing elit. Donec hendrerit tempor tellus. Donec pretium
posuere tellus.
Aliquam erat volutpat. Nunc eleifend leo vitae magna.
Pellentesque dapibus suscipit ligula. Donec posuere augue in quam. Etiam vel tortor sodales tellus ultricies
commodo. Suspendisse potenti. Aenean in sem ac leo mollis blandit. Donec neque quam, dignissim
in, mollis nec, sagittis eu, wisi. Phasellus lacus.
56http://www.fileformat.info/info/unicode/char/2007/index.htm

Miscellaneous 104
Pellentesque dapibus suscipit ligula. Donec posuere augue in quam. Etiam vel tortor sodales tellus ultricies
commodo. Suspendisse potenti. Aenean in sem ac leo mollis blandit. Donec neque quam, dignissim
in, mollis nec, sagittis eu, wisi. Phasellus lacus.
This is a normal paragraph again.
How can I import a Microsoft Word document?
We have a detailed explanation for how to do this here: https://leanpub.com/help/howtofromworddirectly
The video is a bit outdated, so certain tabs and pages will look different, but the process is the same.
Please note that one extra step can help make things easier. Before you make your first Preview, go to the
‘Settings’ page for your book, and click on the ‘Language & Character Encoding’ link. Then, check the
box for ‘Force character encoding to be UTF-8’ and click ‘Update Book’.
Problems With Adobe Digital Editions
Very occasionally, when authors are testing book files and they include Adobe Digital Editions in their
tests, things look right in other apps, but look wrong in Adobe Digital Editions. On rarer occasions, readers
actually use it to read books and also notice an issue. Since we don’t provide specific support for Adobe
Digital Editions, we suggest that if you as an author or a reader are noticing an issue when you are using
it, the best thing to do is to switch to using a better app for reading ebooks.
Long strings of characters running off the right-hand side
of the page / the right margin
Sometimes very long strings of characters will run off the right-hand side of the page, without a line-
break happening automatically. Unfortunately there’s not much we can do to fix this. Usually, we see it
with long Java class names. The only fix that we know of is to manually insert a line-break before the
problematic code-span by putting two-spaces followed by a carriage return right before it. Sorry we don’t
have a better answer!
Time Zone
The time zone Leanpub uses is UTC57. This will affect e.g. the timing of when coupons expire. Someday
we will add a feature so authors can set their time zone, but we can’t promise when. This tool58 can help
you see your time zone in relation to UTC.
57https://en.wikipedia.org/wiki/Coordinated_Universal_Time
58http://everytimezone.com

Miscellaneous 105
How can I increase the space between paragraphs?
Currently there is no setting to increase paragraph spacing. However, there is a workaround, which
involves inserting an empty table by putting | | on a line by itself between two paragraphs. Please note
this will create a large space between the paragraphs.
Here is how you can insert an empty space between two paragraphs:
Here is one paragraph.
| |
Here is another paragraph.
Font Samples
Here are samples of each of the fonts you can choose from if you choose “Custom” as your Book Theme
(if you don’t choose a Custom theme, your text font is set automatically to Linux Libertine for the body
or content of the book. The title font is set to Open Sans, and the code font (if you are writing computer
code samples) is set to Anonymous Pro.
Merriweather (Serif)
To download a sample book with the body text in this font, click here59.
Cousine (Mono)
To download a sample book with the body text in this font, click here60.
Lora (Serif)
To download a sample book with the body text in this font, click here61.
Droid Serif (Serif)
To download a sample book with the body text in this font, click here62.
59https://leanpub.com/s/SCN-YDfHsOSGwbeR7hdhKg.pdf
60https://leanpub.com/s/Ym4LxtaYiCfwzzjm2-c7rA.pdf
61https://leanpub.com/s/MelGV-duvEdXUUwPr5lLDw.pdf
62https://leanpub.com/s/EoZuaqvz6mv51swba4MJJA.pdf
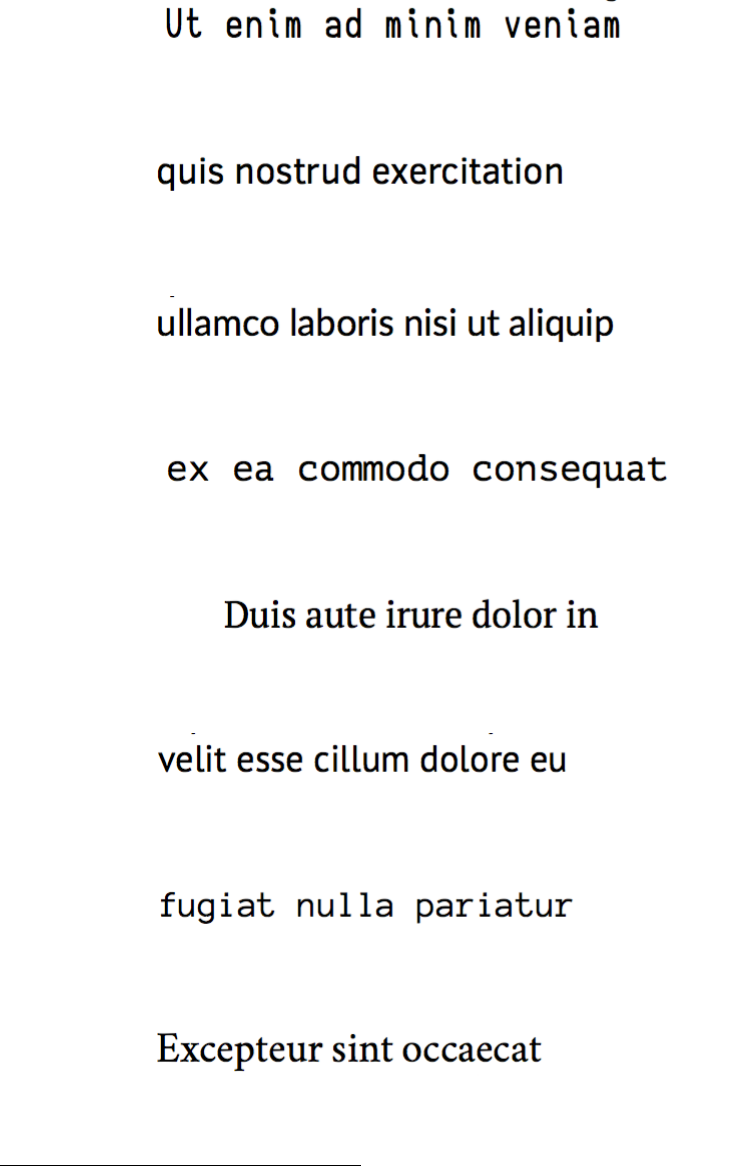
Miscellaneous 106
Luculent (Mono)
To download a sample book with the body text in this font, click here63.
Clear Sans (Sans)
To download a sample book with the body text in this font, click here64.
Lato (Sans)
To download a sample book with the body text in this font, click here65.
PT Mono (Mono)
To download a sample book with the body text in this font, click here66.
PT Serif (Serif)
To download a sample book with the body text in this font, click here67.
PT Sans (Sans)
To download a sample book with the body text in this font, click here68.
Anonymous Pro (Mono)
To download a sample book with the body text in this font, click here69.
Crimson Text (Serif)
To download a sample book with the body text in this font, click here70.
63https://leanpub.com/s/ZR6UzY-psYZ6SNKHdPoDug.pdf
64https://leanpub.com/s/vNPUFvEUskoX3HfVbLf0Kg.pdf
65https://leanpub.com/s/T6z41o50CLygsbjzvwD6vQ.pdf
66https://leanpub.com/s/YXW5gymw8IDLehB0sXEdrg.pdf
67https://leanpub.com/s/m3fUuvlYFftneYVcYV68-A.pdf
68https://leanpub.com/s/vc8EpNANIyF9nfyjcp2pqA.pdf
69https://leanpub.com/s/Z4ignbAq-r8KsaOYHYMfrg.pdf
70https://leanpub.com/s/xzM8wFkcpKQlRPddNKUmzQ.pdf
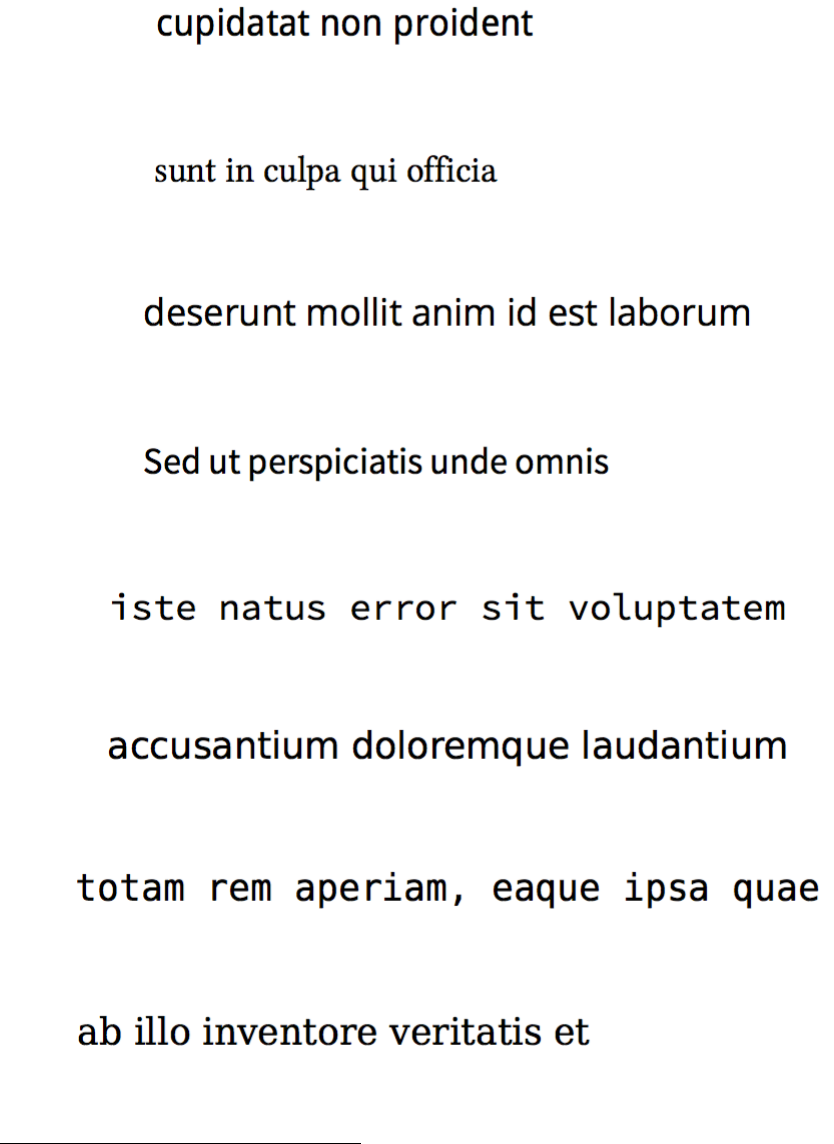
Miscellaneous 107
Droid Sans (Sans)
To download a sample book with the body text in this font, click here71.
Linux Libertine (Serif)
To download a sample book with the body text in this font, click here72.
Open Sans (Sans)
To download a sample book with the body text in this font, click here73.
Source Sans Pro (Sans)
To download a sample book with the body text in this font, click here74.
Source Code Pro (Mono)
To download a sample book with the body text in this font, click here75.
Deja Vu Sans (Sans)
To download a sample book with the body text in this font, click here76.
Deja Vu Mono (Mono)
To download a sample book with the body text in this font, click here77.
Deja Vu Serif (Serif)
To download a sample book with the body text in this font, click here78.
71https://leanpub.com/s/sGNFgAMazaHHMS0Bc2hecQ.pdf
72https://leanpub.com/s/70PnHaVtd7AU9n56xndNWw.pdf
73https://leanpub.com/s/rpjSJDBO5c2OWyMCU20JCg.pdf
74https://leanpub.com/s/RNV7ab4ZxOeweKSFI_SfVA.pdf
75https://leanpub.com/s/c84TXE7UBsc7yReTxXPkPw.pdf
76https://leanpub.com/s/RQl1G7N8H7hc9BZuAPVWTQ.pdf
77https://leanpub.com/s/2WFmH4VDjDZjAXkRpgM8Nw.pdf
78https://leanpub.com/s/TQqmZPZpcnwOGzpyWD5OTw.pdf

Miscellaneous 108
APL 385 (Mono)
To download a sample book with the body text in this font, click here79.
Using Dropbox and Git
If you are using Dropbox and Git, this may increase the size of your manuscript folder to the point where
our book generators start having trouble retrieving data from your manuscript folder when you try to
preview or publish. (If you are having this problem, you will notice that our book generators slow down
or stop when they get to Step 5.) The solution is to use the Selective Sync option in Dropbox to omit the
.git folder, which will probably be hidden when you look in the manuscript folder on your computer.
79https://leanpub.com/s/TvHfIV1qxHM2WBEZyGi7ZQ.pdf
