Manual For Using “MzS Tools” Plugin
manual
User Manual:
Open the PDF directly: View PDF ![]() .
.
Page Count: 21

Version 0.4
Manual for using “MzS Tools”
plugin
1
Software information:
Plugin for QGIS version 0.4 - July 2018
Authors:
Emanuele Tarquini (CNR-IGAG), Gianluca Carbone (CNR-IGAG), Giuseppe Cosentino (CNR-IGAG), Francesco
Pennica (CNR-IGAG)
2
SUMMARY
1. Introduction ............................................................................................................................................... 3
2. Creation of a new project .......................................................................................................................... 5
3. Open a pre-existing project ....................................................................................................................... 6
4. Import of a pre-existing project ................................................................................................................ 7
4.1 Import a project created with the plugin .......................................................................................... 7
4.2 Import a project that conforms to the current standard .................................................................. 7
4.3 Working with the file “CdI_Tabelle.mdb” ........................................................................................ 8
5. Project editing and validation.................................................................................................................. 11
5.1 Editing .............................................................................................................................................. 11
5.1.1 Topological editing .................................................................................................................. 12
5.1.2 Copy feature ........................................................................................................................... 13
5.1.3 Add “Sito puntuale” using XY coordinates .............................................................................. 14
5.2 Validation ......................................................................................................................................... 14
6. Exporting a project .................................................................................................................................. 17
6.1 Export a project created with the plugin ......................................................................................... 17
6.2 Export a project that conforms to the current standard ................................................................. 17
7. Print layouts ............................................................................................................................................. 19
8. Finally... .................................................................................................................................................... 20
3
1. INTRODUCTION
After the earthquake in Abruzzo on 6 April 2009, the “National Plan for Earthquake Prevention” was launched
(law 77/2009 art. 11) and were assigned incentives on the basis of the medium risk index of the territories
for the realization of Seismic Microzonation studies. For the realization of such studies the technical
reference document is represented by the “Criteria for Seismic Microzonation”, approved by the Conference
of Regions and Autonomous Provinces. To support the geologist and in order to facilitate and homogenize
the processing of Seismic Microzonation maps (SM), the “Standards of representation and computer
archiving” (“Standard di rappresentazione e archiviazione informatica”) have been prepared. This document
constitutes the reference for the creation of cartographic products and for the storage of information useful
for carrying out the studies.
According to the “Criteria for Seismic Microzonation” and “Standards of representation and computer
archiving”, the maps present in the SM studies are:
• Investigation map (“Carta delle Indagini”);
• Geological-Technical Map for Seismic Microzonation (“Carta Geologico-Tecnica”);
• Map of Seismically Homogeneous Microzones (“Carta delle Microzone Omogenee in Prospettiva
sismica”);
• Seismic Microzonation Map (“Carta di Microzonazione Sismica”).
Currently, the standards include the setting up of a seismic microzoning project based on shapefiles and mdb
tables, organized according to the structure represented in Figure 7 (later in the manual, this type of project
will be called "project conforming to the current standard of Seismic Microzonation", in order to distinguish
it from the type of project created with the "MzS Tools" plugin.).
This plugin was created to exploit the potential of free software QGIS and SQLite (Spatialite), and of the
Python programming language, to realize a project based on a light and fast geodatabase for data storage
and production of the aforementioned maps.
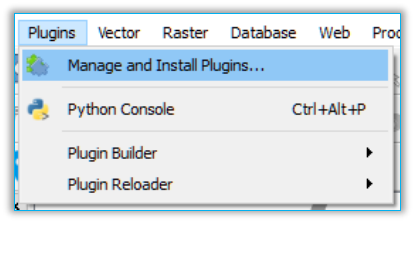
The "MzS Tools" plugin was created for the version of QGIS 2.16 or higher. To install it, select "MANAGE AND
INSTALL PLUGIN ..." from the "PLUGINS" menu (Figure 1).
Inside the window of the same name that will open, click on the "ALL" tab and type, in the search bar, the
name of the plugin ("MzS Tools"). QGIS will show a list of plugins containing the words entered: select "MzS
Tools" in the list and press the "INSTALL PLUGIN" button.
In case it is not visible, you can enable the toolbar through the menu VIEW → TOOLS BAR → MzS TOOLS.
Figure 1

4
The tools contained within the plugin are those shown in Figure 2:
Figure 2
5
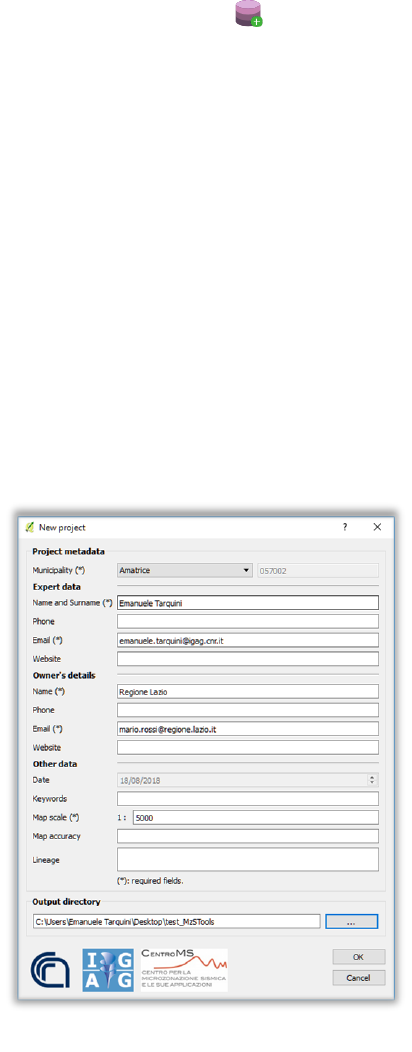
2. CREATION OF A NEW PROJECT
To create a new project, press the "New project" button . A window will open (Figure 3) and you will be
asked to fill it in a series of fields with information about:
• the name of the Municipality object of study;
• the responsible expert who is carrying out the studies;
• the region to which belongs the Municipality object of studies.
This data will be used to compile the project metadata file, which will be automatically saved in the "allegati"
folder of the Seismic Microzonation project.
In the last field, instead, you will be asked to set the project saving directory.
Once the required fields, marked with an asterisk, and the one relating to the save directory, have been
filled in, the "OK" button will be selectable.
Press the "OK" button to create the new project.
The tool will automatically open the project and zoom in on the study area.
Figure 3
6
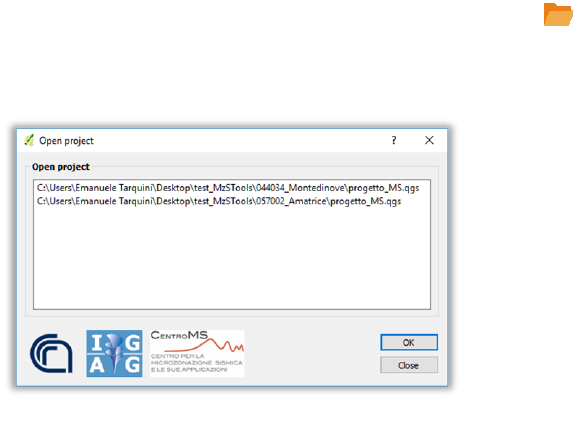
3. OPEN A PRE-EXISTING PROJECT
To open a project previously generated with the plugin, press the "Open project" button .
In the "Open project" window (Figure 4), select the desired project from the list and press the "OK" button.
NOTE: if the project’s directory generated with the plugin is changed, the "Open Project" tool will lose the
tracking. This means that the project will still exist within your device, but it will no longer appear in
the "Open project" tool list. So, before creating / importing a project, you need to be sure to have
saved the project’s directory. If it is necessary to modify the directory of a pre-existing project, first
perform an "Export project" operation (see paragraph 6.1) followed by an "Import project" operation
(see paragraph 4.1) specifying the new save directory. Finally, eliminate the old project.
Figure 4
7
4. IMPORT OF A PRE-EXISTING PROJECT
The "MzS Tools" plugin allows you to import an existing project:
• generated by the plugin;
• that conforms to the current Seismic Microzonation standard.
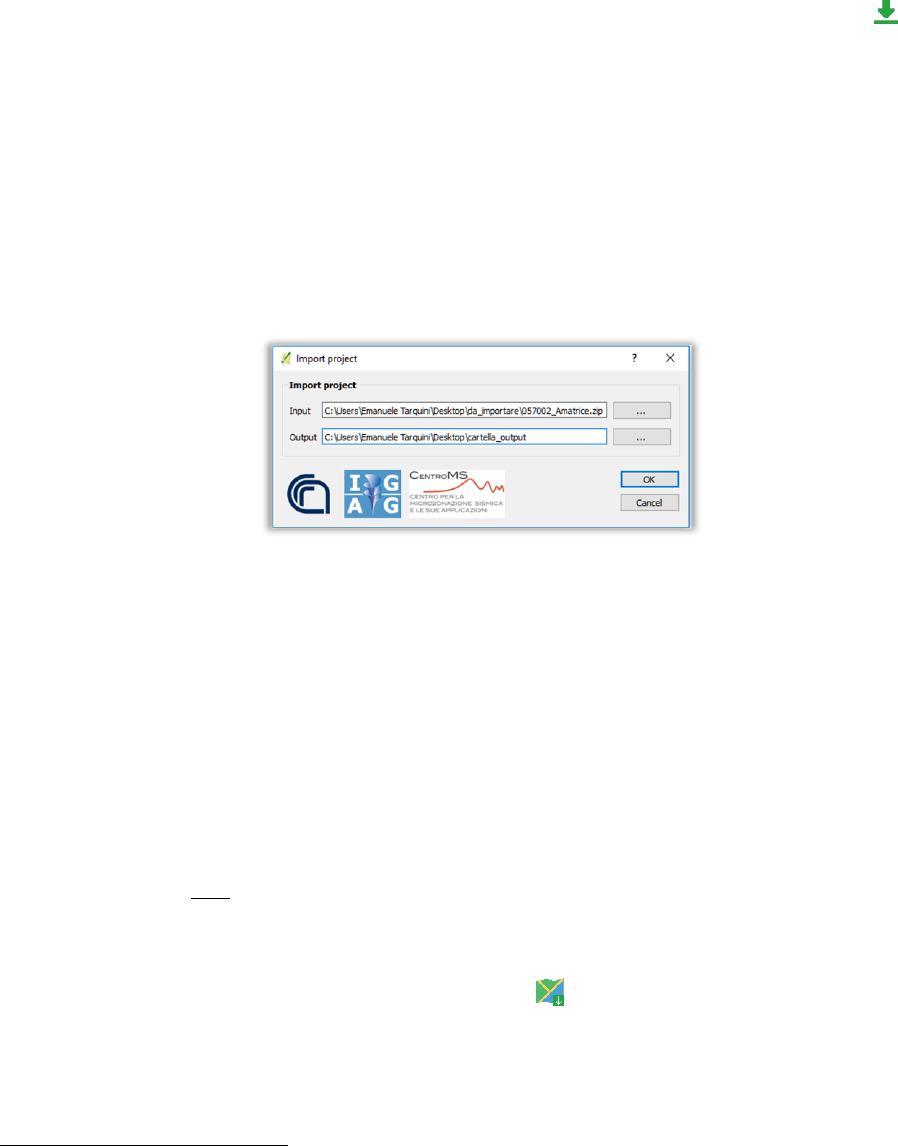
4.1 IMPORT A PROJECT CREATED WITH THE PLUGIN
To import a pre-existing project generated with the plugin, press the "Import project" button . In the
window that will open (Figure 5), enter:
• in the "INPUT" field, the name and the path of the project to be imported (the file will be in .zip
format);
• in "OUTPUT", the save directory of the project that will be imported.
Once the above fields have been filled in, the "OK" button will be selectable.
Click the "OK" button to import the project.
The tool will automatically open the project and zoom in on the study area.
NOTE: the "Export project" tool (see paragraph 6.1) generates a zip file as output. This is why the
"Import Project" tool requires a compressed zip file as input.
The destination folder (in the figure, the "cartella_output" folder), set in the "OUTPUT" field,
must already be present in the saving path (in the figure, the path "C:\Users\Emanuele
Tarquini\Desktop"). The folder of the specified project will be saved in it.
4.2 IMPORT A PROJECT THAT CONFORMS TO THE CURRENT STANDARD
To import a pre-existing project that conforms to the current Seismic Microzonation standard, you will
need to perform three steps:
• open the "CdI_Tabelle.mdb" file and save the project tables in txt format (see section 4.3);
• create a new project using the "New project" tool (see chapter 3) and leave it open within QGIS
1
(the project must not be already edited);
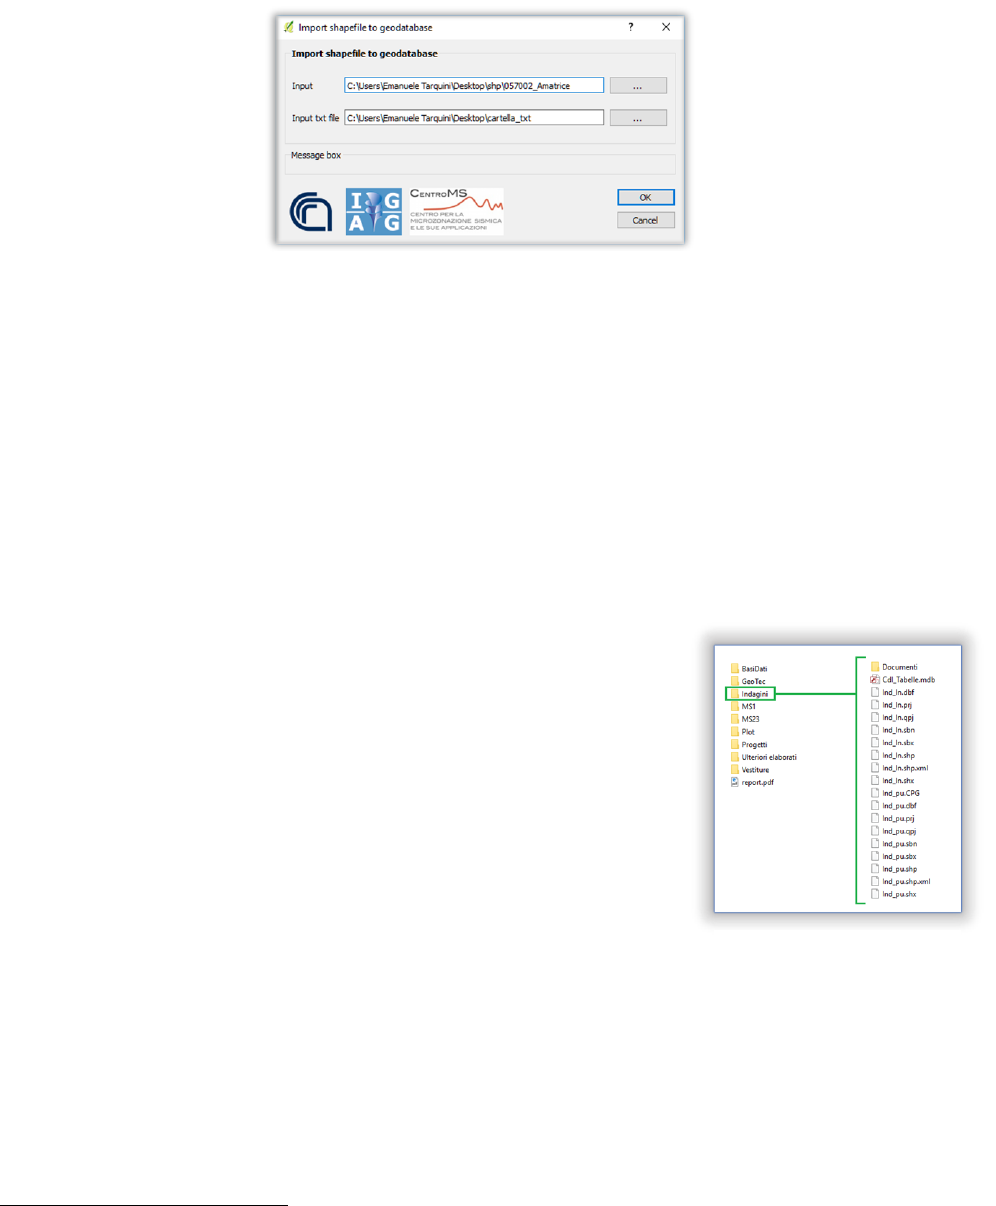
• run the "Import shapefile to geodatabase" tool.
Clicking the "Import shapefile to geodatabase" button will open a window (Figure 6) characterized
by the presence of two fields:
• "INPUT". Enter the directory of the project to be imported, i.e. the path and the name of the
main project folder;
1
The new project must refer to the same Municipality as the project being imported.
Figure 5
8
• "INPUT TXT FILE". Enter the saved directory of the txt file, i.e. the path and the name of the file
saving folder.
Once the above fields have been filled in, the "OK" button will be selectable.
Click the "OK" button to import the project.
NOTE: at the end, the tool "Import shapefile to geodatabase" will generate a report on the outcome of
the import operation. This document will be automatically saved in the project folder to the
following path: ...\allegati\log. The name of the report will be characterized by the date and time
of execution of the tool, and by the words "import_log" (example "2018-06-13_09-06-23_
import_log").
The records of the "Stab" and "Instab" shapefiles of the "MS23" folder that have a "LIVELLO"
field value other than "2" or "3" will not be copied. Therefore, before starting the tool, check
the above files.
WARNING: it may take a long time to run the tool. We recommend running it and letting QGIS work in
the background while doing another computer work.
4.3 WORKING WITH THE FILE “CdI_Tabelle.mdb”
To run the "Import shapefile to geodatabase" tool you will need to
create a folder containing all the project tables in txt format. These
tables, within a project that conforms to the current Seismic
Microzonation standard, are stored in the "CdI_Tabelle.mdb"
database.
The project tables to be imported from "CdI_Tabelle.mdb" are:
• “Sito_Puntuale”;
• “Sito_Lineare”;
• “Indagini_Puntuali”;
• “Indagini_Lineari”;
• “Parametri_ Puntuali”;
• “Curve”.
The procedure to be performed to export the basic tables in txt format is as follows
2
:
1. open the main project folder conforms to the current Seismic Microzonation standard to be
imported;
2
You need to have Microsoft Access installed on your machine to export tables.
Figure 7
Figure 6

9
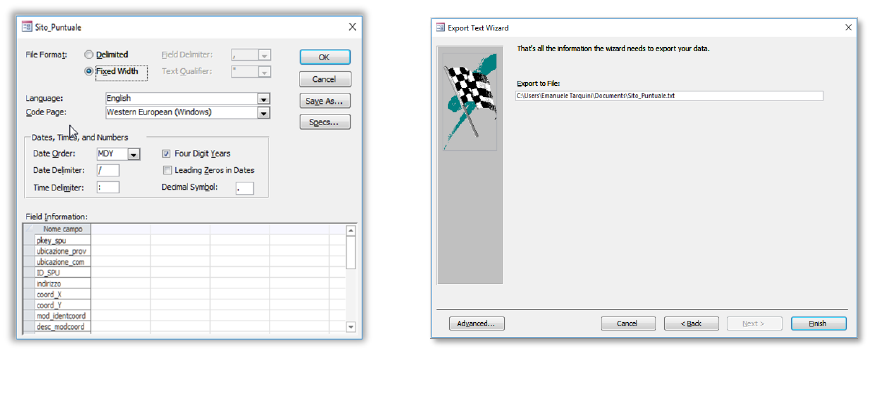
2. enter in the “Indagini” folder (Figure 7);
3. double-click on the "CdI_Tabelle.mdb" icon to open the database;
4. select one of the project tables (in Figure 8 the "Site_Point" table has been chosen), press the
right mouse button and select EXPORT → TEXT FILE;
5. the "EXPORT - TEXT FILE" window will open (Figure 9) where you will be asked to select the save
directory and the name of the output txt file. Leave the default file name unchanged (in the
example "Sito_Puntuale.txt") and select the destination folder. Leave the other options
unchanged and press the "OK" button;
6. the "EXPORT TEXT WIZARD" window will open:
a. in the first step, check the item "DELIMITED" and press the "NEXT" button (Figure 10);
b. in the second step, choose "SEMICOLON" in the "FIELD DELIMITER", check the item
"INCLUDE FIELD NAMES ON FIRST ROW" and check that the double quotation marks are
selected in "TEXT QUALIFIER" (Figure 11). Press the "ADVANCED" button;
c. the "ADVANCED..." window will open. Under "DECIMAL SYMBOL", enter "." (dot). Press
the "OK" button (Figure 12);
d. You will return to the "EXPORT TEXT WIZARD" window. Press the "NEXT" button;
e. in the third step, the output directory will be displayed again. Press the "END" button
(Figure 13);
Figure 9
Figure 8
Figure 10
Figure 11
10
7. repeat operations 4, 5 and 6 for all the project tables listed above.
Figure 12
Figure 13

11
5. PROJECT EDITING AND VALIDATION
The plugin has tools that help the expert:
• in layer editing operations. The aim is to avoid the development of topological errors;
• to perform a validation on the data entered during the editing phase.
5.1 EDITING
The procedure for entering new data consists of:
• selecting the layer to be edited (Figure 14 - phase 1);
• activating editing with:
o the "Toggle editing" toolbar tool from QGIS ;
o the tool "Add feature or record" of the plugin bar (see paragraph 5.1.1);
• select the tool for inserting new items ( or or )
3
;
• draw on the map the geometry of the element (Figure 14 - phase 2);
• once the digitization is complete, QGIS will automatically open the input mask for the newly
created geometry attributes (Figure 14 - phase 3);
• after entering the attributes, click on the "OK" button on the input form;
• to save changes, click:
o on the button of the QGIS toolbar "Save layer edits" ;
o on the "Save" plugin bar button .
To change the attributes of an already existing feature, expert can proceed in this way:
• Select the layer to edit (Figure 14 - phase 1);
• Activate editing with:
o the "Toggle editing" toolbar tool from QGIS ;
o the tool "add feature or record" of the plugin bar (see paragraph 5.1.1);
• Select the editing tool from the toolbar "Digitizing toolbar" and click with the left mouse button
on the feature to be identified;
• only the first time - in the "Results Information" panel that will open, check the "Open module
automatically" to automatically open the input mask (Figure 14 - phase 4);
• inside the mask, modify the fields to be updated;
• to save changes, click:
o on the button of the QGIS toolbar "Save layer edits" ;
o on the "Save" plugin bar button .
3
Only for the "Toggle editing".

12
NOTE: when it is recommended to use the QGIS editing tool and when the plugin tool? According to the
Seismic Microzonation standards, the layers that must comply with the topological rules,
described in Figure 20 in paragraph 5.2 are:
▪ “Zone stabili liv 1”;
▪ “Zone instabili liv 1”;
▪ “Zone stabili liv 2”;
▪ “Zone instabili liv 2”;
▪ “Zone stabili liv 3”;
▪ “Zone instabili liv 3”;
▪ “Unità geologico-tecniche”.
Therefore, for these layers it is highly recommended to use the "Add feature or record" tool of
the "MzS Tools" plugin, while for the others the "Activate changes" tool of QGIS.
WARNING: it may take a few seconds to run the "Add feature or record" tool. When using the "Add
feature or record" tool to open a topological editing session, close it using the "Save" tool. If you
use the "Save layer edits" tool in QGIS, open the editing session again with the "Add feature or
record" tool and close it immediately with the "Save" tool.
The functions of the "MzS Tools" plugin editing tools will be described below.
5.1.1 TOPOLOGICAL EDITING
The topological editing tool was developed to avoid the occurrence of topological errors during
the editing phase. In fact, at the start of an editing session, the tool will apply to the selected layer,
the topological rules required by the Seismic Microzonation standards.
To perform a topological editing session:
• select a layer within the "Layer Panel" (Figure 15 - phase 1);
Figure 14
13
• press the "Add feature or record" button. The topological editing tool will apply the
topological rules listed in Figure 20 (Figure 15 - Phase 2, 3 and 4);
• plot the geometry/geometries within the map area. Once the entry is complete, press the
"Save" button to save the changes.
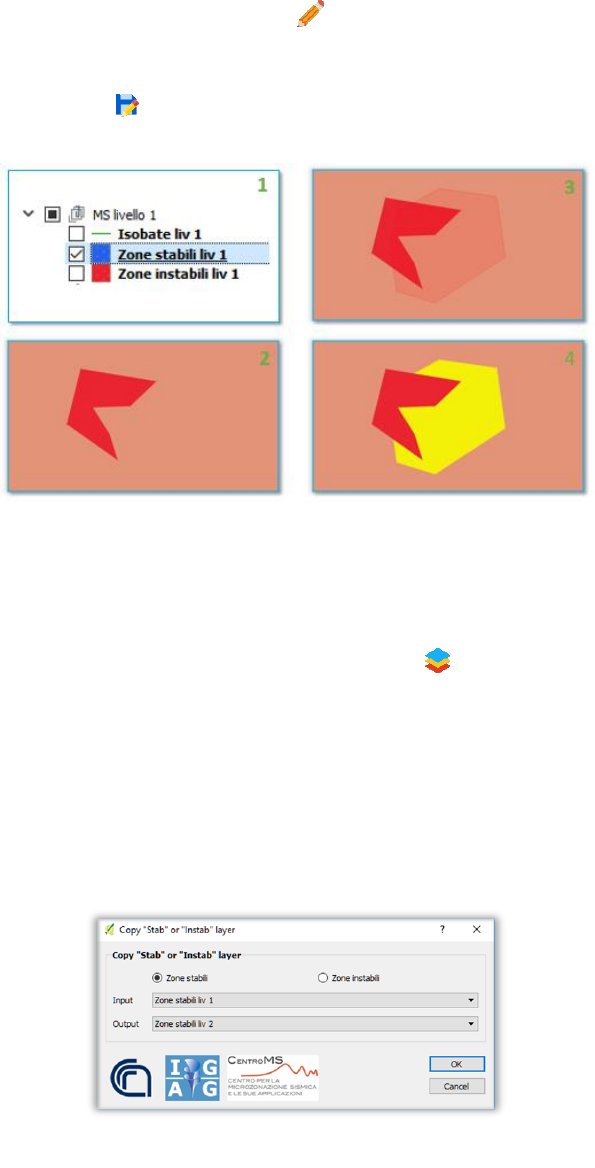
5.1.2 COPY FEATURE
The tool "Copy ‘Stab’ or ‘Instab’ layer" allows the expert to copy all the features present in one of
the "Zone stabili" (or "Zone instabili") layers, within a second "Zone stabili" (or "Zone instabili")
layer. In fact, pressing the "Copy ‘Stab’ or ‘Instab’ layer" button will open a window in which
you will be asked to select (Figure 16):
• the group of layers to work on. Check the item "Zone stabili" or the "Zone instabili" item;
• within the "INPUT" field, the layer from which to copy the features;
• within the "OUTPUT" field, the layer in which the features will be copied.
Press the "OK" button to execute the copy operation of the features.
Figure 15
Figure 16
14
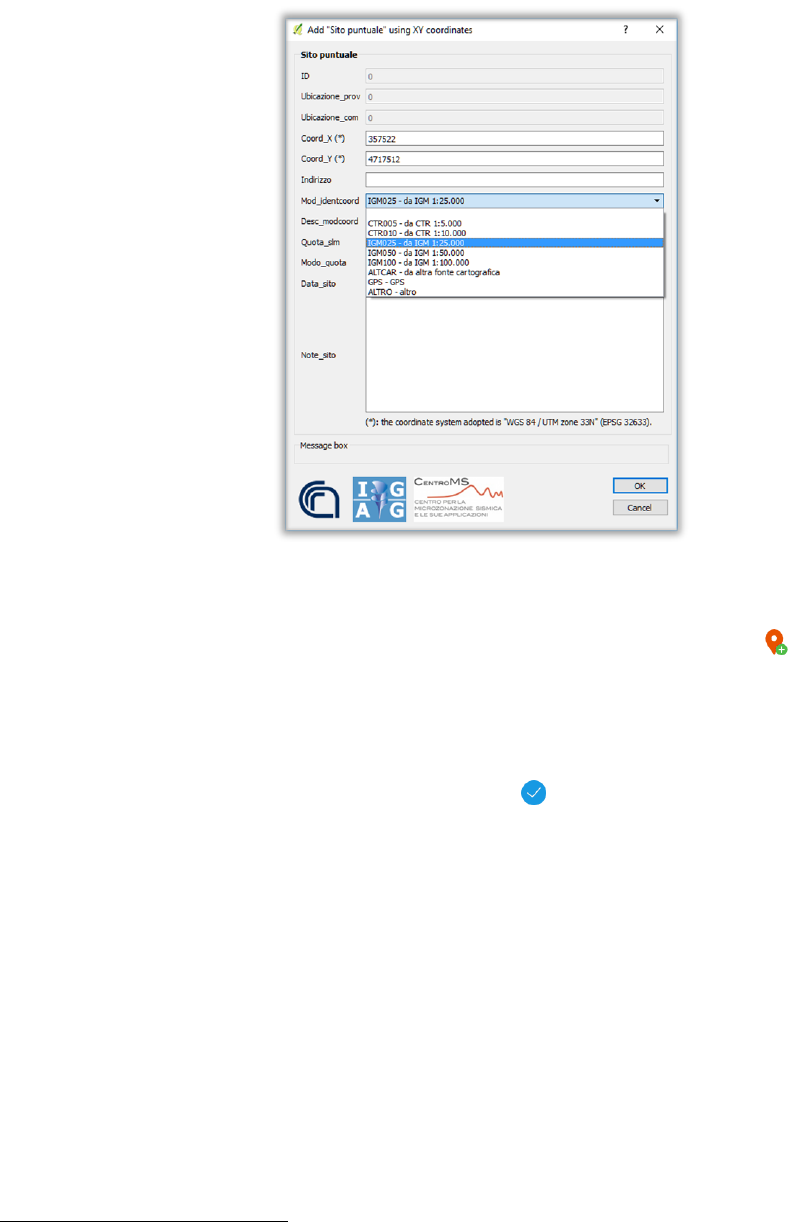
5.1.3 ADD “SITO PUNTUALE” USING XY COORDINATES
The tool "Add ‘Sito puntuale’ using XY coordinates" allows you to add a new feature within the
"Siti puntuali" layer by entering its coordinates’ values.
To execute the tool, press the "Add ‘Sito puntuale’ using XY coordinates" button. Within the
window that will open (Figure 17) enter the coordinates’ values according to the reference system
"WGS84 UTM 33N - EPSG 32633" in the "Coord_X" and "Coord_Y" fields
4
.
5.2 VALIDATION
To validate a project, press the "Validation" button . To be able to validate the project it will be
necessary:
1. to open it in QGIS using the "Open project" tool (see chapter 3);
2. to run the "Validation" tool (Figure 18).
4
This is the official reference system of the project, as defined by the Seismic Microzonation standards.
Figure 17
15
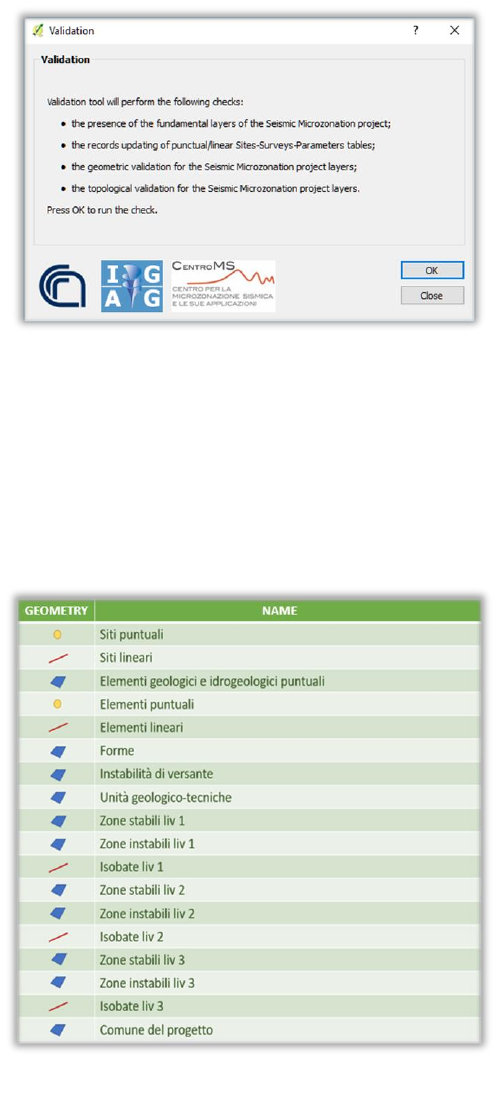
The tool will perform the following checks:
• the presence of the fundamental layers of the Seismic Microzonation project (Figure 19);
• the updating of the records of the punctual/linear Sites-Surveys-Parameters tables;
• the geometric control for the Seismic Microzonation project layers;
• the respect for topological rules for the layers of the Seismic Microzonation project.
At the end of the operations, the tool will generate a report on the outcome of the project validation.
This document will be automatically saved in the project folder to the following path: ...\allegati\log.
The name of the report will be characterized by the date and time of execution of the tool, and by the
words "validation_log" (example "2018-06-13_09-06-23_validation_log").
Figure 18
Figure 19
16
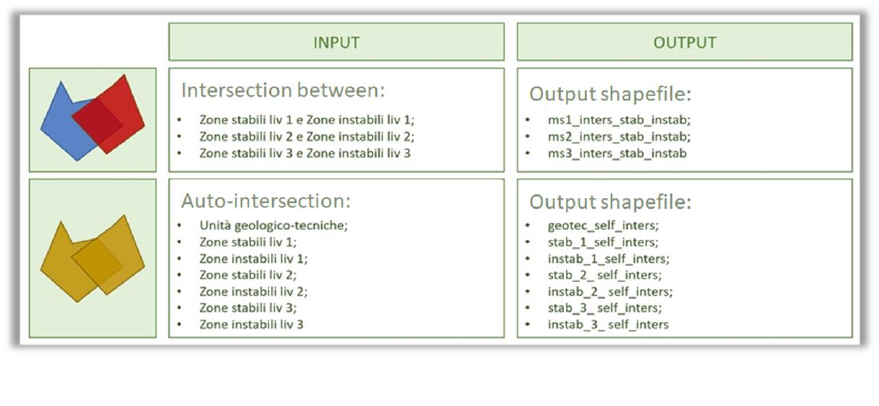
In particular, if during execution, the tool identifies features that do not respect the topological rules
listed in Figure 20, the problem will be reported within the report and will generate shapefiles in which
will be highlighted the areas in which these rules are not observed.
Figure 20
17
6. EXPORTING A PROJECT
The "MzS Tools" plugin allows you to export a project according to two different structures:
• the plugin structure;
• the structure conforms to the current Seismic Microzonation standard.
6.1 EXPORT A PROJECT CREATED WITH THE PLUGIN
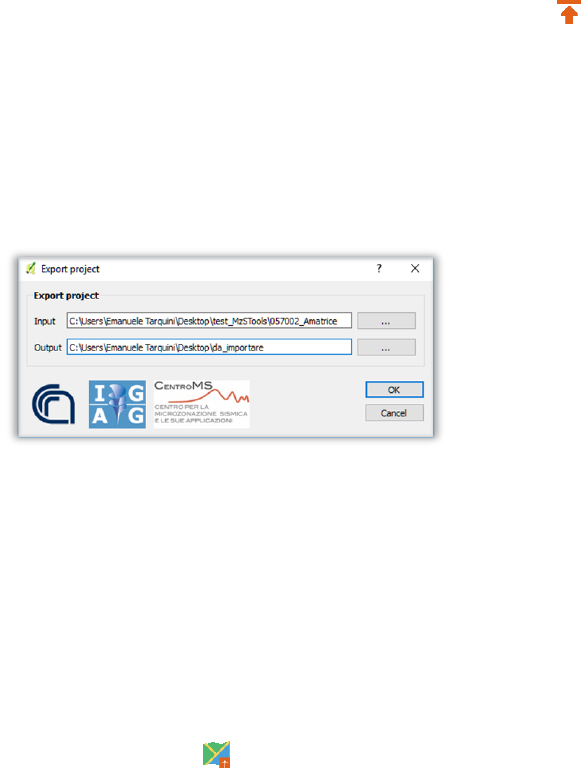
To export a project keeping the structure used in the plugin, press the "Export project" button. In the
window that will open (Figure 21), enter:
• in "INPUT", the main folder of the project to be imported;
• in "OUTPUT", the directory where the compressed project will be saved in zip format.
Once the above fields have been filled in, the "OK" button will be selectable.
Click the "OK" button to export the project.
NOTE: the destination folder (in the figure, the folder "da_importare"), set in the "OUTPUT" field, must
already be present in the saving path (in the figure, the path "C:\Users\Emanuele
Tarquini\Desktop"). Inside it the compressed zip file of the specified project will be saved.
6.2 EXPORT A PROJECT THAT CONFORMS TO THE CURRENT STANDARD
To export a project using the structure that conforms to the current Seismic Microzonation standard, it
will be necessary to:
• open one in QGIS using the "Open project" tool (see chapter 3) if no project is loaded;
• press the "Export as shapefile" button .
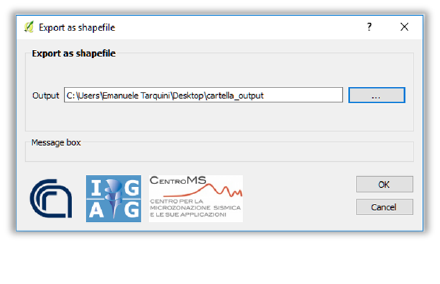
When you click the "Export as shapefile" button a window will open (Figure 22) with the "OUTPUT" field:
insert, inside it, the saving directory of the project to be exported.
Figure 21
18
NOTE: the destination folder (in the figure, the "cartella_output" folder), set in the "OUTPUT" field,
must already be present in the saving path (in the figure, the path "C:\Users\Emanuele
Tarquini\Desktop"). The folder of the specified project will be saved in it.
Figure 22
19
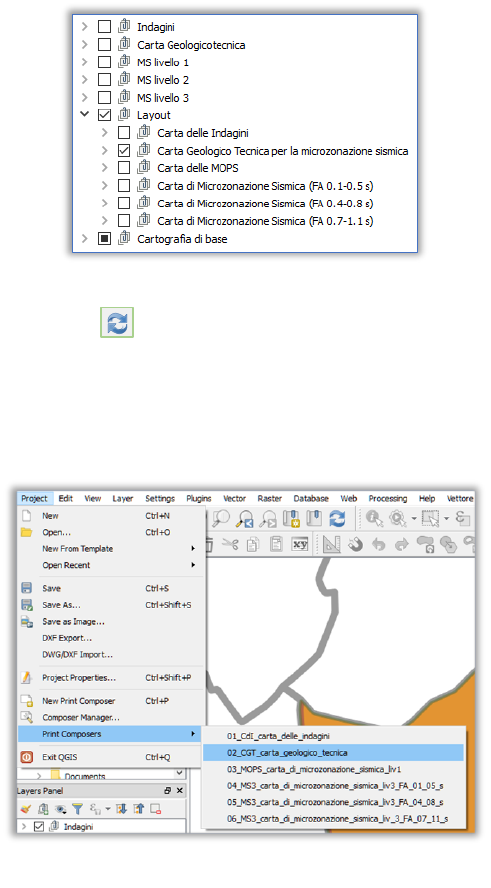
7. PRINT LAYOUTS
When a new project is created (see chapter 2), the plugin automatically generates print layouts specific to
the selected Municipality.
To be able to print a map, as required by the standards, operate as follows:
• inside the LAYER PANEL, uncheck the following group layers:
o “INDAGINI”;
o “CARTA GEOLOGICOTECNICA”;
o “MS LIVELLO 1”;
o “MS LIVELLO 2”;
o “MS LIVELLO 3”;
• in the "LAYOUT" group layer, select the group layer with the name of the map to be printed (Figure
23) always within the LAYER PANEL;
• press the "REFRESH" button inside QGIS, or the "F5" button on the keyboard, to perform an
update of the printing layers;
• select the layout with the name of the map to be printed, in the menu PROJECT → PRINT COMPOSERS
(Figure 24);
• the PRINT COMPOSERS window will open with the desired layout.
Figure 23
Figure 24

20
8. FINALLY...
Some tips:
• do not exceed the size of 2 GB for the project folder;
• do not move the project folder from its save directory;
• do not move project files from their folders;
• do not change the name of the project folder, its sub-folders, the database and / or the files that
make up the project;
• do not change the name of the QGIS project layers;
• do not change the name of the print layouts of the QGIS project;
• if the directory of the QGIS project on which it was working is no longer present in the "Open project"
tool list, then the project folder has been renamed or has been moved from its original directory;
• when using the "Add feature or record" tool, always save with the "Save" tool. If not, open an editing
session again with the "Add feature or record" tool and close it immediately with the "Save" tool;
• run the "Add feature or record" tool only once per layer;
• when using the "Import shapefile to geodatabase" tool, to import data from a pre-existing project
that conforms to the current Seismic Microzonation standard within a project generated with the
tool "New project", the latter must not be edited, i.e. must contain empty layers, without any
features;
• when importing a project using the "Import shapefile to geodatabase" tool, it is important to know
that the "Stab" and "Instab" shapefile records of the "MS23" folder that have a "LEVEL" field value
different from "2" or "3" will not be copied. Therefore, before starting the tool, check the above files.
In case of unexpected errors, send an e-mail to the plugin developers.
If possible, attach screenshots of operations performed before the error occurred.
