IzPack Ation Manual
manual
manual
manual
manual
manual
User Manual:
Open the PDF directly: View PDF ![]() .
.
Page Count: 158 [warning: Documents this large are best viewed by clicking the View PDF Link!]
- Foreword
- Introduction
- Getting started
- Writing Installation XML Files
- What You Need
- Variable Substitution
- The Built-In Variables
- Environment Variables
- Dynamic Variables
- Parse Types
- The IzPack Elements
- The Root Element <installation>
- The Information Element <info>
- The Packaging Element <packaging>
- The Variables Element <variables>
- The dynamic Variables Element <dynamicvariables>
- The Conditions Element <conditions>
- Built-in conditions
- The Installer Requirements Element <installerrequirements>
- The GUI Preferences Element <guiprefs>
- The Localization Element <locale>
- The Resources Element <resources>
- The Panels Element <panels>
- <help> - optional file for a help
- <validator> - optional validation on idata
- <actions> - optional actions for the panel
- The Packs Element <packs>
- Internationalization of the PacksPanel
- <description> - pack description
- <depends> - pack dependencies
- <os> - OS restrictions
- <updatecheck>
- <file> - add files or directories
- <additionaldata>
- <singlefile> - add a single file
- <fileset>: add a fileset
- <parsable> - parse a file after installation
- <executable> - mark file executable or execute it
- <os> - make a file OS-dependent
- The Native Element <native>
- <os> - make a library OS-dependent
- The Jar Merging Element <jar>
- XInclude-style constructs
- The Available Panels
- HelloPanel
- HTMLHelloPanel
- CheckedHelloPanel
- InfoPanel and HTMLInfoPanel
- LicencePanel and HTMLLicencePanel
- PacksPanel
- ImgPacksPanel
- TreePacksPanel
- TargetPanel
- DefaultTargetPanel
- InstallPanel
- XInfoPanel
- FinishPanel
- SimpleFinishPanel
- ShortcutPanel
- UserInputPanel
- CompilePanel
- ProcessPanel
- JDKPathPanel
- SelectPrinterPanel
- DataCheckPanel
- SummaryPanel
- InstallationGroupPanel
- UserPathPanel
- Advanced features
- Apache Ant integration
- Embedding the installation file using a config element
- System properties as variables
- Automated Installers
- Console (headless) installers
- Picture on the Language Selection Dialog
- Picture in the installer
- Modifying the GUI
- Logging the Installation
- Web Installers
- More Internationalization
- Validators for Packs
- Automatic privileges elevation on Windows
- Desktop Shortcuts
- Defining Shortcuts
- Why Native Code to do the Job on Windows?
- The Shortcut Specification
- Shortcut Attributes
- Unix specific shortcut attributes
- Selective Creation of Shortcuts
- Localizing shortcuts
- DesktopShortcutCheckboxEnabled Builtin Variable
- ApplicationShortcutPath Builtin Variable
- Summary
- Shortcut Tips
- Command Line
- Trouble Shooting
- A sample shortcut specification file for Unix
- Creating Your Own Panels
- User Input
- The Basic XML Structure
- Concepts and XML Elements Common to All Fields
- Internationalization
- Panel Title
- Static Text
- Visual Separation
- Text Input
- Radio Buttons
- Combo Box
- Check Box
- Password Field
- File Field
- Multiple File Field
- Directory Field
- Rule Input
- Layout and Input Rules
- Setting Field Content
- The Output Format
- Validating Field Content
- Processing the Field Content
- Summary Example
- Search
- Specification
- Example
- Custom Actions
- Overview
- How It Works
- Custom Action Types
- Package Path
- Native Libraries for Uninstallation
- What You Have To Do
- Custom Actions at Packaging (CompilerListener)
- Custom Actions at Installation Time (InstallerListener)
- Custom Actions at Uninstallation Time (UninstallerListener)
- Example
- Ant Actions (InstallerListener and UninstallerListener)
- The Basic XML Struture
- Registry access (InstallerListener and UninstallerListener)
- The Basic XML Struture
- Extended Uninstall Key
- Uninstall Behavior
- Examples
- Summary Logger (InstallerListener)
- BSF (Bean Scripting Framework) Actions (InstallerListener and UninstallerListener)
- The Basic XML Struture
- IzPack utilities
- Apache License, Version 2.0
- Documentation license
- CookBooks
- Sample Install Definition
- Sample userInputSpec.xml
IzPack Documentation
Foreword
This documentation is a collective work that received many inputs over the years from
many people, notably Julien Ponge, Elmar Grom, Fabrice Mirabile, Tino Schwarze,
Klaus Bartz and many more.
We tried to keep it as up-to-date as possible despite a few source format changes
and many times where we did not check that new features were properly documented.
If you believe that some portions could be enhanced, fixed, or if you find that some
features are not properly documented, feel-free to help us!
Contents
Foreword 1
Introduction 6
Welcome to IzPack ! ............................. 6
The Features .................................. 7
The Development ............................... 7
3rd party code used in IzPack ......................... 8
Getting started 8
Overview ................................... 8
Installation of IzPack ............................. 9
On Windows .............................. 9
On UNIX/Linux ............................. 9
First Compilation ............................... 11
How to develop and debug IzPack using Eclipse ............... 12
The IzPack architecture ............................ 14
The compilation system ......................... 14
How an installer works ......................... 16
The different kinds of installers ..................... 18
Installers for older vm versions ..................... 18
Writing Installation XML Files 19
What You Need ................................ 19
Your editor ............................... 19
Writing XML .............................. 19
Variable Substitution ............................. 20
The Built-In Variables ............................. 20
Environment Variables ............................ 21
1
Dynamic Variables .............................. 21
Parse Types .................................. 22
The IzPack Elements ............................. 22
The Root Element <installation> .................... 23
The Information Element <info> .................... 23
The Packaging Element <packaging> ................. 25
The Variables Element <variables> ................... 25
The dynamic Variables Element <dynamicvariables> ......... 26
The Conditions Element <conditions> ................. 26
Built-in conditions ........................... 28
The Installer Requirements Element <installerrequirements> ..... 28
The GUI Preferences Element <guiprefs> ............... 29
The Localization Element <locale> ................... 30
The Resources Element <resources> .................. 31
The Panels Element <panels> ...................... 32
<help> - optional file for a help ..................... 33
<validator> - optional validation on idata ................ 33
<actions> - optional actions for the panel ............... 33
The Packs Element <packs> ...................... 34
Internationalization of the PacksPanel ................. 35
<description> - pack description .................... 35
<depends> - pack dependencies .................... 35
<os> - OS restrictions .......................... 36
<updatecheck> ............................. 36
<file> - add files or directories ..................... 36
<additionaldata> ............................ 37
<singlefile> - add a single file ...................... 37
<fileset>: add a fileset .......................... 37
<parsable> - parse a file after installation ................ 38
<executable> - mark file executable or execute it ............ 39
<os> - make a file OS-dependent .................... 39
The Native Element <native> ...................... 40
<os> - make a library OS-dependent .................. 40
The Jar Merging Element <jar> ..................... 41
XInclude-style constructs ........................... 41
The fallback element .......................... 42
The xfragment element ......................... 42
The Available Panels 43
HelloPanel ................................... 43
HTMLHelloPanel ............................... 43
CheckedHelloPanel .............................. 43
InfoPanel and HTMLInfoPanel ........................ 43
LicencePanel and HTMLLicencePanel .................... 44
PacksPanel .................................. 44
ImgPacksPanel ................................ 44
TreePacksPanel ................................ 44
TargetPanel .................................. 45
DefaultTargetPanel .............................. 46
InstallPanel .................................. 46
2
XInfoPanel .................................. 46
FinishPanel .................................. 46
SimpleFinishPanel .............................. 46
ShortcutPanel ................................. 46
UserInputPanel ................................ 46
CompilePanel ................................. 47
ProcessPanel ................................. 48
<executeclass> - Execute Java Classes ................. 49
<executeForPack> - Only execute the job for certain packs ...... 50
<logfiledir> - Output of the processPanel saved to a log ........ 50
JDKPathPanel ................................. 50
SelectPrinterPanel ............................... 51
DataCheckPanel ................................ 51
SummaryPanel ................................ 51
InstallationGroupPanel ............................ 52
UserPathPanel ................................. 53
Advanced features 54
Apache Ant integration ............................ 54
Embedding the installation file using a config element ............ 55
System properties as variables ........................ 55
Automated Installers ............................. 56
Console (headless) installers ......................... 56
Picture on the Language Selection Dialog .................. 56
Picture in the installer ............................. 56
Modifying the GUI .............................. 57
Modifying Language Selection Dialog ................. 57
Modifying IzPack Panels ........................ 58
Using a Separated Heading Panel .................... 59
Don’t show pack size in PacksPanel .................. 68
Alternative Cancel Dialog ....................... 69
Logging the Installation ............................ 70
Web Installers ................................. 70
More Internationalization ........................... 71
Special resources ............................ 71
Packs .................................. 72
Validators for Packs .............................. 72
Automatic privileges elevation on Windows ................. 72
Desktop Shortcuts 73
Defining Shortcuts .............................. 73
Introduction ............................... 73
What to Add to the Installer ....................... 74
Why Native Code to do the Job on Windows? ................ 75
The Shortcut Specification .......................... 76
Shortcut Attributes .............................. 77
Unix specific shortcut attributes ........................ 79
Selective Creation of Shortcuts ........................ 80
Localizing shortcuts .............................. 80
DesktopShortcutCheckboxEnabled Builtin Variable ............. 81
3
ApplicationShortcutPath Builtin Variable ................... 81
Summary ................................... 81
Shortcut Tips ................................. 82
The Desktop ............................... 82
Icons ................................... 83
Targets .................................. 84
Command Line ................................ 85
Trouble Shooting ............................... 85
Problems You Can Solve ........................ 85
Problems That Have No Solution (yet) ................. 86
A sample shortcut specification file for Unix ................. 87
Creating Your Own Panels 89
How to get started ............................... 89
Next Steps ................................... 89
Access to the Variable Substitution System .................. 90
Controlling Flow ............................... 90
Reading XML ................................. 90
Supporting Classes .............................. 90
Panels that are not visible ........................... 91
A word about building IzPack ........................ 91
The IzPanel Class ............................... 92
The Internationalization of custom panels .................. 93
User Input 93
The Basic XML Structure ........................... 95
Concepts and XML Elements Common to All Fields ............ 95
Internationalization .............................. 97
Panel Title ................................... 98
Static Text ................................... 98
Visual Separation ............................... 99
Text Input ................................... 99
Radio Buttons ................................. 100
Combo Box .................................. 100
Check Box ................................... 101
Password Field ................................ 101
File Field ................................... 102
Multiple File Field .............................. 103
Directory Field ................................ 104
Rule Input ................................... 104
Layout and Input Rules ............................ 104
Setting Field Content ............................. 107
The Output Format .............................. 107
Validating Field Content ........................... 107
NotEmptyValidator ........................... 108
RegularExpressionValidator ...................... 108
PasswordEqualityValidator ....................... 109
PasswordKeystoreValidator ....................... 109
Creation Your Own Custom Validator ................. 110
Processing the Field Content ......................... 110
4
Summary Example .............................. 110
Search ..................................... 111
Specification .................................. 111
Example .................................... 111
Custom Actions 112
Overview ................................... 112
How It Works ................................. 112
Custom Action Types ............................. 113
Custom Actions At Packaging ..................... 113
Custom Actions At Installing Time ................... 114
Custom Actions At Uninstalling Time ................. 115
Package Path ................................. 116
Native Libraries for Uninstallation ...................... 116
What You Have To Do ............................ 116
Custom Actions at Packaging (CompilerListener) .............. 116
Custom Actions at Installation Time (InstallerListener) ........... 117
Custom Actions at Uninstallation Time (UninstallerListener) ........ 117
Example .................................... 117
Ant Actions (InstallerListener and UninstallerListener) ........... 118
The Basic XML Struture ........................... 119
<property>: define a property ...................... 120
<propertyfile>: define properties in a file ................ 120
<target>: target to call at installation .................. 121
<uninstall_target>: target to call on uninstallation ........... 121
Registry access (InstallerListener and UninstallerListener) ......... 121
The Basic XML Struture ........................... 122
<key>: define a key ........................... 123
<value>: define a value ......................... 123
Extended Uninstall Key ............................ 125
Uninstall Behavior .............................. 125
Examples ................................... 126
Summary Logger (InstallerListener) ..................... 126
BSF (Bean Scripting Framework) Actions (InstallerListener and UninstallerLis-
tener) .................................. 127
The Basic XML Struture ........................... 128
IzPack utilities 130
Windows executable wrapper (izpack2exe) .................. 131
Description ............................... 131
Requirements .............................. 131
Usage .................................. 132
Mac OS X Application bundle wrapper (izpack2app) ............ 132
Description ............................... 132
Requirements .............................. 132
Usage .................................. 132
Java Web Start JNLP file generator (izpack2jnlp) .............. 133
Description ............................... 133
Requirements .............................. 133
Usage .................................. 133
5
Apache License, Version 2.0 133
Overview ................................... 133
License .................................... 133
Documentation license 137
CookBooks 138
1. How To create an ODBC connection with IzPack (by Fabrice Mirabile) . 138
a. Problem ................................ 138
b. Solution ................................ 138
c. Discussion .............................. 139
2. Work around for pack and process dependence And Execution of Java
Classes that runs SQL/PLSQL ..................... 140
a. Problem ................................ 140
b. Solution ................................ 141
c .Discussion .............................. 141
Sample Install Definition 152
Sample userInputSpec.xml 155
Introduction
Welcome to IzPack !
IzPack is a tool that will help you to solve your software installation problems. It
is a JavaTM based software installer builder that will run on any operating system
coming with a Java Virtual Machine (JVM) that is compliant with the Sun JVM 1.5
or higher. Its design is very modular and you will be able to choose how you want
your installer to look and you will also be able to customize it using a very simple
Application Programming Interface (API). Although IzPack is essentially a JavaTM
only application (it can run on virtually any operating system), it can interact in a
clean way with the underlying operating system. Native code can interact with it on a
specific platform without disturbing the operation on incompatible operating systems.
For instance, you can develop Unix-specific code that will be silent if run on Windows.
To put it in a nutshell, whereas most of the other JavaTM installers force you to go their
way, IzPack will let you go your way. Some respectable companies have been using it
in order to produce customized installers for their very specific needs.
“So, if it’s so good, how much is it ?” : well, you can get it for free. BUT IzPack
is not a freeware. It’s not free as in “free beer” but “free as in free speech”. So it’s
neither freeware nor public domain. It is software covered by the Apache Software
License 2.0. You have access to the IzPack source code and you can modify it to make
it suit your needs.
You are not required to publish your modifications per the terms of the Apache
Software License. However if you have made general-purpose changes, please con-
sider contributing them back as it will benefit to the larger IzPack community. An-
other benefit of contributing back your changes is that you won’t have to maintain your
own patches and apply them back whenever we publish a new version of the software...
To learn more about the Apache Software License 2.0, visit http://www.apache.org/
licenses/LICENSE-2.0.html
6
The Features
IzPack uses XML files to describe installations. When you make an installer, you have
a choice of panels. You can see panels as a kind of plugin that composes the installer.
For instance, a panel can choose the installation path, the packs to install, prompt the
user for a license agreement and so on. This approach is very modular. You can also
create your own panels if you have specific needs. In some cases you even have a
choice from multiple panel versions for the same task. You can also choose the order
in which panels appear during the installation process. IzPack can be used in a number
of different ways:
∙by writing the XML installation file “by hand” and compiling it with the com-
mand line compiler
∙by invoking the compiler from the great Apache Ant tool (see http://ant.apache.
org/) as IzPack can be used as a task for Ant
Here is a brief (and certainly incomplete !) list of the main IzPack features :
∙XML based installation files
∙easy internationalization using XML files (10 translations are already available)
∙Ant integration, command-line compiler
∙easy customization with the panels and a rich API (even an XML parser is in-
cluded !)
∙powerful variable substitution system that you can use to customize scripts and
more generally any text-based file
∙powerful condition system that can be used to conditionally show panels, user
input fields and execute files conditionally
∙different kinds of installers (standard, web-based, multi-volume, ...)
∙launching of external executables during the installation process and Unix exe-
cutable flag support (useful for the scripts for instance)
∙layout of the installation files in packs (some can be optional)
∙native code integration facilities
∙jar files nesting support
∙... more things to discover and create !.
The Development
I started writing IzPack in April 2001 and many people have helped me improving it
since. i prefer not to mention them here as i would for sure forget some of them, so
please check the file named Thanks.txt which i try to get as up-to-date as possible
in order to mention everyone who helped me. As far as i’m concerned, i’m a french
student and i rather see this as a fun activity in my free time where i can learn a lot of
great things. The contributors to the project are both individuals and companies. Help
can take any form :
7
∙translations
∙new features and various fixes
∙bug fixes
∙writing manuals
∙... anything else you like :-)
The official IzPack homepage is located at http://izpack.org/. The IzPack developer
services are generously hosted by Codehaus at http://izpack.codehaus.org/. The project
is grateful to the BerliOS community for havinh hosted the services in the past.
3rd party code used in IzPack
IzPack uses several 3rd party libraries and i would like to mention them in respect for
their respective authors work :
∙NanoXML by Marc De Scheemaecker: the XML parser used inside IzPack and
released under a zlib/png-style license - see http://nanoxml.sourceforge.net/
∙Kunststoff Look and Feel by Incors Gmbh: a SwingTM Look and Feel that can be
used for installers. Released under the LGPL license - see http://www.incors.org/
∙Tango Icons: icons from the Tango project at http://tango.freedesktop.org/
∙Some Apache Jakarta classes and libraries: released under the Apache License
∙Metouia Look and Feel by Taoufik Romdhane: released under the LGPL license
- see http://mlf.sf.net/
∙Liquid Look and Feel by Miroslav Lazarevic: released under the LGPL license -
see liquidlnf.sf.net/
∙JGoodies Looks by Karsten Lentzsch: released under a BSD-style license - see
http://looks.dev.java.net/
∙Nimbus look and feel by Sun Microsystems under a LGPL license - see https:
//nimbus.dev.java.net/
So, now let’s dive into understanding how IzPack works. You’ll be surprised to see
how powerful and simple it can be :-)
Getting started
Overview
To begin with, you should know how IzPack is organized if you want to use it. Let’s go
into the directory where you have installed IzPack on your machine. There are 3 text
files and a set of directories. The most important for the moment are bin/ doc/ sample/.
If you are reading this, you already know that doc contains this documentation :-)
So let’s go into bin/. The icons/ directory contains some directories for your sys-
tem, in case you would like an icon to launch a component of IzPack . But the most
8
important things you can see in bin are the compile scripts (in both unix* and win-
dows formats). Compile is used to compile a ready-to-go xml installation file from a
command-line context or from an external tool.
Note : these scripts can be launched from anywhere on your system as the installer
has customized these scripts so that they can inform IzPack of where it is located.
Installation of IzPack
First go get the latest stable version of IzPack from: http://izpack.org/downloads
If needed download the Latest Java Run Time from Sun’s website http://java.sun.
com/. You should get the JRE if you intend to ONLY run the installer and get the SDK
if you’re willing to compile as well.
On Windows
Don’t forget to set up the environment variables:
If using the SDK:
set JAVA_HOME="C:\j2sdk1.4.2_04"
set JRE_HOME=%JAVA_HOME%/jre
set CLASSPATH=%JAVA_HOME%/bin;%CLASSPATH%
set PATH=%JAVA_HOME%/bin;%JRE_HOME%/bin;%PATH%
This is obvioulsy assuming that SDK has been installed to “C:j2sdk1.4.2_04”
If using the JRE:
set JAVA_HOME="C:\Program Files\Java\j2re1.4.2_05"
set CLASSPATH=%JAVA_HOME%/bin;%CLASSPATH%
set PATH=%JAVA_HOME%/bin;%PATH%
This is obviously assuming that SDK has been installed to “C:Program FilesJavaj2re1.4.2_05”
Once this is done, you can install IzPack using the following command:
java -jar izpack.jar
Where izpack.jar is the latest release you downloaded from IzPack website.
On UNIX/Linux
If needed download the Latest Java Run Time from Sun’s website http://java.sun.com/.
You should get the JRE if you intend to ONLY run the installer, but you should get the
SDK if you’re willing to compile as well.
If using the SDK:
export JAVA_HOME=/usr/java/j2sdk1.4.2_06
export JAVA_JAR=/usr/java/java_jar
export JRE_HOME=/usr/java/j2sdk1.4.2_06/jre
export CLASSPATH=/usr/java/j2sdk1.4.2_06/bin
export PATH=/usr/java/j2sdk1.4.2_06/bin:/usr/java/j2sdk1.4.2_06/jre/bin:$PATH
This is obviously assuming that java has been installed to /usr/java/j2sdk1.4.2_06
If using the JRE:
9
export JAVA_HOME=/usr/java/j2re1.4.2_05
export CLASSPATH=$JAVA_HOME/bin:$CLASSPATH
export PATH=$JAVA_HOME/bin:$PATH
This is obviously assuming that SDK has been installed to “/usr/java/j2re1.4.2_05”
You can put them into any script launched at startup if you don’t want to have to do
it everytime. For example, .bashrc of your user, so that whenever you’ll start a bash
console the variables will be set.
To verify that the environment is correct, type SET in the command prompt and
check if those variables are set before running any compilation.
Then you install IzPack using the following command:
java -jar izpack.jar
By default it will be installed in /usr/local/IzPack. Therefore you can create two
scripts, one for compiling your code and the second to execute the installer.
Compile.sh:
#!/bin/sh
/usr/local/IzPack/bin/compile /yourpath/Install.xml -b /yourpath -o /yourpath/yourjaroutput.jar -k standard
Install.sh:
#!/bin/sh
java -jar yourjaroutput.jar
BUGS and TROUBLESHOOTING
1. This is assuming that you’re current Unix/Linux allows the use of the
server X. In cas it doesn’t here is a way to install IzPack using cygwin
(thanks to Shrish Buradkar and Bartz Klaus for this trick):
Install cygwin on a remote machine. Cygwin can be downloaded from
http://www.cygwin.com/ Firstly, start the XWindows server on your PC.
This could be done by using the startxwin-multiwindow batch file or run-
ning /usr/X11R6/bin/startxwin.sh From the cygwin Xterm, type xhost +
Then telnet to the remote UNIX/Linux machine and set the DISPLAY to
your PC. So after you have logged into the remote machine, do export
DISPLAY=pc-ip-adress:0.0 xterm & java -jar installer.jar This should do
the job by displaying an xterm from the remote machine onto yor PC.
2. Normally launching packages created by IzPack under Gnome, KDE or
XFCE works fine. If when trying to launch a pack you receive this error
message:
Exception in thread "main" java.lang.InternalError: Can’t connect to X11
window server using ’:0.0’ as the value of the DISPLAY variable.
at sun.awt.X11GraphicsEnvironment.initDisplay(Native Method)
at
sun.awt.X11GraphicsEnvironment.<clinit>(X11GraphicsEnvironment.java:134)
at java.lang.Class.forName0(Native Method)
at java.lang.Class.forName(Class.java:141)
at
10
java.awt.GraphicsEnvironment.getLocalGraphicsEnvironment(GraphicsEnvironment.java:62)
at java.awt.Font.initializeFont(Font.java:308)
at java.awt.Font.<init>(Font.java:344)
at
com.izforge.izpack.gui.IzPackMetalTheme.createFont(IzPackMetalTheme.java:62)
at
com.izforge.izpack.gui.IzPackMetalTheme.<init>(IzPackMetalTheme.java:52)
at
com.izforge.izpack.gui.IzPackKMetalTheme.<init>(IzPackKMetalTheme.java:59)
at sun.reflect.NativeConstructorAccessorImpl.newInstance0(Native
Method)
at
sun.reflect.NativeConstructorAccessorImpl.newInstance(NativeConstructorAccessorImpl.java:39)
at
sun.reflect.DelegatingConstructorAccessorImpl.newInstance(DelegatingConstructorAccessorImpl.java:27)
at java.lang.reflect.Constructor.newInstance(Constructor.java:274)
at java.lang.Class.newInstance0(Class.java:308)
at java.lang.Class.newInstance(Class.java:261)
at
com.izforge.izpack.installer.GUIInstaller.loadLookAndFeel(GUIInstaller.java:297)
at
com.izforge.izpack.installer.GUIInstaller.<init>(GUIInstaller.java:100)
at sun.reflect.NativeConstructorAccessorImpl.newInstance0(Native
Method)
at
sun.reflect.NativeConstructorAccessorImpl.newInstance(NativeConstructorAccessorImpl.java:39)
at
sun.reflect.DelegatingConstructorAccessorImpl.newInstance(DelegatingConstructorAccessorImpl.java:27)
at java.lang.reflect.Constructor.newInstance(Constructor.java:274)
at java.lang.Class.newInstance0(Class.java:308)
at java.lang.Class.newInstance(Class.java:261)
at com.izforge.izpack.installer.Installer.main(Installer.java:47)
Then, it’s most probably the fact that in some distribution the console and environ-
ment variables are “erased” when switching between users. So, you can type ’su -’ in
order to obtain all commands. With ’su -’ $DISPLAY variables is erased and all X11
connections is refused. So, a best and fast practice in this way is:
1. Log in your system by user
2. In shell type: ’$ echo $DISPLAY’
3. the result seems to be ’:0.0’. If the response isn’t there you can
type:
4. ’$ export $DISPLAY=“:0.0”’
5. Now type $su for a “normal” alias by root.
6. Run: $ java -jar “package.jar”
First Compilation
Now you probably can’t wait to build your first installer. So go on open a command-line
shell and navigate to sample/. The following should work on both unix* and windows
11
systems. for the latter, just change the path separator (slash ’/’) to a backslash. So type
($ is your shell prompt !) :
$ ../bin/compile install.xml -b . -o install.jar -k standard
(installer generation text output here)
$ java -jar install.jar
There you are! The first command has produced the installer and the second one
did launch it.
How to develop and debug IzPack using Eclipse
(thanks to Bartz Klaus)
Here are the steps needed to develop adn debug IzPack with Eclipse:
1. IzPack Installation
Install the latest stable release of IzPack with the sources ! For more details
see the section “IzPack Installation”.
2. Custom class sources and build.xml
Put your custom class sources under %IZPACK_HOME%srclib may be
%IZPACK_HOME%srclibcomizforgeizpackpanelsMyPanel.java Add a cre-
ate rule into %IZPACK_HOME%srcbuild.xml under target “build.panels”
3. Eclipse
You can get Eclipse from http://www.eclipse.org/downloads/index.php
4. Create IzPack project
Select File > New > Project... Java > Java Project > next > give a project
name like “IzPack” deselect “Use default” ( 2.x) or select “Create project
at external location” (3.x) Browse to %IZPACK_HOME%srclib select it
Next > In “Libraries” select “Add External JARs...” select ant.jar and
jakarta-regexp-1.3.jar from %IZPACK_HOME%lib Finish
5. Debug compile (create installation)
Select Run > Debug... Java Application New give a name e.g. “Compile-
MyInstall” select in “Main” the project “IzPack” select as “main class”
“Compile” (from package com.izforge.izpack.compiler) As “Program ar-
guments” put in (for %SOME_THING% use your local value) %SRC_ROOT%%CONFIG_SUBPATH%install.xml
-b %SRC_ROOT% -o %INSTALLER_DEST%install.jar As “VM argu-
ments” put in “-DIZPACK_HOME=n:homebartzkauworkxt150_forIzPackizpack-
src”
No you can debug the compiling of your installation.
5. Debug installation
Compile your installation; now you have %INSTALLER_DEST%install.jar
Run > Debug... Java Application New give a name e.g. “InstallMyIn-
stall” select in “Main” the project “IzPack” select as “main class” “In-
staller” (from package com.izforge.izpack.installer) as “VM arguments”
12
use -DTRACE=true select the tab “Classpath” select “User classes” (2.x)
or “User Entries” (3.x) select “Add External JARs...” select %INSTALLER_DEST%install.jar
(may be, that’s the trick...) install.jar must be under the project entry
BUGS and TROUBLESHOOTING
If you get this error when running the application could not create shortcut
instance
java.lang.Exception: error loading library
at com.izforge.izpack.util.Librarian.loadLibrary(Librarian.java:249)
at com.izforge.izpack.util.os.ShellLink.initialize(ShellLink.java:461)
at com.izforge.izpack.util.os.ShellLink.<init>(ShellLink.java:349)
at com.izforge.izpack.util.os.Win_Shortcut.initialize(Win_Shortcut.java:79)
at com.izforge.izpack.panels.ShortcutPanel.<init>(ShortcutPanel.java:473)
at sun.reflect.NativeConstructorAccessorImpl.newInstance0(Native Method)
at sun.reflect.NativeConstructorAccessorImpl.newInstance(Unknown Source)
at sun.reflect.DelegatingConstructorAccessorImpl.newInstance(Unknown Source)
at java.lang.reflect.Constructor.newInstance(Unknown Source)
at com.izforge.izpack.installer.InstallerFrame.loadPanels(InstallerFrame.java:203)
at com.izforge.izpack.installer.InstallerFrame.<init>(InstallerFrame.java:160)
at com.izforge.izpack.installer.GUIInstaller.loadGUI(GUIInstaller.java:391)
at com.izforge.izpack.installer.GUIInstaller.<init>(GUIInstaller.java:128)
at sun.reflect.NativeConstructorAccessorImpl.newInstance0(Native Method)
at sun.reflect.NativeConstructorAccessorImpl.newInstance(Unknown Source)
at sun.reflect.DelegatingConstructorAccessorImpl.newInstance(Unknown Source)
at java.lang.reflect.Constructor.newInstance(Unknown Source)
at java.lang.Class.newInstance0(Unknown Source)
at java.lang.Class.newInstance(Unknown Source)
at com.izforge.izpack.installer.Installer.main(Installer.java:62)
then it means you forgot to put the shelllink.dll into the correct source
folder in that case, copy %IZPACK_HOME%binnativeizpackShellLink.dll
to %IZPACK_HOME%srclibcomizforgeizpackutilosShellLink.dll
Now you can debug the installation. With 2.x you can edit on demand,
if %INSTALLER_DEST%install.jar is shown in “Classpath” under the
project. With 3.x it seems so, that always the JAR will be loaded; therefore
the contents of install.jar and the sources should be synchron.
6. Debug uninstallation
Install your installation to %INSTALL_PATH% Run > Debug... Java Ap-
plication New give a name e.g. “UninstallMyInstall” select in “Main”
the project “IzPack” select as “main class” “Uninstaller” (from package
com.izforge.izpack.installer) as “VM arguments” use -DTRACE=true se-
lect the tab “Classpath” select “User classes” (2.x) or “User Entries” (3.x)
select “Add External JARs...” select %INSTALL_PATH%Uninstalleruninstall.jar
uninstall.jar must be under the project entry
Now, you can debug your uninstallation. Don’t worry if you get first a
NullPointerException in SelfModifier. This should be; it is a hint, that the
class files of your eclipse session are used. If debugging not working, look
13
whether: there is a fresh installation the uninstall.jar is in the “Classpath”
tab under the project entry
The IzPack architecture
Now that you have packaged your first installer, it’s time for you to understand how the
whole thing works.
The compilation system
The compilation system is quite modular. Indeed, you can use the compiler in 2 ways :
∙from a command-line
∙from jakarta ant
14
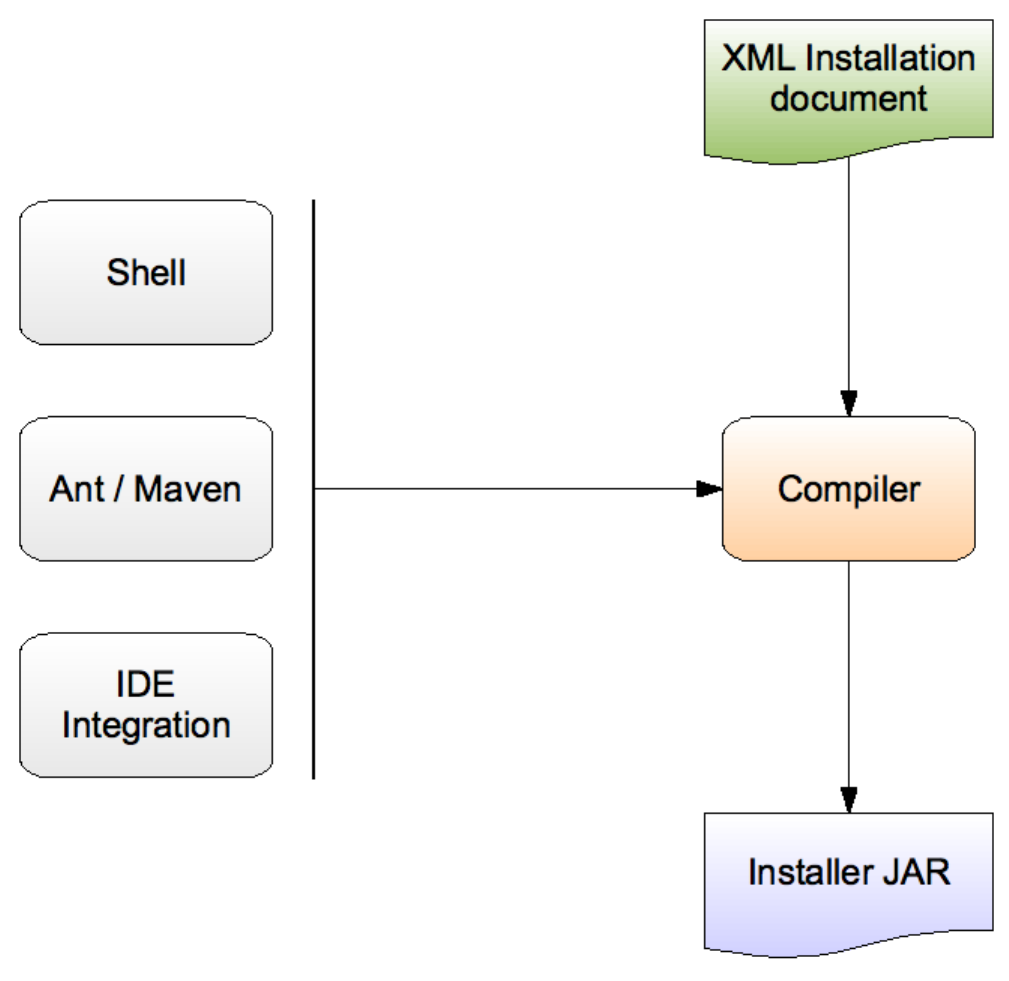
Figure 1: The compilation architecture.
The compiler takes as its input an xml installation file that describes (at a relatively
high-level) the installation. this file contains detailed information such as the applica-
tion name, the authors, the files to install, the panels to use, which resources to load
and much more.
The compiler can generate different kinds of installers, but this information is not
located inside the xml file as it is not were it should be. On the contrary, this is a
15
compiler parameter.
The compilation options for a command-line installer are the following:
-? Gives a list of the available options. -b Specifies the base path, ie the one that will
be used to resolve the relative paths. if your xml file contains absolute paths, specify it
to an empty string (-b “”). -k Specifies the installer kind, for instance most users will
want standard here. -o Specifies the resulting installer jar file name.
How an installer works
An installer presents its panels to the end-user. for instance, there is one to select the
packages, one to prompt for the license agreement, one to select the installation path
and so on. You have a choice from a variety of panels to place in the installer. For
example, you can choose between a plain text and a html text panel for the license
agreement. also, if you don’t want of the hellopanel, you just don’t include it.
16
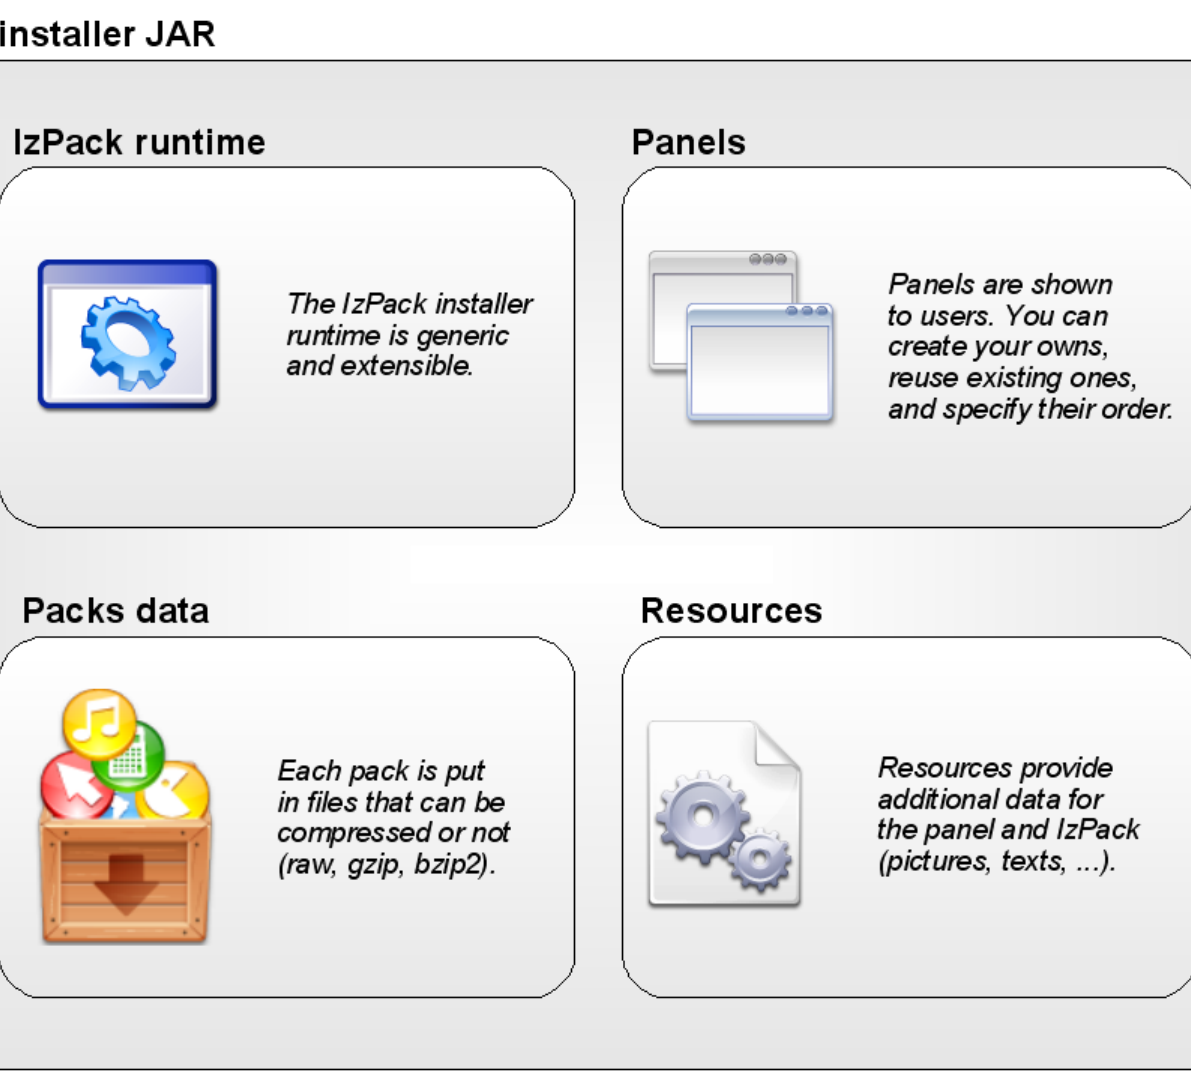
Figure 2: The content of an installer.
It is very important to understand that some of the panels may need extra data.
17
for instance, the license agreement panel needs the license text. A simple approach to
specify such data would have been to add as many xml tags as needed for each panel.
However, this makes the xml file too specific and not easy to maintain. The approach
that has been chosen is to put the data in files and we call these files resource files.
They are specified with a unique xml tag. this is a much cleaner approach.
You might wonder how your files are packaged. They can be grouped in packs. For
instance, you can have one pack for the core files, one for the documentation, one for
the source code and so on. In this way, your end-users will have the choice to install a
pack or not (provided that the pack they don’t want to install is not mandatory). Inside
the jar file (which is a zip file), a sub directory contains the pack files. Each pack file
contains the files that are part of it. Could we do it simpler ? :-)
The different kinds of installers
There are 2 kinds of installers available :
∙Standard : a single-file ready-to-run installer
∙Web : a web based installer (pack data is located on an http server, and the
installer retrieves it at install time (see section 3.6))
Installers for older vm versions
By default the installer will be made for the current most used version of the java
runtime environment. It is possible to create an installation that is runable with an
older vm version.
What version is used can be detected in the ant properties file that is used to build
izpack. It is [izpackroot]/src/ant.properties. The value of the property “source” deter-
mines the vm version.
If compatibility to older versions is needed, a recompilation of the jar files of the
izpack system should be done. For this the sources of izpack and an ant installation
are needed. the sources of izpack are selectable at installation time of izpack. Before a
recompilation of all can be triggered, the version of byte code should be changed. This
can be done simple by changing the “source” entry in [izpackroot]/src/ant.properties
to the needed value. The recompilation should be performed with the current most
used vm version because there are classes of it referenced in the izpack code. Usage
of an older vm version at installation time will be possible because the classes of the
newer vm version are only used after a vm version check. Of course, some features
of izpack will be missing at using an old vm version. To recompile izpack go into
[izpackroot]/src. Use a current jdk (not jre) for this. call
ant clean
followed by
ant all
then all jar files in [izpackroot]/lib, [izpackroot]/bin/panels and [izpackroot]/bin/customactions
should be recompiled with the selected source version.
18
Writing Installation XML Files
What You Need
Your editor
In order to write your XML installation files, you just need a plain text editor. Of course
it’s always easier to work with color coded text, so you might rather want to work with
a text editor having such a feature. Here is a list of free editors that work well :
∙Jext : http://www.jext.org/
∙JEdit : http://www.jedit.org/
∙classics like Vim and (X)Emacs.
If you are a developer and tend to write your own patches, extension or features to
IzPack sources, or, if you wish to debug your compilation, installation and uninstalla-
tion, we recommend these IDE:
∙IntelliJ IDEA : http://www.jetbrains.com/idea/
∙Eclipse : http://www.eclipse.org/
∙Netbeans : http://www.netbeans.org/
For the first one, JetBrains has granted us an Open Source License. All project
members can ask the Licence Key to one of the project manager.
The other ones are well know open source projects (Just like us :-)). We provide a
tutorial on how to develop/debug IzPack using Eclipse in the chapter ”Getting Started
> How to develop and debug IpPack using Eclipse”
Writing XML
Though you might not know much about XML, you have certainly heard about it. If
you know XML you can skip this subsection as we will briefly present how to use
XML.
XML is a markup language, really close to HTML. If you’ve ever worked with
HTML the transition will be fast. However there are a few little things to know. The
markups used in XML have the following form : <markup>. Each markup has to
be closed somewhere with its ending tag : </markup>. Each tag can contain text
and other markups. If a markup does not contain anything, it is just reported once
:<markup/>. A markup can contain attributes like : <markup attr1="123"
attr2="hello !"/>. Here is a sample of a valid XML structure :
<chapter title="Chapter 1">
<section name="Introduction">
<paragraph>
This is the text of the paragraph number 1. It is available
for the very low
price of <price currency="dollar">1 000 000</price>.
</paragraph>
</section>
<section name="xxx">
19
xxx
</section>
</chapter>
You should be aware of the following common mistakes :
∙markups are case sensitive : <markup> is different from <Markup>.
∙you must close the markups in the same order as you create them : <m1><m2>(...)</m2></m1>
is right but “ <m1><m2>(...)</m1></m2>“ is not.
Also, an XML file must start with the following header : <?xml version="1.0"
encoding="iso-8859-1 standalone="yes" ?>. The only thing you should
modify is the encoding (put here the one your text editor saves your files to). The “
standalone“ attribute is not very important for us.
This (brief !) introduction to XML was just meant to enable you to write your
installation specification. For a better introduction there are plenty of books and arti-
cles/tutorials dealing with XML on the Internet, in book stores, in magazines and so
on.
Variable Substitution
During the installation process IzPack can substitute variables in various places with
real values. Obvious targets for variable substitution are resource files and launch
scripts, however you will notice many more places where it is more powerful to use
variables rather then hard coded values. Wherever variables can be used it will be
explained in the documentation.
There are three types of variables:
∙Built-In variables. These are implemented in IzPack and are all dynamic in na-
ture. This means that the value of each variable depends on local conditions on
the target system.
∙Environment variables. These are provided by the operating system the installer
is run on.
∙Variables that you can define. You also define the value, which is fixed for a
given installation file.
You define your own variables in the installation XML file with the <variable>
tag. How to do this is explained in detail later in this chapter.
Please note that when using variables they must always appear with a ’$’ sign as
the first character, even though they are not defined this way.
The Built-In Variables
The following variables are built-in :
∙$INSTALL_PATH : the installation path on the target system, as chosen by the
user
∙$APPLICATIONS_DEFAULT_ROOT : the default path for applications
∙$JAVA_HOME : the JavaTM virtual machine home path
20
∙$CLASS_PATH : the Class Path used mainly for Java Applications
∙$USER_HOME : the user’s home directory path
∙$USER_NAME : the user name
∙$APP_NAME : the application name
∙$APP_URL : the application URL
∙$APP_VER : the application version
∙$ISO3_LANG : the ISO3 language code of the selected langpack.
∙$IP_ADDRESS : the IP Address of the local machine.
∙$HOST_NAME : the HostName of the local machine.
∙$FILE_SEPARATOR : the file separator on the installation system
∙$DesktopShortcutCheckboxEnabled : When set to true, it automati-
cally checks the “Create Desktop Shortcuts” button. To see how to use it, go to
The Variables Element “<variables>‘ Be careful this variable is case sensitve !
∙$InstallerFrame.logfilePath : The path to the install log. This file
contains the paths of all installed files. If set to “default” then the “$INSTALL_PATH/Uninstaller/install.log”
path will be used. To see how to use it, go to The Variables Element “<vari-
ables>‘. If this variable is not set, no install.log will be created.
Environment Variables
Environment variables can be accessed via the syntax ${ENV[variable]}. The
curly braces are mandatory. Note that variable names are case-sensitive and usually in
UPPER CASE.
Example: To get the value of the OS environment variable “CATALINA_HOME”,
use ${ENV[CATALINA_HOME]}.
Dynamic Variables
Dynamic variables can be defined in the installation XML with the <variable> tag
inside the <dynamicvariables> element. The value of dynamic variables will be
evaluated every time a panel is switched, i.e. between the panels. Dynamic variables
can have a condition which will be evaluated first. If it’s true, the value would be
assigned, otherwise nothing happens to the variable.
As and addition to normal variables, the value of a variable can either be defined
by using the value attribute or by using a child element called value.
Example1: To change a certain directory based on user input, use the following
<variable name="test" value="/test/${USER_INPUT}" condition="hasuserinput"
/> The condition has userinput has to be specified in the condition section of installa-
tion XML.
Example2: To comment out something in a xml file if a certain pack with id my-
coolfeature is not activated, you could use “two” dynamic variables to create a xml
comment or not.
21
<variable name="XML_Comment_Start" condition="!izpack.selected.mycoolfeature">
<value><![CDATA[<!--]]></value>
</variable>
<variable name="XML_Comment_End" condition="!izpack.selected.mycoolfeature">
<value><![CDATA[-->]]></value>
</variable>
<variable name="XML_Comment_Start" value="" condition="izpack.selected.mycoolfeature" />
<variable name="XML_Comment_End" value="" condition="izpack.selected.mycoolfeature" />
The condition izpack.selected.mycoolfeature is generated automatically when a
pack with id mycoolfeature was specified. You would now use ${XML_Comment_Start}
and ${XML_Comment_End} in a file which should be parsed.
Parse Types
Parse types apply only when replacing variables in text files. At places where it might
be necessary to specify a parse type, the documentation will mention this. Depending
on the parse type, IzPack will handle special cases -such as escaping control characters-
correctly. The following parse types are available:
∙plain - use this type for plain text files, where no special substitution rules
apply. All variables will be replaced with their respective values as is.
∙javaprop - use this type if the substitution happens in a Java properties file.
Individual variables might be modified to function properly within the context of
Java property files.
∙java - use this type for Java files.
∙xml - use this type if the substitution happens in a XML file. Individual variables
might be modified to function properly within the context of XML files.
∙shell - use this type if the substitution happens in a shell script. Because
shell scripts use $variable themselves, an alternative variable marker is used:
%variable or %{variable}.
∙at - use this type if the substitution must occure on files where paramters are
marked with leading AT characters. The example: @variable.
∙ant - use this type if the substitution must occure on files where parameters are
surrounded with AT characters (similar to ANT filters, hence the type name).
The example: @variable@.
Unless using braces to surround variable’s name (${variable} or %{variable}},
the variable name can contain following characters: letters, digits, dots, dashes (-), un-
derbars (_). Example: $this.is-my_variable
If you want to have two variables separated by character that is allowed to appear
in variable name, for example: $major-version.$minor-version, then you
must use braces, and the above example should look like: ${major-version}.${minor-version}.
The IzPack Elements
When writing your installer XML files, it’s a good idea to have a look at the iZPACK
installation DTD.
22
The Root Element <installation>
The root element of an installation is <installation>. It takes one required at-
tribute : version. The attribute defines the version of the XML file layout and is
used by the compiler to identify if it is compatible with the XML file. This should be
set to 1.0 for the moment.
The Information Element <info>
This element is used to specify some general information for the installer. It contains
the following elements :
∙<appname> : the application name
∙<appversion> : the application version
∙<appsubpath> : the subpath for the default of the installation path. A variable
substitution and a maskable slash-backslash conversion will be done. If this tag
is not defined, the application name will be used instead.
∙<url> : the application official website url
∙<authors> : specifies the author(s) of the application. It must contain at least
one <author> element whose attributes are :
–name : the author’s name
–email : the author’s email
∙<uninstaller> : specifies whether to create an uninstaller after installation,
and which name to use for it. This tag has the write attribute, with default value
“ yes“. If this tag is not specified, the uninstaller will still be written. The name
attribute can be used to change the default name of the generated uninstaller, i.e.
“ uninstaller.jar“. The condition attribute can be used to specify a condition
which has to be fullfilled for creating the uninstaller. The path attribute can
be used to define the destination path where the uninstaller is written to, i.e.
${INSTALL_PATH}/Uninstaller.
∙<javaversion> : specifies the minimum version of Java required to install
your program. Values can be 1.2,1.2.2,1.4, etc. The test is a lexical com-
parison against the java.version System property on the install machine.
∙<requiresjdk>: (yes or no) specifies wether a JDK is required for the soft-
ware to be installed and executed. If not, then the user will be informed and
given the option to still proceed with the installation process or not.
∙<webdir> : Causes a ”web installer” to be created, and specifies the URL
packages are retrieved from at install time. The content of the tag must be a
properly formed URL.
∙<summarylogfilepath> : specifies the path for the logfile of the Summa-
ryLoggerInstallerListener.
∙<writeinstallationinformation> : (yes or no) specifies if the file .in-
stallinformation should be written which includes the information about installed
packs. The default if not specified is yes.
23
∙<pack200/>: adding this element will cause every JAR file that you will add
to your packs to be compressed using Pack200 (see http://java.sun.com/j2se/1.5.
0/docs/guide/deployment/deployment-guide/pack200.html). As a special excep-
tion, signed JARs are not compressed using Pack200, as it would invalidate the
signatures. This makes the compilation process a little bit longer, but it usually
results in drasticaly smaller installer files. The decompression is relatively fast.
Please note that Pack200 compression is destructive, i.e., after decompression
a JAR won’t be identical to its original version (yet the code in the class files
remains semantically equivalent).
∙<run-privileged/>: adding this element will make the installer attempt
to launch itself with administrator permissions. Il also supports a condition
attribute to reference a condition id so that the elevation is not always attempted
(e.g., you may want to activate it only for Windows Vista). This is not supported
on all platforms, in which case a message will be provided to the user before
continuing the installation. You can disable this feature for the uninstaller by
specifying uninstaller="yes" as an attribute. Only use this feature if you
really need to be an administrator as part of your installation process.
Here is an example of a typical <info> section :
<info>
<appname>Super extractor</appname>
<appversion>2.1 beta 6</appversion>
<appsubpath>myCompany/SExtractor</appsubpath>
<url>http://www.superextractor.com/</url>
<authors>
<author name="John John Doo" email="jjd@jjd-mail.com"/>
<author name="El Goyo" email="goyoman@mymail.org"/>
</authors>
<javaversion>1.2</javaversion>
</info>
Here is one where the privileges elevation is attempted on Windows Vista and Mac
OS X :
<info>
<appname>IzPack</appname>
<appversion>4.2.0</appversion>
<authors>
<author email="" name="Julien Ponge (project founder)"/>
<author email="" name="The fantastic IzPack developers and contributors"/>
</authors>
<url>http://izpack.org/</url>
<javaversion>1.5</javaversion>
<requiresjdk>no</requiresjdk>
<run-privileged condition="izpack.windowsinstall.vista|izpack.macinstall"/>
<summarylogfilepath>$INSTALL_PATH/installinfo/Summary.htm</summarylogfilepath>
</info>
24
The Packaging Element <packaging>
This element allows to specify packaging options. If not specified, the default will be
to create an all in one installer. This element will usually be used to create an installer
which spans over multiple volumes, e.g. the output will be two CDs. The packaging-
element contains the following elements:
∙<packager> : specifies options used by the packager. The packager tag has the
class attribute, which specifys the class to use for packaging. Currently two
implementations are available (com.izforge.izpack.compiler.Packager, com.izforge.izpack.compiler.MultiVolumePackager).
The packager-element can contain the <options> element which can have dif-
ferent attributes for the different implementations of packagers. For the Multi-
VolumePackager, it can have the following attributes:
–volumesize: the size of the volumes
–firstvolumefreespace: free space on the first volume used for the
installer jar and additional resources like readme-files etc.
∙<unpacker> (specifies which unpacker class should be used. Currently
there are two unpacker implementations)
(com.izforge.izpack.compiler.UnPacker, com.izforge.izpack.compiler.MultiVolumeUnPacker).
Here’s an example how to specify an installer which will create multiple volumes.
In this example the volumes shall be CDs with 650 megabytes. There will be an
additional free space of 150 megabytes on the first volume. This will result in the
creation of an installer.jar and multiple installer.pak* files. The installer.jar plus in-
staller.pak plus the additional resources have to be copied on the first volume, each
installer.pak.<number> on several volumes.
<packaging>
<packager class="com.izforge.izpack.compiler.MultiVolumePackager">
<!-- 650 MB volumes, 150 MB space on the first volume -->
<options volumesize="681574400" firstvolumefreespace="157286400"/>
</packager>
<unpacker class="com.izforge.izpack.installer.MultiVolumeUnpacker" />
</packaging>
The Variables Element <variables>
This element allows you to define variables for the variables substitution system. Some
variables are built-in, such as $INSTALL_PATH (which is the installation path chosen
by the user). When you define a set of variables, you just have to place as many
<variable> tags in the file as needed. If you define a variable named VERSION
you need to type $VERSION in the files to parse. The variable substitutor will then
replace it with the correct value. One <variable> tag take the following attributes :
∙name : the variable name
∙value : the variable value
Here’s a sample <variables> section :
25
<variables>
<variable name="app-version" value="1.4"/>
<variable name="released-on" value="08/03/2002"/>
</variables>
Here’s a precise sample on how to use desktopshortcutcheckboxenabled and In-
stallerFrame.logfilePath variables:
<variables>
<variable name="InstallerFrame.logfilePath" value="$INSTALL_PATH
/My-install.log"/>
<!-- This means that the log name will be My-install and that
it will be stored at the root of the installation. -->
<!-- Any path is fine. If value is set to "Default" then
"$INSTALL_PATH/uninstall/install.log" is used. -->
<!-- And if variable isn’t defined then no log is written. -->
<variable name="desktopshortcutcheckboxenabled" value="true"/>
<!-- This automatically checks the "Create Desktop Shortcuts"
button. Default value is "False". -->
</variables>
The dynamic Variables Element <dynamicvariables>
This element allows you to define dynamic variables for the variables substitution sys-
tem. In contrast to the static <variables, dynamic variables will be evaluated every
time, a panel switch is done.
When you define a set of variables, you just have to place as many <variable>
tags in the file as needed. Normally you would use the condition attribute to specify,
when a certain value will be set.
One <variable> tag take the following attributes :
∙name : the variable name
∙value : the variable value
∙condition : a condition for this variable, which has to be true to set the value
Here’s a sample <dynamicvariables> section :
<dynamicvariables>
<variable name="app-version" value="1.4" condition="mycondition1" />
<variable name="app-version" value="1.4b" condition="!mycondition1" />
<variable name="released-on" value="08/03/2002" />
</dynamicvariables>
The Conditions Element <conditions>
This element allows you to define conditions which can be used to dynamically change
the installer, e.g. the panels shown, the variables set, files parsed, files executed and
much more. When you define a condition it will get a type and an id. The id has to be
unique. Conditions can be referenced based on this id (e.g. with the RefCondition).
There are several built-in types of conditions. At the time of writing this, Izpack
has the following built-in types:
26
∙VariableCondition: a condition based on the value of a certain variable
∙PackSelectionCondition: a condition based on a pack selected for in-
stallation
∙JavaCondition: a condition based on a static java field or method.
∙CompareNumericsCondition: a condition based on the comparison of a
certain variable with a given value and operator.
There are also boolean types to combine more than one condition:
∙AndCondition: both conditions have to be true
∙OrCondition: only one of both conditions has to be true
∙XOrCondition: one condition has to be true, the other one has to be false
∙NotCondition: the condition has to be false
When you define a set of conditions, you just have to write as many <condition>
tags as you like. A condition can take the following attributes:
∙type: the type of the condition. For built-in types, this is the lowercase portion of the condition class
name without condition appended (variable,packselection,java, ...). Cus-
tom condition types should be referenced by the full qualified class name,
e.g. de.dr.rules.MyCoolCondition.
∙id: the id of the condition. This will be used to refer to this conditions in other
elements
The condition element can have several child elements depending on the type of
this conditions. E.g. the VariableCondition has a name and value child element to
specify, which variable should have a certain value to fullfil this condition.
This is an example which defines four conditions, two VariableConditions, a Java-
Condition and a AndCondition which will refer to two of the first conditions.
<conditions>
<condition type="variable" id="standardinstallation">
<name>setup.type</name>
<value>standard</value>
</condition>
<condition type="variable" id="expertinstallation">
<name>setup.type</name>
<value>expert</value>
</condition>
<condition type="java" id="installonwindows">
<java>
<class>com.izforge.izpack.util.OsVersion</class>
<field>IS_WINDOWS</field>
</java>
<returnvalue type="boolean">true</returnvalue>
</condition>
<condition type="and" id="standardinstallation.onwindows">
27

<condition type="ref" refid="standardinstallation"/>
<condition type="ref" refid="installonwindows" />
</condition>
</conditions>
Note, from IzPack 3.11 on normally, you don’t have to define the compound con-
ditions because you can use a simple expression language. The language has the fol-
lowing operators:
∙+: an operator for the Andcondition
∙|: an operator for the OrCondition
∙\: an operator for the XOrCondition
∙!: an operator for the NotCondition
Neverthless if you define really complex conditions it’s much easier to define them
using the xml structure.
More types of conditions can be defined by inheriting com.izforge.izpack.Condition
class.
Built-in conditions
A number of built-in condition IDs are available for you.
Name Condition
izpack.windowsinstall The OS is Windows
izpack.windowsinstall.xp The OS is Windows XP
izpack.windowsinstall.2003 The OS is Windows Server 2003
izpack.windowsinstall.vista The OS is Windows Vista
izpack.windowsinstall.7 The OS is Windows 7
izpack.macinstall The OS is Mac OS X
izpack.linuxinstall The OS is a Linux variant
izpack.solarisinstall The OS is a Solaris variant
izpack.solarisinstall.x86 The OS is a Solaris,x86 variant
izpack.solarisinstall.sparc The OS is a Solaris sparc variant
The Installer Requirements Element <installerrequirements>
This element allows to specify requirements for running the installation. This will be
done based on conditions defined in the conditons section.
An installer requirement consists of a condition and a message which will be shown
if the condition is not fulfilled. If so, the installer will show the message and exit after
that.
∙installerrequirement: specifies a single installer requirement. You can
define an unlimited number of them.
Installerrequirements have the following attributes: - condition: an id of a con-
dition defined in the conditions section - message: a message text or a langpack
28
key defining which message should be shown before exiting the installer in case of a
missing requirement.
<installerrequirements>
<installerrequirement conditon="installonwindows" message="This installer could only be run on Windows operating systems."/>
</installerrequirements>
The GUI Preferences Element <guiprefs>
This element allows you to set the behavior of your installer GUI. This information
will not have any effect on the command-line installers that will be available in future
versions of IzPack. The arguments to specify are :
∙resizable : takes yes or no and indicates whether the window size can be
changed or not.
∙width : sets the initial window width
∙height : sets the initial window height.
Here’s a sample :
<guiprefs resizable="no" width="800" height="600"/>
Starting from IzPack 3.6, the look and feel can be specified in this section on a
per-OS basis. For instance you can use the native look and feels on Win32 and OS X
but use a third-party one on Unix-like platforms. To do that, you have to add some
children to the guiprefs tag:
∙laf: the tag that specifies a look and feel. It has a name parameter that defines
the look and feel name.
∙Each laf element needs at least one os tag, specified like in the other parts of
the specification that support this tag.
∙Like you can add os elements, you can add any number of param elements to
customize a look and feel. A param elements has two attribues: name and “
value“.
The available look and feels are:
∙Kunststoff: kunststoff
∙Liquid: liquid
∙Metouia: metouia
∙JGoodies Looks: looks
∙Substance: substance
If you don’t specify a look and feel for a particular operating system, then the
default native one will be used: Windows on Windows, Aqua on Mac OS X and Metal
on the Unix-like variants.
The Liquid Look and Feel supports the following parameters:
∙decorate.frames:yes means that it will render the frames in Liquid style
29
∙decorate.dialogs:yes means that it will render the dialogs in Liquid
style
The JGoodies Looks look and feel can be specified by using the variant param-
eters. The values can be one of:
∙windows: use the Windows look
∙plastic: use the basic Plastic look
∙plastic3D: use the Plastic 3D look
∙plasticXP: use the Plastic XP look (default).
Here is a small sample:
<guiprefs height="600" resizable="yes" width="800">
<laf name="metouia">
<os family="unix" />
</laf>
<laf name="looks">
<os family="windows" />
<param name="variant" value="extwin" />
</laf>
</guiprefs>
The Substance look and feel toned-down themes can be specified using the variant
parameter, with the value being one of: business, business- blue, business-black,
creme, sahara, moderate, officesilver. We have reduced the choice
to the toned-down themes since they are the only ones to actually look decent (the
other families colors are way too saturated). Please consult https://substance.dev.java.
net/docs/skins/toneddown.html for a gallery of the different toned-down themes.
Starting from IzPack 3.7, some characteristics can be customized with the <modifier>
tag. There is a separate description in the Advanced Features chapter paragraph Mod-
ifying the GUI.
The Localization Element <locale>
This element is used to specify the language packs (langpacks) that you want to use
for your installer. You must set one <langpack> markup per language. This markup
takes the “ iso3“ parameter which specifies the iso3 language code.
Here’s a sample :
<locale>
<langpack iso3="eng"/>
<langpack iso3="fra"/>
<langpack iso3="spa"/>
</locale>
The supported ISO3 codes are :
30

ISO3
code
Language
cat Catalunyan
chn Chinese
cze Czech
dan Danish
glg Galician
deu German
eng English
eus Basque
fin Finnish
fra French
hun Hungarian
ita Italian
jpn Japanese
mys Malaysian
ned Nederlands
nor Norwegian
pol Polnish
por Portuguese (Brazilian)
prt Portuguese (European)
rom Romanian
rus Russian
scg Serbian
spa Spanish
svk Slovakian
swe Swedish
ukr Ukrainian
The Resources Element <resources>
Several panels, such as the license panel and the shortcut panel, require additional data
to perform their task. This data is supplied in the form of resources. This section
describes how to specify them. Take a look at each panel description to see if it might
need any resources. Currently, no checks are made to ensure resources needed by any
panel have been included. The “ <resources>“ element is not required, and no <res>
elements are required within. The <resources> element is the only element besides
the <packs> element that is taken into consideration in referenced pack-files (see
‘<packs> element‘_ for more info)
You have to set one <res> markup for each resource. Here are the attributes to
specify :
∙src : the path to the resource file which can be named freely of course (for
instance my-picture.jpg).
31
∙id : the resource id, depending on the needs of a particular panel
∙parse : takes yes or no (default is no) - used to specify whether the resource
must be parsed at the installer compilation time. For instance you could set the
application version in a readme file used by InfoPanel.
∙type : specifies the parse type. This makes sense only for a text resource -
the default is plain, other values are javaprop, xml, plain, java,
shell, at, ant (Java properties file and XML files)
∙encoding : specifies the resource encoding if the receiver needs to know. This
makes sense only for a text resource.
Here’s a sample :
<resources>
<res id="InfoPanel.info" src="doc/readme.txt" parse="yes"/>
<res id="LicencePanel.licence" src="legal/License.txt"/>
</resources>
Please note that in general a resource id is unique. Thus if you define multiple
resources with the same id the later definition (e.g. a resource defined in a referenced
pack-file) will overwrite the previous definition. However there is an exception for
packsLang.xml_xyz files (see Internationalization of the PacksPanel ). If multiple
packsLang-files were defined, all files will be merged into a single temporary file. This
allows refpack files to provide their own internationalization-information.
The Panels Element <panels>
Here you tell the compiler which panels you want to use. They will appear in the
installer in the order in which they are listed in your XML installation file. Take a look
at the different panels in order to find the ones you need. The <panel> markup takes
the following attributes:
∙classname: which is the classname of the panel.
∙id: an identifier for a panel which can be used e.g. for referencing in userinput
panel definitions.
∙condition: an id of a condition which has to be fullfilled to show this panel
∙jar: jar file where the classes for this panel can be found. This attribute is
optional. If it is empty (jar=“”) the classes for this panel must be murged using
the <jar> tag.
Here is a sample :
<panels>
<panel classname="HelloPanel"/>
<panel classname="LicencePanel"/>
<panel classname="TargetPanel"/>
<panel classname="InstallPanel"/>
<panel classname="UserInputPanel" id="myuserinput" condition="pack2selected" />
<panel classname="FinishPanel" jar="MyFinishPanel.jar"/>
</panels>
The following sections describe the tags available for a <panel> section.
32
<help> - optional file for a help
The content of the help file is shown in a small window on the panel, when User clicks
on the help button. The button is only shown, when a help in the language exists.
The <help> takes the following attributes :
∙iso3: iso3 representation of the language the help is written
∙src: path to the help file to display
Here’s a sample :
<panel classname="HelloPanel">
<help iso3="deu" src="HelloPanelHelp_deu.html" />
<help iso3="eng" src="HelloPanelHelp_eng.html" />
</panel>
<validator> - optional validation on idata
This validation is done, when going on for the next panel. It is also done in case of an
automatic installation. The class must implement the interface com.izforge.izpack.installer.DataValidator.
The <validator> takes the following attributes :
∙classname: The class implementing com.izforge.izpack.installer.DataValidator
Here’s a sample :
<panel classname="UserInputPanel" id="jdbc.connection.parameters">
<validator classname="JdbcConnectionValidator" />
</panel>
<actions> - optional actions for the panel
Here you can define multiple actions that are done during the lifetime of the panel.
The class must implement the interface com.izforge.izpack.installer.PanelAction. The
actions are also called during an automated installation.
The <actions> tag has no attributes but has <action> markups with the fol-
lowing attributes :
∙stage: The stage when the action should be triggered. Possible values are preconstruct,
preactivate,prevalidate or postvalidate.
∙classname: The class implementing com.izforge.izpack.installer.PanelAction
Here’s a sample :
<panel classname="UserInputPanel" id="jdbc.connection.parameters">
<actions>
<action stage="preconstruct" classname="ConnectionPreConstructAction" />
<action stage="preactivate" classname="ConnectionPreActivateAction" />
<action stage="prevalidate" classname="ConnectionPreVAlidateAction" />
<action stage="postvalidate" classname="ConnectionPostValidateAction" />
</actions>
</panel>
33
The Packs Element <packs>
This is a crucial section as it is used to specify the files that need to be installed. The
<packs> section consists of several <pack>,<refpack> and <refpackset>
tags.
The <pack> takes the following attributes :
∙name: the pack name
∙required: takes yes or no and specifies whether the pack is optional or not.
∙os: optional attribute that lets you make the pack targeted to a specific operating
system, for instance unix,mac and so on.
∙preselected: optional attribute that lets you choose whether the pack is by
default selected for installation or not. Possible values are yes and no. A pack
which is not preselected needs to be explicitly selected by the user during instal-
lation to get installed.
∙loose: can be used so that the files are not located in the installer Jar. The
possible values are true or false, the default beeing false. The author of
this feature needed to put his application on a CD so that the users could run it
directly from this media. However, he also wanted to offer them the possibility
to install the software localy. Enabling this feature will make IzPack take the
files on disk instead of from the installer. Please make sure that your relative
files paths are correct !
∙id: this attribute is used to give a unique id to the pack to be used for interna-
tionalization via packsLang.xml file.
∙packImgId: this attribute is used to reference a unique resource that represents
the pack’s image for the ImgPacksPanel. The resource should be defined in the
<resources> element of the installation XML using the same value for the
id attribute of the <res> element.
∙condition: an id of a condition which has to be fullfilled to install this pack-
age.
∙hidden: takes true or false and specifies whether the pack shall be shown
in the packs panel. The bytes of such a hidden pack will be used to calculate the
required space, but the pack itself won’t be shown. A hidden pack can be selected
conditionally. So you have to specify a condition to enable it for installation. The
default for this attribute is false
The <refpack> takes only one attribute file, which contains the relative path
(from the installation compiler) to an externally defined packs-definition. This external
packs definition is a regular IzPack installation XML. However the only elements that
are used from that XML file are the <packs> and the <resources> elements. This
enables a model in which a single developer is responsible for maintaining the packs
and resources (e.g. separate packsLang.xml_xyz files providing internationaliza-
tion; see Internationalization of the PacksPanel ) related to the development-package
assigned to him. The main install XML references these xml-files to avoid synchro-
nization efforts between the central installation XML and the developer-maintained
installer XMLs.
34
The <refpackset> tag can be used in situations were there is no predefined set
of <refpack> files, but a given directory should be scanned for <refpack> files to
be included instead. This element takes the following parameters:
∙dir: the base directory for the refpackset (relative path)
∙includes: a pattern of files in <refpack> format that must be included
An example:
<refpackset dir="" includes="**/refpack.xml" />
Internationalization of the PacksPanel
In order to provide internationalization for the PacksPanel, so that your users can be
presented with a different name and description for each language you support, you
have to create a file named packsLang.xml_xyz where xyz is the ISO3 code of
the language in lowercase. Please be aware that case is significant. This file has to be
inserted in the resources section of “ install.xml“ with the id and src attributes set at
the name of the file. The format of these files is identical with the distribution langpack
files located at “ $IZPACK_HOME/bin/langpacks/installer“. For the name of the panel
you just use the pack id as the txt id. For the description you use the pack id suffixed
with .description.
An example:
<resources>
<res id="packsLang.xml_eng" src="i18n/myPacksLang.xml_eng"/>
</resources>
The packsLang.xml_eng file:
<langpack>
<str id="myApplication" txt="Main Application"/>
<str id="myApplication.description" txt="A description of my main application"/>
[...]
</langpack>
The following sections describe the tags available for a <pack> section.
<description> - pack description
The contents of the <description> tag describe the pack contents. This description
is displayed if the user highlights the pack during installation.
<depends> - pack dependencies
This can be used to make this pack selectable only to be installed only if some other is
selected to be installed. The pack can depend on more than one by specifying more than
one “ <depends>“ elements. Circular depedencies are not supported and the compiler
reports an error if one occurs.
This tag takes the following attribute:
∙packname: The name of the pack that it depends on
35
<os> - OS restrictions
It is possible to restrict a panel to a certain list of operating systems. This tag takes the
following attributes:
∙family: unix, windows or mac
∙name: the exact OS name (ie Windows, Linux, ...)
∙version: the exact OS version (see the JVM os.version property)
∙arch: the machine architecture (see the JVM os.arch property).
<updatecheck>
This feature can update an already installed package, therefore removing superfluous
files after installation. Here’s how this feature author (Tino Schwarze) described it on
the IzPack development mailing-list:
> Each pack can now specify an <updatecheck> tag. It supports a subset of ant
fileset syntax, e.g.:
<updatecheck>
<include name="lib/**" />
<exclude name="config/local/** />
</updatecheck>
> If the paths are relative, they will be matched relative to $INSTALL_PATH. Up-
date checks are only enabled if at least one <include> is specified. See “ com.izforge.izpack.installer.Unpacker“
for details.
<file> - add files or directories
The <file> tag specifies a file (a directory is a file too) to include into the pack. It
takes the following attributes:
∙src: the file location (relative path) - if this is a directory its content will
be added recursively. It may contain previously defined static variables (see
<variables>).
∙targetdir: the destination directory, could be something like $INSTALL_PATH/subdirX
∙os: can optionally specify a target operating system (unix, windows, mac)
- this means that the file will only be installed on its target operating system
∙override: if true then if the file is already installed, it will be overwritten
(use false otherwise). Alternative values: asktrue and askfalse - ask
the user what to do and supply default value for non-interactive use. Another
possible values is update. It means that the new file is only installed if it’s
modification time is newer than the modification time of the already existing
file (note that this is not a reliable mechanism for updates - you cannot detect
whether a file was altered after installation this way.) By default it is set to “
update“.
∙unpack: if true and the file is an archive then its content will be unpacked
and added as individual files
∙condition: an id of a condition which has to be fullfilled to install this file
36
<additionaldata>
This tag can also be specified in order to pass additional data related to a file tag for
customizing.
∙<key>: key to identify the data
∙<value>: value which can be used by a custom action
<singlefile> - add a single file
Specifies a single file to include. The difference to <file> is that this tag allows the
file to be renamed, therefore it has a target attribute instead of “ targetdir“.
∙src: the file location (relative path). It may contain previously defined static
variables (see <variables>).
∙target: the destination file name, could be something like $INSTALL_PATH/subdirX/fileY
∙os: can optionally specify a target operating system (unix, windows, mac)
- this means that the file will only be installed on its target operating system
∙override: see <file> for description
∙condition: an id of a condition which has to be fullfilled to install this file
A<additionaldata> tag can also be specified for customizing.
<fileset>: add a fileset
The <fileset> tag allows files to be specified using the powerful Jakarta Ant set
syntax. It takes the following parameters:
∙dir: the base directory for the fileset (relative path)
∙targetdir: the destination path, works like for <file>
∙casesensitive: optionally lets you specify if the names are case- sensitive
or not - takes yes or no
∙defaultexcludes: optionally lets you specify if the default excludes will be
used - takes yes or no.
∙os: specifies the operating system, works like for <file>
∙override: see <file> for description
∙includes: comma- or space-separated list of patterns of files that must be
included; all files are included when omitted. This is an alternative for multiple
include tags.
∙excludes: comma- or space-separated list of patterns of files that must be
excluded; no files (except default excludes) are excluded when omitted. This is
an alternative for multiple exclude tags.
∙condition: an id of a condition which has to be fullfilled to install the files in
this fileset
37
You specify the files with <include> and <exclude> tags that take the name
parameter to specify the Ant-like pattern :
∙** : means any subdirectory
∙*: used as a wildcard.
Here are some examples of Ant patterns :
∙<include name="lib"/> : will include lib and the subdirectories of lib
∙<exclude name="**/*.java"/> : will exclude any file in any directory
starting from the base path ending by .java
∙<include name="lib/*.jar"/> : will include all the files ending by
.jar in lib
∙<exclude name="lib/**/*FOO*"/> : will exclude any file in any sub-
directory starting from lib whose name contains FOO.
There area set of definitions that are excluded by default file-sets, just as in Ant.
IzPack defaults to the Ant list of default excludes. There is currently no equivalent to
the <defaultexcludes> task. Default excludes are:
**/*\~{}
*/\#*\#
*/.\#*
*/%*%
*/.\_*
*/CVS
*/CVS/**
*/.cvsignore
*/SCCS
*/SCCS/**
*/vssver.scc
*/.svn
*/.svn/**
*/.DS\_Store
A<additionaldata> tag can also be specified for customizing.
<parsable> - parse a file after installation
Files specified by <parsable> are parsed after installation and may have variables
substituted.
∙targetfile : the file to parse, could be something like $INSTALL_PATH/bin/launch-script.sh
A slash will be changed to the system dependant path separator (e.g. to a back-
slash on Windows) only if no backslash masks the slash.
∙type : specifies the type (same as for the resources) - the default is plain
∙encoding : specifies the file encoding
∙os: specifies the operating system, works like for <file>
∙condition: an id of a condition which has to be fullfilled to parse this file
38
<executable> - mark file executable or execute it
The <executable> tag is a very useful thing if you need to execute something
during the installation process. It can also be used to set the executable flag on Unix-
like systems. Here are the attributes :
∙targetfile : the file to run, could be something like $INSTALL_PATH/bin/launch-script.sh
Slashes are handled special (see attribute targetfile of tag <parsable>).
∙class : If the executable is a jar file, this is the class to run for a JavaTM
program
∙type :bin or jar (the default is bin)
∙stage : specifies when to launch : postinstall is just after the instal-
lation is done, never will never launch it (useful to set the +x flag on Unix).
uninstall will launch the executable when the application is uninstalled. The
executable is executed before any files are deleted. never is the default value.
∙failure : specifies what to do when an error occurs : abort will abort the
installation process, ask (default) will ask the user what to do and warn will
just tell the user that something is wrong
∙os: specifies the operating system, works like for <file>
∙keep : specifies whether the file will be kept after execution. The default is
to delete the file after is has been executed. This can be changed by specifying
keep="true".
∙condition: an id of a condition which has to be fullfilled to execute this file
A<args> tag can also be specified in order to pass arguments to the executable:
∙<arg>: passes the argument specified in the value attribute. Slashes are han-
dled special (see attribute targetfile of tag <parsable>.
<os> - make a file OS-dependent
The <os> tag can be used inside the <file>,<fileset>,<singlefile>,<parsable>,
<executable> tags to restrict it’s effect to a specific operating system family, archi-
tecture or version using the following attributes:
∙family:unix, windows, mac to specify the operating system family
∙name: the operating system name
∙version: the operating system version
∙arch: the operating system architecture (for instance the Linux kernel can run
on i386, sparc, and so on)
Here’s an example installation file fragment:
39
<packs>
(...)
<pack name="Core" required="yes">
(...)
<executable targetfile="$INSTALL_PATH/bin/compile" stage="never">
<os family="unix"/>
</executable>
(...)
</pack>
(...)
</packs>
The Native Element <native>
Use this if you want to use a feature that requires a native library. The native li-
braries are placed under bin/native/... There are 2 kinds of native libraries
: the iZPACK libraries and the third-party ones. The IzPack libraries are located at
bin/native/izpack, you can place your own libraries at “ bin/native/3rdparty“.
It is possible to place a native library also into the uninstaller.
It is usable from CustomActions. If one or more are referenced for it, the needed
support classes are automatically placed into the uninstaller. To place it only on oper-
ating systems for which they are build, it is possible to define an OS restriction. This
restriction will only be performed for the uninstaller. The markup takes the following
attributes :
∙type :izpack or 3rdparty
∙name : the library filename
∙stage: stage where to use the library (install|uninstall|both)
∙src : source directory where to find the library to build the installer
Note for developers: com.izforge.izpack.util.Librarian.loadLibrary()
must be used to load custom native libraries, as it performs some housekeeping.
<os> - make a library OS-dependent
The <os> tag can be used to restrict the inclusion into the uninstaller to a specific
operating system family, architecture or version. The inclusion into the installer will
be always done.
Here’s a sample :
<native type="izpack" name="ShellLink.dll">
<os family="windows"/>
</native>
40
The Jar Merging Element <jar>
If you adapt iZPACK for your own needs, you might need to merge the content of
another jar file into the jar installer. For instance, this could be a library that you need
to merge. The <jar> markup allows you to merge the raw content of another jar file
into the installer and the uninstaller. It is necessary that the paths in the jars are unique
because only the contained files of the jar are added to the installer jar, not the jar file
self. The attributes are:
∙src : the path at compile time
∙stage: stage where to use the contents of the additional jar file (install|uninstall|both)
A sample :
<jar src="../nicelibrary.jar"/>
XInclude-style constructs
The xi:include element is used to include xml or text documents in your configuration
files.
The xi:include element can be used anywhere in pretty much any of the xml files
used by IzPack. It is supported by the javax DocumentBuilder. It follows the XInclude
recommandation produced by the W3C (http://www.w3.org/TR/xinclude/) and should
be able to be used as decribed in that document.
To use the xi:include, you have to specify the namespace xmlns:xi=“http://www.w3.org/2001/XInclude”
in your xml.
If a logical error appear in an included file, the line number shown will indicate the
xinclude element in the main xml file.
The xi:include element has the following attributes:
href The location of the file to include. If this is a relative path (e.g. href=’../bob.xml’)
then the file is resolved relative to the document that includes the xinclude ele-
ment. The href element can be a remote url (e.g. href=’http://example.com/file.
txt’) but this is not recommended.
parse Indicates that the included file should be treated as xml, forcing the included file
to be parsed (which results in all xinclude elements in the included file to also be
included), or as text which includes the specified file as a text node. It can have
a value of ’xml’ or ’text’ and defaults to ’xml’ if ommitted.
xpointer In case in parse=“xml”, you can use xpointer to get a part of the included
xml. The details of the xpointer framework can be found http://www.w3.org/
TR/2003/REC-xptr-framework-20030325/.
encoding This is used when the parse attribute is ’text’ to specify the character encod-
ing of the included text document. It has no effect if parse is ’xml’.
accept Used if the href attribute specifies a url accessible via HTTP. The value of this
attribute will be added as the accpet header on the HTTP request.
41
The fallback element
The xi:fallback element is used to provide a fallback if the xi:include element fails.
It can be empty or can contain a valid xml. If it is empty then a failure to include
the specified document is supressed. If it contains a xml then a failure to include the
specified document causes the xml specified in the fallback is parsed (evaluating nested
xinclude elements) and inserted into the document in its place.
For example the following use of xi:include
<?xml version="1.0" encoding="iso-8859-1" standalone="yes" ?>
<aaa xmlns:xi="http://www.w3.org/2001/XInclude">
<xi:include href="does-not-exist.xml">
<xi:fallback>
<bbb/>
</xi:fallback>
</xi:include>
</aaa>
will result in
<?xml version="1.0" encoding="iso-8859-1" standalone="yes" ?>
<aaa>
<bbb/>
</aaa>
if the file ’does-not-exist.xml’ does indeed not exist.
The xfragment element
The xfragment element allows document fragments (xml documents without a single
top level element) to be included. Simply use the xfragment as the top level element in
the included document. It will be removed when the document is included.
e.g. If I want to use xi:include to include a file containing the following fragments:
<ffff>
<gggg>hello</gggg>
</ffff>
<hhhh>
<iiii>there</iiii>
</hhhh>
I could use the xfragment element to enable it
<?xml version="1.0" encoding="iso-8859-1" standalone="yes" ?>
<xfragment>
<ffff>
<gggg>hello</gggg>
</ffff>
<hhhh>
<iiii>there</iiii>
</hhhh>
</xfragment>
42
The Available Panels
In this section I will introduce the various panels available in IzPack. The usage for
most is pretty simple and described right here. The more elaborate ones are explained
in more detail in the Advanced Features chapter or in their own chapter. The panels are
listed by their class name. This is the name that must be used with the classname
attribute. Please be aware that the classname is Case-Sensitive, meaning that if the case
from the install.xml and the founded class file differs the installation will break. In this
last case, the installer will Throw an IllegalArgumentException in the compiler if the
declared class name in the xml file differs in case from the founded class file.
HelloPanel
This panel welcomes the user by displaying the project name, the version, the URL as
well as the authors.
HTMLHelloPanel
This panel allows an HTML document to be used as the “welcome” panel. It operates
like the ’HTMLInfoPanel’, except that the resource name “HTMLHelloPanel” is used
(i.e., “HTMLHelloPanel.info”).
CheckedHelloPanel
This panel welcomes the user also by displaying the project name, the version, the URL
as well as the authors.
Additonal on windows the registry will be scanned for an entry which determines
that the product is already installed. If so, a dialog will be shown which ask whether to
install a second version of the product or not. If you use this panel do not forget to add
the registry feature into your installation.
InfoPanel and HTMLInfoPanel
This is a kind of ’README’ panel. It presents text of any length. The text is specified
by the (HTML)InfoPanel.info resource. Starting from IzPack 3.7.0, variables
substitution is allowed. To add an image to the HTMLInfoPanel you simply need to
add a ressource to your install.xml with an ID decided by you, then you can call this
image by refering it by this same ID.
In install.xml:
<resources>
<res src="logo.jpg" id="GHGHGH"/>
.....
and in file.html:
<img src="GHGHGH" />
Note that variables are being substituted in HTMLINfoPanel (e.g., $JINSTALL_PATH
will be replaced with the installation path).
You can define multiple HTMLInfoPanel with individual HTML texts by giving
them a specific id. The resources are named HTMLInfoPanel.<panelid> :
43
<resources>
<res id="HTMLInfoPanel.readme" src="readme.html"/>
<res id="HTMLInfoPanel.disclaimer" src="disclaimer.html"/>
...
<resources>
...
<panels>
<panel classname="HTMLInfoPanel" id="readme" />
<panel classname="HTMLInfoPanel" id="disclaimer" />
...
</panels>
LicencePanel and HTMLLicencePanel
Note:* There is a mistake in the name - it should be LicensePanel. In France the word
is Licence ... and one of my diploma is a ’Licence’ so ...:* -)
Adding images to HTMLLicencePanel works exactly the same way as with HTM-
LInfoPanel.
These panels can prompt the user to acknowledge a license agreement. They block
unless the user selects the ’agree’ option. To specify the license agreement text you
have to use the “ (HTML)LicencePanel.licence“ resource.
PacksPanel
Allows the user to select the packs he wants to install. This panel also allows grouping
of packs. Look at InstallationGroupPanel description to get more details.
ImgPacksPanel
This is the same as above, but for each pack a different picture is shown to the user.
The pictures are specified using the packImgId attribute for each pack in the installer
XML. The initial image will be the image of the first pack that has a packImgId. The
image is updated each time the user (de)selects a pack that has a packImgId. Of course
it’s up to you to specify an image for each pack in your installation with a unique
packImgId. For instance if you have 2 packs core and documentation (in this
order), and you assign both packs a packImgId that is identical to the pack’s name
then the resource for core will be core and the resource for documentation will
be documentation. The initially shown image will be the resource core. The
supported image formats depend on what your client’s JVM supports, but starting from
J2SE 1.3, GIF,JPEG and PNG are supported.
TreePacksPanel
This panel is very similar to PacksPanel, but instead of simple list of available
packs, the tree-like list is constructed. By using the parent attribute of pack ele-
ment, one can specify the hierarchy of the tree. This panel supports grouping just like
PacksPanel does.
example
<installation version="1.0">
44
(...)
<panels>
(...)
<panel classname="TreePacksPanel"/>
(...)
</panels>
<packs>
<pack name="Base"
required="yes">
(...)
</pack>
<pack name="Themes"
required="no">
(...)
</pack>
<pack name="Black"
parent="Themes"
required="no">
(...)
</pack>
<pack name="Red"
parent="Themes"
required="no">
(...)
</pack>
</packs>
</installation>
The result tree contains Base element with no children, and Themes with two chil-
dren named Black and Red.
TargetPanel
This panel allows the user to select the installation path. It can be customized with the
following resources (they are text files containing the path) :
∙TargetPanel.dir.f where f stands for the family (mac, macosx, windows,
unix)
∙TargetPanel.dir : the directory name, instead of the software to install
name
∙TargetPanel.dir.d where d is a “dynamic” name, as returned by the Ja-
vaTM virtual machine. You should write the name in lowercase and replace the
spaces with underscores. For instance, you might want a different setting for So-
laris and GNU/Linux which are both Unix-like systems. The resources would be
TargetPanel.dir.sunos, TargetPanel.dir.linux. You should
have a Unix-resource in case it wouldn’t work though.
The ’ShowCreateDirectoryMessage’ variable may be used to suppress the “target
directory will be created” dialog. If the ’ShowCreateDirectoryMessage’ variable is set
45
to “false” then the dialog will not be shown. If the ’ShowCreateDirectoryMessage’
variable is set to “true” or is not specified then the dialog will be shown if the target
directory does not exist. See the “Variables Element” section for information on how
to specify variables.
DefaultTargetPanel
The default installation directory is specified as in the TargetPanel (using identical
names (TargetPanel... not DefaultTargetPanel...), but will not allow the user to change
the installation path. It can be used when software must be installed in a specific
location.
InstallPanel
You should always have this one as it launches the installation process !
XInfoPanel
A panel showing text parsed by the variable substitutor. The text can be specified
through the XInfoPanel.info resource. This panel can be useful when you have
to show information after the installation process is completed (for instance if the text
contains the target path). The font can be set on this text through the optional vari-
able XinfoPanel.font, and its value is to be formatted consistent with the support
provided by java.awt.Font.decode().
In the following example the font size and type are omitted, but they can also be
part of the value:
<variable name="XInfoPanel.font" value="monospaced"/>
FinishPanel
A ending panel, able to write automated installer information. For details see the chap-
ter on ’Advanced Features’.
SimpleFinishPanel
Same as FinishPanel, but without the automated installer features. It is aimed at
making the life easier for end-users who will never encounter the automated installer
extra feature.
ShortcutPanel
This panel is used to create desktop shortcuts. For details on using the ShortcutPanel
see the chapter ’Desktop Shortcuts’.
UserInputPanel
This panel allows you to prompt the user for data. What the user is prompted for is
specified using an XML file which is included as a resource to the installer.
46
CompilePanel
This panel allows you to compile just installed Java sourcecode. The details for the
compilation are specified using the resource CompilePanel.Spec.xml. The XML
file has the following format:
<compilation>
<global>
<compiler>
<choice value="$JAVA_HOME/bin/javac" />
<choice value="jikes" />
</compiler>
<arguments>
<choice value="-O -g:none" />
<choice value="-O" />
<choice value="-g" />
<choice value="" />
</arguments>
</global>
<jobs>
<classpath add="$INSTALL_PATH/src/classes/" />
<job name="optional name">
<directory name="$INSTALL_PATH/src/classes/xyz" />
</job>
<job name="another job">
<packdepency name="some package name" />
<classpath sub="$INSTALL_PATH/" />
<directory name="$INSTALL_PATH/src/classes/abc" />
<file name="$INSTALL_PATH/some/file.java" />
</job>
</jobs>
</compilation>
In theory, jobs can be nested but this has not been tested at all. A change to the
classpath within a job only affects this job and nested jobs. The classpath should be
specified before any files or directories.
The user can change the compiler to use and choose from some default compilation
options before compilation is started.
47
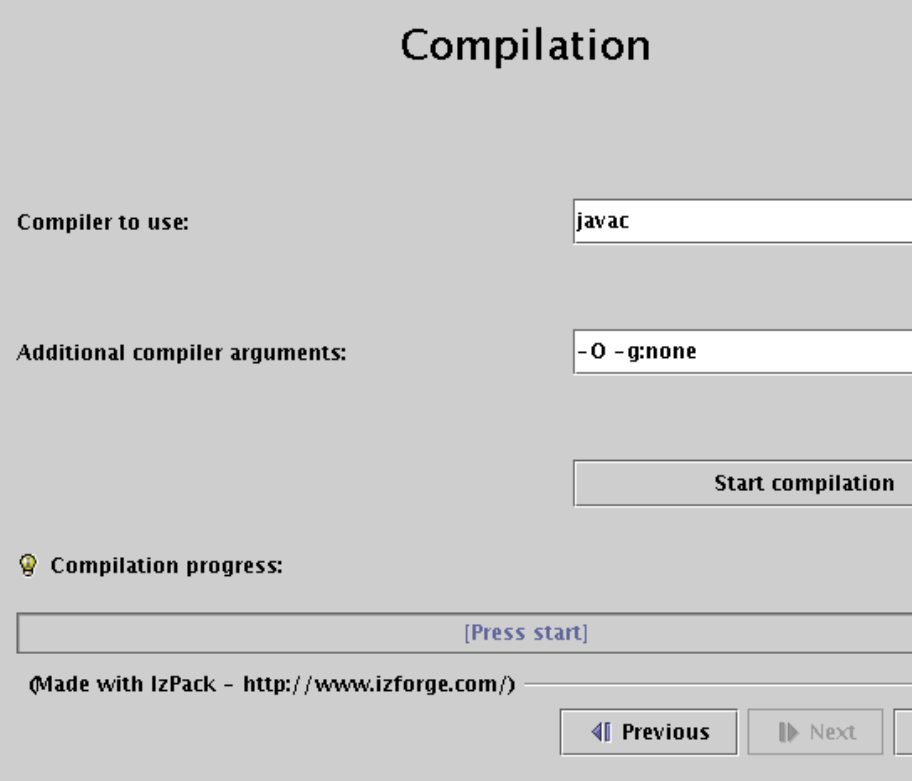
ProcessPanel
This panel allows you to execute arbitrary files after installation. The details for the
compilation are specified using the resource ProcessPanel.Spec.xml.
The XML file has the following format:
<processing>
<job name="do xyz">
<os family="windows" />
<executefile name="$INSTALL_PATH/scripts/xyz.bat">
<arg>doit</arg><arg>$variable</arg>
</executefile>
</job>
<job name="do xyz">
<os family="unix" />
<executefile name="$INSTALL_PATH/scripts/xyz.sh">
48
<arg>doit</arg><arg>$variable</arg>
</executefile>
</job>
</processing>
Each job may have an <os> attribute.
In addition to <arg> elements, the <executefile> element also accepts <env>
elements to set variables in the environment of the target process. This can be useful
if this process requires some environment variables, such as its installation directory, to
work properly. An <env> element has the following syntax: <env>variable=value</env>.
Note the value supports variable substitution, for example: <env>MY_PRODUCT_HOME=$INSTALL_PATH</env>.
The ProcessPanel now also supports configurable behaviour for the panel’s “Pre-
vious” and “Next” buttons. By adding <onFail> and <onSuccess> childs to the
<processing> element, you define which buttons you want unlocked in case of
failure and in case of success, respectively.
<processing>
<job name="do xyz">
<executefile name="$INSTALL_PATH/scripts/xyz.bat">
<arg>doit</arg><arg>$variable</arg>
</executefile>
</job>
<onFail previous="true" next="false" />
<onSuccess previous="true" next="true" condition="mycondition" />
<onSuccess previous="false" next="true" condition="!mycondition" />
</processing>
In the above example the job do xyz would be run, and if it returned with an error,
the next button would be greyed out, and the button to the previous page would be
enabled. If it returned without an error, the conditions of the <onSuccess> elements
would be checked and the respective action would be taken.
<executeclass> - Execute Java Classes
It is also possible to execute Java classes from this panel. Here’s what this feature
author (Alex Bradley) says:
> i’ve been able to work around my requirements by extending the ProcessPanelWorker
functionality to run user-specified classes. i’ve extended the DTD of the “ Process-
Panel.Spec.xml“ to include a new element:
<executeclass name="classname">
<args..../>
</executeclass>
> i’ve also added a new sub-class of Processable called executeclass.
This will run a user-specified class in the context of the installer JVM with a single
method :
run( AbstractUIProcessHandler handler, String[] args]);
> It can do everything i need and more. In particular, it allows me to write a process
extension and still be able to provide feedback to the user through the feedback panel,
and to add new functionality to the installer, after its been built.
49
To use the executeclass facility, you will need to create a jar file with your class and
then add it to the installer with the The Jar Merging Element.
<executeForPack> - Only execute the job for certain packs
This can be be used to run the job only if the pack is enabled. For example, the batch
file will if either the Sources or Executables packs are selected at install time.
<processing>
<job name="List files">
<executeForPack name="Sources"/>
<executeForPack name="Executables"/>
<os family="windows" />
<executefile name="$INSTALL_PATH\batch\ListFiles.bat" />
</job>
</processing>
<logfiledir> - Output of the processPanel saved to a log
New with version 3.7 is the possibility to tee output that is written to the ProcessPanel’s
textarea into an optional logfile. Using this feature is pretty much straightforward,
you only have to add a line in ProcessPanel.Spec.xml that will tell IzPack the
location, where the logfile should be stored.
Variable substitution is performed, so you can use $INSTALL_PATH as example.
The name of the logfile is not (yet) configurable but should fit in most cases. It will
be named
Install_V<$APP_VER>_<YYYY>-<MM>-<DD>_<hh>-<mm>-<ss>_<RandomId>.log
Here’s an example:
<processing>
<logfiledir>$INSTALL_PATH</logfiledir>
<job name="do xyz">
<os family="windows" />
<executefile name="$INSTALL_PATH/scripts/xyz.bat">
<arg>doit</arg><arg>$variable</arg>
</executefile>
</processing>
This will generate a logfile named e.g. Install_V1.3_2004-11-08_19-22-20_43423.log
located in $INSTALL_PATH.
ProcessPanelWorker will write all output that is directed to stdout and
stderr to this file if ProcessPanel.Spec.xml contains the logfiledir en-
try.
Please note that this one file is used for storing the complete output of all jobs and
not a file for each job that is run.
JDKPathPanel
This panel allows the user to select a JDK path. The variable JAVA_HOME does not
point to a JDK, else to a JRE also the environment variable points to a JDK. This is not a
50
bug, this is the behavior of the VM. But some products needs a JDK, for that this panel
can be used. There is not only a selection of the path else a validation. The validation
will be done with the file JDKPath/lib/tools.jar. If JAVA_HOME points to the VM
which is placed in the JDK, the directory will be used as default (JAVA_HOME/..). If
there is the variable
JDKPathPanel.skipIfValid
defined with the value “yes”, the panel will be skiped if the path is valid. Additional
it is possible to make a version control. If one or both variables
JDKPathPanel.minVersion
JDKPathPanel.maxVersion
are defined, only a JDK will be accepted which has a version in the range of it. The
detection is a little bit pragmatically, therefor it is possible, that the detection can fail
at some VMs. The values in the install.xml should be like
<variables>
<variable name="JDKPathPanel.minVersion" value="1.4.1" />
<variable name="JDKPathPanel.maxVersion" value="1.4.99" />
<variable name="JDKPathPanel.skipIfValid" value="yes" />
</variables>
If all is valid, the panels isValidated method sets the variable
JDKPath
to the chosen path. Be aware, this variable exist not until the JDKPanel was quitted
once. At a secound activation, the default will be the last selection.
SelectPrinterPanel
This panel will look at the local printers installed and propose a list box with all of
them. Once chosen, the variable $SELECTED_PRINTER is set to the user choice.
DataCheckPanel
DataCheckPanel is not for inclusion in an actuall install, but is a debugging resource
for developers writing custom panels or code to be included in IzPack. It creates a list
of all the variables in InstallData, their values and a list of all packs, indicating which
are selected. This list is printed to the console and appears in a scrollable text area on
the panel. Put the panel in wherever you want to see any variables in InstallData or a
listing of the packs with a line like this in the <panels> section of install.xml:
<panel classname=“DataCheckPanel” />
It will automatically give you a full list of all the variables and packs whenever the
panel is made active.
SummaryPanel
This panel gives a summary of all shown panels. The best place for it is just in-
front of the InstallPanel. Normaly it contains a warning that this is the last panel
before installation. The panel contains a scrollable HTML text area to display the
51
summary. The informations are collected from each panel by calling the methods
getSummaryCaption and getSummaryBody.getSummaryCaption is im-
plemented in IzPanel with a panel name default text. getSummaryBody has to be
implemented in all panels which should be presented in the summary. If the secound
method is not implemented, no summary of this panel will be shown.
Additional it is possible to log the contents of the summary panel into a HTML file.
InstallationGroupPanel
This Panel groups the pack together. A panel which displays the available install-
Groups found on the packs to allow the user to select a subset of the packs based on the
pack installGroups attribute. This panel will be skipped if there are no pack elements
with an installGroups attribute. For example
<installation version="1.0">
(...)
<panels>
(...)
<panel classname="InstallationGroupPanel"/>
<panel classname="PacksPanel"/>
(...)
</panels>
<packs>
<pack name="Base"
installGroups="Group1"
required="yes">
(...)
</pack>
<pack name="Docs"
installGroups="Group1,Group2"
required="no">
(...)
</pack>
<pack name="Sources"
installGroups="Group3,Group2"
required="no">
(...)
</pack>
</packs>
</installation>
In above example when InstallationGroupPanel is displayed, it contains three radios
named Group1, Group2 and Group3. Depending on what user selects, the respective
Packs will be displayed in PacksPanel. InstallationGroupPanel will look for a descrip-
tion corresponding to the key “InstallationGroupPanel.description.Group1”, “Instal-
lationGroupPanel.description.Group2” etc in installation langpacks and variables and
displays this description for each of the Group_i.
You may also define a sortKey in the variables section of the installer.xml to define
an alternative sorting. The default sorting is based on the Group Name.
Here is an example for alternative sorting of groups:
52
(...)
<variables>
(...)
<variable
name="InstallationGroupPanel.sortKey.Group2" value="A"/>
<variable
name="InstallationGroupPanel.sortKey.Group1" value="B"/>
<variable
name="InstallationGroupPanel.sortKey.Group3" value="C"/>
</variables>
(...)
By default, your group name (and description) are displayed as-is in the installer.
If you want them to be localized, add localized names to your packsLang.xml
resources. The string ID has to be InstallationGroupPanel.group.“‘group_name“.
Here is an example to localize groups into French (these lines have to be put in your
packsLang.xml_fra resource) :
<str id="InstallationGroupPanel.group.Core" txt="Noyau de l’application" />
<str id="InstallationGroupPanel.description.Core" txt="Fichiers principaux, indispensables au fonctionnement de l’application" />
<str id="InstallationGroupPanel.group.Samples" txt="Fichiers d’exemple" />
<str id="InstallationGroupPanel.description.Samples" txt="Fichiers d’exemples" />
If you want to add html markup to those strings, add .html at the end of the string
id (after the group name).
UserPathPanel
This panel allows the user to select a path similar to the installation path. Like the
installation path, this panel will allow the directory to be created if it does not already
exist. It can also be pre-loaded with a path and set to only display if a certain pack is
selected using the following variables:
<variable name="UserPathPanelVariable" value="@{default.dest.dir.sql}"/>
<variable name="UserPathPanelDependsName" value="Install Database Server"/>
Final path selection can be accessed using the variable “UserPathPanelVariable”.
Messages for the UserPathPanel can be customized by creating a custom lang pack
and overriding the following values (attribute values wrapped for readability):
<str id="UserPathPanel.required" txt="The chosen directory should exist."/>
<str id="UserPathPanel.info" txt="Select the path: "/>
<str id="UserPathPanel.browse" txt="Browse"/>
<str id="UserPathPanel.exists_warn" txt="The directory already exists!
Are you sure you want to install here and possibly overwrite existing files?"/>
<str id="UserPathPanel.empty_target" txt="You have not specified a target
location! Is this correct?"/>
<str id="UserPathPanel.createdir" txt="The target directory will be created: " />
<str id="UserPathPanel.nodir" txt="This file is not a directory! Please
53
choose a directory!"/>
<str id="UserPathPanel.notwritable" txt="This directory can not be written!
Please choose another directory!"/>
Advanced features
Apache Ant integration
IzPack can be easily integrated inside an Ant build process. To do so you first need to
tell Ant that you would like to use IzPack:
<!-- Allows us to use the IzPack Ant task -->
<taskdef name="IzPack" classpath="${basedir}/lib/compiler.jar"
classname="com.izforge.izpack.ant.IzPackTask"/>
If you want to use the standalone compiler (and therefore don’t need an IzPack
installation for building), the task needs to be defined as follows:
<!-- Allows us to use the IzPack Ant task -->
<taskdef name="IzPack" classpath="${basedir}/lib/standalone-compiler.jar"
classname="com.izforge.izpack.ant.IzPackTask"/>
Don’t forget to add compiler.jar or standalone-compiler.jar to the classpath of the Ant process.
Then you can invoke IzPack with the IzPack task which takes the following param-
eters:
∙’input’: the XML installation file. The installation can be specified as an external
file, or embedded using a config child element (see section 3.2).
∙’output’: the output jar installer file
∙’installerType’: optional. standard or web. If web, the <webdir> attribute must
be specified in the input file (see section 3.7). Used to force creation of a standard
installer when the <webdir> attribute has been used.
∙’baseDir’: the base directory to resolve the relative paths
∙’IzPackDir’: the IzPack home directory. Only necessary if you do not use the
standalone compiler.
Here is a sample of the task invocation:
<!-- We call IzPack -->
<echo message="Makes the installer using IzPack"/>
<IzPack input="${dist.dir}/IzPack-install.xml"
output="${dist.dir}/IzPack-install.jar"
installerType="standard"
basedir="${dist.dir}"
IzPackDir="${dist.dir}/"/>
54
Embedding the installation file using a config element
Instead of using the ’install’ attribute to specify an external installation document, you
can embed the installation config as a child of the IzPack task using a config child
element with a CDATA section. For example:
<property name="jboss.home.url" value="http://www.jboss.com/" />
...
<!-- Call IzPack with an embedded install using the config element -->
<IzPack output="${dist.dir}/IzPack-install.jar"
installerType="standard"
basedir="${dist.dir}"
IzPackDir="${dist.dir}/">
<config><![CDATA[
<installation version="1.0">
<info>
<appname>JBossAS</appname>
<appversion>4.0.2</appversion>
<appsubpath>jboss-4.0.2</appsubpath>
<authors>
<author name="JBoss Inc." email="sales@jboss.com"/>
</authors>
<url>@{jboss.home.url}</url>
<javaversion>1.4</javaversion>
</info>
...
]]></config>
</IzPack>
Property references of the form
@{x}
are replaced by the associated x ant property if it is defined.
A few variables are made available by both Ant and IzPack:
∙basedir (base directory from Ant)
∙izpack.file
∙UNPACKER_CLASS the name of the unpacker class
∙user.dir the user directory.
System properties as variables
All system properties are available as ’$SYSTEM_<variable>’ where ’<variable>’ is
the actual name but with all separators replaced by ’_’. Properties with null values are
never stored.
Examples:
’$SYSTEM_java_version’ or ’$SYSTEM_os_name’
55
Automated Installers
When you conclude your installation with a FinishPanel, the user can save the data for
an automatic installation. With this data, he will be able to run the same installation
on another similar machine. In an environment where many computers need to be
supported this can save a lot of time.
So run once the installation on a machine and save your automatic installation data
in auto-install.xml (that’s just a sample). Then put this file in the same directory as the
installer on another machine. Run it with:
java -jar installer.jar auto-install.xml
It reproduced the same installation.
Console (headless) installers
An IzPack installer can be run in a full headless mode, i.e., without needing a graphical
user interface. This is useful, e.g., in the case of remotely accessed servers through
SSH or similar means.
It differs from automated installers in the sense that a console installer is not “just”
a replay of a previous installation but a true console-based installation. It shares a
common feature though: it can be automated as well.
To launch an installer in console mode rather than in GUI mode (the default), you
can specify one of the following parameters on the command line:
∙-console: to run the installation in interactive console mode
∙-options-template: to generate a properties file whose name is specified
in args[1]
∙-options: to run an installation while reading the properties from the proper-
ties file specified in args[1].
∙-language: specifies the iso3 code of the language pack to use in the next
argument. Note: the first specified language pack will be used if this argument
was not passed.
As an example, to launch an interactive console installation, just type in a console:
java -jar installer.jar -console
Picture on the Language Selection Dialog
You can add a picture on the language selection dialog by adding the following resource
: ’installer.langsel.img’. GIF, JPEG and PNG pictures are supported starting from J2SE
1.3.
Picture in the installer
It is possible to specify an optional picture to display on the left side of the installer. To
do this, you just have to define a resource whose id is ’Installer.image’. For instance
<res id="Installer.image" src="nice-image.png" />
56

will do that. If the resource isn’t specified, no picture will be displayed at all. GIF,
JPEG and PNG pictures are supported starting from J2SE 1.3.
You can also give a specific picture for a specific panel by using the ’Installer.image.n’
resource names where is the panel index. For instance if you want a specific picture for
the third panel, use ’Installer.image.2’ since the indexes start from 0.
Modifying the GUI
There are some options to modify the graphic user interface. Most of them are managed
with key/value pairs of the element ’<modifier>’ which will be located in the element
’<guiprefs>’ in the installation description file.
Modifying Language Selection Dialog
Additional to the picture in the language selection dialog it is possible to modify flags
and the type of showing the language name. Following different views (without an
images to reduce space).
Figure 3: Standard language selection dialog
Figure 4: Alternative language selection dialog
∙’useFlags’: possible are “yes” or “no”. Default is “yes”. If it is set to “no”, no
flag will be displayed in the language selection dialog. For “no” it is recom-
mended to define also ’langDisplayType’ other then “iso3”.
57
∙’langDisplayType’: possible are “iso3”, “native” and “default”. Default is “iso3”.
With “iso3” the text for a language will be displayed as ISO 639-2:1998 code.
With “native” the notation of the language will be used if possible, else the nota-
tion of the default locale. Using “default” will be presented the language in the
notation of the default locale of the VM.
Modifying IzPack Panels
There are some graphic elements and behavior which are preferred by some people and
deprecate by other. The following keys are related to the whole installation (all panels).
∙’useButtonIcons’: possible are “yes” or “no”. Default is “yes”. If it is set to
“no”, all buttons which are created via the ButtonFactory contains no icon also a
icon id was submitted. Directly created buttons are not affected.
∙’useLabelIcons’: possible are “yes” or “no”. Default is “yes”. If it is set to “no”,
all labels which are created via the LabelFactory contains no icon also a icon id
was submitted. Directly created labels are not affected.
∙’labelFontSize’: A float value used as a multiplier for the font size on labels
created via the LabelFactory and IzPanel. Directly created labels are not affected.
∙’layoutAnchor’:layout anchor for IzPanels. Valid are “NORTH”, “NORTHWEST”,
“SOUTHWEST”, “SOUTH” and “CENTER”. Only panels which are using the
layout helper of IzPanels are supported. These are not all standard panels. At
developing custom panels it is recommended to use the layout helper with an
IzPanelLayout. Note: The anchor definition will be used for all panels!
∙Gaps: there are defined different gaps between different components of a IzPanel
if using IzPanelLayout. The gaps can be set also via the element ’<modifier>’
of ’<guiprefs>’. It is possible to declare different values for X and Y axis. This
will be determined in the key word name. X Gaps are insert after Y gaps under
the control for which the gap was declared. Following key words are defined:
–’labelXGap | labelYGap’: gap in pixel between two labels in X or Y direc-
tion.
–’textXGap | textYGap’: gap in pixel between two text fields.
–’controlXGap | controlYGap’: gap in pixel between two controls other than
label or textfield.
–’paragraphYGap’: gap in pixel for a paragraph. A paragraph will be created
in the panel source for controls which should be separated. paragraphXGap
is declared, but not used.
–’labelToTextXGap | labelToTextYGap’: gap in pixel between a label (left
or top) and a text field (right or bottom).
–’labelToControlXGap | labelToControlYGap’: gap in pixel between a label
(left or top) and a control other than a label or a textfield.
–’textToLabelXGap | textToLabelYGap’: gap in pixel between a text field
(left or top) and a label.
–’controlToLabelXGap | controlToLabelYGap’: gap in pixel between a con-
trol other than a label or a text field and a label.
58
–’controlToTextXGap | controlToTextYGap’: gap in pixel between a control
other than a label or a text field and a text field.
–’textToControlXGap | textToControlYGap’: gap in pixel between a text
field and a control other than a label or a text field .
–’firstYGap’: gap in pixel between the top border and the first control.
–’filler[N]XGap | filler[N]YGap’: gap in pixel created by the layout man-
ager. Filler are used by some panels. [N] is a number between 1 and 5 to
allow to use different filler e.g. filler3XGap or filler1YGap.
–’allXGap | allYGap’: gap in pixel between all controls in X or Y direction.
If this is declared all gaps for which no own declaration exists gets this
value. If a gap has an own declaration this will be used instead.
∙’layoutYStretchType | layoutXStretchType’: the IzPanelLayout manager allows
to declare stretch factors for controls. This means, that a control will be stretched
if there is place in the line. The amount of stretching will be determined by the
stretch factor. But what to do if the hole stretch factor for a line or column is not
1.0? To determine this these settings are exist. Valid values are “RELATIVE”,
“ABSOLUTE” and “NO”. With “NO” no stretch will be performed. with “REL-
ATIVE” the values are normalized, with “ABSOLUTE” the values will be used
as they are (may be a part will be clipped if the sum is greater than 1.0).
∙’layoutFullLineStretch | layoutFullColumnStretch’: as described there are con-
trols which should be stretched. Beside fixed values there are the symbolic
values FULL_LINE_STRETCH and FULL_COLUMN_STRETCH which are
computed at layout. E.g. MultiLineLabels has this stretch factor for x direction.
But what to do if a centered layout is chosen? With a control like this the lines
will be stretch to the hole size. With this settings it can be changed. E.g. a factor
of 0.7 creates a nice centered layout. The default is 1.0, valid are 0.0 up to 1.0.
It is possible to use an alternatively frame title. Normally the title has the aspect
“IzPack - Installation of ” + ’$APP_NAME’. If the langpack key ’installer.reversetitle’
is defined, the value of that key will be used instead of the key ’installer.title’. There is
no string added, but it is possible to use IzPack variables. The third heading example
contains such a alternatively frame title. It is only possible to use predefined variables
like ’$APP_NAME’ because the title will be created before the frame will be shown.
It is common to use the name of the installation toolkit in the frame title.
Using a Separated Heading Panel
Some standard panels have headings (e.g. ShortcutPanel). These headings are inte-
grated in the IzPanel. In opposite to this following heading will be displayed in a sep-
arated panel potential for all panels with the same design. There is no need to modify
existent java classes else declaration of some key/value pairs are enough.
There can be one real head and zero or more info lines. The headline will be
written bold, the font size can be changed. Info lines will be indented and written
with the normal used font. The heading message has to be written into the langpack
(or custom langpack) file with the key ’<panel class name>.headline’. Examples can
be seen in eng.xml. May be the entries for standard panels are not present in other
languages. Messages for info lines have the key ’<panel class name>.headinfo<info
line number>’. First info line has number zero. If no or empty headline messages will
59
be declared in the chosen language no heading panel will be shown. This behavior can
be used to suppress heading for special panels.
It is also possible to declare head and info lines additional dependent on the ’pan-
elid’. The result is, that it is possible to declare different messages for panels which are
shown more than one time (e.g. the UserInputPanel. In this case the key for heading is
<panel class name>.headline.<panelid>
and for info lines
<panel class name>.headinfo<info line number>.<panelid>
Panelids are declared in ’ELEMENT %lt;panel>’. See The Panels Element ’<pan-
els>’ . The standard strings are declared in the standard langpack file. For customized
panels it is common to write the string into the custom langpack (see The Internation-
alization of custom panels. If (as example) in install.xml was following written:
<panels>
...
<panel classname="UserInputPanel" id="one"/>
<panel classname="UserInputPanel"id="two"/>
...
</panels>
Then the messages can be declared in ’CustomLangpack.xml_eng’ like
<langpack>
...
<str id="UserInputPanel.headline.one" txt="User Data one"/>
<str id="UserInputPanel.headline.two" txt="User Data two"/>
<str id="UserInputPanel.headinfo0.one" txt="Info 1 one"/>
<str id="UserInputPanel.headinfo1.one" txt="Info 2 one"/>
<str id="UserInputPanel.headinfo0.two" txt="Info 1 two"/>
<str id="UserInputPanel.headinfo1.two" txt="Info 2 two"/>
...
<langpack>
It is possible to place an icon on the right side of the heading (see below to display
on left side). To do this a simple resource entry will be needed:
<resources>
...
<res id="Heading.image" src="[my path in the source tree]"/>
...
</resources>
There are some guiprefs modifier keys to use and modify heading (see above).
Additionally it is possible to count the general not hidden panels in the heading or
navigation panel.
∙’useHeadingPanel’: General switch for heading. If this key does not exist or
does not have the value “yes” no heading panel will be shown.
∙’headingImageOnLeft’: Option to allow displaying the heading image on the left
of the header instead of the default (right side). Only valid if heading panel is
used.
60
∙’useHeadingForSummary’: In the language files there are entries for the heading
text (’[Panel name].headline’) and the summary caption (’[Panel name].summaryCaption’).
If this modifier is set to “yes”, the text of the heading will be also used for the
summary caption.
∙’headingLineCount’: Number of heading lines. If no info lines should be shown
the value should be one (not zero).
∙’headingFontSize’: A float value used as multiplier for the standard font size.
∙’headingBackgroundColor’: Background color of the heading panel as integer.
Often used is 0x00ffffff (white).
∙’headingForegroundColor’: Font color of the heading panel as integer. Often
used is 0x00ffffff (white).
∙’headingPanelCounter’: Draw a panel counting. Possible values are “text” or
“progressbar”. inHeading the progressbar will be not the best choice.
∙’headingPanelCounterPos’: Declares where the counter will be shown. Possible
are “inHeading” or “inNavigationPanel”. If “inNavigationPanel” is chosen, the
panel counter can be used also no heading was selected.
61
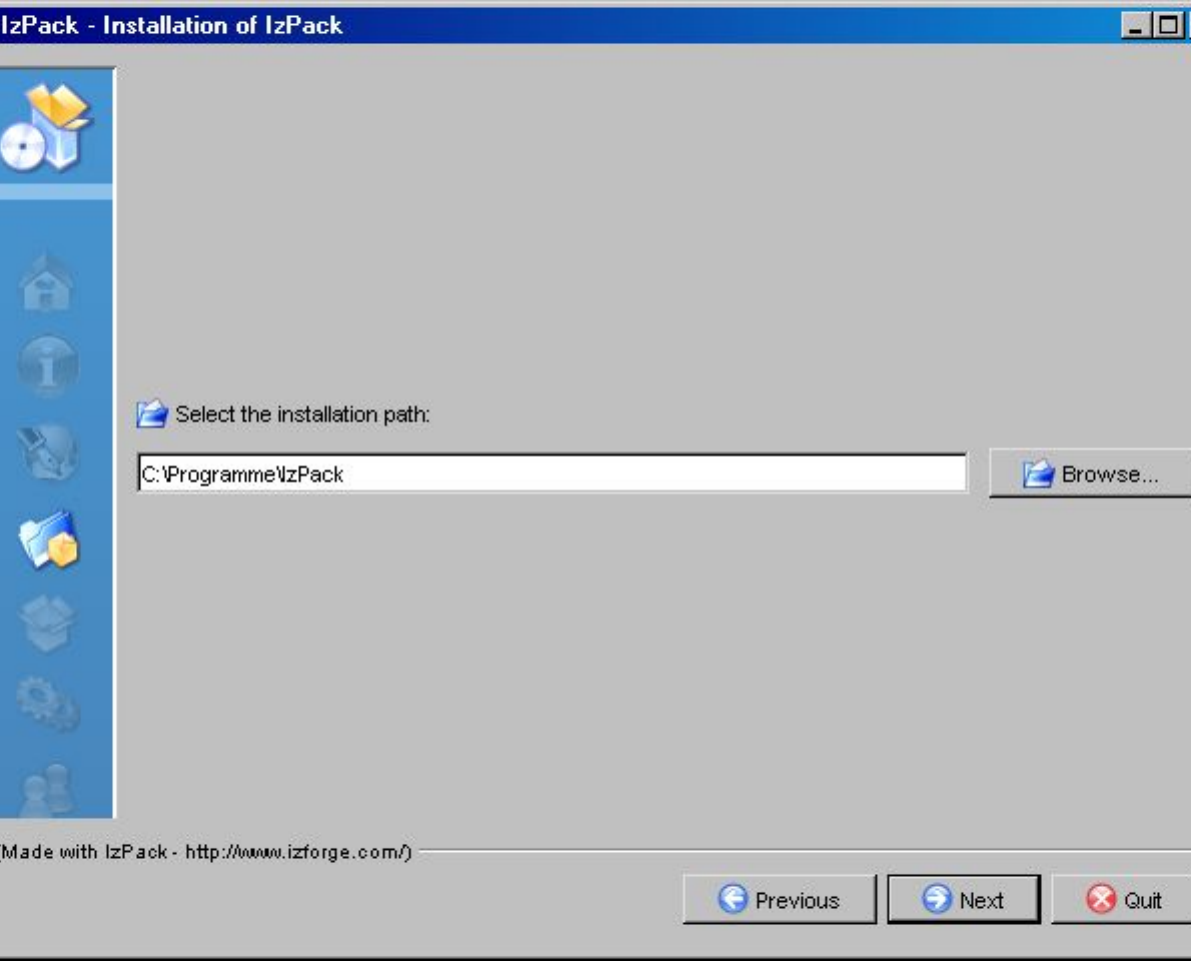
Figure 5: Normal look of an IzPack frame (TargetPanel)
Key/value pairs to create IzPack installation with heading, no button and label icons
and a panel text counter in the heading panel.
<guiprefs width="600" height="480" resizable="no">
<modifier key="useButtonIcons" value="no"/>
<modifier key="useLabelIcons" value="no"/>
62
<modifier key="labelGap" value="2"/>
<modifier key="layoutAnchor" value="NORTHWEST"/>
<modifier key="useHeadingPanel" value="yes"/>
<modifier key="headingImageOnLeft" value="yes"/>
<modifier key="headingLineCount" value="1"/>
<modifier key="headingFontSize" value="1.5"/>
<modifier key="headingBackgroundColor" value="0x00ffffff"/>
<modifier key="headingPanelCounter" value="text"/>
<modifier key="headingPanelCounterPos" value="inHeading"/>
</guiprefs>
63
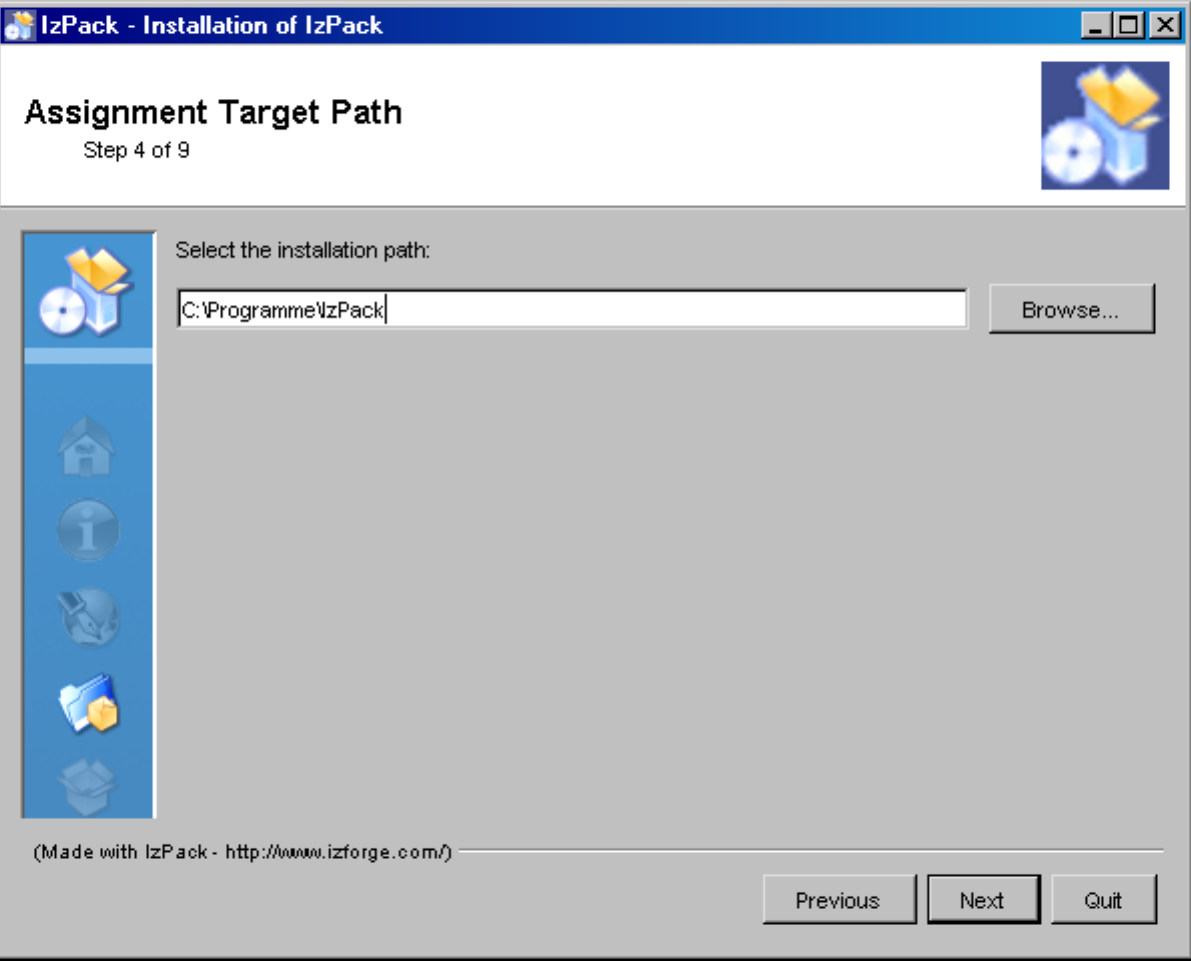
Figure 6: IzPack frame (TargetPanel) with heading panel and a text counter in the
heading panel with panel image.
Changed resources and langpack keys to create IzPack installation with alterna-
tively frame title, heading, no button and label icons and a text counter in the heading
panel.
In install.xml
<installation version="1.0">
64
...
<resources>
...
<res src="border4.png" id="Installer.image.3"/> REMOVED
...
</resources>
</installation>
Add in ’<ISO3>.xml’ or ’CustomLangpack.xml_<ISO3>’
<langpack>
...
<str id="installer.reversetitle" txt="$APP_NAME $APP_VER - IzPack Wizard "/>
...
</langpack>
65
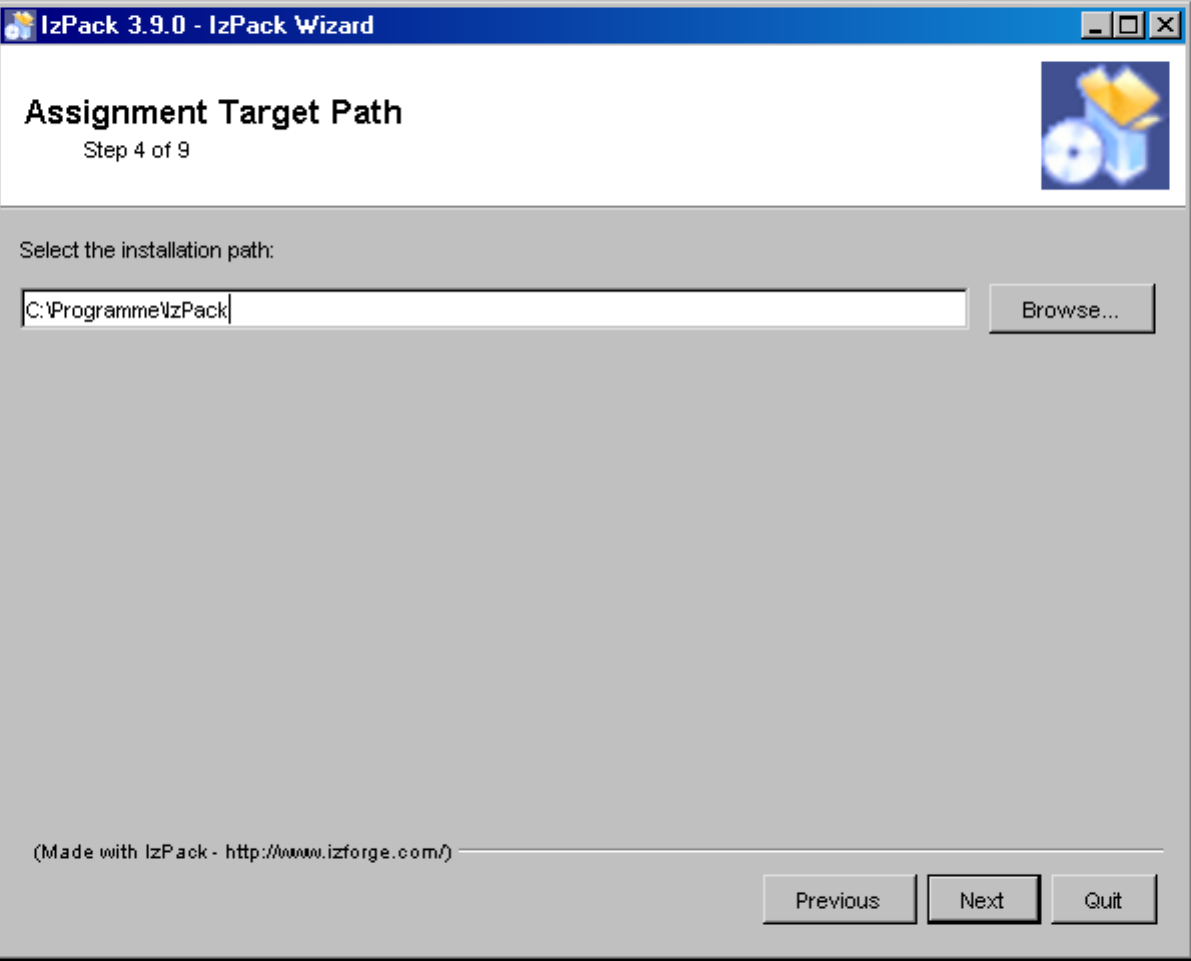
Figure 7: IzPack frame (TargetPanel) with heading panel and a text counter in the
heading panel with alternative frame title, no panel image.
Changed key/value pairs to create IzPack installation with heading, no button and
label icons and a panel progressbar counter in the navigation panel.
Key/value pairs for modifying IzPack GUI (references for panel images removed):
<guiprefs width="640" height="480" resizable="no">
66
<modifier key="useButtonIcons" value="no"/>
<modifier key="useLabelIcons" value="no"/>
<modifier key="layoutAnchor" value="NORTHWEST"/>
<modifier key="labelGap" value="2"/>
<modifier key="useHeadingPanel" value="yes"/>
<modifier key="headingLineCount" value="1"/>
<modifier key="headingFontSize" value="1.5"/>
<modifier key="headingBackgroundColor" value="0x00ffffff"/>
<modifier key="headingPanelCounter" value="progressbar"/>
<modifier key="headingPanelCounterPos" value="inNavigationPanel"/>
</guiprefs>
67
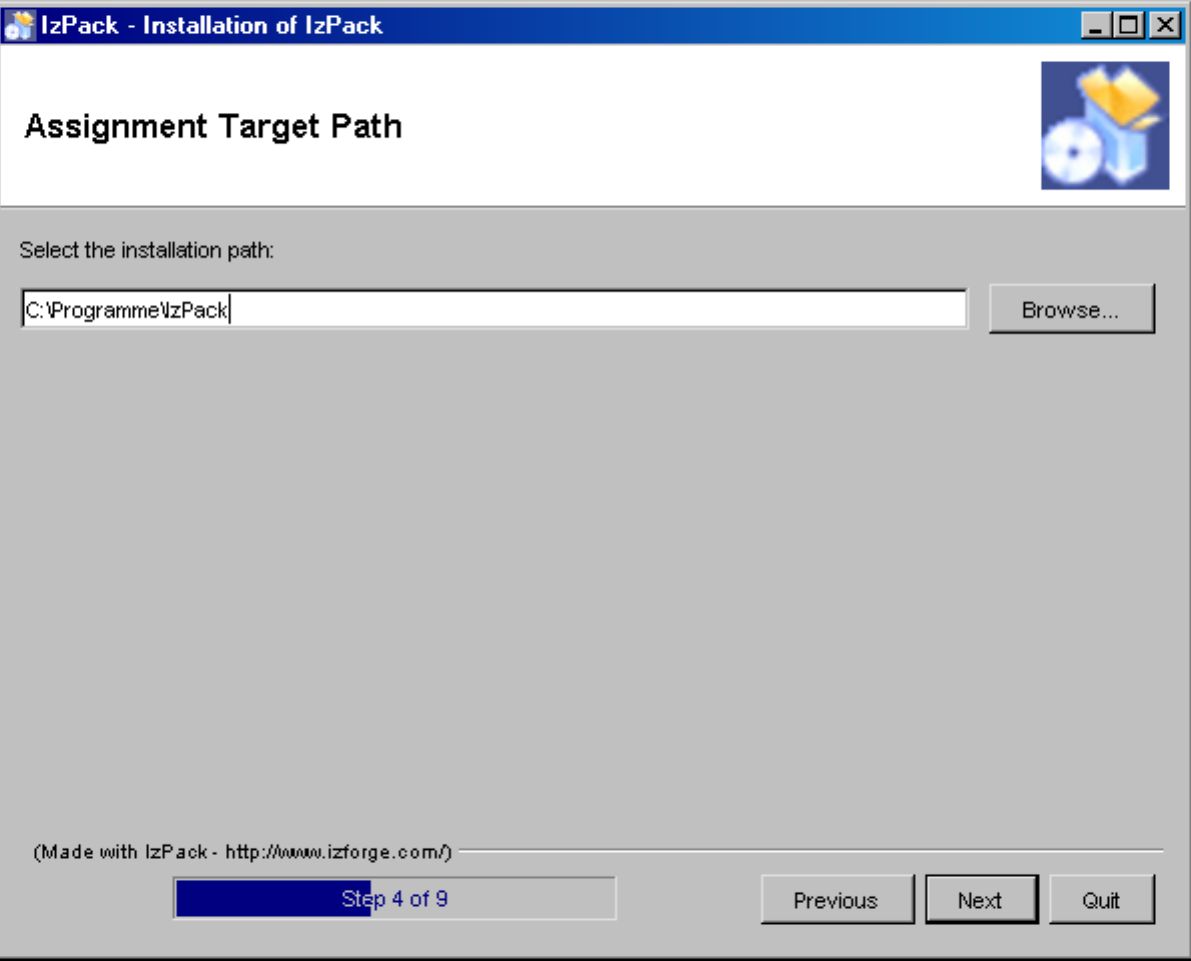
Figure 8: IzPack frame (TargetPanel) with heading panel and a progressbar counter in
the navigation panel without panel image.
Don’t show pack size in PacksPanel
The PacksPanel dialog supports the modifier doNotShowPackSizeColumn which
hides the third column showing the size of each pack. With doNotShowPackSizeColumn
set to true, the third column will not be shown. The required size of all packs is still
68

shown with this setting. The required size can be hidden by setting the doNotShowRequiredSize
to true.
Example :
<guiprefs width="640" height="480" resizable="no">
...
<modifier key="doNotShowPackSizeColumn" value="true"/>
<modifier key="doNotShowRequiredSize" value="yes"/>
...
</guiprefs>
The PacksPanel will not show the column with the sizes of each pack, but will show
the total required space.
Alternative Cancel Dialog
The cancel dialog will be shown if the cancel button or the close button of the frame
was pushed. In the standard dialog the title contains the question and the message
an affirmation. In other dialogs often the title is a common heading and the question
will be called in the dialog as message. The standard behavior will be modified if the
messages ’installer.quit.reversemessage’ and ’installer.quit.reversetitleare’ declared.
Add in ’<ISO3>.xml’ or ’CustomLangpack.xml_<ISO3>’
<langpack>
...
<str id="installer.quit.reversemessage" txt="Are you sure you want to cancel installation?"/>
<str id="installer.quit.reversetitle" txt="$APP_NAME $APP_VER"/>
...
</langpack>
Figure 9: Standard cancel dialog.
69

Figure 10: Alternative cancel dialog.
Logging the Installation
Logging was made as co-product at implementing other features. There
was no common design for it. Therefor there is no one way to made log-
ging of any kind else for each group a different logging stuff exist. Not
nice, but reality.
1. Debug Information
There is a rudimentary debug capability in IzPack. The class ’com.izforge.IzPack.util.Debug’
is used by some other classes to write debug information on ’stdout’. The
class can be used by custom panels or actions or other custom classes. To
activate it, add ’-DTRACE=TRUE’ in front of ’-jar’ of the installer call.
2. Summary of Panels
There is a summary panel which shows some information of previous
shown panels. The same contents can be written to a summary log file.
3. Logging of Installed File Set
The files which are installed are logged into the uninstaller jar file to be
used at uninstallation. The contents can be also duplicated into a logfile.
4. Logging of the Process Panel
The process panel logs information of each performed process in a scrol-
lable text area. The contents can be duplicated into a logfile where the
used directory can be selected (but not the logfile name).
5. Logging of Ant Actions
It is possible to perform ant actions with the ’AntActionInstallerListener’.
The grade of logging and the path of a logfile can by determined.
Web Installers
The web installers allow your users to download a small installer that does not contain
the files to install. These files will be downloaded from an HTTP server such as Apache
HTTPD. If you have many optional packs, this can save people’s resources. Its very
easy: people download a small Jar file containing the installer, they launch it and choose
70
their packages. Then the installer will get the required packages from individual Jar
files located on a server, only downloading those required. It’s that simple.
To create a web installer, add the ’<webdir>’ element to the <info> element. The
text must be a valid, fully qualified URL for a directory on the web server.
<info>
<appname>Super extractor</appname>
<appversion>2.1 beta 6</appversion>
<url>http://www.superextractor.com/</url>
<webdir>http://www.superextractor.com/download</url>
</info>
By default, the compiler will create a standard installer even if ’webdir’ is specified.
You can generate your web installer with the ’web’ option like this :
compile installer.xml -k web
It will generate a jar for each pack and an installer jar. For instance, the sample
installation will generate those 4 jars.
install.jar
install.pack-Base.jar
install.pack-Docs.jar
install.pack-Sources.jar
The pack jars must be copied in the webdir. The installer generated is configured
as a web installer and will download those packs if necessary.
When installing, if the user is behind a firewall, attempting download the jar files
may fail. If this happens, the user will be prompted to enter the name host name and
port of their firewall.
You may password protect the files using mechanisms provided by your web server,
IzPack will prompt for a password at install time, when required.
More Internationalization
Special resources
IzPack is available in several languages. However you might want to internationalize
some additional parts of your installer. In particular you might want this for the ’In-
foPanel’ and ’LicencePanel’. This is actually pretty easy to do. You just have to add
one resource per localization, suffixed with the ISO3 language code. At runtime these
panels will try to load a localized version.
For instance let’s suppose that we use a ’HtmlInfoPanel’. Suppose that we have it
in English, French and German. We want to have a French text for french users. Here
we add a resource pointing to the French text whose name is ’HtmlInfoPanel.info_fra’.
And that’s it! English and German users (or anywhere other than in France) will get the
default text (denoted by ’HtmlInfoPanel.info’) and the French users will get the French
version. Same thing for the other Licence and Info panels.
To sum up: add ’_<iso3 code>’ to the resource name for ’InfoPanel’, ’HtmlIn-
foPanel’, ’LicencePanel’ and ’HtmlLicencePanel’.
71
Packs
Thanks to Thorsten Kamann, it is possible to translate the packs names and descrip-
tions. To do that, you have to define a special identifier in the elements of the XML
installation file and add the related entries in the suitable langpacks. For instance if you
have the following XML snippet:
<pack name="core" id="core.package" ...>
<description/>
</pack>
then the related entries of the langpacks will look like this:
<str id="core.package" txt="Core Package"/>
<str id="core.package.description" txt="The core package provides
Validators for Packs
It’s possible to create custom java validators (as you may know from Panels). To do
that, add the validator element to your packs definition like this:
<pack name="foo" id="foo.package" ...>
<validator>my.Validatorclass</validator>
</pack>
Now you have to create and include a class implementing the ’PackValidator’ in-
terface:
package my;
import com.izforge.izpack.installer.InstallData;
import com.izforge.izpack.installer.PackValidator;
import com.izforge.izpack.util.AbstractUIHandler;
public class Validatorclass implements PackValidator {
public boolean validate(AbstractUIHandler handler,
InstallData idata, String packsId, boolean isSelected) {
[ your validation code here ]
return false; // returns to the pack selection without further notice
return true; // passes on to the next defined validator for this pack
}
}
Automatic privileges elevation on Windows
As an alternative to using the <run-privileged> element, a Java launcher
EXE with the name setup.exe or install.exe can be used (see http://msdn.
microsoft.com/en-us/library/bb530410.aspx).
Windows Vista has a feature called “installer detection”. When an EXE file name
contains one of the words install,setup or update, the operating system auto-
matically prompts the user for UAC privilege elevation when the program is started.
This automatic privilege elevation can be overridden using a manifest file for the EXE
and setting the requestedExecutionLevel in the manifest.
Under Windows XP, when the following conditions are met, the operating system prompts the user to run
the program with the administrator account:
72

∙the user is not part of the administrators group, and
∙the name of the EXE file is setup.exe or install.exe, and
∙the EXE is started via Windows Explorer, e.g. by double-clicking on the icon of
the EXE file.
Desktop Shortcuts
(by Elmar GROM and Marc EPPELMANN)
Defining Shortcuts
Introduction
On todays GUI oriented operating systems, users are used to launching applications,
view web sites, look at documentation and perform a variety of other tasks, by simply
clicking on an icon on the desktop or in a menu system located on the desktop. De-
pending on the operating system these icons have different names. In this context we
will refer to them collectively as shortcuts.
Apart from actually placing an application on the target system, users routinely
expect an installer to create the necessary shortcuts for the application as well. For you
as application developer, this means that for a professional appearance of your product
you should also consider creating shortcuts.
In contrast to the general specification of an IzPack installer, the specification of
shortcuts in IzPack requires a little more effort. In addition, some of the concepts are
a bit more complex and there are some operating system specific issues to observe.
Fortunately, you only need to worry about operating system specifics if you want to
deploy your application to multiple different operating systems. In any case, it will pay
off to spend some time to study this documentation and the example spec files before
you start to implement your own shortcuts.
At the time of writing this Chapter the current IzPack Version 3.7.0-M3 is only
capable to creating shortcuts on
1. Microsoft Windows, and
2. Unix and Unix-based operating systems (like Linux), which use the X11
GUI-System and ‘ FreeDesktop.org‘ based shortcut handling (such as KDE
and Gnome).
Other operating or GUI systems, such as MacOS X are not supported. However,
there is a special UI-variant that automatically pops up on unsupported systems. It
informs the user about the intended targets of your shortcuts and allows the user to
save this information to a text file. While this is not an elegant solution, at least it aids
the user in the manual creation of the shortcuts.
Note
There is no support from the IzPack project of this feature for Windows
95, Windows 98 and Windows ME. Please check the patches at http://jira.
codehaus.org/browse/IZPACK-58 if you need to support those platforms.
73
If you would like to review what an end user would see if the target operating sys-
tem is not supported, you can do the following. Simply place the tag <notSupported/>
in the spec file. This tag requires no attributes or other data. It must be placed under
<shortcuts>, just like the individual shortcut specifications. Be sure to remove this
tag before getting your application ready for shipment.
We expect other operating systems to be supported in the near future and as al-
ways, contributions are very welcome. At present someone is actively working on Mac
support.
What to Add to the Installer
There are some things that you have to add to your installer to enable shortcut creation.
Obviously you need to add the panel responsible for creating shortcuts. This panel is
aptly enough called ShortcutPanel. However, in order for the ShortcutPanel to work
properly a number of additional items are required. These must be added manually to
the installer, as all other resourcs, since the front-end will be rewritten. In this chapter
we will explain which of these items are required and for what reason.
First, we would like to discuss items that are supplied with IzPack and only need
to be added to the installer. After that, we move on to the things you have to pre-
pare yourself before you can add them. The way in which shortcuts are created varies
widely among operating systems. In some cases it is possible to do this with pure Java
code, while other systems -such as MS- Windows- require native code to accomplish
this task. On the other side, the current implementation, which creates shortcuts on
Unix based systems needs no native library at all, since it works with ’these’ pure Java
code. The native library required for the Windows operating systems are supplied with
IzPack is called ShellLink.dll. Note: They will not be automatically added to
your installer file. You need to list them yourself in the XML file for the installer. A
describtion how to do this follows in the next section.
Native libraries can be added to the installer by using the <native> tag. To
add the ShellLink.dll, you just have to add the following line to the installer
XML file: <native type="izpack" name="ShellLink.dll"/> For more
details about the use of the <native> tag see the chapter about the format of the XML
file.
You have also to add an extra specification file for each platform family to en-
able shortcut creation on these platforms. At least one (the default file) is required
by the shortcut panel. The format of all spec files is XML and they must be added
to the installer as a resource. The source name of this specification does not matter,
however its resource name (also called id or alias) when added to the installer must
be (prefix)+shortcutSpec.xml. At this release, there are only two prefixes
supported: “Win” for the Windows family and “Unix” for all Unixes. If the prefix is
ommited the shortcut panel searches for a named resource: “ shortcutSpec.xml“. This
is the default resource name. As the default resource name will be used on Windows
platforms, the "Win_shortcutSpec.xml" can be ommited. Hint: If the shortcut
panel does not find one of these named resources, it will never appears. So, do not use
different resource names and do not add a path to these.
ShortcutSpecs can be localized, see “Localizing shortcuts” below.
Example
<res src="C:\MyDocuments\Installer\default_shortcut_specification.xml"
74
id="shortcutSpec.xml"/>
<res src="C:\MyDocuments\Installer\unix_shortcut_specification.xml"
id="Unix_shortcutSpec.xml"/>
Why use different shortcut spec files?
1. The Target filenames are most different.(batch files on Windows vs. shell
scripts on Unix.)
2. The Icon file formats are different. ICOs on Windows-, PNGs on Unix-
platforms.
3. The Target locations can be different.
4. If your installer is localized, your users sure will expect their shortcuts
names and descriptions to be as well. Moreover, some paths can be differ-
ent when OS are localized (My Documents becomes Mes Documents
on Windows in french for example). See “Localizing shortcuts” below.
This is the simple reason.
Why Native Code to do the Job on Windows?
by Elmar
This little chapter is not strictly part of the documentation but i have been asked this
question sufficiently often that i think it’s worth explaining right here. It is certainly a
natural question to ask. After all IzPack is an application completely written in Java
and primarily targeted for the installation of Java based programs. So why wouldn’t
we try to keep everything pure Java and avoid the use of native code altogether? There
must be some personal preference of the developer hidden behind this approach you
might think. Well, not really, but i admit at first it seems quite feasible to write it all in
Java. On virtually any operating system or GUI surface around, Shortcuts are simply
files on the local file system. Files can be created and accessed directly from within
Java, so why should there be a need for using native code?
Well, it turns out that just creating a file is not good enough, it also needs to have
the right content. Shell Links as they are called in Windows land are binary files. i actu-
ally managed to find documentation on the format. Naturally this was hacker data, you
won’t get this sort of thing from Microsoft (by the way: thanks a lot to Jesse Hager for
a smash job!). Armed with this information i tried to create these files myself in Java.
The problem was that the documentation was not entirely accurate and had some gaps
as well. i tried for over a month to get this to work but finally i had to give up. Even
if i would have succeeded, it would have been a hack, since a shell link requires some
information that is impossible to obtain from within Java. Usually you can success-
fully create a shell link by only filling in the bare minimum information and then ask
Windows to resolve the link. Windows then repairs the shell link. Unfortunately this
was only the beginning, soon i encountered a host of other problems. For one thing, the
installer needs to know the correct directories for placing the links and it turns out they
are named differently in different countries. In addition, there are ways of manually
modifying them, which some people might actually have done. The only way to place
the shortcut files reliably is through accessing the Windows Registry. Naturally, this
operation also required native code. Same thing with asking Windows to resolve the
link... On the bottom line, at every step and turn you run into an issue where you just
75
need to use native code to do the trick. So i decided that i would do it the proper way
all the way through. That is in a nutshell the reason why i used native code to create
shortcuts on MS-Windows.
As i am writing this i am at work with a friend to replicate this work for the Mac
and it looks very much like we need to take the same approach there as well. On the
various Unix GUIs on the other hand, we are lucky that we can do the job without
native libraries.
The Shortcut Specification
As we say above, the specification for shortcuts is provided to the ShortcutPanel in the
XML fileformat. At the time of this writing (for IzPack version 3.7.0-M3) the front-end
will be rewritten. Until these work is in progress you have to write the specification files
manually. For your convenience, there are two annotated sample specification files in
the sample subdirectory of your IzPack installation. At the beginning you might want
to experiment with these files.
Both specification files have one root element called <shortcuts>. This root el-
ements recognizes 3 different child elements: <programGroup>,<skipIfNotSupported/>,
<defaultCurrentUser/> and <shortcut>.
<skipIfNotSupported/> can be used to avoid the panel to show the alter-
native UI which shows the shortcut information that would have been created on a
system that supports it. In other words, using this tag will make the panel be silent on
non-supported systems. The default is to show the alternative UI.
<defaultCurrentUser/> may be specified to make “current user” be the de-
fault selection on the panel. If not specified then “all users” will be the default selection
(if available).
The <programGroup> tag allows you to specify the name of the menu, or more
precise, the folder in which the shortcuts will be grouped. The exact location and
appearance of the program group depends on the specific target system on which the
application will be installed, however you can partially control it. Please note that
<programGroup> may only appear once in the specification. If more than one
instance occurs, only the first one will be used. This tag requires two attributes:
defaultName and location.defaultName specifies the name that the group
menu should have on the target system. You should be aware that the ShortcutPanel
will present this name to the user as a choice. The user can then edit this name or
select a group that already exists. As a result, there is no guarantee that the ac-
tual name of the program group on the target system is identical with your spec-
ification. location specifies where the group menu should show up. There are
two choices: applications and startMenu. If you use applications, then
the menu will be placed in the menu that is ordinarily used for application shortcuts.
applications is recommended for Unix shortcuts. If you use startMenu, the
group menu will be placed at the top most menu level available on the target system.
Depending on the target system, it might not be possible to honor this specification
exactly. In such cases, the ShortcutPanel will map the choice to the location that most
closely resembles your choice. Unix shortcuts do not need to support the startMenu,
because the applications menu is already on the highest level. This means this
has no affect on thess platform.
For each shortcut you want to create, you have to add one <shortcut> tag. Most
details about the shortcut are listed as attributes with this tag. The following sections
describe what each attribute does, which attributes are optional and which ones are
76
required and what the values are that are accepted for each of the attributes. Note that
all attributes that have a yes/no choice can also be omitted. Doing so has the same
effect as using a value of no. The shortcut attributes can be divided into two groups
∙attributes that describe properties of the shortcut
∙attributes that define the location(s) at which a copy of the shortcut should be
placed.
The following attributes are used to define location:
∙programGroup
∙desktop
∙applications
∙startMenu
∙startup
Shortcut Attributes
There are three classes of attributes. Some are required, most are completely optional
and some are semi-optional. The set of semi-optional attributes are all the attributes
used to define the location of a shortcut. These are semi- optional because for any
individual one it is your choice if you want to include it or not. However they are not
completely optional. You must specify at least one location. If all were omitted, the
instruction would essentially tell the panel that a copy of this shortcut is to be placed at
no location. In other words no copy is to be placed anywhere.
name - required
The value of this attribute defines the name that the shortcut will have. This is the
text that makes up the menu name if the shortcut is placed in a menu or the caption that
is displayed with the shortcut if it is placed on the desktop.
target - required
The value of this attribute points to the application that should be launched when the
shortcut is clicked. The value is translated through the variable substitutor. Therefore
variables such as $INSTALL_PATH can be used to describe the location. You should
be aware that the use of this tag is likely to change once other operating systems
are supported.
commandLine - optional
The value of this attribute will be passed to the application as command line. i
recommend to work without command line arguments, since these are not supported by
all operating systems. As a result, your applications will not be portable if they depend
on command line arguments. Instead, consider using system properties or configuration
files.
workingDirectory - optional
This attribute defines the working directory for the application at the time it is
launched. i would recommend some caution in relying on this too heavily if your ap-
plication should be portable, since this might not be supported by all operating systems.
At this time i don’t have enough information to make a definite statement one way or
the other. The value is translated through the variable substitutor. Therefore variables
such as $INSTALL_PATH can be used to describe the directory.
77
description - optional
The value of this attribute will be visible to the user when a brief description about
associated application is requested. The form of the request and the way in which
this description is displayed varies between operating systems. On MS-Windows the
description is shown as a tool tip when the mouse cursor hovers over the icon for a few
seconds. On some operating systems this feature might not be supported but i think it
is always a good idea to include a brief description.
iconFile - optional
The value of this attribute points to the file that holds the icon that should be dis-
played as a symbol for this shortcut. This value is also translated through the variable
substitutor and consequently can contain variables such as $INSTALL_PATH. If this
attribute is omitted, no icon will be specified for the shortcut. Usually this causes the
OS to display an OS supplied default icon. The use of this attribute is also likely to
change once other operating systems are supported. Read the Section about Icons
below, for more information.
iconIndex - optional
If the file type for the icon supports multiple icons in one file, then this attribute
may be used to specify the correct index for the icon. i would also advise against using
this feature, because of operating system incompatibilities in this area. In file formats
that do not support multiple icons, this values is ignored.
initialState - optional
There are four values accepted for this attribute: noShow,normal,maximized
and minimized. If the target operating system supports this feature, then this value
will have the appropriate influence on the initial window state of the application. noShow
is particularly useful when launch scripts are used that cause a command window to
open, because the command window will not be visible with this option. For instance
on MS- Windows starting a batch file that launches a Java application has the less than
pretty side effect that two windows show: the DOS command prompt and the Java
application window. Even if the shortcut is configured to show minimized, there are
buttons for both windows in the task bar. Using noShow will completely eliminate
this effect, only the Java application window will be visible. On Unix use normal ,
because this is not supported.
programGroup - semi-optional
The value for this attribute can be either yes or no. Any other value will be inter-
preted as no. If the value is yes, then a copy of this shortcut will be placed in the group
menu. On Unix (KDE) this will always be placed on the top level.
desktop - semi-optional
For this attribute the value should also be yes or no. If the value is yes, then a copy
of the shortcut is placed on the desktop. On Unix the shortcuts will only be placed on
the (KDE-) desktop of the user, who currently runs the installer. For Gnome the user
can simply copy the *.desktop files from /Desktop to /gnome-desktop. (This is
already a TODO for the Unix- shortcut implementation.)
applications - semi-optional
This is also a yes/no attribute. If the value is yes, then a copy of the shortcut is
placed in the applications menu (if the target operating system supports this). This is
the same location as the applications choice for the program group. This makes no
sense on Unix.
startMenu - semi-optional
This is a yes/no attribute as well. If the value is yes, then a copy of the shortcut is
placed directly in the top most menu that is available for placing application shortcuts.
78
This is not supported on Unix. see above.
startup - semi-optional
This is also a yes/no attribute. If the value is yes, then a copy of the shortcut is
placed in a location where all applications get automatically started at OS launch time,
if this is available on the target OS. This is also not supported on Unix.
Unix specific shortcut attributes
This extension was programmed by MARC EPPELMANN. This is still in development
and may be changed in one of the next releases of IzPack.
type - required
This must be one of Application or Link
∙Application: To start any application, native, Java or shell-script based, the type
has to be Application. The GUI-System will launch this Application, so
as is, thru their native shell or application launcher. In this case, note that the
right workingDirectory is always important on Unix platforms. If the users
PATH environment variable does not contain the path, where the application is
located, this can never be run, until the workingDirectory does not contain
these path. The needed current path: “.”, this is the case on most systems, should
be in the users PATH environment variable. Consult the Unix manuals for more
details.
∙Link: If you want to open a URL in the users default Webbrowser, you have to
set the type to Link. Note: The url attribute must be set to work properly.
∙Other: There are more supported types on KDE, like FSDevice, but these types
makes no sense for IzPack, in my opinion.
Without the type the Unix shortcut does not work.
url - semi-optional
If you want to create a shortcut as type Link, then you have to set the url attribute.
The value can be a locally installed html or another document, with a known MIME
type, like plain text, or a WWW Url i.e. ’http://izpack.org/’.
A local document can be referenced by i.e. “$INSTALL_PATH/doc/index.html”.
The IzPack variable substitution system is supported by the url.
encoding - required
This should always set to UTF-8.
terminal - optional
If you want, the user can see the console output of a program (in Java applications
“System.outs”), set the terminal attribute to true.
KdeSubstUID - optional
This is the sudo option for a shortcut. If set to true you will be asked for the
password of the following KdeUsername.
KdeUsername - optional
This sould be the user, with the right permission. This is root in most cases.
createForAll - optional
If an user with administrative rights, such as root, performs the installation this flag
allows to determine, if the shortcut should be appear to the other users or only for root.
Categories - optional
79
This is the category where to put in the Desktop Application Menu. Here are some
Sample Categories and their apps examine the desktop files in /usr/share/applications
... Categories=“Application;Network;WebDevelopment;” - Nvu, Categories=“Qt;Development;GUIDesigner;”
- QtDesigner3, Categories=“Application;System;” - VMwareServer-console, Cat-
egories=“Network;WebBrowser;” - Opera, Categories=“Development;Debugger;”
- DDD debugger, Categories=“Development;IDE;” - Eclipse IDE, Categories=“SystemSetup;X-
SuSE-Core-System;” - Yast2, Categories=“System;Archiving;” - Sesam archiv-
ing, Categories=“System;Database;” - MySQL Administrator,
TryExec - optional
TryExec=“aTryExecCommand” will passes raw thru and tries to execute the com-
mand.
Selective Creation of Shortcuts
Usually all shortcuts that are listed will be created when the user clicks the ’Next’
button. However it is possible to control to some degree if specific shortcuts should
be created or not. This is based on install conditions. By including one or more
<createForPack name=’’a pack name’’ /> tags in the specification for a
shortcut, you can direct the ShortcutPanel to create the shortcut only if any of the listed
packs are actually installed. The ’name’ attribute is used to define the name of one of
the packs for which the shortcut should be created. You do not need to list all packs if
a shortcut should always be created. In this case simply omit this tag altogether.
A word of caution
For any shortcut that is always created, i would recommend to omit this tag, since i
have seen a number of problems related to changing pack names. You can save yourself
some troubleshooting and some Aspirin by not using this feature if it’s not required.
On the other hand if you need it i would advise to be very careful about changing pack
names.
Localizing shortcuts
The izPack installer allows localization of your installer. Obviously, you will want your
shortcuts labels to be localized, too. Thus, you can provide shortcutSpec files for each
language you support.
This works just like localizing other specs for other panels : add an underscore and
the iso3 language code to the end of the resource name, and set the source name to the
appropriate localized spec file. As for the platforms, if a specific spec file is not de-
clared for the current language, the installer will revert to the default shortcutSpec.xml
resource. This way, you can for example have a resource shortcutSpec.xml_fra
for french installs and have the default resource shortcutSpec.xml (maybe con-
taining strings in english) be used for other languages.
The platform prefix and language suffix are combined like in this example : Unix_shortcutSpec.xml_fra.
When the installer can’t find such a platform-and-language-specific resource, it will
fallback to a suitable default using the following search order : shortcutSpec.xml_<iso3>
(default platform, language-specific) <platform>_shortcutSpec.xml (default
language, platform-specific) shortcutSpec.xml (default platform and language)
Reminder: If the shortcut panel does not find one of these named resources, it will
never appear. So, do not use different resource names and do not add a path to these.
Example
80
<res src="C:\MyDocuments\Installer\default_shortcut_specification.xml"
id="shortcutSpec.xml"/>
<res src="C:\MyDocuments\Installer\default_shortcut_specification_fr.xml"
id="shortcutSpec.xml_fra"/>
<res src="C:\MyDocuments\Installer\unix_shortcut_specification_en.xml"
id="Unix_shortcutSpec.xml"/>
<res src="C:\MyDocuments\Installer\unix_shortcut_specification_fr.xml"
id="Unix_shortcutSpec.xml_fra"/>
DesktopShortcutCheckboxEnabled Builtin Variable
$DesktopShortcutCheckboxEnabled : When set to true, it automatically checks
the “Create Desktop Shortcuts” button. To see how to use it, go to The Variables Ele-
ment “<variables>‘
Be careful this variable is case sensitve !
ApplicationShortcutPath Builtin Variable
$ApplicationShortcutPath : To define the path for the application shortcuts,
absolute or relative to the $$INSTALL_PATH. If undefined, the application shortcuts
will be directly written in the $$INSTALL_PATH.
From Version 4.1.1 the xdg-desktop-icon commandline tool will be used to
copy this application shortcuts to your, or all users desktop.
Summary
Native Libraries
∙ShellLink.dll - required by Microsoft Windows
∙’Nothing’ - for KDE/Gnome shortcuts
Names of the Specification Files shortcutSpec.xml for Windows and as de-
fault. Unix_shortcutSpec.xml for Unix.
Specification File Layout - Windows
<shortcuts>
<skipIfNotSupported/>
<programGroup defaultName="MyOrganization\MyApplication"
location="applications||startMenu"/>
<shortcut
name="Start MyApplication"
target="$INSTALL_PATH\Path\to\MyApplication\launcher.bat"
commandLine=""
workingDirectory="$INSTALL_PATH\Path\to\MyApplication"
description="This starts MyApplication"
iconFile="$INSTALL_PATH\Path\to\MyApplication\Icons\start.ico"
iconIndex="0"
initialState="noShow||normal||maximized||minimized"
programGroup="yes||no"
81
desktop="yes||no"
applications="yes||no"
startMenu="yes||no"
startup="yes||no">
<createForPack name="MyApplication Binaries"/>
<createForPack name="MyApplication Batchfiles"/>
</shortcut>
</shortcuts>
A sample Specification File for Unix is at the end of this chapter
Shortcut Tips
I wrote this section to provide additional information about issues surrounding the cre-
ation of shortcuts. Reading this section is not necessary to successfully create shortcuts,
but it might help you creating an installation that works more smoothly. In addition,
it might give you some knowledge about operating systems that you don’t know so
well. In fact most of the issues described in this section are focused on differences in
operating system specifics.
The Desktop
You should recognize that the desktop is precious real estate for many people. They
like to keep it uncluttered and keep only the things there that they use on a regular
basis. This is not true for everybody and you might personally think different about
this. Still, the fact remains that a lot of people might have different feelings about it, so
you should not automatically assume that it is ok to place all of your shortcuts on the
desktop proper. While your application is certainly one of the most important things
for you, for your customers it is probably one of many applications they use and maybe
not even the most important one. Accordingly, placing more shortcut icons there than
they feel they will use on a regular basis and especially doing this without asking for
permission might trigger some bad temper.
Annotation: But even the experienced user should be able to organize their Desk-
top. On Linux the users desktop is the only place, which supports any kind of shortcuts.
It is common practice to create a program group in the application menu system of
the OS and place all shortcuts that go with an application in that program group. In ad-
dition, only one shortcut to the key access point of the application is placed directly on
the desktop. Many installers first ask for permission to do so, as does the ShortcutPanel
in IzPack.
I would like to recommend that you always create a shortcut in the menu system,
even if your application has only one access point and you are placing this on the
desktop. Note that shortcuts can also be placed directly in the menu, they don’t need to
be in a program group. There are two reasons for doing so.
∙If the user elects not to create shortcuts on the desktop, they will end up with no
access point to your application
∙Even if this works fine, occasionally people ’clean up’ their desktop. They might
later find that they accidentally deleted the only access point to your application.
For the less technology savvy users, recreating the shortcut might be a rough
experience.
82
Icons
Icons are supplied in image files, usually in some kind of bitmap format. Unfortunately
there is no format that is universally recognized by all operating systems. If you would
like to create shortcuts on a variety of operating systems that use your own icons, you
must supply each icon in a number of different formats. This chapter discusses icon
file formats used on various operating systems. Fortunately there are good programs
available that allow you to convert between these formats, so that creating the different
files is not much of a problem once the icons themselves are created.
Microsoft Windows
Windows prefers to use its native icon file format. Files of this type usually use the
extension .ico. These so called ICO files can hold multiple icons in one file, which can
be useful if the same icon is to be provided in a number of sizes and color-depths.
Windows itself selects the icon with the most matching dimensions and displays
it. While the Start menu displays the icon with 16x16 pixel if available, the desktop
displays the 32x32 pixel resolution of the same ICO if this is in.
In other words, a ICO file has embedded one or more dimensions of the same Icon.
We recommend to play with microangelo.
Dlls and Exe files on the other side, can store, amongst other things, a collection of
different Icons. You can select your desired Icon by its index. The lowest index is 0.
Use the iconIndex attribute in the spec file to specify this index.
As a sample look into
%SystemRoot%\system32\shell32.dll
These contains a lot of Windows own icons. You can use the PE Explorer or another
Resource Editor to extract or modify Icons in dlls or exe files. But be warned. You can
also destroy a working application with these kind of tools.
At least Windows also supports the use of bitmap files in the .bmp format as icons.
Note that this format does not support multiple icons.
We might have overlooked other file formats that are supported by Windows. How-
ever, we suggest to test other formats for compatibility as they might not work all the
way back to Windows 95 or on the NT/non-NT strain. Sticking with one of these two
formats should keep you out of trouble.
Apple
Apple Macintosh systems use the Macintosh PICT format, extension .pct. If you
are working with an apple system you know a whole lot more about this format than i
do. If you don’t but would like to be able to install your application on a Mac, simply
start with any bitmap format that you feel comfortable to work with. Then find an
application that is capable of converting this format into a .pct file. i like to use Paint
Shop Pro (PC based), because it provides conversion capabilities among several dozen
different file formats.
UNIX flavors
by Marc Eppelmann
As my knowledge, all X based Unix Window systems supports the (ASCII-) XBM
(X-Bitmap ) and the better XPM (X-PixMap) format. The modern GUI systems like
KDE and Gnome can display additionally a lot of other ImageIcon formats, such as
GIF, JPG, and PNG.
i suggest to use PNG, because this can lossless compress like the GIF format, how-
ever this format is absolutely free. And not least, this can store true transparency infor-
mations (It has an alpha channel).
83
Targets
So, you thought you could escape the ugly mess of operating system dependencies at
least with the way how your Java application is started? Sorry but i have just another
bad message. The one positive thing is that here you have a way of escaping, even
if doing so has a few less pretty side effects. At first, i would like to discuss various
launching options you have available on different operating systems. At the end of the
chapter i write about a way to make launching your application OS independent.
Microsoft Windows
On Microsoft Windows you have a variety of options for launching your applica-
tion. Probably the most simple case is directly starting the Java VM from the command
line and typing out all parameters, such as class path, the class name etc. In principle,
this can be placed right in a shortcut and should work.
A little more elegant solution is to place this in a batch file and have the shortcut
point to this batch file. This will also make it more likely that users can repair or
recreate shortcuts. Recreating shortcuts with sophisticated command lines is practically
impossible.
Another method is less commonly used but just as possible. Implement a native
executable that launches the VM with your Java application. The VM comes as DLL
and is used by java.exe in just the same way. As a sample look at the exlipse.exe
provided by the Eclipse-IDE
Clearly, even though the first option is a bit ugly and has some restrictionss, it is
the most portable solution among the three.
Apple
We hope, there is a IzPack developer currently researching for the details for the
Mac environment. We expect an updated chapter in one of the next releases.
UNIX
UNIX provides essentially the same options as Windows. You can simply use the
command line option, you can write a shell script and you can write a native launcher.
Naturally this stuff is in no way compatible with the equivalent Windows implementa-
tions. The native option is even more problematic in this environment, since the code
can not even be moved from one UNIX platform to another, without recompilation.
OS Independent Launching
So, after all this rather discouraging news, there is actually a portable way to launch
Java applications? You bet! although i have to admit that it is not necessarily the most
pretty way of doing things.
This approach is currently used by IzPack. Package your application in a .jar
file if you don’t already do so and make it executable by including the necessary
metaINF/MANIFEST.MF information file. i am not going into all the details on how
exactly to do this, the Java documentation will have to do. You might have noticed that
even though the instructions to install IzPack say to type :
java -jar IzPack-install.jar
You can just as well double click on IzPack-install.jar and it will start up. This
procedure will work on all GUI based Java supported operating systems -though you
might have to replace double clicking with dropping the file on the VM. In just the
same way, you can make the .jar file itself the target of a shortcut. Note: This works
only, if jars are registered as files, which have to launch by the installed JRE (with:
javaw.exe -jar)
84
The one restriction with this approach is that a .jar file can only have one main
file. So, if you have multiple targets, they need to be packaged each into a different
.jar file. They can be in one .jar file but then you have to start them explicitly, which
gets you back to the problems that i mentioned before. This brings me to the ugly
part. If you have just one target, then you are all set. If you have multiple targets, you
need to create a .jar file for each of them. In addition, you have a much harder time
setting the classpath, because each of the .jar files that contain supporting code must be
listed. In fact, at present there is no way of setting this during the installation, because
IzPack does not yet (version 3.0) support the setting and modification of environment
variables.
Command Line
Before i start to write a lot about the use of command line arguments let me state this:
If you can avoid using them, do it! Not that there is anything wrong with command
line arguments as such. The issue is simply that if you want your application to be
usable cross platform (the big Java promise) you should shy away from using command
line arguments. The problem here is that not all operating systems actually support
command line arguments. To be more precise, to my knowledge only Apple operating
systems do not support command line parameters. If you don’t care for running your
application on a Mac, then you might not worry about his at all. If you are interested
to support the Mac as well, read on.
In fact the Mac lower than MacOSX supports command line parameters in a way.
More to the point, it supports a single parameter that your application should interpret
as the name of a data file to open. You have no way of supplying this to your application
through the command line attribute. The operating system generates this when the user
drops the file on your application and then passes it as command line argument. That’s
it. This same behavior will probably fly well on pretty much any system and should
therefore be an ok implementation.
So what to do if you want to modify program behavior based on runtime switches?
For one thing, you could set system properties accordingly. The disadvantage here
is the same as with the command line parameters: the way of setting these might vary
between operating systems. The best way seems to be using a property file that contains
the configuration data.
Trouble Shooting
by Elmar
It has been some time since i wrote this chapter during which a good number of
users had a chance to gather experience. Unfortunately i never know how many have
used it successfully without much difficulty. i only hear from those that have encoun-
tered one problem or another. The type of problems that i have seen prompted me to
write this section, because i think it will help you in locating most problems that you
might encounter or at least give you some idea where the problem might be located.
Problems You Can Solve
If you see an exception that essentially says that a library can not be loaded (Shel-
lLink.dll) you have an easy problem to deal with. Your installer file is probably missing
85
the native tag that adds the Windows dll to the installer or something with this tag is no
quite right. Read ’What to Add to the Installer’ for all details on this topic.
Most other problems cause the ShortcutPanel not to show at all during the instal-
lation process. The reason is simply that the ShortcutPanel skips if it does not know
what to do or if it has nothing to do (no point showing then and confusing the user).
The problem is that this is not always what you intended. The most simple but not
so uncommon case is, that the ShortcutPanel cannot find their spec file. This can be
caused by a number of reasons. The associated resource tag might be missing in the
installer specification file, the target file name might be misspelled (the name you spec-
ify for the id attribute) or the target file name has a path or package name pre-pended.
You have only to use shortcutSpec.xml or Unix_shortcutSpec.xml and
nothing else, just as described in ’What to Add to the Installer’. You can always verify
if this part is ok by inspecting the content of the installer .jar file. The file shortcut-
Spec.xml should be located in the directory res. This inspection can be performed
with any zip tool. If the file is not there, first correct this before proceeding.
If the file is there and the panel does not appear, you have a problem within the
specification file. In most cases that i have seen, it comes down to a spelling mistake
of an attribute or tag name. You just have to carefully make sure that everything is
spelled correctly. Don’t forget that all names are case sensitive! In a few cases it is also
happend, that required or semi- optional attributes are omitted, so you might want to
verify if all attributes that you need are actually supplied.
If everything is correct up to this point the problem becomes more elusive. Most
likely the panel will not be displayed, because it is instructed not to show. There are
be several reasons for this. The simple case is that no location has been specified for
the shortcuts in your installation. This can happen if all five location attributes are
omitted or if all the ones that are listed are set to no. Remember, you have to specify
at least one location for every shortcut. If this is also correct, you might have used
the <createForPack> tag. Review the details in ’Selective Creation of Shortcuts’.
One possibility for the panel not to show is that based on the packs that are currently
selected for installation no shortcut qualifies for creation. In this case the panel will
not show, this is perfectly normal behavior. More likely this condition is true because
of some accident and not because it’s intended. Make sure the packs that you list
for the shortcut are actually defined in your installation and verify that they are all
spelled correctly. Remember: case matters! Did the ShortcutPanel use to work in your
installation and all of a sudden stopped working? Very likely you are dealing with the
last problem. A package name might have been modified and the shortcut spec was not
adjusted to stay in sync.
Problems That Have No Solution (yet)
Unfortunately one problem has been very persistent and only recently one user found
the reason. The problem occurs when installing on some target systems where non-
English characters are used in the storage path for the shortcuts. The problem is that
these characters don’t seem to be properly translated across the Java Native Interface.
This leads to a situation where the proper path can not be located and the shortcut
creation fails. i write ’some target systems’ because it does not fail everywhere. After
much agonizing over this problem, one user found the solution: The shortcut creation
works fine if a Sun virtual machine is installed, but fails if a version from IBM happens
to be installed. So far i have no solution for this problem but i am trying to find a
workaround the problem.
86
A sample shortcut specification file for Unix
<?xml version="1.0" encoding="UTF-8" standalone="yes" ?>
<shortcuts>
<programGroup defaultName="IzForge/IzPack"
location="applications"/>
<!-- Disabled since there is no Frontend
shortcut
name="IzPack"
programGroup="yes"
desktop="yes"
applications="no"
startMenu="yes"
startup="no"
target="$INSTALL_PATH/bin/izpack-fe.sh"
commandLine=""
workingDirectory="$INSTALL_PATH/bin"
description="Front-End for IzPack installation tool"
iconFile="$INSTALL_PATH/bin/icons/izpack.png"
iconIndex="0"
type="Application"
encoding="UTF-8"
terminal="true"
KdeSubstUID="false"
initialState="normal">
<createForPack name="Core"/>
</shortcut -->
<shortcut
name="IzPack Documentation"
programGroup="yes"
desktop="yes"
applications="no"
startMenu="yes"
startup="no"
target="konqueror"
workingDirectory=""
commandLine=""
initialState="noShow"
iconFile="help"
iconIndex="0"
url="$INSTALL_PATH/doc/izpack/html/izpack-doc.html"
type="Link"
encoding="UTF-8"
description="IzPack user documentation (html format)">
87
<createForPack name="Documentation-html"/>
</shortcut>
<shortcut
name="Documentation"
programGroup="yes"
desktop="yes"
applications="no"
startMenu="yes"
startup="no"
target="acroread"
workingDirectory=""
commandLine="$INSTALL_PATH/doc/izpack/pdf/izpack-doc.pdf"
initialState="noShow"
iconFile="acroread"
iconIndex="0"
url="$INSTALL_PATH/doc/izpack/pdf/izpack-doc.pdf"
type="Application"
encoding="UTF-8"
description="IzPack user documentation (PDF format)">
<createForPack name="Documentation-PDF"/>
</shortcut>
<shortcut
name="Uninstaller"
programGroup="yes"
desktop="yes"
applications="no"
startMenu="no"
startup="no"
target="/usr/lib/java/bin/java"
commandLine="-jar
"$INSTALL_PATH/Uninstaller/uninstaller.jar""
initialState="noShow"
iconFile="trashcan_full"
iconIndex="0"
workingDirectory=""
type="Application"
encoding="UTF-8"
description="IzPack uninstaller">
<createForPack name="Core" />
</shortcut>
</shortcuts>
88
Creating Your Own Panels
In IzPack all of the actual work of installing an application is done in panels. The Iz-
Pack framework is primarily there to support the operation of the panels and to manage
the navigation through the installation process. This enables a user to decide which
operations are carried out during an installation and the order in which they are carried
out, simply by listing the appropriate panels in the desired order.
As far as extending the functionality of IzPack is concerned, the result of this design
is that new functionality can be integrated by adding new panels to the framework and
then listing them in the install spec. Because the existing panels all have a visible GUI
and because the term panel hints at something visible, it is not obvious that a panel
does not have to contain any visible GUI to function in this framework. There are more
details on this subject later on in this chapter.
How to get started
To get started with writing your own panels, it is best to place all the IzPack code into
a separate working directory, from where you can compile it. Then try to compile the
code as is and get that to work.
The next step would be to have a look at another panel implementation, so you can
see how things are done. Make sure you look at the less complicated panels, as the
panels with advanced features will only be confusing. All the code for building UI and
such, only detracts from the essentials of what a panel needs to do. This means that
you shouldn’t start with “ UserInputPanel“ or ShortcutPanel.HelloPanel is
probably a much better choice at this stage. The source code for panels is located at:
/src/lib/com/izforge/izpack/panels.
You will find that all panels are derived from IzPanel; do the same thing with
your new panel. Please note that the IzPanel class itself is located in the “ com.izforge.izpack.installer“
package but your panels need to belong to com.izforge.izpack.panels. Per-
haps you can just copy the code of a panel, remove all the functional stuff and then
start filling in your own code. Start with something very simple to begin with, just to
see how it works. The implementation is really quite straight forward.
Next Steps
Once you have a successful compilation, you must place the compiled result of your
panel code at a special place, so that the installer compiler can fetch it when building
an installer that uses your panel. Go to: /bin/panels
You will see that there is a subdirectory for each panel. Make a subdirectory for
your new panel with the exact same name as your panel and place your compiled panel
code there.
Once this is accomplished, you are ready to use your panel in an installer. Just
list it in the spec file like any other panel, compile and in theory it will show up when
running the installer. Once you made it this far, you can dig deeper and get going with
your specific needs.
Oh, and one other thing: If you think the your code might be useful for a larger
audience, please think about a contribution to IzPack.
89
Access to the Variable Substitution System
One thing many developers ask about is how to get access to the variable substitution
system. This is not surprising, because customizing an installation for a particular tar-
get environment is one of the most important functions of an installer and the variable
substitution system plays a big part in this operation.
You can get access to the variable substitution system through the protected vari-
able idata in IzPanel. This variable is of the type InstallData, which is in
turn subclassed from AutomatedInstallData. The Javadoc documentation will
give you more details on these classes. Of particular interest in this context are the
methods “ getVariable()“, setVariable() and getVariableValueMap() in
AutomatedInstallData.
Controlling Flow
Some of the interesting methods in com.izforge.izpack.InstallerFrame
that you might want to explore are lockPrevButton() and lockNextButton().
They allow you to block the use of the button to move back to the previous panel and
the button that moves to the next panel respectively. Being able to control the avail-
ability of these buttons to the user is important if one of your panels performs a task
where the effects cannot be undone. If the user would navigate back to the previous
panel your installation might get into an unknown or even unstable state. On the other
hand, if the operations in one panel vitally depend that a task in the previous panel is
completed, then you should block the use of the next button until that task is completed.
Reading XML
If you need configuration files for your panel you would want to use XML for that
purpose. To read XML files you should use NanoXML, as it is guaranteed to be avail-
able at installation time. In fact, all of the IzPack infrastructure uses NanoXML to read
XML files. First you should read the NanoXML documentation. The documentation is
included as PDF file with the IzPack distribution, have a look in /doc/nanoxml. In
addition to that, the Javadoc-generated class documentation is an excellent resource to
get help on NanoXML. And then, there is always the code of other panels to see prac-
tical examples. Generally, it is a much simpler matter to use NanoXML then to use the
DOM included with the Java distribution, so don’t hesitate to explore NanoXML.
Supporting Classes
If your panel requires any supporting classes that are part of the panels package, then
you must place the .class files into the same directory with your panel .class file.
It is also possible to have supporting classes that are not part of the panels package.
In fact, these classes don’t even have to be in the com.izpack... tree. You simply
have to ensure that the .class files are located in the proper directory structure inside
/lib/installer.jar. If this is done, they will be available at install time. For
your first experiments you can simply compile your classes and add them to the .jar file
using the jar tool or a zip utility. However, ultimately it is much easier to use Ant and
the IzPack build script to accomplish this task.
90
Panels that are not visible
If you have a task that needs to be performed at a particular step in the installation pro-
cess, but that does not need any user interaction, you can implement a panel that is not
visible. To implement this, you should first familiarize yourself with the Javadoc doc-
umentation of com.izforge.izpack.InstallerFrame. In your panel code
you get access to the right instance of InstallerFrame through the protected vari-
able parent in IzFrame.
To begin with, do not configure any UI. In other words, do not set a layout and do
not place any GUI elements on your panel. In this context the method skipPanel()
is what gets the job done. In your panelActivate() method you simply perform
your task and then call parent.skipPanel(). This gets the job done without the
user being aware that there was another panel in the flow.
A word about building IzPack
If you don’t already use Jakarta Ant to support your development work, i highly rec-
ommend you have a look at it. It is a great help in organizing practically all routine
tasks connected with building and packaging your application. For example, build-
ing and getting IzPack ready for distribution is not a straight forward process but
with Ant this all comes down to starting a single command. In addition, IzPack pro-
vides its own Ant task, which supports the integration of building a complete installer
into your regular build scripts. You can find more details about this in the chap-
ter about advanced features. To get a look at Ant you can visit the following link:
http://ant.apache.org/index.html.
You can find the Ant build script for IzPack itself at: /src/build.xml
91
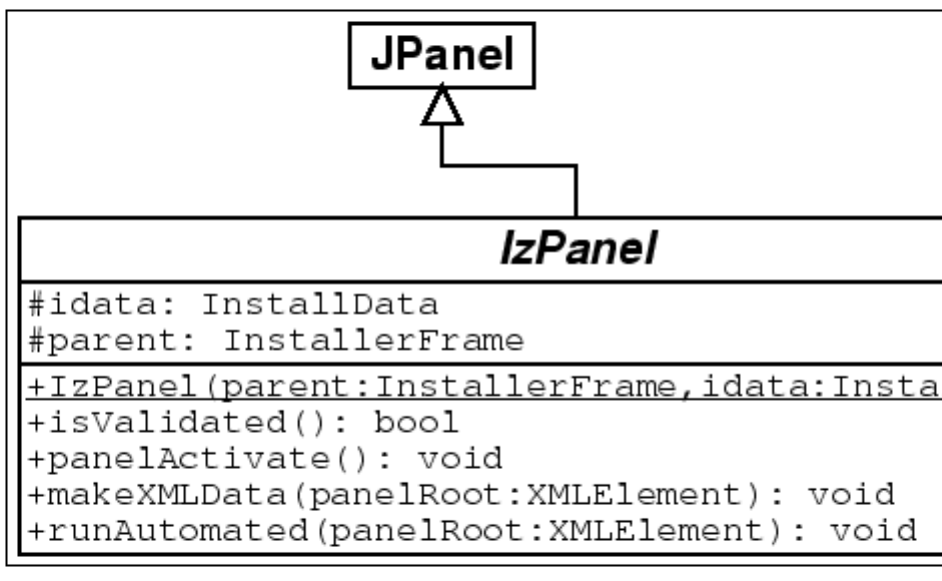
The IzPanel Class
The two data members are : the install data (refer to the InstallData Javadoc
reference) and a reference to the parent installer frame.
The methods have the following functionality :
∙(constructor) : called just after the language selection dialog. All the panels are
constructed at this time and then the installer is shown. So be aware of the fact
that the installer window is not yet visible when the panel is created. If you need
to do some work when the window is created, it is in most cases better do it in
panelActivate.
∙isValidated returns true if the user is allowed to go a step further in the in-
stallation process. Returning false will lock it. For instance the LicencePanel
returns true only if the user has agreed with the license agreement. The default
is to return true.
∙panelActivate is called when the panel becomes active. This is the best
place for most initialization tasks. The default is to do nothing.
∙makeXMLData is called to build the automated installer data. The default is to
do nothing. panelRoot refers to the node in the XML tree where you can save
your data. Each panel is given a node. You can organize it as you want with the
markups you want starting from panelRoot. It’s that simple.
∙runAutomated is called by an automated-mode installation. Each panel is
called and can do its job by picking the data collected during a previous installa-
tion as saved in “ panelRoot“ by makeXMLData.
92
∙setInitialFocus with this method it is possible to set a hint which compo-
nent should be get the focus at activation of the panel. It is only a hint. Not all
components are supported. For more information see java.awt.Component.requestFocusInWindow
or java.awt.Component.requestFocus if the VM version is less than 1.4.
∙getInitialFocus returns the component which should be get the focos at
activation of the panel. If no component was set, null returns.
∙getSummaryBody this method will be called from the SummaryPanel to get
the summary of this class which should be placed in the SummaryPanel. The
returned text should not contain a caption of this item. The caption will be re-
quested from the method getCaption. If null returns, no summary for this panel
will be enerated. Default behaviour is to return null.
∙getSummaryCaption this method will be called from the SummaryPanel
to get the caption for this class which should be placed in the SummaryPanel.
Default behaviour is to return the string given by langpack for the key Class-
Name.summaryCaption.
Additionally, there are some helper methods to simplify grid bag layout handling
and creation of some common used components.
The Internationalization of custom panels
A common way to define language dependant messages for custom panels is to add
entries into the common langpacks which are stored in the directory
[IzPackRoot]/bin/langpacks/installer
New with version 3.8 is the possibility to define a resource for custom langpacks.
Define e.g.
<resources>
...
<res id="CustomLangpack.xml_deu"
src="myConfigSubPath/CustomLangpack_deu.xml"/>
...
</resources>
in the install.xml file.The id should be written as shown, the file sub path and name
can be other than in the example. This file should be using the same DTD as the
common langpack. For each language a separate file with the ISO3 extension in the id
should be used.
User Input
(by Elmar GROM)
Most of the panels that come with IzPack take user input in some form. In some
panels this is through a simple user acknowledgment in others the user can enter text or
select a directory through a file open dialog. In all of those cases the user input is used
for the specific purpose needed by the panel that takes the input. However, if you need
93
user input during installation that will later on be available to your application then you
need to use the user input panel.
To use this panel, list it in the install file with the class name UserInputPanel.
In addition, you must write a XML specification and add it to the install resources. The
name of this resource must be userInputSpec.xml.
A UserInputPanel can be highly dynamic from IzPack 4.3 on, as it will be refreshed
every time the user input changes and will be rendered based on conditions. Thus it
would be possible to enable or disable some more options by clicking a checkbox.
Here’s an example userInputSpec.xml showing 3 panels. There are some advanced
features in this example, but the general flow should be looked at first.
The user input panel is a blank panel that can be populated with UI elements
through a XML specification file. The specification supports text labels, input ele-
ments, explanatory text and some minor formatting options.
The following types of user input elements are supported:
∙Text
∙Combo Box
∙Radio Buttons
∙Check Box
∙Password
∙File
∙Multiple files
∙Directory
∙Rule Input Field
∙Search Field
Additionally visual elements can be added using the following types:
∙Static Text
∙Title
∙Space
∙Divider
The way in which this panel conveys the user input to your application is through
the variable substitution system. User input is not directly inserted into your config-
uration files but the variables that you specify for this panel are set in the variable
substitution system. After this operation has taken place the variables and associated
values are available for all substitutions made. This way of operation has a number of
implications that you should be aware of.
First, not only can you set additional variables in this way but you can also modify
variables that are defined elsewhere -even built in variables. For this reason you should
be careful to avoid overlaps when choosing variable names. Although there might be
cases when it seems useful to modify the value of other variables, it is generally not a
94
good idea to do so. Because you might not exactly know when other variables are set
and when and where they are used throughout the installation process, there might be
unintended side effects.
Second, the panel must be shown at a point during the installation process before
the variables are used. In most cases you will use the values to substitute variables
in launch and configuration files that you supply with your installation. For this to
work you place this panel before the install panel, because the install panel uses the
variable substitutor to replace all such variables. Although using this panel any later in
the process will correctly set the variables internally, there won’t be any affect on the
files written to disk. You can also use variables set in this way in other panels that you
have written yourself. There is a section in the chapter on writing your own panel that
explains how to do this. Also in this case it is important to place the associated input
panel in the process before the variables are used.
At this point I would also like to mention that it is possible to hide every field
element based on conditions.
It would also be possible to hide select elements on the panel or the panel altogether
if certain packs are not selected. For this to work you must place this panel after the
packs panel. One side effect of using this feature is that it is not possible to step back
once the user input panel is displayed. This is because the user might make changes
in the packs selection that would require a complete rebuild of the UI. Unfortunately,
building the UI is an irreversible process, therefore the user can not be allowed to go
back to the packs panel.
The Basic XML Structure
The top level XML section is called <userInput>. For most panels it does not make
sense to present them more than once, however you might want to present multiple user
input panels -with different content of course. Therefore the <userInput> section
can contain multiple tags that each specify the details for one panel instance. The tag
name for this is <panel>.
The <panel> tag uses the following attributes:
order - required
This is the order number of the user input panel for which this specification should
be used. Counting starts at 0 and increments by 1 for each instance of the user input
panel. So if a spec should be used for the second occurrence of the user input panel use
order="1".
layout - optional
There are three general layout rules this panel uses, they are left,center and
right. While i think left is most commonly used, you might want to experiment with
this attribute and see which you like best. The default is left.
Concepts and XML Elements Common to All Fields
Before we dive into the details of defining the various UI elements I would like to
present XML elements and general concepts that apply throughout. This saves me a
lot of work in writing and you a lot of repetitive reading and maybe a tree or two.
The UI elements are generally laid out top to bottom in the order they appear in the
XML file. The only exception to this rule is the title, which always appears at the very
top. The layout pattern for the input fields is as follows: If a description is defined, it
appears first, using the full available layout width. The input field is placed beneath the
95
description. With fields such as the text field or the combo box, the label is placed to
the left and the input field to the right. Fields such as radio buttons and check boxes
are somewhat indented and have the label text appear to their right.
Each UI element is specified with a <field> tag. The type attribute is used
to specify what kind of field you want to place. Obviously, the type attribute is not
optional.
Each field that takes user input must also specify the variable that should be substi-
tuted. This is done with the variable attribute.
Almost all fields allow a description. When a description is allowed it is always
added in the same way. The description is part of the data within the field tag. There
can only be one description per field. If you add more than one, the first one is used and
the others ignored. There are three attributes used with this tag. The text is specified
through the txt or the id attribute. The details on using them are described below.
The attributes are all optional but you must specify text to use, either directly or through
the id attribute. In addition, you can set the text justification to left,center and
right with the align attribute.
The following example illustrates the general pattern for field specification:
<field type="text" variable="myFirstVariable">
<description align="left" txt="A description" id="description1"/>
.
.
.
</field>
A very frequently used pattern is for the definition of text. Where ever text is needed
(labels, descriptions, static text, choices etc.) it can be specified in place using the txt
attribute. This is convenient if you are only supporting a single language. However,
if you would like to separate your text definitions from the panel specification or if
you need to support multiple languages you might want to use the id attribute instead
to only specify an identifier. You can then add multiple XML files with the same
name as this spec file (userInputSpec.xml) appended with an underscore ’_’ and the the
appropriate three letter ISO3 language code. The content of those files must conform
to the specification for IzPack language packages. For more details on this topic see
the chapter on language packages under advanced features. id defines an identifier
that is also defined in the language package, together with the localized text to use.
It is possible to use both the txt and the id attribute. In this case the text from the
language package is used. If for some reason the language package is not available or
the id is not defined there, the text specified with txt is used as default.
All input fields can be pre-set with a value of your choice. Although the details vary
a bit from field type to field type, the set attribute is always used to accomplish this.
The set attribute is of course optional. Please note that if you use the set attribute,
you would have to keep in mind, that the UserInputPanel will be rendered after each
user input. Thus it will be set back to the default value if you don’t use a condition to
handle that. IzPack generates builtin conditions for every variable used as target for a
field to be able to check if there’s any input.
All fields that take user input use a <spec> tag to define the details of the input
field. In the some cases the content of this tag is rather simple. Input fields with a more
complex nature tend to have accordingly complex content in this tag. Since the details
vary widely, they are explained with each input field.
96
Any number of <createForPack name=’’a pack name’’ /> tags can
be added to the <panel> and <field> sections. This tag has only one attribute
and no data. The attribute is name and specifies the name of one of the installation
packs that you have defined. Here is how it works: if no <createForPack ...>
tag exists in a section, the entity is always created. However, if the tag exists, the
entity is only created if one or more of the listed packs are selected for installation. As
mentioned before, if you are using this feature, make sure the user input panel shows
up after the packs panel.
Also, any number of <createForUnselectedPack name=’’a pack name’’
/> tags can be added to the <panel> and <field> sections. This tag has only one
attribute and no data. It works exactly like createForPack except that once added user
input panel will appear for only NOT Selected packs. As mentioned earlier, you need
to make sure that the user input panel shows up after the packs panel for this feature to
work.
There is a possibility to use variables in those elements where the text is supplied
via txt attribute. This includes static fields and input fields (spec, description). The
text can contain unlimited number of variables that will be substituted. Variable sub-
stitution also works with language packs, just use variables in your language pack, and
they will be still substituted properly.
Example
In the following example, the variables: name1, name2, name3 will be substituted.
<field type="text" variable="value1">
<description align="left" txt="Configuration for $name1 and $name2" id=""/>
<spec txt="The value for $name3:" id="" size="20" set="default value" />
</field>
Internationalization
To provide internationalization you can create a file named userInputLang.xml_xyz
where xyz is the ISO3 code of the language in lowercase. Please be aware that case
is significant. This file has to be inserted in the resources section of install.xml
with the id and src attributes set at the name of the file.
Example:
If you have the following userInputSpec.xml and you want to internationalize input.comment,
input.proxy,input.port for English and French you have to create two files
named userInputLang.xml_eng and userInputLang.xml_fra:
<userInput>
<panel order="0">
<field type="staticText" align="left" txt="My comment is here."
id="input.comment"/>
<field type="text" variable="proxyaddress">
<spec txt="Proxy Host:" id="input.proxy" size="25"
set=""/>
</field>
<field type="text" variable="proxyPort">
<spec txt="Proxy Port:" id="input.port" size="6"
set=""/>
</field>
</panel>
97
</userInput>
userInputLang.xml_eng file contains:
<langpack>
<str id="input.comment" txt="English:My comment is here."/>
<str id="input.proxy" txt="English:Proxy Host:"/>
<str id="input.port" txt="English:Proxy Port:"/>
</langpack>
userInputLang.xml_fra file contains:
<langpack>
<str id="input.comment" txt="French:My comment is here."/>
<str id="input.proxy" txt="French:Proxy Host:"/>
<str id="input.port" txt="French:Proxy Port:"/>
</langpack>
you will also have to add the following to the install.xml file
<resources>
...
<res id="userInputSpec.xml" src="userInputSpec.xml"/>
<res id="userInputLang.xml_eng" src="userInputLang.xml_eng" />
<res id="userInputLang.xml_fra" src="userInputLang.xml_fra" />
...
</resources>
Panel Title
You can place an optional title at the top of the panel. Though it is not possible to
select a font for the title that is different form the one used on the rest of the panel, it
is possible to modify the font to some extent. To specify the title create a <field>
tag and use the type attribute with the value title. In addition to the txt and id
attributes, the following attributes are supported:
italic - optional
With a value of true specifies that the title font should be in italics.
bold - optional
With a value of true specifies that the title font should be bold.
size - optional
This attribute specifies the size of the title font. Please note that the size is not
specified in points but as a relative size multiplier compared to the body font on the
panel. The default value is 2.
Static Text
Static text is simply text that is placed on the panel without direct connection to any of
the input elements. It is laid out to use the entire layout width available on the panel
and is broken into multiple lines if necessary. To specify static text create a <field>
tag and use the type attribute with a value of staticText. In addition to the “ txt“
and id attributes, the text can be justified left,center or right with the align
98
attribute. It is not possible to format this text in any way. You can also use variables in
the text (as it was mentioned above), they will be substituted with variable’s value.
Example
The following example inserts some static text in the panel.
<field type="staticText" align="left"
txt="This is just some simple static text with variable substitution in here: $myvariable."
id="staticText.text"/>
Visual Separation
Sometimes it is desirable to separate different entities visually. This can be accom-
plished by inserting a space or a divider. A space simply inserts a vertical separation
of the average height of a single line entity, such as a line of text or a an input field. A
divider inserts the same amount of space but also draws a division line which can be
either aligned at the top or bottom of the separation.
<field type="divider" />
<field type="space" />
Text Input
A text input field allows the user to enter and edit a single line of text, without length
restriction. The input field can have a label, which will show to the left of the input field
and a description, which can span multiple lines. The description is placed above the
input field and uses the entire available layout width. The width of the input field must
be explicitly set, otherwise it will only accommodate a single character. To specify a
text input field create a <field> tag and use the type attribute with a value of text.
The txt and id attributes are not supported here. The variable attribute specifies
the variable that should be replaced with the text taken from the input field.
The Data
The data consists of two items, a description and the spec. The <spec> tag uses
four attributes. The label text is specified with txt and/or id as described above. In
addition, the width of the input field as it appears on the panel can be set with the size
attribute. The value must be an integer and sets the field width based on the average
character width of the active font. If this is not specified, then you will end up with a
very narrow field that is practically unusable.
The fourth attribute set is optional. It takes a text string to pre-fill the input field.
Example
The following example creates a text input field with a label and description. The
width of the input field will be enough to accommodate 15 characters. The field will
be pre-set with the text ’some text’ when the UI is first presented.
<field type="text" variable="textInput">
<description align="left" txt="A description for a text input field"
id="description.text"/>
<spec txt="Enter some text:" id="text.label" size="15" set="some text"/>
</field>
99
Radio Buttons
The radio buttons are useful when the user needs to select a specific option out of a
pre-defined list of choices. This field offers an arbitrary number of mutually exclusive
buttons, each with its own label. The placement of the buttons and labels is different
form other fields. First, the button is placed to the left and the label text to the right.
Second, the buttons are not lined up all the way to the left as other labels are but they
are indented from that location. As with other fields, the description is placed above
the list of radio buttons and uses the entire available layout width. To specify a set
of radio buttons create a <field> tag and use the type attribute with a value of
radio. The txt and “ id“ attributes are not supported here. As with all other input
fields, the variable attribute specifies that variable that should be replaced with the
user selection.
The Data
The data consists of two items, a description and the spec. The <spec> tag has
no attributes, instead the specification details are entered as data within the “ <spec>“
tag. The <spec> data consists of one or more <choice> tags. One <choice> tag
is required for each radio button. The “ <choice>“ tag accepts the usual txt and id
attributes, which are used to specify the label text. In addition the following attributes
are supported:
value - required
The value attribute is used to specify which value to insert if this associated radio
button is selected. In other words, the label text has nothing to do with the value that is
actually substituted for the variable. For this reason there is never an issue if multiple
languages are used, the value is always the same for a given selection.
set - optional
The set attribute accepts the values true and false. Since the attribute is
optional it can also be omitted, which is interpreted as false. If a value of true
is used, the associated radio button will be selected when the UI is first presented.
Obviously, only one of the buttons in a set should be set to true.
Example
The following example creates a set of four radio buttons with description. The
second button will be selected when the UI is first presented.
<field type="radio" variable="radioSelection">
<description align="left" txt="This is a description for radio buttons"
id="description.radio"/>
<spec>
<choice txt="the first choice" id="radio.label.1" value="1 selected" />
<choice txt="the second choice" id="radio.label.2" value="2 selected" set="true" />
<choice txt="the third choice" id="radio.label.3" value="3 selected" />
<choice txt="the fourth choice" id="radio.label.4" value="4 selected" />
</spec>
</field>
Combo Box
The combo box provides essentially the same functionality as do the radio buttons, just
in a different presentation stile. The advantage of the combo box is that it is easier to
deal with a long list of choices.
100
Check Box
If there are a number of choices and any combination of them could be selected, not
just a single one, then radio buttons are not the way to go. You might be better off using
a number of check boxes. The layout for a check box works in the same way as for
radio buttons. The check box is placed indented from the left most edge and the label
text is placed to the right of it. Other than with radio buttons, you cannot define any
number of check boxes. This field allows the definition of only one check box, which
is associated with one variable. If you need multiple check boxes you need to define
one field for each of them. To make it look like a cohesive group you simply provide
a description only for the first check box. All of the check boxes will be positioned
in such a way that they look like a group, even though they are separate entities and
their selections are conveyed to different variables. The description is placed above the
check box and uses the entire available layout width. To specify a check box create a
<field> tag and use the type attribute with a value of check. As with all other
input fields, the variable attribute specifies the variable that should be replaced with
the user input.
The Data
The data consists of two items, a description and the spec. The <spec> tag accepts
the usual txt and id attributes, which are used to specify the label text. In addition,
the following attributes are supported:
true - required
The true attribute specifies the value to use for substitution when the box is se-
lected.
false - required
The false attribute specifies the value to use for substitution when the box is not
selected.
set - optional
The set attribute accepts the values true and false. Since the attribute is
optional it can also be omitted, which is interpreted as false. If a value of true is
used, the check box will be selected when the UI is first presented.
Example
The following example creates a check box with description. The check box will
not be selected when the UI is first presented. This could also be accomplished by
omitting the set attribute.
<field type="check" variable="checkSelection.1">
<description align="left" txt="This is a description for a check box"
id="description.check.1"/>
<spec txt="check box 1" id="check.label.1" true="on" false="off"
set="false"/>
</field>
Password Field
The password field allows masked user input to accept password values. Normally, a
spec is created with 2 ’pwd’ elements to allow equality validation (below) and ensure
the user typed the password correctly. The password field also allows multiple val-
idators (see below). This is a very powerful feature for chaining validation operations
based on user input. See the PasswordKeystoreValidator for an example.
101
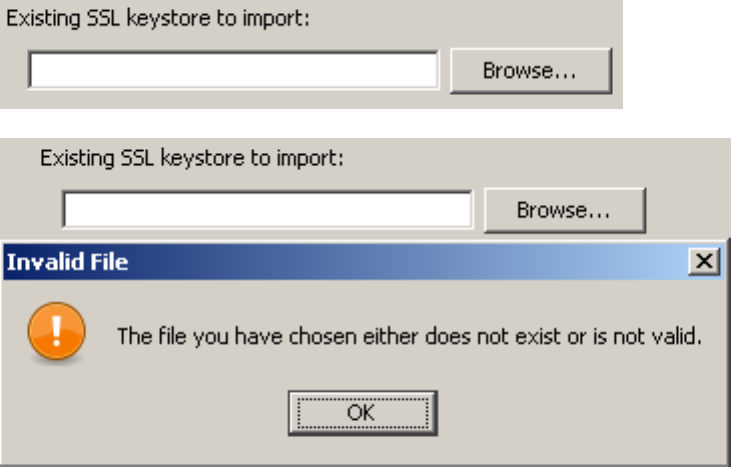
<field type="password" align="left" variable="the.password">
<spec>
<pwd txt="The Password:" size="25" set=""/>
<pwd txt="Retype Password:" size="25" set=""/>
</spec>
</field>
File Field
This field allows the user to select a file from the file system. Text can be added before
the selection or a static text element can be added to display above the selection box (a
little more visually appealing).
<field type="file" align="left" variable="the.file">
<spec txt="" size="25" set=""/>
</field>
<field type="staticText" align="left" txt="Existing SSL keystore to import:"/>
<field type="file" align="left" variable="existing.ssl.keystore">
<spec txt="" size="25" set="$myconfig" />
</field>
Pressing ’Next’ without a file selected show the following message:
Messages for the file field can be customized by creating a custom lang pack and
overriding the following values (attribute values wrapped for readability):
<str id="UserInputPanel.file.nofile.message" txt="You must select a valid file."/>
<str id="UserInputPanel.file.nofile.caption" txt="No File Selected"/>
102
<str id="UserInputPanel.file.notfile.message" txt="The file you have chosen either
does not exist or is not valid."/>
<str id="UserInputPanel.file.notfile.caption" txt="Invalid File"/>
Note: Mixing file fields with other fields that have text in front of them can lead
to formatting (layout) issues. Placing these types of elements on different panels can
provide a much better user experience.
Multiple File Field
This field allows the user to select multiple files from the file system. Text can be added
before the selection or a static text element can be added to display above the selection
box (a little more visually appealing).
The files in the list can be created as a semi-colon separated string in one varibale.
It’s also possible to let the input field create multiple variables with the given variable
appended with indexes. E.g. specifying a variable with name the.file and three files
selected in the box would lead to three variables in the installer (the.file, the.file_1,
the.file_2).
Set-Parameter :
visibleRows How many rows shall be shown in the list box.
prefX The preferred width of the list box. The default is 200.
prefY The preferred height of the list box. The default is 100.
fileext The file extension to search for. This will be used in the FileChooserDialog.
fileextdesc The description of the file extension. This will be used in the File-
ChooserDialog.
multipleVariables If set to true, multiple variables will be created. Each file will
get one variable.
allowEmptyValue If set to true, no file has to be selected and the box can be left
empty.
<field type="multifile" align="left" variable="the.file">
<spec txt="" size="25" set=""/>
</field>
<field type="staticText" align="left" txt="Existing SSL keystore to import:"/>
<field type="file" align="left" variable="existing.ssl.keystore">
<spec txt="" size="25" set=""/>
</field>
Messages for the file field can be customized by creating a custom lang pack and
overriding the following values (attribute values wrapped for readability):
<str id="UserInputPanel.file.nofile.message" txt="You must select a valid file."/>
<str id="UserInputPanel.file.nofile.caption" txt="No File Selected"/>
<str id="UserInputPanel.file.notfile.message" txt="The file you have chosen either
does not exist or is not valid."/>
<str id="UserInputPanel.file.notfile.caption" txt="Invalid File"/>
103
Note: Mixing multiple file fields with other fields that have text in front of them can
lead to formatting (layout) issues. Placing these types of elements on different panels
can provide a much better user experience.
Directory Field
The directory field is essentially the same as the file field except the field will ensure a
directory is selected.
<field type="dir" align="left" variable="existing.jboss.home">
<spec txt="" size="25" set="$INSTALL_PATH$FILE_SEPARATOR${jboss.version}" mustExist="false" />
</field>
The directory supports the following two special attributes for the <spec> ele-
ment:
mustExist - optional (default: true) Specifies whether or not the selected path must
be an existing directory.
create - optional (default: false) Specifies whether or not the selected directory
should be created if it does not exist (requires mustExist=true).
Messages for the directory field can be customized by creating a custom lang pack
and overriding the following values (attribute values wrapped for readability):
<str id="UserInputPanel.dir.nodirectory.message" txt="You must select a valid directory."/>
<str id="UserInputPanel.dir.nodirectory.caption" txt="No Directory Selected"/>
<str id="UserInputPanel.dir.notdirectory.message" txt="The directory you have chosen
either does not exist or is not valid."/>
<str id="UserInputPanel.dir.notdirectory.caption" txt="Invalid Directory"/>
Note: Mixing directory fields with other fields that have text in front of them can
lead to formatting (layout) issues. Placing these types of elements on different panels
can provide a much better user experience.
Rule Input
The rule input field is the most powerful and complex one of all the input fields offered
by this panel. In its most simple incarnation it looks and works like a regular text input
field. There is also only an incremental increase of the complexity in the specification
for this case. However, it is unlikely that you would use it for such a purpose. The real
power of this input field comes from the fact that rules can be applied to it that control
many aspects of its look as well as overt and covert operation.
Layout and Input Rules
The basic nature of this input field is that of a text input field and as mentioned before,
in its most simple incarnation that is what it looks like and how it operates. However,
the layout of the field can be defined in such a way that there are multiple logically
interconnected text input fields, adorned with multiple labels. Further more, each of
these fields can be instructed to restrict the type of input that will be accepted. Now you
might ask what this could be useful for. As an answer, let me present a few examples
104
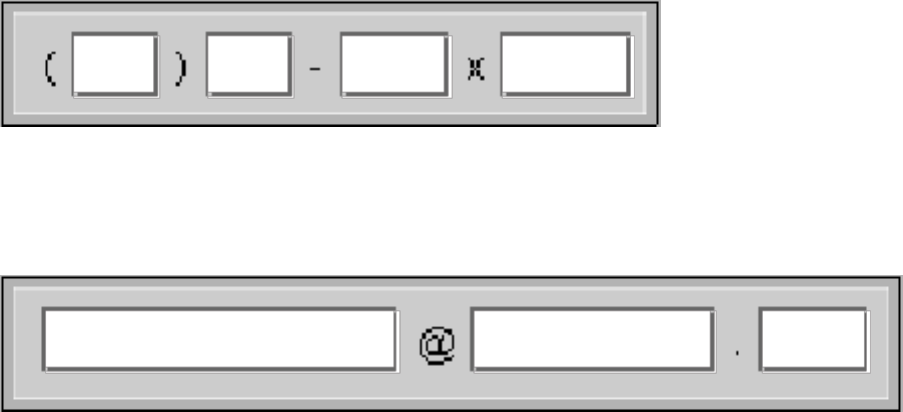
that show how this feature can be used. Before i do this however, i would like to
describe the specification syntax, so that the examples can be presented together with
the specifications that make them work in a meaningful way.
The actual specification of the layout, the labels and the type of input each field
accepts all happens in a single string with the layout attribute. First let us have a
look at the specification format for a single field. This format consists of a triplet of
information, separated by two colons ’:’. A typical field spec would look like this:
N:4:4, where the first item is a key that specifies the type of input this particular field
will accept - numeric input in the example. The second item is an integer number that
specifies the physical width of the field, this is the same as in the with of any regular text
field. Therefore the field in the example will provide space to display four characters.
The third item specifies the editing length of the string or in other words, the maximum
length of the string that will be accepted by the field. In the layout string you can
list as may fields as you need, each with its own set of limitations. In addition you
can add text at the front, the end and in between the fields. The various entities must
be separated by white space. The behavior of this field is such that when the editing
length of a field has been reached, the cursor automatically moves on to the next field.
Also, when the backspace key is used to delete characters and the beginning of a field
has been reached, the cursor automatically moves on to the previous field. So let us
have a look a some examples.
Phone Number
The following specification will produce a pre formatted input field to accept a
US phone number with in-house extension. Even though the pattern is formatted into
number groups as customary, complete with parentheses ’(’ and dash ’-’, entering the
number is as simple as typing all the digits. There is no need to advance using the
tab key or to enter formatting characters. Because the fields only allow numeric entry,
there is a much reduced chance for entering erroneous information. "( N:3:3 )
N:3:3 - N:4:4 x N:5:5". Each of the fields uses the ’N’ key, indicating that
only numerals will be accepted. Also, each of the fields only accepts strings of the
same length as the physical width of the field.
E-Mail address
This specification creates a pattern that is useful for entering an e-mail address
"AN:15:U @ AN:10:40 . A:4:4". Even though the first field is only fifteen
characters wide it will accept a string of unlimited length, because the ’U’ identifier is
used for the edit length. The second field is a bit more restrictive by only accepting a
string up to forty characters long.
IP address
It might not be uncommon to require entering of an IP address. The following
105
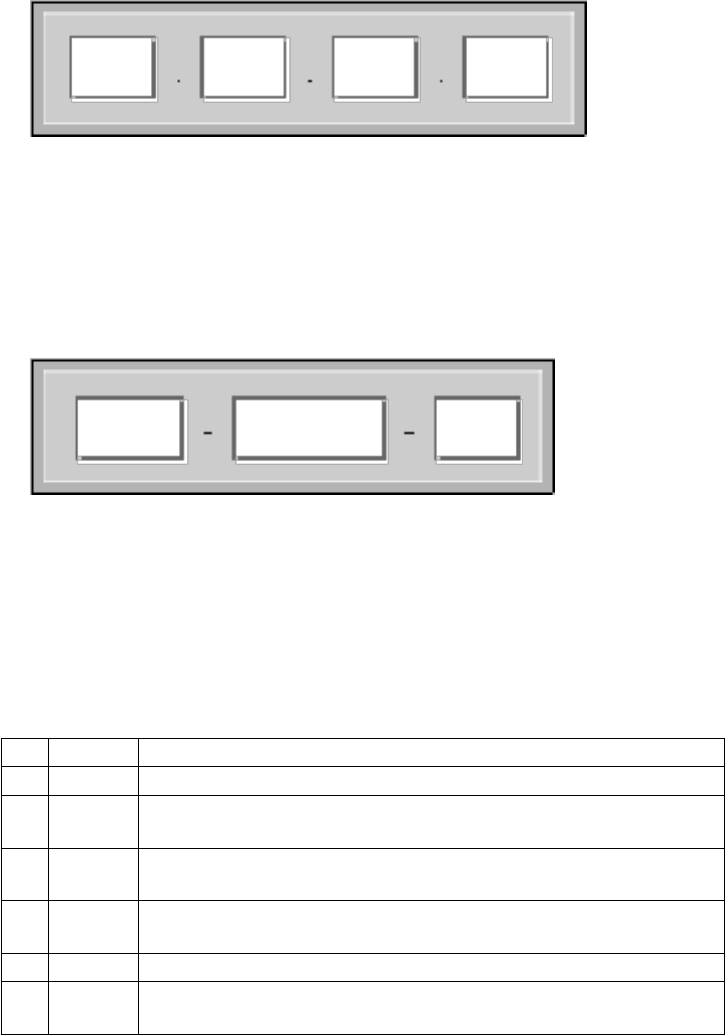
simple specification will produce the necessary input field. All fields are the same,
allowing just three digits of numerical entry. "N:3:3 . N:3:3 . N:3:3 .
N:3:3"
Serial Number or Key Code
If you ship your product with a CD key code or serial number and require this
information for registration, you might want to ask the customer to transcribe that
number from the CD label, so that it is later on accessible to your application. As
this is always an error prone operation, the predefined pattern with the easy editing
support and restriction of accepted data helps to reduce transcription errors "H:4:4
- N:6:6 - N:3:3". This particular specification will produce three fields, the first
accepting four hexadecimal, the second six numerical and the third three numerical
digits.
Limitations
Even though the above examples all use single character labels between fields,
there is no restriction on the length of these labels. In addition, it is possible to place
label text in front of the first field and after the last field and the text can even contain
spaces. The only limitation in this regard is the fact that all white space in the text will
be reduced to a single space on the display. This means that it is not possible to use
multiple spaces or tabs in the text.
The following table lists and describes all the keys that can be used in the specifi-
cation string.
Key Meaning Description
N numeric The field will accept only numerals.
H hexadecimalThe field will accept only hexadecimal numerals, that is all numbers
from 0-F.
A alphabetic The field will accept only alphabetic characters. Numerals and punctu-
ation marks will not be accepted.
AN alpha-
numeric
The field will accept alphabetic characters and numerals but no punc-
tuation marks.
O open The filed will accept any input, without restriction.
U unlimited This key is only legal for specifying the editing length of a fields. If
used, the field imposes no length restriction on the text entered.
106

Setting Field Content
Like all other input fields the rule input field can also be pre-filled with data and as
usual, this is accomplished thought the set attribute. As you might expect, the details
of setting this field are rather on the complicated side. In fact you can set each sub
field individually and you can leave some of the fields blank in the process. The set
specification for all sub fields is given in a single string. Each field is addressed by its
index number, with the count starting at 0. The index is followed by a colon ’:’ and
then by the content of the field. The string “0:1234 1:af415 3:awer” would fill the first
subfield with 1234, the second one with af415 and the fourth with awer. The third
subfield would stay blank and so would any additional fields that might follow.
The individual field specs must be separated with spaces. Spaces within the pre-fill
values are not allowed, otherwise the result is undefined.
The Output Format
The user input from all subfields is combined into one single value and used to re-
place the variable associated with the field. You can make a number of choices when
it comes to the way how the subfield content is combined. This is done with the
resultFormat and separator attributes. The resultFormat attribute can
take the following values:
Value Meaning
plainStringThe content of all subfields is simply concatenated into one long string.
displayFormatThe content of all subfields and all labels (as displayed) is concatenated
into one long string.
specialSeparatorThe content of all subfields is concatenated into one string, using the
string specified with the separator attribute to separate the content
of the subfields.
processedThe content is processed by Java code that you supply before replacing
the variable. How to do this is described below.
Validating Field Content
You can provide runtime validation for user input into a text field and rule field via the
validator element (which is a child of the field element. There are two types of
built-in validators already provided: a NotEmptyValidator and a RegularExpressionValidator.
You can also easily create your own validator. In all cases, if the chosen validator re-
turns false, a messagebox will display the contents of the txt attribute and the user
will be unable to continue to the next panel.
You can specify a processor for a combobox:
<choice processor="fully.qualified.class.name"
set="selectedValue"/>
so that you can fill a combobox with data on a simple way.
107
NotEmptyValidator
The NotEmptyValidator simply checks that the user entered a non-null value into
each subfield, and returns false otherwise.
RegularExpressionValidator
The RegularExpressionValidator checks that the user entered a value which
matches a specified regular expression, as accepted by the Jakarta Regexp library
(http://jakarta.apache.org/regexp/). The syntax of this implementation is described
in the javadoc of the RE class (http://jakarta.apache.org/regexp/apidocs/org/apache/
regexp/RE.html).
You can specify the regular expression to be tested by passing a parameter with
a name of pattern to the validator (via the param element), with the regular ex-
pression as the value attribute. For example, the following would validate an e-mail
address:
The example of using Regexp validator in rule input field:
<field type="rule" variable="EMAILaddress">
<spec
txt="Your Email address:" layout="O:12:U @ O:8:40 .
A:4:4"
set="0: 1:domain 2:com" resultFormat="displayFormat"
/>
<validator
class="com.izforge.izpack.util.RegularExpressionValidator"
txt="Invalid email address!">
<param
name="pattern"
value="[a-zA-Z0-9._-]{3,}@[a-zA-Z0-9._-]+([.][a-zA-Z0
-9_-]+)*[.][a-zA-Z0-9._-]{2,4}"
/>
</validator>
</field>
The example of using Regexp validator in text input field:
<field type="text" variable="EMAILaddress">
<spec
txt="Your Email address:" set="you@domain.com" size="20" id=""
/>
<validator
class="com.izforge.izpack.util.RegularExpressionValidator"
txt="Invalid email address!">
<param
name="pattern"
value="[a-zA-Z0-9._-]{3,}@[a-zA-Z0-9._-]+([.][a-zA-Z0
-9_-]+)*[.][a-zA-Z0-9._-]{2,4}"
/>
</validator>
</field>
108
An example of using regexp validator in a password field (attribute text wrapped
for readability):
<field type="password" align="left" variable="db.password">
<spec>
<pwd txt="DB Password:" size="25" set=""/>
<pwd txt="Retype Password:" size="25" set=""/>
</spec>
<validator class="com.izforge.izpack.util.PasswordEqualityValidator"
txt="Both DB passwords must match." id="key for the error text"/>
<validator class="com.izforge.izpack.util.RegularExpressionValidator"
txt="Service password must begin with a character and be 8-20
mixed-case characters, numbers, and special characters [#@!$_]."
id="key for the error text">
<param name="pattern" value="^(?=[a-zA-Z])(?=.*[0-9])(?=.*[#@!$_])
(?=.*[A-Z])(?=.*[a-z])(?!.*[^a-zA-Z0-9#@!$_])(?!.*\s).{8,20}$"/>
</validator>
</field>
You can test your own regular expressions using the handy applet at http://jakarta.
apache.org/regexp/applet.html.
PasswordEqualityValidator
This validator uses a password field specification to compare the values in each field
for equality. Normally, this would be to ensure a password was typed correctly before
any other validation takes place.
<field type="password" align="left" variable="the.password">
<spec>
<pwd txt="The Password:" size="25" set=""/>
<pwd txt="Retype Password:" size="25" set=""/>
</spec>
<validator class="com.izforge.izpack.util.PasswordEqualityValidator"
txt="Both passwords must match." id="lang pack key for the error text"/>
</field>
PasswordKeystoreValidator
This validator uses the password field and parameters you send in from previous user
input or predefined properties to open a keystore and optionally try to get a specified
key.
You must specify the parameter ’keystoreFile’, and optionally ’keystoreType’ (de-
faults to JKS), ’keystoreAlias’ (to check for existence of a key), and ’aliasPassword’
(for trying to retrieve the key).
An additional parameter ’skipValidation’ can be set to ’true’ in a checkbox and
allow the validator framework to run, but not actually do the validation.
Optionally checking the key password of multiple keys within a keystore requires
the keystore password (if different from the key password) be set in the ’keystorePass-
word’ parameter.
109
<field type="password" align="left" variable="keystore.password">
<spec>
<pwd txt="Keystore Password:" size="25" set=""/>
<pwd txt="Retype Password:" size="25" set=""/>
</spec>
<validator class="com.izforge.izpack.util.PasswordEqualityValidator"
txt="Both keystore passwords must match." id="key for the error text"/>
<validator class="com.izforge.izpack.util.PasswordKeystoreValidator"
txt="Could not validate keystore with password and alias provided." id="key for the error text">
<param name="keystoreFile" value="${ssl.keystore}"/>
<param name="keystoreType" value="${ssl.keystore.type}"/>
<param name="keystoreAlias" value="${keystore.key.alias}"/>
<param name="skipValidation" value="${skip.keystore.validation}"/>
</validator>
</field>
Creation Your Own Custom Validator
You can create your own custom Validator implementation simply by creating a new
class which implements the com.izforge.izpack.panels.Validator inter-
face. This interface specifies a single method: validate(ProcessingClient
client) , which returns a boolean value. You can retrieve the value entered by
the user by casting the input ProcessingClient as a RuleInputField and calling the
RuleInputField.getText() method. You can also retrieve any parameters to
your custom Validator by calling the RuleInputField.getValidatorParams()
which returns a java.util.Map object containing parameter names mapped to pa-
rameter values. For an example, take a look at com.izforge.izpack.util.RegularExpressionValidator.
Set values in the RuleInputField can be preprocessed. At now you can specify a
processor class to pre process a value to be set at initial value of a RuleInputField.
Syntax:
<spec set="0:defaultVal:classname" .../>
The class name is an optional value. The class must implement the Processor
interface.
Processing the Field Content
This feature needs to be documented.
Summary Example
<field type="rule" variable="test1">
<description align="left" txt="A description for a rule input
field."
id="description.rule.1"/>
<spec txt="Please enter your phone number:"
layout="( N:3:3 ) N:3:3 - N:4:4 x N:5:5"
resultFormat="specialSeparator" separator="."/>
<validator class="com.izforge.izpack.util.NotEmptyValidator"
110

txt="The phone number is mandatory!" />
<!--processor class=""/-->
</field>
Search
The search input field allows the user to choose the location of files or directories. It
also supports auto-detection of the location using a list of suggestions. The field is
basically a combobox with an extra button to trigger auto-detection (again).
Specification
The <description> tag is the same as with other fields
The <spec> tag supports the following attributes:
∙filename - the name of the file or directory to search for
∙type - what to search for
–file - search for a file
–directory - search for a directory
∙result - what to return as the search result
–file - result of search is whole pathname of file or directory found
–directory - only return directory where the file was found (this is the
same as file when searching for directories)
–parentdir - return the full path of the parent directory where the file
was found
∙checkfilename - the name of a file or directory to check for existence (this
can be used to validate the user’s selection)
Example
<field type="search" variable="java_sdk_home">
<description align="left"
txt="This is a description for a search
input field."
id="description.java_sdk_home"/>
<spec txt="Path to Java SDK:" checkfilename="lib/tools.jar"
type="file" result="directory">
<choice value="/usr/lib/java/" os="unix" />
<choice value="/opt/java" os="unix" />
111
<choice value="C:\Program Files\Java" os="windows" />
<choice value="C:\Java" os="windows" />
</spec>
</field>
Custom Actions
(by Klaus BARTZ)
Overview
The implementation of custom actions presume knowledge of java. Custom actions are
not a good starting point for learning java. Learners can use existent custom actions
but should not implement them as exercise.
In general the installation procedure is separated into several steps. The first step,
let’s call it the data collection phase, is getting specific data needed for the installation
process. Typically this is done by typing all neded data into one or more panels, if a
GUI is used, or automatically by reading the data from a config file. In general nothing
will be changed on the system until all needed data is obtained. But mostly - depending
on to the information, e.g. the destination path - different input panels are involved.
If all needed data is collected the second step will be perfomed, let us call it the
action phase. During this step the state of the locale machine will be changed, e.g.
files will be copied to the installation destination or some short cuts will be registered.
Each of this subsequent steps are denoted as actions. There are actions intended to be
reused, so called common actions, and actions for one special purpose only, so called
custom actions. In IzPack there are already some common actions, for example “file
transfer”, “parse” or “execute”.
The third step, the reporting phase, is normally represented by a panel that reports
the result state of the installation (OK, or not OK) and a simple good bye message.
With IzPack there are two ways to implement custom actions. Firstly it is always
possible to define a custom panel that perfoms the desired actions too. Secondly, and
that’s the new, custom actions are supported.
Panels still may be used for actions that are perfomed, e.g. before files are trans-
ferred or after the “execute” action. But if the needed action depends on the selected
or already installed packages, this works also, but the implementation effort is much
higher.
If the action should be performed for several amount of elements of a pack, using
custom actions will be more easy than using panels. Additional custom actions may
be defined for installation, but also for packaging and uninstallation purposes. If a
custom action is also needed for uninstallation purposes, it’ll be always a good idea to
implement a corresponding installation action as custom action, but not as panel.
How It Works
Custom actions are implemented as listeners. Each listener implements callback meth-
ods that will be called at well-defined points. The method InstallerListener.afterFile
for example will be called after a file has been copied. There are different interfaces
intended for being used at packaging time, at installation time and at uninstallation
time.
112

Each interface is implemented by a class with the prefix “Simple” (e.g. Simple-
CompilerListener) that implements all declared interface methods with an empty body.
These classes may be used as base classes for own listener implementations.
To apply custom actions to the installer, an entry in the apropriate install.xml file is
needed. The configuration of listeners starts with the facultative ELEMENT “listeners”
which can contain one or more ELEMENTs of “listener”. For a “listener” there are
three attributes which determine the “compiler”, “installer” and “uninstaller” custom
action pupose. Additionally it is possible to make the listener OS dependent using the
“os” ELEMENT.
If file related data will be set, the facultative ELEMENT “additionaldata” is defined
for the ELEMENTs “file”, “singlefile” and “fileset”. This data will be automatically
moved to the corresponding PackFile objects in the install.jar. Extraction and usage
should be implemented in a install custom action (see example).
Custom Action Types
Custom actions are intended to be used at packaging time, at installation time and at
uninstallation time. The interfaces are:
Custom action type Interface name
Packaging com.izforge.izpack.event.CompilerListener
Installation com.izforge.izpack.event.InstallerListener
Uninstallation com.izforge.izpack.event.UninstallerListener
Custom Actions At Packaging
∙(constructor): only the default constructor will be used. It is called from Com-
piler just after creating the packager. Therefore initializing will be better during
in the first notify call.
∙reviseAdditionalDataMap gives the facility to add data to each PackFile
object. This is the place where file related data can be transferred from the install
xml file into the install jar file. Although each key and value of the map can be
113
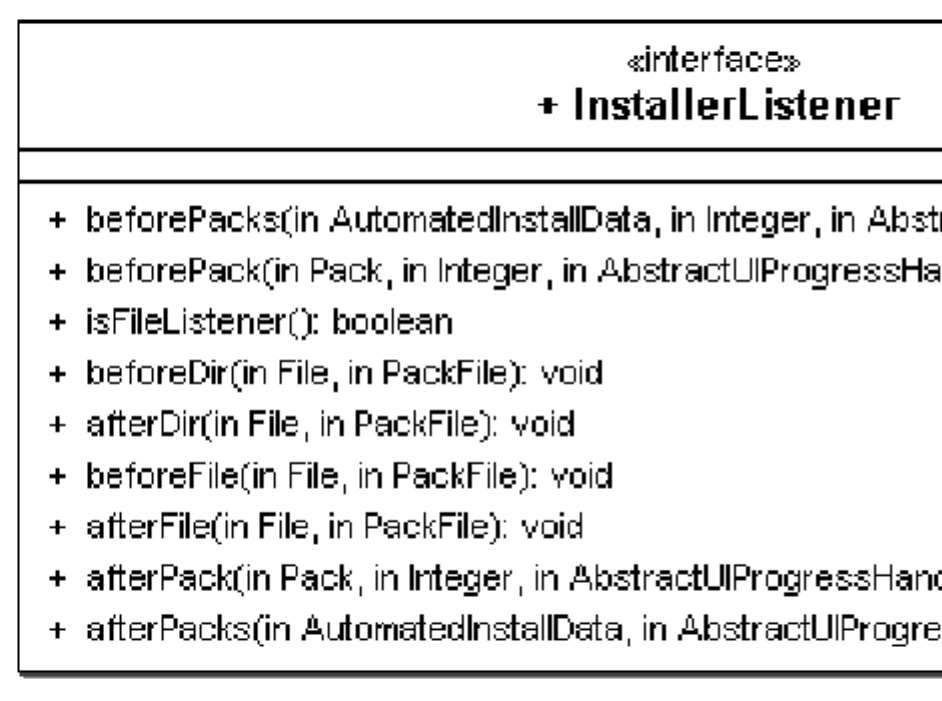
any type, but the class definitions of all used types must therfore be contained
in the installer jar file or in the VM’s classpath. In general strings are the best
choice for being used as keys or values. All keys must be unique over all reg-
istered CompilerListeners. Each call of this method adds own key value
pairs to the given existenDataMap because more than one listener can be
used. If the given map is null, a new one will be created.
∙notify is called at the beginning and at the end of each “add” method call
which is called in Compiler.executeCompiler.
Custom Actions At Installing Time
∙(constructor): only the default constructor will be used. It is called from Unpacker.run
before unpacking.
∙beforePacks will be called each time before an unpacking call is performed.
∙beforePack is called before a package is installed. Pack object and the num-
ber of the pack are passed.
∙isFileListener determines whether the next four methods are called or not.
This is a little performance optimizing.
114
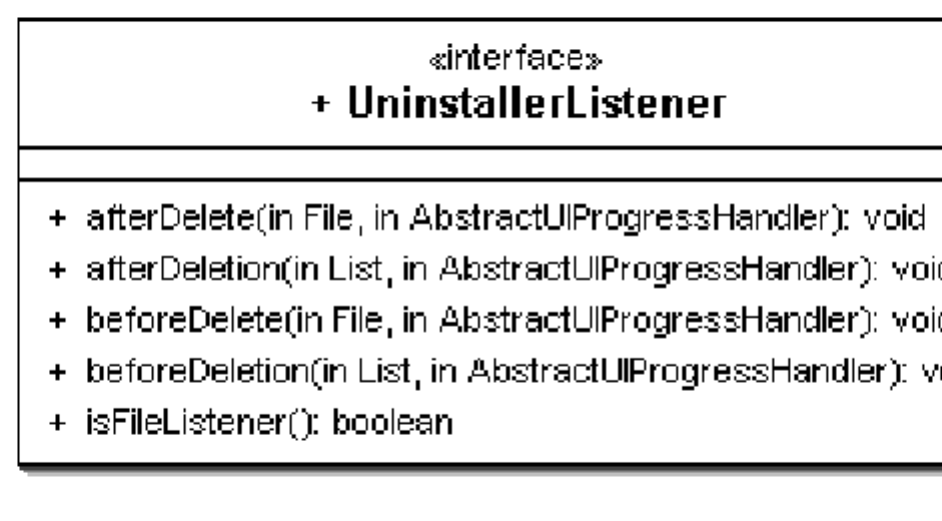
∙beforeDir is called before a directory is created. In this case, when file lis-
teners exist, directories are created recursively and the method is called at each
step. The file and the current PackFile object are passed.
∙afterDir is called directly after the directory creation.
∙beforeFile is called before a file is created. The file and PackFile object
are passed as parameters.
∙afterFile is the best place to perform file related actions. The given PackFile
objects contains the additional data which was set at packaging.
∙afterPack will be just called after the pack is closed.
∙afterPacks is the last step before the handler will be stopped.
Custom Actions At Uninstalling Time
∙(constructor) : only the default constructor will be used. It is called from Destroyer.run
as first call.
∙beforeDeletion will be called after execute files was performed. The given
list contains all File objects which are marked for deletion.
∙isFileListener determines whether the next two methods are called or not.
∙beforeDelete is the method which, is called before a single file is deleted.
The File object is given as parameter.
∙afterDelete will be invoked after the delete call for a single file.
115
∙afterDeletion is the last call before the cleanup of created data is per-
formed.
Package Path
Custom actions must always implement one of the given listener interfaces. As men-
tioned above, it is also possible to derive from one of the “Simple” listeners. The
package path is facultative, only the class name must be unique over all custom actions.
The preparation of a custom action for providing it with an installation is very similar to
panels. Custom actions must also be packed into a jar file with the name of the custom
action class name. This jar file should be placed in [IzPackRoot]/bin/customActions,
may be
[IzPackRoot]/bin/customActions/MyCompilerListener.jar
[IzPackRoot]/bin/customActions/MyInstallerListener.jar
[IzPackRoot]/bin/customActions/MyUninstallerListener.jar
In the default Ant definition file (build.xml) there are some targets for this stuff.
Native Libraries for Uninstallation
If a custom action uses JNI at installation time, often the associated uninstall custom
action needs JNI too. For this situation it is possible to declare a native library for
unstallation. The only work to do is to add a stage attribute to the native tag in the
install xml file like
<!-- The native section. We specify here our os dependant
libs..--> <native type="3rdparty"
name="MyOSHelper.dll"stage="both" >
<os family="windows" />
</native>
The needed additional classes are packed into lib/uninstaller-ext.jar. If a native
library is defined for uninstallation, this file will also be packed into the installer.jar as
IzPack.unistaller-ext and used at its right position.
What You Have To Do
Follow the steps that are needed to create and use custom actions with the “normal”
source environment (not standalone compiler) using Ant. Of course, it works also with
the standalone compiler.
Custom Actions at Packaging (CompilerListener)
∙Implement com.izforge.izpack.event.CompilerListener or ex-
tend com.izforge.izpack.event.SimpleCompilerListener. Place
it as “ [IzPackRoot]/src/lib/[MyPackagePath]/MyCompilerListener.java“.
116
∙Add a “build-compiler-listener” macro call in to the build.listeners
target in [IzPackRoot]/src/build.xml. Note that the name attribute
value in the build-instealler-listener must match CompilerListener imple-
mentation class name (not including the package). You should include the actual
Listener implementation, as well as any other classes required by the listener.
<build-compiler-listener
name="MyCompilerListener">
<include
name="[MyPackagePath]/MyCompilerListener.java"/>
<include
name="[MyPackagePath]/SomeOtherHelperClass.java"/>
</build-compiler-listener>
∙Run [IzPackRoot]/src/build.xml. An ant alone will execute the re-
quired targets.
∙Add a “listeners” ELEMENT with a “listener” ELEMENT with a “compiler”
attribute in to [MyProjectPath]/install.xml
<listeners>
<listener compiler="MyCompilerListener" />
<listeners>
∙Compile with the following command, or an ant task you have set up.
java -jar [IzPackRoot]/lib/compiler.jar -HOME [IzPackRoot]
[MyProjectPath]/install.xml -b [MyProductPath] -o
[MyBuildPath]/install.jar
∙Test it
Custom Actions at Installation Time (InstallerListener)
Perform the same steps as above, replace all occurrences of “CompilerListener” with
“InstallerListener” and “compiler” with “installer”.
Custom Actions at Uninstallation Time (UninstallerListener)
Perform the same steps as above, replace all occurrences of “CompilerListener” with
“UninstallerListener”and “compiler” with “uninstaller”.
Example
Let us say, we want to set access rights for files and directories on Unix. The Java
sources are placed in the directory [IzPackRoot]/sample/src/com/myCompany/tools/install/listener.
There are the files ChmodCompilerListener.java and ChmodInstallerListener.java.
∙Copy the files to [IzPackRoot]/src/lib/com/myCompany/tools/install/listener
∙In [IzPackRoot]/src/build.xml there are the lines
117
<!-- CUSTOM ACTION test START
CUSTOM ACTION test END -->
Uncomment them (activate the lines between them).
∙Build IzPack new.
∙Compile a test installation with
java -jar [IzPackRoot]/lib/compiler.jar -HOME [IzPackRoot]
[IzPackRoot]/sample/listener/install.xml
-b [IzPackRoot]/sample/listener -o
[IzPackRoot]/sample/listener/install.jar
∙Install it
java -jar install.jar
Ant Actions (InstallerListener and UninstallerListener)
In this section the common ant task custom actions are described in detail. It is only
for developers who are not acquainted with IzPack or it’s custom actions. In addi-
tion to the basics there are some recapitulations of the common custom action tech-
niques and some hints for pitfalls. In the package com.izforge.izpack.event
there are the ant related custom actions AntActionInstallerListener and
AntActionUninstallerListener. As recapitulation, to add any custom ac-
tion a reference in install.xml will be needed, as example:
<listeners>
<listener installer="AntActionInstallerListener"
uninstaller="AntActionUninstallerListener" />
</listeners>
For all referenced listeners a jar file with the same name must exist in [IzPackRoot]/bin/customActions.
If compilation (packaging) fails with a “not found” error, first verify, that the jar file
exists. If not, create it. With this custom action it is possible to perform ant calls at in-
stallation and/or uninstallation time. It is not only a wrapper for a comand-line ant call,
but also an intersected description file defining what target of the ant build file should
be performed at what time of (un)installation and specifies which properties for what
IzPack pack are to be used. The intersected description file is written as XML, the
corresponding dtd is placed in src/dtd/event/antaction.dtd. The description file should
be declared as a resource in the install.xml with the id “ AntActionsSpec.xml“ e.g.
<resources>
...
<res id="AntActionsSpec.xml"
src="myInstallSpecs/MyAntActionsSpec.xml" />
...
</resources>
The precise spelling of the id is important. The base path of src is the installation
project path. If you want to use ant, you have to specify it here. IzPack is designed
118
for running without dependencies on external software or libraries. Therefore it is
necessary to include everything needed, in this case ant self. The field <jar> in
installation.xml is predestinated for such cases, e.g.
<jar src="jar/ant/ant.jar" stage="both" />
Be aware, that an “extended” ant use needs more than one jar, for example often
xercesImpl.jar. If an obscure “class not found” exception is raised during testing,
check first for missing jar files. For supporting uninstallation the jar field was extended
by the attribute stage. If an ant uninstaller custom action is used, the uninstaller also
needs the jar files. If “ stage“ is “both” or “uninstall”, the contents of the referenced
jar file will be packed into uninstaller.jar. Be aware that not the jar file itself, but the
contents of it are required. This implies, that the paths of the contained files are unique
and the information in meta-inf/Manifest.mf will be lost.
The Basic XML Struture
An ant action will be defined in the resource with the id “AntActionsSpec.xml”. Some-
times it will help to lock into [IzPackRoot]/src/dtd/event/antaction.dtd
or validate a written xml file with the dtd.
On this xml file a substitution will be performed using all defined IzPack vari-
ables. It is performed just before processing the packs. This is a common way of load-
ing spec files into custom actions. For more information see method com.izforge.izpack.util.SpecHelper.readSpec.
If you want to substitute some custom item, simply add a variable via idata.setVariable
in a custom panel before InstallPanel. The given variable name (id) should be
written into the xml file in the common variable notation.
The top level XML section is called <antactions>. Only one is possible. The
<antactions> are segregated in one or more <pack> elements. The single at-
tribute <name> of the <pack> corresponds to the same structure in install.xml (for
more information see also installation.dtd). Only the “things” included in the <pack>
are performed, if a pack with the same name was chosen to be installed. The “things”
to be done to self are defined by the element <antcall> (without ssss).
The <antcall> takes the following attributes:
∙order: required. Determine at what point of installation the antcalls defined by
element target should be performed. Possible are beforepack,afterpack,
beforepacks or afterpacks. Be aware that with beforepack(s) there are
no installed files and also no installed build file. With this order only preexistent
build files are useable.
∙uninstall_order: optional. Determine at what point of uninstallation the
antcalls defined by element uninstall_target should be performed. Pos-
sible are beforedeletion and afterdeletion. As opposed to the be-
haviour of order the referenced files are also accessible in the order afterdeletion.
The uninstaller action copies the files into tempfiles before deletion which are
marked as deleteOnExit.
∙quiet: optional. To quit or not. Possible are yes or no. Default is no.
∙verbose: optional. To output verbose information or not. Possible are yes or
no. Default is no.
119
∙logfile: optional. Path of the file for logging should be performed. The
logfile should be not marked for uninstallation otherwise it will be deleted too.
∙buildfile: either buildfile or buildresource is required but not
both. Path of the file which contains the antcall. This is the file you normally use
as -buildfile during an ant call via the command line. In this file variables
are not substituted. For substitution there are properties in ant which can be used.
Never write an IzPack variable in an ant buildfile.
∙buildresource: either buildresource or buildfile is required but
not both. The value is the id of the resource which contains the antcall. This
resource will be extracted out into a temporary file and the path to this file will
be passed as if -buildfile were specified during the ant call via the command
line. The temporary file is removed after the ant call. In this file variables are not
substituted. For substitution there are properties in ant which can be used. Never
write an IzPack variable in an ant buildfile.
∙messageid: optional. A string ID which refers to bin/langpacks/installer/<lang>.xml.
If it is defined, the message will be displayed in the InstallPanel whilst perform-
ing the ant call.
In addition to the possible attributes there are some elements. All elements can
be defined more than one time in one <antcall>. All are optional, but with no
<target> element the <antcall> makes no sense. Do not confuse the following:
“required”s are related to the attributes of the elements, not to the elements themselfs.
<property>: define a property
Property to be used with all target and uninstall_target which are defined
for this antcall.
∙name: required. The name (id) of the property.
∙value: required. The value of the property.
<propertyfile>: define properties in a file
Properties to be used with all targets and uninstall_targets which are defined for this
antcall given by the path of a properties file.
∙path: required. Path of a file which contains properties in the syntax which is
used by ant. Some ant calls need properties files. For these this element is used.
One way to fill specific data into it is to create a new file in a custom panel and
fill it with values given by input fields. The file path can be set at installation
time, if there is a variable in AntActionSpec.xml and an IzPack variable was
defined before InstallPanel. That file can be only created with deleteOnExit, if
no <uninstall_target> was defined in this “ <antcall>“. This implies,
that other <antcall>‘‘s can have a ‘‘<uninstall_target>.
120
<target>: target to call at installation
Targets to perform with this antcall at installation time. The targets should be defined
in the given buildfile or else an ant exception will be raised. This is that what you use,
if you don’t want to perform the default target. e.g. cleaning the IzPack project with
ant clean
∙name: required. The name of the target.
<uninstall_target>: target to call on uninstallation
Targets to perform with this antcall at uninstallation time. The targets should be defined
in the given buildfile otherwise an ant exception will be raised. With this target it will
be possible to undo the things done at installation time.
∙name: required. The name of the uninstall target.
Registry access (InstallerListener and UninstallerListener)
The event package of IzPack contains an installer and an uninstaller listener for Win-
dows registry access. The listeners uses the separated pack com.coi.tools which is also
available as source under the src subtree of IzPack. The registry will be called by
JNI.
There is no support from the IzPack project of this feature for Windows 95, Win-
dows 98 and Windows ME. Please check the patches at http://jira.codehaus.org/browse/
IZPACK-58 if you need to support those platforms.
The registry stuff was implemented in all conscience, but certainly WITHOUT
WARRANTIES OR CONDITIONS OF ANY KIND
The listeners themselves are only able to write into the Windows registry at instal-
lation and delet the writing at uninstall time. But it is also possible to use the registry
handler as a registry reader in custom panels or costum actions. The CheckedHel-
loPanel reads the registry and can be used as example for it.
To add registry support to an installation some changes in the installation definition
file (often called“install.xml“) are to be made. First the declaration of the listener
themselves:
<listeners>
<listener installer="RegistryInstallerListener"
uninstaller="RegistryUninstallerListener" >
<os family="windows"/>
</listener>
</listeners>
It is also recomanded to add the uninstaller listener because it is usual to cleanup
the registry at uninstallation. The listeners are only used on Windows, therefore we
declare it.
As with other listeners a jar file with the same name has to exist in [IzPackRoot]/bin/customActions.
If compilation (packaging) fails with an “not found” error, verify, that the jar file ex-
ists. If not, create it. The jar files are RegistryInstallerListener.jar and
RegistryUninstallerListener.jar.
As second change in install.xml we have to declare the native part JNI needs
the dll
121
<native type="3rdparty" name="COIOSHelper.dll" stage="both">
<os family="windows"/>
</native>
The dll should be placed in [IzPackRoot]/bin/native/3rdparty. The
stage “both” marks this dll not only to be put into the installation jar file but also to be
put into the uninstallation jar file. This will automatically be performed by the packager
and installation.
With these two changes the registry support will be incorporated into your instal-
lation. Without any more actions an uninstall key will be crated in the registry at the
installation. If you open the software manager of Windows, there will be an entry with
the variables $APP_NAME $APP_VER, e.g.:
IzPack 4.6.8 (build 2007.02.15)
The variables will be defined from the entries <appname> and <appversion> in the
<info> element of the installation definition file.
If you would like to have more informations in the uninstaller key or to create other
keys or values in the registry, you should create a specification file. The file should be
then refered to in install.xml as resource:
<resources>
...
<res src="mySubPath/MyRegistrySpec.xml"
id="RegistrySpec.xml"/>
</resources>
The id has to be RegistrySpec.xml. The real file name is not of any impor-
tance but should be written the same as in your source tree. It will be securer if you
do not use special chars like blanks or umlauts. Be aware! If you forget to refer to
registrySpec.xml in your install.xml no exception will be made because
this is a facultative file
The Basic XML Struture
The specification file for registry entries will be defined in the resource with the id
“ReigstrySpec.xml”. Sometimes it will help to lock into [IzPackRoot]/src/dtd/event/registry.dtd
or validate a written xml file with the dtd.
On this xml file a substitution will be performed using all defined IzPack vari-
ables. It is performed just before processing the packs. This is a common way of load-
ing spec files into custom actions. For more information see method com.izforge.izpack.util.SpecHelper.readSpec.
If you want to substitute some custom item, simply add a variable via idata.setVariable
in a custom panel before InstallPanel. The given variable name (id) should be
written into the xml file in the common variable notation.
The top level XML section is called <registry>. Only one is possible. The
<registry> is segregated in one or more <pack> elements. The single attribute
<name> of the <pack> corresponds to the same structure in install.xml (for more
information see also installation.dtd). <pack> elements can have a condition attribute
to express that a certain pack shall only be performed if the condition is fulfilled. Only
the “things” included in the <pack> are performed, if a pack with the same name was
chosen to be installed. Valid “things” are <key> <value>.
122
The registry stuff self allows to create keys and values directly under a registry root.
But Windows self allows this not on “real” roots like HKEY_LOCAL_MACHINE or
HKEY_USERS. Only link like roots as HKEY_CLASSES_ROOT are writeable. A try
e.g. on HKLM will be cause an exception and the installation fails. The error number
in this case normally will be 87 with the meaning “wrong parameter”, not “permission
denied”.
We do NOT recommend to create a key or a value directly on a registry root. IzPack
allows it now as a result of some user requests about it. Most it is not needed. E.g. an
extension entry under HKEY_CLASSES_ROOT is really an entry on HKEY_LOCAL_MACHINESoftwareClasses.
Why not write directly there?Reading is in opposite to writing no problem.
<key>: define a key
Key to be set at installation time into the Windows registry.
∙keypath : required. The path of the key in Windows syntax without the root. If
the key should be placed directly under a registry root (not recommended; often
not possible)) write the key name without any backslash.
∙root : required. The root of the key as symbol. Valid is one of HKCR HKCU
HKLM HKU HKPD HKCC HKDDS.
<value>: define a value
Value to be set at installation time into the Windows registry.
∙condition‘: optional. The id of condition which has to be fulfilled to write
this value into the registry.
∙name : required. The name of the value to be set or modified without a path.
The default value will be written as the empty string “”.
∙keypath : required. The key path under which the value should be placed in
Windows syntax without the root and value name. If the key of the value should
be placed directly under a registry root (if not exist, not recommended; often
not possible)) write the key name without any backslash. If the value should
be placed directly under a registry root (also not recommended and often not
possible) write as keypath the empty string “”.
∙root : required. The root of the key as symbol. Valid is one of HKCR HKCU
HKLM HKU HKPD HKCC HKDDS.
∙override : optional. Override an existent value or not. Valid is “true” or
“false”, default is “true”.
∙saveprevious : optional. Save the previous value or not. Valid is “true” or
“false”, default is “true”. Setting to “false” can result in better uninstall behavior
when an install is performed on top of an existing installation.
∙Contents part: accurately one of the following content elements should be
defined. It implicit defines the type of the value.
–string : contents for value to be set if it is a string (REG_SZ).
123
–string : if the string value starts with %, then the string is considered
as an expandable string (REG_EXPAND_SZ) which is useful to reference
Windows environment variables (e.g., in paths, etc).
–dword : contents for value to be set if it is an integer (Windows DWORD).
Only digits are valid. “48” is valid, “0x30” will be raise an NumberForma-
tException from java.lang.Long.parseLong.
–<bin> : element to handle one “line” of binary data.
*data : contents for value of type BINARY written as comma sepa-
rated list of hex. Only hex-digits are valid. “48, f4” is valid, “0x48,
0xf4” will be raise an NumberFormatException from java.lang.Integer.parseInt.
–<multi>: element to handle one contents string for MULTI_STRINGs.
*data : the contents for the element <multi>.
In the case of string values being updated, it is possible to reuse the old value and
have it for substitution through the OLD_KEY_VALUE variable, like in the following
example:
<value condition="izpack.windowsinstall.7" name="PATH"
keypath="Environment"
root="HKCU"
string="$OLD_KEY_VALUE;"$INSTALL_PATH\bin""/>
<value name="PATH"
keypath="SYSTEM\CurrentControlSet\Control\Session Manager\Environment"
root="HKLM"
string="$OLD_KEY_VALUE;"$INSTALL_PATH\bin""/>
Please note that the first value will only be written if the installation is running
on Windows 7. This is expressed through the reference to the builtin condition iz-
pack.windowsinstall.7.
Maybe the descriptions for type BINARY and MULTI_STRING are not fully de-
scriptive. Therefore as example the test entries in the registry specification file of Iz-
Pack:
<registry>
...
<pack name="Core" condition="izpack.windowsinstall.vista">
<value name="Path"
keypath="SOFTWARE\IzForge\IzPack\$APP_VER"
root="HKLM"
string="$INSTALL_PATH"/>
<value name="DWORD"
keypath="SOFTWARE\IzForge\IzPack\$APP_VER"
root="HKLM"
dword="42"/>
<value name="BIN"
keypath="SOFTWARE\IzForge\IzPack\$APP_VER"
root="HKLM" >
<bin data="42, 49, 4e, 20, 54, 45, 53, 54" />
<bin data="42, 49, 4e, 20, 54, 45, 53, 54" />
124
</value>
<value name="MULTI"
keypath="SOFTWARE\IzForge\IzPack\$APP_VER"
root="HKLM" >
<multi data="A multi string with three elements" />
<multi data="Element two"/>
<multi data="Element three"/>
</value>
</pack>
</registry>
Extended Uninstall Key
There is a special pack named UninstallStuff. If a pack will be declared like
<name="UninstallStuff">
the incorporated elements will be used for creating the uninstall key and values
instead of the build-in behavior. This pack name should be not used at an other point
of the installation. It is a virtual and should be used only in RegistrySpec.xml.
The registry handler self cannot ensure the uniqueness of an uninstaller key. There
is the special panel CheckedHelloPanel which does it. If no pack UninstallStuff
will be used, this will be performed full automatically. If the pack was declared, all
keypaths under it should be written as following:
...
<value name="DisplayName"
keypath="SOFTWARE\Microsoft\Windows\CurrentVersion\Uninstall\$UNI
NSTALL_NAME"
root="HKLM"
string="$UNINSTALL_NAME"/>
...
The IzPack variable $UNINSTALL_NAME will be defined in the CheckedHelloPanel.
With the “normal” HelloPanel it is undefined and the uninstall key catches the name
“$UNINSTALL_NAME”.
Uninstall Behavior
During uninstallation the deletion or modification of written keys or values will be
performed depending to the following rules:
∙A review of the registry will be performed only on supported operating systems
(current only on Windows).
∙A review of the registry will be performed only if the registry stuff was bound
for uninstallation.
∙Keys: Keys can only be deleted, a modification is not possible.
–A previous existent key will be NOT deleted.
–A newly created key will be deleted, if...
125
*no new values or subkeys are added after installation.
*no changes are made at the contents of values after installation.
With other words: if under the key something was changed between instal-
lation and uninstallation, the key will be persist.
∙Values:
–A newly created value will be deleted, if the contents at uninstall time is
the same as after installation.
–The contents of a previos existent value will be changed to the previous
contents (the contents before installation) if the contents at uninstall time is
the same as after installation.
In other words: if the contents of a value was changed between installation and
uninstallation this contents will be persist. There is no handling of parts of the
contents (important for type MULTI_STRING).
This conservative behavior cannot be changed to a user dependant voting because
there is no user interface for custom actions at uninstall time. Additional the registry
handler to not support voting.
Examples
There are the files
[IzPackRoot]/src/dist-files/IzPack-install-reg.xml
[IzPackRoot]/src/dist-files/RegistrySpec.xml
IzPack-install-reg.xml contains additional to the normal definition the
stuff needed to create an IzPack installer which sets on Windows an extended unin-
stall key and some keys and values under a “private” key. Compare with the “normal”
installation definition of IzPack.
RegistrySpec.xml will be referred by IzPack-install-reg.xml as re-
source. It contains the special pack named UninstallStuff for Izpack and defines
some additional keys and values.
Summary Logger (InstallerListener)
The listener SummaryLoggerInstallerListener can be used to log the sum-
mary of panels into a file. To use it, add following element to the listener section of
your installation config file.
<listeners>
<listener installer="SummaryLoggerInstallerListener"
uninstaller="SummaryLoggerInstallerListener" >
<os family="windows"/>
</listener>
</listeners>
The default path is
$INSTALL_PATH/Uninstaller/InstallSummary.htm
126
It can be changed with the subelement summarylogfilepath of the element
info of the installation description file. As example:
<info>
...
<summarylogfilepath>
$INSTALL_PATH/Uninstaller/MySummary.htm
</summarylogfilepath>
</info>
BSF (Bean Scripting Framework) Actions (InstallerListener and Unin-
stallerListener)
In this section the BSF custom actions are described in detail. It is only for developers
who are not acquainted with IzPack or it’s custom actions. In addition to the basics
there are some recapitulations of the common custom action techniques and some hints
for pitfalls. In the package com.izforge.izpack.event there are the BSF re-
lated custom actions BSFInstallerListener and BSFUninstallerListener.
As recapitulation, to add any custom action a reference in install.xml will be needed,
as example:
<listeners>
<listener installer="BSFInstallerListener"
uninstaller="BSFUninstallerListener" />
</listeners>
For all referenced listeners a jar file with the same name must exist in [IzPackRoot]/bin/customActions.
If compilation (packaging) fails with a “not found” error, first verify, that the jar file
exists. If not, create it. With this custom action it is possible to perform BSF calls at in-
stallation and/or uninstallation time. It is not only a wrapper for a comand-line ant call,
but also an intersected description file defining what target of the BSF script should
be performed at what time of (un)installation and specifies which properties for what
IzPack pack are to be used. The intersected description file is written as XML, the
corresponding dtd is placed in src/dtd/event/bsfaction.dtd. The description file should
be declared as a resource in the install.xml with the id “ BSFActionsSpec.xml“ e.g.
<resources>
...
<res id="BSFActionsSpec.xml"
src="myInstallSpecs/MyBSFActionsSpec.xml" />
...
</resources>
The precise spelling of the id is important. The base path of src is the installation
project path. If you want to use bsf, you have to specify it here. IzPack is designed
for running without dependencies on external software or libraries. Therefore it is
necessary to include everything needed, in this case ant self. The field <jar> in
installation.xml is predestinated for such cases, e.g.
<jar src="jar/bsf/bsf.jar" stage="both" />
In addition, you must also include the jar file for the language which you are going
to use in your BSF scripts, including any additional language dependencies, e.g.
127
<jar src="jar/groovy/groovy-all.jar" stage="both" />
Finally, if you are NOT going to embed your script content in the “BSFAction-
sSpec.xml”, but instead will be including it in an external resource, you must also
define that resource in your installer.xml file (see below for an explanation)
<res id="actions.groovy" src="myInstallSpecs/actions.groovy" />
The Basic XML Struture
A BSF action will be defined in the resource with the id “BSFActionsSpec.xml”. Some-
times it will help to lock into [IzPackRoot]/src/dtd/event/bsfaction.dtd
or validate a written xml file with the dtd.
On this xml file a substitution will be performed using all defined IzPack vari-
ables. It is performed just before processing the packs. This is a common way of load-
ing spec files into custom actions. For more information see method com.izforge.izpack.util.SpecHelper.readSpec.
If you want to substitute some custom item, simply add a variable via idata.setVariable
in a custom panel before InstallPanel. The given variable name (id) should be
written into the xml file in the common variable notation.
The top level XML section is called <bsfactions>. Only one is possible. The
<bsfactions> are segregated in one or more <pack> elements. The single at-
tribute <name> of the <pack> corresponds to the same structure in install.xml (for
more information see also installation.dtd). Only the “things” included in the <pack>
are performed, if a pack with the same name was chosen to be installed. The “things”
to be done to self are defined by the element <script>.
The <script> takes the following attributes:
∙language: required. The name of the BSF language which is being used. The
exact name of the language is dependent upon the BSF engine integration of that
particular language. Some example values are “javascript” and “groovy”.
∙src: optional. The name of a resource, defined in your installer.xml, which
contains the script contents. This may be used in lieu of embeddeding the script
contents in the BSFActionsSpec.xml file itself.
In addition to the possible attributes <script> can contain a CDATA section
which contains the script content, rather than using the “src” attibute. The different in-
staller/uninstaller phases are scripted by creating a symbol definition for that particular
phase. The symbol will then be called by the listener (if present), and the appropriate
phase variables defined. If a particular phase is not defined, it will be skipped.
NOTE: In some languages, such as groovy and jython, you must create the func-
tion as a closure, so that the symbol is globally defined. In other languages (such as
beanshell), you can create the function normally.
<script language="groovy" src="actions.groovy" />
OR
<script language="groovy"><![CDATA[
// Variables defined
// idata - installer data, of type AutomatedInstallerData
// npacks - # of packs selected
beforePacks = {
128
print "before packs";
}
// Variables defined
// idata - installer data, of type AutomatedInstallerData
afterPacks = {
print "after packs";
}
// Variables defined
// pack - pack information, of type Pack
// i - the package index
beforePack = {
print "before pack " + pack.name;
}
// Variables defined
// pack - pack information, of type Pack
// i - the package index
afterPack = {
print "before pack " + pack.name;
}
// Variables defined
// pack - pack information, of type Pack
// file - the dir which is to be created, of type File
beforeDir = {
print "before dir " + file.absolutePath;
}
// Variables defined
// pack - pack information, of type Pack
// file - the dir which was created, of type File
afterDir = {
print "after dir " + file.absolutePath;
}
// Variables defined
// pack - pack information, of type Pack
// file - the file which is to be installed, of type File
beforeFile = {
print "before file " + file.absolutePath;
}
// Variables defined
// pack - pack information, of type Pack
// file - the file which was installed, of type File
afterFile = {
print "after file " + file.absolutePath;
}
129
// Variables defined
// files - pack information, of type Pack
// variables - the variables which were used during the original install, of type Properties
beforeDeletion = {
print "before deletion";
}
// Variables defined
// files - pack information, of type Pack
// variables - the variables which were used during the original install, of type Properties
afterDeletion = {
print "after deletion";
}
// Variables defined
// file - the file which is to be deleted, of type File
// variables - the variables which were used during the original install, of type Properties
beforeDelete = {
print "before delete";
}
// Variables defined
// file - the file which was to be deleted, of type File
// variables - the variables which were used during the original install, of type Properties
afterDelete = {
print "after delete";
}
]]></script>
<script language="beanshell"><![CDATA[
void beforePacks() {
print "INSTALL_PATH=${INSTALL_PATH}";
}
]]></script>
More detailed examples can be downloaded from http://jira.codehaus.org/secure/
attachment/39246/sample.tar.gz and http://jira.codehaus.org/secure/attachment/39379/
sample2.tar.gz
IzPack utilities
The IzPack project includes a set of utilities that you may find useful.
These projects live outside the regular IzPack installer Subversion repository. You
can access it from http://svn.berlios.de/svnroot/repos/izpack/izpack-utils/ instead of
http://svn.berlios.de/svnroot/repos/izpack/izpack-src/ for IzPack itself.
They will be shipped in the official IzPack releases under their own pack.
130
Windows executable wrapper (izpack2exe)
Description
The 7-Zip project (see http://www.7-zip.org/) provides a so-called SFX for installers,
i.e., an image that can be use to create self-extracting Windows executables. Once its
content has been extracted, such a self-extracting executable can launch an executable
or a file. In the later case, it is assumed that there exists an association between a file
extension and a software component.
7-Zip SFX for installers works as follows:
1. an executable image is provided
2. a configuration file has to be written, specifying among other things the
executable or the file to be launched after the extraction phase
3. a 7-Zip archive containing the files (including the executable of file to be
launched)
4. these files simply need to be concatenated to form a SFX Windows exe-
cutable.
The IzPack Windows executable wrapper takes an IzPack-generated installer JAR
file, and wraps it inside a Windows SFX executable. This has several advantages,
among these two ones:
1. some users may find it strange to have a JAR and not an executable
2. by naming it with setup or install, Windows VISTA will perform a rights
elevation whereas IzPack cannot enforce it when launched as a regular
JAR.
And of course, you can ship a JAR and a Windows executable from the very same
IzPack installer descriptor!
We have customized the SFX image from the 7-Zip project as follows:
∙we have changed the icon
∙we have customized some strings to mention that this is a customized version.
While the rest of the work is licensed under the Apache License version 2, the sole
SFX module is licensed under the Lesser GNU General Public License version 2 or
later as required by the 7-Zip project.
Requirements
izpack2exe is written in Python. It depends on 7-Zip and optionnaly UPX, a tool that
can compresses executables.
In official IzPack releases, we provide this tool batteries-included on Windows,
i.e., we will provide:
∙izpack2exe as a Windows executable, so that you don’t need to install Python,
and
∙7-Zip and UPX executables, so you don’t have to download them.
131
Usage
The usage is quite easy:
usage: izpack2exe.py [options]
options:
-h, --help show this help message and exit
--file=FILE The installer JAR file / files (1 per bundled file, specify at least the installer JAR!)
--output=OUTPUT The executable file
--with-7z=P7Z Path to the 7-Zip executable
--with-upx=UPX Path to the UPX executable
--no-upx Do not use UPX to further compress the output
--launch-file File to launch after extract (e.g., native launcher)
A typical wrapping will be done like:
izpack2exe --file=installer.jar
Mac OS X Application bundle wrapper (izpack2app)
Description
izpack2app is the Mac OS X brother of izpack2exe. It bundles a JAR installer in-
side an application bundle, so that your installer will look like a regular Mac OS X
application.
To do that, we started from the Mac OS X Jar Bundler tool that you can find under
/Developer/Java. We bundled a Jar installer, then stripped it. Indeed, an application
bundle is nothing else but a structured set of files and directories.
What izpack2app does is simply:
1. copy the bundle files structure,
2. put your Jar at the good place, and
3. edit the Info.plist to reference your Jar.
Requirements
izpack2app is written in Python. It does not require any third-party module to work.
Python is bundled with Mac OS X and is mainstream on Linux and other Unix variants.
We ship it as a Windows executable in the official IzPack releases (and of course also
as a Python application!).
Usage
The usage is straightforward:
izpack2app.py installer.jar Installer.app
wraps installer.jar as Installer.app
132
Java Web Start JNLP file generator (izpack2jnlp)
Description
izpack2jnlp is able to generate Java Web Start JNLP files so that IzPack-based in-
stallers can also be shipped via Java Web Start.
Requirements
izpack2jnlp is written in Python and does not need third-party modules to work.
Please note that it only generates JNLP files: you must sign your installer JAR
before you actually upload them to a web server as Java Web Start refuses to launch
unsigned JARs.
Usage
You need to pass a few arguments on the command-line, run:
izpack2jnlp.py --help
to see them.
Apache License, Version 2.0
Overview
IzPack is license under the terms of the Apache License version 2.0.
Please note that IzPack may use some third-party libraries that are not released
under the same conditions (see the legal/ directory of an IzPack source or binary dis-
tribution).
Finally, note that IzPack is not affiliated to the Apache Software Foundation.
License
Apache License
Version 2.0, January 2004
http://www.apache.org/licenses/
TERMS AND CONDITIONS FOR USE, REPRODUCTION, AND DISTRIBUTION
1. Definitions.
"License" shall mean the terms and conditions for use, reproduction,
and distribution as defined by Sections 1 through 9 of this document.
"Licensor" shall mean the copyright owner or entity authorized by
the copyright owner that is granting the License.
"Legal Entity" shall mean the union of the acting entity and all
other entities that control, are controlled by, or are under common
control with that entity. For the purposes of this definition,
133
"control" means (i) the power, direct or indirect, to cause the
direction or management of such entity, whether by contract or
otherwise, or (ii) ownership of fifty percent (50%) or more of the
outstanding shares, or (iii) beneficial ownership of such entity.
"You" (or "Your") shall mean an individual or Legal Entity
exercising permissions granted by this License.
"Source" form shall mean the preferred form for making modifications,
including but not limited to software source code, documentation
source, and configuration files.
"Object" form shall mean any form resulting from mechanical
transformation or translation of a Source form, including but
not limited to compiled object code, generated documentation,
and conversions to other media types.
"Work" shall mean the work of authorship, whether in Source or
Object form, made available under the License, as indicated by a
copyright notice that is included in or attached to the work
(an example is provided in the Appendix below).
"Derivative Works" shall mean any work, whether in Source or Object
form, that is based on (or derived from) the Work and for which the
editorial revisions, annotations, elaborations, or other modifications
represent, as a whole, an original work of authorship. For the purposes
of this License, Derivative Works shall not include works that remain
separable from, or merely link (or bind by name) to the interfaces of,
the Work and Derivative Works thereof.
"Contribution" shall mean any work of authorship, including
the original version of the Work and any modifications or additions
to that Work or Derivative Works thereof, that is intentionally
submitted to Licensor for inclusion in the Work by the copyright owner
or by an individual or Legal Entity authorized to submit on behalf of
the copyright owner. For the purposes of this definition, "submitted"
means any form of electronic, verbal, or written communication sent
to the Licensor or its representatives, including but not limited to
communication on electronic mailing lists, source code control systems,
and issue tracking systems that are managed by, or on behalf of, the
Licensor for the purpose of discussing and improving the Work, but
excluding communication that is conspicuously marked or otherwise
designated in writing by the copyright owner as "Not a Contribution."
"Contributor" shall mean Licensor and any individual or Legal Entity
on behalf of whom a Contribution has been received by Licensor and
subsequently incorporated within the Work.
2. Grant of Copyright License. Subject to the terms and conditions of
this License, each Contributor hereby grants to You a perpetual,
134
worldwide, non-exclusive, no-charge, royalty-free, irrevocable
copyright license to reproduce, prepare Derivative Works of,
publicly display, publicly perform, sublicense, and distribute the
Work and such Derivative Works in Source or Object form.
3. Grant of Patent License. Subject to the terms and conditions of
this License, each Contributor hereby grants to You a perpetual,
worldwide, non-exclusive, no-charge, royalty-free, irrevocable
(except as stated in this section) patent license to make, have made,
use, offer to sell, sell, import, and otherwise transfer the Work,
where such license applies only to those patent claims licensable
by such Contributor that are necessarily infringed by their
Contribution(s) alone or by combination of their Contribution(s)
with the Work to which such Contribution(s) was submitted. If You
institute patent litigation against any entity (including a
cross-claim or counterclaim in a lawsuit) alleging that the Work
or a Contribution incorporated within the Work constitutes direct
or contributory patent infringement, then any patent licenses
granted to You under this License for that Work shall terminate
as of the date such litigation is filed.
4. Redistribution. You may reproduce and distribute copies of the
Work or Derivative Works thereof in any medium, with or without
modifications, and in Source or Object form, provided that You
meet the following conditions:
(a) You must give any other recipients of the Work or
Derivative Works a copy of this License; and
(b) You must cause any modified files to carry prominent notices
stating that You changed the files; and
(c) You must retain, in the Source form of any Derivative Works
that You distribute, all copyright, patent, trademark, and
attribution notices from the Source form of the Work,
excluding those notices that do not pertain to any part of
the Derivative Works; and
(d) If the Work includes a "NOTICE" text file as part of its
distribution, then any Derivative Works that You distribute must
include a readable copy of the attribution notices contained
within such NOTICE file, excluding those notices that do not
pertain to any part of the Derivative Works, in at least one
of the following places: within a NOTICE text file distributed
as part of the Derivative Works; within the Source form or
documentation, if provided along with the Derivative Works; or,
within a display generated by the Derivative Works, if and
wherever such third-party notices normally appear. The contents
of the NOTICE file are for informational purposes only and
do not modify the License. You may add Your own attribution
135
notices within Derivative Works that You distribute, alongside
or as an addendum to the NOTICE text from the Work, provided
that such additional attribution notices cannot be construed
as modifying the License.
You may add Your own copyright statement to Your modifications and
may provide additional or different license terms and conditions
for use, reproduction, or distribution of Your modifications, or
for any such Derivative Works as a whole, provided Your use,
reproduction, and distribution of the Work otherwise complies with
the conditions stated in this License.
5. Submission of Contributions. Unless You explicitly state otherwise,
any Contribution intentionally submitted for inclusion in the Work
by You to the Licensor shall be under the terms and conditions of
this License, without any additional terms or conditions.
Notwithstanding the above, nothing herein shall supersede or modify
the terms of any separate license agreement you may have executed
with Licensor regarding such Contributions.
6. Trademarks. This License does not grant permission to use the trade
names, trademarks, service marks, or product names of the Licensor,
except as required for reasonable and customary use in describing the
origin of the Work and reproducing the content of the NOTICE file.
7. Disclaimer of Warranty. Unless required by applicable law or
agreed to in writing, Licensor provides the Work (and each
Contributor provides its Contributions) on an "AS IS" BASIS,
WITHOUT WARRANTIES OR CONDITIONS OF ANY KIND, either express or
implied, including, without limitation, any warranties or conditions
of TITLE, NON-INFRINGEMENT, MERCHANTABILITY, or FITNESS FOR A
PARTICULAR PURPOSE. You are solely responsible for determining the
appropriateness of using or redistributing the Work and assume any
risks associated with Your exercise of permissions under this License.
8. Limitation of Liability. In no event and under no legal theory,
whether in tort (including negligence), contract, or otherwise,
unless required by applicable law (such as deliberate and grossly
negligent acts) or agreed to in writing, shall any Contributor be
liable to You for damages, including any direct, indirect, special,
incidental, or consequential damages of any character arising as a
result of this License or out of the use or inability to use the
Work (including but not limited to damages for loss of goodwill,
work stoppage, computer failure or malfunction, or any and all
other commercial damages or losses), even if such Contributor
has been advised of the possibility of such damages.
9. Accepting Warranty or Additional Liability. While redistributing
the Work or Derivative Works thereof, You may choose to offer,
and charge a fee for, acceptance of support, warranty, indemnity,
136
or other liability obligations and/or rights consistent with this
License. However, in accepting such obligations, You may act only
on Your own behalf and on Your sole responsibility, not on behalf
of any other Contributor, and only if You agree to indemnify,
defend, and hold each Contributor harmless for any liability
incurred by, or claims asserted against, such Contributor by reason
of your accepting any such warranty or additional liability.
END OF TERMS AND CONDITIONS
APPENDIX: How to apply the Apache License to your work.
To apply the Apache License to your work, attach the following
boilerplate notice, with the fields enclosed by brackets "[]"
replaced with your own identifying information. (Don’t include
the brackets!) The text should be enclosed in the appropriate
comment syntax for the file format. We also recommend that a
file or class name and description of purpose be included on the
same "printed page" as the copyright notice for easier
identification within third-party archives.
Copyright [yyyy] [name of copyright owner]
Licensed under the Apache License, Version 2.0 (the "License");
you may not use this file except in compliance with the License.
You may obtain a copy of the License at
http://www.apache.org/licenses/LICENSE-2.0
Unless required by applicable law or agreed to in writing, software
distributed under the License is distributed on an "AS IS" BASIS,
WITHOUT WARRANTIES OR CONDITIONS OF ANY KIND, either express or implied.
See the License for the specific language governing permissions and
limitations under the License.
Documentation license
This documentation is licensed under the terms of the Creative Commons Attribution-
ShareAlike 3.0 Unported License.
The details can be found at http://creativecommons.org/licenses/by-sa/3.0/, with
the complete license terms being available from http://creativecommons.org/licenses/
by-sa/3.0/legalcode
137
CookBooks
1. How To create an ODBC connection with IzPack (by Fabrice
Mirabile)
a. Problem
ODBC can be used as a layer between app servers and databases. It is quite convienent
to setup an ODBC connection at installation time when the installer can actually re-
trieve all info needed for such setup. How can we achieve that? And for which OS
?
b. Solution
After looking at many solutions, I found one that is very convenient in the sense that it
applies to both Windows and UNIX environment. In fact, the Windows ODBC Man-
ager applet offers two type of setup:
∙The system source
∙The file source
Basically, the system source writes in the registry and unfortunately does something
else that I couldn’t figure out. However, the file source is very similar to ODBC.ini
under UNIX. In ODBC.ini, you can define all connections into this file. For windows
it’s a bit different as you will have as many files as connections. But even though,
there’s a trick!
A fileDSN (the name given to this type of connection) for a connection to an Oracle
database will look like this :
[ODBC]
DRIVER=Oracle in OraHome92
UID=%{UID}
PWD=%{PWD}
DBQ=%{DBName}
SERVER=%{DBName}
Therefore you can realize straightforwardly that by changing the UID and PWD
you will make your connection point to any schemas you want.
In my company’s software, we use ODBC to make the connection between the
application and the database. Therefore, we use a batch to launch the server with a
bunch of parameters. One of them is the ODBC DSN. This one, using fileDSN, should
be defined as follows:
SET DSN=filedsn=$INSTALL_PATH\whateveryoulike.dsn
A very nice trick is to put in this batch the UID and the PWD so that it’s not needed
in the file directly and therefore you make the installer create different batch loaders for
different Schemas ! That’s very usefull when you have on the same DB many schema
and you want the same application server to access both of them without reinstalling
the whole thing !
In the following discussion, I’ll show you an example on how to prepare the in-
staller for creating a file at the root of the installation path which will permit to connect
to an Oracle DataBase.
138
c. Discussion
Install.xml:
<file src=“dsn.dsn” targetdir=“$INSTALL_PATH”/> <parsable type=“shell” tar-
getfile=“$INSTALL_PATH/whateveryoulike.dsn”/>
UserInputSpec.xml:
<userInput>
<panel order="0">
<field type="staticText" align="left" txt="Server Only:
Enter the settings for the ODBC Connection (DSN) environment variable:"
id="staticText3.text"/>
<field type="divider" align="center"/>
<field type="text" variable="UID">
<description align="left" txt=""
id="description2.text"/>
<spec txt="-> Enter UID:" id="text.label"
size="15" set=""/>
</field>
<field type="divider" align="center"/>
<field type="password" variable="PWD">
<description align="left" txt=""
id="description3.text"/>
<spec>
<pwd txt="-> Type the password for the
connection:" id="pwd.label" size="10" set=""/>
<pwd txt="-> Retype the password for the
connection:" id="pwd.label2" size="10" set=""/>
</spec>
<validator
class="com.izforge.sample.PWDValidator" txt="Both versions of the
password must match" id="error.label"/>
<processor
class="com.izforge.sample.PWDEncryptor"/>
</field>
<field type="space" align="center"/>
<field type="divider" align="center"/>
<field type="space" align="center"/>
<field type="text" variable="DBName">
<description align="left" txt=""
id="description4.text"/>
<spec txt="-> Enter the name of the Database:"
id="text.label" size="15" set=""/>
</field>
<field type="text" variable="DBPortNo">
<description align="left" txt="-> Enter the port
number for the database connection" id="description5.text"/>
<spec txt="(usually 1521 for oracle and 1433 for
MS SQL Server)" id="text.label" size="15" set=""/>
</field>
</panel>
139
</userInput>
BatchLoader.bat:
SET DSN=filedsn=$INSTALL_PATH\whateveryoulike.dsn;UID=$UID;PWD=$PWD
start $INSTALL_PATH\yourpath\yourapp
whateveryoulike.dsn:
[ODBC]
DRIVER=Oracle in OraHome92
DBQ=%{DBName}
SERVER=%{DBName}
Now during the installation the user will be prompt for the parameters (UID, PWD...)
and the file will be parsed.
Pretty simple !
What about SQL Server or other db you would say ? Well, there’s many ways
to do it, a simple would be to have a skeleton for kind of db and then during the
userinput ask for the database type (DB2, SQLSERVER,ORACLE...) and switch to
the corresponding file before parsing.
Let’s imagine you choose SQL Server in the userinputpanel, then instead of copy-
ing whateveryoulike.dsn, you can copy whateveryoulikeforMS.dsn which looks like
this:
[ODBC]
DRIVER=SQL Server
WSID=%{DBName}
APP=Microsoft Open Database Connectivity
SERVER=%{DBName}
In our installer, we create four packs, one for each DataBase. These packs copy the
corresponding file and parse them. Again, pretty simple !
Another remark, is that in this way if you choose more than one pack you could
setup more than one connection at once on different DB as long as UID and PWD are
the same. If not you’ll need a little trick...
I hope this helps and if anyone has a question, don’t hesitate to contact me via
http://developer.berlios.de/sendmessage.php?touser=12462 or post into the user/devel
list.
Done by Fabrice Mirabile on 20th of april 2005
2. Work around for pack and process dependence And Execution of
Java Classes that runs SQL/PLSQL
a. Problem
I’ve encountered in many cases the need to have a relation between job being executed
with the processpanel and a pack. Since IzPack doesn’t provide yet such feature I
worked out something that does the job.
I’ll explain it using an example on how to execute a java class that runs SQL state-
ments.
140
b. Solution
Here is what you will need:
∙UserInputSpec.xml
∙Install.xml
∙ProcessPanel.Spec.xml
Which are at the root of the installation folder.
Then you could have a folder with the SQL Stuffs, let’s call it update. So in update
you’ll have:
∙JDBCGeneral.class, I use JDBC to make a DataBase connection
∙launchsql.bat, which runs the class with all kind of arguments
∙ojdbc14.jar, oracle JDBC drivers
∙mssqlserver.jar, msutil.jar and msbase.jar, SQL server drivers (You could have
also drivers for other DB such as DB2 or Sybase)
∙Two folders for the SQL scripts:
–sqlsms, for SQL Server scripts
–sqlsoracle, for oracle scripts
Inside those folders you can have any number of SQL scripts. The scripts can be
written in this way for example: delete from task_category; insert into task_category
values(’LoadSource’,’Data Source Loading’,’source_loader_task.bat’);
Once you have this tree of files prepared you need to setup each file. The idea is that
the install should copy on the client side the SQL scripts depending on the pack(s) cho-
sen, plus the class and the batch file and then run the batch using the processpanel job.
Therefore only the scripts for a specific pack would be run and there is the dependence
we’re looking for!
c .Discussion
Install.xml:
<?xml version="1.0" encoding="iso-8859-1" standalone="yes" ?>
<installation version="1.0">
....
<resources>
<res id="ProcessPanel.Spec.xml"
src="ProcessPanel.Spec.xml"/>
<res id="userInputSpec.xml" src="UserInputSpec.xml"/>
....
</resources>
<panels>
.....
<panel classname="UserInputPanel"/>
141
<panel classname="ProcessPanel"/>
.....
</panels>
<packs>
......
<pack name="16-12-04" preselected="no" required="no"
os="windows">
<description>jar and SQL</description>
<singlefile src="updates\sqlsms\sql161204.txt"
target="$INSTALL_PATH\updates\sqlsms\sql161204.txt"/>
<singlefile src="updates\sqlsoracle\sql161204.txt"
target="$INSTALL_PATH\updates\sqlsoracle\sql161204.txt"/>
<file src="uninstaller.bat"
targetdir="$INSTALL_PATH\Uninstaller"/>
<file src="uninstall.ico"
targetdir="$INSTALL_PATH\Uninstaller"/>
<singlefile src="updates\msbase.jar"
target="$INSTALL_PATH\updates\msbase.jar"/>
<singlefile src="updates\mssqlserver.jar"
target="$INSTALL_PATH\updates\mssqlserver.jar"/>
<singlefile src="updates\msutil.jar"
target="$INSTALL_PATH\updates\msutil.jar"/>
<singlefile src="updates\ojdbc14.jar"
target="$INSTALL_PATH\updates\ojdbc14.jar"/>
<singlefile src="updates\jdbcgeneral.class"
target="$INSTALL_PATH\updates\JDBCGeneral.class"/>
<singlefile src="updates\class\axiom_lang.jar"
target="$INSTALL_PATH\class2\axiom_lang.jar"/>
<singlefile src="updates\class\axiom_lib.jar"
target="$INSTALL_PATH\class2\axiom_lib.jar"/>
<singlefile src="updates\launchsql.bat"
target="$INSTALL_PATH\updates\launchsql.bat"/>
<parsable
targetfile="$INSTALL_PATH\updates\launchsql.bat"/>
<parsable
targetfile="$INSTALL_PATH\Uninstaller\uninstaller.bat"/>
</pack>
<pack name="17-12-04" preselected="no" required="no"
os="windows">
<description>jar and SQL</description>
<singlefile src="updates\sqlsms\sql171204.txt"
target="$INSTALL_PATH\updates\sqlsms\sql171204.txt"/>
<singlefile src="updates\sqlsoracle\sql171204.txt"
target="$INSTALL_PATH\updates\sqlsoracle\sql171204.txt"/>
<file src="uninstaller.bat"
targetdir="$INSTALL_PATH\Uninstaller"/>
<file src="uninstall.ico"
targetdir="$INSTALL_PATH\Uninstaller"/>
<singlefile src="updates\msbase.jar"
142
target="$INSTALL_PATH\updates\msbase.jar"/>
<singlefile src="updates\mssqlserver.jar"
target="$INSTALL_PATH\updates\mssqlserver.jar"/>
<singlefile src="updates\msutil.jar"
target="$INSTALL_PATH\updates\msutil.jar"/>
<singlefile src="updates\ojdbc14.jar"
target="$INSTALL_PATH\updates\ojdbc14.jar"/>
<singlefile src="updates\jdbcgeneral.class"
target="$INSTALL_PATH\updates\JDBCGeneral.class"/>
<singlefile src="updates\launchsql.bat"
target="$INSTALL_PATH\updates\launchsql.bat"/>
<singlefile src="updates\class\axiom_lang.jar"
target="$INSTALL_PATH\class2\axiom_lang.jar"/>
<singlefile src="updates\class\axiom_lib.jar"
target="$INSTALL_PATH\class2\axiom_lib.jar"/>
<parsable
targetfile="$INSTALL_PATH\updates\launchsql.bat"/>
<parsable
targetfile="$INSTALL_PATH\Uninstaller\uninstaller.bat"/>
</pack>
.....
</packs>
</installation>
UserInputSpec.xml:
<userInput>
<panel order="0">
<field type="title" align="Left" txt="Database Connection
Parameters" bold="true" size="1" id="DBParam"/>
<field type="staticText" align="left" txt="The following
information are needed for making the connection with the database."
id="staticText1.text"/>
<field type="staticText" align="left" txt="Careful These
fields are case sensitive !" id="staticText2.text"/>
<field type="divider" align="center"/>
<field type="divider" align="center"/>
<field type="combo" variable="SQLServerType">
<spec txt="Select the type of DataBase you’re using "
id="SqlServerType.spec">
<choice processor="" txt="Not Needed !"
id="SQLServerType.notneeded" value="None" set="true"/>
<choice processor="" txt="Oracle"
id="SQLServerType.Oracle" value="Oracle"/>
<choice processor="" txt="Microsoft SQL Server"
id="SQLServerType.MS" value="SQLServer"/>
</spec>
</field>
<field type="text" variable="ServerNameTextInput">
<description align="left" txt="" id="description1.text"/>
<spec txt="Enter server name " id="text.label" size="15"
143
set="localhost"/>
</field>
<field type="divider" align="center"/>
<field type="text" variable="PortNbTextInput">
<description align="left" txt="-> Enter the port number
for the database connection" id="description5.text"/>
<spec txt="(usually 1521 for oracle and 1433 for MS SQL
Server)" id="text.label" size="15" set="1433"/>
</field>
<field type="divider" align="center"/>
<field type="text" variable="DBNameTextInput">
<description align="left" txt="" id="description3.text"/>
<spec txt="Enter Database name " id="text.label"
size="15" set="axiom"/>
</field>
<field type="divider" align="center"/>
<field type="text" variable="UserNameTextInput">
<description align="left" txt="" id="description4.text"/>
<spec txt="Enter Schema/User name for the Database "
id="text.label" size="15" set="axiom"/>
</field>
<field type="text" variable="UserPwdTextInput">
<description align="left" txt="" id="description5.text"/>
<spec txt="Enter Schema/User name password for the
Database " id="text.label" size="15" set="okta007"/>
</field>
</panel>
</userInput>
ProcessPanel.Spec.xml:
<processing>
<job name="Executing the Needed Queries">
<os family="windows" />
<executefile name="$INSTALL_PATH\updates\launchsql.bat"/>
</job>
</processing>
Launchsql.bat:
echo "Execution of SQL Queries \n"
java -classpath $INSTALL_PATH\updates\msutil.jar;$INSTALL_PATH\update
s\msbase.jar;$INSTALL_PATH\updates\mssqlserver.jar;$INSTALL_PATH\updates\
ojdbc14.jar;$INSTALL_PATH\updates\
JDBCGeneral
$INSTALL_PATH\updates\
$ServerNameTextInput
$PortNbTextInput
$DBNameTextInput
$UserNameTextInput
$UserPwdTextInput
$SQLServerType
144
JDBCGeneral.java: (of course you need the compiled .class !!! but I’m show-
ing the source code)
/**
*Parses a .sql file and runs them depending on DB settings
*through jdbc.
*
*@author Fabrice Mirabile
*@version 2.0
/
import java.*;
import java.sql.*;
import java.io.*;
import java.util.*;
import java.io.File;
public class JDBCGeneral{
private java.sql.Connection con = null;
private final String selectMethod = "cursor";
// Constructor
public JDBCGeneral(){}
public static void main(String[] argv) throws Exception
{
String folderpath = "";
final String folderpathbase = argv[0];
final String serverName= argv[1];
final String portNumber = argv[2];
final String databaseName= argv[3];
final String userName = argv[4];
final String password = argv[5];
final String SQLServerType = argv[6];
if (SQLServerType.equals("SQLServer")) {
final String url = "jdbc:microsoft:sqlserver://";
folderpath = folderpathbase.concat("sqlsms");
String classforname =
"com.microsoft.jdbc.sqlserver.SQLServerDriver";
JDBCGeneral myDbTest = new JDBCGeneral();
//myDbTest.displayDbPropertiesMS(classforname,url,ser
verName,portNumber, databaseName, userName, password);
String[] files =
myDbTest.getfilenamesMS(classforname,url,folderpath, serverName,
portNumber, databaseName, userName, password);
}
145
else if (SQLServerType.equals("Oracle")) {
final String url = "jdbc:oracle:thin:@";
folderpath = folderpathbase.concat("sqlsoracle");
//test if there’s no need for SQL Execution,
//check if null value is returned from file selection
on selecte path
String classforname =
"oracle.jdbc.driver.OracleDriver";
JDBCGeneral myDbTest = new JDBCGeneral();
//myDbTest.displayDbPropertiesOracle(classforname,url,s
erverName,portNumber, databaseName, userName, password);
String[] files =
myDbTest.getfilenamesOracle(classforname,url,folderpath,
serverName, portNumber, databaseName, userName, password);
}
}
public void displayDbPropertiesOracle(String classforname,
String url,String serverName, String portNumber, String
databaseName, String userName, String password){
java.sql.DatabaseMetaData dm = null;
java.sql.ResultSet rs = null;
try{
con=
this.getConnectionOracle(classforname,url,serverName,
portNumber, databaseName, userName, password);
if(con!=null){
dm = con.getMetaData();
System.out.println("Driver
Information");
System.out.println("\tDriver
Name: "+ dm.getDriverName());
System.out.println("\tDriver
Version: "+ dm.getDriverVersion ());
System.out.println("\nDatabase Information ");
System.out.println("\tDatabase Name: "+
dm.getDatabaseProductName());
System.out.println("\tDatabase Version: "+
dm.getDatabaseProductVersion());
System.out.println("Avalilable Catalogs ");
rs = dm.getCatalogs();
while(rs.next()){
System.out.println("\tcatalog: "+
rs.getString(1));
}
rs.close();
rs = null;
closeConnection();
}else System.out.println("Error: No
146
active Connection");
}catch(Exception e){
e.printStackTrace();
}
dm=null;
}
public void displayDbPropertiesMS(String classforname,
String url,String serverName, String portNumber, String
databaseName, String userName, String password){
java.sql.DatabaseMetaData dm = null;
java.sql.ResultSet rs = null;
try{
con=
this.getConnectionMS(classforname,url,serverName,
portNumber, databaseName, userName, password);
if(con!=null){
dm = con.getMetaData();
System.out.println("Driver
Information");
System.out.println("\tDriver
Name: "+ dm.getDriverName());
System.out.println("\tDriver
Version: "+ dm.getDriverVersion ());
System.out.println("\nDatabase Information ");
System.out.println("\tDatabase Name: "+
dm.getDatabaseProductName());
System.out.println("\tDatabase Version: "+
dm.getDatabaseProductVersion());
System.out.println("Avalilable Catalogs ");
rs = dm.getCatalogs();
while(rs.next()){
System.out.println("\tcatalog: "+
rs.getString(1));
}
rs.close();
rs = null;
closeConnection();
}else System.out.println("Error: No
active Connection");
}catch(Exception e){
e.printStackTrace();
}
dm=null;
}
private java.sql.Connection getConnectionMS(String
classforname, String url,String serverName, String portNumber,
String databaseName, String userName, String password){
try{
147
Class.forName(classforname);
con = java.sql.DriverManager.getConnect
ion(getConnectionUrlMS(url,serverName, portNumber,
databaseName),userName,password);
if(con!=null)
System.out.println("Connection Successful!");
}catch(Exception e){
e.printStackTrace();
System.out.println("Error Trace in
getConnection() : " + e.getMessage());
}
return con;
}
private String getConnectionUrlMS(String url,String
serverName, String portNumber, String databaseName){
return url+serverName+":"+portNumber+";databaseNa
me="+databaseName+";selectMethod="+selectMethod+";";
}
private java.sql.Connection getConnectionOracle(String
classforname, String url,String serverName, String portNumber,
String databaseName, String userName, String password){
try{
Class.forName(classforname);
con = java.sql.DriverManager.getConnect
ion(getConnectionUrlOracle(url,serverName, portNumber,
databaseName),userName,password);
if(con!=null)
System.out.println("Oracle Connection Successful!");
}catch(Exception e){
e.printStackTrace();
System.out.println("Error Trace in
getConnectionOracle() : " + e.getMessage());
}
return con;
}
private String getConnectionUrlOracle(String url,String
serverName, String portNumber, String databaseName){
return
url+serverName+":"+portNumber+":"+databaseName;
}
private String[] getfilenamesOracle(String classforname,
String url, String folderpath, String serverName, String portNumber,
String databaseName, String userName, String password) throws
FileNotFoundException,IOException{
String newfolderpath = folderpath + "\\";
File toto = new File(newfolderpath);
148
String [] thelist = toto.list();
for (int j=0; j<thelist.length; ++j)
{
//System.out.println("file n?" + j
+ " = " + thelist[j] + "\n");
String[] StatementsSQL =
SQLFileInput(newfolderpath + thelist[j]);
RunSQLOracle(StatementsSQL,classforname,url,serverName,
portNumber, databaseName, userName, password);
}
return thelist;
}
private String[] getfilenamesMS(String classforname, String
url, String folderpath, String serverName, String portNumber, String
databaseName, String userName, String password) throws
FileNotFoundException,IOException{
String newfolderpath = folderpath + "\\";
File toto = new File(newfolderpath);
String [] thelist = toto.list();
for (int j=0; j<thelist.length; ++j)
{
//System.out.println("file n?" + j + " =
" + thelist[j] + "\n");
String[] StatementsSQL =
SQLFileInput(newfolderpath + thelist[j]);
RunSQLMS(StatementsSQL,classforname,url,serverName,
portNumber, databaseName, userName, password);
}
return thelist;
}
/*
public String[] addToArray(String[] array, String s)
{
String[] ans = new String[array.length+1];
System.arraycopy(array, 0, ans, 0, array.length);
ans[ans.length - 1] = s;
return ans;
}
*/
public String[] SQLFileInput(String sqlinput) throws
FileNotFoundException,IOException {
BufferedReader br = new BufferedReader(new
FileReader(sqlinput));
List lines = new ArrayList();
int i = 0;
int h = 0;
String thisLine;
149
String[] SQLStatements = new String[1000];
while ((thisLine = br.readLine()) != null)
{
//System.out.println(thisLine);
SQLStatements[h] = thisLine;
h++;
}
/*for(String line = br.readLine();line != null;line =
br.readLine()) {
// split by semi-colon
InsertRows = line.split(";");
i++;
}
for (int j=0; j<SQLStatements.length; ++j)
{
if (SQLStatements[j] != null)
System.out.println("query n?" + j + "
= " + SQLStatements[j]);
}*/
return SQLStatements;
}
public void RunSQLOracle(String[] StatementsSQL, String
classforname, String url, String serverName, String portNumber,
String databaseName, String userName, String password){
try {
con=
this.getConnectionOracle(classforname,url,serverName,
portNumber, databaseName, userName, password);
Statement stAddUser = con.createStatement();
for (int i=0; i<StatementsSQL.length; ++i)
{
if (StatementsSQL[i] != null)
{
System.out.print(StatementsSQL[i] + "...");
int rowsAffected =
stAddUser.executeUpdate(StatementsSQL[i]);
if (rowsAffected == 1)
System.out.println("OK");
}
}
closeConnection();
}
catch(SQLException e) {
e.printStackTrace();
150
System.out.println("\nError Trace in
RunSQLOracle(): " + e.getMessage());
}
}
public void RunSQLMS(String[] StatementsSQL, String
classforname, String url, String serverName, String portNumber,
String databaseName, String userName, String password){
try {
con= this.getConnectionMS(classforname,
url,serverName, portNumber, databaseName, userName,
password);
Statement stAddUser = con.createStatement();
for (int i=0; i<StatementsSQL.length; ++i)
{
if (StatementsSQL[i] != null)
{
System.out.print(StatementsSQL[i] + "...");
int rowsAffected =
stAddUser.executeUpdate(StatementsSQL[i]);
if (rowsAffected == 1)
System.out.println("OK");
}
}
closeConnection();
}
catch(SQLException e) {
e.printStackTrace();
System.out.println("\nError Trace in RunSQLMS():
" + e.getMessage());
}
}
private void closeConnection(){
try{
if(con!=null)
con.close();
con=null;
}catch(Exception e){
e.printStackTrace();
}
}
}
To sum up:
The install.xml copy the files, the userinput ask for the DB connections, the pro-
cess.xml launch the class which takes as arguments the following entries:
∙a folder that will contain the sql files (each file is a sequence of sql queries semi-
colon separated). This folder contains subfolder for each type of DB
151
∙the server name of the machine hosting the DB
∙the port number of the connection (1433 for sql server and 1521 for oracle for
example)
∙name of the DB
∙username
∙username password
∙type of DB (oracle, sqlserver...) in order to execute the sql inside the correspond-
ing sub-folder
Once again, i hope you’ll find this useful and if anyone has a question, don’t hesitate
to contact me via http://developer.berlios.de/sendmessage.php?touser=12462 or post
into the user/devel list.
Done by Fabrice Mirabile on 20th of april 2005
Sample Install Definition
This shows an example of how to use many of the features and advanced features
discussed in many of the other sections of this documentation. Look in the sample
directory for a more basic example and all the necessary files and instructions to build
your first IzPack installer.
Normally, a build process will call IzPack from Ant using something like the fol-
lowing:
<!-- Allows us to use the IzPack Ant task, standalone-compiler.jar added to Ant lib -->
<taskdef name="izpack" classpath="${install.lib}/standalone-compiler.jar"
classname="com.izforge.izpack.ant.IzPackTask"/>
<!-- Run installer build -->
<echo message="Running IzPack to build the installer..."/>
<izpack input="install-definition.xml"
output="${output.dir}/${product.short.name}-${product.version}-install.jar"
installerType="standard"
inheritAll="true"
basedir="${temp.dir}"
compression="deflate"
compressionlevel="9"/>
<!-- Clean working directory -->
<echo message="Cleaning up working directory..."/>
<delete dir="${temp.dir}" quiet="true" includeemptydirs="true"/>
<echo message="Done."/>
install-definition.xml
<?xml version="1.0" encoding="iso-8859-1" standalone="yes" ?>
152
<installation version="1.0">
<!-- Ant properties in this file can be referenced with @{},
otherwise use variables below in installer files with ${} -->
<info>
<appname>@{product.name}</appname>
<appversion>@{product.version}</appversion>
<uninstaller name="remove.task" path="${INSTALL_PATH}/Uninstall" write="yes"/>
</info>
<guiprefs width="600" height="480" resizable="no">
<laf name="kunststoff">
<os family="unix" />
</laf>
<modifier key="useHeadingPanel" value="yes"/>
<modifier key="useHeadingForSummary" value="yes"/>
<modifier key="headingImageOnLeft" value="yes"/>
<modifier key="headingLineCount" value="2"/>
<modifier key="headingFontSize" value="1.5"/>
<modifier key="headingBackgroundColor" value="0x00ffffff"/>
<modifier key="headingPanelCounter" value="text"/>
<modifier key="headingPanelCounterPos" value="inHeading"/>
</guiprefs>
<locale>
<langpack iso3="eng"/>
</locale>
<!-- Need to define ant properties we want to use during install as variables -->
<variables>
<variable name="app.name" value="@{app.name}"/>
<variable name="UserPathPanelVariable" value="@{default.dest.dir.sql}"/>
<variable name="UserPathPanelDependsName" value="Install Database Server"/>
<variable name="jboss.version" value="@{jboss.version}"/>
<variable name="install.jboss.service" value="true"/>
</variables>
<resources>
<res id="box-out-32.png" src="@{install.res}/box-out-32.png"/>
<res id="customicons.xml" src="@{install.res}/custom.icons.xml"/>
<res id="CustomLangpack.xml_eng" src="@{install.res}/custom.eng.xml"/>
<res id="HTMLInfoPanel.info" src="@{install.res}/license-notice.html"/>
<res id="Heading.image" src="@{install.res}/heading-image.png"/>
<res id="Installer.image" src="@{install.res}/side-image.png" />
<res id="ProcessPanel.Spec.xml" src="@{build.dir}/processing-tasks.xml"/>
<res id="userInputSpec.xml" src="@{build.dir}/userInputSpec.xml" />
<res id="uninstaller.warning" src="@{install.res}/uninstall-warn.txt"/>
<!-- default-dir.txt is written by the calling build.xml -->
<res id="TargetPanel.dir" src="@{install.res}/default-dir.txt"/>
</resources>
153
<panels>
<panel classname="HelloPanel"/>
<panel classname="HTMLInfoPanel"/>
<panel classname="TargetPanel"/>
<panel classname="InstallationGroupPanel"/>
<panel classname="PacksPanel"/>
<panel classname="UserInputPanel" id="UserInputPanel.0"/>
<panel classname="UserInputPanel" id="UserInputPanel.1"/>
<panel classname="UserInputPanel" id="UserInputPanel.2"/>
<panel classname="UserPathPanel"/>
<panel classname="SummaryPanel"/>
<panel classname="InstallPanel"/>
<panel classname="ProcessPanel"/>
<panel classname="SimpleFinishPanel"/>
</panels>
<listeners>
<listener installer="SummaryLoggerInstallerListener">
<os family="windows"/>
</listener>
</listeners>
<packs>
<pack name="Main Application" required="yes" installGroups="New Application" >
<description>The first application deployed in a new JBoss application server.</description>
<file src="@{jboss.version}" targetdir="$INSTALL_PATH"/>
</pack>
<pack name="Install Database Server" required="no" preselected="yes" os="windows" installGroups="New Application">
<description>New server installation of the selected database as required by the application.</description>
<file src="postgresql" targetdir="$INSTALL_PATH"/>
<file src="sql" targetdir="$INSTALL_PATH"/>
<executable
targetfile="$INSTALL_PATH/postgresql/postgres_install_windows.bat"
stage="postinstall"
keep="true"
>
<args>
<arg value="${UserPathPanelVariable}"/>
<arg value="$HOST_NAME"/>
<arg value="${db.service.name}"/>
<arg value="${db.service.password}"/>
<arg value="${db.su.password}"/>
</args>
</executable>
</pack>
<pack name="JBoss Source Code" required="no" preselected="no" installGroups="New Application">
<description>The JBoss application server source is available as required by the LGPL.</description>
<file src="src" targetdir="$INSTALL_PATH/@{jboss.version}" />
</pack>
<pack name="Update Application" required="yes" installGroups="Update Existing Application">
154
<description>The required application files to update an existing installation.</description>
<file src="update" targetdir="$INSTALL_PATH"/>
</pack>
<pack name="Post-Install Tasks" required="yes">
<description>Configuration and cleanup required for the installation.</description>
<file src="ant" targetdir="$INSTALL_PATH"/>
<file src="post-install-tasks.bat" targetdir="$INSTALL_PATH"/>
<file src="build.xml" targetdir="$INSTALL_PATH"/>
<file src="Uninstall_PostgreSQL_and_Application.bat" targetdir="$INSTALL_PATH"/>
<file src="Uninstall_Application_Only.bat" targetdir="$INSTALL_PATH"/>
<parsable targetfile="$INSTALL_PATH/post-install-tasks.bat"/>
<parsable targetfile="$INSTALL_PATH/build.xml"/>
<parsable targetfile="$INSTALL_PATH/@{jboss.version}/bin/system.properties"/>
<parsable targetfile="$INSTALL_PATH/Uninstall_PostgreSQL_and_Application.bat"/>
<parsable targetfile="$INSTALL_PATH/Uninstall_Application_Only.bat"/>
</pack>
</packs>
<!-- The native libraries to add. This is required for creating shortcuts on Windows -->
<native type="izpack" name="ShellLink.dll"/>
</installation>
Sample userInputSpec.xml
Here’s an example 3 panel userInputSpec.xml file. You specify the use of this XML
document inside your install definition in the resource section like this (assuming your
ant build.xml uses a property called build.dir):
<resources>
<res id="userInputSpec.xml" src="@{build.dir}/userInputSpec.xml" />
</resources>
userInputSpec.xml
<userInput>
<!-- Install -->
<panel order="0">
<createForPack name="Main Application" />
<field type="title" txt="Import Keystores" bold="true" size="1" />
<field type="divider" align="top"/>
<!-- Keystore -->
<field type="staticText" align="left" txt="Existing SSL keystore to import:"/>
<field type="file" align="left" variable="existing.ssl.keystore">
<spec txt="" size="25" set=""/>
</field>
<field type="space"/>
<!-- Truststore -->
<field type="staticText" align="left" txt="Existing SSL truststore to import:"/>
<field type="file" align="left" variable="existing.ssl.truststore">
155
<spec txt="" size="25" set=""/>
</field>
<field type="space"/>
<!-- Signing Keystore -->
<field type="staticText" align="left" txt="Existing signing keystore to import:"/>
<field type="file" align="left" variable="existing.signing.keystore">
<spec txt="" size="25" set=""/>
</field>
<field type="space"/>
<field type="divider" align="bottom"/>
</panel>
<panel order="1">
<!-- Validate access to keystores with information from last panel -->
<createForPack name="Main Application" />
<field type="title" txt="SSL Keystore Settings" bold="true" size="1" />
<field type="divider" align="bottom"/>
<!-- Skip validation in case customer has something wrong they want to fix later -->
<field type="check" align="left" variable="skip.keystore.validation">
<spec txt=" Skip keystore password validation (not recommended)" size="25" true="true" false="false" set="false"/>
</field>
<field type="divider" align="top"/>
<!-- Keystore -->
<field type="combo" variable="existing.ssl.keystore.type">
<spec txt="Keystore type:" id="existing.ssl.keystore.type">
<choice txt="JKS" value="JKS" set="true"/>
<!--
<choice txt="PKCS12" value="PKCS12"/>
-->
</spec>
</field>
<field type="space"/>
<field type="text" align="left" variable="keystore.key.alias">
<spec txt="Keystore Key Alias:" size="25" set="alias-1"/>
</field>
<field type="password" align="left" variable="keystore.password">
<spec>
<pwd txt="Keystore Password:" size="25" set=""/>
<pwd txt="Retype Password:" size="25" set=""/>
</spec>
<validator class="com.izforge.izpack.util.PasswordEqualityValidator" txt="Both keystore passwords must match." id="key for the error text"/>
<validator class="com.izforge.izpack.util.PasswordKeystoreValidator" txt="Could not validate keystore with password and alias provided." id="key for the error text">
<param name="keystoreFile" value="${existing.ssl.keystore}"/>
<param name="keystoreType" value="${existing.ssl.keystore.type}"/>
<param name="keystoreAlias" value="${keystore.key.alias}"/>
<param name="skipValidation" value="${skip.keystore.validation}"/>
</validator>
</field>
<field type="space"/>
<!-- Truststore -->
<field type="combo" variable="existing.ssl.truststore.type">
156
<spec txt="Truststore type:" id="existing.ssl.truststore.type">
<choice txt="JKS" value="JKS" set="true"/>
<!--
<choice txt="PKCS12" value="PKCS12"/>
-->
</spec>
</field>
<field type="space"/>
<field type="password" align="left" variable="truststore.password">
<spec>
<pwd txt="Truststore Password:" size="25" set=""/>
<pwd txt="Retype Password:" size="25" set=""/>
</spec>
<validator class="com.izforge.izpack.util.PasswordEqualityValidator" txt="Both truststore passwords must match." id="key for the error text"/>
<validator class="com.izforge.izpack.util.PasswordKeystoreValidator" txt="Could not validate keystore with password and alias provided." id="key for the error text">
<param name="keystoreFile" value="${existing.ssl.truststore}"/>
<param name="keystoreType" value="${existing.ssl.truststore.type}"/>
<param name="skipValidation" value="${skip.keystore.validation}"/>
</validator>
</field>
<field type="divider" align="bottom"/>
</panel>
<panel order="2">
<!-- Validate access to signing keystore with information from last panel -->
<createForPack name="Main Application" />
<field type="title" txt="Signing Keystore Settings" bold="true" size="1" />
<field type="divider" align="bottom"/>
<!-- Skip validation in case customer has something wrong they want to fix later -->
<field type="check" align="left" variable="skip.keystore.validation">
<spec txt=" Skip keystore password validation (not recommended)" size="20" true="true" false="false" set="false"/>
</field>
<field type="divider" align="top"/>
<!-- Keystore -->
<field type="combo" variable="existing.signing.keystore.type">
<spec txt="Keystore type:" id="existing.signing.keystore.type">
<choice txt="JKS" value="JKS" set="true"/>
<!--
<choice txt="PKCS12" value="PKCS12"/>
-->
</spec>
</field>
<field type="space"/>
<field type="password" align="left" variable="signing.keystore.password">
<spec>
<pwd txt="Keystore Password:" size="20" set=""/>
<pwd txt="Retype Password:" size="20" set=""/>
</spec>
<validator class="com.izforge.izpack.util.PasswordEqualityValidator" txt="Both signing keystore passwords must match." id="key for the error text"/>
<validator class="com.izforge.izpack.util.PasswordKeystoreValidator" txt="Could not access keystore with password provided." id="key for the error text">
<param name="keystoreFile" value="${existing.signing.keystore}"/>
157
<param name="keystoreType" value="${existing.signing.keystore.type}"/>
<param name="skipValidation" value="${skip.keystore.validation}"/>
</validator>
</field>
<field type="space"/>
<!-- Signing Key 1 -->
<field type="text" align="left" variable="first.signing.keystore.key.alias">
<spec txt="First Signing Alias:" size="20" set="alias-1"/>
</field>
<field type="password" align="left" variable="first.signing.password">
<spec>
<pwd txt="First Signing Password:" size="20" set=""/>
<pwd txt="Retype Password:" size="20" set=""/>
</spec>
<validator class="com.izforge.izpack.util.PasswordEqualityValidator" txt="Both first signing key passwords must match." id="key for the error text"/>
<validator class="com.izforge.izpack.util.PasswordKeystoreValidator" txt="Could not validate keystore with password and first signing alias provided." id="key for the error text">
<param name="keystoreFile" value="${existing.signing.keystore}"/>
<param name="keystoreType" value="${existing.signing.keystore.type}"/>
<param name="keystorePassword" value="${signing.keystore.password}"/>
<param name="keystoreAlias" value="${first.signing.keystore.key.alias}"/>
<param name="skipValidation" value="${skip.keystore.validation}"/>
</validator>
</field>
<field type="space"/>
<!-- Signing Key 2 -->
<field type="text" align="left" variable="second.signing.keystore.key.alias">
<spec txt="Second Signing Alias:" size="20" set="crate-cmd-alias"/>
</field>
<field type="password" align="left" variable="second.signing.password">
<spec>
<pwd txt="Second Signing Password:" size="20" set=""/>
<pwd txt="Retype Password:" size="20" set=""/>
</spec>
<validator class="com.izforge.izpack.util.PasswordEqualityValidator" txt="Both second signing key passwords must match." id="key for the error text"/>
<validator class="com.izforge.izpack.util.PasswordKeystoreValidator" txt="Could not validate keystore with password and second signing alias provided." id="key for the error text">
<param name="keystoreFile" value="${existing.signing.keystore}"/>
<param name="keystoreType" value="${existing.signing.keystore.type}"/>
<param name="keystorePassword" value="${signing.keystore.password}"/>
<param name="keystoreAlias" value="${second.signing.keystore.key.alias}"/>
<param name="skipValidation" value="${skip.keystore.validation}"/>
</validator>
</field>
<field type="divider" align="bottom"/>
</panel>
</userInput>
158
