Manual
User Manual:
Open the PDF directly: View PDF ![]() .
.
Page Count: 42

Affiliates for All User Manual
by Pete Chown, Metathinking Ltd
Table of Contents
Introduction to Affiliates for All........................................................................1
Features for Affiliates........................................................................................3
Registration....................................................................................................3
Monitoring your Sales....................................................................................6
Choosing Banners.........................................................................................13
Features for Advertisers...................................................................................15
Managing Banners.......................................................................................16
Paying Affiliates...........................................................................................19
Managing Affiliates......................................................................................21
Managing Orders..........................................................................................23
Managing Payments.....................................................................................28
Installing Affiliates for All...............................................................................31
System Requirements..................................................................................31
Creating a Database and Database User...................................................32
Uploading Affiliates for All..........................................................................32
Upload Location.......................................................................................33
Transferring the Files..............................................................................34
Affiliates for All Configuration....................................................................34
Installing the Magento Module...................................................................37
Configuring Magento...................................................................................39
Subscribe to the Forum................................................................................39
i
ii
Introduction to Affiliates for All
If a company is offering products for sale on the Internet, they often want to
pay commission to people who send them new customers. The people who
refer new customers are usually called affiliates, and the company offering
the products is usually called the merchant or the advertiser.
Affiliates for All is the software you need to run an affiliate programme:
•You will need a way for new affiliates to sign up, without either you
or the affiliate going to a lot of trouble. With Affiliates for All, they
can sign up on your website, and you need not do anything at all.
•Affiliates for All will assign each order to the responsible affiliate, so
you know how much to pay each person at the end of your accounting
period.
•Your affiliates will need reporting functions, in order to see which
marketing efforts are resulting in sales. Affiliates for All provides
graphs of sales activity, and your affiliates can also retrieve the
individual orders if they want to. (It is up to you how much customer
information you give to your affiliates.)
•Affiliates for All provides the advertiser with an overall view of the
site, allowing management of the affiliates’ accounts and the list of
orders. In particular, the order list can be used to approve or
disapprove commissions.
•At the end of the accounting period, the affiliates will need to be
paid. Affiliates for All interfaces with PayPal® mass payment,
allowing the money to be sent automatically without the need to
write cheques or submit payments individually to your bank. At the
same time, the software is sufficiently flexible that you can use those
manual payment methods if you wish.
•Affiliates for All is free software. This means that you can modify it,
and pass copies to others, subject to certain conditions. The formal
1

Features for Affiliates
In this chapter, you will learn to use Affiliates for All from the point of view
of an affiliate. Affiliates have access to reports on their own performance,
but they are prevented from looking at other affiliates’ orders, or
reconfiguring the system.
Registration
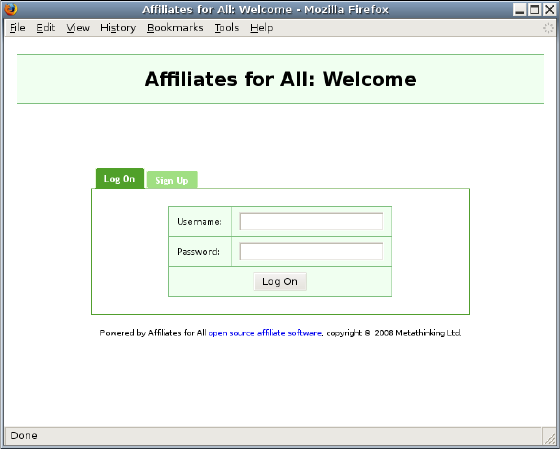
When you decide to join a new affiliate programme, you will be taken to the
Affiliates for All logon screen:
Now click the ‘Sign Up’ tab, and you will be able to register a new affiliate
account:
3
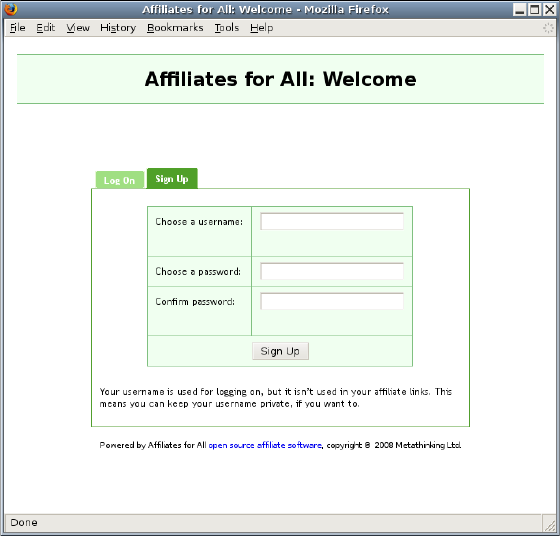
Fill in a username and password, then click ‘Sign Up’. You will then be
asked to fill in your details. There are three screens. In the first screen,
you will be asked to agree to the terms of the site’s affiliate programme. In
the second screen, you will be asked for your contact details. In the third
screen, you will be asked for the PayPal account where payment should be
sent.
4
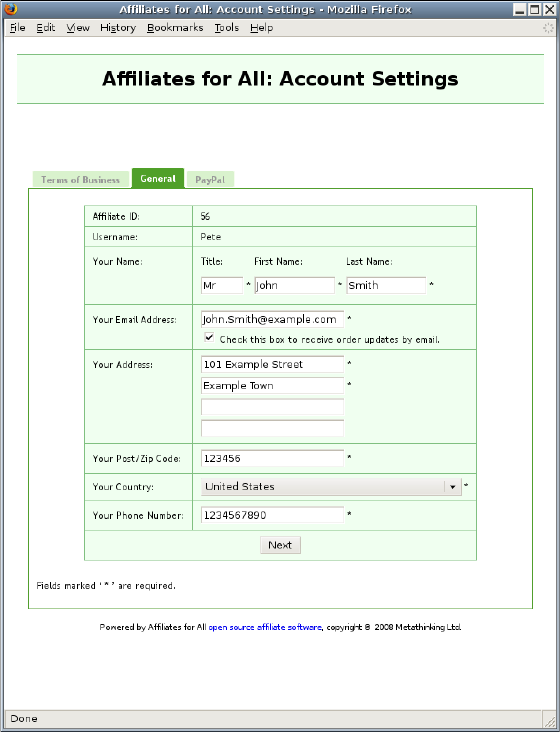
If the ‘order updates by email’ box is checked, you will receive an email
every time a new order is credited to your account. You will also receive an
email when one of your orders changes. For example, when the advertiser
approves commission for a particular order, the order status changes and so
you will receive an email.
The subject of all these emails begins ‘[affiliate]’. This will allow you to
filter them, so the emails do not become a nuisance, even if you generate a
lot of business.
5

Once you have provided the necessary details, you will be taken to an
overview of your account:
Monitoring your Sales
Now you have completed your registration, you have a number of links at
the top of the page which allow you to navigate around your account. You
are currently in the ‘Overview’ screen so clicking the ‘Overview’ link will not
take you anywhere new. ‘Your Account’ will take you to the screens you
have already seen, allowing you to amend your personal details. ‘Your
Orders’ will take you to a list of orders which have been credited to your
account. ‘Your Payments’ will take you to a list of payments which have
been made to you by the advertiser.
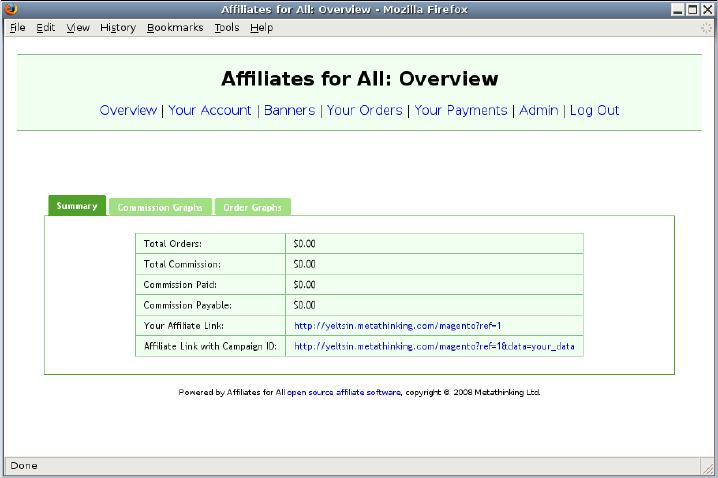
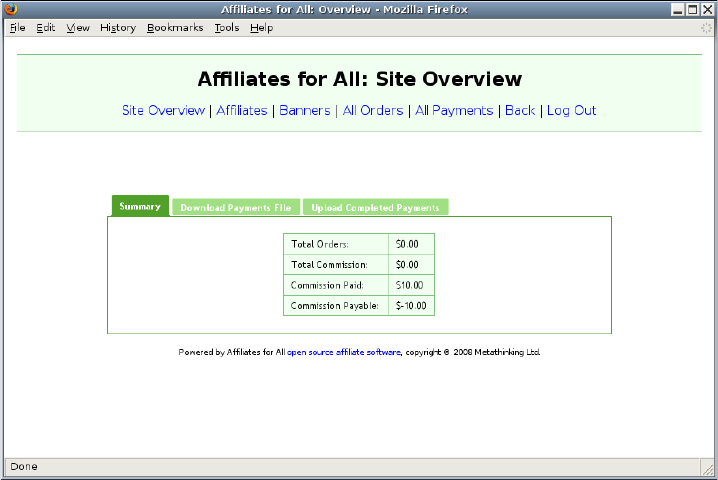
Within the Overview screen, you have three tabs. You start off on the
‘Summary’ tab, which gives some basic facts about your account:
6

Total Orders The total revenue attributable to
your customers.
Total Commission The commission which you have
earned on these orders.
Commission Paid The commission which the
advertiser has paid you so far.
Commission Payable The commission which the
advertiser currently owes to you.
Below these figures, there are two example affiliate links. When your
customers click one of these links, they will be taken to the advertiser’s
website, and any orders they place will be credited to you as the affiliate.
The second example link includes some extra information. In the example,
it is ‘your data’ but you can actually put anything you want there. (You
should be careful that the resulting link is still valid, though. For example,
links are not supposed to contain spaces. If you include one, you might find
that clicking on the link no longer works.)
The extra information—whether it is ‘your_data’ or something else—is
stored along with any orders that your customers place. You can use
different information in different links, allowing you to find out how your
marketing efforts compare. For example, if your marketing involves banner
adverts on websites, you could give each banner a name and use that in
place of ‘your_data’. When you look at your order list, you will see a banner
name against each order. This will tell you which banner is generating the
most sales.
Although the example links point to the front page of the advertiser’s
website, you can actually link to any page. Provided you include the
affiliate number and any extra data, the order will still be credited to your
account. This means that you can link to a specific product. For example, if
the advertiser is selling electronic goods, and you have written about iPods,
you can link directly to the iPod® page on the advertiser’s site. This usually
7

leads to more sales than a link to the front page; visitors who just arrive at
the front page might have difficulty finding the iPods and so end up buying
from a different site.
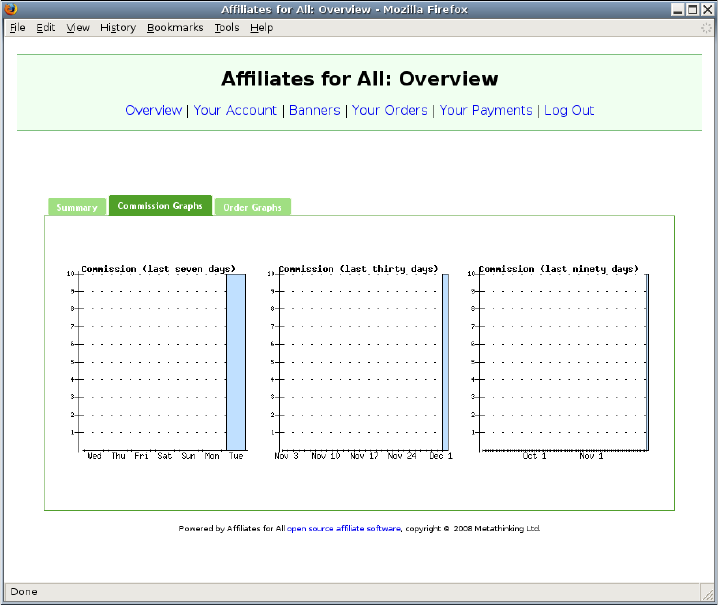
The other tabs on the ‘Overview’ screen provide graphs of the orders which
have been credited to your account. The ‘Commission’ graphs show your
earnings, while the ‘Order’ graphs show the number of orders rather than
the value. Because you have just registered, the graphs will be empty:
You may notice a disagreement between the graphs and the figures shown
in the summary. This is because the graphs show orders where the
commission has not yet been approved. Once the commission is approved,
those orders will show up in the summary as well.
The graphs will update immediately when an order is placed:
8
We will also be able to see this order on the ‘Orders’ screen. Click the ‘Your
Orders’ link at the top of the page:
9
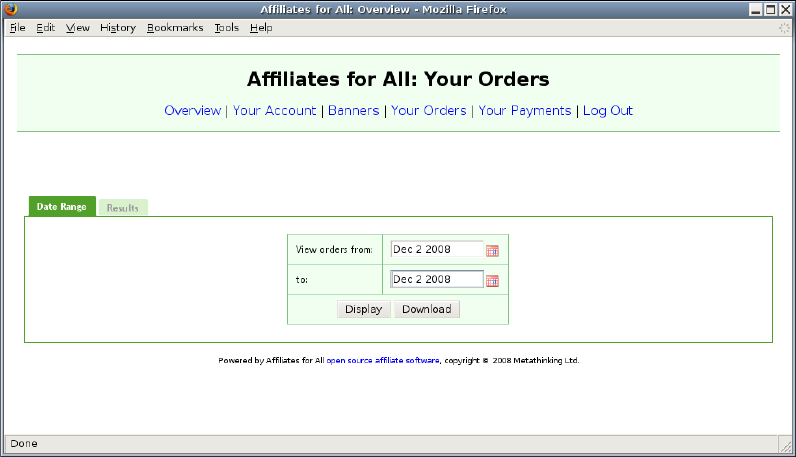
This screen will display all orders which were credited to your account, in a
certain range of dates. By default it shows today’s orders. Clicking the
calendar icons or typing new dates in the boxes will allow the date range to
be changed. The order which was shown on the graph, however, was placed
today so there is no need to change the date range. Clicking ‘Display’ shows
the order:
10

If there was a large number of orders, the links at the bottom could be used
to move between the pages.
Downloading the orders was the other option. This provides the same
information, but in tab separated value format. This can be loaded into a
spreadsheet or database, if you want to process the data in an automated
way. For example, you could load the data into a spreadsheet and then
calculate the return on investment for each of your banners. You would use
the ‘Campaign Data’ column for the banner name, and the ‘Commission’
column for the revenue.
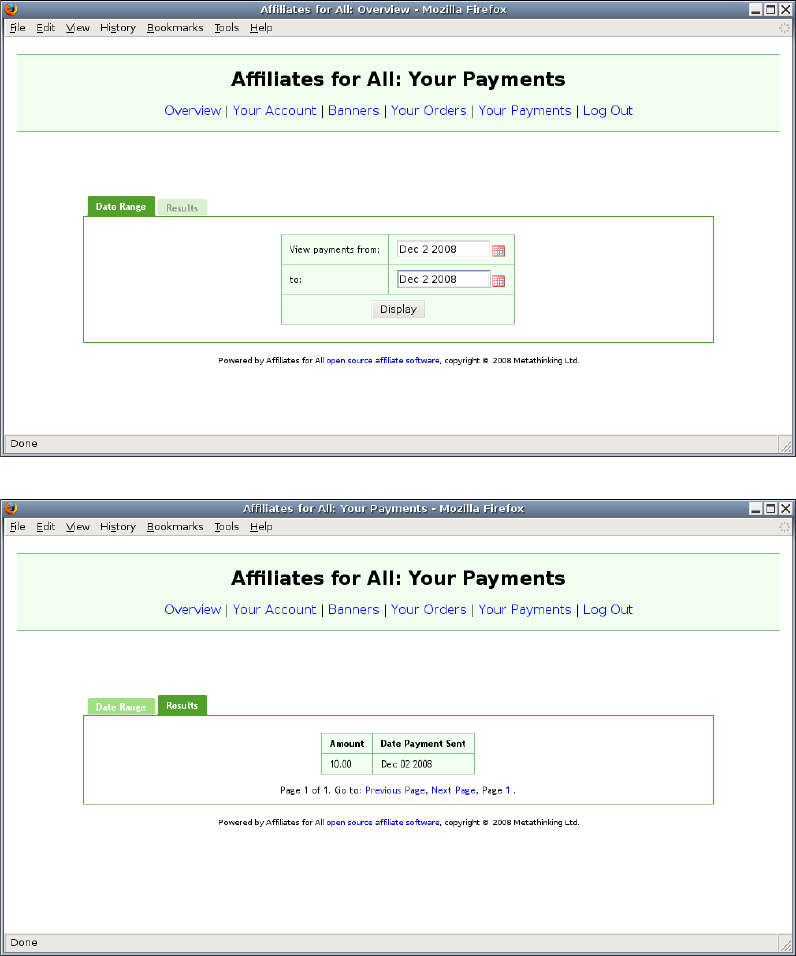
‘Your Payments’ allows you to see a list of payments which the advertiser
has made to you. This works in the same way as the order screens:
11
12
Choosing Banners
Affiliates for All can provide you with a selection of advertising banners, for
use on your own website. If there are banners available for you to use, there
will be a link called ‘Banners’ at the top of the screen. If there are no
banners available, the link will not appear.
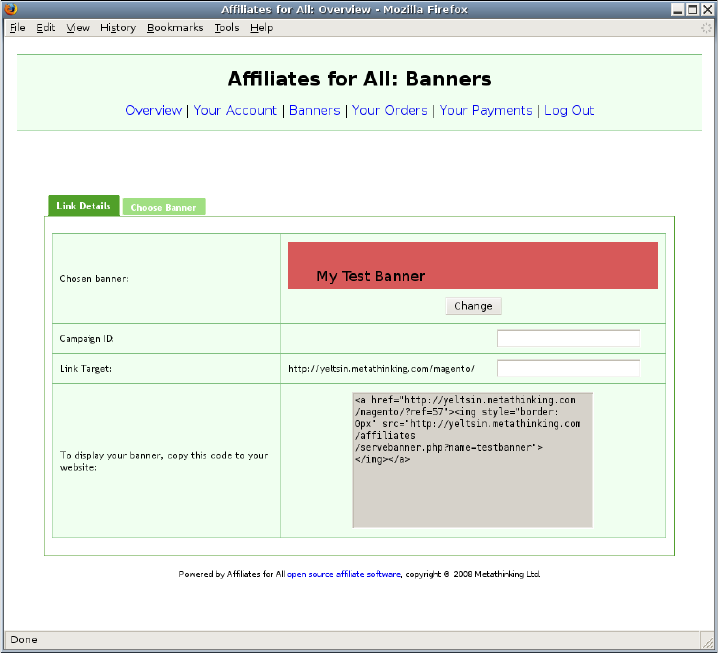
If the link is shown, click it to choose a banner:
On this screen:
13
•You can choose a banner. When you first go to this screen, the
system will select a banner automatically. If you want to keep this
one, you need not do anything. If you want to change it, click
‘Change’. This will display a list of banners, and you should then
click the one you want.
•The campaign ID is saved in the database against all orders placed
using this banner. You can use this to track the performance of each
banner, if you show more than one.
•When potential customers click your banner, they will be taken to a
landing page specified by the ‘link target’. To begin with, the link
target will show the default landing page for your selected banner,
but you can change it if you wish.
As you change these settings, the HTML code in the last box will change as
well. Once you are happy with the settings, copy the HTML code to your
website, in order to display your banner.
14
Features for Advertisers
When Affiliates for All is first installed, a single account is created. This
has username ‘Admin’ and password ‘Admin’. This account is privileged, so
you should change this password straight away. If you do not do this, people
could use the administration screens to award themselves commission.
When you log into this account, you will see that there is an additional link
at the top of the screen, which provides access to the administration
functions:
Clicking this link takes you to the administration screens. From here, you
have access to the site as a whole, rather than just a single affiliate account:
15
Managing Banners
Your affiliates can be provided with a selection of banners, which they can
use on their own websites. This feature is, however, entirely optional. The
banner functionality will only be shown to affiliates if at least one banner
has been uploaded into the system.
To manage the banners, go to the administration screens, and click
‘Banners’:
16
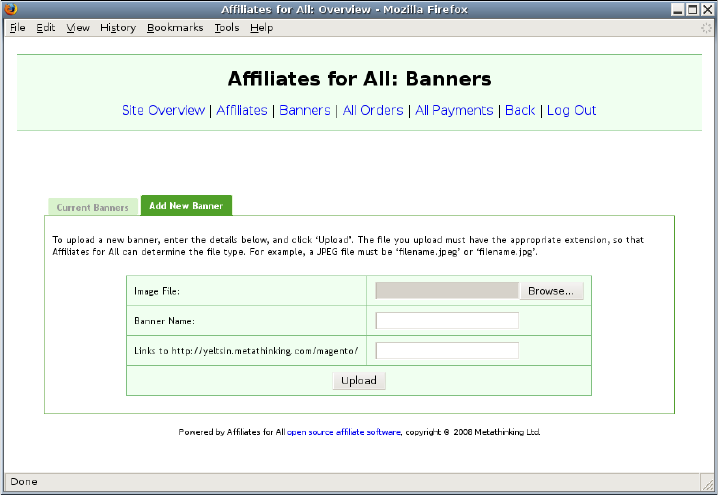
Because no banners have been uploaded, the left hand tab is disabled. You
can, however, add a new banner:
•Click the ‘Browse’ button and choose the file which contains the
banner. The file should contain an image in GIF, PNG or JPEG
format.
•The ‘Banner Name’ will be shown to affiliates. It is also used in
URLs, so you should avoid characters which are not allowed, such as
spaces.
•In the final box, enter the landing page for this banner. By default,
this will be the front page of your Magento installation, which is
often a good choice. However, you can also have banners which take
potential customers directly to a product page. For example, if you
have a banner which advertised iPods®, you would want people
clicking the banner to be taken to the iPod page.
17
Finally, click ‘Upload’ to put your banner onto the system.
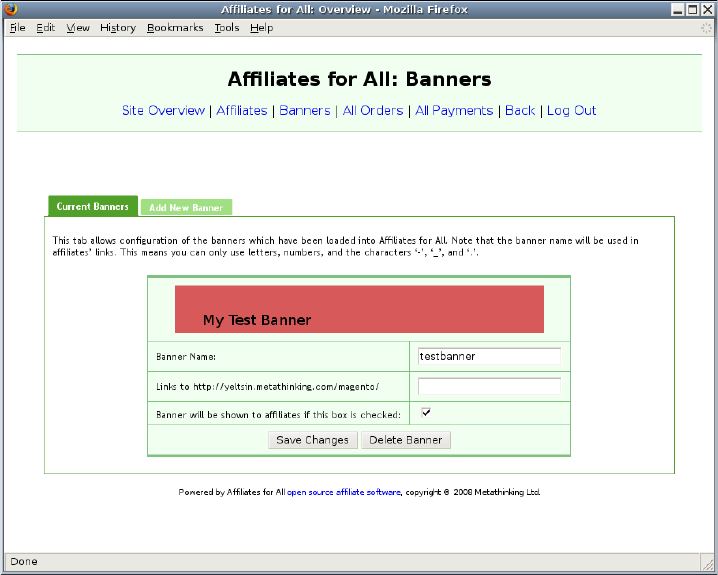
Once you have banners on the system, you can use the left hand tab to edit
them:
You can change the name or the landing page by editing the text. The
checkbox can be cleared if you want to continue serving a banner, but you
no longer want to suggest that affiliates start using it.
For example, suppose that in November, you uploaded some banners with a
Christmas theme. In January, you will probably want to withdraw these
banners, because there is no longer any reason to offer Christmas-themed
advertising to your affiliates. If a few affiliates are still using these
banners, though, you probably shouldn’t just delete them. This would cause
a ‘broken image’ icon to appear on those affiliates’ websites. Instead, clear
the checkbox. Then, when affiliates browse the available banners, they will
18
not see the Christmas ones. On the other hand, Affiliates for All will
continue serving these banners for anyone who is already using them.
After making any changes to the banner settings, click ‘Save Changes’ to
save them. If you have completely finished with a banner, click ‘Delete
Banner’ and it will be removed from the system.
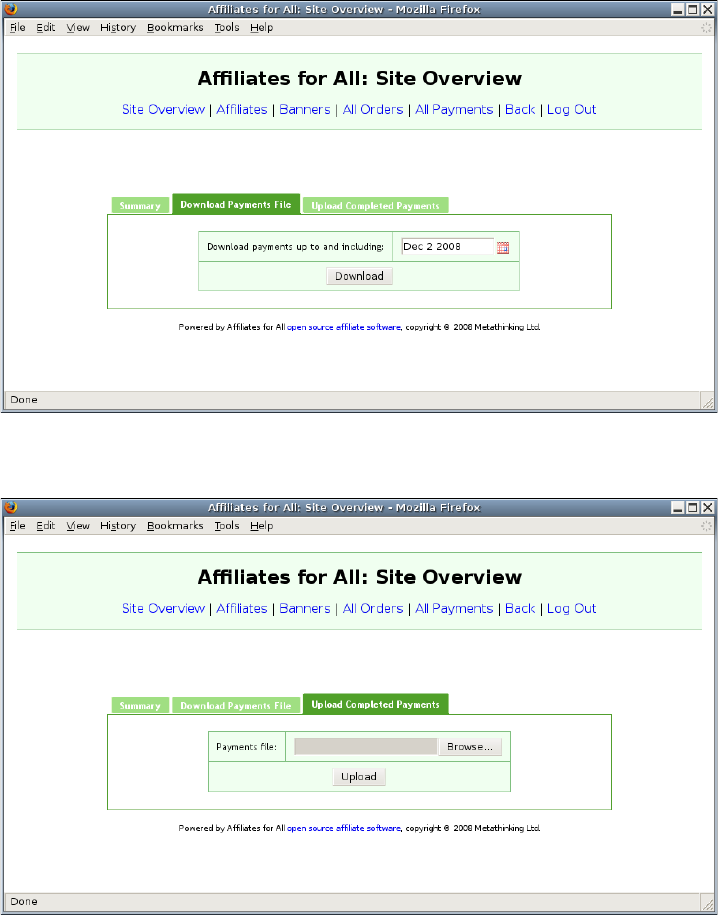
Paying Affiliates
Affiliates for All is designed to work with PayPal Mass Payment. You can
download a file in the form required by PayPal. Once you have this file, you
should upload it to PayPal and make the payments. When the payments
have been made successfully, you can upload the same file to Affiliates for
All. This will record the payments in the database, so when affiliates log
on, they will see that they have been paid.
You may want to make some manual changes to the payments, before
sending them to PayPal. For example, if you discovered that an affiliate
had sent spam, you might want to withhold payment until the matter was
resolved. In this situation, you can simply edit the file. You then upload
the amended file to both PayPal and Affiliates for All. Affiliates for All will
record payments from your amended file; as a result, there will be no
discrepancy between the payments made by PayPal and the payments
recorded by Affiliates for All.
19
20
Managing Affiliates
You will sometimes have to make changes to affiliates’ accounts, for
example to perform password resets, or to correct account information. To
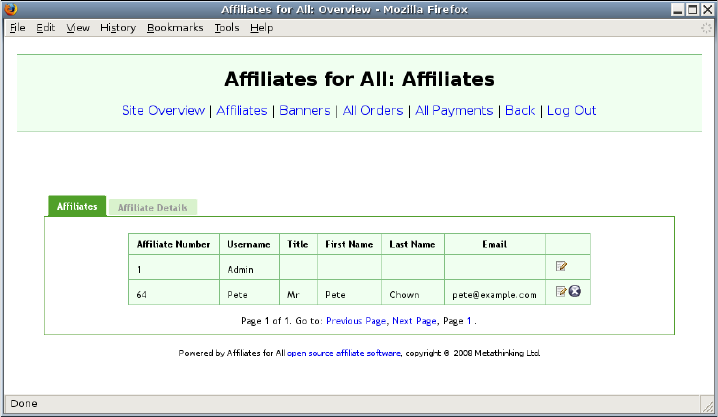
see the list of affiliates who are registered on your site, click ‘Affiliates’:
In this example, you have two affiliates registered, including the ‘Admin’
account. You will notice that the ‘Admin’ account has number 1, but the
‘Pete’ account does not have number 2. This comes about because account
numbers are not reused, if an affiliate is deleted from the system. (If the
numbers were reused, a new affiliate could be credited with orders placed
through a deleted affiliate’s left over links.)
If a large number of affiliates were registered, one page would be shown at
a time. You could then use the links at the bottom to move to the correct
page, just as you did when looking through pages of orders or payments.
The two icons on the right hand side allow affiliate accounts to be:
21
edited, or
deleted.
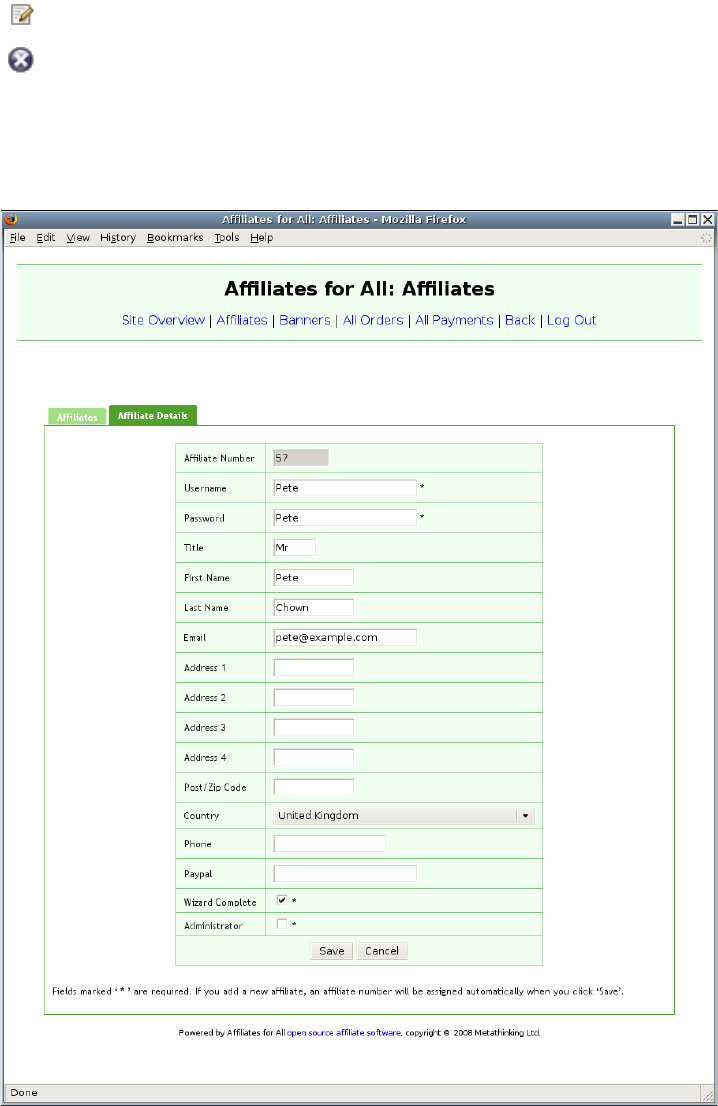
If you choose to edit an affiliate account, you will be given all the account
information on one page, like this:
22
As the administrator, you have access to two fields which affiliates cannot
see. ‘Wizard Complete’ is set if the affiliate has completed the registration
process. This involves agreeing to the terms and conditions, and providing
personal details. ‘Administrator’ is set if this user has access to the
administration screens. You can use this feature to create additional
privileged users, if you wish.
Managing Orders
As the administrator, you can see all the orders in the system, not just your
own. You can also edit the orders manually. You may want to do this in
order to:
•manually approve commission;
•manually revoke commission, perhaps for a refunded order; or
•correct errors.
To see the list of orders, click ‘All Orders’:
23
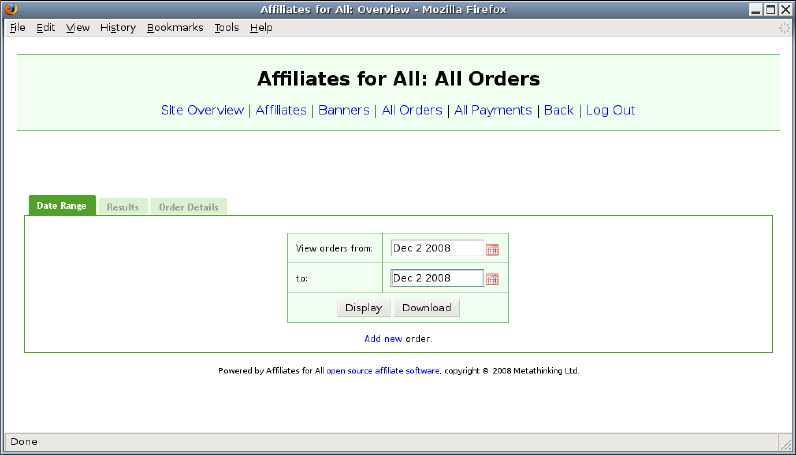
You can enter a date range, to display or download all orders between two
dates. You can also click ‘Add new order’ to insert a completely new order
into the system. When you add a new order, you will be taken to the order
details tab; see below.
If you choose to display the orders then a list will be displayed:
24
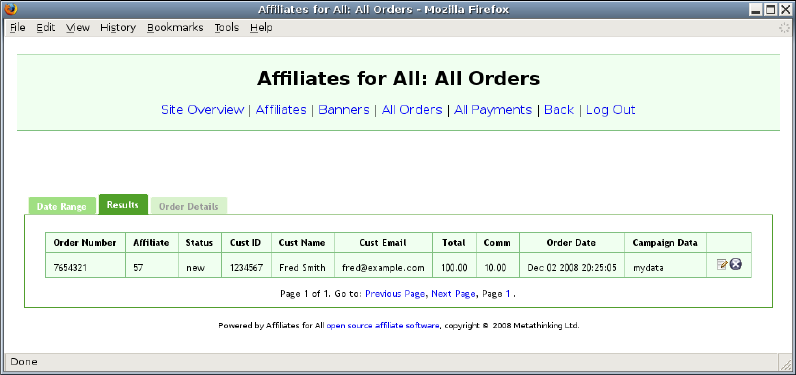
This list works in the same way as the list of affiliates. You can move to
different pages using the links at the bottom. You can also edit or delete the
order using the icons on the right. If you choose to edit the order, Affiliates
for All displays the ‘Order Details’ tab:
25

Any of these fields can now be edited. The order status affects the payment
of commission for this order:
•‘new’ orders show up in the affiliate’s graphs, but commission is not
paid. It is expected that the order will be moved to a different state
once it has been processed by the advertiser.
•‘shipped’ orders have been processed by the advertiser, so commission
is due. These orders show up in the affiliate’s graphs and totals.
Furthermore, when you download the payment list, ‘shipped’ orders
will be included in the total.
26
•‘cancelled’ orders do not carry commission and do not show up in any
totals.
•‘refunded’ orders are, perhaps surprisingly, treated the same as
‘shipped’ orders. However, it is expected that there will be a
corresponding ‘refund’ order. The refund order will have a later date
than the refunded order, and the commission will be negative. This
means that the ‘refunded’ order and the ‘refund’ order cancel each
other out.
If you decide not to pay commission for a particular order, you can either set
it to ‘cancelled’, or you can set it to ‘refunded’ and create a corresponding
‘refund’. Affiliates for All does not force you to do it either way, so the choice
is entirely yours. However, the intention is that you will set the order to
‘cancelled’ if you have not yet paid commission on it. If you pay the
commission and then want to claw it back, you will create a refund.
If you work this way, the accounting becomes simpler. Imagine that during
January, an affiliate is credited with some orders. At the end of January,
commission is paid. At that point, the affiliate’s overview screen will show
nothing owing. During February, you get some chargebacks from the bank,
and you want to claw back the commission for these orders.
•If you mark the orders cancelled, the affiliate’s commission total will
be lower at the end of February, so you will pay the right amount of
money. On the other hand, you will never be able to work out why
you paid the amount of money you did at the end of January. You
will know that you paid more money than now appears to be due, but
you will have no way of working out which orders ceased to be valid
after you paid January’s commission.
•If you create a refund, dated in February, you preserve that
information. You will be able to see which orders were thought to be
valid at the end of January, and when you changed your mind.
27
If you are concerned about preserving information, then, you should create
refunds. If you just want convenience, you might as well set any refunded
orders to ‘cancelled’.
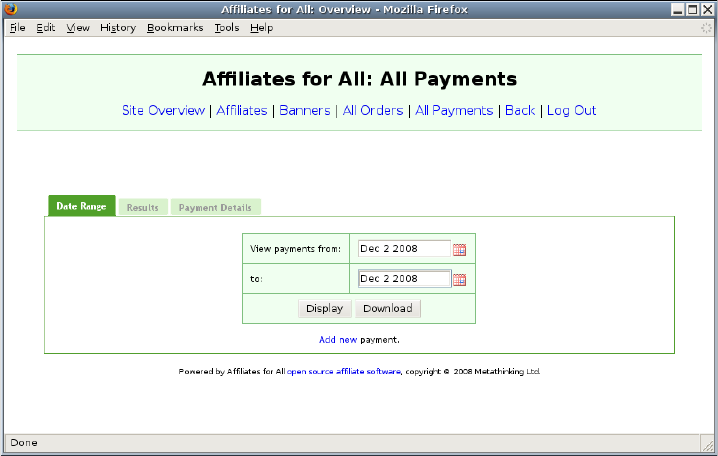
Managing Payments
Privileged accounts can see all the payments, as well as all the orders. To
manage the payments, click ‘All Payments’:
You now have the same options you had for the orders. You can enter a date
range, if you want to view or edit existing payments. Alternatively, you can
click the link at the bottom to add a completely new one.
If you prefer not to use the PayPal integration, you can add all the
payments here, by hand. For example, if you pay your affiliates by cheque
or manual bank transfer, you can enter a payment into Affiliates for All as
you complete each one.
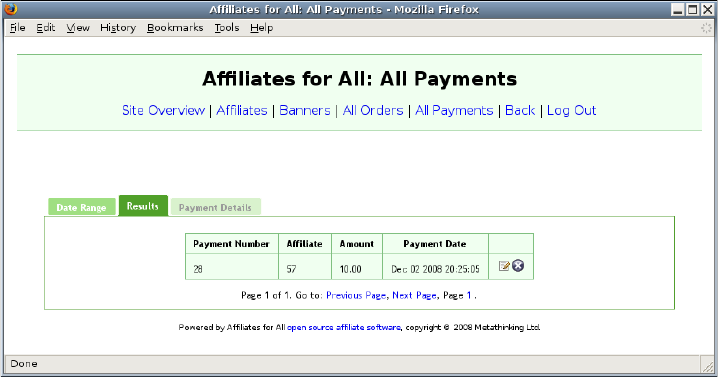
Again, clicking ‘Display’ takes you to a list of payments:
28
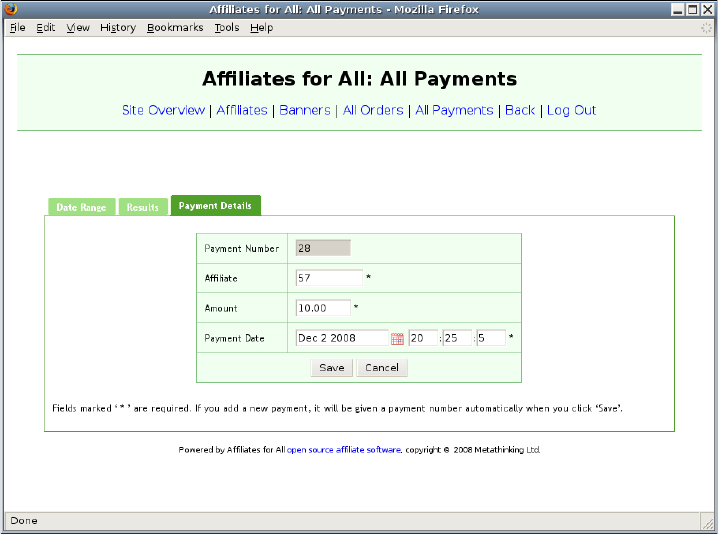
Editing the payment, or using the ‘Add new payment’ option, takes you to
the payment details tab:
29
30
Installing Affiliates for All
This chapter explains how to install Affiliates for All on a suitable hosting
service. Usually you will want to install Affiliates for All and Magento on
the same host, but this is not a requirement. You can install Affiliates for
All anywhere you want, though the Magento integration module must be
installed in Magento’s directory structure.
System Requirements
Before attempting to install Affiliates for All, you should make sure that
your hosting service satisfies the system requirements:
•PHP 5.2. Affiliates for All may work against earlier versions of PHP
5, but this has not been verified. It will not work against PHP 4 or
earlier.
•MySQL 5.0. Affiliates for All may work against the upcoming
MySQL 5.1, but this has not been verified. It will not work against
earlier versions of MySQL.
•Affiliates for All has been tested against Apache 2.2 running on
Linux. It should be possible to use other web servers or operating
systems, but you should know that there are some important settings
in a ‘.htaccess’ file. These files are read by Apache, but they may not
be read by other web servers. Before using a different web server,
you would need to convert these settings to the appropriate form.
•Compression should be enabled on your web server. On Apache, this
involves loading ‘mod_deflate’. If you cannot enable this module, you
must remove the reference to it from ‘.htaccess’.
If you do turn off compression, your affiliates will have to load 178k of data
before getting to the logon screen. With compression, this is reduced to 48k.
31
This is because Affiliates for All has to send a large amount of Javascript to
the browser before it can display any pages, and Javascript compresses well.
Fortunately, most of the Javascript can be cached, so this penalty only
applies when the user loads the first page. Subsequent pages are not
affected.
Creating a Database and Database User
Affiliates for All stores its data in MySQL, and creating a database is the
first step when installing. The way you create this database depends on
your hosting company, but they should have provided you with a suitable
tool.
If you want to install Affiliates for All multiple times on the same host, you
must create a separate database for each installation. If you are not doing
this, and you have the option of calling your database ‘affiliates’ you should
do so, as this will give you slightly less configuration work later.
Once you have created a database, you need to create a MySQL user for
Affiliates for All to use. Again, your hosting company should have provided
a tool for doing this.
The user you create must have full access to the database you have just
created. To maximise security, it should not be given access to any other
databases. It does not require access to the Magento database.
This user can, if you wish, be shared among multiple installations of
Affiliates for All. Again, if you call the user ‘affiliates’ you will have slightly
less configuration work to do later.
Uploading Affiliates for All
There are two steps in uploading Affiliates for All. First of all, you will
need to work out where to put it. Once you know that, you can transfer the
files.
32
Upload Location
From version 1.1.2, Affiliates for All can be uploaded to a directory which is
published by your web server. If you need to install an earlier version, you
should refer to the corresponding version of the manual, as the procedure is
rather different.
Most hosting services publish a particular directory on the web. For
example, suppose you have bought hosting for ‘www.example.com’. Your
hosting service would provide you with some disk space, into which you can
upload files. You may find that the file ‘/public_html/example.html’ gets
published on the web at ‘http://www.example.com/example.html’. In this
case, the hosting service is publishing the ‘public_html’ directory on the
web.
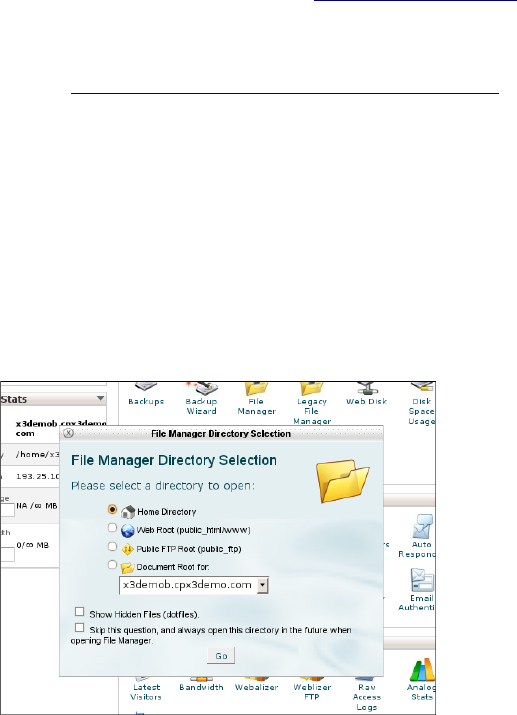
A lot of hosting services publish the ‘public_html’ directory, but some may
call it something different. If you are unsure, you could ask your hosting
company. In many cases, you can also see it in your control panel. For
example, this hosting service is using cPanel® for the control panel, and it
is publishing ‘/public_html/www’:
33

Next, you need to choose the URL where you want Affiliates for All to
appear. Using ‘www.example.com’ again, you might choose
‘http://www.example.com/afa’ or ‘http://www.example.com/affiliates’.
Once you have determined your web directory (‘public_html’ in the example
above) and chosen your URL, you are ready to upload Affiliates for All. To
work out the right place, join together the web directory and the URL you
have chosen. For the examples above, you would upload to ‘/public_html/afa’
in the first case, and ‘/public_html/affiliates’ in the second.
Transferring the Files
Now you should upload the Affiliates for All distribution. This will be a file
called ‘affiliates-x.y.z.tar.gz’ where x, y and z are the version number. This
distribution file contains all the smaller files which make up Affiliates for
All. These files must be extracted, and for doing this, you have two choices:
•You can upload the distribution file, then extract it on the server
using tools provided by your hosting company. If your hosting
company provides such tools, this is probably the easiest option.
•You can extract the files on your own computer, then upload the files
themselves. Affiliates for All contains nearly five hundred files, so
you should not try to upload them one at a time! However, if you
have a program that can upload a whole directory of files at once,
this is a viable option.
Affiliates for All Configuration
You should now go to the Affiliates for All directory, copy ‘config.inc.sample’
to ‘config.inc’ and begin editing it. Many of the parameters of your affiliate
programme are set in this file:
•‘$affiliate_referrer_parameter’ and ‘$affiliate_data_parameter’
control the parameters that are used in affiliate links. For example,
34

if the first was set to ‘a’ and the second to ‘b’ an affiliate link might
look like this:
http://www.example.com/shop?a=123&b=mydata
This would indicate that affiliate number 123 was to be credited with
any orders. Furthermore, the affiliate would like Affiliates for All to
tag any orders with the string ‘mydata’.
•‘$affiliate_cookie’ and ‘$cookie_lifetime’ set the name and lifetime of
the affiliate cookie. This cookie is set when a potential customer
follows an affiliate link, and is used to save the affiliate’s details until
an order is placed.
Although affiliate links use two parameters, there is only one cookie.
This cookie stores both the affiliate number and any data provided by
the affiliate.
•‘$currency’ and ‘$currency_code’ should contain the currency symbol
and the SWIFT code for the currency which is in use. Usually the
system uses the currency symbol; the currency code is only used in
the PayPal payment files. A list of currency codes can be found at
http://en.wikipedia.org/wiki/ISO_4217 .
•‘$store_home’ should be set to the base of your Magento installation,
for example ‘http://www.example.com/shop’.
•‘$commission_percent’ and ‘$commission_fixed’ control the amount of
commission that is paid. Using the first parameter, you can set the
commission to a percentage of the amount spent by the customer
(excluding shipping and taxes). Using the second parameter, you can
pay a fixed commission per order. If you give both, they add.
•‘$affiliate_programme_name’ appears at the top of every page when
the affiliates are using Affiliates for All. You can leave this as
‘Affiliates for All’ or you can give the name of your own affiliate
programme, for example ‘My Affiliate Programme’.
•‘$lifetime_revenue_share’ should be set to ‘TRUE’ or ‘FALSE’. If you
set it to ‘TRUE’ then all orders placed by a customer will be credited
to the affiliate who first introduced him. If you set it to ‘FALSE’ then
35

an affiliate will only receive credit until customers’ affiliate cookies
expire.
•‘$notification_email_address’ will receive an email when Affiliates for
All accepts an order, and also when an order changes state (‘new’ to
‘shipped’ for example). If you do not want emails, set
‘$notification_email_address’ to ''.
•‘$administrator_email_address’ is used in the ‘From:’ line of emails
sent by Affiliates for All. You should set it to an email address which
you control.
You could put your customer service address here, so you can respond
to affiliates who reply to automated notifications with questions.
Alternatively, if you find that you get annoying numbers of bounces,
you could set it to an auto-responder which explains how your
affiliates can send you account queries.
Do not leave this address as ‘example-admin@affiliatesforall.org’. You
will not be considered a valid sender for this address, which could
cause your notifications to be classified as spam.
•‘$order_fields_available’ and ‘$order_fields_headings’ control how
much information affiliates are given about their customers’ orders.
By default they will be given customer names and email addresses,
but you may want to take these out, if you do not want your affiliates
sending follow-up emails to your customers.
If you want to take a field out, you must take it out of both
‘$order_fields_available’ and ‘$order_fields_headings’.
•‘$rpc_secret’ is a password which is used to secure communication
between Affiliates for All and Magento. You can set it to anything
you like, but you should choose something which is difficult to guess.
Do not leave ‘$rpc_secret’ unchanged as this would allow people
to put fake orders in your system.
•‘$database_dsn’, ‘$database_username’ and ‘$database_password’
configure Affiliates for All’s connection to MySQL. If you used a
database name other than ‘affiliates’ you should change
36
‘$database_dsn’. If you used a database user other than ‘affiliates’
you should change ‘$database_username’. Finally, you should put
your database password in ‘$database_password’.
If your database is not on the same machine as your web server, you
should put the relevant address in ‘$database_dsn’ in place of
‘127.0.0.1’.
•‘$session_cookie_name’ is the name of the cookie which keeps track of
people who are logged on to Affiliates for All’s web interface. If you
have two copies of Affiliates for All installed on the same website, you
should change this in one of the copies, to stop them interfering with
each other. If you only have one copy of Affiliates for All installed,
you should not need to change this value.
•‘$terms_of_business’ contains the terms and conditions of your
affiliate programme. New affiliates will be asked to agree to these
terms before opening their accounts.
Once you have edited ‘config.inc’ you should find that you can log on to
Affiliates for All. In the next section, you will integrate Affiliates for All
with Magento, so that new orders show up in Affiliates for All. However,
before doing that, please change the ‘Admin’ password. There are people
who search the Internet, trying to get into systems by using the default
passwords, so it is important to change it straight away.
Installing the Magento Module
If you look in the Affiliates for All directory, you will find a subdirectory
called ‘carts’. In there you will find two more subdirectories. One is called
‘dummy’ and one is called ‘magento’.
The ‘dummy’ cart is used for testing Affiliates for All, and it is also a good
starting point if you want to write a new integration. However, normally
you should not need to use it.
The ‘magento’ subdirectory contains the Magento module which integrates
Affiliates for All into Magento. This module:
37
•sets an affiliate cookie when someone reaches Magento after clicking
on an affiliate link;
•copies new orders from Magento into Affiliates for All when an
appropriate affiliate cookie exists; and
•marks orders ‘shipped’ in Affiliates for All when the they are marked
‘complete’ in Magento.
At the time of writing, the Magento module does not process refunds
automatically. If you refund an order, and you want to cancel the associated
commission, you will have to do this manually through the Affiliates for All
administration screens.
To install the Magento module, you need to copy:
•the file ‘carts/magento/app/etc/modules/Afa.xml’ to ‘app/etc/modules’
in Magento, and
•the directory ‘carts/magento/app/code/local/Afa’ to ‘app/code/local’ in
Magento.
The module is now installed. However, for speed, Magento caches the pages
it serves to customers and administrators. These cached pages will not
contain Affiliates for All. So that Magento will regenerate these pages, you
must clear the cache. Go to System/Cache Management. Under ‘All Cache’
select ‘Refresh’. Click ‘Save Cache Settings’.
If you are logged into the Magento administration system, you should now
log out. This will force Magento to recalculate your access rights when you
log back in, which is important because the administrator now has access to
an additional component: the Affiliates for All module. If you try to
configure the Affiliates for All module without doing this, you will be told
38

that you have insufficient rights, even though you are logged into an
account that is supposed to have access to all of Magento.
Configuring Magento
You now need to configure Affiliates for All’s Magento module. Go to
‘System/Configuration’. Part way down the bar on the left hand side of the
screen, you will see a link labelled ‘Affiliates for All’. Click this link. You
will now see the Affiliates for All module configuration screen. (If you now
see a bar labelled ‘Affiliates for All Integration’ and nothing else, then the
configuration pane is currently closed. Click the arrow on the right hand
side of the bar to open it.)
You will now see two fields:
•Against ‘URL of Affiliates for All’ enter the URL under which
Affiliates for All is installed. Enter a URL like
‘http://www.example.com/afa’ and not, for example,
‘http://www.example.com/afa/index.php’.
•Against ‘Security Secret’ enter the password from ‘$rpc_secret’ in
‘config.inc’.
Affiliates for All will now be working with Magento. All you need to do now
is create links on the Magento site which will invite people to sign up for
your affiliate programme.
Subscribe to the Forum
Finally, you should register for an account at ‘http://www.affiliatesforall.org/
forums/’. Go to the ‘Announcements’ forum and click the ‘Subscribe forum’
link in the bottom left corner. You will now receive email every time a new
post is made in the announcements forum. A post is made in that forum
whenever a new version of Affiliates for All is released, so subscribing
means that you will be kept up to date with new releases.
39
