Manual
User Manual:
Open the PDF directly: View PDF ![]() .
.
Page Count: 290 [warning: Documents this large are best viewed by clicking the View PDF Link!]
- I Using the Pencil Code
- System requirements
- Obtaining the code
- Getting started
- Code structure
- Using the code
- Configuring the code to compile and run on your computer
- Adapting Makefile.src [obsolete; see Sect. 5.1]
- Changing the resolution
- Using a non-equidistant grid
- Diagnostic output
- Data files
- Video files and slices
- Averages
- Helper scripts
- RELOAD and STOP files
- RERUN and NEWDIR files
- Start and run parameters
- Physical units
- Minimum amount of viscosity
- The time step
- Boundary conditions
- Restarting a simulation
- One- and two-dimensional runs
- Visualization
- Running on multi-processor computers
- Running in double-precision
- Power spectrum
- Structure functions
- Particles
- Non-cartesian coordinate systems
- The equations
- Continuity equation
- Equation of motion
- Induction equation
- Entropy equation
- Transport equation for a passive scalar
- Bulk viscosity
- Equation of state
- Ionization
- Radiative transfer
- Self-gravity
- Incompressible and anelastic equations
- Dust equations
- Cosmic ray pressure in diffusion approximation
- Particles
- N-body solver
- Test-field equations
- Gravitational wave equations
- Troubleshooting / Frequently Asked Questions
- Download and setup
- Compilation
- Problems compiling syscalls
- Unable to open include file: chemistry.h
- Compiling with ifc under Linux
- Segmentation fault with ifort 8.0 under Linux
- The underscore problem: linking with MPI
- Compilation stops with the cryptic error message:
- The code doesn't compile,
- Some samples don't even compile,
- Internal compiler error with Compaq/Dec F90
- Assertion failure under SunOS
- After some dirty tricks I got pencil code to compile with MPI, ...
- Error: Symbol 'mpi_comm_world' at (1) has no IMPLICIT type
- Error: Can't open included file 'mpif.h'
- Pencil check
- The pencil check complains for no reason.
- The pencil check reports MISSING PENCILS and quits
- The pencil check reports unnecessary pencils
- The pencil check reports that most or all pencils are missing
- Running the pencil check triggers mathematical errors in the code
- The pencil check still complains
- The pencil check is annoying so I turned it off
- Running
- Periodic boundary conditions in start.x
- csh problem?
- run.csh doesn't work:
- Code crashes after restarting
- auto-test gone mad...?
- Can I restart with a different number of cpus?
- Can I restart with a different number of cpus?
- fft_xyz_parallel_3D: nygrid needs to be an integer multiple...
- Unit-agnostic calculations?
- Visualization
- General questions
- II Programming the Pencil Code
- III Appendix
- Timings
- Coding standard
- Some specific initial conditions
- Some specific boundary conditions
- High-frequency filters
- Special techniques
- Runs and reference data
- Numerical methods
- Curvilinear coordinates
- Switchable modules
- Startup and run-time parameters
- Startup parameters for start.in
- Runtime parameters for run.in
- Parameters for print.in
- Parameters for video.in
- Parameters for phiaver.in
- Parameters for xyaver.in
- Parameters for xzaver.in
- Parameters for yzaver.in
- Parameters for yaver.in
- Parameters for zaver.in
- Boundary conditions
- Initial condition parameter dependence
- IV Indexes

Contributors to the code
(in inverse alphabetical order according to their user name)
An up to date list of Pencil Code contributors can be found at GitHub.
wladimir.lyra Wladimir Lyra California State University/JPL
weezy S. Louise Wilkin University of Newcastle
wdobler Wolfgang Dobler Potsdam
vpariev Vladimir Pariev University of Rochester
torkel Ulf Torkelsson Chalmers University
tavo.buk Gustavo Guerrero Stanford University
thomas.gastine Thomas Gastine MPI for Solar System Research
theine Tobias (Tobi) Heinemann IAS Princeton
tarek Tarek A. Yousef University of Trondheim
sven.bingert Sven Bingert MPI for Solar System Research
steveb Steve Berukoff UCLA
snod Andrew Snodin University of Newcastle
pkapyla Petri K¨
apyl¨
a University of Helsinki
nils.e.haugen Nils Erland L. Haugen SINTEF
ngrs Graeme R. Sarson University of Newcastle
NBabkovskaia Natalia Babkovskaia University of Helsinki
mreinhardt Matthias Rheinhardt University of Helsinki
mkorpi Maarit J. K¨
apyl¨
a (n´
ee Korpi, Mantere) University of Helsinki
miikkavaisala Miikka V¨
ais¨
al¨
a University of Helsinki
mee Antony (tOnY) Mee University of Newcastle
mcmillan David McMillan York University, Toronto
mattias Mattias Christensson formerly at Nordita
koenkemel Koen Kemel Nordita, Stockholm
karlsson Torgny Karlsson Nordita
joishi Jeff S. Oishi Kavli Institute for Particle Astrophysics
joern.warnecke J¨
orn Warnecke MPI for Solar System Research, Lindau
Iomsn1 Simon Candelaresi University of Dundee, Dundee
fadiesis Fabio Del Sordo Nordita, Stockholm
dorch Bertil Dorch University of Copenhagen
boris.dintrans Boris Dintrans Observatoire Midi-Pyr´
en´
ees, Toulouse
dhruba.mitra Dhrubaditya Mitra Nordita, Stockholm
ccyang Chao-Chin Yang Lund Observatory
christer Christer Sandin University of Uppsala
Bourdin.KIS Philippe Bourdin MPI for Solar System Research
AxelBrandenburg Axel Brandenburg Nordita
apichat Apichat Neamvonk University of Newcastle
amjed Amjed Mohammed University of Oldenburg
alex.i.hubbard Alex Hubbard Am. Museum Nat. History
michiel.lambrechts Michiel Lambrechts Lund Observatory, Lund University
anders Anders Johansen Lund Observatory, Lund University
mppiyali Piyali Chatterjee University of Oslo
Copyright c
2001–2017 Wolfgang Dobler & Axel Brandenburg
Permission is granted to make and distribute verbatim copies of this manual provided
the copyright notice and this permission notice are preserved on all copies.
iii
Permission is granted to copy and distribute modified versions of this manual under
the conditions for verbatim copying, provided that the entire resulting derived work is
distributed under the terms of a permission notice identical to this one.
iv
License agreement and giving credit
The content of all files under :pserver:$USER@svn.nordita.org:/var/cvs/brandenb are
under the GNU General Public License (http://www.gnu.org/licenses/gpl.html).
We, the PENCIL CODE community, ask that in publications and presenta-
tions the use of the code (or parts of it) be acknowledged with reference to
the web site http://www.nordita.org/software/pencil-code/ or (equivalently) to.
https://github.com/pencil-code/pencil-code. As a courtesy to the people involved in
developing particularly important parts of the program (use svn annotate src/*.f90 to
find out who did what!) we suggest to give appropriate reference to one or several of the
following (or other appropriate) papers (listed here in temporal order):
Dobler, W., Haugen, N. E. L., Yousef, T. A., & Brandenburg, A.: 2003, “Bottleneck ef-
fect in three-dimensional turbulence simulations,” Phys. Rev. E 68, 026304, 1-8
(astro-ph/0303324)
Haugen, N. E. L., Brandenburg, A., & Dobler, W.: 2003, “Is nonhelical hydromag-
netic turbulence peaked at small scales?” Astrophys. J. Lett. 597, L141-L144
(astro-ph/0303372)
Brandenburg, A., K ¨
apyl¨
a, P., & Mohammed, A.: 2004, “Non-Fickian diffusion and
tau-approximation from numerical turbulence,” Phys. Fluids 16, 1020-1027
(astro-ph/0306521)
Johansen, A., Andersen, A. C., & Brandenburg, A.: 2004, “Simulations of dust-
trapping vortices in protoplanetary discs,” Astron. Astrophys. 417, 361-371
(astro-ph/0310059)
Haugen, N. E. L., Brandenburg, A., & Mee, A. J.: 2004, “Mach number dependence
of the onset of dynamo action,” Monthly Notices Roy. Astron. Soc. 353, 947-952
(astro-ph/0405453)
Brandenburg, A., & Multam ¨
aki, T.: 2004, “How long can left and right handed life forms
coexist?” Int. J. Astrobiol. 3, 209-219 (q-bio/0407008)
McMillan, D. G., & Sarson, G. R.: 2005, “Dynamo simulations in a spherical shell of
ideal gas using a high-order Cartesian magnetohydrodynamics code,” Phys. Earth
Planet. Int.153, 124-135
Heinemann, T., Dobler, W., Nordlund, ˚
A., & Brandenburg, A.: 2006, “Radiative transfer
in decomposed domains,” Astron. Astrophys. 448, 731-737 (astro-ph/0503510)
Dobler, W., Stix, M., & Brandenburg, A.: 2006, “Convection and magnetic field genera-
tion in fully convective spheres,” Astrophys. J. 638, 336-347 (astro-ph/0410645)
Snodin, A. P., Brandenburg, A., Mee, A. J., & Shukurov, A.: 2006, “Simulating field-
aligned diffusion of a cosmic ray gas,” Monthly Notices Roy. Astron. Soc. 373, 643-
652 (astro-ph/0507176)
Johansen, A., Klahr, H., & Henning, T.: 2006, “Dust sedimentation and self-sustained
Kelvin-Helmholtz turbulence in protoplanetary disc mid-planes,” Astrophys. J.
636, 1121-1134 (astro-ph/0512272)
de Val-Borro, M. and 22 coauthors (incl. Lyra, W.): 2006, “A comparative study
of disc-planet interaction,” Monthly Notices Roy. Astron. Soc. 370, 529-558
(astro-ph/0605237)
Johansen, A., Oishi, J. S., Mac Low, M. M., Klahr, H., Henning, T., & Youdin, A.: 2007,
“Rapid planetesimal formation in turbulent circumstellar disks,” Nature 448,
1022–1025 (arXiv/0708.3890)
Lyra, W., Johansen, A., Klahr, H., & Piskunov, N.: 2008, “Global magnetohydrody-
namical models of turbulence in protoplanetary disks I. A cylindrical potential
v
on a Cartesian grid and transport of solids,” Astron. Astrophys. 479, 883-901
(arXiv/0705.4090)
Brandenburg, A., R ¨
adler, K.-H., Rheinhardt, M., & K¨
apyl¨
a, P. J.: 2008, “Magnetic diffu-
sivity tensor and dynamo effects in rotating and shearing turbulence,” Astrophys.
J. 676, 740-751 (arXiv/0710.4059)
Lyra, W., Johansen, A., Klahr, H., & Piskunov, N.: 2008, “Embryos grown in the dead
zone. Assembling the first protoplanetary cores in low-mass selfgravitating cir-
cumstellar disks of gas and solids,” Astron. Astrophys. 491, L41-L44
Lyra, W., Johansen, A., Klahr, H., & Piskunov, N.: 2009, “Standing on the shoulders of
giants. Trojan Earths and vortex trapping in low-mass selfgravitating protoplan-
etary disks of gas and solids,” Astron. Astrophys. 493, 1125-1139
Lyra, W., Johansen, A., Zsom, A., Klahr, H., & Piskunov, N.: 2009, “Planet formation
bursts at the borders of the dead zone in 2D numerical simulations of circumstel-
lar disks,” Astron. Astrophys. 497, 869-888 (arXiv/0901.1638)
Mitra, D., Tavakol, R., Brandenburg, A., & Moss, D.: 2009, “Turbulent dynamos in spher-
ical shell segments of varying geometrical extent,” Astrophys. J. 697, 923-933
(arXiv/0812.3106)
Haugen, N. E. L., & Kragset, S.: 2010, “Particle impaction on a cylinder in a crossflow
as function of Stokes and Reynolds numbers,” J. Fluid Mech. 661, 239-261
Rheinhardt, M., & Brandenburg, A.: 2010, “Test-field method for mean-field coefficients
with MHD background,” Astron. Astrophys. 520, A28 (arXiv/1004.0689)
Babkovskaia, N., Haugen, N. E. L., Brandenburg, A.: 2011, “A high-order public domain
code for direct numerical simulations of turbulent combustion,” J. Comp. Phys.
230, 1-12 (arXiv/1005.5301)
Johansen, A., Klahr, H., & Henning, Th.: 2011, “High-resolution simulations of planetes-
imal formation in turbulent protoplanetary discs,” Astron. Astrophys. 529, A62
Johansen, A., Youdin, A. N., & Lithwick, Y.: 2012, “Adding particle collisions to the for-
mation of asteroids and Kuiper belt objects via streaming instabilities,” Astron.
Astrophys. 537, A125
Lyra, W. & Kuchner, W. : 2013, “Formation of sharp eccentric rings in debris disks with
gas but without planets,” Nature 499, 184–187
Yang, C.-C., & Johansen, A.: 2016, “Integration of Particle-Gas Systems with Stiff Mu-
tual Drag Interaction,” Astrophys. J. Suppl. Series 224, 39
This list is not always up-to-date. We therefore ask the developers to check in new rele-
vant papers, avoiding however redundancies.
vi
Foreword
This code was originally developed at the Turbulence Summer School of the Helmholtz
Institute in Potsdam (2001). While some SPH and PPM codes for hydrodynamics and
magnetohydrodynamics are publicly available, this does not generally seem to be the
case for higher order finite-difference or spectral codes. Having been approached by peo-
ple interested in using our code, we decided to make it as flexible as possible and as
user-friendly as seems reasonable, and to put it onto a public
CVS
repository. Since
21 September 2008 it is distributed via https://github.com/pencil-code/pencil-code.
The code can certainly not be treated as a black box (no code can), and in order to solve
a new problem in an optimal way, users will need to find their own optimal set of pa-
rameters. In particular, you need to be careful in choosing the right values of viscosity,
magnetic diffusivity, and radiative conductivity.
The PENCIL CODE is primarily designed to deal with weakly compressible turbulent
flows, which is why we use high-order first and second derivatives. To achieve good par-
allelization, we use explicit (as opposed to compact) finite differences. Typical scientific
targets include driven MHD turbulence in a periodic box, convection in a slab with non-
periodic upper and lower boundaries, a convective star embedded in a fully nonperiodic
box, accretion disc turbulence in the shearing sheet approximation, etc. Furthermore,
nonlocal radiation transport, inertial particles, dust coagulation, self-gravity, chemical
reaction networks, and several other physical components are installed, but this num-
ber increases steadily. In addition to Cartesian coordinates, the code can also deal with
spherical and cylindrical polar coordinates.
Magnetic fields are implemented in terms of the magnetic vector potential to ensure
that the field remains solenoidal (divergence-free). At the same time, having the mag-
netic vector potential readily available is a big advantage if one wants to monitor the
magnetic helicity, for example. The code is therefore particularly well suited for all kinds
of dynamo problems.
The code is normally non-conservative; thus, conserved quantities should only be con-
served up to the discretization error of the scheme (not to machine accuracy). There is
no guarantee that a conservative code is more accurate with respect to quantities that
are not explicitly conserved, such as entropy. Another important quantity that is (to
our knowledge) not strictly conserved by ordinary flux conserving schemes is
magnetic
helicity
.
There are currently no plans to implement adaptive mesh refinement into the code,
which would cause major technical complications. Given that turbulence is generically
space-filling, local refinement to smaller scales would often not be very useful anyway.
On the other hand, in some geometries turbulence may well be confined to certain re-
gions in space, so one could indeed gain by solving the outer regions with fewer points.
In order to be cache-efficient, we solve the equations along
pencils
in the xdirection.
One very convenient side-effect is that auxiliary and derived variables use very little
memory, as they are only ever defined on one pencil. The domain can be tiled in the y
and zdirections. On multiprocessor computers, the code can use
MPI
(Message Pass-
ing Interface) calls to communicate between processors. An easy switching mechanism
allows the user to run the code on a machine without MPI libraries (e.g. a notebook
computer). Ghost zones are used to implement boundary conditions on physical and
processor boundaries.
vii
A high level of flexibility is achieved by encapsulating individual physical processes
and variables in individual
modules
, which can be switched on or off in the file
‘Makefile.local’ in the local ‘src’ directory. This approach avoids the use of difficult-
to-read preprocessor directives, at the price of requiring one dummy module for each
physics module. For nonmagnetic hydrodynamics, for example, one will use the module
‘nomagnetic.f90’ and specifies
MAGNETIC = nomagnetic
in ‘Makefile.local’, while for MHD simulations, ‘magnetic.f90’ will be used:
MAGNETIC = magnetic
Note that the term
module
as used here is only loosely related to Fortran modules: both
‘magnetic.f90’ and ‘nomagnetic.f90’ define an F90 module named Magnetic — this is the
basis of the switching mechanism we are using.
Input parameters (which are set in the files ‘start.in’, ‘run.in’) can be changed without
recompilation. Furthermore, one can change the list of variables for monitoring (diag-
nostic) output on the fly, and there are mechanisms for making the code reload new
parameters or exit gracefully at runtime. You may want to check for correctness of these
files with the command pc_configtest.
The requirements for using the Pencil-MPI code are modest: you can use it on any Linux
or Unix system with a
F95
and
C
compiler suite, like
GNU gcc
and
gfortran
, together
with the shell
CSH
, and the
Perl
interpreter are mandatory requirements.
Although the PENCIL CODE is mainly designed to run on supercomputers, more than
50% of the users run their code also on Macs, and the other half uses either directly
Linux on their laptops or they use VirtualBox on their Windows machine on which they
install Ubuntu Linux. If you have
IDL
as well, you will be able to visualize the re-
sults (a number of sample procedures are provided), but other tools such as
Python
,
DX
(OpenDX, data explorer) can also be used and some relevant tools and routines come
with the PENCIL CODE.
If you want to make creative use of the code, this manual will contain far too little in-
formation. Its major aim is to give you an idea of the way the code is organized, so you
can more efficiently read the source code, which contains a reasonable amount of com-
ments. You might want to read through the various sample directories that are checked
in. Choose one that is closest to your application and start modifying. For further en-
hancements that you may want to add to the code, you can take as an example the lines
in the code that deal with related variables, functions, diagnostics, equations etc., which
have already been implemented. Just remember: grep is one of your best friends when
you want to understand how certain variables or functions are used in the code.
We will be happy to include user-supplied changes and updates to the code in future
releases and welcome any feedback.
wdobler@gmail.com Potsdam
AxelBrandenburg@gmail.com Stockholm
viii
Acknowledgments
Many people have contributed in different ways to the development of this code. We
thank first of all ˚
Ake Nordlund (Copenhagen Observatory) and Bob Stein (University of
Michigan) who introduced us to the idea of using high-order schemes in compressible
flows and who taught us a lot about simulations in general.
The calculation of the power spectra, structure functions, the remeshing procedures,
routines for changing the number of processors, as well as the shearing sheet approxi-
mation and the flux-limited diffusion approximation for radiative transfer were imple-
mented by Nils Erland L. Haugen (University of Trondheim). Tobi Heinemann added
the long characteristics method for radiative transfer as well as hydrogen ionization.
He also added and/or improved shock diffusion for other variables and improved the
resulting timestep control. Anders Johansen, Wladimir (Wlad) Lyra, and Jeff Oishi con-
tributed to the implementation of the dust equations (which now comprises an array of
different components). Antony (Tony) Mee (University of Newcastle) implemented shock
viscosity and added the interstellar module together with Graeme R. Sarson (also Uni-
versity of Newcastle), who also implemented the geodynamo set-up together with David
McMillan (currently also at the University of Newcastle). Tony also included a method
for outputting auxiliary variables and enhanced the overall functionality of the code
and related idl and dx procedures. He also added, together with Andrew Snodin, the
evolution equations for the cosmic ray energy density. Vladimir Pariev (University of
Rochester) contributed to the development and testing of the potential field boundary
condition at an early stage. The implementation of spherical and cylindrical coordinates
is due to Dhrubaditya (Dhruba) Mitra and Wladimir Lyra. Wlad also implemented the
global set-up for protoplanetary disks (as opposed to the local shearing sheet formalism).
He also added a N-body code (based on the particle module coded by Anders Johansen
and Tony), and implemented the coupled evolution equations of neutrals and ions for
two-fluid models of ambipolar diffusion. Boris Dintrans is in charge of implementing the
anelastic and Boussinesq modules. Philippe-A. Bourdin implemented HDF5 support and
wrote the optional IO-modules for high-performance computing featuring various com-
munication strategies. He also contributed to the solar-corona module and worked on
the IDL GUI, including the IDL routines for reading and working with large amounts of
data. Again, this list contains other recent items that are not yet fully documented and
acknowledged.
Use of the PPARC supported supercomputers in St Andrews (Mhd) and Leicester (Ukaff)
is acknowledged. We also acknowledge the Danish Center for Scientific Computing for
granting time on Horseshoe, which is a 512+140 processor Beowulf cluster in Odense
(Horseshoe).
ix
Contents
I Using the PENCIL CODE 1
1 System requirements 1
2 Obtaining the code 2
2.1 Obtaining the code via git or svn . . . . . . . . . . . . . . . . . . . . . . . . 2
2.2 Updating via svn or git . . . . . . . . . . . . . . . . . . . . . . . . . . . . . . 2
2.3 Getting the last validated version . . . . . . . . . . . . . . . . . . . . . . . . 3
2.4 Getting older versions . . . . . . . . . . . . . . . . . . . . . . . . . . . . . . 4
3 Getting started 5
3.1 Setup . . . . . . . . . . . . . . . . . . . . . . . . . . . . . . . . . . . . . . . . 5
3.1.1 Environment settings . . . . . . . . . . . . . . . . . . . . . . . . . . . 5
3.1.2 Linking scripts and source files . . . . . . . . . . . . . . . . . . . . . 6
3.1.3 Adapting ‘Makefile.src’ ......................... 6
3.1.4 Running make ............................... 6
3.1.5 Choosing a data directory . . . . . . . . . . . . . . . . . . . . . . . . 7
3.1.6 Running the code . . . . . . . . . . . . . . . . . . . . . . . . . . . . . 7
3.2 Further tests . . . . . . . . . . . . . . . . . . . . . . . . . . . . . . . . . . . . 9
4 Code structure 11
4.1 Directory tree . . . . . . . . . . . . . . . . . . . . . . . . . . . . . . . . . . . 11
4.2 Basic concepts . . . . . . . . . . . . . . . . . . . . . . . . . . . . . . . . . . . 12
4.2.1 Data access in pencils . . . . . . . . . . . . . . . . . . . . . . . . . . 12
4.2.2 Modularity . . . . . . . . . . . . . . . . . . . . . . . . . . . . . . . . . 13
4.3 Files in the run directories . . . . . . . . . . . . . . . . . . . . . . . . . . . . 14
4.3.1 ‘start.in’, ‘run.in’, ‘print.in’ . . . . . . . . . . . . . . . . . . . . . . 14
4.3.2 ‘datadir.in’ ................................ 14
4.3.3 ‘reference.out’ .............................. 14
4.3.4 ‘start.csh’, ‘run.csh’, ‘getconf.csh’ [obsolete; see Sect. 5.1] . . . . . 14
4.3.5 ‘src/ ’.................................... 14
4.3.6 ‘data/ ’ . . . . . . . . . . . . . . . . . . . . . . . . . . . . . . . . . . . 15
5 Using the code 17
5.1 Configuring the code to compile and run on your computer . . . . . . . . . 17
5.1.1 Locating the configuration file . . . . . . . . . . . . . . . . . . . . . . 17
5.1.2 Structure of configuration files . . . . . . . . . . . . . . . . . . . . . 18
5.1.3 Compiling the code . . . . . . . . . . . . . . . . . . . . . . . . . . . . 20
5.1.4 Running the code . . . . . . . . . . . . . . . . . . . . . . . . . . . . . 20
5.1.5 Testing the code . . . . . . . . . . . . . . . . . . . . . . . . . . . . . . 20
5.2 Adapting ‘Makefile.src’ [obsolete; see Sect. 5.1] . . . . . . . . . . . . . . . 21
5.3 Changing the resolution . . . . . . . . . . . . . . . . . . . . . . . . . . . . . 22
5.4 Using a non-equidistant grid . . . . . . . . . . . . . . . . . . . . . . . . . . 23
5.5 Diagnostic output . . . . . . . . . . . . . . . . . . . . . . . . . . . . . . . . . 25
5.6 Data files . . . . . . . . . . . . . . . . . . . . . . . . . . . . . . . . . . . . . . 25
5.6.1 Snapshot files . . . . . . . . . . . . . . . . . . . . . . . . . . . . . . . 25
5.7 Video files and slices . . . . . . . . . . . . . . . . . . . . . . . . . . . . . . . 26
x
5.8 Averages . . . . . . . . . . . . . . . . . . . . . . . . . . . . . . . . . . . . . . 29
5.8.1 One-dimensional output averaged in two dimensions . . . . . . . . 29
5.8.2 Two-dimensional output averaged in one dimension . . . . . . . . . 29
5.8.3 Azimuthal averages . . . . . . . . . . . . . . . . . . . . . . . . . . . . 29
5.8.4 Time averages . . . . . . . . . . . . . . . . . . . . . . . . . . . . . . . 30
5.9 Helper scripts . . . . . . . . . . . . . . . . . . . . . . . . . . . . . . . . . . . 31
5.10 RELOAD and STOP files . . . . . . . . . . . . . . . . . . . . . . . . . . . . . 33
5.11 RERUN and NEWDIR files . . . . . . . . . . . . . . . . . . . . . . . . . . . 34
5.12 Start and run parameters . . . . . . . . . . . . . . . . . . . . . . . . . . . . 34
5.13 Physical units . . . . . . . . . . . . . . . . . . . . . . . . . . . . . . . . . . . 36
5.14 Minimum amount of viscosity . . . . . . . . . . . . . . . . . . . . . . . . . . 37
5.15 The time step . . . . . . . . . . . . . . . . . . . . . . . . . . . . . . . . . . . 38
5.15.1 The usual RK-2N time step . . . . . . . . . . . . . . . . . . . . . . . 38
5.15.2 The Runge-Kutta-Fehlberg time step . . . . . . . . . . . . . . . . . . 38
5.16 Boundary conditions . . . . . . . . . . . . . . . . . . . . . . . . . . . . . . . 39
5.16.1 Where to specify boundary conditions . . . . . . . . . . . . . . . . . 39
5.16.2 How to specify boundary conditions . . . . . . . . . . . . . . . . . . 39
5.17 Restarting a simulation . . . . . . . . . . . . . . . . . . . . . . . . . . . . . 40
5.18 One- and two-dimensional runs . . . . . . . . . . . . . . . . . . . . . . . . . 41
5.19 Visualization . . . . . . . . . . . . . . . . . . . . . . . . . . . . . . . . . . . . 41
5.19.1 Gnuplot . . . . . . . . . . . . . . . . . . . . . . . . . . . . . . . . . . . 41
5.19.2 Data explorer . . . . . . . . . . . . . . . . . . . . . . . . . . . . . . . 41
5.19.3 GDL . . . . . . . . . . . . . . . . . . . . . . . . . . . . . . . . . . . . . 42
5.19.4 IDL . . . . . . . . . . . . . . . . . . . . . . . . . . . . . . . . . . . . . 43
5.19.5 Python . . . . . . . . . . . . . . . . . . . . . . . . . . . . . . . . . . . 46
5.20 Running on multi-processor computers . . . . . . . . . . . . . . . . . . . . . 49
5.20.1 How to run a sample problem in parallel . . . . . . . . . . . . . . . 49
5.20.2 Hierarchical networks (e.g. on Beowulf clusters) . . . . . . . . . . . 50
5.20.3 Extra workload caused by the ghost zones . . . . . . . . . . . . . . . 50
5.21 Running in double-precision . . . . . . . . . . . . . . . . . . . . . . . . . . . 51
5.22 Power spectrum . . . . . . . . . . . . . . . . . . . . . . . . . . . . . . . . . . 52
5.23 Structure functions . . . . . . . . . . . . . . . . . . . . . . . . . . . . . . . . 54
5.24 Particles . . . . . . . . . . . . . . . . . . . . . . . . . . . . . . . . . . . . . . 55
5.24.1 Particles in parallel . . . . . . . . . . . . . . . . . . . . . . . . . . . . 56
5.24.2 Large number of particles . . . . . . . . . . . . . . . . . . . . . . . . 58
5.24.3 Random number generator . . . . . . . . . . . . . . . . . . . . . . . 58
5.25 Non-cartesian coordinate systems . . . . . . . . . . . . . . . . . . . . . . . . 59
6 The equations 60
6.1 Continuity equation . . . . . . . . . . . . . . . . . . . . . . . . . . . . . . . . 60
6.2 Equation of motion . . . . . . . . . . . . . . . . . . . . . . . . . . . . . . . . 60
6.3 Induction equation . . . . . . . . . . . . . . . . . . . . . . . . . . . . . . . . 61
6.4 Entropy equation . . . . . . . . . . . . . . . . . . . . . . . . . . . . . . . . . 61
6.4.1 Viscous heating . . . . . . . . . . . . . . . . . . . . . . . . . . . . . . 62
6.4.2 Alternative description . . . . . . . . . . . . . . . . . . . . . . . . . . 62
6.5 Transport equation for a passive scalar . . . . . . . . . . . . . . . . . . . . 63
6.6 Bulk viscosity . . . . . . . . . . . . . . . . . . . . . . . . . . . . . . . . . . . 63
6.6.1 Shock viscosity . . . . . . . . . . . . . . . . . . . . . . . . . . . . . . 63
6.7 Equation of state . . . . . . . . . . . . . . . . . . . . . . . . . . . . . . . . . 63
6.8 Ionization . . . . . . . . . . . . . . . . . . . . . . . . . . . . . . . . . . . . . . 64
xi

6.8.1 Ambipolar diffusion . . . . . . . . . . . . . . . . . . . . . . . . . . . . 65
6.9 Radiative transfer . . . . . . . . . . . . . . . . . . . . . . . . . . . . . . . . . 66
6.10 Self-gravity . . . . . . . . . . . . . . . . . . . . . . . . . . . . . . . . . . . . . 67
6.11 Incompressible and anelastic equations . . . . . . . . . . . . . . . . . . . . 67
6.12 Dust equations . . . . . . . . . . . . . . . . . . . . . . . . . . . . . . . . . . . 67
6.13 Cosmic ray pressure in diffusion approximation . . . . . . . . . . . . . . . 68
6.14 Particles . . . . . . . . . . . . . . . . . . . . . . . . . . . . . . . . . . . . . . 69
6.14.1 Tracer particles . . . . . . . . . . . . . . . . . . . . . . . . . . . . . . 69
6.14.2 Dust particles . . . . . . . . . . . . . . . . . . . . . . . . . . . . . . . 69
6.15 N-body solver . . . . . . . . . . . . . . . . . . . . . . . . . . . . . . . . . . . 70
6.16 Test-field equations . . . . . . . . . . . . . . . . . . . . . . . . . . . . . . . . 71
6.17 Gravitational wave equations . . . . . . . . . . . . . . . . . . . . . . . . . . 71
7 Troubleshooting / Frequently Asked Questions 75
7.1 Download and setup . . . . . . . . . . . . . . . . . . . . . . . . . . . . . . . 75
7.1.1 Download forbidden . . . . . . . . . . . . . . . . . . . . . . . . . . . . 75
7.1.2 Shell gives error message when sourcing ‘sourceme.X’ . . . . . . . . 75
7.2 Compilation . . . . . . . . . . . . . . . . . . . . . . . . . . . . . . . . . . . . 76
7.2.1 Problems compiling syscalls . . . . . . . . . . . . . . . . . . . . . . . 76
7.2.2 Unable to open include file: chemistry.h . . . . . . . . . . . . . . . . 76
7.2.3 Compiling with
ifc
under Linux . . . . . . . . . . . . . . . . . . . . . 76
7.2.4 Segmentation fault with
ifort
8.0 under Linux . . . . . . . . . . . . 77
7.2.5 The underscore problem: linking with
MPI
. . . . . . . . . . . . . . 77
7.2.6 Compilation stops with the cryptic error message: . . . . . . . . . . 77
7.2.7 The code doesn’t compile, . . . . . . . . . . . . . . . . . . . . . . . . . 78
7.2.8 Some samples don’t even compile, . . . . . . . . . . . . . . . . . . . 78
7.2.9 Internal compiler error with Compaq/Dec F90 . . . . . . . . . . . . 79
7.2.10 Assertion failure under SunOS . . . . . . . . . . . . . . . . . . . . . 79
7.2.11 After some dirty tricks I got pencil code to compile with MPI, ... . . 80
7.2.12 Error: Symbol ’mpi comm world’ at (1) has no IMPLICIT type . . . 80
7.2.13 Error: Can’t open included file ’mpif.h’ . . . . . . . . . . . . . . . . . 81
7.3 Pencil check . . . . . . . . . . . . . . . . . . . . . . . . . . . . . . . . . . . . 81
7.3.1 The pencil check complains for no reason. . . . . . . . . . . . . . . . 81
7.3.2 The pencil check reports MISSING PENCILS and quits . . . . . . 81
7.3.3 The pencil check reports unnecessary pencils . . . . . . . . . . . . . 81
7.3.4 The pencil check reports that most or all pencils are missing . . . . 81
7.3.5 Running the pencil check triggers mathematical errors in the code 82
7.3.6 The pencil check still complains . . . . . . . . . . . . . . . . . . . . . 82
7.3.7 The pencil check is annoying so I turned it off . . . . . . . . . . . . 82
7.4 Running . . . . . . . . . . . . . . . . . . . . . . . . . . . . . . . . . . . . . . 82
7.4.1 Periodic boundary conditions in ‘start.x’ . . . . . . . . . . . . . . . 82
7.4.2 csh problem? . . . . . . . . . . . . . . . . . . . . . . . . . . . . . . . . 82
7.4.3 ‘run.csh’ doesn’t work: . . . . . . . . . . . . . . . . . . . . . . . . . . 83
7.4.4 Code crashes after restarting . . . . . . . . . . . . . . . . . . . . . . 83
7.4.5 auto-test gone mad...? . . . . . . . . . . . . . . . . . . . . . . . . . . 83
7.4.6 Can I restart with a different number of cpus? . . . . . . . . . . . . 84
7.4.7 Can I restart with a different number of cpus? . . . . . . . . . . . . 84
7.4.8 fft xyz parallel 3D: nygrid needs to be an integer multiple... . . . . 84
7.4.9 Unit-agnostic calculations? . . . . . . . . . . . . . . . . . . . . . . . 85
7.5 Visualization . . . . . . . . . . . . . . . . . . . . . . . . . . . . . . . . . . . . 86
xii
7.5.1 ‘start.pro’ doesn’t work: . . . . . . . . . . . . . . . . . . . . . . . . . 86
7.5.2 ‘start.pro’ doesn’t work: . . . . . . . . . . . . . . . . . . . . . . . . . 86
7.5.3 Something about tag name undefined: . . . . . . . . . . . . . . . . . 86
7.5.4 Something INC in start.pro . . . . . . . . . . . . . . . . . . . . . . . 86
7.5.5 nl2idl problem when reading param2.nml . . . . . . . . . . . . . . . 87
7.5.6 Spurious dots in the time series file . . . . . . . . . . . . . . . . . . 87
7.5.7 Problems with pc_varcontent.pro . . . . . . . . . . . . . . . . . . . 87
7.6 General questions . . . . . . . . . . . . . . . . . . . . . . . . . . . . . . . . . 88
7.6.1 “Installation” procedure . . . . . . . . . . . . . . . . . . . . . . . . . 88
7.6.2 Small numbers in the code . . . . . . . . . . . . . . . . . . . . . . . . 88
7.6.3 Why do we need a /lphysics/ namelist in the first place? . . . . . . 89
7.6.4 Can I run the code on a Mac? . . . . . . . . . . . . . . . . . . . . . . 90
7.6.5 Pencil Code discussion forum . . . . . . . . . . . . . . . . . . . . . . 90
7.6.6 The manual . . . . . . . . . . . . . . . . . . . . . . . . . . . . . . . . 90
II Programming the PENCIL CODE 91
8 Understanding the code 95
8.1 Example: how is the continuity equation being solved? . . . . . . . . . . . 95
9 Adapting the code 97
9.1 The PENCIL CODE coding standard . . . . . . . . . . . . . . . . . . . . . . . 97
9.2 Adding new output diagnostics . . . . . . . . . . . . . . . . . . . . . . . . . 98
9.3 The f-array . . . . . . . . . . . . . . . . . . . . . . . . . . . . . . . . . . . . . 100
9.4 The df-array . . . . . . . . . . . . . . . . . . . . . . . . . . . . . . . . . . . . 100
9.5 The fp-array . . . . . . . . . . . . . . . . . . . . . . . . . . . . . . . . . . . . 101
9.6 The pencil case . . . . . . . . . . . . . . . . . . . . . . . . . . . . . . . . . . . 101
9.6.1 Pencil check . . . . . . . . . . . . . . . . . . . . . . . . . . . . . . . . 102
9.6.2 Adding new pencils . . . . . . . . . . . . . . . . . . . . . . . . . . . . 103
9.7 Adding new physics: the Special module . . . . . . . . . . . . . . . . . . . . 103
9.8 Adding switchable modules . . . . . . . . . . . . . . . . . . . . . . . . . . . 104
9.9 Adding your initial conditions: the InitialCondition module . . . . . . . . . 104
10 Testing the code 106
10.1 How to set up periodic tests (auto-tests) . . . . . . . . . . . . . . . . . . . . 106
11 Useful internals 108
11.1 Global variables . . . . . . . . . . . . . . . . . . . . . . . . . . . . . . . . . . 108
11.2 Subroutines and functions . . . . . . . . . . . . . . . . . . . . . . . . . . . . 108
III Appendix 111
A Timings 111
A.1 Test case . . . . . . . . . . . . . . . . . . . . . . . . . . . . . . . . . . . . . . 118
A.2 Running the code . . . . . . . . . . . . . . . . . . . . . . . . . . . . . . . . . 119
A.3 Triolith . . . . . . . . . . . . . . . . . . . . . . . . . . . . . . . . . . . . . . . 119
A.4 Lindgren . . . . . . . . . . . . . . . . . . . . . . . . . . . . . . . . . . . . . . 119
B Coding standard 122
xiii

B.1 File naming conventions . . . . . . . . . . . . . . . . . . . . . . . . . . . . . 122
B.2 Fortran Code . . . . . . . . . . . . . . . . . . . . . . . . . . . . . . . . . . . . 122
B.2.1 Indenting and whitespace . . . . . . . . . . . . . . . . . . . . . . . . 122
B.2.2 Comments . . . . . . . . . . . . . . . . . . . . . . . . . . . . . . . . . 123
B.2.3 Module names . . . . . . . . . . . . . . . . . . . . . . . . . . . . . . . 124
B.2.4 Variable names . . . . . . . . . . . . . . . . . . . . . . . . . . . . . . 124
B.2.5 Emacs settings . . . . . . . . . . . . . . . . . . . . . . . . . . . . . . 125
B.3 Other best practices . . . . . . . . . . . . . . . . . . . . . . . . . . . . . . . . 126
B.4 General changes to the code . . . . . . . . . . . . . . . . . . . . . . . . . . . 126
C Some specific initial conditions 127
C.1 Random velocity or magnetic fields . . . . . . . . . . . . . . . . . . . . . . . 127
C.2 Turbulent initial with given spectrum . . . . . . . . . . . . . . . . . . . . . 127
C.3 Beltrami fields . . . . . . . . . . . . . . . . . . . . . . . . . . . . . . . . . . . 128
C.4 Magnetic flux rings: initaa=’fluxrings’ . . . . . . . . . . . . . . . . . . . 128
C.5 Vertical stratification . . . . . . . . . . . . . . . . . . . . . . . . . . . . . . . 129
C.5.1 Isothermal atmosphere . . . . . . . . . . . . . . . . . . . . . . . . . . 129
C.5.2 Polytropic atmosphere . . . . . . . . . . . . . . . . . . . . . . . . . . 130
C.5.3 Changing the stratification . . . . . . . . . . . . . . . . . . . . . . . 131
C.5.4 The Rayleigh number . . . . . . . . . . . . . . . . . . . . . . . . . . . 131
C.5.5 Entropy boundary condition . . . . . . . . . . . . . . . . . . . . . . . 132
C.5.6 Temperature boundary condition at the top . . . . . . . . . . . . . . 132
C.6 Potential-field boundary condition . . . . . . . . . . . . . . . . . . . . . . . 132
C.7 Planet solution in the shearing box . . . . . . . . . . . . . . . . . . . . . . . 134
D Some specific boundary conditions 135
D.1 Perfect-conductor boundary condition . . . . . . . . . . . . . . . . . . . . . 135
D.2 Stress-free boundary condition . . . . . . . . . . . . . . . . . . . . . . . . . 135
D.3 Normal-field-radial boundary condition . . . . . . . . . . . . . . . . . . . . 136
E High-frequency filters 137
E.1 Conservative hyperdissipation . . . . . . . . . . . . . . . . . . . . . . . . . . 137
E.2 Hyperviscosity . . . . . . . . . . . . . . . . . . . . . . . . . . . . . . . . . . . 139
E.2.1 Conservative case . . . . . . . . . . . . . . . . . . . . . . . . . . . . . 139
E.2.2 Non-conservative cases . . . . . . . . . . . . . . . . . . . . . . . . . . 140
E.2.3 Choosing the coefficient . . . . . . . . . . . . . . . . . . . . . . . . . 141
E.2.4 Turbulence with hyperviscosity . . . . . . . . . . . . . . . . . . . . . 141
E.3 Anisotropic hyperdissipation . . . . . . . . . . . . . . . . . . . . . . . . . . . 142
E.4 Hyperviscosity in Burgers shock . . . . . . . . . . . . . . . . . . . . . . . . 142
F Special techniques 144
F.1 After changing
REAL PRECISION
. . . . . . . . . . . . . . . . . . . . . . . 144
F.2 Remeshing (regridding) . . . . . . . . . . . . . . . . . . . . . . . . . . . . . . 144
F.3 Restarting from a run with less physics . . . . . . . . . . . . . . . . . . . . 145
F.4 Restarting with particles from a run without them . . . . . . . . . . . . . . 146
G Runs and reference data 148
G.1 Shock tests . . . . . . . . . . . . . . . . . . . . . . . . . . . . . . . . . . . . . 148
G.1.1 Sod shock tube problem . . . . . . . . . . . . . . . . . . . . . . . . . 148
G.1.2 Temperature jump . . . . . . . . . . . . . . . . . . . . . . . . . . . . 148
G.2 Random forcing function . . . . . . . . . . . . . . . . . . . . . . . . . . . . . 148
xiv
G.3 Three-layered convection model . . . . . . . . . . . . . . . . . . . . . . . . . 149
G.4 Magnetic helicity in the shearing sheet . . . . . . . . . . . . . . . . . . . . 150
H Numerical methods 154
H.1 Sixth-order spatial derivatives . . . . . . . . . . . . . . . . . . . . . . . . . 154
H.2 Upwind derivatives to avoid ‘wiggles’ . . . . . . . . . . . . . . . . . . . . . . 155
H.3 The bidiagonal scheme for cross-derivatives . . . . . . . . . . . . . . . . . . 156
H.4 The 2N-scheme for time-stepping . . . . . . . . . . . . . . . . . . . . . . . . 157
H.5 Diffusive error from the time-stepping . . . . . . . . . . . . . . . . . . . . . 158
H.6 Ionization . . . . . . . . . . . . . . . . . . . . . . . . . . . . . . . . . . . . . . 159
H.7 Radiative transfer . . . . . . . . . . . . . . . . . . . . . . . . . . . . . . . . . 160
H.7.1 Solving the radiative transfer equation . . . . . . . . . . . . . . . . 160
H.7.2 Angular integration . . . . . . . . . . . . . . . . . . . . . . . . . . . . 161
I Curvilinear coordinates 163
I.1 Covariant derivatives . . . . . . . . . . . . . . . . . . . . . . . . . . . . . . . 163
I.2 Differential operators . . . . . . . . . . . . . . . . . . . . . . . . . . . . . . . 163
I.2.1 Gradient . . . . . . . . . . . . . . . . . . . . . . . . . . . . . . . . . . 163
I.2.2 Divergence . . . . . . . . . . . . . . . . . . . . . . . . . . . . . . . . . 164
I.2.3 Curl . . . . . . . . . . . . . . . . . . . . . . . . . . . . . . . . . . . . . 164
I.2.4 Advection operator . . . . . . . . . . . . . . . . . . . . . . . . . . . . 165
I.2.5 Mixed advection operator . . . . . . . . . . . . . . . . . . . . . . . . 165
I.2.6 Shear term . . . . . . . . . . . . . . . . . . . . . . . . . . . . . . . . . 166
I.2.7 Another mixed advection operator . . . . . . . . . . . . . . . . . . . 166
I.2.8 Strain Matrix . . . . . . . . . . . . . . . . . . . . . . . . . . . . . . . 166
I.2.9 Lambda effect . . . . . . . . . . . . . . . . . . . . . . . . . . . . . . . 166
I.2.10 Laplacian of a scalar . . . . . . . . . . . . . . . . . . . . . . . . . . . 167
I.2.11 Hessian of a scalar . . . . . . . . . . . . . . . . . . . . . . . . . . . . 167
I.2.12 Double curl . . . . . . . . . . . . . . . . . . . . . . . . . . . . . . . . . 168
I.2.13 Gradient of a divergence . . . . . . . . . . . . . . . . . . . . . . . . . 169
J Switchable modules 171
K Startup and run-time parameters 172
K.1 Startup parameters for ‘start.in’ . . . . . . . . . . . . . . . . . . . . . . . . 172
K.2 Runtime parameters for ‘run.in’ . . . . . . . . . . . . . . . . . . . . . . . . 179
K.3 Parameters for ‘print.in’ . . . . . . . . . . . . . . . . . . . . . . . . . . . . . 186
K.4 Parameters for ‘video.in’ . . . . . . . . . . . . . . . . . . . . . . . . . . . . . 222
K.5 Parameters for ‘phiaver.in’ . . . . . . . . . . . . . . . . . . . . . . . . . . . 224
K.6 Parameters for ‘xyaver.in’ . . . . . . . . . . . . . . . . . . . . . . . . . . . . 225
K.7 Parameters for ‘xzaver.in’ . . . . . . . . . . . . . . . . . . . . . . . . . . . . 231
K.8 Parameters for ‘yzaver.in’ . . . . . . . . . . . . . . . . . . . . . . . . . . . . 232
K.9 Parameters for ‘yaver.in’ . . . . . . . . . . . . . . . . . . . . . . . . . . . . . 235
K.10 Parameters for ‘zaver.in’ . . . . . . . . . . . . . . . . . . . . . . . . . . . . . 237
K.11 Boundary conditions . . . . . . . . . . . . . . . . . . . . . . . . . . . . . . . 240
K.11.1 Boundary condition
bcx
. . . . . . . . . . . . . . . . . . . . . . . . . 240
K.11.2 Boundary condition
bcy
. . . . . . . . . . . . . . . . . . . . . . . . . 243
K.11.3 Boundary condition
bcz
. . . . . . . . . . . . . . . . . . . . . . . . . 245
K.12 Initial condition parameter dependence . . . . . . . . . . . . . . . . . . . . 249
xv

1
Part I
Using the PENCIL CODE
1 System requirements
To use the code, you will need the following:
1. Absolutely needed:
•
F95
compiler
•
C
compiler
2. Used heavily (if you don’t have one of these, you will need to adjust many things
manually):
•a
Unix
/
Linux
-type system with
make
and
csh
•
Perl
(remember: if it doesn’t run Perl, it’s not a computer)
3. The following are dispensable, but enhance functionality in one way or the other:
•an
MPI
implementation (for parallelization on multiprocessor systems)
•
DX
alias
OpenDX
or
data explorer
(for 3-D visualization of results)
•
IDL
(for visualization of results; the 7-minute demo license will do for many
applications)

2 THE PENCIL CODE
2 Obtaining the code
The code is now distributed via https://github.com/pencil-code/pencil-code, where
you can either download a tarball, or, preferably, download it via
svn
or
git
. In Iran and
some other countries, GitHub is not currently available. To alleviate this problem, we
have made a recent copy available on http://www.nordita.org/software/pencil-code/.
If you want us to update this tarball, please contact us.
To ensure at least some level of stability of the
svn/git
versions, a set of test problems
(listed in ‘$PENCIL_HOME/bin/auto-test’) are routinely tested. This includes all problems
in ‘$PENCIL_HOME/samples’. See Sect. 10 for details.
2.1 Obtaining the code via git or svn
1. Many machines have
svn
installed (try svn -v or which svn). On Ubuntu, for ex-
ample,
svn
comes under the package name subversion.
2. The code is now saved under Github, git can be obtained in Linux by typing sudo
apt-get install git
3. Unless you are a privileged users with write access, you can download the code
with the command
git clone https://github.com/pencil-code/pencil-code.git
or
svn checkout https://github.com/pencil-code/pencil-code/trunk/ ...\\
pencil-code --username MY_GITHUB_USERNAME
In order to push your changes to the repository, you have to ask the maintainer of
pencil code for push access (to become a contributor), or put a pull request to the
maintainer of the code.
Be sure to run auto-test before you check anything back in again. It can be very
annoying for someone else to figure out what’s wrong, especially if you are just up
to something else. At the very least, you should do
pc_auto-test --level=0 --no-pencil-check -C
This allows you to run just 2 of the most essential tests starting with all the no-
modules and then most-modules.
2.2 Updating via svn or git
Independent of how you installed the code in the first place (from tarball or via
svn/git
),
you can update your version using
svn/git
. If you have done nontrivial alterations to
your version of the code, you ought to be careful about upgrading: although
svn/git
is an
excellent tool for distributed programming, conflicts are quite possible, since many of us
are going to touch many parts of the code while we develop it further. Thus, despite the

2.3 Getting the last validated version 3
fact that the code is under
svn/git
, you should probably back up your important changes
before upgrading.
Here is the upgrading procedure for
git
:
1. Perform a git update of the tree:
unix> git pull
2. Fix any conflicts you encounter and make sure the examples in the directory
‘samples/’ are still working.
Here is the upgrading procedure for
svn
:
1. Perform a svn update of the tree:
unix> pc_svnup
2. Fix any conflicts you encounter and make sure the examples in the directory
‘samples/’ are still working.
If you have made useful changes, please contact one of the (currently) 10 “Contributors”
(listed under https://github.com/pencil-code/pencil-code) who can give you push or
check-in permission. Be sure to have sufficient comments in the code and please follow
our standard coding conventions explained in Section 9.1. There is also a script to check
and fix the most common stylebreaks, pc codingstyle.
2.3 Getting the last validated version
The script pc_svnup accepts arguments -val or -validated, which means that the current
changes on a user’s machine will be merged into the last working version. This way
every user can be sure that any problems with the code must be due to the current
changes done by this user since the last check-in.
Examples:
unix> pc_svnup -src -s -validated
brings all files in ‘$PENCIL_HOME/src’ to the last validated status, and merges all your
changes into this version. This allows you to work with this, but in order to check in
your changes you have to update everything to the most recent status first, i.e.
unix> pc_svnup -src
Your own changes will be merged into this latest version as before.
NOTE: The functionality of the head of the trunk should be preserved at all times. How-
ever, accidents do happen. For the benefit of all other developers, any errors should
be corrected within 1-2 hours. This is the reason why the code comes with a file
‘pencil-code/license/developers.txt’, which should contain contact details of all de-
velopers. The pc_svnup -val option allows all other people to stay away from any trou-
ble.

4 THE PENCIL CODE
2.4 Getting older versions
You may find that the latest
svn
version of the code produces errors. If you have reasons
to believe that this is due to changes introduced on 27 November 2008 (to give an ex-
ample), you can check out the version prior to this by specifying a revision number with
svn update -r #####. One reason why one cannot always reproduce exactly the same
situation too far back in time is connected with the fact that processor architecture and
the compiler were different, resulting e.g. in different rounding errors.

3. Getting started 5
3 Getting started
To get yourself started, you should run one or several examples which are provided in
one of the ‘samples/’ subdirectories. Note that you will only be able to fully assess the
numerical solutions if you visualize them with
IDL
,
DX
or other tools (see Sect. 5.19).
3.1 Setup
3.1.1 Environment settings
The functionality of helper scripts and IDL routines relies on a few environment vari-
ables being set correctly. The simplest way to achieve this is to go to the top directory of
the code and source one of the two scripts ‘sourceme.csh’ or ‘sourceme.sh’ (depending on
the type of shell you are using):
csh> cd pencil-code
csh> source ./sourceme.csh
for
tcsh
or
csh
users; or
sh> cd pencil-code
sh> . ./sourceme.sh
for users of
bash
,
Bourne shell
, or similar shells. You should get output similar to
PENCIL_HOME = </home/dobler/f90/pencil-code>
Adding /home/dobler/f90/pencil-code/bin to PATH
Apart from the PATH variable, the environment variable IDL_PATH is set to something
like ./idl:../idl:+$PENCIL_HOME/idl:./data:<IDL_DEFAULT> .
Note 1 The <IDL_DEFAULT> mechanism does not work for IDL versions 5.2 or older. In
this case, you will have to edit the path manually, or adapt the ‘sourceme’ scripts.
Note 2 If you don’t want to rely on the ‘sourceme’ scripts’ (quite heuristic) ability to cor-
rectly identify the code’s main directory, you can set the environment variable PENCIL_-
HOME explicitly before you run the source command.
Note 3 Do not just source the ‘sourceme’ script from your shell startup file (‘~/.cshrc’
or ‘~/.bashrc’, because it outputs a few lines of diagnostics for each sub-shell, which will
break many applications. To suppress all output, follow the instructions given in the
header documentation of ‘sourceme.csh’ and ‘sourceme.sh’. Likewise, output from other
files invoked by source should also be suppressed.
Note 4 The second time you source ‘sourceme’, it will not add anything to your PATH
variable. This is on purpose to avoid cluttering of your environment: you can source the
file as often as you like (in your shell startup script, then manually and in addition in
some script you have written), without thinking twice. If, however, at the first sourcing,
the setting of PENCIL_HOME was wrong, this mechanism would keep you from ever adding

6 THE PENCIL CODE
the right directory to your PATH. In this case, you need to first undefine the environment
variable PENCIL_HOME:
csh> unsetenv PENCIL_HOME
csh> source ./sourceme.csh
or
sh> unset PENCIL_HOME
sh> . ./sourceme.sh
3.1.2 Linking scripts and source files
With your environment set up correctly, you can now go to the directory you want to
work in and set up subdirectories and links. This is accomplished by the script ‘pc_-
setupsrc’, which is located in ‘$PENCIL_HOME/bin’ and is thus now in your executable
path.
For concreteness, let us assume you want to use ‘samples/conv-slab’ as your
run direc-
tory
, i.e. you want to run a three-layer slab model of solar convection. You then do the
following:
unix> cd samples/conv-slab
unix> pc_setupsrc
src already exists
2 files already exist in src
The script has linked a number of scripts from ‘$PENCIL_HOME/bin’, generated a directory
‘src’ for the source code and linked the Fortran source files (plus a few more files) from
‘$PENCIL_HOME/src’ to that directory:
unix> ls -F
reference.out src/
start.csh@ run.csh@ getconf.csh@
start.in run.in print.in
3.1.3 Adapting ‘Makefile.src’
This step requires some input from you, but you only have to do this once for each
machine you want to run the code on. See Sect. 5.2 for a description of the steps you
need to take here.
Note: If you are lucky and use compilers similar to the ones we have, you may be able
to skip this step; but blame yourself if things don’t compile, then. If not, you can run
make with explicit flags, see Sect. 5.2 and in particular Table 1.
3.1.4 Running make
Next, you run make in the ‘src’ subdirectory of your run directory. Since you are
using one of the predefined test problems, the settings in ‘src/Makefile.local’ and
‘src/cparam.local’ are all reasonable, and you just do

3.1 Setup 7
unix> make
If you have set up the compiler flags correctly, compilation should complete successfully.
3.1.5 Choosing a data directory
The code will by default write data like snapshot files to the subdirectory ‘data’ of the
run directory. Since this will involve a large volume of IO-operations (at least for large
grid sizes), one will normally try to avoid writing the data via NFS. The recommended
way to set up a ‘data’ data directory is to generate a corresponding directory on the local
disc of the computer you are running on and (soft-)link it to ‘./data’. Even if the link is
part of an NFS directory, all the IO operations will be local. For example, if you have a
local disc ‘/scratch’, you can do the following:
unix> mkdir -p /scratch/$USER/pencil-data/samples/conv-slab
unix> ln -s /scratch/$USER/pencil-data/samples/conv-slab ./data
This is done automatically by the pc_mkdatadir command which, in turn, is invoked
when making a new run directory with the pc_newrun command, for example.
Even if you don’t have an NFS-mounted directory (say, on your notebook computer), it
is probably still a good idea to have code and data well separated by a scheme like the
one described above.
An alternative to symbolic links, is to provide a file called ‘datadir.in’ in the root of
the run directory. This file should contain one line of text specifying the absolute or
relative data directory path to use. This facility is useful if one wishes to switch one run
directory between different data directories. It is suggested that in such cases symbolic
links are again made in the run directory to the various locations, then the ‘datadir.in’
need contain only a short relative path.
3.1.6 Running the code
You are now ready to start the code:
unix> start.csh
Linux cincinnatus 2.4.18-4GB #1 Wed Mar 27 13:57:05 UTC 2002 i686 unknown
Non-MPI version
datadir = data
Fri Aug 8 21:36:43 CEST 2003
src/start.x
CVS: io_dist.f90 v. 1.61 (brandenb ) 2003/08/03 09:26:55
[. . . ]
CVS: start.in v. 1.4 (dobler ) 2002/10/02 20:11:14
nxgrid,nygrid,nzgrid= 32 32 32
thermodynamics: assume cp=1
uu: up-down
piecewise polytropic vertical stratification (lnrho)
init_lnrho: cs2bot,cs2top= 1.450000 0.3333330
e.g. for ionization runs: cs2bot,cs2top not yet set
piecewise polytropic vertical stratification (ss)

8 THE PENCIL CODE
start.x has completed successfully
0.070u 0.020s 0:00.14 64.2% 0+0k 0+0io 180pf+0w
Fri Aug 8 21:36:43 CEST 2003
This runs ‘src/start.x’ to construct an initial condition based on the parameters
set in ‘start.in’. This initial condition is stored in ‘data/proc0/var.dat’ (and in
‘data/proc1/var.dat’, etc. if you run the multiprocessor version). It is fair to say that
this is now a rather primitive routine; see ‘pencil-code/idl/read’ for various reading
routines. You can then visualize the data using standard idl language.
If you visualize the profiles using
IDL
(see below), the result should bear some resem-
blance to Fig. 2, but with different values in the ghost zones (the correct values are set
at run-time only) and a simpler velocity profile.
Now we run the code:
unix> run.csh
This executes ‘src/run.x’ and carries out
nt
time steps, where
nt
and other run-time
parameters are specified in ‘run.in’. On a decent PC (1.7 GHz), 50 time steps take about
10 seconds.
The relevant part of the code’s output looks like
--it----t-------dt-------urms----umax----rhom------ssm-----dtc----dtu---dtnu---dtchi-
0 0.34 6.792E-03 0.0060 0.0452 14.4708 -0.4478 0.978 0.013 0.207 0.346
10 0.41 6.787E-03 0.0062 0.0440 14.4707 -0.4480 0.978 0.013 0.207 0.345
20 0.48 6.781E-03 0.0064 0.0429 14.4705 -0.4481 0.977 0.012 0.207 0.345
30 0.54 6.777E-03 0.0067 0.0408 14.4703 -0.4482 0.977 0.012 0.207 0.345
40 0.61 6.776E-03 0.0069 0.0381 14.4702 -0.4482 0.977 0.011 0.207 0.346
and lists
1. the number
it
of the current time step;
2. the time,
t
;
3. the time step,
dt
;
4. the rms velocity,
urms
=phu2i;
5. the maximum velocity,
umax
= max |u|;
6. the mean density,
rhom
=hρi;
7. the mean entropy,
ssm
=hsi/cp;
8. the time step in units of the acoustic Courant step,
dtc
=δt/(cs0δxmin);
9. the time step in units of the advective time step,
dtu
=δt/(cδt δx/ max |u|);
10. the time step in units of viscous time step,
dtnu
=δt/(cδt,vδx2/νmax);
11. the time step in units of the conductive time step,
dtchi
=δt/(cδt,vδx2/χmax).
The entries in this list can be added, removed or reformatted in the file ‘print.in’, see
Sects 5.5 and K.3. The output is also saved in ‘data/time_series.dat’ and should be
identical to the content of ‘reference.out’.
3.2 Further tests 9
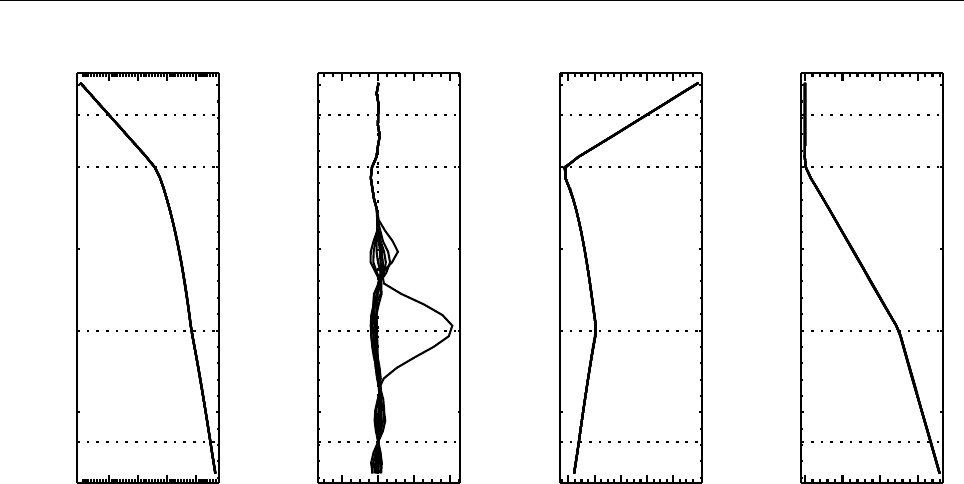
ln ρ
0 1 2 3
−0.5
0.0
0.5
1.0
1.5
z
uz
−0.02 0.00 0.02 0.04
−0.5
0.0
0.5
1.0
1.5
z
Entropy s
−0.6−0.4−0.2 0.0 0.2
−0.5
0.0
0.5
1.0
1.5
z
Temperature T
0.5 1.0 1.5 2.0
−0.5
0.0
0.5
1.0
1.5
z
Figure 2: Stratification of the three-layer convection model in ‘samples/conv-slab’ after 50 timesteps
(t= 0.428). Shown are (from left to right) density ρ, vertical velocity uz, entropy s/cpand temperature
Tas functions of the vertical coordinate zfor about ten different vertical lines in the computational box.
The dashed lines denote domain boundaries: z < −0.68 is the lower ghost zone (points have no physical
significance); −0.68 < z < 0is a stably stratified layer (ds/dz > 0); 0< z < 1is the unstable layer
(ds/dz < 0); 1< z < 1.32 is the isothermal top layer; z > 1.32 is the upper ghost zone (points have no
physical significance).
If you have
IDL
, you can visualize the stratification with (see Sect. 5.19.4 for details)
unix > idl
IDL > pc_read_var,obj=var,/trimall
IDL > tvscl,var,uu(*,*,0,0)
which shows uxin the xy plane through the first meshpoint in the zdirection. There
have been some now outdates specific routines that produce results like that shown in
Fig. 2.
Note: If you want to run the code with
MPI
, you will probably need to adapt
‘getconf.csh’, which defines the commands and flags used to run MPI jobs (and which
is sourced by the scripts ‘start.csh’ and ‘run.csh’). Try
csh -v getconf.csh
or
csh -x getconf.csh
to see how ‘getconf.csh’ makes its decisions. You would add a section for the host name
of your machine with the particular settings. Since ‘getconf.csh’ is linked from the cen-
tral directory ‘pencil-code/bin’, your changes will be useful for all your other runs too.
3.2 Further tests
There is a number of other tests in the ‘samples/’ directory. You can use the script
‘bin/auto-test’ to automatically run these tests and have the output compared to refer-

10 THE PENCIL CODE
ence results.
4. Code structure 11
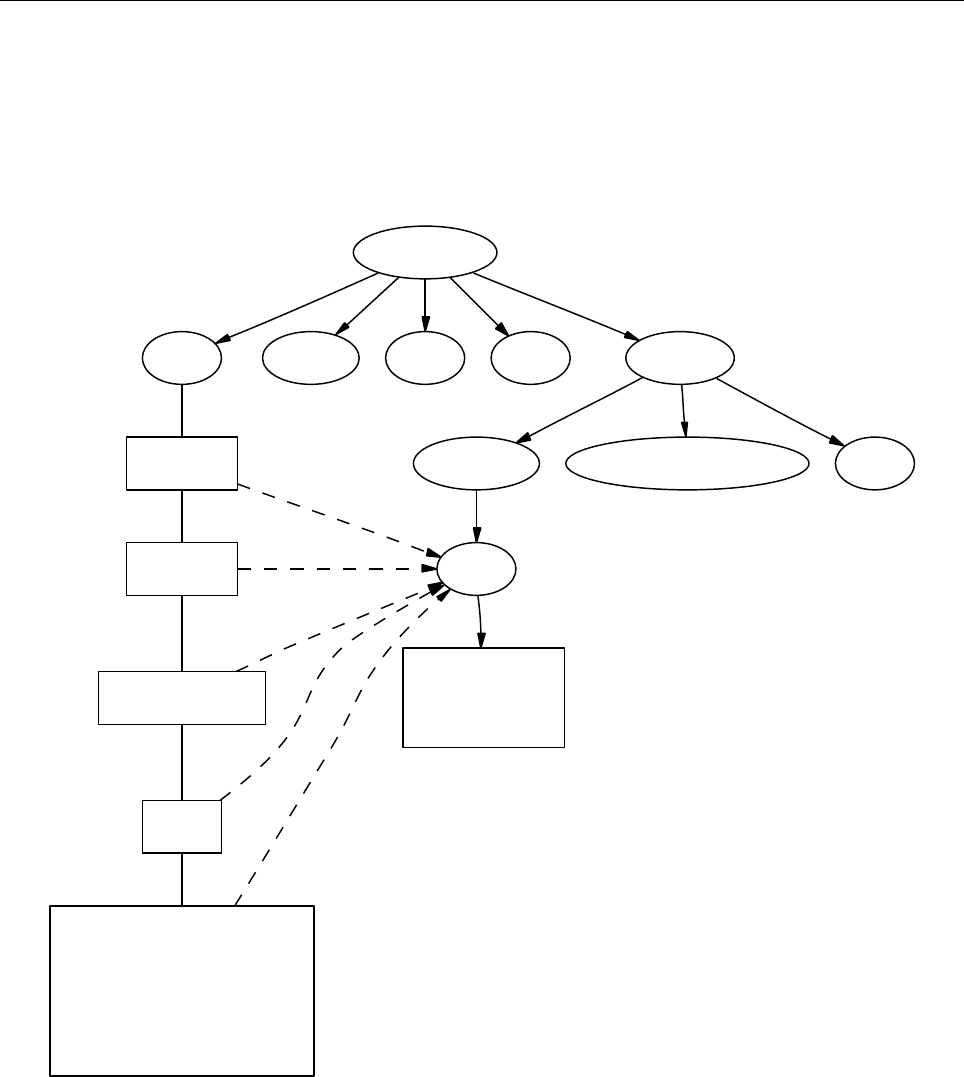
4 Code structure
4.1 Directory tree
pencil-code
src idl | dx doc bin samples
Makefile conv-slab interlocked-fluxrings ...
srcstart, run
timestep, deriv
equ
hydro | nohydro
density | nodensity
entropy | noentropy
grav_z | grav_r | nograv
magnetic | nomagnetic
Makefile.local
cparam.local
Figure 3: The basic structure of the code
The overall directory structure of the code is shown in Fig. 3. Under ‘pencil-code’, there
are currently the following files and directories:
bin/ config/ doc/ idl/ license/ perl/ samples/ sourceme.sh utils/
bugs/ dx/ lib/ misc/ README sourceme.csh src/ www/
Almost all of the source code is contained in the directory ‘src/’, but in order to encap-
sulate individual applications, the code is compiled separately for each run in a local
directory ‘src’ below the individual run directory, like e. g. ‘samples/conv-slab/src’.
It may be a good idea to keep your own runs also under
svn
or
cvs
(which is older than
but similar to
svn
), but this would normally be a different repository. On the machine
where you are running the code, you may want to check them out into a subdirectory of

12 THE PENCIL CODE
‘pencil-code/’. For example, we have our own runs in a repository called ‘pencil-runs’,
so we do
unix> cd $PENCIL_HOME
unix> svn co runs pencil-runs
In this case, ‘runs’ contains individual run directories, grouped in classes (like ‘spher’ for
spherical calculations, or ‘kinematic’ for kinematic dynamo simulations). The current
list of classes in our own ‘pencil-runs’ repository is
1d-tests/ disc/ kinematic/ rings/
2d-tests/ discont/ Misc/ slab_conv/
3d-tests/ discussion/ OLD/ test/
buoy_tube/ forced/ pass_only/
convstar/ interstellar/ radiation/
The directory ‘forced/’ contains some forced turbulence runs (both magnetic and non-
magnetic); ‘gravz/’ contains runs with vertical gravity; ‘rings/’ contains decaying MHD
problems (interlocked flux rings as initial condition, for example); and ‘kinematic/’ con-
tains kinematic dynamo problems where the hydrodynamics is turned off entirely. The
file ‘samples/README’ should contain an up-to-date list and short description of the indi-
vidual classes.1
The subdirectory ‘src’ of each run directory contains a few local configuration files (cur-
rently these are ‘Makefile.local’ and ‘cparam.local’) and possibly ‘ctimeavg.local’. To
compile the samples, links the files ‘.f90’, ‘.c’ and ‘Makefile.src’ need to be linked from
the top file[src/]src directory to the local directory ‘./src’. These links are set up by the
script pc_setupsrc) when used in the root of a run directory.
General-purpose visualization routines for
IDL
or
DX
are in the directories ‘idl’ and ‘dx’,
respectively. There are additional and more specialized
IDL
directories in the different
branches under ‘pencil-runs’.
The directory ‘doc’ contains this manual; ‘bin’ contains a number of utility scripts
(mostly written in
csh
and
Perl
), and in particular the ‘start.csh’, ‘run.csh’, and
‘getconf.csh’ scripts. The ‘.svn’ directory is used (you guessed it) by
.svn
, and is not
normally directly accessed by the user; ‘bugs’, finally is used by us for internal purposes.
The files ‘sourceme.csh’ and ‘sourceme.sh’ will set up some environment variables — in
particular PATH — and aliases/shell functions for your convenience. If you do not want
to source one of these files, you need to make sure your
IDL
path is set appropriately
(provided you want to use
IDL
) and you will need to address the scripts from ‘bin’ with
their explicit path name, or adjust your PATH manually.
4.2 Basic concepts
4.2.1 Data access in pencils
Unlike the CRAY computers that dominated supercomputing in the 80s and early 90s,
all modern computers have a cache that constitutes a significant bottleneck for many
1Our ‘pencil-runs’ directory also contains runs that were done some time ago. Occasionally, we try to
update these, especially if we have changed names or other input conventions.

4.2 Basic concepts 13
codes. This is the case if large three-dimensional arrays are constantly used within each
time step, which has the obvious advantage of working on long arrays and allows vector-
ization of elementary machine operations. This approach also implies conceptual sim-
plicity of the code and allows extensive use of the intuitive F90 array syntax. However,
a more cache-efficient way of coding is to calculate an entire time step (or substep of a
multi-stage time-stepping scheme) only along a one-dimensional pencil of data within
the numerical grid. This technique is more efficient for modern RISC processors: on
Linux PCs and SGI workstations, for example, we have found a speed-up by about 60%
in some cases. An additional advantage is a drastic reduction in temporary storage for
auxiliary variables within each time step.
4.2.2 Modularity
Each run directory has a file ‘src/Makefile.local’ in which you choose certain
modules
2,
which tell the code whether or not entropy, magnetic fields, hydrodynamics, forcing, etc.
should be invoked. For example, the settings for forced turbulent MHD simulations are
HYDRO = hydro
DENSITY = density
ENTROPY = noentropy
MAGNETIC = magnetic
GRAVITY = nogravity
FORCING = forcing
MPICOMM = nompicomm
GLOBAL = noglobal
IO = io_dist
FOURIER = nofourier
This file will be processed by
make
and the settings are thus assignments of
make
variables. Apart from the physics modules (equation of motion: yes, density [pressure]:
yes, entropy equation: no, magnetic fields: yes, gravity: no, forcing: yes), a few technical
modules can also be used or deactivated; in the example above, these are
MPI
(switched
off), additional global variables (none), input/output (distributed), and
FFT
(not used).
The table in Sect. J in the Appendix lists all currently available modules.
Note that most of these
make
variables must be set, but they will normally obtain rea-
sonable default values in ‘Makefile’ (so you only need to set the non-standard ones in
‘Makefile.local’). It is by using this switching mechanism through make that we achieve
high flexibility without resorting to excessive amounts of cryptic preprocessor directives
or other switches within the code.
Many possible combinations of modules have already been tested and examples are part
of the distribution, but you may be interested in a combination which was never tried
before and which may not work yet, since the modules are not fully orthogonal. In such
cases, we depend on user feedback for fixing problems and documenting the changes for
others.
2We stress once more that we are not talking about F90 modules here, although there is some connec-
tion, as most of our modules define F90 modules: For example each of the modules
gravity simple
,
grav r
and
nogravity
defines a Fortran module
Gravity
.

14 THE PENCIL CODE
4.3 Files in the run directories
4.3.1 ‘start.in’, ‘run.in’, ‘print.in’
These files specify the startup and runtime parameters (see Sects. 5.12 and K.2), and the
list of diagnostic variables to print (see 5.5). They specify the setup of a given simulation
and are kept under
svn
in the individual ‘samples’ directories.
You may want to check for the correctness of these configuration files by issuing the
command pc_configtest.
4.3.2 ‘datadir.in’
If this file exists, it must contain the name of an existing directory, which will be used as
data directory
, i. e. the directory where all results are written. If ‘datadir.in’ does not
exist, the data directory is ‘data/’.
4.3.3 ‘reference.out’
If present, ‘reference.out’ contains the output you should obtain in the given run direc-
tory, provided you have not changed any parameters. To see whether the results of your
run are OK, compare ‘time_series.dat’ to ‘reference.out’:
unix> diff data/time_series.dat reference.out
4.3.4 ‘start.csh’, ‘run.csh’, ‘getconf.csh’ [obsolete; see Sect. 5.1]
These are links to ‘$PENCIL_HOME/bin’. You will be constantly using the scripts
‘start.csh’ and ‘run.csh’ to initialize the code. Things that are needed by both (like the
name of the mpirun executable,
MPI
options, or the number of processors) are located in
‘getconf.csh’, which is never directly invoked.
4.3.5 ‘src/ ’
The ‘src’ directory contains two local files, ‘src/Makefile.local’ and ‘src/cparam.local’,
which allow the user to choose individual modules (see 4.2.2) and to set parameters like
the grid size and the number of processors for each direction. These two files are part
of the setup of a given simulation and are kept under
svn
in the individual ‘samples’
directories.
The file ‘src/cparam.inc’ is automatically generated by the script ‘mkcparam’ and contains
the number of fundamental variables for a given setup.
All other files in ‘src/’ are either links to source files (and ‘Makefile.src’) in the
‘$PENCIL_HOME/src’ directory, or object and module files generated by the compiler.

4.3 Files in the run directories 15
4.3.6 ‘data/ ’
This directory (the name of which will actually be overwritten by the first line of
‘datadir.in’, if that file is present; see §4.3.2) contains the output from the code:
‘data/dim.dat’The global array dimensions.
‘data/legend.dat’The header line specifying the names of the diagnostic variables in
‘time_series.dat’.
‘data/time_series.dat’Time series of diagnostic variables (also printed to stdout). You
can use this file directly for plotting with
Gnuplot
,
IDL
,
Xmgrace
or similar tools (see
also §5.19).
‘data/tsnap.dat’, ‘data/tvid.dat’Time when the next snapshot ‘VARN’ or animation
slice should be taken.
‘data/params.log’Keeps a log of all your parameters: ‘start.x’ writes the startup pa-
rameters to this file, ‘run.x’ appends the runtime parameters and appends them anew,
each time you use the ‘RELOAD’ mechanism (see §5.10).
‘data/param.nml’Complete set of startup parameters, printed as Fortran namelist.
This file is read in by ‘run.x’ (this is how values of startup parameters are propagated
to ‘run.x’) and by
IDL
(if you use it).
‘data/param2.nml’Complete set of runtime parameters, printed as Fortran namelist.
This file is read by
IDL
(if you use it).
‘data/index.pro’Can be used as include file in
IDL
and contains the column in which
certain variables appear in the diagnostics file (‘time_series.dat’). It also contains the
positions of variables in the ‘VARN’ files. These positions depend on whether
entropy
or
noentropy
, etc, are invoked. This is a temporary solution and the file may disappear in
future releases.
‘data/interstellar.dat’Unformatted file containing the time at which the next su-
pernova event will occur, under certain supernova schemes. (Only needed by the
inter-
stellar
module.)
‘data/proc0’, ‘data/proc1’, . . . These are the directories containing data from the in-
dividual processors. So after running an
MPI
job on two processors, you will have the
two directories ‘data/proc0’ and ‘data/proc1’. Each of the directories can contain the
following files:
‘var.dat’binary file containing the latest snapshot;

16 THE PENCIL CODE
‘VARN’binary file containing individual snapshot number N;
‘dim.dat’ASCII file containing the array dimensions as seen by the given processor;
‘time.dat’ASCII file containing the time corresponding to ‘var.dat’ (not actually used
by the code, unless you use the
io mpiodist.f90
module);
‘grid.dat’binary file containing the part of the grid seen by the given processor;
‘seed.dat’the random seed for the next time step (saved for reasons of reproducibility).
For multi-processor runs with velocity forcing, the files ‘procN/seed.dat’ must all
contain the same numbers, because globally coherent waves of given wavenumber
are used;
‘X.xy’, ‘X.xz’, ‘X.yz’two-dimensional sections of variable X, where Xstands for the
corresponding variable. The current list includes
bx.xy bx.xz by.xy by.xz bz.xy bz.xz divu.xy lnrho.xz
ss.xz ux.xy ux.xz uz.xy uz.xz
Each processor writes its own slice, so these need to be reassembled if one wants
to plot a full slice.

5. Using the code 17
5 Using the code
5.1 Configuring the code to compile and run on your computer
Note: We recommend to use the procedure described here, rather than the old method
described in Sects. 5.2 and 4.3.4.
Quick instructions: You may compile with a default compiler-specific configuration:
1. Single-processor using the GNU compiler collection:
unix> pc_build -f GNU-GCC
2. Multi-processor using GNU with MPI support:
unix> pc_build -f GNU-GCC_MPI
Many compilers are supported already, please refer to the available config files in
‘$PENCIL_HOME/config/compilers/*.conf’, e.g. ‘Intel.conf’ and ‘Intel_MPI.conf’.
If you have to set up some compiler options specific to a certain host system you work on,
or if you like to create a host-specific configuration file so that you can simply execute
pc_build without any options, you can clone an existing host-file, just include an existing
compiler configuration, and simply only add the options you need. A good example of
a host-file is ‘$PENCIL_HOME/config/hosts/IWF/host-andromeda-GNU_Linux-Linux.conf’.
You may save a clone under ‘$PENCIL_HOME/config/hosts/<ID>.conf’, where ‘<ID>’ is to
be replaced by the output of pc_build -i. This will be the new default for pc_build.
If you don’t know what this was all about, read on.
In essence, configuration, compiling and running the code work like this:
1. Create a configuration file for your computer’s host ID.
2. Compile the code using pc_build.
3. Run the code using pc_run
In the following, we will discuss the essentials of this scheme. Exhaustive documen-
tation is available with the commands perldoc Pencil::ConfigFinder and perldoc
PENCIL::ConfigParser.
5.1.1 Locating the configuration file
Commands like pc_build and pc_run use the Perl module ‘Pencil::ConfigFinder’ to lo-
cate an appropriate configuration file and ‘Pencil::ConfigParser’ to read and interpret
it. When you use ‘ConfigFinder’ on a given computer, it constructs a host ID for the sys-
tem it is running on, and looks for a file ‘host_ID.conf’ in any subdirectory of ‘$PENCIL_-
HOME/config/hosts’.
E.g., if the host ID is “workhorse.pencil.org”, ‘ConfigFinder’ would consider the file
‘$PENCIL_HOME/config/hosts/pencil.org/workhorse.pencil.org.conf’.

18 THE PENCIL CODE
Note 1: The location in the tree under ‘hosts/’ is irrelevant, which allows you to group
related hosts by institution, owner, hardware, etc.
Note 2: ‘ConfigFinder’ actually uses the following search path:
1. ‘./config’
2. ‘$PENCIL_HOME/config-local’
3. ‘$HOME/.pencil/config-local’
4. ‘$PENCIL_HOME/config’
This allows you to override part of the ‘config/’ tree globally on the given file system,
or locally for a particular run directory, or for one given copy of the PENCIL CODE. This
search path is used both, for locating the configuration file for your host ID, and for
locating included files (see below).
The host ID is constructed based on information that is easily available for your system.
The algorithm is as follows:
1. Most commands using ‘ConfigFinder’ have a ‘--host-id’ (sometimes abbreviated
as ‘-H’) option to explicitly set the host ID.
2. If the environment variable
PENCIL HOST ID
is set, its value is used.
3. If any of the files ‘./host-ID’, ‘$PENCIL_HOME/host-ID’, ‘$HOME/.pencil/host-ID’, ex-
ists, its first line is used.
4. If ‘ConfigFinder’ can get hold of a
fully qualified host name
, that is used as host
ID.
5. Else, a combination of host name, operating system name and possibly some other
information characterizing the system is used.
6. If no config file for the host ID is found, the current operating system name is tried
as fallback host ID.
To see which host IDs are tried (up to the first one for which a configuration file is found),
run
unix> pc_build --debug-config
This command will tell you the host-ID of the system that you are using:
unix> pc_build -i
5.1.2 Structure of configuration files
It is strongly recommended to include in a users configuration file one of the preset
compiler suite configuration files. Then, only minor options need to be set by a user, e.g.
the optimization flags. One of those user configuration files looks rather simple:
# Simple config file. Most files don’t need more.
%include compilers/GNU-GCC
or if you prefer a different compiler:

5.1 Configuring the code to compile and run on your computer 19
# Simple Intel compiler suite config file.
%include compilers/Intel
A more complex file (using MPI with additional options) would look like this:
# More complex config file.
%include compilers/GNU-GCC_MPI
%section Makefile
MAKE_VAR1 = -j4 # joined compilation with four threads
FFLAGS += -O3 -Wall -fbacktrace # don’t redefine, but append with ’+=’
%endsection Makefile
%section runtime
mpiexec = mpirun # some MPI backends need a redefinition of mpiexec
%endsection runtime
%section environment
SCRATCH_DIR=/var/tmp/$USER
%endsection environment
Adding ” MPI” to a compiler suite’s name is usually sufficient to use MPI.
Note 3: We strongly advise not to mix Fortran- and C-compilers from different manu-
facturers or versions by manually including multiple separate compiler configurations.
Note 4: We strongly advise to use at maximum the optimization levels ’-O2’ for the
Intel compiler and ’-O3’ for all other compilers. Higher optimization levels implicate an
inadequate loss of precision.
The ‘.conf’ files consist of the following elements:
Comments: A#sign and any text following it on the same line are ignored.
Sections: There are three sections:
Makefile for setting make parameters
runtime for adding compiler flags used by pc_run
environment shell environment variables for compilation and running
Include statements: An %include ... statement is recursively replaced by the con-
tents of the files it points to.3
The included path gets a .conf suffix appended. Included paths are typically “ab-
solute”, e.g.
%include os/Unix
will include the file ‘os/Unix.conf’ in the search path listed above (typically from
‘$PENCIL_HOME/config’). However, if the included path starts with a dot, it is a rel-
ative path, so
3However, if the include statement is inside a section, only the file’s contents inside that section are
inserted.

20 THE PENCIL CODE
%include ./Unix
will only search in the directory where the including file is located.
Assignments: Statements like FFLAGS += -O3 or mpiexec=mpirun are assignments and
will set parameters that are used by pc_build/make or pc_run.
Lines ending with a backslash ‘\’ are continuation lines.
If possible, one should always use incremental assignments, indicated by using a
+= sign instead of =, instead of redefining certain flags.
Thus,
CFLAGS += -O3
CFLAGS += -I../include -Wall
is the same as
CFLAGS = $(CFLAGS) -O3 -I../include -Wall
5.1.3 Compiling the code
Use the pc_build command to compile the code:
unix> pc_build # use default compiler suite
unix> pc_build -f Intel_MPI # specify a compiler suite
unix> pc_build -f os/GNU_Linux,mpi/open-mpi # explicitly specify config files
unix> pc_build VAR=something # set variables for the makefile
unix> pc_build --cleanall # remove generated files
The third example circumvents the whole host ID mechanism by explicitly instructing
pc_build which configuration files to use. The fourth example shows how to define extra
variables (VAR=something) for the execution of the Makefile.
See pc_build --help for a complete list of options.
5.1.4 Running the code
Use the pc_run command to run the code:
unix> pc_run # start if necessary, then run
unix> pc_run start
unix> pc_run run
unix> pc_run start run^3 # start, then run 3 times
unix> pc_run start run run run # start, then run 3 times
unix> pc_run ^3 # start if necessary, then run 3 times
See pc_run --help for a complete list of options.
5.1.5 Testing the code
The pc_auto-test command uses pc_build for compiling and pc_run for running the
tests. Here are a few useful options:

5.2 Adapting ‘Makefile.src’file]Makefile.src@Makefile.src [obsolete; see Sect. 5.1]21
unix> pc_auto-test
unix> pc_auto-test --no-pencil-check # suppress pencil consistency check
unix> pc_auto-test --max-level=1 # run only tests in level 0 and 1
unix> pc_auto-test --time-limit=2m # kill each test after 2 minutes
See pc_auto-test --help for a complete list of options.
The pencil-test script will use pc_auto-test if given the ‘--use-pc_auto-test’ or ‘-b’
option:
unix> pencil-test --use-pc_auto-test
unix> pencil-test -b # ditto
unix> pencil-test -b -Wa,--max-level=1,--no-pencil-check # quick pencil
See pencil-test --help for a complete list of options.
5.2 Adapting ‘Makefile.src’ [obsolete; see Sect. 5.1]
By default, one should use the above described configuration mechanism for compila-
tion. If for whatever reason one needs to work with a modified ‘Makefile’, there is a
mechanism for picking the right set of compiler flags based on the hostname.
To give you an idea of how to add your own machines, let us assume you have several
Linux boxes running a compiler f95 that needs the options ‘-O2 -u’, while one of them,
Janus
, runs a compiler f90 which needs the flags ‘-O3’ and requires the additional op-
tions ‘-lmpi -llam’ for
MPI
.
The ‘Makefile.src’ you need will have the following section:
### Begin machine dependent
## IRIX64:
[. . . ] (leave as it is in the original Makefile)
## OSF1:
[. . . ] (leave as it is in the original Makefile)
## Linux:
[. . . ] (leave everything from original Makefile and add:)
#FC=f95
#FFLAGS=-O2 -u
#FC=f90 #(Janus)
#FFLAGS=-O3 #(Janus)
#LDMPI=-lmpi -llam #(Janus)
## SunOS:
[. . . ] (leave as it is in the original Makefile)
## UNICOS/mk:
[. . . ] (leave as it is in the original Makefile)
## HI-UX/MPP:
[. . . ] (leave as it is in the original Makefile)
## AIX:
[. . . ] (leave as it is in the original Makefile)

22 THE PENCIL CODE
Table 1: Compiler flags for common compilers. Note that some combinations of OS and compiler require
much more elaborate settings; also, if you use MPI, you will have to set LDMPI.
Compiler FC FFLAGS CC CFLAGS
Unix/POSIX:
GNU gfortran -O3 gcc -O3 -DFUNDERSC=1
Intel ifort -O2 icc -O3 -DFUNDERSC=1
PGI pgf95 -O3 pgcc -O3 -DFUNDERSC=1
G95 g95 -O3 -fno-second-underscore gcc -O3 -DFUNDERSC=1
Absoft f95 -O3 -N15 gcc -O3 -DFUNDERSC=1
IBM XL xlf95 -qsuffix=f=f90 -O3 xlc -O3 -DFUNDERSC=1
outdated:
IRIX Mips f90 -64 -O3 -mips4 cc -O3 -64 -DFUNDERSC=1
Compaq f90 -fast -O3 cc -O3 -DFUNDERSC=1
### End machine dependent
Note 1 There is a script for adapting the Makefile: ‘adapt-mkfile’. In the example
above, #(Janus) is not a comment, but marks this line to be activated (uncommented) by
adapt-mkfile if your hostname (‘uname -n‘) matches ‘Janus’ or ‘janus’ (capitalization
is irrelevant). You can combine machine names with a vertical bar: a line containing
#(onsager|Janus) will be activated on both,
Janus
and
Onsager
.
Note 2 If you want to experiment with compiler flags, or if you want to get things
running without setting up the machine-dependent section of the ‘Makefile’, you can set
make
variables at the command line in the usual manner:
src> make FC=f90 FFLAGS=’-fast -u’
will use the compiler f90 and the flags ‘-fast -u’ for both compilation and linking. Ta-
ble 1 summarizes flags we use for common compilers.
5.3 Changing the resolution
It is advisable to produce a new run directory each time you run a new case. (This does
not include restarts from an old run, of course.) If you have a 323run in some directory
‘runA_32a’, then go to its parent directory, i.e.
runA_32a> cd ..
forced> pc_newrun runA_32a runA_64a
forced> cd runA_64a/src
forced> vi cparam.local
and edit the ‘cparam.local’ for the new resolution.
If you have ever wondered why we don’t do dynamic allocation of the main variable (f)
array, the main reason it that with static allocation the compiler can check whether we
are out of bounds.

5.4 Using a non-equidistant grid 23
5.4 Using a non-equidistant grid
We introduce a non-equidistant grid zi(by now, this is also implemented for the other
directions) as a function z(ζ)of an equidistant grid ζiwith grid spacing ∆ζ= 1.
The way the parameters are handled, the box size and position are not changed when
you switch to a non-equidistant grid, i.e. they are still determined by
xyz0
and
Lxyz
.
The first and second derivatives can be calculated by
df
dz =df
dζ
dζ
dz =1
z′f′(ζ),d2f
dz2=1
z′2f′′(ζ)−z′′
z′3f′(ζ),(1)
which can be written somewhat more compactly using the inverse function ζ(z):
df
dz =ζ′(z)f′(ζ),d2f
dz2=ζ′2(z)f′′(ζ) + ζ′′(z)ζ′(z)f′(ζ).(2)
Internally, the code uses the quantities
dz 1
≡1/z′=ζ′(z)and
dz tilde
≡ −z′′/z′2=
ζ′′/ζ′, and stores them in ‘data/procN/grid.dat’.
The parameters
lequidist
(a 3-element logical array),
grid func
,
coeff grid
(a
≥2-element real array) are used to choose a non-equidistant grid and define
the function z(ζ). So far, one can choose between grid_function=’sinh’,grid_-
function=’linear’ (which produces an equidistant grid for testing purposes), and
grid_function=’step-linear’.
The sinh profile: For grid_function=’sinh’, the function z(ζ)is given by
z(ζ) = z0+Lz
sinh a(ζ−ζ∗) + sinh a(ζ∗−ζ1)
sinh a(ζ2−ζ∗) + sinh a(ζ∗−ζ1),(3)
where z0and z0+Lzare the lowest and uppermost levels, ζ1,ζ2are the ζvalues represent-
ing those levels (normally ζ1= 0, ζ2=Nz−1for a grid of Nzvertical layers [excluding
ghost layers]), and ζ∗is the ζvalue of the inflection point of the sinh function. The z
coordinate and ζvalue of the inflection point are related via
z∗=z0+Lz
sinh a(ζ∗−ζ1)
sinh a(ζ2−ζ∗) + sinh a(ζ∗−ζ1),(4)
which can be inverted (“after some algebra”) to
ζ∗=ζ1+ζ2
2+1
aartanh 2z∗−z0
Lz−1tanh aζ2−ζ1
2.(5)
General profile: For a general monotonic function ψ() instead of sinh we get,
z(ζ) = z0+Lz
ψ[a(ζ−ζ∗)] + ψ[a(ζ∗−ζ1)]
ψ[a(ζ2−ζ∗)] + ψ[a(ζ∗−ζ1)] ,(6)
and the reference point ζ∗is found by inverting
z∗=z0+Lz
ψ[a(ζ∗−ζ1)]
ψ[a(ζ2−ζ∗)] + ψ[a(ζ∗−ζ1)] ,(7)
numerically.

24 THE PENCIL CODE
Duct flow: The profile function grid_function=’duct’ generates a grid profile for tur-
bulent flow in ducts. For a duct flow, most gradients are steepest close to the walls, and
hence very fine resolution is required near the walls. Here we follow the method of [22]
and use a Chebyshev-type grid with a cosine distribution of the grid points such that in
the ydirection they are located at
yj=hcos θj,(8)
where
θj=(Ny−j)π
Ny−1, j = 1,2,...,Ny(9)
and h=Ly/2is the duct half-width.
Currently this method is only adapted for ducts where xis the stream-wise direction, z
is in the span-wise direction and the walls are at y=y0and y=y0+Ly.
In order to have fine enough resolution, the first grid point should be a distance δ=
0.05 lwfrom the wall, where
lw=ν
uτ
, uτ=rτw
ρ,(10)
and τwis the shear wall stress. This is accomplished by using at least
Ny≥N∗
y=π
arccos1−δ
h+ 1 (11)
=πrh
2δ+ 1 −π
24r2δ
h+O"δ
h3/2#(12)
grid points in the y-direction. After rounding up to the next integer value, we find that
the truncated condition
Ny≥&πrh
2δ'+ 1 (13)
(where ⌈x⌉denotes the ceiling function, i.e. the smallest integer equal to, or larger than,
x) gives practically identical results.
Example: To apply the sinh profile, you can set the following in ‘start.in’ (this exam-
ple is from ‘samples/sound-spherical-noequi’):
&init_pars
[...]
xyz0 = -2., -2., -2. ! first corner of box
Lxyz = 4., 4., 4. ! box size
lperi = F , F , F ! periodic direction?
lequidist = F, F, T ! non-equidistant grid in z
xyz_star = , , -2. ! position of inflection point
grid_func = , , ’sinh’ ! sinh function: linear for small, but
! exponential for large z
coeff_grid = , , 0.5
/

5.5 Diagnostic output 25
The parameter array
coeff grid
represents z∗and a; the bottom height z0and the total
box height Lzare taken from
xyz0
and
Lxyz
as in the equidistant case. The inflection
point of the sinh profile (the part where it is linear) is not in the middle of the box,
because we have set
xyz star(3)
(i. e. z∗) to −2.
5.5 Diagnostic output
Every
it1
time steps (
it1
is a runtime parameter, see Sect. K.2), the code writes moni-
toring output to
stdout
and, parallel to this, to the file ‘data/time_series.dat’. The vari-
ables that appear in this listing and the output format are defined in the file ‘print.in’
and can be changed without touching the code (even while the code is running). A simple
example of ‘print.in’ may look like this:
t(F10.3)
urms(E13.4)
rhom(F10.5)
oum
which means that the output table will contain time
t
in the first column formatted as
(F10.3), followed by the mean squared velocity,
urms
(i.e. hu2i1/2) in the second column
with format (E13.4), the average density
rhom
(hρi, which allows to monitor mass con-
servation) formatted (F10.5) and the kinetic helicity
oum
(that is hω·ui) in the last
column with the default format (E10.2).4The corresponding diagnostic output will look
like
----t---------urms--------rhom------oum----
0.000 4.9643E-03 14.42457 -8.62E-06
0.032 3.9423E-03 14.42446 -5.25E-06
0.063 6.8399E-03 14.42449 -3.50E-06
0.095 1.1437E-02 14.42455 -2.58E-06
0.126 1.6980E-02 14.42457 -1.93E-06
5.6 Data files
5.6.1 Snapshot files
Snapshot files contain the values of all evolving variables and are sufficient to restart a
run. In the case of an MHD simulation with entropy equation, for example, the snapshot
files will contain the values of velocity, logarithmic density, entropy and the magnetic
vector potential.
There are two kinds of snapshot files: the current snapshot and permanent snapshots,
both of which reside in the directory ‘data/procN/’. The parameter
isav
determines the
frequency at which the current snapshot ‘data/procN/var.dat’ is written. If you keep
this frequency too high, the code will spend a lot of time on I/O, in particular for large
jobs; too low a frequency makes it difficult to follow the evolution interactively during
test runs. There is also the
ialive
parameter. Setting this to 1 or 10 gives an updated
4The format specifiers are like in Fortran, apart from the fact that the Eformat will use standard
scientific format, corresponding to the Fortran 1pE syntax. Seasoned Fortran IV programmers may use
formats like (0pE13.4) to enjoy nostalgic feelings, or (1pF10.5) if they depend on getting wrong numbers.

26 THE PENCIL CODE
timestep in the files ‘data/proc*/alive.info’. You can put
ialive=0
to turn this off to
limit the I/O on your machine.
The permanent snapshots ‘data/proc*/VARN’ are written every
dsnap
time units. These
files are numbered consecutively from N= 1 upward and for long runs they can occupy
quite some disk space. On the other hand, if after a run you realize that some addi-
tional quantity qwould have been important to print out, these files are the only way to
reconstruct the time evolution of qwithout re-running the code.
File structure Snapshot files consist of the following
Fortran records
5:
1. variable vector f[
mx
×
my
×
mz
×
nvar
]
2. time t[1], coordinate vectors x[
mx
], y[
my
], z[
mz
], grid spacings δx [1], δy [1], δz
[1], shearing-box shift ∆y[1]
All numbers (apart from the record markers) are single precision (4-byte) floating point
numbers, unless you use double precision (see §5.21, in which case all numbers are 8-
byte floating point numbers, while the record markers remain 4-byte integers.
The script pc_tsnap allows you to determine the time tof a snapshot file:
unix> pc_tsnap data/proc0/var.dat
data/proc0/var.dat: t = 8.32456
unix> pc_tsnap data/proc0/VAR2
data/proc0/VAR2: t = 2.00603
5.7 Video files and slices
We use the terms
video files
and
slice files
interchangeably. These files contain a time
series of values of one variable in a given plane. The output frequency of these video
snapshots is set by the parameter
dvid
(in code time units).
When output to video files is activated by some settings in ‘run.in’ (see example below)
and the existence of ‘video.in’, slices are written for four planes:
1. x-zplane (yindex
iy
; file suffix .xz)
2. y-zplane (yindex
ix
; suffix .yz)
3. x-yplane (yindex
iz
; suffix .xy)
4. another slice parallel to the x-yplane (yindex
iz2
; suffix .xy2)
You can specify the position of the slice planes by setting the parameters
ix
,
iy
,
iz
and
iz2
in the namelist
run pars
in ‘run.in’. Alternatively, you can set the input parameter
slice position
to one of ’p’ (periphery of box) or ’m’ (middle of box). Or you can also
specify the z−position in terms of z using the tags
zbot slice
and
ztop slice
. In this case,
the
zbot slice
slice will have the suffix .xy and the
ztop slice
the suffix .xy2
In the file ‘video.in’ of your run directory, you can choose for which variables you want
to get video files; valid choices are listed in §K.4.
5A
Fortran record
is marked by the 4-byte integer byte count of the data in the record at the beginning
and the end, i.e. has the form hNbytes,raw data, Nbytesi

5.7 Video files and slices 27
The
slice files
are written in each processor directory ‘data/proc*/’ and have a file name
indicating the individual variable (e. g. ‘slice_uu1.yz’ for a slice of uxin the y-zplane).
Before visualizing slices one normally wants to combine the sub-slices written by each
processor into one global slice (for each plane and variable). This is done by running
‘src/read_videofiles.x’, which will prompt for the variable name, read the individual
sub-slices and write global slices to ‘data/’ Once all global slices have been assembled
you may want to remove the local slices ‘data/proc*/slice*’.
To read all sub-slices demanded in ‘video.in’ at once use ‘src/read_all_videofiles.x’.
This program doesn’t expect any user input and can thus be submitted in computing
queues.
For visualization of slices, you can use the
IDL
routines ‘rvid_box.pro’, ‘rvid_-
plane.pro’, or ‘rvid_line.pro’ which allows the flag ‘/png’ for writing
PNG
images that
can then be combined into an
MPEG
movie using
mpeg encode
. Based on ‘rvid_box’,
you can write your own video routines in
IDL
.
An example Suppose you have set up a run using
entropy.f90
and
magnetic.f90
(most
probably together with
hydro.f90
and other modules). In order to animate slices of en-
tropy sand the z-component Bzof the magnetic field, in planes passing through the
center of the box, do the following:
1. Write the following lines to ‘video.in’ in your run directory:
ss
bb
divu
2. Edit the namelist
run pars
in the file ‘run.in’. Request slices by setting
write slices
and set
dvid
and
slice position
to reasonable values, say
!lwrite_slices=T !(no longer works; write requested slices into video.in)
dvid=0.05
slice_position=’m’
3. Run the PENCIL CODE:
unix> start.csh
unix> run.csh
4. Run ‘src/read_videofiles.x’ to assemble global slice files from those scattered
across ‘data/proc*/’:
unix> src/read_videofiles.x
enter name of variable (lnrho, uu1, ..., bb3): ss
unix> src/read_videofiles.x
enter name of variable (lnrho, uu1, ..., bb3): bb3
5. Start
IDL
and run ‘rvid_box’:
unix> idl
IDL> rvid_box,’bb3’
IDL> rvid_box,’ss’,min=-0.3,max=2.
etc.

28 THE PENCIL CODE
Another example Suppose you have set up a run using
magnetic.f90
and some other
modules. This run studies some process in a “surface” layer inside the box. This “surface”
can represent a sharp change in density or turbulence. So you defined your box setting
the z= 0 point at the surface. Therefore, your ‘start.in’ file will look something similar
to:
&init_pars
lperi=T,T,F
bcz = ’s’,’s’,’a’,’hs’,’s’,’s’,’a’
xyz0 = -3.14159, -3.14159, -3.14159
Lxyz = 6.28319, 6.28319, 9.42478
Now you can analyze quickly the surface of interest and some other xy−slice setting
zbot slice
and
ztop slice
in the ‘run.in’ file:
&run_pars
slice_position=’c’
zbot_slice=0.
ztop_slice=0.2
In this case, the slices with the suffix .xy will be at the “surface” and the ones with the
suffix .xy2 will be at the position z= 0.2above the surface. And you can visualize this
slices by:
1. Write the following lines to ‘video.in’ in your run directory:
bb
2. Edit the namelist
run pars
in the file ‘run.in’ to include
zbot slice
and
ztop slice
.
3. Run the PENCIL CODE:
unix> start.csh
unix> run.csh
4. Run ‘src/read_videofiles.x’ to assemble global slice files from those scattered
across ‘data/proc*/’:
unix> src/read_videofiles.x
enter name of variable (lnrho, uu1, ..., bb3): bb3
5. Start
IDL
, load the slices with ‘pc_read_video’ and plot them at some time:
unix> idl
IDL> pc_read_video, field=’bb3’,ob=bb3,nt=ntv
IDL> tvscl,bb3.xy(*,*,100)
IDL> tvscl,bb3.xy2(*,*,100)
etc.
File structure
Slice files
consist of one Fortran record (see footnote on page 26) for
each slice, which contains the data of the variable (without ghost zones), the time tof
the snapshot and the position of the sliced variable (e. g. the xposition for a y-zslice):
1. data1[
nx
×
ny
×
nz
], time t1[1], position1[1]

5.8 Averages 29
2. data2[
nx
×
ny
×
nz
], time t2[1], position2[1]
3. data3[
nx
×
ny
×
nz
], time t3[1], position3[1]
etc.
5.8 Averages
5.8.1 One-dimensional output averaged in two dimensions
In the file ‘xyaver.in’, z-dependent (horizontal) averages are listed. They are written to
the file ‘data/xyaverages.dat’. A new line of averages is written every
it1
th time steps.
There is the possibility to output two-dimensional averages. The result then de-
pends on the remaining dimension. The averages are listed in the files ‘xyaver.in’,
‘xzaver.in’, and ‘yzaver.in’ where the first letters indicate the averaging directions.
The output is then stored to the files ‘data/xyaverages.dat’, ‘data/xzaverages.dat’, and
‘data/yzaverages.dat’. The output is written every
it1d
th time steps.
The rms values of the so defined mean magnetic fields are referred to as
bmz
,
bmy
and
bmx
, respectively, and the rms values of the so defined mean velocity fields are referred
to as
umz
,
umy
, and
umx
. (The last letter indicates the direction on which the averaged
quantity still depends.)
See Sect. 9.2 on how to add new averages.
In idl such xy-averages can be read using the procedure ‘pc_read_xyaver’.
5.8.2 Two-dimensional output averaged in one dimension
There is the possibility to output one-dimensional averages. The result then depends
on the remaining two dimensions. The averages are listed in the files ‘yaver.in’,
‘zaver.in’, and ‘phiaver.in’ where the first letter indicates the averaging direction.
The output is then stored to the files ‘data/yaverages.dat’, ‘data/zaverages.dat’, and
‘data/phiaverages.dat’.
See Sect. 9.2 on how to add new averages.
Disadvantage: The output files, e.g. ‘data/zaverages.dat’, can be rather big because each
average is just appended to the file.
5.8.3 Azimuthal averages
Azimuthal averages are controlled by the file ‘phiaver.in’, which currently supports the
quantities listed in Sect. K.5. In addition, one needs to set
lwrite phiaverages
,
lwrite -
yaverages
, or
lwrite zaverages
to
.true.
. For example, if ‘phiaver.in’ contains the single
line
b2mphi
then you will get azimuthal averages of the squared magnetic field B2.

30 THE PENCIL CODE
Azimuthal averages are written every
d2davg
time units to the files
‘data/averages/PHIAVGN’. The file format of azimuthal-average files consists of the
following
Fortran records
:
1. number of radial points Nr,φ−avg [1], number of vertical points Nz,φ−avg [1], number
of variables Nvar,φ−avg[1], number of processors in zdirection [1]
2. time t[1], positions of cylindrical radius rcyl [Nr,φ−avg] and z[Nz,φ−avg] for the grid,
radial spacing δrcyl [1], vertical spacing δz [1]
3. averaged data [Nr,φ−avg×Nz,φ−avg]
4. label length [1], labels of averaged variables [Nvar,φ−avg]
All numbers are 4-byte numbers (floating-point numbers or integers), unless you use
double precision (see §5.21).
To read and visualize azimuthal averages in
IDL
, use ‘$PENCIL_HOME/idl/files/pc_-
read_phiavg.pro’
IDL> avg = pc_read_phiavg(’data/averages/PHIAVG1’)
IDL> contour, avg.b2mphi, avg.rcyl, avg.z, TITLE=’!17B!U2!N!X’
or have a look at ‘$PENCIL_HOME/idl/phiavg.pro’ for a more sophisticated example.
5.8.4 Time averages
Time averages need to be prepared in the file ‘src/ctimeavg.local’, since they use extra
memory. They are controlled by the averaging time τavg (set by the parameter
tavg
in
‘run.in’), and by the indices
idx tavg
of variables to average.
Currently, averaging is implemented as exponential (memory-less) average,6
hfit+δt =hfit+δt
τavg
[f(t+δt)− hfit],(16)
which is equivalent to
hfit=
t
Z
t0
e−(t−t′)/τavg f(t′)dt′.(17)
Here t0is the time of the snapshot the calculation started with, i.e. the snapshot read by
the last run.x command. Note that the implementation (16) will approximate Eq. (17)
only to first-order accuracy in δt. In practice, however, δt is small enough to make this
accuracy suffice.
6At some point we may also implement the more straight-forward average
hfit+δt =hfit+δt
t−t0+δt[f(t+δt)− hfit],(14)
which is equivalent to
hfit=1
t−t0
t
Z
t0
f(t′)dt′,(15)
but we do not expect large differences.

5.9 Helper scripts 31
In ‘src/ctimeavg.local’, you need to set the number of slots used for time averages.
Each of these slots uses mx ×my ×mz floating-point numbers, i.e. half as much memory
as each fundamental variable.
For example, if you want to get time averages of all variables, set
integer, parameter :: mtavg=mvar
in ‘src/ctimeavg.local’, and don’t set
idx tavg
in ‘run.in’.
If you are only interested in averages of variables 1–3and 6–8(say, the velocity vector
and the magnetic vector potential in a run with ‘hydro.f90’, ‘density.f90’, ‘entropy.f90’
and ‘magnetic.f90’), then set
integer, parameter :: mtavg=6
in ‘src/ctimeavg.local’, and set
idx_tavg = 1,2,3,6,7,8 ! time-average velocity and vector potential
in ‘run.in’.
Permanent snapshots of time averages are written every
tavg
time units to
the files ‘data/proc*/TAVN’. The current time averages are saved periodically in
‘data/proc*/timeavg.dat’ whenever ‘data/proc*/var.dat’ is written. The file format for
time averages is equivalent to that of the snapshots; see §5.6.1 above.
5.9 Helper scripts
The ‘bin’ directory contains a collection of utility scripts, some of which are discussed
elsewhere, Here is a list of the more important ones.
adapt-mkfile Activate the settings in a ‘Makefile’ that apply to the given computer,
see §5.2.
auto-test Verify that the code compiles and runs in a set of run directories and compare
the results to the reference output. These tests are carried out routinely to ensure
that the
svn
version of the code is in a usable state.
cleanf95 Can be use to clean up the output from the Intel x86 Fortran 95 compiler
(ifc).
copy-proc-to-proc Used for restarting in a different directory. Example
copy-proc-to-proc seed.dat ../hydro256e.
copy-snapshots Copy snapshots from a processor-local directory to the global direc-
tory. To be started in the background before ‘run.x’ is invoked. Used by ‘start.csh’
and ‘run.csh’ on network connected processors.
pc copyvar var1 var2 source dest Copies snapshot files from one directory (source)
to another (dest). See documentation in file.
pc copyvar v v dir Copies all ‘var.dat’ files from current directory to ‘var.dat’ in ’dir’
run directory. Used for restarting in a different directory.

32 THE PENCIL CODE
pc copyvar N v Used to restart a run from a particular snapshot ‘VARN’. Copies a
specified snapshot ‘VARN’ to ‘var.dat’ where Nand (optionally) the target run di-
rectory are given on the command line.
cvs-add-rundir Add the current run directory to the
svn
repository.
cvsci run Similar to cvs-add-rundir, but it also checks in the ‘*.in’ and ‘src/*.local’
files. It also checks in the files ‘data/time_series.dat’, ‘data/dim.dat’ and
‘data/index.pro’ for subsequent processing in
IDL
on another machine. This is
particularly useful if collaborators want to check each others’ runs.
dx *These script perform several data collection or reformatting exercises required to
read particular files into
DX
. They are called internally by some of the
DX
macros
in the ‘dx/macros/’ directory.
getconf.csh See §4.3.4
gpgrowth Plot simple time evolution with Gnuplot’s ASCII graphics for fast orienta-
tion via a slow modem line.
local Materialize a symbolic link
mkcparam Based on ‘Makefile’ and ‘Makefile.local’, generate ‘src/cparam.inc’,
which specifies the number
mvar
of fundamental variables, and
maux
of auxiliary
variables. Called by the ‘Makefile’.
pc mkdatadir Creates a link to a data directory in a suitable workspace. By default
this is on ‘/var/tmp/’, but different locations are specified for different machines.
mkdotin Generate minimal ‘start.in’, ‘run.in’ files based on ‘Makefile’ and
‘Makefile.local’.
mkinpars Wrapper around ‘mkdotin’ — needs proper documentation.
mkproc-tree Generates a multi-processor(‘procN’/), directory structure. Useful when
copying data files in a processor tree, such as slice files.
mkwww Generates a template HTML file for describing a run of the code, showing
input parameters and results.
move-slice Moves all the slice files from a processor tree structure, ‘procN/’, to a new
target tree creating directories where necessary.
nl2idl Transform a Fortran
namelist
(normally the files ‘param.nml’, ‘param2.nml’ writ-
ten by the code) into an
IDL
structure. Generates an
IDL
file that can be sourced
from ‘start.pro’ or ‘run.pro’.
pacx-adapt-makefile Version of adapt-makefile for highly distributed runs using
PACX MPI.
pc newrun Generates a new run directory from an old one. The new one contains a
copy of the old ‘*.local’ files, runs pc_setupsrc, and makes also a copy of the old
‘*.in’ and ‘k.dat’ files.
pc newscan Generates a new scan directory from an old one. The new one contains
a copy of the old, e.g. the one given under ‘samples/parameter_scan’. Look in the
‘README’ file for details.

5.10 RELOAD and STOP files 33
pc inspectrun Check the execution of the current run: prints legend and the last few
lines of the ‘time_series.dat’ file. It also appends this result to a file called ‘SPEED’,
which contains also the current wall clock time, so you can work out the speed of
the code (without being affected by i/o time).
read videofiles.csh The script for running read videofiles.x.
remote-top Create a file ‘top.log’ in the relevant ‘procN/’ directory containing the
output of top for the appropriate processor. Used in batch scripts for multi-
processor runs.
run.csh The script for producing restart files with the initial condition; see §4.3.4
scpdatadir Make a tarball of data directory, ‘data/’ and use scp to secure copy to copy
it to the specified destination.
pc setupsrc Link ‘start.csh’, ‘run.csh’ and ‘getconf.csh’ from ‘$PENCIL_HOME/bin’.
Generate ‘src/’ if necessary and link the source code files from ‘$PENCIL_HOME/src’
to that directory.
start.csh The script for initializing the code; see §4.3.4
summarize-history Evaluate ‘params.log’ and print a history of changes.
timestr Generate a unique time string that can be appended to file names from shell
scripts through the backtick mechanism.
pc tsnap Extract time information from a snapshot file, ‘VARN’.
There are several additional scripts on ‘pencil-code/utils’. Some are located in sepa-
rate folders according to users. There could be redundancies, but it is often just as easy
to write your own new script than figuring out how something else works.
5.10 RELOAD and STOP files
The code periodically (every
it
time steps) checks for the existence of two files, ‘RELOAD’
and ‘STOP’, which can be used to trigger certain behavior.
Reloading run parameters In the directory where you started the code, create the file
‘RELOAD’ with
unix> touch RELOAD

34 THE PENCIL CODE
to force the code to re-read the runtime parameters from ‘run.in’. This will happen the
next time the code is writing monitoring output (the frequency of this happening is
controlled by the input parameter
it
, see Sect. 5.12).
Each time the parameters are reloaded, the new set of parameters is appended (in the
form of
namelists
) to the file ‘data/params.log’ together with the time t, so you have a
full record of your changes. If ‘RELOAD’ contains any text, its first line will be written to
‘data/params.log’ as well, which allows you to annotate changes:
unix> echo "Reduced eta to get fields growing" > RELOAD
Use the command summarize-history to print a history of changes.
Stopping the code In the directory where you started the code, create the file ‘STOP’
with
unix> touch STOP
to stop the code in a controlled manner (it will write the latest snapshot). Again, the
action will happen the next time the code is writing monitoring output.
5.11 RERUN and NEWDIR files
After the code finishes (e.g., when the final timestep number is reached or when a ‘STOP’
file is found), the ‘run.csh’ script checks whether there is a ‘RERUN’ file. If so, the code will
simply run again, perhaps even after you have recompiled the code. This is useful in the
development phase when you changed something in the code, so you don’t need to wait
for a new slot in the queue!
Even more naughty, as Tony says, is the ‘NEWDIR’ file, where you can enter a new direc-
tory path (relative path is ok, e.g. ../conv-slab). If nothing is written in this file (e.g.
via touch NEWDIR) it stays in the same directory. On distributed machines, the ‘NEWDIR’
method will copy all the ‘VAR#’ and ‘var.dat’ files back to and from the sever. This can be
useful if you want to run with new data files, but you better do it in a separate directory,
because with ‘NEWDIR’ the latest data from the code are written back to the server before
running again.
Oh, by the way, if you want to be sure that you haven’t messed up the content of the pair
of ‘NEWDIR’ files, you may want to try out the pc_jobtransfer command. It writes the
decisive ‘STOP’ file only after the script has checked that the content of the two ‘NEWDIR’
files points to existing run directory paths, so if the new run crashes, the code returns
safely to the old run directory. I’m not sure what Tony would say now, but this is now
obviously extremely naughty.
5.12 Start and run parameters
All input parameters in ‘start.in’ and ‘run.in’ are grouped in Fortran
namelists
. This
allows arbitrary order of the parameters (within the given namelist; the namelists need
no longer be in the correct order), as well as enhanced readability through inserted For-
tran comments and whitespace. One namelist (
init pars
/
run pars
) contains general
parameters for initialization/running and is always read in. All other namelists are spe-
cific to individual modules and will only be read if the corresponding module is used.

5.12 Start and run parameters 35
The syntax of a namelist (in an input file like ‘start.in’) is
&init_pars
ip=5, Lxyz=2,4,2
/
— in this example, the name of the namelist is
init pars
, and we read just two variables
(all other variables in the namelist retain their previous value):
ip
, which is set to 5, and
Lxyz
, which is a vector of length three and is set to (2,4,2).
While all parameters from the namelists can be set, in most cases reasonable default
values are preset. Thus, the typical file ‘start.in’ will only contain a minimum set of
variables or (if you are very minimalistic) none at all. If you want to run a particular
problem, it is best to start by modifying an existing example that is close to your appli-
cation.
Before starting a simulation run, you may want to execute the command pc_configtest
in order to test the correctness of your changes to these configuration files.
As an example, we give here the start parameters for ‘samples/helical-MHDturb’
&init_pars
cvsid=’$Id:$’, ! identify version of start.in
xyz0 = -3.1416, -3.1416, -3.1416, ! first corner of box
Lxyz = 6.2832, 6.2832, 6.2832, ! box size
lperi = T , T , T , ! periodic in x, y, z
random_gen=’nr_f90’
/
&hydro_init_pars
/
&density_init_pars
gamma=1.
/
&magnetic_init_pars
initaa=’gaussian-noise’, amplaa=1e-4
/
The three entries specifying the location, size and periodicity of the box are just given
for demonstration purposes here — in fact a periodic box from −πto −πin all three
directions is the default. In this run, for reproducibility, we use a random number gen-
erator from the Numerical Recipes [30], rather than the compiler’s built-in generator.
The adiabatic index γis set explicitly to 1(the default would have been 5/3) to achieve
an isothermal equation of state. The magnetic vector potential is initialized with uncor-
related, normally distributed random noise of amplitude 10−4.
The run parameters for ‘samples/helical-MHDturb’ are
&run_pars
cvsid=’$Id:$’, ! identify version of start.in
nt=10, it1=2, cdt=0.4, cdtv=0.80, isave=10, itorder=3
dsnap=50, dvid=0.5
random_gen=’nr_f90’
/
&hydro_run_pars
/

36 THE PENCIL CODE
&density_run_pars
/
&forcing_run_pars
iforce=’helical’, force=0.07, relhel=1.
/
&magnetic_run_pars
eta=5e-3
/
&viscosity_run_pars
nu=5e-3
/
Here we run for
nt
= 10 timesteps, every second step, we write a line of diagnostic output;
we require the time step to keep the advective
Courant number
≤0.4and the diffusive
Courant number
≤0.8, save ‘var.dat’ every 20 time steps, and use the 3-step time-
stepping scheme described in Appendix H.4 (the Euler scheme
itorder
= 1 is only useful
for tests). We write permanent snapshot file ‘VARN’ every
dsnap
= 50 time units and 2d
slices for animation every
dvid
= 0.5time units. Again, we use a deterministic random
number generator. Viscosity νand magnetic diffusivity ηare set to 5×10⁻³(so the mesh
Reynolds number is about urmsδx/ν = 0.3×(2π/32)/5×10−3≈12, which is in fact rather a
bit to high). The parameters in
forcing run pars
specify fully helical forcing of a certain
amplitude.
A full list of input parameters is given in Appendix K.
5.13 Physical units
Many calculations are unit-agnostic, in the sense that all results remain the same in-
dependent of the unit system in which you interpret the numbers. E. g. if you simulate
a simple hydrodynamical flow in a box of length L= 1.and get a maximum velocity of
umax = 0.5after t= 3 time units, then you may interpret this as L= 1 m,umax = 0.5 m/s,
t= 3 s, or as L= 1 pc,umax = 0.5 pc/Myr,t= 3 Myr, depending on the physical system you
have in mind. The units you are using must of course be consistent, thus in the second
example above, the units for diffusivities would be pc2/Myr, etc.
The units of magnetic field and temperature are determined by the values µ0= 1 and
cp= 1 used internally by the code7. This means that if your units for density and velocity
are [ρ]and [v], then magnetic fields will be in
[B] = pµ0[ρ] [v]2,(18)
and temperatures are in
[T] = [v]2
cp
=γ−1
γ
[v]2
R/µ .(19)
For some choices of density and velocity units, Table 2 shows the resulting units of
magnetic field and temperature.
7Note that cp= 1 is only assumed if you use the module
noionization.f90
. If you work with
ioniza-
tion.f90
, temperature units are specified by
unit temperature
as described below.

5.14 Minimum amount of viscosity 37
Table 2: Units of magnetic field and temperature for some choices of [ρ]and [v]according to Eqs. (18) and
(19). Values are for a monatomic gas (γ= 5/3) of mean atomic weight ¯µg= ¯µ/1 g in grams.
[ρ] [v] [B] [T]
1 kg/m31 m/s 1.12 mT = 11.2 G ¯µg
0.6×2.89 ×10−5K
1 g/cm31 cm/s 3.54 ×10⁻⁴T = 3.54 G ¯µg
0.6×2.89 nK
1 g/cm31 km/s 35.4 T = 354 kG ¯µg
0.6×28.9 K
1 g/cm310 km/s 354 T = 3.54 MG ¯µg
0.6×2 890 K
On the other hand, as soon as material equations are used (e.g. one of the popular pa-
rameterizations for radiative losses, Kramers opacity, Spitzer conductivities or ioniza-
tion, which implies well-defined ionization energies), the corresponding routines in the
code need to know the units you are using. This information is specified in ‘start.in’ or
‘run.in’ through the parameters
unit system
,
unit length
,
unit velocity
,
unit density
and
unit temperature
8like e. g.
unit_system=’SI’,
unit_length=3.09e16, unit_velocity=978. ! [l]=1pc, [v]=1pc/Myr
Note: The default unit system is unit_system=’cgs’ which is a synonym for unit_-
system=’Babylonian cubits’.
5.14 Minimum amount of viscosity
We emphasize that, by default, the code works with constant diffusion coefficients (vis-
cosity ν, thermal diffusivity χ, magnetic diffusivity η, or passive scalar diffusivity D).
If any of these numbers is too small, you would need to have more meshpoints to get
consistent numerical solutions; otherwise the code develops wiggles (‘ringing’) and will
eventually crash. A useful criterion is given by the mesh Reynolds number based on the
maximum velocity,
Remesh = max(|u|) max(δx, δy, δz)/ν, (20)
which should not exceed a certain value which can be problem-dependent. Often the
largest possible value of Remesh is around 5. Similarly there exist mesh P´
eclet and mesh
magnetic Reynolds numbers that should not be too large.
Note that in some cases, ‘wiggles’ in ln ρwill develop despite sufficiently large diffusion
coefficients, essentially because the continuity equation contains no dissipative term.
For convection runs (but not only for these), we have found that this can often be pre-
vented by
upwinding
, see Sect. H.2.
If the Mach number of the code approaches unity, i.e. if the rms velocity becomes com-
parable with the speed of sound, shocks may form. In such a case the mesh Reynolds
number should be smaller. In order to avoid excessive viscosity in the unshocked regions,
8Note: the parameter
unit temperature
is currently only used in connection with
ionization.f90
. If you
are working with
noionization.f90
, the temperature unit is completely determined by Eq. (19) above.

38 THE PENCIL CODE
one can use the so-called shock viscosity (Sect. 6.6.1) to concentrate the effects of a low
mesh Reynolds number to only those areas where it is necessary.
5.15 The time step
5.15.1 The usual RK-2N time step
RK-2N refers to the third order Runge-Kutta scheme by Williamson (1980) with a mem-
ory consumption of two chunks. Therefore the 2N in the name.
The time step is normally specified as Courant time step through the coefficients
cdt
(cδt),
cdtv
(cδt,v) and
cdts
(cδt,s). The resulting Courant step is given by
δt = min cδt
δxmin
Umax
, cδt,v
δx2
min
Dmax
, cδt,s
1
Hmax ,(21)
where
δxmin ≡min(δx, δy, δz) ; (22)
Umax ≡max |u|+qc2
s+v2
A,(23)
csand vAdenoting sound speed and Alfv´
en speed, respectively;
Dmax = max(ν, γχ, η, D),(24)
where νdenotes kinematic viscosity, χ=K/(cpρ)thermal diffusivity and ηthe magnetic
diffusivity; and
Hmax = max 2νS2+ζshock(∇·u)2+...
cvT,(25)
where dots indicate the presence of other terms on the rhs of the entropy equation.
To fix the time step δt to a value independent of velocities and diffusivities, explicitly set
the run parameter
dt
, rather than
cdt
or
cdtv
(see p. 180).
If the time step exceeds the viscous time step the simulation may actually run ok for
quite some time. Inspection of images usually helps to recognize the problem. An exam-
ple is shown in Fig. 4.
Timestepping is accomplished using the Runge-Kutta 2N scheme. Regarding details of
this scheme see Sect. H.4.
5.15.2 The Runge-Kutta-Fehlberg time step
A fifth order Runge-Kutta-Fehlberg time stepping procedure is available. It is used
mostly for chemistry application, often together with the double precision option. In
order to make this work, you need to compile with
TIMESTEP = timestep_rkf
in ‘src/Makefile.local’. In addition, you must put itorder=5 in ‘run.in’. An example
application is ‘samples/1d-tests/H2_flamespeed’. This procedure is still experimental.
5.16 Boundary conditions 39
Figure 4: Example of a velocity slice from a run where the time step is too long. Note the spurious
checkerboard modulation in places, for example near x=−0.5and −2.5< y < −1.5. This is an example
of a hyperviscous turbulence simulations with 5123meshpoints and a third order hyperviscosity of ν3=
5×10⁻¹². Hyperviscosity is explained in the Appendix E.
5.16 Boundary conditions
5.16.1 Where to specify boundary conditions
In most tests that come with the PENCIL CODE, boundary conditions are set in ‘run.in’,
which is a natural choice. However, this may lead to unexpected initial data written by
‘start.x’, since when you start the code (via ‘start.csh’), the boundary conditions are
unknown and ‘start.x’ will then fill the ghost zones assuming periodicity (the default
boundary condition) in all three directions. These ghost data will never be used in a
calculation, as ‘run.x’ will apply the boundary conditions before using any ghost-zone
values.
To avoid these periodic conditions in the initial snapshot, you can set the boundary
conditions in ‘start.in’ already. In this case, they will be inherited by ‘run.x’, unless you
also explicitly set boundary conditions in ‘run.in’.
5.16.2 How to specify boundary conditions
Boundary conditions are implemented through three layers of
ghost points
on either
boundary, which is quite a natural choice for an MPI code that uses ghost zones for
representing values located on the neighboring processors anyway. The desired type of
boundary condition is set through the parameters
bc
{
x,y,z
}in ‘run.in’; the nomenclature
used is as follows. Set
bc
{
x,y,z
}to a sequence of letters like
bcx = ’p’,’p’,’p’, ’p’, ’p’
for periodic boundaries, or
bcz = ’s’,’s’,’a’,’a2’,’c1:c2’
for non-periodic ones. Each element corresponds to one of the variables, which are those
of the variables ux,uy,uz,ln ρ,s/cp,Ax,Ay,Az,ln cthat are actually used in this order.
The following conditions are available:
‘p’periodic boundary condition
‘a’antisymmetric condition w. r. t. the boundary, i. e. vanishing value

40 THE PENCIL CODE
‘s’symmetric condition w. r. t. the boundary, i. e. vanishing first derivative
‘a2’antisymmetry w. r. t. the arbitrary value on the boundary, i. e. vanishing second
derivative
‘c1’special boundary condition for ln ρand s: constant heat flux through the boundary
‘c2’special boundary condition for s: constant temperature at the boundary — requires
boundary condition a2 for ln ρ
‘cT’special boundary condition for sor ln T: constant temperature at the boundary (for
arbitrarily set ln ρ)
‘ce’special boundary condition for s: set temperature in ghost points to value on bound-
ary (for arbitrarily set ln ρ)
‘db’low-order one-sided derivatives (“no boundary condition”) for density
‘she’shearing-sheet boundary condition (default when the module
Shear
is used)
‘g’force the value of the corresponding field on vertical boundaries (should be used
in combination with the force lower bound and force upper bound flags set in the
namelist init pars)
‘hs’special boundary condition for ln ρand swhich enforces hydrostatic equilibrium on
vertical boundaries
The extended syntax a:b(e. g. ‘c1:c2’) means: use boundary condition aat the left/lower
boundary, but bat the right/upper one.
If you build a new ‘run.in’ file from another one with a different number of variables
(
noentropy
vs.
entropy
, for example), you need to remember to adjust the length of the
arrays
bcx
to
bcz
. The advantage of the present approach is that it is very easy to ex-
change all boundary conditions by a new set of conditions in a particular direction (for
example, make everything periodic, or switch off shearing sheet boundary conditions
and have stress-free instead).
5.17 Restarting a simulation
When a run stops at the end of a simulation, you can just resubmit the job again, and
it will start from the latest snapshot saved in ‘data/proc*/var.dat’. The value of the
latest time is saved in a separate file, ‘data/proc*/time.dat’. On parallel machines it is
possible that some (or just one) of the ‘var.dat’ are corrupt; for example after a system
crash. Check for file size and date, and restart from a good ‘VAR’Nfile instead.
If you want to run on a different machine, you just need to copy the ‘data/proc*/var.dat’
(and, just to be sure) ‘data/proc*/time.dat’) files into a new directory tree. You may also
need the ‘data/proc*/seed.dat’ files for the random number generator. The easiest way
to get all these other files is to run start.csh again on the new machine (or in a new
directory) and then to overwrite the ‘data/proc*/var.dat’ files with the correct ones.
For restarting from runs that didn’t have magnetic fields, passive scalar fields, or test
fields, see Sect. F.3.

5.18 One- and two-dimensional runs 41
5.18 One- and two-dimensional runs
If you want to run two-dimensional problems, set the number of mesh points in one
direction to unity, e.g.
nygrid
=1 or
nzgrid
=1 in ‘cparam.local’. Remember that the num-
ber of mesh points is still divisible by the number of processors. For 2D-runs, it is also
possible to write only 2D-snapshots (i.e. VAR files written only in the considered (x, y)
or (x, z)plane, with a size seven times smaller as we do not write the third unused di-
rection). To do that, please add the logical flag ‘lwrite 2d=T’ in the namelist init pars in
‘start.in’.
Similarly, for one-dimensional problems, set, for example,
nygrid
=1 and
nzgrid
=1 in
‘cparam.local’. You can even do a zero-dimensional run, but then you better set
dt
(rather than
cdt
), because there is no Courant condition for the time step.
See 0d, 1d, 2d, and 3d tests with examples.
5.19 Visualization
5.19.1 Gnuplot
Simple visualization can easily be done using
Gnuplot
(http://www.gnuplot.info), an
open-source plotting program suitable for two-dimensional plots.
For example, suppose you have the variables
---it-----t-------dt-------urms-----umax-----rhom-----ssm------dtc---
in ‘time_series.dat’ and want to plot urms(t). Just start gnuplot and type
gnuplot> plot "data/time_series.dat" using 2:4 with lines
If you work over a slow line and want to see both urms(t)and umax(t), use ASCII graphics:
gnuplot> set term dump
gnuplot> set logscale y
gnuplot> plot "data/time_series.dat" using 2:4 title "urms", \
gnuplot> "data/time_series.dat" using 2:5 title "umax"
5.19.2 Data explorer
DX
(
data explorer
;http://www.opendx.org) is an open-source tool for visualization of
three-dimensional data.
The PENCIL CODE provides a few networks for
DX
. It is quite easy to read in a snapshot
file from
DX
(the only tricky thing is the four extra bytes at the beginning of the file,
representing a Fortran record marker), and whenever you run ‘start.x’, the code writes
a file ‘var.general’ that tells
DX
all it needs to know about the data structure.
As a starting point for developing your own
DX
programs or
networks
, you can use a
few generic
DX
scripts provided in the directory ‘dx/basic/’. From the run directory,
start
DX
with
unix> dx -edit $PENCIL_HOME/dx/basic/lnrho

42 THE PENCIL CODE
to load the file ‘dx/basic/lnrho.net’, and execute it with ✄
✂
✁
Ctl-o or Execute →Execute
Once. You will see a set of iso-surfaces of logarithmic density. If the viewport does not
fit to your data, you can reset it with ✄
✂
✁
Ctl-f. To rotate the object, drag the mouse over
the Image window with the left or right mouse button pressed. Similar networks are
provided for entropy (‘ss.net’), velocity (‘uu.net’) and magnetic field (‘bb.net’).
When you expand these simple networks to much more elaborate ones, it is probably
a good idea to separate the different tasks (like Importing and Selecting, visualizing
velocity, visualizing entropy, and Rendering) onto separate pages through Edit →Page.
Note Currently,
DX
can only read in data files written by one single processor, so from
a multi-processor run, you can only visualize one subregion at a time.
5.19.3 GDL
GDL
, also known as
Gnu Data Language
is a free visualization package that can be
found at http://gnudatalanguage.sourceforge.net/. It aims at replacing the very ex-
pensive
IDL
package (see S. 5.19.4). For the way we use IDL for the Pencil Code, com-
patibility is currently not completely sufficient, but you can use GDL for many of the
visualization tasks. If you get spurious “Error opening file” messages, you can normally
simply ignore them.
This section tells you how to get started with using GDL for visualization.
Setup As of GDL 0.9 – at least the version packed with Ubuntu Jaunty (9.10) – you
will need to add GDL’s ‘examples/pro/’ directory to your
!PATH
variable. So the first call
after starting
GDL
should be
GDL> .run setup_gdl
Starting visualization There are mainly two possibilities for visualization: using a sim-
ple GUI or loading the data with pc_read and work with it interactively. Please note that
the GUI was written and tested only with IDL, see §5.19.4.
Here, the pc_read family of IDL routines to read the data is described. Try
GDL> pc_read
to get an overview.
To plot a time series, use
GDL> pc_read_ts, OBJECT=ts
GDL> help, ts, /STRUCT ;; (to see which slots are available)
GDL> plot, ts.t, ts.umax
GDL> oplot, ts.t, ts.urms
Alternatively, you could simply use the ‘ts.pro’ script:
GDL> .run ts
To work with data from ‘var.dat’ and similar snapshot files, you can e.g. use the follow-
ing routines:

5.19 Visualization 43
GDL> pc_read_dim, OBJECT=dim
GDL> $$PENCIL_HOME/bin/nl2idl -d ./data/param.nml> ./param.pro
GDL> pc_read_param, OBJECT=par
GDL> pc_read_grid, OBJECT=grid
GDL> pc_read_var, OBJECT=var
Having thus read the data structures, we can have a look at them to see what informa-
tion is available:
GDL> help, dim, /STRUCT
GDL> help, par, /STRUCT
GDL> help, grid, /STRUCT
GDL> help, var, /STRUCT
To visualize data, we can e.g. do9
GDL> plot, grid.x, var.ss[*, dim.ny/2, dim.nz/2]
GDL> contourfill, var.ss[*, *, dim.nz/2], grid.x, grid.y
GDL> ux_slice = var.uu[*, *, dim.nz/2, 0]
GDL> uy_slice = var.uu[*, *, dim.nz/2, 1]
GDL> wdvelovect, ux_slice, uy_slice, grid.x, grid.y
GDL> surface, var.lnrho[*, *, dim.nz/2, 0]
See also Sect. 5.19.4.
5.19.4 IDL
IDL
is a commercial visualization program for two-dimensional and simple three-
dimensional graphics. It allows to access and manipulate numerical data in a fashion
quite similar to how Fortran handles them.
In ‘$PENCIL_HOME/idl’, we provide a number of general-purpose
IDL
scripts that we are
using all the time in connection with the PENCIL CODE. While
IDL
is quite an expensive
software package, it is quite useful for visualizing results from numerical simulations.
In fact, for many applications, the 7-minute demo version of
IDL
is sufficient.
Visualization in IDL The Pencil Code GUI is a data post-processing tool for the usage
on a day-to-day basis. It allows fast inspection of many physical quantities, as well as ad-
vanced features like horizontal averages, streamline tracing, freely orientable 2D-slices,
and extraction of cut images and movies. To use the Pencil Code GUI, it is sufficient to
run:
unix> idl
IDL> .r pc_gui
If you like to load only some subvolume of the data, like any 2D-slices from the given
data snapshots, or 3D-subvolumes, it is possible to choose the corresponding options in
the file selector dialog. The Pencil Code GUI offers also some options to be set on the
command-line, please refer to their description in the source code.
9If contourfill produces just contour lines instead of a color-coded plot, your version of GDL is too
old. E.g. the version shipped with Ubuntu 9.10 is based on GDL 0.9rc1 and has this problem.

44 THE PENCIL CODE
There are also other small GUIs available, e.g. the file ‘time-series.dat’ can easily be
analyzed with the command:
unix> idl
IDL> pc_show_ts
The easiest way to derive physical quantities at the command-line is to use one of the
many pc_read_var-variants (pc_read_var_raw is recommended for large datasets be-
cause of its high efficiency regarding computation and memory usage) for reading the
data. With that, one can make use of pc_get_quantity to derive any implemented physi-
cal quantity. Packed in a script, this is the recommended way to get reproducible results,
without any chance for accidental errors on the interactive IDL command-line.
Alternatively, by using the command-line to see the time evolution of e.g. velocity and
magnetic field (if they are present in you run), start
IDL
10 and run ‘ts.pro’:
unix> idl
IDL> .run ts
The
IDL
script ‘ts.pro’ reads the time series data from ‘data/time_series.dat’ and sorts
the column into the structure
ts
, with the slot names corresponding to the name of the
variables (taken from the header line of ‘data/time_series.dat’). Thus, you can refer to
time as ts.t, to the rms velocity as ts.urms, and in order to plot the mean density as a
function of time, you would simply type
IDL> plot, ts.t, ts.rhom
The basic command sequence for working with a snapshot is:
unix> idl
IDL> .run start
IDL> .run r
IDL>
[specific commands]
You run ‘start.pro’ once to initialize (or reinitialize, if the mesh size has changed, for
example) the fields and read in the startup parameters from the code. To read in a new
snapshot, run ‘r.pro’ (or ‘rall.pro’, see below).
If you are running in parallel on several processors, the data are scattered over different
directories. To reassemble everything in
IDL
, use
10 If you run IDL from the command line, you will highly appreciate the following tip: IDL’s command
line editing is broken beyond hope. But you can fix it, by running IDL under rlwrap, a wrapper for the
excellent GNU
readline
library.
Download and install rlwrap from http://utopia.knoware.nl/~hlub/uck/rlwrap/ (on some systems
you just need to run ‘emerge rlwrap’, or ‘apt-get install rlwrap’), and alias your idl command:
csh> alias idl ’rlwrap -a -c idl’
bash> alias idl=’rlwrap -a -c idl’
From now on, you can
•use long command lines that correctly wrap around;
•type the first letters of a command and then ✄
✂
✁
PageUp to recall commands starting with these letters;
•capitalize, uppercase or lowercase a word with ✄
✂
✁
Esc-C, ✄
✂
✁
Esc-U, ✄
✂
✁
Esc-L;
•use command line history across IDL sessions (you might need to create ‘~/.idl_history’ for this);
•complete file names with ✄
✂
✁
Tab (works to some extent);
•. . . use all the other
readline
features that you are using in bash,octave,bc,gnuplot,ftp, etc.

5.19 Visualization 45
IDL> .r rall
instead of .r r (here, .r is a shorthand for .run). The procedure ‘rall.pro’ reads (and
assembles) the data from all processors and correspondingly requires large amounts of
memory for very large runs. If you want to look at just the data from one processor, use
‘r.pro’ instead.
If you need the magnetic field or the current density, you can calculate them in IDL by
11
IDL> bb=curl(aa)
IDL> jj=curl2(aa)
By default one is reading always the current snapshot ‘data/procN/var.dat’; if you want
to read one of the permanent snapshots, use (for example)
IDL> varfile=’VAR2’
IDL> .r r
(or
.r rall
)
See Sect. 5.6.1 for details on permanent snapshots.
With ‘r.pro’, you can switch the part of the domain by changing the variable
datadir
:
IDL> datadir=’data/proc3’
IDL> .r r
will read the data written by processor 3.
Reading data into IDL arrays or structures As an alternative to the method described
above, there is also the possibility to read the data into structures. This makes some
more operations possible, e.g. reading data from an IDL program where the command
.r is not allowed.
An efficient and still scriptable way would look like the following:
IDL> pc_read_var_raw, obj=var, tags=tags
IDL> bb = pc_get_quantity (’B’, var, tags)
IDL> jj = pc_get_quantity (’j’, var, tags)
This reads the data into an array ‘var’, as well as the array indices of the contained phys-
ical variables into a separate structure ‘tags’. To use a caching mechanism within pc_-
get_quantity, please refer to the documentation and the examples contained in ‘pencil-
code/idl/pc get quantity.pro’, where you can also start adding not yet implemented phys-
ical quantities.
To read a snapshot ’VAR10’ into the IDL structure ff, type the following command
IDL> pc_read_var, obj=ff, varfile=’VAR10’, /trimall
The option /trimall removes ghost zones from the data. A number of other options are
documented in the source code of pc_read_var. You can see what data the structure
contains by using the command tag_names
IDL> print, tag_names(ff)
T X Y Z DX DY DZ UU LNRHO AA
11 Keep in mind that jj=curl(bb) would use iterated first derivatives instead of the second derivatives
and thus be numerically less accurate than jj=curl2(aa), particularly at small scales.

46 THE PENCIL CODE
One can access the individual variables by typing ff.varname, e.g.
IDL> help, ff.aa
<Expression> FLOAT = Array[32, 32, 32, 3]
There are a number of files that read different data into structures. They are placed in
the directory $PENCIL_HOME/idl/files. Here is a list of files (including suggested options
to call them with)
•pc_read_var_raw, obj=var, tags=tags
Efficiently read a snapshot into an array.
•pc_read_var, obj=ff, /trimall
Read a snapshot into a structure.
•pc_read_ts, obj=ts
Read the time series into a structure.
•pc_read_xyaver, obj=xya
pc_read_xzaver, obj=xza
pc_read_yzaver, obj=yza
Read 1-D time series into a structure.
•pc_read_const, obj=cst
Read code constants into a structure.
•pc_read_pvar, obj=fp
Read particle data into a structure.
•pc_read_param, obj=par
Read startup parameters into a structure.
•pc_read_param, obj=par2, /param2
Read runtime parameters into a structure.
Other options are documented in the source code of the files.
For some examples on how to use these routines, see Sect. 5.19.3.
5.19.5 Python
Pencil supports reading, processing and the visualization of data using
python
. A num-
ber of scripts are placed in the subfolder ‘$PENCIL_HOME/python’. A README file placed
under that subfolder contains the information needed to read Pencil output data into
python.
Installation For modern operating systems, Python is generally installed together with
the system. If not, it can be installed via your preferred package manager or downloaded
from the website https://www.python.org/. For convenience, it is strongly recommend
to also install IPython, which is a more convenient console for Python. You will also need
the NumPy, matplotlib and Tk library.
Perhaps the easiest way to obtain all the required software mentioned above is to install
either Continuum’s Anaconda or Enthought’s Canopy. These Python distributions also
provide (or indeed are) integrated graphical development environments.

5.19 Visualization 47
In order for Python to find the Pencil Code commands you will have to add to your
.bashrc:
export PYTHONPATH=$PENCIL_HOME/python
ipythonrc If you use IPython, for convenience, you should modify your
.ipython/ipythonrc (create it if it doesn’t exist) and add:
import_all pencil
Additional, add to your .ipython/profile_default/startup/init.py the following lines:
import numpy as np
import pylab as plt
import pencil as pc
import matplotlib
from matplotlib import rc
plt.ion()
matplotlib.rcParams[’savefig.directory’] = ’’
.pythonrc In case you are on a cluster and don’t have access to IPython you can edit
your .pythonrc:
#!/usr/bin/python
import numpy as np
import pylab as plt
import pencil as pc
import atexit
#import readline
import rlcompleter
# enables search with CTR+r in the history
try:
import readline
except ImportError:
print "Module readline not available."
else:
import rlcompleter
readline.parse_and_bind("tab: complete")
# enables command history
historyPath = os.path.expanduser("~/.pyhistory")
def save_history(historyPath=historyPath):
import readline
readline.write_history_file(historyPath)
if os.path.exists(historyPath):
readline.read_history_file(historyPath)
atexit.register(save_history)
del os, atexit, readline, rlcompleter, save_history, historyPath
plt.ion()

48 THE PENCIL CODE
create the file .pythonhistory and add to your .bashrc:
export PYTHONSTARTUP=~/.pythonrc
Pencil Code Commands in General For a list of all Pencil Code commands start
IPython and type pc. <TAB> (as with auto completion). To access the help of any com-
mand just type the command followed by a ’?’ (no spaces), e.g.:
In [1]: pc.dot?
Type: function
String Form:<function dot at 0x7f9d96cb0cf8>
File: ~/pencil-code/python/pencil/math/vector_multiplication.py
Definition: pc.dot(a, b)
Docstring:
take dot product of two pencil-code vectors a & b with shape
a.shape = (3,mz,my,mx)
You can also use help(pc.dot) for a more complete documentation of the command.
There are various reading routines for the Pencil Code data. All of them return an object
with the data. To store the data into a user defined variable type e.g.
In [1]: ts = pc.read_ts()
Most commands take some arguments. For most of them there is a default value, e.g.
In [1]: pc.read_ts(filename=’time_series.dat’, datadir=’data’, plot_data=True)
You can change the values by simply typing e.g.
In [1]: pc.read_ts(plot_data = False)
Reading and Plotting Time Series Reading the time series file is very easy. Simply
type
In [1]: ts = pc.read_ts()
and Python stores the data in the variable ts. The physical quantities are members of
the object ts and can be accessed accordingly, e.g. ts.t,ts.emag. To check which other
variables are stored simply do the tab auto completion ts. <TAB>.
Plot the data with the matplotlib commands:
In [1]: plt.plot(ts.t, ts.emag)
The standard plots are not perfect and need a little polishing. See
the online wiki for a few examples on how to make pretty plots
(https://github.com/pencil-code/pencil-code/wiki/PythonForPencil). You can
save the plot into a file using the GUI or with
In [1]: plt.savefig(’plot.eps’)
Reading and Plotting VAR files and slice files Read var files:
In [1]: var = pc.read_var()

5.20 Running on multi-processor computers 49
Read slice files:
In [1]: slices, t = pc.read_slices(field=’bb1’, extension=’xy’)
This returns the array slices with indices slices[nTimes, my, mx] and the time array
t.
If you want to plot e.g. the x-component of the magnetic field at the central plane simply
type:
In [1]: plt.imshow(zip(*var.bb[0, 128, :, :]), origin=’lower’, extent=[-4, 4, -4, 4])
For a complete list of arguments of plt.imshow refer to its documentation.
For a more interactive plot use:
In [1]: pc.animate_interactive(slices, t)
Be aware: arrays from the reading routines are ordered f[nvar, mz, my, mx], i.e. re-
versed to IDL. This affects reading var files and slice files.
5.20 Running on multi-processor computers
The code is parallelized using
MPI
(
message passing interface
) for a simple domain
decomposition (data-parallelism), which is a straight-forward and very efficient way of
parallelizing finite-difference codes. The current version has a few restrictions, which
need to be kept in mind when using the MPI features.
The global number of grid points (but excluding the ghost zones) in a given direction
must be an exact multiple of the number of processors you use in that direction. For
example if you have nprocy=8 processors for the ydirection, you can run a job with
nygrid=64 points in that direction, but if you try to run a problem with nygrid=65 or
nygrid=94, the code will complain about an inconsistency and stop. (So far, this has not
been a serious restriction for us.)
5.20.1 How to run a sample problem in parallel
To run the sample problem in the directory ‘samples/conv-slab’ on 16 CPUs, you need
to do the following (in that directory):
1. Edit ‘src/Makefile.local’ and replace
MPICOMM = nompicomm
by
MPICOMM = mpicomm
2. Edit ‘src/cparam.local’ and replace
integer, parameter :: ncpus=1, nprocy=1, nprocz=ncpus/nprocy, nprocx=1
integer, parameter :: nxgrid=32, nygrid=nxgrid, nzgrid=nxgrid
by
integer, parameter :: ncpus=16, nprocy=4, nprocz=ncpus/nprocy, nprocx=1
integer, parameter :: nxgrid=128, nygrid=nxgrid, nzgrid=nxgrid

50 THE PENCIL CODE
The first line specifies a 4×4layout of the data in the yand zdirection. The second
line increases the resolution of the run because running a problem as small as 323
on 16 CPUs would be wasteful. Even 1283may still be quite small in that respect.
For performance timings, one should try and keep the size of the problem per CPU
the same, so for example 2563on 16 CPUs should be compared with 1283on 2 CPUs.
3. Recompile the code
unix> (cd src; make)
4. Run it
unix> start.csh
unix> run.csh
Make sure that all CPUs see the same ‘data/’ directory; otherwise things will go wrong.
Remember that in order to visualize the full domain with IDL (rather than just the
domain processed and written by one processor), you need to use ‘rall.pro’ instead of
‘r.pro’.
5.20.2 Hierarchical networks (e.g. on Beowulf clusters)
On big Beowulf clusters, a group of nodes is often connected with a switch of modest
speed, and all these groups are connected via a ntimes faster uplink switch. When
bandwidth-limited, it is important to make sure that consecutive processors are mapped
onto the mesh such that the load on the uplink is .ntimes larger than the load on the
slower switch within each group. On a 512 node cluster, where groups of 24 processors
are linked via fast ethernet switches, which in turn are connected via a Gigabit uplink
(∼10 times faster), we found that
nprocy
=4 is optimal. For 128 processors, for example
we find that
nprocy
×
nprocz
= 4×32 is the optimal layout, while. For comparison, 8×16
is 3 times slower, and 16 ×8is 17 (!) times slower. These results can be understood from
the structure of the network, but the basic message is to watch out for such effects and
to try varying
nprocy
and
nprocz
.
In cases where nygrid>nzgrid it may be advantageous to swap the ordering of processor
numbers. This can be done by setting
lprocz slowest
=F.
5.20.3 Extra workload caused by the ghost zones
Normally, the workload caused by the ghost zones is negligible. However, if one increases
the number of processors, a significant fraction of work is done in the ghost zones. In
other words, the effective mesh size becomes much larger than the actual mesh size.
Consider a mesh of size Nw=Nx×Ny×Nz, and distribute the task over Pw=Px×Py×
Pzprocessors. If no communication were required, the number of points per processor
would be Nw
Pw
=Nx×Ny×Nz
Px×Py×Pz
.(26)
However, for finite difference codes some communication is required, and the amount of
communication depends on spatial order of the scheme, Q. The PENCIL CODE works by

5.21 Running in double-precision 51
default with sixth order finite differences, so Q= 6, i.e. one needs 6 ghost zones, 3 on
each end of the mesh. With Q6= 0 the number of points per processor is
N(eff)
w
Pw
=Nx
Px
+Q×Ny
Py
+Q×Nz
Pz
+Q.(27)
There is efficient scaling only when
min Nx
Px
,Ny
Py
,Nz
Pz≫Q. (28)
In the special case were Nx=Ny=Nz≡N=N1/3
w, with Px= 1 and Py=Pz≡P=P1/2
w,
we have
N(eff)
w
Pw
= (N+Q)×N
P+Q2
.(29)
For N= 128 and Q= 6 the effective mesh size exceeds the actual mesh size by a factor
N(eff)
w
Nw
= (N+Q)×N
P+Q2
×Pw
Nw
.(30)
These factors are listed in Table 3.
Table 3: N(eff)
w/Nwversus Nand P.
P\N128 256 512 1024 2048
1 1.15 1.07 1.04 1.02 1.01
2 1.19 1.09 1.05 1.02 1.01
4 1.25 1.12 1.06 1.03 1.01
8 1.34 1.16 1.08 1.04 1.02
16 1.48 1.22 1.11 1.05 1.03
32 1.68 1.31 1.15 1.07 1.04
64 1.98 1.44 1.21 1.10 1.05
128 2.45 1.64 1.30 1.14 1.07
256 3.21 1.93 1.43 1.20 1.10
512 4.45 2.40 1.62 1.29 1.14
Ideally, one wants to keep the work in the ghost zones at a minimum. If one accepts
that 20–25% of work are done in the ghost zones, one should use 4 processors for 1283
mesh points, 16 processors for 2563mesh points, 64 processors for 5123mesh points, 256
processors for 10243mesh points, and 512 processors for 15363mesh points.
5.21 Running in double-precision
With many compilers, you can easily switch to double precision (8-byte floating point
numbers) as follows.
Add the lines
# Use double precision
REAL_PRECISION = double

52 THE PENCIL CODE
to ‘src/Makefile.local’ and (re-)run pc_setupsrc.
If
REAL PRECISION
is set to ‘double’, the flag
FFLAGS DOUBLE
is appended to
the Fortran compile flags. The default for
FFLAGS DOUBLE
is -r8, which works for
g95
or ifort; for
gfortran
, you need to make sure that
FFLAGS DOUBLE
is set to
-fdefault-real-8.
You can see the flags in ‘src/Makefile.inc’, which is the first place to check if you have
problems compiling for double precision.
Using double precision might be important in turbulence runs where the resolution
is 2563meshpoints and above (although such runs often seem to work fine at single
precision). To continue working in double precision, you just say lread_from_other_-
prec=T in run_pars; see Sect. F.1.
5.22 Power spectrum
Given a real variable u, its Fourier transform ˜uis given by
˜u(kx, ky, kz) = F(u(x, y, z)) = 1
NxNyNz
Nx−1
X
p=0
Ny−1
X
q=0
Nz−1
X
r=0
u(xp, yq, zr)
×exp(−ikxxp) exp(−ikyyq) exp(−ikzzr),(31)
where
|kx|<πNx
Lx
,|ky|<πNy
Ly
,|kz|<πNz
Lz
,
when Lis the size of the simulation box. The three-dimensional power spectrum P(k)is
defined as
P(k) = 1
2˜u˜u∗,(32)
where
k=qk2
x+k2
y+k2
z.(33)
Note that we can only reasonably calculate P(k)for k < πNx/Lx.
To get power spectra from the code, edit ‘run.in’ and add for example the following lines
dspec=5., ou_spec=T, ab_spec=T !(for energy spectra)
oned=T
under run_pars. The kinetic (vel_spec) and magnetic (mag_spec) power spectra will
now be calculated every 5.0 (dspec) time units. The Fourier spectra is calculated using
fftpack
. In addition to calculating the three-dimensional power spectra also the one-
dimensional power spectra will be calculated (oned).
In addition one must edit ‘src/Makefile.local’ and add the lines
FOURIER = fourier_fftpack
POWER = power_spectrum
Running the code will now create the files ‘powerhel_mag.dat’ and ‘power_kin.dat’
containing the three-dimensional magnetic and kinetic power spectra respectively. In
addition to these three-dimensional files we will also find the one-dimensional files
‘powerbx_x.dat’, ‘powerby_x.dat’, ‘powerbz_x.dat’, ‘powerux_x.dat’, ‘poweruy_x.dat’ and

5.22 Power spectrum 53
‘poweruz_x.dat’. In these files the data are stored such that the first line contains the
time of the snapshot, the following
nxgrid
/2numbers represent the power at each
wavenumber, from the smallest to the largest. If several snapshots have been saved,
they are being stored immediately following the preceding snapshot.
You can read the results with the idl procure ‘power’, like this:
power,’_kin’,’_mag’,k=k,spec1=spec1,spec2=spec2,i=n,tt=t,/noplot
power,’hel_kin’,’hel_mag’,k=k,spec1=spec1h,spec2=spec2h,i=n,tt=t,/noplot
If powerhel is invoked, krms is written during the first computation. The relevant out-
put file is ‘power_krms.dat’. This is needed for a correct calculation of kused in the
realizability conditions.
A caveat of the implementation of Fourier transforms in the PENCIL CODE is that, due
to the parallelization, the permitted resolution is limited to the case when one direction
is an integer multiple of the other. So, it can be done for
Nx = n*Ny
Unfortunately, for some applications one wants Nx < Ny. Wlad experimented with ar-
bitrary resolution by interpolating xto the same resolution of yprior to transposing,
then transform the interpolated array and then interpolating it back (check ‘fourier_-
transform_y’ in ‘fourier_fftpack.f90’).
A feature of our current implementation with xparallelization is that fft_xyz_-
parallel_3D requires nygrid to be an integer multiple of nprocy*nprocz. Examples of
good mesh layouts are listed in Table 4.
Table 4: Examples of mesh layouts for which Fourier transforms with xparallelization is possible.
ny nprocyx nprocy nprocz ncpus
256 1 16 16 256
256 2 16 16 512
256 4 16 16 1024
256 8 16 16 2048
288 2 16 18 576
512 2 16 32 1024
512 4 16 16 1024
512 4 16 32 2048
576 4 18 32 2304
576 8 18 32 4608
576 16 18 32 9216
1024 4 32 32 4096
1024 4 16 64 4096
1024 8 16 32 4096
1152 4 36 32 4608
1152 4 32 36 4608
2304 2 32 72 4608
2304 4 36 64 9216
2304 4 32 72 9216
To visualize with
IDL
just type power and you get the last snapshot of the three-

54 THE PENCIL CODE
dimensional power spectrum. See head of ‘$PENCIL_HOME/idl/power.pro’ for options to
power.
5.23 Structure functions
We define the p-th order longitudinal structure function of uas
Sp
long(l) = h|ux(x+l, y, z)−ux(x, y, z)|pi,(34)
while the transverse is
Sp
trans(l) = h|uy(x+l, y, z)−uy(x, y, z)|pi+h|uz(x+l, y, z)−uz(x, y, z)|pi.(35)
Edit ‘run.in’ and add for example the following lines
dspec=2.3,
lsfu=T, lsfb=T, lsfz1=T, lsfz2=T
under run_pars. The velocity (lsfu), magnetic (lsfb) and Elsasser (lsfz1 and lsfz2)
structure functions will now be calculated every 2.3 (dspec) time unit.
In addition one must edit ‘src/Makefile.local’ and add the line
STRUCT_FUNC = struct_func
In ‘src/cparam.local’, define
lb nxgrid
and make sure that
nxgrid = nygrid = nzgrid = 2**lb_nxgrid
E.g.
integer, parameter :: lb_nxgrid=5
integer, parameter :: nxgrid=2**lb_nxgrid,nygrid=nxgrid,nzgrid=nxgrid
Running the code will now create the files:
‘sfu-1.dat’, ‘sfu-2.dat’, ‘sfu-3.dat’ (velocity),
‘sfb-1.dat’, ‘sfb-2.dat’, ‘sfb-3.dat’ (magnetic field),
‘sfz1-1.dat’, ‘sfz1-2.dat’, ‘sfz1-3.dat’ (first Elsasser variable),
‘sfz2-1.dat’, ‘sfz2-2.dat’, ‘sfz2-3.dat’ (second Elsasser variable),
which contains the data of interest. The first line in each file contains the time tand
the number
qmax
, such that the largest moment calculated is
qmax
−1. The next
imax
numbers represent the first moment structure function for the first snapshot, here
imax
= 2ln(
nxgrid
)
ln 2 −2.(36)
The next
imax
numbers contain the second moment structure function, and so on until
qmax
−1. The following
imax
numbers then contain the data of the signed third order
structure function i.e. S3
long(l) = h[ux(x+l, y, z)−ux(x, y, z)]3i.
The following
imax
×
qmax
×2numbers are zero if
nr directions
= 1 (default), otherwise
they are the same data as above but for the structure functions calculated in the y and
z directions.

5.24 Particles 55
If the code has been run long enough as to calculate several snapshots, these snapshots
will now follow, being stored in the same way as the first snapshot.
To visualize with
IDL
just type structure and you get the time-average of the first order
longitudinal structure function (be sure that ‘pencil-runs/forced/idl/’ is in IDL_PATH).
See head of ‘pencil-runs/forced/idl/structure.pro’ for options to structure.
5.24 Particles
The PENCIL CODE has modules for tracer particles and for dust particles (see Sect. 6.14).
The particle modules are chosen by setting the value of the variable PARTICLES in
Makefile.local to either particles_dust or particles_tracers. For the former case
each particle has six degrees of freedom, three positions and three velocities. For the
latter it suffices to have only three position variables as the velocity of the particles are
equal to the instantaneous fluid velocity at that point. In addition one can choose to have
several additional internal degrees of freedoms for the particles. For example one can
temporally evolve the particles radius by setting PARTICLES_RADIUS to particles_radius
in Makefile.local.
All particle infrastructure is controlled and organized by the Particles_main module.
This module is automatically selected by Makefile.src if PARTICLES is different from
noparticles. Particle modules are compiled as a separate library. This way the main
part of the Pencil Code only needs to know about the particles_main.a library, but not
of the individual particle modules.
For a simulation with particles one must in addition define a few parameters in
cparam.local. Here is a sample of cparam.local for a parallel run with 2,000,000 parti-
cles:
integer, parameter :: ncpus=16, nprocy=4, nprocz=4, nprocx=1
integer, parameter :: nxgrid=128, nygrid=256, nzgrid=128
integer, parameter :: npar=2000000, mpar_loc=400000, npar_mig=1000
integer, parameter :: npar_species=2
The parameter npar is the number of particles in the simulation, mpar_loc is the number
of particles that is allowed on each processor and npar_mig is the number of particles
that are allowed to migrate from one processor to another in any time-step. For a non-
parallel run it is enough to specify npar. The number of particle species is set through
npar_species (assumed to be one if not set). The particle input parameters are given in
start.in and run.in. Here is a sample of the particle part of start.in for dust particles:
/
&particles_init_pars
initxxp=’gaussian-z’, initvvp=’random’
zp0=0.02, delta_vp0=0.01, eps_dtog=0.01, tausp=0.1
lparticlemesh_tsc=T
/
The initial positions and velocities of the dust particles are set in initxxp and initvvp.
The next four input parameters are further specifications of the initial condition. Inter-
action between the particles and the mesh, e.g. through drag force or self-gravity, require
a mapping of the particles on the mesh. The PENCIL CODE currently supports NGP
(Nearest Grid Point, default), CIC (Cloud in Cell, set lparticlemesh_cic=T) and TSC

56 THE PENCIL CODE
(Triangular Shaped Cloud, set lparticlemesh_tsc=T). See Youdin & Johansen (2007) for
details.
Here is a sample of the particle part of run.in (also for dust particles):
/
&particles_run_pars
ldragforce_gas_par=T
cdtp=0.2
/
The logical ldragforce_gas_par determines whether the dust particles influence the gas
with a drag force. cdtp tells the code how many friction times should be resolved in a
minimum time-step.
The sample run ‘samples/sedimentation/’ contains the latest setup for dust particles.
5.24.1 Particles in parallel
The particle variables (e.g. xiand vi) are kept in the arrays fp and dfp. For parallel
runs, particles must be able to move from processor to processor as they pass out of the
(x, y, z)-interval of the local processor. Since not all particles are present at the same
processor at the same time (hopefully), there is some memory optimization in making
fp not big enough to contain all the particles at once. This is achieved by setting the code
variable mpar_loc less than npar in cparam.local for parallel runs. When running with
millions of particles, this trick is necessary to keep the memory need of the code down.
The communication of migrating particles between the processors happens as follows
(see the subroutine redist_particles_procs in particles_sub.f90):
1. In the beginning of each time-step all processors check if any of their particles have
crossed the local (x, y, z)-interval. These particles are called migrating particles. A
run can have a maximum of npar_mig migrating particles in each time-step. The
value of npar_mig must be set in cparam.local. The number should (of course) be
slightly larger than the maximum number of migrating particles at any time-step
during the run. The diagnostic variable nmigmax can be used to output the maxi-
mum number of migrating particles at a given time-step. One can set lmigration_-
redo=T in &particles_run_pars to force the code to redo the migration step if more
than npar_mig want to migrate. This does slow the code down somewhat, but has
the benefit that the code does not stop when more than npar_mig particles want to
migrate.
2. The index number of the receiving processor is then calculated. This requires some
assumption about the grid on other processors and will currently not work for
nonequidistant grids. Particles do not always pass to neighboring processors as the
global boundary conditions may send them to the other side of the global domains
(periodic or shear periodic boundary conditions).
3. The migrating particle information is copied to the end of fp, and the empty spot
left behind is filled up with the particle of the highest index number currently
present at the processor.
4. Once the number of migrating particles is known, this information is shared with
neighboring processors (including neighbors over periodic boundaries) so that they

5.24 Particles 57
all know how many particles they have to receive and from which processors.
5. The communication happens as directed MPI communication. That means that
processors 0 and 1 can share migrating particles at the same time as processors 2
and 3 do it. The communication happens from a chunk at the end of fp (migrating
particles) to a chunk that is present just after the particle of the highest index
number that is currently at the receiving processor. Thus the particles are put
directly at their final destination, and the migrating particle information at the
source processor is simply overwritten by other migrating particles at the next
time-step.
6. Each processor keeps track of the number of particles that it is responsible for. This
number is stored in the variable npar_loc. It must never be larger than mpar_loc
(see above). When a particle leaves a processor, npar_loc is reduced by one, and
then increased by one at the processor that receives that particle. The maximum
number of particles at any processor is stored in the diagnostic variable nparmax. If
this value is not close to npar/ncpus, the particles have piled up in such a way that
computations are not evenly shared between the processors. One can then try to
change the parallelization architecture (nprocy and nprocz) to avoid this problem.
In simulations with many particles (comparable to or more than the number of grid
cells), it is crucial that particles are shared relatively evenly among the processors. One
can as a first approach attempt to not parallelize directions with strong particle density
variations. However, this is often not enough, especially if particles clump locally.
Alternatively one can use Particle Block Domain Decomposition (PBDD, see Johansen
et al. 2011). The steps in Particle Block Domain Decomposition scheme are as follows:
1. The fixed mesh points are domain-decomposed in the usual way (with
ncpus=nprocx×nprocy×nprocz).
2. Particles on each processor are counted in bricks of size nbx×nby×nbz (typically
nbx=nby=nbz=4).
3. Bricks are distributed among the processors so that each processor has approxi-
mately the same number of particles
4. Adopted bricks are referred to as blocks.
5. The Pencil Code uses a third order Runge-Kutta time-stepping scheme. In the be-
ginning of each sub-time-step particles are counted in blocks and the block counts
communicated to the bricks on the parent processors. The particle density assigned
to ghost cells is folded across the grid, and the final particle density (defined on the
bricks) is communicated back to the adopted blocks. This step is necessary because
the drag force time-step depends on the particle density, and each particle assigns
density not just to the nearest grid point, but also to the neighboring grid points.
6. In the beginning of each sub-time-step the gas density and gas velocity field is
communicated from the main grid to the adopted particle blocks.
7. Drag forces are added to particles and back to the gas grid points in the adopted
blocks. This partition aims at load balancing the calculation of drag forces.
8. At the end of each sub-time-step the drag force contribution to the gas velocity field
is communicated from the adopted blocks back to the main grid.

58 THE PENCIL CODE
Particle Block Domain Decomposition is activated by setting PARTICLES = particles_-
dust_blocks and PARTICLES_MAP = particles_map_blocks in Makefile.local. A sam-
ple of cparam.local for Particle Block Domain Decomposition can be found in
samples/sedimentation/blocks:
integer, parameter :: ncpus=4, nprocx=2, nprocy=2, nprocz=1
integer, parameter :: nxgrid=32, nygrid=32, nzgrid=32
integer, parameter :: npar=10000, mpar_loc=5000, npar_mig=100
integer, parameter :: npar_species=4
integer, parameter :: nbrickx=4, nbricky=4, nbrickz=4, nblockmax=32
The last line defines the number of bricks in the total domain – here we divide the grid
into 4×4×4bricks each of size 8×8×8grid points. The parameter nblockmax tells the
code the maximum number of blocks any processor may adopt. This should not be so low
that there is not room for all the bricks with particles, nor so high that the code runs out
of memory.
5.24.2 Large number of particles
When dealing with large number of particles, one needs to make sure that the number
of particles npar is less than the maximum integer that the compiler can handle with.
The maximum integer can be checked by the Fortran intrinsic function huge,
program huge_integers
print *, huge(0_4) ! for default Fortran integer (32 Bit)
print *, huge(0_8) ! for 64 Bit integer in Fortran
end program huge_integers
If the number of particles npar is larger than default maximum integer, one can promote
the maximum integer to 64 Bit by setting
integer(kind=8), parameter :: npar=4294967296
in the cparam.local file. This works because the data type of npar is only set here. It is
worth noting that one should not use the flag
FFLAGS += -integer-size 64
to promote all the integers to 64 Bit. This will break the Fortran-C interface. One
should also make sure that npar_mig<=npar/ncpus. It is also beneficial to set mpar_-
loc=2*npar/ncpus.
5.24.3 Random number generator
There are several methods to generate random number in the code. It is worth noting
that when simulating coagulation with the super-particle approach, one should use the
intrinsic random number generator of FORTRAN instead of the one implemented in the
code. When invoking random_number_wrapper, there will be back-reaction to the gas flow.
This unexpected back-reaction can be tracked by inspecting the power spectra, which
exhibits the oscillation at the tail. To avoid this, one should set luser_random_number_-
wrapper=F under the module particles_coag_run_pars in run.in.

5.25 Non-cartesian coordinate systems 59
5.25 Non-cartesian coordinate systems
Spherical coordinates are invoked by adding the following line in the file ‘start.in’
&init_pars
coord_system=’spherical_coords’
One can also invoke cylindrical coordinates by saying cylindrical_coords instead. In
practice, the names (x, y, z)are still used, but they refer then to (r, θ, φ)or (r, φ, z)instead.
When working with curvilinear coordinates it is convenient to use differential operators
in the non-coordinate basis, so the derivatives are taken with respect to length, and
not in a mixed fashion with respect to length for ∂/∂r and with respect to angle for
∂/∂θ and ∂/∂φ. The components in the non-coordinate basis are denoted by hats, see,
e.g., [26], p. 213; see also Appendix B of [27]. For spherical polar coordinates the only
nonvanishing Christoffel symbols (or connection coefficients) are
Γˆ
θ
ˆrˆ
θ= Γˆ
φ
ˆrˆ
φ=−Γˆrˆ
θˆ
θ=−Γˆrˆ
φˆ
φ= 1/r, (37)
Γˆ
φˆ
θˆ
φ=−Γˆ
θˆ
φˆ
φ= cot θ/r. (38)
The Christoffel symbols enter as correction terms for the various differential opera-
tors in addition to a term calculated straightforwardly in the non-coordinate basis. The
derivatives of some relevant Christoffel symbols are
Γˆ
θ
ˆrˆ
θ,ˆ
θ= Γˆ
φ
ˆrˆ
φ, ˆ
φ= Γˆ
φˆ
θˆ
φ, ˆ
φ= 0 (39)
Γˆ
θ
ˆrˆ
θ,ˆr= Γˆ
φ
ˆrˆ
φ,ˆr=−r−2(40)
Γˆ
φˆ
θˆ
φ,ˆ
θ=−r−2sin−2θ(41)
Further details are given in Appendix I.

60 THE PENCIL CODE
6 The equations
The equations solved by the PENCIL CODE are basically the standard compressible
MHD equations. However, the modular structure allows some variations of the MHD
equations, as well as switching off some of the equations or individual terms of the
equation (nomagnetic, noentropy, etc.).
In this section the equations are presented in their most complete form. It may be ex-
pected that the code can evolve most subsets or simplifications of these equations.
6.1 Continuity equation
In the code the continuity equation, ∂ρ/∂t +∇·ρu= 0, is written in terms of ln ρ,
D ln ρ
Dt=−∇·u.(42)
Here ρdenotes density, uthe fluid velocity, tis time and D/Dt≡∂/∂t +u·∇is the
convective derivative.
6.2 Equation of motion
In the equation of motion, using a perfect gas, the pressure term, can be expressed as
−ρ−1∇p=−c2
s(∇s/cp+∇ln ρ), where the squared sound speed is given by
c2
s=γp
ρ=c2
s0 exp γs/cp+ (γ−1) ln ρ
ρ0,(43)
and γ=cp/cvis the ratio of specific heats, or adiabatic index. Note that c2
sis proportional
to the temperature with c2
s= (γ−1)cpT.
The equation of motion is accordingly
Du
Dt=−c2
s∇s
cp
+ ln ρ−∇Φgrav +j×B
ρ
+ν∇2u+1
3∇∇ ·u+ 2S·∇ln ρ+ζ(∇∇ ·u) ; (44)
Here Φgrav is the gravity potential, jthe electric current density, Bthe magnetic flux
density, νis kinematic viscosity, ζdescribes a bulk viscosity, and, in Cartesian coordi-
nates
Sij =1
2∂ui
∂xj
+∂uj
∂xi−2
3δij∇·u(45)
is the rate-of-shear tensor that is traceless, because it can be written as the generic rate-
of-strain tensor minus its trace. In curvilinear coordinates, we have to replace partial
differentiation by covariant differentiation (indicated by semicolons), so we write Sij =
1
2(ui;j+uj;i)−1
3δij∇·u.
The interpretation of the two viscosity terms varies greatly depending upon the Viscos-
ity module used, and indeed on the parameters given to the module. See §6.6.
For isothermal hydrodynamics, see §6.4 below.

6.3 Induction equation 61
6.3 Induction equation
∂A
∂t =u×B−ηµ0j.(46)
Here Ais the magnetic vector potential, B=∇ × Athe magnetic flux density, η=
1/(µ0σ)is the magnetic diffusivity (σdenoting the electrical conductivity), and µ0the
magnetic vacuum permeability. This form of the induction equation corresponds to the
Weyl gauge
Φ = 0, where Φdenotes the scalar potential.
6.4 Entropy equation
The current thermodynamics module
entropy
formulates the thermal part of the physics
in terms of entropy s, rather than thermal energy e, which you may be more famil-
iar with. Thus the two fundamental thermodynamical variables are ln ρand s. The
reason for this choice of variables is that entropy is the natural physical variable for
(at least) convection processes: the sign of the entropy gradient determines convective
(in)stability, the Rayleigh number is proportional to the entropy gradient of the associ-
ated hydrostatic reference solution, etc. The equation solved is
ρT Ds
Dt=H − C +∇·(K∇T) + ηµ0j2+ 2ρνS⊗S+ζρ (∇·u)2.(47)
Here, Tis temperature, cpthe specific heat at constant pressure, Hand Care explicit
heating and cooling terms, Kis the radiative (thermal) conductivity, ζdescribes a bulk
viscosity, and Sis the rate-of-shear tensor that is traceless.
In the entropy module we solve for the specific entropy, s. The heat conduction term on
the right hand side can be written in the form
∇·(K∇T)
ρT (48)
=cpχh∇2ln T+∇ln T·∇(ln T+ ln χ+ ln ρ)i(49)
=cpχγ∇2s/cp+ (γ−1)∇2ln ρ
+cpχ[γ∇s/cp+ (γ−1)∇ln ρ]·[γ(∇s/cp+∇ln ρ) + ∇ln χ],(50)
where χ=K/(ρcp)is the thermal diffusivity. The latter equation shows that the diffu-
sivity for sis γχ, which is what we have used in Eq. (24).
In an alternative formulation for a constant K, the heat conduction term on the right
hand side can also be written in the form
∇·(K∇T)
ρT =K
ρh∇2ln T+ (∇ln T)2i(51)
which is the form used when constant Kis chosen.
Note that by setting γ= 1 and initially s= 0, one obtains an isothermal equation of
state (albeit at some unnecessary expense of memory). Similarly, by switching off the
evolution terms of entropy, one immediately gets polytropic behavior (if swas initially
constant) or generalized polytropic behavior (where sis not uniform, but ∂s/∂t = 0).
A better way to achieve isothermality is to use the
noentropy
module.

62 THE PENCIL CODE
6.4.1 Viscous heating
We can write the viscosity as the divergence of a tensor τij,j ,
ρ∂ui
∂t =... +τij,j ,(52)
where τij = 2νρSij is the stress tensor. The viscous power density Pis
P=uiτij,j (53)
=∂
∂xj
(uiτij)−ui,j τij (54)
The term under the divergence is the viscous energy flux and the other term is the
kinetic energy loss due to heating. The heating term +ui,jτij is positive definite, because
τij is a symmetric tensor and the term only gives a contribution from the symmetric part
of ui,j, which is 1
2(ui,j +uj,i), so
ui,jτij =1
2νρ(ui,j +uj,i)(2Sij ).(55)
But, because Sij is traceless, we can add anything proportional to δij and, in particular,
we can write
ui,jτij =1
2(ui,j +uj,i)(2νρSij )(56)
=1
2(ui,j +uj,i −1
3δij∇·u)(2νρSij)(57)
= 2νρS2,(58)
which is positive definite.
6.4.2 Alternative description
By setting pretend_lnTT=T in init_pars or run_pars (i.e. the general part of the name
list) the logarithmic temperature is used instead of the entropy. This has computational
advantages when heat conduction (proportional to K∇T) is important. Another alterna-
tive is to use another module, i.e. set ENTROPY=temperature_idealgas in ‘Makefile.local’.
When pretend_lnTT=T is set, the entropy equation
∂s
∂t =−u·∇s+1
ρT RHS (59)
is replaced by
∂ln T
∂t =−u·∇ln T+1
ρcvTRHS −(γ−1) ∇·u,(60)
where RHS is the right hand side of equation (47).

6.5 Transport equation for a passive scalar 63
6.5 Transport equation for a passive scalar
In conservative form, the equation for a passive scalar is
∂
∂t(ρc) + ∇·[ρcu−ρD∇c] = 0.(61)
Here cdenotes the concentration (per unit mass) of the passive scalar and Dits diffusion
constant (assumed constant). In the code this equation is solved in terms of ln c,
D ln c
Dt=D∇2ln c+ (∇ln ρ+∇ln c)·∇ln c.(62)
Using ln cinstead of chas the advantage that it enforces c > 0for all times. However,
the disadvantage is that one cannot have c= 0. For this reason we ended up using the
non-logarithmic version by invoking PSCALAR=pscalar_nolog.
6.6 Bulk viscosity
For a monatomic gas it can be shown that the bulk viscosity vanishes. We therefore don’t
use it in most of our runs. However, for supersonic flows, or even otherwise, one might
want to add a shock viscosity which, in its simplest formulation, take the form of a bulk
viscosity.
6.6.1 Shock viscosity
Shock viscosity, as it is used here and also in the Stagger Code of ˚
Ake Nordlund, is
proportional to positive flow convergence, maximum over five zones, and smoothed to
second order,
ζshock =cshock Dmax
5[(−∇·u)+]E(min(δx, δy, δz))2,(63)
where cshock is a constant defining the strength of the shock viscosity. In the code this
dimensionless coefficient is called nu_shock, and it is usually chosen to be around unity.
Assume that the shock viscosity only enters as a bulk viscosity, so the whole stress
tensor is then
τij = 2ρνSij +ρζshockδij ∇·u.(64)
Assume ν=const, but ζ6=const, so
ρ−1Fvisc =ν∇2u+1
3∇∇ ·u+ 2S·∇ln ρ+ζshock [∇∇ ·u+ (∇ln ρ+∇ln ζshock)∇·u].
(65)
and
ρ−1Γvisc = 2νS2+ζshock(∇·u)2.(66)
In the special case with periodic boundary conditions, we have 2hS2i=hω2i+4
3h(∇·u)2i.
6.7 Equation of state
In its present configuration only hydrogen ionization is explicitly included. Other con-
stituents (currently He and H2) can have fixed values. The pressure is proportional to
the total number of particles, i.e.
p= (nHI +nHII +nH2+ne+nHe +...)kBT. (67)

64 THE PENCIL CODE
It is convenient to normalize to the total number of H both in atomic and in molecular
hydrogen, nHtot ≡nH+ 2nH2, where nHI +nHII =nH, and define xe≡ne/nHtot,xHe ≡
nHe/nHtot, and xH2≡nH2/nHtot. Substituting nH=nHtot −2nH2, we have
p= (1 −xH2+xe+xHe +...)nHtotkBT. (68)
This can be written in the more familiar form
p=R
µρT, (69)
where R=kB/muand muis the atomic mass unit (which is for all practical purposes the
same as mHtot) and
µ=nH+ 2nH2+ne+ 4nHe
nH+nH2+ne+nHe
=1 + 4xHe
1−xH2+xe+xHe
(70)
is the mean molecular weight (which is here dimensionless; see Kippenhahn & Weigert
1990, p. 102). The factor 4 is really to be substituted for 3.97153. Some of the familiar
relations take still the usual form, in particular e=cvTand h=cpTwith cv=3
2R/µ and
cp=5
2R/µ.
The number ratio, xHe, is more commonly expressed as the mass ratio, Y=
mHenHe/(mHnHtot +mHenHe), or Y= 4xHe/(1 + 4xHe), or 4xHe = (1/Y −1)−1. For exam-
ple, Y= 0.27 corresponds to xHe = 0.092 and Y= 0.25 to xHe = 0.083. Note also that for
100% H2abundance, xH2= 1/2.
In the following, the ionization fraction is given as y=ne/nH, which can be different
from xeif there is H2. Substituting for nHin terms of nHtot yields y=xe/(1 −2xH2).
6.8 Ionization
This part of the code can be invoked by setting EOS=eos_ionization (or EOS=eos_-
temperature_ionization) in the ‘Makefile.local’ file. The equation of state described
below works for variable ionization, and the entropy offset is different from that used in
Eq. (43), which is now no longer valid. As a replacement, one can use EOS=eos_fixed_-
ionization, where the degree of ionization can be given by hand. Here the normalization
of the entropy is the same as for EOS=eos_ionization. This case is described in more de-
tail below.12
We treat the gas as being composed of partially ionized hydrogen and neutral helium.
These are four different particle species, each of which regarded as a perfect gas.
The ionization fraction y, which gives the ratio of ionized hydrogen to the total amount
of hydrogen nH, is obtained from the Saha equation which, in this case, may be written
as
y2
1−y=1
nHmekBT
2π~23/2
exp −χH
kBT.(71)
The temperature Tcannot be obtained directly from the PENCIL CODE’s independent
variables ln ρand s, but is itself dependent on y. Hence, the calculation of yessentially
becomes a root finding problem.
12We omit here the contribution of H2.
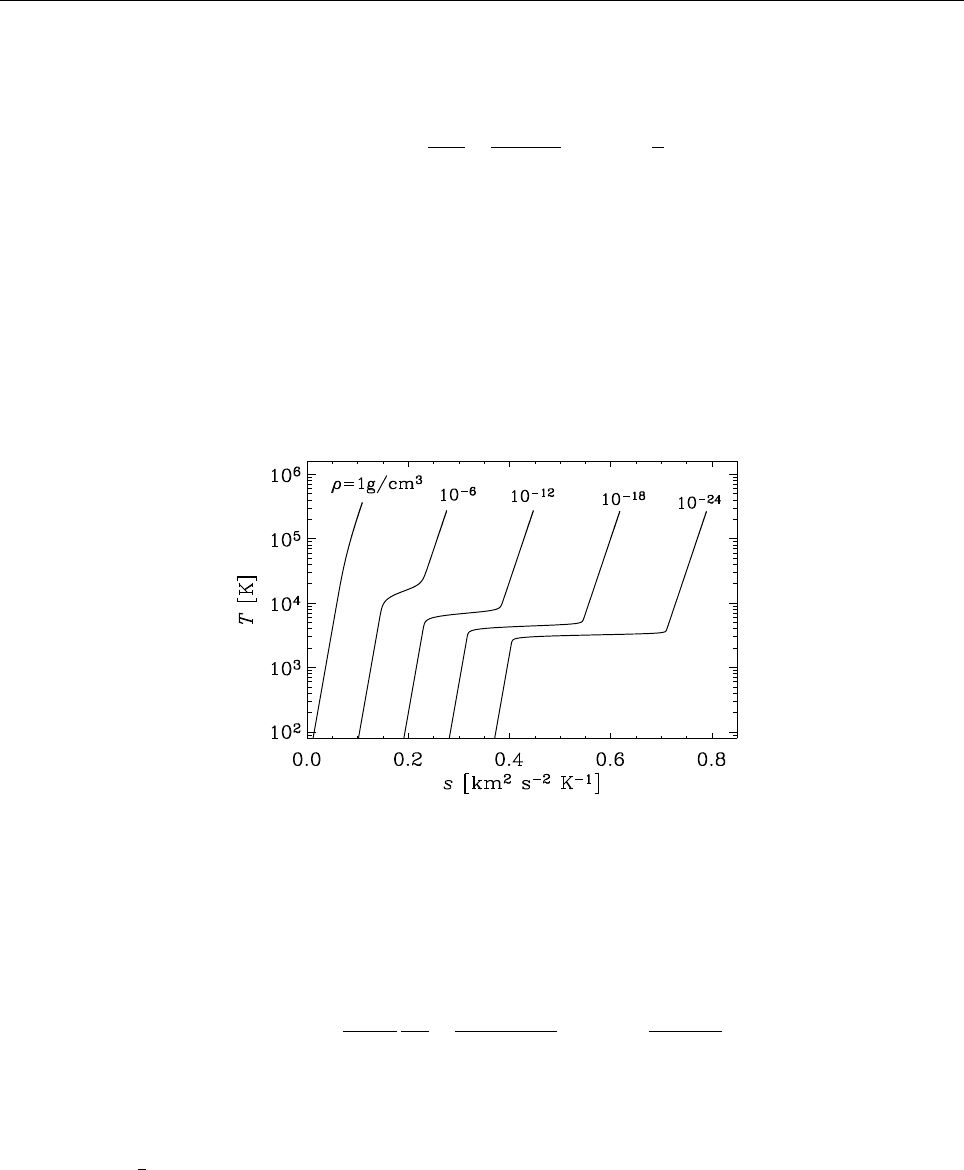
6.8 Ionization 65
The entropy of a perfect gas consisting of particles of type iis known from the Sackur-
Tetrode equation
Si=kBNi ln "1
ntot mikBT
2π~23/2#+5
2!.(72)
Here Niis the number of particles of a single species and ntot is the total number density
of all particle species.
In addition to the individual entropies we also have to take the entropy of mixing,
Smix =−NtotkBPipiln pi, into account. Summing up everything, we can get a closed ex-
pression for the specific entropy sin terms of y,ln ρand T, which may be solved for
T.
Figure 5: Dependence of temperature on entropy for different values of the density.
For given ln ρand swe are then able to calculate the ionization fraction yby finding the
root of
f(y) = ln "1−y
y2
1
nHmekBT(y)
2π~23/2#−χH
kBT(y).(73)
In the ionized case, several thermodynamic quantities of the gas become dependent on
the ionization fraction ysuch as its pressure, P= (1+ y+xHe)nHkBT, and its internal
energy, E=3
2(1 + y+xHe)nHkBT+yχH, where xHe gives the ratio of neutral helium to the
total amount of hydrogen. The dependence of temperature on entropy is shown in Fig. 5
for different values of the density.
For further details regarding the procedure of solving for the entropy see Sect. H.6 in
the appendix.
6.8.1 Ambipolar diffusion
Another way of dealing with ionization in the PENCIL CODE is through use of the neu-
trals module. That module solves the coupled equations of neutral and ionized gas, in a
two-fluid model

66 THE PENCIL CODE
∂ρi
∂t =−∇·(ρiui) + G(74)
∂ρn
∂t =−∇·(ρnun)− G (75)
∂(ρiui)
∂t =−∇·(ρiui:ui)−∇pi+pe+B2
2µ0+F(76)
∂(ρnun)
∂t =−∇·(ρnun:un)−∇pn− F (77)
∂A
∂t =ui×B(78)
where the subscripts nand iare for neutral and ionized, respectively. The terms Gand
F, through which the two fluids exchange mass and momentum, are given by
G=ζρn−αρ2
i(79)
F=ζρnun−αρ2
iui+γρiρn(un−ui).(80)
In the above equations, ζis the ionization coefficient, αis the recombination coefficient,
and γthe collisional drag strength. By the time of writing (spring 2009), these three
quantities are supposed constant. The electron pressure peis also assumed equal to the
ion pressure. Only isothermal neutrals are supported so far.
In the code, Eq. (74) and Eq. (76) are solved in ‘density.f90’ and ‘hydro.f90’ respectively.
Equation 75 is solved in ‘neutraldensity.f90’ and Eq. (77) in ‘neutralvelocity.f90’. The
sample ‘1d-test/ambipolar-diffusion’ has the current setup for a two-fluid simulation
with ions and neutrals.
6.9 Radiative transfer
Here we only state the basic equations. A full description about the implementation is
given in Sect. H.7 and in the original paper by Heinemann et al. (2006).
The basic equation for radiative transfer is
dI
dτ =−I+S , (81)
where
τ≡
s
Z
0
χ(s′)ds′(82)
is the optical depth (sis the geometrical coordinate along the ray).
Note that radiative transfer is called also in ‘start.csh’, and again each time a snapshot
is being written, provided the output of auxiliary variables is being requested lwrite_-
aux=T. (Also, of course, the pencil check runs radiative transfer 7 times, unless you put
pencil_check_small=F.)

6.10 Self-gravity 67
6.10 Self-gravity
The PENCIL CODE can consider the self-gravity of the fluid in the simulation box by
adding the term
∂u
∂t =...−∇φself (83)
to the equation of motion. The self-potential φself (or just φfor simplicity) satisfies Pois-
son’s equation
∇2φ= 4πGρ . (84)
The solution for a single Fourier component at scale kis
φk=−4πGρk
k2.(85)
Here we have assumed periodic boundary conditions. The potential is obtained by
Fourier-transforming the density, then finding the corresponding potential at that scale,
and finally Fourier-transforming back to real space.
The x-direction in the shearing sheet is not strictly periodic, but is rather shear periodic
with two connected points at the inner and outer boundary separated by the distance
∆y(t) = mod[(3/2)Ω0Lxt, Ly]in the y-direction. We follow here the method from [17]
to allow for shear-periodic boundaries in the Fourier method for self-gravity. First we
take the Fourier transform along the periodic y-direction. We then shift the entire y-
direction by the amount δy(x) = ∆y(t)x/Lxto make the x-direction periodic. Then we
proceed with Fourier transforms along xand then z. After solving the Poisson equation
in Fourier space, we transform back to real space in the opposite order. We differ here
from the method by [17] in that we shift in Fourier space rather than in real space13.
The Fourier interpolation formula has the advantage over polynomial interpolation in
that it is continuous and smooth in all its derivatives.
6.11 Incompressible and anelastic equations
This part has not yet been documented and is still under development.
6.12 Dust equations
The code treats gas and dust as two separate fluids14. The dust and the gas interact
through a drag force. This force can most generally be written as an additional term to
the equation of motion as
Dud
Dt=...−1
τs
(ud−u).(86)
Here τsis the so-called stopping time of the considered dust species. This measures the
coupling strength between dust and gas. In the Epstein drag regime
τs=adρs
csρ,(87)
13We were kindly made aware of the possibility of interpolating in Fourier space by C. McNally on his
website.
14See master’s thesis of A. Johansen (can be downloaded from
http://www.mpia.de/homes/johansen/research_en.php)

68 THE PENCIL CODE
where adis the radius of the dust grain and ρsis the solid density of the dust grain.
Two other important effects work on the dust. The first is coagulation controlled
by the discrete coagulation equation
dnk
dt=1
2X
i+j=k
Aijninj−nk
∞
X
i=1
Aikni.(88)
In the code Ndiscrete dust species are considered. Also the bins are logarithmically
spaced in order to give better mass resolution. It is also possible to keep track of both
number density and mass density of each bin, corresponding to having a variable grain
mass in each bin.
Dust condensation is controlled by the equation
dN
dt=1
τcond
Nd−1
d.(89)
Here Nis the number of monomers in the dust grain (such as water molecules) and dis
the physical dimension of the dust grain. The condensation time τcond is calculated from
1
τcond
=A1vthαnmon 1−1
Smon ,(90)
where A1is the surface area of a monomer, αis the condensation efficiency, nmon is the
number density of monomers in the gas and Smon is the saturation level of the monomer
given by
Smon =Pmon
Psat
.(91)
Here Psat is the saturated vapor pressure of the monomer. Currently only water ice has
been implemented in the code.
All dust species fulfill the continuity equation
∂ρd
∂t +∇·(ρdud) = 0.(92)
6.13 Cosmic ray pressure in diffusion approximation
Cosmic rays are treated in the diffusion approximation. The equation of state is pc=
(γc)ecwhere the value of γcis usually somewhere between 14/9and 4/3. In the momen-
tum equation (44) the cosmic ray pressure force, −ρ−1∇pcis added on the right hand
side, and ecsatisfies the evolution equation
∂ec
∂t +∇·(ecu) + pc∇·u=∂i(Kij ∂jec) + Qc,(93)
where Qcis a source term and
Kij =K⊥δij + (Kk−K⊥)ˆ
Biˆ
Bj(94)
is an anisotropic diffusivity tensor.

6.14 Particles 69
In the non-conservative formulation of this code it is advantageous to expand the diffu-
sion term using the product rule, i.e.
∂i(Kij∂jec) = −Uc·∇ec+Kij ∂i∂jec.(95)
where Uci=−∂Kij /∂xjacts like an extra velocity trying to straighten magnetic field
lines. We can write this term also as Uc=−(Kk−K⊥)∇·(ˆ
Bˆ
B), where the last term
is a divergence of the dyadic product of unit vectors.15 However, near magnetic nulls,
this term can becomes infinite. In order to avoid this problem we are forced to limit
∇·(ˆ
Bˆ
B), and hence |Uc|, to the maximum possible value that can be resolved at a given
resolution.
A physically appealing way of limiting the maximum propagation speed is to restore
an explicit time dependence in the equation for the cosmic ray flux, and to replace the
diffusion term in Eq. (93) by a divergence of a flux that in turn obeys the equation
∂Fci
∂t =−˜
Kij∇jec−Fci
τ(non-Fickian diffusion),(96)
where Kij =τ˜
Kij would be the original diffusion tensor of Eq. (94), if the time derivative
were negligible. Further details are described in Snodin et al. (2006).
6.14 Particles
Particles are entities that each have a space coordinate and a velocity vector, where
a fluid only has a velocity vector field (the continuity equation of a fluid in some way
corresponds to the space coordinate of particles). In the code particles are present either
as tracer particles or as dust particles
6.14.1 Tracer particles
Tracer particles always have the local velocity of the gas. The dynamical equations are
thus ∂xi
∂t =u,(97)
where the index iruns over all particles. Here uis the gas velocity at the position of
the particle. One can choose between a first order (default) and a second order spline
interpolation scheme (set lquadratic_interpolation=T in &particles_init_pars) to cal-
culate the gas velocity at the position of a tracer particle.
The sample run ‘samples/dust-vortex’ contains the latest setup for tracer particles.
6.14.2 Dust particles
Dust particles are allowed to have a velocity that is not similar to the gas,
dxi
dt=vi.(98)
15In practice, we calculate ∂j(ˆ
Biˆ
Bj) = (δij −2ˆ
Biˆ
Bk)ˆ
BjBk,j /|B|, where derivatives of Bare calculated as
Bi,j =ǫiklAl,jk.

70 THE PENCIL CODE
The particle velocity follows an equation of motion similar to a fluid, only there is no
advection term. Dust particles also experience a drag force from the gas (proportional to
the velocity difference between a particle and the gas).
dvi
dt=...−1
τs
(vi−u).(99)
Here τsis the stopping time of the dust particle. The interpolation of the gas velocity to
the position of a particle is done using one of three possible particle-mesh schemes,
•NGP (Nearest Grid Point, default)
The gas velocity at the nearest grid point is used.
•CIC (Cloud in Cell, set lparticlemesh_cic=T)
A first order interpolation is used to obtain the gas velocity field at the position of
a particle. Affects 8 grid points.
•TSC (Triangular Shaped Cloud, set lparticlemesh_tsc=T)
A second order spline interpolation is used to obtain the gas velocity field at the
position of a particle. Affects 27 grid points.
The particle description is the proper description of dust grains, since they do not feel
any pressure forces (too low number density). Thus there is no guarantee that the grains
present within a given volume will be equilibrated with each other, although drag force
may work for small grains to achieve that. Larger grains (meter-sized in protoplanetary
discs) must be treated as individual particles.
To conserve momentum the dust particles must affect the gas with a friction force as
well. The strength of this force depends on the dust-to-gas ratio ǫd, and it can be safely
ignored when there is much more gas than there is dust, e.g. when ǫd= 0.01. The friction
force on the gas appears in the equation of motion as
∂u
∂t =...−ρ(i)
p
ρ∂v(i)
∂t drag
(100)
Here ρ(i)
pis the dust density that particle irepresents. This can be set through the pa-
rameter eps_todt in &particle_init_pars. The drag force is assigned from the particles
onto the mesh using either NGP, CIC or TSC assignment. The same scheme is used both
for interpolation and for assignment to avoid any risk of a particle accelerating itself (see
Hockney & Eastwood 1981).
6.15 N-body solver
The N-body code takes advantage of the existing Particles module, which was coded with
the initial intent of treating solid particles whose radius a•is comparable to the mean
free path λof the gas, for which a fluid description is not valid. A N-body implementation
based on that module only needed to include mass as extra state for the particles, solve
for the N2gravitational pair interactions and distinguish between the N-body and the
small bodies that are mapped into the grid as a ρpdensity field.
The particles of the N-body ensemble evolve due to their mutual gravity and by inter-
acting with the gas and the swarm of small bodies. The equation of motion for particle i
is

6.16 Test-field equations 71
dvpi
dt =Fgi−
N
X
j6=i
GMj
R2
ij
ˆ
Rij (101)
where Rij =|rpi−rpj|is the distance between particles iand j, and ˆ
Rij is the unit vector
pointing from particle jto particle i. The first term of the R.H.S. is the combined gravity
of the gas and of the dust particles onto the particle i, solved via
Fgi=−GZV
[ρg(r) + ρp(r)]Ri
(R2
i+b2
i)3/2dV, (102)
where the integration is carried out over the whole disk. The smoothing distance biis
taken to be as small as possible (a few grid cells). For few particles (<10), calculating the
integral for every particle is practical. For larger ensembles one would prefer to solve
the Poisson equation to calculate their combined gravitational potential.
The evolution of the particles is done with the same third-order Runge-Kutta time-
stepping routine used for the gas. The particles define the timestep also by the Courant
condition that they should not move more than one cell at a time. For pure particle runs,
where the grid is absent, one can adopt a fixed time-step tp≪2πΩ−1
fp where Ωfp is the
angular frequency of the fastest particle.
By now (spring 2009), no inertial accelerations are included in the N-body module, so
only the inertial frame - with origin at the barycenter of the N-body ensemble - is avail-
able. For a simulation of the circular restricted three-body problem with mass ratio
q=10−3, the Jacobi constant of a test particle initially placed at position (x, y)=(2,0) was
found to be conserved up to one part in 105within the time span of 100 orbits.
We stress that the level of conservation is poor when compared to integrators designed
to specifically deal with long-term N-body problems. These integrators are usually sym-
plectic, unlike the Runge-Kutta scheme of the PENCIL CODE. As such, PENCIL should
not be used to deal with evolution over millions of years. But for the time-span typical
of astrophysical hydrodynamical simulations, this degree of conservation of the Jacobi
constant can be deemed acceptable.
As an extension of the particle’s module, the N-body is fully compatible with the par-
allel optimization of PENCIL, which further speeds up the calculations. Parallelization,
however, is not yet possible for pure particle runs, since it relies on splitting the grid
between the processors. At the time of writing (spring 2009), the N-body code does not
allow the particles to have a time-evolving mass.
6.16 Test-field equations
The test-field method is used to calculate turbulent transport coefficients for magneto-
hydrodynamics. This is a rapidly evolving field and we refer the interested reader to
recent papers in this field, e.g. by Sur et al. (2008) or Brandenburg et al. (2008). For
technical details; see also Sect. F.3.
6.17 Gravitational wave equations
The expansion of the universe with time is described by the scale factor a(τ), where
τis the physical time. Using conformal time, t(τ) = Rτ
0dτ′/a(τ′), and dependent vari-

72 THE PENCIL CODE
Table 5: Scale factor and conformal Hubble parameter for different values of n.
n a HH
0 1 0 0
1/2η/2 1/η 1/η
2/3η2/3 2/η 6/η2
ables that are appropriately scaled with powers of a, the hydromagnetic equations can
be expressed completely without scale factor [9, 16]. This is not true, however, for the
gravitational wave (GW) equations, where a dependence on aremains [16]. The time
dependence of acan be modeled as a power law, a∝τn, where n= 1/2applies to the
radiation-dominated era; see Table 5 the general relationship. To compare with cases
where the expansion is ignored, we put n= 0.
In the transverse traceless (TT) gauge, the six components of the spatial part of the
symmetric tensor characterizing the linearized evolution of the metric perturbations
hij, reduce to two components which, in the linear polarization basis, are the +and
×polarizations. However, the projection onto that basis is computationally intensive,
because it requires nonlocal operations involving Fourier transformations. It is therefore
advantageous to evolve instead the perturbation of the metric tensor, hij , in an arbitrary
gauge, compute then hTT
ij in the TT gauge, and perform then the decomposition into the
linear polarization basis whenever we compute diagnostic quantities such as averages
or spectra. Thus, we solve the linearized GW equation in the form [16]
∂2hij
∂t2=−2H∂hij
∂t +c2∇2hij +16πG
a2c2Tij (103)
for the six components 1≤i≤j≤3, where tis comoving time, ais the scale factor,
H= ˙a/a is the comoving Hubble parameter, Tij is the source term, cis the speed of light,
and Gis Newton’s constant. For n= 0, when the cosmic expansion is ignored, we have
a= 1 and H= 0. We use the PENCIL CODE; for the numerical treatment of Eq. (103)
and equations (105)–(107). For most of the simulations, we use 11523meshpoints on 1152
cores of a Cray XC40 system with 2.3 GHz processors.
The source term is chosen to be the traceless part of the stress tensor,
Tij(x, t) = ρuiuj−BiBj−1
3δij(ρu2−B2).(104)
The removal of the trace is in principle not necessary, but it helps preventing a contin-
uous build-up of a large trace, which would be numerically disadvantageous. We have
ignored here the viscous stress, which is usually small.
We compute Tij by solving the energy, momentum, and induction equations for an ultra-
relativistic gas in the form [9, 11]
∂ln ρ
∂t =−4
3(∇·u+u·∇ln ρ) + 1
ρu·(J×B) + ηJ2,(105)
Du
Dt =u
3(∇·u+u·∇ln ρ)−u
ρu·(J×B) + ηJ2
−1
4∇ln ρ+3
4ρJ×B+2
ρ∇·(ρνS) + f,(106)

6.17 Gravitational wave equations 73
∂B
∂t =∇ × (u×B−ηJ),(107)
where B=∇×Ais the magnetic field expressed in terms of the magnetic vector poten-
tial to ensure that ∇·B= 0,J=∇×Bis the current density, D/Dt = ∂/∂t + u ·∇is
the advective derivative, Sij =1
2(ui,j +uj,i)−1
3δijuk,k is the trace-free rate of strain tensor,
and p=ρc2
sis the pressure, where cs=c/√3is the sound speed for an ultra-relativistic
gas. Lorentz-Heaviside units for the magnetic field are used.
We are interested in the rms value of the metric tensor perturbations and the GW energy
density in the linear polarization basis. To compute hTT
ij from hij, we Fourier transform
the six components of hij and ˙
hij,
˜
hij(k, t) = Zhij(x, t)e−ik·vd3xfor 1≤i≤j≤3(108)
and compute the components in the TT gauge as
˜
hTT
ij (k, t) = (PilPjm −1
2PijPlm)˜
hlm(k, t),(109)
where Pij =δij −ˆ
kiˆ
kjis the projection operator, and ˆ
k=k/k is the unit vector of k, with
k=|k|being the modulus. Next, we compute the linear polarization bases
e+
ij =e1
ie1
j−e2
ie2
j, e×
ij =e1
ie2
j+e2
ie1
j,(110)
where e1and e2are unit vectors perpendicular to k. Thus
˜
h+(k, t) = 1
2e+
ij(k)˜
hij(k, t),(111)
˜
h×(k, t) = 1
2e×
ij(k)˜
hij(k, t).(112)
We then return into real space and compute
h+/×(x, t) = Z˜
h+/×(k, t)eik·xd3k/(2π)3.(113)
Analogous calculations are performed for ˙
h+/×(x, t), which are used to compute the GW
energy via
EGW(t) = c2
32πG h˙
h2
+i+h˙
h2
×i,(114)
where angle brackets denote volume averages.
Analogously to kinetic and magnetic energy and helicity spectra, it is convenient to
compute the GW energy and polarization spectra integrated over concentric shells of
surface R4πk2dΩkin kspace, defined by
S˙
h(k) = Z4π|˙
˜
h+|2+|˙
˜
h×|2k2dΩk,(115)
A˙
h(k) = Z4π
2Im ˙
˜
h+˙
˜
h×
∗k2dΩk,(116)
and normalized such that R∞
0S˙
h(k) dk=h˙
h2
+i+h˙
h2
×iis proportional to the energy density
and R∞
0A˙
h(k) dkis proportional to the polarized energy density. The A˙
h(k)spectra are
not to be confused with the magnetic vector potential A(x, t). The corresponding GW
energy spectra are noted by
EGW(k) = (c2/32πG)S˙
h(k),(117)
HGW(k) = (c2/32πG)A˙
h(k).(118)

74 THE PENCIL CODE
We also define spectra for the metric tensor perturbation,
Sh(k) = Z4π|˜
h+|2+|˜
h×|2k2dΩk,(119)
Ah(k) = Z4π
2Im ˜
h+˜
h×
∗k2dΩk,(120)
which are normalized such that R∞
0Sh(k) dk=h2
rms is the mean squared metric tensor
perturbation.

7. Troubleshooting / Frequently Asked Questions 75
7 Troubleshooting / Frequently Asked Questions
7.1 Download and setup
7.1.1 Download forbidden
A: Both GitHub and SourceForge are banned from countries on the United
States Office of Foreign Assets Control sanction list, including Cuba, Iran, Libya,
North Korea, Sudan and Syria; see http://de.wikipedia.org/wiki/GitHub and
http://en.wikipedia.org/wiki/SourceForge. As a remedy, you might download a tar-
ball from http://pencil-code.nordita.org/; see also Section 2.
7.1.2 When sourcing the ‘sourceme.sh’/‘sourceme.csh’ file or running pc_setupsrc, I get
error messages from the shell, like ‘if: Expression Syntax.’ or ‘set: Variable name
must begin with a letter.’
A: This sounds like a buggy shell setup, either by yourself or your system administrator
— or a shell that is even more idiosyncratic than the ones we have been working with.
To better diagnose the problem, collect the following information before filing a bug
report to us:
1. uname -a
2. /bin/csh -v
3. echo $version
4. echo $SHELL
5. ps -p $$
6. If you have problems while sourcing the ‘sourceme’ script,
(a) unset the PENCIL_HOME variable:
for
csh
and similar: unsetenv PENCIL_HOME
for
bash
and similar: unexport PENCIL_HOME; unset PENCIL_HOME
(b) switch your shell in verbose mode,
for
csh
and similar: set verbose; set echo
for
bash
and similar: set -v; set -x
then source again.
7. If you have problems with pc_setupsrc, run it with csh in verbose mode:
/bin/csh -v -x $PENCIL_HOME/bin/pc_setupsrc

76 THE PENCIL CODE
7.2 Compilation
7.2.1 Linker can’t find the syscalls functions:
ld: 0711-317 ERROR: Undefined symbol: .is_nan_c
ld: 0711-317 ERROR: Undefined symbol: .sizeof_real_c
ld: 0711-317 ERROR: Undefined symbol: .system_c
ld: 0711-317 ERROR: Undefined symbol: .get_env_var_c
ld: 0711-317 ERROR: Undefined symbol: .get_pid_c
ld: 0711-317 ERROR: Undefined symbol: .file_size_c
A: The Pencil Code needs a working combination of a Fortran- and a C-compiler. If this
is not correctly set up, usually the linker won’t find the functions inside the
syscalls
module. If that happens, either the combination of C- and Fortran-compiler is inappro-
priate (e.g.
ifort
needs
icc
), or the compiler needs additional flags, like
g95
might need
the option ‘-fno-second-underscore’ and
xlf
might need the option ‘-qextname’. Please
refer to Sect. 5.2, Table 1.
7.2.2 Make gives the following error now:
PGF90-S-0017-Unable to open include file: chemistry.h (nochemistry.f90: 43)
0 inform, 0 warnings, 1 severes, 0 fatal for chemistry
Line 43 of the nochemistry routine, only has ’contains’.
A: This is because somebody added a new module (together with a corresponding
nomod-
ule.f90
and a
module.h
file (chemistry in this case). These files didn’t exist before, so you
need to say:
pc_setupsrc
If this does not help, say first make clean and then pc_setupsrc.
7.2.3 How do I compile the PENCIL CODE with the Intel (
ifc
) compiler under
Linux
?
A: The PENCIL CODE should compile successfully with
ifc
6.x,
ifc
7.0, sufficiently recent
versions of
ifc
7.1 (you should get the latest version; if yours is too old, you will typically
get an ‘internal compiler error’ during compilation of ‘src/hydro.f90’), as well as with
recent versions of
ifort
8.1 (8.0 may also work).
You can find the
ifort
compiler at ftp://download.intel.com/software/products/compilers/downloads
On many current (as of November 2003) Linux systems, there is a mismatch between
the
glibc
versions used by the compiler and the linker. To work around this, use the
following flag for compiling
FC=ifc -i_dynamic
and set the environment variable
LD_ASSUME_KERNEL=2.4.1; export LD_ASSUME_KERNEL
or

7.2 Compilation 77
setenv LD_ASSUME_KERNEL 2.4.1
This has solved the problems e.g. on a system with glibc-2.3.2 and kernel 2.4.22.
Thanks to Leonardo J. Milano (http://udel.edu/~lmilano/) for part of this info.
7.2.4 I keep getting segmentation faults with ‘start.x’ when compiling with
ifort
8.0
A: There was/is a number of issues with
ifort
8.0. Make sure you have the latest patches
applied to the compiler. A number of things to consider or try are:
1. Compile with the the ‘-static -nothreads’ flags.
2. Set your stacksize to a large value (but a far too large value may be problematic,
too), e. g.
limit stacksize 256m
ulimit -s 256000
3. Set the environment variable KMP STACKSIZE to a large value (like 100M)
See also http://softwareforums.intel.com/ids/board/message?board.id=11&message.id=1375
7.2.5 When compiling with MPI on a Linux system, the linker complains:
mpicomm.o: In function ‘mpicomm_mpicomm_init_’:
mpicomm.o(.text+0x36): undefined reference to ‘mpi_init_’
mpicomm.o(.text+0x55): undefined reference to ‘mpi_comm_size_’
mpicomm.o(.text+0x6f): undefined reference to ‘mpi_comm_rank_’
[...]
A: This is the infamous
underscore problem
. Your
MPI
libraries have been compiled
with
G77
without the option ‘-fno-second-underscore’, which makes the
MPI
symbol
names incompatible with other Fortran compilers.
As a workaround, use
MPICOMM = mpicomm_
in ‘Makefile.local’. Or, even better, you can set this globally (for the given computer)
by inserting that line into the file ‘~/.adapt-mkfile.inc’ (see perldoc adapt-mkfile for
more details).
7.2.6 Compilation stops with the cryptic error message:
f95 -O3 -u -c .f90.f90
Error : Could not open sourcefile .f90.f90
compilation aborted for .f90.f90 (code 1)
make[1]: *** [.f90.o] Error 1
What is the problem?
A: There are two possibilities:

78 THE PENCIL CODE
1. One of the variables for
make
has not been set, so
make
expands it to the empty
string. Most probably you forgot to specify a module in ‘src/Makefile.local’. One
possibility is that you have upgraded from an older version of the code that did not
have some of the modules the new version has.
Compare your ‘src/Makefile.local’ to one of the examples that work.
2. One of the variables for
make
has a space appended to it, e.g. if you use the line
MPICOMM = mpicomm_
(see §7.2.5) with a trailing blank, you will encounter this error message. Remove
the blank. This problem can also occur if you added a new module (and have an
empty space after the module name in ‘src/Makefile.src’, i.e. CHIRAL=nochiral ),
in which case the compiler will talk about “circular dependence” for the file
‘nochiral’.
7.2.7 The code doesn’t compile,
. . . there is a problem with
mvar
:
make start.x run.x
f95 -O3 -u -c cdata.f90
Error: cdata.f90, line 71: Implicit type for MVAR
detected at MVAR@)
[f95 terminated - errors found by pass 1]
make[1]: *** [cdata.o] Error 2
A: Check and make sure that ‘mkcparam’ (directory ‘$PENCIL_HOME/bin’) is in your path. If
this doesn’t help, there may be an empty ‘cparam.inc’ file in your ‘src’ directory. Remove
‘cparam.inc’ and try again (Note that ‘cparam.inc’ is automatically generated from the
‘Makefile’).
7.2.8 Some samples don’t even compile,
as you can see on the web, http://www.nordita.org/software/pencil-code/tests.html.
samples/helical-MHDturb:
Compiling.. not ok:
make start.x run.x read_videofiles.x
make[1]: Entering directory ‘/home/dobler/f90/pencil-code/samples/helical-MHDturb/src’
/usr/lib/lam/bin/mpif95 -O3 -c initcond.f90
/usr/lib/lam/bin/mpif95 -O3 -c density.f90
use Gravity, only: gravz, nu_epicycle
^
Error 208 at (467:density.f90) : No such entity in the module
Error 355 : In procedure INIT_LNRHO variable NU_EPICYCLE has not been given a type
Error 355 : In procedure POLYTROPIC_LNRHO_DISC variable NU_EPICYCLE has not been given a
3 Errors
compilation aborted for density.f90 (code 1)
make[1]: *** [density.o] Error 1

7.2 Compilation 79
make[1]: Leaving directory ‘/home/dobler/f90/pencil-code/samples/helical-MHDturb/src’
make: *** [code] Error 2
A: Somebody may have checked in something without having run auto-test beforehand.
The problem here is that something has been added in one module, but not in the corre-
sponding no-module. You can of course check with
svn
who it was. . .
7.2.9 Internal compiler error with Compaq/Dec F90
The Dec Fortran optimizer has occasional problems with ‘nompicomm.f90’:
make start.x run.x read_videofiles.x
f90 -fast -O3 -tune ev6 -arch ev6 -c cparam.f90
[...]
f90 -fast -O3 -tune ev6 -arch ev6 -c nompicomm.f90
otal vm 2755568 otal vm 2765296 otal vm 2775024
otal vm 2784752 otal...
Assertion failure: Compiler internal error - please submit problem r...
GEM ASSERTION, Compiler internal error - please submit problem report
Fatal error in: /usr/lib/cmplrs/fort90_540/decfort90 Terminated
*** Exit 3
Stop.
*** Exit 1
Stop.
A: The occurrence of this problem depends upon the grid size; and the problem never
seems to occur with ‘mpicomm.f90’, except when ncpus=1. The problem can be avoided by
switching off the loop transformation optimization (part of the ‘-O3’ optimization), via:
#OPTFLAGS=-fast -O3 -notransform_loops
This is currently the default compiler setting in ‘Makefile’, although it has a measurable
performance impact (some 8% slowdown).
7.2.10 Assertion failure under SunOS
Under SunOS, I get an error message like
user@sun> f90 -c param_io.f90
Assertion failed: at_handle_table[at_idx].tag == VAR_TAG,
file ../srcfw/FWcvrt.c, line 4018
f90: Fatal error in f90comp: Abort
A: This is a compiler bug that we find at least with Sun’s WorkShop Compiler version ‘5.0
00/05/17 FORTRAN 90 2.0 Patch 107356-05’. Upgrade the compiler version (and possi-
bly also the operating system): we find that the code compiles and works with version
‘Sun WorkShop 6 update 2 Fortran 95 6.2 Patch 111690-05 2002/01/17’ under SunOS
version ‘5.8 Generic 108528-11’.

80 THE PENCIL CODE
7.2.11 After some dirty tricks I got pencil code to compile with MPI, ...
> Before that i installed lam-7.1.4 from source.
Goodness gracious me, you shouldn’t have to compile your own MPI library.
A: Then don’t use the old LAM-MPI. It is long superseded by open-mpi now. Open-mpi
doesn’t need a daemon to be running. I am using the version that ships with Ubuntu
(e.g. 9.04):
frenesi:~> aptitude -w 210 search openmpi | grep ’^i’
i libopenmpi-dev - high performance message passing library -- header files
i A libopenmpi1 - high performance message passing library -- shared library
i openmpi-bin - high performance message passing library -- binaries
i A openmpi-common - high performance message passing library -- common files
i openmpi-doc - high performance message passing library -- man pages
Install that and keep your configuration (Makefile.src and getconf.csh) close to that for
‘frenesi’ or ‘norlx50’. That should work.
7.2.12 Error: Symbol ’mpi comm world’ at (1) has no IMPLICIT type
I installed the pencil code on Ubuntu system and tested "run.csh"
in ...\samples\conv-slab. Here the code worked pretty well.
Nevertheless, running (auto-test), I found there are some errors.
The messages are,
Error: Symbol ’mpi_comm_world’ at (1) has no IMPLICIT type
Fatal Error: Error count reached limit of 25.
make[2]: *** [mpicomm_double.o] Error 1
make[2]: Leaving directory
‘/home/pkiwan/Desktop/pencil-code/samples/2d-tests/selfgravitating-shearwave/src’
make[1]: *** [code] Error 2
make[1]: Leaving directory
‘/home/pkiwan/Desktop/pencil-code/samples/2d-tests/selfgravitating-shearwave/src’
make: *** [default] Error 2
Finally, ### auto-test failed ###
Will it be OK? Or, how can I fix this?
A: Thanks for letting me know about the status, and congratulations on your progress!
Those tests that fail are those that use MPI. If your machine is a dual or multi core
machine, you could run faster by running under MPI. But this is probably not crucial
for you at this point. (I just noticed that there is a ToDo listed in the auto-test command
to implement the option not to run the MPI tests, but this hasn’t been done yet. So I
guess you can start with the science next.

7.3 Pencil check 81
7.2.13 Error: Can’t open included file ’mpif.h’
It always worked, but now, after some systems upgrade, I get
gfortran -O3 -o mpicomm.o -c mpicomm.f90
Error: Can’t open included file ’mpif.h’
When I say locate mpif.h I only get things like
/scratch/ntest/1.2.7p1-intel/include/mpif.h
But since I use FC=mpif90 I thought I don’t need to worry.
A: Since you use FC=mpif90 there must definitely be something wrong with their setup.
Try mpif90 -showme or mpif90 -show; the ‘-I’ option should say where it looks for ’mpif.h’.
If those directories don’t exist, it’s no wonder that it doesn’t work, and it is time to
complain.
7.3 Pencil check
7.3.1 The pencil check complains for no reason.
A: The pencil check only complains for a reason.
7.3.2 The pencil check reports MISSING PENCILS and quits
A: This could point to a serious problem in the code. Check where the missing pencil
is used in the code. Request the right pencils, likely based on input parameters, by
adapting one or more of the pencil_criteria_MODULE subroutines.
7.3.3 The pencil check reports unnecessary pencils
The pencil check reports possible overcalculation... pencil rho ( 43) is
requested, but does not appear to be required!
A: Such warnings show that your simulation is possibly running too slowly because it is
calculating pencils that are not actually needed. Check in the code where the unneces-
sary pencils are used and adapt one or more of the pencil_criteria_MODULE subroutines
to request pencils only when they are actually needed.
7.3.4 The pencil check reports that most or all pencils are missing
A: This is typically a thing that can happen when testing new code development for the
first time. It is usually an indication that the reference df changes every time you call
pde. Check whether any newly implemented subroutines or functionality has a “mem-
ory”, i.e. if calling the subroutine twice with the same fgives different output df.

82 THE PENCIL CODE
7.3.5 Running the pencil check triggers mathematical errors in the code
A: The pencil check puts random numbers in fbefore checking the dependence of df on
the chosen set of pencils. Sometimes these random numbers are inconsistent with the
physics and cause errors. In that case you can set lrandom_f_pencil_check=F in &run_-
pars in ‘run.in’. The initial condition may contain many idealized states (zeros or ones)
which then do not trigger pencil check errors when lrandom_f_pencil_check=F, even if
pencils are missing. But it does prevent mathematical inconsistencies.
7.3.6 The pencil check still complains
A: Then you need to look into the how the code and the pencil check operate. Reduce the
problem in size and dimensions to find the smallest problem that makes the pencil check
fail (e.g. 1x1x8 grid points). At the line of ‘pencil_check.f90’ when a difference is found
between df_ref and df, add some debug lines telling you which variable is inconsistent
and in what place. Often you will be surprised that the pencil check has correctly found
a problem in the simulation.
7.3.7 The pencil check is annoying so I turned it off
A: Then you are taking a major risk. If one or more pencils are not calculated properly,
then the results will be wrong.
7.4 Running
7.4.1 Why does ‘start.x’ / ‘start.csh’ write data with periodic boundary conditions?
A: Because you are setting the boundary conditions in ‘run.in’, not in ‘start.in’; see
Sect. 5.16.1. There is nothing wrong with the initial data — the ghost-zone values will
be re-calculated during the very first time step.
7.4.2 csh problem?
Q: On some rare occasions we have problems with csh not being supported on other
machines. (We hope to fix this by contacting the responsible person, but may not be that
trivial today!) Oliver says this is a well known bug of some years ago, etc. But maybe in
the long run it would be good to avoid csh.
A: These occasions will become increasingly frequent, and eventually for some architec-
tures, there may not even be a csh variant that can be installed.
We never pushed people to use pc_run and friends (and to report corresponding bugs
and get them fixed), but if we don’t spend a bit of effort (or annoy users) now, we create
a future emergency, where someone needs to run on some machine, but there is no csh
and he or she just gets stuck.
We don’t have that many csh files, and for years now it should be possible to compile
run without csh (using bin/pc_run) — except that people still fall back on the old way of

7.4 Running 83
doing things. This is both cause and consequence of the ‘new’ way not being tested that
much, at least for the corner cases like ‘RERUN’, ‘NEWDIR’, ‘SCRATCH_DIR’.
7.4.3 ‘run.csh’ doesn’t work:
Invalid character ’’’ in NAMELIST input
Program terminated by fatal I/O error
Abort
A: The string array for the boundary condition, e.g.
bcx
or
bcz
is too long. Make sure it
has exactly as many elements as
nvar
is big.
7.4.4 Code crashes after restarting
> > removing mu_r from the namelist just ‘like that’ makes the code
> > backwards incompatible.
>
> That means that we can never get rid of a parameter in start.in once we
> have introduced it, right?
A: In the current implementation, without a corresponding cleaning procedure, unfor-
tunately yes.
Of course, this does not affect users’ private changes outside the central svn tree.
7.4.5 auto-test gone mad...?
Q: Have you ever seen this before:
giga01:/home/pg/n7026413/cvs-src/pencil-code/samples/conv-slab> auto-test
.
/home/pg/n7026413/cvs-src/pencil-code/samples/conv-slab:
Compiling.. ok
No data directory; generating data -> /var/tmp/pencil-tmp-25318
Starting.. ok
Running.. ok
Validating results..Malformed UTF-8 character (unexpected continuation
byte 0x80, with no preceding start byte) in split at
/home/pg/n7026413/cvs-src/pencil-code/bin/auto-test line 263.
Malformed UTF-8 character (unexpected continuation byte 0x80, with no
preceding start byte) in split at
/home/pg/n7026413/cvs-src/pencil-code/bin/auto-test line 263.
A: You are running on a RedHat 8 or 9 system, right?
Set LANG=POSIX in your shell’s startup script and life will be much better.

84 THE PENCIL CODE
7.4.6 Can I restart with a different number of cpus?
Q: I am running a simulation of nonhelical turbulence on the cluster using MPI. Suppose
if I am running a 1283simulation on 32 cpus/cores i.e.
integer, parameter :: ncpus=32,nprocy=2,nprocz=ncpus/nprocy,nprocx=1
integer, parameter :: nxgrid=128,nygrid=nxgrid,nzgrid=nxgrid
And I stop the run after a bit. Is there a way to resume this run with different number
of cpus like this :
integer, parameter :: ncpus=16,nprocy=2,nprocz=ncpus/nprocy,nprocx=1
integer, parameter :: nxgrid=128,nygrid=nxgrid,nzgrid=nxgrid
I understand it has to be so in a new directory but making sure that the run starts from
where I left it off in the previous directory.
A: The answer is no, if you use the standard distributed io. There is also parallel io, but
I never used it. That would write the data in a single file, and then you could use the
data for restart in another processor layout.
7.4.7 Can I restart with a different number of cpus?
Q: Is it right that once the simulation is resumed, pencil-code takes the last data from
var.dat (which is the current snapshot of the fields)? If that is true, then, is it not possible
to give that as the initial condition for the run in the second directory (with changed
”ncpus”)? Is there a mechanism already in place for that?
A: Yes, the code restarts from the last var.dat. It is written after a successful completion
of the run, but it crashes or you hit a time-out, there will be a var.dat that is overwritten
every isave timesteps. If the system stops during writing, some var.dat files may be
corrupt or have the wrong time. In that case you could restart from a good VAR file, if
you have one, using, e.g.,
restart-new-dir-VAR . 46
where 46 is the number of your VAR file, i.e., VAR46 im this case. To restart in another
directory, you say, from the old run directory,
restart-new-dir ../another_directory
Hope this helps. Look into pencil-code/bin/restart-new-dir to see what it is doing.
7.4.8 fft xyz parallel 3D: nygrid needs to be an integer multiple...
Q: I just got an:
fft_xyz_parallel_3D: nygrid needs to be an integer multiple of nprocy*nprocz
In my case, nygrid=2048, nprocy=32, and nprocz=128, so nprocy*nprocz=4096. In other
words, 2048 needs to be a multiple of 4096. But isn’t this the case then?
A: No, because 2048 = 0.5 * 4096 and 0.5 is not an integer. Maybe try either setting
nprocz=64 or nprocy=64. You could compensate the change of ncpus with the x-direction.

7.4 Running 85
For 20483simulations, nprocy=32 and nprocz=64 would be good. A list of good meshes is
given in Table 4.
7.4.9 Unit-agnostic calculations?
Q: The manual speaks about unit-agnostic calculations, stating that one may choose to
interpret the results in any (consistent) units, depending on the problem that is solved
at hand. So, for example, if I chose to run the ‘2d-tests/battery_term’ simulation for an
arbitrary number of time-steps and then choose to examine the diagnostics, am I correct
in assuming the following:
1) [Brms] = Gauss (as output by unit_magnetic, before the run begins)
2) [t] = s (since the default unit system is left as CGS)
3) [urms] = cm/s (again, as output by unit_velocity, before the run begins)
4) and etc. for the units of the other diagnostics
A: Detailed correspondence on this item can be found on:
https://groups.google.com/forum/?fromgroups#!topic/pencil-code-discuss/zek-uYNbgXI
There is also working material on unit systems under
http://www.nordita.org/~brandenb/teach/PencilCode/MixedTopics.html with a link to
http://www.nordita.org/~brandenb/teach/PencilCode/material/AlfvenWave_SIunits/
Below is a pedagogical response from Wlad Lyra:
In the sample battery-term, the sound speed cs0=1 sets the unit of
velocity. Together with the unit of length, that sets your unit of
time. The unit of magnetic field follows from the unit of velocity,
density, and your choice of magnetic permittivity, according to the
definition of the Alfven velocity.
If you are assuming cgs, you are saying that your sound speed cs0=1
actually means [U]=1 cm/s. Your unit of length is equivalently 1 cm,
and therefore the unit of time is [t] = [L]/[U]=1 s. The unit of
density is [rho] = 1 g/cm^3. Since in cgs vA=B/sqrt(4*pi * rho), your
unit of magnetic field is [B] = [U] * sqrt([rho] * 4*pi) ~= 3.5
sqrt(g/cm) / s = 3.5 Gauss.
If instead you are assuming SI, you have cs0=1 assuming that means
[U]=1 m/s and rho0=1 assuming that to mean [rho]=1 kg/m^3. Using [L]=1
m, you have still [t]=1 s, but now what appears as B=1 in your output
is actually [B] = [U] * sqrt (mu * [rho]) = 1 m/s * sqrt(4*pi * 1e-7
N*A-2 1 kg/m^3) ~= 0.0011210 kg/(s^2*A) ~ 11 Gauss.
You can make it more interesting and use units relevant to the
problem. Say you are at the photosphere of the Sun. You may want to
use dimensionless cs0=1 meaning a sound speed of 10 km/s. Your
appropriate length can be a megameter. Now your time unit is
[t]=[L]/[U] = 1e3 km/ 10 km/s = 10^2 s, i.e., roughly 1.5 minute. For
density, assume rho=2x10⁻⁴ kg/m^3, typical of the solar photosphere.
Your unit of magnetic field is therefore [B] = [U] * sqrt([rho] *
4*pi) = 1e6 cm/s * sqrt(4*pi * 2e-7 g/cm^3) ~ 1585.33 Gauss.
Notice that for mu0=1 and rho0=1 you simply have vA=B. Then you can
conveniently set the field strength by your choice of plasma beta (=

86 THE PENCIL CODE
2*cs^2/vA^2). There’s a reason why we like dimensionless quantities!
7.5 Visualization
7.5.1 ‘start.pro’ doesn’t work:
Reading grid.dat..
Reading param.nml..
\% Expression must be a structure in this context: PAR.
\% Execution halted at: \$MAIN\$ 104
/home/brandenb/pencil-code/runs/forced/hel1/../../../idl/start.pro
A: You don’t have the subdirectory ‘data’ in your IDL variable
!path
. Make sure you
source ‘sourceme.csh’/‘sourceme.sh’ or set a sufficient IDL path otherwise.
7.5.2 ‘start.pro’ doesn’t work:
Isn’t there some clever (or even trivial) way that one can avoid the annoying error mes-
sages that one gets, when running e.g. ”.r rall” after a new variable has been introduced
in ”idl/varcontent.pro”? Ever so often there’s a new variable that can’t be found in my
param2.nml – this time it was IECR, IGG, and ILNTT that I had to circumvent. . .
A: The simplest solution is to invoke ‘NOERASE’, i.e. say
touch NOERASE
start.csh
or, alternatively, start_run.csh. What it does is that it reruns src/start.x with a new
version of the code; this then produces all the necessary auxiliary files, but it doesn’t
overwrite or erase the ‘var.dat’ and other ‘VAR’ and ‘slice’ files.
7.5.3 Something about tag name undefined:
Q: In one of my older run directories I can’t read the data with idl anymore. What should
I do? Is says something like
Reading param.nml..
% Tag name LEQUIDIST is undefined for structure <Anonymous>.
% Execution halted at: $MAIN$ 182
/people/disk2/brandenb/pencil-code/idl/start.pro
A: Go into ‘data/param.nml’ and add , LEQUIDIST=T anywhere in the file (but before the
last slash).
7.5.4 Something INC in start.pro
Q: start doesn’t even work:

7.5 Visualization 87
% Compiled module: $MAIN$.
nname= 11
Reading grid.dat..
Reading param.nml..
Can’t locate Namelist.pm in INC (INC contains: /etc/perl /usr/local/lib/perl/5.8.4 /usr/local/share/perl/5.8.4
BEGIN failed--compilation aborted at /home/brandenb/pencil-code/bin/nl2idl line 49.
A: Go into ‘$PENCIL_HOME’ and say svn up sourceme.csh and/or svn up sourceme.sh.
(They were just out of date.)
7.5.5 nl2idl problem when reading param2.nml
Q: Does anybody encounter a backward problem with nl2idl? The file param*.nml files
are checked in under ‘pencil-code/axel/couette/SStrat128a_mu0.20_g2’ and the prob-
lem is below.
at /people/disk2/brandenb/pencil-code/bin/nl2idl line 120
HCOND0= 0.0,HCOND1= 1.000000,HCOND2= 1.000000,WIDTHSS= 1.192093E-06,MPOLY0=
^------ HERE
at /people/disk2/brandenb/pencil-code/bin/nl2idl line 120
A: The problem is the stupid ifc compiler writing the following into the namelist file:
COOLING_PROFILE=’gaussian ’,COOLTYPE=’Temp
’COOL= 0.0,CS2COOL= 0.0,RCOOL= 1.000000,WCOOL= 0.1000000,FBOT= 0.0,CHI_T= 0.0
If you add a comma after the closing quote:
COOLING_PROFILE=’gaussian ’,COOLTYPE=’Temp
’,COOL= 0.0,CS2COOL= 0.0,RCOOL= 1.000000,WCOOL= 0.1000000,FBOT= 0.0,CHI_T= 0.0
things will work.
Note that ifc cannot even itself read what it is writing here, so if this happened to occur
in param.nml, the code would require manual intervention after each start.csh.
7.5.6 Spurious dots in the time series file
Q: Wolfgang, you explained it to me once, but I forget. How can one remove spurious
dots after the timestep number if the time format overflows?
A: I don’t know whether it exists anywhere, but it’s easy. In Perl you’d say
perl -pe ’s/^(\s*[-0-9]+)\.([-0-9eEdD])/$1 $2/g’
and in sed (but that’s harder to read)
sed ’s/^\( *[-0-9]\+\)\.\([-0-9eEdD]\)/\1 \2/g’
7.5.7 Problems with pc_varcontent.pro
Q:

88 THE PENCIL CODE
% Subscript range values of the form low:high must be >= 0, < size, with low
<= high: VARCONTENT.
% Error occurred at: PC_VARCONTENT 391
/home/brandenb/pencil-code/idl/read/pc_varcontent.pro
% PC_READ_VAR 318
/home/brandenb/pencil-code/idl/read/pc_read_var.pro
% $MAIN$
A: Make sure you don’t have any unused items in your src/cparam.local such as
! MAUX CONTRIBUTION 3
! COMMUNICATED AUXILIARIES 3
They would leave gaps in the counting of entries in your data/index.pro file.
7.6 General questions
7.6.1 “Installation” procedure
Why don’t you use GNU
autoconf/automake
for installation of the PENCIL CODE?
A: What do you mean by “installation”? Unlike the applications that normally use
auto-
conf
, the
Pencil Code
is neither a binary executable, nor a library that you compile once
and then dump somewhere in the system tree.
Autoconf
is the right tool for these appli-
cations, but not for numerical codes, where the typical compilation and usage pattern is
very different:
You have different directories with different ‘Makefile.local’ settings, recompile after
introducing that shiny new term in your equations, etc. Moreover, you want to some-
times switch to a different compiler (but just for that run directory) or another
MPI
implementation. Our adapt-mkfile approach gives you this flexibility in a reasonably
convenient way, while doing the same thing with
autoconf
would be using that system
against most of its design principles.
Besides, it would really get on my (WD’s) nerves if I had to wait two minutes for
autoconf
to finish before I can start compiling (or maybe 5–10 minutes if I worked on a NEC
machine. . . ).
Finally, if you have ever tried to figure out what a ‘configure’ script does, you will ap-
preciate a comprehensible configuration system.
7.6.2 Small numbers in the code
What is actually the difference between epsi, tini and tiny?
A:
F90 has two functions epsilon() and tiny(), with
epsilon(x) = 1.1920929e-07
tiny(x) = 1.1754944e-38
(and then there is huge(x) = 3.4028235e+38)

7.6 General questions 89
for a single-precision number x.
epsilon(x) is the smallest number that satisfies
1+epsilon(1.) /= 1 ,
while tiny(x) is the smallest number that can be represented without
precision loss.
In the code we have variants hereof,
epsi=5*epsilon(1.0)
tini=5*tiny(1.0)
huge1=0.2*huge(1.0)
that have added safety margins, so we don’t have to think about doing
things like 1/tini.
So in sub.f90,
- evr = evr / spread(r_mn+epsi,2,3)
did (minimally) affect the result for r_mn=O(1), while the correct version
+ evr = evr / spread(r_mn+tini,2,3)
only avoids overflow.
7.6.3 Why do we need a /lphysics/ namelist in the first place?
Wolfgang answered on 29 July 2010: “‘cdata.f90’ has the explanation”
! Constant ’parameters’ cannot occur in namelists, so in order to get the
! now constant module logicals into the lphysics name list...
! We have some proxies that are used to initialize private local variables
! called lhydro etc, in the lphysics namelist!
So the situation is this: we want to write parameters like ldensity to param.nml so
IDL (and potentially octave, python, etc.) can know whether density was on or not. To
avoid confusion, we want them to have exactly their original names. But we cannot
assemble the original ldensity etc. constants in a namelist, so we have to define a local
ldensity variable. And to provide it with the value of the original cdata.ldensity, we need
to transfer the value via
ldensity var
. That’s pretty scary, although it seems to work
fine. I can track the code back to the big
eos merger
commit, so it may originate from
that branch. One obvious problem is that you have to add code in a number of places
(the ldensity →
ldensity var
assignment and the local definition of ldensity) to really
get what you need. And when adding a new boolean of that sort to ‘cdata.f90’, you may
not even have a clue that you need all the other voodoo.
There may be a cleaner solution involving generated code. Maybe something like
logical :: ldensity ! INCLUDE_IN_LPHYSICS
could later generate code (in some param io extra.inc file) that looks like this:
write(unit, *) ’ldensity = ’, ldensity
i.e. we can manually write in namelist format. But maybe there are even simpler solu-
tions?

90 THE PENCIL CODE
7.6.4 Can I run the code on a Mac?
A: Macs work well for Linux stuff, except that the file structure is slightly different.
Problems when following Linux installs can usually be traced to the PATH. For general
reference, if you need to set an environment variable for an entire OS-X login session,
google environment.plist. That won’t be needed here.
For a Mac install, the following should work:
a) Install Dev Tools (an optional install on the MacOS install disks). Unfortunately,
last time I checked the svn version that comes with DevTools is obsolete. So:
b) Install MacPorts (download from web). Note that MacPorts installs to a non-
standard location, and will need to be sourced. The installation normally drops
an appropriate line in .profile. If it does so, make sure that that line gets sourced.
Otherwise
export PATH=/opt/local/bin:/opt/local/sbin:$PATH
export MANPATH=/opt/local/share/man:$MANPATH
c) Install g95 (download from web). Make sure it is linked in /bin.
d) execute macports svn install
e) download the pencil-code and enjoy.
Note: the above way to get svn works. It takes a while however, so there are certainly
faster ways out there. If you already have a non-obsolete svn version, use that instead.
7.6.5 Pencil Code discussion forum
Do I just need to send an email somewhere to subscribe or what?
A” The answer is yes; just go to:
http://groups.google.com/group/pencil-code-discuss
7.6.6 The manual
It would be a good idea to add this useful information in the manual, no?
A: When you have added new stuff to the code, don’t forget to mention this in the
‘pencil-code/doc/manual.tex’ file.
Again, the answer is yes; just go to:
cd pencil-code/doc/
vi manual.tex
svn ci -m "explanations about a new module in the code"
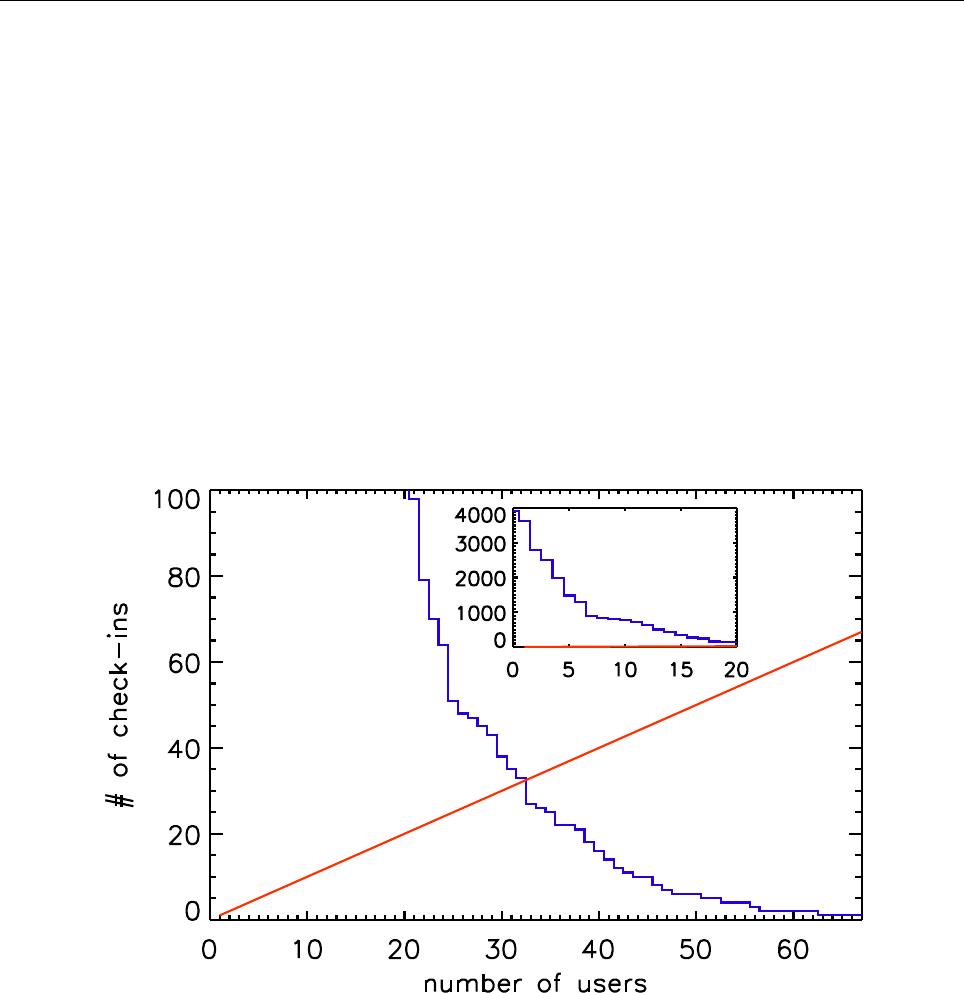
91
Part II
Programming the PENCIL CODE
All developers are supposed to have an up-to-date entry in the file
‘pencil-code/license/developers.txt’ so that they can be contacted in case a code
change breaks an auto-test or other code functionality.
Several PENCIL CODE committers have done several hundred check-ins, but many of
the currently 68 registered people on the repository have hardly done anything. To put
a number to this, one can define an hindex, which gives the number of users, who have
done at least as many as that number of check-ins. This hindex is currently 32, i.e., 32
users have done at least 32 check-ins; see Figure 6.
Figure 6: The hindex of PENCIL CODE check-ins.
The PENCIL CODE has expanded approximately linearly in the number of lines of code
and the number of subroutines (Fig. 7). The increase in the functionality of the code is
documented by the rise in the number of sample problems (Fig. 8). It is important to
monitor the performance of the code as well. Figure 9 shows that for most of the runs
the run time has not changed much.
Before making changes to the code, it is important that you verify that you can run
the pc_auto-test successfully. Don’t do this when you have already modified the code,
because then you cannot be sure that any problems are caused by your changes, or
because it wouldn’t have worked anyway. Also, keep in mind that the code is public,
so your changes should make sense from a broader perspective and should not only
be intended for yourself. Regarding more general aspects about coding standards see
Sect. B.2.
In order to keep the development of the code going, it is important that the users are
able to understand and modify (program!) the code. In this section we explain first how
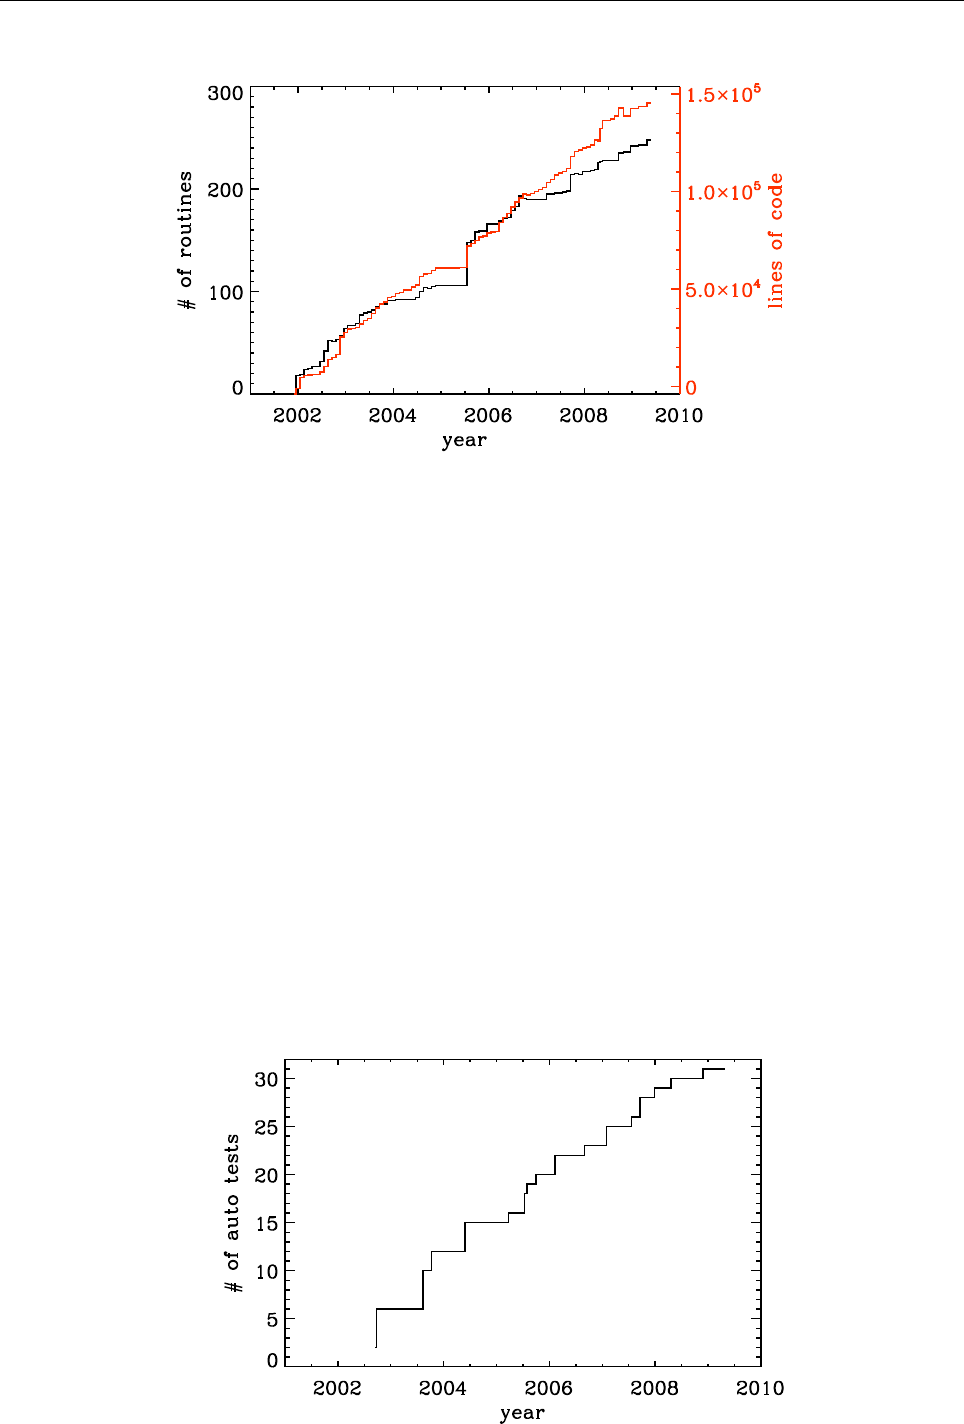
92 THE PENCIL CODE
Figure 7: Number of lines of code and the number of subroutines since the end of 2001. The jump in the
Summer of 2005 was the moment when the developments on the side branch (eos branch) were merged
with the main trunk of the code. Note the approximately linear scaling with time.
to orient yourself in the code and to understand what is in it, and then to modify it
according to your needs.
The Pencil Code check-ins occur regularly all the time. By the Pencil Code User Meeting
2010 we have arrived at a revision number of 15,000. In February 2017, the number of
check-ins has risen to 26,804; see https://github.com/pencil-code/pencil-code. Ma-
jor code changes are nowadays being discussed by the Pencil Code Steering Committee
(https://www.nordita.org/~brandenb/pencil-code/PCSC/). The increase of the revision
number with time is depicted in Figure 10. The number of Pencil Code developers in-
creases too (Figure 11), but the really active ones are getting rare. This may indicate
that new users can produce new science with the code as it is, but it may also indicate
that it is getting harder to understand the code. How to understand the code will be
discussed in the next section.
Figure 8: Number of tests in the sample directory that are used in the nightly auto tests. Note again the
approximately linear scaling with time.
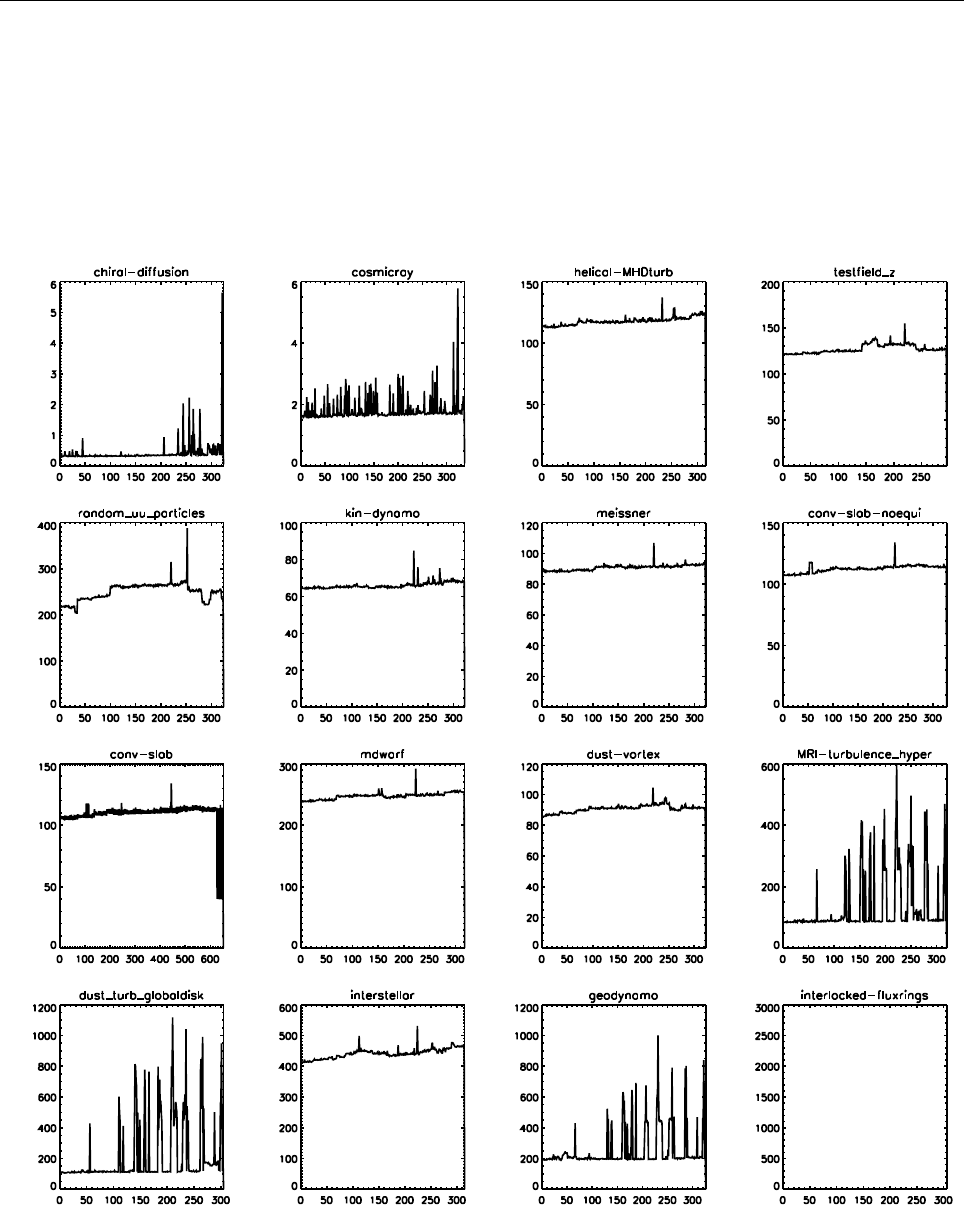
93
Figure 9: Run time of the daily auto-tests since August 17, 2008. For most of the runs the run time has
not changed much. The occasional spikes are the results of additional load on the machine.
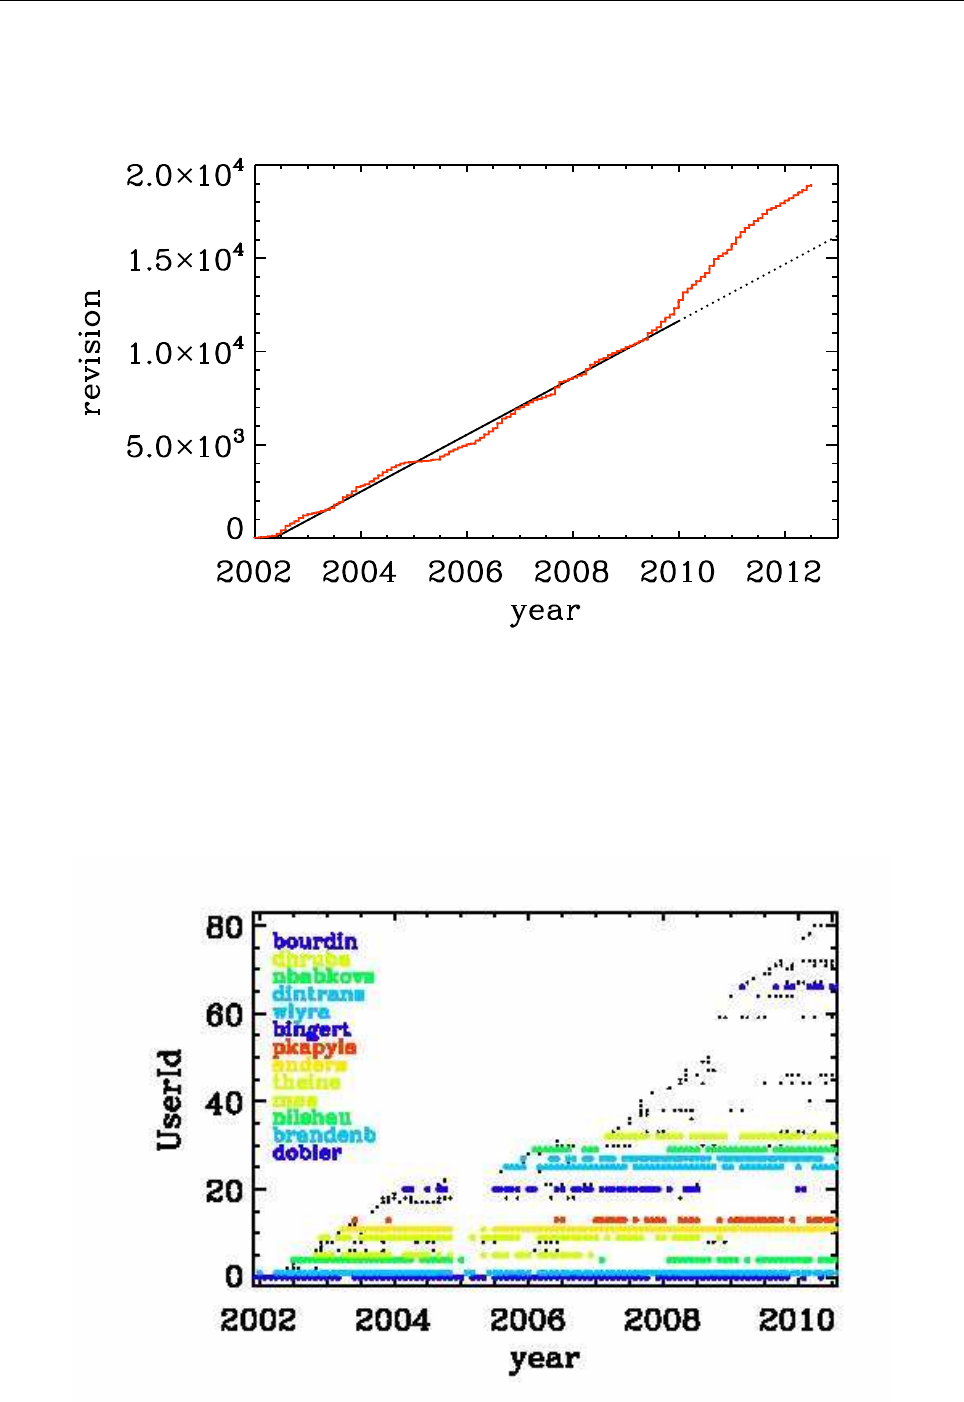
94 THE PENCIL CODE
Figure 10: Number of check-ins since 2002. Note again the linear increase with time, although in the last
part of the time series there is a notable speed-up.
Figure 11: Check-ins since 2002 per user. Users with more than 100 check-ins are color coded.

8. Understanding the code 95
8 Understanding the code
Understanding the code means looking through the code. This is not normally done by
just printing out the entire code, but by searching your way through the code in order to
address your questions. The general concept will be illustrated here with an example.
8.1 Example: how is the continuity equation being solved?
All the physics modules are solved in the routine pde, which is located in the file and
module ‘Equ’. Somewhere in the pde subroutine you find the line
call dlnrho_dt(f,df,p)
This means that here the part belonging to ∂ln ρ/∂t is being assembled. Using the grep
command you will find that this routine is located in the module density, so look in
there and try to understand the pieces in this routine. We quickly arrive at the following
crucial part of code,
!
! Continuity equation.
!
if (lcontinuity_gas) then
if (ldensity_nolog) then
df(l1:l2,m,n,irho) = df(l1:l2,m,n,irho) - p%ugrho - p%rho*p%divu
else
df(l1:l2,m,n,ilnrho) = df(l1:l2,m,n,ilnrho) - p%uglnrho - p%divu
endif
endif
where, depending on some logicals that tell you whether the continuity equation should
indeed be solved and whether we do want to solve for the logarithmic density and not
the actual density, the correct right hand side is being assembled. Note that all these
routines always only add to the existing df(l1:l2,m,n,ilnrho) array and never reset
it. Resetting df is only done by the timestepping routine. Next, the pieces p%uglnrho
and p%divu are being subtracted. These are pencils that are organized in the structure
with the name p. The meaning of their names is obvious: uglnrho refers to u· ∇ln ρ
and divu refers to ∇ · u. In the subroutine pencil_criteria_density you find under
which conditions these pencils are requested. Using grep, you also find where they are
calculated. For example p%uglnrho is calculated in ‘density.f90’; see
call u_dot_grad(f,ilnrho,p%glnrho,p%uu,p%uglnrho,UPWIND=lupw_lnrho)
So this is a call to a subroutine that calculates the u·∇ operator, where there is the possi-
bility of
upwinding
, but this is not the default. The piece divu is calculated in ‘hydro.f90’
in the line
!
! Calculate uij and divu, if requested.
!
if (lpencil(i_uij)) call gij(f,iuu,p%uij,1)
if (lpencil(i_divu)) call div_mn(p%uij,p%divu,p%uu)

96 THE PENCIL CODE
Note that the divergence calculation uses the velocity gradient matrix as input, so no
new derivatives are recalculated. Again, using grep, you will find that this calculation
and many other ones happen in the module and file ‘sub.f90’. The various derivatives
that enter here have been calculated using the gij routine, which calls the der routine,
e.g., like so
k1=k-1
do i=1,3
do j=1,3
if (nder==1) then
call der(f,k1+i,tmp,j)
For all further details you just have to follow the trail. So if you want to know how the
derivatives are calculated, you have to look in deriv.f90, and only here is it where the
indices of the farray are being addressed.
If you are interested in magnetic fields, you have to look in the file ‘magnetic.f90’. The
right hand side of the equation is assembled in the routine
!***********************************************************************
subroutine daa_dt(f,df,p)
!
! Magnetic field evolution.
!
! Calculate dA/dt=uxB+3/2 Omega_0 A_y x_dir -eta mu_0 J.
! For mean field calculations one can also add dA/dt=...+alpha*bb+delta*WXJ.
! Add jxb/rho to momentum equation.
! Add eta mu_0 j2/rho to entropy equation.
!
where the header tells you already a little bit of what comes below. It is also here where
ohmic heating effects and other possible effects on other equations are included, e.g.
!
! Add Ohmic heat to entropy or temperature equation.
!
if (lentropy .and. lohmic_heat) then
df(l1:l2,m,n,iss) = df(l1:l2,m,n,iss) &
+ etatotal*mu0*p%j2*p%rho1*p%TT1
endif
We leave it at this and encourage the user to do similar inspection work on
a number of other examples. If you think you find an error, file a ticket at
http://code.google.com/p/pencil-code/issues/list. You can of course also repair it!

9. Adapting the code 97
9 Adapting the code
9.1 The PENCIL CODE coding standard
As with any code longer than a few lines the appearance and layout of the source code
is of the utmost importance. Well laid out code is more easy to read and understand and
as such is less prone to errors.
A consistent coding style has evolved in the PENCIL CODE and we ask that those con-
tributing try to be consistent for everybody’s benefit. In particular, it would be appreci-
ated if those committing changes of existing code via svn follow the given coding style.
There are not terribly many rules and using existing code as a template is usually the
easiest way to proceed. In short the most important rules are:
•tab characters do not occur anywhere in the code (in fact the use of tab character
is an extension to the Fortran standard).
•Code in any delimited block, e.g. if statements, do loops, subroutines etc., is in-
dented be precisely 2 spaces. E.g.
if (lcylindrical) then
call fatal_error(’del2fjv’,’del2fjv not implemented’)
endif
•continuation lines (i.e. the continuation part of a logical line that is split using
the & sign) are indented by 4 spaces. E.g. (note the difference from the previous
example)
if (lcylindrical) &
call fatal_error(’del2fjv’,’del2fjv not implemented’)
[...]
•There is always one space separation between ’if’ and the criterion following in
parenthesis:
if (ldensity_nolog) then
rho=f(l1:l2,m,n,irho)
endif
This is wrong:
if(ldensity_nolog) then ! WRONG
rho=f(l1:l2,m,n,irho)
endif
•In general, try to follow common practice used elsewhere in the code. For example,
in the code fragment above there are no empty spaces within the mathematical
expressions programmed in the code. A unique convention helps in finding certain
expressions and patterns in the code. However, empty spaces are often used after
commas and semicolons, for examples in name lists.
•Relational operators are written with symbols (==,/=,<,<=,>,>=), not with
characters (.eq.,.ne.,.lt.,.le.,.gt.,.ge.).
•In general all comments are placed on their own lines with the ’!’ appearing in the
first column.

98 THE PENCIL CODE
•All subroutine/functions begin with a standard comment block describing what
they do, when and by whom they were created and when and by whom any non-
trivial modifications were made.
•Lines longer that 78 characters should be explicitly wrapped using the & character,
unless there is a block of longer lines that can only be read easily when they are
not wrapped. Always add one whitespace before the & character.
These and other issues are discussed in more depth and with examples in Appendix B,
and in particular in Sect. B.2.
9.2 Adding new output diagnostics
With the implementation of new physics and the development of new procedures it will
become necessary to monitor new diagnostic quantities that have not yet been imple-
mented in the code. In the following, we describe the steps necessary to set up a new
diagnostic variable.
This is nontrivial as, in order to keep latency effects low on multi-processor machines,
the code minimizes the number of global reduction operations by assembling all quan-
tities that need the maximum taken in
fmax
, and those that need to be summed up
over all processors (mostly for calculating mean quantities) in
fsum
(see subroutine
diagnostic in file ‘src/equ.f90’).
As a sample variable, let us consider
jbm
(the volume average j·B). Only the mod-
ule
magnetic
will be affected, as you can see (the diagnostic quantity
jbm
is already
implemented) with
unix> grep -i jbm src/*.f90
If we pretend for the sake of the exercise that no trace of
jbm
was in the code, and we
were only now adding it, we would need to do the following
1. add the variable
idiag jbm
to the module variables of
Magnetic
in both
‘magnetic.f90’ and ‘nomagnetic.f90’:
integer :: idiag_jbm=0
The variable
idiag jbm
is needed for matching the position of
jbm
with the list of
diagnostic variables specified in ‘print.in’.
2. in the subroutine daa_dt in ‘magnetic.f90’, declare and calculate the quantity
jb
(the average of which will be
jbm
), and call sum_mn_name
real, dimension (nx) :: jb
! jj
·
BB
[. . . ]
if (ldiagnos) then
! only calculate if diagnostics is required
if (idiag_jbm/=0) then
! anybody asked for jbm?
call dot_mn(jj,bb,jb)
! assuming jj and bb are known
call sum_mn_name(jb,i_jbm)
endif
endif

9.2 Adding new output diagnostics 99
3. in the subroutine rprint_magnetic in both ‘magnetic.f90’, add the following:
!
! reset everything in case of RELOAD
! (this needs to be consistent with what is defined above!)
!
if (lreset) then
! need to reset list of diagnostic variables?
[. . . ]
idiag_jbm=0
[. . . ]
endif
!
! check for those quantities that we want to evaluate online
!
do iname=1,nname
[. . . ]
call parse_name(iname,cname(iname),cform(iname),’jbm’,idiag_jbm)
[. . . ]
enddo
[. . . ]
!
! write column, i_XYZ, where our variable XYZ is stored
!
[. . . ]
write(3,*) ’i_jbm=’,idiag_jbm
[. . . ]
4. in the subroutine rprint_magnetic in ‘nomagnetic.f90’, add the following (newer
versions of the code may not require this any more):
!
! write column, i_jbm, where our variable jbm is stored
! idl needs this even if everything is zero
!
[. . . ]
write(3,*) ’i_jbm=’,idiag_jbm
[. . . ]
5. and don’t forget to add your new variable to ‘print.in’:
jbm(f10.5)
If, instead of a mean value, you want a new maximum quantity, you need to replace
sum_mn_name() by max_mn_name().
Sect. 5.8.1 describes how to output horizontal averages of the magnetic and velocity
fields. New such averages can be added to the code by using the existing averaging
procedures calc_bmz() or calc_jmz() as examples.

100 THE PENCIL CODE
9.3 The f-array
The ‘f’ array is the largest array in the PENCIL CODE and its primary role is to store
the current state of the timestepped PDE variables. The f-array and its slightly smaller
counter part (the df-array; see below) are the only full size 3D arrays in the code. The
f-array is of type real but PDEs for a complex variable may be solved by using two
slots in the f-array. The actual size of the f-array is mx ×my ×mz ×mfarray. Here,
mfarray = mvar + maux + mglobal + mscratch where mvar refers to the number of real PDE
variables.
As an example, we describe here how to put the time-integrated velocity,
uut
, into the
f-array (see ‘hydro.f90’). If this is to be invoked, there must be the following call some-
where in the code:
call farray_register_auxiliary(’uut’,iuut,vector=3)
Here,
iuut
is the index of the variable
uut
in the f-array. Of course, this requires that
maux
is increased by 3, but in order to do this for a particular run only one must write
a corresponding entry in the ‘cparam.local’ file,
! -*-f90-*- (for Emacs)
! cparam.local
!
!** AUTOMATIC CPARAM.INC GENERATION ****************************************
! Declare (for generation of cparam.inc) the number of f array
! variables and auxiliary variables added by this module
!
! MAUX CONTRIBUTION 3
!
!***************************************************************************
! Local settings concerning grid size and number of CPUs.
! This file is included by cparam.f90
!
integer, parameter :: ncpus=1,nprocy=1,nprocz=ncpus/nprocy,nprocx=1
integer, parameter :: nxgrid=16,nygrid=nxgrid,nzgrid=nxgrid
This way such a change does not affect the memory usage for other applications where
this addition to ‘cparam.local’ is not made. In order to output this part of the f-array,
one must write lwrite_aux=T in the init_pars of ‘start.in’. (Technically, lwrite_aux=T
can also be invoked in run_pars of ‘run.in’, but this does not work at the moment.)
9.4 The df-array
The ‘df’ array is the second largest chunk of data in the PENCIL CODE. By using a 2N
storage scheme (see H.4) after Williamson [32] the code only needs one more storage
area for each timestepped variable on top of the current state stored in the f-array. As
such, and in contrast to the f-array, the df-array is of size mx ×my ×mz ×mvar. Like the
df-array it is of type real. In fact the ghost zones of df are not required or calculated but
having f- and df-arrays of the same size make the coding more transparent. For mx,my
and mz large the wasted storage becomes negligible.

9.5 The fp-array 101
9.5 The fp-array
Similar to the ‘f’ array the code also has a ’fp’ array which contains current states of
all the particles. Like the f-array the fp-array also has a time derivative part, the dfp-
array. The dimension of the fp-array is mparlocal ×mpvar where mparlocal is the number
of particles in the local processor (for serial runs this is the total number of particles)
and mpvar depends on the problem at hand. For example if we are solving for only
tracer particles then mpvar = 3, for dust particles mpvar = 6 The sequence in which the
slots in the fp-array are filled up depends on the sequence in which different particle
modules are called from the particles_main.f90. The following are the relevant lines
from particles_main.f90.
!***********************************************************************
subroutine particles_register_modules()
!
! Register particle modules.
!
! 07-jan-05/anders: coded
!
call register_particles ()
call register_particles_radius ()
call register_particles_spin ()
call register_particles_number ()
call register_particles_mass ()
call register_particles_selfgrav ()
call register_particles_nbody ()
call register_particles_viscosity ()
call register_pars_diagnos_state ()
!
endsubroutine particles_register_modules
!***********************************************************************
The subroutine resister_particles can mean either the tracer particles or dust parti-
cles. For the former the first three slots of the fp-array are the three spatial coordinates.
For the latter the first six slots of the fp-array are the three spatial coordinates followed
by the three velocity components. The seventh slot (or the fourth if we are use tracer
particles) is the radius of the particle which can also change as a function of time as
particles collide and fuse together to form bigger particles.
9.6 The pencil case
Variables that are derived from the basic physical variables of the code are stored in
one-dimensional
pencils
of length
nx
. All the pencils that are defined for a given set
of physics modules are in turn bundled up in a Fortran structure called p(or, more
illustrative, the
pencil case
). Access to individual pencils happens through the variable
p%name, where name is the name of a pencil, e.g. rho that is a derived variable of the
logarithmic density lnrho.
The pencils provided by a given physics module are declared in the header of the file,
e.g. in the Density module:

102 THE PENCIL CODE
! PENCILS PROVIDED lnrho; rho; rho1; glnrho(3); grho(3); uglnrho; ugrho
Notice that the pencil names are separated with a semi-colon and that vector pencils
are declared with “(3)” after the name. Before compiling the code, the script ‘mkcparam’
collects the names of all pencils that are provided by the chosen physics modules. It
then defines the structure pwith slots for every single of these pencils. The defini-
tion of the pencil case pis written in the include file ‘cparam_pencils.inc’. When the
code is run, the actual pencils that are needed for the run are chosen based on the in-
put parameters. This is done in the subroutines pencil_criteria_modulename that are
present in each physics module. They are all called once before entering the time loop.
In the pencil_criteria subroutines the logical arrays lpenc_requested,lpenc_diagnos,
lpenc_diagnos2d, and lpenc_video are set according to the pencils that are needed for
the given run. Some pencils depend on each other, e.g. uglnrho depends on uu and glnrho.
Such interdependencies are sorted out in the subroutines pencil_interdep_modulename
that are called after pencil_criteria_modulename.
In each time-step the values of the pencil logicals lpenc_requested,lpenc_diagnos,
lpenc_diagnos2d, and lpenc_video are combined to one single pencil array lpencil
which is different from time-step to time-step depending on e.g. whether diagnostics
or video output are done in that time-step. The pencils are then calculated in the sub-
routines calc_pencils_modulename. This is done before calculating the time evolution of
the physical variables, as this depends very often on derived variables in pencils.
The centralized pencil calculation scheme is a guarantee that
•All pencils are only calculated once
•Pencils are always calculated by the proper physics module
Since the PENCIL CODE is a multipurpose code that has many different physics mod-
ules, it can lead to big problems if a module tries to calculate a derived variable that
actually belongs to another module, because different input parameters can influence
how the derived variables are calculated. One example is that the Density module can
consider both logarithmic and non-logarithmic density, so if the Magnetic module calcu-
lates
rho = exp(f(l1:l2,m,n,ilnrho)
it is wrong if the Density module works with non-logarithmic density! The proper way
for the Magnetic module to get to know the density is to request the pencil rho in
pencil_criteria_magnetic.
9.6.1 Pencil check
To check that the correct pencils have been requested for a given run, one can run a
pencil consistency check
in the beginning of a run by setting the logical lpencil_check
in &run_pars. The check is meant to see if
•All needed pencils have been requested
•All requested pencils are needed
The consistency check first calculates the value of df with all the requested pencils. Then
the pencil requests are flipped one at a time – requested to not requested, not requested
to requested. The following combination of events can occur:

9.7 Adding new physics: the Special module 103
•not requested →requested, df not changed
The pencil is not requested and is not needed.
•not requested →requested, df changed
The pencil is not requested, but is needed. The code stops.
•requested →not requested, df not changed
The pencil is requested, but is not needed. The code gives a warning.
•requested →not requested, df changed
The pencil is requested and is needed.
9.6.2 Adding new pencils
Adding a new pencil to the pencil case is trivial but requires a few steps.
•Declare the name of the pencil in the header of the proper physics module. Pencils
names must appear come in a ”;” separated list, with dimensions in parenthesis
after the name [(3) for vector, (3,3) for matrix, etc.].
•Set interdependency of the new pencil (i.e. what other pencils does it depend on) in
the subroutine pencil_interdep_modulename
•Make rule for calculating the pencil in calc_pencils_modulename
•Request the new pencil based on the input parameters in any relevant physics
module
Remember that the centralized pencilation scheme is partially there to force the users
of the code to think in general terms when implementing new physics. Any derived
variable can be useful for a number of different physics problems, and it is important
that a pencil is accessible in a transparent way to all modules.
9.7 Adding new physics: the Special module
If you want to add new physics to the code, you will in many cases want to add a new
Special module. Doing so is relatively straight forward and there is even a special direc-
tory for such additions.
To create your own special module, copy ‘nospecial.f90’ from the src/ directory to a
new name in the src/special/ directory. It is currently only possible to have one special
modules at a time and so several new bits of physics are often put in to one special
module. For this reasons a name should be chosen that relates to the problem to be
solved rather than the specific physics being implemented.
The first thing to do in your new module is to change the lspecial=.false. header to say
lspecial=.true.
The file is heavily commented though all such comments can be removed as you go. You
may implement any of the subroutines/function that exist in
nospecial.f90
and those
routines must have the names and parameters as in
nospecial.f90
. You do not how-
ever need to implement all routines, and you may either leave the dummy routines

104 THE PENCIL CODE
copied from
nospecial.f90
or delete them all together (provided the ”include ’special -
dummy.inc’” is kept intact at the end of the file. Beyond that, and data and subroutines
can be added to a special module as required, though only for use within that module.
There are routines in the special interface to allow you to add new equations, modify the
existing equation, add diagnostics, add slices, and many more things. If you feel there is
something missing extra hooks can easily be added - please contact the PENCIL CODE
team for assistance.
You are encouraged to submit/commit your special modules to the Pencil Code source.
When you have added new stuff to the code, don’t forget to mention this in the
‘pencil-code/doc/manual.tex’ file.
9.8 Adding switchable modules
In some cases where a piece of physics is thought to be more fundamental, useful in
many situations or simply more flexibility is required it may be necessary to add a new
module
newphysics
together with the corresponding
nonewphysics
module. The special
modules follow the same structure as the rest of the switchable modules and so using a
special module to prototype new ideas can make writing a new switchable module much
easier.
For an example of module involving a new variable (and PDE), the
pscalar
module is a
good prototype. The grep command
unix> grep -i pscalar src/*
gives you a good overview of which files you need to edit or add.
9.9 Adding your initial conditions: the InitialCondition module
Although the code has many initial conditions implemented, we now discourage such
practice. We aim to eventually removed most of them. The recommended course of action
is to make use of the InitialCondition module.
InitialCondition works pretty much like the Special module. To implement your own
custom initial conditions, copy the file ‘noinitial_condition.f90’ from the src/ to src/
initial_condition, with a new, descriptive, name.
The first thing to do in your new module is to change the linitialcondition=.false. header
to say linitialcondition=.true. Also, don’t forget to add ../ in front of the file names in
include statements.
This file has hooks to implement a custom initial condition to most vari-
ables. After implementing your initial condition, add the line INITIAL_-
CONDITION=initial_condition/myinitialcondition to your ‘src/Makefile.local’
file. Here, myinitialcondition is the name you gave to your initial condition file. Add
also initial_condition_pars to the ‘start.in’ file, just below init_pars. This is a
namelist, which you can use to add whichever quantity your initial condition needs
defined, or passed. You must also un-comment the relevant lines in the subroutines
for reading and writing the namelists. For compiling reasons, these subroutines in
‘noinitial_condition.f90’ are dummies. The lines are easily identifiable in the code.

9.9 Adding your initial conditions: the InitialCondition module 105
Check e.g. the samples ‘2d-tests/baroclinic’, ‘2d-tests/spherical_viscous_ring’, or
‘interlocked-fluxrings’, for examples of how the module is used.

106 THE PENCIL CODE
10 Testing the code
To maintain reproducibility despite sometimes quite rapid development, the PENCIL
CODE is tested nightly on various architectures. The front end for testing are the scripts
pc_auto-test and (possibly) pencil-test.
To see which samples would be tested, run
unix> pc_auto-test -l
, to actually run the tests, use
unix> pc_auto-test
or
unix> pc_auto-test --clean
. The latter compiles every test sample from scratch and currently (September 2009)
takes about 2 hours on a mid-end Linux PC.
The pencil-test script is useful for cron jobs and allows the actual test to run on a
remote computer. See Sect. 10.1 below.
For a complete list of options, run pc_auto-test --help and/or pencil-test --help.
10.1 How to set up periodic tests (auto-tests)
To set up a nightly test of the PENCIL CODE, carry out the following steps.
1. Identify a host for running the actual tests (the work host) and one to initiate
the tests and collect the results (the scheduling host). On the scheduling host, you
should be able to
(a) run cron jobs,
(b) ssh to the work host without password,
(c) publish HTML files (optional, but recommended),
(d) send e-mail (optional, but recommended).
Work host and scheduling host can be the same (in this case, use pencil-test’s ‘-l’
option, see below), but often they will be two different computers.
2. [Recommended, but optional:] On the work host, check out a separate copy of the
PENCIL CODE to reduce the risk that you start coding in the auto-test tree. In the
following, we will assume that you checked out the code as ‘~/pencil-auto-test’.
3. On the work host, make sure that the code finds the correct configuration file for
the tests you want to carry out. [Elaborate on that: PENCIL_HOME/local_config and
‘-f’ option; give explicit example]
Remember that you can set up a custom host ID file for your auto-test tree under
‘${PENCIL_HOME}/config-local/hosts/’.
4. On the scheduling host, use crontab -e to set up a
cron
job similar to the following:

10.1 How to set up periodic tests (auto-tests) 107
30 02 * * * $HOME/pencil-auto-test/bin/pencil-test \
-D $HOME/pencil-auto-test \
--use-pc_auto-test \
-N15 -Uc -rs \
-T $HOME/public_html/pencil-code/tests/timings.txt \
-t 15m
-m <email1@inter.net,email2@inter.net,...> \
<work-host.inter.net> \
-H > $HOME/public_html/pencil-code/tests/nightly-tests.html
Note 1: This has to be one long line. The backslash characters are written only
for formatting purposes for this manual you cannot use them in a crontab file.
Note 2: You will have to adapt some parameters listed here and may want to
modify a few more:
‘-D <dir>’: Sets the directory (on the work host) to run in.
‘-T <file>’: If this option is given, append a timing statistics line for each test to
the given file.
‘--use-pc’: You want this option (and at some point, it will be the default).
‘-t 15m’: Limit the time for ‘start.x’ and ‘run.x’ to 15 minutes.
‘-N 15’: Run the tests at nice level 15 (may not have an effect for MPI tests).
‘-Uc’: Do svn update and pc_build --cleanall before compiling.
‘-m <email-list>’: If this option is given, send e-mails to everybody in the
(comma-separated) list of e-mail addresses if any test fails. As soon as this
option is set, the maintainers (as specified in the ‘README’ file) of failed tests
will also receive an e-mail.
‘work-host.inter.net|-l’: Replace this with the remote host that is to run the
tests. If you want to run locally, write -l instead.
‘-H’: Output HTML.
‘> $HOME/public_html/pencil-code/tests/nightly-tests.html’: Write output to
the given file.
If you want to run fewer or more tests, you can use the ‘-Wa,--max-level’ option:
-Wa,--max-level=3
will run all tests up to (and including) level 3. The default corresponds to
‘-Wa,--max-level=2’.
For a complete listing of pencil-test options, run
unix> pencil-test --help

108 THE PENCIL CODE
11 Useful internals
11.1 Global variables
The following variables are defined in ‘cdata.f90’ and are available in any routine that
uses the module
Cdata
.
Variable Meaning
real
t
simulated time t.
integer
n[xyz]grid
global number of grid points (excluding ghost cells)
in x,yand zdirection.
nx
,
ny
,
nz
number of grid points (excluding ghost cells) as seen
by the current processor, i. e. ny=nygrid/nprocy, etc.
mx
,
my
,
mz
number of grid points seen by the current processor,
but including ghost cells. Thus, the total box for the
ivar
th variable (on the given processor) is given by
f(1:mx,1:my,1:mz,ivar).
l1
,
l2
smallest and largest x-index for the physical domain
(i. e. excluding ghost cells) on the given processor.
m1
,
m2
smallest and largest y-index for physical domain.
n1
,
n2
smallest and largest z-index for physical domain,
i. e. the physical part of the
ivar
th variable is given
by f(l1:l2,m1:m2,n1:n2,ivar)
m
,
n
pencil indexing variables: During each time-substep
the box is traversed in x-pencils of length
mx
such
that the current pencil of the
ivar
th variable is
f(l1:l2,m,n,ivar).
logical
lroot
true only for MPI root processor.
lfirst
true only during first time-substep of each time step.
headt
true only for very first full time step (comprising 3
substeps for the 3rd-order Runge–Kutta scheme) on
root processor.
headtt
= (lfirst .and. lroot): true only during very first
time-substep on root processor.
lfirstpoint
true only when the very first pencil for a given time-
substep is processed, i. e. for the first set of (
m
,
n
),
which is probably (3,3) .
lout
true when diagnostic output is about to be written.
11.2 Subroutines and functions
output(file,a,nv) (module
IO
): Write (in each ‘procN’ directory) the content of the
global array ato a file called file, where ahas dimensions
mx
×
my
×
mz
×
nv
, or

11.2 Subroutines and functions 109
mx
×
my
×
mz
if nv=1.
output_pencil(file,a,nv) (module
IO
): Same as output(), but for a pencil variable,
i. e. an auxiliary variable that only ever exists on a pencil (e. g. the magnetic field
strength
bb
in ‘magnetic.f90’, or the squared sound speed
cs2
in ‘entropy.f90’).
The file has the same structure as those written by output(), because the values
of aon the different pencils are accumulated in the file. This involves a quite non-
trivial access pattern to the file and has thus been coded in
C
(‘src/debug_c.c’).
cross(a,b,c) (module
Sub
): Calculate the cross product of two vectors aand band
store in c. The vectors must either all be of size
mx
×
my
×
mz
×3 (global arrays), or
of size
nx
×3 (pencil arrays).
dot(a,b,c) (module
Sub
): Calculate the dot product of two vectors aand band store
in c. The vectors must either be of size
mx
×
my
×
mz
×3 (aand b) and
mx
×
my
×
mz
(c), or of size
nx
×3 (aand b) and
nx
(c).
dot2(a,c) (module
Sub
): Same as dot(a,a,c).

110 THE PENCIL CODE

111
Part III
Appendix
APPENDIX Date, Revision
A Timings
In the following table we list the results of timings of the code on different machines.
Shown is (among other quantities) the wall clock time per mesh point (excluding the
ghost zones) and per full 3-stage time step, a quantity that is printed by the code at the
end of a run.16
As these results were assembled during the development phase of the code (that hasn’t
really finished yet,. . . ), you may not get the same numbers, but they should give some
orientation of what to expect for your specific application on your specific hardware.
The code will output the timing (in microseconds per grid point per time-step) at the
end of a run. You can also specify walltime in print.in to have the code continuously
output the physical time it took to reach the time-steps where diagnostics is done. The
time-dependent code speed can then be calculated by differentiating, e.g. in IDL with
IDL> pc_read_ts, obj=ts
IDL> plot, ts.it, 1/nw*deriv(ts.it,ts.walltime/1.0e-6), psym=2
where nw=nx*ny*nz.
proc machine µs
pt step resol. what mem/proc when who
1 Nl3 19 643kinematic 10 MB 20-may-02 AB
1 Nl3 30 643magn/noentro 20 MB 20-may-02 AB
1 Nq1 10 643magn/noentro 30-may-02 AB
1 Ukaff 9.2 643magn/noentro 20-may-02 AB
1 Nl6 6.8 643magn/noentro 10-mar-03 AB
1 Nl6 36.3 64×128×64 nomag/entro/dust 19-sep-03 AB
1 Nl6 42.7 162
×256 nomag/entro/rad6/ion 22-oct-03 AB
1 Nl6 37.6 162
×256 nomag/entro/rad2/ion 22-oct-03 AB
1 Nl6 19.6 162
×256 nomag/entro/ion 22-oct-03 AB
1 Nl6 8.7 162
×256 nomag/entro 22-oct-03 AB
1 Nl6n 9.8 323magn/noentro/pscalar 17-mar-06 AB
1 Mhd 7.8 643magn/noentro 20-may-02 AB
1 Nq4 14.4 1283magn/noentro 8-oct-02 AB
1 Nq5 6.7 1283magn/noentro 8-oct-02 AB
1 fe1 5.1 1283magn/noentro 9-oct-02 AB
1 Kabul 4.4 1283magn/noentro 130 MB 20-jun-02 WD
1 Hwwsx5 3.4 2563convstar 7.8 GB 29-jan-03 WD
1 Mac/g95 7.7 323magn/noentro 14-jan-07 BD
1 Mac/ifc 4.5 323magn/noentro 14-jan-07 BD
2 Kabul 2.5 1283magn/noentro 80 MB 20-jun-02 WD
2 Nq3+4 7.4 1283magn/noentro 8-oct-02 AB
2 Nq4+4 8.9 1283magn/noentro 8-oct-02 AB
2 Nq4+5 7.3 1283magn/noentro 8-oct-02 AB
2 Nq5+5 3.7 1283magn/noentro 8-oct-02 AB
16 Note that when using ‘nompicomm.f90’, the timer currently used will overflow on some machines, so
you should not blindly trust the timings given by the code.

112 THE PENCIL CODE
2 fe1 3.45 1283magn/noentro 9-oct-02 AB
2 Nq2 9.3 643magn/noentro 11-sep-02 AB
2 Nq1+2 8.3 643magn/noentro 11-sep-02 AB
2 Hwwsx5 1.8 2563convstar 7.9 GB 29-jan-03 WD
4 Nq1+2 5.4 643magn/noentro 11-sep-02 AB
4 Nq1235 4.1 1283magn/noentro 11-sep-02 AB
4 Nq0-3 6.8 2563magn/noentro 294 MB 10-jun-02 AB
4 Mhd 2.76 643magn/noentro 30-may-02 AB
4 fe1 3.39 323magn/noentro 16-aug-02 AB
4 Rasm. 2.02 643magn/noentro 2x2 8-sep-02 AB
4 Mhd 8.2 642
×16 nomag/entro 23-jul-02 AB
4 fe1 6.35 64×128×64 nomag/entro/dust 19-sep-03 AB
4 fe1 2.09 1283magn/noentro 9-oct-02 AB
4 fe1 1.45 1283magn/noentro giga 9-oct-02 AB
4 fe1 7.55 162
×512 nomag/entro/rad2/ion 4x1 1-nov-03 AB
4 fe1 5.48 162
×512 nomag/entro/rad2/ion 1x4 1-nov-03 AB
4 Luci 1.77 643magn/noentro 27-feb-07 AB
4 Lenn 0.65 643nomag/noentro 13-jan-07 AB
4 Lenn 1.21 643magn/noentro 7-nov-06 AB
4 Kabul 1.5 1283magn/noentro 47 MB 20-jun-02 WD
4 Hwwsx5 1.8 2563convstar 8.2 GB 29-jan-03 WD
8 Nqall 3.0 1283magn/noentro 8-oct-02 AB
8 fe1 3.15 643magn/noentro 1x8 8-sep-02 AB
8 fe1 2.36 643magn/noentro 2x4 8-sep-02 AB
8 Ukaff 1.24 643magn/noentro 20-may-02 AB
8 Kabul 1.25 642
×128 nomag/entro 11-jul-02 WD
8 fe1 1.68 1283magn/noentro 1x8 8-sep-02 AB
8 fe1 1.50 1283magn/noentro 2x4 8-sep-02 AB
8 fe1 1.44 1283magn/noentro 4x2 8-sep-02 AB
8 Kabul 0.83 1283magn/noentro 28 MB 20-jun-02 WD
8 Gridur 1.46 1283magn/noentro 19-aug-02 NE
8 Kabul 0.87 2563magn/noentro 160 MB 20-jun-02 WD
8 fe1 0.99 2563magn/noentro 2x4 8-sep-02 AB
8 fe1 0.98 2563magn/noentro 4x2 8-sep-02 AB
8 cetus 0.58 643magn/noentro 4x2 19-aug-07 SS
8 cetus 0.73 2563magn/noentro 4x2,156M 19-aug-07 SS
8 Neolith 0.82 643magn/noentro 4x2 5-dec-07 AB
8 Mhd 1.46 1602
×40 nomag/entro 46 MB 7-oct-02 AB
8 Hwwsx5 0.50 2563convstar 8.6 GB 29-jan-03 WD
8 Neolith 0.444 1283magn/noentro 6-dec-07 AB
8 Ferlin 0.450 6431test/noentro 21-jun-09 AB
8 Ferlin 0.269 643magn/noentro 2-apr-10 AB
8 Ferlin 0.245 1283magn/noentro 2-feb-11 AB
8 nor52 2.00 323magn/noentro 2-dec-09 AB
9 hydra(2) 0.317 723magn/noentro 1x3x3 8-may-16 AB
9 charybdis 0.169 723magn/noentro 1x3x3 8-may-16 AB
9 scylla 0.150 723magn/noentro 1x3x3 8-may-16 AB
12 scylla 0.151 723magn/noentro 1x4x3 8-may-16 AB
12 janus 6.02 722×22 coag/noentro 17-dec-15 AB
16 fe1 1.77 643convstar 9-feb-03 AB
16 copson 0.596 1283geodynamo/ks95 21-nov-03 DM
16 fe1 0.94 1283magn/noentro 4x4 8-sep-02 AB
16 fe1 0.75 1283magn/noentro 4x4/ifc6 9-may-03 AB
16 workq 0.88 1283magn/noentro 4x4/ifc6 21-aug-04 AB
16 giga 0.76 1283magn/noentro 4x4/ifc6 21-aug-04 AB
16 giga2 0.39 1283magn/noentro 4x4/ifc6 20-aug-04 AB
16 giga 0.47 1283chiral 4x4/ifc6 29-may-04 AB
16 giga 0.43 1283nomag/noentro 4x4/ifc6 28-apr-03 AB
16 Mhd 2.03 1283magn/noentro 26-nov-02 AB
16 Mhd 0.64 2563magn/noentro 60 MB 22-may-02 AB

A. Timings 113
16 fe1 0.56 2563magn/noentro 4x4 16-aug-02 AB
16 fe1 6.30 128×256×128 nomag/entro/dust 19-sep-03 AB
16 fe1 1.31 1282
×512 nomag/entro/rad2/ion 4x4 1-nov-03 AB
16 Ukaff 0.61 1283magn/noentro 22-may-02 AB
16 Ukaff 0.64 2563magn/noentro 20-may-02 AB
16 Kabul 0.80 1283magn/noentro 16 MB 20-jun-02 WD
16 Kabul 0.51 2563magn/noentro 9 MB 20-jun-02 WD
16 Gridur 0.81 1283magn/noentro 19-aug-02 NE
16 Gridur 0.66 2563magn/noentro 19-aug-02 NE
16 Sander 0.53 2563magn/noentro 8-sep-02 AB
16 Luci 0.375 1283magn/noentro 28-oct-06 AB
16 Lenn 0.284 1283magn/noentro 8-nov-06 AB
16 Neolith 0.180 2563magn/noentro 6-dec-07 AB
16 Triolith 0.075 1283magn/noentro 2x2x4 1-mar-14 AB
16 Triolith 0.065 1283magn/noentro 1x4x4 1-mar-14 AB
16 Triolith 0.054 2563magn/noentro 1x4x4 1-mar-14 AB
16 Coma 0.603 1283GW/magn/noentro 1x4x4 27-jul-17 SM
24 Gardar 0.44 1282×48 magn/noentro 6-nov-13 AB
24 Summit 0.041 1443magn/noentro 28-jul-17 AB
32 giga? 0.32 2563magn/noentro 13-sep-03 AB
32 Ukaff 0.34 2563magn/noentro 20-may-02 AB
32 Ukaff 0.32 5123magn/noentro 20-may-02 AB
32 Hermit 0.200 256×512×256 spherical conv/magn 1x8x4 22-aug-13 PJK
32 fe1 0.168 5123nomag/noentro 9-oct-02 AB
32 fe1 1.26 642
×256 nomag/entro/rad/ion 7-sep-03 AB
32 Luci 0.182 2563magn/noentro 26-feb-07 AB
32 Lenn 0.147 2563nomag/entro/cool/fo 4x8 8-nov-06 AB
32 Steno 0.076 2563nomag/entro/cool/fo 4x8 20-jun-06 AB
32 Steno 0.081 2563nomag/entro/cool 4x8 20-jun-06 AB
32 Steno 0.085 2563nomag/entro/cool/sh 4x8 20-jun-06 AB
32 Steno 0.235 5122
×256 mag/entro 4x8 9-jul-06 AB
32 Sanss 0.273 128×2562nomag 4x8 3-jul-07 AB
32 Neolith 0.275 1283testfield4 24-oct-08 AB
32 Ferlin 0.556 1283testscalar 7-jan-09 AB
36 Kraken 0.177 192×384×64 magn/noentro 3x6x2 12-jan-12 WL
36 scylla 0.096 723magn/noentro 1x6x6 8-may-16 AB
48 janus 0.028 722∗216 magn/noentro 4x12 28-mar-16 AB
64 Coma 0.573 1283GW/magn/noentro 1x8x8 7-aug-17 SM
64 fe1 0.24 2563magn/noentro 8x8 2-sep-02 AB
64 giga 0.11 2563nomag/noentro 4x16 29-apr-03 AB
64 giga 0.23 2563nomag/noentro/hyp 4x16 8-dec-03 AB
64 fe1 0.164 5123nomag/noentro/hyp 4x16 17-dec-03 AB
64 giga 0.091 5123nomag/noentro/hyp 4x16 17-dec-03 AB
64 giga 0.150 2563magn/noentro 4x16 1-jul-03 AB
64 giga 0.166 5123magn/noentro 64*173MB 10-jul-03 AB
64 Gridur 0.25 2563magn/noentro 19-aug-02 NE
64 Ukaff 0.17 5123magn/noentro 21-may-02 AB
64 Steno 0.075 5123magn/noentro 8x16 19-oct-06 AB
64 Neolith 0.0695 2563magn/noentro 6-dec-07 AB
64 Ferlin 8.51 150×1282Li mechanism 8x8 21-jun-09 AB
64 Ferlin 0.156 2563magn/noentro 8x8 14-jun-09 AB
64 Akka 0.038 2562
×512 magn/noentro 8x8 27-dec-12 AB
64 Triolith 0.0146 2563magn/noentro 1x8x8 1-mar-14 AB
64 Triolith 0.0164 2563magn/noentro 2x4x8 1-mar-14 AB
64 Hermit 0.101 256×512×256 spherical conv/magn 1x8x8 22-aug-13 PJK
64 Sisu 0.00205 256×512×256 spherical conv/magn 1x8x8 22-aug-13 PJK
72 Kraken 0.093 192×384×64 magn/noentro 3x12x2 12-jan-12 WL
72 Kraken 0.151 96×192×16 magn/noentro 6x12 17-jan-12 WL
72 Kraken 0.091 192×384×32 magn/noentro 6x12 17-jan-12 WL
72 Kraken 0.071 384×768×64 magn/noentro 6x12 17-jan-12 WL

114 THE PENCIL CODE
72 Summit 0.0128 5763magn/noentro 7-aug-17 AB
128 fe1 0.44 2563nomag/entro/rad8/ion 4x32 10-mar-04 TH
128 fe1 2.8 5123magn/noentro 16x8 5-sep-02 AB
128 fe1 0.51 5123magn/noentro 8x16 5-sep-02 AB
128 fe1 0.27 5123magn/noentro 4x32 5-sep-02 AB
128 fe1 0.108 5123magn/noentro 4x32/ifc6 5-jan-02 AB
64+64 giga2 0.0600 5123magn/noentro 4x32/ifc6 21-aug-04 AB
128l giga2 0.0605 5123magn/noentro 4x32/ifc6 21-aug-04 AB
128 fe1 0.35 5123magn/noentro 2x64 9-sep-02 AB
128 fe1 0.094 7863magn/noentro 4x32/ifc6 9-sep-02 AB
128 Hermit 0.0532 256×512×256 spherical conv/magn 1x16x8 22-aug-13 PJK
128 Hermit 0.0493 256×512×256 spherical conv/magn 2x8x8 22-aug-13 PJK
128 Sisu 0.00108 256×512×256 spherical conv/magn 1x16x8 22-aug-13 PJK
144 Kraken 0.080 96×192×32 magn/noentro 6x12x2 13-jan-12 WL
144 Kraken 0.058 192×384×64 magn/noentro 6x12x2 17-jan-12 WL
144 Kraken 0.044 384×768×128 magn/noentro 6x12x2 18-jan-12 WL
144 Gardar 2.19 288×1×288 coag43 8x1x18 13-sep-15 AB
144 Summit 0.0064 5763magn/noentro 7-aug-17 AB
192 Janus 0.0123 144×288×72 magn/noentro/sph 1x24x32 24-jul-16 AB
256 Hermit 0.0328 512×1024×512 spherical conv/magn 1x16x16 22-aug-13 PJK
256 Hermit 0.0285 256×512×256 spherical conv/magn 1x16x16 22-aug-13 PJK
256 giga2 0.028 10243magn/noentro 4x64/ifc6 20-aug-04 AB
256 Hermit 0.0262 256×512×256 spherical conv/magn 2x16x8 22-aug-13 PJK
256 Hermit 0.0254 512×1024×512 spherical conv/magn 2x16x8 22-aug-13 PJK
256 Hermit 0.0226 512×1024×512 spherical conv/magn 4x8x8 22-aug-13 PJK
256 Akka 0.0113 5123magn/noentro 16x16 12-jun-11 AB
256 Sisu 0.00618 256×512×256 spherical conv/magn 1x16x16 22-aug-13 PJK
256 Sisu 0.00500 512×1024×512 spherical conv/magn 1x16x16 22-aug-13 PJK
256 Triolith 0.030 2562×512 magn/rad 1x16x16 17-mar-14 AB
256 Triolith 0.0049 2563magn/noentro 1x16x16 1-mar-14 AB
256 Beskow 3.36 1×1×1024 coag43 1x1x256 3-mar-15 AB
288 Gardar 0.042 5762
×288 magn/rad 1x18x16 17-mar-14 AB
288 Kraken 0.0432 192×384×64 magn/noentro 6x12x4 12-jan-12 WL
288 Kraken 0.0447 96×192×64 magn/noentro 6x12x4 13-jan-12 WL
288 Kraken 0.0201 384×768×256 magn/noentro 6x12x4 18-jan-12 WL
288 Janus 0.0360 2883magn/entro/rad 1x16x18 22-feb-16 AB
288 Summit 0.0033 5763magn/noentro 1x16x18 7-aug-17 AB
512 Hermit 0.01717 512×1024×512 spherical conv/magn 1x32x16 22-aug-13 PJK
512 Hermit 0.0166 256×512×256 spherical conv/magn 1x32x16 22-aug-13 PJK
512 Hermit 0.0142 256×512×256 spherical conv/magn 2x16x16 22-aug-13 PJK
512 Hermit 0.01340 512×1024×512 spherical conv/magn 2x16x16 22-aug-13 PJK
512 Hermit 0.01189 512×1024×512 spherical conv/magn 8x8x8 22-aug-13 PJK
512 Hermit 0.01165 512×1024×512 spherical conv/magn 4x16x8 22-aug-13 PJK
512 Akka 0.0081 5123magn/noentro 16x32 10-sep-11 AB
512 Neolith 0.0073 2563magn/noentro 20-nov-09 AB
512 Gardar 0.0035 5123magn/noentro 14-jan-13 AB
512 Lindgren 0.0040 5122
×1024 magn/noentro 16x32 8-jul-12 AB
512 Sisu 0.00446 256×512×256 spherical conv/magn 4x16x8 22-aug-13 PJK
512 Sisu 0.00435 1024×2048×1024 spherical conv/magn 22-aug-13 PJK
512 Sisu 0.00268 512×1024×512 spherical conv/magn 1x32x16 22-aug-13 PJK
576 Kraken 0.0257 192×384×64 magn/noentro 6x24x4 12-jan-12 WL
576 Kraken 0.0317 1922
×64 magn/noentro 122x4 13-jan-12 WL
576 Kraken 0.0116 7682
×256 magn/noentro 122x4 18-jan-12 WL
576 Summit 0.00183 5763magn/noentro 1x24x48 29-jul-17 AB
576 Beskow 0.00174 5763magn/noentro 1x24x48 23-may-16 AB
768 Lindgren 0.0049 256×11522magn/noentro/sph 1x24x32 17-oct-14 SJ
1024 Hermit 0.00943 512×1024×512 spherical conv/magn 1x32x32 22-aug-13 PJK
1024 Hermit 0.00707 512×1024×512 spherical conv/magn 2x32x16 22-aug-13 PJK
1024 Hermit 0.00698 1024×2048×1024 spherical conv/magn 4x16x16 22-aug-13 PJK
1024 Hermit 0.00630 512×1024×512 spherical conv/magn 4x16x16 22-aug-13 PJK

A. Timings 115
1024 Triolith 0.00236 2563magn/noentro 4x16x16 1-mar-14 AB
1024 Triolith 0.00126 5123magn/noentro 2x16x32 1-mar-14 AB
1024 Triolith 0.00129 5123magn/noentro 4x16x16 1-mar-14 AB
1024 Sisu 0.00225 1024×2048×1024 spherical conv/magn 22-aug-13 PJK
1024 Sisu 0.00148 512×1024×512 spherical conv/magn 2x32x16 22-aug-13 PJK
1152 Kraken 0.0212 192×384×64 magn/noentro 12x24x4 13-jan-12 WL
1152 Kraken 0.00856 384×768×128 magn/noentro 12x24x4 17-jan-12 WL
1152 Kraken 0.00549 768×1536×256 magn/noentro 12x24x4 17-jan-12 WL
1152 Lindgren 0.016 5122
×512 magn/rad 1x36x32 17-mar-14 AB
1152 Lindgren 0.0066 11523magn/noentro 1x32x36 25-nov-14 AB
1152 Beskow 0.0055 11523magn/noentro/GW 1x32x36 27-aug-17 AB
1152 Beskow 0.0024 11523magn/noentro 1x32x36 20-jan-15 AB
1152 Beskow 0.00098 11523magn/noentro 1x32x36 18-jan-16 AB-gnu
1152 Beskow 0.00090 11523magn/noentro 1x32x36 30-mar-17 AB
1152 Beskow 0.0060 11523magn/noentro/GW 1x32x36 31-mar-18 AB
1152 Beskow 0.0063 5763magn/entro/rad 1x32x36 17-feb-18 AB
1536 Lindgren 0.00171 5122
×384 magn/noentro 2x32x24 15-jul-13 AB
2048 Hermit 0.00451 1024×2048×1024 spherical conv/magn 2x32x32 22-aug-13 PJK
2048 Hermit 0.00380 512×1024×512 spherical conv/magn 8x16x16 22-aug-13 PJK
2048 Hermit 0.00355 512×1024×512 spherical conv/magn 4x32x16 22-aug-13 PJK
2048 Hermit 0.00350 1024×2048×1024 spherical conv/magn 4x32x16 22-aug-13 PJK
2048 Lindgren 0.00129 5122
×1024 magn/noentro 32x64 20-apr-13 AB
2048 Lindgren 0.00129 10242
×2048 magn/noentro 32x64 31-jul-12 AB
2048 Triolith 9.3×10−45123magn/noentro 4x16x32 1-mar-14 AB
2048 Sisu 0.00120 1024×2048×1024 spherical conv/magn 22-aug-13 PJK
2048 Sisu 9.2×10−4512×1024×512 spherical conv/magn 4x32x16 22-aug-13 PJK
2304 Triolith 1.07×10−35763magn/noentro 4x18x32 1-mar-14 AB
2304 Kraken 0.02267 192×384×64 magn/noentro 12x24x8 13-jan-12 WL
2304 Kraken 0.01233 192×768×64 magn/noentro 12x48x4 13-jan-12 WL
2304 Kraken 0.00300 768×3072×256 magn/noentro 12x48x4 18-jan-12 WL
4096 Hermit 0.00193 1024×2048×1024 spherical conv/magn 4x32x32 22-aug-13 PJK
4096 Triolith 3.6×10−410243magn/noentro 4x32x32 1-mar-14 AB
4096 Triolith 3.8×10−410243magn/noentro 8x16x32 1-mar-14 AB
4096 Triolith 4.2×10−410243magn/noentro 4x16x64 1-mar-14 AB
4096 Lindgren 4.6×10−420483magn/noentro 4x16x64 26-mar-13 AB
4096 Sisu 6.7×10−41024×2048×1024 spherical conv/magn 22-aug-13 PJK
4608 Triolith 7.4×10−45763magn/noentro 8x18x32 1-mar-14 AB
4608 Triolith 2.7×10−411523magn/noentro 4x32x36 1-mar-14 AB
4608 Triolith 3.0×10−411523magn/noentro 4x36x32 1-mar-14 AB
4608 Triolith 3.7×10−411523magn/noentro 4x18x64 1-mar-14 AB
4608 Triolith 2.36×10−423043magn/noentro 2x32x72 1-mar-14 AB
4608 Kraken 0.00764 192×768×128 magn/noentro 12x48x8 13-jan-12 WL
4608 Kraken 0.00144 768×3072×512 magn/noentro 12x48x8 18-jan-12 WL
6144 Lindgren 4.2×10−410243×1536 magn/noentro 4x16x64 21-oct-13 AB
6144 Lindgren 8.9×10−42562magn/noentro/sph 2x48x64 6-jan-15 SJ
8192 Hermit 0.00101 1024×2048×1024 spherical conv/magn 8x32x32 22-aug-13 PJK
8192 Sisu 4.1×10−41024×2048×1024 spherical conv/magn 22-aug-13 PJK
8192 Triolith 1.48×10−420483magn/noentro 4x32x64 1-mar-14 AB
9216 Kraken 0.00485 192×768×256 magn/noentro 24x48x8 13-jan-12 WL
9216 Kraken 0.00158 768×1536×256 magn/noentro 24x48x8 17-jan-12 WL
9216 Kraken 8.0×10−41536×3072×512 magn/noentro 24x48x8 18-jan-12 WL
9216 Lindgren 2.36×10−423043magn/noentro 4x48x48 15-feb-14 AB
9216 Triolith 1.04×10−35763magn/noentro 16x18x32 1-mar-14 AB
9216 Triolith 1.28×10−423043magn/noentro 4x36x64 1-mar-14 AB
9216 Triolith 1.30×10−423043magn/noentro 4x32x72 1-mar-14 AB
16384 Hermit 6.4×10−41024×2048×1024 spherical conv/magn 16x32x32 22-aug-13 PJK
18432 Kraken 0.00316 384×768×256 magn/noentro 24x48x16 13-jan-12 WL
18432 Kraken 8.8×10−4768×1536×512 magn/noentro 24x48x16 17-jan-12 WL
18432 Kraken 4.0×10−41536×3072×1024 magn/noentro 24x48x16 18-jan-12 WL
36864 Kraken 0.0020 384×768×512 magn/noentro 482x16 14-jan-12 WL

116 THE PENCIL CODE
36864 Kraken 4.9×10−415362
×512 magn/noentro 482x16 17-jan-12 WL
36864 Kraken 2.2×10−41536×3072×2048 magn/noentro 24x48x32 18-jan-12 WL
73728 Kraken 0.00121 7682
×512 magn/noentro 482x32 19-jan-12 WL
73728 Kraken 2.9×10−415362
×1024 magn/noentro 482x32 26-jan-12 WL
73728 Kraken 1.2×10−430722
×2048 magn/noentro 482x32 26-jan-12 WL
The machines we have used can be characterized as follows:
Nl3: 500 MHz Pentium III single CPU; RedHat Linux 6.2; 256 MB memory
Nq0: 931 MHz Pentium III single CPU; RedHat Linux 7.3; 0.5 GB memory
Nq[1-4]: 869 MHz Pentium III dual-CPU cluster; RedHat Linux 7.3; 0.77 GB memory
per (dual) node
Nq[5-6]: 1.2 GHz Athlon dual-CPU cluster; RedHat Linux 7.3; 1 GB memory per (dual)
node
Kabul: 1.9 GHz Athlon dual-CPU cluster; 1 GB memory per (dual) node; 256 kB cache
per CPU; Gigabit ethernet; SuSE Linux 8.0; LAM-MPI
Cincinnatus: 1.7 GHz Pentium 4 single CPU; 1 GB memory; 256 kB cache per CPU;
SuSE Linux 7.3
Horseshoe (fe1, giga, and giga2): consists of different subclusters. The old one
(queue name: workq, referred to as fe1) 2.0 GHz Pentium 512 single CPU; 25x 24-
port fast ethernet switches with gigabit ethernet uplink; 1 30-port gigabit ethernet
switch; 1 GB memory. The next generation has gigabit switches directly between
nodes, and 2.6 GHz processors. The third generation (giga2) has 3.2 GHz proces-
sors (most of which have 1 GB, some 2 GB), is organized in 2 blocks interconnected
with 2 Gb links, with 10 Gb uplinks within each block.
Ukaff: SGI Origin 3000; 400 MHz IP35 CPUs; IRIX 6.5; native MPI
Mhd: EV6 Compaq cluster with 4 CPUs per node; 4 GB memory per node (i. e. 1 GB per
CPU) OSF1 4.0; native MPI
Sander and Rasmussen: Origin 3000
Steno 118 node IBM cluster with dual node AMD Opteron processors with 10 Gb in-
finiband network, compiled with pgf90 -fastsse -tp k8-64e (Copenhagen).
Gridur: Origin 3000
Luci: (full name Lucidor) is an HP Itanium cluster, each of the 90 nodes has two 900
MHz Itanium 2 ”McKinley” processors and 6 GB of main memory. The interconnect
is myrinet.
Lenn: (full name Lenngren) is a Dell Xeon cluster with 442 nodes. Each node has two
3.4GHz “Nocona” Xeon processors and 8GB of main memory. A high performance
Infiniband network from Mellanox is used for MPI traffic.
Kraken: Cray Linux Environment (CLE) 3.1, with a peak performance of 1.17
PetaFLOP; the cluster has 112,896 cores, 147 TB of memory, in 9,408 nodes. Each
node has two 2.6 GHz six-core AMD Opteron processors (Istanbul), 12 cores, and
16 GB of memory. Connection via Cray SeaStar2+ router.
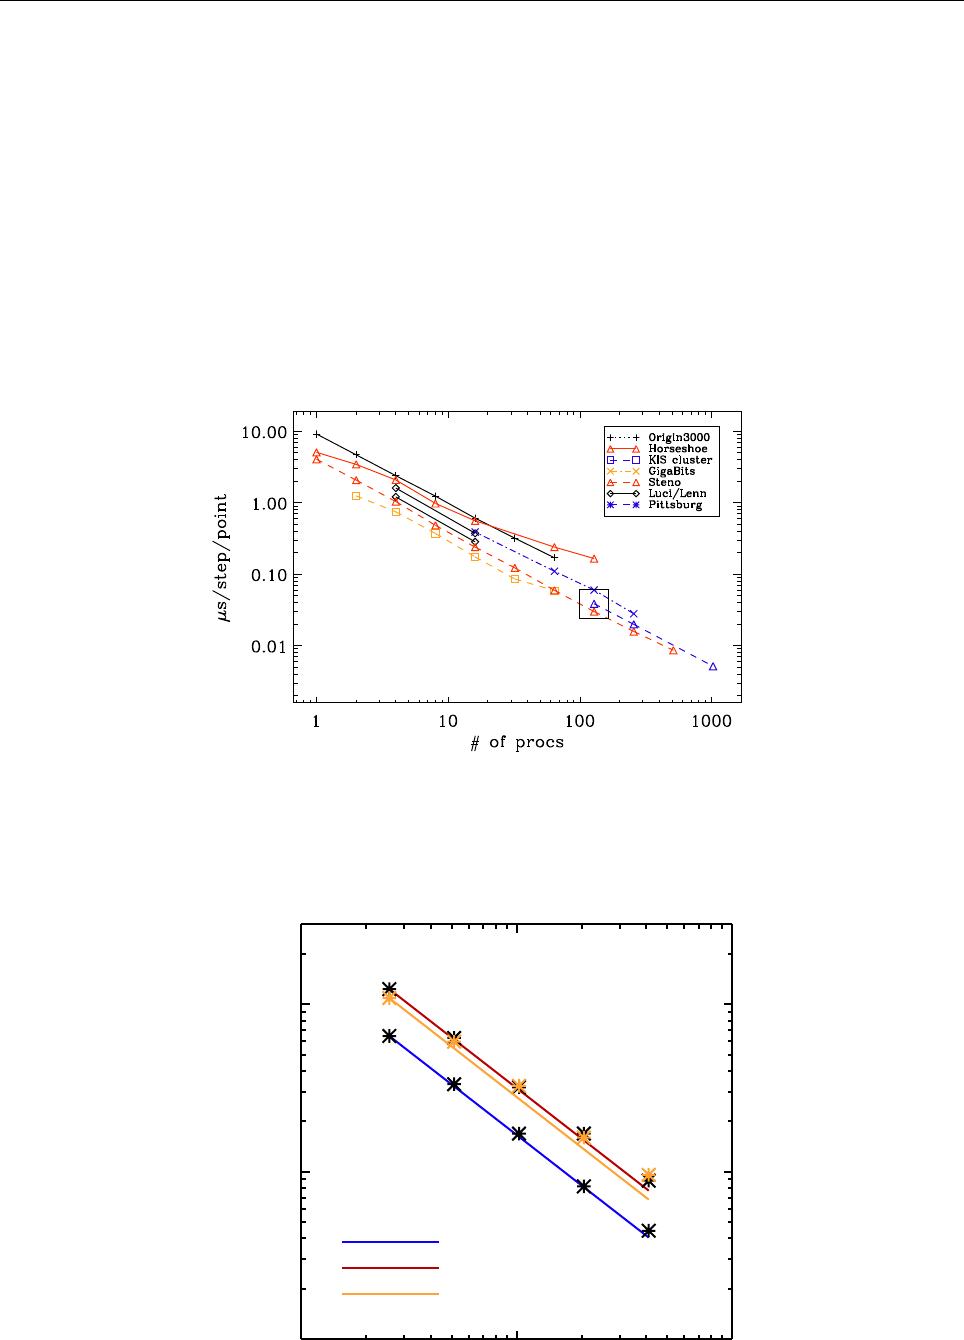
A. Timings 117
Hermit: Cray XE6 with 7104 2.3 GHz AMD Interlagos 16 core processors (113,664
cores in total), nodes with either 1 or 2 GB of memory per core.
Sisu: Cray XC30 with 1472 2.6 GHz Intel (Xeon) Sandy Bridge 8 core (E5-2670) pro-
cessors (11,776 cores in total), 2 GB of memory per core.
Beskow: Cray XC40 with 2.3 GHz Intel (Xeon) Haswell 16 core (E5-2698v3) processors
(67,456 cores in total), 2 GB of memory per core. Theoretical peak performance 2.43
pflops.
Table 8 shows a similar list, but for a few well-defined sample problems. The
svn
check-
in patterns are displayed graphically in Fig 1.
Figure 12: Scaling results on three different machines. The thin straight line denotes perfectly linear
scaling.
5123 gas + 64×106 particles
100 1000 10000
No. of cores
0.001
0.010
0.100
Time per step per point [µs]
NGP+FFT
TSC
NGP
Figure 13: Scaling results of particle-mesh problem on Blue Gene/P on up to 4096 cores. The different
lines denote different particle-mesh schemes (NGP=Nearest Grid Point, TSC=Triangular Shaped Cloud)
and whether self-gravity is included (FFT).
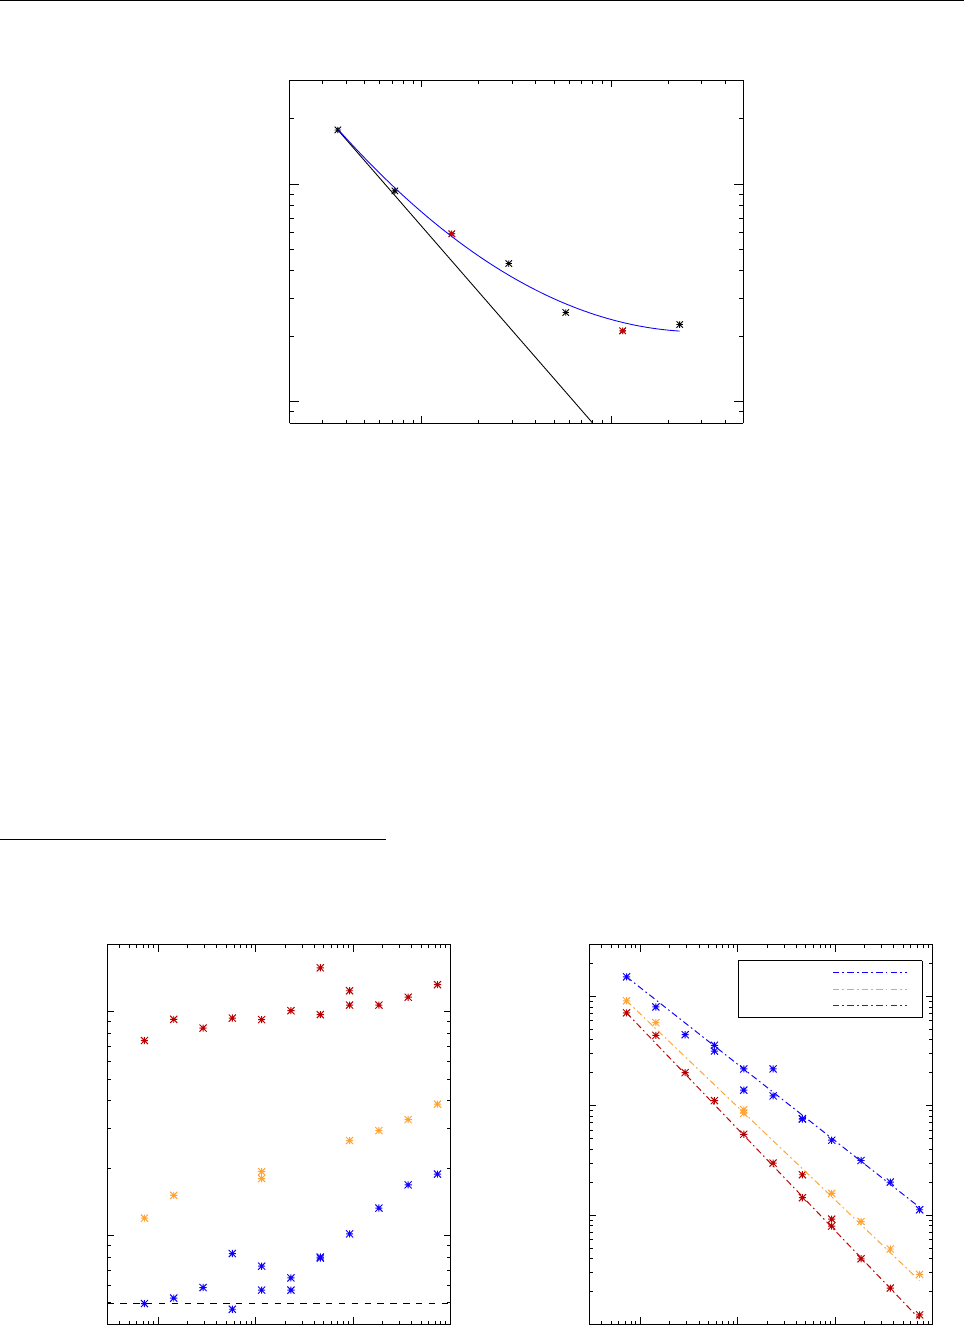
118 THE PENCIL CODE
Strong scaling − Problem size 192 x 384 x 64
100 1000
proc #
0.01
0.10
µs/timestep/point
323
163
Figure 14: Scaling results on Kraken at fixed problem size, for a magnetized disk model in cylindrical
coordinates. The black line shows ideal scaling from 32 cores. The blue line is the best second-order fit to
the data points. A load of 163mesh points per processor marks the best strong scaling.
A.1 Test case
In the following test samples, we run isothermal magnetohydrodynamics in a periodic
domain17. Power spectra are computed during the run, but our current parallelization
of the Fourier transform requires that the meshpoint number is an integer multiple of
the product of processor numbers in the yand zdirections and the product of processor
numbers in the xand ydirections. In addition, the number of processors in one direction
17Run directories are available on http://norlx51.nordita.org/~brandenb/pencil-code/timings/bforced/
102103104105
proc #
0.01
0.10
Wall time (hours)
102103104105
proc #
0.0001
0.0010
0.0100
0.1000
µs/timestep/point
163 p=0.70
323 p=0.85
643 p=0.93
Weak Scaling
Figure 15: Scaling results on Kraken at fixed load per processor, for a magnetized disk model in cylindrical
coordinates. The figure shows, after determining that 163is the best load per processor for strong scaling,
how far one can push with weak scaling. The scaling index is found to be 0.7 for 163and 0.93 for 643, up
to 73 728 processors.

A.2 Running the code 119
Table 8: Like previous table, but for the versions from the ‘samples’ directory.
proc(s) machine µs
pt step resol. mem./proc when who
conv-slab
1 Mhd 6.45 3234 MB 23-jul-02 wd
1 Cincinnatus 4.82 3233 MB 23-jul-02 wd
1 Cincinnatus 11.6 64314 MB 23-jul-02 wd
1 Cincinnatus 20.8 128393 MB 23-jul-02 wd
1 Kabul 3.91 32323-jul-02 wd
1 Kabul 3.88 64323-jul-02 wd
1 Kabul 4.16 128393 MB 23-jul-02 wd
conv-slab-flat
1 Kabul 3.02 1282
×32 29 MB 23-jul-02 wd
2 Kabul 1.81 1282
×32 18 MB 23-jul-02 wd
4 Kabul 1.03 1282
×32 11 MB 23-jul-02 wd
8 Kabul 0.87 1282
×32 9 MB 23-jul-02 wd
should not be so large that the number of mesh points per processor becomes comparable
to or less than the number of ghost zones (which is 6).
A.2 Running the code
To run the code, get one of the sample run directories, e.g.,
http://norlx51.nordita.org/~brandenb/pencil-code/timings/bforced/512_4x16x32.
The relevant file to be changed is src/cparam.local
ncpus=2048,nprocx=4,nprocy=16,nprocz=ncpus/(nprocx*nprocy)
nxgrid=512,nygrid=nxgrid,nzgrid=nxgrid
in particular the values of ncpus, nprocx, nprocy, and nxgrid. Once they are chosen, say
make, and submit start run.csh.
A.3 Triolith
On Triolith, strong scaling tests have been performed for three mesh sizes. The time per
time step and mesh point is given for different processor numbers and layouts. Gener-
ally, it is advantageous to keep the number of processors in the xdirection small.
Comments. Although on Triolith the number of processors per node is 16, resolutions
with one or two powers of 3 (such as 576) still work well. Furthermore, the number
of processors above which the scaling becomes poor increases quadratically with the
number of mesh points. This implies that the RAM per processor increases linearly with
the problem size per direction. However, this will not be a limitation, because even for
23043meshes, the required RAM is still below 100 MB.
A.4 Lindgren
On Lindgren, we have performed weak scaling tests and compare with weak scaling
results for Triolith. Triolith is about twice as fast as Lindgren.
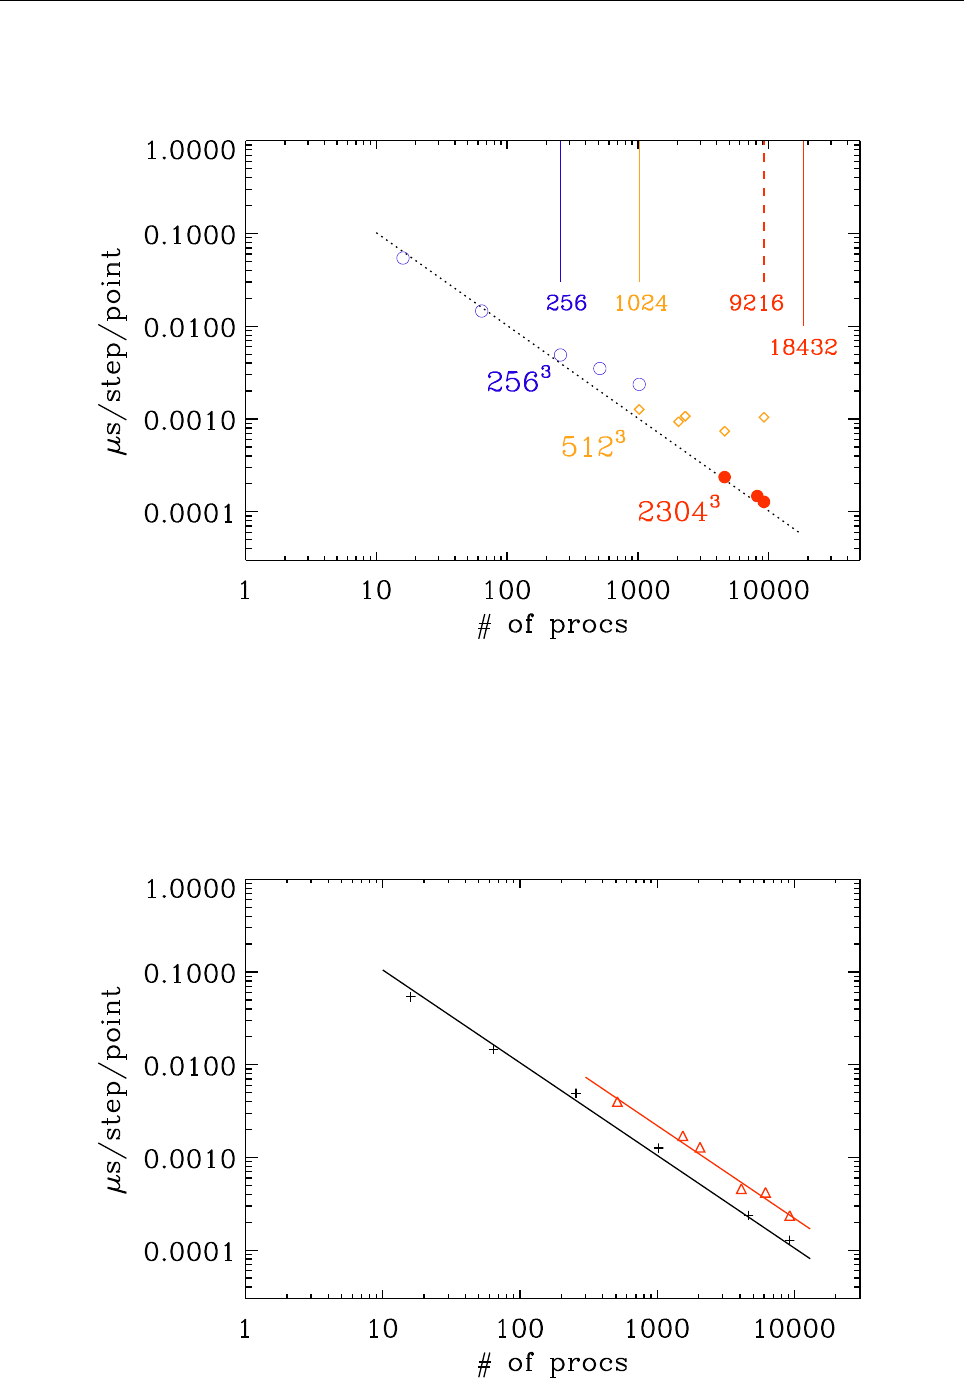
120 THE PENCIL CODE
Figure 16: Strong scaling on Triolith (2014).
Figure 17: Comparison Triolith (black, plus signs) and Lindgren (red, triangles). Weak scaling (2014).

A.4 Lindgren 121
Table 9: Triolith timings
proc µs
pt step resol. layout
16 0.075 12832x2x4
16 0.065 12831x4x4
16 0.0544 25631x4x4
64 0.0146 25631x8x8
64 0.0164 25632x4x8
256 0.0049 25631x16x16
512 0.0035 25632x16x16
1024 0.00236 25632x16x32
1024 0.00127 51232x16x32
1024 0.00129 51234x16x16
2048 9.34×10−451234x16x32
2304 0.00107 57634x18x32
4096 3.6×10−4102434x32x32
4096 3.8×10−4102438x16x32
4096 4.2×10−4102434x16x64
4608 7.38×10−457638x18x32
4608 2.66×10−4115234x32x36
4608 3.03×10−4115234x36x32
4608 3.12×10−4115234x18x64
4608 2.36×10−4230432x32x72
8192 1.475×10−4204834x32x64
9216 0.00104 576316x18x32
9216 1.276×10−4230434x36x64
9216 1.30×10−4230434x32x72
Table 10: Lindgren timings
proc µs
pt step resol. layout
1536 0.00171 5122×384 2x32x24
2048 0.00129 5122×1024 1x32x64
2048 0.00129 10242×2048 1x32x64
4096 4.6×10−4204834x16x64
9216 2.36×10−4230434x48x48

122 THE PENCIL CODE
B Coding standard
The numerous elements that make up the PENCIL CODE are written in a consistent
style that has evolved since it was first created. Many people have contributed their
knowledge and experience with in this and the result is what we believe is and extremely
readable and manageable code.
As well as improving the readability of the code, by having some naming conventions for
example aids greatly in understanding what the code does.
There is a standard for all aspects of the code, be it Fortran source, shell scripts, Perl
scripts, LaTeX source, Makefiles, or otherwise. Where nothing has been explicitly stated
it is recommended that similar existing examples found in the code are used as a tem-
plate.
B.1 File naming conventions
All files with the exception of the ‘Makefile’s are given lowercase filenames.
Fortran source files all have the ‘.f90’ extension. Files that contain ‘non-executable code’
i.e. declarations that are included into other files are given the extension ‘.h’ and those
that are generated dynamically at compile time have an ‘.inc’ extension.
Fortran source code defining a module is placed in files whose names begin with the
Fortran module name in all lowercase. Where there exist multiple implementations of
a specific module the filenames are extended using and with an underscore ad a brief
name relating to what they do.
Text files containing parameters to be read by the code at run time are placed in files
with the extension ‘.in’
B.2 Fortran Code
The code should remain fully compatible with the Fortran90 standard. This ensures that
the code will run on all platforms. Indeed, an important aspect of PENCIL CODE philos-
ophy is to be maximally flexible. This also means that useful non-standard extensions
to the code should be hidden in and be made accessible through suitable non-default
modules.
Fortran is not case-sensitive but in almost all instances we prescribe some form of capi-
talization for readability.
In general all Fortran code including keywords, variable names etc. are written in low-
ercase. Some of the coding standard has already been discussed in Sect. 9.1. Here we
discuss and amplify some remaining matters.
B.2.1 Indenting and whitespace
Whitespace should be removed from the end of lines.
Blank lines are kept to a minimum, and when occurring in subroutines or functions are
replaced by a single ‘!’ in the first column.

B.2 Fortran Code 123
Tab characters are not used anywhere in the code. Tab characters are not in fact allowed
by the Fortran standard and compilers that accept them do so as an extension.
All lines are kept to be not more than 80 characters long. Where lines are longer they
must be explicitly wrapped using the Fortran continuation character ‘&’. Longer lines
(up to 132 characters) and additional spaces are allowed in cases where the readability
of the code is enhanced, e.g. when one line is followed by a similar one with minor
differences in some places.
Code in syntactic blocks such as if–endif,do–enddo,subroutine–endsubroutine etc. is
always indented by precisely two spaces. The exception to this is that nested loops where
only the innermost loop contains executable code should be written with the do–enddo
pairs at the same level of indentation,
do n=n1,n2
do m=m1,m2
[...]
enddo
enddo
Alternatively nested loops may be written on a single line, i.e.
do n=n1,n2; do m=m1,m2
[...]
enddo; enddo
B.2.2 Comments
Descriptive comments are written on their own lines unless there is a strong reason to do
otherwise. Comments are never indented and the ‘!’ should appear in the first column
followed by two spaces and then the text of the comment. Extremely short comments
may follow at the end of a line of code, provided there is space.
Comments also must not exceed the 78 character line length and should be wrapped
onto more lines as needed.
Typically comments should appear with a blank commented line above and below the
wrapped text of the comment.
All subroutine/functions begin with a standard comment block describing what they do,
when and by whom they were created and when and by whom any non-trivial modifica-
tions were made.
Comments should be written in sentences using the usual capitalization and punctua-
tion of English, similar to how text is formatted in an e-mail or a journal article.
For example:
some fortran code
some more fortran code
!
! A descriptive comment explaining what the following few lines
! of code do.
!
the fortran code being described

124 THE PENCIL CODE
the fortran code being described
...
!
! A final detail described here.
!
the final fortran code
the final fortran code
...
Subroutines and functions are started with a comment block describing what they do,
when and by whom they were created and when and by whom any non-trivial modifica-
tions were made. The layout of this comment block is a standard, for example:
!***********************************************************************
subroutine initialize_density(f,lstarting)
!
! Perform any post-parameter-read initialization i.e. calculate derived
! parameters.
!
! For compatibility with other applications, we keep the possibility
! of giving diffrho units of dxmin*cs0, but cs0 is not well defined general.
!
! 24-nov-02/tony: coded
! 1-aug-03/axel: normally, diffrho should be given in absolute units
!
where dates are written in dd-mmm-yy format as shown and names appearing after the
‘/’ are either the users cvs login name or, where such exists amongst the PENCIL CODE
community, the accepted short form (≈4characters) of the authors name.
B.2.3 Module names
The names of modules are written with initial letter capitalization of each word and the
multiple words written consecutively without any separator.
B.2.4 Variable names
Variable are given short but meaningful names and written in all lowercase. Single
character names are avoided except for commonly used loop indices and the two code
data structures of the PENCIL CODE: ‘f’ the main state array (see 9.3) and ‘p’ the pencil
case structure (see 9.6).
Quantities commonly represented by a particular single character in mathematics are
typically given names formed by repeating the character (usually in lowercase), e.g. the
velocity ubecomes ‘uu’, specific entropy sbecomes ‘ss’ etc.
Temperature in variable names is denoted with a capital T so as not to be confused
with time as represented by a lowercase t. Note however the since Fortran is not case
sensitive the variables for example ‘TT’ and ‘tt’ are the same so distinct names must
be used. For this reason time is usually represented by a single t contrary to the above
guideline.

B.2 Fortran Code 125
The natural log of a quantity is represented by using adding ‘ln’ to its name, for example
log of temperature would be ‘lnTT’.
There are some standard prefixes used to help identify the type and nature of variables
they are as follows:
•i – Denotes integer variables typically used as array indices.
•i– Denotes pencil case array indices.
•idiag – Denotes diagnostic indices.
•l – Denotes logical/boolean flags
•cdt – Denotes timestep constraint parameters.
•unit – Denotes conversion code/physics unit conversion parameters.
B.2.5 Emacs settings
Here are some settings from wd’s ‘~/.emacs’ file:
;;; ~/.f90.emacs
;;; Set up indentation and similar things for coding the {\sc Pencil Code}.
;;; Most of this can probably be set through Emacs’ Customize interface
;;; as well.
;;; To automatically load this file, put the lines
;;; (if (file-readable-p "~/.f90.emacs")
;;; (load-file "~/.f90.emacs"))
;;; into your ~/.emacs file.
;; F90-mode indentation widths
(setq f90-beginning-ampersand nil) ; no 2nd ampersand at continuation line
(setq f90-do-indent 2)
(setq f90-if-indent 2)
(setq f90-type-indent 2)
(setq f90-continuation-indent 4)
;; Don’t use any tabs for indentation (with TAB key).
;; This is actually already set for F90-mode.
(setq-default indent-tabs-mode nil)
;; Ensure Emacs uses F90-mode (and not Fortran-mode) for F90 files:
(setq auto-mode-alist
(append
’(
("\\.[fF]90$" . f90-mode)
("\\.inc$" . f90-mode)
)
auto-mode-alist))
;; Make M-Backspace behave in Xemacs as it does in GNU Emacs. The default
;; behavior is apparently a long-known bug the fix for which wasn’t

126 THE PENCIL CODE
;; propagated from fortran.el to f90.el.
;; (http://list-archive.xemacs.org/xemacs-patches/200109/msg00026.html):
(add-hook ’f90-mode-hook
(function (lambda ()
(define-key f90-mode-map [(meta backspace)] ’backward-kill-word)
)))
B.3 Other best practices
When implementing IF or SELECT blocks always write code for all cases – including
the default or else case. This should be done even when that code is only a call to raise
an error that the case should not have been reached. If you see a missing case anywhere
then do add it. These failsafes are essential in a large multi-purpose multi-user code
like the PENCIL CODE.
If a case is supposed to do nothing and it may be unclear that the coder has recognized
this fact then make it explicit by adding the default case with a comment like
! Do Nothing. The compiler will clean away any such empty blocks.
B.4 General changes to the code
It is sometimes necessary to do major changes to the code. Since this may af-
fect many people and may even be controversial among the developers, such
changes are restricted to the time of the next Pencil Code User Meeting. Such
meetings are advertised on http://www.nordita.org/software/pencil-code/ under
the news section. Notes about previous such meetings can be found under
http://www.nordita.org/software/pencil-code/UserMeetings/.
Major changes can affect those developers who have not checked in their latest changes
for some time. Before doing such changes it is therefore useful to contact the people who
have contributed to the latest developments on that module. If it is not functional or oth-
erwise in bad shape, it should be moved to ‘experimental’, i.e. one says svn mv file.f90
experimental/file.f90. However, any such directory change constitutes a major change
in itself and should be performed in agreement with those involved in the development.
Otherwise any file that has been changed in the mean time will end up being outside
revision control, which is to be avoided at all cost.
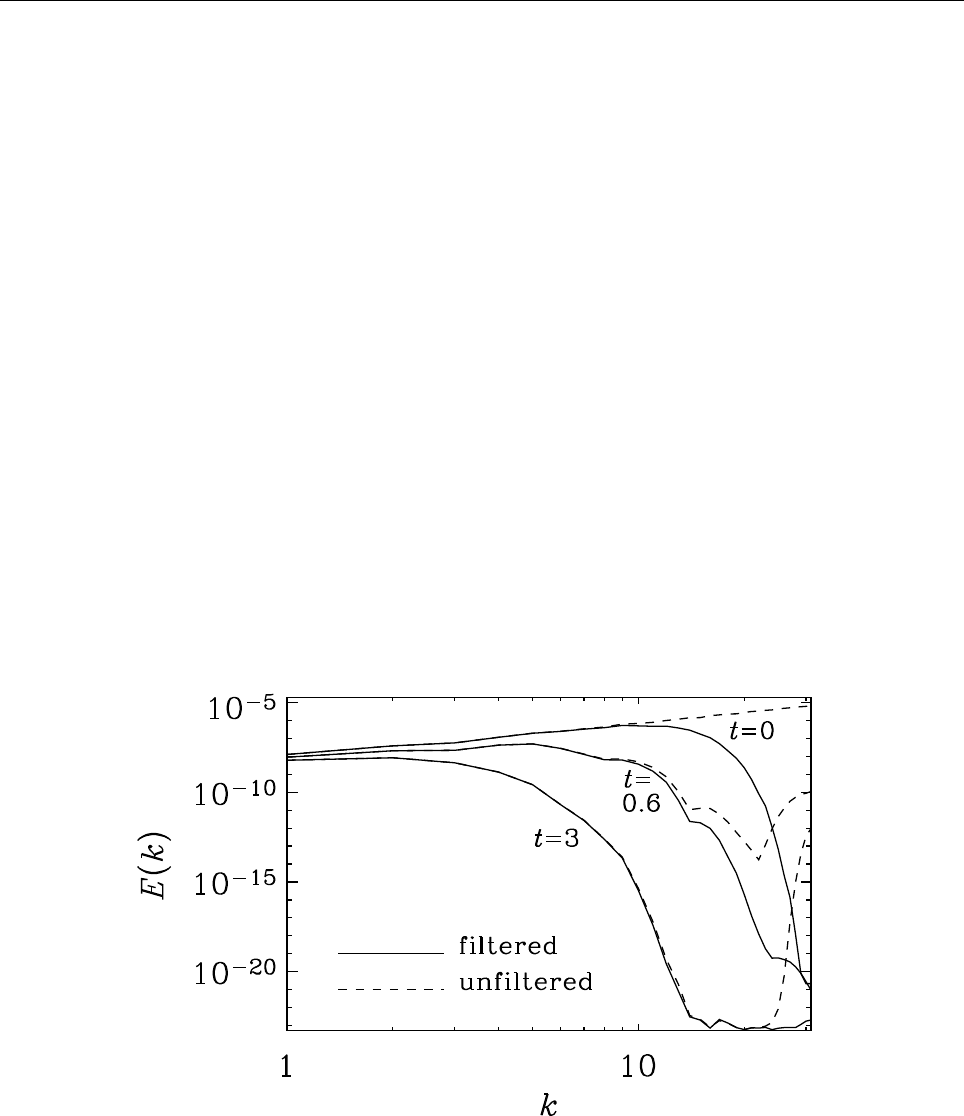
C. Some specific initial conditions 127
C Some specific initial conditions
C.1 Random velocity or magnetic fields
Obtained with inituu=’gaussian-noise’ (or initaa=’gaussian-noise’). The vector u(or
A) is set to normally distributed, uncorrelated random numbers in all meshpoints for
all three components. The power spectrum of u(A) increases then quadratically with
wavenumber k(without cutoff) and the power spectrum of ω(or B) increases like k4.
Note that a random initial condition contains significant power at the Nyquist frequency
(kNy =π/N, where Nis the number of mesh points). In a decay calculation, because of
the discretization error, such power decays slower than it ought to; see Fig. 18, where
we show the evolution for a random initial velocity field for 643meshpoints, ν= 5 ×10⁻²
(fairly large!), and nfilter=30.
It is clearly a good idea to filter the initial condition to prevent excess power at kNy. On
the other hand, such excess power is weak by comparison with the power at the energy
carrying scale, so one does not see it in visualizations in real space. Furthermore, as seen
from Fig. 18, for k < kNy/2the power spectra for filtered and unfiltered initial conditions
is almost the same.
Figure 18: Velocity power spectra at three different times with and without filtering of the initial condi-
tion.
C.2 Turbulent initial with given spectrum
The most general procedure for producing an initial condition with a turbulent spec-
trum is inituu=’power_randomphase_hel’, which allows one to set two different slopes,
together with an exponential cutoff as well as a Gaussian peak within the spectrum. By
default, the field is solenoidal unless one puts lskip_projection=.true. and can have
fractional helicity by setting relhel_uu to a value between −1and 1. By default it is 0,
which means it is nonhelical.

128 THE PENCIL CODE
The spectral indices
initpower
and
initpower2
refer to energy spectral indices. By de-
fault,
initpower2=-5/3
, corresponding to a Kolmogorov spectrum. For a delta-correlated
spectrum, we have to put
initpower=2
, corresponding to a k2energy spectrum for ki-
netic energy. This would be suitable for the subinertial range from k= 1 to k=kp
(corresponding to the variable
kpeak
).
If
cutoff=0
, no cutoff will be imposed. Otherwise, the spectrum will be multiplied by an
exponential function with exp(−k2n), where n=’ncutoff=1’ by default.
Example, for
ampluu=1e-1
,
initpower=4.
, and
kpeak=3.
, we get
urms=3.981E-01
when
relhel uu=1
and
urms=3.981E-01
when
relhel uu=0
and
urms=5.560E-01
when
relhel -
uu=1
. The
urms
values scale linearly with
ampluu
and for
initpower=2
also approxi-
mately linearly with
kpeak
. For the magnetic field, we initialize the magnetic vector
potential, so to get a k4spectrum, we have to put
initpower aa=2.
Everything else is
analogous; see, e.g.,
&hydro_init_pars
inituu=’power_randomphase_hel’, ampluu=1e-1, initpower=4., kpeak=3.
relhel_uu=0., cutoff=30.
/
&magnetic_init_pars
initaa=’power_randomphase_hel’, amplaa=1e-1, initpower_aa=2., kpeak_aa=3.
relhel_aa=0., cutoff_aa=30.
/
for which we get
urms=3.981E-01
and
brms=3.871E-01
.
C.3 Beltrami fields
Obtained with inituu=’Beltrami-z’ or initaa=’Beltrami-z’.
A= (cos z, sin z, 0),or u= (cos z, sin z, 0) (121)
C.4 Magnetic flux rings: initaa=’fluxrings’
This initial condition sets up two interlocked thin magnetic tori (i. e. thin, torus-shaped
magnetic flux tubes). One torus of radius Rlying in the plane z= 0 can be described in
cylindrical coordinates, (r, ϕ, z), by the vector potential
A= Φm
0
0
−θ(r−R)δ(z)
,(122)
resulting in a magnetic field
B= Φm
0
δ(r−R)δ(z)
0
.(123)
Here Φmis the magnetic flux through the tube, θ(x)denotes the Heaviside function, and
δ(x) = θ′(x)(124)

C.5 Vertical stratification 129
is Dirac’s delta function.
Any smoothed versions of θ(x)and δ(x)will do, as long as the consistency condition (124)
is satisfied. E. g. the pairs
δε(x) = 1
√2πε2e−x2
2ε2, θε(x) = 1
21 + erf x
√2ε(125)
or
δε(x) = 1
2ε
1
cosh2x
ε
, θε(x) = 1
21 + tanh x
ε(126)
are quite popular. Another possibility is a constant or box-like profile with
δε(x) = 1
2εθ(|x| − ε), θε(x) = 1
2{1 + max[−1,min(x/ε),1]}(127)
Note, however, that the Gaussian profile (125) is the only one that yields a radially
symmetric (with respect to the distance from the central line of the torus) magnetic field
profile Bϕ=Bφ(p(r−R)2+z2)if εis sufficiently small.
In Cartesian coordinates, the vector potential (122) takes the form
A= Φm
0
0
−θpx2+y2−Rδ(z)
.(128)
C.5 Vertical stratification
Gravity, g=−∇Φ, is specified in terms of a potential Φ. In slab geometry, Φ = Φ(z), we
have g= (0,0, gz)and gz=−dΦ/dz.
Use
grav profile
=’const’ together with
gravz
=−1to get
Φ = (z−z∞)(−gz),(−gz)>0.(129)
Use
grav profile
=’linear’ to get
Φ = 1
2(z2−z2
∞)ν2
g, gz=−ν2
gz(130)
where νgis the vertical epicyclic frequency. For a Keplerian accretion disc, νg=Ω. For
galactic discs, νg= 0.5Ωis representative of the solar neighborhood.
The value of z∞is determined such that ρ=ρ0and c2
s=c2
s0 at z=zref . This depends on
the values of γand the polytropic index m(see below).
C.5.1 Isothermal atmosphere
Here we want cs=cs0 =const. Using initlnrho=’isothermal’ means
ln ρ
ρ0
=−γΦ
c2
s0
.(131)
The entropy is then initialized to
s
cp
= (γ−1) Φ
c2
s0
.(132)
In order that ρ=ρ0and c2
s=c2
s0 at z=zref , we have to choose z∞=zref .

130 THE PENCIL CODE
C.5.2 Polytropic atmosphere
For a polytropic equation of state, p=KρΓ, where generally Γ6=γ, we can write
−∇h+T∇s=−1
ρ∇p=−∇ΓK
Γ−1ρΓ−1≡ −∇˜
h, (133)
where we have introduced a pseudo enthalpy ˜
has
˜
h=ΓK
Γ−1ρΓ−1=1−1
γ1−1
Γh . (134)
Obviously, for Γ = γ, the pseudo enthalpy ˜
his identical to hitself. Instead of specifying
Γ, one usually defines the polytropic index m= 1/(Γ−1). Thus, Γ = 1 + 1/m, and
˜
h= (m+1) 1−1
γh(135)
This is consistent with a fixed entropy dependence, where sonly depends on ρlike
s
cp
=Γ
γ−1ln ρ
ρ0
,(136)
and implies that
ln c2
s
c2
s0
= (Γ−1) ln ρ
ρ0
.(137)
For hydrostatic equilibrium we require ˜
h+ Φ = ˜
h0=const. For gravity potentials that
vanish at infinity, we can have ˜
h06= 0, i.e. a finite pseudo enthalpy at infinity. For gz=−1
or gz=−z, this is not the case, so we put ˜
h0= 0, and therefore ˜
h=−Φ. Using c2
s= (γ−1)h
together with (135) we find
c2
s=−γ
m+1 Φ.(138)
In order that ρ=ρ0and c2
s=c2
s0 at z=zref , we have to choose (remember that gzis
normally negative!)
z∞=zref + (m+1) c2
s0
γ(−gz)for
grav profile
=’const’,(139)
and
z2
∞=z2
ref + (m+1) c2
s0
1
2γν2
g
for
grav profile
=’linear’.(140)
Thus, when using initlnrho=’polytropic_simple’ we calculate
ln c2
s
c2
s0
= ln −γΦ
(m+1)c2
s0 (141)
and so the stratification is given by
ln ρ
ρ0
=mln c2
s
c2
s0
,s
cp
=Γ
γ−1mln c2
s
c2
s0
.(142)

C.5 Vertical stratification 131
C.5.3 Changing the stratification
Natural: measure length in units of c2
s0/gz. Can increase stratification by moving ztop
close to z∞or, better still, keeping ztop = 0 and moving zbot → −∞. Disadvantage: in the
limit of weak stratification, the box size will be very small (in nondimensional units).
Box units: measure length in units of d. Can increase stratification by increasing gzto
gmax, which can be obtained by putting ztop =z∞in (139), so
gmax =m+1
γ
c2
s0
ztop −zref
.(143)
For m= 1,γ= 5/3,ztop = 1, and zref = 0, for example, we have gmax = 6/5 = 1.2.
Gravitational box units: measure speed in units of √gzd. The limit of vanishing stratifi-
cation corresponds to cs0 → ∞. This seems optimal if we want to approach the Boussi-
nesq case.
In Hurlburt et al. (1984), zincreased downward and the atmosphere always terminated
at z= 0. In order to reproduce their case most directly, we put z∞= 0 and consider only
negative values of z. To reproduce their case with a density stratification of 1:1.5, we
place the top of the model at z=−2and the bottom at z=−3. In addition, the reference
height, zref , is chosen to be at the top of the box, i.e. zref =−2. From Eq. (139) we have
c2
s0 =γ(−gz)(−zref )/(m+ 1). Using (−gz) = 1 and m= 1 we find c2
s0 =γ, so cs0 = 1.291 (for
γ= 5/3). Values for other combinations are listed in Table 11.
Table 11: Correspondence between density contrast, top and bottom values of z, and cs0 for (−gz) = 1,
m= 1, and γ= 5/3.
ρbot/ρtop zbot ztop cs0
1.5 3 2 1.291
3 1.5 0.5 0.645
6 1.2 0.2 0.408
11 1.1 0.1 0.289
21 1.05 0.05 0.204
C.5.4 The Rayleigh number
In Ref. [10] the Rayleigh number is defined as
Ra = gd4
ν χ −ds/cp
dzhydrostat
,(144)
where the (negative) entropy gradient was evaluated in the middle of the box for the
associated hydrostatic reference solution, and χ=K/(ρcp)and either ν=ν(if νwas
assumed constant) or ν=µ/ρ (if µwas assumed constant). Note that ρis the average
mass in the box per volume, which is conserved. For a polytrope we have
−ds/cp
dzhydrostat
=1−(m+ 1) 1−1
γ 1
z∞−zm
,(145)
where zm= (z1+z2)/2. This factor was also present in the definition of Hurlburt et al.
[21], but their definition differs slightly from Eq. (144), because they normalized the

132 THE PENCIL CODE
density not with respect to the average value (which is constant for all times), but with
respect to the value at the top of the initial hydrostatic solution. Since the Rayleigh
number is proportional to ρ2, their definition included the extra factor [(z∞−zm)/d]2.
Therefore
RaHTM =z∞−zm
d2mρtop
ρ2
Ra (146)
In the first model of Hurlburt et al. (1984), the Rayleigh number, RaHTM, was chosen to
be 310 times supercritical, and the critical Rayleigh number was around 400, so RaHTM =
1.25 ×10⁵. In their model the density contrast was 1:1.5 and m= 1. This turns out to
correspond to Ra = 4.9×10⁴,Fbot = 0.0025, and K= 0.002.
Another model that was considered by Hurlburt & Toomre (1988) had RaHTM = 105,
a density contrast of 11, and had a vertical imposed magnetic field (Chandrasekhar
number Q= 72). This corresponds to Ra = 3.6×10⁸,K= 0.0011,Fbot = 0.0014.
C.5.5 Entropy boundary condition
This discussion only applies to the case of convection in a slab. A commonly used lower
boundary condition is to prescribe the radiative flux at the bottom, i.e. Fbot =−KdT/dz.
Assuming that the density in the ghost zones has already been updated, we can calculate
the entropy gradient from
Fbot =−K
cp
c2
s
γ−1(γ−1)d ln ρ
dz+γds/cp
dz,(147)
which gives
ds/cp
dz=−γ−1
γcp
Fbot
Kc2
s
+d ln ρ
dz(148)
for the derivative of the entropy at the bottom. This is implemented as the ‘c1’ boundary
condition at the bottom.
C.5.6 Temperature boundary condition at the top
In earlier papers the temperature at the top was set in terms of the quantity ξ0, which
is the ratio of the pressure scale height relative to the depth of the unstable layer. Ex-
pressed in terms of the sound speed at the top we have
c2
s,top =γξ0gd. (149)
c2
s,bot =ξ0+1
m+ 1γgd. (150)
C.6 Potential-field boundary condition
The ‘pot’ [or currently rather the ‘pwd’] boundary condition for the magnetic vector poten-
tial implements a potential-field boundary condition in zfor the case of an x-y-periodic
box. In this section, we discuss the relevant formulas and their implementation in the
PENCIL CODE.

C.6 Potential-field boundary condition 133
Table 12: Correspondence between ξ0and c2
s,bot in single layer polytropes.
ξ0c2
s,bot
10.00 17.500
0.20 1.167
0.10 1.000
0.05 0.917
0.02 0.867
If the top boundary is at z= 0, the relevant potential field for z > 0is given by
˜
Ax(kx, ky, z) = Cx(kxy)e−κz ,(151)
˜
Ay(kx, ky, z) = Cy(kxy)e−κz ,(152)
˜
Ax(kx, ky, z) = Cz(kxy)e−κz ,(153)
where
˜
Ai(kx, ky, z)≡Ze−ikxy ·xAi(x, y, z)dx dy (154)
is the horizontal Fourier transform with kxy ≡(kx, ky,0), and k≡ |kxy|. Note that this im-
plies a certain gauge and generally speaking the zdependence in Eq. (153) is completely
arbitrary, but the form used here works well in terms of numerical stability.
At the very boundary, the potential field (151)–(153) implies
∂˜
A
∂z +κ˜
A= 0 ,(155)
and, due to natural continuity requirements on the vector potential, these conditions
also hold for the interior field at the boundary.
Robin boundary conditions and ghost points To implement a homogeneous Robin
boundary condition, i. e. a condition of the form
df
dz +κf = 0 (156)
using ghost points, we first write it as
d
dz (f eκz) = 0 (157)
and implement this as symmetry condition for the variable φ(z)≡f(z)eκz:
φN−j=φN+j, j = 1,2,3(158)
(where zNis the position of the top boundary and zN+1, . . . are the boundary points). In
terms of f, this becomes
fN+j=fN−je−κ(zN+j−zN−j).(159)
Note that although the exponential term in Eq. (159) looks very much like the exterior
potential field (151)–(153), our ghost-zone values do not represent the exterior field –
they are rather made-up values that allow us to implement a local boundary condition
at z= 0.

134 THE PENCIL CODE
C.7 Planet solution in the shearing box
In order to test the setup for accretion discs and the sliding periodic shearing sheet
boundary condition, a useful initial condition is the so-called planet solution of Good-
man, Narayan, & Goldreich [18].
Assume s= 0 (isentropy), so the equations in 2-D are
uxux,x + (u(0)
y+uy)ux,y = 2Ωuy−h,x (160)
uxuy,x + (u(0)
y+uy)uy,y =−(2 −q)Ωux−h,y (161)
where u(0)
y=−qΩx. Express uin terms of a stream function, so u=∇ × (ψˆ
z), or
ux=ψ,y, uy=−ψ,x.(162)
Ansatz for enthalpy
h=1
2δ2Ω2(R2−x2−ǫ2y2−z2/δ2)(163)
ψ=−1
2σΩ(R2−x2−ǫ2y2)−1
2qΩx2(164)
This implies
ux=σΩǫ2y, uy= (q−σ)Ωx (165)
and ux,x =uy,y = 0. Inserting into Eqs (160) and (161) yields
(−q+q−σ)σǫ2= 2(q−σ) + δ2(166)
σ(q−σ) = −(2 −q)σ+δ2(167)
where we have already canceled common Ω2factors in both equations and common ǫ2
factors in the last equation. Simplifying both equations yields
−σ2ǫ2= 2(q−σ) + δ2(168)
−σ2=−2σ+δ2(169)
The second equation yields
δ2= (2 −σ)σ(170)
and subtracting the two yields
σ2= 2q/(1 −ǫ2)(171)
Table 13: Dependence of ǫand δon ǫ.
ǫ σ δ
0.1 1.74 0.67
0.2 1.77 0.64
0.3 1.82 0.58
0.4 1.89 0.46
0.48 1.97 0.22
0.5 2 0

D. Some specific boundary conditions 135
D Some specific boundary conditions
In this section, we formulate and discuss the implementation of some common boundary
conditions in spherical and cylindrical coordinates.
D.1 Perfect-conductor boundary condition
This is a popular boundary condition for the magnetic field; it implies that
Bn= 0 (172)
and
Et= 0 (173)
on the boundary, where the subscript ndenotes the normal component, and Etdenotes
the tangential components of the electric field.
In Cartesian geometry, these conditions can be implemented by setting the two tangen-
tial components of the vector potential Ato zero on the boundary. It is easy to see that
this also works in arbitrary curvilinear coordinates.
In particular, for spherical coordinates on a radial boundary we must have
rsin θ Br=∂θ(sin θ Aφ)−∂φAθ= 0 .(174)
This can be achieved by setting
Aφ=Aθ= 0 (175)
everywhere on the boundary. Note that this does not impose any condition on the radial
component of the vector potential.
Next, in spherical coordinates on a boundary with constant θ, we must have
Bθ=1
rsin θ∂φAr−1
r∂r(rAφ) = 0 .(176)
Again this can be achieved by Ar=Aφ= 0.
D.2 Stress-free boundary condition
On an impenetrable, stress-free boundary, we have
un= 0 ,(177)
and the shear stress components Snt must vanish for any tangential direction t. At the
radial boundary, the relevant components of the strain tensor (required to vanish at the
boundary) are:
Srθ =1
r∂θur+r∂ruθ
r,(178)
Srφ =1
rsin θ∂φur+r∂ruφ
r.(179)
Both of them vanish if we require
ur= 0 , ∂r(uθ/r) = 0 , ∂r(uφ/r) = 0 .(180)

136 THE PENCIL CODE
We implement this by requiring urto be antisymmetric and uθ/r and uφ/r to be symmet-
ric with respect to the boundary.
The more general condition
rα∂r(uθ/rα) = ∂ruθ−α
ruθ= 0 (181)
(where αis a constant) can be implemented by requiring uθ/rαto be symmetric.
At a boundary θ=const, the stress-free boundary condition will take the form
Srθ =1
r∂θur+r∂ruθ
r= 0 ,(182)
Sθφ =1
rsin θ∂φuθ+ sin θ ∂θuφ
rsin θ= 0 .(183)
With uθ= 0, the first condition gives ∂θur= 0, i.e. we require urto be symmetric with
respect to the boundary. The second condition requires
sin θ
r∂θuφ
sin θ= 0 (184)
and is implemented by requiring uφ/sin θto be symmetric.
D.3 Normal-field-radial boundary condition
While unphysical, this boundary condition is often used as a cheap replacement for a
potential-field condition for the magnetic field. It implies that the two tangential com-
ponents of the magnetic field are zero at the boundary, while the normal component is
left unconstrained.
At a radial boundary, this gives:
Bθ=1
rsin θ∂φAr−1
r∂r(rAφ) = 0 ,(185)
Bφ=1
r∂r(rAθ)−1
r∂θAr= 0 .(186)
Which are satisfied by setting
Ar= 0 , ∂r(rAθ) = 0 , ∂r(rAφ) = 0 ,(187)
and these are implemented by requiring Arto be antisymmetric, and rAθand rAφto be
symmetric.
On a boundary θ=const, we have
rsin θ Br=∂θ(sin θ Aφ)−∂φAθ= 0 ,(188)
rBφ=∂r(rAθ)−∂θAr= 0 (189)
which can be achieved by setting
∂θAr= 0 , Aθ= 0 , ∂θ(sin θ Aφ) = 0 .(190)
We thus require Arand sin θ Aφto be symmetric, and Aθto be antisymmetric.

E. High-frequency filters 137
E High-frequency filters
Being high order, PENCIL CODE has much reduced numerical dissipation. In order to
perform inviscid simulations, high-frequency filters can be used to provide extra dissi-
pation for modes approaching the Nyquist frequency. Usual Laplacian viscosity ν∇2uis
equivalent to a multiplication by k2in Fourier space, where kis the wavenumber. An-
other tool is hyperviscosity, which replaces the k2dependency by a higher power-law, kn,
n>2. The idea behind it is to provide large dissipation only where it is needed, at the grid
scale (high k), while minimizing it at the largest scales of the box (small k). In principle,
one can use as high nas desired, but in practice we are limited by the order of the code.
A multiplication by knis equivalent to an operator ∇nin real space. As PENCIL CODE
is of sixth order, three ghost cells are available in each direction, thus the sixth-order
derivative is the highest we can compute. The hyperdissipation we use is therefore ∇6,
or k6is Fourier space. Figure 19 illustrates how such tool maximizes the inertial range
of a simulation.
Simplified hyperdiffusivity has been implemented for many dynamical variables and
can be found in the respective modules. A strict generalization of viscosity and resistivity
to higher order is implemented in the modules ‘hypervisc_strict_2nd’ and ‘hyperresi_-
strict_2nd’.
Hyperdiffusivity is meant purely as a numerical tool to dissipate energy at small scales
and comes with no guarantee that results are convergent with regular second order
dissipation. See Haugen & Brandenburg (2004) for a discussion. In fact, large-scale dy-
namo action is known to be seriously altered in simulations of closed systems where
magnetic helicity is conserved: this results in prolonged saturation times and enhanced
saturation amplitudes (Brandenburg & Sarson 2002).
E.1 Conservative hyperdissipation
It is desirable to have this high-frequency filter obeying the conservation laws. So, for
density we want a mass conserving term, for velocities we want a momentum conserving
term, for magnetic fields we want a term conserving magnetic flux, and for entropy we
want an energy conserving term. These enter as hyperdiffusion, hyperviscosity, hyper-
resistivity, and hyper heat conductivity terms in the evolution equations. To ensure con-
servation under transport, they must take the form of the divergence of the flux Jof the
quantity ψ, so that Gauss theorem applies and we have
∂ψ
∂t +∇·J= 0 (191)
For density, the flow due to mass diffusion is usually taken as the phenomenological
Fick’s Law
J=−D∇ρ(192)
i.e., proportional to the density gradient, in the opposite direction. This leads to the
usual Laplacian diffusion
∂ρ
∂t =D∇2ρ(193)
138 THE PENCIL CODE
Laplacian vs hyper dissipation
0.5 1.0 1.5 2.0
r
0.0
0.5
1.0
1.5
2.0
ψ
0.5 1.0 1.5 2.0
r
−4
−2
0
2
4
Dn∇2nψ
n=1
n=3
1 10 100
k
10−12
10−10
10−8
10−6
10−4
10−2
100
k2n Dn|ψ|
~
Figure 19: Dissipation acting on a scalar field ψ, for n=1 (Laplacian dissipation) and n=3 (third-order
hyperdissipation). The field is initially seeded with noise (upper panel). For n=3 the large scale is not
affected as much as in the n=1 case, which is seen by the larger wiggling of the latter in the middle panel.
In Fourier space (lower panel) we see that near the grid scale both formulations give strong dissipation.
It also illustrates that at the large scales (k≃1), the effect of n=3 is indeed negligible.
under the assumption that the diffusion coefficient Dis isotropic. Higher order hyper-
diffusion of order 2ninvolves a generalization of Eq. (192), to
J(n)= (−1)nD(n)∇2n−1ρ . (194)
In our case, we are interested in the case n= 3, so that the hyperdiffusion term is
∂ρ
∂t =D(3)∇6ρ. (195)
The hyperdiffusion coefficient D(3) can be calculated from Dassuming that at the
Nyquist frequency the two formulations (193) and (195) yield the same quenching. Con-
sidering a wave as a Fourier series in one dimension (x), one element of the series is
expressed as
ψk=Aei(kx+ωt)(196)

E.2 Hyperviscosity 139
Plugging it into the second order diffusion equation (193) we have the dispersion con-
dition iω =−Dk2. The sixth order version (195) yields iω =−D(3)k6. Equating both
we have D(3) =Dk−4. This condition should hold at the grid scale, where k=π/∆x,
therefore
D(3) =D∆x
π4
(197)
For the magnetic potential, resistivity has the same formulation as mass diffusion
∂A
∂t =−η∇ × B=η∇2A,(198)
where we used the Coulomb gauge ∇·A= 0. The algebra is the same as above, also
yielding η(3) =η(∆x/π)4. For entropy, the heat conduction term is
∂S
∂t =1
ρT ∇·(K∇T),(199)
and requiring that Kbe constant, we substitute it by
∂S
∂t =K(3)
ρT ∇6T. (200)
also with K(3) =K(∆x/π)4.
E.2 Hyperviscosity
Viscosity has some caveats where subtleties apply. The difference is that the momentum
flux due to viscosity is not proportional to the velocity gradient, but to the rate-of-strain
tensor
Sij =1
2∂ui
∂xj
+∂uj
∂xi−2
3δij∇·u,(201)
which only allows the viscous acceleration to be reduced to the simple formulation ν∇2u
under the condition of incompressibility and constant dynamical viscosity µ=νρ. Due
to this, the general expression for conservative hyperviscosity involves more terms. In
some cases, it is no great overhead, but for others, simpler formulations can be applied.
E.2.1 Conservative case
In the general case, the viscous acceleration is
fvisc =ρ−1∇·(2ρνS)(202)
So, for the hyperviscous force, we must replace the rate-of-strain tensor by a high order
version
f(hyper)
visc =ρ−1∇·2ρνnS(n)(203)
where the nth-order rate of strain tensor is
S(n)= (−∇2)n−1S.(204)

140 THE PENCIL CODE
For the n= 3 case it is
S(3)
ij =1
2∂5uj
∂xi5+∂4
∂xi4∂ui
∂xj−1
3
∂4
∂xi4(∇·u).(205)
Plugging it into Eq. (203), and assuming µ3=ρν3= const
f(hyper)
visc =ν3∇6u+1
3∇4(∇(∇·u)).(206)
For ν3= const, we have to take derivatives of density as well
f(hyper)
visc =ν3∇6u+1
3∇4(∇(∇·u)) + 2S(3) ·∇ln ρ(207)
E.2.2 Non-conservative cases
Equations (206) and (207) explicitly conserve linear and angular momentum. Although
desirable properties, such expressions are cumbersome and numerically expensive, due
to the fourth order derivatives of ∇(∇·u).
This term, however, is only important when high compressibility is present (since it
depends on the divergence of u). In practice we drop this term and use a simple hyper-
viscosity
fvisc =(ν3∇6uif µ= const
ν3∇6u+ 2S(3) ·∇ln ρif ν= const (208)
Notice that this can indeed be expressed as the divergence of a simple rate-of-strain
tensor
S(3)
ij =∂5ui
∂xj5,(209)
so it does conserve linear momentum. It does not, however, conserve angular momen-
tum, since the symmetry of the rate-of-strain tensor was dropped. Thus, vorticity sinks
and sources may be spuriously generated at the grid scale.
A symmetric tensor can be computed, that conserves angular momentum and can be
easily implemented
Sij =1
2∂5ui
∂xj5+∂5uj
∂xi5(210)
This tensor, however, is not traceless, and therefore accurate only for weak compressibil-
ity. It should work well if the turbulence is subsonic. Major differences are not expected,
since the spectral range in which hyperviscosity operates is very limited: as a numerical
tool, only its performance as a high-frequency filter is needed. This also supports the
usage of the highest order terms only, since these are the ones that provide quenching
at high k. Momentum conservation is a cheap bonus. Angular momentum conservation
is perhaps playing it too safe, at great computational expense.

E.2 Hyperviscosity 141
E.2.3 Choosing the coefficient
When changing the resolution, one wants to keep the grid Reynolds number, here de-
fined as
Regrid =urms νnk2n−1
Ny (211)
approximately constant. Here, kNy =π/δx is the Nyquist wavenumber and δx is the
mesh spacing. Thus, when doubling the number of meshpoints, we can decrease the
viscosity by a factor of about 25= 32 (Haugen & Brandenburg 2004). This shows that
hyperviscosity can allow a dramatic increase of the Reynolds number based on the scale
of the box.
By choosing idiff=’hyper3_mesh’ in density_run_pars the hyperdiffusion for density is
being set automatically in a mesh-independent way. A hyper-mesh Reynolds number of
30 corresponds to a coefficient diffrho_hyper3_mesh=2 if
maxadvec
is about 1, but in
practice we need a bit more (5 is currently the default).
E.2.4 Turbulence with hyperviscosity
When comparing hyperviscous simulations with non-hyperviscous ones, it turns out that
the Reynolds number at half the Nyquist frequency is usually in the range 5–7, i.e.
Rehalf−grid =urms νn(kNy/2)2n−1≈5–7 (212)
The following table gives some typical values used in simulations with forcing wavenum-
ber kf= 1.5and a forcing amplitude of f0= 0.02. If hyperdiffusion D3is used in the
continuity equation, the corresponding values are about 30 times smaller than those of
ν3; see Table 14.
Table 14: Empirical values of viscosity and hyperviscosity, as well as hyperdiffusion for density, at differ-
ent numerical resolution, for simulations with forcing wavenumber kf= 1.5and a forcing amplitude of
f0= 0.02 in a 2πperiodic domain. In all cases the half-mesh Reynolds number is about 5–7. For compar-
ison, estimates of the numerical 4th order hyperdiffusion resulting from a third order time step are give
for two values of the CFL parameter.
N ν1ν2ν3D3κCFL=0.4
2κCFL=0.9
2
16 1×10−23×10−42×10−56×10−77×10−41×10−4
32 5×10−34×10−56×10−72×10−81×10−62×10−5
64 2×10−35×10−62×10−86×10−10 2×10−73×10−6
128 1×10−36×10−76×10−10 2×10⁻¹¹ 3×10−84×10−7
256 5×10−48×10−82×10−11 6×10⁻¹³ 4×10−95×10−8
512 2×10−41×10−86×10−13 2×10⁻¹⁴ 5×10⁻¹⁰ 6×10⁻⁹
1024 1×10−41×10−92×10−14 6×10⁻¹⁶ 6×10⁻¹¹ 8×10⁻¹⁰
For comparison, we give in Table 14 estimates of the numerical 4th order hyperdiffusion
resulting from a third order time step, for which we have
κCFL
2=1
24urms (CCFLδx)3(213)
where CCFL is the CFL parameter which is either 0.4 in the conservative case or 0.9 in
the more progressive case.
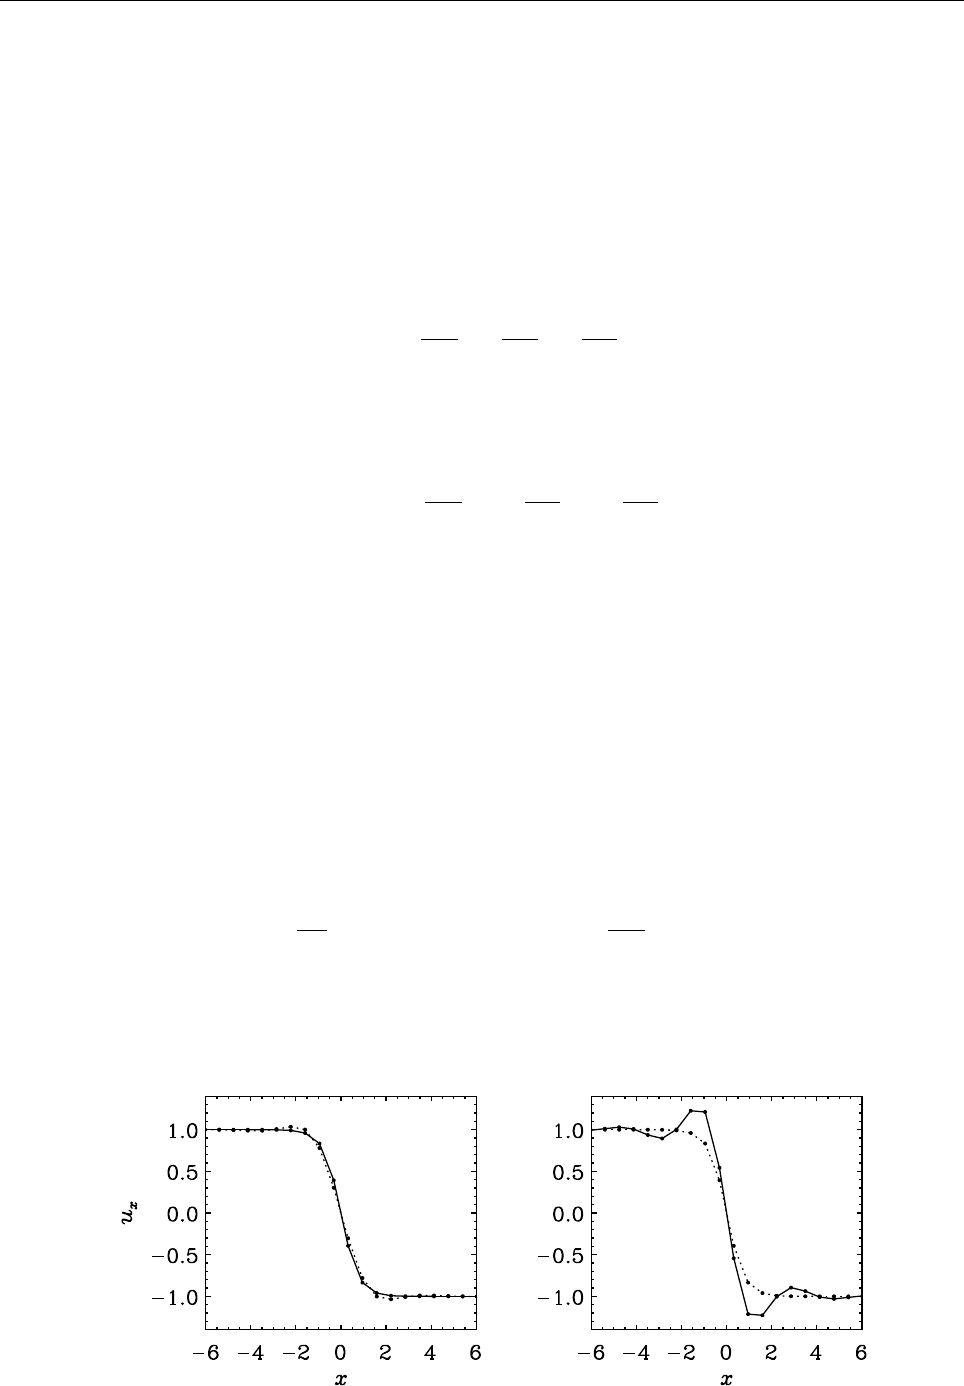
142 THE PENCIL CODE
E.3 Anisotropic hyperdissipation
As we want quenching primarily at the Nyquist frequency, hyperdissipation depends
intrinsically on the resolution, according to Eq. (197). Because of this, isotropic hyper-
dissipation only gives equal quenching in all spatial directions if ∆x=∆y=∆z, i.e., if the
cells are cubic. For non-cubic cells, anisotropic dissipation is required as different direc-
tions may be better/worse sampled, thus needing less/more numerical smoothing. Such
generalization is straightforward. For that, we replace Eq. (194) by
J=Dx
∂5ρ
∂x5, Dy
∂5ρ
∂y5, Dz
∂5ρ
∂z5,(214)
so that different diffusion operates in different directions. Since Dx,Dyand Dzare con-
stants, the divergence of this vector is
∇·J=Dx
∂6ρ
∂x6+Dy
∂6ρ
∂y6+Dz
∂6ρ
∂z6.(215)
The formulation for resistivity and heat conductivity are strictly the same. For viscosity
it also assumes the same form if we consider the simple non-conservative rate-of-strain
tensor (209).
Mathematically, these operations can be written compactly by noticing that the coeffi-
cients in Eq. (215) transform like diagonal tensors χ(3)
ij =χ(3)
kδijk, where δijk is the unit
diagonal third order tensor, χ(3) is the vector containing the dissipative coefficients (dif-
fusion, viscosity, resistivity, or heat conductivity) in x,y, and z, and summation over
repeated indices applies.
Therefore, for a scalar quantity ψ(density, any of the three components of the velocity
or magnetic potential), we can write
∂ψ
∂t =−χ(3)
ij ∂i∂5
jψ=−X
q
χ(3)
q
∂6
∂x6
q
ψ. (216)
E.4 Hyperviscosity in Burgers shock
Figure 20: Left: Burgers shock from teach/PencilCode/material/BurgersShock (in the teaching material)
with −20 ≤x≤20,nx= 64 mesh points, ux=∓1on the two ends, ν= 0.4and either ν3= 0 (solid line)
or ν3= 0.05 (dashed line). Right: similar to the left hand side, but with ν= 0 and ν3= 0.05 (dashed line),
compared with the case ν= 0.4and ν3= 0 (solid line).


144 THE PENCIL CODE
F Special techniques
F.1 After changing REAL PRECISION
To continue working in double precision (REAL_PRECISION=double), you just say lread_-
from_other_prec=T in run_pars. Afterwards, remember to put lread_from_other_prec=F.
If continuation is done in a new run directory, first execute start.csh there and then copy
the files var.dat (and if present global.dat) from the old to the new directory, using pc -
copyvar.
F.2 Remeshing (regridding)
[This should be written up in a better way and put somewhere else. But currently,
remeshing is only available for the Pencil developers anyway.]
Suppose you have a directory run 64 with a 643run (running on N0=
ny
×
nz
=2×1CPUs)
that you want to continue from ‘VAR1’ at 1283(on
ny
×
nz
=4×4CPUs).
1. The remeshing code is part of the PENCIL CODE repository.
2. Create another run directory with current ‘VAR1’ as ‘var.dat’ (remesh.csh so far
only works with ‘var.dat’):
unix> cd run_64
run_64> pc_newrun ../tmp_64
or
new tmp_64
run_64> mkdir -p ../tmp_64/data
or
(cd ../tmp_64/; crtmp)
run_64> (cd ../tmp_64/data ; mkproc-tree N0)
run_64> restart-new-dir-VAR ../tmp_64 1
3. Create the new run directory (linking the executables with -s):
run_64> cd ../tmp_64
tmp_64> pc_newrun -s ../run_128
or
new run_128
tmp_64> vi ../run_128/src/cparam.local
# set nxgrid=128, ncpus=16, nprocy=4
tmp_64> (cd ../run_128; crtmp; pc_setupsrc; make)
4. Setup and do remeshing
tmp_64> setup-remesh
tmp_64> vi remesh/common.local
# set muly=2, mulz=4, remesh par=2
tmp_64> (cd remesh; make)
tmp_64> vi remesh.in
# Replace line by ../run 128
tmp_64> remesh.csh
# Answer ‘yes’

F.3 Restarting from a run with less physics 145
F.3 Restarting from a run with less physics
First, prepare a new run directory with the new physics included. By new physics, we
mean that the new run wants to read in more fields (e.g. magnetic fields, if the old run
didn’t have magnetic fields).
Example for test fields:
1. Prepare ‘src/cparam.local’
Add the following 2 fragments into the ‘cparam.local’ file. The first piece comes in
the beginning and the second in the end of the file.
!** AUTOMATIC CPARAM.INC GENERATION ****************************************
! Declare (for generation of cparam.inc) the number of f array
! variables and auxiliary variables added by this module
! Use MVAR to reserve the appropriate workspace for testfield_z.f90
! The MAUX number must be equally big and is used for uxb in the f-array.
! At the end of this file, njtest must be set such that 3*njtest=MVAR.
!
! MVAR CONTRIBUTION 12
! MAUX CONTRIBUTION 12
!
!***************************************************************************
!
! note that MVAR=MAUX=3*njtest must be obeyed
!
integer, parameter :: njtest=4
!
2. Prepare ‘src/Makefile.local’
Add the line TESTFIELD=testfield_z to the file. Finally, compile the code.
3. Prepare restart data
Go into data directory of the new run and prepare the directory tree using, e.g., the
command pc_mkproctree 16. [In principle this could be automatized, but it isn’t
yet.]
Next, go into old run directory and say restart-new-dir ../32c, if ‘../32c’ is the
name of the new run directory. This procedure copies all the files from the processor
tree, plus files like ‘param.nml’, but this file may need some manual modification (or
you could just us one from another runs with the new physics included, which is
definitely the simplest!).
4. Prepare ‘run.in’
Set lread_oldsnap_notestfield=T in
run pars
. This means (as the name says) that
one reads an old snapshot that did not have test fields in it.
Reset boundary conditions and add stuff for the newly added fields, e.g.,
bcz=’a:s’,’a’,’a:s’,’a2’,’a’,’a’,’s’,’a’,’a’,’s’,’a’,’a’,’s’,’a’,’a’,’s’
in
run pars
. If you don’t do this, you would effectively use periodic boundary
conditions for the response to the test field, which is hardly correct once you set
non-periodic boundary conditions for the other variables.

146 THE PENCIL CODE
Add something like the following text fragments in the right position (after
grav -
run pars
and
magnetic run pars
, but before
shear run pars
and
viscosity run -
pars
.
&testfield_run_pars
!linit_aatest=T, daainit=100.
itestfield=’B11-B22’
etatest=1e-4
lsoca=F
/
Make sure that the data above are correct. You may want to change the values of
daainit
or
etatest
.
If you now run, and if you didn’t fix the file ‘data/param.nml’ you might get some-
thing like the following error:
forrtl: severe (24): end-of-file during read, unit 1, file /wkspace/brandenb/pencil-code/axel/Poiseuille/2d/32c/data/pa
The reason for this is that it reads the old boundary data, but the correspond-
ing array is too short. This includes stuff like
FBCX1
to
FBCX2 2
, but it is still
not enough. Therefore it is easiest to use the ‘data/param.nml’ file from another
run. You may well just use one from a single processor run with a different mesh.
But remember to fix the ‘start.in’ file by correcting the boundary conditions and
adding things like
&testfield_init_pars
luxb_as_aux=T
/
5. Prepare ‘print.in’, ‘xyaver.in’, and other obvious files such as ‘video.in’.
6. Once it works and is running, you must say explicitly
&run_pars
...
lread_oldsnap_notestfield=F
/
because otherwise you won’t read in your precious test field data next time you
restart the code! (If you instead just remove this line, it will remember lread_-
oldsnap_notestfield=T from the previous run, which is of course wrong!)
Comments: For large magnetic Reynolds numbers the solutions to the test-field equa-
tions can show a linear instability, which can introduce large fluctuations. In that case
it is best to reset the dependent test-field variable to zero in regular intervals. This is
done by setting linit aatest=T. Note that daainit=100 sets the reset interval to 100.
F.4 Restarting with particles from a run without them
If you want to restart from a run without particles to a run with them, you need to
(1) Compile a run with particles,
RunWithParticles$ pc_build

F.4 Restarting with particles from a run without them 147
(2) Copy a VARN or var.dat into this new run directory. Say the old run is at the directory
OldRun and you want to copy the var.dat of that run and restart with particles. You do
RunWithParticles$ pc_copyvar v v ../OldRun . -e
(3) In the start.in init pars of the new run, add the lines
lread_oldsnap = T
ireset_tstart = 0
(4) Remove all calls to initial conditions (make all initlnrho, inituu, initss, initaa, etc
‘nothing’), and
5) Run pc_start.
The variable lread_oldsnap makes the code on start time read from the f-array of the
snapshop, instead of the default, which is to initialize it with zeros. The necessity in step
(4) to remove all calls to initial conditions is because otherwise the code would rewrite
the content of the f-array with these initial conditions, or add them on top of the existing
values of the snapshot.
The variable ireset_tstart when set to zero makes it read the timestamp of the old
snapshot and restart from that time. The default is 2, which sets the timestamp back to
zero.

148 THE PENCIL CODE
G Runs and reference data
For reference purposes we document here some results obtained with various samples
of the code.
G.1 Shock tests
G.1.1 Sod shock tube problem
Table 15: Combinations of ρ,p, and s/cpthat are relevant for the Sod shock tube problem with constant
temperature and different pressure ratios on the left and right hand sides of the shock.
ρ p s
1.0 1.0 0.3065
0.1 0.1 1.2275
0.01 0.01 2.1486
G.1.2 Temperature jump
Table 16: Combinations of c2
s,p, and s/cpthat are relevant for the temperature shock problem with
constant density, ρ= 1, and different temperature ratios on the left and right hand sides of the shock.
c2
ss
1.0 0.0
0.1 −2.3
0.01 −4.6
10−4−9.2
G.2 Random forcing function
A solenoidal random forcing function fcan be invoked by putting iforce=’helical’ in
the
forcing run pars
namelist. This produces the forcing function fof the form
f(x, t) = Re{Nfk(t)exp[ik(t)·x+iφ(t)]},(217)
where k(t) = (kx, ky, kz)is a time dependent wave vector, x= (x, y, z)is position, and
φ(t)with |φ|< π is a random phase. On dimensional grounds the normalization factor
is chosen to be N=f0cs(kcs/δt)1/2, where f0is a nondimensional factor, k=|k|, and δt
is the length of the timestep. The δt−1/2dependence ensures that the forcing, which is
delta-correlated in time, is properly normalized such that the correlator of the forcing
function is independent of the length of the time step, δt. We focus on the case where
|k|is around 5, and select at each timestep randomly one of the 350 possible vectors in
4.5<|k|<5.5. We force the system with eigenfunctions of the curl operator,
fk=ik×(k×e)−σ|k|(k×e)
√1 + σ2k2q1−(k·e)2/k2,(218)
G.3 Three-layered convection model 149
where eis an arbitrary unit vector needed in order to generate a vector k×ethat is
perpendicular to k. Note that |fk|2= 1 and, for σ= 1,ik×fk=|k|fk, so the helicity
density of this forcing function satisfies
f·∇×f=|k|f2>0 (for σ= 1) (219)
at each point in space. We note that since the forcing function is like a delta-function in
k-space, this means that all points of fare correlated at any instant in time, but are dif-
ferent at the next timestep. Thus, the forcing function is delta-correlated in time (but the
velocity is not). This is the forcing function used in Brandenburg (2001), Brandenburg
& Dobler (2001), and other papers in that series.
For σ= 0, the forcing function is completely nonhelical and reduces to the simpler form
fk= (k×e)/qk2−(k·e)2.(220)
For 0<|σ|<1, the forcing function has fractional helicity, where σ≈ hω·ui/(kfhu2i);
see Sect. 4.5 of Ref. [8]. In the code and the
forcing run pars
namelist, σis called
relhel
.
In the code, the possible wavevectors are pre-calculated and stored in ‘k.dat’, which
is being read in the beginning the code runs. To change the wavevectors (e.g.
the typical value of kf, you need to change the file. In the directory ‘$PENCIL_-
HOME/samples/helical-MHDturb/K_VECTORS/’ there are several such files prepared:
k10.dat k1.dat k2.dat k3.dat k5.dat
k15.dat k27.dat k30.dat k4.dat k8.dat
and more can be prepared in IDL with the procedure ‘$PENCIL_-
HOME/samples/helical-MHDturb/idl/generate_kvectors.pro’ There is also more help in
the ‘README’ file in ‘helical-MHDturb’.
G.3 Three-layered convection model
ln ρ
−1 0 1 2 3
−0.5
0.0
0.5
1.0
1.5
z
uz
−0.15−0.10−0.050.000.05
−0.5
0.0
0.5
1.0
1.5
z
Entropy s
−0.6−0.4−0.20.0 0.2 0.4
−0.5
0.0
0.5
1.0
1.5
z
Temperature T
0.5 1.0 1.5 2.0
−0.5
0.0
0.5
1.0
1.5
z
Figure 21: Like in Fig. 2, but at time t= 50.
In Sect. 3 we have shown the early stages of the convection model located in
‘samples/conv-slab’. To arrive at fully developed convection, you will need to run the
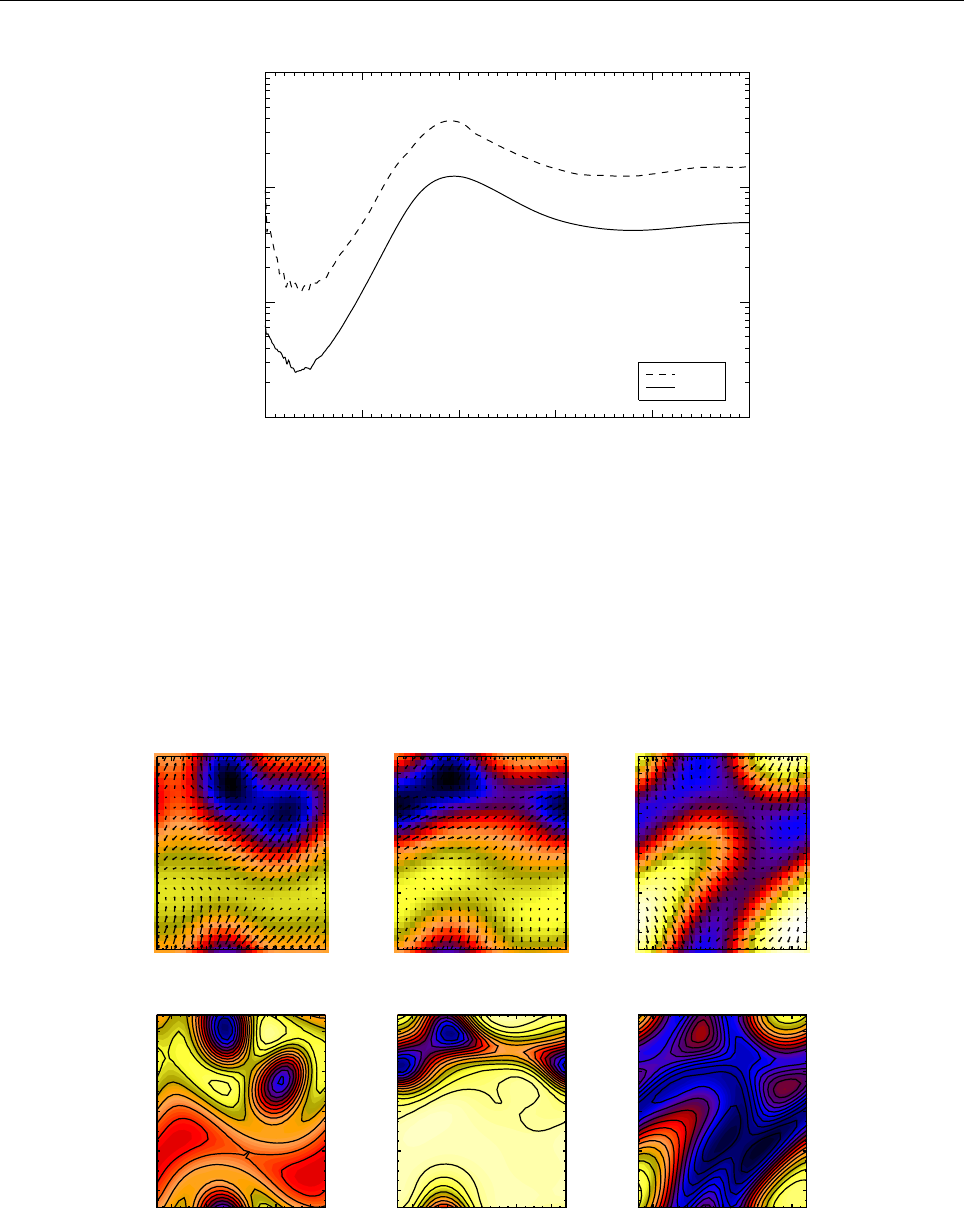
150 THE PENCIL CODE
0 10 20 30 40 50
t
0.001
0.010
0.100
1.000
u
umax
urms
Figure 22: Time evolution of rms and maximum velocity for the model ‘samples/conv-slab’. Similar plots
can be produced by running the IDL script ‘ts.pro’.
code for many more time steps. Figure 21 shows the vertical profiles of four basic quan-
tities at time t= 50. Figure 22 shows the time evolution of rms and maximum velocity
for the model for 0< t < 50.
Figures 23 and 24 show vertical and horizontal sections for time t= 50.
u at z=−0.292903
−0.4−0.2 0.0 0.2 0.4
x
−0.4
−0.2
0.0
0.2
0.4
y
u at z=−0.292903
−0.4−0.2 0.0 0.2 0.4
x
−0.4
−0.2
0.0
0.2
0.4
y
u at z=0.352258
−0.4−0.2 0.0 0.2 0.4
x
−0.4
−0.2
0.0
0.2
0.4
y
u at z=0.352258
−0.4−0.2 0.0 0.2 0.4
x
−0.4
−0.2
0.0
0.2
0.4
y
u at z=0.932903
−0.4−0.2 0.0 0.2 0.4
x
−0.4
−0.2
0.0
0.2
0.4
y
u at z=0.932903
−0.4−0.2 0.0 0.2 0.4
x
−0.4
−0.2
0.0
0.2
0.4
y
s and ρ at z=−0.292903
−0.4−0.2 0.0 0.2 0.4
x
−0.4
−0.2
0.0
0.2
0.4
y
s and ρ at z=0.352258
−0.4−0.2 0.0 0.2 0.4
x
−0.4
−0.2
0.0
0.2
0.4
y
s and ρ at z=0.932903
−0.4−0.2 0.0 0.2 0.4
x
−0.4
−0.2
0.0
0.2
0.4
y
Figure 23: Horizontal sections for t= 50. Top: velocity field. Bottom: entropy (color coded) and density
(isocontours). Plots of this type can be produced by running the IDL script ‘hsections.pro’)
G.4 Magnetic helicity in the shearing sheet
To test magnetic helicity evolution in the shearing shear, we can choose as initial
condition initaa=’Beltrami-y’ with amplaa=1. in magnetic_init_pars together with
Sshear=-1. in shear_run_pars.
G.4 Magnetic helicity in the shearing sheet 151
u at y=−0.296875
−0.4 −0.2 0.0 0.2 0.4
x
−0.5
0.0
0.5
1.0
z
u at y=−0.296875
−0.4 −0.2 0.0 0.2 0.4
x
−0.5
0.0
0.5
1.0
z
u at y=0.0156250
−0.4 −0.2 0.0 0.2 0.4
x
−0.5
0.0
0.5
1.0
z
u at y=0.0156250
−0.4 −0.2 0.0 0.2 0.4
x
−0.5
0.0
0.5
1.0
z
u at y=0.296875
−0.4 −0.2 0.0 0.2 0.4
x
−0.5
0.0
0.5
1.0
z
u at y=0.296875
−0.4 −0.2 0.0 0.2 0.4
x
−0.5
0.0
0.5
1.0
z
s and ρ at y=−0.296875
−0.4 −0.2 0.0 0.2 0.4
x
−0.5
0.0
0.5
1.0
z
s and ρ at y=0.0156250
−0.4 −0.2 0.0 0.2 0.4
x
−0.5
0.0
0.5
1.0
z
s and ρ at y=0.296875
−0.4 −0.2 0.0 0.2 0.4
x
−0.5
0.0
0.5
1.0
z
Figure 24: Vertical section y= 0.516 at t= 50. Top: velocity field. Bottom: entropy (color coded) and
density (isocontours). Plots of this type can be produced by running the IDL scripts ‘vsections.pro’) or
‘vsections2.pro’).
Thus, in ‘src/Makefile.local’ we just use
MAGNETIC=magnetic
HYDRO=nohydro
EOS=noeos
DENSITY=nodensity
SHEAR=shear
VISCOSITY=noviscosity
and put
&init_pars
cvsid=’$Id$’,
/
&magnetic_init_pars
initaa=’Beltrami-y’, amplaa=1.
/
&shear_init_pars
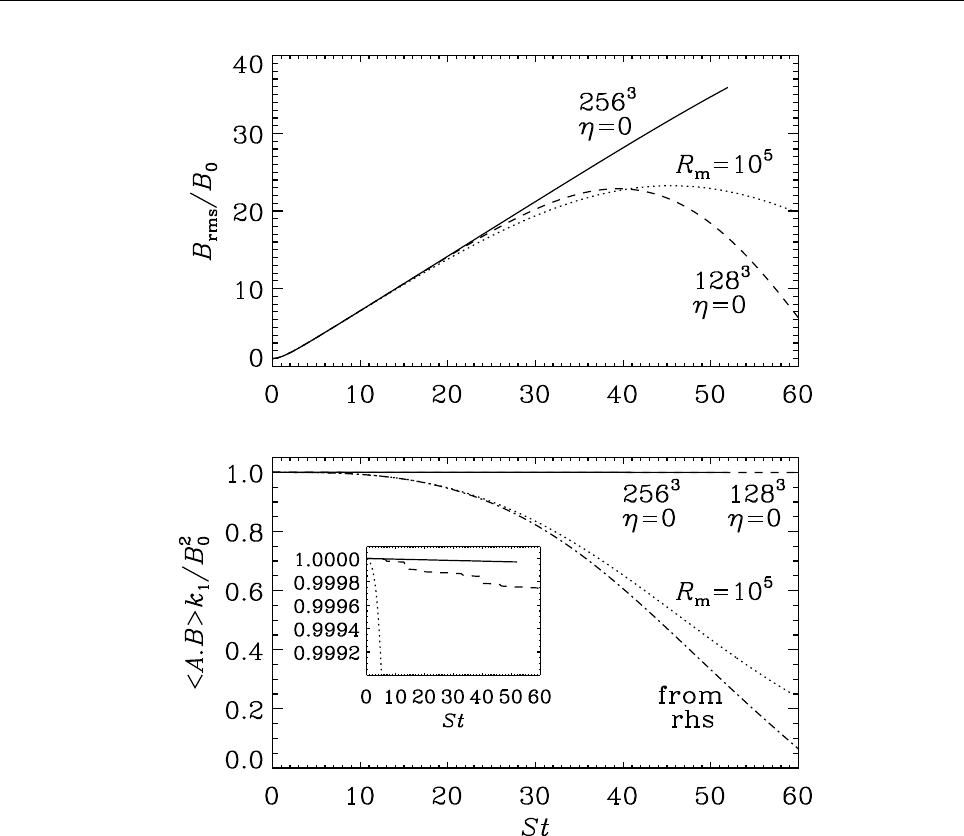
152 THE PENCIL CODE
Figure 25: Wind-up of the magnetic field leads to a linear increase in the rms magnetic field strength
until Ohmic diffusion begins to become important (top panel). During this time the magnetic helicity is
conserved. With Ohmic diffusion, the decay of hA·Biis well described by integrating −2ηhJ·Bi(indicated
by “from rhs” in the second panel).
/
in ‘start.in’ and, for example,
&run_pars
cvsid=’$Id$’
nt=150000, it1=10, cdt=0.9, isave=50, itorder=3
dsnap=100. dvid=5., ialive=1
/
&magnetic_run_pars
eta=0.
/
&shear_run_pars
Sshear=-1.
/
in ‘run.in’. The output includes, among other things
arms(f10.7)

G.4 Magnetic helicity in the shearing sheet 153
brms(f12.7)
jrms(f14.7)
abm(f14.11)
jbm(f14.7)
The result is shown in Figure 25, where we show the wind-up of the magnetic field,
which leads to a linear increase in the rms magnetic field strength until Ohmic diffu-
sion begins to become important (top panel). During this time the magnetic helicity is
conserved. With Ohmic diffusion, the decay of hA·Biis well described by integrating
−2ηhJ·Bi(indicated by “from rhs” in the second panel).

154 THE PENCIL CODE
H Numerical methods
H.1 Sixth-order spatial derivatives
Spectral methods are commonly used in almost all studies of ordinary (usually incom-
pressible) turbulence. The use of this method is justified mainly by the high numerical
accuracy of spectral schemes. Alternatively, one may use high order finite differences
that are faster to compute and that can possess almost spectral accuracy. Nordlund &
Stein [29] and Brandenburg et al. [13] use high order finite difference methods, for ex-
ample fourth and sixth order compact schemes [25].18
The sixth order first and second derivative schemes are given by
f′
i= (−fi−3+ 9fi−2−45fi−1+ 45fi+1 −9fi+2 +fi+3)/(60δx),(221)
f′′
i= (2fi−3−27fi−2+ 270fi−1−490fi+ 270fi+1 −27fi+2 + 2fi+3)/(180δx2),(222)
In Fig. 26 we plot effective wavenumbers for different schemes. Apart from the different
explicit finite difference schemes given above, we also consider a compact scheme of 6th
order, which can be written in the form
1
3f′
i−1+f′
i+1
3f′
i+1 = (fi−2−28fi−1+ 28fi+1 −fi+2)/(36δx),(223)
for the first derivative, and
2
11 f′′
i−1+f′′
i+2
11 f′′
i+1 = (3fi−2+ 48fi−1−102fi+ 48fi+1 + 3fi+2)/(44δx2).(224)
for the second derivative. As we have already mentioned in the introduction, this scheme
involves obviously solving tridiagonal matrix equations and is therefore effectively non-
local.
In the second panel of Fig. 26 we have plotted effective wavenumbers for second deriva-
tives, which were calculated as
(cos kx)′′
num =−k2
eff cos kx. (225)
Of particular interest is the behavior of the second derivative at the Nyquist frequency,
because that is relevant for damping zig-zag modes. For a second-order finite difference
scheme k2
eff is only 4, which is less than half the theoretical value of π2= 9.87. For
fourth, sixth, and tenth order schemes this value is respectively 5.33, 6.04, 6.83. The
last value is almost the same as for the 6th order compact scheme, which is 6.86. Signif-
icantly stronger damping at the Nyquist frequency can be obtained by using hypervis-
cosity, which Nordlund & Galsgaard (1995) treat as a quenching factor that diminishes
the value of the second derivative for wavenumbers that are small compared with the
Nyquist frequency. Accurate high order second derivatives (with no quenching factors)
are important when calculating the current Jin the Lorentz force J×Bfrom a vector
potential Ausing −µ0J=∇2A−∇∇·A. This will be important in the MHD calculations
presented below.
18The fourth order compact scheme is really identical to calculating derivatives from a cubic spline,
as was done in Ref. [29]. In the book by Collatz [14] the compact methods are also referred to as Her-
mitian methods or as Mehrstellen-Verfahren, because the derivative in one point is calculated using the
derivatives in neighboring points.
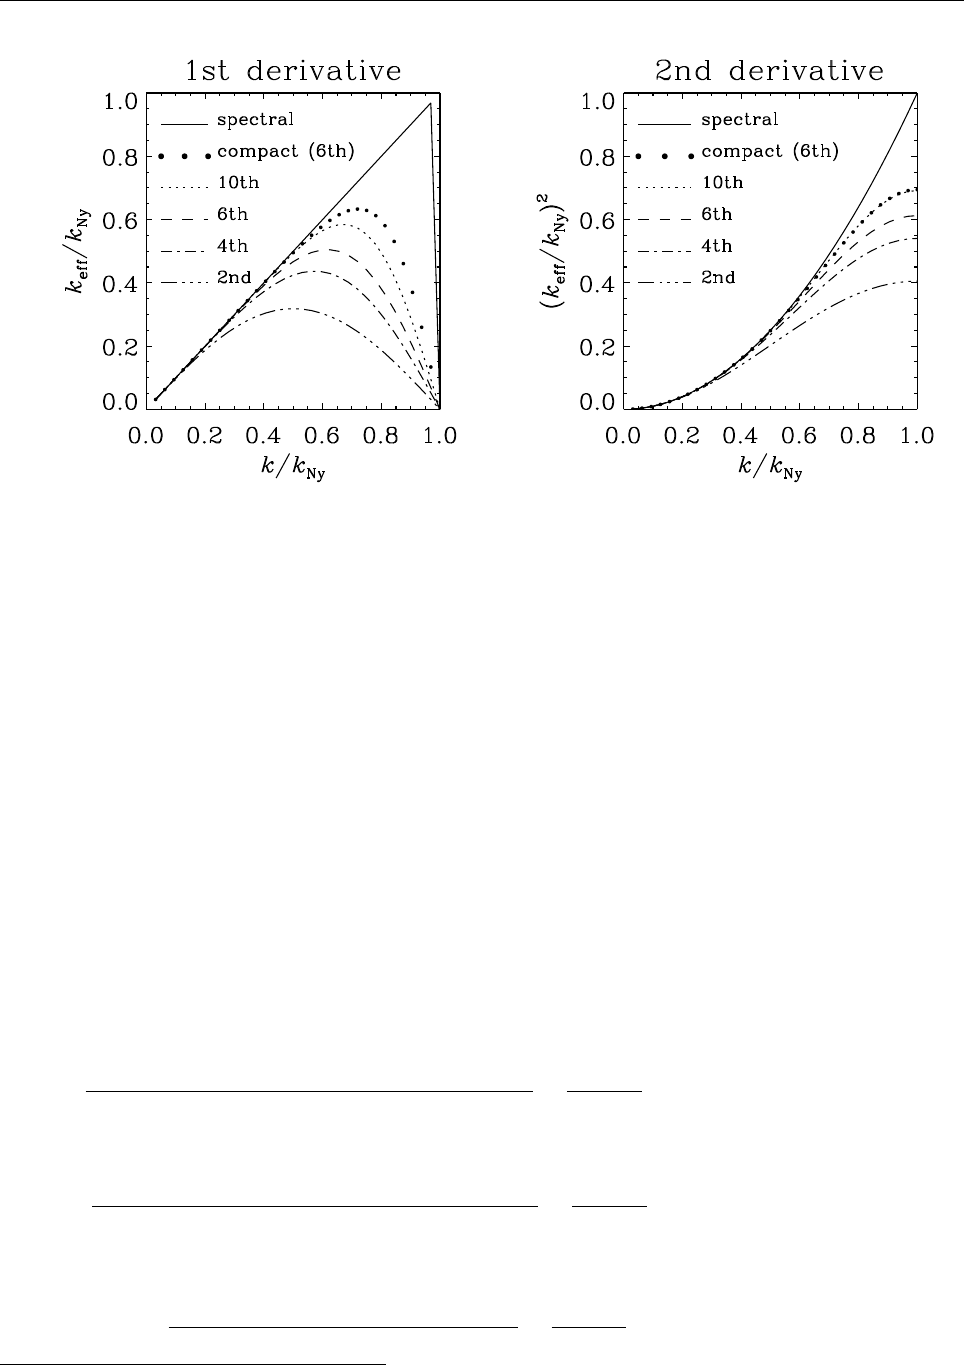
H.2 Upwind derivatives to avoid ‘wiggles’ 155
Figure 26: Effective wave numbers for first and second derivatives using different schemes. Note that
for the second derivatives the sixth order compact scheme is almost equivalent to the tenth order explicit
scheme. For the first derivative the sixth order compact scheme is still superior to the tenth order explicit
scheme.
H.2 Upwind derivatives to avoid ‘wiggles’
High-order centered-difference convection simulations often show “wiggles” (Nyquist
zigzag pattern) in ln ρ, which are apparently caused by a velocity profile where the veloc-
ity approaches zero on the boundary or inside the box.19 This causes the density profile
to be squeezed into a boundary layer where eventually numerical resolution is insuffi-
cient and, for centered differences, a spurious Nyquist signal is generated that almost
instantaneously propagates into much of the whole box.
Even if the stagnation point is on the boundary (and enforced by the boundary con-
ditions), this behavior is hardly influenced by the boundary conditions on ln ρat all.
A solution, however, is to apply upwinded derivative operators. The simplest upwind
derivative is a finite-difference derivative operator where the point furthest downwind
is excluded from the stencil. For u > 0, that means that instead of
f′
0=−f−3+ 9f−2−45f−1+ 45f1−9f2+f3
60 δx −δx6f(7)
140 =D(cent,6) +Oδx6,(226)
one takes
f′
0=−2f−3+ 15f−2−60f−1+ 20f0+ 30f1−3f2
60 δx +δx5f(6)
60 =D(up,5) +Oδx5.(227)
A fourth-order upwind scheme (excluding two downwind points) would be
f′
0=−f−3+ 6f−2−18f−1+ 10f0+ 3f1
12 δx −δx4f(5)
20 =D(up,4) +Oδx4.(228)
19A simple one-dimensional test profile would be u(x) = 1 −x2on x∈[−1,1], which will accumulate
more and more mass near the right boundary x= 1.
In two- or three-dimensional settings, the presence of stagnation points of X-type leads to the same
configuration, this time with the possibility of a steady state (i.e. without accumulation of mass). Such
stagnation points occur e.g. at the top of an upwelling, or at the bottom of a downdraft in convection
simulations, where locally uz∝zX−z.

156 THE PENCIL CODE
The effect of upwinding is mostly to stop the Nyquist perturbations from spreading away
from the boundary or stagnation point. With the fourth-order formula they actually
hardly ever develop.
The difference between central and fifth-order upwind derivative is
[D(up,5) −D(cent,6)]f0=−f−3+ 6f−2−15f−1+ 20f0−15f1+ 6f2−f3
60 δx =−δx5
60 f(6)
0.(229)
In other words, 5th-order upwinding can be represented for any sign of uas hyperdiffu-
sion (Dobler et al. 2006):
−uf′
(up,5th) =−uf′
(centr,6th) +|u|δx5
60 f(6) .(230)
The advantage over adopting constant hyperdiffusion is that in the upwinding scheme
hyperdiffusion is only applied where it is needed (i.e. where advection is happening,
hence the factor |u|).
The form (230) also suggests an easy way to get ‘stronger’ upwinding: Rather than ex-
cluding more points in the downwind direction, we can simply treat the weight of the
hyperdiffusion term as a free parameter α:
−uf′
(up,5th,α)=−uf′
(centr,6th) +α|u|δx5f(6) .(231)
If αis large, this may affect the time step, but for α= 1/60, the stability requirement for
the hyperdiffusive term should always be weaker than the advective Courant criterion.
H.3 The bidiagonal scheme for cross-derivatives
The old default scheme used for cross-derivatives of type ∂2/(∂x∂y)used to read as fol-
lows:
df=fac*( &
270.*( f(l1+1:l2+1,m+1,n,k)-f(l1-1:l2-1,m+1,n,k) &
+f(l1-1:l2-1,m-1,n,k)-f(l1+1:l2+1,m-1,n,k)) &
- 27.*( f(l1+2:l2+2,m+2,n,k)-f(l1-2:l2-2,m+2,n,k) &
+f(l1-2:l2-2,m-2,n,k)-f(l1+2:l2+2,m-2,n,k)) &
+ 2.*( f(l1+3:l2+3,m+3,n,k)-f(l1-3:l2-3,m+3,n,k) &
+f(l1-3:l2-3,m-3,n,k)-f(l1+3:l2+3,m-3,n,k)) &
)
and is “visualized” in the left part of Fig. 27. It is way more efficient than the straight-
forward approach of first taking the xand the yderivative consecutively. (shown in the
right part of Fig. 27).
Off-diagonal terms enter not only the diffusion terms through ∇∇ ·uand ∇∇ ·Aterms,
but also through the J=∇×∇×Aoperator. The general formula is Ji=Aj,ij −Ai,jj ,
so in 2-D in the xy-plane we have
Jx=Ax,xx +Ay,xy −Ax,xx −Ax,yy =Ay,xy −Ax,yy ,(232)
Jy=Ax,yx +Ay,yy −Ay,xx −Ay,yy =Ax,yx −Ay,xx (233)
Figure 28 shows how the two schemes perform for the propagation of Alfv´
en waves,
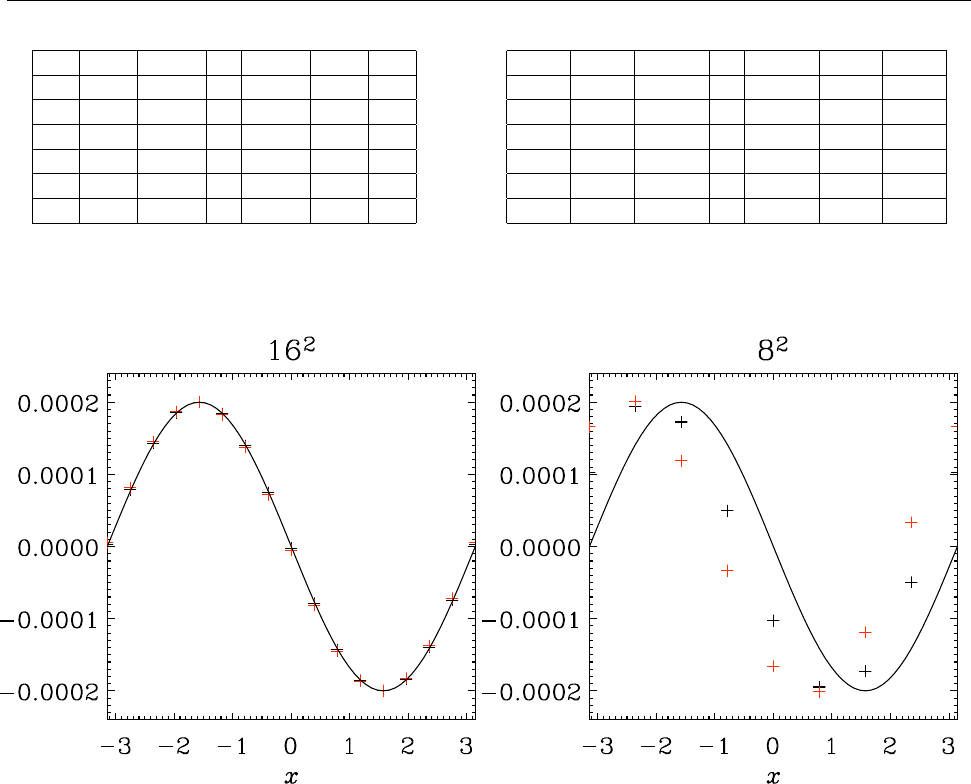
H.4 The 2N-scheme for time-stepping 157
-2 0 0 0 0 0 +2
0 +27 0 0 0 -27 0
0 0 -270 0 +270 0 0
0 0 0 0 0 0 0
0 0 +270 0 -270 0 0
0 -27 0 0 0 +27 0
+2 0 0 0 0 0 -2
9 -27 135 0 -135 27 -9
-27 81 -405 0 405 -81 27
135 -405 2025 0 -2025 405 -135
0 0 0 0 0 0 0
-135 405 -2025 0 2025 -405 135
27 -81 405 0 -405 81 -27
-9 27 -135 0 135 -27 9
Figure 27: Weights of bidiagonal scheme (left) and consecutive scheme (right) for mixed derivatives
∂2/∂x∂y. The numbers shown need to be divided by 720 δx δy for the bidiagonal and by 3600 δx δy for
the consecutive scheme.
Figure 28: Alfv´
en wave for B0= (1,2,0) and k= (1,2,0) after t= 2π. The wave travels in the direction of
k. Red symbols are for the bidiagonal scheme, black symbols show results obtained using the consecutive
scheme. Already for 162mesh points there are no clear differences. For 82mesh points both schemes are
equally imprecise regarding the phase error, but the amplitude error is still quite small (but this is mainly
a property of the time stepping scheme).
˙uz=JxB0y−JyB0x,(234)
˙
Ax=−uzB0y,(235)
˙
Ay= +uzB0x.(236)
The initial condition (as implemented in subroutine alfven_xy) is
uz∼cos(kxx+kyy−ωt),(237)
Ax∼+B0ysin(kxx+kyy−ωt)/ω , (238)
Ay∼ −B0xsin(kxx+kyy−ωt)/ω , (239)
where ω=k·B0. The figure shows that there is no clear advantage of either scheme, so
the code uses the more efficient bidiagonal one.
H.4 The 2N-scheme for time-stepping
For time stepping, higher-order schemes are necessary in order to reduce the amplitude
and phase errors of the scheme and, to some extent, to allow longer time steps. Usually

158 THE PENCIL CODE
such schemes require large amounts of memory. However, we here use the memory-
effective 2N-schemes that require only two sets of variables to be held in memory. Such
schemes work for arbitrarily high order, although not all Runge-Kutta schemes can be
written as 2N-schemes [32, 31]. Consider the ordinary differential equation (ODE)
˙u=F(u, t),(240)
which can also be used as a prototype for a system of ODEs to be solved, like the ones
obtained by spatial discretization of PDEs. The 2N-schemes construct an approximation
to the solution
u(n)≡u(tn)(241)
according to the iterative procedure
wi=αiwi−1+δt F (ui−1, ti−1),(242)
ui=ui−1+βiwi.(243)
For a three-step (RK3-2N) scheme we have i= 1, ..., 3. In order to advance the variable
ufrom u(n)at time t(n)to u(n+1) at time t(n+1) =t(n)+δt we set in Eq. (243)
u0=u(n)and, after the last step, u(n+1) =u3,(244)
with u1and u2being intermediate steps. In order to be able to calculate the first step,
i= 1, for which no wi−1≡w0exists, we have to require α1= 0. Thus, we are left with 5
unknowns, α2,α3,β1,β2, and β3. Three conditions follow from the fact that the scheme be
third order for linear equations, so we have to have two more conditions. One possibility
is to choose the fractional times at which the right hand side is evaluated, for example
(0,1/3,2/3) or even (0,1/2,1). Yet another possibility is to require that inhomogeneous
equations of the form ˙u=tnwith n= 1 and 2 are solved exactly. The corresponding
coefficients are listed in Table 17 and compared with those given by Williamson [32]. In
practice all of them are about equally good when it comes to real applications, although
we found the first one in Table 17 (‘symmetric’) marginally better in some simple test
problems where an analytic solution was known. In Ref. [4] the accuracy of some non-
linear equations is tested.
Table 17: Coefficients for different 2N-type third-order Runge-Kutta schemes. The coefficients ci(which
are determined by the αi,βi) give the time for each substep, ti=t0+ciδt
scheme c1c2c3α2α3β1β2β3
symmetric 0 1/3 2/3−2/3−1 1/3 1 1/2
[predictor/corrector] 0 1/2 1 −1/4−4/3 1/2 2/3 1/2
inhomogeneous 0 15/32 4/9−17/32 −32/27 1/4 8/9 3/4
Williamson (1980) 0 4/9 15/32 −5/9−153/128 1/3 15/16 8/15
H.5 Diffusive error from the time-stepping
In many cases we use centered first derivatives for the advection operator, so the result-
ing discretization errors are only of dispersive nature (proportional to odd derivatives). A
diffusive error can be obtained from the discretization error of the time-stepping scheme.
For the RK3-2N scheme we have
df
dtnth order
=df
dtexact
+anδtndn+1f
dtn+1 +..., (245)

H.6 Ionization 159
where an= 1/(n+ 1)! = 0.5. In particular, for n= 1 we have a1= 1/2 = 0.2and for
n= 3 we have a3= 1/24 ≈0.04. The advection operator leads to a diffusive error equal
to a1δt(u·∇)2for n= 1 and a hyperdiffusive error equal to a3δt3(u·∇)4for n= 3.
Substituting δt =cCFLδx/|u|, where cCFL is Courant-Friedrich-Lewy constant, we have a
diffusive error ν∇2with negative ν=−a1cCFL|u|δx for n= 1, and a hyperdiffusive error
−νhyp∇4with positive νhyp =a3c3
CFL|u|δx3for n= 3. The fact that the hyperdiffusive
error has a positive effective hyperdiffusivity is an important factor in the choice of this
scheme.
To decide whether the effective hyperdiffusivity from the diffusive error is significant,
we can compare with the error that would occur had we used a third-order upwinding
scheme (Sect. H.2). In that case we would have an effective hyperdiffusive coefficient
|u|δx/12 that is 1/(12a3c3
CFL)≈5.8times larger than that from the time stepping scheme.
In this sense, the hyperdiffusive error can be regarded as small.
Since the hyperdiffusive error is proportional to −∇4, we cannot directly compare with
the physical diffusion which is proportional to ∇2. Therefore we define an effective vis-
cosity as νeff =νhypk2
Ny with kNy =π/δx being the Nyquist wavenumber of the mesh
of the domain covered by Nmesh points. We define Reynolds number based on the
Nyquist wavenumber as ReNy =|u|/νeff kNy, and find Re =−24/(πcCFL)3≈2.3for our
favorite choice cCFL = 0.7. Thus, at the scale of the mesh, the effective Reynolds number
is comparable to the value often obtained in simulations. However, in turbulence sim-
ulations the viscous cutoff wavenumber is usually 5–10 times smaller than kNy, so the
relevant Reynolds number at the viscous scale is then another 2–3 orders of magnitude
larger and does therefore not impose a constraint in view of the physical viscosity that
is applied in such calculations.
H.6 Ionization
The specific entropy of each particle species (neutral hydrogen, electrons, protons and
neutral helium) may be written as
si
s0
=xi ln "1
xtot
ρi
ρT
T03/2#+5
2!,(246)
where
xH= 1 −y , xe=xp=y , xtot = 1 + y+xHe (247)
s0=kB
µmH
, T0=χH
kB
,(248)
and
ρi=µmHmiχH
2π~23/2.(249)
The specific entropy of mixing is
smix
s0
=−X
i
xiln xi
xtot
.(250)

160 THE PENCIL CODE
Summing up everything, we get the total specific entropy
s
s0
=X
i
si
s0
+smix
s0
=X
i
xi ln "1
xi
ρi
ρT
T03/2#+5
2!(251)
=X
i
xiln ρi
xi
+xtot ln "1
ρT
T03/2#+5
2!.(252)
Solving for Tgives
3
2ln T
T0
=s/s0+Pixiln xi/ρi
xtot
+ ln ρ−5
2.(253)
Using this expression and the constants defined above, we may obtain the ionization
fraction yfor given ln ρand sby finding the root of
F= ln "ρe
ρT
T03/21−y
y2#−T0
T.(254)
The derivative with respect to yfor Newton-Raphson is
∂F
∂y =3
2+T0
T∂ln T/T0
∂y −1
1−y−2
y,(255)
where
∂ln T/T0
∂y =
2
3(ln ρH/ρp−F−T0/T )−1
1 + y+xHe
.(256)
In order to compute the pressure gradient in the momentum equation, the derivative of
ywith respect to ln ρand sneeds to be known:
∂ln P
∂ln ρ=1
1 + y+xHe
∂y
∂ln ρ+∂ln T
∂ln ρ+∂ln T
∂y
∂y
∂ln ρ+ 1,(257)
∂ln P
∂s =1
1 + y+xHe
∂y
∂s +∂ln T
∂s +∂ln T
∂y
∂y
∂s .(258)
Since F= 0 for all desired solutions (y, ln ρ, s)we also have
dF =∂F
∂ln ρd ln ρ+∂F
∂s ds+∂F
∂y dy= 0 ,(259)
and thus ∂y
∂ln ρ=dy
d ln ρds=0
=−∂F/∂ ln ρ
∂F/∂y (260)
and ∂y
∂s =dy
dsd ln ρ=0
=−∂F/∂s
∂F/∂y .(261)
H.7 Radiative transfer
H.7.1 Solving the radiative transfer equation
A formal solution of Eq. (81) is given by
I(τ) = I(τ0)e−(τ−τ0)+
τ
Z
τ0
e−(τ−τ′)S(τ′)dτ′.(262)

H.7 Radiative transfer 161
Using a generalization of the trapezoidal rule,
τ
Z
τ0
e−(τ−τ′)f(τ′)dτ′≈
τ
Z
τ0
e−(τ−τ′)f(τ0) + f(τ)−f(τ0)
τ−τ0
(τ′−τ0)dτ′(263)
=1−e−(τ−τ0)f(τ)−1−e−(τ−τ0)(1 + τ−τ0)
τ−τ0
[f(τ)−f(τ0)] ,(264)
which is exact for linear functions S(τ), we discretize this as
Ik+1 =Ike−δτ + (1−e−δτ )Sk+1 −1−e−δτ (1 + δτ)
δτ (Sk+1 −Sk),(265)
=Ike−δτ + (1−e−δτ )Sk+e−δτ −1 + δτ
δτ (Sk+1 −Sk).(266)
Here the simplest way to calculate δτ is
δτ =χk+χk+1
2δx ;(267)
more accurate alternatives are
δτ =√χkχk+1 δx (268)
or
δτ =χk+1 −χk
ln χk+1
ln χk
δx (269)
H.7.2 Angular integration
Table 18: Sums √4πY m
l(θi, φi)for special sets of directions. For all degrees and orders up to l= 8 not
mentioned in this table, the sums are 0. The label ‘Non-h. f-d.’ stands for ‘non-horizontal face-diagonals’,
i.e. the eight face diagonals that are not in the horizontal plane.
Directions Y0
0Y0
2Y0
4Y±4
4Y0
6Y±4
6Y0
8Y±4
8Y±8
8
Coord. 6 0 21
2
3
4√70 3
4√13 −3
8√182 99
32√17 3
32√2618 3
64√24310
Face diag. 12 0 −21
4−3
8√70 −39
16√13 39
32√182 891
256√17 27
256√2618 27
512√24310
Space diag. 8 0 −28
3−2
3√70 16
9√13 −8
9√182 11
9√17 1
27√2618 1
54√24310
Non-h. f-d. 8 2√5−39
4
3
8√70 −19
16√13 27
32√182 611
256√17 51
256√2618 3
512√24310
Coord. x,y4−2√59
2
4
3√70 −5
4√13 −3
8√182 35
32√17 3
32√2618 3
64√24310
Coord. z2 2√5 6 0 2√13 0 2√17 0 0
For angular integration over the full solid angle, we make the ansatz
Z
4π
f(θ, φ)dω
4π=
N
X
i=1
wif(θi, φi) + RN.(270)

162 THE PENCIL CODE
Table 18 shows the sums √4πY m
l(θi, φi)over special sets of directions (θi, φi). Using these
numbers and requiring that angular integration is exact for l≤lmax, we find the follow-
ing weights wifor different sets of directions (see also [1], §25.4.65).20
Cooling times have been determined numerically in [2]. Comparing with analytic ex-
pressions obtained in the Eddington approximation, the proposed suitable switches in
1-D and 2-D problems.
20
1. Axes
Coordinate axes: 1/6
lmax = 3
2. Face diagonals
Face diagonals: 1/12
lmax = 3
3. Space diagonals
Space diagonals: 1/8
lmax = 3
4. Axes + face diagonals
Coordinate axes: 1/30
Face diagonals: 1/15
lmax = 5
5. Axes + space diagonals
Coordinate axes: 1/15
Space diagonals: 3/40
lmax = 5
6. Face + space diagonals
Face diagonals: 2/15
Space diagonals: -3/40
lmax = 5
7. Axes, face + space diagonals
Coordinate axes: 1/21
Face diagonals: 4/105
Space diagonals: 9/280
lmax = 7
8. Axes, non-horizontal face diagonals
Coordinate axes x,y: 1/10
Coordinate axes z: 1/30
Non-hor. face diagonals: 1/15
lmax = 3
9. Axes, non-horizontal face diagonals, space diagonals
Coordinate axes x,y: 12/215
Coordinate axes z: 10/129
Non-hor. face diagonals: -14/645
Space diagonals: 171/1720
lmax = 5

I. Curvilinear coordinates 163
I Curvilinear coordinates
The use and implementation of non-cartesian coordinate systems is briefly explained in
Section 5.25. All differential operators look like their cartesian counterparts, except that
all derivatives are now replaced by covariant derivatives. The relevant reference for the
PENCIL CODE is [27]; see their Appendix B. Here some details.
I.1 Covariant derivatives
Aˆα;ˆ
β=Aˆα, ˆ
β−Γˆσ
ˆαˆ
βAˆσ,(271)
Aˆαˆ
β;ˆγ=Aˆαˆ
β,ˆγ−ΓˆσˆαˆγAˆσˆ
β−Γˆσˆ
βˆγAˆαˆσ.(272)
Second derivative tensor
Aˆα;ˆ
βˆγ=Aˆα;ˆ
β,ˆγ−ΓˆσˆαˆγAˆσ;ˆ
β−Γˆσˆ
βˆγAˆα;ˆσ
=Aˆα, ˆ
βˆγ−Γˆσ
ˆαˆ
βAˆσ,ˆγ−Γˆσ
ˆαˆ
β,ˆγAˆσ−ΓˆσˆαˆγAˆσ, ˆ
β+ ΓˆσˆαˆγΓˆν
ˆσˆ
βAˆν−Γˆσˆ
βˆγAˆα,ˆσ+ Γˆσˆ
βˆγΓˆνˆαˆσAˆν.
Elements of the first derivative tensor
Aˆr;ˆr=Aˆr,ˆr, Aˆ
θ;ˆ
θ=Aˆ
θ,ˆ
θ+r−1Aˆr, Aˆ
φ;ˆ
φ=Aˆ
φ, ˆ
φ+r−1Aˆr+r−1cotθ Aˆ
θ.(273)
Aˆ
φ;ˆ
θ=Aˆ
φ,ˆ
θAˆ
θ;ˆ
φ=Aˆ
θ, ˆ
φ−r−1cotθ Aˆ
φ
Aˆr;ˆ
φ=Aˆr, ˆ
φ−r−1Aˆ
φAˆ
φ;ˆr=Aˆ
φ,ˆr
Aˆ
θ;ˆr=Aˆ
θ,ˆrAˆr;ˆ
θ=Aˆr,ˆ
θ−r−1Aˆ
θ
(274)
I.2 Differential operators
All differential operators look like their cartesian counterparts, except that all deriva-
tives are now replaced by covariant derivatives.
I.2.1 Gradient
For the gradient operator the covariant and partial derivatives are the same, i.e.
∇Ψ = Ψ;ˆα= Ψ,ˆα=
∂ˆrΨ
∂ˆ
θΨ
∂ˆ
φΨ
(275)
where
∂ˆr=∂r(276)
∂ˆ
θ=r−1∂θ(277)
∂ˆ
φ=̟−1∂φ(278)
and ̟=rsin θis the cylindrical radius. Thus,
∇Ψ=(∇Ψ)(0) ,(279)

164 THE PENCIL CODE
where the superscript (0) indicated the straightforward calculation in the non-
coordinate basis. The coordinate and non-coordinate bases are related to each other
via
(∇Ψ)0≡
Ψ,ˆr
Ψ,ˆ
θ
Ψ,ˆ
φ
1 0 0
0r−10
0 0 ̟−1
(∇Ψ)(coord) .(280)
Here, the result in the coordinate basis is just what one would get by computing as if
one had cartesian coordinates. In the PENCIL CODE the output or the subroutine der is
now in this non-coordinate basis.
I.2.2 Divergence
For the divergence operator we have a ‘correction term’, i.e.
∇·A=Aˆα; ˆα(281)
=Aˆα,ˆα+ Γˆαˆ
βˆαAˆ
β,(282)
where the only non-vanishing contributions to the last term are
Γˆαˆ
βˆαAˆ
β= Γˆ
θ
ˆrˆ
θAˆr+ Γˆ
φ
ˆrˆ
φAˆr+ Γˆ
φˆ
θˆ
φAˆ
θ(283)
= 2r−1Aˆr+r−1cotθ Aˆ
θ.(284)
Thus,
∇·A= (∇·A)(0) +M(div)
ˆαAˆα,(285)
where
M(div)
ˆα=
2r−1
r−1cotθ
0
(286)
represents the correction term.
Alternatively:
Aˆα; ˆα=Aˆα, ˆα−ΓˆσˆαˆαAˆσ(287)
=Aˆα, ˆα+ 2r−1Aˆr+r−1cotθ Aˆ
θ.(288)
I.2.3 Curl
The curl operator is given by
(∇×B)ˆα=ǫˆαˆ
βˆγBˆγ, ˆ
β.(289)
So
∇×A=
Aˆ
φ;ˆ
θ−Aˆ
θ;ˆ
φ
Aˆr;ˆ
φ−Aˆ
φ;ˆr
Aˆ
θ;ˆr−Aˆr;ˆ
θ
(290)
∇×A=
Aˆ
φ,ˆ
θ−Aˆ
θ, ˆ
φ+ Γˆ
φˆ
θˆ
φAˆ
φ
Aˆr, ˆ
φ−Aˆ
φ,ˆr−Γˆ
φˆrˆ
φAˆ
φ
Aˆ
θ,ˆr−Aˆr,ˆ
θ+ Γˆ
θˆrˆ
θAˆ
θ
(291)

I.2 Differential operators 165
Thus,
∇×A= (∇×A)(0) +M(curl)
ˆαˆ
βAˆ
β,(292)
where
M(curl)
ˆαˆ
β=
0 0 r−1cotθ
0 0 −r−1
0r−10
(293)
is the correction term. In the PENCIL CODE we use the subroutine curl mn(aij,bb,aa),
which uses aij=Aˆα, ˆ
βand aa=Aˆαas input pencils and produces bb=Bˆαas output.
I.2.4 Advection operator
[The usage of roman indices here is insignificant.]
u·∇u=ω×u+1
2∇u2=−u×ω+1
2∇u2(294)
(u·∇u)i=−ǫijkǫklmujum;l+ujuj,i
= (−δilδjm +δimδjl)ujum;l+ujuj,i
=−ujuj;i+ujui;j+ujuj,i
=ujui;j+ Γkjiujuk
=ujui,j + (−Γkij + Γkji)ujuk(295)
Note that the terms with Γˆrˆ
θˆ
θ,Γˆrˆ
φˆ
φ, and Γˆ
θˆ
φˆ
φdrop out. Thus, we have
(u·∇u)ˆr=ujuˆr,j + (−Γkˆrj + Γkjˆr)ujuk
=ujuˆr,j −Γˆ
θ
ˆrˆ
θu2
ˆ
θ−Γˆ
φ
ˆrˆ
φu2
ˆ
φ
=ujuˆr,j −r−1(u2
ˆ
θ+u2
ˆ
φ)(296)
(u·∇u)ˆ
θ=ujuˆ
θ,j + (−Γkˆ
θj + Γk
jˆ
θ)ujuk
=ujuˆ
θ,j −Γˆ
φˆ
θˆ
φu2
ˆ
φ+ Γˆ
θ
ˆrˆ
θuˆruˆ
θ
=ujuˆ
θ,j −r−1cotθ u2
ˆ
φ+r−1uˆruˆ
θ(297)
(u·∇u)ˆ
φ=ujuˆ
φ,j + (−Γkˆ
φj + Γk
jˆ
φ)ujuk
=ujuˆ
φ,j + Γˆ
φ
ˆrˆ
φuˆruˆ
φ+ Γˆ
φˆ
θˆ
φuˆ
θuˆ
φ
=ujuˆ
φ,j +r−1uˆruˆ
φ+r−1cotθ uˆ
θuˆ
φ(298)
Note that the formulation above is slightly misleading, because
Γk
jˆ
θujuk= Γˆrˆ
θˆ
θuˆ
θuˆr+ Γˆ
θ
ˆrˆ
θuˆruˆ
θ= 0 (299)
Γk
jˆ
φujuk= Γˆrˆ
φˆ
φuˆ
φuˆr+ Γˆ
φ
ˆrˆ
φuˆruˆ
φ+ Γˆ
θˆ
φˆ
φuˆ
φuˆ
θ+ Γˆ
φˆ
θˆ
φuˆ
θuˆ
φ= 0 (300)
I.2.5 Mixed advection operator
u×B=u×∇B=ujǫijkǫklmAm;l=uj(δilδjm −δimδjl)Am;l=ujAj;i−ujAi;j(301)

166 THE PENCIL CODE
I.2.6 Shear term
ujAj;i= (ujAj);i−uj;iAj= (ujAj),i −uj;iAj(302)
uj;iAj=uj,iAj−Γk
jiukAj(303)
So
uˆ
φ;ˆrAˆ
φ=uˆ
φ,ˆrAˆ
φ−Γk
ˆ
φˆrukAˆ
φ=uˆ
φ,ˆrAˆ
φ(304)
uˆr;ˆ
φAˆr=uˆr, ˆ
φAˆr−Γˆ
φ
ˆrˆ
φuˆ
φAˆr(305)
I.2.7 Another mixed advection operator
uˆ
βAˆα;ˆ
β=uˆ
βAˆα, ˆ
β−Γˆσ
ˆαˆ
βuˆ
βAˆσ,(306)
Write out
(u·∇A)ˆr=uˆrAˆr;ˆr+uˆ
θAˆr;ˆ
θ+uˆ
φAˆr;ˆ
φ=uˆrAˆr,ˆr,+uˆ
θAˆr,ˆ
θ−r−1uˆ
θAˆ
θ+uˆ
φAˆr, ˆ
φ−r−1uˆ
φAˆ
φ
(u·∇A)ˆ
θ=uˆrAˆ
θ;ˆr+uˆ
θAˆ
θ;ˆ
θ+uˆ
φAˆ
θ;ˆ
φ=uˆrAˆ
θ,ˆr+uˆ
θAˆ
θ,ˆ
θ+r−1uˆ
θAˆr,+uˆ
φAˆ
θ, ˆ
φ−r−1cotθ uˆ
φAˆ
φ
(u·∇A)ˆ
φ=uˆrAˆ
φ;ˆr+uˆ
θAˆ
φ;ˆ
θ+uˆ
φAˆ
φ;ˆ
φ=uˆrAˆ
φ,ˆr+uˆ
θAˆ
φ,ˆ
θ+uˆ
φAˆ
φ, ˆ
φ+r−1uˆ
φAˆr+r−1cotθ uˆ
φAˆ
θ.
Reorder
(u·∇A)ˆr=uˆrAˆr,ˆr+uˆ
θAˆr,ˆ
θ+uˆ
φAˆr, ˆ
φ−r−1uˆ
θAˆ
θ−r−1uˆ
φAˆ
φ
(u·∇A)ˆ
θ=uˆrAˆ
θ,ˆr+uˆ
θAˆ
θ,ˆ
θ+uˆ
φAˆ
θ, ˆ
φ+r−1uˆ
θAˆr−r−1cotθ uˆ
φAˆ
φ
(u·∇A)ˆ
φ=uˆrAˆ
φ,ˆr+uˆ
θAˆ
φ,ˆ
θ+uˆ
φAˆ
φ, ˆ
φ+r−1uˆ
φAˆr+r−1cotθ uˆ
φAˆ
θ.(307)
I.2.8 Strain Matrix
The strain matrix takes the form 2sˆαˆ
β=uˆα;ˆ
β+uˆ
β;ˆα. The components of the covariant
derivative tensor were given in Eqs. (273) and (274), so the final result reads
2s≡
2uˆr,ˆruˆr,ˆ
θ+uˆ
θ,ˆr−uˆ
θ/r uˆr, ˆ
φ+uˆ
φ,ˆr−uˆ
φ/r
uˆr,ˆ
θ+uˆ
θ,ˆr−uˆ
θ/r 2uˆ
θ,ˆ
θ+ 2uˆr/r uˆ
θ, ˆ
φ+uˆ
φ,ˆ
θ−uˆ
φ
cotθ
r
uˆr, ˆ
φ+uˆ
φ,ˆr−uˆ
φ/r uˆ
θ, ˆ
φ+uˆ
φ,ˆ
θ−uˆ
φ
cotθ
r2uˆ
φ, ˆ
φ+ 2uˆr/r + 2uˆ
θ
cotθ
r
(308)
The trace-less rate of strain matrix is given by
Sij =sij −1
3δij∇·u.(309)
I.2.9 Lambda effect
Qij =
0 0 ΛVΩ
0 0 ΛHΩ
ΛVΩ ΛHΩ 0
(310)
where Ω = uˆ
φ/r sin θ. Next, compute Qij;j.
Qˆαˆ
β;ˆγ=Qˆαˆ
β,ˆγ−ΓˆσˆαˆγQˆσˆ
β−Γˆσˆ
βˆγQˆαˆσ.(311)

I.2 Differential operators 167
Qˆ
θˆr;ˆr=Qˆ
θˆr,ˆr−Γˆσˆ
θˆrQˆσˆr−ΓˆσˆrˆrQˆ
θˆσ.
= 0 (312)
Qˆ
θˆ
θ;ˆ
θ=Qˆ
θˆ
θ,ˆ
θ−Γˆσˆ
θˆ
θQˆσˆ
θ−Γˆσˆ
θˆ
θQˆ
θˆσ.
=−Γˆ
φˆ
θˆ
θQˆ
φˆ
θ−Γˆ
φˆ
θˆ
θQˆ
θˆ
φ.
= 0 (313)
Qˆ
θˆ
φ;ˆ
φ=Qˆ
θˆ
φ, ˆ
φ−Γˆσˆ
θˆ
φQˆσˆ
φ−Γˆσˆ
φˆ
φQˆ
θˆσ.
=Qˆ
θˆ
φ, ˆ
φ−Γˆ
φˆ
θˆ
φQˆ
φˆ
φ−Γˆrˆ
φˆ
φQˆ
θˆr−Γˆ
θˆ
φˆ
φQˆ
θˆ
θ.
= 0 (314)
φterms
Qˆ
φˆr;ˆr=Qˆ
φˆr,ˆr−Γˆσˆ
φˆrQˆσˆr−ΓˆσˆrˆrQˆ
φˆσ.
=Qˆ
φˆr,ˆr(315)
Qˆ
φˆ
θ;ˆ
θ=Qˆ
φˆ
θ,ˆ
θ−Γˆσˆ
φˆ
θQˆσˆ
θ−Γˆσˆ
θˆ
θQˆ
φˆσ
=Qˆ
φˆ
θ,ˆ
θ−Γˆrˆ
θˆ
θQˆ
φˆr
=Qˆ
φˆ
θ,ˆ
θ+r−1Qˆ
φˆr(316)
Qˆ
φˆ
φ;ˆ
φ=Qˆ
φˆ
φ, ˆ
φ−Γˆσˆ
φˆ
φQˆσˆ
φ−Γˆσˆ
φˆ
φQˆ
φˆσ
=−Γˆσˆ
φˆ
φQˆσˆ
φ−Γˆσˆ
φˆ
φQˆ
φˆσ
=−Γˆrˆ
φˆ
φQˆrˆ
φ−Γˆ
θˆ
φˆ
φQˆ
θˆ
φ−Γˆrˆ
φˆ
φQˆ
φˆr−Γˆ
θˆ
φˆ
φQˆ
φˆ
θ
= +r−1Qˆrˆ
φ+ cot θ r−1Qˆ
θˆ
φ+r−1Qˆ
φˆr+ cot θ r−1Qˆ
φˆ
θ
= +2r−1ΛVΩ + 2 cot θ r−1ΛHΩ(317)
So, the φcomponent of the divergence of the Lambda tensor is then
Qˆ
φˆσ;ˆσ=Qˆ
φˆr,ˆr+Qˆ
φˆ
θ,ˆ
θ+ 3r−1ΛVΩ + 2 cot θ r−1ΛHΩ(318)
I.2.10 Laplacian of a scalar
Let Eˆα≡(∇Ψ)ˆα=∂ˆαΨThen
∆Ψ = Eˆ
β;ˆ
β= (∂ˆ
βΨ),ˆ
β+2
rΨ,ˆr+cotθ
rΨ,ˆ
θ(319)
I.2.11 Hessian of a scalar
s;ˆα=s,ˆα(320)
s;ˆrˆr=s,ˆrˆr−Γˆσˆrˆrs,ˆσ,=s,ˆrˆr(321)
s;ˆ
θˆ
θ=s,ˆ
θˆ
θ−Γˆrˆ
θˆ
θs,ˆr,=s,ˆ
θˆ
θ+r−1s,ˆr,(322)
s;ˆ
φˆ
φ=s,ˆ
φˆ
φ−Γˆσˆ
φˆ
φs,ˆσ,=s,ˆ
φˆ
φ−Γˆrˆ
φˆ
φs,ˆr,−Γˆ
θˆ
φˆ
φs,ˆ
θ,=s,ˆ
φˆ
φ+r−1s,ˆr,+r−1cot θ s,ˆ
θ,(323)

168 THE PENCIL CODE
s;ˆrˆ
θ=s,ˆrˆ
θ−Γˆ
θ
ˆrˆ
θs,ˆ
θ,=s,ˆrˆ
θ−r−1s,ˆ
θ,(324)
s;ˆrˆ
φ=s,ˆrˆ
φ−Γˆ
φ
ˆrˆ
φs,ˆ
φ,=s,ˆrˆ
φ−r−1s,ˆ
φ(325)
s;ˆ
θˆr=s,ˆ
θˆr−Γˆσˆ
θˆrs,ˆσ,=s,ˆ
θˆr(326)
s;ˆ
φˆr=s,ˆ
φˆr−Γˆσˆ
φˆrs,ˆσ,=s,ˆ
φˆr(327)
s;ˆ
θˆ
φ=s,ˆ
θˆ
φ−Γˆ
φˆ
θˆ
φs,ˆ
φ,=s,ˆ
θˆ
φ−r−1cot θ s,ˆ
φ(328)
s;ˆ
φˆ
θ=s,ˆ
φˆ
θ−Γˆσˆ
φˆ
θs,ˆσ,=s,ˆ
φˆ
θ(329)
So,
s;ˆαˆ
β=s,ˆαˆ
β+
0−r−1s,ˆ
θ−r−1s,ˆ
φ
0 +r−1s,ˆr−r−1cot θ s,ˆ
φ
0 0 −Γˆrˆ
φˆ
φs,ˆr−Γˆ
θˆ
φˆ
φs,ˆ
θ
(330)
I.2.12 Double curl
For the calculation of J=∇×Bwe use the same curl routine, but with different argu-
ments, bij=Bˆα, ˆ
βand bb=Bˆαas input pencils and jj=Jˆαas output, i.e. curl mn(bij,jj,bb),
so that
J=
Bˆ
φ,ˆ
θ−Bˆ
θ, ˆ
φ+ Γˆ
φˆ
θˆ
φBˆ
φ
Bˆr, ˆ
φ−Bˆ
φ,ˆr−Γˆ
φˆrˆ
φBˆ
φ
Bˆ
θ,ˆr−Bˆr,ˆ
θ+ Γˆ
θˆrˆ
θBˆ
θ
= (∇×B)(0) +M(curl)
ˆαˆ
βBˆ
β,(331)
where
(∇×B)(0)ˆα=ǫˆαˆ
βˆγBˆγ, ˆ
β.(332)
Expressing the components of (∇×B)(0) in terms of Aˆαwe have
Bˆ
φ,ˆ
θ= (Aˆ
θ,ˆr−Aˆr,ˆ
θ+ Γˆ
θˆrˆ
θAˆ
θ),ˆ
θBˆ
θ, ˆ
φ= (Aˆr, ˆ
φ−Aˆ
φ,ˆr−Γˆ
φˆrˆ
φAˆ
φ),ˆ
φ
Bˆr, ˆ
φ= (Aˆ
φ,ˆ
θ−Aˆ
θ, ˆ
φ+ Γˆ
φˆ
θˆ
φAˆ
φ),ˆ
φBˆ
φ,ˆr= (Aˆ
θ,ˆr−Aˆr,ˆ
θ+ Γˆ
θˆrˆ
θAˆ
θ),ˆr
Bˆ
θ,ˆr= (Aˆr, ˆ
φ−Aˆ
φ,ˆr−Γˆ
φˆrˆ
φAˆ
φ),ˆrBˆr,ˆ
θ= (Aˆ
φ,ˆ
θ−Aˆ
θ, ˆ
φ+ Γˆ
φˆ
θˆ
φAˆ
φ),ˆ
θ
(333)
or
Bˆ
φ,ˆ
θ=Aˆ
θ,ˆrˆ
θ−Aˆr,ˆ
θˆ
θ+ (Γˆ
θˆrˆ
θAˆ
θ),ˆ
θBˆ
θ, ˆ
φ=Aˆr, ˆ
φˆ
φ−Aˆ
φ,ˆrˆ
φ−(Γˆ
φˆrˆ
φAˆ
φ),ˆ
φ
Bˆr, ˆ
φ=Aˆ
φ,ˆ
θˆ
φ−Aˆ
θ, ˆ
φˆ
φ+ (Γˆ
φˆ
θˆ
φAˆ
φ),ˆ
φBˆ
φ,ˆr=Aˆ
θ,ˆrˆr−Aˆr,ˆ
θˆr+ (Γˆ
θˆrˆ
θAˆ
θ),ˆr
Bˆ
θ,ˆr=Aˆr, ˆ
φˆr−Aˆ
φ,ˆrˆr−(Γˆ
φˆrˆ
φAˆ
φ),ˆrBˆr,ˆ
θ=Aˆ
φ,ˆ
θˆ
θ−Aˆ
θ, ˆ
φˆ
θ+ (Γˆ
φˆ
θˆ
φAˆ
φ),ˆ
θ
(334)
Thus,
Bˆα, ˆ
β= (Bˆα, ˆ
β)(0) +M(2curl2)
ˆαˆ
βˆγˆ
δAˆγ,ˆ
δ+M(1curl2)
ˆαˆ
βˆγAˆγ,(335)
where
(Bˆα,ˆ
δ)(0) =ǫˆαˆ
βˆγAˆγ, ˆ
βˆ
δ(336)

I.2 Differential operators 169
with
Ψ,ˆrˆr= Ψ,rr (337)
Ψ,ˆ
θˆ
θ= Ψ,θθ r−2(338)
Ψ,ˆ
φˆ
φ= Ψ,φφ r−2sin−2θ(339)
Ψ,ˆrˆ
θ= Ψ,rθ r−1(340)
Ψ,ˆ
θˆr= Ψ,θr r−1−Ψ,ˆ
θr−1(341)
Ψ,ˆrˆ
φ= Ψ,rφ r−1sin−1θ(342)
Ψ,ˆ
φˆr= Ψ,φr r−1sin−1θ−Ψ,ˆ
φr−1(343)
Ψ,ˆ
θˆ
φ= Ψ,θφ r−2sin−1θ(344)
and
Bˆ
φ,ˆ
θ=... + Γˆ
θˆrˆ
θAˆ
θ,ˆ
θ+ Γˆ
θˆrˆ
θ,ˆ
θAˆ
θBˆ
θ, ˆ
φ=... −Γˆ
φˆrˆ
φAˆ
φ,ˆ
φ−Γˆ
φˆrˆ
φ, ˆ
φAˆ
φ
Bˆr, ˆ
φ=... + Γˆ
φˆ
θˆ
φAˆ
φ,ˆ
φ+ Γˆ
φˆ
θˆ
φ, ˆ
φAˆ
φBˆ
φ,ˆr=... + Γˆ
θˆrˆ
θAˆ
θ,ˆr+ Γˆ
θˆrˆ
θ,ˆrAˆ
θ
Bˆ
θ,ˆr=... −Γˆ
φˆrˆ
φAˆ
φ,ˆr−Γˆ
φˆrˆ
φ,ˆrAˆ
φBˆr,ˆ
θ=... + Γˆ
φˆ
θˆ
φAˆ
φ,ˆ
θ+ Γˆ
φˆ
θˆ
φ,ˆ
θAˆ
φ
(345)
Note that some derivatives of Christoffel symbols vanish, so we are left with
Bˆ
φ,ˆ
θ=... +r−1Aˆ
θ,ˆ
θBˆ
θ, ˆ
φ=... −r−1Aˆ
φ,ˆ
φ
Bˆr, ˆ
φ=... +r−1cotθAˆ
φ,ˆ
φBˆ
φ,ˆr=... +r−1Aˆ
θ,ˆr−r−2Aˆ
θ
Bˆ
θ,ˆr=... −r−1Aˆ
φ,ˆr+r−2Aˆ
φBˆr,ˆ
θ=... +r−1cotθ Aˆ
φ,ˆ
θ−r−2sin−2θ Aˆ
φ
(346)
I.2.13 Gradient of a divergence
Aˆα; ˆαˆγ=Aˆα, ˆαˆγ−ΓˆσˆαˆαAˆσ,ˆγ−Γˆσˆαˆα,ˆγAˆσ−ΓˆσˆαˆγAˆσ, ˆα+ ΓˆσˆαˆγΓˆνˆσˆαAˆν−ΓˆσˆαˆγAˆα,ˆσ+ ΓˆσˆαˆγΓˆνˆαˆσAˆν.
ˆrcomponent:
Aˆα; ˆαˆr=Aˆα,ˆαˆr−ΓˆσˆαˆαAˆσ,ˆr−Γˆσˆαˆα,ˆrAˆσ−ΓˆσˆαˆrAˆσ,ˆα+ ΓˆσˆαˆrΓˆνˆσˆαAˆν−ΓˆσˆαˆrAˆα,ˆσ+ ΓˆσˆαˆrΓˆνˆαˆσAˆν
=Aˆα, ˆαˆr−ΓˆσˆαˆαAˆσ,ˆr−Γˆσˆαˆα,ˆrAˆσ
=Aˆα, ˆαˆr+ 2r−1Aˆr,ˆr+r−1cotθAˆ
θ,ˆr−2r−2Aˆr−r−2cotθAˆ
θ(347)
ˆ
θcomponent:
Aˆα; ˆαˆ
θ=Aˆα, ˆαˆ
θ−ΓˆσˆαˆαAˆσ,ˆ
θ−Γˆσ
ˆαˆα,ˆ
θAˆσ−Γˆσ
ˆαˆ
θAˆσ, ˆα+ Γˆσ
ˆαˆ
θΓˆνˆσˆαAˆν−Γˆσ
ˆαˆ
θAˆα,ˆσ+ Γˆσ
ˆαˆ
θΓˆνˆαˆσAˆν
=Aˆα, ˆαˆ
θ+ 2r−1Aˆr,ˆ
θ+r−1cotθAˆ
θ,ˆ
θ−r−2sin−2θAˆ
θ(348)
Note that the last four terms in the above expression canceled, because
−Γˆσ
ˆαˆ
θAˆσ, ˆα+ Γˆσ
ˆαˆ
θΓˆνˆσˆαAˆν−Γˆσ
ˆαˆ
θAˆα,ˆσ+ Γˆσ
ˆαˆ
θΓˆνˆαˆσAˆν
=−r−1Aˆ
θ,ˆr+r−1Aˆr,ˆ
θ−r−2Aˆ
θ−r−1Aˆr,ˆ
θ+r−1Aˆ
θ,ˆr+r−2Aˆ
θ= 0 (349)
ˆ
φcomponent:
Aˆα; ˆαˆ
φ=Aˆα, ˆαˆ
φ−ΓˆσˆαˆαAˆσ, ˆ
φ−Γˆσ
ˆαˆα, ˆ
φAˆσ−Γˆσ
ˆαˆ
φAˆσ, ˆα+ Γˆσ
ˆαˆ
φΓˆνˆσˆαAˆν−Γˆσ
ˆαˆ
φAˆα,ˆσ+ Γˆσ
ˆαˆ
φΓˆνˆαˆσAˆν.
=Aˆα, ˆαˆ
φ−ΓˆσˆαˆαAˆσ, ˆ
φ−Γˆσ
ˆαˆα, ˆ
φAˆσ

170 THE PENCIL CODE
=Aˆα, ˆαˆ
φ−ΓˆσˆαˆαAˆσ, ˆ
φ
=Aˆα, ˆαˆ
φ−Γˆrˆ
θˆ
θAˆr, ˆ
φ−Γˆrˆ
φˆ
φAˆr, ˆ
φ−Γˆ
θˆ
φˆ
φAˆ
θ, ˆ
φ
=Aˆα, ˆαˆ
φ+r−1Aˆr, ˆ
φ+r−1Aˆr, ˆ
φ+r−1cotθAˆ
θ, ˆ
φ
=Aˆα, ˆαˆ
φ+ 2r−1Aˆr, ˆ
φ+r−1cotθAˆ
θ, ˆ
φ(350)
In the first line of the expression above, the last four terms vanish21 and the φderivative
of any Christoffel symbol (term before that) also vanishes.
21 The following four terms vanish because
−Γˆσ
ˆαˆ
φAˆσ, ˆα+ Γˆσ
ˆαˆ
φΓˆνˆσˆαAˆν−Γˆσ
ˆαˆ
φAˆα,ˆσ+ Γˆσ
ˆαˆ
φΓˆνˆαˆσAˆν
= Γˆσ
ˆαˆ
φ(−Aˆσ, ˆα+ ΓˆνˆσˆαAˆν−Aˆα,ˆσ+ ΓˆνˆαˆσAˆν)
= Γˆ
φ
ˆrˆ
φ(−Aˆ
φ,ˆr+ Γˆνˆ
φˆrAˆν−Aˆr, ˆ
φ+ Γˆν
ˆrˆ
φAˆν)
+ Γˆrˆ
φˆ
φ(−Aˆr, ˆ
φ+ Γˆν
ˆrˆ
φAˆν−Aˆ
φ,ˆr+ Γˆνˆ
φˆrAˆν)
+ Γˆ
φˆ
θˆ
φ(−Aˆ
φ,ˆ
θ+ Γˆνˆ
φˆ
θAˆν−Aˆ
θ, ˆ
φ+ Γˆνˆ
θˆ
φAˆν)
+ Γˆ
θˆ
φˆ
φ(−Aˆ
θ, ˆ
φ+ Γˆνˆ
θˆ
φAˆν−Aˆ
φ,ˆ
θ+ Γˆνˆ
φˆ
θAˆν)
= Γˆ
φ
ˆrˆ
φ(−Aˆ
φ,ˆr−Aˆr, ˆ
φ+ Γˆν
ˆrˆ
φAˆν)
+ Γˆrˆ
φˆ
φ(−Aˆr, ˆ
φ+ Γˆν
ˆrˆ
φAˆν−Aˆ
φ,ˆr)
+ Γˆ
φˆ
θˆ
φ(−Aˆ
φ,ˆ
θ−Aˆ
θ, ˆ
φ+ Γˆνˆ
θˆ
φAˆν)
+ Γˆ
θˆ
φˆ
φ(−Aˆ
θ, ˆ
φ+ Γˆνˆ
θˆ
φAˆν−Aˆ
φ,ˆ
θ)
=r−1(−Aˆ
φ,ˆr−Aˆr, ˆ
φ+ Γˆν
ˆrˆ
φAˆν)
−r−1(−Aˆr, ˆ
φ−Aˆ
φ,ˆr+ Γˆν
ˆrˆ
φAˆν)
+r−1cotθ(−Aˆ
φ,ˆ
θ−Aˆ
θ, ˆ
φ+ Γˆνˆ
θˆ
φAˆν)
−r−1cotθ(−Aˆ
θ, ˆ
φ−Aˆ
φ,ˆ
θ+ Γˆνˆ
θˆ
φAˆν) = 0 (351)

J. Switchable modules 171
J Switchable modules
The material in this section is being assembled from the file ‘inlinedoc-modules.tex’,
which is automatically assembled. However, it is currently incomplete and contains only
a small number of the available modules.
Module Description
hydro.f90
This module takes care of most of the things related to velocity.
Pressure, for example, is added in the energy (entropy) module.
chemistry.f90
This modules adds chemical species and reactions.
The units used in the chem.in files are cm3,mole,sec,kcal and K
gpu astaroth.f90
This module contains GPU related types and functions to be used with
ASTAROTH nucleus.
noentropy.f90
Calculates pressure gradient term for
polytropic equation of state p=constρΓ.
nogpu.f90
This module contains GPU related dummy types and functions.
nohydro.f90
no variable u: useful for kinematic dynamo runs.
nopower spectrum.f90
reads in full snapshot and calculates power spetrum of u
noyinyang.f90
This module contains Yin-Yang related dummy types and functions.
noyinyang mpi.f90
This module contains Yin-Yang related dummy types and functions.
particles adsorbed.f90
This module takes care of the evolution of adsorbed
species on the particle surface for reactive particles
particles chemistry.f90
This module implements reactive particles.
particles surfspec.f90
immediate vicinity of reactive particles.
power spectrum.f90
reads in full snapshot and calculates power spetrum of u
timestep.f90
Runge-Kutta time advance, accurate to order itorder.
At the moment, itorder can be 1, 2, or 3.
timestep strang.f90
Runge-Kutta time advance, accurate to order itorder.
At the moment, itorder can be 1, 2, or 3.
timestep subcycle.f90
This is a highly specified timestep module currently only working
together with the special module coronae.f90.
yinyang.f90
This module contains Yin-Yang related types and functions
which are incompatible with FORTRAN 95.
yinyang mpi.f90
This module contains Yin-Yang related types and functions
which are incompatible with FORTRAN 95.

172 THE PENCIL CODE
K Startup and run-time parameters
K.1 List of startup parameters for ‘start.in’
The following table lists all (at the time of writing, September 2002) namelists used
in ‘start.in’, with the corresponding parameters and their default values (in square
brackets). Any variable referred to as a
flag
can be set to any nonzero value to switch
the corresponding feature on. Not all parameters are used for a given scenario. This
list is not necessarily up to date; also, in many cases it can only give an idea of the
corresponding initial state; to get more insight and the latest set of parameters, you
need to look at the code.
The value εcorresponds to 5 times the smallest number larger than zero. For single
precision, this is typically about ε≈5×1.2×10−7= 6×10⁻⁷; for double precision, ε≈
10−15.
Variable [default value] Meaning
Namelist
init pars
cvsid
[’’] the
svn
identification string, which allows you to
keep track of the version of ‘start.in’.
ip
[14] (anti-)verbosity level: ip=1 produces lots of diagnos-
tic output, ip=14 virtually none.
xyz0
[(−π, −π, −π)],
Lxyz
[(2π, 2π, 2π)],
lperi
[(T,T,T)] determine the geometry of the box. All three are vec-
tors of the form (x-comp., y-comp., z-comp.);
xyz0
de-
scribes the left (lower) corner of the box,
Lxyz
the box
size.
lperi
specifies whether a direction is considered
periodic (in which case the last point is omitted) or
not. In all cases, three ghost zones will be added.
lprocz slowest
[T] if set to F, the ordering of processor numbers is
changed, so the zprocessors are now in the inner
loop. Since
nprocy
=4 is optimal (see Sect. 5.20.2),
you may want to put
lprocz slowest
=T when
nygrid>nzgrid.
lwrite ic
[F] if set T, the initial data are written into the file ‘VAR0’.
This is generally useful, but doing this all the time
uses up plenty of disk space.
lnowrite
[F] if set T, all initialization files are written, including
the param.nml file, except ‘var.dat’. This option al-
lows you to use old filevar.dat files, but updates all
other initialization files. This could be useful after
having changed the code and, in particular, when the
‘var.dat’ files will be overwritten by ‘remesh.csh’.
lwrite aux
[F] if set T, auxiliary variables (those calculated at each
step, but not evolved mathematically) to ‘var.dat’ af-
ter the evolved quantities.
lwrite 2d
[F] if set T, only 2D-snapshots are written into VAR files
in the case of 2D-runs with nygrid = 1 or nzgrid = 1.

K.1 Startup parameters for ‘start.in’ 173
lread oldsnap
[F] if set T, the old snapshot will be read in before pro-
ducing (overwriting) initial conditions. For example,
if you just want to add a perturbation to the mag-
netic field, you’d give no initial condition for density
and velocity (so you keep the data from a hopefully
relaxed run), and just add whatever you need for the
magnetic field. In this connection you may want to
touch NOERASE, so as not to erase the previous data.
lread oldsnap nomag
[F] if set T, the old snapshot from a non-magnetic run
will be read in before producing (overwriting) ini-
tial conditions. This allows one to let a hydrody-
namic run relax before adding a magnetic field.
However, for this to work one has to modify manu-
ally ‘data/param.nml’ by adding an entry for
MAG-
NETIC INIT PARS
or
PSCALAR INIT PARS
. In
addition, for idl to read correctly after the first
restarted run, you must adjust the value of
mvar
in
‘data/dim.dat’
lread oldsnap nopscalar
[F] if set T, the old snapshot from a run without passive
scalar will be read in before producing (overwriting)
initial conditions. This allows one to let a hydrody-
namic run relax before adding a passive scalar.
lshift origin
[F,F,F] if set Tfor any or some of the three directions, the
mesh is shifted by 1/2 meshpoint in that or those di-
rections so that the mesh goes through the origin.
unit system
[’cgs’] you can set this character string to ’SI’, which
means that you can give physical dimensions in SI
units. The default is cgs units.
unit length
[1] allows you to set the unit length. Suppose you want
the unit length to be 1 kpc, then you would say unit_-
length=’3e21’. (Of course, politically correct would
be to say unit_system=’SI’ in which case you say
unit_length=’3e19’.)
unit velocity
[1] Example: if you want km/s you say unit_-
length=’1e5’.
unit density
[1] Example: if you want your unit density to be
10−24 g/cm3you say unit_density=’1e-24’.
unit temperature
[1] Example: unit_temperature=’1e6’ if you want mega-
Kelvin.
random gen
[system] choose random number generator; currently valid
choices are
’system’ (your compiler’s generator),
’min_std’ (the ‘minimal standard’ generator ran0()
from ‘Numerical Recipes’),
’nr_f90’ (the Parker-Miller-Marsaglia generator
ran() from ‘Numerical Recipes for F90’).
bcx
[(’p’,’p’, . . . )],
bcy
[(’p’,’p’, . . . )],

174 THE PENCIL CODE
bcz
[(’p’,’p’, . . . )] boundary conditions. See Sect. 5.16 for a discussion
of where and how to set these.
pretend lnTT
[F] selects ln Tas fundamental thermodynamic variable
in the entropy module
Namelist
hydro init pars
inituu
[’zero’] initialization of velocity. Currently valid choices are
‘zero’ (u= 0 ),
‘gaussian-noise’ (random, normally-distributed
ux,uz),
‘gaussian-noise-x’ (random, normally-distributed
ux),
‘sound-wave’ (sound wave in xdirection),
‘shock-tube’ (polytropic standing shock),
‘bullets’ (blob-like velocity perturbations),
‘Alfven-circ-x’ (circularly polarized Alfven wave
in x direction),
‘const-ux’ (constant x-velocity),
‘const-uy’ (constant y-velocity),
‘tang-discont-z’ (tangential discontinuity: veloc-
ity is directed along x, jump is at z= 0),
‘Fourier-trunc’ (truncated Fourier series),
‘up-down’ (flow upward in one spot, downward in
another; not solenoidal).
ampluu
[0.] amplitude for some types of initial velocities.
widthuu
[0.1] width for some types of initial velocities.
urand
[0.] additional random perturbation of u. If urand>0, the
perturbation is additive, ui7→ ui+urandU[0.5,0.5]; if
urand<0, it is multiplicative, ui7→ ui×urandU[0.5,0.5]; in
both cases, U[0.5,0.5] is a uniformly distributed random
variable on the interval [−0.5,0.5].
uu left
[0.],
uu right
[0.] needed for inituu=’shock-tube’.
Namelist
density init pars

K.1 Startup parameters for ‘start.in’ 175
initlnrho
[’zero’] initialization of density. Currently valid choices are
‘zero’ (ln ρ= 0),
‘isothermal’ (isothermal stratification),
‘polytropic_simple’ (polytropic stratification),
‘hydrostatic-z-2’ (hydrostatic vertical stratifica-
tion for isentropic atmosphere),
‘xjump’ (density jump in xof width
widthlnrho
),
‘rho-jump-z’ (density jump in zof width
widthlnrho
),
‘piecew-poly’ (piecewise polytropic vertical strati-
fication for solar convection),
‘polytropic’ (polytropic vertical stratification),
‘sound-wave’ (sound wave),
‘shock-tube’ (polytropic standing shock),
‘gaussian-noise’ (Gaussian-distributed, uncorre-
lated noise),
‘gaussian-noise’ (Gaussian-distributed, uncorre-
lated noise in x, but uniform in yand z),
‘hydrostatic-r’ (hydrostatic radial density strati-
fication for isentropic or isothermal sphere),
‘sin-xy’ (sine profile in xand y),
‘sin-xy-rho’ (sine profile in xand y, but in ρ, not
ln ρ),
‘linear’ (linear profile in k·x),
‘planet’ (planet solution; see §C.7).
gamma
[5./3] adiabatic index γ=cp/cv.
cs0
[1.] can be used to set the dimension of velocity; larger
values can be used to decrease stratification
rho0
[1.] reference values of sound speed and density, i. e. val-
ues at height
zref
.
ampllnrho
[0.],
widthlnrho
[0.1] amplitude and width for some types of initial densi-
ties.
rho left
[1.],
rho right
[1.] needed for initlnrho=’shock-tube’.
cs2bot
[1.],
cs2top
[1.] sound speed at bottom and top. Needed for some
types of stratification.
Namelist
grav init pars
zref
[0.] reference height where in the initial stratification
c2
s=c2
s0 and ln ρ= ln ρ0.
gravz
[−1.] vertical gravity component gz.
grav profile
[’const’] constant gravity gz=gravz (grav_profile=’const’)
gravity or linear profile gz=gravz ·z(grav_-
profile=’linear’, for accretion discs and similar).
z1
[0.],

176 THE PENCIL CODE
z2
[1.] specific to the solar convection case
initlnrho=’piecew-poly’. The stable layer is
z0< z < z1, the unstable layer z1< z < z2, and the
top (isothermal) layer is z2< z < ztop.
nu epicycle
[1.] vertical epicyclic frequency; for accretion discs it
should be equal to Omega, but not for galactic discs;
see Eq. (130) in Sect. C.5.
grav amp
[0.],
grav tilt
[0.] specific to the tilted gravity case (amplitude and an-
gle wrt the vertical direction).
Namelist
entropy init pars
initss
[’nothing’] initialization of entropy. Currently valid choices are
‘nothing’ (leaves the initialization done in the den-
sity module unchanged),
‘zero’ (put s= 0 explicitly; this may overwrite the
initialization done in the density module),
‘isothermal’ (isothermal stratification, T=const),
‘isobaric’ (isobaric, p=const),
‘isentropic’ (isentropic with superimposed hot [or
cool] bubble),
‘linprof’ (linear entropy profile in z),
‘piecew-poly’ (piecewise polytropic stratification
for convection),
‘polytropic’ (polytropic stratification, polytropic
exponent is
mpoly0
),
‘blob’ (puts a gaussian blob in entropy for buoy-
ancy experiments; see Ref. [6] for details)
‘xjump’ (jump in xdirection),
‘hor-tube’ (horizontal flux tube in entropy, ori-
ented in the y-direction).
pertss
[’zero’] additional perturbation to entropy. Currently valid
choices are
’zero’ (no perturbation)
’hexagonal’ (hexagonal perturbation for convec-
tion).
ampl ss
[0.],
widthss
[2ε] amplitude and width for some types of initial en-
tropy.
grads0
[0.] initial entropy gradient for initss=linprof.
radius ss
[0.1] radius of bubble for initss=isentropic.
mpoly0
[1.5],
mpoly1
[1.5],

K.1 Startup parameters for ‘start.in’ 177
mpoly2
[1.5] specific to the solar convection case
initss=piecew-poly: polytropic indices of unstable
(
mpoly0
), stable (
mpoly1
) and top layer (
mpoly2
). If
the flag
isothtop
is set, the top layer is initialized to
be isothermal, otherwise thermal (plus hydrostatic)
equilibrium is assumed for all three layers, which
results in a piecewise polytropic stratification.
isothtop
[0] flag for isothermal top layer for initss=piecew-poly.
khor ss
[1.] horizontal wave number for pertss=hexagonal
Namelist
magnetic init pars
initaa
[’zero’] initialization of magnetic field (vector potential).
Currently valid choices are
‘Alfven-x’ (Alfv´
en wave traveling in the x-
direction; this also sets the velocity),
‘Alfven-z’ (Alfv´
en wave traveling in the z-
direction; this also sets the velocity),
‘Alfvenz-rot’ (same as ‘Alfven-z’, but with rota-
tion),
‘Alfven-circ-x’ (circularly polarized Alfven wave
in x direction),
‘Beltrami-x’ (x-dependent Beltrami wave),
‘Beltrami-y’ (y-dependent Beltrami wave),
‘Beltrami-z’ (z-dependent Beltrami wave),
‘Bz(x)’ (Bz∝cos(kx)),
‘crazy’ (for testing purposes).
‘diffrot’ ([needs to be documented]),
‘fluxrings’ (two interlocked magnetic fluxrings;
see §C.4),
‘gaussian-noise’ (white noise),
‘halfcos-Bx’ ([needs to be documented]),
‘hor-tube’ (horizontal flux tube in B, oriented in
the y-direction).
‘hor-fluxlayer’ (horizontal flux layer),
‘mag-support’ ([needs to be documented]),
‘mode’ ([needs to be documented]),
‘modeb’ ([needs to be documented]),
‘propto-ux’ ([needs to be documented]),
‘propto-uy’ ([needs to be documented]),
‘propto-uz’ ([needs to be documented]),
‘sinxsinz’ (sin xsin z),
‘uniform-Bx’ (uniform field in xdirection),
‘uniform-By’ (uniform field in ydirection),
‘uniform-Bz’ (uniform field in zdirection),
‘zero’ (zero field),

178 THE PENCIL CODE
initaa2
[’zero’] additional perturbation of magnetic field. Currently
valid choices are
‘zero’ (zero perturbation),
‘Beltrami-x’ (x-dependent Beltrami wave),
‘Beltrami-y’ (y-dependent Beltrami wave),
‘Beltrami-z’ (z-dependent Beltrami wave).
amplaa
[0.] amplitude for some types of initial magnetic fields.
amplaa2
[0.] amplitude for some types of magnetic field perturba-
tion.
fring
{
1,2
}[0.],
Iring
{
1,2
}[0.],
Rring
{
1,2
}[1.],
wr
{
1,2
}[0.3] flux, current, outer and inner radius of flux ring 1/2;
see Sect. C.4.
radius
[0.1] used by some initial fields.
epsilonaa
[10−2] used by some initial fields.
widthaa
[0.5] used by some initial fields.
z0aa
[0.] used by some initial fields.
kx aa
[1.],
ky aa
[1.],
kz aa
[1.] wavenumbers used by some initial fields.
lpress equil
[F] flag for pressure equilibrium (can be used in connec-
tion with all initial fields)
Namelist
pscalar init pars
initlncc
[’zero’] initialization of passive scalar (concentration per
unit mass, c). Currently valid choices (for ln c) are
‘zero’ (ln c= 0.),
‘gaussian-noise’ (white noise),
‘wave-x’ (wave in xdirection),
‘wave-y’ (wave in ydirection),
‘wave-z’ (wave in zdirection),
‘tang-discont-z’ (Kelvin-Helmholtz instability),
‘hor-tube’ (horizontal tube in concentration; used
as a marker for magnetic flux tubes).
initlncc2
[’zero’] additional perturbation of passive scalar concentra-
tion c. Currently valid choices are
‘zero’ (δln c= 0.),
‘wave-x’ (add x-directed wave to ln c).
ampllncc
[0.1] amplitude for some types of initial concentration.
ampllncc2
[0.] amplitude for some types of concentration perturba-
tion.
kx lncc
[1.],
ky lncc
[1.],
kz lncc
[1.] wave numbers for some types of initial concentra-
tion.
Namelist
shear init pars

K.2 Runtime parameters for ‘run.in’ 179
qshear
[0.] degree of shear for shearing-box simulations (the
shearing-periodic boundaries are the x-boundaries
and are sheared in the y-direction). The shear veloc-
ity is U=−qΩx ˆ
y.
Namelist
particles ads init pars
init ads mol frac
[0.] initial adsorbed mole fraction
Namelist
particles surf init pars
init surf mol frac
[0.] initial surface mole fraction
Namelist
particles chem init pars
total carbon sites
[1.08e−8] carbon sites per surface area [mol/cm]2
Namelist
particles stalker init pars
dstalk
[0.1] times between printout of stalker data
lstalk xx
[F] particles position
lstalk vv
[F] particles velocity
lstalk uu
[F] gas velocity at particles position
lstalk guu
[F] gas velocity gradient at particles position
lstalk rho
[F] gas density at particles position
lstalk grho
[F] gas density gradient at particles position
lstalk ap
[F] particles diameter
lstalk bb
[T] magnetic field at particles position
lstalk relvel
[F] particles relative velocity to gas
K.2 List of runtime parameters for ‘run.in’
The following table lists all (at the time of writing, September 2002) namelists used
in file ‘run.in’, with the corresponding parameters and their default values (in square
brackets). Default values marked as [start] are taken from ‘start.in’. Any variable re-
ferred to as a
flag
can be set to any nonzero value to switch the corresponding feature
on. Not all parameters are used for a given scenario. This list is not necessarily up to
date; also, in many cases it can only give an idea of the corresponding setup; to get more
insight and the latest set of parameters, you need to look at the code.
Once you have changed any of the ‘*.in’ files, you may want to first execute the command
pc_configtest in order to test the correctness of these configuration files, before you
apply them in an active simulation run.
Variable [default value] Meaning
Namelist
run pars
cvsid
[’’]
svn
identification string, which allows you to keep
track of the version of ‘run.in’.
ip
[14] (anti-)verbosity level: ip=1 produces lots of addi-
tional diagnostic output, ip=14 virtually none.
nt
[0] number of time steps to run. This number can be
increased or decreased during the run by touch
RELOAD.

180 THE PENCIL CODE
it1
[10] write diagnostic output every
it1
time steps (see
Sect. 5.5).
it1d
[it1] write averages every
it1d
time steps (see Sect. 5.8.1).
it1d
has to be greater than or equal to
it1
.
cdt
[0.4] Courant coefficient for advective time step; see §5.15.
cdtv
[0.08] Courant coefficient for diffusive time step; see §5.15.
dt
[0.] time step; if 6= 0., this overwrites the Courant time
step. See §5.15 for a discussion of the latter.
dtmin
[10−6] abort if time step δt < δtmin.
tmax
[1033] don’t run time steps beyond this time. Useful if you
want to run for a given amount of time, but don’t
know the necessary number of time steps.
isave
[100] update current snapshot ‘var.dat’ every
isave
time
steps.
itorder
[3] order of time step (1 for Euler; 2 for 3nd-order, 3 for
3rd-order Runge–Kutta).
dsnap
[100.] save permanent snapshot every
dsnap
time units
to files ‘VARN’, where Ncounts from N= 1
upward. (This information is stored in the file
‘data/tsnap.dat’; see the module
wsnaps.f90
, which
in turn uses the subroutines
out1
and
out2
).
dvid
[100.] write two-dimensional sections for generation of
videos every
dvid
time units (not timesteps; see the
subroutines
out1
and
out2
in the code).
iwig
[0] if 6= 0, apply a Nyquist filter (a filter eliminating any
signal at the Nyquist frequency, but affecting large
scales as little as possible) every
iwig
time steps to
logarithmic density (sometimes necessary with con-
vection simulations).
ix
[−1],
iy
[−1],
iz
[−1],
iz2
[−1] position of slice planes for video files. Any negative
value of some of these variables will be overwritten
according to the value of
slice position
. See §5.7) for
details.
slice position
[’p’] symbolic specification of slice position. Currently
valid choices are
’p’ (periphery of the box)
’m’ (middle of the box)
’e’ (equator for half-sphere calculations, i. e. x,y
centered, zbottom)
These settings are overridden by explicitly setting
ix
,
iy
,
iz
or
iz2
. See §5.7) for details.
zbot slice
[value] z position of slice xy-plane. The value can be any float
number inside the z domain. These settings are over-
ridden by explicitly setting
ix
,
iy
,
iz
or
iz2
. Saved as
slice with the suffix
xy
. See §5.7) for details.
ztop slice
[value] z position of slice xy-plane. The value can be any float
number inside the z domain. These settings are over-
ridden by explicitly setting
ix
,
iy
,
iz
or
iz2
. Saved as
slice with the suffix
xy2
. See §5.7) for details.

K.2 Runtime parameters for ‘run.in’ 181
tavg
[0] averaging time τavg for time averages (if 6= 0); at the
same time, time interval for writing time averages.
See §5.8.4 for details.
idx tavg
[(0,0,...,0)] indices of variables to time-average. See §5.8.4 for
details.
d2davg
[100.] time interval for azimuthal and z-averages, i.e. the
averages that produce 2d data. See §5.8.3 for details.
ialive
[0] if 6= 0, each processor writes the current time step
to ‘alive.info’ every
ialive
time steps. This provides
the best test that the job is still alive. (This can be
used to find out which node has crashed if there is a
problem and the run is hanging.)
bcx
[(’p’,’p’, . . . )],
bcy
[(’p’,’p’, . . . )],
bcz
[(’p’,’p’, . . . )] boundary conditions. See Sect. 5.16 for a discussion
of where and how to set these.
random gen
[start] see start parameters, p. 173
lwrite aux
[start] if set T, auxiliary variables (those calculated at each
step, but not evolved mathematically) to ‘var.dat’
and ‘VAR’ files after the evolved quantities.
Namelist
hydro run pars
Omega
[0.] magnitude of angular velocity for
Coriolis force
(note: the centrifugal force is turned off by default,
unless lcentrifugal_force=T is set).
theta
[0.] direction of angular velocity in degrees (θ= 0 for z-
direction, θ= 90 for the negative x-direction, corre-
sponding to a box located at the equator of a rotating
sphere. Thus, e.g., θ= 60 corresponds to 30◦latitude.
(Note: prior to April 29, 2007, there was a minus sign
in the definition of θ.)
ttransient
[0.] initial time span for which to do something special
(transient). Currently just used to smoothly switch
on heating [Should be in
run pars
, rather than here].
dampu
[0.],
tdamp
[0.],
ldamp fade
[F] damp motions during the initial time interval 0< t <
tdamp with a damping term −
dampu
(u). If
ldamp -
fade
is set, smoothly reduce damping to zero over
the second half of the time interval
tdamp
. Initial ve-
locity damping is useful for situations where initial
conditions are far from equilibrium.
dampuint
[0.], weighting of damping external to spherical region
(see
wdamp
,
damp
ubelow).
dampuext
[0.], weighting of damping in internal spherical region
(see
wdamp
,
damp
ubelow).
rdampint
[0.], radius of internal damping region
rdampext
[impossible], radius of external damping region, used in place of
former variable
rdamp

182 THE PENCIL CODE
wdamp
[0.2], permanently damp motions in |x|< rdampint
with damping term −
damp
uint uχ(r−rdampint)
or |x|> rdampext with damping term
−
damp
uext uχ(r−rdampext), where χ(·)is a smooth
profile of width
wdamp
.
ampl forc
[0.], amplitude of the ux-forcing or uy-forcing on the verti-
cal boundaries that is of the form ux(t) = ampl forc∗
sin(kforc ∗x)∗cos(w forc ∗t)[must be used in
connection with bcx=’g’ or bcz=‘g’ and force lower -
bound=‘vel time’ or force upper bound=‘vel time’]
k forc
[0.], corresponding horizontal wavenumber
w forc
[0.] corresponding frequency
Namelist
density run pars
cs0
[start],
rho0
[start],
gamma
[start] see start parameters, p. 175
cdiffrho
[0.] Coefficient for mass diffusion (diffusion term will be
cdiffrho δx cs0.
cs2bot
[start],
cs2top
[start] squared sound speed at bottom and top for boundary
condition ‘c2’.
lupw lnrho
[.false.] use 5th-order upwind derivative operator for the ad-
vection term u·∇ln ρto avoid spurious Nyquist sig-
nal (‘wiggles’); see §H.2.
Namelist
entropy run pars
hcond0
[0.],
hcond1
[start],
hcond2
[start] specific to the solar convection case
initss=piecew-poly: heat conductivities Kin
the individual layers.
hcond0
is the value Kunst in
the unstable layer,
hcond1
is the ratio Kstab/Kunst for
the stable layer, and
hcond2
is the ratio Ktop/Kunst
for the top layer. The function K(z)is not discontin-
uous, as the transition between the different values
is smoothed over the width
widthss
. If
hcond1
or
hcond2
are not set, they are calculated according to
the polytropic indices of the initial profile, K∝m+1.
iheatcond
[’K-const’] select type of heat conduction. Currently valid
choices are
‘K-const’ (constant heat conductivity),
‘K-profile’ (vertical or radial profile),
‘chi-const’ (constant thermal diffusivity),
‘magnetic’ (heat conduction by electrons in mag-
netic field – currently still experimental).
lcalc heatcond constchi
[F] flag for assuming thermal diffusivity χ=K/(cpρ) =
const, rather than K=const (which is the
default). This is currently only correct with
‘noionization.f90’. Superseded by
iheatcond
.

K.2 Runtime parameters for ‘run.in’ 183
chi
[0.] value of χwhen lcalc_heatcond_constchi=T.
widthss
[start] width of transition region between layers. See start
parameters, p. 177.
isothtop
[start] flag for isothermal top layer for solar convection case.
See start parameters, p. 177.
luminosity
[0.],
wheat
[0.1] strength and width of heating region.
cooltype
[’Temp’] type of cooling; currently only implemented for spher-
ical geometry. Currently valid choices are
‘Temp’,‘cs2’ (cool temperature toward c2
s=
cs2cool
) with a cooling term
−C =−ccool
c2
s−c2
scool
c2
scool
)
‘Temp-rho’,cs2-rho (cool temperature toward c2
s=
cs2cool
) with a cooling term
−C =−ccool ρc2
s−c2
scool
c2
scool
— this avoids numerical instabilities in low-
density regions [currently, the cooling coeffi-
cient ccool ≡
cool
is not taken into account when
the time step is calculated])
‘entropy’ (cool entropy toward 0.).
cool
[0.],
wcool
[0.1] strength ccool and smoothing width of cooling region.
rcool
[1.] radius of cooling region: cool for |x| ≥
rcool
.
Fbot
[start] heat flux for bottom boundary condition ‘c1’. For
polytropic atmospheres, if
Fbot
is not set, it will be
calculated from the value of
hcond0
in ‘start.x’, pro-
vided the entropy boundary condition is set to ‘c1’.
chi t
[0.] entropy diffusion coefficient for diffusive term
∂s/∂t =...+χt∇2sin the entropy equation, that can
represent some kind of turbulent (sub-grid) mixing.
It is probably a bad idea to combine this with heat
conduction
hcond0
6= 0.
lupw ss
[.false.] use 5th-order upwind derivative operator for the ad-
vection term u·∇sto avoid spurious Nyquist signal
(‘wiggles’); see §H.2.
tauheat buffer
[0.] time scale for heating to target temperature
(=
TTheat buffer
); zero disables the buffer zone.
zheat buffer
[0.]zcoordinate of the thermal buffer zone. Buffering is
active in |z|>
TTheat buffer
.
dheat buffer1
[0.] Inverse thickness of transition to buffered layer.
TTheat buffer
[0.] target temperature in thermal buffer zone (zdirec-
tion only).

184 THE PENCIL CODE
lhcond global
[F] flag for calculating the heat conductivity K(and
also ∇log K) globally using the global arrays facility.
Only valid when
iheatcond
=‘K-profile’.
Namelist
magnetic run pars
B ext
[(0., 0., 0.)] uniform background magnetic field (for fully periodic
boundary conditions, uniform fields need to be explic-
itly added, since otherwise the vector potential Ahas
a linear x-dependence which is incompatible with pe-
riodicity).
lignore Bext in b2
[F] add uniform background magnetic field when
or
luse Bext in b2
[T] computing b2pencils
eta
[0.] magnetic diffusivity η= 1/(µ0σ), where σis the elec-
tric conductivity.
height eta
[0.],
eta out
[0.] used to add extra diffusivity in a halo region.
eta int
[0.] used to add extra diffusivity inside sphere of radius
r int
.
eta ext
[0.] used to add extra diffusivity outside sphere of radius
r ext
.
kinflow
[’’] set type of flow fixed with ‘nohydro’. Currently the
only recognized value is ’ABC’ for an ABC flow; all
other values lead to u=0.
kx
[1.],
ky
[1.],
kz
[1.] wave numbers for ABC flow.
ABC A
[1.],
ABC B
[1.],
ABC C
[1.] amplitudes A,Band Cfor ABC flow.
Namelist
pscalar run pars
pscalar diff
[0.] diffusion for passive scalar concentration c.
tensor pscalar diff
[0.] coefficient for non-isotropic diffusion of passive
scalar.
reinitialize lncc
[F] reinitialize the passive scalar to the value of cc const
in start.in at next run
Namelist
forcing run pars
iforce
[2] select form of forcing in the equation of motion; cur-
rently valid choices are
’zero’ (no forcing),
’irrotational’ (irrotational forcing),
’helical’ (helical forcing),
’fountain’ (forcing of “fountain flow”; see Ref. [12]),
’horizontal-shear’ (forcing localized horizontal si-
nusoidal shear).
’variable_gravz’ (time-dependent vertical gravity
for forcing internal waves),
iforce2
[0] select form of additional forcing in the equation of
motion; valid choices are as for
iforce
.

K.2 Runtime parameters for ‘run.in’ 185
force
[0.] amplitude of forcing.
relhel
[1.] helicity of forcing. The parameter
relhel
corresponds
to σintroduced in Sect. G.2. (σ=±1corresponds to
maximum helicity of either sign).
height ff
[0.] multiply forcing by z-dependent profile of width
height ff
(if 6= 0) .
r ff
[0.] if 6= 0, multiply forcing by spherical cutoff profile (of
radius
r ff
) and flip signs of helicity at equatorial
plane.
width ff
[0.5] width of vertical and radial profiles for modifying
forcing.
kfountain
[5] horizontal wavenumber of the fountain flow.
fountain
[1.] amplitude of the fountain flow.
omega ff
[1.] frequency of the cos or sin forcing [e.g. cos(omega -
ff*t)].
ampl ff
[1.] amplitude of forcing in front of cos or sin [e.g. ampl -
ff*cos(omega ff*t)].
Namelist
grav run pars
zref
[start],
gravz
[start],
grav profile
[start] see p. 175.
nu epicycle
[start] see Eq. (130) in Sect. C.5.
Namelist
viscosity run pars
nu
[0.] kinematic viscosity.
nu hyper2
[0.] kinematic hyperviscosity (with ∇4u).
nu hyper3
[0.] kinematic hyperviscosity (with ∇6u).
zeta
[0.] bulk viscosity.
ivisc
[’nu-const’] select form of viscous term (see §6.2); currently valid
choices are
’nu-const’ – viscous force for ν=const, Fvisc =
ν(∇2u+1
3∇∇ ·u+ 2S·∇ln ρ)
’rho_nu-const’ – viscous force for µ≡ρν =const,
Fvisc = (µ/ρ)(∇2u+1
3∇∇ ·u). With this op-
tion, the input parameter
nu
actually sets the
value of µ/ρ0(
rho0
=ρ0is another input param-
eter, see pp. 175 and 182)
’simplified’ – simplified viscous force Fvisc =
ν∇2u
Namelist
shear run pars
qshear
[start] See p. 179.
Namelist
particles run pars
ldragforce dust par
[F] dragforce on particles
ldragforce gas par
[F] particle-gas friction force
ldraglaw steadystate
[F] particle forces only with 1
τ∆v
lpscalar sink
[F] particles consume passive scalar
pscalar sink rate
[0] volumetric pscalar consumption rate

186 THE PENCIL CODE
lbubble
[F] addition of the virtual mass term
Namelist
particles ads run pars
placeholder
[start] placeholder
Namelist
particles surf run pars
lspecies transfer [T]
Species transfer from solid to fluid phase
Namelist
particles chem run pars
lthiele [T]
Modeling of particle porosity by application of Thiele
modulus
K.3 List of parameters for ‘print.in’
The following table lists all possible inputs to the file ‘print.in’ that are documented.
Variable Meaning
Module ‘cdata.f90’
it
number of time step (since beginning of job only)
t
time t(since start.csh)
dt
time step δt
walltime
wall clock time since start of run.x, in seconds
Rmesh
Rmesh
Rmesh3
R(3)
mesh
maxadvec
maxadvec
Module ‘hydro.f90’
u2tm
Du(t)·Rt
0u(t′)dt′E
uotm
Du(t)·Rt
0ω(t′)dt′E
outm
Dω(t)·Rt
0u(t′)dt′E
fkinzm
1
2̺u2uz
u2m
hu2i
uxpt
ux(x1, y1, z1, t)
uypt
uy(x1, y1, z1, t)
uzpt
uz(x1, y1, z1, t)
uxp2
ux(x2, y2, z2, t)
uyp2
uy(x2, y2, z2, t)
uzp2
uz(x2, y2, z2, t)
urms
hu2i1/2
urmsx
hu2i1/2for the hydro xaver range
urmsz
hu2i1/2for the hydro zaver range
durms
hδu2i1/2
umax
max(|u|)
umin
min(|u|)
uxrms
hu2
xi1/2
uyrms
u2
y1/2

K.3 Parameters for ‘print.in’ 187
uzrms
hu2
zi1/2
uxmin
min(|ux|)
uymin
min(|uy|)
uzmin
min(|uz|)
uxmax
max(|ux|)
uymax
max(|uy|)
uzmax
max(|uz|)
uxm
huxi
uym
huyi
uzm
huzi
ux2m
hu2
xi
uy2m
u2
y
uz2m
hu2
zi
ux2ccm
hu2
xcos2kzi
ux2ssm
u2
xsin2kz
uy2ccm
u2
ycos2kz
uy2ssm
u2
ysin2kz
uxuycsm
huxuycos kz sin kzi
uxuym
huxuyi
uxuzm
huxuzi
uyuzm
huyuzi
umx
huxi
umy
huyi
umz
huzi
omumz
DhWixy · hUixyE(xy-averaged mean cross helicity produc-
tion)
umamz
Dhuixy · hAixyE
umbmz
DhUixy · hBixyE(xy-averaged mean cross helicity produc-
tion)
umxbmz
DhUixy × hBixyEz(xy-averaged mean emf)
rux2m
hρu2
xi
ruy2m
ρu2
y
ruz2m
hρu2
zi
divum
hdivu)i
rdivum
h̺divu)i
divu2m
h(divu)2i
gdivu2m
h(grad divu)2i
u3u21m
hu3u2,1i
u1u32m
hu1u3,2i
u2u13m
hu2u1,3i
u2u31m
hu2u3,1i
u3u12m
hu3u1,2i
u1u23m
hu1u2,3i
ruxm
h̺uxi(mean x-momentum density)
ruym
h̺uyi(mean y-momentum density)
ruzm
h̺uzi(mean z-momentum density)
ruxtot
hρ|u|i (mean absolute x-momentum density)
rumax
max(̺|u|)(maximum modulus of momentum)

188 THE PENCIL CODE
ruxuym
h̺uxuyi(mean Reynolds stress)
ruxuzm
h̺uxuzi(mean Reynolds stress)
ruyuzm
h̺uyuzi(mean Reynolds stress)
divrhourms
|∇ · (̺u)|rms
divrhoumax
|∇ · (̺u)|max
rlxm
hρyuz−zuyi
rlym
hρzux−xuzi
rlzm
hρxuy−yuxi
rlx2m
h(ρyuz−zuy)2i
rly2m
h(ρzux−xuz)2i
rlz2m
h(ρxuy−yux)2i
tot ang mom
Total angular momentum in spherical coordinates about the
axis.
dtu
δt/[cδt δx/ max |u|](time step relative to advective time step;
see §5.15)
oum
hω·ui
ou int
RVω·udV
fum
hf·ui
odel2um
hω∇2ui
o2m
hω2i ≡ h(∇ × u)2i
orms
hω2i1/2
omax
max(|ω|)
ox2m
hω2
xi
oy2m
ω2
y
oz2m
hω2
zi
oxuzxm
hωxuz,xi
oyuzym
hωyuz,yi
oxoym
hωxωyi
oxozm
hωxωzi
oyozm
hωyωzi
qfm
hq·fi
q2m
hq2i
qrms
hq2i1/2
qmax
max(|q|)
qom
hq·ωi
quxom
hq·(u×ω)i
pvzm
hωz+ 2Ω/̺i(z component of potential vorticity)
oumphi
hω·uiϕ
ugurmsx
(u∇u)21/2for the hydro xaver range
ugu2m
hu∇ui2
dudx
δu
δx
Marms
hu2/c2
si(rms Mach number)
Mamax
max |u|/cs(maximum Mach number)
ekin
1
2̺u2
ekintot
RV
1
2̺u2dV
uxglnrym
hux∂yln ̺i
uyglnrxm
huy∂xln ̺i
uzdivum
huz∇ · ui
uxuydivum
huxuy∇ · ui

K.3 Parameters for ‘print.in’ 189
divuHrms
(∇H·uH)rms
uxxrms
urms
x,x
uyyrms
urms
y,y
uxzrms
urms
x,z
uyzrms
urms
y,z
uzyrms
urms
z,y
dtF
δt/[cδt δx/ max |F|](time step relative to max force time step;
see §5.15) Rur(θ, φ)Ym
ℓ(θ, φ) sin(θ)dθdφ
udpxxm
components of symmetric tensor hui∂jp+uj∂ipi
Module ‘density.f90’
rhom
h̺i(mean density)
rhomxmask
h̺ifor the density xaver range
rhomzmask
h̺ifor the density zaver range
drho2m
<(̺−̺0)2>
drhom
< ̺ −̺0>
rhomin
min(ρ)
rhomax
max(ρ)
lnrhomin
min(log ρ)
lnrhomax
max(log ρ)
ugrhom
hu· ∇̺i
uglnrhom
hu· ∇ln ̺i
totmass
R̺ dV
mass
R̺ dV
vol
RdV (volume)
grhomax
max(|∇̺|)
Module ‘entropy.f90’
dtc
δt/[cδt δx/max cs](time step relative to acoustic time step;
see §5.15)
ethm
h̺ei(mean thermal [=internal] energy)
ssruzm
hs̺uz/cpi
ssuzm
hsuz/cpi
ssm
hs/cpi(mean entropy)
ss2m
h(s/cp)2i(mean squared entropy)
eem
hei
ppm
hpi
csm
hcsi
cgam
hcγi
pdivum
hp∇ · ui
fradbot
RFbot ·dS
fradtop
RFtop ·dS
TTtop
RTtopdS
ethtot
RV̺e dV (total thermal [=internal] energy)
dtchi
δt/[cδt,vδx2/χmax](time step relative to time step based on
heat conductivity; see §5.15)
Hmax
Hmax (net heat sources summed see §5.15)
tauhmin
Hmax (net heat sources summed see §5.15)
dtH
δt/[cδt,scvT/Hmax](time step relative to time step based on
heat sources; see §5.15)

190 THE PENCIL CODE
yHm
mean hydrogen ionization
yHmax
max of hydrogen ionization
TTm
hTi
TTmax
Tmax
TTmin
Tmin
gTmax
max(|∇T|)
ssmax
smax
ssmin
smin
gTrms
(∇T)rms
gsrms
(∇s)rms
gTxgsrms
(∇T× ∇s)rms
fconvm
hcp̺uzTi
ufpresm
h−u/ρ∇pi
Kkramersm
hKkramersiModule ‘magnetic.f90’
eta tdep
t-dependent η
ab int
RA·BdV
jb int
Rj·BdV
b2tm
Db(t)·Rt
0b(t′)dt′E
bjtm
Db(t)·Rt
0j(t′)dt′E
jbtm
Dj(t)·Rt
0b(t′)dt′E
b2ruzm
B2ρuz
b2uzm
B2uz
ubbzm
h(u·B)Bzi
b1m
h|B|i
b2m
B2
EEM
B2/2
b4m
B4
bm2
max(B2)
j2m
j2
jm2
max(j2)
abm
hA·Bi
abumx
huxA·Bi
abumy
huyA·Bi
abumz
huzA·Bi
abmh
hA·Bi(temp)
abmn
hA·Bi(north)
abms
hA·Bi(south)
abrms
h(A·B)2i1/2
jbrms
h(j·B)2i1/2
ajm
hj·Ai
jbm
hj·Bi
jbmh
hJ·Bi(temp)
jbmn
hJ·Bi(north)
jbms
hJ·Bi(south)
ubm
hu·Bi
dubrms
h(u−B)2i1/2

K.3 Parameters for ‘print.in’ 191
dobrms
h(ω−B)2i1/2
uxbxm
huxBxi
uybxm
huyBxi
uzbxm
huzBxi
uxbym
huxByi
uybym
huyByi
uzbym
huzByi
uxbzm
huxBzi
uybzm
huyBzi
uzbzm
huzBzi
cosubm
hU·B/(|U||B|)i
jxbxm
hjxBxi
jybxm
hjyBxi
jzbxm
hjzBxi
jxbym
hjxByi
jybym
hjyByi
jzbym
hjzByi
jxbzm
hjxBzi
jybzm
hjyBzi
jzbzm
hjzBzi
uam
hu·Ai
ujm
hu·Ji
fbm
hf·Bi
fxbxm
hfxBxi
epsM
ηµ0j2
epsAD
hρ−1tAD(J×B)2i(heating by ion-neutrals friction)
bxpt
Bx(x1, y1, z1, t)
bypt
By(x1, y1, z1, t)
bzpt
Bz(x1, y1, z1, t)
jxpt
Jx(x1, y1, z1, t)
jypt
Jy(x1, y1, z1, t)
jzpt
Jz(x1, y1, z1, t)
Expt
Ex(x1, y1, z1, t)
Eypt
Ey(x1, y1, z1, t)
Ezpt
Ez(x1, y1, z1, t)
axpt
Ax(x1, y1, z1, t)
aypt
Ay(x1, y1, z1, t)
azpt
Az(x1, y1, z1, t)
bxp2
Bx(x2, y2, z2, t)
byp2
By(x2, y2, z2, t)
bzp2
Bz(x2, y2, z2, t)
jxp2
Jx(x2, y2, z2, t)
jyp2
Jy(x2, y2, z2, t)
jzp2
Jz(x2, y2, z2, t)
Exp2
Ex(x2, y2, z2, t)
Eyp2
Ey(x2, y2, z2, t)
Ezp2
Ez(x2, y2, z2, t)
axp2
Ax(x2, y2, z2, t)
ayp2
Ay(x2, y2, z2, t)
azp2
Az(x2, y2, z2, t)

192 THE PENCIL CODE
exabot
RE×AdS|bot
exatop
RE×AdS|top
emag
RV
1
2µ0B2dV
brms
B21/2
bfrms
DB′2E1/2
bf2m
DB′2E
bf4m
DB′4E
bmax
max(|B|)
bxmin
min(|Bx|)
bymin
min(|By|)
bzmin
min(|Bz|)
bxmax
max(|Bx|)
bymax
max(|By|)
bzmax
max(|Bz|)
bbxmax
max(|Bx|)excludingBvext
bbymax
max(|By|)excludingBvext
bbzmax
max(|Bz|)excludingBvext
jxmax
max(|jvx|)
jymax
max(|jvy|)
jzmax
max(|jvz|)
jrms
j21/2
hjrms
j21/2
jmax
max(|j|)
vArms
B2/̺1/2
vAmax
max(B2/̺)1/2
dtb
δt/[cδt δx/vA,max](time step relative to Alfv´
en time step; see
§5.15)
dteta
δt/[cδt,vδx2/ηmax](time step relative to resistive time step;
see §5.15)
a2m
A2
arms
A21/2
amax
max(|A|)
divarms
h(∇ · A)2i1/2
beta1m
B2/(2µ0p)(mean inverse plasma beta)
beta1max
max[B2/(2µ0p)] (maximum inverse plasma beta)
betam
hβi
betamax
max β
betamin
min β
bxm
hBxi
bym
hByi
bzm
hBzi
bxbym
hBxByi
bmx
DhBi2
yzE1/2(energy of yz-averaged mean field)
bmy
hBi2
xz1/2(energy of xz-averaged mean field)
bmz
DhBi2
xyE1/2(energy of xy-averaged mean field)

K.3 Parameters for ‘print.in’ 193
bmzS2
DhBSi2
xyE
bmzA2
DhBAi2
xyE
jmx
DhJi2
yzE1/2(energy of yz-averaged mean current density)
jmy
hJi2
xz1/2(energy of xz-averaged mean current density)
jmz
DhJi2
xyE1/2(energy of xy-averaged mean current density)
bmzph
Phase of a Beltrami field
bmzphe
Error of phase of a Beltrami field
bsinphz
sine of phase of a Beltrami field
bcosphz
cosine of phase of a Beltrami field
emxamz3
DhEixy × hAixyE(xy-averaged mean field helicity flux)
embmz
DhEixy · hBixyE(xy-averaged mean field helicity production
)
ambmz
DhAixy · hBixyE(magnetic helicity of xy-averaged mean
field)
ambmzh
DhAixy · hBixyE(magnetic helicity of xy-averaged mean
field, temp)
ambmzn
DhAixy · hBixyE(magnetic helicity of xy-averaged mean
field, north)
ambmzs
DhAixy · hBixyE(magnetic helicity of xy-averaged mean
field, south)
jmbmz
DhJixy · hBixyE(current helicity of xy-averaged mean field)
Rmmz
D|u×B|
|ηJ|Exy
kx aa
kx
kmz
DhJixy · hBixyE/DhBi2
xyE
bx2m
hB2
xi
by2m
B2
y
bz2m
hB2
zi
uxbm
hu×Bi · B0/B2
0
jxbm
hj×Bi · B0/B2
0
magfricmax
hj×Bi · B2
b3b21m
hB3B2,1i
b3b12m
hB3B1,2i
b1b32m
hB1B3,2i
b1b23m
hB1B2,3i
b2b13m
hB2B1,3i
b2b31m
hB2B3,1i
uxbmx
h(u×B)xi
uxbmy
h(u×B)yi
uxbmz
h(u×B)zi
jxbmx
h(j×B)xi
jxbmy
h(j×B)yi
jxbmz
h(j×B)zi
examx
hE×Ai|x

194 THE PENCIL CODE
examy
hE×Ai|y
examz
hE×Ai|z
exjmx
hE×Ji|x
exjmy
hE×Ji|y
exjmz
hE×Ji|z
dexbmx
h∇ × E×Bi|x
dexbmy
h∇ × E×Bi|y
dexbmz
h∇ × E×Bi|z
phibmx
hφBi|x
phibmy
hφBi|y
phibmz
hφBi|z
b2divum
B2∇ · u
jdel2am
hJ· ∇2A)i
ujxbm
hu·(J×B)i
jxbrmax
max(|J×B/ρ|)
jxbr2m
h(J×B/ρ)2i
bmxy rms
p[hbxiz(x, y)]2+ [hbyiz(x, y)]2+ [hbziz(x, y)]2
etasmagm
Mean of Smagorinsky resistivity
etasmagmin
Min of Smagorinsky resistivity
etasmagmax
Max of Smagorinsky resistivity
etavamax
Max of artificial resistivity η∼vA
etajmax
Max of artificial resistivity η∼J/√ρ
etaj2max
Max of artificial resistivity η∼J2/ρ
etajrhomax
Max of artificial resistivity η∼J/ρ
cosjbm
hJ·B/(|J||B|)i
jparallelm
Mean value of the component of J parallel to B
jperpm
Mean value of the component of J perpendicular to B
hjparallelm
Mean value of the component of Jhyper parallel to B
hjperpm
Mean value of the component of Jhyper perpendicular to B
brmsx
B21/2for the magnetic xaver range
brmsz
B21/2for the magnetic zaver range
Exmxy
hExiz
Eymxy
hEyiz
Ezmxy
hEziz
Module ‘pscalar.f90’
rhoccm
h̺ci
ccmax
max(c)
ccglnrm
hc∇z̺iModule ‘1D_loop.f90’
dtchi2
heatconduction
dtrad
radiative loss from RTV
dtspitzer
Spitzer heat conduction time step
qmax
max of heat flux vector
qrms
rms of heat flux vector
Module ‘advective_gauge.f90’
Lamm
hΛi
Lampt
Λ(x1, y1, z1)

K.3 Parameters for ‘print.in’ 195
Lamp2
Λ(x2, y2, z2)
Lamrms
hΛ2i1/2
Lambzm
hΛBzi
Lambzmz
hΛBzixy
gLambm
hΛBi
apbrms
h(A′B)2i1/2
jxarms
h(J×A)2i1/2
jxaprms
h(J×A′)2i1/2
jxgLamrms
h(J× ∇Λ)2i1/2
gLamrms
h(∇Λ)2i1/2
divabrms
h[(∇ · A)B]2i1/2
divapbrms
h[(∇ · A′)B]2i1/2
d2Lambrms
h[(∇2Λ)B]2i1/2
d2Lamrms
h[∇2Λ]2i1/2
Module ‘anelastic.f90’
rhom
h̺i(mean density)
ugrhom
hu· ∇̺i
mass
R̺ dV
divrhoum
h∇ · (̺u)i
divrhourms
|∇ · (̺u)|rms
divrhoumax
|∇ · (̺u)|max
Module ‘bfield.f90’
bmax
max B
bmin
min B
brms
hB2i1/2
bm
hBi
b2m
hB2i
bxmax
max |Bx|
bymax
max |By|
bzmax
max |Bz|
bxm
hBxi
bym
hByi
bzm
hBzi
bx2m
hB2
xi
by2m
hB2
yi
bz2m
hB2
zi
bxbym
hBxByi
bxbzm
hBxBzi
bybzm
hByBzi
dbxmax
max |Bx−Bext,x|
dbymax
max |By−Bext,y|
dbzmax
max |Bz−Bext,z|
dbxm
hBx−Bext,xi
dbym
hBy−Bext,yi
dbzm
hBz−Bext,zi
dbx2m
h(Bx−Bext,x)2i
dby2m
h(By−Bext,y)2i

196 THE PENCIL CODE
dbz2m
h(Bz−Bext,z)2i
jmax
max J
jmin
min J
jrms
hJ2i1/2
jm
hJi
j2m
hJ2i
jxmax
max |Jx|
jymax
max |Jy|
jzmax
max |Jz|
jxm
hJxi
jym
hJyi
jzm
hJzi
jx2m
hJ2
xi
jy2m
hJ2
yi
jz2m
hJ2
zi
divbmax
max |∇ · B|
divbrms
h(∇ · B)2i1/2
betamax
max β
betamin
min β
betam
hβi
vAmax
max vA
vAmin
min vA
vAm
hvAiModule ‘chemistry.f90’
dtchem
dtchem
Module ‘chemistry_simple.f90’
dtchem
dtchem
Module ‘chiral_fluids.f90’
mu5m
hµ5i
mu5rms
hµ2
5i1/2
bgmu5rms
h(B· ∇µ5)2i1/2
bgtheta5rms
h(B· ∇θ5)2i1/2
theta5m
hθ5i
theta5rms
hθ2
5i1/2
Module ‘chiral_fluids_gradtheta.f90’
mu5m
hµ5i
mu5rms
hµ2
5i1/2
bgmu5rms
h(B· ∇µ5)2i1/2
bgtheta5rms
h(B· ∇θ5)2i1/2
gtheta5rms
h(∇θ5)2i1/2
gmu5rms
h(∇µ5)2i1/2
gtheta5mx
h∇θ5xi
gtheta5my
h∇θ5yi
gtheta5mz
h∇θ5ziModule ‘chiral_mhd.f90’

K.3 Parameters for ‘print.in’ 197
mu5m
hµ5i
mu5rms
hµ2
5i1/2
gmu5rms
h(∇µ5)2i1/2
gmu5mx
h∇µ5ix
gmu5my
h∇µ5iy
gmu5mz
h∇µ5iz
bgmu5rms
h(B· ∇µ5)2i1/2
dt mu5 1
min(µ5/B2)δx/(λη)
dt mu5 2
(ληmin(B2))−1
dt mu5 3
δx2/D5
dt bb 1
δx/(ηmax(µ5))
dt chiral
total time-step contribution from chiral MHD
Module ‘coronae.f90’
dtchi2
δt/[cδt,vδx2/χmax](time step relative to time step based on
heat conductivity; see §5.15)
dtspitzer
Spitzer heat conduction time step
dtrad
radiative loss from RTV
Module ‘cosmicray_current.f90’
ekincr
1
2̺u2
cr
ethmcr
h̺crecri
Module ‘density_stratified.f90’
mass
Rρ d3x
rhomin
min |ρ|
rhomax
max |ρ|
drhom
h∆ρ/ρ0i
drho2m
h(∆ρ/ρ0)2i
drhorms
h∆ρ/ρ0irms
drhomax
max |∆ρ/ρ0|
Module ‘detonate.f90’
detn
Number of detonated sites (summed over time steps between
adjacent outputs)
dettot
Total energy input (summed over time steps between adjacent
outputs)
Module ‘dustdensity.f90’
KKm
PTcoag
k
KK2m
PTcoag
k
MMxm
PMx
k,coag
MMym
PMy
k,coag
MMzm
PMz
k,coag
Module ‘entropy_anelastic.f90’
dtc
δt/[cδt δx/max cs](time step relative to acoustic time step;
see §5.15)
ethm
h̺ei(mean thermal [=internal] energy)
ssm
hs/cpi(mean entropy)

198 THE PENCIL CODE
ss2m
h(s/cp)2i(mean squared entropy)
eem
hei
ppm
hpi
csm
hcsi
pdivum
hp∇ui
fradbot
RFbot ·dS
fradtop
RFtop ·dS
TTtop
RTtopdS
ethtot
RV̺e dV (total thermal [=internal] energy)
dtchi
δt/[cδt,vδx2/χmax](time step relative to time step based on
heat conductivity; see §5.15)
ssmxy
hsiz
ssmxz
hsiy
Module ‘gravitational_waves.f90’
hhT2m
hh2
Ti
hhX2m
hh2
Xi
hhThhXm
hhThXi
ggTpt
gT(x1, y1, z1, t)
strTpt
ST(x1, y1, z1, t)
strXpt
SX(x1, y1, z1, t)
Module ‘gravitational_waves_hij6.f90’
h22rms
hrms
22
h33rms
hrms
33
h23rms
hrms
23
g11pt
g11(x1, y1, z1, t)
g22pt
g22(x1, y1, z1, t)
g33pt
g33(x1, y1, z1, t)
g12pt
g12(x1, y1, z1, t)
g23pt
g23(x1, y1, z1, t)
g31pt
g31(x1, y1, z1, t)
hhTpt
hT(x1, y1, z1, t)
hhXpt
hX(x1, y1, z1, t)
ggTpt
˙
hT(x1, y1, z1, t)
ggXpt
˙
hX(x1, y1, z1, t)
hhTp2
hT(x1, y1, z1, t)
hhXp2
hX(x1, y1, z1, t)
ggTp2
˙
hT(x1, y1, z1, t)
ggXp2
˙
hX(x1, y1, z1, t)
hrms
hh2
T+h2
Xi1/2
EEGW
hg2
T+g2
Xic2/(32πG)
gg2m
hg2
T+g2
Xi
hhT2m
hh2
Ti
hhX2m
hh2
Xi
hhTXm
hhThXi
ggT2m
hg2
Ti
ggX2m
hg2
Xi
ggTXm
hgTgXi
ggTm
hgTi

K.3 Parameters for ‘print.in’ 199
ggXm
hgXiModule ‘gravity_simple.f90’
epot
h̺Φgravi(mean potential energy)
epottot
RV̺ΦgravdV (total potential energy)
ugm
hu·giModule ‘heatflux.f90’
dtspitzer
Spitzer heat conduction time step
dtq
heatflux time step
dtq2
heatflux time step due to tau
qmax
max(|q|)
qxmin
min(|qx|)
qymin
min(|qy|)
qzmin
min(|qz|)
qxmax
max(|qx|)
qymax
max(|qy|)
qzmax
max(|qz|)
qrms
rms of heat flux vector
qsatmin
minimum of qsat/qabs
qsatrms
rms of qsat/abs
Module ‘lorenz_gauge.f90’
phim
hφi
phipt
φ(x1, y1, z1)
phip2
φ(x2, y2, z2)
phibzm
hφBzi
phibzmz
hφBzixy
Module ‘magnetic_shearboxJ.f90’
ab int
RA·BdV
jb int
Rj·BdV
b2tm
Db(t)·Rt
0b(t′)dt′E
bjtm
Db(t)·Rt
0j(t′)dt′E
jbtm
Dj(t)·Rt
0b(t′)dt′E
b2ruzm
B2ρuz
b2uzm
B2uz
ubbzm
h(u·B)Bzi
b1m
h|B|i
b2m
B2
bm2
max(B2)
j2m
j2
jm2
max(j2)
abm
hA·Bi
abumx
huxA·Bi
abumy
huyA·Bi
abumz
huzA·Bi
abmh
hA·Bi(temp)
abmn
hA·Bi(north)

200 THE PENCIL CODE
abms
hA·Bi(south)
abrms
h(A·B)2i1/2
jbrms
h(j·B)2i1/2
ajm
hj·Ai
jbm
hj·Bi
jbmh
hJ·Bi(temp)
jbmn
hJ·Bi(north)
jbms
hJ·Bi(south)
ubm
hu·Bi
dubrms
h(u−B)2i1/2
dobrms
h(ω−B)2i1/2
uxbxm
huxBxi
uybxm
huyBxi
uzbxm
huzBxi
uxbym
huxByi
uybym
huyByi
uzbym
huzByi
uxbzm
huxBzi
uybzm
huyBzi
uzbzm
huzBzi
cosubm
hU·B/(|U||B|)i
jxbxm
hjxBxi
jybxm
hjyBxi
jzbxm
hjzBxi
jxbym
hjxByi
jybym
hjyByi
jzbym
hjzByi
jxbzm
hjxBzi
jybzm
hjyBzi
jzbzm
hjzBzi
uam
hu·Ai
ujm
hu·Ji
fbm
hf·Bi
fxbxm
hfxBxi
epsM
ηµ0j2
epsAD
hρ−1tAD(J×B)2i(heating by ion-neutrals friction)
bxpt
Bx(x1, y1, z1, t)
bypt
By(x1, y1, z1, t)
bzpt
Bz(x1, y1, z1, t)
jxpt
Jx(x1, y1, z1, t)
jypt
Jy(x1, y1, z1, t)
jzpt
Jz(x1, y1, z1, t)
Expt
Ex(x1, y1, z1, t)
Eypt
Ey(x1, y1, z1, t)
Ezpt
Ez(x1, y1, z1, t)
axpt
Ax(x1, y1, z1, t)
aypt
Ay(x1, y1, z1, t)
azpt
Az(x1, y1, z1, t)
bxp2
Bx(x2, y2, z2, t)

K.3 Parameters for ‘print.in’ 201
byp2
By(x2, y2, z2, t)
bzp2
Bz(x2, y2, z2, t)
jxp2
Jx(x2, y2, z2, t)
jyp2
Jy(x2, y2, z2, t)
jzp2
Jz(x2, y2, z2, t)
Exp2
Ex(x2, y2, z2, t)
Eyp2
Ey(x2, y2, z2, t)
Ezp2
Ez(x2, y2, z2, t)
axp2
Ax(x2, y2, z2, t)
ayp2
Ay(x2, y2, z2, t)
azp2
Az(x2, y2, z2, t)
exabot
RE×AdS|bot
exatop
RE×AdS|top
emag
RV
1
2µ0B2dV
brms
B21/2
bfrms
DB′2E1/2
bmax
max(|B|)
bxmin
min(|Bx|)
bymin
min(|By|)
bzmin
min(|Bz|)
bxmax
max(|Bx|)
bymax
max(|By|)
bzmax
max(|Bz|)
bbxmax
max(|Bx|)excludingBvext
bbymax
max(|By|)excludingBvext
bbzmax
max(|Bz|)excludingBvext
jxmax
max(|jvx|)
jymax
max(|jvy|)
jzmax
max(|jvz|)
jrms
j21/2
hjrms
j21/2
jmax
max(|j|)
vArms
B2/̺1/2
vAmax
max(B2/̺)1/2
dtb
δt/[cδt δx/vA,max](time step relative to Alfv´
en time step; see
§5.15)
dteta
δt/[cδt,vδx2/ηmax](time step relative to resistive time step;
see §5.15)
a2m
A2
arms
A21/2
amax
max(|A|)
divarms
h(∇ · A)2i1/2
beta1m
B2/(2µ0p)(mean inverse plasma beta)
beta1max
max[B2/(2µ0p)] (maximum inverse plasma beta)
betam
hβi
betamax
max β
betamin
min β
bxm
hBxi

202 THE PENCIL CODE
bym
hByi
bzm
hBzi
bxbym
hBxByi
bmx
DhBi2
yzE1/2(energy of yz-averaged mean field)
bmy
hBi2
xz1/2(energy of xz-averaged mean field)
bmz
DhBi2
xyE1/2(energy of xy-averaged mean field)
bmzS2
DhBSi2
xyE
bmzA2
DhBAi2
xyE
jmx
DhJi2
yzE1/2(energy of yz-averaged mean current density)
jmy
hJi2
xz1/2(energy of xz-averaged mean current density)
jmz
DhJi2
xyE1/2(energy of xy-averaged mean current density)
bmzph
Phase of a Beltrami field
bmzphe
Error of phase of a Beltrami field
bsinphz
sine of phase of a Beltrami field
bcosphz
cosine of phase of a Beltrami field
emxamz3
DhEixy × hAixyE(xy-averaged mean field helicity flux)
embmz
DhEixy · hBixyE(xy-averaged mean field helicity production
)
ambmz
DhAixy · hBixyE(magnetic helicity of xy-averaged mean
field)
ambmzh
DhAixy · hBixyE(magnetic helicity of xy-averaged mean
field, temp)
ambmzn
DhAixy · hBixyE(magnetic helicity of xy-averaged mean
field, north)
ambmzs
DhAixy · hBixyE(magnetic helicity of xy-averaged mean
field, south)
jmbmz
DhJixy · hBixyE(current helicity of xy-averaged mean field)
kx aa
kx
kmz
DhJixy · hBixyE/DhBi2
xyE
bx2m
hB2
xi
by2m
B2
y
bz2m
hB2
zi
uxbm
hu×Bi · B0/B2
0
jxbm
hj×Bi · B0/B2
0
magfricmax
Magneto-Frictional velocity hj×Bi · B2
b3b21m
hB3B2,1i
b3b12m
hB3B1,2i
b1b32m
hB1B3,2i
b1b23m
hB1B2,3i
b2b13m
hB2B1,3i
b2b31m
hB2B3,1i
uxbmx
h(u×B)xi

K.3 Parameters for ‘print.in’ 203
uxbmy
h(u×B)yi
uxbmz
h(u×B)zi
jxbmx
h(j×B)xi
jxbmy
h(j×B)yi
jxbmz
h(j×B)zi
examx
hE×Ai|x
examy
hE×Ai|y
examz
hE×Ai|z
exjmx
hE×Ji|x
exjmy
hE×Ji|y
exjmz
hE×Ji|z
dexbmx
h∇ × E×Bi|x
dexbmy
h∇ × E×Bi|y
dexbmz
h∇ × E×Bi|z
phibmx
hφBi|x
phibmy
hφBi|y
phibmz
hφBi|z
b2divum
B2∇ · u
ujxbm
hu·(J×B)i
jxbrmax
max(|J×B/ρ|)
jxbr2m
h(J×B/ρ)2i
bmxy rms
p[hbxiz(x, y)]2+ [hbyiz(x, y)]2+ [hbziz(x, y)]2
etasmagm
Mean of Smagorinsky resistivity
etasmagmin
Min of Smagorinsky resistivity
etasmagmax
Max of Smagorinsky resistivity
etavamax
Max of artificial resistivity η∼vA
etajmax
Max of artificial resistivity η∼J/√ρ
etaj2max
Max of artificial resistivity η∼J2/ρ
etajrhomax
Max of artificial resistivity η∼J/ρ
cosjbm
hJ·B/(|J||B|)i
jparallelm
Mean value of the component of J parallel to B
jperpm
Mean value of the component of J perpendicular to B
hjparallelm
Mean value of the component of Jhyper parallel to B
hjperpm
Mean value of the component of Jhyper perpendicular to B
brmsx
B21/2for the magnetic xaver range
brmsz
B21/2for the magnetic zaver range
Exmxy
hExiz
Eymxy
hEyiz
Ezmxy
hEziz
Module ‘meanfield.f90’
qsm
qp(B)
qpm
qp(B)
qem
qe(B), in the paper referred to as qg(B)
qam
qa(B)
alpm
hαi
etatm
hηti
EMFmz1
hEixy |x
EMFmz2
hEixy |y
EMFmz3
hEixy |z

204 THE PENCIL CODE
EMFdotBm
hE · Bi
EMFdotB int
RE · BdV
Module ‘meanfield_demfdt.f90’
EMFrms
(hEi)rms
EMFmax
max(hEi)
EMFmin
min(hEi)
Module ‘noentropy.f90’
dtc
δt/[cδt δx/max cs](time step relative to acoustic time step;
see §5.15)
ethm
h̺ei(mean thermal [=internal] energy)
pdivum
hp∇ui
Module ‘particles_chemistry.f90’
Shchm
meanparticleSherwoodnumber
Module ‘particles_dust.f90’
xpm
xpart
xpmin
xpart
xpmax
xpart
xp2m
x2
part
vrelpabsm
Absolutevalueofmeanrelativevelocity
vpxm
upart
vpx2m
u2
part
ekinp
Ekin,part
vpxmax
MAX(upart)
vpxmin
MIN(upart)
npm
meanparticlenumberdensity
Module ‘particles_dust_brdeplete.f90’
xpm
xpart
xp2m
x2
part
vrelpabsm
Absolutevalueofmeanrelativevelocity
vpxm
upart
vpx2m
u2
part
ekinp
Ekin,part
vpxmax
MAX(upart)
vpxmin
MIN(upart)
npm
meanparticlenumberdensity
Module ‘particles_lagrangian.f90’
xpm
xpart
xp2m
x2
part
vrelpabsm
Absolutevalueofmeanrelativevelocity
vpxm
upart
vpx2m
u2
part
ekinp
Ekin,part
vpxmax
MAX(upart)
vpxmin
MIN(upart)
npm
meanparticlenumberdensity

K.3 Parameters for ‘print.in’ 205
Module ‘particles_mass_swarm.f90’
mpm
mp
mpmin
minjmp,j
mpmax
maxjmp,j
Module ‘particles_surfspec.f90’
dtpchem
dtparticle,chemistry
Module ‘polymer.f90’
polytrm
hT r[Cij]i
frmax
max(f(r))
Module ‘shear.f90’
dtshear
advec shear/cdt
deltay
deltay
Module ‘shock.f90’
shockmax
Max shock number
Module ‘shock_highorder.f90’
gshockmax
max |∇νshock|
Module ‘solar_corona.f90’
dtvel
Velocity driver time step
dtnewt
Radiative cooling time step
dtradloss
Radiative losses time step
dtchi2
δt/[cδt,vδx2/χmax](time step relative to time step based on
heat conductivity; see §5.15)
dtspitzer
Spitzer heat conduction time step
mag flux
Total vertical magnetic flux at
Module ‘solid_cells_CGEO.f90’
Module ‘solid_cells_reactive.f90’
Module ‘temperature_idealgas.f90’
TTmax
max(T)
gTmax
max(|∇T|)
TTmin
min(T)
TTm
hTi
TTzmask
hTifor the temp zaver range
TT2m
hT2i
TugTm
hTu· ∇Ti
Trms
phT2i
uxTm
huxTi
uyTm
huyTi
uzTm
huzTi
gT2m
h(∇T)2i
guxgTm
h∇ux· ∇Ti
guygTm
h∇uy· ∇Ti
guzgTm
h∇uz· ∇Ti
Tugux uxugTm
hTu· ∇ux+uxu· ∇Ti=hu· ∇(uxT)i

206 THE PENCIL CODE
Tuguy uyugTm
hTu· ∇uy+uyu· ∇Ti=hu· ∇(uyT)i
Tuguz uzugTm
hTu· ∇uz+uzu· ∇Ti=hu· ∇(uzT)i
Tdxpm
hT dp/dxi
Tdypm
hT dp/dyi
Tdzpm
hT dp/dzi
fradtop
<−KdT
dz >top (top radiative flux)
fradbot
<−KdT
dz >bot (bottom radiative flux)
yHmax
DOCUMENT ME
yHmin
DOCUMENT ME
yHm
DOCUMENT ME
ethm
hethi=hcvρT i(mean thermal energy)
eem
hei=hcvTi(mean internal energy)
ethtot
RV̺e dV (total thermal energy)
ssm
S
thcool
τcool
ppm
P
csm
cs
dtc
δt/[cδt δx/max cs](time step relative to acoustic time step;
see §5.15)
dtchi
δt/[cδt,vδx2/χmax](time step relative to time step based on
heat conductivity; see §5.15)
Emzmask
hn2exp −(log T−log T0)2/(δlog T)2ithe emiss zaver range
Module ‘temperature_ionization.f90’
TTmax
max(T)
TTmin
min(T)
TTm
hTi
ethm
hethi=hcvρT i(mean thermal energy)
eem
hei(mean internal energy)
ppm
hpiModule ‘testfield_axisym.f90’
alpPERP
α⊥
alpPARA
α⊥
gam
γ
betPERP
β⊥
betPARA
β⊥
del
δ
kapPERP
κ⊥
kapPARA
κ⊥
mu
µ
alpPERPz
α⊥(z)
alpPARAz
α⊥(z)
gamz
γ(z)
betPERPz
β⊥(z)
betPARAz
β⊥(z)
delz
δ(z)
kapPERPz
κ⊥(z)
kapPARAz
κ⊥(z)
muz
µ(z)

K.3 Parameters for ‘print.in’ 207
bx1pt
b1
x
bx2pt
b2
x
bx3pt
b3
x
b1rms
hb2
1i1/2
b2rms
hb2
2i1/2
b3rms
hb2
3i1/2
Module ‘testfield_axisym2.f90’
alpPERP
α⊥
alpPARA
α⊥
gam
γ
betPERP
β⊥
betPARA
β⊥
del
δ
kapPERP
κ⊥
kapPARA
κ⊥
mu
µ
bx1pt
b1
x
bx2pt
b2
x
bx3pt
b3
x
b1rms
hb2
1i1/2
b2rms
hb2
2i1/2
b3rms
hb2
3i1/2
Module ‘testfield_axisym4.f90’
alpPERP
α⊥
alpPARA
α⊥
gam
γ
betPERP
β⊥
betPERP2
β(2)
⊥
betPARA
β⊥
del
δ
del2
δ(2)
kapPERP
κ⊥
kapPERP2
κ(2)
⊥
kapPARA
κ⊥
mu
µ
mu2
µ(2)
alpPERPz
α⊥(z)
alpPARAz
α⊥(z)
gamz
γ(z)
betPERPz
β⊥(z)
betPARAz
β⊥(z)
delz
δ(z)
kapPERPz
κ⊥(z)
kapPARAz
κ⊥(z)
muz
µ(z)
bx1pt
b1
x
bx2pt
b2
x

208 THE PENCIL CODE
bx3pt
b3
x
b1rms
hb2
1i1/2
b2rms
hb2
2i1/2
b3rms
hb2
3i1/2
Module ‘testfield_compress_z.f90’
alp11
α11
alp21
α21
alp31
α31
alp12
α12
alp22
α22
alp32
α32
eta11
η11k
eta21
η21k
eta12
η12k
eta22
η22k
alpK
αK
alpM
αM
alpMK
αMK
phi11
φ11
phi21
φ21
phi12
φ12
phi22
φ22
phi32
φ32
psi11
ψ11k
psi21
ψ21k
psi12
ψ12k
psi22
ψ22k
phiK
φK
phiM
φM
phiMK
φMK
alp11cc
α11 cos2kz
alp21sc
α21 sin kz cos kz
alp12cs
α12 cos kz sin kz
alp22ss
α22 sin2kz
eta11cc
η11 cos2kz
eta21sc
η21 sin kz cos kz
eta12cs
η12 cos kz sin kz
eta22ss
η22 sin2kz
s2kzDFm
hsin 2kz∇ · Fi
M11
M11
M22
M22
M33
M33
M11cc
M11 cos2kz
M11ss
M11 sin2kz
M22cc
M22 cos2kz
M22ss
M22 sin2kz
M12cs
M12 cos kz sin kz
bx11pt
b11
x
bx21pt
b21
x

K.3 Parameters for ‘print.in’ 209
bx12pt
b12
x
bx22pt
b22
x
bx0pt
b0
x
by11pt
b11
y
by21pt
b21
y
by12pt
b12
y
by22pt
b22
y
by0pt
b0
y
u11rms
hu2
11i1/2
u21rms
hu2
21i1/2
u12rms
hu2
12i1/2
u22rms
hu2
22i1/2
j11rms
hj2
11i1/2
b11rms
hb2
11i1/2
b21rms
hb2
21i1/2
b12rms
hb2
12i1/2
b22rms
hb2
22i1/2
ux0m
hu0xi
uy0m
u0y
ux11m
hu11xi
uy11m
u11y
u0rms
hu2
0i1/2
b0rms
hb2
0i1/2
jb0m
hjb0i
E11rms
hE2
11i1/2
E21rms
hE2
21i1/2
E12rms
hE2
12i1/2
E22rms
hE2
22i1/2
E0rms
hE2
0i1/2
Ex11pt
E11
x
Ex21pt
E21
x
Ex12pt
E12
x
Ex22pt
E22
x
Ex0pt
E0
x
Ey11pt
E11
y
Ey21pt
E21
y
Ey12pt
E12
y
Ey22pt
E22
y
Ey0pt
E0
y
bamp
bamp
E111z
E11
1
E211z
E11
2
E311z
E11
3
E121z
E21
1
E221z
E21
2
E321z
E21
3
E112z
E12
1
E212z
E12
2

210 THE PENCIL CODE
E312z
E12
3
E122z
E22
1
E222z
E22
2
E322z
E22
3
E10z
E0
1
E20z
E0
2
E30z
E0
3
EBpq
E · Bpq
E0Um
E0·U
E0Wm
E0·W
bx0mz
hbxixy
by0mz
hbyixy
bz0mz
hbzixy
M11z
hM11ixy
M22z
hM22ixy
M33z
hM33ixy
Module ‘testfield_meri.f90’
E11xy
E11xy
E12xy
E12xy
E13xy
E13xy
E21xy
E21xy
E22xy
E22xy
E23xy
E23xy
E31xy
E31xy
E32xy
E32xy
E33xy
E33xy
E41xy
E41xy
E42xy
E42xy
E43xy
E43xy
E51xy
E51xy
E52xy
E52xy
E53xy
E53xy
E61xy
E61xy
E62xy
E62xy
E63xy
E63xy
E71xy
E71xy
E72xy
E72xy
E73xy
E73xy
E81xy
E81
E82xy
E82
E83xy
E83
E91xy
E91
E92xy
E92
E93xy
E93
a11xy
α11
a12xy
α12
a13xy
α13
a21xy
α21
a22xy
α22

K.3 Parameters for ‘print.in’ 211
a23xy
α23
a31xy
α31
a32xy
α32
a33xy
α33
b111xy
¯111
b121xy
¯121
b131xy
¯131
b211xy
¯211
b221xy
¯221
b231xy
¯231
b311xy
¯311
b321xy
¯321
b331xy
¯331
b112xy
¯112
b122xy
¯122
b132xy
¯132
b212xy
¯212
b222xy
¯222
b232xy
¯232
b312xy
¯312
b322xy
¯322
b332xy
¯332
Module ‘testfield_nonlin_z.f90’
alp11
α11
alp21
α21
alp31
α31
alp12
α12
alp22
α22
alp32
α32
eta11
η11k
eta21
η21k
eta12
η12k
eta22
η22k
alpK
αK
alpM
αM
alpMK
αMK
phi11
φ11
phi21
φ21
phi12
φ12
phi22
φ22
phi32
φ32
psi11
ψ11k
psi21
ψ21k
psi12
ψ12k
psi22
ψ22k
phiK
φK
phiM
φM
phiMK
φMK
alp11cc
α11 cos2kz

212 THE PENCIL CODE
alp21sc
α21 sin kz cos kz
alp12cs
α12 cos kz sin kz
alp22ss
α22 sin2kz
eta11cc
η11 cos2kz
eta21sc
η21 sin kz cos kz
eta12cs
η12 cos kz sin kz
eta22ss
η22 sin2kz
s2kzDFm
hsin 2kz∇ · Fi
M11
M11
M22
M22
M33
M33
M11cc
M11 cos2kz
M11ss
M11 sin2kz
M22cc
M22 cos2kz
M22ss
M22 sin2kz
M12cs
M12 cos kz sin kz
bx11pt
b11
x
bx21pt
b21
x
bx12pt
b12
x
bx22pt
b22
x
bx0pt
b0
x
by11pt
b11
y
by21pt
b21
y
by12pt
b12
y
by22pt
b22
y
by0pt
b0
y
u11rms
hu2
11i1/2
u21rms
hu2
21i1/2
u12rms
hu2
12i1/2
u22rms
hu2
22i1/2
j11rms
hj2
11i1/2
b11rms
hb2
11i1/2
b21rms
hb2
21i1/2
b12rms
hb2
12i1/2
b22rms
hb2
22i1/2
ux0m
hu0xi
uy0m
u0y
ux11m
hu11xi
uy11m
u11y
u0rms
hu2
0i1/2
b0rms
hb2
0i1/2
jb0m
hjb0i
E11rms
hE2
11i1/2
E21rms
hE2
21i1/2
E12rms
hE2
12i1/2
E22rms
hE2
22i1/2
E0rms
hE2
0i1/2
Ex11pt
E11
x

K.3 Parameters for ‘print.in’ 213
Ex21pt
E21
x
Ex12pt
E12
x
Ex22pt
E22
x
Ex0pt
E0
x
Ey11pt
E11
y
Ey21pt
E21
y
Ey12pt
E12
y
Ey22pt
E22
y
Ey0pt
E0
y
bamp
bamp
E111z
E11
1
E211z
E11
2
E311z
E11
3
E121z
E21
1
E221z
E21
2
E321z
E21
3
E112z
E12
1
E212z
E12
2
E312z
E12
3
E122z
E22
1
E222z
E22
2
E322z
E22
3
E10z
E0
1
E20z
E0
2
E30z
E0
3
EBpq
E · Bpq
E0Um
E0·U
E0Wm
E0·W
bx0mz
hbxixy
by0mz
hbyixy
bz0mz
hbzixy
M11z
hM11ixy
M22z
hM22ixy
M33z
hM33ixy
Module ‘testfield_x.f90’
alp11
α11
alp21
α21
alp31
α31
alp12
α12
alp22
α22
alp32
α32
eta11
η11k
eta21
η21k
eta12
η12k
eta22
η22k
alp11cc
α11 cos2kx
alp21sc
α21 sin kx cos kx
alp12cs
α12 cos kx sin kx
alp22ss
α22 sin2kx

214 THE PENCIL CODE
eta11cc
η11 cos2kx
eta21sc
η21 sin kx cos kx
eta12cs
η12 cos kx sin kx
eta22ss
η22 sin2kx
alp11 x
α11x
alp21 x
α21x
alp12 x
α12x
alp22 x
α22x
eta11 x
η11kx
eta21 x
η21kx
eta12 x
η12kx
eta22 x
η22kx
alp11 x2
α11x2
alp21 x2
α21x2
alp12 x2
α12x2
alp22 x2
α22x2
eta11 x2
η11kx2
eta21 x2
η21kx2
eta12 x2
η12kx2
eta22 x2
η22kx2
b11rms
hb2
11i1/2
b21rms
hb2
21i1/2
b12rms
hb2
12i1/2
b22rms
hb2
22i1/2
b0rms
hb2
0i1/2
E11rms
hE2
11i1/2
E21rms
hE2
21i1/2
E12rms
hE2
12i1/2
E22rms
hE2
22i1/2
E0rms
hE2
0i1/2
E111z
E11
1
E211z
E11
2
E311z
E11
3
E121z
E21
1
E221z
E21
2
E321z
E21
3
E112z
E12
1
E212z
E12
2
E312z
E12
3
E122z
E22
1
E222z
E22
2
E322z
E22
3
E10z
E0
1
E20z
E0
2
E30z
E0
3
EBpq
E · Bpq
bx0mz
hbxixy
by0mz
hbyixy

K.3 Parameters for ‘print.in’ 215
bz0mz
hbzixy
alp11x
α11(x, t)
alp21x
α21(x, t)
alp12x
α12(x, t)
alp22x
α22(x, t)
eta11x
η11(x, t)
eta21x
η21(x, t)
eta12x
η12(x, t)
eta22x
η22(x, t)
Module ‘testfield_xz.f90’
E111z
E11
1
E211z
E11
2
E311z
E11
3
E121z
E21
1
E221z
E21
2
E321z
E21
3
alp11
α11
alp21
α21
eta11
η113k
eta21
η213k
b11rms
hb2
11i
b21rms
hb2
21iModule ‘testfield_z.f90’
alp11
α11
alp21
α21
alp31
α31
alp12
α12
alp22
α22
alp32
α32
alp13
α13
alp23
α23
eta11
η113kor η11kif leta rank2=T
eta21
η213kor η21kif leta rank2=T
eta31
η313k
eta12
η123kor η12kif leta rank2=T
eta22
η223kor η22kif leta rank2=T
eta32
η323k
alp11cc
α11 cos2kz
alp21sc
α21 sin kz cos kz
alp12cs
α12 cos kz sin kz
alp22ss
α22 sin2kz
eta11cc
η11 cos2kz
eta21sc
η21 sin kz cos kz
eta12cs
η12 cos kz sin kz
eta22ss
η22 sin2kz
s2kzDFm
hsin 2kz∇ · Fi
M11
M11
M22
M22

216 THE PENCIL CODE
M33
M33
M11cc
M11 cos2kz
M11ss
M11 sin2kz
M22cc
M22 cos2kz
M22ss
M22 sin2kz
M12cs
M12 cos kz sin kz
bx11pt
b11
x
bx21pt
b21
x
bx12pt
b12
x
bx22pt
b22
x
bx0pt
b0
x
by11pt
b11
y
by21pt
b21
y
by12pt
b12
y
by22pt
b22
y
by0pt
b0
y
b11rms
hb2
11i1/2
b21rms
hb2
21i1/2
b12rms
hb2
12i1/2
b22rms
hb2
22i1/2
b0rms
hb2
0i1/2
jb0m
hjb0i
E11rms
hE2
11i1/2
E21rms
hE2
21i1/2
E12rms
hE2
12i1/2
E22rms
hE2
22i1/2
E0rms
hE2
0i1/2
Ex11pt
E11
x
Ex21pt
E21
x
Ex12pt
E12
x
Ex22pt
E22
x
Ex0pt
E0
x
Ey11pt
E11
y
Ey21pt
E21
y
Ey12pt
E12
y
Ey22pt
E22
y
Ey0pt
E0
y
bamp
bamp
alp11z
α11(z, t)
alp21z
α21(z, t)
alp12z
α12(z, t)
alp22z
α22(z, t)
alp13z
α13(z, t)
alp23z
α23(z, t)
eta11z
η11(z, t)
eta21z
η21(z, t)
eta12z
η12(z, t)
eta22z
η22(z, t)

K.3 Parameters for ‘print.in’ 217
E111z
E11
1
E211z
E11
2
E311z
E11
3
E121z
E21
1
E221z
E21
2
E321z
E21
3
E112z
E12
1
E212z
E12
2
E312z
E12
3
E122z
E22
1
E222z
E22
2
E322z
E22
3
E10z
E0
1
E20z
E0
2
E30z
E0
3
EBpq
E · Bpq
E0Um
E0·U
E0Wm
E0·W
bx0mz
hbxixy
by0mz
hbyixy
bz0mz
hbzixy
M11z
hM11ixy
M22z
hM22ixy
M33z
hM33ixy
Module ‘testflow_z.f90’
gal
GAL-coefficients, couple Fand U
aklam
AKA-λ-tensor, couples Fand W=∇ × U
gamma
γ-vector, couples Fand ∇ · U
nu
ν-tensor, couples Fand ∂2U/∂z2
zeta
ζ-vector, couples Fand Gz=∇zH
xi
ξ-vector, couples Fand ∂2H/∂z2
aklamQ
aklamQ-vector, couples Qand W
gammaQ
γQ-scalar, couples Qand ∇ · U=dUz/dz
nuQ
νQ-vector, couples Qand ∂2U/∂z2
zetaQ
ζQ-scalar, couples Qand Gz
xiQ
ξQ-scalar, couples Qand ∂2H/∂z2
αK,ij γiνij ζiξiνQ
iaklamQ
iFpq
iQpq upq2hpq2
ux0mz
huxixy
uy0mz
huyixy
uz0mz
huzixy
Module ‘testperturb.f90’
alp11
α11
alp21
α21
alp31
α31
alp12
α12
alp22
α22
alp32
α32
eta11
η113k

218 THE PENCIL CODE
eta21
η213k
eta31
η313k
eta12
η123k
eta22
η223k
eta32
η323k
Module ‘testscalar.f90’
gam11
γ(1)
1
gam12
γ(1)
2
gam13
γ(1)
3
gam21
γ(2)
1
gam22
γ(2)
2
gam23
γ(2)
3
gam31
γ(3)
1
gam32
γ(3)
2
gam33
γ(3)
3
kap11
κ11
kap21
κ21
kap31
κ31
kap12
κ12
kap22
κ22
kap32
κ32
kap13
κ13
kap23
κ23
kap33
κ33
gam11z
γ(1)
1(z, t)
gam12z
γ(1)
2(z, t)
gam13z
γ(1)
3(z, t)
gam21z
γ(2)
1(z, t)
gam22z
γ(2)
2(z, t)
gam23z
γ(2)
3(z, t)
gam31z
γ(3)
1(z, t)
gam32z
γ(3)
2(z, t)
gam33z
γ(3)
3(z, t)
kap11z
κ11(z, t)
kap21z
κ21(z, t)
kap31z
κ31(z, t)
kap12z
κ12(z, t)
kap22z
κ22(z, t)
kap32z
κ32(z, t)
kap13z
κ13(z, t)
kap23z
κ23(z, t)
kap33z
κ33(z, t)
mgam33
˜γ33
mkap33
˜κ33
ngam33
ˆγ33
nkap33
ˆκ33
c1rms
hc2
1i1/2

K.3 Parameters for ‘print.in’ 219
c2rms
hc2
2i1/2
c3rms
hc2
3i1/2
c4rms
hc2
4i1/2
c5rms
hc2
5i1/2
c6rms
hc2
6i1/2
c1pt
c1
c2pt
c2
c3pt
c3
c4pt
c4
c5pt
c5
c6pt
c6
F11z
F1
1
F21z
F1
2
F31z
F1
3
F12z
F2
1
F22z
F2
2
F32z
F2
3
Module ‘testscalar_axisym.f90’
muc1
µ(c1)
muc2
µ(c2)
gamc
γ(c)
kapcPERP1
κ(1)
⊥
kapcPERP2
κ(2)
⊥
kapcPARA
κk
mucz
µ(c)(z, t)
gamcz
γ(c)(z, t)
kapcPERPz
κ⊥(z, t)
kapcPARAz
κk(z, t)
gam11
γ(1)
1
gam12
γ(1)
2
gam13
γ(1)
3
gam21
γ(2)
1
gam22
γ(2)
2
gam23
γ(2)
3
gam31
γ(3)
1
gam32
γ(3)
2
gam33
γ(3)
3
kap11
κ11
kap21
κ21
kap31
κ31
kap12
κ12
kap22
κ22
kap32
κ32
kap13
κ13
kap23
κ23
kap33
κ33
gam11z
γ(1)
1(z, t)

220 THE PENCIL CODE
gam12z
γ(1)
2(z, t)
gam13z
γ(1)
3(z, t)
gam21z
γ(2)
1(z, t)
gam22z
γ(2)
2(z, t)
gam23z
γ(2)
3(z, t)
gam31z
γ(3)
1(z, t)
gam32z
γ(3)
2(z, t)
gam33z
γ(3)
3(z, t)
gam3z
γ(c)(z, t)
kap11z
κ11(z, t)
kap21z
κ21(z, t)
kap31z
κ31(z, t)
kap12z
κ12(z, t)
kap22z
κ22(z, t)
kap32z
κ32(z, t)
kap13z
κ13(z, t)
kap23z
κ23(z, t)
kap33z
κ33(z, t)
mgam33
˜γ33
mkap33
˜κ33
ngam33
ˆγ33
nkap33
ˆκ33
c1rms
hc2
1i1/2
c2rms
hc2
2i1/2
c3rms
hc2
3i1/2
c4rms
hc2
4i1/2
c5rms
hc2
5i1/2
c6rms
hc2
6i1/2
c1pt
c1
c2pt
c2
c3pt
c3
c4pt
c4
c5pt
c5
c6pt
c6
F11z
F1
1
F21z
F1
2
F31z
F1
3
F12z
F2
1
F22z
F2
2
F32z
F2
3
Module ‘testscalar_simple.f90’
gam11
γ(1)
1
gam12
γ(1)
2
gam13
γ(1)
3
gam21
γ(2)
1
gam22
γ(2)
2
gam23
γ(2)
3

K.3 Parameters for ‘print.in’ 221
gam31
γ(3)
1
gam32
γ(3)
2
gam33
γ(3)
3
kap11
κ11
kap21
κ21
kap31
κ31
kap12
κ12
kap22
κ22
kap32
κ32
kap13
κ13
kap23
κ23
kap33
κ33
gam11z
γ(1)
1(z, t)
gam12z
γ(1)
2(z, t)
gam13z
γ(1)
3(z, t)
gam21z
γ(2)
1(z, t)
gam22z
γ(2)
2(z, t)
gam23z
γ(2)
3(z, t)
gam31z
γ(3)
1(z, t)
gam32z
γ(3)
2(z, t)
gam33z
γ(3)
3(z, t)
kap11z
κ11(z, t)
kap21z
κ21(z, t)
kap31z
κ31(z, t)
kap12z
κ12(z, t)
kap22z
κ22(z, t)
kap32z
κ32(z, t)
kap13z
κ13(z, t)
kap23z
κ23(z, t)
kap33z
κ33(z, t)
mgam33
˜γ33
mkap33
˜κ33
ngam33
ˆγ33
nkap33
ˆκ33
c1rms
hc2
1i1/2
c2rms
hc2
2i1/2
c3rms
hc2
3i1/2
c4rms
hc2
4i1/2
c5rms
hc2
5i1/2
c6rms
hc2
6i1/2
c1pt
c1
c2pt
c2
c3pt
c3
c4pt
c4
c5pt
c5
c6pt
c6
F11z
F1
1
F21z
F1
2

222 THE PENCIL CODE
F31z
F1
3
F12z
F2
1
F22z
F2
2
F32z
F2
3
Module ‘thermal_energy.f90’
TTmax
max(T)
TTmin
min(T)
ppm
hpi
TTm
hTi
ethm
hethi=hcvρT i(mean thermal energy)
ethtot
RVeth dV (total thermal energy)
ethmin
mineth
ethmax
maxeth
eem
hei=hcvTi(mean internal energy)
etot
heth +ρu2/2i
Module ‘visc_smagorinsky.f90’
nu LES
Mean value of Smagorinsky viscosity
Module ‘viscosity.f90’
nu tdep
time-dependent viscosity
fviscm
Mean value of viscous acceleration
fviscmin
Min value of viscous acceleration
fviscmax
Max value of viscous acceleration
fviscrmsx
Rms value of viscous acceleration for the vis xaver range
num
Mean value of viscosity
nusmagm
Mean value of Smagorinsky viscosity
nusmagmin
Min value of Smagorinsky viscosity
nusmagmax
Max value of Smagorinsky viscosity
nu LES
Mean value of Smagorinsky viscosity
visc heatm
Mean value of viscous heating
qfviscm
hq·fvisci
ufviscm
hu·fvisci
Sij2m
S2
epsK
2ν̺S2
dtnu
δt/[cδt,vδx2/νmax](time step relative to viscous time step; see
§5.15)
meshRemax
Max mesh Reynolds number
Reshock
Mesh Reynolds number at shock
K.4 List of parameters for ‘video.in’
The following table lists all (at the time of writing, June 17, 2018) possible inputs to the
file ‘video.in’.
Variable Meaning
Module ‘hydro.f90’

K.4 Parameters for ‘video.in’ 223
uu
velocity vector u; writes all three components separately to
files ‘u[xyz].{xz,yz,xy,xy2}’
u2
kinetic energy density u2; writes ‘u2.{xz,yz,xy,xy2}’
oo
vorticity vector ω=∇ × u; writes all three components sepa-
rately to files ‘oo[xyz].{xz,yz,xy,xy2}’
o2
enstrophy ω2=|∇ × u|2; writes ‘o2.{xz,yz,xy,xy2}’
divu
∇·u; writes ‘divu.{xz,yz,xy,xy2}’
mach
Mach number squared Ma2; writes ‘mach.{xz,yz,xy,xy2}’
Module ‘density.f90’
lnrho
logarithmic density ln ρ; writes ‘lnrho.{xz,yz,xy,xy2}’
rho
density ρ; writes ‘rho.{xz,yz,xy,xy2}’
Module ‘entropy.f90’
ss
entropy s; writes ‘ss.{xz,yz,xy,xy2}’
pp
pressure p; writes ‘pp.{xz,yz,xy,xy2}’
Module ‘temperature_idealgas.f90’
lnTT
logarithmic temperature ln T; writes ‘lnTT.{xz,yz,xy,xy2}’
TT
temperature T; writes ‘TT.{xz,yz,xy,xy2}’
Module ‘shock.f90’
shock
shock viscosity νshock; writes ‘shock.{xz,yz,xy,xy2}’
Module ‘eos_ionization.f90’
yH
ionization fraction yH; writes ‘yH.{xz,yz,xy,xy2}’
Module ‘radiation_ray.f90’
Qrad
radiative heating rate Qrad; writes ‘Qrad.{xz,yz,xy,xy2}’
Isurf
surface intensity Isurf (?); writes ‘Isurf.xz’
Module ‘magnetic.f90’
aa
magnetic vector potential A; writes ‘aa[xyz].{xz,yz,xy,xy2}’
bb
magnetic flux density B; writes ‘bb[xyz].{xz,yz,xy,xy2}’
b2
magnetic energy density B2; writes ‘b2.{xz,yz,xy,xy2}’
jj
current density j; writes ‘jj[xyz].{xz,yz,xy,xy2}’
j2
current density squared j2; writes ‘j2.{xz,yz,xy,xy2}’
jb
jB; writes ‘jb.{xz,yz,xy,xy2}’
beta1
inverse plasma beta B2/(2µ0p); writes ‘beta1.{xz,yz,xy,xy2}’
Poynting
Poynting vector ηj×B−(u×B)×B/µ0; writes
‘Poynting[xyz].{xz,yz,xy,xy2}’
ab
magnetic helicity density A·B; writes
‘ab[xyz].{xz,yz,xy,xy2}’
Module ‘pscalar.f90’
lncc
logarithmic density of passive scalar ln c; writes
‘lncc.{xz,yz,xy,xy2}’
Module ‘cosmicray.f90’
ecr
energy ecr of cosmic rays (?); writes ‘ec.{xz,yz,xy,xy2}’

224 THE PENCIL CODE
K.5 List of parameters for ‘phiaver.in’
The following table lists all (at the time of writing, November 2003) possible inputs to
the file ‘phiaver.in’.
Variable Meaning
Module ‘cdata.f90’
rcylmphi
cylindrical radius ̟=px2+y2(useful for debugging az-
imuthal averages)
phimphi
azimuthal angle ϕ= arctan y
x(useful for debugging)
zmphi
z-coordinate (useful for debugging)
rmphi
spherical radius r=√̟2+z2(useful for debugging)
Module ‘hydro.f90’
urmphi
hu̟iϕ[cyl. polar coords (̟, ϕ, z)]
upmphi
huϕiϕ
uzmphi
huziϕ
ursphmphi
huriϕ
uthmphi
huϑiϕ
uumphi
shorthand for
urmphi
,
upmphi
and
uzmphi
together
uusphmphi
shorthand for
ursphmphi
,
uthmphi
and
upmphi
together
u2mphi
hu2iϕ
Module ‘density.f90’
lnrhomphi
hln ̺iϕ
rhomphi
h̺iϕ
Module ‘entropy.f90’
ssmphi
hsiϕ
cs2mphi
hc2
siϕ
Module ‘magnetic.f90’
jbmphi
hJ·Biϕ
brmphi
hB̟iϕ[cyl. polar coords (̟, ϕ, z)]
bpmphi
hBϕiϕ
bzmphi
hBziϕ
bbmphi
shorthand for
brmphi
,
bpmphi
and
bzmphi
together
bbsphmphi
shorthand for
brsphmphi
,
bthmphi
and
bpmphi
together
b2mphi
B2ϕ
brsphmphi
hBriϕ
bthmphi
hBϑiϕ
Module ‘anelastic.f90’
lnrhomphi
hln ̺iϕ
rhomphi
h̺iϕ
Module ‘entropy_anelastic.f90’
ssmphi
hsiϕ

K.6 Parameters for ‘xyaver.in’ 225
cs2mphi
hc2
siϕ
Module ‘magnetic_shearboxJ.f90’
jbmphi
hJ·Biϕ
brmphi
hB̟iϕ[cyl. polar coords (̟, ϕ, z)]
bpmphi
hBϕiϕ
bzmphi
hBziϕ
bbmphi
shorthand for
brmphi
,
bpmphi
and
bzmphi
together
bbsphmphi
shorthand for
brsphmphi
,
bthmphi
and
bpmphi
together
b2mphi
B2ϕ
brsphmphi
hBriϕ
bthmphi
hBϑiϕ
K.6 List of parameters for ‘xyaver.in’
The following table lists possible inputs to the file ‘xyaver.in’. This list is not complete
and maybe outdated.
Variable Meaning
Module ‘hydro.f90’
u2mz
hu2ixy
o2mz
W2xy
divu2mz
h(∇ · u)2ixy
curlru2mz
h(∇ × ̺U)2ixy
divru2mz
h(∇ · ̺u)2ixy
fmasszmz
h̺uzixy
fkinzmz
1
2̺u2uzxy
uxmz
huxixy (horiz. averaged xvelocity)
uymz
huyixy
uzmz
huzixy
uzupmz
huz↑ixy
uzdownmz
huz↓ixy
ruzupmz
h̺uz↑ixy
ruzdownmz
h̺uz↓ixy
divumz
hdivuixy
uzdivumz
huzdivuixy
oxmz
hωxixy
oymz
hωyixy
ozmz
hωzixy
ux2mz
hu2
xixy
uy2mz
u2
yxy
uz2mz
hu2
zixy
ox2mz
hω2
xixy
oy2mz
ω2
yxy
oz2mz
hω2
zixy

226 THE PENCIL CODE
ruxmz
h̺uxixy
ruymz
h̺uyixy
ruzmz
h̺uzixy
rux2mz
h̺u2
xixy
ruy2mz
̺u2
yxy
ruz2mz
h̺u2
zixy
uxuymz
huxuyixy
uxuzmz
huxuzixy
uyuzmz
huyuzixy
ruxuymz
hρuxuyixy
ruxuzmz
hρuxuzixy
ruyuzmz
hρuyuzixy
ruxuy2mz
hρuxuyixy
ruxuz2mz
hρuxuzixy
ruyuz2mz
hρuyuzixy
oxuxxmz
hωxux,xixy
oyuxymz
hωyux,yixy
oxuyxmz
hωxuy,xixy
oyuyymz
hωyuy,yixy
oxuzxmz
hωxuz,xixy
oyuzymz
hωyuz,yixy
uyxuzxmz
huy,xuz,xixy
uyyuzymz
huy,yuz,yixy
uyzuzzmz
huy,zuz,zixy
ekinmz
1
2̺u2xy
oumz
hω·uixy
Remz
h|u·u|
∂
∂xj(νSij )
ixy
oguxmz
h(ω· ∇u)xixy
oguymz
h(ω· ∇u)yixy
oguzmz
h(ω· ∇u)zixy
ogux2mz
h(ω· ∇u)2
xixy
oguy2mz
(ω· ∇u)2
yxy
oguz2mz
h(ω· ∇u)2
zixy
oxdivumz
hωx∇ · uixy
oydivumz
hωy∇ · uixy
ozdivumz
hωz∇ · uixy
oxdivu2mz
h(ωxnabla ·u)2ixy
oydivu2mz
h(ωy∇ · u)2ixy
ozdivu2mz
h(ωz∇ · u)2ixy
accpowzmz
h(uzDuz/Dt)2ixy
accpowzupmz
h(uzDuz/Dt)2ixy+
accpowzdownmz
h(uzDuz/Dt)2ixy−
fkinxmx
1
2̺u2uxyz
Module ‘density.f90’
rhomz
h̺ixy
rho2mz
h̺2ixy

K.6 Parameters for ‘xyaver.in’ 227
gzlnrhomz
h∇zln ̺ixy
uglnrhomz
hu· ∇ln ̺ixy
ugrhomz
hu· ∇̺ixy
uygzlnrhomz
huy∇zln ̺ixy
uzgylnrhomz
huz∇yln ̺ixy
rho2mx
h̺2iyz
Module ‘entropy.f90’
fradz
hFradixy
fconvz
hcp̺uzTixy
ssmz
hsixy
ss2mz
hs2ixy
ppmz
hpixy
TTmz
hTixy
TT2mz
hT2ixy
uxTTmz
huxTixy
uyTTmz
huyTixy
uzTTmz
huzTixy
gTxgsxmz
h(∇T× ∇s)xixy
gTxgsymz
h(∇T× ∇s)yixy
gTxgszmz
h(∇T× ∇s)zixy
gTxgsx2mz
h(∇T× ∇s)2
xixy
gTxgsy2mz
(∇T× ∇s)2
yxy
gTxgsz2mz
h(∇T× ∇s)2
zixy
fradz kramers
Frad (from Kramers’ opacity)
fradz Kprof
Frad (from Kprof)
fradz constchi
Frad (from chi const)
fturbz
h̺T χt∇zsixy (turbulent heat flux)
fturbtz
h̺T χt0∇zsixy (turbulent heat flux)
fturbmz
h̺T χt0∇zsixy (turbulent heat flux)
fturbfz
h̺T χt0∇zs′ixy (turbulent heat flux)
dcoolz
surface cooling flux
heatmz
heating
Kkramersmz
K0T(3−b)/rho(a+ 1)xy
ethmz
h̺eixy
Module ‘magnetic.f90’
axmz
hAxixy
aymz
hAyixy
azmz
hAzixy
abuxmz
h(A·B)uxixy
abuymz
h(A·B)uyixy
abuzmz
h(A·B)uzixy
uabxmz
h(u·A)Bxixy
uabymz
h(u·A)Byixy
uabzmz
h(u·A)Bzixy
bbxmz
hB′
xixy
bbymz
B′
yxy

228 THE PENCIL CODE
bbzmz
hB′
zixy
bxmz
hBxixy
bymz
hByixy
bzmz
hBzixy
jxmz
hJxixy
jymz
hJyixy
jzmz
hJzixy
Exmz
hExixy
Eymz
hEyixy
Ezmz
hEzixy
bx2mz
hB2
xixy
by2mz
B2
yxy
bz2mz
hB2
zixy
bx2rmz
hB2
x/̺ixy
by2rmz
B2
y/̺xy
bz2rmz
hB2
z/̺ixy
beta1mz
h(B2/2µ0)/pixy
betamz
hβixy
beta2mz
hβ2ixy
jbmz
hJ·Bi|xy
d6abmz
h∇6A·Bi|xy
d6amz1
h∇6Aixy |x
d6amz2
h∇6Aixy |y
d6amz3
h∇6Aixy |z
abmz
hA·Bi|xy
ubmz
hu·Bi|xy
uamz
hu·Ai|xy
uxbxmz
huxbxi|xy
uybxmz
huybxi|xy
uzbxmz
huzbxi|xy
uxbymz
huxbyi|xy
uybymz
huybyi|xy
uzbymz
huzbyi|xy
uxbzmz
huxbzi|xy
uybzmz
huybzi|xy
uzbzmz
huzbzi|xy
examz1
hE×Aixy |x
examz2
hE×Aixy |y
examz3
hE×Aixy |z
e3xamz1
hEhyper3×Aixy |x
e3xamz2
hEhyper3×Aixy |y
e3xamz3
hEhyper3×Aixy |z
etatotalmz
hηixy
bxbymz
hBxByixy
bxbzmz
hBxBzixy
bybzmz
hByBzixy
b2mz
B2xy
bf2mz
B′2xy

K.6 Parameters for ‘xyaver.in’ 229
j2mz
j2xy
poynzmz
Averaged poynting flux in z direction
epsMmz
ηµ0j2xy
Module ‘bfield.f90’
bmz
hBixy
b2mz
hB2ixy
bxmz
hBxixy
bymz
hByixy
bzmz
hBzixy
bx2mz
hB2
xixy
by2mz
hB2
yixy
bz2mz
hB2
zixy
bxbymz
hBxByixy
bxbzmz
hBxBzixy
bybzmz
hByBzixy
betamz
hβixy
beta2mz
hβ2ixy
Module ‘density_stratified.f90’
drhomz
h∆ρ/ρ0ixy
drho2mz
h(∆ρ/ρ0)2ixy
Module ‘gravity_simple.f90’
epotmz
h̺Φgravixy
epotuzmz
h̺Φgravuzixy (potential energy flux)
Module ‘magnetic_shearboxJ.f90’
axmz
hAxixy
aymz
hAyixy
azmz
hAzixy
abuxmz
h(A·B)uxixy
abuymz
h(A·B)uyixy
abuzmz
h(A·B)uzixy
uabxmz
h(u·A)Bxixy
uabymz
h(u·A)Byixy
uabzmz
h(u·A)Bzixy
bbxmz
hB′
xixy
bbymz
B′
yxy
bbzmz
hB′
zixy
bxmz
hBxixy
bymz
hByixy
bzmz
hBzixy
jxmz
hJxixy
jymz
hJyixy
jzmz
hJzixy
Exmz
hExixy
Eymz
hEyixy
Ezmz
hEzixy

230 THE PENCIL CODE
bx2mz
hB2
xixy
by2mz
B2
yxy
bz2mz
hB2
zixy
bx2rmz
hB2
x/̺ixy
by2rmz
B2
y/̺xy
bz2rmz
hB2
z/̺ixy
beta1mz
h(B2/2µ0)/pixy
betamz
hβixy
beta2mz
hβ2ixy
jbmz
hJ·Bi|xy
d6abmz
h∇6A·Bi|xy
d6amz1
h∇6Aixy |x
d6amz2
h∇6Aixy |y
d6amz3
h∇6Aixy |z
abmz
hA·Bi|xy
ubmz
hu·Bi|xy
uamz
hu·Ai|xy
uxbxmz
huxbxi|xy
uybxmz
huybxi|xy
uzbxmz
huzbxi|xy
uxbymz
huxbyi|xy
uybymz
huybyi|xy
uzbymz
huzbyi|xy
uxbzmz
huxbzi|xy
uybzmz
huybzi|xy
uzbzmz
huzbzi|xy
examz1
hE×Aixy |x
examz2
hE×Aixy |y
examz3
hE×Aixy |z
e3xamz1
hEhyper3×Aixy |x
e3xamz2
hEhyper3×Aixy |y
e3xamz3
hEhyper3×Aixy |z
etatotalmz
hηixy
bxbymz
hBxByixy
bxbzmz
hBxBzixy
bybzmz
hByBzixy
b2mz
B2xy
bf2mz
B′2xy
j2mz
j2xy
poynzmz
Averaged poynting flux in z direction
epsMmz
ηµ0j2xy
Module ‘meanfield.f90’
qpmz
hqpixy
Module ‘shock_highorder.f90’
Module ‘temperature_idealgas.f90’
ppmz
hpixy

K.7 Parameters for ‘xzaver.in’ 231
TTmz
hTixy
ethmz
hethixy
fpresxmz
h(∇p)xixy
fpresymz
h(∇p)yixy
fpreszmz
h(∇p)zixy
TT2mz
hT2ixy
uxTmz
huxTixy
uyTmz
huyTixy
uzTmz
huzTixy
fradmz
hFradixy
fconvmz
hcp̺uzTixy
Module ‘temperature_ionization.f90’
puzmz
hpuzixy
pr1mz
hp/̺ixy
eruzmz
he̺uzixy
ffakez
h̺uzcpTixy
mumz
hµixy
TTmz
hTixy
ssmz
hsixy
eemz
heixy
ppmz
hpixy
Module ‘thermal_energy.f90’
ppmz
hpixy
TTmz
hTixy
Module ‘viscosity.f90’
fviscmz
h2ν̺uiSizixy (z-component of viscous flux)
fviscsmmz
h2νSmag̺uiSiz ixy (z-component of viscous flux)
epsKmz
2ν̺S2xy
K.7 List of parameters for ‘xzaver.in’
The following table lists possible inputs to the file ‘xzaver.in’. This list is not complete
and maybe outdated.
Variable Meaning
Module ‘hydro.f90’
uxmy
huxixz
uymy
huyixz
uzmy
huzixz
oumy
hω·uixz
Module ‘density.f90’
rhomy
h̺ixz

232 THE PENCIL CODE
Module ‘entropy.f90’
ssmy
hsixz
ppmy
hpixz
TTmy
hTixz
Module ‘magnetic.f90’
bxmy
hBxixz
bymy
hByixz
bzmy
hBzixz
bx2my
hB2
xixz
by2my
B2
yxz
bz2my
hB2
zixz
bxbymy
hBxByixz
bxbzmy
hBxBzixz
bybzmy
hByBzixz
Module ‘density_stratified.f90’
drhomy
h∆ρ/ρ0ixz
drho2my
h(∆ρ/ρ0)2ixz
Module ‘gravity_simple.f90’
epotmy
h̺Φgravixz
Module ‘magnetic_shearboxJ.f90’
bxmy
hBxixz
bymy
hByixz
bzmy
hBzixz
bx2my
hB2
xixz
by2my
B2
yxz
bz2my
hB2
zixz
bxbymy
hBxByixz
bxbzmy
hBxBzixz
bybzmy
hByBzixz
Module ‘shock_highorder.f90’
Module ‘temperature_idealgas.f90’
ppmy
hpixz
TTmy
hTixz
Module ‘thermal_energy.f90’
ppmy
hpixz
TTmy
hTixz
K.8 List of parameters for ‘yzaver.in’
The following table lists possible inputs to the file ‘yzaver.in’. This list is not complete
and maybe outdated.

K.8 Parameters for ‘yzaver.in’ 233
Variable Meaning
Module ‘hydro.f90’
uxmx
huxiyz
uymx
huyiyz
uzmx
huziyz
ruxmx
h̺uxiyz
ruymx
h̺uyiyz
ruzmx
h̺uziyz
rux2mx
hρu2
xiyz
ruy2mx
hρu2
yiyz
ruz2mx
hρu2
ziyz
ruxuymx
hρuxuyiyz
ruxuzmx
hρuxuziyz
ruyuzmx
hρuyuziyz
ux2mx
hu2
xiyz
uy2mx
u2
yyz
uz2mx
hu2
ziyz
ox2mx
hω2
xiyz
oy2mx
ω2
yyz
oz2mx
hω2
ziyz
uxuymx
huxuyiyz
uxuzmx
huxuziyz
uyuzmx
huyuziyz
oumx
hω·uiyz
ekinmx
h1
2ρu2ixy
Module ‘density.f90’
rhomx
h̺iyz
Module ‘entropy.f90’
ssmx
hsiyz
ss2mx
hs2iyz
ppmx
hpiyz
TTmx
hTiyz
TT2mx
hT2iyz
uxTTmx
huxTiyz
uyTTmx
huyTiyz
uzTTmx
huzTiyz
fconvxmx
hcp̺uxTiyz
fradmx
hFradiyz
fturbmx
h̺T χt∇xsiyz (turbulent heat flux)
Kkramersmx
K0T(3−b)/rho(a+ 1)yz
dcoolx
surface cooling flux
fradx kramers
Frad (from Kramers’ opacity)
Module ‘magnetic.f90’
b2mx
hB2iyz

234 THE PENCIL CODE
bxmx
hBxiyz
bymx
hByiyz
bzmx
hBziyz
bx2mx
hB2
xiyz
by2mx
B2
yyz
bz2mx
hB2
ziyz
bxbymx
hBxByiyz
bxbzmx
hBxBziyz
bybzmx
hByBziyz
betamx
hβiyz
beta2mx
hβ2iyz
etatotalmx
hηiyz
Module ‘bfield.f90’
bmx
hBiyz
b2mx
hB2iyz
bxmx
hBxiyz
bymx
hByiyz
bzmx
hBziyz
bx2mx
hB2
xiyz
by2mx
hB2
yiyz
bz2mx
hB2
ziyz
bxbymx
hBxByiyz
bxbzmx
hBxBziyz
bybzmx
hByBziyz
betamx
hβiyz
beta2mx
hβ2iyz
Module ‘density_stratified.f90’
drhomx
h∆ρ/ρ0iyz
drho2mx
h(∆ρ/ρ0)2iyz
Module ‘gravity_simple.f90’
epotmx
h̺Φgraviyz
epotuxmx
h̺Φgravuxiyz (potential energy flux)
Module ‘magnetic_shearboxJ.f90’
b2mx
hB2iyz
bxmx
hBxiyz
bymx
hByiyz
bzmx
hBziyz
bx2mx
hB2
xiyz
by2mx
B2
yyz
bz2mx
hB2
ziyz
bxbymx
hBxByiyz
bxbzmx
hBxBziyz
bybzmx
hByBziyz
betamx
hβiyz
beta2mx
hβ2iyz
etatotalmx
hηiyz

K.9 Parameters for ‘yaver.in’ 235
Module ‘shock_highorder.f90’
Module ‘temperature_idealgas.f90’
ppmx
hpiyz
TTmx
hTiyz
Module ‘thermal_energy.f90’
ppmx
hpiyz
TTmx
hTiyz
Module ‘viscosity.f90’
fviscmx
h2ν̺uiSixiyz (x-component of viscous flux)
numx
hνiyz (yz-averaged viscosity)
K.9 List of parameters for ‘yaver.in’
The following table lists possible inputs to the file ‘yaver.in’. This list is not complete
and maybe outdated.
Variable Meaning
Module ‘hydro.f90’
uxmxz
huxiy
uymxz
huyiy
uzmxz
huziy
ux2mxz
hu2
xiy
uy2mxz
u2
yy
uz2mxz
hu2
ziy
uxuymxz
huxuyiy
uxuzmxz
huxuziy
uyuzmxz
huyuziy
oumxz
hω·uiy
Module ‘density.f90’
rhomxz
h̺iy
Module ‘entropy.f90’
TTmxz
hTiy
ssmxz
hsiy
Module ‘magnetic.f90’
b2mxz
B2y
axmxz
hAxiy
aymxz
hAyiy
azmxz
hAziy
bx1mxz
h|Bx|iy

236 THE PENCIL CODE
by1mxz
h|By|iy
bz1mxz
h|Bz|iy
bxmxz
hBxiy
bymxz
hByiy
bzmxz
hBziy
jxmxz
hJxiy
jymxz
hJyiy
jzmxz
hJziy
bx2mxz
hB2
xiy
by2mxz
B2
yy
bz2mxz
hB2
ziy
bxbymxz
hBxByiy
bxbzmxz
hBxBziy
bybzmxz
hByBziy
uybxmxz
hUyBxiy
uybzmxz
hUyBziy
Exmxz
hExiy
Eymxz
hEyiy
Ezmxz
hEziy
vAmxz
hv2
Aiy
Module ‘density_stratified.f90’
drhomxz
h∆ρ/ρ0iy
drho2mxz
h(∆ρ/ρ0)2iy
Module ‘magnetic_shearboxJ.f90’
b2mxz
B2y
axmxz
hAxiy
aymxz
hAyiy
azmxz
hAziy
bx1mxz
h|Bx|iy
by1mxz
h|By|iy
bz1mxz
h|Bz|iy
bxmxz
hBxiy
bymxz
hByiy
bzmxz
hBziy
jxmxz
hJxiy
jymxz
hJyiy
jzmxz
hJziy
bx2mxz
hB2
xiy
by2mxz
B2
yy
bz2mxz
hB2
ziy
bxbymxz
hBxByiy
bxbzmxz
hBxBziy
bybzmxz
hByBziy
uybxmxz
hUyBxiy
uybzmxz
hUyBziy
Exmxz
hExiy

K.10 Parameters for ‘zaver.in’ 237
Eymxz
hEyiy
Ezmxz
hEziy
vAmxz
hv2
Aiy
Module ‘meanfield.f90’
peffmxz
hPeff iy
alpmxz
hαiy
Module ‘temperature_idealgas.f90’
TTmxz
hTiy
Emymxz
hEmyiyEmission in y-direction
Module ‘thermal_energy.f90’
TTmxz
hTiy
K.10 List of parameters for ‘zaver.in’
The following table lists possible inputs to the file ‘zaver.in’. This list is not complete
and maybe outdated.
Variable Meaning
Module ‘hydro.f90’
uxmxy
huxiz
uymxy
huyiz
uzmxy
huziz
uxuymxy
huxuyiz
uxuzmxy
huxuziz
uyuzmxy
huyuziz
oxmxy
hωxiz
oymxy
hωyiz
ozmxy
hωziz
oumxy
hω·uiz
pvzmxy
h(ωz+ 2Ω)/̺iz(z component of potential vorticity)
uguxmxy
h(u·∇u)xiz
uguymxy
h(u·∇u)yiz
uguzmxy
h(u·∇u)ziz
ruxmxy
hρuxiz
ruymxy
hρuyiz
ruzmxy
hρuziz
ux2mxy
hu2
xiz
uy2mxy
u2
yz
uz2mxy
hu2
ziz
rux2mxy
hρu2
xiz
ruy2mxy
ρu2
yz
ruz2mxy
hρu2
ziz
ruxuymxy
hρuxuyiz
ruxuzmxy
hρuxuziz

238 THE PENCIL CODE
ruyuzmxy
hρuyuziz
fkinxmxy
1
2̺u2uxz
fkinymxy
1
2̺u2uyz
Module ‘density.f90’
rhomxy
h̺iz
Module ‘entropy.f90’
TTmxy
hTiz
ssmxy
hsiz
uxTTmxy
huxTiz
uyTTmxy
huyTiz
uzTTmxy
huzTiz
gTxmxy
h∇xTiz
gTymxy
h∇yTiz
gTzmxy
h∇zTiz
gsxmxy
h∇xsiz
gsymxy
h∇ysiz
gszmxy
h∇zsiz
gTxgsxmxy
h(∇T× ∇s)xiz
gTxgsymxy
D(∇T× ∇s)yEz
gTxgszmxy
h(∇T× ∇s)ziz
gTxgsx2mxy
(∇T× ∇s)2
xz
gTxgsy2mxy
D(∇T× ∇s)2
yEz
gTxgsz2mxy
(∇T× ∇s)2
zz
fconvxy
hcp̺uxTiz
fconvyxy
hcp̺uyTiz
fconvzxy
hcp̺uzTiz
fradxy Kprof
Frad
x(x-component of radiative flux, z-averaged, from Kprof)
fradymxy Kprof
Frad
y(y-component of radiative flux, z-averaged, from Kprof)
fradxy kramers
Frad (z-averaged, from Kramers’ opacity)
fturbxy
h̺T χt∇xsiz
fturbymxy
h̺T χt∇ysiz
fturbrxy
h̺T χri∇isiz(radial part of anisotropic turbulent heat flux)
fturbthxy
h̺T χθi∇isiz(latitudinal part of anisotropic turbulent heat
flux)
dcoolxy
surface cooling flux
Module ‘magnetic.f90’
bxmxy
hBxiz
bymxy
hByiz
bzmxy
hBziz
jxmxy
hJxiz
jymxy
hJyiz
jzmxy
hJziz
axmxy
hAxiz
aymxy
hAyiz
azmxy
hAziz
bx2mxy
hB2
xiz

K.10 Parameters for ‘zaver.in’ 239
by2mxy
B2
yz
bz2mxy
hB2
ziz
bxbymxy
hBxByiz
bxbzmxy
hBxBziz
bybzmxy
hByBziz
poynxmxy
hE×Bix
poynymxy
hE×Biy
poynzmxy
hE×Biz
jbmxy
hJ·Biz
abmxy
hA·Biz
examxy1
hE×Aiz|x
examxy2
hE×Aiz|y
examxy3
hE×Aiz|z
StokesImxy
hǫB⊥iz|z
StokesQmxy
−hǫB⊥cos 2χiz|z
StokesUmxy
−hǫB⊥sin 2χiz|z
StokesQ1mxy
+hF ǫB⊥sin 2χiz|z
StokesU1mxy
−hF ǫB⊥cos 2χiz|z
beta1mxy
B2/(2µ0p)z|z
Module ‘density_stratified.f90’
drhomxy
h∆ρ/ρ0iz
drho2mxy
h(∆ρ/ρ0)2iz
Module ‘gravity_simple.f90’
epotmxy
h̺Φgraviz
epotuxmxy
h̺Φgravuxiz(potential energy flux)
Module ‘magnetic_shearboxJ.f90’
bxmxy
hBxiz
bymxy
hByiz
bzmxy
hBziz
jxmxy
hJxiz
jymxy
hJyiz
jzmxy
hJziz
axmxy
hAxiz
aymxy
hAyiz
azmxy
hAziz
bx2mxy
hB2
xiz
by2mxy
B2
yz
bz2mxy
hB2
ziz
bxbymxy
hBxByiz
bxbzmxy
hBxBziz
bybzmxy
hByBziz
poynxmxy
hE×Bix
poynymxy
hE×Biy
poynzmxy
hE×Biz
jbmxy
hJ·Biz
abmxy
hA·Biz
examxy1
hE×Aiz|x

240 THE PENCIL CODE
examxy2
hE×Aiz|y
examxy3
hE×Aiz|z
StokesImxy
hǫB⊥iz|z
StokesQmxy
−hǫB⊥cos 2χiz|z
StokesUmxy
−hǫB⊥sin 2χiz|z
StokesQ1mxy
+hF ǫB⊥sin 2χiz|z
StokesU1mxy
−hF ǫB⊥cos 2χiz|z
beta1mxy
B2/(2µ0p)z|z
Module ‘temperature_idealgas.f90’
TTmxy
hTiz
Emzmxy
hEmzizEmission in z-direction
Module ‘thermal_energy.f90’
TTmxy
hTiz
Module ‘viscosity.f90’
fviscmxy
h2ν̺uiSixiz(x-xomponent of viscous flux)
fviscsmmxy
h2νSmag̺uiSixiz(x-xomponent of viscous flux)
fviscymxy
h2ν̺uiSiyiz(y-xomponent of viscous flux)
K.11 Boundary conditions
The following tables list all possible boundary condition labels that are documented.
K.11.1 Boundary condition
bcx
Variable Meaning
Module ‘boundcond.f90’
0
zero value in ghost zones, free value on boundary
p
periodic
s
symmetry, fN+i=fN−i; implies f′(xN) = f′′′(x0) = 0
sf
symmetry with respect to interface
ss
symmetry, plus function value given
s0d
symmetry, function value such that df/dx=0
a
antisymmetry, fN+i=−fN−i; implies f(xN) = f′′(x0) = 0
af
antisymmetry with respect to interface
a2
antisymmetry relative to boundary value, fN+i= 2fN−fN−i; implies
f′′(x0) = 0
a2v
set boundary value and antisymmetry relative to it fN+i= 2fN−fN−i;
implies f′′(x0) = 0
a2r
sets d2f/dr2+ 2df/dr −2f/r2= 0 This is the replacement of zero second
derivative in spherical coordinates, in radial direction.
cpc
cylindrical perfect conductor implies f′′ +f′/R = 0
cpp
cylindrical perfect conductor implies f′′ +f′/R = 0
cpz
cylindrical perfect conductor implies f′′ +f′/R = 0
spr
spherical perfect conductor implies f′′ + 2f′/R = 0 and f(xN) = 0
v
vanishing third derivative

K.11 Boundary conditions 241
cop
copy value of last physical point to all ghost cells
1s
onesided
d1s
onesided for 1st/2nd derivative in two first inner points, Dirichlet in
boundary point
n1s
onesided for 1st/2nd derivative in two first inner points, Neumann in
boundary point
1so
onesided
cT
constant temperature (implemented as condition for entropy sor tem-
perature T)
c1
constant temperature (or maybe rather constant conductive flux??)
Fgs
Fconv = - chi t*rho*T*grad(s)
Fct
Fbot = - K*grad(T) - chi t*rho*T*grad(s)
Fcm
F bot =−K∗grad(T)−chit∗rho ∗T∗grad(s)
sT
symmetric temperature, TN−i=TN+i; implies T′(xN) = T′′′(x0) = 0
asT
select entropy for uniform ghost temperature matching fluctuating
boundary value, TN−i=TN=; implies T′(xN) = T′(x0) = 0
f
“freeze” value, i.e. maintain initial
fg
“freeze” value, i.e. maintain initial
1
f= 1 (for debugging)
set
set boundary value to
fbcx
der
set derivative on boundary to
fbcx
slo
set slope at the boundary =
fbcx
slp
set slope at the boundary and in ghost cells =
fbcx
shx
set shearing boundary proportional to x with slope=
fbcx
and ab-
scissa=
fbcx2
shy
set shearing boundary proportional to y with slope=
fbcx
and ab-
scissa=
fbcx2
shz
set shearing boundary proportional to z with slope=
fbcx
and ab-
scissa=
fbcx2
dr0
set boundary value [really??]
ovr
overshoot boundary condition ie (d/dx −1/dist)f= 0.
out
allow outflow, but no inflow forces ghost cells and boundary to not point
inwards
e1o
allow outflow, but no inflow uses the e1 extrapolation scheme
ant
stops and prompts for adding documentation
e1
extrapolation [describe]
e2
extrapolation [describe]
e3
extrapolation in log [maintain a power law]
el
linear extrapolation from last two active cells
hat
top hat jet profile in spherical coordinate.
jet
top hat jet profile in cartezian coordinate.
spd
sets d(rAα)/dr =fbcx(j)
sfr
stress-free boundary condition for spherical coordinate system.
sr1
Stress-free bc for spherical coordinate system. Implementation with
one-sided derivative.
nfr
Normal-field bc for spherical coordinate system. Some people call this
the “(angry) hedgehog bc”.
nr1
Normal-field bc for spherical coordinate system. Some people call this
the “(angry) hedgehog bc”. Implementation with one-sided derivative.

242 THE PENCIL CODE
sa2
(d/dr)(rBφ) = 0 imposes boundary condition on 2nd derivative of rAφ.
Same applies to θcomponent.
pfc
perfect-conductor in spherical coordinate: d/dr(Ar) + 2/r = 0.
fix
set boundary value [really??]
fil
set boundary value from a file
cfb
radial centrifugal balance
g
set to given value(s) or function
nil
do nothing; assume that everything is set
ioc
inlet/outlet on western/eastern hemisphere in cylindrical coordinates
do nothing; assume that everything is set
s
implies f′(yN) = f′′′(y0) = 0
Module ‘boundcond_alt.f90’
0
zero value in ghost zones, free value on boundary
p
periodic
s
symmetry, fN+i=fN−i; implies f′(xN) = f′′′(x0) = 0
ss
symmetry, plus function value given
s0d
symmetry, function value such that df/dx=0
a
antisymmetry, fN+i=−fN−i; implies f(xN) = f′′(x0) = 0
a2
antisymmetry relative to boundary value, fN+i= 2fN−fN−i; implies
f′′(x0) = 0
a2r
sets d2f/dr2+ 2df/dr −2f/r2= 0 This is the replacement of zero second
derivative in spherical coordinates, in radial direction.
cpc
cylindrical perfect conductor implies f′′ +f′/R = 0
cpp
cylindrical perfect conductor implies f′′ +f′/R = 0
cpz
cylindrical perfect conductor implies f′′ +f′/R = 0
spr
spherical perfect conductor implies f′′ + 2f′/R = 0 and f(xN) = 0
v
vanishing third derivative
cop
copy value of last physical point to all ghost cells
1s
onesided
1so
onesided
cT
constant temperature (implemented as condition for entropy sor tem-
perature T)
c1
constant temperature (or maybe rather constant conductive flux??)
Fgs
Fconv = - chi t*rho*T*grad(s)
Fct
Fbot = - K*grad(T) - chi t*rho*T*grad(s)
Fcm
F bot =−K∗grad(T)−chit∗rho ∗T∗grad(s)
sT
symmetric temperature, TN−i=TN+i; implies T′(xN) = T′′′(x0) = 0
asT
select entropy for uniform ghost temperature matching fluctuating
boundary value, TN−i=TN=; implies T′(xN) = T′(x0) = 0
f
“freeze” value, i.e. maintain initial
fg
“freeze” value, i.e. maintain initial
1
f= 1 (for debugging)
set
set boundary value to
fbcx12
der
set derivative on boundary to
fbcx12
slo
set slope at the boundary =
fbcx12
dr0
set boundary value [really??]
ovr
overshoot boundary condition ie (d/dx −1/dist)f= 0.
out
allow outflow, but no inflow forces ghost cells and boundary to not point
inwards

K.11 Boundary conditions 243
e1o
allow outflow, but no inflow uses the e1 extrapolation scheme
ant
stops and prompts for adding documentation
e1
extrapolation [describe]
e2
extrapolation [describe]
e3
extrapolation in log [maintain a power law]
hat
top hat jet profile in spherical coordinate.
jet
top hat jet profile in cartezian coordinate.
spd
sets d(rAα)/dr =fbcx12(j)
sfr
stress-free boundary condition for spherical coordinate system.
nfr
Normal-field bc for spherical coordinate system. Some people call this
the “(angry) hedgehog bc”.
sa2
(d/dr)(rBφ) = 0 imposes boundary condition on 2nd derivative of rAφ.
Same applies to θcomponent.
pfc
perfect-conductor in spherical coordinate: d/dr(Ar) + 2/r = 0.
fix
set boundary value [really??]
fil
set boundary value from a file
g
set to given value(s) or function
nil
do nothing; assume that everything is set
ioc
inlet/outlet on western/eastern hemisphere in cylindrical coordinates
do nothing; assume that everything is set
s
implies f′(yN) = f′′′(y0) = 0
K.11.2 Boundary condition
bcy
Variable Meaning
Module ‘boundcond.f90’
sds
symmetric-derivative-set
0
zero value in ghost zones, free value on boundary
p
periodic
pp
periodic across the pole
yy
Yin-Yang grid
ap
anti-periodic across the pole
s
symmetry symmetry, fN+i=fN−i;
ss
symmetry, plus function value given
sds
symmetric-derivative-set
cds
complex symmetric-derivative-set
s0d
symmetry, function value such that df/dy=0
a
antisymmetry
a2
antisymmetry relative to boundary value
v
vanishing third derivative
v3
vanishing third derivative
out
allow outflow, but no inflow forces ghost cells and boundary to not point
inwards
1s
onesided
d1s
onesided for 1st and 2nd derivative in two first inner points, Dirichlet
in boundary point
n1s
onesided for 1st and 2nd derivative in two first inner points, Neumann
in boundary point
cT
constant temp.

244 THE PENCIL CODE
sT
symmetric temp.
asT
select entropy for uniform ghost temperature matching fluctuating
boundary value, TN−i=TN=; implies T′(xN) = T′(x0) = 0
f
freeze value
s+f
freeze value
fg
“freeze” value, i.e. maintain initial
fBs
frozen-in B-field (s)
fB
frozen-in B-field (a2)
1
f=1 (for debugging)
set
set boundary value
sse
symmetry, set boundary value
sep
set boundary value
e1
extrapolation
e2
extrapolation
e3
extrapolation in log [maintain a power law]
der
set derivative on the boundary
cop
outflow: copy value of last physical point to all ghost cells
c+k
no-inflow: copy value of last physical point to all ghost cells, but sup-
pressing any inflow
sfr
stress-free boundary condition for spherical coordinate system.
nfr
Normal-field bc for spherical coordinate system. Some people call this
the “(angry) hedgehog bc”.
spt
spherical perfect conducting boundary condition along θboundary f′′ +
cot θf′= 0 and f(xN) = 0
pfc
perfect conducting boundary condition along θboundary
nil’,’
do nothing; assume that everything is set
sep
set boundary value
crk
no-inflow: copy value of last physical point to all ghost cells, but sup-
pressing any inflow
Module ‘boundcond_alt.f90’
sds
symmetric-derivative-set
0
zero value in ghost zones, free value on boundary
p
periodic
pp
periodic across the pole
ap
anti-periodic across the pole
s
symmetry symmetry, fN+i=fN−i;
ss
symmetry, plus function value given
sds
symmetric-derivative-set
cds
complex symmetric-derivative-set
s0d
symmetry, function value such that df/dy=0
a
antisymmetry
a2
antisymmetry relative to boundary value
v
vanishing third derivative
v3
vanishing third derivative
out
allow outflow, but no inflow forces ghost cells and boundary to not point
inwards
1s
onesided
cT
constant temp.
sT
symmetric temp.

K.11 Boundary conditions 245
asT
select entropy for uniform ghost temperature matching fluctuating
boundary value, TN−i=TN=; implies T′(xN) = T′(x0) = 0
f
freeze value
s+f
freeze value
fg
“freeze” value, i.e. maintain initial
1
f=1 (for debugging)
set
set boundary value
sse
symmetry, set boundary value
sep
set boundary value
e1
extrapolation
e2
extrapolation
e3
extrapolation in log [maintain a power law]
der
set derivative on the boundary
cop
outflow: copy value of last physical point to all ghost cells
c+k
no-inflow: copy value of last physical point to all ghost cells, but sup-
pressing any inflow
sfr
stress-free boundary condition for spherical coordinate system.
nfr
Normal-field bc for spherical coordinate system. Some people call this
the “(angry) hedgehog bc”.
spt
spherical perfect conducting boundary condition along θboundary f′′ +
cot θf′= 0 and f(xN) = 0
pfc
perfect conducting boundary condition along θboundary
nil’,’
do nothing; assume that everything is set
sep
set boundary value
K.11.3 Boundary condition
bcz
Variable Meaning
Module ‘boundcond.f90’
0
zero value in ghost zones, free value on boundary
p
periodic
yy
Yin-Yang grid
s
symmetry
sf
symmetry with respect to interface
s0d
symmetry, function value such that df/dz=0
0ds
symmetry, function value such that df/dz=0
a
antisymmetry
a2
antisymmetry relative to boundary value
a2v
set boundary value and antisymmetry relative to it
af
antisymmetry with respect to interface
a0d
antisymmetry with zero derivative
v
vanishing third derivative
v3
vanishing third derivative
1s
one-sided
d1s
onesided for 1st and 2nd derivative in two first inner points, Dirichlet
in boundary point
n1s
onesided for 1st and 2nd derivative in two first inner points, Neumann
in boundary point

246 THE PENCIL CODE
a1s
special for perfect conductor with const alpha and etaT when A con-
sidered as B; one-sided for 1st and 2nd derivative in two first inner
points
fg
“freeze” value, i.e. maintain initial
c1
complex
c1s
complex
Fgs
Fconv = - chi t*rho*T*grad(s)
Fct
Fbot = - K*grad(T) - chi t*rho*T*grad(s)
c3
constant flux at the bottom with a variable hcond
pfe
potential field extrapolation
p1D
potential field extrapolation in 1D
pot
potential magnetic field
pwd
a variant of ’pot’ for nprocx=1
hds
hydrostatic equilibrium with a high-frequency filter
cT
constant temp.
cT1
constant temp.
cT2
constant temp. (keep lnrho)
cT3
constant temp. (keep lnrho)
hs
hydrostatic equilibrium
hse
hydrostatic extrapolation rho or lnrho is extrapolated linearily and the
temperature is calculated in hydrostatic equilibrium.
cp
constant pressure
sT
symmetric temp.
ctz
for interstellar runs copy T
cdz
for interstellar runs limit rho
ism
for interstellar runs limit rho
asT
select entropy for uniform ghost temperature matching fluctuating
boundary value, TN−i=TN=; implies T′(xN) = T′(x0) = 0
c2
complex
db
complex
ce
complex
e1
extrapolation
e2
extrapolation
ex
simple linear extrapolation in first order
exf
simple linear extrapolation in first order
exd
simple linear extrapolation in first order
exm
simple linear extrapolation in first order
b1
extrapolation with zero value (improved ’a’)
b2
extrapolation with zero value (improved ’a’)
b3
extrapolation with zero value (improved ’a’)
f’,’fa
freeze value + antisymmetry
fs
freeze value + symmetry
fBs
frozen-in B-field (s)
fB
frozen-in B-field (a2)
g
set to given value(s) or function
1
f=1 (for debugging)
StS
solar surface boundary conditions
set
set boundary value
der
set derivative on the boundary
div
set the divergence of uto a given value use bc = ’div’ for iuz

K.11 Boundary conditions 247
ovr
set boundary value
inf
allow inflow, but no outflow
ouf
allow outflow, but no inflow
in
allow inflow, but no outflow forces ghost cells and boundary to not point
outwards
out
allow outflow, but no inflow forces ghost cells and boundary to not point
inwards
in0
allow inflow, but no outflow forces ghost cells and boundary to not point
outwards relaxes to vanishing 1st derivative at boundary
ou0
allow outflow, but no inflow forces ghost cells and boundary to not point
inwards relaxes to vanishing 1st derivative at boundary
ind
allow inflow, but no outflow forces ghost cells and boundary to not point
outwards creates inwards pointing or zero 1st derivative at boundary
oud
allow outflow, but no inflow forces ghost cells and boundary to not point
inwards creates outwards pointing or zero 1st derivative at boundary
ubs
copy boundary outflow,
win
forces massflux given as Σρi(ui+u0) = fbcz1/2(ρ)
cop
copy value of last physical point to all ghost cells
nil
do nothing; assume that everything is set
Module ‘boundcond_alt.f90’
cfb
radial centrifugal balance
fBs
frozen-in B-field (s)
fB
frozen-in B-field (a2)
0
zero value in ghost zones, free value on boundary
p
periodic
s
symmetry
sf
symmetry with respect to interface
s0d
symmetry, function value such that df/dz=0
0ds
symmetry, function value such that df/dz=0
a
antisymmetry
a2
antisymmetry relative to boundary value
af
antisymmetry with respect to interface
a0d
antisymmetry with zero derivative
v
vanishing third derivative
v3
vanishing third derivative
1s
one-sided
fg
“freeze” value, i.e. maintain initial
c1
complex
Fgs
Fconv = - chi t*rho*T*grad(s)
Fct
Fbot = - K*grad(T) - chi t*rho*T*grad(s)
c3
constant flux at the bottom with a variable hcond
pfe
potential field extrapolation
p1D
potential field extrapolation in 1D
pot
potential magnetic field
pwd
a variant of ’pot’ for nprocx=1
hds
hydrostatic equilibrium with a high-frequency filter
cT
constant temp.
cT2
constant temp. (keep lnrho)
cT3
constant temp. (keep lnrho)

248 THE PENCIL CODE
hs
hydrostatic equilibrium
hse
hydrostatic extrapolation rho or lnrho is extrapolated linearily and the
temperature is calculated in hydrostatic equilibrium.
cp
constant pressure
sT
symmetric temp.
ctz
for interstellar runs copy T
cdz
for interstellar runs limit rho
asT
select entropy for uniform ghost temperature matching fluctuating
boundary value, TN−i=TN=; implies T′(xN) = T′(x0) = 0
c2
complex
db
complex
ce
complex
e1
extrapolation
e2
extrapolation
ex
simple linear extrapolation in first order
exf
simple linear extrapolation in first order
exd
simple linear extrapolation in first order
exm
simple linear extrapolation in first order
b1
extrapolation with zero value (improved ’a’)
b2
extrapolation with zero value (improved ’a’)
b3
extrapolation with zero value (improved ’a’)
f’,’fa
freeze value + antisymmetry
fs
freeze value + symmetry
fBs
frozen-in B-field (s)
fB
frozen-in B-field (a2)
g
set to given value(s) or function
1
f=1 (for debugging)
StS
solar surface boundary conditions
set
set boundary value
der
set derivative on the boundary
div
set the divergence of uto a given value use bc = ’div’ for iuz
ovr
set boundary value
inf
allow inflow, but no outflow
ouf
allow outflow, but no inflow
in
allow inflow, but no outflow forces ghost cells and boundary to not point
outwards
out
allow outflow, but no inflow forces ghost cells and boundary to not point
inwards
in0
allow inflow, but no outflow forces ghost cells and boundary to not point
outwards relaxes to vanishing 1st derivative at boundary
ou0
allow outflow, but no inflow forces ghost cells and boundary to not point
inwards relaxes to vanishing 1st derivative at boundary
ind
allow inflow, but no outflow forces ghost cells and boundary to not point
outwards creates inwards pointing or zero 1st derivative at boundary
oud
allow outflow, but no inflow forces ghost cells and boundary to not point
inwards creates outwards pointing or zero 1st derivative at boundary
ubs
copy boundary outflow,
win
forces massflux given as Σρi(ui+u0) = fbcz1/2(ρ)
cop
copy value of last physical point to all ghost cells
nil
do nothing; assume that everything is set

K.12 Initial condition parameter dependence 249
K.12 Initial condition parameter dependence
The following tables list which parameters from each Namelist are required (•), optional
(⋄) or irrelevant (blank). The distinction is made between required and optional where by
a parameter requires a setting if the default value would give an invalid or degenerate
case for the initial condition.
inituu
ampluu
widthuu
urand
uu left
uu right
uu upper
uu lower
uy left
uy right
kx uu
ky uu
kz uu
zero
gaussian-noise •
gaussian-noise-x •
xjump ⋄ • • • •
Beltrami-x •
Beltrami-y •
Beltrami-z •
trilinear-x •
trilinear-y •
trilinear-z •
cos-cos-sin-uz •
tor pert •
trilinear-x •
sound-wave • •
shock-tube ⋄ • •
bullets • ⋄
Alfven-circ-x • ⋄
const-ux •
const-uy •
tang-discont-z ⋄ • • •
Fourier-trunc • ⋄ • •
up-down • ⋄

250 THE PENCIL CODE
initss
ampl ss
radius ss
widthss
epsilon ss
grads0
pertss
ss left
ss right
ss const
mpoly0
mpoly1
mpoly2
isothtop
khor ss
center1 x
center1 y
center1 z
center2 x
center2 y
center2 z
thermal background
thermal peak
zero
const ss •
blob • •
isothermal
Ferri`
ere
xjump • • •
hor-fluxtube • • •
hor-tube • • •
sedov • • • • •
sedov-dual • • • • • • • •
isobaric
isentropic
linprof
piecew-poly
polytropic

REFERENCES 251
References
[1] Abramowitz, A., Stegun, I. A., Pocketbook of Mathematical Functions, Harri
Deutsch, Frankfurt (1984)
[2] Barekat, A., & Brandenburg, A., Astron. Astrophys. 571, A68 (2014) “Near-
polytropic stellar simulations with a radiative surface”
[3] Brandenburg, A., Astrophys. J. 550, 824–840 (2001) “The inverse cascade and non-
linear alpha-effect in simulations of isotropic helical hydromagnetic turbulence”
[4] Brandenburg, A., in Advances in non-linear dynamos, ed. A. Ferriz-Mas &
M. N ´
u˜
nez Jim´
enez, (The Fluid Mechanics of Astrophysics and Geophysics,
Vol. 9) Taylor & Francis, London and New York, pp. 269–344 (2003);
http://arXiv.org/abs/astro-ph/0109497
[5] Brandenburg, A., Dobler, W., Astron. Astrophys. 369, 329–338 (2001) “Large scale
dynamos with helicity loss through boundaries”
[6] Brandenburg, A., & Hazlehurst, J., Astron. Astrophys. 370, 1092–1102 (2001) “Evo-
lution of highly buoyant thermals in a stratified layer”
[7] Brandenburg, A., & Sarson, G. R., Phys. Rev. Lett. 88, 055003 (2002) “The effect of
hyperdiffusivity on turbulent dynamos with helicity”
[8] Brandenburg, A., Dobler, W., & Subramanian, K., Astron. Nachr. 323, 99–122
(2002) “Magnetic helicity in stellar dynamos: new numerical experiments”
[9] Brandenburg, A., Enqvist, K., & Olesen, P., Phys. Rev. D 54, 1291–1300 (1996)
“Large-scale magnetic fields from hydromagnetic turbulence in the very early uni-
verse”
[10] Brandenburg, A., Jennings, R. L., Nordlund, ˚
A., Rieutord, M., Stein, R. F., & Tuomi-
nen, I., J. Fluid Mech. 306, 325–352 (1996) “Magnetic structures in a dynamo sim-
ulation”
[11] A. Brandenburg, T. Kahniashvili, S. Mandal, A. Roper Pol, A. G. Tevzadze, and T.
Vachaspati, Phys. Rev. D 96, 123528 (2017) “Evolution of hydromagnetic turbulence
from the electroweak phase transition”
[12] Brandenburg, A., Moss, D., & Shukurov, A., MNRAS 276, 651–662 (1995) “Galactic
fountains as magnetic pumps”
[13] Brandenburg, A., Nordlund, ˚
A., Stein, R. F., & Torkelsson, U., Astrophys. J. 446,
741–754 (1995) “Dynamo-generated turbulence and large scale magnetic fields in a
Keplerian shear flow”
[14] Collatz, L., The numerical treatment of differential equations, Springer-Verlag, New
York, p. 164 (1966)
[15] Dobler, W., Stix, M., & Brandenburg, A.: 2006, “Convection and magnetic field gen-
eration in fully convective spheres,” Astrophys. J. 638, 336-347
[16] Durrer, R., “The Cosmic Microwave Background,” Cambridge University Press
(2008)
[17] Gammie, C. F., Astrophys. J. 553, 174–183 (2001) “Nonlinear outcome of gravita-
tional instability in cooling, gaseous disks”

252 THE PENCIL CODE
[18] Goodman, J., Narayan, R. & Goldreich, P., Month. Not. Roy. Soc. 225, 695–711
(1987) “The stability of accretion tori – II. Nonlinear evolution to discrete planets”
[19] Haugen, N. E. L., & Brandenburg, A. Phys. Rev. E 70, 026405 (2004) “Inertial range
scaling in numerical turbulence with hyperviscosity”
[20] Hockney, R. W., & Eastwood, J. W., Computer Simulation Using Particles, McGraw-
Hill, New York (1981)
[21] Hurlburt, N. E., Toomre, J., & Massaguer, J. M., Astrophys. J. 282, 557–573 (1984)
“Two-dimensional compressible convection extending over multiple scale heights”
[22] Kim, J., Moin, P. & Moser, R J. of Fluid Mech. 177, 133 (1987) “Turbulence statistics
in fully developed channel flow at low Reynolds number”
[23] Kippenhahn, R. & Weigert, A. Stellar structure and evolution, Springer: Berlin
(1990)
[24] Krause, F., R¨
adler, K.-H., Mean-Field Magnetohydrodynamics and Dynamo Theory,
Akademie-Verlag, Berlin; also Pergamon Press, Oxford (1980)
[25] Lele, S. K., J. Comp. Phys. 103, 16–42 (1992) “Compact finite difference schemes
with spectral-like resolution”
[26] Misner, C. W., Thorne, K. S. & Wheeler, J. A. Gravitation, San Francisco: W.H.
Freeman and Co. (1973), p. 213.
[27] Mitra, D., Tavakol, R., Brandenburg, A., & Moss, D.: 2009, “Turbulent dynamos in
spherical shell segments of varying geometrical extent,” Astrophys. J. 697, 923-933
(arXiv/0812.3106)
[28] Nordlund, ˚
A., & Galsgaard, K., A 3D MHD code for Parallel Computers,
http://www.astro.ku.dk/~aake/NumericalAstro/papers/kg/mhd.ps.gz (1995)
[29] Nordlund, ˚
A., Stein, R. F., Comput. Phys. Commun. 59, 119 (1990) “3-D simulations
of solar and stellar convection and magnetoconvection”
[30] Press, W., Teukolsky, S., Vetterling, W., & Flannery, B., Numerical Recipes in For-
tran 90, 2nd ed., Cambridge (1996)
[31] Stanescu, D., Habashi, W. G., J. Comp. Phys. 143, 674 (1988) “2N-storage low dissi-
pation and dispersion Runge–Kutta schemes for computational acoustics”
[32] Williamson, J. H., J. Comp. Phys. 35, 48 (1980) “Low-storage Runge–Kutta
schemes”

253
Part IV
Indexes
File Index
*.c . . . . . . . . . . . . . . 12
*.f90 ............12
*.in . . . . . . . . . 32, 179
*.local ..........32
../32c ..........145
./config ..........18
./host-ID .........18
.adapt-mkfile.inc . . 77
.bashrc ...........5
.conf ............19
.cshrc ............5
.emacs ..........125
.svn/ ............12
/scratch/ ..........7
<ID> .............17
$HOME/.pencil/config-local
18
$HOME/.pencil/host-ID
18
$PENCIL_HOME ......87
$PENCIL_HOME/config 18,
19
$PENCIL_HOME/config-local
18
$PENCIL_HOME/config/compilers/*.conf
17
$PENCIL_HOME/config/hosts
17
$PENCIL_HOME/config/hosts/<ID>.conf
17
$PENCIL_HOME/config/hosts/IWF/host-andromeda-GNU_-
Linux-Linux.conf
17
$PENCIL_HOME/config/hosts/pencil.org/workhorse.pencil.org.conf
17
$PENCIL_HOME/host-ID18
$PENCIL_HOME/python 46
${PENCIL_HOME}/config-local/hosts/
106
~/.idl_history . . . . 44
~/pencil-auto-test 106
1D_loop.f90 ......194
1d-test/ambipolar-diffusion
66
2d-tests/baroclinic105
2d-tests/battery_term
85
2d-tests/spherical_-
viscous_ring 105
aa[xyz].{xz,yz,xy,xy2}
223
ab[xyz].{xz,yz,xy,xy2}
223
adapt-mkfile ......22
advective_gauge.f90194
alive.info .......181
anelastic.f90 195, 224
auto-test ........2,9
b2.{xz,yz,xy,xy2}. 223
bb.net ...........42
bb[xyz].{xz,yz,xy,xy2}
223
beta1.{xz,yz,xy,xy2}
223
bfield.f90 195, 229, 234
bin/ 6, 9, 12, 14, 31, 33,
78
boundcond.f90 240, 243,
245
boundcond_alt.f90 242,
244, 247
bugs/ ............12
cdata.f90 . 89, 108, 186,
224
chemistry.f90 . . . . 196
chemistry_simple.f90
196
chiral_fluids.f90 . 196
chiral_fluids_-
gradtheta.f90
196
chiral_mhd.f90 . . . 196
config/ ..........18
ConfigFinder . . . 17, 18
configure .........88
conv-slab/ 6, 9, 49, 149,
150
conv-slab/src/ . . . . 11
coronae.f90 ......197
cosmicray.f90 . . . . 223
cosmicray_current.f90
197
cparam.inc . . 14, 32, 78
cparam.local . . . 6, 12,
14, 22, 41, 49, 54,
100, 145
cparam_pencils.inc 102
ctimeavg.local . 12, 30,
31
data/7, 14, 27, 33, 50, 86
data/ ...........15
data/dim.dat . . . . . 173
data/param.nml 86, 146,
173
data/procN/......25
data/proc*/ . . . . 27, 28
data/proc*/alive.info
26
data/proc*/slice* . . 27
data/proc*/var.dat . 40
datadir.in . . . 7, 14, 15
debug_c.c ........109
density.f90 . . . . 31, 66,
95, 189, 223, 224,
226, 231, 233,
235, 238
density_stratified.f90
197, 229, 232,
234, 236, 239
detonate.f90 . . . . . 197
dim.dat . . . . 15, 16, 32
divu.{xz,yz,xy,xy2}223
doc/ .............12
dustdensity.f90 . . . 197
dx/ ..............12
dx/basic ..........41
dx/macros/ ........32
ec.{xz,yz,xy,xy2}. 223
entropy.f9031, 109, 189,
223, 224, 227,
232, 233, 235, 238
entropy_anelastic.f90
197, 224
eos_ionization.f90 223
Equ ..............95
equ.f90 ..........98
examples/pro/ .....42
254

FILE INDEX 255
experimental . . . . . 126
forced/ ..........12
forced/idl/ .......55
fourier_fftpack.f90 53
fourier_transform_y 53
generate_kvectors.pro
149
getconf.csh 9, 12, 14, 33
gravitational_-
waves.f90 . . 198
gravitational_waves_-
hij6.f90 . . . 198
gravity_simple.f90 199,
229, 232, 234, 239
gravz/ ...........12
grid.dat . . . . . . . 16, 23
heatflux.f90 . . . . . 199
helical-MHDturb 35, 149
host_ID.conf ......17
hosts/ ...........18
hsections.pro . . . . 150
hydro.f90 . . . 31, 66, 76,
95, 100, 186, 222,
224, 225, 231,
233, 235, 237
hyperresi_strict_2nd
137
hypervisc_strict_2nd
137
idl/ .......... 12,43
index.pro . . . . . . 15, 32
inlinedoc-modules.tex
171
Intel.conf ........17
Intel_MPI.conf . . . . 17
interlocked-fluxrings
105
interstellar.dat . . . 15
Isurf.xz .........223
j2.{xz,yz,xy,xy2}. 223
jb.{xz,yz,xy,xy2}. 223
jj[xyz].{xz,yz,xy,xy2}
223
k.dat . . . . . . . . 32, 149
K_VECTORS/ .......149
kinematic/ ........12
legend.dat ........15
lncc.{xz,yz,xy,xy2}223
lnrho.{xz,yz,xy,xy2}
223
lnrho.net .........42
lnTT.{xz,yz,xy,xy2}223
lorenz_gauge.f90 . . 199
mach.{xz,yz,xy,xy2}223
magnetic.f90 viii, 31, 96,
98, 99, 109, 190,
223, 224, 227,
232, 233, 235, 238
magnetic_shearboxJ.f90
199, 225, 229,
232, 234, 236, 239
Makefile . 13, 21, 22, 31,
32, 78, 79, 122
Makefile.local . viii, 6,
12–14, 32, 49, 52,
54, 62, 64, 77, 78,
88
Makefile.src . 6, 12, 14,
21, 78
meanfield.f90 203, 230,
237
meanfield_demfdt.f90
204
mkcparam . . . 14, 78, 102
mpicomm.f90 .......79
neutraldensity.f90 . 66
neutralvelocity.f90 66
NEWDIR . . . . . . . . 34, 83
nochiral ..........78
noentropy.f90 . . . . 204
NOERASE ..........86
noinitial_condition.f90
104
noionization.f90 . . 182
nomagnetic.f90 viii, 98,
99
nompicomm.f90 . 79, 111
nospecial.f90 . . . . 103
o2.{xz,yz,xy,xy2}. 223
oo[xyz].{xz,yz,xy,xy2}
223
os/Unix.conf ......19
param.nml . . 15, 32, 145
param2.nml . . . . . 15, 32
params.log . . 15, 33, 34
particles_chemistry.f90
204
particles_dust.f90 204
particles_dust_-
brdeplete.f90
204
particles_lagrangian.f90
204
particles_mass_-
swarm.f90 . . 205
particles_surfspec.f90
205
pc_read_phiavg.pro . 30
pc_read_video .....28
pc_read_xyaver . . . . 29
pc_setupsrc ........6
pencil-code/ 11, 12, 87
pencil-code/doc/manual.tex
90, 104
pencil-code/idl/read 8
pencil-code/license/developers.txt
3, 91
pencil-code/utils . . 33
pencil-runs/ ......12
Pencil::ConfigFinder17
Pencil::ConfigParser17
pencil_check.f90 . . . 82
phiaver.in . . . . 29, 224
phiaverages.dat . . . . 29
PHIAVGN..........30
phiavg.pro ........30
polymer.f90 ......205
power ............53
power.pro .........54
power_kin.dat .....52
power_krms.dat . . . . 53
powerbx_x.dat .....52
powerhel_mag.dat . . . 52
powerux_x.dat . . 52, 53
Poynting[xyz].{xz,yz,xy,xy2}
223
pp.{xz,yz,xy,xy2}. 223
print.in . . 8, 14, 25, 98,
99, 146, 186
procN. . . . . . 15, 32, 33
proc0 ............15
proc1 ............15
procN/ ..........108
pscalar.f90 . . 194, 223

256 THE PENCIL CODE
Qrad.{xz,yz,xy,xy2}223
r.pro . . . . . . 44, 45, 50
radiation_ray.f90 . 223
rall.pro . . . . 44, 45, 50
README . . . 32, 107, 149
reference.out . . . 8, 14
RELOAD . . . . . 15, 33, 34
remesh.csh .......172
RERUN . . . . . . . . . 34, 83
rho.{xz,yz,xy,xy2}223
rings/ ...........12
run.csh 9, 12, 14, 31, 33,
34, 83
run.in . . . . . . . . viii, 8,
14, 26–28, 30–32,
34, 37–40, 52, 54,
82, 100, 145, 152,
179
run.pro ..........32
run.x . 8, 15, 31, 39, 107
runA_32a ..........22
runs/ ............12
rvid_box ..........27
rvid_box.pro ......27
rvid_line.pro .....27
rvid_plane.pro . . . . 27
samples/ . . 2, 3, 5, 9, 14,
119
samples/1d-tests/H2_-
flamespeed . . 38
samples/dust-vortex 69
samples/parameter_scan
32
samples/README . . . . 12
samples/sedimentation/
56
SCRATCH_DIR .......83
seed.dat . . . . . . . 16, 40
sfb-1.dat .........54
sfu-1.dat .........54
sfz1-1.dat ........54
shear.f90 ........205
shock.{xz,yz,xy,xy2}
223
shock.f90 . . . . 205, 223
shock_highorder.f90
205, 230, 232, 235
slice ............86
slice_uu1.yz ......27
solar_corona.f90 . . 205
solid_cells_CGEO.f90
205
solid_cells_reactive.f90
205
sound-spherical-noequi
24
sourceme . . . . . . . . 5, 75
sourceme.csh . 5, 12, 75,
86
sourceme.sh 5, 12, 75, 86
SPEED ............33
spher/ ...........12
src/ viii, 3, 6, 11, 12, 14,
33, 78
src/ ............14
src/*.local .......32
src/cparam.local . . 145
src/Makefile.inc . . . 52
src/Makefile.local 38,
104, 145, 151
src/read_all_-
videofiles.x 27
src/read_videofiles.x
27, 28
ss.{xz,yz,xy,xy2}. 223
ss.net ...........42
start.csh . 9, 12, 14, 31,
33, 39, 66, 82
start.in . . . . . . . viii, 8,
14, 24, 28, 32, 34,
35, 37, 39, 41, 59,
82, 100, 104, 146,
152, 172, 179
start.pro . . . 32, 44, 86
start.x 8, 15, 39, 41, 77,
82, 107, 183
STOP .......... 33,34
structure.pro .....55
sub.f90 ..........96
TAVGN............31
temperature_idealgas.f90
205, 223, 230,
232, 235, 237, 240
temperature_ionization.f90
206, 231
testfield_axisym.f90
206
testfield_axisym2.f90
207
testfield_axisym4.f90
207
testfield_compress_-
z.f90 . . . . . 208
testfield_meri.f90 210
testfield_nonlin_z.f90
211
testfield_x.f90 . . . 213
testfield_xz.f90 . . 215
testfield_z.f90 . . . 215
testflow_z.f90 . . . 217
testperturb.f90 . . . 217
testscalar.f90 . . . 218
testscalar_axisym.f90
219
testscalar_simple.f90
220
thermal_energy.f90 222,
231, 232, 235,
237, 240
time.dat . . . . . . . 16, 40
time_series.dat . 8, 14,
15, 25, 32, 33, 41,
44
timeavg.dat .......31
top.log ..........33
ts.pro . . . . 42, 44, 150
tsnap.dat . . . . . 15, 180
TT.{xz,yz,xy,xy2}. 223
tvid.dat ..........15
u2.{xz,yz,xy,xy2}. 223
u[xyz].{xz,yz,xy,xy2}
223
uu.net ...........42
VAR . . . . . . . 40, 86, 181
VARN15, 16, 26, 32, 33,
36, 180
var.dat .......... 8,
15, 16, 25, 31, 32,
34, 36, 40, 42, 45,
86, 144, 172, 180,
181
var.general .......41
VAR0 ............172
VAR1 ............144
VAR# .............34
video.in 26–28, 146, 222
visc_smagorinsky.f90
222

FILE INDEX 257
viscosity.f90 222, 231,
235, 240
vsections.pro . . . . 151
vsections2.pro . . . 151
X.xy .............16
X.xz .............16
X.yz .............16
xyaver.in . 29, 146, 225
xyaverages.dat . . . . 29
xzaver.in . . . . . 29, 231
xzaverages.dat . . . . 29
yaver.in . . . . . . 29, 235
yaverages.dat .....29
yH.{xz,yz,xy,xy2}. 223
yzaver.in . . . . . 29, 232
yzaverages.dat . . . . 29
zaver.in . . . . . . 29, 237
zaverages.dat .....29

Variable Index
.true. .............29
0ds . . . . . . . . . 245, 247
1s . . . . . . 241–245, 247
1so . . . . . . . . . 241, 242
0. . . . 240, 242–245, 247
1241, 242, 244–246, 248
a. . . . 240, 242–245, 247
a0d . . . . . . . . . 245, 247
a11xy . . . . . . . . . . . 210
a12xy . . . . . . . . . . . 210
a13xy . . . . . . . . . . . 210
a1s . . . . . . . . . . . . . 246
a2 . . . 240, 242–245, 247
a21xy . . . . . . . . . . . 210
a22xy . . . . . . . . . . . 210
a23xy . . . . . . . . . . . 211
a2m . . . . . . . . 192, 201
a2r . . . . . . . . . 240, 242
a2v . . . . . . . . . 240, 245
a31xy . . . . . . . . . . . 211
a32xy . . . . . . . . . . . 211
a33xy . . . . . . . . . . . 211
aa . . . . . . . . . . . . . . 223
ab . . . . . . . . . . . . . . 223
ab int . . . . . . . 190, 199
ABC A..........184
ABC B..........184
ABC C..........184
abm . . . . . . . . 190, 199
abmh . . . . . . . 190, 199
abmn . . . . . . . 190, 199
abms . . . . . . . 190, 200
abmxy ..........239
abmz . . . . . . . 228, 230
abrms . . . . . . . 190, 200
abumx . . . . . . 190, 199
abumy . . . . . . 190, 199
abumz . . . . . . 190, 199
abuxmz . . . . . . 227, 229
abuymz . . . . . . 227, 229
abuzmz . . . . . . 227, 229
accpowzdownmz . . . 226
accpowzmz .......226
accpowzupmz . . . . . 226
af . . . . . . 240, 245, 247
ajm . . . . . . . . . 190, 200
aklam ...........217
aklamQ .........217
alp11 208, 211, 213, 215,
217
alp11 x..........214
alp11 x2 .........214
alp11cc . . 208, 211, 213,
215
alp11x ..........215
alp11z ..........216
alp12 208, 211, 213, 215,
217
alp12 x..........214
alp12 x2 .........214
alp12cs . . 208, 212, 213,
215
alp12x ..........215
alp12z ..........216
alp13 ...........215
alp13z ..........216
alp21 208, 211, 213, 215,
217
alp21 x ..........214
alp21 x2 .........214
alp21sc . . 208, 212, 213,
215
alp21x ..........215
alp21z ..........216
alp22 208, 211, 213, 215,
217
alp22 x..........214
alp22 x2 .........214
alp22ss . . 208, 212, 213,
215
alp22x ..........215
alp22z ..........216
alp23 ...........215
alp23z ..........216
alp31 208, 211, 213, 215,
217
alp32 208, 211, 213, 215,
217
alpK . . . . . . . . 208, 211
alpM . . . . . . . 208, 211
alpm ............203
alpMK . . . . . . 208, 211
alpmxz ..........237
alpPARA . . . . 206, 207
alpPARAz . . . . 206, 207
alpPERP . . . . 206, 207
alpPERPz . . . . 206, 207
amax . . . . . . . 192, 201
ambmz . . . . . . 193, 202
ambmzh . . . . . 193, 202
ambmzn . . . . . 193, 202
ambmzs . . . . . 193, 202
ampl ff ..........185
ampl forc ........182
ampl ss .........176
amplaa ..........178
amplaa2 .........178
ampllncc ........178
ampllncc2 ........178
ampllnrho .......175
ampluu . . . . . . 128, 174
ampluu=1e-1 . . . . . 128
ant . . . . . . . . . 241, 243
ap . . . . . . . . . . 243, 244
apbrms ..........195
arms . . . . . . . . 192, 201
asT . 241, 242, 244–246,
248
axmxy . . . . . . . 238, 239
axmxz . . . . . . . 235, 236
axmz . . . . . . . 227, 229
axp2 . . . . . . . . 191, 201
axpt . . . . . . . . 191, 200
aymxy . . . . . . . 238, 239
aymxz . . . . . . . 235, 236
aymz . . . . . . . 227, 229
ayp2 . . . . . . . . 191, 201
aypt . . . . . . . . 191, 200
azmxy . . . . . . . 238, 239
azmxz . . . . . . . 235, 236
azmz . . . . . . . . 227, 229
azp2 . . . . . . . . 191, 201
azpt . . . . . . . . 191, 200
b0rms 209, 212, 214, 216
b1 . . . . . . . . . . 246, 248
b111xy ..........211
b112xy ..........211
258

VARIABLE INDEX 259
b11rms . . . . . . 209, 212,
214–216
b121xy ..........211
b122xy ..........211
b12rms . . 209, 212, 214,
216
b131xy ..........211
b132xy ..........211
b1b23m . . . . . 193, 202
b1b32m . . . . . 193, 202
b1m . . . . . . . . 190, 199
b1rms . . . . . . . 207, 208
b2 . . . . . . 223, 246, 248
b211xy ..........211
b212xy ..........211
b21rms . . . . . . 209, 212,
214–216
b221xy ..........211
b222xy ..........211
b22rms . . 209, 212, 214,
216
b231xy ..........211
b232xy ..........211
b2b13m . . . . . 193, 202
b2b31m . . . . . 193, 202
b2divum . . . . . 194, 203
b2m . . . . 190, 195, 199
b2mphi . . . . . . 224, 225
b2mx . . . . . . . 233, 234
b2mxz . . . . . . . 235, 236
b2mz . . . . . . . 228–230
b2rms . . . . . . . 207, 208
b2ruzm . . . . . . 190, 199
b2tm . . . . . . . . 190, 199
b2uzm . . . . . . 190, 199
b3 . . . . . . . . . . 246, 248
b311xy ..........211
b312xy ..........211
b321xy ..........211
b322xy ..........211
b331xy ..........211
b332xy ..........211
b3b12m . . . . . 193, 202
b3b21m . . . . . 193, 202
b3rms . . . . . . . 207, 208
b4m ............190
Bext ............184
bamp . . . 209, 213, 216
bb . . . . . . . . . . 109, 223
bbmphi . . . . . . 224, 225
bbsphmphi . . . 224, 225
bbxmax . . . . . . 192, 201
bbxmz . . . . . . . 227, 229
bbymax . . . . . . 192, 201
bbymz . . . . . . . 227, 229
bbzmax . . . . . . 192, 201
bbzmz . . . . . . . 228, 229
bc{x,y,z}..........39
bcosphz . . . . . . 193, 202
bcx 39, 40, 83, 173, 181,
240
bcy . . . 39, 173, 181, 243
bcz 39, 40, 83, 174, 181,
245
beta1 ...........223
beta1m . . . . . . 192, 201
beta1max . . . . 192, 201
beta1mxy . . . . 239, 240
beta1mz . . . . . 228, 230
beta2mx .........234
beta2mz . . . . . 228–230
betam . . . 192, 196, 201
betamax . 192, 196, 201
betamin . 192, 196, 201
betamx ..........234
betamz . . . . . . 228–230
betPARA . . . . . 206, 207
betPARAz . . . . 206, 207
betPERP . . . . . 206, 207
betPERP2 . . . . . . . . 207
betPERPz . . . . 206, 207
bf2m ............192
bf2mz . . . . . . . 228, 230
bf4m ............192
bfrms . . . . . . . 192, 201
bgmu5rms . . . 196, 197
bgtheta5rms ......196
bjtm . . . . . . . . 190, 199
bm .............195
bm2 . . . . . . . . 190, 199
bmax . . . 192, 195, 201
bmin ............195
bmx . . 29, 192, 202, 234
bmxy rms . . . . 194, 203
bmy . . . . . 29, 192, 202
bmz . . 29, 192, 202, 229
bmzA2 . . . . . . 193, 202
bmzph . . . . . . 193, 202
bmzphe . . . . . . 193, 202
bmzS2 . . . . . . 193, 202
bpmphi . . . . . . 224, 225
brmphi . . . . . . 224, 225
brms . . . . 192, 195, 201
brms=3.871E-01 . . . 128
brmsx . . . . . . . 194, 203
brmsz . . . . . . . 194, 203
brsphmphi . . . 224, 225
bsinphz . . . . . . 193, 202
bthmphi . . . . . 224, 225
bx0mz 210, 213, 214, 217
bx0pt . . . 209, 212, 216
bx11pt . . 208, 212, 216
bx12pt . . 209, 212, 216
bx1mxz . . . . . . 235, 236
bx1pt ...........207
bx21pt . . 208, 212, 216
bx22pt . . 209, 212, 216
bx2m . . . 193, 195, 202
bx2mx ..........234
bx2mxy . . . . . . 238, 239
bx2mxz ..........236
bx2my ..........232
bx2mz . . . . . . . 228–230
bx2pt ...........207
bx2rmz . . . . . . 228, 230
bx3pt . . . . . . . 207, 208
bxbym . . 192, 195, 202
bxbymx ..........234
bxbymxy .........239
bxbymxz .........236
bxbymy ..........232
bxbymz . . . . . . 228–230
bxbzm ...........195
bxbzmx ..........234
bxbzmxy .........239
bxbzmxz .........236
bxbzmy ..........232
bxbzmz . . . . . . 228–230
bxm . . . . 192, 195, 201
bxmax . . 192, 195, 201
bxmin . . . . . . . 192, 201
bxmx ...........234
bxmxy . . . . . . . 238, 239
bxmxz ...........236
bxmy ...........232
bxmz . . . . . . . 228, 229
bxp2 . . . . . . . . 191, 200
bxpt . . . . . . . . 191, 200
by0mz 210, 213, 214, 217
by0pt . . . 209, 212, 216

260 THE PENCIL CODE
by11pt . . 209, 212, 216
by12pt . . 209, 212, 216
by1mxz ..........236
by21pt . . 209, 212, 216
by22pt . . 209, 212, 216
by2m . . . 193, 195, 202
by2mx ..........234
by2mxy ..........239
by2mxz ..........236
by2my ..........232
by2mz . . . . . . . 228–230
by2rmz . . . . . . 228, 230
bybzm . . . . . . . . . . . 195
bybzmx ..........234
bybzmxy .........239
bybzmxz .........236
bybzmy ..........232
bybzmz . . . . . . 228–230
bym . . . . 192, 195, 202
bymax . . 192, 195, 201
bymin . . . . . . . 192, 201
bymx . . . . . . . . . . . 234
bymxy . . . . . . . 238, 239
bymxz . . . . . . . . . . . 236
bymy . . . . . . . . . . . 232
bymz . . . . . . . 228, 229
byp2 . . . . . . . . 191, 201
bypt . . . . . . . . 191, 200
bz0mz 210, 213, 215, 217
bz1mxz ..........236
bz2m . . . 193, 195, 202
bz2mx . . . . . . . . . . . 234
bz2mxy ..........239
bz2mxz ..........236
bz2my . . . . . . . . . . . 232
bz2mz . . . . . . . 228–230
bz2rmz . . . . . . 228, 230
bzm . . . . 192, 195, 202
bzmax . . . 192, 195, 201
bzmin . . . . . . . 192, 201
bzmphi . . . . . . 224, 225
bzmx . . . . . . . . . . . 234
bzmxy . . . . . . . 238, 239
bzmxz . . . . . . . . . . . 236
bzmy . . . . . . . . . . . 232
bzmz . . . . . . . . 228, 229
bzp2 . . . . . . . . 191, 201
bzpt . . . . . . . . 191, 200
c+k . . . . . . . . . 244, 245
c1 . . . 241, 242, 246, 247
c1pt . . . . . . . . 219–221
c1rms . . . 218, 220, 221
c1s .............246
c2 .......... 246,248
c2pt . . . . . . . . 219–221
c2rms . . . . . . . 219–221
c3 .......... 246,247
c3pt . . . . . . . . 219–221
c3rms . . . . . . . 219–221
c4pt . . . . . . . . 219–221
c4rms . . . . . . . 219–221
c5pt . . . . . . . . 219–221
c5rms . . . . . . . 219–221
c6pt . . . . . . . . 219–221
c6rms . . . . . . . 219–221
ccglnrm .........194
ccmax ...........194
cdiffrho .........182
cds . . . . . . . . . 243, 244
cdt . . . . . . . 38, 41, 180
cdts .............38
cdtv ......... 38,180
cdz . . . . . . . . . 246, 248
ce .......... 246,248
cfb . . . . . . . . . 242, 247
cgam ...........189
chemistry.f90 . . . . . 171
chi .............183
chi t............183
coeff grid . . . . . . 23, 25
cool .............183
cooltype .........183
cop . 241, 242, 244, 245,
247, 248
cosjbm . . . . . . 194, 203
cosubm . . . . . . 191, 200
cp .......... 246,248
cpc . . . . . . . . . 240, 242
cpp . . . . . . . . . 240, 242
cpz . . . . . . . . . 240, 242
crk .............244
cs0 . . . . . . . . . 175, 182
cs2 .............109
cs2bot . . . . . . . 175, 182
cs2cool ..........183
cs2mphi . . . . . 224, 225
cs2top . . . . . . . 175, 182
csm . . . . . 189, 198, 206
cT . . . 241–244, 246, 247
cT1 .............246
cT2 . . . . . . . . . 246, 247
cT3 . . . . . . . . . 246, 247
ctz . . . . . . . . . 246, 248
curlru2mz ........225
cutoff=0 .........128
cvsid . . . . . . . . 172, 179
d1s . . . . . 241, 243, 245
d2davg . . . . . . . 30, 181
d2Lambrms ......195
d2Lamrms .......195
d6abmz . . . . . 228, 230
d6amz1 . . . . . 228, 230
d6amz2 . . . . . 228, 230
d6amz3 . . . . . 228, 230
damp . . . . . . . 181, 182
dampu ..........181
dampuext ........181
dampuint ........181
datadir ...........45
db . . . . . . . . . . 246, 248
dbx2m ..........195
dbxm ...........195
dbxmax .........195
dby2m ..........195
dbym ...........195
dbymax .........195
dbz2m ..........196
dbzm ...........195
dbzmax ..........195
dcoolx ...........233
dcoolxy ..........238
dcoolz ...........227
del . . . . . . . . . 206, 207
del2 ............207
deltay ...........205
delz . . . . . . . . 206, 207
der . 241, 242, 244–246,
248
detn ............197
dettot ...........197
dexbmx . . . . . . 194, 203
dexbmy . . . . . . 194, 203
dexbmz . . . . . . 194, 203
dheat buffer1 . . . . . 183
div . . . . . . . . . 246, 248
divabrms ........195
divapbrms .......195
divarms . . . . . 192, 201
divbmax .........196
divbrms .........196

VARIABLE INDEX 261
divrhoum ........195
divrhoumax . . 188, 195
divrhourms . . 188, 195
divru2mz ........225
divu ............223
divu2m ..........187
divu2mz .........225
divuHrms ........189
divum ...........187
divumz ..........225
dobrms . . . . . . 191, 200
dr0 . . . . . . . . . 241, 242
drho2m . . . . . 189, 197
drho2mx .........234
drho2mxy ........239
drho2mxz ........236
drho2my .........232
drho2mz .........229
drhom . . . . . . 189, 197
drhomax .........197
drhomx ..........234
drhomxy .........239
drhomxz .........236
drhomy ..........232
drhomz ..........229
drhorms .........197
dsnap . . . . . 26, 36, 180
dstalk ...........179
dt . . . 8, 38, 41, 180, 186
dt bb 1 ..........197
dt chiral .........197
dt mu5 1 ........197
dt mu5 2 ........197
dt mu5 3 ........197
dtb . . . . . . . . . 192, 201
dtc 8, 189, 197, 204, 206
dtchem ..........196
dtchi . . . 8, 189, 198, 206
dtchi2 . . . 194, 197, 205
dteta . . . . . . . . 192, 201
dtF .............189
dtH ............189
dtmin ...........180
dtnewt ..........205
dtnu .......... 8,222
dtpchem .........205
dtq .............199
dtq2 ............199
dtrad . . . . . . . 194, 197
dtradloss ........205
dtshear ..........205
dtspitzer . 194, 197, 199,
205
dtu ........... 8,188
dtvel ............205
dubrms . . . . . . 190, 200
dudx ............188
durms ...........186
dvid . . . . 26, 27, 36, 180
dz 1.............23
dz tilde ...........23
E0rms209, 212, 214, 216
E0Um . . . 210, 213, 217
E0Wm . . 210, 213, 217
e1 . . . 241, 243–246, 248
E10z . 210, 213, 214, 217
E111z 209, 213–215, 217
E112z 209, 213, 214, 217
E11rms . 209, 212, 214,
216
E11xy ...........210
E121z 209, 213–215, 217
E122z 210, 213, 214, 217
E12rms . 209, 212, 214,
216
E12xy ...........210
E13xy ...........210
e1o . . . . . . . . . 241, 243
e2 . . . 241, 243–246, 248
E20z . 210, 213, 214, 217
E211z 209, 213–215, 217
E212z 209, 213, 214, 217
E21rms . 209, 212, 214,
216
E21xy ...........210
E221z 209, 213–215, 217
E222z 210, 213, 214, 217
E22rms . 209, 212, 214,
216
E22xy ...........210
E23xy ...........210
e3 . . . . . . 241, 243–245
E30z . 210, 213, 214, 217
E311z 209, 213–215, 217
E312z 210, 213, 214, 217
E31xy ...........210
E321z 209, 213–215, 217
E322z 210, 213, 214, 217
E32xy ...........210
E33xy ...........210
e3xamz1 . . . . . 228, 230
e3xamz2 . . . . . 228, 230
e3xamz3 . . . . . 228, 230
E41xy ...........210
E42xy ...........210
E43xy ...........210
E51xy ...........210
E52xy ...........210
E53xy ...........210
E61xy ...........210
E62xy ...........210
E63xy ...........210
E71xy ...........210
E72xy ...........210
E73xy ...........210
E81xy ...........210
E82xy ...........210
E83xy ...........210
E91xy ...........210
E92xy ...........210
E93xy ...........210
EBpq 210, 213, 214, 217
ecr .............223
EEGW ..........198
EEM ...........190
eem . . 189, 198, 206, 222
eemz ............231
ekin ............188
ekincr ...........197
ekinmx ..........233
ekinmz ..........226
ekinp ...........204
ekintot ..........188
el ..............241
emag . . . . . . . 192, 201
embmz . . . . . . 193, 202
EMFdotB int . . . . . 204
EMFdotBm ......204
EMFmax ........204
EMFmin .........204
EMFmz1 ........203
EMFmz2 ........203
EMFmz3 ........203
EMFrms .........204
emxamz3 . . . . 193, 202
Emymxz .........237
Emzmask ........206
Emzmxy .........240
eos merger ........89
epot ............199

262 THE PENCIL CODE
epotmx ..........234
epotmxy .........239
epotmy ..........232
epotmz ..........229
epottot ..........199
epotuxmx ........234
epotuxmxy .......239
epotuzmz ........229
epsAD . . . . . . . 191, 200
epsilonaa ........178
epsK . . . . . . . . . . . . 222
epsKmz ..........231
epsM . . . . . . . 191, 200
epsMmz . . . . . 229, 230
eruzmz ..........231
eta . . . . . . . . . . . . . 184
eta11 208, 211, 213, 215,
217
eta11 x..........214
eta11 x2 .........214
eta11cc . . 208, 212, 214,
215
eta11x . . . . . . . . . . . 215
eta11z . . . . . . . . . . . 216
eta12 208, 211, 213, 215,
218
eta12 x..........214
eta12 x2 .........214
eta12cs . . 208, 212, 214,
215
eta12x . . . . . . . . . . . 215
eta12z . . . . . . . . . . . 216
eta21 208, 211, 213, 215,
218
eta21 x ..........214
eta21 x2 .........214
eta21sc . . 208, 212, 214,
215
eta21x . . . . . . . . . . . 215
eta21z . . . . . . . . . . . 216
eta22 208, 211, 213, 215,
218
eta22 x..........214
eta22 x2 .........214
eta22ss . . 208, 212, 214,
215
eta22x . . . . . . . . . . . 215
eta22z . . . . . . . . . . . 216
eta31 . . . . . . . 215, 218
eta32 . . . . . . . 215, 218
eta ext ..........184
eta int ..........184
eta out ..........184
eta tdep .........190
etaj2max . . . . 194, 203
etajmax . . . . . 194, 203
etajrhomax . . . 194, 203
etasmagm . . . . 194, 203
etasmagmax . . 194, 203
etasmagmin . . 194, 203
etatm ...........203
etatotalmx .......234
etatotalmz . . . 228, 230
etavamax . . . . 194, 203
ethm 189, 197, 204, 206,
222
ethmax ..........222
ethmcr ..........197
ethmin ..........222
ethmz . . . . . . . 227, 231
ethtot 189, 198, 206, 222
etot .............222
ex .......... 246,248
Ex0pt . . . 209, 213, 216
Ex11pt . . 209, 212, 216
Ex12pt . . 209, 213, 216
Ex21pt . . 209, 213, 216
Ex22pt . . 209, 213, 216
exabot . . . . . . . 192, 201
examx . . . . . . . 193, 203
examxy1 .........239
examxy2 . . . . . 239, 240
examxy3 . . . . . 239, 240
examy . . . . . . . 194, 203
examz . . . . . . . 194, 203
examz1 . . . . . . 228, 230
examz2 . . . . . . 228, 230
examz3 . . . . . . 228, 230
exatop . . . . . . . 192, 201
exd . . . . . . . . . 246, 248
exf . . . . . . . . . 246, 248
exjmx . . . . . . . 194, 203
exjmy . . . . . . . 194, 203
exjmz . . . . . . . 194, 203
exm . . . . . . . . 246, 248
Exmxy . . . . . . 194, 203
Exmxz ..........236
Exmz . . . . . . . 228, 229
Exp2 . . . . . . . . 191, 201
Expt . . . . . . . . 191, 200
Ey0pt . . . 209, 213, 216
Ey11pt . . 209, 213, 216
Ey12pt . . 209, 213, 216
Ey21pt . . 209, 213, 216
Ey22pt . . 209, 213, 216
Eymxy . . . . . . 194, 203
Eymxz . . . . . . 236, 237
Eymz . . . . . . . 228, 229
Eyp2 . . . . . . . . 191, 201
Eypt . . . . . . . . 191, 200
Ezmxy . . . . . . 194, 203
Ezmxz . . . . . . 236, 237
Ezmz . . . . . . . 228, 229
Ezp2 . . . . . . . . 191, 201
Ezpt . . . . . . . . 191, 200
f. . . . 241, 242, 244, 245
f’,’fa . . . . . . . . 246, 248
F11z . . . . . . . . 219–221
F12z . . . . 219, 220, 222
F21z . . . . . . . . 219–221
F22z . . . . 219, 220, 222
F31z . . . . 219, 220, 222
F32z . . . . 219, 220, 222
fB . . . . . . 244, 246–248
fbcx ............241
fbcx12 ...........242
fbcx2 ............241
fbm . . . . . . . . . 191, 200
Fbot ............183
fBs . . . . . 244, 246–248
Fcm . . . . . . . . 241, 242
fconvm ..........190
fconvmz .........231
fconvxmx ........233
fconvxy ..........238
fconvyxy .........238
fconvz ...........227
fconvzxy .........238
Fct . . 241, 242, 246, 247
ffakez ...........231
FFLAGS DOUBLE . . 52
fg . . . 241, 242, 244–247
Fgs . . 241, 242, 246, 247
fil .......... 242,243
fix .......... 242,243
fkinxmx .........226
fkinxmxy ........238
fkinymxy ........238
fkinzm ..........186
fkinzmz .........225

VARIABLE INDEX 263
fmasszmz ........225
fmax .............98
force ............185
fountain .........185
fpresxmz .........231
fpresymz .........231
fpreszmz .........231
fradbot . . 189, 198, 206
fradmx ..........233
fradmz ..........231
fradtop . . 189, 198, 206
fradx kramers . . . . 233
fradxy Kprof . . . . . 238
fradxy kramers . . . . 238
fradymxy Kprof . . . 238
fradz ...........227
fradz constchi . . . . . 227
fradz Kprof ......227
fradz kramers . . . . . 227
fring1,fring2 ......178
frmax ...........205
fs . . . . . . . . . . 246, 248
fsum .............98
fturbfz ..........227
fturbmx .........233
fturbmz .........227
fturbrxy .........238
fturbthxy ........238
fturbtz ..........227
fturbxy ..........238
fturbymxy ........238
fturbz ...........227
fum ............188
fviscm ...........222
fviscmax .........222
fviscmin .........222
fviscmx ..........235
fviscmxy .........240
fviscmz ..........231
fviscrmsx ........222
fviscsmmxy .......240
fviscsmmz ........231
fviscymxy ........240
fxbxm . . . . . . . 191, 200
g. . . . 242, 243, 246, 248
g11pt ...........198
g12pt ...........198
g22pt ...........198
g23pt ...........198
g31pt ...........198
g33pt ...........198
gal .............217
gam . . . . . . . . 206, 207
gam11 . . . . . . 218–220
gam11z . . 218, 219, 221
gam12 . . . . . . 218–220
gam12z . . 218, 220, 221
gam13 . . . . . . 218–220
gam13z . . 218, 220, 221
gam21 . . . . . . 218–220
gam21z . . 218, 220, 221
gam22 . . . . . . 218–220
gam22z . . 218, 220, 221
gam23 . . . . . . 218–220
gam23z . . 218, 220, 221
gam31 . . 218, 219, 221
gam31z . . 218, 220, 221
gam32 . . 218, 219, 221
gam32z . . 218, 220, 221
gam33 . . 218, 219, 221
gam33z . . 218, 220, 221
gam3z ..........220
gamc ...........219
gamcz ...........219
gamma . . 175, 182, 217
gammaQ ........217
gamz . . . . . . . 206, 207
gdivu2m .........187
gg2m ...........198
ggT2m ..........198
ggTm ...........198
ggTp2 ...........198
ggTpt ...........198
ggTXm ..........198
ggX2m ..........198
ggXm ...........199
ggXp2 ...........198
ggXpt ...........198
gLambm .........195
gLamrms ........195
gmu5mx .........197
gmu5my .........197
gmu5mz .........197
gmu5rms . . . . 196, 197
gpu astaroth.f90 . . . 171
grads0 ..........176
grav amp ........176
grav profile . . . 129, 130,
175, 185
grav tilt .........176
gravz . . . 129, 175, 185
grhomax .........189
grid func .........23
gshockmax .......205
gsrms ...........190
gsxmxy ..........238
gsymxy ..........238
gszmxy ..........238
gT2m ...........205
gtheta5mx .......196
gtheta5my .......196
gtheta5mz ........196
gtheta5rms .......196
gTmax . . . . . . 190, 205
gTrms ...........190
gTxgsrms ........190
gTxgsx2mxy ......238
gTxgsx2mz .......227
gTxgsxmxy .......238
gTxgsxmz ........227
gTxgsy2mxy ......238
gTxgsy2mz .......227
gTxgsymxy .......238
gTxgsymz ........227
gTxgsz2mxy ......238
gTxgsz2mz .......227
gTxgszmxy .......238
gTxgszmz ........227
gTxmxy .........238
gTymxy ..........238
gTzmxy ..........238
guxgTm .........205
guygTm .........205
guzgTm .........205
gzlnrhomz .......227
h22rms ..........198
h23rms ..........198
h33rms ..........198
hat . . . . . . . . . 241, 243
hcond0 . . . . . . 182, 183
hcond1 ..........182
hcond2 ..........182
hds . . . . . . . . . 246, 247
headt ...........108
headtt ...........108
heatmz ..........227
height eta ........184
height ff .........185
hhT2m ..........198
hhThhXm ........198

264 THE PENCIL CODE
hhTp2 ..........198
hhTpt . . . . . . . . . . . 198
hhTXm ..........198
hhX2m ..........198
hhXp2 ..........198
hhXpt . . . . . . . . . . . 198
hjparallelm . . 194, 203
hjperpm . . . . . 194, 203
hjrms . . . . . . . 192, 201
Hmax . . . . . . . . . . . 189
hrms . . . . . . . . . . . . 198
hs . . . . . . . . . . 246, 248
hse . . . . . . . . . 246, 248
hydro.f90 ........171
ialive . . . . . . . . 25, 181
ialive=0 ..........26
idiag jbm .........98
IDL PATH . . . . . . 5, 55
idx tavg . . . 30, 31, 181
iforce . . . . . . . . . . . 184
iforce2 ..........184
iheatcond . . . . 182, 184
imax .............54
in . . . . . . . . . . 247, 248
in0 . . . . . . . . . 247, 248
ind . . . . . . . . . 247, 248
inf . . . . . . . . . 247, 248
init ads mol frac . . 179
init surf mol frac . . 179
initaa . . . . . . . . . . . 177
initaa2 ..........178
initlncc ..........178
initlncc2 .........178
initlnrho . . . . . . . . . 175
initpower ........128
initpower2 .......128
initpower2=-5/3 . . . 128
initpower=2 ......128
initpower=4. ......128
initpower aa=2. . . . 128
initss . . . . . . . . . . . 176
inituu . . . . . . . . . . . 174
ioc . . . . . . . . . 242, 243
ip . . . . . . . 35, 172, 179
Iring1,Iring2 . . . . . 178
isav .............25
isave . . . . . . . . . . . . 180
ism . . . . . . . . . . . . . 246
isothtop . . . . . 177, 183
Isurf . . . . . . . . . . . . 223
it . . . . . . 8, 33, 34, 186
it1 . . . . . . . 25, 29, 180
it1d ......... 29,180
itorder . . . . . . . 36, 180
iuut ............100
ivar ............108
ivisc ............185
iwig ............180
ix ........... 26,180
iy ........... 26,180
iz ........... 26,180
iz2 .......... 26,180
j11rms . . . . . . 209, 212
j2 ..............223
j2m . . . . . 190, 196, 199
j2mz . . . . . . . . 229, 230
jb ........... 98,223
jb0m . . . . 209, 212, 216
jb int . . . . . . . 190, 199
jbm . . . . . . 98, 190, 200
jbmh . . . . . . . . 190, 200
jbmn . . . . . . . . 190, 200
jbmphi . . . . . . 224, 225
jbms . . . . . . . . 190, 200
jbmxy ...........239
jbmz . . . . . . . . 228, 230
jbrms . . . . . . . 190, 200
jbtm . . . . . . . . 190, 199
jdel2am .........194
jet .......... 241,243
jj ..............223
jm .............196
jm2 . . . . . . . . . 190, 199
jmax . . . . 192, 196, 201
jmbmz . . . . . . 193, 202
jmin ............196
jmx . . . . . . . . . 193, 202
jmy . . . . . . . . . 193, 202
jmz . . . . . . . . . 193, 202
jparallelm . . . 194, 203
jperpm . . . . . . 194, 203
jrms . . . . 192, 196, 201
jx2m ............196
jxaprms .........195
jxarms ..........195
jxbm . . . . . . . . 193, 202
jxbmx . . . . . . . 193, 203
jxbmy . . . . . . . 193, 203
jxbmz . . . . . . . 193, 203
jxbr2m . . . . . . 194, 203
jxbrmax . . . . . 194, 203
jxbxm . . . . . . . 191, 200
jxbym . . . . . . . 191, 200
jxbzm . . . . . . . 191, 200
jxgLamrms . . . . . . . 195
jxm .............196
jxmax . . . 192, 196, 201
jxmxy . . . . . . . 238, 239
jxmxz ...........236
jxmz . . . . . . . . 228, 229
jxp2 . . . . . . . . 191, 201
jxpt . . . . . . . . . 191, 200
jy2m ............196
jybxm . . . . . . . 191, 200
jybym . . . . . . . 191, 200
jybzm . . . . . . . 191, 200
jym .............196
jymax . . . 192, 196, 201
jymxy . . . . . . . 238, 239
jymxz ...........236
jymz . . . . . . . . 228, 229
jyp2 . . . . . . . . 191, 201
jypt . . . . . . . . . 191, 200
jz2m ............196
jzbxm . . . . . . . 191, 200
jzbym . . . . . . . 191, 200
jzbzm . . . . . . . 191, 200
jzm .............196
jzmax . . . 192, 196, 201
jzmxy . . . . . . . 238, 239
jzmxz ...........236
jzmz . . . . . . . . 228, 229
jzp2 . . . . . . . . 191, 201
jzpt . . . . . . . . . 191, 200
kforc ...........182
kap11 . . . 218, 219, 221
kap11z . . 218, 220, 221
kap12 . . . 218, 219, 221
kap12z . . 218, 220, 221
kap13 . . . 218, 219, 221
kap13z . . 218, 220, 221
kap21 . . . 218, 219, 221
kap21z . . 218, 220, 221
kap22 . . . 218, 219, 221
kap22z . . 218, 220, 221
kap23 . . . 218, 219, 221
kap23z . . 218, 220, 221
kap31 . . . 218, 219, 221
kap31z . . 218, 220, 221
kap32 . . . 218, 219, 221

VARIABLE INDEX 265
kap32z . . 218, 220, 221
kap33 . . . 218, 219, 221
kap33z . . 218, 220, 221
kapcPARA .......219
kapcPARAz .......219
kapcPERP1 ......219
kapcPERP2 ......219
kapcPERPz ......219
kapPARA . . . . 206, 207
kapPARAz . . . 206, 207
kapPERP . . . . 206, 207
kapPERP2 .......207
kapPERPz . . . 206, 207
kfountain ........185
khor ss ..........177
kinflow ..........184
KK2m ...........197
KKm ............197
Kkramersm ......190
Kkramersmx . . . . . . 233
Kkramersmz . . . . . . 227
kmz . . . . . . . . 193, 202
kpeak ...........128
kpeak=3. .........128
kx ..............184
kx aa . . . 178, 193, 202
kx lncc ..........178
ky ..............184
ky aa ...........178
ky lncc ..........178
kz ..............184
kz aa ...........178
kz lncc ..........178
l1 ..............108
l2 ..............108
Lambzm .........195
Lambzmz ........195
Lamm ..........194
Lamp2 ..........195
Lampt ..........194
Lamrms .........195
lb nxgrid .........54
lbubble ..........186
lcalc heatcond constchi
182
ldamp fade .......181
ldensity var .......89
ldragforce dust par . 185
ldragforce gas par . 185
ldraglaw steadystate 185
lequidist ..........23
lfirst ............108
lfirstpoint ........108
lhcond global . . . . . 184
lignore Bext in b2 . . 184
lncc ............223
lnowrite .........172
lnrho ...........223
lnrhomax ........189
lnrhomin ........189
lnrhomphi . . . . . . . 224
lnTT ............223
lout .............108
lperi ............172
lpress equil . . . . . . . 178
lprocz slowest . . 50, 172
lpscalar sink . . . . . 185
lread oldsnap . . . . . 173
lread oldsnap nomag
173
lread oldsnap nopscalar
173
lroot ............108
lshift origin ......173
lspecies transfer [T] 186
lstalk ap .........179
lstalk bb . . . . . . . . . 179
lstalk grho . . . . . . . 179
lstalk guu . . . . . . . . 179
lstalk relvel ......179
lstalk rho ........179
lstalk uu . . . . . . . . . 179
lstalk vv .........179
lstalk xx .........179
lthiele [T] ........186
luminosity . . . . . . . 183
lupw lnrho . . . . . . . 182
lupw ss ..........183
luse Bext in b2 . . . . 184
lwrite 2d ........172
lwrite aux . . . . 172, 181
lwrite ic .........172
lwrite phiaverages . . 29
lwrite yaverages . . . . 29
lwrite zaverages . . . . 29
Lxyz . . . . 23, 25, 35, 172
m..............108
m1 .............108
M11 . . . . 208, 212, 215
M11cc . . . 208, 212, 216
M11ss . . . 208, 212, 216
M11z . . . 210, 213, 217
M12cs . . . 208, 212, 216
m2 .............108
M22 . . . . 208, 212, 215
M22cc . . . 208, 212, 216
M22ss . . . 208, 212, 216
M22z . . . 210, 213, 217
M33 . . . . 208, 212, 216
M33z . . . 210, 213, 217
mach ...........223
mag flux .........205
magfricmax . . 193, 202
MAGNETIC INIT -
PARS . . . . . 173
Mamax ..........188
Marms ..........188
mass . . . . 189, 195, 197
maux . . . . . . . . 32, 100
maxadvec . . . . 141, 186
meshRemax ......222
mgam33 . 218, 220, 221
mkap33 . 218, 220, 221
MMxm ..........197
MMym ..........197
MMzm ..........197
mpm ............205
mpmax ..........205
mpmin ..........205
mpoly0 . . . . . . 176, 177
mpoly1 . . . . . . 176, 177
mpoly2 ..........177
mu . . . . . . . . . 206, 207
mu2 ............207
mu5m . . . . . . . 196, 197
mu5rms . . . . . 196, 197
muc1 ...........219
muc2 ...........219
mucz ...........219
mumz ...........231
muz . . . . . . . . 206, 207
mvar . . . . . 32, 78, 173
mx . . . . . . 26, 108, 109
my . . . . . . 26, 108, 109
mz . . . . . . 26, 108, 109
n..............108
n1 ..............108
n1s . . . . . 241, 243, 245
n2 ..............108
nfr . . . . . 241, 243–245

266 THE PENCIL CODE
ngam33 . 218, 220, 221
nil . . 242, 243, 247, 248
nil’,’ . . . . . . . . 244, 245
nkap33 . . 218, 220, 221
noentropy.f90 . . . . . 171
nogpu.f90 ........171
nohydro.f90 ......171
nopower spectrum.f90
171
noyinyang.f90 . . . . . 171
noyinyang mpi.f90 . 171
npm . . . . . . . . . . . . 204
nprocy . . . . . . . 50, 172
nprocz ...........50
nr1 . . . . . . . . . . . . . 241
nr directions .......54
nt . . . . . . . . . 8, 36, 179
nu . . . . . . . . . 185, 217
nu epicycle . . . 176, 185
nu hyper2 ........185
nu hyper3 ........185
nu LES .........222
nu tdep ..........222
num . . . . . . . . . . . . 222
numx . . . . . . . . . . . 235
nuQ . . . . . . . . . . . . 217
nusmagm ........222
nusmagmax ......222
nusmagmin ......222
nv . . . . . . . . . . . . . . 108
nvar . . . . . . . . . . 26, 83
nx . 28, 29, 101, 108, 109
nxgrid . . . . 53, 54, 108
ny . . . . . 28, 29, 108, 144
nygrid ...........41
nz . . . . . 28, 29, 108, 144
nzgrid ............41
o2 . . . . . . . . . . . . . . 223
o2m . . . . . . . . . . . . 188
o2mz . . . . . . . . . . . 225
odel2um .........188
ogux2mz .........226
oguxmz ..........226
oguy2mz .........226
oguymz ..........226
oguz2mz .........226
oguzmz ..........226
omax . . . . . . . . . . . 188
Omega ..........181
omega ff .........185
omumz ..........187
oo ..............223
orms ............188
ou0 . . . . . . . . . 247, 248
ou int ...........188
oud . . . . . . . . . 247, 248
ouf . . . . . . . . . 247, 248
oum ......... 25,188
oumphi ..........188
oumx ...........233
oumxy ...........237
oumxz ...........235
oumy ...........231
oumz ...........226
out . . 241–244, 247, 248
out1 ............180
out2 ............180
outm ............186
ovr . . 241, 242, 247, 248
ox2m ...........188
ox2mx ...........233
ox2mz ...........225
oxdivu2mz .......226
oxdivumz ........226
oxmxy ...........237
oxmz ............225
oxoym ...........188
oxozm ...........188
oxuxxmz .........226
oxuyxmz .........226
oxuzxm ..........188
oxuzxmz .........226
oy2m ...........188
oy2mx ...........233
oy2mz ...........225
oydivu2mz .......226
oydivumz ........226
oymxy ...........237
oymz ............225
oyozm ...........188
oyuxymz .........226
oyuyymz .........226
oyuzym ..........188
oyuzymz .........226
oz2m ...........188
oz2mx ...........233
oz2mz ...........225
ozdivu2mz .......226
ozdivumz ........226
ozmxy ...........237
ozmz ............225
p. . . . 240, 242–245, 247
p1D . . . . . . . . 246, 247
particles adsorbed.f90
171
particles chemistry.f90
171
particles surfspec.f90 171
PATH . . . . . . . . 5, 6, 12
pdivum . . 189, 198, 204
peffmxz ..........237
PENCIL HOME 5, 6, 75
PENCIL HOST ID . . 18
pertss ...........176
pfc . . . . . . . . . 242–245
pfe . . . . . . . . . 246, 247
phi11 . . . . . . . 208, 211
phi12 . . . . . . . 208, 211
phi21 . . . . . . . 208, 211
phi22 . . . . . . . 208, 211
phi32 . . . . . . . 208, 211
phibmx . . . . . . 194, 203
phibmy . . . . . . 194, 203
phibmz . . . . . . 194, 203
phibzm ..........199
phibzmz .........199
phiK . . . . . . . . 208, 211
phiM . . . . . . . 208, 211
phim ...........199
phiMK . . . . . . 208, 211
phimphi .........224
phip2 ...........199
phipt ...........199
placeholder .......186
polytrm ..........205
pot . . . . . . . . . 246, 247
power spectrum.f90 171
Poynting .........223
poynxmxy ........239
poynymxy ........239
poynzmxy ........239
poynzmz . . . . . 229, 230
pp . . . . . . 223, 243, 244
ppm . 189, 198, 206, 222
ppmx . . . . . . . 233, 235
ppmy ...........232
ppmz . . . 227, 230, 231
pr1mz ...........231
pretend lnTT . . . . . 174
pscalar diff ......184

VARIABLE INDEX 267
PSCALAR INIT PARS
173
pscalar sink rate . . 185
psi11 . . . . . . . 208, 211
psi12 . . . . . . . 208, 211
psi21 . . . . . . . 208, 211
psi22 . . . . . . . 208, 211
puzmz ...........231
pvzm ...........188
pvzmxy ..........237
pwd . . . . . . . . 246, 247
q2m ............188
qam ............203
qem ............203
qfm .............188
qfviscm ..........222
qmax . 54, 188, 194, 199
qom ............188
qpm ............203
qpmz ...........230
Qrad ...........223
qrms . . . . 188, 194, 199
qsatmin .........199
qsatrms .........199
qshear . . . . . . 179, 185
qsm ............203
quxom ..........188
qxmax ..........199
qxmin ...........199
qymax ..........199
qymin ...........199
qzmax ...........199
qzmin ...........199
rext ............184
rff .............185
rint ............184
radius ..........178
radius ss ........176
random gen . . 173, 181
rcool ............183
rcylmphi .........224
rdamp ..........181
rdampext ........181
rdampint ........181
rdivum ..........187
REAL PRECISION 52,
144
reinitialize lncc . . . . 184
relhel . . . . . . . 149, 185
relhel uu=0 . . . . . . . 128
relhel uu=1 . . . . . . . 128
Remz ...........226
Reshock .........222
rho .............223
rho0 . . . . 175, 182, 185
rho2mx ..........227
rho2mz ..........226
rho left ..........175
rho right . . . . . . . . . 175
rhoccm ..........194
rhom . . . 8, 25, 189, 195
rhomax . . . . . . 189, 197
rhomin . . . . . . 189, 197
rhomphi .........224
rhomx ...........233
rhomxmask ......189
rhomxy ..........238
rhomxz ..........235
rhomy ...........231
rhomz ...........226
rhomzmask .......189
rlx2m ...........188
rlxm ............188
rly2m ...........188
rlym ............188
rlz2m ...........188
rlzm ............188
Rmesh ..........186
Rmesh3 .........186
Rmmz ...........193
rmphi ...........224
Rring1,Rring2 . . . . 178
rumax ..........187
rux2m ...........187
rux2mx ..........233
rux2mxy .........237
rux2mz ..........226
ruxm ...........187
ruxmx ...........233
ruxmxy ..........237
ruxmz ...........226
ruxtot ...........187
ruxuy2mz ........226
ruxuym ..........188
ruxuymx . . . . . . . . . 233
ruxuymxy ........237
ruxuymz .........226
ruxuz2mz ........226
ruxuzm ..........188
ruxuzmx .........233
ruxuzmxy ........237
ruxuzmz .........226
ruy2m ...........187
ruy2mx ..........233
ruy2mxy .........237
ruy2mz ..........226
ruym ...........187
ruymx ...........233
ruymxy ..........237
ruymz ...........226
ruyuz2mz ........226
ruyuzm ..........188
ruyuzmx .........233
ruyuzmxy ........238
ruyuzmz .........226
ruz2m ...........187
ruz2mx ..........233
ruz2mxy .........237
ruz2mz ..........226
ruzdownmz . . . . . . . 225
ruzm ...........187
ruzmx ...........233
ruzmxy ..........237
ruzmz ...........226
ruzupmz .........225
s. . . . 240, 242–245, 247
s+f . . . . . . . . . 244, 245
s0d . . 240, 242–245, 247
s2kzDFm 208, 212, 215
sa2 . . . . . . . . . 242, 243
sds . . . . . . . . . 243, 244
sep . . . . . . . . . 244, 245
set . 241, 242, 244–246,
248
sf . . . . . . 240, 245, 247
sfr . . . . . 241, 243–245
Shchm ..........204
shock ...........223
shockmax ........205
shx .............241
shy .............241
shz .............241
Sij2m ...........222
slice position 26, 27, 180
slo . . . . . . . . . 241, 242
slp .............241
spd . . . . . . . . . 241, 243
spr . . . . . . . . . 240, 242
spt . . . . . . . . . 244, 245

268 THE PENCIL CODE
sr1 . . . . . . . . . . . . . 241
ss . . . 223, 240, 242–244
ss2m . . . . . . . . 189, 198
ss2mx . . . . . . . . . . . 233
ss2mz . . . . . . . . . . . 227
sse . . . . . . . . . 244, 245
ssm . . . . 8, 189, 197, 206
ssmax . . . . . . . . . . . 190
ssmin . . . . . . . . . . . 190
ssmphi ..........224
ssmx . . . . . . . . . . . . 233
ssmxy . . . . . . . 198, 238
ssmxz . . . . . . . 198, 235
ssmy . . . . . . . . . . . . 232
ssmz . . . . . . . . 227, 231
ssruzm ..........189
ssuzm . . . . . . . . . . . 189
sT . . 241, 242, 244, 246,
248
StokesImxy . . . 239, 240
StokesQ1mxy . 239, 240
StokesQmxy . . 239, 240
StokesU1mxy . 239, 240
StokesUmxy . . 239, 240
strTpt . . . . . . . . . . . 198
strXpt . . . . . . . . . . . 198
StS . . . . . . . . . 246, 248
t. . . . . . . 8, 25, 108, 186
tauheat buffer . . . . . 183
tauhmin .........189
tavg . . . . . . 30, 31, 181
tdamp . . . . . . . . . . . 181
Tdxpm ..........206
Tdypm ..........206
Tdzpm ..........206
tensor pscalar diff . 184
thcool . . . . . . . . . . . 206
theta . . . . . . . . . . . . 181
theta5m .........196
theta5rms ........196
timestep.f90 ......171
timestep strang.f90 . 171
timestep subcycle.f90 171
tmax . . . . . . . . . . . . 180
tot ang mom . . . . . . 188
total carbon sites . . 179
totmass ..........189
Trms . . . . . . . . . . . 205
ts . . . . . . . . . . . . . . . 44
TT . . . . . . . . . . . . . 223
TT2m ...........205
TT2mx ..........233
TT2mz . . . . . . 227, 231
TTheat buffer . . . . . 183
TTm . 190, 205, 206, 222
TTmax . . 190, 205, 206,
222
TTmin190, 205, 206, 222
TTmx . . . . . . . 233, 235
TTmxy . . . . . . 238, 240
TTmxz . . . . . . 235, 237
TTmy ...........232
TTmz . . . . . . . 227, 231
ttransient ........181
TTtop . . . . . . . 189, 198
TTzmask ........205
TugTm ..........205
Tugux uxugTm . . . . 205
Tuguy uyugTm . . . . 206
Tuguz uzugTm . . . . 206
u0rms . . . . . . . 209, 212
u11rms . . . . . . 209, 212
u12rms . . . . . . 209, 212
u1u23m .........187
u1u32m .........187
u2 ..............223
u21rms . . . . . . 209, 212
u22rms . . . . . . 209, 212
u2m ............186
u2mphi ..........224
u2mz ...........225
u2tm ...........186
u2u13m .........187
u2u31m .........187
u3u12m .........187
u3u21m .........187
uabxmz . . . . . . 227, 229
uabymz . . . . . . 227, 229
uabzmz . . . . . . 227, 229
uam . . . . . . . . 191, 200
uamz . . . . . . . 228, 230
ubbzm . . . . . . 190, 199
ubm . . . . . . . . 190, 200
ubmz . . . . . . . 228, 230
ubs . . . . . . . . . 247, 248
udpxxm .........189
ufpresm .........190
ufviscm ..........222
uglnrhom ........189
uglnrhomz .......227
ugm ............199
ugrhom . . . . . . 189, 195
ugrhomz .........227
ugu2m ..........188
ugurmsx .........188
uguxmxy .........237
uguymxy .........237
uguzmxy .........237
ujm . . . . . . . . 191, 200
ujxbm . . . . . . . 194, 203
umamz ..........187
umax ......... 8,186
umbmz ..........187
umin ...........186
umx ......... 29,187
umxbmz .........187
umy ......... 29,187
umz ......... 29,187
unit density . . . 37, 173
unit length . . . . 37, 173
unit system . . . . 37, 173
unit temperature 36, 37,
173
unit velocity . . . 37, 173
uotm ............186
upmphi ..........224
urand ...........174
urmphi ..........224
urms . . . . 8, 25, 128, 186
urms=3.981E-01 . . . 128
urms=5.560E-01 . . . 128
urmsx ...........186
urmsz ...........186
ursphmphi .......224
uthmphi .........224
uu .............223
uu left ..........174
uu right .........174
uumphi .........224
uusphmphi . . . . . . . 224
uut .............100
ux0m . . . . . . . 209, 212
ux0mz ..........217
ux11m . . . . . . 209, 212
ux2ccm ..........187
ux2m ...........187
ux2mx ..........233
ux2mxy ..........237
ux2mxz ..........235
ux2mz ..........225

VARIABLE INDEX 269
ux2ssm ..........187
uxbm . . . . . . . 193, 202
uxbmx . . . . . . 193, 202
uxbmy . . . . . . 193, 203
uxbmz . . . . . . 193, 203
uxbxm . . . . . . 191, 200
uxbxmz . . . . . . 228, 230
uxbym . . . . . . 191, 200
uxbymz . . . . . . 228, 230
uxbzm . . . . . . 191, 200
uxbzmz . . . . . . 228, 230
uxglnrym ........188
uxm ............187
uxmax ..........187
uxmin ...........187
uxmx ...........233
uxmxy ...........237
uxmxz ...........235
uxmy ...........231
uxmz ...........225
uxp2 ............186
uxpt ............186
uxrms ...........186
uxTm ...........205
uxTmz ..........231
uxTTmx .........233
uxTTmxy ........238
uxTTmz .........227
uxuycsm .........187
uxuydivum .......188
uxuym ..........187
uxuymx .........233
uxuymxy .........237
uxuymxz .........235
uxuymz ..........226
uxuzm ..........187
uxuzmx ..........233
uxuzmxy .........237
uxuzmxz .........235
uxuzmz ..........226
uxxrms ..........189
uxzrms ..........189
uy0m . . . . . . . 209, 212
uy0mz ..........217
uy11m . . . . . . 209, 212
uy2ccm ..........187
uy2m ...........187
uy2mx ..........233
uy2mxy ..........237
uy2mxz ..........235
uy2mz ..........225
uy2ssm ..........187
uybxm . . . . . . 191, 200
uybxmxz .........236
uybxmz . . . . . . 228, 230
uybym . . . . . . 191, 200
uybymz . . . . . . 228, 230
uybzm . . . . . . 191, 200
uybzmxz .........236
uybzmz . . . . . . 228, 230
uyglnrxm ........188
uygzlnrhomz ......227
uym ............187
uymax ..........187
uymin ...........187
uymx ...........233
uymxy ...........237
uymxz ...........235
uymy ...........231
uymz ...........225
uyp2 ............186
uypt ............186
uyrms ...........186
uyTm ...........205
uyTmz ..........231
uyTTmx .........233
uyTTmxy ........238
uyTTmz .........227
uyuzm ..........187
uyuzmx ..........233
uyuzmxy .........237
uyuzmxz . . . . . . . . . 235
uyuzmz ..........226
uyxuzxmz ........226
uyyrms ..........189
uyyuzymz ........226
uyzrms ..........189
uyzuzzmz ........226
uz0mz ...........217
uz2m ...........187
uz2mx ..........233
uz2mxy ..........237
uz2mxz ..........235
uz2mz ...........225
uzbxm . . . . . . 191, 200
uzbxmz . . . . . . 228, 230
uzbym . . . . . . 191, 200
uzbymz . . . . . . 228, 230
uzbzm . . . . . . . 191, 200
uzbzmz . . . . . . 228, 230
uzdivum .........188
uzdivumz ........225
uzdownmz .......225
uzgylnrhomz . . . . . . 227
uzm ............187
uzmax ..........187
uzmin ...........187
uzmphi ..........224
uzmx ...........233
uzmxy ...........237
uzmxz ...........235
uzmy ...........231
uzmz ...........225
uzp2 ............186
uzpt ............186
uzrms ...........187
uzTm ...........205
uzTmz ..........231
uzTTmx .........233
uzTTmxy ........238
uzTTmz .........227
uzupmz .........225
uzyrms ..........189
v. . . . 240, 242–245, 247
v3 . . . . . . 243–245, 247
vAm ............196
vAmax . . 192, 196, 201
vAmin ..........196
vAmxz . . . . . . 236, 237
vArms . . . . . . . 192, 201
visc heatm .......222
vol .............189
vpx2m ..........204
vpxm ...........204
vpxmax ..........204
vpxmin ..........204
vrelpabsm ........204
wforc ...........182
walltime .........186
wcool ...........183
wdamp . . . . . . 181, 182
wheat ...........183
width ff .........185
widthaa .........178
widthlnrho .......175
widthss . . 176, 182, 183
widthuu .........174
win . . . . . . . . . 247, 248
wr1,wr2 .........178

270 THE PENCIL CODE
write slices ........27
wsnaps.f90 .......180
xi . . . . . . . . . . . . . . 217
xiQ . . . . . . . . . . . . . 217
xp2m . . . . . . . . . . . 204
xpm . . . . . . . . . . . . 204
xpmax ..........204
xpmin . . . . . . . . . . . 204
xy . . . . . . . . . . . . . . 180
xy2 . . . . . . . . . . . . . 180
xyz0 . . . . . . 23, 25, 172
xyz star ..........25
yH .............223
yHm . . . . . . . . 190, 206
yHmax . . . . . . 190, 206
yHmin ..........206
yinyang.f90 .......171
yinyang mpi.f90 . . . 171
yy .......... 243,245
z0aa ............178
z1 ..............175
z2 ..............176
zbot slice . . 26, 28, 180
zeta . . . . . . . . 185, 217
zetaQ ...........217
zheat buffer ......183
zmphi ...........224
zref . . . . . . . . 175, 185
ztop slice . . 26, 28, 180

Index
This index contains options, names, definitions and commands. Files and variables have
their own indexes.
’VAR10’ ..........45
.r ...............45
.run .............45
.svn .............12
/trimall ..........45
$
PENCIL HOME/idl/files
46
2N-scheme . . . . . . . 157
6th-order derivatives154
pc mkproctree 16 . . 145
adapt-mkfile . . . . . . . 77
adapt-mkfile . . . . 22, 88
anelastic . . . . . . . . . . 67
Auto-tests . . . . . . . . 106
autoconf . . . . . . . . . . 88
Autoconf . . . . . . . . . . 88
Autoconf/automake . . 88
Averages . . . . . . 29, 30
Azimuthal averages . 29
bandwidth . . . . . . . . 50
Bash . . . . . . . . . . . 5, 75
bash .............44
bc ...............44
Beowulf clusters . . . . 50
Bidiagonal scheme . 156
bin/pc run ........82
Boundary conditions . 39
Bourne shell . . . . . . . . 5
C . . . . . . . . . viii, 1, 109
Cdata...........108
cgs units . . . . . . 36, 173
Changes . . . . . . . . . 126
Check-in details . . . . 91
CHIRAL=nochiral . . 78
Coding standards97, 122
Comments . . . . . . . 123
Coordinate systems . 59
copy-proc-to-proc
seed.dat ../hy-
dro256e . . . . 31
Coriolis force . . . . . 181
Cosmic rays . . . . . . . 68
Courant number . . . . 36
Covariant derivatives
163
Cron............106
crontab -e ........106
CSH............ viii
Csh . . . . . . . 1, 5, 12, 75
csh ..............75
Curvilinear coordinates
59, 163
CVS ..............2
CVS .............vii
Cvs..............11
cvs-add-rundir .....32
Daainit . . . . . . . . . . 146
Data directory . . . . . 14
Data explorer . . . . 1, 41
datafiles . . . . . . . . . . 25
Density init pars . . 174
Density run pars . . 182
diffrho hyper3 mesh=2
141
double precision 51, 144
Download . . . . 2, 44, 75
Download forbidden . 75
DX . viii, 1, 5, 12, 32, 41,
42
Emacs settings . . . . 125
Entropy . . . . . . . . . . 61
Entropy . . . . 15, 40, 61
Entropy.f90 . . . . . . . . 27
Entropy init pars . . 176
Entropy run pars . . 182
Equation of state . . . 63
Error, diffusive . . . . 158
Etatest . . . . . . . . . . 146
f-array . . . . . . . . . . 100
f90 ........... 21,22
F95 . . . . . . . . . . . viii, 1
f95 ..............21
FAQ .............75
FBCX1 . . . . . . . . . . 146
FBCX2 2 ........146
FC=mpif90 ........81
ff ...............45
ff.varname ........46
FFT .............13
Fftpack . . . . . . . . . . . 52
Filters . . . . . . . . . . 137
Flag . . . . . . . . 172, 179
Flux rings . . . . . . . . 128
Forcing run pars . . 36,
148, 149, 184
Fortran record . . 26, 30
Fortran record . . . . . 26
fp-array . . . . . . . . . 101
Frequently Asked Ques-
tions . . . . . . . 75
ftp ..............44
Fully qualified host
name . . . . . . 18
G77 .............77
G95 . . . . . . . . . . 52, 76
GDL.............42
Gfortran . . . . . . viii, 52
Ghost points . . . . . . . 39
Ghost zones . . . . 39, 50
Git ...............2
Git .............2,3
git ...............3
Glibc ............76
Gnu Data Language . 42
GNU gcc . . . . . . . . . viii
Gnuplot . . . . . . . 15, 41
gnuplot ...........44
Grav init pars . . . . 175
Grav r ...........13
Grav run pars 146, 185
Gravitational Waves . 71
Gravity . . . . . . . . . . . 13
Gravity simple . . . . . 13
grep . . . . . . . viii, 95, 96
grid, nonuniform . . . 23
h-index . . . . . . . . . . . 91
Hydro.f90 . . . . . . . . . 27
271

272 THE PENCIL CODE
Hydro init pars . . . 174
Hydro run pars . . . 181
hyperdiffusivity . . . 137
Hyperviscosity 137, 139–
141, 154, 156
Icc . . . . . . . . . . . . . . 76
idiff=’hyper3 mesh’ . 141
IDL . . viii, 1, 5, 8, 9, 12,
15, 27, 28, 30, 32,
42–44, 53, 55
IDL . . . . . . . . . . . . 149
idl . . . . . . . . . . . . . . 44
Ifc . . . . . . . . . . . . . . . 76
Ifort . . . . . . . . . . 76, 77
ifort .............52
incompressible . . . . . 67
Init pars . . . 34, 35, 172
Initial conditions . . 127
InitialCondition module
104
Interlocked flux rings128
Interstellar . . . . . . . . 15
IO . . . . . . . . . . 108, 109
Io mpiodist.f90 . . . . . 16
Ionization . . . . . 64, 159
Ionization.f90 . . . 36, 37
itorder=5 .........38
Janus . . . . . . . . . 21, 22
LANG=POSIX .....83
ldensity ..........89
Linux . . . . . . . . . . 1, 76
locate mpif.h .......81
lwrite aux=T ......66
Magnetic . . . . . . . . . 98
Magnetic . . . . . . . . . 98
Magnetic helicity . . . vii
Magnetic.f90 . . . 27, 28
Magnetic init pars . 177
Magnetic run pars 146,
184
Make . . . . 1, 13, 22, 78
make . . . . 6, 13, 19, 20
make clean ........76
Makefile . . 6, 14, 21, 80
Makefile ..........20
Manual . . . . . iv, 90, 104
mesh, nonuniform . . 23
Message passing inter-
face . . . . . . . 49
Module . . . . . . . . . . viii
Module.h . . . . . . . . . 76
Modules . . . . . . . . . . 13
Modules . . . . . . viii, 13
MPEG ...........27
Mpeg encode . . . . . . 27
MPI vii, 1, 9, 13–15, 21,
49, 77, 88
mpif90 -show ......81
mpif90 -showme . . . . 81
mpirun ...........14
Namelist . . . . . . . . . 32
Namelists . . . . . . . . . 34
Networks . . . . . . . . . 41
NEWDIR file . . . . . . 34
Newphysics . . . . . . 104
Noentropy . . 15, 40, 61
NOERASE file . . . . . 86
Nogravity . . . . . . . . . 13
Noionization.f90 . 36, 37
Nomodule.f90 . . . . . . 76
Nonewphysics . . . . 104
nonuniform grid . . . . 23
Nospecial.f90 . 103, 104
octave ............44
Onsager . . . . . . . . . . 22
OpenDX...........1
Option ‘–host-id’ . . . . 18
Option ‘–use-pc’ . . . 107
Option ‘–use-pc auto-test’
21
Option ‘-b’ .........21
Option ‘-D
¡dir¿
’. . . 107
Option ‘-f’ ........106
Option ‘-fast’ .......22
Option ‘-fno-second-
underscore’ . . 76,
77
Option ‘-H’ . . . . 18, 107
Option ‘-l’ ........106
Option ‘-lmpi’ ......21
Option ‘-m
¡email-list¿
’
107
Option ‘-N 15’ . . . . . 107
Option ‘-nothreads’ . . 77
Option ‘-O2 -u’ .....21
Option ‘-O3’ . . . . 21, 79
Option ‘-qextname’ . . 76
Option ‘-t 15m’ . . . . 107
Option ‘-T
¡file¿
’. . . 107
Option ‘-Uc’ ......107
Option ‘-Wa,–max-level’
107
Option ‘-Wa,–max-
level=2’ . . . . 107
Option ‘/png’ ......27
Option ‘¿
$
HOME/public -
html/pencil-
code/tests/nightly-
tests.html’ . . 107
Option ‘a’ .........39
Option ‘a2’ ........40
Option ‘c1’ 40, 132, 183
Option ‘c2’ . . . . 40, 182
Option ‘ce’ .........40
Option ‘cT’ ........40
Option ‘db’ ........40
Option ‘g’ .........40
Option ‘hs’ ........40
Option ‘nohydro’ . . . 184
Option ‘p’ .........39
Option ‘pot’ .......132
Option ‘pwd’ ......132
Option ‘s’ .........40
Option ‘she’ ........40
Particles . . . . . . 69, 146
Particles ads init pars
179
Particles ads run pars
186
Particles chem init pars
179
Particles chem run pars
186
Particles run pars . 185
Particles stalker init -
pars . . . . . . 179
Particles surf init pars
179
Particles surf run pars
186
pc jobtransfer . . . . . . 34
pc auto-test . . 20, 21, 91,
106
pc auto-test –help21, 106
pc build . . . . . . . 17, 20
pc build –cleanall . . 107

INDEX 273
pc build –help ......20
pc get quantity . . 44, 45
pc jobtransfer ......34
pc mkdatadir .......7
pc newrun .........7
pc read const, obj=cst 46
pc read param, obj=par
46
pc read param, obj=par2,
/param2 . . . 46
pc read pvar, obj=fp . 46
pc read ts, obj=ts . . . 46
pc read var . . . . . 44, 45
pc read var, obj=ff, /tri-
mall ....... 46
pc read var raw . . . . 44
pc read var raw,
obj=var, tags=tags
46
pc read xyaver, obj=xya
46
pc read xzaver, obj=xza
46
pc read yzaver, obj=yza
46
pc run . . 17, 19, 20, 82
pc run –help .......20
pc setupsrc . . 12, 32, 52,
75, 76
pc svnup ...........3
pc svnup -val .......3
pc tsnap ..........26
Pencil case . . . . . . . 101
Pencil check . . . . . . 102
Pencil Code . . . . . . . 88
Pencil consistency check
102
Pencil design . . . . . . 12
pencil-test . 21, 106, 107
pencil-test –help 21, 106
pencil check small=F 66
Pencils . . . . . . . vii, 101
Perl . . . . . . . . viii, 1, 12
perldoc Pencil::ConfigFinder
17
perldoc PENCIL::ConfigParser
17
Planet solution . . . . 134
PNG.............27
Polytropic atmosphere
130
Potential-field boundary
condition . . 132
power . . . . . . . . . 53, 54
pretend lnTT . . 62, 174
Programming style . 97,
122
Pscalar . . . . . . . . . . 104
Pscalar init pars . . 178
Pscalar run pars . . 184
Python . . . . . . . . . . viii
Python . . . . . . . . . . . 46
Radiative transfer . 66,
160
Readline . . . . . . . . . . 44
Regridding . . . . . . . 144
Remeshing . . . . . . . 144
RERUN file . . . . . . . 34
restart-new-dir ../32c
145
Restarting 40, 145, 146
rlwrap ...........44
Run directory . . . . . . . 6
run.x ............30
Run pars 26–28, 34, 145,
179, 181
Runge-Kutta . . . . . 157
Runge-Kutta time step
38
Runge-Kutta-Fehlberg
time step . . . 38
Scripts . . . . . . . . . . . 31
Setup . . . . . . . 5, 42, 75
Shear............40
Shear init pars . . . . 178
Shear run pars 146, 185
Shock viscosity . . 37, 63
SI units . . . . . . 36, 173
Sixth-order derivatives
154
slice files . . . . . . . . . 28
Slice files . . . . . . 26, 27
Special module . . . . 103
start.csh ..........40
Stdout . . . . . . . . . . . 25
Stratification . . . . . 129
structure ..........55
Style . . . . . . . 3, 97, 122
Sub.............109
summarize-history . . 34
svn . . . . . . 2–4, 14, 117
Svn . 2–4, 11, 14, 31, 32,
79, 117, 172, 179
svn ...............3
svn annotate src/*.f90 v
svn mv file.f90 exper-
imental/file.f90
126
svn up sourceme.csh . 87
svn up sourceme.sh . . 87
svn update .......107
svn update -r ##### . . 4
Svn/git . . . . . . . . . . 2, 3
Syscalls . . . . . . . . . . 76
tab ..............97
Tab characters . . . . 122
tag names .........45
Tcsh..............5
teach/PencilCode/material/Burger
142
Testfield method 71, 145
Time averages . . . . . 30
Time step . . . . . 38, 157
Toroidal averages . . . 29
touch NEWDIR .....34
touch NOERASE . . 173
touch RELOAD . . . . 179
uname ...........22
Underscore problem . 77
Units . . . . . . . . 36, 173
Unix..............1
Upwinding . 37, 95, 155
use .............108
Vector potential . . . . 61
Video files . . . . . . . . . 26
Viscosity . . . . . . . 37, 63
Viscosity run pars 146,
185
Weyl gauge . . . . . . . . 61
Whitespace . . . . . . . 122
Xlf ..............76
Xmgrace . . . . . . . . . . 15

274 THE PENCIL CODE
Id
