Manual
User Manual:
Open the PDF directly: View PDF ![]() .
.
Page Count: 6

GeckoBot Code Manual
Lars Schiller
June 21, 2018
Contents
1 Setting Up the BBB 1
1.1 InstallOSonBBB ............................................ 1
1.2 LoginBBBforthefirsttime ...................................... 2
1.3 Set LAN connection on BBB at AmP . . . . . . . . . . . . . . . . . . . . . . . . . . . . . . . . . 2
1.4 ConfigureSSHConnectiontoBBB................................... 3
1.5 ConfigureBBBDeviceTree....................................... 4
1.6 InstallingSoftwareonBBB ....................................... 4
1.7 RunningtheCode ............................................ 5
2 Pin Layout 5
3 Auxilary 5
3.1 FormattingSDCardwithdebian.................................... 5
3.2 SetWiFiconnection ........................................... 6
3.3 Setupforanaloginputs ......................................... 6
1 Setting Up the BBB
1.1 Install OS on BBB
The developers of BBB embedded linux systems decided to change the device tree structure from kernel overlay
(till version 8.7), to uboot overlay (9.1+). (Don’t ask me to explain). However, the PWM setup for all pins is
only possible with kernel overlay (or at least I’m not able to configure it in version 9.1+). Therefore you have
to use the following image:
bone-debian-8.7-iot-armhf-2017-03-19-4gb.img (Download: http://beagleboard.org/latest-images)
To install it on a 8GB Micro-SD Card follow the instructions:
•You can use Etcher (https://etcher.io/).
OR (on debian):
•Instructions from: http://derekmolloy.ie/write-a-new-image-to-the-beaglebone-black/
and from: https://learn.adafruit.com/beaglebone-black-installing-operating-systems?view=
all#copying-the-image-to-a-microsd
•Decompress and write on SD card (need to be su and make sure the security locker of SD Adapter is in
writing mode):
1$ xz −dbone−debian −∗∗.img . xz
2$ dd i f =./bone−debi an −∗∗. img o f =/dev /sdX
(Here, sdX is the mounted empty uSD Card. It can be found with multiple use of the command mount or
df.)
1
•Obsolete:
–In order to turn these images into eMMC flasher images, edit the /boot/uEnv.txt file on the BBB and remove the #
on the line with
cmdline=init=/opt/scripts/tools/eMMC/init-eMMC-flasher-v3.sh.
Enabling this will cause booting the microSD card to flash the eMMC. Images are no longer provided here to avoid
people accidentally overwriting their eMMC flash.
–Insert the SD Card in the unpowered BBB, and power it by plugging in the USB or the 5VDC supply. Wait until all
4 LED have solid lights. This can take up to 45 minutes.
–Flash MicroSD 4 with: Debian 8.7 2017-03-19 4GB SD IoT from http://beagleboard.org/latest-images (MicroSD
3 is weird ...).
–Insert MicroSD in (unpowered) BBB, press the USER Button, and apply power.
–It will take 30-45 minutes to flash the image onto the on-board chip. Once it is done, the bank of 4 LEDs to the right
of the Ethernet port will all turn off. You can then power down your BBB.
1.2 Log in BBB for the first time
Assuming you are called bianca and your PC is also called bianca, your BBB is called beaglebone and the
default user on BBB is called debian, then the following sythax is correct.
•Connect your PC with a MicroUSB cable to the BBB.
•Open a terminal and ssh into BBB as debian and then get superuser to configure the Board.
1bianc a@b ianc a : ˜ ssh debian@192 . 1 6 8 . 7 . 2
2temppwd
3de bi an@ bea gl ebo ne : ˜ su
4root
5ro ot@beaglebo ne :˜#
•Note that the default passwords are: temppwd for debian
root for root
1.3 Set LAN connection on BBB at AmP
This is from:
https://groups.google.com/forum/#!msg/beaglebone/AS2US9rtNd4/8y0mZ3LxAwAJ
•You have to configure eth0 like this:
address 134.28.136.51 (ask administrator for your personal IP)
netmask 255.255.255.0
dns-nameservers 134.28.205.14
gateway 134.28.136.1
•Plug in LAN cable.
•Get the name of the LAN connection:
1su
2ro ot @b ea gl eb on e : / e t c / network# connmanctl s e r v i c e s
3∗Ac Wired e t h e r n e t 6 8 9 e 1 9 b 5 0 5 4 3 c a b l e
•Using the appropriate ethernet service, tell connman to setup a static IP address for this service.
Syntax:
1connmanctl c o n f i g <service>−−ip v4 manual <i p a dd r > <netmask> <gateway>−−na me se rvers <
dns server>
In our case:
1con nma nc tl c o n f i g e t h e r n e t 6 8 9 e 1 9 b 5 0 5 4 3 c a b l e −−ipv4 manual 134.28.136.51 255.255.255.0
1 3 4 . 2 8 . 1 3 6 . 1 −−n ames erve rs 1 3 4 . 2 8 . 2 0 5 . 1 4
2

•Reboot and you are done.
•You can revert back to a DHCP configuration simply as follows:
1$ sudo conn man ct l c o n f i g e t h e r n e t 6 8 9 e 1 9 b 5 0 5 4 3 c a b l e −−ip v4 dhcp
1.4 Configure SSH Connection to BBB
•Source: https://askubuntu.com/questions/115151/how-to-set-up-passwordless-ssh-access-for-
root-user
•If your Board crashed, and you were forced to reinstall the OS, there already exist a ssh-key. This you
have to remove first (this is for USB cable):
1bianca@bianca :˜ ssh−keygen −f ”/home/ bi anca / . ssh / kno wn hosts ” −R 1 9 2 . 1 6 8 . 7 . 2
•Generate a new key:
1bianca@bianca :˜ ssh−keygen −f ”/home/ b i a n c a / . s s h / k e y b i a n c a ”
When you are prompted for a password, just hit the enter key and you will generate a key with no
password.
•Allow to log in as root with a password on the server, in aim to transfer the created key to it:
1ro ot@beaglebone:# nano / e t c / s sh / s s h d c o n f i g
Make sure you allow root to log in with the following syntax
1PermitRootLogin yes
2PasswordAuthentication yes
Restart the ssh-server:
1ro ot @b ea gl eb on e :# s e r v i c e ssh r e s t a r t
•Now you are able to transfer the key to the server:
1bianca@bianca :˜ ssh−copy−i d −i /home/ b i a n c a / . s s h / k e y b i a n c a ro ot @1 92 . 1 6 8 . 7 . 2
•Check if its work:
1bianc a@b ianc a : ˜ ssh root@192 . 1 6 8 . 7 . 2
•Now disable root login with password on server (for saftey):
1ro ot@beaglebone:# nano / e t c / s sh / s s h d c o n f i g
And modify the Line:
1PermitRootLogin without−password
2PasswordAuthentication yes
This will allow to login as root with valid key, but not with a password. All other users can further login
with a password. Restart the ssh-server and you are done:
1ro ot @b ea gl eb on e :# s e r v i c e ssh r e s t a r t
3
1.5 Configure BBB Device Tree
In order to enable P9.28 as pwm pin, you have to load cape-universala. This you gonna do in /boot/uEnv.txt:
•source: https://groups.google.com/forum/#!topic/beagleboard/EYSwmyxYjdM
•/boot/uEnv.txt should be looking something like this:
1ro ot @beagle bo ne :# c at / boo t /uEnv . t x t |gr ep −v ”#”
3uname r =4.4.54 −t i −r93
4cm dl ine=c o h e r e n t p o o l =1M q u i e t c a p e u n i v e r s a l=e na b le
Edit it with:
1ro ot @beagle bo ne :# nano / bo ot /uEnv . tx t
Add the following lines, such that /boot/uEnv.txt looks like:
1ro ot @beagle bo ne :# c at / boo t /uEnv . t x t |gr ep −v ”#”
3uname r =4.4.54 −t i −r93
4dtb=am335x−boneblack−o v e r l a y . dt b
5cm dl ine=c o h e r e n t p o o l =1M q u i e t c a p e u n i v e r s a l=e na b le
6c a p e e n a b l e=bone ca pe mg r . e n a b l e p a r t n o=ca pe−universala
•Reboot and you should be able to configure with:
1r oo t@ be ag le bo n e :# c o n f i g −p in P9 28 pwm
Note:
•In debian-elinux-version-9.1+ the /boot/uEnv.txt looks like:
1ro ot @beagle bo ne :# c at / boo t /uEnv . t x t |gr ep −v ”#”
3uname r =4.9.82 −t i −r 10 2
4enable uboot overlays=1
5enable uboot cape universal=1
6cm dl ine=c o h e r e n t p o o l =1M n et . i fn a me s=0 q u i e t
If you see this, you may want to find a way to enable all the pins. I failed.
Robert C Nelson seems to be the only one, who has an idea whats going on... https://elinux.org/Beagleboard:BeagleBo
neBlack Debian#U-Boot Overlays
1.6 Installing Software on BBB
In order to run the GeckoBot software on the BBB install following packages:
•on BBB as su
1r oo t@ be ag le bo ne :# apt−get update
2r oo t@ be ag le bo ne :# apt−get i n s t a l l n tpdate
3ro ot @b ea gl eb on e :# ntpda te poo l . ntp . or g
4r oo t@ be ag le bo ne :# apt−get i n s t a l l bu il d −essential python−dev python−pip −y
5ro ot @b ea gl eb on e :# pip i n s t a l l −−upgrade p ip
6ro ot @b ea gl eb on e :# pip i n s t a l l Adafruit BBIO
7ro ot @b ea gl eb on e :# pip i n s t a l l Adafruit GPIO
8r oo t@ b ea gl eb o ne :# p ip i n s t a l l t e r m c o l o r
9ro ot @b ea gl eb on e :# pip i n s t a l l numpy
11 ro ot@beaglebo ne :˜# mkdir Git
12 ro ot@beaglebo ne :˜# cd Git
13 ro ot @b ea gl eb on e : ˜ / Git/# g i t c lo ne htt p s : / / g ith ub . com/ l a r s l e v i t y /GeckoBot . g i t
4

1.7 Running the Code
To run the geckobot code:
•on BBB as su
1ro ot@beaglebo ne :˜# cd Git / GeckoBot /Code
2ro ot @be aglebone : ˜ Git /GeckoBot/Code/# python s e r v e r h a r d w a r e c o n t r o l l e d . py
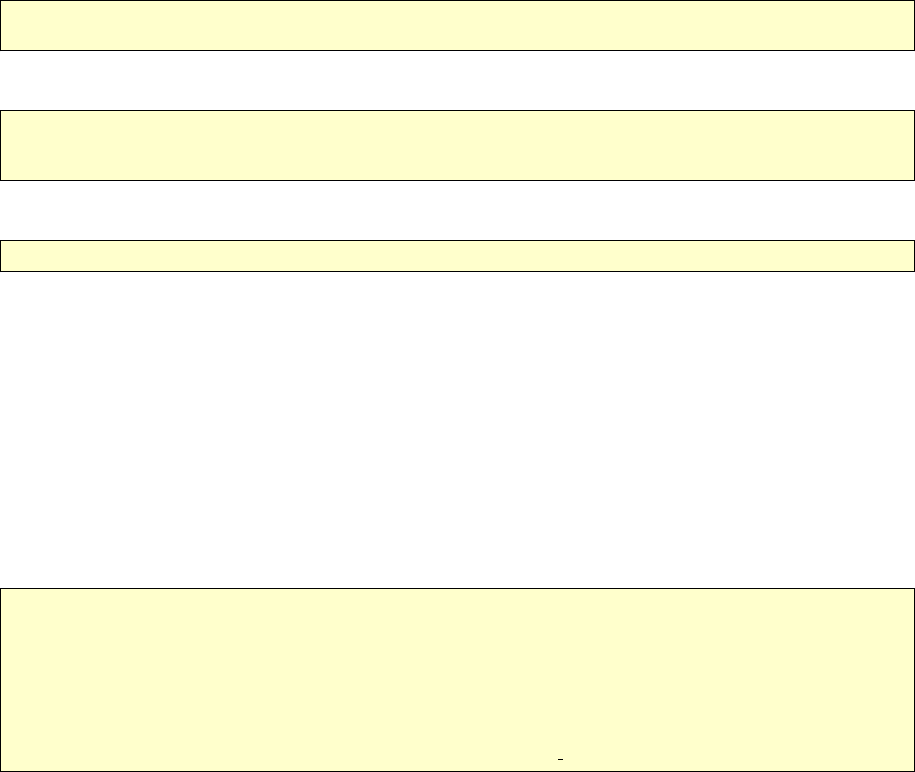
2 Pin Layout
Figure 1: Pin layout of BBB
The following pins were used, where Fx means foot x and y means leg or belly y:
Table 1: Used pins (Outdated)
P8-7 P8-8 P8-9 P8-10 P8-13 P8-19
F1 F2 F3 F4 2 1
P9-1 P9-5 P9-14 P9-16 P9-19 P9-20 P9-21 P9-22
VDD GND 6 5 I2C-SCL I2C-SDA 4 3
3 Auxilary
3.1 Formatting SD Card with debian
•Source: https://www.techwalla.com/articles/how-to-format-an-sd-card-in-debian-linux
5
•Determine location of SDCard (in the following called: /dev/mmcblk0p2) and directory where it is mounted
(in the following called: /media/SDCard):
1su
2df
•Unmount, format, and remount:
1umount / dev / mmcblk0p2
2mk do sf s / de v /mmcblk0p2 −F16
3mount / dev / mmcblk0p2 / media /SDCard
•For formatting SD with more than one partition, use:
1c f d i s k /dev /mmcblk0
and follow the instructions.
3.2 Set WiFi connection
•Order WiFi Antenna TP-LINK WLAN LITEN HI.G USB ADA. WN722N from somewhere.
•Complete this tuturial ...
3.3 Setup for analog inputs
•https://groups.google.com/forum/#!topic/beagleboard/Lk3vWNIExiQ
•Insert in command line on BBB:
1su apt−get i n s t a l l bb−cape−overlays
3cd / op t /sourc e /bb . org−overlays
5. / dtc−o v e r l a y . sh
7. / i n s t a l l . sh
9sudo sh −c ” echo ’BB−ADC’ >/ s y s / d e v i c e s / p l at fo r m / bone ca pemg r / s l o t s ”
•Reboot.
•For readout the ADC input Pins from python: https://learn.adafruit.com/setting-up-io-python-
library-on-beaglebone-black/adc
6
