BREW: Manual (s://github.com/FoelliX/BREW/wiki)
User Manual:
Open the PDF directly: View PDF ![]() .
.
Page Count: 18
- Menu
- BREW
- Benchmark Refinement and Execution Wizard (BREW)
- Runthrough
- Runthrough
- Install & Compile
- Install
- Compile
- Launch parameters
- Launch Parameters
- Configuration
- Configuration
- Benchmarking
- Benchmarking
- Setup/Load/Execute
- 1. Setup a Benchmark
- 2. Load & Execute a Benchmark
- Refine a benchmark
- Evaluation
- Evaluation of Benchmarks
- Load AQL-System results
- Load AQL-System results
- ReproDroid
- Fully load a ReproDroid benchmark
- BREW 1.2.0
- Benchmark Refinement and Execution Wizard (BREW)
- Improvements
- FAQ
- FAQ

BREW: Manual
(https://github.com/FoelliX/BREW/wiki)
1/18


The Benchmark Refinement and Execution Wizard (BREW) can be used to do what the name suggests, first refine and then execute a
benchmark.
The improvements introduced along with the release of version 1.2.0 are described in the following tutorial:
Improvements
Runthrough
Launch parameters
Configuration
Benchmarking
Setup/Load/Execute
Evaluation
Load AQL-System results
Fully load ReproDroid benchmarks
FAQ
BREW
Benchmark Refinement and Execution Wizard (BREW)
New Tutorial
Basic Tutorials
3/18

The following instructions deal with the installation of BREW. Along with that Amandroid will be installed. Hence, BREW will be setup to use
Amandroid only. (The operating system considered is Linux.)
1. Download the latest version of BREW: here
Unzip it!
2. Download Amandroid: https://bintray.com/arguslab/maven/argus-saf/3.1.2
(direct link: https://bintray.com/arguslab/maven/download_file?file_path=com%2Fgithub%2Farguslab%2Fargus-
saf_2.12%2F3.1.2%2Fargus-saf_2.12-3.1.2-assembly.jar)
3. Download the DirectLeak1 app from DroidBench 3.0: https://github.com/secure-software-
engineering/DroidBench/raw/develop/apk/AndroidSpecific/DirectLeak1.apk
4. Setup a configuration
Create file config_amandroid.xml located in the directory of BREW
Copy and Paste the following content:
<?xml version="1.0" encoding="UTF-8" standalone="yes"?>
<config>
<androidPlatforms>/path/to/android/platforms/</androidPlatforms>
<maxMemory>8</maxMemory>
<tools>
<tool name="Amandroid" version="1">
<priority>1</priority>
<execute>
<run>/path/to/Amandroid/aqlRun.sh %APP_APK% %MEMORY%</run>
<result>/path/to/Amandroid/outputPath/%APP_APK_FILENAME%/result/AppData.txt</result>
<instances>0</instances>
<memoryPerInstance>4</memoryPerInstance>
</execute>
<path>/path/to/Amandroid</path>
<questions>IntraAppFlows</questions>
<runOnExit>/path/to/BREW/flushMemory.sh</runOnExit>
<runOnAbort>/path/to/BREW/killpid.sh %PID%</runOnAbort>
</tool>
</tools>
</config>
Adjust the path to the Android SDK’s platforms directory ( <androidPlatforms>/path/to/android/platforms/</androidPlatforms> )
Adjust the path for Amandroid ( <path>/path/to/Amandroid</path> ) (The directory should contain the previously downloaded .jar file.)
Use the same path in <run> and <result>
Adjust the path to flushMemory.sh and killpid.sh to the path of BREW in <runOnExit> and <runOnAbort> .
Lastly adjust <maxMemory> and <memoryPerInstance> . The latter has to be less than or equal to the first value. Both values are given in
gigabytes. (If sufficient memory is provided, a tool might be executed multiple times in parallel.)
5. Make flushMemory.sh and killpid.sh , located in BREW directory, executeable:
chmod u+x flushMemory.sh killpid.sh
6. Create launch script
cd /path/to/Amandroid
nano aqlRun.sh
7. Copy and Paste the following:
#!/bin/bash
rm -R outputPath
java -Xmx${2}g -jar argus-saf_2.12-3.1.2-assembly.jar t -o outputPath ${1}
Runthrough
Runthrough
4/18

8. Save (Ctrl+o) and exit (Ctrl+x) nano
9. Make the script executable:
chmod u+x aqlRun.sh
10. Finally, launch BREW
cd /path/to/BREW
java -jar BREW-1.2.0.jar -config config_amandroid.xml -d detailed -gui
11. Load the app
Open the File menu
Click on Load File..
Navigate to and select DirectLeak1.apk
12. Click on Next (Green Right-Arrow in the toolbar)
13. Click on Preselect source & sinks based on SuSi
14. Click on Next again
15. Click on "Run"
16. Wait for the result and inspect it!
5/18

To simply install BREW you must
download the current release: here
and unzip it
done!
For a hello world like tutorial follow the runthrough tutorial.
To compile BREW by yourself follow these steps:
Clone the repository
Build the Maven project by:
cd /path/to/project/BREW
mvn
(Test might not be completely up-to-date, consider skipping: mvn -DskipTests )
Install & Compile
Install
Compile
6/18

BREW can be launched with the parameters mentioned in the table below.
Parameter Meaning
-help , -
h, -? , -
man , -
manpage
Outputs a very brief manual, which contains a list of all available parameters
-config
"X" , -cfg
"X" , -c
"X"
By default the config.xml file in the tool's directory is used as configuration. With this parameter a different configuration file
can be chosen. X has to reference the path to and the configuration file itself.
-rules
"X"
By default the rule-set in rules.xml file is loaded. With this parameter a different rule file can be chosen. X has to reference
the path to and the rule file itself.
-output
"X" , -out
"X" , -o
"X"
The answer to a query is automatically saved in the answers directory. This parameter can be used to store it in a second
directory. X has to define this directory including its path.
-timeout
"X"s/m/h ,
-t
"X"s/m/h
With this parameter the maximum execution time of each tool can be set. If it expires the tool's execution is aborted. X refers
to this time in seconds (e.g. 10s), minutes or hours.
-debug
"X" , -d
"X"
The output generated during the execution of this tool can be set to different levels. X may be set to: error , warning ,
normal , debug , detailed (ascending precision from left to right). Additionally it can be set to short , the output will then be
equal to normal but shorter at some points. By default it is set to normal .
-nogui
If this parameter is added, the GUI will not be launched. Instead the currently stored benchmark in data/data.ser is directly
executed.
-backup ,
-bak , -b
To backup previously computed results on startup add one of these parameters.
-reset , -
re , -r
To reset BREW on startup add one of these parameters.
--from
"X" , --to
"X"
If only some benchmark cases shall be executed these parameters can be used to set the limits.
Launch parameters
Launch Parameters
7/18


Open the File menu
Click on Load File.. and choose an application
OR
Click on Load Folder.. and select a directory containing a set of apps
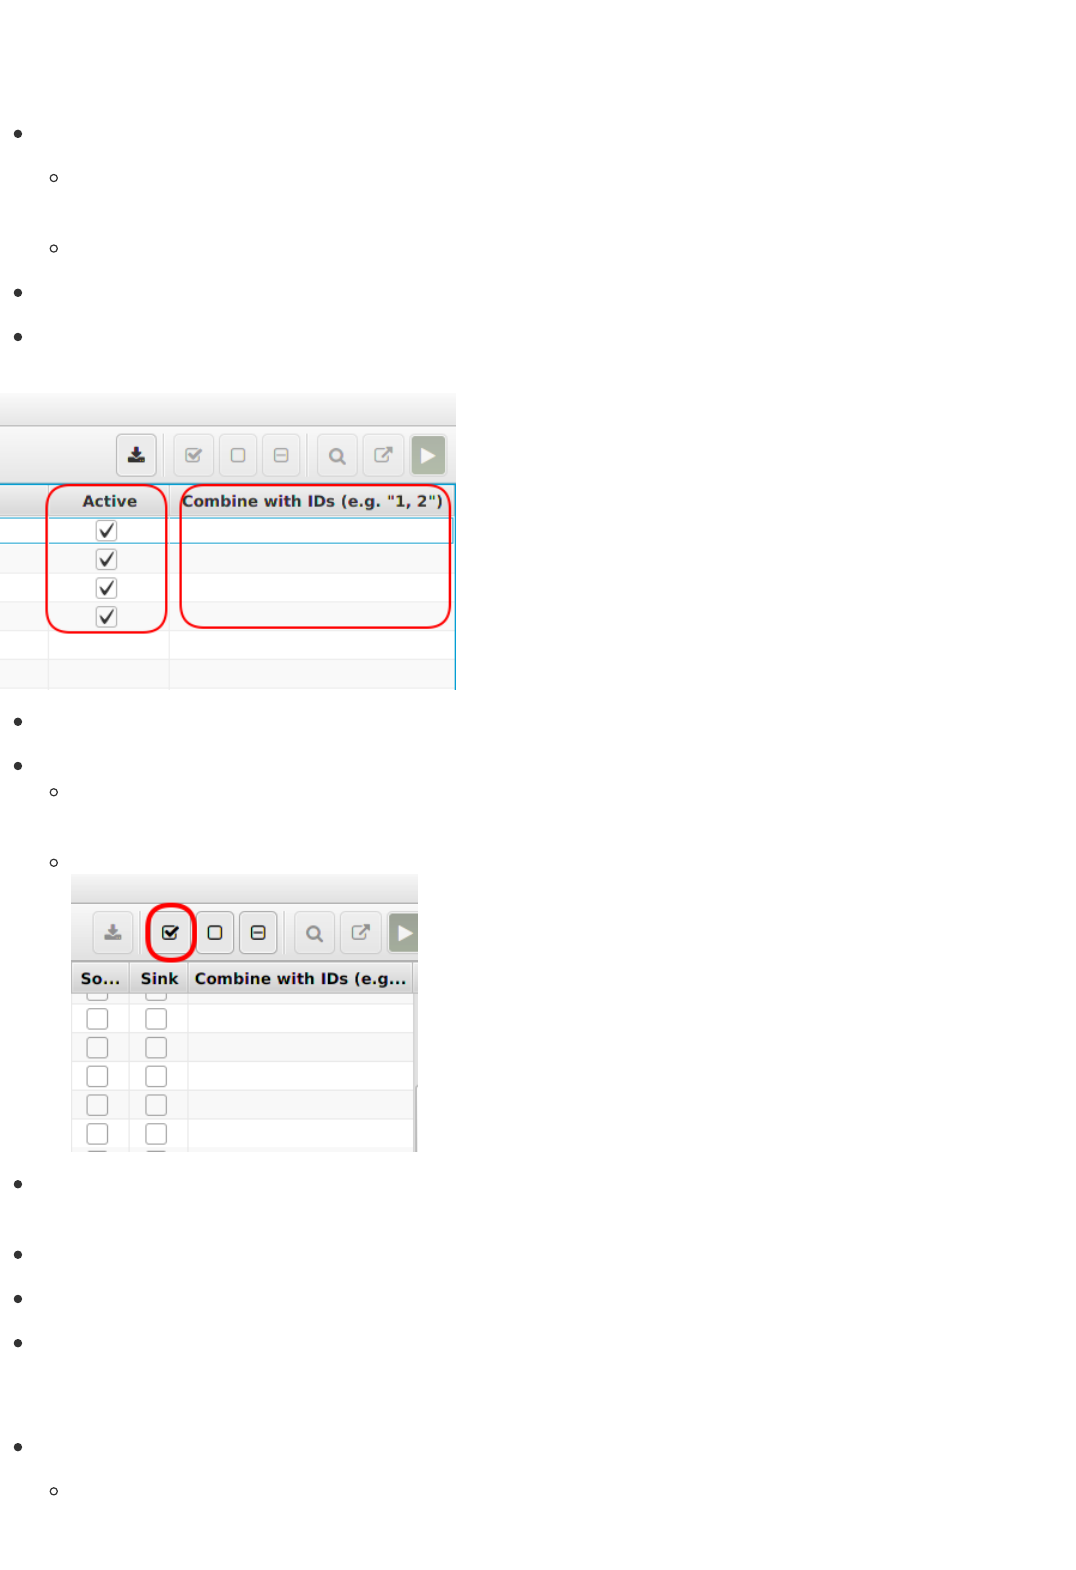
Deselect testcases you do not want to run.
To build an inter-app testcase activate the initial app and enter all other apps' IDs in the last column ( Combine with IDs). Deactivate the other
apps.
Click on Next (Green Right-Arrow in the toolbar)
On the next screen specify which statements are sources and sinks. There exist two options to do so:
manually by selecting the checkboxes
OR
click on Preselect Sources & Sinks based on SuSi.
Sources & Sinks can be combined by entering appropiate IDs in the Combine with IDs column. This makes sense if multiple statements may
be expectable as source for the same resource, for example.
Click on Next (Green Right-Arrow in the toolbar)
Finally, decide which of the generated benchmark cases should be found ( True Positive) and which should not be found (False Positive).
The setup is done. Feel free to save the benchmark.
Open the File menu
Click Open.. and choose the benchmark you want to load. You can also add another benchmark to an already opened one by clicking
on Add...
Setup/Load/Execute
1. Setup a Benchmark
2. Load & Execute a Benchmark
10/18

Click on Next (Green Right-Arrow in the toolbar)
Click on Next again
Click on Run Benchmark
To refine a benchmark just open one (see 2.) and edit it as described for a new one (see 1.).
Refine a benchmark
11/18
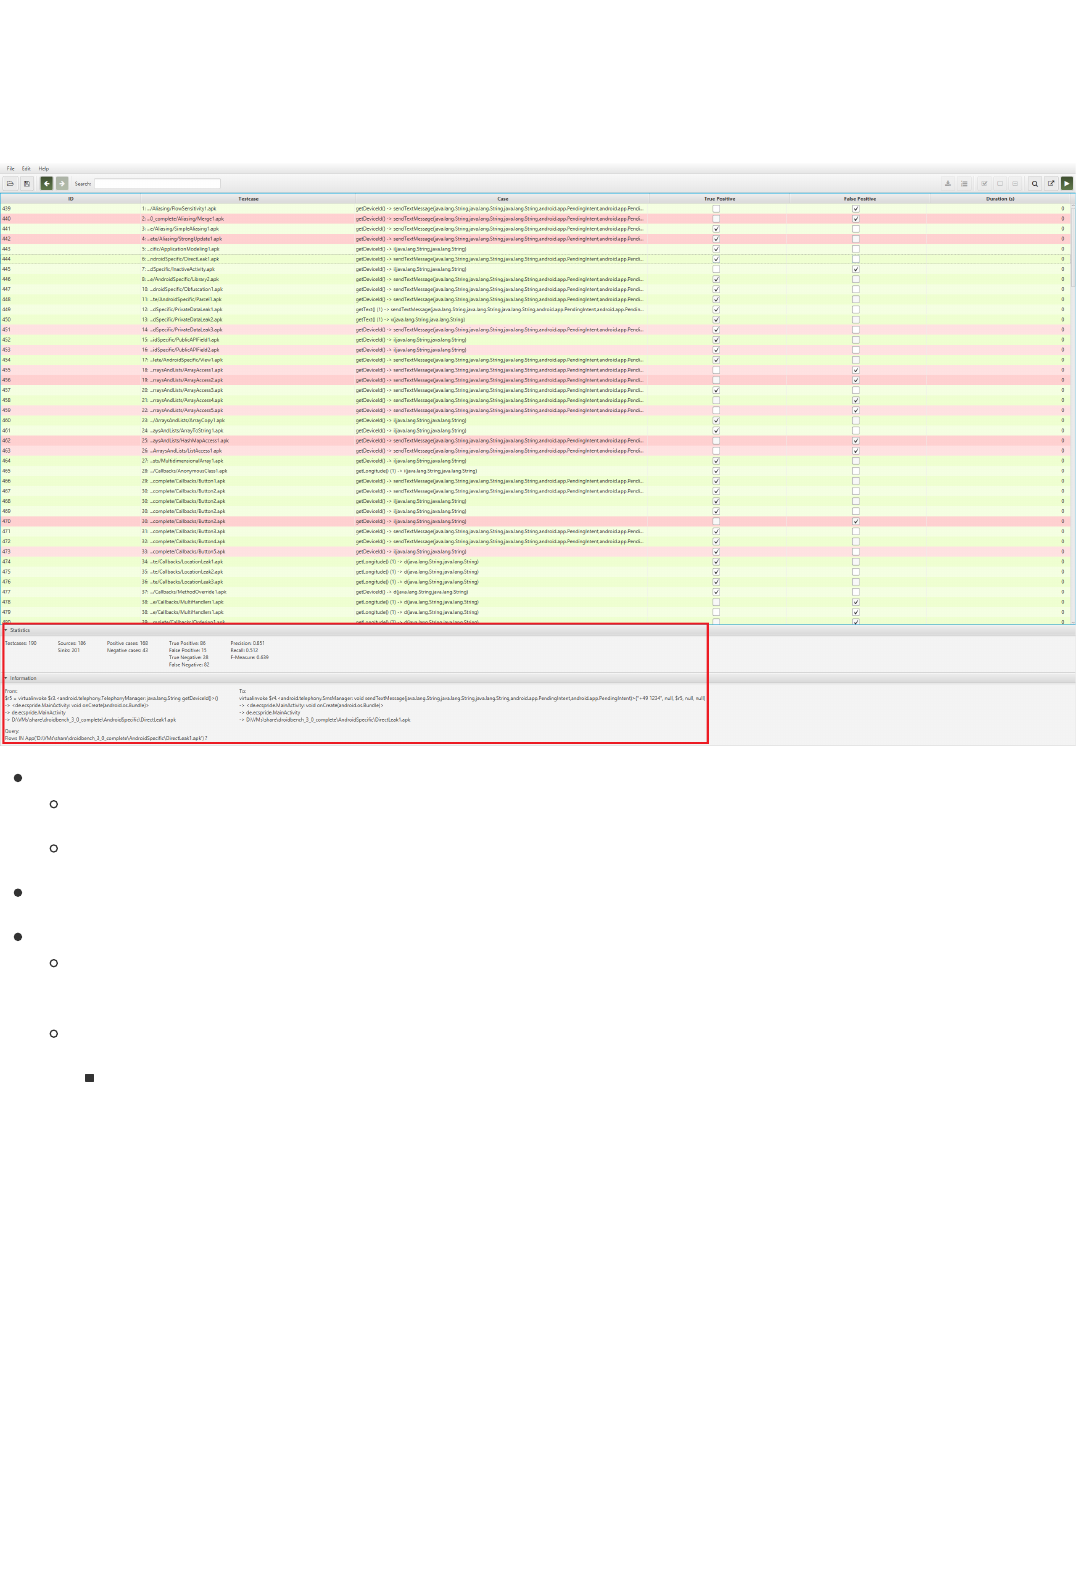
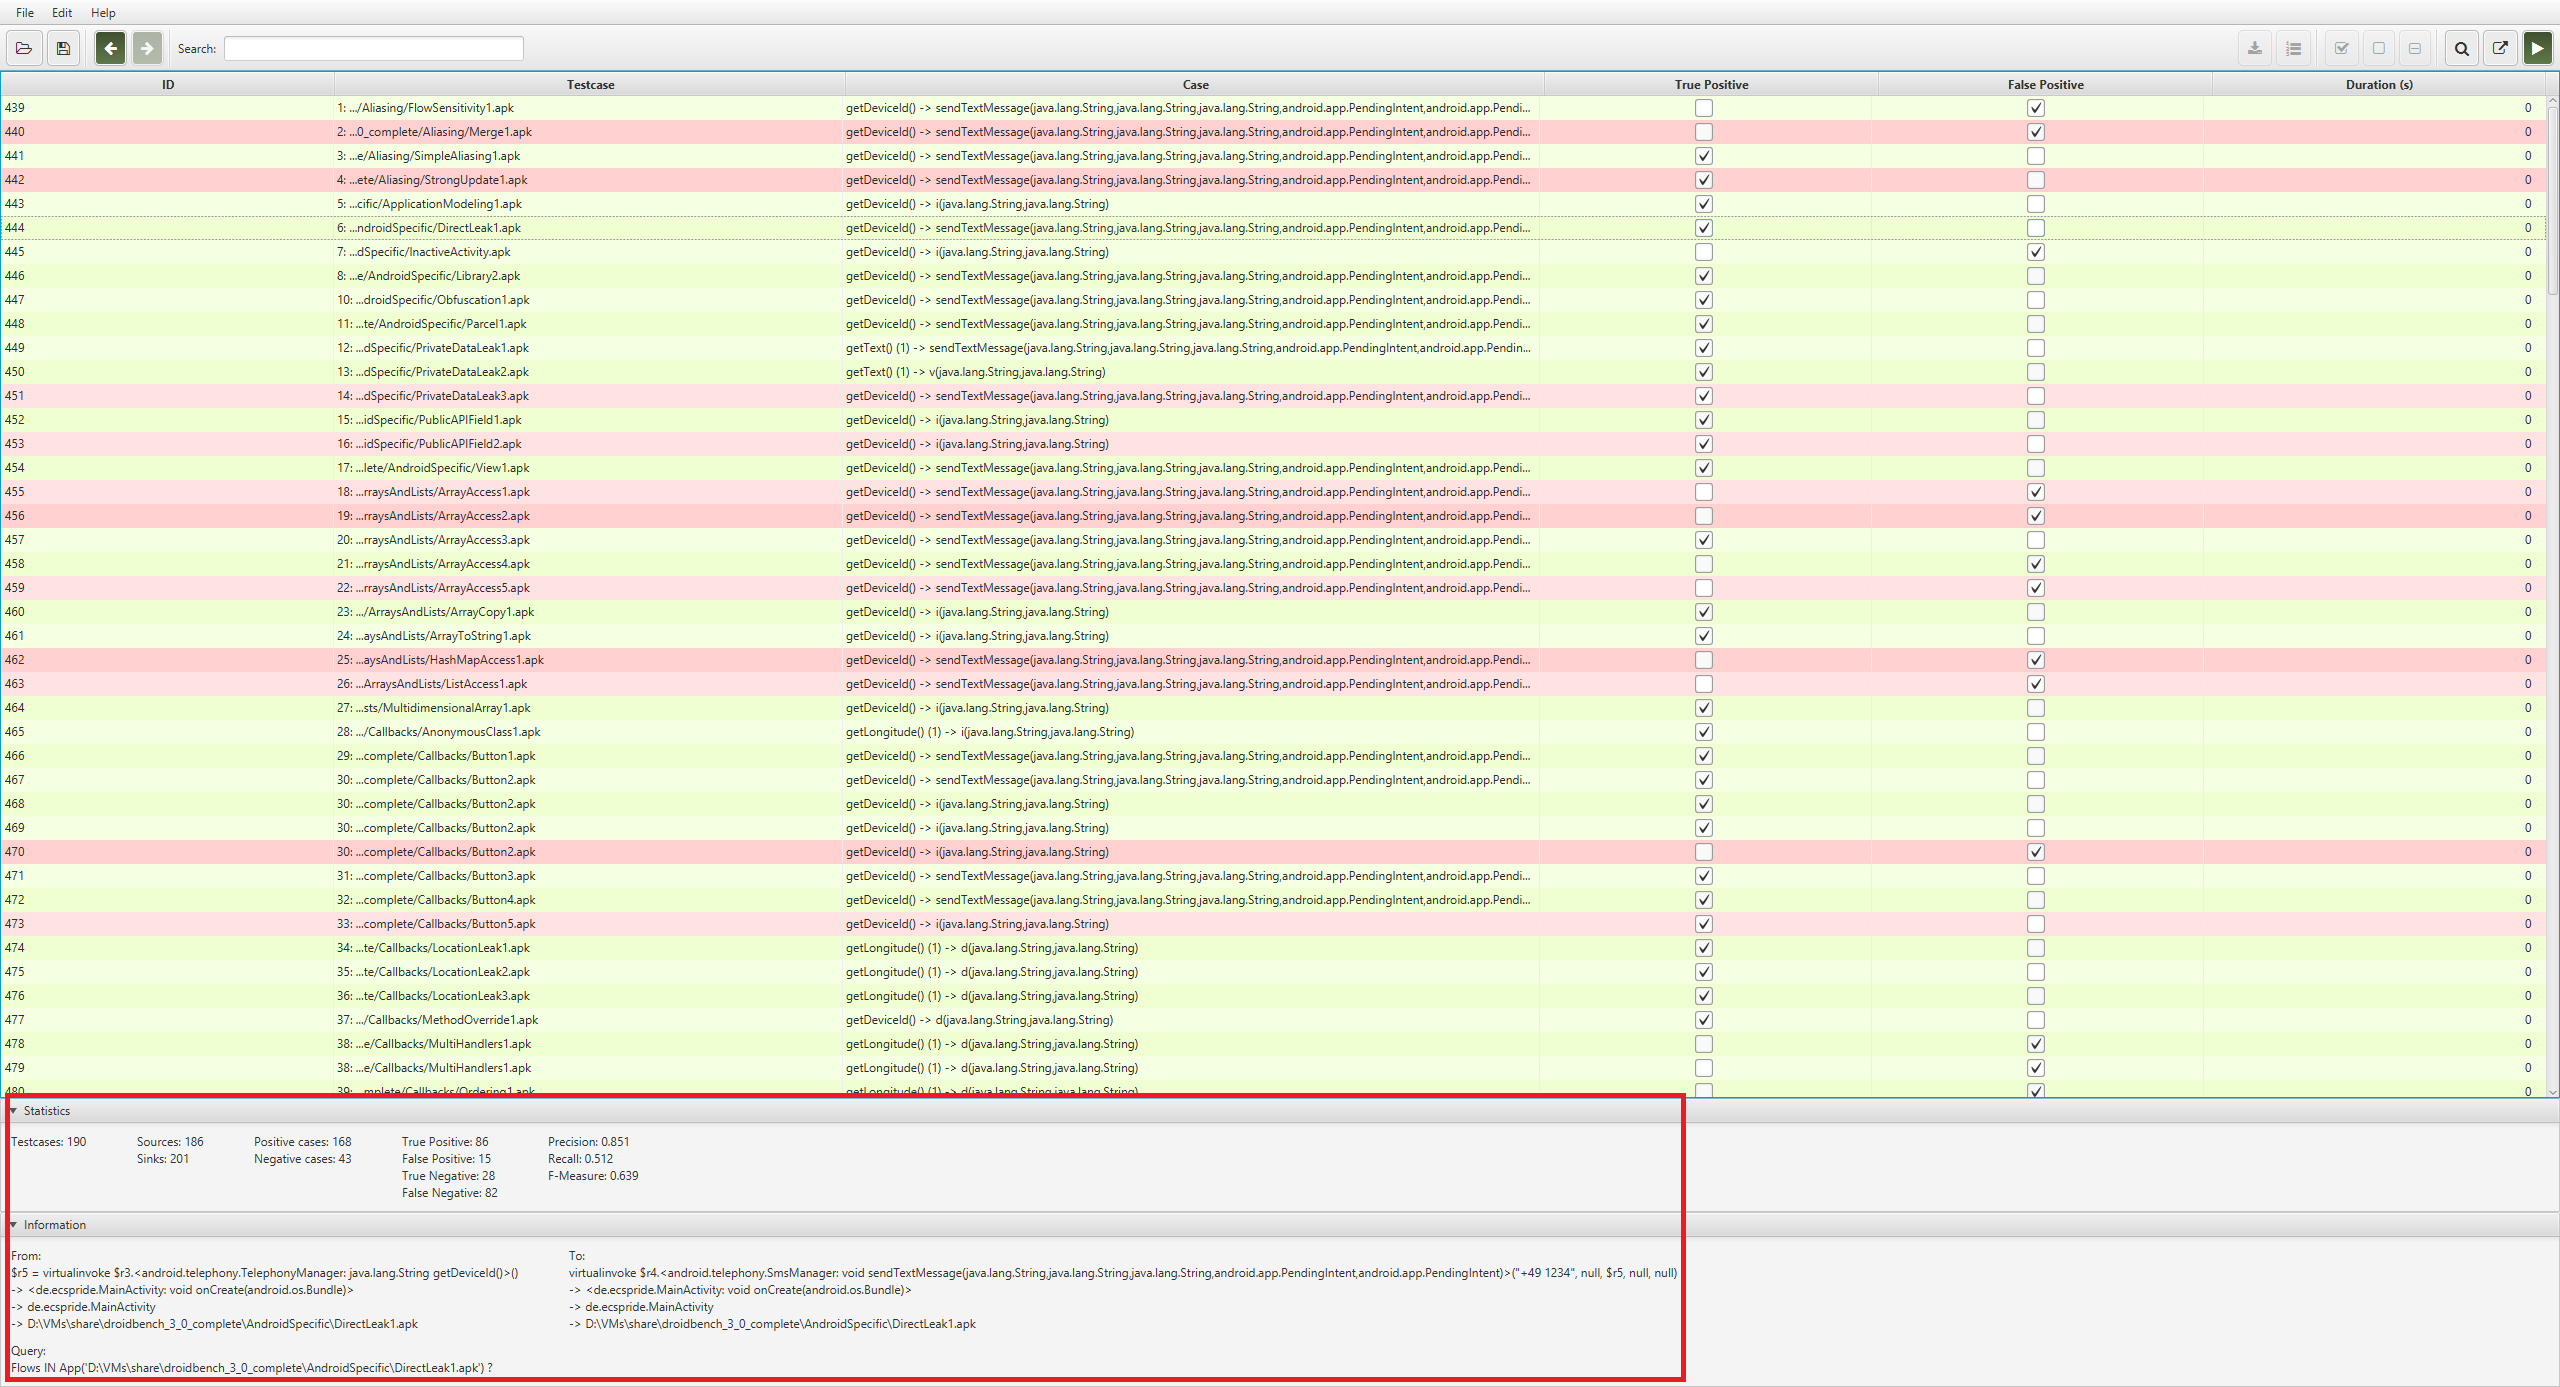
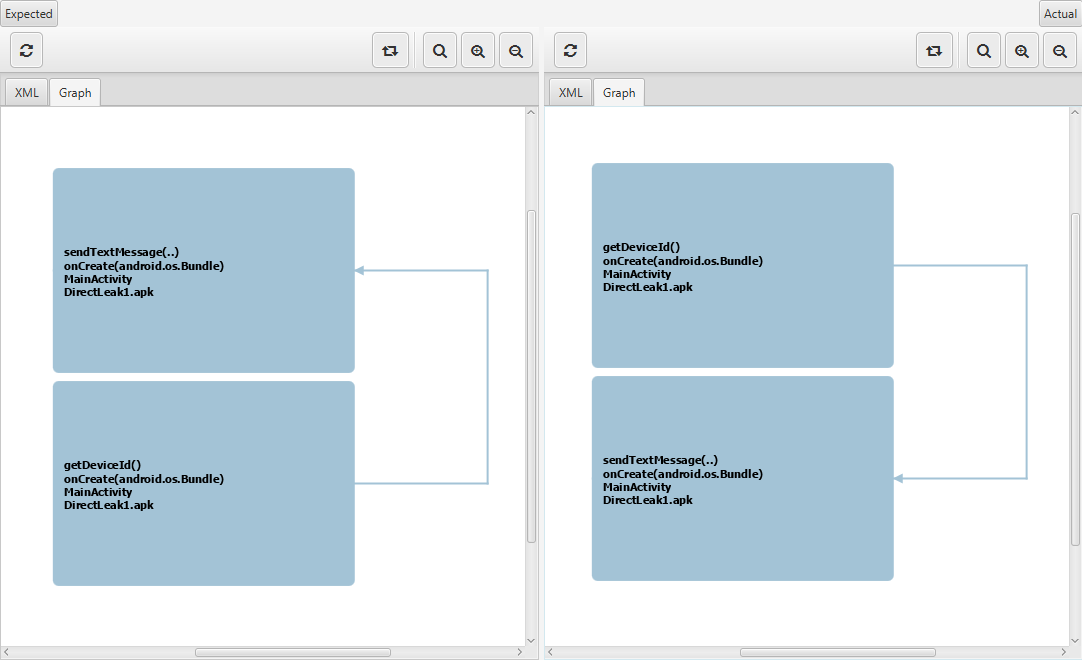
After executing a benchmark successfully, the result should look like:
Legend:
A red, green row indicates a failed, successful benchmark case, respectively.
A blue row stands for an aborted or timed-out benchmark case.
The values for Precision, Recall and F-measure can be checked in Statistics pane.
To inspect a single results:
Select one benchmark case in the table and check the information pane. It shows, for example, which AQL-Query would be executed to
evaulate this case.
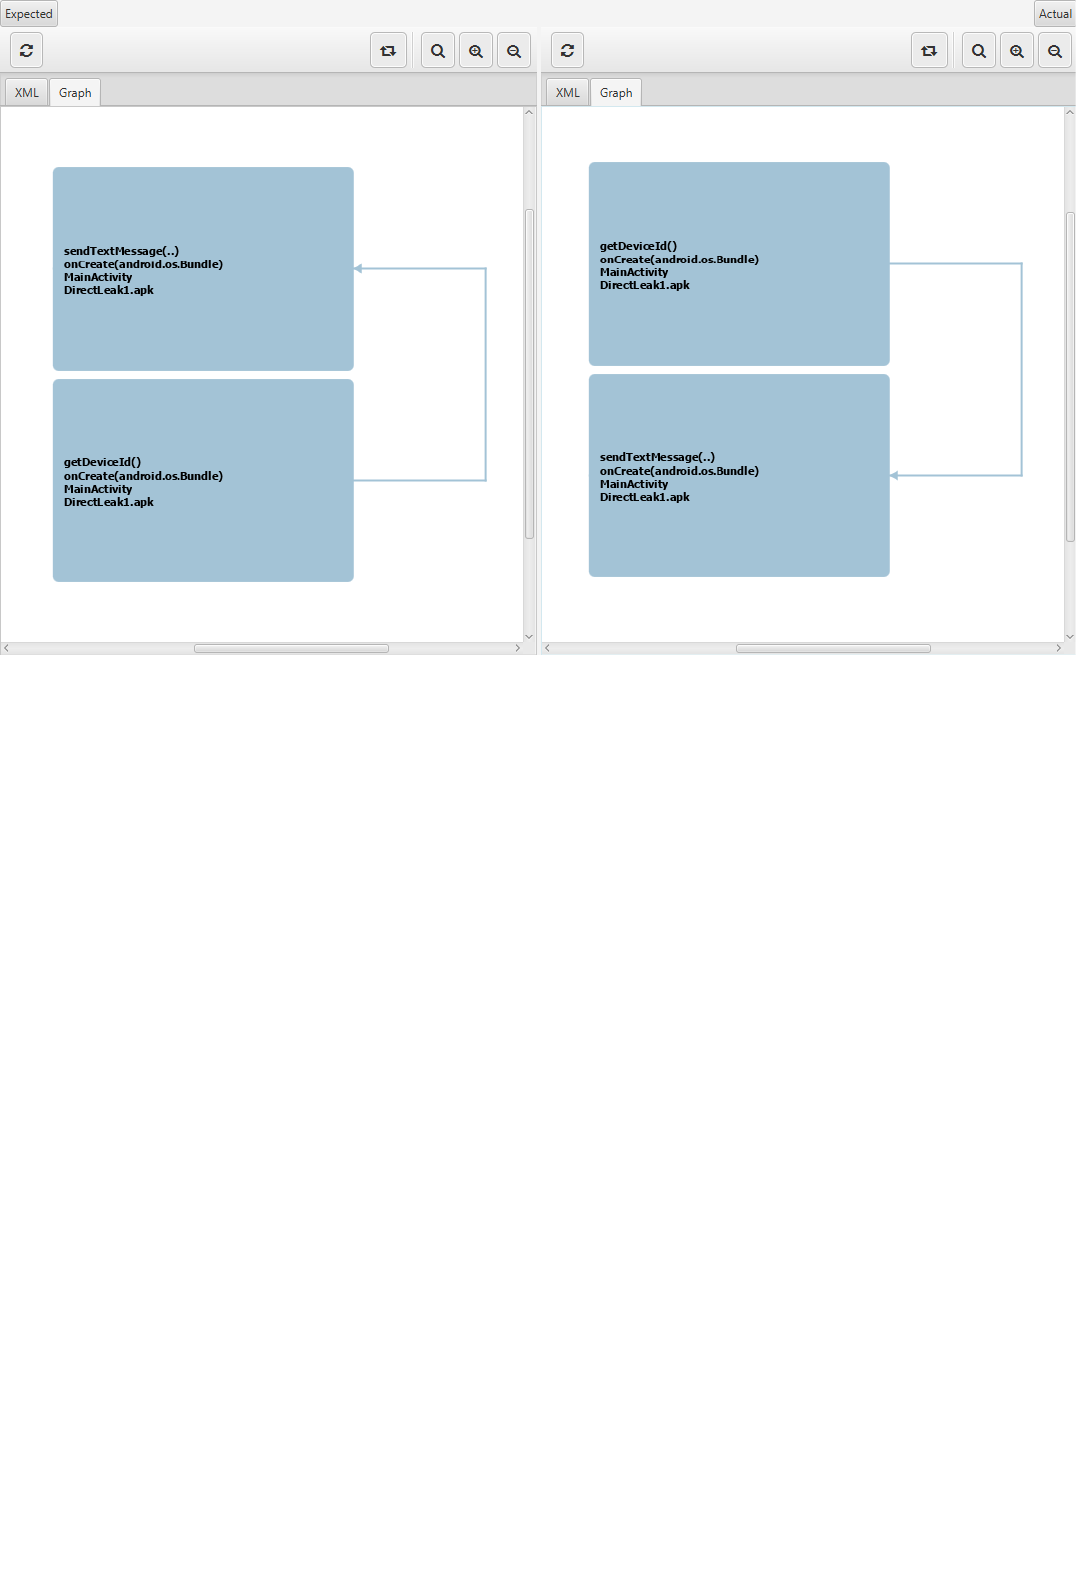
Press V or click on Show in Viewer (magnifying glass in the toolbar) to review the expected and actual result.
(optional) Switch to the graphical representation on both sides in order to get a better overview.
Evaluation
Evaluation of Benchmarks
12/18

1. Run a query in the AQL-System (see the query execution tutorial)
2. Save the computed AQL-Answer
3. Load results in BREW
Launch BREW
Load the same app that was considered in the query or open a benchmark that contains this app
Click twice on Next (Green Right-Arrow in the toolbar)
Open the Edit menu
Click on Mark successful (Result based - XML) and choose the saved AQL-Answer
Load AQL-System results
Load AQL-System results
14/18

Download the latest BREW release: https://github.com/FoelliX/BREW/releases
Download a ReproDroid benchmark: https://FoelliX.github.io/ReproDroid
e.g. the refined benchmark version of DroidBench 3.0: https://uni-paderborn.sciebo.de/s/ZmlRvtzI6pVYHVP/download?
path=%2Fbenchmarks&files=DroidBench30.zip
Extract both downloaded archives: Let us assume %BREW% and %benchmark% refer to the respective extracted archives.
Choose the tool for which you want to load the benchmark (for this example we assume it is Amandroid).
Copy %benchmark%/results/Amandroid/data to %BREW%/data
Start BREW with
config_toolset1.xml (for Amandroid, DroidSafe, FlowDroid and IccTA)
config_toolset2.xml (for DIALDroid and DidFail)
Click on Next (Green rightarrow in the toolbar)
Click on Directory (Ignore parent directory)
Select the %benchmark%/benchmark/apks directory
If any warnings appear, just click OK
Click on Next (Green rightarrow in the toolbar) again
Click Yes
Inspect the fully loaded benchmark result
The lower Statistics pane shows general information such as precision, recall and F-measure
Individual results can be reviewed by selecting a case and clicking on Show in Viewer (magnifying glass in toolbar) or pressing v.
ReproDroid
Fully load a ReproDroid benchmark
15/18

The Benchmark Refinement and Execution Wizard (BREW) can be used to do what the name suggests, first refine and then execute a
benchmark.
The improvements introduced along with the release of version 1.2.0 are described in the following tutorial:
Improvements
Runthrough
Launch parameters
Configuration
Benchmarking
Setup/Load/Execute
Evaluation
Load AQL-System results
Fully load ReproDroid benchmarks
FAQ
BREW 1.2.0
Benchmark Refinement and Execution Wizard (BREW)
New Tutorial
Basic Tutorials
16/18
With BREW version 1.2.0 mainly two improvements are introduced. Both help to select the best tool associated with any benchmark case.
Futhermore, the new version relies on the up-to-date AQL-System (v. 1.2.0).
IMPORTANT: This makes it mandatory to upgrade existing configurations (see Configuration Upgrades)!
BREW 1.2.0 allows to automatically determine or specify features for certain benchmark cases. This way tools can be choosen more selectively
based on a tool's priority to handle certain features.
Example: The following configuration holds two artificial tools, namely AwesomeDroid and LameDroid .
<tool name="AwesomeDroid" version="1">
<priority>1</priority>
<priority feature="Awesome">3</priority>
...
</tool>
<tool name="LameDroid" version="1">
<priority>2</priority>
...
</tool>
For arbitrary benchmark cases LameDroid has the highest priority ( 2). For benchmark cases with the associated Awesome feature assigned
AwesomeDroid has the highest priority ( 3) and will be selected.
The same features can be used to activate (query transformation) rules for certain benchmark cases. These rules are loaded from an XML file.
The structure of such a file is defined through the rules.xsd schema. The launchparameter -rules X can be used to load rules from file X.
Inside any rule the following variables can be used:
Variable Meaning
%QUERY% The original query before applying the rule without question mark, if the original query ends with a question mark
%FILE_i% File number i (i in [1, n]) from the original query
%FEATURE_i% Feature number i (i in [1, n]) from the original query
%FEATURES% All features from the original query
Example: Let us consider the following query Flows IN App('AwesomeApp.apk') FEATURING 'Awesome' ? .
With the rule-set below in place, it gets transformed to FILTER [ Flows IN App('AwesomeApp.apk') FEATURING 'Awesome' ? ] since only the rule
with the highest priority is applied.
<rules>
<rule always="true">
<priority>1</priority>
<query>UNIFY [ %QUERY% ?, Permissions IN App('%FILE_1%') ? ]</query>
</rule>
<rule always="false">
<priority feature="Awesome">2</priority>
<query>FILTER [ %QUERY% ? ]</query>
</rule>
</rules>
The first rule included is always applied (see attribute always="true" ) independently of the features mentioned in the query. However, since its
priority is only 1 the sencond rule gets applied with a priority of 2 for this query.
Improvements
Improvements
1. Features
2. Rules
17/18

No questions, yet!
FAQ
FAQ
18/18
