STOA Ation Manual
User Manual:
Open the PDF directly: View PDF ![]() .
.
Page Count: 21

STOA Documentation
Release 0.8.0
Peter Hague
Feb 08, 2019

CONTENTS:
1 Introduction 1
1.1 Getting Started .............................................. 1
1.2 First Use ................................................. 2
1.3 Creating Worktables ........................................... 3
2 How worktables are processed 5
2.1 Action queue ............................................... 5
2.2 Execution ................................................. 5
2.3 Output .................................................. 5
3 Design 7
3.1 Overview ................................................. 7
3.2 Data Model ................................................ 7
4 Functions 9
4.1 Worktable module ............................................ 9
4.2 Web Backend ............................................... 9
4.3 User State ................................................. 11
5 Indices and tables 13
Python Module Index 15
Index 17
i

ii

CHAPTER
ONE
INTRODUCTION
Stoa is a workflow management system that keeps your code and data on a server and allows you and your collaborators
to control them remotely through a web interface. It organises your data into worktables, into which your code is
embedded through CWL (Common Workflow Language). Worktables are linked together into a higher level execution
graph. STOA is able to take the output of any worktable and present it online as a service to others. At present, the
services supported are fits format download, and VO cone search.
The central data structure in Stoa is the Worktable. Worktables encapsulate workflows, written in CWL (Common
Workflow Language), which define the inputs and outputs of either a single command, or a workflow composed of
multiple commands with their inputs and outputs linked. A Worktable is also a table - whose columns are defined by
the inputs and outputs of the workflow. Once the user has written a CWL workflow, a Worktable can be automatically
generated from it.
The columns corresponding to the workflow outputs are read only, the columns corresponding to the workflow input
can be written to, and writing to them changes the status of a row to indicate that the outputs no longer correspond to
the inputs and the row needs to be rerun. Stoa can handle this automatically.
Worktables are linked in a relational manner, so the output from one Worktable can be used to populate the rows of
another. For a trivial example, a simple worktable can encapsulate the Bash command ‘find’ to locate all the folders
in a large directory structure where a process should be run. The output of this, one pathname per row, could be used
to populate the input columns of the Worktable encapsulating another process
Stoa is designed to operate complex processing pipelines across heterogenous data sets. It does this mainly through
Worktables - objects combining a workflow object (written in CWL) with a data table. Any program can be inlcuded
in a Worktable.
1.1 Getting Started
STOA requires Python 3 and some Python libraries, all available through pip - we recommend that you use a virtual
environment when trying this out. When you have one set up, install numpy,astropy,wltool,grpcio-tools
and tornado and you should be good to go
In order to prepare STOA to run, type:
./ready.sh
this only need be done once per STOA install. Then type:
./start.sh $PWD/example 9000
to run the demo. Go to your browser and visit “localhost:9000” to try it out
1

STOA Documentation, Release 0.8.0
1.2 First Use
Login as admin (no password is required) and use Create New User to add yourself as a user. Logout with the X
icon on the left and then log back in with your username. No passwords are required at present; the current version is
not designed to be visible outside private networks.
Now create a worktable to implement the find command. Click on the Create New Worktable link and choose
the workflow and yml file (which stores default values) then click Create. The STOA install provides find.cwl and
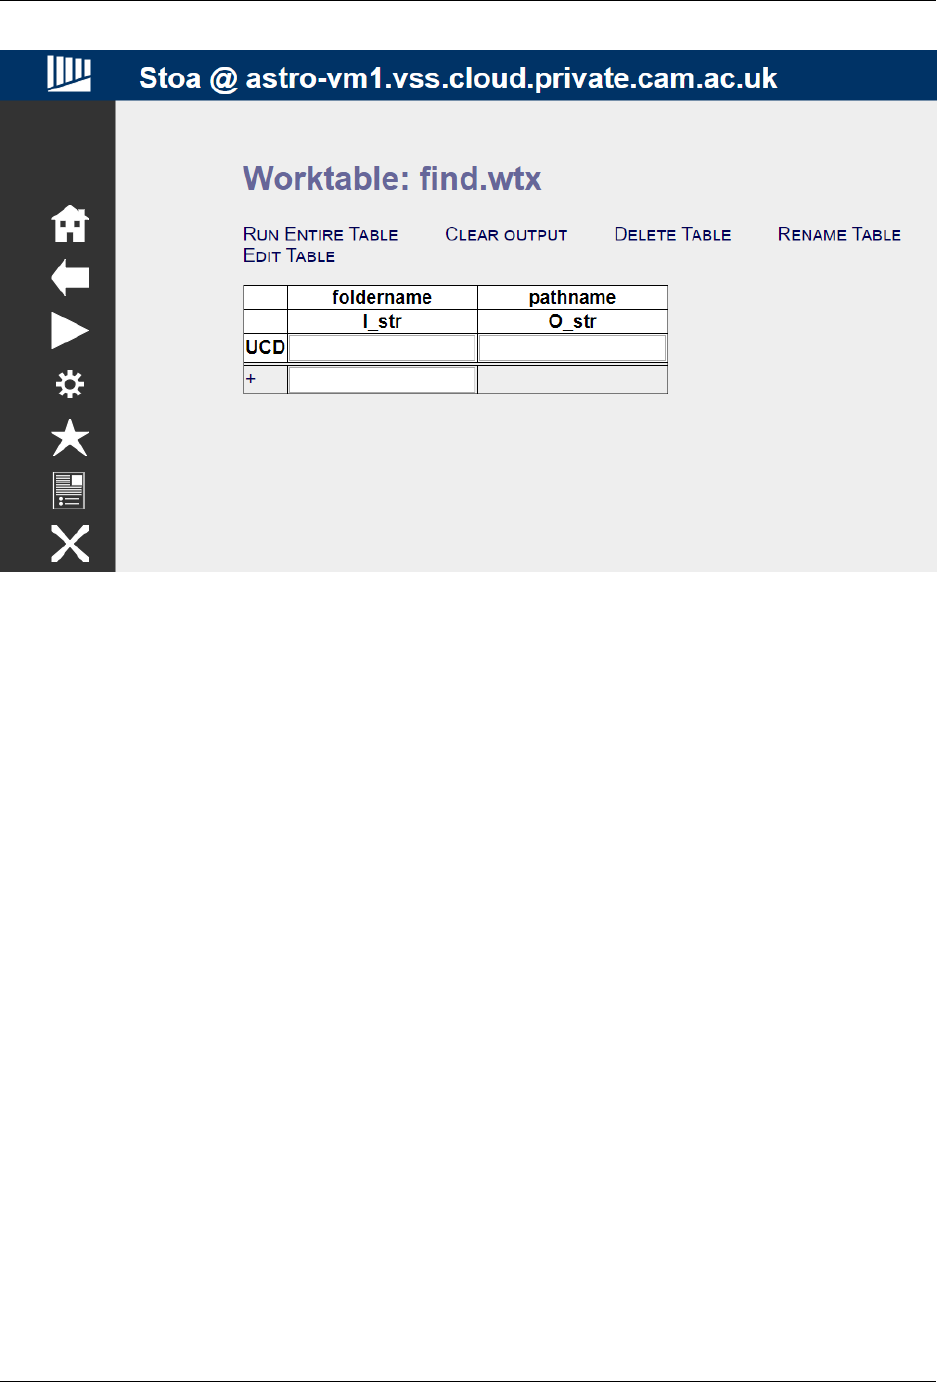
find.yml for testing purposes. Once the worktable is created, the screen should look like Figure 2. In order to run the
worktable, it needs input for the workflow. Recall that each execution instance of a workflow is a row in the table, so
in order to provide input for a workflow, we need to add a row. The dialogue box next to the ‘+’ sign can be used to
type in a value for this workflow’s solitary input. Then click on + to add a row.
Once this table is present, go into it and add a new row with product as its input, and then run that row.
2 Chapter 1. Introduction
STOA Documentation, Release 0.8.0
At this point, there will be two pathnames from the example folder. This information will be passed on to the next
worktable
1.3 Creating Worktables
In order to create your own worktables in STOA, it is first necessary to create CWL wrappers for all the code you need.
This is not typically difficult, and some wrappers for simple functions are included already for your convenience. There
is a user guide for CWL at https://www.commonwl.org/user_guide/ which will teach you the basics of the language
and quickly get you writing wrappers for your own scripts. In brief, CWL describes the tools you use in terms of their
inputs and outputs, and then lets you combine them into workflows with linked inputs and outputs.
Any command line tool whose operation is driven by its command line parameters, and can be modified to store all its
output in a file named cwl.output.json, will have a very simple wrapper. Future versions of STOA will include
a way to automatically generate such wrappers.
1.3. Creating Worktables 3

STOA Documentation, Release 0.8.0
4 Chapter 1. Introduction

CHAPTER
TWO
HOW WORKTABLES ARE PROCESSED
Execution in STOA is brooken up into ‘actions’, which are executions of a workflow with a specific set of input. Each
row in a worktable (except those which do not yet have anything in the output fields) is a record of an action. Actions
are pushed to a queue either by the user or by the automated recomputation system, and then removed from the queue
and implemented by an action server.
2.1 Action queue
Each users had their own action queue, which at present only allows serial execution. The queue is cleared by a
dedicated action server, so in a future version multiple action servers will be deployed in a swarm to clear the action
queue in parallel. There will be no overhead in doing this, as actions must be by definition trivilally parallel and their
results not depend on the order in which they are executed. This is in part up to the user, and STOA does not at this
time perform any checks that would prevent a race condition if the user made two actions operate on the same data.
Each action consists of a list of inputs and the name of the worktable. It does not have a copy of the worktable, so
whichever version is on the disk at the time the action is implemented will be used. This should be borne in mind by
users who wish to continue workflow development whilst previous tasks are running.
2.2 Execution
After being removed from the queue by the action server, the worktables contents are unpacked into a temporary
location, and the CWL workflow is run using the input parameters specified. CWL creates its own enviroment in
which to run the workflow, and STOA adds the users folder to the PATH variable in this enviroment, so uploaded
programs can be run.
2.3 Output
Output bindings are processed as in CWL. However, if the stdout file is callecd ‘list.txt’ then it binds each line to an
output.
The simplest way to send outputs back to CWL is to have programs write a JSON file called ‘cwl.output.json’ into
their working directory.
5

STOA Documentation, Release 0.8.0
6 Chapter 2. How worktables are processed
CHAPTER
THREE
DESIGN
This is the main design document, which is primarily aimed at developers
3.1 Overview
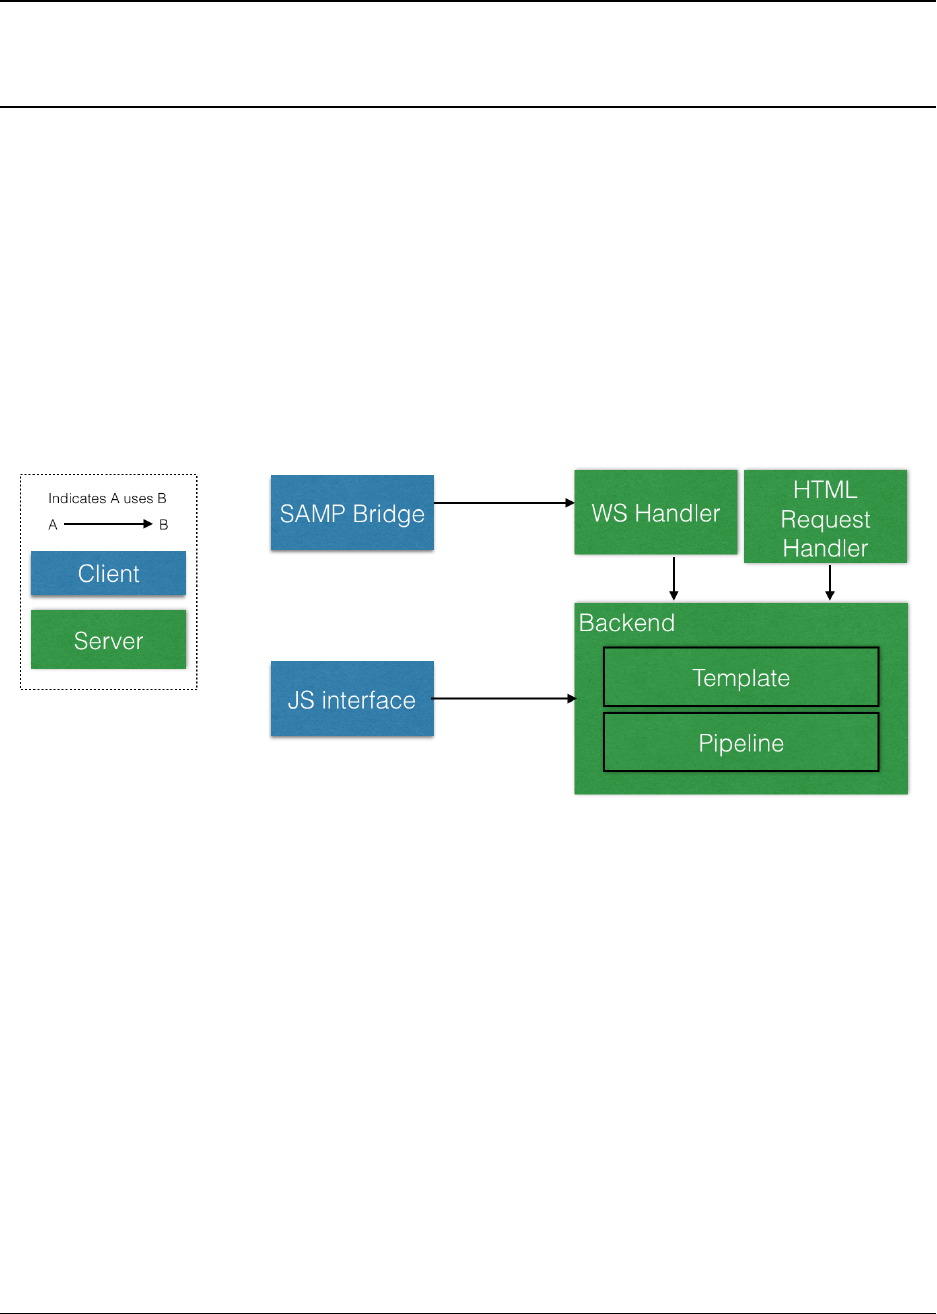
The web interface initiates a WebSocket connection when started in order to drive the main UI. The web server is run
as a separate process from the action server, which executes workflows. This means that continuous connectivity is
not required to keep workflows running. Once the interface has highlighted which rows of which worktables need to
be run, no further input via the web is required, and the user can close their browser and come back later.
3.2 Data Model
Worktable are stored on the disk as zipped files, which always contain the following:
• A Common Workflow Language (CWL) file detailing the workflow
• A Yaml file providing a row template
• The table data
7

STOA Documentation, Release 0.8.0
In addition, each Worktable may store any number of files, typically the individual steps of the workflow (as CWL
files) and the program(s) that are to be invoked by the workflow. Data must only be stored inside the table itself, not
in any auxilary files inside the worktable package.
8 Chapter 3. Design

CHAPTER
FOUR
FUNCTIONS
These functions are documented for completeness, most are not intended for the end user to call directly
4.1 Worktable module
4.2 Web Backend
class backend.ConeSearchHandler(application,request,**kwargs)
class backend.FitsHandler(application,request,**kwargs)
class backend.SocketHandler(application,request,**kwargs)
Handler for WebSocket connections
check_origin(origin)
To be implemented for security checks
Parameters origin – Page originating WS request
Returns Always “True” at the moment
on_close()
Closes WebSocket
Returns None
on_message(message)
Responds to WS messages. Action is determined by first character of message
• H: Home
• F: Flag target
• U: Unflag target
• A/a: Get action list
• P: Run a worktable
• p: Run one row of a worktable
• R/f: Run the specified action
• r: Terminate an action
• D: Display a file
• C: Create new worktable
9

STOA Documentation, Release 0.8.0
• z: Clear contents of a worktable
• k: Delete a worktable
• t: Display a worktable
• &: Append to a worktable
• s: Display a service
• X: Logout
Parameters message – WS message string
Returns None
open()
Opens WebSocket
Returns None
backend.current(userip)
Get the current folder being viewed by a user
Parameters userip – The IP address of the user (currently used as ID)
Returns The name of the folder
backend.getwsroot(userip)
Get the address this user has to send ws connections to
Parameters userip – The IP address of the user (currently used as ID)
Returns A URL
backend.projectInfo(userFolder)
Produces the main page containing information about the current project
Returns HTML output
backend.setCurrent(userip,foldername)
Sets the current folder being viewed by a user
Parameters
•userip – The IP address of the user (currently used as ID)
•foldername – The name of the folder
Returns None
backend.setTarget(t)
Sets the target folder
Parameters t– The name of the new target folder
Returns None
backend.startBackend()
Initialises the web database (distinct from the pipeline one) and loads in user table
Returns None
backend.usercheck(userip)
Check if the user is valid
Parameters userip – The IP address of the user (currently used as ID)
10 Chapter 4. Functions

STOA Documentation, Release 0.8.0
Returns A session ID, or “False” if there is no such user
backend.xmlListing(path)
Parses XML files stored in target folders
Parameters path – The path name of the folder containing the .xml file
Returns List of subpaths (i.e. observations) defined in the file
4.3 User State
class userstate.userState
appendQueue()
Add the contents of the process queue to the buffer
Returns None
finalise()
Checks if the process has finished, and if so performs finalisation operations
Returns None
4.3. User State 11

STOA Documentation, Release 0.8.0
12 Chapter 4. Functions

CHAPTER
FIVE
INDICES AND TABLES
• genindex
• modindex
• search
• process
13

STOA Documentation, Release 0.8.0
14 Chapter 5. Indices and tables


STOA Documentation, Release 0.8.0
16 Python Module Index

INDEX
A
appendQueue() (userstate.userState method), 11
B
backend (module), 9
C
check_origin() (backend.SocketHandler method), 9
ConeSearchHandler (class in backend), 9
current() (in module backend), 10
F
finalise() (userstate.userState method), 11
FitsHandler (class in backend), 9
G
getwsroot() (in module backend), 10
O
on_close() (backend.SocketHandler method), 9
on_message() (backend.SocketHandler method), 9
open() (backend.SocketHandler method), 10
P
projectInfo() (in module backend), 10
S
setCurrent() (in module backend), 10
setTarget() (in module backend), 10
SocketHandler (class in backend), 9
startBackend() (in module backend), 10
U
usercheck() (in module backend), 10
userState (class in userstate), 11
W
worktable (module), 9
X
xmlListing() (in module backend), 11
17
