Manual
User Manual:
Open the PDF directly: View PDF ![]() .
.
Page Count: 24

manual.md 3/25/2019
1 / 24
Manual for Image Classification using TensorFlow
This instruction manual provides the procedure to setup the infrastructure and environment to
perform machine learning-based image classfication. Along with this manual, a compressed file
named requirements_image.zip is provided for requried software package and library installations.
Author: Yu-Chang Ho (Andy)
E-mail: ycaho@ucdavis.edu
Section 1. Specifications for Machine
This section describe the requirments for environment setup, including hardware aspect and
software aspect. This instruction is intended for MicroSoft Windows users.
1-1. Hardware for Host Machine:
The following are the hardware specification needed for your machine.
Category Value
CPU 4 cores or higher x86-64 (64-bit)
Memory 8 GB or higher
Disk 1 TB (1024 GB) or higher
GPU An NVIDIA GPU device gen. GTX 7-series or newer
[IMPORTANT] An AMD GPU deivce will not be compatible!
1-2. Software:
The following are the required softwares:
Category Name
Operating System Microsoft Windows 10
Programming Python 3.6
Machine Learning CUDA 9.0 by NVIDIA
manual.md 3/25/2019
2 / 24
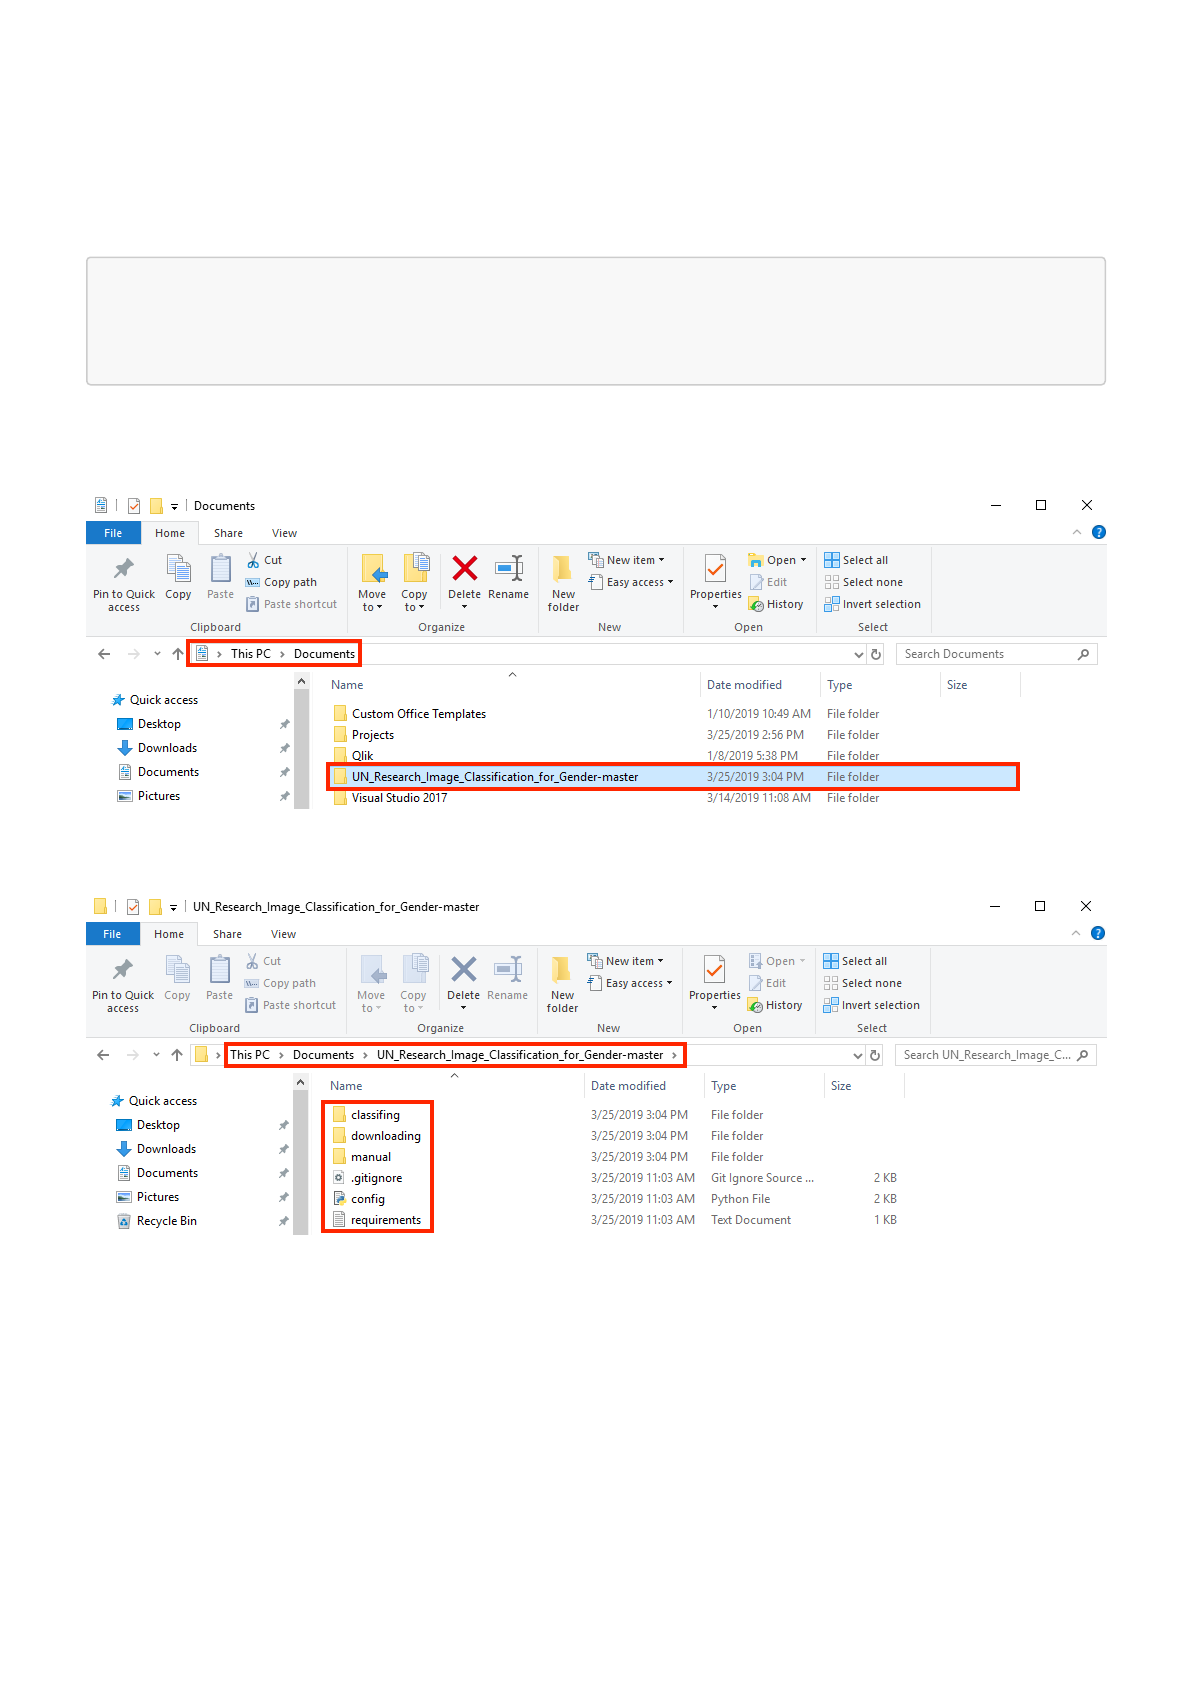
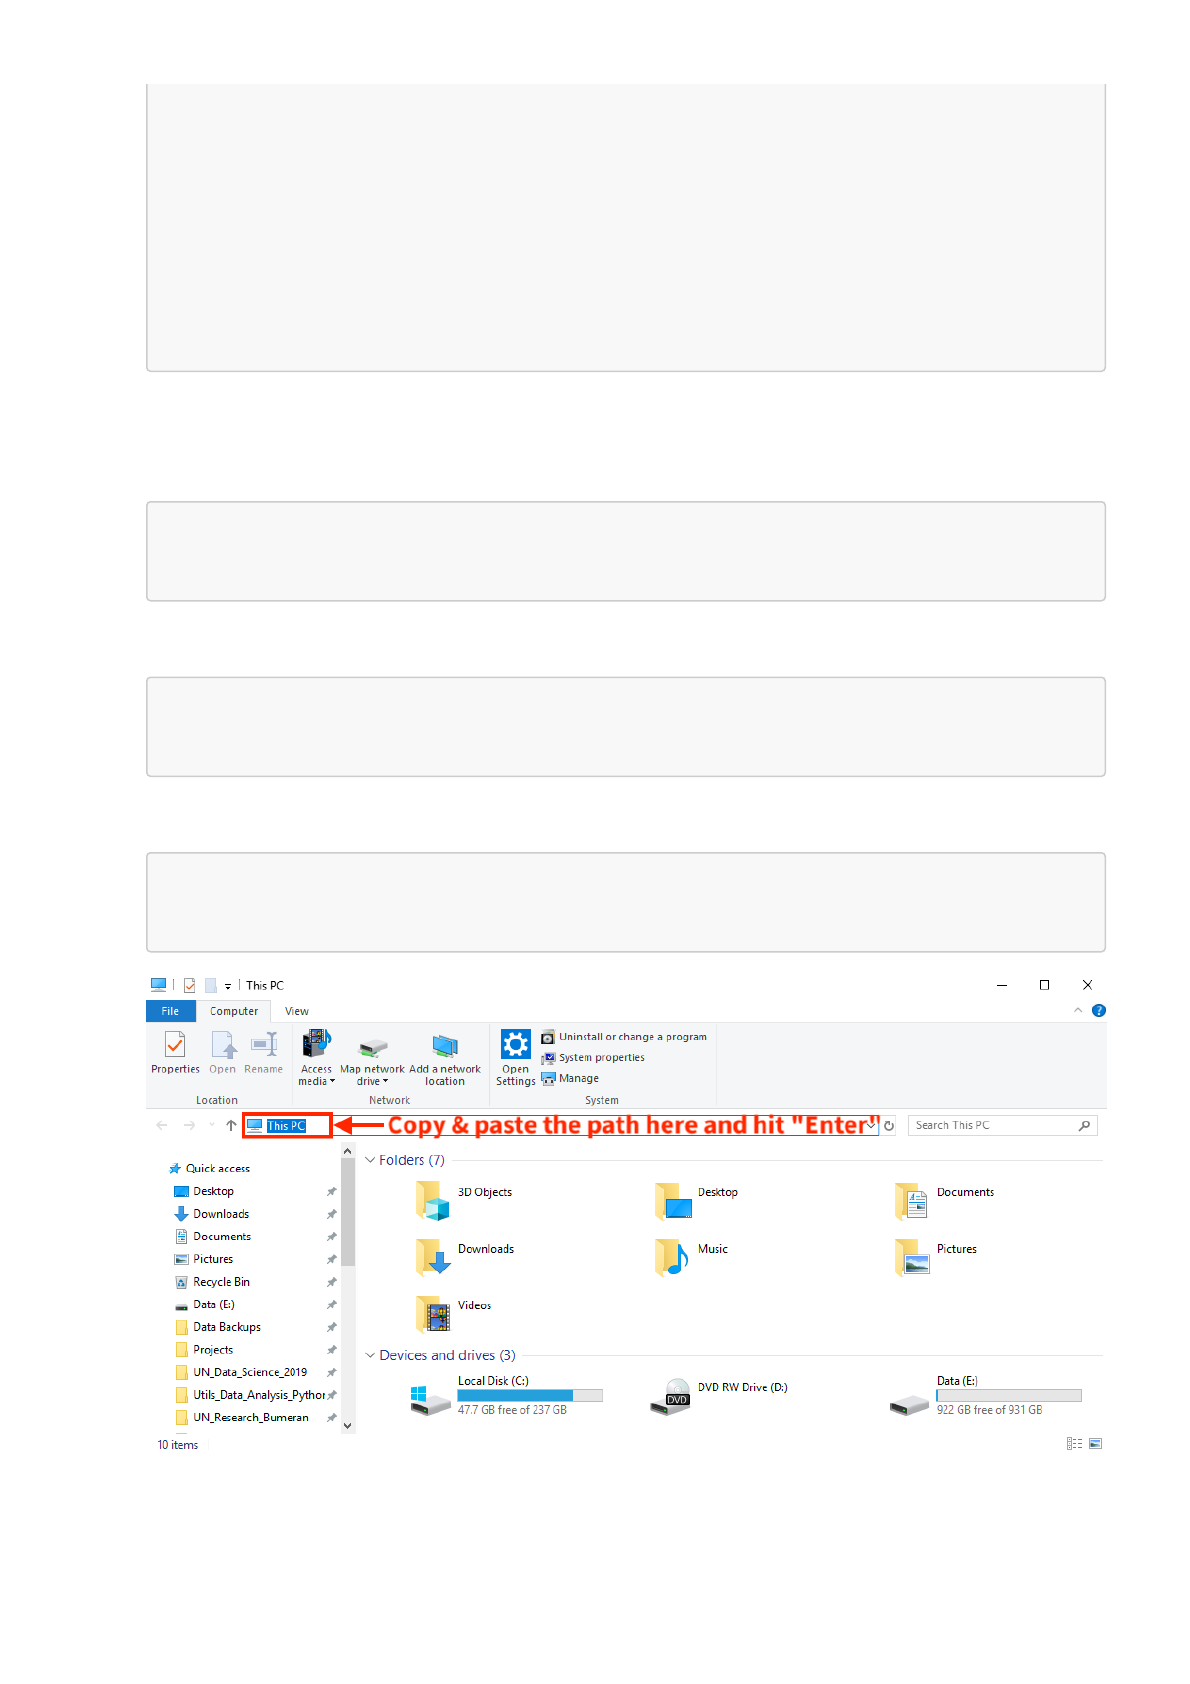
Section 2. Deploy this Repository on your Computer
Along with this manual, a file named programs_image.zip which stores the program files was
given. Please extract it into the location:
C:\Users\<user_name>\Documents\
# Change <user_name> to your computer username.
After the extraction, a folder named UN_Research_Image_Classification_for_Gender-master
should be available under Documents folder as follow:
The following content should be available:

manual.md 3/25/2019
3 / 24
Section 3. Software Installation
In this section, the environment setup for the prepared machine is described. A compressed file
name requirements_image.zip is provided along with this manual. It contains all the software
installation executables needed to get the machine ready. Please uncompress it with a compression
software like IZArc, WinRAR, or 7-zip.
If the computer does not have a compression software available, 7-zip is a recommendation.
Please use the link: https://www.7-zip.org/a/7z1900-x64.exe to download and install it. Visit
https://www.7-zip.org/ if the provided link is not working.
Please extract the content of requirements_image.zip. The structure is as follow:
+-- Dataset/
| +-- training_imgs/
| | +-- female/
| | | +-- (many image files)
| | +-- male/
| | | +-- (many image files)
| | +-- unknown/
| | | +-- (many image files)
| +-- freelancer_supply_20190204.csv
|
+-- Installation/
| +-- Git-2.21.0-64-bit.exe
| +-- python-3.6.8-amd64.exe
| +-- cuda_9.0.176_win10_network.exe
| +-- cudnn_lib/
| | +-- bin/
| | | +-- cudnn64_7.dll
| | +-- include/
| | | +-- cudnn.h
| | +-- lib/
| | | +-- x64/
| | | | +-- cudnn.lib
| +-- vc_redist.x64.exe
| +-- vs_community__881455873.1549905826.exe

manual.md 3/25/2019
4 / 24
3-1. Install Git for Windows
Git is the repository syncing service for repository management. In the requirements_image.zip,
a folder named Installation contains Git-2.21.0-64-bit.exe, which is for the installation. If the
file is not found, please visit https://git-scm.com/downloads and click Download X.X.X for
Windows to download the executable.
Procedure
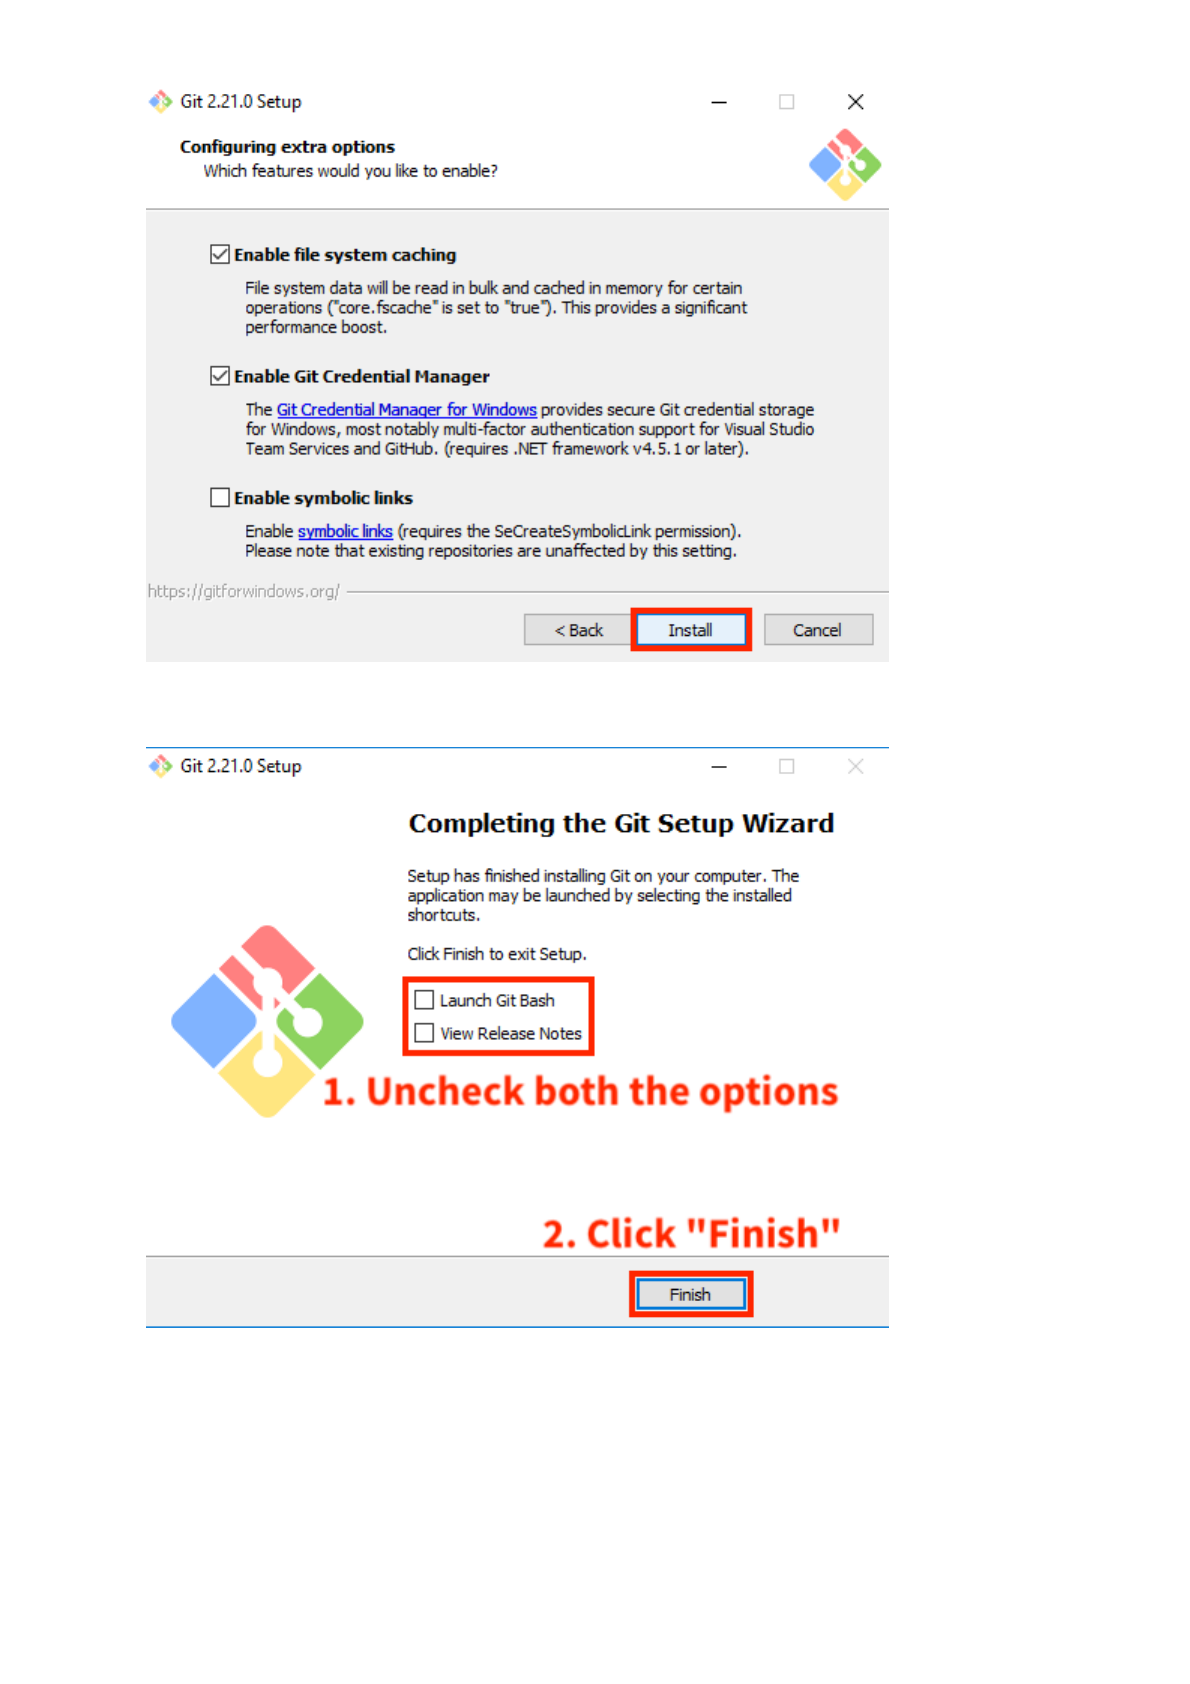
1. Double-click on Git-2.21.0-64-bit.exe, click Next:
2. Keep click on Next until the following page, click Install:
manual.md 3/25/2019
5 / 24
3. Wait until the process complete, uncheck all the given options then click Finish:
manual.md 3/25/2019
6 / 24
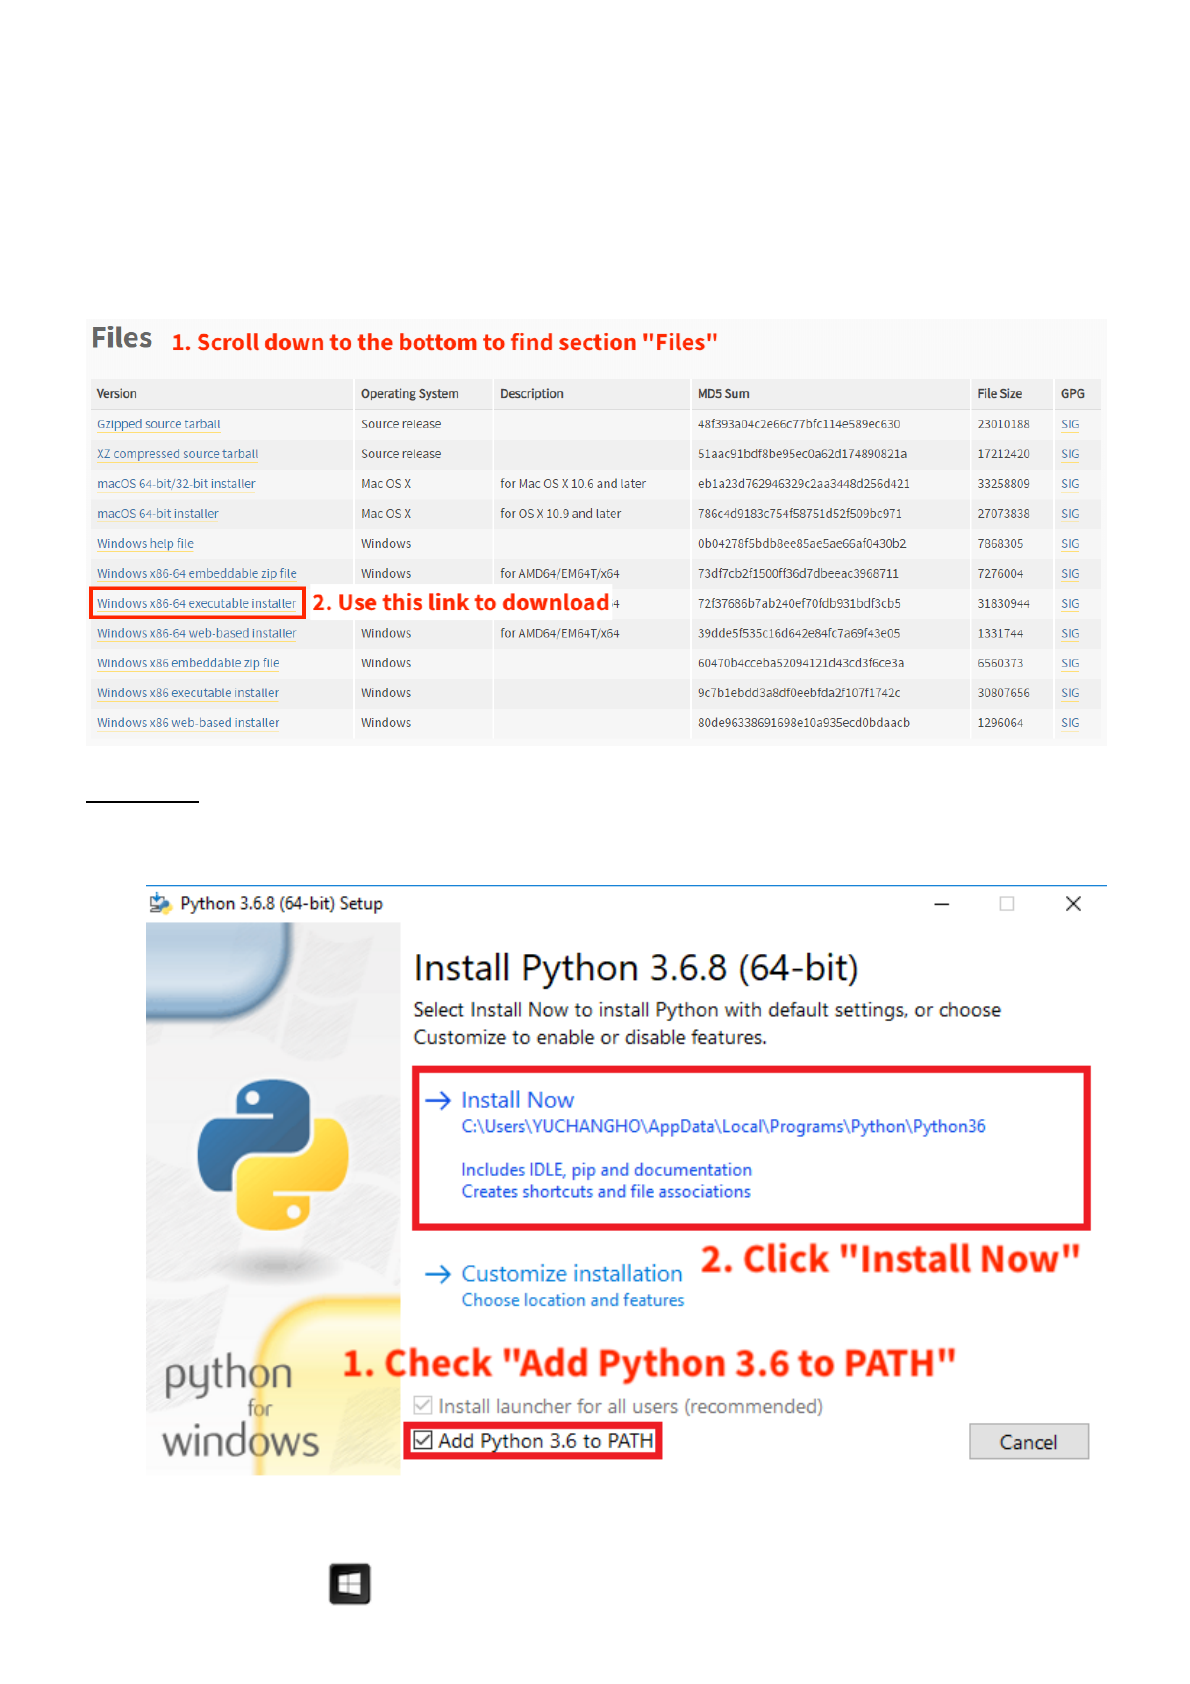
3-2. Install Python 3.6 Environment
Python is the programming language used for this project. The file python-3.6.8-amd64.exe is
available under folder Installation. If the file is not found, please visit
https://www.python.org/downloads/release/python-368/, scroll down to the bottom of the page,
and find the download link Windows x86-64 executable installer.
Procedure
1. Make sure to check Add Python 3.6 to PATH then click Install Now:
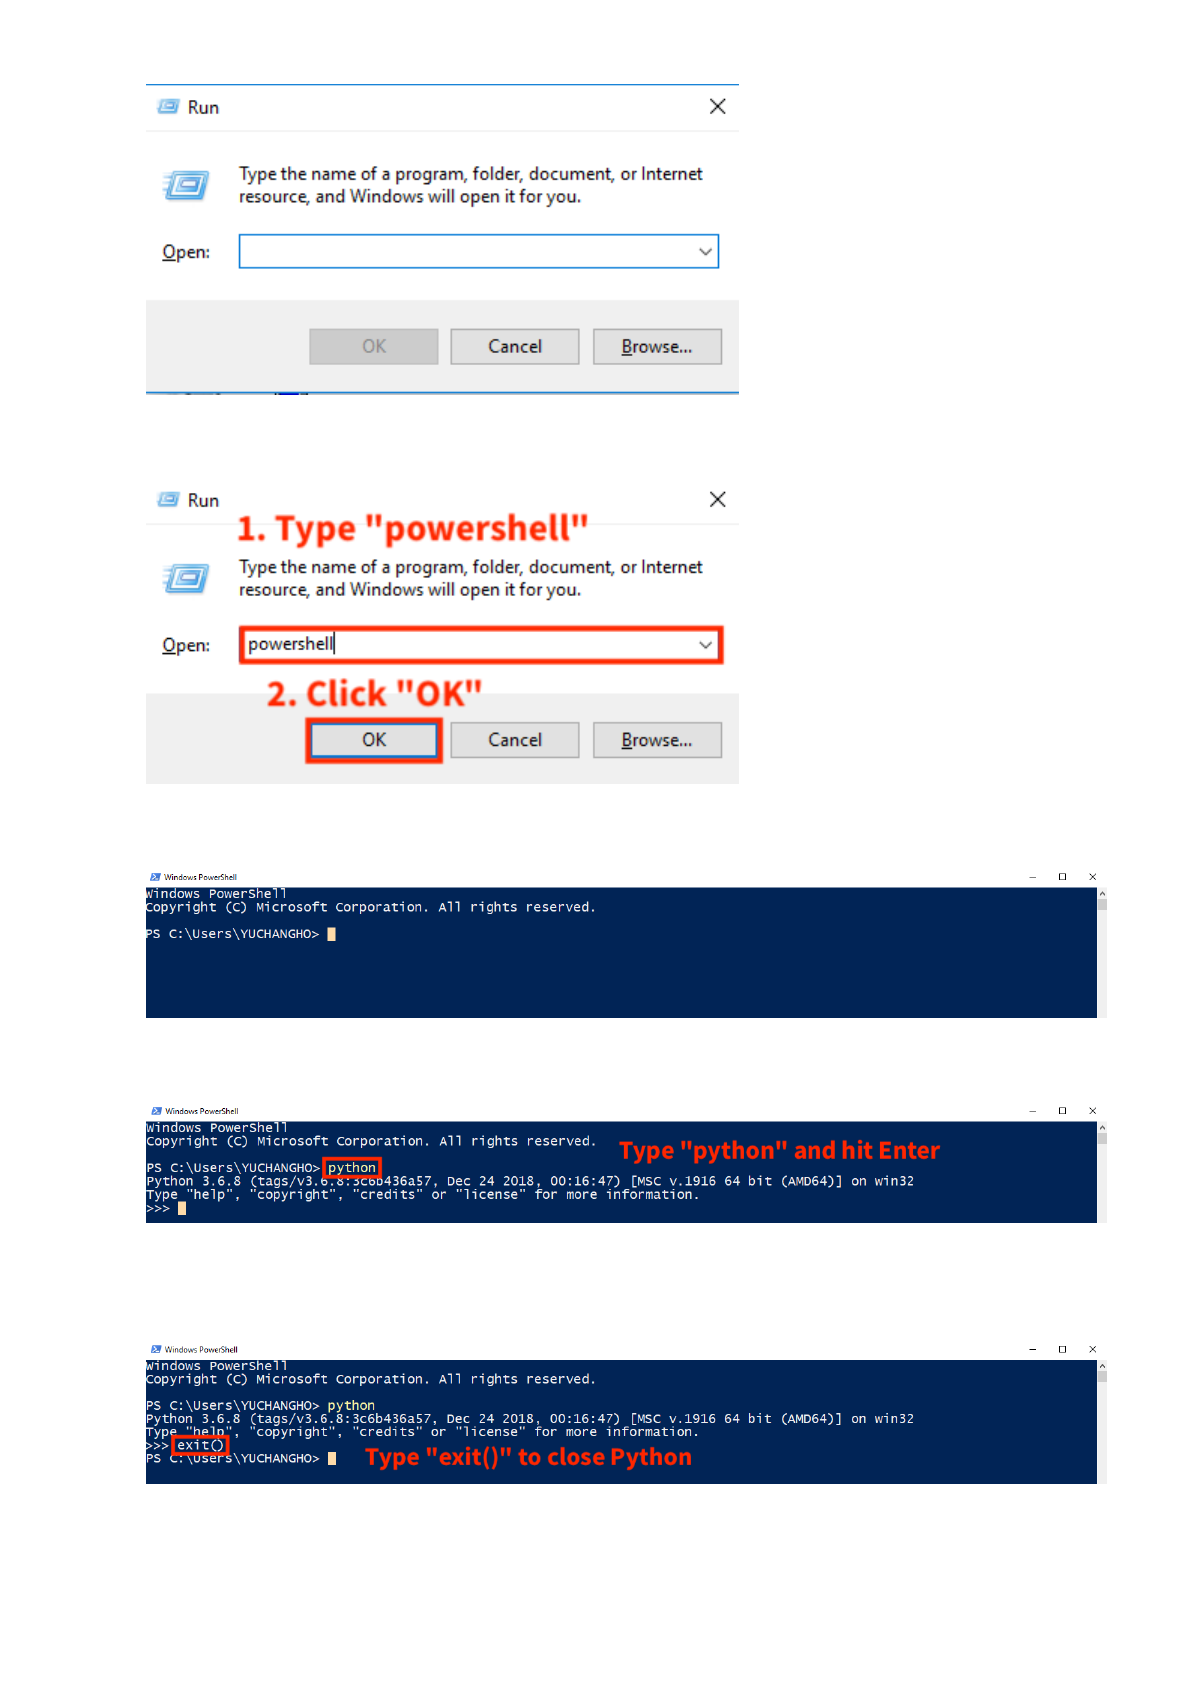
2. Open up an Windows Powershell by follow the steps:
a. Press "win key + R" on the keyboard, the following window will be prompted:
manual.md 3/25/2019
7 / 24
b. Type powershell then hit Enter
c. This is the Windows PowerShell:
d. Within the window, type python then hit Enter:
e. If no error message shows up, type exit() to quit the program or simply close the
window.
A file named requirements.txt is located within the repository for required Python library
installations. Please follow:
manual.md 3/25/2019
8 / 24
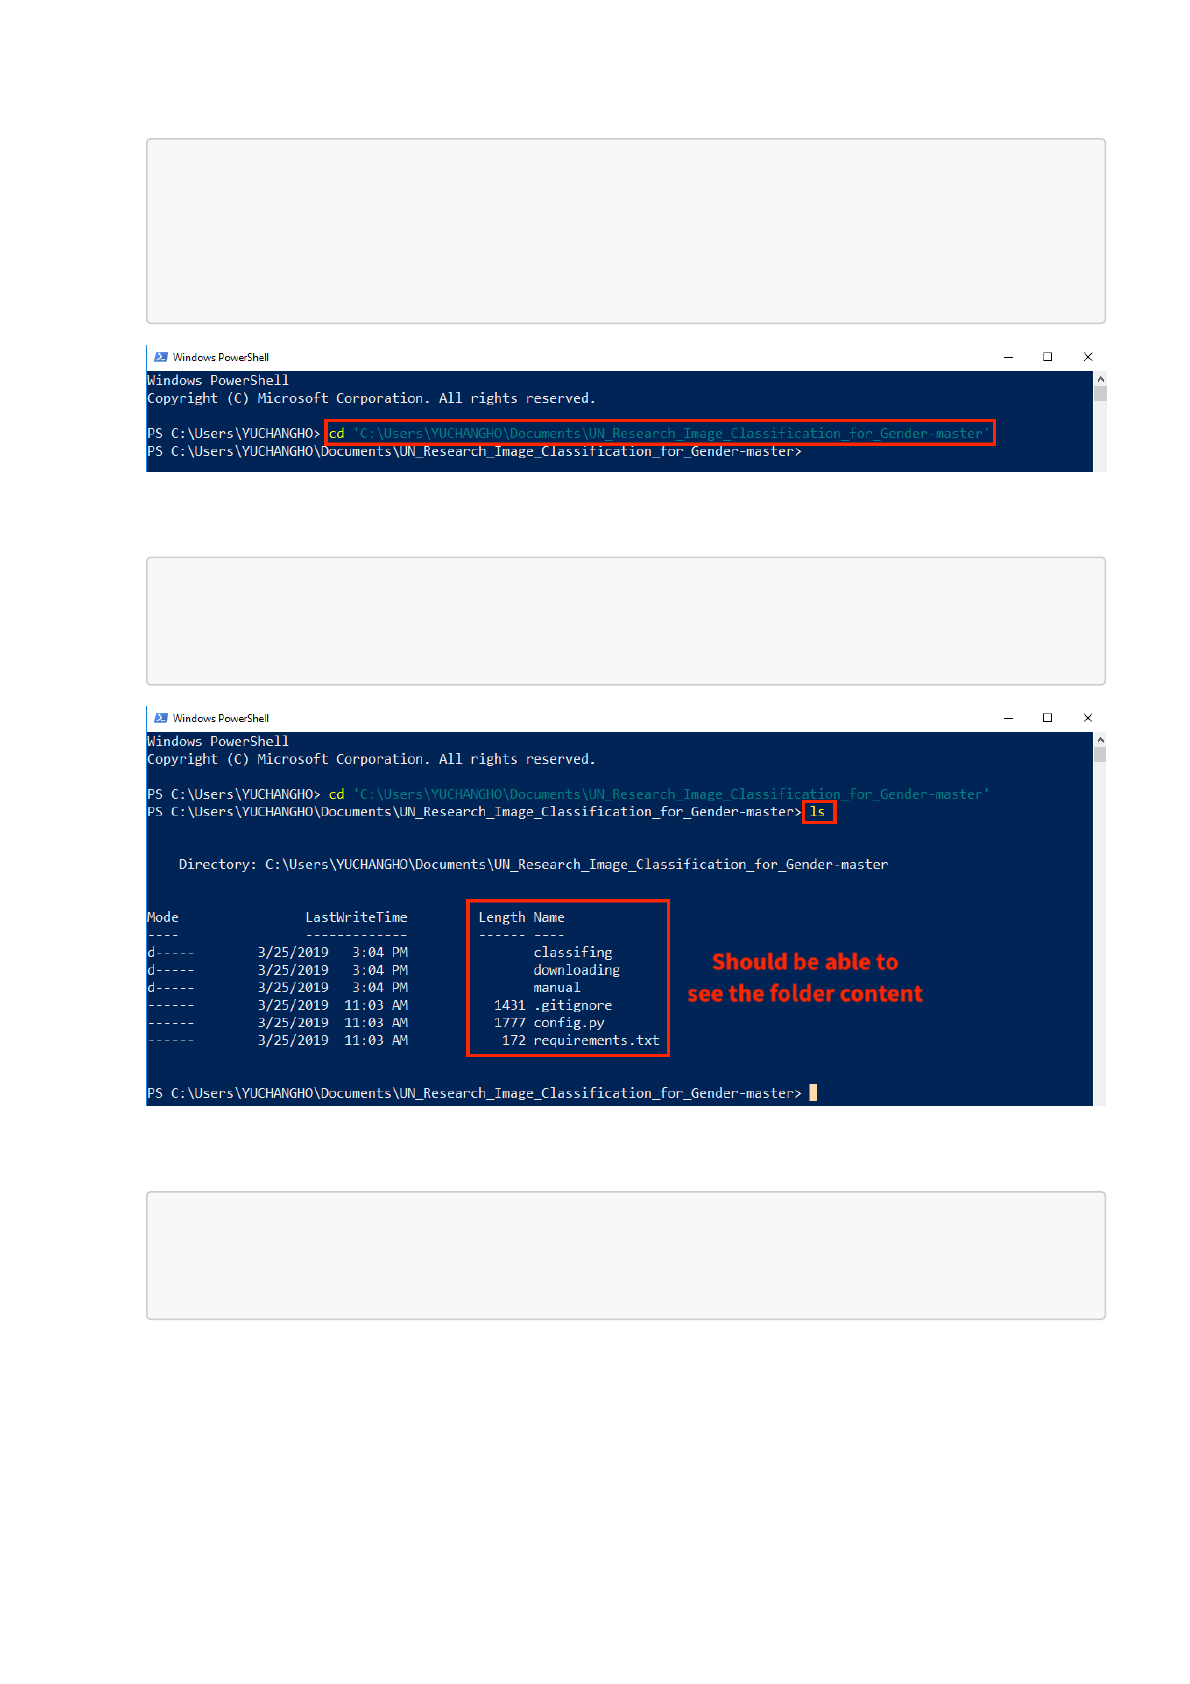
3. Navigate to the repository folder through:
$ cd 'C:\Users\
<user_name>\Documents\UN_Research_Image_Classification_for_Gender-master'
# Change <user_name> to the computer username. Do not type in the `$` sign.
Hit "Enter" after the command is typed.
4. Use command ls to check the content of the folder. The following should be seen:
$ ls
# Hit "Enter" after the command is typed.
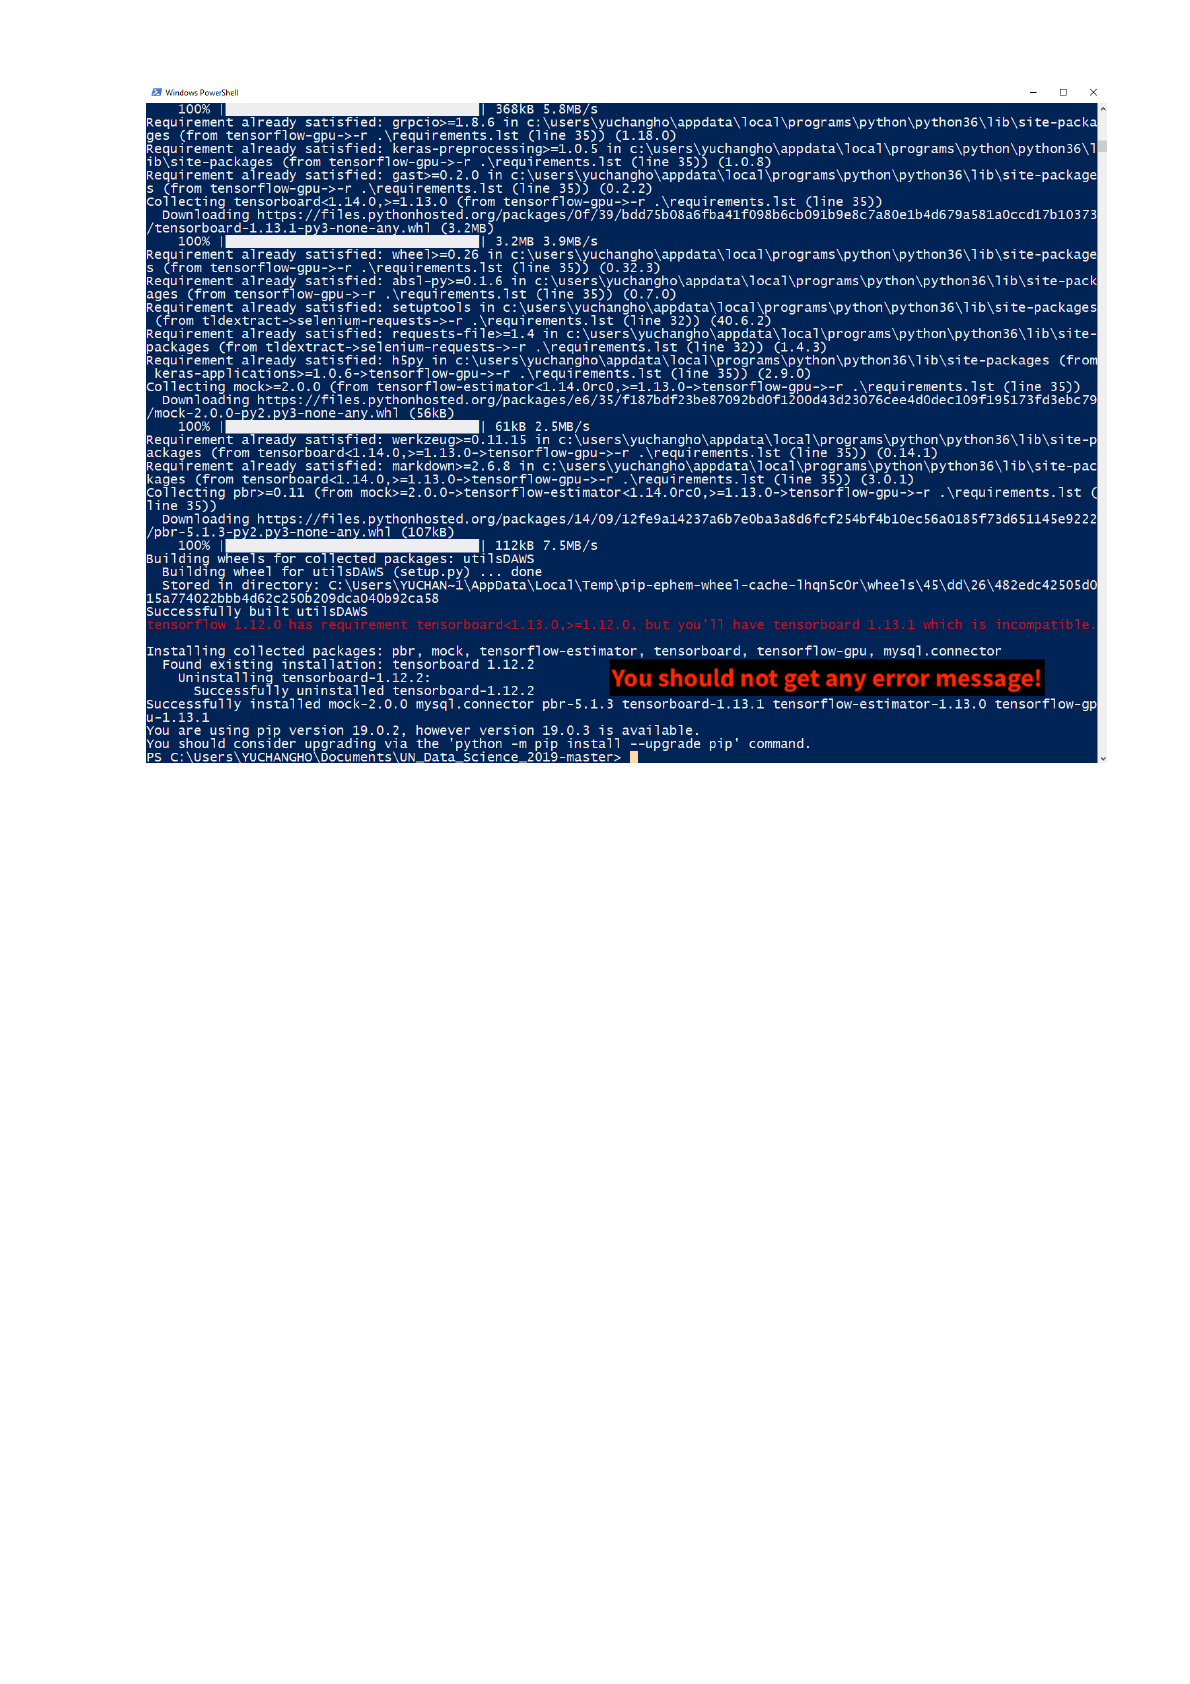
5. Install the required Python libraries using the command:
$ pip install -r .\requirements.txt
# Hit "Enter" and wait until the process complete.
manual.md 3/25/2019
9 / 24
manual.md 3/25/2019
10 / 24
3-3. Install NVIDIA CUDA 9.0 Library (for Computer with NIVIDA GPU Device Only)
In this sub-section, the NVIDIA CUDA 9.0 library will be installed. It is the library for accerlating
the TensorFlow computation while conducting image classification for gender identification.
Please make sure the working machine has a compatible NIVIDIA GPU device equipped. Please
refer to https://www.geforce.com/hardware/technology/cuda/supported-gpus for the list of
compatible NIVIDA GPU. Also, for the latest updated tutorial for the installation, please refer to the
TensorFlow developer site for enabling GPU support for TensorFlow:
https://www.tensorflow.org/install/gpu
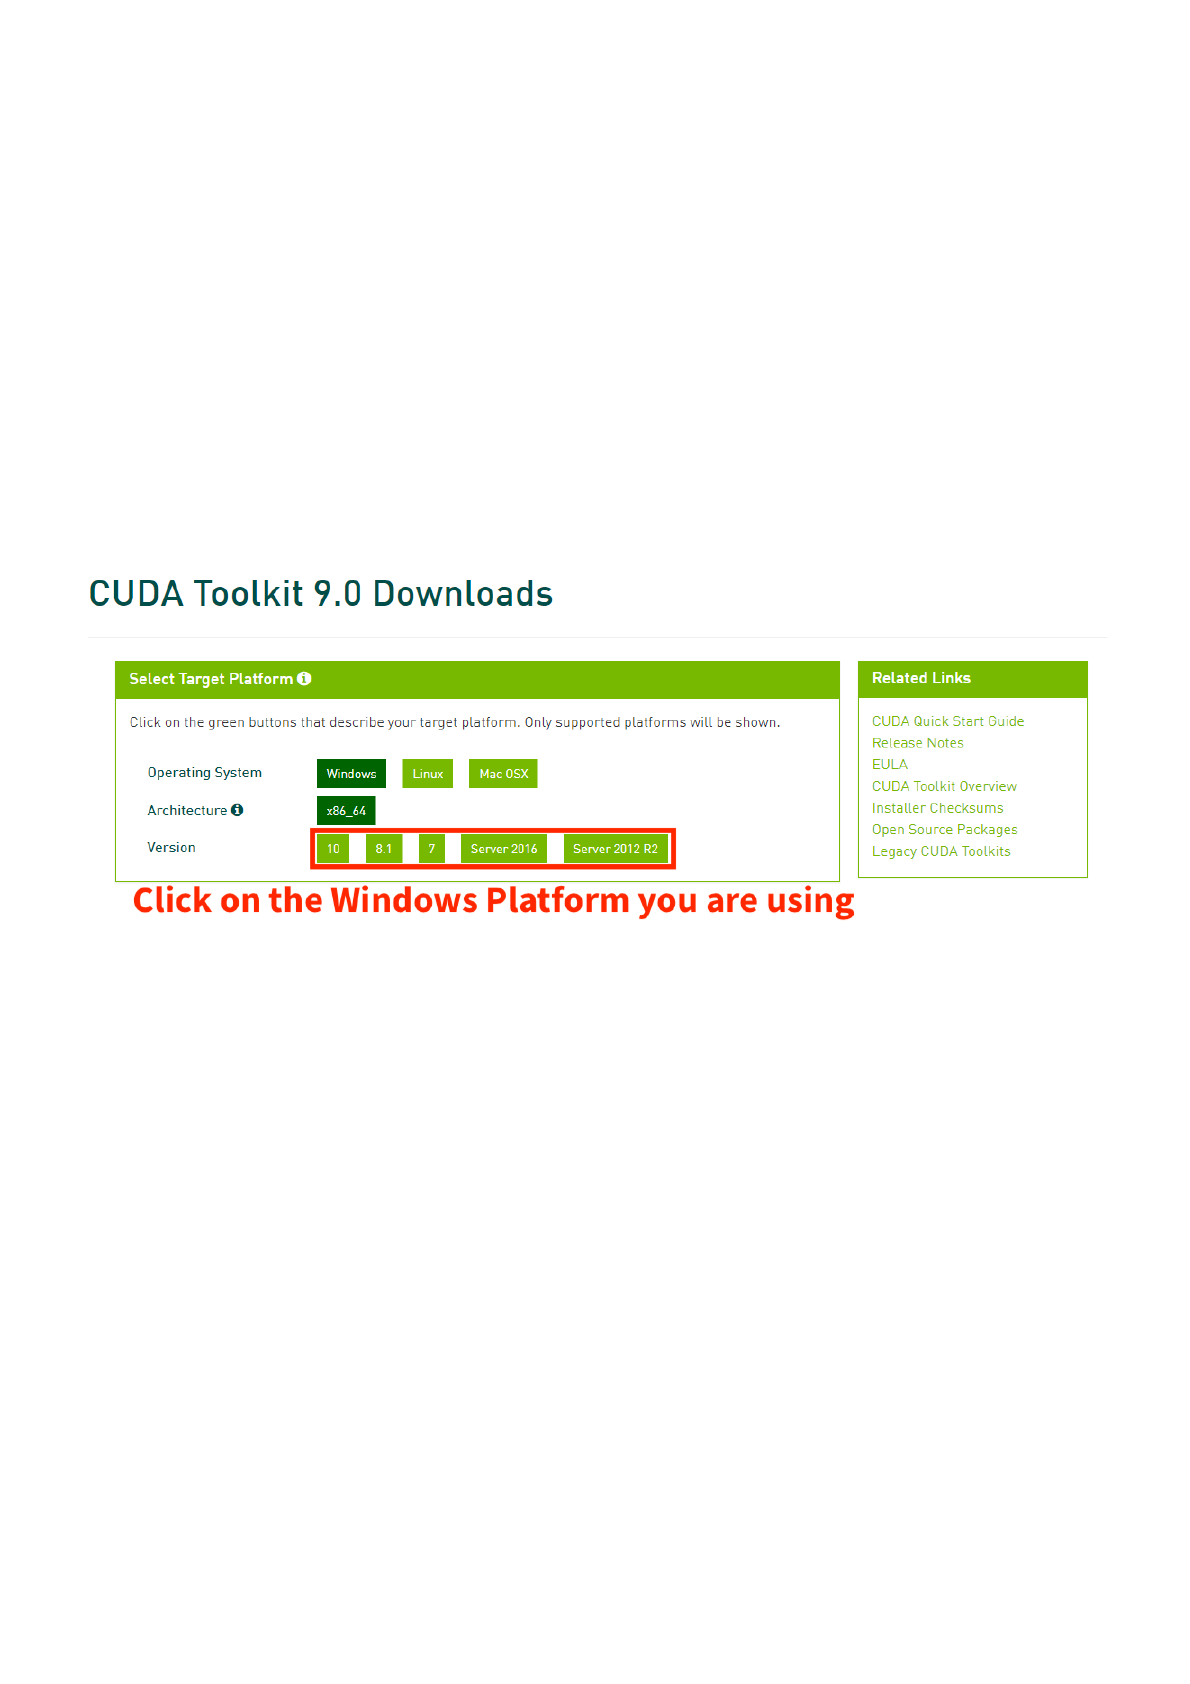
In the given requirements_image.zip, an executable named cuda_9.0.176_win10_network.exe
could be found under folder Installation. If the file is not found, please visit
https://developer.nvidia.com/cuda-90-download-archive?
target_os=Windows&target_arch=x86_64 and use the link Windows to download.
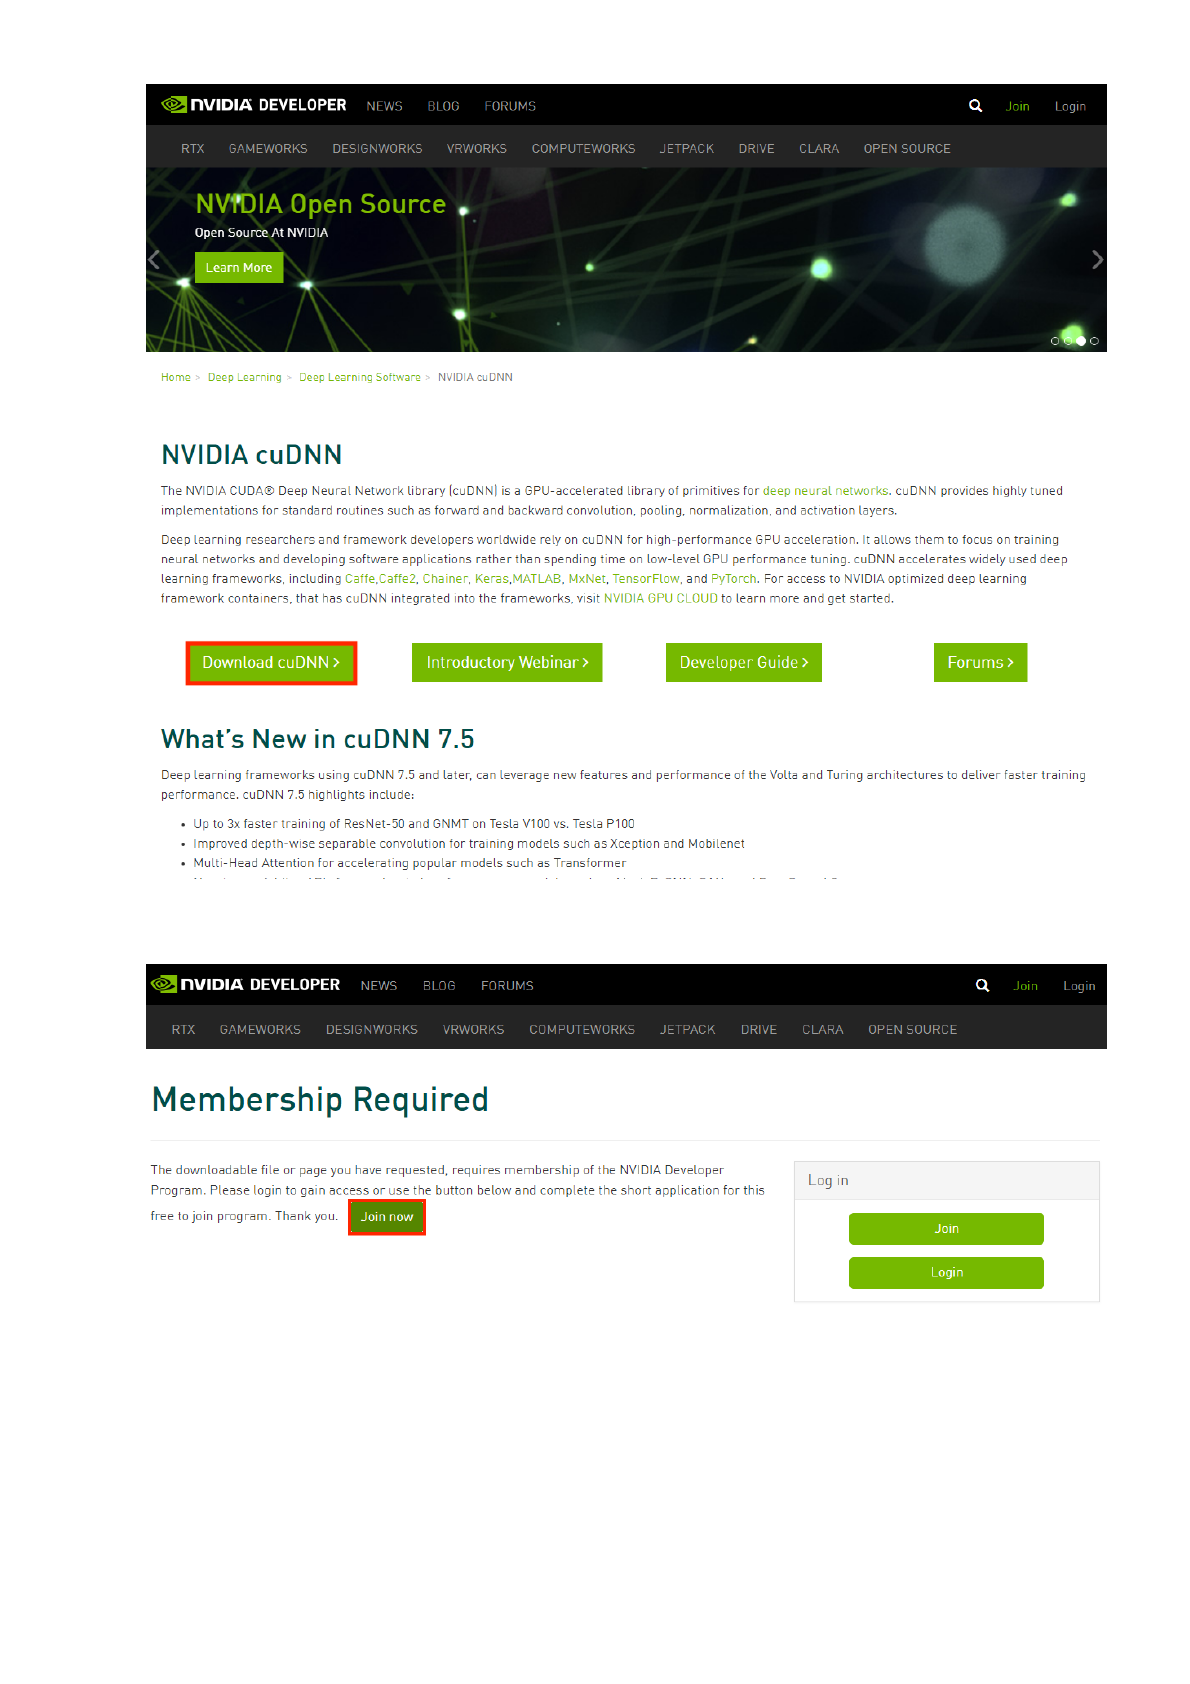
An folder named cudnn_lib is also available under the same folder. Those are the requirements for
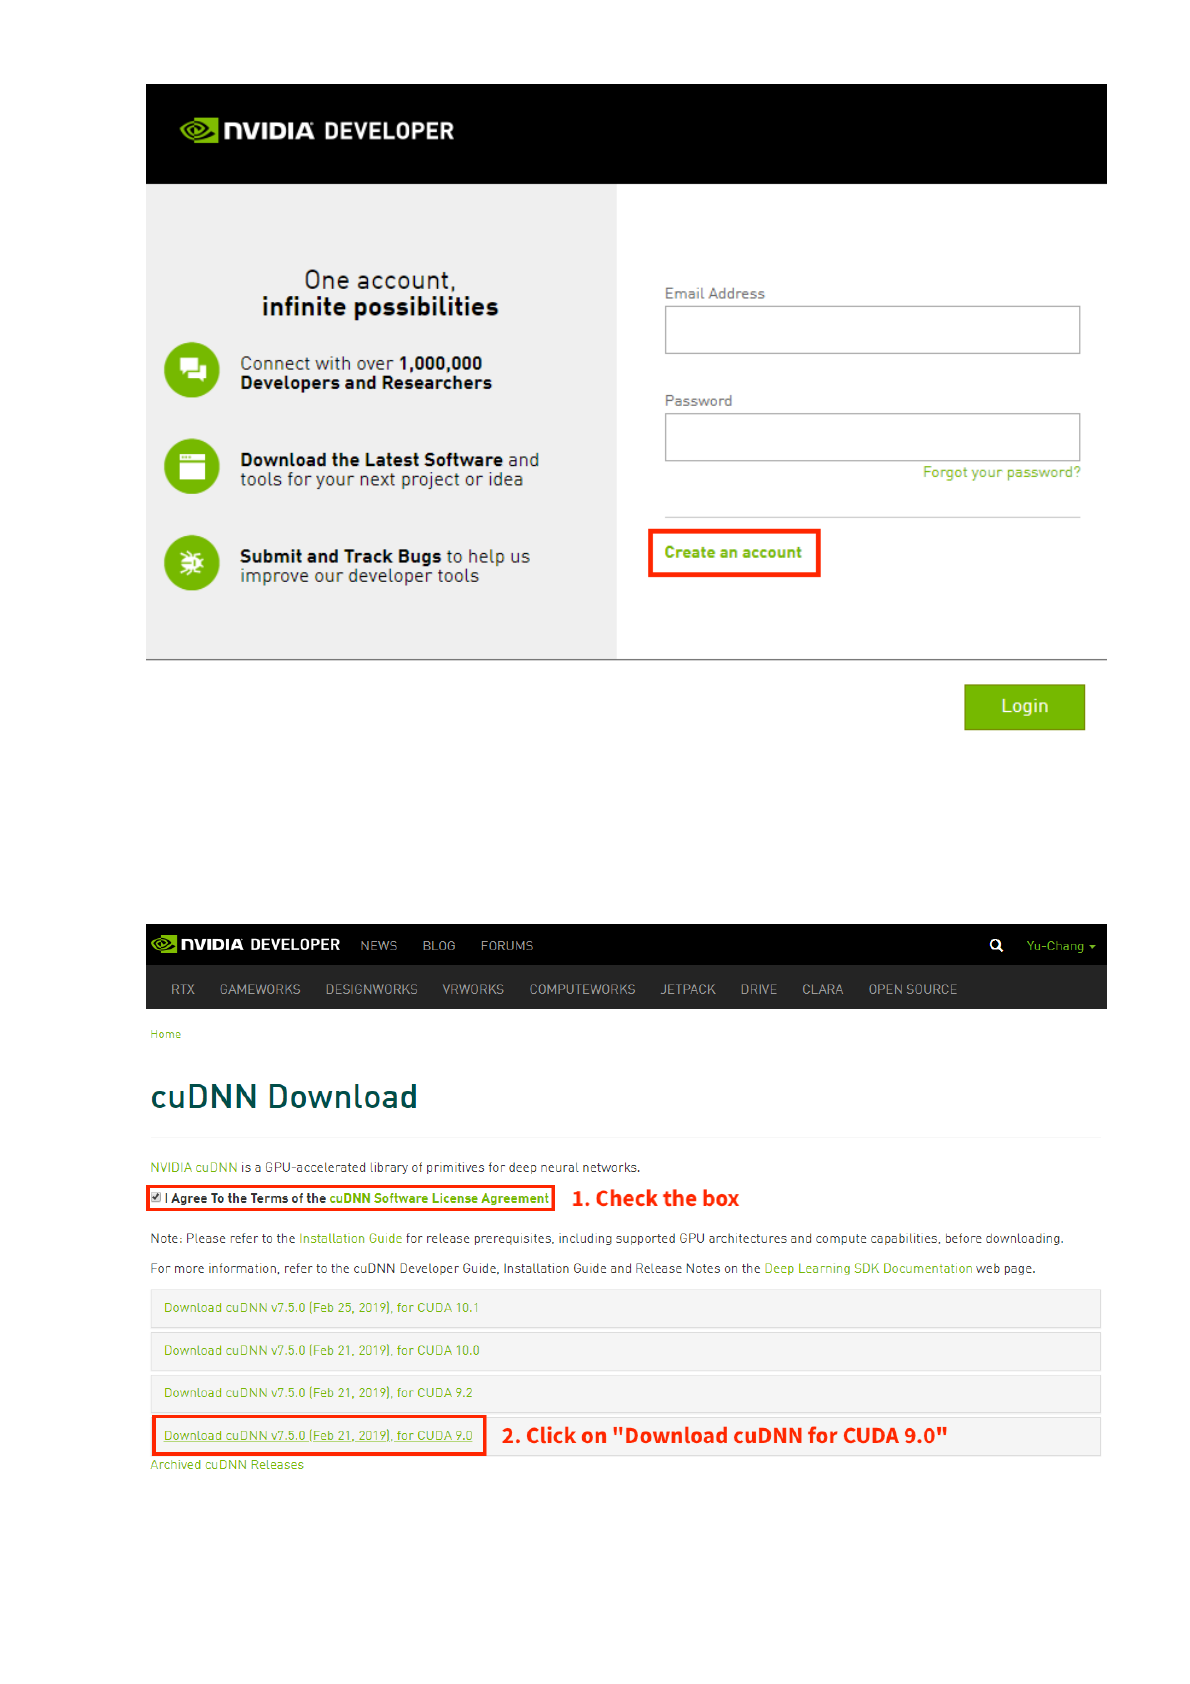
the installation. If cudnn_lib is not found, please visit https://developer.nvidia.com/cudnn and click
on the link Download cuDNN. It will ask for an valid NVIDIA developer account to proceed to
download. Follow the steps below:
1. Click Download cuDNN:
manual.md 3/25/2019
11 / 24
2. Click Join Now:
3. Click Create an account and then follow the webpage's instructions for account creation:
manual.md 3/25/2019
13 / 24
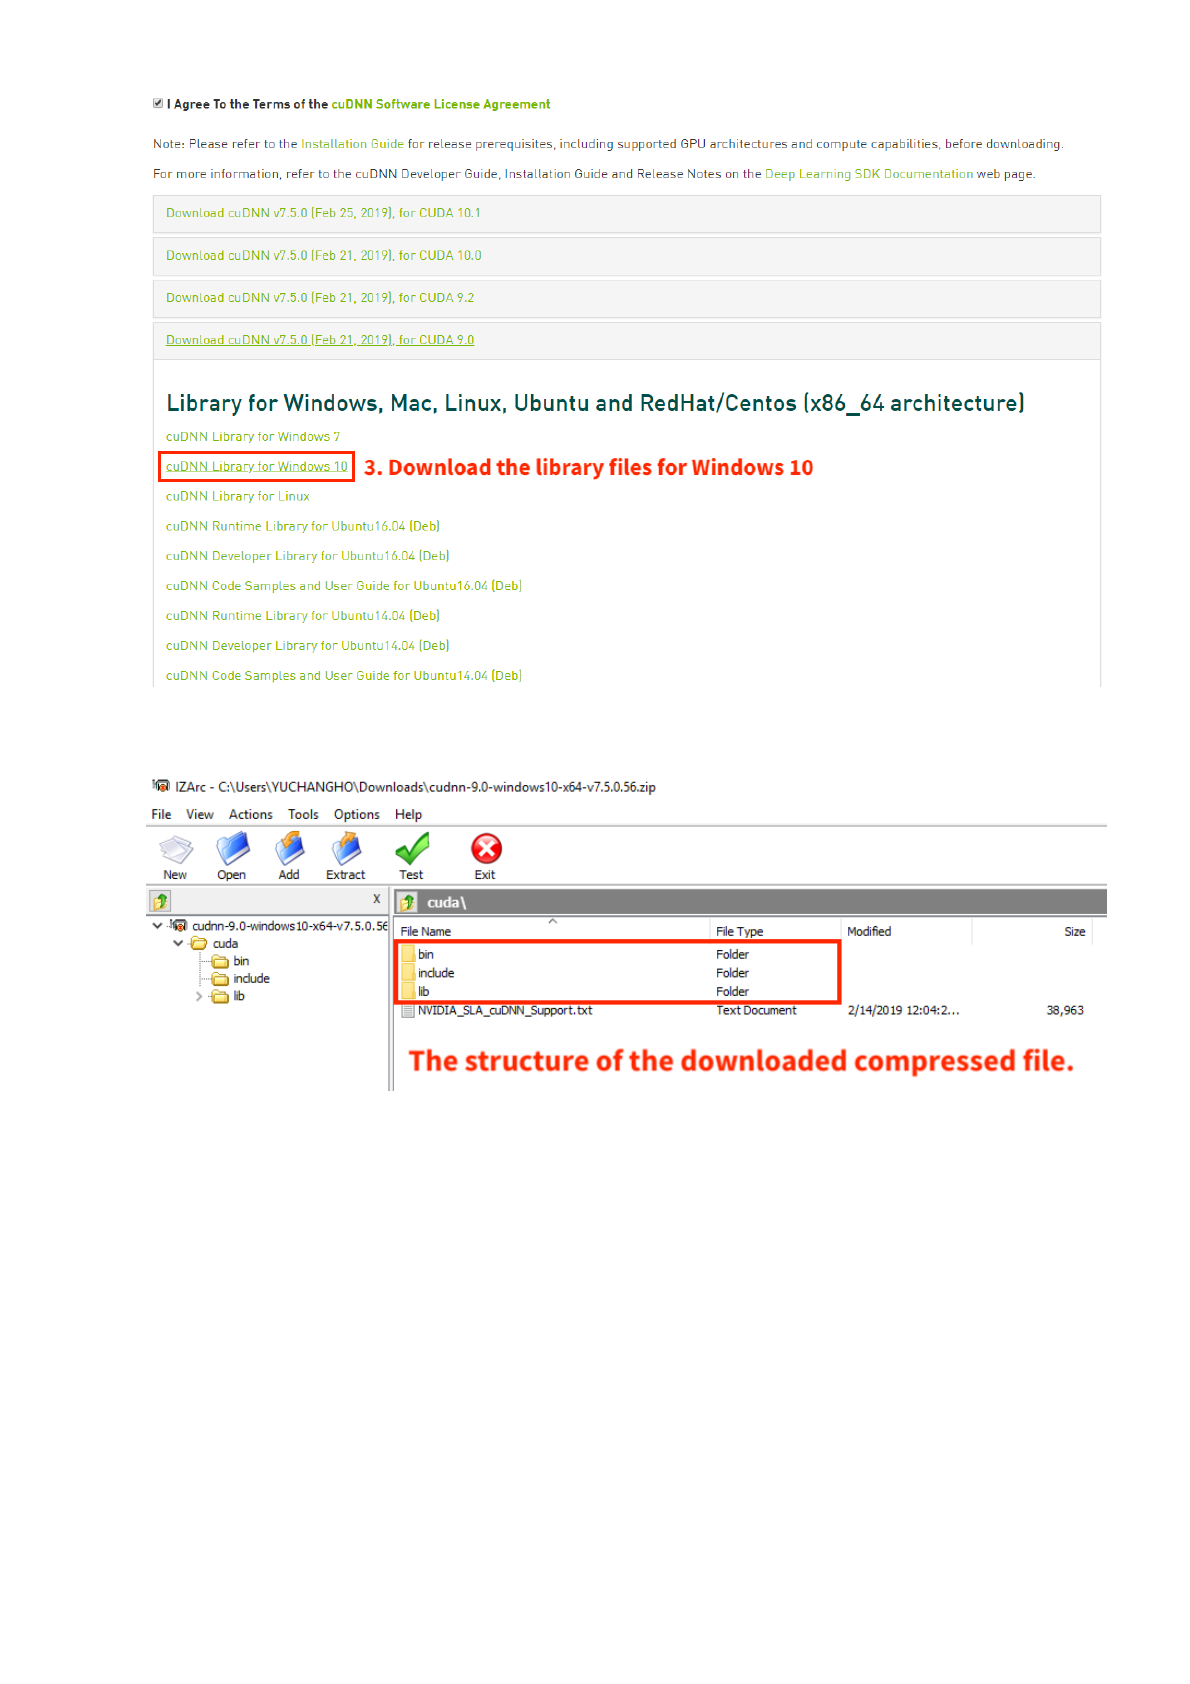
7. The downloaded compressed file could look like this:
manual.md 3/25/2019
14 / 24
3-3-1. Install MS Visual Studio Tools
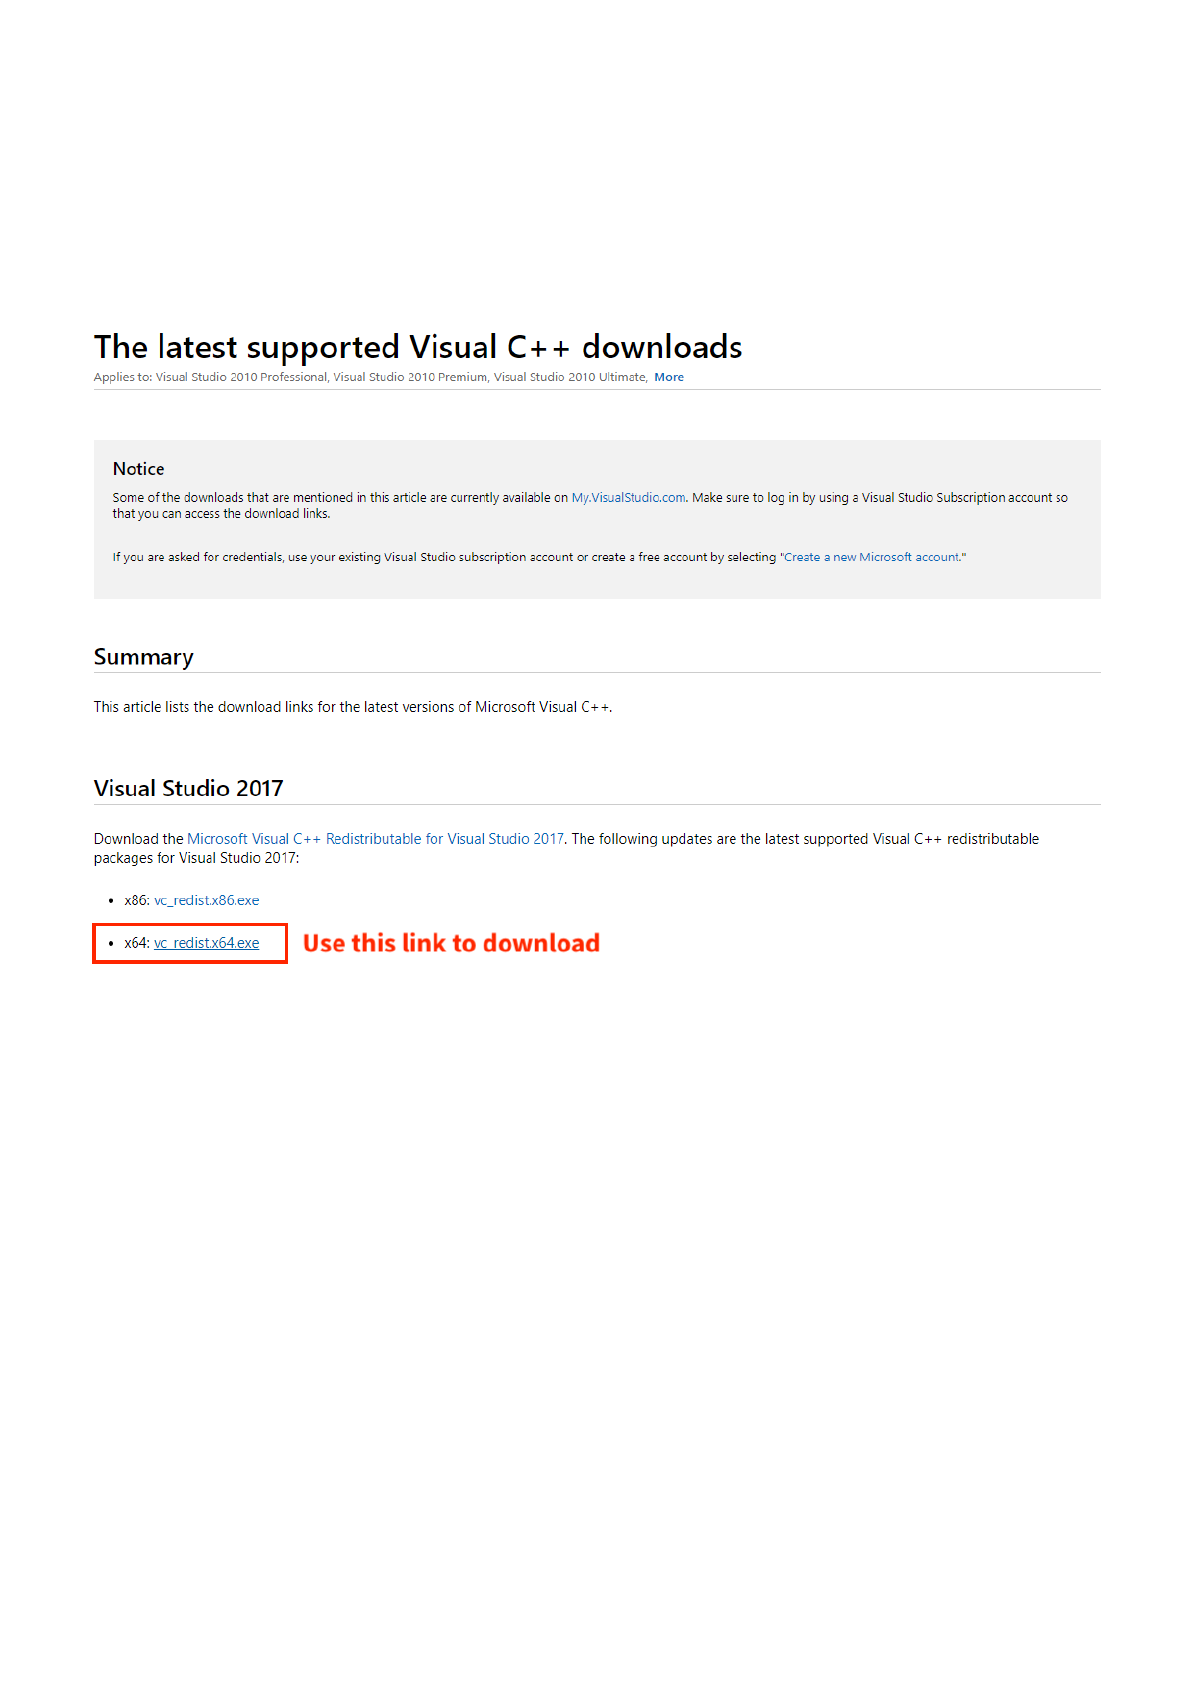
In the folder Installation, two executables, vc_redist.x64.exe and
vs_community__881455873.1549905826.exe, are available. Refer to
https://support.microsoft.com/en-us/help/2977003/the-latest-supported-visual-c-downloads to
download vc_redist.x64.exe under section Visual Studio 2017.
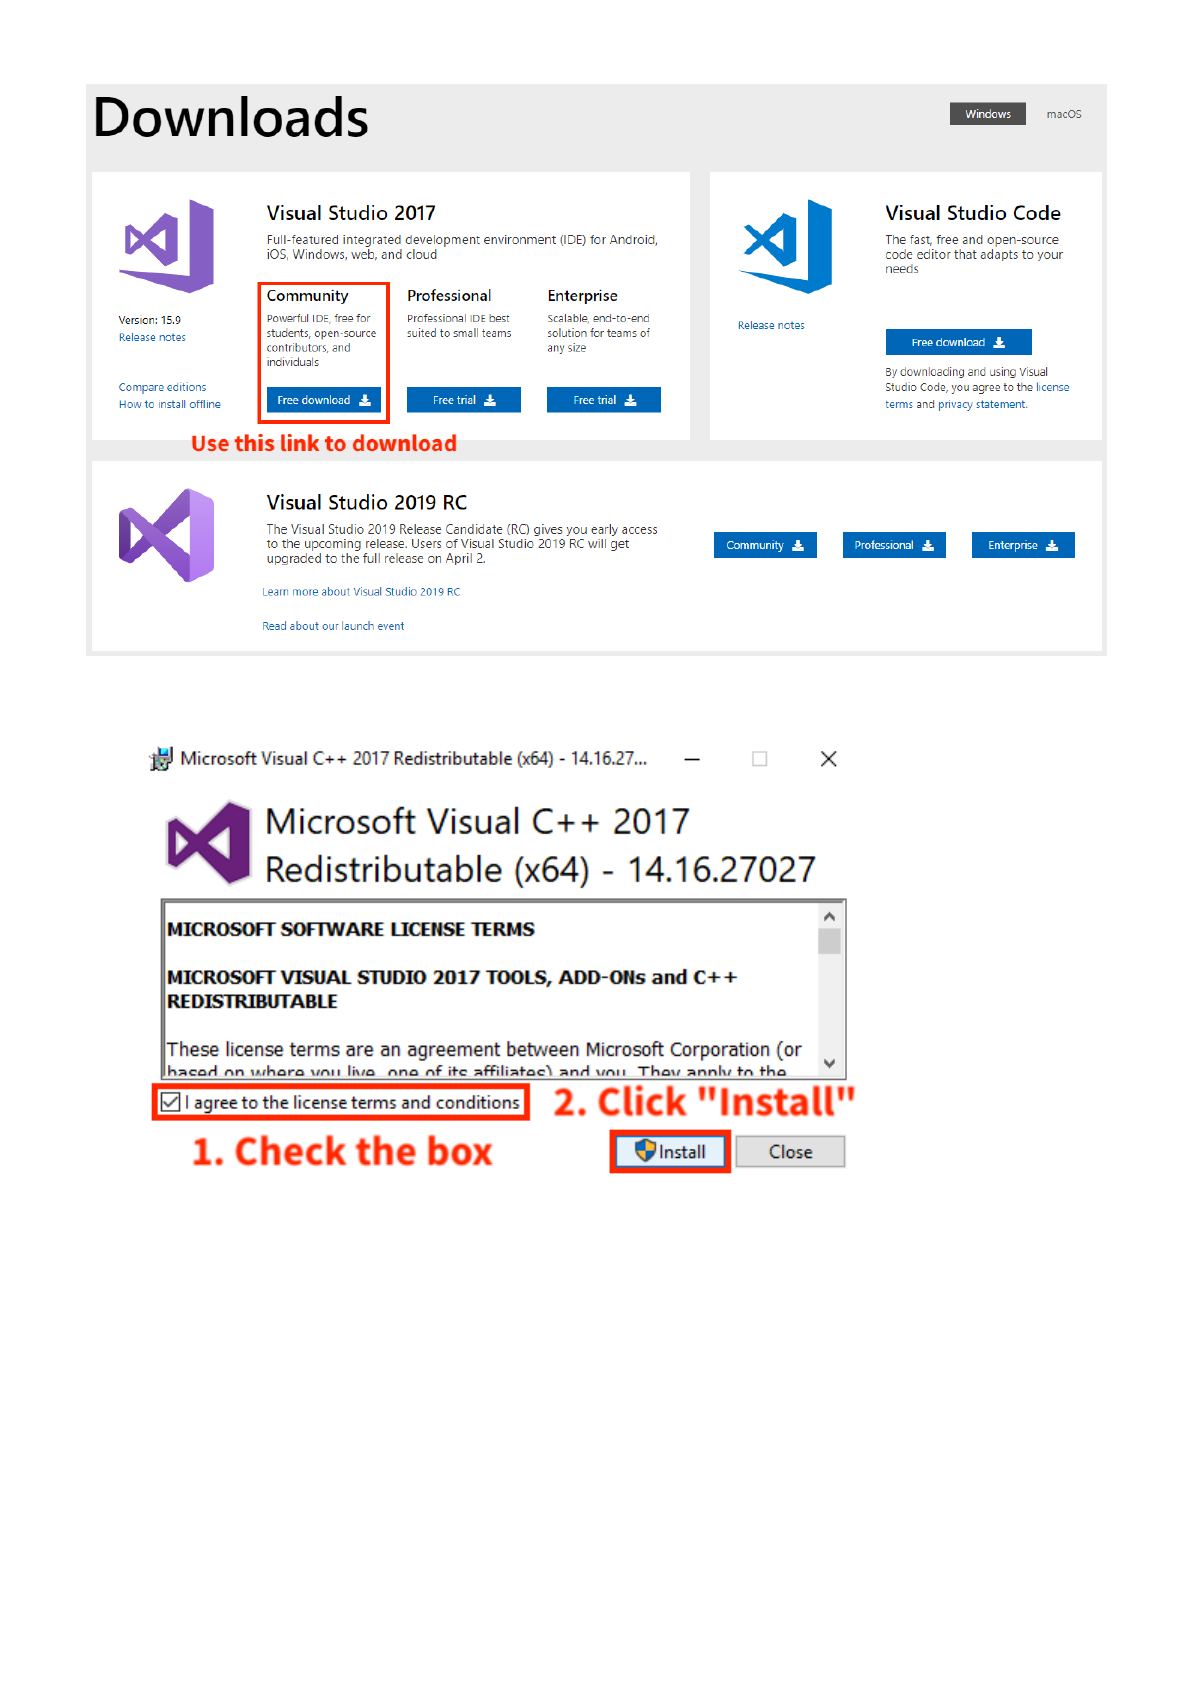
Refer to https://visualstudio.microsoft.com/downloads/#build-tools-for-visual-studio-2017 to
download vs_community__881455873.1549905826.exe as follow:
manual.md 3/25/2019
15 / 24
1. Double-click on vc_redist.x64.exe, check the box to accept agreement then click Install:
2. Click Close to finish the installation:
manual.md 3/25/2019
16 / 24
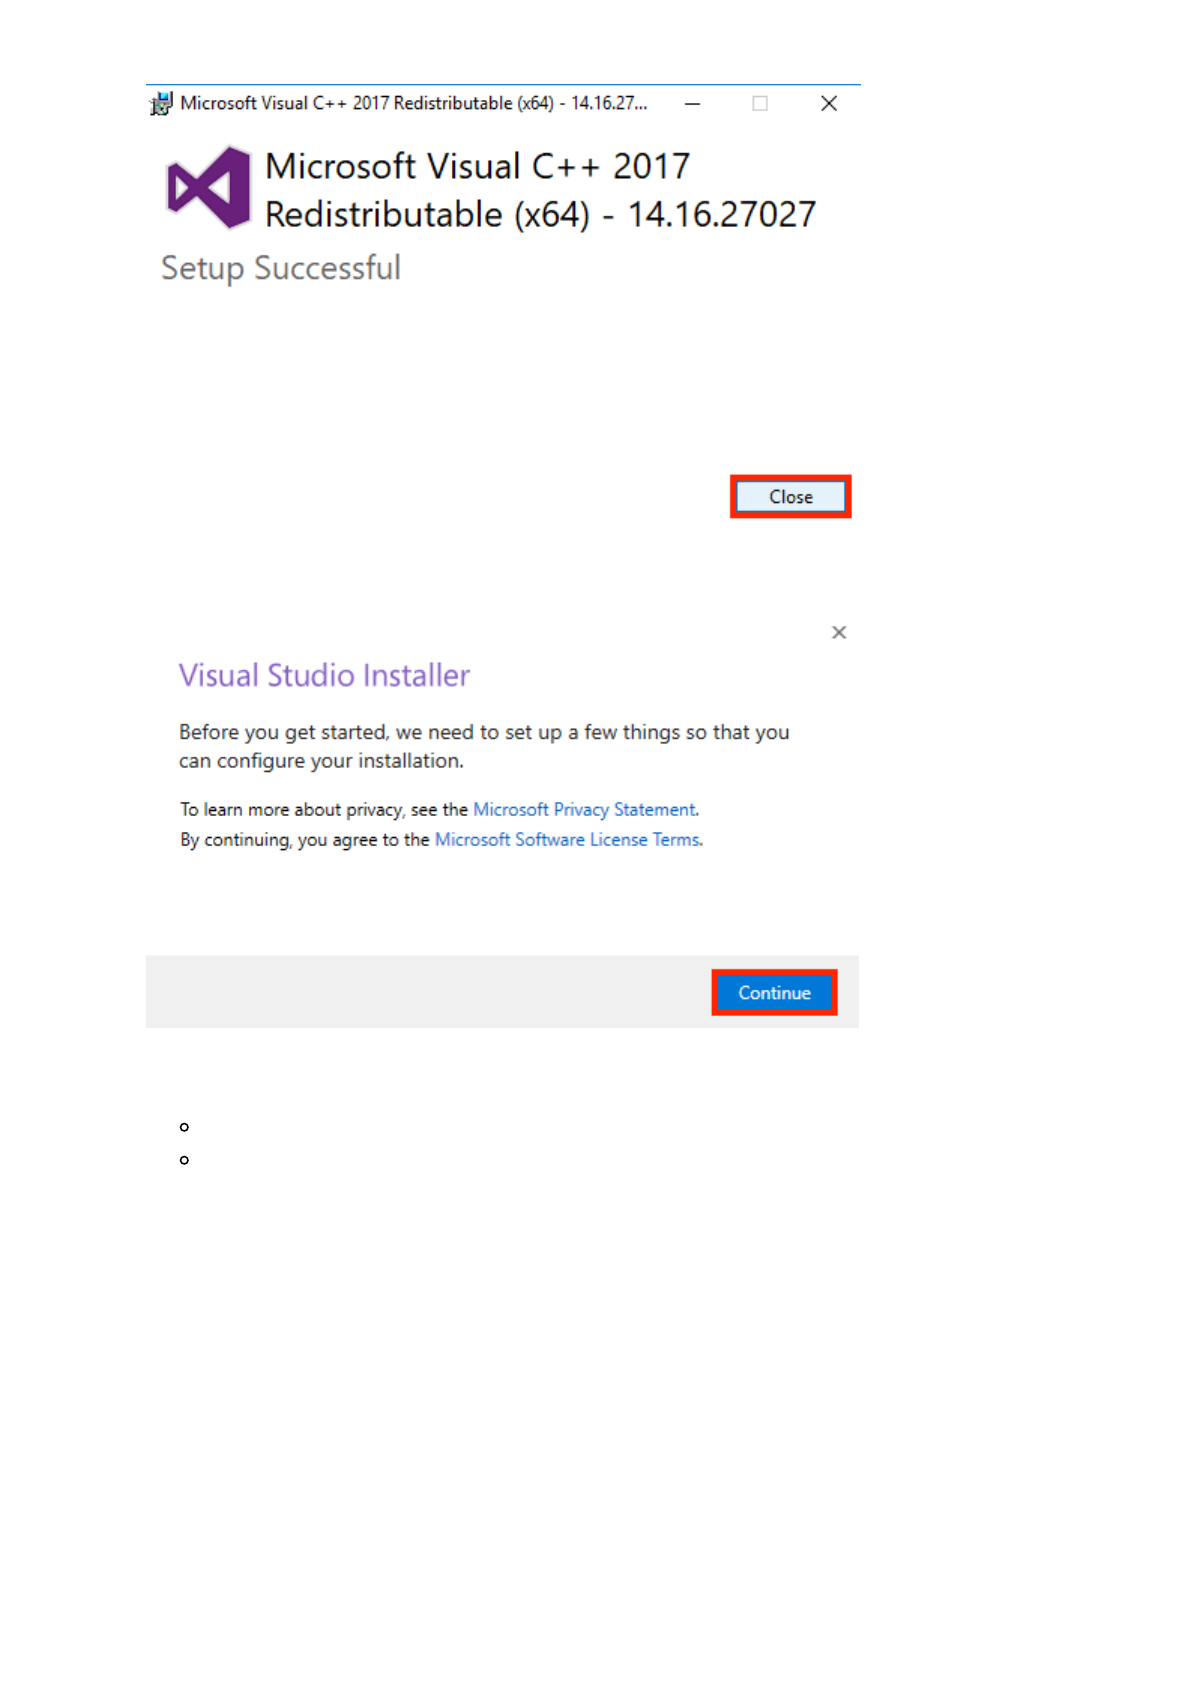
3. Double-click on vs_community__881455873.1549905826.exe, click Continue:
4. Make sure the following 2 options are checked, then click Install:
.NET Desktop Development
Desktop development with C++

manual.md 3/25/2019
17 / 24
5. Safely close the window after the installation process reach 100%:
manual.md 3/25/2019
18 / 24
3-3-2. Install CUDA 9.0 and cuDNN
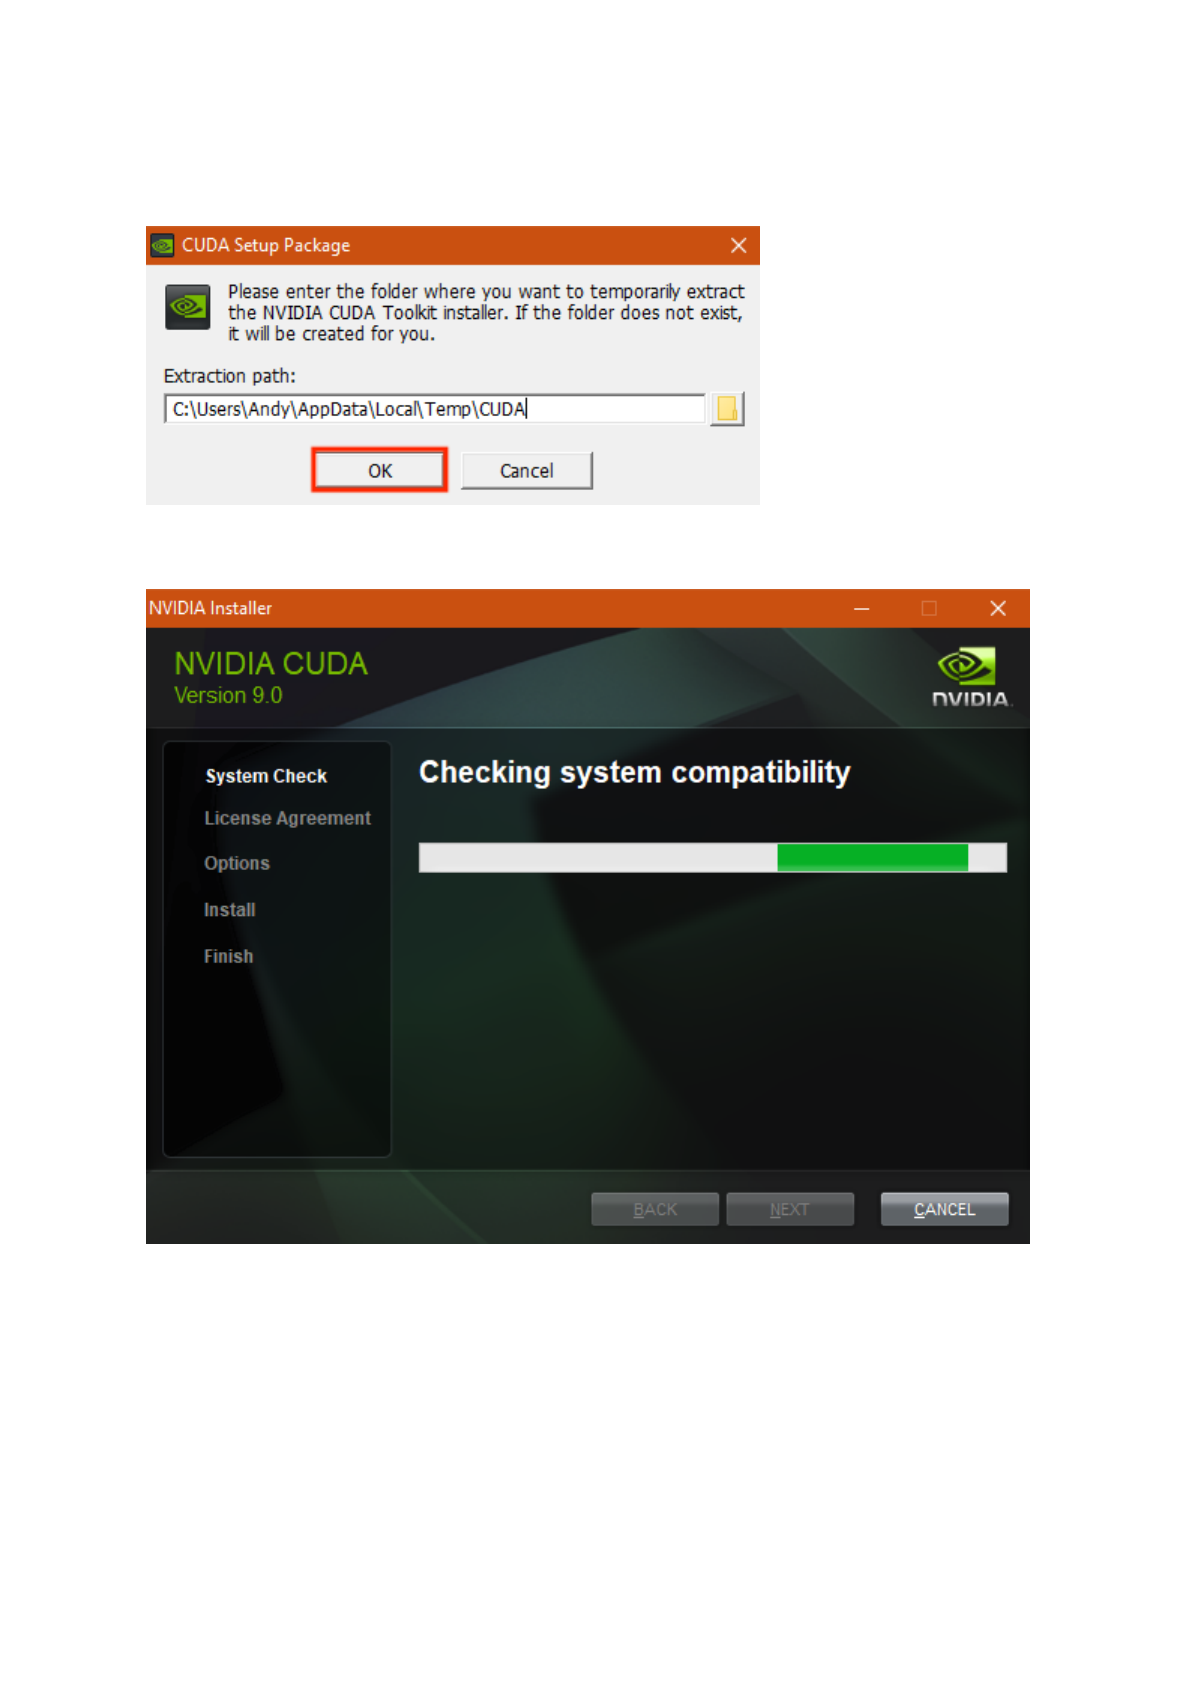
1. Double-click on cuda_9.0.176_win10_network.exe, then click OK:
2. Wait for the program to check the system compatibility:
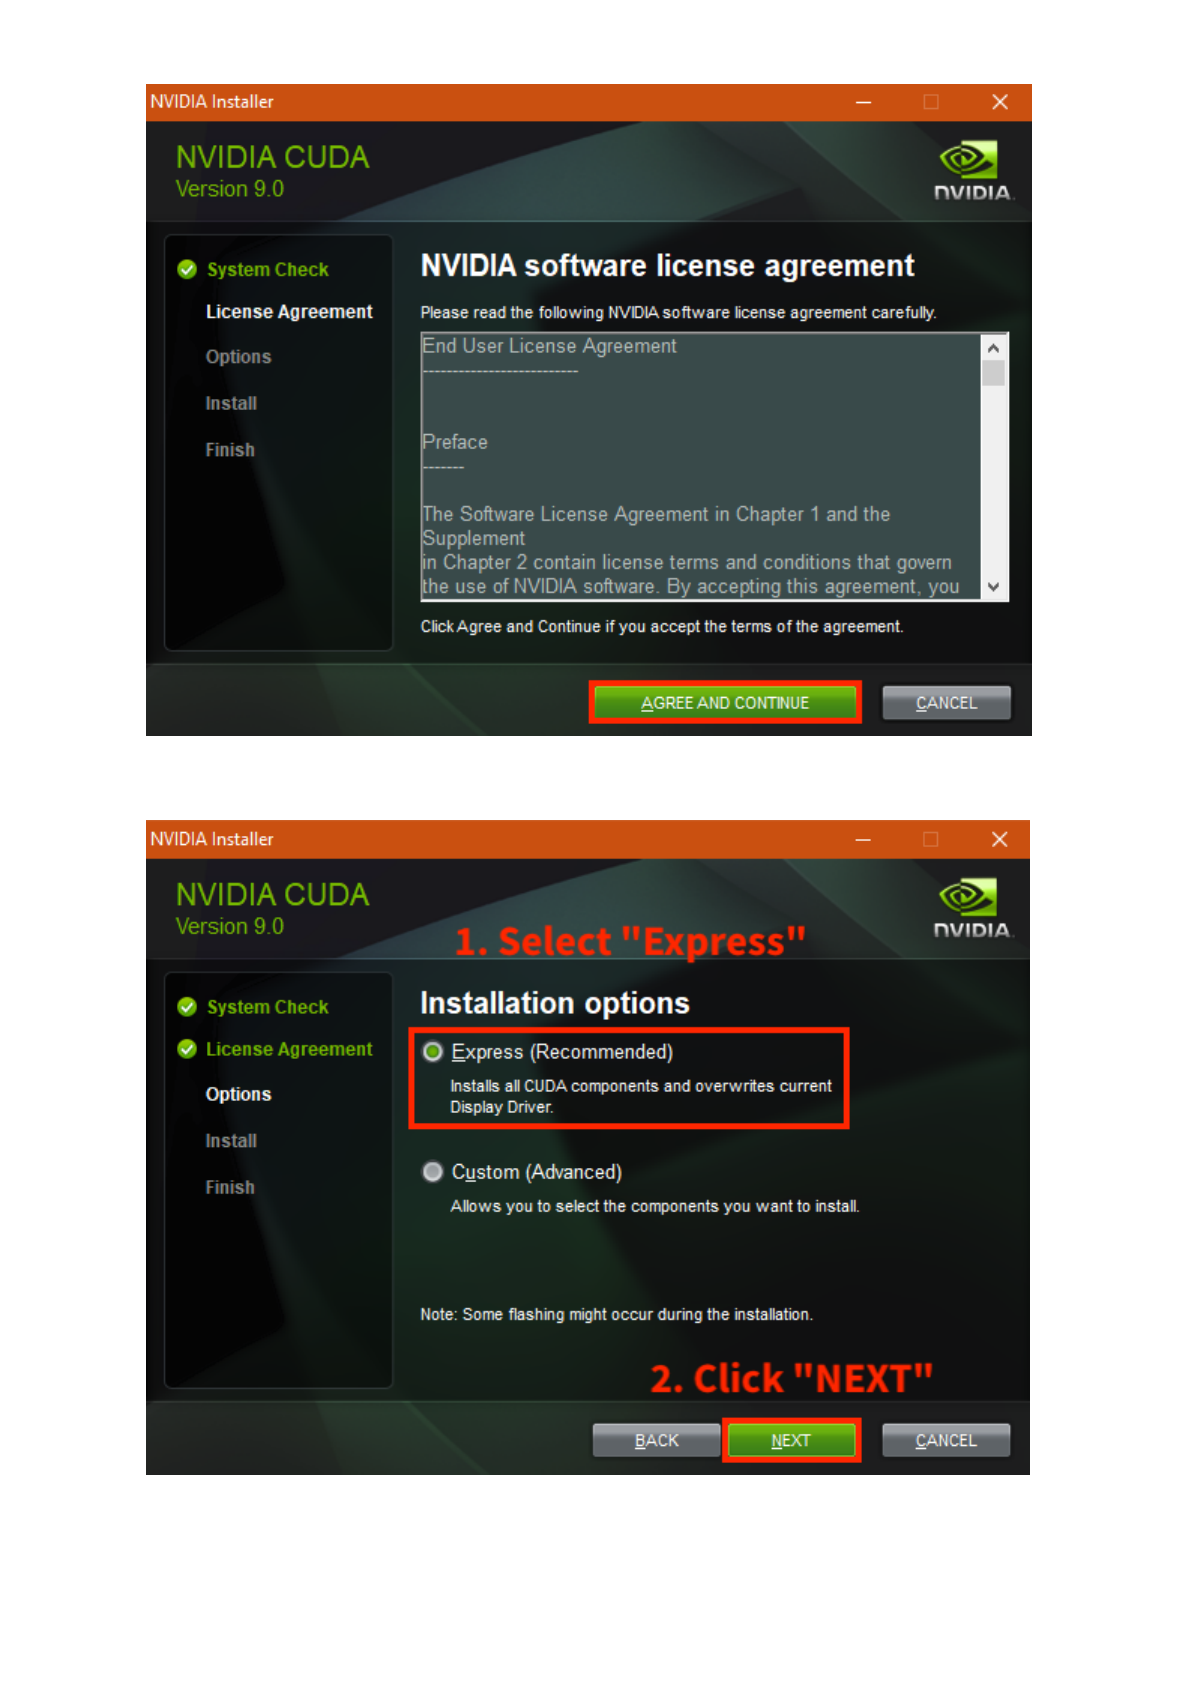
3. Click AGREE AND CONTINUE:
manual.md 3/25/2019
19 / 24
4. Make sure the option Express is selected then click NEXT:
5. Wait for the installation to complete. The screen might go dark for several times during
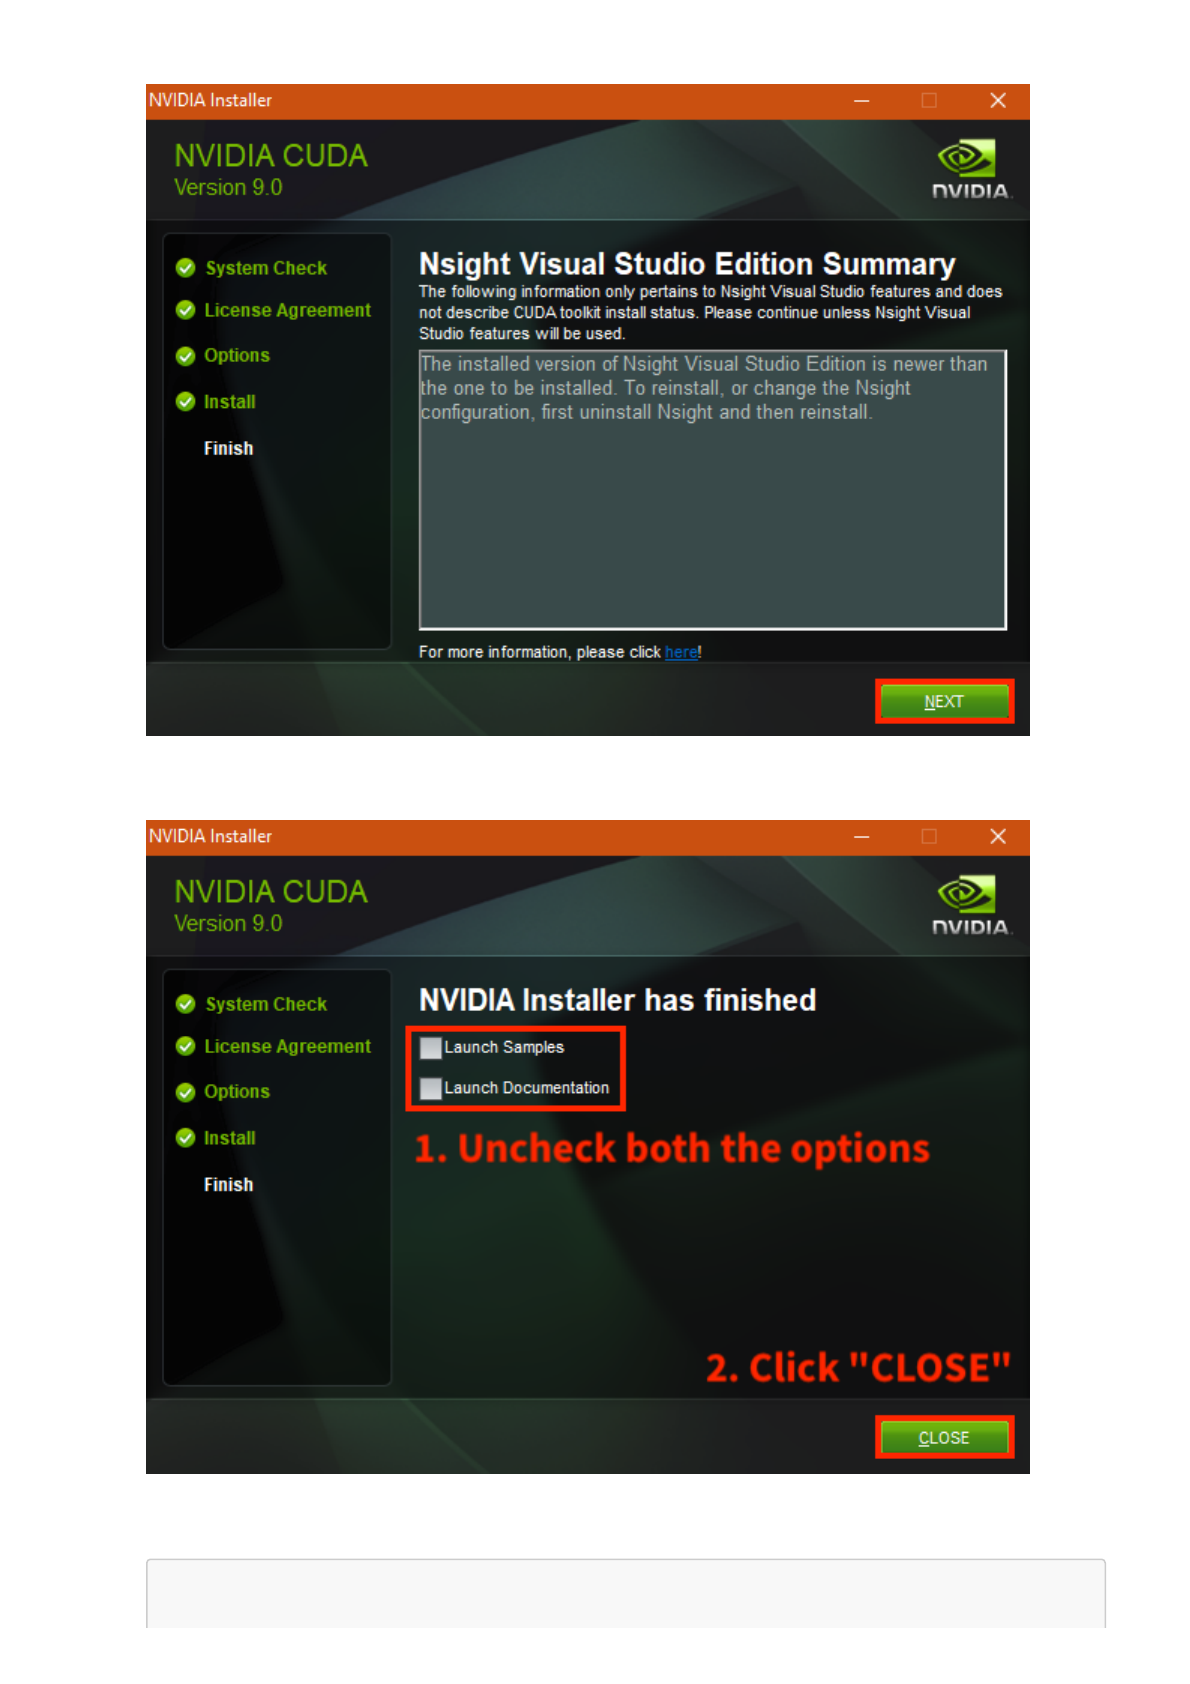
installation. Click NEXT if this page shows up:
manual.md 3/25/2019
20 / 24
6. Uncheck all the given options then click CLOSE to finish the installation:
7. Within the folder cudnn_lib, 3 folders are given as follow:
manual.md 3/25/2019
21 / 24
cudnn_lib/
| +-- bin/
| | +-- cudnn64_7.dll
| +-- include/
| | +-- cudnn.h
| +-- lib/
| | +-- x64/
| | | +-- cudnn.lib
a. Open a File Explorer
b. Copy the file bin/cudnn64_7.dll into the folder:
C:\Program Files\NVIDIA GPU Computing Toolkit\CUDA\v9.0\bin
c. Copy the file include/cudnn.h into the folder:
C:\Program Files\NVIDIA GPU Computing Toolkit\CUDA\v9.0\include
d. Copy the file lib/x64/cudnn.lib into the folder:
C:\Program Files\NVIDIA GPU Computing Toolkit\CUDA\v9.0\lib\x64
manual.md 3/25/2019
22 / 24
3-3-3. Test the GPU Support
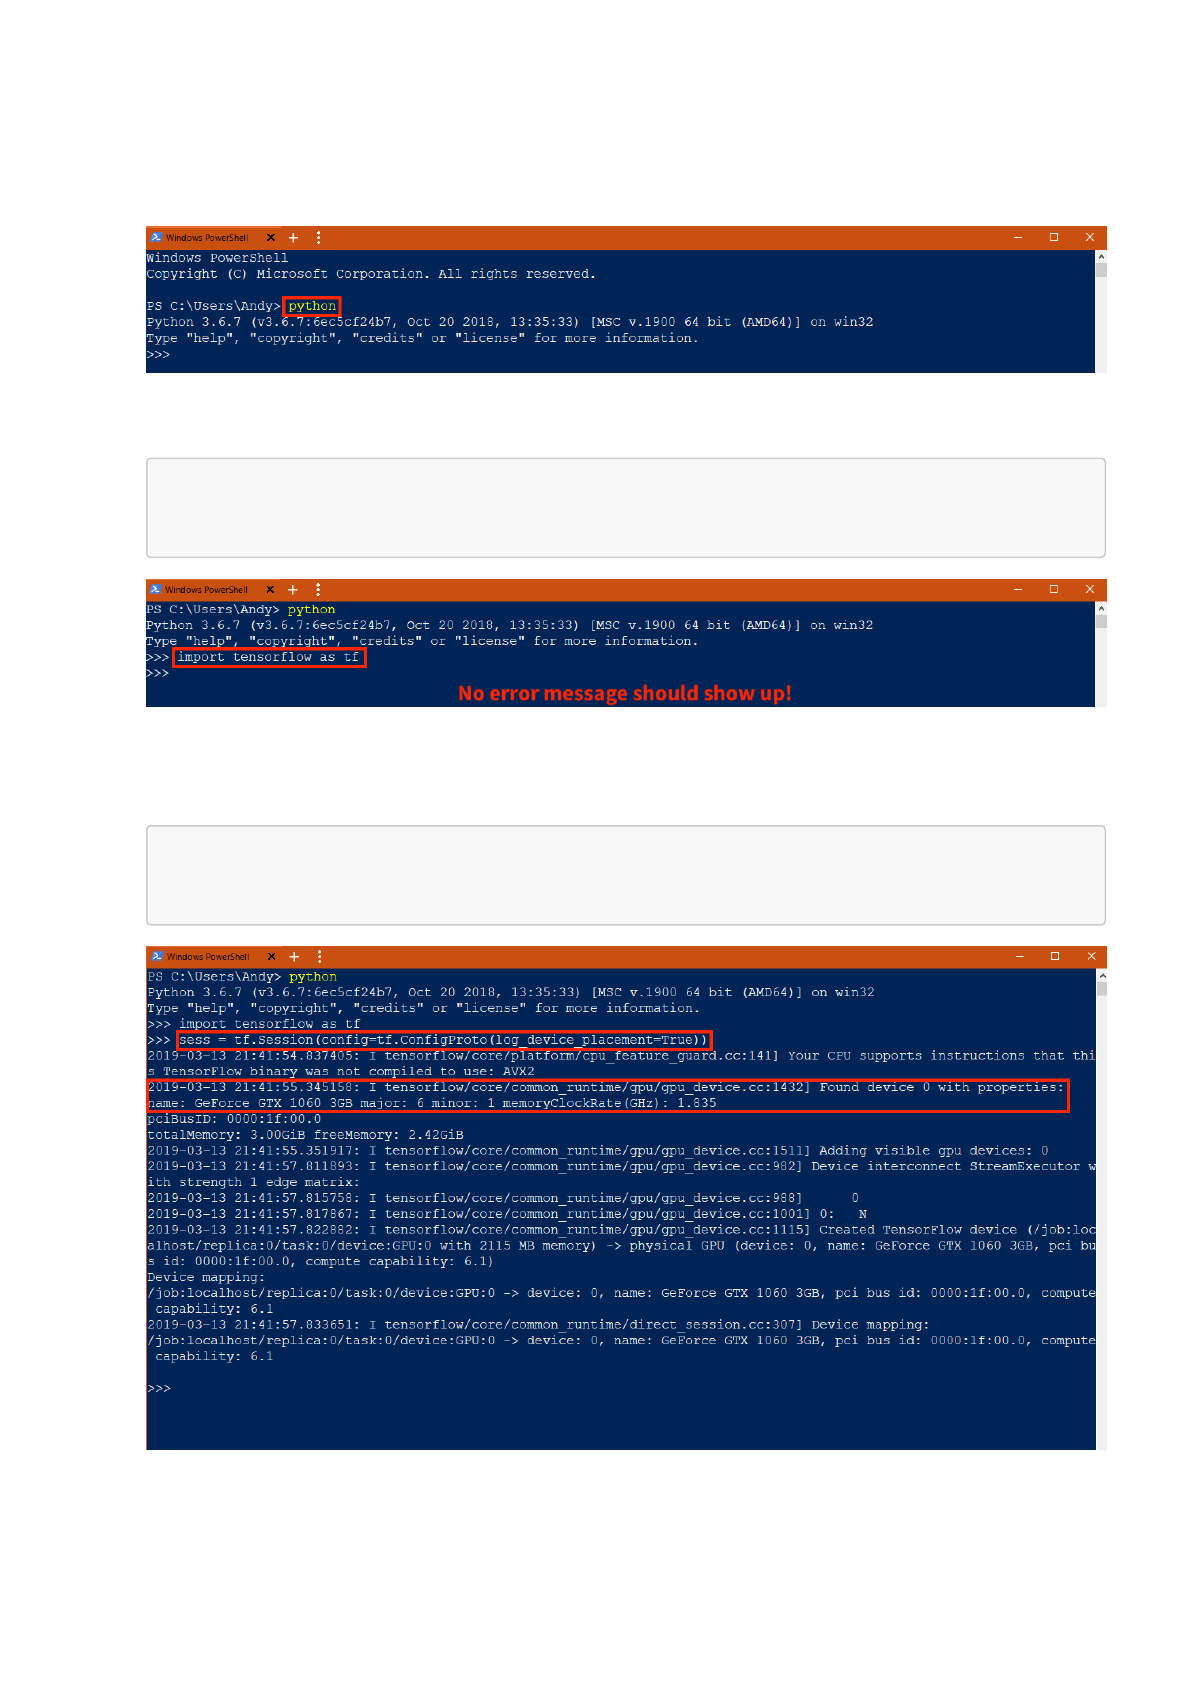
1. Open up a Windows Powershell, type python then hit Enter:
2. Input the following code and hit Enter:
import tensorflow as tf
3. Type the following code and hit Enter, the name of equipped GPU device should shows up.
Here the name of the GPU is GeForce GTX 1060:
sess = tf.Session(config=tf.ConfigProto(log_device_placement=True))
4. If everything works correctly, type exit() to close Python or simply close the window.

manual.md 3/25/2019
23 / 24
Section 4. Perform Image Classification for Project Labor Market
Analysis
Requirement: A machine with a compatible NVIDIA GPU device available & tensorflow-
gpu lib. for Python available
For labor market analysis, one of the objectives is to provide gender-related analysis. For
Freelancer dataset, however, the gender information for each job seeker is not revealed.
Therefore, a TensorFlow-based Machine Learning model for image classification is proposed.
The profile pictures of job seekers on Freelancer were already collected within the dataset.
Procedure
1. Scraping Profile Pictures:
To prepare for downloading the profile images, in the extracted folder of the given
requirements_image.zip, a folder named Dataset contains the pre-scraped Freelancer
dataset that holds the links to all the profile pictures. Follows:
a. Copy the file freelancer_supply_20190204.csv into the path:
C:\Users\<user_name>\Documents\UN_Research_Image_Classification_for_Gender-
master\labor_market\gender_classification\downloading
# Change <user_name> to the computer username.
b. Open a Windows Powershell, then:
$ cd 'C:\Users\
<user_name>\Documents\UN_Research_Image_Classification_for_Gender-
master\labor_market\gender_classification\downloading'
# Change <user_name> to the computer username. Then, run the program:
$ python run.py -u 1
c. The program will prompt to ask for inputing the exact filename of the Freelancer dataset
file. Type the following then hit Enter:
./freelancer_supply_20190204.csv
2. Performing Image Classification:
a. Create 1 folder named imgs under path:
C:\Users\<user_name>\Documents\UN_Research_Image_Classification_for_Gender-
master\labor_market\gender_classification\
manual.md 3/25/2019
24 / 24
# Change <user_name> to the computer username.
b. Place the images which to be classified into that newly created folder.
c. Under extracted folder of requirements_image.zip, the folder Dataset contains a folder
training_imgs. Copy that folder into the same path given above. The folder training_imgs
has 3 sub-folders, female, male, and unknown. Each of the sub-folders contains nearly
1000 pre-classified images. Those images are the training dataset for machine learning
model training.
d. Open a Windows Powershell, navigate to the program folder by:
$ cd C:\Users\
<user_name>\Documents\UN_Research_Image_Classification_for_Gender-
master\labor_market\gender_classification\classifying
# Change <user_name> to the computer username.
e. Perform model retraining:
$ python retrain.py --img_dir=../training_imgs
# Wait until the process complete.
f. Finally, perform classification on the target images:
$ python label_image.py --graph=/tmp/output_graph.pb --
labels=/tmp/output_labels.txt \
--input_layer=Placeholder --output_layer=final_result \
--start 0 --concurrent 1000 --partition 1000 \
--img_dir=../imgs/ \
--data_file=*.jpg \
# Wait until the process complete.
