Print Manual
User Manual:
Open the PDF directly: View PDF ![]() .
.
Page Count: 19

DIGITAL ATTENDANCE
USER MANUAL
Mobile/Web Application

CONTENTS
- ABOUT THE APP
2
- INSTALLING THE APP
3
- USING THE APP
4-11
- WEB DASHBOARD
12-17
ABOUT THE APP
2
1.1 OVERVIEW
The Digital Attendance web & mobile application is a child attendance tracking tool
that helps stakeholders in the education system to monitor the rate of school dropouts.
Teachers are able to digitally take child attendance in class via the mobile application
and reports are sent to the different stakeholders in realtime for analysis.
1.2 MINIMUM REQUIREMENTS
Digital Attendance is currently available on Android.
It is compatible with Android version 4.4 and higher.
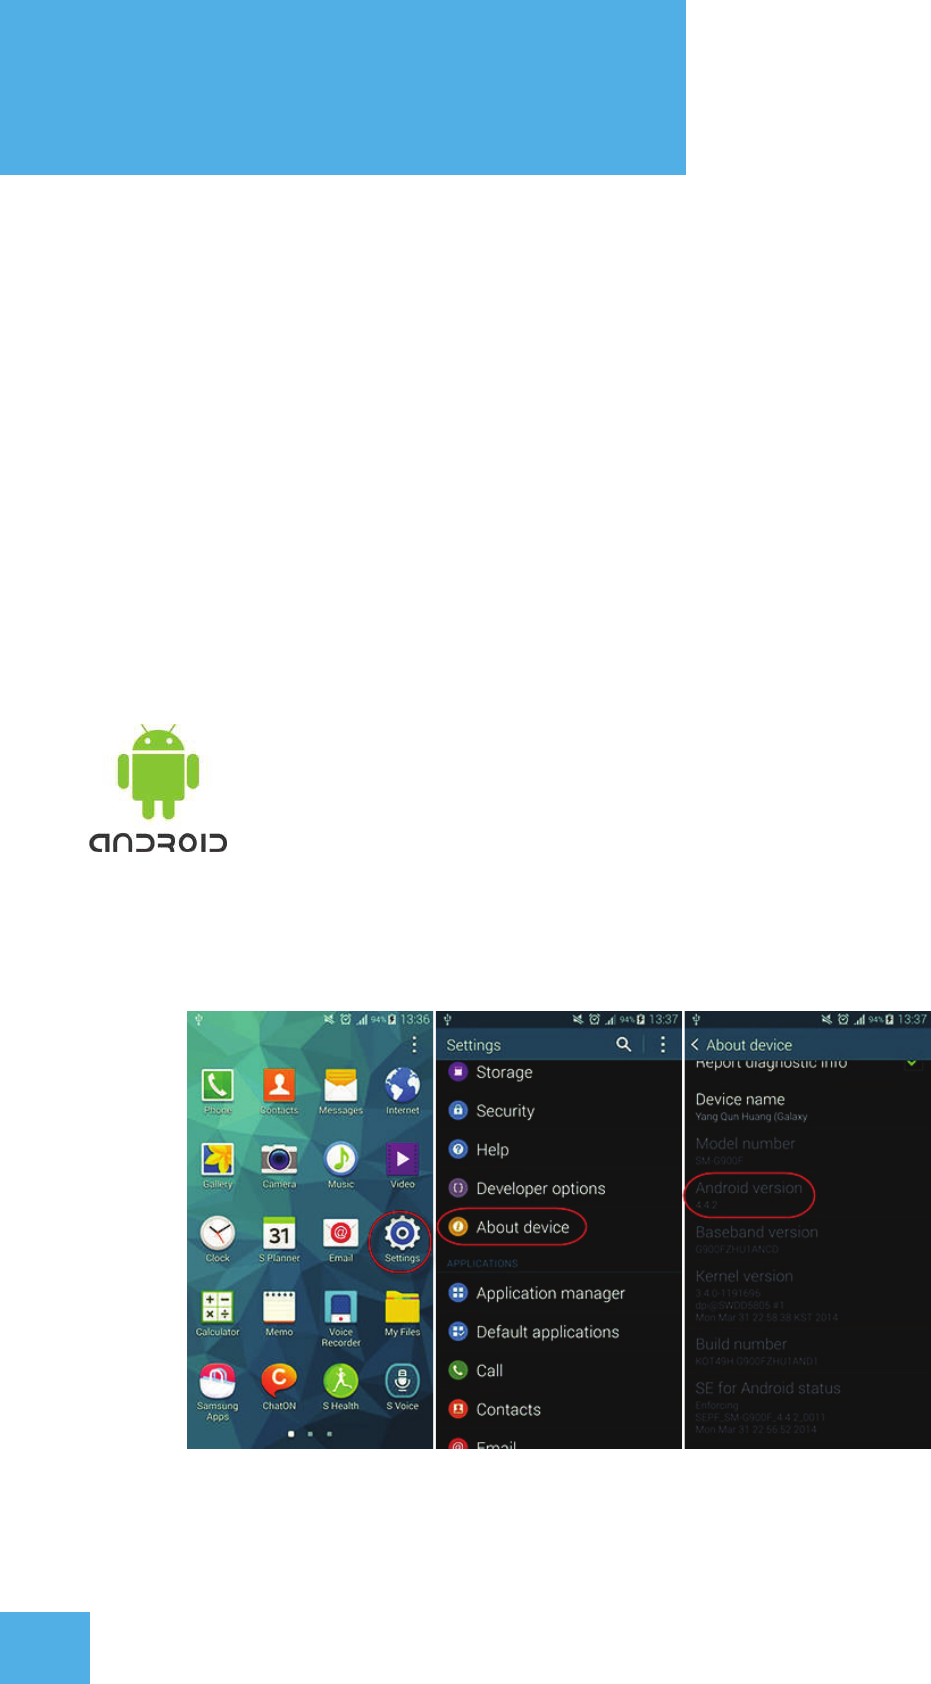
1.3 HOW TO CHECK YOUR ANDROID VERSION
Select ‘System Settings’ > Select the ‘About Device’ Option > Check the number under ‘Android Version’
INSTALLING THE APP
3
Digital Attendance Mobile Application is currently available for Android only.
We may in the future release versions of the App for various Windows-based devices
and other operating systems.
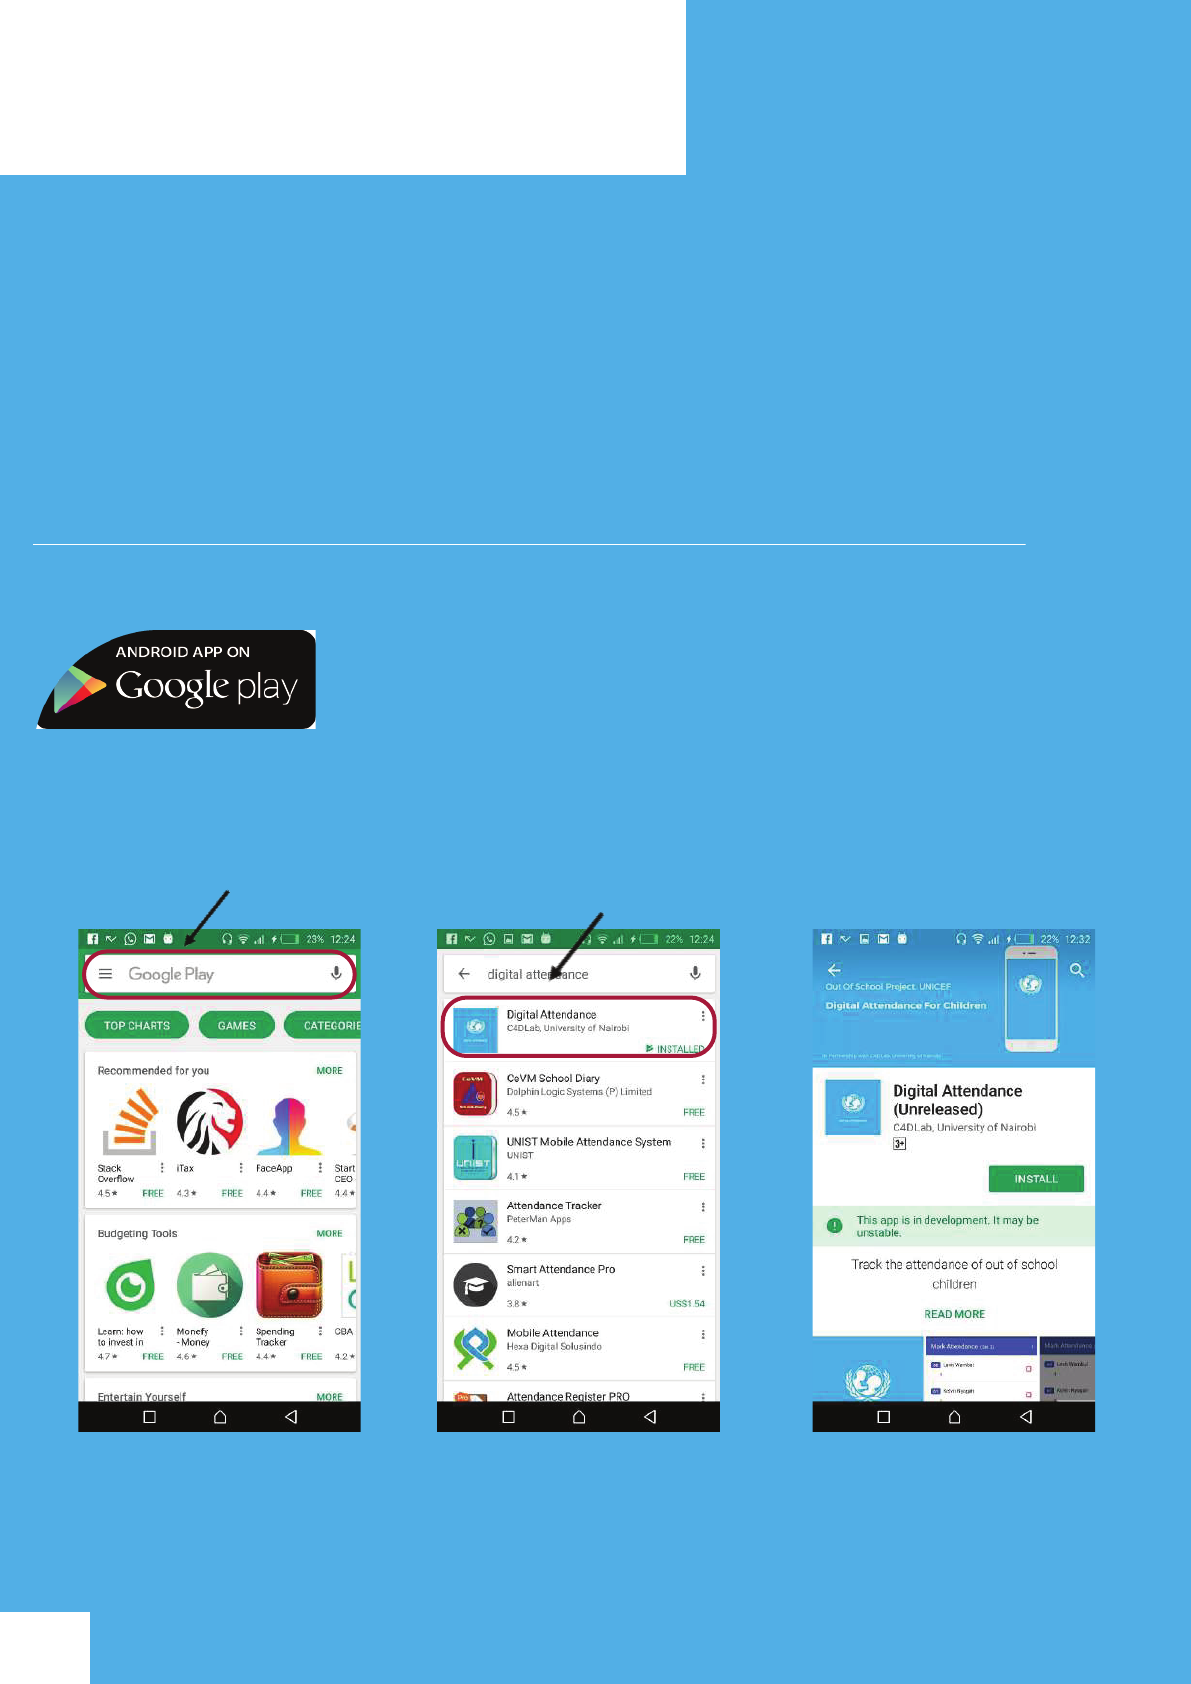
To download the mobile app for android, follow this link :
https://play.google.com/store/apps/details?id=com.c4dlab.sisitechoosc&hl=en
You can also search for ‘Digital Attendance’ under
Google Play Store.
1. Search ‘Digital Attendance’ 2. Click on the app 3. Install the app
2.1 Overview
The application can operate in both offline and online mode i.e. in online mode, the
user has to have mobile data/wifi in order to mark student attendance in class. Offline
mode works in that information collected is stored within the mobile application
until an active Internet connection is accessed and once that is established, the
information is automatically synced to our cloud servers.
However, a user requires internet connection to log into the system.
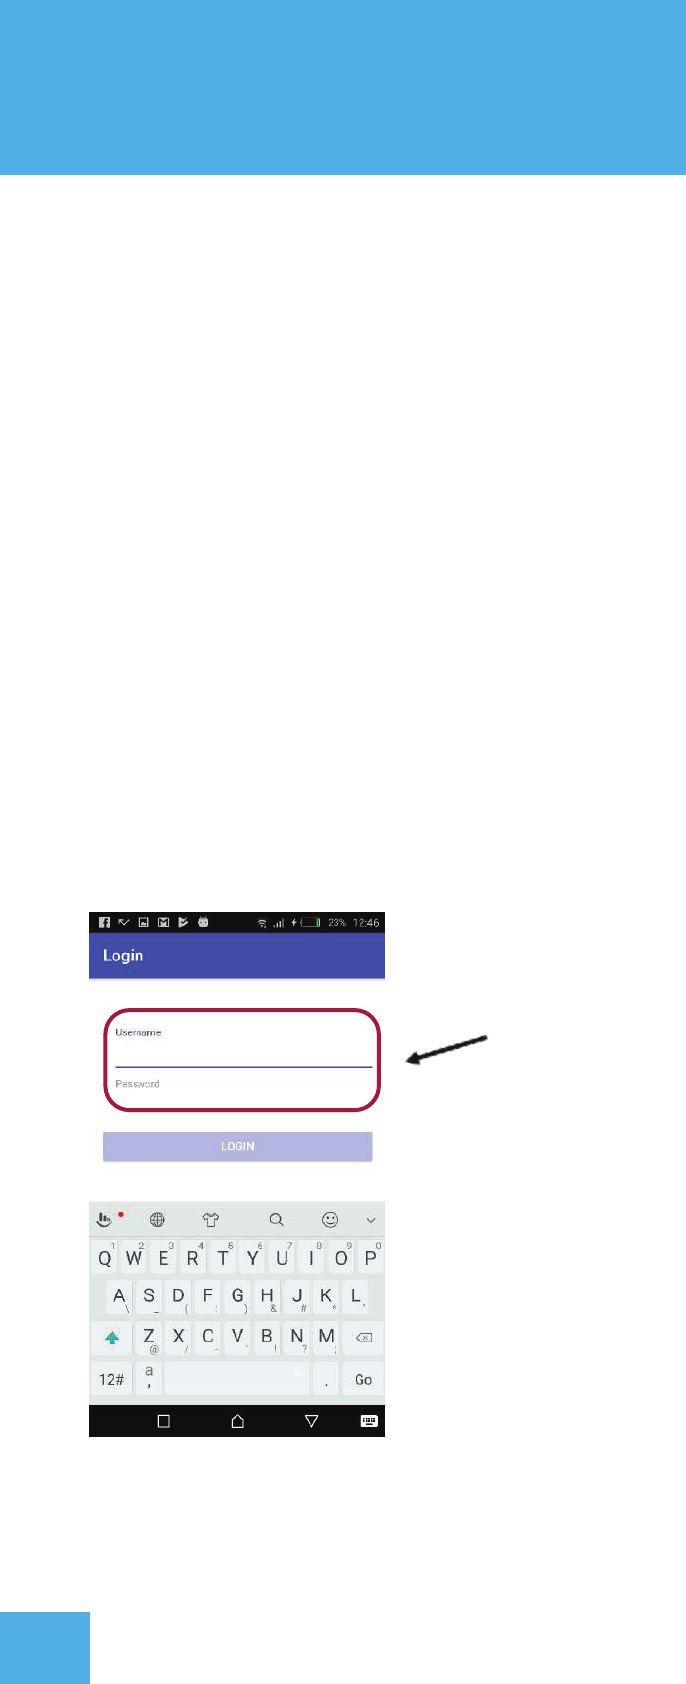
2.2 Screen 1 - Log In -
USING THE APP
4
After installation of the mobile application, teachers/head-teachers will need to login
into the system via a username and password.
Enter valid Username & Password
and click ‘Login’
USING THE APP
5
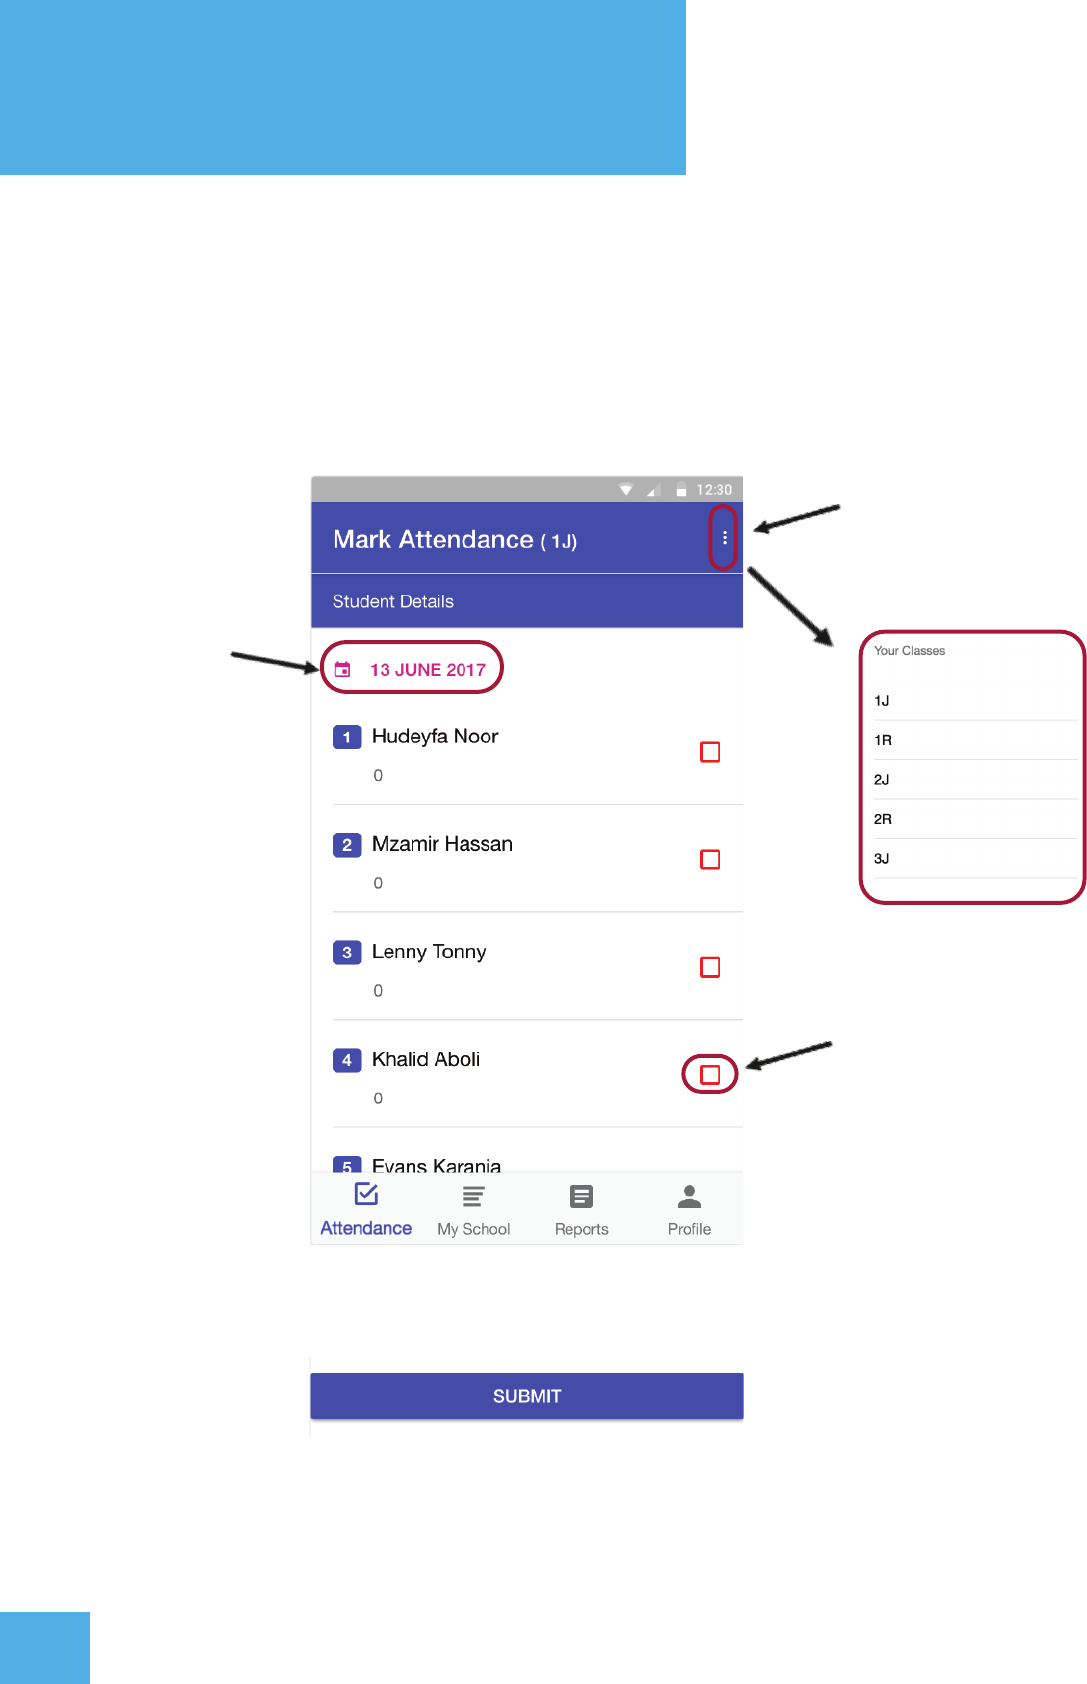
2.2 Screen 2 - Mark Attendance
The Mark Attendance screen allows the teacher to mark class attendance for
students in different classes.
Click the three dots on
the top-right to select
a different class
Click on the
date to take
attendance for
different date
Click on the ‘red button’
to mark a child present.
If child is marked, the
button turns blue. Do not
click the button if the
child is absent
IMPORTANT : When done marking attendance, click the ‘submit’ button
to send information.
USING THE APP
6
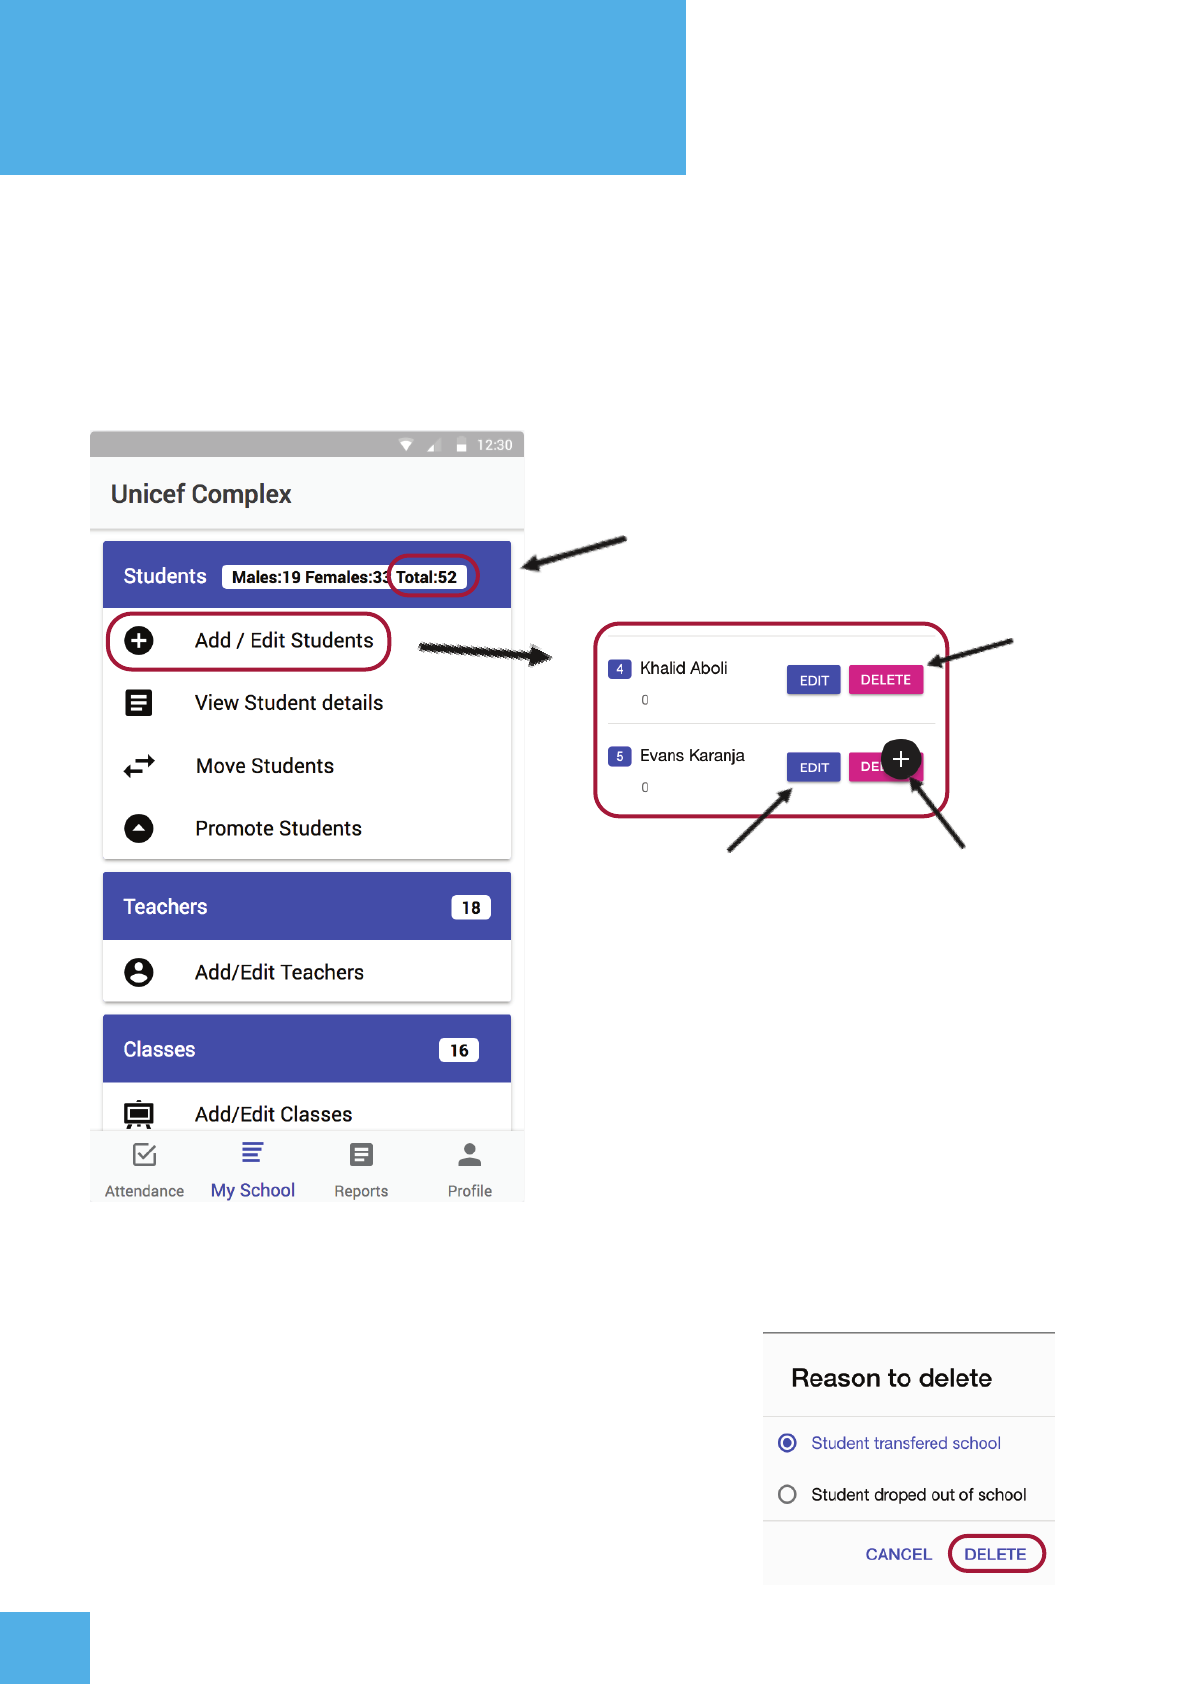
2.3 Screen 3 - My School
My School allows the headteacher to add, edit or delete students, teachers or classes
into the system.
Number of students in school.
Click on the ‘+’ button
to add new students
Click to update child
information.
Click on the ‘update’
button when done
to save
Click to
delete
student
When deleting a student, a headteacher is required to state reason for
deleting/removing the student from the school.
USING THE APP
7
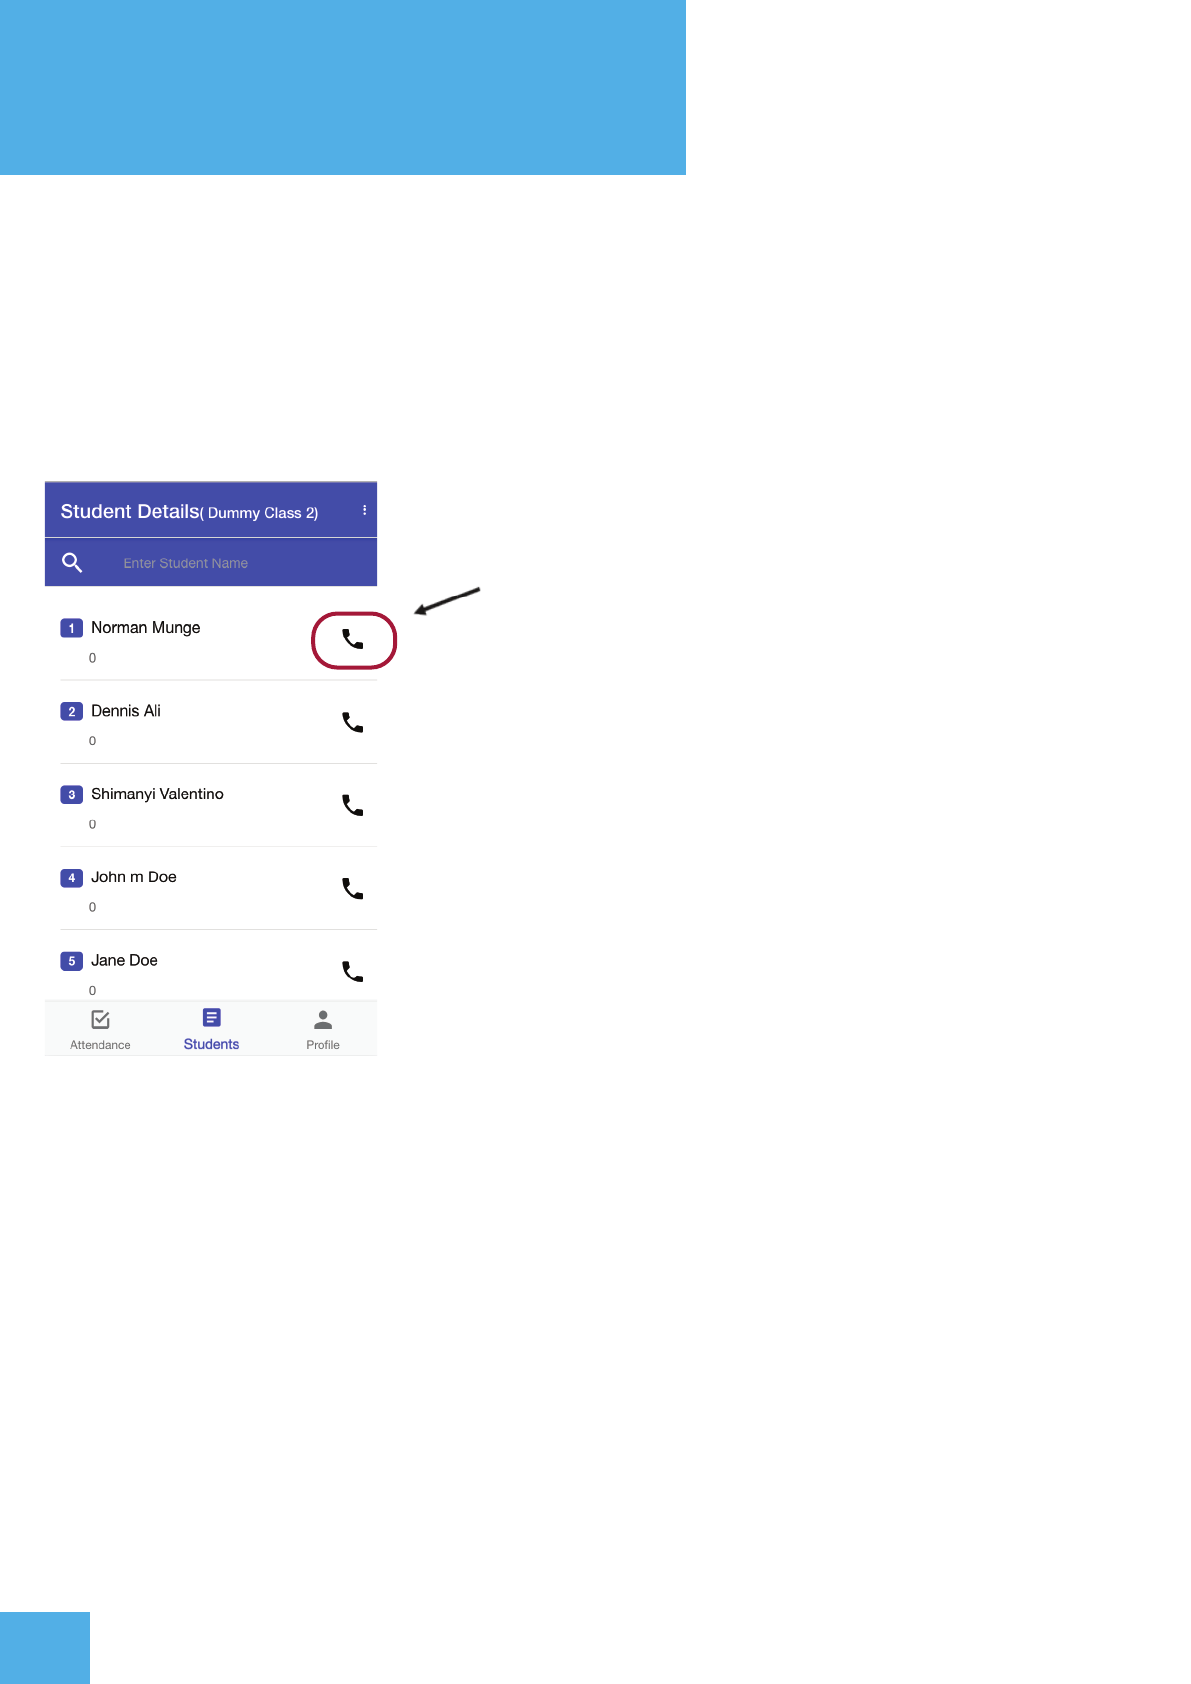
View Student Details
The students tab for a teacher’s access allows access to view individual student details.
Teachers can search for student names based on the class they are in, and contact their
guardian through the application.
Contact child’s guardian information.
The ‘Add/Edit Teachers’ page allows the headteacher to add,edit or remove information on
respective teachers.
The ‘Add/Edit Classes’ page allows the headteacher to add, edit or remove classes from
their school.
USING THE APP
8
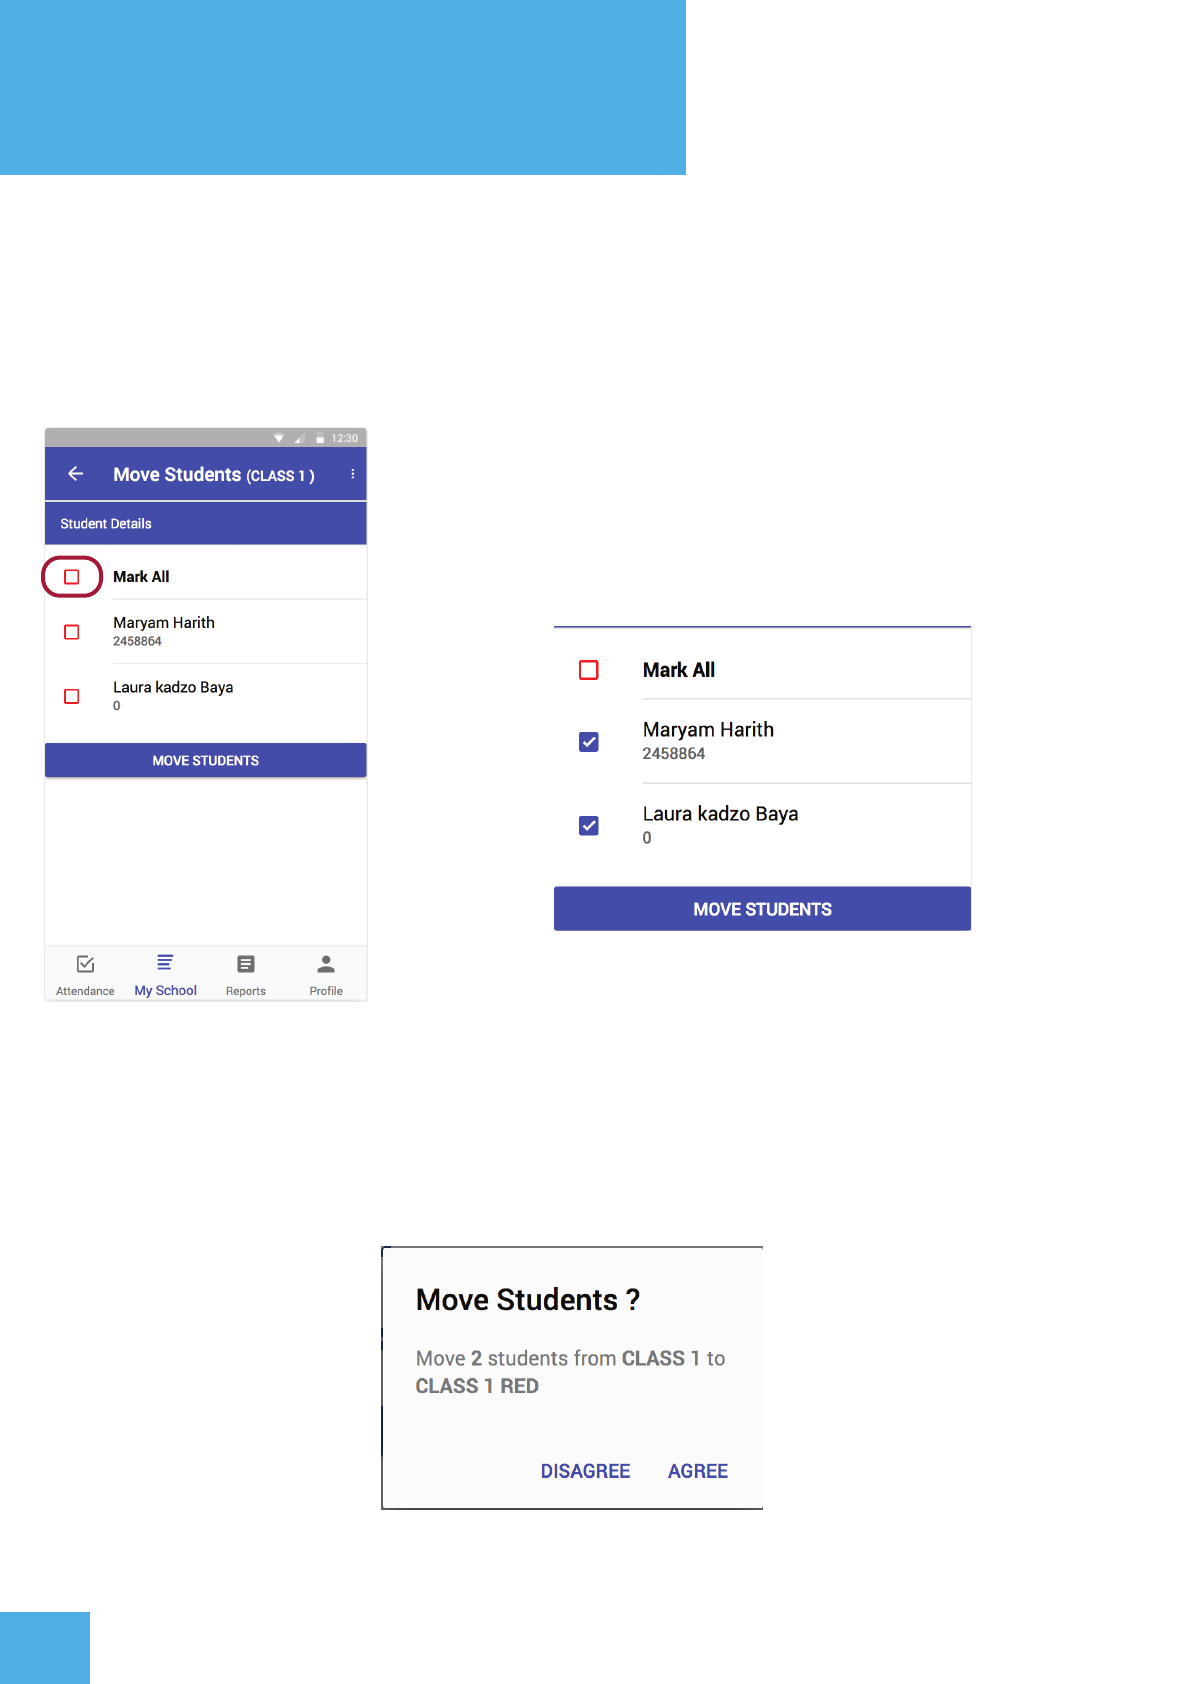
Moving Students
The Move Student tab under My School allows a teacher to move students from one class
to another class without limiting it to promotion of only one level up.
Select students to move by clicking on the red checkbox on
the left. Once a checbox is selected, it turns color to blue
accompanied by a tick.
Once students have been selected, simply click on the move students button and select the class
you want to move the students to. Click on OK and agree /disagree to move the students. You will get
a notification that your student/s have been moved to another class.
USING THE APP
9
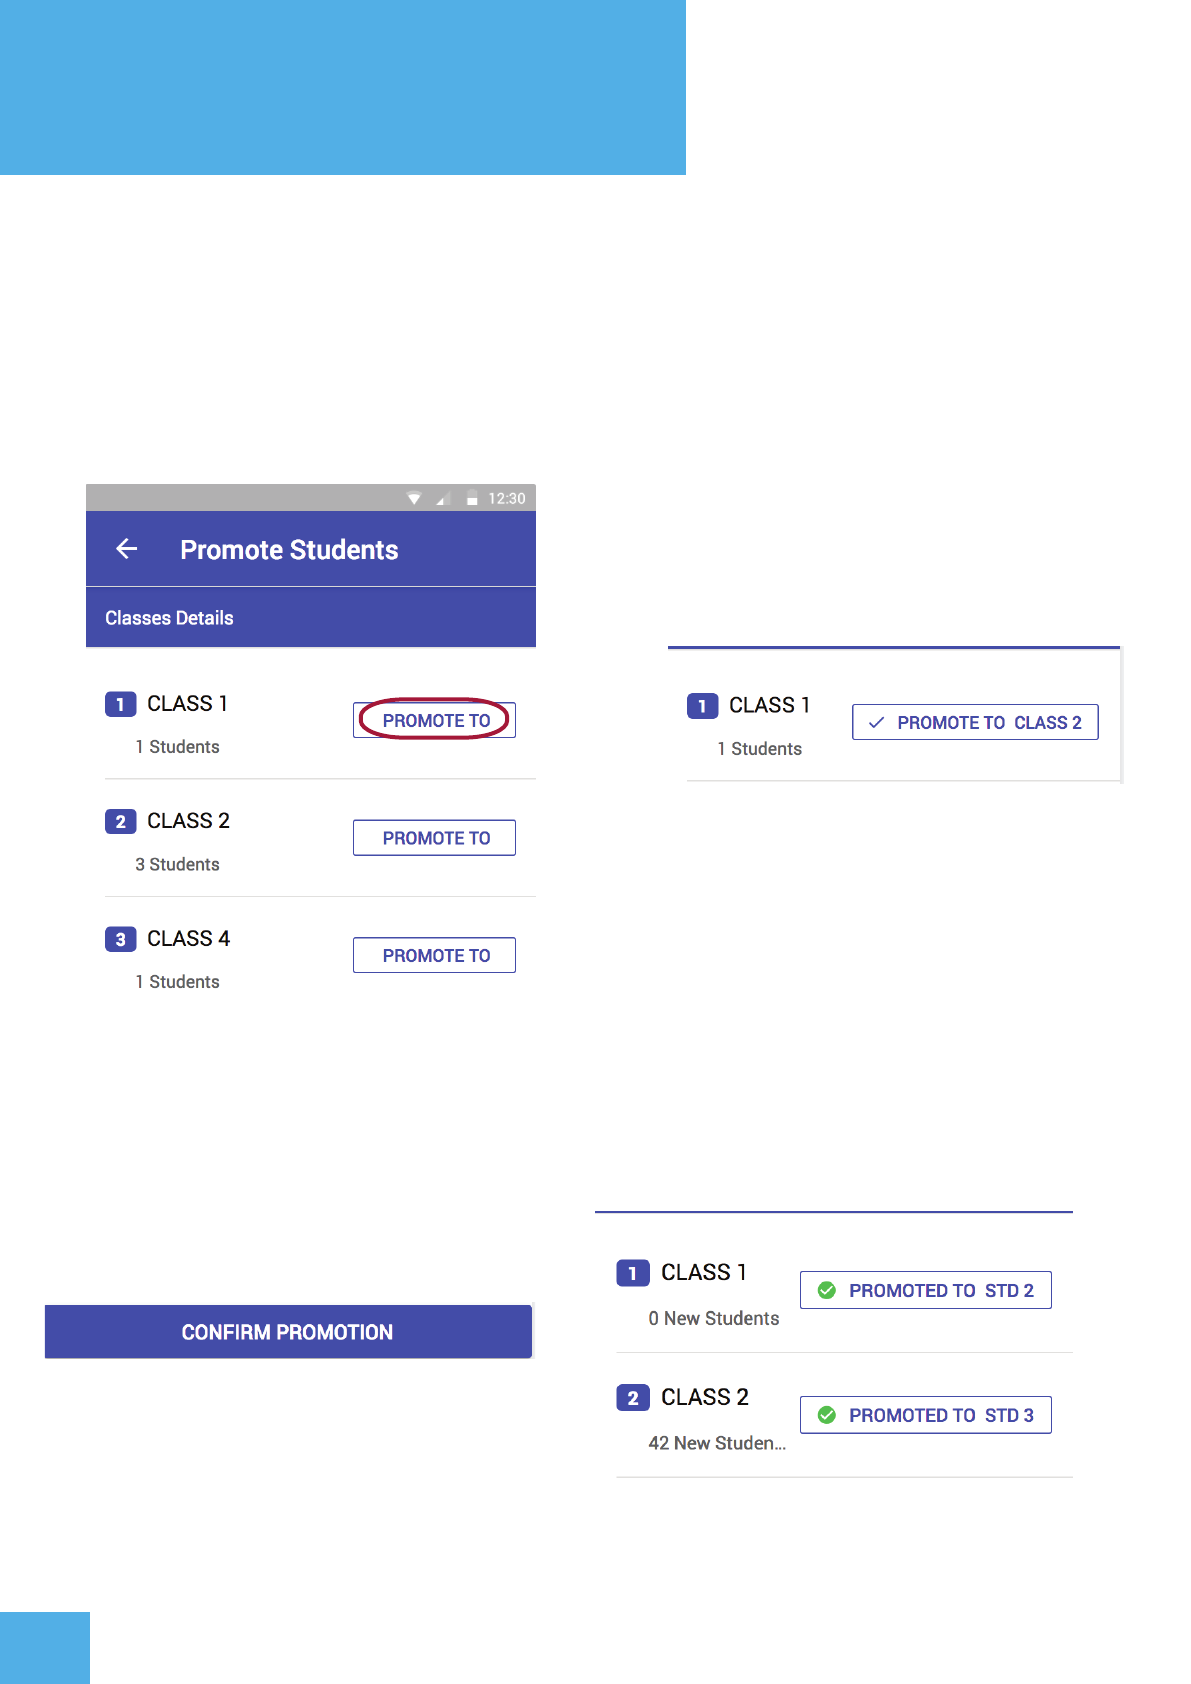
Promoting Students
To promote students click on the Promote To button on the right against the class.
Make sure you promote all classes. A tick appears on a class that has been selected to
be promoted.
Once all the classes have the blue tick mark against them, click on the confirm promotion button.
A successful promotion will be symbolized by green ticks against the promote button as well as
a notification letting you know that promotion was successful.
USING THE APP
10
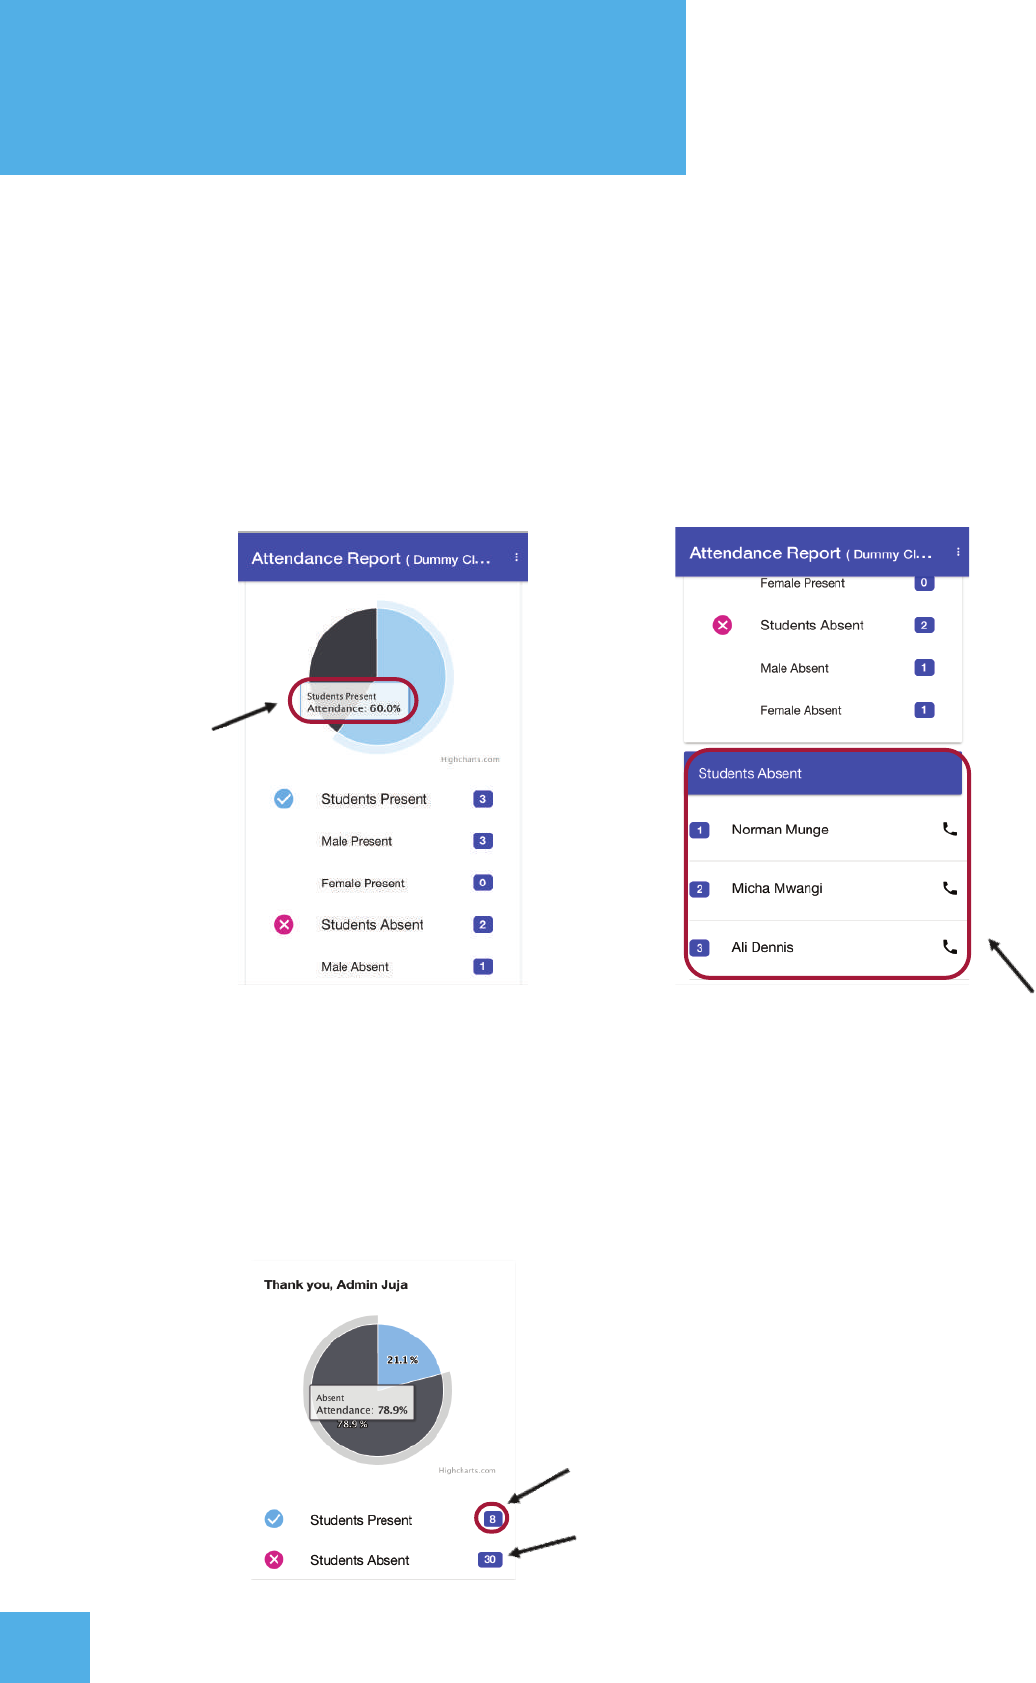
2.4 Screen 4 - Attendance Report
The reports tab allows the head-teacher to view an aggregated list of student
attendance performance per class, based on gender. Head-teacher's can also view
on a daily basis a list of absent students from every class on a certain date.
Percentage of
students present
List of absent
students.
The daily attendance report is compiled everytime a teacher takes attendance in
their class and submits the information by clicking the ‘SUBMIT’ button.
Number of present students.
Number of absent students.
USING THE APP
11
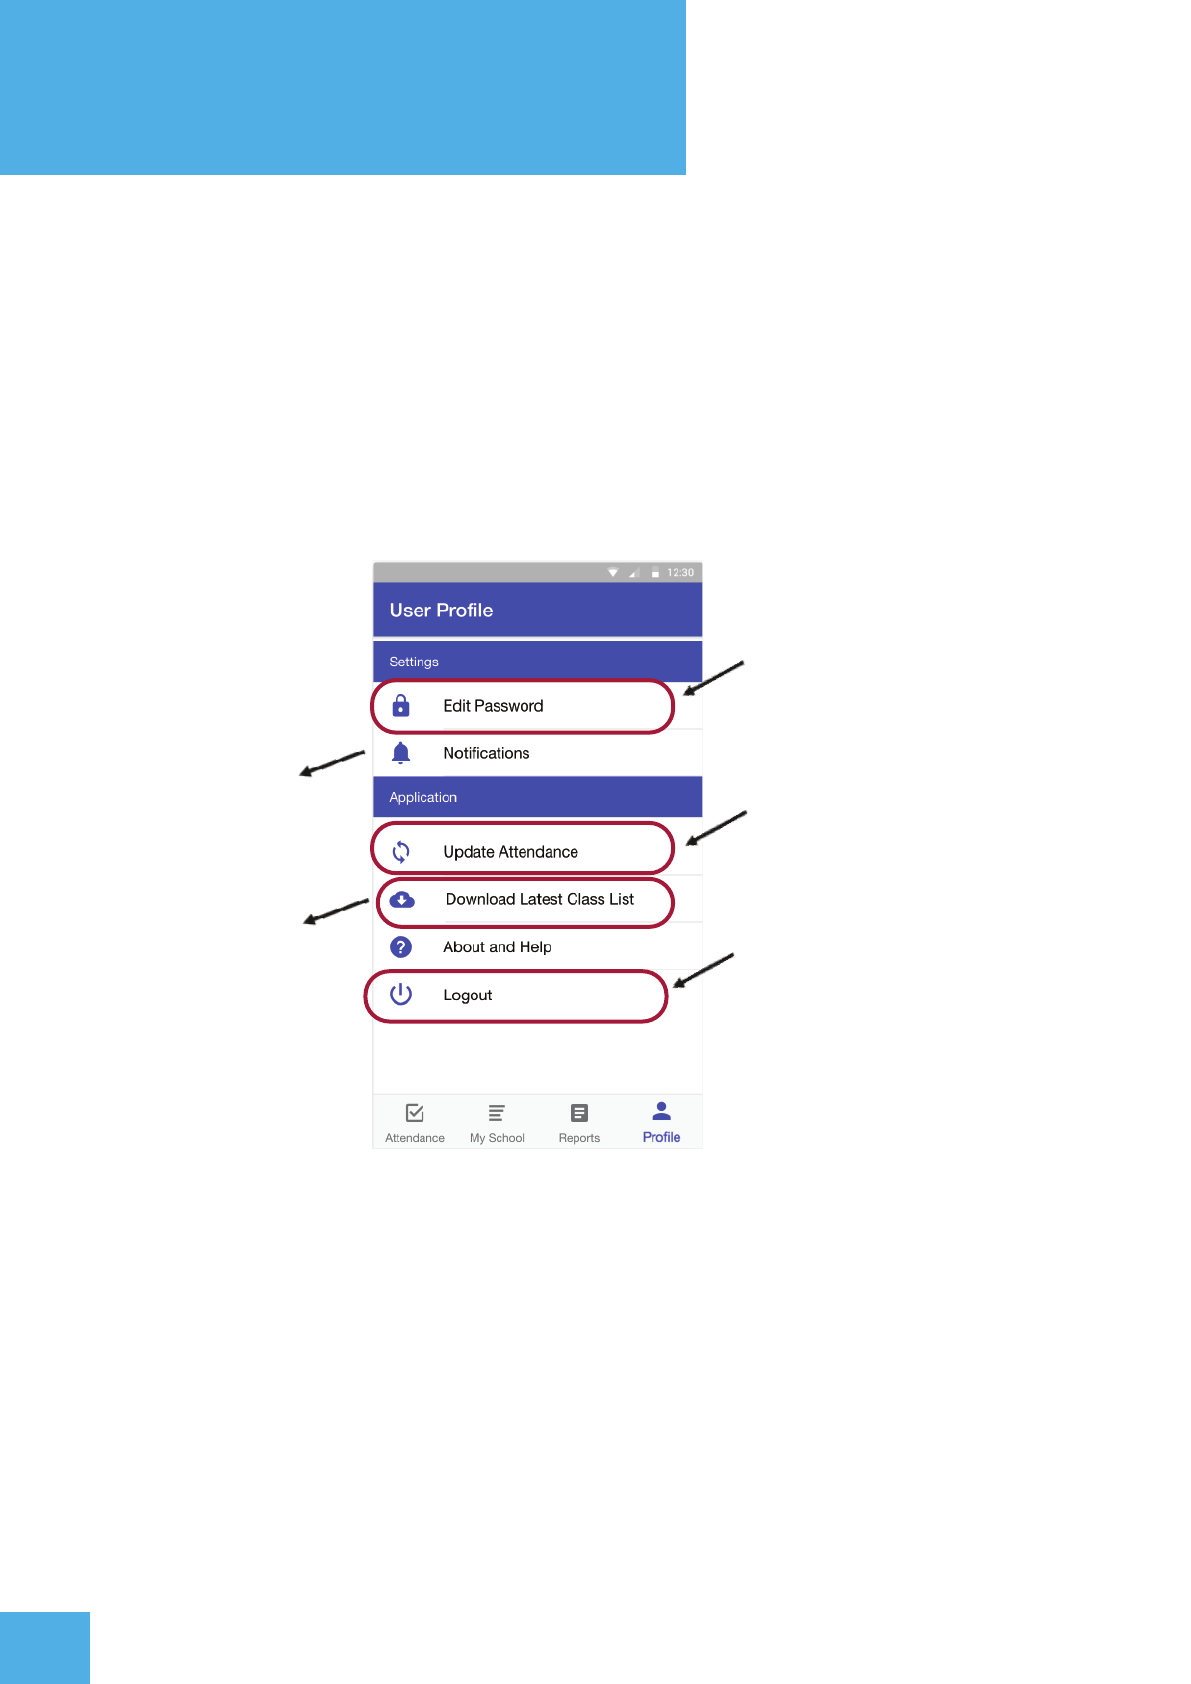
2.5 Screen 5 - User Profile
The user profile tab allows the user to change their password, view notifications,
claim available rewards, sync off-line attendance with the database, update class
registry as well as log out and access the About and Help page.
Allows a teacher/headteacher
change their login password
System notifications
Enable manual synchronizing of
information when online
Click to allow see
updated class list Logout of the system
WEB DASHBOARD
12
3.2 Log In Details
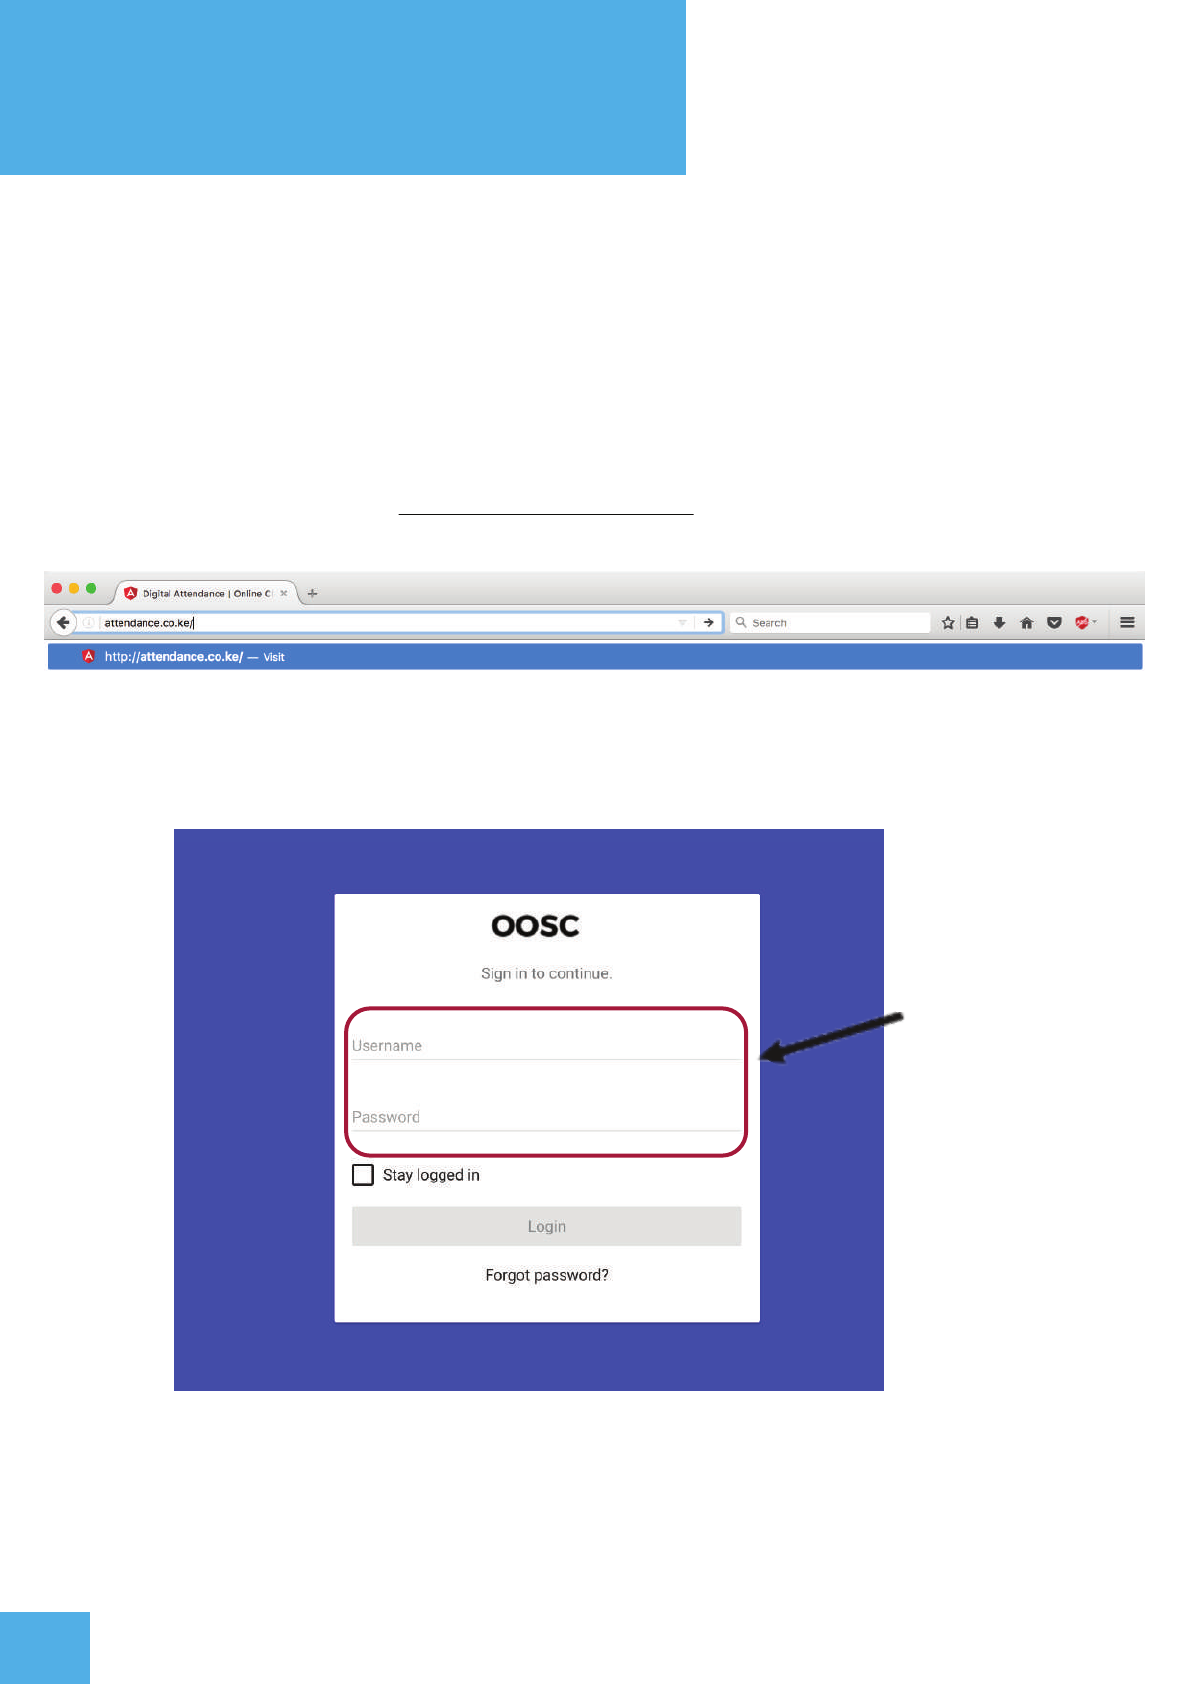
The web application can be accessed online through a web browser thus there is no
need for an installation. To log in, a user must have the proper credentials given to
them prior by the admin.
To log into the system, type www.attendance.co.ke on your browser e.g. google chrome.
3.2.1 Screen 1 - Log In
Enter valid
Username &
Password and
click ‘Login’ button
WEB DASHBOARD
13
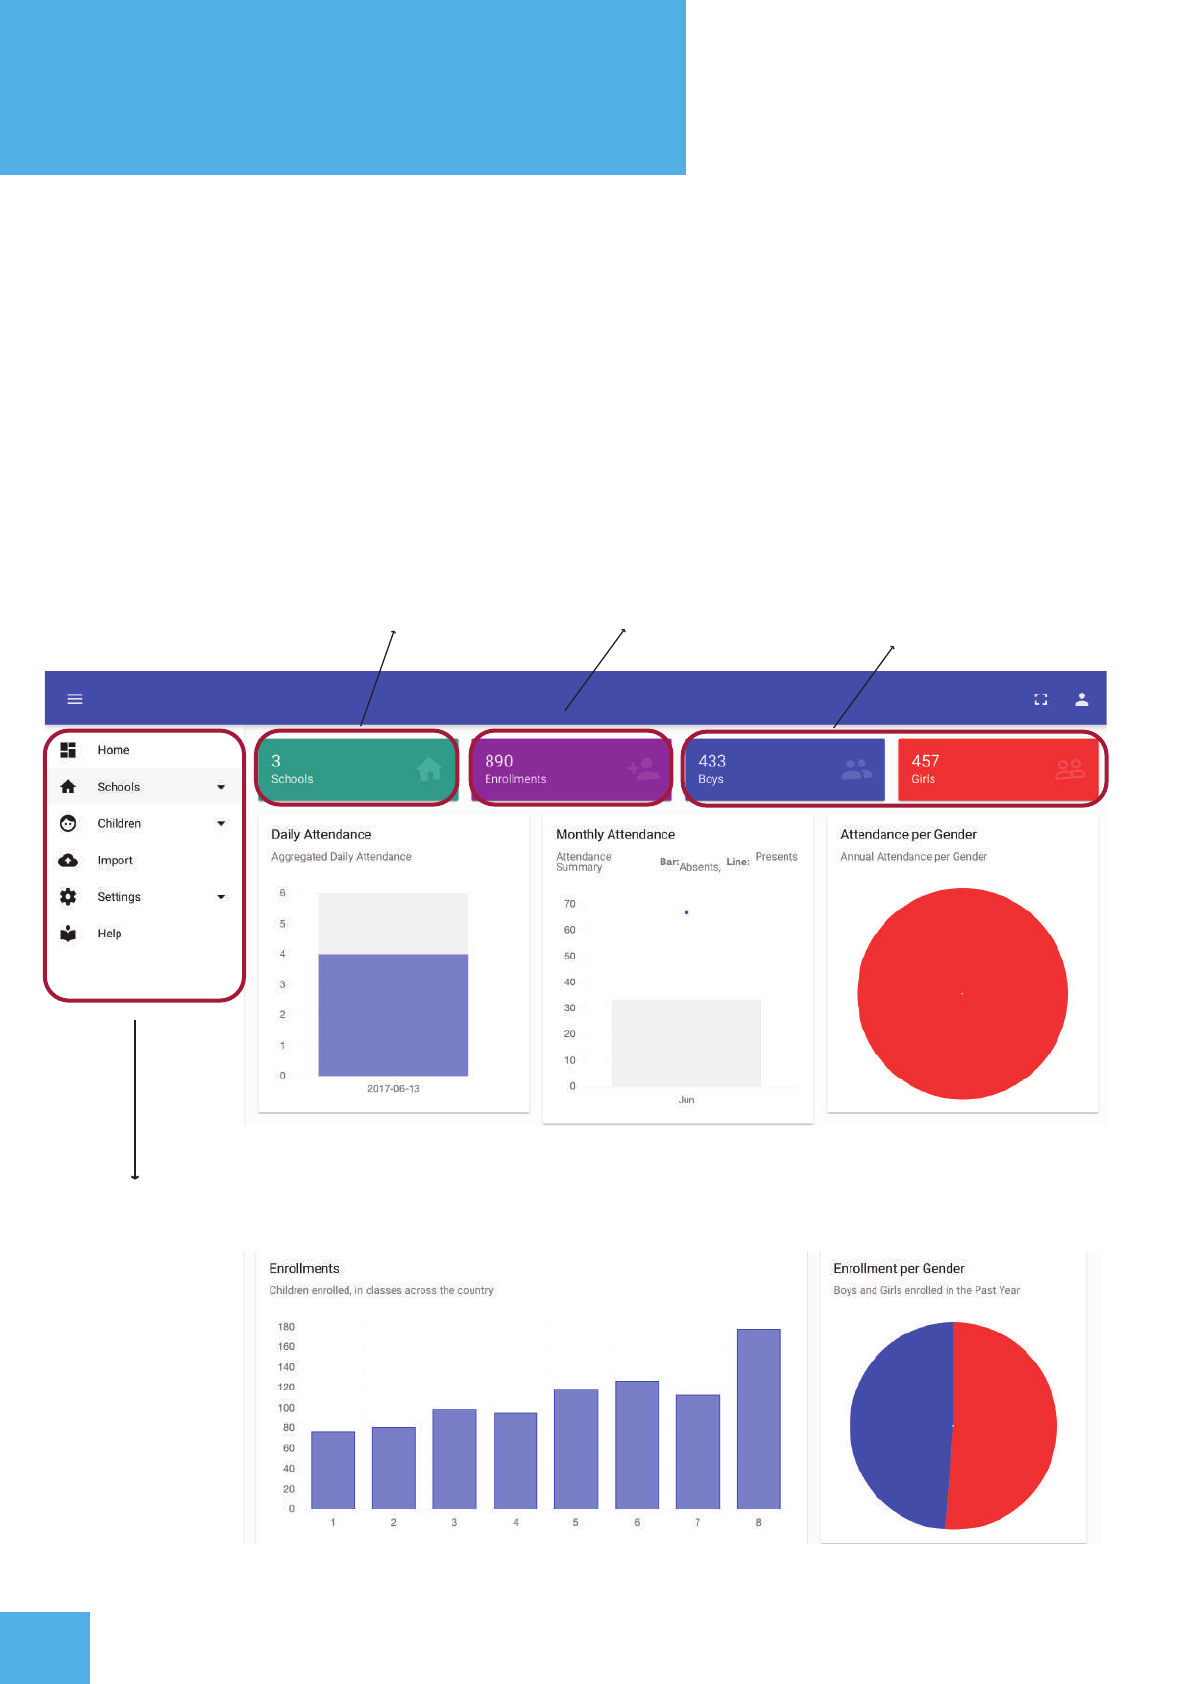
3.2.2 Screen 2 - Home Screen
The home screen is the main screen for the web dashboard. Different stakeholders
have different information on the dashbaord. The stakeholders include : implementing
partners, administrators and schools.
Sidebar menu
Total number of schools Enrollment by gender
Children enrolled
WEB ADASHBOARD
14
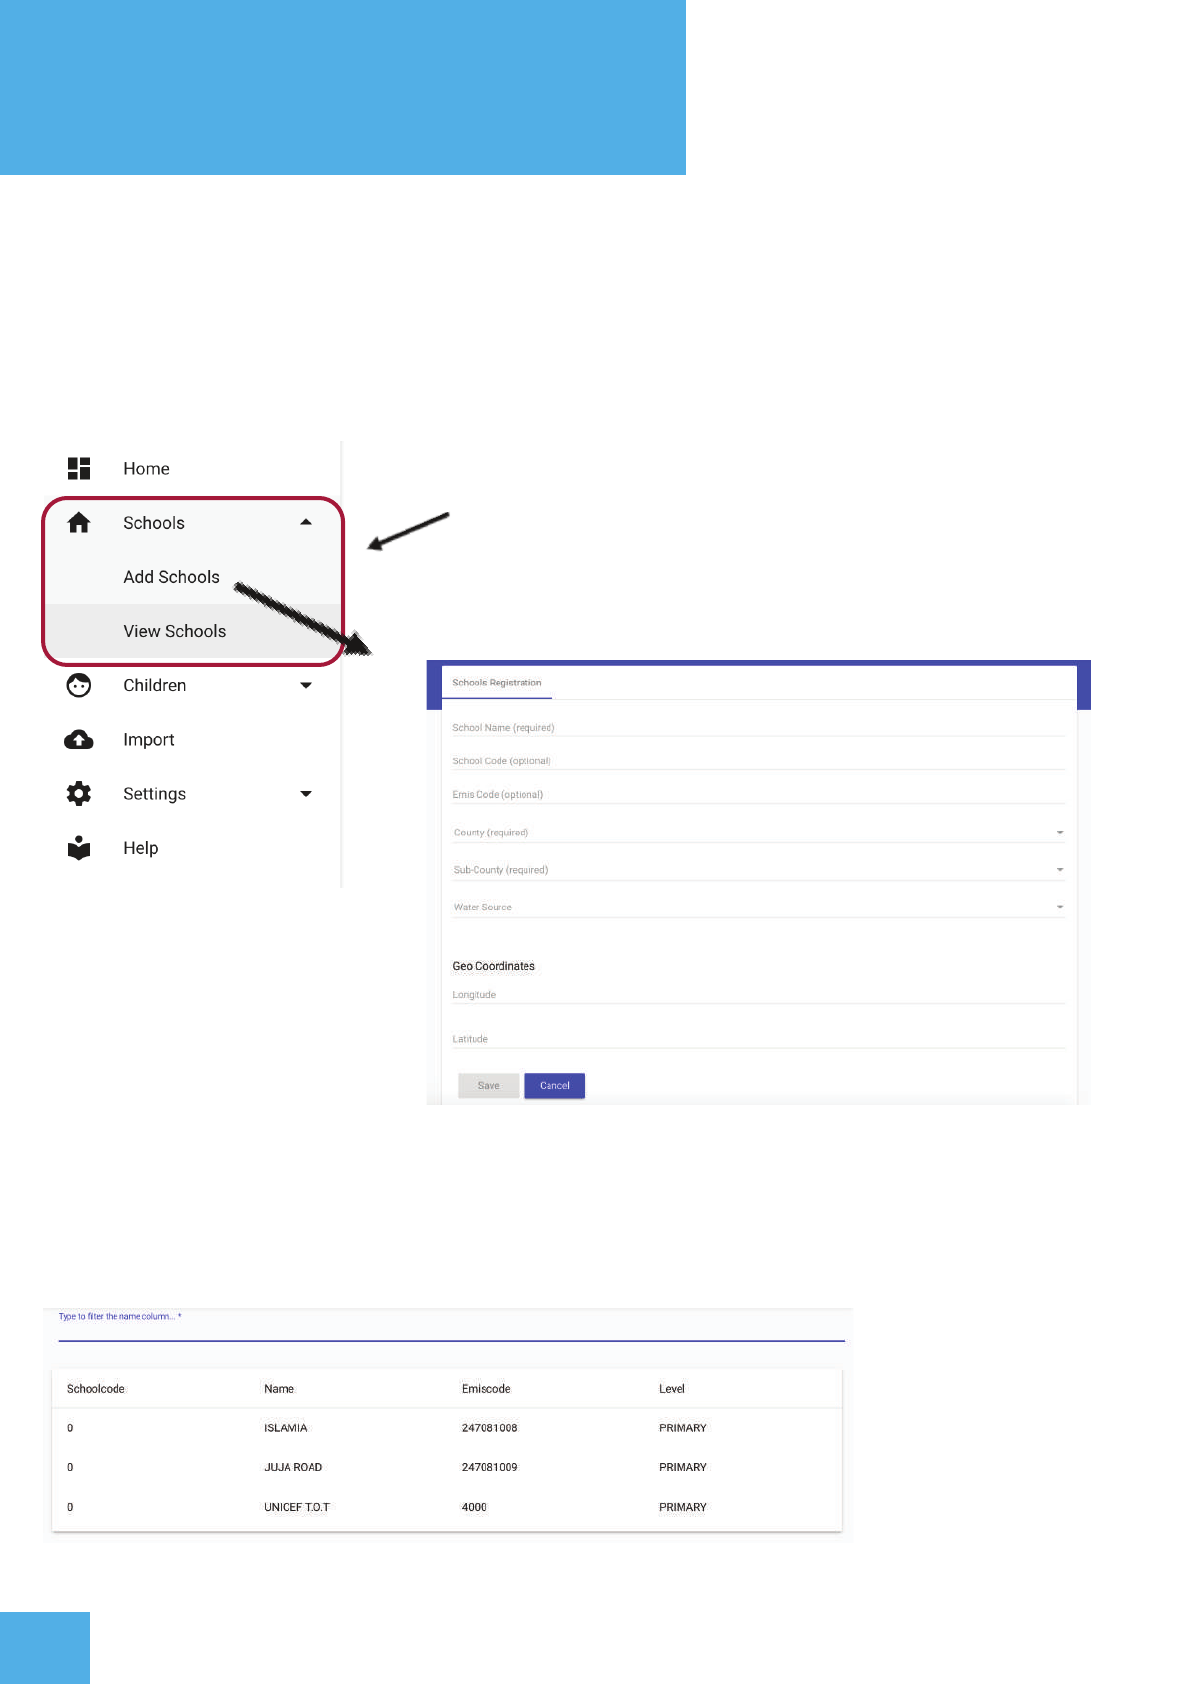
3.2.3 Screen 3 - Schools
In order to access information for a specific school, click the “Schools” tab on the
sidebar menu. A user can “Add Schools” or “View Schools”.
Add a new school/View school
“Add School” screen allows users to enter details
about a school.
“View School”
screen allows users
to search for schools
WEB DASHBOARD
15
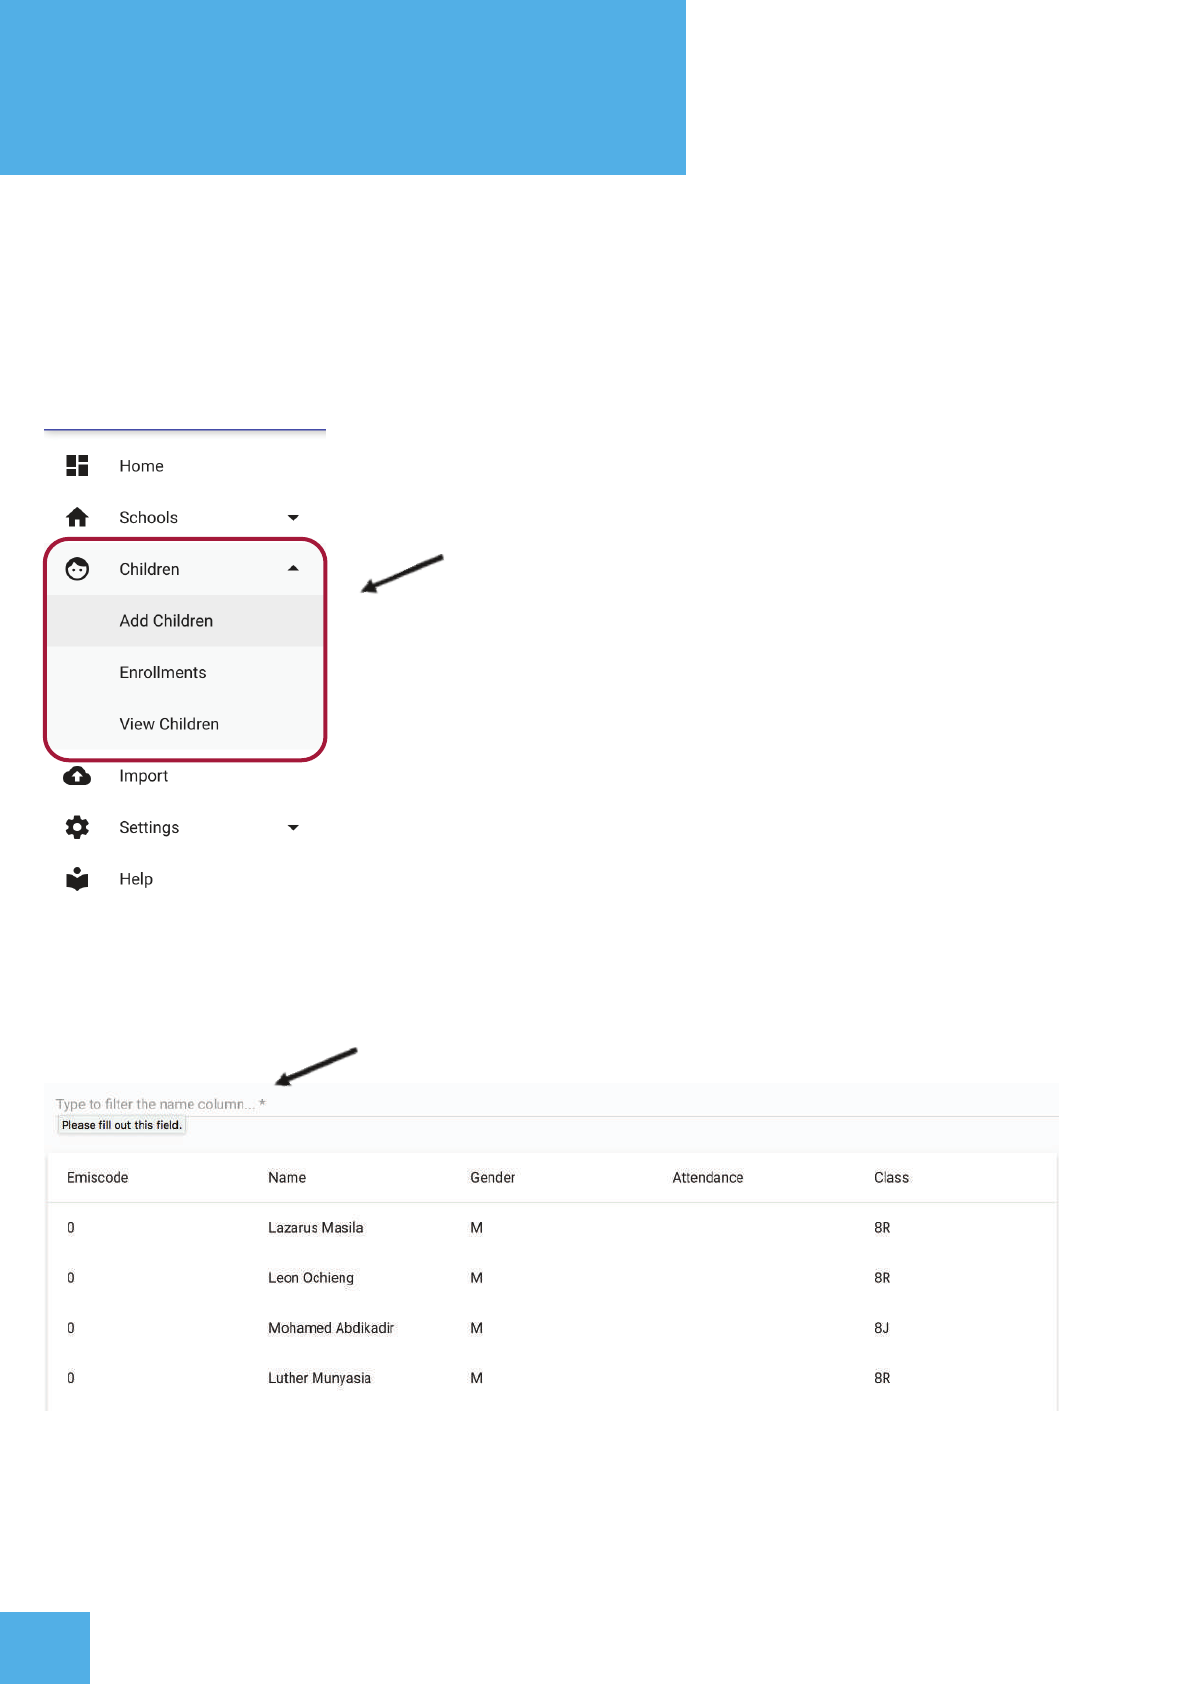
3.2.3 Screen 4 - Children
The ‘Children’ tab allows users to add new students and view individual student
attendance.
Add/View Children information
- To “Add Children” fill in the student details
form in the “Add Children” screen.
Search child by name
Click on ‘View Children’ to see individual child information.
WEB DASHBOARD
16
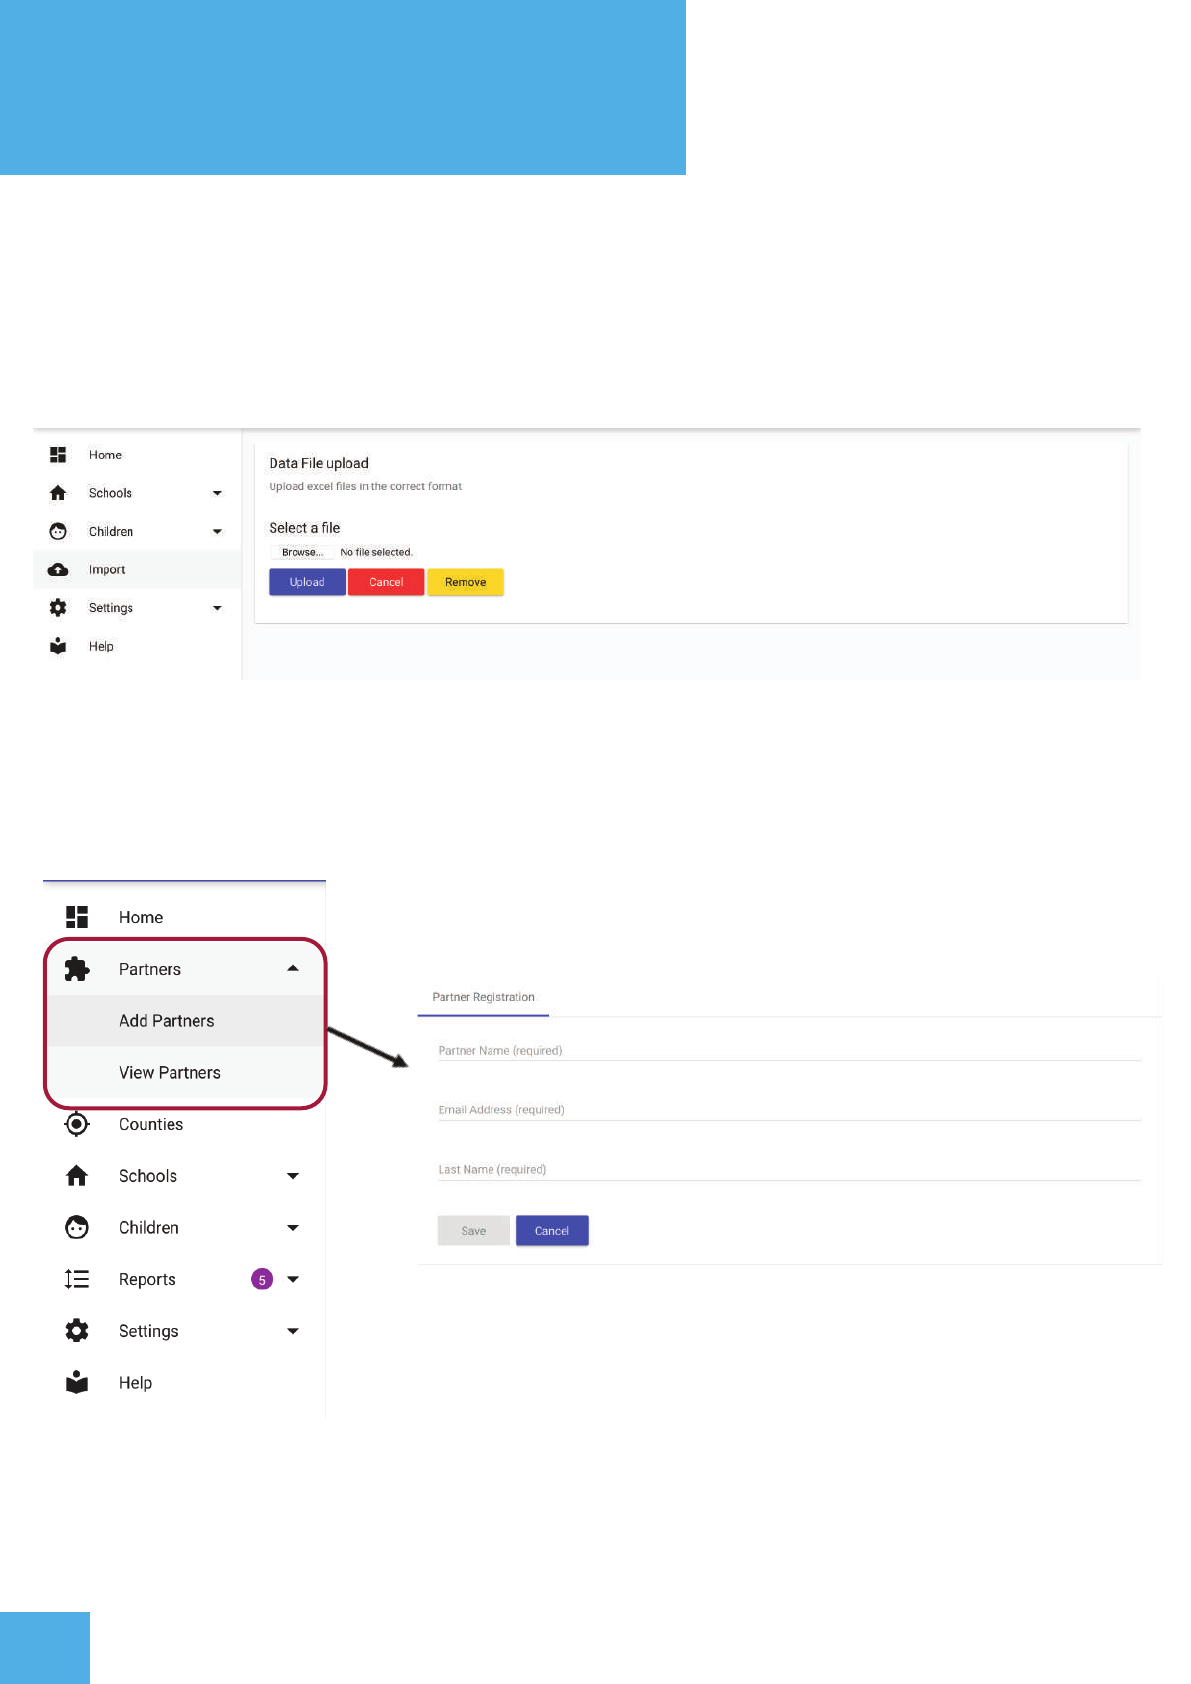
3.2.3 Screen 5 - Import
The ‘Import’ tab allows implementing partners/administrators to upload student
information off excel sheets.
3.2.4 Screen 6 - Partners
An administrator can add partners by clicking the “Partners” tab
Add partner information
WEB DASHBOARD
17
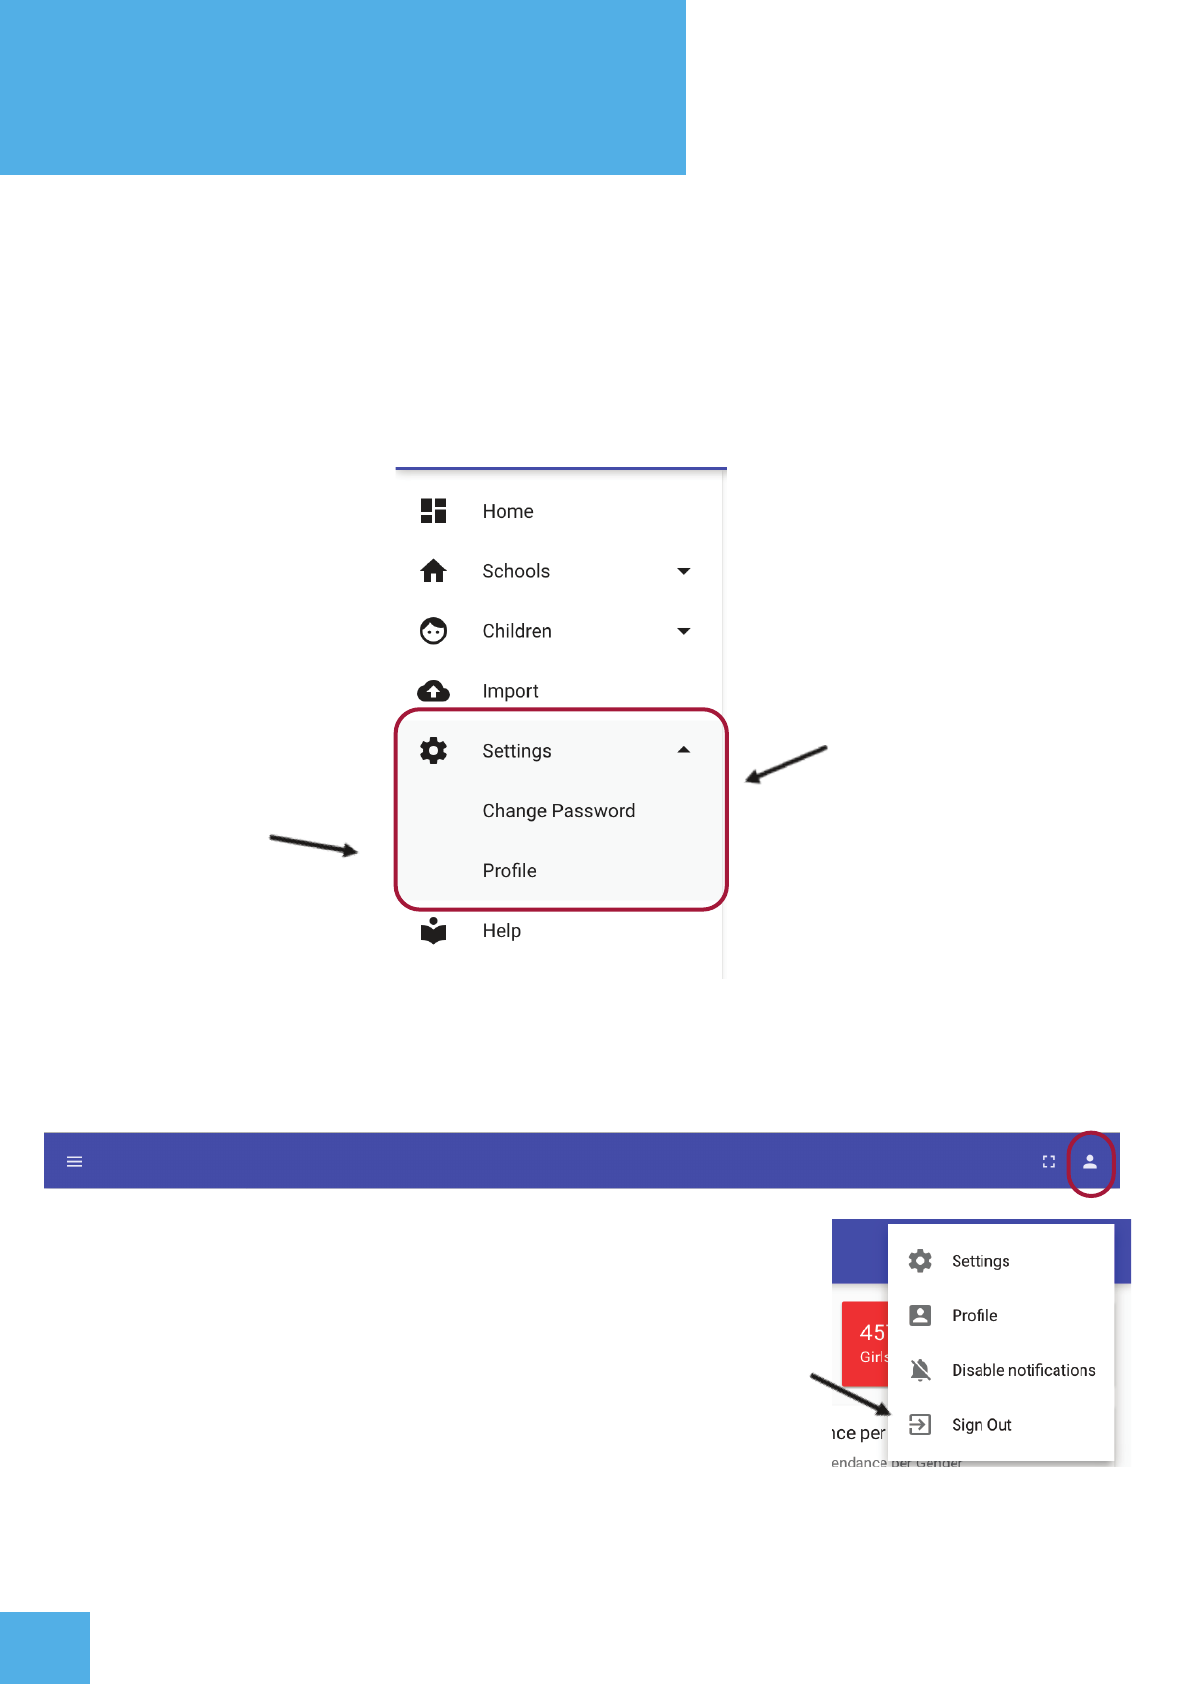
3.2.5 Screen 7 -Settings
Users can change their account password and view the profile by clicking on the
‘settings’ tab.
Change Password
View User Profile
3.2.6 Screen 8 - Logout
To logout from the system click the “Profile” icon on the top right, and select Sign Out
Sign Out

