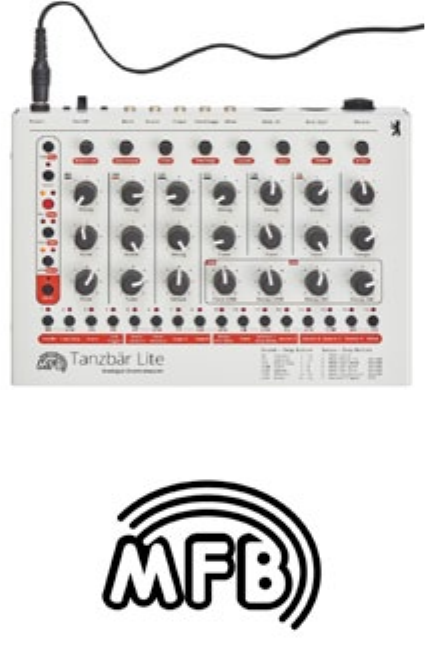
Mfb Tanzbar Lite Manual
User Manual:
Open the PDF directly: View PDF ![]() .
.
Page Count: 21
User Manual
Tanzbär Lite
3
User Manual
Content:
Function Overview 4
Connections and initial operation 6
The User Interface 8
Play-Mode 11
Playing with Patterns 12
Manual-Mode 14
Sound Generation 18
Record-Mode 21
The different Modes 21
Step-Record-Mode 22
Patterns with more
than 16 Steps 28
Realtime-Record-Mode 30
Manual-Trigger-Mode /
Manual-Trigger-Record 31
Memory-Functions 34
Setup- / MIDI-Functions 35
Setup-Menu 35
MIDI-Dump-Functions 37
Addendum 38
MIDI-Implementation 38
Impressum 39
MFB-Tanzbär Lite

MFB Tanzbär Lite MFB Tanzbär Lite
Overview
4 5
Overview
OVERVIEW
Thank you from us at MFB.
First of all, we would like to thank you for having purchased Tanzbär Lite. We appreciate
your choice very much and hope you will have lots of fun with your new instrument.
What is Tanzbär Lite (”Dancing Mouse”)?
Tanzbär Lite is a drum computer, featuring a combination of real analog sound generation
as well as a very sophisticated pattern-based step sequencer. The latter provides individu-
al sound settings of any instrument for every step. This way, you can create very complex-
sounding beats pretty easily.
Why Tanzbär Lite? Well, rst of all, it is small and cute (would you have thought...?). And
then, in 1950s Germany, this is what a blonde girl with pony-tail and petticoat skirts was
called, dancing along to the exciting and infectious new rhythms of rock‘n‘roll music. Histo-
ry lesson over.
Infectious new rhythms...? Hang on a second...
What exactly is going on inside Tanzbär Lite? Here is a brief overview of its functions:
Sound generation:
• Ten drum instruments with up to four tweakable and storable parameters (real
analog instruments).
• Level pots on all drum instruments plus master volume (not programmable in
memory).
• Individual outputs (for bassdrum, snare, clap, tom/conga and hihat).
Sequencer:
• 64 patterns (four banks of sixteen patterns each).
• Eleven tracks triggering the drum instruments.
• Five LFO tracks for programming pitch modulation (for bassdrum, clap, tom/conga,
cowbell and claves).
• Combination of step number (1 to 32) and scaling (ve settings) allows for almost
all kinds of time signatures.
• A/B pattern toggle
• Roll/Flam function (multiple triggering)
• Chain function (chaining patterns - not programmable in memory).
• Track mute function
• Shufe function (global setting – same for all tracks)
The following functions can be programmed for each track:
• Track length (up to sixteen steps resp. up to 32 steps when A/B function is active)
The following functions can be programmed for each step:
• Step on/off
• Accent level (four settings)
• Flam (multi trigger = am, rolls etc.)
• Sound setting of current instrument
• LFO settings for bassdrum, clap, tom/conga, cowbell and claves (modulation depth,
wave, and speed)
Operation Modes:
Play Mode
• Pattern selection
• Access to sound parameters via front-panel knobs
• Access to play functions (A/B pattern toggle, chain and mute functions)
Manual Trigger Mode
• Triggering instruments via step buttons and/or MIDI notes (with velocity).
• Access to sound parameters via knobs or MIDI controller.
Record Mode
• Programming a pattern in one of the two modes available (Step Record or Manual
Trigger Record)
Synchronisation:
• MIDI clock
Not bad, huh? Of course, it was not possible to place a dedicated control or button for
each function on the front panel. Sometimes, a second function level and pressing some
button combinations is required to access all functions. To make sure you and your Tanz-
bär Lite will become close friends really soon, we advise you to read this manual carefully.
This will be the best and easiest way to explore your Tanzbär Lite thoroughly - and there is
pretty much to be explored. So we beg you: please bother to read (and understand) this
f...antastic manual.
MFB Tanzbär Lite MFB Tanzbär Lite
Setup
6 7
Setup
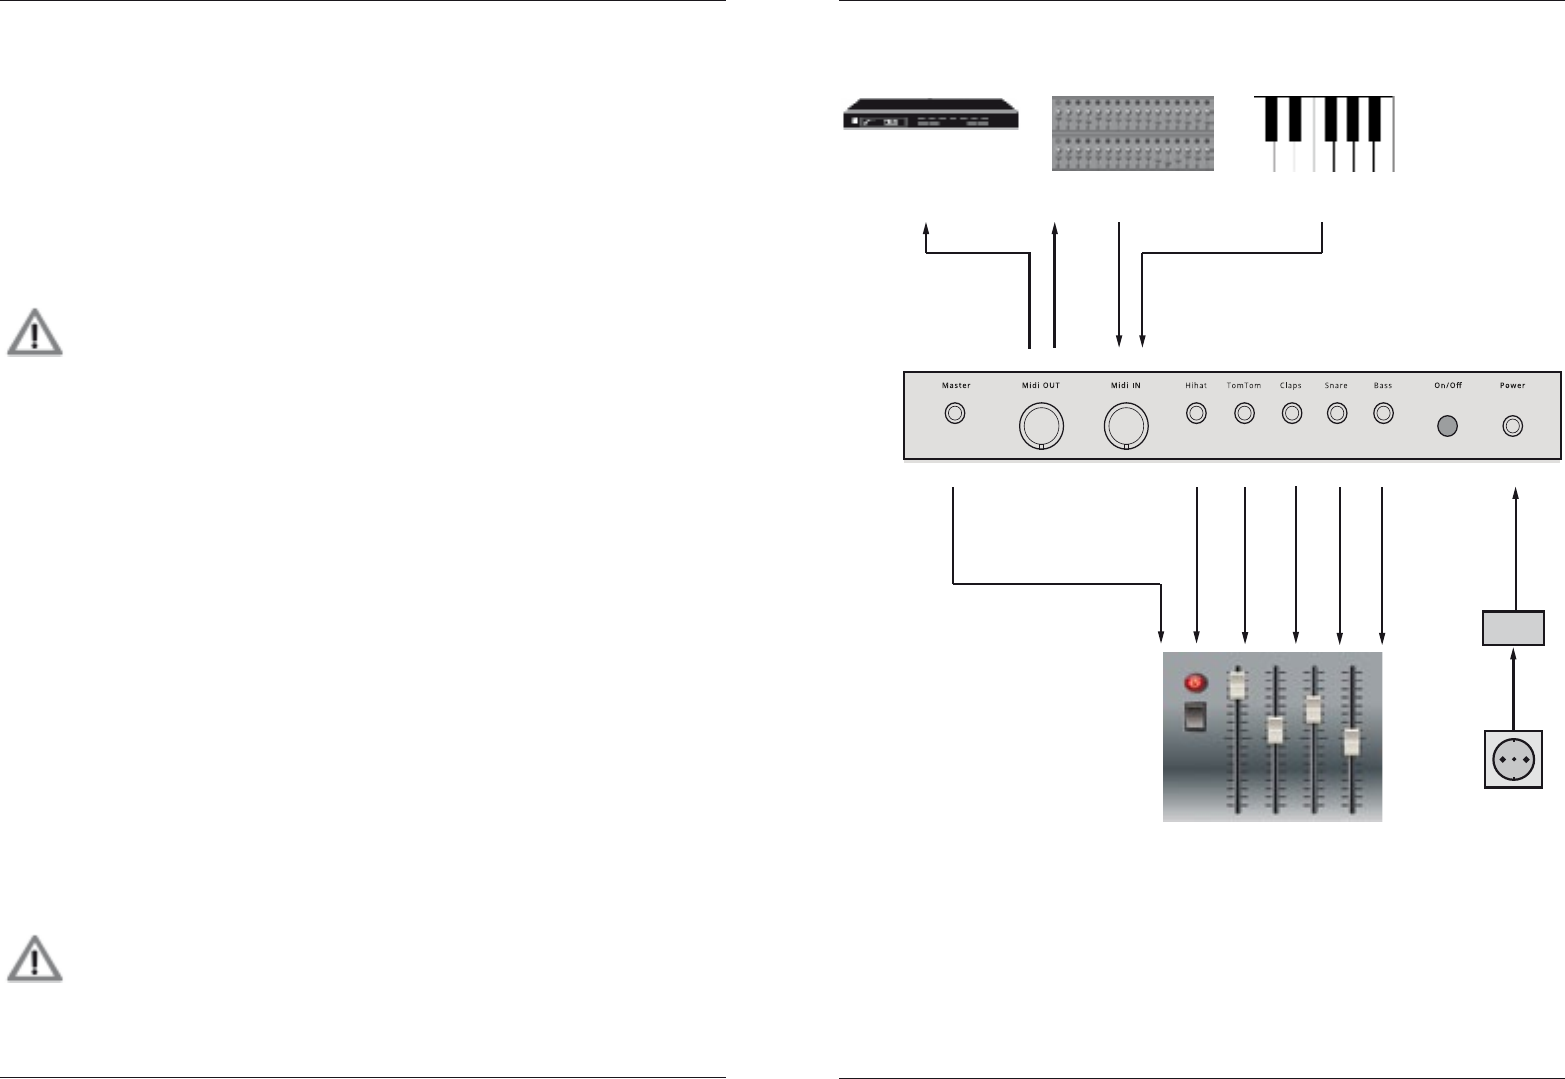
CONNECTIONS AND INITIAL OPERATION
Rear panel connectors
Power
Please connect the 12VDC / 500mA wall-wart here. Power up/down your Tanzbär Lite
using the ON/OFF switch – do not simply pull the wall-wart from the socket if you only want
to turn off Tanzbär Lite. Please unplug the power supply from the wall outlet if you do not
use your Tanzbär Lite for an extended period of time as the wall-wart is still drawing current
and will eventually run hot in course of time. Don‘t waste energy by not using it..
Please use only the power supply originally included wih your Tanzbär Lite
or one with exactly the same specications - please do not mess around
with other external power supplies which do not (or only half-ways) match
our specications! We cannot be held liable for any damage caused by the
use of improper power supplies – don‘t say we didn‘t warn you!
MIDI In / MIDI Out
Please connect MIDI devices here. Via MIDI In, Tanzbär Lite receives MIDI clock, MIDI
notes, and controller data as well as program change data. When connecting a MIDI
keyboard or MIDI drum pads here, sounds can be triggered live in realtime. Via MIDI Out,
Tanzbär Lite transmits note data of all tracks, MIDI clock, and song position pointer data
as well as program change data. Incoming MIDI information is put through to the MIDI Out
socket (Thru function).
Audio Outs
Tanzbär Lite features one main audio out using a 6.3mm (1/4“) stereo jack and ve addi-
tional instrument outputs. The latter put out individual signals of bassdrum, snare, clap,
tom/conga, and hihat (e. g. for external processing). These are 3.5mm (1/8“) mono jacks.
Rimshot, cowbell, clave and cymbal are only available from the master out.
When plugging a cable into an instrument output, this instrument will be disconnected from
the main out.
Please connect Tanzbär Lite‘ main output to an audio mixer, soundcard, or amp before
powering up Tanzbär Lite..
To avoid a cracking or thumping noise, please power up your Tanzbär Lite
rst, then your sound system.
Please avoid excessive volume levels – your eardrums and neighbors will be
eternally thankful to you.
Wall
ward
MIDI keyboard
MIDI
clock
MIDI notes,
controller data,
program change data
MIDI notes
12V DC
Audio
Power
outlet
MIDI sequencer
MIDI
sound source
Audio mixer
MFB Tanzbär LiteUser Interface
8 9
MFB Tanzbär Lite User Interface
THE USER INTERFACE
As mentioned already, most of Tanzbär Lite‘ buttons cover more than one single function.
Depending on the selected mode, the function of the buttons will change.
The main purpose of the function buttons (left-hand side) is selecting the operation
mode (Play or Record), selecting patterns and banks as well as starting and stopping the
sequencer and toggling between the A/B parts of a pattern. These are dual-function keys
(except the Select key).
The Step keys (lower row) are also dual- or even triple-function keys. Depending on the
operation mode, they change their function. In Play mode, they mute tracks and control
various playback functions (e.g. shufe, pattern length, scale, and A/B toggle).
In Record mode, they are used to program the step sequencer. Apart from that, there is
an additional sound parameter hidden behind them which cannot be accessed directly via
the sound controls. The Step keys are also required when it comes to storing, clearing, and
copying patterns.
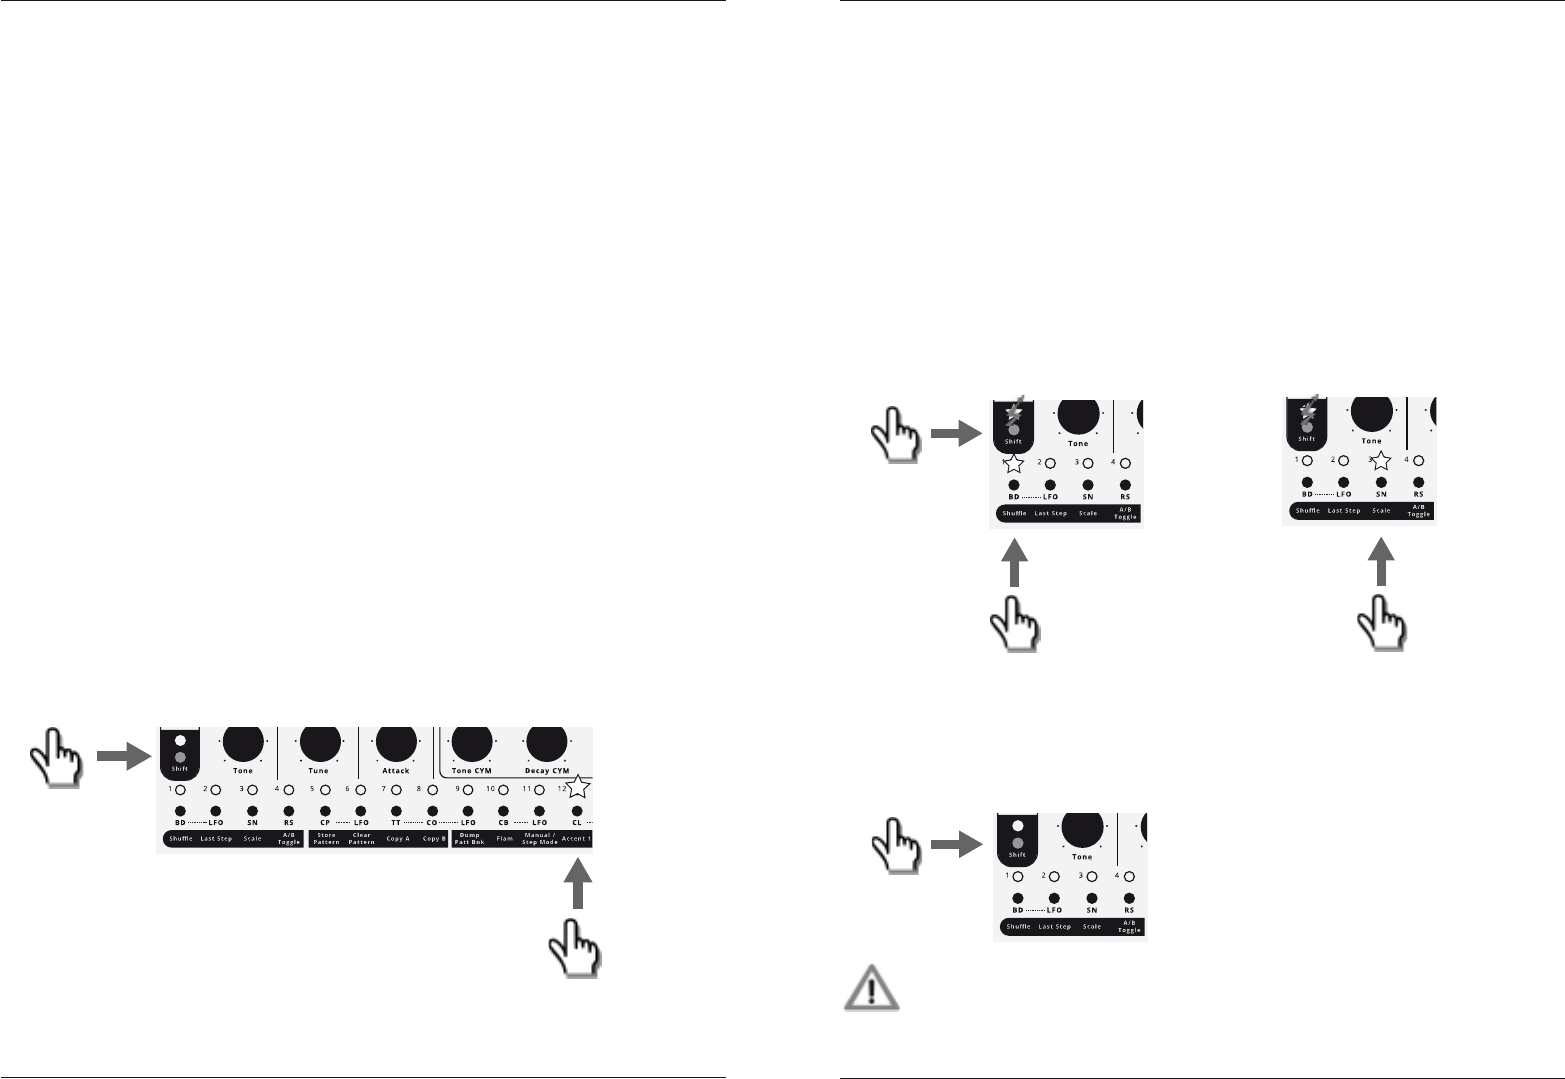
The Shift key (bottom left) accesses the „shift function“ resp. second function of the other
keys. On the front panel, the shift functions are always labelled in a darker font so make
sure you put your glasses on (or turn on the ood lights).
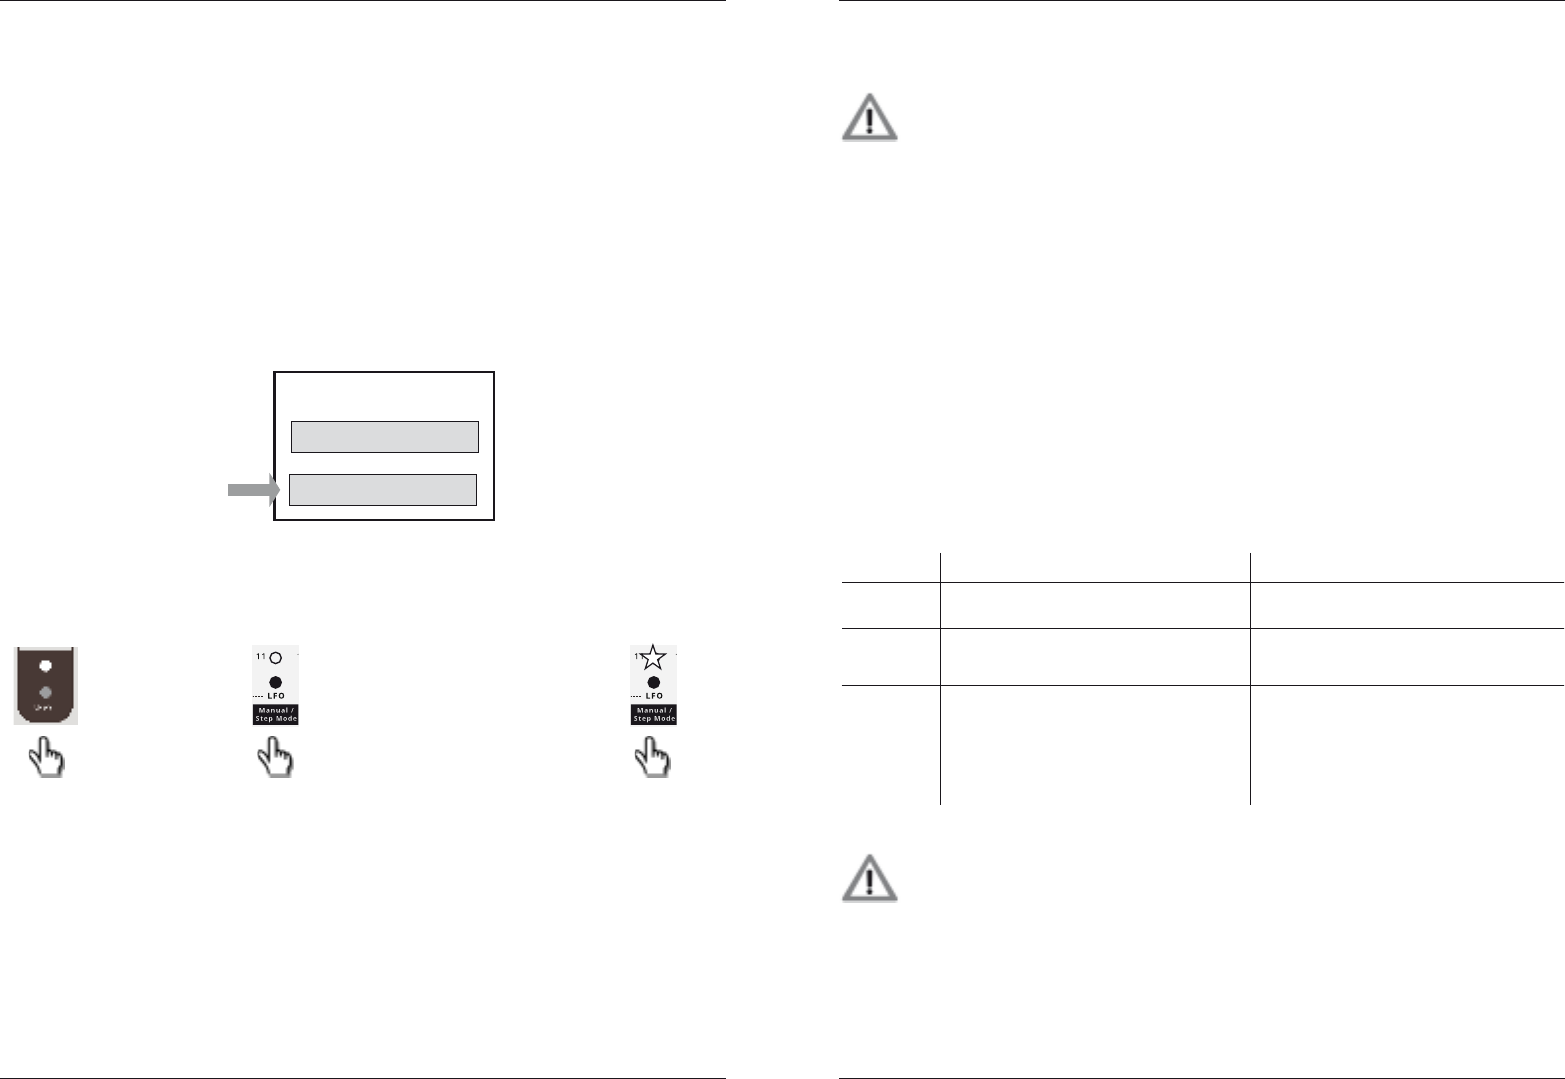
Depending on the dedicated function, the shift function works in two different ways:
When a shift function only has two settings (e.g. on/off), or when all available values can
directly be accessed in the next lower level, simply hit the shift key and keep it depressed.
Now hit the desired step key to toggle between the two possible settings or enter the desi-
red value. For example, the start/stop function and the selection of the four Accent levels
works just this way.
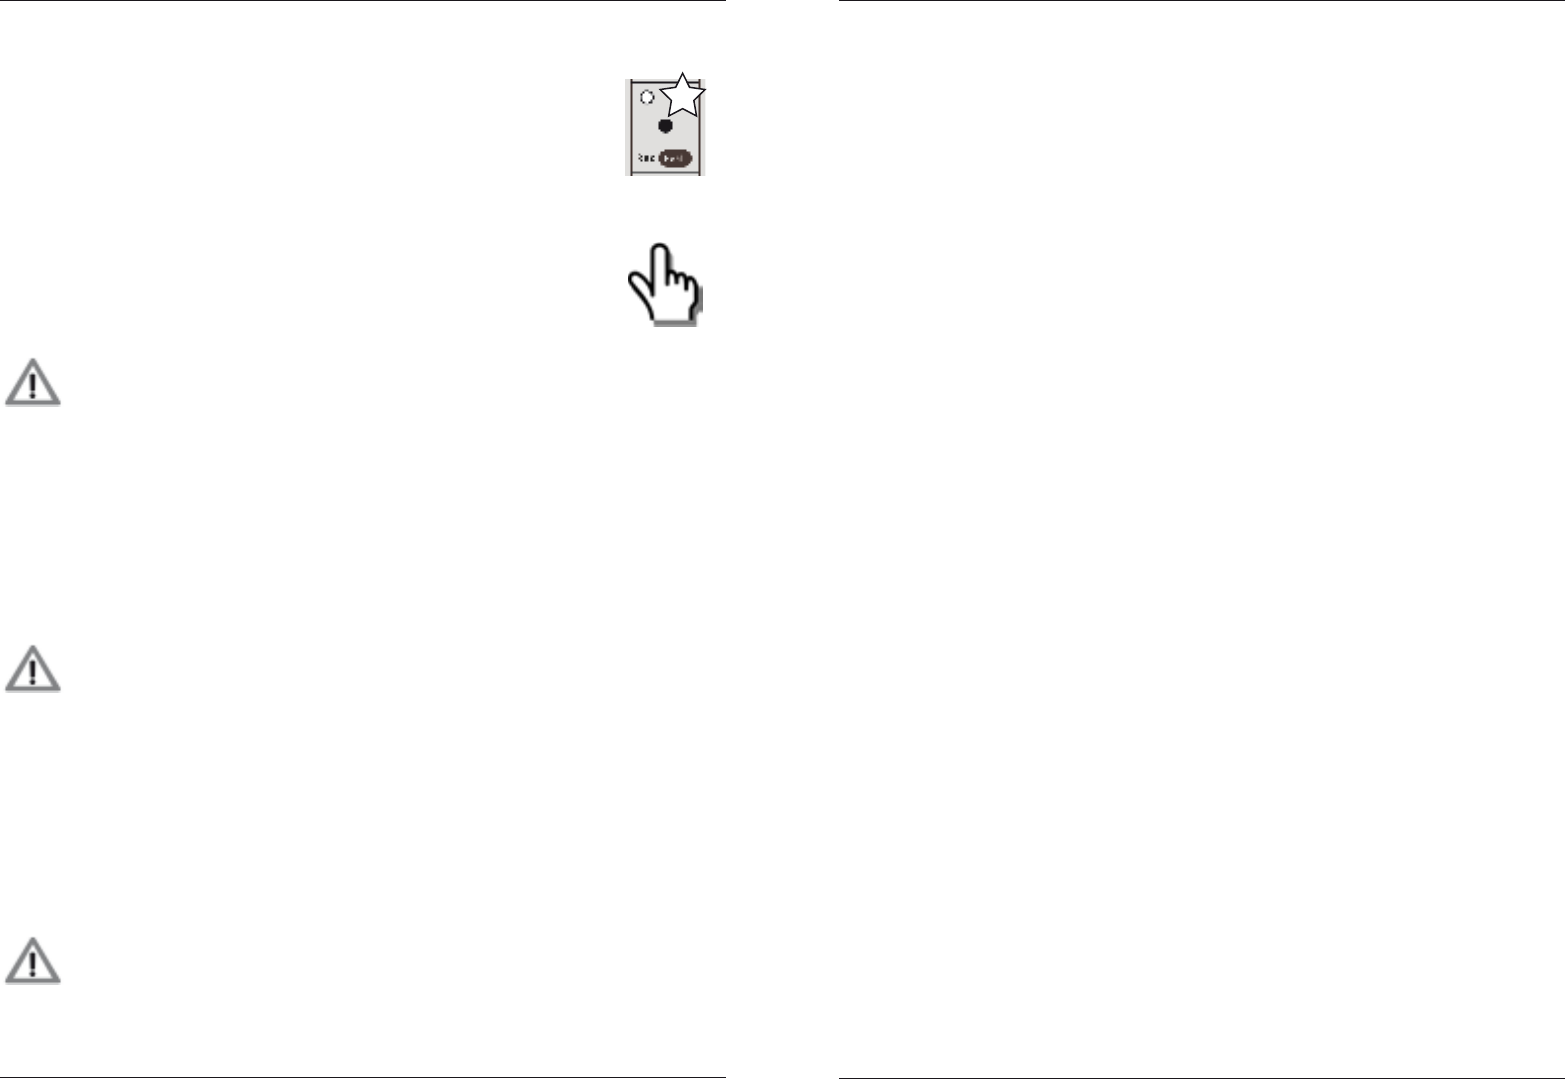
O H
LED lights up
press Shift +
hold
press step key
(e.g. „Accent 1“)
Next, there are shift functions that access another level of possible value settings. It takes
an additional function level to access them. They include, for example, the shufe intensity,
the step number of the tracks resp. pattern length („Last Step“), and the scale function.
In this case, please select the desired function using both shift and step keys rst. Then
select the desired parameter value, again using a step key. The example below illustrates
the adjustment procedure for the shufe intensity (Step key 1).
1. Select shift function: Press and hold Shift and press Step key 1. Shift will be ashing
and the step with the current shufe intensity setting lights up.
2. Release Shift (ashes continuously) and select the desired value by hitting a step key.
The step keys now correspond to the parameter values 1 - 16.
3. To exit the shift function, simply hit Shift again – done.
O H
O H
O H
press Shift +
hold
release
Shift
press step key
(e.g. „Shuffle“)
press step key
(e.g. „3“)
LED with current value lights up
(e.g. „1“ = no shuffle)
1. Select shift function 2. Select parameter value
LED flashes LED flashes
LED with new value lights up
press Shift
3. Exit shift function
LEDs off
To determine whether the parameter setting/value of a shift function is
selected directly or requires an additional step to be selected, the shift LED
will either be ashing intermittently or not. In the rst case (direct access),
the shift LED will stay dark, in the second case (hidden function) it will be
ashing.
11
MFB Tanzbär Lite Play Mode – Playing the Tanzbär Lite
MFB Tanzbär LiteUser Interface
10
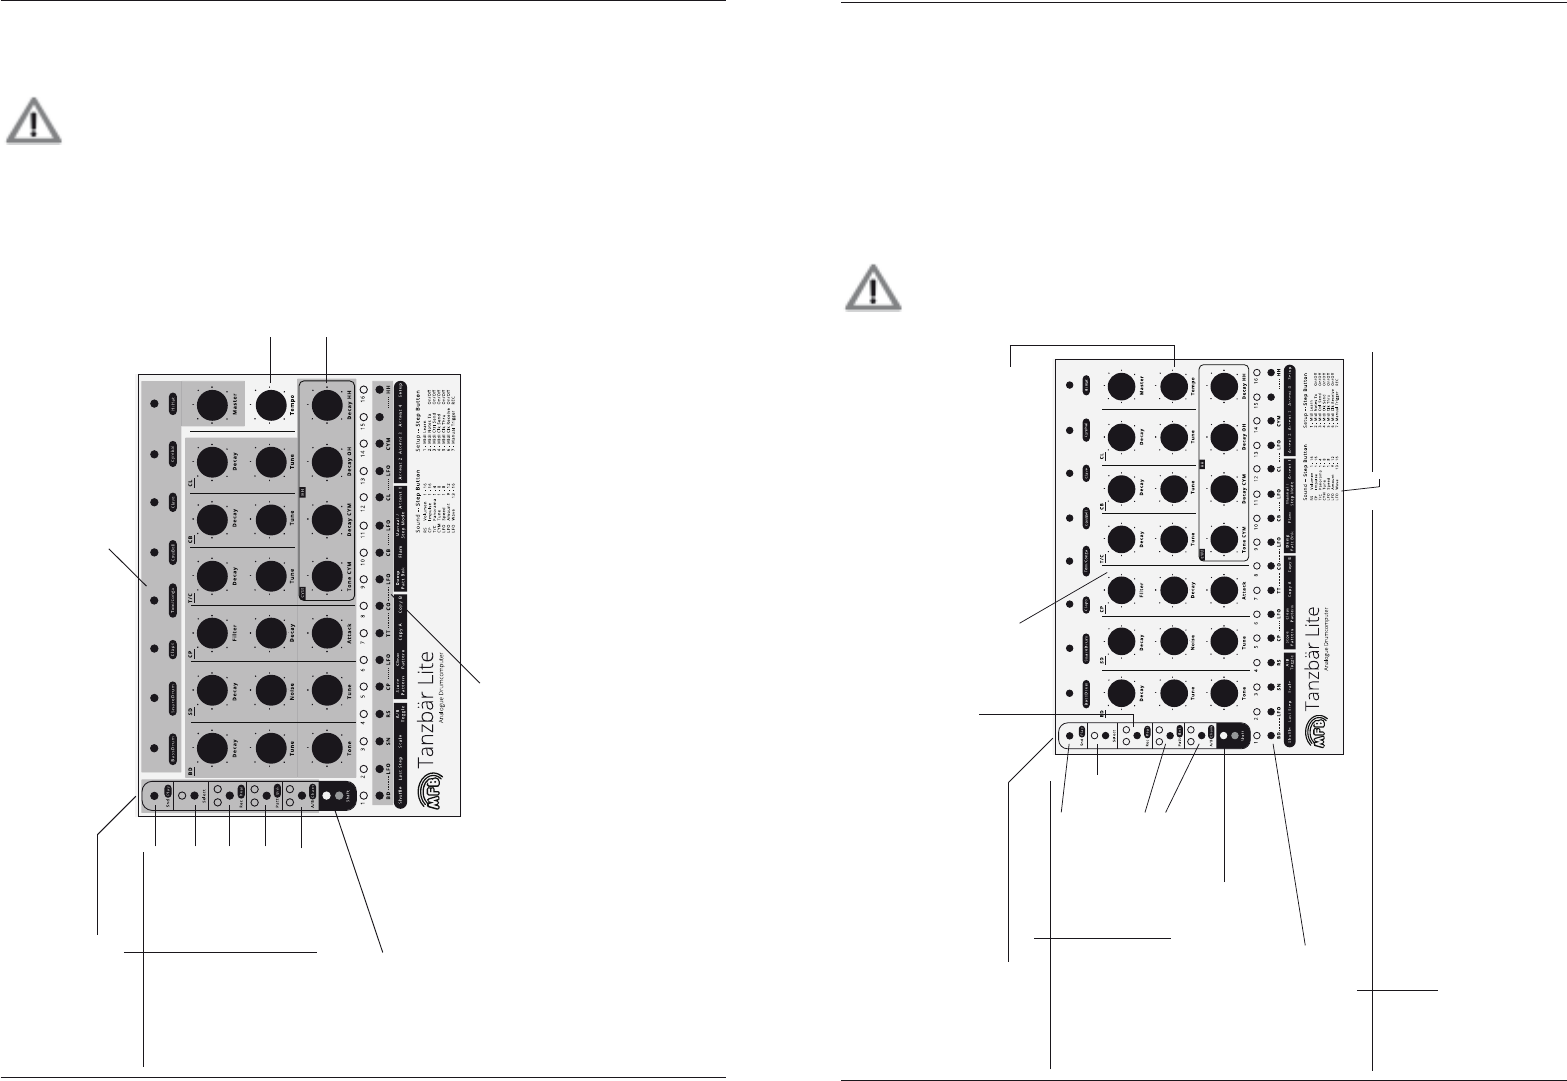
The following gure will show you which modes and functions are related to specic
buttons.
Please note that this is just an overview. You may use it mainly as an orien-
tation or quick programming guide. The complete set of functions and the
operating steps necessary will be explained later in the text. Please feel free
to read on.
O H
Level controls (not storable)
Tempo
Function keys
Shift
Access to
dual/sub functions
Sound parameters
for:
- bass (BD)
- snare (SD)
- clap (CP)
- tom/conga (T/C)
- cowbell (CB)
- claves (CL)
- cymbal (CYM)
- hihat (HH)
Step keys 1-16 to:
- select Pattern (in Play mode)
- mute track (in Play Mode) / select track (in Record mode)
- select / set / erase steps (in Record mode)
- select sub functions (+ Shift)
- sequencer functions (shuffle etc.) (in Play mode / Record mode)
- add. sound parameter, LFO parameter (in Record mode)
- memory functions
- setup functions (MIDI etc.)
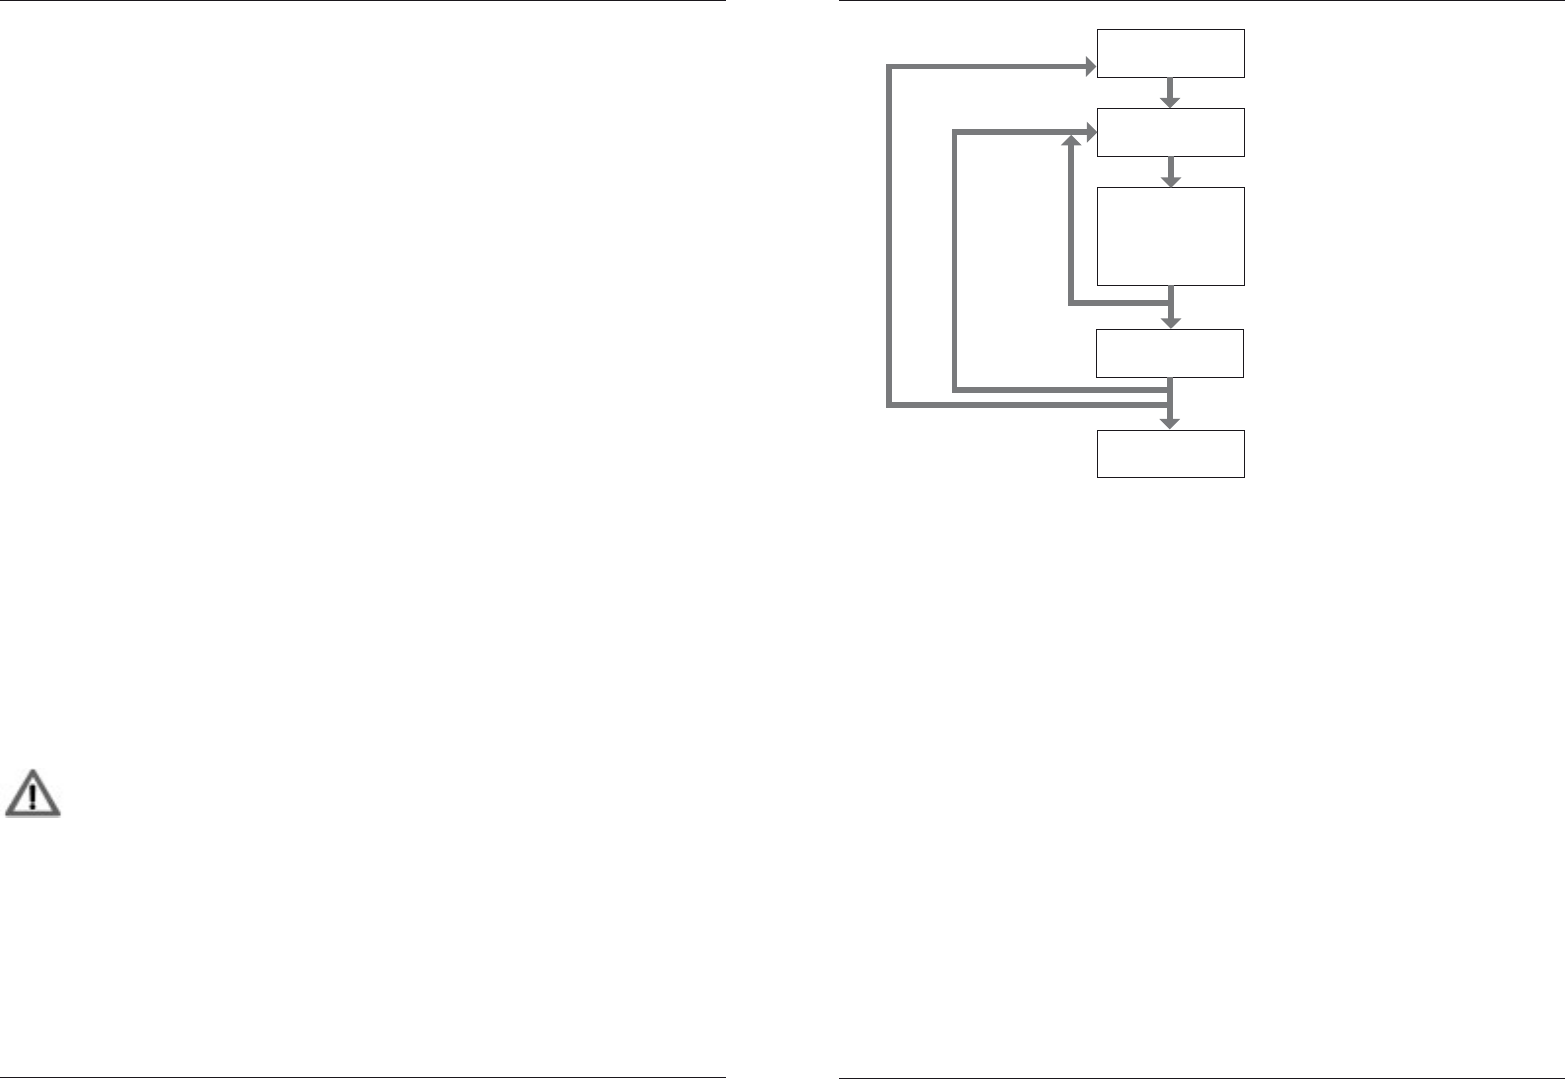
Function
Hidden
sound param.
Select fctn.
Play mode /
Step Rec mode
Pattern
selection
Pattern
A/B-toggel
+ Shift
Play/Stop
- / -
Realtime
Rec mode
Bank
selection
Pattern
chaining
PLAY MODE
First of all, let´s have a go at some demo patterns to give you an idea of what Tanzbär Lite
can do. At the same time, we will learn how to ”perform“ on the Tanzbär Lite – that is, how
to play back patterns, modify them, and how to tweak sounds.
To play back and tweak pre-programmed sounds and patterns, we need to go into PLAY
MODE.
The following gure shows an overview of the Play Mode and its functions.
Please bear in mind this is just an overview. You may use it mainly as an
orientation – all the necessary operating steps are covered in detail in the
following text – please read on carefully.
OH
Tempo
Function keys
Shift
Access to dual/sub functions
Sound parameters
Function
Access to hidden
Sound-Parameter
Reload sound setting
from current pattern
Pattern selection
Pattern A/B toggel
+ Shift
Play/Stop
Save current
sound setting to pattern
Bank selection
Pattern chaining
In Play mode the Rec/Real LEDs have to be off !
(if necessary, press Rec/Real key)
Track mute
Step keys 1 - 16
Shuffle
Shuffle intensity
1 - 16
1 - 16
Last Step
Pattern lenght
1 - 16 steps
1 - 16
Scale
Scale (time signature)
32th. / 16th.-triplet /
16th. / 8th.-triplet / 8th.
1 - 5
A/BToggle
Selects pattern A/B-part
manual / auto
-/-
+ Shift:
- Function:
- Value range:
- Select with
step keys:
+ Snd
add. sound parameter
1 - 16
1 - 16
MFB Tanzbär LitePlay Mode – Playing the Tanzbär Lite
12 13
MFB Tanzbär Lite Play Mode – Playing the Tanzbär Lite
To enable Play mode, please hit the Rec/Real key. Both LEDs above
should be idle now.
In Play mode, you can play back patterns. The following functions are
available:
• select patterns
• start / stop the sequencer
• adjust tempo
• mute tracks
• tweak the sound settings using the associated controls
• set the shufe intensity
• select pattern length („Last Step“)
• select scaling – only available when sequencer is stopped
• toggle between pattern parts A and B
Selecting patterns
Tanzbär Lite offers four pattern banks with 16 patterns each – 64 patterns in total.
Bank 1 contains great beats created by Berlin-based techno wizard Yapacc. If desired,
the content of Bank 1 can be overwritten (for example when you believe your beats to be
smarter). Banks 2, 3, and 4 are waiting for great creations of your own.
The following gure shows how to select banks and patterns:
Bank 1 (MFB-presets by Yapacc)
Pattern 1
Select bank: Select preset:
Pattern 16
to
Patt/Bnk LEDs:
hold Shift +
press Patt/Bnk
hold Patt/Bnk +
press Step 1-16
Bank 2
Bank 3
Bank 4
Pattern 1
Pattern 16
to
Pattern 1
Pattern 16
to
Pattern 1
Pattern 16
to
Starting / stopping the sequencer
• Hold Shift + press Play. The sequencer will start.
• Hold Shift + press Play again. The sequencer will stop.
Adjusting tempo
• Turn Tempo control.
There is no tempo readout on Tanzbär Lite. The value range of the control covers approx.
30 BPM to 180 BPM.
Muting tracks
• Press Step keys.
When in Play mode, the tracks are directly muted using the corresponding step keys, me-
aning Step 1 = bassdrum, Step 5 = clap etc. LFO tracks can also be muted. In this case,
the pitch of the corresponding instrument will not be modulated anymore. The LED of a
muted track will glow at reduced brightness.
You can decide whether mutes will be stored in a pattern or not when using
the Save Pattern function for permanent saving. Please use the Setup func-
tion #8, described on page 34 of this manual.
Tweaking sounds
• Turn sound parameter controls.
By moving the 19 sound parameter controls, you can tweak the sounds of the seven inst-
ruments in realtime just as you fancy (BD - bassdrum, SD - snare, CP - clap, TT - tom, CO
- conga, CB - cowbell, CL - clave, CYM - cymbal, OH - open hihat, HH - closed hihat).
• Press Select to reload the sound settings stored in the current pattern.
• Hold Shift + press Select to store all edits of a sound in the current pattern.
Attention: The sound settings previously stored in the patterns will be overwritten.
There is no undo function so you better think twice!
We will have a closer look at the sound parameters in the next chapter – stay tuned (no
pun intended).
MFB Tanzbär LitePlay Mode – Playing the Tanzbär Lite
14 15
MFB Tanzbär Lite Play Mode – Playing the Tanzbär Lite
Step Mode and Manual Mode
It is about time to try out a very interesting feature of your Tanzbär Lite: As you may have
noticed when playing back patterns, all steps of each instrument can have individual sound
settings. In other words, you can program individual sound settings for each step of the
sequencer. We will nd out later how to operate sounds for individual steps. However,
this feature also effects the Play mode – that is why we do not want to keep it secret any
longer.
Basically, trigger data (the active steps) and sound settings are stored separately in each
pattern. Using the sound controls, you can tweak the sounds at any time without overwri-
ting the stored settings or tampering with the trigger data of the pattern. This opens up two
different programming options that we call „Step mode“ and „Manual mode“.
To toggle between Step mode and Manual mode, please use Shift and Step key 11. When
holding down Shift and Step key 11 lights up, Tanzbär Lite will be in Step mode. Step mode
is the default setting.
Step Mode
In Step mode, each step of a pattern can have its own individual sound setting. Step mode
is the default factory setting. When loading a pattern (page 12), you will hear its sound
settings the way they are stored in memory.
Now you can tweak the sounds any time, using the front panel controls. Of course, they will
now lose their individual sound settings per step.
• To reload the sound settings stored within the current pattern, simply press Select.
• To store the tweaked sound setting in the current pattern, hold Shift + press Select.
Attention: The sound settings previously stored in the patterns will be over-
written. There is NO UNDO! Don‘t say we didn‘t warn you.
Alternatively, you can store the entire pattern (trigger and sound settings) permanently any
time, using the Store Pattern function. Please see page 34.
Manual Mode
When loading a pattern in Manual mode, only its trigger data will be loaded. The sound
settings are matching the current settings of the front panel controls. That means, when
playing back the same pattern in Manual mode, you will not hear individual sounds per
step but the sound that matches the current front panel control settings across the entire
pattern length.
Of course you can tweak the sound settings again as you feel and store the new creation
permanently in the current pattern by using the Store Pattern function (please see
page 34).
The following chart compares the options of Manual- and Step mode:
Again: The key shortcut Shift + Select only exits the currently selected
sound-editing process and prevents unintentionally overwriting the sound
with your new sound setting.
To store the entire pattern (trigger and sound settings) permanently, you
need to use the Store Pattern function. Please see page 34.
Pattern
Trigger data
Sound
controls Sound settings
Manual Mode or Step Mode
(default setting)
press Step 11
hold Shift
+
O H
O H
Manual Mode
Sounds per stepSound per pattern
or
Sound complies with the current control settings Sounds comply with the setting stored in current pattern
• Set „live tweaked“ sounds back to pattern setting
with Select
• Store „live tweaked“ sounds in pattern with
Shift+Select.
• Store pattern (triggers + step-sounds)
with Store Pattern function
• Store pattern (triggers + sound)
with Store Pattern function
Step Mode (defaul setting)
press Step 11
hold Shift
Sound-
settings:
When Pattern
is loaded, you
hear:
Pattern store
options:
+

MFB Tanzbär LitePlay Mode – Playing the Tanzbär Lite
16 17
MFB Tanzbär Lite Play Mode – Playing the Tanzbär Lite
Shufe
This function alters the shufe ratio of a pattern. This is a global parameter, all tracks will
be given the same degree of shufe intensity.
• Hold Shift + press Shufe (Step 1) to access the shufe function.
Shift LED is ashing, the Step key representing the shufe intensity value currently
active will light up.
• Press Step 1 - 16 to select one of 16 available shufe intensities.
Shift LED is ashing, the newly selected Step key will light up.
• Press Shift to exit the shufe function.
Last Step
This function determines the pattern length resp. its number of steps.
• Hold Shift + press Last Step (Step 2) to select the Last Step function.
Shift LED is ashing, the Step key representing the currently active Last Step
setting will light up.
• Press Step 1 - 16 to select the last step of the pattern resp. the pattern length.
Shift LED is ashing, the newly selected Step key will light up.
• Press Shift to exit the Last Step function.
Using this function while the sequencer is running can produce interesting
results. Please keep in mind that, in this case, the sequencer will be unable
to locate the original downbeat resp. the rst note of the pattern. This might
cause sync problems when using multiple sequencers, rhythm units, or
DAWs.
Scale
Through this function, you can select the scaling of a pattern or, in other words, the note
values and the directly related maximum number of steps per pattern. The step keys 1 - 5
provide the following values:
• Step 1: 32th note (32 steps, spread across pattern parts A and B)
• Step 2: 16th note triplets (24 steps, spread across pattern parts A and B)
• Step 3: 16th note (16 steps, default / standard setting)
• Step 4: 8th note triplets (twelve steps)
• Step 5: 8th note (eight steps)
This is how to operate the scale function:
• Hold Shift + press Scale (Step 3) to select the Scale function.
Shift LED is ashing, the Step key representing the currently active scaling will light
up.
• Press Step 1 - 5 to select the desired new scaling.
Shift LED is ashing, the newly selected Step key will light up.
• Press Shift to exit the Scale function.
A/B Toggle
As you have just learned from the scale function, a pattern can have a maximum number
of up to 32 steps. In order not to waste precious studio space, we have equipped your neat
little Tanzbär Lite with just 16 step keys. When selecting a scaling that requires more than
16 steps, Tanzbär Lite automatically creates a pattern of two halves „A“ and „B“. The A/B
Toggle function determines how both halves of the patterns are played back. You have the
following options:
• Auto: The entire pattern will be played back, Tanzbär Lite automatically toggles
between part A and part B.
• Manual: Part A or part B will be played back optionally. The selection is done
manually using the A/B key.
Both LEDs of the A/B key show the pattern part that is currently being played back. The left
LED of the A/B key represents part A, the right one part B.
This is how to operate the A/B Toggle function:
• Hit A/B chain key to toggle between the played back pattern halves (only available
if patterns have more than 16 steps). The respective LED will light up.
To change the A/B toggle mode:
• Hold Shift + press A/B Toggle (Step 4) to select between the two available
A/B Toggle modes:
- Auto: A/B Toggle (Step 4) will light up.
- Manual: A/B Toggle (Step 4) will stay dark.
Chain
Through this function, you can daisy-chain up to sixteen patterns to form a longer
sequence. Any pattern order is allowed. The pattern chain cannot be stored permanently,
so the function is intended to be used in a live situation. Programming can be done while
the sequencer is running. This is how to operate the Chain function:
• Hold A/B Chain key + and press up to 16 step keys in any order to program the
desired pattern sequence.
• Release A/B Chain key. Both LEDs will light up.
The pattern sequence that has just been entered is now being played back as an innite
loop.
To stop the playback of the pattern chain,
• hold Shift + press A/B Chain.
The sequencer will now play back the last pattern selected. You do not need to stop the
sequencer playback to access the chain function.
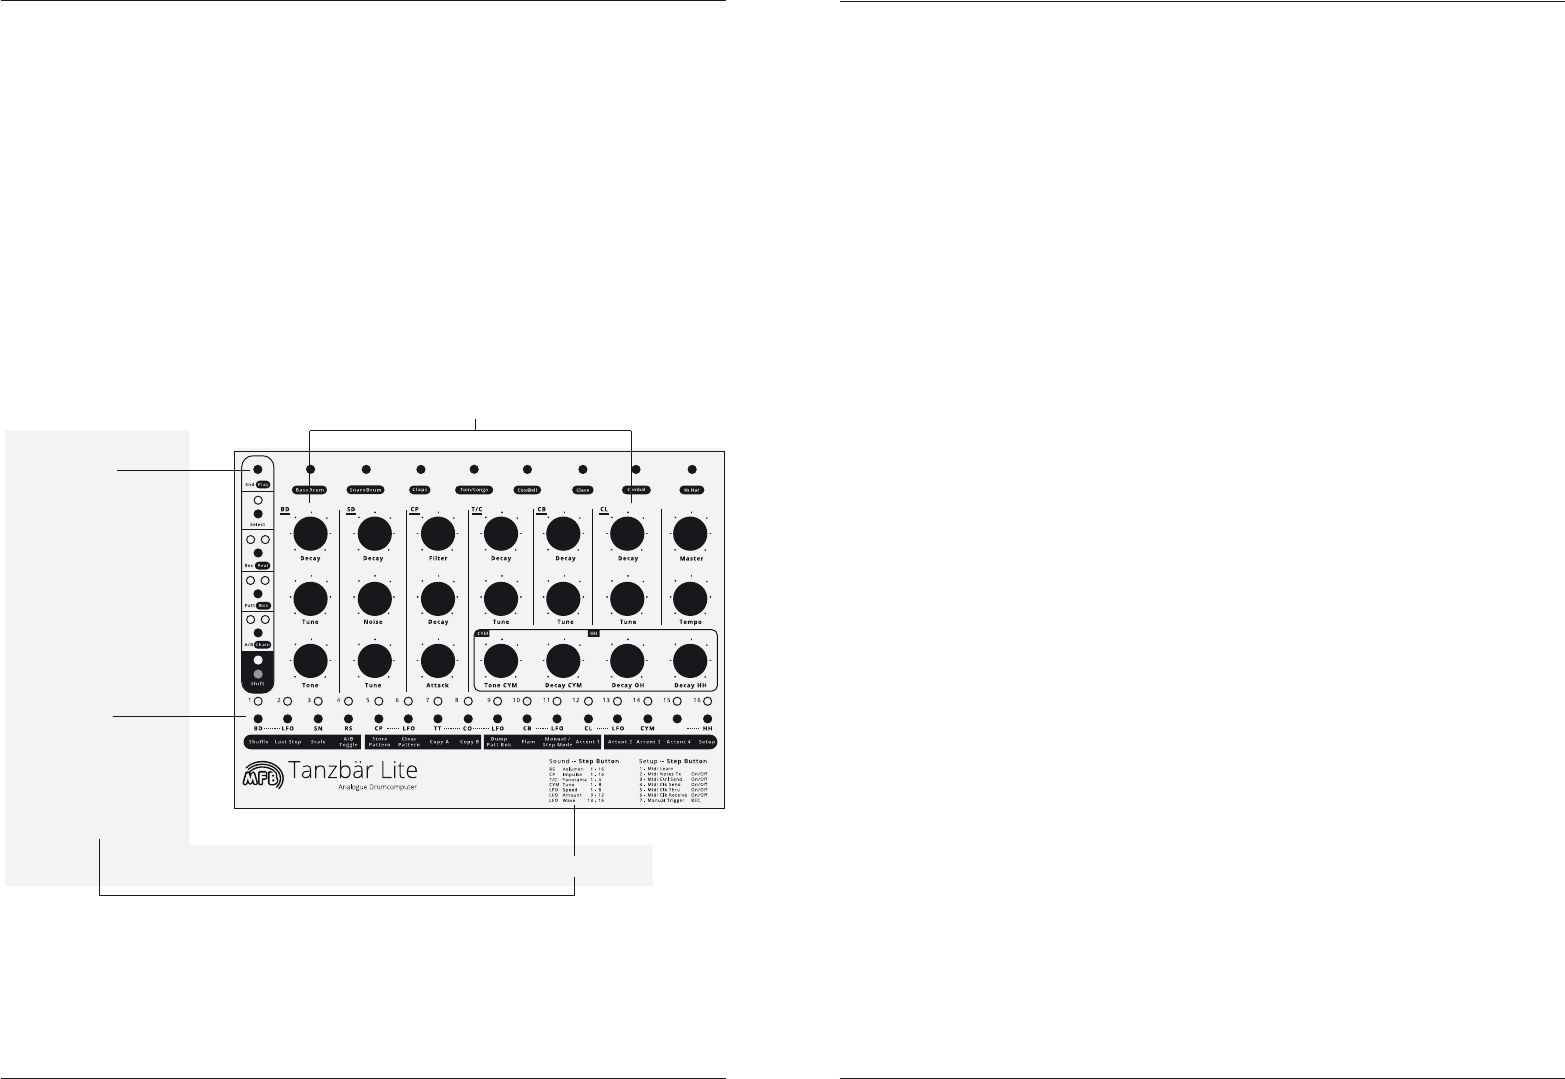
MFB Tanzbär Lite MFB Tanzbär LiteSound Generation
18 19
Sound Generation
SOUND GENERATION
In this chapter, we are going to introduce the sound generation and its parameters.
Instruments
Tanzbär Lite offers ten different instruments with real analog sound generation.
Bassdrum, clap, tom/conga as well as cowbell and claves, are assigned to LFO tracks
which allow for pitch- resp. tone color modulation of the respective instrument. The LFO
tracks can be edited and muted individually.
The instruments can be edited directly using the controls on the front panel. Apart from
that, some instruments offer an additional „hidden“ parameter that can be accessed and
edited using the function key „Snd“ and a corresponding step key.
Snd keys and Step keys
Through the Sound key (Snd) you can access a hidden sound parameter for some instru-
ments (listed as „Sound – Step Button“ on the front panel). This is how the hidden sound
parameter can be accessed:
• Hold Snd key.
• Additionally press step key to select the desired instrument (depending on the
number of available parameter values, several step key LEDs will light up).
In Record mode, this selection is not required since there is an instrument selected
all the time.
• Press step key again (while still holding Snd) to enter the desired parameter value,
e.g. between 1 and 16. You may press several step keys consecutively to try out
different settings. The last step key selected will light up permanently.
• Release Snd key.
Here you will nd a list of all available sound parameters of all instruments:
BD (Bassdrum)
• Decay controls decay time
• Tune controls pitch (can be modulated by an LFO track)
• Tone controls the volume of the „kick impulse“
SD (Snaredrum)
• Decay controls decay time
• Noise controls level of the noise signal
• Tune controls pitch
CP (Clap)
• Filter controls brightness of the sound (can be modulated by an LFO
track)
• Decay controls decay time
• Attack controls the density of the clap impulses
• Snd+CP+Step selects between sixteen different attack transients
T/C (Tom/Conga)
• Decay controls decay time (up to innite tone)
• Tune controls pitch (can be modulated by an LFO track)
• Snd+TT/CO+Step controls panorama position – four differnt values
(only audible when stereo master out is used)
Depending if tom- or conga track is selected, the decay- and tune controls access the
corresponding parameter of one of these two instruments.
O H
direct access to sound parameter
2.
Step keys
• select instrument resp.
hidden sound parameter
• selects parameter value
1.
Snd key
provides hidden
sound parameter
- press + hold
mapping of step keys with parameters and values

MFB Tanzbär Lite
21
Record Mode – Programming Patterns
MFB Tanzbär LiteSound Generation
20
CB (Cowbell)
• Decay controls decay time
• Tune detunes both signal generators and changes the sound
(can be modulated by an LFO track)
CL (Claves)
• Decay controls decay time
• Tune detunes both signal generators and changes the sound
(can be modulated by an LFO track)
CYM (Cymbal)
• Decay controls decay time
• Tone changes the sound
• Snd+CYM+Step changes the tuning (eight values)
HH (Open und Closed Hihat)
• Decay controls decay time
When using long decay settings, open and closed hihat may cut off each others decay
phase.
LFO (modulation tracks for BD, CP, T/C, CB and CL)
• Snd+LFO+Step 1-8 controls LFO speed („Speed“)
• Snd+LFO+Data 9-12 controls modulation amount („Amount“)
• Snd+LFO+Step 13-16 selects LFO waveshape („Wave“): saw up /
down, sine up / down
In addition to the parameters listed above, each instrument comes with a dedicated
level control that cannot be programmed / stored. Same thing goes for the Master Volume
control. We thought we should point this out in case you were wondering.
RECORD MODE – PROGRAMMING PATTERNS
It is about time now to create your own patterns – please stay tuned.
The different record modes
As you (hopefully) will have learned in the Play mode section, you can program individual
sound settings for each sequencer step. Patterns programmed that way can sound much
more interesting than you would expect from a drumcomputer with only seven instruments.
Still, you might not want to use this cool feature all the time. Sometimes, it can make sense
when every beat of a pattern sounds exactly the same across the entire pattern length. Or
maybe you feel like tweaking the sound in realtime while the sequencer is running? This is
all possible.
Apart from that, you can play Tanzbär Lite „live“ via step keys or external MIDI devices
such as a keyboard, or drum pads. You can even program your pattern in realtime by
recording these steps into the sequencer. To provide you with all these features, Tanzbär
Lite uses several different record modes that will be discussed right now (sweaty hands
already).
Step Record Mode (page 22)
In this mode, you can set steps, program accent and am settings as well as sound
settings for each step individually, or in groups.
Realtime Record Mode (page 28)
Here, you can tweak the sound settings using the frontpanel controls and record them into
an existing pattern in realtime.
Manual Trigger Record (page 29)
In this mode, you can record steps via step keys or external MIDI devices such as a
keyboard, or drum pads in realtime. The sounds can be tweaked (but not recorded) via
frontpanel controls or MIDI controller in realtime.
Pattern length and scaling (Last Step and Scale)
No matter which mode you select – it makes perfect sense to select specic scaling and
pattern length rst. This goes for Record mode as well as for Play mode – with one impor-
tant difference: in Record mode, each track can have an individual length (resp. number
of steps). The functions „Last Step“ and „Scale“ are described on page 16 in section „Play
Mode“.
MFB Tanzbär Lite MFB Tanzbär Lite
Record Mode – Programming Patterns
22 23
Record Mode – Programming Patterns
Step Record Mode
1. Enabling Step Record mode / select track / select track length
To enable Step Record mode and select the desired track (resp. the
instrument) at the same time, please
• hold the Rec key + press a Track key.
When releasing the keys, the right LED above the Rec key will light up.
If the selected track contains any steps, their LEDs will light up as well.
You may now (or after any other programming step) determine the length
resp. the step number of the selected track using the shift-function „Last
Step“ (page 16).
Please note: In Record mode, each track may have an individual number
of steps while in Play mode, „Last Step“ is a global parameter. „Scale“ is
always applied globally.
2. Setting Steps
• Press Step key(s). Their LED(s) will be ashing.
When pressing a step key once, its associated LED will be ashing, telling you that the
step is „set“ and puts out a trigger. At the same time, the step is „selected“, waiting for
further editing, e.g. sound, accent, and am settings.
Pressing the step one more time will erase the step from the sequence (LED off).
The tracks OH and HH cannot have identical steps. Setting e.g. step 1 on
track OH erases a previously setted step 1 from track HH and vice versa.
3. Editing sounds per step
• Turn sound controls (and perhaps the Data control) of the selected
track/instrument.
All steps previously set / selected will now feature the new sound setting you have just
dialled in. Any further step(s) you are entering right now will also be ashing and feature
this sound setting.
If one (or more) step is to feature individual sound settings – the actual
purpose of the Step Record mode –, the steps previously selected rst have
to be „locked“ before other steps can be set and/or selected for further sound
editing. The process of „selecting“ and „locking“ sequencer steps is descri-
bed in the section Programming steps 7 and 8 on pages 24/25. This way,
you can set steps and provide them with individual sound settings without
having to stop the sequencer.
You may also proceed with further editing of the steps set previously. The following func-
tions are available:
4. Programming Accents
You can assign one out of four different accent levels to each selected step. This is done
using the shift function.
Let‘s pretend a track has been selected and the Record mode enabled (see programming
step 1). The selected track features some steps (see programming step 2), which – if ne-
cessary – have to be selected to be edited (Hold Select + press step(s) – their LEDs will
start ashing). Please now proceed as follows:
• Hold Shift + press Step key 12 – 15 („Accent 1 – 4“). This will determine the
accent level of the selected step(s). The Step key in question will light up.
All steps selected previously (ashing) will now receive the current accent setting. Every
further steps you set will also receive this setting. To change these settings again, rst
„lock“ (see programming step 7) and re-select (see step programming 8) the desired steps
before you enter new values.
5. Programming Flams
Flams are double or multiple drumhits. Drummers use these to make their performance
sound more sophisticated, and to attract girl-friends. Tanzbär Lite provides the option of
assigning sixteen different am patterns to each sequencer step. This is also done by using
the shift function.
Again, let‘s pretend a track has been selected and the Record mode enabled (see pro-
gramming step 1). The selected track features some steps (see programming
step 2), which – if necessary – have to be selected in order to be edited (Hold Select +
press step(s) – their LEDs will start ashing). Please now proceed as follows:
• Hold Shift + press Step key 10 („Flam“). Shift and all sixteen step keys will be
ashing, telling you that a shift function has been enabled (am, in this case) and
sixteen different parameter values are up for selection using the step keys.
• Press a Step key 1 - 16 to select a am pattern.
You may press several step keys consecutively to try out different settings. The
step key selected last will light up permanently.
• Press Shift to exit the shift function. The shift LED will go dark again.
All steps previously selected (ashing) will now receive the current am setting. All further
steps you set will also receive this setting. To change these settings again, rst „lock“ (see
programming step 7) and re-select (see programming step 8) the desired steps before you
enter new values.
6. Programming additional sound parameter
Rimshot, clap, tom/conga and cymbal feature an additional sound parameter that can be
accessed via the shift function.
+ Track
MFB Tanzbär Lite MFB Tanzbär Lite
Record Mode – Programming Patterns
24 25
Record Mode – Programming Patterns
Again, let‘s pretend a track has been selected and the Record mode enabled (see pro-
gramming step 1). The selected track (RS, CP, T/C, CYM) features some steps (see
programming step 2) which – if necessary – have to be selected in order to be edited (Hold
Select + press step(s) – their corresponding LEDs will start ashing). Please now proceed
as follows:
• Hold Snd. Depending on the previously selected track, the step keys 1-16 (for „RS
Volume“ or „CP Impulse“) or 1-4 (for „T/C Panorama“) or 1-8 (for „CYM Tune“) will
be ashing, telling you that a parameter value between 1 and 16 resp. 1 and 4 or
1 and 8 can be selected using corresponding step keys.
• Keep on holding Snd + press step keys 1-16 or 1-4 or 1-8 to select a desired para-
meter setting.
You may press several step keys consecutively to try out different parameter value
settings. The step key selected last will light up permanently.
• Release Snd to exit Shift mode. The selected steps will start ashing again.
All steps selected previously (ashing again) will now receive the current parameter set-
ting. All further steps you set will also receive this setting. To change these settings again,
rst „lock“ (see programming step 7) and re-select (see programming step 8) the desired
steps before you enter new values.
7. „Locking“ already programmed steps
Do you like the track you have come up with? That‘s cool – please
• Press Select.
The steps that have previously been ashing will now light up permanently. This is to tell
you that the steps have been set and un-selected, i. e. the editing process of these steps
has been completed for the time being. Their parameter settings are now protected against
overwriting them unintentionally – in other words, they are rmly „locked“ away.
You may lock any steps at any time during the programming procedure described above.
Please note: The currently „locked“ settings are now only protected against
getting overwritten unintentionally but they have not yet been stored perma-
nently in the pattern itself. If you were to change the pattern now (or decide
to power down your Tanzbär Lite because of your neighbors complaining),
the step settings that had just been programmed would be lost forever. To
store them permanently, you need to use the „Store Pattern“ function which
will be discussed on page 34.
The following diagram shows a slightly simplied programming sequence of a track. To
simplify matters, all step edits (sound, accent, ams etc. – see programming steps 3-6)
are summed up in one single programming step.
8. Continuing programming process
Still not satised with your track? No problem – you can proceed with your track program-
ming work any time and set / edit / erase steps or edit already existing ones, no matter
whether individually or in groups.
To re-select and edit already set steps, please
• Hold Select + press step key(s).
The LEDs of the selected step will ash again, showing you that these steps have now
been selected and are ready to be edited. The process continues from programming
step 3.
To create / edit another track, start again at programming step 1. That way you can create
an entire pattern track by track.
9. Copying sound setting to other steps
You are lucky – you do not need to perform the entire programming procedure for eve-
ry new step all over again. Tanzbär Lite features a copy function that copies the sound,
accent, and am settings to other steps very easily, as well as the impulse and sample
selection of any step. Please
• Hold Select + press the source step key. Its associated LED will start ashing.
start Step Rec
/ select track
exit Step Rec
set step(s)
• hold Rec + press Track
• press Step(s)
• press Select
• press Rec
• move Sound/Data control
use accent-, flam-functions,
add. sound parameters etc.
right Rec LED lights up
Rec LED off,
Step LED(s) off
Step LED(s) flash
Step LED(s) flashes
Step LED(s) lights up
new
step(s)
with
same
sound
with
new
sound
new
track
tweak sounds,
set accents, flams
etc.
lock step(s)
MFB Tanzbär Lite MFB Tanzbär Lite
Record Mode – Programming Patterns
26 27
Record Mode – Programming Patterns
• Release Select.
• Press new step keys to set new sequence steps. These steps will automatically
adopt the sound, accent, and am settings as well as the impulse and sample
selection of the source step.
Please note: In this operation mode, the sound controls only access selected
(ashing) steps.
All ve LFO tracks are identical. In our example, we will focus on the bassdrum LFO track.
Programming the LFOs is done in a fairly similar fashion as setting the additional instru-
ment parameter. It is done using the shift function and the step keys.
Let‘s pretend a bassdrum track has already been programmed completely. The BD-LFO
track has been selected and the Step Record mode enabled (see page 22, programming
step 1). Please now proceed as follows:
• Press step key(s). The steps set will start ashing and tell you that they have been
activated for further editing.
• Hold Snd. The step keys 1-16 will start ashing, showing you that parameter values
between 1 to 8 („LFO Speed“), 9 to 12 („LFO Amount“) and 13 to 16 („LFO Wave“)
are now available.
• Keep Snd pressed + press step key 1-8 resp. 9-12 or 13-16 to select LFO speed,
amount and wave. The selected step key will light up permanently.
You may press several step keys consecutively to try out different settings.
The step key selected last will light up permanently.
Please keep in mind to select a sufcient LFO amount to make the modulation
effect audible.
• Release Snd. The step key set last will be ashing. Now you can select more steps
using Snd + Step(s) in order to assign different LFO settings to them.
• Press Select. The edited steps will now be de-selected and the parameter settings
„locked“ (when in doubt, please refer to page 25, programming step 8).
The key assignment for the LFO parameters works as follows:
Step 1 whole note Step 7 1/16th. triplet Step 13 sine up
Step 2 1/2th. note Step 8 1/16th. note Step 14 sine down
Step 3 1/4th. triplet Step 9 mod amount 1 Step 15 saw up
Step 4 1/4th. note Step 10 mod amount 2 Step 16 saw down
Step 5 1/8th. triplet Step 11 mod amount 3
Step 6 1/8th. note Step 12 mod amount 4
10. Programming LFOs
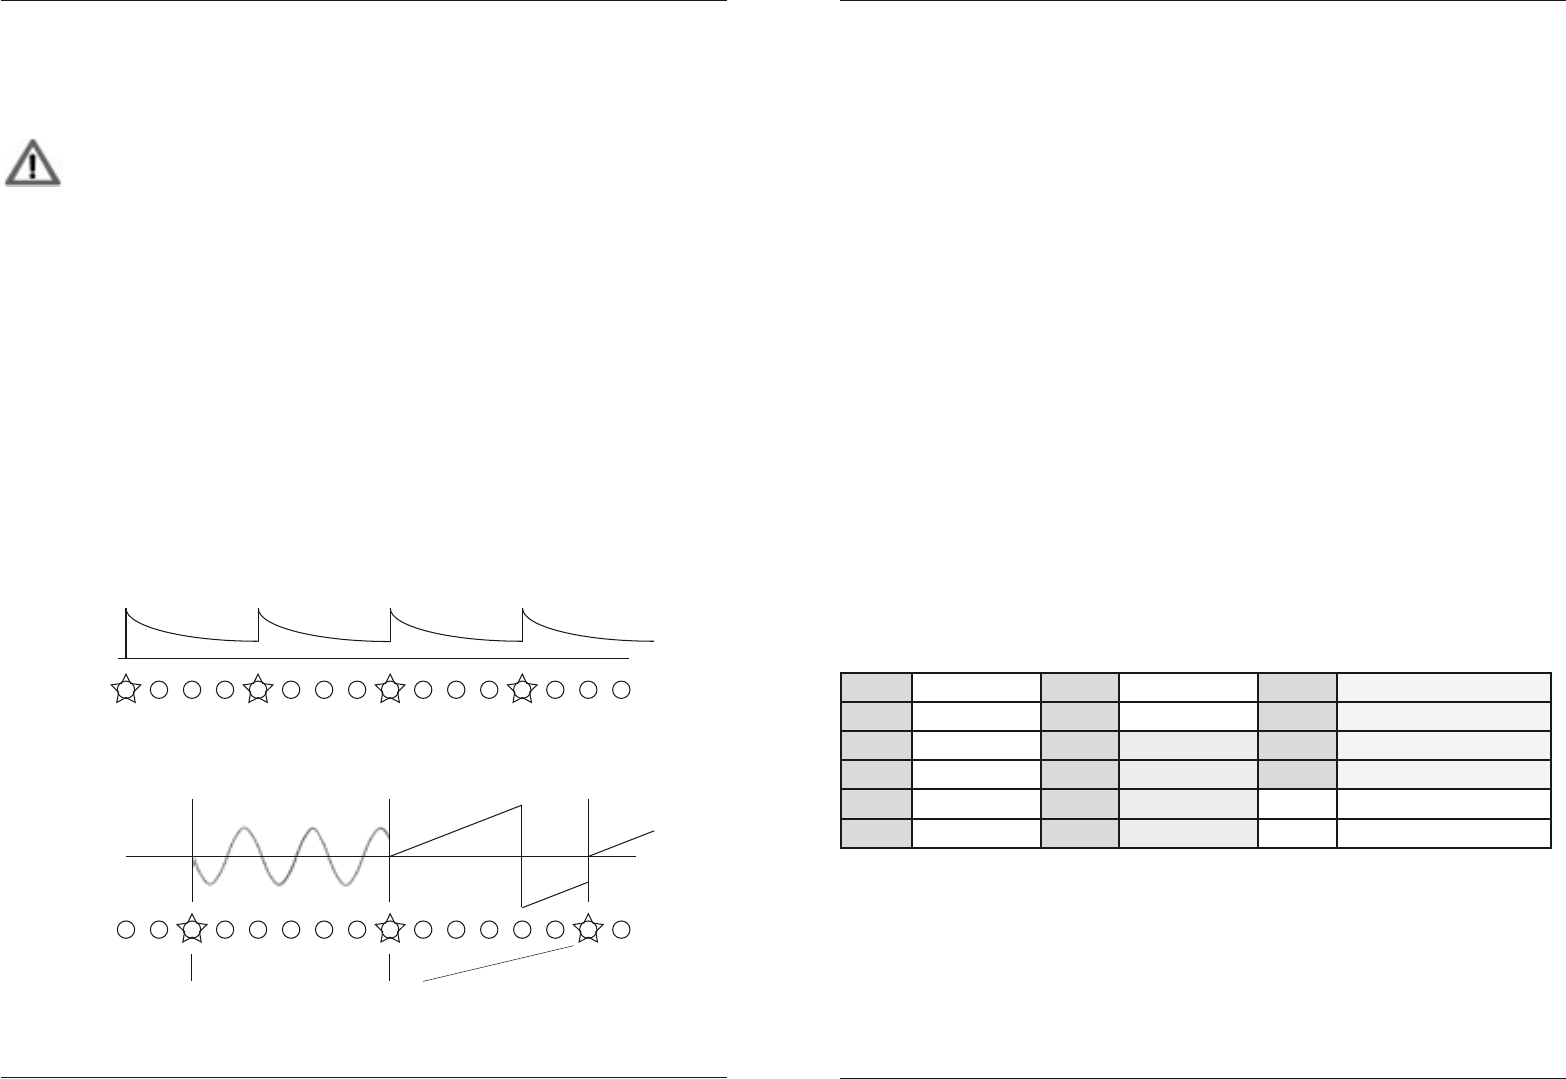
An LFO – low frequency oscillator – provides a continuously sweeping control voltage at a
low frequency (usually in sub-audio range). In other words, a slowly rising and falling vol-
tage that is used to modulate sound parameters. This is exactly what is happening inside
your Tanzbär Lite: Bass drum, toms, and both sampling instruments use dedicated LFO
tracks to control their respective pitch – in sync with the beat of your patterns! If so desired,
you can also program individual parameter settings for each LFO step.
Instrument track and related LFO track work independently from each other. Whereas
steps on an instrument track trigger sounds, a set step on an LFO track triggers a modu-
lation waveform. This waveform oscillates at the selected „speed“, „wave“, and „amount“
settings until the next step set has been reached. Here, it will be triggered again, if desired
with different „speed“, „wave“, and „amount“ settings. The following chart shows the relati-
on between Instrument and LFO tracks:
BD
...
...
LFO
BOOM...
Instr.-Trigger
Speed: 8th. note
Wave: Sine
Amount: 75%
Speed: 4th. note
Wave: Sawtooth up
Amount: 100%
LFO-Trigger
BOOM... BOOM... BOOM...
MFB Tanzbär Lite MFB Tanzbär Lite
Record Mode – Programming Patterns
28 29
Record Mode – Programming Patterns
11. Shufe
You can assign some shufe to you pattern (i. e. delaying one note by a certain factor,
shifting the focus of the rhythm a bit – real drummers tend to do this all the time, but not
always in musically meaningful ways). To accomplish that, you do not need to exit Record
mode or even stop the sequencer. Please note that shufe is a global parameter which
affects all tracks in the same way.
You already know the programming procedure of the shufe function from the Play mode
section. Please refer to page 16 when in doubt. In Record mode, it works exactly the same
way.
12. Saving patterns
To save your pattern permanently, you need to use the „Store Pattern“
function, described on page 34.
Programming patterns containing more than sixteen steps.
As you already know, you can program patterns with a length of more than sixteen steps.
In the section „Play Mode“ on pages 16 and 17 you have learned about the functions
„Last Step“, „Scale“, and „A/B Toggle“ and the way they interact. These functions are also
available in Record mode and work the same way here.
Please use the A/B key to toggle betwen both pattern sections „A“ and „B“. This way, you
can play back only the section you are currently working on (don‘t complain, the 808 you
sold for peanuts ages ago did that in a similar fashion). To use the toggle function, please
set the „A/B Toggle“ mode to „Manual“:
• Hold Shift + press A/B Toggle (Step 4) to select the A/B Toggle function.
If the LED of step key 4 stays dark, the function is set to „Manual“.
Now you can toggle between the pattern sections A and B manually:
• Press A/B key to select the pattern section that is to be played back.
The corresponding LED will light up.
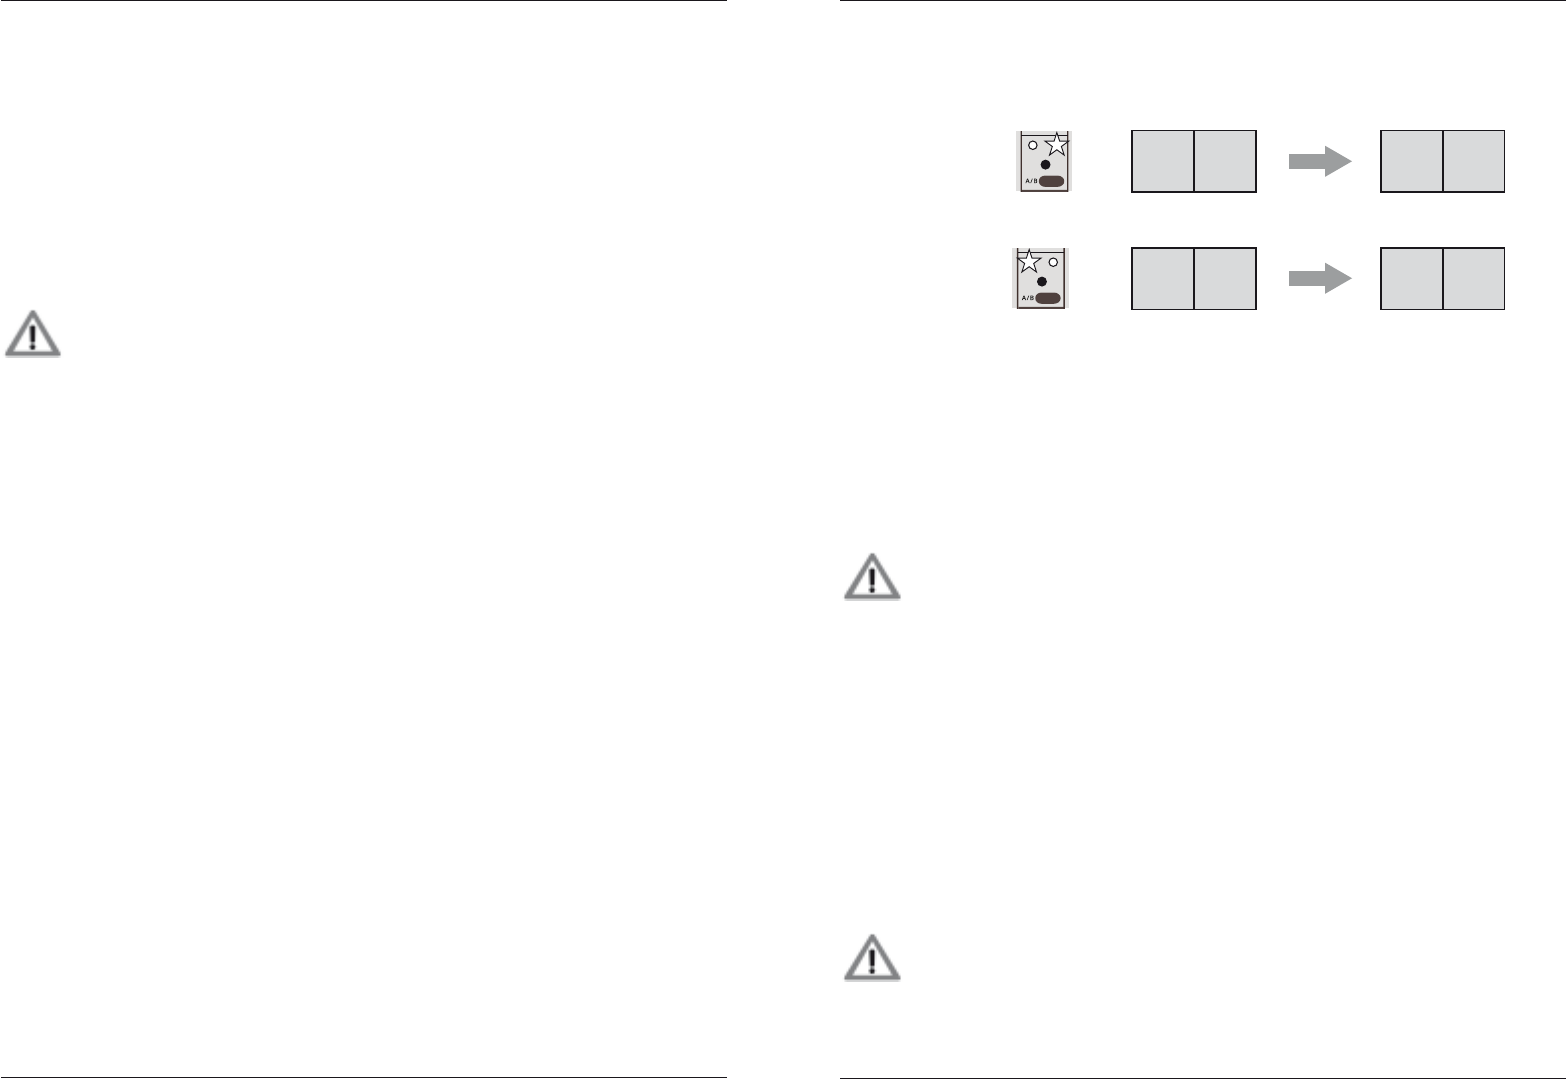
Copy A / Copy B functions
These two copy functions are pretty useful for creating several variations of an existing A/B
pattern easily and instantly. Depending on the function („Copy A“ / „Copy B“), the rst or
second section of the pattern will be copied to the respective other section. It can be used
as a starting point for variations.
The following gure shows the different modes of operation of these two functions:
This is how to operate the Copy A / Copy B functions:
Load or create a pattern with A/B sections rst (in other words, a pattern with more than
16 steps in length). Now you can use the copy functions:
• If required, press A/B key to select the target section (to copy section „A“ to the
empty section „B“, rst you have to select „B“ with the A/B key and vice versa –
please see gure above).
• Hold Shift + press Step 7 resp. 8 (Copy A / Copy B).
Please note:
• In Record mode, these functions will affect the selected track.
• In Play mode, these functions will affect all tracks, resp. the entire pattern.
Clearing Pattern
This function is closely related to the copy functions explained above. You can optionally
clear the entire pattern or only the section currently selected.
This is how to clear the currently selected section:
• Hold Shift + press Step 6 (Clear Pattern).
This is how to clear the entire pattern:
• Hold Shift + press Step 6 (Clear Pattern) two times.
Please note:
• In Record mode, these functions will affect the selected track.
• In Play mode, these functions will affect all tracks, resp. the entire pattern.
Attention: There is no undo! Please think (!!!) twice before using the
Clear Pattern function.
Initial situation: Result:Function:
Copy A:
Pattern
Copy B:
Pattern
A-Part A-Part A-Part
B-Part B-Part B-Part
empty
empty
TomTom
SnareDrum
Claps
Sample 1
Sample 2
Master Level
Rimshot
A/B
Flam
Shift
Play
Real
Bnk
Chain
SP1
SP2
Send On/O
TomTom
SnareDrum
Claps
Sample 1
Sample 2
Master Level
Rimshot
A/B
Flam
Shift
Play
Real
Bnk
Chain
SP1
SP2
Send On/O

MFB Tanzbär Lite MFB Tanzbär Lite
Record Mode – Programming Patterns
30 31
Record Mode – Programming Patterns
Realtime Record mode
Instead of programming the sound parameters stepwise, you can record parameter chan-
ges in realtime. In other words, you can tweak the sound controls of an instrument and
record these tweakings into the sequencer. This is how it works:
1. Enabling Record mode / select track
To enable the Record mode and select the desired track (resp. the instru-
ment) at the same time, please
• hold the Rec key + press a Track key.
When releasing the keys, the right LED above the Rec key will light up. If
the selected track contains any steps, their LEDs will also light up.
To record parameter changes in Realtime Record mode, it obviously is
recommended that the selected track contains a certain number of steps.
Setting steps works as described on page 22.
2. Enable Realtime Record mode
• Hold Shift + press Rec. Then release both keys.
For the selected track, the Realtime Record mode has now been enabled.
When the sequencer reaches the next downbeat (resp. step 1), the record
function will automatically become active and wait for your input.
3. Recording parameter changes
• Move sound controls and/or Data control.
Over the duration of one pattern, Tanzbär Lite will record all control tweaks you are
now performing on the selected instrument. As soon as the end of the pattern has been
reached, the record function will automatically be disabled. If the pattern uses an A and B
section, the recording will take place across both sections.
In case you are not happy with the result, simply enable the Realtime Record mode again
(programming step 2) and repeat the recording process. Feel free to „ne-tune“ your pa-
rameter recordings later in Step Record mode. To make things easier, it can be helpful to
reduce the tempo while recording.
4. Saving Patterns
To save your pattern permanently, you need to use the Store Pattern
function, described on page 34.
Manual Trigger mode / Manual Trigger Record
You can trigger Tanzbär Lite‘ instruments in realtime – by hitting step keys or via MIDI,
using a suitable MIDI device such as a keyboard, or drum pads. At the same time, you can
tweak the sounds of the steps played back in realtime, either using the controls on Tanzbär
Lites frontpanel or via MIDI controllers. In this operation mode, Tanzbär Lite will act just like
a MIDI expander. We call it „Manual Trigger mode“.
Apart from that, the „Manual Trigger Record“ function provides recording of steps played
‚live‘ (but not sound parameter changes).
Triggering and recording instruments in realtime
1. Enable Manual Trigger function
• Press Rec key. Its left LED should light up.
The Manual Trigger function has now been enabled. You can trigger all
instruments via step buttons and „play along“ to a running pattern (you may
also sing along if you feel so inclined). Please keep in mind that nothing will
be recorded at this point (speaking of which, this might not be too bad when
it comes to your singing).
Using the sound controls, you can tweak all instruments in realtime.
Please note that these tweaks only affect the sound of those steps that
have just been played live – not of those that might already be a part of the
existing pattern.
2. Enabling Manual Trigger Record
To record your „live-performance“ resp. steps played in realtime, you need to enable the
Manual Trigger Record function. This is done by setup function # 7.
To perform that, please open the setup menu rst:
• Hold Shift + press Setup (Step 16). The Shift LED will start ashing.
Enabling „Manual Trigger REC“ (setup function #7):
• Press Step key 7.
If the Manual Trigger Record function is „on“, step LED 7 will light up.
Exit setup function:
• Press Shift key.
+ Track
Shift
+
MFB Tanzbär Lite MFB Tanzbär Lite
Record Mode – Programming Patterns
32 33
Record Mode – Programming Patterns
Please note: The setting „Enable Manual Trigger REC“ is a global function
which is permanent, even when you change operation modes or power down
Tanzbär Lite. Through this function you can basically determine whether
steps played „live“ will be recorded or not as soon as you enable the „Manual
Trigger“ function.
3. Recording / erasing steps in realtime
• Please start the sequencer.
• Press step keys. As soon as you hit step keys, these steps will be recorded into the
current pattern. The quantisation corresponds to the setting of the Scale parameter.
To erase steps quickly without stopping the sequencer, please
• hold Select + press Track key.
While holding both keys, the steps set previously will be deleted as soon as the running
sequencer reaches their position. You can enter new steps immediately.
4. Tweaking sound settings
• Turn Sound controls.
As soon as you turn a Sound control and/or the Data control, the sound of the correspon-
ding instrument will change.
Please note that these tweaks only affect the sound of those steps that have
just been entered „live“ on the y, not of those that might already be part of
the existing pattern. This „performance at the controls“ will not be recorded!
To record parameter changes, you need to use the Realtime Record mode
(please see page 30).
Please also bear in mind that these tweaks will only affect the sound of steps
entered live and on the y, not of those that might already be part of the
existing pattern.
5. Storing patterns
To store the new pattern permanently, you need to use the Store Pattern
function which will be discussed on page 34.
Manual Trigger Recording via MIDI
As mentioned above, you can record steps via MIDI – e.g. using a MIDI keyboard, or
MIDI drumpads. Sounds can also be tweaked „live“ via MIDI controller (but not recorded).
Step recording in the Manual Trigger Record function via MIDI works the same way as with
step keys.
However, you have to adjust some of Tanzbär Lite‘ MIDI functions rst. To do that, please
use Tanzbär Lite‘ MIDI learn function (smart mouse, eh?). The MIDI learn function is used
to assign MIDI note numbers and MIDI channels (1 - 9) to drum instruments. The MIDI
learn function is to be found in the setup menu.
Please open the setup menu rst:
• Hold Shift + press Setup (Step 16). The Shift LED will be ashing.
Select „MIDI learn“ (setup function #1):
• Press Step key 1.
Executing MIDI learn function:
• As soon as the MIDI learn function is enabled, the instrument LEDs will light up suc-
cessively – starting from step 1 (BD) –, waiting for a MIDI note (and the channel #).
As soon as you send a MIDI note to Tanzbär Lite, it will be assigned to the rst inst-
rument (the one with its LED ashing). Now Tanzbär Lite will automatically switch to
the next instrument and wait for input of the next MIDI note (and channel).
When all instruments have been assigned to MIDI notes, the LED of the Select key
will start ashing.
Now hit Select to conrm the assignment and exit the MIDI learn function.
After that, you will need to exit the setup menu:
• Press Shift key.
Tanzbär Lites sound controls and the Data control will receive MIDI controller data on the
MIDI channels that have just been assigned and/or pre-selected.
In the setup menu you can determine whether Tanzbär Lite is to send MIDI notes and
controller data.
Please note: Aside from the Step Record mode, Tanzbär Lite receives MIDI
notes and controller data in all operation modes. This way, you can trigger
steps via MIDI notes and tweak sound parameters via MIDI controllers
without setting any functions previously. Only recording steps via MIDI notes
needs to be activated rst by enabling the Manual-Trigger-Record function.
This is done via setup function # 7.

MFB Tanzbär Lite
35
MIDI / Setup Functions
MFB Tanzbär LiteMemory Functions
34
MEMORY FUNCTIONS
To enjoy your newly created or edited patterns forever, you have to save them permanently
– would you have guessed?
Please note: The so-called „locking“ of one or more edited sequencer
steps in Step Record mode only prevents overwriting of parameter settings
unintentionally by further editing. To save a pattern permanently and in its
entirety – individual steps and the sounds assigned to them –, you have to
use the Store Pattern function.
The following section describes how to store and erase patterns permanently.
Storing patterns
You can save the current pattern in any pattern memory location. To do so, please
• (If necessary hold Shift + press Patt/Bank key to change the current preset bank.)
• Hold Shift + press Step 5 (Store Pattern).
All sixteen step LEDs will start ashing.
• Release Shift.
• Press Step key to save the current preset in the corresponding memory location.
• If necessary, press Shift any time to abort the Store Pattern function.
Attention: There is no undo! Please think (yes, insert multiple exclamation
marks here) twice before you overwrite an existing pattern which was to be
used with your million-selling hit record!
Clearing Pattern
If desired, you can erase resp. initialise the current pattern. To do so, please
• Hold Shift + press Step 6 (Clear Pattern) two times.
The current pattern has now been erased from memory permanently.
Patterns with more than sixteen steps in length allow for alternatively erasing either their
A or B section.
• Press Patt key to select the desired pattern section.
• Hold Shift + press Step 6 (Clear Pattern).
Attention: There is also no undo! Please think (no kidding here this time
around) twice before you erase the current pattern or its individual sections!
The consequences might be dreadful.
SETUP / MIDI FUNCTIONS
The setup menu is hidden behind step key # 16 and makes use of eight step keys there,
each of them assigned to a sub-function. Here you will nd Tanzbär Lite‘ MIDI functions in
the rst place. Also, you can enable the „Manual Trigger Record“ function (please see page
31) and determine whether the „Store Pattern“ function is to store muted instruments within
the current pattern or not (please refer to page 13).
All setup functions are global settings that will be retained after powering Tanzbär Lite
down.
To open the setup menu, please
• Hold Shift + press Setup (Step 16). The Shift LED will start ashing.
To edit setup functions:
• Press Step key 1-8. The corresponding setup function (please see below) will be
set to on/off or toggle between two available settings.
To exit / abort a setup function:
• Press Shift key.
The following setup functions are available:
Step key 1: MIDI learn
The MIDI learn function assigns MIDI note numbers and MIDI channels (1 - 9) to
Tanzbär Lite‘ drum instruments. This is how to operate the MIDI learn function:
As soon as the MIDI learn function has been enabled, the instrument-LEDs will be ashing
successively, starting at step 1 (BD) and waiting for a MIDI note (and the channel #) to be
entered. As soon as you send a MIDI note to Tanzbär Lite, it will be assigned to the rst
instrument (the one whose LED is ashing). Now Tanzbär Lite will automatically switch to
the next instrument and wait for input of the next MIDI note (and channel). When all instru-
ments have been assigned to MIDI notes, the LED of the Select key will be ashing. Now
hit Select to conrm the assignment procedure and exit the MIDI learn function.
Step key 2: MIDI note send on/off
Selects whether Tanzbär Lite will transmit MIDI note numbers while the sequencer is
running.
Default setting = on
MFB Tanzbär Lite MFB Tanzbär LiteMIDI / Setup Functions
36 37
MIDI / Setup Functions
Step key 3: MIDI Ctrl send on/off
Selects whether Tanzbär Lites front panel controls will transmit MIDI controller data or not.
Default setting = off
Step key 4: MIDI Clk send on/off
Selects whether Tanzbär Lite transmits MIDI clock data while the sequencer is running.
Default setting = on
Step key 5: MIDI Clk Thru on/off
Selects whether Tanzbär Lite transmits incoming MIDI clock data to its MIDI out socket or
not.
Default setting = off
Step key 6: MIDI Clk Receive on/off
Selects whether Tanzbär Lite receives MIDI clock data or not.
Default setting = on
Step key 7: Manual Trigger REC
This function determines whether steps set „live“ in Manual Trigger mode (by step keys, or
received via MIDI) will be recorded into the current pattern or not. In other words: You can
enable the Manual Trigger function through this setting. If this setting has been disabled,
instruments can be triggered via step keys or MIDI notes but the steps will not be recorded.
Default setting = off
Step key 8: Saving track mutes
This function determines whether track mutes (please see page 13) will be saved into the
current pattern when using the „Store Pattern“ function. The function is active when step
LED #8 lights up.
Please note that this function is not labelled on Tanzbär Lite‘ frontpanel.
Default setting = off
MIDI dump functions
Tanzbär Lite allows for transmitting the current pattern bank as a MIDI SysEx datale.
Apart from that, a pattern bank, sent from a suitably equipped MIDI device, can be recei-
ved by your Tanzbär Lite.
These functions are only available in Play mode (see page 11). The sequencer must be
inactive.
Sending pattern bank
By using the shift function you can send the current pattern bank to a suitable MIDI device.
e.g. your DAW.
• Hold Shift + press Step key 9 (Dump Patt Bank).
The LEDs of the step keys visualize the progress of the data upload: The LED of the
corresponding pattern that is currently being transmitted is ashing. As soon as the data
transmission has been completed, the function will exit automatically.
Receive pattern banks
As long as the sequencer is inactive, Tanzbär Lite will always be ready to receive a pattern
bank as SysEx datale. You do not need to enable any additional functions. The LEDs of
the step keys will again tell you about the progress of data transmission.
Attention: When receiving a bank dump, the pattern bank currently selected
will be overwritten. There is no undo! So please think (…) twice if you really
want to send a bank dump to your Tanzbär Lite!

MFB Tanzbär Lite MFB Tanzbär LiteAppendix
38 39
Appendix
MIDI Implementation
MIDI Controller assignment
MIDI_CC_BD_TONE 2
MIDI_CC_BD_DECAY 64
MIDI_CC_BD_TUNE 3
MIDI_CC_SD_TONE 11
MIDI_CC_SD_NOISE 13
MIDI_CC_SD_DECAY 67
MIDI_CC_CP_DECAY 75
MIDI_CC_CP_FILTER 18
MIDI_CC_CP_ATTACK 76
MIDI_CC_CP_TRIGGER 77
MIDI_CC_TT_TUNE 19
MIDI_CC_TT_DECAY 20
MIDI_CC_CO_DECAY 78
MIDI_CC_CO_TUNE 79
MIDI_CC_CO_PAN 82
MIDI_CC_TT_PAN 73
MIDI_CC_CB_TUNE 84
MIDI_CC_CB_DECAY 85
MIDI_CC_CL_TUNE 86
MIDI_CC_CL_DECAY 87
MIDI_CC_CY_DECAY 88
MIDI_CC_CY_TONE 92
MIDI_CC_CY_TUNE 89
MIDI_CC_OH_DECAY 90
MIDI_CC_HH_DECAY 91
The MIDI channel for controller data transfer is
always the same as the channel of the corres-
ponding instrument. It is selected with the MIDI
Learn function.
Tanzmaus responds to the following MIDI data:
MIDI_CLOCK
MIDI_START
MIDI_CONTINUE
MIDI_STOP
MIDI_NOTE_OFF
MIDI_NOTE_ON
MIDI_CONTROLLER
MIDI_PROG_CHANGE: 0...63
MIDI_SYSEX
MIDI_SONG_POSITION_POINTER
Service and terms of warranty
Concerning service and warranty conditions, please refer to our terms of business.
Imprint
Copying, distribution or any commercial use in any way is prohibited and needs the written
permission by the manufacturer.
Specications subject to change without notice.
Although the content of this owners manual has been thoroughly checked for errors, MFB
cannot guarantee that it is error-free throughout. MFB cannot be held liable for any mislea-
ding or incorrect information within this guide.
MFB – Ingenieurbüro Manfred Fricke
Neue Str. 13
14163 Berlin
www.mfberlin.de
All rights reserved ©2015 MFB
Tanzbär Lite
