Modify A Virtual Server Workflow Guide F5 With Servicenow And Infoblox AVX12.3
User Manual:
Open the PDF directly: View PDF ![]() .
.
Page Count: 18
- AppViewX Overview
- Modify Virtual Server Workflow
- Prerequisites
- Compatible Software Versions
- Log In to AppViewX
- Import Visual Workflows
- Import Helper Scripts
- Add an ADC Device: F5 LTM
- Add an IPAM Device: Infoblox
- Register an ITSM Device: ServiceNow
- Enable a Workflow
- Modify a Virtual Server Workflow
- Rollback a Workflow
- Request Inventory
- Schedule a Workflow
- View Scheduled Workflows
- Troubleshooting

Modify a Virtual Server
Workflow Guide

Copyright © 2018 AppViewX, Inc. All Rights Reserved.
This document may not be copied, disclosed, transferred, or modified without the prior written consent of AppViewX,
Inc. While all content is believed to be correct at the time of publication, it is provided as general purpose information.
The content is subject to change without notice and is provided “as is” and with no expressed or implied warranties
whatsoever, including, but not limited to, a warranty for accuracy made by AppViewX. The software described in this
document is provided under written license only, contains valuable trade secrets and proprietary information, and is
protected by the copyright laws of the United States and other countries. Unauthorized use of software or its
documentation can result in civil damages and criminal prosecution.
Trademarks
The trademarks, logos, and service marks displayed in this manual are the property of AppViewX or other third
parties. Users are not permitted to use these marks without the prior written consent of AppViewX or such third party
which may own the mark.
This product includes software developed by the CentOS Project (www.centos.org).
This product includes software developed by Red Hat, Inc. (www.redhat.com).
This product includes software developed by the VMware (www.vmware.com).
All other trademarks mentioned in this document are the property of their respective owners.
Contact Information
AppViewX, Inc.
500 Yale Avenue North, Suite 100
Seattle, WA 98109
Tel: +1 (206) 207 7541
Email: info@appviewx.com
Web: www.appviewx.com
Document Information
Software Version: 12.3.0
Document Version: 1.1
Last updated on: April 05, 2017

Modify a Virtual Server Workflow Guide
1
Contents
AppViewX Overview................................................................................................................... 2
Modify Virtual Server Workflow .................................................................................................. 3
Prerequisites .............................................................................................................................. 3
Compatible Software Versions ................................................................................................... 3
Log In to AppViewX ................................................................................................................... 4
Import Visual Workflows ............................................................................................................. 4
Import Helper Scripts ................................................................................................................. 5
Add an ADC Device: F5 LTM ..................................................................................................... 5
Add an IPAM Device: Infoblox .................................................................................................... 7
Register an ITSM Device: ServiceNow ...................................................................................... 8
Enable a Workflow ..................................................................................................................... 9
Modify a Virtual Server Workflow ............................................................................................... 9
Workorder Flow .....................................................................................................................11
Rollback a Workflow..................................................................................................................13
Workorder Flow .....................................................................................................................13
Request Inventory .....................................................................................................................14
Schedule a Workflow ................................................................................................................15
View Scheduled Workflows .......................................................................................................15
Troubleshooting ........................................................................................................................16

Modify a Virtual Server Workflow Guide
2
AppViewX Overview
Application-oriented companies can only accomplish true business agility through the
automation of delivery infrastructure. At AppViewX, we believe that in order to power faster and
more compliant application provisioning, Network Operations groups need to work smarter, not
harder. Our platform offers a solid foundation to start your automation journey. It enables
complete change management automation by integrating with leading technology providers and
defining workflows for all stages of application provisioning on ADC: validation, approval,
implementation, and rollback. To get started, you can download Free AppViewX, which comes
with a series of preloaded application automation provisioning workflows.

Modify a Virtual Server Workflow Guide
3
Modify Virtual Server Workflow
With the Modify Virtual Server automation workflow, users can add or delete iRules, profiles,
monitors, and pool members on an existing virtual server. This workflow filters F5 ADC devices
based on the user’s access permissions, defined by Role Based Access Control (RBAC), and
displays the list of virtual servers available on the selected ADC device. When a virtual server is
selected, object details like iRules, profiles, monitors, and pool members are displayed in the
form fields. The workflow also provides an option to modify the association of these virtual
server objects and allows users to create change request tickets in ITSM systems like
ServiceNow for approvals and tracking. The service request change ID is associated with a
work order and is updated based on the implementation status.
The work order that is generated confirms the existence of the virtual server and its associated
objects before any changes are made. On successful pre-validation, the configuration changes
are reviewed through a two-level approval process: first by ServiceNow, then by AppViewX.
After approval is received, the configuration changes are implemented on the ADC device. A
post-validation script ensures the virtual server and the associated objects are modified
successfully.
Prerequisites
To run this workflow in your environment, the following prerequisites must be met:
Free AppViewX or AVX 12.3.0 has been downloaded and installed.
An F5 LTM device has been added to AppViewX as a managed device.
(Optional) An Infoblox device has been added to AppViewX.
(Optional) ServiceNow is registered to AppViewX.
Multiple server nodes are running the application.
Compatible Software Versions
The application provisioning automation temples have been validated for the following software
versions:
AppViewX – Free AppViewX or AVX 12.3.0 has been downloaded and installed.
ServiceNow – Geneva, Jakarta, and Eureka
Modify a Virtual Server Workflow Guide
4
Infoblox – version 7.2.X
F5 LTM – version 10.X, 11.X, or 12.X
Log In to AppViewX
Log in to the AppViewX web interface. The standard format for a login URL is:
http://hostname:portnumber.
The hostname and port number are configured during deployment, with the default port number
set to 5004 and the default web credentials set to admin/AppViewX@123.
Note: It is recommended that you access AppViewX using Internet Explorer, Firefox, or Google
Chrome.
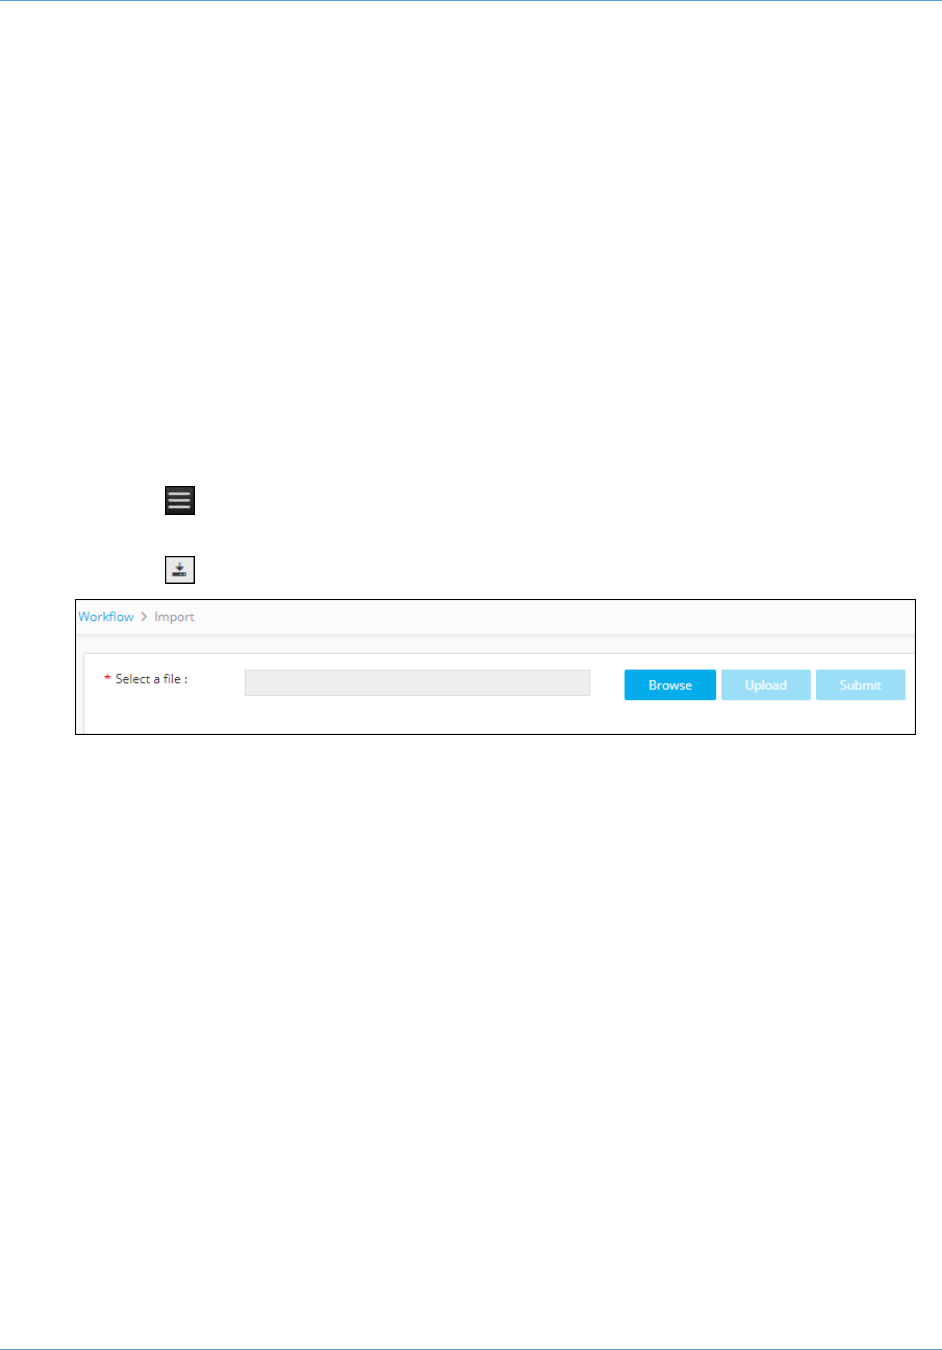
Import Visual Workflows
Note: Free AppViewX comes preloaded with visual workflows. You will only need to use the
following import instructions when newer versions of the workflows become available.
1. Click the (Menu) button.
2. Navigate to Workflow > Configurator.
3. Click the (Import) button in the Command bar.
4. To import a workflow, complete the following sub-steps:
a. Click the Browse button.
b. Select the zip file containing one or more workflows, then click Upload.
c. In the table at the bottom of the Import page, select the check box beside the
unzipped workflow file.
d. Click Submit to deploy the workflow into your AppViewX environment.
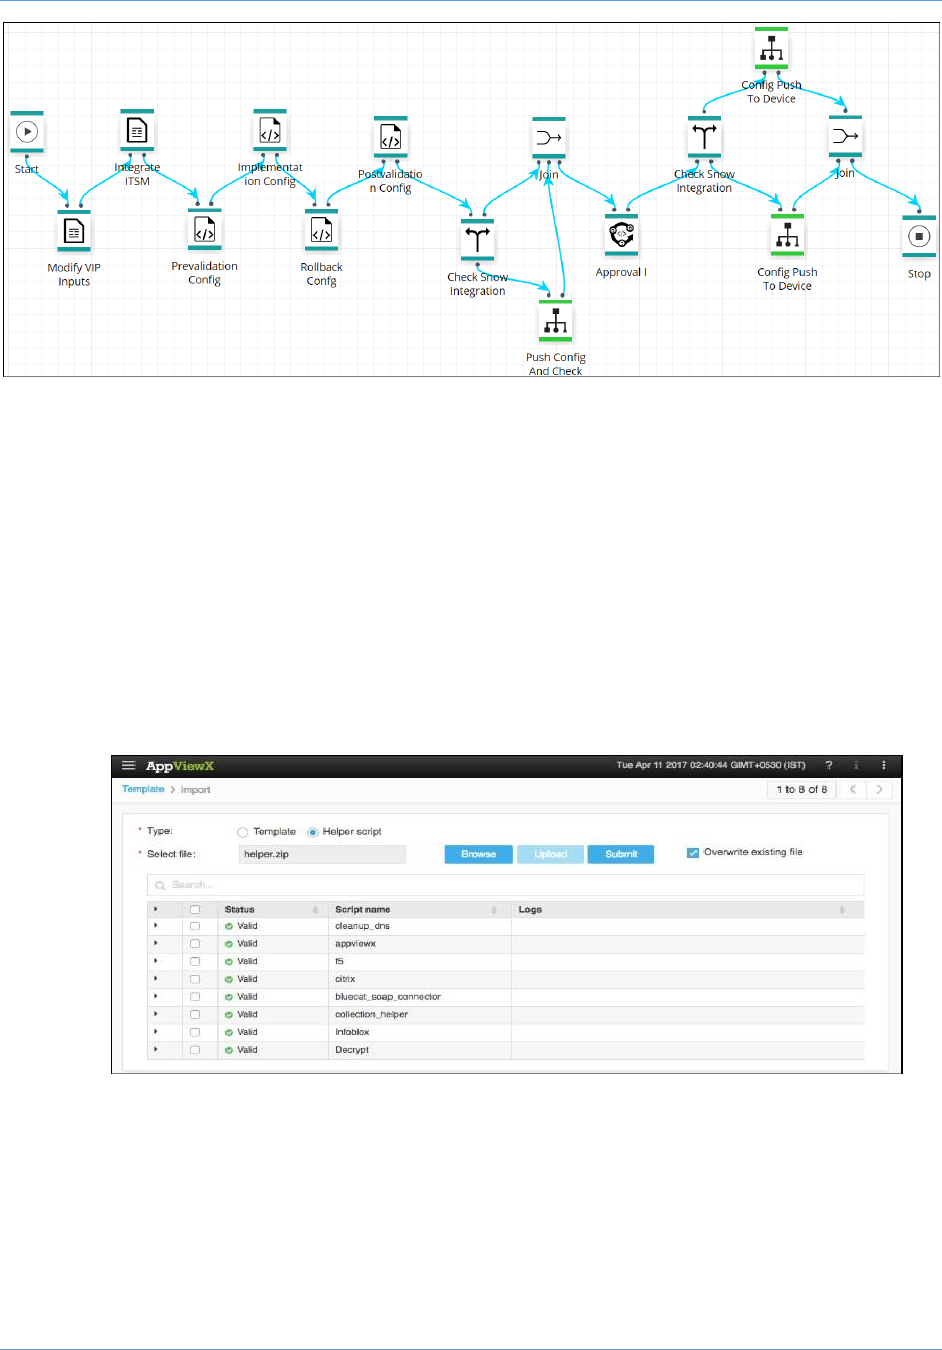
The Modify Virtual Server workflow is shown in the image below:
Modify a Virtual Server Workflow Guide
5
Import Helper Scripts
Note: Free AppViewX comes preloaded with the helper scripts. You will only need to use the
following import instructions when newer versions of the helper scripts become
available.
1. In the navigation menu on the left-hand side of the AppViewX screen, navigate to
Provisioning > Template.
2. Click on the Helper script button.
3. To import a helper script, complete the following sub-steps:
a. Select the Helper Script radio button.
b. Click Browse and select the helper script zip file you want to import.
c. Click Upload to import the file and view its contents.
d. In the table at the bottom of the Import page, select the check boxes beside each
of the helper scripts.
e. Click Submit to deploy them into your AppViewX environment.
Add an ADC Device: F5 LTM
1. In the navigation menu on the left-hand side of the AppViewX screen, navigate to
Inventory > Device.

Modify a Virtual Server Workflow Guide
6
2. On the Device screen, click the ADC tab if it is not already visible.
3. Click the (Add) button in the Command bar.
4. On the Add screen that opens, click to select F5 as the ADC vendor.
5. Select the module to be managed on the ADC device.
6. Create a Device name that is specific to AppViewX and that will identify the device in
the AppViewX inventory.
7. Enter the management IP address of the device.
8. (Optional) Specify a Data center location if you want to have the option later to filter
devices based on their location.
9. In the Cert sync field, select the radio button for the kind of synchronization relationship
you want to establish between SSL certificates on the ADC device and AppViewX:
Managed, Monitored, or Ignored.
10. (Optional) Select the AppViewX group sync check box if you need AppViewX to sync
the configuration changes from an active to standby F5 ADC device. This is required in
older F5 versions like v10. The latest versions of F5 sync automatically.
11. Select a Credential type from the dropdown menu.
12. Enter the User name and Password that are associated with the credentials.
13. Note: The user you enter in the User name field must have advanced shell access.
14. Select Auto detect to automatically detect and add secondary or failover devices or
sync groups to the ADC device inventory.
15. Click Save to save the new ADC device on the ADC tab.

Modify a Virtual Server Workflow Guide
7
The device will display one of the following statuses:
o In Progress – Device configuration fetch is in progress.
o Managed - Device configurations are fetched and parsed successfully. This is the
status a successfully added ADC device should have.
o Unresolved – Unable to communicate with device, due to invalid login credentials.
o Failed – Device configuration fetch failed, due to unsupported version.
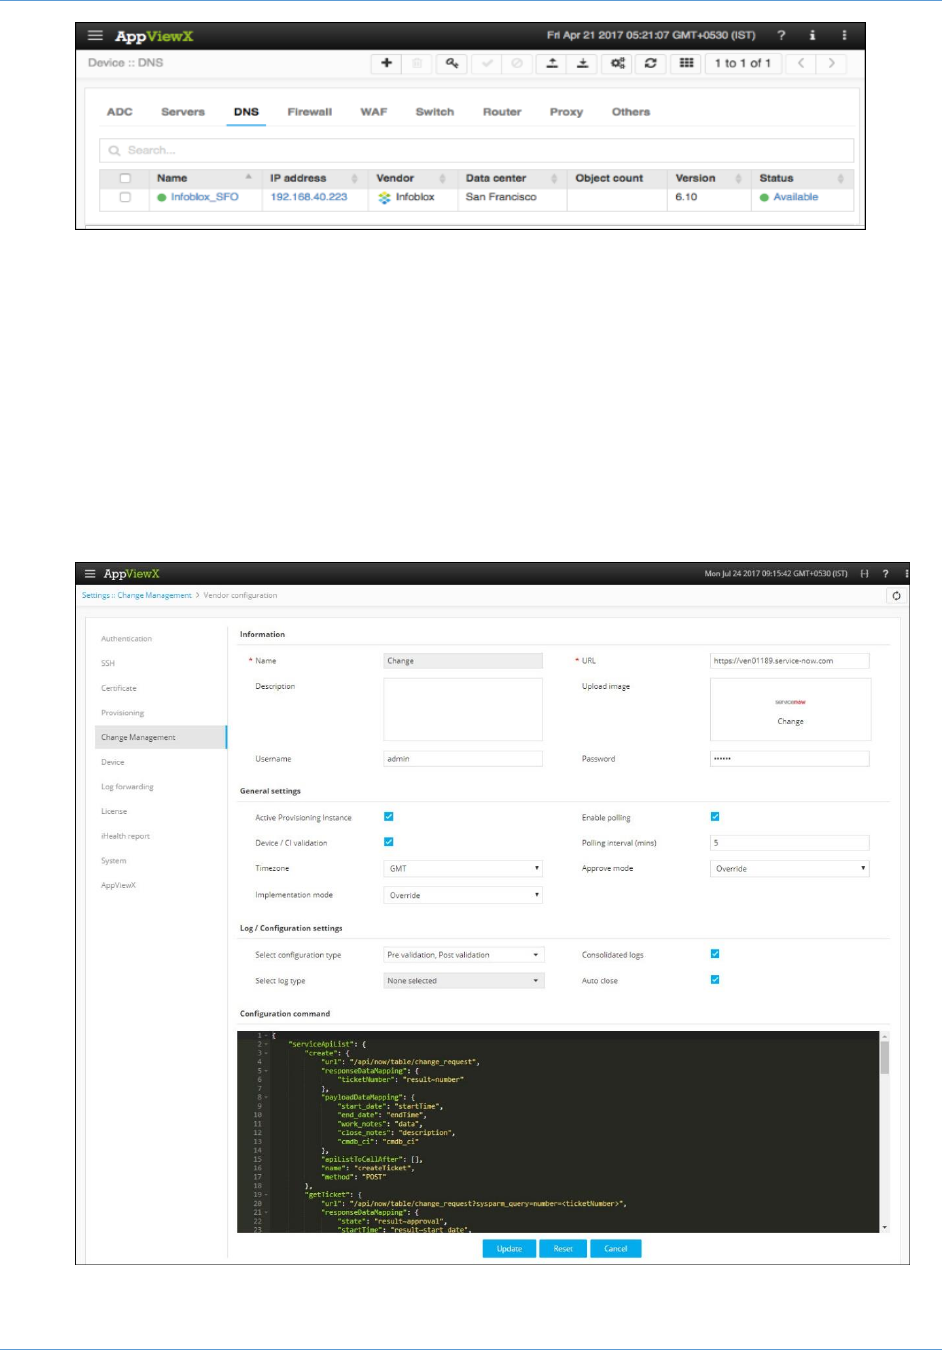
Add an IPAM Device: Infoblox
1. In the navigation menu on the left-hand side of the AppViewX screen, navigate to
Inventory > Device.
2. Click the DNS tab.
3. Click the (Add) button in the Command bar.
4. On the Add page that appears, click to select Infoblox and enter the device’s IP address
and advanced shell access credentials.
5. Click the Save button.
The device status on the DNS tab changes to Available to indicate the successful
addition of Infoblox.
Modify a Virtual Server Workflow Guide
8
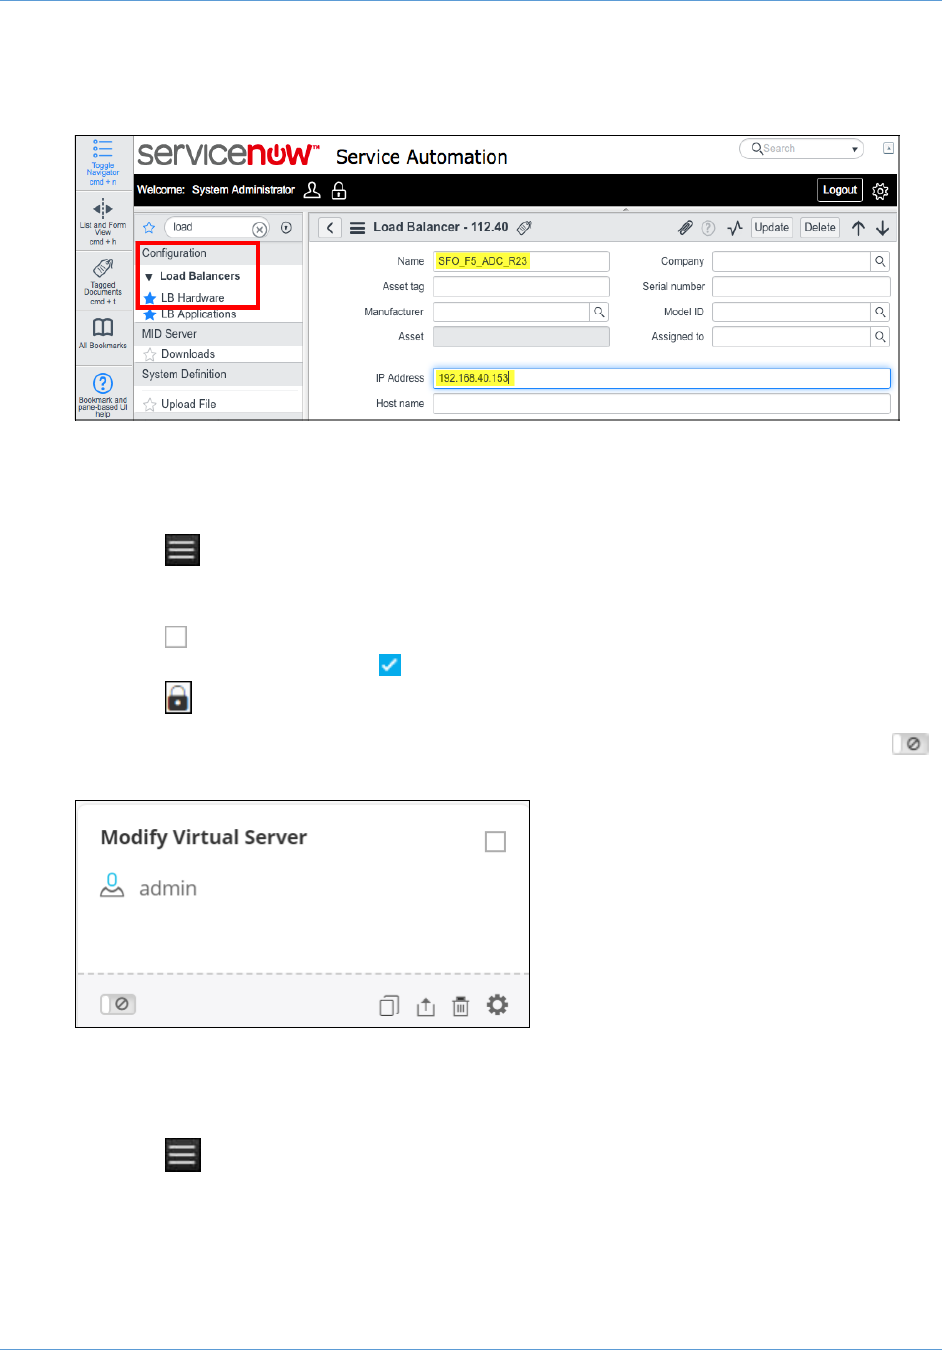
Register an ITSM Device: ServiceNow
1. In the navigation menu on the left-hand side of the AppViewX screen, navigate to
Settings.
2. On the Settings page that opens, click Change Management in the column on the left.
3. Click the ServiceNow plug-in.
4. On the Vendor configuration screen that opens, enter a valid web URL
5. (Optional) Enter a Description of the vendor to help users identify it.
6. Enter the ServiceNow username and password credentials in the respective fields.
7. Click Update to save the changes made in the system.
Modify a Virtual Server Workflow Guide
9
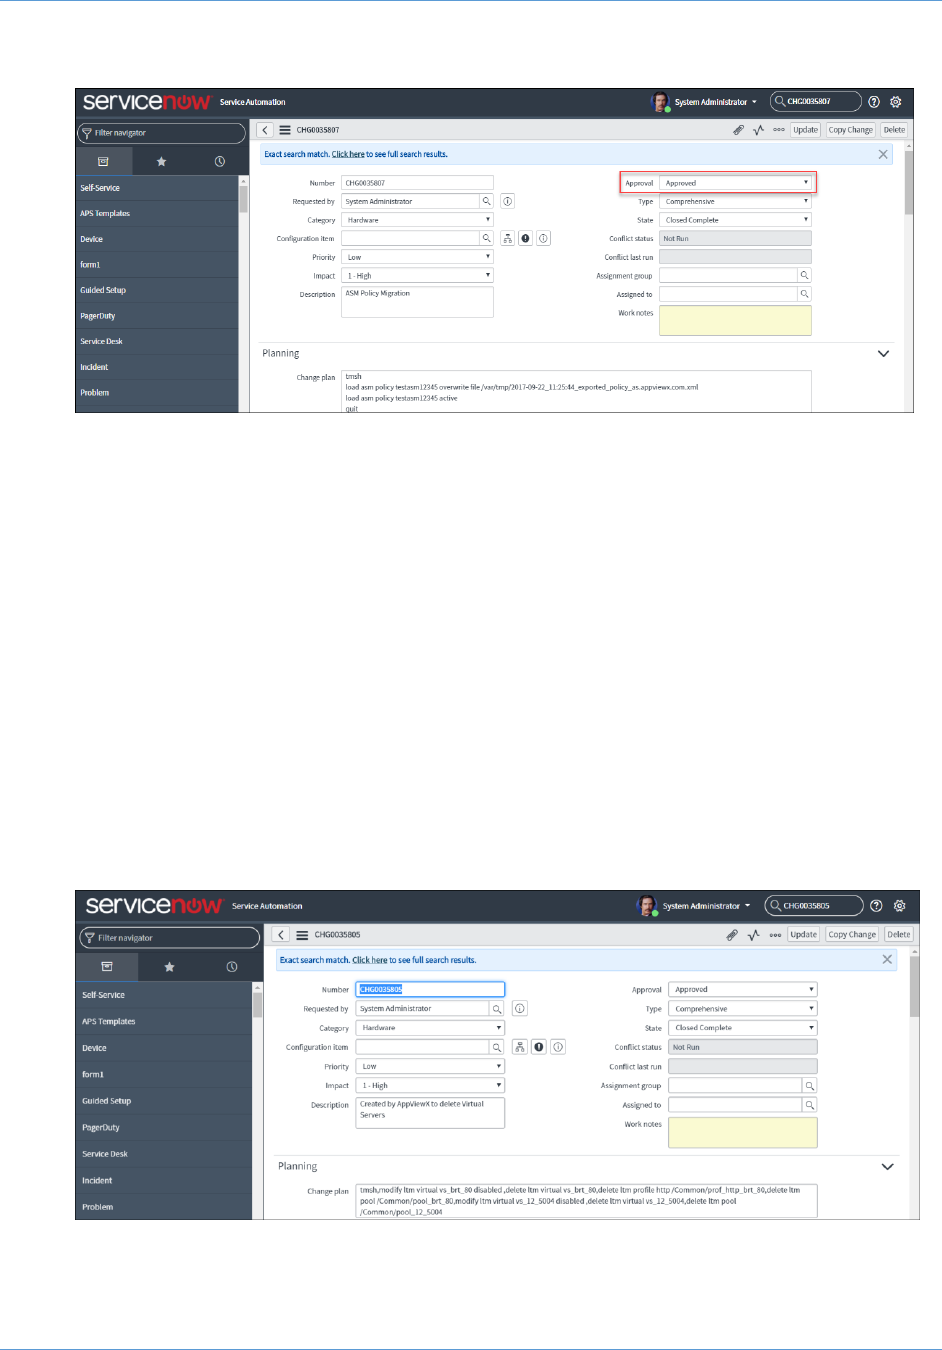
8. (Optional) The F5 LTM device you are configuring should be present in the ServiceNow
LB Hardware inventory. You can check this by opening ServiceNow and clicking to open
the Load Balancers > LB Hardware section shown below. The device name used in
the ServiceNow inventory and AppViewX ADC device inventory should be the same.
Enable a Workflow
To enable the Create Virtual Server workflow, complete the following steps:
1. Click the (Menu) button.
2. Navigate to Workflow > Configurator.
3. The Workflow screen opens.
4. Click the (Select) button on the Create Virtual Server workflow to enable it. If the
workflow is already selected, a (Deselect) button appears.
5. Click the (Enable) button in the Command bar.
Note: You can also enable the required workflow from the Card view by clicking the
(Disable) button.
6. On the Confirmation screen that appears, click Yes.
Modify a Virtual Server Workflow
1. Click the (Menu) button.
2. Navigate to Workflow > Request.
The Request screen opens with the My catalog tab displayed by default. This screen
displays all enabled workflows assigned to a specific user role.

Modify a Virtual Server Workflow Guide
10
3. Click the (Run workflow) button from the Card view of Modify a Virtual Server
workflow.
4. Click the Get F5 LTM Device List button to fetch the list of managed F5 LTM devices.
5. In the F5 LTM Device field, click the (Retrieve field values) button and select the
device that contains the virtual server to be modified.
6. In the Virtual ServerName field, click the (Retrieve field values) button to fetch
the list of virtual servers from the device. Select a virtual server from the dropdown list.
7. Click the Fetch Device Details button to retrieve virtual server related details from the
selected device and populate the form fields, like profiles and monitors.
8. Click the (Retrieve field values) button in the following fields and select the
required options from the corresponding dropdowns:
a. Select Client SSL Profile
b. Select Server SSL Profile
c. Select HTTP Profile
d. Select Persistence
e. SNAT
9. Click the Fetch Existing Monitors button to retrieve the monitor associated to the
selected VIP and display it in the Monitor Details table.
10. In the Select Existing Monitors field, click the (Retrieve field values) button to
retrieve the existing monitor from the device. Select the required monitor from the
dropdown.
11. Click the Fetch Existing iRules button to retrieve the iRule associated to the selected
VIP and display it in the iRule Details table.
12. In the iRules field, click the (Retrieve field values) button to retrieve the existing
iRules from the device. Select the required iRule from the dropdown.
13. In the Load Balancing Method field, click the (Retrieve field values) button to
retrieve the existing load balancing methods from the device. Select the required method
from the dropdown.
14. Modify the Pool Member IP and Pool Member Port if required.
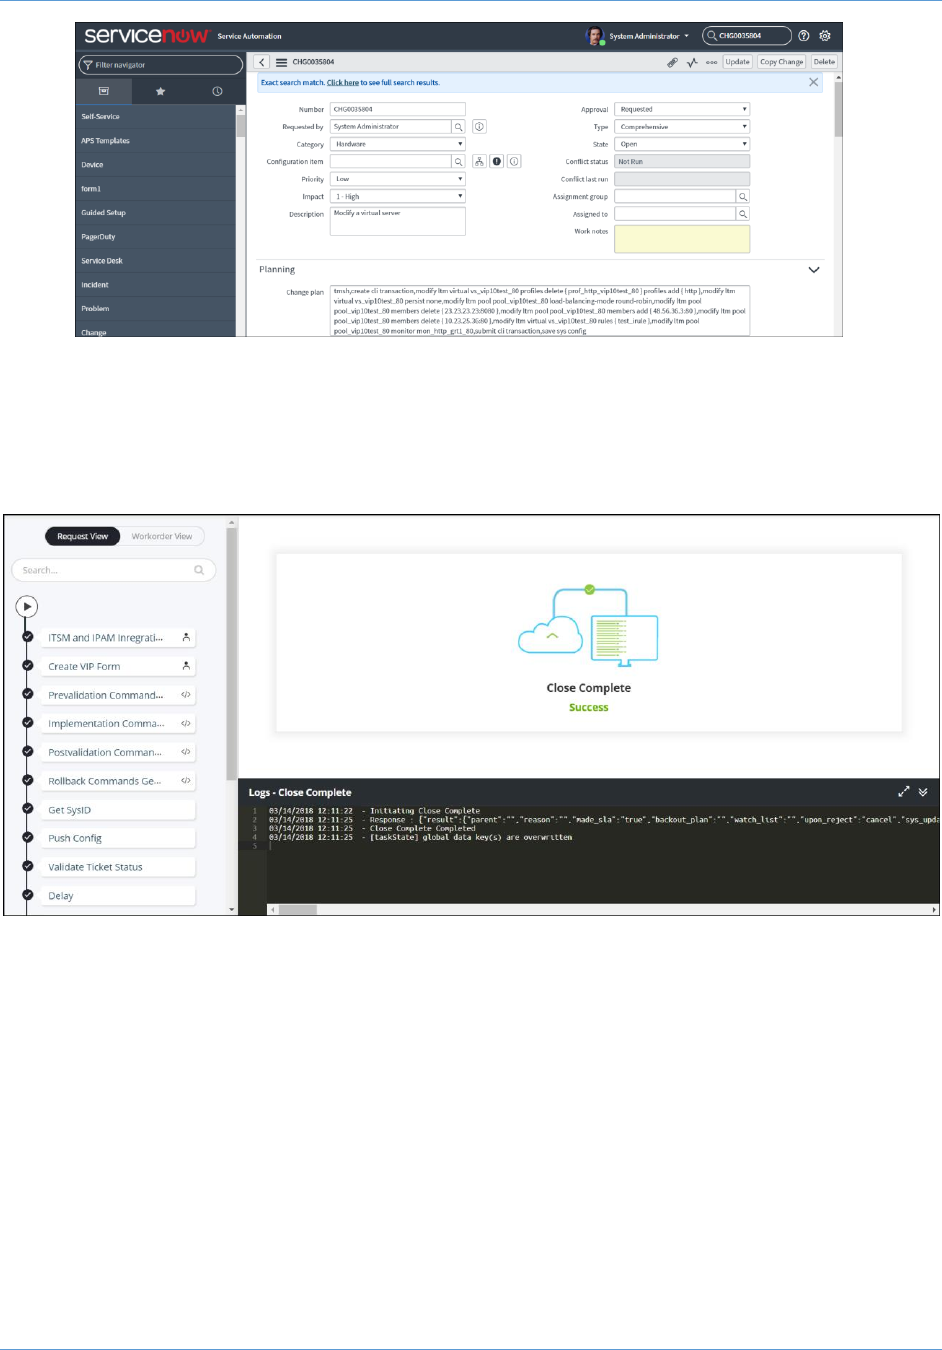
15. Click the Submit VIP Modification Request button to submit the self-service form and
create the work order and associate it with the ServiceNow change request ID (RFC-ID)
in the AppViewX system.
AppViewX then creates the ServiceNow change request and populates the change
request fields like Configuration item, Planned start date, and Planned end date from
the self-service form. The Change plan field is populated with the proposed F5 LTM
configuration changes, which can be reviewed at any time by the approver.
Modify a Virtual Server Workflow Guide
11
Workorder Flow
The following are the workorder tasks of the Modify Virtual Server workflow.
Note: You can click each task to view its details. Wherever applicable, all logs related to the
selected task are displayed in the Logs pane at the bottom of the screen.
1. Integrate ITSM ─ ITSM is integrated with the Delete Virtual Server workflow.
2. Pre-validation Command Generation─ Pre-validation commands are generated to
initiate the pre-validation process.
3. Implementation command generation ─ Configuration commands are generated to
implement the deletion of a virtual server from a source device.
4. RollBack command generation ─ Configuration commands are generated to
implement the deleted virtual server and their LTM objects from a source device.
5. Post-validation command generation ─ Post validation commands are generated to
initiate the post-validation process.
6. Get SYSID ─ The ticket information for the Delete Virtual Server workflow is generated
to track the ServiceNow request.
7. Push Config ─ Push the configuration commands to the ServiceNow ticket.
Modify a Virtual Server Workflow Guide
12
8. ValidateTicket Status ─ To validate the ticket, log in to ServiceNow and manually
approve the ticket.
9. Approval I ─ Approval of a work order is based on the role assigned to the user, who
has access to approve and implement. After you submit the request form, the
configuration changes are reviewed and approved at AppViewX. The configuration
changes are implemented on the device only after the approval is received.
10. ValidateTicket Status ─ To validate the ticket, log in to ServiceNow and manually
approve the ticket.
11. Prevalidation ─ Check the following:
o A list of virtual servers is available in the source and destination devices.
o The performance metrics, such as CPU and memory utilization on the destination
device, are validated.
12. Implementation ─ Configuration commands are implemented for the deletion of a
virtual server from a source device.
13. Post-Validation ─ Checks if the virtual server has been deleted successfully.
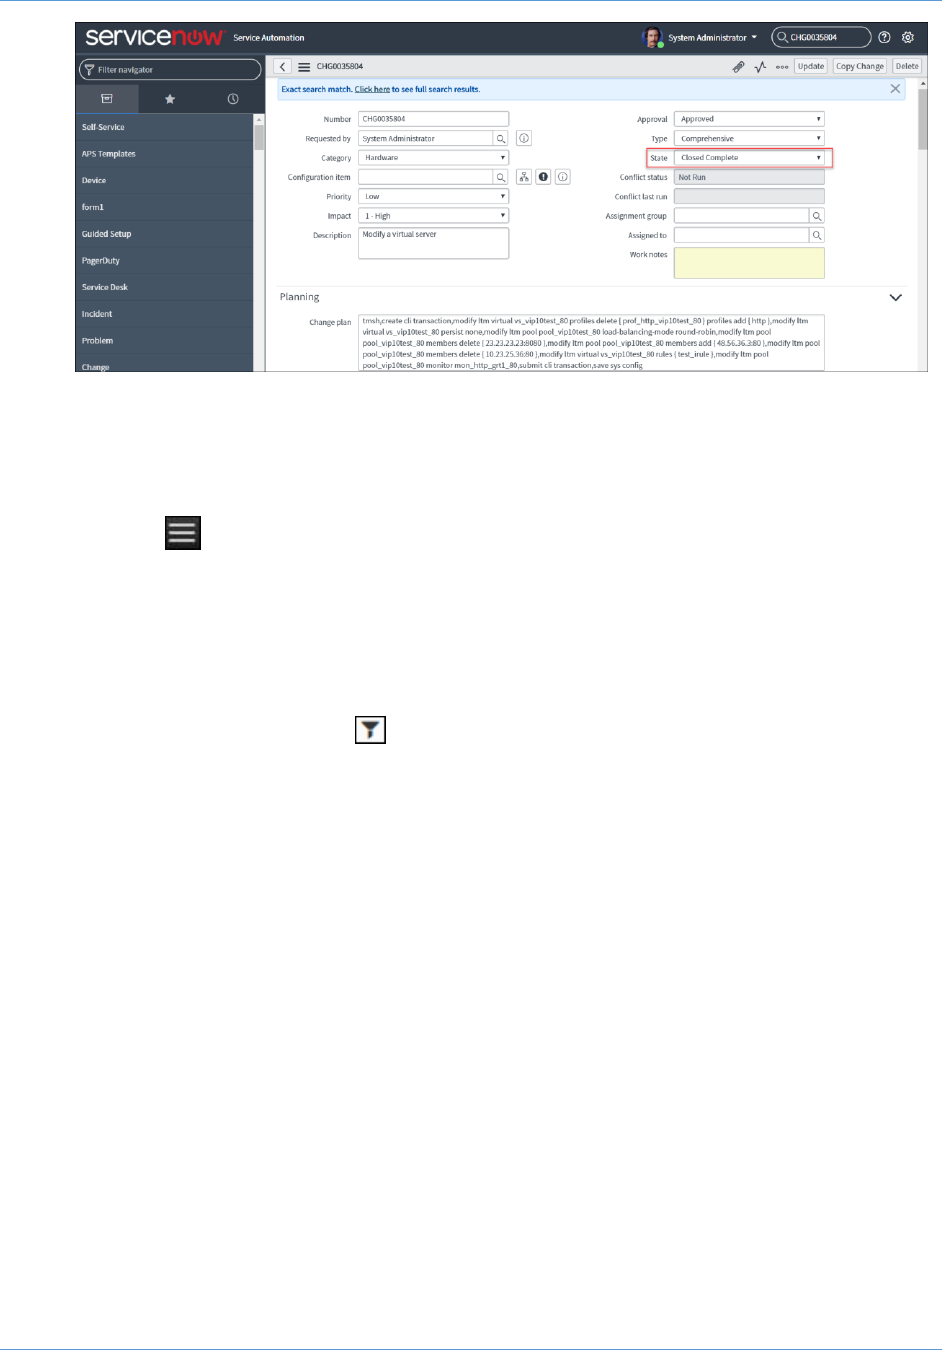
14. Close Complete ─ After successful deletion of the virtual server, the status of the
ServiceNow ticket updates automatically.
Modify a Virtual Server Workflow Guide
13
Rollback a Workflow
A rollback action can be performed only on the completed workflows. To trigger a rollback
action, complete the following steps:
1. Click the (Menu) button.
2. Navigate to Workflow > Request.
The Request screen opens with My catalog tab displayed by default.
3. Click the Request Inventory tab.
This displays all workflows that have been triggered. On the Request Inventory screen,
you can search for a request created for Modify a Virtual Server workflow using the
Search field and/or click the (Filter) button.
4. Right-click the request and select Rollback.
5. On the Confirmation screen that appears, click Yes.
6. Select the Request or Workorder radio button based on how you want to set the
rollback type.
7. Click Rollback to trigger the action.
Workorder Flow
The following are the workorder tasks of Modify a Virtual Server workflow.
Note: You can click each task to view its details. Wherever applicable, all logs related to the
selected task are displayed in the Logs pane at the bottom of the screen.

Modify a Virtual Server Workflow Guide
14
1. Rollback Approval ─ Review the configurations that will be rolled back. The
configuration changes are implemented on the device only after an approval.
2. Prevalidation ─ Check the following:
o A list of virtual servers available in the source and destination device.
o The performance metrics, such as CPU and memory utilization on the destination
device have been validated.
3. RollBack ─ The configuration commands are implemented to rollback the changes
made to the virtual server.
4. Post-Validation ─ Checks if the virtual server has been modified successfully.
Request Inventory
To go to the Request inventory, complete the following steps:
1. Click the (Menu) button.
2. Navigate to Workflow > Request.
The Request screen opens with the My catalog tab displayed by default.
3. Click the Request Inventory tab.
This displays all workflows that have been triggered. On the Request Inventory screen,
you can search for a request using the Search field and/or click the (Filter) button to
select the options you want to use to sort the requests.
Modify a Virtual Server Workflow Guide
15
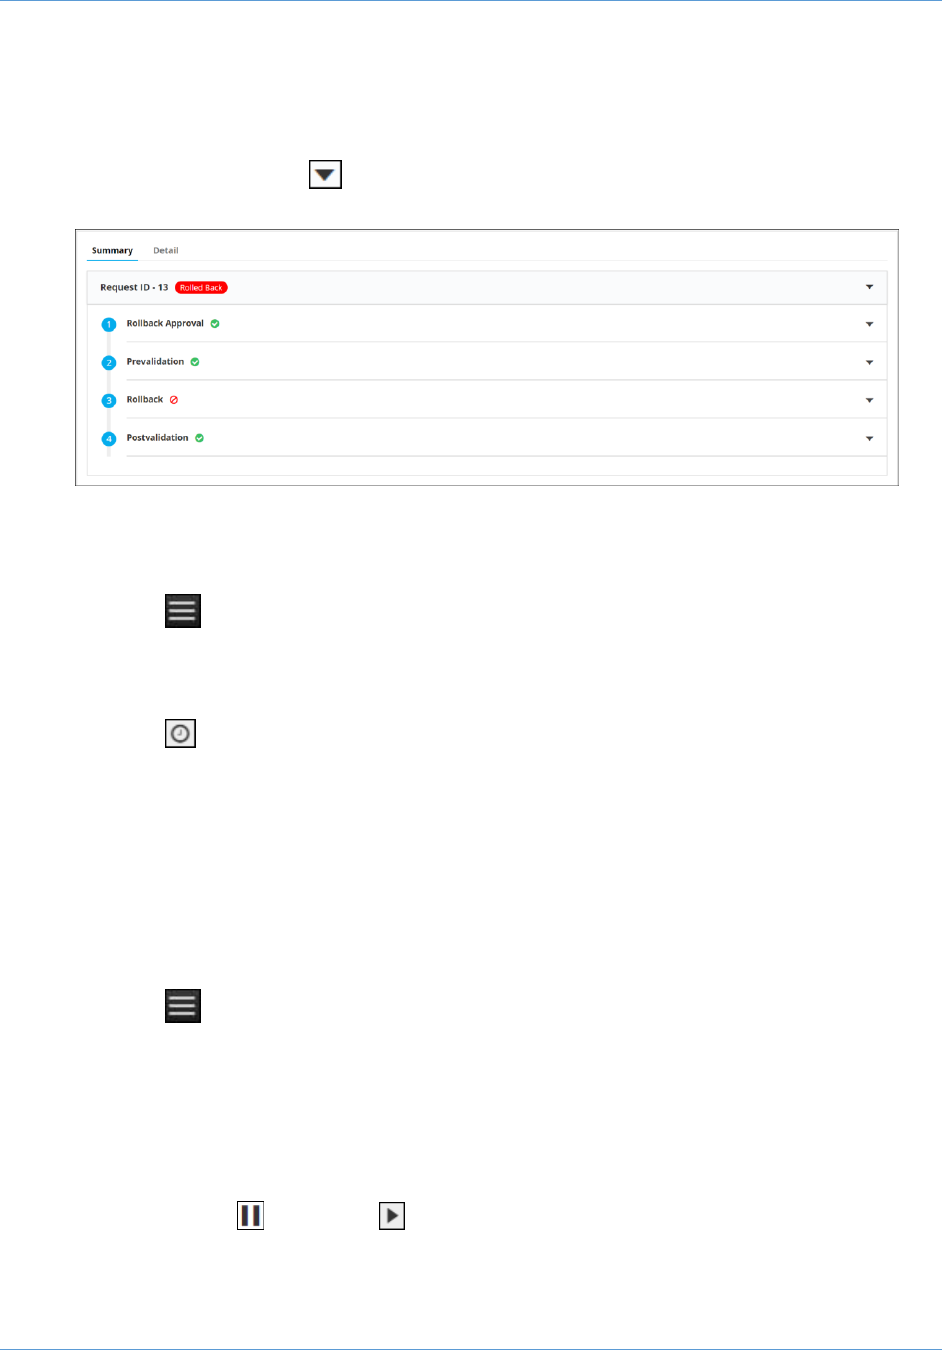
4. Click the Request ID of the requested workflow to view the tasks or phases of a request
in a tree-view.
5. You can also view the following details of the request that are created: request creator,
request time, last updated time, status, and activity log.
6. Click View in the Activity log column to display the request in a stage view. In the
Summary tab, click the (Expand) icon to view the details of each task. Click the
Details tab to view log messages and other particulars of a request.
Schedule a Workflow
To schedule a workflow, complete the following steps:
1. Click the (Menu) button.
2. Navigate to Workflow > Request.
The Request screen opens with the My catalog tab displayed by default.
3. Click the (Schedule workflow) button on the respective workflow.
4. On the window that opens, select the frequency of the policy migration process: once,
hourly, daily, weekly, monthly, or yearly. The remaining fields in the Scheduler region
update depending on what you select.
5. Click Save.
View Scheduled Workflows
To go to the scheduled workflow screen, complete the following steps:
1. Click the (Menu) button.
2. Navigate to Workflow > Request.
3. The Request screen opens with the My catalog tab displayed by default.
4. Click the Scheduled workflows tab.
5. On the Scheduled workflow screen that appears, you can perform the following tasks:
o In the View log column, click View to display the details of a scheduled workflow.
o Click the (Pause) or (Resume) button to temporarily stop or continue the
execution of a workflow.