Manual Mp600 Qsg Us V2
User Manual: Manual Canon Pixma MP600 Quick Start Guide Manual | Manual Device
Open the PDF directly: View PDF ![]() .
.
Page Count: 112 [warning: Documents this large are best viewed by clicking the View PDF Link!]
- Before Printing
- Printing from Your Computer
- Scanning Images
- Copying
- Printing from a Memory Card
- Photo Printing from Photo
- Printing Photographs Directly from a Compliant Device
- Routine Maintenance
- Troubleshooting
- Error Message Is Displayed on the LCD
- LCD Cannot Be Seen At All
- An Unintended Language Is Displayed on the LCD
- Cannot Install the MP Drivers
- Cannot Connect to Computer Properly
- Print Results Not Satisfactory
- Printing Does Not Start
- Paper Does Not Feed Properly
- Paper Jams
- Error Message Appears on the Screen
- Cannot Print Properly from a Digital Camera
- Cannot Print Properly from a Photo Index Sheet
- Appendix
- Safety Precautions
- Index

Photo All-in-One
Quick Start Guide
The following ink tanks are compatible with this product.
QT5-0684-V01 XXXXXXXX ©CANON INC.2006 PRINTED IN THAILAND

Getting Help from Canon
Help Us Help You Better
Before you contact Canon, please record the following information.
Serial Number (located on the inside of the product): _________________________________________
Model Number (located on the front of the product): _________________________________________
Setup CD-ROM number (located on the CD-ROM): __________________________________________
Purchase Date: ______________________________________________________________________
Customer Technical Support Sequence*
1.Internet — www.canontechsupport.com
For quick and comprehensive self-help in an intuitively guided interactive troubleshooting
environment, the place to start is our helpful tech support web site. In addition, the latest driver
downloads, answers to frequently asked questions, product information, and “where to buy”
instructions are found here.
2.Email Tech Support — www.canontechsupport.com
For individual attention to a special issue, try emailing our friendly technical support representatives,
specially trained to communicate quick, easy, and logical solutions to your inquiries within 24 hours.
3.Toll-Free Live Tech Support — (1-800-828-4040)
This option provides live telephone technical support, free of service charges, Monday-
Saturday (excluding holidays), during your product’s 1 year limited warranty period.
Telephone Device for the Deaf (TDD) support is available at (1-866-251-3752).
4.Extended Service and Support — www.canonesp.com
Canon CarePAK Extended Service Plan is a cost-attractive and easy-to-use extended service
program that provides up to three full years of service and support coverage at a very attractive price.
CarePAK offers toll-free Canon technical support and includes Canon’s superb InstantExchange
product replacement program. For further information about extending your Canon service and
support, call (1-800-385-2155), or visit our Web site at www.canonesp.com. CarePAK must be
purchased during your product’s warranty period.
For more information and updated program specifics, please visit our web site at
www.canontechsupport.com.
* Support program specifics are subject to change without notice.
Ordering Information
For additional supplies, use the following descriptions and order numbers.
Description Order #
Ink Tanks
PGI-5 Black 0628B002
CLI-8 Black 0620B002
CLI-8 Cyan 0621B002
CLI-8 Magenta 0622B002
CLI-8 Yellow 0623B002
Canon Specialty Papers
Photo Paper Plus Glossy (4" x 6" / 20 sheets) 7980A007
Photo Paper Plus Glossy (4" x 6" / 50 sheets) 7980A012
Photo Paper Plus Glossy (4" x 6" / 120 sheets) 7980A022
Photo Paper Plus Glossy (5" x 7" / 20 sheets) 7980A019
Photo Paper Plus Glossy (8.5" x 11" / 20 sheets) 7980A006
Photo Paper Plus Double Sided (5" x 7" / 10 sheets) 9981A006
Photo Paper Plus Double Sided (8.5" x 11" / 10 sheets) 9981A005
Photo Paper Plus Double Sided Album Kit (5" x 7") 0041B005
Photo Paper Plus Double Sided Album Kit (8.5" x 11") 0041B006
Photo Paper Pro for Borderless Printing (4" x 6" / 20 sheets) 1029A014
Photo Paper Pro for Borderless Printing (4" x 6" / 75 sheets) 1029A027
All Occasion Photo Cards (4" x 8" / 50 sheets) 1029A055
Photo Paper Pro (8.5" x 11" / 15 sheets) 1029A004
Photo Paper Pro (8.5" x 11" / 30 sheets) 1029A028
Photo Paper Pro (8" x 10" / 20 sheets) 1029A059
Matte Photo Paper (4" x 6" / 120 sheets) 7981A014
Matte Photo Paper (8.5" x 11" / 50 sheets) 7981A004
Photo Paper Glossy (4" x 6" / 50 sheets) 0775B021
Photo Paper Glossy (4" x 6" / 100 sheets) 0775B022
Photo Paper Glossy (8.5" x 11" / 50 sheets) 0775B023
Photo Paper Glossy (8.5" x 11" / 100 sheets) 0775B024
Glossy Photo Paper Credit Card Size 9157A023
Photo Stickers 0001C001
High Resolution Paper (8.5" x 11" / 100 sheets) 1033A011
Call 1-800-OK-CANON to locate a dealer near you, or visit the Canon eStore at
www.estore.usa.canon.com.
© 2006 Canon U.S.A., Inc. Canon is a registered trademark of Canon Inc. in the United States and may be a registered trademark or
trademarks in other countries. All other product and brand names are trademarks of their respective owners. As an ENERGY STAR®
partner, Canon U.S.A., Inc. has determined that this product meets the ENERGY STAR® guidelines for energy efficiency.
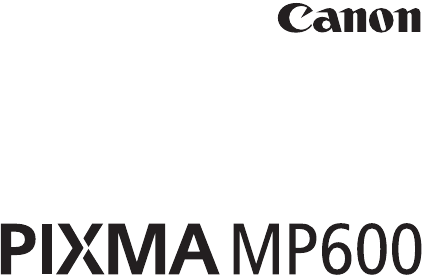
Photo All-in-One
Quick Start Guide

Canon PIXMA MP600 Photo All-in-One Quick Start Guide.
Copyright
This manual is copyrighted by Canon U.S.A., Inc. with all rights reserved. Under the copyright laws,
this manual may not be reproduced in any form, in whole or in part, without the prior written consent
of Canon U.S.A., Inc.
© 2006 Canon U.S.A., Inc.
Disclaimer
Canon U.S.A., Inc. has reviewed this manual thoroughly in order that it will be an easy-to-use
guide to your Canon PIXMA MP600 Photo All-in-One. All statements, technical information and
recommendations in this manual and in any guides or related documents are believed reliable, but
the accuracy and completeness thereof are not guaranteed or warranted, and they are not intended
to be, nor should they be understood to be, representation or warranties concerning the products
described.
Specifications are subject to change without notice.
As an ENERGY STAR® Partner, Canon Inc. has determined that this product meets the ENERGY
STAR guidelines for efficiency.
All information regarding non-Canon products was compiled from publicly available information. No
representation is made regarding the accuracy thereof.
About Consumables
Consumables (ink tanks / FINE Cartridges) are available for 5 years after production has stopped.
Trademarks
zMicrosoft and Windows are either registered trademarks or trademarks of Microsoft Corporation in
the U.S. and/or other countries.
zMacintosh and Mac are trademarks of Apple Computer, Inc., registered in the U.S. and other
countries.
zSmartMedia is a trademark of Toshiba Corporation.
zMEMORY STICK, Memory Stick PRO, MEMORY STICK Duo and Memory Stick Pro Duo are
trademarks of Sony Corporation.
zxD-Picture Card is a trademark of Fuji Photo Film Co., Ltd.
zMultiMediaCard is a trademark of the MultiMediaCard Association.
zSD card and miniSD Card are trademarks of SD Association.
zBluetooth is a trademark of Bluetooth SIG, Inc., U.S.A. and are licensed to Canon Inc.
Canon U.S.A., Inc.
One Canon Plaza
Lake Success, NY 11042
Bluetooth ID: B02954
The International ENERGY STAR® Office Equipment Program is a global program that
promotes energy saving through the use of computer and other office equipment. The
program backs the development and dissemination of products with functions that
effectively reduce energy consumption. It is an open system in which business can
participate voluntarily. The targeted products are office equipment such as computers,
monitors, printers, faxes and copiers.
Their standards and logos are uniform among participating nations.

Table of Contents
1
Before Printing................................................2
Basic Operation for the Operation Panel ........2
Turning the Machine On and Off ....................4
Handling the Original Document.....................5
Loading Printing Paper ...................................7
Changing the Paper and Print Settings ........21
Printing from Your Computer......................26
Printing with Windows...................................26
Printing with Macintosh.................................27
Scanning Images ..........................................28
Scanning Methods........................................28
Copying .........................................................29
Making Copies..............................................29
Using Other Copy Functions.........................30
Printing from a Memory Card ......................31
Memory Cards Supported by
This Machine ................................................31
Inserting the Memory Card ...........................32
Removing the Memory Card.........................33
Printing Photographs Stored on
a Memory Card.............................................33
Using Other Printing Functions.....................34
Using Useful Display Functions....................34
Printing Using the Photo Index Sheet...........35
Photo Printing from Photo...........................36
Scanning a Photo .........................................36
Printing Scanned Photographs.....................37
Other Useful Functions .................................37
Using Useful Display Functions....................38
Printing Photographs Directly from
a Compliant Device ................................39
Printing from a PictBridge Compliant
Device...........................................................39
Routine Maintenance ...................................46
Replacing an Ink Tank ..................................46
Keeping the Best Printing Results ................51
When Printing Becomes Faint or Colors
Are Incorrect .................................................52
Printing the Nozzle Check Pattern................53
Examining the Nozzle Check Pattern ...........54
Print Head Cleaning......................................56
Print Head Deep Cleaning ............................58
Aligning the Print Head.................................60
Cleaning Your Machine ................................64
Troubleshooting ...........................................67
Error Message Is Displayed on the LCD ......68
LCD Cannot Be Seen At All..........................70
An Unintended Language Is Displayed
on the LCD....................................................70
Cannot Install the MP Drivers.......................71
Cannot Connect to Computer Properly ........72
Print Results Not Satisfactory.......................73
Printing Does Not Start.................................78
Paper Does Not Feed Properly ....................79
Paper Jams ..................................................81
Error Message Appears on the Screen ........85
Cannot Print Properly from a Digital
Camera......................................................... 88
Cannot Print Properly from a Photo Index
Sheet ............................................................ 89
Appendix....................................................... 90
Reading the On-screen Manuals..................90
Specifications ............................................... 91
Safety Precautions....................................... 94
Legal Limitations on Use of Your Product
and Use of Images ....................................... 97
Users in the U.S.A. .......................................98
Index............................................................ 102
2Before Printing
Before Printing
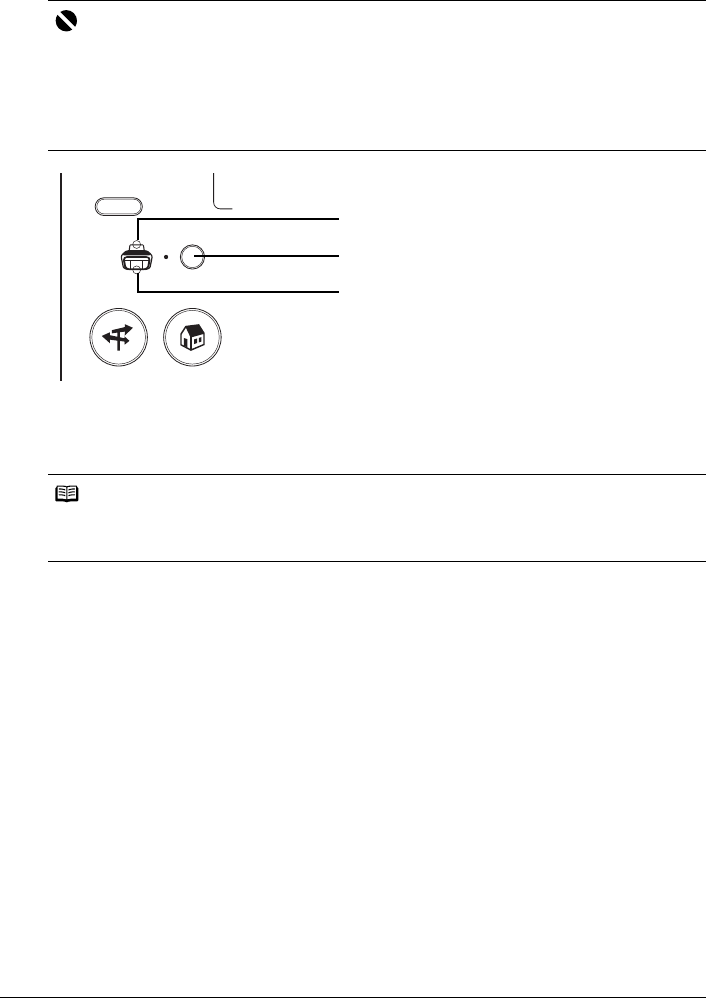
Basic Operation for the Operation Panel
(A) HOME button
(B) Easy-Scroll Wheel
(C) OK button
Easy-Scroll Wheel
Turn the Easy-Scroll Wheel left or right to select the setting item. The selected item is
highlighted or surrounded by a frame. You can also use the {, }, [ or ] button to select the
setting items.
HOME button
This section describe the procedure to display each mode from the HOME screen.
1Display the HOME screen.
(1) Press the HOME button.
The HOME screen will be displayed.
2Select the mode.
(1) Turn the Easy-Scroll Wheel to select the
mode, then press the OK button.
Example: Select Memory card.
The selected mode screen will be appeared.
You can select the following modes on the HOME screen:
Copy: You can copy in various layouts. See “Copying” on page 29.
Scan: You can save the scanned data to a connected computer using
the Operation Panel. See “Scanning Images” on page 28.
Photo index sheet: You can easily print the photos from a memory card using the
Photo Index Sheet. See “Printing Using the Photo Index Sheet”
on page 35.
Note
When you select a mode and press the Function
button (f2/Introduction), the instructions for the
selected mode are displayed.
(A) (B) (C)
(1)
3Before Printing
Settings: You can perform the maintenance or change the various settings
of the machine. See “When Printing Becomes Faint or Colors Are
Incorrect” on page 52, “Cleaning Your Machine” on page 64, or
“Changing the Machine Settings” in the User’s Guide on-screen
manual.
Easy photo reprint: You can scan printed photos and then print them. See “Photo
Printing from Photo” on page 36.
Memory card: Print the photo data stored in a memory card of a digital camera.
See “Printing from a Memory Card” on page 31.
Other Buttons
(A) NAVI button
(B) Function buttons
zNAVI Button
You can easily reach the function that you want to perform. Select what you want to do on the
navigation menu, then press the OK button.
zFunction Buttons
Two Function buttons enable you to select menus displayed at the bottom of the LCD.
The screen that appears when you press a Function button depends on the screen that is
displayed and which Function button you press.
(A) Function button (f1): When you press the Function button (f1/Remaining ink vol) on the
HOME screen, the remaining ink volume screen is displayed.
(B) Function button (f2): When you press the Function button (f2/Introduction) on the
HOME screen, the introductions for the selected mode functions are
displayed.
When you press them on screens other than the HOME screen, an operation procedure or
menus is displayed.
(A) (B)
(A) (B)
4Before Printing
Turning the Machine On and Off
Turn on the machine before printing.
Turning on the Machine
Before turning on the machine, confirm the following.
zThe Print Head and ink tanks are set into place.
If you are using the machine connected to a computer, confirm also the following.
zThe machine is connected to your computer (or a compatible device).
zThe MP Drivers are installed.
1Open the Operation Panel and press the ON/
OFF button to turn on the machine.
The POWER lamp flashes green, and changes to
steady, non-flashing light.
2If you are using the machine connected to a
computer, turn on your computer.
Turning off the Machine
1To turn off the machine, press the ON/OFF
button.
When the POWER lamp stops flashing, the
machine is turned off.
zThe Screen-saver Mode
The LCD goes out if the machine is not operated for 5 minutes. Press any button to restore the
display. You cannot change the wait time before the LCD goes out.
Note
If preparatory operations above are not complete, follow the Easy Setup Instructions to complete
them.
Important
If the ALARM lamp lights up or flashes orange and an
error message is displayed on the LCD, see “Error
Message Is Displayed on the LCD” on page 68.
Important
About the Power Plug
When removing the power plug after turing off the
machine, be sure to confirm that the POWER lamp is
not lit. If the power plug is removed from the wall outlet
with the POWER lamp still lit or flashing green, the
machine may become unable to print.
See “Keeping the Best Printing Results” on page 51.
5Before Printing
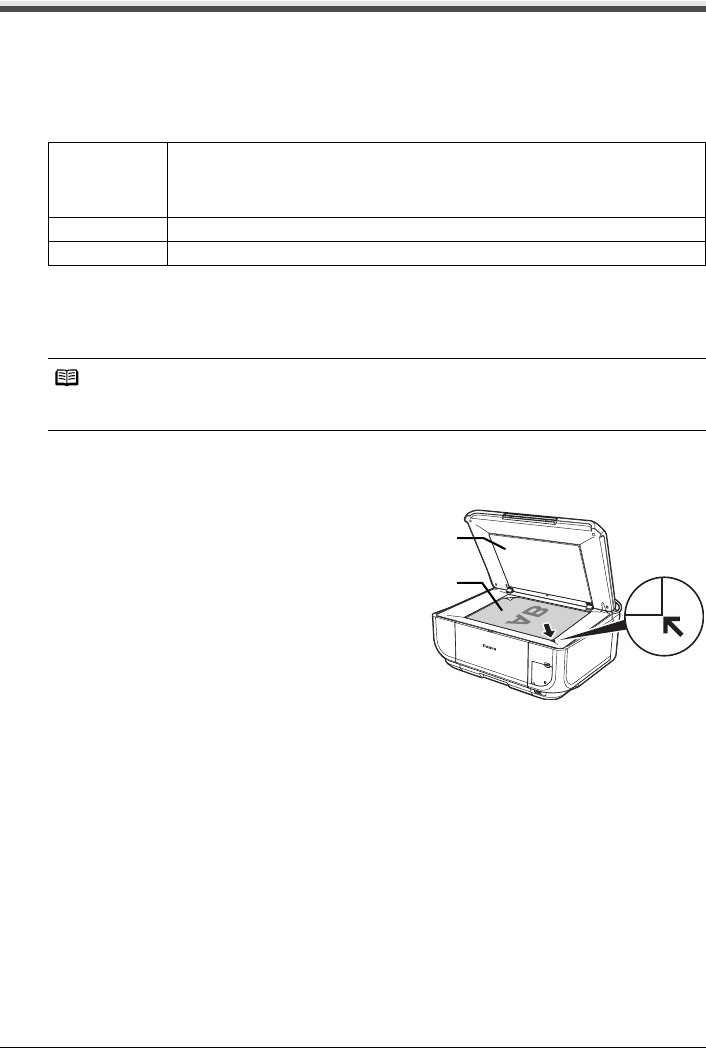
Handling the Original Document
This section describes how to load the original document on the Platen Glass.
Original Document Requirements
The original documents you load on the Platen Glass for copying or scanning must meet these
requirements:
Loading Original Documents
Load originals to copy or scan on the Platen Glass. For details on how to load a photo, see
“Scanning a Photo” on page 36.
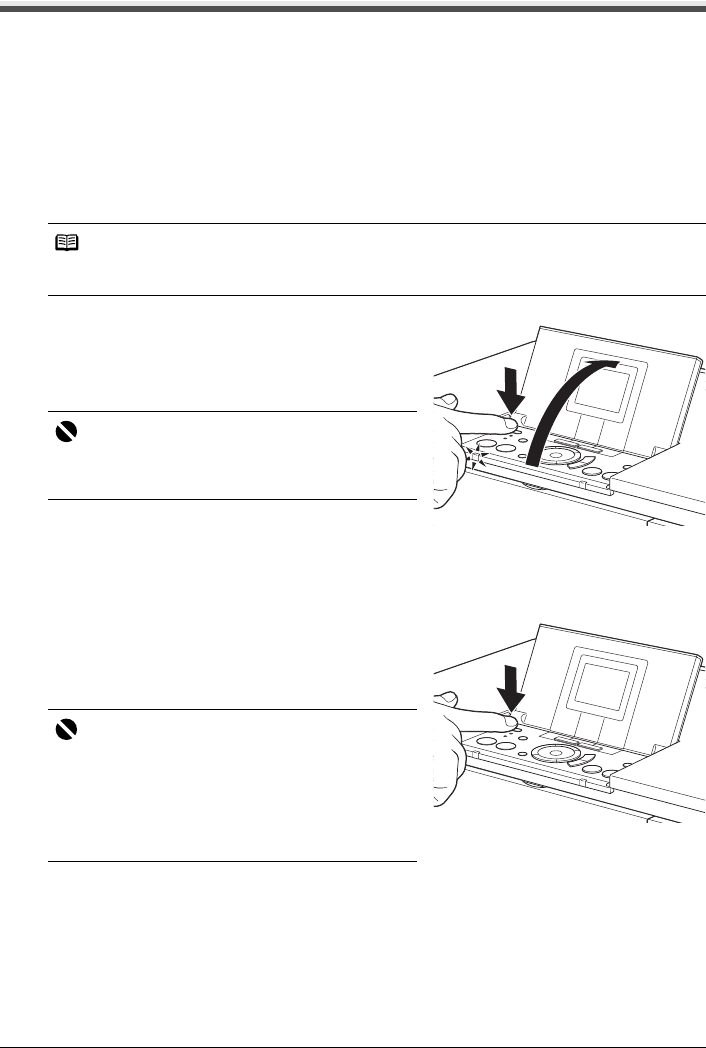
1Load the original document on the Platen Glass.
(1) Lift the Document Cover.
(2) Load the original on the Platen Glass.
Place the original face down on the Platen
Glass.
Align the upper left corner of your original with
the alignment mark on the lower right corner of
the Platen Glass.
Document
type
z
Paper documents
z
Photographs
z
Books
Size (W x L) Max. 8.5 x 11.7 inches / 216 x 297 mm
Thickness Max. 0.7 inches / 18 mm
Note
Make sure any glue, ink, correction fluid, or the like on the original document is completely dry
before loading it on the Platen Glass.
(1)
(2)
6Before Printing
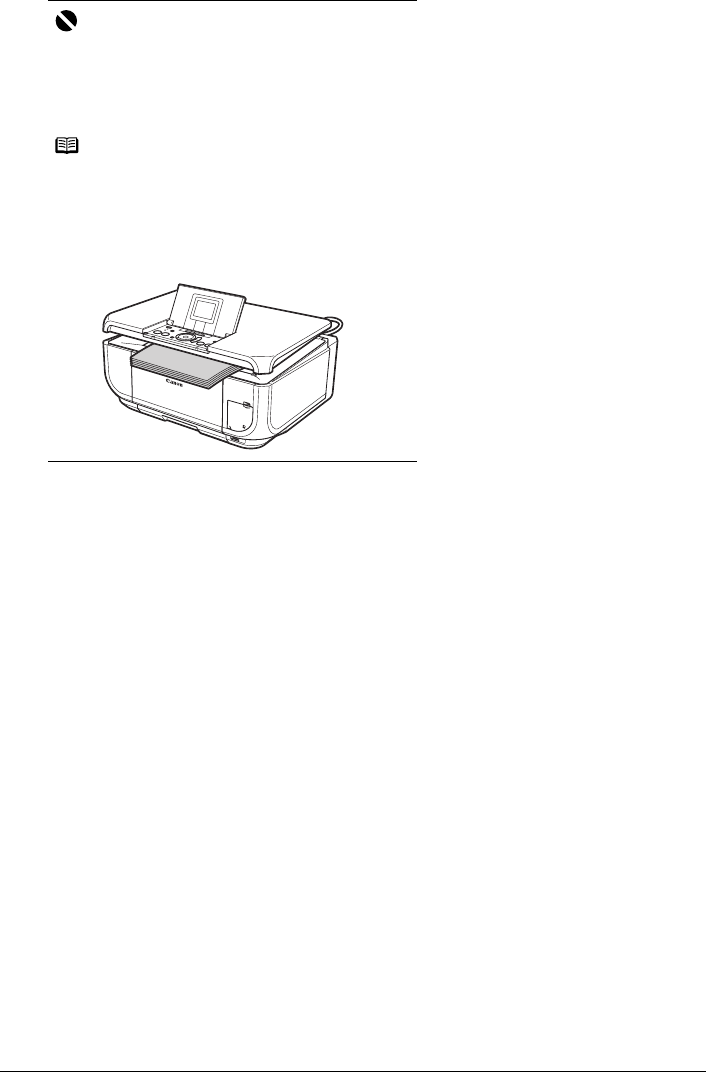
2Gently close the Document Cover.
Important
zDo not place any objects weighing more than 4.4 lb
/ 2 kg on the Platen Glass.
zDo not press or put weight on the original with
pressure exceeding 4.4 lb / 2 kg.
Doing so may cause the scanner to malfunction or
the Platen Glass to break.
Note
zThe machine cannot scan the area within about
0.04 inches / 1 mm from the front edge, and within
about 0.04 inches / 1 mm from the right edge of the
Platen Glass.
zYou can also scan in originals that are up to 0.7
inches / 18 mm thick, such as books. Set them on
the Platen Glass in the same way as paper
documents.

7Before Printing
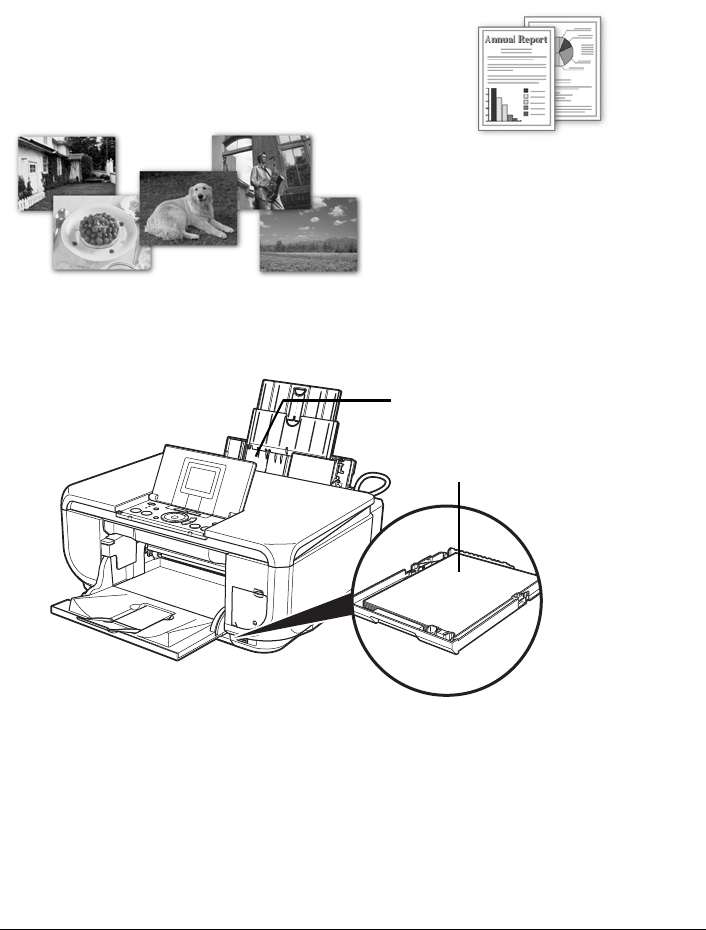
Loading Printing Paper
This section describes how to load printing paper in the Auto Sheet Feeder and the Cassette.
Paper Handling
zRecommended Paper and Requirements
Media Type Model*1 Paper Support Load Limit Machine
Setting for
Media Type
Auto Sheet Feeder Cassette
Plain Paper — 0.52 inches / 13 mm 0.52 inches / 13 mm Plain paper
Envelopes*2 — 10 envelopes 5 envelopes —
High Resolution
Paper*2 HR-101N 80 sheets (A4, Letter) 80 sheets (A4, Letter) —
Super White
Paper
SW-201 0.52 inches / 13 mm
(A4, Letter)
0.52 inches / 13 mm
(A4, Letter)
Plain paper
Glossy Photo
Paper
GP-401 10 sheets (A4),
20 sheets (4" x 6" / 101.6
x 152.4 mm, Credit card)
10 sheets (A4),
20 sheets (4" x 6" / 101.6
x 152.4 mm), Not
loadable (Credit card)*3
Glossy Photo
Paper
Glossy Photo
Paper
“Everyday Use”
GP-501 10 sheets (A4),
20 sheets (4" x 6" / 101.6
x 152.4 mm)
10 sheets (A4),
20 sheets (4" x 6" / 101.6
x 152.4 mm)
Glossy Photo
Paper
Matte Photo
Paper
MP-101 10 sheets (A4, Letter),
20 sheets (4" x 6" /101.6
x 152.4 mm)
10 sheets (A4, Letter),
20 sheets (4" x 6" / 101.6
x 152.4 mm)
Matte Photo
Paper
Photo Paper
Glossy
GP-502 10 sheets (Letter),
20 sheets (4" x 6" / 101.6
x 152.4 mm)
10 sheets (Letter),
20 sheets (4" x 6" / 101.6
x 152.4 mm)
Glossy Photo
Paper
Photo Paper
Plus Glossy*4 PP-101 10 sheets (A4, Letter, 5"x
7" / 127.0 x 177.8 mm),
20 sheets (4" x 6" / 101.6
x 152.4 mm)
10 sheets (A4, Letter, 5"x
7" / 127.0 x 177.8 mm),
20 sheets (4" x 6" /101.6
x 152.4 mm)
Photo Plus
Glossy
Photo Paper
Plus Double
Sided*2, *4
PP-101D 10 sheets (A4, Letter, 5"x
7" / 127.0 x 177.8 mm)
10 sheets (A4, Letter, 5"x
7" / 127.0 x 177.8 mm)
—
Photo
PaperPlus
Semi-gloss*4
SG-101,
SG-201
10 sheets (A4, Letter),
10 sheets (8" x 10" /
203.2 x 254.0 mm)*5,
20 sheets (4" x 6" /101.6
x 152.4 mm)
10 sheets (A4, Letter),
10 sheets (8" x 10" /
203.2 x 254.0 mm)*5,
20 sheets (4" x 6" / 101.6
x 152.4 mm)
Photo Plus
Glossy
Photo Paper
Pro*4 PR-101 10 sheets (A4, Letter, 8"x
10" / 203.2 x 254.0 mm),
20 sheets (4" x 6" / 101.6
x 152.4 mm, Wide)
10 sheets (A4, Letter, 8"x
10" / 203.2 x 254.0 mm),
20 sheets (4" x 6" / 101.6
x 152.4 mm, Wide)
Photo Paper
Pro
Photo
Stickers*6, *7 PS-101 1 sheet Not loadable*3 Photo Plus
Glossy
T-Shirt
Transfers*2 TR-301 1 sheet 1 sheet —

8Before Printing
Paper with a Model Number is Canon specialty media.
You may not be able to purchase some Canon genuine papers depending on your country.
*1 Paper is not sold in the US by Model Number. Purchase paper by name.
*2 Available only when printing from your computer.
*3 Feeding this paper from the Cassette can damage the machine. Load in the Auto Sheet
Feeder.
*4 When loading a stack of paper, the printed side may become marked when it is fed in. In this
case, load paper one sheet at a time.
*5 SG-201 only
*6 You can specify the print setting easily by using the Easy-Photo Print provided with the
Setup CD-ROM.
*7 When copying onto sticker paper, be sure to select Sticker print in Easy photo reprint
mode. Refer to “Printing on a Sticker (Sticker Print)” in “Using Other Useful Printing
Functions” of the User’s Guide on-screen manual.
When printing photos stored in a memory card to sticker paper, be sure to select Sticker
print in the Memory card mode. Refer to “Printing on Stickers (Sticker Print)” in “Using Other
Useful Printing Functions” of the User’s Guide on-screen manual.
When printing photos saved on your mobile phone to sticker paper, select Stickers for paper
size in Wireless print settings. Refer to “Setting Items” in “Setting the Page Size, Media
Type, and Layout When Printing from a Mobile Phone” of the User’s Guide on-screen
manual.
zTo specify the page size and media type when printing from your computer, refer to the Printer
Driver Guide on-screen manual.
zTo specify the page size and media type when printing photos saved on mobile phones, refer
to “Setting the Page Size, Media Type, and Layout When Printing from a Mobile Phone” in the
User’s Guide on-screen manual.
Note
For a detailed description of printing media types, refer to “Printing Media” in the User’s Guide on-
screen manual.

9Before Printing
zMedia Types You Cannot Use
Do not use the following types of paper. Using such paper will not only produce unsatisfactory
results, but can also cause the machine to jam or malfunction. Additionally, when printing on A5
or smaller sized paper, do not use paper thinner than a post card, including plain paper or
notepad paper cut to a small size.
zFolded, curled, or wrinkled paper
zDamp paper
zPaper that is too thin (weighing less than 64 gsm / 17 lb)
zPaper that is too thick (non-Canon genuine paper weighing more than 105 gsm / 28 lb)
zPicture postcards
zPostcards affixed with photos or stickers
zEnvelopes with double flaps
zEnvelopes with sticker flaps
zEnvelopes with an embossed or treated surface
zAny type of paper with holes
zPaper that is not rectangular
zPaper bound with staples or glue
zPaper with adhesives
zPaper decorated with glitter, etc.
zPhoto Paper Pro Guidelines
zDo not touch the print surface until the ink is dry (approximately 30 minutes). Colors in dark
images may appear indistinct at first, but will become clearer after approximately 30 minutes.
zImages may become smudged if you place printouts in an album before the ink is completely
dry. We recommend to allow the ink to dry for 24 hours before placing your printouts in an
album.
zDo not attempt to dry the ink with a hair dryer or by exposing printouts to direct sunlight.
zDo not store or display printouts in hot or humid conditions. Never expose them to heat or
direct sunlight.
zStore printouts in photo albums, photo frames, or presentation binders to protect them from
direct exposure to air or sunlight.
zDo not mount printouts in an adhesive-type album as you may not be able to remove them.
Note that some types of clear plastic folders and albums may cause the edges of the paper to
turn yellow.
10 Before Printing
Using Specialty Media
Canon recommends that you use Canon genuine media to ensure optimal print quality.
Using the Auto Sheet Feeder and the Cassette
This machine offers two paper sources to load printing paper; the Auto Sheet Feeder, found at
the top of the machine, and the Cassette, found at the front of the machine.
(A) Auto Sheet Feeder
(B) Cassette
zPhoto Quality Media
zGlossy Photo Paper
zMatte Photo Paper
zPhoto Paper Plus Double Sided
zPhoto Paper Plus Glossy
zPhoto Paper Plus Semi-gloss
zPhoto Paper Pro
zPhoto Stickers
zMedia Suited for Business
Documents
zHigh Resolution Paper
(A)
(B)
11Before Printing
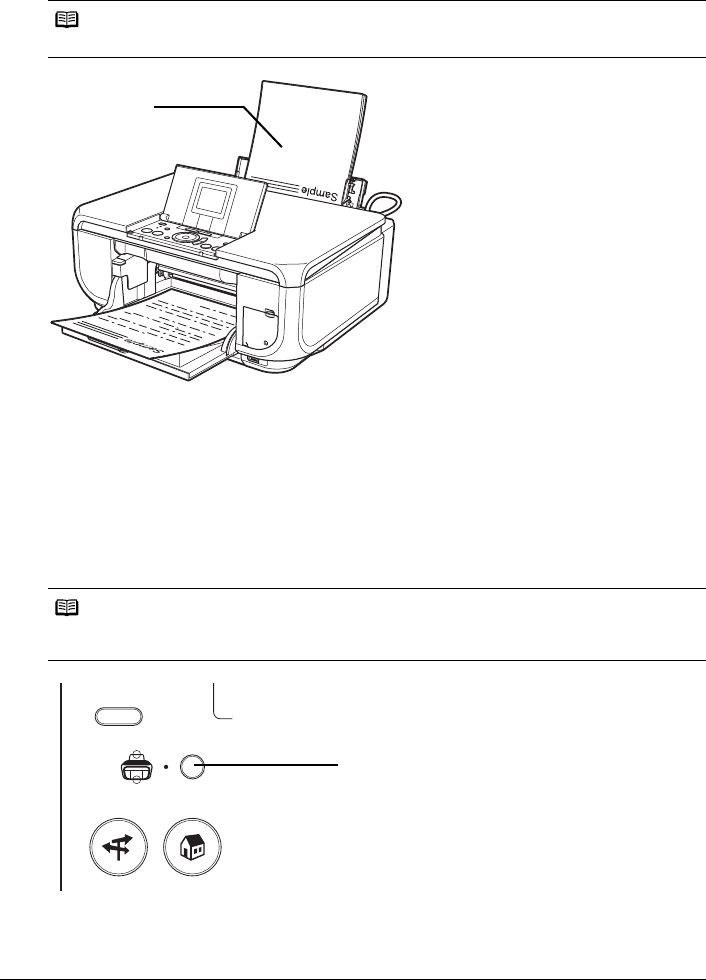
zWhen Printing for the First Time
At purchase, the machine is set to feed from the Auto Sheet Feeder.
If you are printing without changing paper source settings, load paper in the Auto Sheet
Feeder.
(A) Load plain paper in the Auto Sheet Feeder.
zTo Change the Paper Source
The Auto Sheet Feeder lamp lights up when feeding from the Auto Sheet Feeder, and the
Cassette lamp lights up when feeding from the Cassette.
Before you print, make sure that the paper source selection matches the paper source where
you actually loaded paper.
To change the paper source, simply press the Paper Feed Switch.
For details, see “Changing the Paper Source” on page 14.
(A) Press to change the paper source
Note
For details on loading paper, see “Loading Paper in the Auto Sheet Feeder” on page 16.
Note
You can also select the paper source using the printer driver. For details on paper source selection
using the printer driver, refer to the Printer Driver Guide on-screen manual.
(A)
(A)
12 Before Printing
Paper Source Selection Scenarios
Deciding on the usage of the two paper sources to print with minimum reloading of paper
depends mainly on the variety of the type of paper you use regularly.
zIf you print regularly on photo paper as well as on plain paper
If you use photo paper as much as plain paper, you can load photo paper in the Auto Sheet
Feeder and plain paper in the Cassette. This way, you can switch the paper source according
to the type of paper just by pressing the Paper Feed Switch.
You can also specify the type and size of paper to be fed from the Cassette using the printer
driver. You can print more efficiently by specifying the type of paper you use regularly this
way, since the paper source will be switched automatically to the Cassette for this paper.
(A) Auto Sheet Feeder: Load paper of various types and sizes, including photo paper.
(B) Cassette: Load paper you use most regularly, such as plain paper.
Note
zSome types and sizes of paper are not loadable in the Cassette and requires the use of the
Auto Sheet Feeder. See “Paper Handling” on page 7. For details on loading paper, see
“Loading Paper” on page 15.
zFor details on printer driver settings, refer to the Printer Driver Guide on-screen manual.
(A)
(B)
13Before Printing
zIf you print mainly on plain paper
You can load plain paper of the same size in both paper sources, and set the printer driver to
automatically switch the paper source when either paper source runs out of paper during
printing.
(A) Auto Sheet Feeder: Load plain paper
(B) Cassette: Load plain paper
Note
zFor details on how to load paper, see “Loading Paper” on page 15.
zFor details on printer driver settings, refer to the Printer Driver Guide on-screen manual.
(A)
(B)
14 Before Printing
Changing the Paper Source
Before printing, confirm that the location where you have loaded paper is selected as the paper
source. Press the Paper Feed Switch to change the paper source.
(A) Auto Sheet Feeder lamp
(B) Paper Feed Switch
(C) Cassette lamp
Important
When Printing from Your Computer
zIf Paper Feed Switch is not selected for Paper Source in the printer driver, the Paper Feed
Switch on the machine will be disabled when printing. Confirm the setting in the printer driver.
See “Printing with Windows” on page 26 or “Printing with Macintosh” on page 27.
zIf a setting other than Paper Feed Switch is selected for Paper Source in the printer driver, the
printer driver settings takes precedence when printing. For details on paper source selection
using the printer driver, refer to the Printer Driver Guide on-screen manual.
Note
Press the Paper Feed Switch to select the paper source so that the Auto Sheet Feeder lamp is lit
when feeding from the Auto Sheet Feeder, and the Cassette lamp is lit when feeding from the
Cassette.
(B)
(C)
(A)

15Before Printing
Loading Paper
Important
zIf you cut plain paper to 4" x 6" / 101.6 x 152.4 mm, 5" x 7" / 127.0 x 177.8 mm, or 2.13" x 3.39"
/ 54.0 x 86.0 mm (credit card-size) for a trial print, it can cause paper jams.
zYou cannot print on postcards affixed with photos or stickers.
zAlways load paper in portrait orientation (A). Loading paper in landscape orientation (B) can
cause the paper to be jammed.
Note
zFor details on the specialty media Canon provides for use with its various printers, refer to
“Printing Media” in the User’s Guide on-screen manual.
zFor detailed instructions on how to load specialty media into the machine, refer to “Printing
Media” in the User’s Guide on-screen manual.
When Printing on Plain Paper
zYou can use general copy paper or Canon’s Super White Paper. When printing on both sides,
we recommend Canon’s Super White Paper Double-Sided.
Paper size:
– Standard sizes: A4, B5, A5, Letter, and Legal (Auto Sheet Feeder only)
– Non-standard sizes for the Auto Sheet Feeder: 2.13" x 3.39" to 8.5" x 23" / 54.0 x 86.0 mm to
215.9 x 584.2 mm
– Non-standard sizes for the Cassette: 3.5" x 5" to 8.5" x 11.69" / 89.0 x 127.0 mm to 215.9 x
297.0 mm
Paper weight: 17 to 28 lb / 64 to 105 gsm (non-Canon genuine plain paper)
zYou can load up to 150 sheets of plain paper (17 lb / 64 gsm, 0.52 inches / 13 mm in height).
However, proper feeding of paper may not be possible at this maximum capacity depending on
the type of paper or environmental conditions (either very high or low temperature and
humidity). In such cases, reduce the sheets of paper you load at a time to around half (around
0.2 inches / 5 mm in paper stack height).
zDo not stack more than 50 sheets in the Paper Output Tray.
When Printing on 5" x 7", 4" x 6", or 2.13" x 3.39" (Credit Card-sized) paper
zLoad 2.13" x 3.39" (credit card-sized) paper only in the Auto Sheet Feeder.
zYou can load up to 20 sheets of 4" x 6" or 2.13" x 3.39" (credit card-sized) paper and 10 sheets
of 5" x 7" paper.
zWe recommend using genuine Canon photo media when printing photographs.
Refer to “Printing Media” in the User’s Guide on-screen manual.
(A) (B)
16 Before Printing
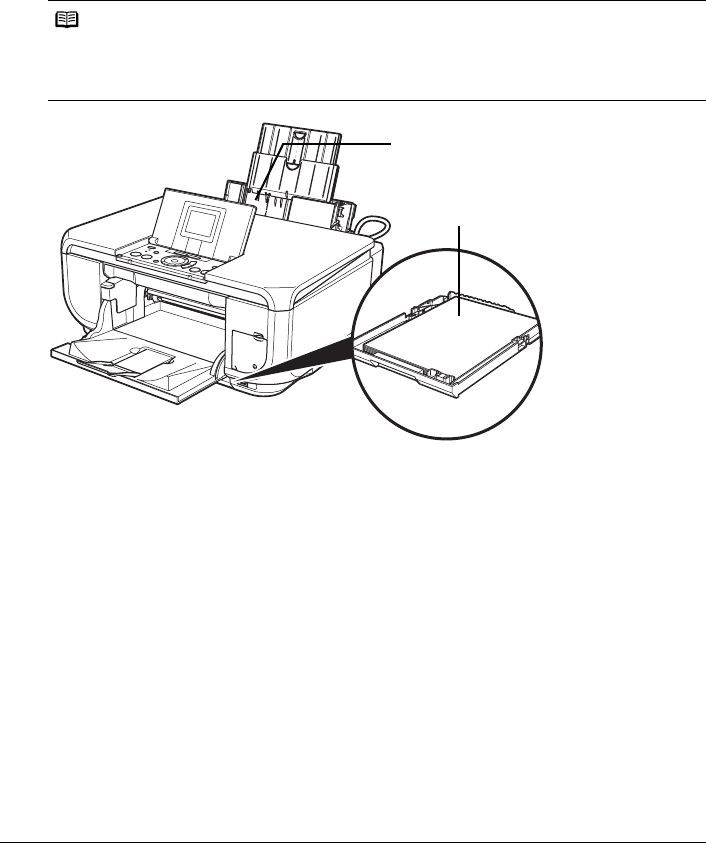
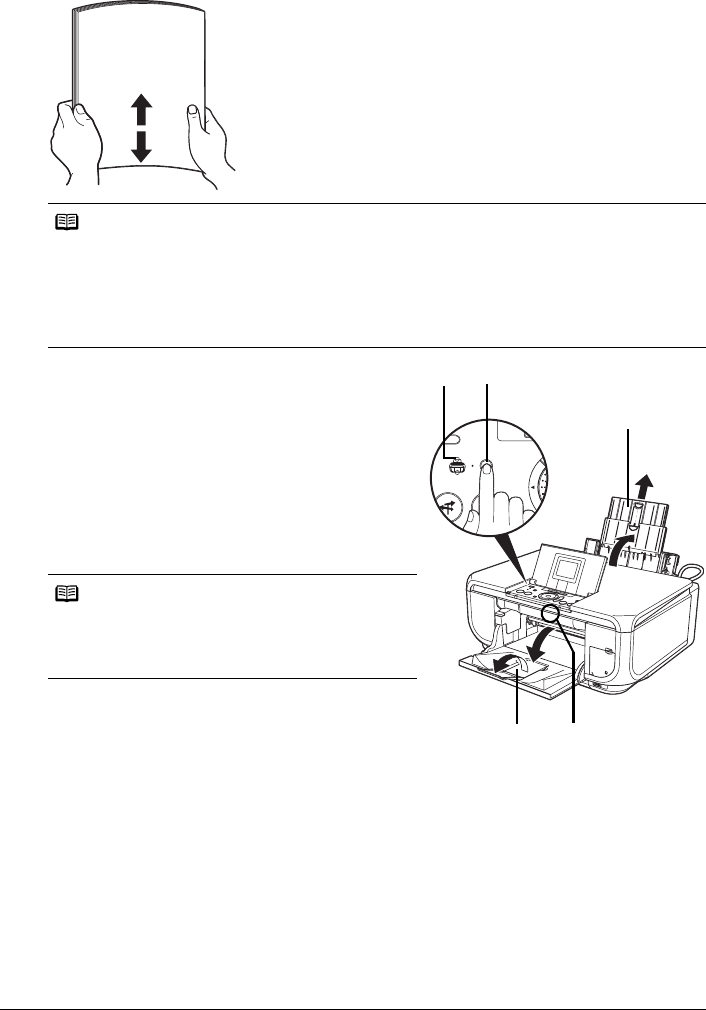
zLoading Paper in the Auto Sheet Feeder
1Flatten the four corners of the paper before loading it.
2Prepare to load paper.
(1) Open the Sheet Feeder Cover and pull out the
Paper Support.
(2) Open the Paper Output Tray.
Put your finger in the rounded indent of the
Paper Output Tray and open it gently.
(3) Open the Output Tray Extension.
(4) Press the Paper Feed Switch so that the Auto
Sheet Feeder lamp (A) lights.
Note
zAlign the edges of paper neatly before loading. Loading paper without aligning the edges may
cause paper jams.
zIf paper is curled, hold the opposing curled corners and gently bend them in the opposite
direction until the paper becomes completely flat. See “Paper is curled.” on page 76.
zTo avoid curling, handle paper as follows.
– Put unused paper back into the package and keep them on a level surface.
– Take out only the necessary number of sheets from the package, just before printing.
Note
You can also select the paper source with the printer
driver.
For details, refer to the Printer Driver Guide on-screen
manual.
(A) (4)
(1)
(3) (2)
17Before Printing
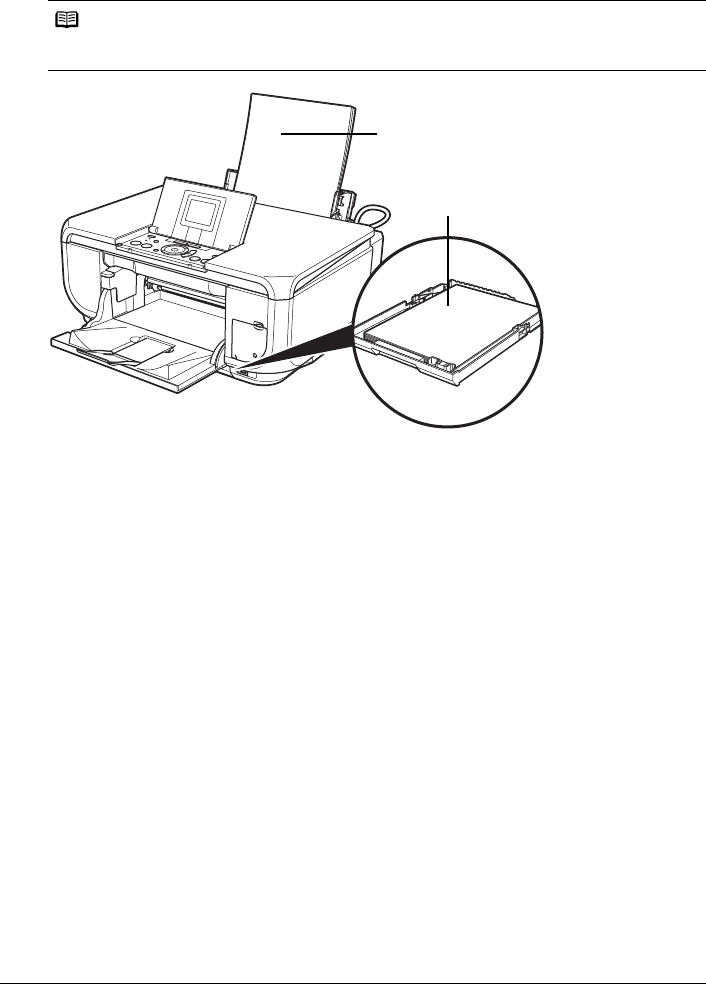
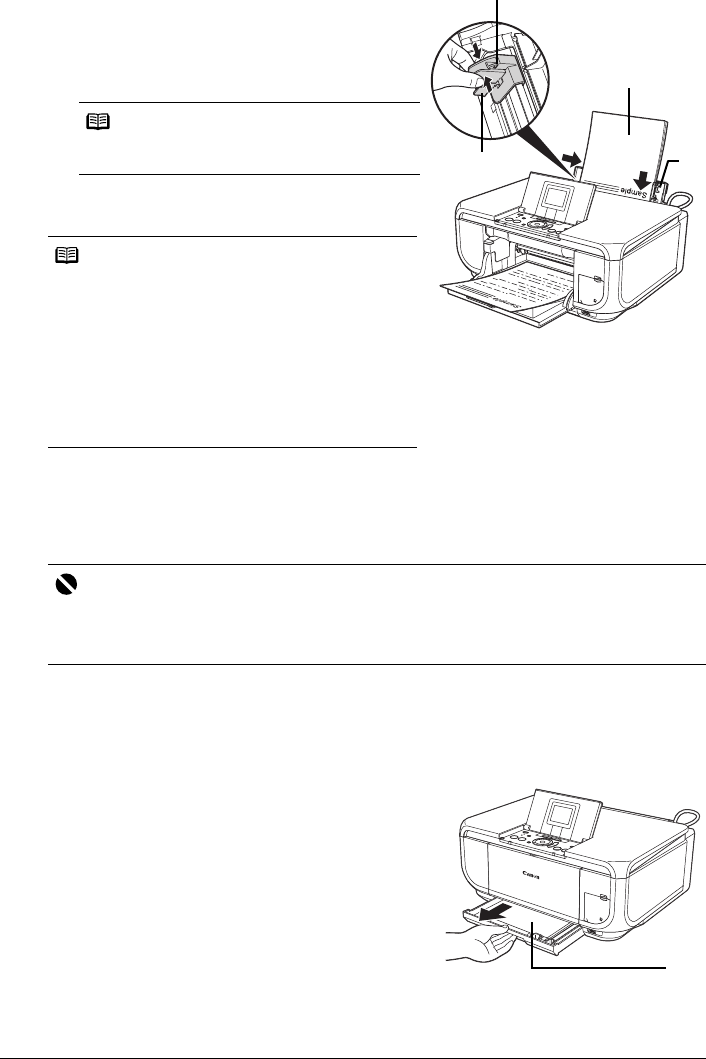
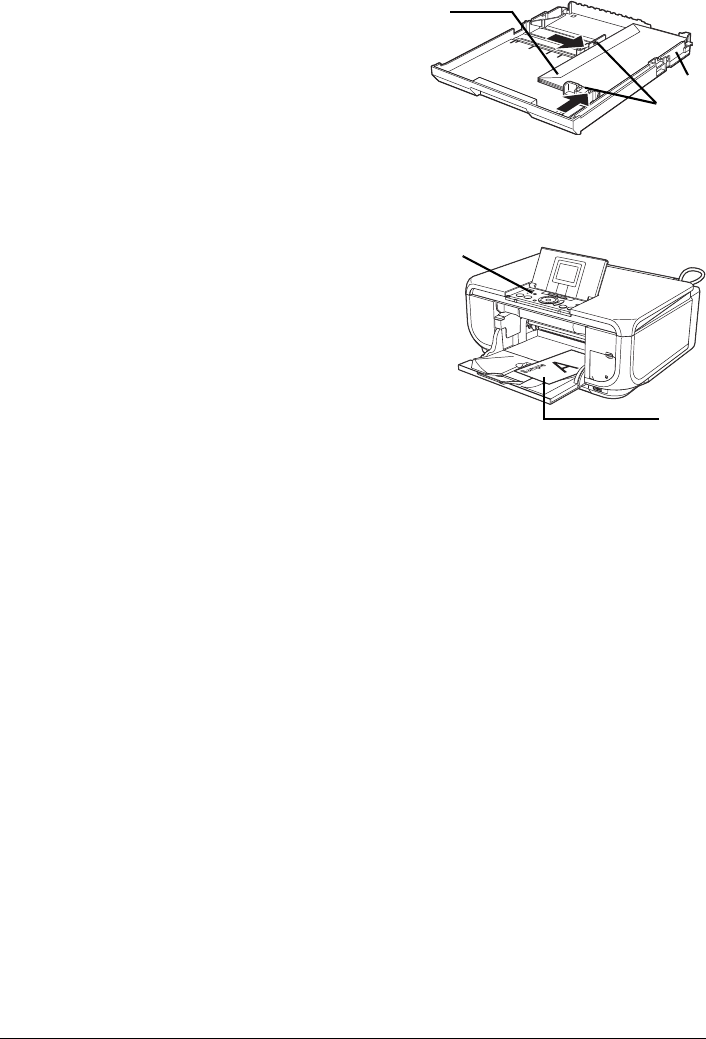
3Load the paper.
(1) Load the paper in the Auto Sheet Feeder with
the print side facing UP.
(2) Align the paper stack against the Cover Guide
on the right side of the Paper Support.
(3) Pinch the Paper Guide and slide it against the
left side of the paper stack.
zLoading Paper in the Cassette
Some types and sizes of paper are not loadable in the Cassette and requires the use of the Auto
Sheet Feeder. If you intend to use only the Cassette, check for any usage restrictions in
advance. See “Paper Handling” on page 7.
1Flatten the four corners of the paper before loading it.
See “Flatten the four corners of the paper before loading it.” on page 16.
2Prepare to load paper.
(1) Pull out the Cassette from the machine.
Note
Make sure that the Cover Guide is set upright
when you load paper in the Auto Sheet Feeder.
Note
When performing copy direct printing without using a
computer, select the page size selected in Page size
in each menu. For details on settings in each menu,
see “Changing the Paper and Print Settings” on
page 21.
When using the machine connected to a computer,
select the page size of the loaded paper in Page Size
in the printer driver.
For details on printer driver settings, see “Printing with
Windows” on page 26 or “Printing with Macintosh” on
page 27.
Important
zDo not leave photo paper, such as Photo Paper Pro, in the Cassette for a long time. This may
cause paper discoloration due to natural aging.
zIf you load photo paper such as Photo Paper Pro in the Cassette, you may get roller traces on
the print surface. To avoid this, load paper in the Auto Sheet Feeder.
(A)
(1)
(3) (2)
Do not load higher than the Load Limit
Mark (A).
(1)
18 Before Printing
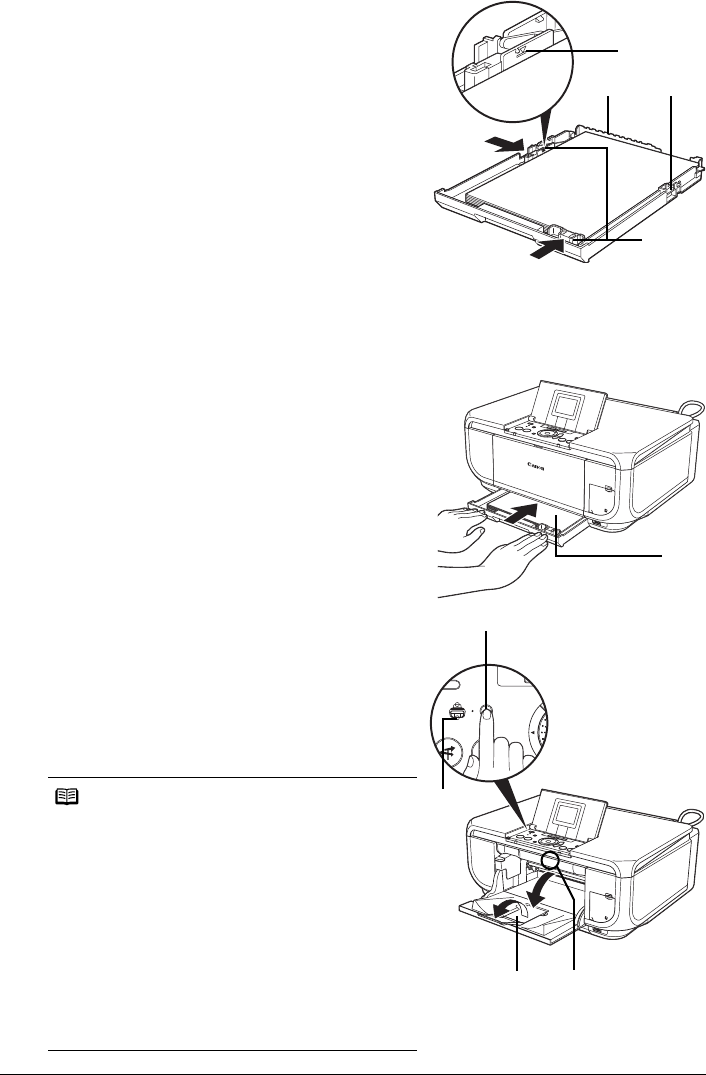
3Load the paper with the print side facing
DOWN.
(1) Load the paper in the Cassette with the print
side facing DOWN and the leading edge to the
far side.
(2) Align the paper stack against the right side of
the Cassette.
(3) Slide the paper guides to fit to the loaded
paper stack.
4Insert the Cassette into the machine.
(1) Insert the Cassette into the machine.
Push the Cassette all the way into the
machine.
5Prepare the Paper Output Tray.
(1) Open the Paper Output Tray.
Put your finger in the rounded indent of the
Paper Output Tray and open it gently.
(2) Open the Output Tray Extension.
(3) Press the Paper Feed Switch so that the
Cassette lamp (A) lights.
Note
zWhen performing copy direct printing without using
a computer, select the page size selected in Page
size in each mode. For details on settings in each
mode, see “Changing the Paper and Print Settings”
on page 21.
When using the machine connected to a computer,
select the page size of the loaded paper in Page
Size in the printer driver.
For details on printer driver settings, see “Printing
with Windows” on page 26 or “Printing with
Macintosh” on page 27.
zYou can also select the paper source with the
printer driver.
For details, refer to the Printer Driver Guide on-
screen manual.
(A)
(1) (2)
(3)
Do not load higher than the Load Limit
Mark (A).
(1)
(A)
(3)
(2) (1)

19Before Printing
Loading Envelopes
Use either European DL or US Comm. Env. #10-sized envelope.
zLoading Envelopes in the Auto Sheet Feeder
1Load the envelope against the Cover Guide
(the right side of the Paper Support).
Load with the front face UP and the rear flaps
DOWN on the left.
A maximum of 10 envelopes can be loaded at
once.
2Pinch the Paper Guide and slide it against the left side of the envelope.
3Press the Paper Feed Switch so that the Auto Sheet Feeder lamp lights up.
4In the printer driver, select Envelope in Media Type, and then select DL Env. or
Comm. Env. #10 in Page Size.
For details on printer driver settings, see “Printing with Windows” on page 26 or “Printing with
Macintosh” on page 27.
Important
zYou need to print from the computer to print on envelopes.
zDo not use envelopes with embossed or treated surfaces, a double flap, pressure seals, or
sticker flaps.
zSelect either DL Env. or Comm. Env. #10 in the printer driver according to the envelope size
you are using. If you do not, the address will be printed in the wrong direction.
Important
Make sure that the Cover Guide is set upright when
you load paper in the Auto Sheet Feeder.
2
3
*2
1
*1
*1 Printing orientation
*2 Make sure the flaps are folded.
20 Before Printing
zLoading Envelopes in the Cassette
1Align the envelope stack against the right side
of the Cassette.
Load with the front face DOWN. The flap of the
envelope will appear facing UP on the left side.
A maximum of 5 envelopes can be loaded at once.
2Slide the Paper Guides against the side of the envelope.
3Press the Paper Feed Switch so that the
Cassette lamp lights up.
4In the printer driver, select Envelope in Media Type, and then select DL Env. or
Comm. Env. #10 in Page Size.
For details on printer driver settings, see “Printing with Windows” on page 26 or “Printing with
Macintosh” on page 27.
*1
1
2
*1 Make sure the flaps are folded.
3
*1
*1 Printing orientation
21Before Printing
Changing the Paper and Print Settings
This section describes the Settings screen that can be specified on the Operation Panel when
copying, or when printing from a memory card or printed photo.
Setting Items in Each Mode
Items in each mode are as follows.
When you select the item to set and press the OK button, a screen with various settings is
displayed.
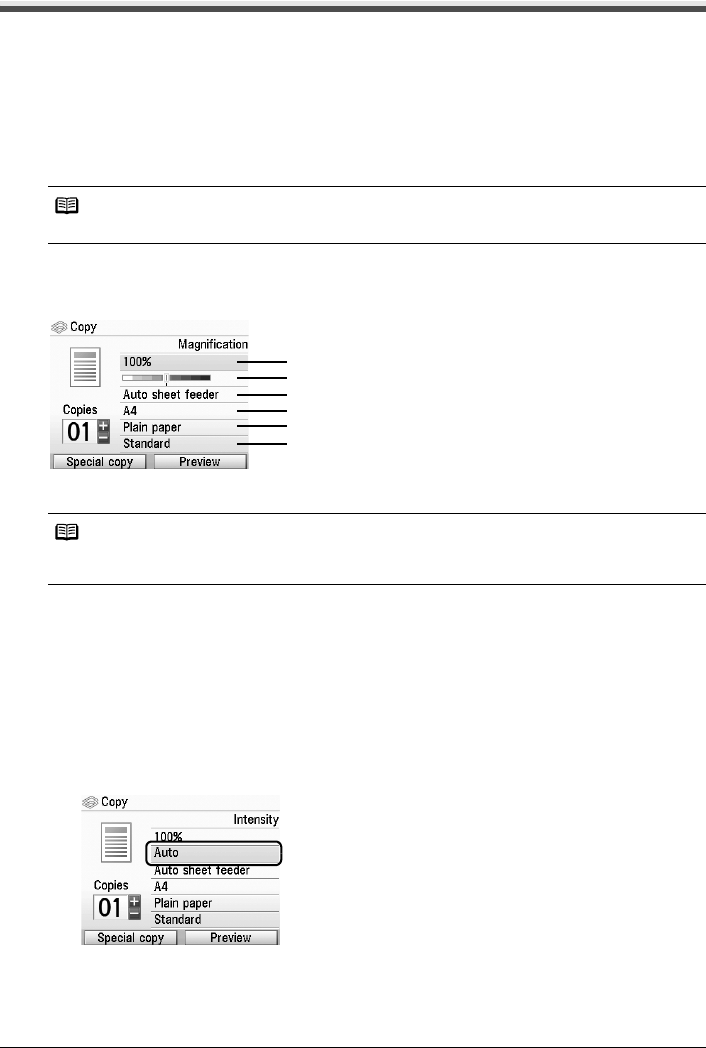
zCopy Mode
This section describes paper and print settings for Copy mode.
You can specify the paper settings for printing or print quality.
(1) You can specify the reduction or enlargement method.
Fit-to-page, Zoom (25 - 400%), 100%, Preset ratio
(2) You can specify the intensity.
Turn the Easy-Scroll Wheel clockwise to increase intensity or counterclockwise to
decrease it. You can also use the [ or ] button to make settings.
Press the Function button (f2/Switch auto/man) in the intensity screen to automatically
match the intensity to the original on the Platen Glass and then print the image. See
“Function Buttons” on page 3.
The slide bar for the intensity adjustment on the LCD changes to Auto when it is done.
Note
Depending on the functions, some setting items cannot be specified in combination.
Note
Paper size, media type, and print quality settings are specified for the paper source selected by the
Paper Feed Switch. Confirm the selected paper source.
(1)
(2)
(3)
(4)
(5)
(6)
22 Before Printing
(3) Select the paper source.
Before printing, confirm that the location where you have loaded paper is selected as the
paper source. Press the OK button to change the paper source.
(4) Specify the page size.
Credit card, A5, B5, A4, 8.5" x 11" (215 x 279), 5" x 7" (127 x 177.8), 4" x 6" (101.6 x
152.4)
(5) Specify the media type.
Glossy Photo Paper, Matte Photo Paper, Photo Plus Glossy, Plain paper, Photo Paper
Pro
(6) Adjust print quality according to the original.
Fast (speed-priority), Standard, High(quality-priority)
Important
While Auto is selected, you can not change the intensity by using the Easy-Scroll Wheel.
Press the Function button (f2/Switch auto/man) to enable manual intensity settings again
and then specify the intensity. See “Function Buttons” on page 3.
Important
Credit card can be selected when the Auto Sheet Feeder is selected as the paper source.
Note
Some of these options are not available depending on the country of purchase.
Note
zFast (speed-priority) can be selected when Plain paper is selected as the media type.
zIf you used Fast (speed-priority) with media type set to Plain paper and the quality is not
as good as expected, select Standard or High(quality-priority) and try copying again.
zSelect High(quality-priority) to copy in grayscale. Grayscale renders tones in a range of
grays instead of black or white.
23Before Printing
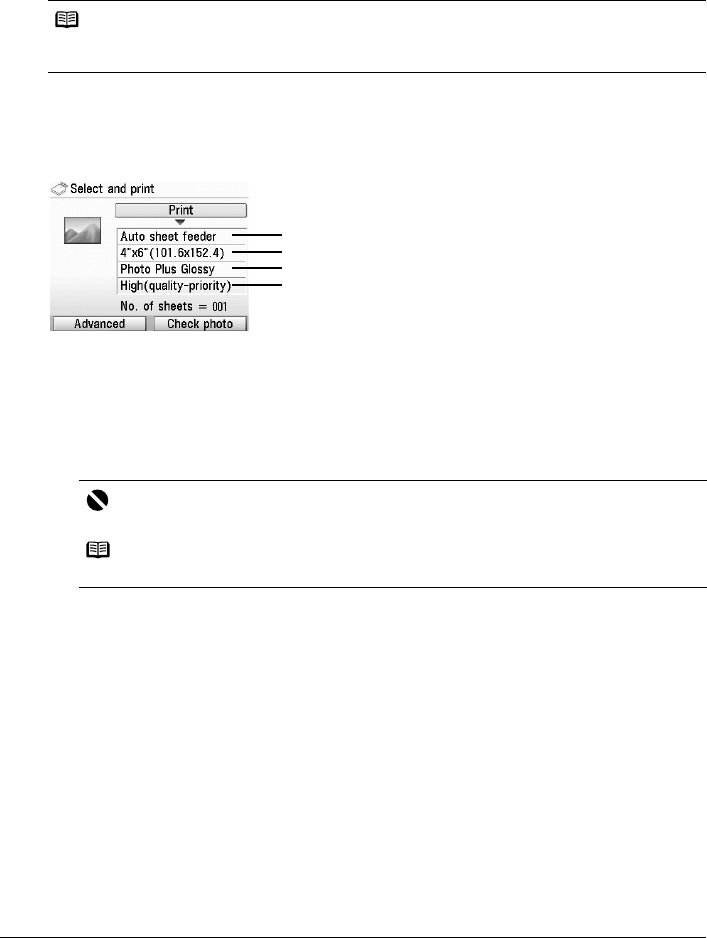
zMemory Card and Easy Photo Reprint Modes
This section describes the paper and print settings for Memory card and Easy photo reprint
modes.
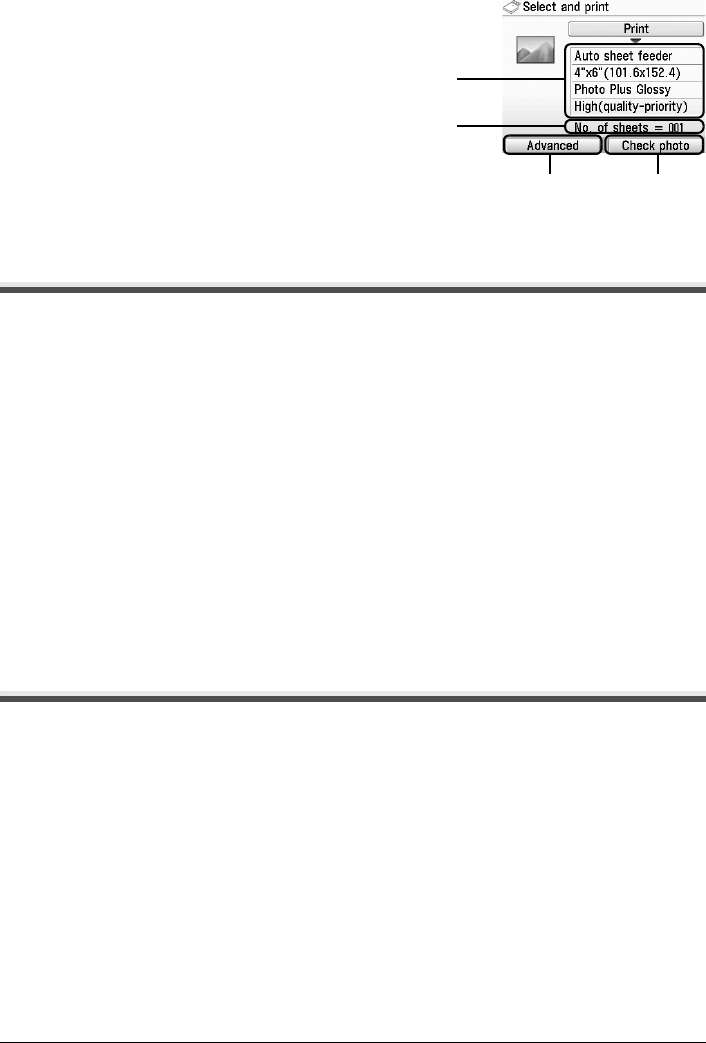
Print Settings Confirmation Screen
You can specify the paper settings for printing or print quality.
Example: Screens displayed in Select and print in the Memory card mode or the Easy photo
reprint mode
See “Printing Photographs Stored on a Memory Card” on page 33 or “Printing Scanned
Photographs” on page 37.
(1) Select the paper source.
Before printing, confirm that the location where you have loaded paper is selected as the
paper source. Press the OK button to change the paper source.
(2) Select the page size.
Credit card, A4, 8.5" x 11" (215 x 279), 8" x 10" (203.2 x 254.0)*, 5" x 7" (127 x 177.8), 4"
x 6" (101.6 x 152.4), Wide 4" x 7.1" (101 x 180)
(3) Select the media type.
Glossy Photo Paper, Matte Photo Paper, Photo Plus Glossy, Plain paper*, Photo Paper
Pro
(4) Select the print quality.
Standard, High(quality-priority)
* Can be selected only in Memory card mode.
Note
Paper size, media type, and print quality settings are specified for the paper source selected by the
Paper Feed Switch. Confirm the selected paper source.
Important
Credit card can be selected when the Auto Sheet Feeder is selected as the paper source.
Note
Some of these options are not available depending on the country of purchase.
(1)
(2)
(3)
(4)
24 Before Printing
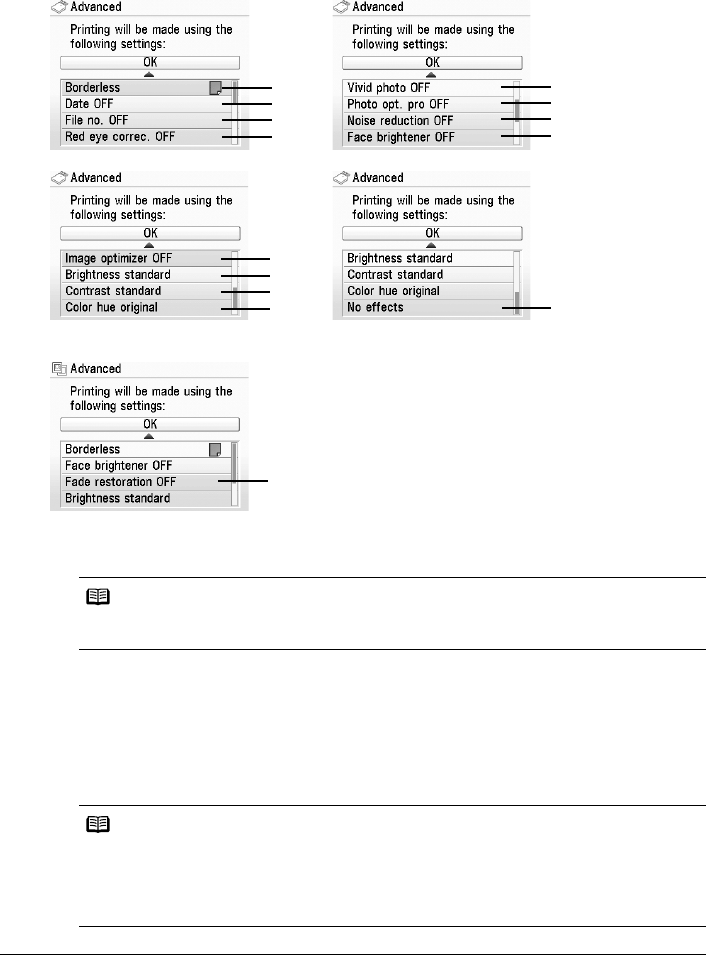
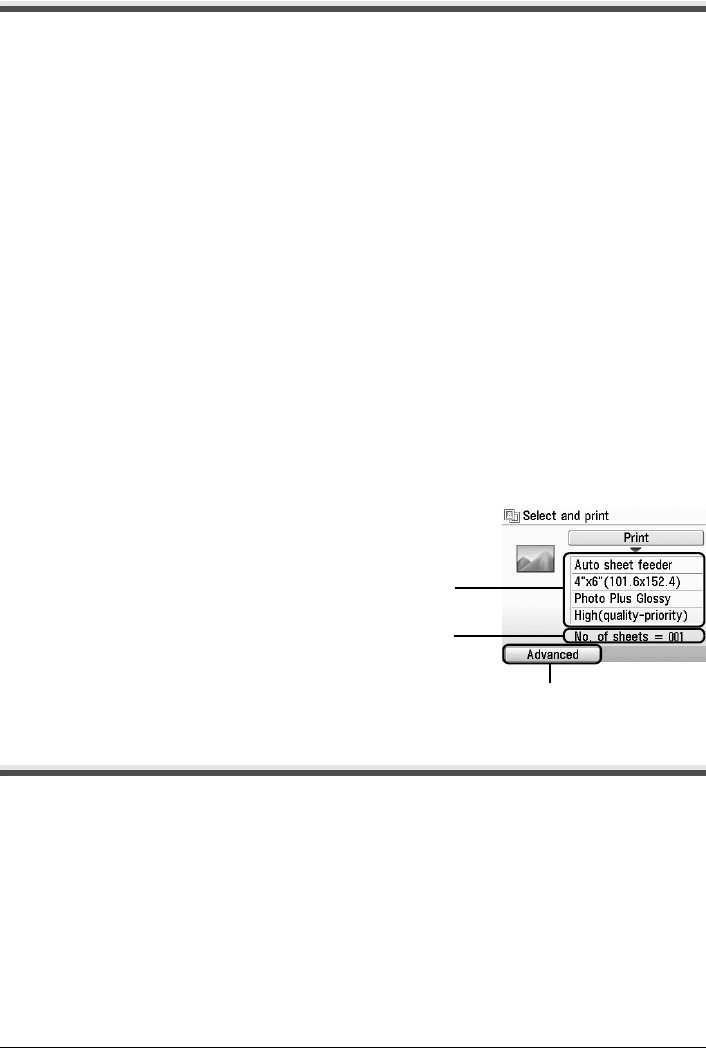
Advanced Print Settings Screen
When you press the Function button (f1/Advanced) in the print settings confirmation screen, the
advanced print settings screen is displayed. See “Function Buttons” on page 3.
You can optimize photos and advanced print settings with the functions below.
Memory card mode
Easy photo reprint mode
(1) Select bordered or borderless print.
Bordered, Borderless
(2) Activate/deactivate to print the shooting date on a photo.*1
Print the shooting date on a photo.
Date OFF, Date ON
(3) Activate/deactivate to print the file no. on a photo.*1
Print the file no. on a photo.
File no. OFF, File no. ON
Note
When Plain paper is selected in Media type, bordered printing will be performed even if you
select Borderless.
Note
It is not possible to print both the shooting date and the file no. under the following conditions:
zLayout print is selected as a print function in the Memory card mode, and/or
zCredit card is selected in Page size.
Under these conditions, even if both Date ON and File no. ON are set, only the shooting date
will be printed. If you want to print the file no., select Date OFF.
(1)
(2)
(3)
(4)
(5)
(6)
(7)
(8)
(9)
(10)
(11)
(12) (13)
(14)

25Before Printing
(4) Activate/deactivate Red eye correction.*1
Corrects red eyes in portraits caused by flash photography.
Red eye correc. OFF, Red eye correc. ON
(5) Activate/deactivate Vivid photo function.*1
Makes green and blue more lively.
Vivid photo OFF, Vivid photo ON
(6) Activate/deactivate the Photo Optimizer pro function.*1
Automatically optimizes brightness and tone of a photo.
Photo opt. pro OFF, Photo opt. pro ON
(7) Activate/deactivate the Noise reduction function.*1
Reduces the noise on blue areas like the sky as well as on black areas.
Noise reduction OFF, Noise reduction ON
(8) Activate/deactivate Face brightener function.
Brightens a darkened face on the photo taken against the light.
Face brightener OFF, Face brightener ON
(9) Activate/deactivate Image optimizer function.*1
Corrects and smooths the jagged contours for printing.
Image optimizer OFF, Image optimizer ON
(10) Adjust brightness.
Brightness -2, Brightness -1, Brightness standard, Brightness +1, Brightness +2
(11) Adjust contrast.
Contrast -2, Contrast -1, Contrast standard, Contrast +1, Contrast +2
(12) Adjust color hue.
Color hue red +2, Color hue red +1, Color hue original, Color hue yellow +1, Color hue
yellow +2
(13) Activate/deactivate Effects*1
Applies special effects to the photo, such as printing in sepia tones or with a sketch
illustration like effect.
No effects, Effect: Sepia, Simulate illustration
(14) Activate/deactivate Fade restoration*2
Corrects the color when printing photos that have faded or color cast over time.
Fade restoration OFF, Fade restoration ON
*1 Can be selected only in Memory card mode.
*2 Can be selected only in Easy photo reprint mode.
26 Printing from Your Computer
Printing from Your Computer
This section describes procedure for basic printing.
Printing with Windows
1Turn on the machine and load the paper in the machine.
See “Turning the Machine On and Off” on page 4 and “Loading Printing Paper” on page 7.
2Make sure that the proper paper source is selected.
See “Changing the Paper Source” on page 14.
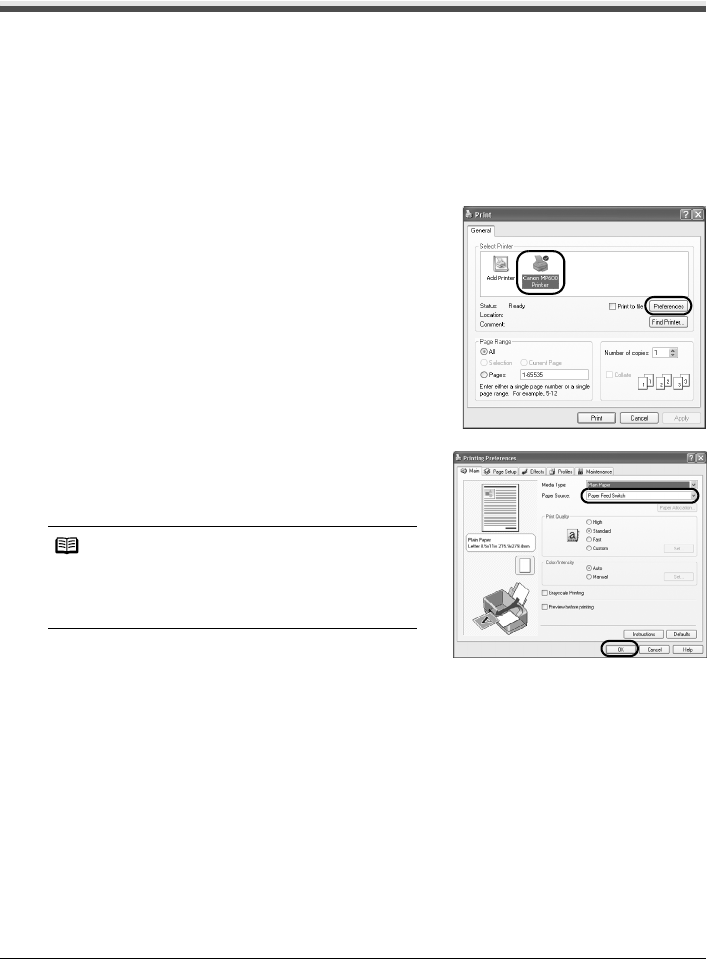
3Create a document or open a file to print using an appropriate application software.
4Select Print on the application software’s File
menu.
5Make sure that Canon MP600 Printer is
selected, and click Preferences (or
Properties).
6Specify the required settings and click OK.
Make sure that Paper Feed Switch is selected in
Paper Source.
7Click Print (or OK).
Note
For details on other printer driver functions, click Help
or Instructions to view the online help or the Printer
Driver Guide on-screen manual. Instructions is only
displayed when the on-screen manuals are installed.
27Printing from Your Computer
Printing with Macintosh
1Turn on the machine and load the paper in the machine.
See “Turning the Machine On and Off” on page 4 and “Loading Printing Paper” on page 7.
2Make sure that the proper paper source is selected.
See “Changing the Paper Source” on page 14.
3Create a document or open a file to print using an appropriate application software.
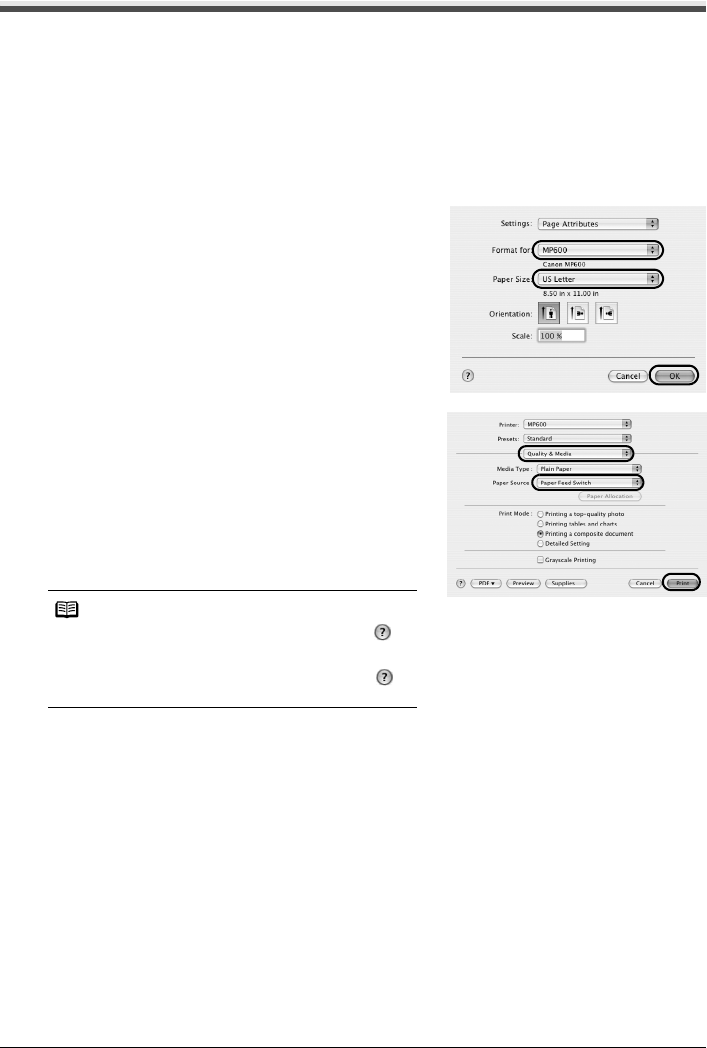
4Select Page Setup on the application
software’s File menu.
5Confirm that MP600 is selected in Format
for.
6Select the desired paper size in Paper Size.
7Click OK.
8Select Print on the application software’s File
menu.
9Select Quality & Media in the pop-up menu.
10 Specify the required settings.
Make sure that Paper Feed Switch is selected in
Paper Source.
11 Click Print.
Note
For details on other printer driver functions, click to
view the Printer Driver Guide on-screen manual. If the
on-screen manuals are not installed, the Printer Driver
Guide on-screen manual is not displayed even if is
clicked.

28 Scanning Images
Scanning Images
You can scan images from the machine to a computer without printing them and save them in
popular file formats, such as JPEG, TIFF, bitmaps, or PDF. If you are scanning printed text, you can
use the OCR (Optical Character Recognition) software to convert it to text data.
Scanning Methods
Scanning Using the MP Navigator
Using MP Navigator, you can scan originals loaded on the Platen Glass and view images saved
on your computer or on a memory card. Scanned documents can be previewed and be easily
printed and edited according to your needs.
You can use the bundled software applications to edit or print the document you have scanned.
For detailed operations of the MP Navigator, refer to the Scanning Guide on-screen manual.
Scanning Using the Operation Panel of the Machine
1Turn on the machine.
See “Turning the Machine On and Off” on page 4.
2Load the original document on the Platen Glass.
See “Handling the Original Document” on page 5, and on setting a photo, see “Scanning a
Photo” on page 36.
3Select Scan on the HOME screen.
See “Basic Operation for the Operation Panel” on page 2.
4Select the scan operation, then press the OK button.
5Press the Color or Black button.
The operation to be performed after scanning the original depends on the scan operation
setting you have selected in step 4. For details on how to modify the operation settings, refer
to the Scanning Guide on-screen manual.
Scanning from an Application Software
You can scan an image from a TWAIN- or WIA- (Windows® XP only) compliant application
software and handle the scanned image in the application software. For detailed operations,
refer to the Scanning Guide on-screen manual.
29Copying
Copying
Making Copies
This section describes the basic procedure to make copies.
1Turn on the machine.
See “Turning the Machine On and Off” on page 4.
2Select Copy on the HOME screen.
See “Basic Operation for the Operation Panel” on page 2.
3Load paper.
See “Loading Printing Paper” on page 7.
4Make sure that the proper paper source is selected.
See “Changing the Paper Source” on page 14.
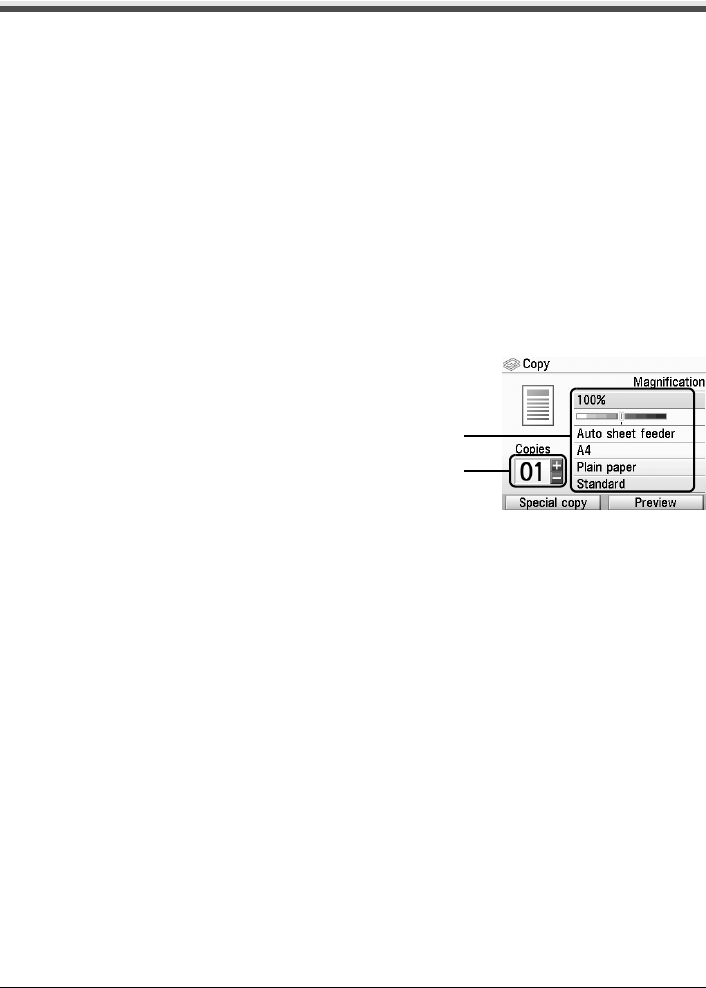
5Specify copy settings.
(1) Confirm the page size, media type, or other
settings. To change the settings, select the
item and press the OK button.
(2) Use the + or - button to specify the number of
copies.
6Load the original on the Platen Glass.
See “Loading Original Documents” on page 5.
7Press the Color button for color copying, or the Black button for black & white
copying.
(1)
(2)

30 Copying
Using Other Copy Functions
Reduced/Enlarged Copy
Reduces or enlarges copies.
Two-sided copy
Copies two original pages onto the sides of a single sheet of paper.
Borderless copy
Copies color images so that they fill the entire page without borders.
2-on-1 copy
Copies two original pages onto a single sheet of paper by reducing each image.
4-on-1 copy
Copies four original pages onto a single sheet of paper by reducing each image. Four different
layouts are available.
Image repeat
Copies an image multiple times onto a single page. For the number of times to repeat the image,
you can select from Auto layout or the machine’s pre-defined settings.
31Printing from a Memory Card
Printing from a Memory Card
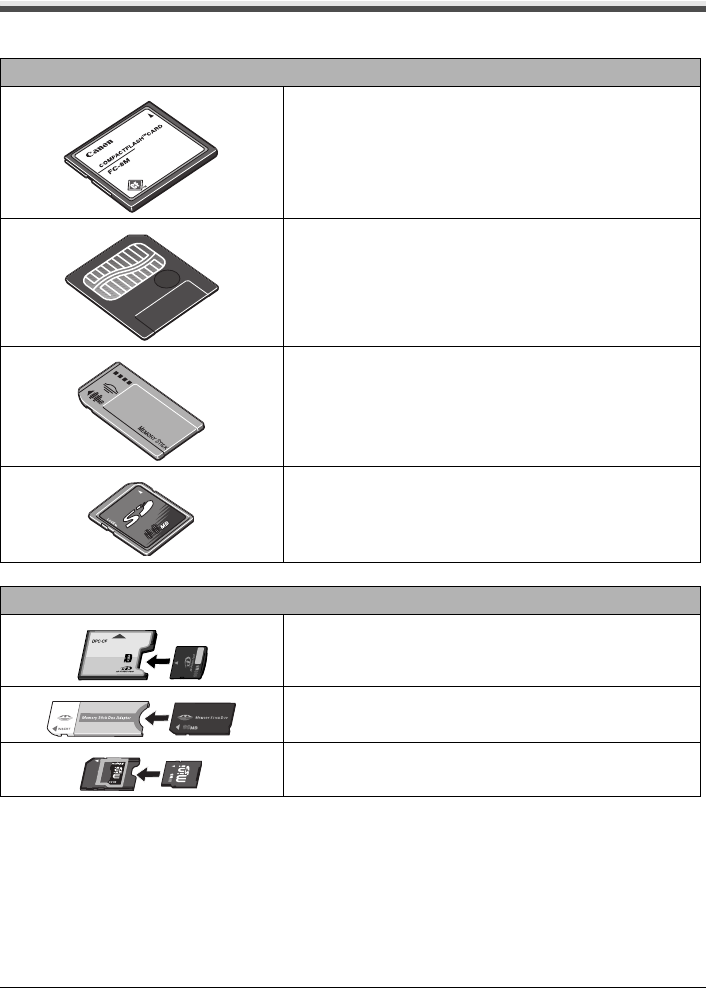
Memory Cards Supported by This Machine
The following memory cards are compatible with this machine.
*1 Requires purchase of a separate compact flash card adapter for xD-Picture cards.
*2 Use the special adapter provided with the card.
Memory cards that can be directly inserted into the Card Slot:
z
Compact Flash (CF) Card
Supports Type I/II (3.3 V)
z
Microdrive
z
SmartMedia
Supports 3.3 V card only
1 MB and 2 MB cards are not supported
z
MEMORY STICK
z
MEMORY STICK PRO
z
SD Secure Digital memory card
z
MultiMediaCard (v3.31)
Memory cards that can be inserted in the Card Slot using the adapter:
xD-Picture Card*1
z
MEMORY STICK Duo
*2
z
MEMORY STICK PRO Duo
*2
Mini SD Card*2
32 Printing from a Memory Card
Inserting the Memory Card
1Turn on the machine.
See “Turning the Machine On and Off” on page 4.
2Open the Card Slot Cover.
3Insert one and only one memory card into the Card Slot.
* Be sure to attach the memory card to the special adapter before inserting it into the Card
Slot.
4Confirm that the Access lamp has lit up.
5Close the Card Slot Cover.
Card Type Inserting Card
z
Compact Flash (CF) card
z
Microdrive
z
xD-Picture card*
z
SmartMedia
z
MEMORY STICK
z
MEMORY STICK PRO
z
MEMORY STICK Duo*
z
MEMORY STICK PRO Duo*
z
SD Secure Digital memory card
z
MiniSD Card*
z
MultiMediaCard (v3.31)
Lights up
Insert into the left
Card Slot.
Lights up
Insert into the
right Card Slot.
Lights up
Insert into the
center part of the
right Card Slot.

33Printing from a Memory Card
Removing the Memory Card
1Open the Card Slot Cover.
2Make sure that the Access lamp is not flashing, then remove the memory card.
3Close the Card Slot Cover.
Printing Photographs Stored on a Memory Card
1Prepare for printing.
(1) Turn on the machine.
See “Turning the Machine On and Off” on page 4.
(2) Load paper.
See “Loading Printing Paper” on page 7.
(3) Make sure that the proper paper source is selected.
See “Changing the Paper Source” on page 14.
2Insert the memory card.
(1) Select Memory card on the HOME screen.
See “Basic Operation for the Operation Panel” on page 2.
(2) Insert the memory card into the Card Slot.
See “Inserting the Memory Card” on page 32.
3Select the print menu.
(1) Select Select and print, then press the OK button.
(2) Confirm the paper size, media type, and other settings, select Next, and then press the
OK button. To change the settings, select the item and press the OK button.
4Select the photo to print and specify the number of copies for each photo.
(1) Use the Easy-Scroll Wheel or the [ or ] button to display a photo to print.
(2) Use the + or - button to specify the number of copies.
(3) Repeat steps (1) and (2) to specify the number of copies for each photo.
(4) Press the OK button.
34 Printing from a Memory Card
5Start printing.
(1) Confirm the print setting. To change the
settings, select the item and press the OK
button.
(2) Confirm the total number of copies for the
selected photos.
(3) Confirm the selected photos and number of
copies for each photo.
(4) Change the advanced print settings.
(5) Press the Color button.
The specified number of copies of each photo
will be printed.
Using Other Printing Functions
Layout print
Prints photos your pasted in the specified layout.
Sticker print
Prints your favorite photo with a frame on Canon Photo Stickers.
DPOF print
Prints according to the Digital Print Order Format (DPOF) settings on your digital camera, if you
have specified them.
Captured info print
Prints information on photographs at the time of its shooting (Exif info) in the margin of Photo
index print or selected individual photos.
Photo index print
Prints an index of all the photos saved on a memory card.
Print all photos
Prints all photos saved on the memory card.
Using Useful Display Functions
Change display
The display method of a photograph can be changed.
Trimming
Edits images displayed on the LCD by cropping them.
Search
When there are a lot of photos saved on the memory card, displays and prints only photos shot
on the specified date or within the specified range of dates.
(1)
(4) (3)
(2)
35Printing from a Memory Card
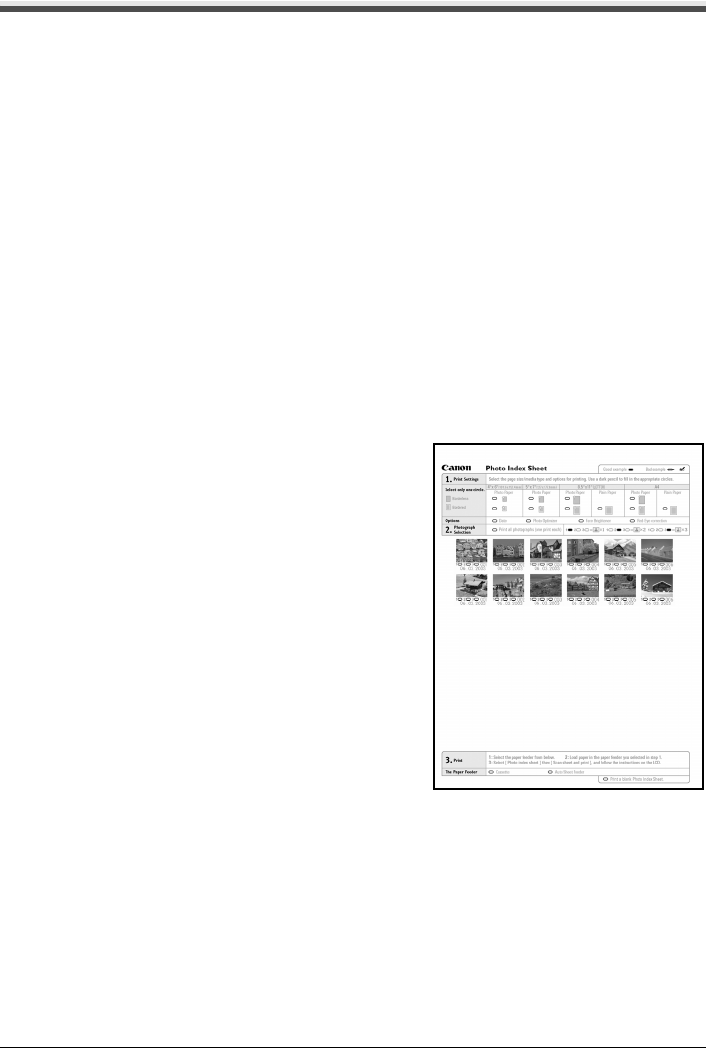
Printing Using the Photo Index Sheet
1Turn on the machine, and load A4 or Letter-sized paper.
See “Turning the Machine On and Off” on page 4 and “Loading Printing Paper” on page 7.
2Make sure that the proper paper source is selected.
See “Changing the Paper Source” on page 14.
3Select Photo index sheet on the HOME screen.
See “Basic Operation for the Operation Panel” on page 2.
4Select Index sheet print, then press the OK button.
5Insert a memory card into the Card Slot.
See “Inserting the Memory Card” on page 32.
6Select a range of images to include in the Photo Index Sheet, then press the OK
button.
7Press the Color button.
8Fill in the appropriate circles in the Photo
Index Sheet.
9Load the type of paper you selected in the
Photo Index Sheet.
See “Loading Printing Paper” on page 7.
10 Select Scan sheet and print, then press the
OK button.
11 Place the Photo Index Sheet face-down on
the Platen Glass, then press the OK button.
36 Photo Printing from Photo
Photo Printing from Photo
You can scan photos into and then print them from the machine. Various effects can be applied to
the images before printing them.
Scanning a Photo
1Turn on the machine.
See “Turning the Machine On and Off” on page 4.
2Select Easy photo reprint on the HOME screen.
See “Basic Operation for the Operation Panel” on page 2.
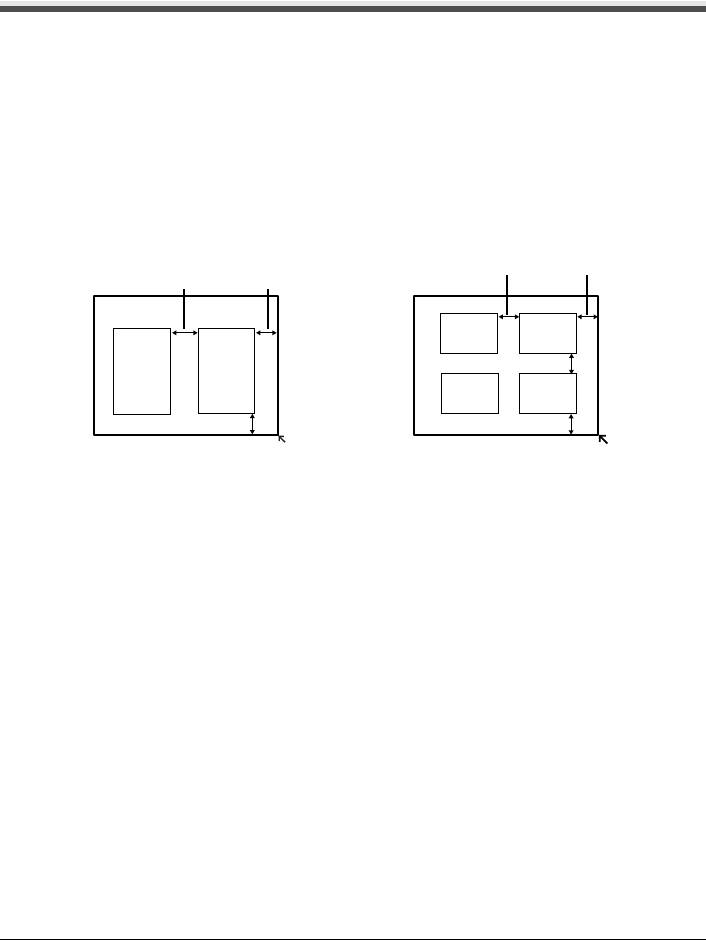
3Lift the Document Cover and load the photos on the Platen Glass.
Place the photos face down on the Platen Glass as follows.
4Gently close the Document Cover and press the OK button.
4"x 6" / 101.6 x 152.4 mm or
5"x 7" / 127 x 177.8 mm originals
0.4" / 10 mm
Credit card-sized originals
0.4" / 10 mm
0.4" / 10 mm
0.4" / 10 mm 0.4" / 10 mm 0.4" / 10 mm 0.4" / 10 mm
37Photo Printing from Photo
Printing Scanned Photographs
1Prepare for printing.
(1) Load paper.
See “Loading Printing Paper” on page 7.
(2) Scan a photo.
See “Scanning a Photo” on page 36.
(3) Make sure that the proper paper source is selected.
See “Changing the Paper Source” on page 14.
2Select the print menu.
(1) Select Select and print, then press the OK button.
(2) Confirm the paper size, media type, and other settings, then select Next, and then press
the OK button. To change the settings, select the item and press the OK button.
3Select the photo to print and specify the number of copies for each photo.
(1) Use the Easy-Scroll Wheel or the [ or ] button to display a photo to print.
(2) Use the + or - button to specify the number of copies.
(3) Repeat steps (1) and (2) to specify the number of copies for each photo.
(4) Press the OK button.
4Start printing.
(1) Confirm the print setting. To change the
settings, select the item and press the OK
button.
(2) Confirm the total number of copies for selected
photos.
(3) Change the advanced print settings.
(4) Press the Color button to print in color, or the
Black button to print in black & white.
The specified number of copies of each photo
will be printed.
Other Useful Functions
Sticker print
Prints your favorite photo on Canon Photo Stickers to create your own stickers.
Print all photos
Prints all scanned photos.
(1)
(3)
(2)

38 Photo Printing from Photo
Using Useful Display Functions
Change display
The display method of a photograph can be changed.
Trimming
Edits images displayed on the LCD by cropping them.
39Printing Photographs Directly from a Compliant Device
Printing Photographs Directly from a
Compliant Device
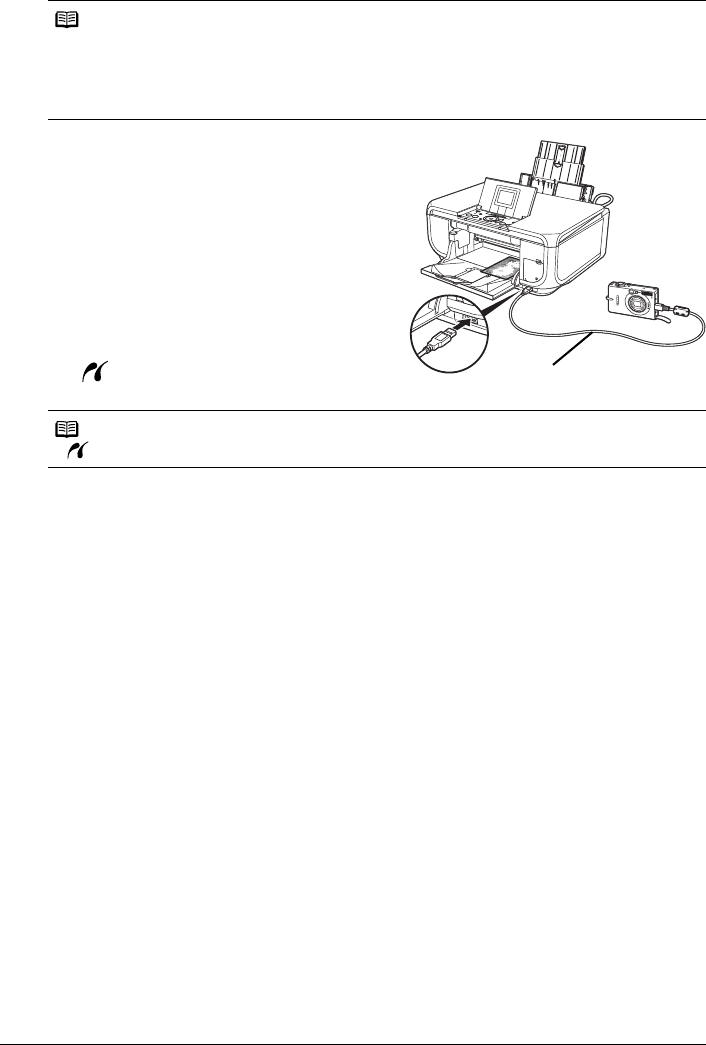
Printing from a PictBridge Compliant Device
You can connect a PictBridge compliant device such as a digital camera, camcorder, or mobile
phone and print recorded images directly without using a computer.
A device with this mark is PictBridge-compatible.
Connecting a PictBridge Compliant Device
To connect a PictBridge compliant device to this machine, use a USB cable recommended by
the device’s manufacturer.
1Set up the machine.
Refer to the Easy Setup Instructions to set up the machine and make it ready for printing.
2Turn on the machine and load the paper in the machine.
See “Turning the Machine On and Off” on page 4 and “Loading Printing Paper” on page 7.
Note
zPictBridge is an industry standard enabling a range of digital photo solutions, including the direct
printing of photos from a digital still camera, camcorder or mobile phone* without the need to use a
computer. A device can be connected to this machine for direct printing regardless of the manufacturer
or the model as long as it complies with the PictBridge standard.
zYou can select the images to print and specify various print settings from your camera or mobile phone.
* PictBridge compatible digital still cameras, digital camcorders, and camera-equipped mobile phones
are hereafter collectively referred to as “PictBridge compliant device”.
Caution
Do not connect any equipment other than PictBridge compliant devices or optional Bluetooth Units
BU-20 to the Direct Print Port of the machine. If you do so, electric shock, fire, or damage to the
device could result.
Note
When printing photos with the digital device connected to the machine, we recommend the use of
the AC adapter supplied with the device. If you are using the device battery, be sure to charge it
fully.
Note
The Print Head cannot be aligned using the controls of the PictBridge compliant device. If Print
Head alignment is not yet performed and the MP Drivers are not installed in the computer, be sure
to align the Print Head. See “Aligning the Print Head” on page 60.
40 Printing Photographs Directly from a Compliant Device
3Connect the PictBridge compliant device to the machine.
(1) Make sure that the PictBridge compliant
device is turned off.
(2) Connect the PictBridge compliant device to
the machine using a USB cable
recommended by the manufacturer of the
device.
The device turns on automatically.
If your device does not turn on
automatically, turn it on manually.
(3) Set up the PictBridge compliant device for
direct printing.
will appear on the LCD of the device
when the machine is correctly connected.
Note
Depending on the model or brand of your device, you may have to select a print mode compliant
with PictBridge before connecting the device. You may also have to turn on the device or select
Play mode manually after connecting the device to the machine.
Perform necessary operations on the PictBridge compliant device before connecting it to this
machine according to instructions given in the device’s instruction manual.
Note
If does not appear, see “Cannot Print Properly from a Digital Camera” on page 88.
(2)
41Printing Photographs Directly from a Compliant Device
Printing Photographs Directly from a PictBridge Compliant Device
When operating the device, be sure to follow the instructions given in the instruction manual of
your PictBridge compliant device. This section describes the page size, media type, layout,
image optimization modes, and date printing mode that can be set on a PictBridge compliant
device connected to the machine.
zConfirming or Changing PictBridge Print Settings from Your Camera
To change the page size or media type, operate the device to select the PictBridge print setup
mode and confirm or change the settings.
About the Settings Explained Below
Some setting items explained below may not be available on some devices. In this case, the
Default setting explained below is applied for the setting item.
* In the following description, names of settings items are given according to those used in
Canon-brand PictBridge compliant devices. Setting item names may be different depending
on the brand or model of your device.
The settings below can be changed in the PictBridge settings screen on the machine when a
PictBridge compliant device is connected. However, changes can be made in the PictBridge
settings screen on the machine only when the corresponding items below are in the Default
setting items (the setting to follow that of the machine) on the PictBridge compliant device.
See “Confirming or Changing PictBridge Print Settings on the Machine” on page 44.
zPrintable Image Data Format
This machine prints images taken with a DCF® (Design rule for Camera File system)-
compatible digital camera*, as well as PNG files.
* Exif2.21 compliant
PictBridge compliant
device setting items
Machine setting on the Print Setting screen
Paper size: Default You can change the following settings on the PictBridge
settings screen:
Page size, Media type, Bordered/Borderless
For the setting items, see “Setting items” on page 44.
Paper type: Default
Layout: Default
Image optimize: Default You can change the following settings on the PictBridge
settings screen:
Photo opt.pro, Vivid photo, Face brightener, Noise
reduction, Image optimizer, Red eye correc., Brightness,
Contrast, Color hue, Effects
For the setting items, see “Setting items” on page 44.

42 Printing Photographs Directly from a Compliant Device
zPaper Size and Paper Type Settings
If these settings are set to Default (the setting to follow that of the machine) on the PictBridge
compliant device, the Page size and the Media type settings specified in the PictBridge
settings of the machine are applied.
The following sizes and types of printing paper can be loaded according to the Paper size
and Paper type settings.
*1 Exclusively used to print photo stickers. When printing on sticker paper, select 10 x 15
cm/4" x 6" in Paper size.
*2 Can be selected only on certain Canon-brand PictBridge compatible devices.
*3 Plain Paper can be selected for Paper type only when Paper size is set to A4 or 8.5" x
11" (Letter). When Paper type is set to Plain Paper, borderless printing will be disabled
even when Layout is set to Borderless.
*4 You can print in 4-up layout when Paper size is set to A4 or 8.5" x 11" (Letter).
*5 Feeding this paper from the Cassette can damage the machine. Load in the Auto Sheet
Feeder.
*6 You may not be able to purchase some Canon genuine papers depending on your
country.
*7 When printing on Photo Paper Plus Semi-gloss 8" x 10" / 203.2 x 254.0 mm (SG-201),
select 20 x 25 cm/8" x 10" for Paper size and Default for Paper type.
* Select Photo Plus Glossy for Media type in the PictBridge settings screen on the
machine.
See “Confirming or Changing PictBridge Print Settings on the Machine” on page 44.
Paper Size Setting Paper Type Setting Loadable Paper*6
10 x 15 cm/4" x 6" Photo Photo Paper Plus Glossy
Fast Photo Photo Paper Pro
Photo Photo Paper Plus Semi-gloss
Photo Glossy Photo Paper
Glossy Photo Paper “Everyday
Use”
Photo Paper Glossy
Photo Stickers*1, *5
13 x 18 cm/5" x 7"*2 Photo Photo Paper Plus Glossy
A4*3, *4 Photo Photo Paper Plus Glossy
Fast Photo Photo Paper Pro
Photo Photo Paper Plus Semi-gloss
Photo Glossy Photo Paper
Photo Glossy Photo Paper “Everyday
Use”
8.5" x 11" (Letter)*3, *4 Photo Photo Paper Plus Glossy
Fast Photo Photo Paper Pro
Photo Photo Paper Plus Semi-gloss
Photo Glossy Photo Paper
Photo Photo Paper Glossy
5.4 x 8.6 cm/Credit card Photo Glossy Photo Paper
20 x 25 cm/8" x 10"*7 Fast Photo Photo Paper Pro
10.1 x 18 cm/4" x 7.1"*2 Fast Photo Photo Paper Pro

43Printing Photographs Directly from a Compliant Device
zLayout and Trimming Settings
If Layout is set to Default (the setting to follow that of the machine) on the PictBridge
compliant device, the print setting specified in the PictBridge settings of the machine is
applied. The setting on the PictBridge compliant device is applied for Trimming.
When printing onto Photo Stickers (PS-101), select N-up for Layout, then select 16-up.
* Some PictBridge compliant devices may display the Layout option 2-up, 4-up, 9-up, and
16-up. In this case always select 16-up.
* If there are no options on the PictBridge compliant device that correspond to 16-up,
printing on stickers is not possible.
* When printing on Photo Stickers (PS-101), do not set Layout to Borderless.
zImage Optimize Setting
If Image optimize is set to Default (the setting to follow that of the machine) on the
PictBridge compliant device, the print setting specified in the PictBridge settings of the
machine is applied. For details on the setting, see “Confirming or Changing PictBridge Print
Settings from Your Camera” on page 41.
If you are using a Canon-brand PictBridge compatible device, additional options of VIVID,
NR, Face, or Red eye may be available, depending on the model.
* VIVID prints green and blue portions of photos more vividly.
NR (Noise Reduction) reduces noise in blue portions, such as the sky, and dark portions.
Face corrects the contrast of backlit images.
Red eye corrects red eyes.
zDate/File No. Print Setting
You cannot change this setting on this machine. The setting on the PictBridge compliant
device is applied.
If the images already have dates superimposed when shot, set this PictBridge setting item to
Off. If you select Date, File No., or Both, the date and/or file number will be printed over the
date printed by the camera’s function.
zOther Settings
The following additional options are available for Canon-brand PictBridge-compliant devices,
depending on the model. For details, refer to your Canon-brand PictBridge compliant device’s
instruction manual.
Shooting Info (Exif Data)
You can print shooting Info (Exif Data) on photos in list format, or in the margins of specified
photos. In Layout select the item with the “i” icon.
35 mm Film Style Layout (Contact Printing Layout)
You can print selected photos or index-specified photos in 35 mm film style layout (contact
printing layout).
In Layout select the item with the film icon.
Note
zNever disconnect the USB cable during printing unless when explicitly allowed to by the
PictBridge compliant device.
When disconnecting the USB cable between the PictBridge compliant device and machine,
follow the instructions given in the device’s instruction manual.
zYou cannot set or do the following by operating on the PictBridge compatible device.
– Print quality setting
– Machine maintenance

44 Printing Photographs Directly from a Compliant Device
zConfirming or Changing PictBridge Print Settings on the Machine
You can confirm and change the print settings such as media type and size that are preset to the
machine and applied to PictBridge printing.
zDisplaying the PictBridge Settings Screen and Specifying the Settings
(1) Turn on the machine.
See “Turning the Machine On and Off” on page 4.
(2) Select Settings on the HOME screen.
See “Basic Operation for the Operation Panel” on page 2.
(3) Select Device settings, then press the OK button.
(4) Select PictBridge settings, then press the OK button.
(5) Select the item to set, then press the OK button.
(6) Select the item, then press the OK button.
(7) Confirm the print settings, select Next and then press the OK button.
(8) Repeat steps (5) and (6) to specify the item.
(9) After finishing all settings you need, select OK and then press the OK button.
zSetting items
Page size
Select the page size, when printing directly from a PictBridge compliant device.
Media type
Select the media type, when printing directly from a PictBridge compliant device.
Print quality
Select the print quality, when printing directly from a PictBridge compliant device.
Bordered/Borderless
Select bordered or borderless print.
Photo opt.pro
Activate/deactivate the Photo Optimizer pro function.
Automatically optimizes brightness and tone of a photo.
Vivid photo
Activate/deactivate Vivid photo function.
Makes green and blue more lively.
Face brightener
Activate/deactivate Face brightener function.
Brightens a darkened face on the photo taken against the light.
Noise reduction
Activate/deactivate the Noise reduction function.
Reduces the noise on blue areas like the sky as well as on black areas.
Image optimizer
Activate/deactivate Image optimizer function.
Corrects and smooths the jagged contours for printing.
Red eye correc.
Activate/deactivate Red eye correction.
Corrects red eyes in portraits caused by flash photography.
Brightness
Adjust brightness.

45Printing Photographs Directly from a Compliant Device
Contrast
Adjust contrast.
Color hue
Adjust color hue.
Effects
Applies special effects to the photo, such as printing in sepia tones or with a sketch
illustration like effect.
46 Routine Maintenance
Routine Maintenance
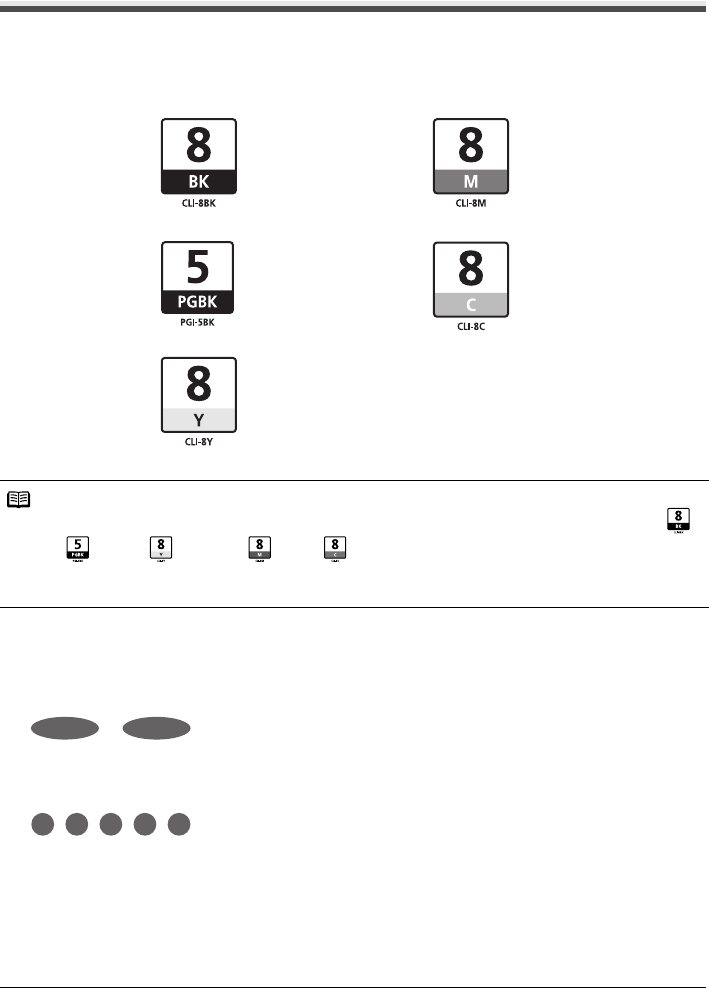
Replacing an Ink Tank
When ink runs out, replace the ink tank. The machine will not print if the wrong type of ink tank is
used, or if it is installed in the incorrect position.
The machine uses the following ink tanks.
Getting the Ink Level Information
You can confirm the ink level in each ink tank by the ink lamps. Open the Scanning Unit (Printer
Cover) of the machine to confirm how the ink lamps light or flash.
Ink is low:
......Repeats
The ink lamp flashes slowly (at around 3-second intervals). You can continue printing for a while,
but we recommend you to have a replacement ink tank available.
Ink is out:
......Repeats
The ink lamp flashes quickly (at around 1-second intervals). Replace the ink tank with a new
one.
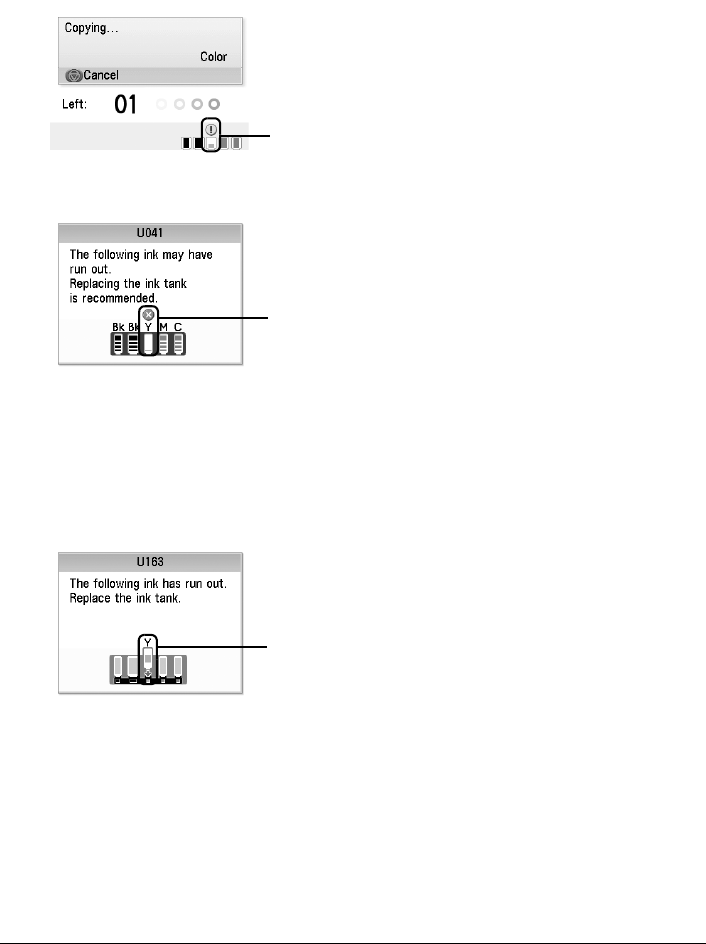
* If an ink tank related error message is displayed on the LCD, an ink tank error has occurred
and the machine is unable to print. For details, see “Error Message Is Displayed on the LCD”
on page 68.
Black: CLI-8BK Magenta: CLI-8M
Black: PGI-5BK Cyan: CLI-8C
Yellow: CLI-8Y
Note
zBe sure to install the ink tanks in the correct order. The proper arrangement from the left is Black ,
Black , Yellow , Magenta , Cyan .
zIf printing becomes faint or white streaks appear despite sufficient ink levels, see “When Printing
Becomes Faint or Colors Are Incorrect” on page 52.
47Routine Maintenance
Knowing When to Replace Ink Tank
Identify the empty ink tank on the LCD and replace it.
If the “!” symbol is displayed above an ink tank
If the machine detects low ink when you start printing, the “!” symbol is displayed on the LCD.
Obtain a replacement tank as soon as possible.
(A) Ink tanks with low ink
If the “X” symbol is displayed above an ink tank
(B) Ink tanks that may have run out of ink.
zInk may have run out. Replacing the ink tank is recommended.
zPress the Stop/Reset button to cancel printing. Replace the ink tank with a new one.
zIf printing is in progress and you want to continue printing, press the OK button with the ink
tank installed. Then printing can continue. Replacing the ink tank is recommended after the
printing. The machine may be damaged if printing is continued under the ink out condition.
If an empty ink tank is displayed distinctly from other ink tanks
(C) Ink tanks with no ink
zInk has run out. Replace the ink tank.
Printing under the current condition may damage the machine.
zIf you want to continue printing in this condition, you need to release the function for detecting
the remaining ink level. Press and hold the Stop/Reset button for at least 5 seconds, and
then release it.
* With this operation, releasing the function for detecting the remaining ink level is
memorized. Please be advised that Canon shall not be liable for any malfunction or trouble
which may be caused by continuation of printing under the ink out condition.
(A)
(B)
(C)
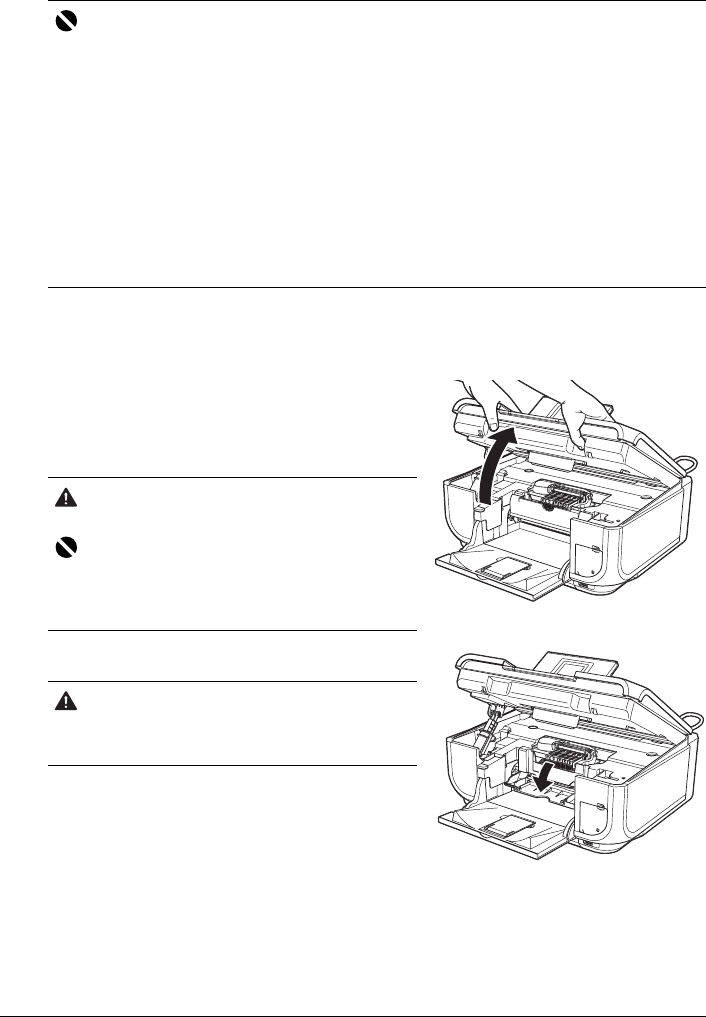
48 Routine Maintenance
Replacing Ink Tanks
When ink tanks run out of ink, replace them using the following steps.
1Open the Paper Output Tray.
(1) Put your finger in the rounded indent of the Paper Output Tray and open it gently.
2Make sure that the machine is turned on, and
raise the Scanning Unit (Printer Cover) until it
stops.
The Print Head Holder moves to the center.
3Open the Inner Cover.
Important
Handling Ink
zTo maintain optimal printing quality, we recommend the use of specified Canon brand ink tanks.
Refilling ink is not recommended.
zOnce you remove an ink tank, replace it immediately. Do not leave the machine with ink tanks
removed.
zReplace empty tanks with new ones. Inserting partially used ink tanks may cause the nozzles to
clog. Furthermore, with such tanks, the machine will not be able to inform you when to replace
the tanks properly.
zOnce an ink tank has been installed, do not remove it from the machine and leave it out in the
open. This will cause the ink tank to dry out, and the machine may not operate properly when it
is reinstalled. To maintain optimal printing quality, use an ink tank within six months of first use.
zColor ink may be consumed even when printing a black-and-white document or when black-
and-white printing is specified.
Color ink is also consumed in Print Head Cleaning and Print Head Deep Cleaning, which may
be necessary to maintain the machine’s performance. When an ink tank is out of ink, replace it
immediately with a new one.
Caution
Do not hold the LCD or the Operation Panel.
Important
If the Scanning Unit (Printer Cover) is left open for
more than 10 minutes, the Print Head Holder moves to
the right. Close and reopen the Scanning Unit (Printer
Cover) to return the holder to the center.
Caution
zDo not hold the Print Head Holder to stop or move
it.
zDo not touch the metallic parts inside the machine.
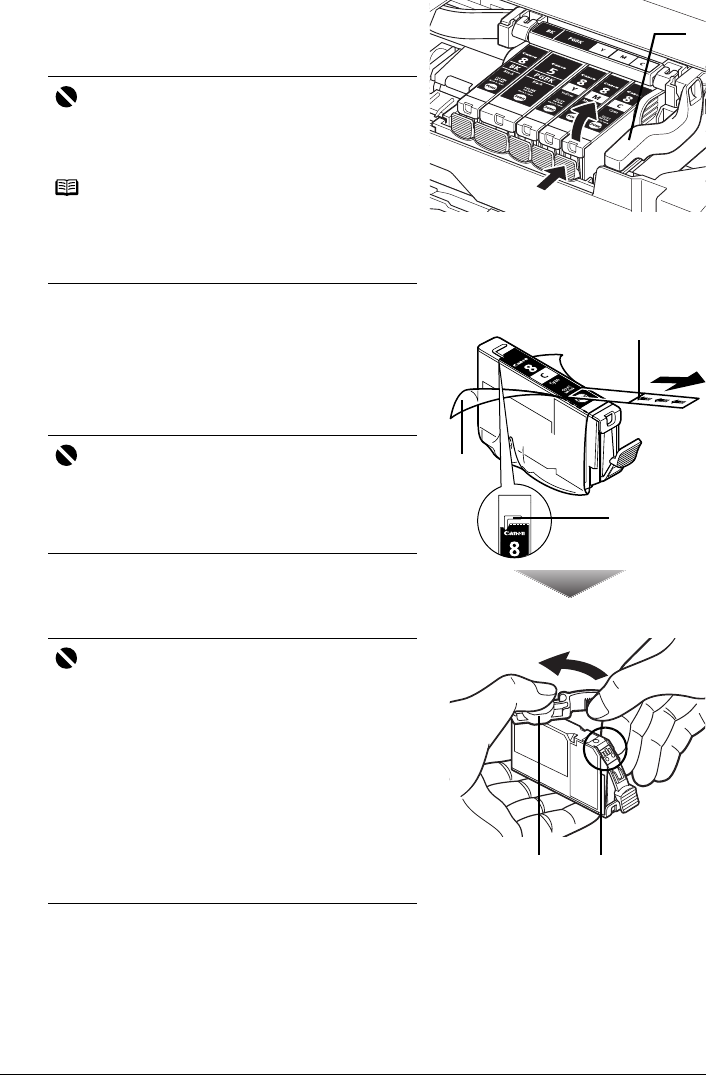
49Routine Maintenance
4Remove the ink tank whose lamp is flashing
fast.
(1) Push the tab and remove the ink tank.
5Prepare the replacement tank.
(1) Remove the new ink tank from its packaging,
then pull the orange tape in the direction of the
arrow (A) so that the protective film does not
remain on the air hole (B). Then remove the
film completely (C).
(2) Remove the orange protective cap from the
bottom of the ink tank.
Discard the cap once it is removed.
Important
zHandle ink tanks carefully to avoid staining clothing
or the surrounding area.
zDiscard empty ink tanks according to the local laws
and regulations regarding disposal of consumables.
Note
zDo not remove more than one ink tank at a time. Be
sure to replace ink tanks one by one when
replacing more than one ink tank.
zFor details on ink lamp flashing speeds, see
“Getting the Ink Level Information” on page 46.
Important
Make sure that all the orange tape has been peeled off
along the perforation. If part of the orange tape is
remaining, ink may leak out when you remove the
protective cap and may not eject properly when
printing.
Important
zBe sure to remove the clear film from the ink tank in
the exact order shown in step 5-(1), as failure to
follow this step may cause the ink to leak and stain
your clothes and hands.
zDo not squeeze the side of ink tanks as this may
cause the ink to leak out and stain your clothes and
hands.
zDo not re-attach the protective cap once you have
removed it. Discard it according to the local laws
and regulations regarding disposal of consumables.
zDo not touch the open ink port once the protective
cap is removed, as this may prevent the ink from
being ejected properly.
zBe careful not to stain your clothes and hands with
ink on the removed protective cap.
*1
*1 Do NOT touch the Print Head Lock
Lever; remove only the ink tank.
(1)
(2)
(C)
(A)
(B)
*2 *1
*1 Do not touch the electrical contacts
on the ink tank. Doing so can cause
the machine to malfunction or
become unable to print.
*2 Carefully hold the protective cap
when removing it to prevent the ink
from staining your fingers.
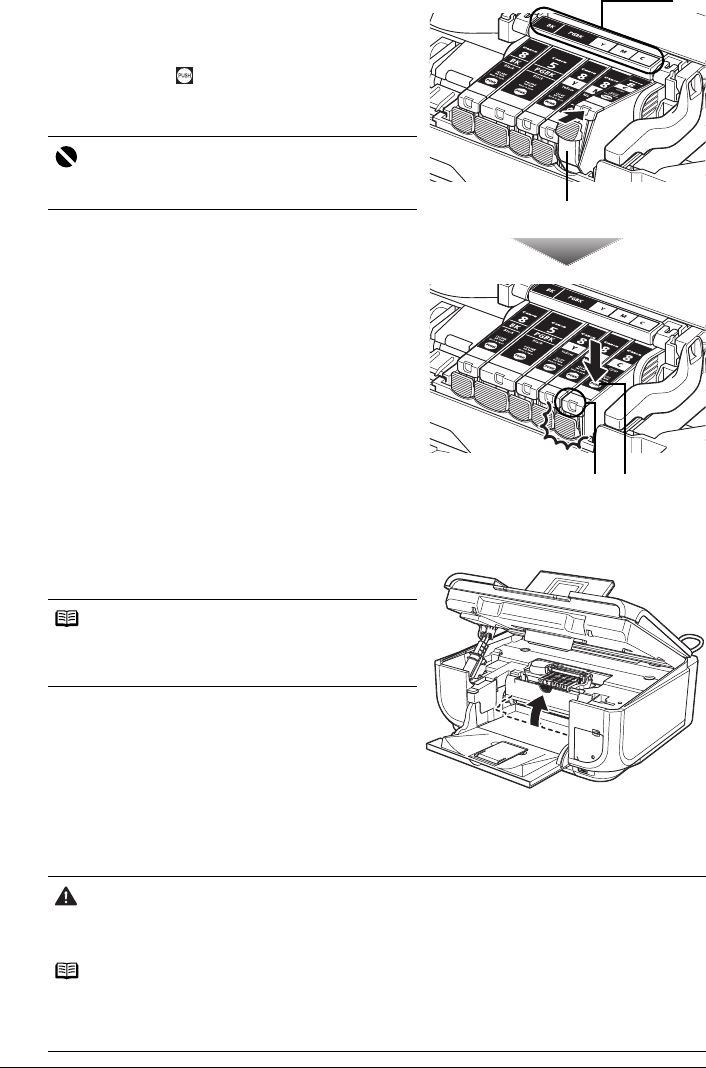
50 Routine Maintenance
6Install the ink tank.
(1) Insert the front end of the ink tank into the Print
Head.
(2) Press on the mark on the ink tank until the
ink tank snaps firmly into place.
(3) Make sure that the ink lamp lights up red.
7Close the Inner Cover.
8Gently close the Scanning Unit (Printer Cover).
Important
The machine cannot be used unless all the ink tanks
are installed.
Note
Make sure that the Inner Cover is closed. Printing will
not start with the Inner Cover open since paper can not
be fed properly.
Caution
zBe sure to hold the Scanning Unit (Printer Cover) firmly using both hands, and be careful not to
get your fingers caught.
zDo not hold the LCD or the Operation Panel.
Note
zIf the error message is still displayed after the Scanning Unit (Printer Cover) is closed, see
“Error Message Is Displayed on the LCD” on page 68.
zWhen you start printing after replacing the ink tank, Print Head Cleaning is performed
automatically. Do not perform any other operations until Print Head Cleaning finishes.
*1
(1)
(2)(3)
*1 Make sure the position of the tank
matches the label.
51Routine Maintenance
Keeping the Best Printing Results
To avoid drying of the Print Head and clogging of the nozzles, note the following.
When You Turn Off the Machine
Follow the procedure below to turn off the machine.
(1) Press the ON/OFF button to turn off the machine.
(2) Confirm that the POWER lamp has gone out.
This takes a few seconds or as long as around 30 seconds.
(3) Unplug the power cord from the wall outlet.
If you are using a power outlet strip, you can switch it off instead.
When you press the ON/OFF button to turn off the machine, the machine automatically puts a
protective cap on the Print Head to prevent the ink from drying. If you remove the power cord or
switch off the power outlet strip before the POWER lamp goes out, this capping will not be done
properly, causing the Print Head to dry and clog.
When You Are Not Using the Machine for a Long Time
When you are not using the machine for a long time, print or copy in both black & white and in
color, or perform Print Head Cleaning, about once a month to prevent degradation of the Print
Head.
Numerous nozzles are installed in the Print Head for high-precision printing. Just as the
uncapped tip of a ballpoint pen or marker becomes dry and unusable if it is not used for a long
period of time, the print head nozzles become blocked by dried ink. Periodically printing or
cleaning the Print Head can prevent this blockage.
Note
zIf the printed area is traced with a highlight pen or paint-stick or stained with water or sweat, ink
may blur depending on the paper.
zIf the print head nozzles get clogged, printouts will become faint or particular colors will not be
printed properly. For details, see “When Printing Becomes Faint or Colors Are Incorrect” on
page 52.
52 Routine Maintenance
When Printing Becomes Faint or Colors Are Incorrect
When printing becomes faint or colors are incorrect even if ink remains in the ink tanks, the print
head nozzles are probably clogged. Print the nozzle check pattern to confirm the condition of the
nozzles and then perform Print Head Cleaning.
If the ruled lines are shifted after running print head maintenance, align the Print Head.
zIf the Ruled Lines Are Shifted
Note
Before performing maintenance
zOpen the Scanning Unit (Printer Cover) and make sure that all lamps for the ink tanks are lit red.
– If any one of the lamps is flashing slowly, the associated ink tank is running low. You can continue
printing for a while, but we recommend you to have a replacement ink tank available.
– If any one of the lamps is flashing fast, the associated ink tank is empty. Replace the ink tank.
See “Replacing Ink Tanks” on page 48.
If an ink lamp is flashing fast even though ink remains in that ink tank, it is inserted in the wrong
position. Make sure that the ink tank of the correct color is inserted in each position, matching the
label. See “Replacing an Ink Tank” on page 46.
– If the ink lamp is not lit, the tank is not set properly. Press the mark on the ink tank until the tank
clicks into place. Make sure that all packaging material is peeled off the ink tank. See “Prepare the
replacement tank.” on page 49.
zIncrease the Print Quality setting in the printer driver settings.
See “Print Results Not Satisfactory” on page 73.
Step 1
See “Printing the Nozzle Check Pattern” on page 53.
If lines are missing or if white streaks appear After cleaning the
Print Head, print
and examine the
nozzle check
pattern.
Step 2
See “Print Head Cleaning” on page 56.
If the problem is not resolved after performing
Print Head Cleaning twice
Step 3
See “Print Head Deep Cleaning” on page 58.
Note
If Print Head Deep Cleaning does not resolve the problem, the Print Head may be damaged. Contact your
Canon service representative.
Step 1
See “Aligning the Print Head” on page 60.
53Routine Maintenance
Printing the Nozzle Check Pattern
Print the nozzle check pattern to determine whether the ink ejects properly from the Print Head.
1Make sure that the machine is turned on, then load a sheet of A4 or Letter-sized
plain paper in the Auto Sheet Feeder or the Cassette.
2Open the Paper Output Tray, and then open the Output Tray Extension.
(1) Put your finger in the rounded indent of the Paper Output Tray and open it gently.
(2) Open the Output Tray Extension.
3Press the Paper Feed Switch to select the paper source where you have loaded
paper.
4Print the nozzle check pattern.
(1) Select Settings on the HOME screen.
See “Basic Operation for the Operation Panel” on page 2.
(2) Select Maintenance, then press the OK button.
The Maintenance screen is displayed.
(3) Select Nozzle check pattern and then press
the OK button.
The pattern print confirmation screen is
displayed.
(4) Select Yes and then press the OK button.
The nozzle check pattern is printed, and the
pattern confirmation screens are displayed
alternately.
5Examine the pattern and take the appropriate action.
See “Examining the Nozzle Check Pattern” on page 54.
Note
Make sure that the Inner Cover is closed.
(3)
(4)
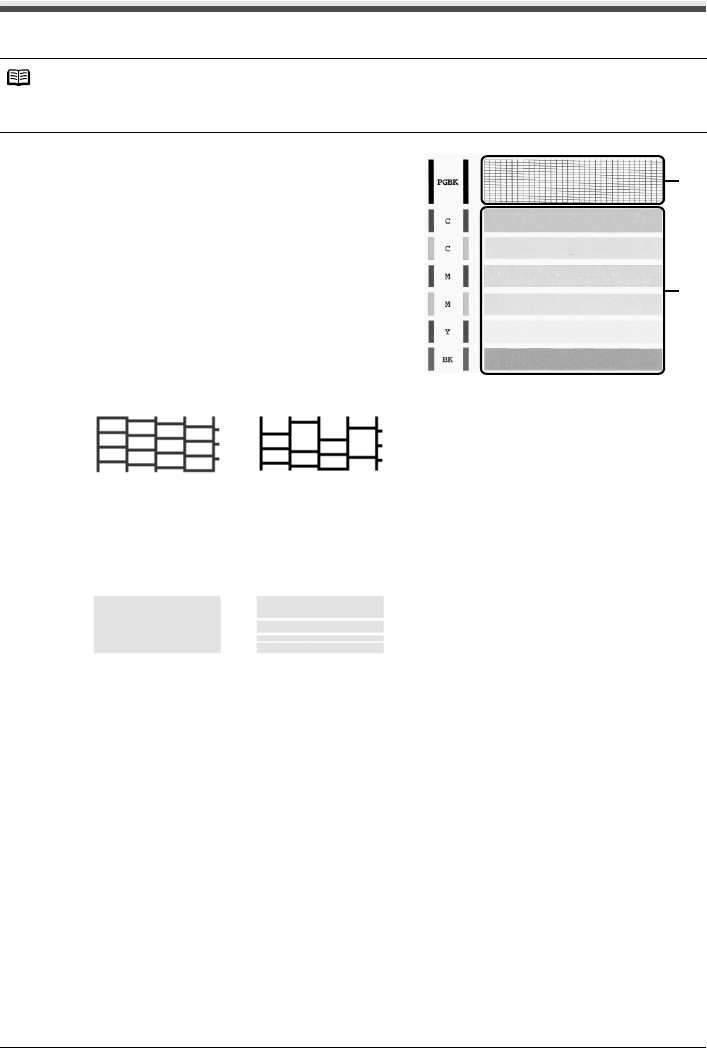
54 Routine Maintenance
Examining the Nozzle Check Pattern
Follow the procedure below to examine the nozzle check pattern, and perform cleaning if necessary.
1Check the nozzle check pattern you printed.
(1) Check if lines in this pattern are missing.
(A) Good
(B) Lines are missing
(2) Check if there are white streaks in this pattern.
(A) Good
(B) White streaks present
Note
If the ink level is low, the nozzle check pattern is not printed correctly. Replace the relevant ink tank.
See “Replacing an Ink Tank” on page 46.
(2)
(1)
(A) (B)
(A) (B)
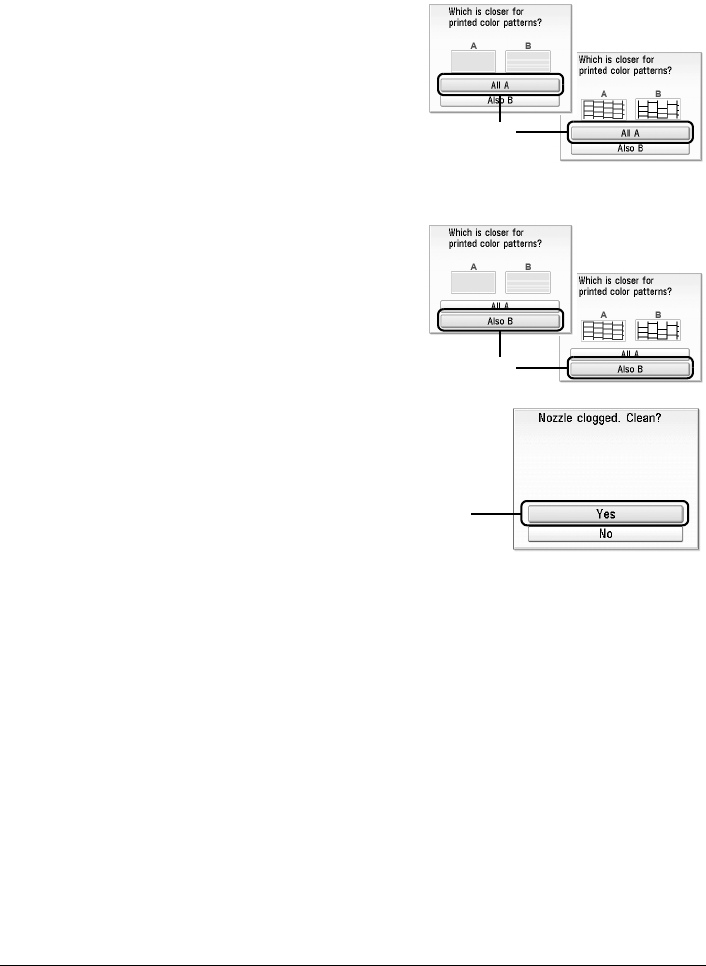
55Routine Maintenance
2The confirmation screens for white streaks and missing lines are displayed
alternately. Select the pattern that is closer to the nozzle check pattern that you
printed.
zIf There Are No Missing Lines and No White Streaks
(1) Select All A and press the OK button.
The LCD returns to the Maintenance screen.
zIf Lines Are Missing or White Streaks Are Present
(1) Select Also B and press the OK button.
The cleaning confirmation screen is displayed.
(2) Select Yes and press the OK button to start
Print Head Cleaning.
See “Print Head Cleaning” on page 56.
(1)
(1)
(2)
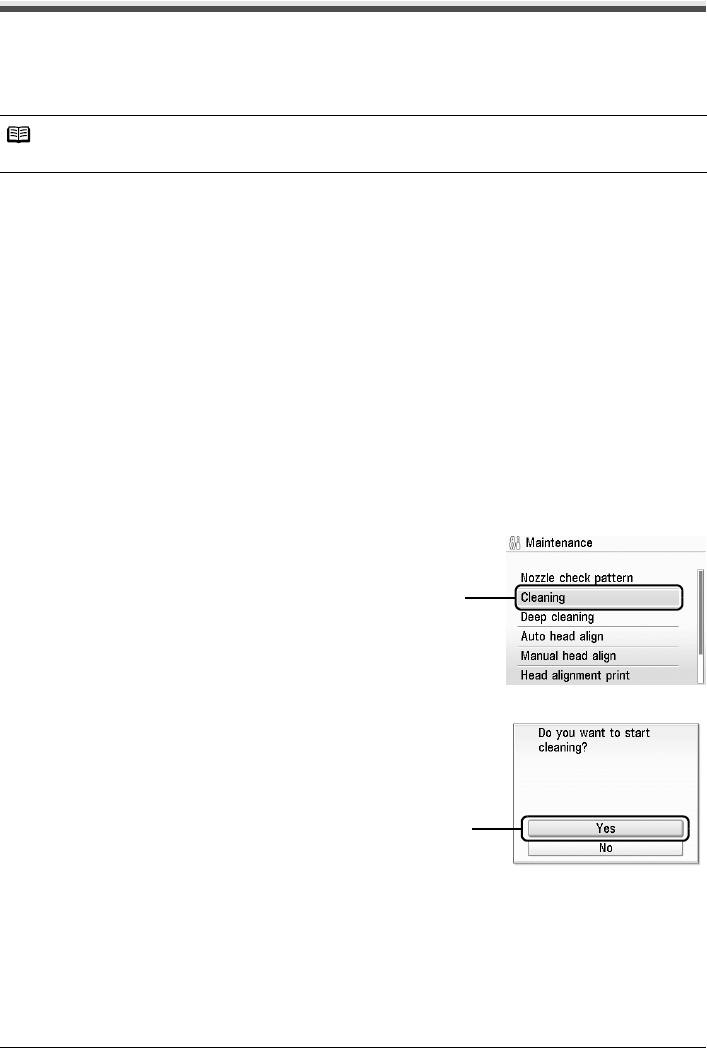
56 Routine Maintenance
Print Head Cleaning
Clean the Print Head if lines are missing or if white streaks appear in the printed nozzle check
pattern. Cleaning unclogs the nozzles and restores the print head condition. Note that cleaning the
Print Head causes used ink to be absorbed in the ink absorber. Cleaning the Print Head consumes
ink, so perform Print Head Cleaning only when necessary.
1Make sure that the machine is turned on, then load a sheet of A4 or Letter-sized
plain paper in the Auto Sheet Feeder or the Cassette.
2Open the Paper Output Tray, and then open the Output Tray Extension.
(1) Put your finger in the rounded indent of the Paper Output Tray and open it gently.
(2) Open the Output Tray Extension.
3Press the Paper Feed Switch to select the paper source where you have loaded
paper.
4Start Print Head Cleaning.
(1) Select Settings on the HOME screen.
See “Basic Operation for the Operation Panel” on page 2.
(2) Select Maintenance, then press the OK button.
The Maintenance screen is displayed.
(3) Select Cleaning, then press the OK button.
The confirmation screen is displayed.
(4) Select Yes, then press the OK button.
Print Head Cleaning starts.
Do not perform any other operations until Print
Head Cleaning finishes. This takes about 70
seconds.
The pattern print confirmation screen is
displayed.
(5) Select Yes, then press the OK button.
The nozzle check pattern is printed.
Note
Make sure that the Inner Cover is closed.
(3)
(4)

57Routine Maintenance
5Check the print head condition with the printed nozzle check pattern, and take
appropriate action.
See “Examining the Nozzle Check Pattern” on page 54.
Note
If the problem is not resolved after performing steps 4 and 5 twice, try Print Head Deep Cleaning.
See “Print Head Deep Cleaning” on page 58.
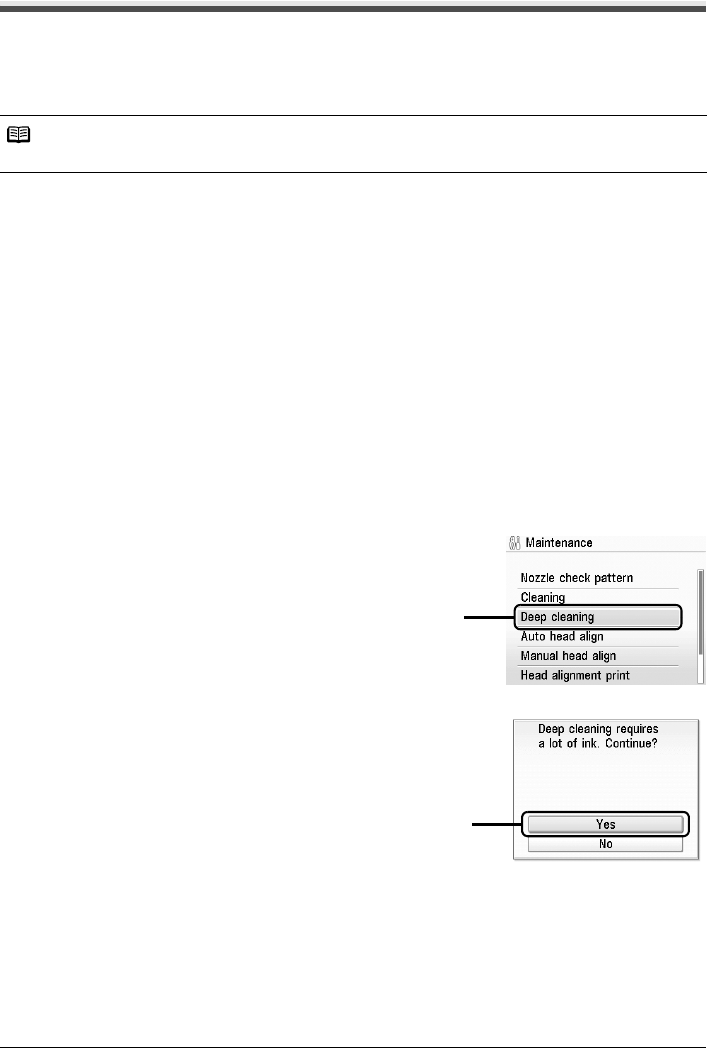
58 Routine Maintenance
Print Head Deep Cleaning
If print quality does not improve by standard Print Head Cleaning, try Print Head Deep Cleaning,
which is a more powerful process. Note that cleaning the Print Head causes used ink to be absorbed
in the ink absorber. Print Head Deep Cleaning consumes more ink than standard Print Head
Cleaning, so perform this procedure only when necessary.
1Make sure that the machine is turned on, then load a sheet of A4 or Letter-sized
plain paper in the Auto Sheet Feeder or the Cassette.
2Open the Paper Output Tray, and then open the Output Tray Extension.
(1) Put your finger in the rounded indent of the Paper Output Tray and open it gently.
(2) Open the Output Tray Extension.
3Press the Paper Feed Switch to select the paper source where you have loaded
paper.
4Start Print Head Deep Cleaning.
(1) Select Settings on the HOME screen.
See “Basic Operation for the Operation Panel” on page 2.
(2) Select Maintenance, then press the OK button.
The Maintenance screen is displayed.
(3) Select Deep cleaning, then press the OK
button.
The confirmation screen is displayed.
(4) Select Yes, then press the OK button.
Print Head Deep Cleaning starts.
Do not perform any other operations until Print
Head Deep Cleaning finishes. This takes about
100 seconds.
Note
Make sure that the Inner Cover is closed.
(3)
(4)

59Routine Maintenance
5Check the condition of the Print Head.
(1) Print the nozzle check pattern to check the print head condition.
See “Printing the Nozzle Check Pattern” on page 53.
If a particular color is not printed properly, replace the ink tank of that color.
See “Replacing an Ink Tank” on page 46.
(2) If the print head nozzles are still not clean, turn off the machine and perform another Print
Head Deep Cleaning after 24 hours.
(3) If this does not solve the problem, the Print Head may be damaged. Contact your Canon
service representative.
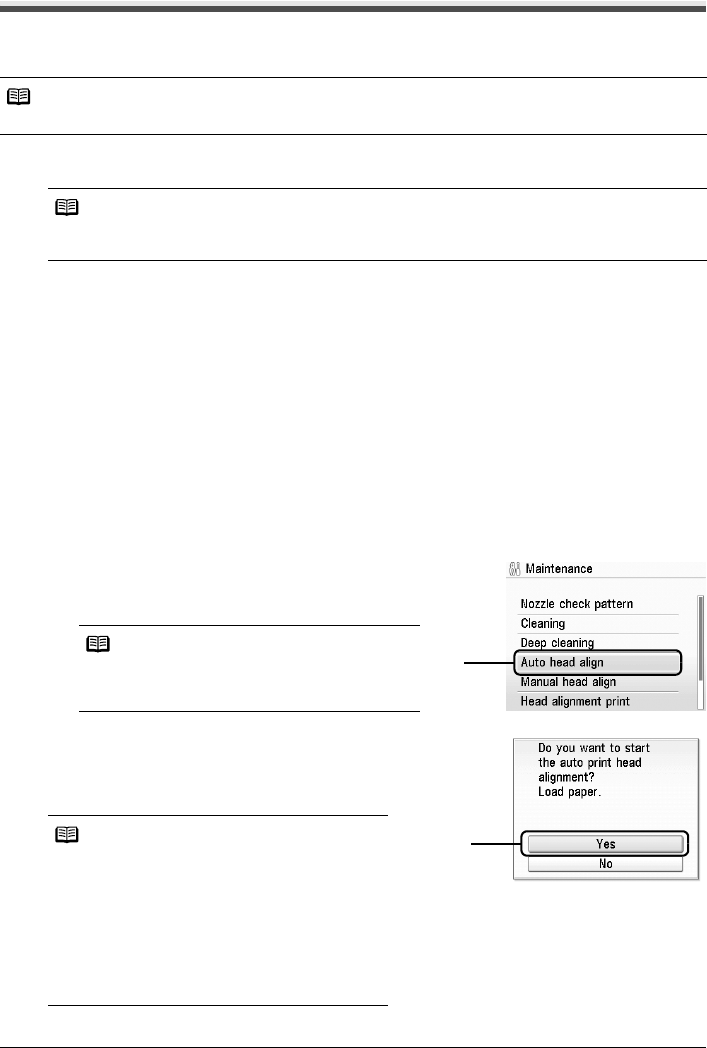
60 Routine Maintenance
Aligning the Print Head
If ruled lines are printed misaligned or print results are otherwise unsatisfactory, adjust the print head
position.
Automatic Print Head Alignment
1Make sure that the machine is turned on, and then load a sheet of A4 or Letter-
sized plain paper in the Auto Sheet Feeder.
2Open the Paper Output Tray, and then open the Output Tray Extension.
(1) Put your finger in the rounded indent of the Paper Output Tray and open it gently.
(2) Open the Output Tray Extension.
3Adjust the print head position.
(1) Select Settings on the HOME screen.
See “Basic Operation for the Operation Panel” on page 2.
(2) Select Maintenance, then press the OK button.
The Maintenance screen is displayed.
(3) Select Auto head align, then press the OK
button.
The confirmation screen is displayed.
(4) Select Yes, then press the OK button.
The print head is aligned automatically, and the
print head pattern after the adjustment is
printed out. This takes about 4 minutes.
Note
Make sure that the Inner Cover is closed.
Note
You cannot feed paper from the Cassette when performing Automatic Print Head Alignment.
Always load paper in the Auto Sheet Feeder.
Note
If you select Head alignment print, the machine
exits the process after printing the current head
position adjustment values.
Note
zThe print head alignment pattern is printed in
black and blue.
zIf adjustment was not done successfully, the
“Auto head align has failed.” error message
is displayed on the LCD. For details, see “Error
Message Is Displayed on the LCD” on page 68.
zIf results of Automatic Print Head Alignment
are not satisfactory, perform Manual Print Head
Alignment. For details, see “Manual Print Head
Alignment” on page 61.
(3)
(4)
61Routine Maintenance
Manual Print Head Alignment
If the results of Automatic Print Head Alignment are not satisfactory, follow the procedure below
to perform Manual Print Head Alignment.
For details on performing Automatic Print Head Alignment, see “Automatic Print Head
Alignment” on page 60.
1Make sure that the machine is turned on, and then load three sheets of A4 or
Letter-sized plain paper in the Auto Sheet Feeder or the Cassette.
2Open the Paper Output Tray, and then open the Output Tray Extension.
(1) Put your finger in the rounded indent of the Paper Output Tray and open it gently.
(2) Open the Output Tray Extension.
3Press the Paper Feed Switch to select the paper source where you have loaded
paper.
4Select Settings on the HOME screen.
See “Basic Operation for the Operation Panel” on page 2.
5Select Maintenance, then press the OK button.
The Maintenance screen is displayed.
6Select Manual head align, then press the OK button.
Confirmation screen is displayed.
7Select Yes, then press the OK button.
8When the Print Head alignment pattern is printed, select Yes, then press the OK
button.
Important
You cannot print the print head alignment pattern if paper of size other than A4 or Letter is loaded.
Be sure to use A4 or Letter-sized plain paper.
Note
If you select Head alignment print, the machine exits the process after printing the current head
position adjustment values.
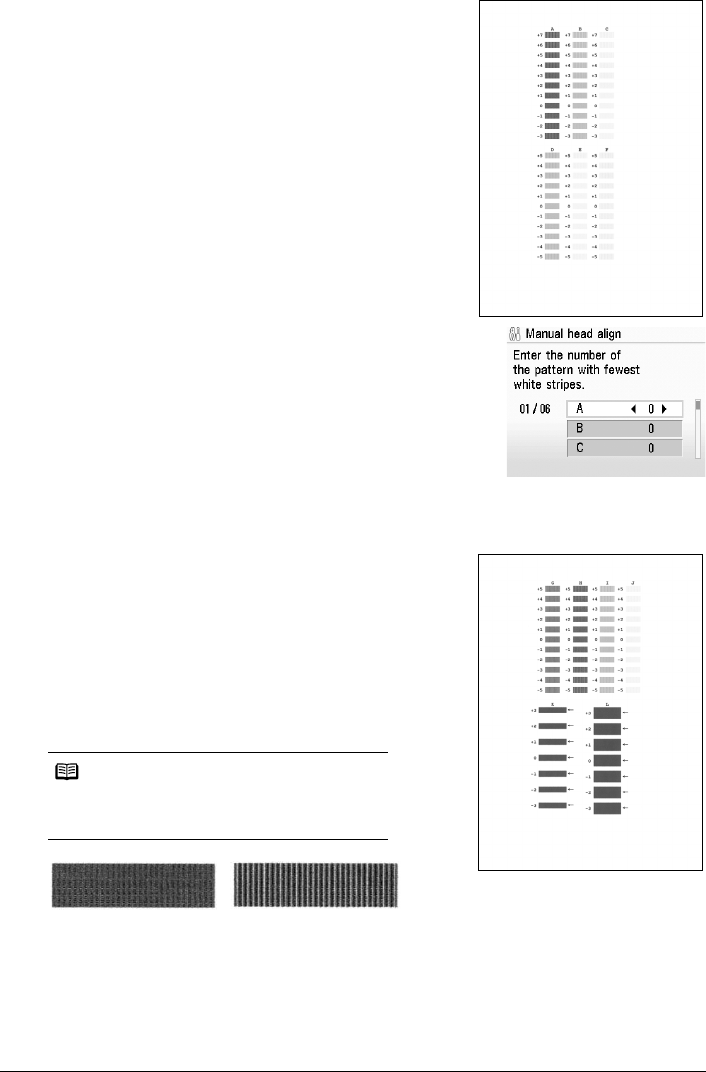
62 Routine Maintenance
9Look at the printout. From the patterns, select
the most even, least irregular patterns for
each column and input their numbers. Press
the OK button.
(1) Select a column to input the pattern number.
(2) Use the [ or ] button to input the number of
the pattern.
(3) Repeat the steps (1) and (2) until you finish
inputting all pattern numbers, press the OK
button.
10 When the confirmation message is displayed, press the OK button.
11 Look at the printout. From the patterns, select
the most even, least irregular patterns for
each column and input their numbers. Press
the OK button.
In the same way in step 9, input the numbers.
Columns G to J are striped vertically and columns
K and L are striped horizontally. For Columns K and
L, the best patterns will be smooth and have no
streaks in the border indicated by the arrows.
(A) Less noticeable white streaks
(B) More noticeable white streaks
12 When the confirmation message is displayed, press the OK button.
Note
If it is difficult to pick the best pattern, pick the
setting that produces the least noticeable vertical
white streaks.
(B)(A)

63Routine Maintenance
13 Look at the printout. From the patterns, select
the most even, least irregular patterns for
each column and input their numbers. Press
the OK button.
In the same way in step 9, input the numbers.
Note
When you turn off the machine, be sure to press the ON/OFF button on the machine.
Otherwise, the settings made here will not be saved.
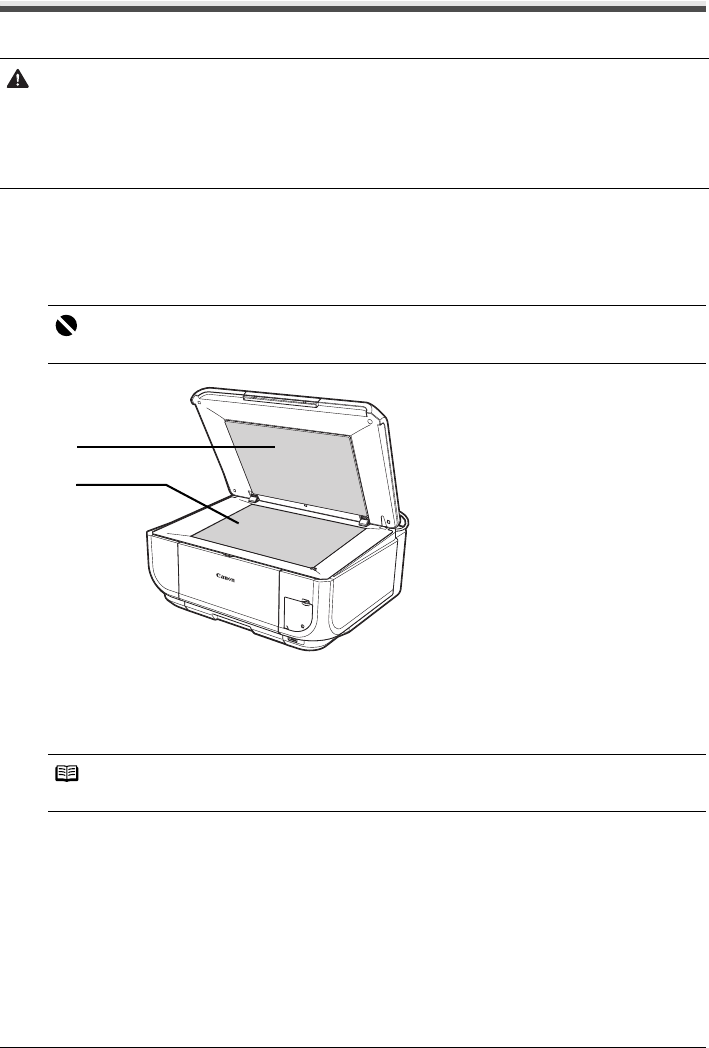
64 Routine Maintenance
Cleaning Your Machine
This section describes the cleaning procedure that is needed to maintain your machine.
Cleaning the Platen Glass and Document Cover
Moisten a clean, soft, lint-free cloth and wring out excess water. With it, wipe the Platen Glass
(A) and the inner side of the Document Cover (white sheet) (B). Then wipe with another clean,
soft, dry, lint-free cloth, making sure not to leave any residue, especially on the Platen Glass.
Cleaning the Paper Feed Rollers (Roller Cleaning)
Clean the paper feed rollers if paper is not fed properly. Cleaning the paper feed rollers will wear
the rollers, so perform this only when necessary.
1Make sure that the machine is turned on, and then remove any paper from the Auto
Sheet Feeder and Cassette.
2Press the Paper Feed Switch to select the paper source to clean.
Caution
zBe sure to turn off the power and disconnect the power cord before cleaning the machine.
zDo not use tissue paper, paper towels, or similar materials for cleaning. Paper tissue powders or fine
threads may remain inside the machine and cause problems such as a blocked Print Head and poor
printing results. Use a soft cloth to avoid scratching the components.
zNever use volatile liquids such as thinners, benzene, acetone, or any other chemical cleaner to clean
the machine; these can damage the machine’s components.
Important
The sheet (B) is easily damaged, so wipe it gently.
Note
Make sure that the Inner Cover is closed.
(B)
(A)

65Routine Maintenance
3Clean the paper feed rollers.
(1) Select Settings on the HOME screen.
See “Basic Operation for the Operation Panel” on page 2.
The Settings screen is displayed.
(2) Select Maintenance, then press the OK button.
The Maintenance screen is displayed.
(3) Select Roller cleaning, then press the OK button.
The confirmation screen is displayed.
(4) Select Yes, then press the OK button.
The Paper Feed Rollers will rotate as they clean.
4Repeat step 3 twice.
5Open the Paper Output Tray, and then open the Output Tray Extension.
(1) Put your finger in the rounded indent of the Paper Output Tray and open it gently.
(2) Open the Output Tray Extension.
6Load three or more sheets of A4 or Letter-sized plain paper in portrait orientation in
the paper source you selected in step 2.
7Repeat step 3 three times.
The paper cleans the inside of the machine as it feeds through the machine.
If there are no signs of improvement after performing cleaning three times, contact a Canon
service representative.
Cleaning the Inside of the Machine (Bottom Plate Cleaning)
This section describes how to clean the inside of the machine. If the inside of the machine
becomes dirty, printed paper may get dirty, so we recommend performing cleaning regularly.
1Make sure that the machine is turned on, and then remove any paper from the Auto
Sheet Feeder.
2Open the Paper Output Tray, and then open the Output Tray Extension.
(1) Put your finger in the rounded indent of the Paper Output Tray and open it gently.
(2) Open the Output Tray Extension.
3Fold a single sheet of A4 or Letter-sized plain paper in half widthwise, and then
unfold the paper.
Note
Make sure that the Inner Cover is closed.
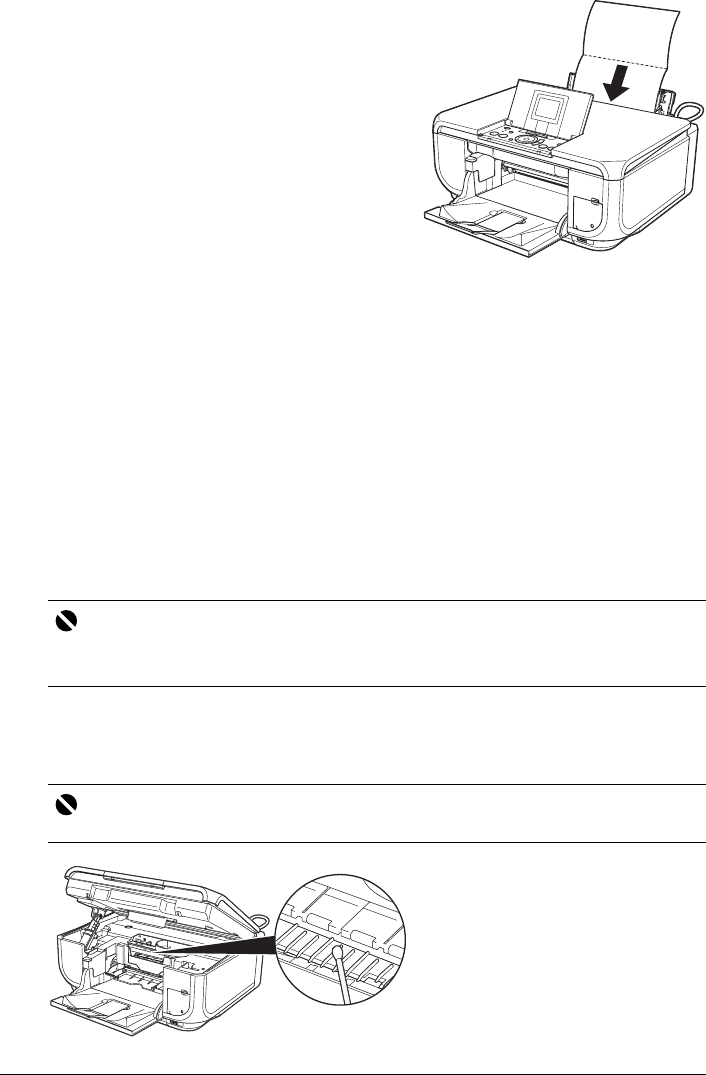
66 Routine Maintenance
4Load this and only this sheet of paper in the
Auto Sheet Feeder with the open side to the
front.
5Perform bottom plate cleaning.
(1) Select Settings on the HOME screen.
See “Basic Operation for the Operation Panel” on page 2.
The Settings screen is displayed.
(2) Select Maintenance, then press the OK button.
The Maintenance screen is displayed.
(3) Select Bottom plate cleaning, then press the OK button.
The confirmation screen is displayed.
(4) Select Yes, then press the OK button.
The paper cleans the inside of the machine as it feeds through the machine.
If the ejected paper is smudged, clean the inside of the machine again.
If the problem is not resolved after performing cleaning again, the protrusions inside the
machine may be stained. Clean them according to instructions. See “Cleaning the
Protrusions Inside the Machine” on page 66.
Cleaning the Protrusions Inside the Machine
If protrusions inside the machine are stained, wipe off any ink from the protrusions using a cotton
swab or the like.
Important
zEven if the Cassette is selected as the paper source, paper will be fed from the Auto Sheet
Feeder.
zDo not perform any other operation while the bottom plate is being cleaned.
Important
Before cleaning the inner parts, be sure to turn the machine off.
67Troubleshooting
Troubleshooting
This section describes troubleshooting tips for problems you may encounter when using the
machine.
z“Error Message Is Displayed on the LCD” on page 68
z“LCD Cannot Be Seen At All” on page 70
z“An Unintended Language Is Displayed on the LCD” on page 70
z“Cannot Install the MP Drivers” on page 71
z“Cannot Connect to Computer Properly” on page 72
z“Printing Speed Is Slow / USB 2.0 Hi-Speed Connection Does Not Work” on page 72
z““Hi-Speed USB Device Plugged into non-Hi-Speed USB Hub” or “This Device Can
Perform Faster” Message Is Displayed (Windows XP Only)” on page 72
z“Print Results Not Satisfactory” on page 73
z“Cannot Print to End of Job” on page 73
z“Part of the Page Is Not Printed” on page 73
z“Colors Are Unclear” on page 73
z“Ink Does Not Come Out/Printing Does Not Start/Printing Is Blurred/Colors Are Wrong/
Straight Lines Are Misaligned” on page 74
z“White Streaks” on page 75
z“Printed Paper Curls or Has Ink Blots” on page 75
z“Printed Surface Is Scratched/Paper Is Smudged” on page 75
z“Colors Are Uneven or Streaked” on page 77
z“Printing Problems When Copying” on page 77
z“Printing Does Not Start” on page 78
z“Paper Does Not Feed Properly” on page 79
z“Paper Jams” on page 81
z“Error Message Appears on the Screen” on page 85
z“Writing Error/Output Error/Communication Error” on page 85
z“Error Regarding Automatic Duplex Printing Is Displayed” on page 86
z“Error No.: 300 Is Displayed” on page 86
z“Error No.: 1700 Is Displayed” on page 87
z“Error No.: 1851 Is Displayed” on page 87
z“Error No.: 1856 Is Displayed” on page 87
z“Error No.: 2001 Is Displayed” on page 87
z“Error No.: 2500 Is Displayed” on page 87
z“Cannot Print Properly from a Digital Camera” on page 88
z“Cannot Print Properly from a Photo Index Sheet” on page 89
Note
If you cannot find appropriate tips for your problem, refer to the on-screen manuals.
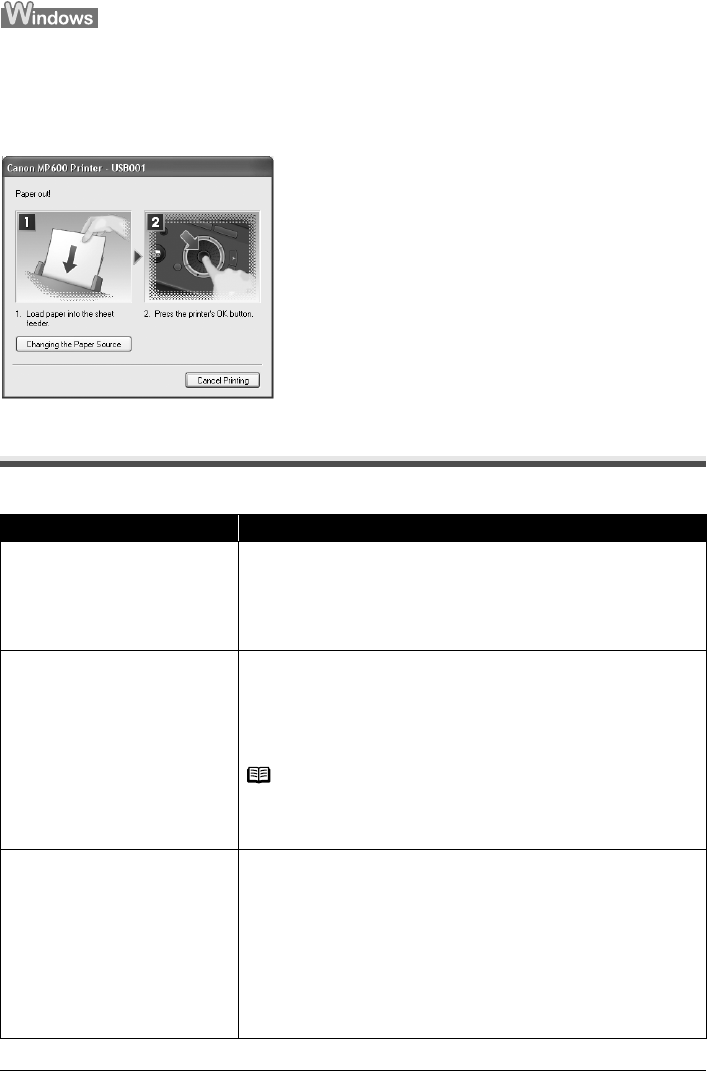
68 Troubleshooting
If an Error Occurs When the Machine Is Connected to a Computer
When an error occurs in printing such as the machine is out of paper or paper is jammed, a
troubleshooting message is displayed automatically. Take the appropriate action described in the
message.
The message may vary depending on the version of your Windows operating system.
Error Message Is Displayed on the LCD
If an error message is displayed on the LCD, take the corresponding action described below.
Message Action
“There are no photos in the memory
card.”
zThere are no image data stored on the memory card that can be read by this
machine.
zThe machine may not recognize the file if the file name or the folder path
contains certain characters. Use only alphanumeric characters.
zPhoto data edited or processed on a computer must be printed from the
computer.
“The following ink may have run out.
Replacing the ink tank is
recommended.”
U041
If the lamp on the ink tank is flashing, ink may have run out.
Replacing the ink tank is recommended.
If printing is in progress and you want to continue printing, press the OK button
with the ink tank installed. Then printing can continue. Replacing the ink tank is
recommended after the printing. The machine may be damaged if printing is
continued under the ink out condition. See “Replacing an Ink Tank” on page 46.
Note
If multiple ink lamps are flashing red, check how fast they are flashing. Fast
flashing (at about 1-second intervals) indicates the tank is empty. Slow flashing
(at about 3-second intervals) indicates ink is low. For details on different flashing
speeds, see “Getting the Ink Level Information” on page 46.
“The following ink has run out. Replace
the ink tank.”
U163
Ink has run out. (The lamp on the ink tank flashes.)
Replace the ink tank and close the Scanning Unit (Printer Cover).
Printing under the current condition may damage the machine.
If you want to continue printing in this condition, you need to release the function
for detecting the remaining ink level. Press and hold the Stop/Reset button for
at least 5 seconds, and then release it.
* With this operation, releasing the function for detecting the remaining ink
level is memorized. Please be advised that Canon shall not be liable for any
malfunction or trouble which may be caused by continuation of printing under
the ink out condition.
See “Replacing an Ink Tank” on page 46.

69Troubleshooting
“Print head is not installed. Install the
print head.”
U051
“The type of print head is incorrect.
Install the correct print head.”
U052
Follow the directions given in the Easy Setup Instructions to install the Print
Head.
If the Print Head is already installed, remove the Print Head once and then
reinstall it.
If the error is not resolved, the Print Head may be damaged. Contact your
Canon service representative.
“Inner cover is open. Close the inner
cover and press OK.”
If the Inner Cover is open when starting printing, close it and then press the OK
button on the machine.
Do not open or close the Inner Cover while printing, as this can damage the
machine.
“Some ink tanks are not installed in
place.”
U072
“More than one ink tank of the following
color is installed.”
U071
Possible causes are as follows:
zSome ink tanks are not installed in the correct position.
zMore than one ink tanks of the same color are installed.
Confirm that the ink tanks are installed in the appropriate positions.
See “Replacing an Ink Tank” on page 46.
“The ink absorber is almost full. Press
OK to continue printing. Contact the
service center.”
The machine has a built-in ink absorber to hold the ink used during Print Head
Cleaning, for example.
This error message indicates that the ink absorber is nearly full.
Press the OK button to cancel the error so you can continue printing.
However, because printing is disabled once the ink absorber becomes
completely full and until the ink absorber is replaced, you are recommended to
contact a Canon service representative as early as possible. (You will need to
replace a particular part of the machine.)
“The device may be incompatible.
Remove the device and check the
manual supplied with the connected
device.”
Disconnect the cable connecting the machine and the device, and then
reconnect it.
Depending on the model or brand of your device, you may have to select a
PictBridge-compliant print mode on the device before connecting it to the
machine. You may also have to turn on the camera or select Play mode
manually after connecting the device to the machine. Perform necessary
operations according your device’s instruction manual.
If the error is still not resolved, there is a possibility that you are using a digital
camera or digital video camcorder that is not supported by this machine. Use a
digital camera or digital video camcorder compatible with this machine.
“Auto head align has failed. Press OK
and repeat operation. <See manual>”
Possible causes are as follows:
zPaper of size other than A4 or Letter is loaded in the Auto Sheet Feeder.
Press the OK button on the machine to dismiss the error message, then load
a sheet of A4/Letter-sized paper in the Auto Sheet Feeder.
Automatic Print Head Alignment cannot be performed using paper from the
Cassette. For Automatic Print Head Alignment, always load paper in the Auto
Sheet Feeder.
zPrint Head nozzles are clogged.
Press the OK button to dismiss the error message, and print the nozzle
check pattern to check the status of the Print Head. See “Printing the Nozzle
Check Pattern” on page 53.
zThe Paper Output Slot is exposed to strong light.
Press the OK button to dismiss the error message, and then adjust your
operating environment and/or the position of the machine so that the Paper
Output Slot is not exposed directly to strong light.
After carrying out the above measures, if the problem continues after aligning
the Print Head again, press the OK button to dismiss the error message, and
then perform Manual Print Head Alignment. For details on Manual Print Head
Alignment, see “Manual Print Head Alignment” on page 61.
Message Action
70 Troubleshooting
LCD Cannot Be Seen At All
An Unintended Language Is Displayed on the LCD
“The remaining level of the following ink
cannot be correctly detected. Replace
the ink tank.”
U130
The remaining ink level cannot be correctly detected.
Replace the ink tank and close the Scanning Unit (Printer Cover).
Printing with an ink tank that was once empty may damage the machine.
If you want to continue printing in this condition, you need to release the function
for detecting the remaining ink level. Press and hold the Stop/Reset button for
at least 5 seconds, and then release it.
* With this operation, releasing the function for detecting the remaining ink
level is memorized. Please be advised that Canon shall not be liable for any
machine malfunction or damage caused by refilled ink tanks.
See “Replacing an Ink Tank” on page 46.
“The following ink tank cannot be
recognized.”
U140
U150
zThe ink tank is not compatible with this machine. (The lamp on the ink tank is
off.)
Install an appropriate ink tank.
See “Replacing an Ink Tank” on page 46.
zAn Ink tank error has occurred. (The lamp on the ink tank is off.)
Replace the ink tank.
See “Replacing an Ink Tank” on page 46.
“****
Error code”
Turn off the machine, and unplug the power cord of the machine from the power
supply. After a while, plug the power cord of the machine back in, and then turn
on the machine. If the same error occurs, contact a Canon service
representative.
“Scanner is not operating correctly.” Turn off the machine, and unplug the power cord of the machine from the power
supply. After a while, plug the power cord of the machine back in, and then turn
on the machine. If the same error occurs, contact a Canon service
representative.
Cause Action
Cannot see the display on the LCD. zIf the POWER lamp is off
The machine is not powered on. Connect the power cord and press the ON/
OFF button. The machine will power on and the LCD will display a message.
zIf the POWER lamp is lit
The LCD may be in the screen-saver mode. On the Operation Panel, press a
button other than the ON/OFF button.
Cause Action
The language you want to be displayed
is not selected.
Select the language you want to be displayed according to the following
procedure.
(1)Press the HOME button. Wait for about 5 seconds, select , and then
press the OK button.
(2)Press the ] button to select , then press the OK button.
(3)Press the } button four times, then press the OK button.
If the Bluetooth unit is connected to the machine, press the } button five
times, and then press the OK button.
(4)Press the { or } button to select the language you want to be displayed,
then press the OK button.
Message Action
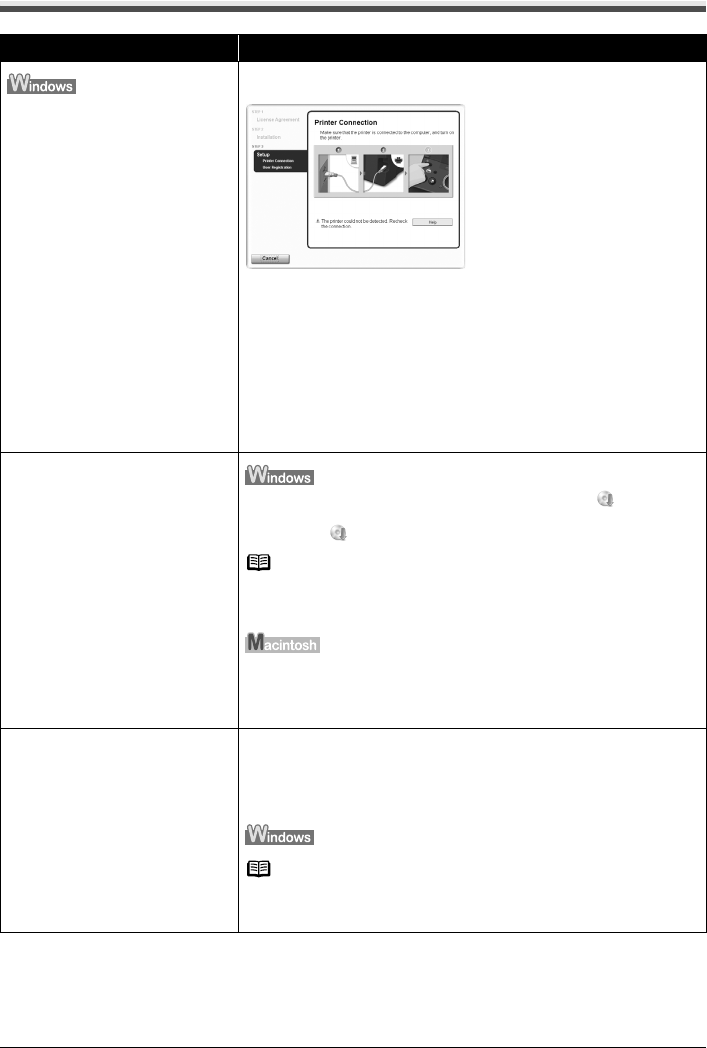
71Troubleshooting
Cannot Install the MP Drivers
Cause Action
Unable to proceed beyond the Printer
Connection screen.
If you were unable to proceed beyond the Printer Connection screen, follow
the procedure below to reinstall the MP Drivers.
(1)Click Cancel on the Printer Connection screen.
(2)Click Start Over on the Installation Failure screen.
(3)Click Back on the screen that appears next.
(4)Click Exit on the Welcome screen, then remove the CD-ROM.
(5)Turn the machine off.
(6)Restart the computer.
(7)Make sure you have no application software running, including anti-virus
software.
(8)Follow the procedure described in the Easy Setup Instructions to reinstall the
MP Drivers.
Installation does not start automatically
when the Setup CD-ROM is inserted
into your computer’s disc drive. Click Start > My Computer > double-click the CD-ROM icon .
In non-XP Windows, open the My Computer window and then double-click the
CD-ROM icon .
Note
To use the Run command to start the setup program, specify your disc drive and
then the name of the setup program, Msetup4.exe. The drive letter of the disc
drive depends on your computer.
Double-click the CD-ROM icon on your desktop to start installation.
If the CD-ROM icon is not displayed on the desktop, there may be a problem
with the CD-ROM. Contact a Canon service representative.
Installation procedure not followed
correctly.
Follow the procedure described in the Easy Setup Instructions for proper
installation.
If the drivers were not installed correctly, uninstall the MP Drivers, restart your
computer, and then reinstall the drivers. Refer to the Printer Driver Guide on-
screen manual.
Note
If the installer was forced to be terminated due to an Windows error, the system
may be in an unstable condition and you may not be able to install the drivers.
Restart your computer before reinstalling.
72 Troubleshooting
Cannot Connect to Computer Properly
Printing Speed Is Slow / USB 2.0 Hi-Speed Connection Does Not Work
“Hi-Speed USB Device Plugged into non-Hi-Speed USB Hub” or “This
Device Can Perform Faster” Message Is Displayed (Windows XP Only)
The Setup CD-ROM is defective.
Click Start, select My Computer, and confirm that the CD-ROM icon is
visible.
In non-XP Windows, double-click the My Computer icon and confirm that the
CD-ROM icon is visible in the window.
Confirm that the CD-ROM icon is displayed when you insert the CD-ROM.
If the CD-ROM icon is not displayed, restart your computer. If the icon is still not
displayed, try different disks and see if they are displayed. If other disks are
displayed, there is a problem with the Setup CD-ROM. Contact a Canon service
representative.
Cause Action
Your system environment is not fully
compatible with USB 2.0 Hi-Speed.
If your system environment is not fully compatible with USB 2.0 Hi-Speed, the
machine will operate at a lower speed provided under USB 1.1. In this case, the
machine operates properly but printing speed may slow down due to
communication speed.
Check the following to ensure that your system environment supports USB 2.0
Hi-Speed connection.
zThe USB port on your computer supports USB 2.0 Hi-Speed connection.
zThe USB cable, and the USB hub if you are using one, support USB 2.0 Hi-
Speed connection.
Be sure to use a certified USB 2.0 Hi-Speed cable. We recommend the cable
to be no longer than around 10 feet (3 meters).
zThe operating system of your computer supports USB 2.0 Hi-Speed
connection.
Obtain and install the latest update for your computer.
zThe USB 2.0 Hi-Speed driver operates properly.
Obtain the latest version of the USB 2.0 Hi-Speed driver compatible with your
hardware and install it on your computer.
Important
For details on USB 2.0 Hi-Speed of your system environment, contact the
manufacturer of your computer, USB cable, or USB hub.
Cause Action
The machine is connected to a
computer that does not support USB
2.0 Hi-Speed.
Your system environment is not compatible with USB 2.0.
See “Printing Speed Is Slow / USB 2.0 Hi-Speed Connection Does Not Work” on
page 72.
Cause Action
73Troubleshooting
Print Results Not Satisfactory
Cannot Print to End of Job
Part of the Page Is Not Printed
Colors Are Unclear
Cause Action
Size of the print data is extremely large
(Windows XP/Windows 2000 only).
In Windows XP and Windows 2000, click Print Options on the Page Setup
sheet. Then, select the Reduce spool data size check box in the displayed
dialog.
Selecting Reduce spool data size may reduce the print quality.
Cause Action
Page Size setting in the Operation
Panel does not match the actual size of
the paper loaded in the machine.
If the Page Size setting set in the Operation Panel does not match the actual
size of the printing paper, part of the page may not be printed.
Check the Page Size setting on the Operation Panel.
You are performing automatic duplex
printing.
When performing automatic duplex printing, the printable area at the top of the
page will be 0.08 inches / 2 mm narrower than the usual. For this reason, the
bottom of the page may not be printed. To prevent this, select Use reduced
printing from the printer driver.
Important
Reduced printing may affect the layout depending on your document.
(1)Open the printer properties dialog box.
Refer to “Opening the Printer Properties Dialog Box Directly from the Start
Menu” in “Opening the Printer Properties Dialog Box (Windows)” of the
User’s Guide on-screen manual.
(2)Click Print Area Setup in the Page Setup sheet and select Use reduced
printing.
(1)Open the Print dialog box.
Refer to “Opening the Print Dialog Box” in “Opening the Page Setup and
Print Dialog Box (Macintosh)” of the User’s Guide on-screen manual.
(2)Select Duplex Printing & Margin in the pop-up menu.
(3)Select Automatic Duplex Printing and click Use reduced printing in Print
Area.
Cause Action
Media Type setting in the Operation
Panel does not match the actual type of
paper.
Check that the Media Type set in the Operation Panel matches the type of the
loaded printing paper.
If you are printing a photograph or an illustration, incorrect Media Type setting
may reduce the quality of printout color. The quality of printout color may also be
reduced in borderless printing depending on the Media Type setting.
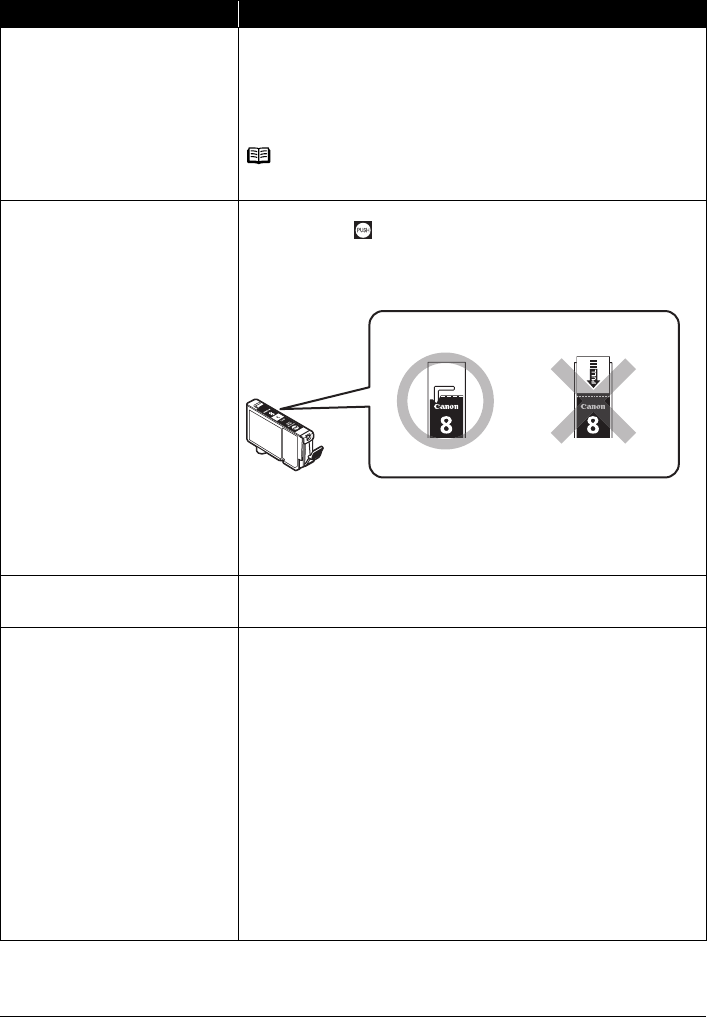
74 Troubleshooting
Ink Does Not Come Out/Printing Does Not Start/Printing Is Blurred/
Colors Are Wrong/Straight Lines Are Misaligned
Cause Action
Ink tank is empty. Open the Scanning Unit (Printer Cover) and check the ink lamps.
If an ink lamp is flashing red slowly at about 3-second intervals, ink is running
low. If an ink lamp is flashing red fast at about 1-second intervals or is not lit, the
tank is empty.
Replace the ink tank, and close the Scanning Unit (Printer Cover).
See “Replacing an Ink Tank” on page 46.
Note
For details on different flashing speeds, see “Getting the Ink Level Information”
on page 46.
Ink tank is not installed securely. / Part
of the orange tape is remaining.
Open the Scanning Unit (Printer Cover) and check the ink lamps. If the ink lamp
is not lit, press the mark on the ink tank until it clicks into place. The ink
lamp lights up red when the ink tank is fully inserted.
Make sure all of the orange tape is peeled off the ink tank and the air hole is
completely exposed, as illustrated in (A). If any orange parts are left as in (B),
remove all of the orange parts.
(A) Correct
L-shaped air hole.
(B) Incorrect
Part of the orange tape is remaining. Peel off the tape completely along the
perforation.
Media Type setting in the Operation
Panel does not match the actual type of
paper.
Make sure that the Media Type set in the Operation Panel matches the type of
the loaded printing paper.
Print Head nozzles are clogged. Print the nozzle check pattern to check for uneven ink output.
zIf the nozzle check pattern does not print out properly
Check if any of the missing colors are due to empty tanks.
If there is plenty of ink and the machine does not print, clean the Print Head
and then print the nozzle check pattern to check that ink is ejecting properly.
zIf the problem is not resolved after performing Print Head Cleaning
twice
Perform Print Head Deep Cleaning.
If the problem is not resolved after performing Print Head Deep Cleaning,
turn off the machine and perform Print Head Deep Cleaning again after 24
hours or later.
zIf the problem is still not resolved after performing Print Head Deep
Cleaning twice
The Print Head may be damaged. Contact your Canon service
representative.
For details on how to print the nozzle check pattern, how to clean the Print
Head, and how to perform Print Head Deep Cleaning, see “When Printing
Becomes Faint or Colors Are Incorrect” on page 52.
(A) (B)

75Troubleshooting
White Streaks
Printed Paper Curls or Has Ink Blots
Printed Surface Is Scratched/Paper Is Smudged
The media is loaded with the wrong
side facing upwards.
Many types of paper are made to be printed on only a particular side of the
paper.
Printing on the wrong side may cause unclear prints or prints with reduced
quality.
Refer to “Printing Media” in the User’s Guide on-screen manual.
Print Head is misaligned. If you did not align the Print Head after installation, straight lines may be printed
misaligned. Make sure to align the Print Head after you install it.
See “Automatic Print Head Alignment” on page 60 and perform Automatic Print
Head Alignment. If this does not solve the problem, see “Manual Print Head
Alignment” on page 61 and perform Manual Print Head Alignment.
Print quality is not set appropriately. In the Operation Panel, set Print quality in each mode to High(quality-
priority).
Cause Action
Media Type setting in the Operation
Panel does not match the actual type of
paper.
Check that the Media Type set in the Operation Panel matches the type of the
loaded printing paper.
Print quality is not set appropriately. In the Operation Panel, set Print quality in each mode to High(quality-
priority).
Especially when using coated (high-quality) paper, increasing the Print quality
setting is effective in reducing white streaks.
Cause Action
Paper is too thin. When printing data with high color saturation such as photographs or images in
deep color, we recommend using Photo Paper Pro or other Canon specialty
paper. See “Media Types You Cannot Use” on page 9.
Media Type setting in the Operation
Panel does not match the actual type of
paper.
Check that the Media Type set in the Operation Panel matches the type of the
loaded printing paper.
Print quality is not set appropriately. In the Operation Panel, set Print quality in each mode to High(quality-
priority).
This will reduce blurs even when printing images with plenty of adjacent
contrasting colors.
Cause Action
Paper Feed Roller is dirty. If paper is not feeding properly, clean the Paper Feed Rollers. Cleaning the
Paper Feed Rollers will wear the rollers, so perform this procedure only when
necessary.
For details on cleaning, see “Cleaning the Paper Feed Rollers (Roller Cleaning)”
on page 64.
Inside of the machine is dirty. When performing Two-sided copy, if the paper size specified using the
Operation Panel does not match the actual size of paper loaded in the paper
source, the inside will become stained with ink, causing printed paper to
become smudged.
Perform the Bottom Plate Cleaning to clean the inside of the machine.
For details on cleaning, see “Cleaning the Inside of the Machine (Bottom Plate
Cleaning)” on page 65.
Cause Action
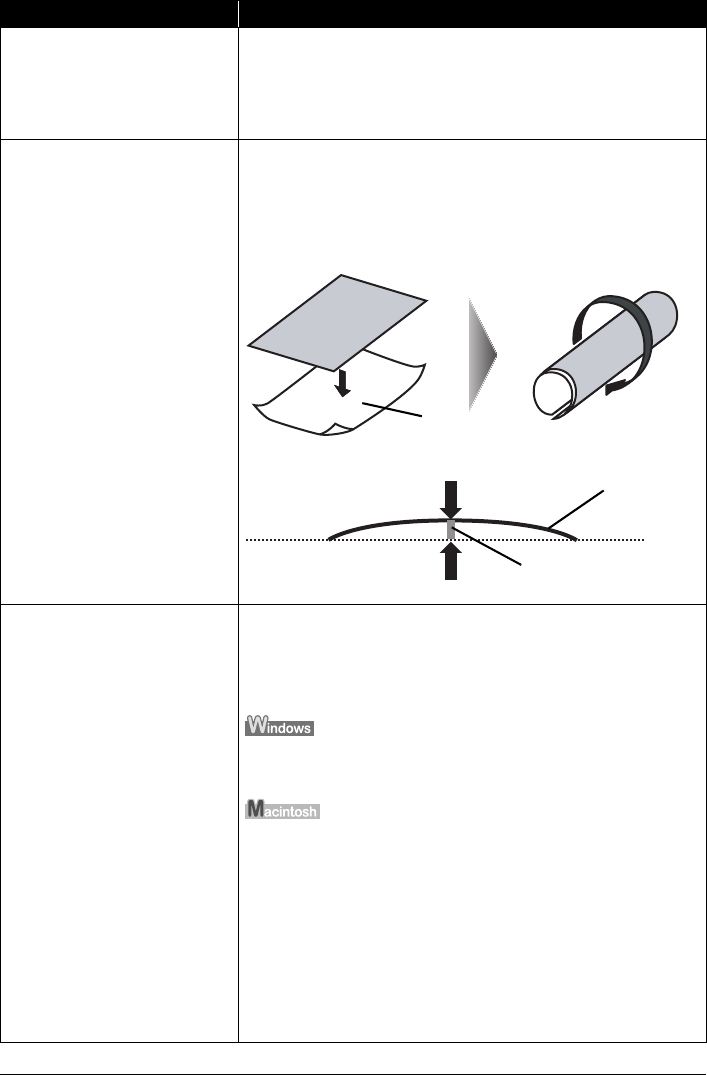
76 Troubleshooting
Printing on inappropriate type of paper. zCheck to see if the paper you are printing on is not too thick or curled.
See “Media Types You Cannot Use” on page 9.
zWhen performing Borderless Printing, print quality may be reduced at the top
and bottom edges of the paper. Make sure that the paper you are using is
suitable for Borderless Printing.
For details, refer to the Printer Driver Guide on-screen manual.
Paper is curled. If you are using paper with either any of the corners or the whole printing
surface curled, the paper may become dirty, not feed properly, or both. Use such
paper after correcting paper curl as follows.
(1)With the printing side (A) facing up, cover the paper with a fresh sheet of
plain paper to avoid staining or scratching the surface.
(2)Roll up the paper in a direction opposite to paper curl as seen below.
(3)Check to see that the paper curl is corrected to within approximately 0.08 to
0.2 inches / 2 to 5 mm (B) in height.
We recommend printing curl-corrected paper one sheet at a time.
Printing on thick paper. Selecting the Prevent paper abrasion setting will widen the clearance between
the Print Head and the loaded paper. If you notice abrasion even with the media
type set correctly to match the loaded paper, set the machine to prevent paper
abrasion.
* Clear the Prevent paper abrasion check box once printing is complete, and
then click Send.
Open the printer properties dialog box, and in Custom Settings in the
Maintenance sheet, select the Prevent paper abrasion check box, and then
click Send.
In the Canon IJ Printer Utility, select Custom Settings in the pop-up menu,
select the Prevent paper abrasion check box, and then click Send.
To open the printer properties dialog box (Windows), refer to “Opening the
Printer Properties Dialog Box (Windows)” in the User’s Guide on-screen
manual.
To open the Canon IJ Printer Utility (Macintosh®), refer to “Opening the Canon
IJ Printer Utility (Macintosh)” in the User’s Guide on-screen manual.
When Prevent paper abrasion is selected, the setting is also applied to direct
printing from a digital camera.
When performing copy direct printing without using a computer, select Print
settings, set Prevent paper abrasion to ON. For details on settings, refer to
“Changing the Machine Settings” in the User’s Guide on-screen manual.
Cause Action
(1) (2)
(A)
(A)
(B)

77Troubleshooting
Colors Are Uneven or Streaked
Printing Problems When Copying
Media Type setting in the Operation
Panel does not match the actual type of
paper.
Check that the Media Type set in the Operation Panel matches the type of the
loaded printing paper.
If you notice abrasion even with the media type set correctly to match the
loaded paper, set Prevent paper abrasion to ON in Print settings.
Refer to “Changing the Machine Settings” in the User’s Guide on-screen
manual.
Printing graphics with Intensity setting
set too high.
Especially if you are using plain paper to print images with high intensity, the
paper may absorb too much ink and become wavy, causing paper abrasion. In
this case, reduce the Intensity setting in the Operation Panel and try printing
again.
Printing beyond the recommended
printing area.
If you are printing beyond the recommended printing area of your printing paper,
the lower edge of the paper may become stained with ink.
Resize your original document in your application software.
For details on recommended printing area, refer to “Printing Area” in the User’s
Guide on-screen manual.
Cause Action
Print quality is not set appropriately. In the Operation Panel, set Print quality in each mode to High(quality-
priority).
Especially when printing a document that requires a lot of ink, increasing the
Print quality setting is effective in reducing uneven colors.
Cause Action
The original document is not loaded
correctly.
Check that the original is loaded correctly on the Platen Glass.
See “Loading Original Documents” on page 5.
The print quality setting is not suitable
for the original.
Set the print quality to suit the type of your document.
See “Setting Items in Each Mode” on page 21.
The original document is not loaded
with the side to be copied faced down.
When loading the original on the Platen Glass, the side to be copied should be
faced down.
The original document is a printout
from this machine.
Print quality may be reduced if you copy a printout.
Instead of copying a printout, print the original directly either from the digital
camera, memory card, or your computer.
The Platen Glass or the inner side of
the Document Cover is dirty.
Clean the Platen Glass and the inner side of the Document Cover.
See “Cleaning the Platen Glass and Document Cover” on page 64.
Cause Action
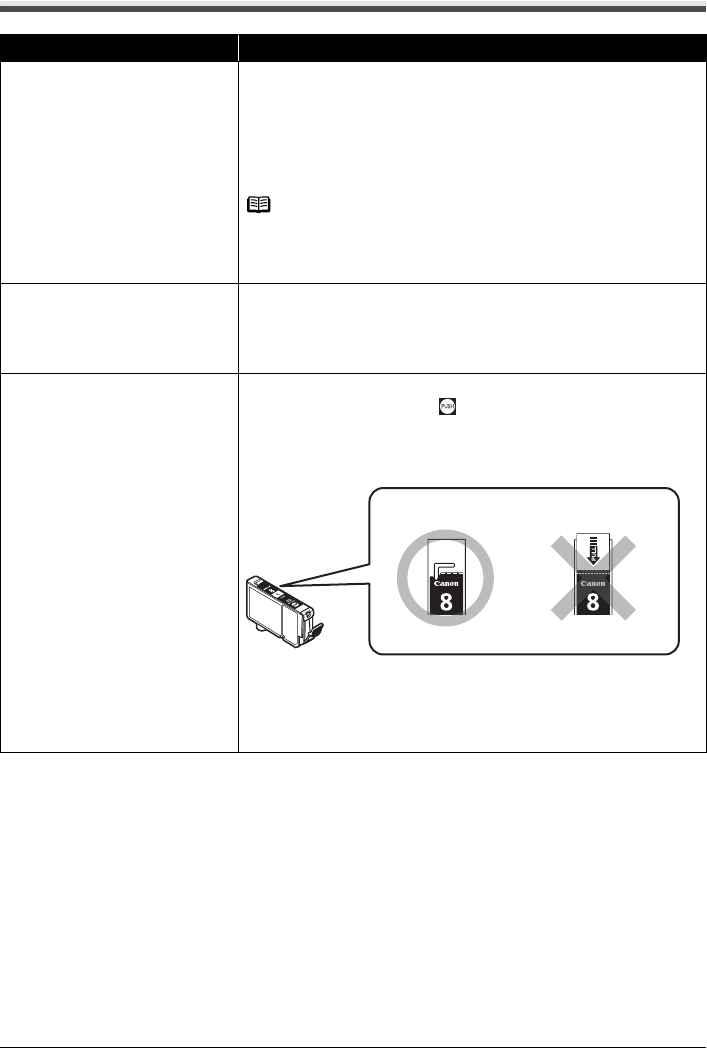
78 Troubleshooting
Printing Does Not Start
Cause Action
Ink tank is empty. Open the Scanning Unit (Printer Cover) and check the ink lamps.
If an ink lamp is flashing red at about 1-second intervals, the tank is empty.
Replace the ink tank, and close the Scanning Unit (Printer Cover). See
“Replacing an Ink Tank” on page 46.
If you want to continue printing, confirm the message displayed on the LCD and
take the appropriate action. See “Error Message Is Displayed on the LCD” on
page 68.
Note
If multiple ink lamps are flashing, check how fast they are flashing.
Fast flashing (at about 1-second intervals) indicates the tank is empty. Slow
flashing (at about 3-second intervals) indicates ink is low. For details on different
flashing speeds, see “Getting the Ink Level Information” on page 46.
Ink tank not installed in proper position. Open the Scanning Unit (Printer Cover) and check the ink lamps.
If there is still sufficient ink but its ink lamp is flashing red, an ink tank may be
installed in a wrong position.
Confirm that the ink tanks are installed in the appropriate positions. See
“Replacing an Ink Tank” on page 46.
Ink tank is not installed securely. / Part
of the orange tape is remaining.
Open the Scanning Unit (Printer Cover) and check the ink lamps.
If the ink lamp is not lit, press the mark on the ink tank until it clicks into
place. The ink lamp lights up red when the ink tank is fully inserted.
Make sure all of the orange tape is peeled off the ink tank and the air hole is
completely exposed, as illustrated in (A). If any orange parts are left as in (B),
remove all of the orange parts.
(A) Correct
L-shaped air hole.
(B) Incorrect
Part of the orange tape is remaining. Peel off the tape completely along the
perforation.
(A) (B)
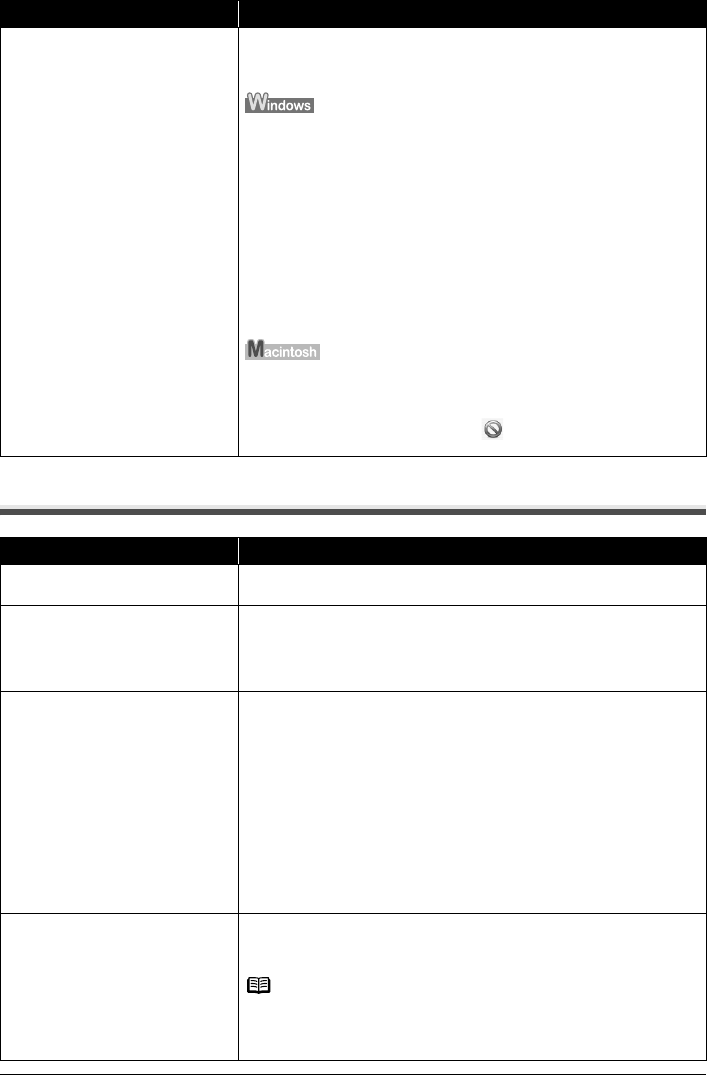
79Troubleshooting
Paper Does Not Feed Properly
Unnecessary print jobs are left in
queue. / Computer problems.
Restarting your computer may solve the problem.
If there are any unnecessary print jobs, follow the procedure below to delete
them.
(1)Open the printer properties dialog box.
Refer to “Opening the Printer Properties Dialog Box Directly from the Start
Menu” in “Opening the Printer Properties Dialog Box (Windows)” of the
User’s Guide on-screen manual.
(2)Click the Maintenance tab and then View Printer Status.
(3)Click Display Print Queue.
(4)Select Cancel All Documents (Purge Print Documents in Windows Me or
Windows 98) on the Printer menu.
You may not be able to select individual print jobs in Windows XP or
Windows 2000.
(5)When the confirmation message is displayed, click Yes.
The print jobs are deleted.
(1)Click the printer icon in the Dock to display the list of print jobs in progress.
In Mac® OS X v.10.2.8, click the printer icon in the Dock to start up the Print
Center and double-click the name of your machine in the Printer List.
(2)Select the print job to delete and click .
The print jobs are deleted.
Cause Action
Printing on inappropriate type of paper. Check to see if the paper you are printing on is not too thick or curled.
See “Media Types You Cannot Use” on page 9.
Paper Feed Rollers are dirty. If paper is not feeding properly, clean the Paper Feed Rollers. Cleaning the
Paper Feed Rollers will wear the rollers, so perform this procedure only when
necessary.
For details on cleaning, see “Cleaning the Paper Feed Rollers (Roller Cleaning)”
on page 64.
Paper not loaded properly. Make sure of the following when you load paper in the machine.
zWhen loading two or more sheets of paper, align the edges of the sheets
before loading.
zAlways load the paper in portrait orientation, either in the Auto Sheet Feeder
or the Cassette, regardless of the printing orientation.
zWhen loading paper in the Auto Sheet Feeder, load the paper with the print
side facing UP. Align the right edge of the paper stack against the Cover
Guide and slide the Paper Guide so that it just touches the left edge of the
stack.
zWhen loading paper in the Cassette, load the paper with the print side facing
DOWN. Align the right edge of the paper stack against the right edge of the
Cassette and slide the Paper Guide against the left edge of the stack.
For details on loading paper, see “Loading Paper” on page 15.
Paper source selection is
inappropriate.
Make sure that the proper paper source is selected. If not, change the paper
source using the Paper Feed Switch or the printer driver. For details, see
“Changing the Paper Source” on page 14.
Note
When printing from your computer, if a setting other than Paper Feed Switch is
selected for Paper Source in the printer driver, the printer driver settings takes
precedence when printing. For details on paper source selection using the
printer driver, refer to the Printer Driver Guide on-screen manual.
Cause Action

80 Troubleshooting
Too much plain paper loaded. You can load approximately up to 150 sheets of 17 lb / 64 gsm plain paper (0.52
inches / 13 mm in stack height). However, proper feeding of paper may not be
possible at this maximum capacity depending on the type of paper or
environmental conditions (either very high or low temperature and humidity).
In such cases, reduce the sheets of paper you load at a time to around half
(around 0.2 inches / 5 mm in paper stack height).
For details on loading paper, see “Loading Paper” on page 15.
Foreign object in the Auto Sheet
Feeder or Cassette.
Make sure that there are no foreign objects in the Auto Sheet Feeder or
Cassette.
Envelopes not prepared or loaded
properly.
When printing on envelopes, refer to “Envelopes” in the User’s Guide on-screen
manual, and prepare the envelopes before printing.
Once you have prepared the envelopes, load them in the machine in portrait
orientation. If the envelopes are placed in landscape orientation, they will not
feed properly.
Inner Cover is not completely closed. Close the Inner Cover completely. Paper does not feed properly if the Inner
Cover is even slightly open.
Cause Action
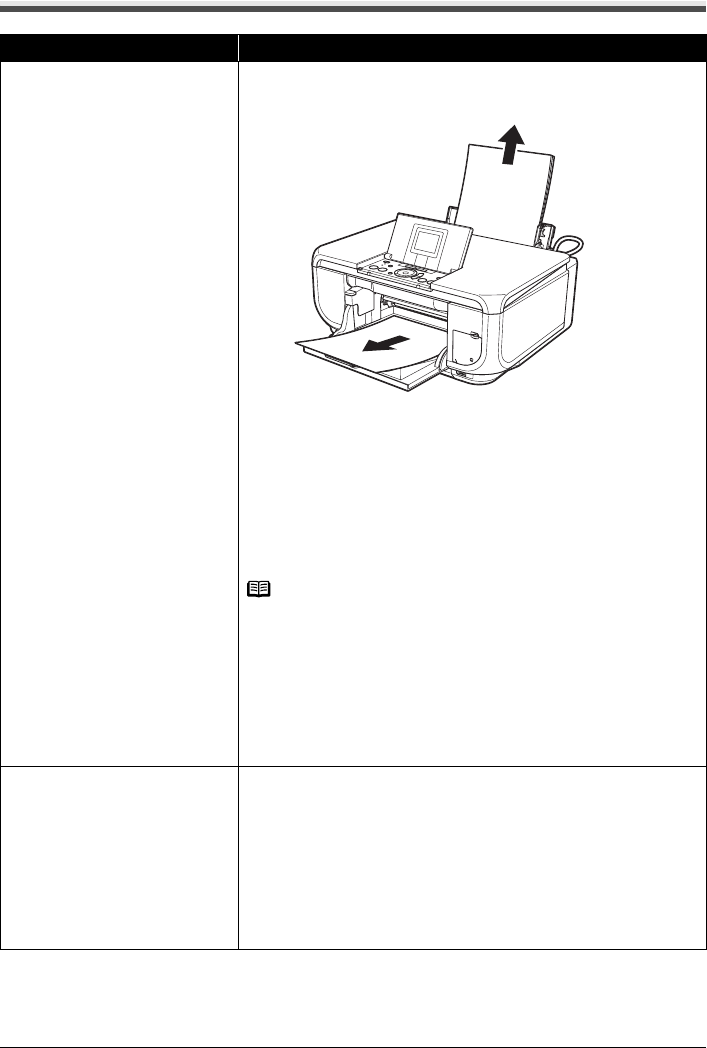
81Troubleshooting
Paper Jams
Cause Action
Paper jammed in the Paper Output Slot
or the Auto Sheet Feeder.
Remove the paper following the procedure below.
(1)Slowly pull the paper out, either from the Auto Sheet Feeder or from the
Paper Output Slot, whichever is easier.
zIf the paper tears and a piece remains inside the machine, open the
Scanning Unit (Printer Cover) and remove it.
After removing all paper, close the Scanning Unit (Printer Cover), turn the
machine off, and turn it back on.
* Be careful not to touch the components inside the machine.
zIf you cannot pull the paper out, turn the machine off and turn it back on. The
paper will be ejected automatically.
(2)Reload the paper in the machine, and press the OK button on the machine.
If you turned off the machine in step 1, all print jobs in queue are canceled.
Reprint if necessary.
Note
zFor details on how to load paper, see “Loading Printing Paper” on page 7.
zWhen reloading the paper in the machine, see “Paper Does Not Feed
Properly” on page 79 to confirm that you are using the correct paper and are
loading it into the machine correctly.
zA5-sized paper are suited to print documents consisting mainly of text. We do
not recommend using such paper to print documents with photos or graphics,
since the printout may curl and cause paper exit jams.
If you cannot remove the paper or the paper tears inside the machine, or if the
paper jam error continues after removing the paper, contact your Canon service
representative.
Landscape credit card-sized paper
jammed inside the machine.
Do not load credit card-sized paper in the landscape orientation.
Remove the paper following the procedure below.
(1)Load a single sheet of the same paper in the Auto Sheet Feeder in portrait
orientation.
Do not load it in the landscape orientation.
(2)Turn off the machine.
(3)Turn on the machine.
The paper is fed and then pushes out the jammed paper as it ejects.
If you cannot remove the jammed paper or the paper jam error continues after
removing the paper, contact your Canon service representative.

82 Troubleshooting
Landscape 4" x 6" / 101.6 x 152.4 mm
paper loaded in the Cassette jammed
inside the machine.
Always load 4" x 6" / 101.6 x 152.4 mm media in portrait orientation regardless
of the printing orientation.
Remove the paper following the procedure below.
(1)Turn off the machine, and then open the Rear Cover.
(2)Fold a piece of A4 or Letter-sized plain paper in four, push it in until it hits the
jammed paper, then pull out the paper folded in four.
(3)Close the Rear Cover, then turn on the machine.
Wait until the jammed paper is automatically ejected.
If you cannot remove the jammed paper or the paper jam error continues after
removing the paper, contact your Canon service representative.
Cause Action
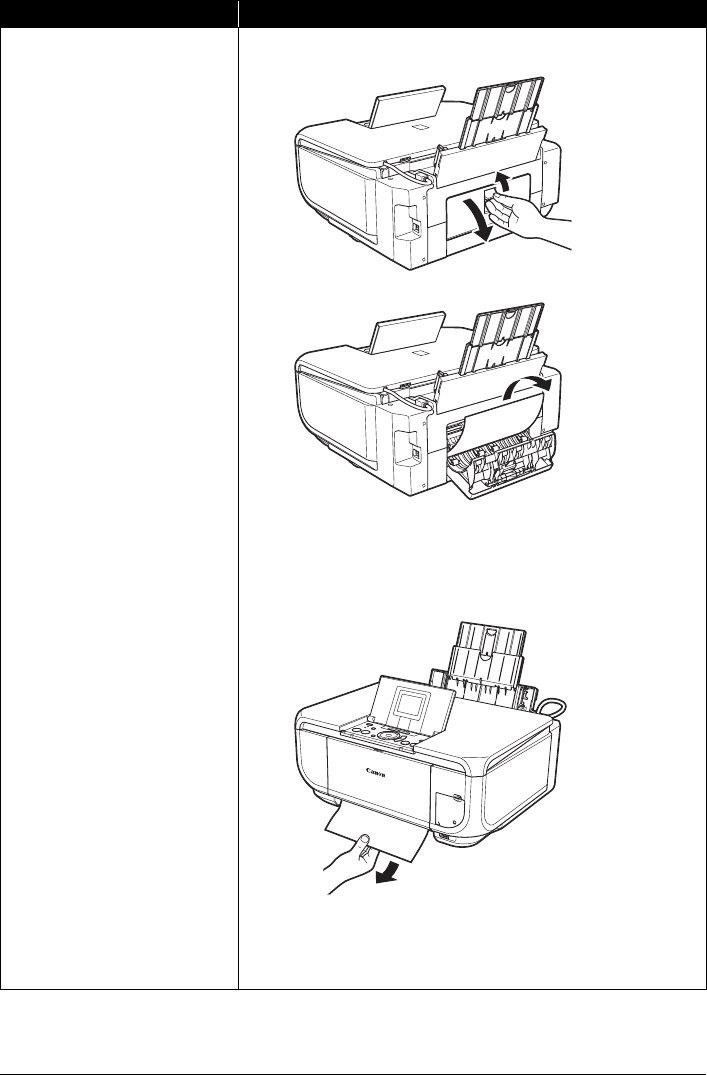
83Troubleshooting
Paper jammed inside the machine at
the transport unit.
Remove the paper following the procedure below.
(1)Open the Rear Cover.
(2)If you can see the jammed paper, slowly pull the paper out.
zBe careful not to touch the components inside the machine.
zIf you cannot pull the paper out, turn the machine off and turn it back on. The
paper will be ejected automatically.
(3)Close the Rear Cover.
(4)If you were not able to remove the paper out in step 2, remove the Cassette.
(5)Slowly pull the jammed paper out.
(6)If any paper is sticking out of the Cassette, reload the paper in the Cassette.
(7)Insert the Cassette into the machine again, and press the OK button on the
machine.
If you turned off the machine in step 2, all print jobs in queue are canceled.
Reprint if necessary.
Cause Action
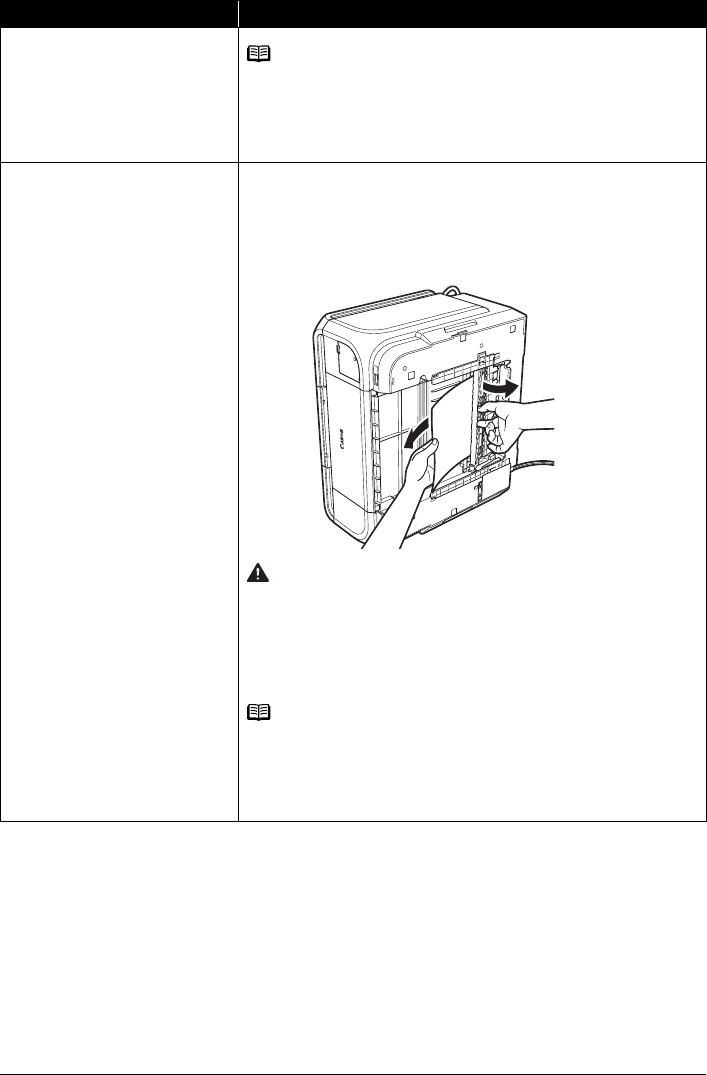
84 Troubleshooting
Paper jammed inside the machine at
the transport unit.
(Continued)
Note
When reloading the paper in the machine, see “Paper Does Not Feed Properly”
on page 79 to confirm that you are using the correct paper and are loading it into
the machine correctly.
If you cannot remove the paper or if the paper tears inside the machine, or if the
paper jam error continues after removing the paper, contact your Canon service
representative.
Paper jammed inside the machine at
the duplex transport section.
Remove the paper following the procedure below.
(1)Remove the Cassette.
If the paper is loaded in the Auto Sheet Feeder, remove the paper from the
Auto Sheet Feeder and close the Paper Support.
(2)Stand the machine with the left side down.
(3)Slowly pull the jammed paper out while pulling the green cover toward you.
Caution
Set the machine back to its original position immediately after removing the
jammed paper.
(4)If any paper is sticking out of the Cassette, reload the paper in the Cassette.
Reload paper in the Auto Sheet Feeder, if necessary.
(5)Insert the Cassette into the machine.
(6)Press the OK button on the machine.
Note
When reloading the paper into the machine, see “Paper Does Not Feed
Properly” on page 79 to confirm that you are using the correct paper and are
loading it into the machine correctly.
If you cannot remove a sheet of paper or a teared piece of paper inside the
machine, or if the paper jam error continues after removing the paper, contact
your Canon service representative.
Cause Action

85Troubleshooting
Error Message Appears on the Screen
Writing Error/Output Error/Communication Error
Cause Action
The machine is not ready. Confirm that the POWER lamp is lit green.
If the POWER lamp is off, turn the machine on.
While the POWER lamp is flashing green, the machine is initializing. Wait until
the POWER lamp stops flashing and remains lit green.
If the ALARM lamp is lit orange, an error may have occurred in the machine.
For details on how to resolve the error, see “Error Message Is Displayed on the
LCD” on page 68.
Paper is not loaded. An out of paper error may have been left unattended for a period of time.
Load paper and press the OK button.
If paper is loaded, make sure that the paper source (the Auto Sheet Feeder or
Cassette) is selected correctly. If the paper source is not selected correctly,
press the Paper Feed Switch or use the printer driver to change the paper
source.
Printer port setting does not match the
computer’s interface connecting the
machine.
Check the printer port settings.
(1)Click Start > Control Panel > Printers and Other Hardware > Printers and
Faxes.
In non-XP Windows, click Start > Settings > Printers.
(2)Click the Canon MP600 Printer icon.
(3)Open the File menu and select Properties.
(4)Click the Ports tab to confirm the port settings.
Make sure that a port named USBnnn (Canon MP600 Printer) (where n is a
number) is selected for Print to the following port(s).
In Windows Me or Windows 98, click the Details tab and make sure that
MPUSBPRNnn (Canon MP600 Printer) is selected for Print to the
following port.
If the port setting is not correct, change the port setting according to the
interface you are using, or reinstall the MP Drivers.
The machine is not connected properly. Make sure that the printer cable is securely plugged in to the machine and the
computer.
zIf you are using a relay device such as a USB hub, disconnect it, connect the
machine directly to the computer, and try printing again. If printing starts
normally, there is a problem with the relay device.
Consult the reseller of the relay device for details.
zThere could also be a problem with the USB cable. Replace the USB cable
and try printing again.
MP Drivers are not installed properly. The MP Drivers may not be installed properly. Uninstall them following the
procedure described in the Printer Driver Guide on-screen manual and reinstall
them following the procedure described in the Easy Setup Instructions.
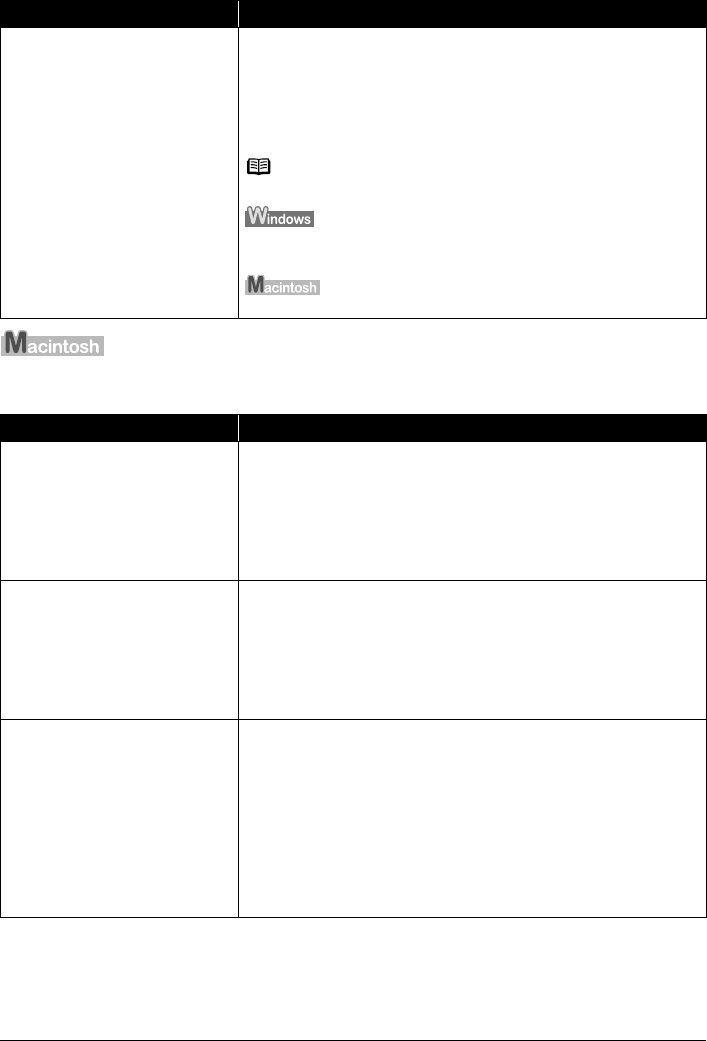
86 Troubleshooting
Error Regarding Automatic Duplex Printing Is Displayed
Error No.: 300 Is Displayed
Cause Action
The correct media size is not selected
in the MP Drivers.
First, check the Page Size setting in the application software you are printing
from.
Then, check the Page Size setting on the Page Setup sheet in the printer
properties dialog box (Windows) or the Page Setup dialog box (Macintosh).
The page sizes that can be used for Automatic Duplex Printing are Letter, A4,
B5, A5, and 5" x 7" / 127.0 x 177.8 mm. Check that the page size of the loaded
paper is correct.
Note
To switch to manual duplex printing, follow the procedure below.
On the Page Setup sheet, clear the Automatic check box. Then try printing
again.
Manual duplex printing is not available.
Cause Action
The machine is not ready. Make sure that the machine is turned on, and that it is connected securely to the
computer.
If the POWER lamp is off, turn the machine on.
While the POWER lamp is flashing green, the machine is initializing. Wait until
the POWER lamp stops flashing and remains lit green.
When the ALARM lamp is lit orange, an error may have occurred on the
machine. For details on how to resolve the error, see “Error Message Is
Displayed on the LCD” on page 68.
Machine is not connected properly. Make sure that the USB cable is plugged in securely to the computer and the
machine.
zIf you are using a relay device such as a USB hub, disconnect it, connect the
machine directly to the computer, and try printing again. If printing starts
normally, there is a problem with the relay device.
Consult the reseller of the relay device for details.
zThere could also be a problem with the USB cable. Replace the USB cable
and try printing again.
Your machine is not selected in Printer
on the Print dialog box.
Select MP600 in Printer on the Print dialog box.
If MP600 does not appear in Printer, follow the procedure below to check that
the driver for your machine is installed to your computer.
(1)Select Print and Fax Preferences from Printer.
In Mac OS X v.10.2.8 or 10.3.x, select Edit Printer List from Printer.
(2)Check that MP600 is displayed in the list of printers and that the check box is
selected.
In Mac OS X v.10.2.8, check that MP600 is displayed in Printer List.
(3)If MP600 is not displayed, click Add(+) to add the machine.
If you cannot add the machine, follow the procedure described in the Easy
Setup Instructions to reinstall the MP Drivers.
87Troubleshooting
Error No.: 1700 Is Displayed
Error No.: 1851 Is Displayed
Error No.: 1856 Is Displayed
Error No.: 2001 Is Displayed
Error No.: 2500 Is Displayed
Cause Action
The ink absorber is almost full. The machine has a built-in ink absorber to hold the ink used during Print Head
Cleaning, for example.
This error message indicates that the ink absorber is nearly full.
Press the OK button to cancel the error so you can continue printing.
However, because printing is disabled once the ink absorber becomes
completely full and until the ink absorber is replaced, you are recommended to
contact a Canon service representative as early as possible. (You will need to
replace a particular part of the machine.)
Cause Action
Inner Cover was open when you
started printing.
Close Inner Cover, press the OK button on the machine. Printing will start again.
Cause Action
Inner Cover was opened while printing
was in progress.
Close the Inner Cover, then press the OK button on the machine.
A page of print data being sent at the time of the error will be erased, so print
that page again.
Cause Action
No response from connected digital
camera or video camcorder. /
Connected digital camera or video
camcorder connected is not compatible
with this machine.
Disconnect the cable connecting the machine and the device, and then
reconnect it.
Depending on the model or brand of your device, you may have to select a
PictBridge-compliant print mode on the device before connecting it to the
machine. You may also have to turn on the camera or select Play mode
manually after connecting the device to the machine.
Perform necessary operations according your device’s instruction manual
before reconnecting it to the machine.
If the error is still unresolved, there is a possibility that you are using a digital
camera or digital video camcorder that is not supported by this machine. Use a
digital camera or digital video camcorder compatible with this machine.
Cause Action
Automatic Print Head Alignment has
failed.
See “Auto head align has failed. Press OK and repeat operation. <See
manual>” in “Error Message Is Displayed on the LCD” on page 68.
88 Troubleshooting
Cannot Print Properly from a Digital Camera
The following are the possible errors that may occur when printing directly from a digital still camera
or digital video camcorder*, and the actions to resolve them.
* Hereafter, the digital still cameras and digital video camcorders are collectively referred to as
“digital camera” or “camera”.
Note
zPictBridge compatible digital cameras can be connected to your machine for direct printing.
zThis section describes errors that are indicated on Canon-brand PictBridge compatible cameras. The
error messages and operations may vary depending on the camera you are using. If you are using a
non-Canon PictBridge compatible camera and not sure how to dismiss the printer error message from
the camera, check the error message displayed on the LCD and dismiss the error message. For details
on dismissing an error message from the machine, see “Error Message Is Displayed on the LCD” on
page 68.
zA communication time out occurs if printing takes a long time or if it takes too much time to send data.
This may cancel printing. In such cases, disconnect the cable between the machine and the camera,
and then reconnect it. Turn the camera on if it does not turn on automatically. If the problem is still not
resolved, select a different photo and check if it can be printed.
zYour PictBridge compatible device may need to be switched to printing mode before it is connected to
the machine, depending on the model of the camera. Also, it may need to be turned on manually or
switched to playback mode after connected to the machine. Refer to your camera’s instruction manual
and take perform necessary operation before connection.
zThe print head nozzles may be clogged if printing becomes faint or colors are incorrect. See “When
Printing Becomes Faint or Colors Are Incorrect” on page 52.
zIf the paper is curled or its surface is scratched during printing, make sure that you are using the correct
type of paper. If the problem is not resolved by using the correct type of paper, turn on the Prevent
paper abrasion function. See “Printing on thick paper.” on page 76.
zFor the errors indicated on the camera and their solution, also refer to your camera’s instruction
manual. For details on other troubles with a digital camera, contact the manufacturer of the camera.
Error Message On Camera Action
“Printer in use” The machine is busy, perhaps processing a print job from the computer.
Wait until printing is complete. If the machine is warming up, wait until the warm-
up is complete. When it is ready, the machine starts printing your print job
automatically.
“No paper” Load paper in the paper source, or press the Paper Feed Switch to select the
paper source where you have loaded paper (the Auto Sheet Feeder or the
Cassette), and select Continue*1 in the display on your camera.
“Paper Error” zThe page size that cannot be fed from the Cassette is selected. Load paper
in the Auto Sheet Feeder, press the Paper Feed Switch to select the Auto
Sheet Feeder as the paper source, and try printing again.
For details, see “Changing the Paper Source” on page 14.
zIf the Paper Output Tray is closed, open it. The machine resumes printing. If
the Inner Cover is open, close it and select Stop in the display on your
camera to stop printing.
“Paper jam” Select Stop in the display on your camera to stop printing.
Remove the jammed paper, load new paper, press the OK button on the
machine, and reprint.
“Printer cover open” Close the Scanning Unit (Printer Cover) on the machine.
“No Print Head” The Print Head is not installed or is defective.
Follow the directions described in the Easy Setup Instructions to install the Print
Head.
If the Print Head is already installed, remove the Print Head and then reinstall it.
If the error is still not resolved, the Print Head may be damaged. Contact your
Canon service representative.

89Troubleshooting
*1 To resume printing, you can also press the OK button on the machine instead of selecting
Continue on the camera.
*2 The ink absorber absorbs ink used during cleaning, for example. If this message appears, you
will need to call for servicing to replace the absorber and to check the machine for proper
operation.
Cannot Print Properly from a Photo Index Sheet
“Waste tank (ink absorber*2) full”/
“ink absorber*2 full”
This error message indicates that the ink absorber is nearly full.
The machine has a built-in ink absorber to hold the ink used during Print Head
Cleaning, for example.
You can continue printing by selecting Continue*1 on the display on your
camera.
However, because printing is disabled once the ink absorber becomes
completely full and until the ink absorber is replaced, you are recommended to
contact a Canon service representative as early as possible. (You will need to
replace a particular part of the machine.)
“No ink” An ink tank is not installed properly, or is out of ink.
Confirm the error message displayed on the LCD and take the appropriate
action to resolve the error. For details, see “Error Message Is Displayed on the
LCD” on page 68.
“Ink Error” An ink tank that was once empty is installed.
Replace the ink tank and close the Scanning Unit (Printer Cover).
Printing with an ink tank that was once empty may damage the machine.
If you want to continue printing in this condition, you need to release the function
for detecting the remaining ink level. Press and hold the Stop/Reset button for
at least 5 seconds, and then release it.
* With this operation, releasing the function for detecting the remaining ink
level is memorized. Please be advised that Canon shall not be liable for any
machine malfunction or damage caused by refilled ink tanks.
See “Replacing an Ink Tank” on page 46.
“Hardware Error” An ink tank error has occurred. Replace the ink tank. See “Replacing an Ink
Tank” on page 46.
“Printer error” An error requiring servicing may have occurred. (Machine’s POWER lamp
flashes green and ALARM lamp flashes orange alternately.)
Disconnect the cable between the machine and the camera, turn off the
machine, and unplug the power cord of the machine from the power supply.
After a while, plug the power cord of the machine back in, turn on the machine,
and then reconnect the camera to the machine.
If the same error occurs, contact your Canon service representative.
Cause Action
“Failed to scan Photo Index Sheet.” is
displayed.
zMake sure the Photo Index Sheet is set in the correct position and orientation
on the Platen Glass.
zMake sure the Platen Glass and the Photo Index Sheet are not dirty.
zMake sure all required circles on the Photo Index Sheet are filled in. If the
filled circles on the sheet are not marked dark enough, the machine may not
read the settings.
Refer to “Printing by Using the Photo Index Sheet” in “Using Other Useful
Printing Functions” of the User’s Guide on-screen manual.
Error Message On Camera Action
90 Appendix
Appendix
Reading the On-screen Manuals
Along with this Quick Start Guide, on-screen manuals are also supplied with your machine. For
detailed instructions on installing the on-screen manuals, refer to your setup sheet.
You can view the on-screen manuals in the following way:
To view the on-screen manual, double-click the MP600 On-screen Manual shortcut icon on the
desktop, or click Start > All Programs (or Programs) > Canon MP600 Manual > MP600 On-
screen Manual.
System Requirements
Browser: Windows HTML Help Viewer
To view the on-screen manual, double-click the MP600 On-screen Manual alias on the desktop.
System Requirements
Browser: Help Viewer
Note
zMicrosoft® Internet Explorer 5.0 or later must be installed.
zThe on-screen manual may not be displayed properly depending on your operating system or
Internet Explorer version. We recommend that you keep your system up to date with Windows
Update.
Note
Users in Asia
If you installed the User’s Guide from the Manual folder in the Setup CD-ROM, open the folder in which
you copied the User’s Guide and double-click top.htm.
Note
zThe on-screen manual may not be displayed properly depending on your operating system. We
recommend that you keep your system up to date.
zWe recommend using Safari as your Web browser to view the HTML format on-screen
manuals. If Safari is not installed on your computer, download it from Apple Computer, Inc.
website and install it.
91Appendix
Specifications
General Specifications
Printing resolution (dpi) 9600 (horizontal)* x 2400 (vertical)
* Ink droplets can be placed with a pitch of 1/9600 inch at minimum.
Print speed*
* Based on Canon standard
pattern.
Print speed may vary
depending on system
configuration, software,
document complexity, print
mode and page coverage.
Black printing (text pattern)
Max Speed (Custom Setting 5): 30 ppm
Standard: 14.8 ppm
Color printing
Max Speed (Custom Setting 5): 24 ppm
Standard: 11.6 ppm
Print width 8 inches / 203.2 mm max.
(for Borderless Printing: 8.5 inches / 216 mm)
Acoustic noise level Approx. 33.5 dB (A) (when printing in the highest print quality mode on Photo Paper
Pro)
Operating environment Temperature: 5 to 35°C (41 to 95°F)
Humidity: 10 to 90%RH (no condensation)
Storage environment Temperature: 0 to 40°C (32 to 104°F)
Humidity: 5 to 95% RH (no condensation)
Power supply AC 100-240 V, 50/60 Hz
Power consumption Printing (Copy): Approx. 17 W
Standby (minimum): Approx. 1.5 W
OFF: Approx. 0.8 W
External dimensions
(with the Paper Support and
Paper Output Tray retracted)
Approx. 17.7 (W) x 15.3 (D) x 7.6 (H) inches /
Approx. 450 (W) x 389 (D) x 194 (H) mm
Weight Approx. 10.1 kg (Approx. 22.3 lb.)
Print Head Total 3,584 nozzles (BK: 512 nozzles, C/M/Y/Dye Bk 512x6 nozzles)
Copy Specifications
Copy speed
* Based on Canon standard
pattern.
Copy speed may vary
depending on document
complexity, copy mode, page
coverage and the number of
copies.
Black & white: Fast mode approx. 30 cpm
Color: Fast mode approx. 24 cpm
Multiple copy 1 - 99 pages
Intensity adjustment 9 positions, Auto intensity (AE copy)
Zoom 25% - 400% (1% unit)
Scan Specifications
Scanner driver TWAIN / WIA (Windows XP only)
Maximum scanning size A4/Letter, 8.5" x 11.7" / 216 x 297 mm
Scanning resolution Optical resolution (horizontal x vertical) max: 2400 dpi x 4800 dpi
Interpolated resolution max: 19200 dpi x 19200 dpi
Gradation (Input/Output) 16bit/8bit
48bit/24bit (RGB each 16bit/8bit)

92 Appendix
Camera Direct Print (PictBridge)
Paper size Default (Selections based on the machine setting)
10 x 15 cm / 4" x 6" (Photo Paper Plus Glossy, Photo Paper Pro, Photo Paper Plus
Semi-gloss, Glossy Photo Paper, Glossy Photo Paper “Everyday Use”, Photo Paper
Glossy, Photo Stickers*1)
13 x 18 cm / 5" x 7" (Photo Paper Plus Glossy)*2
A4 / 8.5" x 11" (Photo Paper Plus Glossy A4/Letter, Photo Paper Pro A4/Letter,
Photo Paper Plus Semi-gloss A4/Letter, Glossy Photo Paper A4/Letter, Glossy
Photo Paper “Everyday Use” A4, Photo Paper Glossy Letter, Plain Paper A4/Letter)
5.4 x 8.6 cm / Credit card (Glossy Photo Paper Card Size)
20 x 25 cm / 8" x 10" (Photo Paper Pro)
10.1 x 18 cm / 4" x 7.1" (Photo Paper Pro)*2
*1 Canon-brand sticker. Printing on this paper is available only when the Layout
function on your camera has a 16-up option. See “Recommended Paper and
Requirements” on page 7.
*2 If using a Canon PictBridge-compatible camera, you can select it.
Paper type Default (Selections based on the machine setting), Photo (Photo Paper Plus
Glossy, Glossy Photo Paper), Fast Photo (Photo Paper Pro), Plain Paper (A4/
Letter only)
Layout Default (Selections based on the machine setting), Borderless, Bordered, N-up
(2, 4, 9, 16)*1, 35-up*2
*1 Layout compatible with Canon-brand sticker above. See “Recommended Paper
and Requirements” on page 7.
*2 Selected photos are printed in 35 mm film style layout (contact printing layout).
This print setting is only available with certain Canon PictBridge-compliant devices.
You can print shooting Info (Exif Data) on photos in list format, or in the margins of
specified photos.
Select Layout, then select the item displayed with the [i] icon.
(Note that this print setting cannot be used for some models.)
See “Recommended Paper and Requirements” on page 7.
Image optimize Default (Selections based on the machine setting), On, Off, “VIVID”*, “NR” (Noise
Reduction)*, “Face”*, “Red eye”*
* If using a Canon PictBridge-compatible camera, you can select it.
Print data & file no. Default (Off: No printing), Date, File No., Both, Off
Trimming Default (Off: No trimming), On (follow camera’s setting), Off
Minimum System Requirements*1
*2
Interface Operating System Processor RAM Hard Disk
Space*4
USB 2.0 Hi-Speed Windows XP SP1,SP2 Pentium III*3
(Celeron 566
MHz)
128 MB 550 MB
Windows 2000 Professional SP4
USB Windows XP SP1, SP2 Pentium II 300
MHz*3
Windows 2000 Professional SP2, SP3,
SP4
Windows Millennium Edition
Windows 98*5, 98 Second Edition
*2
Interface Operating System Processor RAM Hard Disk
Space*4
USB 2.0 Hi-Speed
USB
Mac OS X v.10.4 Intel processor
PowerPC G3/
G4/G5
256 MB 450 MB
Mac OS X v.10.2.8 - v.10.3 128 MB

93Appendix
*1 Conform to the operating system’s requirement when it is higher than this.
For updated compatibility, visit our website.
*2 Operation can only be guaranteed on a computer with built-in USB or USB 2.0 Hi-Speed port
and pre-installed Windows XP, 2000, Me, 98, or Mac OS X v.10.2.8 - v.10.4.
*3 Including compatible processors.
*4 For bundled software installation.
*5 ScanSoft OmniPage SE (OCR software) does not support Windows 98 first edition.
zCD-ROM drive
zDisplay: Windows: 1024 x 768 Color 16 bit, Macintosh: 1024 x 768 Thousands Colors
zMacintosh File System: Mac OS Extended (Journaled), Mac OS X Extended.
Additional System Requirements for On-Screen Manuals
Browser: Windows HTML Help Viewer
Note: Microsoft Internet Explorer 5.0 or later must be
installed. The on-screen manual may not be displayed
properly depending on your operating system or Internet
Explorer version. We recommend that you keep your
system up to date with Windows Update.
Browser: Help Viewer
Note: The on-screen manual may not be displayed properly
depending on your operating system. We recommend that
you keep your system up to date.
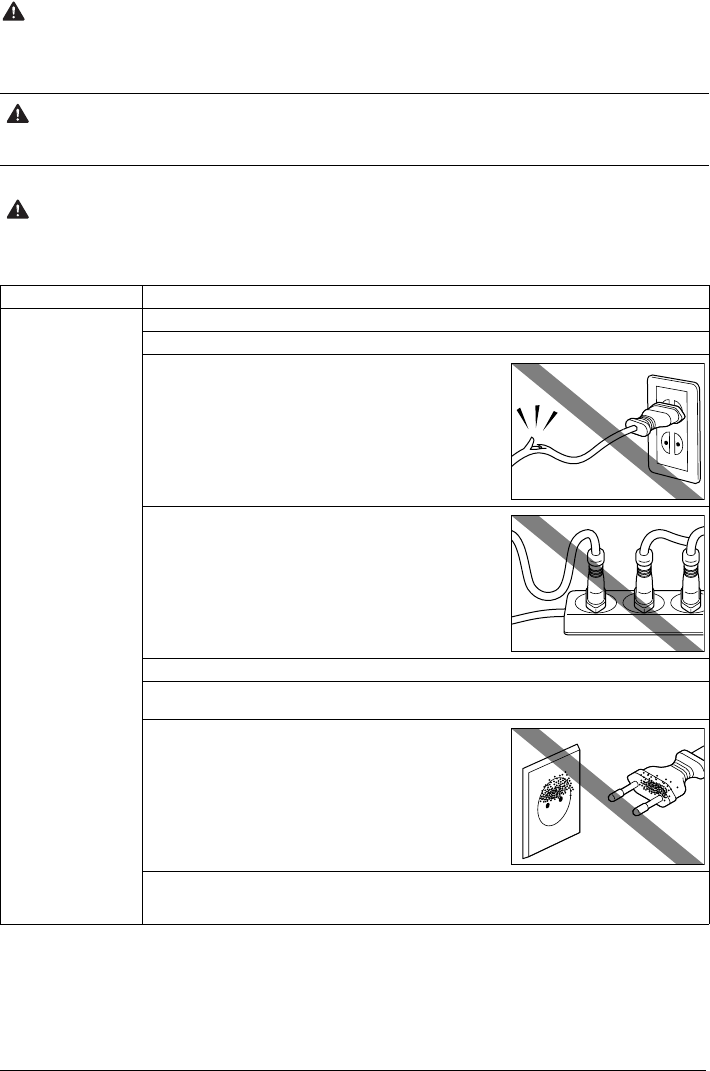
94 Safety Precautions
Safety Precautions
Please read the safety warnings and cautions provided in this manual to ensure that you use the
machine safely. Do not attempt to use the machine in any way not described in this manual.
Warning
This product emits low level magnetic flux. If you use a cardiac pacemaker and feel abnormalities, please
move away from this product and consult your doctor.
Warning
You may cause an electric shock, fire, or damage the machine if you ignore any of these safety
precautions.
Choosing a location Do not place the machine close to flammable solvents such as alcohol or thinners.
Power supply Never attempt to plug in or unplug the machine from the power supply when your hands are wet.
Always push the plug all the way into the power outlet.
Never damage, modify, stretch or excessively bend or twist
the power cord. Do not place heavy objects on the power
cord.
Never plug the machine into a power socket that is shared
with other equipment (extension lead/cord, 2- or 3-way
adapter, etc.).
Never use the machine if the power cord is bundled or knotted.
If you detect smoke, unusual smells or strange noises around the machine, immediately unplug
the machine at the power supply and call for service.
Periodically, unplug the machine and use a dry cloth to wipe
off any dust or dirt collected on the plug and the power outlet.
If the machine is placed at a location exposed to a lot of dust,
smoke, or high humidity, the dust collected on the plug
absorbs moisture and may cause insulation failure and fire.
If you hear thunder, disconnect the power supply of the machine and refrain from using it. Leaving
the machine plugged in may cause fire, electric shock, or damage to the machine, depending on
the thunder storm.
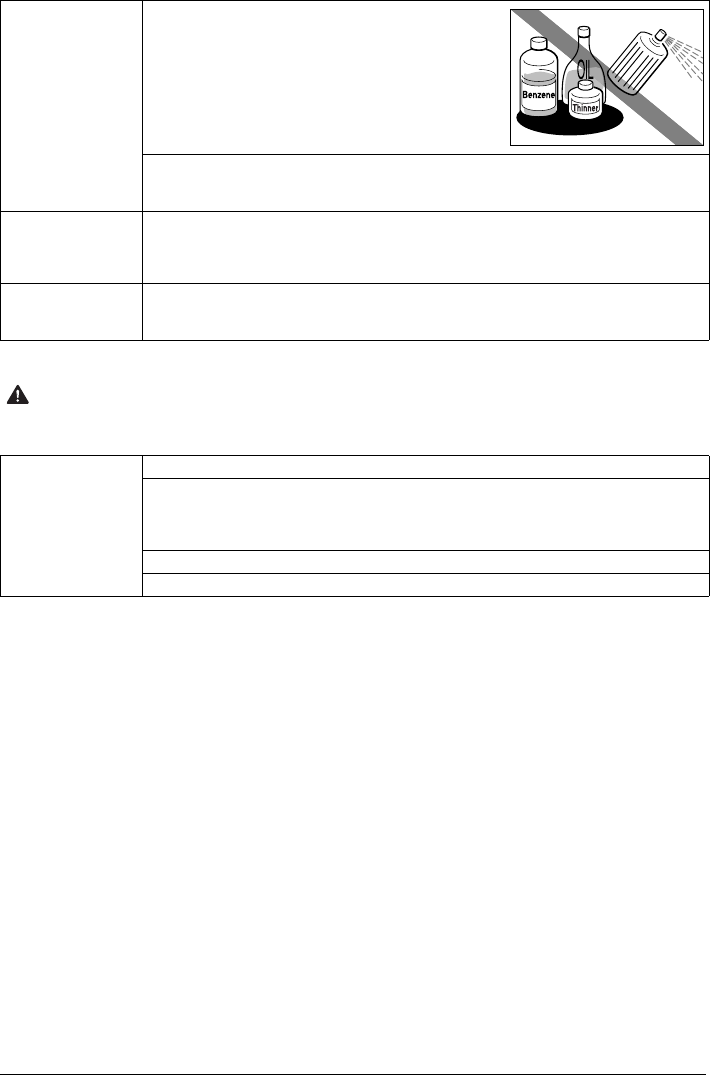
95Safety Precautions
Cleaning the machine Use a damp cloth to clean the machine. Never use
flammable solvents such as alcohol, benzene or thinners.
If flammable solvents come in contact with electrical
components inside the machine, it could cause a fire or
electric shock.
Always unplug the machine from the power outlet before cleaning the machine.
If you accidentally switch the machine on while cleaning it, you could injure yourself or damage the
machine.
Maintaining the
machine
Do not attempt to disassemble or modify the machine. There are no user serviceable parts inside
the machine.
The machine contains high-voltage components. Never attempt any maintenance procedure not
described in this guide.
Working around the
machine
Do not use highly flammable sprays near the machine.
This could cause a fire or electric shock if the spray comes into contact with electrical components
inside the machine.
Caution
You may cause injury or damage the machine if you ignore any of these safety precautions.
Choosing a location Do not install the machine in a location that is unstable or subject to excessive vibration.
Do not install the machine in locations that are very humid or dusty, in direct sunlight, outdoors, or
close to a heating source.
To avoid the risk of fire or electric shocks, install the machine in a location with an ambient
temperature range of 5°C to 35°C (41°F to 95°F) and humidity of 10% to 90% (condensation free).
Do not place the machine on a thick rug or carpet.
Do not place the machine with its back attached to the wall.
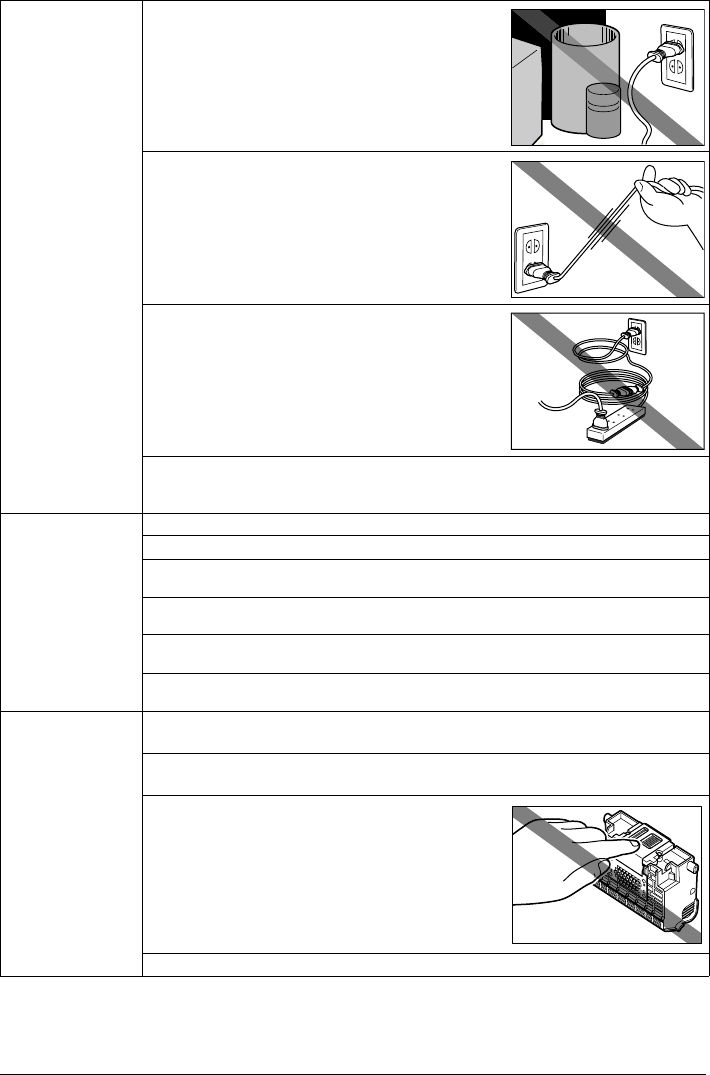
96 Safety Precautions
Power supply Ensure that the area around the power outlet is kept clear at
all times so you can easily unplug the power cord if
necessary.
Never remove the plug by pulling on the cord.
Do not use an extension lead/cord.
Never use a power supply source other than the one rated for the machine in the country of where
you purchased the machine.
AC 100-240 V, 50/60 Hz
Working around the
machine
Never put your hands or fingers in the machine while it is printing.
Do not place any object on the machine.
Do not place metal objects (paper clips, staples, etc.) or containers of flammable solvents (alcohol,
thinners, etc.) on top of the machine.
If any foreign object (metal or liquid) fall into the machine, unplug the power cord and call for
service.
Do not transport or store the machine on a slant, vertically or upside-down, as the ink may leak
and damage the machine.
When loading a thick book on the Platen Glass, do not press hard on the Document Cover. The
Platen Glass may break and cause injury.
Print Heads and ink
tanks
For safety reasons, store Print Heads and ink tanks out of the reach of small children.
If a child ingests any ink, consult a doctor immediately.
Do not shake Print Heads or ink tanks.
Ink may leak out and stain clothing or the surrounding area.
Never touch the electrical contacts on a Print Head after
printing. The metal parts may be very hot and could cause
burns.
Do not throw ink tanks into fire.

97Safety Precautions
Legal Limitations on Use of Your Product and Use of
Images
It may be unlawful to make copies of, scan, print, or use reproductions of the following documents.
The list provided is non-exhaustive. When in doubt, check with a legal representative in your
jurisdiction.
zPaper money
zMoney orders
zCertificates of deposit
zPostage stamps (canceled or uncanceled)
zIdentifying badges or insignias
zSelective service or draft papers
zChecks or drafts issued by governmental
agencies
zMotor vehicle licenses and certificates of title
zTraveler’s checks
zFood stamps
zPassports
zImmigration papers
zInternal revenue stamps (canceled or uncanceled)
zBonds or other certificates of indebtedness
zStock certificates
zCopyrighted works/works of art without permission of
copyright owner

98 Safety Precautions
Users in the U.S.A.
Regulatory Information
FCC Notice (U.S.A. Only)
For 120V, 60Hz model
Model Number: K10287
This device complies with Part 15 of the FCC Rules. Operation is subject to the following two
conditions: (1) This device may not cause harmful interference, and (2) this device must accept any
interference received, including interference that may cause undesired operation.
Note: This equipment has been tested and found to comply with the limits for a Class B digital
device, pursuant to Part 15 of the FCC Rules. These limits are designed to provide reasonable
protection against harmful interference in a residential installation. This equipment generates, uses
and can radiate radio frequency energy and, if not installed and used in accordance with the
instructions, may cause harmful interference to radio communications.
However, there is no guarantee that interference will not occur in a particular installation. If this
equipment does cause harmful interference to radio or television reception, which can be
determined by turning the equipment off and on, the user is encouraged to try to correct the
interference by one or more of the following measures:
zReorient or relocate the receiving antenna.
zIncrease the separation between the equipment and receiver.
zConnect the equipment into an outlet on a circuit different from that to which the receiver is
connected.
zConsult the dealer or an experienced radio/TV technician for help.
Use of a shielded cable is required to comply with Class B limits in Subpart B of Part 15 of the FCC
Rules.
Do not make any changes or modifications to the equipment unless otherwise specified in the
manual. If such changes or modifications should be made, you could be required to stop operation of
the equipment.
Canon U.S.A., Inc.
One Canon Plaza
Lake Success, NY 11042
1-516-328-5600
Canon U.S.A., INC. LIMITED WARRANTY --- (USA Only)
The limited warranty set forth below is given by Canon U.S.A., Inc. ("Canon USA") with respect to
the new or refurbished Canon-brand product ("Product") packaged with this limited warranty, when
purchased and used in the United States only.
The Product is warranted against defects in materials and workmanship under normal use and
service (a) for a period of one (1) year from the date of original purchase when delivered to you in
new condition in its original container or (b) for 90 days from the date of original purchase for
refurbished Products. Defective parts or a defective Product returned to a Canon USA repair facility
or a Canon USA Authorized Service Facility ("ASF"), and proven to be defective upon inspection will
be (a) repaired; (b) exchanged for new or comparable rebuilt, recovered, remanufactured, repaired
and/or recycled parts or; (c) exchanged for a refurbished Product, as determined by the Canon USA
repair facility or the ASF. Warranty repair or replacement shall not extend the original warranty period
of the Product. A dated proof of purchase is required at the time of warranty service. A copy of your
dated bill of sale will satisfy this requirement. This warranty does not cover any accessories, or any
consumables, such as paper or ink cartridges, as to which there shall be no warranty or
replacement.

99Safety Precautions
This limited warranty shall only apply if the Product is used in conjunction with compatible
computers, peripheral equipment and software. Canon USA shall have no responsibility for such
items except for compatible Canon brand peripheral equipment covered by a separate warranty
("Separate Warranty"). Repairs of such Canon brand peripheral equipment shall be governed by the
terms of the Separate Warranty. Non-Canon brand equipment and software that may be distributed
with the Product are sold "as is" and without warranty of any kind by Canon USA, including any
implied warranty regarding merchantability or fitness for a particular purpose, and all such warranties
are disclaimed. The sole warranty, if any, with respect to such non-Canon brand items is given by the
manufacturer or producer thereof.
This limited warranty covers all defects encountered in normal use of the Product and does not apply
in the following cases:
(a) Loss of or damage to the Product due to abuse, neglect, mishandling, improper packaging by
you, alteration, accident, electrical current fluctuations, improper use, failure to follow operating
or maintenance instructions in, or environmental conditions prescribed in, Canon USA's user's
manual or other documentation, or services performed by someone other than a Canon USA
repair facility or ASF. Without limiting the foregoing, dropping the Product, scratches, and
abrasions will be presumed to have resulted from misuse, abuse or failure to operate the
Product as set forth in the user's manual or other documentation for the Product.
(b) Use of parts, media, software or supplies (other than those sold by Canon USA), including non-
Canon ink cartridges or refilled ink cartridges, that cause damage to the Product or cause
abnormally frequent service calls or service problems.
(c) If the Product has had its serial number or dating defaced, altered or removed.
ANY SYSTEM SOFTWARE (WHETHER FACTORY LOADED ON THE PRODUCT OR
CONTAINED ON THE SOFTWARE DISKETTES OR CD-ROMS ENCLOSED WITH, OR
ACCOMPANYING, THE PRODUCT), AND ANY UTILITY SOFTWARE, DISTRIBUTED WITH OR
FOR THE PRODUCT, IS SOLD "AS IS" AND WITHOUT WARRANTY BY CANON USA. THE SOLE
WARRANTY WITH RESPECT TO SUCH SOFTWARE IS CONTAINED IN THE SOFTWARE
MANUFACTURER'S LICENSE AGREEMENT DISTRIBUTED THEREWITH, INCLUDING ANY
LIMITATIONS AND DISCLAIMERS THEREON. PLEASE CONTACT CANON USA IMMEDIATELY
IF YOU HAVE NOT RECEIVED A COPY OF THE SOFTWARE MANUFACTURER'S LICENSE
AGREEMENT.
NO IMPLIED WARRANTY, INCLUDING ANY IMPLIED WARRANTY OF MERCHANTABILITY OR
FITNESS FOR A PARTICULAR PURPOSE, APPLIES TO THE PRODUCT AFTER THE
APPLICABLE PERIOD OF THE EXPRESS LIMITED WARRANTY STATED ABOVE, AND NO
OTHER EXPRESS WARRANTY OR GUARANTY, EXCEPT AS MENTIONED ABOVE, GIVEN BY
ANY PERSON OR ENTITY WITH RESPECT TO THE PRODUCT SHALL BIND CANON USA, OR
ITS ASF. (SOME STATES DO NOT ALLOW LIMITATIONS ON HOW LONG AN IMPLIED
WARRANTY LASTS, SO THE ABOVE LIMITATION MAY NOT APPLY TO YOU.) CANON USA
SHALL NOT BE LIABLE FOR LOSS OF REVENUES OR PROFITS, INCONVENIENCE, EXPENSE
FOR SUBSTITUTE EQUIPMENT OR SERVICE, STORAGE CHARGES, LOSS OR CORRUPTION
OF DATA, OR ANY OTHER SPECIAL, INCIDENTAL OR CONSEQUENTIAL DAMAGES CAUSED
BY THE USE, MISUSE, OR INABILITY TO USE THE PRODUCT REGARDLESS OF THE LEGAL
THEORY ON WHICH THE CLAIM IS BASED, AND EVEN IF CANON USA OR ITS ASF HAS BEEN
ADVISED OF THE POSSIBILITY OF SUCH DAMAGES. NOR SHALL RECOVERY OF ANY KIND
AGAINST CANON USA OR ITS ASF BE GREATER IN AMOUNT THAN THE PURCHASE PRICE
OF THE PRODUCT CAUSING THE ALLEGED DAMAGE. WITHOUT LIMITING THE FOREGOING,
YOU ASSUME ALL RISK AND LIABILITY FOR LOSS, DAMAGE OR INJURY TO YOU AND YOUR
PROPERTY AND TO OTHERS AND THEIR PROPERTY ARISING OUT OF THE POSSESSION,
USE, MISUSE, OR INABILITY TO USE THE PRODUCT SOLD BY CANON USA NOT CAUSED
SOLELY AND DIRECTLY BY THE NEGLIGENCE OF CANON USA, OR ITS ASF. (SOME STATES
DO NOT ALLOW THE EXCLUSION OR LIMITATION OF INCIDENTAL OR CONSEQUENTIAL
DAMAGES, SO THE ABOVE EXCLUSION OR LIMITATION MAY NOT APPLY TO YOU.) THIS
LIMITED WARRANTY SHALL NOT EXTEND TO ANYONE OTHER THAN THE ORIGINAL

100 Safety Precautions
PURCHASER OF THE PRODUCT OR THE PERSON FOR WHOM IT WAS PURCHASED AS A
GIFT, AND STATES YOUR EXCLUSIVE REMEDY.
Canon USA offers a range of customer technical support* options:
zInteractive troubleshooting, e-mail technical support, the latest driver downloads and answers to
frequently asked questions (www.canontechsupport.com)
zToll-free live technical support Monday-Saturday (excluding holidays) at 1-800-828-4040
zTelephone Device for the Deaf (TDD-1-866-251-3752)
zRepair or Exchange Service Options:
In the event service is required for the Product during the limited warranty period, Canon USA
offers two hardware support options:
Authorized Service Facility Carry-In / Mail-In Service
Canon USA's Carry-In/Mail-In Service provides repair or exchange, at Canon USA's option, through
Canon USA's Authorized Service Facility (ASF) network. The name and telephone number of the
ASF(s) near you may be obtained from Canon USA's Web site at www.canontechsupport.com or
by calling the Canon USA Customer Care Center at 1-800-828-4040, or any time while speaking to a
technical support person. A Product covered by this limited warranty will be repaired or exchanged,
as determined by Canon USA, and returned without charge by the ASF.
InstantExchange Service **
A Canon Customer Care Center or ASF technician will attempt to diagnose the nature of the problem
and, if possible, correct it over the telephone. If the problem cannot be corrected over the telephone,
and you elect the InstantExchange option, a reference number will be issued to you. You will be
asked for the Product serial number and other information pertaining to your defective Product and
for a ship-to location for the replacement Product (must include street address).
The Canon USA repair facility will ship out the replacement Product, via 2nd day Air freight service,
prepaid by Canon USA. After receipt of the replacement Product (with instructions and a prepaid
waybill), follow the enclosed instructions on how to ship the defective Product to the Canon USA
repair facility. The defective Product must be returned in the shipping carton in which the
replacement Product was packed and include the reference number, A COPY OF YOUR DATED
PROOF OF PURCHASE (BILL OF SALE), and a complete explanation of the problem. DO NOT
INCLUDE ANY OTHER ITEMS WITH THE DEFECTIVE PRODUCT IN THE RETURN SHIPPING
CARTON, AND BE SURE TO RETAIN YOUR PRINTHEAD AND INK CARTRIDGE(S) AND
TANK(S).
InstantExchange Service expedites, usually by the second business day, the exchange of a
defective Product with a replacement Product, which will normally be shipped the same day if your
request for this service is by 3 p.m. E.T. Monday through Friday, except holidays (three (3) business
day InstantExchange Service for Alaska and Hawaii). Canon USA does not guarantee expedited
shipping service in the event of the occurrence of factors beyond its reasonable control. The
replacement Product you receive may be a refurbished or reconditioned unit and will be covered for
the balance of the period remaining on your original limited warranty. NOTE THAT BY USING THIS
SERVICE YOU WILL KEEP THE REPLACEMENT PRODUCT THAT IS SENT TO YOU. CANON
USA WILL RETAIN THE DEFECTIVE PRODUCT THAT YOU ORIGINALLY PURCHASED, WHICH
SHALL BECOME THE PROPERTY OF CANON USA. InstantExchange warranty program service is
available only during the express limited-warranty period for your Product and only in the continental
United States, Alaska and Hawaii during such period.
This limited warranty gives you specific legal rights, and you may also have other rights, which vary
from state to state.
* Support program specifics are subject to change without notice.
** InstantExchange warranty service is subject to the availability of refurbished or new replacement
units.

101Safety Precautions
Canon U.S.A., Inc.
One Canon Plaza
Lake Success, NY 11042
USA
©2006 Canon U.S.A., Inc. Canon is a registered trademark of Canon Inc. in the United States and
may also be a registered trademark in other countries.

102 Index
Index
A
Appendix 90
B
Before Printing 2
C
Changing the Paper and Print Settings 21
copy mode 21
memory card and easy photo reprint modes 23
Cleaning
inside 65
platen glass and document cover 64
roller 64
CLI-8BK Black 46
CLI-8C Cyan 46
CLI-8M Magenta 46
CLI-8Y Yellow 46
Copying 29
E
Easy-Scroll Wheel 2
F
Function Buttons 3
H
HOME button 2
L
Legal Limitations on Use of Your Product and Use
of Images 97
Loading Original Documents 5
Loading Printing Paper
Auto Sheet Feeder 16
Cassette 17
Envelopes 19
recommended paper and requirements 7
M
Media
cannot use 9
specialty 10
Media Type 7
Memory Card
inserting 32
removing 33
supported by this machine 31
N
NAVI Button 3
Nozzle Check Pattern
examining 54
printing 53
P
PGI-5BK Black 46
Photo Printing from Photo 36
scanning a photo 36
select and print 37
Print Head
automatic print head alignment 60
cleaning 56
deep cleaning 58
manual print head alignment 61
Printing from a Memory Card 31
Photo Index Sheet 35
select and print 33
Printing from Your Computer 26
Macintosh 27
Windows 26
Printing Photographs Directly from a Compliant
Device 39
connecting 39
PictBridge 41
R
Replacing Ink Tanks 48
ink level information 46
knowing when to replace ink tank 47
Routine Maintenance 46
replacing ink tanks 48
S
Safety Precautions 94
Scanning Images 28
Specialty Media 10
Specifications
copy 91
general 91
PictBridge 92
scan 91
System Requirements 92
T
Troubleshooting 67
Turning off the Machine 4
Turning on the Machine 4
U
Users in the U.S.A.
Canon U.S.A., Inc. Limited Warranty
- U.S. Only 98

103Index

104 Index

105Index

Copyright © 1990 The Regents of the University of California.
All rights reserved.
Redistribution and use in source and binary forms are permitted provided that
the above copyright notice and this paragraph are duplicated in all such forms
and that any documentation, advertising materials, and other materials related
to such distribution and use acknowledge that the software was developed by
the University of California, Berkeley. The name of the University may not be
used to endorse or promote products derived from this software without
specific prior written permission.
THIS SOFTWARE IS PROVIDED ''AS IS'' AND WITHOUT ANY EXPRESS OR
IMPLIED WARRANTIES, INCLUDING, WITHOUT LIMITATION, THE IMPLIED
WARRANTIES OF MERCHANTABILITY AND FITNESS FOR A PARTICULAR
PURPOSE.
Copyright © 1995, 1996 Cygnus Support.
All rights reserved.
Redistribution and use in source and binary forms are permitted provided that
the above copyright notice and this paragraph are duplicated in all such forms
and that any documentation, advertising materials, and other materials related
to such distribution and use acknowledge that the software was developed at
Cygnus Support, Inc. Cygnus Support, Inc. may not be used to endorse or
promote products derived from this software without specific prior written
permission.
THIS SOFTWARE IS PROVIDED ''AS IS'' AND WITHOUT ANY EXPRESS OR
IMPLIED WARRANTIES, INCLUDING, WITHOUT LIMITATION, THE IMPLIED
WARRANTIES OF MERCHANTABILITY AND FITNESS FOR A PARTICULAR
PURPOSE.
Copyright © 1994, 1997 Cygnus Solutions.
All rights reserved.
Redistribution and use in source and binary forms are permitted provided that
the above copyright notice and this paragraph are duplicated in all such forms
and that any documentation, advertising materials, and other materials related
to such distribution and use acknowledge that the software was developed at
Cygnus Solutions. Cygnus Solutions may not be used to endorse or promote
products derived from this software without specific prior written permission.
THIS SOFTWARE IS PROVIDED ''AS IS'' AND WITHOUT ANY EXPRESS OR
IMPLIED WARRANTIES, INCLUDING, WITHOUT LIMITATION, THE IMPLIED
WARRANTIES OF MERCHANTABILITY AND FITNESS FOR A PARTICULAR
PURPOSE.
exit.c
environ.c
impure.c
string.h
_ansi.h
This product uses the following copyrighted software:

Getting Help from Canon
Help Us Help You Better
Before you contact Canon, please record the following information.
Serial Number (located on the inside of the product): _________________________________________
Model Number (located on the front of the product): _________________________________________
Setup CD-ROM number (located on the CD-ROM): __________________________________________
Purchase Date: ______________________________________________________________________
Customer Technical Support Sequence*
1.Internet — www.canontechsupport.com
For quick and comprehensive self-help in an intuitively guided interactive troubleshooting
environment, the place to start is our helpful tech support web site. In addition, the latest driver
downloads, answers to frequently asked questions, product information, and “where to buy”
instructions are found here.
2.Email Tech Support — www.canontechsupport.com
For individual attention to a special issue, try emailing our friendly technical support representatives,
specially trained to communicate quick, easy, and logical solutions to your inquiries within 24 hours.
3.Toll-Free Live Tech Support — (1-800-828-4040)
This option provides live telephone technical support, free of service charges, Monday-
Saturday (excluding holidays), during your product’s 1 year limited warranty period.
Telephone Device for the Deaf (TDD) support is available at (1-866-251-3752).
4.Extended Service and Support — www.canonesp.com
Canon CarePAK Extended Service Plan is a cost-attractive and easy-to-use extended service
program that provides up to three full years of service and support coverage at a very attractive price.
CarePAK offers toll-free Canon technical support and includes Canon’s superb InstantExchange
product replacement program. For further information about extending your Canon service and
support, call (1-800-385-2155), or visit our Web site at www.canonesp.com. CarePAK must be
purchased during your product’s warranty period.
For more information and updated program specifics, please visit our web site at
www.canontechsupport.com.
* Support program specifics are subject to change without notice.
Ordering Information
For additional supplies, use the following descriptions and order numbers.
Description Order #
Ink Tanks
PGI-5 Black 0628B002
CLI-8 Black 0620B002
CLI-8 Cyan 0621B002
CLI-8 Magenta 0622B002
CLI-8 Yellow 0623B002
Canon Specialty Papers
Photo Paper Plus Glossy (4" x 6" / 20 sheets) 7980A007
Photo Paper Plus Glossy (4" x 6" / 50 sheets) 7980A012
Photo Paper Plus Glossy (4" x 6" / 120 sheets) 7980A022
Photo Paper Plus Glossy (5" x 7" / 20 sheets) 7980A019
Photo Paper Plus Glossy (8.5" x 11" / 20 sheets) 7980A006
Photo Paper Plus Double Sided (5" x 7" / 10 sheets) 9981A006
Photo Paper Plus Double Sided (8.5" x 11" / 10 sheets) 9981A005
Photo Paper Plus Double Sided Album Kit (5" x 7") 0041B005
Photo Paper Plus Double Sided Album Kit (8.5" x 11") 0041B006
Photo Paper Pro for Borderless Printing (4" x 6" / 20 sheets) 1029A014
Photo Paper Pro for Borderless Printing (4" x 6" / 75 sheets) 1029A027
All Occasion Photo Cards (4" x 8" / 50 sheets) 1029A055
Photo Paper Pro (8.5" x 11" / 15 sheets) 1029A004
Photo Paper Pro (8.5" x 11" / 30 sheets) 1029A028
Photo Paper Pro (8" x 10" / 20 sheets) 1029A059
Matte Photo Paper (4" x 6" / 120 sheets) 7981A014
Matte Photo Paper (8.5" x 11" / 50 sheets) 7981A004
Photo Paper Glossy (4" x 6" / 50 sheets) 0775B021
Photo Paper Glossy (4" x 6" / 100 sheets) 0775B022
Photo Paper Glossy (8.5" x 11" / 50 sheets) 0775B023
Photo Paper Glossy (8.5" x 11" / 100 sheets) 0775B024
Glossy Photo Paper Credit Card Size 9157A023
Photo Stickers 0001C001
High Resolution Paper (8.5" x 11" / 100 sheets) 1033A011
Call 1-800-OK-CANON to locate a dealer near you, or visit the Canon eStore at
www.estore.usa.canon.com.
© 2006 Canon U.S.A., Inc. Canon is a registered trademark of Canon Inc. in the United States and may be a registered trademark or
trademarks in other countries. All other product and brand names are trademarks of their respective owners. As an ENERGY STAR®
partner, Canon U.S.A., Inc. has determined that this product meets the ENERGY STAR® guidelines for energy efficiency.
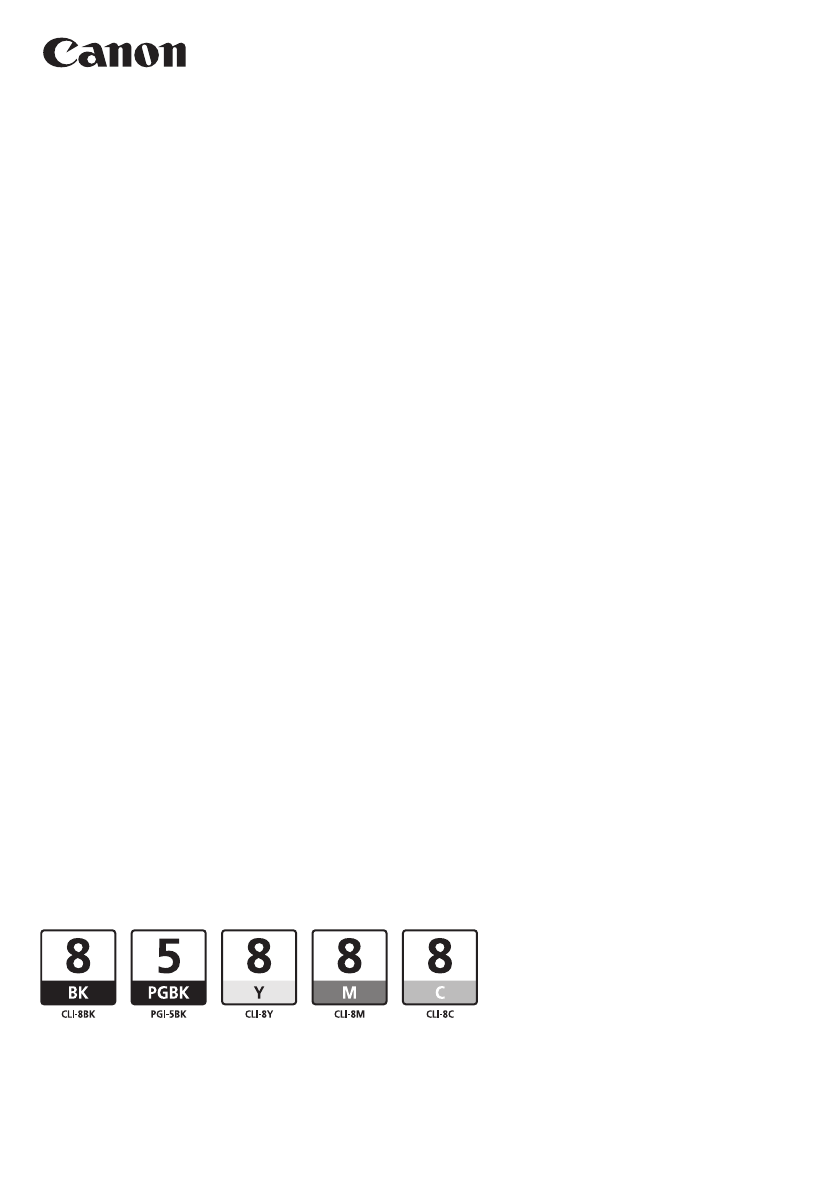
Photo All-in-One
Quick Start Guide
The following ink tanks are compatible with this product.
QT5-0684-V02 XXXXXXXX ©CANON INC.2006 PRINTED IN THAILAND
