Odin Guide
User Manual:
Open the PDF directly: View PDF ![]() .
.
Page Count: 38

Odin
Premium HTML5 Template - User Guide!
Page 1
Odin - Premium template by Designova

Page 2
Odin - Premium template by Designova
A premium product from Designova.
Copyright © 2015 ArrowsMedia Holdings IN.
All rights reserved. Designova is a featured venture
of ArrowsMedia Holdings IN.
Under the copyright laws, this manual may not be
copied, in whole or in part, without the written
consent of ArrowsMedia Holdings. Your rights to the
software are governed by the accompanying
software license agreement.
The Designova brand and logo is a trademark of
ArrowsMedia Holdings IN., registered in Kerala.
Use of the Designova logo for commercial
purposes without the prior written consent of
ArrowsMedia Holdings may constitute trademark
infringement and unfair competition in violation of
international and state laws.
Every effort has been made to ensure that the
information in this manual is accurate. ArrowsMedia
is not responsible for printing or clerical errors.
Designova
ArrowsMedia.
Thrissur 22
Kerala, IN
info@designova.net
www.designova.net
Other company and product names mentioned
herein are trademarks of their respective
companies. Mention of third-party products is for
informational purposes only and constitutes neither
an endorsement nor a recommendation.
ArrowsMedia Holdings assumes no responsibility
with regard to the performance or use of these
products.

TABLE OF CONTENTS
1. Welcome 4
2. IMPORTANT: (Read this before you edit anything) 5
3. Files & Directory Structure 8
4. Basic Steps for Building Your Website 10
5. Bootstrap 3 Framework 12
6. Editing Colors (via LESS) 16
7. Replacing Placeholder Images 20
8. Setting Up Navigations 22
9. Setting Up Featured Modules 24
10. Setting Up Parallax Images 32
11. Free Support 34
12. Future Updates 35
13. Rating & Reviews 36
14. Vote of Thanks 37
Page 3
Odin - Premium template by Designova

1. Welcome
Greetings from Designova.
Thank you for purchasing our product.
We hope you have enjoyed the template’s live preview and you want to create such a
beautiful website. Now, this guide is everything needed for you to setup your perfect
website. Please follow each instruction carefully, even single a line of code can do
wonders (in all senses) so please don’t miss anything on this user guide.
If you love our work please rate it on themeforest.
It will NOT take even a couple of minutes for you to rate our template, but it will be a
great motivation for our developers. If you don’t know how to rate items on themeforest,
please click here to see a demonstration: http://goo.gl/iWbKi3
Please be aware of the legal validity of license type you have
purchased.
We appreciate your purchase and we expect you have understood the different types of
license and usage permissions.
FYI, a Regular License should be used only for a single application (single website /
single client project) on which your end-users are not charged for.
If your end-users are being charged for the usage of your website (built with this
template), then you have to buy Extended License from themeforest.
For complete & precise information about licenses, please see: http://themeforest.net/
licenses
Page 4
Odin - Premium template by Designova

2. IMPORTANT: (Read this before
you edit anything)
This template is an advanced HTML5 template powered by some
modern features such as CSS3, LESS and AJAX to render the styles,
colors, fonts and some additional visual enhancements. LESS and AJAX
will work only from server side, means you have to upload all files
to a real web hosting server in order to view proper colours
and fonts rendering of this template. If you just test them from your
local computer you will not be able to see proper colours or fonts, but
this is not at all any errors. Please upload the template to a web server
and edit it there.
1. Why should I read this user guide?
Having 40+ pages, our developers have spent some great time on preparing this user
guide. We are sure that we have covered all the essential instructions needed to setup a
nice website as you see in our template’s live preview. We expect you to read this user
guide before you open any support request (if you ask about things already present
in this guide, you will be gently asked to read this again).
2. If I need help, will you provide free support?
Yes, we have a dedicated support system http://designova.net/support.html where we
offer free support even though providing support is not mandatory for themeforest
authors.
Our support is applicable only for issues and bugs within our product live previews (non-
edited version of the template). We do NOT provide free customisation services in the
scope of free support. If you request any free customisation via support system, such
tickets will not be answered.
3. What kind of support are you providing?
We offer free support for our products where we can help you fix issues within our
code (if any) and assist you on template setup (in some cases if the task is minimal).
Page 5
Odin - Premium template by Designova

Please note support is not applicable for third party jQuery plugins and GPL code
components (because they are not created or maintained by us). Also support is not
applicable to issues or bugs happening on your edited version of the template. We are
not offering any debugging service on your edited websites.
4. When can I expect a response from you guys?
Our team will be online during 09.30 to 18.30 on Monday – Friday (GMT + 5.30, Kerala).
For support request we usually make a response within 24 to 48 hours. Due to the
complex nature of some queries, responses can’t be guaranteed a specific turn-around
time, but we value each user and we will surely get back to you. In case if we experience
heavy load of support tickets we will announce the status on Twitter.
5. If I need to customise this template will you offer it?
To be frank, we are unable to provide free customisation services on our products. If you
have great passion and considerable budget please open the request as a premium
project, please email to: project@designova.net If our developers are free we will get
back to you via email.
6. How can I know about future updates and bug fixes?
We release updates regularly and we notify our users via Tweets as well as Email
Newsletters (we do hate spam). We recommend you to subscribe to our update
channels:
Get updates via Email: http://eepurl.com/xDO_v"
Get updates via Twitter: https://twitter.com/designovastudio
7. Do you offer refund / exchange for my purchased item?
We are not permitted to handle sales or marketing of our products as Envato solely
handles it through themeforest websites (we are exclusive author having active contract
with them). If you are looking for a refund or exchange on any of your purchased items
from themeforest, please contact Envato support. Their decision will be final on all
cases.
8. I am not sure about the License type I am having, what should I do?
Page 6
Odin - Premium template by Designova

We appreciate your purchase and we expect you have understood the different types of
license and usage permissions.
FYI, a Regular License should be used only for a single application (single website /
single client project) on which your end-users are not charged for.
If your end-users are being charged for the usage of your website (built with this
template), then you have to buy Extended License from themeforest.
For complete & precise information about licenses, please see: http://themeforest.net/
licenses
Page 7
Odin - Premium template by Designova
3. Files & Directory Structure
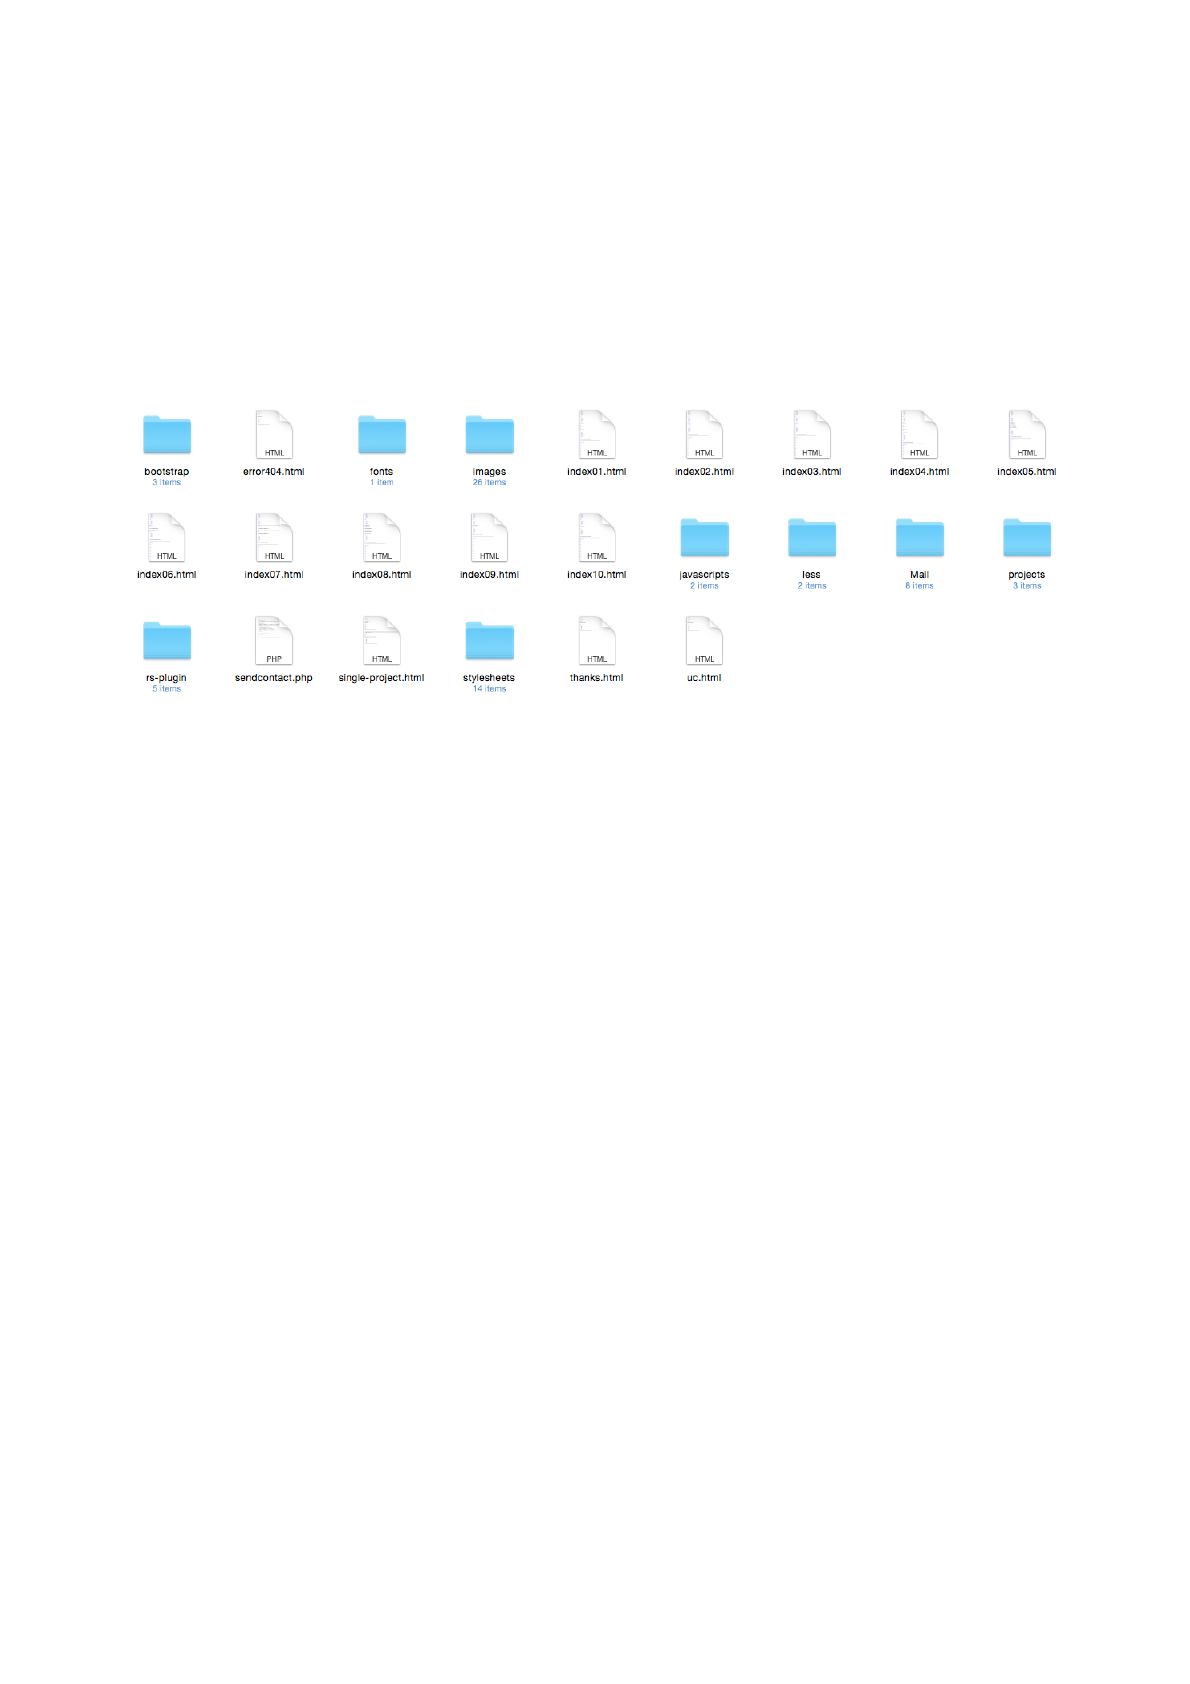
Once you download the ZIP file from themeforest and you extract them to a folder, you
will find a directory with a name such as ‘site’. This will be the root directory containing
your web template and associated files & resources. The contents of this directory may
look like this:
Organising the resources
The template consists of various directories which can contain media and elements used
in the website.
Page 8
Odin - Premium template by Designova
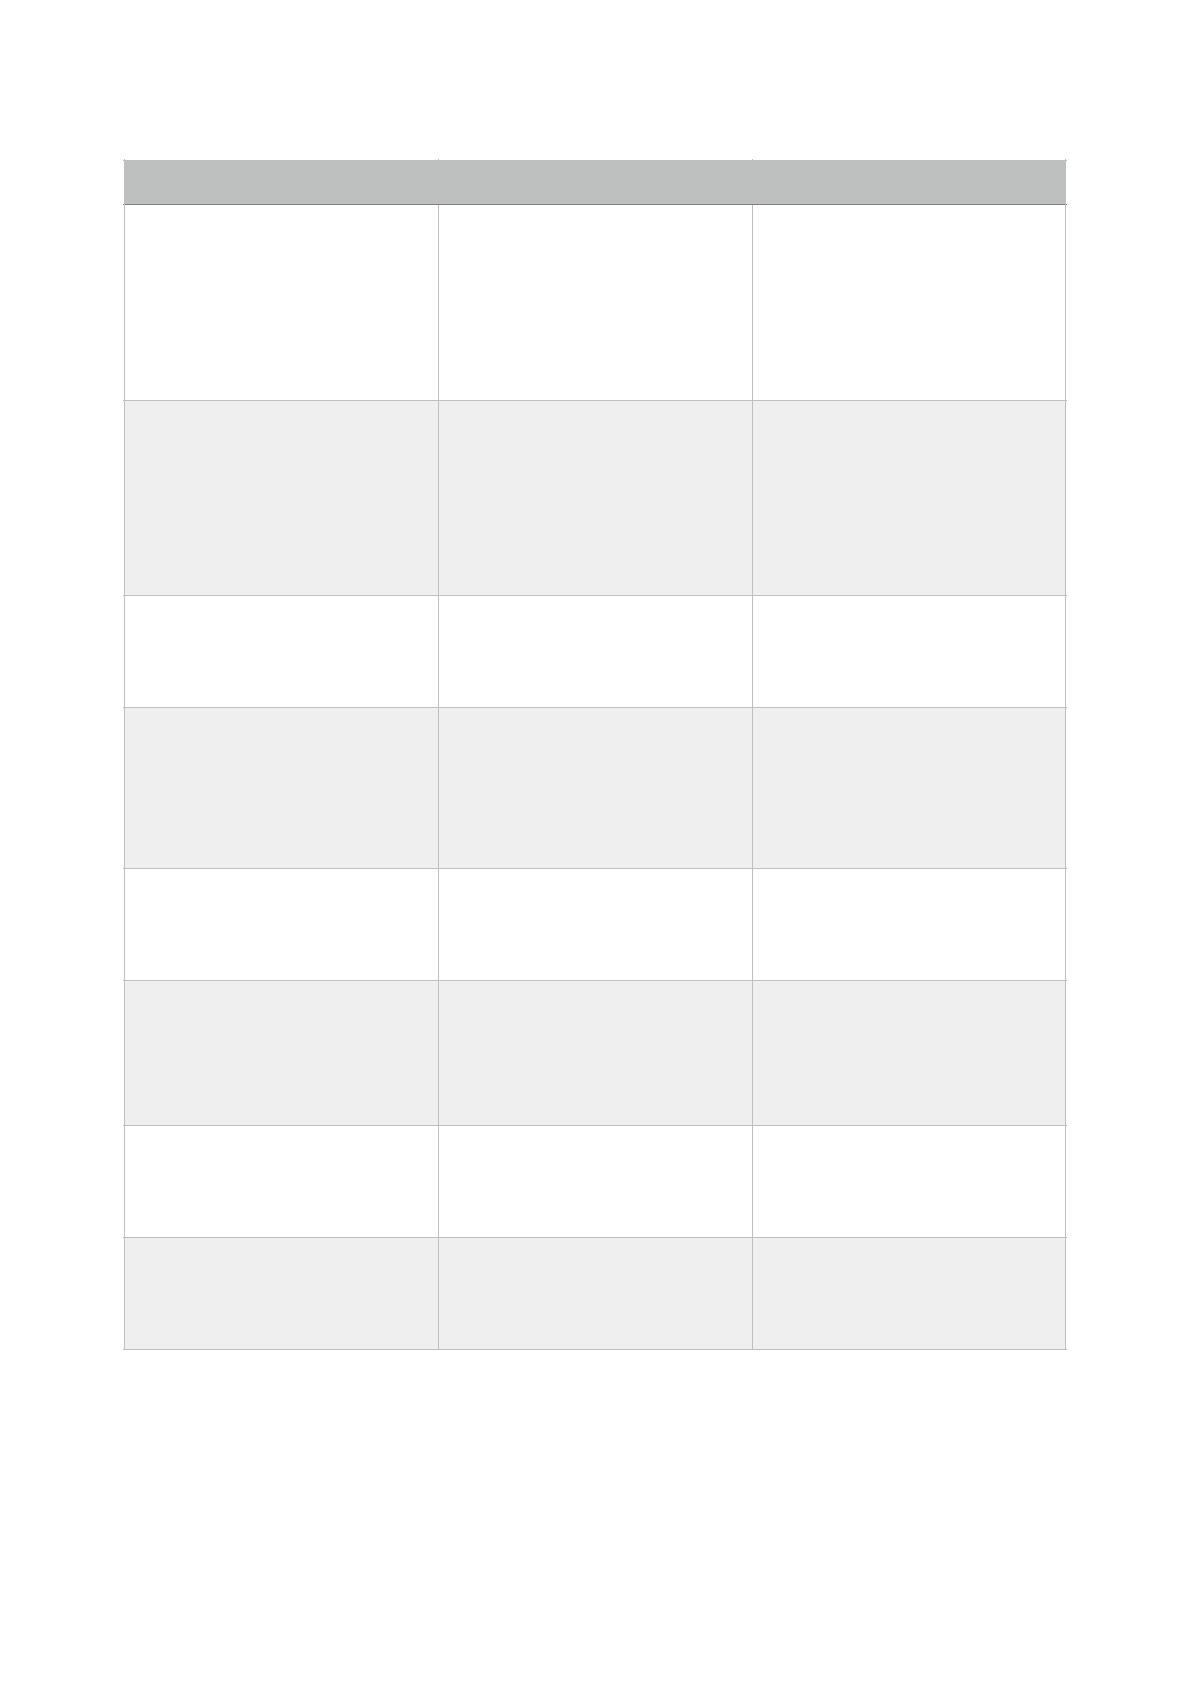
Directory
Purpose
Note
bootstrap
Contains framework used
to power this template
which is Bootstrap 3
Do not rename or move.
Modify the contents only if
you are updating Bootstrap
to new version
fonts
You can keep your custom
fonts / external font files
(uses Font- Face)
Do not rename or move.
Modify the contents only if
you need to add external
fonts via font-face
images
Contains all the images and
graphical elements used in
this site
Do not rename or move.
Feel free to modify the files
as needed.
javascripts
Contains executable scripts
(JS) used in this site
Do not rename or move.
Modify the contents only if
you are familiar of JS
mail
Contains PHP libraries
used for contact form email
sending feature
Do not rename or move.
stylesheets
Contains CSS files used to
define visual appearance of
this site
Do not rename or move.
Modify the contents as you
are familiar with CSS rule
editing.
twitter
Contains PHP libraries
used to activate dynamic
Twitter feed.
Do not rename, move or
edit the contents without
proper understanding.
less
Contains LESS files to
power easy customisation
and color management
Do not rename or move this
folder.
Page 9
Odin - Premium template by Designova

4. Basic Steps for Building Your
Website
In order to make your website functional with this template you have to edit the web
pages, add your own content and media, upload all these files to a web server
Step 1: Editing template web pages
The template consists of HTML5 files that can form a collection of web pages linked in
between which is called as a Site. The site is initially loaded from a main web page
(index.html) and linked to other pages or sections.
In order to edit a web page you have to use any standard code editor where you should
be familiar of editing general HTML5 markup. We recommend SublimeText http://
www.sublimetext.com/ as the best code editor as it is the first choice among our
developers.
Once you opened the editor, you can view and edit HTML5 files, for example the root
HTML5 file:
[ROOT]/INDEX01.HTML
You can now add / remove contents by modifying the markup inside this HTML5
document (this is completely explained from chapter 4 onwards).
Please note, you have to keep the home page of your site renamed as INDEX.HTML
even if it may be named differently in the template directory structure.
Step 2: Editing template style (look and feel)
The template consists of CSS files along with the associated resources such images
linked within. You can use the same code editor for editing the CSS rules. Don’t worry, if
you are not planning to change the look and feel of this template you don’t have to edit
any CSS. But in other case, you must be familiar of advanced CSS rules in order to
modify this template’s look and feel. Similarly, you have to know JS in order to control
the interactions defined in this template (JS knowledge is not needed for basic users to
edit the site content).
Page 10
Odin - Premium template by Designova

Step 3: Finalising the website
Once everything is edited and content is added you may combine multiple CSS files as
well as multiple JS files to separate files. This will increase overall loading response of
the website. You can get more info about this online.
Step 4: Publishing the website online.
The final step is to upload all files to web server (we mean all files as explained in
previous chapter). The server is actually a web-hosting provider, which can store your
files, and anyone can access the site across the globe.
If you don’t have a web server space, it is time to get one. That means you need a
working web hosting account to be purchased from any of the hosting providers. If you
don’t have it yet, we recommend the professional web hosting from MediaTemple
http://goo.gl/Gl9rm1 as it is the best option from our experience - we use it for
powering our templates live preview (perfectly as you see). We can guarantee the
equivalent performance it if you are using the same kind of server.
An ideal configuration of web server needed for this website will be:
1. Should be able to run PHP
2. Should support standard HTML5 web pages.
3. Should permit PHP email sending (Web Hosting Server Required).
4. Should support AJAX (Web Hosting Server Required).
5. Should support LESS technology (Web Hosting Server Required) to generate
dynamic CSS.
Page 11
Odin - Premium template by Designova

5. Bootstrap 3 Framework
This web template is completely built with Bootstrap 3 responsive (Mobile First)
framework, which is the best front-end development framework available at present. It is
very easy to edit the layout as well as for making any advanced customisation. Kindly
note, you have to familiarise Bootstrap’s native arrangements (it is easy) and short
codes before you proceed to advanced editing of markup. The default Bootstrap files are
kept inside:
[ROOT]/BOOTSTRAP/
This directory contains CSS, JS, FONTS etc.
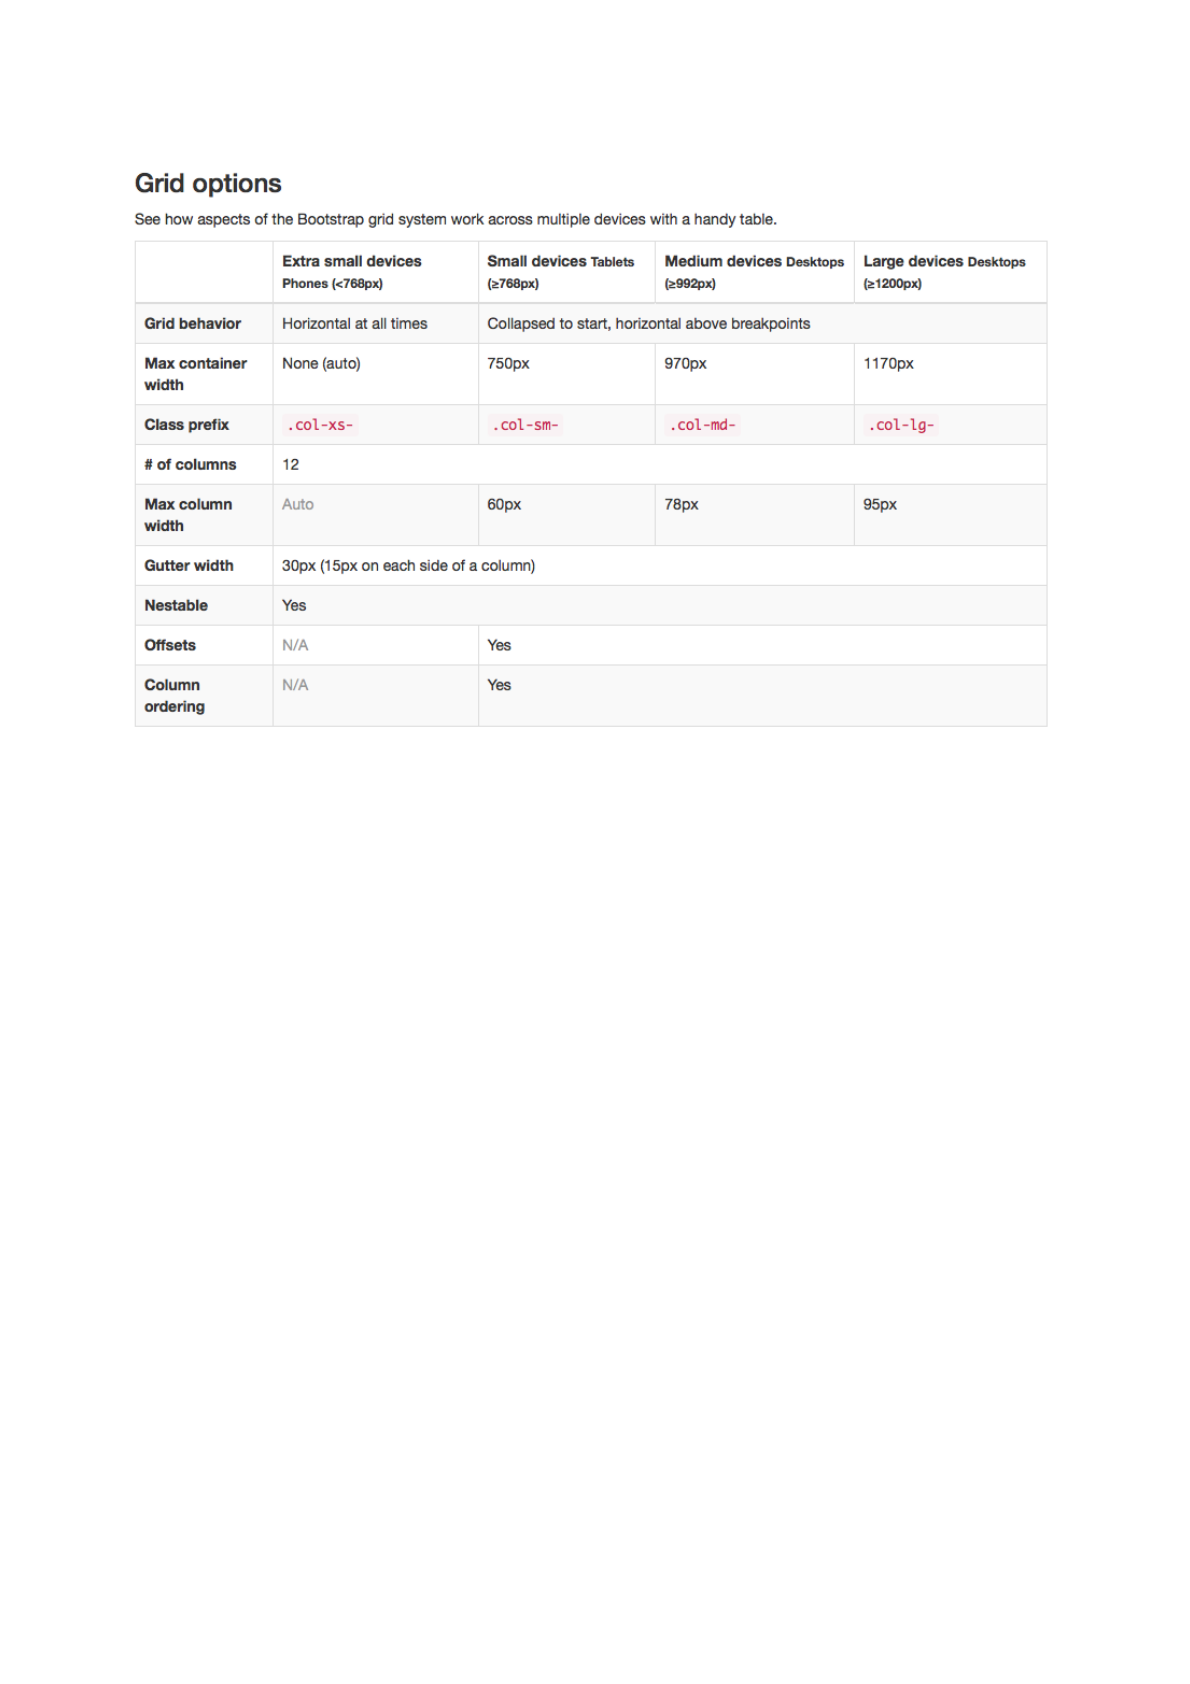
Bootstrap’s grid system
Bootstrap includes a responsive, mobile first fluid grid system that appropriately scales
up to 12 columns as the device or viewport size increases. It includes Grid Options with
predefined classes for easy layout options.
Page 12
Odin - Premium template by Designova
!
Page 13
Odin - Premium template by Designova
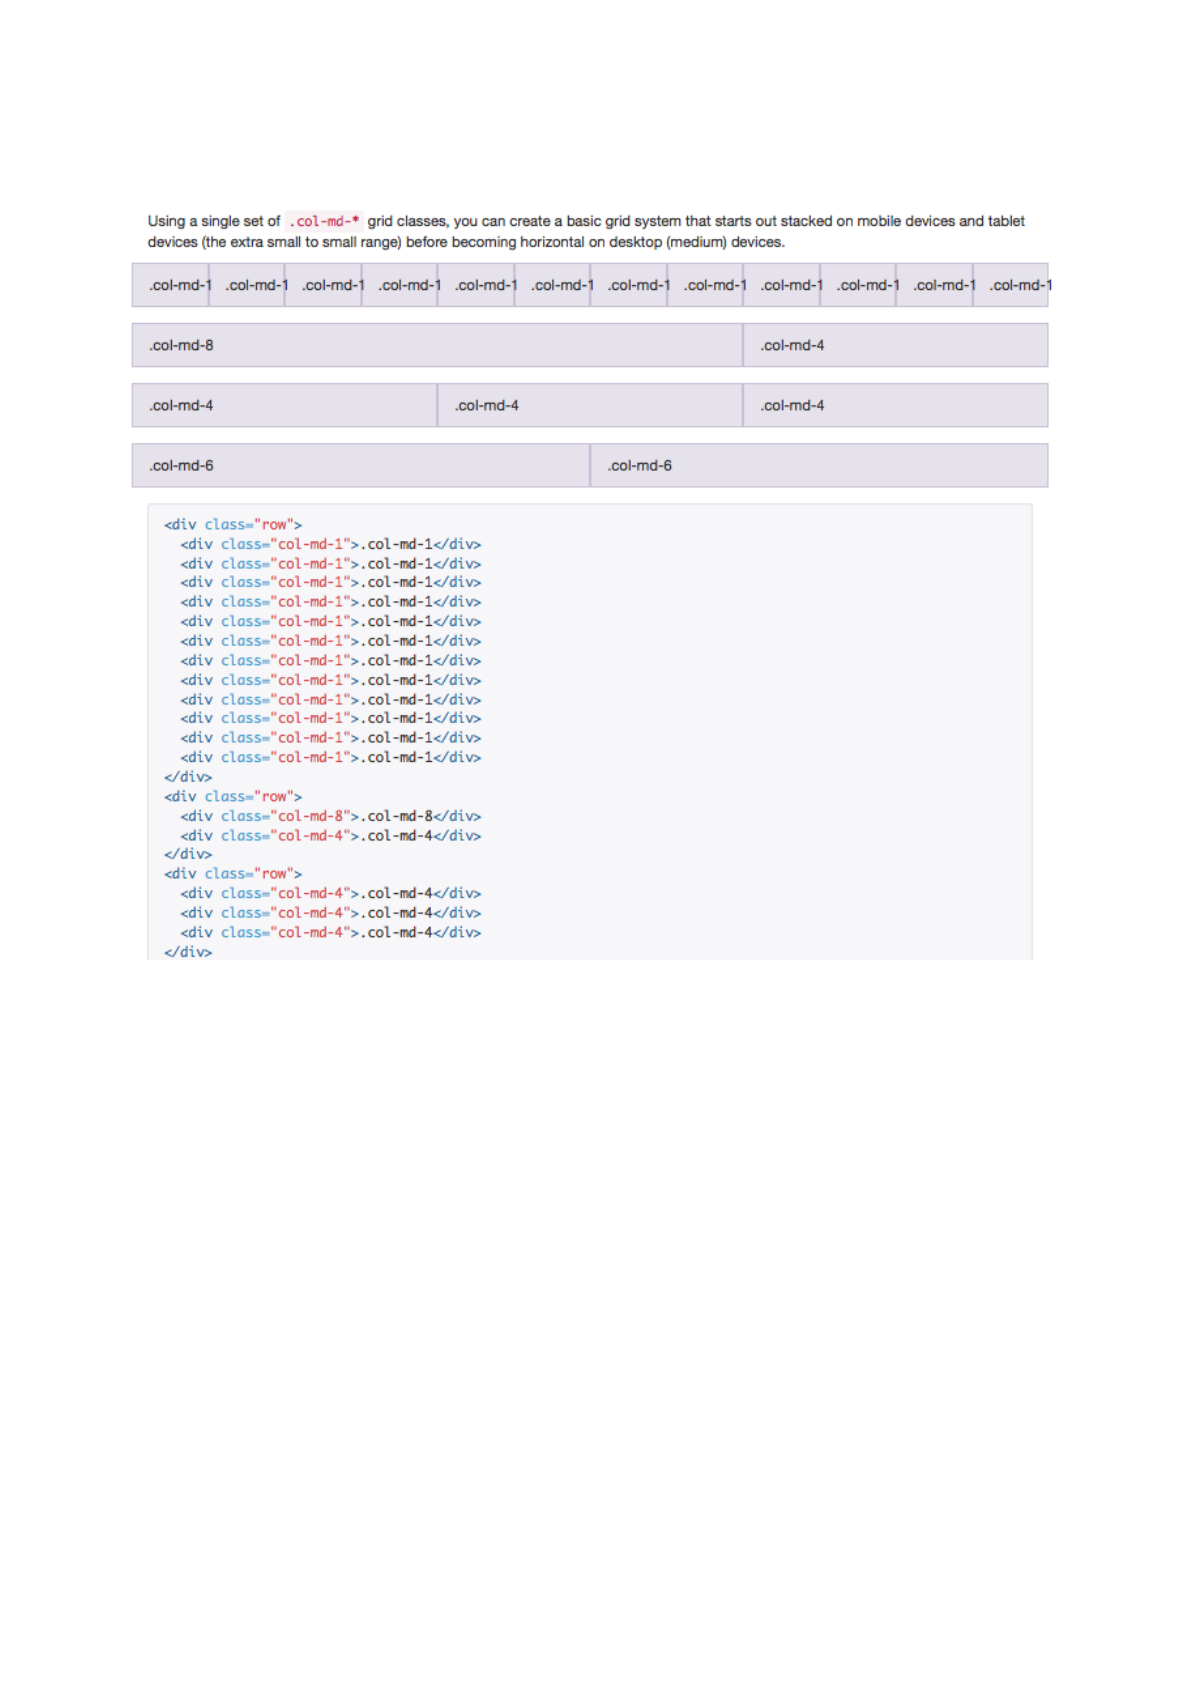
Setting up the Bootstrap 3 grid via HTML
Page 14
Odin - Premium template by Designova
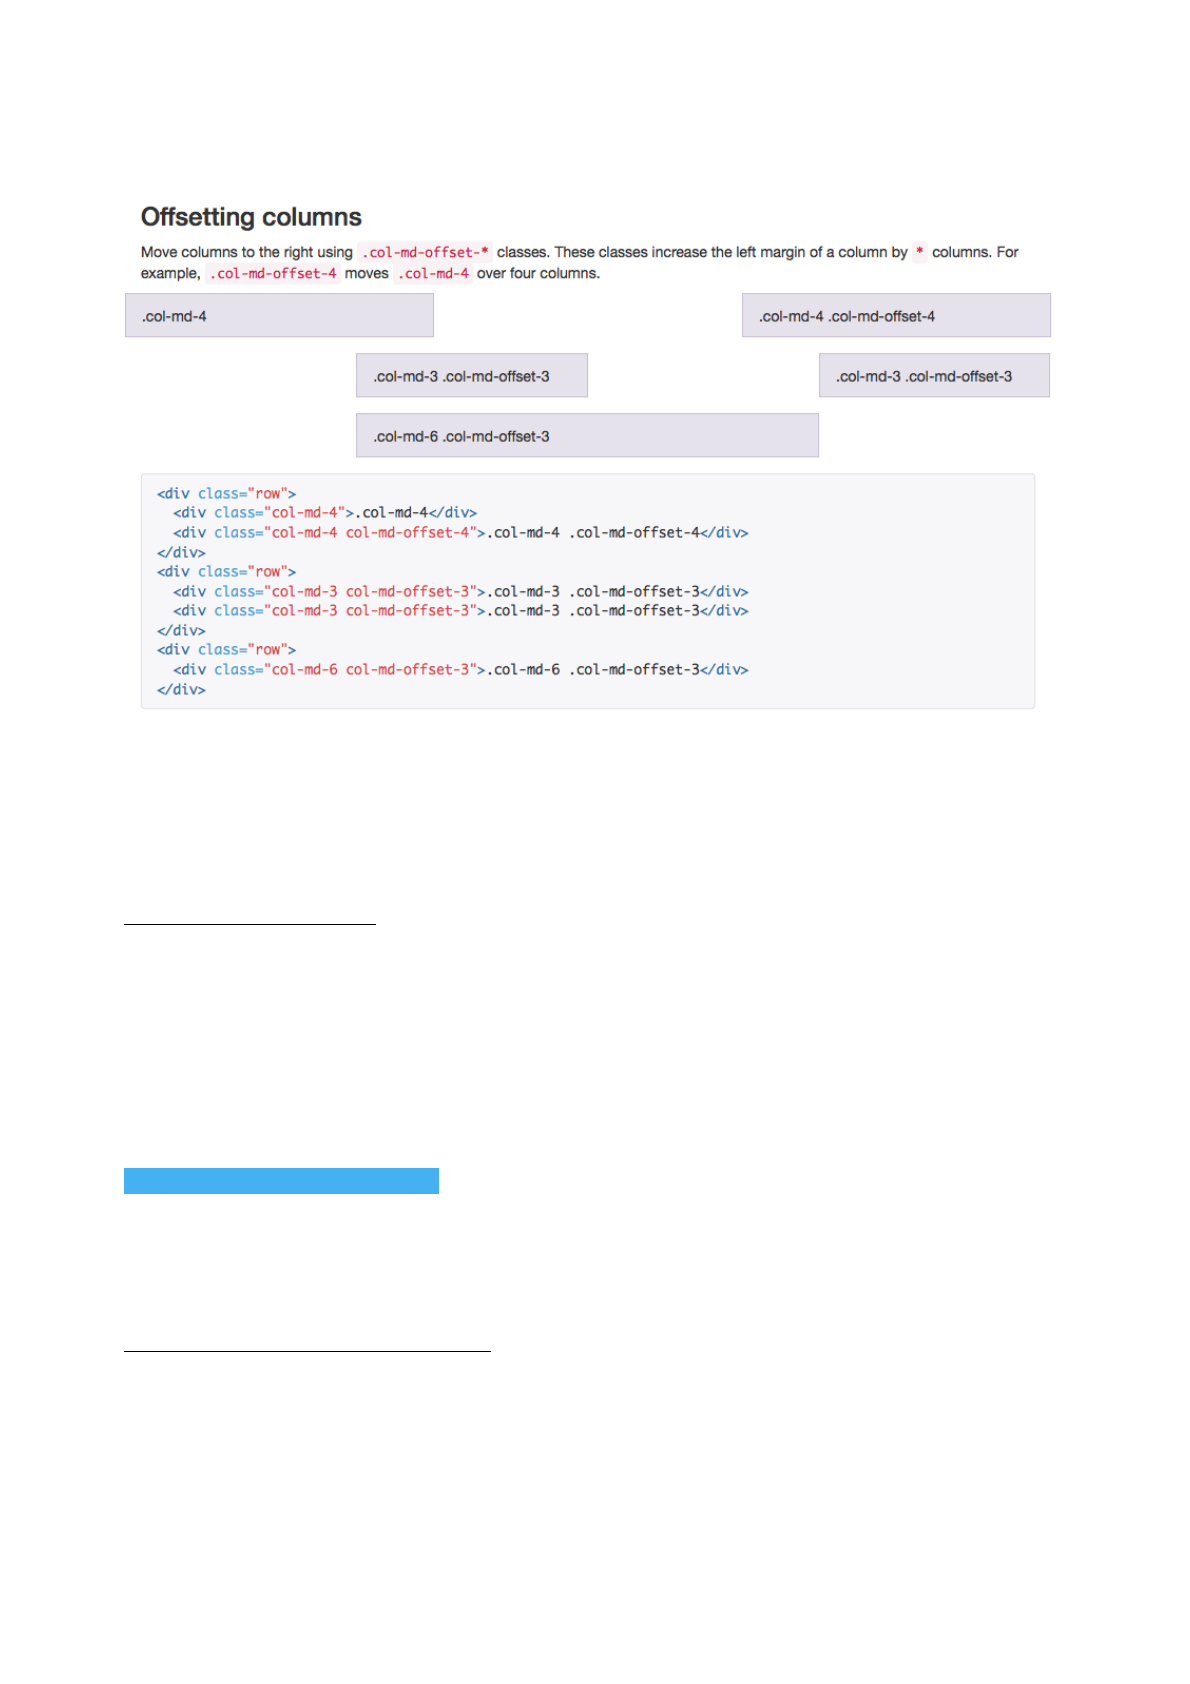
Bootstrap 3 for Offsetting columns
!
More Info About Bootstrap:
We are having page limitation to explain everything about Bootstrap here. So for more
information we refer to original documentation for Bootstrap, found here:
http://getbootstrap.com/
Upgrading Bootstrap on Future:
As Web is always changing day by day, we would like to keep our themes expandable
and adaptable to innovations. We have kept all assets and files related to Bootstrap
framework on a separate folder called ASSETS found on the following location:
[ROOT FOLDER]/BOOTSTRAP
Please replace the following files contained in this ‘ASSETS’ folder with your new files
coming from Bootstrap’s newly downloaded ZIP pack or the pack generated by
customisation options at Bootstrap website:
http://getbootstrap.com/customize/
Page 15
Odin - Premium template by Designova
6. Editing Colors (via LESS)
We use LESS technology to implement and modify the colors used in this template,
LESS gives possibility to add Unlimited Colors to this template along with in-depth colour
scheme setup option.
IMPORTANT NOTE:
This feature (LESS) requires you to upload your edited site to a web server (or) local
host in order to work properly. But if you check it by just opening static HTML files in a
browser you may not be able to see colors and background colors. This is not a bug.
Instead please upload entire website to a web server (or) local host and check the
preview from there. Everything will work properly then, we have tested it and 100% OK.
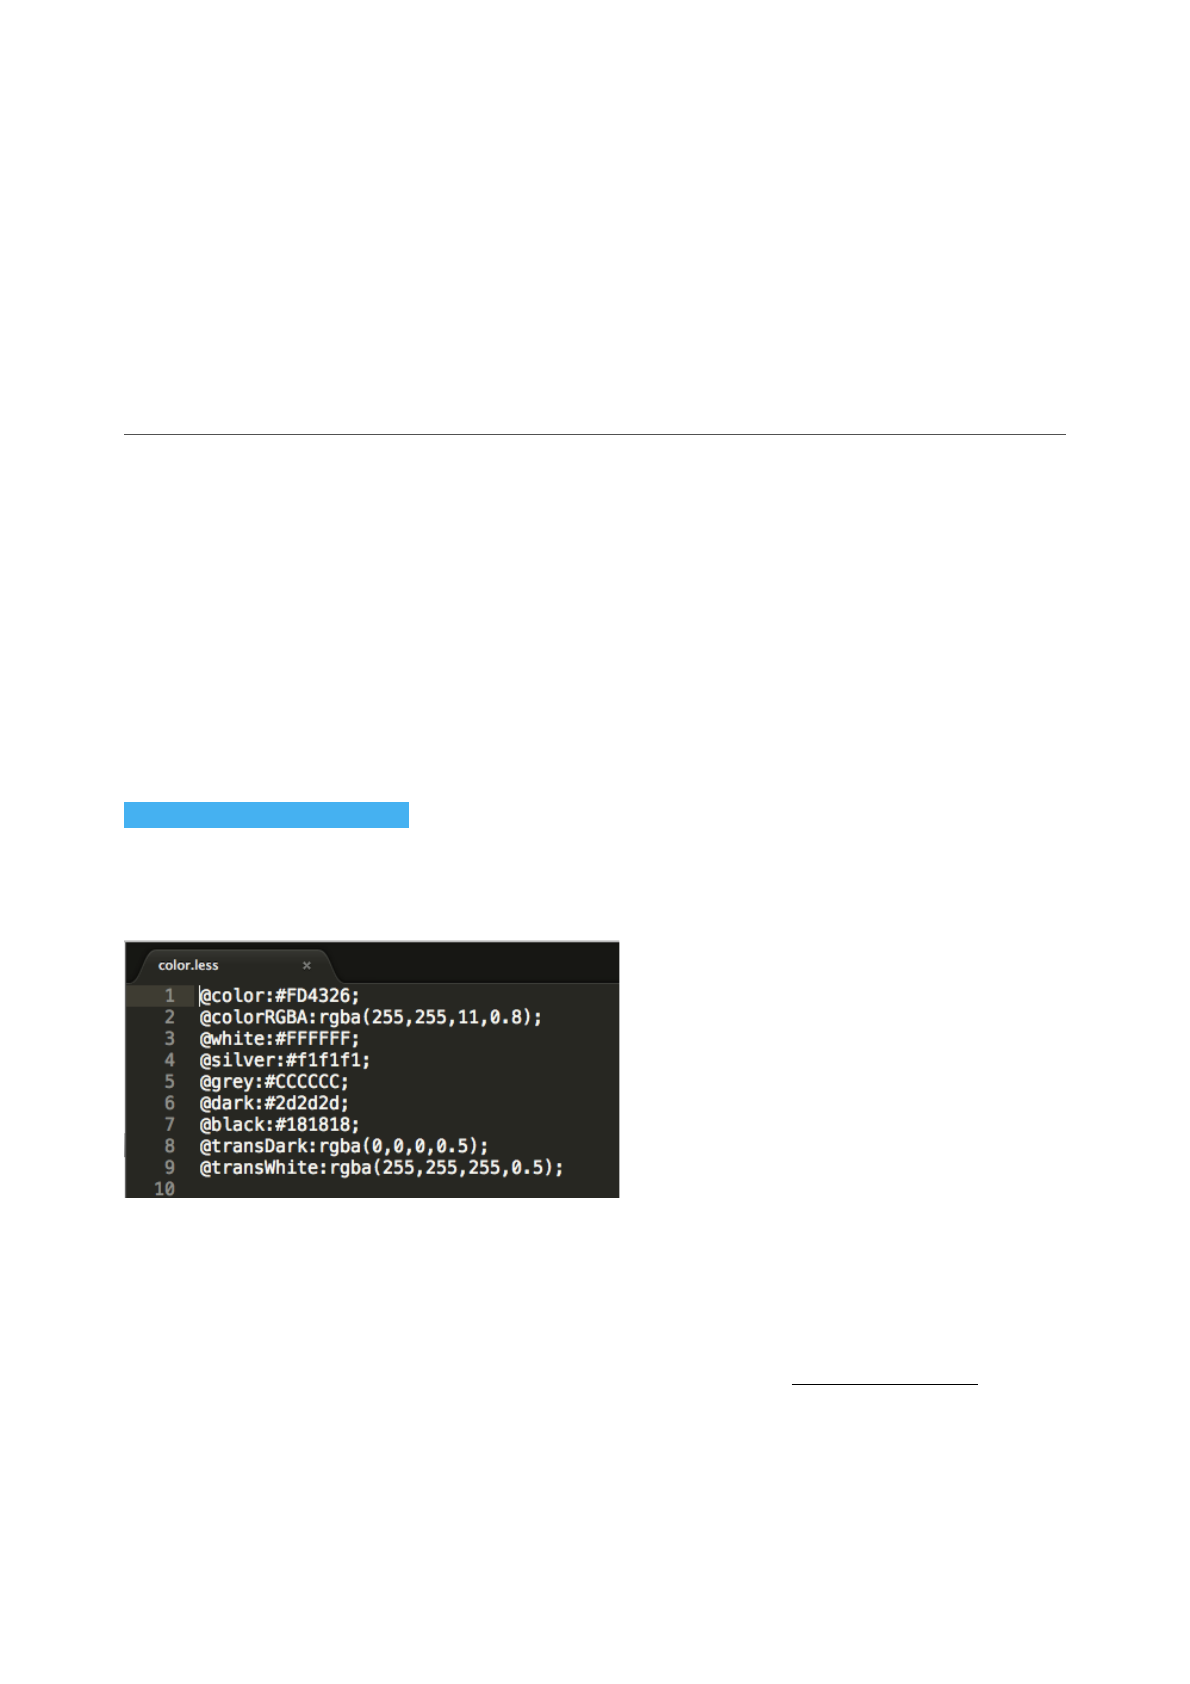
This template features LESS for changing color schemes with a single line of css. For
example, please see the following file:
[ROOT]/LESS/COLOR.LESS
In this file you can see the following 4 Color controllers along with 3 Grey- scale
controllers:
These values will hold color schemes
for entire layout. If you like to create a
new color scheme simply change to
your preferred color value (we mean
HEX values in standard CSS rules) to
any Controller variable. After editing it
you have to save the file.
Please make sure that you have activated this edited LESS file by loading it via markup
for initialization on HEAD tag of HTML5 page, as shown below:
For more info about LESS, please see original documentation: http://lesscss.org/
We have used some demo LESS files only for demo purpose. They are files such as:
COLOR-YELLOW.LESS etc. But these can be removed without any worries (YOU DO
NOT NEED THEM). You only need to use a single file such as COLOR.LESS file, which
contains your own preferred color value set (as explained above).
Page 16
Odin - Premium template by Designova
Step by step instructions on setting colors with LESS
stylesheets:
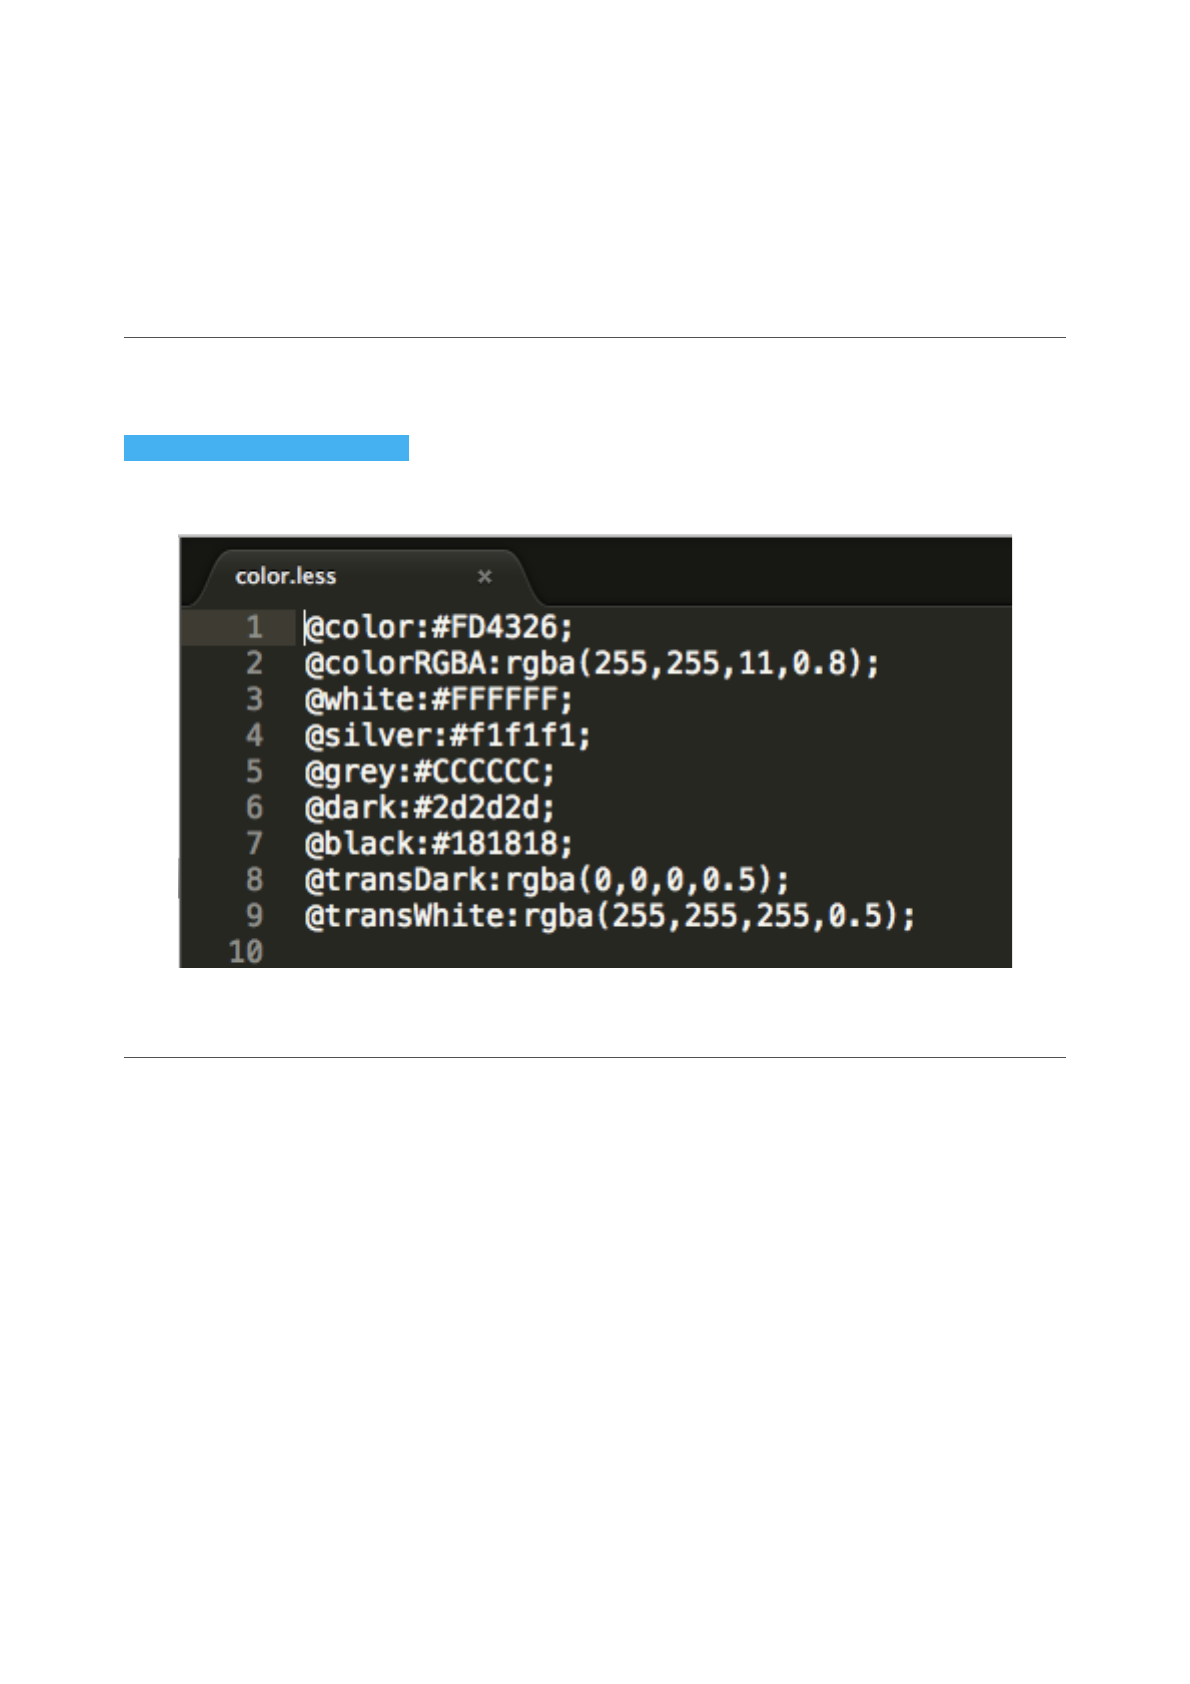
STEP 1:
Open the following file:
[ROOT]/LESS/COLOR.LESS
And set your color value inside Color Controller variable, for example:
STEP 2:
Open your preferred HTML file and trace the following code inside HEAD tag:
<!-- LESS stylesheet for managing color presets --> <link rel="stylesheet/less"
type="text/css" href=“less/color.less”>
This will activate the selected LESS file and everything will work properly.
Page 17
Odin - Premium template by Designova
FOR BETTER PERFORMANCE, ALWAYS COMPILE LESS
TO CSS:
Most modern browsers and servers can handle LESS rendering perfectly. But there may
be some exceptions. So we recommend you to use LESS on development environment
only. This means, you can use LESS to edit colors or fonts in this website and once all
editing is finished you have to compile LESS rules to CSS rules and add it to website
stylesheet. The procedure is explained as below:
Step 1:
Once your LESS file is all set with your preferred modifications or additions, you should
save the file on your system. Now Go to any online LESS compiler tools such as http://
winless.org/online-less-compiler
Step 2:
You can copy all rules from your LESS files (such as COLOR.LESS and FONT.LESS)
and paste these LESS rules in the compiler window. Then generate the CSS equivalent
rules using the compiler. Copy the CSS rules and paste it inside the following CSS file:
[ROOT]/STYLESHEETS/MAIN.CSS
(you MUST paste them at the end of file, that is after all rules present inside this file.
Please do not remove any existing rules.)!
Step 3:
Now you can deactivate all LESS related files in your web pages simply by commenting
those lines in HTML markup. The site will load from CSS instead of LESS.
In short, we can summarise the whole procedure as below:
1. Locate your LESS files (in LESS directory).!
2. Edit all colors and fonts as you like.!
3. After all editing, copy entire LESS rules from the files.!
4. Paste these rules inside http://winless.org/online-less-compiler LHS area for LESS
insertion!
5. Compile winless and you get CSS equivalent of LESS rules.!
6. Copy the generated CSS rules!
7. Now paste them within MAIN.CSS file (you MUST paste them at the end of file, that
is after all rules present inside this file. Please do not remove any existing rules.)!
8. Now you can deactivate LESS functionality, by simply removing the codes related to
LESS. You can either remove the code manually or just comment the code.!
9. Now your site will be quickly loading CSS instead of generating LESS on your server.!
Page 18
Odin - Premium template by Designova

GOOGLE WEB FONTS:
CHANGING / ADDING A NEW FONT FAMILY
This template is powered by Google Web Fonts library to execute fonts rendering. So,
in order to setup font families you have to choose it from Google Web Fonts. You can
learn more about this from online tutorial:
https://developers.google.com/fonts/docs/getting_started#
Page 19
Odin - Premium template by Designova
7. Replacing Placeholder Images
DOWNLOAD THE PREVIEW IMAGE PACK:
If you find it difficult to replace placeholder images in your website,
please click here to request the pack of original live preview for this
template. You can easily replace those preview images with your own.
Once you download the template from themeforest you may notice that Live preview
images (as you see in our demo) is not included in the pack. This is because
themeforest does not permit us including stock images within the template pack they
provide to you. We have provided placeholder images instead of such stock images, we
have generated placeholders via an online service: http://placehold.it/
For example, an image may be defined as a placeholder like:
<img src=“http://www.placehold.it/1000x570.jpg”/>
Now, you have to make your own image with a dimension as:
WIDTH = 1000px
HLogic = 570px
Format = JPG.
and replace the URL as your own image. For example:
Page 20
Odin - Premium template by Designova

<img src=“your_image.jpg”/>
Like this you can simply replace any placholder image with your own images with similar
dimensions and file format. Also keep them in the same directory structure if specified in
the markup or CSS rules for such images.
PLEASE NOTE:
Images are usually supplied via HTML markup itself, for example <IMG> tag. So please
locate such images in source markup of HTML files. BG Images are usually supplied via
CSS file, in this template we have arranged the BG images in the following CSS file:
[ROOT]/STYLESHEETS/MAIN-BG.CSS
But in some cases the images will be supplied by JS files, for example in Fullscreen BG
Slideshows. So please read the documentation information related to each module to
locate the actual images supplied via their code.
Retina Ready (High Resolution) Images:
The template is High Resolution Ready means it features a script known as Retina.JS
which makes it easy to serve high-resolution images to devices with retina displays.
When your users load a page, retina.js checks each image on the page to see if there is
a high-resolution version of that image on your server. If a high-resolution variant exists,
the script will swap in that image in-place. The script assumes you use Apple's
prescribed high-resolution modifier (@2x) to denote high-resolution image variants on
your server. For example, if you have an image on your page that looks like this:
<img src="/images/my_image.png" />
The script will check your server to see if an alternative image exists at this path:
"/images/my_image@2x.png"
You have to supply high definition (@2x variation) images which should have Double
Width and Double Height of your original image dimensions. Once such @2x images are
located, the plugin will render it.
Important, please note:
If the markup has “data-no-retina” attribute associated with any IMG tag found in this
template, you should remove this “data-no-retina” to enable Retina rendering for that
element.!
Page 21
Odin - Premium template by Designova
8. Setting Up Navigations
This web template is completely editable and configurable according to your needs. Let’s
start by the navigation first. This template features 2 types of navigations.
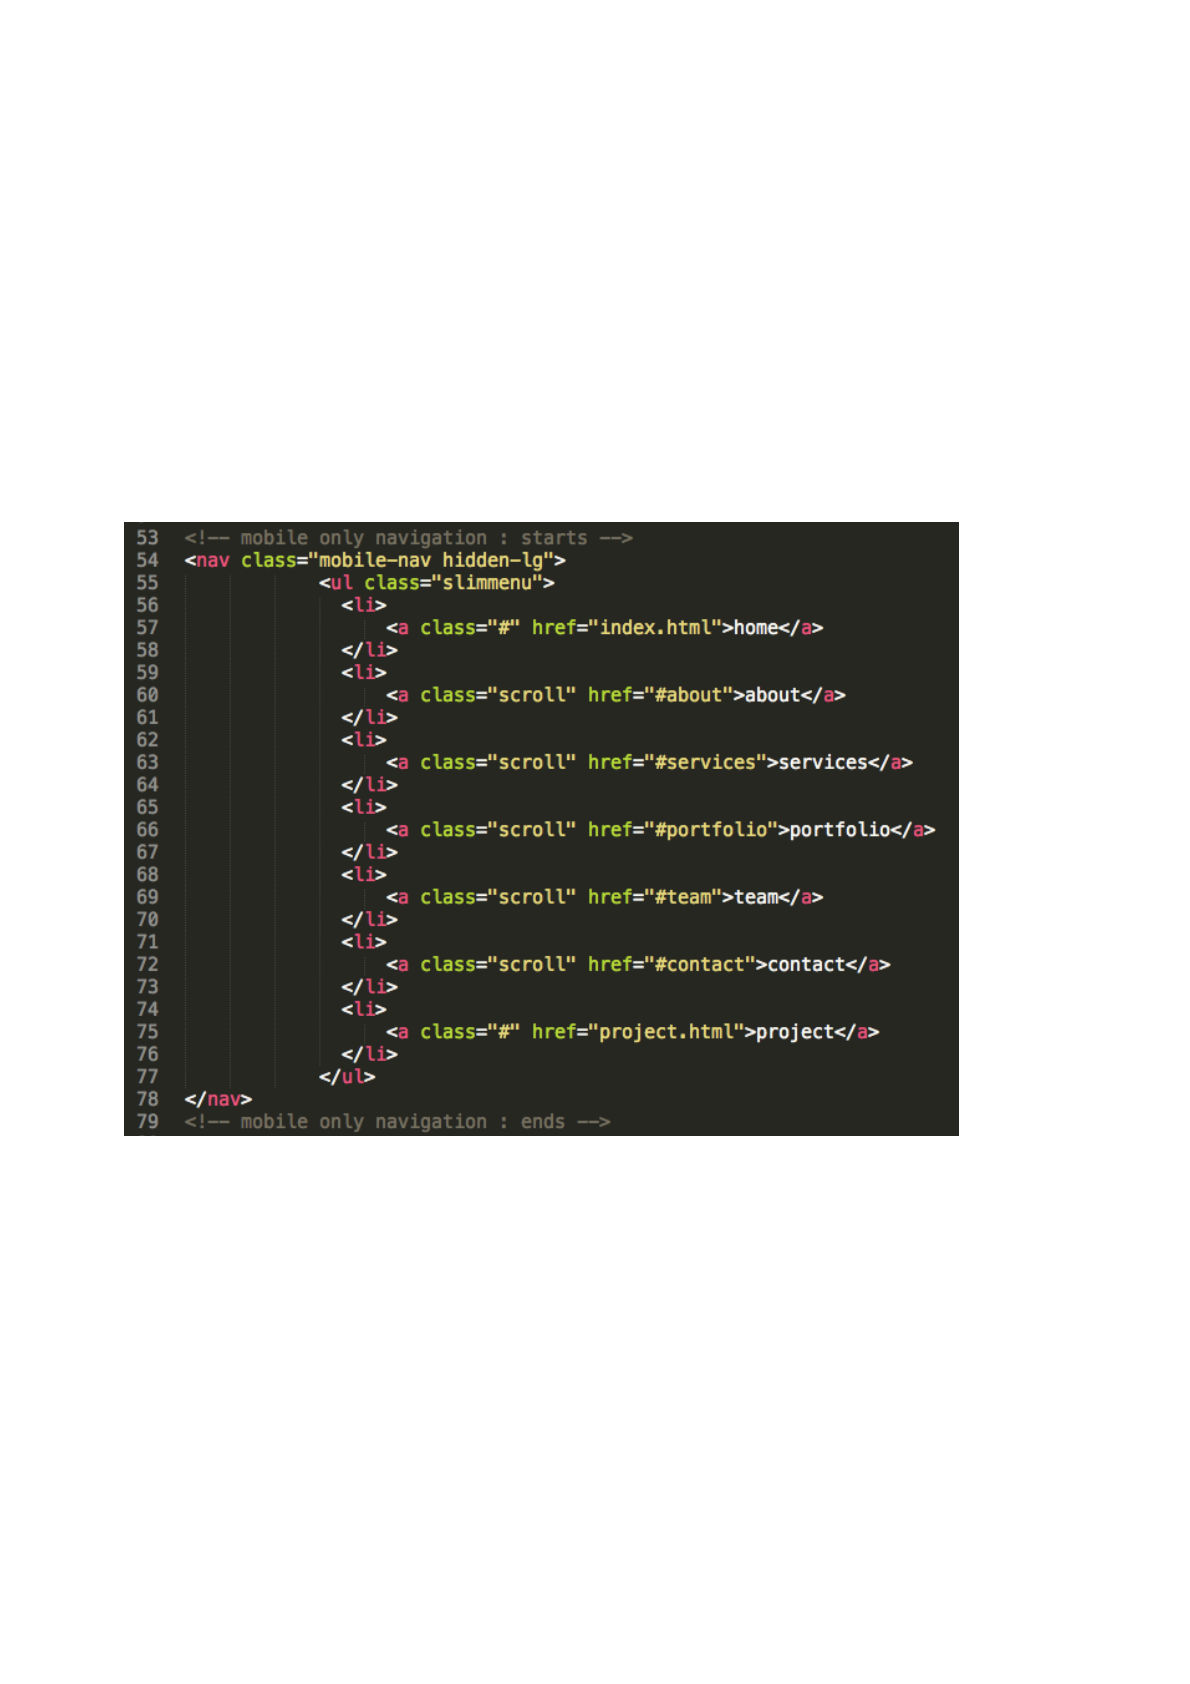
Setting Up The Mobile Navigation (Only for Mobile and
Tablets)
This can be set like shown below:
Setting Up Standard Navigation (Only for Desktop)
This template features also a standard navigation menu (2 instances of header + menu
is present within the template, one is visible for default INTRO screen and another is
visible when user scrolls to inner sections, hence you have to set 2 menu in same
manner. This is useful if you need both of these header to be look different in terms of
visual feel depending on the website’s intro and inner section styles). In order to set the
navigations please see:
Page 22
Odin - Premium template by Designova
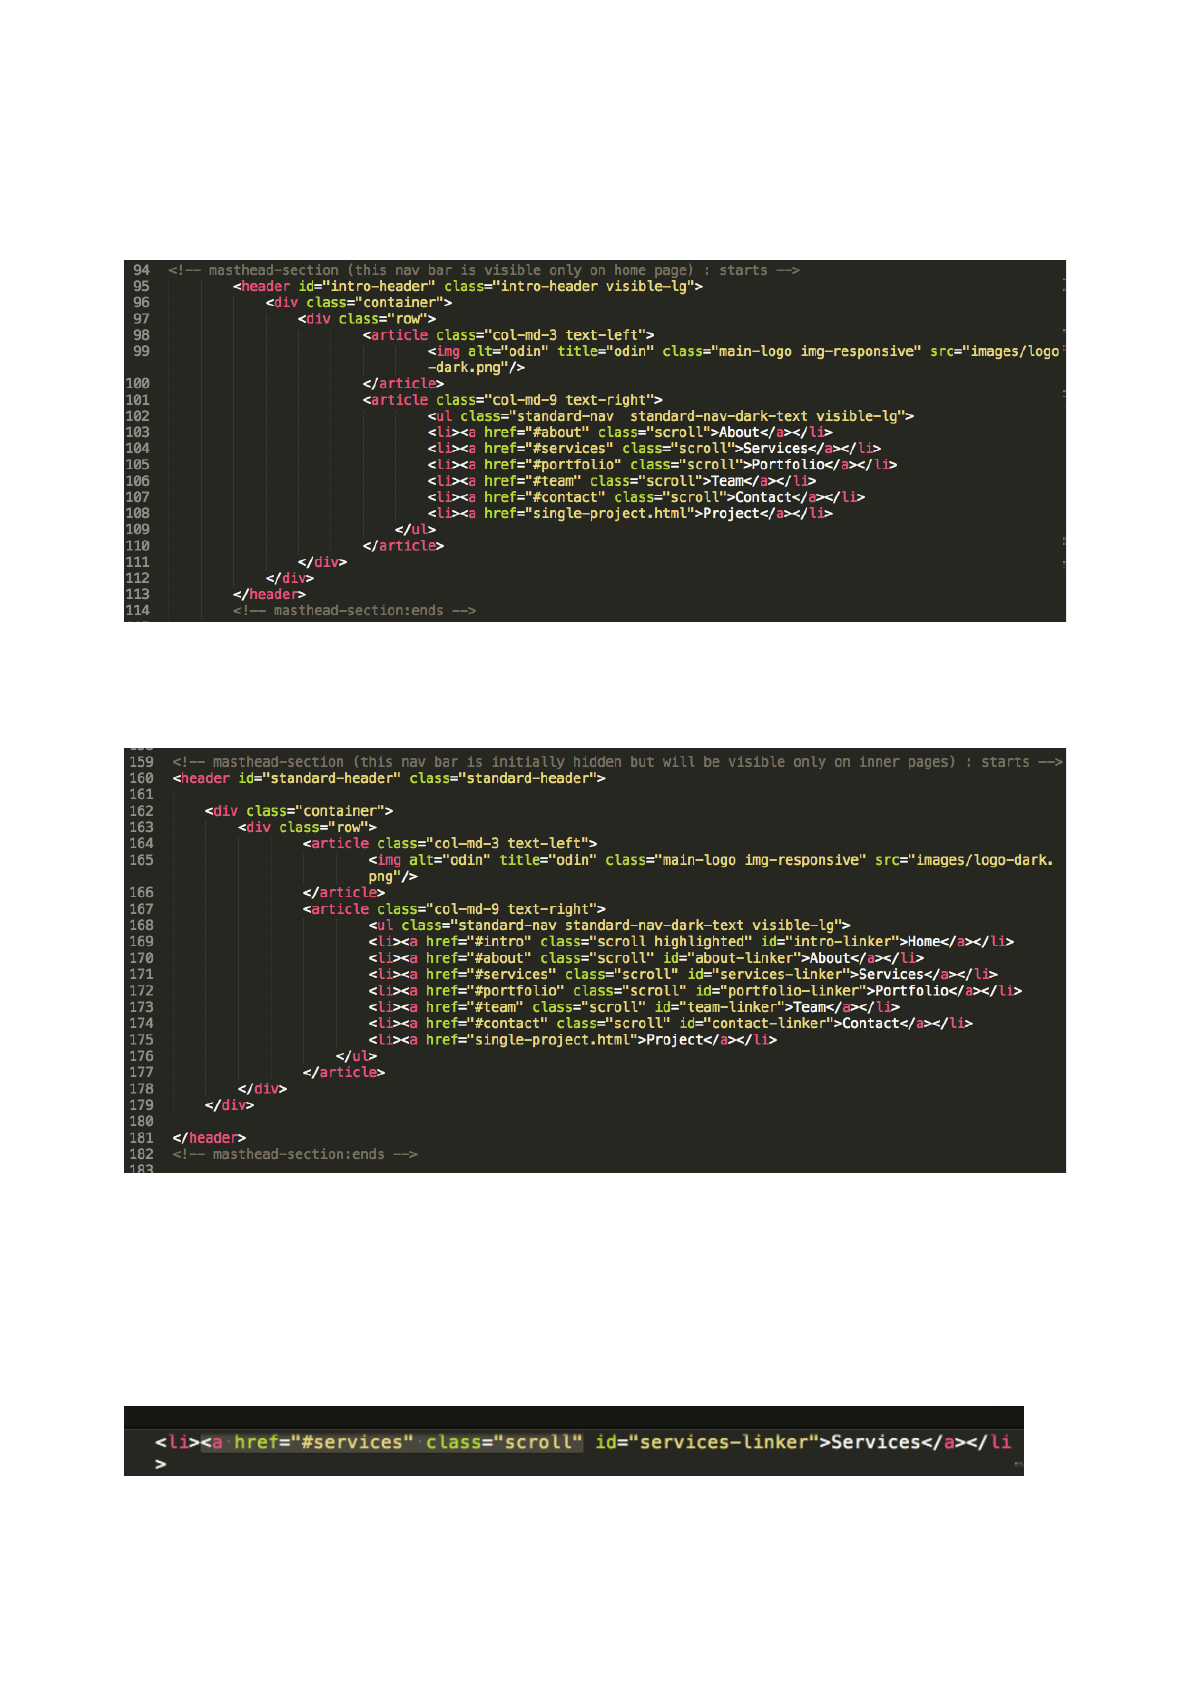
1. Home / Intro view header + navigation:
2. Inner Sections view header + navigation:
Setting Up ‘Scroll Down’ Action on Navigation Links:
In order to set a scroll down navigation action on clicking any navigation link (the page
will be scrolled to the destination section), please do the following:
Page 23
Odin - Premium template by Designova

Here the HREF holds the target section where the page should be scrolled to (usually,
#sectionID. And you have to add CLASS=“SCROLL” to this Anchor Tag (exactly as
shown above). This will scroll down page to the destination section when the particular
link is clicked.
IMPORTANT NOTE:
The CLASS=“SCROLL” should not be used on any other links rather than ‘scroll down’
links. For example, if you are planning to open a URL / other web page when user clicks
on a link, the link’s Anchor Tag should NOT have the CLASS=“SCROLL” associated with
it.
9. Setting Up Featured Modules
This template features some interactive components powered by jQuery and CSS3. If
you have fair understanding of these technologies (advanced users) you can modify the
modules to any levels as you like.
1. Full Screen Carousel
This template features full screen carousels on intro sections which is powered by JS
Plugin: http://owlgraphic.com/owlcarousel/
The BG images are actually set via CSS. In order to change the BG images please
check relevant sections defined via CSS inside:
[ROOT]/STYLESHEETS/MAIN-BG.CSS
In order to replace (add / remove) slide sections you have to modify the markup found
inside any home variant HTML files having the module. For example:
Page 24
Odin - Premium template by Designova
IMPORTANT NOTE:
For advanced editing of this section we recommend you to follow the instructions found
in original plugin user guide here: http://www.owlcarousel.owlgraphic.com/
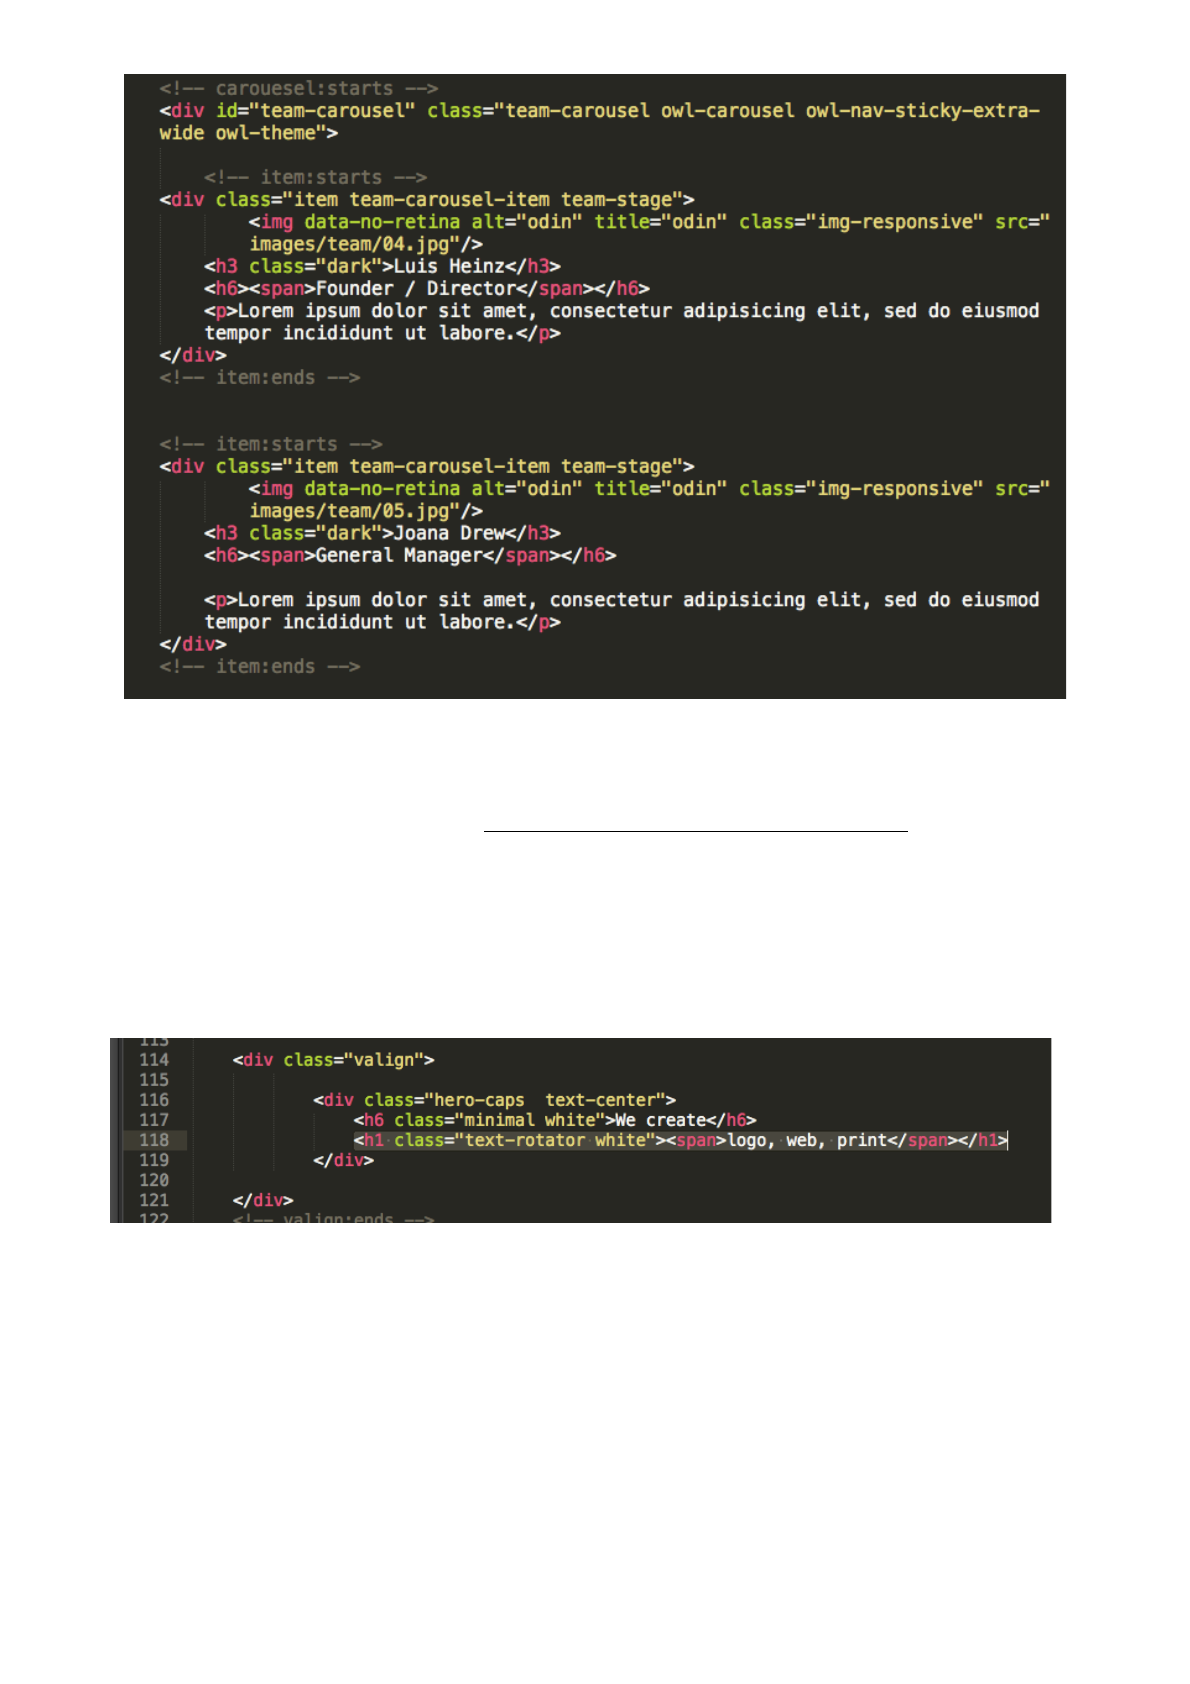
2. Text Ticker / Text Scroller
This template features text ticker module which is very simple but hardly plugin. The
ticker (scrollable) texts are supplied via HTML markup within SPAN tag and COMMA
separated as highlighted above.
For example, the above code sets the following words as Scrollable Text Elements.
<span>logo, web, print</span>
Page 25
Odin - Premium template by Designova
3. SLIDER REVOLUTION (Premium) - Ultimate Slider
This template features the most popular premium plugin Slider Revolution with Ken
Burns effect and Vertical Slide effect, also many more possibilities. The instructions for
setting up the plugin, creating any kind of slider and modifying the slider etc. are
explained in the original documentation of this plugin (these topics are beyond the scope
of our PDF guide, but covered very well in the original plugin documentation). The
complete plugin documentation for Slider Revolution can be accessed here:
http://designova.net/guides/rs/documentation.html
4. Fullscreen BG Video
This template also features full screen BG video in the intro / home area. You can set
both Youtube or Vimeo video URL.
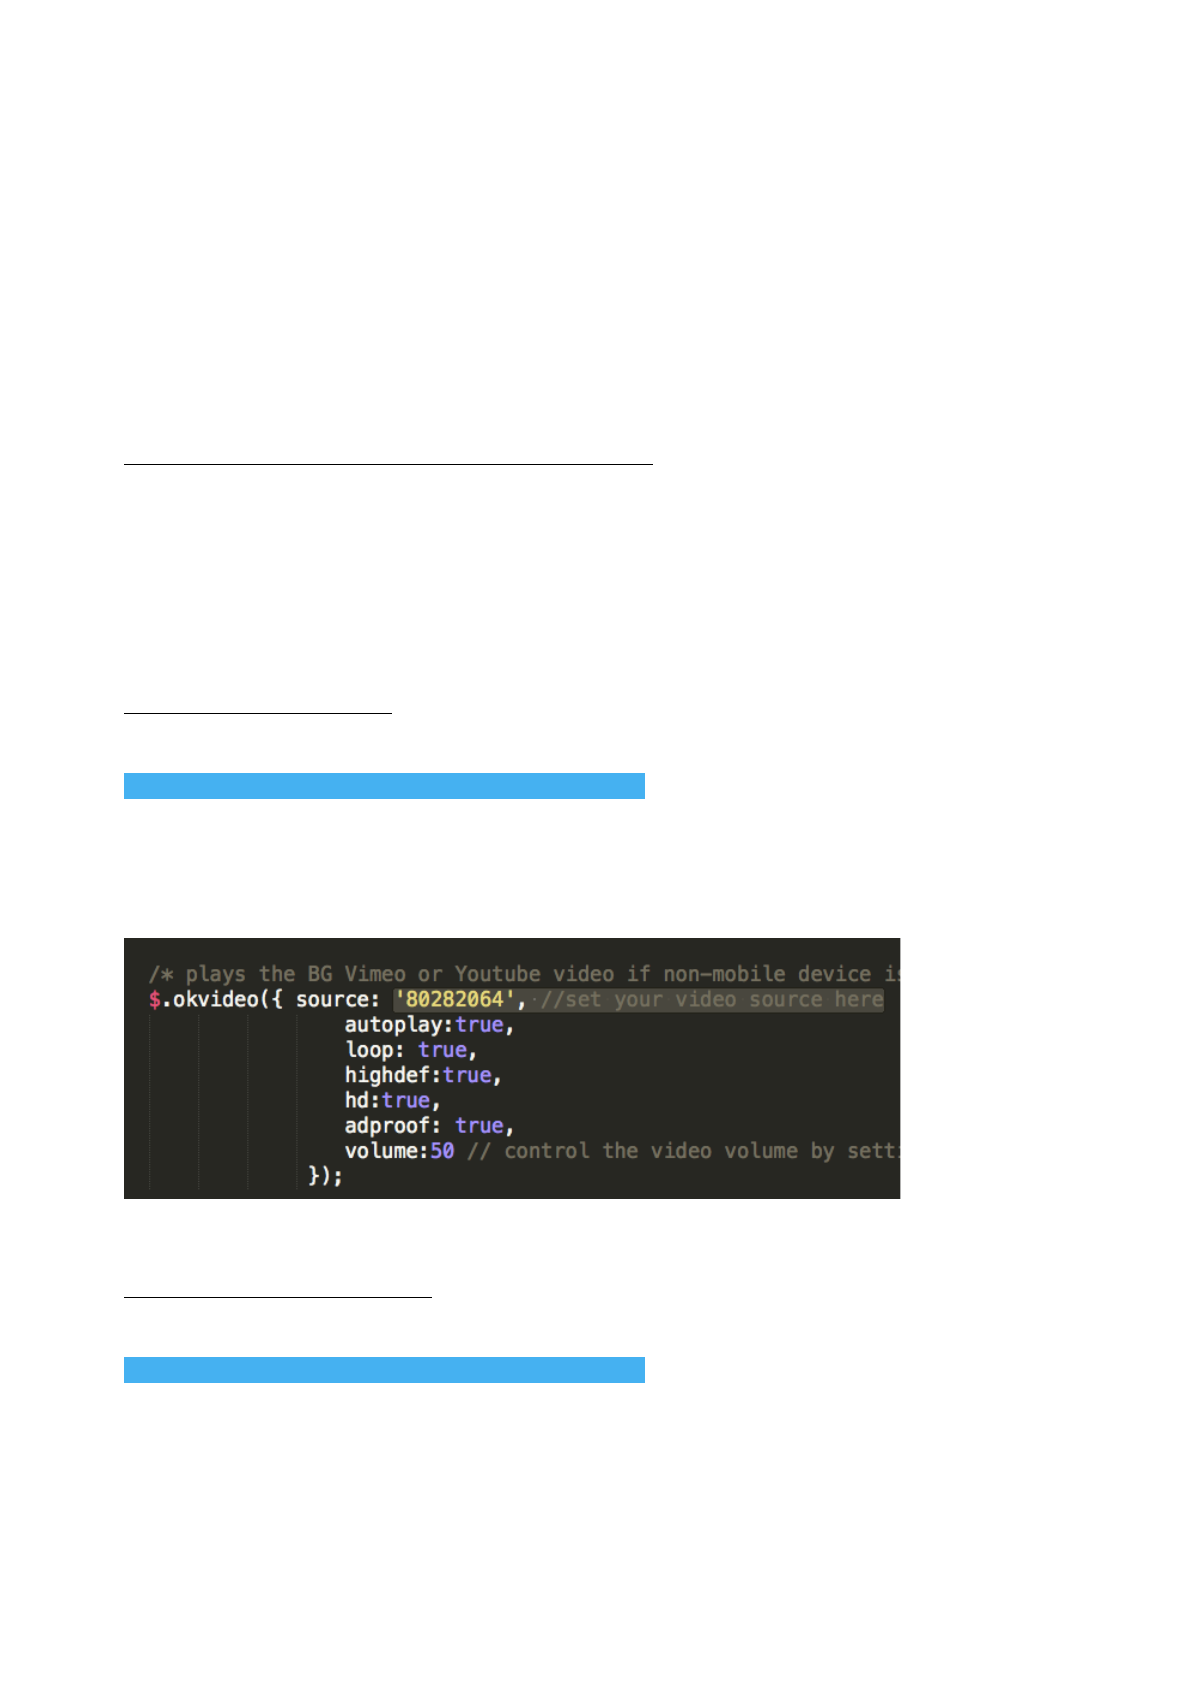
ADDING VIMEO VIDEO:
Open the file:
[ROOT]/JAVASCRIPTS/CUSTOM/BGVIDEO-INIT.JS
and find the following line of code, there you can simply supply the Video ID (vimeo ID or
URL) of video, it will be played easily:
ADDING YOUTUBE VIDEO:
Open the same file:
[ROOT]/JAVASCRIPTS/CUSTOM/BGVIDEO-INIT.JS
Page 26
Odin - Premium template by Designova
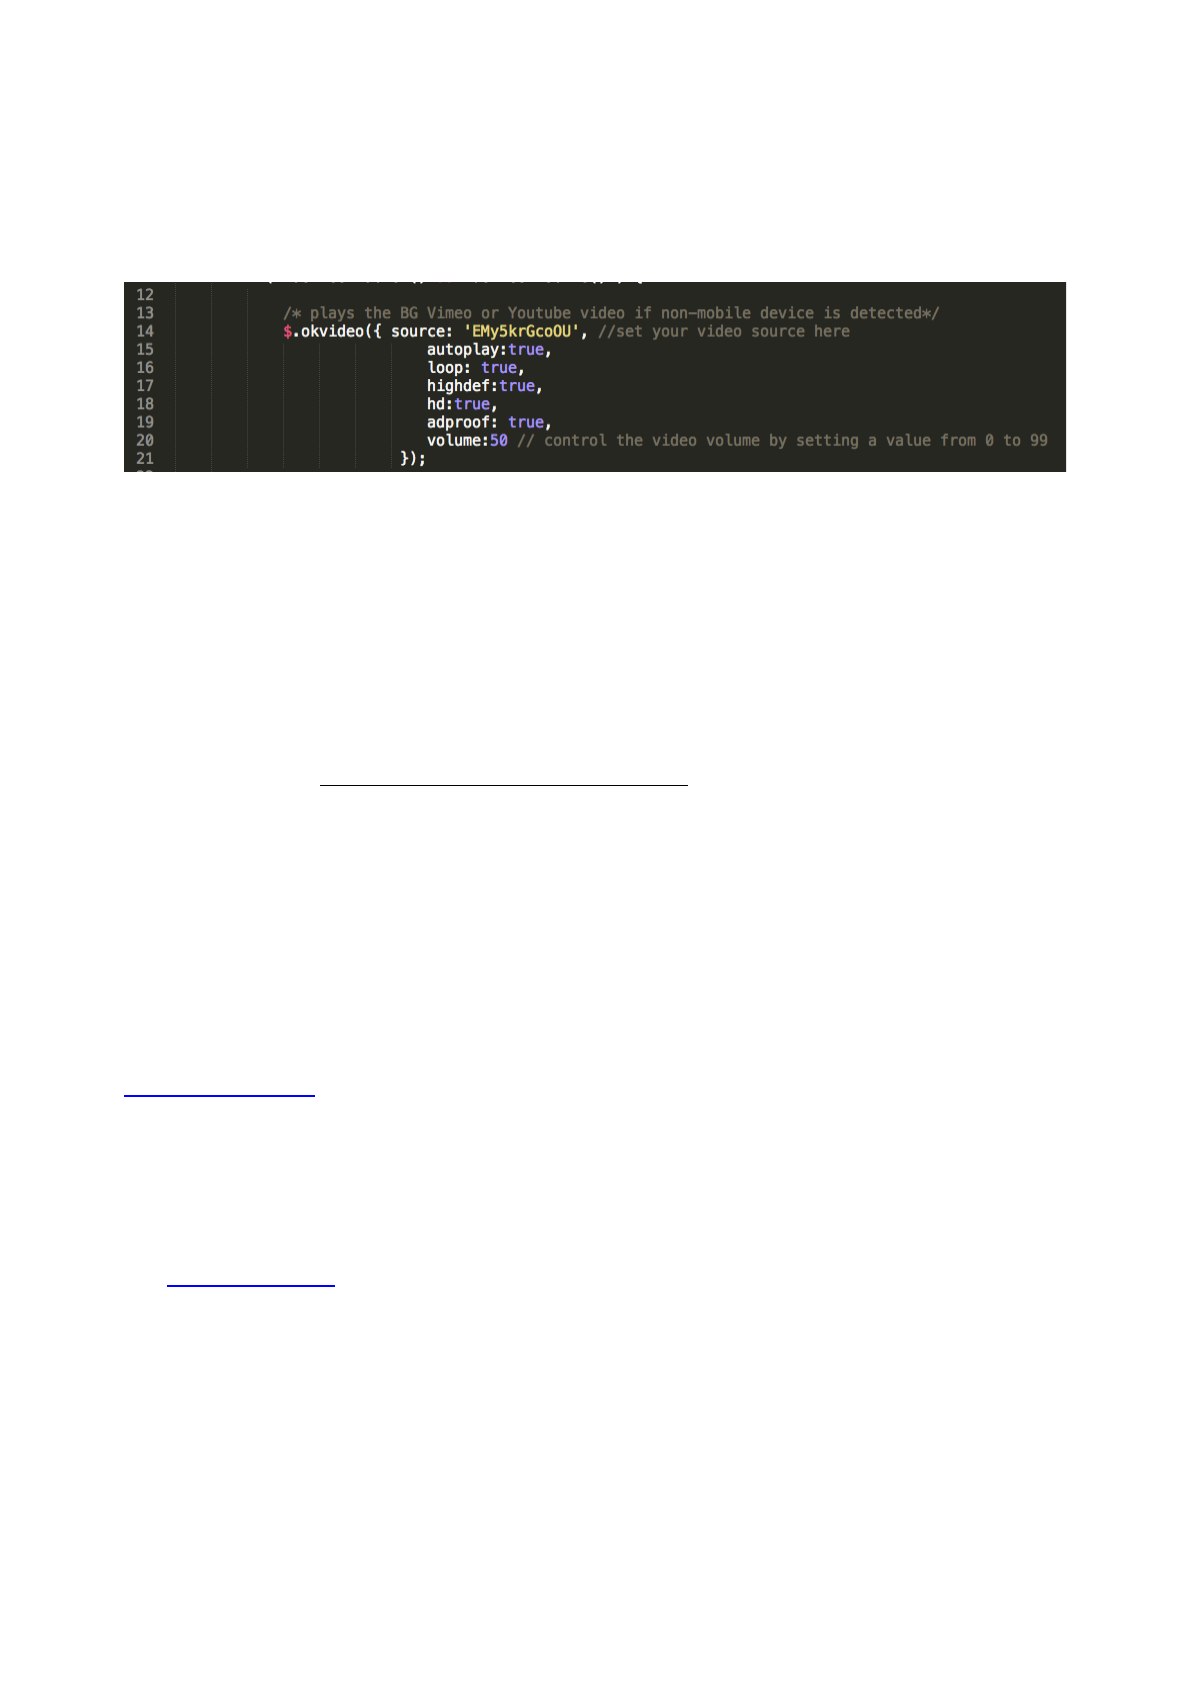
and add the following line of code instead of vimeo, here we are simply supplying the
URL (youtube URL OR id of the video) of video, it will be played once you upload the site
to a web server:
IMPORTANT NOTE:
Youtube video will be played only from live web server (not from Local Host). So please
upload your site to a web server and test it from online. The video will work.
If you need more options such as audio controls, looping etc. please refer to original
plugin user guide: https://github.com/okfocus/okvideo
5. WORKS: Filterable Portfolio & Lightbox
This module is very useful to show a typical creative portfolio, which is powered by
jQuery plugin MixItUp.
http://mixitup.io/
MixItUp can be applied to any type of elements within a container, such as an
unordered list. Your container should have a unique ID (e.g. 'Grid') that we will use
to instantiate MixItUp in your JavaScript. By default, MixItUp will apply itself only to
elements within your container with the class 'mix', but this can be changed with
the 'targetSelector' configuration option. An example portfolio thumbnail block code
is shown below:
Page 27
Odin - Premium template by Designova
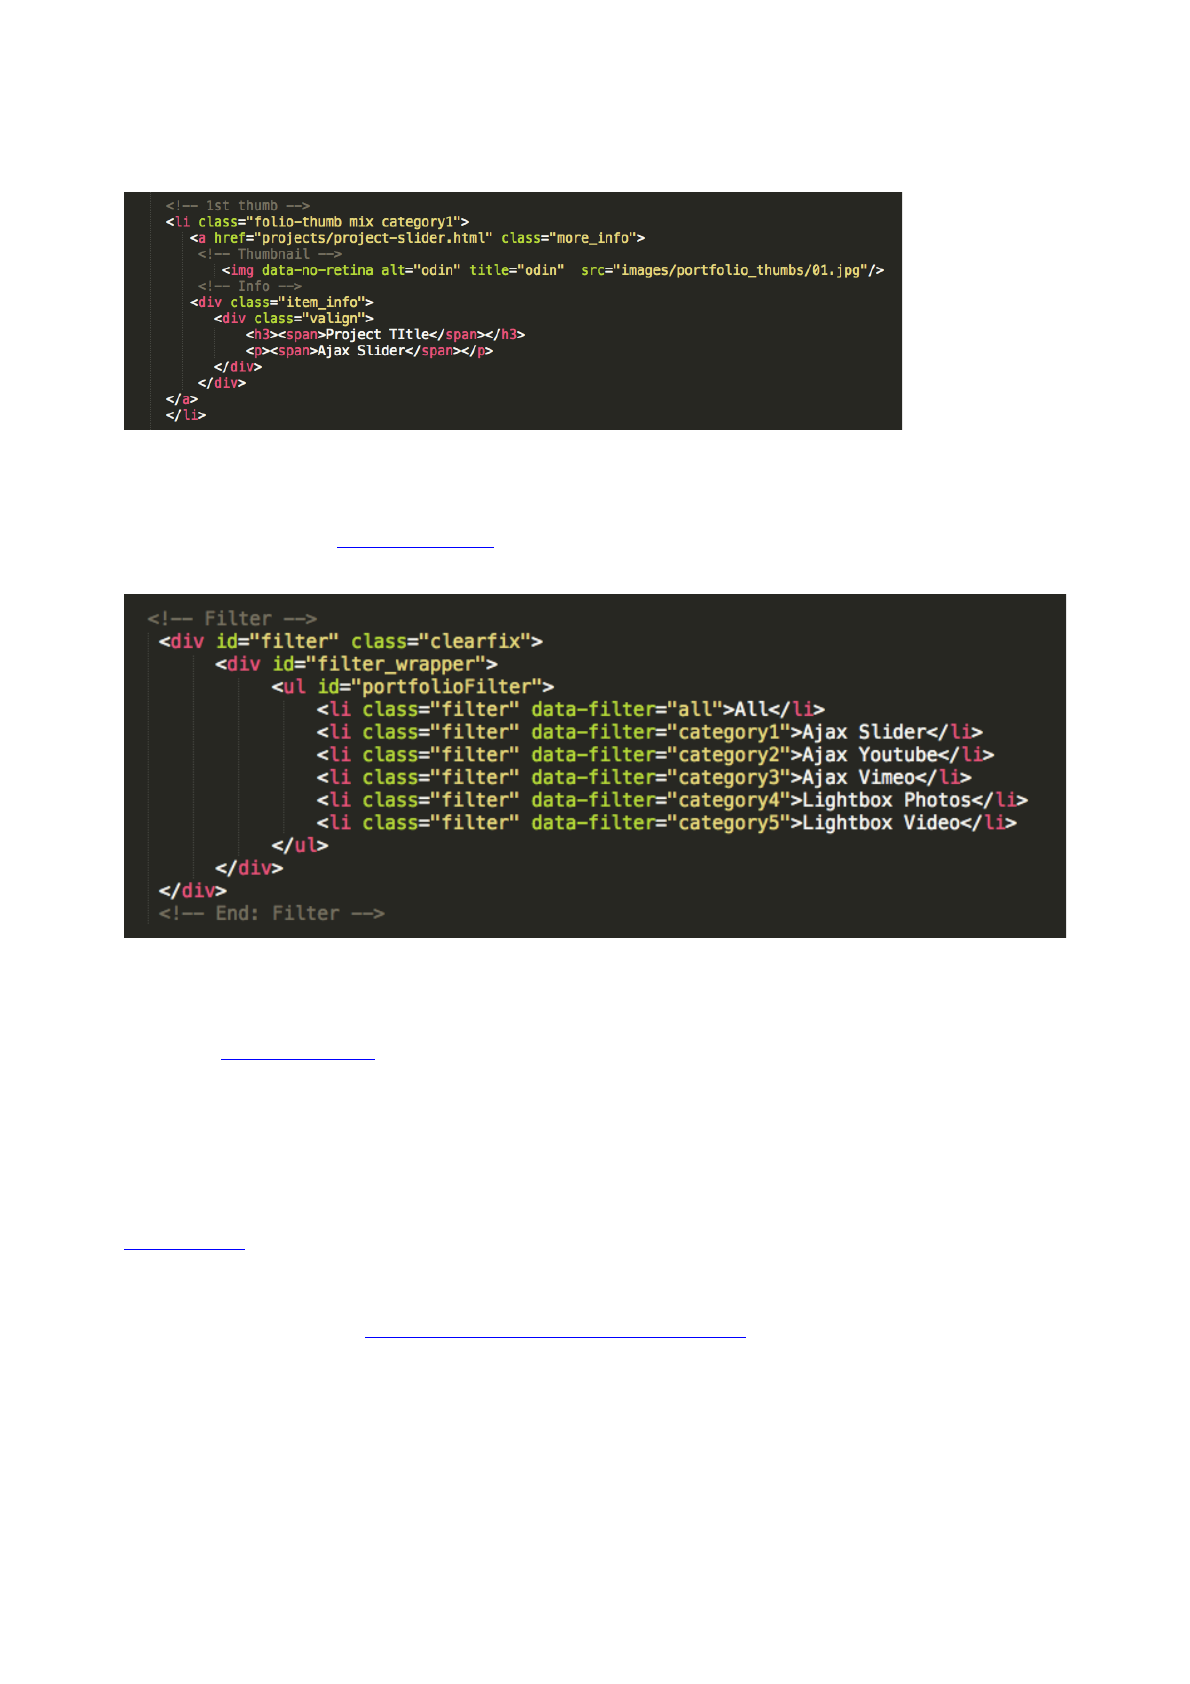
The filtering categories of each target element should be entered into its class
attribute (after the targetSelector class if you are using a class):
Filtering happens when filter buttons are clicked. By default MixItUp will apply
filtering click handlers to any element with the class 'filter', but this can be changed
with the 'filterSelector' configuration option. When a filter category is active, its
corresponding filter buttons gets the class 'active', which can be used for styling
active buttons.
These buttons could also be part of an unordered list. The desired filter categories
of each filter button should be entered as the "data-filter" attribute. See the
'filterLogic' option for details on how MixItUp handles multiple filters.
For complete info and demos on MixItUp plugin please refer original plugin
documentation here: http://mixitup.io/#Documentation
Page 28
Odin - Premium template by Designova
Expanding Portfolio Panels to Show More Info about Each Portfolio Item
Each portfolio item when clicked, displays expanded preview containing additional
information such as content text, image slider or videos. This is implemented with AJAX
loading of external pages such as:
1) Image Slider + Content:
[ROOT]/ PROJECTS / project-slider.html
2) Youtube Video:
[ROOT]/ PROJECTS / project-youtube.html
3) Vimeo:
[ROOT]/ PROJECTS / project-vimeo.html
You can open these files and edit the content as required. If you need to show more portfolio item
previews then you may clone these files, rename it and link them properly, for example:
Each portfolio item when clicked, can also display either a responsive lightbox or an
external URL
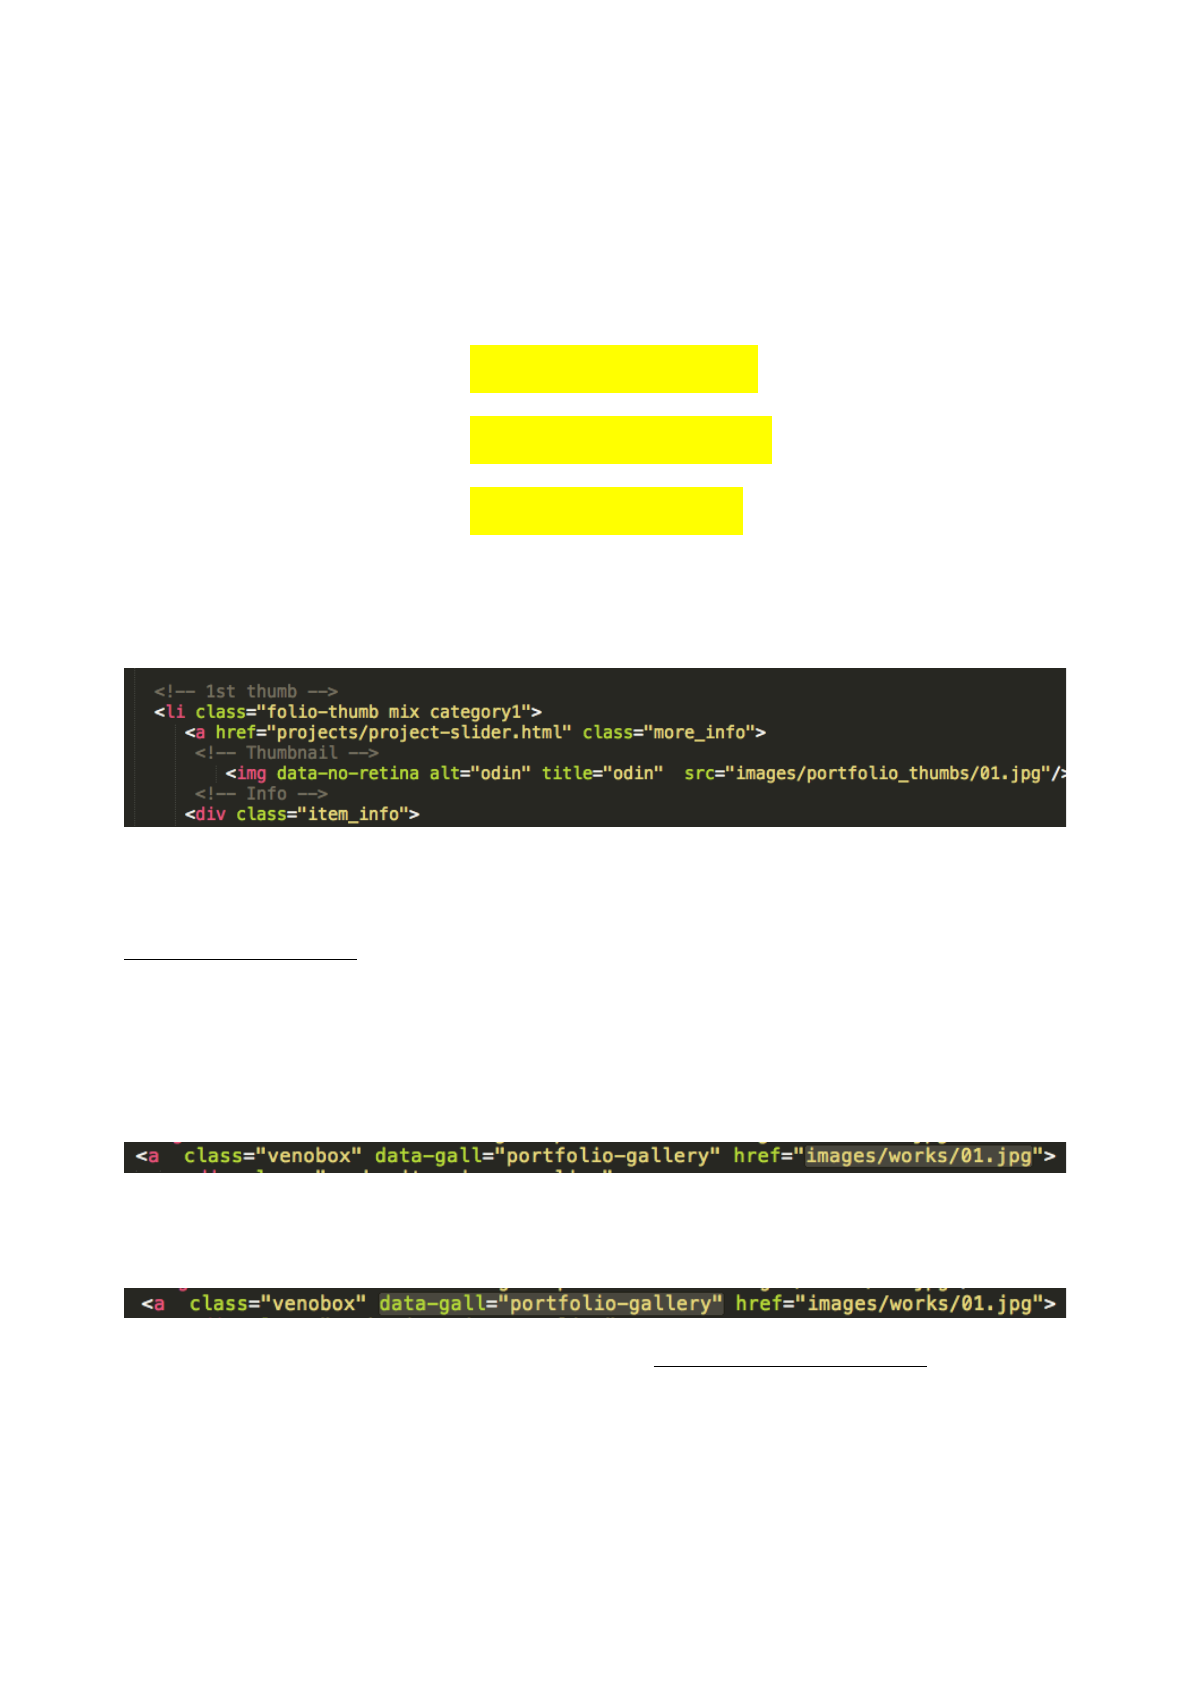
LIGHTBOX IMAGES:
The lightbox in the featured thumb carousel is a simple plugin, Venobox. You can easily
supply a big image to any of the thumbnails and the plugin will open this as a Lightbox
(full size image) on click. In order to supply images please edit the following highlighted
code:
The attribute data-gall="portfolio-gallery" should be attached on each instance if you
need to show all images in this lightbox as a slider, say a gallery kind of appearance.
More options can be found on original plugin site: http://lab.veno.it/venobox/
Page 29
Odin - Premium template by Designova
LIGHTBOX VIDEO:
You can also display a Video in this lightbox region. This plugin is same Venobox as we
mentioned in previous sections. In order to set the video please see the markup and
modify the highlighted area:
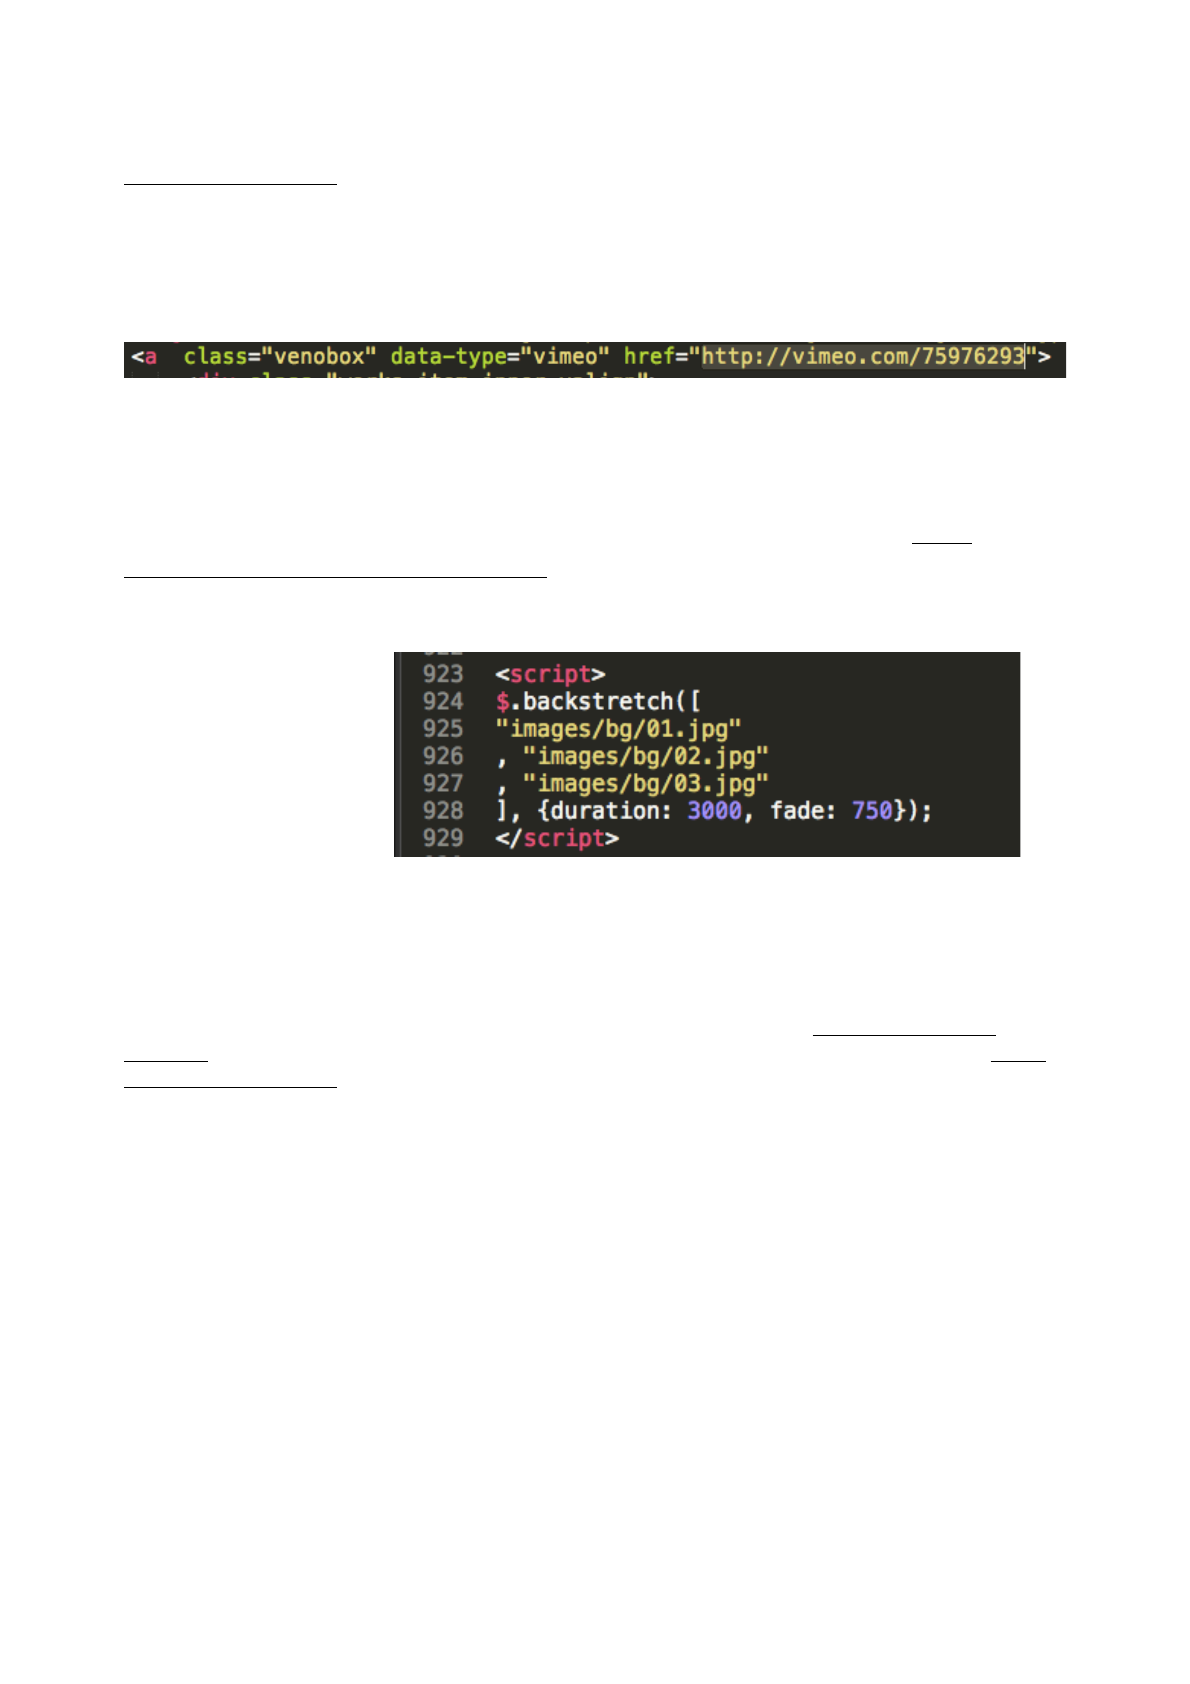
6. Full Screen BG Image Slider:
This module is very useful image slider powered by Backstretch JS plugin http://
srobbin.com/jquery-plugins/backstretch/ , which can also act as Single Full Screen
Background Image on your webpage. The images are supplied via HTML5 markup
itself, please see
below code segment:
How to set Images
via HTML markup:
7. ANIMATED ELEMENTS powered by animate.css
This template features animated elements supporting 50+ effects from http://daneden.me/
animate/ For more info & demo of all these effects please visit the original plugin website http://
daneden.me/animate/
8. CONTACT: Contact Form and Email Sending
You can use this contact form send emails, the Email Sending feature is already
implemented using PHP along with client side Form Validations using jQuery.
The template is featuring a fully working contact form with PHP m
You can use this contact form send emails, the Email Sending feature is already
implemented using PHP along with client side Form Validations using jQuery.
The template is featuring a fully working contact form with PHP mail sending ready. We
have kept everything ready, you have to only provide your own email id instead of the
Page 30
Odin - Premium template by Designova
predefined demo email id. This can be done by simply modifying the email id, as shown
in the SENDCONTACT.PHP file, located in root directory.
[ROOT]/SENDCONTACT.PHP
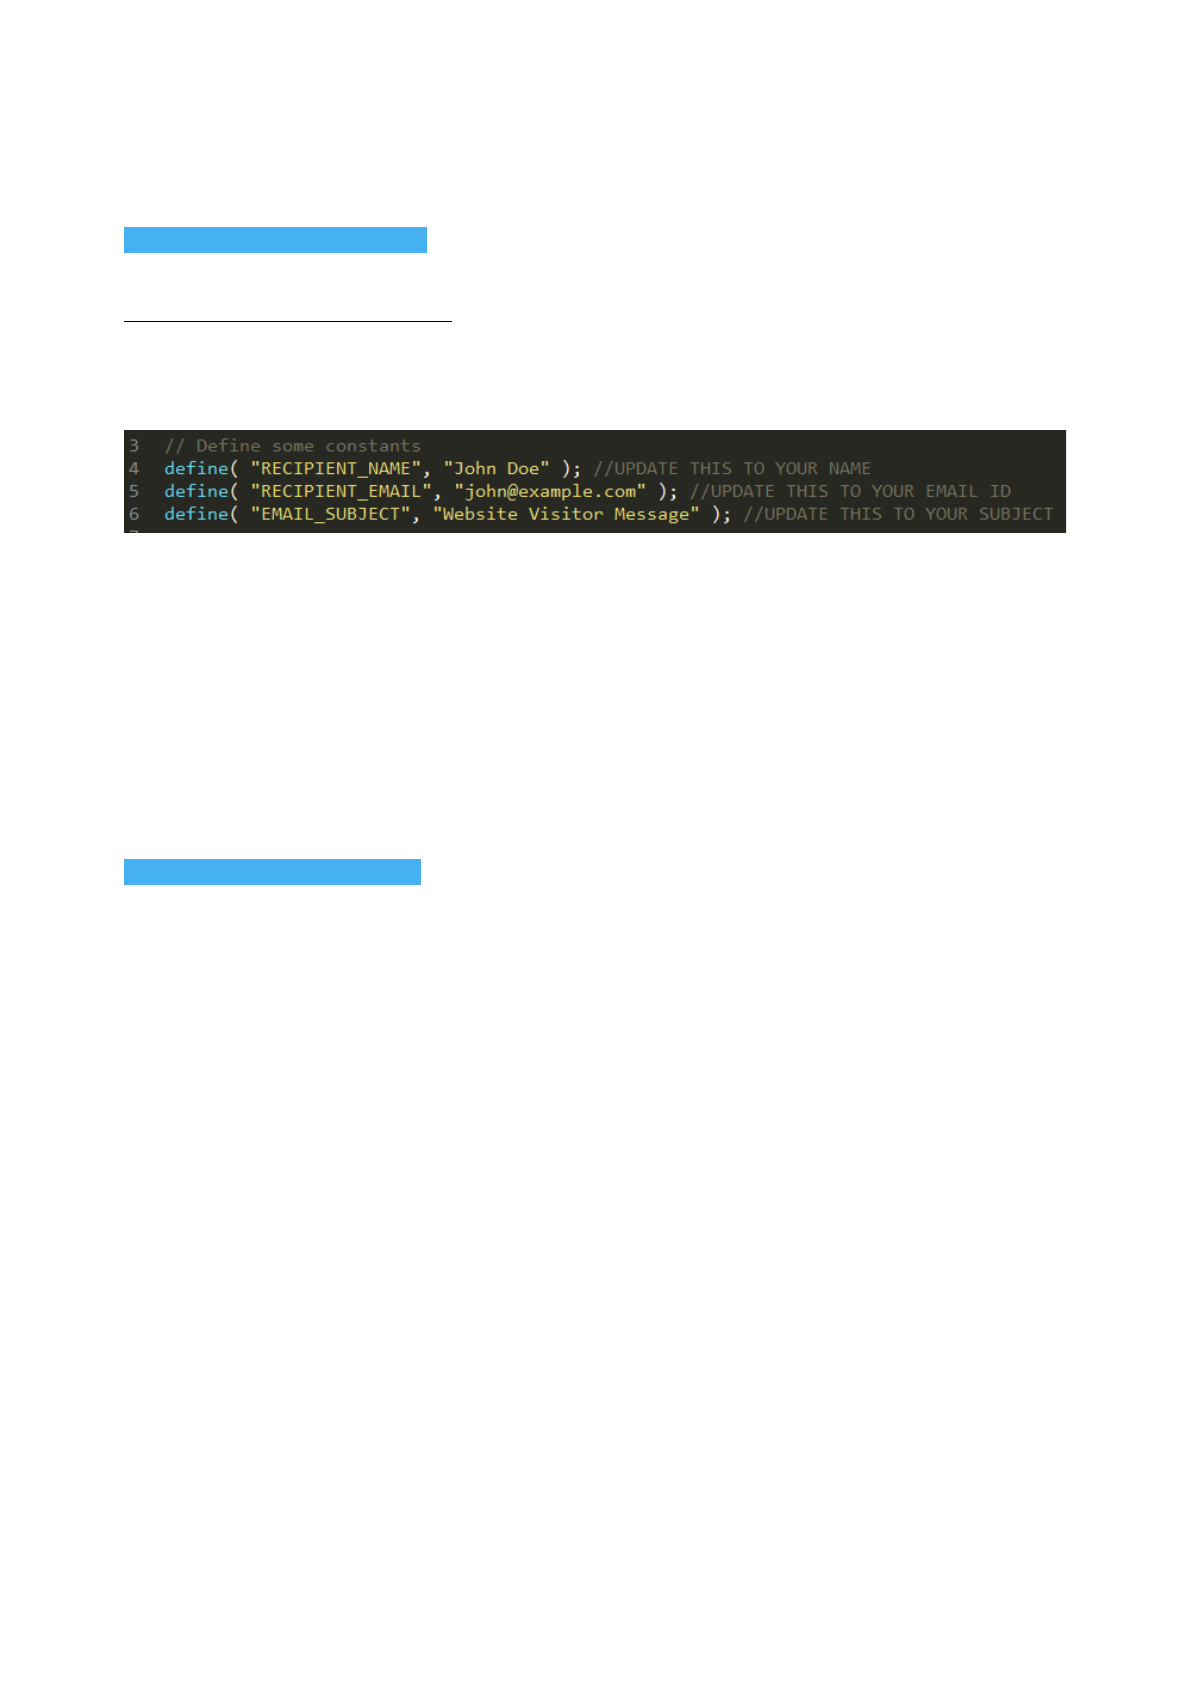
Setting Up Email Credentials
Open this file via a code editor / text editor and now go to the code segment: Line 4 to 6.
Please see the screenshot:
The value “john@example.com” should be replaced with your own email so that the
emails will be sending to this email id. The value inside ‘subject’ should be changed to
something meaningful since this will be displayed as the subject of the email message
send via the contact form. That’s all for basic setup.
All PHP mail sending library files and server scripts are stored in MAIL folder in the root.
For advanced users who need in-depth customizations, the PHP script can be modified
appropriately. The PHP file is:
[ROOT]/SENDCONTACT.PHP#
Page 31
Odin - Premium template by Designova
10. Setting Up Parallax Images
This template features some parallax layers across various sections in multiple web
pages. The parallax functionality is implemented via JS but you don’t have to worry
about any of the complex code editing.
In order to set parallax action on any region (for example, DIV) you have to simply do the
following 2 steps:
Step 1: Set a BG image for the region
In this step, you simply set a background image for the layer via CSS. For example,
Here the BG Image which is set via CSS. In order to set this image just open the
following CSS file:
[ROOT]/STYLESHEETS/MAIN-BG.CSS
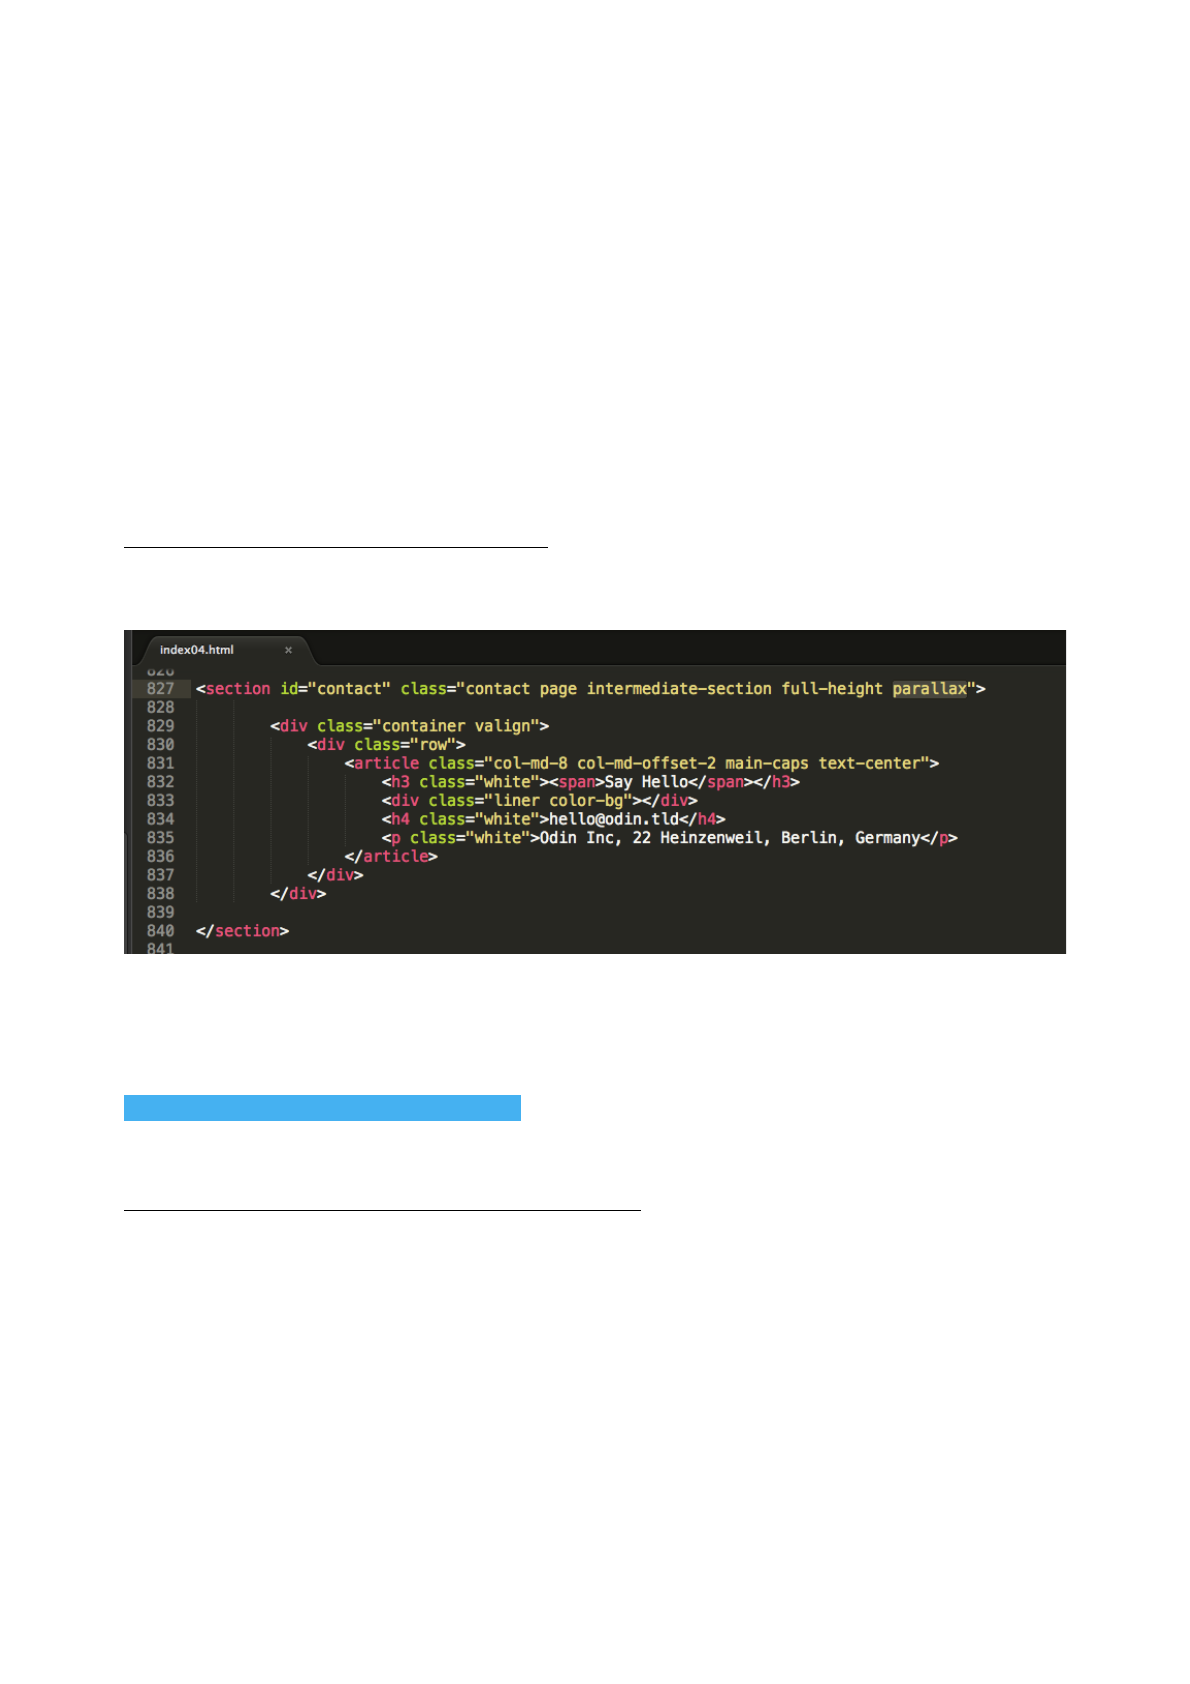
Step 2: Activate Parallax action for the region
Activating parallax action to the region is very simple, just add a single class name
“parallax” (or) “parallax-layer" to the region, and the parallax action will be activated for
that particular region. For example:
Page 32
Odin - Premium template by Designova
We use NBW
Parallax JS plugin
for rendering
parallax action in
this template.
Original plugin
website: http://www.ianlunn.co.uk/plugins/jquery-parallax/
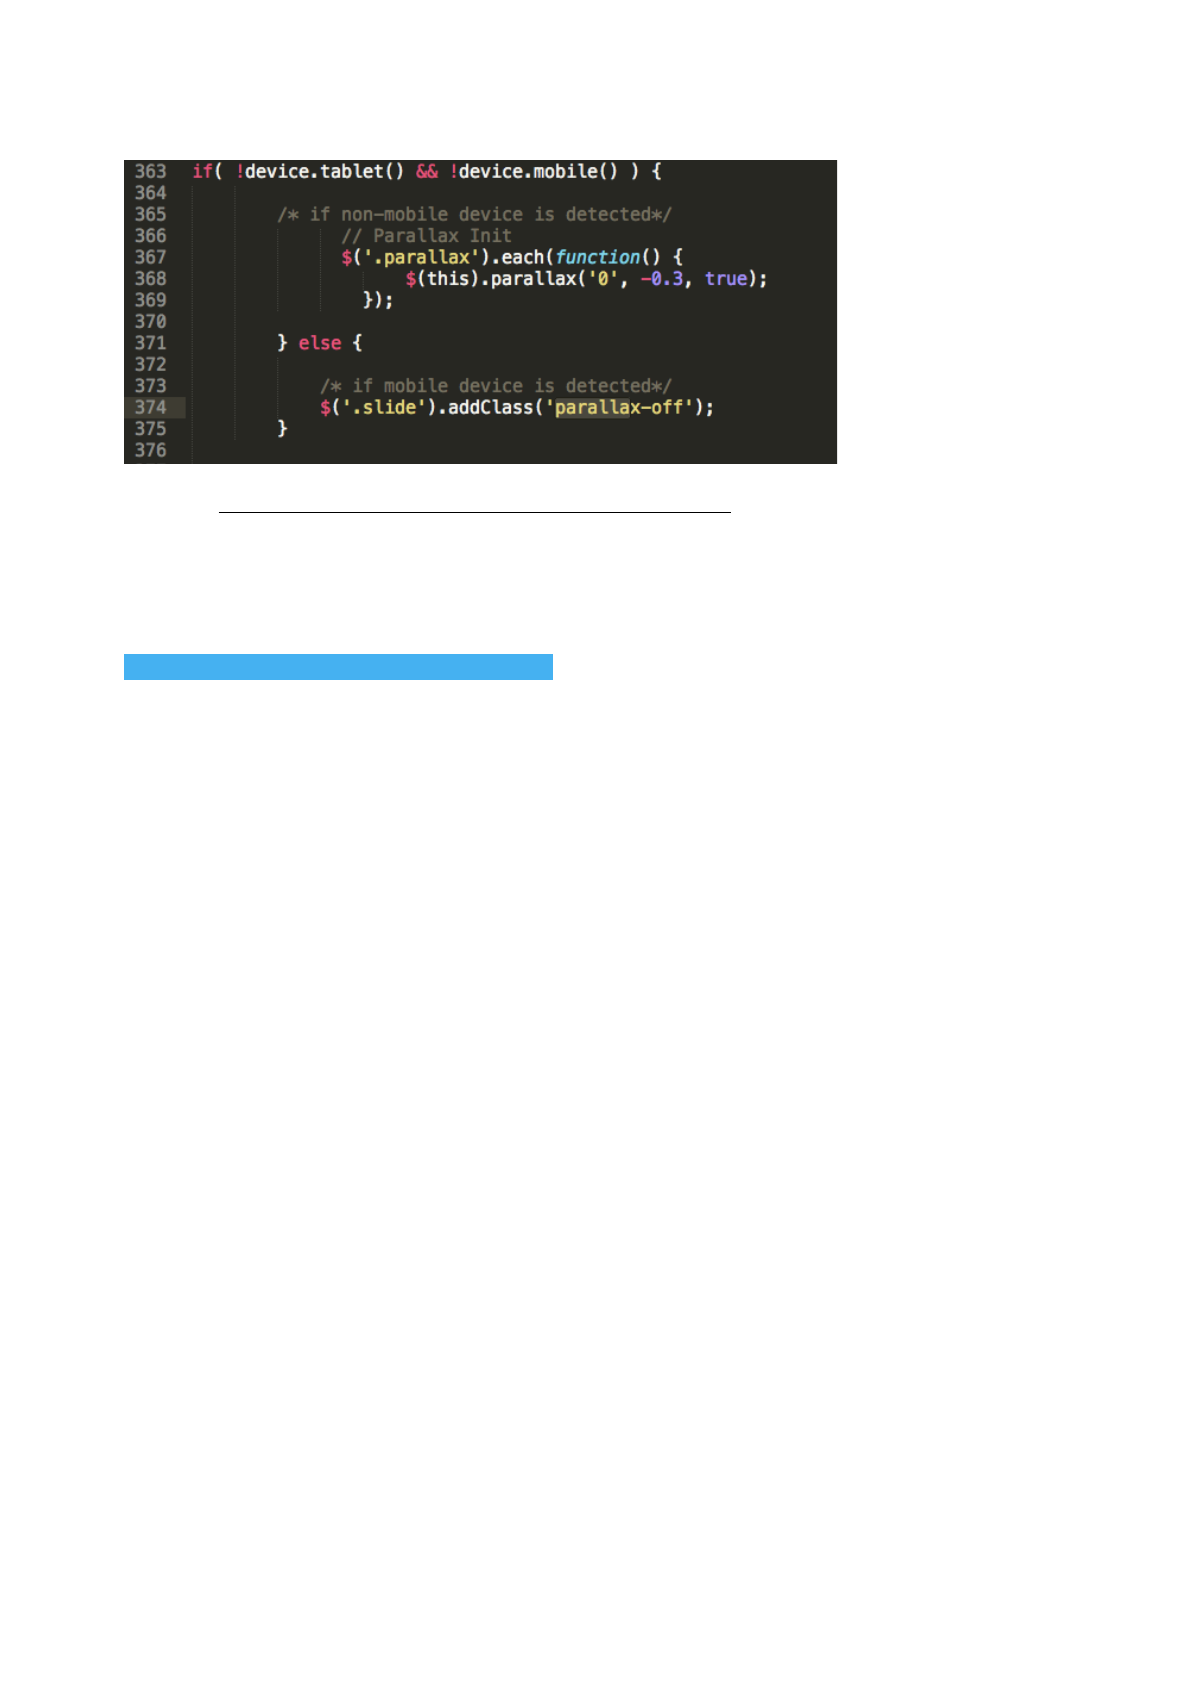
If you want to further modify / customise the parallax engine and additional options of
parallax function you have to manually modify the Parallax Initialization JS file:
[ROOT]/JAVASCRIPTS/CUSTOM/MAIN.JS
Page 33
Odin - Premium template by Designova
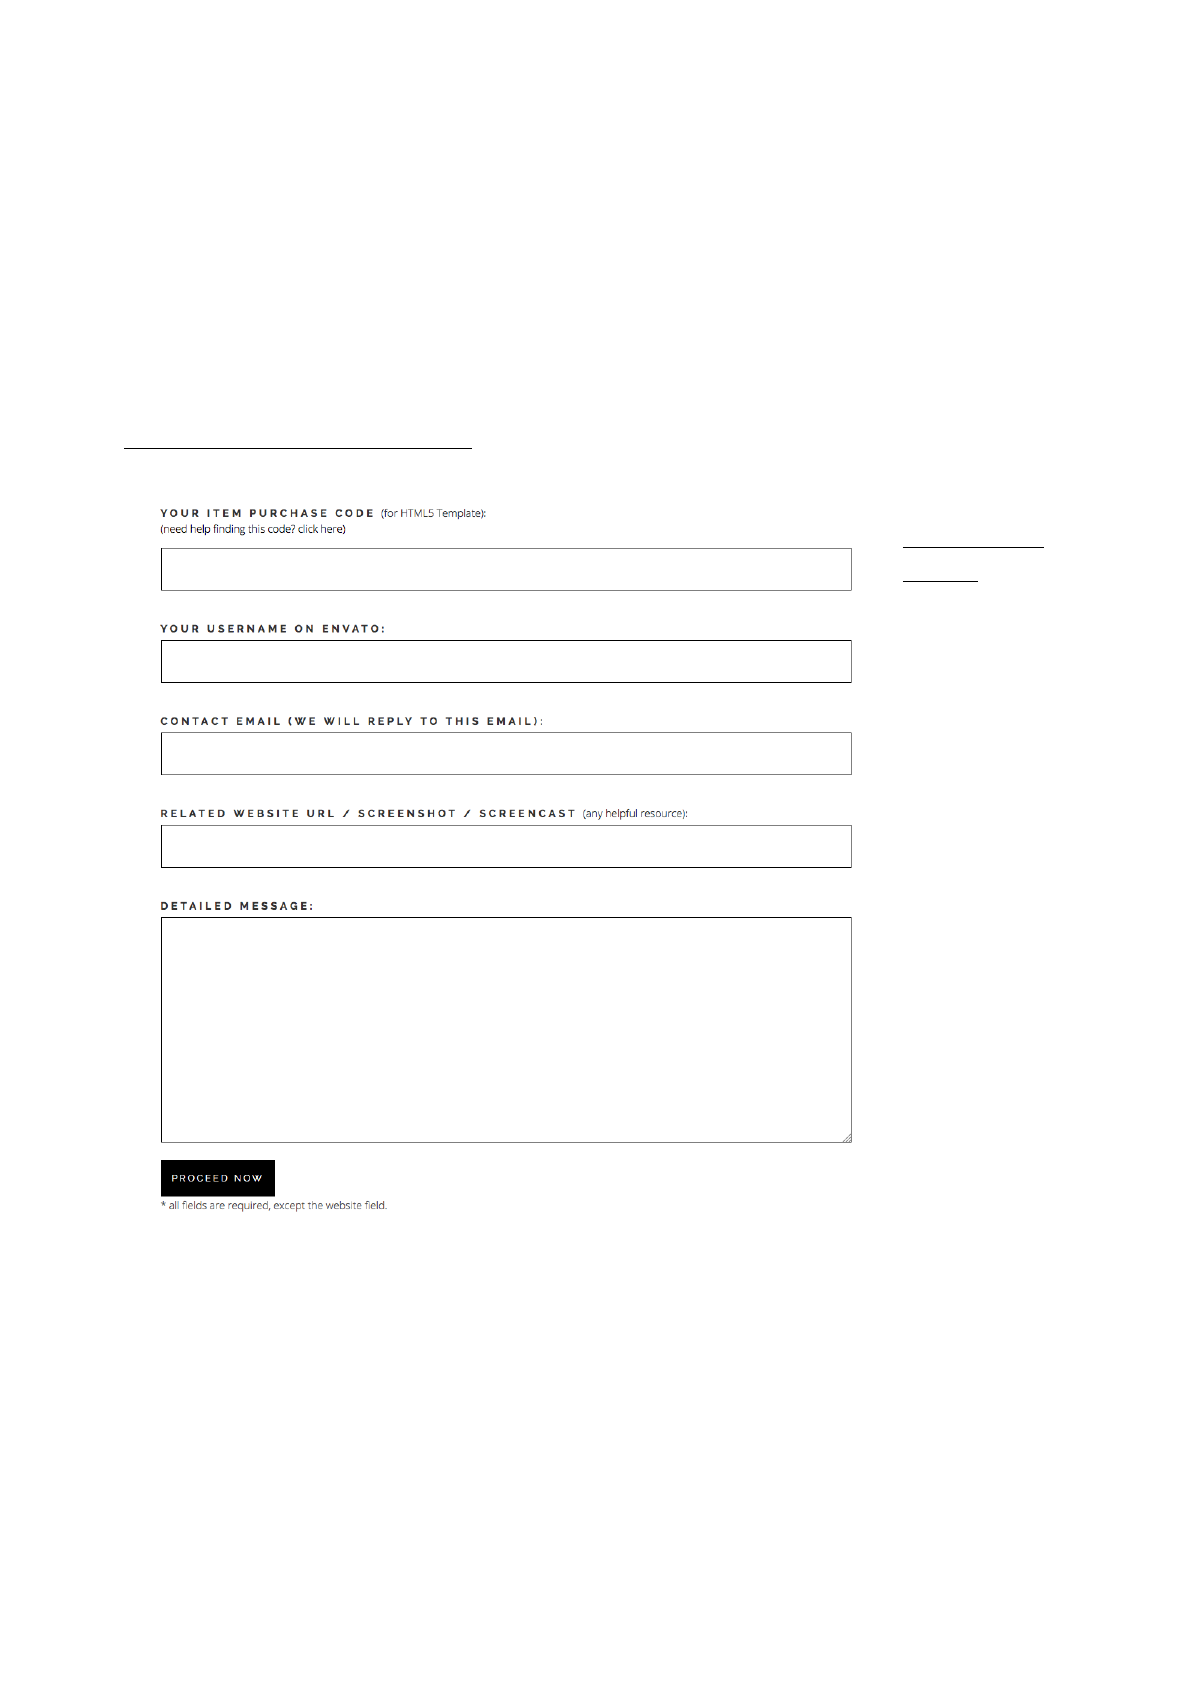
11. Free Support
This user manual covers everything you need to setup the website. But if you find any
bugs, issues and limitations on this theme please contact our support team via our
official support system for HTML Templates via:
http://designova.net/support.html
IMPORTANT
NOTE:
You must have
the purchase
code for the
product
(received from
Envato) in
order to
access our
system. Any
support
request sent
via other
medium such
as emails or
item comments
(themeforest
message form)
may not be
answered. So
please use
support system instead. We will usually make a response within 24 to 48 hours except
weekends and holidays. Due to complex nature of support requests we are unable to
promise a specific turn around time – but we will surely make a response in all cases.
That is our guaranty.#
Page 34
Odin - Premium template by Designova
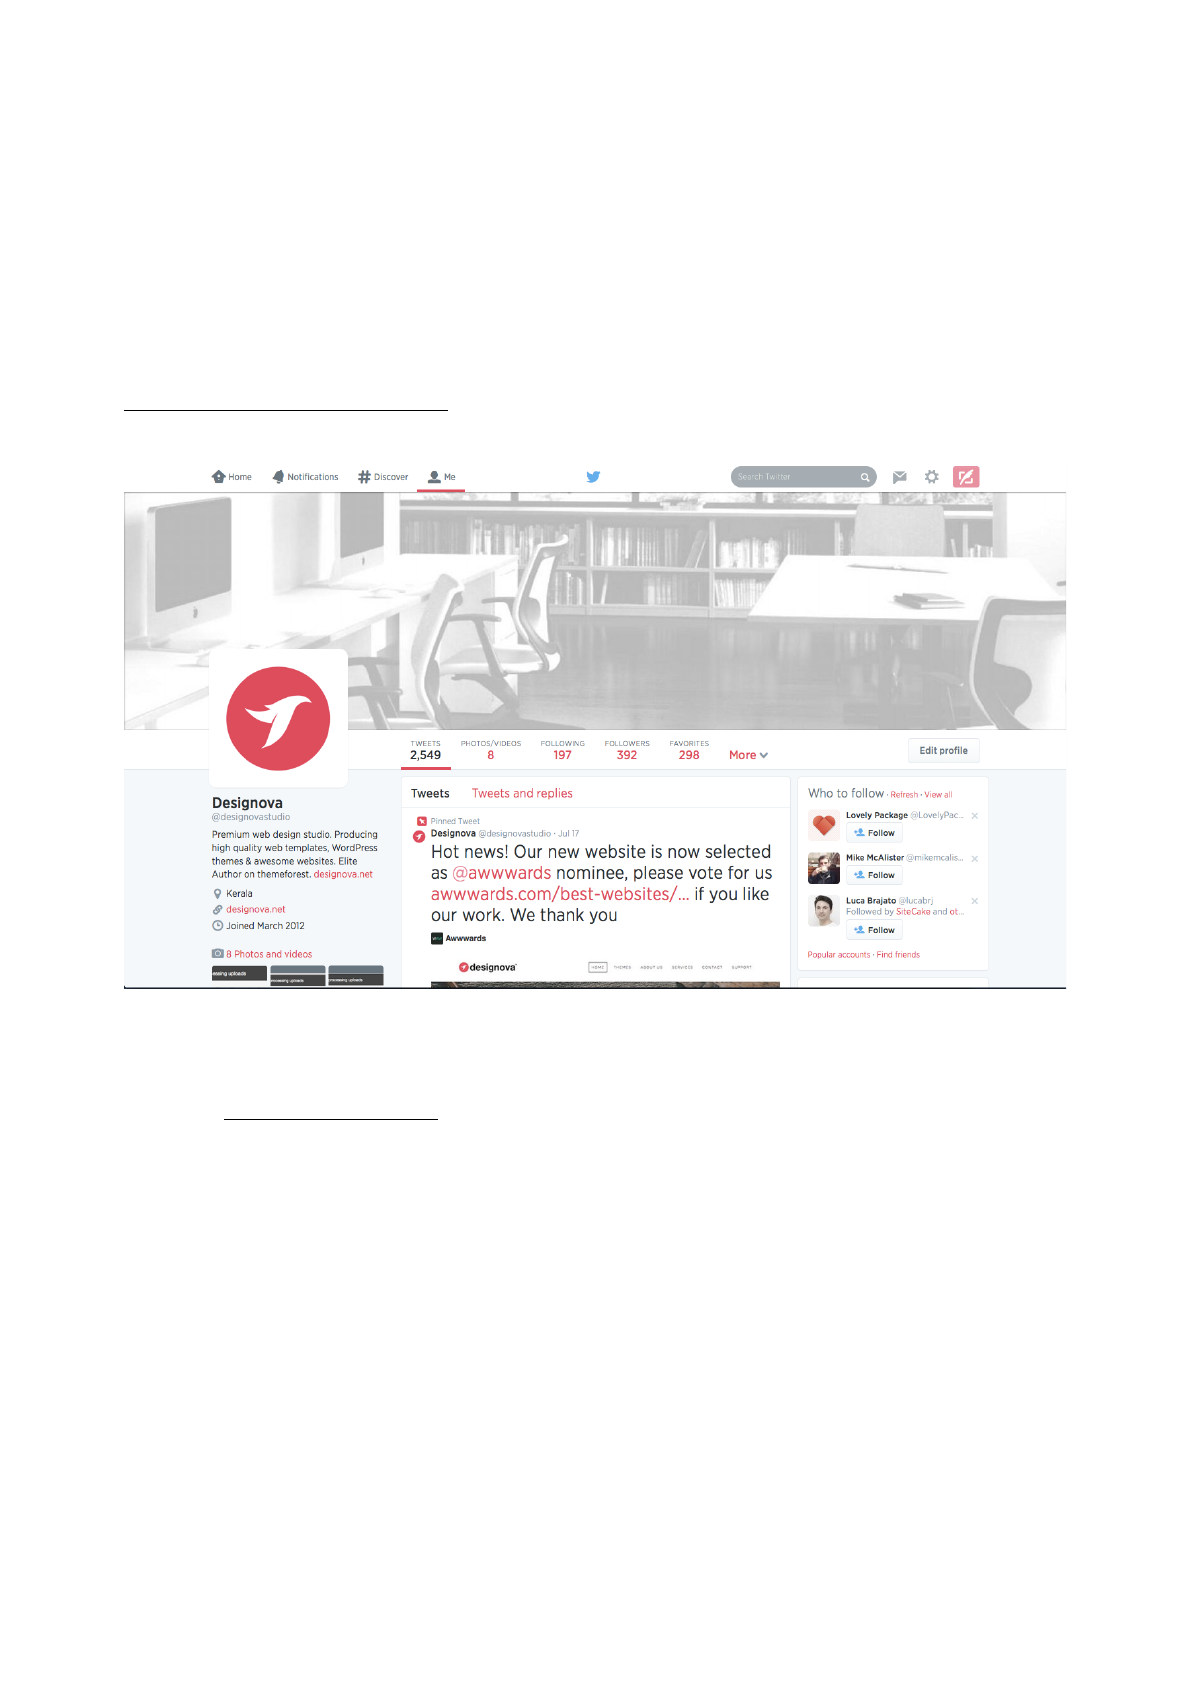
12. Future Updates
We will regularly release updates and bug fixes on our themes and we will send
notifications via newsletters. You may subscribe to our weekly newsletter by visiting the
following link:
http://eepurl.com/xDO_v
We also use Twitter to announce the latest news and updates to our customers. Please
follow us @designovastudio#
Page 35
Odin - Premium template by Designova
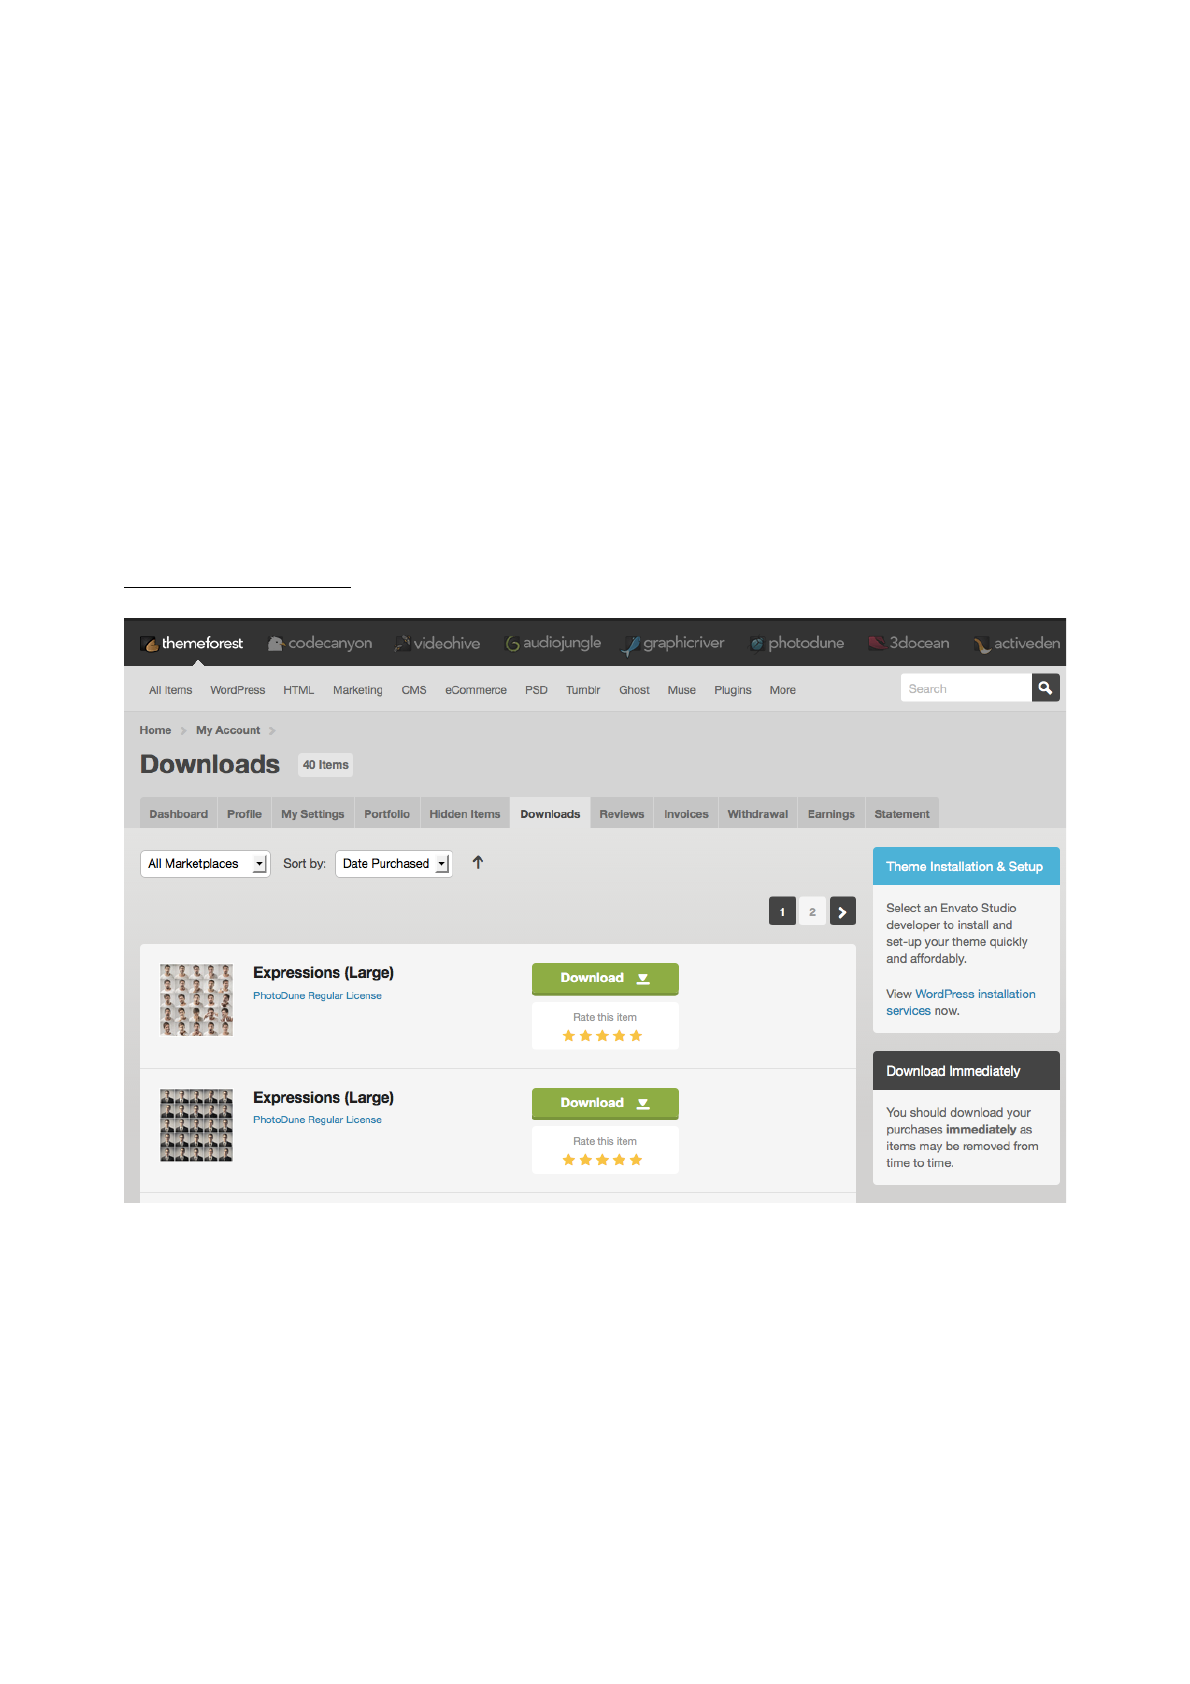
13. Rating & Reviews
We expect feedback from our users and we are seriously taking care of their opinion and
suggestions. We would like to know your comments, suggestions and feedback in any
sense.
So kindly consider rating our product on themeforest. It will NOT take even a couple of
minutes for you to rate our template, but it will be a great motivation for our developers.
If you don’t know how to rate items on themeforest, please click here to see a
demonstration:
http://goo.gl/iWbKi3
Kindly consider rating our work.
We thank you in advance.#
Page 36
Odin - Premium template by Designova

14. Vote of Thanks
Once again, we thank you for purchasing our product.
We hope you like our product as well as this documentation. We have done our level
best to make things pretty clean and clear. Anyway if you have queries, support requests
or something to know more from us, kindly contact us via support system:
http://designova.net/support.html
About Us:
We are Designova, a small team of young web designers and developers and we are
good people to work with. We have more premium themes exclusively available via
Themeforest, please visit our portfolio: http://themeforest.net/user/designova/portfolio
Designova Official Website:
http://designova.net/
Page 37
Odin - Premium template by Designova