Openloyalty User Guide
User Manual:
Open the PDF directly: View PDF ![]() .
.
Page Count: 235 [warning: Documents this large are best viewed by clicking the View PDF Link!]
1
WELCOME TO THE OPEN LOYALTY
PLATFORM!
Congratulations on your new Loyalty Platform. This manual is intended to help you get
the most out of your Loyalty program in your day-to-day use.
This guide answers the “why, where, and how” questions that most users have when learning
to use Open Loyalty platform. You’ll find lots of step-by-step instructions, screenshots and
examples.
Revel Systems offers businesses the ability to customize their loyalty and rewards programs.
This feature gives businesses the power to create engaging programs that generate customer
loyalty and increase sales. Through this Platform, you can easily manage the rewards and
loyalty points to be provided to your customers. Thereafter, the customers can earn or
redeem the points as per the rules defined by you.
Open Loyalty Platform
2
GETTING STARTED
This section of the guide introduces your Loyalty Platform Admin, and walks you through
the basic configuration settings. You’ll get an overview of the resources that are available to
you as an Admin of the Open Loyalty and how to log into your Admin account. Finally, you’ll
learn the concepts of loyalty platform and configuration scope, and establish best practices
for project standards and requirements.
WELCOME
OPEN LOYALTY ADMIN
Admin Sidebar
Admin Workspace
Dashboard
Grid Controls
Actions Controls
OPEN LOYALTY SETTINGS
Configuration
Level downgrade settings
Template
Customer earning and spending statuses
Account activation method
Marketing Automation Tool
Identification factors
Webhooks
Users
Locked users
Translations
Create new translations
Updating translations
Emails
Customizing Email templates
System logs
Search Logs by date range
Search/Filter Logs
3
CHAPTER 1:
WELCOME
An Open Loyalty is technology for loyalty solutions. It's a loyalty platform in open source,
with ready-to-use gamification and loyalty features, easy to set up and customize, ready to
work on-line and off-line. Open Loyalty is an open source solution that can be
easily integrate with eCommerce or can be used as a standalone solution.
There is variety of applications for Open Loyalty. Based on it you can build loyalty solutions
like: loyalty modules for eCommerce, full loyalty programs for off-line and on-line,
motivational programs for sales department or customer care programs with mobile
application.
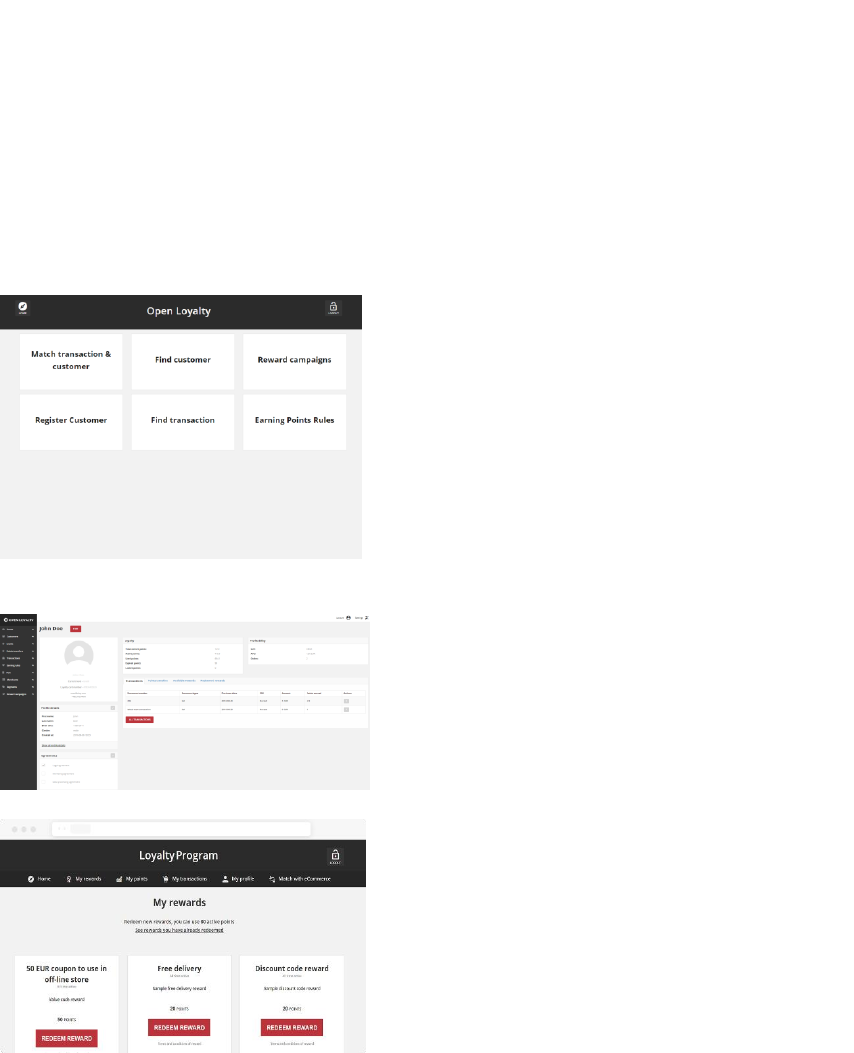
POS COCKPIT
Use the POS Cockpit and run your loyalty app in
your off-line stores
ADMIN COCKPIT
Use the Admin Cockpit to manage your loyalty
application
CLIENT COCKPIT
Use the Client Cockpit and create a dedicated
web portal for your customers
4
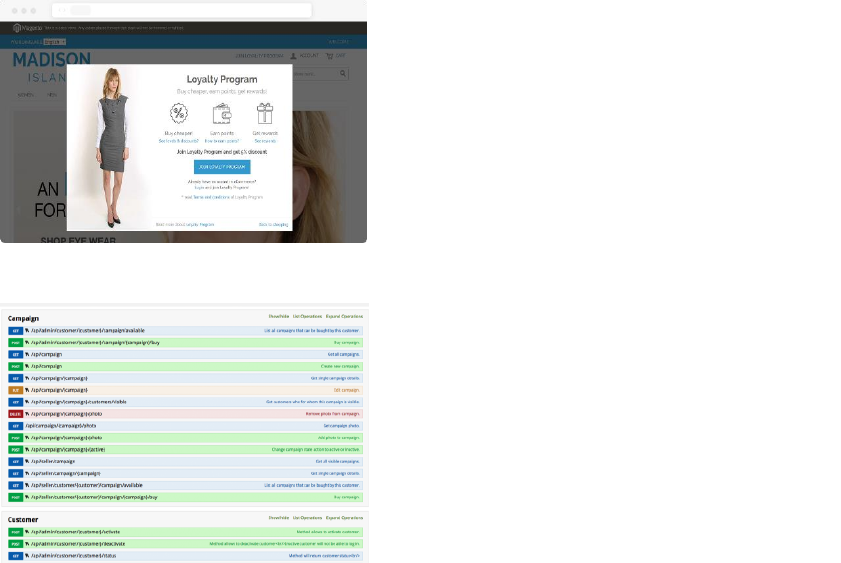
E-COMMERCE COCKPIT
New additional loyalty and gamification features
as a seamless part of your webshop
API & CONNECTORS
Connect Open Loyalty to eCommerce platforms,
ERP systems, mobile applications, or any
external system
5
CHAPTER 2:
OPEN LOYALTY ADMIN
Your store Admin is the password-protected back office where you can set up points rule,
reward campaigns, manage customers, and perform other administrative tasks. All basic
configuration tasks and loyalty campaign management operations are performed from the
Admin.
Your initial sign-in credentials were set up during the Open Loyalty installation. If you forget
your password, a temporary password can be sent to the email address that is associated
with the account
Admin Sidebar and Dashboard

6
Admin Sign In
The first thing you will learn is how to sign in and out of the Admin, and to reset your
password. All of the instructions in the rest of this guide are written for a user with full
administrative privileges, and begin with the assumption that you are logged in to the
Admin.
Admin Sign In
To sign in to the Admin:
1. In the address bar of your browser, enter the URL that was specified during the
installation, followed by the base URL of your store’s Admin.
The default Admin URLs look something like this:
You can bookmark the page or save a shortcut on your desktop for easy access.
2. Enter your Admin Login and Password
3. If you want to log in automatically every time you open the website without needing to
enter your login and password mark Keep me logged in checkbox.
4. Tap
To reset your password:
1. If you forget your password, click the Forgot password? Link
http://www.domain.com/admin
Sign in
7
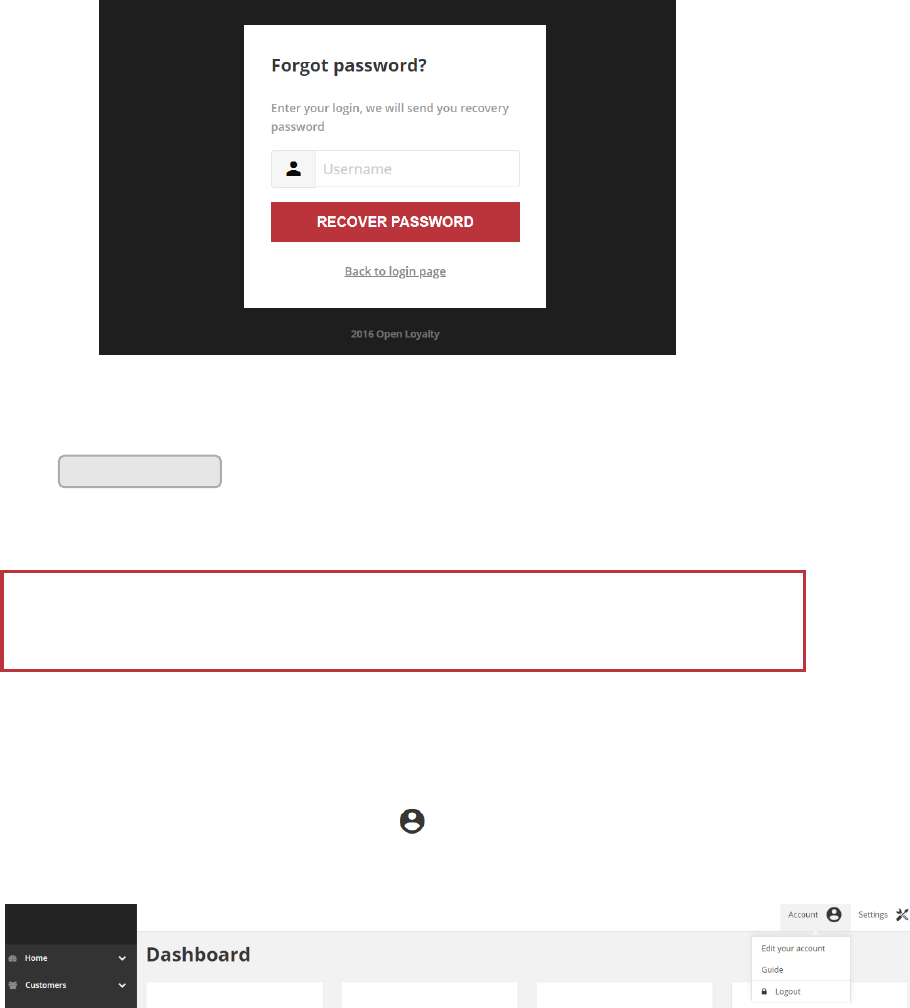
Forgot Password
2. Enter the Email Address that is associated with the Admin account
3. Tap
If an account is associated with the email address, an email with recovery password will
be sent to reset your password.
To sign out of the Admin:
In the upper-right corner, tab the Account ( ) icon. Then on the menu, choose Logout.
Logout
When you logout, the Sign-In page returns.
Recover Password
Your Admin password must be eight or more characters long, and contains at least
one upper case letters, one numeric character and one special character
8
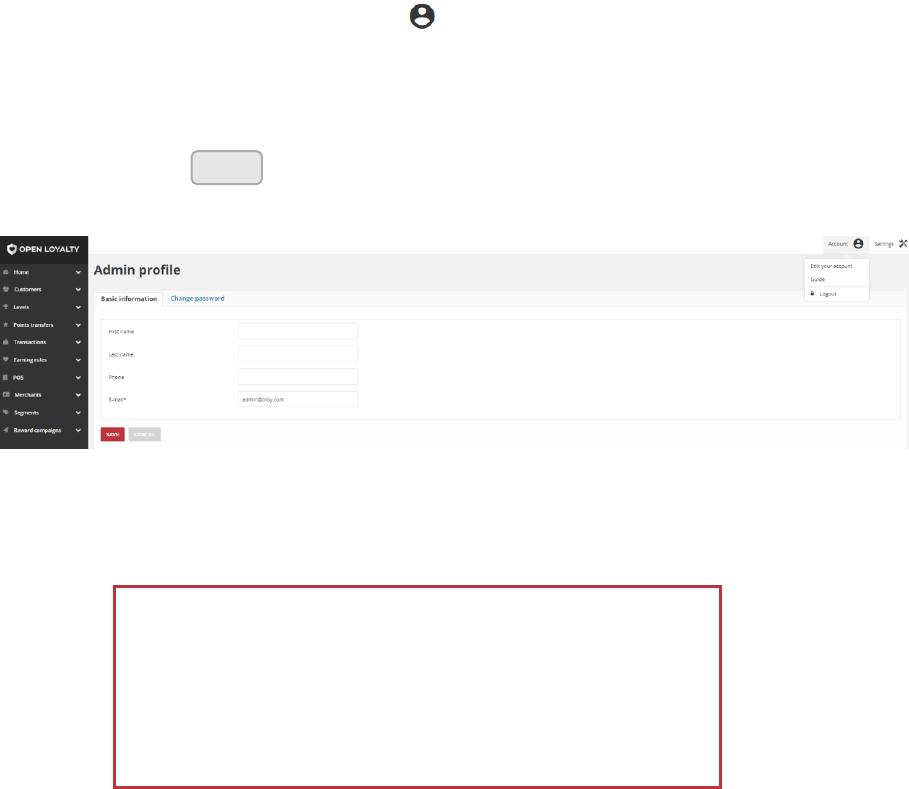
Your Admin Account
Your Admin account was initially set up during the installation. You can personalize your
user name and password, and update your first and last name, and email address and
phone number at any time.
To edit your account information:
1. In the upper-right corner, tab the Account ( ) icon. Then on the menu, choose Edit
your account
2. Make any necessary changes to your profile information. If you change your password,
make sure to write it down.
3. When complete, tap
Admin Profile Information
Acceptable Phone Numbers format:
• + “country code” “local number” e.g. +48123456789
• “country code” “local number” e.g. 48123456789
• only “local number” e.g. 123456789
Save
9
Admin Sidebar
The sidebar on the left is the main menu for your Loyalty Platform Admin, and is designed
for both desktop and mobile devices. The menu provides access to all the tools you need to
manage your loyalty programs on a daily basis.
Dashboard
The Dashboard provides a quick overview
of the customers activity in your loyalty
programs, and is usually the first page that
appears when you log in to the Admin
Customers
The Customers menu is where you can
manage customer registered in your
loyalty programs, and see referred
customers list
Levels
The levels menu is where you manage and
define Customer levels with discounts and
rewards.
Points Transfers
The Points Transfer menu includes tools to
controls everything related to your points
transfer operation
Transactions
The Transaction menu provides an
overview of all data on offline and online
transactions registered on customers
10
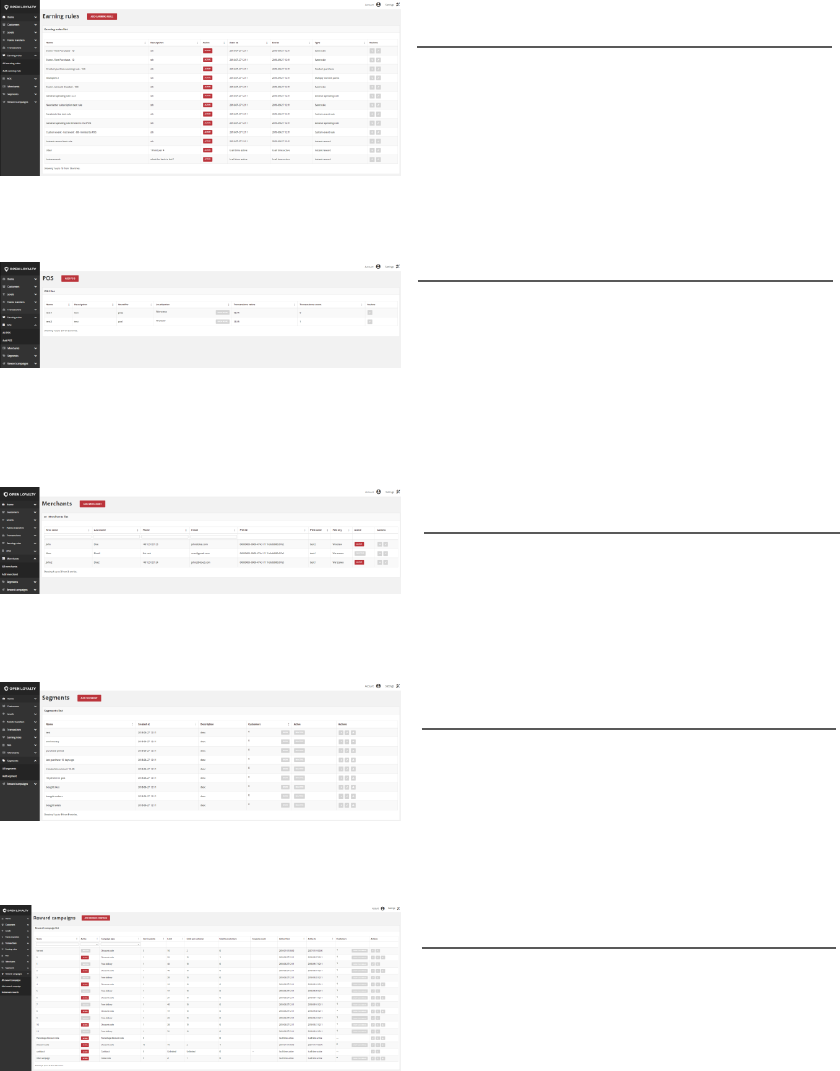
Earning Rules
The Earning Rules menu is where you set
up rules for earning points based on
transactions and behavior of Customers
POS
The POS menu controls data related to
your online and offline stores including
localization and customers transaction
values that were processed in POS.
Merchants
The Merchants menu is where you can
manage merchants and assigned them to
particular POS.
Segments
The Segments menu is where you create
customer segments based on customer
transactions or behavior
Reward Campaigns
The Reward Campaign menu is where you
manage rewards available in your loyalty
application, decide who can redeem
rewards, and when
11
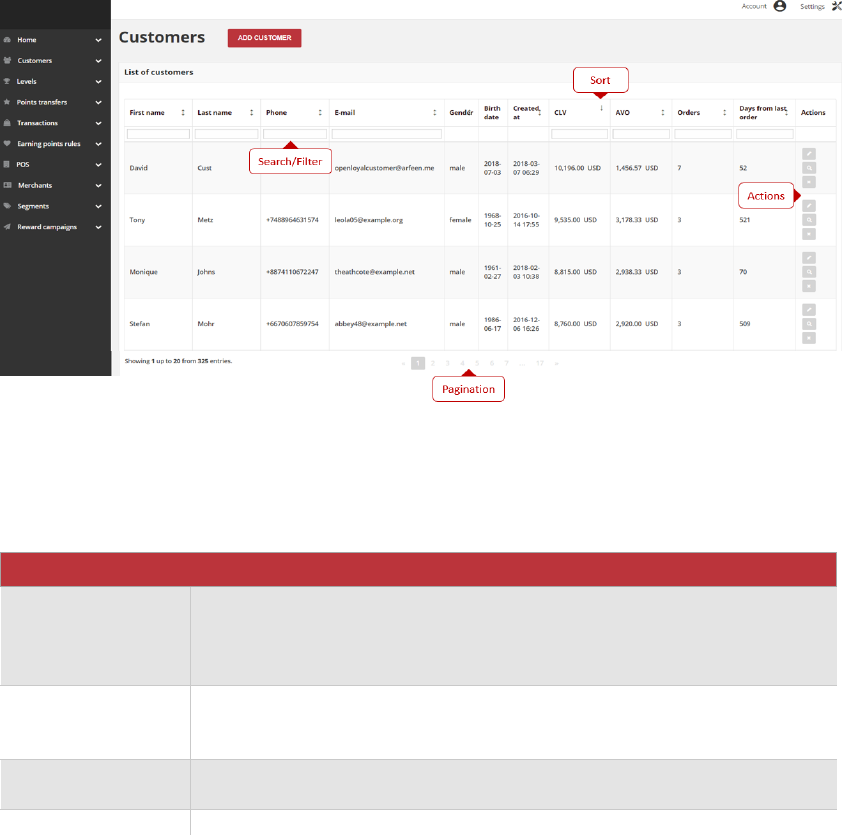
Admin Workspace
The Admin workspace provides access to all the tools, data, and content that you need to
run your loyalty platform. The main pages have a grid that lists the data for the section,
with a set of tools to search, sort, filter, select, and apply actions.
Admin Workspace
Workspace Controls
CONTROL
DESCRIPTION
Search / Filter
The filters in the header of each column can be used to limit the list to
specific values. You can simply type the value you want to find and press
Enter
Sort
The header of each column can be used to sort the list in ascending or
descending order
Paginate
The pagination controls are used to view the additional pages of results
Actions
The Actions control applies an operation to selected record

12
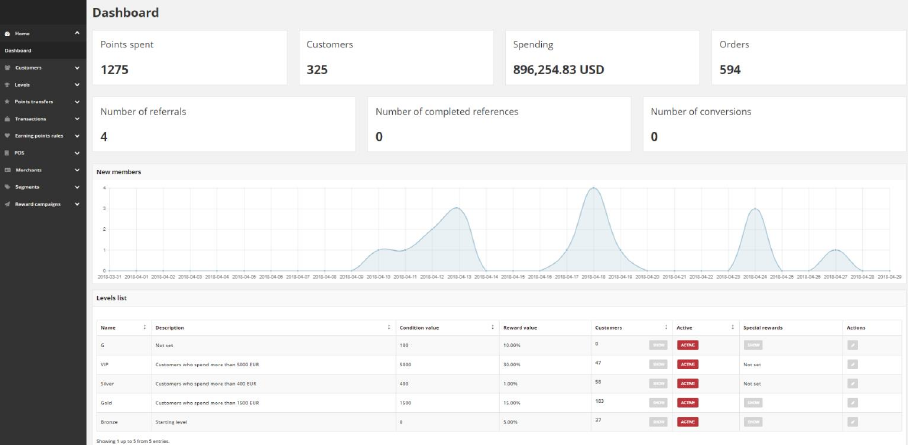
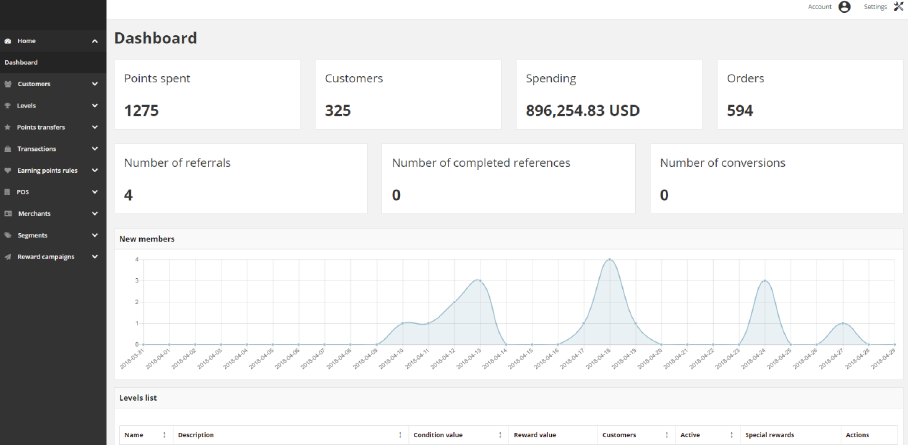
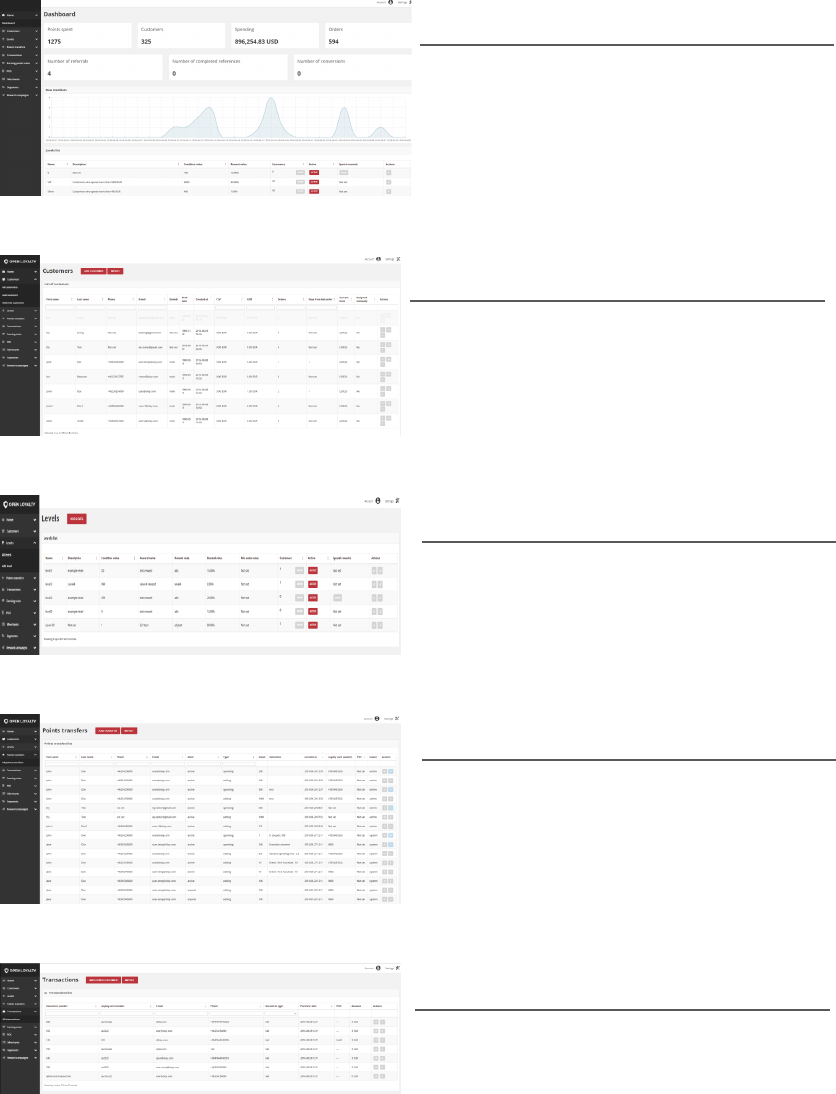
Dashboard
The dashboard is the default startup page for the Admin – the first page that appears when
you log in to the Admin. Dashboard gives an overview of the customers activity in your
loyalty programs.
The blocks at the top of the page provide a snapshot of:
• Number of all spent points
• Number of all customer accounts
• Total amount of all registered transaction
• Number of all registered transactions
Blocks below, show some factors describing current state of referral program:
• Number of all invitations send by customers
• Number of all customers that register an account from invitation link
• Number of all customers that make purchase after register an account from
invitation link
The chart shows the number of new customer accounts in time line. You can view the
amount of member by hover your mouse over any day.
The tabs at the bottom provide quick overview of your Customer Levels list, associated to
various benefits such as discounted fees and credentials for customer to reach this value.
To learn more about customer Levels, see Levels
Dashboard
13
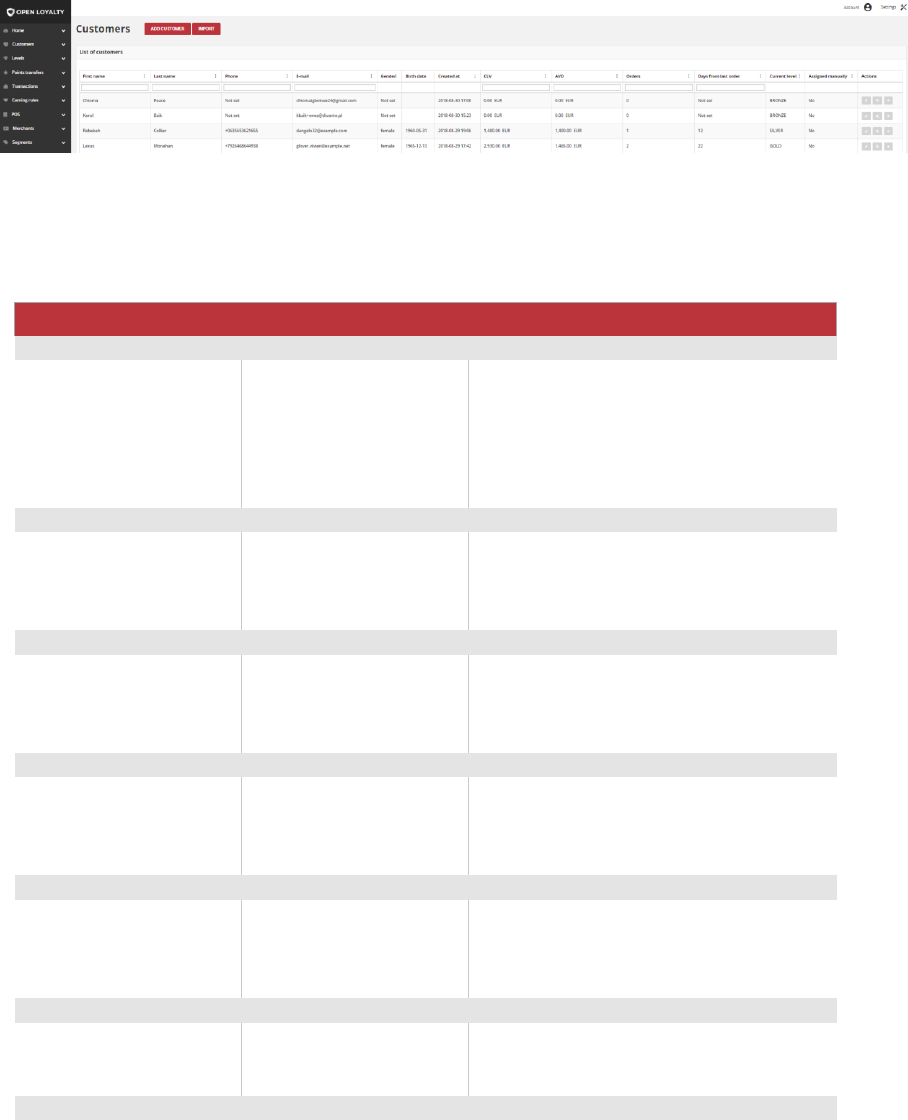
Grid Controls
Admin pages that manage data display a collection of records in a grid. The controls at the
top of each column can be used to sort the data. The current sort order is indicated by an
ascending or descending arrow in the column header. The Action column lists operations
that can be applied to an individual record.
Customer Grid
To sort the list:
1. Tap any column header. The arrow indicates the current order as either ascending or
descending.
2. Use the pagination controls to view additional pages in the collection.
To paginate the list:
1. Tap Next and Previous to page through the list, or click a specific Page Number.
Pagination options
To search the list:
1. In the selected column in the field under column header type the value you want to find

14
• To find a close match, enter the few letters/signs of what you want to find
• To find an exact match, enter the exact word/number you want to find.
2. You can put as many values under different columns headers as needed to describe the
conditions that must be met for the search result. Search values from each column
create an AND Condition rule. It means that in search results only records matching all
entered values are displayed.
Customer search controls
15
Actions Controls
When working with a collection of records in the grid, you can use the Actions control to
apply an operation to the records. The Actions control lists each operation that is available
for the specific type of data. For example, for Customer records, you can use the Actions
control to edit basic information of selected customer, view the customer account form, or
to deactivate record without possibility to activate them again.
Applying an Action to selected record
Actions by Grid
MENU
LIST
ACTIONS
CUSTOMERS
All Customers
Edit customer
View Customer Account details
Deactivate/Activate customer
Unlink manually assigned level - optional
LEVELS
All Levels
Edit level
Export customers to CSV
POINTS TRANSFER
All points transfers
View Points transfer details
Cancel transfer
TRANSACTIONS
All transactions
Edit transaction labels
View Transaction details
EARNING RULE
All earning rules
View earning rule details
Edit earning rule
POS
All POS
Edit POS
MERCHANTS
16
All merchants
Remove merchant account
Edit Merchant
SEGMENTS
All segments
Delete selected segment
Edit segment
Export customers to CSV
REWARD CAMPAIGNS
All reward campaigns
Edit reward campaign
View campaign details
Buy reward campaign for client
All campaign categories
Edit campaign category
17
CHAPTER 3:
OPEN LOYALTY SETTINGS
The high level settings for the Admin management of your Loyalty Platform includes five
areas that can be configured to enable and customize your activity.
• Configuration - basic settings of loyalty platforms elements including loyalty
programs behavior
• Users - detailed information about Open Loyalty users and theirs account settings
• Translations - available languages list with the editing possibility
• Emails - events list that send email from Open Loyalty system and theirs preview.
• System logs - informational, error and warning events list related to the Open
Loyalty system
Open Loyalty Settings
18
Configuration
The Configuration section determines loyalty program and points details, customer earning
and spending statuses, account activation, identification factors of matching transaction
with customer and other settings that are used throughout the Open Loyalty system.
Open Loyalty Settings
19
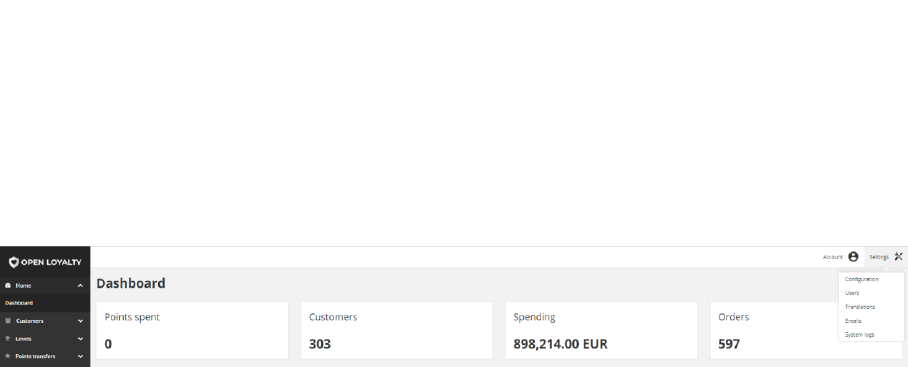
To configure Open Loyalty:
1. In the upper-right corner, tab the Settings ( ) icon. Then on the menu, choose
Configuration
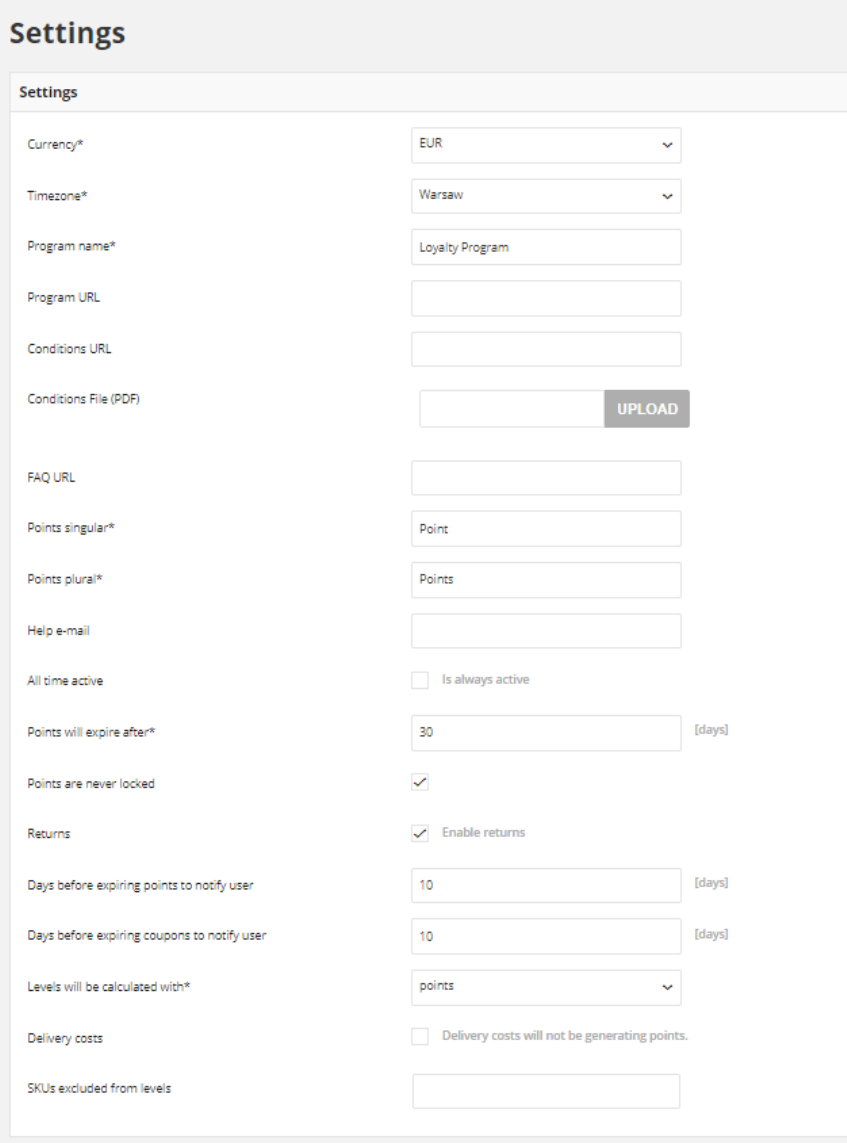
2. In the Settings section, do the following:
a. In the Currency list, select the currency to be used for online and offline
transaction, to one of the following:
• EUR
• HKD
• PLN
• USD
b. Select your Timezone from the list. Time zone is used for date time calculation
c. Enter the Program name that you want to use in all communications
d. If applicable, enter the URLs to the following:
Program URL URL to page with Loyalty Program description
Conditions URL URL to page with Loyalty Program Terms & Conditions description
FAQ URL URL to page with Loyalty Program FAQ page
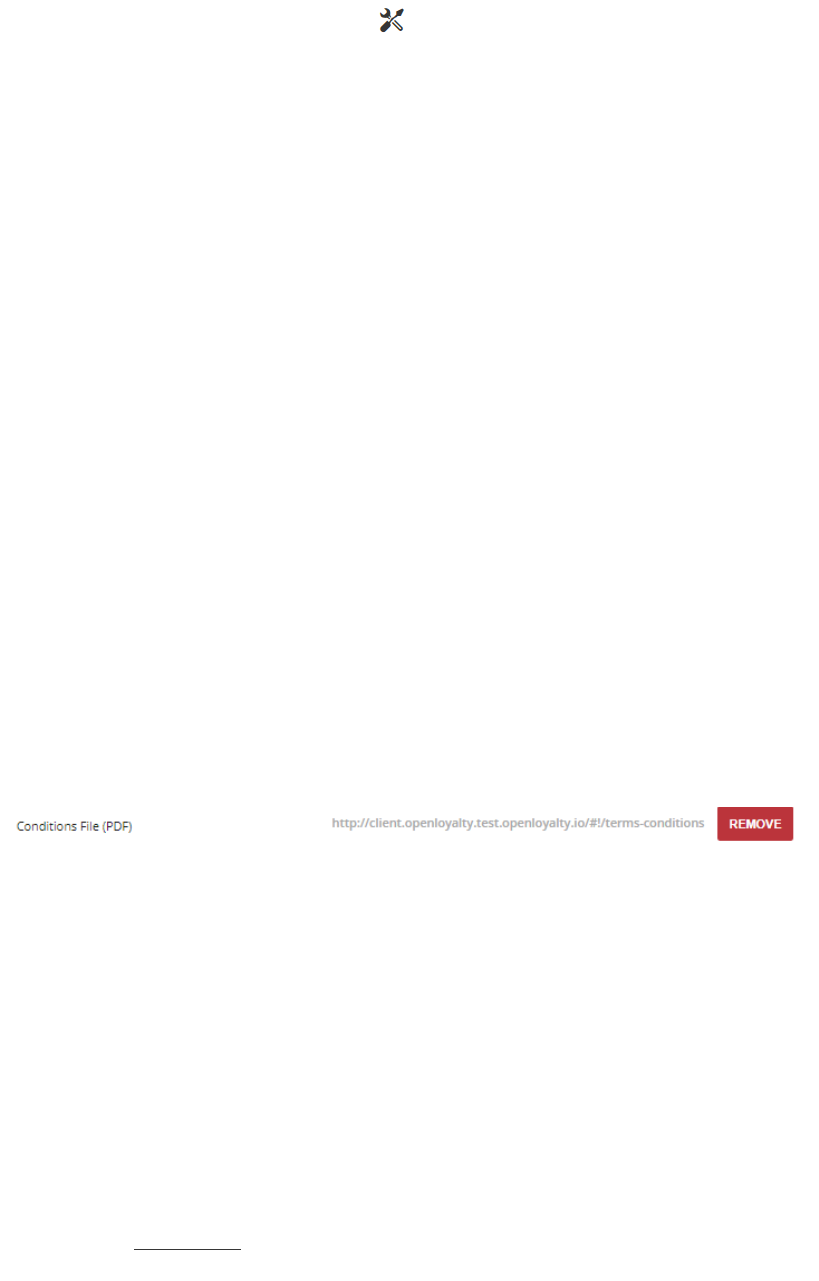
e. If applicable, in Conditions File (PDF) field you can upload Loyalty Program Terms
& Conditions document in .pdf. After uploading and saving settings a link where file
is available appears
Conditions file uploaded
Document will be attached as a link in the Welcome system e-mails footer. For
more information please see system Emails
f. In Points singular and Points plural, type a unit label of scoring in singular and
plural, that you want to appear. For example: Point, Points
g. Set Help e-mail, where customer can write to find help and support for you Loyalty
Program.
h. Mark the All time active checkbox, if you want the points accumulated by the
participants of your loyalty program don’t expire.
i. Points will expire after field is available and required only when All time active
checkbox is unselected. Points will expire after provided number of days from date
of adding Points transfer.
20
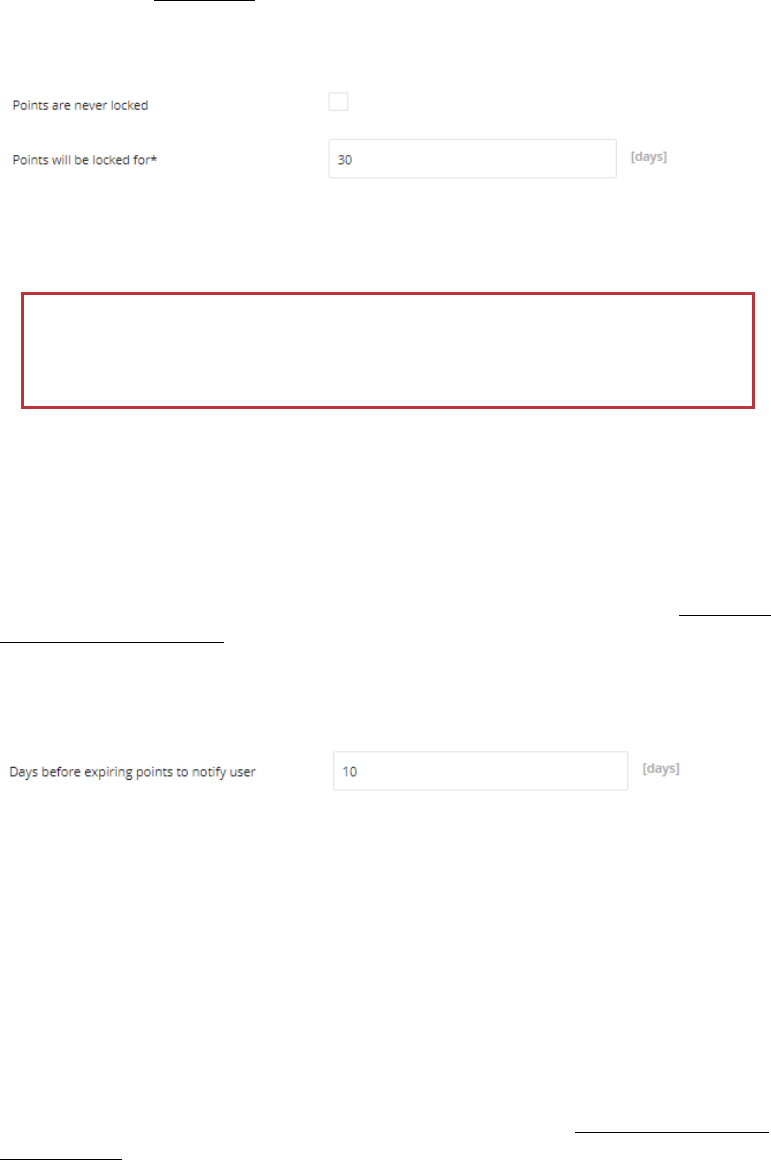
j. Mark the Points are never locked checkbox, if you want assign points to Active
points pool and recalculate customer level instantly when his transaction will be
registered in Open Loyalty.
k. Points will be locked for field is available and required only when Points are
never locked is unselected. Points will be locked for provided number of days from
date of transaction registration. After passing selected locked time points
automatically will get active and customer level will be recalculated.
Locked points options
l. If you marked Returns checkbox, then after Return process completed amount of
points earned for returned transaction will be subtracted.
m. If you want to get a webhook notification about the customer earned points
expiration you can define in Days before expiring points to notify user field
number of days when notification will be sent. For proper operation, it is necessary
to activate the webhook and provide the URL address to which the information will
be sent (more in Webhook section)
Webhook notification option – points expiration
For example, when you enter 10, it means that every day Open Loyalty will be
checking if there is any customer who have points which will expire in 10 days. If
yes webhook event will be sent (on the URL address provided by you in Webhooks
section) with information about: customer, sum of his points which will expire in 10
days and points expiration date.
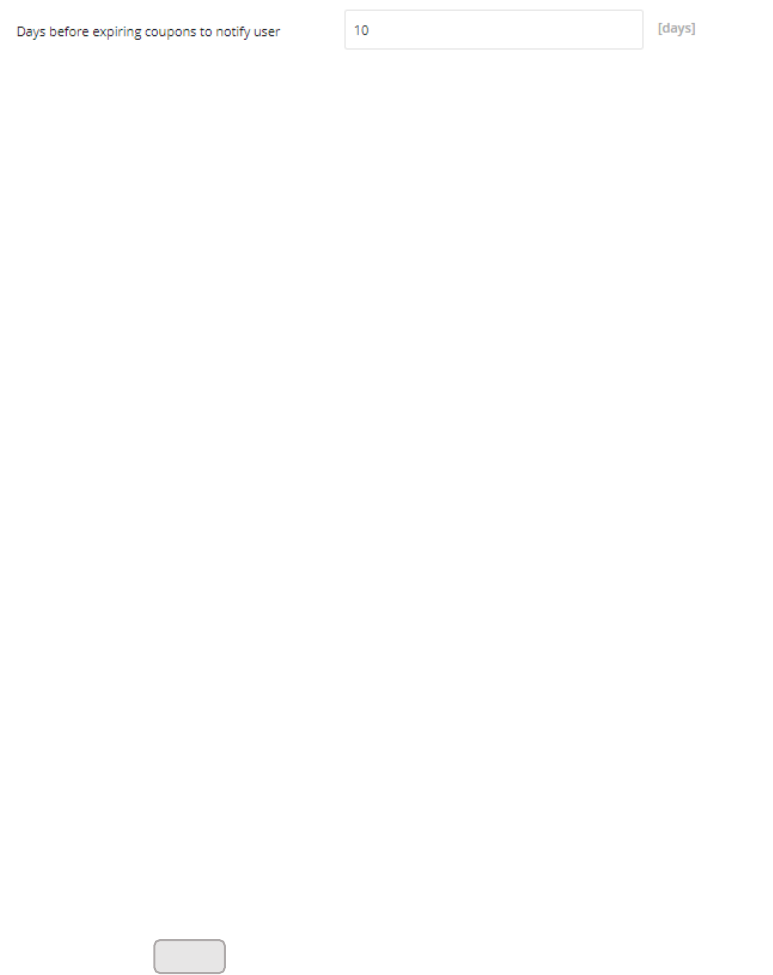
n. If you want to get a webhook notification about the customer coupon expiration
you can define in Days before expiring coupons to notify user field number of
days when notification will be sent. For proper operation, it is necessary to activate
the webhook and provide the URL address to which the information will be sent
(more in Webhook section)
Date until points will be locked and amount of locked points is displaying in
Customer profile details from the Admin and for customers via Client Cockpit
21
Webhook notification option – coupons expiration
For example, when you enter 10, it means that every day Open Loyalty will be
checking if there is any coupon which will expire in 10 days. If yes webhook event
will be sent (on the URL address provided by you in Webhooks section) with
information about: customer, coupon code which will expire in 10 days, expiration
date and coupon status (status is calculated based on days inactive and days valid
defined during reward campaign creation).
o. Set the Levels will be calculated with field to one of the following:
Points current level assignment will be calculated on the basis of sum of
points earned from transactions (with use of earning rules)
Transactions current level assignment will be calculated on the basis of the
summary value of all transactions
When Points is selected additional section appears below. Please see Level
downgrade settings to learn how to configure reset points after selected time
period and level expiration.
p. When Delivery costs checkbox is selected then delivery cost will not be included in
order value used for earned points calculation.
q. Excluded SKUs of delivery cost field is available and required only when Delivery
costs checkbox is selected. SKU's provided in this field will be excluded from
calculation of earned points.
r. In the SKUs excluded from levels enter SKUs that will not be included in order
value used for earned points calculation.
3. When complete, tap
Save
22
Level downgrade settings
Section appears only when Levels will be calculated with points option is chosen and
allows to specify if and when customer level should be recalculated. Here you also
determine whether level recalculation should be combined wait a customer points reset
and define when and which points should be expired.
To configure level downgrade options:
1. In the upper-right corner, tab the Settings ( ) icon. Then on the menu, choose
Configuration
2. Scroll down to Level downgrade settings section
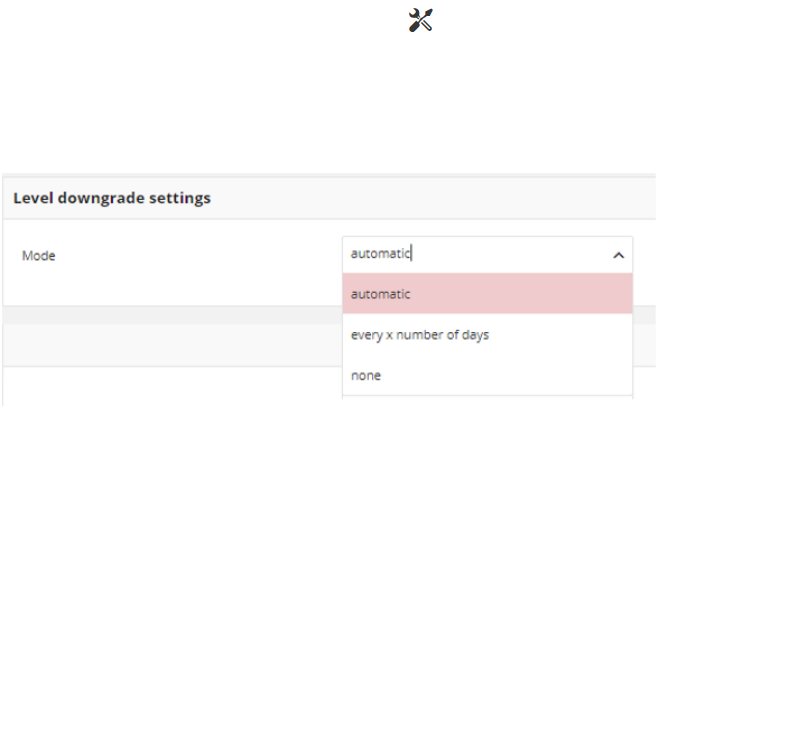
3. Set the Mode option to one of the following:
Mode options
None
Customer level doesn’t decrease and his accumulated points are not
reset.
No additional settings to configure here.
Automatic
Default Open Loyalty logic. The only scenarios when customer can return
to previous level is when transaction (order), which caused this
promotion, will be returned or his level will be changed manually by
Admin. More about levels here. His accumulated points are not reset –
Loyalty points pool based on Points transfers.
No additional settings to configure here
Every x number
of days
Customer level will be recalculated every provided number of days based
on accumulated points counting from registration date/last downgrade
date or last level change.
If at the end of specified period (registration date/last downgrade
date/last level change + number of days every which customer level is re-
calculated) customer won't reach enough points to stay at the same level,
a customer will be relegated to whichever level his points determine.
23
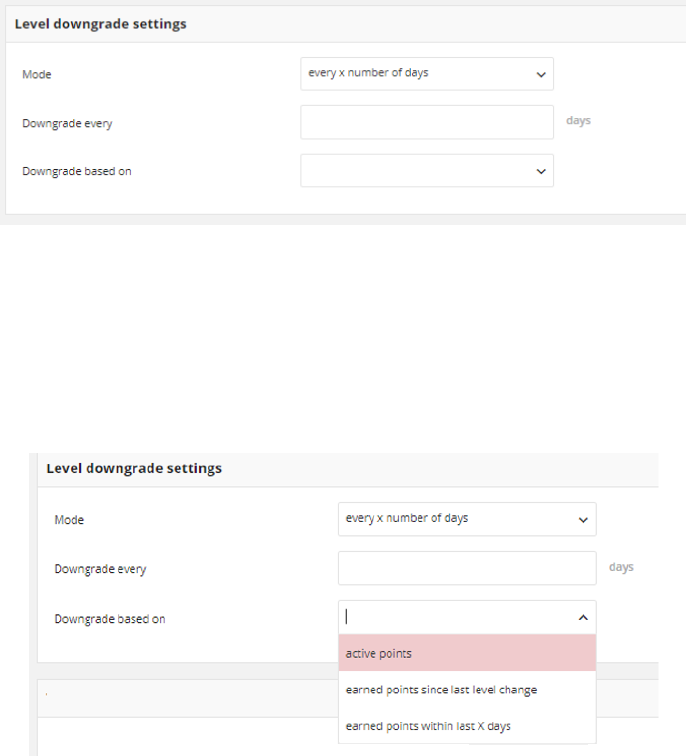
4. To set up level expiration after selected time period choose Every x number of days
and do the following:
Level expiration settings
a. In Downgrade every field define after how many days since registration date or last
downgrade date (in next period) level will be recalculated. For example, provide 365
to recalculate level every year.
b. In Downgrade based on field choose which points should be used to level
recalculation after defined X number of days:
Level downgrade points pool options
Active points
Calculate a customer current level based on only his active points pool
Earned points
within last X days
Calculate a customer current level based on his earned points since last
level recalculation date (registration date/las level recalulaction). It sums
up added (Active) points. Used points won't affect on earned points.
Locked points are also excluded from earned points and will be added af-
ter unlocking them.
Currently earned points from last downgrade date are displaying in Cus-
tomer Loyalty points balance as a Total points earned since last level
recalculation. At the of every defined period amount of collected within
points is reset.
Earned points
since last level
change
Calculate a customer current level based on his earned points since last
level change date (base on his activity within loyalty program). For exam-
ple, after registration customer is assigned to the basic level and from
24
the registration date, days till level recalculation is counted. If in the mid-
dle time, customer will earn points that implicate promotion to the next
level days are counted from the beginning starting from the date of pro-
motion
Currently earned points from last change are displaying in Customer
Loyalty points balance as a Total points earned since last level recal-
culation. At the of every defined period amount of collected within
points is reset
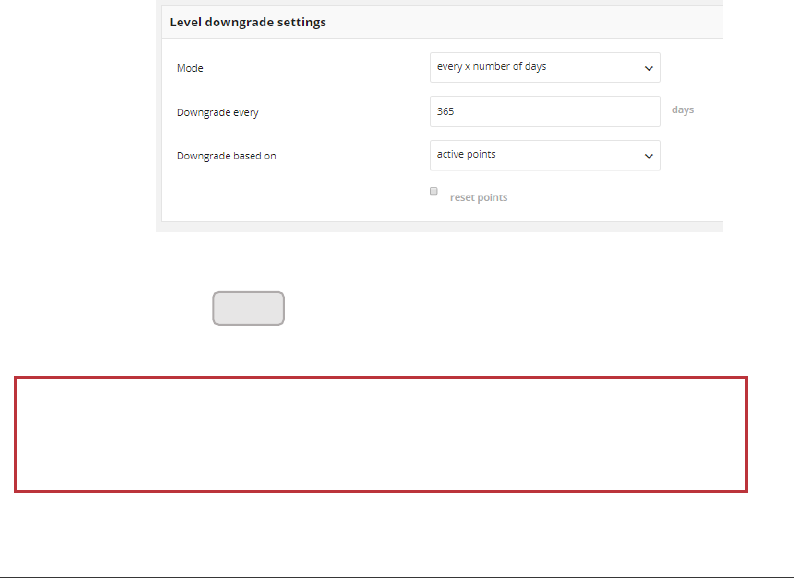
5. Reset points checkbox appears only when Active points are selected. When you mark it,
Open Loyalty resets all Active and Locked points and move it to Expired points pool after
specified Downgrade every number of days.
If you leave checkbox blank, Active points will not be reset and will pass to next period.
The amount of Active points will be changing by Customer activity within Loyalty
program – spending points for reward campaign, earning points for transaction,
newsletter subscription, Admin adding/spending points transfer etc.
Reset points checkbox
6. When complete, tap
Example of customer level downgrade base on earned points within last X days:
Your customer points credentials to level promotion :
• Level O - if a customer has no points
• Level 1 – if a customer has 10 points
• Level 2 – if customer has 30 points
• Level 3 – if customer has 100 points
A customer changes his level, before points are reset. Points are reset after
specified time period, counting from registration date, without customer
level change.
Save
25
You decided to recalculate level every year since the customer registration date and to use for
this Active points, which will be reset at the end of the year (after level recalculation).
A customer made a two transactions and get 10 points and 20 points. After getting 10 points a
customer leveled up to 1st level, after getting another 20 points a customer leveled up to 2nd
level.
If at the end of year a customer:
• has only 5 active points then he is downgraded to the Level0, and all his points are re-
set
• has 10 active points the he is downgraded to the Level1, and all his points are reset
• has 30 active points the he stays in the same Level2, and all his points are reset
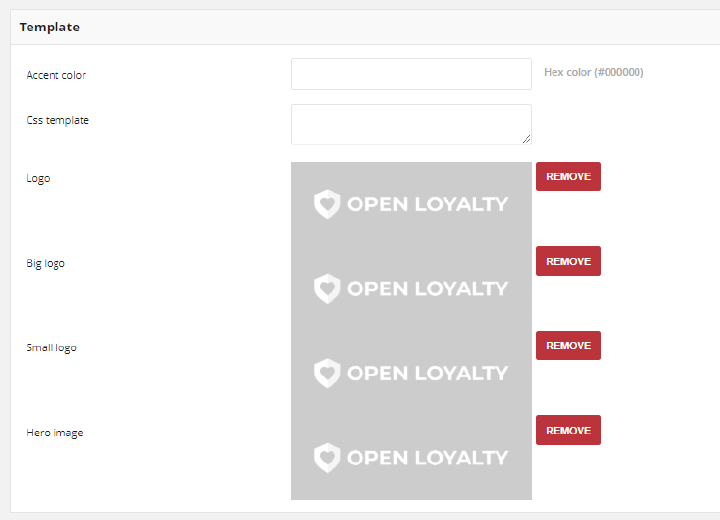
Template
Template management determines the logo, as well as the other content elements e.g.
fonts, headers, colors, that are used for all pages within Open Loyalty.
Template
The content is formatted with CSS, and can be easily edited and customizes by adding
variables and other content element. You can make a color theme on the frontend using
your primary color (Accent color).
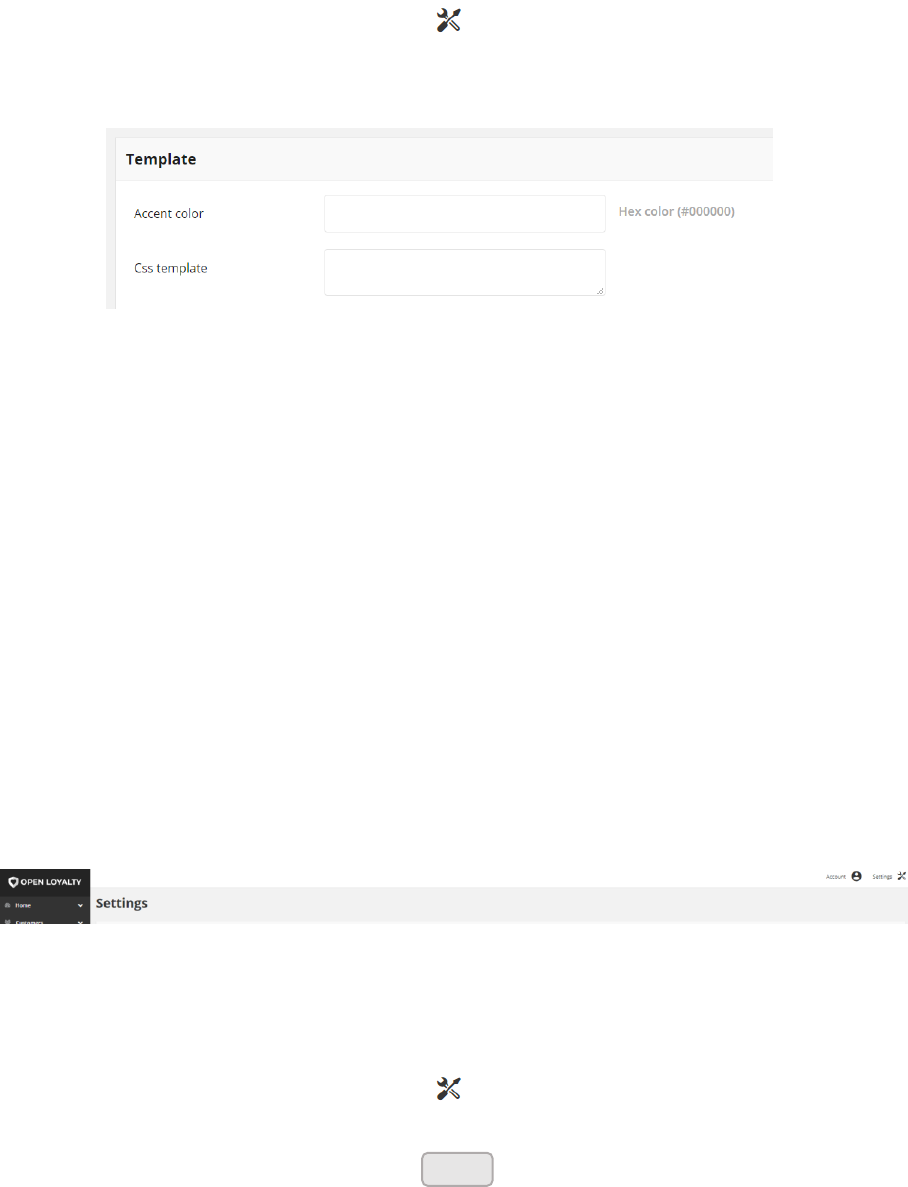
26
To customize your template:
1. In the upper-right corner, tab the Settings ( ) icon. Then on the menu, choose
Configuration
2. Scroll down to Template section and do the following:
Content management
b. In Accent color, define your primary color indicator. Accent color is the color
displayed most frequently across your Loyalty Program screens and components.
Only Hexadecimal color values are supported.
c. In the CSS template box, enter the CSS code as needed. The content consists of a
combination of CSS directives, variables and text.
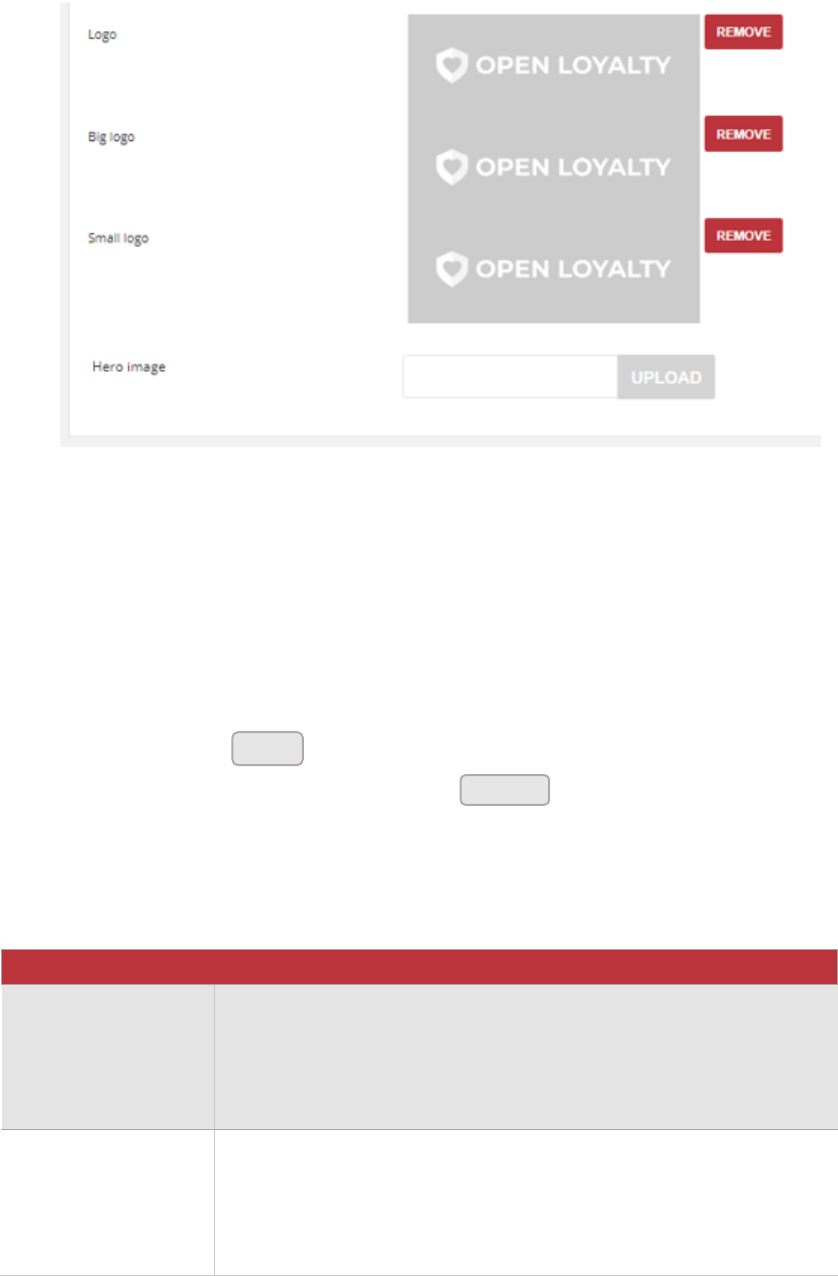
One of the first things you’ll want to do is to change the logo in the header above the
menu. Your logo can be saved as either a PNG, JPG, or JPEG file type, and uploaded from
the Admin of your Open Loyalty. The default Open Loyalty logo in the sample data is an
PNG file. During upload, Logo and Small logo images will be automatically resized to
applicable versions.
In addition, you can also add an oversized banner image, called Hero image, that will be
placed on a login page. Hero image is the first visual element a customer’s encounters on
your site.
Logo in Header Menu
To upload your logo:
1. In the upper-right corner, tab the Settings ( ) icon. Then on the menu, choose
Configuration
2. Scroll down to Template section and tap on selected fields to do the following:
Upload
27
Logo Updating
a. In Logo field, to import logo image that will be displayed on desktop version in Admin
cockpit. Then choose the file from your computer.
b. In Small logo field, to import logo image that will be displayed on mobile version. Then
choose the file from your computer.
c. In Hero image field, to import image that will be displayed as a banner on login page.
3. When complete, tap
You can simply remove uploaded logo by taping
Image Roles
FIELD
DESCRIPTION
Logo
Main logo image in the Admin cockpit placed in the header above the
menu. Image is display on desktop version of application.
Applicable image size: 512 x 512 pixels.
Big logo
Big logo image in the Client cockpit placed above login credentials
section on a login page. Image is display on desktop version of
application.
Applicable image size: 512 x 512 pixels.
Remove
Save
28
Small logo
Small logo image in the Client cockpit placed above login credentials
section on a login page. Small image is display on mobile version of
application.
It can be also used as an icon of the application on the mobile device
Applicable image size: 192 x 192 pixels.
Hero image
Large web banner image placed on a login page in the front. Hero
image is the first visual element a customer’s encounters on the site
and display on mobile and desktop version.
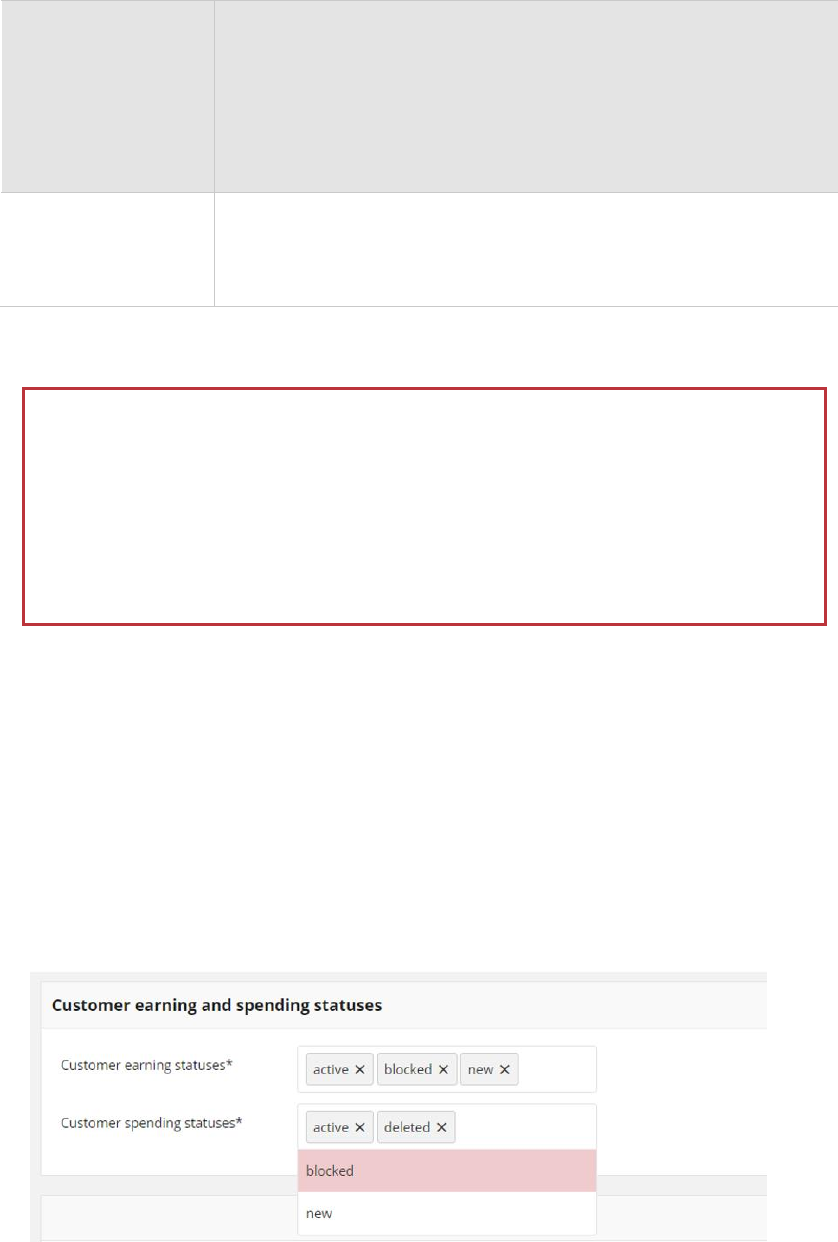
Customer earning and spending statuses
The Customer statuses section allows to specify to which customers with particular status,
points transfer can be handled. Specify the customer statuses which determines adding
and subtracting loyalty points.
Customer Statuses
Images sizing and formats
• The minimum and maximum image width is between 200-2560 pixels
• The minimum and maximum image height is between 200 – 1440 pixels
• The size of any one image must not exceed 2 MB
• Supported image formats: JPEG, JPG, PNG
29
To assigned a status:
1. In the upper-right corner, tab the Settings ( ) icon. Then on the menu, choose
Configuration
2. Scroll down to Customer earning and spending statuses section.
3. Set the Customer earning statuses field to one of the following:
New Customer create an account in your Loyalty Program, but didn’t
activate it. To learn more about account activation, see: Account
activation
Active Customer create and activate an account in your Loyalty Program
Blocked Customer is temporary inactive
Deleted Customer has been removed
If the Customer earning statuses field remain blank, i.e. no status will be assigned,
loyalty points will not be charged to any Customer.
4. Set the Customer spending statuses field to one of the following
New Customer create an account in your Loyalty Program, but didn’t activate it.
Customer is displaying in Customer grid from the Admin cockpit as a grayed-out.
To learn more about account activation, see: Account activation
Active Customer create and activate an account in your Loyalty Program. Customer is
displaying in Customer grid from the Admin cockpit.
Blocked Customer is temporary inactive
Deleted Customer has been removed
If the Customer spending statuses field remain blank, i.e. no status will be assigned, any
customer will be able to spend loyalty points.
5. When complete, tap
Save
30
Account activation method
In order to use Open Loyalty Client cockpit, your customers must first activate their
customer account. In Account activation section you set the method how their accounts will
be activated – by clicking link in welcome email or by code received via SMS.
Account Activation Method
To set up account activation method:
1. In the upper-right corner, tab the Settings ( ) icon. Then on the menu, choose
Configuration
2. Scroll down to Account activation section.
3. Set the Account activation method field to one of the following:
email account will be activated after clicking on activation link sent to
email address
SMS account will be activated after entering a verification code sent to
phone number. The Verification PIN is valid for 30 minutes
4. When complete, tap
Save
31
Marketing Automation Tool
To create effective email marketing and easy determine which of your products and
services will suit to individual customer who registered to your Loyalty Program or just left
their email address (newsletter subscription) you can integrate Open Loyalty Platform with
SALESmanago.
SALESmanago is the 1st in Poland and 6th in the world*
1
a comprehensive, next-generation
platform for marketing automation. SALESmanago identify people entering your website,
analyze their online behavior and transaction. Based on this information create complete
and individual customer behavioral profile. This information is processed by the Machine
Learning & AI algorithms to provide fully personalized offers.
Marketing Automation Tool integration
To set up integration with SALESmanago:
1. In the upper-right corner, tab the Settings ( ) icon. Then on the menu, choose
Configuration
2. Scroll down to Marketing Automation Tool section.
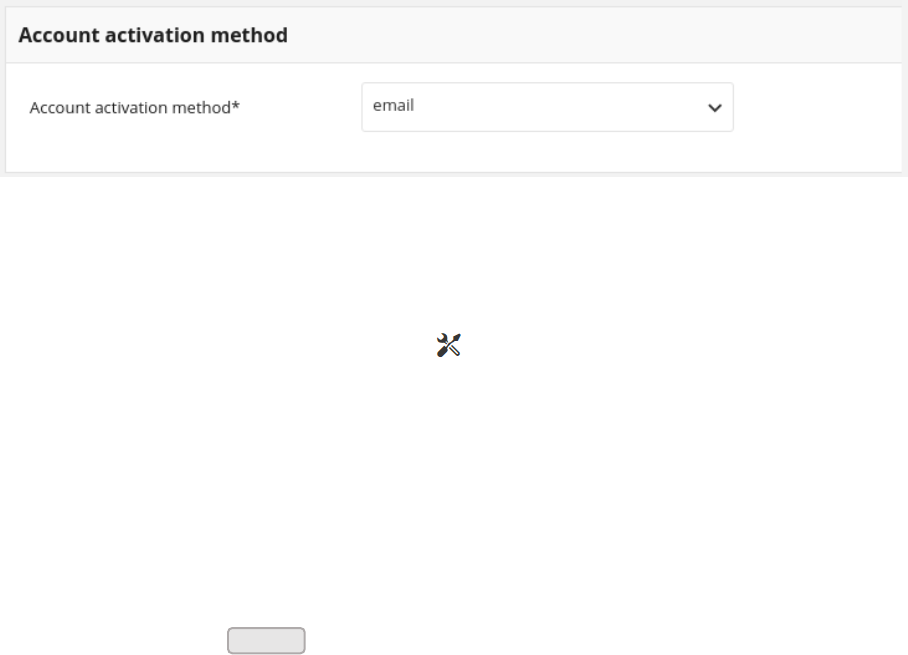
3. To integrate with SALESmanago in Choose integration field select “SalesManago” from
the dropdown list. By default, field is set as Disabled.
1
Source: https://www.salesmanago.pl/
Note
To integrate Open Loyalty platform with SALESmanago tool firstly, you have to create
an account in SALESmanago. The data from you account will be needed to set up
integration.
32
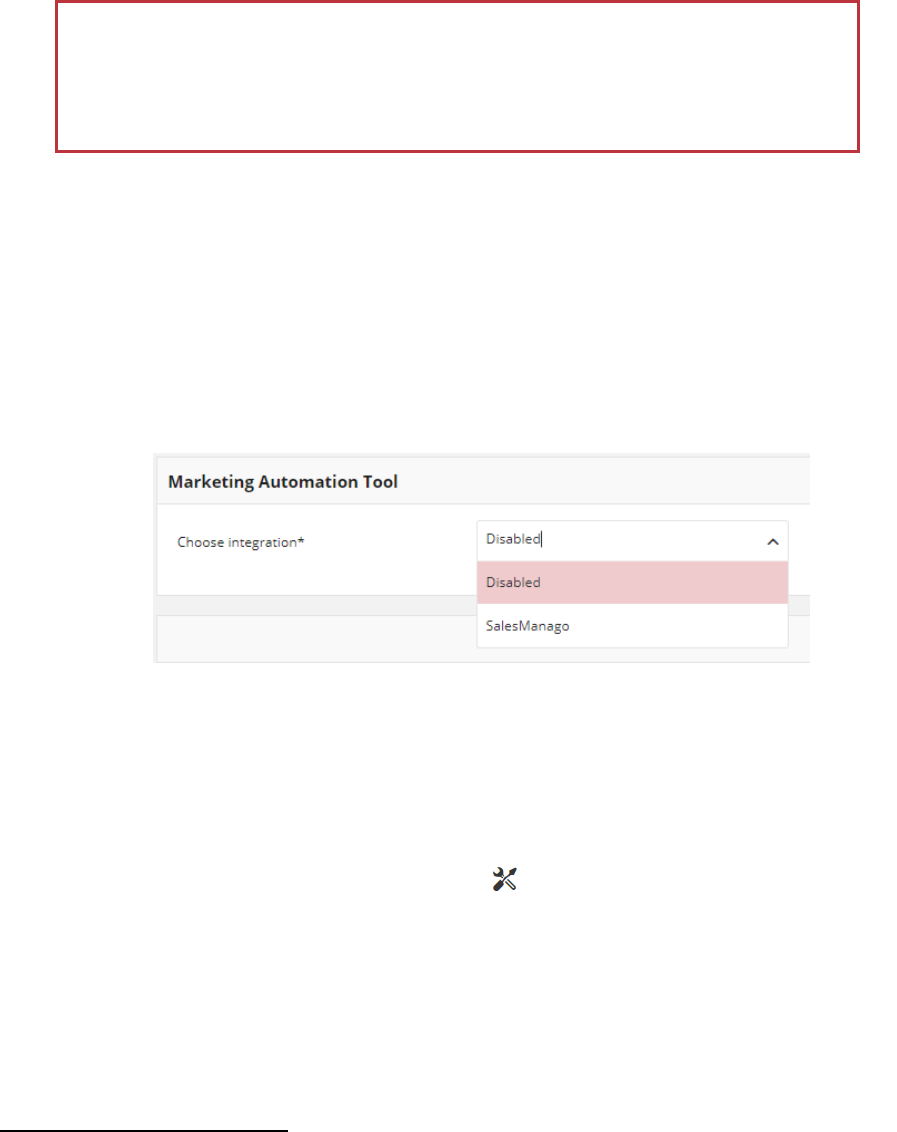
4. Additional fields to complete will appear. To find information to fill them, open your
SALESmanago account and choose: Settings -> Integration ->API Access. Then do the
following:
SalesManago settings
a. In API URL field provide your SALESmanago Endpoint
b. In API secret field provide your SALESmanago ApiSecret string
c. In API key field provide your SALESmanago MicoSite Key- a random string used for
authentication
d. In Customer ID provide your SALESmanago Client ID
e. In Email field enter the email address of the default owner of acquired contacts in
SALESmanago
5. When complete, tap
Save
33
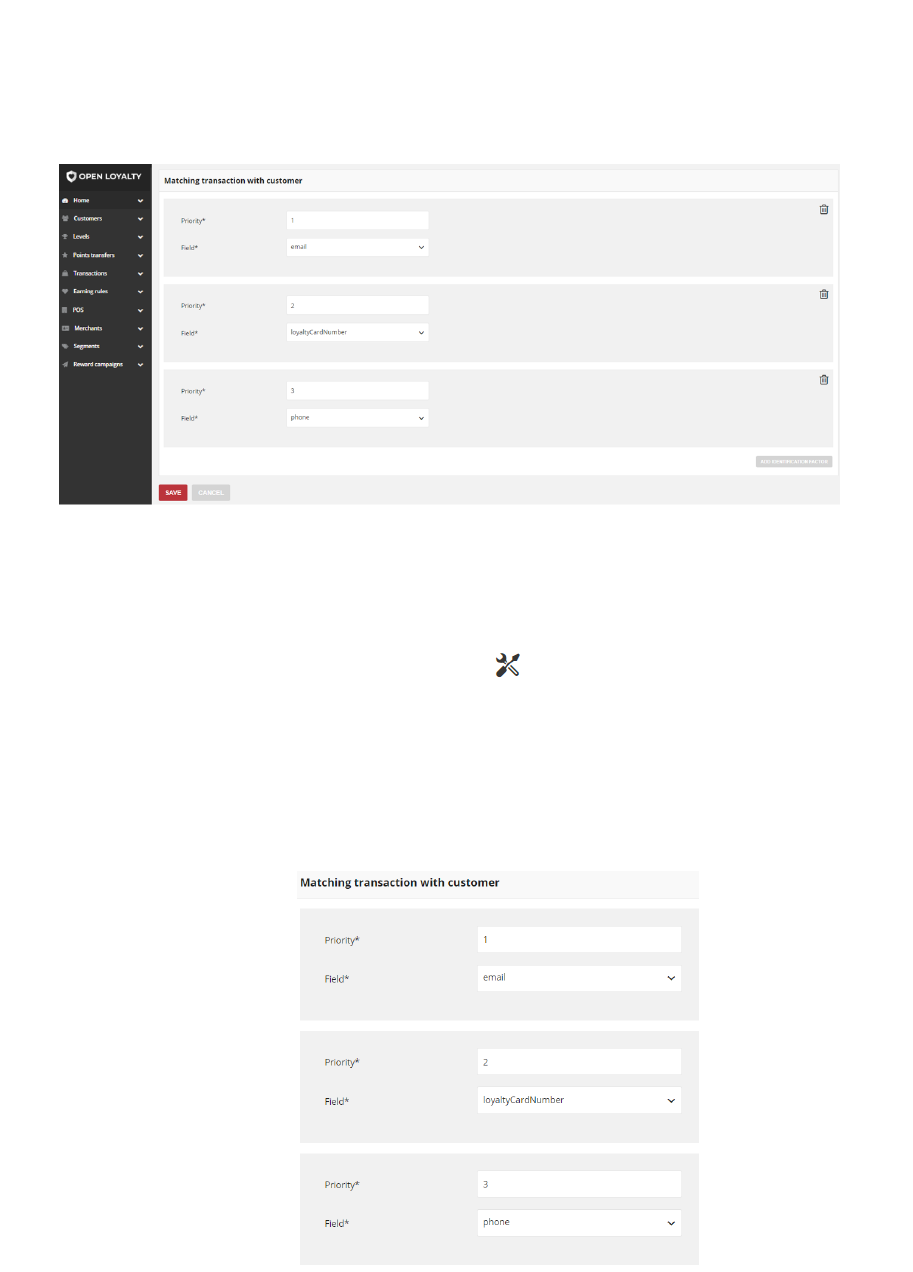
Identification factors
The identification factors determines the priority of factors used to match particular trans-
action with particular customer. Otherwise, these information are used to assign your loy-
alty program participant with transaction they making and transmitting relevant transac-
tion data to Open Loyalty for completing or validating redemption-related transactions or
rewards, calculating associated rewards or identifying transaction matches.
Identification factors
To set up identification factors:
1. In the upper-right corner, tab the Settings ( ) icon. Then on the menu, choose
Configuration
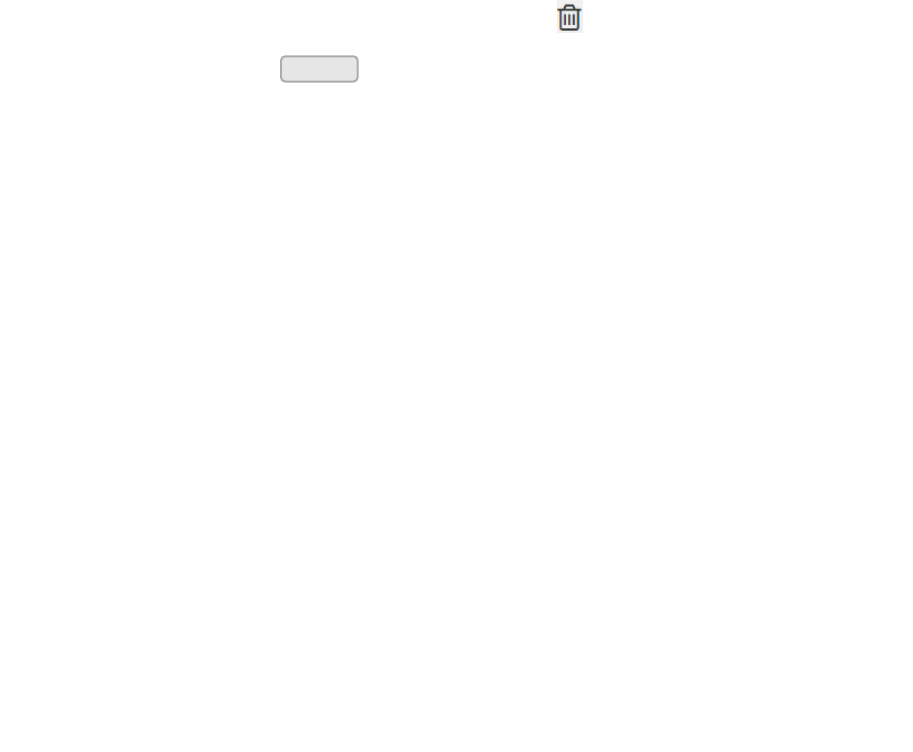
2. Scroll down to Matching transaction with customer section. Fields in this section are
used to prioritize which of factors will be taken first to calculate transaction to customer
assignment.
Matching Factors with Priority
34
3. The Priority field determines the order in which the calculation will be handled. Enter a
number to determine the Priority of this factor in relation to other factors that might be
active at the same time (number 1 has the highest priority)
For example, if there are three factors, with a priority of one, two, and three, the one
with the highest priority (number one) is calculated before the others. If there will be no
clear result, factor with the second highest priority is verified etc.
4. Set the Field to one of the following:
email when matching transaction with the Customer email will be used
(e.g. email provided in Loyalty Program and eCommerce must be
the same)
loyalty card number when matching transaction with the Customer loyalty card
number will be used (e.g. Loyalty Card Number must be added to
eCommerce account)
phone when matching transaction with the Customer phone number will
be used (e.g. phone number must be provided during account in
Loyalty Program creation)
5. You can simply remove factor rule by clicking bin ( ) icon in a particular row.
6. When complete, tap
Save
35
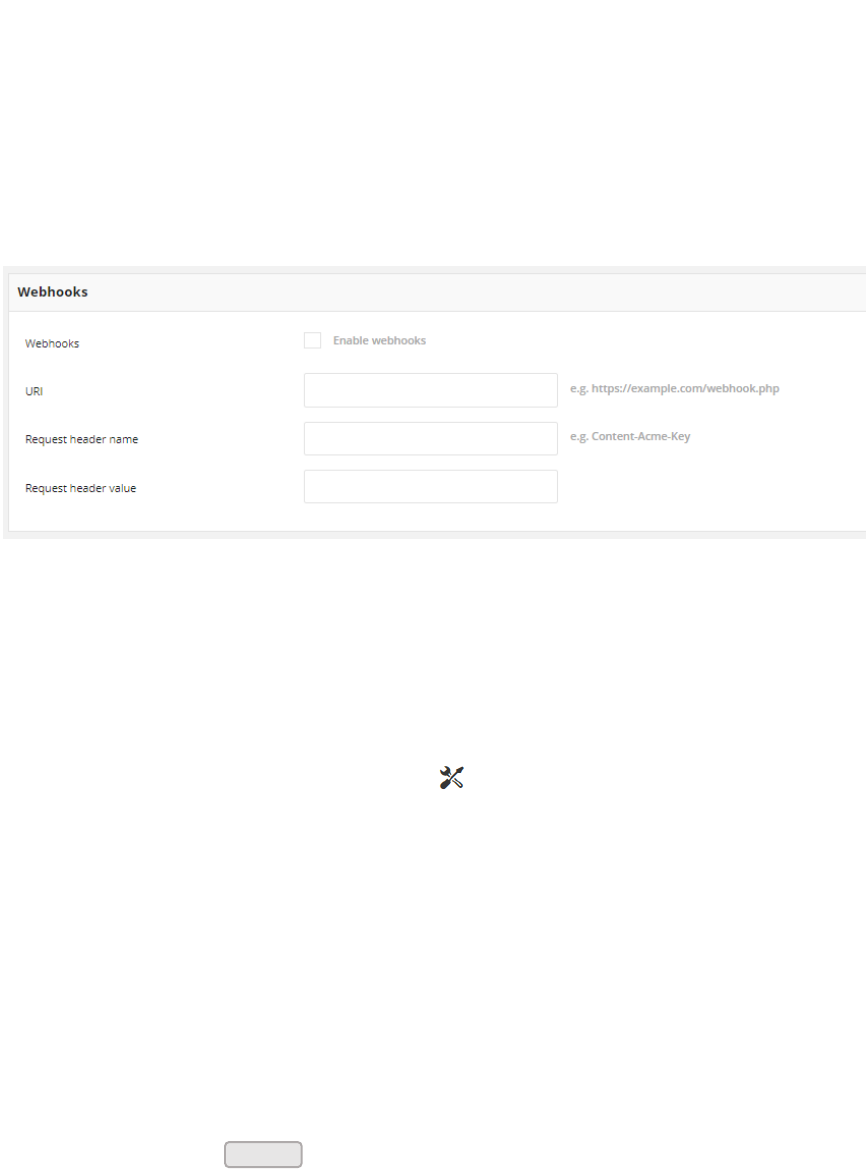
Webhooks
Webhooks is a mechanism allowing to send HTTP requests to the URL configured by
Admin, triggered by some event, such us customer registration, transaction created,
customer data edit etc. There is no need to be a request initiated on your end, data is sent
whenever there’s new data available.
To setup a webhook all you have to do is register a URL with the company proving the
service you’re requesting data from. That URL will accept data and can activate a workflow
to turn the data into something useful.
Webhooks Enable Option
To enable Webhook:
1. In the upper-right corner, tab the Settings ( ) icon. Then on the menu, choose
Configuration
2. Scroll down to Webhooks section, and to enable mechanism do the following:
a. In Webhooks field mark Enable webhooks checkbox
b. Enter configured URL address on which request will be sent
c. In Request header name as an additional security measure for webhooks batch
provide a custom header that batches can be securely sent to your webhook
endpoint(s). This gives you the option of rejecting webhook batches if these custom
headers and associated values are not included in the batch
d. In Request header value enter associated with header value
3. When complete, tap
Save
36
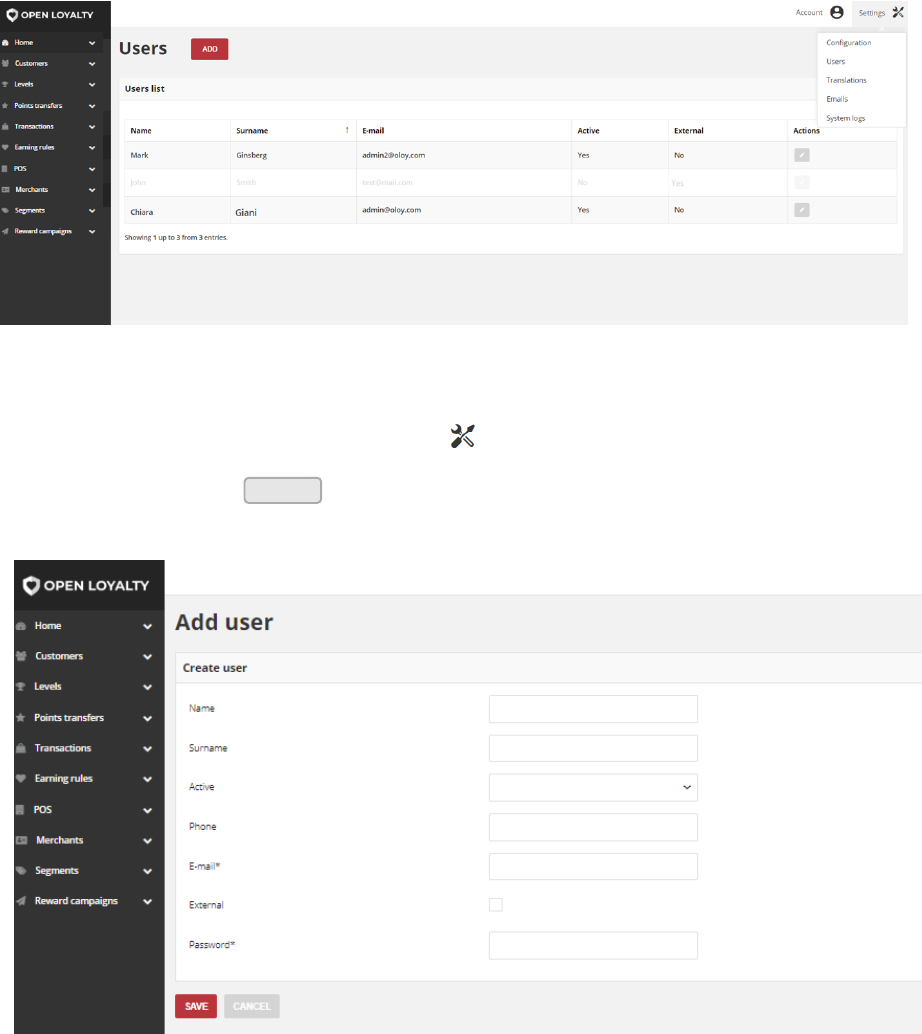
Users
When your store is first set up, you receive a set of login credentials for the Administrator
role that has full permissions. If there are others on your team, or service providers who
need access, you can create a separate user account for each from this section.
Users list include both active and inactive Admin user’s – inactive are grayed-out. You can
also see their status in Active column. Additionally Users list grid provides basic information
about users – name, surname, email address and authenticate method.
All Users
To add New user:
1. In the upper-right corner, tab the Settings ( ) icon. Then on the menu, choose Users.
2. To add new user, tap
New User Account Information
Add
37
3. In the Create user section, complete the following information:
• Name
• Surname
• Phone
• E-mail
This email address must be different from the one that is associated with your
original Admin account.
4. Then you have to decide which of following user authenticate method to choose:
a. To authenticate user via an API key, do the following:
• Mark checkbox External
• Enter an API key, received from Open Loyalty provider
In this case, you will authenticate the user and store that authentication in the
session so that the user is automatically logged in for every subsequent request.
b. To authenticate user via Password, do the following:
• Leave External checkbox blank
• Assign a Password to the account.
5. Set Active field to “Active”
6. When complete, tap
Locked users
Any user account that is currently inactive appears in the Users list as grayed-out. An ac-
count can be unlocked (set to active) by other Admin user.
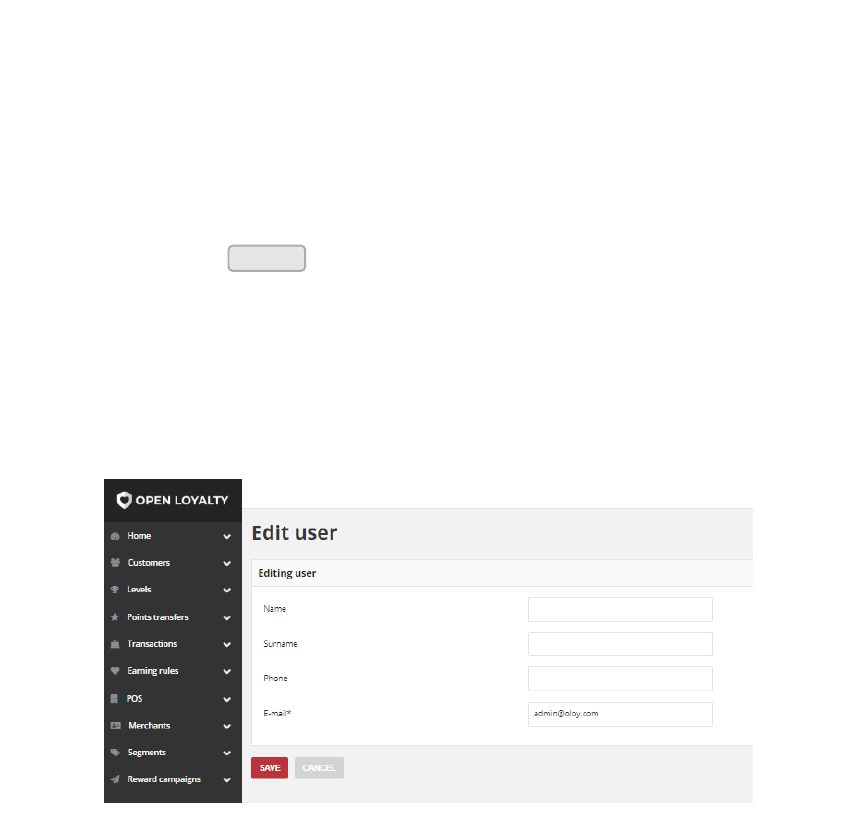
Admin User Editing
Save
38
To edit an admin account:
1. In the upper-right corner, tab the Settings ( ) icon. Then on the menu, choose Users.
2. In the Users list, find the record to be edited and click Edit ( ) icon in the Action
column to open the record in edit mode.
3. Make any necessary changes to user account information. If you change password/API
key, make sure to inform user about changes
4. When complete, tap
To lock/unlock an admin account:
1. In the upper-right corner, tab the Settings ( ) icon. Then on the menu, choose Users.
2. In the Users list, find the record to be edited, and click Edit ( ) icon in the Action
column to open the record in edit mode
3. Set Active field, to one of the following:
Active to unlock admin account. User can log in and have access to the
Open Loyalty platform.
Inactive To lock an admin account. User will not be able to log in and have
access to the Open Loyalty platform.
Admin users can not be deleted from Open Loyalty platform. To prevent any user
from access to the platform, set the Active field as Inactive.
Save
39
Translations
The Translations section allows defining many language versions used throughout the
Open Loyalty platform in both, Client cockpit and Admin cockpit. All content elements will
appear in the selected default language.
Most of the text that appears to be hard-coded on pages throughout your loyalty platform
can be instantly changed to a different language by changing the default language
parameter. The Default language is selected at the translation creation process but can be
changed at any time in edition mode.
Moreover, during Reward campaigns and Levels creation/edition processes admin can
fulfill Basic Information section in every language version listed here. For example, if we
have Polish and English translations, there is a possibility to provide Basic information of
Levels and Reward Campaign in this both languages.
Thanks to this, changing the default language translate the text word-for-word and
references a different translation table that provides the interface text that is used in the
Admin and Client cockpit. The text that can be changed includes navigational titles, labels,
buttons, and links such as “List of customers” and “Account”, Reward campaigns and Levels
name, description etc.
Currently, Open Loyalty is available in two languages: English and Polish.
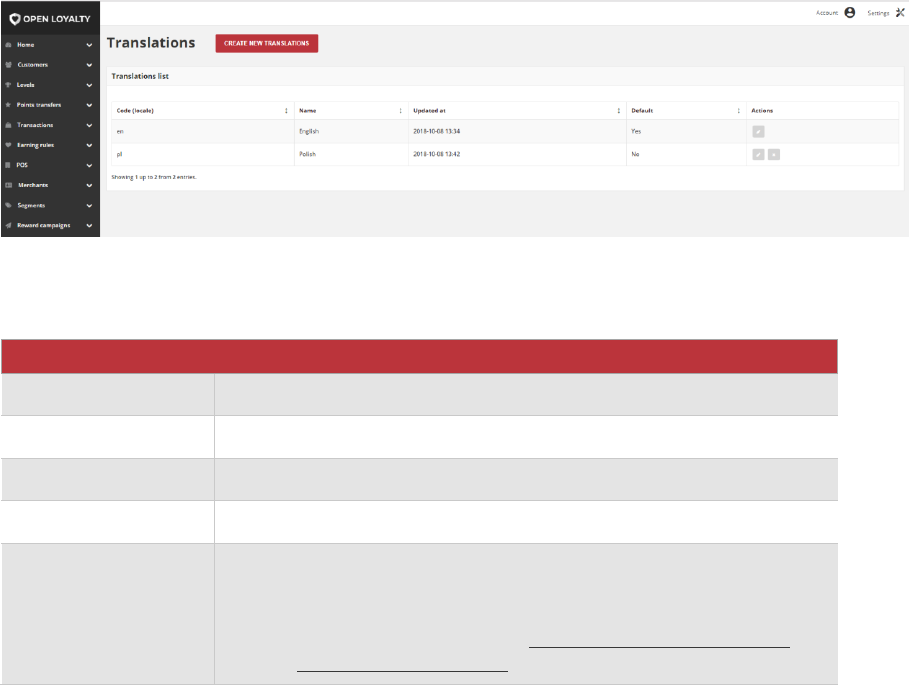
Translations Lists
Field description
FIELD
DESCRIPTION
Code (locale)
Language identifier
Name
Language name
Updated at
Date of last language version modification
Default
Information which language is default. Options include: Yes/No
Actions
The operations that can be applied to selected translations. Options
include:
• Edit translation
• Remove translation. Note – there is not possible to remove
default language version.
40
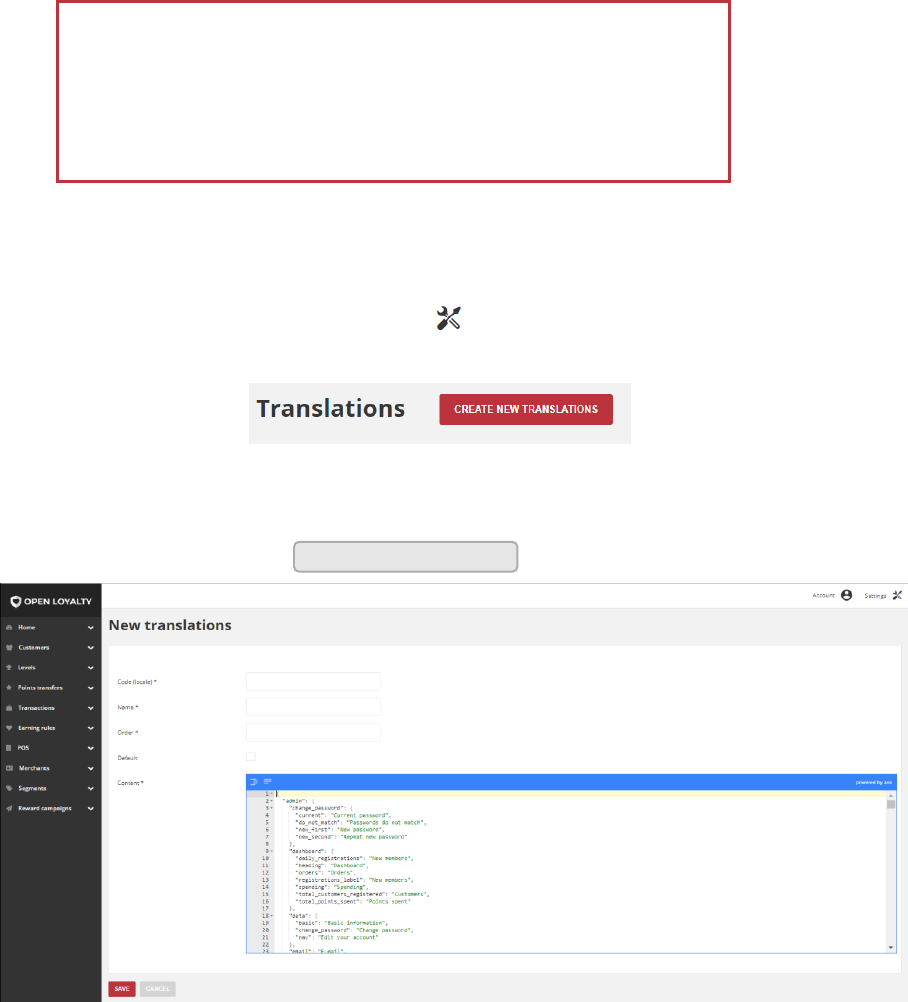
Create new translations
You can create and versions your loyalty platform in multiple languages. You can have only
one default language at a time.
To add new translation:
1. In the upper-right corner, tab the Settings ( ) icon. Then on the menu, choose
Translations.
Add new translation button
2. To add new translation, tap
New Translations Form
3. Enter a Code (locale) in lowercase characters to identify the language. For example: de
4. Enter a Name for the translations. For example: German
5. Enter a sort Order number to determine the sequence in which the translation is listed
on a Translations list
Before adding new translations, copy existing content in JSON and
paste into new one.
It helps you to include all content elements that should be translated
and keep JSON format of file.
Create new translations
41
6. To set translation as a main language within the platform, mark Default checkbox
7. In Content field, for each text to be edited either paste or type the translated text into
the field. Translated text is marked in green.
Text in editor must be valid JSON.
Content field is available in two JSON format:
• Format JSON data, with proper indentation and line feeds
• Compact JSON data, remove all whitespaces
8. When complete, tap
9. Repeat the process for all language version used in the Open Loyalty
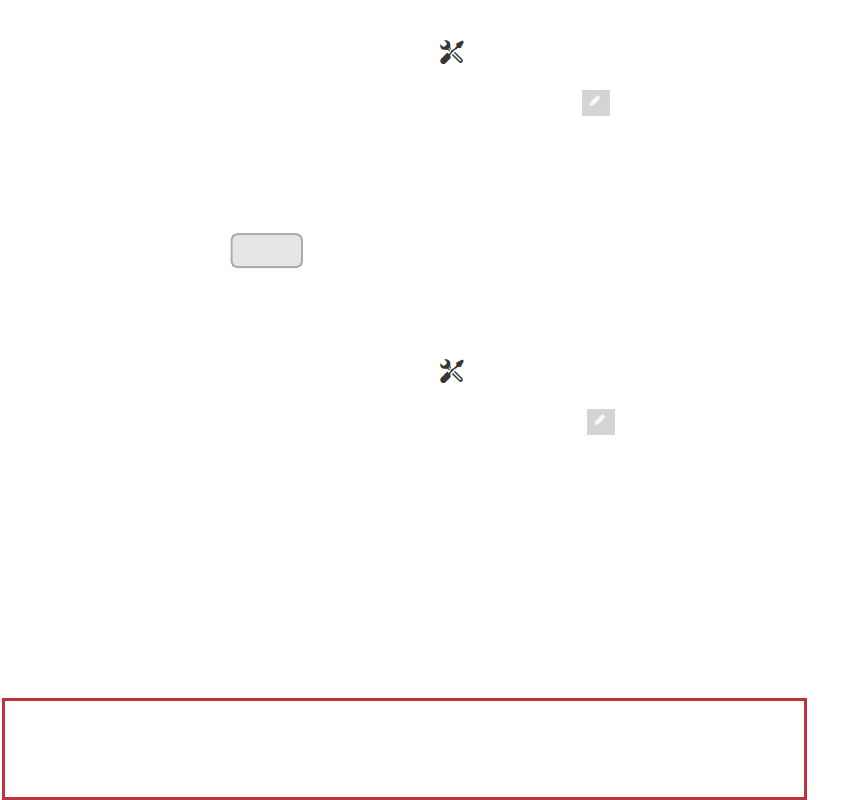
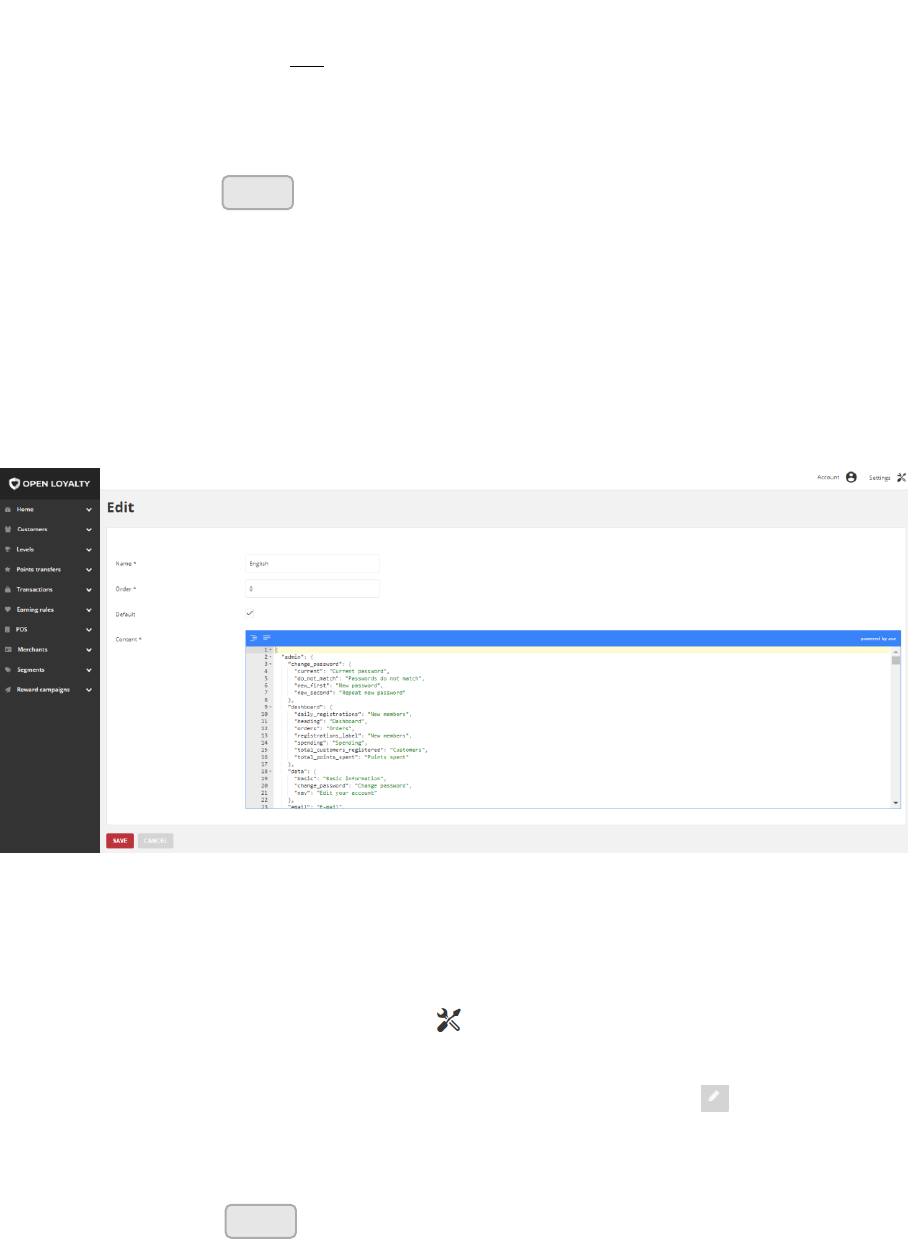
Updating translations
You can edit all data provided during translation creation process (except Code locale),
including change the default language to another. You can update translation data by
selecting it’s record from Translations list.
Translation Editing mode
To edit a translation:
1. In the upper-right corner, tab the Settings ( ) icon. Then on the menu, choose
Translations
2. In the Translations list grid, find the record to be edited, and click Edit ( ) icon in the
Action column to open the record in edit mode
3. Make any necessary changes to translated text.
4. When complete, tap
Save
Save
42
5. Date of last translation modification will be displaying in the Translations list grid in the
Updated at column.
To change default language:
1. In the upper-right corner, tab the Settings ( ) icon. Then on the menu, choose
Translations
2. In the Translations list grid, find the language to be set as default, and click Edit ( )
icon in the Action column to open the record in edit mode
3. Mark Default checkbox
4. When complete, tap
Date of last translation modification and selected as default will be displaying in the
Translations list grid.
Save
43
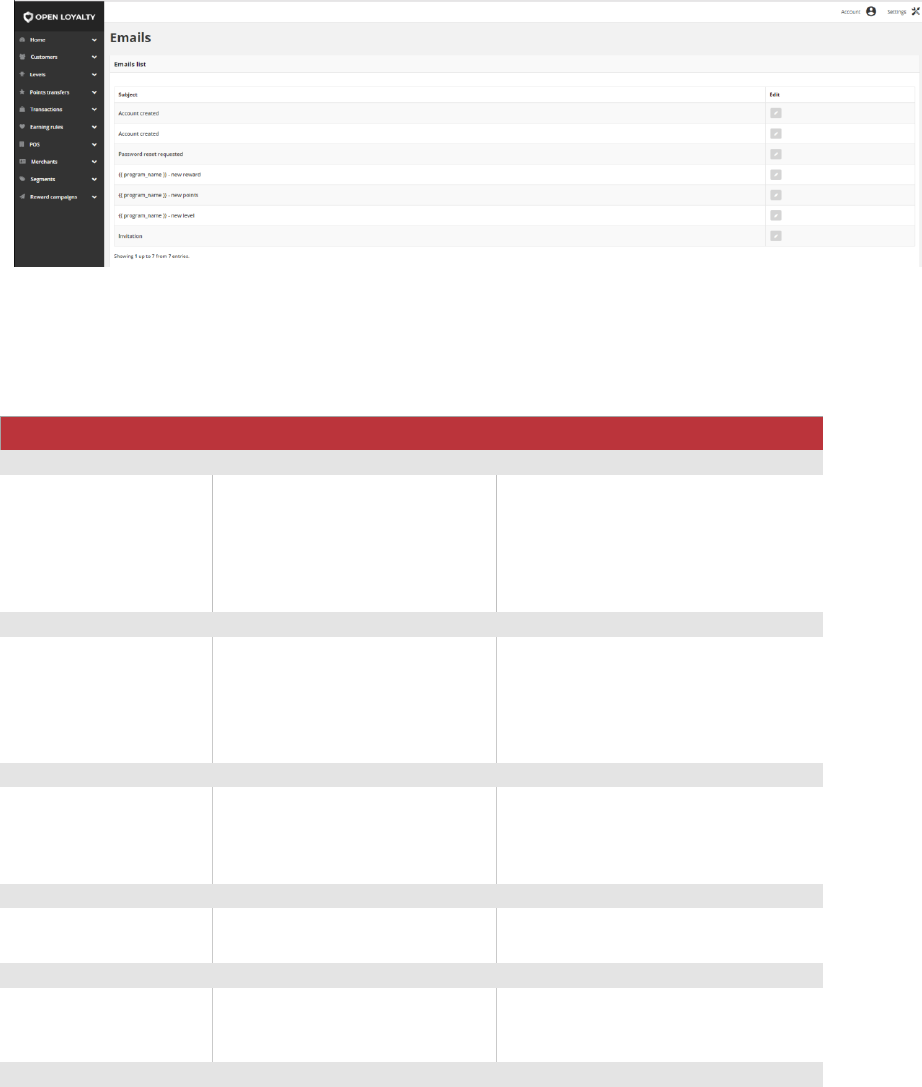
Emails
Email templates define the layout, content, and formatting of automated messages sent
from Open Loyalty. Open Loyalty includes a set of responsive email templates that are
triggered by a variety of events that take place during the operation of your Loyalty
Program. You will find a variety of prepared email templates related to customer activities,
admin actions, and system messages that you can customize
Email Templates
Email templates
EMAIL
EVENT
DESCRIPTION
ACCOUNT CREATED
E-mail send when Customer
register to program using
Customer Cockpit.
Email with link to activate account
(password is entered by customer
during filling out registration form)
and link to download Terms &
Conditions file (.PDF)
ACCOUNT CREATED
E-mail send after registering new
Customer Account using
Administrator Cockpit, POS
Cockpit, API.
It contains temporary password to
activate an account and link to
download Terms & Conditions file
(.PDF)
PASSWORD RESET REQUESTED
Send when user click on Forgot
password and provide proper
email address
E-mail with reset password link
NEW REWARD
Send after Customer confirm
reward redemption
It contains coupon code and reward
campaign name.
NEW POINTS
Send after Customer earn points
It contains new points value and
current amount of all active points
NEW LEVEL
44
Send after Customer reach next
level
It contains information about
customer new level and new
discount.
INVITATION
Send after Customer invite his
friend to loyalty program (refer a
friend)
It contains referrer customer name
and registration link for his friend
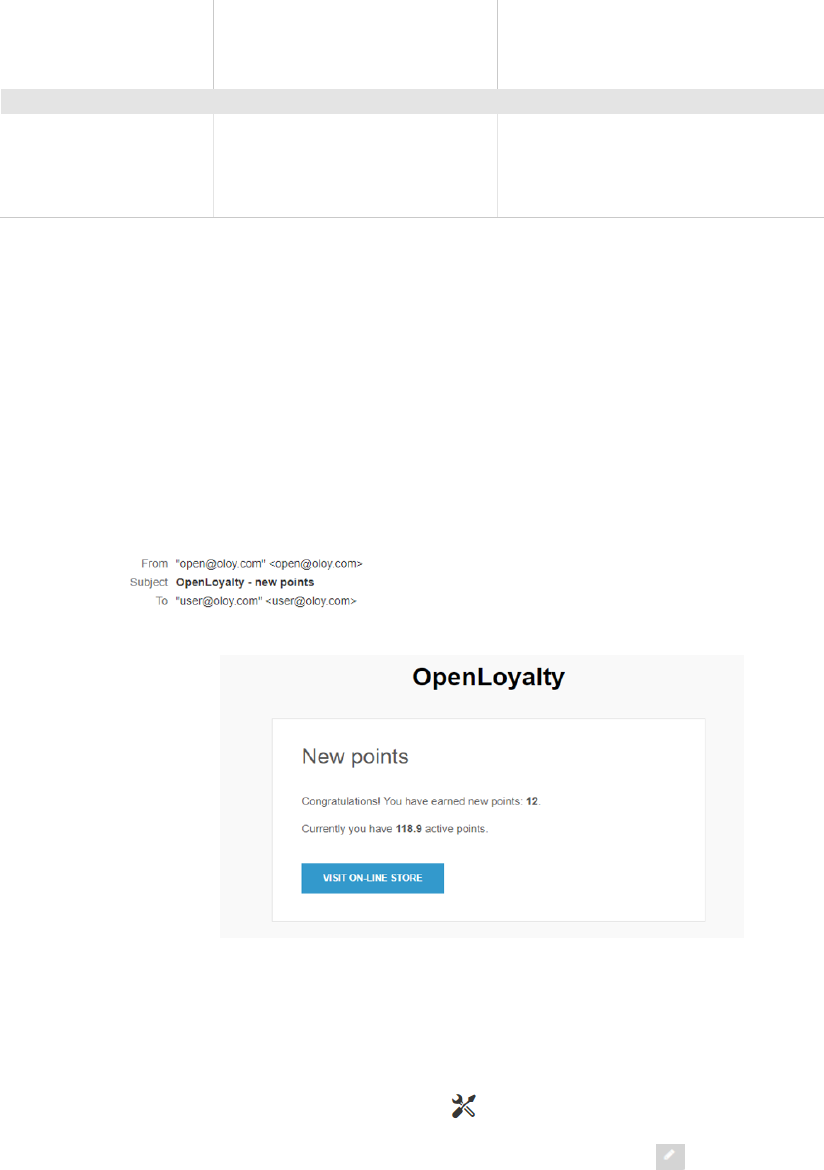
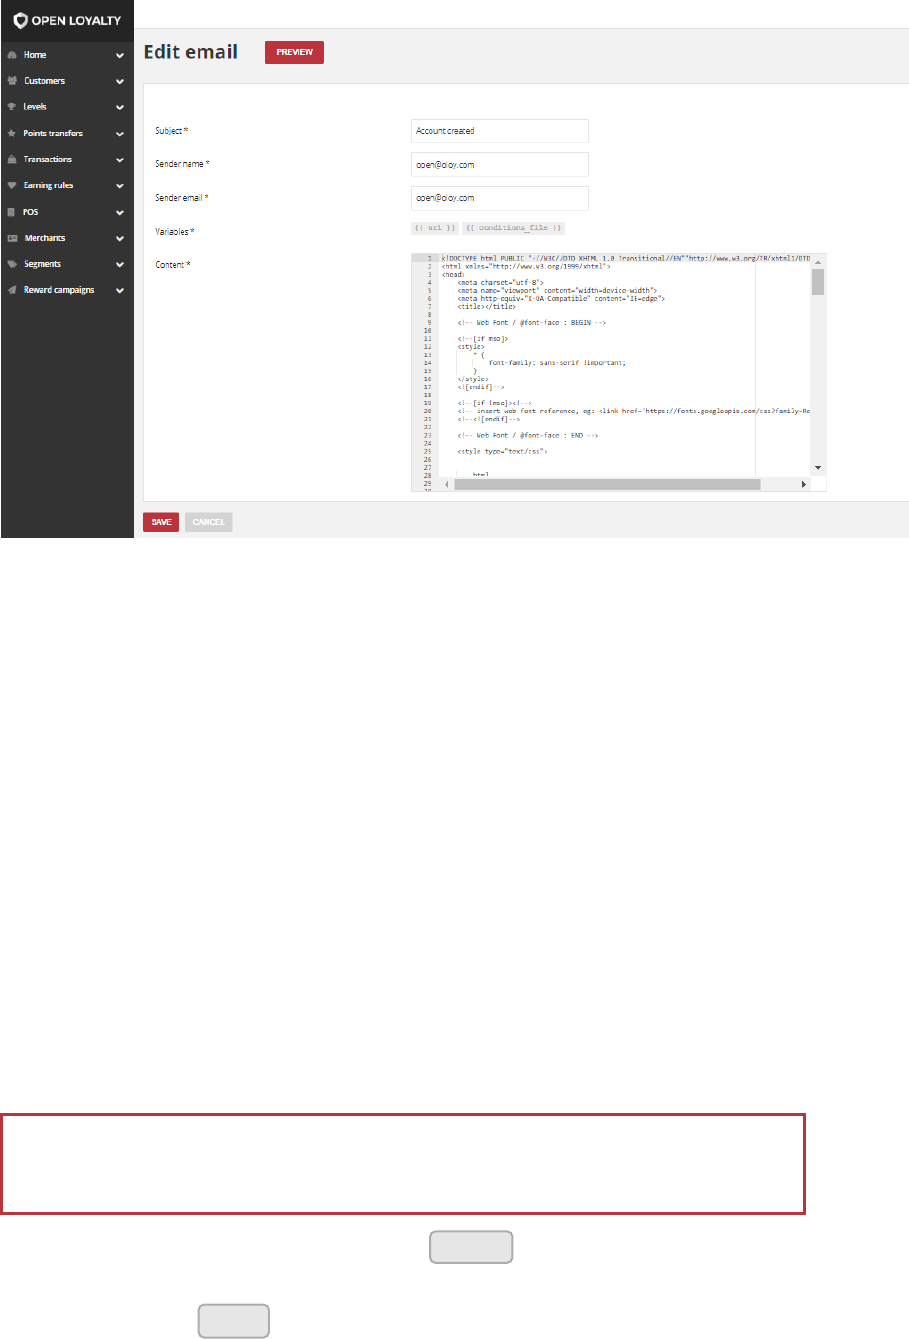
Customizing Email templates
Open Loyalty includes a default email template for the body section of each message that
is sent by the system. The template for the body content is formatted with HTML and CSS,
and can be easily edited, and customized.
Preview of New Points Email
To edit an email template:
1. In the upper-right corner, tab the Settings ( ) icon. Then on the menu, choose Emails
2. In the Emails list grid, find the record to be edited, and click Edit ( ) icon in the Action
column to open the record in edit mode
45
Template Information
3. Make any necessary changes to the following:
a. Enter new Subject of email message which will be displayed when recipient get
email. For example OpenLoyalty – new points. The Template Subject appears also in
the Subject column in Emails list grid.
b. In Sender name field enter the name which will be displayed when recipient open an
email in external email system, as the reference so that your recipient knows it was
you who sent the message
c. In Sender email field provide an email address which will be displayed when
recipient open an email in external system,
d. Every template has predefined variables added to content in Variables field. The
selection of available variables depends on the template and can not be changed.
e. HTML code is used to define content of email. In the Content box, modify the HTML
as needed. Any changes of the content should be made by technical persons, who
knows HTML to avoid further technical issues with templates.
4. When you are ready to review your work, tap . Then, make adjustments to the
template as needed.
5. When complete, tap
When working in the template code, be careful not to overwrite anything that is
enclosed in double braces
Save
Preview
46
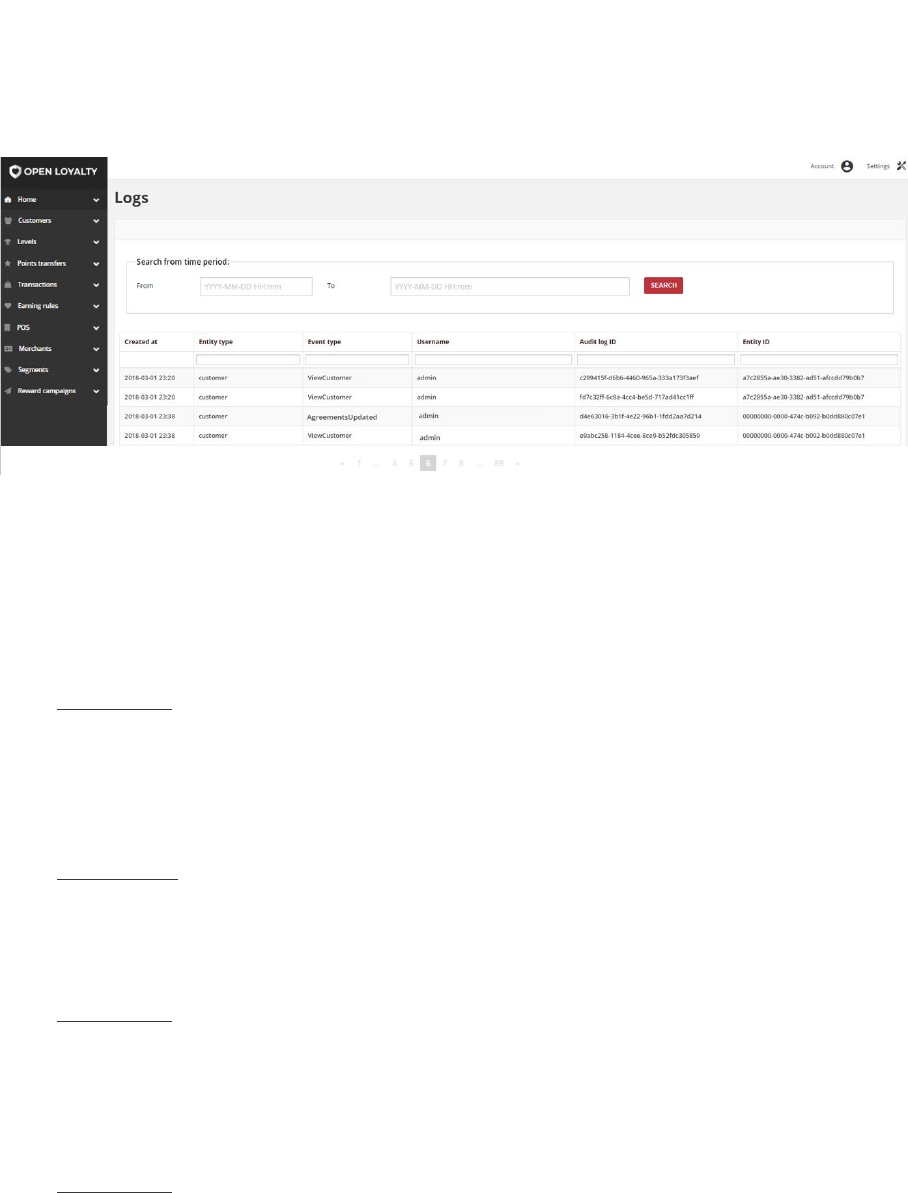
System logs
Logs grid allows to monitor every changes on the customer data. The log file is accessible
only to Admin users throughout the Admin Cockpit. Logs view allows you to check the date
and time that change was made, type and unique ID of change and user name and his
unique ID associated with this change.
In addition you can control logs results by filter and search option.
System Logs
System monitors and logged following events/operations:
1. Create –
Customer and all elements related to customer: transactions, transfers.
For example: new points transfer to customer account creation
2. Modify -
Customer, all elements related to customer (transactions, transfers, redeemed
rewards), operations that change customer data indirectly (segments and level
assignment)
For example: agreements updated,
3. Read -
Customer and all elements related to customer: transactions, transfers, redeemed
rewards
For example: view customer
4. Delete -
Customer, all elements related to customer (transactions, transfers, redeemed
rewards), operations that change customer data indirectly ( segments and level
assignment)
For example: delete points transfer to customer account
47
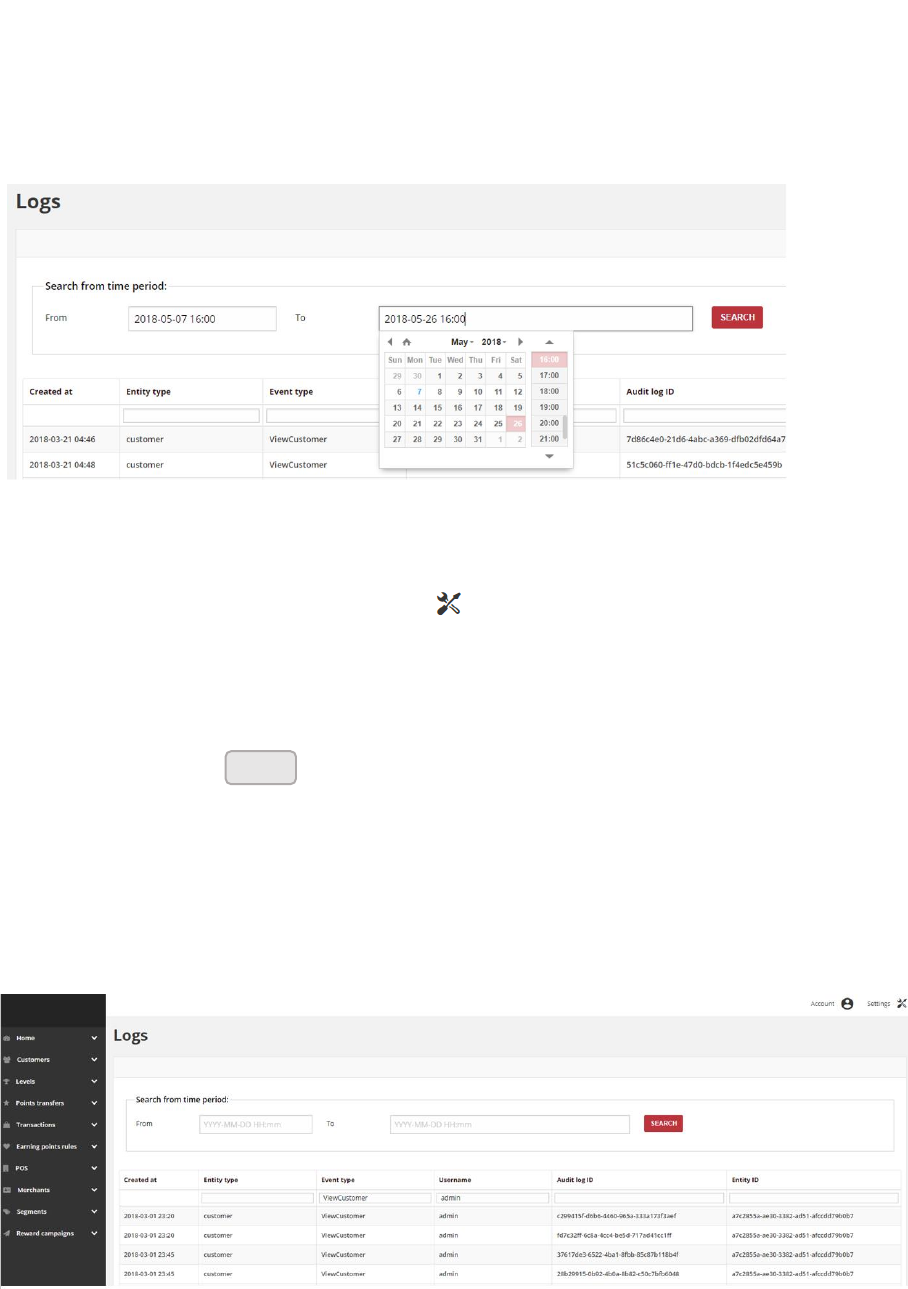
Search Logs by date range
You can search for system logs by a certain time period using Search from time period
search box. Date ranges can be specified with static start and end dates.
The date format is as follows: “YYYY-MM-DD HH:mm” and allows to display logs that have
been placed from and up to the specified date
Search box
To find a match:
In the upper-right corner, tab the Settings ( ) icon. Then on the menu, choose
System logs
4. Set up the starting date in From field by selecting date and time from calendar grid
5. Set up the end date in To field by selecting date and time from calendar grid
6. When complete, tap
Search/Filter Logs
The filters in the header of each column can be used to limit the list to specific values. You
can simply type the value you want to find and press Enter.
Search/Filter Logs Results
Search
48
To search the list:
1. In the selected column in the field under column header type the value you want to find
• To find a close match, enter the few letters/signs of what you want to find
• To find an exact match, enter the exact word/number you want to find.
2. You can put as many values under different columns headers as needed to describe the
conditions that must be met for the search result. Search values from each column
create an AND Condition rule. It means that in search results only records matching all
entered values are displayed.
49
CUSTOMERS
In this section of the guide, you will become familiar with the customer account menu, and
learn to manage customer accounts according to adding, deleting and modifying data. You
will also learn how to create customer account that can be referenced in customer levels
and segments.
CUSTOMERS MENU
All Customers
Referred customers
CREATING CUSTOMER ACCOUNT
Import Customer list
XML file structure
Updating customer account
Deactivate a customer’s account
CUSTOMER PROFILE DETAILS
Customer Account details
Profile details
Agreements
Segments
Current level
Assigned POS
Assigned Merchant
Customer Loyalty Activity
Loyalty
Profitability
Transactions
Points transfers
Available rewards
Redeemed rewards
CUSTOMERS ACCOUNTS
Customer account activation
Account activation via SMS
Account activation via E-mail
Customer Sign In
Customer Account
50
CHAPTER 4:
CUSTOMERS MENU
The Customers menu provides access to all customer information required for its existence
in your Loyalty Program. This applies to both, customer personal data (such as name,
surname, gender, date of birth and contact details) and data on its activity in the program
(such as registered transactions and points transfer).
Customers Menu
To display the Customers menu:
On the Admin sidebar, tap , then choose All customers.
Menu options
All customers
Lists all customers who have registered for
an account with your loyalty program, or
were added by the administrator.
Customers
51
Add customer
Lists all data that need to be filled out to
add new customer to your Loyalty
Program
Referred customers
Lists all referred customers and recipients
of their invitations details
52
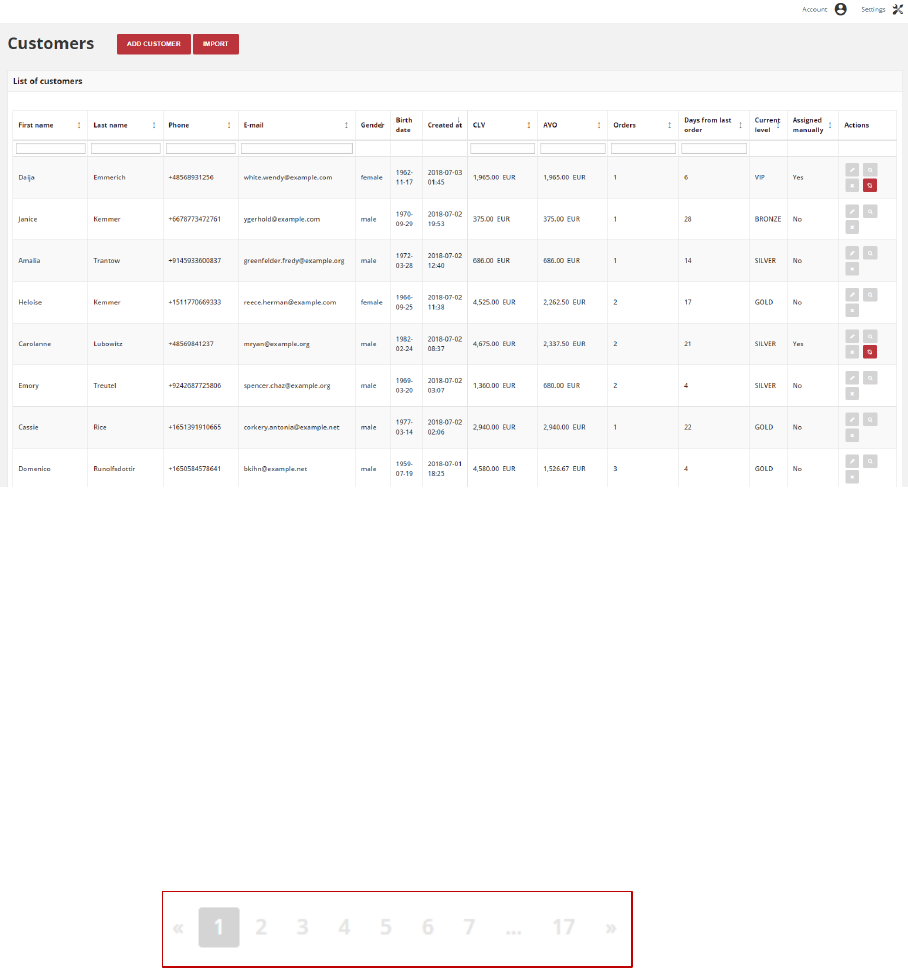
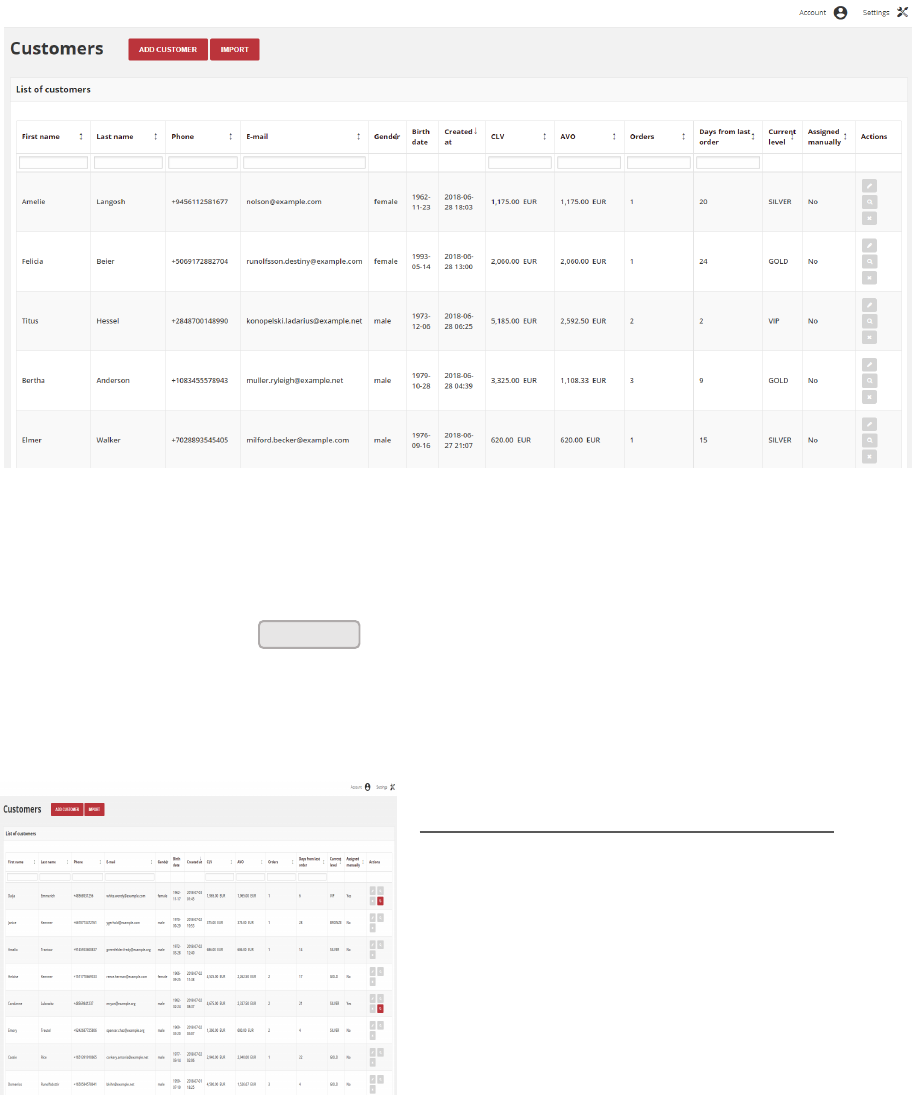
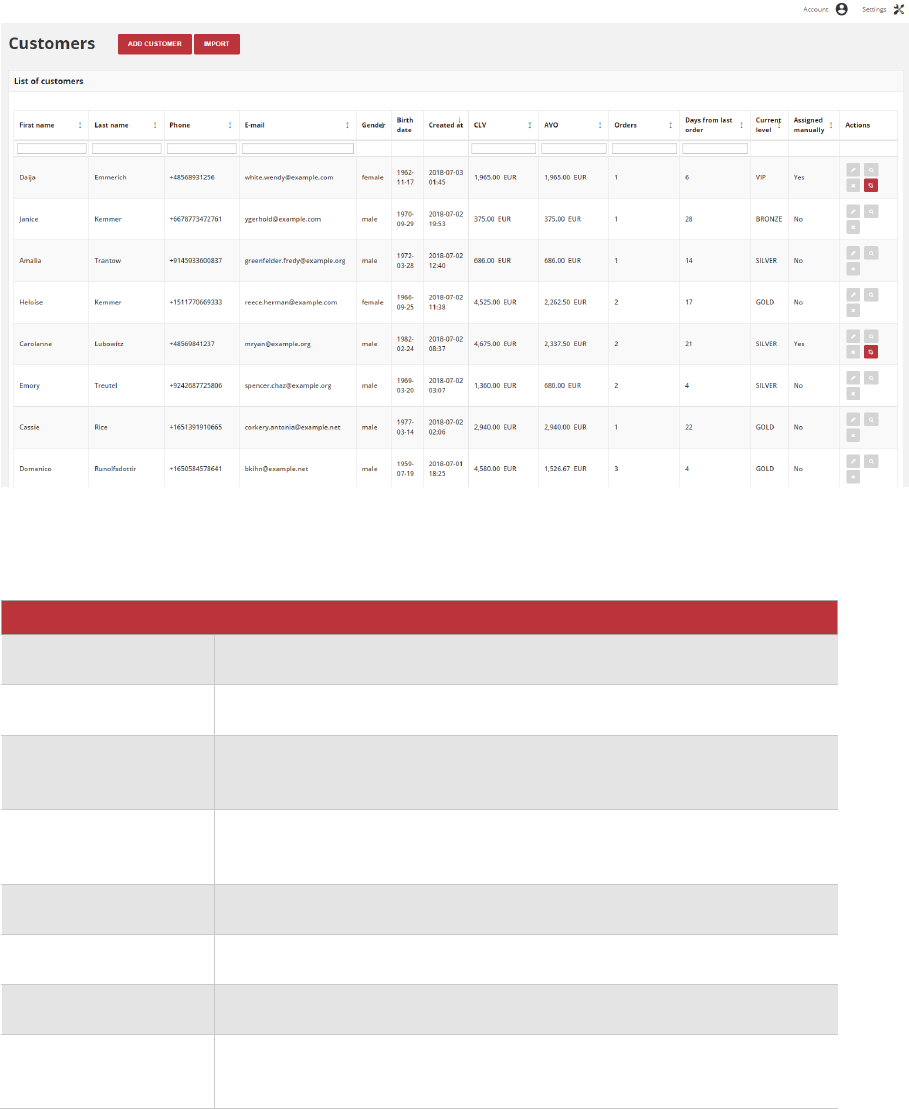
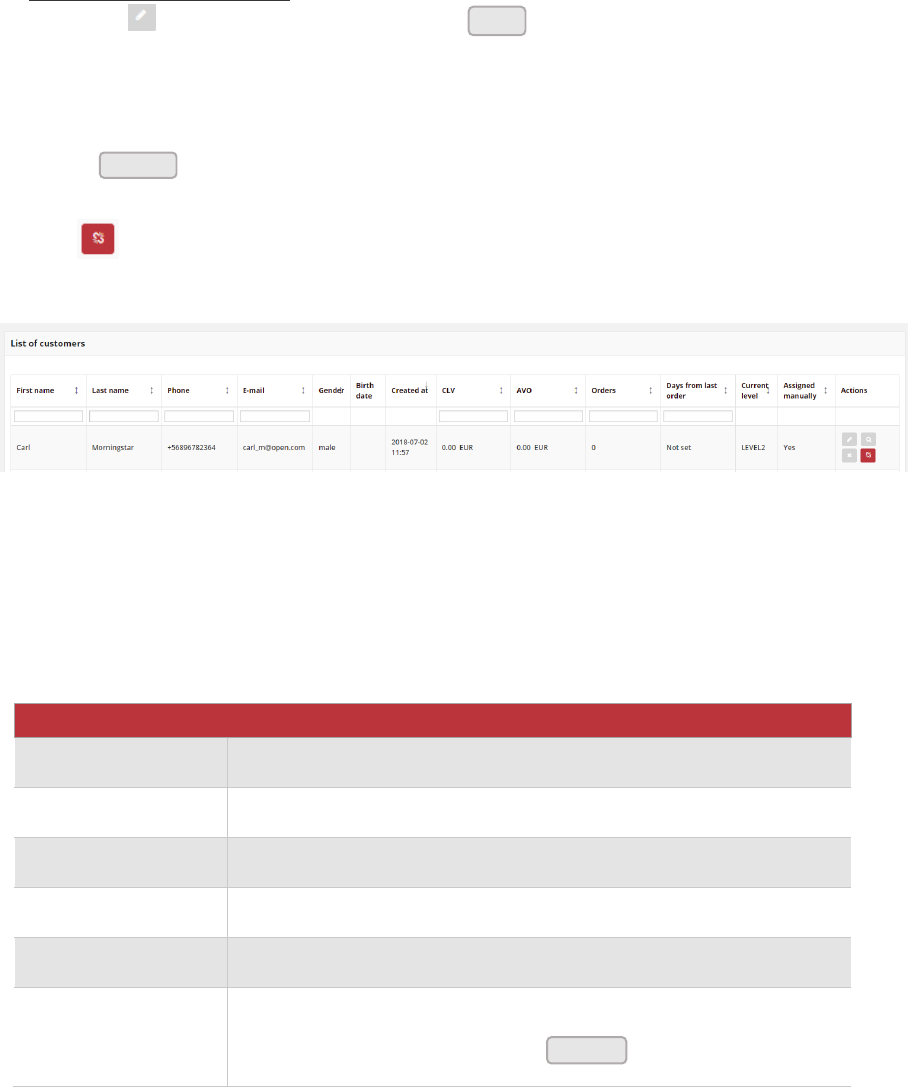
All Customers
The Customers page lists all customers who have registered for an account with your
loyalty program, or were added by the administrator (manually or imported from XML file)
Use the standard controls to sort the list, filter and search customer by typing in the field
under column header value you want to find, and apply actions to selected customers.
Pagination controls appear if there are more customer records than fit on the page, and
are used to move from one page to the next.
All Customers
Field description
FIELD
DESCRIPTION
First name
The first name of the customer
Last name
The last name of the customer
Phone
The customer’s phone number in one of acceptable format. Can be
used as a login to Customer Cockpit or search/filter option.
E-mail
The customer’s email address. Can be used as a login to Customer
Cockpit or search/filter option.
Gender
The customer gender
Birth date
The customer’s date of birth
Created at
The date when customer account was created
CLV
(Customer Lifetime
Value)
The total amount of customer registered transactions
53
AVO
(Average Value of
Order)
The average amount of customer registered transactions
Orders
The total number of registered transactions (orders) from customer
registering in the Loyalty Program
Days from last order
The number of days since the last registered customer transaction
Current level
Current level that is assigned to customer account.
To learn more about levels see Levels
Assigned manually
Information whether current customer level was assigned manually by
Admin or not. Options include: Yes/No.
To learn more about distinction between manually assigned level and
system assignment please see Levels
Actions
The operations that can be applied to selected customer record.
Options include:
• Edit customer account
• View Customer profile details
• Deactivate customer account
• Unlink manually assigned level. Previous system level will be
assigned.
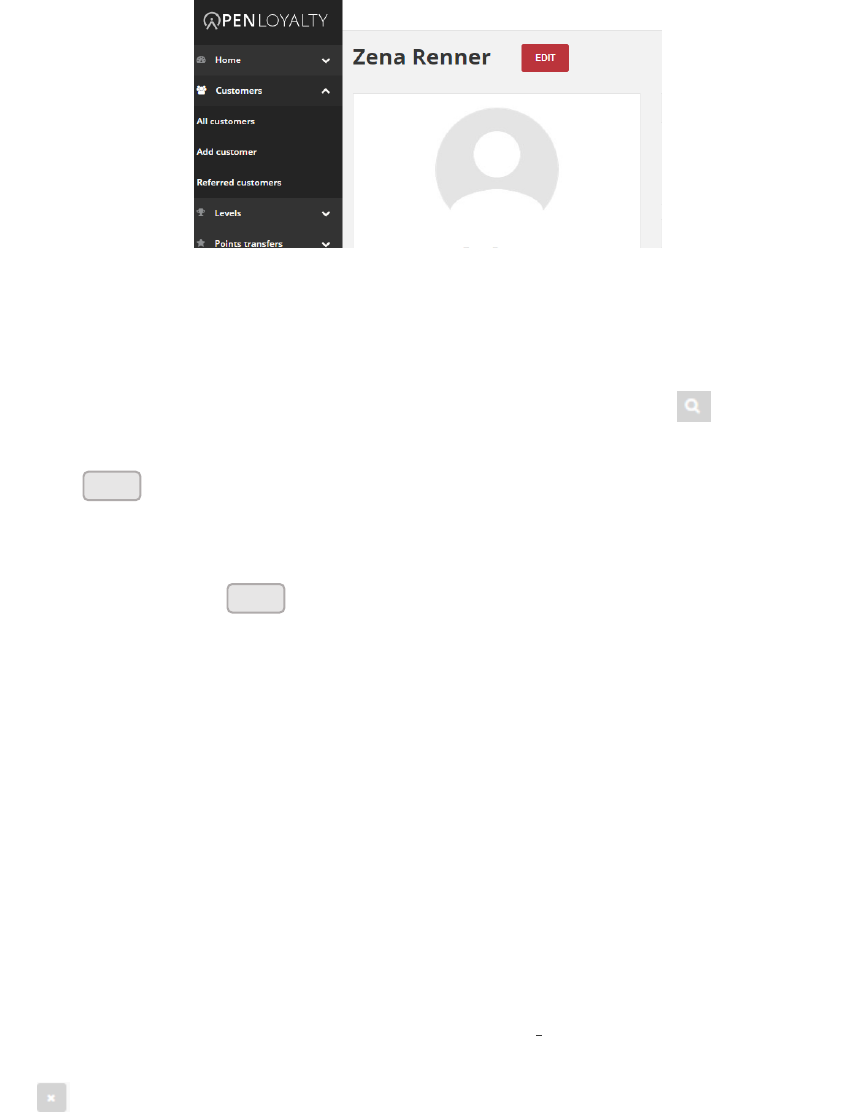
To view customer detail information:
1. On the Admin sidebar, tap Customers. Then choose All Customers
2. In the Customers list, find the record to be previewed and click View ( ) icon in the
Action column to open the record in view mode.
Customer Record Preview
To learn more about Customer Profile Detail Page, see Profile details
54
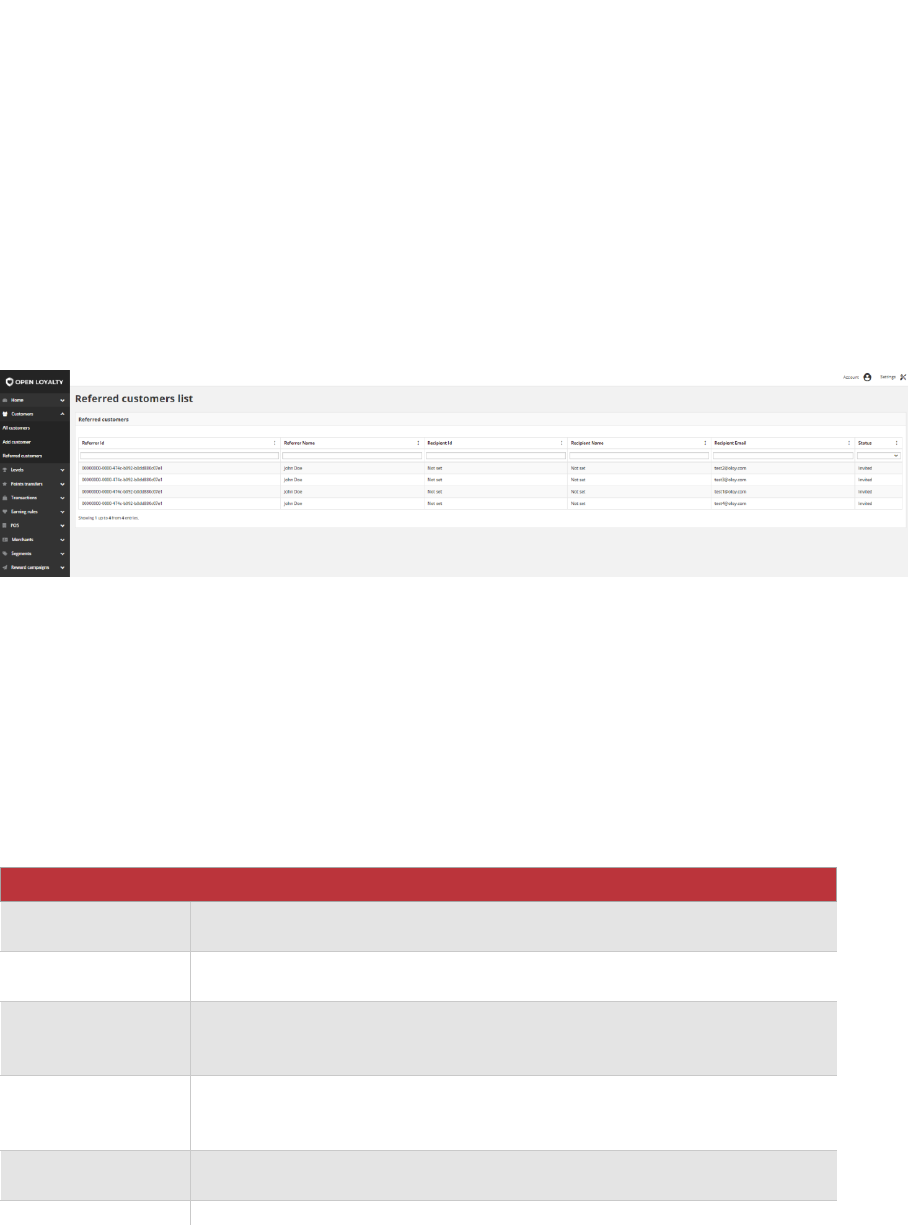
Referred customers
Referral (refer a friend, member get member) functionality allow to reward Customers for
invitation other Customers to Loyalty program. It allows to give prize either referrer
(Customer who send invitation) and recipient (Customer who respond with action to
invitation).
Administrator can view all invitations sent by customer with current status:
• Invited – invitation was sent by referrer to the recipient on his email address
• Registered – referred customer (recipient) register new account in Open Loyalty
• Made purchase – referred customer (recipient) made first purchase in Open
Loyalty
Referred Customers
To see all customers who send and received invitation:
1. On the Admin sidebar, tap Customers. Then choose Referred customers.
Column descriptions
COLUMN
DESCRIPTION
Referrer Id
The customer ID of a registered customer, who send invitation
Referrer Name
The name and surname of a registered customer
Recipient Id
The customer ID of a referred person. Will be shown when referred
customer will register
Recipient Name
The name and surname of a referred person. Will be shown when
referred customer will register
Recipient Email
The email address of an invitation recipient
Status
Options include: invited/registered/made purchase
55
CHAPTER 5:
CREATING CUSTOMER ACCOUNT
Customer usually create their own accounts from your webshop or using Customer
Cockpit. However, you can also create customer account directly from the Admin or POS
Cockpit, which is useful when customers order by phone or at merchant location.
New Customer Account Information
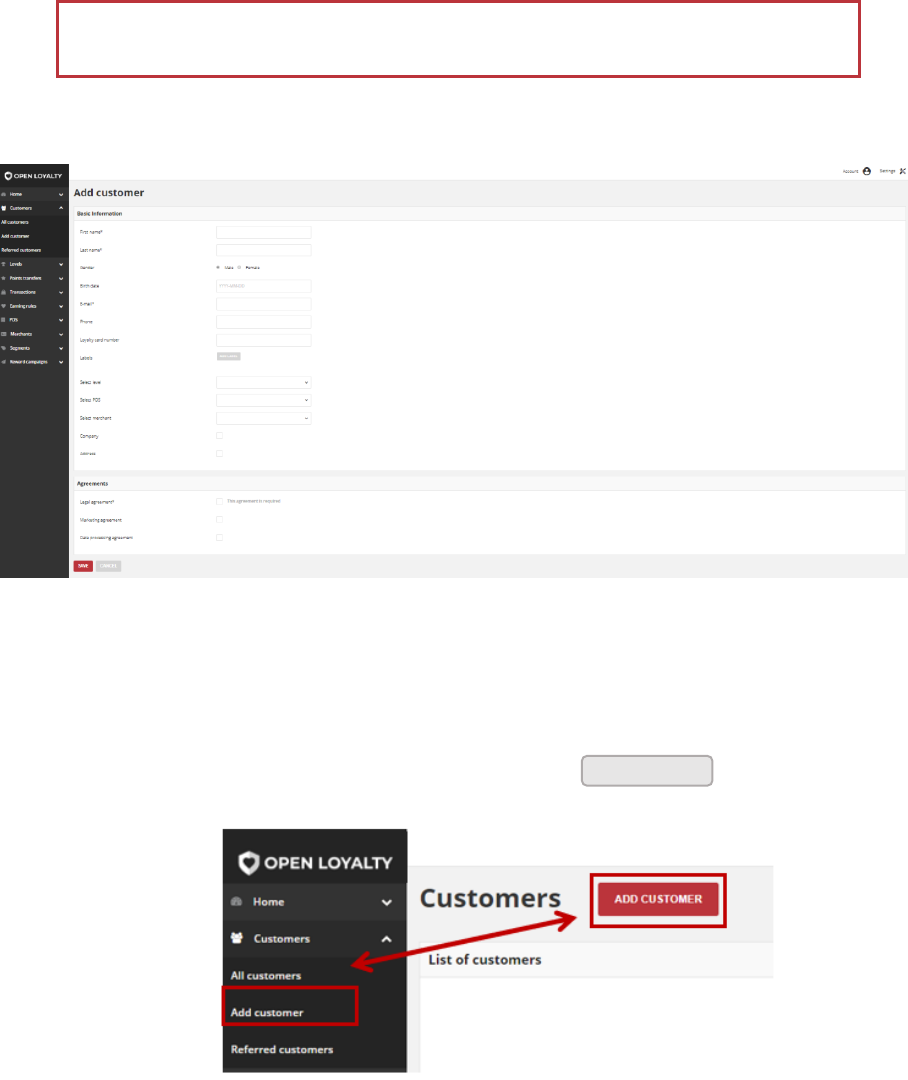
To create a New Customer Account :
1. On the Admin sidebar, tap Customers. Then, choose Add Customer. You can also add
customer directly from All customers list by clicking at the top of the
page.
Add Customer Options
The Customer account created from the Admin or POS Cockpit has an active status at
once, so there is no need to activate its account by him
Add Customer
56
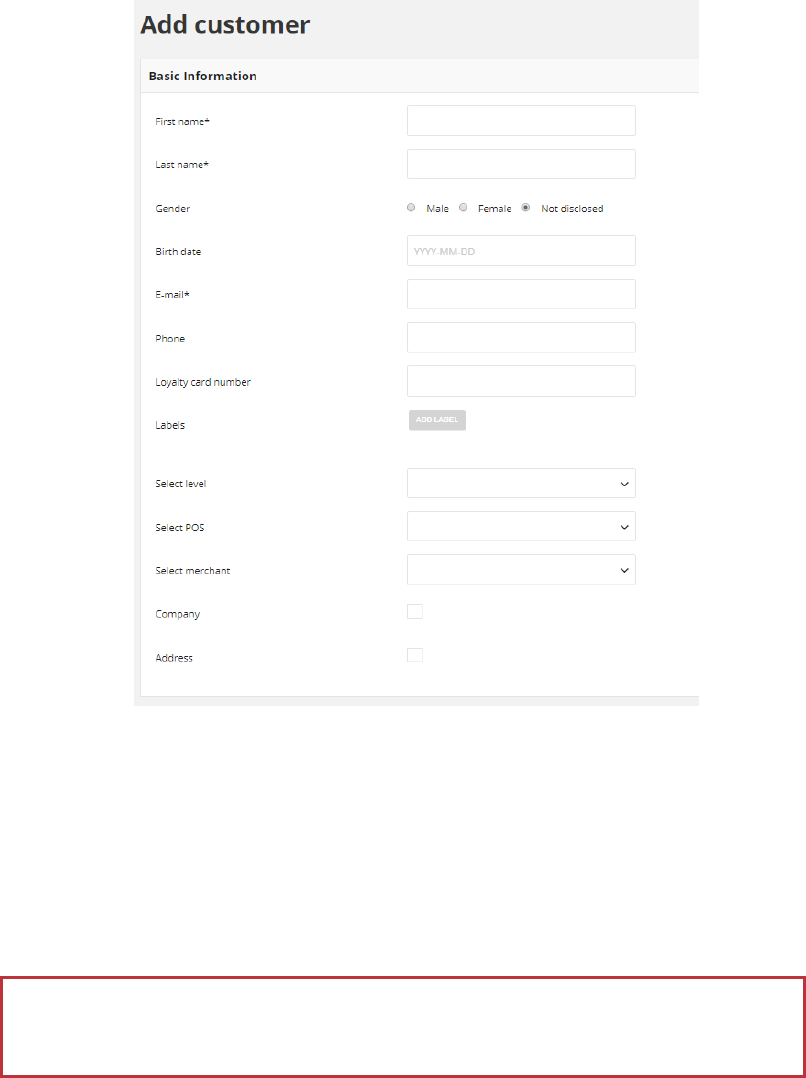
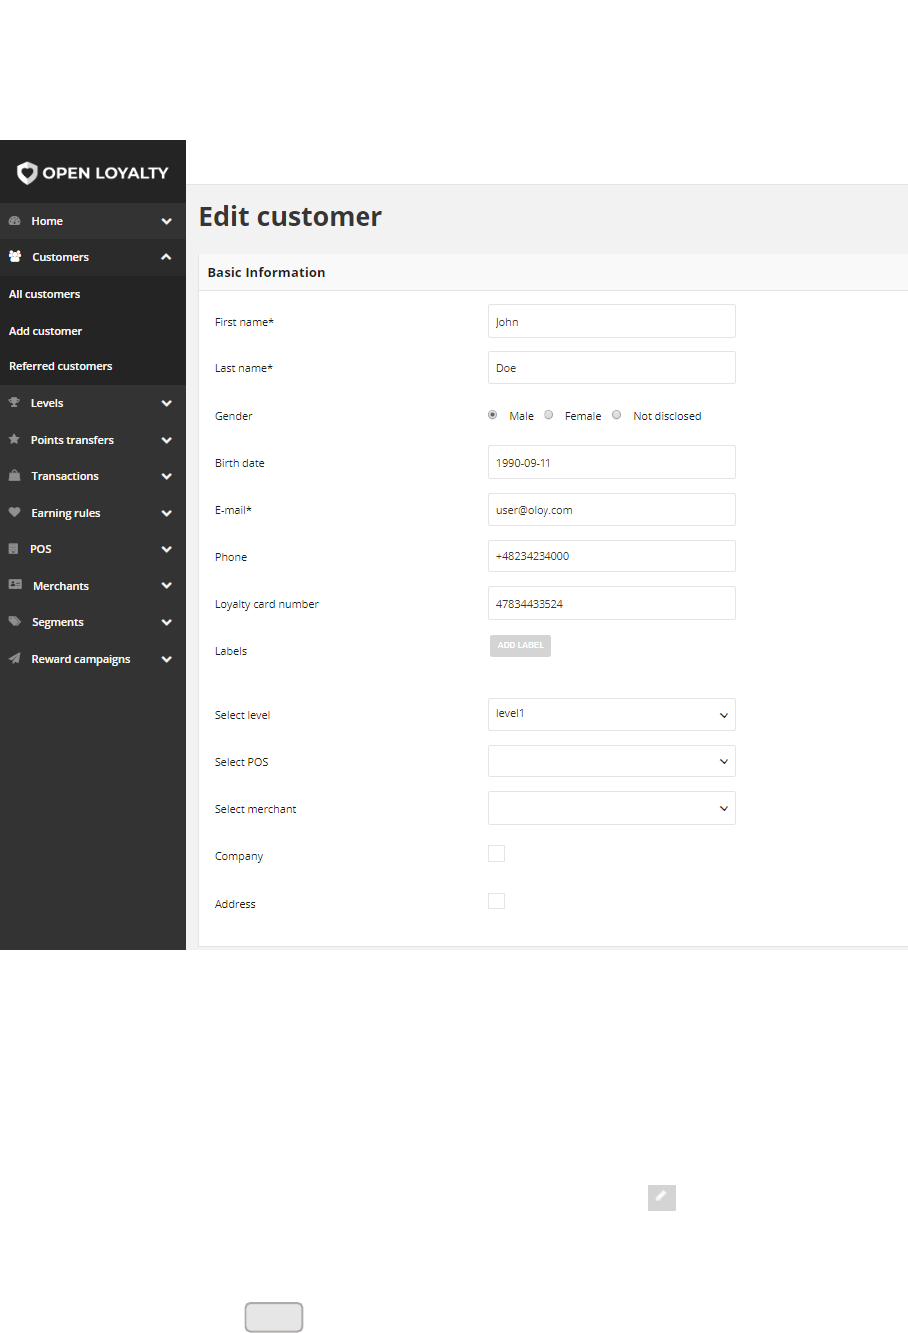
Basic Information
2. In the Basic Information section, complete the following required fields:
• First name
• Last name
• E-mail
3. In the same section, complete the optional fields as needed:
• Gender
• Birth date
• Phone (in one of acceptable format)
• Loyalty card number
For one email address only one Customer Account could be created.
You can change the email address associated with an account by editing a customer
57
• Select level
• Select POS
• Select merchant
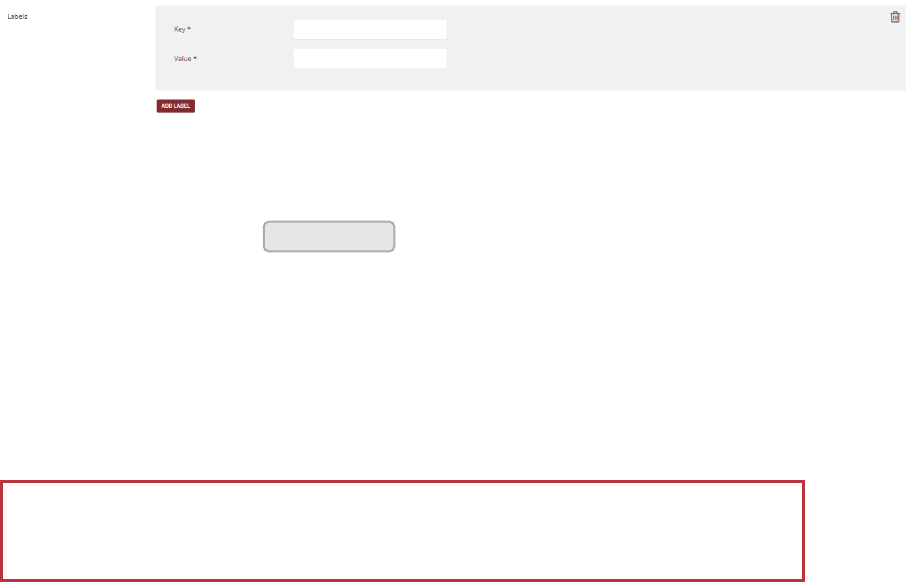
4. If applicable, create Label(s) you want refer to customer. Labels are intended to be
used to specify identifying attributes of customer. Labels can be used to organize and
to select subsets of customers at customer segmentation process. To learn more about
Customer segmentation, see Segments
Customer Labels
a. To create Label, tap and do the following:
• Type label Key, which is a label name
• Type label Value
For example: Key – Customer type, Value – wholesale
b. Repeat the process for all labels you want to used in your Loyalty Program
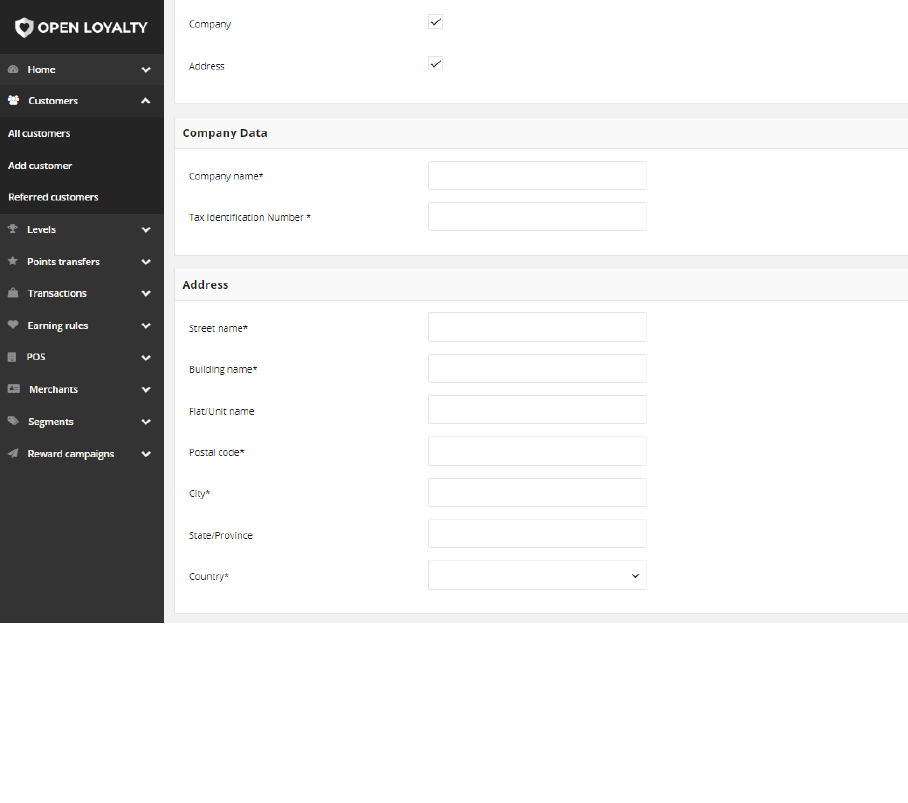
5. Mark Company checkbox, to define customer type if needed.
6. Mark Address checkbox, to complete customer address information if needed.
Labels can be added to customer during account creation and subsequently added
and modified at any time
Add Label
58
Company Data and Address Sections
7. Company Data section is available only when Company checkbox is selected. All fields
available in this section i.e. Company name and Tax Identification Number are
required and need to be filled out.
8. Address section is available only when Address checkbox is selected. Complete the
following required fields:
• Street name
• Building name
• Postal code
• City
• Country
In the same section, complete the optional fields as needed:
• Flat/Unit name
• State/Province
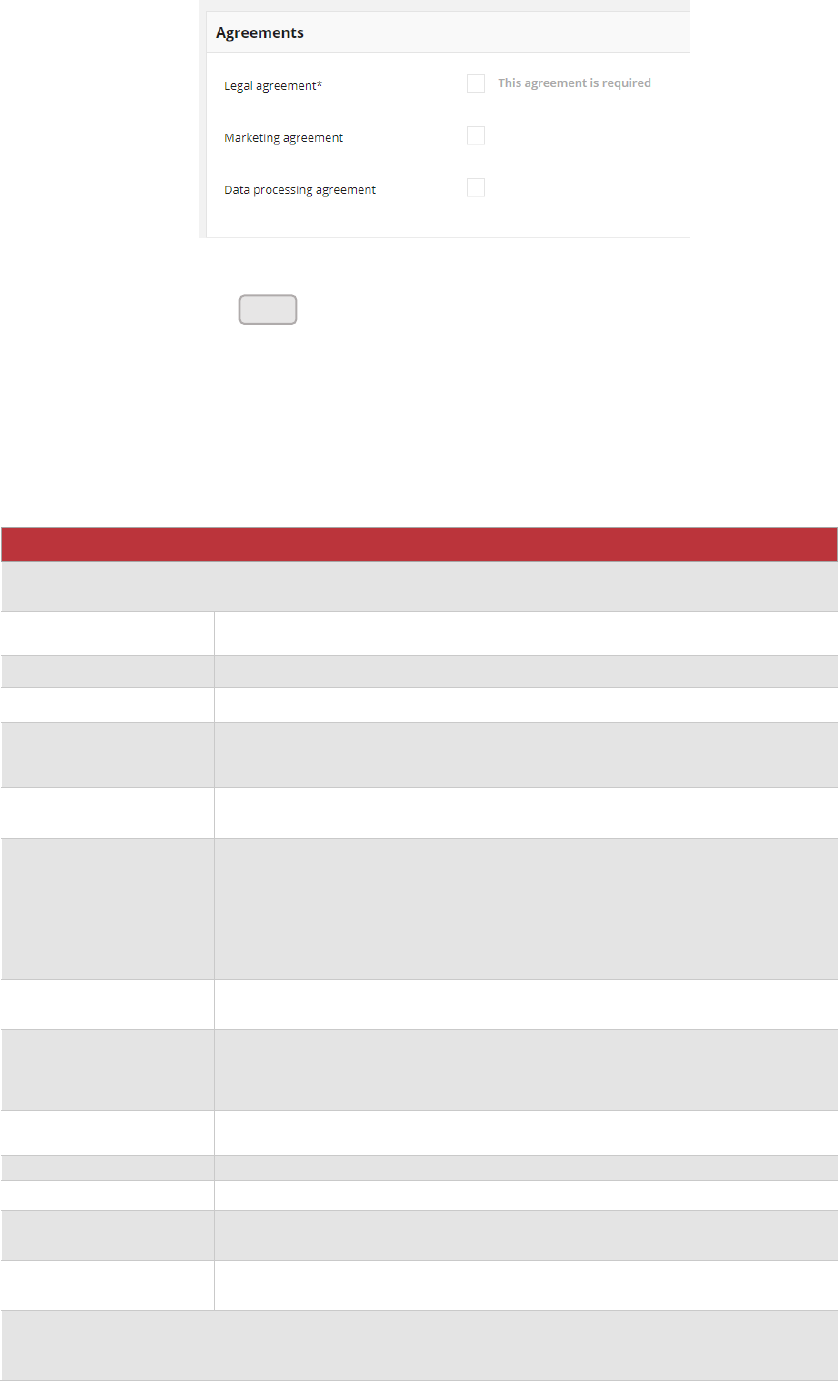
9. Mark the Agreements that customer has agreed to. Legal agreement is required and
need to be filled out to set up an account.
59
Agreements
10. When complete, tap
When the customer account is saved, it’s record appears at All customers list. The
Customer Profile Details tab displays a summary of account activity and data provided
during account creation. To learn more about Customer Profile, see Profile details
Field description
FIELD
DESCRIPTION
BASIC INFORMATION
First name*
The customer’s first name
Last name*
The customer’s last name
Gender
Identifies the customer’s gender as Male, Female or Not disclosed
Birth date
The customer’s date of birth. Information can be used to calculate
points for the birth anniversary
Email*
The customer’s email address. Is used as a login name while logging to
Customer Cockpit.
Phone
The customer’s phone number.
Formatting is as on follow example:
• Country code: +48/48
• Subscriber number: 123456789
• In total: +48123456789 / 123456789 / 48123456789
Loyalty card
number
The customer loyalty card number
Labels
Internal tags you can use to refer your customer. If applicable, can be
used to segmentation to identify the customers that this segment
applies to
Select level
Starting level assigning to customer
Select POS
POS which will be linked to the customer
Select Merchant
Merchant account, which will be linked to the customer
Company
customer associated with company. If marked then additional section
will be shown.
Address
customer address needed. If marked then additional section will be
shown
COMPANY DATA
Visible only when Company checkbox is marked
Save
60
Company name*
The company name, if applicable for this customer
Tax Identification
Number*
The company Tax or Value Added Tax number, if applicable
ADDRESS
Visible only when Address checkbox is marked
Street name*
The street address of the customer
Building name*
The name/number of a building or property where the customer
resides at this address
Flat/Unit name
The flat/unit name or number of the customer at this address
Postal code*
The postal code of the customer at this address
City*
The city where the customer resides at this address
State/Province
The state or province of the customer at this address
Country*
The country where customer resides at this address
AGREEMENTS
List of consents to which the customer can/has agreed. Options include:
• Legal agreement (required)
• Marketing agreement
• Data processing agreement
61
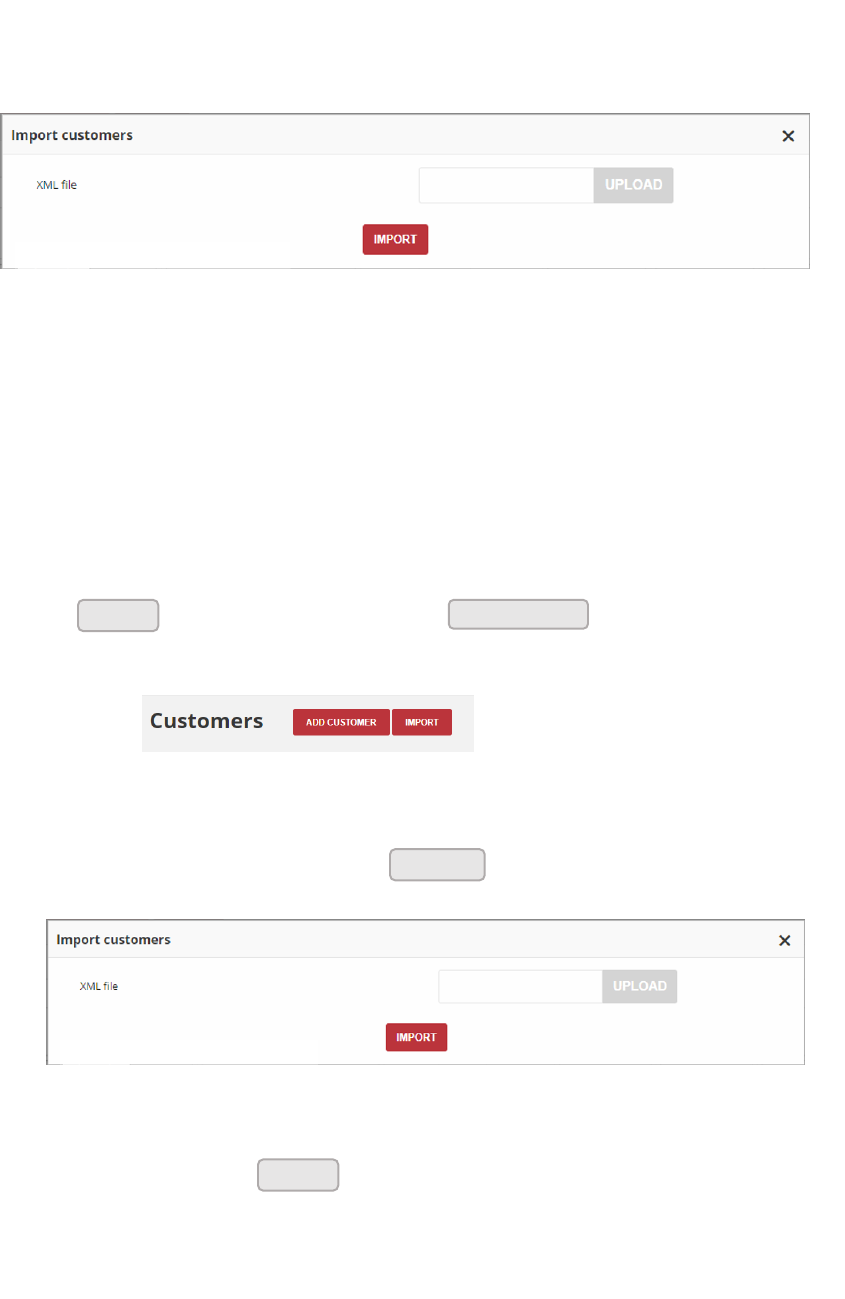
Import Customer list
If you have a customer list that you want to add to your Loyalty Program, you can enter it
into a customer XML file and then import it in your Open Loyalty Admin.
Customers import
Importing a XML file will create a customer in your Loyalty platform for each email address,
phone number and loyalty card number in the file. Any customers with duplicate email
addresses, phone numbers or loyalty card number will be skipped during an import
To import a Customer list from a file:
1. On the Admin sidebar, tap Customers. Then, choose All Customers
2. Click at the top of the page, next to
Customers Import Button
3. In the Import Customers dialog, click , and then choose your customer XML
file.
Import customers
4. When file selected, click
The customers whose records you've added to the XML file will appear in the All customers
list in your Open Loyalty admin
Import
Add customer
Upload
Import

62
XML file structure
Example of complete Customer XML file structure below.
<?xml version="1.0" encoding="UTF-8"?>
<customers>
<customer>
<active>true</active>
<sendActivationMail>false</sendActivationMail>
<address>
<address1>Building name </address1>
<address2>Flat/Unit name</address2>
<city>Wroclaw</city>
<country>PL</country>
<postal>45-123</postal>
<province>dolnoslaskie</province>
<street>Main road</street>
</address>
<agreement1>true</agreement1>
<agreement2>true</agreement2>
<agreement3>true</agreement3>
<birthDate>1985-02-03</birthDate>
TIPS
1. If you don’t have or don’t want to import all this data, remove all code
line/section instead leave it blank.
For example, if you don’t want to include province remove all line from the
code. Don’t leave it with no value as below:
<province>dolnoslaskie</province> OK
<province> </province> WRONG
Remember that some of them are required, so if you remove it
Import will not be possible.

63
<company>
<name>Company</name>
<nip>123-12-22-123</nip>
</company>
<email>jdoe@example.com</email>
<firstName>John</firstName>
<lastName>Doe</lastName>
<gender>male</gender>
<labels>
<label>
<key>group</key>
<value>wholesaler</value>
</label>
</labels>
<loyaltyCardNumber>936592735</loyaltyCardNumber>
<phone>+48231231233</phone>
<levelID>000096cf-32a3-43bd-9034-4df343e5fd93</levelID>
<posId>00000000-0000-474c-1111-b0dd880c07e2</posId>
<sellerId>00000000-0000-474c-b092-b0dd880c07e4</sellerId>
</customer>
</customers>
64
Updating customer account
You can edit information about your customers, including all their data provided during
account creation process. You can update customer data directly from their Profile Detail
Page or by selecting it’s record from All Customers list.
Customer account editing
To edit a Customer Account from Customers list:
1. On the Admin sidebar, tap Customers. Then, choose All Customers.
2. In the Customers list, find the record to be edited and click Edit ( ) icon in the Action
column to open the record in edit mode.
3. Make any necessary changes to the customer account information.
4. When complete, tap
Save
65
To edit a Customer Account from Profile Detail Page:
Edit Option in Profile Details
1. On the Admin sidebar, tap Customers. Then, choose All Customers.
2. In the Customers list, find the record to be previewed and click View ( ) icon in the
Action column to open the record in view mode.
3. Click at the top of the page. The same editor will be opened like in example
above.
4. Make any necessary changes to the customer account information.
5. When complete, tap
Deactivate a customer’s account
Any customer account that is currently inactive appears in the Customers list as grayed-
out. An account can be locked and unlocked (set to active) by Admin user.
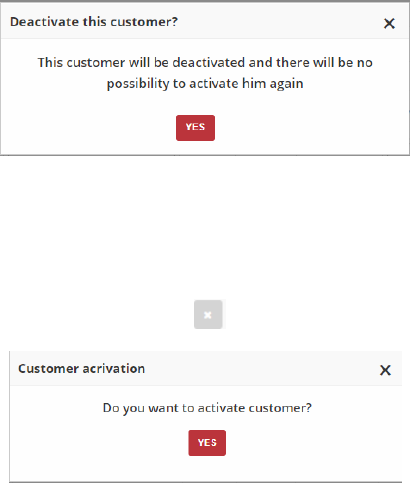
To lock/unlock an admin account:
1. On the Admin sidebar, tap Customers. Then, choose All Customers. You can also
deactivate/activate customer account from Edit mode.
2. In the Customers list, find the record to be lock/unlock and click Deactivate/Activate
( ) icon in the Action column.
3. System will display a message asked you to confirm the action
Save
Edit
66
System Message
4. The deactivated customer account appears on the Customers list as a greyed-out.
5. To activate an account click the same icon ( ) and confirm the action
System message
6. The activated customer account appears on the Customers list as a black
67
CHAPTER 6:
CUSTOMER PROFILE DETAILS
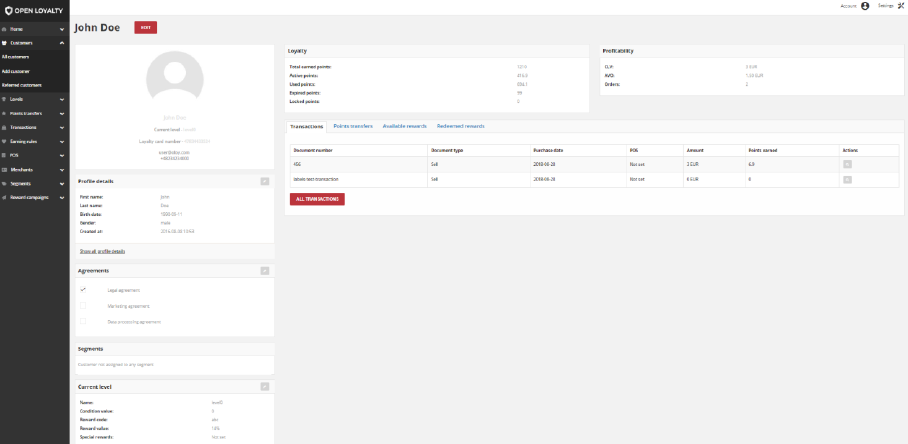
The Customer Profile Detail Page is used to hold all the details of your customers. You can
view and manage the customer’s loyalty & personal information, history of customer
transactions, points transfer and redeemed rewards.
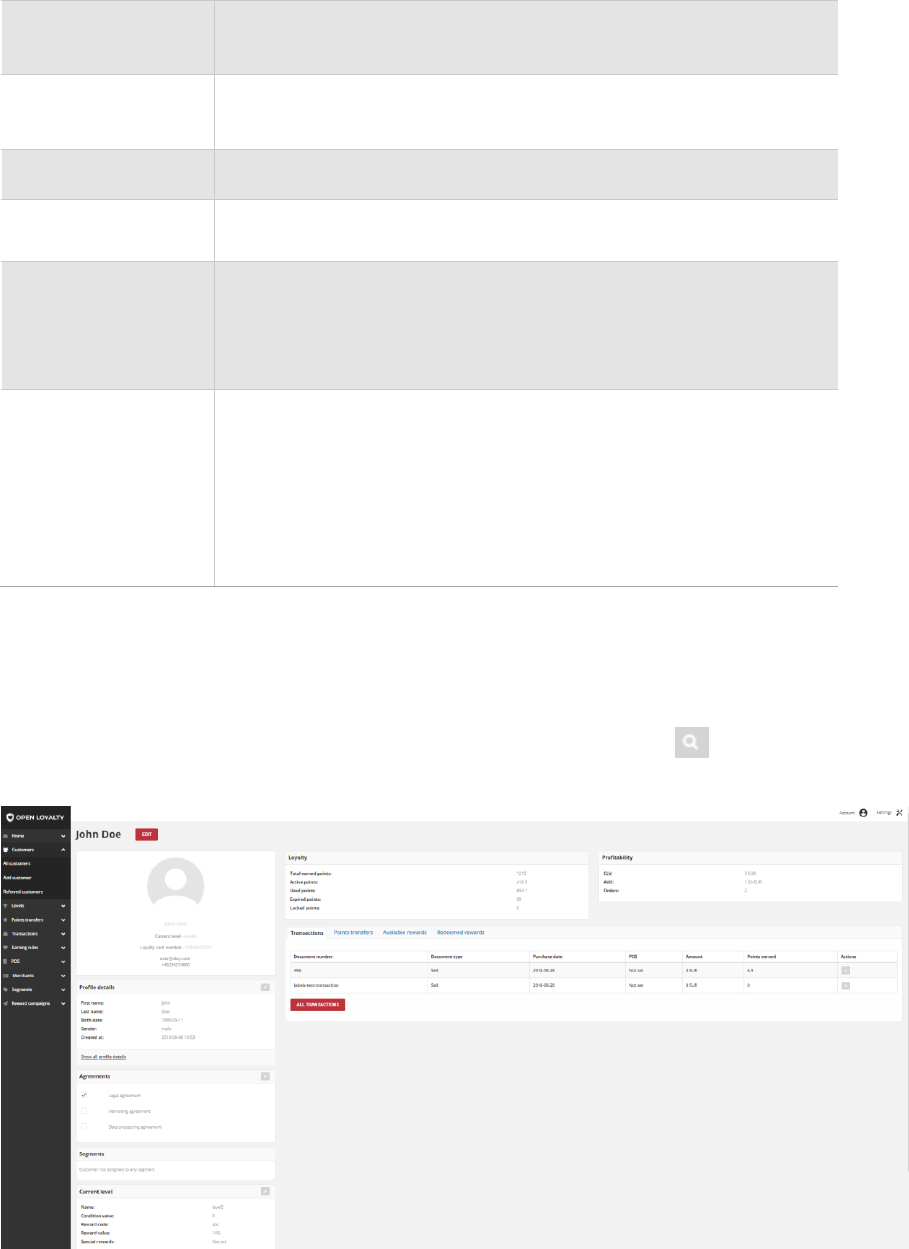
Customer Profile
Customer Account details
Profile details
The Customer Profile details section provides the short customer account summary and
information of customer provided during registration.
Block in the upper left corner, shows some factors describing Customer and its account
summary, such as:
• First name,
• Last name,
• Current loyalty level,
• Loyalty card number (if assigned)
• Email address
• Phone number (in one of acceptable format)
68
Customer Account Summary
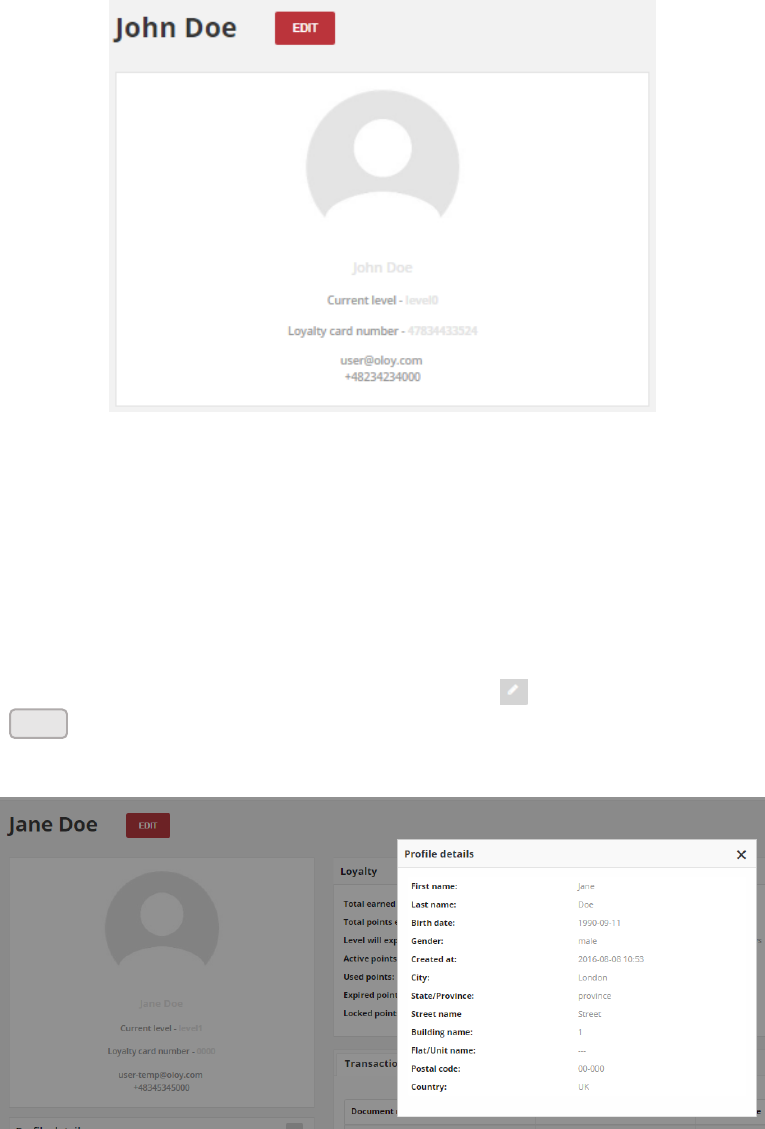
Block below, provides a snapshot of customer personal information entered during
registration process both required and optional. Address information will appear in small
window after clicking Show all profile details link.
If the optional information (such as birth date, gender, address etc.) will not be completed
during registration, the corresponding fields in this sections remain blank.
To update customer data go to edit mode by clicking Edit ( ) icon in the block header or
Click above account summary block, at the top of the page.
Customer Profile Details
The following details are displayed in this section:
1. Profile details (displaying in block)
• First name
Edit
69
• Last name
• Birth date
• Gender
• Created at
2. Profile details (after link clicking)
• Basic information displaying in block, and in addition address information:
• City
• State/Province
• Street name
• Building name
• Flat/Unit name
• Postal code
• Country
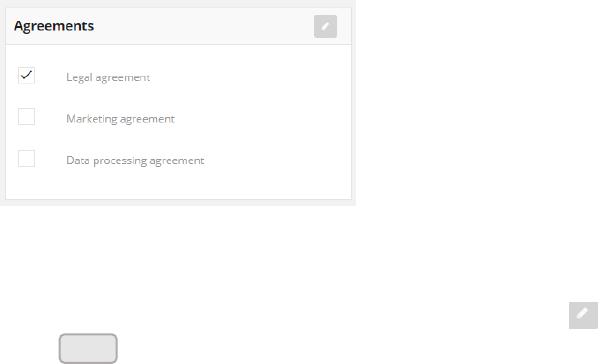
Agreements
Agreements section is a list of consents and include information about their acceptance by
customer. If the customer has accepted the agreement, the checkbox in the name record is
marked.
Agreements
To mark the agreement as a accepted by the customer go to edit mode by clicking Edit ( )
icon in the block header or Click above account summary block, at the top of the
page. The same behavior is used to withdrawal of consent by the customer.
Edit
70
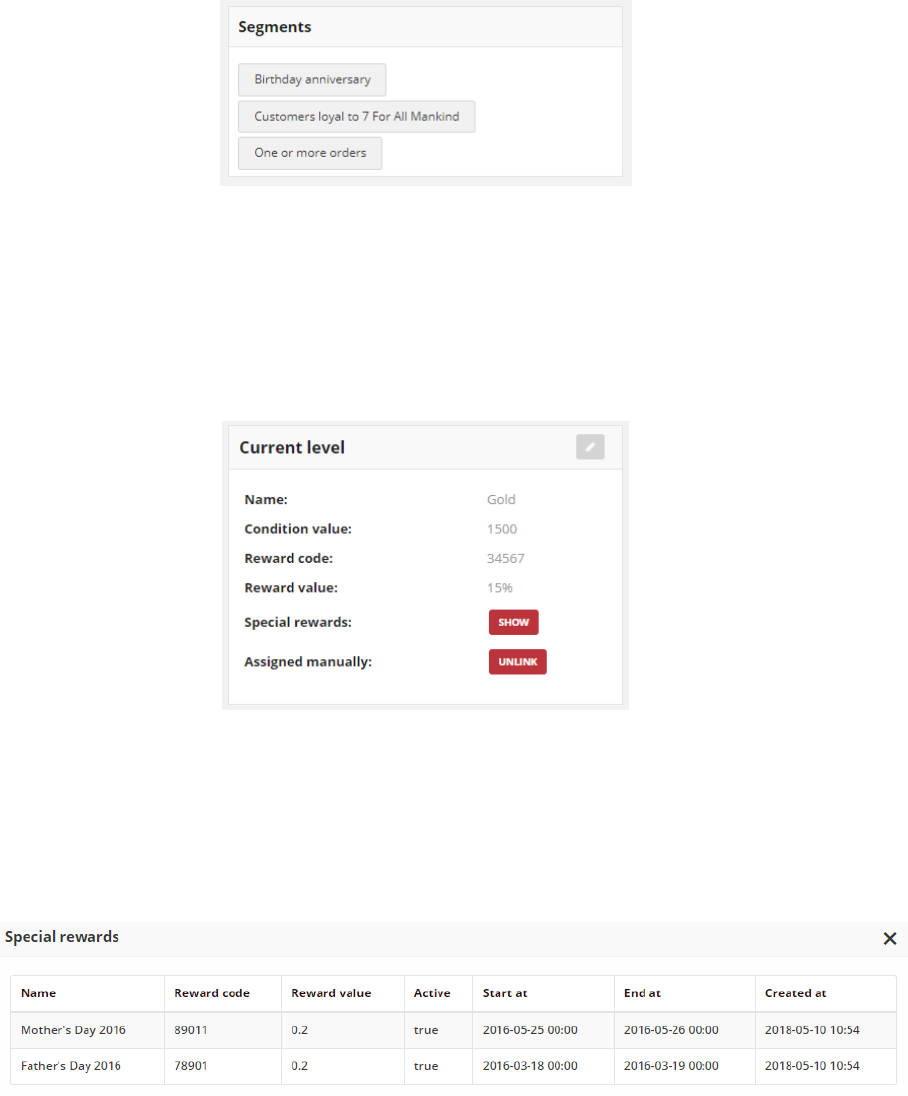
Segments
Segments box consists list of segments to which the customer is currently assigned. To
learn more about segments, see Segments
Segments
Current level
Current level section provides information about current (assigned to customer) level and
rewards if available.
Level Section
Special rewards specify temporary additional discounts that customer assigned to this
level can get.
Special Rewards Preview
71
To change manually the level to which the customer is assigned go to edit mode by
clicking Edit ( ) icon in the block header or click above account summary block, at
the top of the page. Then, additional field Assigned manually appears.
To remove manual assignment by Admin, and let customer earn points based on Earning
rules click
You can also simply Unlink manually assignment also from All customers list by clicking
Unlink ( ) icon in the Action column.
Unlink manual assignment
To learn more about levels and special rewards, see Levels
Field description
FIELD
DESCRIPTION
Name
Name of the customer level
Condition value
The points limit value after which customer was assigned to the level
Reward code
Discount code to be used on
Reward value
Percentage discount value
Special rewards
Special discounts available when additional conditions are met
Assigned manually
Field will be displayed only when customer level will be assigned
manually by Admin – during adding or editing account.
To remove manual assignment click
Assigned POS
Assigned POS section include information about customer account assignment to the
offline or online store. Customer can be assigned to only one POS.
Edit
Unlink
Unlink

72
Assigned POS
To change the POS to which the customer is assigned click Edit ( ) icon in the block
header and select new POS from a list or Click above account summary block, at the
top of the page to go to edit mode.
Change of POS assignment from Profile Detail Page
To learn more about offline stores, see POS
Assigned Merchant
Assigned Merchant section provide information to which merchant customer is assigned.
Not only merchant from POS assigned to customer account can be selected.
Assigned Merchant
To change the Merchant to which the customer is assigned click above account
summary block, at the top of the page to go to edit mode.
Edit
Edit
73
Customer Loyalty Activity
In the middle part you will find customer data related to his activity in Loyalty Program
such as loyalty points balance, transactions, points transfer and rewards (available and
redeemed) summary.
Customer Loyalty Activity
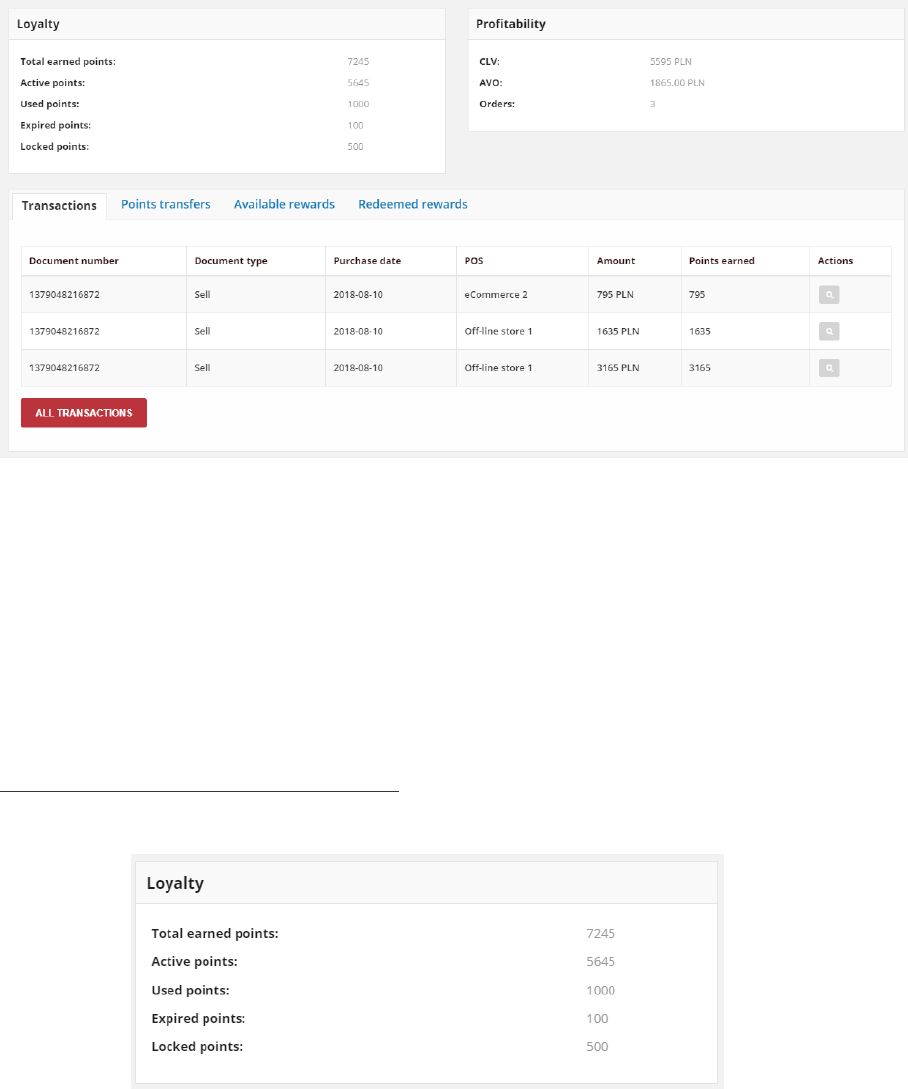
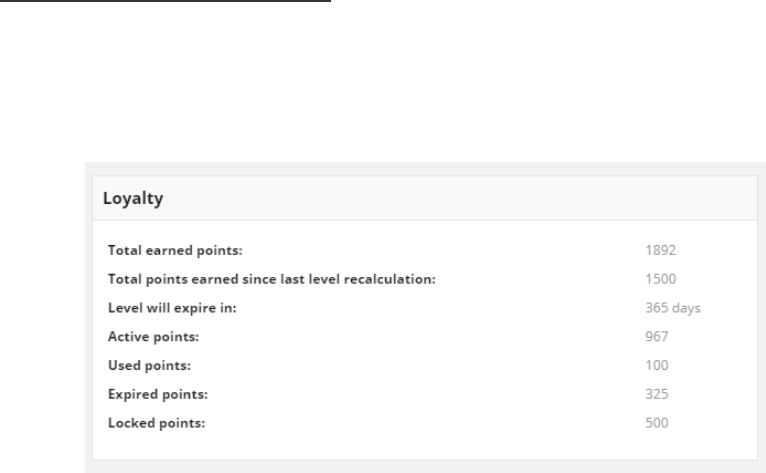
Loyalty
In Loyalty section you can view Loyalty Points balance in the customer’s account.
Depending on the Configuration (whether level is calculated with points or transactions)
different values will be displayed.
Level is calculated with transactions
Loyalty Points Balance
74
a. Total earned points – Total accumulated points assigned to the customer account
thought various activity within the loyalty program based on Earning Rules. Sum of
active, locked, used and expired points.
b. Active Points - Points that may be used to redeem a reward campaigns. Depending on
the Configuration, this value can be used to level recalculation instead Total points
earned since last level recalculation amount.
c. Used Points - Points redeemed by the Customer thought various Reward Campaigns
within the loyalty program
d. Expired Points - Points expired due to non-redemption of assigned active points. Points
will expire after number of days from date of adding Point transfer. Points lifetime is set
in Open Loyalty Configuration
e. Locked points – Points earned through various activity within the loyalty program that
cannot be used after passing selected locked time. Points will be locked for number of
days set in Open Loyalty Configuration, as a customer may return whole transaction
or selected products. Locked points are not used to calculate customer level. After
passing selected locked time, points automatically get active. When points get active, a
customer level will be recalculated.
Level is calculated with points
When you set up in Open Loyalty configuration to use points for level recalculation
additional information about level expiration date and earned points within specified
period amount will be displayed.
a. Total points earned since last level recalculation - currently earned points from last
downgrade date/level changed. The displayed value is sum of all Active points earned
within specified in Level downgrade settings period. Depending on the Configuration,
this value can be used to level recalculation instead Active points amount.
b. Level will expire in – Number of days until customer level recalculation. It is calculated
since registration date or last downgrade date plus configured in Level downgrade
settings number of days
75
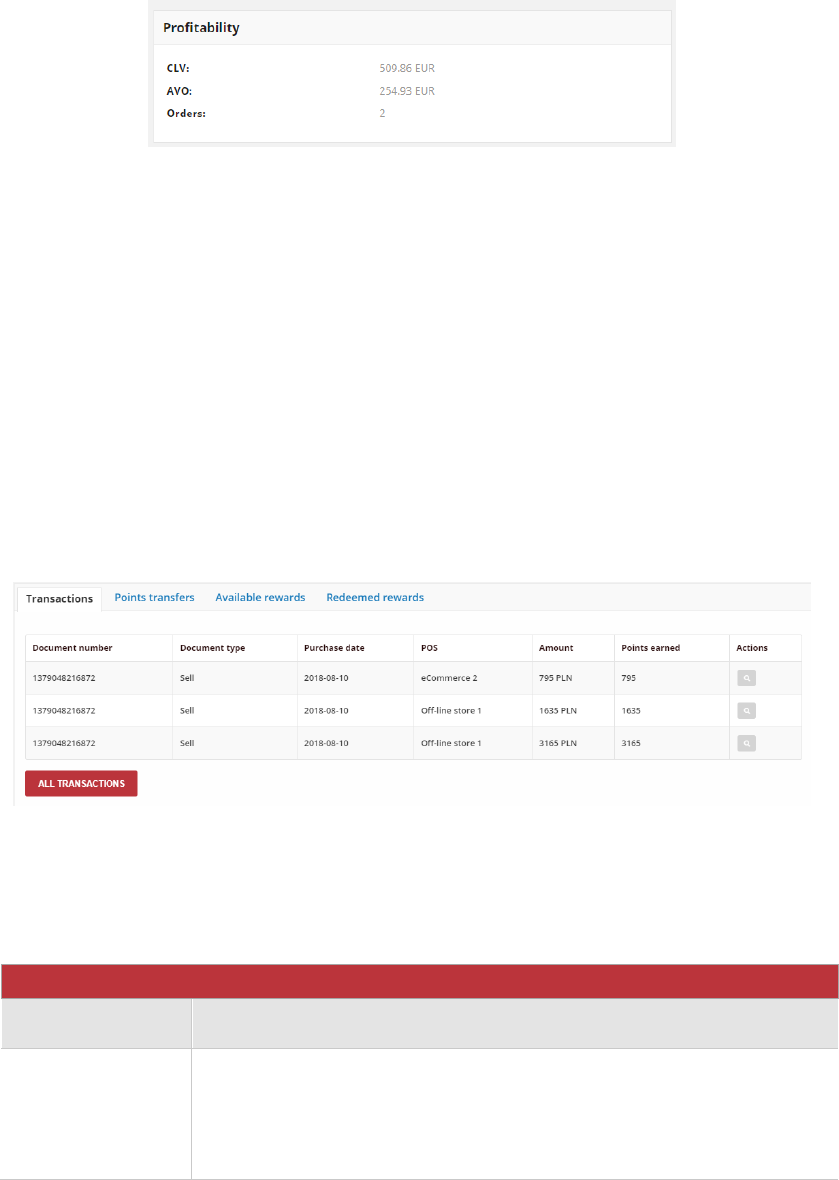
Profitability
Profitability include information about basic factors regarding customer transactions
within the loyalty program.
Customer Profitability
1. CLV (Customer Lifetime Value) - the total amount of customer registered transactions
2. AVO (Average Value of Order) - the average amount of customer registered transactions
3. Orders - the total number of customer registered transactions (orders)within the
Loyalty Program
Transactions
Transactions is a tab which contain latest transaction data such as type, place and date of
transaction, value of earned points etc. linked with Customer:
Transactions view
Field description
FIELD
DESCRIPTION
Document
number
Unique transaction ID
Document type
Transaction type:
• Sell – customer buy products
• Return – customer return bought products
76
Purchase date
Date of transaction
POS
POS where transaction was made
Amount
Transaction amount
Points earned
How many points Customer earned/lose for this transaction (order).
Transaction with the type "Sell" adds points, and "Return" subtracts
Actions
Open transaction record in view mode to see customers and purchased
items details
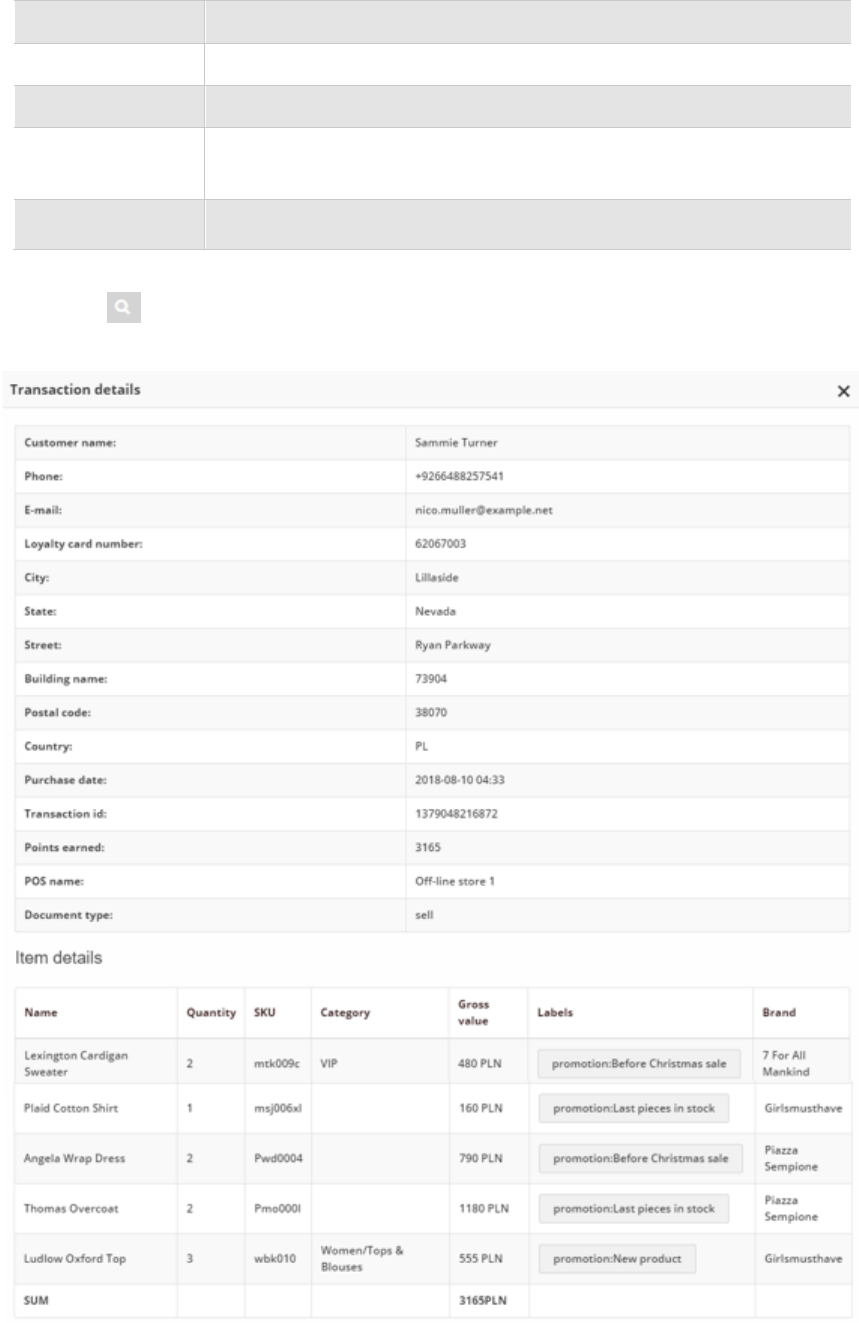
Click View ( ) icon in the Action column to open the transaction details – customer detail
information and purchased items.
Transaction Record Preview
77
To see the list of all your customer transaction (not only the latest) click
below the tab.
To learn more about Transactions, see Transaction
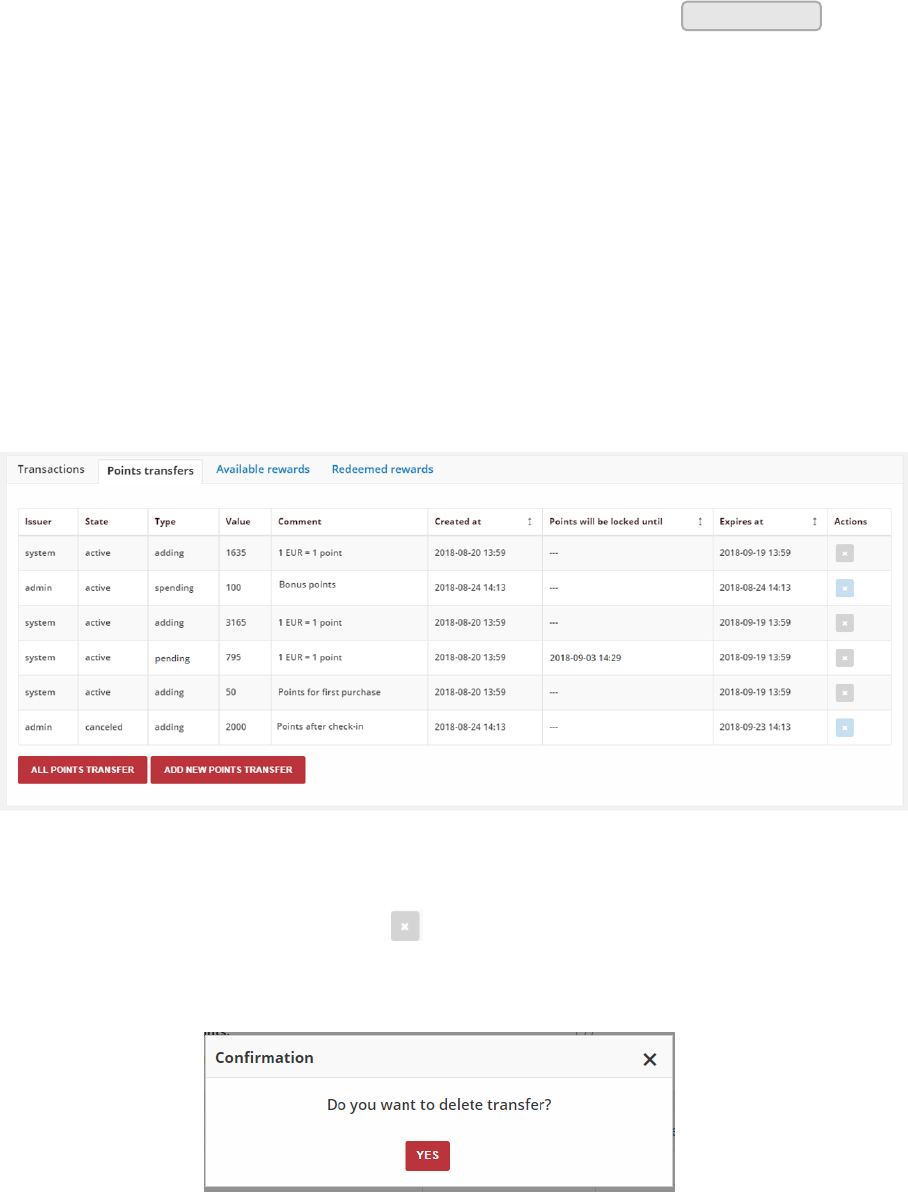
Points transfers
Points transfers tab provide a view of latest points which customer gain or spend.
Moreover, list contains information whether points are the result of Earning Rules (system)
or they have been manually set by the Admin user (admin) and date until they will be
locked.
Points Transfers Lists
To cancel points transfer click Remove ( ) icon in the Action column. System will display
a message asked you to confirm the action.
Removing Transfer Action
After canceling, no action to canceled transfer record will be longer available and the
Remove icon background change color to blue. The same situation deal with Points
transfers with “spending” type.
All Transactions
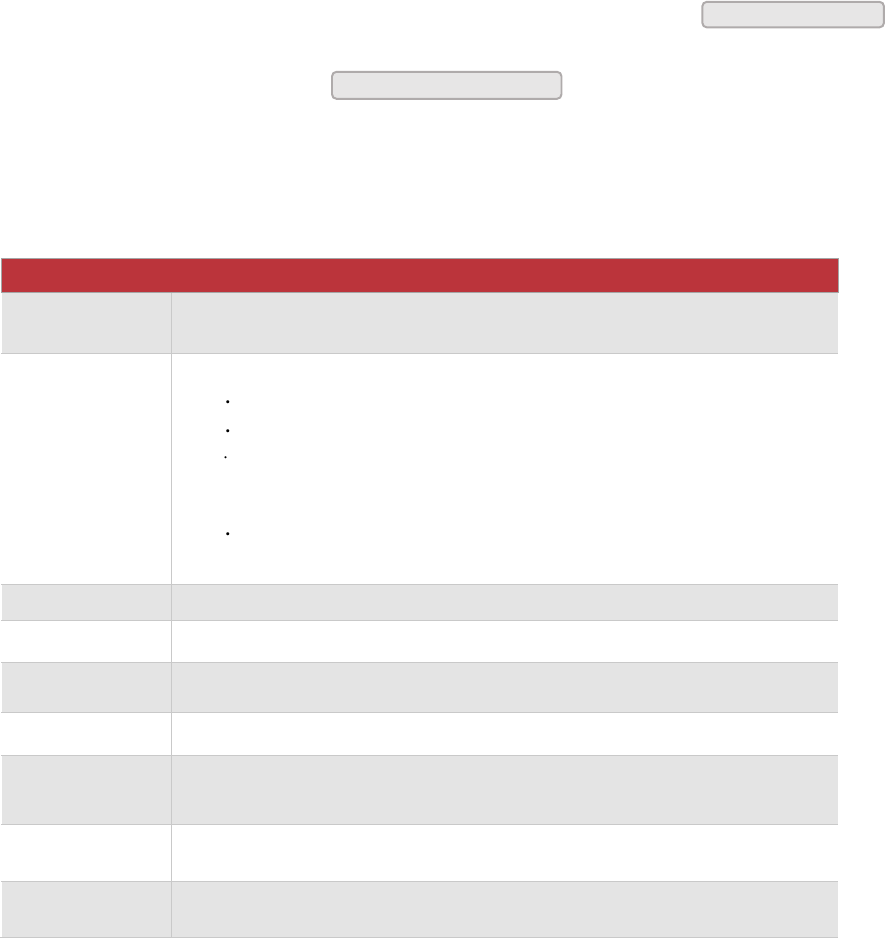
78
To see the list of all your customer points transfers (not only the latest) click
below the tab.
To add point transfer manually click
To learn more about Points transfers, see Points transfer
Field description
FIELD
DESCRIPTION
Issuer
Define who create Transfer operation.
Options include: system/admin
State
Transferred points state:
Active - points are available to spend
Expired - points expired and cannot be used to redeem reward
Pending – points are locked and cannot be used to redeem reward
until locked time will be passing. Locked time is set in Open Loyalty
Configuration
Canceled – points are subtracted from the pool of Active Points as a
result of canceling the points transfer
Type
Transfer operation type: Adding/Spending
Value
Amount of points earned/spent within the transfer
Comment
Show details about transfer, e.g. for what customer gets points, for what
customer spend points
Created at
Date when points transfer was made
Points will be
locked until
Date until points with pending state will be locked. Locked time is set in
Open Loyalty Configuration
Expires at
Date when points will expire and cannot be used to redeem reward
Actions
The remove operations that can be applied to selected, adding type, transfer
record
All Points Transfer
Add new Points Transfer
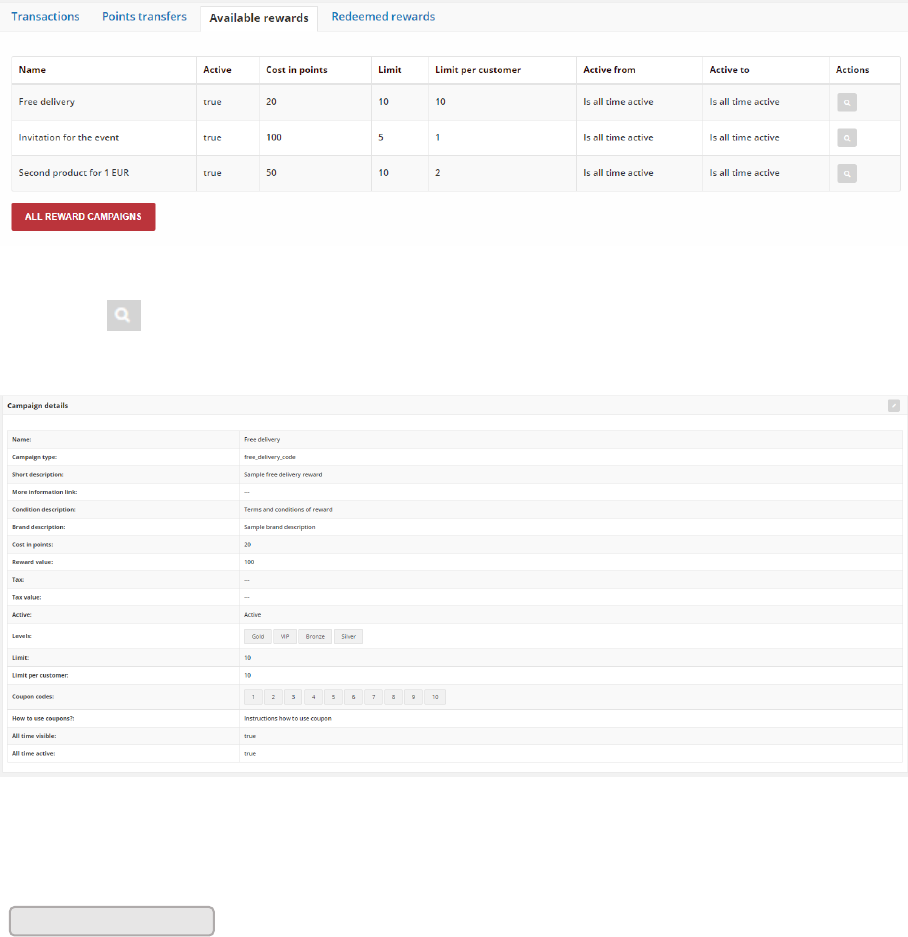
79
Available rewards
Available rewards tab contain view of Reward Campaigns available for particular
customer, including cost in points to redeem reward and dates when reward is available.
Available Rewards
Click View ( ) icon in the Action column to open the Reward Campaign detail information
Reward Campaign Details
To see the list of all rewards available for customer within Loyalty Program click
below the tab.
To learn more about rewards, see Reward campaigns
All Reward Campaigns
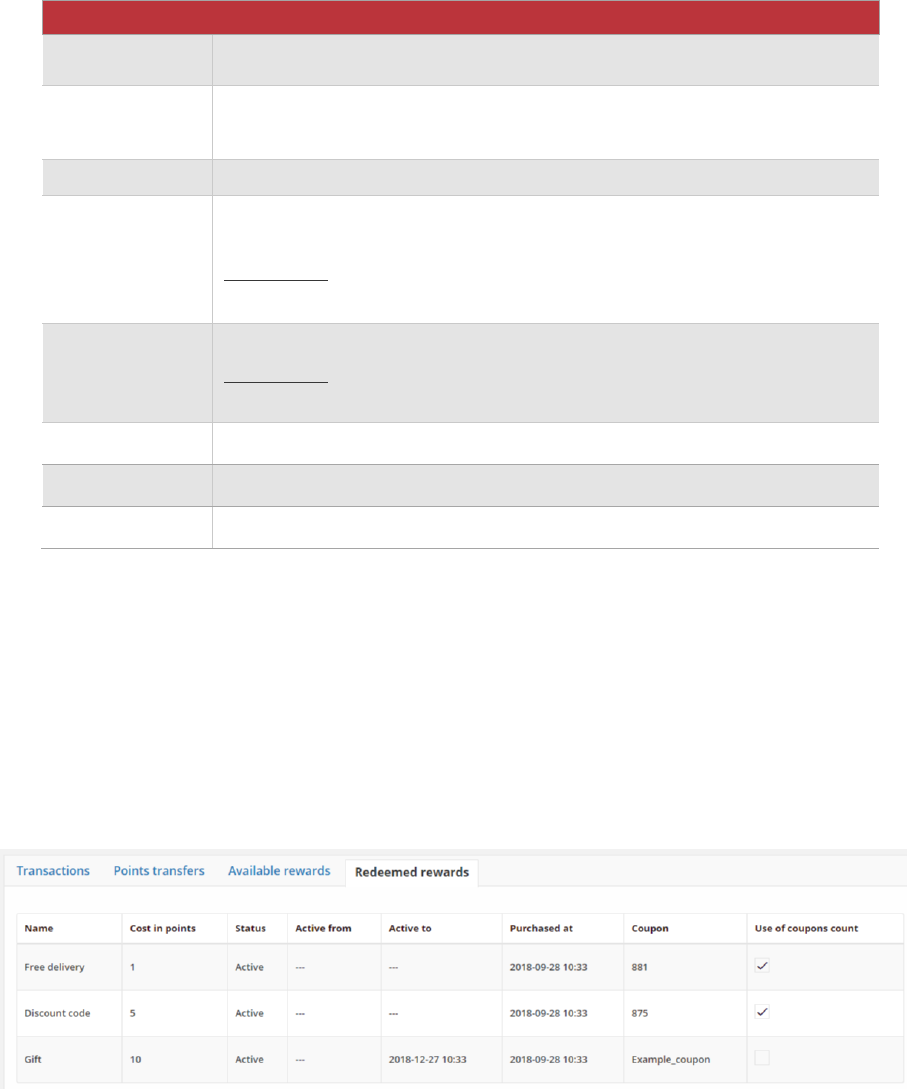
80
Field description
FIELD
DESCRIPTION
Name
Reward name, that is display to customer
Active
Determines whether the reward is available to customers. Option include:
true/false
Cost in points
Define how much points customer must spend to redeem reward
Limit
Information about the redeem rewards limit globally. Is associated with Limit
per customer value.
For example, value 10 means that reward can be redeem only 10 times (by
the same or different customers, what depends on Limit per customer value)
Limit per
customer
Information about the redeem rewards limit by one customer.
For example, value 1 means that reward can be redeem only once by one
customer, value 2 twice etc.
Active from
Start date from which customer can redeem reward
Active to
End date until which customer can redeem reward
Actions
Open reward record in view mode to see reward campaign details
Redeemed rewards
Redeemed rewards tab provide information about rewards (Reward Campaigns) that
customer has redeemed, divided into used and delivered.
Redeemed Rewards
All rewards that customer redeemed appears in this tab as a “delivered”. Only when
customer uses the reward/discount code during the purchase, reward is treated as “used”.
On the Redeemed rewards list, Used rewards will have a marked checkbox in the column
Use of coupon count, unlike to those Delivered, which will have an empty checkbox.
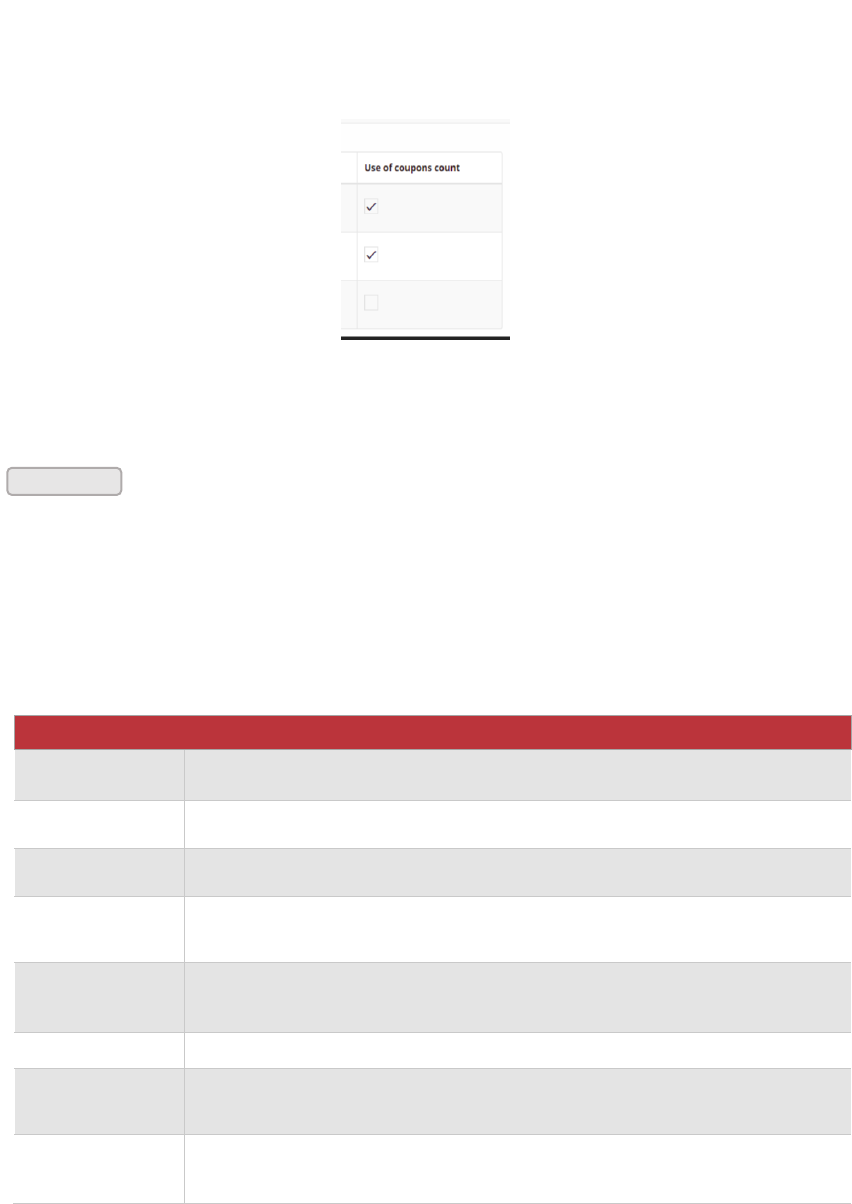
81
From the Admin you can mark selected redeemed reward record as a Used, when
customer used coupon code during purchase, you sent gift which customer selected from
his cockpit etc.
To mark reward as a used:
1. In the Redeemed reward list, find the reward you want to mark as Used and click
checkbox in the Use of coupons count column
Used/Delivered reward
To see the list of all redeemed rewards by customer within Loyalty Program click
below the tab.
To learn more about rewards, see Redeemed rewards
Field description
FIELD
DESCRIPTION
Name
Reward name, that is display to customer
Cost in points
Define how much points customer spent to redeem reward
Status
Reward campaign status. Options include: Active/Inactive
Active from
Reward campaign start date from which customer can used reward, define
during reward campaign creation in Activity section
Active to
Reward campaign end date until which customer can used reward, , define
during reward campaign creation in Activity section
Purchased at
The date when reward was redeemed
Coupon
Discount code that was used
Use of coupon
count
Define whether customer already used the reward or it’s only delivered and
can be used by him
All Rewards
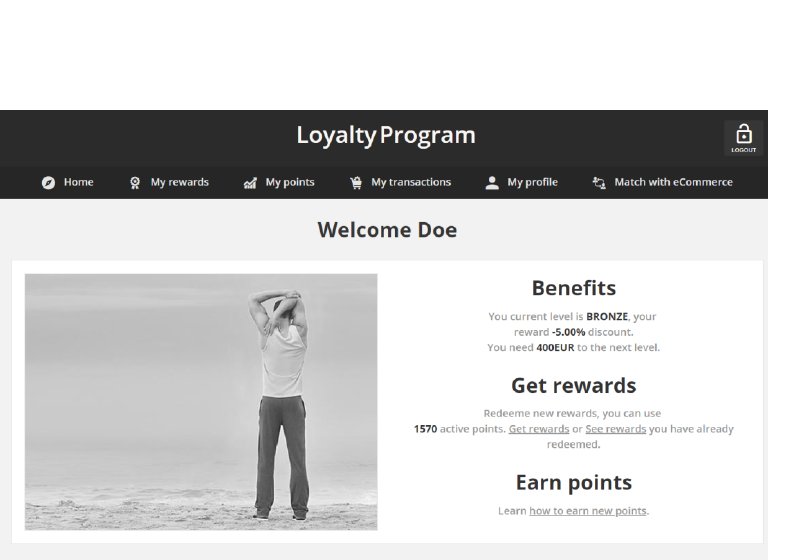
82
CHAPTER 7:
CUSTOMERS ACCOUNTS
The main page of your website can display message for customers to log in or register for
an account with your Loyalty Program. Customers who open an account with your Loyalty
Program enjoy a range of benefits.
Customers can access their account dashboard by clicking the link on your website. They
can use their account to view and modify their personal information provided during
registration process, check and redeem rewards , learn how to earn points, view their
transaction history (offline and online) and history of points earned and spent.
Customer Account Home Page

83
Customer account activation
When customer complete registration form directly from the Client cockpit, depending on
the settings, to activate the account he will receive:
b. activation code – when account activation method is selected to SMS.
Activation code will be sent to his phone number provided in the form.
c. activation link – when account activation method is selected to E-mail.
Link will be sent to his e-mail address provided in the form.
Remember, that in Open Loyalty settings you can choose only one Account activation
method that will be used for all customer.
Account activation via SMS
On the phone number provided by customer in the registration form activation code will be
sent.
Account activation code SMS message
Note, if you register customer from Admin or POS Cockpit activation code or link is
not sent. Customer account is active instantly.
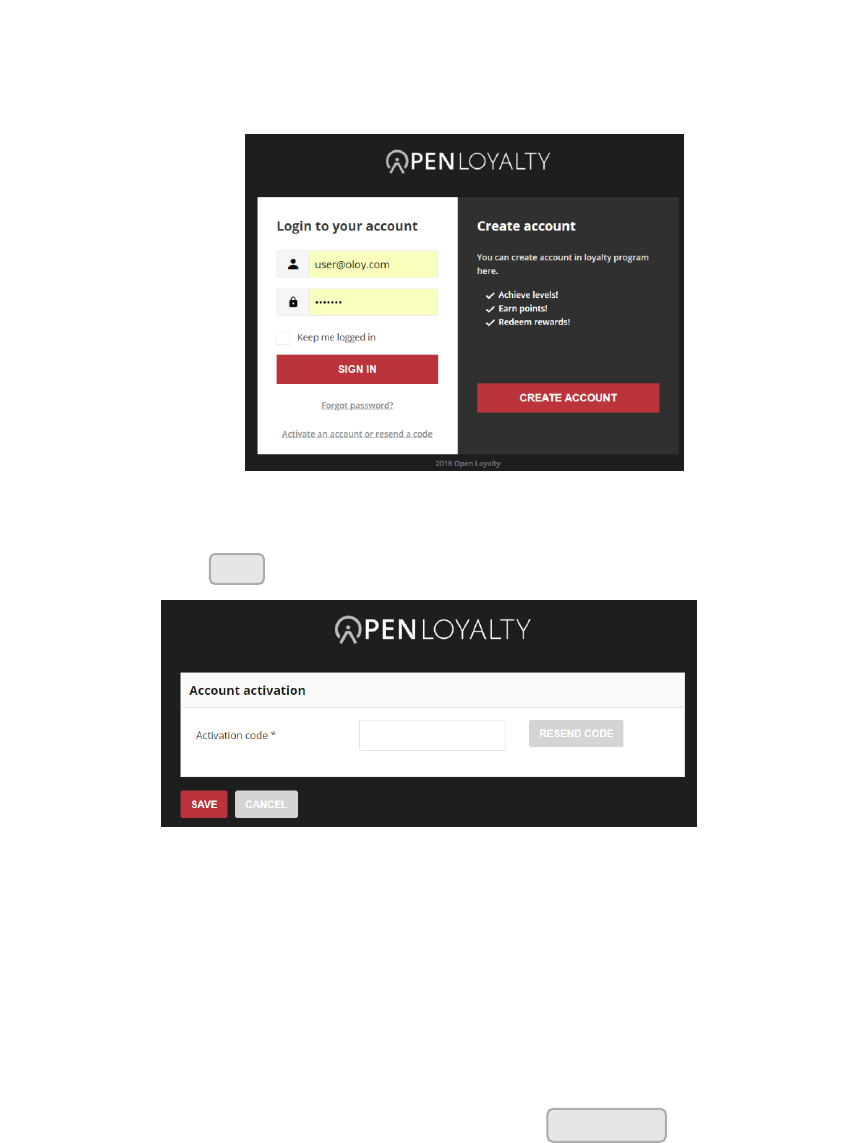
84
To activate customer account using SMS code:
When customer receive that message, he needs to return on Login page and do as follow:
1. On the login page, tap Activate an account or resend a code
Login page
2. When prompted, in the Account activation window, enter the Activation code that
received. Then tap
Customer account activation
If for some reason customer will lost this code he can simply resend an activation code.
To resend an activation code:
1. On the login page, tap Activate an account or resend a code, like in a previous step
2. When prompted, in the Account activation window, tap
3. Enter the Phone number on which another resend code will be sent. Phone number
can be different than this one provided in registration form. Formatting is as on follow
example:
• Country code: +48/48
• Subscriber number: 123456789
• In total: +48123456789 / 123456789 / 48123456789
Save
Resend code
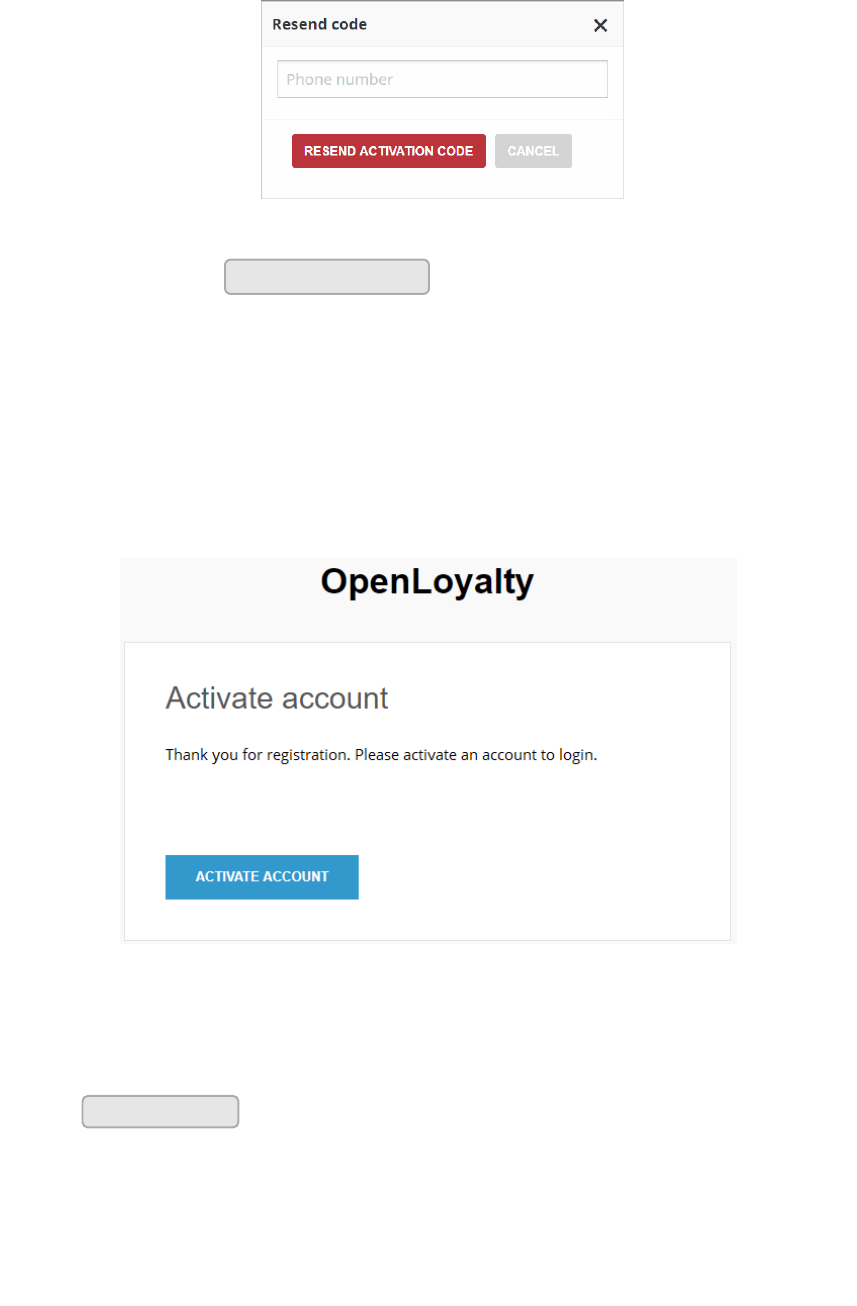
85
Resend code
4. When complete, tap
Account activation via E-mail
On the email address provided by customer in the registration form activation link will be
sent.
Account activation link email message
To activate customer account using link:
1. Click in the email message
2. Customer account will be activate instantly. Customer will be redirect automatically to
login page to enter login credentials.
If for some reason customer will lost this email/link his account can be activated manually
by Admin. To learn more about manually customer account activation please see
Deactivate a customer’s account
Resend activation code
Activate account
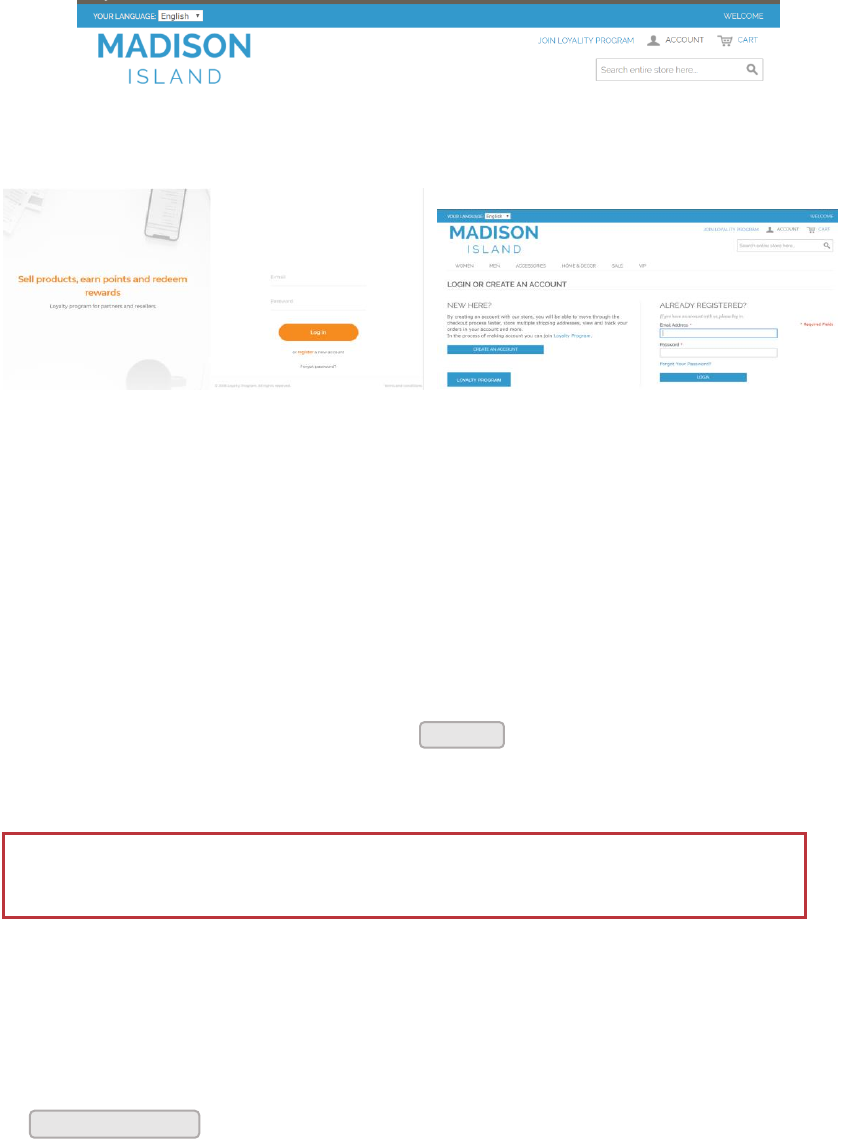
86
Customer Sign In
Customer have easy access to their account from main page of your website. Depending
on the configuration, customers can be redirected to customer cockpit as subdomain (like
club.yourbrand.com) or as loyalty module within your website.
Link to Loyalty Module within Webshop
Sign In to Customer Account within Subdomain Sign In to Customer Account within Webshop
When customers forget their passwords, a reset link is sent to the email address that is
associated with the account.
To sign in to your customer account:
1. Click a link on the website to open Login page
2. When prompted, enter the Email Address/Phone number that is associated with cus-
tomer account, and Password. Then, tap
To reset your customer account password:
1. On the Login page, tap Forgot password?
2. When prompted, enter the Email Address that is associated with your account, and tap
Depending on the configuration, customer can use to log in: E-mail address or Phone
number and Password
Sign In
Recover Password
87
If the email address you entered matches the one that is associated with the account,
you will receive a "Password reset requested" email with a link to reset your password.
3. Click the Reset Password link in the email and enter your New Password. Enter it
again to confirm.
When you receive confirmation that the password is updated, you can use the new
password to log in to your account.
To sign out of the customer account:
In the upper-right corner, tap the Logout ( ) icon.
Logout
When customer logout, the Sign-In page returns.
Your password must be eight or more characters long, and contains at least one
upper case letters, one numeric character and one special character
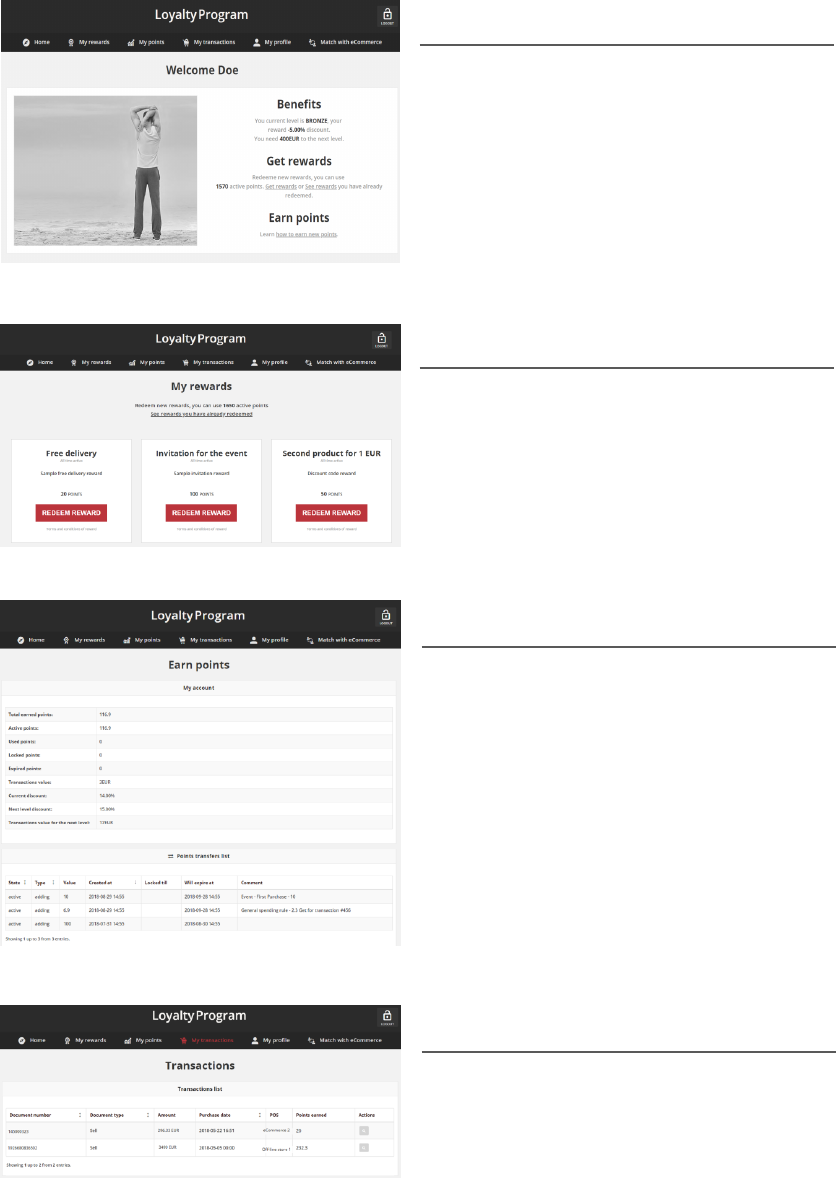
88
Customer Account
Customers through theirs account can view all their activity within Loyalty Program, and
manage their own personal information.
Home
The customer’s Home page provides them
the ability to view current level and
assigned to this level reward, active points
balance, points missing to next level and
links to other areas of loyalty activities:
redeem rewards, get more points, edit
profile, check transaction, invite friend etc.
My rewards
Lists all available for customer account
rewards with information about Active
points amount and a link to see rewards
he has already redeemed.
My points
Displays a loyalty points balance and levels
details. Menu gives him also ability to track
all points transfers with detail information
regarding the date, point’s state and type
and reward (in case of transfers with
“spending” type)
My transactions
Displays a list of all customer transaction,
with a link to each to see more
information – purchased items and
transaction details.
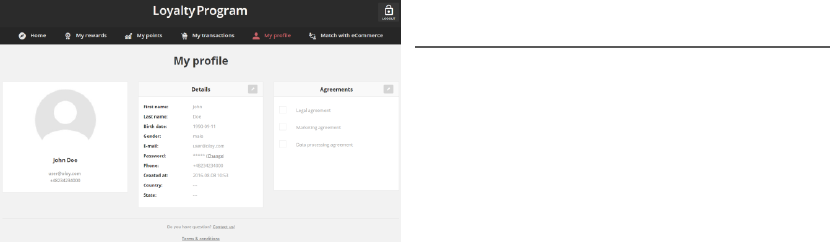

90
LEVELS
In this section of the guide, you will learn how to create and use customer levels to create
opportunities for customer engagement and how to set up targeted discounts and rewards
based on a variety of conditions. The more points customers receive, the higher level they'll
reach. And, the higher level of loyalty, the more rewards customers will get.
You can use levels to offer customer incentives, such as:
• assigned a fixed reward to the particular level. The higher level – the better reward.
• offer limited in time special rewards for customer assigned to particular level
LEVELS MENU
All levels
Customers assigned to level list
Download the Customers list
CREATING CUSTOMER LEVEL
Updating levels data
Activate/deactivate a level
Special rewards

91
CHAPTER 8:
LEVELS MENU
Levels are used to categorize customers based on the value of their transactions (orders) -
The higher value/amount of transaction, the more points they will get and the higher level
they'll reach.
Customer is assigned to only one level at a time. Customers are placed into a levels based
either on their total amount of transaction or points they have earned. If customer has
spent enough money or earned enough points to move up a level, his level will
automatically move up and he will be informed about it via email.
The only scenario when customer can return to previous level is when order, which caused
this promotion, will be returned.
Customer level can be also changed to higher or lower manually by the Admin user. If you
move a customer to a level manually, they are excluded from any automatic levels
upgrades or downgrades.
Each level can provide fixed discounts and also have exclusive rewards that can only be
claimed when a customer is on that level.
Customers Levels
To display the Levels menu:
On the Admin sidebar, tap , then choose All levels.
Menu options
All levels
Lists all customers level within your loyalty
program with additional information
regarding conditions values, assigned
rewards and possible, limited in time,
special rewards
Levels
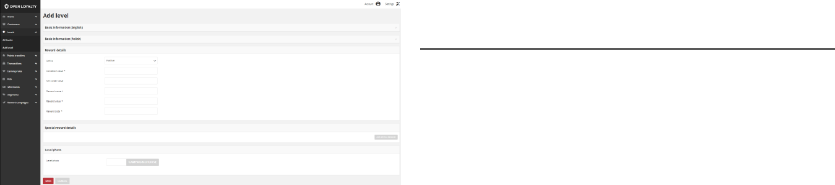
92
Add level
Lists all data that need to be filled out to
add new customer level
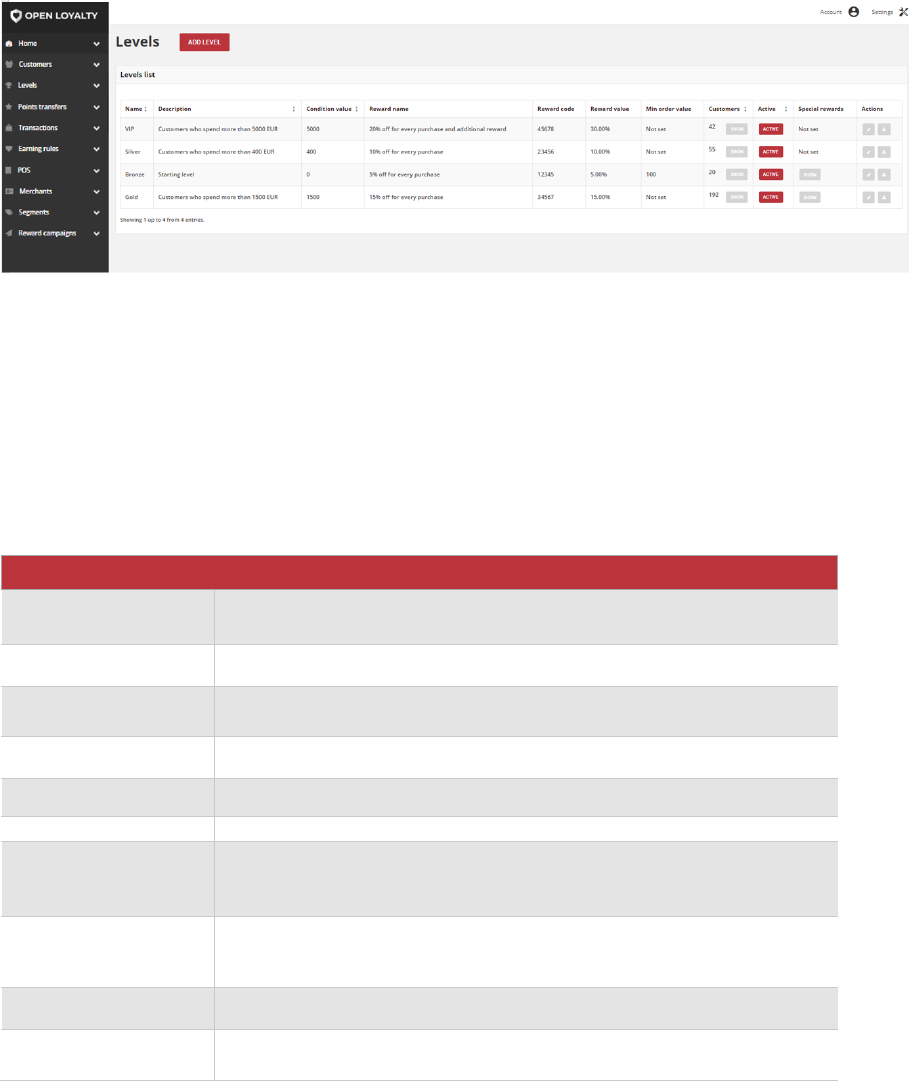
93
All levels
The Levels page lists all customers levels available to reach within Loyalty Program. The
same list is also visible from the Dashboard.
You can easily view and modify all levels credentials such as condition value, assigned
rewards and special rewards. Tab allows also to preview number of customers assigned to
particular levels and see theirs detail or download in .CSV file.
Customers Levels
Use the standard controls to sort the list and apply actions (modify and download targeted
customer) to selected levels.
Field description
FIELD
DESCRIPTION
Name
Name of the Customer level, visible when information about level will
be displayed
Description
Level brief description
Condition value
Minimum sum of earned points or sum of all transactions value needed
to be assigned to this level
Reward name
Description of level reward (e.g. 5% discount).
Reward code
Discount code to be used on
Reward value
Discount value for this level (e.g. 5)
Min order value
Only when earned points for one transaction or one transaction value
exceed provided value then it will be added to sum. If level has not
defined Min order value then “Not set” will be shown.
Customers
Show customers account number assigned to this level. After Show
click, list of these customer details will be shown.
Active
Action to change is Level active. Option include: Active/Inactive
Special rewards
Show Special Reward data related to Level, available when additional
conditions will be met. If Level has not defined Special Reward then
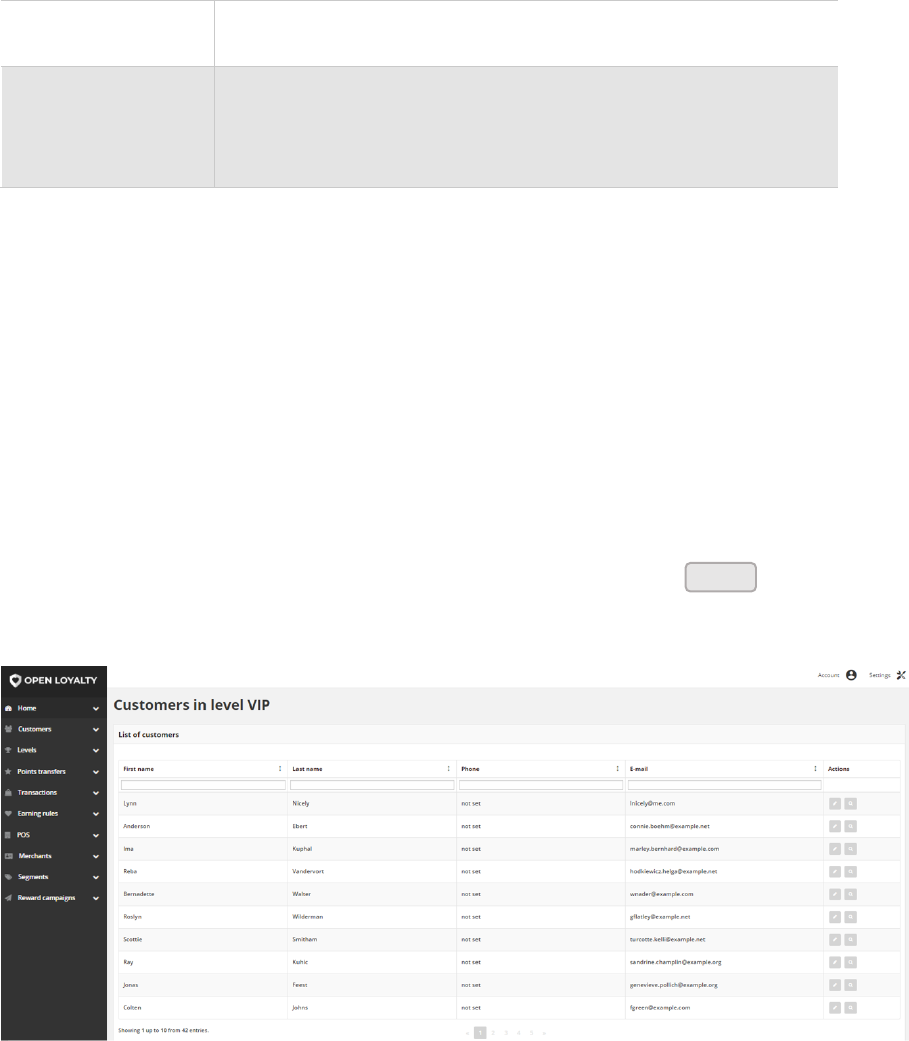
94
"Not set" will be shown. To learn more about special rewards, see spe-
cial reward section.
Actions
The operations that can be applied to selected customer record.
Options include:
• Edit level data
• Download list of customers details assigned to this level
Customers assigned to level list
You can simply view not only the number but also the list of customers with details
assigned to particular level.
To display the list of customers:
1. On the Admin sidebar, tap Levels. Then, choose All levels.
2. In the levels list, find the level you want to see customers list and click in the
Customers column. After clicking, the list of customers will be opened, filtered
according to the assigned level.
List of Customers in Level VIP
Use the standard controls to sort the list, filter and search customer by typing in the field
under column header value you want to find, and apply actions to selected customers (edit
and view). Pagination controls appear if there are more customer records than fit on the
page, and are used to move from one page to the next.
Show

95
Download the Customers list
There is also possibility to download a list of customers to a CSV file.
To download the list of customers assigned to a level:
1. On the Admin sidebar, tap Levels. Then, choose All levels
2. In the levels list, find the level you want to download customers list and click Download
( ) icon in the Action column.
After clicking, the list of customers will be download in .CSV format.
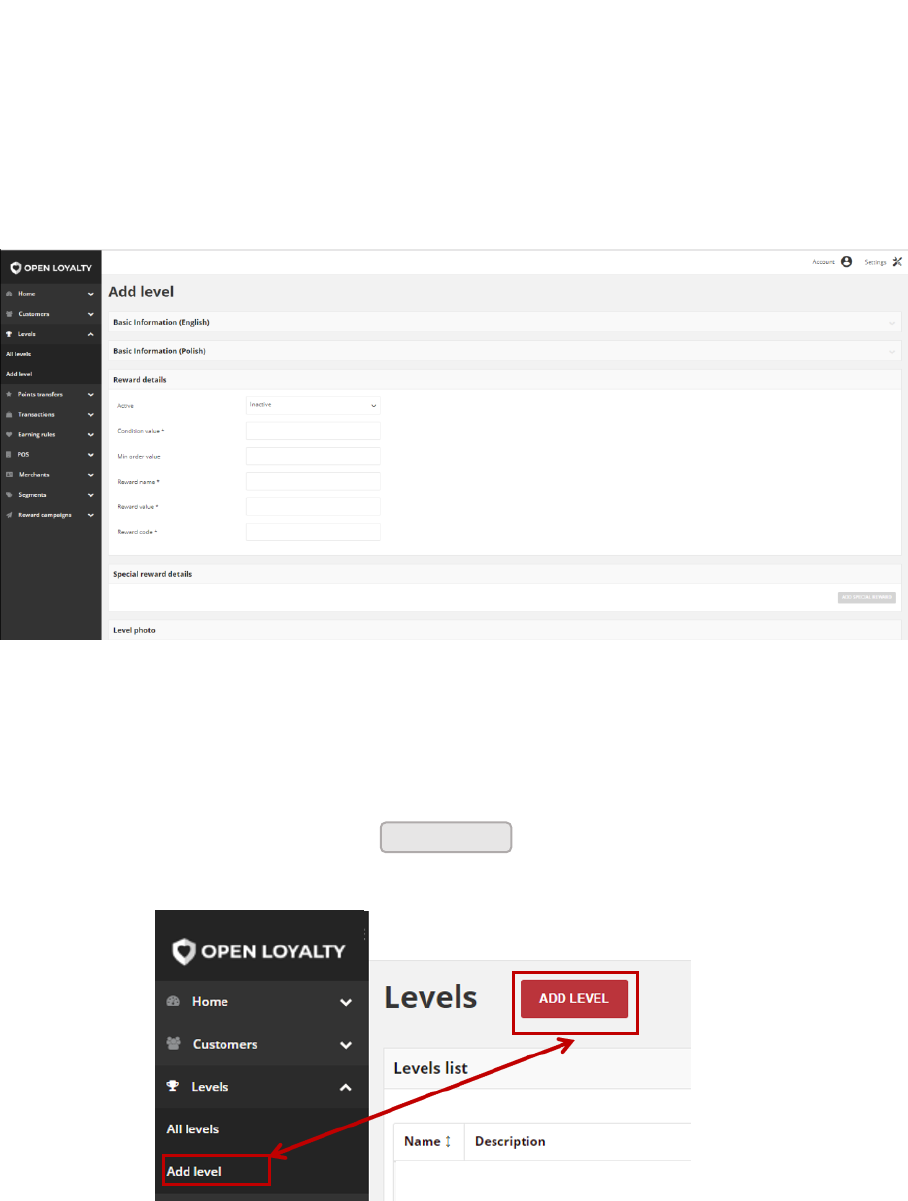
96
CHAPTER 9:
CREATING CUSTOMER LEVEL
You can create unlimited amount customizable customers levels for your loyalty program
based on various conditions.
Depending on the Translations settings, Basic information’s can be provided in different
language versions (listed in Translations). Information from that section can be display on
a Client cockpit depending on a chosen from the admin cockpit default language version.
For example, when default language is English, information are display in English, but when
we change it on polish as a default language, all basic information will be displayed in
polish (if provided).
Add New Level
To create a New Customer Level :
1. On the Admin sidebar, tap Levels. Then, choose Add level. You can also add level
directly from All levels list by clicking at the top of the page.
Add Level Options
Add level
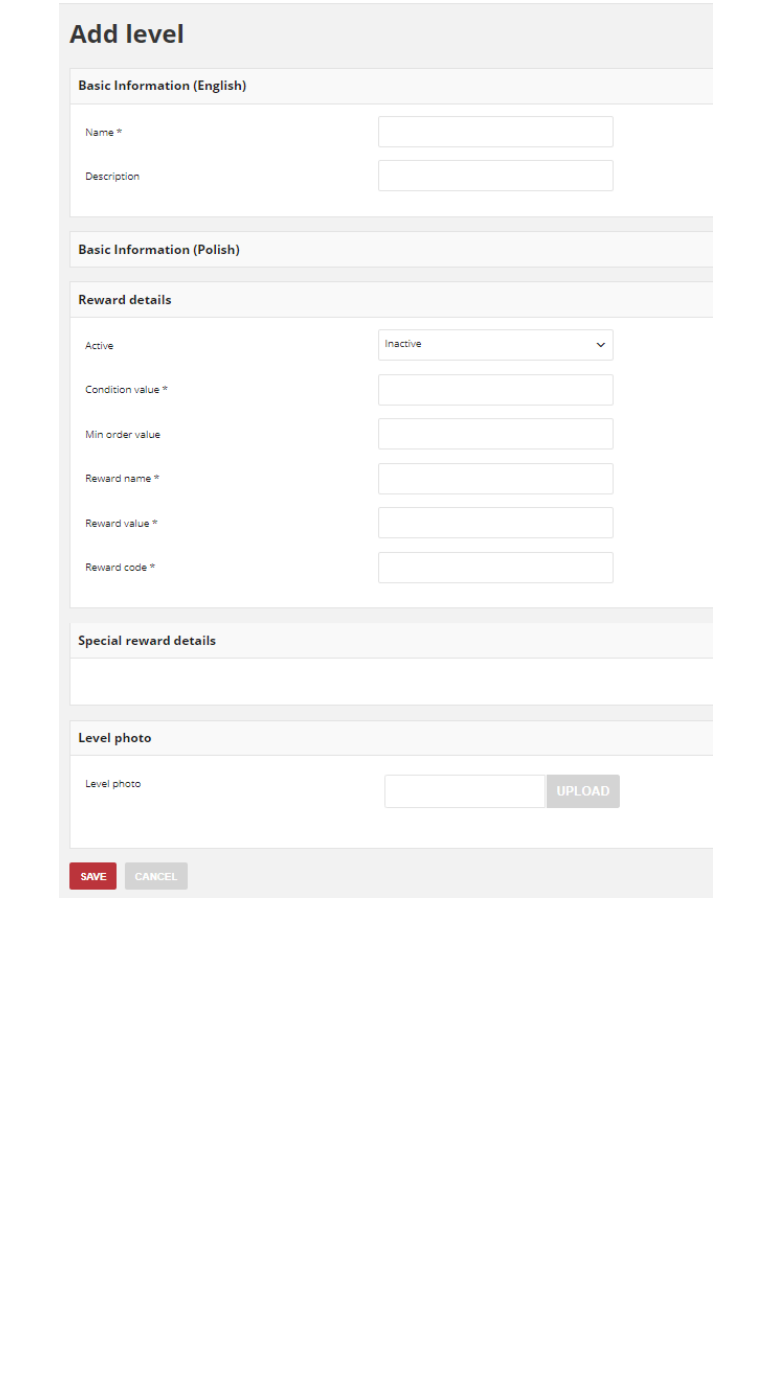
97
Add Level Form
2. In Basic Information section related to the default language version do the following:
a. Enter a unique level Name to identify the customer level
b. Enter a brief Description that explain purpose of the level for internal reference
c. If applicable, fulfill the same fields in other language version e.g. polish as on a
screen above.
3. In Reward detail section do the following:
a. To activate the customer level, in Active field select “Active” from the dropdown list
b. Depending on the configuration, set Condition value as a minimum points value or
minimum transaction amount needed to be achieved to be assigned to this level
98
c. Field Min order value is currently not used so you don’t have to fill it in.
d. In Reward name provide a brief description that explain purpose of the reward. For
example, 15% off for every purchase
e. In Reward value field enter a discount value for level reward. For example, value 15
means 15% discount
f. Enter a Reward code to be used by customers assigned to this level authorizing to
Reward value.
4. If you want to give special discount for Customer but only in limited time, complete the
Special reward details section. To learn how to assigned special reward to particular
level, see Special Rewards
5. If applicable, upload a Level photo that will be displayed on a storefront
6. When complete, tap
To check whether customer levels should be calculated based on points or
transaction see Configuration settings
Save
Image size is limited to 2MB. Image dimensions could not be smaller than 600 x 600
px. Allowed file formats: png, gif, jpg.
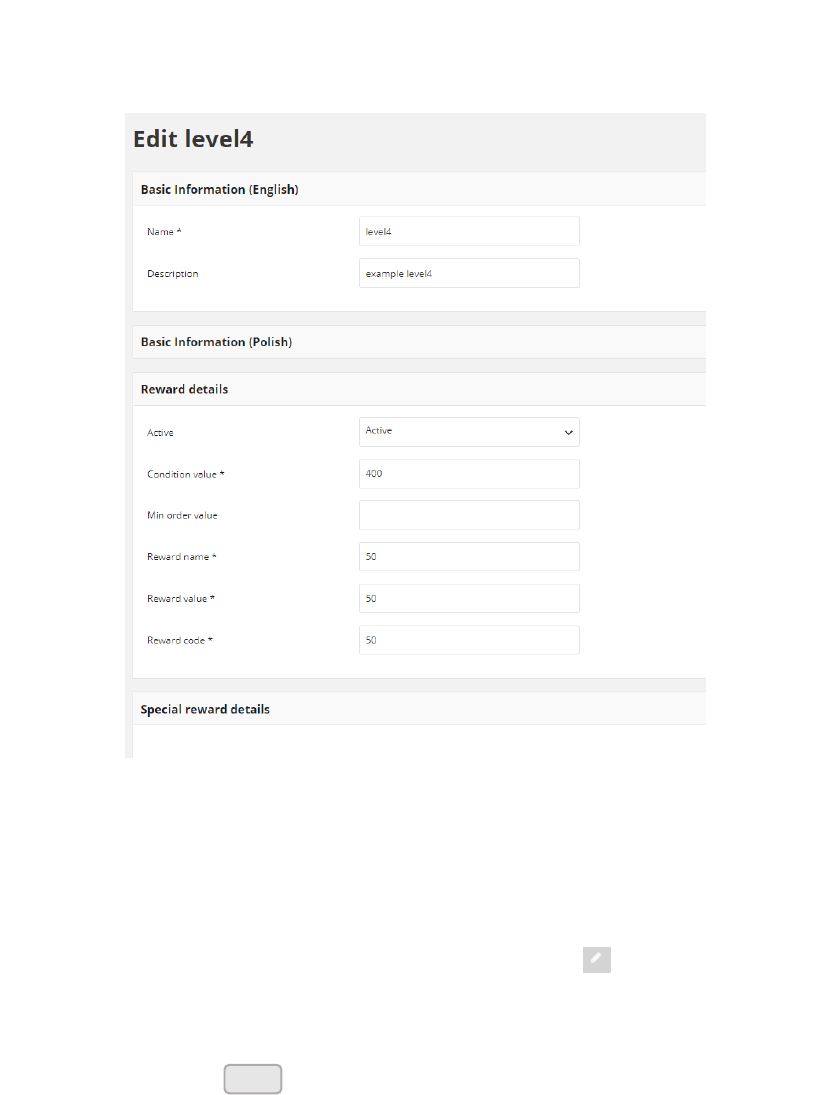
99
Updating levels data
You can edit all data provided during level creation process. You can update level data by
selecting it’s record from All levels list.
Level Edition
To edit a level:
1. On the Admin sidebar, tap Levels. Then, choose All levels.
2. In the Levels list, find the record to be edited and click Edit ( ) icon in the Action
column to open the record in edit mode.
3. Make any necessary changes to the level data
4. When complete, tap
Save

100
Activate/deactivate a level
Any levels from the list can be activated and deactivated by Admin user.
To activate/deactivate level:
1. On the Admin sidebar, tap Levels. Then, choose All levels. You can also
deactivate/activate level from Edit mode
2. In the levels list, find the level to be deactivated and click in the Active column.
The button in the column change to Inactive and appear as a grey-out.
Active Column
When you deactivate levels, customers accounts assigned to this level will be still display
level name but redeeming rewards and special rewards assigned to this level will not be
possible.
3. To activate the level click in the Active column. The button in the column
change to Active and appears as a red.
Customer can be assigned only to Active levels
Active
Inactive
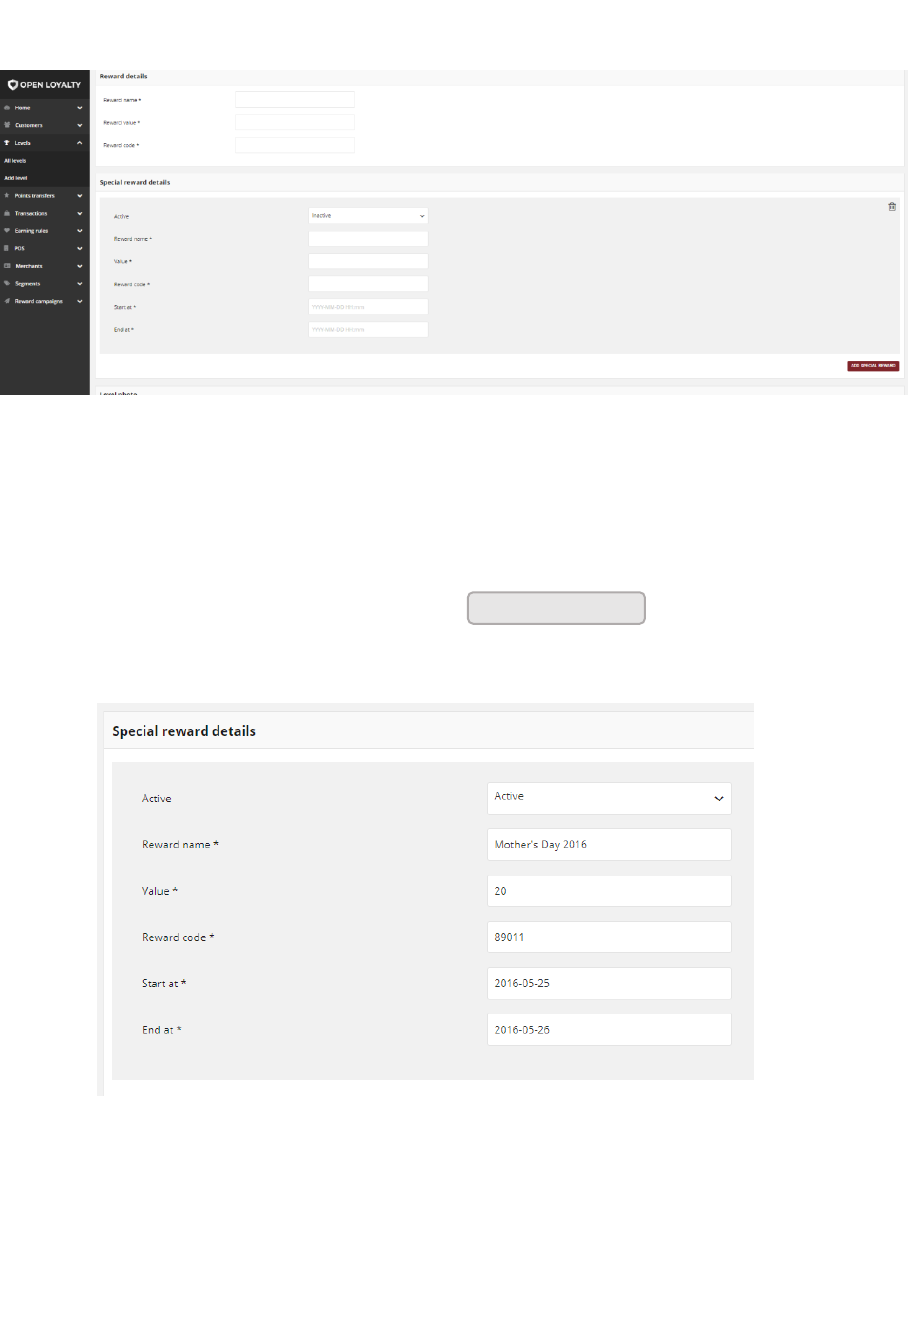
101
Special rewards
Special reward should be set if you want to give special discount for customer but only
limited in time.
Add Special Reward
To assigned special rewards to level:
1. Open Add Level Form as described in previous point
2. Go to Special reward details section and click . Then do the
following:
Special Reward Details
a. To activate the level special reward, in Active field select “Active” from the dropdown
list
b. Enter a Reward name as a brief description that explain purpose of the reward
creation. For example, Woman’s day
Add special reward
102
c. Enter discount Value for special reward. For example, value 20 means 20% discount
d. Enter a Reward code to be used by customers assigned to this level authorizing to
special reward Value.
e. In Start at and End at fields specify time boundaries when special reward will be
visible and active.
3. Repeat the steps for all special rewards you want to assigned to this level
4. When complete, tap
5. You can simply remove special reward by clicking bin ( ) icon in a particular box
Save
103
POINTS TRANSFERS
This section of the guide walks you through the basic points transfer information. You will
learn how to add and manage transfer of loyalty points records and finally better
understand all terms related to points transfer.
POINTS TRANSFERS MENU
All points transfers
Canceling points transfer
Points transfer details preview
Creating points transfer
Import points transfers
XML file structure
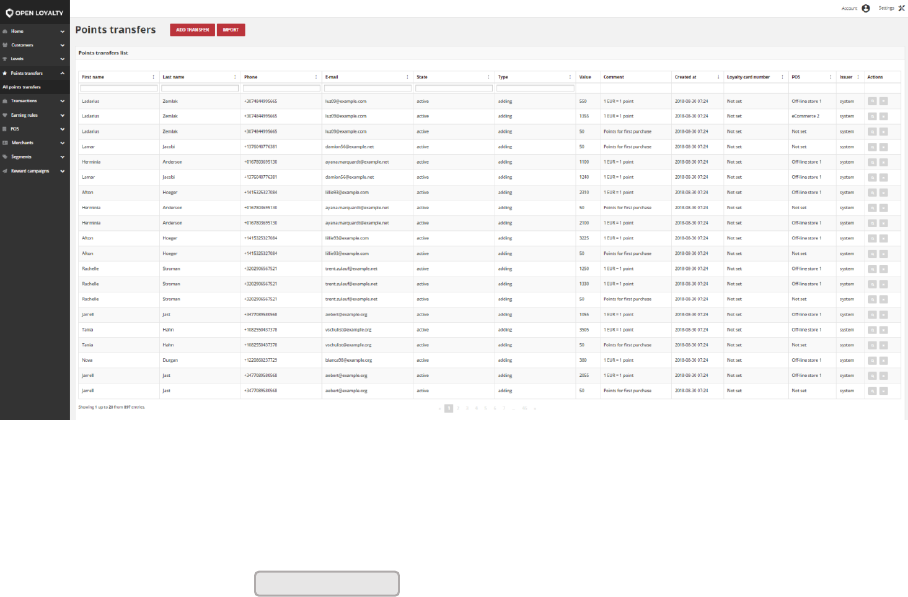
104
CHAPTER 10:
POINTS TRANSFERS MENU
The Points Transfers section lists all – system and imported, increasing and decreasing sum
of loyalty points assigned to customer account points transfers that has taken place
between your customers account and Open Loyalty, and provides access to more detailed
information.
Points Transfers
To display the Points Transfers menu:
On the Admin sidebar, tap , then choose All points transfers.
Points transfers

105
All points transfers
The Points transfers lists gives you information about value of earned and spent points by
particular customer with details regarding customers and transfer process. Moreover, list
contains information whether points are the result of Earning Rules (system) or they have
been manually set by the Admin user (admin).
To learn more about Earning Rules, see Rules details
Points Transfers List
Use the standard controls to sort the list, filter and search transfers by typing in the field
under column header value you want to find, and apply actions to selected transfers
records. Pagination controls appear if there are more transfer records than fit on the page,
and are used to move from one page to the next.
Field description
FIELD
DESCRIPTION
First name
The first name of customer referred to transfer
Last name
The last name of customer referred to transfer
Phone
The customer referred to transfer phone number
E-mail
The customer referred to transfer email address
State
Transferred points state:
Active - points are available to spend
Expired - points expired and cannot be used to redeem reward
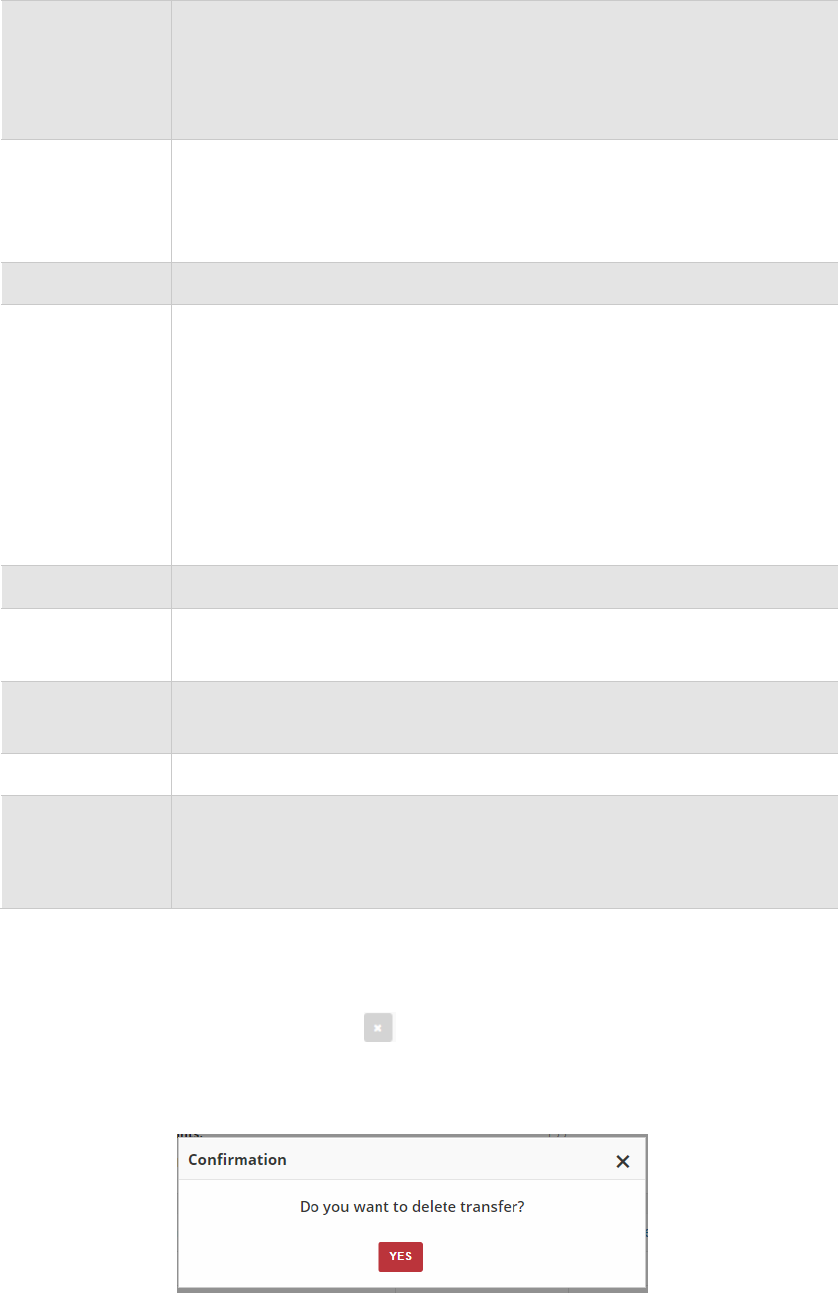
106
Pending – points are locked and cannot be used to redeem reward until
locked time will be passing. Locked time is set in Open Loyalty
Configuration
Canceled – points are subtracted from the pool of Active Points as a result
of canceling the points transfer
Type
Transfer operation type:
Adding – customer earn point for transaction or other activity
Spending – customer spent points for campaign reward
Value
Amount of points earned/spent within the transfer
Comment
Show details about transfer, e.g. for what Customer gets points, for what
Customer spend points.
Field is automatically filled in with the reward campaign name when the
customer spends points for the reward using his account.
Field is automatically filled in with the earning rule name, used to earn points
by customer.
If transfer is created manually by Admin user, field is filled in with
information provided by the Admin during transfer creation.
Created at
Date when points transfer was made
Loyalty card
number
Customer loyalty card number linked with transfer. If there is no value assign
“Not set” is displayed
POS
Which of POS processed transaction upon which points were calculated. If
there is no assignment “Not set” is displayed
Issuer
Define who create Transfer operation. Option include: system/admin
Actions
The operations that can be applied to selected transfer record. Options
include:
• Cancel points transfer
• View points transfer details
Canceling points transfer
To cancel points transfer click Remove ( ) icon in the Action column. System will display
a message asked you to confirm the action.
Removing Transfer Action
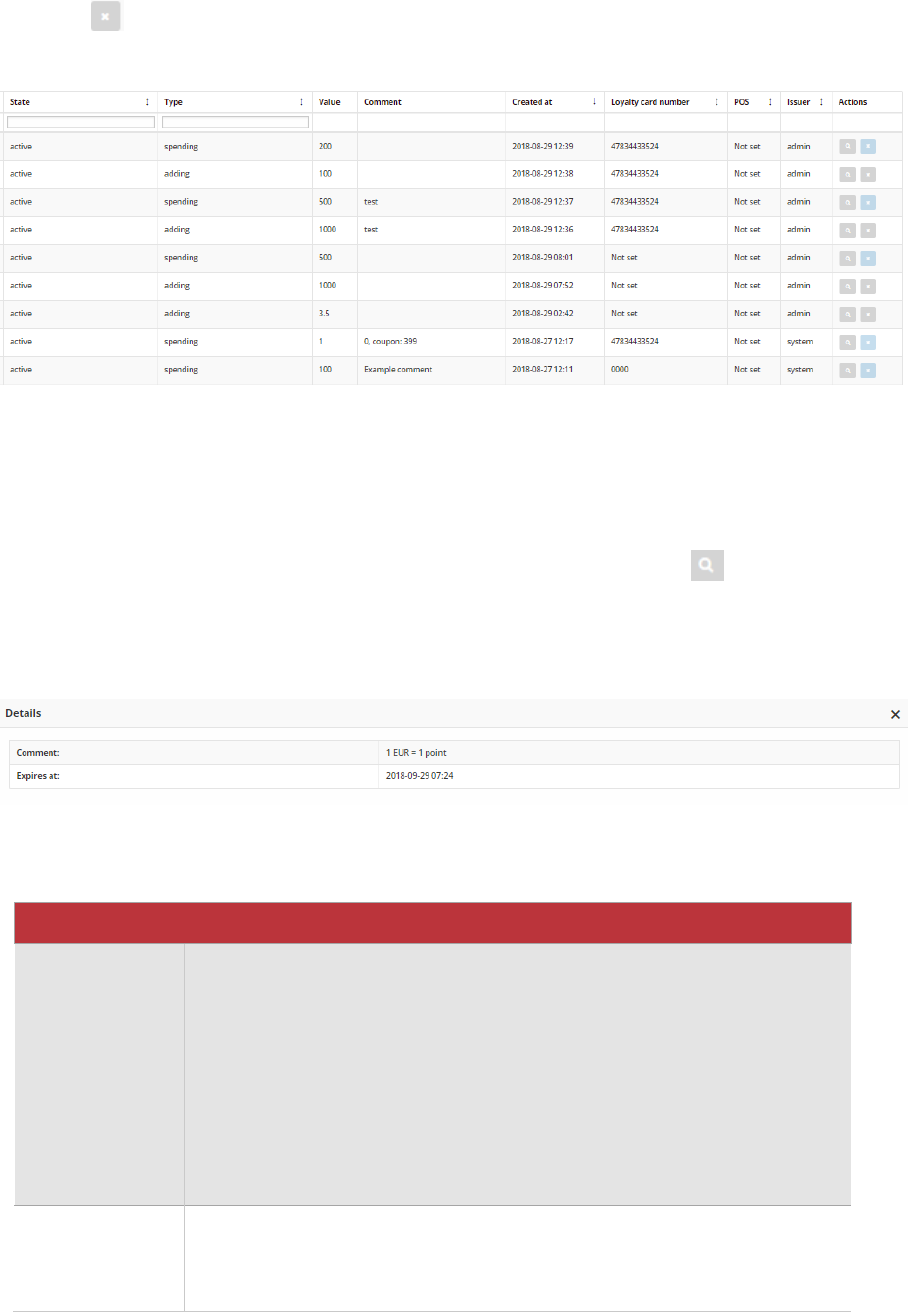
107
After canceling, no action to canceled transfer record will be longer available and the
Remove () icon background change color to blue. The same situation deal with Points
transfers with “spending” type.
Deleting Transfers Icons
Points transfer details preview
To see more information related with particular point transfer click View ( ) icon in the
Action column. System will display a popup with additional information, with comment and
points expires date.
Points transfer details
FIELD
DESCRIPTION
Comment
Show details about transfer, e.g. for what Customer gets points, for what
Customer spend points.
Field is automatically filled in with the reward campaign name when the
customer spends points for the reward using his account.
Field is automatically filled in with the earning rule name, used to earn points
by customer.
If transfer is created manually by Admin user, field is filled in with
information provided by the Admin during transfer creation.
Expires at
Date when points earned by customer expire.
Number of days after points expire is set up in Open Loyalty
Configuration.

108
Creating points transfer
Customers usually earn and spend points within Open Loyalty system – points are added
for transaction and activity based on Earning Rules and spent for Reward Campaigns
selected by customer within customer cockpit . However, you can also create customer
points transfer directly from the Admin, which is useful in case of ad-hoc special situation
e.g. long delivery delay, the biggest purchase among customers in year etc.
Add Points Transfer
To add points transfer manually:
1. On the Admin sidebar, tap Points transfers. Then, choose All points transfers
2. Tap at the top of the page. Then, do the following:
a. From the dropdown list choose Transfer type:
• If you want to subtract points select Spend points
• If you want to add points select Add points
b. Select customer account for which points transfer will be deal with. Enter few
letters/signs of customer name/surname/phone. System display the list of all
matching customer record.
Select Customer
Add transfer
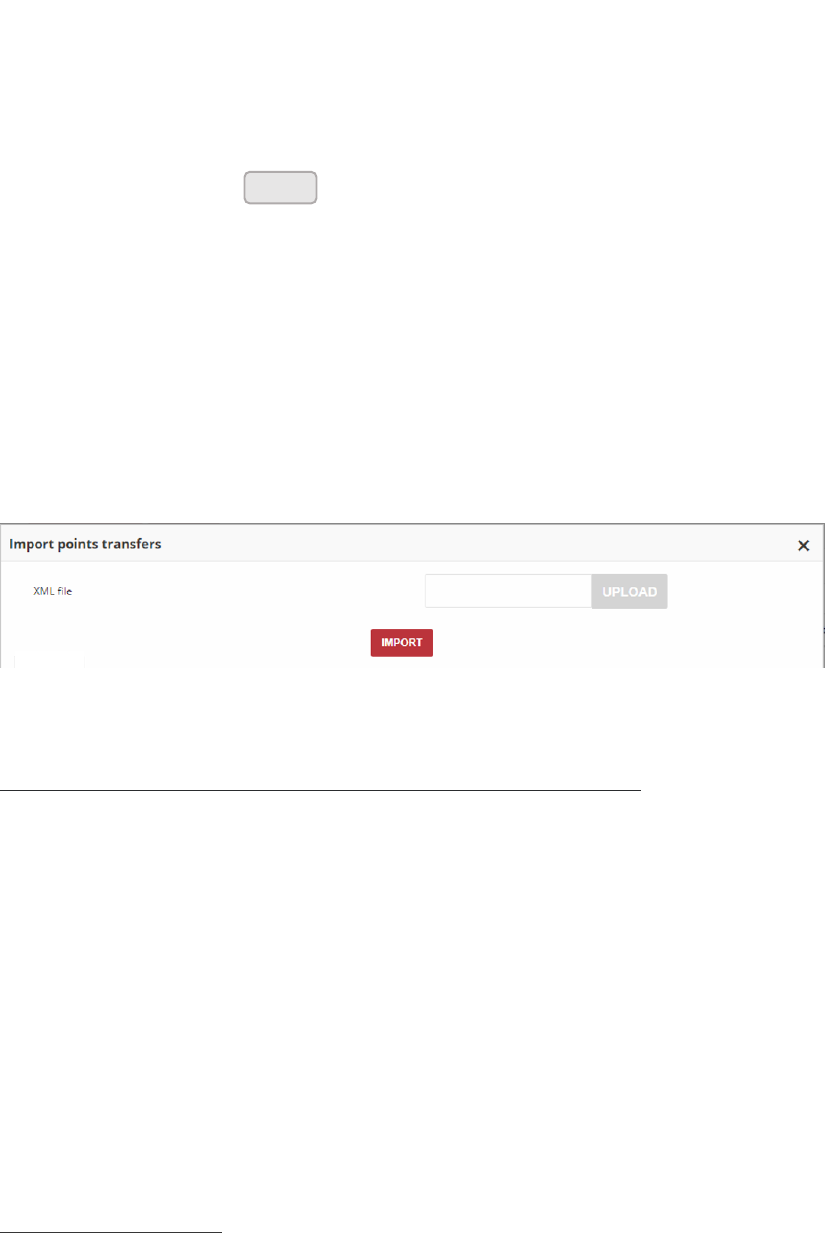
109
c. In Points to add/spend field enter amount of points that will be added to/
subtracted from Customer Account active Points
d. If needed, provide a Comment for operation as a brief description that explain
purpose of the transfer e.g. information on what they were spent or why they were
subtracted
3. When complete, tap
Import points transfers
If you have a customer list that you want to add points within your Loyalty Program, you
can enter it into a Points transfer XML file and then import it in your Open Loyalty Admin.
Import Points Transfers
Importing a XML file will create a points transfers for each customer:
• email address
• phone number
• ID
• Loyalty card number
At least one, of the listed above value, must be provided to identify the customer and
create points transfer for him. For example, in XML file you can provide only customer
loyalty card number – if this number is unique and allow to identify him. If not provide e-
mail or phone number for better authentication.
If all information is provided, platform uses them to assign your loyalty program participant
with points transfer based on hard-coded priorities assigned to this value. Priorities can’t
be changed.
Priorities are as follows:
1. Customer ID
2. Customer e-mail address
3. Customer Loyalty card number
Save
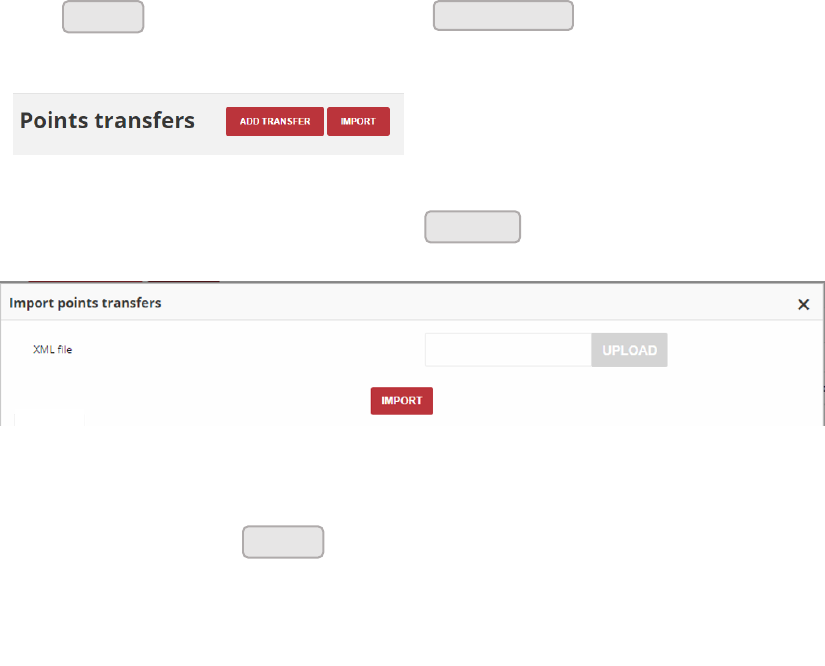
110
4. Customer phone number
Mechanism of matching the customer with points transfer basing on priorities is the
same like in Identification factors description (number 1 has the highest priority)
For example, if XML file includes customer ID and email address, customer ID is used for
matching before the email address. If there will be no clear result, email is verified.
If any of this four listed value will not give a result an error message occurred.
To import a points from a file:
1. On the Admin sidebar, tap Points transfers. Then, choose All points transfers
2. Click at the top of the page, next to
Points Import Button
3. In the Import points transfers dialog, click , and then choose your customer
XML file.
Import Points Transfers
4. When file selected, click
The points transfers details of customers whose you've added to the XML file will
appear in the All points transfers list in your Open Loyalty admin.
Import
Add transfer
Upload
Import

111
XML file structure
Example of Points transfer XML file structure below:
<?xml version="1.0" encoding="UTF-8"?>
<pointsTransfers>
<pointsTransfer>
<customerId>00000000-0000-474c-b092-b0dd880c07e2</customerId>
<customerEmail>john.doe@example.com</customerEmail>
<customerPhoneNumber>+48888888888</customerPhoneNumber>
<customerLoyaltyCardNumber>936592735</customerLoyaltyCardNumber>
<points>12</points>
<type>adding</type>
<comment>reason of points transfer</comment>
<validityDuration>30 </ validityDuration >
</pointsTransfer>
<pointsTransfer>
<customerEmail>jane.doe@example.com</customerEmail>
<customerLoyaltyCardNumber>0123456789</customerLoyaltyCardNumber>
<points>50</points>
<type>spending</type>
<comment>reason of points transfer</comment>
<validityDuration>30 </ validityDuration >
TIPS
1. If you don’t have or don’t want to import all this data, remove all code
line/section instead leave it blank.
For example, if you don’t want to include phone number remove all line
from the code. Don’t leave it with no value as below:
<customerPhoneNumber>+48888888888</customerPhoneNumber> OK
<customerPhoneNumber></customerPhoneNumber> WRONG
Remember that some of them are required, so if you remove it
Import will not be possible.

112
</pointsTransfer>
</pointsTransfers>
113
TRANSACTIONS
In this section of the guide, you’ll learn how to manage all aspects of the transaction,
including matching transaction with customer and better understanding of terms and
transaction process.
TRANSACTIONS MENU
All transactions
Transaction details
Transaction labels
Returns
Match transaction with customer
Import transactions
XML file structure
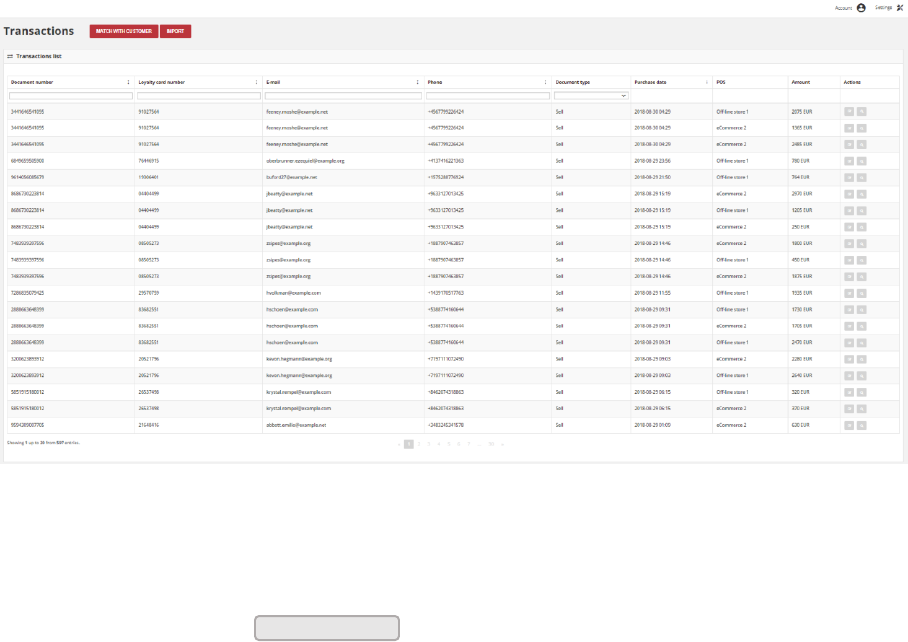
114
CHAPTER 11:
TRANSACTIONS MENU
The Transactions grid lists all (system and imported) payment activity that has taken place
between your store system and customers, and provides access to more detailed
information about purchased items and transaction itself.
Transactions
To display the Transactions menu:
On the Admin sidebar, tap , then choose All transactions.
Transactions
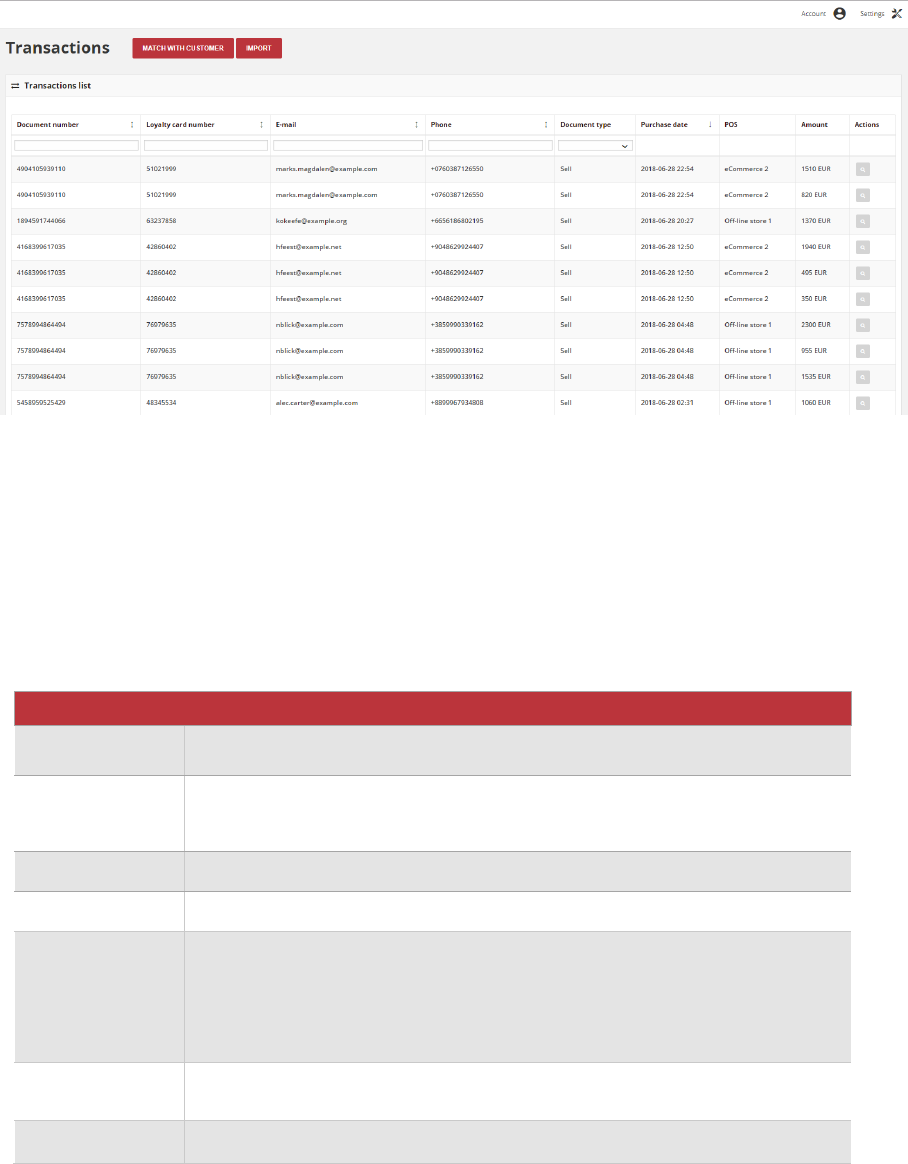
115
All transactions
The All transactions lists gives you information about type and value of all payment activity
referred to customer. Moreover, list contains detail information about store and date when
transaction was made, transaction internal number and allows to preview transaction and
purchased items detail.
Transactions List
Use the standard controls to sort the list by Purchase date, filter and search transfers by
typing in the field under column header value you want to find, and apply action (preview)
to selected transaction records. Pagination controls appear if there are more transaction
records than fit on the page, and are used to move from one page to the next.
Field description
FIELD
DESCRIPTION
Document
number
Unique transaction ID from your store internal system (e.g. e-commerce)
Loyalty card
number
Number of customer loyalty card related to the transaction If transaction is
linked with customer account
E-mail
Email address of customer related to the transaction
Phone
Phone number of customer related to the transaction
Document type
Transaction type:
• Sell – customer buy products
• Return – customer return bought products
Purchase date
Valid date of transaction
POS
POS where transaction was made
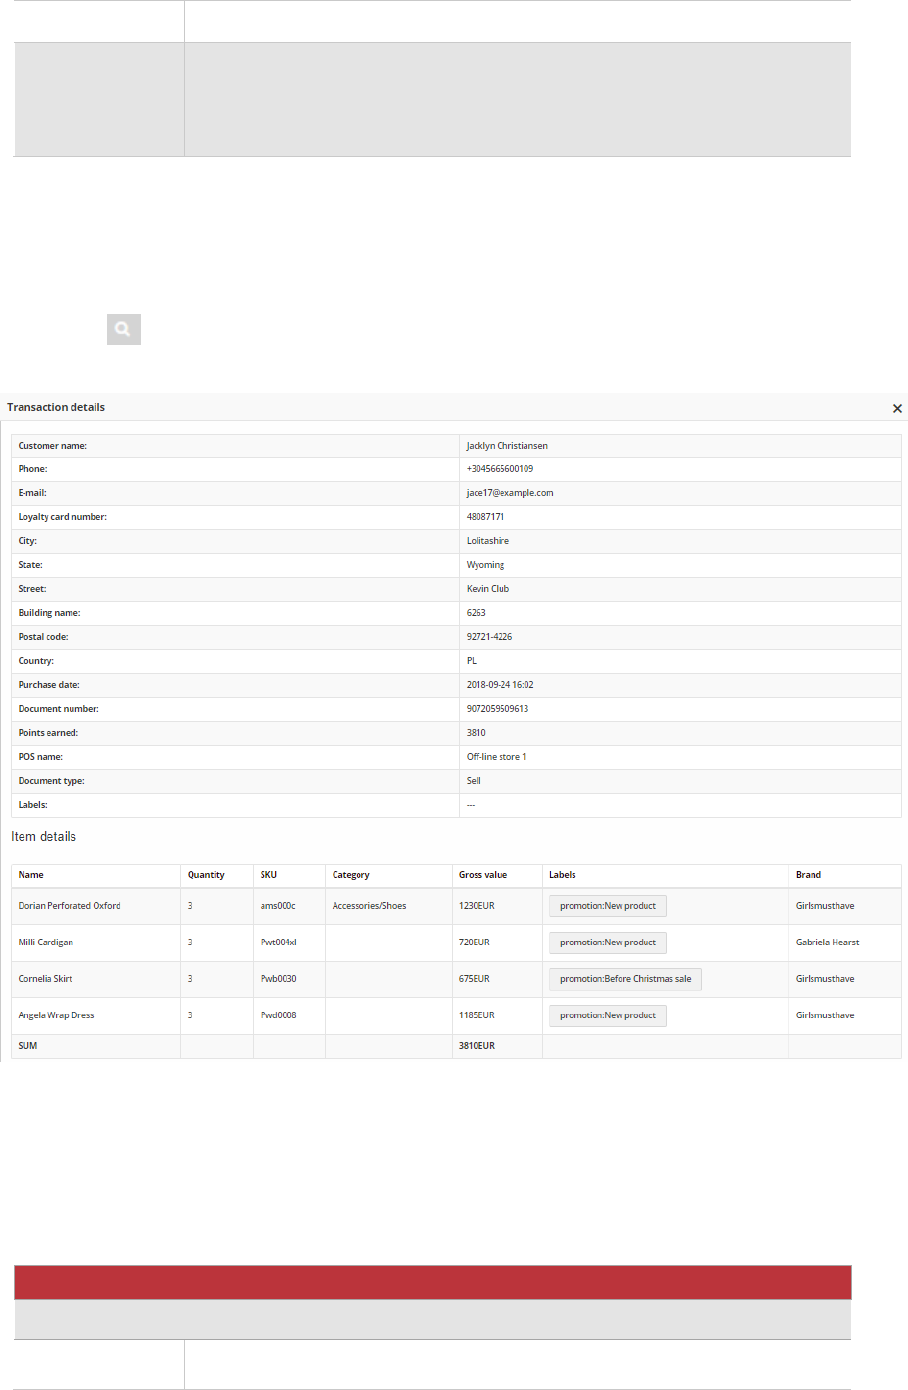
116
Amount
The amount of the transaction
Actions
The operations that can be applied to selected transaction record. Options
include:
• View transaction details
• Add/Edit transaction labels
Transaction details
Click View ( ) icon in the Action column to open the transaction details – customer detail
information and purchased items.
Transaction Record Preview
Field description
FIELD
DESCRIPTION
TRANSACTION DETAILS
Customer
name
First and last name of customer related to the transaction
117
Phone
Phone number of customer related to the transaction
Email
Email address of customer related to the transaction
Loyalty card
number
Number of customer loyalty card related to the transaction If transaction is
linked with customer account
City
The city where the customer resides at this address
State
The state or province of the customer at this address
Street
The street address of the customer
Building
name
The name/number of a building or property where the customer resides at
this address
Postal code
The postal code of the customer at this address
Country
The country where customer resides at this address
Purchase
date
Valid date of transaction
Document
number
Unique transaction ID from your store internal system (e.g. e-commerce)
Points
earned
How many points Customer earned/lose for this transaction (order).
Transaction with the type "Sell" adds points, and "Return" subtracts
POS name
POS where transaction was made
Document
type
Transaction type:
• Sell – customer buy products
• Return – customer return bought products
Labels
Assign transaction labels
ITEM DETAILS
Name
Bought product name
Quantity
Bought product quantity
SKU
Bought product SKU
Category
Bought product category
Gross value
Gross value of bought product
Labels
Bought product label, if assigned
Brand
Bought product brand, if assigned
SUM
Total amount of bought products within one transaction
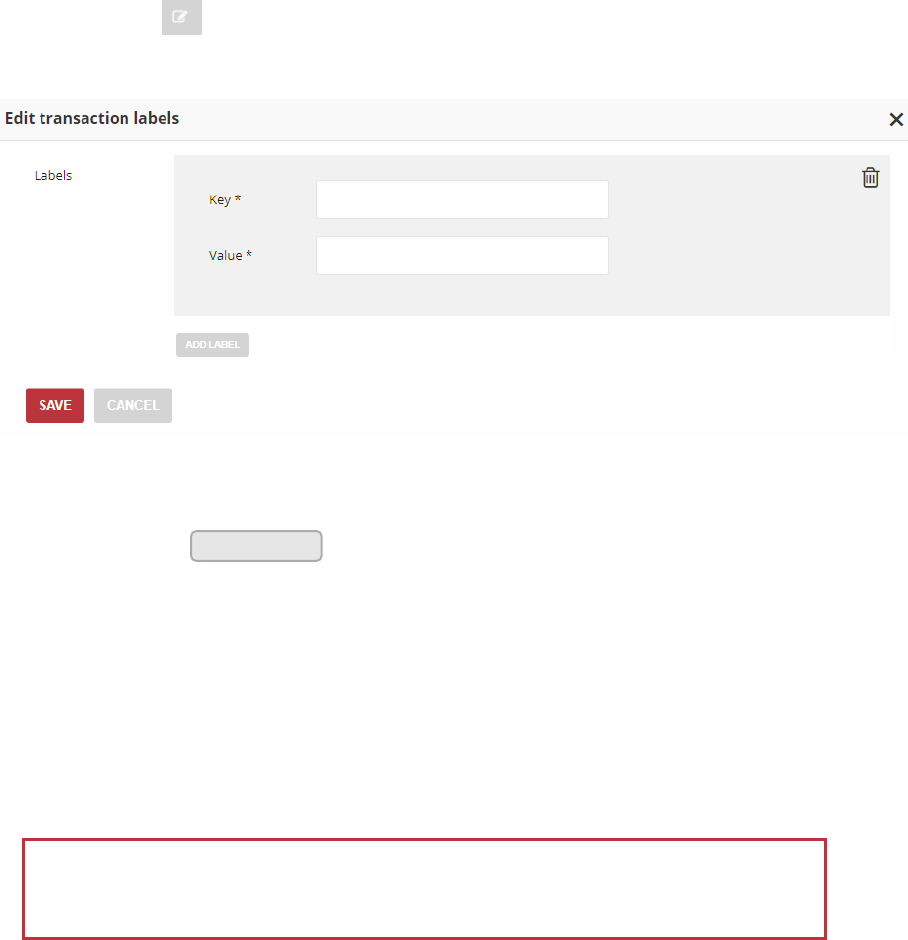
118
Transaction labels
As an administrator you can add a label refer to transaction during creation or after
creating a transaction in the system. Transaction labels are intended to be used only for
the informational purpose. Transaction doesn’t have to be matched with customer to add a
label.
Customer from Client cockpit can also add or edit transaction labels but only this related
with transaction matched with him. In that case administrator need to match transaction
with a customer from Admin panel.
Click Edit labels ( ) icon in the Action column to open the transaction labels editor.
Transaction labels editor
To create Label, tap and do the following:
• Type label Key, which is a label name
• Type label Value
For example: Key – Special event, Value – Birthday
Repeat the process for all labels you want to use in your Loyalty Program
Labels can be added to during transaction creation and subsequently added and
modified at any time
Add Label
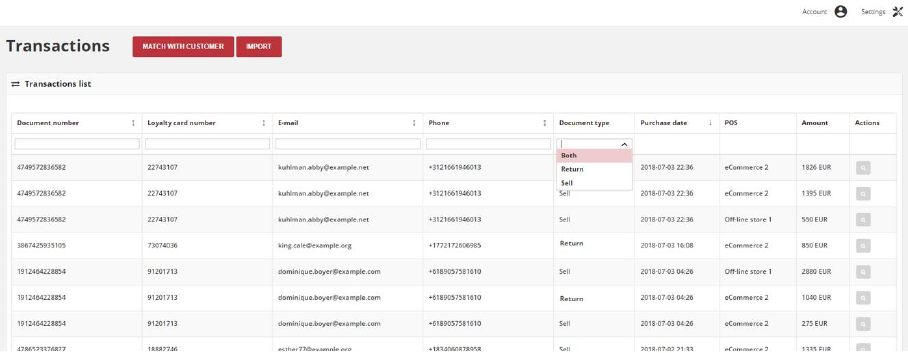
119
Returns
If for any reason the customer returns the purchased products and claims a refund a
Return transaction is created. Customer can request a return from both, online and offline
stores and both, partial or full refund. Typically, customer contacts the merchant to request
a refund. If merchant authorize the return and agree for refund, a unique document
number of related sell transaction is required to identify the returned products and sell
transaction, that caused the points earned.
The All transactions menu lists all – return and sell transactions. To see only returns, you
have to filter the list.
To display Return transactions:
1. On the Admin sidebar, tap Transactions. Then, choose All transactions.
2. In the field under Document type column header, click on the arrow.
3. To see only returns, choose Return from dropdown list
Return and Sell Transactions Filter
When Returns are enable (see Configuration section), if the customer made a Return, in
addition to subtracting the transaction value from the total value of transactions assigned
to Customer, the number of earned points assigned to a given sell transaction is also
reversed.
The reversed points will be listed in All points transfers menu with Type spending.
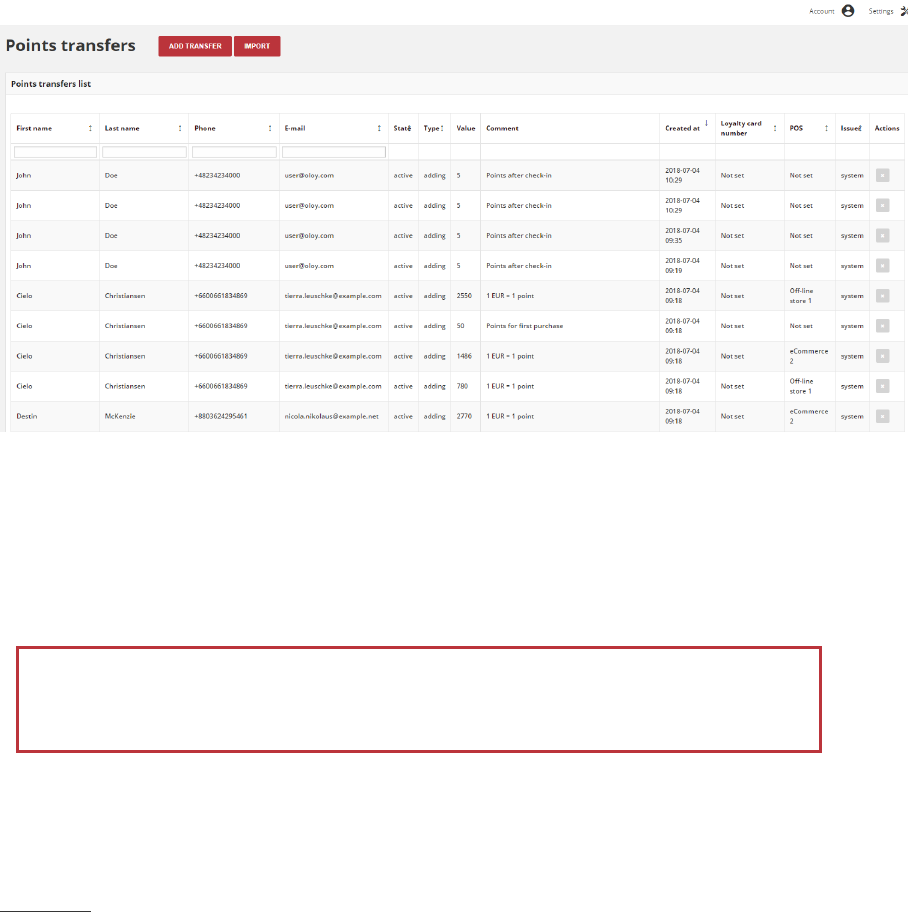
120
Points Transfer as a Result of Return Transaction
After the return, points are subtracted from the pool of Active points, according to the
number of points earned within sell transaction and in proportion to the amount of
transaction.
For better understanding please see Example below
Example:
Your customer transaction value is 40 € and include following products:
• Product A – 10 €
• Product B – 10 €
• Product C – 20 €
For following transactions and purchase of these products your customer has earned the value
of points as below:
• Product A – 10 points (for bought specific products)
• Product B – 20 points (for bought specific product)
• Product C – 0 points
• 40 points for total transaction value (1€ spend = 1 point earned)
Points are not reversed according to points earned for bought specific products but in
proportion to the all transaction amount (including all bought products)

121
So in total customer spent 40 € and earned 70 points. Points were added to his Active points
pool, and transaction value to total amount of his registered transaction value (CLV attribute).
For some reason, he decided to return Product C, which cost 20 €, which is a half of the total
transaction value.
And exactly in the same proportion will be calculated the value of points that will be subtracted.
For this transaction he earned 70 points, so half of them – 35 points will be subtracted from the
Active points pool.
Note, that the transaction value also affects to the Levels and Segments, which criteria are
based on this value. Customer can return to previous level or not be included in a given
segment when transaction, which caused this promotion, will be returned.
For more information please see Levels and Segments chapters.
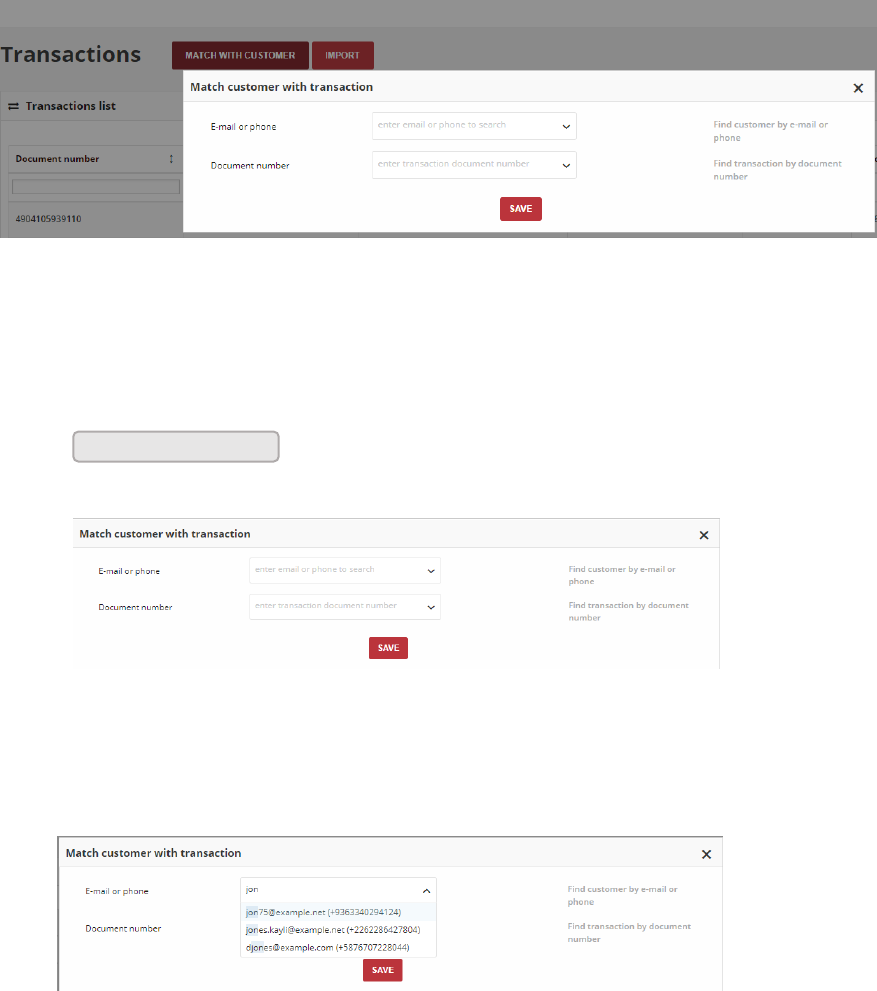
122
Match transaction with customer
Usually, transaction come from your store system with information about customer related
with. However, you can link transaction with Customer Account directly from the Admin in
Open Loyalty, which is useful when you send to Open Loyalty only transactions.
Depending on Matching transaction with customer identification factors priority (set up in
Configuration) customer email, phone number or/and loyalty card number can be used. To
remain about identification factors please see Configuration
Match Customer Account with Transaction
To match transaction with customer:
1. On the Admin sidebar, tap Transactions. Then, choose All transactions.
2. Tap at the top of the page. Then, do the following:
Matching Transaction
a. Enter E-mail or phone to find customer, which you want to associate with the
transaction
Matching Customer List
Match with customer

123
b. Enter transaction Document number (transaction ID), which you want to associate
with the customer
c. In the both fields:
• To find a close match, enter few letters/signs of what you want to find
• To find an exact match, enter the exact word/number you want to find.
3. When complete, tap
Save

124
Import transactions
If you have a transaction that you want to add within your Loyalty Program, you can enter it
into a transactions XML file and then import it in your Open Loyalty Admin.
Import Transactions
Importing a XML file will create a transactions for each record in the file.
To import a transaction from a file:
1. On the Admin sidebar, tap Transactions. Then, choose All transactions
2. Click at the top of the page, next to
Transactions Import Button
3. In the Import transactions dialog, click , and then choose your customer XML
file.
Import Transactions
4. When file selected, click
The transactions records which you've added to the XML file will appear in the All
transactions list in your Open Loyalty admin
Import
Match with customer
Upload
Import

125
XML file structure
Example of Transaction XML file structure below:
<?xml version="1.0" encoding="UTF-8"?>
<transactions>
<transaction>
<documentNumber>R123/11</documentNumber>
<purchasePlace>Wroclaw</purchasePlace>
<purchaseDate>2018-08-15T15:52:01+00:00</purchaseDate>
<documentType>sell</documentType>
<posId>00000000-0000-474c-1111-b0dd880c07e2</posId>
<posIdentifier>pos1</posIdentifier>
<customer>
<name>John Doe</name>
<email> jdoe@example.com</email>
<nip>123-12-22-123</nip>
<phone>48231231232</phone>
<loyaltyCardNumber>12982332</loyaltyCardNumber>
<address>
<street> Main road</street>
TIPS
1. If you don’t have or don’t want to import all this data, remove all code
line/section instead leave it blank.
For example, if you don’t want to include posID remove all line from the
code. Don’t leave it with no value as below:
<posId>00000000-0000-474c-1111-b0dd880c07e2</posId> OK
<posId> </posId> WRONG
Remember that some of them are required, so if you remove it
Import will not be possible.
2. If you don’t know POS ID you can include only POS Identifier. POS
Identifier is provided during POS creation and accessible from POS list.

126
<address1>123</address1>
<city>Wroclaw</city>
<country>PL</country>
<province>Dolnoslaskie</province>
<postal>45-123</postal>
</address>
</customer>
<items>
<item>
<sku>
<code>SKU1</code>
</sku>
<name>Item 1</name>
<quantity>1</quantity>
<grossValue>100</grossValue>
<category>category1</category>
<maker>maker</maker>
<labels>
<label>
<key>key1</key>
<value>value1</value>
</label>
</labels>
</item>
<item>
<sku>
<code>SKU2</code>
</sku>
<name>Item 2</name>
<quantity>3</quantity>
<grossValue>300</grossValue>
<category>category2</category>

127
<maker>maker</maker>
<labels>
<label>
<key>key3</key>
<value>value3</value>
</label>
</labels>
</item>
</items>
</transaction>
128
EARNING RULES
This section of the guide provides an overview of the ways for customers to earn points –
the engine of your Loyalty Program. You’ll learn how to create and manage Earning Rule to
accomplish many things, from rewarding high-value customers, to stopping points earning
all together.
EARNING RULES MENU
All earning rules
CREATING EARNING RULE
Updating Earning rules
Activate/deactivate earning rule
EARNING RULES TYPES
Transactional rules
Set Earning Rule as the last one
General spending rule
Multiply earned points
Multiply earned points by product labels
Instant reward
Product purchase
Non-transactional rules
Custom event rule
Customer Referral
Event rule
Geolocation
QRcode
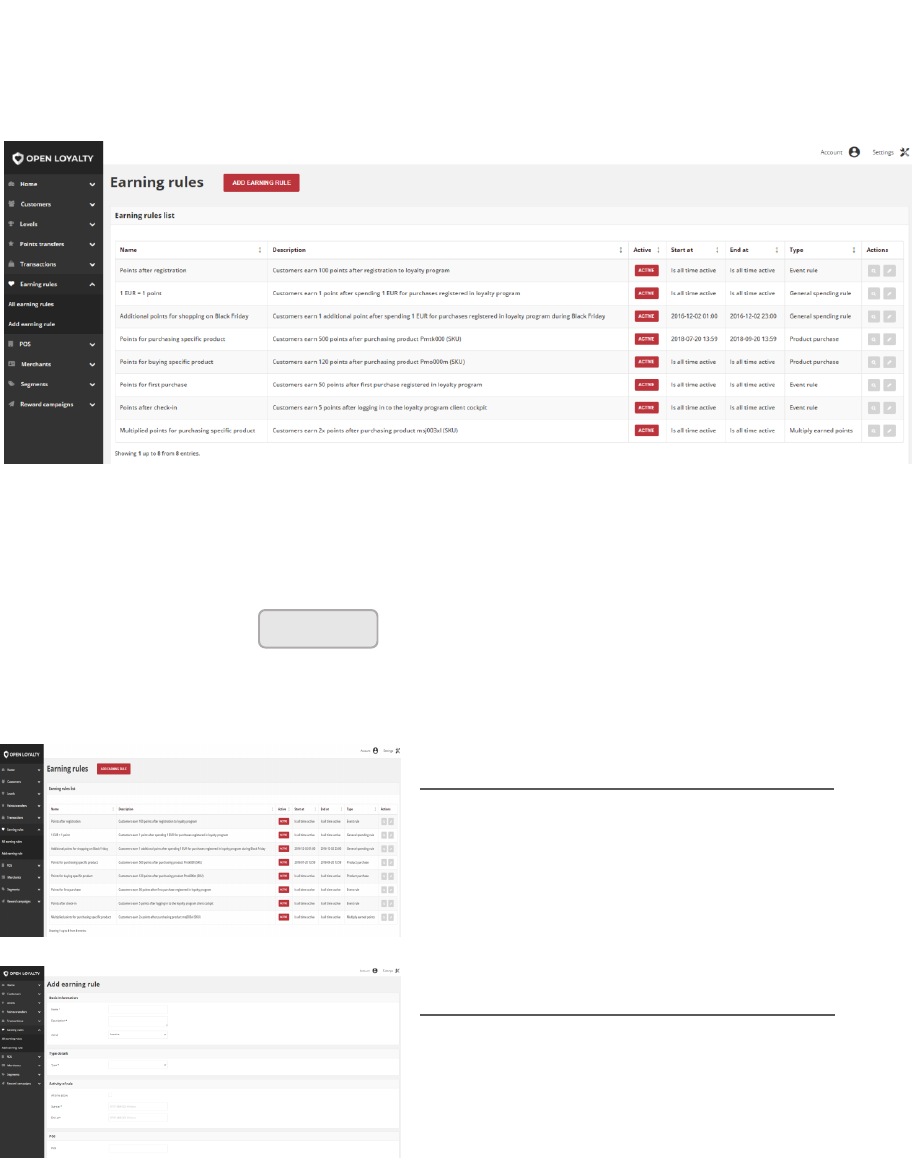
129
CHAPTER 11:
EARNING RULES MENU
Earning define ways and conditions for customers to earn points.
Points can be awarded for a wide range of transaction and customer activities, and the
configuration can be set to control the point allotment, balance, and expiration.
You can add point multipliers, eligibility criteria and even exclude certain products or
customers.
Customers can redeem points toward rewards, based on the condition (points cost) that
you establish.
Earning Rules
To display the Earning rules menu:
On the Admin sidebar, tap , then choose All earning rules.
Menu options
All earning rules
Lists all Earning Rules within your loyalty
program with additional information
regarding it’s activity, conditions and
general information.
Add earning rule
Lists all data that need to be filled out to
add new earning rule
Earning rules
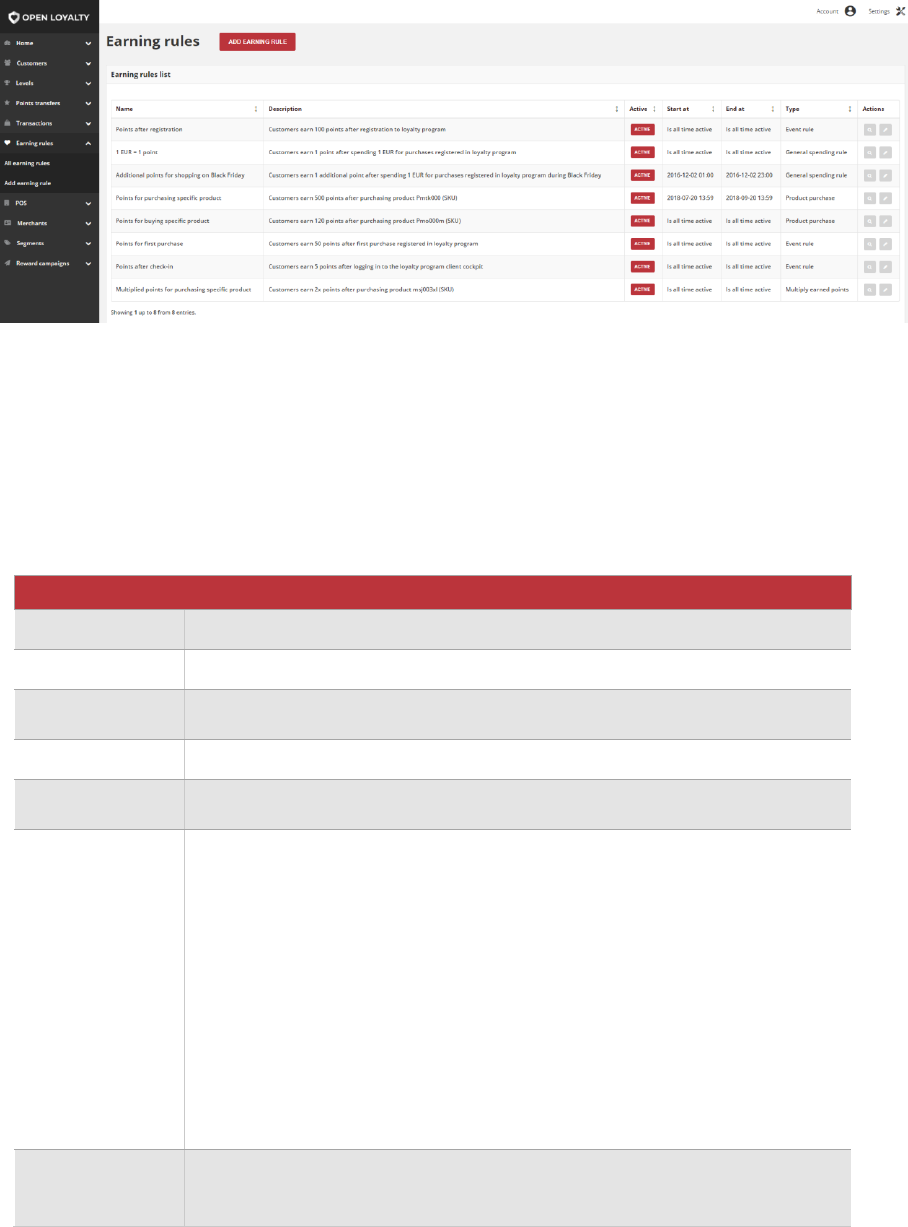
130
All earning rules
The All earning rules grid provide information about type and activity of all Earning Rules
within Loyalty Program. Moreover, list contains brief description about each one and allows
to preview and modify rule detail.
Earning Rules List
Use the standard controls to sort the list and apply action (preview and modify) to selected
rule records. Pagination controls appear if there are more rule records than fit on the page,
and are used to move from one page to the next.
Field description
FIELD
DESCRIPTION
Name
Name of the rule displayed in views
Description
Brief description of rule
Active
Rule current status. Option include: Active/Inactive.
Only Active rules are using for calculating earned points
Start at
Start date from which rule is active and can be used to calculate points
End at
End date until rule is active. After that date rule become inactive and can’t be
used to calculate points.
Type
Rule type. Option include:
• Custom event rule
• Customer referral
• Event rule
• General spending rule
• Geolocation
• Instant reward
• Multiple earned points
• Multiply earned points by product labels
• Product purchase
• QRCode
To learn more about the rule types, please see Rule Types
Actions
The operations that can be applied to selected rule. Options include:
• Edit rule data
• View rule details information
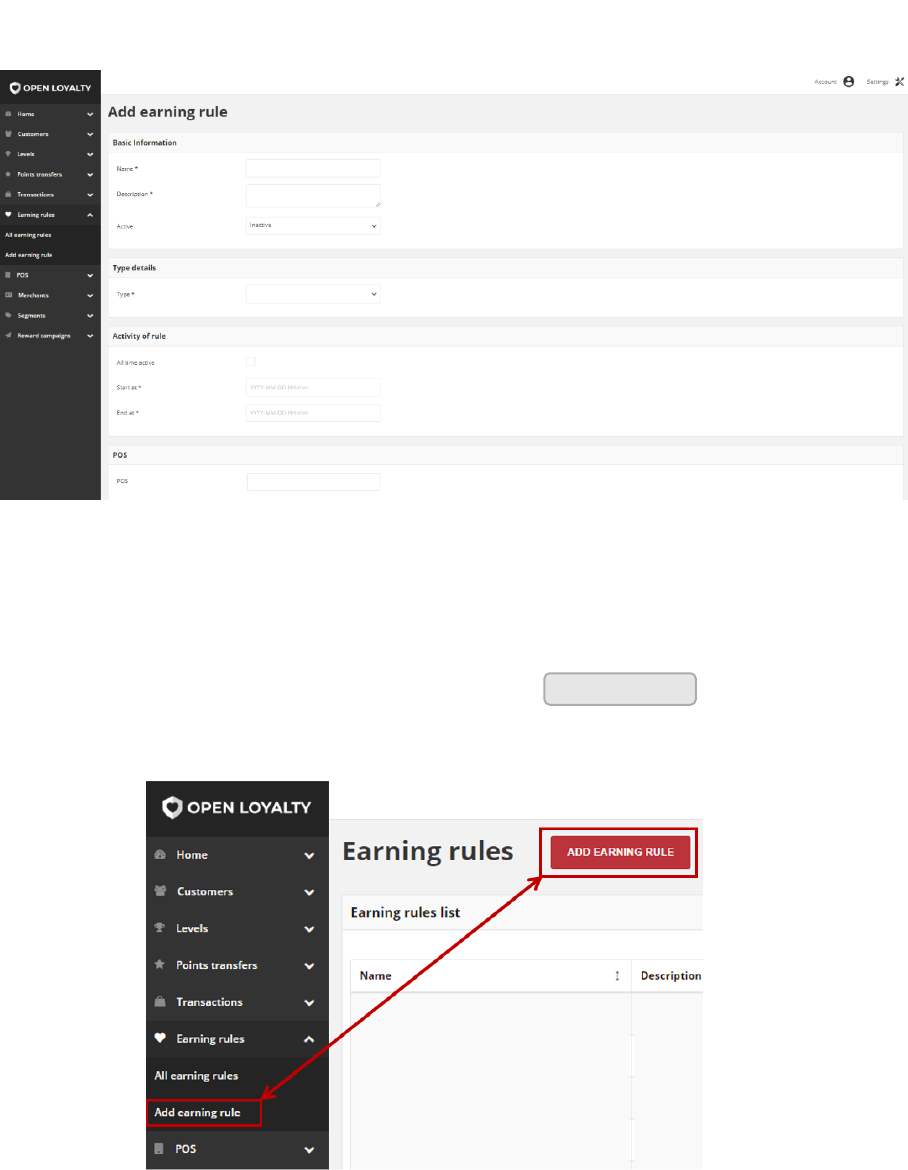
131
CHAPTER 12:
CREATING EARNING RULE
You can create unlimited amount customizable ways for customers to earn points within
Loyalty Program based on various conditions.
Add Earning Rule
To add new Earning Rule:
1. On the Admin sidebar, tap Earning rules. Then, choose Add earning rule. You can also
add rule directly from All earning rules list by clicking at the top of
the page
Add Rule Options
Add earning rule
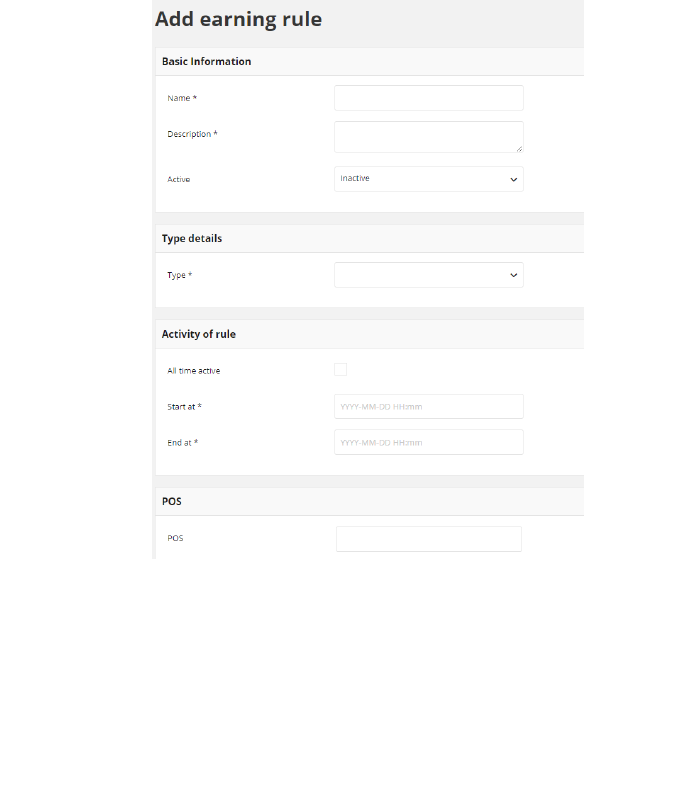
132
Add Earning Rule Form
2. In Basic informations section, do the following:
a. Enter Name of the rule that will be displayed in views
b. Provide a brief Description of the rule that explains how to award points and
information when the rule is active (thereby using to points calculation)
c. To activate the rule, in Active field select “Active” from the dropdown list
3. In Type details section set rule type. Note, that once selected type can not be changed.
See Rule types to learn more about Earning rules types.
4. In Activity of rule section specify time boundaries when rule will be active
• If you want the rule to be active all the time mark All time active checkbox
• If you want the rule to be limited in time in Start at and End at fields specify dates
between rule will be active
5. In POS section, as an option you can assign an Earning rule to the existing POS. When a
transaction comes from a specific POS, only earning rules assigned to this POS will be
used to calculate points.
To do this, click POS field and choose store to which rule will be applied.
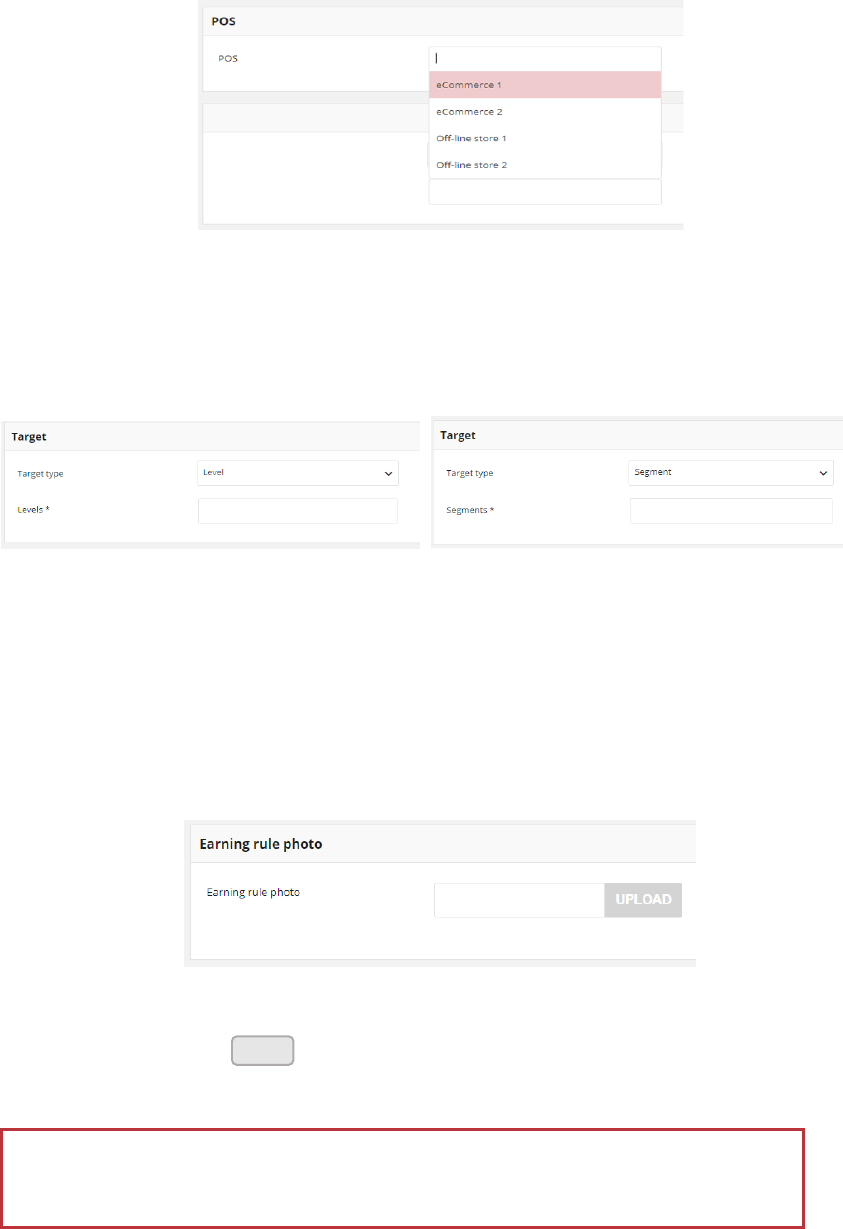
133
Earning rule assignment to POS
6. In Target section specify group of customers for which rule will be used. For example,
Gold members will get 2 times more points than Bronze
Earning rule target option
a. In Target type choose from dropdown list Level or Segment to specify whether the
rule will be active for customers assigned to particular level or segment.
b. Depending on the Target type field Segments to specify segments or Levels to
specify levels appear. You can choose one or more levels/segments to used.
7. If applicable, in Earning rule photo section upload image for Earning rule
Earning rule photo option
8. When complete, tap
Image size is limited to 2MB. Image dimensions could not be smaller than 600 x 600
px. Allowed file formats: png, gif, jpg.
Save
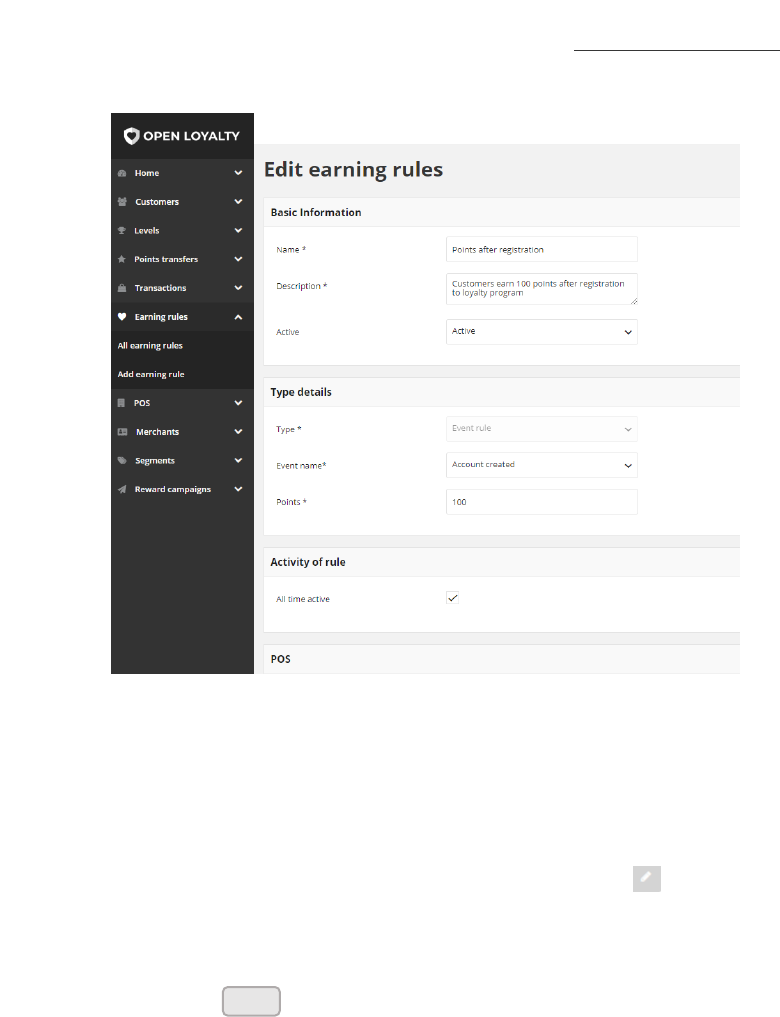
134
Updating Earning rules
You can edit information regarding earning rule used within your Loyalty Program,
including all their data provided during rule creation process, except the rule type.
Earning Rule editing
To edit an Earning Rule:
1. On the Admin sidebar, tap Earning rules. Then, choose All earning rules.
2. In the Earning Rules list,, find the rule to be edited and click Edit ( ) icon in the Action
column to open the rule in edit mode.
3. Make any necessary changes to the rule.
4. When complete, tap
Save
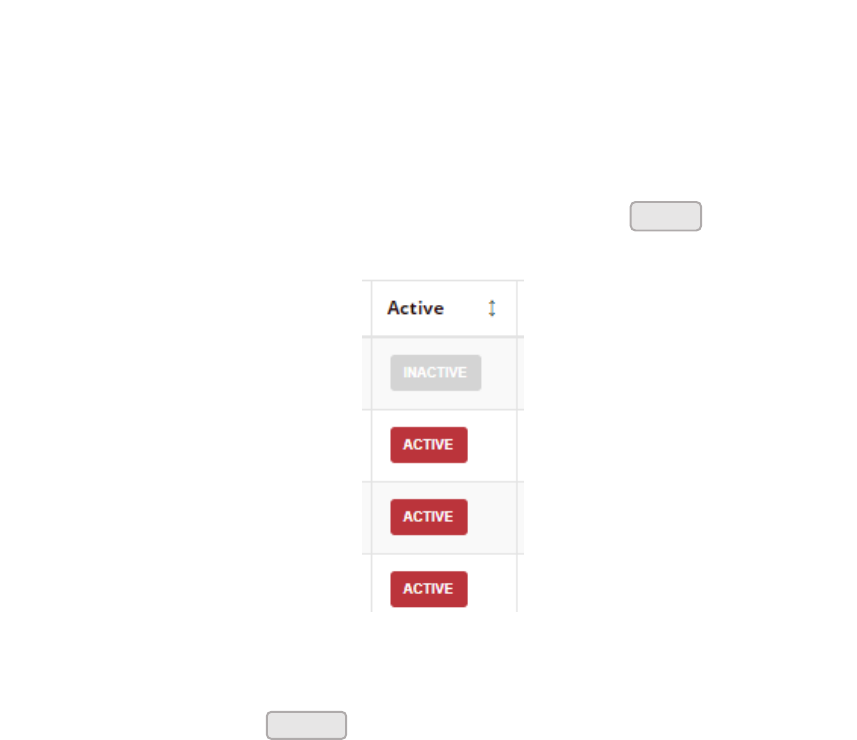
135
Activate/deactivate earning rule
Any rule from the list can be activated and deactivated by Admin user.
To activate/deactivate rule:
1. On the Admin sidebar, tap Earning Rules. Then, choose All earning rules. You can also
deactivate/activate the rule from Edit mode
2. In the Earning rules list, find the rule to be deactivated and click in the Active
column. The button in the column change to Inactive and appear as a grey-out.
Active Column
When you deactivate rule, customers’ will not earned points based on this rule terms.
3. To activate the rule click in the Active column. The button in the column
change to Active and appears as a red.
Active
Inactive
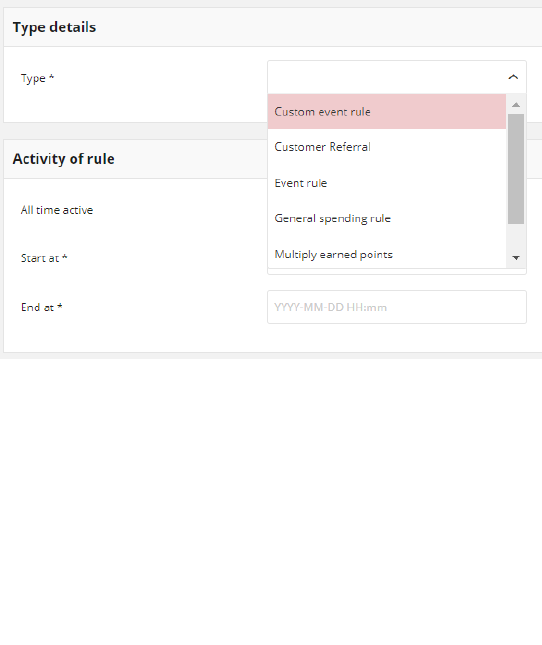
136
CHAPTER 13:
EARNING RULES TYPES
In general, Earning rules can be divided into two types:
• Transactional rules – related to transactions made by customer e.g. transaction
total amount, purchased products etc.
• Non-transactional rules – related to other customer data and his activity within
loyalty program e.g. refer a friend, his friend registration/purchases, newsletter
subscription, first purchase, account created etc.
During creation of rule you must specify its type, describing conditions for awarding points.
Every rule type has its own required fields (conditions) that must be filled.
Rule Types
Transactional rules
Open Loyalty offer following standard types:
a. General spending rule - Customer could receive points for order value
b. Multiple earned points - Customer could receive multiple points for product with
specified SKU
c. Multiply earned points by product labels – Customer could receive multiple points for
product with specified labels
d. Instant reward – Customer could receive any reward campaign for his transaction
registered within Loyalty Program
e. Product purchase - Customer could receive given amount of points for specified
product
137
The sequence of points calculation is as following:
• Firstly, if applicable, customer receives points from General spending rule
• Secondly, if applicable, points are multiply based on Multiply earned points rule,
and based on labels multipliers from Multiply earned points by product labels.
Also reward is assigned from Instant reward rule.
• Finally, if applicable, customer receives points from Product purchase rule
Set Earning Rule as the last one
If there are more than one Earning Rule to be applied and one of them has a flag "stoppa-
ble", then this rule will be applied and stops any further rules according to sequence listed
above.
When customer registers a transaction, Open Loyalty checks for Earning Rules that can be
applied. Then Open Loyalty starts executing each Earning Rule. When executed Earning
Rule has a flag “stoppable” it should be the last Earning Rule executed for that transaction
which means any next Earning Rules should be skipped.
Note
Rule from the 2nd step of sequence:
• Multiply earned points,
• Multiply earned points by product labels and
• Instant reward
have the same priority. It means, that to points calculation by default only one of them, the most
“current” rule is used. In that case, “current” means edited as the last one.
138
Exceptional case
By default only one of rule from second step, the most “current” rule (edited as the last one)
is used.
But, if you add a “stoppable” flag to one of them and before points calculation you
will also edited any of Multiply points rules or Instant reward (name, description, ac-
tivity etc.), Open Loyalty recognize the edited one as the most “current” and use it be-
fore the rule with stoppable flag. The behavior is also related with more than one
this rule type.
In this exceptional case, the sequence of points calculation can be as follow:
1. If applicable, General spending rule
2. Multiply earned points – rule edited today, the most “current”
3. Multiply earned points by product labels – rule edited today, but before Multiply
earned points rule edition
4. 2nd Instant reward – rule edited yesterday
5. 1st Instant reward - rule with stoppable flag added day before yesterday
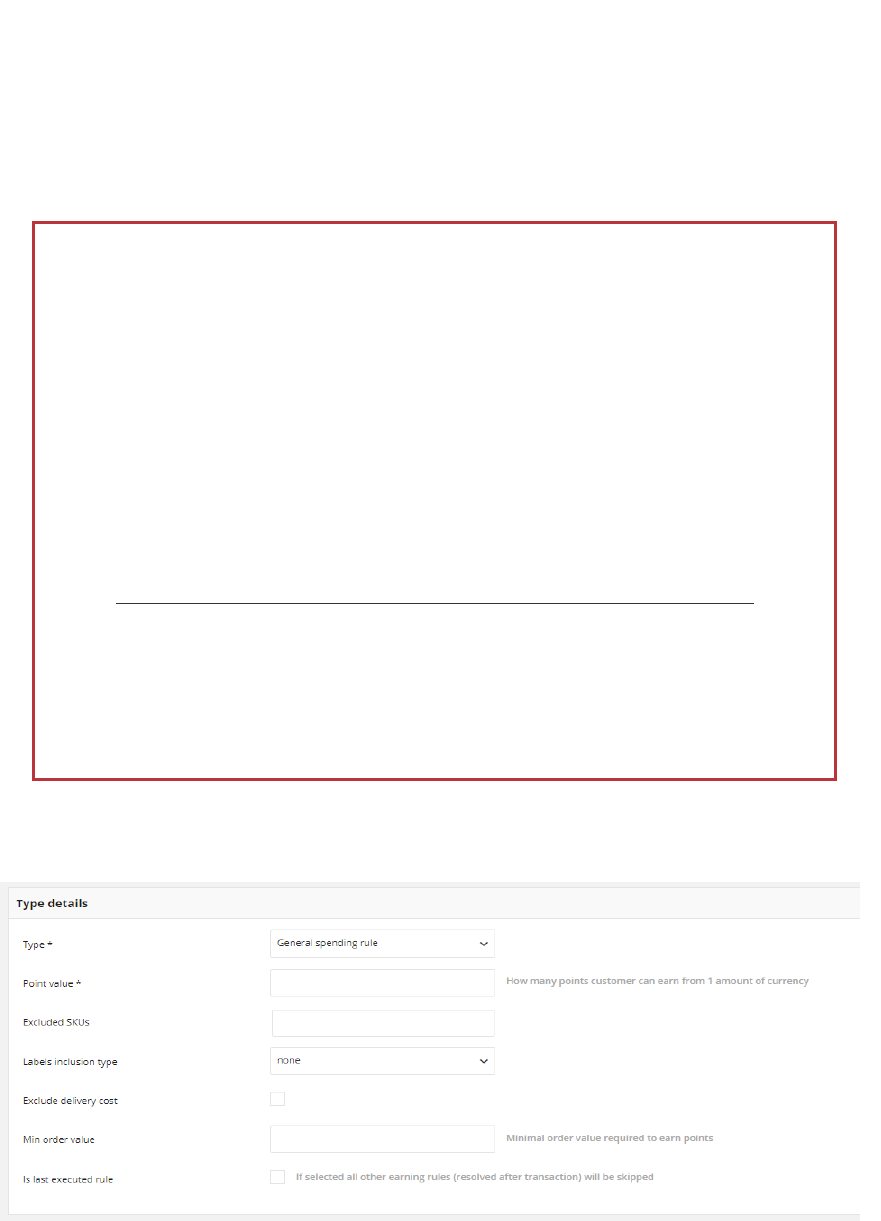
139
General spending rule
Reward customer with defined amount of points for his order value. Allows to specify how
many points customer can earn from 1 amount of currency. If needed, you can exclude
certain products (with define SKUs or labels) and delivery costs from the points calculation.
If you marked Is last executed rule checkbox, then you add a “stoppable” flag to this rule. It
means, that if more than this transactional rule can be applied, any next transactional
Earning Rules will be skipped (other general spending rules, multiply points rules, product
purchase rule).
General Spending Rule
Exceptional case
What if there are only general spending rules to be used and there are more than one?
All General spending rules have the same priority. It means, that to points calculation the
most “current” rule is used. In that case, “current” means edited as the last one.
So, if you add a “stoppable” flag to 1st rule and before points calculation you will also edited
2nd and 3rd (name, description, activity etc.), Open Loyalty recognize the 2nd and 3rd as the
more “current” and use them before the rule with stoppable flag.
Another words, any edited General spending rule will be used before that one with
“stoppable” flag, if edition was made after you add a flag to the rule.
In this exceptional case, the sequence of points calculation is as follow:
1. 3rd General spending rule - rule edited today, the most “current”
2. 2nd General spending rule - rule edited yesterday, more “current” than the flag
rule
3. 1st General spending rule - rule with stoppable flag added day before yesterday
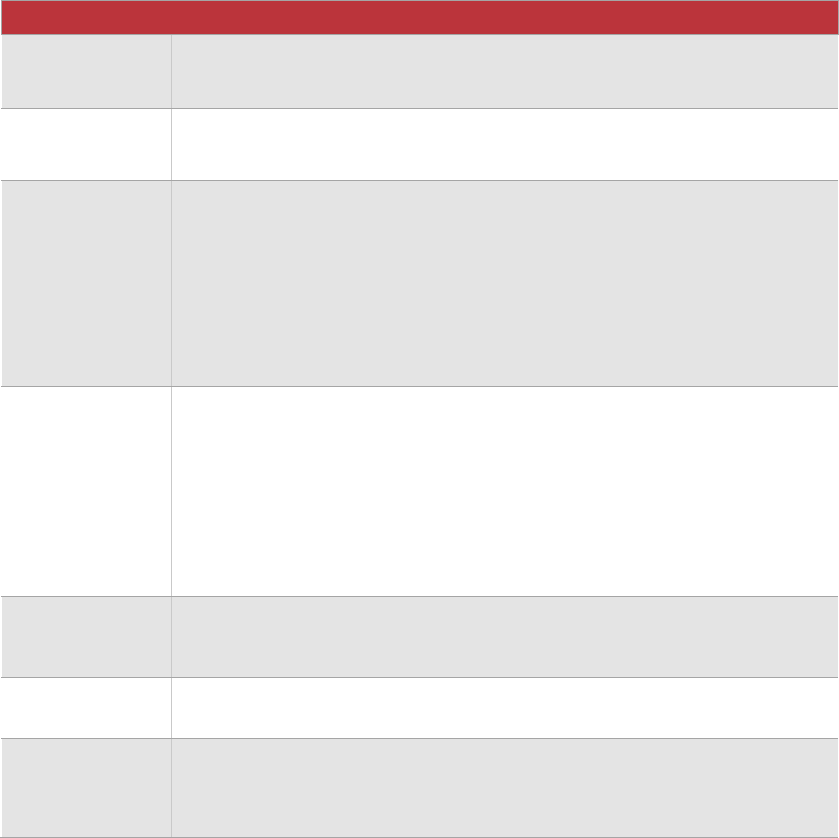
140
Field description
FIELD
DESCRIPTION
Point value
Ratio for calculating earned points based on purchased value. For example,
if ratio is 2 then user get 2 points for every 1$ spent.
Excluded SKUs
Product with selected SKUS will not be included in order value used
for earned points calculation.
Labels inclusion
type
Points can be calculated for the purchase of products with defined labels.
Options include:
• None – product labels are not applicable. Points will be calculated
for all purchased products (except excluded SKUs, if applicable)
• Exclude – points will not be calculated for purchased products with
defined labels
• Include - points will be calculated for purchased products with
defined labels
Has labels /
Excluded labels
Depending on the option chose in Labels inclusion type field, appropriate
field will be display:
• Has labels – when Include is selected in previous step
• Excluded labels – when Exclude is selected in previous step
• When None is selected in previous step, any field is not displayed
Both fields, Has labels and Excluded labels are pair of Key, Value.
Excluded
delivery cost
When selected, then delivery cost will not be included in order value used for
earned points calculation
Min order value
Minimal order value required to earn points. Points will not be calculated for
whole purchase if its value will be not provided below
Is last executed
rule
If selected, all other transactional earning rules will be skipped, according to
sequence.
In that case, only General spending rule will be used.
141
Multiply earned points
Multiple points that customer receive for purchase products with specified SKU. The rule is
related to General spending rule. The rule defines for which purchase products, points
(defined in General spending rule) are to be multiplied.
If you marked Is last executed rule checkbox, then you add a “stoppable” flag to this rule. It
means, that if more than this transactional rule can be applied, next transactional Earning
Rule will be skipped (product purchase, multiply earned points by product labels) and
Multiply earned points rule will be used as the last one (according to the sequence).
Another words, only these rules that occur in the sequence before the Multiply earned
points rule with a flag and the rule itself will be used – in that case, if applicable, General
spending rule, Multiply earned points rules edited after added a flag and rule with a flag
itself.
Exceptional case
When also Multiply earned points by product labels will be used?
Multiply earned points, Multiply earned points by product labels and Instant reward
rules have the same priority. It means, that to points calculation the most “current”
rule is used. In that case, “current” means edited as the last one.
So, if you add a “stoppable” flag to this rule and before points calculation you will also
edited Multiply earned points by product labels (name, description, activity etc.),
Open Loyalty recognize the second one as the most “current” and use it before the
rule with stoppable flag.
In this exceptional case, the sequence of points calculation is as follow:
1. If applicable, General spending rule
2. Multiply earned points by product labels - edited rule, the most “current”
3. Multiply earned points - rule with stoppable flag

142
Multiple earned points
Field description
FIELD
DESCRIPTION
SKU
Rule will be applied only for listed products with selected SKUs
Multiplier
Points gained for purchase product will be multiplied by this factor
Is last executed
rule
If selected, all next transactional earning rules will be skipped, according to
sequence.
In that case, only General spending rule (if applicable) and Multiply earned
points rule will be used.
In exceptional case also Multiply earned points by product labels also can be
used – please see Exceptional case box.
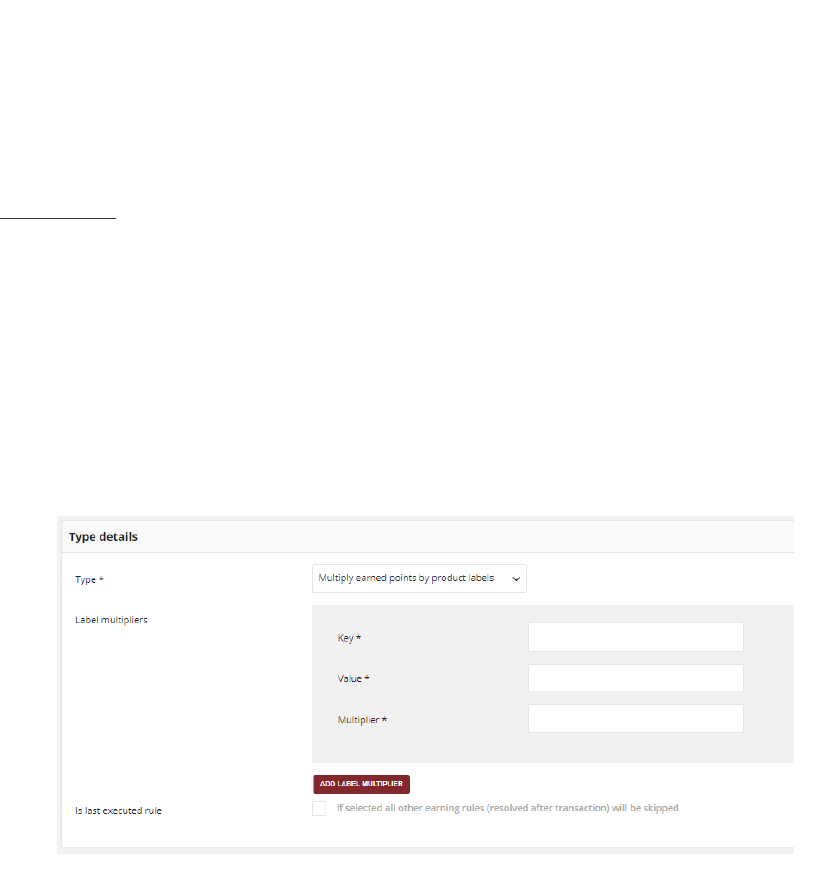
143
Multiply earned points by product labels
Multiple points that customer receive for purchase products with specified labels. The rule
is related to Product purchase, Multiply earned points and General spending rule. The rule
defines for which purchased products, points (defined in rules above) are to be multiplied.
Rule can contains more than one product label. Different Labels are linked with OR
condition - at least one of labels linked with this rule must be true to let customer earn
points. If more than one is true, points are multiply in order by all multipliers.
For example, if you have 2 labels assigned to this rule which are true, points gathered from
purchases are multiply firstly by multiplier assigned to 1st label, and then again multiply by
multiplier assigned to 2nd label.
If you marked Is last executed rule checkbox, then you add a “stoppable” flag to this rule.
The behavior of the flag is the same like in Multiply earned points rule - only these rules
that occur in the sequence before the Multiply earned points by product labels rule with a
flag and the rule itself will be used – in that case, if applicable, General spending rule,
Multiply earned points by product labels rule edited after added a flag and rule with a flag
itself.
Multiply earned points by product labels
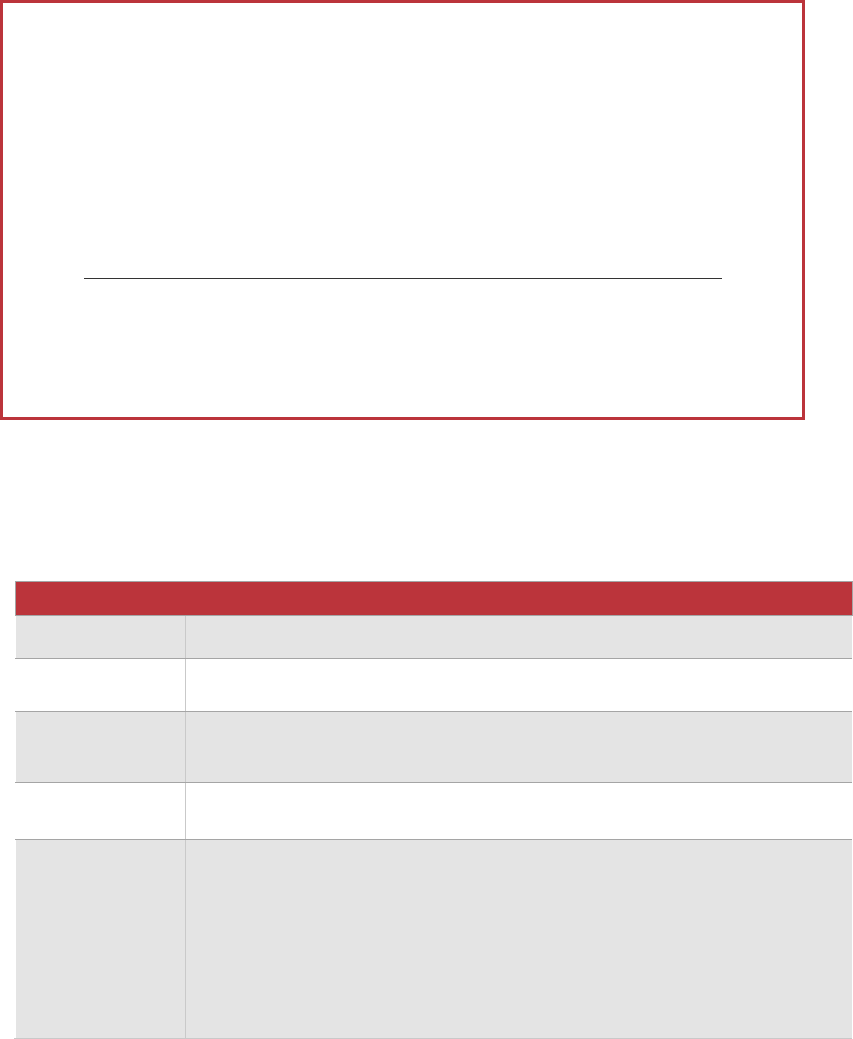
144
Field description
FIELD
DESCRIPTION
Key
Product label name e.g. size, color
Value
Value of product label with specified in previous step Key, e.g. M, red
Multiplier
Points gained for purchases product with label key and value from above will
be multiplied by this factor
Add label
multiplier
Button allowing to add next product label that will be assigned to rule
Is last executed
rule
If selected, all next transactional earning rules will be skipped, according to
sequence.
In that case, only General spending rule (if applicable) and Multiply earned
points by product labels rule will be used.
In exceptional case also Multiply earned points rule also can be used –
please see Exceptional case box.
Exceptional case
When also Multiply earned points will be used?
The same case as was described in Multiply earned points rule exception. If you add a
“stoppable” flag to this rule and before points calculation you will also edited Multi-
ply earned points (name, description, activity etc.), Open Loyalty recognize the sec-
ond one as the most “current” and use it before the rule with stoppable flag.
In this exceptional case, the sequence of points calculation is as follow:
1. If applicable, General spending rule
2. Multiply earned points - edited rule, the most “current”
3. Multiply earned points by product labels - rule with stoppable flag
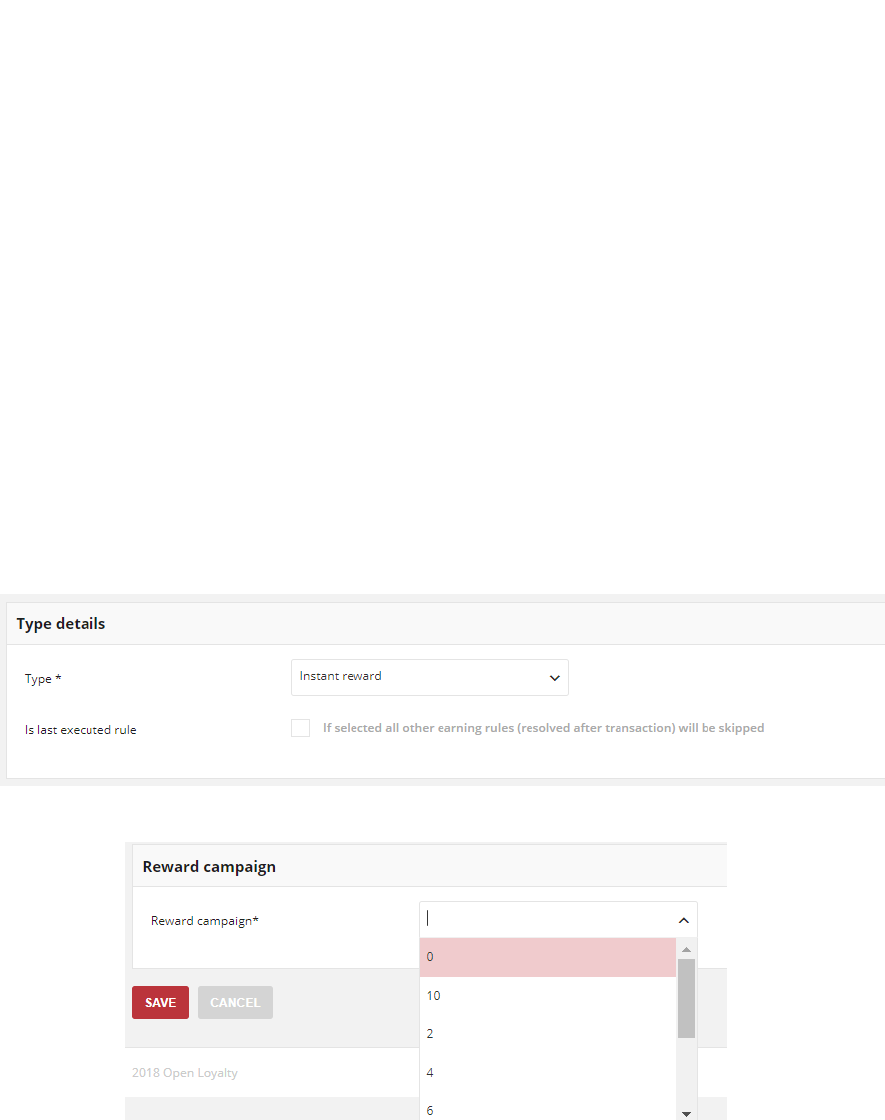
145
Instant reward
Reward customer with defined reward campaign for his order. Rule can be related with any
active Reward campaign, but only one at once.
If you marked Is last executed rule checkbox, then you add a “stoppable” flag to this rule.
The behavior of the flag is the same like in Multiply earned points rule - only these rules
that occur in the sequence before the Instant reward with a flag and the rule itself will be
used – in that case, if applicable, General spending rule, Instant reward rules edited after
added a flag and rule with a flag itself.
Within rule creation, additional section Reward campaign at the bottom of the page
appear. Here you need to select from a dropdown active reward to associate with Instant
reward rule. Selected reward will appear in Customer Redeemed reward instantly after his
transaction will be registered.
Note, that Instant reward rule conditions and associated with it Reward campaign
conditions must be met to let customer receive this reward. Another words, after customer
transaction registered, Open Loyalty verify e.g. if customer has appropriate level/segment,
if transaction date is in defined rule/reward Activity time boundaries etc. If any of
conditions is not met, rule is not used and customer doesn’t receive reward.
Please see Reward campaigns for more information.
Instant reward
Reward campaign section to be associated with Instant reward
146
Field description
FIELD
DESCRIPTION
Is last executed
rule
If selected, all other transactional earning rules will be skipped, according to
sequence.
In that case, only General spending rule (if applicable) and Multiply earned
points by product labels rule will be used
In exceptional case also Multiply earned points rule and Multiply earned
points by product labels rule can be used – please see Exceptional case
box.
Reward
campaign
List of all active reward campaigns to be associated with Instant reward rule.
To learn more about rewards please see Reward campaigns
Exceptional case
When also Multiply earned points rules will be used?
The same case as was described in Multiply earned points rule exception. If you add a
“stoppable” flag to this rule and before points calculation you will also edited Multi-
ply earned points and Multiply earned points by product labels (name, description,
activity etc.), Open Loyalty recognize the edited once as the most “current” and use it
before the rule with stoppable flag.
In this exceptional case, the sequence of points calculation is as follow:
1. If applicable, General spending rule
2. Multiply earned points – rule edited today, the most “current”
3. Multiply earned points by product labels – rule edited today, before Multi-
ply earned points rule edition
4. Instant reward - rule with stoppable flag
147
Product purchase
Reward customer with defined amount of points for purchase specified products. Rule can
be related to Multiply earned points rule.
If you marked Is last executed rule checkbox, then you add a “stoppable” flag to this rule. It
means, that if more than this transactional rule can be applied, next transactional Earning
Rule will be skipped and Product purchase will be used as the last one (according to the
sequence).
Another words, only these rules that occur in the sequence before the Product purchase
rule with a flag and rule itself will be used – in that case, if applicable, General spending
rule, both Multiply earned points rules, Product purchase rules edited after added a flag
and rule with a flag itself.
Exceptional case
What if there are more than one Product purchase rule to be used?
All Product purchase rules have the same priority. It means, that to points calculation the
most “current” rule is used. In that case, “current” means edited as the last one.
So, if you add a “stoppable” flag to 1st rule and before points calculation you will also edited
2nd and 3rd (name, description, activity etc.), Open Loyalty recognize the 2nd and 3rd as the
more “current” and use them before the rule with stoppable flag.
Another words, any edited Product purchase rule will be used before that one with
“stoppable” flag, if edition was made after you add a flag to the rule.
In this exceptional case, the sequence of points calculation is as follow:
1. If applicable, General spending rule
2. If applicable, Multiply earned points rules
3. 3rd Product purchase rule - rule edited today, the most “current”
4. 2nd Product purchase rule - rule edited yesterday, more “current” than the
flag rule
5. 1st Product purchase rule - rule with stoppable flag added day before yes-
terday
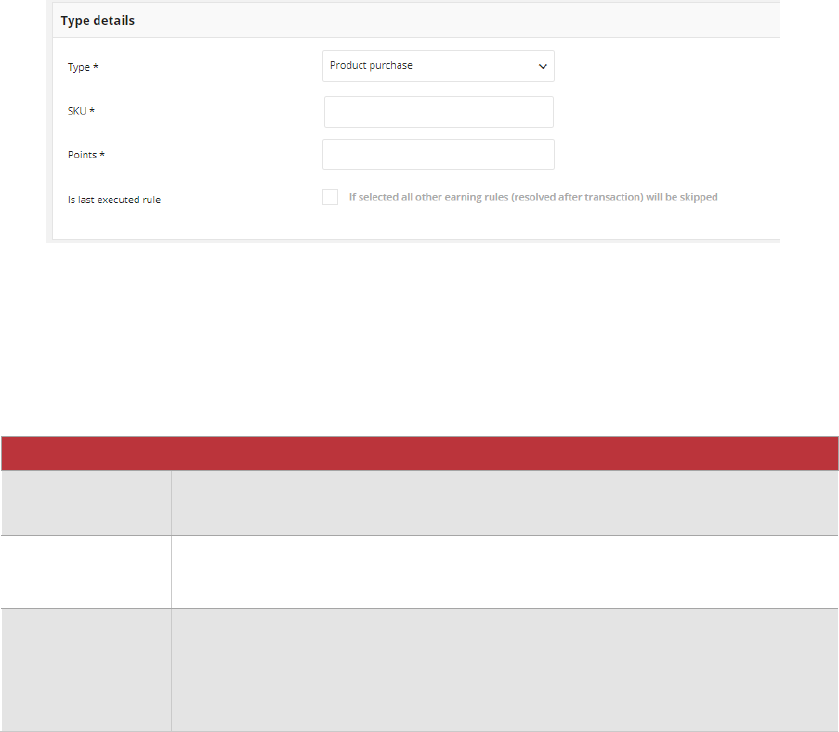
148
Product Purchase
Field description
FIELD
DESCRIPTION
SKU
Rule will be applied only for listed products with selected SKUs
Points
Predefined amount of points will be earned instead of calculation based on
product value
Is last executed
rule
If selected, all other transactional earning rules will be skipped, according to
sequence.
In that case, General spending rule, Multiply earned points, Multiply earned
points by product labels (all if applicable) and Product purchase rule will be
used.
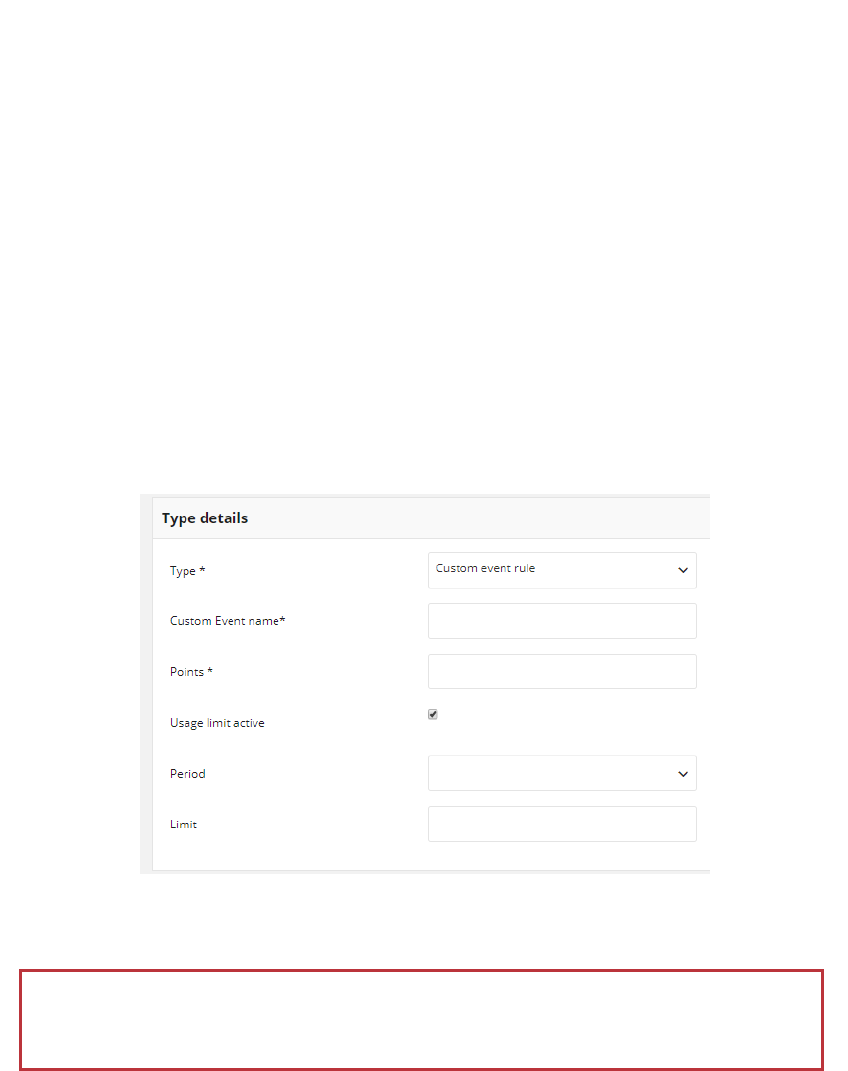
149
Non-transactional rules
Open Loyalty offer following standard types:
a. Custom event rule – Customer could receive points for external actions
b. Customer referral – Referred and/or Referrer customer receive points for his action
c. Event rule - Customer could receive points for specified actions
d. Geolocation – Customer could receive points for his location
e. QRcode – Customer could receive points for scanning define QR codes
Custom event rule
Reward customer with defined amount of points for his action in external system. For
example, share account with Facebook, add review for a product etc. If needed, you can
also add repeatability limit to this rule type.
This Earning rule could be call only with API. Every run of API function will reward Customer
with defined points.
Custom Event Rule
\
If customer used the limit then rule will not be shown on available rules list in
Customer cockpit
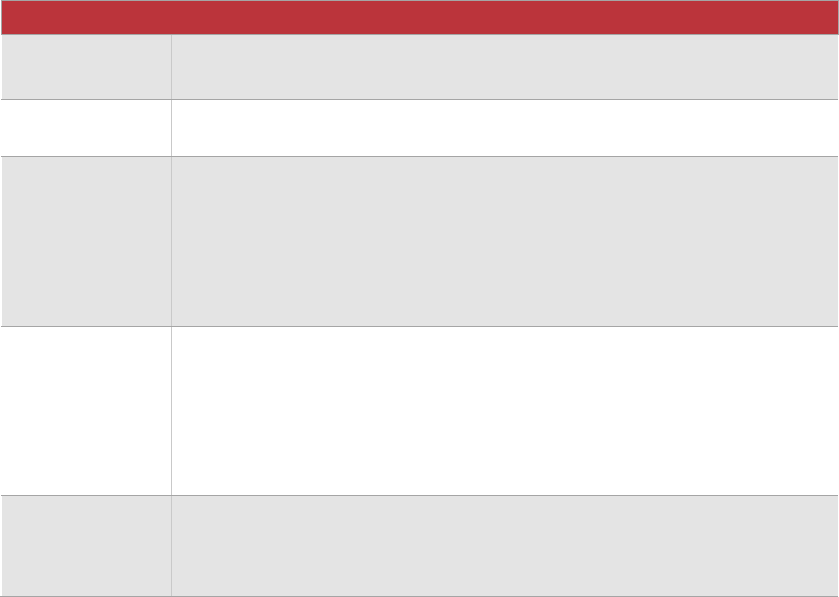
150
Field description
FIELD
DESCRIPTION
Custom Event
name
Name of the rule (to be used with calling API function)
Points
Number of points that will be added after earning rule has been called
Usage limit
active
Option to limit how many times customer could be rewarded for the same
action with the specified period of time.
Option include:
• Yes – mark checkbox to limit repeatability
• No – leave checkbox blank to reward customer for this rule without
limits
Period
Visible and required if Usage limit active is marked.
It defines period of time within customer can be rewarded for this rule.
Option include:
• 1 day
• 1 week
• 1 month
Limit
Visible and required if Usage limit active is marked.
how many times customer could be rewarded for this rule in specified
period of time.
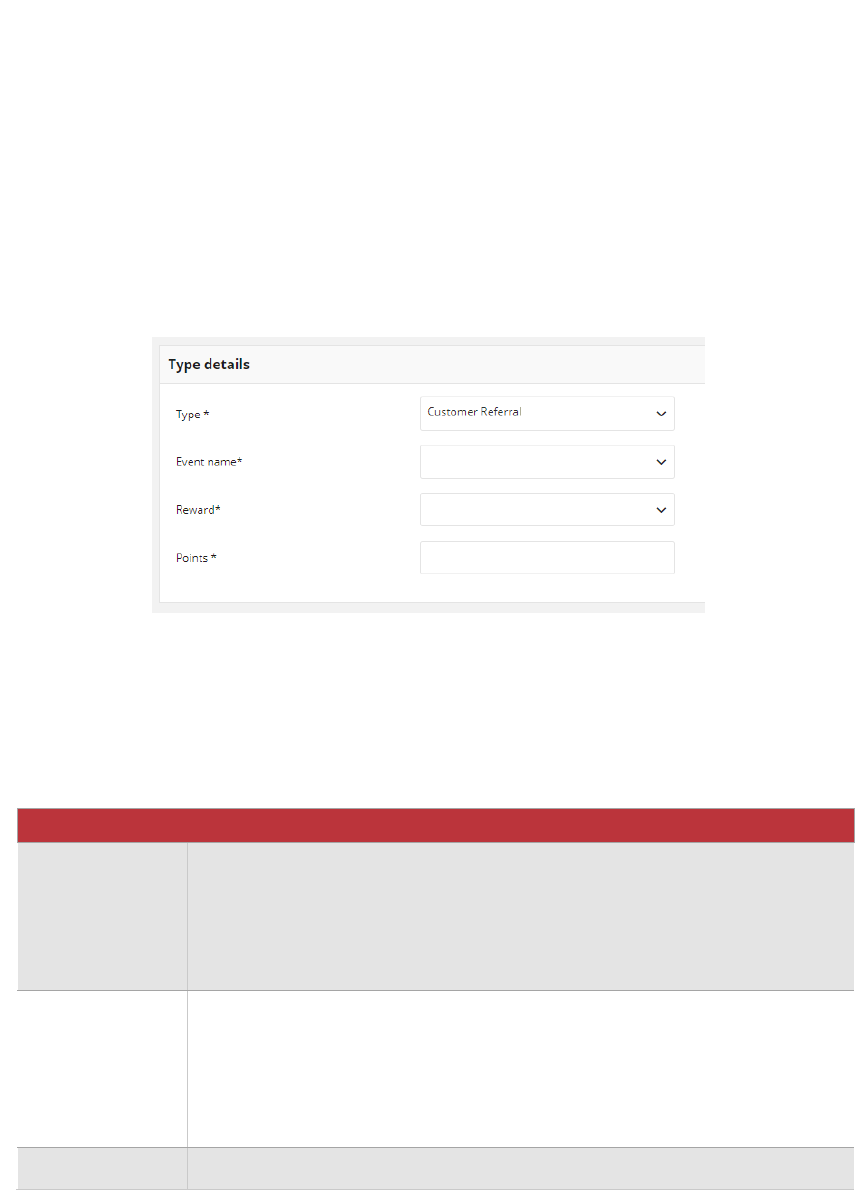
151
Customer Referral
Referral (refer a friend, member get member) functionality allow to reward Customers for
invitation other Customers to Loyalty program. It allow to give prize either referrer (Cus-
tomer who send invitation) and referred person (Customer who respond with action to in-
vitation).
Functionality allow to reward for actions:
• Referred Customer register new account in OL
• Referred Customer make first purchase in OL (first transaction)
• Referred Customer make purchase in OL (every transaction)
Customer Referral Rule
Field description
FIELD
DESCRIPTION
Event name
Select an event for which the customer will receive points.
Options include:
• Every purchase
• First purchase
• Register
Reward
Select who should receive points for this action.
Option include:
• Referred
• Referrer
• Both
Points
Amount of points that will be earned for this event rule
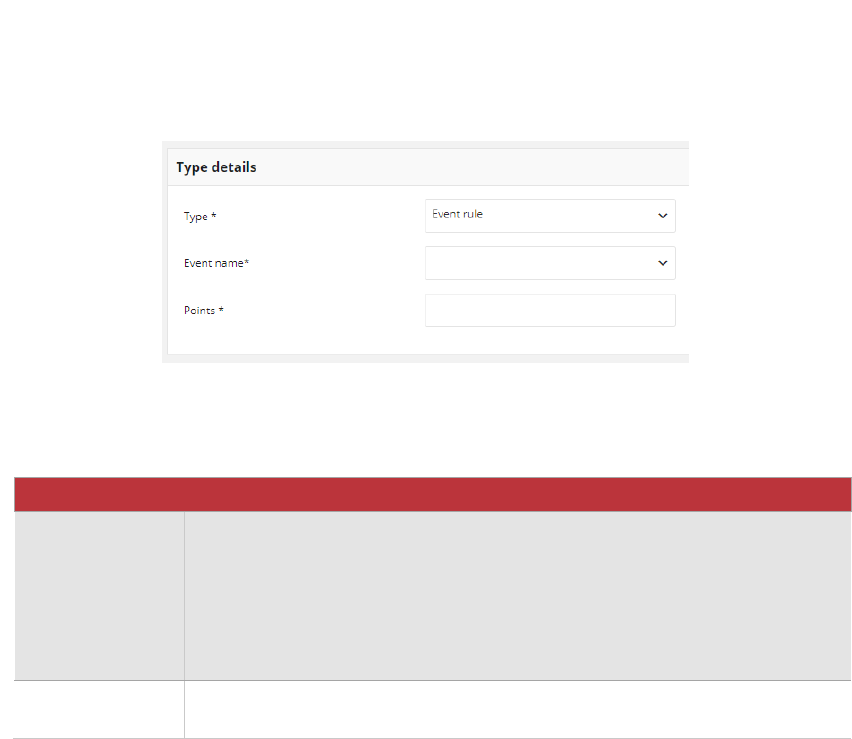
152
Event rule
Reward customer with defined amount of points for his action. Actions for which customer
can get points are predefined in the Open Loyalty and related to events of your loyalty
program. For example, create an account, first purchase etc.
Event Rule
Field description
FIELD
DESCRIPTION
Event name
Select an event for which the customer will receive points.
Options include:
• Account created
• Customer logged in
• First purchase
• Newsletter subscription
Points
Amount of points that will be earned for this event rule
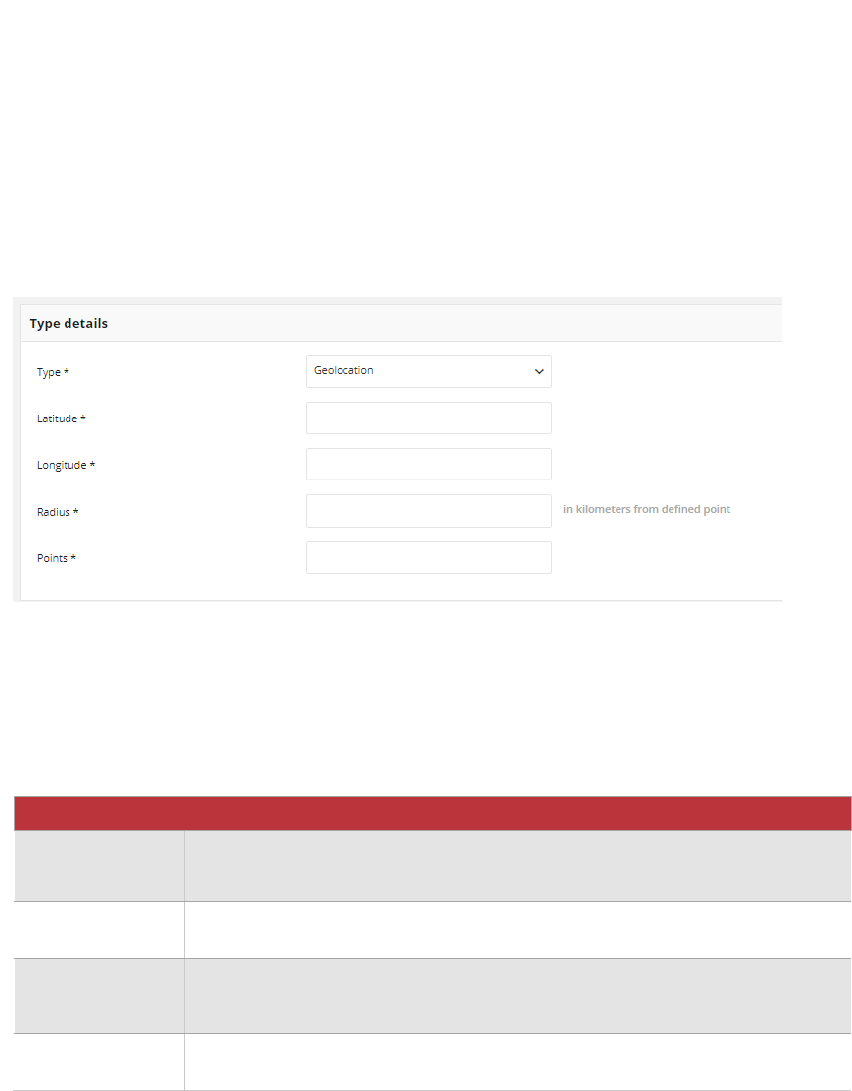
153
Geolocation
Reward customer with defined amount of points for his location. Locations for which
customer can get points are defined in the Open Loyalty and related to radius.
This Earning rule could be call only with API. Every run of API function will reward Customer
with defined points.
Rule can be used only when mechanism of getting customer location is
implemented.
Geolocation
Field description
FIELD
DESCRIPTION
Latitude
Latitude defining the central point to which the location applies
Longitude
Longitude defining the central point to which the location applies
Radius
A circular area having an extent determined by the length of the radius from
a specified by latitude and longitude central point.
Customer can get points only when he is in radius area
Points
Amount of points that will be earned for this event rule
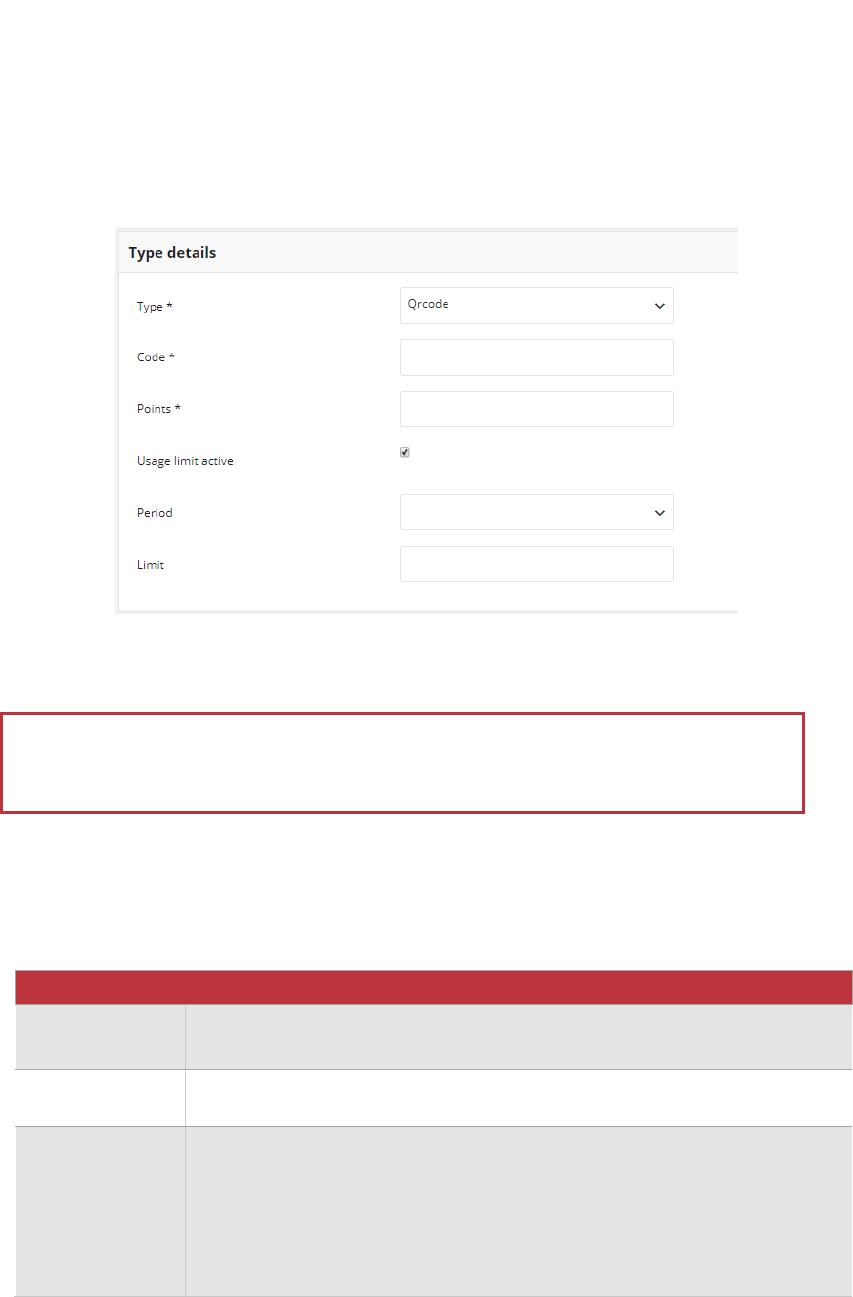
154
QRcode
Reward customer with defined amount of points for scanning QR code e.g. of product.
Code for which customer can get points is defined in the Open Loyalty.
If needed, you can also add repeatability limit to this rule type.
This Earning rule could be call only with API. Every run of API function will reward Customer
with defined points.
QR code earning rule
Field description
FIELD
DESCRIPTION
Code
QR code (to be used with calling API function)
Points
Number of points that will be added after earning rule has been triggered
Usage limit
active
Option to limit how many times customer could be rewarded for the same
code with the specified period of time.
Option include:
• Yes – mark checkbox to limit repeatability
• No – leave checkbox blank to reward customer for this rule without
limits
If customer used the limit then rule will not be shown on available rules list in
Customer cockpit
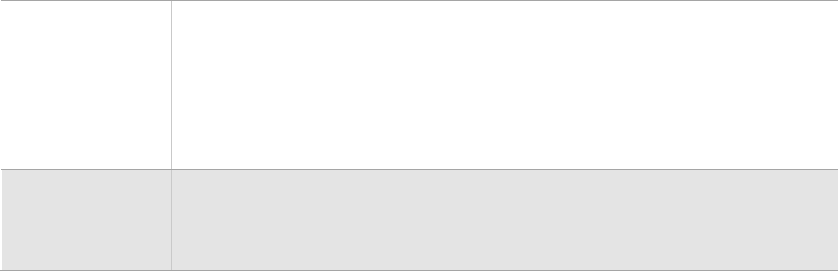
155
Period
Visible and required if Usage limit active is marked.
It defines period of time within customer can be rewarded for this rule.
Option include:
• 1 day
• 1 week
• 1 month
Limit
Visible and required if Usage limit active is marked.
how many times customer could be rewarded for this rule in specified
period of time.
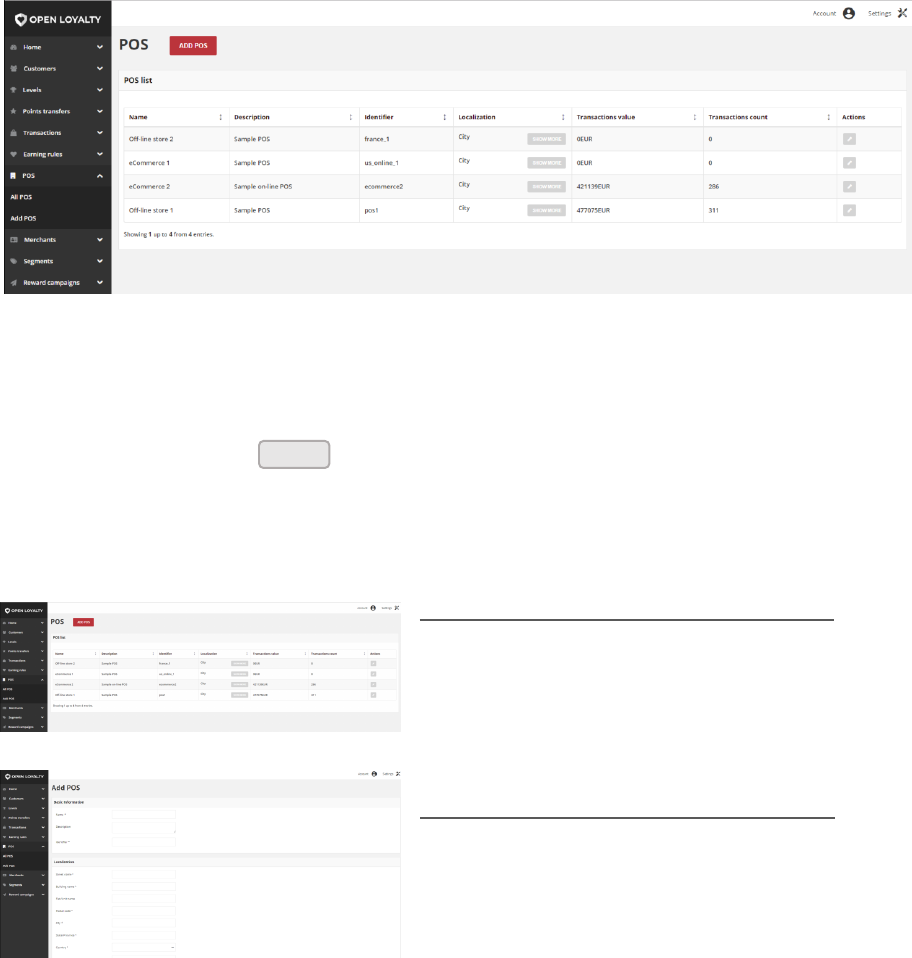
157
CHAPTER 14:
POS MENU
Customers can make transactions not only in the online store but also in offline stores.
Both transactions should be count within your Loyalty Program. POS menu allows you to
define all stores, that transaction should be included within your Loyalty Program.
You can simply track all stores and theirs transactions details – value and number.
POS
To display the POS menu:
On the Admin sidebar, tap , then choose All POS.
Menu options
All POS
Lists all POS within your loyalty program
with additional information regarding it’s
localization and transactions.
Add POS
Lists all data that need to be filled out to
add new POS
POS
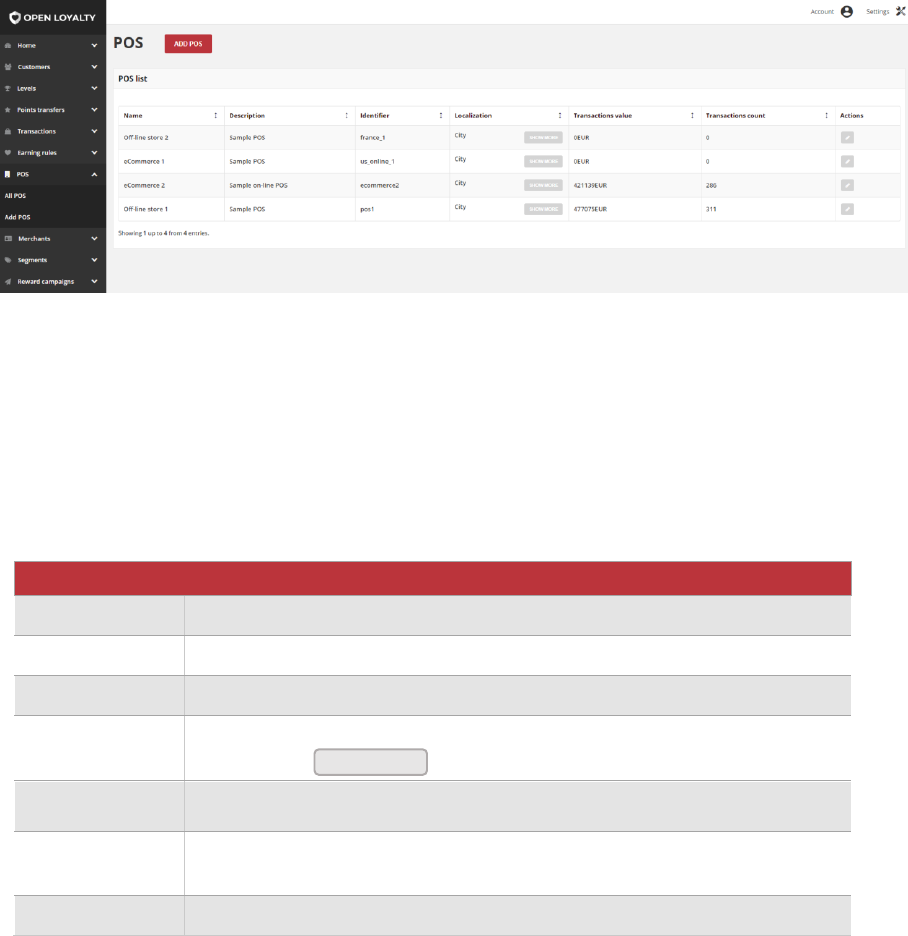
158
All POS
The All POS grid provide information about all stores, which transactions made by
customers will be registered and count within Loyalty Program. Moreover, list contains
address details and brief description about each one and allows modify POS detail.
POS
Use the standard controls to sort the list and apply action (modify) to selected POS records.
Pagination controls appear if there are more rule records than fit on the page, and are
used to move from one page to the next.
Field description
FIELD
DESCRIPTION
Name
Name of the store
Description
Brief description of the store
Identifier
Unique name used for internal identification
Localization
Address details of the store. Only city is visible. More information is available
after clicking .
Transactions
value
Sum of all transactions values that were processed in POS
Transactions
count
How many transactions were processed in POS
Actions
Open POS record in edit mode
Show more

159
POS localization details
You can simply view not only the transaction summary and city were store is located but
also the address details.
To display the address details:
1. On the Admin sidebar, tap POS. Then, choose All POS.
2. In the POS list, find the store you want to see address details and click
in the Localization column. After clicking, the popup with detailed address will be
shown.
Localization Details Popup
Show more
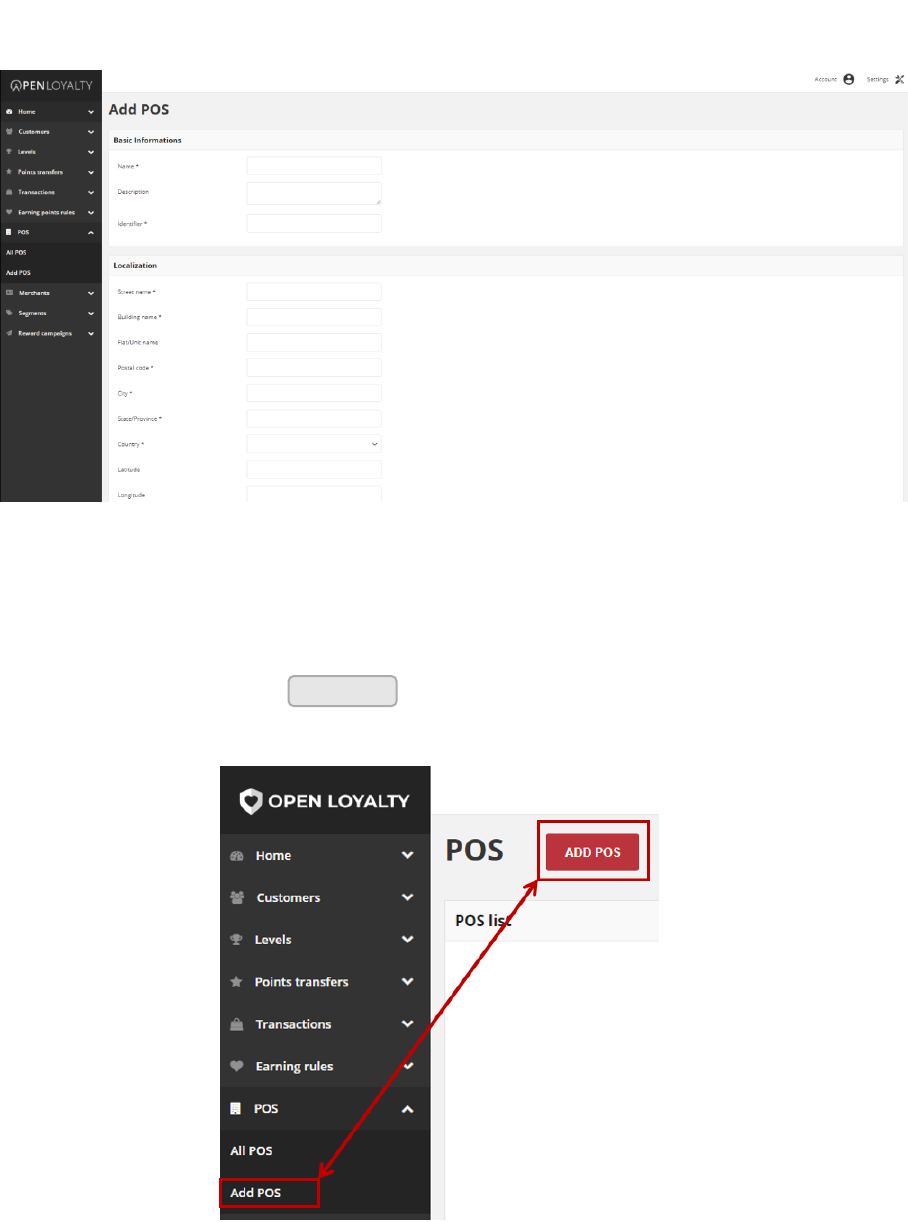
160
CHAPTER 15:
ADDING NEW POS
You can add unlimited amount of stores where processed transaction within Loyalty
Program will be recorded and count.
Add POS
To add new POS:
1. On the Admin sidebar, tap POS. Then, choose Add POS. You can also add store directly
from All POS list by clicking at the top of the page.
Add POS Options
Add POS
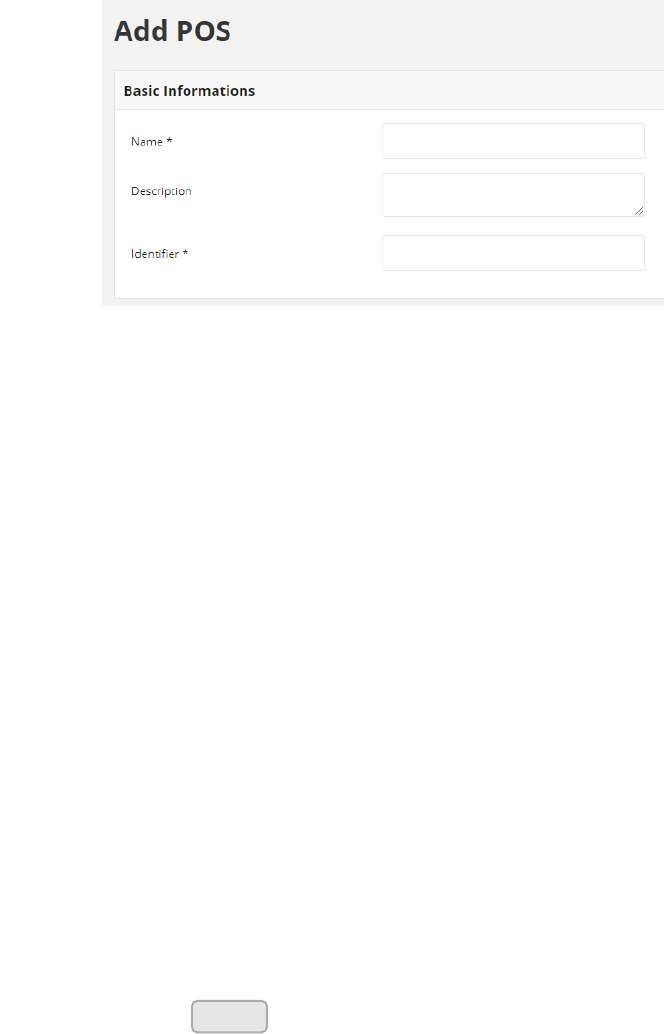
161
2. In the Basic informations section, do the following:
Add POS Basic Information Section
a. Enter Name of the store that will be displayed in views
b. If needed, provide a brief Description of store that help identifications
c. To better identification, in Identifier field select enter unique store name
3. In Localization section, provide the following required store address detail information:
• Street name
• Building name
• Postal code
• City
• State/Province
• Country
4. In the same Localization section, complete the optional fields as needed:
• Flat/Unit name
• Latitude
• Longitude
5. When complete, tap
Save
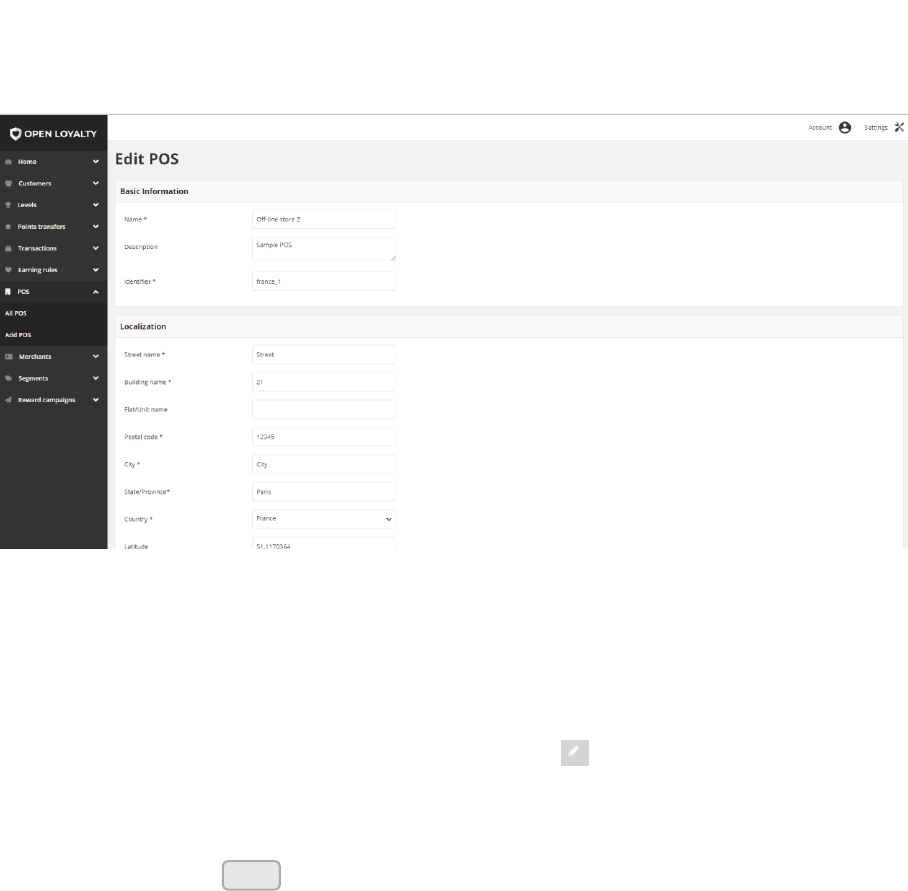
162
Updating POS information
You can edit information regarding POS used within your Loyalty Program, including all
their data provided during POS creation process.
POS Editing
To edit a POS:
1. On the Admin sidebar, tap POS. Then, choose All POS.
2. In the POS list,, find the store to be edited and click Edit ( ) icon in the Action column
to open the store in edit mode.
3. Make any necessary changes to the store.
4. When complete, tap
Save
163
MERCHANTS
This section of the guide provides an overview of the all merchants working in yours stores
and involve with Loyalty Program. You’ll learn how to add and manage merchant data,
including assigning to particular store.
MERCHANTS MENU
All Merchants
CREATING MERCHANT ACCOUNT
Updating Merchant account
Activate/deactivate merchant account
Remove merchant account
POS COCKPIT
POS Cockpit Sign In
Merchant Account
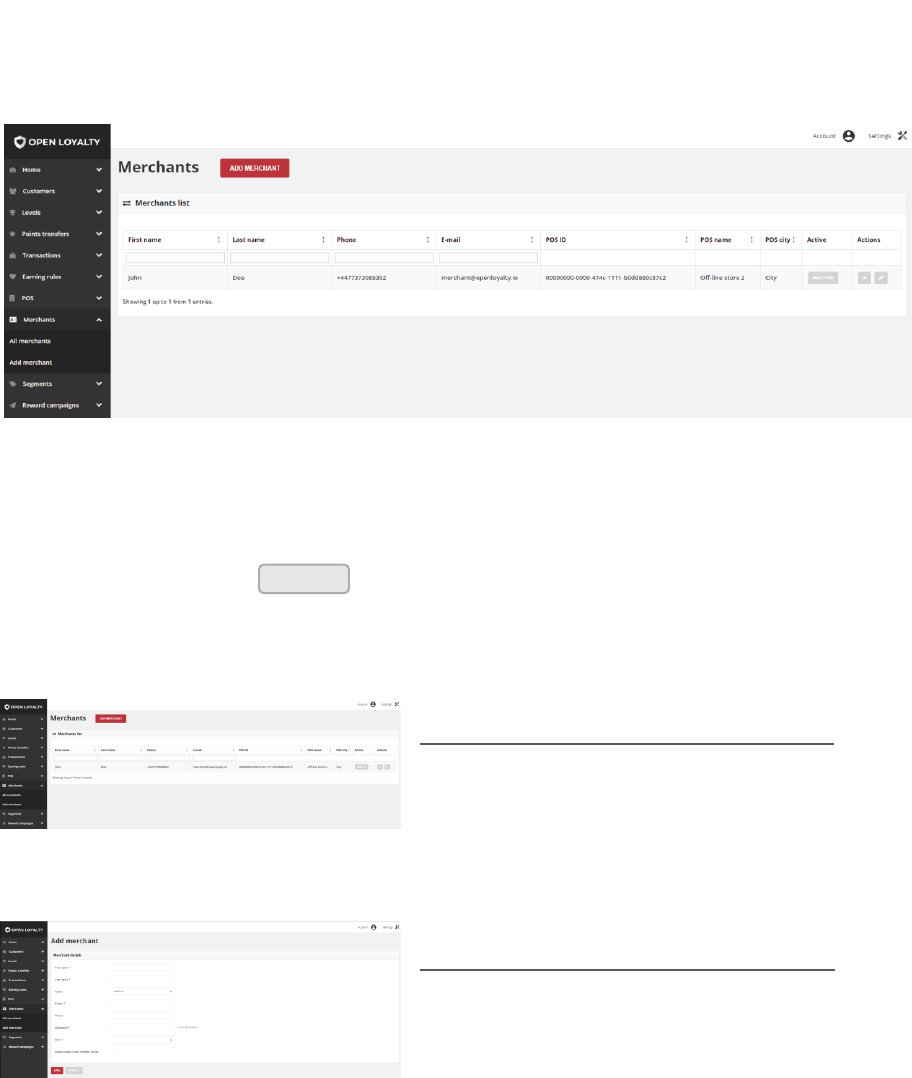
164
CHAPTER 16:
MERCHANTS MENU
The Merchant is linked to a store. In Open Loyalty store is called point-of-sale (POS).
Merchants menu provide an overview of all merchants and it’s assigned to particular POS.
You can simply see number of merchants works in particular store. Moreover, you can
assigned merchant to customer, who is operated by a given merchant.
Merchants
To display the Merchant menu:
On the Admin sidebar, tap , then choose All merchants.
Menu options
All merchants
Lists all Merchant within your loyalty
program with additional information
regarding his data and assigned POS
localization.
Add merchants
Lists all data that need to be filled out to
add new Merchant
Merchant
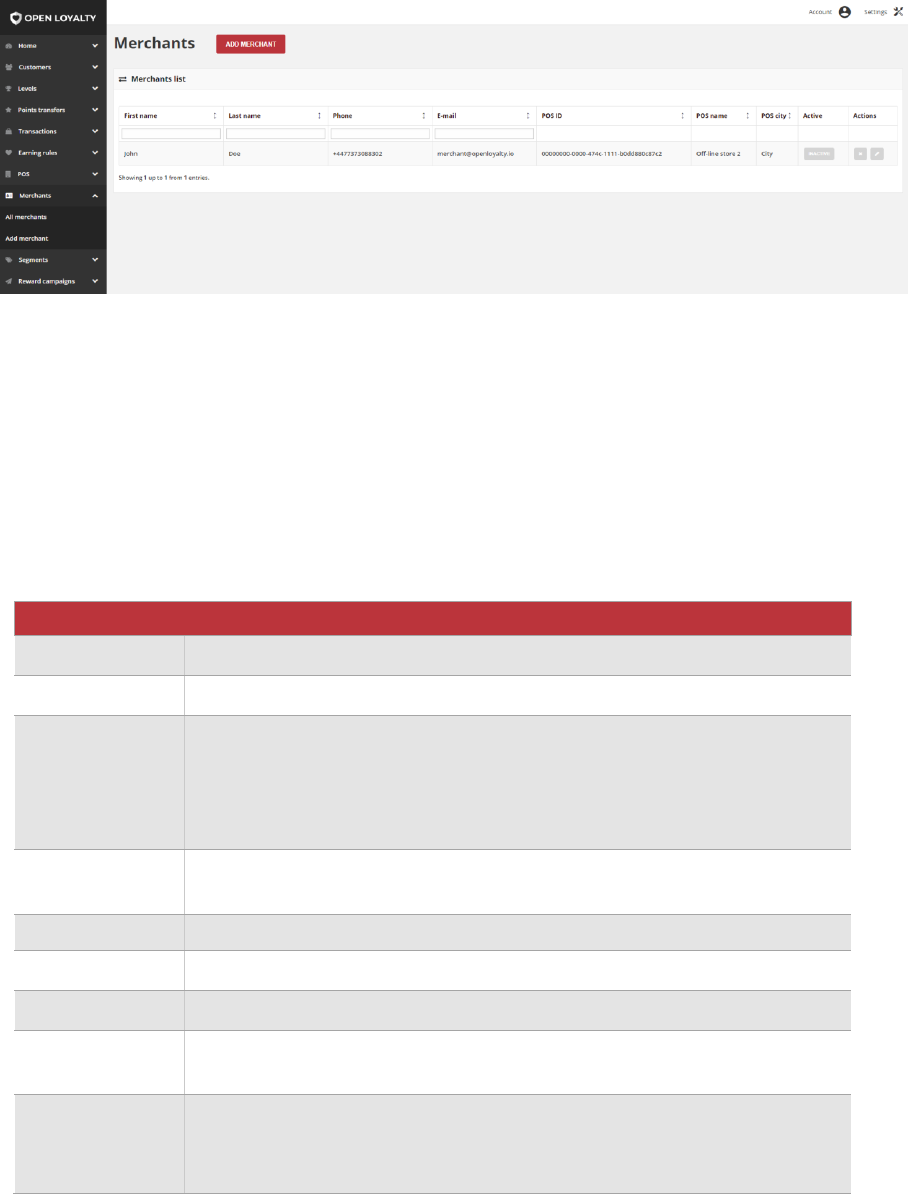
165
All Merchants
The All merchants grid provide information about all merchants and its assigned to a POS,
which transactions made by customers will be registered and count within Loyalty
Program. Moreover, list contains POS address details and additional information about
each one and allows modify merchant data.
All Merchants
Use the standard controls to sort the list, filter and search merchant by typing in the field
under column header value you want to find, and apply actions to selected merchants
(modify or remove). Pagination controls appear if there are more merchants records than
fit on the page, and are used to move from one page to the next.
Field description
FIELD
DESCRIPTION
First name
The first name of the merchant
Last name
The last name of the merchant
Phone
The merchant phone number. Can be used as a search/filter option.
Formatting is as on follow example:
• Country code: +48/48
• Subscriber number: 123456789
• In total: +48123456789 / 123456789 / 48123456789
Email
The merchant email address. Can be used as a login to POS Cockpit or
search/filter option.
POS ID
Unique POS ID. Can be used in XML file to import transaction and customer
POS name
Name of the store
POS city
City where store is located
Active
Merchant account current status. Option include: Active/Inactive.
Only Active merchants account are using for login to POS Cockpit.
Actions
The operations that can be applied to selected merchant account. Options
include:
• Edit merchant data
• Remove merchant account
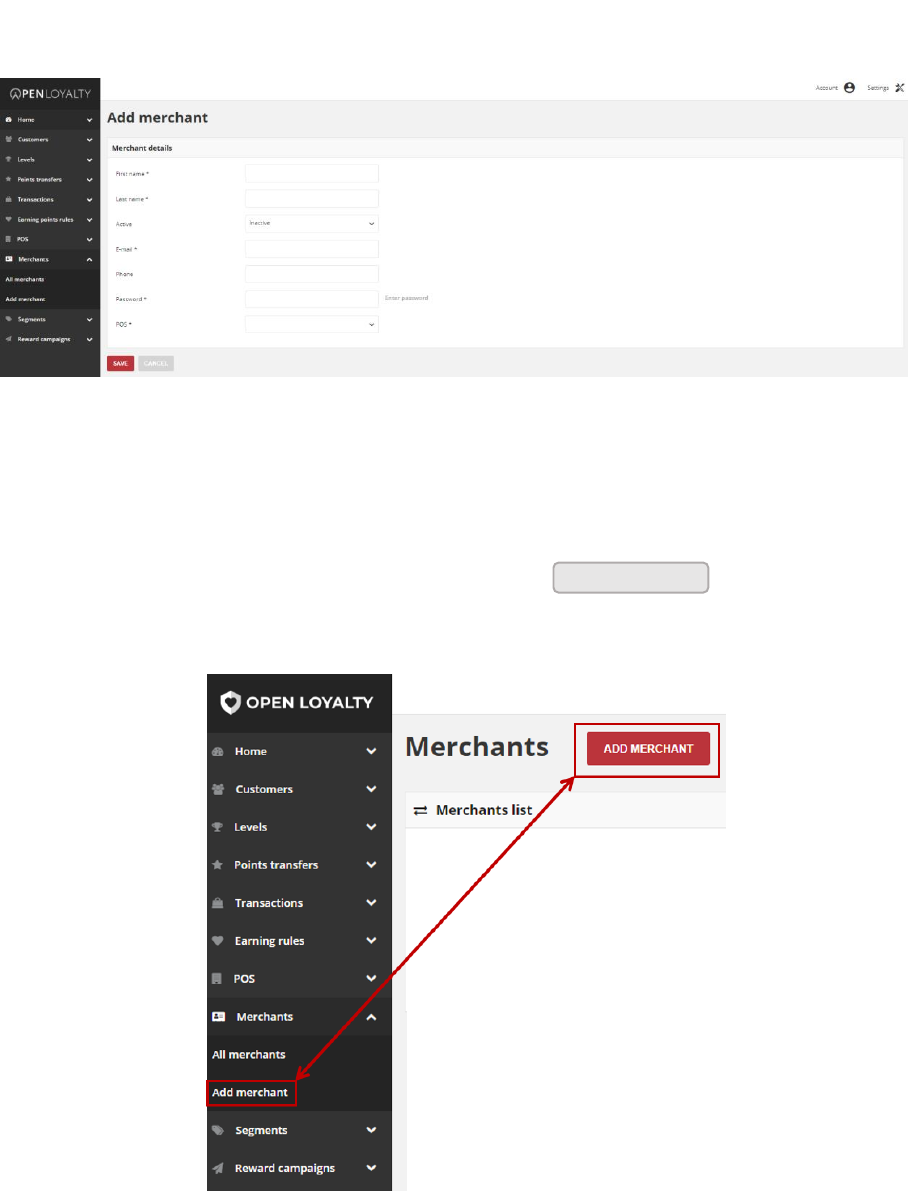
166
CHAPTER 17:
CREATING MERCHANT ACCOUNT
You can create from Admin unlimited amount of merchants account and assigned them
with particular store (POS). Merchant account is needed to log in to POS Cockpit.
Add Merchant Account
To add new merchant account:
1. On the Admin sidebar, tap Merchants. Then, choose Add merchant. You can also add
merchant directly from All merchants list by clicking at the top of the
page.
Add Merchant Options
Add Merchant
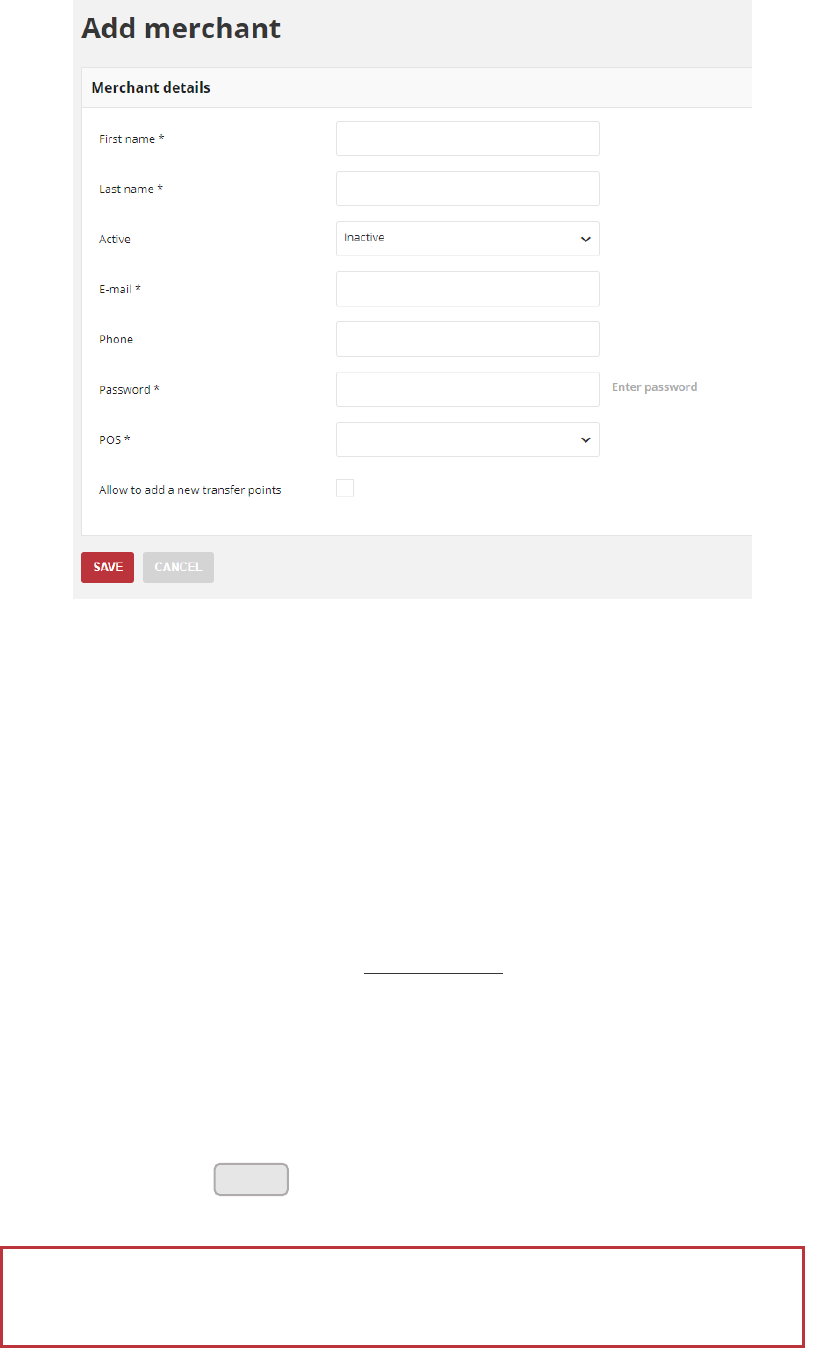
167
2. In the Merchant details section, do the following:
Add Merchant Form
a. Enter merchant First name and Last name
b. To activate the merchant account, in Active field select “Active” from the dropdown
list
c. Enter merchant E-mail address, which will be used as a login credential to merchant
account in POS Cockpit.
d. Provide merchant Phone number (in one of the acceptable format)
e. Enter Password to merchant account, which will be used as a login credential to
account in POS Cockpit. Merchant will not receive password to his account
automatically via email/sms message. You have to give it to him “in person”.
f. Assign POS to merchant by selecting from the dropdown list POS name
g. Mark Allow to add a new transfer points checkbox to allow merchant to manage
customers points transfers (add, spend, cancel, deduct points amount etc.) from the
POS Cockpit
3. When complete, tap
Your password must be eight or more characters long, and contains at least one
upper case letters, one numeric character and one special character
Save
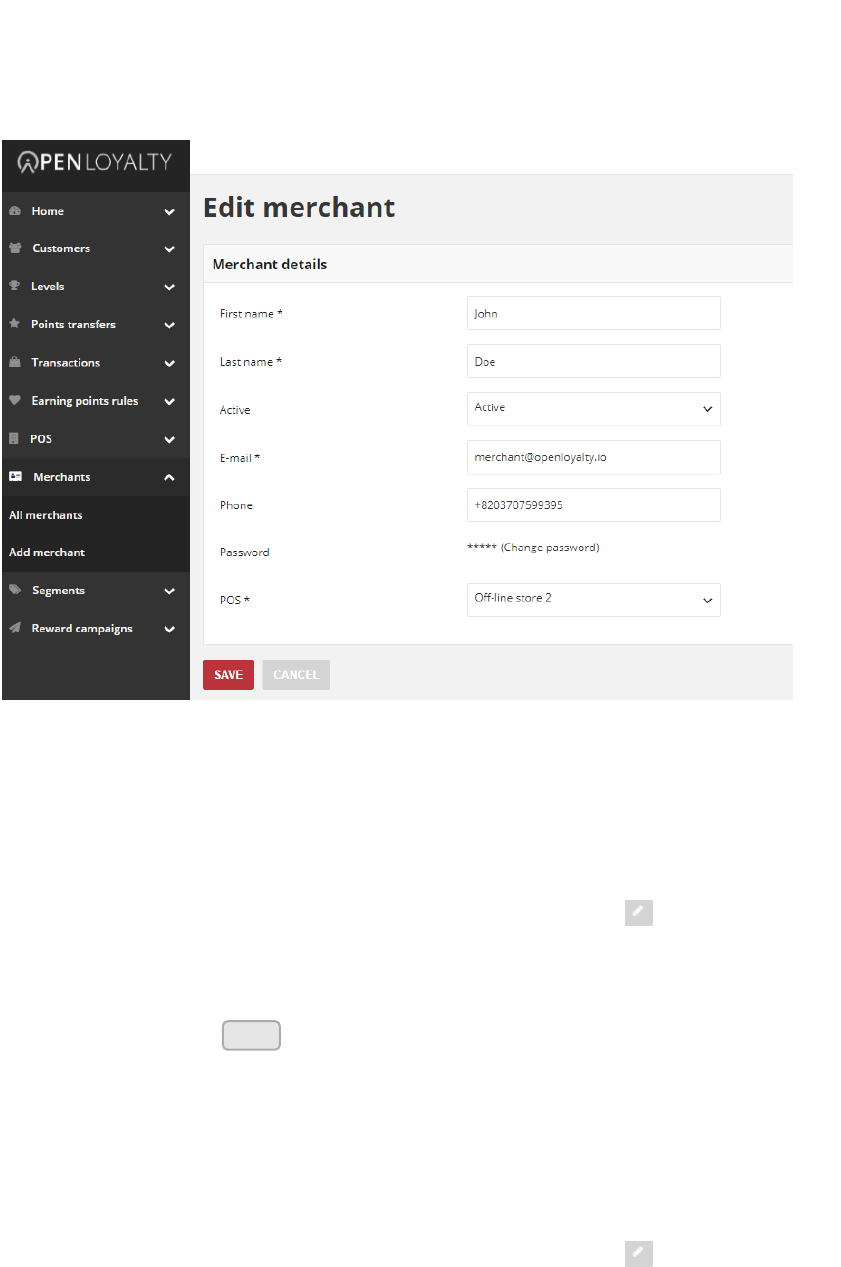
168
Updating Merchant account
You can edit information about your merchants, including all their data provided during
account creation process and password. Obviously Merchant can also edited all listed data
(including password) from his account in POS Cockpit.
Merchant Account Editing
To edit a merchant account:
1. On the Admin sidebar, tap Merchants Then, choose All merchants.
2. In the Merchants list, find the record to be edited and click Edit ( ) icon in the Action
column to open the merchant in edit mode.
3. Make any necessary changes to the merchant account.
4. When complete, tap
To change a password to merchant account:
1. On the Admin sidebar, tap Merchants Then, choose All merchants.
2. In the Merchants list, find the record to be edited and click Edit ( ) icon in the Action
column to open the merchant in edit mode.
Save

169
3. In Password field click Change password link. After clicking the field will be blank.
4. Provide a new password in blank Password field
5. When complete, tap
Activate/deactivate merchant account
Any merchant account from the list can be activated and deactivated by Admin user.
To activate/deactivate level:
1. On the Admin sidebar, tap Merchants. Then, choose All merchants. You can also
deactivate/activate merchant account from Edit mode.
2. In the Merchants list, find the merchants to be deactivated and click in the
Active column. The button in the column change to Inactive and appear as a grey-out.
Active Column
When you deactivate account, merchant will not be able to login to his account in POS
Cockpit.
3. To activate the merchant account click in the Active column. The button in the
column change to Active and appears as a red.
The same like during merchant account creation, merchant will not receive
password to his account automatically via email/sms message. You have to
give it to him “in person”.
Save
Active
Inactive
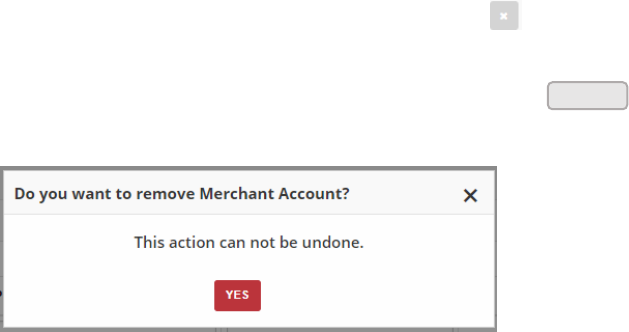
170
Remove merchant account
You can also delete merchant account from the Admin.
To delete a merchant account:
1. On the Admin sidebar, tap Merchants Then, choose All merchants.
2. In the Merchants list, find the record to be edited and click Remove ( ) icon in the
Action column to delete the merchant account.
3. System display a message asked you to confirm the action. To confirm tap
Removing Merchant Action
Yes
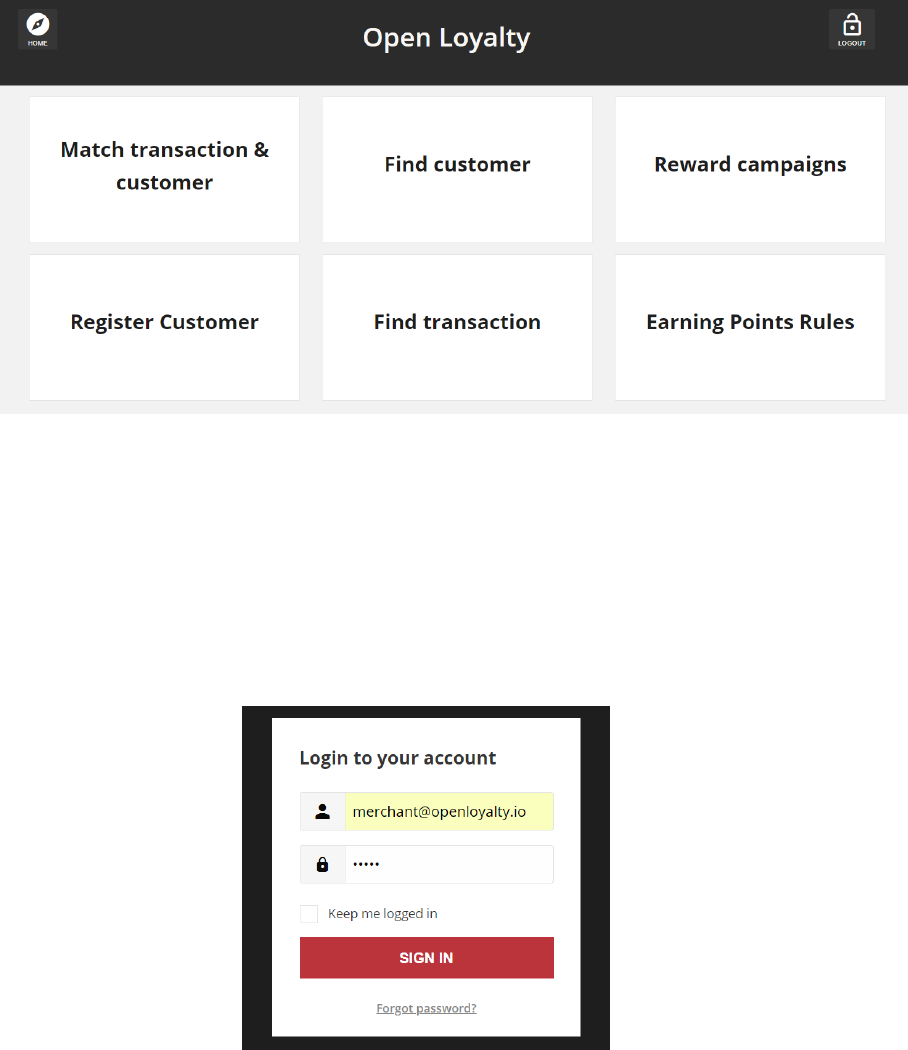
171
CHAPTER 18:
POS COCKPIT
Merchants are linked with a store and Point of Sale (POS) device. PoS device play an
important role in implementation of the Loyalty Program. The sale can be done by
webshop or stationary by retailers to customers – but in that case only through PoS
devices. This chapter gives an overview of the use of PoS Cockpit.
POS Cockpit Home Page
POS Cockpit Sign In
Merchants have easy access to their account from their POS. Merchants can be redirected
to POS cockpit as loyalty module within your POS.
Sign In to POS Merchant Account
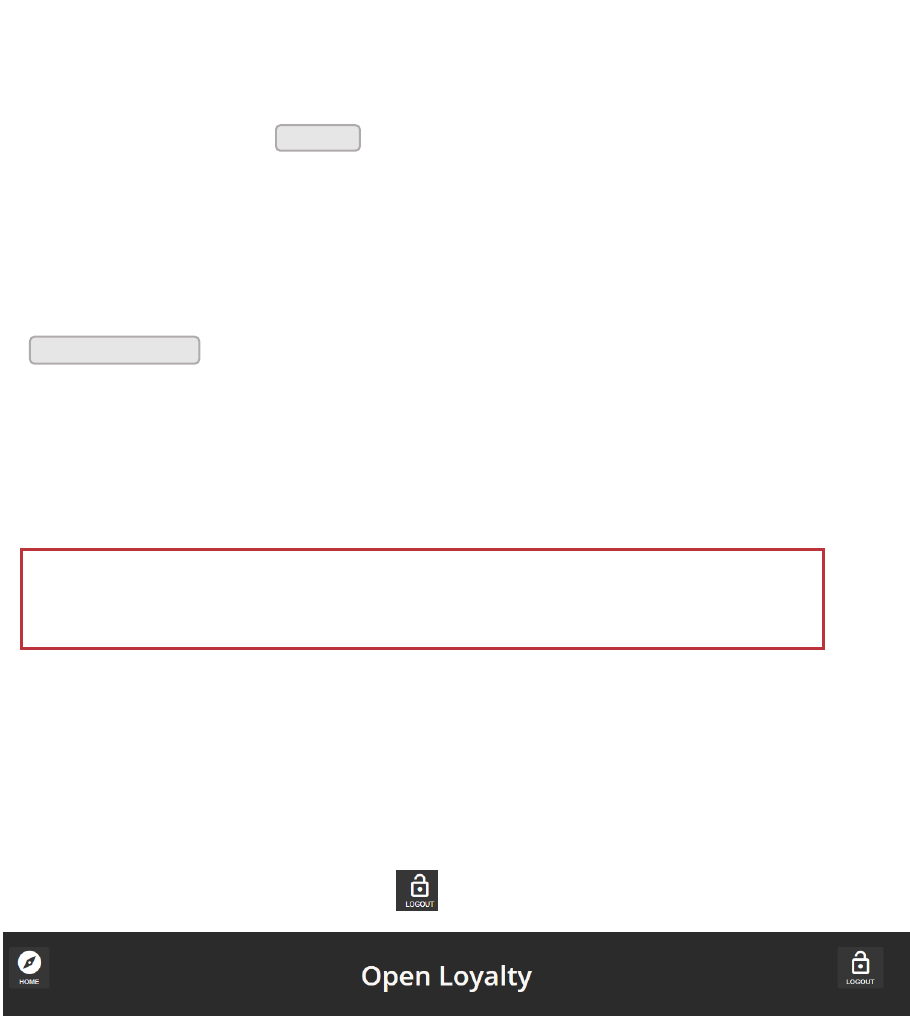
172
When merchants forgot their passwords, a reset link is sent to the email address that is
associated with the account.
To sign in to your merchant account:
1. Click a link on the POS to open Login page
2. When prompted, enter the Email Address that is associated with customer account,
and Password. Then, tap
To reset your merchant account password:
1. On the Login page, tap Forgot password?
2. When prompted, enter the Email Address that is associated with your account, and tap
If the email address you entered matches the one that is associated with the account,
you will receive a "Password reset requested" email with a link to reset your password
3. Click the Reset Password link in the email and enter your New Password. Enter it
again to confirm.
When you receive confirmation that the password is updated, you can use the new
password to log in to your account.
To sign out of the merchant account:
In the upper-right corner, tap the Logout ( ) icon.
Logout
When merchant logout, the Sign-In page returns.
Sign In
Recover Password
Your password must be eight or more characters long, and contains at least one
upper case letters, one numeric character and one special character
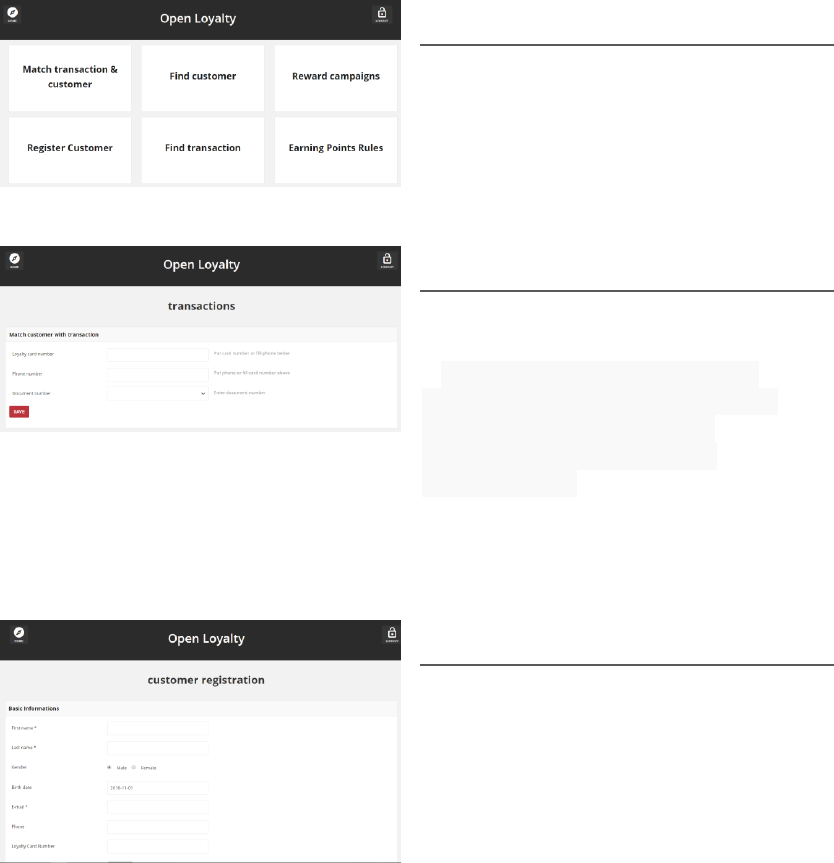
173
Merchant Account
Merchant through theirs account can view basic customer data and activity within Loyalty
Program, and manage their own personal information.
Your till is equipped with a touchscreen displaying the Open Loyalty POS Cockpit. Touch a
control element (e.g. buttons, entry fields, etc.) displayed on the screen using your finger or
a blunt object. The control element is activated and the function requested is executed.
The general elements described below provide you with transaction details, loyalty
program operations and allow you to enter information or select functions displayed.
Home Page
The POS Cockpit Home page provides
button links to main details of loyalty
activities: transactions, customers, Earning
Rules and Reward Campaigns.
Match transaction & customer
Allows to link transaction with Customer
Account directly from the POS. Based on
matching transaction with customer
identification factors priority (set up in
Configuration. To remain about
identification factors please see
Configuration. Useful when only
transactions are sent to Open Loyalty
Register customer
Allows to register new customer directly
from the POS. Useful when new customer
want to register to Loyalty Program during
his shopping in a store.

174
Find customer
Allows to find specify customer with a link
to each to preview his profile details
directly from the POS.
Find transaction
Allows to find specify transactions and
preview its details directly from the POS
with a link to each to see more
information.
Reward campaigns
Lists all available rewards with details
about target, limits, cost in points and
status with a link to each to see more
information.
Earning Rules
Lists all available rewards with description
and details about type, time boundaries
when rule is active and status with a link to
each to see more information.
175
SEGMENTS
In this section of the guide you will become familiar with the customer segmentation
feature, and learn to configure customer segments according to your preference. You will
also learn how to create and assigned customers to segments, that can be referenced in
rewards, earning rules, levels etc.
SEGMENTS MENU
All Segments
Customers assigned to segment list
Download the Customers list
CREATING CUSTOMER SEGMENT
Updating segments data
Activate/deactivate Segment
Remove Segment
SEGMENT PARTS TYPES
Anniversary
Average transaction value
Bought in specific POS
Bought products with labels
Bought specific brands
Bought specific SKU
Custom customer list
Customers who has such labels
Customers who has such labels value
Last purchase was n days ago
Purchase period
Transaction count
Transaction percent in POS
Transaction value
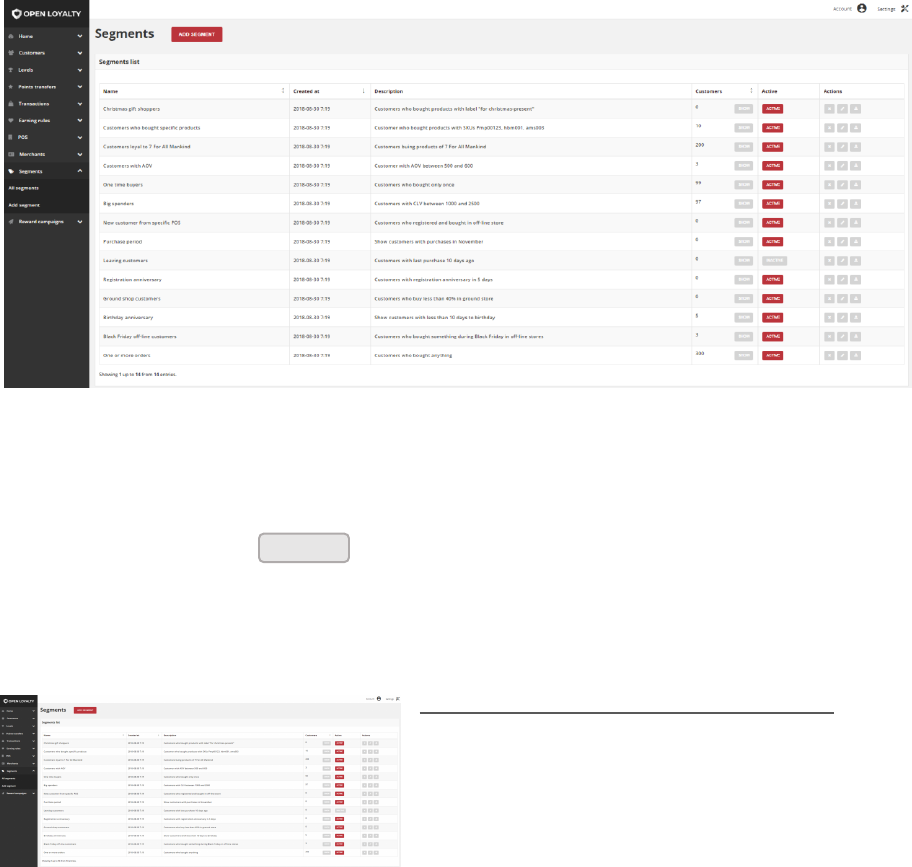
176
CHAPTER 19:
SEGMENTS MENU
Customer segments allow you to e.g. dynamically count points, levels and display rewards
to specific customers, based on properties such as system events, transactions history,
purchasing activity, and so on. Customer can be assigned to several segments.
You can optimize marketing initiatives based on targeted segments. You can also preview
and export the list of targeted customers. Because customer segment information is
constantly refreshed, customers can become associated and disassociated from a segment
as they shop in your store.
Segments
To display the Segments menu:
On the Admin sidebar, tap , then choose All segments.
Menu options
All segments
Lists all customer segments within your
loyalty program with brief description of
each and additional information regarding
assigned customers. There is also
possibility to preview and export the list of
targeted customers
Segments

177
Add segment
Lists all data that need to be filled out to
create new segment
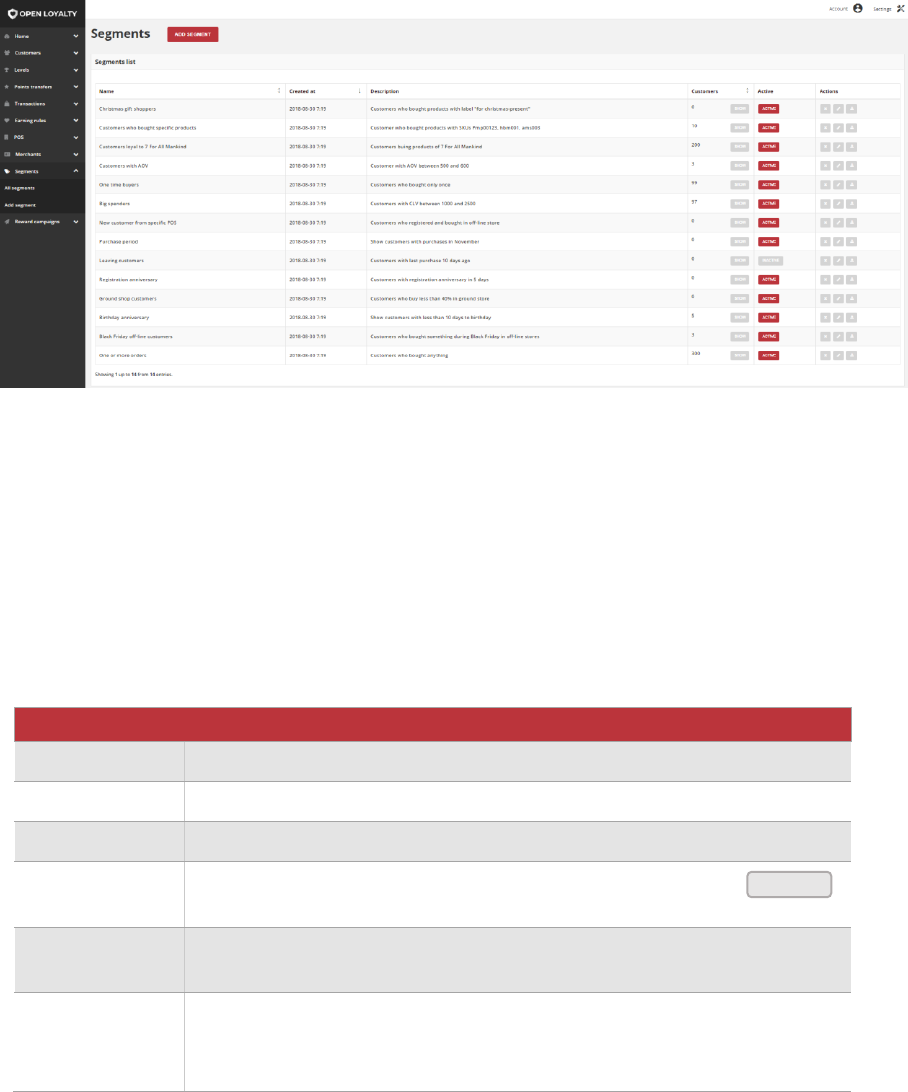
178
All Segments
The All segments grid provide information about all segments within your Loyalty Program
with information about assigned customers. Moreover, you can also export the list of
targeted customers.
All Segments
Use the standard controls to sort the list and apply actions to selected segments (modify,
remove, active/inactive, export customer list). Pagination controls appear if there are more
segments records than fit on the page, and are used to move from one page to the next.
Field description
FIELD
DESCRIPTION
Name
Name of the segment
Created at
The date when segment was created
Description
Brief description of the segment
Customers
Show customers account number assigned to this segment. After
click, list of these customer details will be shown.
Active
Segment current status. Option include: Active/Inactive.
Customer could be assigned only to Active segment.
Actions
The operations that can be applied to selected segments. Options include:
• Edit segment data
• Delete segment
• Download list of customers details assigned to this segment
Show
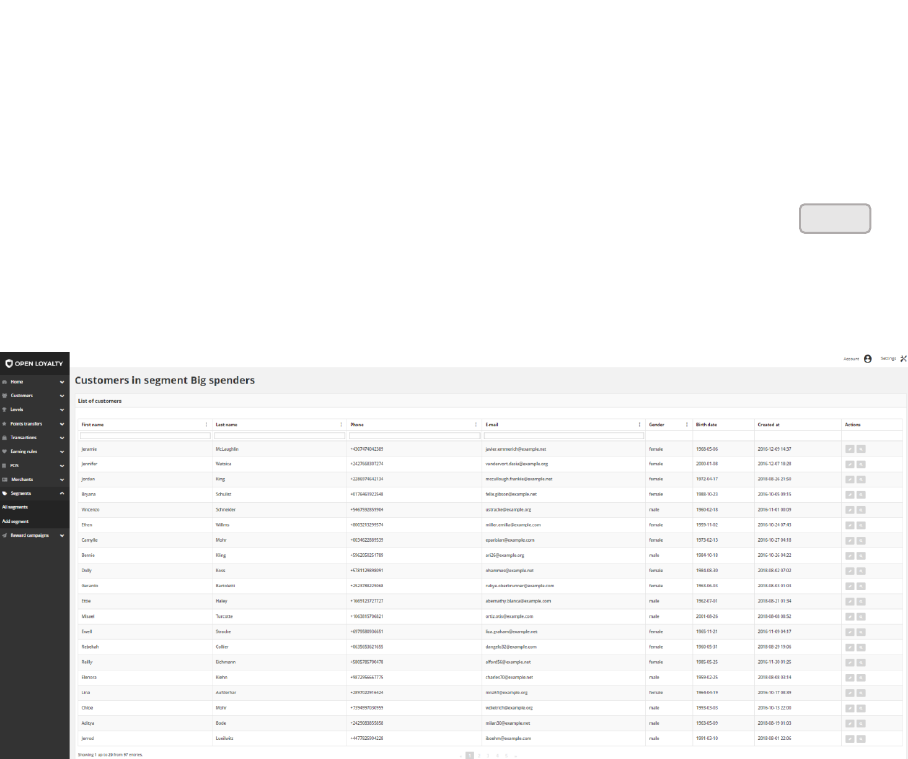
179
Customers assigned to segment list
You can simply view not only the number but also the list of customers with details
assigned to particular segment.
To display the list of customers:
1. On the Admin sidebar, tap Segments. Then, choose All segments.
2. In the Segments list, find the segment that you want to see customers list and click
in the Customers column. After clicking, the list of customers will be opened, filtered
according to the assigned segment.
List of Customers in Big Spenders Segment
Use the standard controls to sort the list, filter and search customer by typing in the field
under column header value you want to find, and apply actions to selected customers (edit
and view detail). Pagination controls appear if there are more customer records than fit on
the page, and are used to move from one page to the next.
Show

180
Download the Customers list
There is also possibility to download a list of customers to a CSV file.
To download the list of customers assigned to a segment:
1. On the Admin sidebar, tap Segments. Then, choose All segments
2. In the Segment list, find the segment that you want download customers list and click
Download ( ) icon in the Action column.
After clicking, the list of customers will be download in .CSV format.
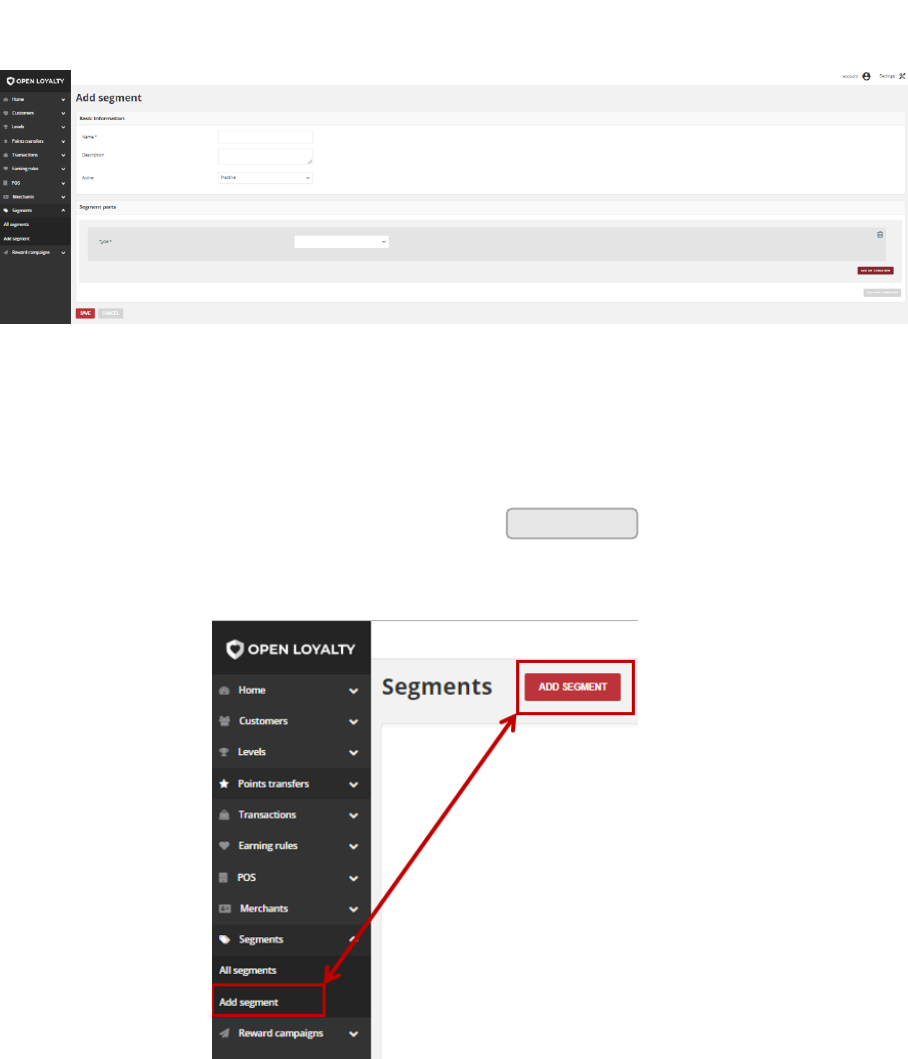
181
CHAPTER 20:
CREATING CUSTOMER SEGMENT
You can create unlimited amount customizable customers segments for your loyalty
program based on various criteria’s.
Add New Segment
To create a New Customer Segment:
1. On the Admin sidebar, tap Segments. Then, choose Add segment. You can also add
segment directly from All segments list by clicking at the top of the
page.
Add Segment Options
Add segment
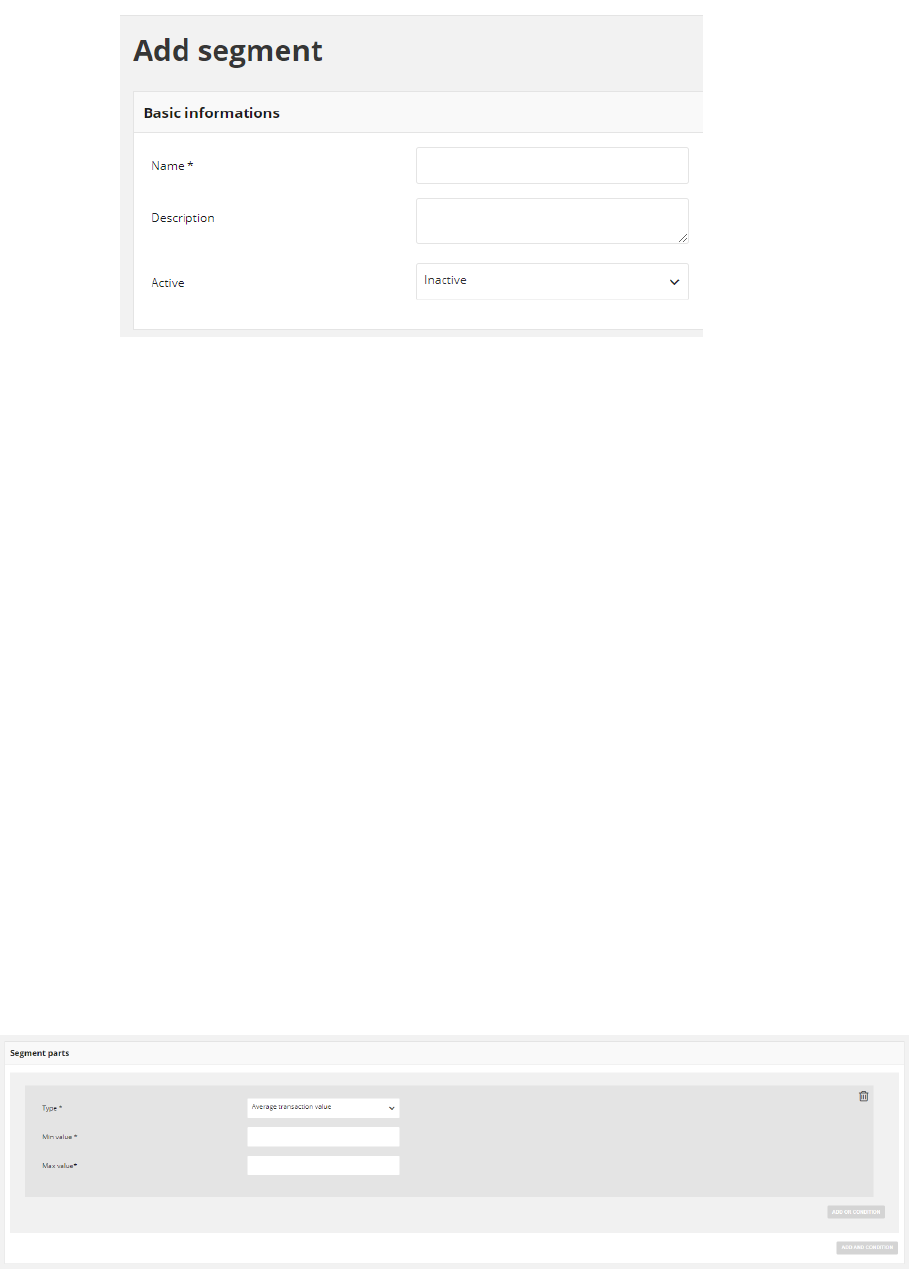
182
2. In the Basic informations section, do the following:
Basic Informations Section
a. Enter a unique segment Name to identify the customer segment when working in
the Admin
b. Enter a brief Description that explain purpose of the segment for internal reference
c. To activate the customer segment, in Active field select “Active” from the dropdown
list
3. In Segment Parts set the conditions that must be met to assign the customer to this
segment. One Segment consists of one or more conditions. Conditions can be combined
through AND and OR logical operators.
a. AND Condition is used to perform a logical conjuction on two conditions. Both
conditions linked with this operator must be true. For example, you can create
segment with a list of customers who made purchase in specific POS and bought
specific SKU. The list will contain customer who met both, 1st and 2nd condition.
b. OR Condition is used to perform a logical disjunction on two conditions. At least one
of conditions linked with this operator must be true. For example you can create
segment with a list of customers who made purchase in specific POS or bought
specific SKU. List will contain customer who met only the 1st condition, who met only
the 2nd condition and met both conditions.
Segment Parts Section
To learn more about conditions type, see Segment parts types
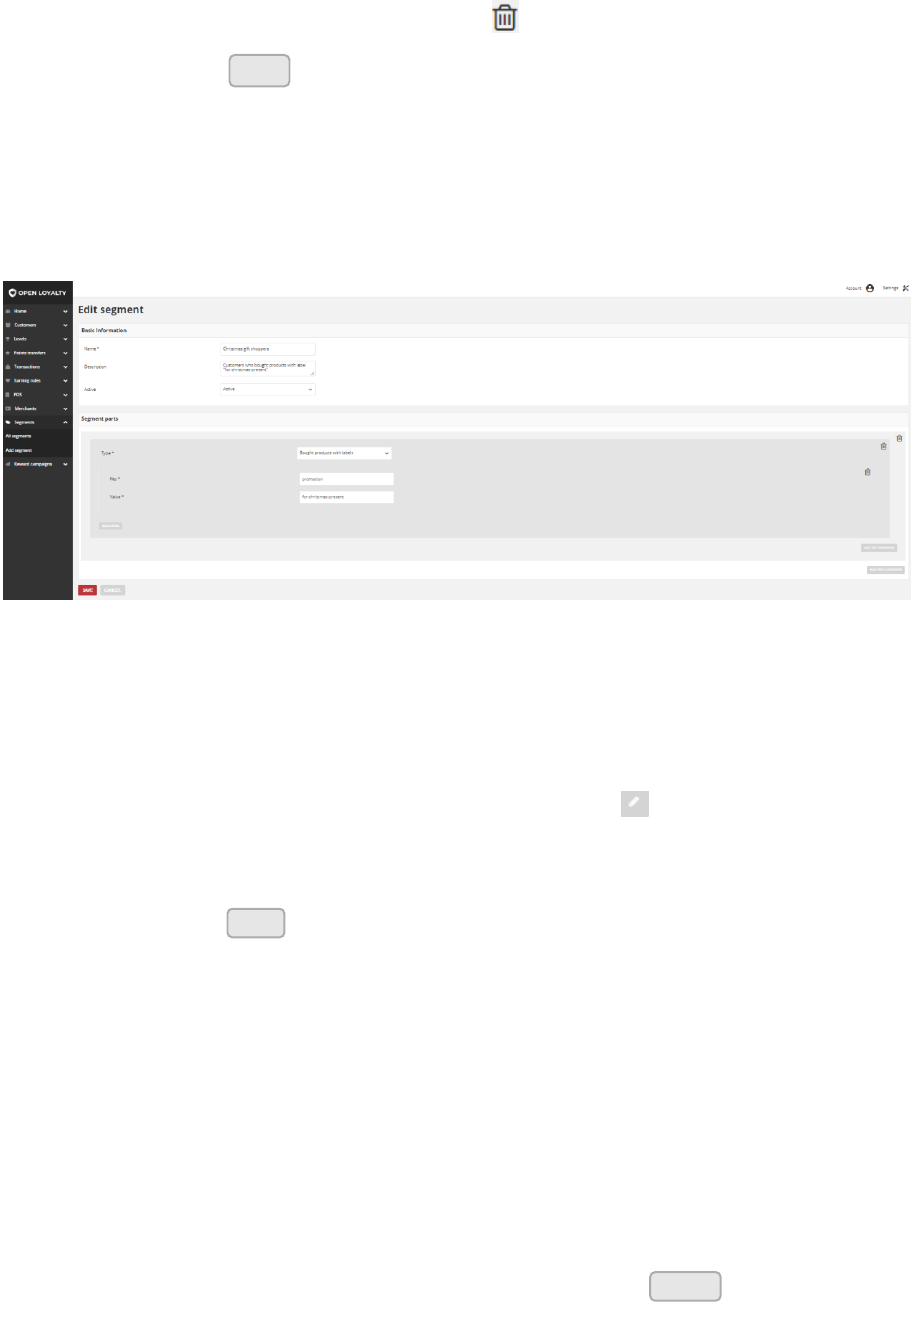
183
4. You can simply remove condition by clicking bin ( ) icon in a particular row.
5. When complete, tap
Updating segments data
You can edit all data provided during segment creation process. You can update segment
data by selecting it’s record from All segments list.
Segment Edition
To edit a Segment:
1. On the Admin sidebar, tap Segments. Then, choose All segments.
2. In the Segments list, find the record to be edited and click Edit ( ) icon in the Action
column to open the segment in edit mode.
3. Make any necessary changes to the segment data
4. When complete, tap
Activate/deactivate Segment
Any Segments from the list can be activated and deactivated by Admin user.
To activate/deactivate Segment:
1. On the Admin sidebar, tap Segments. Then, choose All segments. You can also deacti-
vate/activate segment from Edit mode
2. In the Segments list, find the segment to be deactivated and click in the Active
column. The button in the column change to Inactive and appear as a grey-out.
Save
Save
Active
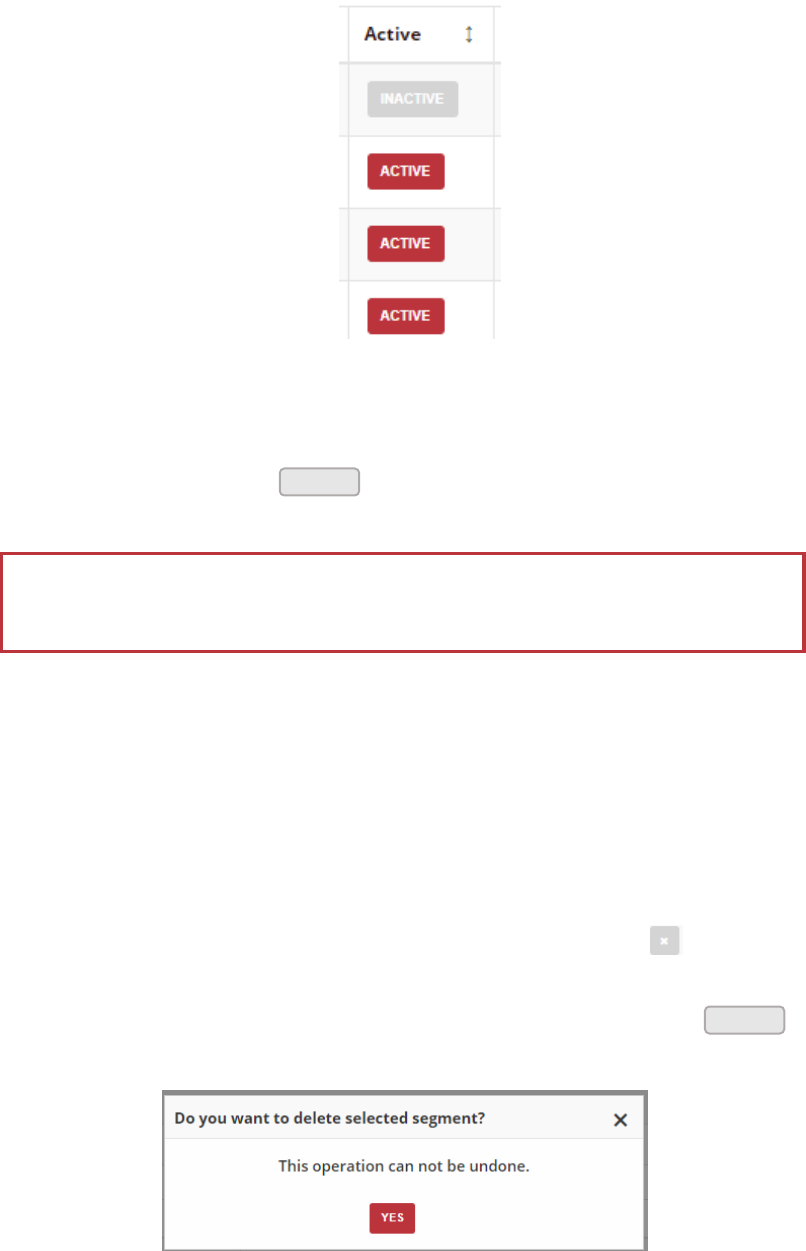
184
Active Column
When you deactivate segments, customers accounts assigned to this level will not be
refreshed and new customers will not be associated to it.
3. To activate the segment click in the Active column. The button in the column
change to Active and appears as a red.
Remove Segment
You can also delete Segment from the Admin.
To delete a Segment:
1. On the Admin sidebar, tap Segments Then, choose All segments.
2. In the Segments list, find the record to be deleted and click Remove ( ) icon in the
Action column to delete the segment.
3. System display a message asked you to confirm the action. To confirm tap
Removing Segment Action
Inactive
Customer can be assigned only to Active segments
Yes
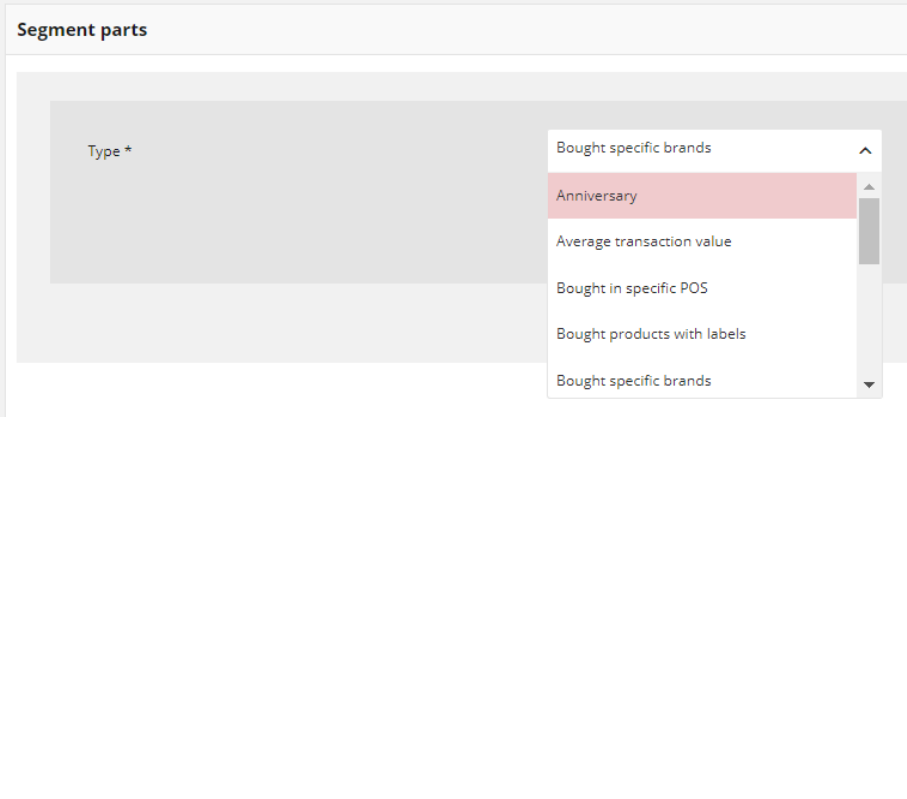
185
CHAPTER 21:
SEGMENT PARTS TYPES
The assignment process is carried out by the application based on defined rules.
Customers who meet all criteria will be assigned to the segment. The criteria consist of
conditions that can be combined through AND (conjuction of sets) and OR (disjunction of
sets) logical operators.
During creation of Segment you must specify Segment parts type, describing conditions for
assigning customer. Every type has its own required fields that must be filled, to specified
condition.
Segment Parts Types
Open Loyalty offer following standard types:
a. Anniversary – Customers who have registration/birthday anniversary in specify
number of days
b. Average transaction amount – Customers whose average transaction value is
between the limits
c. Bought in specific POS - Customers who made purchase in selected POS
d. Bought products with labels - Customers who bought products where label on
product is one of the list
e. Bought specific brands – Customers who bought products of a given brand
f. Bought specific SKU – Customers who bought specific products (on the basis of
selected SKU)
g. Custom customer list – Any Customers selected by admin
h. Customer who has such labels – Customers whose label on is one of the list
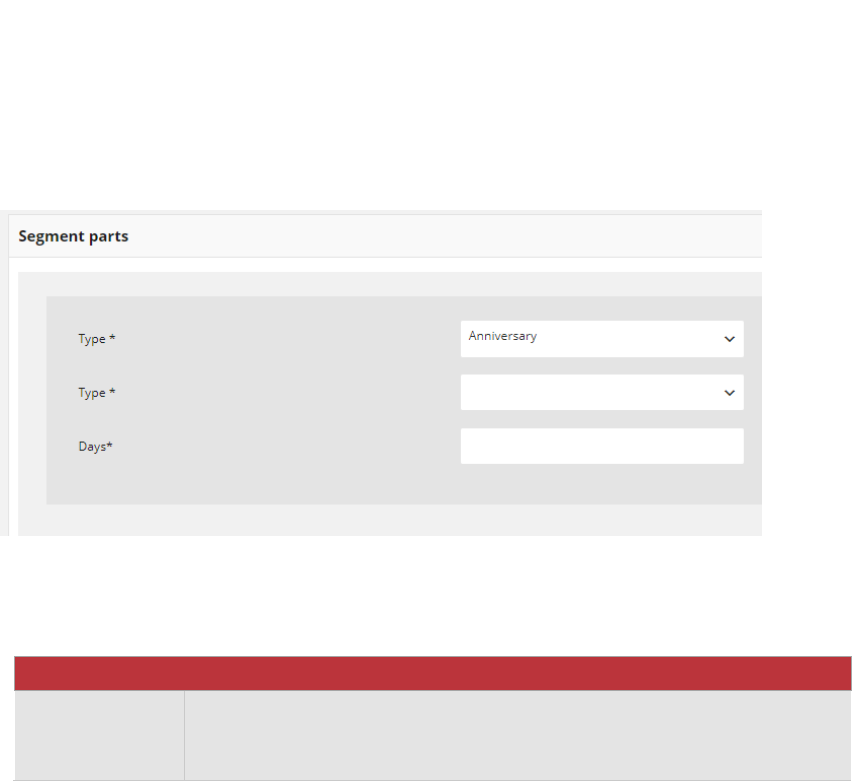
186
i. Customers who has such labels value – Customers whose labels value on is one of
the list
j. Last purchase was n days ago – Customers who have made their last purchase n-days
ago
k. Purchase period – Customers who made purchase (at least one) between the specified
days
l. Transaction count – Customers whose number of purchases is within the defined
range
m. Transaction percent in POS – Customers whose number of purchases in a specified
POS is within defined percent amount.
n. Transaction value – Customers whose overall amount of purchases is between the
limits
Anniversary
Segment of customers who have registration or birthday anniversary in specify number of
days . During creation, you need to specify whether to include dates of birth or registration
dates and number of days before anniversary occurs.
For example, you can create segment of customers who have birthday within 14 days from
today.
Anniversary Type
Field description
FIELD
DESCRIPTION
Type
Anniversary type. Options include:
• Birthday
• Registration
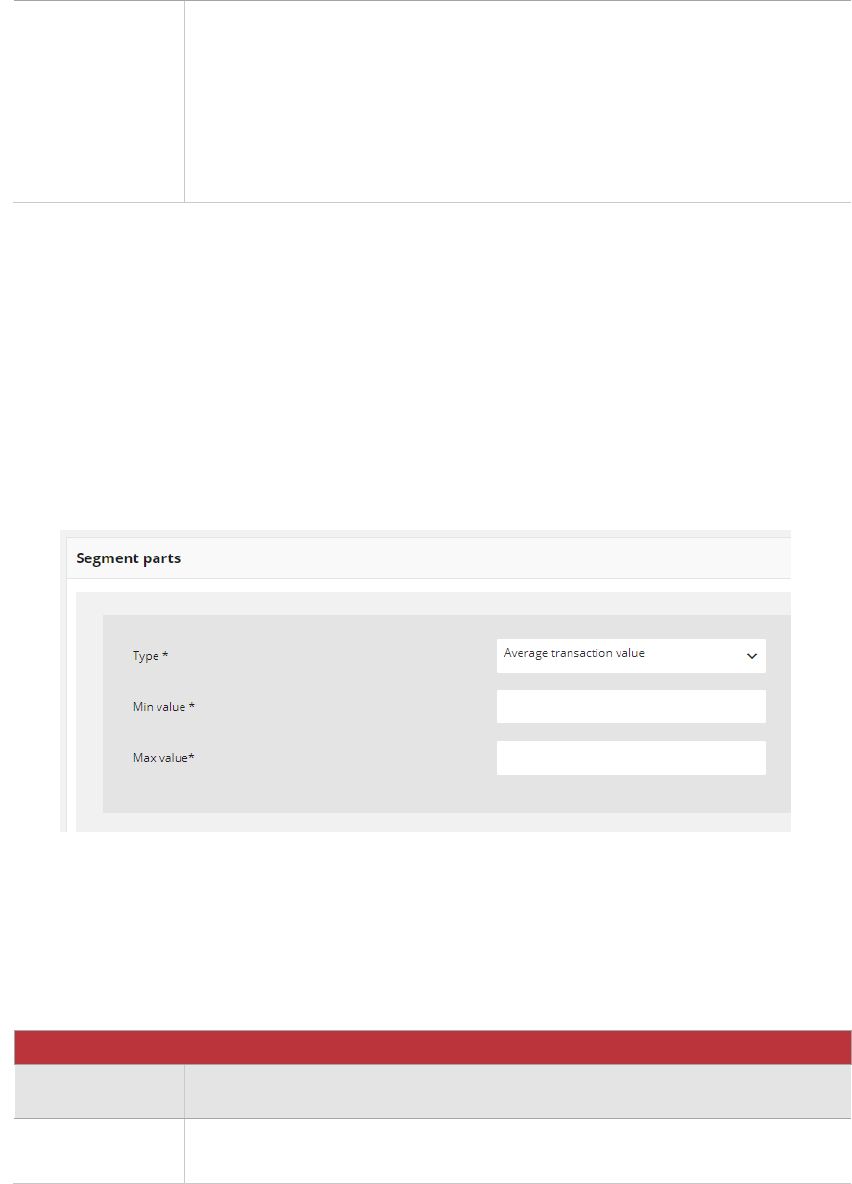
187
Days
Number of days before anniversary occurs
For example, if Days is equal 1 then all customers who e.g. have birthday to-
day or register account today or at the same date like today but in previous
years will be assign to this segment.
If Days is equal 5 then all customers who e.g. have birthday within 5 days
(including today) or registered account within 5 days in previous years (in-
cluding today) will be assign to the segment.
Average transaction value
Segment of customers whose average transaction value is within the defined range. During
creation, you need to specify Minimum and Maximum value to define the range in which
the average transaction amount must be found.
Average Transaction Value Type
Field description
FIELD
DESCRIPTION
Min value
Determines the minimum value of the average transaction amount of
customer account
Max value
Determines the maximum value of the average transaction amount of cus-
tomer account
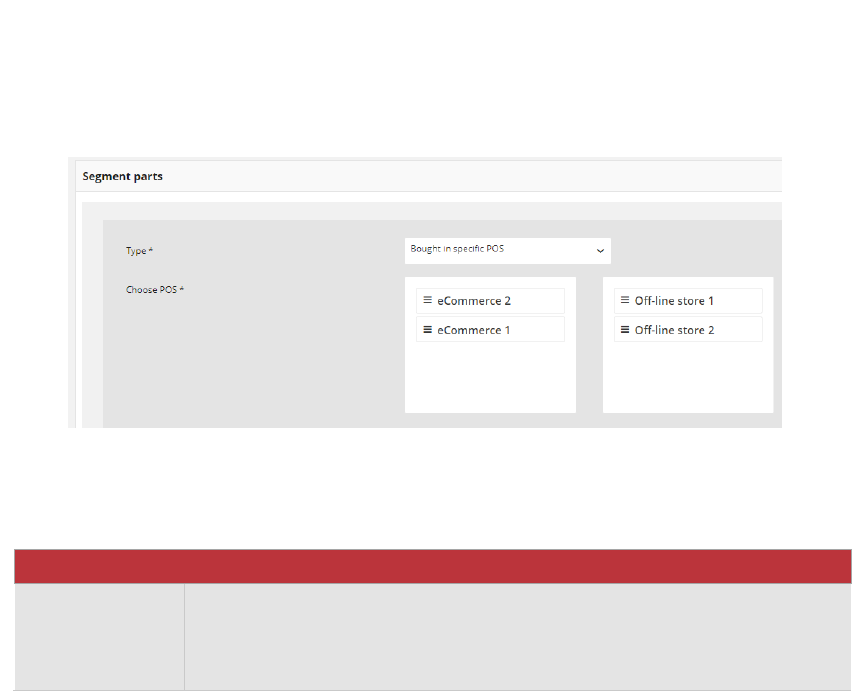
188
Bought in specific POS
Segment of customers who have made purchase (at least one) in selected POS. During
creation, you need to specify list of one or more stores (POS) that will be included. You
create the list by drag the selected POS name from left column to the right one.
Bought in POS Type
Field description
FIELD
DESCRIPTION
Choose POS
First column list all available POS within your Loyalty Program.
Second column list all selected POS which transaction will be included.
To choose POS drag the POS name to the second column.
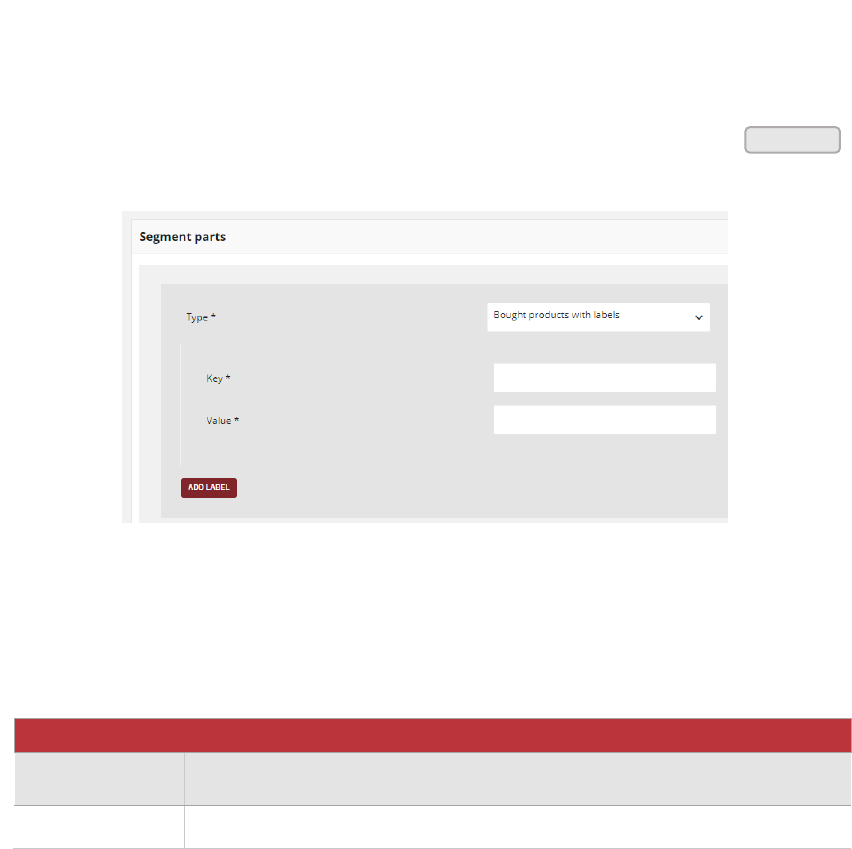
189
Bought products with labels
Segment of customers who bought products where label on product is one of the list.
Labels are key-value pairs that you can attach to a products. Each of list element has two
values – Key, which is a label name, and Value, which is a label value. Both field need to be
filled out.
Enter your key and value to add a product label. To apply additional labels, click
Bought Labels Type
Field description
FIELD
DESCRIPTION
Key
Product label name
Value
Value of product label with specified in previous step Key
Add label
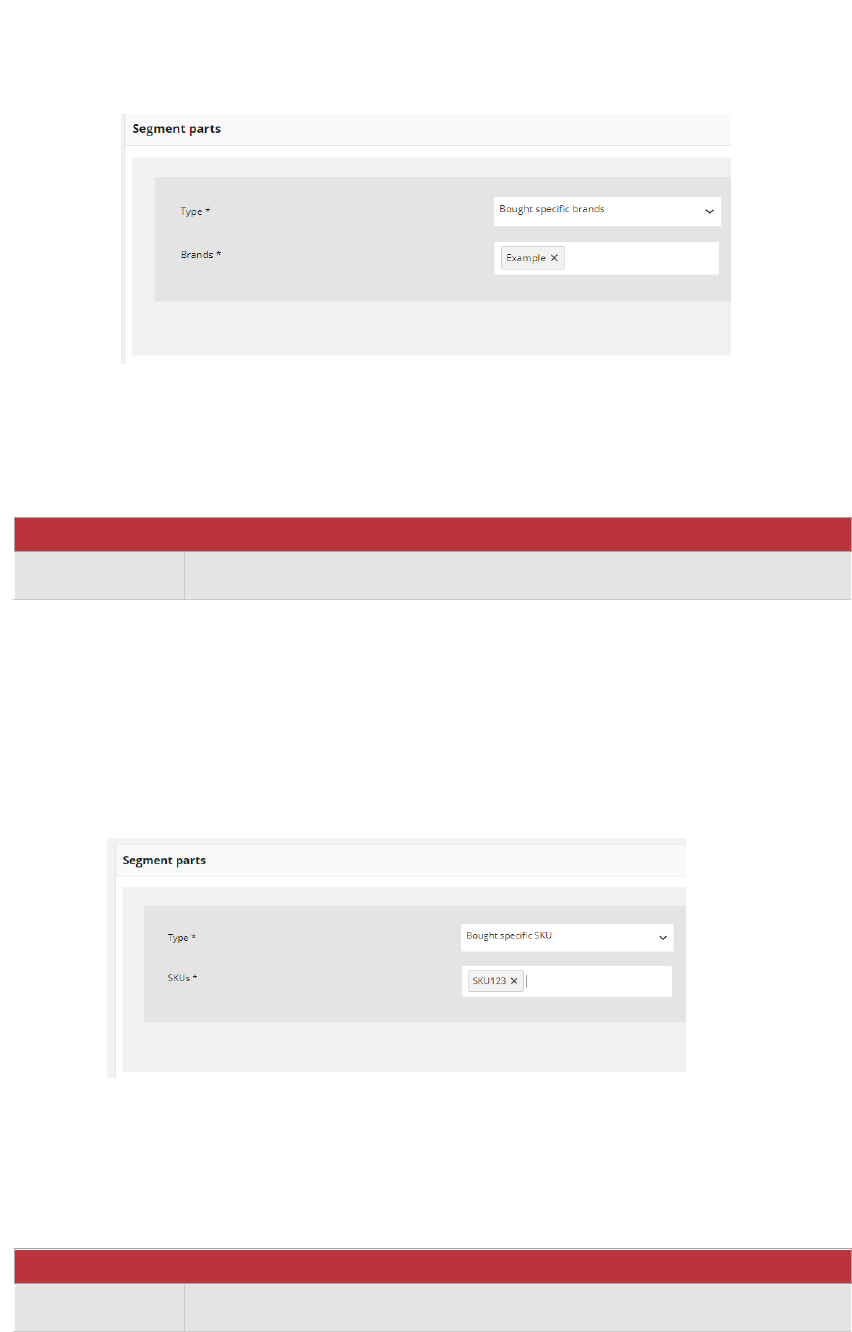
190
Bought specific brands
Segment of customers who bought product or products of a given brand. During creation,
you need to specify one or more Brands that will be included.
Bought Brands Type
Field description
FIELD
DESCRIPTION
Brands
Selected Brands
Bought specific SKU
Segment of customers who bought specific products (on the basis of selected SKU). During
creation, you need to specify one or more SKUs that will be included.
Bought SKUs Type
Field description
FIELD
DESCRIPTION
SKUs
Selected products
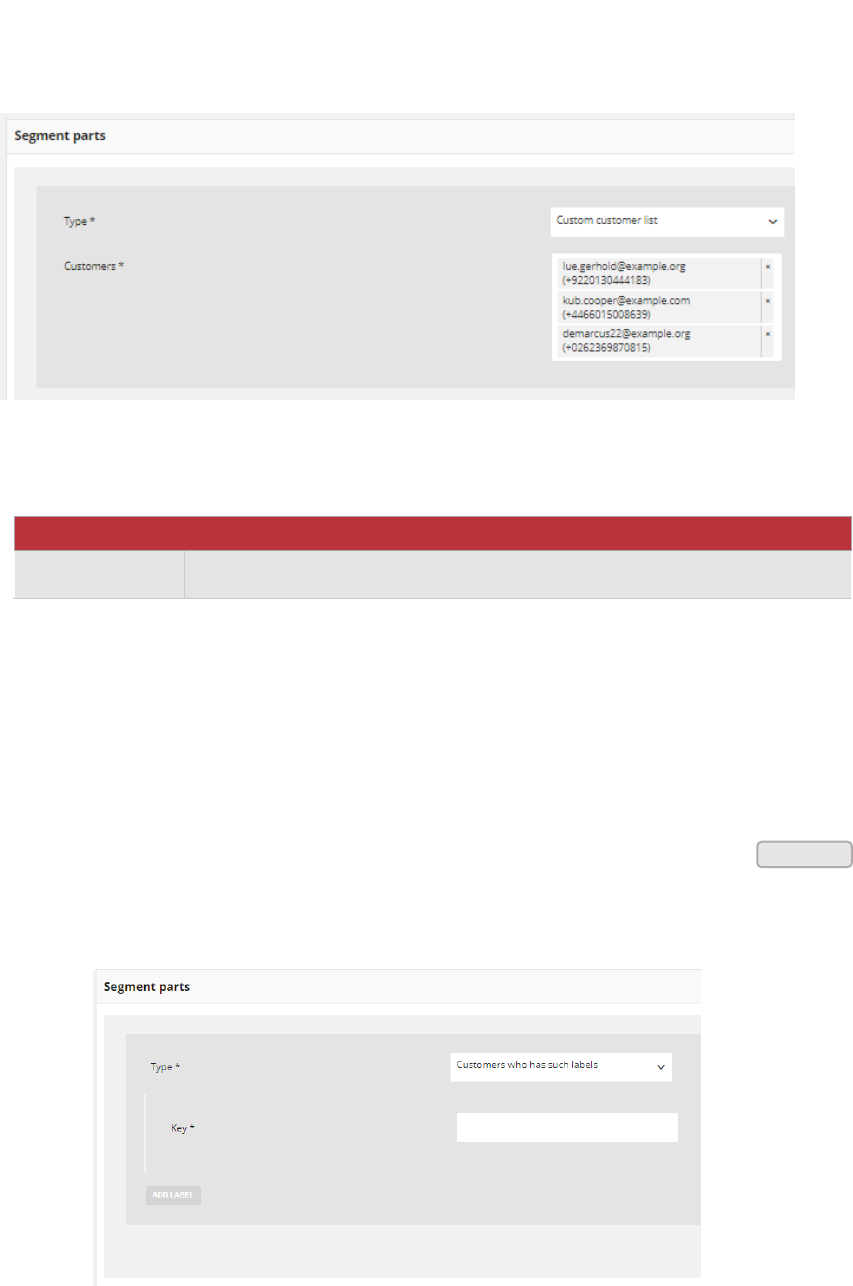
191
Custom customer list
Segment of customers chose by admin user on demand. During creation, you need to
specify email address or phone number of every customer that you want to add.
Custom customer list
FIELD
DESCRIPTION
Customers
Selected Customers
Customers who has such labels
Segment of customers whose label value on is one of the list. Labels are key-value pairs
that you can attach to a customer during customer account creation.
Enter your label Key to add a customer label that will be included. To apply additional
labels, click
Customers Labels Type
Add label
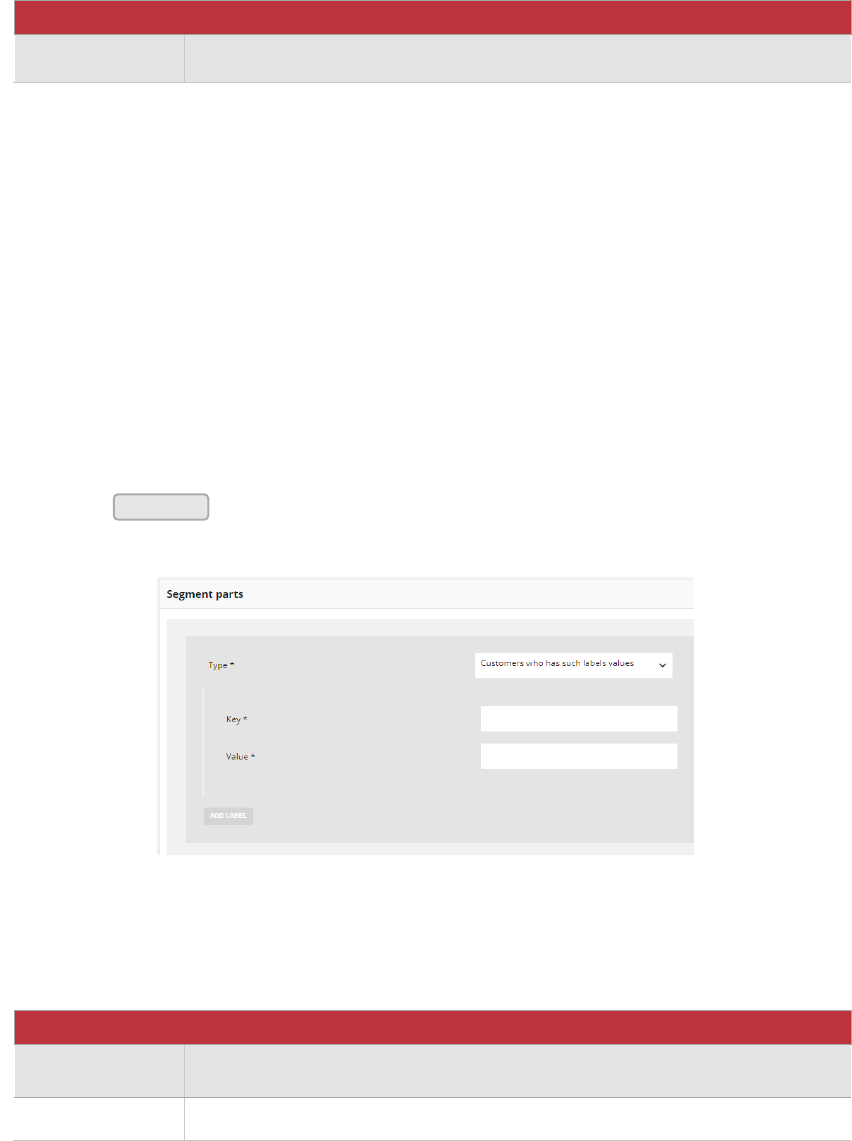
192
Field description
FIELD
DESCRIPTION
Key
Customer label name
Customers who has such labels value
Segment of customers whose label value on is one of the list. Labels are key-value pairs
that you can attach to a customer during customer account creation. Each of list element
has two values – Key, which is a label name, and Value, which is a label value. Both field
need to be filled out.
Enter your key and value to add a customer label that will be included. To apply additional
labels, click
Customer Labels Value Type
Field description
FIELD
DESCRIPTION
Key
Customer label name
Value
Value of customer label with specified in previous step Key
Add label
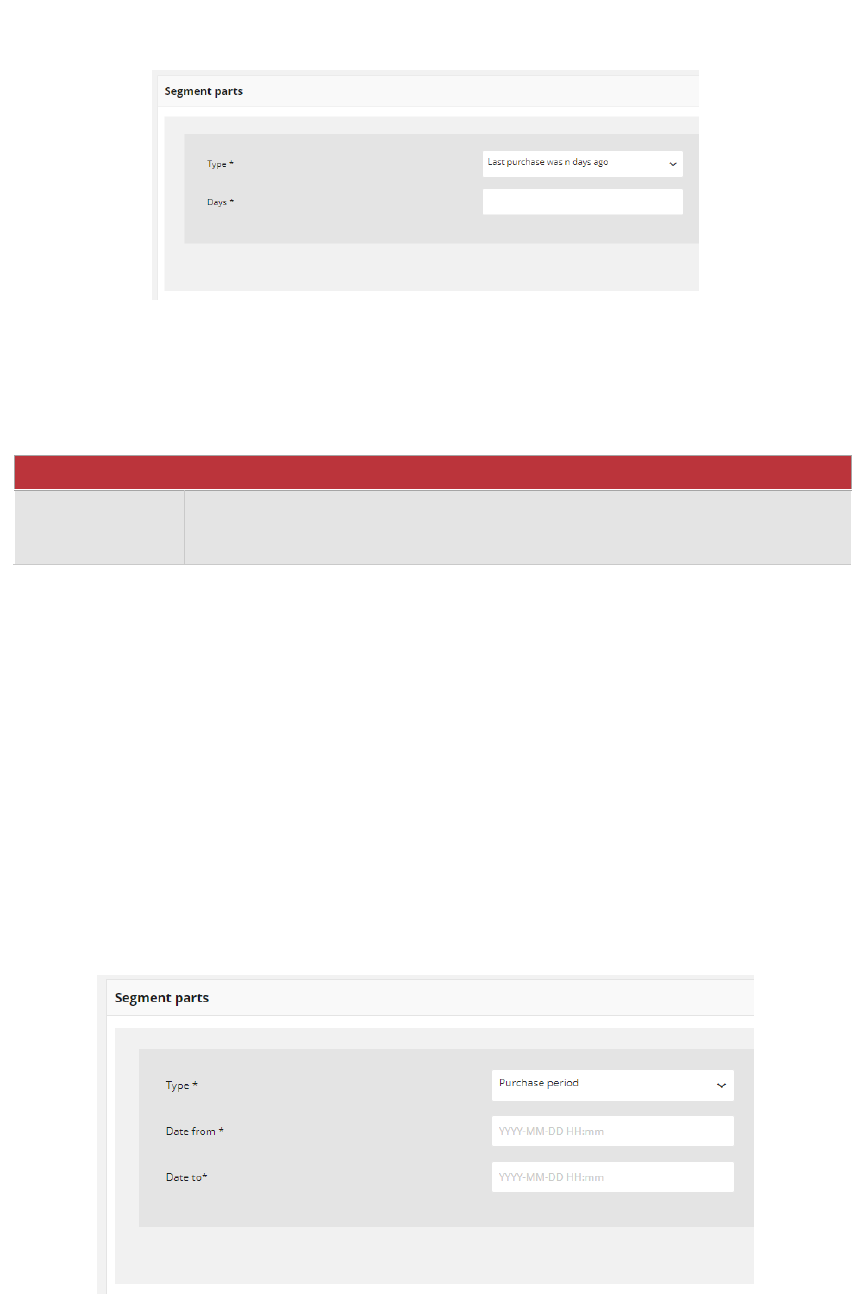
193
Last purchase was n days ago
Segment of customers who have made their last purchase n-days ago. During creation, you
need to specify number of Days back, that will be included.
Last Purchase Type
Field description
FIELD
DESCRIPTION
Days
Number of days back
For example, if Days is equal to 7 then all customers, who made their last
purchase within 7 days back from today will be assigned to segment
Purchase period
Segment of customers who made purchase (at least one) between the specified date
range. During creation, you need to specify the start and end date that will create a time
boundaries from which purchases will be included.
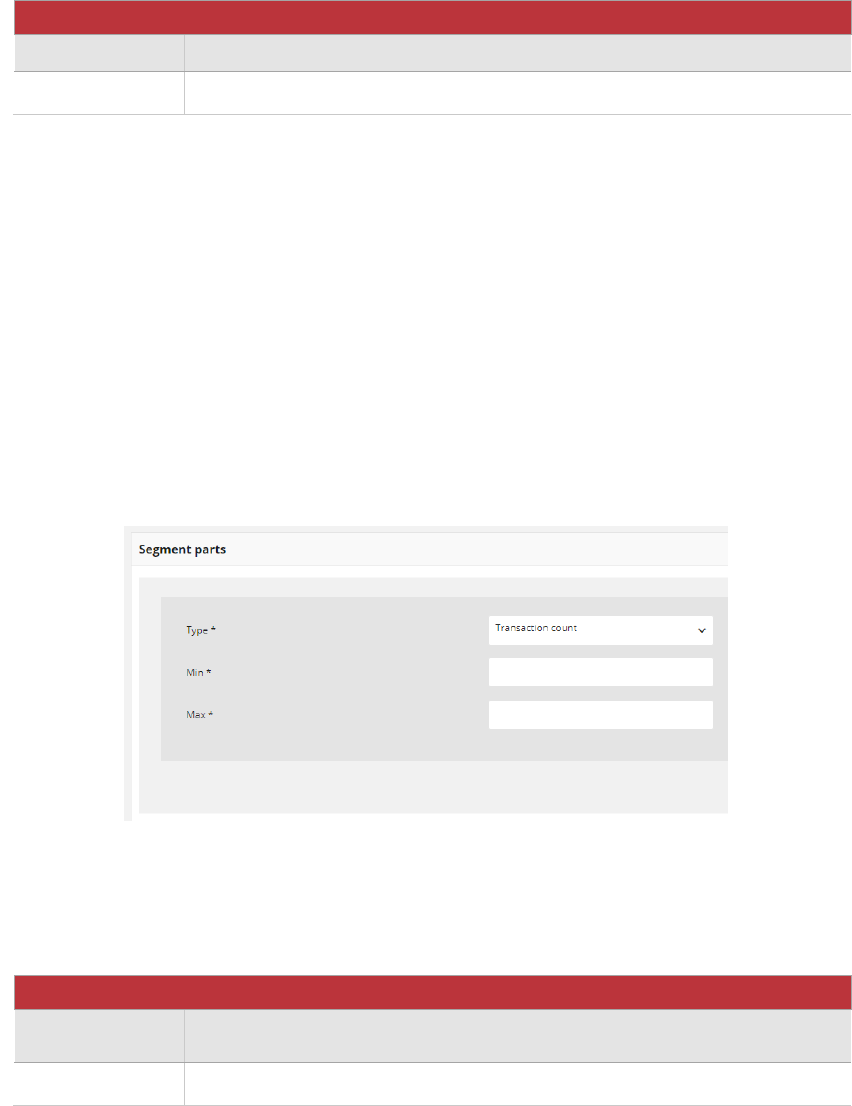
194
Purchase Period Type
FIELD
DESCRIPTION
Date from
Start date from which customers purchases will be included
Date to
End date until which customers purchases will be included
Transaction count
Segment of customers whose number of purchases is within the defined range. During
creation, you need to specify Minimum and Maximum number to define the range in
which the number of transactions must be found.
Transaction Number Type
Field description
FIELD
DESCRIPTION
Min
Determines the minimum number of transactions of customer account
Max
Determines the maximum number of transactions of customer account
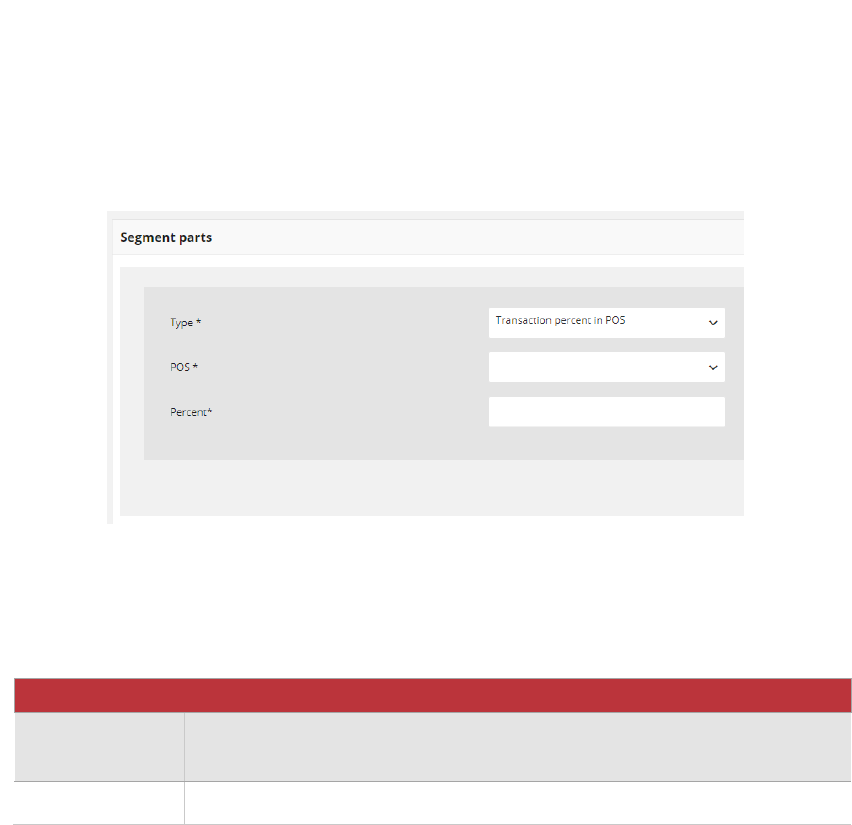
195
Transaction percent in POS
Segment of customers whose number of purchases in a specified POS is within defined
percent amount. During creation, you must specify one POS (store) that will be included
and transaction percentage to be analyzed within that POS.
For example, you can create a segment of customers whose 20% of all transactions are
transactions in a given POS.
Transaction Percent Type
Field description
FIELD
DESCRIPTION
POS
Store which transaction will be included.
To choose store select POS name from a dropdown list
Percent
Percent amount of transaction in a selected POS
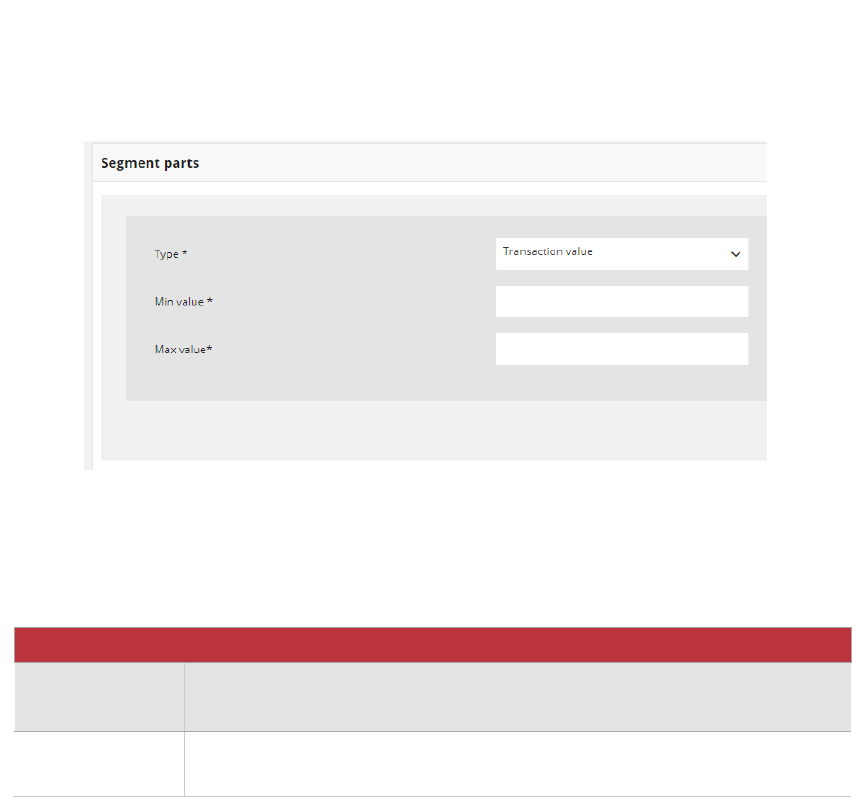
196
Transaction value
Segment of customers whose overall amount of purchases is between the limits. During
creation, you need to specify Minimum and Maximum value to define the range in which
the value of all transactions must be found.
Transaction Value Type
Field description
FIELD
DESCRIPTION
Min value
Determines the minimum value of all transactions value of customer
account
Max value
Determines the maximum value of all transactions value of customer ac-
count
197
REWARD CAMPAIGNS
In this section of the guide you will be familiar with creating and managing rewards
available within your Loyalty Program. You will learn what type of rewards can be choose,
how to assigned reward to specify customers, define activity time and manage reward
details. You will also learn how to verify which rewards have been already redeemed and
by which customers.
REWARD CAMPAIGNS MENU
All reward campaigns
List of customers able to redeem reward
Reward campaign details preview
Buy Reward campaign for Customer
Redeemed rewards
Download redeemed rewards report
All campaign categories
Creating new campaign category
CREATING REWARD CAMPAIGN
CASHBACK
PERCENTAGE DISCOUNT CODE
CUSTOM CAMPAIGN
OTHER TYPES
Updating reward data
Activate/deactivate Reward campaign
Conditions of reward availability to Customer:
198
CHAPTER 22:
REWARD CAMPAIGNS MENU
Customers can redeem points toward various rewards, based on the cost in points of each
that you establish during reward creation. When customer reaches the defined amount of
points, points can be spent for a reward. Redeemed reward appears automatically in
Redeemed rewards menu. During creation you can specify for each reward e.g.:
• How many points customer need to spent to get reward
• How many times rewards can be used by one customer
• How many times reward can be used during all campaign
• To which customer reward will be visible and ready to use
• Time boundaries when reward will be active
• Reward value & taxes information
• Category to which reward belongs
• Reward brand information
For example, a coupon code can be created for a specific customer group, or for anyone
who makes a purchase over a certain amount (segment). To apply the coupon to a
purchase, the customer can enter the coupon code in your online store, or possibly at the
cash register of your offline store.
Reward Campaign Menu
To display the Reward campaigns menu:
On the Admin sidebar, tap , then choose All reward campaigns.
Reward campaigns
199
Menu options
All reward campaigns
Lists all rewards within your loyalty
program, with additional information
about its type, activity, limits, points costs
and customers who can redeem each
reward.
Add reward campaign
Lists all data that need to be filled out to
add new reward to your Loyalty Program
Redeemed rewards
Lists all redeemed rewards with additional
information who and when redeemed
reward and it’s status – delivered or used.
All campaign categories
Lists all reward campaign categories within
your loyalty program, with additional
information about its status and sort order
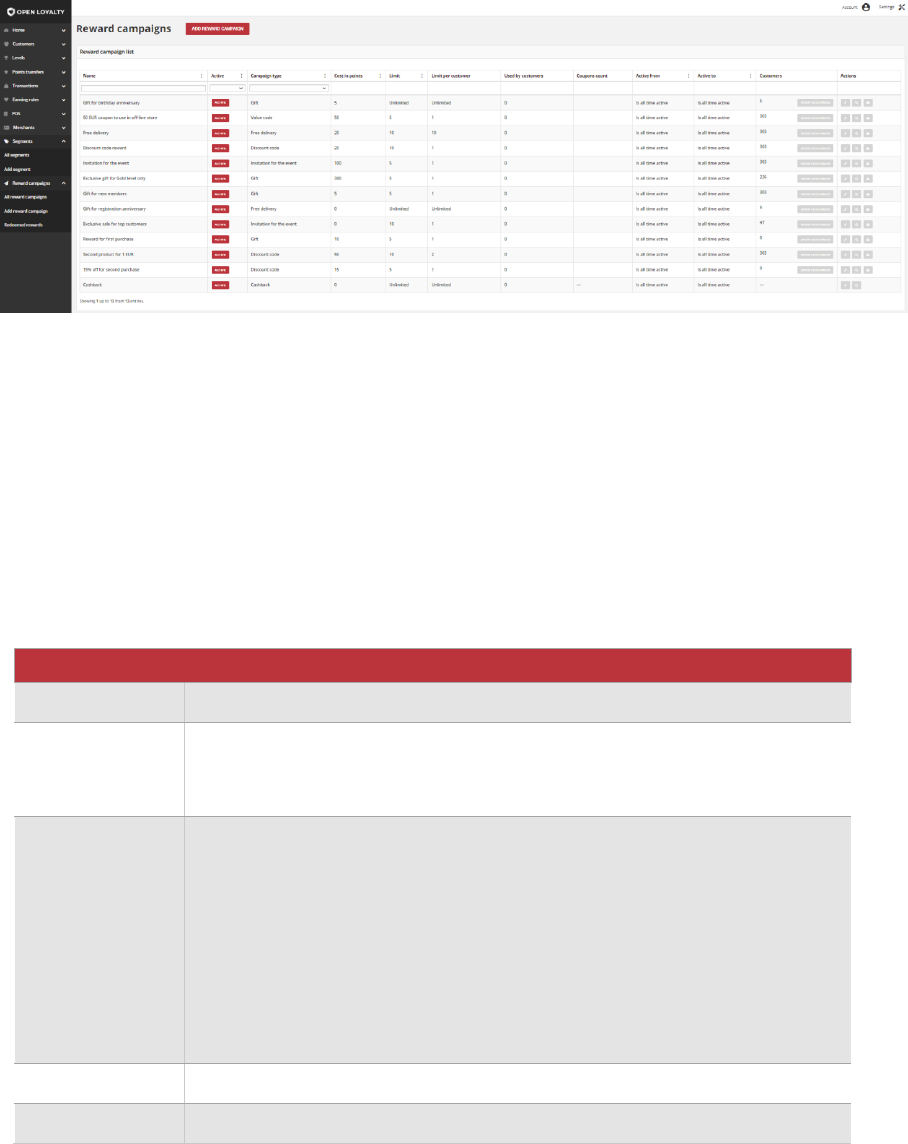
200
All reward campaigns
The All reward campaigns grid provide information about all rewards within your Loyalty
Program with information about type, status, cost in points, limits of use, if and how many
times reward has been used by customers and time boundaries of activity. Moreover, you
can also see how many customers could use reward and preview theirs details.
All Reward Campaigns
Use the standard controls to sort the list, filter and search rewards by typing in the field
under Name column header value you want to find, and apply actions to selected rewards
record (modify, preview details). Pagination controls appear if there are more rewards
records than fit on the page, and are used to move from one page to the next.
Field description
FIELD
DESCRIPTION
Name
Name of the reward
Active
Reward campaign current status. It has higher priority than time Activity
Option include: Active/Inactive.
Customer can redeem only Active reward.
Campaign type
Reward type. Option include:
• Percentage discount code
• Cashback
• Discount code
• Free delivery
• Gift
• Invitation for the event
• Value code
• Custom campaign
Cost in points
How many points Customer must spend to redeem reward
Limit
Information about limit the redeem of rewards globally.
201
Limit per
customer
Information about limit the redeem of rewards by one customer
Used by
customers
Information how many times reward has been redeemed
Coupons count
Information about number of coupons available to redeem
Active from
Day from which reward is active, so visible and available to use for
customers
Active to
Day until reward can be redeem. After that day reward will not be visible for
customer and unavailable to use
Customers
Show number of customers who could redeem reward. After
click, list of these customer details will be shown.
Actions
The operations that can be applied to selected reward. Options include:
• Edit reward details
• View reward details
• Buy reward campaign for client
Show customers
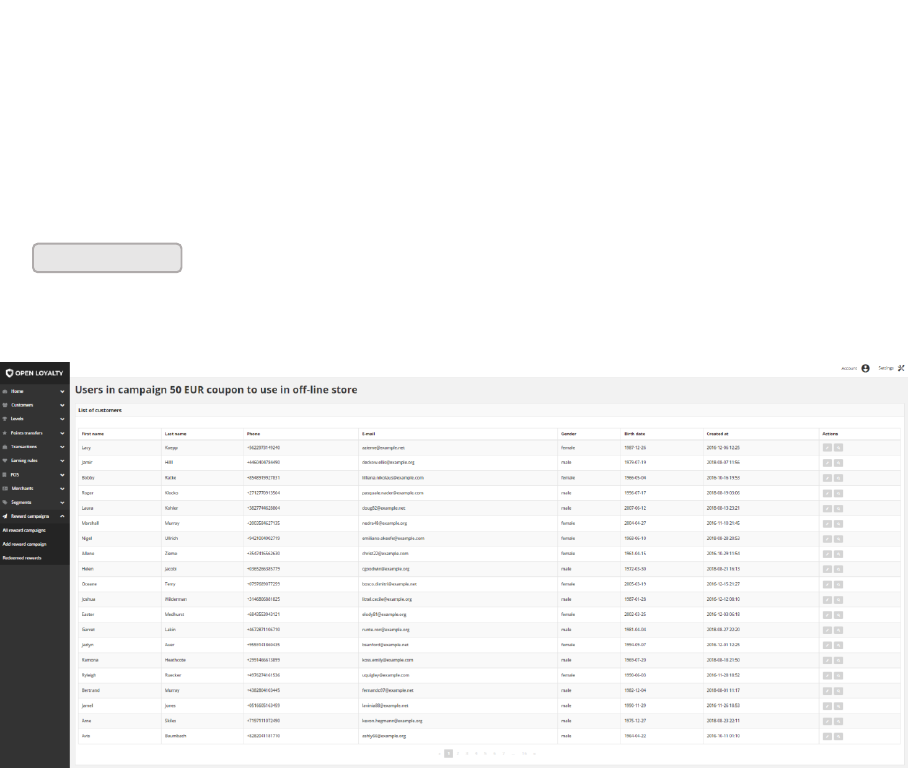
202
List of customers able to redeem reward
You can simply view not only the number but also the list of customers with details who
could redeem reward.
To display the list of customers:
1. On the Admin sidebar, tap Reward campaigns. Then, choose All reward campaigns.
2. In the Reward campaigns list, find the reward you want to see customers list and click
in the Customers column. After clicking, the list of customers will be
opened, filtered according to the selected reward.
List of Customers in Reward Campaign
Use the standard controls to apply actions to selected customers (edit and view profile
details). Pagination controls appear if there are more customer records than fit on the
page, and are used to move from one page to the next.
Show customers
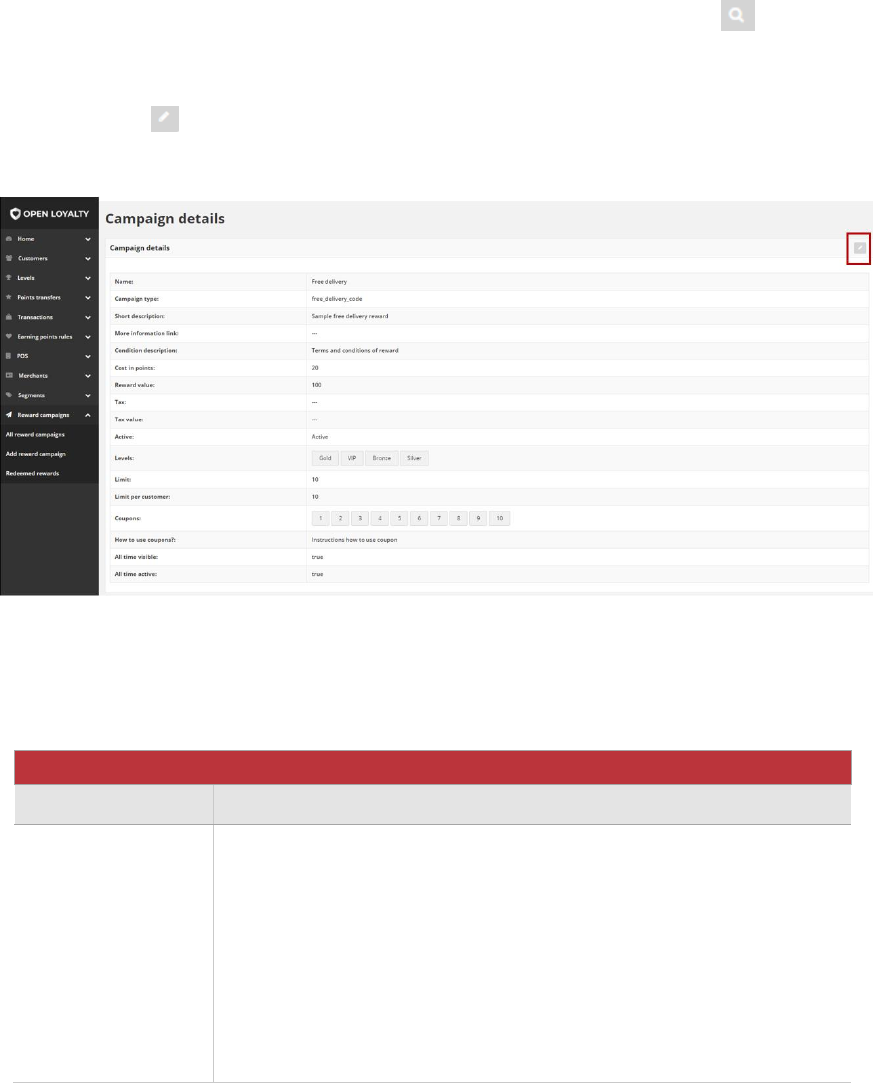
203
Reward campaign details preview
You can see details of each reward campaign directly from All reward campaigns menu.
Campaign details include all data provided during creation process.
To view reward detail information:
1. On the Admin sidebar, tap Reward campaigns. Then choose All reward campaigns.
2. In the Reward campaign list, find the reward to be preview and click View ( ) icon in
the Action column to open the reward in view mode.
3. If applicable, you can simply go to edit mode to change previewed reward data by
clicking Edit ( ) icon in the upper right corner
Campaign Details Preview
Field description
FIELD
DESCRIPTION
Name
Name of the reward
Campaign type
Reward type.
Option include:
• Cashback
• Discount code
• Free delivery
• Gift
• Invitation for the event
• Value code
• Custom campaign
204
Connect type
Display only when Custom campaign is selected
Earning rule
Name of the assign Earning Rule
Display only when Custom campaign is selected
Earning rule points
amount
Display only when Custom campaign is selected
Short description
Brief description of the reward
More information
link
URL to linked page with more information about the reward
Condition
description
Brief description of the conditions of getting a reward
Brand description
Brand description of reward
Categories
Reward assign category/categories.
Cost in points /
Point value
1) Point value displayed only when Cashback is selected.
Monetary value of the points to define the number of points that
can be applied as a refund towards the amount of order
2) Cost in points displayed for any other campaign type (except
Custom campaign)
Number of points represented by the reward to define how
many points customer needs to spend to get a reward
Transaction
percentage value
Value of voucher which is calculated based on the transaction value. For
example, 5, means that customer receive voucher worth 5% of the
transaction amount.
Display only when Percentage discount code is selected
Days inactive
Number of days during which voucher will be inactive since the
transaction date.
Not display when Cashback or Custom campaign is selected
Days valid
Number of days during which voucher will be active since the inactive
time boundaries finished.
Not display when Cashback or Custom campaign is selected
Reward value
Monetary value of reward
Tax
Percentage value of tax for reward
Tax value
Value of tax for reward
Active
Reward campaign status. Option include: Active/Inactive
Levels /
Segments
Identify the customer group that qualifies to receive the reward
1) Levels are displayed when Campaign target type is Level
2) Segments are displayed when Campaign target type is Segment
Limit
Define how many coupon codes could be used during time boundaries
when reward is available.

205
Not displayed when:
• Usage of code number is unlimited
• Cashback or Custom campaign is selected
Limit per customer
Define how many coupon codes could be used by one customer during
time boundaries when reward is available.
Not displayed when:
• Usage of code number is unlimited
• Cashback or Custom campaign is selected
Coupon codes
List of Coupon codes to use by Customer.
Not displayed when Cashback or Custom campaign is selected.
How to use
coupons?
Description how Customer can use discount code.
Not displayed when Cashback or Custom campaign is selected.
All time visible
Define is reward always visible for customers on the storefront. Options
include: true/false
If false, additional field Visible from and Visible to are display with
information about time boundaries
Not displayed only when Cashback is selected.
All time active
Define is reward always available for customers to choose and use.
Options include: true/false.
If false, additional field Active from and Active to are display with
information about time boundaries
Campaign photo
Reward campaign images
Labels
Reward campaign labels, if assigned
Featured
Define if the reward has an featured attribute. Options include: true/false
Public
Define if the reward has an public attribute. Options include: true/false
Brand name
Reward brand name
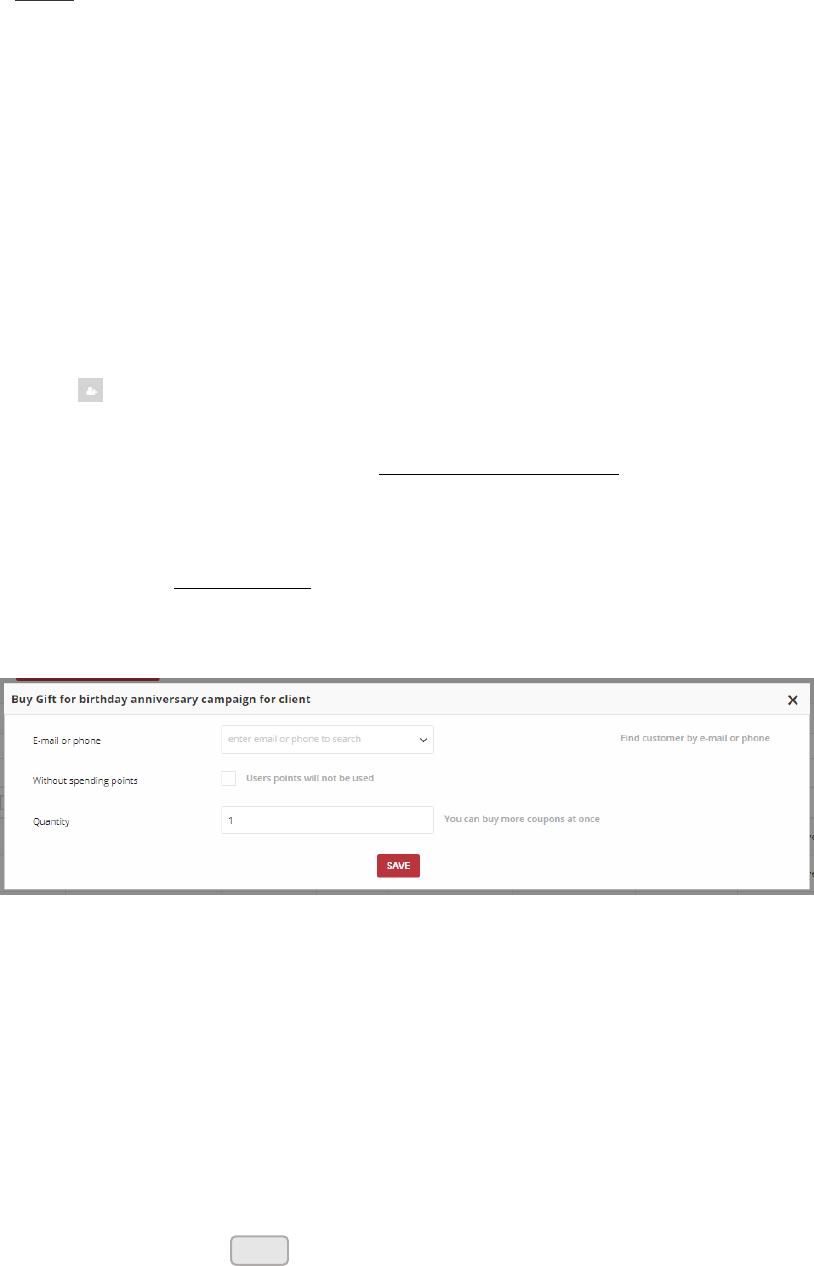
206
Buy Reward campaign for Customer
Any active Reward campaign (except Cashback) can be assign manually by Admin user to
selected customer account.
Admin user can create new or use existing reward campaign from All reward campaigns
list to “buy” a reward for a customer using his points or just add it for free.
As an admin you can “buy” more than one coupon within one campaign at once. Note, that
quantity is limited by Reward campaign limits (define during creation – Limit & Limit per
customer)
To assign a Reward campaign to Customer:
1. On the Admin sidebar, tap Reward campaigns. Then, choose All reward campaigns.
2. In the Reward campaign list, find the active reward campaign to be bought and click
Assign ( ) icon in the Action column.
Depending on the selected Campaign type, a window will display different fields to
filled in. Different fields are required for Percentage discount code, than for other types
i.e. discount code, free delivery etc.
3. When you choose any other than Percentage discount code, in the opened window do
the following:
Buy reward campaign for client
a. Provide E-mail or phone number of the customer to whom you want to assign the
reward
b. Mark Without spending points checkbox to give reward to a customer for free
(without using his points). When unmarked, defined in Reward campaign details
points amount (Cost in points) will be deducted from customer Active points pool
c. In Quantity filed provide number of coupons to be assign to customer (remember
about the reward campaign limits)
d. When complete, tap
Save
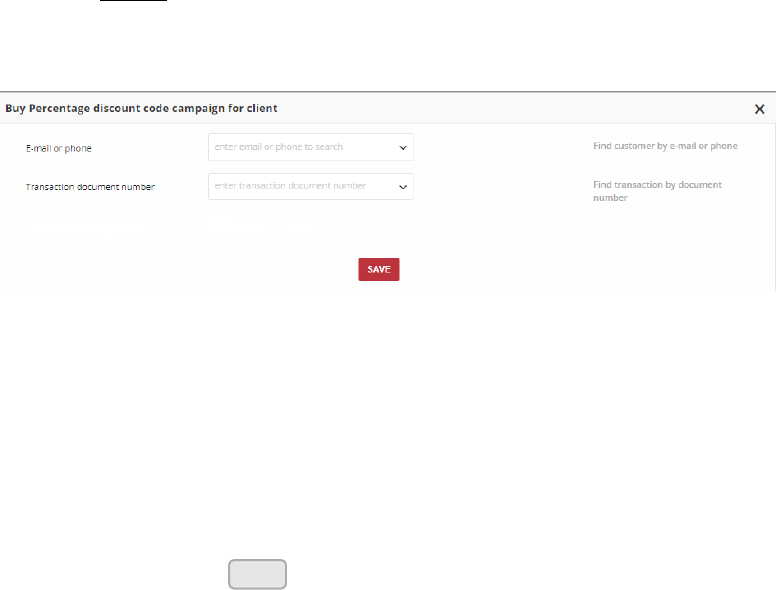
207
4. When you choose Percentage discount code, additional field to assign it with
transaction will be displayed instead Quantity. In the opened window do the following:
Buy Percentage discount code for Client
a. Provide E-mail or phone number of the customer to whom you want to assign the
reward
b. Ener Transaction document number belonging to selected in previous step
customer. Value of this transaction will be a base to calculate percentage discount
that customer receive.
c. When complete, tap
5. Bought reward campaign appears on Redeemed rewards list.
Save
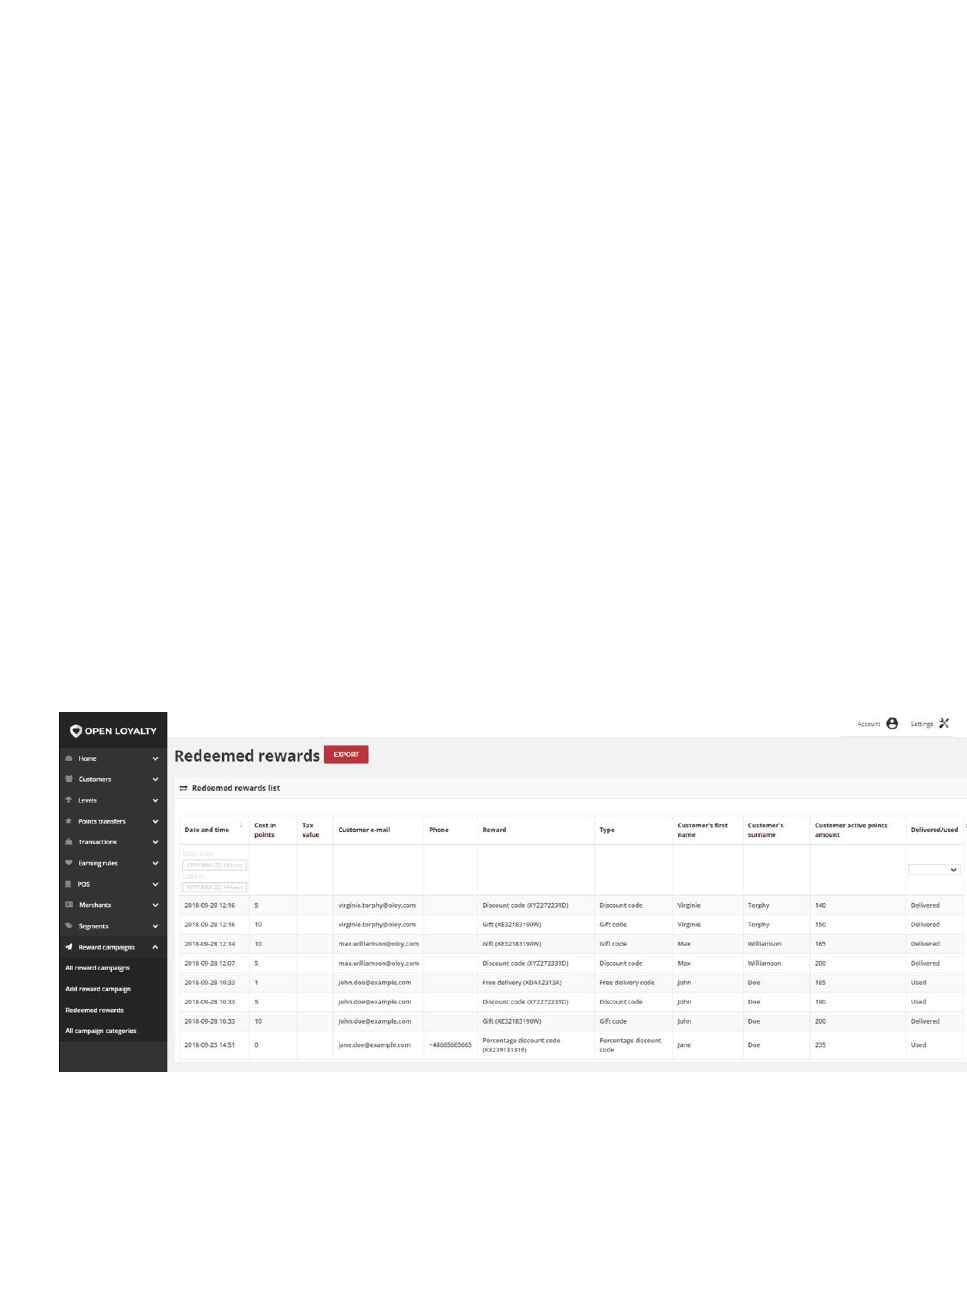
208
Redeemed rewards
Redeemed reward is an instance of reward that Customer has bought with Points
or earned for performing specified action.
There is possibility to get:
• virtual reward - as a Discount or Value Code, free delivery
• physical reward - which will be send to Customer, e.g. printed coupon, gift, etc.
• cashback
Not enough points
If Customer does not have enough points to redeem reward then Redeem reward button
will be disabled (greyed out).
When mouse hover over disabled button then tooltip will show "You must have <<reward
cost - customer active points>> more points to get reward.".
Redeemed reward from Admin perspective
Redeemed reward management could be performed only from Administrator Cockpit by
user who has Admin privileges.
Redeemed rewards list grid provide an information about which customer and when re-
deemed given reward. Moreover, you can check whether reward is Delivered (customer
choose reward and spent points but he has not used it yet) or Used (customer used cou-
pon code during purchase, gift was sent to customer etc.)
Redeemed Rewards
Use the standard controls to sort the list by Date and time and filter list to get a register of
reward that are Delivered or Used. By default Redeemed rewards grid show both – deliv-
ered and used reward. Pagination controls appear if there are more redeemed rewards
records than fit on the page, and are used to move from one page to the next
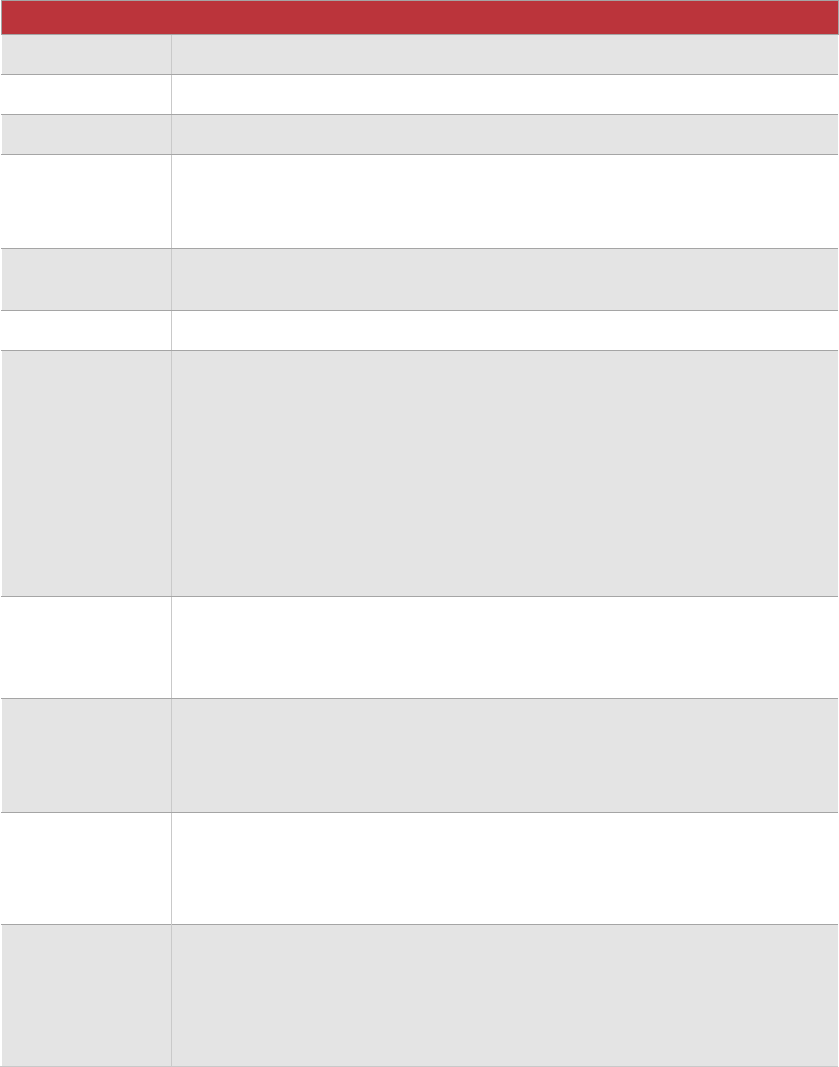
209
To see all Redeemed rewards:
1. On the Admin sidebar, tap Reward campaigns. Then choose Redeemed rewards.
Field description
FIELD
DESCRIPTION
Date and time
Date when reward was redeemed
Cost in points
Number of points that customer spent for this reward
Tax value
Value of tax for reward
Customer e-mail
Email address of customer who redeemed reward. E-mail address is used as
an identification factor to verify which customer choose particular reward.
Phone
The customer’s phone number. Can be used also as an identification factor.
Reward
Name of the reward with coupon code number in round brackets
Type
Reward type.
Option include:
• Cashback
• Discount code
• Custom campaign
• Free delivery
• Gift
• Invitation for the event
• Percentage discount code
• Value code
Customer’s first
name
First name of customer who redeemed reward
Customer’s
surname
Last name of customer who redeemed reward
Customer active
points amount
Amount of customer active points after he redeemed reward.
From customer Active points pool, redeemed reward Cost in points value is
deducted.
Delivered/Used
Redeemed reward statuses. Options include:
• Delivered
• Used
To learn how to select reward as a used, see Redeemed rewards in profile
detail section

210
Download redeemed rewards report
There is also possibility to download a report of redeemed rewards into a CSV file.
Redeemed rewards report
To download the redeemed reward report:
1. On the Admin sidebar, tap Reward campaigns. Then, choose All reward campaign
2. Click at the top of the page
Redeemed rewards export Button
2. In the Redeemed rewards report dialog, do the following:
Redeemed rewards export
a. In Date from field choose start date from which redeemed rewards data will be
included in a report (base on Date and time)
b. In Date to field choose end date until which redeemed rewards data will be
included (base on Date and time)
3. When complete, tap . After clicking, the list of redeemed rewards will
be download in .CSV format
Export
Download report
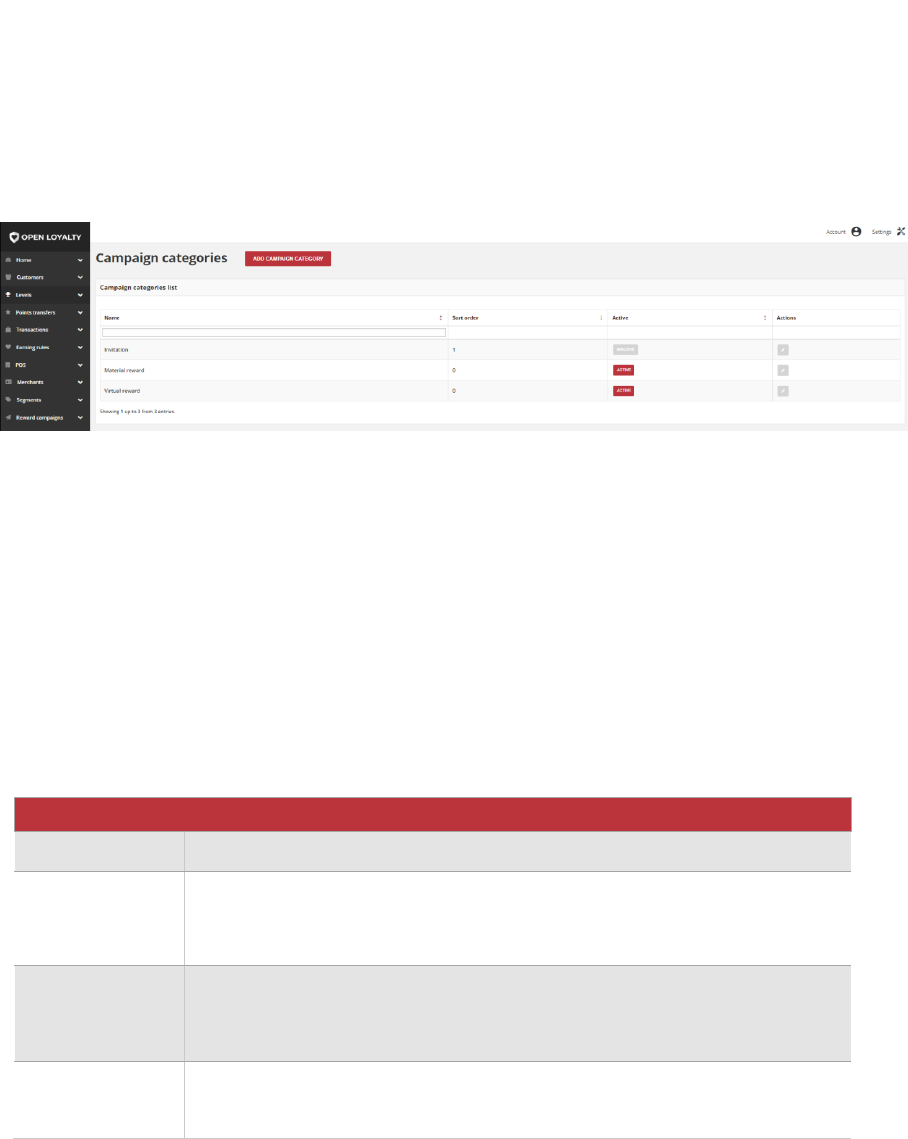
211
All campaign categories
The All campaign categories grid allows you to manage reward campaign category to
facilitate their identification.
Grid provide information about all categories that can be assign to particular reward
(during it’s creation/edition) with information about status.
Depending on the Translations settings, Basic information’s can be provided in different
language versions (listed in Translations). Information from that section can be display on
a Client cockpit depending on a chosen from the admin cockpit default language version.
For example, when default language is English, information are display in English, but when
we change it on polish as a default language, all basic information will be displayed in
polish (if provided).
All Campaign categories
Use the standard controls to sort the list in Sort order column, filter and search categories
by typing in the field under Name column header value you want to find, and apply actions
to selected rewards record (modify). Pagination controls appear if there are more
campaign categories records than fit on the page, and are used to move from one page to
the next.
Field description
FIELD
DESCRIPTION
Name
Name of the campaign category
Sort order
Column is used to sort campaign category.
Number determine order in which category will be listed after sorting in
ascending (from high to low) and descending (from low to high) order.
Active
Category status. Options include: Active/Inactive.
Regardless of the status, each category can be assigned to the reward
campaign
Actions
The operations that can be applied to selected category. Option include:
• Edit category details
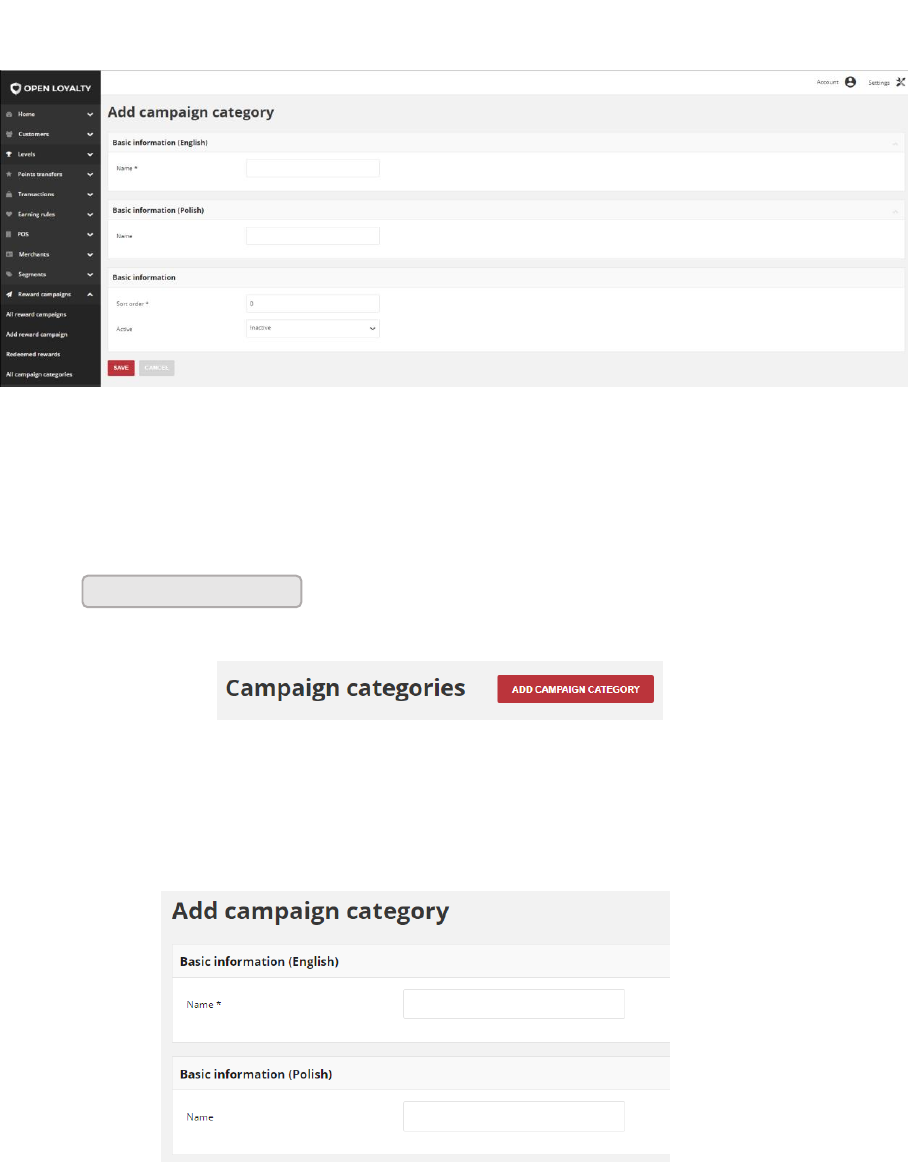
212
Creating new campaign category
You can create unlimited amount of category that can be assign to the reward campaign.
Add Campaign Category
To add new campaign category:
1. On the Admin sidebar, tap Reward campaigns. Then, choose All campaign categories
2. Click at the top of the page
Category add Button
3. In the first Basic information section, related to the default language version do the
following:
General basic information
a. Enter the Name of the category
b. If applicable, fulfill the same fields in other language version e.g. polish as on a
screen above
Add campaign category
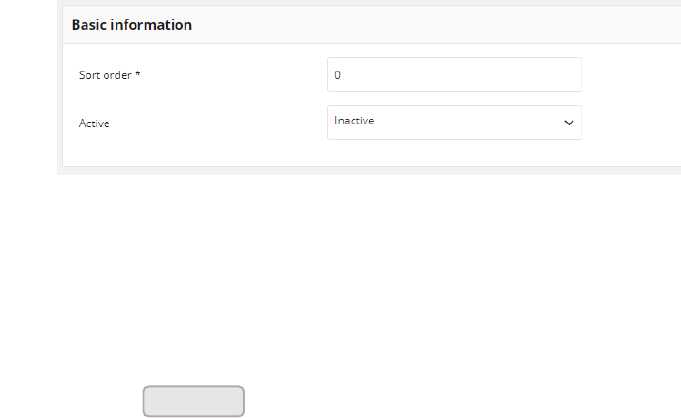
213
4. In next Basic information section provide as follow:
Detail Basic information
a. In Sort order field enter the number, determine order in which category will be
listed after sorting
b. To activate the rule, in Active field select “Active” from the dropdown list
5. When complete, tap
Save
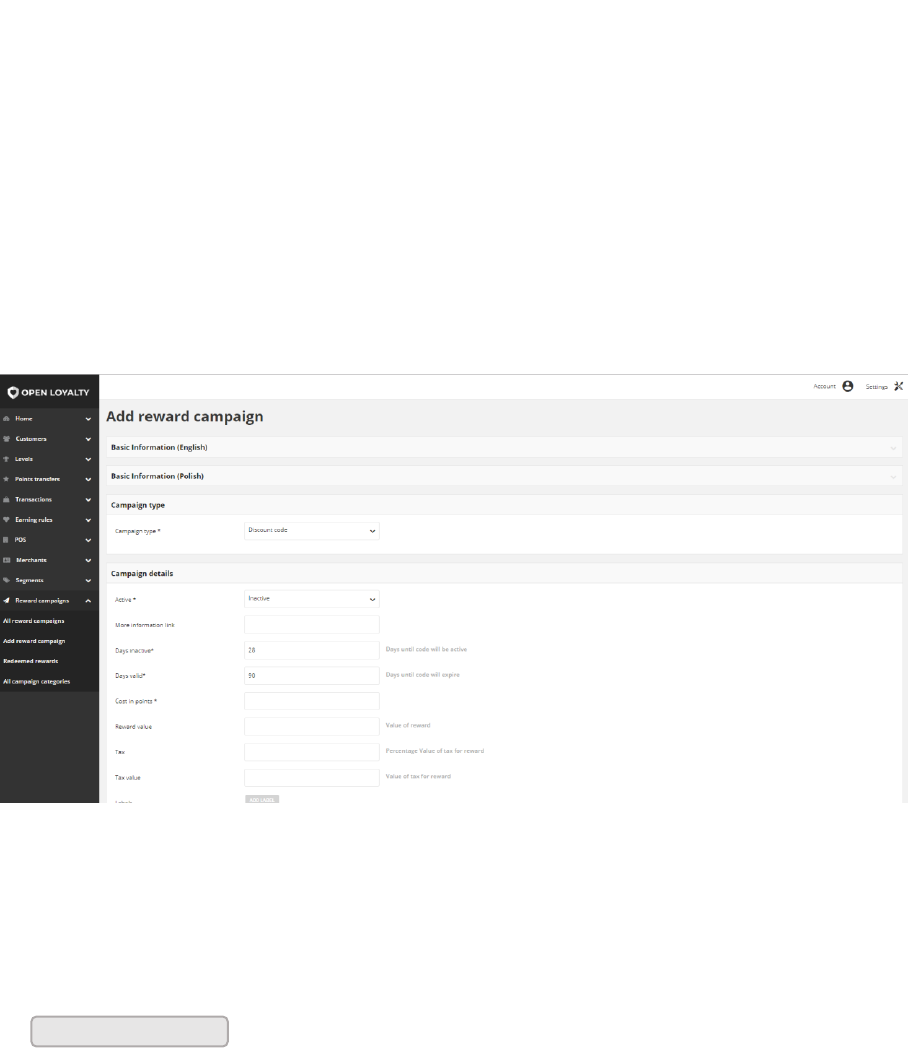
214
CHAPTER 23:
CREATING REWARD CAMPAIGN
Open Loyalty Reward campaigns gives you the ability to create unique rewards that
customer can be awarded for a wide range of transaction and activities within your loyalty
program. During creation you determine time boundaries, when reward is available for
customer, customers groups for whom the reward is available and defines the basic
operating parameters.
Depending on the Translations settings, Basic information’s can be provided in different
language versions (listed in Translations). Information from that section can be display on
a Client cockpit depending on a chosen from the admin cockpit default language version.
For example, when default language is English, information are display in English, but when
we change it on polish as a default language, all basic information will be displayed in
polish (if provided).
Add New Reward
To create a New Reward Campaign:
1. On the Admin sidebar, tap Reward campaigns. Then, choose Add reward campaign.
You can also add new reward directly from All reward campaigns list by clicking
at the top of the page.
Add reward campaign
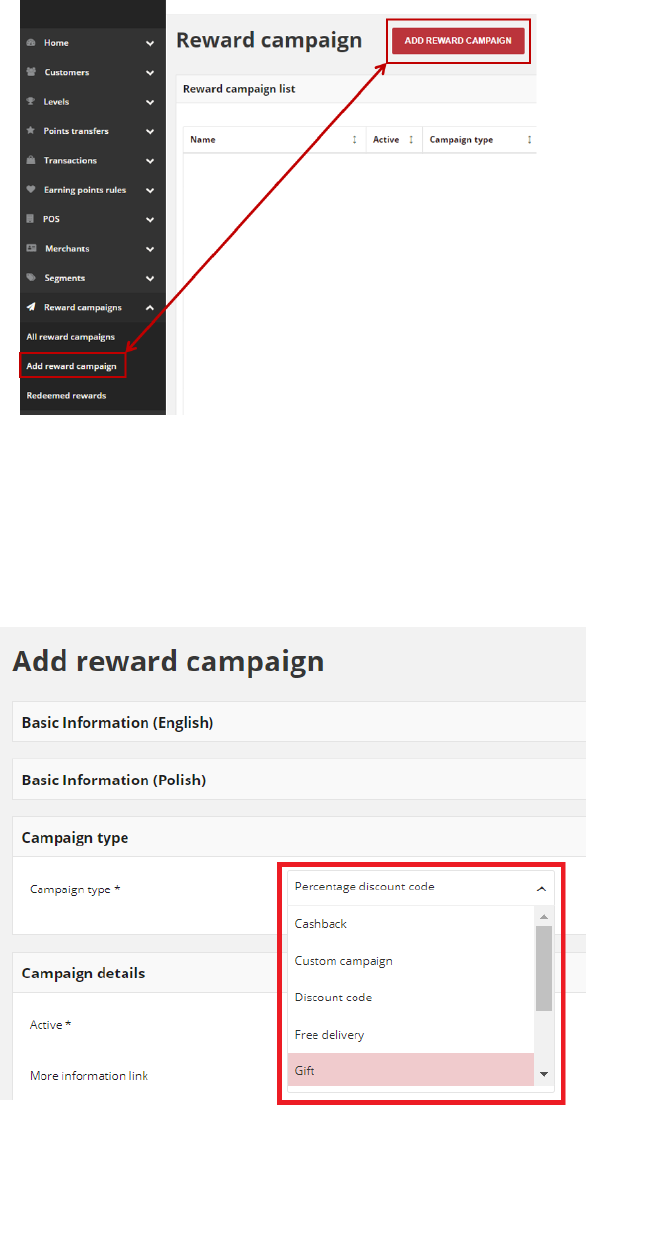
215
Add Reward Options
2. In the Campaign type section, select a reward type from a dropdown list, to one of the
following (by default Discount code is displaying):
Campaign Type
Cashback during purchase customer can exchange earned points for
value discount and reduce order amount
Custom campaign possibility to link with geolocation or QRcode earning rule.
Information about that connection will be accessible via API
and in reward details.

216
Discount code percentage discount applied to reduce order amount, e.g. 25%
off for next purchase
Free delivery free shipping promotion
Gift material article offer as a present (without payment), e.g. book
Invitation for the event invitation for business & corporate events or other depending
on your business, e.g. conference
Percentage discount code percentage discount of registered order amount
Value code value discount applied to reduce order amount, e.g. 25 EUR
off for next purchase
Depending on the selected Campaign type, a Basic information and next section -
Campaign details will display different fields to filled in. Different fields are required for
Cashback, Custom reward and Percentage discount code , than for other types i.e.
discount code, free delivery etc.
CASHBACK
3. When you choose Cashback, in the Basic information section related to the default
language version do the following:
Cashback Basic Information
Percentage discount code, Custom campaign and Cashback are not visible for a
customer in Available rewards section
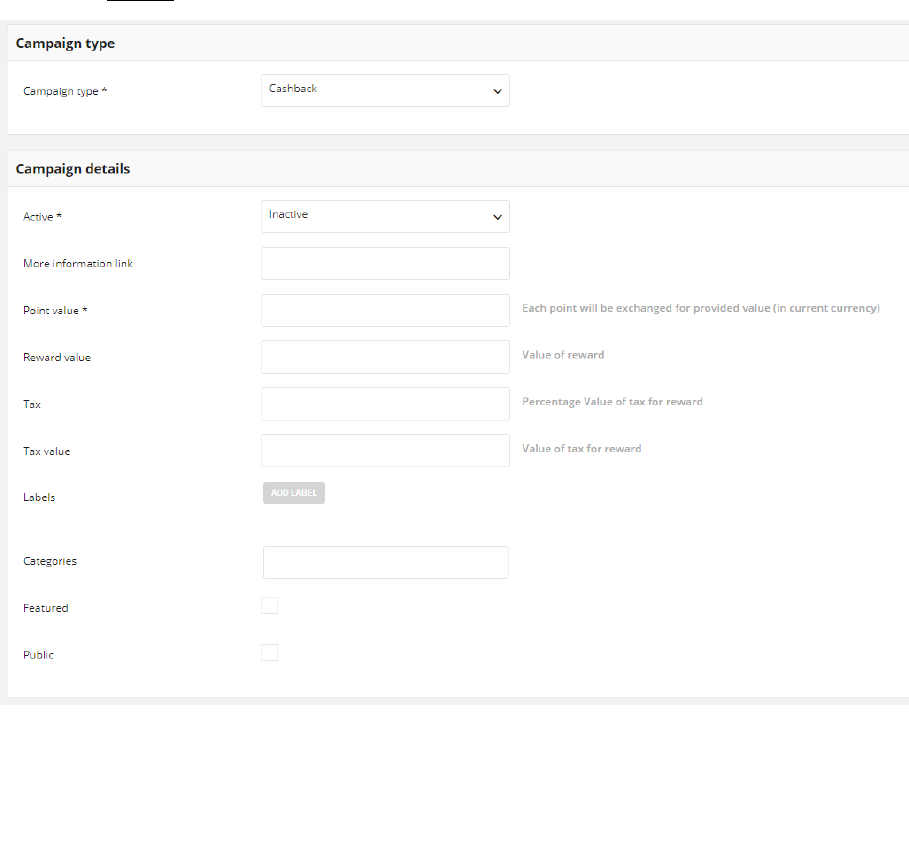
217
a. Enter unique reward Name
b. If needed, provide a Short description of the reward campaign detail using rich
media format.
c. If needed, in Brand name field provide the name of the brand, that will be display in
Client cockpit
d. If needed, provide a Brand description of the reward campaign using rich media
format
e. If applicable, fulfill the same fields in other language version e.g. polish as on a
screen above.
4. When you choose Cashback, In the Campaign details section do the following:
Cashback Campaign Details
a. To make reward available for customer, in Active field select status “Active” from the
dropdown list
b. If needed, enter URL to the content page in More information link field, that
explains your reward campaign or to external web with reward details

218
c. In Point value field, enter the monetary value of the points to define the number of
points that can be applied as a refund towards the amount of order
d. If applicable, In Reward value field provide a monetary value of reward
e. If needed, enter Tax rate that applies to the reward and monetary value of tax for
reward in Tax value
f. If applicable, create Label(s) you want refer to reward. Labels are intended to be
used to specify identifying attributes of reward campaign. Labels can be used only
when you use API to organize subsets of rewards and make filtering/searching
rewards campaign easier. Through API you will be able to get list of all rewards with
specified key or key and value.
Reward Campaign Labels
To create Label, tap and do the following:
• Type label Key, which is a label name
• Type label Value
For example: Key – Event, Value – Birthday. Filtering/Searching via API
allows you to get list of all rewards related to events or (more specified)
related to birthday event.
Repeat the process for all labels you want to used in your Loyalty Program
g. In Categories field, select campaign category or categories to be assign to this
reward campaign. You can assign more than one campaign category.
Campaign category
Labels can be added to reward campaign during reward creation and subsequently
added and modified at any time
Add Label
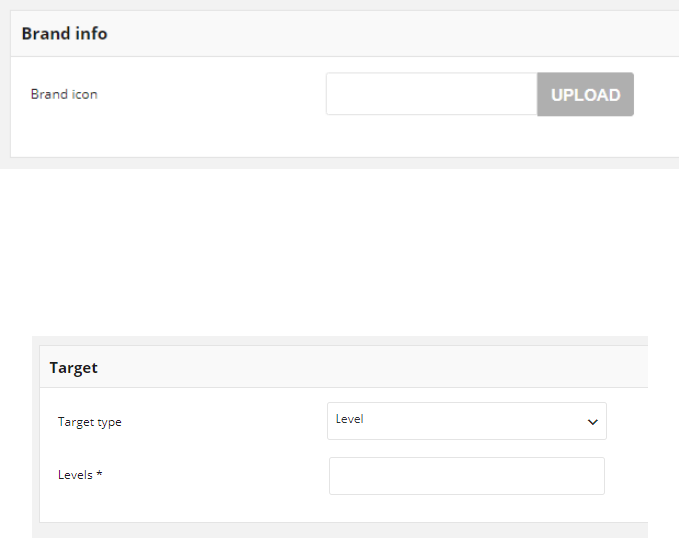
219
h. If applicable, mark Featured checkbox to differentiate campaign from the
others. Feature is used when you want to filter campaigns using API .
i. If applicable, mark Public checkbox to differentiate campaign from the others.
Feature is used when you want to filter campaigns using API .
5. Brand info section allow to upload an image of the reward brand, that will be display in
Client cockpit
Brand info
6. A reward can be extended to members of a specific customer group. In the Target
section identify the customer group that qualifies to receive the reward:
Target
a. In Target type field, select from dropdown list Level or Segment to specify whether
the reward will be available for customers assigned to particular level or segment
b. Depending on selected Target type, field Segments to specify segments or Levels to
specify levels appear. You can choose one or more levels/segments to used
7. Activity section define time boundaries when reward can be used by customers. To
make the reward available for a limited period of time, complete the From and To dates
in Activity section:
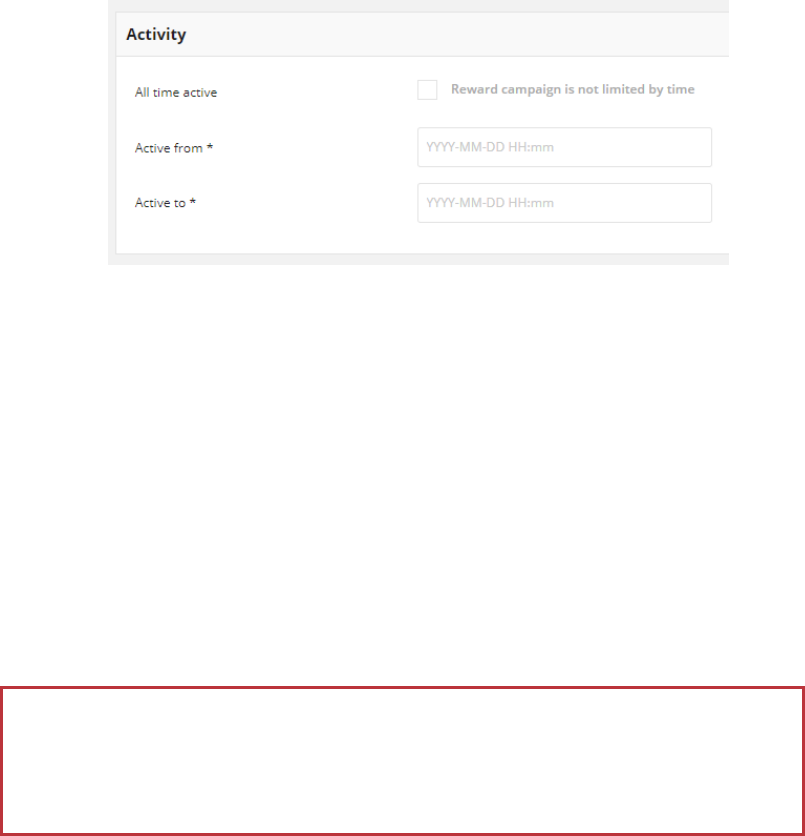
220
Activity
a. In Active from field set the first date the reward is available. You can either enter the
date or select it from the calendar.
b. In Active to field set the last date the reward is available. You can either enter the
date or select it from the calendar.
Active to and Active from fields are available only when reward activity (availability) is
limited.
c. If you want the reward to be active all the time mark All time active checkbox. When
you choose that option Active from and Active to fields will not be available.
Status of the Reward campaign (Active/Inactive) has higher priority than time
boundaries from Active section.
Even if time boundaries from Activity section will be valid, changing Status to
Inactive means that reward will not be available to customers.
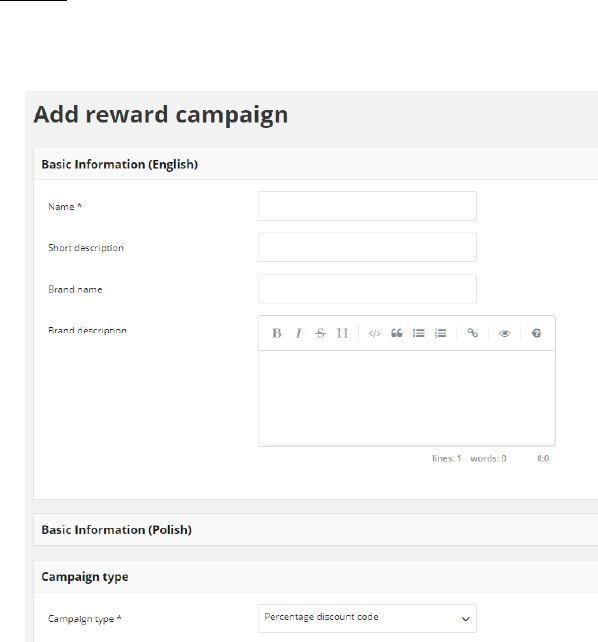
221
PERCENTAGE DISCOUNT CODE
8. When you choose Percentage discount code, in the Basic information section repeat
steps a-e from point 3, and provide reward:
Percentage discount code Basic Information
• Name
• Short description, if needed
• Brand name, if needed
• Brand description, if needed
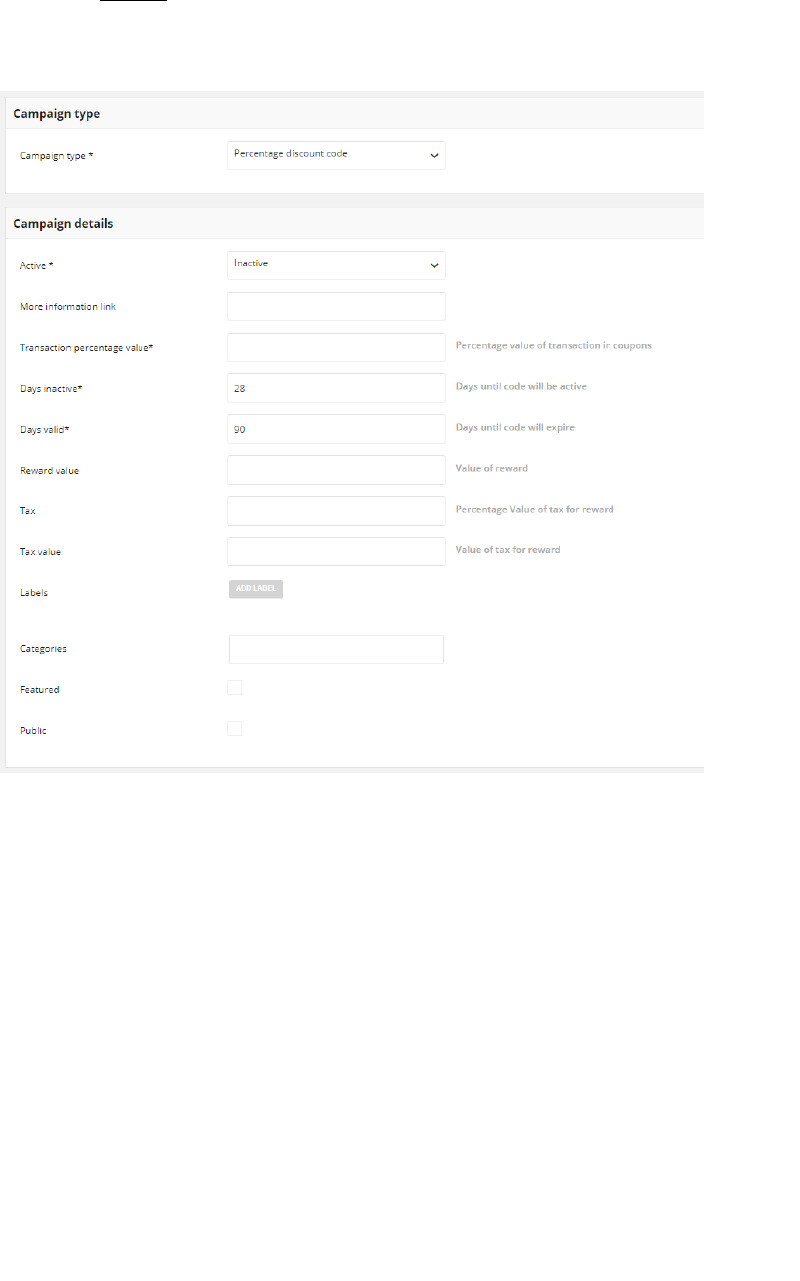
222
9. When you choose Percentage discount code, In the Campaign details section do the
following:
Percentage discount code campaign details
a. Repeat steps a-b from point 4, and provide reward:
• Status
• More information link, if needed
b. In Transaction percentage value field provide a value of voucher which is
calculated based on the transaction amount. For example, if you enter 10, customer
receive voucher worth 10% of the transaction value.
c. In Days inactive define number of days during which coupons assign to this
campaign will be inactive since the transaction date. If you want make coupon valid
instantly, provide 0.
d. In Days valid specified number of days during which coupon assign to this campaign
will be active since the inactive time boundaries finished. After provided here
number of days voucher will be inactive.
e. If needed, repeat steps d-i from point 4, and provide as an optional:
• Reward value
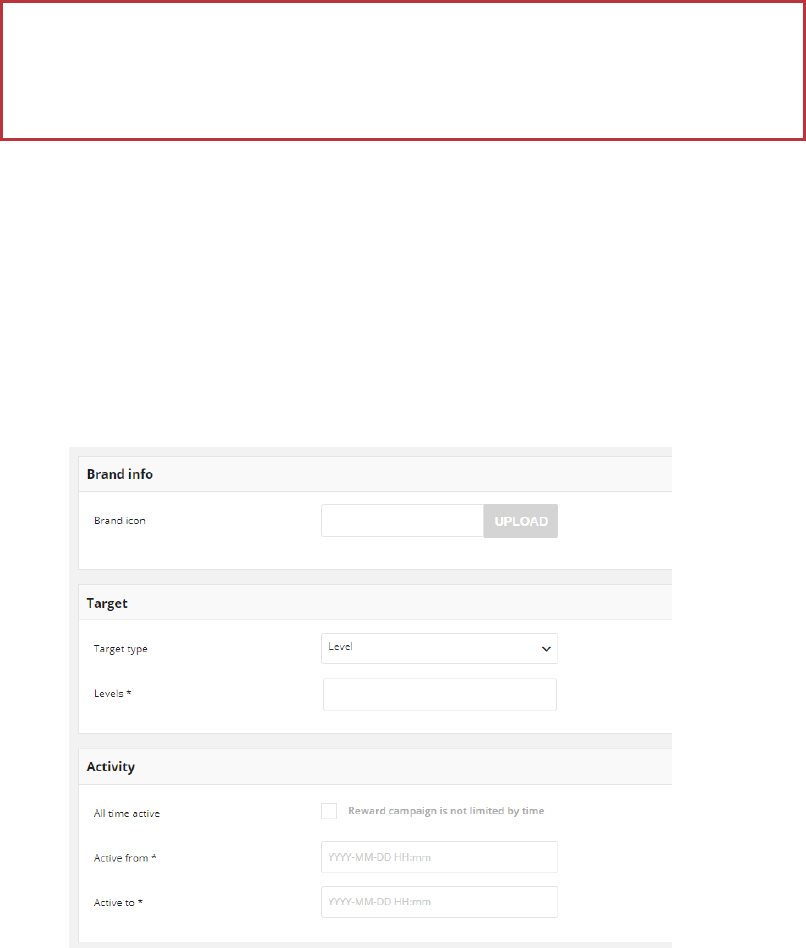
223
• Tax
• Tax value
• Labels
• Categories
• Featured
• Public
10. Repeat steps from points 5, 6 and 7 and fulfill listed section:
• Brand info, with reward brand icon
• Target section, to specify the customer groups that qualifies to receive the
reward
• Reward campaign Activity time boundaries
Percentage discount code other sections to be filled out
Percentage discount code must be match with specified customer transaction to be
used.
It can be match manually by Admin from Reward campaign list or automatically
assigned within Instant reward rule.
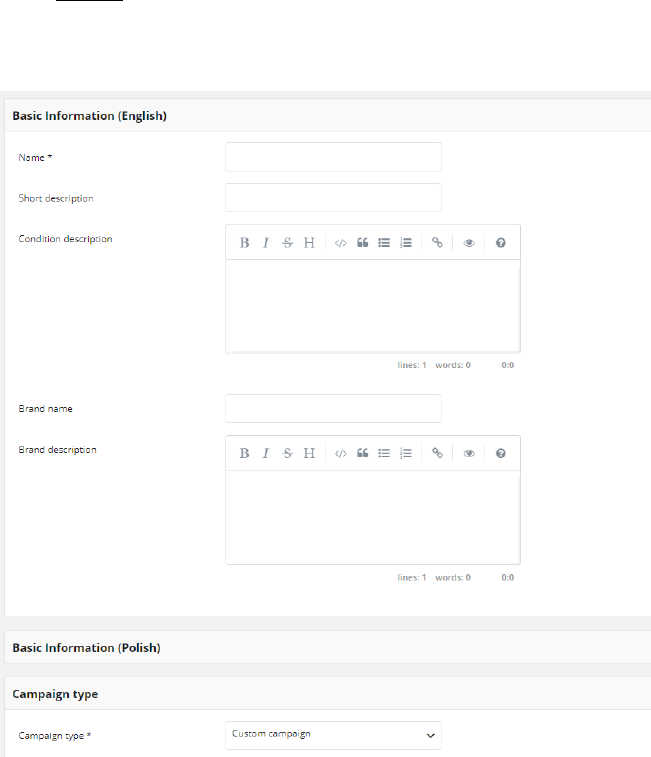
224
CUSTOM CAMPAIGN
11. When you choose Custom campaign, in the Basic information section related to the
default language version do the following:
Custom Campaign Basic Information
a. repeat steps a-d from point 3, and provide reward:
• Name
• Short description, if needed
• Brand name, if needed
• Brand description, if needed
b. If applicable, in Condition description field, provide a description of the conditions
of getting a reward using rich media format
c. If applicable, fulfill the same fields in other language version e.g. polish as on a
screen above
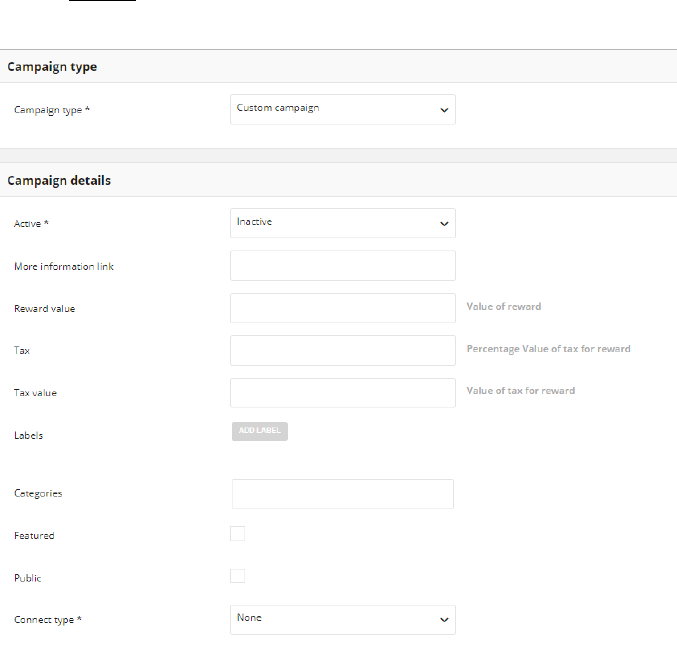
225
12. When you choose Custom campaign, In the Campaign details section do the
following:
Custom campaign details
a. repeat steps a -i (except c) from point 4, and provide reward:
• Status
• More information link, if needed
• Reward value, if needed
• Tax, if needed
• Tax value, if needed
• Labels, if needed
• Categories, if needed
• Featured, if needed
• Public, if needed
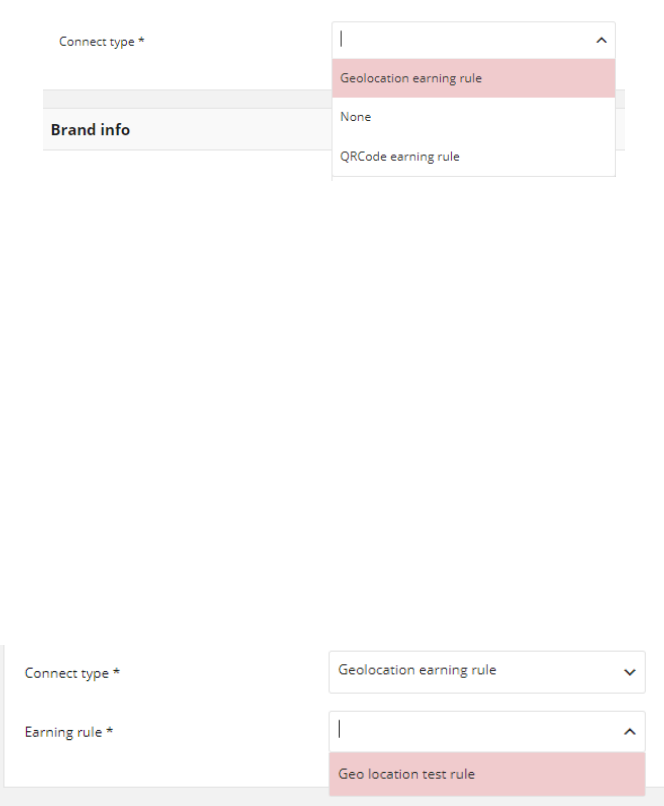
226
b. In Connect type field, set earning rule type that will be linked with this campaign, to
one of the following:
Connect type
Geolocation earning rule Customer could receive points for his location
QRCode earning rule Customer could receive points for scanning define QR code
None Any earning rule linked
c. If you choose any other type than None, choose one of the Earning rule from a
dropdown. Note, displaying earning rule names will be related with type, chose in
previous step. For example, if you set Connect type to Geolocation earning rule, only
Geolocation earning rule will be listed.
Earning rule
13. Repeat steps from points 5, 6 and 7 and fulfill listed section:
• Brand info, with reward brand icon
• Target section, to specify the customer groups that qualifies to receive the
reward
• Reward campaign Activity time boundaries

227
Custom campaign other sections to be filled out
14. To make the reward visible on the storefront for a limited period of time, complete
the From and To dates in Visibility section:
Reward Visibility
a. In Visible from field set the first date the reward is visible. You can either enter the
date or select it from the calendar.
b. In Visible to field set the last date the reward is visible. You can either enter the date
or select it from the calendar.
Visible to and Visible from fields are available only when reward visibility is limited.
c. If you want the reward to be visible all the time mark All time visible checkbox.
When you choose that option Visible from and Visible to fields will not be available.
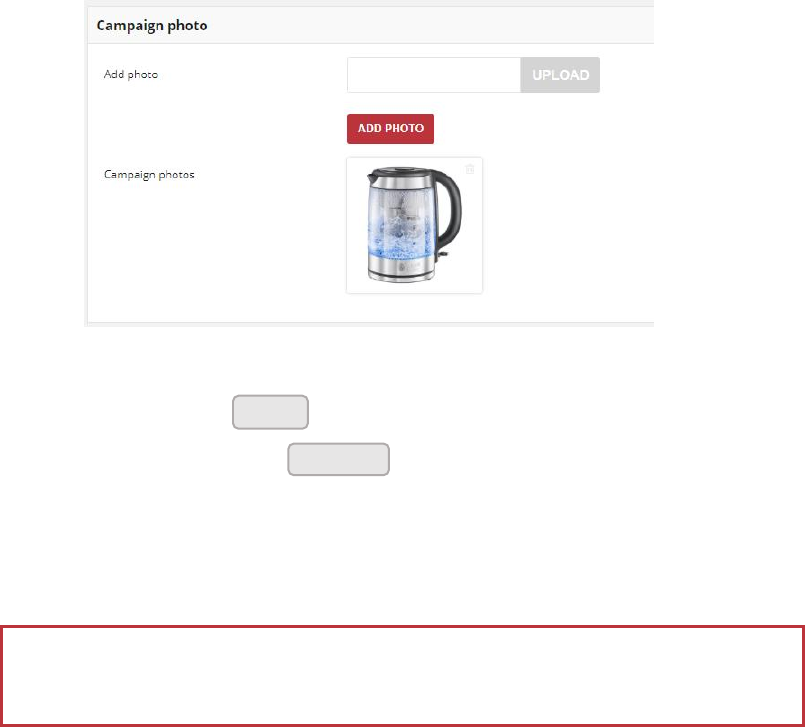
228
15. If applicable, in Campaign photo section upload reward images that will be visible
on the storefront
Reward photo
a. To add a photo tap to import main image
b. To add more images click and then upload another photo. Reapeat
it for all photos that you want add.
c. All added images will be visible in Campaign photos field after save
Upload
Add photo
Image size is limited to 2MB. Image dimensions could not be smaller than 600 x 600
px. Allowed file formats: png, gif, jpg.
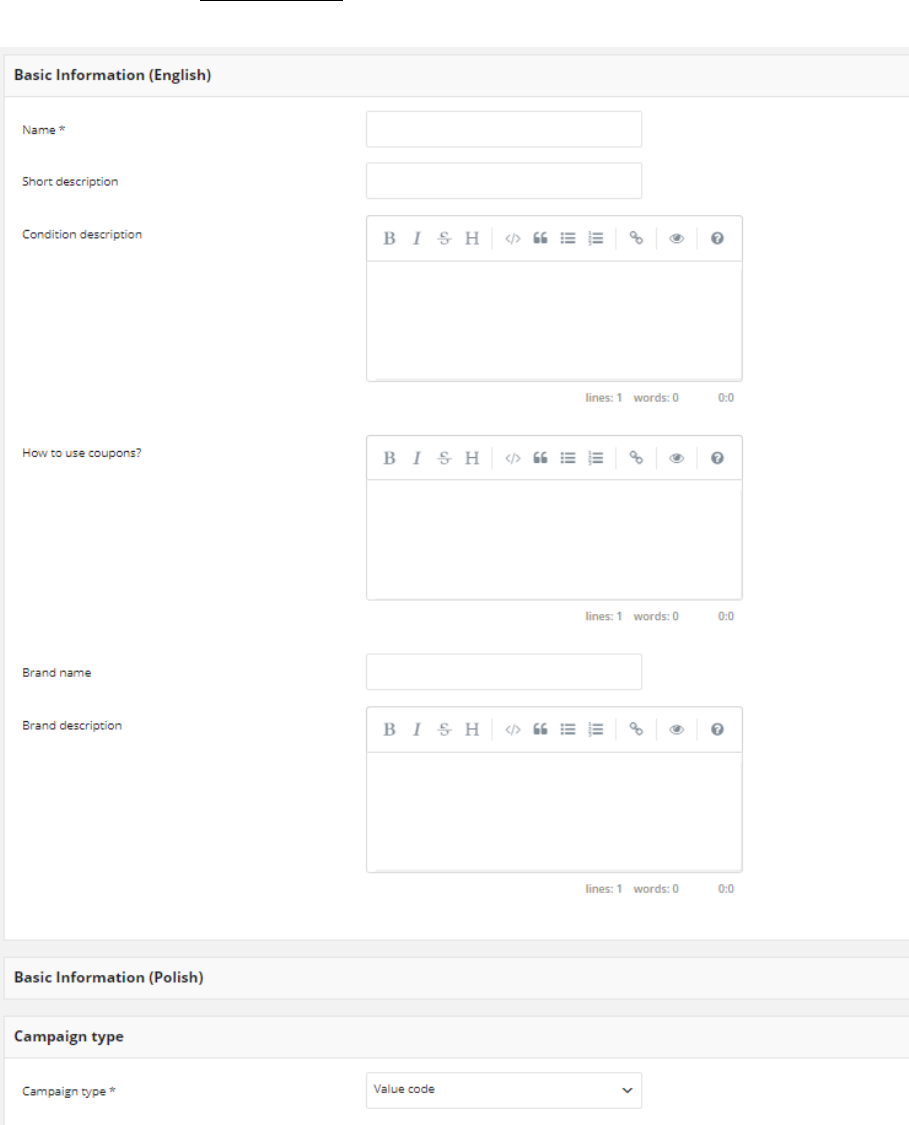
229
OTHER TYPES
16. When you choose any other than Cashback, Percentage discount code and Custom
campaign, in the Basic Information section do the following:
Other Campaigns types Basic Information
a. Repeat steps a-b from point 11, and provide reward:
• Name
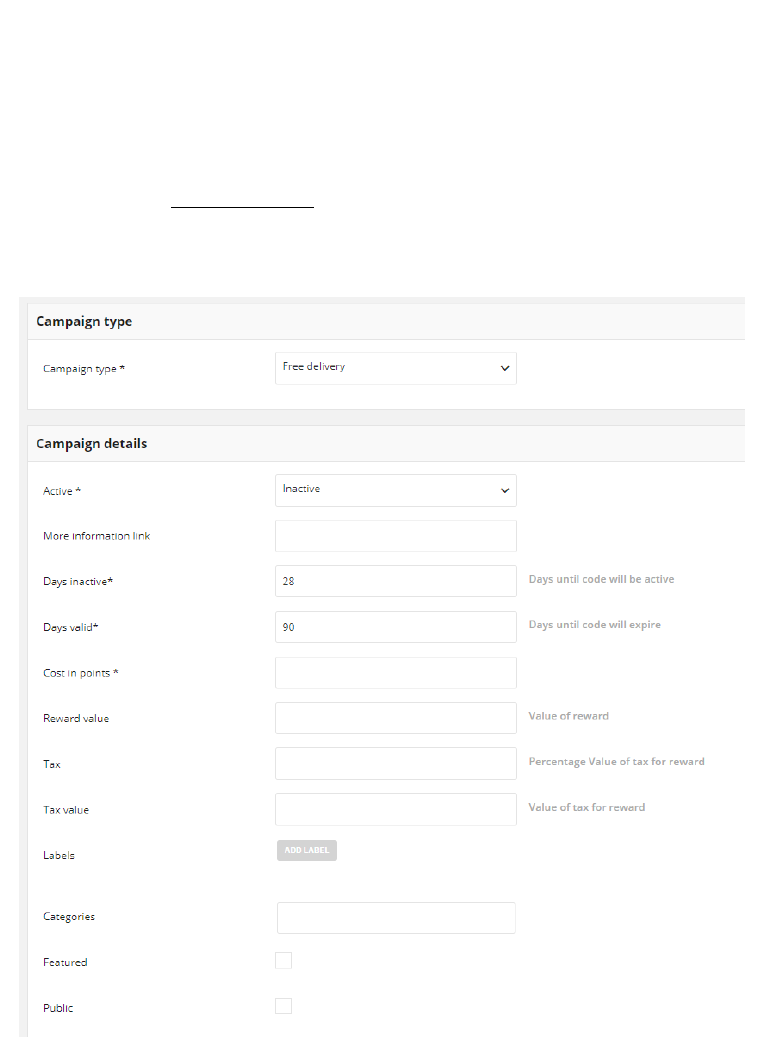
230
• Short description, if needed
• Condition description, if needed
• Brand name, if needed
• Brand description, if needed
b. If applicable, enter description How to use coupons codes, to display instructions
for customers on the storefront
c. If applicable, fulfill the same fields in other language version e.g. polish as on a
screen above
17. When you choose any other than Cashback, Percentage discount code and Custom
campaign, in the Campaign details section do the following:
Other campaigns details
a. Repeat steps: a and c-e from point 9, and provide reward:
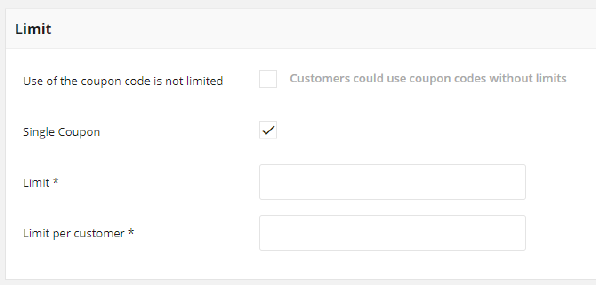
231
• Status
• More information link, if needed
• Number of days during coupon will be inactive
• Number of days during coupon will be active
• Reward value, if needed
• Tax, if needed
• Tax value, if needed
• Labels, if needed
• Categories, if needed
• Featured, if needed
• Public, if needed
b. In Cost in points field, enter the number of points represented by the reward to
define how many points customer needs to spend to get a reward.
18. Repeat steps from points 13, 14 and 15 and fulfill listed section:
• Brand info, with reward brand icon
• Target section, to specify the customer groups that qualifies to receive the
reward
• Reward campaign Activity time boundaries
• Reward campaign Visibility time boundaries
• Reward Campaign photo
19. To limit the number of times each customer can use the coupon, enter the number
of usage limits in Limit section:
Limit
a. To limit the number of times the coupon can be used, complete the following:
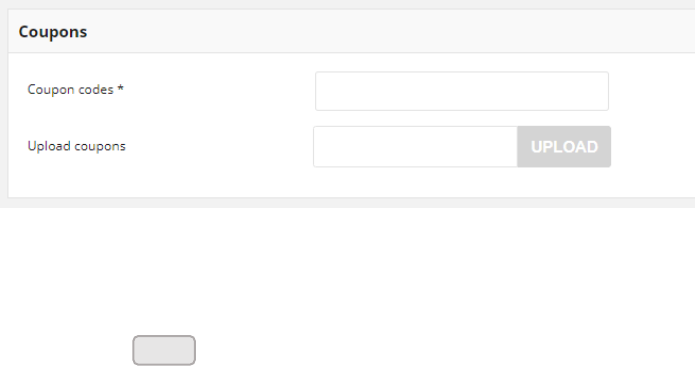
232
• Mark Single coupon checkbox
• In Limit field, define how many reward codes could be used during time
boundaries from Activity section
• In Limit per customer field, define how many reward codes could be used
by one customer during time boundaries from Activity section.
b. For unlimited use, mark Use of the coupon code is not limited checkbox. When you
choose that option Limit and Limit per customer fields will not be available
20. Add batch of Coupons to be used with the reward:
Coupons
a. Type manually a Coupons codes to be used by customer or Upload coupons list of
codes from CSV file.
21. When complete, tap
Save

233
Updating reward data
You can edit all data provided during Reward campaign creation process. You can update
reward data by selecting it’s record from All reward campaigns list.
Reward Campaign Edition
To edit a Reward campaign:
1. On the Admin sidebar, tap Reward campaigns. Then, choose All reward campaigns.
2. In the Reward campaign list, find the reward to be edited and click Edit ( ) icon in the
Action column to open the reward campaign in edit mode.
3. Make any necessary changes to the reward data
4. When complete, tap
Save
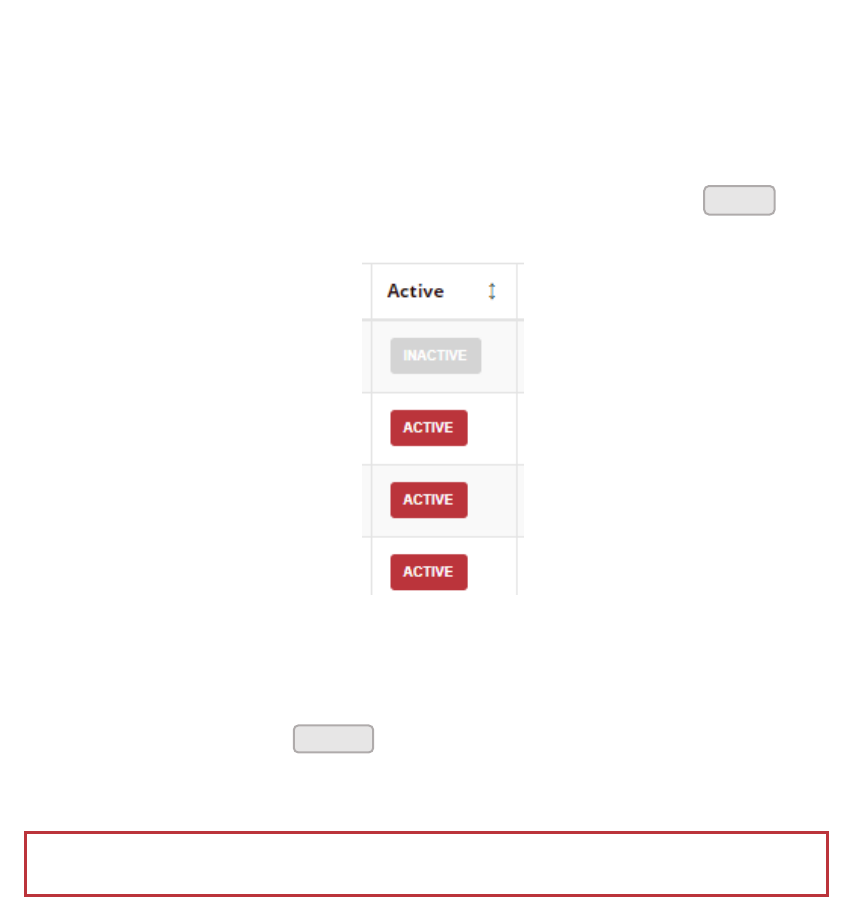
234
Activate/deactivate Reward campaign
Any reward from the list can be activated and deactivated by Admin user.
To activate/deactivate Reward:
1. On the Admin sidebar, tap Reward campaigns. Then, choose All reward campaign.
You can also deactivate/activate reward from Edit mode
2. In the Reward campaign list, find the reward to be deactivated and click in the
Active column. The button in the column change to Inactive and appear as a grey-out.
Active Column
When you deactivate reward campaigns, customer will not be able to see it on the
storefront and use.
3. To activate the reward click in the Active column. The button in the column
change to Active and appears as a red.
Active
Inactive
Customer can use only Active reward campaigns

235
Conditions of reward availability to Customer:
1. Campaign must be Active.
2. Campaign must be Visible (if visibility is limited in time).
3. Customer is assigned to Segment/Level which are selected in Reward Campaign con-
figuration.
4. There are available coupon codes (non used) for the campaign or campaign is not lim-
ited with single coupon code.
5. If there is option to limit coupon per campaign then reward is available when usage
count is below limit.
6. If there is option to limit coupon per user then reward is available when usage count is
below limit.
