Www.orphancameras.com PDF Pentax Super Program 1
pentax_super_program-1 pentax_super_program-1
User Manual: PDF T E X T F I L E S
Open the PDF directly: View PDF ![]() .
.
Page Count: 38
This manual is for reference and historical purposes, all rights reserved.
This page
is copyright@ bV
M. Butkus,
Nl
This page may not be sold or distributed without the expressed permission of the producer
I have no connection with any camera company
On-line camera
manual library
- www.orphancameras.com
This is the full
text and images from the manual. This may take 3 full
minutes for
the PDF file to download
depending on
your
connection type.
If you find this manual useful,
how about a donation
of $3
to: M. Butkus, 29
Lake
Ave.,
High Bridge, NJ 08829-170I
and send
your e-mail address so
I can
thank you.
Most other places
would charge
you $7.50
for a electronic copy or $L8.00
for a hard
to read Xerox copy.
This will allow me
to continue
to buy new manuals
and pay their shipping costs.
It'll make
you feel
better, won'tit?
If you use
Pay Pal or wish to use
your credit card,
click on the secure site on my main page.

www.orphancameras.com
SupEftpffi}fFiflt
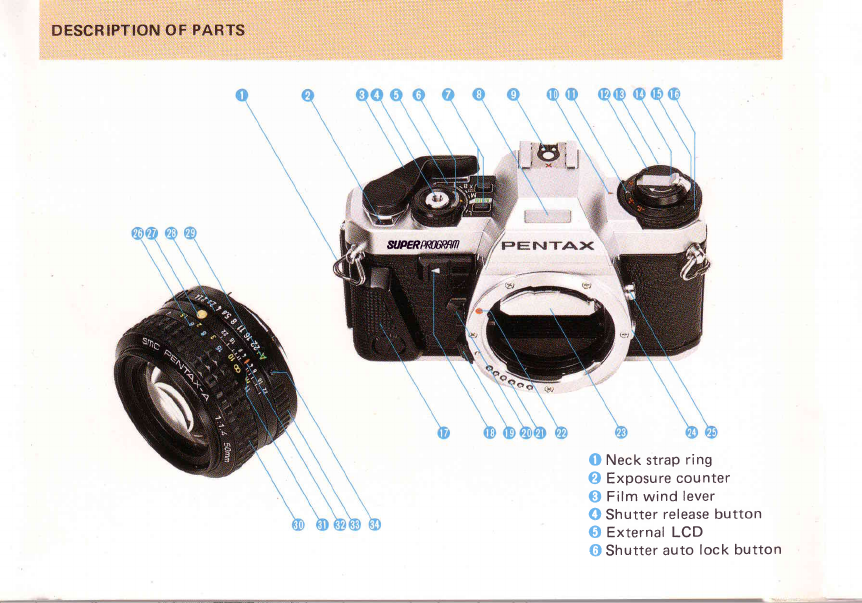
O Neck strap
ring
O f xposure counter
O f ilm wind
lever
O Sfrutter
release button
€! External
LCD
O Shutter
auto
lock button
www.orphancameras.com
€)
Manual
shutter
speed
select
buttons
@
llluminating
window
G)
Hotshoe
(D
Exposure
compensation
index
mark
(D
Exposure
compensation
scale
@
Film rewind knob/Back
cover release
knob
(D
ASA/ISO film speed
scale
(E
Fitm
rewind
crank
(E
F;tm
speed
dial lock button
(D
Film speed
dial/Exposure
compensation
dial
O Grip
Super
A
@
Self-timer
lever
(D
Lens release
lever
@
Preview
lever
(D
Lens information
contacts
@
Lens
alignment
index
@ Instant
return
mirror
@
Lighting
button for viewfinder
LCDs
@
X-synch
terminal
@
Distance
scale
(D
Lens alignment
node
@
Aperture
scale
@
"A" index
on aperture
scale
@ Focusing
ring
(D
Depth-of-field
scale
@
Aperture/Distance
index
@
Aperture
ring
@ Aperture
auto lock button
co
The Super
Program in 9 easy steps.
Inserting
batteries
......
Usi
ng batteries
correctlY
Grip
Super
A
Strap
and
case
Lens
mounting
Film wind
lever
Shutter
dial,
shutter
release button
and
release button
lock
..........
setting
ASA/ISO f ilm speed,
Memo
Holder/Grip 15
Film
loading ..................
16
Viewf
inder displays 1 I
Focusing ...
21
Holding the
camera .........:.....--."
22
Unloading
the
film .r.i-----r.............. .-....23
Six exposure
modes
Pentax
" ^" lens .........
28
Shutter
dial,
Manual
shutter
speed
sef
ect button ......... 29
Warning
indication
for each
exposure
mode ...-..
30
Sef
ecting
the Programmed AE rnode ............;..-.--
32
Selecting
the
Aperture-priority AE mode............
34
Selecting
the Shutter-priority
AE mode ............
36
Selecting
the Metered
Manual
mode
Using
Pentax dedicated
auto flash
units
Selecting
the
TTL Auto Flash
mode
Selecting
the Programmed
Auto Flash
mode
......
Programmed AE diagram,
Shutter/Aperture
coupling
range,
Meter coupling
range
Exposure
compensation
Depth-of-f
ield
Depth-of-field
preview .........'-....
Tripod,
B (Bulb)
and
Time
exposures
........
Self
-timer
.........
Use
of non-dedicated
flash
units
Diopter
adfustment,
changing
back
cover
lnfr.ared
index
mark
Using
screw-
mount Takumar
lenses
How to use
various
accessories
with your Super
Program
O & As on your Pentax
Super
Program
Camera
maintenance
Resistance to temperature
extremes
and
changes, A few notes on the LCD
' (Liquid
Cr:ystal
Display) .........
Specif
ications
Warranty
policy
2
6
I
9
10
11
12
13
38
.40
42
43
44
46
48
49
52
53
54
55
56
57
58
59
60
61
62
64
www.orphancameras.com
THE SUPER
PROGRAM IN 9 EASY STEPS
Follow
the
I steps below,
and in a very
short
time you'll be
able to take
pictures
with the
Super
Program in its
Programmed
AE mode.
For
more details about
each step, consult the
accompanying
page
numbers.
* Remove
the cap
from the
viewfinder eyepiece.
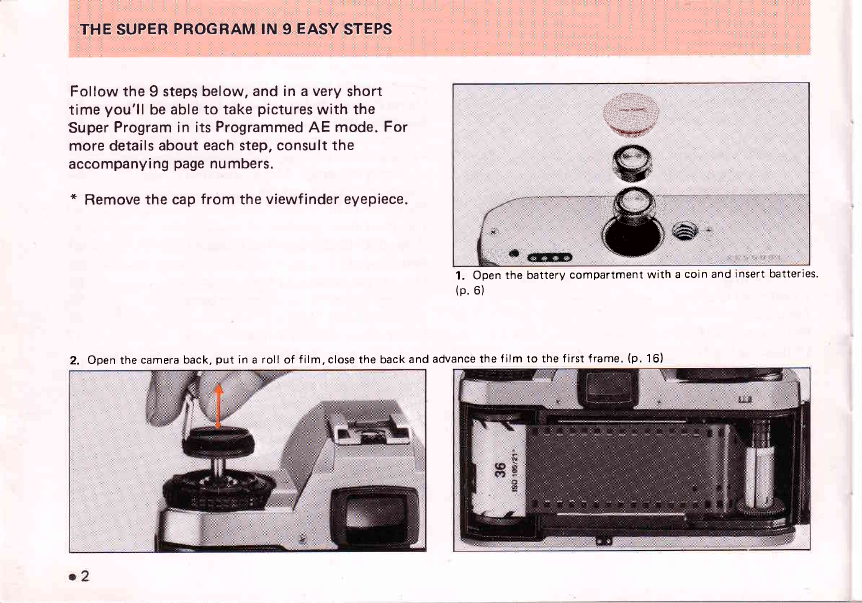
1. Open
the battery
compartment with a coin and insert batteries.
(p.
6)
2. Open the
camera back,
put in a roll of f ilm, close the back and advance
the f ilm to the first frame.
(p. 16)
#
ffi#-"
#- fr GEGp
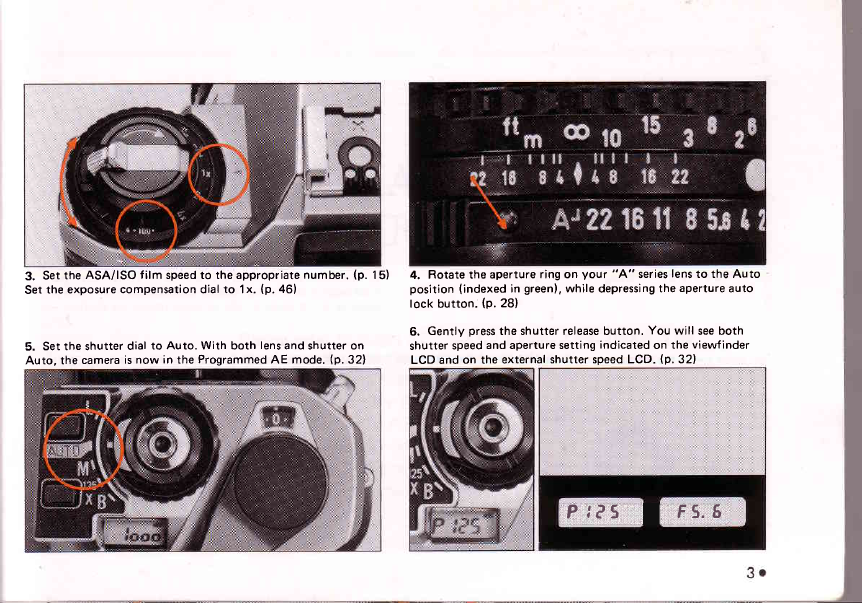
3. Set the ASA/ISO f ilm speed to the appropriate number. {p. 15)
Set the exposure compensation dial to 1
x. {p. 46}
5. Set the shutter dial to Auto. With both lens
and shutter on
Auto, the camera is now in the Programmed AE mode. (p. 32)
4. Rotate the aperture ring on your "A" series
lens
to the Auto
position (indexed in green),
while depressing
the aperture auto
lock button. (p. 281
6. Gently press
the shutter release button. You will see both
shutter speed
and aperture setting indicated on the viewfinder
LCD and on the external shutter speed LCD. (p. 321
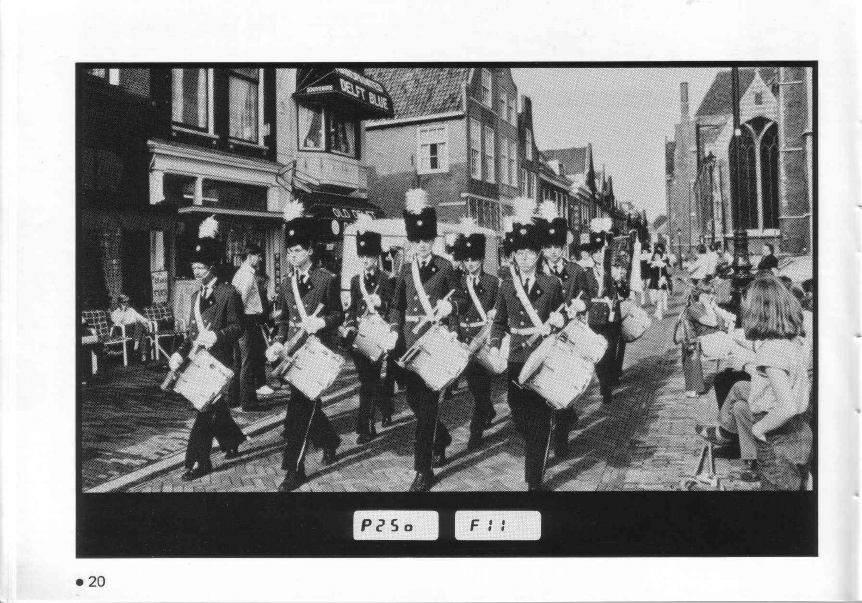
P,?s I Fs.6
www.orphancameras.com
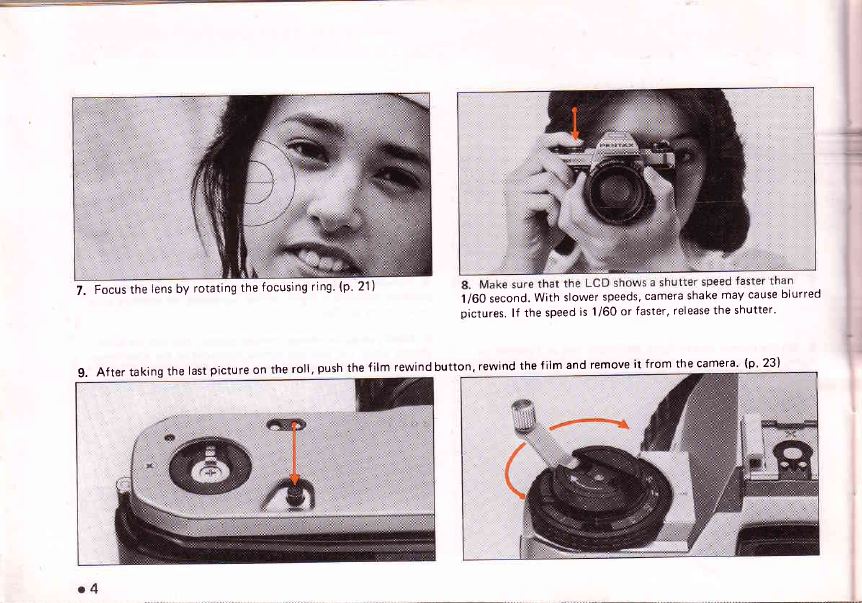
7. Focus
the lens by rotating
the
focusing
ring.
(p.
21
)1/60 second.
With slower speeds,
camera shake
may cause
blurred
Dictures.
lf the speed
is
1/60 or faster,
release
the shutter'
9. After taking the last
picture on the roll. push the film rewind button. rewind the f ilm and remove it from the camera' (p. 23)
OPERATING
INSTRUCTIONS
Pfease
refer to pages321 43 for detailed'information,on
the Super
Prograffr,
six,exposure,modes. , l
o,,Pro$f0n'lITlBd,AEmode, ': , ', ,,
oApe'r.ture.priorityAEmode.
oS-hutter,-pr,iol'ityAE,modg, , ,,, , , ,,
o.Metered.lManua|..mode1]1'''.'.''.i.
a-
Progt'ammed,Auto
Flash mode ,, -
'',
' 'r ',,, :r "' ',
www.orphancameras.com

lEf$tpEi*$ifi$fit
Your Super Program
doesn't operate
without batteries.
Use
two
1.5V silver
or alkaline
batteries, or a 3V lithium battery.
Before
inserting batteries
in the battery
compartment,
wipe
them with
a clean
dry cloth.
o Open
the battery
compartment
cover with a
coin or similar object.
o Place
the two batteries
in the compartment
with '+'marks
downward,
and
close
the cover.
Battery check
To confirm battery status,
set
the shutter
dial to AUTO and
slightly
depress
the shutter
release
button to activate
the metering system.
lf the LCDs
on the
camera
top and
in the viewfinder indicate
shutter speed
information,
the batteries
are
properly
inserted and
sufficient
in voltage for normal camera
functioning.
#
ffi
w
,,iffi
o prri,rilp
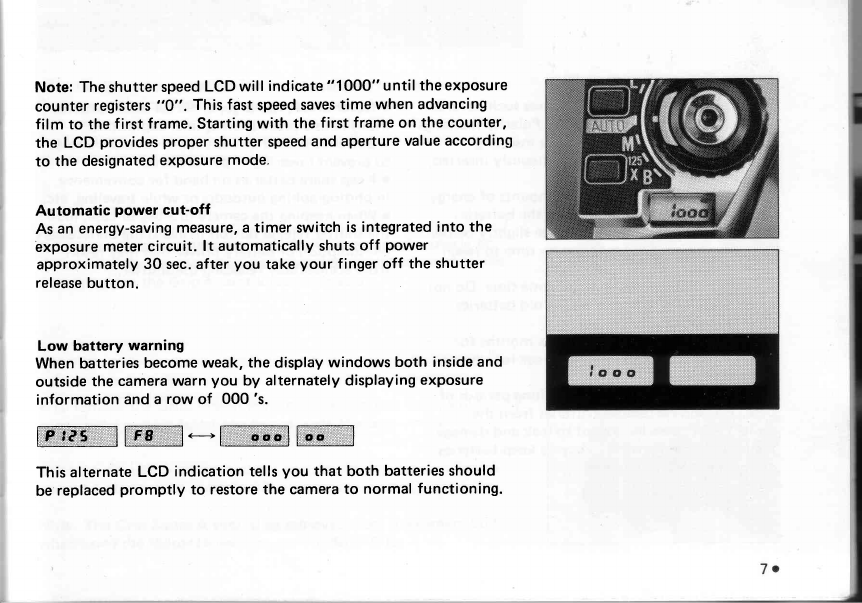
Note:
The shutter
speed
LCD will indicate
"1000" until
the exposure
counter registers
"O". This fast
speed
saves
time when advancing
film to the
first frame.
Starting
with the first
frame
on the counter,
the LCD provides proper shutter
speed
and
aperture
value according
to the designated
exPosure
mode,
Automatic power cut-off
As an energy-saving
measure, a
timer switch is integrated
into the
'exposure
meter
circuit. lt automatically shuts
off power
approximately
30 sec. after
you take
your finger off the shutter
release
button.
Low battery warning
When
batteries
become
weak,
the display
windows both inside and
outside
the camera warn you by alternately displaying
exposure
information and a row of 000 's.
ffi.H ffiF,,,,,.'j...iffi
<---+
H,,.,.-..Effi'
1
ffi,--l-ll.t.
This
alternate
LCD indication tells
you that both batteries
should
be
replaced
promptly to restore the camera
to normal functioning.
www.orphancameras.com
Usi
ng batteries correctly
o Incorrect usage
of batteries causes
such
hazards o Never
break,
recharge,
or throw use
as
leakage,
heating
or explosions.
Polarity
markings into fire
as
a precaution
against
explo
should be carefully checked
while inserting . Batteries
should
be kept
warm in cr
batteries. lf either battery is
erroneously inserted, to prevent
lowering
of performance.
unexpected
mishap
may occur. . Keep
spare
batteries on hand for co
o The
battery discharges
small
amounts
of energy in photographing
outdoors or while tr
even when not in use. Therefore,
the batteries o When keeping
the camera in a bag c
supplied with your camera may be
slightly
below the shutter
release
button to avoid th
full capacity,
as
it has
taken some
time to reach consumption of battery
power
that n
you. from accidentally releasing the
shutte
o Replace
both batteries
at the same
time. Do not
mix battery brands
and types,
or old batteries
with new batteries.
o Battery
life is
approximatelV
six
months
for
alkaline and
approximately
one
year
for silver or
f ithium batteries.
o When not using
the camera for long
periods
of
time,
you should
remove
batteries from the
camera. Old batteries
are apt to leak
and
damage
the battery compartment. Always keep batteries
out of the reach
of children.
' o8
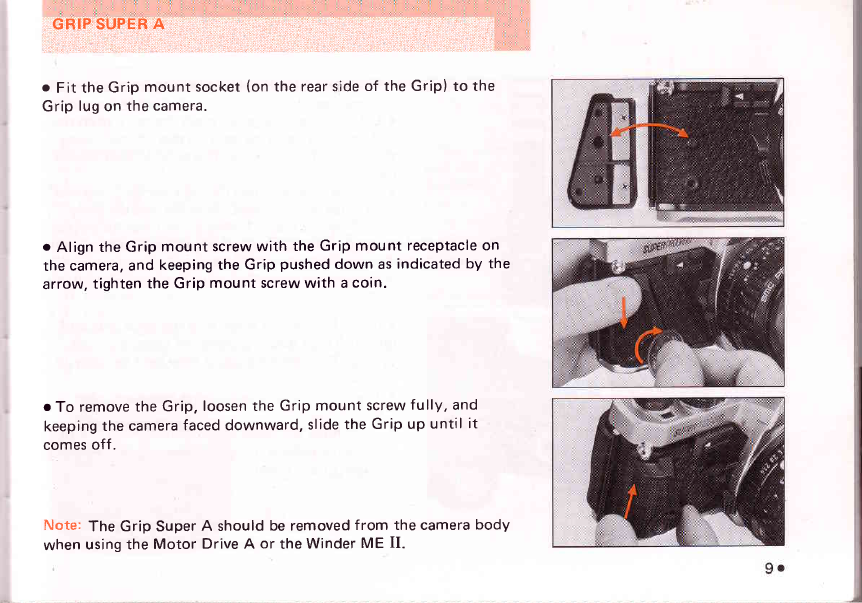
GRIP.SUPER A
o Fit the
Grip
mount
socket
(on
the
rear side
of the Grip) to the
Grip
lug
on
the camera.
o Align the Grip mount screw with the Grip mount receptacle
on
the
camera, and keeping the Grip pushed
down as
indicated by the
arrow,
tighten
the Grip mount screw with a
coin.
r To remove
the
Grip,
loosen the
Grip mount
screw
fully, and
keeping
the camera
faced downward,
slide
the
Grip up
until
it
comes
off .
Note: fhs Grip Super
A should
be removed
f rom the camera
body
when
using the
Motor Drive A or
the
Winder
ME II.
www.orphancameras.com
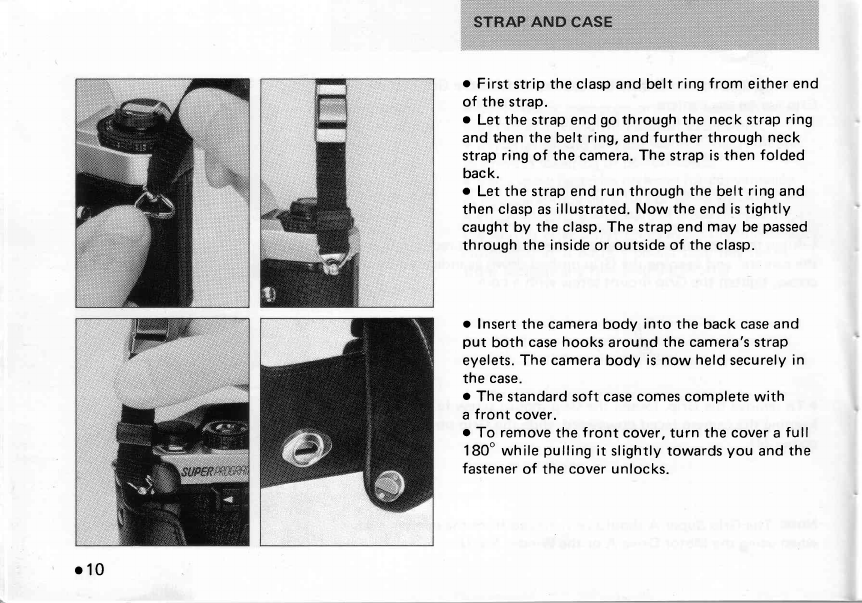
. First
strip the
clasp
and belt
ring from either end
of the strap.
o Let the strap
end
go
through the neck
strap
ring
and then the belt ring, and
further
through
neck
strap
ring
of the camera. The strap
is
then
folded
bac k.
o Let the strap end
run
through
the
belt
ring
and
then
clasp
as
illustrated.
Now the end
is
tightly
caught by the clasp. The strap end
may be
passed
through
the
inside
or outside
of the clasp.
o Insert the
camera
body into the back
case and
put both case
hooks
around the
camera's strap
eyelets. The camera body is now held
securely
in
the
case.
o The
standard soft
case comes complete with
a
front cover.
o To remove
the
front cover,
turn the cover
a
full
180' while
pulling
it
slightly towards
you
and the
fastener
of the
cover unlocks.
o10
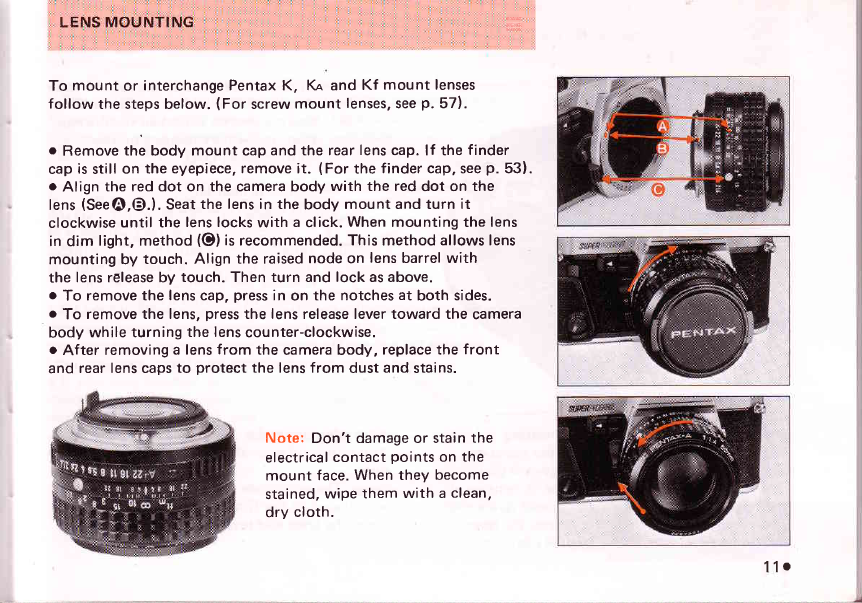
To mount or interchange
Pentax K, KA and Kf mount lenses
follow the steps below.
(For screw
mount lenses,
see
p. 57).
o Remove the body mount cap
and the rear
lens
cap. lf the
finder
cap
is
still
on the eyepiece, remove it. (For
the finder cap, see
p.53).
o Align the red dot on the camera body with the red
dot on the
lens
(SeeO,@.).
Seat
the lens in the body mount and turn it
clockwise
until the lens locks
with a click.
When mounting the lens
in dim light, methoO
(O) is
recommended.
This
method
allows lens
mounting by touch. Align the raised
node on lens
barrel with
the lens release by touch. Then turn and lock as above.
o To remove the lens cap, press
in on the notches
at both sides.
o To remove the lens,
press
the lens release lever toward the camera
body while turning
the lens
counter-clockwise.
o After removing
a lens
from the camera body, replace the front
and rear lens caps to protect
the lens from dust
and
stains.
Note: Don't damage or stain
the
electrical
contact
points
on the
mount face.
When they become
stained,
wipe them with a
clean,
dry cloth.
110
www.orphancameras.com
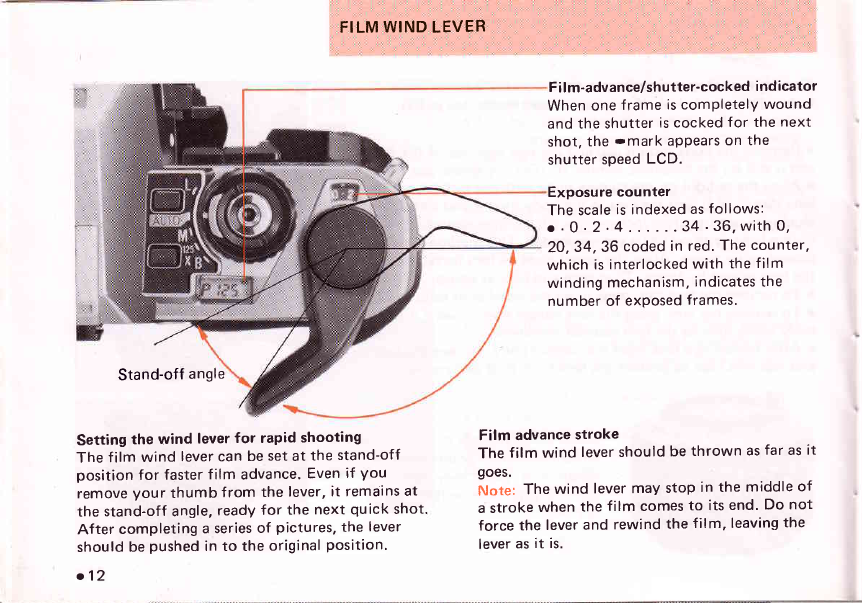
FILM WIND LEVER
Setting the wind lever
for rapid shooting
The film wind lever can
be
set
at the stand-off
position
for faster
film advance.
Even
if you
remove
your thumb f rom the lever,
it remains
at
the stand-off angle,
ready
for the next quick shot.
After completing
a series
of pictures,
the lever
should
be
pushed
in to the
original
position.
o12
Film-advance/shutter-cocked
indicator
When one
frame
is completelY
wound
and the shutter
is cocked
for the next
shot,
the
-mark appears
on the
shutter
speed
LCD.
Exposure
counter
The scale
is indexed
as
follows:
o.0.2.4. 34.36,with0,
20,34,36 coded
in red.
The
counter,
which
is interlocked
with the
film
winding
mechanism,
indicates the
number of exposed
frames.
Film advance
stroke
The
film wind lever should
be
thrown as
far
as
it
goes.
Note: The
wind lever may
stop
in the middle
of
a stroke
when
the film comes
to its
end.
Do not
force
the lever
and rewind
the
film, leaving
the
lever
as
it is.
Stand-of{ angle
SHUTTER
DIAL, SHUTTER BELEASE
BUTTON AND
REI-EASE
BUTTON
LOCK
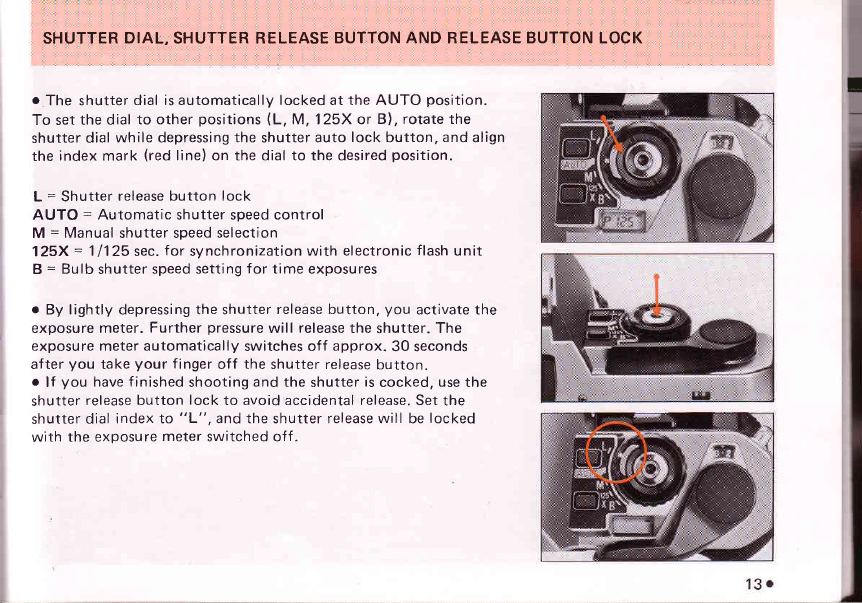
o The shutter
dial is automatically locked at the AUTO position.
To set
the dial
to other positions
(L, M, '125X
or B), rotate the
shutter
dial while depressing
the
shutter
auto
lock
button,
and
align
the
index mark
(red
line) on the dial to the desired
position.
L = Shutter
release button lock
AUTO = Automatic shutter speed control
M = Manual shutter speed
selection
125X
= 11125
sec.
f
or
synchronization
with electronic
flash
unit
B
= Bulb
shutter
speed setting
f
or time exposures
o By lightly depressing the shutter
release button,
you activate the
exposure meter.
Further
pressure
will release
the shutter.
The
exposure
meter
automatically
switches off approx.
30 seconds
after
you take
your finger
off the shutter release
button.
o lf you have finished
shooting
and the
shutter
is
cocked,
use
the
shutter
release button
lock
to avoid accidental release. Set
the
shutter
dial
index to "L", and the shutter release will be
locked
with the exposure
meter
switched off .
I
www.orphancameras.com
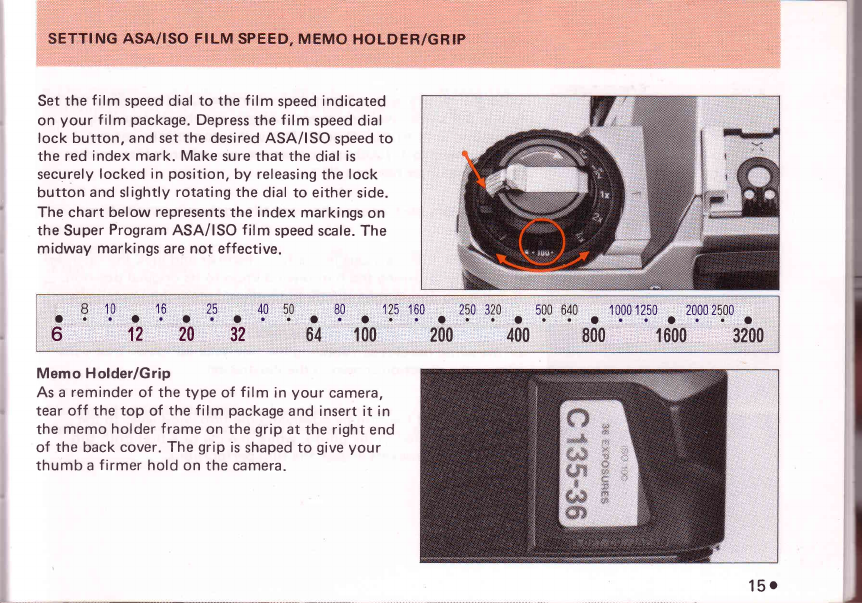
Set
the
film speed dial
to the
film speed
indicated
on
your f
ilm package.
Depress
the
f
ilm speed dial
lock button, and set
the desired
ASA/ISO speed
to
the
red
index
mark. Make
sure that the
dial
is
securely
locked in
position,
by releasing
the
lock
button
and slightly
rotating the
dial
to either
side.
The chart below
represents
the index
markings
on
the
Super
Program
ASA/ISO f
ilm speed
scale.
The
midway markings are not effective.
04 900,,
',.,{600,,,
' 3200
Memo Holder/Grip
As a
reminder
of the type
of film in
your camera,
tear off the top of the film package
and insert it in
the
memo
holder
frame
on the
grip
at
the
right
end
of the back
cover. The
grip
is
shaped
to give your
thumb a
firmer hold
on the
camera.
150
www.orphancameras.com
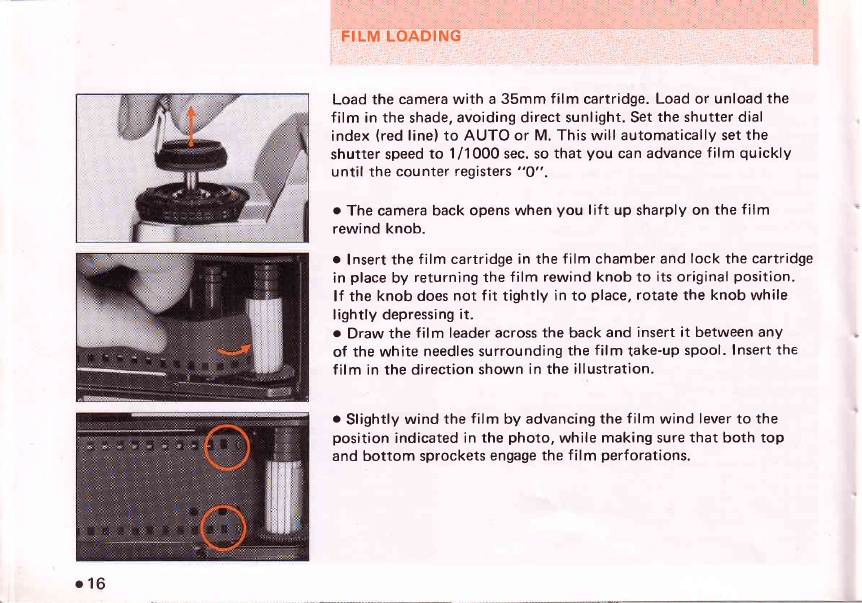
FILM LOADING
Load
the camera with a 35mm film cartridge.
Load or unload
the
film in the shade,
avoiding direct sunlight. Set
the shutter dial
index (red
line) to AUTO or M. This will automatically set
the
shutter speed
to 1/1000
sec. so
that you can advance
film quickly
until the counter
registers
"Q".
o The camera back
opens when
you lift up sharply
on the film
rewind knob.
o Insert
the film cartridge
in the
film chamber and
lock the
cartridge
in place
by returning
the film rewind knob to its
original
position.
lf the knob does
not fit tightly in to place,
rotate
the knob
while
lightly depressing
it.
o Draw the film leader across the back
and insert it between any
of the white needles surrounding
the film take-up
spool. Insert
the
film in the direction
shown
in the
illustration.
o Slightly
wind the film by advancing the film wind lever
to the
position
indicated
in the photo,
while making sure that both top
and bottom sprockets
engage
the
film perforations.
o16

o Lightly rotate the film rewinding
knob until
any
slack is
taken
up,
and confirm that the film is
properly
fitted between
both guide
rails. Close the back
cover tightly.
o Advance the film wind lever
to check
that the red vertical
stripes
of the film wind/rewind indicator
flicker;
this indicates
that the
film is advancing
properly.
Film advance
can
be
also
checked
by
the rotation
of the rewinding
knob.
o Repeat
shutter-tripping/f ilm-advancing
operation
until the
exposure counter reaches
to "0". The next
frame
is ready
for
the
first shot.
www.orphancameras.com
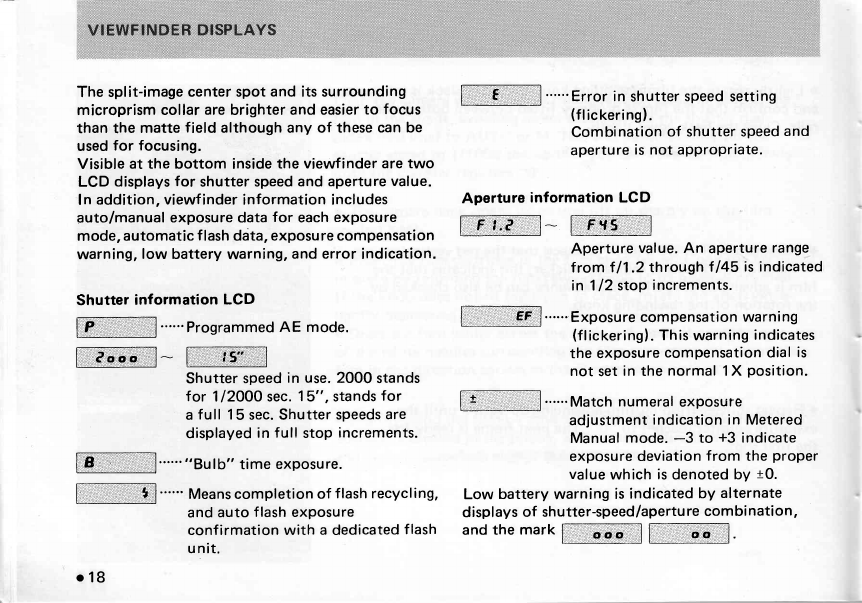
The split-image
center spot and its surrounding
microprism
collar
are
brighter
and easier
to focus
than the matte
field
although any of these
can be
used
for focusing.
Visible
at the bottom inside
the
viewf inder
are two
LCD displays
for shutter speed
and
aperture
value.
In addition, viewf inder information includes
auto/manual
exposure data
for each
exposure
mode,
automatic
f
lash data,
exposure compensation
warning,
low battery
warning,
and error
indication.
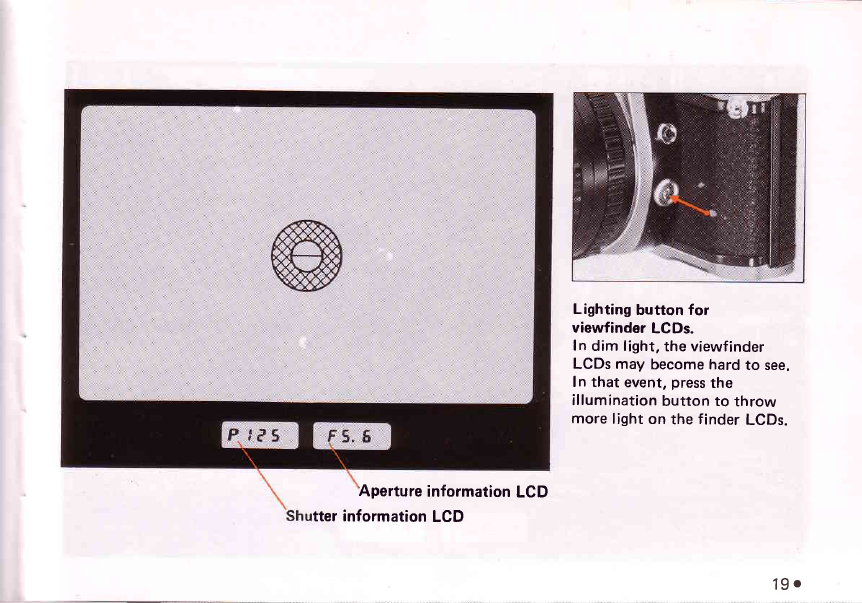
Shutter information LCD
ffi """Programmed AE mode.
ffi,,,,....,'
- ffi,,,.,'.-..-.
Shutter
speed
in use.
2000
stands
for 1
I2OOO
sec.
1
5", stands
for
a
full 15 sec. Shutter
speeds
are
displayed
in full stop
increments.
ffi,,,,,,,...-',-.
''"'"'BuIb" time exposure.
ffi """ Means completion
of f lash recycling,
and
auto
flash exposure
confirmation with a
dedicated
flash
u nit.
o
18
ffi """Error in shutter
speed
setting
(f
lickering).
Combination
of shutter speed
and
aperture
is not appropriate.
Aperture information LCD
ffil -ffi,.,-.ffi
Aperture
value. An aperture
range
f
rom t
11
.2
through
f 145
is indicated
in 112 stop
increments.
ffi,,,,,,,',l,ffi '' "'' E x
p
os
u r
e co
m
p
e
n
sa
t i
o
n wa
r n i n
g
(ft
ickering).
This warning
indicates
the exposure
compensation dial
is
not
set
in
the
normal 1X position.
trllI,I..--TIf
......
Ma tch
n u m
era
I ex
posu
re
adjustment
indication in Metered
Manual
mode.
-3 to +3 indicate
exposure
deviation
from the proper
value
which
is
denoted by t0.
Low battery warning is
indicated
by alternate
displays
of shutter-speed/apertu
re
combination,
and
the mark
ffi ffi,...'..-.'-.-tr1
Aperture information LCD
Lighting button for
viewfinder LCDs.
In dim light,
the viewfinder
LCDs may become hard to see.
In that event,
press
the
illumination
button to throw
more
light on the finder LCDs.
tter information LCD
190
www.orphancameras.com
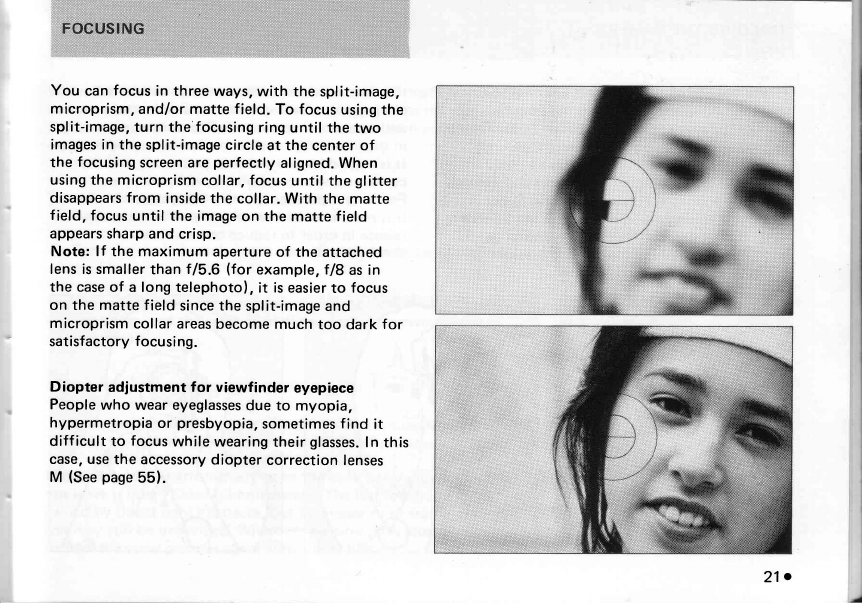
You can
focus
in three
ways,
with the split-image,
microprism,
and/or matte f
ield.
To focus
using
the
split-image,
turn
the'focusing ring
until
the
two
images
in the split-image
circle
at the center
of
the focusing
screen are
perfectly
aligned. When
using the
microprism
collar, focus
until
the
glitter
disappears
from inside
the collar. With the matte
field,
focus
until
the image
on the
matte
field
appears
sharp and
crisp.
Note: lf the maximum aperture
of the attached
f ens is smaller
than t15.6
(for example, f/8 as in
the case
of a long telephoto),
it is
easier
to focus
on the matte field
since the
split-image
and
microprism
collar areas
become
much
too dark
for
satisfactory focusi
ng.
Diopter adjustment
for viewfinder eyepiece
People
who wear
eyeglasses
due
to myopia,
hypermetropia
or presbyopia,
sometimes
f
ind it
difficult to focus
while
wearing
their
glasses.
In
this
case, use
the accessory
diopter correction lenses
M (See
page
55).
21
o
www.orphancameras.com
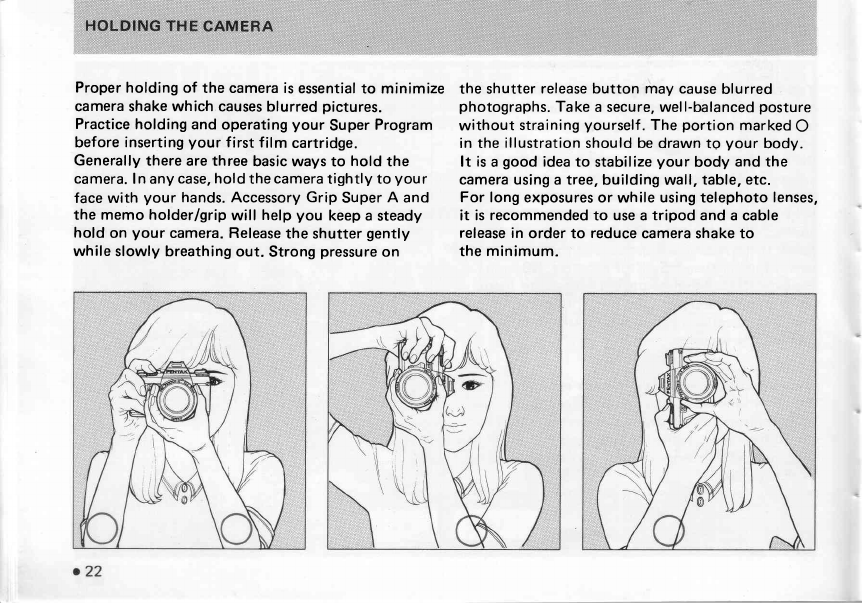
Proper
holding of the camera is
essential
to minimize
camera
shake
which causes blurred pictures.
Practice
holding
and operating
your Super
Program
before
inserting
your f
irst f
ilm cartridge.
Generally
there are
three
basic
ways to hold
the
camera. In any
case, hold
the
camera
tightly to you
r
face with your hands.
Accessory
Grip
Super
A and
the memo
holderlgrip
will help
you keep a
steady
hold on your camera. Release
the shutter
gently
while slowly breathing out. Strong
pressure
on
the shutter
release button may cause
blurred
photographs.
Take
a secure, well-balanced
posture
without straining
yourself
.
The
portion
marked
O
in the
illustration
should be
drawn te your body.
It is
a
good idea to stabilize
your body and the
camera using
a tree, building wall,
table, etc.
For long
exposures or while using telephoto
lenses,
it is recommended
to use
a
tripod and
a cable
release in order to reduce
camera
shake to
the minimum.
UNLOADING
THE FILM
Whdn the last
frame
of the film has
been
exposed,
the film should
be rewound
into the cartridge
before
unloading
from the camera.
Do not force
the wind lever
beyond
the number
of frames
indicated
on the f ilm cartridge.
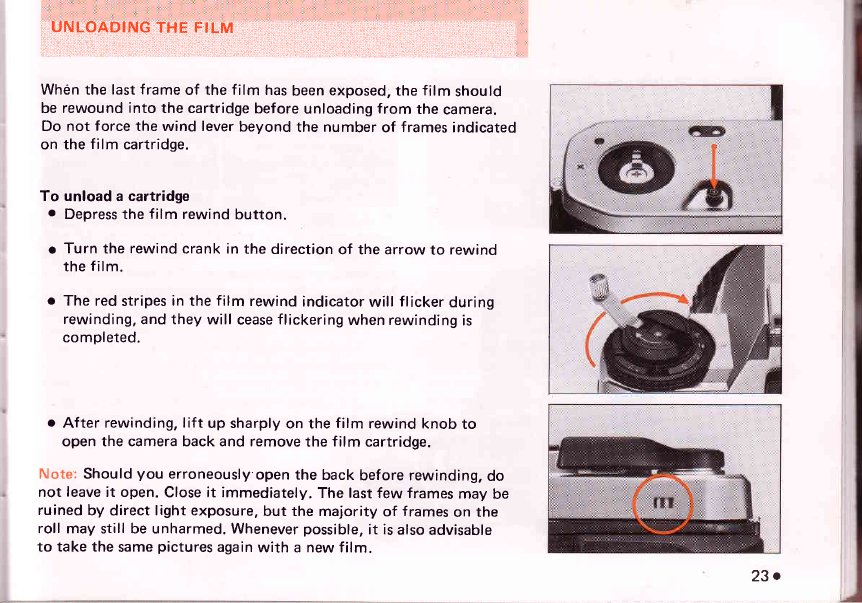
To unload a cartridge
o Depress the film rewind
button.
o Turn the rewind
crank in the direction
of the arrow
to rewind
the
film.
o The red
stripes
in the film rewind
indicatorwill flicker
during
rewinding,
and they will cease
flickering
when rewinding
is
completed.
r After rewinding, lift up sharply
on the film rewind knob to
open the camera back and remove
the film cartridge.
Note':
Should
you erroneously
open
the back
before rewinding,
do
not leave
it open. Close it immediately. The last
few frames
may be
ruined
by direct
light exposure,
but the majority of frames
on the
roll may still be unharmed. Whenever
possible,
it is
also
advisable
to take the
same
pictures
again
with a new film.
23o
www.orphancameras.com
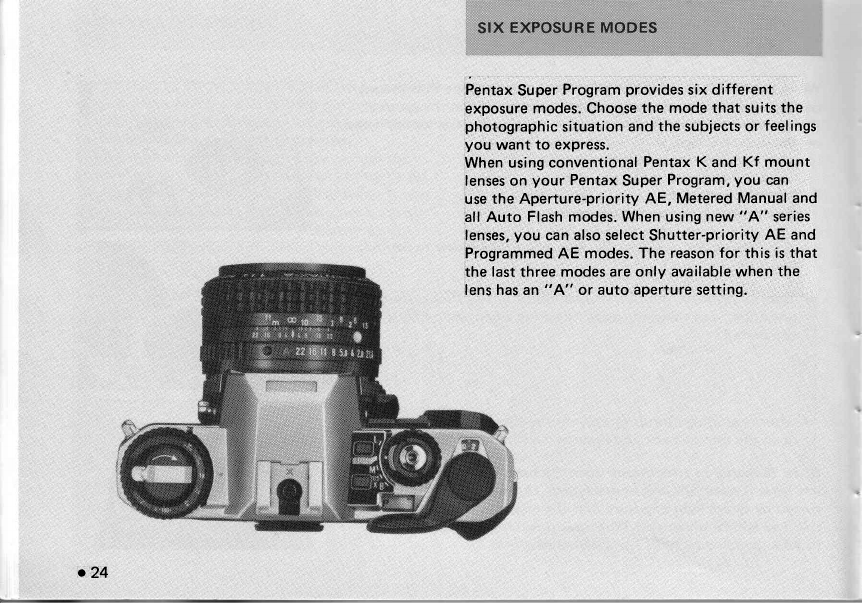
Pentax
Super
Program
provades
six'different
exposure
rnodes. choo,se
the, mode that,sui,ts
the
pho-tographic
situation
and the subjects or feelings
you want to express. ' 1
When using conventional
Pentax K,and Kf mount
lenses on your Pentax
Super
Program,
you can
use
the Aperture-pri,orit\y',AE,
Metered Manual
and
af
f Auto Flash
modes,
When
using,new
t.'A'!
$eries
lenses,,,you
can
also-
select Shutter-priority AE and
Programmed AE modes. The reason
for this is
that
the last three modes
are
only available
when the
f
ens,has
an " A" or auto aperture
setting.
,
.24
Programmed
AE (lens
on "A", shutter dial on "A"l
Your Super
Program
itself automatically
selects
the most appropriate
combination
of shutter
speed
and
aperture to obtain
proper
exposure,
changing
them simultaneously
according to the subiect's
brightness.
The Programmed
AE mode is
most
suitable
for advanced
photographers
who want to
shoot very
quickly or for novices
who do not want
to be
bothered
by setting
exposure
controls
accord-
ing
to light conditions.
(nt. 32 page
for details)
Aperture-priority AE
(lens
on any f-number,
shutter dial on "A"l
When
the aperture
is
set manually,
the
shutter
speed
is automatically
adjusted
by built-in
electronic
circuitry
according
to subject's
brightness
to provide
appropriate
expozure. When
"depth-of-
field" is
important
for your picture,
this mode is
recommended.
lt is suitable
for both general
photography
and
carefully
controlled
pictures
such as
portraits.
(nt. 34 page
for details)
25o
www.orphancameras.com
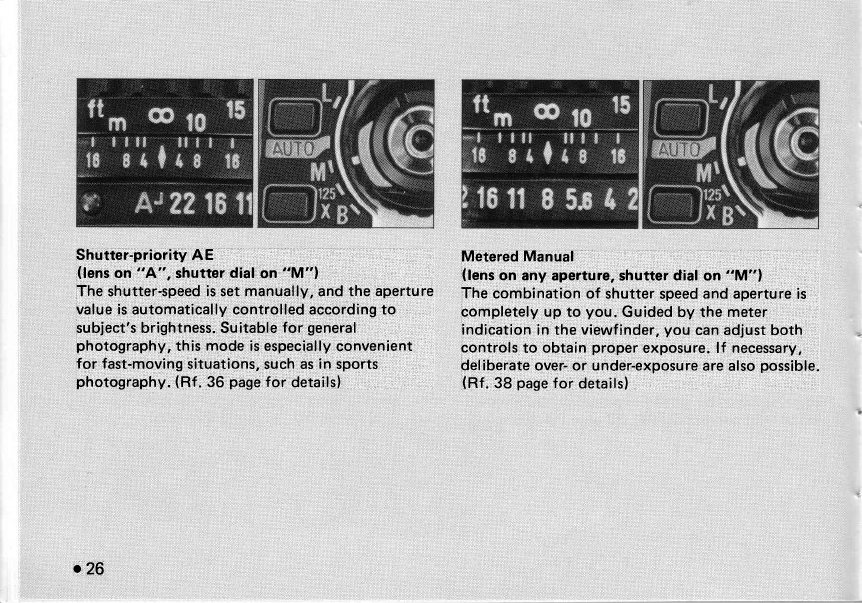
Shutter-priority AE,
(lens
on "Af', shutter
dial on "M'rl , ,, ,
, ,'
The shutterspeed
is
set
manually, and the aperture
value
ii's
automatically.' Co-htrol'led
accor.dihg,to :
srlbiectrs brightness.,suitabl,e
fo-r
general,',
I. ,::
phot-oEraphy,
this mode is especially
convenient
for fast-moving
situatlons,
such
os
,ih
sports , ,
photography.(Rt,
36 page
for details) : . i ,
Metered Manual
(lens
on any aperture, shutter diat on "M")
The cornbination of shutter speed
and,apertur,e
is ,
cornpletely up to you. Guided
by,the
meter :
indication
in the
viewf
inder,
you can
adiust both :
controls
to obtain proper exposure. lf necessor!,,
,
deliber:ate
over-
or under-€Xp-osure are
also
possible.
(Rf.,38
page
for details) :
-,26
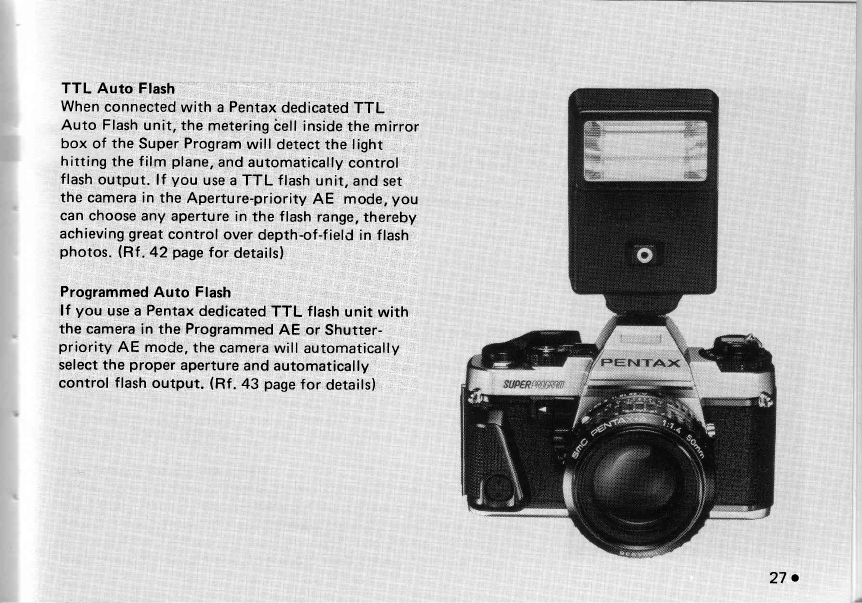
TTL Auto Flash :
When
connected
with a Pentax
dedicated
TTL
Auto Flash
unit, the me,tering
bell inside
the mirro,r
box of the
Super Program:will
detect
the
light
,,
,
hitting
the
film plane,
and
automatically
control
flash
output. lf you use
a TTL flash
unit, and
set
the camera in the Aperture-priority
AE mode,
you
can choose
any
aperture
in the flash
range,
ther:eby
achieving
great
control
over
depth-of.f iel,J
in flash
photos.(Rf'42pagefordetai|s}
Programmed
Auto Flash
lf you use
a Pentax
dedicated
TTL tfash
unit with
the camera
in the Programmed
AE oro
Shutter-
priority
AE mode,
the
camera
will automatically
select the proper aperture
and
autornatically
control flash
output. (nt. 43 page
for detailsl
:
<r7,:a
www.orphancameras.com
PENTAX T'A'' LENS.
To set the lens in the A position,
match
the A-index (green
line) on
the aperture
ring to the o index mark
while depressing
the aperture
auto lock button. Release the button to lock the lens
in the A
position.
To release
the lock, rotate the aperture ring towards aperture
scale
with the auto lock button depressed.
A (autol setting Programmed
AE mode
Shutter-priority AE mode
The following modes
are available
when
the lens
is set in the manual
f
-stops:
f/number setting Aperture-priority AE mode
Metered Manual
mode
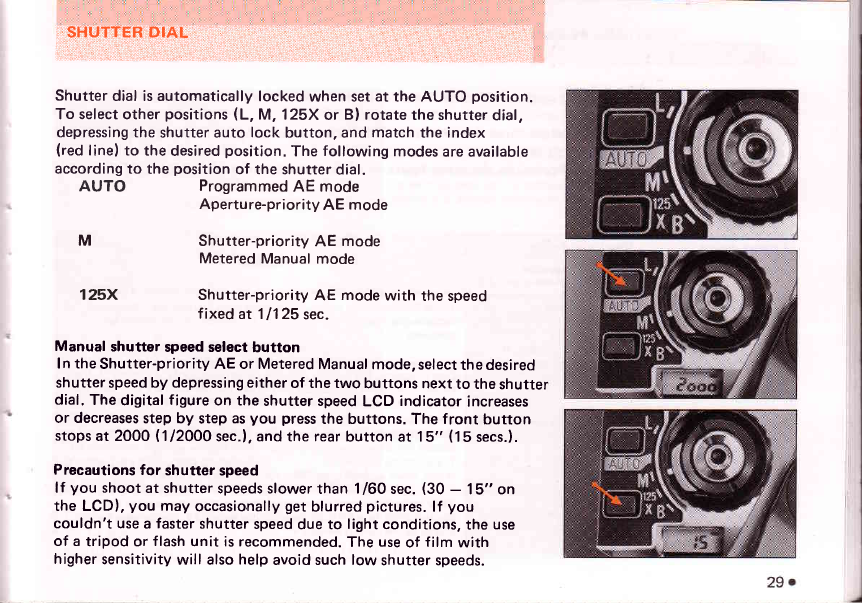
I,fr*if.ttTt*ifi '
Shutter
dial is automatically
locked
when set at the AUTO position.
To select other positions
(L, M, 125X or B) rotate
the shutter
dial,
depressing the shutter auto lock button, and
match
the index
(red
line) to the desired
position.
The following modes
are available
according to the position
of the shutter
dial.
AUTO Programmed
AE mode
Apertu
re-priority AE mode
M Shutter-priority
AE mode
Metered
Manual mode
125X Shutter-priority
AE mode
with the speed
f ixed
at 11125
sec.
Manual shutter speed select button
In the
Shutter-priority AE or Metered
Manual mode,
select
the desired
shutter
speed
by depressing either
of the two buttons next
to the shutter
dial. The digital figure on the shutter speed
LCD indicator increases
or decreases
step by step
as
you press
the buttons. The front button
stops
at 2000 (1
I2OOO
sec.), and the rear
button at 15" (15
secs.).
Precautions
for shutter speed
lf you shootat shutter
speeds slower
than 1/60
sec.
(30 - 15" on
the LCD),
you may occasio,nally
get
blurred
pictures.
lf you
couldn't use
a
faster
shutter
speed
due to light
conditions,
the use
of a tripod or flash
unit is recommended.
The use
of film with
higher
sensitivity
will also help
avoid such low shutter speeds.
www.orphancameras.com
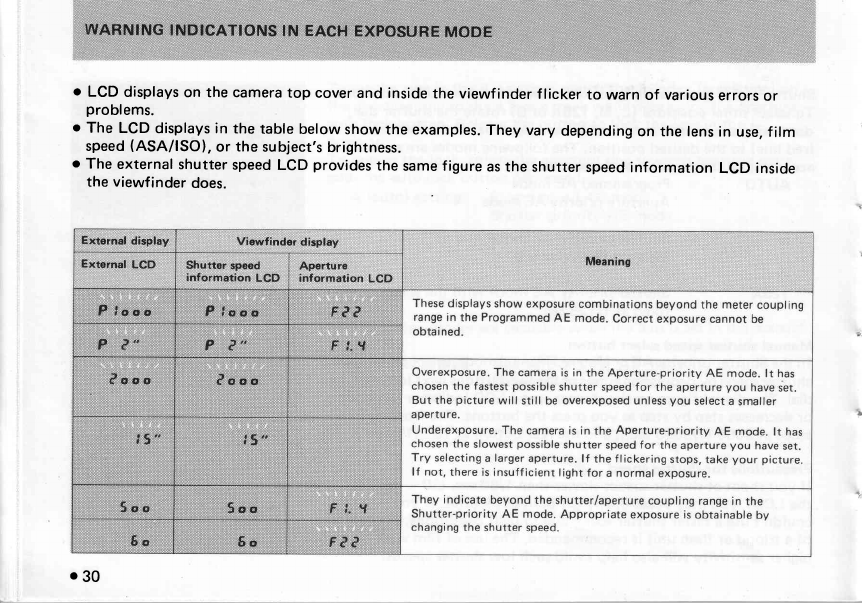
o LCD displays
on the camera
top cover
and inside
the viewfinder
flicker
to warn
of various
r
problems.
o The LCD displays in the
table
below
show
the examples.
They vary
depending
on the lens
i
speed
(ASA/ISO),
or the
subject's
brightness.
o The
external
shutter
speed
LCD provides
the
same
figure
as
the shutter
speed information
the viewfinder
does.
o30
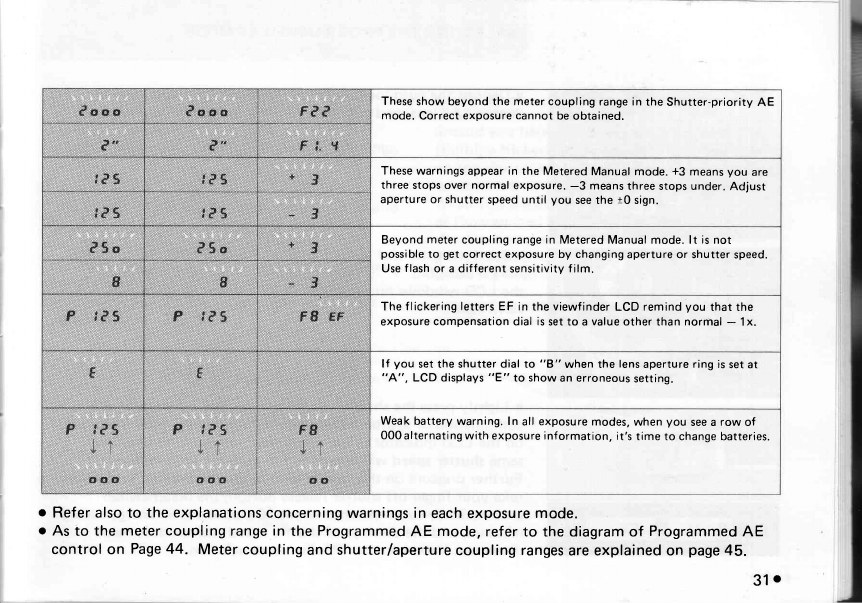
These
show beyond the meter coupling range in the Shutter-priority AE
mode. Correct exposure
cannot be obtained.
These warnings appear in the Metered Manual mode. -t3 means
you are
three stops over normal exposure.
-3 means
three stops under. Adjust
aperture or shutter
speed
until you see the t0 sign.
Beyond meter
coupling range
in Metered
Manual mode. lt is not
possible
to get
correct exposure by changing
aperture or shutter speed.
Use
f lash
or a
different sensitivity f ilm.
The flickering letters EF in the
viewfinder LCD remind
you that the
exposure
compensation
dial
is
set to a
value
other than normal - 1x.
lf you set the shutter dial to "B" when the lens
aperture ring is
set at
"A", LCD displays
"E" to show an erroneous
setting.
Weak battery warning. In all exposure
modes,
when you see a rowof
O00alternating
with exposure
information, it's time to change batteries.
o Refer also to the explanations
concerning
warnings in
each exposure
mode.
o As to the
meter coupling
range
in
the
Programmed
AE mode,
refer to the diagram of Progr
control on Page 44. Meter
coupling
and shutter/aperture
coupling
ranges
are explained on
31
o
www.orphancameras.com
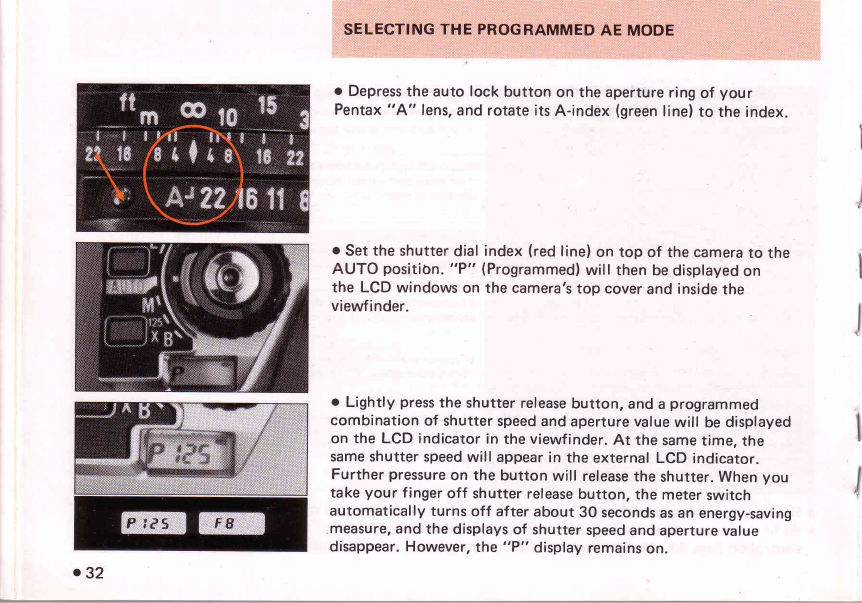
o Depress
the auto lock button on the aperture
ring
of your
Pentax
"A" lens,
and rotate its
A-index (green
line)
to the index.
o Set
the shutter
dial
index (red
line)
on top of the camera
to the
AUTO positibn.
"P" (Programmed)
will then
be
displayed
on
the LCD windows
on the camera's
top cover
and inside
the
viewf
inder.
o Lightly press
the shutter
release
button,
and
a
programmed
combination
of shutter
speed
and
aperture value
will be
displayed
on the LcD indicator
in the
viewfinder.
At the
same
time, the
same shutter
speed
will appear
in the
external
LCD indicator.
Further
pressure
on the button will release
the
shutter. When
you
take your finger
off shutter
release
button, the meter
switch
automatically
turns
off after
about
30 seconds
as an
energy-saving
measure,
and
the displays
of shutter
speed
and
aperture
value
disappear. However,
the "P" display
remains
on.
.32
Programmed AE mode warnings
When the programmed
combination
of shutter
speed
and
aperture
value is
beyond the meter
coupling
range, the camera
displays
two warnings.
\\llr// \\llr//
ffi...'.affi ffi,,,,,..,,-..i Both shutter speed
and
aperture flickering
at high values.
This
indicates
that the light
situation exceeds
the
Super
Program's light
measuring ability since
subject
brightness
is extremely high.
To get
a proper
exposure,
use
another
f
ilm with lower
sensitivity
or an ND filter.
\lll/ \\lll//
ffi ffi,,,,,,,-,-..-.l Both f|ickering at |ow
values.
The subject
is
extremely
dark
and
below the
lowest
limit of the Programmed
AE mode's
meter coupling
range. Use a higher
speed
film,
flash
or some
other
illumination
source
to
throw more
light
to the
subject.
\llr/
ffi
Should
you happen to shift
the shutter dial
to "8"
(Bulb),
a
flickering
"E" (Error)
warning appears
on the
shutter
speed
LCD.
The shutter
cannot be
released
even
if the button is
depressed.
When
you are
using
dedicated
f lash
(TTL Auto,
or Programmed Auto) in Programmed
AE mode,
the displays
of shutter
speed
and aperture
value
are
replaced
by displays
for f
lash
photography
when
the flash
is
ready to fire.
ffi,...f.jffi ffi*'-a--
-' m ffi
33o
www.orphancameras.com
