PGP® Desktop For Windows User's Guide 10.1.0 Instruction Manual Pgp Win 1010 Users En
User Manual: Desktop - 10.1.0 - Windows - Instruction Manual User Guide for PGP Desktop Software, Free Instruction Manual
Open the PDF directly: View PDF ![]() .
.
Page Count: 341 [warning: Documents this large are best viewed by clicking the View PDF Link!]
- About PGP Desktop 10.1 for Windows
- PGP Desktop Basics
- Installing PGP Desktop
- The PGP Desktop User Interface
- Working with PGP Keys
- Managing PGP Keys
- Examining and Setting Key Properties
- Working With Photographic IDs
- Managing User Names and Email Addresses on a Key
- Importing Keys and X.509 Certificates
- Changing Your Passphrase
- Deleting Keys, User IDs, and Signatures
- Disabling and Enabling Public Keys
- Verifying a Public Key
- Signing a Public Key
- Granting Trust for Key Validations
- Working with Subkeys
- Working with ADKs
- Working with Revokers
- Splitting and Rejoining Keys
- If You Lost Your Key or Passphrase
- Protecting Your Keys
- Securing Email Messages
- Securing Instant Messaging
- Viewing Email with PGP Viewer
- Protecting Disks with PGP Whole Disk Encryption
- About PGP Whole Disk Encryption
- Licensing PGP Whole Disk Encryption
- Using PGP Remote Disable and Destroy
- Prepare Your Disk for Encryption
- Determining the Authentication Method for the Disk
- Setting Encryption Options
- Encrypting a Disk or Partition
- Using a PGP WDE-Encrypted Disk
- Using PGP WDE Single Sign-On
- Maintaining the Security of Your Disk
- Getting Disk or Partition Information
- Using the Bypass Feature
- Adding Other Users to an Encrypted Disk or Partition
- Deleting Users From an Encrypted Disk or Partition
- Changing User Passphrases
- Re-Encrypting an Encrypted Disk or Partition
- If you Forgot Your Passphrase
- Backing Up and Restoring
- Uninstalling PGP Desktop from Encrypted Disks or Partitions
- Working with Removable Disks
- Using PGP WDE in a PGP Universal Server-Managed Environment
- Recovering Data From an Encrypted Drive
- Decrypting a PGP WDE-Encrypted Disk
- Special Security Precautions Taken by PGP Desktop
- Using the Windows Preinstallation Environment
- Using PGP Virtual Disks
- About PGP Virtual Disks
- Creating a New PGP Virtual Disk
- Viewing the Properties of a PGP Virtual Disk
- Finding PGP Virtual Disks
- Using a Mounted PGP Virtual Disk
- Working with Alternate Users
- Changing User Passphrases
- Deleting PGP Virtual Disks
- Maintaining PGP Virtual Disks
- The PGP Virtual Disk Encryption Algorithms
- Special Security Precautions Taken by PGP Virtual Disk
- Creating and Accessing Mobile Data with PGP Portable
- Using PGP NetShare
- About PGP NetShare
- Licensing PGP NetShare
- Authorized User Keys
- Establishing a PGP NetShare Admin (Owner)
- "Blacklisted" and "Whitelisted" Files, Folders, and Applications
- Working with Protected Folders
- Choosing the Location for a Protected Folder
- Creating a New PGP NetShare Protected Folder
- Using Files in a PGP NetShare Protected Folder
- Unlocking a Protected Folder
- Determining the Files in a Protected Folder
- Adding Subfolders to a Protected Folder
- Checking Folder Status
- Copying Protected Folders to Other Locations
- Working with PGP NetShare Users
- Importing PGP NetShare Access Lists
- Working with Active Directory Groups
- Decrypting PGP NetShare-Protected Folders
- Re-Encrypting a Folder
- Clearing a Passphrase
- Protecting Files Outside of a Protected Folder
- Backing Up PGP NetShare-Protected Files
- Accessing PGP NetShare Features using the Shortcut Menu
- PGP NetShare in a PGP Universal Server-managed Environment
- Accessing the Properties of a Protected File or Folder
- Using the PGP NetShare Menus in PGP Desktop
- Using PGP Zip
- Shredding Files with PGP Shredder
- Storing Keys on Smart Cards and Tokens
- Setting PGP Desktop Options
- Working with Passwords and Passphrases
- Using PGP Desktop with PGP Universal Server
- Using PGP Desktop with IBM Lotus Notes

PGP® Desktop for Windows
User's Guide

Version Information
PGP Desktop for Windows User's Guide. PGP Desktop Version 10.1.0. Released September 2010.
Copyright Information
Copyright © 1991-2010 by PGP Corporation. All Rights Reserved. No part of this document can be reproduced or transmitted in any form or by any
means, electronic or mechanical, for any purpose, without the express written permission of PGP Corporation.
Trademark Information
PGP, Pretty Good Privacy, and the PGP logo are registered trademarks of PGP Corporation in the US and other countries. IDEA is a trademark of
Ascom Tech AG. Windows and ActiveX are registered trademarks of Microsoft Corporation. AOL is a registered trademark, and AOL Instant
Messenger is a trademark, of America Online, Inc. Red Hat and Red Hat Linux are trademarks or registered trademarks of Red Hat, Inc. Linux is a
registered trademark of Linus Torvalds. Solaris is a trademark or registered trademark of Sun Microsystems, Inc. AIX is a trademark or registered
trademark of International Business Machines Corporation. HP-UX is a trademark or registered trademark of Hewlett-Packard Company. SSH and
Secure Shell are trademarks of SSH Communications Security, Inc. Rendezvous and Mac OS X are trademarks or registered trademarks of Apple
Computer, Inc. All other registered and unregistered trademarks in this document are the sole property of their respective owners.
Licensing and Patent Information
The IDEA cryptographic cipher described in U.S. patent number 5,214,703 is licensed from Ascom Tech AG. The CAST-128 encryption algorithm,
implemented from RFC 2144, is available worldwide on a royalty-free basis for commercial and non-commercial uses. PGP Corporation has secured a
license to the patent rights contained in the patent application Serial Number 10/655,563 by The Regents of the University of California, entitled Block
Cipher Mode of Operation for Constructing a Wide-blocksize block Cipher from a Conventional Block Cipher. Some third-party software included in PGP
Universal Server is licensed under the GNU General Public License (GPL). PGP Universal Server as a whole is not licensed under the GPL. If you would
like a copy of the source code for the GPL software included in PGP Universal Server, contact PGP Support (https://support.pgp.com). PGP Corporation
may have patents and/or pending patent applications covering subject matter in this software or its documentation; the furnishing of this software or
documentation does not give you any license to these patents.
Acknowledgments
This product includes or may include:
-- The Zip and ZLib compression code, created by Mark Adler and Jean-Loup Gailly, is used with permission from the free Info-ZIP implementation,
developed by zlib (http://www.zlib.net). -- Libxml2, the XML C parser and toolkit developed for the Gnome project and distributed and copyrighted
under the MIT License found at http://www.opensource.org/licenses/mit-license.html. Copyright © 2007 by the Open Source Initiative. -- bzip2 1.0, a
freely available high-quality data compressor, is copyrighted by Julian Seward, © 1996-2005. -- Application server (http://jakarta.apache.org/), web
server (http://www.apache.org/), Jakarta Commons (http://jakarta.apache.org/commons/license.html) and log4j, a Java-based library used to parse
HTML, developed by the Apache Software Foundation. The license is at www.apache.org/licenses/LICENSE-2.0.txt. -- Castor, an open-source,
data-binding framework for moving data from XML to Java programming language objects and from Java to databases, is released by the ExoLab
Group under an Apache 2.0-style license, available at http://www.castor.org/license.html. -- Xalan, an open-source software library from the Apache
Software Foundation that implements the XSLT XML transformation language and the XPath XML query language, is released under the Apache
Software License, version 1.1, available at http://xml.apache.org/xalan-j/#license1.1. -- Apache Axis is an implementation of the SOAP ("Simple Object
Access Protocol") used for communications between various PGP products is provided under the Apache license found at
http://www.apache.org/licenses/LICENSE-2.0.txt. -- mx4j, an open-source implementation of the Java Management Extensions (JMX), is released
under an Apache-style license, available at http://mx4j.sourceforge.net/docs/ch01s06.html. -- jpeglib version 6a is based in part on the work of the
Independent JPEG Group. (http://www.ijg.org/) -- libxslt the XSLT C library developed for the GNOME project and used for XML transformations is
distributed under the MIT License http://www.opensource.org/licenses/mit-license.html. -- PCRE Perl regular expression compiler, copyrighted and
distributed by University of Cambridge. ©1997-2006. The license agreement is at http://www.pcre.org/license.txt. -- BIND Balanced Binary Tree Library
and Domain Name System (DNS) protocols developed and copyrighted by Internet Systems Consortium, Inc. (http://www.isc.org) -- Free BSD
implementation of daemon developed by The FreeBSD Project, © 1994-2006. -- Simple Network Management Protocol Library developed and
copyrighted by Carnegie Mellon University © 1989, 1991, 1992, Networks Associates Technology, Inc, © 2001- 2003, Cambridge Broadband Ltd. ©
2001- 2003, Sun Microsystems, Inc., © 2003, Sparta, Inc, © 2003-2006, Cisco, Inc and Information Network Center of Beijing University of Posts and
Telecommunications, © 2004. The license agreement for these is at http://net-snmp.sourceforge.net/about/license.html. -- NTP version 4.2 developed
by Network Time Protocol and copyrighted to various contributors. -- Lightweight Directory Access Protocol developed and copyrighted by OpenLDAP
Foundation. OpenLDAP is an open-source implementation of the Lightweight Directory Access Protocol (LDAP). Copyright © 1999-2003, The
OpenLDAP Foundation. The license agreement is at http://www.openldap.org/software/release/license.html. Secure shell OpenSSH developed by
OpenBSD project is released by the OpenBSD Project under a BSD-style license, available at
http://www.openbsd.org/cgi-bin/cvsweb/src/usr.bin/ssh/LICENCE?rev=HEAD. -- PC/SC Lite is a free implementation of PC/SC, a specification for
SmartCard integration is released under the BSD license. -- Postfix, an open source mail transfer agent (MTA), is released under the IBM Public License
1.0, available at http://www.opensource.org/licenses/ibmpl.php. -- PostgreSQL, a free software object-relational database management system, is
released under a BSD-style license, available at http://www.postgresql.org/about/licence. -- PostgreSQL JDBC driver, a free Java program used to
connect to a PostgreSQL database using standard, database independent Java code, (c) 1997-2005, PostgreSQL Global Development Group, is
released under a BSD-style license, available at http://jdbc.postgresql.org/license.html. -- PostgreSQL Regular Expression Library, a free software
object-relational database management system, is released under a BSD-style license, available at http://www.postgresql.org/about/licence. --
21.vixie-cron is the Vixie version of cron, a standard UNIX daemon that runs specified programs at scheduled times. Copyright © 1993, 1994 by Paul
Vixie; used by permission. -- JacORB, a Java object used to facilitate communication between processes written in Java and the data layer, is open
source licensed under the GNU Library General Public License (LGPL) available at http://www.jacorb.org/lgpl.html. Copyright © 2006 The JacORB
Project. -- TAO (The ACE ORB) is an open-source implementation of a CORBA Object Request Broker (ORB), and is used for communication between
processes written in C/C++ and the data layer. Copyright (c) 1993-2006 by Douglas C. Schmidt and his research group at Washington University,
University of California, Irvine, and Vanderbilt University. The open source software license is available at
http://www.cs.wustl.edu/~schmidt/ACE-copying.html. -- libcURL, a library for downloading files via common network services, is open source software
provided under a MIT/X derivate license available at http://curl.haxx.se/docs/copyright.html. Copyright (c) 1996 - 2007, Daniel Stenberg. -- libuuid, a
library used to generate unique identifiers, is released under a BSD-style license, available at
http://thunk.org/hg/e2fsprogs/?file/fe55db3e508c/lib/uuid/COPYING. Copyright (C) 1996, 1997 Theodore Ts'o. -- libpopt, a library that parses command
line options, is released under the terms of the GNU Free Documentation License available at http://directory.fsf.org/libs/COPYING.DOC. Copyright ©
2000-2003 Free Software Foundation, Inc. -- gSOAP, a development tool for Windows clients to communicate with the Intel Corporation AMT chipset

on a motherboard, is distributed under the gSOAP Public License version 1.3b, available at http://www.cs.fsu.edu/~engelen/license.html. -- Windows
Template Library (WTL) is used for developing user interface components and is distributed under the Common Public License v1.0 found at
http://opensource.org/licenses/cpl1.0.php. -- The Perl Kit provides several independent utilities used to automate a variety of maintenance functions
and is provided under the Perl Artistic License, found at http://www.perl.com/pub/a/language/misc/Artistic.html. -- rEFIt - libeg, provides a graphical
interface library for EFI, including image rendering, text rendering, and alpha blending, and is distributed under the license found at
http://refit.svn.sourceforge.net/viewvc/*checkout*/refit/trunk/refit/LICENSE.txt?revision=288. Copyright (c) 2006 Christoph Pfisterer. All rights
reserved. -- Java Radius Client, used to authenticate PGP Universal Web Messenger users via Radius, is distributed under the Lesser General Public
License (LGPL) found at http://www.gnu.org/licenses/lgpl.html. -- Yahoo! User Interface (YUI) library version 2.5.2, a Web UI interface library for AJAX.
Copyright (c) 2009, Yahoo! Inc. All rights reserved. Released under a BSD-style license, available at http://developer.yahoo.com/yui/license.html. --
JSON-lib version 2.2.1, a Java library used to convert Java objects to JSON (JavaScript Object Notation) objects for AJAX. Distributed under the
Apache 2.0 license, available at http://json-lib.sourceforge.net/license.html. -- EZMorph, used by JSON-lib, is distributed under the Apache 2.0 license,
available at http://ezmorph.sourceforge.net/license.html. -- Apache Commons Lang, used by JSON-lib, is distributed under the Apache 2.0 license,
available at http://commons.apache.org/license.html. -- Apache Commons BeanUtils, used by JSON-lib, is distributed under the Apache 2.0 license,
available at http://commons.apache.org/license.html. -- SimpleIni is an .ini format file parser and provides the ability to read and write .ini files, a
common configuration file format used on Windows, on other platforms. Distributed under the MIT License found at
http://www.opensource.org/licenses/mit-license.html. Copyright 2006-2008, Brodie Thiesfield. -- uSTL provides a small fast implementation of common
Standard Template Library functions and data structures and is distributed under the MIT License found at
http://www.opensource.org/licenses/mit-license.html. Copyright (c) 2005-2009 by Mike Sharov <msharov@users.sourceforge.net>. -- Protocol Buffers
(protobuf), Google's data interchange format, are used to serialize structure data in the PGP SDK. Distributed under the BSD license found at
http://www.opensource.org/licenses/bsd-license.php. Copyright 2008 Google Inc. All rights reserved.
Additional acknowledgements and legal notices are included as part of the PGP Universal Server.
Export Information
Export of this software and documentation may be subject to compliance with the rules and regulations promulgated from time to time by the Bureau
of Export Administration, United States Department of Commerce, which restricts the export and re-export of certain products and technical data.
Limitations
The software provided with this documentation is licensed to you for your individual use under the terms of the End User License Agreement provided
with the software. The information in this document is subject to change without notice. PGP Corporation does not warrant that the information meets
your requirements or that the information is free of errors. The information may include technical inaccuracies or typographical errors. Changes may be
made to the information and incorporated in new editions of this document, if and when made available by PGP Corporation.
Unsupported Third Party Products
By utilizing third party products, software, drivers, or other components ("Unsupported Third Party Product") to interact with the PGP software and/or by
utilizing any associated PGP command or code provided by to you by PGP at its sole discretion to interact with the Unsupported Third Party Product
("PGP Third Party Commands"), you acknowledge that the PGP software has not been designed for or formally tested with the Unsupported Third Party
Product, and therefore PGP provides no support or warranties with respect to the PGP Third Party Commands or the PGP software's compatibility with
Unsupported Third Party Products. THE PGP THIRD PARTY COMMANDS ARE PROVIDED "AS IS," WITH ALL FAULTS, AND THE ENTIRE RISK AS TO
SATISFACTORY QUALITY, PERFORMANCE, ACCURACY, AND EFFORT IS WITH YOU. TO THE MAXIMUM EXTENT PERMITTED BY APPLICABLE
LAW, PGP DISCLAIMS ALL REPRESENTATIONS, WARRANTIES, AND CONDITIONS, WHETHER EXPRESS OR IMPLIED, INCLUDING ANY
WARRANTIES OR CONDITIONS OF MERCHANTABILITY, FITNESS FOR A PARTICULAR PURPOSE, TITLE, NONINFRINGEMENT, QUIET
ENJOYMENT, AND ACCURACY WITH RESPECT TO THE PGP THIRD PARTY COMMANDS OR THE PGP SOFTWARE'S COMPATIBILITY WITH THE
UNSUPPORTED THIRD PARTY PRODUCT.
4

1
Contents
About PGP Desktop 10.1 for Windows
What's New in PGP Desktop for Windows Version 10.1 1
What's New in PGP Desktop 10.1 2
Using this Guide 4
“Managed” versus “Unmanaged” Users 4
Conventions Used in This Guide 5
Who Should Read This Document 5
About PGP Desktop Licensing 6
Licensing PGP Desktop for Windows 6
Checking License Details 6
If Your License has Expired 8
Getting Assistance 9
Getting product information 9
Contact Information 10
PGP Desktop Basics 11
PGP Desktop Terminology 11
PGP Product Components 11
Terms Used in PGP Desktop 12
Conventional and Public Key Cryptography 14
Using PGP Desktop for the First Time 15
Installing PGP Desktop 19
Before You Install 19
System Requirements 19
Citrix and Terminal Services Compatibility 20
Installing and Configuring PGP Desktop 21
Installing the Software 21
Upgrading the Software 21
Licensing PGP Desktop 24
Running the Setup Assistant 24
Uninstalling PGP Desktop 24
Moving Your PGP Desktop Installation From One Computer to Another 25
The PGP Desktop User Interface 27
Accessing PGP Desktop Features 27
The PGP Desktop Main Screen 28
Using the PGP Tray Icon 29
Using Shortcut Menus in Windows Explorer 31
Using the Start Menu 32
i

PGP® Desktop for Windows Contents
PGP Desktop Notifier alerts 32
PGP Desktop Notifier for Messaging 33
PGP Desktop Notifier for Disk features 35
Enabling or Disabling Notifiers 36
Viewing the PGP Log 37
Working with PGP Keys 39
Viewing Keys 39
Creating a Keypair 40
Passwords and Passphrases 42
Protecting Your Private Key 43
Protecting Keys and Keyrings 44
Backing up Your Private Key 44
What if You Lose Your Key? 45
Distributing Your Public Key 45
Placing Your Public Key on a Keyserver 46
Including Your Public Key in an Email Message 47
Exporting Your Public Key to a File 47
Copying from a Smart Card Directly to Someone’s Keyring 48
Getting the Public Keys of Others 48
Getting Public Keys from a Keyserver 49
Getting Public Keys from Email Messages 50
Working with Keyservers 50
Using Master Keys 51
Adding Keys to the Master Key List 52
Deleting Keys from the Master Key List 52
Managing PGP Keys 53
Examining and Setting Key Properties 53
Working With Photographic IDs 55
Managing User Names and Email Addresses on a Key 55
Importing Keys and X.509 Certificates 57
Using the Import Certificate Assistant 57
Importing X.509 Certificates Included in S/MIME Email Messages 59
Changing Your Passphrase 59
Deleting Keys, User IDs, and Signatures 60
Disabling and Enabling Public Keys 60
Verifying a Public Key 61
Signing a Public Key 62
Revoking Your Signature from a Public Key 64
Granting Trust for Key Validations 64
Working with Subkeys 65
Using Separate Subkeys 66
Viewing Subkeys 67
Creating New Subkeys 68
Specifying Key Usage for Subkeys 68
Revoking Subkeys 70
Removing Subkeys 70
ii

PGP® Desktop for Windows Contents
Working with ADKs 70
Adding an ADK to a Keypair 71
Updating an ADK 71
Removing an ADK 72
Working with Revokers 72
Appointing a Designated Revoker 72
Revoking a Key 73
Splitting and Rejoining Keys 73
Creating a Split Key 74
Rejoining Split Keys 75
If You Lost Your Key or Passphrase 77
Reconstructing Keys with PGP Universal Server 77
Creating Key Reconstruction Data 77
Reconstructing Your Key if You Lost Your Key or Passphrase 79
Protecting Your Keys 81
Securing Email Messages 83
How PGP Desktop Secures Email Messages 83
Incoming Messages 84
Verifying Signatures on Incoming Messages 86
Understanding Annotations on Incoming Messages 87
Outgoing Messages 88
Securing Sent Items on IMAP Email Servers 88
Sending MAPI Email with Microsoft Outlook 89
Using the Sign and Encrypt Buttons in Microsoft Outlook 90
Using Offline Policy 92
Services and Policies 93
Viewing Services and Policies 94
Creating a New Messaging Service 95
Editing Messaging Service Properties 98
Disabling or Enabling a Service 99
Deleting a Service 99
Multiple Services 100
Troubleshooting PGP Messaging Services 100
Creating a New Security Policy 102
Regular Expressions in Policies 107
Security Policy Information and Examples 109
Working with the Security Policy List 113
Editing a Security Policy 113
Editing a Mailing List Policy 114
Deleting a Security Policy 118
Changing the Order of Policies in the List 119
PGP Desktop and SSL 119
Key Modes 121
Determining Key Mode 122
Changing Key Mode 123
Viewing the PGP Log 124
iii
PGP® Desktop for Windows Contents
Securing Instant Messaging 125
About PGP Desktop’s Instant Messaging Compatibility 125
Instant Messaging Client Compatibility 126
About the Keys Used for Encryption 127
Encrypting your IM Sessions 127
Viewing Email with PGP Viewer 129
Overview of PGP Viewer 129
Compatible Email Clients 130
Opening an Encrypted Email Message or File 130
Copying Email Messages to Your Inbox 132
Exporting Email Messages 132
Specifying Additional Options 132
Specifying Options in PGP Viewer 133
Security Features in PGP Viewer 134
Protecting Disks with PGP Whole Disk Encryption 135
About PGP Whole Disk Encryption 136
How does PGP WDE Differ from PGP Virtual Disk? 137
Licensing PGP Whole Disk Encryption 137
License Expiration 138
Using PGP Remote Disable and Destroy 138
Prepare Your Disk for Encryption 140
Supported Disk Types 141
Supported Keyboards 142
Ensure Disk Health Before Encryption 144
Calculate the Encryption Duration 144
Maintain Power Throughout Encryption 145
Run a Pilot Test to Ensure Software Compatibility 146
Determining the Authentication Method for the Disk 146
Passphrase and Single Sign-On Authentication 147
Public Key Authentication 147
Token-Based Authentication 147
Two-Factor Authentication Using a USB Flash Device 148
Trusted Platform Module (TPM) Authentication 148
Setting Encryption Options 149
Partition-Level Encryption 150
Preparing a Smart Card or Token to Use For Authentication 150
Using PGP Whole Disk Encryption Options 154
Encrypting a Disk or Partition 155
Supported Characters for PGP WDE Passphrases 156
Encrypting the Disk 157
Encountering Disk Errors During Encryption 160
Using a PGP WDE-Encrypted Disk 161
Authenticating at the PGP BootGuard Screen 161
iv

PGP® Desktop for Windows Contents
Selecting Keyboard Layouts 165
Using PGP WDE Single Sign-On 167
Prerequisites for Using Single Sign-On 168
Encrypting the Disk to Use Single Sign-On 168
Multiple Users and Single Sign-On 169
Logging in with Single Sign-On 169
Changing Your Passphrase With Single Sign-On 169
Displaying the Windows Login dialog box 170
Maintaining the Security of Your Disk 170
Getting Disk or Partition Information 170
Using the Bypass Feature 171
Adding Other Users to an Encrypted Disk or Partition 172
Deleting Users From an Encrypted Disk or Partition 173
Changing User Passphrases 173
Re-Encrypting an Encrypted Disk or Partition 174
If you Forgot Your Passphrase 175
Backing Up and Restoring 177
Uninstalling PGP Desktop from Encrypted Disks or Partitions 177
Working with Removable Disks 177
Encrypting Removable Disks 178
Using Locked (Read-Only) Disks as Read-Only 179
Moving Removable Disks to Other Systems 179
Reformatting an Encrypted Removable Disk 180
Using PGP WDE in a PGP Universal Server-Managed Environment 180
PGP Whole Disk Encryption Administration 180
Creating a Recovery Token 182
Using a Recovery Token 182
Recovering Data From an Encrypted Drive 183
Creating and Using Recovery Disks 183
Decrypting a PGP WDE-Encrypted Disk 185
Special Security Precautions Taken by PGP Desktop 186
Passphrase Erasure 186
Virtual Memory Protection 187
Hibernation vs Standby 187
Memory Static Ion Migration Protection 187
Other Security Considerations 187
Using the Windows Preinstallation Environment 188
Using PGP Whole Disk Encryption with IBM Lenovo ThinkPad Systems 188
Using PGP Whole Disk Encryption with the Microsoft Windows XP Recovery Console189
Using PGP Virtual Disks 191
About PGP Virtual Disks 192
Creating a New PGP Virtual Disk 193
Viewing the Properties of a PGP Virtual Disk 196
Finding PGP Virtual Disks 196
Using a Mounted PGP Virtual Disk 196
Mounting a PGP Virtual Disk 197
Unmounting a PGP Virtual Disk 197
Compacting a PGP Virtual Disk 198
v
PGP® Desktop for Windows Contents
Re-Encrypting PGP Virtual Disks 199
Working with Alternate Users 200
Adding Alternate User Accounts to a PGP Virtual Disk 200
Deleting Alternate User Accounts from a PGP Virtual Disk 200
Disabling and Enabling Alternate User Accounts 201
Changing Read/Write and Read-Only Status 202
Granting Administrator Status to an Alternate User 202
Changing User Passphrases 203
Deleting PGP Virtual Disks 203
Maintaining PGP Virtual Disks 204
Mounting PGP Virtual Disk Volumes on a Remote Server 204
Backing up PGP Virtual Disk Volumes 204
Exchanging PGP Virtual Disks 205
The PGP Virtual Disk Encryption Algorithms 205
Special Security Precautions Taken by PGP Virtual Disk 206
Passphrase Erasure 206
Virtual Memory Protection 207
Hibernation 207
Memory Static Ion Migration Protection 207
Other Security Considerations 208
Creating and Accessing Mobile Data with PGP Portable 209
Creating PGP Portable Disks 209
Creating a PGP Portable Disk from a Folder 210
Creating a PGP Portable Disk from a Removable USB Device 211
Creating Read/Write or Read-Only PGP Portable Disks 212
Accessing Data on a PGP Portable Disk 213
Changing the Passphrase for a PGP Portable Disk 214
Unmounting a PGP Portable Disk 215
Using PGP NetShare 217
About PGP NetShare 218
PGP NetShare Roles 220
Licensing PGP NetShare 220
Authorized User Keys 221
Establishing a PGP NetShare Admin (Owner) 221
"Blacklisted" and "Whitelisted" Files, Folders, and Applications 222
“Blacklisted” and Other Files You Cannot Protect 222
"Blacklisted" and "Whitelisted" Folders Specified by PGP Universal Server 223
Application-based Encryption and Decryption Bypass Lists 223
Working with Protected Folders 224
Choosing the Location for a Protected Folder 225
Creating a New PGP NetShare Protected Folder 226
Using Files in a PGP NetShare Protected Folder 229
Unlocking a Protected Folder 229
Determining the Files in a Protected Folder 231
Adding Subfolders to a Protected Folder 231
Checking Folder Status 232
vi

PGP® Desktop for Windows Contents
Copying Protected Folders to Other Locations 232
Working with PGP NetShare Users 233
Adding a PGP NetShare User 233
Changing a User's Role 234
Deleting a User from a Protected Folder 235
Importing PGP NetShare Access Lists 236
Working with Active Directory Groups 237
Setting up PGP NetShare to Work with Groups 237
Refreshing Groups 238
Decrypting PGP NetShare-Protected Folders 238
Re-Encrypting a Folder 239
Clearing a Passphrase 240
Protecting Files Outside of a Protected Folder 240
Backing Up PGP NetShare-Protected Files 242
Accessing PGP NetShare Features using the Shortcut Menu 243
PGP NetShare in a PGP Universal Server-managed Environment 243
Accessing the Properties of a Protected File or Folder 244
Using the PGP NetShare Menus in PGP Desktop 245
The File Menu 245
The Edit Menu 246
The NetShare Menu 246
Using PGP Zip 249
Overview 249
Creating PGP Zip Archives 250
Encrypting to Recipient Keys 252
Encrypting with a Passphrase 254
Creating a PGP Self-Decrypting Archive (SDA) 256
Creating a Sign Only Archive 258
Opening a PGP Zip Archive 259
Opening a PGP Zip SDA 260
Editing a PGP Zip Archive 260
Verifying Signed PGP Zip Archives 262
Shredding Files with PGP Shredder 265
Using PGP Shredder to Permanently Delete Files and Folders 265
Shredding Files using the PGP Shredder Icon on Your Desktop 267
Shredding Files From Within PGP Desktop 267
Shredding Files in Windows Explorer 267
Using the PGP Shred Free Space Assistant 268
Scheduling Free Space Shredding 269
Storing Keys on Smart Cards and Tokens 271
About Smart Cards and Tokens 271
Compatible Smart Cards 273
Recognizing Smart Cards 274
vii
PGP® Desktop for Windows Contents
Examining Smart Card Properties 275
Generating a PGP Keypair on a Smart Card 275
Copying your Public Key from a Smart Card to a Keyring 277
Copying a Keypair from Your Keyring to a Smart Card 277
Wiping Keys from Your Smart Card 279
Using Multiple Smart Cards 279
Special-Use Tokens 280
Configuring the Aladdin eToken 281
Setting PGP Desktop Options 283
Accessing the PGP Options dialog box 283
General Options 284
Keys Options 286
Master Keys Options 289
Messaging Options 289
Proxy Options 292
PGP NetShare Options 296
Disk Options 297
Notifier Options 299
Advanced Options 302
Working with Passwords and Passphrases 305
Choosing whether to use a password or passphrase 305
The Passphrase Quality Bar 306
Creating Strong Passphrases 307
What if You Forget Your Passphrase? 309
Using PGP Desktop with PGP Universal Server 311
Overview 311
For PGP Administrators 312
Manually binding to a PGP Universal Server 313
Using PGP Desktop with IBM Lotus Notes 315
About Lotus Notes and MAPI Compatibility 315
Using PGP Desktop with Lotus Notes 316
Sending email to recipients inside your Lotus Notes organization 316
Sending email to recipients outside your Lotus Notes organization 316
Binding to a PGP Universal Server 317
Pre-Binding 317
Manual Binding 317
Notes Addresses 318
Notes Client Settings 318
The Notes.ini Configuration File 319
Using Lotus Notes Native Encryption 319
viii


1 About PGP Desktop 10.1
for Windows
PGP Desktop is a security tool that uses cryptography to protect your data
against unauthorized access.
PGP Desktop protects your data while being sent by email or by instant
messaging (IM). It lets you encrypt your entire hard drive or hard drive partition
(on Windows systems)—so everything is protected all the time—or just a
portion of your hard drive, via a virtual disk on which you can securely store your
most sensitive data. You can use it to share your files and folders securely with
others over a network. It lets you put any combination of files and folders into
an encrypted, compressed package for easy distribution or backup. Finally, use
PGP Desktop to shred (securely delete) sensitive files—so that no one can
retrieve them—and shred free space on your hard drive, so there are no
unsecured remains of any files.
Use PGP Desktop to create PGP keypairs and manage both your personal
keypairs and the public keys of others.
To make the most of PGP Desktop, you should be familiar with PGP Desktop
Terminology (on page 11). You should also understand conventional and
public-key cryptography, as described in Conventional and Public Key
Cryptography (on page 14).
In This Chapter
What's New in PGP Desktop for Windows Version 10.1.......................... 1
Using this Guide ........................................................................................ 4
Who Should Read This Document ............................................................ 5
About PGP Desktop Licensing .................................................................. 6
Getting Assistance .................................................................................... 9
What's New in PGP Desktop for Windows Version 10.1
Building on PGP Corporation’s proven technology, PGP Desktop 10.1 for
Windows includes numerous improvements and the following new and
resolved features.
1

PGP® Desktop for Windows About PGP Desktop 10.1 for Windows
What's New in PGP Desktop 10.1
General
The SafeNet 330 smart card has been added for both pre- and post-boot
authentication.
Messaging
Improvements have been made to annotations. In a PGP Universal
Server-managed environment, your administrator can now specify where
the email annotation will be, such as end of message rather than wrapped
around the message.
Improvements have been made to the Encrypt and Sign buttons for
Microsoft Outlook (MAPI) email. In addition, your administrator may have
specified the default states for the Encrypt and Sign buttons, if they are
enabled. You can choose to override the default state specified by your
administrator by toggling the buttons.
You can now protect sent message copies for IMAP accounts (available for
standalone installations only) to provide additional security so you can
protect sensitive emails that you have sent using your IMAP account.
Choose to Encrypt, Encrypt and Sign, or Sign Only messages as they
are copied to your IMAP Sent Items mailbox.
In a managed environment, your PGP Universal Server administrator can
set policy to enable you to decide if you want to perform signature
verification on email messages. If enabled, a new button and/or menu
option appears in your Microsoft Outlook or Lotus Notes email client. The
button or option will be in the default state set by your administrator but
you can choose to override this setting.
In a managed environment, your PGP Universal Server administrator may
have specified certain PGP Notifier settings (for example, whether
notifications are to be displayed or the location of the notifier).
X.509 certificates included in an S/MIME email message sent to you can
now be imported to your key ring. The same settings you have specified
when public keys are found apply to these certificates. If specified, PGP
Desktop extracts and then imports the X.509 certificate to your keyring. If
you want to encrypt email using imported certificates, be sure to manually
sign the certificate.
In a managed environment, your PGP Universal Server administrator may
have specified a setting so that additional information is included in the
Non-Delivery Receipt when a message is blocked. If PGP Desktop is
unable to find a key for one or more of the recipients in a group list, the
email addresses are listed in the Error Details of the Non-Delivery Receipt.
2

PGP® Desktop for Windows About PGP Desktop 10.1 for Windows
PGP NetShare
Improvements made to PGP NetShare so that when blacklists have been
defined by the PGP Universal Server administrator, wildcard characters are
now supported as well as blacklists are honored when PGP Tray is
unavailable. In addition, invalid blacklist entries are skipped.
A new column is now displayed in the Access List section to display the
user’s User type (role).
The PGP NetShare command line is now available able to run in standalone
mode, so you can perform PGP NetShare-related tasks on servers and
other file stores without the PGP NetShare client installed on the system.
For more information, refer to the PGP NetShare Command Line User’s
Guide.
PGP Portable
You can now require that the user of the PGP Portable Disk change the
passphrase on first use (the first time the user inserts the device into the
system. This option is useful if you plan to create several PGP Portable
Disks to be handed out, such as at a conference or trade show.
A link for More Info is now available on the PGP Portable dialog box
displayed when you access data on the device. Your browser launches and
the PGP Corporation Support site page is displayed.
You can now view available disk space and total size of the PGP Portable
Disk once the disk has been mounted. When you move your cursor over
the task bar item for a few seconds, the PGP Notifier message appears and
displays the mount status of the PGP Portable Disk as well as the updated
disk space information.
PGP Remote Disable & Destroy (PGP RDD)
PGP Remote Disable & Destroy utilizing Intel® Anti-Theft Technology
addresses the need to keep data secure in mobile environments, and
comply with increasingly stringent regulations in data security and privacy.
With PGP RDD, your PGP Universal Server administrator can remotely
disable your laptop, and/or disable access to data if the laptop is lost or
stolen and perform secure decommission of laptops.
PGP Whole Disk Encryption
If your Microsoft Windows system supports the Intel® Advanced
Encryption Standard (AES) Instructions (AES-NI), your system is encrypted
and decrypted using the hardware associated with this encryption
algorithm. AES-NI provides improved performance during encryption and
decryption processes as well as disk I/O enhancements while your disk is
encrypted.
3

PGP® Desktop for Windows About PGP Desktop 10.1 for Windows
Enhancement to force the encryption of boot drives, by policy. This
includes forcing encryption if policy changed (for example, you previously
did not have to encrypt boot drives, and your administrator modified policy
to require encryption).
In the Advanced screen of PGP BootGuard on Windows systems, the
name of your system is now displayed. This information can be useful to
your help desk if you need to use the Whole Disk Recovery Token in case
you have forgotten your passphrase.
Enhancements have been made to PGP BootGuard so you can use a virtual
keyboard on your Tablet PC to enter your passphrase and authenticate at
the PGP BootGuard screen. If you have docked your system or have an
external keyboard connected directly to your system, you can also use that
keyboard to authenticate. Refer to the system requirements for
supported Tablet PCs.
Enhancements made to PGP Desktop for Windows to add full support for
USB 2.0 and EHCI controllers in PGP BootGuard. This enhancement adds
support for smart card readers and tokens on new laptops based on the
new Intel chipset.
Using this Guide
This Guide provides information on configuring and using the components
within PGP Desktop. Each chapter of the guide is devoted to one of the
components of PGP Desktop.
“Managed” versus “Unmanaged” Users
A PGP Universal Server can be used to control the policies and settings used by
components of PGP Desktop. This is often the case in enterprises using PGP
software. PGP Desktop users in this configuration are known as managed
users, because the settings and policies available in their PGP Desktop software
are pre-configured by a PGP administrator and managed using a PGP Universal
Server. If you are part of a managed environment, your company may have
specific usage requirements. For example, managed users may or may not be
allowed to send plaintext email, or may be required to encrypt their disk with
PGP Whole Disk Encryption.
Users not under the control of a PGP Universal Server are called unmanaged or
standalone users.
This document describes how PGP Desktop works in both situations; however,
managed users may discover while working with the product that some of the
settings described in this document are not available in their environments. For
more information, see Using PGP Desktop with PGP Universal Server (on page
311).
4

PGP® Desktop for Windows About PGP Desktop 10.1 for Windows
Features Customized by Your PGP Universal Server Administrator
If you are using PGP Desktop as a "managed" user in a PGP Universal
Server-managed environment, there are some settings that can be specified by
your administrator. These settings may change the way features are displayed
in PGP Desktop.
Disabled features. Your PGP Universal Server administrator can enable or
disable specific functionality. For example, your administrator may disable
the ability to create PGP Zip archives, or to create PGP NetShare protected
folders (on Windows systems).
When a feature is disabled, the control item in the left side is not displayed
and the menu for that feature is not available. The graphics included in this
guide depict the default installation with all features enabled. The PGP
Desktop interface may look different if your administrator has customized
the features available.
Customized BootGuard. If you are using PGP Desktop in a PGP Universal
Server-managed environment, your PGP administrator may have
customized the PGP Whole Disk Encryption BootGuard screen to include
additional text or a custom image such as your organization's logo. The
graphics included in this guide depict the default installation. Your actual
login screen may look different if your administrator has customized the
screen.
Conventions Used in This Guide
Notes, Cautions, and Warnings are used in the following ways.
Notes: Notes are extra, but important, information. A Note calls your
attention to important aspects of the product. You will be able to use the
product better if you read the Notes.
Cautions: Cautions indicate the possibility of loss of data or a minor security
breach. A Caution tells you about a situation where problems could occur
unless precautions are taken. Pay attention to Cautions.
Warnings: Warnings indicate the possibility of significant data loss or a major
security breach. A Warning means serious problems are going to happen
unless you take the appropriate action. Please take Warnings very seriously.
Who Should Read This Document
This document is for anyone who is going to be using the PGP Desktop for
Windows software to protect their data.
5

PGP® Desktop for Windows About PGP Desktop 10.1 for Windows
Note: If you are new to cryptography and would like an overview of the
terminology and concepts in PGP Desktop, see An Introduction to
Cryptography (it was installed onto your computer when you installed PGP
Desktop).
About PGP Desktop Licensing
A license is used within the PGP software to enable the functionality you
purchased, and sets the expiration of the software. Depending on the license
you have, some or all of the PGP Desktop family of applications will be active.
Once you have entered the license, you must then authorize the software with
PGP Corporation, either manually or online.
There are three types of licenses:
Evaluation: This type of license is typically time-delimited and may not
include all PGP Desktop functionality.
Subscription: This type of license is typically valid for a subscription period
of one year. During the subscription period, you receive the current version
of PGP software and all upgrades and updates released during this period.
Perpetual: This type of license allows you to use PGP Desktop indefinitely.
With the addition of the annual Software Insurance policy, which must be
renewed annually, you also receive all upgrades and updates released
during the policy term.
Licensing PGP Desktop for Windows
To license PGP Desktop Do one of the following:
If you are a managed user, you are most likely already using a licensed
copy of PGP Desktop. Check your license details as described in Checking
License Details (on page 6). If you have questions, please contact your PGP
administrator.
If you are an unmanaged user, or a PGP administrator, check your license
details as described in Checking License Details (on page 6). If you need to
authorize your copy of PGP Desktop, do so as described in Authorizing PGP
Desktop for Windows (on page 7).
Checking License Details
To see the details of your PGP Desktop license
1 Double-click the PGP Desktop icon in the system tray.
6

PGP® Desktop for Windows About PGP Desktop 10.1 for Windows
2 Select Help > License. The PGP Desktop License dialog box is displayed.
This dialog box displays the following details:
Item Description
License Type The name of the licensed product.
License Seats The number of seats available for this license.
License Expiration The date when the license will expire.
Product Information The components that are active in your license.
Move your cursor over the product name to see
information about the product and to find out if
you are currently licensed to use it.
Note: If you do not authorize your copy of PGP Desktop, only limited features
will be available to you (PGP Zip and Keys).
Authorizing PGP Desktop for Windows
If you need to change to a new license number, or if you skipped the license
authorization process during configuration, follow these instructions to authorize
your software.
To authorize PGP Desktop for Windows
If you purchased PGP Desktop, you received an order confirmation with
licensing information.
1 Double-click the PGP Desktop icon in the System Tray.
2 Select Help > License. The PGP Desktop License dialog box is displayed.
3 Click Change License. The PGP Licensing Assistant dialog box is
displayed.
4 Type the Name and Organization exactly as specified in your order
confirmation.
7

PGP® Desktop for Windows About PGP Desktop 10.1 for Windows
5 Type the email address you want to assign to the licensing of the product.
6 Type the email address again to confirm it.
7 Click Next.
8 Do one of the following:
Type your 28-character license number in the provided fields (for
example, DEMO1-DEMO2-DEMO3-DEMO4-DEMO5-ABC).
Note: To avoid typing errors and make the authorization easier, copy the
entire license number, put the cursor in the first “License Number” field,
and paste. Your license number will be correctly entered into all six
“License Number” fields.
To use PGP Desktop without a license, select Use without a license
and disable most functionality. The only feature of PGP Desktop
you can use without a license is PGP Zip and Keys.
9 Click Next to authorize.
10 When PGP is authorized, the features enabled by your license will be
displayed. Click Next, and then click Finish to complete the process.
Resolving License Authorization Errors
If you receive any error messages while authorizing your software, the ways to
resolve this issue vary based on the error message. See the HOWTO: License
PGP Desktop 10.1 section in the PGP Support Portal (https://support.pgp.com)
for suggestions.
If Your License has Expired
If your PGP Desktop license has expired, you will receive a PGP License
Expiration message when you launch PGP Desktop. See the following sections
for information on how an expired license affects the functionality of PGP
Desktop.
PGP Desktop Email
Outgoing email messages are no longer sent encrypted.
PGP NetShare
PGP NetShare protected folders can be accessed however the protected
files remain encrypted. (To view the encrypted files, manually decrypt the
folders and files.)
New PGP NetShare protected folders cannot be created.
Files moved into a protected folder are not encrypted.
8

PGP® Desktop for Windows About PGP Desktop 10.1 for Windows
Keys cannot be added or removed from PGP NetShare protected folders.
PGP Remote Disable and Destroy
When the disk is encrypted with PGP WDE and PGP RDD with Intel AT is
activated, the disk remains encrypted and PGP RDD with Intel AT remains
activated after the license expiration date.
PGP Virtual Disk
PGP Virtual Disks are still accessible in Read-Only mode. Read-Only allows
data to be copied from a PGP Virtual Disk, however no data can be copied
to a PGP Virtual Disk.
PGP Whole Disk Encryption
Any fixed disks that have been encrypted with PGP Desktop are
automatically decrypted 90 days after the license expiration date. However,
if you have PGP Remote Disable & Destroy enabled, and your system is
marked as “active” or “stolen” by your PGP Universal Server
administrator, the disk will not automatically decrypt when the license
expires.
Getting Assistance
For additional resources, see these sections.
Getting product information
Unless otherwise noted, online help is installed and is available within the PGP
Desktop product. Release notes are also available, which may have last-minute
information not found in the product documentation. The users guide and quick
start guides, provided as Adobe Acrobat PDF files, are available on the
Documentation (https://pgp.custhelp.com/app/docs) section on the PGP Support
Portal.
Once PGP Desktop is released, additional information regarding the product is
entered into the online Knowledge Base available on the PGP Support Portal
Web Site (https://support.pgp.com).
9

PGP® Desktop for Windows About PGP Desktop 10.1 for Windows
Contact Information
Contacting Technical Support
To learn about PGP support options and how to contact PGP Technical
Support, please visit the PGP Corporation Support Home Page
(https://support.pgp.com).
To access the PGP Support Knowledge Base or request PGP Technical
Support, please visit PGP Support Portal Web Site
(https://support.pgp.com). Note that you may access portions of the
PGP Support Knowledge Base without a support agreement;
however, you must have a valid support agreement to request
Technical Support.
To access the PGP Support forums, please visit PGP Support
(http://forum.pgp.com). These are user community support forums hosted
by PGP Corporation.
Contacting Customer Service
For help with orders, downloads, and licensing, please visit PGP
Corporation Customer Service (https://pgp.custhelp.com/app/cshome).
Contacting Other Departments
For any other contacts at PGP Corporation, please visit the PGP Contacts
Page (http://www.pgp.com/about_pgp_corporation/contact/index.html).
For general information about PGP Corporation, please visit the PGP Web
Site (http://www.pgp.com).
10

2 PGP Desktop Basics
This section describes the PGP Desktop terminology and provides some
high-level conceptual information on cryptography.
In This Chapter
PGP Desktop Terminology ...................................................................... 11
Conventional and Public Key Cryptography............................................. 14
Using PGP Desktop for the First Time .................................................... 15
PGP Desktop Terminology
To make the most of PGP Desktop, you should be familiar with the terms in the
following sections.
PGP Product Components
PGP Desktop and its components are described in the following list. Depending
on your license, you may not have all functionality available. For more
information, see About PGP Desktop Licensing (see "Licensing PGP Desktop for
Windows" on page 6).
PGP Desktop: A software tool that uses cryptography to protect your data
against unauthorized access. PGP Desktop is available for Mac OS X and
Windows.
PGP Messaging: A feature of PGP Desktop that automatically and
transparently supports all of your email clients through policies you
control. PGP Desktop accomplishes this using a new proxy
technology; the older plug-in technology is also available. PGP
Messaging also protects many IM clients, such as AIM and iChat
(both users must have PGP Messaging enabled).
PGP Whole Disk Encryption: Whole Disk Encryption is a feature of
PGP Desktop that encrypts your entire hard drive or partition (on
Windows systems), including your boot record, thus protecting all
your files when you are not using them. You can use PGP Whole Disk
Encryption and PGP Virtual Disk volumes on the same system. On
Windows systems, you can protect whole disk encrypted drives with
a passphrase or with a keypair on a USB token for added security.
11

PGP® Desktop for Windows PGP Desktop Basics
PGP NetShare: A feature of PGP Desktop for Windows with which
you can securely and transparently share files and folders among
selected individuals. PGP NetShare users can protect their files and
folders simply by placing them within a folder that is designated as
protected.
PGP Keys: A feature of PGP Desktop that gives you complete control
over both your own PGP keys, and the keys of those persons with
whom you are securely exchanging email messages.
PGP Virtual Disk volumes: PGP Virtual Disk volumes are a feature of
PGP Desktop that let you use part of your hard drive space as an
encrypted virtual disk. You can protect a PGP Virtual Disk volume with
a key or a passphrase. You can even create additional users for a
volume, so that people you authorize can also access the volume. The
PGP Virtual Disk feature is especially useful on laptops, because if
your computer is lost or stolen, the sensitive data stored on the PGP
Virtual Disk is protected against unauthorized access.
PGP Shred: A feature of PGP Desktop that lets you securely delete
data from your system. PGP Shred overwrites files so that even file
recovery software cannot recover them.
PGP Viewer: Use PGP Viewer decrypt, verify, and display
messages outside the mail stream
PGP Zip: A feature of PGP Desktop that lets you put any combination
of files and folders into a single encrypted, compressed package for
convenient transport or backup. You can encrypt a PGP Zip archive to
a PGP key or to a passphrase.
PGP Universal: A tool for enterprises to automatically and transparently
secure email messaging for their employees. If you are using PGP Desktop
in a PGP Universal Server-managed environment, your messaging policies
and other settings may be controlled by your organization’s PGP
administrator.
PGP Global Directory: A free, public keyserver hosted by PGP
Corporation. The PGP Global Directory provides quick and easy access
to the universe of PGP keys. It uses next-generation keyserver
technology that queries the email address on a key (to verify that the
owner of the email address wants their key posted) and lets users
manage their own keys. Using the PGP Global Directory significantly
enhances your chances of finding a valid public key of someone to
whom you want to send secured messages. PGP Desktop is
designed to work closely with the PGP Global Directory.
Terms Used in PGP Desktop
Before you use PGP Desktop, you should be familiar with the following terms:
12

PGP® Desktop for Windows PGP Desktop Basics
Decrypting: The process of taking encrypted (scrambled) data and making
it meaningful again. When you receive data that has been encrypted by
someone using your public key, you use your private key to decrypt the
data.
Encrypting: The process of scrambling data so that if an unauthorized
person gets access to it, they cannot do anything with it. The data is so
scrambled, it’s meaningless.
Signing: The process of applying a digital signature to data using your
private key. Because data signed by your private key can be verified only by
your public key, the ability to verify signed data with your public key proves
that your private key signed the data and thus proves the data is from you.
Verifying: The process of proving that the private key was used to digitally
sign data by using that person’s public key. Because data signed by a
private key can only be verified by the corresponding public key, the fact
that a particular public key can verify signed data proves the signer was the
holder of the private key.
Keypair: A private key/public key combination. When you create a PGP
“key”, you are actually creating a keypair. As your keypair includes your
name and your email address, in addition to your private and public keys, it
might be more helpful to think of your keypair as your digital ID—it
identifies you in the digital world as your driver’s license or passport
identifies you in the physical world.
Private key: The key you keep very, very private. Only your private key can
decrypt data that was encrypted using your public key. Also, only your
private key can create a digital signature that your public key can verify.
Caution: Do not give your private key, or its passphrase, to anyone! And
keep your private key safe.
Public key: The key you distribute to others so that they can send
protected messages to you (messages that can only be decrypted by your
private key) and so they can verify your digital signature. Public keys are
meant to be widely distributed.
Your public and private keys are mathematically related, but there’s no way
to figure out your private key if someone has your public key.
Keyserver: A repository for keys. Some companies host keyservers for the
public keys of their employees, so other employees can find their public
keys and send them protected messages. The PGP Global Directory
(https://keyserver.pgp.com) is a free, public keyserver hosted by PGP
Corporation.
13

PGP® Desktop for Windows PGP Desktop Basics
Smart cards and tokens: Smart cards and tokens are portable devices on
which you can create your PGP keypair or copy your PGP keypair. Creating
your PGP keypair on a smart card or token adds security by requiring
possession of the smart card or token in order to encrypt, sign, decrypt, or
verify. So even if an unauthorized person gains access to your computer,
your encrypted data is secure because your PGP keypair is with you on
your smart card or token. Copying your PGP keypair to a smart card or
token is a good way to use it away from your main system, back it up, and
distribute your public key. Smart cards and tokens are not available for key
storage when used with PGP Desktop for Mac OS X.
Conventional and Public Key Cryptography
Conventional cryptography uses the same passphrase to encrypt and decrypt
data. Conventional cryptography is great for data that isn’t going anywhere
(because it encrypts and decrypts quickly). However, conventional cryptography
is not as well suited for situations where you need to send encrypted data to
someone else, especially if you want to send encrypted data to someone you
have never met.
Public-key cryptography uses two keys (called a keypair) for encrypting and
decrypting. One of these two keys is your private key; and, like the name
suggests, you need to keep it private. Very, very private. The other key is your
public key, and, like its name suggests, you can share it with the general public.
In fact, you’re supposed to share.
Public-key cryptography works this way: let’s say you and your cousin in
another city want to exchange private messages. Both of you have PGP
Desktop. First, you both need to create your keypair: one private key and one
public key. Your private key you keep secret, your public key you send to a
public keyserver like the PGP Global Directory (keyserver.pgp.com), which is a
public facility for distributing public keys. (Some companies have their own
private keyservers.)
Once the public keys are on the keyserver, you can go back to the keyserver
and get your cousin’s public key, and she can go to the keyserver and get yours
(there are other ways to exchange public keys; for more information, see
Working with PGP Keys (on page 39)). This is important because to send an
encrypted email message that only your cousin can decrypt, you encrypt it
using your cousin’s public key. What makes this work is that only your cousin’s
private key can decrypt a message that was encrypted using her public key.
Even you, who have her public key, cannot decrypt the message once it has
been encrypted using her public key. Only the private key can decrypt data
that was encrypted with the corresponding public key.
Your public and private keys are mathematically related, but there’s no feasible
way to figure out someone’s private key if you just have a public key.
14

PGP® Desktop for Windows PGP Desktop Basics
Using PGP Desktop for the First Time
PGP Corporation recommends the following procedure for getting started with
PGP Desktop:
1 Install PGP Desktop on your computer.
If you are a corporate user, your PGP administrator may have specific
installation instructions for you to follow or may have configured your PGP
installer with certain settings. Either way, this is the first step.
2 Let the Setup Assistant be your guide.
To help you get started, after you install PGP Desktop and reboot your
computer, the Setup Assistant is displayed. It assists with:
Licensing PGP Desktop
Creating a keypair—with or without subkeys (if you do not already
have a keypair).
Publishing your public key on the PGP Global Directory.
Enabling PGP Messaging
Giving you a quick overview of other features.
If your PGP Desktop installer application was configured by a PGP
administrator, the Setup Assistant may perform other tasks.
3 Exchange public keys with others.
After you have created a keypair, you can begin sending and receiving
secure messages with other PGP Desktop users (once you have
exchanged public keys with them). You can also use the PGP Desktop
disk-protection features.
Exchanging public keys with others is an important first step. To send them
secure messages, you need a copy of their public key, and to reply with a
secure message, they need a copy of your public key. If you did not upload
your public key to the PGP Global Directory using the Setup Assistant, do
so now. If you do not have the public key for someone to whom you want
to send messages, the PGP Global Directory is the first place to look. PGP
Desktop does this for you—when you send email, it finds and verifies the
keys of other PGP Desktop users automatically. It then encrypts your
message to the recipient public key, and sends the message.
4 Validate the public keys you get from untrusted keyservers.
15

PGP® Desktop for Windows PGP Desktop Basics
When you get a public key from an untrusted keyserver, try to make sure
that it has not been tampered with, and that the key really belongs to the
person it names. To do this, use PGP Desktop to compare the unique
fingerprint on your copy of someone’s public key to the fingerprint on that
person’s key (a good way to do that is by telephoning the key’s owner and
having them read you the fingerprint information so that you can compare
it). Keys from trusted keyservers like the PGP Global Directory have already
been verified.
5 Start securing your email, files, and instant message (IM) sessions.
After you have generated your keypair and exchanged public keys, you can
begin encrypting, decrypting, signing, and verifying email messages and
files. The secure IM chat session feature generates its own keys
automatically, so you can use this feature even before you generate your
keypair. The only requirement is that you must be chatting with another
PGP Desktop user for the chat session to be secured.
6 Watch for information boxes from the PGP Desktop Notifier feature to
appear.
As you send or receive messages, or perform other PGP Desktop
functions, the PGP Desktop Notifier feature displays information boxes that
appear in whichever corner of the screen you specify. These PGP Notifier
boxes tell you the action that PGP Desktop took, or will take. After you
grow familiar with the process of sending and receiving messages, you can
change options for the PGP Notifier feature—or turn it off.
7 After you have sent or received some messages, check the logs to
make sure everything is working correctly.
If you want more information than the Notifier feature displays, the PGP
Log provides detailed information about all messaging operations.
8 Modify your messaging policies, if necessary.
Email messages are sent and received—automatically and seamlessly—if
PGP Desktop messaging policies are configured correctly. If your message
recipient has a key on the PGP Global Directory the default PGP Desktop
policies provide opportunistic encryption. Opportunistic encryption means
that, if PGP Desktop has what it needs (such as the recipient's verified
public key) to encrypt the message automatically, then it does so.
Otherwise, it sends the message in clear text (unencrypted). The default
PGP Desktop policies also provide optional forced encryption. This means
that, if you include the text “[PGP]” in the Subject line of a message, then
the message must be sent securely. If verified keys cannot be found, then
the message is not sent, and a Notifier box alerts you.
9 Start using the other features in PGP Desktop.
Along with its messaging features, you can also use PGP Desktop to
secure the disks that you work with:
16

PGP® Desktop for Windows PGP Desktop Basics
Use PGP Whole Disk Encryption to encrypt a boot disk, disk partition
(on Windows systems), external disk, or USB thumb drive. All files on
the disk or partition are secured — encrypted and decrypted on the fly
as you use them. The process is completely transparent to you.
Use PGP Virtual Disk to create a secure “virtual hard disk.” You can
use this virtual disk like a bank vault for your files. Use PGP Desktop
or Windows Explorer or the Mac OS X finder to unmount and lock the
virtual disk, and your files are secure, even if the rest of your
computer is unlocked.
Use PGP Zip to create compressed and encrypted PGP Zip archives.
These archives offer an efficient way to transport or store files
securely.
Use PGP Shredder to delete sensitive files that you no longer need.
PGP Shredder removes them completely, eliminating any possibility of
recovery.
Use PGP NetShare to share files and folders securely and easily
among any number of people—with maximum access control.
17

3 Installing PGP Desktop
This section describes how to install PGP Desktop onto your computer and how
to get started after installation.
In This Chapter
Before You Install .................................................................................... 19
Installing and Configuring PGP Desktop.................................................. 21
Uninstalling PGP Desktop........................................................................ 24
Moving Your PGP Desktop Installation From One Computer to Another25
Before You Install
This section describes the minimum system requirements for installing PGP
Desktop on your Windows computer.
System Requirements
Note: In order to continue to improve our products and deliver more
sophisticated features and performance, we have added support of the
Microsoft Windows 7 operating systems in PGP Desktop 10.0. As a result,
we are ending PGP Desktop support for Microsoft Windows 2000
Professional and Microsoft Windows 2000 Server & Advanced Server
beginning with PGP Desktop 10.1.
Before you begin the installation, verify that your system meets these minimum
requirements:
PGP Desktop can be installed on systems running the following versions of
Microsoft Windows operating systems:
Windows XP Professional 32-bit (Service Pack 2 or 3), Windows XP
Professional 64-bit (Service Pack 2), Windows XP Home Edition (Service
Pack 2 or 3), Microsoft Windows XP Tablet PC Edition 2005, Windows
Vista (all 32- and 64-bit editions, including Service Pack 1 and 2), Windows
7 (all 32- and 64-bit editions), Windows Server 2003 (Service Pack 1 and 2).
Note: The above operating systems are supported only when all of the
latest hot fixes and security patches from Microsoft have been applied.
19

PGP® Desktop for Windows Installing PGP Desktop
PGP Whole Disk Encryption on Windows Servers
PGP Whole Disk Encryption (WDE) is supported on all client versions above as
well as the following Windows Server versions:
Windows Server 2003 SP 2 (32- and 64-bit editions); Windows Server 2008
SP 1 and 2 (32- and 64-bit editions); Windows Server 2008 R2 (32- and
64-bit editions)
For additional system requirements and best practices information on using
PGP WDE on Windows Server systems, see PGP KB article 1737
(http://support.pgp.com/?faq=1737).
PGP Whole Disk Encryption on Tablet PCs
PGP Whole Disk Encryption is supported on Tablet PCs that meet the following
additional requirements:
Dell Latitude XT1 and XT2 Tablet PC Touch Screen Laptops (undocked)
1024 x 768 x 16 screen display running SVGA mode
Optional physical keyboard
Hardware Requirements
512 MB of RAM
64 MB hard disk space
For information on compatible email, instant messaging, and anti-virus software,
see the PGP Desktop10.1 for Windows Release Notes.
Citrix and Terminal Services Compatibility
PGP Desktop for Windows has been tested with the following terminal services
software:
Citrix Presentation Server 4.0
Citrix Metaframe XP
Windows 2003 Terminal Services
The following features of PGP Desktop for Windows are available in these
environments, as specified:
Email encryption is fully supported.
PGP Zip functionality is fully supported.
PGP Shred functionality is fully supported.
PGP NetShare is fully supported.
20

PGP® Desktop for Windows Installing PGP Desktop
PGP Virtual Disks cannot be mounted at a drive letter over Citrix/TS, but
can be mounted at directory mount points on NTFS volumes.
PGP Whole Disk Encryption is not supported.
Smart cards are not supported.
For information on how to install PGP Desktop on a Citrix server, see PGP
Support KB Article 832 (https://support.pgp.com/?faq=832).
Installing and Configuring PGP Desktop
This section includes information on installing or upgrading PGP Desktop, as
well as information on the Setup Assistant.
Installing the Software
Note: You must have administrative rights on your system in order to install
PGP Desktop.
To install PGP Desktop on your Windows system
1 Locate the PGP Desktop installation program. The installer program is an
.MSI file, which your PGP administrator may have distributed to you using
the Microsoft SMS deployment tool.
2 Double-click the PGP Desktop installer.
3 Follow the on-screen instructions.
4 If prompted to do so, restart your system.
Note: If you are in a domain protected by a PGP Universal Server, your PGP
administrator may have preconfigured your PGP Desktop installer with
specific features and/or settings. In addition, if your PGP administrator set up
silent enrollment, your Windows domain password will be used for all
passphrase requirements in PGP Desktop. If specified by policy, PGP Whole
Disk Encryption may automatically start to encrypt your disk when your
Windows password is entered.
Upgrading the Software
Note: PGP Desktop for Windows and PGP Universal Satellite for Windows
cannot both be installed on the same system. The installation programs for
both products detect the presence of the other program and end the
installation process if the other product is found.
21

PGP® Desktop for Windows Installing PGP Desktop
You can upgrade to PGP Desktop for Windows from a previous version of one
of the following products:
PGP Desktop for Windows
PGP Universal Satellite for Windows
If you are using Microsoft Windows XP with your computer, you can upgrade
only to PGP Desktop 9.6 or later from PGP Desktop 8.x. If you are using a
Microsoft Windows 2000 system, you can upgrade from PGP Desktop Versions
6.x, 7.x, or 8.x.
Important Note: If you are upgrading your computer to a new version of the
operating system and want to use this version of PGP Desktop, be sure to
uninstall any previous versions of PGP Desktop before upgrading the OS and
installing this release. Be sure to back up your keys and keyrings before
uninstalling. Note that if you have used PGP Whole Disk Encryption, you will
need to unencrypt your disk before you can uninstall PGP Desktop.
Upgrading PGP Desktop
Do one of the following:
From PGP Desktop 8.x for Windows: Follow the standard installation
process for PGP Desktop 10.1 for Windows.
PGP Desktop for Windows 8.x is automatically uninstalled, and PGP
Desktop 10.1 for Windows is installed. Existing keyrings and PGP Virtual
Disk files are usable in the upgraded version.
From a version of PGP Desktop for Windows prior to 8.0: Manually
uninstall versions of PGP Desktop prior to 8.0 before beginning the
installation of PGP Desktop 10.1 for Windows. Existing keyrings and PGP
Virtual Disk files will be usable in the upgraded version.
Upgrading from PGP Universal Satellite
Do one of the following:
From PGP Universal Satellite 1.2 for Windows or previous: Follow the
installation process for PGP Desktop 10.1 for Windows.
Existing versions of PGP Universal Satellite for Windows are automatically
uninstalled, and PGP Desktop 10.1 for Windows will be installed. Existing
settings will be retained.
Caution: Installing any version of PGP Universal Satellite on top of PGP
Desktop 10.1 for Windows is an unsupported configuration. Neither
program will work correctly. Uninstall both programs and then install only
PGP Desktop.
From PGP Desktop for Windows (Version 8.x) and PGP Universal
Satellite: Follow the installation process for PGP Desktop 10.1 for
Windows.
22

PGP® Desktop for Windows Installing PGP Desktop
PGP Desktop and PGP Universal Satellite for Windows are automatically
uninstalled, and then PGP Desktop 10.1 for Windows is installed. Existing
keyrings and PGP Virtual Disk files are usable in the upgraded version.
Checking for Updates
Note: The option to automatically check for updates is no longer available in
PGP Desktop, starting with version 10.1. To check for an update or to install
an update, you must manually download the file.
With the acquisition of PGP Corporation by Symantec Corporation, PGP
operations is in the process of integrating with Symantec operations. When
checking to see if there are updates, or to download an update, use the second
download link if the first link does not appear operational.
To upgrade PGP Desktop, do the following:
Go to the PGP License and Entitlement Management System (LEMS) and
log in (https://lems.pgp.com/account/login). If the update for PGP Desktop
is not available, then
Go to Symantec FileConnect (https://fileconnect.symantec.com/), select
your language, and enter your serial number.
Upgrading From Standalone to Managed PGP Desktop Installations
If you have been using PGP Desktop in standalone mode and now will be
managed by a PGP Universal Server, you must install a bound and stamped
version of PGP Desktop over your existing, standalone installation. You must
also complete the enrollment process. Your PGP Administrator will provide an
installation file so you can install a bound and stamped version.
Upgrading the Operating System Software
If you are upgrading your computer to a new major release of the operating
system (for example, on a Windows system to Windows Vista or on a Mac OS
X system from 10.4.x to 10.5.x), be sure to do the following:
1 Back up your keys and keyrings before uninstalling.
2 If you have used PGP Whole Disk Encryption, decrypt your disk before you
uninstall PGP Desktop.
3 Uninstall any previous versions of PGP Desktop before upgrading to the
new version of the operating system.
4 Once you have upgraded your version of the operating system, reinstall
PGP Desktop. Import your keys/keyring and, if necessary, you can then
encrypt your disk.
23

PGP® Desktop for Windows Installing PGP Desktop
Licensing PGP Desktop
For license information for this release, see the PGP Desktop Release Notes.
Running the Setup Assistant
When the installation of PGP Desktop is complete, you are prompted to restart
your computer. Once the computer restarts, as soon as you see the Windows
Desktop, the PGP Desktop Setup Assistant starts automatically. The Setup
Assistant displays a series of screens that ask you questions—then uses your
answers to configure PGP Desktop for you.
Based on a number of factors, the Setup Assistant for your system contains
only those screens that are appropriate for your installation.
The Setup Assistant does not configure all PGP Desktop settings. When you
finish going through the Setup Assistant screens, you can then configure those
settings not covered in the Setup Assistant.
Uninstalling PGP Desktop
You can uninstall PGP Desktop using the PGP Desktop uninstaller, or by using
Windows' Add or Remove Programs feature. The following procedure
describes using the PGP Desktop uninstaller directly.
If you are upgrading from PGP Desktop 8.x or later, you do not have to uninstall
PGP Desktop first. For more information, see Upgrading the Software (on page
21).
Note: You must have administrative rights on your system in order to
uninstall PGP Desktop.
To uninstall PGP Desktop
1 Click the Start menu and select Programs > PGP > Uninstall PGP
Desktop. A confirmation dialog box is displayed.
2 Click Yes to continue with the uninstall process. The PGP Desktop
software is removed from your system.
Keyring, PGP Virtual Disk, and PGP Zip (.pgp) files are not removed from
your system, in case you decide to reinstall PGP Desktop in the future.
3 If prompted, restart your computer to complete the uninstall process.
24

PGP® Desktop for Windows Installing PGP Desktop
Note: An alternative to uninstalling PGP Desktop is stopping PGP Desktop
background services. Doing this prevents PGP Desktop from protecting your
email and instant messages, but both PGP Virtual Disk volumes and disks or
partitions protected by PGP Whole Disk Encryption are still accessible. If you
just need to turn off the PGP Desktop email or IM proxies, you can do that in
the PGP Options dialog box (select Tools > Options, click the Messaging
tab, and deselect the options as needed).
Moving Your PGP Desktop Installation From One Computer
to Another
Moving a PGP Desktop installation from one computer to another is not a
difficult process, although there are a few crucial steps which must be
completed successfully. The process consists of the following steps:
To transfer your PGP Desktop installation to another computer
1 Uninstall PGP Desktop. To do this, choose Start > Programs > PGP >
Uninstall PGP Desktop. You can also use the Add/Remove Programs
functionality in the Windows Control Panel, which is the only way to
remove PGP Desktop if you are running an older version of the program.
Note that this step does not remove the keyring files.
2 Transfer the keyrings. To do this, copy the keyring files (both
pubring.pkr and secring.skr) from the old computer to diskette or
other removable media, and then copy them to the new computer. The
default location for the keyring files is C:\Documents and
Settings\<user>\My Documents\PGP\.
If PGP Desktop has never been installed on the new computer, create this
folder first before copying the keyring files to the computer.
3 Install PGP Desktop on the new computer. To do this, download PGP
Desktop by clicking the download link in your original PGP Corporation
order confirmation email.
4 During the installation process, do the following:
During the PGP Desktop setup wizard on the new computer select
No, I have existing keyrings and specify the location where you
copied the keyring files to on the new computer.
Use the same name, organization, and license number used when
PGP Desktop was originally authorized.
25

4 The PGP Desktop User
Interface
This section describes the PGP Desktop user interface.
In This Chapter
Accessing PGP Desktop Features........................................................... 27
PGP Desktop Notifier alerts..................................................................... 32
Viewing the PGP Log............................................................................... 37
Accessing PGP Desktop Features
There are four main ways to access PGP Desktop:
PGP Desktop Main Window (see "The PGP Desktop Main Screen" on page
28)
PGP Tray Icon (see "Using the PGP Tray Icon" on page 29)
Shortcut Menus in Windows Explorer (see "Using Shortcut Menus in
Windows Explorer" on page 31)
Start Menu (see "Using the Start Menu" on page 32)
27
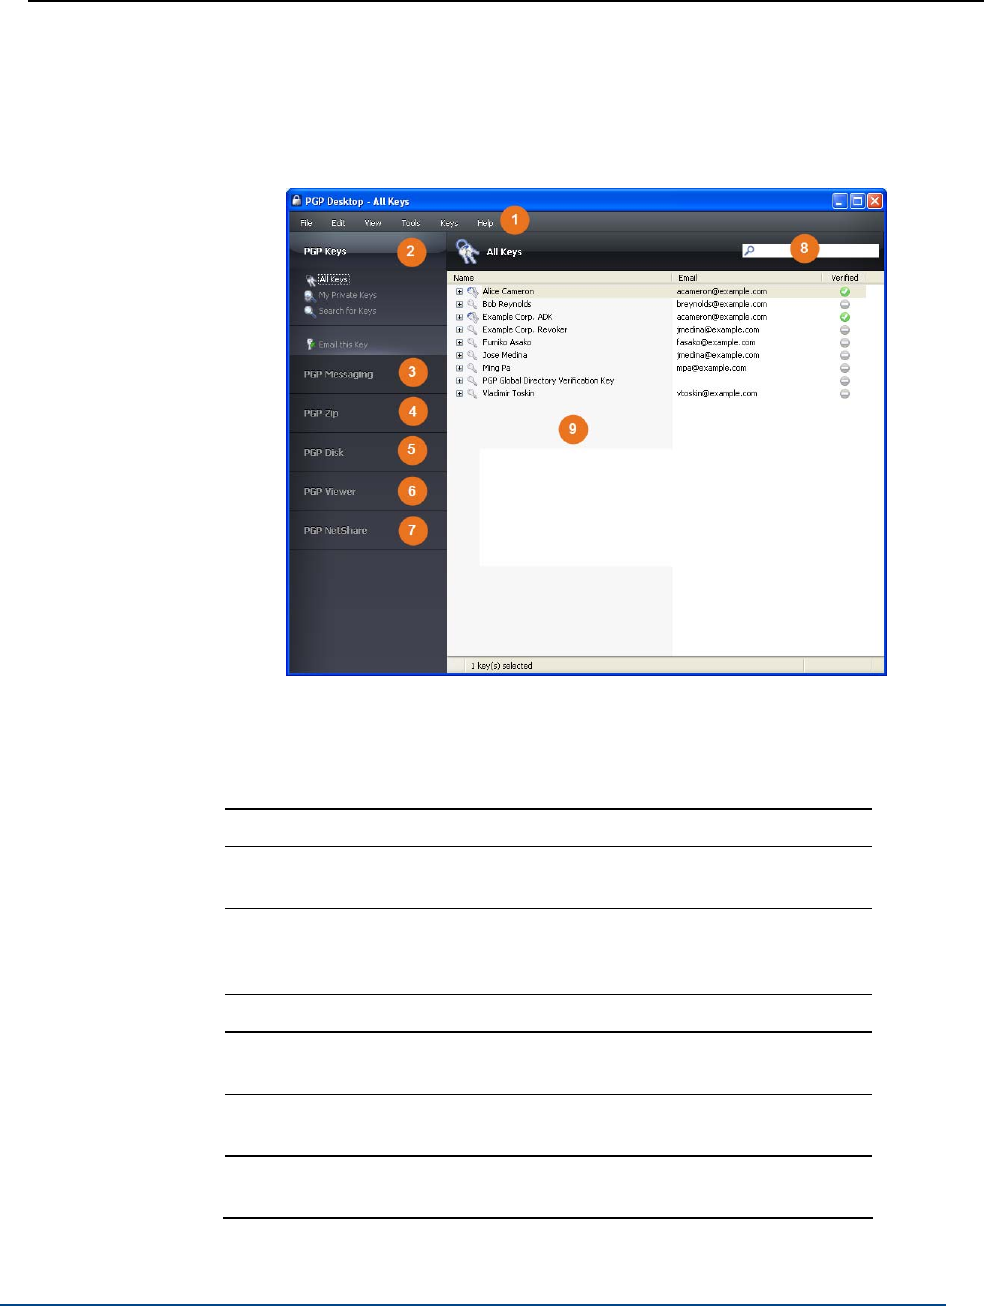
PGP® Desktop for Windows The PGP Desktop User Interface
The PGP Desktop Main Screen
The main screen of PGP Desktop is your primary interface to the product.
The PGP Desktop main screen includes:
1 The Menu bar. Gives you access to PGP Desktop commands.
The menus on the Menu bar change depending on which Control
box is selected.
2 The PGP Keys Control Box. Gives you control of PGP keys.
3 The PGP Messaging Control Box. Gives you control over PGP
Messaging.
4 The PGP Zip Control Box. Gives you control of PGP Zip, as well
as the PGP Zip Assistant, which helps you create new PGP Zip
archives.
5 The PGP Disk Control Box. Gives you control of PGP Disk.
6 The PGP Viewer Control Box. Gives you the ability to decrypt,
verify, and display messages outside the mail stream.
7 The PGP NetShare Control Box. Gives you control of PGP
NetShare.
8 The PGP Desktop Work area. Displays information and actions
you can take for the selected Control box.
28
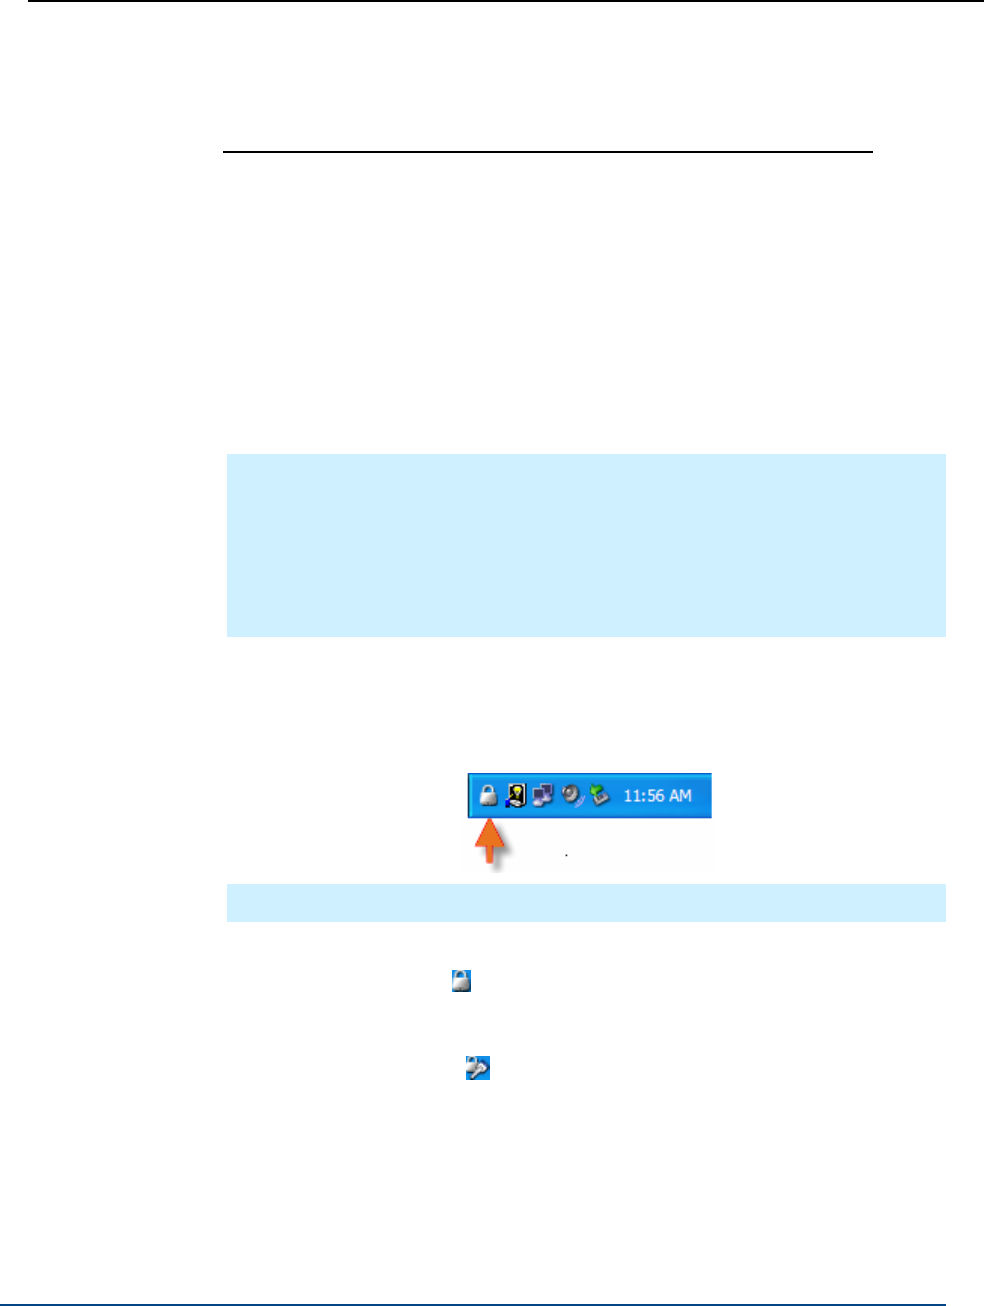
PGP® Desktop for Windows The PGP Desktop User Interface
9 PGP Keys Find box. Use to search for keys on your keyring. As
you type text in this box, PGP Desktop displays search results
based on either name or email address.
Each Control box expands to show available options, and collapses to save
space (only the Control Box’s banner displays). Expand a Control Box by clicking
its banner.
When expanded, the contents of Control Boxes change depending on what is
appropriate for what you are working on, or what is selected. For example,
when the PGP Keys Control Box is selected, if a public key is selected, the
options Email this Recipient and Email this Key appear at the bottom of the
PGP Keys Control Box. If a private key is selected, only Email this Key is
displayed. If no key is selected, neither option is displayed.
To navigate around the PGP Desktop main screen, use the Tab key. Then use
the Space key or Enter to select an option.
Note: Click Email this Recipient to open your system’s default email client
and create a new email using the address of the selected key. This makes it
easy to send a message to someone on your keyring. Click Email this Key to
open your system’s default email client and create a new email with the
selected public key attached (the message is not addressed). This is useful
for sending your public key, or a public key on your keyring, to someone who
does not already have it.
Using the PGP Tray Icon
One way to access many PGP Desktop features is from the PGP Tray icon.
Tip: You can open PGP Desktop by double-clicking the PGP Tray icon.
The PGP Tray displays one of four icons:
Normal operation ( ): PGP Desktop is operating normally; no
passphrases are cached, message proxying is enabled, no other PGP
operations are in progress.
Cached passphrase ( ): PGP Desktop is operating normally; additionally,
one or more private key passphrases has been cached. Caching
passphrases is an optional time-saving feature, in that you don’t have to
type your passphrase if it’s cached to sign a key, for example, but it’s also a
security risk in that if you leave your system with the passphrase cached,
whoever walks up to your system could use PGP Desktop without having
to type the appropriate passphrase.
29

PGP® Desktop for Windows The PGP Desktop User Interface
Message proxying disabled ( ): Proxying of email messages has been
disabled; incoming encrypted messages will not be decrypted or verified
and outgoing messages will not be encrypted or signed. You can turn
message proxying back on using the PGP Tray menu or the PGP Options.
Busy ( ): PGP Desktop is in the middle of an operation, such as
encrypting a disk. When the operation is complete, the PGP Tray icon
changes back to the appropriate icon.
When you right- or left-click on the PGP Tray icon, a menu is displayed giving
you access to various options. Note that not all options may be available,
depending on if you are a standalone or managed installation.
Exit PGP Services. Stops PGP Desktop services on this computer. Be very
careful with this command; it will stop automatic encryption and decryption
of email and instant messaging sessions.
If you stop the PGP Services, you can start them again by restarting your
computer or by selecting PGP Desktop from the Start menu (Start >
Programs > PGP > PGP Desktop).
About PGP Desktop. Displays information about the version of PGP
Desktop you are using, including licensing information.
Help. Opens PGP Desktop’s integrated online help.
Options. Opens the PGP Desktop Options dialog.
View Notifier. Displays the last incoming and outgoing message notifiers.
View PGP Log. Displays the PGP Desktop Log. Use the PGP Desktop Log
to see what actions PGP Desktop is taking to secure your data.
Open PGP Viewer. Opens PGP Viewer so you can decrypt email out of the
mail stream.
Open PGP Desktop. Opens the PGP Desktop main screen. You can also
open PGP Desktop by double-clicking the PGP Desktop Tray icon.
Update Policy. Manually downloads policy from the PGP Universal Server.
This option is available only for managed installations.
Clear Caches. Clears from memory any cached information, such as
passphrases and cached public keys.
Note: A cached passphrase is not cleared if you used a smart card or
token to access a PGP NetShare protected folder, and removed the smart
card or token. To clear a cached passphrase, create a hot key. For more
information, see Advanced Options (on page 302).
Unmount PGP Virtual Disks. Unmounts all mounted PGP Virtual Disk
volumes.
Current Window. Lets you use PGP Desktop functionality (Decrypt &
Verify, Encrypt & Sign, Sign, Encrypt) on the contents of the current
window.
30

PGP® Desktop for Windows The PGP Desktop User Interface
Clipboard. Lets you use PGP Desktop functionality (Decrypt & Verify,
Encrypt & Sign, Sign, Encrypt) on the contents of the Clipboard. Also lets
you clear or edit the contents of the Clipboard.
Using Shortcut Menus in Windows Explorer
You can also access PGP Desktop functions using shortcut menus in Windows
Explorer. Open Windows Explorer, right-click the items you want to work on,
and select PGP Desktop from the shortcut menu.
Windows Explorer gives you access to PGP Desktop functions depending on
the item that you right-clicked:
Drive. If you right-click a drive on your system in Windows Explorer and
select PGP Desktop from the menu displayed, you can do the following to
the drive:
PGP Shred Free Space on it
PGP Virtual Disk. If you right-click a mounted PGP Virtual Disk drive on
your system in Windows Explorer and select PGP Desktop from the menu
displayed, you can do the following to the drive:
Unmount the PGP Virtual Disk
Locate the PGP Virtual Disk file (.pgd) in Windows Explorer
Edit the PGP Virtual Disk properties
If you right-click the PGP Virtual Disk file (.pgd) in Windows Explorer for an
unmounted disk, and select PGP Desktop from the menu displayed, you
can also do the following:
Compact unused space
Use PGP Shred to securely delete the PGP Virtual Disk (note that this
also deletes all data on the disk)
Re-encrypt the PGP Virtual Disk
Folder. If you right-click a folder in Windows Explorer and select PGP
Desktop from the menu displayed, you can do the following to the folder:
Add to new PGP Zip
Create Self-Decrypting Archive of the contents in the folder
Secure with a key or passphrase
Decrypt & Verify it
Add it to PGP NetShare
Shred it
File. If you right-click a file in Windows Explorer and select PGP Desktop
from the menu displayed, you can do the following to the file, depending
on what kind of file it is:
31

PGP® Desktop for Windows The PGP Desktop User Interface
If you select an unencrypted file, you can Secure it with a key or
passphrase, Sign, Shred, or Create a Self-Decrypting Archive
If you select an encrypted file, you can decrypt/verify or Shred it
If you select an unmounted PGP Virtual Disk volume (.pgd), you can
mount or edit it; if you select a mounted volume, you can unmount it
If you select a PGP Zip (.PGP) file, you can Decrypt & Verify it, View it,
or Shred it
If you select a PGP key file (.asc), you can decrypt/verify or Shred it.
If you select decrypt/verify, you are given the option of importing the
file
If you select a PGP public or private keyring file (PKR or SKR files,
respectively), you can add the keys in it to your keyring or Shred it
Using the Start Menu
You can access PGP Desktop through the Windows Start menu. To do this,
select Start > Programs > PGP.
The Start menu provides you with access to:
PGP Desktop documentation in English and other supported languages
The PGP Desktop application
Uninstalling PGP Desktop
PGP Desktop Notifier alerts
The PGP Desktop Notifier feature displays a small information box that tells you
the status of incoming and outgoing email messages, as well as instant
messaging sessions.
Note: The PGP Desktop Notifier feature also displays the status of the PGP
Whole Disk Encryption and PGP NetShare features on your computer. For
more information, see PGP Desktop Notifier for Disk features (on page 35).
In a PGP Universal Server-managed environment, your administrator may have
specified certain notifications settings (for example, whether notifications are to
be displayed or the location of the notifier). In this case, you may not see any
notifier messages at all.
32

PGP® Desktop for Windows The PGP Desktop User Interface
PGP Desktop Notifier for Messaging
Use the PGP Desktop Notifier for Messaging feature to:
See if an incoming email is properly decrypted and/or signed.
See if an outgoing email is properly encrypted and/or signed.
Stop an email message from being sent if the encryption options are not
what you want.
View a quick summary of the sender, subject, and encryption key of an
email.
Review, at any time, the status of previous incoming or outgoing messages
for that Windows session.
See that a chat session with another PGP Desktop user is being secured.
Use the PGP Desktop Notifier feature to monitor all or some of your incoming
email, as well as maintain precise control over all or some of your outgoing
messages. The choice is yours. You can set various Notifier options, or turn the
PGP Desktop Notifier feature completely off if you prefer.
Some additional points about the PGP Desktop Notifier feature:
For message notifications, use the left and right arrow buttons in the
upper-right corner of the Notifier box to scroll Notifier messages forward or
backward. This way, you can review messages that came before or after
the message you are viewing currently.
When they first display, Notifier message boxes have a partially transparent
appearance to prevent obscuring anything on your screen. Notifier
message boxes become opaque if you move your cursor over them, and
become translucent again when you move your cursor away from them.
Unless the cursor is over them, Notifier messages display for four seconds
(this default setting can be changed in the Notifier options). If you want
more time to read a Notifier, move your cursor over the Notifier and it
remains on your display.
If you completely miss reading a Notifier, or you would like to review
previous ones, do the following:
On Windows systems, choose View Notifier from the PGP Tray icon.
On Mac OS X systems, choose View Notifier from the PGP Desktop
icon in the Mac OS X Menu Bar.
Close a Notifier message by clicking the X (in the upper right corner of the
message on Windows systems, in the upper left corner on Mac OS X
systems).
For more information about setting PGP Desktop Notifier options, see Notifier
Options (on page 299).
33

PGP® Desktop for Windows The PGP Desktop User Interface
Incoming PGP Desktop Notifier Messages
Notifications for incoming email provide information on whether the email was
decrypted and verified, or decrypted and signed by an unverified or unknown
key.
Outgoing PGP Desktop Notifier Messages
For simple notification, choose to have a PGP Desktop Notifier appear
momentarily when email is sent (all email, or email meeting certain criteria).
You can also set PGP Desktop to include Block and Send buttons in the Notifier
box.
To manage the outgoing email with this Notifier
1 In the PGP Outgoing Message Notifier box, do the following:
To stop this email message from being sent, click Block. Note this
blocks only this outgoing email message; future email messages to
this sender can be sent.
To send this message, even though the recipient’s key cannot be
found, click Send.
To continue to delay a message from being processed, hover your
cursor over the Notifier box. When you move your cursor away from
the Notifier box, the message is then processed using the default
rule.
In Notifier options, the Delay outbound mail for setting specifies
how long (in seconds) the Notifier gives you before it sends the mail
without your intervention. The Notifier displays a countdown before it
sends your mail.
2 To view additional information, including the Action, Recipient, Policy, and
Signing Key, click More.
It is not necessary for you to view this additional information unless you
want to see it. To hide it again, click Less.
Outgoing PGP Desktop Notifier Messages for Offline Policy
If you are using PGP Desktop in a PGP Universal Server-managed environment,
your administrator may have specified what actions to take on outgoing
messages if the PGP Universal Server is not available. The outgoing notifier
message indicates one of the following:
Your PGP Universal Server is not available and policy has been set to block
all messages. Email messages remain in your outbox and are sent when
the PGP Universal Server can be contacted.
34

PGP® Desktop for Windows The PGP Desktop User Interface
Your PGP Universal Server is not available and policy has been set to send
all messages in the clear.
Your PGP Universal Server is not available and policy has been set to allow
your local policy to take precedence.
In the latter two cases, you can choose to send or block the outgoing message
as you would any other outgoing message.
PGP Notifier for Instant Messaging
If you have PGP Desktop installed on your computer, and if you have specified
to receive Notifiers for Instant Messaging (under the Notifications tab in PGP
Desktop Preferences), then PGP Desktop Notifiers alert you when the AOL
Instant Messenger (AIM) sessions that you have with other PGP Desktop users
are protected.
When you use the secure instant messaging feature, a Notifier displays when
you log on to the instant messaging program to inform you that your chat is
secure, and a padlock icon displays next to your “buddy name” with most
AIM-compliant instant messaging clients.
When you log off of your instant messaging program, a final Notifier message
informs you that the secure session has ended.
For more information on proper configuration, as well as the use of the secure
instant message chat feature, see Securing Instant Messages.
PGP Desktop Notifier for Disk features
The PGP Desktop Notifier for Disk features keep you informed when you are
working with the PGP NetShare and the PGP Whole Disk Encryption features.
Note: The PGP Desktop Notifier feature also displays the status of incoming
and outgoing email messages on your computer. For more information, see
PGP Desktop Notifier for Messaging (on page 33).
PGP NetShare
When used with PGP NetShare, the PGP Desktop Notifier feature alerts you to
these things:
Actions taken to a shared folder.
Location of the affected folder.
Name of the affected folder.
Who performed the action.
35

PGP® Desktop for Windows The PGP Desktop User Interface
PGP Whole Disk Encryption
When used with the PGP Whole Disk Encryption feature, the PGP Desktop
Notifier feature alerts you to these things:
The disk being encrypted.
The size and type of disk.
Status of the encryption process.
Enabling or Disabling Notifiers
In a PGP Universal Server-managed environment, your administrator may have
specified certain notifications settings (for example, whether notifications are to
be displayed or the location of the notifier). In this case, the Notifier tab is not
available and not displayed.
To enable or disable Notifiers
1 Open PGP Desktop and select Tools > PGP Options.
2 Click the Notifier tab.
3 Under Usage, specify if you want to Use PGP Notifer and, if so, the
location. PGP Desktop Notifications can appear at any of the four corners of
your screen (Lower Right, Lower Left, Upper Right, or Upper Left).
Select the corner that you want PGP Desktop Notifications to appear. The
default position is Lower Right.
4 If you are using PGP Desktop Messaging and you want PGP Desktop
Notifiers to appear, informing you of encryption and/or signing status when
you send email, select the checkbox to Notify when processing
outbound email. Deselect this checkbox to stop PGP Desktop Notifiers
from appearing when you send mail.
5 PGP Desktop looks for a public key for every recipient of the email
messages that you send. By default, if it cannot find a public key for a
recipient, it sends that email in the clear (without encryption). Select Ask
me before sending email when the recipient’s key is not found if you
want to be notified when a key is not found and be given a chance to block
the email so that it is not sent. Then specify the following options:
Always ask me before sending email: Select this checkbox if you
would prefer approving every email that you send. You can review the
encryption status in the Notifier, and either send or block the email.
36

PGP® Desktop for Windows The PGP Desktop User Interface
Delay outbound email for n second(s) to confirm (where n is a
number from 1-30; the default is 4 seconds). To change the amount of
time that outbound messages are delayed, and a PGP Desktop
Notifier is displayed, click the up or down arrows. Use the delay
period to review the PGP Desktop Notifier message.
(For more information on the PGP Desktop default policy settings, see
Services and Policies (on page 93).)
6 For incoming email, specify how you are notified of its status upon arrival.
Select one of the following for Display notifications for incoming mail:
When receiving secured email—A Notifier appears whenever you
receive secured email. The box displays who the email is from, its
subject, its encryption and verification status, and the email address of
the person sending it.
Only when message verification fails—For incoming email, you see
a Notifier only when PGP Desktop is unable to verify the signature of
the incoming email.
Never—If you do not need or want to see a Notifier as you receive
email, select this option. This option does not affect Notifiers for
outgoing mail.
7 If you want a PGP Desktop Notifier to appear briefly when you begin a
secure instant message chat, and appear briefly again when the chat ends,
select the checkbox to Notify for status of PGP Encrypted IM sessions.
Viewing the PGP Log
Use the PGP Log to see what actions PGP Desktop is taking to secure your
data.
To view the PGP Log
1 To view logs, you must turn on logging. To do this, in PGP Desktop select
Tools > Enable Logging.
2 Do one of the following:
Click the PGP Desktop system tray icon and select View PGP Log
from the shortcut menu. The PGP Log opens in a new window.
In PGP Desktop, select Tools > View Log. The PGP Log opens in a
new window.
In PGP Desktop, click the PGP Messaging control box and then click
PGP Log. The PGP Log is displayed in the application window.
3 To change the view options or filter on specific logging information, do the
following:
37

PGP® Desktop for Windows The PGP Desktop User Interface
Click the arrow for View log for to select the days of the logs you
want to view.
Click the arrow for View topic to select the types of logs you want to
view. Choose from All, PGP, Email, IM, Whole Disk, NetShare,
Zip/SDA, or Virtual Disk.
Click the arrow for View level to select the minimum severity of log
entries you want to view. Choose from Error, Warn, Info, or
Verbose.
To view Verbose logs, the PGP Log view window must remain open.
When you close the window, the level of logging reverts back to the
default level, Info. Note that Verbose can result in some large log files.
4 When you are finished viewing the log:
To save a copy of the PGP Log, click Save.
To clear the entries in the PGP Log, click Shred.
To exit the PGP Log window, click Close.
38

5 Working with PGP Keys
PGP Keys is the feature of PGP Desktop you use to create and maintain your
keypair(s) and the public keys of other PGP Desktop users.
This section describes viewing keys, creating a keypair, distributing your public
key, getting the public keys of others, and working with keyservers.
Note: If you are using PGP Desktop in a PGP Universal Server-managed
environment, your PGP Universal Server administrator may have disabled
certain features. When a feature is disabled, the control item in the left side
is not displayed and the menu and other options for that feature are not
available. The graphics included in this guide depict the default installation
with all features enabled. If your PGP Universal Server administrator has
disabled this functionality, this section does not apply to you.
In This Chapter
Viewing Keys ........................................................................................... 39
Creating a Keypair.................................................................................... 40
Protecting Your Private Key..................................................................... 43
Distributing Your Public Key .................................................................... 45
Getting the Public Keys of Others........................................................... 48
Working with Keyservers ........................................................................ 50
Using Master Keys .................................................................................. 51
Viewing Keys
To view the keys on the local keyring, open PGP Desktop and click on the PGP
Keys Control box. Then click:
All Keys. Shows all PGP keys on your keyrings.
My Private Keys. Shows only the private keys on your keyrings.
Search for Keys. Lets you search for keys on your keyrings based on
criteria you specify.
Smart Card Keys. If you have a smart card on your system, you also have
this option.
39

PGP® Desktop for Windows Working with PGP Keys
Some of the more common tasks you may want to perform are available from
the PGP Keys Control box or work area. These are:
If a public key is selected in any view of the PGP Keys on your keyrings,
the option to Email this Recipient is available in the PGP Keys Control box.
If you perform a search, and you select a public key found in the search
that is not on your local keyrings, the option Add to my Keyring is
available in the PGP Keys Control box.
To see the properties of any key displayed in the work area, just
double-click any part of the key listing to display the Key Properties dialog
box for that key.
When you perform a search, the option Save this Key Search is available in the
PGP Keys Control box, so you can save the results for later access.
Creating a Keypair
You probably already created a PGP keypair for yourself using the PGP Desktop
Setup Assistant or with a previous version of PGP Desktop — but if you have
not, you need to now. Most of the things you do with PGP Desktop require a
keypair.
Caution: It is bad practice to keep creating new keys for yourself. A PGP
keypair is like a digital driver’s license or passport; if you create lots of them,
you’re going to end up confusing yourself and those people who want to
send you encrypted messages. It is best to have only one key that contains
all the email addresses that you use. The PGP Global Directory will publish
only one key per email address.
If you are using PGP Desktop in a PGP Universal Server-managed environment,
keypair creation may be disabled.
To create a PGP keypair
1 Make sure the PGP Keys Control box is selected.
2 Select File > New PGP Key or press Ctrl+N. The first screen of the PGP
Key Generation Assistant is displayed.
3 Read the information on this screen.
4 If you want to generate your new PGP keypair on a token or smart card,
make sure the token or smart card is connected to the system and then
select the box labeled Generate Key on Token: [name of smart card or
token on system]. For more information about smart cards and tokens,
see Storing Keys on Smart Cards and Tokens (on page 271).
5 Click Next. The Name and Email Assignment screen is displayed.
40

PGP® Desktop for Windows Working with PGP Keys
6 Type your real name in the Full Name field and your correct email address
in the Primary Email field. It is not absolutely necessary to type your real
name or even your email address. However, using your real name makes it
easier for others to identify you as the owner of your public key. Also,
when you upload your public key to the PGP Global Directory (which makes
it easily available to other PGP Desktop users), your real email address is
required.
7 If you would like to add more email addresses to the key you are creating,
click More and type them in the fields that appear.
8 To specify advanced settings for the key you are creating, click Advanced.
The Advanced Key Settings dialog box is displayed. Use this dialog box to
specify the key type and size, expiration, and other settings.
9 Select settings for the following:
Key type. Choose between Diffie-Hellman/DSS and RSA.
Generate separate signing subkey. Select this box if you need a
separate subkey for signing. A separate Signing Subkey is created
along with the new keypair. You can also create additional signing or
encryption subkeys any time after the new key has been created. For
more information about separate Signing and Encryption Subkeys, see
Working with Subkeys (on page 65).
Key size. Type from 1024 bits to 4096 bits. The larger the key, the
more secure it is, but the longer it will take to generate. Some smart
cards and tokens limit key size to 1024 bits.
Expiration. Select Never or specify a date on which the keypair you
are creating will expire.
Allowed Ciphers. Deselect any cipher you do not want the keypair
you are creating to support.
Preferred Cipher. Select the cipher you want to be used in those
cases where no algorithm is specified. Only a cipher that is allowed
can be selected as preferred.
Allowed Hashes. Deselect any hash you do not want the keypair you
are creating to support.
Preferred Hash. Select the hash you want to be used in those cases
where no hash is specified. Only a hash that is allowed can be
selected as preferred.
10 Click OK to close the Advanced Key Settings dialog box.
11 Click Next.
12 If you are part of a PGP-Universal managed environment, you may see the
Organization Settings screen, which displays keys your PGP administrator
has configured to add to your copy of PGP Desktop (such as your
organization’s Additional Decryption Key (ADK) or Organization Key).
The Passphrase Assignment screen is displayed.
41

PGP® Desktop for Windows Working with PGP Keys
13 Type the passphrase you want to use to maintain exclusive access to the
private key of the keypair being created.
14 To confirm your entry, press Tab to advance to the Confirmation field, then
type the same passphrase again. For information on the Passphrase Quality
Bar, see The Passphrase Quality Bar (on page 306).
Note: Normally, as an added level of security, the characters you type for
the passphrase do not appear on the screen. However, if you are sure
that no one is watching, and you want to see the characters of your
passphrase as you type, select the Show Keystrokes checkbox.
Warning: Unless your PGP administrator has implemented a PGP key
reconstruction policy for your company, no one, including PGP
Corporation, can salvage a key with a forgotten passphrase.
15 Click Next to begin the key generation process. PGP Desktop generates
your new keypair.
This process can take several minutes.
16 When the key generation process indicates that it is done, click Next. You
are prompted to add the public key portion of the key you just created to
the PGP Global Directory.
17 Read the text on the screen and click Next to add your new key to the PGP
Global Directory (recommended). Click Skip if you want to prevent the
public key from being posted to the PGP Global Directory.
18 Click Finish. Your new PGP keypair has been generated. It should be
visible in the PGP Keys Work area. If you don’t see it listed, make sure All
Keys or My Private Keys is selected in the PGP Keys Control box.
Caution: Consider backing up your private key to a safe location at this
point. Your private key is very important, and losing it could have
catastrophic consequences once you have data that is encrypted to it.
See Protecting Your Private Key (on page 43).
Passwords and Passphrases
Encrypting a file and then finding yourself unable to decrypt it is a painful lesson
in learning how to choose a passphrase you will remember.
Most applications require a password between three and eight letters. Using a
single-word passphrase is generally a bad practice, and is discouraged. A single
word password is vulnerable to a dictionary attack, which consists of having a
computer try all the words in the dictionary until it finds your password. You can
imagine simple enhancements to dictionary attacks which manage to find broad
arrays of passwords even when slightly modified from dictionary terms.
42

PGP® Desktop for Windows Working with PGP Keys
To protect against this manner of attack, it is widely recommended that you
create a word that includes a combination of upper and lowercase alphabetic
letters, numbers, punctuation marks, and spaces. This results in a stronger
password, but an obscure one that you are unlikely to remember easily.
Trying to thwart a dictionary attack by arbitrarily inserting a lot of non-alphabetic
characters into a passphrase makes your passphrase too easy to forget and
could lead to a disastrous loss of information because you can’t decrypt your
own files. A multiple word passphrase is less vulnerable to a dictionary attack.
However, unless the passphrase you choose is something that is easily
committed to long-term memory, you are unlikely to remember it verbatim.
Picking a phrase on the spur of the moment is likely to result in forgetting it
entirely. Choose something that is already residing in your long-term memory. It
should not be something that you have repeated to others recently, nor a
famous quotation, because you want it to be hard for a sophisticated attacker to
guess. If it’s already deeply embedded in your long-term memory, you probably
won’t forget it. Of course, if you are reckless enough to write your passphrase
down and tape it to your monitor or put it in your desk drawer, it won’t matter
what you choose.
For more information, see Working with Passwords and Passphrases (on page
305).
Protecting Your Private Key
PGP Corporation recommends that you take these actions immediately after
you create your keypair:
Caution: Failure to take these actions could result in a devastating loss of
data some time in the future.
Back up a copy of your private key file to another, safe location, in case
your primary copy is ever damaged or lost. See Backing up Your Private
Key (on page 44).
Reflect on your chosen passphrase to ensure that you chose something
that you will not forget. If you are concerned that you chose a passphrase
during the key creation process that you will not remember, change it
RIGHT NOW to something you will not forget. For information on changing
your passphrase, see Changing Your Passphrase (on page 59).
Your private key file is very important because once you have encrypted data to
your public key; only the corresponding private key can be used to decrypt the
data. This holds true for your passphrase as well; losing your private key or the
passphrase means that you will not be able to decrypt data encrypted to the
corresponding public key. When you encrypt information, it is encrypted to both
your passphrase and your private key. You need both to decrypt the encrypted
data. Once the data is encrypted, no one—not even PGP Corporation—can
decrypt the data without your private key file and your passphrase.
43

PGP® Desktop for Windows Working with PGP Keys
Consider a situation where you have important encrypted data, and then either
forget your passphrase or lose your private key. The encrypted data would be
inaccessible, unusable, and unrecoverable.
Protecting Keys and Keyrings
Besides making backup copies of your keys, you should be especially careful
about where you store your private key. Even though your private key is
protected by a passphrase that only you should know, it is possible that
someone could discover your passphrase and then use your private key to
decipher your email or forge your digital signature. For instance, somebody
could look over your shoulder and watch the keystrokes you enter or intercept
them on the network or even over the Internet.
To prevent anyone who might happen to intercept your passphrase from using
your private key, store your private key only on your own computer. If your
computer is attached to a network, make sure that your files are not
automatically included in a system-wide backup where others might gain access
to your private key. Given the ease with which computers are accessible over
networks, if you are working with extremely sensitive information, you may
want to keep your private key on a diskette, which you can insert like an
old-fashioned key whenever you want to read or sign private information.
As another security precaution, consider assigning a different name to your
private keyring file and then storing it somewhere other than in the default
location. Use the Keys tab of the Options dialog box to specify a name and
location for your private and public keyring files.
Your private and public keys are stored in separate keyring files. You can copy
them to another location on your hard drive or to a diskette. By default, the
private keyring (secring.skr) and the public keyring (pubring.pkr) are
stored along with the other program files in your “PGP” folder; you can save
your backups in any location you like.
Keys generated on a smart card cannot be backed up because the private
portion of your keypair is non-exportable. (Keys can be generated on a smart
card on Windows systems only.)
You can configure PGP Desktop to back up your keyrings automatically after
you close PGP Desktop. Your keyring backup options can be set in the Keys tab
of the Options dialog box (for Windows) and in the Keys section of the
Preferences dialog box (for Mac OS X).
Backing up Your Private Key
To back up your private key
1 In the PGP Keys control box, click My Private Keys.
2 Select the icon representing your keypair.
44

PGP® Desktop for Windows Working with PGP Keys
3 Select File > Export.
4 Type a name for the file.
5 Select the Include Private Key(s) check box. This is important, because if
you do not do this, only your public key will be exported.
6 Click Save.
7 Copy the file (which has an .asc extension) to a secure location. This may
be a compact disc which you carefully archive, another personal computer,
or a USB flash drive that you keep in a safe location. Please remember not
to distribute this file to others, as it contains both your private key and your
public key.
Note: If you are in a PGP Universal Server-managed environment and your
key mode is SKM, you cannot export your key using this method. To export
your keypair, ask your PGP Universal Server administrator to export it from
the management console. To determine what your key mode is, see Key
Modes (on page 121).
What if You Lose Your Key?
If you lose your key and do not have a backup copy from which to restore your
key, you will never again be able to decrypt any information encrypted to your
key. You can, however, reconstruct your key if your PGP administrator has
implemented a key restoration policy for your company. For more information,
see PGP Key Reconstruction (see "Reconstructing Keys with PGP Universal
Server" on page 77, "If You Lost Your Key or Passphrase" on page 77) and
contact your PGP administrator.
Distributing Your Public Key
After you create your PGP Desktop keypair, you need to get your public key to
those with whom you intend to exchange encrypted messages.
You make your public key available to others so they can send you encrypted
information and verify your digital signature; and you need their public key to
send encrypted messages to them.
You can distribute your public key in various ways:
Publish your key on the PGP Global Directory (see "Placing Your Public Key
on a Keyserver" on page 46).
Generally none of the other methods are necessary once your key is
published to this directory.
Include your public key in an email message (see "Including Your Public Key
in an Email Message" on page 47).
45

PGP® Desktop for Windows Working with PGP Keys
Export your public key or copy it to a text file (see "Exporting Your Public
Key to a File" on page 47).
On Windows systems, you can also:
Copy from a Smart Card directly to someone's keyring (see "Copying from
a Smart Card Directly to Someone’s Keyring" on page 48).
Placing Your Public Key on a Keyserver
The best method for making your public key available is to place it on a public
keyserver, which is a large database of keys, where anyone can access it. That
way, people can send you encrypted email without having to explicitly request a
copy of your key. It also relieves you and others from having to maintain a large
number of public keys that you rarely use.
There are a number of keyservers worldwide, including the PGP Global
Directory, where you can make your key available for anyone to access. If you
are using PGP Desktop in a domain protected by a PGP Universal Server, your
PGP administrator will have preconfigured PGP Desktop with appropriate
settings.
When you’re working with a public keyserver, keep these things in mind before
you send your key:
Is this the key you intend to use? Others attempting to communicate with
you might encrypt important information to that key. For this reason, we
strongly recommend you only put keys on a keyserver that you intend for
others to use.
Will you remember your passphrase for this key so you can retrieve data
encrypted to it or, if you don’t want to use the key, so you can revoke it?
Other than the PGP Global Directory, once a key is up there, it’s up there.
Some public keyservers have a policy against deleting keys. Others have
replication features that replicate keys between keyservers, so even if you
are able to delete your key on one server, it could reappear later.
Most people post their public key to the PGP Global Directory right after they
create their keypair. If you have already posted your key to the PGP Global
Directory, you do not need to do it again. Under most circumstances, there is
no need to publish your key to any other keyserver. Note also that other
keyservers may not verify keys, and thus keys found on other keyservers may
require significantly more work on your part to contact the key owner for
fingerprint verification.
To manually send your public key to a keyserver
1 Open PGP Desktop.
2 Make sure the PGP Keys Control box is selected.
3 Right-click the keypair whose public key you want to send to the keyserver.
46

PGP® Desktop for Windows Working with PGP Keys
4 Select Send To and then select the keyserver you want to send the public
key to from the list. If the keyserver you want to send your public key to is
not on the list, see Working with Keyservers (on page 50). PGP Desktop
lets you know when the public key is successfully copied to the keyserver.
Once you place a copy of your public key on a keyserver, it’s available to people
who want to send you encrypted data or to verify your digital signature. Even if
you don’t explicitly point people to your public key, they can get a copy by
searching the keyserver for your name or email address.
Many people include the Web address for their public key at the end of their
email messages. In most cases, the recipient can just double-click the address
to access a copy of your key on the server. Some people even put their PGP
fingerprint on their business cards for easier verification.
Including Your Public Key in an Email Message
Another convenient method of delivering your public key to someone is to
include it with an email message.
When you send someone your public key, be sure to sign the email. That way,
the recipient can verify your signature and be sure no one has tampered with
the information along the way. Of course, if your key has not yet been signed
by any trusted introducers, recipients of your signature can only truly be sure
the signature is from you by verifying the fingerprint on your key.
To include your public key in an email message
1 In PGP Desktop, make sure the PGP Keys Control box is selected.
2 Right-click the keypair whose public key you want to include in an email
message.
3 Select Send To and then select Mail Recipient. Your email application
opens with your key information already in place.
4 Address the message and send it.
If this method does not work for you, you can open PGP Desktop, select your
keypair, select Edit > Copy, open an email message, then paste the public key
into the body of the message. With some email applications you can simply
drag your key from PGP Desktop into the text of your email message to transfer
the public key information.
Exporting Your Public Key to a File
Another method of distributing your public key is to export it to a file and then
make this file available to the person with whom you want to communicate
securely.
There are three ways to export or save your public key to a file:
47

PGP® Desktop for Windows Working with PGP Keys
Select your keypair, then select File > Export. Enter a name and a location
for the file, then click Save. Be sure not to include your private key along
with your public key if you plan on giving this file to others.
Ctrl+click the key you want to save to a file, select Export from the list,
enter a name and a location for the file, then click Save. Be sure not to
include your private key along with your public key if you plan on giving this
file to others.
Select your keypair, then select Edit > Copy. Open a text editor and select
Paste to insert the key information into the text file, and save the file. You
can then email or give the file to anyone you like. The recipient needs to
use PGP Desktop on his or her system to retrieve the public key portion.
Copying from a Smart Card Directly to Someone’s Keyring
Another method of distributing your public key—if you have it on a smart
card—is to copy it from the smart card directly to someone’s keyring.
For more information about how to do this, see Copying your Public Key from a
Smart Card to a Keyring (on page 277).
Getting the Public Keys of Others
Just as you need to distribute your public key to those who want to send you
encrypted mail or verify your digital signature, you need to obtain the public
keys of others to send them encrypted mail or verify their digital signatures.
There are multiple ways to obtain someone’s public key:
Automatically retrieve the verified key from the PGP Global Directory
Find the key manually on a public keyserver
Automatically add the public key to your keyring directly from an email
message
Import the public key from an exported file
Get the key from your organization’s PGP Universal Server
Public keys are just blocks of text, so they are easy to add to your keyring by
importing them from a file or by copying them from an email message and then
pasting them into your public keyring in PGP Desktop.
48

PGP® Desktop for Windows Working with PGP Keys
Getting Public Keys from a Keyserver
If the person to whom you want to send encrypted mail is an experienced PGP
Desktop user, it is likely that a copy of his or her public key is on the PGP Global
Directory or another public keyserver. This makes it very convenient for you to
get a copy of the most up-to-date key whenever you want to send him or her
mail and also relieves you from having to store a lot of keys on your public
keyring.
There are a number of public keyservers, such as the PGP Global Directory
maintained by PGP Corporation, where you can locate the keys of most PGP
users. If the recipient has not pointed you to the Web address where his or her
public key is stored, you can access any keyserver and do a search for the
user’s name or email address. This may or may not work, as not all public
keyservers are regularly updated to include the keys stored on all the other
servers.
If you are in a domain protected by a PGP Universal Server, then your PGP
administrator may direct you to use the keyserver built into the PGP Universal
Server. In this case, your PGP Desktop software is probably already configured
to access the appropriate PGP Universal Server.
Similarly, the PGP Universal Server is configured by default to communicate
with the PGP Global Directory. Thus, the PGP ecosystem distributes the load of
key lookup and verification.
To get someone’s public key from a keyserver
1 Open PGP Desktop and highlight the PGP Keys Control box.
2 Choose Search for Keys from the PGP Keys Control box. The Search for
Keys screen is displayed in the Work area.
3 Specify your search criteria, then click Search. If you want to search only a
specific keyserver, click in the Search field and select the keyserver. If the
keyserver you want to search is not currently on the list, select Edit
Keyserver List and add it.
You can search for keys on a keyserver by specifying values for multiple
key characteristics. The inverse of most operations is also available. For
example, you may search using “User ID is not Charles” as your criteria.
The results of the search appear.
4 If the search found a public key you want to add to your keyring, click Add
to My Keying in the PGP Keys Control box. The selected key is added to
your keyring.
Tip: If you set the search criteria to look for a very common name (for
example, 'Name', 'contains', "John"), only the first match found is returned.
This is by design, to prevent phishing (or harvesting keys from a keyserver).
For common names or domains, you may have to enter the entire name or
email address in order to find the correct key.
49

PGP® Desktop for Windows Working with PGP Keys
Getting Public Keys from Email Messages
A convenient way to get a copy of someone’s public key is to have that person
attach it to an email message.
To add a public key attached to an email message
1 Open the email message.
2 Double-click the .asc file that includes the public key. PGP Desktop
recognizes the file format and opens the Select key(s) dialog box.
3 If asked, specify to open the file.
4 Select the public key(s) you want to add to your keyring and click Import.
Working with Keyservers
PGP Desktop understands the following kinds of keyservers:
PGP Universal keyservers. If you are using PGP Desktop in a domain
protected by a PGP Universal Server, PGP Desktop is preconfigured to only
communicate with the keyserver built into the PGP Universal Server with
which it has a relationship. To PGP Desktop, this is a trusted keyserver, and
PGP Desktop will automatically trust any key it finds on this keyserver
unless the PGP Universal Server tells PGP Desktop that the key is not
trusted—this can happen, for instance, when verifying signatures from
remote keys.
The address for your PGP Universal keyserver may look like
https://keyserver.example.com.
The PGP Global Directory. If you are using PGP Desktop outside of a
domain protected by a PGP Universal Server, PGP Desktop is
preconfigured to communicate with the PGP Global Directory
(https://keyserver.pgp.com).
The PGP Global Directory is a free, public keyserver hosted by PGP
Corporation and provides quick and easy access to the universe of PGP
keys. It uses next-generation keyserver technology that verifies the key
associated with each email address (so the keyserver does not fill up with
unused keys, multiple keys per email address, forged keys, and other
problems that plagued older keyservers) and lets you manage your own
keys, including replacing your key, deleting your key, and adding email
addresses to your key. Using the PGP Global Directory significantly
enhances your chances of finding the public key of someone with whom
you want to send secured messages.
50
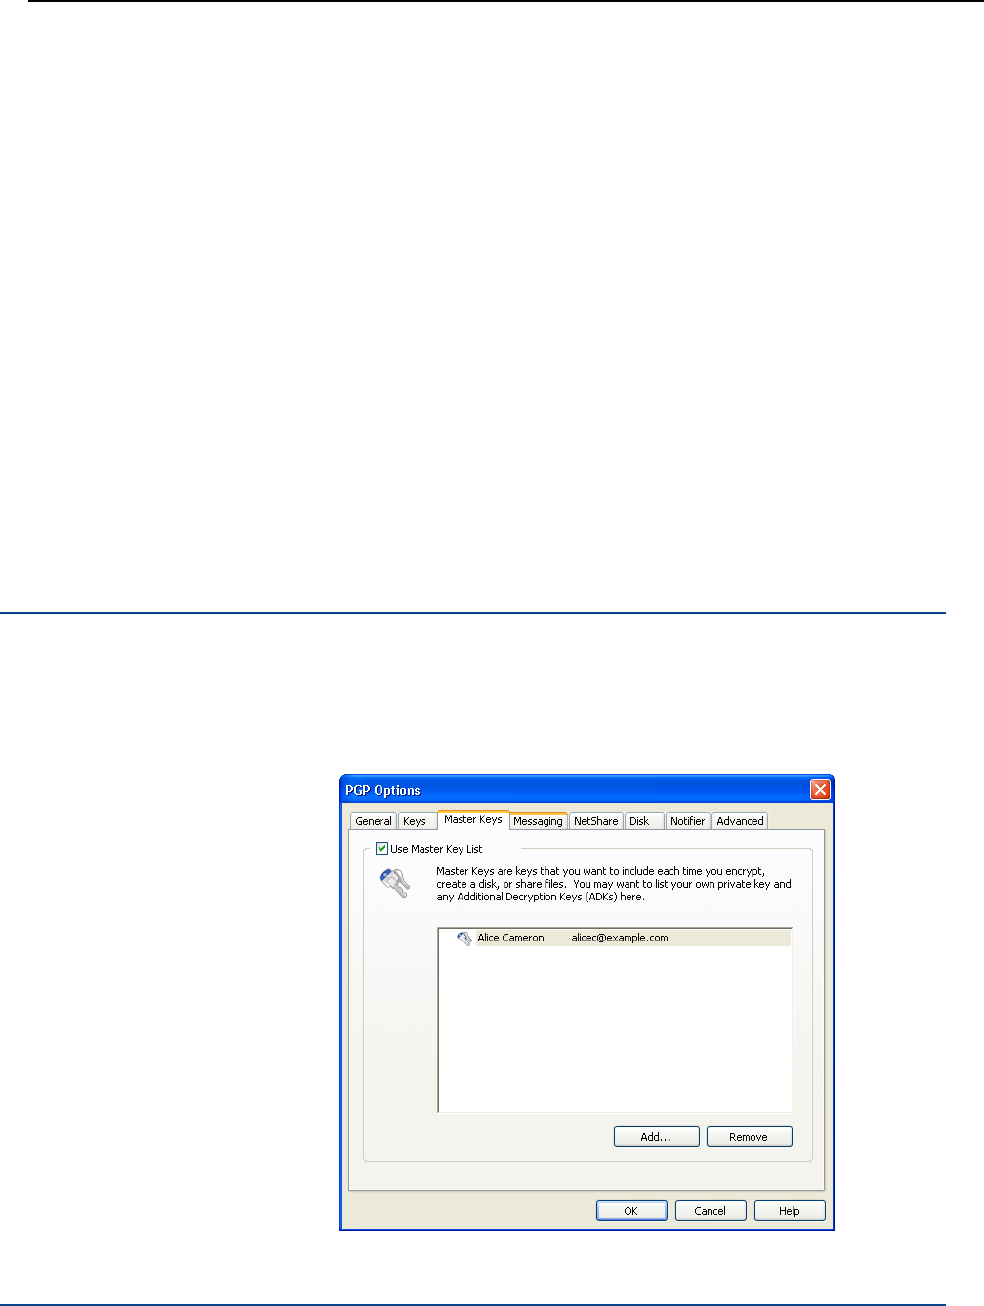
PGP® Desktop for Windows Working with PGP Keys
To PGP Desktop, the PGP Global Directory is a trusted keyserver, and PGP
Desktop automatically trusts any key it finds there. During the initial
connection to the PGP Global Directory, the PGP Global Directory
Verification Key is downloaded, signed, and trusted by the key you publish
to the directory. The PGP Global Directory key is also added to your
keyring. All of the keys verified by the PGP Global Directory are thus
considered valid by PGP Desktop.
PGP Universal Services Protocol. The PGP Universal Services Protocol
(USP) is a SOAP protocol operating over standard HTTP/HTTPS ports. This
is the default key lookup mechanism. If you are in a PGP Universal
Server-managed environment, all key search requests as well as all other
communications between the PGP Universal Server and PGP Desktop use
PGP USP.
Other keyservers. In most cases, other keyservers are other public
keyservers. However, you may have access, through your company or
some other means, to a private keyserver.
For more information about working with keyservers, see Keys Options (on
page 286).
Using Master Keys
The Master Key List is a set of keys that you want added by default any time
you are selecting keys for messaging, disk encryption, PGP NetShare, and PGP
Zip. This saves you the step of dragging the keys that you regularly use into the
Recipients field.
51

PGP® Desktop for Windows Working with PGP Keys
Note: If you generated your key using the Setup Assistant, your key is
automatically added to the Master Key list. If you skipped key generation and
imported your key into PGP Desktop, your key is not automatically added to
the list.
Adding Keys to the Master Key List
To add keys to the Master Key List
1 In PGP Desktop, select Tools > Options.
2 Select the Master Keys tab.
3 To use the Master Key List, select the Use Master Key List checkbox. You
cannot add or remove keys from the Master Key List unless this box is
selected.
4 Click Add. The Select Master Keys dialog box is displayed.
5 From the Key Source list on the left, select the key(s) that you want to
use. Use Shift+click or Ctrl+click to select multiple keys.
6 After selecting the keys you want, click Add.
Tip: If there are any keys in the Keys to Add list on the right that you do
not want to include, select them and click Remove.
7 When you have finished selecting keys, click OK. The keys you have
selected appear in the Master Key List.
Deleting Keys from the Master Key List
To remove keys from the Master Key List
1 In PGP Desktop, select Tools > Options.
2 Select the Master Keys tab.
3 To use the Master Key List, select the Use Master Key List checkbox. You
cannot add or remove keys from the Master Key List unless this box is
selected.
4 Select the key(s) that you want to remove. You can Shift+click or Ctrl+click
to select multiple keys.
5 Click Remove. The key(s) are removed.
52

6 Managing PGP Keys
This section describes how to manage keys with the PGP Desktop application.
Note: If you are using PGP Desktop in a PGP Universal Server-managed
environment, your PGP Universal Server administrator may have disabled
certain features. When a feature is disabled, the control item in the left side
is not displayed and the menu and other options for that feature are not
available. The graphics included in this guide depict the default installation
with all features enabled. If your PGP Universal Server administrator has
disabled this functionality, this section does not apply to you.
In This Chapter
Examining and Setting Key Properties .................................................... 53
Working With Photographic IDs .............................................................. 55
Managing User Names and Email Addresses on a Key .......................... 55
Importing Keys and X.509 Certificates .................................................... 57
Changing Your Passphrase...................................................................... 59
Deleting Keys, User IDs, and Signatures ................................................ 60
Disabling and Enabling Public Keys ......................................................... 60
Verifying a Public Key .............................................................................. 61
Signing a Public Key ................................................................................ 62
Granting Trust for Key Validations ........................................................... 64
Working with Subkeys............................................................................. 65
Working with ADKs ................................................................................. 70
Working with Revokers ........................................................................... 72
Splitting and Rejoining Keys .................................................................... 73
If You Lost Your Key or Passphrase ........................................................ 77
Protecting Your Keys ............................................................................... 81
Examining and Setting Key Properties
The PGP Keys Work Area can display these important details about your keys:
Name
Email address
53
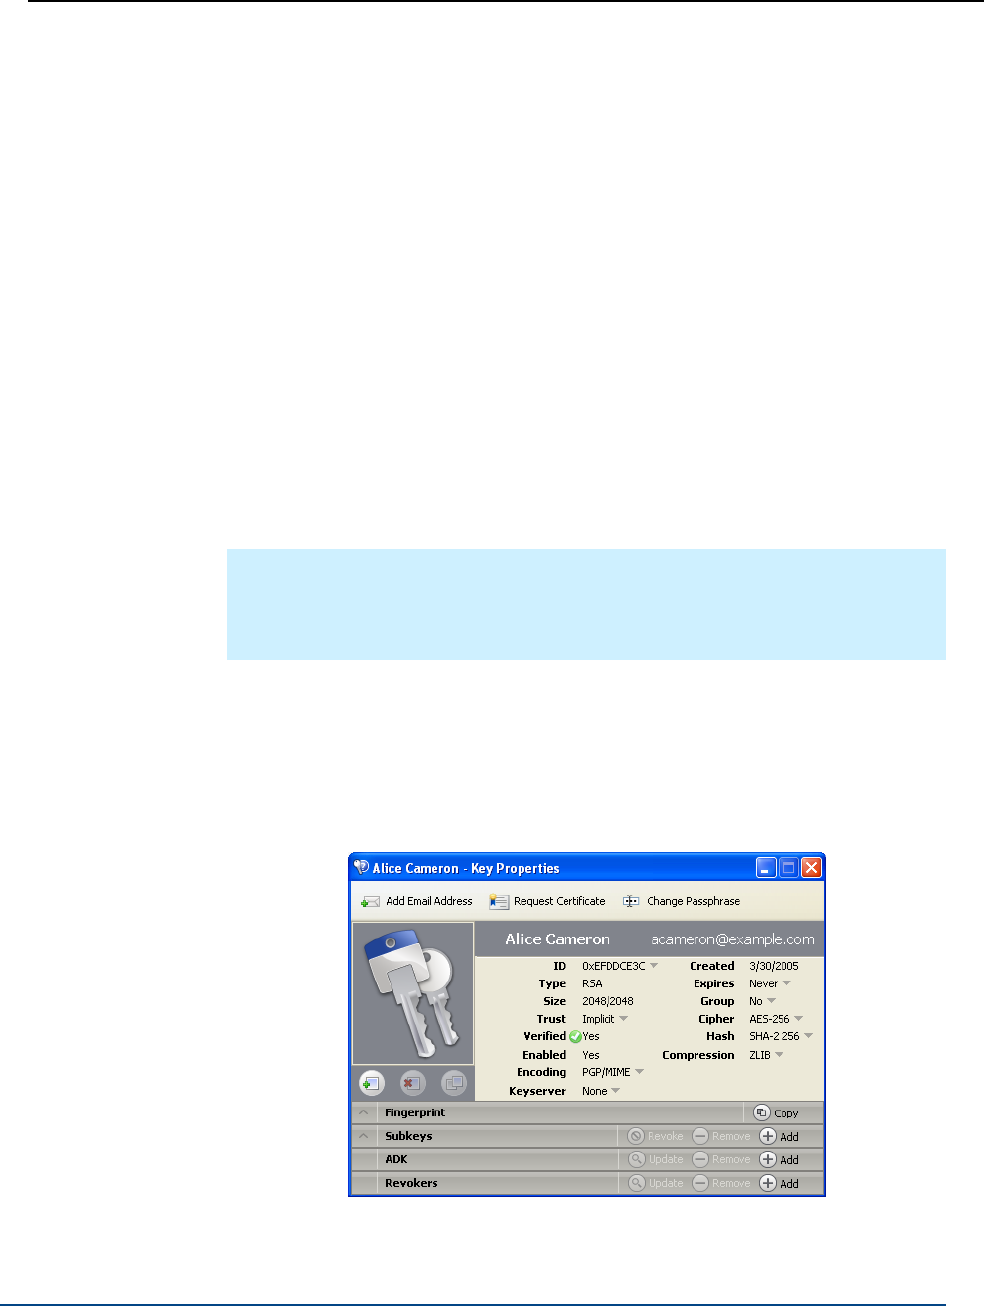
PGP® Desktop for Windows Managing PGP Keys
Validity
Size
KeyID
Trust
Creation date
Expiration date
ADK
Status
Key description
Key usage
You can choose how many or how few details are displayed by clicking the
Keys item, then choosing columns to display by selecting View > Columns.
You can, however, see more information about a key and you can modify
certain information about a key, by examining its key properties.
Note: If you are in a PGP Universal Server-managed environment and your
key mode is SKM, you cannot make changes to your key. In addition, SKM
keys are set to never expire. To determine what your key mode is, see Key
Modes (on page 121).
To view a key’s properties
1 Open PGP Desktop, click the PGP Keys Control box, and then click All
Keys in the Control box. All keys on your keyring appear.
2 Double-click the key whose properties you want to view. The Key
Properties dialog box for the key you selected is displayed.
54

PGP® Desktop for Windows Managing PGP Keys
Working With Photographic IDs
You can include a photographic ID on your Diffie-Hellman/DSS and RSA keys.
To add your photograph to your key
1 Open PGP Desktop, click the PGP Keys Control box, and select My Private
Keys.
2 In the PGP Keys Work area, double-click the private key to which you are
adding the photo ID. The Key Properties dialog box for the selected key is
displayed.
3 Right-click the placeholder key and silhouette icon and select Add Photo
ID. The Add Photo dialog box is displayed.
4 Drag or paste your photograph onto the Add Photo dialog box or browse to
it by clicking Select File.
5 Click OK. The Passphrase dialog box opens.
6 Type your passphrase for the key you are modifying, then click OK. Your
photo ID is added to your public key.
To delete a photo ID
Right-click the existing photo on the Key Properties dialog box and select
Remove Photo ID. The photo is removed from the key.
To copy a photo ID
Right-click the existing photo on the Key Properties dialog box and select
Copy Photo ID. You can then paste the photo into another key or into a
graphics program.
Managing User Names and Email Addresses on a Key
PGP Desktop supports multiple user names and email addresses on your
keypair. These names and email addresses help others find your key so that
they can send you encrypted messages.
To add a new user name or address to your key
1 Open PGP Desktop, click the PGP Keys Control box, and select My Private
Keys.
55

PGP® Desktop for Windows Managing PGP Keys
2 In the PGP Keys Work area, double-click the private key to which you are
adding a user name or email address. The Key Properties dialog box for the
key you double-clicked is displayed.
3 Click Add Email Address. The PGP New User Name dialog box is
displayed.
4 Type the new name and email address in the appropriate fields, then click
OK. The PGP Enter Passphrase for Key dialog box is displayed.
5 Enter the private key passphrase of the key you are modifying, then click
OK.
6 To set the new user name and address as the primary identifier for your
key, click the name of the current primary keyholder in the Key Properties
dialog box and select the user you just added.
7 Exit the Key Properties dialog box. In the list of keys in PGP Desktop, the
new name is added to the end of the user name list associated with the
key.
To change the primary name associated with your key
1 Do one of the following:
In the Key Properties dialog box, click the name of the current primary
keyholder and select the name of the user from the list that is
displayed.
In PGP Desktop, expand your key in the keys list, right-click the user
name you want to set as the primary identifier, and choose Set as
Primary Name from the shortcut menu.
To delete a name/email address from your keypair
1 From the list of keys, click the plus sign to the left of the key name to
expand the key.
2 Select the user ID you want to delete.
3 Press the Delete key on your keyboard. A confirmation dialog box is
displayed.
Tip: You can also select Edit > Delete (on Windows systems) or Edit >
Clear (on Mac OS X systems).
4 Click Delete. The user ID is deleted.
56

PGP® Desktop for Windows Managing PGP Keys
Importing Keys and X.509 Certificates
You can import PGP public keys and PKCS-12 X.509 certificates (a digital
certificate format used by most Web browsers) to your PGP Desktop keyring,
as well as PKCS-7 public X.509 certificates. You can also import Privacy
Enhanced Mail (PEM) format X.509 certificates from your browser by copying
and pasting into your public keyring.
There are many ways to import someone’s PGP public key and add it to your
keyring. These methods include:
Double-clicking the file on your system. If PGP Desktop recognizes the file
format, it will open and ask if you want to import the key(s) in the file.
Choosing to import the key file in PGP Desktop.
Dragging the file containing the public key onto the PGP Keys window.
PGP Desktop provides an Import Certificate Assistant to help you with this task.
For more information, see Using the Import Certificate Assistant (on page 57).
Note: If you are using PGP Desktop in a PGP Universal Server-managed
environment and you imported an X.509 certificate on a token during
enrollment (choosing to import the certificate as a PGP key), you must
manually enable the Synchronize keyring with tokens and smart cards
option. To do this, in PGP Desktop choose Tools > Options and click the
Keys tab. This step is required in order for the key to work properly with PGP
Whole Disk Encryption.
Using the Import Certificate Assistant
X.509 certificates can be imported into PGP Desktop from files, the Windows
Personal Certificate store, or smart cards. Even smart card-based certificates
which appear in your Windows Certificate store may be imported. The Import
Certificate Assistant guides you through the importation process.
When importing certificates from files, the certificate can only be imported from
a file with a PEM, PFX, P7b, or P12 extension.
Notes: When using certificates from the Windows Personal Certificate store,
you may get prompted for your certificate's password or PIN by Windows
itself (or the third-party smart card software, if using smart card-based
Windows Personal Certificates).
Some operations, such as changing the certificate's password, are not
permitted from within PGP Desktop when using certificates from the
Windows Personal Certificate store. Use the Windows (or smart card)
software for performing such operations.
57

PGP® Desktop for Windows Managing PGP Keys
To import a certificate using the Import Certificate Assistant
Before You Begin: Make sure that you know the passphrase for the
certificate that you are importing.
1 Start the Assistant by:
Selecting File > Open.
Selecting File > Import Personal Certificates.
Dragging the file containing the public key into the PGP Keys window
2 If you are using PGP Desktop in a PGP Universal Server-managed
environment, and your administrator has defined that you can choose the
method to import the certificate, select:
Onto an existing key—the certificate is added to a key that is already
in your keyring.
As new PGP key(s)—a new PGP key is created using the imported
certificate.
As PGP X.509 wrapper key(s)—a new PGP key is created using the
imported certificate. PGP Desktop treats the new key as an X.509
certificate.
3 After you make your selection, click Next. Either the Certificate Passphrase
Entry screen or the PGP Enter Passphrase dialog box displays.
4 Provide the password for the certificate, then click Next.
If you are importing the certificate using the Onto an existing key
option, the Select Key screen displays. Go to the next step.
If you are importing the certificate using the As new PGP key(s)
option, the key is generated. Click Finish. The process is complete.
If you are importing the certificate using the As PGP X.509 wrapper
key(s) option, the Select key(s) dialog box displays. Click to select the
key, click Import, and the PGP X.509 wrapper key is generated. The
process is complete.
5 To complete importing the certificate using the Onto an existing key
option, from the Select Key dialog box, select the key onto which you
would like to import the certificate, then type the password for the key.
Click Next.
6 The Key Generation Progress dialog box is displayed as the certificate is
imported onto the key.
7 Click Finish. The process is complete.
58

PGP® Desktop for Windows Managing PGP Keys
Importing X.509 Certificates Included in S/MIME Email Messages
If an X.509 certificate is included in an S/MIME email message sent to you, you
can have PGP Desktop import the certificates to your key ring. The same
settings you have specified when public keys are found apply to these
certificates. If specified, PGP Desktop extracts and then imports the X.509
certificate to your keyring. If you want to encrypt email using imported
certificates, be sure to manually sign the certificate.
To import X.509 certificates, choose Tools > Options and select the Keys tab.
Then select Ask to save to my keyring or Save keys to my keyring.
Changing Your Passphrase
It’s a good practice to change your passphrase at regular intervals, perhaps
every three months. More importantly, you should change your passphrase the
moment you think it has been compromised, for example, by someone looking
over your shoulder at the keyboard as you typed it in.
To change the passphrase for a split key, you must rejoin it first.
Tip: Changing your passphrase on your key does not change the passphrase
on any copies of the key (such as backups you may have made). If you think
your key has been compromised, PGP Corporation recommends that you
shred any previous backup copies and then make new backups of your key.
If you are in a PGP Universal Server-managed environment and your key mode
is SKM, you cannot change the passphrase for your key. SKM keys are
protected by a randomly generated passphrase (that is itself protected) and you
are never prompted to enter a passphrase for an SKM key. To determine what
your key mode is, see Key Modes (on page 121).
To change your private key passphrase
1 Open PGP Desktop, click the PGP Keys Control box, and select My Private
Keys.
2 In the PGP Keys work area, double-click the private key for which you are
changing the passphrase. The Key Properties dialog box is displayed.
3 Click Change Passphrase. The PGP Passphrase Assistant is displayed.
4 Enter your current passphrase for the private key, then click Next. The
Create Passphrase dialog box is displayed.
5 Enter your new passphrase in the first text field, and then enter it again in
the Re-Enter Passphrase field to confirm the new passphrase.
To display your keystrokes as you type your passphrase, select the Show
Keystrokes box.
59

PGP® Desktop for Windows Managing PGP Keys
The Passphrase Quality bar provides a basic guideline for the strength of
the passphrase you are creating by comparing the amount of entropy in the
passphrase you type against a true 128-bit random string (the same
amount of entropy in an AES128 key). For more information, see The
Passphrase Quality Bar (on page 306).
6 Click Finish. Your passphrase is changed.
Deleting Keys, User IDs, and Signatures
PGP Desktop gives you control over the keys on your keyrings, as well as the
user IDs and signatures on those keys.
With public keys on your keyrings, you can delete entire keys, any user IDs on a
key, and any or all signatures on a key.
With your keypairs, you can delete entire keypairs or any or all signatures, as
well as delete user IDs from a keypair as long as that is not the only user ID on
the keypair.
Note, however, that you cannot delete a user ID on a key if it is the only user
ID, and you cannot delete self-signatures from keys.
To delete a key, user ID, or signature from your PGP keyring
1 Open PGP Desktop, click the PGP Keys Control box, and then click All
Keys in the Control box. All keys on your keyring appear.
2 Do one of the following:
To delete a key, right-click on the key, select Delete from the list of
commands displayed, then click OK on the Confirmation dialog box.
The key is deleted from your keyring.
To delete a user ID (from a public key) or signature, click the plus sign
on the left side of the key to display the user IDs and signatures.
When you see the user ID or signature you wish to delete, right-click
it, select Delete from the list of commands displayed, then click OK
on the Confirmation dialog. The user ID or signature is deleted.
Disabling and Enabling Public Keys
Sometimes you may want to temporarily disable a public key on your keyring,
which can be useful when you want to retain a public key for future use, but
you don’t want it cluttering up your recipient list every time you send mail.
60

PGP® Desktop for Windows Managing PGP Keys
You cannot disable a keypair that is "implicitly trusted." In order to disable a key
that has been set to implicitly trust, you must first change the trust status to
None.
To disable or enable a public key
1 Open PGP Desktop, click the PGP Keys Control box, and then click All
Keys in the Control box. All keys on your keyring appear.
2 Double-click the public key you want to disable. The Key Properties dialog
box for the key you selected is displayed.
3 Locate the Enabled field in the Key Properties.
If the current Enabled setting is Yes, the key is enabled. To disable
the key, click Yes once. The Enabled field changes to No; the key is
disabled.
If the current Enabled setting is No, the key is disabled. To enable the
key, click No once. The Enabled field changes to Yes and the key is
enabled.
A disabled key cannot be used to encrypt or sign. You can use a disabled key,
however to decrypt or verify.
Tip: You can also synchronize keys on your keyring with the PGP Universal
Server. This option is used primarily to enable/disable public keys on your
keyring. To do this, right-click a key and choose Synchronize.
Verifying a Public Key
It is difficult to know for certain whether a public key belongs to a particular
individual unless that person physically hands the key to you on a removable
media or you get the key from the PGP Global Directory. Exchanging keys on
removable media is not usually practical, especially for users who are located
many miles apart.
So the question remains: how can I make sure the public key I got from a public
keyserver (not the PGP Global Directory) is really the public key of the person
listed on the key? The answer is: you have to check the key’s fingerprint.
There are several ways to check a key’s fingerprint, but the safest is to call the
person and have them read the fingerprint to you over the phone. Unless the
person is the target of an attack, it is highly unlikely that someone would be
able to intercept this random call and imitate the person you expect to hear on
the other end. You can also compare the fingerprint on your copy of someone’s
public key to the fingerprint on their original key on a public server.
The fingerprint can be viewed in two ways: in a unique list of words or in its
hexadecimal format.
61

PGP® Desktop for Windows Managing PGP Keys
To check the digital fingerprint of a public key
1 Open PGP Desktop, click the PGP Keys Control box, and then click All
Keys in the Control box.
All keys on your keyring appear.
2 Double-click the public key whose fingerprint you want to check. The Key
Properties dialog box for the key you selected is displayed.
The fingerprint of the key is shown under the name and email address, in
either hexadecimal format (10 sets of four characters per set) or word list
format (four columns with five unique words per column).
3 Compare the fingerprint on the key with the original fingerprint. If the two
are the same, then you have the real key. If not, then you do not have the
real key.
The word list is made up of special authentication words that PGP Desktop
uses and are carefully selected to be phonetically distinct and easy to
understand without phonetic ambiguity.
The word list serves a similar purpose as the military alphabet, which
allows pilots to convey information distinctly over a noisy radio channel.
4 If you have a forged key, delete it.
5 Open your Web browser, navigate to the PGP Global Directory
(https://keyserver.pgp.com), and search for the real public key.
Signing a Public Key
When you create a keypair, the keys are automatically signed. Similarly, once
you are sure a key belongs to the correct person, you can sign that person’s
public key, indicating that you have verified the key. When you sign someone’s
public key, a signature icon along with your user name is shown attached to
that key.
If you import a keypair from a backup or from a different computer, that keypair
may also need to be signed.
Note: If you are using PGP Desktop in a PGP Universal Server-managed
environment, key signing may be disabled.
To sign someone’s key
1 Open PGP Desktop, click the PGP Keys Control box, and then click All
Keys in the Control box. All keys on your keyring appear.
2 Do one of the following:
From the Keys menu, select Sign.
62

PGP® Desktop for Windows Managing PGP Keys
Right-click on the key you want to sign and select Sign from the list of
commands that is displayed.
The PGP Sign Key dialog box is displayed with the user name/email
address and hexadecimal fingerprint displayed in the text box.
3 Select the Allow signature to be exported checkbox, to allow your
signature to be exported with this key.
An exportable signature is one that is allowed to be sent to servers and
travels with the key whenever it is exported, such as by dragging it to an
email message. The checkbox provides a shorthand means of indicating
that you want to export your signature so that others can rely on your
signature and trust your keys as a result.
4 Click More Choices to configure options such as signature type and
signature expiration.
5 Choose a signature type to sign the public key with. Your choices are:
Non-exportable. Use this signature when you believe the key is valid,
but you don’t want others to rely on your certification. This signature
type cannot be sent with the associated key to a keyserver or
exported in any way.
Exportable. Use exportable signatures in situations where your
signature is sent with the key to the keyserver, so that others can rely
on your signature and trust your keys as a result. This is equivalent to
selecting the Allow signature to be exported checkbox on the Sign
Keys menu.
Meta-Introducer Non-Exportable. Certifies that this key and any
keys signed by this key with a Trusted Introducer Validity Assertion
are fully trusted introducers to you. This signature type is
non-exportable.
Trusted Introducer Exportable. Use this signature in situations
where you certify that this key is valid, and that the owner of the key
should be completely trusted to vouch for other keys. This signature
type is exportable. You can restrict the validation capabilities of the
trusted introducer to a particular email domain.
6 The Maximum Trust Depth option enables you to identify how many
levels deep you can nest trusted-introducers. For example, if you set this to
1, there can only be one layer of introducers below the meta-introducer
key.
7 If you want to limit the trusted introducer’s key validation capabilities to a
single domain, type the domain name in the Domain Restriction text box.
8 In the Expiration field, select Never if you don’t want this signature to
expire or select a date on which it does expire.
9 Click OK. The PGP Enter Passphrase for Key dialog box is displayed.
63

PGP® Desktop for Windows Managing PGP Keys
10 Select the key you want to sign with from the list, then type the
passphrase of the signing key, if required. (If the passphrase is already
cached, you don’t need to type it again.)
11 Click OK. The key is signed.
Revoking Your Signature from a Public Key
You may, on occasion, want or need to revoke your signature from a key on
your keyring.
To revoke your signature
1 Open PGP Desktop, click the PGP Keys Control box, and then click All
Keys in the Control box. All keys on your keyring appear.
2 Expand the key from which you want to revoke your signature until you see
your signing key.
3 Right-click your signing key and then select Revoke from the list of
commands displayed. The Revoke Signature dialog box is displayed.
4 Verify that the Key ID and Name are the correct key (from which you want
to revoke your signature) and click OK. The PGP Enter Passphrase for Key
dialog box is displayed.
5 Enter your passphrase and click OK. Your signature is revoked from the
key.
Note: If your signature was exportable and you distributed the key with the
exportable signature, you must distribute the key with the revoked signature
before others can see the revocation.
Granting Trust for Key Validations
Besides certifying that a key belongs to someone, you can assign a level of
trust to the owner of the keys indicating how well you trust them to act as an
introducer for others, whose keys you may get in the future.
This means that if you ever get a key from someone that has been signed by an
individual whom you have designated as trustworthy, the key is considered
valid even though you have not done the check yourself.
You must sign a key before you can set a trust level for it.
Public keys can be None, Marginal, or Trusted. Your keypairs can be None or
Implicit (meaning it is your own key and thus you trust it completely). You
shouldn’t have anyone else’s keypairs.
For more information about trusting keys, see An Introduction to Cryptography.
64

PGP® Desktop for Windows Managing PGP Keys
Note: If you are using PGP Desktop in a PGP Universal Server-managed
environment, the ability to grant trust to keys may be disabled.
To grant trust to a key
1 Open PGP Desktop, click the PGP Keys Control box, and then click All
Keys in the Control box. All keys on your keyring appear.
2 Double-click the key for which you are granting trust. The Key Properties
dialog box for the key you selected is displayed.
3 Locate the Trust field.
4 Click the current setting and select the desired setting from the list.
If you are granting trust for a public key, you can select None,
Marginal, or Trusted. None means you don’t trust the owner to act
as an introducer, Marginal means you partially trust them, Trusted
means you fully trust them.
If you are granting trust for a keypair, you can select None or Implicit.
Only keypairs that you are importing from backup or from another
computer of yours need to have their trust set to Implicit; when you
create a keypair, its trust is automatically set to Implicit.
Working with Subkeys
A PGP Desktop keypair consists of these elements:
the Master Key, for signing only;
one mandatory Subkey for encryption;
one or more optional Separate Subkey(s) for signing, encryption, or
signing/encryption.
The Master Key is used by default for signing, while a subkey is always used for
encryption. This can improve the security of a PGP Desktop keypair, as a
separate encryption subkey can be revoked, removed, or added to the PGP
Desktop keypair without affecting the Master Key or the signatures on it.
In addition to the Master Key and the mandatory encryption subkey, you have
the option of creating one or more additional subkeys for your PGP Desktop
keypair. You can create any combination of subkeys that can be used for
encryption only, for signing only, or for both encryption and signing.
65
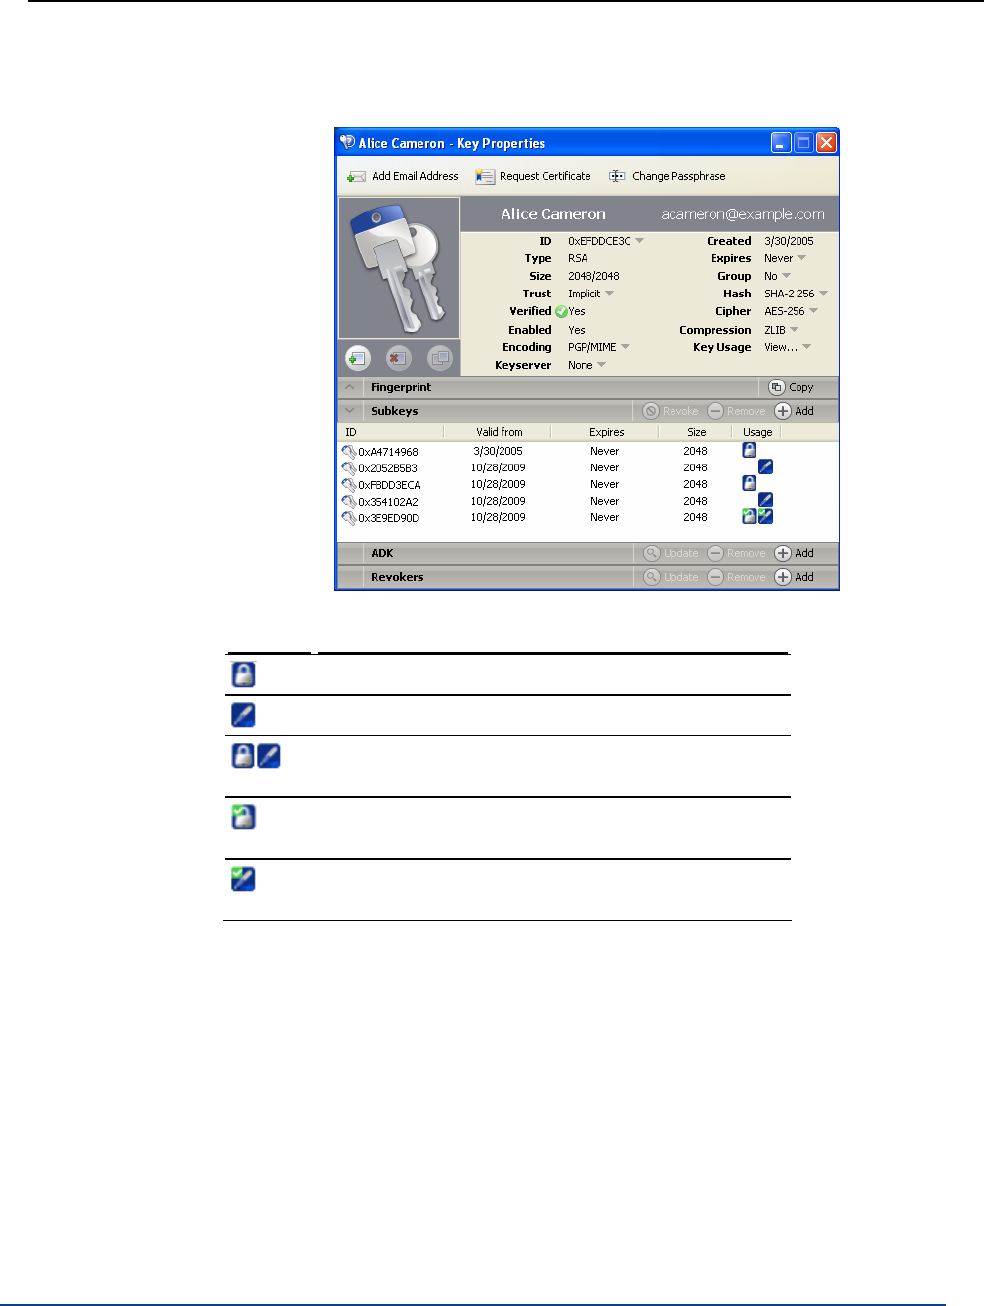
PGP® Desktop for Windows Managing PGP Keys
You can view the subkeys of a keypair from the Key Properties dialog box. The
Usage column indicates the function that a subkey performs:
Key Description
Encryption subkeys display a blue padlock symbol.
Signing subkeys display a blue pen symbol.
Subkeys used for both encryption and signing
display both symbols.
The default encryption subkey displays a small
green checkmark in the upper left corner.
The default signing subkey displays a small green
check mark in the upper left corner.
Using Separate Subkeys
Here are some examples of how additional separate subkeys can be useful:
66

PGP® Desktop for Windows Managing PGP Keys
Multiple encryption subkeys that are valid during different portions of the
keypair’s lifetime can increase security. You can create encryption subkeys
that have the Start and Expiration dates set so that only one encryption
subkey at a time is valid. For example, you could create several encryption
subkeys that are valid only during one future year (make sure you specify
correct dates). The Encryption Subkey in use then changes with the new
year. This can be a useful security measure, as it provides an automatic
way to switch to a new encryption key periodically without having to
recreate and distribute a new public key. Expired subkeys display a key
icon with a red clock.
Separate signing subkeys are needed in regions where separate subkeys
for signing are required for legally-binding digital signatures.
The separate subkeys that you can create depend on the type of keypair that
you are working with:
For RSA keypairs, you can create subkeys for encryption, signing, and
encryption/signing.
For Diffie-Hellman/DSS keypairs, you can create subkeys for encryption or
signing, but you cannot create subkeys that both encrypt and sign.
For older PGP Legacy keypairs, subkeys are not supported.
Viewing Subkeys
You can view and change the subkey information on your own keypairs. The
subkey information on your keyring’s public keypairs can be viewed, but not
changed.
To view subkeys and subkey properties
1 Open PGP Desktop, click the PGP Keys control box, then click All Keys.
All keys on your Keyring appear.
2 View the properties of a key by doing one of the following:
Double-clicking the key you want to view.
Right-clicking on the key, then selecting Key Properties from the
shortcut menu.
Clicking to select the key in the Keyring, then selecting Keys > Key
Properties.
The Key Properties dialog box for the key you selected is displayed.
3 Click the Subkeys heading in the Key Properties dialog box. The Subkeys
for this key are displayed.
4 To view the properties of a subkey, right-click the subkey you want to view
and select Subkey Properties from the shortcut menu.
67

PGP® Desktop for Windows Managing PGP Keys
Creating New Subkeys
Most likely you will create new subkeys in the manner described in this section.
However, you can also create subkeys when you first install PGP Desktop and
are using the New Key wizard. For more information, see Using PGP Desktop
for the First Time (on page 15).
To create new subkeys
1 In the Subkeys section of the Key Properties dialog, click the Add button.
The New Subkey dialog box is displayed.
2 In the Use this subkey for area, select Encryption, Signing, or
Encryption and Signing, depending on how you want to use the new
subkey.
3 In the Key Size field, choose a key size from 1024 to 4096 bits, or type a
custom key size from 1024 to 4096 bits.
4 In the Start Date field, type a date on which the subkey you are creating
becomes effective or choose a date from the calendar.
5 In the Expiration area, select Never, or select Date and specify a date or
select a date from the calendar. This information controls when the subkey
expires.
6 Click OK. The Passphrase dialog box is displayed.
7 Type your passphrase and then click OK. The subkey is created.
To specify how the key can be used (such as only for PGP Messaging), see
Specifying Key Usage for Subkeys (on page 68).
Specifying Key Usage for Subkeys
Each subkey can have its own key usage properties. For example, one subkey
could be used for PGP WDE only, and another could be used for all other PGP
Desktop functions.
An example of why you would want to set the key usage of a key is when you
want to use a key for disk encryption only but you do not want to receive
encrypted email. If you distribute your public key that does not allow for PGP
Messaging, then email sent by another user would not be encrypted to your
public key.
Note: If you are in a PGP Universal Server-managed environment and your
key mode is SKM, you cannot make changes to the key usage flags. To
determine what your key mode is, see Key Modes (on page 121).
68
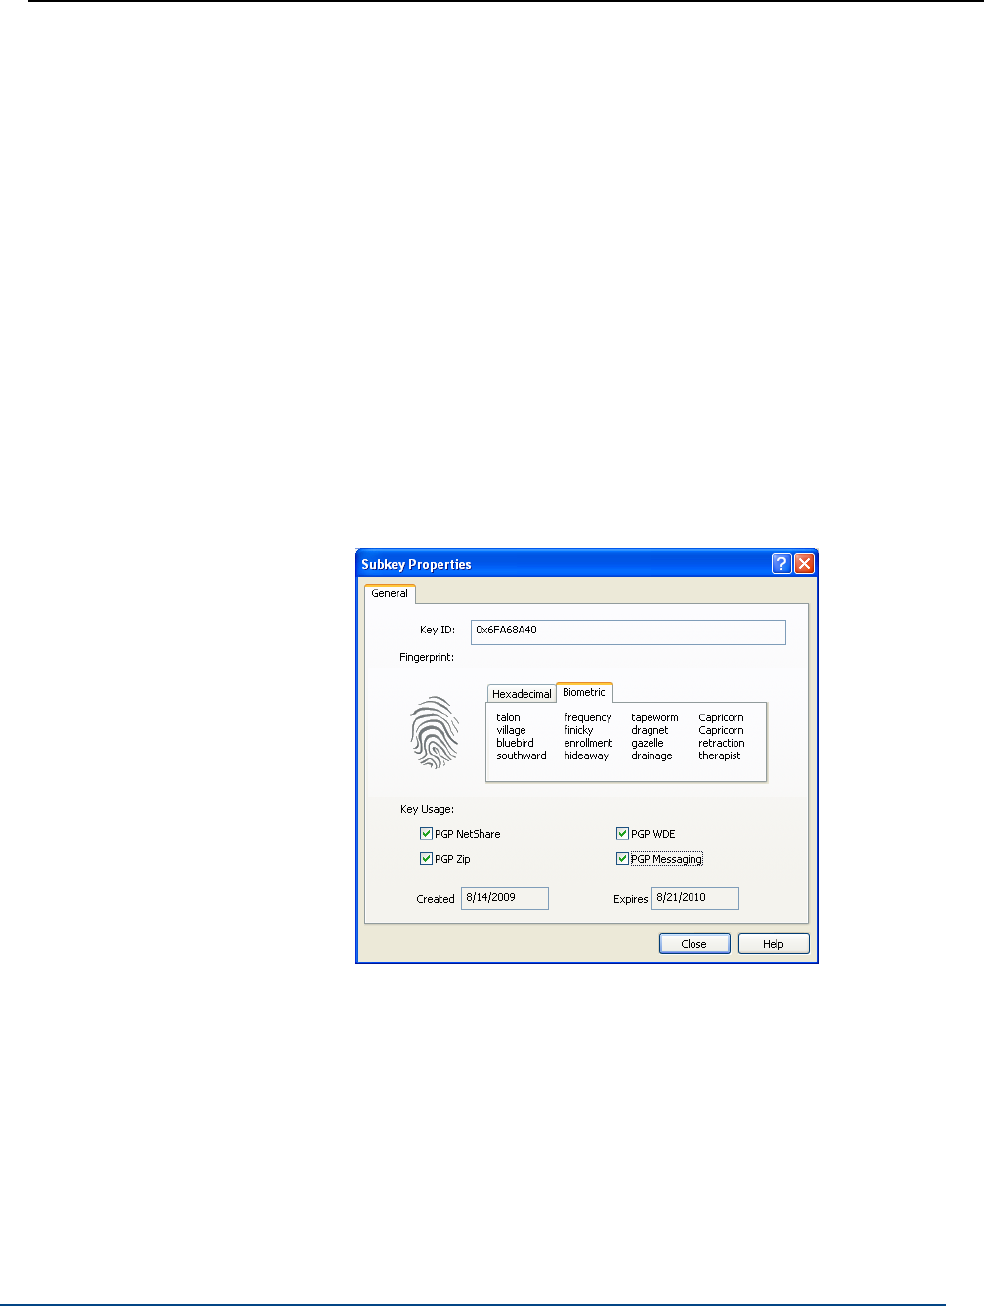
PGP® Desktop for Windows Managing PGP Keys
To specify key usage
1 Open PGP Desktop, click the PGP Keys control box, then click All Keys.
All keys on your Keyring appear.
2 View the properties of a key by doing one of the following:
Double-clicking the key you want to view.
Right-clicking on the key, then selecting Key Properties from the
shortcut menu.
Clicking to select the key in the Keyring, then selecting Keys > Key
Properties.
The Key Properties dialog box for the key you selected is displayed.
3 Click the Subkeys heading in the Key Properties dialog box. The Subkeys
for this key are displayed.
4 To view the properties of a subkey, right-click the subkey you want to view
and select Subkey Properties from the shortcut menu.
5 Under the Key Usage section, select the PGP Desktop functions for which
this key can be used. A check next to the item indicates the key can be
used for that function.
6 Click Close to save the subkey properties.
69

PGP® Desktop for Windows Managing PGP Keys
Revoking Subkeys
To revoke a subkey
1 In the Subkeys section of the Key Properties dialog box, select the subkey
you want to revoke, then click Revoke (above the subkey list). A PGP
Warning dialog box is displayed, informing you that once you revoke the
subkey, other users will not be able to encrypt data to it.
2 Click Yes to revoke the subkey or click No to cancel. The Passphrase
dialog box is displayed.
3 Type your passphrase, then click OK. The subkey is revoked and the icon
changes.
Removing Subkeys
To remove a subkey
1 In the Subkeys section of the Key Properties dialog box, select the subkey
you want to remove, then click Remove (above the subkey list). A PGP
Warning dialog is displayed, informing you that once you remove the
subkey, you will not be able to decrypt information encrypted to it.
2 Click Yes to remove the subkey or click No to cancel. The subkey is
removed.
Working with ADKs
An additional decryption key (ADK) is a key generally used by security officers of
an organization to decrypt messages that have been sent to or from employees
within the organization.
Messages encrypted by a key with an ADK are encrypted to the public key of
the recipient and to the ADK, which means the holder of the ADK can also
decrypt the message.
ADKs are rarely used or needed outside of a PGP Universal Server-managed
environment. Although your PGP administrator should not ordinarily need to use
the additional decryption keys, there may be circumstances when it is
necessary to recover someone’s email. For example, if someone is injured and
out of work for some time, or if email records are subpoenaed by a law
enforcement agency and the corporation must decrypt mail as evidence for a
court case.
70

PGP® Desktop for Windows Managing PGP Keys
You can only modify ADKs on your keypairs.
Adding an ADK to a Keypair
To add an ADK
1 Open PGP Desktop, click the PGP Keys Control box, and then click My
Private Keys in the Control box. The private keys on your keyring appear.
2 Double-click the key to which you are adding an ADK. The Key Properties
dialog box for the key you selected is displayed.
3 Click the up-arrow to the left of ADK, if applicable (only those keys that
already have at least one ADK already assigned will have the up-arrow). The
ADK information for this key is displayed, if configured.
4 Click the plus sign icon on the right side of the ADK section. The Select
Key(s) dialog box is displayed.
5 Select the key you want to use as the ADK, then click OK. A PGP Warning
dialog box is displayed, asking if you are sure you would like to add the
selected key as an ADK.
6 Click Yes. The PGP Enter Passphrase for Key dialog box is displayed.
7 Type the passphrase for the key to which you are adding the ADK, then
click OK. A PGP Information dialog box is displayed, telling you the ADK
was added to the key.
8 Click OK.
Note: If add an ADK to your key, then those who send you encrypted email
must be able to access the public key portion of the ADK.
Updating an ADK
To update an ADK
1 Select the ADK you want to update from the list of ADKs. The selected
ADK highlights.
2 Click the down arrow icon. The ADK is updated.
71

PGP® Desktop for Windows Managing PGP Keys
Removing an ADK
To remove an ADK
1 Select the ADK you want to remove from the list of ADKs. The selected
ADK highlights.
2 Click the minus sign icon. A PGP Warning dialog box is displayed, asking if
you are sure you want to remove the ADK.
3 Click OK to remove the ADK. The ADK is removed.
Working with Revokers
It is possible that one day you might forget your passphrase or lose your keypair
(your laptop is stolen or your hard drive crashes, for example).
Unless you are also using Key Reconstruction and can reconstruct your private
key, you would be unable to use your key again, and you would have no way of
revoking it to show others not to encrypt to it. To safeguard against this
possibility, you can appoint a third-party key revoker. The third-party you
designate is then able to revoke your key just as if you had revoked it yourself.
This feature is available for both Diffie-Hellman/DSS and RSA keys.
You can only change revoker information on your keypairs. If a public key on
your keyring has a revoker, you can see that information but you cannot change
it.
Appointing a Designated Revoker
To add a designated revoker to your key
1 Open PGP Desktop, click the PGP Keys Control box, and then click My
Private Keys in the Control box. The private keys on your keyring appear.
2 Double-click the key to which you are adding a revoker. The Key Properties
dialog box for the key you selected is displayed.
3 Click the plus sign to the left of Revokers, if applicable (only those keys
that already have at least one revoker configured will have the plus sign).
The Revokers information for this key is displayed, if configured.
4 Click the plus sign icon on the right side of the Revokers section. The
Select key(s) dialog box is displayed.
5 Select the key you want to use as the Revoker key, then click OK.
72

PGP® Desktop for Windows Managing PGP Keys
A PGP Warning dialog box is displayed, asking if you are certain that you
want to grant revoker privileges to the selected key(s).
6 Click Yes to continue or No to cancel. The PGP Enter Passphrase for Key
dialog box is displayed.
7 Type the passphrase for the keypair to which you are adding the revoker,
then click OK. A PGP Information dialog box is displayed.
8 Click OK. The selected key(s) is now authorized to revoke your key. For
effective key management, distribute a current copy of your key to the
revoker(s) or upload your key to the keyserver.
Revoking a Key
If the situation ever arises that you no longer trust your personal keypair, you
can revoke your key, which tells everyone to stop using your public key.
The best way to circulate a revoked key is to place it on a public keyserver.
To revoke a key
1 Open PGP Desktop, click the PGP Keys Control box, and then click My
Private Keys in the Control box. The private keys on your keyring appear.
2 Right-click the key you want to revoke, then select Revoke from the list of
commands displayed. A PGP Warning dialog box is displayed, asking if you
are sure you want to revoke this key.
3 Click Yes to confirm your intent to revoke the selected key or No to cancel.
The PGP Enter Passphrase for Key dialog box is displayed.
4 Type the passphrase for the keypair you are revoking, then click OK. When
you revoke a key, it is marked out with a red X to indicate that it is no
longer valid.
5 Synchronize the revoked key so everyone will know not to use the now
revoked public key.
Splitting and Rejoining Keys
Any private key can be split into shares among multiple “shareholders” using a
cryptographic process known as Blakely-Shamir key splitting. This technique is
recommended for extremely high security keys.
For example, PGP Corporation keeps a corporate key split between multiple
individuals. Whenever we need to sign with that key, the shares of the key are
rejoined temporarily.
73

PGP® Desktop for Windows Managing PGP Keys
Creating a Split Key
When you split a key, the shares are saved as files either encrypted to the
public key of a shareholder or encrypted conventionally if the shareholder has
no public key. After the key has been split, any attempts to sign or decrypt with
it will automatically attempt to rejoin the key.
To create a split key with multiple shares
1 Open PGP Desktop, click the PGP Keys Control box, and then click My
Private Keys in the Control box. The private keys on your keyring appear.
2 Click on the keypair you want to split. The selected keypair highlights.
3 Select Keys > Share Key > Make Shared. The Shared PGP Key dialog box
is displayed.
4 Add shareholders for the split key by dragging and dropping their keys in
the Shareholder list.
To add a shareholder that does not have a public key, click Add, type the
person’s name, then allow the person to type in their passphrase. (The
shareholder needs to be physically present in order to type their own
passphrase.)
5 When all of the shareholders are listed, you can specify the number of key
shares that are necessary to decrypt or sign with this key.
By default, each shareholder is responsible for one share. To increase the
number of shares a shareholder controls, click the name in the
shareholder’s list and then use the arrows to adjust the number of shares.
6 Click Split Key. You are prompted to select a directory in which to store
the shares.
7 Select a location to store the key shares, then click OK. The Passphrase
screen is displayed.
8 Enter the passphrase for the key you want to split, then click OK. A
confirmation dialog box is displayed.
9 Click Yes to split the key. The key is split and the shares are saved in the
location you specified. Each key share is saved with the shareholder’s
name as the file name and an SHF extension.
10 Distribute the key shares to the owners, then delete the local copies of the
shares.
Once a key is split among multiple shareholders, attempting to sign or
decrypt with it will cause PGP Desktop to automatically attempt to rejoin
the key.
Be sure you keep the original key that was split. You will need to have this key
before you can rejoin the split key for any decryption functions.
74

PGP® Desktop for Windows Managing PGP Keys
Rejoining Split Keys
Once a key is split among multiple shareholders, attempting to sign or decrypt
with it causes PGP Desktop to attempt to rejoin the key automatically. There
are two ways to rejoin the key: locally and remotely.
Rejoining key shares locally requires the shareholder’s presence at the rejoining
computer. Each shareholder is required to enter the passphrase for their key
share.
Rejoining key shares remotely requires the remote shareholders to authenticate
and decrypt their keys before sending them over the network. The PGP
Desktop Transport Layer Security (TLS) feature provides a secure link to
transmit key shares, allowing multiple individuals in distant locations to securely
sign or decrypt with their key share.
Caution: Before receiving key shares over the network, you should verify
each shareholder’s fingerprint and sign their public key to ensure that their
authenticating key is legitimate.
Before you begin, be sure you have the original key that was split on the
rejoining computer.
To rejoin a split key
1 Contact each shareholder of the split key. To rejoin key shares locally, the
shareholders of the key must be present.
To collect key shares over the network, make sure the remote
shareholders have PGP Desktop installed and are prepared to send their
key share file. Remote shareholders must have:
their key share files and passwords
a keypair (for authentication to the computer that is collecting the key
shares)
a network connection
the IP address or Fully Qualified Domain Name of the computer that is
collecting the key shares
2 Do one of the following:
To temporarily rejoin the key, at the rejoining computer, use Windows
Explorer to select the file(s) that you want to sign or decrypt with the
split key.
Right-click on the file(s) and select Sign or Decrypt from the PGP
shortcut menu. The PGP Enter Passphrase for Selected Key screen is
displayed with the split key selected.
Click OK to reconstitute the selected key. The Key Share Collection
screen is displayed.
75

PGP® Desktop for Windows Managing PGP Keys
To permanently rejoin the key, right-click the split key and select Key
Properties from the menu displayed.
In the Key Properties dialog box, click Join Key (this button is labeled
Change Passphrase for keys that are not split).
The Passphrase dialog box is displayed.
3 Do one of the following:
If you are collecting the key shares locally, click Select Share File and
then locate the share files associated with the split key. The share
files can be collected from the hard drive, a diskette, or a mounted
drive. Continue with the next step.
If you are collecting key shares over the network, click Start
Network. The remote user must start PGP Desktop and select Keys
> Share Key > Send Key Share. This starts the process of selecting
the share file, decrypting the share file, selecting an authorization key,
unlocking the authorization key, and entering the hostname/IP address
of the joining computer.
In the Signing Key field, select the keypair that you want to use for
authentication to the remote system and enter the passphrase.
Click OK to prepare the computer to receive the key shares.
The status of the transaction is displayed in the Network Shares box.
When the status changes to “Listening,” the PGP application is ready to
receive the key shares.
At this time, the shareholders must send their key shares.
When a share is received, the Remote Authentication dialog box is
displayed. If you have not signed the key that is being used to
authenticate the remote system, the key is considered invalid. Although
you can rejoin the split key with an invalid authenticating key, it is not
recommended. You should verify each shareholder’s fingerprint and
sign each shareholder’s public key to ensure that the authenticating key
is legitimate.
4 Click Confirm to accept the share file.
5 Continue collecting key shares until the value for Total Shares Collected
matches the value for Total Shares Needed on the Key Shares Collection
screen.
6 Click OK.
If you elected to temporarily rejoin the key in order to decrypt or sign,
the file is signed or decrypted with the split key and the rejoined key
is discarded.
If you elected to permanently rejoin the key, the key is saved as a fully
rejoined key (and is no longer split).
76

PGP® Desktop for Windows Managing PGP Keys
If You Lost Your Key or Passphrase
If you lost your key, you can reconstruct your key so you can continue to
encrypt and decrypt data. How you do this depends on if you are using PGP
Desktop in a standalone environment or in a PGP Universal Server-managed
environment.
If you forgot your passphrase, you can reset your passphrase. To do this, you
answer correctly three of the five security questions you answered when you
set up your key or created your security questions.
Reconstructing Keys with PGP Universal Server
This section applies only to PGP Desktop users in a PGP Universal
Server-managed environment whose PGP administrator has configured
key reconstruction support for their copy of PGP Desktop.
If you lose your key or forget your passphrase and do not have a backed up
copy from which to restore your key, you will never again be able to decrypt any
information encrypted to your key. You can, however, reconstruct your key if
your PGP administrator has implemented a PGP key reconstruction policy for
you, in which your key is encrypted and stored on a PGP Universal Server in
such a way that only you can retrieve it.
The PGP Universal Server holding the key reconstruction data stores your key in
such a way that only you can access it. Not even the PGP administrator has the
ability to decrypt your key.
If your PGP administrator has configured support for key reconstruction, you will
be prompted to enter additional “secret” information when you install PGP
Desktop or when you create your security questions.
Once your key is on the server, you can restore it at anytime by selecting Keys
> I Lost My Key or Keys > I Forgot My Passphrase in PGP Desktop for
Windows, or Keys > Reconstruct in PGP Desktop for Mac OS X.
Tip: If you were not prompted to create your PGP questions during
installation of PGP Desktop, and your PGP Universal Server administrator
allows local key reconstruction, you can manually create your questions. For
more information, see Creating Your Security Questions (on page 78).
Creating Key Reconstruction Data
When you answer the PGP security questions, you are creating the key
reconstruction data. In a standalone environment, this information is stored on
your local disk in a .krb file. In a managed environment, you send the key
reconstruction data to your company's PGP Universal Server whenever you
install PGP Desktop or when you create and answer your security questions.
77
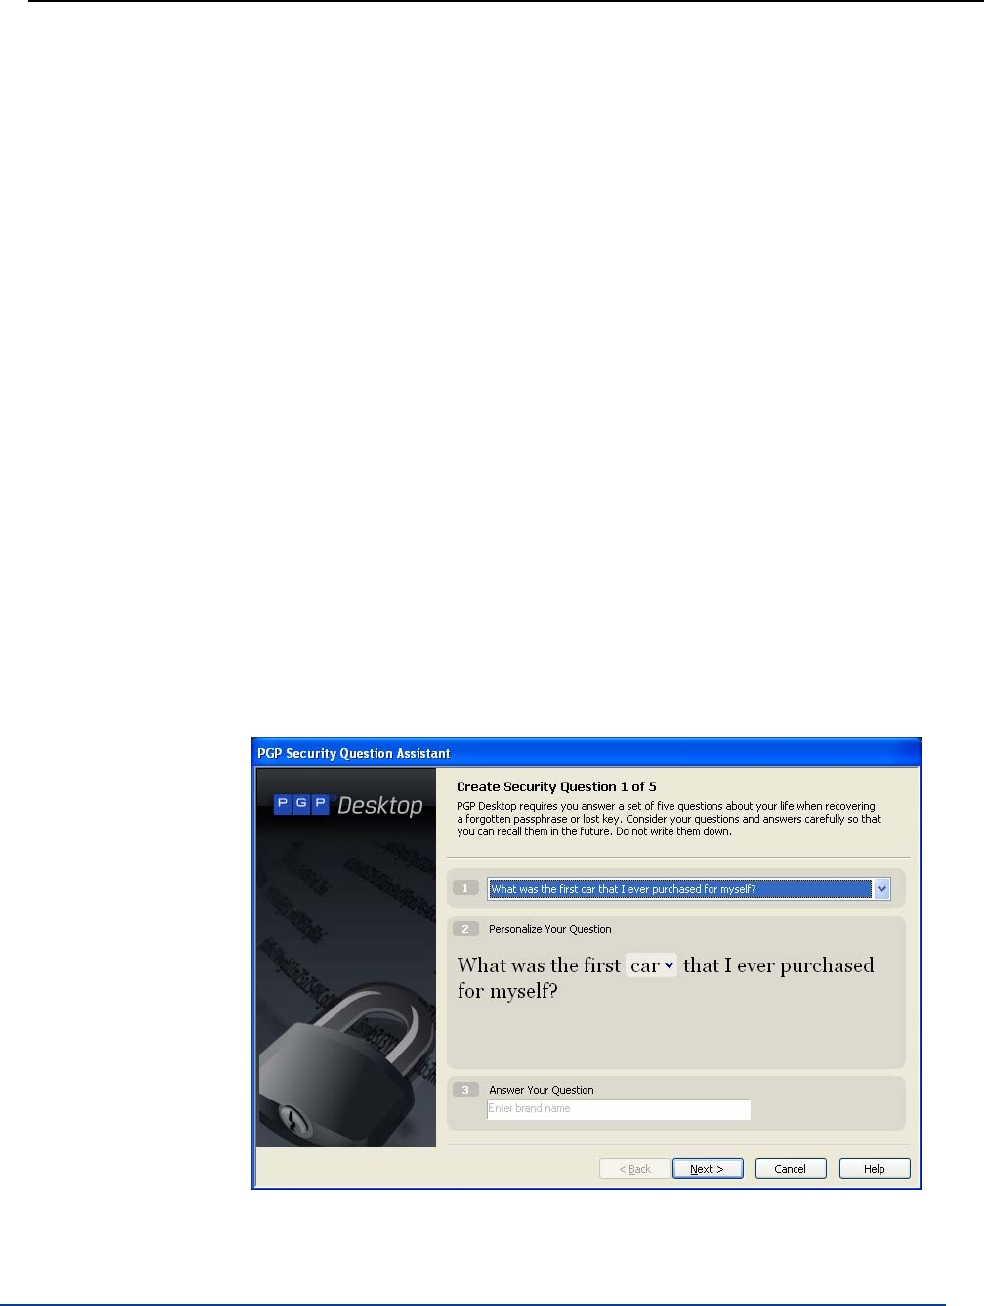
PGP® Desktop for Windows Managing PGP Keys
Choose obscure personal questions with answers that you are not likely to
forget. Your questions can be up to 95 characters in length. An example of a
good question might be, “Who took me to the beach?” or “Why did Fred
leave?” An example of a bad question would be, “What is my mother’s maiden
name?” or “Where did I go to high school?”
When you have created and answered all five PGP questions, your private key
is split into five pieces, using Blakely-Shamir key splitting. Three of the five
pieces are needed to reconstruct the key. Each piece is then encrypted with the
hash, the uniquely identifying number, of one answer. If you know any three
answers, you can successfully reconstruct the whole key.
Creating Your Security Questions
Before you can reconstruct your key or create a new passphrase when you've
forgotten it, you must create your security questions. You can customize the
five security questions so that the answers are something that only you would
know.
To create your security questions
1 In PGP Desktop, click the PGP Keys Control box and then select your key.
2 Select Keys > Create My PGP Questions. The PGP Security Question
Assistant is displayed.
3 Enter the passphrase for your key and click Next. The Create Security
Question 1 of 5 dialog box is displayed.
4 In the first Create Security Question screen, click the arrow for the first
field to select the question you want to use. Note that you can customize
parts of the question in the next step.
78

PGP® Desktop for Windows Managing PGP Keys
If you want to completely customize the question to create your own
question, select Enter my own question.
5 For Personalize Your Question, click the arrows next to any of the text
that you can customize. For example, if you selected the first question, you
can customize that question by changing "friend" to "boy" and "had a crush
on" to "held hands with."
If you chose to create your own question, enter the question in this field.
Be sure to enter a question that only you can know the answer to.
6 For Answer Your Question, enter the answer to this security question.
You can enter the answer using mixed upper- and lowercase letters, or use
all one case (when you answer the question, the case will not matter).
A hint is displayed in this field that disappears once you start entering the
answer. For example, to answer the question "Who was the first boy that I
ever held hands with?", the hint is "Enter first and last name".
7 When you have defined your question and entered the answer, click Next
to continue. The Create Security Question 2 of 5 dialog box is displayed.
8 You are prompted to create and answer a total of five security questions.
Continue to follow the steps above to select the question, customize the
question, and answer the question.
When you have entered all five questions and answers, the Completing the
PGP Security Question Assistant screen is displayed. Click Finish to exit
the assistant.
You have now defined the five security questions. If you lost your key or forget
your passphrase, you can reconstruct your key or reset your passphrase by
answering three of these five questions.
Reconstructing Your Key if You Lost Your Key or Passphrase
If you have lost your key or have forgotten your passphrase, you can recover by
reconstructing your key. You must first have created a set of security questions
that only you can answer. For more information, see Creating Your Security
Questions (on page 78).
To reconstruct your key
1 In PGP Desktop, click the PGP Keys Control box and then select your key.
79
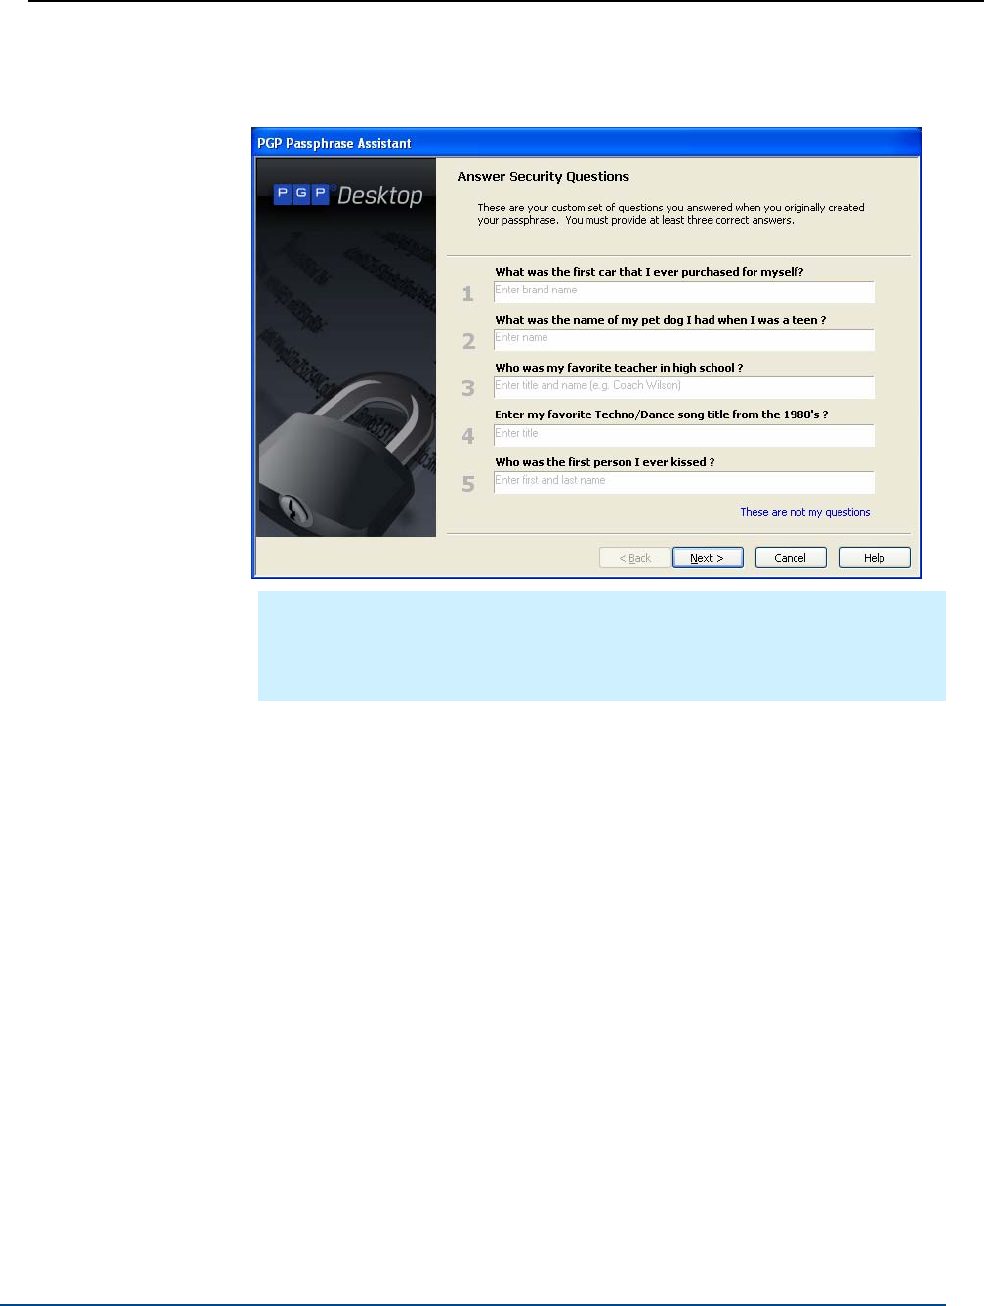
PGP® Desktop for Windows Managing PGP Keys
2 Select Keys > I Lost My Key. The PGP Passphrase Assistant: Answer
Security Questions dialog box is displayed.
Tip: If the questions displayed are not your questions, click the link for
These are not my questions. The PGP Passphrase Assistant: Select Key
to Reconstruct dialog box is displayed. Select the Key ID of the key you
want to reconstruct and click Next.
3 Answer three of the five security questions correctly and click Next. The
PGP Passphrase Assistant: Success dialog box is displayed.
4 Click Next. to continue with creating a new passphrase. The PGP
Passphrase Assistant: Create Passphrase dialog box is displayed.
5 Enter and re-enter your passphrase.
Select Show Keystrokes if you want to see the characters you type for
your passphrase. Be sure no one can see what you type.
The Passphrase Quality bar provides a basic guideline for the strength of
the passphrase you are creating by comparing the amount of entropy in the
passphrase you type against a true 128-bit random string (the same
amount of entropy in an AES128 key). For more information, see The
Passphrase Quality Bar (on page 306).
6 Click Finish. Your key has been reconstructed.
80

PGP® Desktop for Windows Managing PGP Keys
Protecting Your Keys
Besides making backup copies of your keys, you should be especially careful
about where you store your private key. Even though your private key is
protected by a passphrase that only you should know, it is possible that
someone could discover your passphrase and then use your private key to
decipher your email or forge your digital signature. For instance, somebody
could look over your shoulder and watch the keystrokes you enter or intercept
them on the network or even over the Internet.
To prevent anyone who might happen to intercept your passphrase from using
your private key, store your private key only on your own computer. If your
computer is attached to a network, make sure that your files are not
automatically included in a system-wide backup where others might gain access
to your private key. Given the ease with which computers are accessible over
networks, if you are working with extremely sensitive information, you may
want to keep your private key on a flash drive, which you can insert like an
old-fashioned key whenever you want to read or sign private information.
As another security precaution, consider assigning a different name to your
private keyring file and then storing it somewhere other than in the default
location.
Your private and public keys are stored in separate keyring files. You can copy
them to another location on your hard drive or to a diskette. By default, the
private keyring (secring.skr) and the public keyring (pubring.pkr) are
stored along with the other program files in your “PGP” folder; you can save
your backups in any location you like.
You can configure PGP Desktop to back up your keyrings automatically after
you close PGP Desktop. Your keyring backup options can be set in the Keys tab
of the Options dialog box (for Windows systems) or the Preferences dialog box
(for Mac OS X systems).
Tip: If you have changed your passphrase on your key, remember that it does
not change the passphrase on any copies of the key (such as backups you
may have made). If you think your key has been compromised, PGP
Corporation recommends that you shred any previous backup copies and
then make new backups of your key.
81

7 Securing Email Messages
This section describes how to use PGP Desktop Email to automatically and
transparently secure your email messages.
Note: If you are using PGP Desktop in a PGP Universal Server-managed
environment, your PGP Universal Server administrator may have disabled
certain features. When a feature is disabled, the control item in the left side
is not displayed and the menu and other options for that feature are not
available. The graphics included in this guide depict the default installation
with all features enabled. If your PGP Universal Server administrator has
disabled this functionality, this section does not apply to you.
In This Chapter
How PGP Desktop Secures Email Messages ......................................... 83
Using Offline Policy ................................................................................. 92
Services and Policies ............................................................................... 93
Creating a New Security Policy ............................................................. 102
Working with the Security Policy List.................................................... 113
PGP Desktop and SSL ........................................................................... 119
Key Modes............................................................................................. 121
Viewing the PGP Log............................................................................. 124
How PGP Desktop Secures Email Messages
When secure email messaging is enabled, PGP Desktop monitors the email
traffic between your email client and your mail server. Depending on the
circumstances, PGP Desktop will intercede on your behalf to encrypt, sign,
decrypt, or verify messages.
Once configured correctly—and it’s very likely PGP Desktop can do that for you
automatically—you don’t have to do anything to encrypt and/or sign outgoing
messages or to decrypt and/or verify incoming messages; the PGP Desktop
messaging proxy does it for you.
How this happens is different for incoming and outgoing messages.
83

PGP® Desktop for Windows Securing Email Messages
For incoming messages, PGP Desktop automatically evaluates all incoming
email messages and takes the appropriate actions (described in the following
section).
For outgoing messages, there are a range of actions that PGP Desktop can take
on your behalf based on configured policies. A policy is a set of instructions
(such as "In this circumstance, do this") that tells PGP Desktop what to do in
specific situations. By combining these instructions, policies can be tailored to
meet all of your email security requirements. PGP Desktop comes
pre-configured with a set of policies that suit the needs of the vast majority of
users. However, you are also provided with fine-grained control over these
policies if you want to change them.
By default, when you are using PGP Desktop standalone and are sending an
outgoing message, PGP Desktop looks for a key it can trust to encrypt the
message. It looks first on the default keyring (called "All Keys" on Windows
systems) or the local keyring (called "Keys" on Mac OS X systems) for the public
key of the recipient. If it does not find such a key, it will, again by default, check
the PGP Global Directory for a trusted key for the recipient. If it does not find a
trusted key there, the message is sent in the clear, which is unencrypted. This
default behavior, called Opportunistic Encryption, strikes a balance between
protecting outgoing messages and making sure they get sent.
Creating new policies is covered in detail in Creating a New Security Policy (on
page 102).
If you are in a PGP Universal-protected domain, your local PGP Desktop policies
determine how your messages are encrypted and when. For more information,
consult with your organization’s PGP Universal Server administrator.
Note: PGP Desktop checks only the default keyring. To send encrypted email
to a recipient whose key is on your local keyring, be sure to import the key to
your default keyring.
If you have multiple keyrings, the default keyring is the first keyring listed in
the PGP Keys control box. To specify a different default keyring, right-click
the keyring in the PGP Keys control box, choose Properties, and select the
Default Keyring checkbox.
Incoming Messages
PGP Desktop manages incoming mail messages based on the content of the
message. These scenarios assume standalone PGP Desktop, not in a
domain protected by a PGP Universal server (in which case mail action
policies set by your PGP Universal Server administrator can apply):
Message not encrypted nor signed. PGP Desktop does nothing to the
content of these messages; it simply passes the message along to your
email client.
84

PGP® Desktop for Windows Securing Email Messages
Message encrypted, but not signed. When PGP Desktop sees a
message coming to you that is encrypted, it will attempt to decrypt it for
you. To do this, PGP Desktop will check the local keyring for the private key
that can decrypt the message. If the private key is not on the local keyring,
PGP Desktop will not be able to decrypt it; the message will be passed to
your email client still encrypted. If the private key is on the local keyring,
PGP Desktop will decrypt it immediately if the passphrase for the private
key is in memory (cached). If the passphrase is not cached, PGP Desktop
will prompt you for the passphrase and decrypt the message when you
supply the correct passphrase. Once a message is decrypted, PGP
Desktop passes it to your email client.
If the PGP Desktop messaging proxy is turned off, PGP Desktop will not be
able to decrypt incoming encrypted messages; it will pass them along to
your email client still encrypted. It is recommended that you leave your
messaging proxy on all the time if you expect to be sending and receiving
encrypted messages. On is the default setting.
Message signed, but not encrypted. PGP Desktop will search the local
keyring for a public key that can be used to verify the signature. If PGP
Desktop cannot find the appropriate public key on the local keyring, it will
try to search for a keyserver at keys.domain (where domain is the domain
of the sender of the message), then the PGP Global Directory
(https://keyserver.pgp.com), and finally any other configured keyservers. If
PGP Desktop finds the right public key at any of these locations, it verifies
the signature (or not, if the signature is bad) and passes the message to
your email client annotated with information about the
signature—information is also put into the PGP Log. If PGP Desktop cannot
find the appropriate public key, it passes the message to your email client
unverified.
Message encrypted and signed. PGP Desktop goes through both of the
processes described above: first finding the private key to decrypt the
message and then finding the public key to verify the signature. However,
if a message cannot be decrypted, then it cannot be verified.
If PGP Desktop is unable to either decrypt or verify a message, you might want
to consider contacting the sender of the message. If the message could not be
decrypted, make sure the sender was using your real public key. If the message
could not be verified, ask the sender to publish their key on the PGP Global
Directory — older PGP versions or other OpenPGP products can access the
web version of this directory at PGP Global Directory
(https://keyserver.pgp.com) , or ask them to send their public key to you directly
by email.
Note: PGP Desktop only encrypts by default to keys that are known to be
valid. If you did not get a key from the PGP Global Directory, you may need to
verify its fingerprint with the owner and sign it for it to be used.
85
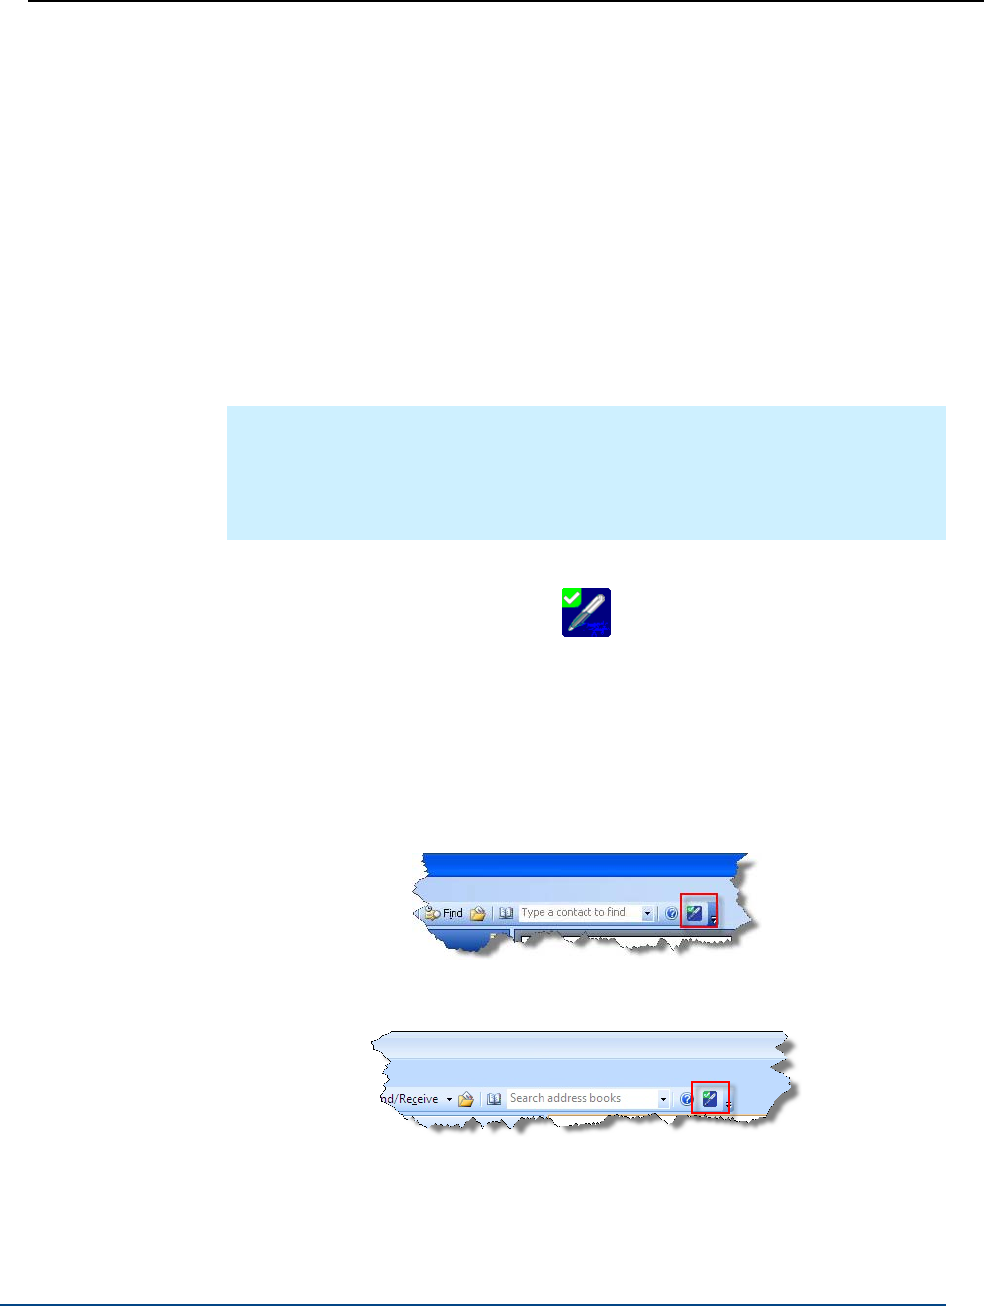
PGP® Desktop for Windows Securing Email Messages
Verifying Signatures on Incoming Messages
Starting with PGP Desktop version 10.1, in a managed environment your PGP
Universal Server administrator can set policy to enable you to decide if you want
to perform signature verification on email messages. If enabled, a new button
and/or menu option appears in your Microsoft Outlook or Lotus Notes email
client. The button or option will be in the default state set by your administrator.
For example, you administrator may allow you to choose to use signature
verification and set the default state to always verify. However, you can
override this setting by manually selecting the button or menu option to disable
signature verification. When signature verification is turned off, it is turned off
for all messages.
Tip: If you have turned off signature verification and then you want to view
the signature status on incoming email messages, select the PGP Verify
Signatures button (so it is highlighted) or menu option. If you are viewing an
email message, close the message or move away from the message's
Preview pane, to view the signature verification of that message.
The PGP Verify Signatures is added to the tool bar in Microsoft Office.
When the button is selected, and signature verification is enabled, the
button is highlighted (a color border appears around the button). There is no
border around the button when signature verification is turned off.
There is also a menu option in Microsoft Office to enable or disable
signature verification (Actions > PGP Verify Signatures).
When enabled in Microsoft Office 2003, the PGP Verify Signatures
button is added to the tool bar.
When enabled in Microsoft Office 2007, the PGP Verify Signatures
button is added to the tool bar.
86
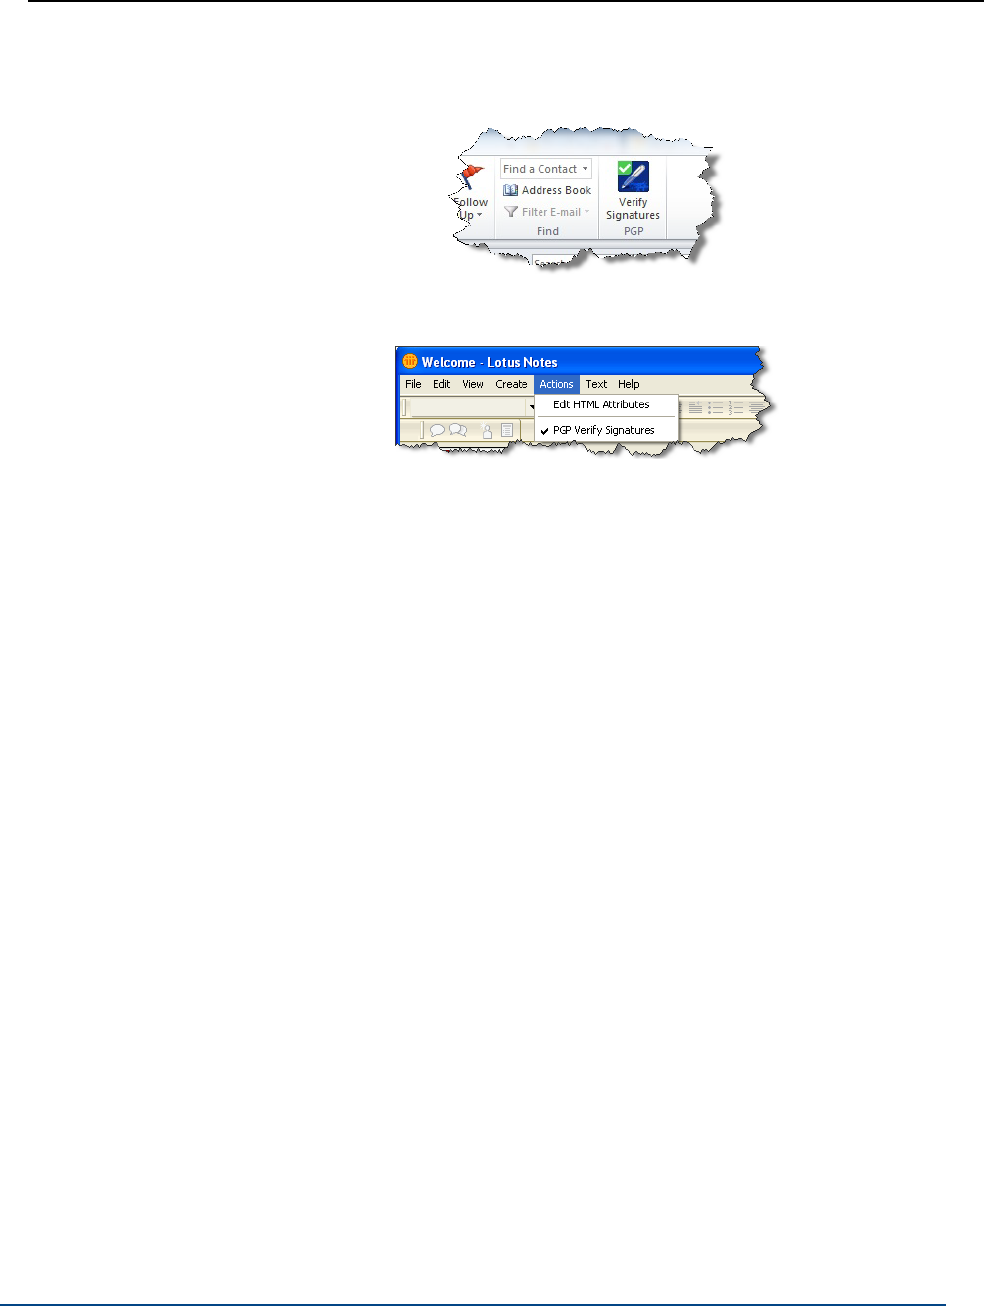
PGP® Desktop for Windows Securing Email Messages
When enabled in Microsoft Office 2010, the PGP Verify Signatures
button is added to the tool bar.
When signature verification is enabled in Lotus Notes, a check appears
next to the PGP Verify Signatures menu option:
Annotations
When you view an email message and signature verification is turned off, the
annotation for the message includes the beginning statement PGP Signature
not checked and the ending statement Signature checking is off by
policy. Any other actions, such as the decryption of the message, remain in
the annotation.
Notifications
When you receive an email message and signature verification is turned off, the
PGP notifier includes the statement Signature checking is off by
policy.
Understanding Annotations on Incoming Messages
When incoming email messages are received, PGP Desktop decrypts any
encrypted portions and verifies any signatures. Then a snippet of text, called an
annotation, is inserted into the processed email message to indicate what
encryption and signatures were present. Any email message with at least partial
protection (encrypted, signed, or both) receives an annotation. If an email
message is completely unprotected (for example, the email is not encrypted or
signed by the sender) then the message is not annotated.
You can choose three annotation levels:
Maximum: Verbose Annotation. Adds annotations to your incoming
email detailing every action that PGP Desktop has taken during message
processing.
87

PGP® Desktop for Windows Securing Email Messages
Medium: Failures and Successes. This option is the default. Provides
annotations when there has been a processing failure, such as unknown
key, or unknown signer. The Medium setting provides annotations for all
decrypted and/or signed email, but does not list individual attached files.
Minimum: Failures Only. Only provides annotations when there has been
a processing failure, such as detecting an unknown key or unknown signer.
To specify the level of annotation you want to use, see Messaging Options (on
page 289).
In a PGP Universal Server-managed environment, your administrator may have
specified the location of the annotation. The annotation can be "wrapped
around" the message text (the default setting), or placed below the message
text.
For more information on annotations, see PGP KB article 2039
(http://support.pgp.com/?faq=2039).
Outgoing Messages
Email messages that you send can be encrypted, signed, both, or neither.
Because you probably have different combinations for different recipients or
email domains, you need to create policies for all of your outgoing email
message possibilities. Once correct policies are in place, your email messages
are protected automatically and transparently.
If you are in a PGP Universal Server-managed environment, your PGP Desktop
policies are controlled by the policies specified by your PGP Universal Server
administrator. Your administrator may also have specified how to handle
outgoing email messages if the PGP Universal Server is not available. These
policies are called offline (or local) policies.
Securing Sent Items on IMAP Email Servers
If you are using an IMAP email server, messages in your Sent Items folder are
typically stored on the mail server. IMAP email clients send the sent message
copy over the network to the folder using the IMAP protocol. If the sent
message is not encrypted, the message could be intercepted. PGP Desktop
provides the ability for sent messages to be encrypted and/or signed as they are
sent to the IMAP server.
In a PGP Universal Server-managed environment, your administrator may have
specified that all messages in the Sent Items folder be secured.
In a standalone environment, you can specify if you want to secure the sent
messages. To do this, choose Tools > Options (in PGP Desktop for Windows)
or PGP > Preferences (in PGP Desktop for Mac OS X) and click the Messaging
tab or item. Then specify if you want to encrypt, encrypt and sign, or just sign
the messages.
Email messages are encrypted using your public PGP key.
88
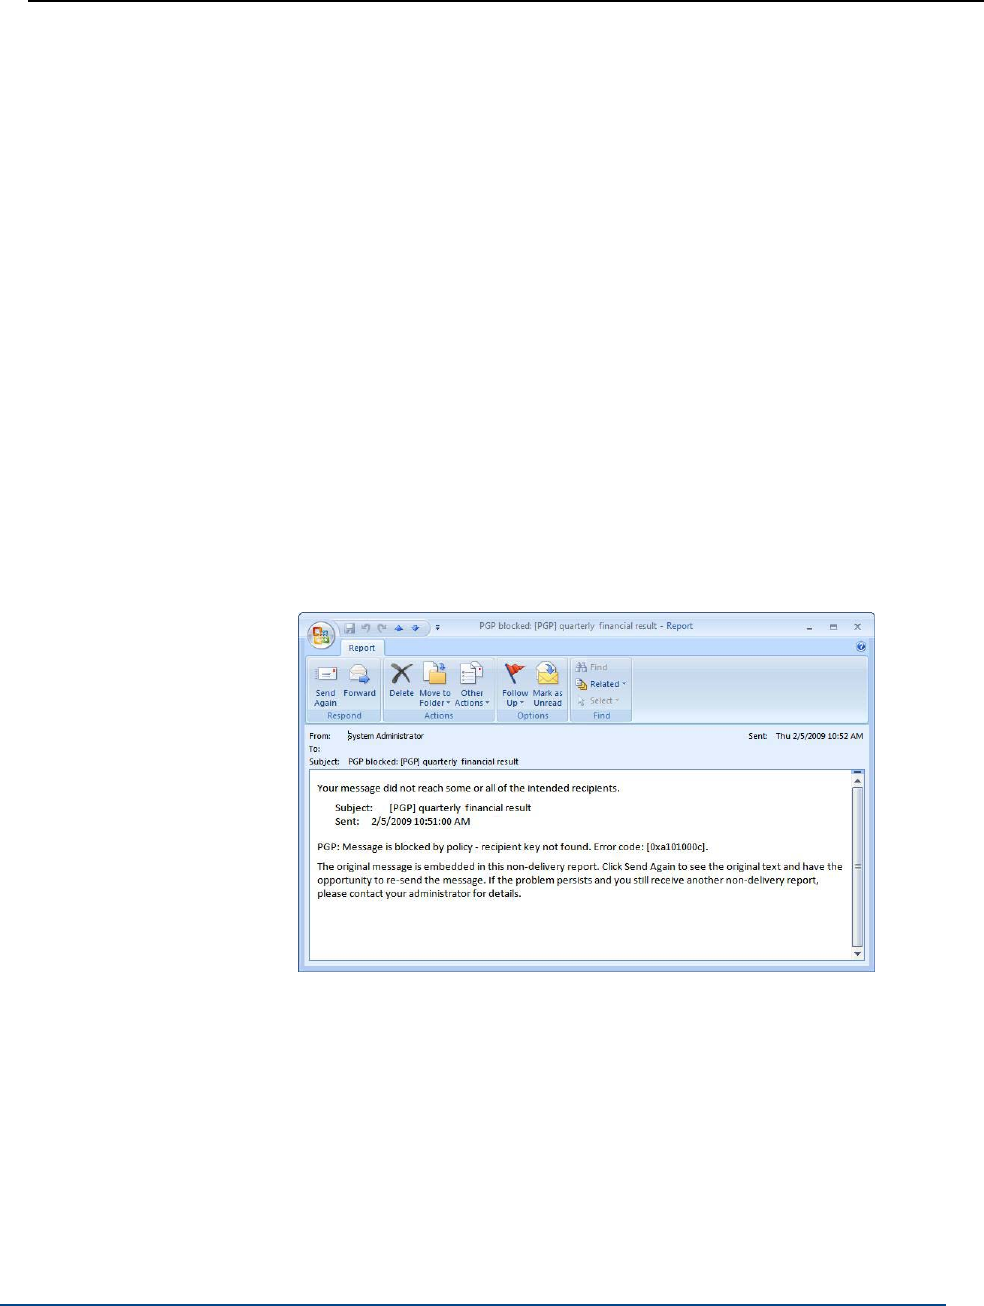
PGP® Desktop for Windows Securing Email Messages
When you access your Sent Items folder, and your key's passphrase is not
cached, you are prompted to enter the passphrase.
If the name of the folder is not a name that PGP Desktop recognizes (for
example, instead of "Sent Items" the folder is named "Outgoing Messages"), a
message is displayed asking you confirm if the name of the folder is where your
sent messages are typically stored. Note that the first message copied to this
folder is not encrypted and/or signed, but that subsequent messages copied to
this folder are.
Sending MAPI Email with Microsoft Outlook
New in PGP Desktop version 9.10 is the ability to "spool" outgoing messages so
that you can continue to work in email without having to wait for the PGP
Notifier message to disappear.
When a key is not found, instead of displaying the message in a PGP Notifier
and then displaying the outgoing message (so that you can modify it to remove
the recipient, for example), a "key not found" non-delivery report is generated
and sent. This is in the format of an incoming email message and is sent from
the "System Administrator" and provides information on why the email did not
reach some or all of the intended recipients.
The most common messages contained in a non-delivery report include:
PGP: Message is blocked by policy - server not reachable.
PGP: Message is blocked - additional decryption key not found.
PGP: Message is blocked - failed to unlock signing key.
PGP: Message is blocked - failed to find key by KeyID.
PGP: Message is blocked - blocked from notifier.
PGP: Message is blocked by policy - recipient key not found.
PGP: Message is blocked by policy.
89
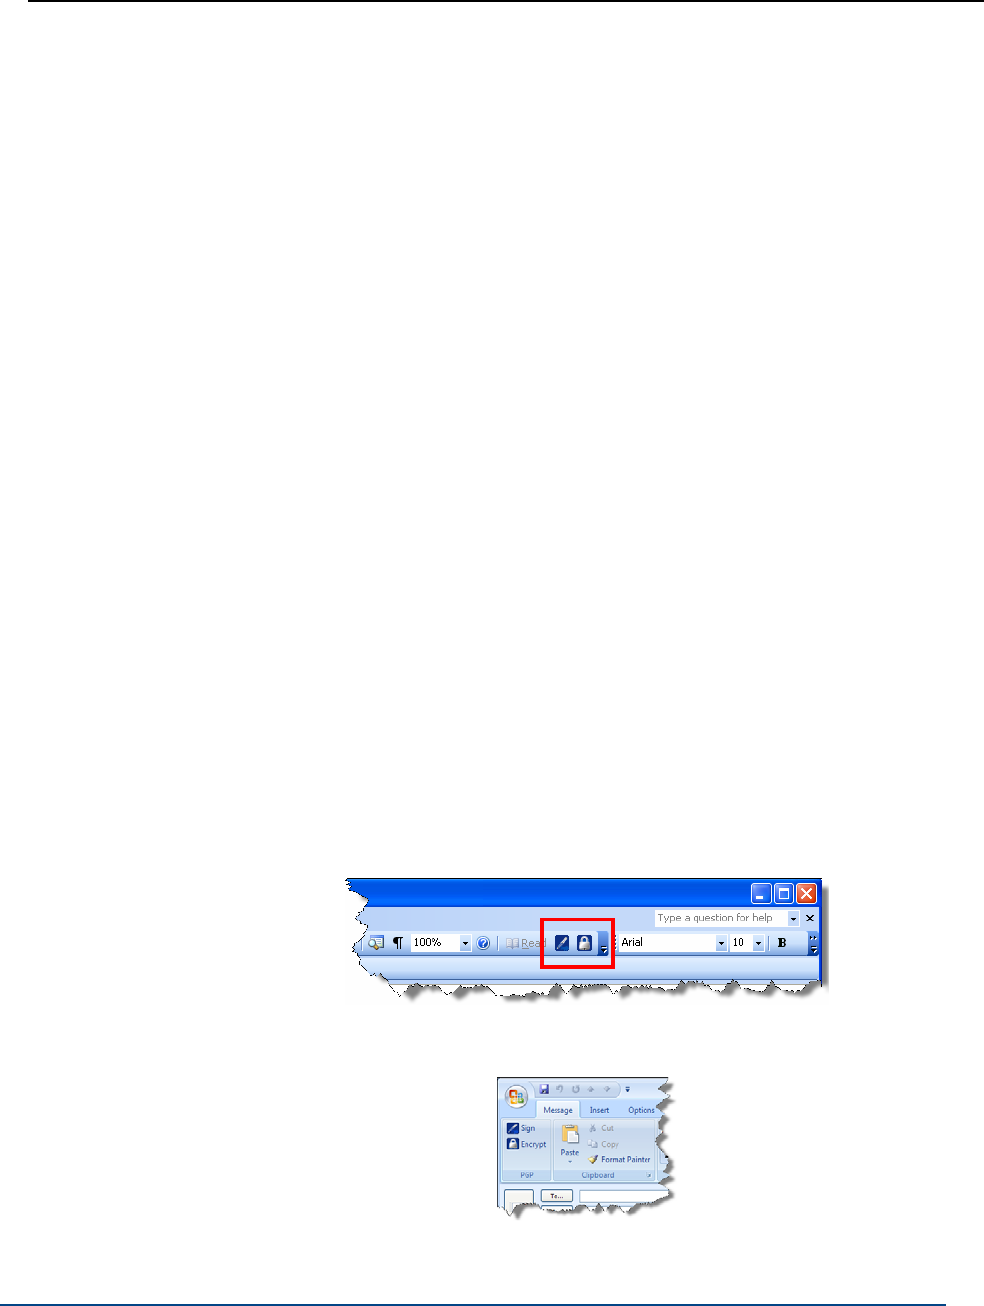
PGP® Desktop for Windows Securing Email Messages
Contact your PGP Universal Server administrator for assistance with policy
issues.
Using the Sign and Encrypt Buttons in Microsoft Outlook
In PGP Desktop for Windows 10.0, a new feature is available for Microsoft
Outlook 2002 SP3, 2003 (XP) SP3, and 2007 when used with Microsoft
Exchange (MAPI) and SMTP email accounts. This new feature provides buttons
to explicitly sign, encrypt, or sign and encrypt an email message. This feature
satisfies compliance with signature regulations, such as for the European Union,
that require users to consciously sign email messages.
The Sign and Encrypt buttons are available for both managed and standalone
installations of PGP Desktop.
In standalone environments, enable or disable the Sign and Encrypt
buttons in the Options dialog box. To do this, select Tools > Options,
select the Messaging tab, and select (or deselect) the option to Enable
PGP encrypt and sign buttons in Outlook. The buttons are disabled by
default.
If you are using PGP Desktop in a managed environment, your PGP
Universal Server administrator will have specified if this feature is available
and may have disabled this feature by policy. In addition, your administrator
may have specified the default states for the Sign and Encrypt buttons, if
they are enabled. Override the default state specified by your administrator
by selecting the button to toggle the default state. For example, if your
administrator has specified the buttons are enabled by default, so that all
messages are sent out encrypted and signed, but you want to send an
email message that is not signed, click Sign to toggle the button off. The
email will be sent out encrypted but not signed.
When enabled in Microsoft Outlook 2002/2003, both buttons appear on the
toolbar:
When enabled in Microsoft Outlook 2007, both buttons appear on the Message
ribbon:
90
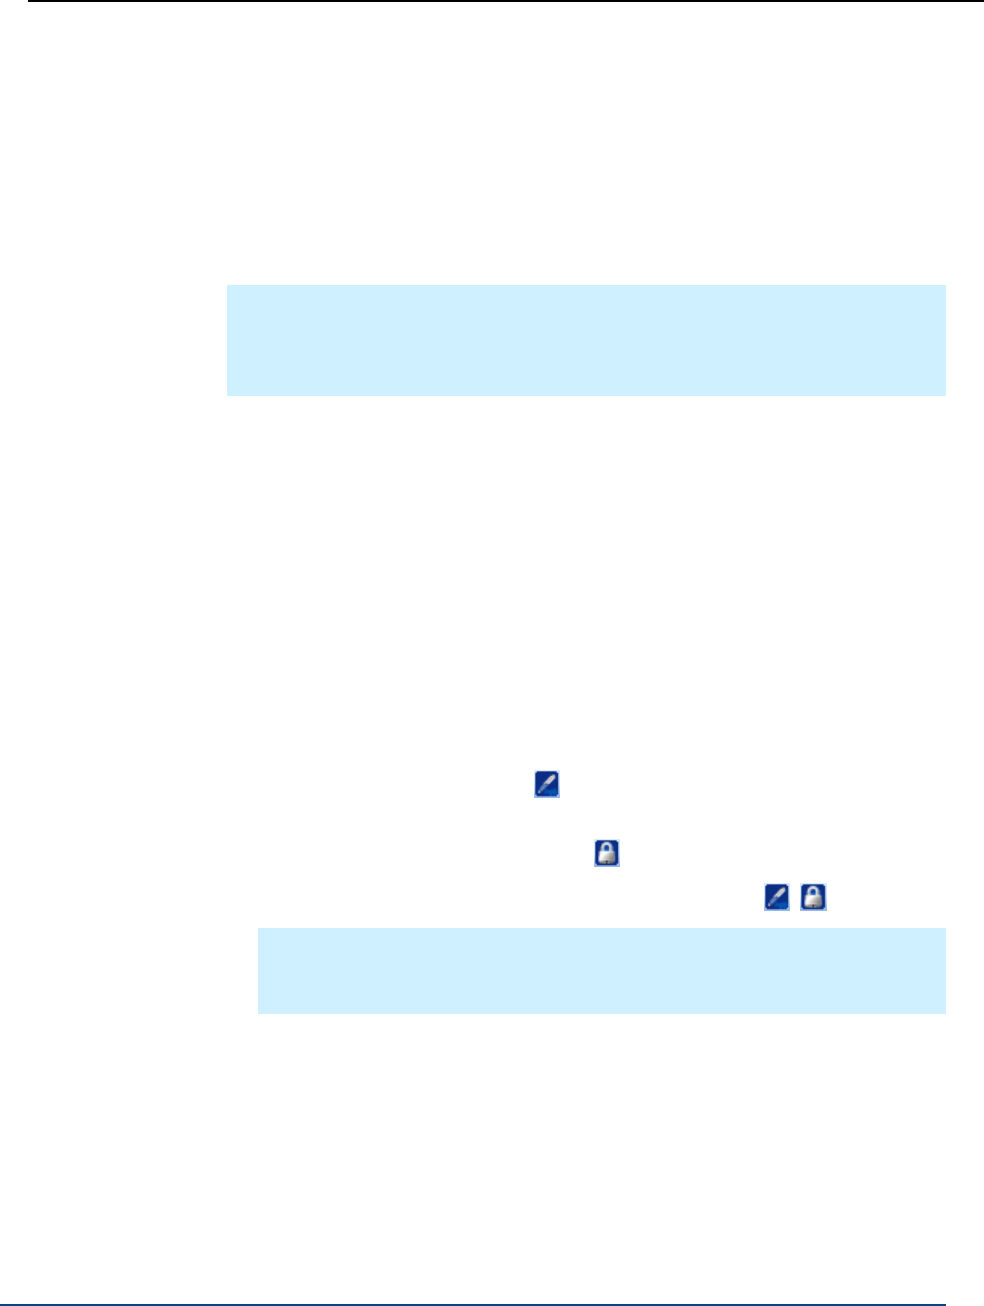
PGP® Desktop for Windows Securing Email Messages
Outgoing email policy determines how the email message is sent. There are
three new default policies included in new installations of PGP Desktop to
support these buttons. For existing installations, these three default policies
must be created. For more information on the policy settings, see Security
Policy Information and Examples (on page 109).
The Sign and Encrypt buttons are an additional feature where you have control
over which email needs to be encrypted and/or signed. The buttons are not a
replacement for the email proxying used in PGP Desktop.
Note: If you reply to or forward an email message that you want to encrypt
and/or sign, be sure to select the appropriate buttons. Forwards or replies are
treated as new messages and require you explicitly select the options to
secure the message.
Use the following procedure whether you are creating a new email message, or
forwarding or replying to an email message.
If you are using PGP Desktop in a managed environment, your PGP Universal
Server administrator may have specified the default states for the Sign and
Encrypt buttons. Override the default state specified by your administrator by
selecting the button to toggle the default state.
The following instructions describe how to encrypt and/or sign a message when
the default button actions are toggled off.
To sign, encrypt, or sign and encrypt a email message
1 Begin composing your email message.
2 Do one of the following:
To sign only, click Sign ( ). Note that when you choose to sign only,
the email will be sent in cleartext.
To encrypt only, click Encrypt (
To sign and encrypt, click both Sign and Encrypt ( ).
).
Tip: If you have selected one or both buttons and then save the email
message as a draft, the buttons remain selected when you continue
composing the message.
3 Continue composing your email message and send it. The PGP Desktop
notifier displays the result of sign and/or encrypt process (for more
information on notifiers, see Outgoing PGP Desktop Notifier Messages (on
page 34)).
91

PGP® Desktop for Windows Securing Email Messages
Using Offline Policy
If you are using PGP Desktop in a PGP Universal Server-managed environment,
the offline mail policy is defined by your PGP Universal Server administrator.
This policy defines what happens to email messages when the PGP Universal
Server is offline or cannot be reached by PGP Desktop.
Block outbound messages. Your outbound messages are not sent. If the
messages can be queued by your mail client, they stay in the queue until
the PGP Universal Server is available. If the messages cannot be queued,
the email messages are blocked.
Send outbound messages in the clear. You are prompted to choose if
you want to allow the email message to be sent unsecured. If you choose
to send, the message is sent in the clear. If you choose not to send, the
message is blocked.
Follow standalone policy. PGP Desktop follows the standalone policy to
process your outbound messages. For more information, see Viewing
Services and Policies (on page 94).
For information on the notifiers you receive when any of the above occurs, see
Outgoing PGP Desktop Notifier Messages for Offline Policy (on page 34).
Your PGP Universal Server administrator can specify how often your mail
policies get downloaded to PGP Desktop. When you are in offline mode, the
last downloaded offline mail policy remains in effect for processing your
outbound email messages. If you have been in offline mode for a period of time
that is longer than the grace period allowed for the offline standalone mail policy
to be in effect, your administrator could have also specified how outgoing email
should be processed. In this case, PGP Desktop can start blocking your
outbound messages or the same offline standalone mail policy can be used for
processing your outbound messages, depending on how policy is defined by
your administrator.
When you have been offline for some time, you can manually request a
download of policy from the PGP Universal Server once you are back online. To
do this when you are back online, select the PGP Desktop icon in the tray and
then select Update Policy. The latest policies are downloaded from the PGP
Universal Server and any client logs are uploaded to the server. The option to
manually update a policy is available for managed users only.
If your PGP Universal Server administrator allows you to use standalone
policies, see Creating a New Security Policy (on page 102).
92

PGP® Desktop for Windows Securing Email Messages
Services and Policies
To understand how to use PGP Desktop to automatically and transparently
protect your outgoing messages, you need to understand two terms: service
and policy.
Service. Information about one email account on your system and the
policies that apply to that account. In most cases, PGP Desktop will
automatically create and configure a service for each email account on your
system. In some circumstances, you may want to create and configure a
service manually.
Policy. A set of one or more instructions that tell PGP Desktop what to do
in specific situations. Policies are associated with services—often more
than one (a policy can be reused by different services). Conversely, a
service can (and usually does) have more than one policy.
When deciding how to handle a specific outgoing email message, PGP Desktop
checks the policies configured for the service one at a time (from the top of the
list going down). When it finds a policy that applies, it stops checking policies
and implements the one that applies.
All new services are created with the following default policies:
Encrypt and Sign Buttons. Specifies that email is both signed and
encrypted when both the Encrypt and Sign buttons are enabled in
Microsoft Outlook 2002, 2003, or 2007. This policy is available only on PGP
Desktop for Windows.
Sign Button. Specifies that email is signed when the Sign button is
enabled in Microsoft Outlook 2002, 2003, or 2007. This policy is available
only on PGP Desktop for Windows.
Encrypt Button. Specifies that email is encrypted when the Encrypt
button is enabled in Microsoft Outlook 2002, 2003, or 2007. This policy is
available only on PGP Desktop for Windows.
Mailing List Admin Requests. Specifies that administrative requests to
mailing lists are sent in the clear; that is, not encrypted or signed.
Mail List Submissions. Specifies that submissions to mailing lists are sent
signed (so they can be authenticated) but not encrypted.
Require Encryption: [PGP] Confidential. Specifies that any message
flagged as confidential in your email client or containing the text “[PGP]” in
the subject line must be encrypted to a valid recipient public key or it
cannot be sent.
Opportunistic Encryption. Specifies that any message for which a key to
encrypt cannot be found should be sent without encryption (in the clear).
Having this policy as the last policy in the list ensures that your messages
will always be sent, albeit in the clear, even if a key to encrypt it to the
recipient cannot be found.
93
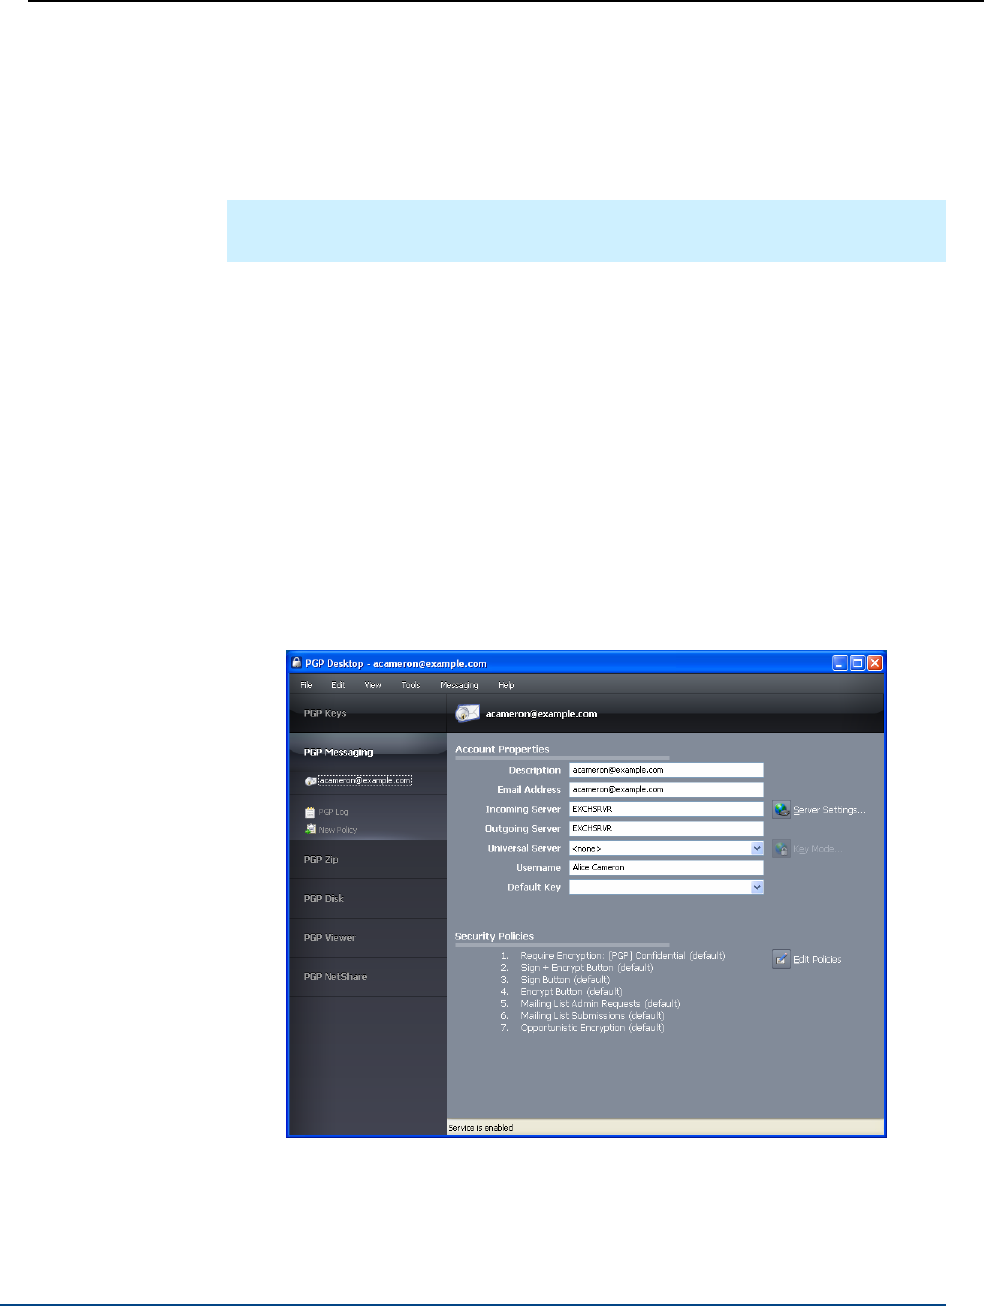
PGP® Desktop for Windows Securing Email Messages
Do not put Opportunistic Encryption first in the list of policies (or anywhere
but last, for that matter) because when PGP Desktop finds a policy that
matches, and Opportunistic Encryption matches everything, it stops
searching and implements the matching policy. So if a policy is lower on
the list than Opportunistic Encryption, it will never be implemented.
Note: The default policies can be modified, but not deleted. Alternatively,
they can be disabled, then moved up or down in the list of policies.
Viewing Services and Policies
To view services and policies
1 Open PGP Desktop.
2 Click the PGP Messaging Control box. The PGP Messaging Control box
highlights. All currently configured services are listed at the top of the PGP
Messaging Control box.
3 Click on a service to see the account properties and the security policies
that are part of the service. This section provides information on what
security policy is being enforced. If you are managed by a PGP Universal
Server, the security policies are set by your administrator.
If you are using PGP Desktop in a PGP Universal Server-managed environment,
different messages and/or options may be displayed above the list of policies
depending on how policy is set.
94

PGP® Desktop for Windows Securing Email Messages
If PGP Universal Server Policy
is:
Offline policy is set to block
Offline policy is set to send in
clear
Offline policy is set to
standalone
Policy is set to standalone
Message displayed in PGP Desktop
above the list of policies is:
"Messages will be blocked when the
server is unreachable."
"Messages will be sent in the clear when
the server is unreachable."
"Standalone policies will be enforced
when the server is unreachable." A
checkbox is available to Display
standalone policies.
"The following standalone policies will be
enforced."
In all cases, if your administrator has specified you can override policy, a
checkbox is available to Override server policies with local policies.
Creating a New Messaging Service
A service is information about an email account, as well as the security policies
that are to be applied to outgoing messages for that email account.
Important: In most cases, PGP Desktop creates services for you as you use
your email accounts to send or receive messages. If you need to create a
service yourself, make sure to read and understand these instructions.
Incorrect configuration of a service could result in problems sending or
receiving email messages.
To create a new service
1 Open PGP Desktop and click the PGP Messaging Control box. The PGP
Messaging Control box highlights.
2 Click New Messaging Service in the PGP Messaging Control box. You can
also select Messaging > Create New Service.
In the PGP Messaging Work area, “New Service” is displayed at the top of
the screen, the account properties appear with no values, and the default
security policies appear in the Security Policies section.
3 In the Description field of the Account Properties section, specify a name
for this service.
4 Type your email address in the Email Address field.
5 Type the name of your incoming and outgoing email servers, or click
Server Settings if you want to set advanced options. If you chose to set
advanced options, the Server Settings dialog box is displayed.
95

PGP® Desktop for Windows Securing Email Messages
6 Select the type of server that the new service will be using under Server
Type:
Internet Mail—for standalone PGP Desktop users who have a POP or
IMAP mail connections.
PGP Universal—for PGP Desktop users who are in a PGP Universal
Server-managed environment. Contact your PGP Universal Server
administrator for more details on correct settings.
MAPI/Exchange—for PGP Desktop users who are using Microsoft
Outlook as a client on a Microsoft Exchange/MAPI server. Contact
your mail administrator for more information on correct settings.
Lotus Notes—for PGP Desktop users who are using Lotus Notes as
their email client with a Lotus Domino server. For more information on
the correct settings, contact your email administrator.
Some of the fields in the Server Settings dialog box change depending on
what type of server you select.
Note: If you are manually connecting to a PGP Universal Server, see
Manually binding to a PGP Universal Server (on page 313).
7 Enter the following for Incoming Mail Server:
Name: Type the name of the mail server that handles incoming
messages.
Protocol: Select the protocol used to pick up messages on the
incoming mail server.
The Automatic setting (available with the Internet Mail or PGP
Universal Server settings) can automatically detect either POP or IMAP
connections.
Port: Keep Automatic (the default) or specify a port to connect to on
the incoming mail server to pick up messages (if you have selected
either the Internet Mail or PGP Universal Server settings and either
POP or IMAP—not Automatic).
SSL/TLS: Specify how PGP Desktop interacts with your mail server.
Choose one:
Automatic: PGP will do its best to provide SSL/TLS protection. It
first tries the alternate port, then it attempts STARTTLS (if
supported by the server), finally, if the above fails, it connects to
the server unprotected.
Require STARTTLS: PGP Desktop requires that the server
honor the STARTTLS command.
Require SSL: PGP Desktop requires that the server honor
SSL-protected connections on the specified alternate port.
Do Not Attempt: PGP Desktop does not attempt any SSL/TLS
protection of the connection with the mail server.
96

PGP® Desktop for Windows Securing Email Messages
Warn if email client attempts SSL/TLS: When selected, PGP
Desktop displays a warning dialog box if the email client attempts
SSL/TLS, as this is a condition that is incompatible with PGP Desktop
proxying your email. (This option is selected by default.)
Caution: This option should only be enabled if you are certain your mail
server supports SSL. It ensures that PGP Desktop will not fall back to
sending or receiving messages with the mail server over an unprotected
connection if, for example, a problem occurs while negotiating SSL
protection for the connection. If you enable this option and your mail
server does not support SSL, PGP Desktop will not send or receive
any of your messages.
Outgoing Mail Server (SMTP)
Name: Type the name of the mail server that handles outgoing
messages.
Port: Keep Automatic (465, 25) or specify another port to connect to
on the outgoing mail server to send messages.
This option is only available for the outgoing mail server if your settings
permitted choosing it for the incoming mail server.
SSL/TLS: Specify how PGP Desktop interacts with your mail server.
Choose one:
Automatic: PGP Desktop will do its best to provide SSL/TLS
protection. It first tries the alternate port, then it attempts
STARTTLS (if supported by the server), finally, if the above fails,
it connects to the server unprotected.
Require STARTTLS: PGP Desktop requires that the server
honor the STARTTLS command.
Require SSL: PGP Desktop requires that the server honor
SSL-protected connections on the specified alternate port.
Do Not Attempt: PGP Desktop does not attempt any SSL/TLS
protection of the connection with the mail server.
Warn if email client attempts SSL/TLS: When selected, PGP
Desktop displays a warning dialog box if the email client attempts
SSL/TLS, as this is a condition that is incompatible with PGP Desktop
proxying your email. (This option is selected by default.)
Caution: This option should only be enabled if you are certain your mail
server supports SSL. It ensures that PGP Desktop will not fall back to
sending or receiving messages with the mail server over an unprotected
connection if, for example, a problem occurs while negotiating SSL
protection for the connection. If you enable this option and your mail
server does not support SSL, PGP Desktop will not send or receive
any of your messages.
8 Click OK when you are finished.
97

PGP® Desktop for Windows Securing Email Messages
9 In the Universal Server field, select the name of the PGP Universal Server
protecting the email domain you are in. <None> is displayed if you are not
in an email domain protected by a PGP Universal Server. If your domain is
protected by a PGP Universal Server, but it is not listed, select <create
new> to enter the name of your PGP Universal Server. For more
information, check with your PGP Universal Server administrator.
10 Click Key Mode. The Key Management Mode dialog box is displayed,
displaying your current key mode. If necessary, click Reset Key, which
starts the Key Setup Assistant.
11 Click OK.
12 In the Username field, type the user name on the email account.
13 In the Default Key field, the current key displays.
If you are using PGP Desktop as a standalone product, you can either
keep the default key, or select another one from the menu (if another
key is available).
If you are using PGP Desktop in a PGP Universal Server-managed
environment, the default key is displayed and you cannot change it. If
you need to change your key, you must click Key Mode and go
through the procedure to reset your key on the PGP Universal Server.
14 Enable Cache this key’s passphrase when I log in (by selecting the
checkbox) if you want to cache the passphrase for the keypair you just
selected when you log in.
If you don’t cache the key’s passphrase, you will be prompted for it when
you are sending signed messages or receiving encrypted messages.
15 In the Security Policies provided by [server name] section, the current
policies that apply to you are displayed. You can keep the default security
polices, disable the default security policies, or add new policies if you are
using PGP Desktop as a standalone product. If you are using PGP Desktop
in a PGP Universal Server-managed environment, your options are likely to
be different, depending on what your PGP Universal Server administrator
has specified.
16 If you have edited any policies, you must click Done when you are finished.
Otherwise, when you are done with the security policies, the account is
ready. It is not necessary to click a button to save your information. It was
saved as soon as you typed it.
Editing Messaging Service Properties
Caution: Before making any changes to an existing messaging service, be
sure to exit your email client.
98

PGP® Desktop for Windows Securing Email Messages
To make changes to the account properties of an existing service
1 Open PGP Desktop and click the PGP Messaging Control box. The PGP
Messaging Control box highlights.
2 Click on the name of the service whose account properties you want to
edit. The settings for the selected service appear in the PGP Messaging
Work area.
3 Make the desired changes to the account properties of the service. For
more information, see Creating a New Messaging Service (on page 95).
Disabling or Enabling a Service
If you want to stop a service from working, but you don’t want to delete the
service because you might need it again, you can disable the service. This is
useful if you only want PGP Desktop to process mail on particular accounts, but
not others. If you are certain that you won’t need the service again, you can
delete the service.
To disable or enable an existing service
1 In the PGP Messaging Control box, click the name of the service you want
to disable. The settings for the service appear in the PGP Messaging Work
area.
2 Do one of the following:
To disable the service, select Messaging > Disable Service. The
service is disabled.
To enable the service select Messaging > Enable Service. The
service is enabled.
PGP Desktop alerts you that the change may not take place until you
restart your email client.
Tip: You can disable, enable, and delete services by right-clicking the
name in the PGP Messaging Control Box and selecting the desired
command.
Deleting a Service
If you are certain that you will not need a messaging service any longer, you can
delete the service from PGP Desktop.
99

PGP® Desktop for Windows Securing Email Messages
To delete a service
1 Click the name of the service you want to delete. The settings for the
service appear in the PGP Messaging Work area.
2 Select Messaging > Delete Service. The service is deleted.
Tip: You can delete a service by right-clicking the name in the PGP
Messaging Control Box and selecting the desired command.
Multiple Services
Some email services and Internet Service Providers use multiple mail servers
for a single DNS name in a round-robin fashion such that PGP Desktop may
create multiple messaging services for a single email account, seeing each mail
server as separate and thus requiring its own messaging service.
PGP Desktop ships with wildcard support for common email services, such as
*.yahoo.com and *.me.com (or *.mac.com). However, if you are using a
less-common email service or if the services change their mail server
configurations, you could run into this problem.
If you see PGP Desktop create multiple services for a single email account, and
you check the settings and see they are the same except the mail server for the
first service is mail1.example.com, the mail server for the second service is
mail2.example.com, and the mail server for the third is
mail3.example.com, and so on, you may need to manually edit one of the
services.
The best solution is to manually edit one of the services such that the mail
server entry for that service can support multiple mail servers being used
round-robin. For the example cited above, you could manually change the server
name on the Server Settings dialog box for one of the services to
mail*.example.com, and then delete the other services.
Some round-robin setups may be more complicated, requiring a slightly
different solution. For example, if PGP Desktop were to create services with
mail servers of pop.frodo.example.com, smtp.bilbo.example.com, and
mail.example.com, then the best wildcard solution would be *.example.com.
Troubleshooting PGP Messaging Services
By default, PGP Desktop automatically determines your email account settings
and creates a PGP Messaging service that proxies messaging for that email
account.
Because of the large number of possible email account settings and mail server
configurations, on some occasions a messaging service that PGP Desktop
automatically creates may not work quite right.
100

PGP® Desktop for Windows Securing Email Messages
If PGP Desktop has created a messaging service that is not working right for
you, one or more of the following items may help correct the problem:
Verify that you can both connect to the Internet and send and receive email
with PGP Services stopped. To do this:
On Windows systems, right-click the PGP Desktop tray icon and
select Stop PGP Services from the list of commands.
On Mac OS X systems, hold down the Option key and select Quit
from the PGP Desktop icon in the Menu bar.
Note: You should always restart your email client after starting or
stopping PGP Services.
Read the PGP Desktop Release Notes for the version of PGP Desktop you
are using to see if your problem is a known issue.
Make sure SMTP authentication is enabled for the email account (in your
email client). This is recommended for PGP Desktop to proxy your
messaging. If you only have one email account and you are not using PGP
Desktop in a PGP Universal Server-managed environment, then SMTP
authentication is not needed. It is required when using a PGP Universal
Server as your SMTP server, or when you have multiple email accounts on
the same SMTP server.
Open the PGP Log to see if the entries offer any clues as to what the
problem might be.
If SSL/TLS is enabled in your email client, you must disable it there if you
want PGP Desktop to proxy your messaging. (This does not leave the
connection to and from your mail server unprotected; by default PGP
Desktop automatically attempts to upgrade any unprotected connection to
SSL/TLS protection. The mail server must support SSL/TLS for the
connection to be protected.)
If either Require STARTTLS or Require SSL is selected (in the SSL/TLS
settings of the Server Settings dialog box) your mail server must support
SSL/TLS or PGP Desktop will not send or receive any messages.
If your email account uses non-standard port numbers, make sure these
are included in the settings of your messaging service.
If PGP Desktop is creating multiple messaging services for one email
account, use a wild card for your mail server name. For more information,
see Multiple Services (on page 100).
Delete the PGP Messaging service that is not working correctly and
send/receive email. PGP Desktop regenerates the messaging service.
If none of these items help correct the problem, try the following:
1 Delete the PGP Messaging service that is not working correctly.
2 Stop all PGP Desktop services and then exit PGP Desktop if it was open.
To stop the services:
101

PGP® Desktop for Windows Securing Email Messages
On Windows systems, right-click the PGP Desktop tray icon and
select Exit PGP Services from the list of commands.
On Mac OS X systems, hold down the Option key and elect Quit from
the PGP Desktop icon in the Menu bar.
3 Verify that you have Internet connectivity and can send and receive email
with PGP Messaging services stopped.
4 Open your email client and write down your email account settings
(including user name, email address, incoming and outgoing mail server,
incoming mail server protocol, and any non-standard mail server ports).
5 Close your email client and restart PGP Desktop, which restarts PGP
services:
On Windows systems, either restart your computer or open PGP
Desktop from the Windows Start menu.
On Mac OS X systems, either restart your computer or open PGP
Desktop.
6 Manually create a PGP Messaging service using the account settings you
wrote down.
7 Open your email client and begin sending and receiving messages.
8 If you continue to have problems with a PGP Messaging service, access
any of the following for assistance:
PGP Corporation website (http://www.pgp.com)
PGP Support website (https://support.pgp.com)
PGP Support forums (http://forum.pgp.com)
Creating a New Security Policy
Security policies control how PGP Desktop handles outgoing email messages.
Note: When you create a new security policy, you are creating a messaging
security policy, not a mailing list policy. You cannot create a new mailing list
policy, but you can edit the default mailing list policies.
To create a new security policy
1 In the PGP Messaging Control box, click the name of the service for which
you want to create a new security policy. The settings for the service
appear in the PGP Messaging Work area, including the list of existing
security policies.
2 Do one of the following:
Click New Policy in the PGP Messaging Control box.
102

PGP® Desktop for Windows Securing Email Messages
Select Messaging > New Messaging Policy. The Message Policy
dialog box is displayed.
If your email domain is protected by a PGP Universal Server, and you look
at the Message Policy settings for a policy from a PGP Universal Server,
the fields may be different from the fields shown above.
3 In the Description field, type a descriptive name for the policy you are
creating.
4 In the First Section (stating the policy conditions), in the If field, select:
If any. The policy applies when any condition is met.
If all. The policy only applies when all conditions are met.
If none. The policy only applies if none of the conditions are met.
5 In the first condition field, select:
Recipient. The policy applies only to messages to the specified
recipient.
Recipient Domain. The policy applies only to email messages in the
specified recipient domain.
Sender. The policy applies only to messages with the specified
sender address.
Message. The policy applies only to messages which have the
specified signed and/or encrypted state.
Message Subject. The policy applies only to messages with the
specified message subject.
103

PGP® Desktop for Windows Securing Email Messages
Message Header. The policy applies only to messages for which the
specified header meets the specified criterion. Note that the
conditions described in the next section (is, is not, contains, and so
on) apply to the text typed in the text box that is displayed when you
select Message Header.
Note: When searching message headers in MAPI email systems, you can
search on the Subject, Sensitivity, Priority, and Importance headers only.
Message Body. The policy applies only to messages with the
specified message body.
Message Size. The policy applies only to messages of the specified
size (in bytes).
Message Priority. The policy applies only to messages with the
specified message priority.
Message Sensitivity. The policy applies only to messages with the
specified message sensitivity.
6 In the second condition field, select:
is. The condition is met when text in the first condition field matches
the text typed in the text box.
is not. The condition is met when text in the first condition field does
not match the text typed in the text box.
contains. The condition is met when text in the first condition field
contains the text typed in the text box.
does not contain. The condition is met when text in the first
condition field does not contain the text typed in the text box.
begins with. The condition is met when text in the first condition field
begins with the text typed in the text box.
ends with. The condition is met when text in the first condition field
ends with the text typed in the text box.
matches pattern. The condition is met when text in the first
condition field matches the pattern typed in the text box.
greater than. The condition is met when message size is greater than
the text typed in the text box.
less than. The condition is met when message size is less than the
text typed in the text box.
7 In the third condition field, select:
text entry box. Type text for the matching criteria. For example, if
you selected Message Size is greater than, then type a number
representing the size of the message.
normal. Matching criteria for Message Sensitivity is normal.
104

PGP® Desktop for Windows Securing Email Messages
none or normal. Matching criteria for Message Sensitivity is none (for
Mac OS X systems) or normal (for Windows systems).
personal. Matching criteria for Message Sensitivity is personal.
private. Matching criteria for Message Sensitivity is private.
confidential. Matching criteria for Message Sensitivity is confidential.
signed. Matching criteria for Message is signed.
encrypted. Matching criteria for Message is encrypted.
encrypted to key ID. Matching criteria for encrypted to key ID (you
must then type a key ID in the resulting text box).
low. Matching criteria for Message Priority is low.
normal. Matching criteria for Message Priority is normal.
high. Matching criteria for Message Priority is high.
Create more condition lines by clicking the plus sign icon.
8 In the Perform the following actions on the message section, in the first
action field, select:
Send In Clear. Specifies that the message should be sent in the clear;
that is, not signed nor encrypted.
Sign. Specifies that the message should be signed.
Encrypt to. Specifies that the message should be encrypted.
9 In the second action field, select:
recipient’s verified key. Ensures the message can be encrypted only
to a verified key of the intended recipient.
recipient’s unverified key. Allows the message to be encrypted to
an unverified key of the intended recipient. Will also encrypt to a
verified key, if available.
recipient’s verified end-to-end key. Ensures the message can be
encrypted only to a verified end-to-end key of the intended recipient.
An end-to-end key is a key in sole possession of the individual
recipient. In a PGP Universal Server-managed environment, this is a
Client Key Mode key which is different from a Server Key Mode key,
where the PGP Universal Server is in possession of the key.
Whether the key is end-to-end or not is shown in the Group field on the
Key Properties dialog box on Windows systems or the Key Info dialog
box on Mac OS X systems. No means that the key is end-to-end (is not
part of a group), and Yes means that it is not end-to-end.)
recipient’s unverified end-to-end key. Allows the message to be
encrypted to an unverified end-to-end key of the intended recipient.
Will also encrypt to a verified key, if available.
a list of keys. Specifies that the message can only be encrypted to
keys on the list.
105

PGP® Desktop for Windows Securing Email Messages
Create more action lines by clicking the plus sign icon.
10 In the Prefer encoding field, select:
automatic. Lets PGP Desktop choose the message encoding format.
This is almost always the best option unless you know exactly why
you need to use one of the other message encoding formats
explicitly.
PGP Partitioned. Sets PGP Partitioned as the preferred message
encoding format. This format is the most backwards compatible with
older PGP and OpenPGP products.
PGP/MIME. Sets PGP/MIME as the preferred message encoding
format. PGP/MIME is able to encrypt and sign the entire message
including attachments in one pass and is usually therefore faster and
better able to reproduce the full message fidelity.
S/MIME. Sets S/MIME as the preferred message encoding format.
Choose S/MIME if, for some reason, you need to force messages to
be S/MIME even if the user has a PGP key.
11 In the Recipient’s key is not available section (or in the If a recipient key
cannot be found section on Mac OS X systems), in the first Key Not
Found field, select:
Search keys.domain and. Specifies a search that includes both
keys.domain as well as another server you specify.
Search. Allows for searching for an appropriate key if one is not found
on the local keyring.
Clear-sign message. Specifies that the message should be sent in
the clear, but signed.
Send message unsecured. Specifies that the message be sent in the
clear.
Block message. Specifies that the message must not be sent if an
appropriate key is not found.
12 In the second Key Not Found field, select:
All keyservers. Allows all keyservers, including the PGP Global
Directory, to be searched for an appropriate key.
PGP Global Directory or keyserver.pgp.com. Specifies that only the
PGP Global Directory is searched.
[configured keyservers]. Specifies that only the keyserver you
choose from the list of currently configured keyservers is searched.
Note that keyservers other than the PGP Global Directory may provide
unverified keys that cannot be used if you require verified keys in the
policy. Unless you know exactly why you need to search another
keyserver and are prepared to find those keys manually to verify them
when necessary, search only on the PGP Global Directory. This option
is available only on Windows systems.
106

PGP® Desktop for Windows Securing Email Messages
Edit Keyserver List. Lets you add keyservers to the list of currently
configured keyservers. This option is available only on Windows
systems.
13 In the last Key Not Found field, specify:
temporarily cache found keys. Specifies that a found key should be
temporarily saved in memory. Keys in this cache will automatically be
used when verifying signed messages, and will be used for encryption
if they have been verified.
ask to save found keys. Specifies that PGP Desktop should ask if
you want to save to your local keyring a particular found key.
save found keys. Specifies that found keys should automatically be
saved to your local keyring.
14 In the If no result field, select:
Clear-sign message. Allows messages for which an encryption key
has not been found to be signed and sent in the clear.
Send message unsecured. Do not encrypt message.
Block message. Prevents message for which an encryption key has
not been found from being sent.
15 Click OK when the policy settings are configured. The new policy is
displayed in the list of security policies.
Regular Expressions in Policies
PGP Desktop supports the use of regular expressions in security policies in text
entry boxes. Using regular expressions lets you match multiple text strings
using a single text string.
Note: In addition to the following examples, PGP Desktop also supports
broader regular expressions that adhere to standard formats. The “Matches
Pattern” criteria actually means “matches regular expression.”
Some mail policy rule conditions require that some part of an email must match
a pattern. The patterns in the condition take the form of a regular expression. A
regular expression is a string of characters that represents the format for a term
to match. Any term that fits the format of the regular expression is a match.
Some common elements of regular expressions:
? indicates that there should be one or none of the previous
expression
+ indicates that there is at least one of the previous expression
. matches any single character
* indicates that there should be none, one, or any number of the
107

PGP® Desktop for Windows Securing Email Messages
previous expression
[ ] matches any single character contained within the brackets
[a-z] matches any lowercase letter within the set from a to z
[1-9] matches any digit within the set from 1 to 9
{n} a sequence of exactly n matches of the
expression
The following are examples of regular expressions to match common items that
may appear in a sensitive email message.
Data Example Regular Expression
\(?[2-9][0-9]{2}[\]-.)[2-9][0
Phone number (555)555-4567 -9]{2}[-.][0-9]{4}
Email address joe@example.com [a-zA-Z0-9._%-]+@[a-zA-
Z0-9.-]+\.[a-zA-Z]{2,6}
Credit card number 1234 1234 1234 1234 [1-9][0-9]{3} ?[0-9]{4}
?[0-9]{4} ?[0-9]{4}
Social Security Number 123-45-6789 [0-9]{3}-[0-9]{2}-[0-9]{4}
City, state abbreviation Palo Alto, CA .*, [A-Z][A-Z]
2-character state
abbreviation CA [A-Z][A-Z]
Zip code 12345 [0-9]{5}(-[0-9]{4})?
Dollar amounts, with
leading $ symbol $3.95 \$[0-9]+.[0-9][0-9]
Date, numeric 2003-08-06 [0-9]{4}-[0-9]{2}-[0-9]{2}
(Jan|Feb|Mar|Apr|May|J
un|Jul|Aug|Sep|Oct|Nov|
Date, alpha-numeric Jan 3, 2003 Dec)\.?
(3[0-1]|[1-2][0-9]|0?[0-9])
, [0-9]{4}
https?://(([012][0-9]{0,2}\
HTTP URL http://www.example.com .){3}[012][0-9]{0,2}|([a-zA
-Z0-9]+\.)+[a-zA-Z0-9]{2,
6})(/.*)?
IP address 123.123.123.123 ([012][0-9]{0,2}\.){3}[012]
[0-9]{0,2}
A blank line ^$
108

PGP® Desktop for Windows Securing Email Messages
Security Policy Information and Examples
When you create a service, several default security policies are automatically
created:
Require Encryption: [PGP] Confidential
Sign + Encrypt Button*
Sign Button*
Encrypt Button*
Mailing List Admin Requests
Mailing List Submissions
Opportunistic Encryption.
* These policies are available only on PGP Desktop for Windows.
The order of the default policy rules is important. Be sure the order appears
exactly as described above.
This section describes how the default security policies work. It also describes
two example situations for which you might want to create a security policy and
explains how to configure them.
Note: If you make any changes to the default policies and want to restore the
default settings, click Revert to Default (for Windows systems) or Revert
(for Mac OS X systems) in the Message Policy dialog box.
Encrypt Button Default Policy
Encrypt Button is one of the default security policies that PGP Desktop
automatically creates for a service. The settings for this default policy are:
If: If all
Conditions: Message Header "X-PGP-Encrypt-Button" contains "selected"
Actions: Encrypt to recipient's verified key
Prefer encoding: automatic
If a recipient's key is not available: Search keys.domain and
keyserver.pgp.com and temporarily cache found keys
If no result: Block message
This rule should appear fourth in the list of default policies.
109

PGP® Desktop for Windows Securing Email Messages
Note: If you have upgraded from PGP Desktop for Windows version 9.x, this
policy is not automatically included and you will need to create the policy
manually with the settings described above. For information on how to create
a new policy, see Creating a New Security Policy (on page 102). If you do not
plan to use the Encrypt button with Microsoft Outlook, you do not need to
create this policy.
Mailing List Admin Requests Default Policy
Mailing List Admin Requests is one of the default security policies that PGP
Desktop automatically creates for a service.
The settings for this default policy are:
If: If any
Conditions: Recipient / matches pattern/ .*-subscribe@.*,
.*-unsubscribe@.*, .*-report@.*, .*-request@.*, .*-bounce@.*,
Actions: Send in clear
This rule should appear fifth in the list of default policies.
Mailing List Submission Default Policy
Mailing List Submission is one of the default security policies that PGP Desktop
automatically creates for a service.
The settings for this default policy are:
If: If any
Conditions: Recipient / matches pattern/ .*-users@.*, .*-bugs@.*,
.*-docs@.*, .*-help@.*, .*-news@.*, .*-digest@.*, .*-list@.*, .*-devel@.*,
.*-announce@.*,
Actions: Sign
Prefer Encoding: PGP Partitioned This rule should appear sixth in the list of
default policies.
Opportunistic Encryption Default Policy
Opportunistic Encryption is one of the default security policies that PGP
Desktop automatically creates for a service. The settings for this default policy
are:
If: any
Conditions: Recipient Domain / is / *
Actions: Sign / Encrypt to / recipient’s verified key
110

PGP® Desktop for Windows Securing Email Messages
Prefer message encoding: automatic
Key Not Found: Search keys.domain and / keyserver.pgp.com/ temporarily
cache found keys
If no result: Send message unsecured This rule should appear seventh (last) in
the list of default policies. Opportunistic Encryption causes those messages
for which a verified key can be found to be sent signed and encrypted. Those
messages for which a verified key cannot be found are delivered with no
encryption (in the clear). This ensures your messages get sent, although some
may be sent in the clear.
This policy was designed to go last in your list of security policies, as it will
match any message sent. If placed above a policy in the list, PGP Desktop will
never reach that policy, thus rendering it useless.
Require Encryption: [PGP] Confidential Default Policy
Require Encryption: [PGP] Confidential is one of the default security policies that
PGP Desktop automatically creates for a service. The settings for this default
policy are:
If: any
Conditions: Message Subject / contains / [PGP]
Message Sensitivity / is / confidential
Actions: Sign / Encrypt to / recipient’s verified key
Prefer message encoding: automatic
Key Not Found: Search keys.domain and / All Keyservers / temporarily
cache found keys
If no result: Block message
This rule should appear first in the list of policies.
Require Encryption: [PGP] Confidential causes those messages with subjects
that contain [PGP] or are marked confidential in your email client to require
encryption to a verified key in order to be sent. If a verified key cannot be found,
the message is not sent.
Sign + Encrypt Buttons Default Policy
Encrypt and Sign Buttons is one of the default security policies that PGP
Desktop automatically creates for a service. The settings for this default policy
are:
If: If all
Conditions: Message Header "X-PGP-Sign-Button" contains "selected";
Message Header "X-PGP-Encrypt-Button" contains "selected"
Actions: Sign; Encrypt to recipient's verified key
111

PGP® Desktop for Windows Securing Email Messages
Prefer encoding: automatic
If a recipient's key is not available: Search keys.domain and
keyserver.pgp.com and temporarily cache found keys
If no result: Block message
This rule should appear second in the list of default policies.
Note: If you have upgraded from PGP Desktop for Windows version 9.x, this
policy is not automatically included and you will need to create the policy
manually with the settings described above. For information on how to create
a new policy, see Creating a New Security Policy (on page 102). If you do not
plan to use the Encrypt button with Microsoft Outlook, you do not need to
create this policy.
Sign Button Default Policy
Sign Button is one of the default security policies that PGP Desktop
automatically creates for a service. The settings for this default policy are:
If: If all
Conditions: Message Header "X-PGP-Sign-Button" contains "selected"
Actions: Sign
Prefer encoding: automatic
This rule should appear third in the list of default policies.
Note: If you have upgraded from PGP Desktop for Windows version 9.x, this
policy is not automatically included and you will need to create the policy
manually with the settings described above. For information on how to create
a new policy, see Creating a New Security Policy (on page 102). If you do not
plan to use the Encrypt button with Microsoft Outlook, you do not need to
create this policy.
Example of a Policy to Require Encryption to <Domain>
If you use Opportunistic Encryption with its default settings and you put it at the
bottom of the list of policies, it will cause those messages for which a verified
key cannot be found to be delivered in the clear. This ensures that your
messages get sent, but it also means that some may be sent in the clear.
If there are specific domains to which sending in the clear is not an option, you
can create a security policy that calls for encrypting and/or signing or the
message is not sent. When you create this policy, make sure it is higher in the
list than Opportunistic Encryption.
If: any
Conditions: Recipient Domain / is / example.com
112

PGP® Desktop for Windows Securing Email Messages
Actions: Encrypt to / recipient’s verified key
Prefer message encoding: automatic
Key Not Found: Search keys.domain and / All Keyservers / temporarily
cache found keys
If no result: Block message
This security policy is similar to Require Encryption: [PGP] Confidential in that it
requires a message be encrypted or the message is not sent, but the criteria is
not whether the message is marked confidential but rather that the email
domain of the recipient is example.com. Using this policy ensures all messages
to example.com are encrypted with a verified key or they are not sent.
Example of a Policy to Sign and Send in the Clear to a Specific Domain
If you regularly send email to a domain for which you want to sign all messages
but not encrypt them, you should set up a policy for that domain.
If: any
Conditions: Recipient Domain / is / example.com
Actions: Sign
Prefer message encoding: automatic
Working with the Security Policy List
There are several important things you can do to the security policies in the list
of security policies, such as edit a policy, add a new policy (described in
Creating a New Security Policy (on page 102)), delete a policy, and change the
order of policies in the list.
Editing a Security Policy
To edit an existing security policy
1 Open PGP Desktop and click the PGP Messaging Control box. The PGP
Messaging Control box highlights.
2 In the PGP Messaging Control box, click the name of the service that has
the security policy you want to edit. The properties for the service you
selected appear in the PGP Messaging Work area.
3 Click Edit Policies.
113

PGP® Desktop for Windows Securing Email Messages
4 Select the security policy you want to edit, then do one of the following:
To edit the policy, click Edit Policy. The Message Policy dialog box is
displayed, displaying the current settings for the specified policy.
Make the desired changes to the policy. For information about the
fields on the Message Policy dialog box, see Creating a New Security
Policy (on page 102). When you have made the desired changes, click
OK to close the Message Policy dialog box. The specified security
policy is changed.
To delete the policy, click Remove Policy.
To create a copy of the policy (to use as a basis for a new policy), click
Duplicate Policy.
To move the policy up or down in the list (changing the order in which
policies are applied), click Move Up or Move Down.
Default policies can be viewed, modified, and disabled, but not deleted.
5 Click Done.
Editing a Mailing List Policy
To edit a default Mailing List policy
1 Open PGP Desktop and click the PGP Messaging Control box. The PGP
Messaging Control box highlights.
2 In the PGP Messaging Control box, click the name of the service that has
the security policy you want to edit. The properties for the service you
selected appear in the PGP Messaging Work area.
3 Click the Edit Policies button.
4 In the list of security policies, click on the Mailing List policy you want to
edit. The selected policy highlights.
114
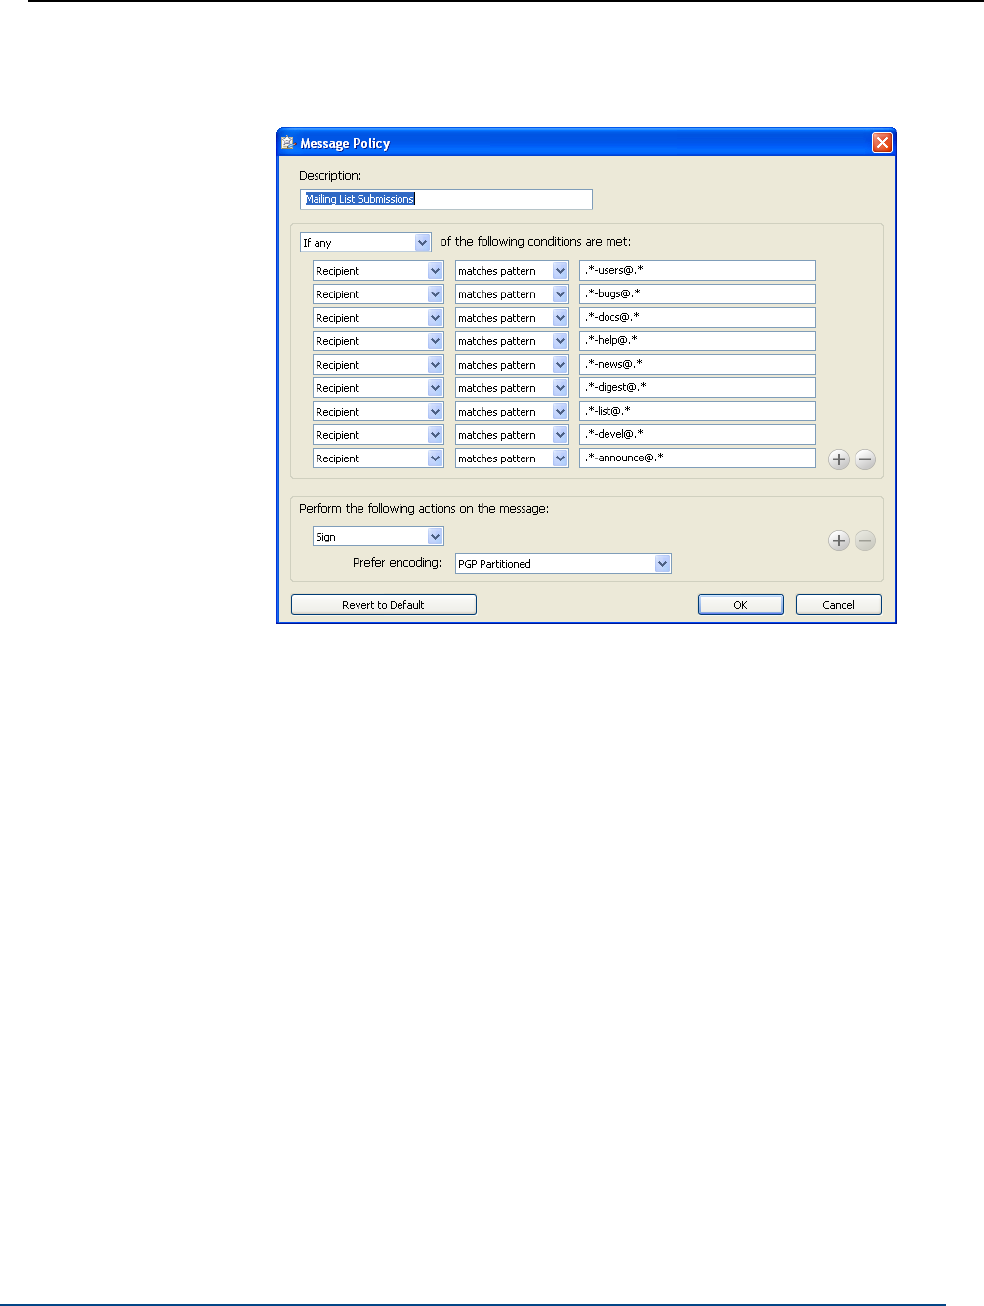
PGP® Desktop for Windows Securing Email Messages
5 Click Edit Policy. The Message Policy dialog box is displayed, displaying
the current settings for the specified policy.
The default policies can be viewed, modified, and disabled, but not deleted.
6 Make the desired changes to the policy. In the first field, select:
If any. The policy applies when any condition is met.
If all. The policy only applies when all conditions are met.
If none. The policy only applies if none of the conditions are met.
7 In the first condition field, select:
Recipient. The policy applies only to messages to the specified
recipient.
Recipient Domain. The policy applies only to email messages in the
specified recipient domain.
Sender. The policy applies only to messages with the specified
sender address.
Message. The policy applies only to messages which have the
specified signed and/or encrypted state.
Message Subject. The policy applies only to messages with the
specified message subject.
Message Header. The policy applies only to messages for which the
specified header meets the specified criterion. Note that the
conditions described in the next section (is, is not, contains, and so
on) apply to the text typed in the text box that is displayed when you
select Message Header.
115

PGP® Desktop for Windows Securing Email Messages
Note: Searching message headers in Lotus Notes and MAPI email
systems is not implemented, as messages in these systems do not
include headers.
Message Body. The policy applies only to messages with the
specified message body.
Message Size. The policy applies only to messages of the specified
size (in bytes).
Message Priority. The policy applies only to messages with the
specified message priority.
Message Sensitivity. The policy applies only to messages with the
specified message sensitivity.
8 In the second condition field, select:
is. The condition is met when text in the first condition field matches
the text typed in the text box.
is not. The condition is met when text in the first condition field does
not match the text typed in the text box.
contains. The condition is met when text in the first condition field
contains the text typed in the text box.
does not contain. The condition is met when text in the first
condition field does not contain the text typed in the text box.
begins with. The condition is met when text in the first condition field
begins with the text typed in the text box.
ends with. The condition is met when text in the first condition field
ends with the text typed in the text box.
matches pattern. The condition is met when text in the first
condition field matches the pattern typed in the text box.
9 In the third condition field, in the text entry box, type the text for the
matching criteria.
10 In the Perform the following actions on the message section, in the first
action field, select:
Send In Clear. Specifies that the message should be sent in the clear;
that is, not signed nor encrypted.
Sign. Specifies that the message should be signed.
Encrypt to. Specifies that the message should be encrypted.
11 In the second action field, select:
recipient’s verified key. Ensures the message can be encrypted only
to a verified key of the intended recipient.
recipient’s unverified key. Allows the message to be encrypted to
an unverified key of the intended recipient.
116

PGP® Desktop for Windows Securing Email Messages
recipient’s verified end-to-end key. Ensures the message can be
encrypted only to a verified end-to-end key of the intended recipient. An
end-to-end key is a key in sole possession of the individual recipient. In
a PGP Universal-managed environment, this is a Client Key Mode key
which is different from a Server Key Mode key, where the PGP
Universal Server is in possession of the key.
Whether the key is end-to-end or not is shown in the Group field on the
Key Properties dialog box on Windows systems or the Key Info dialog
box on Mac OS X systems. No means that the key is end-to-end (is not
part of a group), and Yes means that it is not end-to-end.)
recipient’s unverified end-to-end key. Allows the message to be
encrypted to an unverified end-to-end key of the intended recipient.
a list of keys. Specifies that the message can only be encrypted to
keys on the list.
12 In the prefer message encoding field, select:
automatic. Lets PGP Desktop choose the message encoding format.
This is almost always the best option unless you know exactly why
you need to use one of the other message encoding formats
explicitly.
PGP Partitioned. Sets PGP Partitioned as the preferred message
encoding format. This format is the most backwards compatible with
older PGP and OpenPGP products.
PGP/MIME. Sets PGP/MIME as the preferred message encoding
format. PGP/MIME is able to encrypt and sign the entire message
including attachments in one pass and is usually therefore faster and
better able to reproduce the full message fidelity.
S/MIME. Sets S/MIME as the preferred message encoding format.
Choose S/MIME if, for some reason, you need to force messages to
be S/MIME even if the user has a PGP key.
13 In the Recipient’s key is not available section, in the first Key Not Found
field, select:
Search keys.domain and. Specifies a search that includes both
keys.domain as well as another server you specify.
Search. Allows for searching for an appropriate key if one is not found
on the local keyring.
Clear-sign message. Specifies that the message should be sent in
the clear, but signed.
Send message unsecured. Specifies that the message be sent in the
clear.
Block message. Specifies that the message must not be sent if an
appropriate key is not found.
14 In the second Key Not Found field, select:
117

PGP® Desktop for Windows Securing Email Messages
All keyservers. Allows all keyservers, including the PGP Global
Directory, to be searched for an appropriate key.
PGP Global Directory or keyserver.pgp.com. Specifies that only the
PGP Global Directory is searched.
[configured keyservers]. Specifies that only the keyserver you
choose from the list of currently configured keyservers is searched.
Note that keyservers other than the PGP Global Directory may provide
unverified keys that cannot be used if you require verified keys in the
policy. Unless you know exactly why you need to search another
keyserver and are prepared to find those keys manually to verify them
when necessary, search only on the PGP Global Directory. This option
is available only on Windows systems.
Edit Keyserver List. Lets you add keyservers to the list of currently
configured keyservers. This option is available only on Windows
systems.
15 In the last Key Not Found field, specify:
temporarily cache found keys. Specifies that a found key should be
temporarily saved in memory. Keys in this cache will automatically be
used when verifying signed messages, and will be used for encryption
if they have been verified.
ask to save found keys. Specifies that PGP Desktop should ask if
you want to save to your local keyring a particular found key.
save found keys. Specifies that found keys should automatically be
saved to your local keyring.
16 In the If no result field, select:
Clear-sign message. Allows messages for which an encryption key
has not been found to be signed and sent in the clear.
Send message unsecured. Do not encrypt message.
Block message. Prevents message for which an encryption key has
not been found from being sent.
17 When you have made the desired changes, click OK to close the Message
Policy dialog box. The specified security policy is changed.
Deleting a Security Policy
To delete an existing security policy
1 In the PGP Messaging Control box, click the name of the service that has
the security policy you want to delete. The properties for the service you
selected appear in the PGP Messaging Work area.
2 Click Edit Policies.
118

PGP® Desktop for Windows Securing Email Messages
3 In the list of security policies, click on the policy you want to delete. The
specified policy highlights.
4 Click Remove Policy. A PGP Desktop Confirmation dialog box is displayed.
5 Click Delete Policy to delete the policy or OK to disable it. The specified
security policy is deleted or disabled.
6 Click Done.
Note: Default policies can be disabled, but not deleted.
Changing the Order of Policies in the List
To change the order of policies in the Security Policy list
1 In the PGP Messaging Control box, click on the name of the service that
has the security policy whose order you want to change. The properties for
the service you selected appear in the PGP Messaging Work area.
2 Click Edit Policies.
3 In the list of security policies, click on the policy whose order in the list you
want to change. The specified policy highlights.
4 Click Move Up or Move Down until the policy is in the desired location in
the list. Make sure Opportunistic Encryption is at the bottom of the list.
Any policy below it will not be implemented.
5 Click Done.
PGP Desktop and SSL
When you use PGP Desktop, PGP Corporation’s goal is for your data to be
automatically protected whenever possible. This includes protecting your data in
transit between your email client and your mail server.
Tip: SSL stands for Secure Sockets Layer, which is a cryptographic protocol
that secures communications between two devices; in this case, between
your email client or PGP Desktop and your mail server.
PGP Desktop protects your data to and from your mail server in different ways
depending on the circumstances. The following information applies only if you
selected Automatic (the default) for the SSL/TLS setting in the server settings
dialog:
119

PGP® Desktop for Windows Securing Email Messages
When the connection is not SSL protected. If the connection between
your email client and your mail server is not SSL protected, PGP Desktop
will automatically attempt to upgrade that connection to SSL (it will
negotiate with your mail server and upgrade the connection if the mail
server supports it).
If the mail server does not support SSL, the message(s) PGP Desktop
sends and receives during the session will be over an unprotected
connection. Whether or not those messages will be encrypted or
decrypted by PGP Desktop does not affect the attempt by PGP Desktop to
upgrade the connection. Messages encrypted by PGP Desktop can be sent
or received over a connection protected by SSL or not protected by SSL.
Note: PGP Desktop always attempts to upgrade an unprotected
connection to the mail server to SSL protection because an SSL-protected
connection not only protects any non-PGP-encrypted messages on their
way to the mail server or coming from it, but it also protects your mail
server authentication passphrase when it is sent to the mail server.
When the connection is protected by SSL. If you have SSL protection
turned on in your email client for the connection to your mail server, you
must turn it off if you want PGP Desktop to encrypt or decrypt your
messages; PGP Desktop cannot process your messages if they are already
SSL-encrypted.
Turning off SSL protection in your email client does not mean that your
non-PGP-encrypted messages are now unprotected going to or coming
from your mail server. As with any connection that is not SSL protected,
PGP Desktop will automatically attempt to upgrade the connection to SSL
protection if the mail server supports it (if you selected Automatic for the
SSL/TLS setting in the server settings dialog). If the mail server does not
support SSL connections, the messages PGP Desktop sends during the
session will be over an unprotected connection.
The only time your messages will be sent in the clear to your mail server is
if the messages are not PGP encrypted and the connection to the mail
server cannot be upgraded to SSL protected, or you have selected the Do
Not Attempt option in the SSL/TLS setting.
When you cannot have messages sent in the clear. Some security
policies require that only protected messages can be sent; in other words,
unprotected messages must never be sent. If necessary, you can
configure PGP Desktop to support this kind of security policy.
Select the applicable PGP Messaging service, access the Server Settings
dialog box (click the name of the server currently in the Server field of the
Account Properties for the service), and choose an option from the
SSL/TLS list other than Automatic.
When this option is enabled, PGP Desktop will only send messages to or
receive messages from your mail server if the connection between them is
SSL protected. If an SSL-protected connection cannot be established, PGP
Desktop will not interact with the server.
120

PGP® Desktop for Windows Securing Email Messages
Note: This option should be enabled only if you are certain your mail
server supports SSL. It ensures that PGP Desktop will not fall back to
sending or receiving messages with the mail server over an unprotected
connection if, for example, a problem occurs while negotiating SSL
protection for the connection. If you enable this option and your mail
server does not support SSL, PGP Desktop will not send or receive any of
your messages.
Key Modes
When you want SSL enabled in your email client. To use PGP Desktop
with SSL enabled in your email client, you must deselect the option to
Warn if email client attempts SSL/TLS for your incoming or outgoing
mail server, or both. When you disable this option for a connection to a mail
server, PGP Desktop ignores incoming and outgoing traffic over that
connection when the connection is protected by SSL.
PGP Desktop monitors the connections to and from this server, ignoring
traffic sent or received on SSL-protected connections. If, however, PGP
Desktop detects a non-SSL-protected connection, it handles the traffic like
any other unprotected connection and attempts to upgrade the connection
to SSL (if in Automatic mode) and apply applicable policies to messages.
If you are using PGP Desktop in a PGP Universal Server-managed environment,
PGP Desktop will have a key mode.
Note: The information in this section applies only to users of PGP Desktop in
an email domain protected by a PGP Universal Server.
Available key modes are:
Server Key Mode (SKM): Keys are generated on and managed by the PGP
Universal Server; they are only shared with the computer on which you are
running PGP Desktop as needed. Your private key is stored only on the
PGP Universal Server, which also handles all private key management. The
PGP Universal administrator has complete access to your private key and
can thus access all messages you encrypt. This key mode is not
compatible with smart cards (smart cards can be used on Windows
systems only).
Starting with PGP Desktop version 10.0, SKM keys that previously could be
used only for messaging can be used for all other PGP Desktop encryption
actions. This includes encrypting disks and files, and decrypting MAPI email
messages when offline.
If you are using an SKM key, you will never need to enter a passphrase for
authentication. SKM key passphrases are randomly generated by PGP
Desktop and are stored encrypted. When PGP Desktop requires a
passphrase, PGP Desktop retrieves the encrypted passphrase from your
system without requiring interaction from you.
121

PGP® Desktop for Windows Securing Email Messages
Client Key Mode (CKM): Keys are generated on and managed by the
computer on which you are running PGP Desktop; private keys are not
shared with the PGP Universal Server. All cryptographic operations
(encrypt, decrypt, sign, verify) are also handled by the computer on which
you are running PGP Desktop. On Windows systems, this key mode is
compatible with smart cards.
Guarded Key Mode (GKM): Very similar to CKM, except that an encrypted
copy of the private key is stored on the PGP Universal Server, which you
can access if you change computers. As the key is encrypted, the PGP
Universal administrator cannot access this private key, only you can. This
key mode is compatible with smart cards (on Windows systems only) as
long as the key is not generated directly on the smart card; that is, as long
as the key is copied to the smart card.
Server Client Key Mode (SCKM): Also very similar to CKM, except that a
copy of the private encryption key is stored on the PGP Universal Server;
private signing keys never leave the computer on which you are running
PGP Desktop. This key mode ensures compliance with laws and corporate
policies that require that the private signing key not leave the control of the
user, while making sure that the private encryption key is stored in case of
emergency. This key mode is compatible with smart cards (on Windows
systems only) as long as the key is not generated directly on the smart
card. SCKM requires a key with a separate signing subkey, which can be
created for a new key with PGP Desktop 9.5 or later or added to an older
PGP key using PGP Desktop 9.5 or later.
Depending on how your PGP administrator configured your copy of PGP
Desktop, you may or may not be able to choose your key mode. Also, you may
or may not be able to change your key mode.
Contact your PGP administrator if you have additional questions about your key
mode.
Determining Key Mode
Remember that only PGP Desktop users in a PGP Universal-protected
environment will have a key mode; standalone PGP Desktop users do not have
a key mode.
To determine your key mode
Open PGP Desktop and select the PGP Messaging service whose key
mode you want to determine. The account properties and security policies
for the selected service appear.
In the Universal Server field, the key mode for the selected service is
shown in parentheses after the name of the PGP Universal Server (for
example, keys.example.com (GKM)). This indicates that the key mode for
the selected service, in this example, is Guarded Key Mode and that the
associated PGP Universal Server is keys.example.com.
122

PGP® Desktop for Windows Securing Email Messages
Changing Key Mode
Depending on how your PGP administrator configured your copy of PGP
Desktop, you may not be able to change your key mode.
To change your key mode
1 Open PGP Desktop and select the PGP Messaging service for the key
mode you want to change. The account properties and security policies for
the selected service appear.
2 Click Key Mode. The PGP Universal Key Mode screen is displayed,
describing your current key management mode.
3 Click Reset Key and then click Yes in the confirmation message displayed.
The PGP Key Setup Assistant is displayed.
4 Read the text, then click Next. The Key Management Selection screen is
displayed.
5 Select the desired key mode. Depending on how your PGP Universal
administrator configured your copy of PGP Desktop, some key modes may
not be available.
6 Click Next. The Key Source Selection screen is displayed.
7 Choose one of the following:
New Key. You will be prompted to create a new PGP key, which will
be used to protect your messaging.
PGP Desktop Key. You will be prompted to specify an existing PGP
key to use to protect your messaging.
Import Key. You will be prompted to import a PGP key, which will be
used to protect your messaging.
8 Make the desired selection, then click Next.
9 If you selected New Key, do the following:
Enter a passphrase for the key, then click Next.
When the key is generated, click Next.
Click Finish.
10 If you selected PGP Desktop Key, do the following:
Select the key from the local keyring that you want to use, then click
Next.
Click Finish.
11 If you selected Import Key, do the following:
Browse to file that holds the PGP key you want to import (it must
contain a private key), then click Next.
123

PGP® Desktop for Windows Securing Email Messages
Click Finish.
Tip: You can also change your key mode from the PGP Options dialog box.
Choose Tools > PGP Options and select the Advanced tab. Click Reset Key,
and follow the steps above when the PGP Key Setup Assistant is displayed.
This option is available if you are using PGP Desktop in a PGP Universal
Server-managed environment.
Viewing the PGP Log
Use the PGP Log to see what actions PGP Desktop is taking to secure your
messages.
To view the PGP Desktop Log
1 To view logs, you must turn on logging. To do this, in PGP Desktop select
Tools > PGP Logging.
2 In PGP Desktop, click the PGP Messaging control box and then click PGP
Log. The PGP Log is displayed in the application window.
3 To change the view options or filter on specific logging information, do the
following:
Click the arrow for View log for to select the days of the logs you
want to view.
Click the arrow for View topic to select the types of logs you want to
view. Choose from All, PGP, Email, IM, Whole Disk, NetShare,
Zip/SDA, or Virtual Disk.
Click the arrow for View level to select the minimum severity of log
entries you want to view. Choose from Error, Warn, Info, or
Verbose. Note that Verbose can result in some large log files.
4 When you are finished viewing the log:
To save a copy of the PGP Log, click Save.
To clear the entries in the PGP Log, click Shred.
124

8 Securing Instant
Messaging
This section provides information on how to use PGP Desktop to secure your
instant messaging (IM) sessions. For information about the PGP Options that
affect IM sessions, see Messaging Options (on page 289).
Note: If you are using PGP Desktop in a PGP Universal Server-managed
environment, your PGP Universal Server administrator may have disabled
certain features. When a feature is disabled, the control item in the left side
is not displayed and the menu and other options for that feature are not
available. The graphics included in this guide depict the default installation
with all features enabled. If your PGP Universal Server administrator has
disabled this functionality, this section does not apply to you.
In This Chapter
About PGP Desktop’s Instant Messaging Compatibility ....................... 125
About the Keys Used for Encryption ..................................................... 127
Encrypting your IM Sessions................................................................. 127
About PGP Desktop’s Instant Messaging Compatibility
PGP Desktop automatically encrypts AOL and iChat standard instant messaging
sessions, direct connects, and file transfers if the following conditions are met:
Both users in the IM session have PGP Desktop 9.0 or later installed and
running on the system on which they are using IM. To confirm that you are
using PGP Desktop 9.0 or later, click the PGP Tray icon and select About
PGP from the shortcut menu (from within the PGP Desktop window, select
Help > About PGP).
Both users have the Encrypt instant messages setting enabled. To do
this:
On Windows systems, select Tools > Options, click the Messaging
tab, and select the checkbox to Encrypt AOL Instant Messages
(AIM).
On Mac OS X systems, select PGP > Preferences, click the
Messaging icon, and select the checkbox to Encrypt AOL Instant
Messages (AIM).
125

PGP® Desktop for Windows Securing Instant Messaging
Tip: On Windows systems, quickly verify that instant messaging
encryption is enabled by clicking the PGP Tray icon. There should be a
check mark next to Use PGP AIM Proxy in the shortcut menu.
Both users are using compatible IM clients. For information on the
compatible IM clients, see the following section.
The AIM address of the initiator of the IM session is on the Buddy List of
the recipient of the session (or the session will not be encrypted).
The secure IM feature is compatible with any IM client that supports AOL's
OSCAR protocol for instant messaging, such as AOL Instant Messenger, Trillian
Pro, iChat and Gaim.
The file transfer and direct connect sessions require recent versions of these
clients in order for PGP Desktop to encrypt them. In addition, PGP Corporation
recommends that you set up the connection for both Direct IM/Direct Message
and File Transfer to use the AOL Proxy, rather than allowing your buddy to
connect directly to your computer.
Notes:
Audio and video connections are not encrypted by PGP Desktop.
PGP Desktop’s secure IM feature uses Perfect Forward Secrecy for
enhanced security. All keys used to secure your IM sessions are generated at
the beginning of the connection and then destroyed when you disconnect;
completely new sets of keys are used for every IM session. This adds an
extra level of security to your IM sessions.
Instant Messaging Client Compatibility
PGP Desktop is compatible with the following instant messaging clients when
encrypting AIM instant messages, file transfers, and direct connections:
AOL AIM 6.5.5
To encrypt instant messages with AIM 6.5, you must change the
default port that AIM uses from 493 to 5190.
Audio and video connections are not encrypted by PGP Desktop.
Continued interoperability with the AIM service may be affected by
changes made to the underlying AIM protocols after PGP Desktop
version 10.1 is released.
Trillian 3.1 (Basic and Pro)
Other instant messaging clients may work for basic instant messaging, but have
not been certified for use.
126

PGP® Desktop for Windows Securing Instant Messaging
About the Keys Used for Encryption
A 1024-bit RSA key is generated each time you log onto your IM software, and
is destroyed when you log out. This key is used to exchange randomly
generated seed data with anyone with whom you communicate. The seed data
is combined and hashed to allow each participant in the communication to
generate a set of symmetric keys used for that particular communication (one
for each direction). The symmetric keys are used to encrypt all the messages
with AES256.
Some of that data is also used to generate keyed-hash message authentication
code, or HMAC, for each message so that the message integrity can be
checked.
Note: The keys used for secure IM communication are not user configurable.
Encrypting your IM Sessions
Once you have met the conditions described in About PGP Desktop’s Instant
Messaging Compatibility (on page 125), start your IM session as you normally
would. Your IM sessions with any other PGP Desktop user using a compatible
IM client are automatically and transparently protected.
There are multiple ways to verify that your IM session is being protected:
When you start an IM session, the PGP Notifier is displayed, informing you
that a secured IM session has begun.
When the IM session begins, the first message you see from the other
user in the session will have extra text below it that says: “Conversation
encrypted by PGP Desktop.”
A padlock icon shown next to the names in the Buddy List indicates that
the users are probably using PGP Desktop to secure their IM sessions.
Note that the padlock could also mean that the user is using AIM’s built-in
security.
If you open the PGP Log after you have started your IM session, it will have
an entry noting that the IM session is encrypted, for example:
17:01:06 Info Initiating PGP Desktop encrypted AIM
session with breynolds using your key with id 0xEFDDCE3C.
127

9 Viewing Email with PGP
Viewer
This section provides information on how to use PGP Viewer to decrypt, verify,
and display encrypted messages.
Note: PGP Viewer only runs on systems with PGP Desktop installed. You
cannot use PGP Viewer standalone.
In This Chapter
Overview of PGP Viewer....................................................................... 129
Opening an Encrypted Email Message or File ...................................... 130
Copying Email Messages to Your Inbox................................................ 132
Exporting Email Messages .................................................................... 132
Specifying Additional Options................................................................ 132
Specifying Options in PGP Viewer ........................................................ 133
Security Features in PGP Viewer........................................................... 134
Overview of PGP Viewer
In normal usage, PGP Desktop sits between your email client (Mozilla
Thunderbird, for example) and your email server so that PGP Desktop can
encrypt and sign outgoing messages and decrypt and verify incoming
messages. When PGP Desktop is doing this, it is called “in the mail stream.”
Use PGP Viewer to decrypt, verify, and display messages outside the mail
stream.
There are multiple ways you could have ended up with encrypted messages
outside the mail stream:
Encrypted messages saved securely. Many organizations store
messages encrypted for security purposes. Storing them puts them
outside the mail stream, but PGP Viewer can decrypt, verify, and display
them while maintaining the original encrypted message.
Encrypted text in a webmail message. Encrypted messages sent to a
webmail account cannot be decrypted by PGP Desktop. However, PGP
Viewer can decrypt those messages. Simply open the message.pgp file
attachment using PGP Viewer.
129

PGP® Desktop for Windows Viewing Email with PGP Viewer
Encrypted text not decrypted by PGP Desktop. If a message was
automatically downloaded by your email client when PGP Desktop was not
running or when your passphrase was not cached, you could end up with
encrypted message text that is now outside the mail stream.
PGP Viewer decrypts, verifies, and displays multiple types of messaging
content:
Modern PGP-encrypted content (PGP/MIME and PGP Partitioned)
Legacy PGP-encrypted content (PGP/MIME and PGP Partitioned)
RFC-2822 compliant encrypted content PGP Viewer uses PGP Desktop keyrings
for operations that require keys. PGP Viewer honors applicable PGP Desktop
preferences; passphrase caching options, for example.
In a PGP Universal Server-managed environment, PGP Viewer searches for
verification keys per the applicable policy.
PGP Viewer displays signature information for messages it decrypts in the
message window, not in the message itself. This provides access to full
signature information and prevents spoofing of inline signature annotations.
Compatible Email Clients
Use PGP Viewer to copy the text of a decrypted/verified message to the
following email clients:
Windows Mail (Windows)
Microsoft Outlook (Windows)
Thunderbird (Windows and Mac OS X)
Outlook Express (Windows)
Mail.app (Mac OS X)
Due to the design of Lotus Notes architecture, an encrypted message cannot
be dragged from Lotus Notes email client and dropped into PGP Viewer to be
decrypted.
Opening an Encrypted Email Message or File
Use PGP Viewer to open (decrypt, verify, and display) encrypted message files
of the following types:
*.pgp: Created by a PGP application.
*.eml: Created by Outlook Express or Thunderbird.
*.emlx: Created by Apple's Mail.app program on Mac OS X systems.
*.msg: Created by Microsoft Outlook.
130
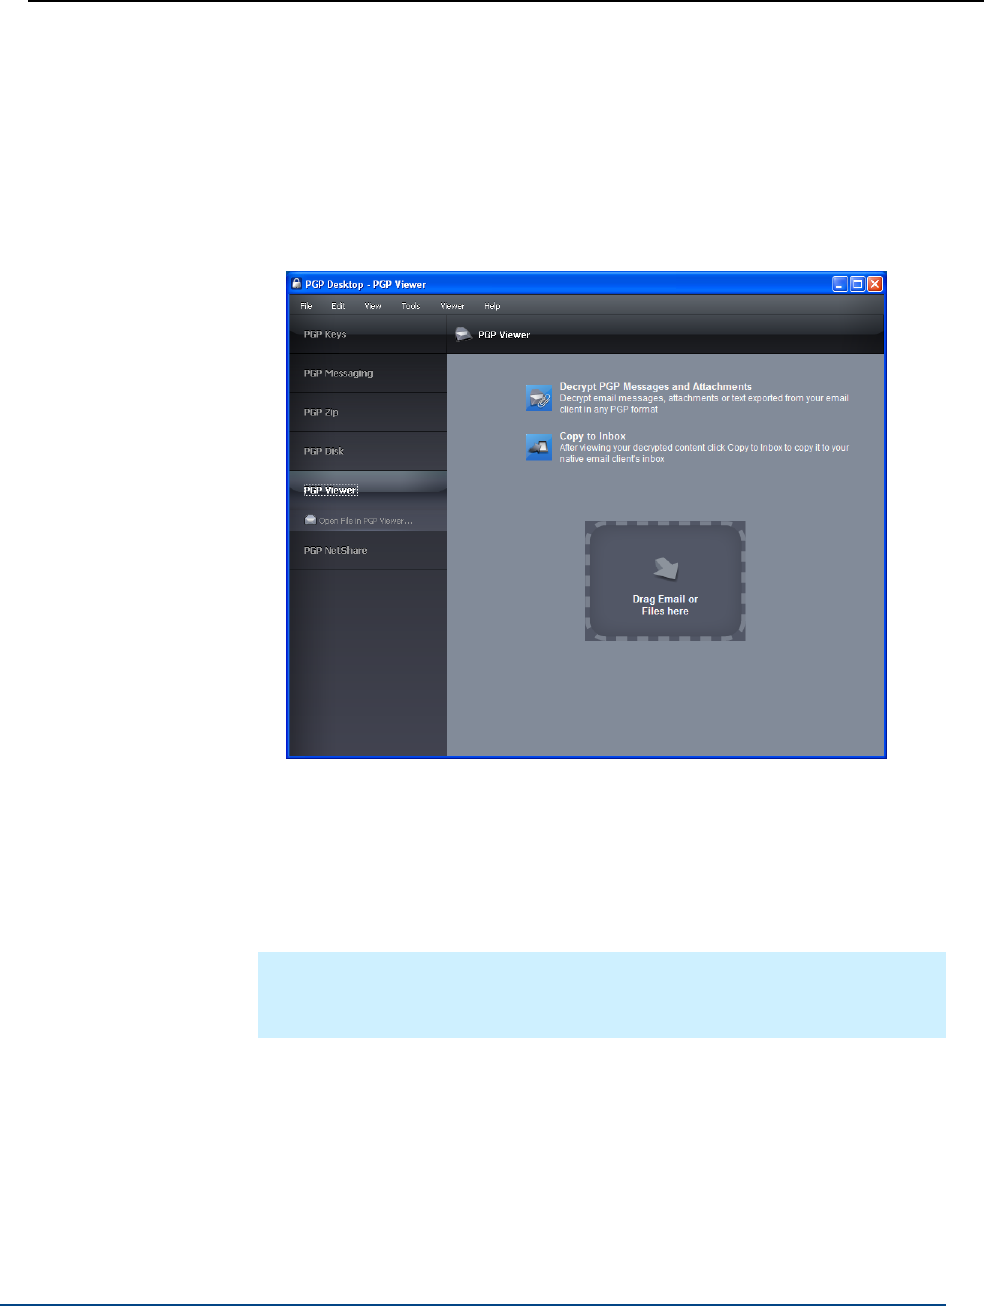
PGP® Desktop for Windows Viewing Email with PGP Viewer
When PGP Viewer opens an encrypted message, it does not overwrite the
encrypted text. The original message remains intact.
To decrypt, verify, and display an encrypted message from a file
1 Open PGP Viewer. To do this, select the PGP icon in the system tray and
then select PGP Viewer or from within PGP Desktop select the PGP
Viewer control box.
2 Click Open File in PGP Viewer or pull down the Viewer menu and select
Open File in PGP Viewer.
The Open Message File dialog appears.
3 In the Open Message File dialog box, navigate to the file you want to open,
select it, then click Open. PGP Viewer decrypts, verifies, and displays the
message in a separate window.
Tip: You can drag and drop the file you want to open onto the portion of
the PGP Viewer windows that displays: Drag Email or Files Here. PGP
Viewer opens the file, decrypts and verifies it, and displays the message.
4 To open another message, click Open Message in the toolbar, navigate to
the desired file, select it, then click Open. PGP Viewer decrypts, verifies,
and displays the message. A pane on the left side of the PGP Viewer
screen is displayed so that you can see all open messages.
5 To open a pane on the left side of the PGP Viewer window or to close the
pane if it is open, click the Pane button on the toolbar.
131

PGP® Desktop for Windows Viewing Email with PGP Viewer
Copying Email Messages to Your Inbox
Use PGP Viewer to copy plaintext versions of decrypted messages to the inbox
of your email client.
To copy a message to the inbox of your email client
1 With the message in the PGP Viewer window, click Copy to Inbox. The
Copy to Inbox confirmation dialog box displays the name of the email client
to which the message will be copied. To change this setting, see
Specifying Options in PGP Viewer (on page 133).
2 Click OK to continue.
If you are copying a message to the Mozilla Thunderbird email client for the
first time, a dialog box displays, advising that you must install an add-on.
Click Yes to install the add-on and follow the on-screen instructions or click
No. You must be using Thunderbird 2.0 or greater to install the add-on.
3 PGP Viewer opens your email client and copies a plaintext version of the
message to the inbox.
Exporting Email Messages
Use PGP Viewer to export a decrypted message to a file.
To export a message from PGP Viewer to a file
1 With the message displayed in the PGP Viewer window, click Export. The
Export Message File dialog is displayed.
2 In the Export Message File dialog box, specify the desired location,
filename, and format for the file, then click Save. PGP Viewer saves the file
to the specified location.
Specifying Additional Options
Use the Tools button on the PGP Viewer Toolbar (on the far right) to specify
several PGP Viewer features:
Text Encoding: Specify the text encoding format for the message
currently being displayed by PGP Viewer.
132

PGP® Desktop for Windows Viewing Email with PGP Viewer
Show Remote Images: Display external resources (images, CSS style
sheets, iframe content, and so on) for the message currently being
displayed by PGP Viewer. You can specify that PGP Viewer automatically
displays external resources in Preferences.
View Message Source: Display the source of the message currently being
displayed by PGP Viewer. Viewing the message source can tell you more
information about the message.
Preferences: Display the PGP Viewer Preferences dialog box.
Specifying Options in PGP Viewer
PGP Viewer includes options (preferences) that provide control of certain
functionality.
To access PGP Viewer preferences
1 Open PGP Viewer from the PGP tray or use PGP Viewer to decrypt, verify,
and display a message.
The PGP Viewer screen appears.
2 Click the Tools icon (on the far right of the PGP Viewer Toolbar) and select
Preferences. The Preferences dialog box is displayed.
3 Select the General tab and specify the following options:
Ask user to confirm Copy to Inbox command: Controls whether or
not a confirmation prompt is displayed when you copy text from PGP
Viewer to the inbox of your email client. The default is enabled.
Automatically load remote images: Controls whether external
resources like images, CSS style sheets, or iframe content, for
example, are automatically loaded by PGP Viewer. The default is
disabled, as this may be a security risk.
Use email client: Lets you specify the email client to which PGP
Viewer will copy content. The default is Windows Default (Email);
PGP Viewer determines your default Windows email and uses that as
its default. You can also select Outlook, Outlook Express, and
Thunderbird.
4 Select the Text tab, and specify the following options:
Font: Controls the font PGP Viewer uses to display text.
Text Color: Controls the color of text that PGP Viewer displays.
Background Color: Controls the background color of text that PGP
Viewer displays.
133

PGP® Desktop for Windows Viewing Email with PGP Viewer
Security Features in PGP Viewer
PGP Viewer proactively protects your security:
The Web browser embedded in PGP Viewer, which displays messaging
content, has JavaScript, Java Applets, and plugins disabled. This prevents
an attacker from delivering a malicious payload that PGP Viewer might
otherwise load.
External resources — images, CSS style sheets, iframe content (an inline
frame that contains another document), and so on — are loaded
automatically based on the Automatically load remote images
preference. For security purposes, this preference is disabled by default.
When this preference is disabled, PGP Viewer does not generate any
network traffic to external sites.
134

10 Protecting Disks with PGP
Whole Disk Encryption
PGP Whole Disk Encryption (PGP WDE) locks down the entire contents of a
laptop, desktop, external drive, or USB flash drive, including boot sectors,
system files, and swap files. You can also use PGP WDE to encrypt just the
boot partition or Windows partitions. Encryption runs as a background process
that is transparent to you, automatically protecting valuable data without
requiring you to take additional steps.
Note: If you are using PGP Desktop in a PGP Universal Server-managed
environment, your PGP Universal Server administrator may have disabled
certain features. When a feature is disabled, the control item in the left side
is not displayed and the menu and other options for that feature are not
available. The graphics included in this guide depict the default installation
with all features enabled. If your PGP Universal Server administrator has
disabled this functionality, this section does not apply to you.
If you are using PGP Desktop in a PGP Universal Server-managed
environment, your PGP administrator may have specified, by policy, that all
boot drives must be encrypted. If this is the case, PGP Desktop periodically
verifies that drives are encrypted and will enforce policy by automatically
encrypting unencrypted boot drives.
If you are using PGP Desktop in a PGP Universal Server-managed
environment, your PGP administrator may have customized the PGP Whole
Disk Encryption BootGuard screen to include additional text or a custom
image such as your organization's logo. The graphics included in this guide
depict the default installation. Your actual login screen may look different if
your administrator has customized the screen.
135

PGP® Desktop for Windows Protecting Disks with PGP Whole Disk Encryption
In This Chapter
About PGP Whole Disk Encryption........................................................ 136
Licensing PGP Whole Disk Encryption.................................................. 137
Using PGP Remote Disable and Destroy .............................................. 138
Prepare Your Disk for Encryption .......................................................... 140
Determining the Authentication Method for the Disk........................... 146
Setting Encryption Options.................................................................... 149
Encrypting a Disk or Partition ................................................................ 155
Using a PGP WDE-Encrypted Disk........................................................ 161
Using PGP WDE Single Sign-On ........................................................... 167
Maintaining the Security of Your Disk ................................................... 170
Working with Removable Disks ............................................................ 177
Using PGP WDE in a PGP Universal Server-Managed Environment .... 180
Recovering Data From an Encrypted Drive ........................................... 183
Decrypting a PGP WDE-Encrypted Disk................................................ 185
Special Security Precautions Taken by PGP Desktop ........................... 186
Using the Windows Preinstallation Environment .................................. 188
About PGP Whole Disk Encryption
When you encrypt an entire disk using the PGP Whole Disk Encryption feature,
every sector is encrypted using a symmetric key. This includes all files including
operating system files, application files, data files, swap files, free space, and
temp files.
On subsequent reboots, PGP WDE prompts you for the correct passphrase.
Then the encrypted data is decrypted as you access it. Before any data is
written to the disk, PGP WDE encrypts it. As long as you are authenticated to
your PGP WDE-encrypted disk (after you have entered the correct passphrase
at the PGP BootGuard screen), the files are available. When you shut down your
system, the disk is protected against use by others.
If your system supports the Intel® Advanced Encryption Standard (AES)
Instructions (AES-NI), your system is encrypted and decrypted using the
hardware associated with this encryption algorithm. AES-NI provides improved
performance during encryption and decryption processes as well as disk I/O
enhancements while your disk is encrypted.
Before encrypting your disk with PGP WDE, it is important to understand the
process of creating and using a PGP WDE-encrypted disk:
1 Make sure that your PGP Desktop license supports its use, as described in
Licensing PGP Whole Disk Encryption (on page 137).
136

PGP® Desktop for Windows Protecting Disks with PGP Whole Disk Encryption
2 Perform the tasks to Prepare Your Disk for Encryption (on page 140).
3 Choose how you want to authenticate yourself to encrypt the disk in
Determine the Authentication Method for the Disk (see "Determining the
Authentication Method for the Disk" on page 146).
4 Choose the encryption options to use in Setting Encryption Options (on
page 149).
5 Start the encryption process in Encrypting a Disk or Partition (on page 155).
6 Learn how to use an encrypted disk in Using a PGP WDE-Encrypted Disk
(on page 161).
7 Learn how to maintain your encrypted disk in Maintaining the Security of
Your Disk (on page 170).
8 Learn how to decrypt the disk, if needed, in Decrypting a PGP
WDE-Encrypted Disk (on page 185).
9 Understand the features that help avoid security problems in Special
Security Precautions Taken by PGP Desktop.
If you are a PGP Universal Administrator, or are using PGP WDE in a PGP
Universal Server-managed environment, see Using PGP-WDE in a PGP
Universal Server-Managed Environment (see "Using PGP WDE in a PGP
Universal Server-Managed Environment" on page 180) for additional information.
Warning: Once you unlock a disk, its files are available to you—as well as
anyone else who can physically use your system. Your files are unlocked until
you lock them again by shutting down your computer. Use a PGP Virtual Disk
volume for files that need to be secured even while your computer is in use.
For more information, see Using PGP Virtual Disks (on page 191).
How does PGP WDE Differ from PGP Virtual Disk?
The PGP Virtual Disk feature differs from PGP WDE in that PGP Virtual Disks
perform like additional volumes on your system that can be locked, even while
you are using your computer. These volumes are like a vault where you can
store files needing protection. There is no actual physical disk, only the virtual
one that the PGP Virtual Disk feature creates and manages.
PGP WDE protects your entire physical hard disk.
Both products work independently of each other, so you can use them at the
same time. For more information, see Using PGP Virtual Disks (on page 191).
Licensing PGP Whole Disk Encryption
To use the PGP Whole Disk Encryption feature, your copy of PGP Desktop must
have a license that supports it.
137

PGP® Desktop for Windows Protecting Disks with PGP Whole Disk Encryption
To verify your license supports PGP Whole Disk Encryption
1 Open PGP Desktop.
2 Select Help > License. The PGP Desktop License dialog box is displayed.
3 In the Product Information section, find the PGP Whole Disk Encryption
icon. Move your cursor over the product name to see information about the
product and to find out if you are currently licensed to use it.
If your license does not support PGP WDE, you can find more information about
licensing PGP Desktop using one of the following methods:
If you are using PGP Desktop in a PGP Universal Server-managed
environment, contact your PGP administrator for more information about
support for the PGP WDE feature in your license. For more information,
see Using PGP Desktop with PGP Universal Server (on page 311).
If you are using PGP Desktop outside of a PGP Universal Server-managed
environment, go to the PGP Corporation website (http://www.pgp.com) for
more information about adding the PGP WDE feature to your license.
License Expiration
PGP WDE used under a subscription license basis provides a 90-day
post-license expiration decryption feature for boot disks only. 90 days after the
subscription license expires, the PGP WDE feature decrypts your data (after
notifying you) so you can retrieve your files.
Using PGP Remote Disable and Destroy
PGP Remote Disable & Destroy uses Intel® Anti-Theft Technology to address
the need to keep data secure in mobile environments, and comply with
increasingly stringent regulations in data security and privacy.
With PGP RDD, your PGP Universal Server administrator can remotely disable
your laptop, and/or disable access to data if the laptop is lost or stolen and
perform secure decommission of laptops.
When PGP RDD is activated on your laptop, the PGP RDD service periodically
pings the PGP Universal Server to indicate that the system is online and
connected. This is known as a rendezvous. If your system does not rendezvous
with the PGP Universal Server at the appointed time, your system may be
flagged as stolen.
138

PGP® Desktop for Windows Protecting Disks with PGP Whole Disk Encryption
It is important to let your administrator know if you plan to go on vacation or
traveling out of the country or without network access, so that your system is
not flagged as lost or stolen. Your administrator may put your system into a
group where the rendezvous timer policy is set for a longer period of time. You
may need to perform recovery actions on your system if the theft policy is
triggered due to you not having connected to your corporate network period of
time specified in the policy. See the following section on recovering your
system.
Encrypting and Decrypting Your Disk
If your administrator has enabled PGP RDD, when you install PGP WDE, disk
encryption will begin automatically. During the installation process, you may
receive PGP Notifier messages informing you that activation has occurred. Note
that your PGP Universal Server administrator may disable PGP RDD notification
messages only (and allow all other notifications to be displayed).
If your administrator has specified the use of PGP RDD, then your disk is
encrypted automatically during installation and activation of PGP RDD is
completed transparently, you will not be able to decrypt your disk while PGP
RDD is activated. For more information, contact your administrator.
If Your Laptop is Lost or Stolen
If your laptop is lost or stolen, contact your IT administrator immediately. Your
PGP Universal Server administrator will determine the course of action and
mark your system as stolen.
Recovering Your System
If your system has been flagged as lost or stolen, you will need to perform one
or more recovery tasks to gain access to the system. Contact your administrator
and request both the recovery passphrase as well as the Whole Disk Recovery
Token.
To recover your system
Note: The following procedures provides a general guideline of the recovery
process. Your individual recovery steps will be dictated by the security policy
your organization has defined and by the make and model of your laptop.
1 Turn your system on. At the initial prompt for passphrase, enter the
hardware passphrase you received from your administrator.
2 At the PGP BootGuard screen, enter your PGP WDE passphrase. If this
passphrase is not accepted, enter the WDRT you received from your
administrator.
During the recovery operation, you are prompted what to enter. How the actual
recovery process works depends on the hardware you are using. If PGP RDD is
enabled, additional steps may be required to recover from the lockout.
139

PGP® Desktop for Windows Protecting Disks with PGP Whole Disk Encryption
Prepare Your Disk for Encryption
Before you encrypt your disk, there are a few tasks you must perform to ensure
successful initial encryption of the disk.
Determine whether your target disk is supported. See Supported Disk
Types (on page 141).
Make sure your keyboard type is supported. See Supported Keyboards
(on page 142).
Ensure the health of the disk before you encrypt it. If PGP WDE
encounters disk errors during encryption, it will pause encryption so you
can repair the disk errors. However, it is more efficient to repair errors
before you initiate encryption. See Ensure Disk Health Before Encryption
(on page 144).
Back up the disk before you encrypt it. Before you encrypt your disk, be
sure to back it up so that you won’t lose any data if your laptop or
computer is lost, stolen, or you are unable to decrypt the disk. Also be sure
to make regular backups of your disk.
Create a recovery disk. While the chances are extremely low that a
master boot record could become corrupt on a boot disk or partition
protected by PGP Whole Disk Encryption, it is possible. Before you encrypt
a boot disk or partition using PGP Whole Disk Encryption, create a recovery
disk. See Creating Recovery Disks (see "Creating and Using Recovery
Disks" on page 183).
Consider the time it will take to encrypt the disk and prepare
accordingly. See Calculate the Encryption Duration (on page 144).
Be certain that you will have AC power for the duration of the
encryption process. See Maintain Power Throughout Encryption (on page
145).
Run a pilot test to ensure software compatibility. As a good security
practice, PGP Corporation recommends testing PGP WDE on a small group
of computers to ensure that PGP WDE is not in conflict with any software
on the computer before rolling it out to a large number of computers. This
is particularly useful in environments that use a standardized Corporate
Operating Environment (COE) image. Certain other disk protection
software is incompatible with PGP WDE and can cause serious disk
problems, up to and including loss of data. See Run a Pilot Test to Ensure
Software Compatibility (on page 146) for known interoperability issues, and
review the PGP Desktop Release Notes for the latest updates to this list.
140

PGP® Desktop for Windows Protecting Disks with PGP Whole Disk Encryption
Ensure you have the correct token and drivers. If you are using a USB
token for authentication to a fixed disk protected using PGP Whole Disk
Encryption, make sure you have the correct token and you have installed
the proper driver software. See Preparing a Token to Use For
Authentication (see "Preparing a Smart Card or Token to Use For
Authentication" on page 150).
Using Windows Server software, For additional system requirements
and best practices information on using PGP WDE on Windows Server
systems, see PGP KB article 1737 (http://support.pgp.com/?faq=1737).
Supported Disk Types
The PGP WDE feature protects the contents of the following types of disks:
Desktop or laptop disks, including solid-state drives (either partitions, or the
entire disk).
External disks, excluding music devices and digital cameras.
USB flash disks.
You can encrypt FAT16, FAT32, and NTFS formatted disks or partitions. If you
use PGP Whole Disk Encryption with a FAT disk or partition, you can later
convert it to NTFS.
You can use the PGP Whole Disk Encryption feature on a dual-boot system, as
long as you boot to an operating system supported by PGP WDE (such as
Windows XP, Windows 2000, or Windows Vista) and PGP Whole Disk
Encryption is installed. Partition mode supports dual-booting with another
operating system (such as Linux) as long as you encrypt only your Windows
partition. The other operating system must be on another, non-encrypted
partition.
There is no minimum or maximum size for a PGP WDE-encrypted disk. If the
disk or partition is supported by the operating system (or your hardware BIOS
for the boot disk or partition), it should work with PGP Desktop.
If you want to re-partition a drive that has been encrypted with PGP WDE, you
must first decrypt the drive. After you have decrypted the drive, you can then
partition the drive and re-encrypt the partition(s).
All Windows power management modes (Hibernation, Standby, Suspend) are
supported.
Unsupported Disk Types
The following disk types are not supported:
Dynamic disks.
Diskettes and CD-RW/DVD-RWs.
141

PGP® Desktop for Windows Protecting Disks with PGP Whole Disk Encryption
Warning: Windows XP allows basic disks to be converted to dynamic disks,
which support some features that basic disks do not. Never perform this
conversion on the boot drive of a system that has already been protected
using PGP Whole Disk Encryption. This conversion, from a basic-type disk to
a dynamic one, renders the drive unusable.
Encryption Algorithm Used by PGP WDE
The encryption algorithm used by PGP WDE is AES-256. The hashing algorithm
is SHA-1. You cannot change these options.
Supported Keyboards
Be sure that you are using a keyboard with one of the supported languages.
The PGP Whole Disk Encryption log-in screen supports the following keyboard
layouts:
Belgian (Belgium; Comma)
Belgian (Belgium; Period)
Bosnian (Bosnia)
Bosnian (Bosnia; Cyrillic)
Bulgarian (Bulgaria)
Bulgarian (Bulgaria; Latin)
Bulgarian (Bulgaria; Typewriter)
Canadian Multilingual Standard (Canada)
Chinese Simplified (China, Singapore)
Chinese Traditional (Hong Kong, Taiwan)
Croatian (Croatia)
Czech (Czech Republic; QWERTY)
Danish (Denmark)
Dutch (The Netherlands)
English (United States)
English (United Kingdom)
English (US-International)
Estonian (Estonia)
Finnish (Finland)
French (Belgium)
142

PGP® Desktop for Windows Protecting Disks with PGP Whole Disk Encryption
French (Canada)
French (France)
French (Switzerland)
German (Germany/Austria)
German (IBM)
German (Switzerland)
Hebrew (Israel)
Hungarian (Hungary)
Hungarian (Hungary; 101 keys)
Icelandic (Iceland)
Irish (Ireland)
Italian (Italy)
Italian (Italy; 142 keys)
Japanese (Japan)
Korean (Korea)
Norwegian (Norway)
Polish (Poland; Programmers)
Polish (Poland; 214 keyboard)
Portuguese (Brazil; ABNT keyboards)
Portuguese (Brazil; ABNT2 keyboards)
Portuguese (Portugal)
Romanian (Romania)
Russian (Russia; Cyrillic)
Serbian (Serbia and Montenegro; Cyrillic)
Serbian (Serbia and Montenegro; Latin)
Slovak (Slovakia)
Slovenian (Slovenia)
Spanish (Spain)
Spanish (Latin America)
Spanish Variation
Swedish (Sweden)
Turkish (Turkey; F)
Turkish (Turkey; Q)
Ukrainian (Ukraine)
143

PGP® Desktop for Windows Protecting Disks with PGP Whole Disk Encryption
Different keyboard layouts can have different mappings between characters,
potentially causing problems when you enter your passphrase to authenticate.
Select the keyboard layout that most closely maps to the keyboard you are
using, then make sure to use that same layout each time you authenticate.
For information on supported characters for passphrases, see Supported
Characters for PGP WDE Passphrases (on page 156).
Ensure Disk Health Before Encryption
PGP Corporation deliberately takes a conservative stance when encrypting
drives, to prevent loss of data. It is not uncommon to encounter Cyclic
Redundancy Check (CRC) errors while encrypting a hard disk. If PGP WDE
encounters a hard drive or partition with bad sectors, PGP WDE will, by default,
pause the encryption process. This pause allows you to remedy the problem
before continuing with the encryption process, thus avoiding potential disk
corruption and lost data.
To avoid disruption during encryption, PGP Corporation recommends that you
start with a healthy disk by correcting any disk errors prior to encrypting.
Note: If you are using PGP Desktop in a PGP Universal Server-managed
environment, the bad sectors encountered during encryption are logged to
the PGP Universal Server and the encryption process continues.
Best Practices Recommendation
As a best practice, before you attempt to use PGP WDE, use a third-party scan
disk utility that has the ability to perform a low-level integrity check and repair
any inconsistencies with the drive that could lead to CRC errors. Microsoft
Windows' Check Disk (chkdsk.exe) utility is not sufficient for detecting these
issues on the target hard drive. Instead, use software such as SpinRite or
Norton Disk Doctor™. These software applications can correct errors that would
otherwise disrupt encryption.
Caution: As a best practice, highly fragmented disks should be
defragmented before you attempt to encrypt them.
If you are installing PGP WDE on a Windows Server system, see PGP KB article
1737 (http://support.pgp.com/?faq=1737) for additional best practices
information.
Calculate the Encryption Duration
Encryption is a time-consuming and CPU-intensive process. The larger the disk
or partition being encrypted, the longer the encryption process takes. You
should consider this as you schedule initial encryption of the disk.
Factors that may affect encryption speed include:
144

PGP® Desktop for Windows Protecting Disks with PGP Whole Disk Encryption
the size of the disk or partition
the processor speed and number of processors
the number of system processes running on the computer
the number of other applications running on the system
the amount of processor time those other applications require
With an average system, an 80 GB boot disk or partition takes approximately
three hours to encrypt using PGP Whole Disk Encryption (when no other
applications are running). A very fast system, on the other hand, can easily
encrypt such a disk or partition in less than an hour.
You can still use your system during encryption. Your system is somewhat
slower than usual during the encryption process, although it is fully usable.
PGP Desktop automatically slows the encryption process if you are using the
system. The encryption process is faster if you avoid using your computer
during the initial encryption. The system returns to normal operation when the
encryption process is complete.
If you decide to run other applications during the encryption process, those
applications will probably run slightly slower than normal until the encryption
process is over.
If you will not be using the computer during encryption, you can speed up initial
encryption using the Maximum CPU Usage option, described in Setting
Encryption Options (on page 149). The extra speed during encryption comes
primarily by taking priority over other operations that your computer is
performing.
Maintain Power Throughout Encryption
Because encryption is a CPU-intensive process, encryption cannot begin on a
laptop computer that is running on battery power. The computer must be on AC
power. If a laptop computer goes on battery power during the initial encryption
process (or a later decryption or re-encryption process) PGP WDE pauses its
activity. When you restore AC power, the encryption, decryption, or
re-encryption process resumes automatically.
Regardless of the type of computer you are working with, your system must
not lose power, or otherwise shut down unexpectedly, during the encryption
process, unless you have selected the Power Failure Safety option. Do not
remove the power cord from the system before the encryption process is over.
If loss of power during encryption is a possibility—or if you do not have an
uninterruptible power supply for your computer—consider choosing the Power
Failure Safety option described in Setting Encryption Options (on page 149).
Caution: This holds true for removable disks, such as USB devices. Unless
you have selected the Power Failure Safety option, you run the risk of
corrupting the device if you remove it during encryption.
145

PGP® Desktop for Windows Protecting Disks with PGP Whole Disk Encryption
Run a Pilot Test to Ensure Software Compatibility
As a good security practice, PGP Corporation recommends testing PGP WDE
on a small group of computers to ensure that PGP WDE is not in conflict with
any software on the computer before rolling it out to a large number of
computers. This is particularly useful in environments that use a standardized
Corporate Operating Environment (COE) image.
Certain other disk protection software is incompatible with PGP WDE and can
cause serious disk problems, up to and including loss of data. Please note the
following known interoperability issues, and please review the PGP Desktop
Release Notes for the latest updates to this list.
Software that is not compatible:
Faronics Deep Freeze (any edition)
Utimaco Safeguard Easy 3.x
Absolute Software's CompuTrace laptop security and tracking product.
PGP Whole Disk Encryption is compatible only with the BIOS configuration
of CompuTrace. Using CompuTrace in MBR mode is not compatible.
Hard disk encryption products from GuardianEdge Technologies:
Encryption Anywhere Hard Disk and Encryption Plus Hard Disk products,
formerly known as PC Guardian products.
The following programs co-exist with PGP Desktop on the same system, but
will block the PGP Whole Disk Encryption feature:
Safeboot Solo
SecureStar SCPP
Determining the Authentication Method for the Disk
When you encrypt a disk or partition using PGP Whole Disk Encryption, you
choose a method that determines how you will authenticate yourself to decrypt
the disk.
You have the following options:
Passphrase and Single Sign-On Authentication (on page 147)
Public Key Authentication (on page 147)
Token-Based Authentication (on page 147)
Two-Factor Authentication Using a USB Flash Device (on page 148)
Trusted Platform Module (TPM) Authentication (on page 148)
146

PGP® Desktop for Windows Protecting Disks with PGP Whole Disk Encryption
Note: On a multi-user system, be sure to create separate authentication
methods for each user.
Note: To authenticate users using Windows PE or BartPE, you must use
passphrase users. Token or TPM users are not supported.
Passphrase and Single Sign-On Authentication
With passphrase authentication, you specify a passphrase to use when you
reboot a computer with an encrypted boot disk or partition, or if you attempt to
access any other encrypted disk or partition. This method requires no additional
files or hardware, and can be used with fixed as well as removable disks.
You have two options with passphrase authentication:
You can choose a passphrase that you use only with PGP WDE.
You can synchronize your PGP WDE passphrase with your Windows
Account logon, so you only need to type your passphrase once to unlock
your encrypted disk or partition and to log in to Windows. If synchronized
with your Windows login, this option is known as Single Sign-On (SSO).
For instructions on setting up Single Sign-On, see Using PGP WDE Single
Sign-On (on page 167).
Public Key Authentication
With public-key authentication, you specify a public key when encrypting a disk
or partition using PGP Whole Disk Encryption. Only the holder of the
corresponding private key can access the contents of the disk or partition. To do
that, they must provide the passphrase of their private key.
Public key authentication is available only for removable disks you use with your
system. Fixed disks, including boot disks, partitions, or disks in USB enclosures,
can use either passphrase or token authentication—not public key
authentication.
Token-Based Authentication
If you are using the PGP WDE feature to encrypt a fixed disk (including your
boot disk or partition) and for authentication you want to use a PGP key on a
token, you must use a PGP keypair on a token or smart card that is compatible
with PGP WDE. For a list of compatible devices, see Using Smart Cards to
Authenticate at the PGP BootGuard Screen (see "Using Smart Cards or Tokens
to Authenticate at the PGP BootGuard Screen" on page 151).
Using a keypair on a token adds an extra level of security, as you can take the
token away with you.
147

PGP® Desktop for Windows Protecting Disks with PGP Whole Disk Encryption
Note that you must install the appropriate drivers for your device before you can
proceed with disk encryption. For more information, see Preparing a Token to
Use For Authentication (see "Preparing a Smart Card or Token to Use For
Authentication" on page 150).
Two-Factor Authentication Using a USB Flash Device
You can use two-factor authentication to increase the security of data on your
system. Two-factor authentication uses "something you know" (your
passphrase) and "something you have" (your USB flash device) to verify that you
are who you say you are and are entitled to access the disk.
With two-factor authentication, create a passphrase user and then select
another form of hardware to identify the user. Choose between using a USB
flash drive or, if the hardware is available on your system, Trusted Platform
Module (TPM).
Note: If you use a USB flash device for two-factor authentication, you must
reboot your computer with the USB device inserted in order for this
authentication method to take effect. Until you reboot with the USB device,
you can authenticate at the PGP BootGuard screen using only your
passphrase.
For more information on creating two-factor authentication using a USB flash
device, see Encrypting the Disk (on page 157).
Trusted Platform Module (TPM) Authentication
If Trusted Platform Module (TPM) hardware is available on your system, the
option to use TPM is available. Adding a user with TPM means that the user can
only authenticate to the disk on this particular system (the user is "locked" to the
system). TPM can be used only with passphrase users and works with Single
Sign-On.
PGP Whole Disk Encryption is compatible with TPM version 1.1 or 1.2.
Computers that support TPM and are compatible with PGP WDE include the
following:
Hewlett-Packard Compaq nx6325 (Infineon TPM with HP BIOS)
Dell D630 (Broadcom TPM)
Lenovo ThinkPad T60 (Atmel TPM)
Fujitsu LifeBook T2010, (Infineon TPM with Phoenix BIOS)
Panasonic Toughbook T5, W5, or Y5 (Infineon TPM with Matsushita BIOS)
Your TPM vendor may implement security features that affect usage of the
TPM. Please consult the documentation for your system for information.
148

PGP® Desktop for Windows Protecting Disks with PGP Whole Disk Encryption
Note: If you clear your TPM by resetting it to factory settings, or if your
system board containing the TPM is replaced, you will not be able to access
your encrypted disk when using the TPM user because your credentials
stored on the TPM are no longer accessible. Ensure that you have an
alternate method to access your encrypted disk (see the following section on
"Special Considerations when using TPM."
For more information on creating two-factor authentication using TPM, see
Encrypting the Disk (on page 157).
Why TPM?
Computers with TPM have an on-board secure random number generator which
can be queried and used as a source of random bits. It can generate, load, and
work with 2048 bit RSA keys. In addition, it has anti brute-forcing features. If an
incorrect passphrase is entered too many times, the TPM locks up or drastically
slows down its responses, making brute force passphrase guessing too slow to
be useful. This gives TPM keys protected by passphrases a much higher level
of security than is available with software.
Special considerations when using TPM
Before you encrypt your disk, be sure that you establish ownership of the
TPM on your system, configure the TPM, and then reboot your system
before starting the encryption process. When you take ownership you set
up a passphrase for TPM (separate from PGP Desktop or Windows) that is
used to edit the TPM. Establishing ownership allows you to configure and
use products with TPM.
Ensure that you have an alternate method of authenticating to your
encrypted disk. If you are using PGP WDE in a PGP Universal
Server-managed environment, you can use your Whole Disk Recovery
Token (for more information, see Creating a Recovery Token (on page
182)). If you are using PGP WDE in a standalone environment, create a
passphrase user as a backup, or create a passphrase user with a USB flash
device for two-factor authentication (for more information, see Encrypting
the Disk (on page 157)).
Setting Encryption Options
Once you have completed the tasks for getting your disk ready for encryption,
you should review the process for starting initial encryption:
1 Choose whether to encrypt the entire disk or specific partitions. See
Partition-Level Encryption (on page 150).
149

PGP® Desktop for Windows Protecting Disks with PGP Whole Disk Encryption
2 Choose options to use during encryption, such as power failure safety or
greater encryption speed. See Using PGP Whole Disk Encryption Options
(on page 154).
3 Select your choice of authentication. See Determine the Authentication
Method for the Disk (see "Determining the Authentication Method for the
Disk" on page 146).
Note: If you are using token-based authentication, make sure your token
is ready for use. See Preparing a Token to Use For Authentication (see
"Preparing a Smart Card or Token to Use For Authentication" on page
150).
4 Encrypt the disk as described in Encrypting a Disk or Partition (on page
155).
Note: If you are a PGP Universal Server-managed user, PGP WDE creates
a Recovery Token to use to recover disks for which the passphrase has
been forgotten. See Creating a Recovery Token (on page 182).
Partition-Level Encryption
If your disk is divided into partitions, you can choose to encrypt by partition,
rather than encrypting the entire disk. You can use this flexibility to encrypt:
One disk partition.
All disk partitions except one.
Any number of partitions in-between.
Only the files on the partition(s) that you have selected are encrypted.
Partition mode supports dual-booting with another operating system (such as
Linux) as long as you encrypt only your Windows partition. The other operating
system must be on another, non-encrypted partition.
Note: Once a disk or any of its partitions have been encrypted, you cannot
change the disk’s partitioning (for example, adding or removing a partition, or
resizing an existing partition). Make sure the disk is partitioned the way you
want it before protecting it with PGP Whole Disk Encryption.
Preparing a Smart Card or Token to Use For Authentication
If you choose to authenticate with a smart card or token, please note that you
must use a compatible device (for a list of compatible devices, see Using Smart
Cards to Authenticate at the PGP BootGuard Screen (see "Using Smart Cards or
Tokens to Authenticate at the PGP BootGuard Screen" on page 151)).
Use the proper token model.
150

PGP® Desktop for Windows Protecting Disks with PGP Whole Disk Encryption
Consider adding other users (a passphrase user, for example) to the
encrypted disk in case the token is ever lost.
Install the token’s drivers on the system on which you will use the token
before you use the token.
Requirements for Using Smart Cards or Tokens for Authentication
Please review these requirements and ensure you meet them prior to
encryption.
Warning: Using a keypair on a token to authenticate to a disk or partition
encrypted using PGP Whole Disk Encryption increases your security, but if
you lose the token you can no longer authenticate to the PGP BootGuard
login screen, and all the data on the disk or partition is lost. For this reason,
consider adding other users (passphrase, token, or both) to a disk or partition
encrypted using PGP Whole Disk Encryption. If your token is lost or stolen,
those additional users can authenticate and unlock the disk or partition for
you.
You can use only keypairs stored on the token. You must either create a
keypair on the Aladdin eToken, or send an existing keypair to the token by
choosing Add To from the right-click shortcut menu.
When you create a keypair on a token, or when you send an existing
keypair to the token, the passphrase to the private key of that keypair
changes to the PIN of the token. For an Aladdin eToken, the default PIN is
1234567890. Because this is a well-known default PIN, you should
immediately change the PIN using Aladdin’s configuration tools so that the
security of the keypair is not severely reduced.
Using Smart Cards or Tokens to Authenticate at the PGP BootGuard Screen
This section describes the system requirements (compatible smart cards/tokens
and readers) and provides instructions for using smart cards to authenticate at
the PGP BootGuard screen.
Compatible Smart Card Readers for PGP WDE Authentication
The following smart card readers are compatible when communicating to a
smart card at pre-boot time. These readers can be used with any compatible
removable smart card (it is not necessary to use the same brand of smart card
and reader).
Generic smart card readers
Most CCID smart card readers are compatible. The following readers have been
tested by PGP Corporation:
151

PGP® Desktop for Windows Protecting Disks with PGP Whole Disk Encryption
OMNIKEY CardMan 3121 USB for desktop systems (076b:3021)
OMNIKEY CardMan 6121 USB for mobile systems (076b:6622)
ActivIdentity USB 2.0 reader (09c3:0008)
SCM Microsystem Smart Card Reader model SCR3311
CyberJack smart card readers
Reiner SCT CyberJack pinpad (0c4b:0100).
ASE smart card readers
Athena ASEDrive IIIe USB reader (0dc3:0802)
Embedded smart card readers
Dell D430 embedded reader
Dell D630 embedded reader
Dell D830 embedded reader
Compatible Smart Cards or Tokens for PGP WDE Authentication
PGP Whole Disk Encryption is compatible with the following smart cards for
pre-boot authentication:
ActiveIdentity ActivClientCAC cards, 2005 model
Aladdin eToken PRO 64K, 2048 bit RSA capable
Aladdin eToken PRO USB Key 32K, 2048 bit RSA capable
Aladdin eToken PRO without 2048 bit capability (older smart cards)
Aladdin eToken PRO Java 72K
Aladdin eToken NG-OTP 32K
Note: Other Aladdin eTokens, such as tokens with flash, should work
provided they are APDU compatible with the compatible tokens. OEM
versions of Aladdin eTokens, such as those issued by VeriSign, should
work provided they are APDU compatible with the compatible tokens.
Athena ASEKey Crypto USB Token
Athena ASECard Crypto Smart Card Note: The Athena tokens are
compatible only for credential storage.
Axalto Cyberflex Access 32K V2
Charismathics CryptoIdentity plug 'n' crypt Smart Card only stick
EMC RSA SecurID 800 Rev A, B, and D
152

PGP® Desktop for Windows Protecting Disks with PGP Whole Disk Encryption
Note: This token is compatible only for key storage. SecurID is not
compatible.
EMC RSA Smart Card 5200
Marx CrypToken USB token
Rainbow iKey 3000
S-Trust StarCOS smart card
Note: S-Trust SECCOS cards are not compatible.
SafeNet iKey 2032 USB token
SafeNet 330 smart card
T-Systems Telesec NetKey 3.0 smart card
T-Systems TCOS 3.0 IEI smart card
Personal Identity Verification (PIV) cards
Oberthur ID-One Cosmo V5.2D personal identity verification cards using
ActivClient version 6.1 client software.
Giesecke and Devrient Sm@rtCafe Expert 3.2 personal identity verification
cards using ActivClient version 6.1 client software.
Required Drivers for the Aladdin eToken
Before you use the Aladdin eToken, install the latest software drivers on the
system on which you will be using the token. Microsoft Windows may
recognize the token generically if you do not install the software drivers, but
PGP Desktop requires the appropriate software drivers to be installed. You can
obtain the latest software drivers from the Aladdin Support Web site
(http://www.aladdin.com/support/default.asp).
Download the latest version of the eToken PKI Client (RTE) driver software
(version 4.5 was the current version when this document was written), then
install it on your system. When the installation of the eToken PKI client driver
software on your system is complete, open PGP Desktop and click the PGP
Keys control box. If the driver software was installed correctly, you see Smart
Card Keys listed in the PGP Keys control box.
If you see No suitable key available in the Select Key field when you specify
Token Key User as your method of authentication for the disk or partition you
are encrypting using PGP Whole Disk Encryption, it means one of several
things:
Your Aladdin eToken is not inserted.
The driver software is not the right version, or was not installed correctly.
The keypair on the token cannot be used, or there is no key on the eToken
(that is, the eToken is empty).
153

PGP® Desktop for Windows Protecting Disks with PGP Whole Disk Encryption
Using PGP Whole Disk Encryption Options
The PGP Whole Disk Encryption feature offers two options that you can select
prior to protecting your disk or partition:
Maximum CPU Usage. This is the fastest way to perform initial encryption
on your disk using PGP Whole Disk Encryption, yet it is just as safe. This
extra speed comes primarily by taking priority over other operations that
your computer is performing. Consider this option for a time when you are
away from your computer.
Power Failure Safety. While you can pause the initial encryption process
at any time by properly shutting down or restarting your computer, it is
exceptionally important to avoid unexpected shutdowns (power failures,
power cord gets pulled out, and so on). If this is a possibility for you—or if
you do not have an uninterruptible power supply for your
computer—consider choosing the Power Failure Safety option. When
Power Failure Safety is selected, encrypting is journaled; if the power
fails, the encryption process can safely and accurately resume where it
was interrupted. However, this option can cause initial encryption to take
several times longer to complete.
This is also useful when encrypting USB devices. Interrupting encryption by
removing a USB device during encryption can corrupt the device and
require that it be reformatted. Encrypting with Power Failure Safety mode
permits you to remove the USB device during encryption and resume
encryption once it is reinserted.
Use this table to help you decide which options are best for you:
Option
Selected Benefits Things to consider
Neither Option
(Normal)
Encrypts the disk or
partition with a good
combination of speed
and safety.
You can use the
computer while the disk
or partition is being
encrypted.
Best for most users.
Maximum CPU
Usage
Encrypts the disk or
partition more quickly
than Normal mode.
Despite additional
speed, is as safe as
encryption using Normal
Encryption runs at the
standard speed.
You must make sure that
the computer does not
shut down unexpectedly,
or data loss may occur.
This option takes
maximum computer
power, so your system is
much less responsive than
usual while the disk or
partition is being
encrypted.
154

PGP® Desktop for Windows Protecting Disks with PGP Whole Disk Encryption
Option
Selected Benefits Things to consider
mode.
Power Failure
Safety
Encrypts your disk or
partition using a method
with which it can safely
resume encryption
easily, even if power is
interrupted.
Takes much longer than
Normal mode.
Good for locations
where power loss is a
risk.
Both Options Protects the disk or Is still considerably slower
partition with the extra than Normal mode.
safety of Power Failure
Safety mode.
Works faster than
Power Failure Safety
mode alone.
Encrypting a Disk or Partition
Once you have prepared the disk and specified encryption options, you can
encrypt the disk or partition. Note the following before you begin:
If you are using a USB token for authentication to a fixed disk protected
using PGP Whole Disk Encryption, make sure you have the correct token
and you have installed the proper driver software. For more information,
see Token-Based Authentication (on page 147).
Note: Token-based authentication is not available for Single Sign-On.
Your system is somewhat slower than usual during the encryption process,
although it is fully usable. It returns to normal operation when the
encryption process is complete.
PGP Desktop automatically slows the encryption process if you are using
the system. The encryption process is faster if you avoid using your
computer during the initial encryption.
155

PGP® Desktop for Windows Protecting Disks with PGP Whole Disk Encryption
You can minimize or close PGP Desktop during encryption. This does not
affect the process, but it does improve the speed of the encryption
process.
To stop the encryption process for a short time, click Stop, then click
Pause on the dialog box. Click Resume to restart. You may need to
authenticate after you click Resume.
To shut down the system before the encryption process is over, perform a
normal shutdown. You do not need to pause the process. When you
restart, the encryption process automatically resumes where it left off.
You can only encrypt, decrypt, or re-encrypt one disk or partition at a time.
Once you begin an operation on a disk or partition, you cannot start
encrypting another one until the process is complete on the first. You
cannot circumvent this by pausing the first operation.
Supported Characters for PGP WDE Passphrases
The PGP Whole Disk Encryption feature supports alphanumeric characters,
punctuation characters, standard meta-characters, and extended ASCII
characters when creating passphrases. Tab and control characters are not
supported. As you choose a passphrase, please note the following.
The following characters are supported: abcdefghijklmnopqrstuvwxyz
ABCDEFGHIJKLMNOPQRSTUVWXYZ
0123456789
`~!@#$%^&*()_+={}\|:;[]'"<>,.?/-
The following table provides a list of characters that are not supported when
entered as part of a passphrase for the associated keyboard:
Keyboard
Italian `~
(Italy)
Hebrew abcdefghijklmnopqrstuvwxyz`
(Israel)
Russian
(Russia)
Bosnian
(Bosnia;
Cyrillic)
Bulgarian
(Bulgaria)
Polish
Unsupported Characters
abcdefghijklmnopqrstuvwxyzABCDEFGHIJKLMN
OPQRSTUVWXYZ`@#$^&{}|[]'<>~
abcdefghijklmnopqrstuvwxyzABCDEFGHIJKLMN
OPQRSTUVWXYZ
abcdefghijklmnopqrstuvwxyzABCDEFGHIJKLMN
OPQRSTUWXYZ'[]<>{}@#$^&*
[]|
156

PGP® Desktop for Windows Protecting Disks with PGP Whole Disk Encryption
(Poland;
214 keys)
Serbian abcdefghijklmnopqrstuvwxyzABCDEFGHIJKLMN
(Serbia; OPQRSTUVWXYZ[]{}|@^
Cyrillic)
Ukranian
(Ukraine)
abcdefghijklmnopqrstuvwxyzABCDEFGHIJKLMN
OPQRSTUVWXYZ'[]`<>{}|~@#$^&
Encrypting the Disk
Before you encrypt your disk, be sure to back it up so that you won’t lose any
data if your laptop or computer is lost, stolen, or you are unable to decrypt the
disk.
You can only encrypt, decrypt, or re-encrypt one disk or partition at a time. Once
you begin an operation on a disk or partition, you cannot start encrypting
another one until the process is complete on the first. You cannot circumvent
this by pausing the first operation.
Caution: While your disk is encrypting, do not accept any operating system
updates if they are offered. If the update occurs automatically, do not restart
your computer until the encryption process has completed.
To protect a disk or partition using PGP Whole Disk Encryption
1 Open PGP Desktop and click on the PGP Disk Control box. The PGP Disk
Control box highlights.
157
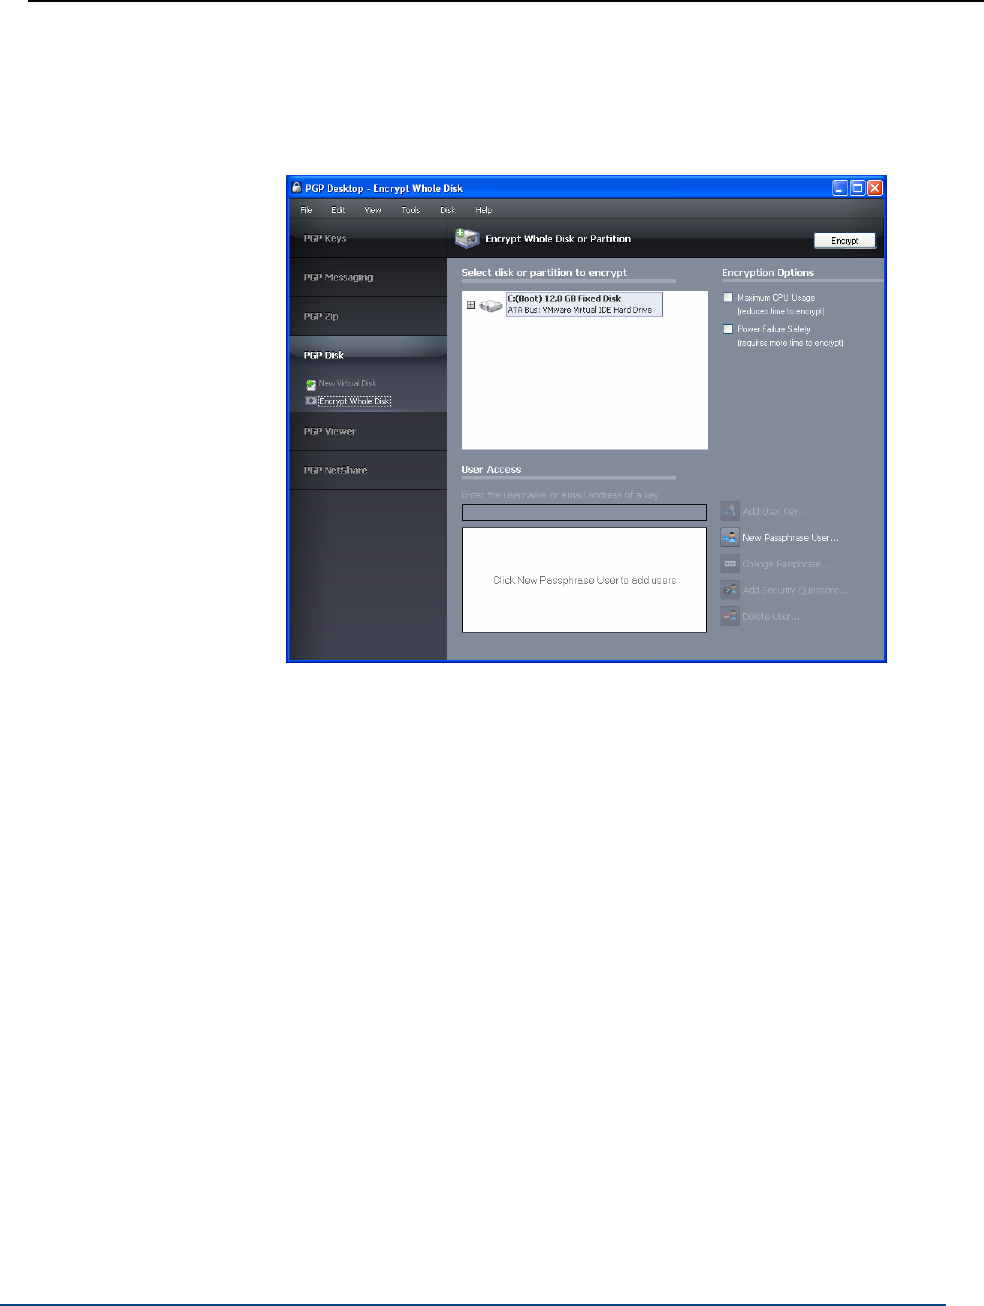
PGP® Desktop for Windows Protecting Disks with PGP Whole Disk Encryption
2 Click Encrypt Whole Disk. The Encrypt Whole Disk (Partition) work area
displays, and you see a listing of the disks on your system that can be
protected by PGP Whole Disk Encryption: disks, disk partitions, removable
media, and so on.
3 In the Encrypt Whole Disk (Partition) work area, in the Select disk or
partition to encrypt section at the top, click to select the disk or partition
on your computer that you want to protect using PGP Whole Disk
Encryption.
4 Choose the Encryption Options that you want to use, if any. For more
information about your choices, see Using PGP Whole Disk Encryption
Options (on page 154).
5 In the User Access section, specify how you want to access your
protected disk or partition:
Token-based Public Key User. If you are protecting a fixed
(non-removable) disk on your system.
Type the user name or email address associated with the key,
then press Enter to find the key. You can also select Add User
Key. A list of the keypairs on your keyring is displayed. From the
key source box, select the public key or keys that you want to
use. Click Add to move the keys to the Keys to add field and
then click OK. Click Encrypt.
Passphrase User. If you want to protect your disk or partition with a
passphrase, select New Passphrase User. The PGP Disk Assistant:
Whole Disk Encryption - New User dialog box is displayed.
158

PGP® Desktop for Windows Protecting Disks with PGP Whole Disk Encryption
To unlock your encrypted disk using your Windows Account
Logon, select Use Windows Password then click Next. In the
PGP Disk Assistant: Two Factor Authentication dialog box, select
Proceed with Passphrase Authentication only and click Next.
In the PGP Disk Assistant: Windows Account Logon dialog box,
type your Windows user name, domain, and password, and click
Next. Click Finish.
If you choose the Use Windows Password option, after initial
encryption, use your Windows password when the PGP BootGuard
screen is displayed at the start of booting. The PGP Single Sign-On
(SSO) feature logs into Windows for you—you only need to type
your passphrase once. (This is the Single Sign-On feature. For more
information, see Using PGP WDE Single Sign-On (on page 167).)
To unlock your encrypted disk or partition using a new
passphrase, select Create New Passphrase, then click Next. In
the PGP Disk Assistant: Two Factor Authentication dialog box,
select Proceed with Passphrase Authentication only and click
Next. In the PGP Disk Assistant: Create Username and
Passphrase dialog box, type the name of the new user and the
passphrase you want associated with the user. Type the
passphrase again in the Confirm field and click Next. Click
Finish.
To unlock your encrypted disk or partition using two-factor
authentication with a passphrase and USB flash drive, select
Create New Passphrase, then click Next.
In the PGP Disk Assistant: Two Factor Authentication dialog box,
select Generic USB Flash Device, select the device from the list,
and click Next. In the PGP Disk Assistant: Create Username and
Passphrase dialog box, type the name of the new user and the
passphrase you want associated with the user. Type the passphrase
again in the Confirm field and click Next. Click Finish.
To unlock your encrypted disk or partition using two-factor
authentication with a passphrase and TPM, select Create
New Passphrase, then click Next. In the PGP Disk Assistant:
Two Factor Authentication dialog box, select Trusted Platform
Module, and click Next. In the PGP Disk Assistant: Create
Username and Passphrase dialog box, type the name of the new
user and the passphrase you want associated with the user.
Type the passphrase again in the Confirm field and click Next.
Click Finish.
Normally, as an added level of security, the characters you type for the
passphrase are not visible on the screen. However, if you are sure that no
one is watching (either physically over your shoulder or scanning for the
radio waves emitted by your monitor) and you would like to see the
characters of your passphrase as you type, select the Show Keystrokes
checkbox. See The Passphrase Quality Bar (on page 306).
159

PGP® Desktop for Windows Protecting Disks with PGP Whole Disk Encryption
Caution: It is strongly recommended that you use a supported keyboard
layout when you are creating a passphrase for your disk or partition
protected with PGP Whole Disk Encryption (for more information, see
Supported Keyboards (on page 142)). The Whole Disk Encryption log-in
screen assumes you are using one of these keyboard layouts when you
type your passphrase to authenticate. Using a different keyboard layout
could result in problems authenticating. For more information, see
Authenticating at the PGP BootGuard Screen (on page 161).
6 Confirm that you have the user access arrangement that you want, then
click Encrypt.
7 Read the information in the dialog box, and then click OK.
8 To see how much of the disk has been encrypted, refer to the Encryption
Progress bar.
9 To stop the encryption process temporarily, click Stop, then click Pause in
the dialog box is displayed. To resume, click Resume. You may be
prompted for the appropriate passphrase.
Note: If the encryption process stops and PGP Desktop indicates a disk
read/write error, it means that PGP Desktop has encountered bad sectors
on your disk or partition during the encryption process. You can continue
encryption or abort the process and fix the errors. See Encountering Disk
Errors During Encryption (on page 160). If you are using PGP Desktop in a
PGP Universal Server-managed environment, the bad sectors
encountered during encryption are logged to the PGP Universal Server
and the encryption process continues.
When the encryption process completes, the User Access section displays
the user you used to encrypt the disk with, and additional user access
options become available so you can add a new user, change the
passphrase, or delete a user.
10 Once your disk has been encrypted, PGP Corporation recommends that
you then create a recovery disk. For more information, see Creating
Recovery Disks (see "Creating and Using Recovery Disks" on page 183).
Encountering Disk Errors During Encryption
Note: If you are using PGP Desktop in a PGP Universal Server-managed
environment, the bad sectors encountered during encryption are logged to
the PGP Universal Server and the encryption process continues.
Many hard disks have bad sectors. If PGP WDE encounters bad disk sectors
during encryption, encryption pauses. You are warned that PGP WDE has
encountered disk errors. (Note that these errors are unrelated to encryption;
they are an indication that your hard disk needs maintenance.)
You can do one of the following:
160

PGP® Desktop for Windows Protecting Disks with PGP Whole Disk Encryption
Force encryption to continue by clicking Yes. Disk errors are frequently
encountered and often harmless. Clicking Yes will continue the encryption
process and PGP WDE will ignore further errors.
Stop encryption by clicking No, completely decrypt the disk, and then
repair the disk errors using a tool such as SpinRite or Norton Disk Doctor
before making another attempt to encrypt the disk. If you know that your
disk is seriously fragmented or has many bad sectors, you should
immediately perform the maintenance that your hard disk needs before
encrypting the disk.
Using a PGP WDE-Encrypted Disk
Your computer boots up in a different way once you use PGP Whole Disk
Encryption to protect the boot disk—or a secondary fixed disk—on your system.
On power-up, the first thing you see is the PGP BootGuard log-in screen asking
for your passphrase.
PGP WDE then decrypts the disk. If you enabled the Single Sign-On feature
(that is, you synchronized your PGP WDE passphrase with your Windows
Account logon), you are also logged on to Windows.
When you use a PGP WDE-encrypted disk, it is decrypted and opened
automatically as needed. With most modern computers, after the disk is
completely encrypted, there is no noticeable slowdown of your activities.
Once you unlock a disk or partition, its files are available to you—as well as
anyone else who can physically use your system. Your files are unlocked until
you lock them again by shutting down your computer.
Warning: Because your files remain unlocked until you lock them again, you
may want to use a PGP Virtual Disk volume for files that need to be secured
even while your computer is in use. See Using PGP Virtual Disks (on page
191).
When you shut down a system with an encrypted boot disk or partition, or if
you remove an encrypted removable disk from the system, all files on the disk
or partition remain encrypted and fully protected—data is never written to the
disk or partition in an unencrypted form. Proper authentication (passphrase,
token, or private key) is required to make the files accessible again.
Authenticating at the PGP BootGuard Screen
The PGP BootGuard log-in screen prompts you for the proper passphrase for a
protected disk or partition for one of two reasons:
161

PGP® Desktop for Windows Protecting Disks with PGP Whole Disk Encryption
If your boot disk or partition is protected using PGP Whole Disk Encryption,
you must authenticate correctly for your system to start up. This is required
because the operating system files that control system startup are
encrypted, and must be decrypted before they can be used to start up the
system. The PGP Single Sign-On feature also logs into Windows for you, if
you chose the SSO option when you first encrypted the boot disk or
partition.
If a secondary fixed disk or partition is protected using PGP Whole Disk
Encryption, you can authenticate at startup so that you don’t have to
authenticate later when you need to use files on the secondary disk or
partition. Because the files on the secondary (non-boot) disk or partition are
not required for startup, you are not required to authenticate at startup. If
you have administrative rights, and your PGP Universal Server policy allows
for it, you can use the Bypass feature to skip authentication at startup. You
are then asked to authenticate later, when you try to use files on the
secondary disk or partition.
Note: The PGP BootGuard log-in screen accepts the authentication
information from any user configured for an encrypted disk or partition. For
example, if you have two users configured for a boot disk or partition and two
different users configured for a secondary fixed disk or partition on the same
system, any of the four configured users can use their passphrase to
authenticate on the PGP BootGuard log-in screen at startup, even the two
users configured on the secondary disk or partition.
On the PGP BootGuard log-in screen you can:
Authenticate an encrypted boot or secondary disk or partition on the
system.
View information about the disks or partitions on your system and access
the Bypass feature (Bypass can be used by users with administrative rights
only if PGP Universal Policy allows it).
Choose your keyboard layout.
If you are using PGP Desktop in a PGP Universal Server-managed environment,
your PGP administrator may have customized the PGP Whole Disk Encryption
BootGuard screen to include additional text or a custom image such as your
organization's logo. The graphics included in this guide depict the default
installation. Your actual login screen may look different if your administrator has
customized the screen.
To authenticate using the PGP BootGuard log-in screen
1 Start or restart the system that has a disk or partition protected by PGP
Whole Disk Encryption. On startup, the PGP BootGuard log-in screen is
displayed.
162
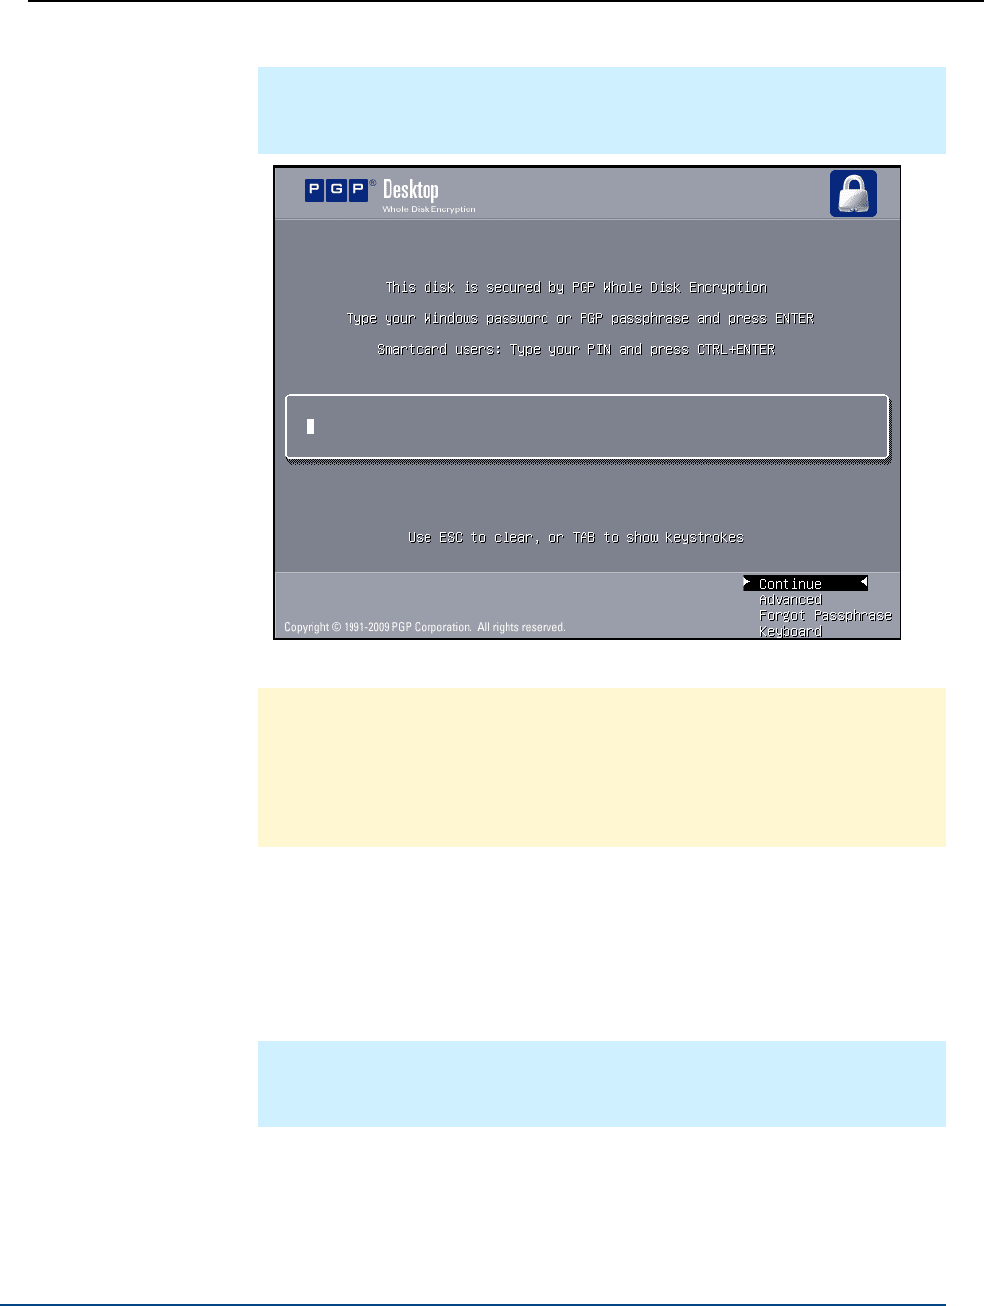
PGP® Desktop for Windows Protecting Disks with PGP Whole Disk Encryption
Note: If you are using a USB device for two-factor authentication, be sure
the USB device is properly inserted before you start or restart your
system.
2 Type a valid passphrase or Windows password and press Enter.
Caution: The PGP BootGuard log-in screen assumes you are using one of
the supported keyboard layouts when you type your passphrase. If you
used a different keyboard layout to create the passphrase for a disk or
partition protected by PGP Whole Disk Encryption, you could have
problems authenticating because the mappings between the keyboard
layouts may be different. See Selecting Keyboard Layouts (on page 165).
To see the characters you type, press Tab before you begin typing.
If you make a typing error, or think you might have made a typing error,
press Esc to clear all characters and start again.
If local self recovery has been configured and you have forgotten your
passphrase, select Forgot Passphrase. For more information, see Using
Local Self Recovery (see "If you Forgot Your Passphrase" on page 175).
Note: Token authentication in PGP BootGuard requires pressing
Ctrl+Enter instead of just Enter. You may also experience some delay
during the authentication of tokens in PGP BootGuard.
3 If you typed a valid passphrase, the PGP BootGuard log-in screen goes
away and the system boots normally.
When you first encrypted the boot disk, if you chose to use your Windows
Account Logon to authenticate, the PGP Whole Disk Encryption feature
logs into Windows for you. You only need to type your passphrase once.
163
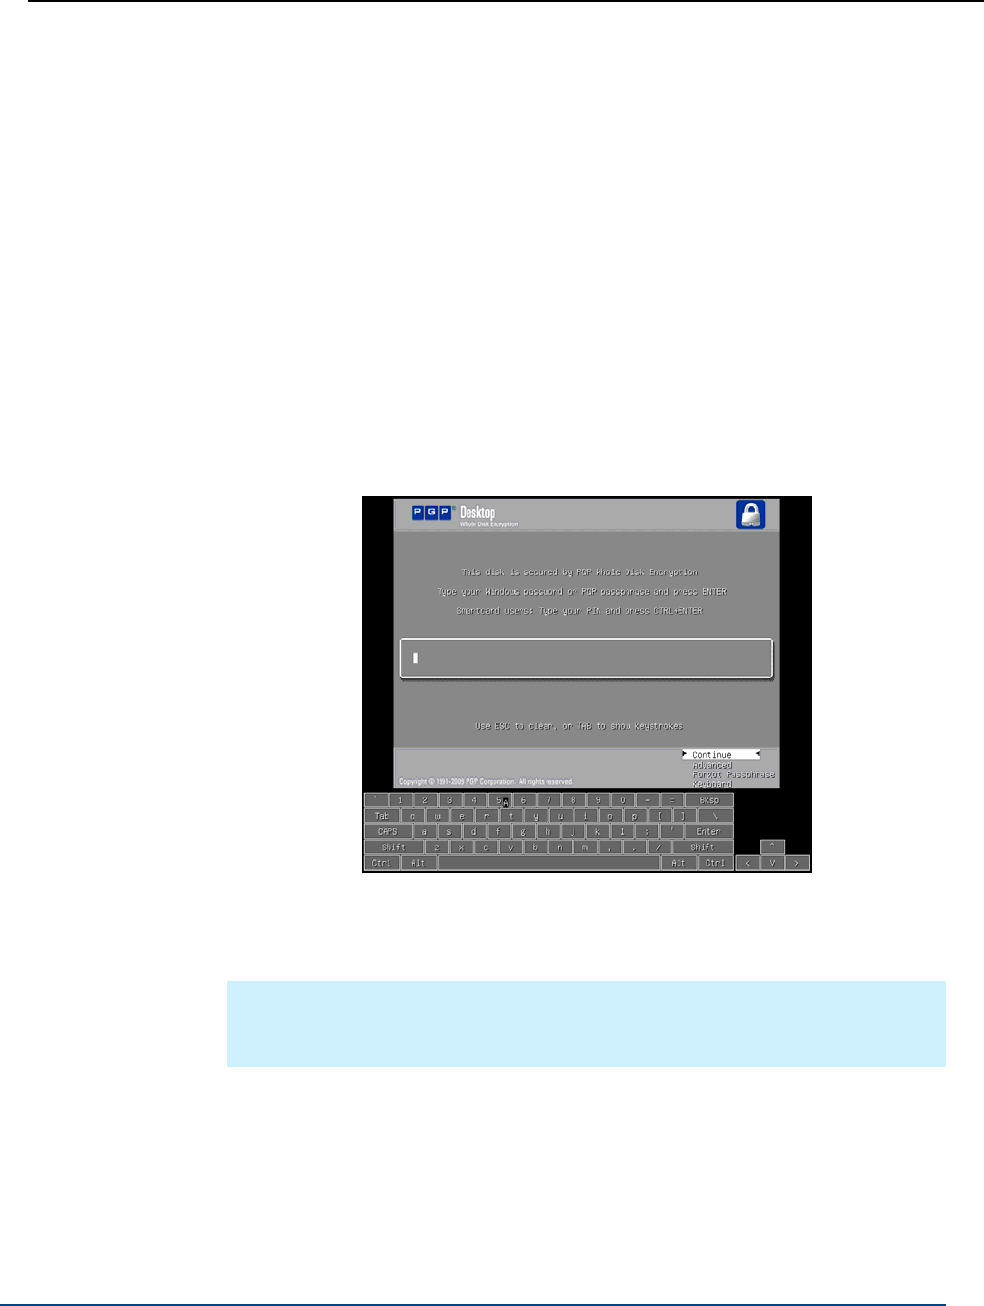
PGP® Desktop for Windows Protecting Disks with PGP Whole Disk Encryption
If you typed an invalid passphrase, an error message is displayed. Try
typing the passphrase again.
Authenticating Using a Virtual Keyboard on a Tablet PC
This section describes how to use a virtual keyboard on your Tablet PC to enter
your passphrase and authenticate at the PGP BootGuard screen.
The following instructions describe how to use the virtual keyboard displayed at
the PGP BootGuard screen. If you have docked your system or have an external
keyboard connected directly to your system, you can also use that keyboard to
authenticate.
To use the virtual keyboard
1 When you reboot your computer, the PGP BootGuard screen appears. On
this screen is a virtual keyboard.
2 Enter your passphrase using the virtual keyboard (using a pen or your
fingertip).
3 When you are finished, on the virtual keyboard press the Enter key.
Note: The Continue and Advanced menu items displayed in the PGP
BootGuard screen are not buttons and cannot be selected using the touch
screen on your Tablet PC.
Audible Sounds During Authentication
If you are using PGP Desktop in a PGP Universal Server-managed environment,
and your PGP administrator has enabled this option, your system makes audible
sounds during PGP BootGuard authentication. There are three different tone
pairs to indicate when to enter a passphrase, and the success or failure of
authentication.
164

PGP® Desktop for Windows Protecting Disks with PGP Whole Disk Encryption
Each indicator starts with a middle sound and the second sound is higher, the
same, or lower.
When the system is first ready for passphrase/pin entry, the middle-middle
(ready) sound is played. When you hear this sound, enter your passphrase
and press Enter.
After you have entered a passphrase, the tones played depend on the
success or failure of the passphrase:
If passphrase authentication succeeded, the middle-high sound is
played. The system then continues booting.
If passphrase authentication failed, the middle-low sound is played.
The PGP BootGuard authentication screen is displayed and the
passphrase field is cleared so you can re-enter your passphrase.
Note that these sounds cannot be customized by your PGP administrator. The
administrator can specify only if audible sounds are enabled during PGP
BootGuard authentication.
Becoming Locked Out at the PGP BootGuard Screen
If you are using PGP Desktop in a PGP Universal Server-managed environment,
your PGP administrator may have specified a PGP BootGuard lockout. You are
"locked out" if you exceed the maximum allowed number of passphrase
attempts at the PGP BootGuard screen. This applies only to passphrase users
(token or TPM users are not affected).
To remove the lockout, please contact your PGP administrator.
Selecting Keyboard Layouts
The PGP Whole Disk Encryption log-in screen supports the following keyboard
layouts:
Belgian (Belgium; Comma)
Belgian (Belgium; Period)
Bosnian (Bosnia)
Bosnian (Bosnia; Cyrillic)
Bulgarian (Bulgaria)
Bulgarian (Bulgaria; Latin)
Bulgarian (Bulgaria; Typewriter)
Canadian Multilingual Standard (Canada)
Chinese Simplified (China, Singapore)
Chinese Traditional (Hong Kong, Taiwan)
Croatian (Croatia)
165

PGP® Desktop for Windows Protecting Disks with PGP Whole Disk Encryption
Czech (Czech Republic; QWERTY)
Danish (Denmark)
Dutch (The Netherlands)
English (United States)
English (United Kingdom)
English (US-International)
Estonian (Estonia)
Finnish (Finland)
French (Belgium)
French (Canada)
French (France)
French (Switzerland)
German (Germany/Austria)
German (IBM)
German (Switzerland)
Hebrew (Israel)
Hungarian (Hungary)
Hungarian (Hungary; 101 keys)
Icelandic (Iceland)
Irish (Ireland)
Italian (Italy)
Italian (Italy; 142 keys)
Japanese (Japan)
Korean (Korea)
Norwegian (Norway)
Polish (Poland; Programmers)
Polish (Poland; 214 keyboard)
Portuguese (Brazil; ABNT keyboards)
Portuguese (Brazil; ABNT2 keyboards)
Portuguese (Portugal)
Romanian (Romania)
Russian (Russia; Cyrillic)
Serbian (Serbia and Montenegro; Cyrillic)
Serbian (Serbia and Montenegro; Latin)
166

PGP® Desktop for Windows Protecting Disks with PGP Whole Disk Encryption
Slovak (Slovakia)
Slovenian (Slovenia)
Spanish (Spain)
Spanish (Latin America)
Spanish Variation
Swedish (Sweden)
Turkish (Turkey; F)
Turkish (Turkey; Q)
Ukrainian (Ukraine)
Different keyboard layouts can have different mappings between characters,
potentially causing problems when you enter your passphrase to authenticate.
Select the keyboard layout that most closely maps to the keyboard you are
using, then make sure to use that same layout each time you authenticate.
To select a keyboard layout
1 Start or restart the system with the disk or partition protected by PGP
Whole Disk Encryption. On startup, the PGP BootGuard log-in screen is
displayed.
2 Press the down arrow on your keyboard until Keyboard is highlighted.
3 Press Enter. The Keyboard layouts screen is displayed.
4 Press Tab to move focus to the list of keyboard layouts, then use the up
and down arrows on your keyboard to select the desired keyboard layout.
5 Press Tab again. The Go Back option highlights.
6 Press Enter. The PGP BootGuard log-in screen is displayed again.
Using PGP WDE Single Sign-On
Single Sign-On allows you to use your existing Windows passphrase to both
authenticate to your PGP WDE-encrypted drive and automatically log you into
Windows.
How does Single Sign-On Work?
Single Sign-On utilizes one of the methods Microsoft Windows provides for
customizing the Windows login experience. PGP WDE uses your configured
authentication information to dynamically create specific registry entries when
you attempt to log in.
167

PGP® Desktop for Windows Protecting Disks with PGP Whole Disk Encryption
Note: Your Windows password is never stored in the registry, nor in any
form on the disk—neither encrypted, nor as cleartext.
Prerequisites for Using Single Sign-On
You must have PGP Whole Disk Encryption installed.
Local users and Single Sign-On
If a computer is not a member of a domain, PGP Whole Disk Encryption
automatically disables certain User Access features when a Single Sign-On user
is added to a disk, including 'Use Welcome Screen' and 'Fast User Switching'
(which relies on the welcome screen), such that it then makes the Windows
Security panel available when using the Ctrl+Alt+Delete key combination.
These features are already automatically disabled if computers are members of
a domain.
Encrypting the Disk to Use Single Sign-On
To encrypt the disk to use Single Sign-On
1 Click the PGP Disk control box, then select Encrypt Whole Disk.
2 Select the disk or partition that you would like to encrypt, and choose the
PGP Whole Disk Encryption options that you would like, if any. For
information on these options, see Setting Encryption Options (on page
149).
3 In the User Access section, select New Passphrase User.
4 Select Use Windows Password, and then click Next.
5 Type your Windows login password, and then click Finish.
PGP Whole Disk Encryption verifies that your name is correct across the
domain, and that the Windows password is correct. PGP Whole Disk
Encryption also checks your password to make sure that it contains only
allowable characters. If your password does contain any such characters,
you are not allowed to continue. See Supported Characters for PGP WDE
Passphrases (on page 156) for information on allowable characters.
6 Click Encrypt, and then click OK.
168

PGP® Desktop for Windows Protecting Disks with PGP Whole Disk Encryption
Multiple Users and Single Sign-On
You can configure up to 28 users for Single Sign-On. PGP Corporation,
however, recommends limiting the number of Single Sign-On users to the
fewest possible persons who must share the system. While technically feasible
to do so, a large number of users sharing a single, encrypted computer is not a
secure solution, and PGP Corporation discourages this practice.
Note: The Single Sign-On feature is passphrase-only; you cannot utilize
Single Sign-On with users' keys, nor is the feature compatible with smart
cards or tokens.
Logging in with Single Sign-On
Once you have configured Single Sign-On, when you start up the system, the
PGP BootGuard screen is displayed. If you provide the correct user name and
password PGP WDE logs you in to the Windows session and provides access
to those disk partitions encrypted with PGP WDE.
Changing Your Passphrase With Single Sign-On
To synchronize your Windows password changes with PGP WDE, you must
change your password for Single-Sign On using the Change Password…
feature in the Windows Security dialog box, which you access by pressing
CTRL+ALT+DEL.
To change your passphrase
1 Press Ctrl+Alt+Delete.
2 Type your old password.
3 Type and confirm your new password.
4 Click OK.
Single Sign-On automatically and transparently synchronizes with this new
password. You can use the new password immediately, in your next login
attempt.
Caution: If you change your password in any other manner—via Domain
Controller, the Windows Control Panel, via the system administrator, or from
another system—your next login attempt on the PGP BootGuard screen will
fail. You must then supply your old Windows password. Successful login on
the PGP BootGuard screen using your old Windows password then brings up
the Windows Login username/password screen. You must then log in
successfully using your new Windows password, at which time PGP WDE
will synchronize with the new password.
169

PGP® Desktop for Windows Protecting Disks with PGP Whole Disk Encryption
Displaying the Windows Login dialog box
When using PGP WDE with SSO, once you have successfully entered your
passphrase at the PGP BootGuard, you are automatically logged in to your
computer. As soon as Windows has started up, your Windows desktop is
displayed.
However, there may be times when you need to log in to your system using the
Windows Login dialog box, rather than automatically logging in. For example,
you may need to access certain network dialog boxes, such as your corporate
VPN, that might be bypassed using SSO.
To skip PGP WDE SSO login and display the Windows Login
1 Log in to your computer at the PGP BootGuard screen as usual by entering
your passphrase and pressing Enter.
2 When the Microsoft Windows splash screen is displayed, press and hold
the Shift key until the Windows Login dialog box is displayed. Note that you
can press the Shift key when the splash screen is about halfway through
the Windows boot process.
3 When the Windows Login dialog box is displayed, enter the information to
log in to your system.
Maintaining the Security of Your Disk
The following sections describe how to work with your disk once you have
encrypted it with PGP WDE.
Getting Disk or Partition Information
To see read-only disk or partition information on the Advanced PGP
BootGuard log-in screen
1 Start or restart the system that has a disk or partition protected using PGP
Whole Disk Encryption. On startup, the PGP BootGuard log-in screen is
displayed.
2 Press the down-facing arrow on your keyboard. In the lower right corner,
Advanced highlights.
3 Press Enter. The Advanced PGP BootGuard log-in screen is displayed.
This screen displays the following information:
170

PGP® Desktop for Windows Protecting Disks with PGP Whole Disk Encryption
All disks or partitions on the system, including the encryption status of
disks or partitions protected using PGP Whole Disk Encryption.
The computer name (if allowed by PGP Universal Server policy). Note
that if you just changed your computer name, it is not updated in this
screen until you log out or restart your system.
The computer ID.
The disk or partition that is currently selected, and whether the
Bypass feature is available for the selected disk or partition. (The
Bypass feature can be used only by users with administrative rights
on the system and if your PGP Universal Server policy allows it.)
4 To return to the PGP BootGuard log-in screen, highlight Go Back in the
lower right corner of the screen, then press Enter.
Modifying the System Partition
Do not make any changes to the system partition on a boot disk that has been
encrypted by PGP WDE; it will fail to boot properly on the next startup. If you
must make changes to the partitioning of an encrypted disk, decrypt the disk
first and then make the partition changes.
Using the Bypass Feature
Note: This feature is available only for users who have administrative rights
on the system and your PGP Universal Server policy allows it.
With the Bypass feature, you can skip authentication at startup. If your boot disk
or partition is not protected using PGP Whole Disk Encryption, but a different
fixed disk or partition on your system is, the PGP BootGuard log-in screen is
displayed at startup. You can use the Bypass feature to skip authentication so
the boot disk or partition can start up.
Caution: You can use the Bypass feature only if your boot disk or partition is
not protected using PGP Whole Disk Encryption. If your boot disk or partition
is protected and you do not authenticate, the operating system does not load
and the computer does not boot.
To use the Bypass feature
1 Start or restart the system with the disk or partition protected using PGP
Whole Disk Encryption. On startup, the PGP BootGuard log-in screen is
displayed.
2 Press the down arrow on your keyboard. In the lower right corner,
Advanced highlights.
3 Press Enter. The Advanced PGP BootGuard log-in screen is displayed.
171

PGP® Desktop for Windows Protecting Disks with PGP Whole Disk Encryption
4 Press the down arrow on your keyboard again. In the lower right corner,
Bypass highlights.
5 Press Enter. The PGP BootGuard Advanced log-in screen stops displaying,
and the system boots normally.
Adding Other Users to an Encrypted Disk or Partition
The user who creates an encrypted disk or partition can make it available to
others. These additional users can access the encrypted disk or partition using
their own unique passphrase, private key, or token (including PIV cards). You
can have up to 120 users per encrypted disk.
To determine what type of user is associated with the encrypted disk, move
your cursor over the user's name in the User Access list. A "hint" is displayed
showing the type of user. A token key icon is used to indicate a token user and
the Windows Domain/User Name is displayed for an SSO user.
Caution: Having multiple users who can access a disk or partition protected
by PGP Whole Disk Encryption serves as a backup in case one person forgets
their passphrase or loses their authentication token. Users configured for an
encrypted disk or partition can authenticate to the PGP Whole Disk
Encryption log-in screen to unlock any protected disk or partition on that
system.
To add additional users to a disk or partition protected by PGP Whole
Disk Encryption
1 Click the PGP Disk Control box on the left pane of the PGP Desktop main
screen.
2 Select the encrypted disk or partition to which you want to add another
user in the list of disks at the top of the PGP Disk Work area.
3 Click New Passphrase User. The Select User Type dialog box is displayed.
4 Follow the instructions provided in the User Access step in Encrypting the
Disk (on page 157).
Note: Public key encryption is the most secure protection method when
adding other users to disks or partitions encrypted with PGP Whole Disk
Encryption because: (1) There is no need to reveal passphrases to new users,
so the risk of passphrases being intercepted or overheard is minimal. (2)
Other users do not need to memorize another passphrase. (3) It is easier to
manage lists of users if each uses their own private key to access the disk. If
you are protecting a boot disk or partition with PGP Whole Disk Encryption,
the public key must be on a token.
172

PGP® Desktop for Windows Protecting Disks with PGP Whole Disk Encryption
Deleting Users From an Encrypted Disk or Partition
At some point you may want to remove the ability of a user to access an
encrypted disk or partition.
To remove a user from an encrypted disk or partition
1 On the Encrypt Whole Disk (Partition) screen, select the appropriate disk or
partition protected by PGP Whole Disk Encryption.
2 From the User Access list, select the name of the user you want to
remove.
3 Click Delete User. The Passphrase dialog box is displayed, prompting you
to authenticate.
4 Type a valid passphrase, then click OK. The alternate user is removed.
Changing User Passphrases
If you are using Single Sign-On, change your password as described in
Changing Your Passphrase when the Single Sign-On Feature is Used (on page
174).
To change user passphrases on an encrypted disk or partition
1 On the Encrypt Whole Disk (Partition) screen, select the appropriate disk or
partition protected by PGP Whole Disk Encryption.
2 In the User Access list, select the name of the user whose passphrase you
want to change.
3 Click Change Passphrase. You are prompted to type the current
passphrase.
4 Type the appropriate passphrase, then click OK. The Change User
Passphrase dialog box is displayed.
5 Type a new passphrase.
6 In the Confirm Passphrase field, type the new passphrase again, then click
OK. The passphrase is changed.
The Passphrase Quality bar provides a basic guideline for the strength of
the passphrase you are creating. For more information, see The
Passphrase Quality Bar (on page 306).
Normally, as an added level of security, the characters you type for a
passphrase are not visible on the screen. If you would like to see the
characters of your passphrase as you type, select the Show Keystrokes
check box.
173

PGP® Desktop for Windows Protecting Disks with PGP Whole Disk Encryption
Changing Your Passphrase when the Single Sign-On Feature is Used
If you opt for the PGP Whole Disk Encryption Single Sign-On feature, it is
recommended that you change your passphrase using the Change Password
feature in the Windows Security dialog box.
Note: You can access the Windows Security dialog box by pressing
CTRL+ALT+DEL.
To change your passphrase while using the Single Sign-On feature
1 Press Ctrl+Alt+Delete. The Windows Security dialog box is displayed.
2 Type your old passphrase.
3 Type and confirm your new passphrase.
4 Click OK. Your Windows password and PGP Whole Disk Encryption
passphrase are changed together. Use the new passphrase during your
next login attempt.
Caution: If you change your passphrase in any manner other than the one
described here, your next login attempt on the PGP BootGuard screen will
fail. You must then supply your old passphrase. Successful login on the PGP
BootGuard screen using your old passphrase then brings up the Windows
Login username/password screen. You must then log in successfully using
the Windows Login screen, at which time the PGP Whole Disk Encryption
feature will synchronize with the new passphrase.
Local users and the PGP Whole Disk Encryption Single Sign-On Feature
If a computer is not a member of a domain, PGP Whole Disk Encryption
automatically ensures that users must sign in using Ctrl+Alt+Delete. It does
that by disabling certain Windows user access features, including the Use
Welcome Screen and Ctrl+Alt+Delete options after a Single Sign-On user has
been added.
These features are automatically disabled when a computer is member of a
domain.
Re-Encrypting an Encrypted Disk or Partition
Consider re-encrypting a protected disk or partition that you suspect of having a
passphrase or authentication token that has been compromised, or if users
have been removed who previously had access.
174

PGP® Desktop for Windows Protecting Disks with PGP Whole Disk Encryption
To re-encrypt a disk or partition, the PGP Whole Disk Encryption feature uses
the same encryption algorithm (AES256)—but a different underlying encryption
key—to encrypt the disk or partition again. The result is as if you decrypted the
disk or partition and encrypted it again, but much faster.
Note: Re-encryption applies to all partitions that are already encrypted.
Selecting one partition to encrypt implies all partitions on the same disk that
are already encrypted would be re-encrypted one by one.
To re-encrypt an encrypted disk or partition
1 Select the appropriate encrypted disk or partition.
2 Select Disk > Re-Encrypt. You are prompted to authenticate.
3 Type the appropriate passphrase, then click OK. The re-encryption process
begins.
If you Forgot Your Passphrase
If you forgot your passphrase, and if your system is configured for it, you can
bypass PGP BootGuard by answering three out of five security questions
correctly. You create and answer the five security questions. This is similar to
recovering your key if you lost the key or forgot the passphrase for the key.
Note: If you are using PGP Desktop in a PGP Universal Server-managed
environment, your PGP Universal Server administrator may have disabled the
option for local self recovery. Your administrator may also have specified that
local self recovery be configured during enrollment. In this case, you are
prompted to enter the security questions as you set up PGP Desktop.
To create your security questions
1 Using PGP Desktop, encrypt your internal drive. You can use either a
Passphrase user or a Windows SSO user.
2 Right-click the user's name in PGP Desktop and select Add Security
Questions.
Note: You cannot create security questions for the WDE-Admin user or
the ADK.
3 Create and answer the five security questions. The user's name is
displayed with LSR to the right (and a tool tip), to indicate that "local self
recovery" has been configured for the user.
175

PGP® Desktop for Windows Protecting Disks with PGP Whole Disk Encryption
To recover your passphrase at PGP BootGuard
1 At the PGP BootGuard screen, use the arrow keys to select Forgot
Passphrase and press Enter.
2 Answer the first security question displayed. Type the answer and press
Enter.
3 Continue to answer the questions. You must answer three of the five
questions correctly.
4 When you have answered the questions correctly, the Windows operating
system begins to start up. When the Log On to Windows dialog box is
displayed, enter your Windows login name and password.
When Windows has finished launching, the PGP Disk - Change User
Passphrase dialog box is displayed.
5 Enter and confirm a new passphrase for the user, and click OK. The new
passphrase is created for the user.
The Passphrase Quality bar provides a basic guideline for the strength of
the passphrase you are creating. For more information, see The
Passphrase Quality Bar (on page 306).
Normally, as an added level of security, the characters you type for a
passphrase are not visible on the screen. If you would like to see the
characters of your passphrase as you type, select the Show Keystrokes
check box.
The same security questions are displayed if you forget your passphrase again.
If you want to change your security questions, right-click the user name and
select Create Security Questions.
176

PGP® Desktop for Windows Protecting Disks with PGP Whole Disk Encryption
Backing Up and Restoring
While most modern backup programs have no problem backing up the data on a
PGP WDE-encrypted disk, some other backup programs do have problems with
it. These other backup programs fail when they encounter the file PGPWDE01,
a file used by PGP WDE. The solution is to have these programs exclude
PGPWDE01 from the backup (most backup programs let you exclude individual
files). Once you get your backups working again with these programs, it is a
good idea to test the backup to make sure it works.
Using Automatic Backup Software on a PGP WDE-Encrypted Disk
You can automatically back up the disk or partition once protected with PGP
WDE. Be sure to back up your system first before you encrypt it with PGP
WDE.
It is important to note that any files the software backs up are decrypted before
being backed up. To back up encrypted data, use a PGP Virtual Disk or PGP
NetShare protected folders.
Uninstalling PGP Desktop from Encrypted Disks or Partitions
If you have any disks or partitions on your system that are protected by PGP
Whole Disk Encryption, these disks or partitions become inaccessible once PGP
Desktop is uninstalled. For that reason, a safety feature prevents you from
uninstalling PGP Desktop if your system has any disks or partitions protected by
PGP Whole Disk Encryption. In this instance you see an error message
explaining that the uninstall process is being terminated to protect the
encrypted disk or partition.
If you want to uninstall PGP Desktop, first decrypt any disks or partitions on
your system that are protected using PGP Whole Disk Encryption.
Working with Removable Disks
This section describes how to work with removable disks. If you are using PGP
Whole Disk Encryption in a PGP Universal Server-managed environment, your
security policy may require that removable disks be encrypted. Your security
policy may also require that removable disks be mounted as read-only disks, but
an option is provided for you to encrypt the disk.
Caution: Always use the Microsoft Windows Safely Remove Hardware
option to stop attached USB devices before removing them.
177

PGP® Desktop for Windows Protecting Disks with PGP Whole Disk Encryption
Encrypting Removable Disks
If you are using PGP Whole Disk Encryption in a PGP Universal Server-managed
environment, your security policy may require that removable disks be
encrypted. When you insert the removable disk, the PGP Desktop Storage
Device Connected dialog box is displayed.
Do one of the following:
If the removable disk is an external drive, such as a USB flash disk or
external hard drive, click Encrypt. The device is automatically encrypted to
your key. Note that if your boot disk is encrypted with other users' keys,
they are added as users to your removable disk. If your key cannot be
found, or if other users' keys cannot be found, then you are prompted to
create a passphrase user.
Note: If your PGP Universal Server administrator has specified all
removable disks be encrypted automatically, and your boot disk is not
encrypted, the first keypair on user's keyring is used for encrypting the
device.
Depending on the size of the disk, it may take some time for the encryption
process to complete. While the disk is being encrypted you can continue to
use the removable disk.
Warning: Be sure the encryption process has completed before you
remove the disk.
If you do not want to encrypt the device, click Lock. The device will be
locked and will be read-only. If you attempt to modify or delete any files
from the device, a Windows error message will appear.
If the removable disk is a music device or digital camera, click Lock. These
types of devices will not work if the contents of the device are encrypted.
If you accidentally encrypt a music device or digital camera, you will need
to decrypt it. Depending on your corporate security policy you may need to
contact your IT department or PGP administrator for help with decrypting
this device.
If your security policy requires that all removable disks be encrypted and the
PGP Universal Server is not available (for example, if you are on an airplane and
not connected to your corporate network), the removable device cannot be
encrypted. Therefore, the device will be “locked” and will be read-only. The
next time you connect to the PGP Universal Server, you will be able to encrypt
the contents of the disk (if it has not already been encrypted).
Note: When your PGP Administrator has specified that all removable disks be
encrypted, the option to Exit PGP Services is no longer available from the
PGP tray menu.
178

PGP® Desktop for Windows Protecting Disks with PGP Whole Disk Encryption
Using Locked (Read-Only) Disks as Read-Only
If you are using PGP Whole Disk Encryption in a PGP Universal Server-managed
environment, your security policy may require that removable disks be mounted
as read-only devices. When you insert the removable disk, the PGP Desktop
Storage Device Connected dialog box is displayed. The removable disk is
locked, and you cannot write data to the disk until you encrypt it. If you choose
to encrypt the device, you can continue to use the disk as normal.
Do one of the following:
If the removable disk is an external drive, such as a USB flash disk or
external hard drive, and you want to be able to write to the disk, click
Encrypt. The device is automatically encrypted to your key. Note that if
your boot disk is encrypted with other users' keys, they are added as users
to your removable disk. If your key cannot be found, or if other users' keys
cannot be found, then you are prompted to create a passphrase user.
Depending on the size of the disk, it may take some time for the encryption
process to complete. While the disk is being encrypted you can continue to
use the removable disk.
Warning: Be sure the encryption process has completed before you
remove the disk.
If you do not want to encrypt the device, click Lock. The device will be
locked and will be read-only. If you attempt to modify or delete any files
from the device, a Windows error message will appear.
If the removable disk is a music device or digital camera, click Lock. These
types of devices will not work if the contents of the device are encrypted.
If you accidentally encrypt a music device or digital camera, you will need
to decrypt it. Depending on your corporate security policy you may need to
contact your IT department or PGP administrator for help with decrypting
this device.
Moving Removable Disks to Other Systems
If you use PGP Whole Disk Encryption to protect a removable disk—a USB flash
disk, for example—you can move that disk to another Windows or Mac OS X
system and access the encrypted files on that flash disk on the other system.
Removable disks created using PGP WDE on Linux can be accessed using PGP
Desktop version 10.0 or later.
You will need to be able to authenticate to access the contents of the disk.
179

PGP® Desktop for Windows Protecting Disks with PGP Whole Disk Encryption
Note: Consider PGP Desktop licensing when moving an encrypted,
removable disk. To protect a disk using the PGP Whole Disk Encryption
feature, you must have the appropriate PGP Desktop license. However, if you
have protected a removable disk with PGP Whole Disk Encryption, you can
use that removable disk on another computer with PGP Desktop 9.5.2 or
later installed—even if the other system does not have a PGP Desktop
license that supports Whole Disk Encryption.
Reformatting an Encrypted Removable Disk
If you have encrypted a removable disk and then used the Windows Disk
Management utility to reformat it, the next time you insert the disk you are
prompted to enter the passphrase.
In order to remove this requirement, do the following:
1 Start a command prompt (Start > Run, and enter cmd) and navigate to
C:\Program Files\PGP Corporation\PGP Desktop.
2 Enter the following command:
pgpwde --fixmbr --disk 1
If you have more than one encrypted disk on your system, you may need
to run the pgpwde --enum command first. This command lists your
encrypted disks. If the command returns information that your USB drive is
not disk "1", use that number instead (for example, if your USB disk is disk
"2", enter the command to remove encryption as pgpwde --fixmbr
--disk 2 .
You will no longer be prompted for the passphrase when you insert the disk.
Using PGP WDE in a PGP Universal Server-Managed
Environment
The PGP Whole Disk Encryption feature can be administered for PGP Desktop
users in a PGP Universal Server-managed environment. Administrators can
deploy PGP Desktop installers to users throughout their enterprise.
PGP Whole Disk Encryption Administration
The PGP administrator can control:
Whether or not the PGP Whole Disk Encryption feature is available to
users. If you are in a PGP Universal Server-managed environment and the
PGP Whole Disk Encryption feature is not available, check with your PGP
administrator to see if the feature has been disabled by policy.
180

PGP® Desktop for Windows Protecting Disks with PGP Whole Disk Encryption
The PGP Whole Disk Encryption feature also requires an appropriate
license from PGP Corporation. If the feature is disabled for you, even
though it is enabled by policy, check with your PGP administrator to make
sure you have an appropriate license.
Whether or not you can recover disks or partitions that are protected
with PGP Whole Disk Encryption. If you forget the passphrase to a disk
or partition encrypted with PGP Whole Disk Encryption, or if you lose the
authentication token, the disk or partition is not accessible. However, if you
are using the PGP Whole Disk Encryption feature in a PGP Universal
Server-managed environment, check with your PGP administrator to see if
disk or partition recovery is an available option.
Whether or not your boot disk must be encrypted with PGP Whole
Disk Encryption when you install PGP Desktop.
If you are using PGP Desktop in a PGP Universal Server-managed
environment, contact your PGP administrator for more information.
Whether or not your computer uses the PGP Whole Disk Encryption
Single Sign-on (SSO) feature.
For more information on this feature, see Using PGP WDE Single Sign-On
(on page 167).
What modes you can use with the PGP Whole Disk Encryption
feature.
Whether or not your PGP administrator can use an administrator key
(with a smart card) to access your encrypted disk or partition.
For more information on encryption modes, see Determine the Authentication
Method for the Disk (see "Determining the Authentication Method for the Disk"
on page 146).
If you are using PGP Desktop in a PGP Universal Server-managed environment,
after installing PGP Desktop, you may be required to encrypt your boot disk or
partition using the PGP WDE feature. Conversely, the PGP WDE feature may be
disabled by your PGP administrator.
If you are using PGP Desktop in a PGP Universal Server-managed environment,
you may be prompted to encrypt a removable disk when it is inserted. For more
information, see Encrypting Removable Disks (on page 178).
If your policy should change from one to the other, specifically from having the
ability to encrypt a disk to having that feature disabled, note that you are still
able to use any drives that are already whole disk encrypted. You will not,
however, be able to encrypt any more drives, re-encrypt existing encrypted
drives, or add new users.
For more information, see Using PGP Desktop with PGP Universal Server (on
page 311).
181

PGP® Desktop for Windows Protecting Disks with PGP Whole Disk Encryption
Creating a Recovery Token
If you are working within a PGP Universal Server-managed environment, and
the policy that applies to you allows for the creation of whole disk recovery
tokens, then PGP Desktop creates a recovery token whenever you encrypt a
disk, partition (on Windows systems), or removable disk with PGP Whole Disk
Encryption. This recovery token can be used to access the disk or partition (on
Windows systems) in case the passphrase or authentication token (on
Windows systems) is lost.
If the policy that applies to you does not support it, or if you are not in a PGP
Universal Server-managed environment with a pre-configured installation of
PGP Desktop, you will not be able to use whole disk recovery tokens.
This recovery token is automatically sent to the PGP Universal Server managing
security for the disk or partition (on Windows systems) protected by PGP Whole
Disk Encryption.
If you are in a PGP Universal Server-managed environment, and you lose the
passphrase or authentication token used to protect a disk or partition (on
Windows systems) with PGP Whole Disk Encryption, you should contact your
PGP administrator for assistance using the recovery token.
The recovery token can be used only once to gain access to a disk or partition
(on Windows systems) that has been protected using PGP Whole Disk
Encryption. After a recovery token is used, a new one is generated
automatically and sent to the PGP Universal server. The PGP Desktop user is
given the option of creating a new user, or keeping the existing one(s) on the
disk or partition.
Note that the recovery token is used only to gain access to an encrypted disk or
partition (on Windows systems). You cannot use the recovery token to encrypt
or decrypt data.
Caution: Consider re-encrypting disks or partitions (on Windows systems)
protected by PGP Whole Disk Encryption if security is compromised, by
passphrase exposure for example, or loss of the authentication token (on
Windows systems). This process re-encrypts the disk or partition with the
same encryption algorithm, but with a different underlying encryption key.
The result is as if you decrypted the disk or partition and encrypted it again,
but is much faster.
Using a Recovery Token
Once you have received the recovery token from your PGP Universal
Administrator, follow the steps below to unlock your disk.
When you enter a recovery token, you do not need to match the case (all
uppercase) or dashes that you received from your PGP Universal Administrator.
You can enter all lowercase characters without the dashes if you want.
182

PGP® Desktop for Windows Protecting Disks with PGP Whole Disk Encryption
To use a recovery token on a boot disk
At the PGP BootGuard screen, enter the recovery token in the passphrase
field.
To use a recovery token on a removable drive
Insert the disk and enter the recovery token when prompted to enter the
passphrase.
Recovering Data From an Encrypted Drive
Although rare, you may find it necessary to recover data from an encrypted
drive that has been damaged or corrupted. Or, you may find that you do not
have the login information in order to access a drive (such as a former
employee's encrypted drive). In these cases, there are several things you can
do:
1 Use a recovery disk. If a recovery disk was created before the disk or
partition was encrypted, you can use it to decrypt the disk. For more
information, see Creating and Using Recovery Disks (on page 183).
2 Use another system to decrypt the drive. For more information, see
Decrypting a PGP WDE-Encrypted Disk (on page 185).
3 Use the Whole Disk Recovery Token. If you are using PGP Desktop in a
PGP Universal Server-managed environment, the recovery token is created
automatically when the disk is encrypted. For more information, see Using
a Recovery Token (on page 182).
Creating and Using Recovery Disks
While the chances are extremely low that a master boot record could become
corrupt on a boot disk or partition protected by PGP Whole Disk Encryption, it is
possible. If it happens, it could prevent your system from booting.
Be safe: prepare for this highly unlikely event by creating a recovery CD or
diskette—or both—before you encrypt a boot disk or partition using PGP Whole
Disk Encryption.
Caution: Note that recovery disks work only with the version of PGP
Desktop that created the recovery disk. For example, if you attempt to use a
9.0.x recovery disk to decrypt a disk protected with PGP WDE 9.5 software,
it will render the PGP WDE 9.5 disk inoperable.
183

PGP® Desktop for Windows Protecting Disks with PGP Whole Disk Encryption
This section includes procedures for creating both a recovery compact disc and
a diskette. It also discusses their use.
To create a recovery CD
1 Make sure PGP Desktop for Windows and Roxio Easy Media Creator or
Roxio Easy CD Creator (or other software that can create a CD from an ISO
image) are installed on your system.
2 Open Roxio Easy Media Creator or Roxio Easy CD Creator and choose to
create a Data CD Project.
3 Select File > Record CD from CD Image. The Record CD from Hard Disk
Image screen is displayed.
4 Select Files of Type > ISO Image Files (ISO).
5 Navigate to the PGP directory. The default directory is C:\Program
Files\PGP Corporation\PGP Desktop\.
6 Select bootg.iso and click Open. The Record CD Setup screen is
displayed.
7 Insert a blank, recordable CD into a CD drive on your system.
8 On the Record CD Setup screen, click Start Recording. The Record CD
from CD Image Progress screen is displayed as the ISO file is burned to
the CD.
9 When the file is burned to the CD, click OK. The PGP Whole Disk
Encryption recovery CD is ready.
10 Remove the recovery CD from the drive and label it appropriately.
To create a recovery diskette
1 Make sure PGP Desktop for Windows and an application that can create a
recovery diskette (such as MagicISO) are installed on your system.
2 Insert a blank diskette into the disk drive.
3 Open MagicISO.
4 Select Tools > Write Floppy Disk Image. The Open dialog box is
displayed.
5 Navigate to the PGP directory. The default directory is C:\Program
Files\PGP Corporation\PGP Desktop\.
6 Select Bootg.img, then click Open. The file is written to the diskette.
7 Remove the recovery diskette from the drive and label it appropriately.
8 Exit from MagicISO.
184

PGP® Desktop for Windows Protecting Disks with PGP Whole Disk Encryption
To use a recovery disc or diskette
Caution: Once you have started to decrypt a disk or partition using a
recovery disc or diskette, do not stop the decryption process. Depending on
the size of the disk being decrypted, this process can take a long time. A
faster way to decrypt the drive is to use another system that has the same
version of PGP Desktop installed on it. For more information, see Decrypting
a PGP WDE-Encrypted Disk (on page 185).
1 If the PGP Whole Disk Recovery log-in screen does not appear when you
restart your system, or on restart you are prompted for a PGP Whole Disk
Encryption recovery disk, insert the recovery CD into a CD drive on the
system or the recovery diskette into the disk drive.
2 Restart the system. The PGP Whole Disk Encryption log-in screen from the
recovery disk is displayed.
3 Type an appropriate passphrase for the boot drive or partition that is
protected by PGP Whole Disk Encryption. You can:
Press Enter to attempt to boot the system.
Type D to decrypt the disk.
Decrypting a PGP WDE-Encrypted Disk
As a best practice, if you need to perform any disk recovery activities on a disk
protected with PGP Whole Disk Encryption, PGP Corporation recommends that
you first decrypt the disk. Decrypt a disk by doing one of the following:
Use the PGP Desktop Disk > Decrypt option (see the following procedure
for information on how to use this option to decrypt a disk).
Use your prepared PGP WDE Recovery Disk (see Creating Recovery Disks
(see "Creating and Using Recovery Disks" on page 183) for information on
how to create a recovery disk).
Connect the hard disk via a USB cable to a second system and decrypt
from that system's PGP Desktop software.
Once the disk is decrypted, proceed with your recovery activities.
To use PGP Desktop to decrypt a disk
1 Open PGP Desktop and click on the PGP Disk Control box. The PGP Disk
Control box highlights.
2 Click Encrypt Whole Disk or Partition. The Encrypt Whole Disk (Partition)
work area displays, and you see a listing of the disks on your system that
can be protected by PGP Whole Disk Encryption: disks, disk partitions,
removable media, and so on.
185

PGP® Desktop for Windows Protecting Disks with PGP Whole Disk Encryption
3 In the Encrypt Whole Disk (Partition) work area, in the Select disk or
partition to encrypt section at the top, click to select the disk or partition
on your computer that you want to decrypt.
4 Select Disk > Decrypt or click Decrypt. The Unlock Disk dialog box is
displayed.
5 Enter the passphrase to unlock the disk. The Decryption Progress displays
in the PGP Desktop window.4
The time it will take to decrypt the disk is also displayed in the PGP
Desktop window. To pause or cancel the decryption process, click Stop. If
necessary, you can shut down the computer by choosing Start > Shut
Down. Do not power down the system by depressing the power on/off
button.
To use another system to decrypt a PGP WDE-encrypted drive
1 Remove the hard drive you want to decrypt from the computer and place it
in a drive enclosure.
2 Connect a USB cable from the drive enclosure to a computer that has PGP
Desktop installed on it.
3 On the computer that has PGP Desktop installed, at the prompt enter the
passphrase to decrypt the drive that is located in the drive enclosure.
Special Security Precautions Taken by PGP Desktop
PGP Desktop has features that help avoid security problems with the PGP
Whole Disk Encryption feature. These precautions also apply to PGP Virtual Disk
volumes.
Passphrase Erasure
When you enter a passphrase, PGP Desktop uses it only for a brief time, then
erases it from memory. PGP Desktop also avoids making copies of the
passphrase. The result is that your passphrase typically remains in memory for
only a fraction of a second. Without this critically important feature, someone
could search for your passphrase in your computer memory while you were
away from the system. You would not know it, but they would then have full
access to data protected by this passphrase.
186

PGP® Desktop for Windows Protecting Disks with PGP Whole Disk Encryption
Virtual Memory Protection
Your passphrase or other keys could be written to disk as part of the virtual
memory system swapping memory to disk. PGP Desktop takes care that the
passphrases and keys are never written to disk. This feature prevents a
potential intruder from scanning the virtual memory file looking for passphrases.
Hibernation vs Standby
In Windows, Hibernate mode writes an image of your computer’s entire main
memory storage to a file on your hard drive, but not your passphrase. PGP
Corporation recommends that you always use Hibernate, rather than Standby,
as Hibernate turns your computer off and then requires that you authenticate at
the PGP BootGuard screen to log in again.
Memory Static Ion Migration Protection
When you protect a disk or partition (on Windows systems) with PGP Whole
Disk Encryption, your passphrase is turned into a key. This key is used to
encrypt and decrypt the data on the encrypted disk or partition. While the
passphrase is erased from memory immediately, the key (from which your
passphrase cannot be derived) remains in memory.
This key is protected from virtual memory; however, if a certain section of
memory stores the exact same data for extremely long periods of time without
being turned off or reset, that memory tends to retain a static charge, which
could be read by attackers. If your encrypted disk or partition (on Windows
systems) is decrypted for long periods, over time, detectable traces of your key
could be retained in memory. Devices exist that could recover the key. You
won’t find such devices at your neighborhood electronics shop, but major
governments are likely to have a few.
PGP Desktop protects against this by keeping two copies of the key in RAM,
one normal copy and one bit-inverted copy, and inverting both copies every few
seconds.
Other Security Considerations
In general, the ability to protect your data depends on the precautions you take,
and no encryption program can protect you from sloppy security practices. For
instance, if you leave your computer on with sensitive files open when you
leave your desk, anyone can access that information—even if the disk or
partition (on Windows systems) is protected using PGP Whole Disk Encryption.
Here are some tips for maintaining optimal security:
When you are away from your desk, use a screen saver with a password to
deter others from accessing your computer or viewing your screen.
187

PGP® Desktop for Windows Protecting Disks with PGP Whole Disk Encryption
Make sure that your encrypted disks or partitions (on Windows systems)
are not available to other computers on a network. You may need to
arrange this with the network management staff within your organization.
Once you have unlocked your disk or partition, PGP Whole Disk Encryption
can no longer protect the files. They can be seen by anyone with network
access to them. Consider the PGP Virtual Disk feature for storing files that
need to be locked even while you are using your computer.
Never write down your passphrase. Pick something you can remember. If
you have trouble remembering your passphrase, use something to jog your
memory, such as a poster, a song, a poem, or a joke—just do not write it
down.
If you use PGP Desktop at home and share your computer with other
people, they will probably be able to see your open files on a disk or
partition (on Windows systems) that is protected using PGP Whole Disk
Encryption. As long as you shut down a system with a whole disk
encrypted disk or partition, or if you remove an encrypted removable disk
from the system, all files on the disk or partition remain encrypted and fully
protected.
Using the Windows Preinstallation Environment
Creating a customized Windows Preinstallation (PE) CD/UFD (USB Flash Drive)
provides a bootable recovery tool that can be used for rescue purposes. For
example, you can use the DOS commands to copy, edit, backup and delete
files.
Also use Windows PE to upgrade a PGP WDE-encrypted computer to Windows
Vista.
To obtain the PGP WDE drivers and tools, see the PGP Support Knowledgebase
Article 807 (https://support.pgp.com/?faq=807). Also included in this KB article
is a technical note you can download that contains all of the instructions in this
section.
Using PGP Whole Disk Encryption with IBM Lenovo ThinkPad Systems
Use the Windows Preinstallation Environment (PE) to pre-install the PGP WDE
driver into IBM Lenovo ThinkPad Rescue and Recovery and automatically detect
the Lenovo Rescue and Recovery feature.
188

PGP® Desktop for Windows Protecting Disks with PGP Whole Disk Encryption
This option is available only for IBM Lenovo systems running Rescue and
Recovery version 3.0 and later. This option pre-installs the PGP WDE driver into
Lenovo Rescue and Recovery and automatically detects the Lenovo Rescue and
Recovery support. It picks up the PGP WDE driver from the
\windows\system32\drivers directory. The two files installed into the IBM
Lenovo Rescue and Recovery are the PGP WDE driver (pgpwded.sys) and the
PGPstart.exe file (for more information on this file, see the following
procedure).
The files that are required to install PGP Whole Disk Encryption into IBM
Lenovo Rescue and Recovery are:
Files from pgppe tool: pgppe.exe, pgpstart.exe
Files from PGP Desktop installation: pgpwded.sys, pgpbootb.bin,
pgpbootg.bin, pgpsdk.dll, pgpsdknl.dll, pgpwd.dll,
pgpwde.exe
Files for Windows Vista only: wimfltr drivers need to be installed (this is
part of the Windows Automated Installation Kit)
Caution: Use this option only after PGP Desktop is installed on the system.
To enable Lenovo Rescue and Recovery
1 Install PGP Desktop.
2 Obtain and install the Windows Preinstallation Environment tools from the
PGP Support Knowledgebase Article 807
(https://support.pgp.com/?faq=807).
3 Copy the PGPstart.exe and PGPpe.exe files from the zipped file into
your PGP Desktop installation directory (usually, c:\Program Files\PGP
Corporation\PGP Desktop).
4 Start a command prompt and change to your PGP Desktop directory.
5 Run the pgppe command as follows:
pgppe /recovery
To remove Lenovo Rescue and Recovery support
Run the pgppe command as follows: pgppe /recovery /remove
Using PGP Whole Disk Encryption with the Microsoft Windows XP
Recovery Console
If you use the Windows XP Recovery Console for administration purposes, you
must install the PGP WDE drivers to the Microsoft Windows Recovery Console
when the disk is encrypted otherwise the Recovery Console can not be used.
189

PGP® Desktop for Windows Protecting Disks with PGP Whole Disk Encryption
Note: To authenticate users using Windows PE or BartPE, you must use
passphrase users. Token or TPM users are not supported.
Caution: Install these drivers after PGP Desktop is installed and the disk
encrypted with PGP WDE.
To install PGP WDE drivers to the Windows XP Recovery Console
1 Install PGP Desktop.
2 Obtain and install the Windows Preinstallation Environment tools from the
PGP Support Knowledgebase Article 807
(https://support.pgp.com/?faq=807).
3 Copy the PGPstart.exe and PGPpe.exe files from the zipped file into
your PGP Desktop installation directory (usually, c:\Program Files\PGP
Corporation\PGP Desktop).
4 Start a command prompt and change to your PGP Desktop installation
directory.
5 Run the pgppe command as follows:
pgppe /cmdcons
To remove drivers from the Windows XP Recovery Console
Run the pgppe command as follows: pgppe /cmdcons /remove
190

11 Using PGP Virtual Disks
Use PGP Virtual Disks to organize your work, keep similarly named files
separate, or keep multiple versions of the same documents or programs
separate.
This section describes the PGP Virtual Disk feature of PGP Desktop.
Note: If you are using PGP Desktop in a PGP Universal Server-managed
environment, your PGP Universal Server administrator may have disabled
certain features. When a feature is disabled, the control item in the left side
is not displayed and the menu and other options for that feature are not
available. The graphics included in this guide depict the default installation
with all features enabled. If your PGP Universal Server administrator has
disabled this functionality, this section does not apply to you.
In This Chapter
About PGP Virtual Disks ........................................................................ 192
Creating a New PGP Virtual Disk........................................................... 193
Viewing the Properties of a PGP Virtual Disk ........................................ 196
Finding PGP Virtual Disks ...................................................................... 196
Using a Mounted PGP Virtual Disk........................................................ 196
Working with Alternate Users ............................................................... 200
Changing User Passphrases.................................................................. 203
Deleting PGP Virtual Disks .................................................................... 203
Maintaining PGP Virtual Disks ............................................................... 204
The PGP Virtual Disk Encryption Algorithms ......................................... 205
Special Security Precautions Taken by PGP Virtual Disk....................... 206
Note: PGP Virtual Disks were called PGP Disks in previous versions of PGP
Desktop. The phrase PGP Disk now includes both the PGP Virtual Disk and
the PGP Whole Disk Encryption features.
191

PGP® Desktop for Windows Using PGP Virtual Disks
About PGP Virtual Disks
A PGP Virtual Disk is an area of space, on any disk connected to your computer,
which is set aside and encrypted. PGP Virtual Disks are much like a bank vault,
and are very useful for protecting sensitive files while the rest of your computer
is unlocked for work.
A PGP Virtual Disk looks and acts like an additional hard disk, although it is
actually a single file that can reside on any of your computer disks. It provides
storage space for your files—you can even install applications, or save files to a
PGP Virtual Disk — but it can also be locked at any time without affecting other
parts of your computer. When you need to use the applications or files that are
stored on a PGP Virtual Disk, you can unlock the disk and make the files
accessible again.
PGP Virtual Disks are unlocked and locked by mounting and unmounting them
from your computer. PGP Desktop helps manage this operation for you.
Although you specify a size for your PGP Virtual Disk, you can also create a
dynamically-sizing disk, one that grows larger as needs require it. The size you
specify when you are creating the disk is the maximum size the disk can
become.
When a PGP Virtual Disk is mounted, you can:
Move/copy files into or out of the mounted PGP Virtual Disk.
Save files to the mounted PGP Virtual Disk.
Install applications within the mounted PGP Virtual Disk.
Files and applications on a PGP Virtual Disk are stored encrypted. If your
computer crashes while a PGP Virtual Disk is unmounted, the contents remain
safely encrypted.
When a PGP Virtual Disk is unmounted, it does not appear within Windows
Explorer or the Mac OS X Finder, and it is inaccessible to anyone without proper
authentication.
It is important to remember that all your data remains secure in the encrypted
file and is only deciphered when you access one of the files. Having the data for
a volume stored in this manner makes it easy to manipulate and exchange PGP
Virtual Disks with others but it also makes it easier to lose data if the file is
somehow deleted. It is wise to keep a back up copy of these encrypted files so
that the data can be recovered if something happens to the original.
For information about the PGP options that affect PGP Virtual Disk volumes, see
Disk Options (on page 297).
192
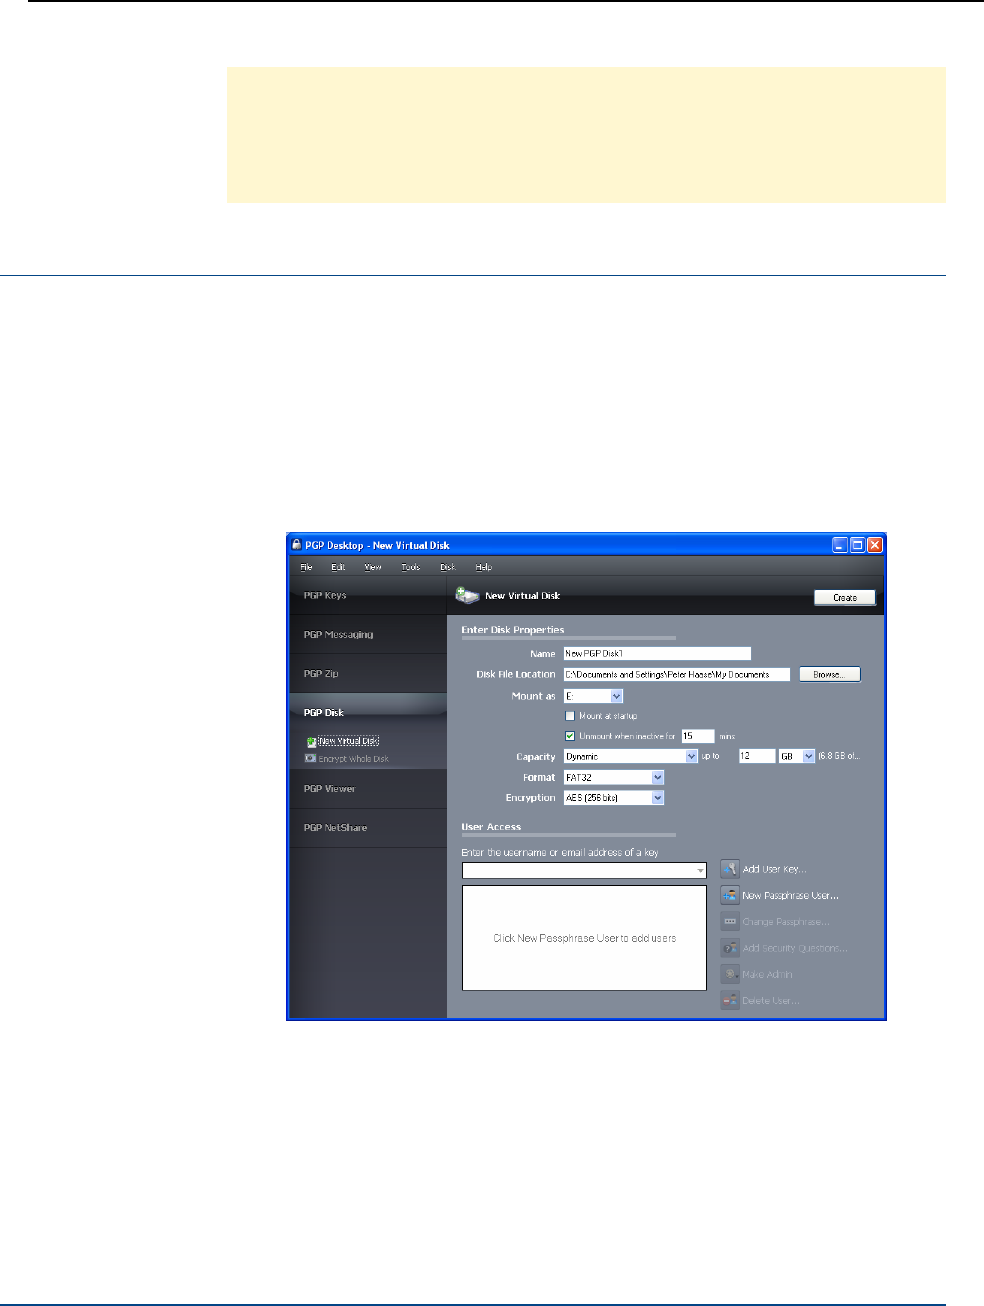
PGP® Desktop for Windows Using PGP Virtual Disks
Caution: If you are using PGP Desktop in a PGP Universal Server-managed
environment, you may be required to create a PGP Virtual Disk after installing
PGP Desktop. If so, the size, file system, and algorithm may have been
specified. For more information, see Using PGP Desktop with PGP Universal
Server (on page 311).
Creating a New PGP Virtual Disk
To create a new PGP Virtual Disk
1 Open PGP Desktop.
2 Click the PGP Disk control box on the left pane of the PGP Desktop main
screen, then click New Virtual Disk. Alternatively, select File > New >
PGP Virtual Disk. The New Virtual Disk screen is displayed in the right
pane of the screen.
3 In the Name field, type the name that you would like for the new PGP
Virtual Disk.
4 In the Disk File Location field, accept the default location for the PGP
Virtual Disk volume you are creating, or click Browse to specify another
location.
5 From the Mount as menu, select the drive letter that you would like for the
new PGP Virtual Disk.
You can:
193

PGP® Desktop for Windows Using PGP Virtual Disks
Accept the drive letter that PGP Desktop suggests for you.
From the Mount as menu, select an available drive from the list.
From the Mount as menu, select Folder, if you would like to mount
the new PGP Virtual Disk to a folder instead of a drive letter. If you do
this, a field is displayed next to the Mount as menu, so you can
specify a location for the folder.
6 Select Mount at Startup to have your new PGP Virtual Disk volume mount
at startup automatically. When selected, you are prompted for your PGP
Virtual Disk passphrase when you start your computer.
7 Select Unmount when inactive for n mins [where n is a number of
minutes] to have the PGP Virtual Disk unmount if you have not used your
computer for a specific time interval that you specify (in minutes). This is
helpful if you often leave your computer unattended—it is an additional
safeguard that locks your PGP Virtual Disk if you forget to.
8 From the Capacity menu, select the desired type of PGP Virtual Disk. Your
choices are:
Dynamic (resizable). This type of disk grows in capacity as files are
added to it, yet it stays small until the additional space is needed. PGP
Desktop manages this process, you only need to set the maximum
size that you would like the disk to be. You can also compress this
disk later, if you choose. This type of PGP Virtual Disk is available for
FAT- or FAT32-formatted disks only.
Expandable. This type of disk grows in capacity as files are added to
it, yet it stays small until the additional space is needed. PGP Desktop
manages this process, you only need to set the maximum size that
you would like the disk to be. You can also compress this disk later, if
you choose. This type of PGP Virtual Disk is available for
NTFS-formatted disks only.
Fixed size. This type of disk remains the same size, regardless of
how many files are added to it. This type of PGP Virtual Disk is
available for any type of formatted disk.
9 From the Capacity menu, set the size (in the case of Dynamic disks, the
maximum size) for your new PGP Virtual Disk. Use whole numbers; no
decimal places. Choose KB (kilobytes), MB (megabytes), or GB (gigabytes)
from the menu.
The maximum allowable size for a PGP Virtual Disk depends on the size
and format of your hard disk.
10 Specify a file system format for the volume:
FAT. Volume must be 100 KB or larger.
FAT32. Volume must be 260 MB or larger.
NTFS. Volume must be 5 MB or larger (12 MB for Windows Vista).
11 Specify the encryption algorithm you want to use to protect your data:
194

PGP® Desktop for Windows Using PGP Virtual Disks
AES (256 bits). AES (Advanced Encryption Standard) is a block cipher
that can be used at 128, 192, or 256 bits. The more secure 256-bit
version is used for creating PGP Virtual Disk volumes by default.
EME2-AES (256 bits). EME2 (Encrypt-Mix-Encrypt v2) is a stronger
algorithm that encrypts twice for each operation. EME2 is a wide
block mode algorithm that is currently under review by the IEEE
Standards Working Group.
CAST5 (128 bits). CAST is a 128-bit block cipher. CAST is a strong,
military-grade encryption algorithm that has a solid reputation for its
ability to withstand unauthorized access.
Twofish (256 bits). Twofish is a 256-bit block cipher, symmetric
algorithm. It was one of five algorithms that the U.S. National Institute
of Standards and Technology (NIST) considered for the AES (Rijndael
was selected).
12 You must have at least one user who can access your new PGP Virtual
Disk. In the User Access section, specify who you want to give access to,
and what method they use for access:
User Key. To add users who authenticate with public-key
cryptography:
Click Add User Key. The Add Key Users box is displayed,
displaying the keypairs currently on your keyring.
From the Add Key Users box, select the key users you want by
double-clicking the listing. Alternatively, you can drag the listing
from the left side to the right, or select a listing and click Add.
Click OK when you are finished.
Passphrase. Click New Passphrase User. The Create New User
dialog box is displayed.
For each new passphrase user, type a name for that user, type a
passphrase for them, then type the passphrase again to confirm.
Click OK to create the passphrase user. If you want to authorize
more passphrase users, repeat the process.
To modify the passphrase for a passphrase user, select that
user, then click Change Passphrase.
For information on creating effective, high-quality passphrases, refer to
Creating Strong Passphrases (on page 307).
13 Click Create to start creating the new PGP Virtual Disk. A progress bar
indicates how much of the PGP Virtual Disk has been initialized and
formatted. When complete, your new PGP Virtual Disk is displayed in the
PGP Disk control area.
14 The first user you create is granted administrator status, and there can only
be one administrator at a time. However, you can grant administrator
status to any of your other users, regardless of whether they are public key
or passphrase users. Click their name in the User Access list, then click
Make Admin.
195

PGP® Desktop for Windows Using PGP Virtual Disks
15 Delete any user, other than the Administrator, by selecting their name and
clicking Delete User. To delete the Administrator, first grant administrator
status to another user, then delete the former administrator.
Viewing the Properties of a PGP Virtual Disk
Once a PGP Virtual Disk has been created, information about the disk and
settings you can change are accessible from the Disk Properties screen.
To view the properties of a PGP Disk volume
In the PGP Disk control box on the left pane of the PGP Desktop main
screen, click the name of the disk. The Disk Properties is displayed in the
right side of the main screen. Information displayed includes the PGP
Virtual Disk file location, disk capacity, mounted drive letter, disk format,
encryption type, and status of the disk (mounted or unmounted).
Finding PGP Virtual Disks
If you created PGP Virtual Disks using previous installations of PGP Desktop,
you can easily find these volumes using the PGP Disk Search Assistant.
To find PGP Virtual Disks on your system
1 In PGP Desktop, click the PGP Disk control box. The PGP Disk main screen
is displayed.
2 Select File > Scan for PGP Disks. The PGP Disk Search Assistant dialog
box is displayed.
3 Follow the instructions displayed in the assistant.
Tip: To find the mounted volume of a specific PGP Virtual Disk, in PGP
Desktop, right-click the name of the volume and select Show disk location
in Explorer. Windows Explorer opens a new window displaying the contents
of that volume.
Using a Mounted PGP Virtual Disk
Create, copy, move, and delete files and folders on a PGP Virtual Disk just as
you normally do with any other disk on your system.
196

PGP® Desktop for Windows Using PGP Virtual Disks
Anyone else who has access to the volume (either on the same computer or
over the network) can also access the data stored there. It is not until you
unmount the volume that the data is protected.
Caution: Although each PGP Virtual Disk file is encrypted and cannot be
accessed by anyone without proper authorization, it can still be deleted from
your system. Anyone with access to your system could delete the encrypted
file containing the PGP Virtual Disk. For this reason, keeping a backup copy of
the encrypted file is an excellent safety measure, as is keeping your
computer locked when you are not nearby.
Mounting a PGP Virtual Disk
When you create a new PGP Virtual Disk, it is automatically mounted so you
can begin using it to store your files.
To secure the contents of a volume, you must unmount it. Once a volume is
unmounted, its contents remain secured in an encrypted file where they are
inaccessible until the volume is mounted once again.
There are several ways to mount a PGP Virtual Disk:
In PGP Desktop, select the PGP Virtual Disk you want to mount and select
Disk > Mount.
In PGP Desktop, select the PGP Virtual Disk you want to mount and then
click Mount in the upper-right corner on Windows systems, or the Mount
icon on the toolbar on Mac OS X systems.
Change the properties of the PGP Virtual Disk so that it mounts when your
computer starts.
On Windows systems only:
During creation of the PGP Virtual Disk, select the Mount at Startup
checkbox. The volume mounts automatically when you start Windows. If
you do not select this during creation of the PGP Virtual Disk, you can set it
as an option later.
In Windows Explorer, right-click the PGP Virtual Disk file, and select PGP >
Mount PGP Virtual Disk from the shortcut menu.
Mounted PGP Virtual Disk volumes appear as empty drives in Windows
Explorer and Mac OS X Finder.
Unmounting a PGP Virtual Disk
You lock a PGP Virtual Disk by unmounting it. Once a PGP Virtual Disk is
unmounted, its contents are locked in the encrypted file associated with the
volume. Its contents are inaccessible until the volume is mounted once again.
197

PGP® Desktop for Windows Using PGP Virtual Disks
Caution: You may lose data if you unmount a PGP Virtual Disk when some
files that it contains are open. Specify options for unmounting disks by
selecting Tools > PGP and clicking the Disk tab. One option is Allow PGP
Virtual Disks to unmount even while files are still open. If that option is
selected, the option for Don’t ask before unmounting also becomes
available. Do not use these options unless you are familiar with them.
While these options can be useful for advanced users who protect their data
with regular data backups, they are not recommended for most users.
There are several ways to unmount a PGP Virtual Disk volume:
Click the PGP Disk control box on the left pane of the PGP Desktop main
screen, then select the volume you want to unmount. Click Unmount in
the upper-right corner, or select Disk > Unmount.
In Windows Explorer, right-click on the PGP Virtual Disk file, then select
PGP > Unmount PGP Virtual Disk from the shortcut menu.
Use the hot key to unmount all PGP Virtual Disks. The default hot key is
Ctrl+Shift+U. The hot key must be enabled first.
Once a PGP Virtual Disk is unmounted, its contents remain locked and
inaccessible until the volume is mounted once again.
Compacting a PGP Virtual Disk
To free up additional space on your PGP Virtual Disk, compact the disk. If the
PGP Virtual Disk is mounted, you must unmount the disk first, before you can
compact it.
Note: Only FAT- or FAT32 formatted PGP Virtual Disks that are dynamic (not
fixed in size) can be compacted. NTFS-formatted disks or fixed size disks
cannot be compacted.
To compact a PGP Virtual Disk
Do one of the following:
In Windows Explorer navigate to the location of the .pgd file.
Right-click the file and select PGP Desktop > Compact unused
space.
In PGP Desktop, click the PGP Disk control box on the left pane of the
PGP Desktop main screen, select the PGP Virtual Disk you want to
compact, and then select Disk > Compact. You can also right-click
the PGP Virtual Disk in the PGP Disk control box and select Compact
from the shortcut menu.
198

PGP® Desktop for Windows Using PGP Virtual Disks
Re-Encrypting PGP Virtual Disks
You can re-encrypt all data stored on a PGP Virtual Disk. You might do this for
either (or both) of two reasons:
You want to change the encryption algorithm currently being used to
protect the volume.
You suspect there has been a security breach.
With re-encryption, you encrypt your PGP Virtual Disk again, but use a different
underlying encryption key.
Caution: Adept users may be able to search the memory of a computer for
the underlying encryption key of a PGP Virtual Disk. These users could use
the key to access the volume even after being removed from the user list.
Re-encrypting the disk changes this underlying key and prevents this kind of
intrusion.
To re-encrypt a PGP Virtual Disk
1 Click the PGP Disk control box on the left pane of the PGP Desktop main
screen, then select the PGP Virtual Disk you want to re-encrypt.
2 If the PGP Virtual Disk that you want to re-encrypt is mounted, unmount it.
3 Select the PGP Virtual Disk you want to re-encrypt.
4 Select Disk > Re-Encrypt.
5 Type your passphrase for the volume. The PGP Re-Encryption Assistant is
displayed.
6 Read the introductory information, and then click Next. A dialog box is
displayed displaying:
The current encryption algorithm protecting your PGP Virtual Disk.
The available encryption algorithms other than the one you originally
chose.
For example, if your PGP Virtual Disk is currently encrypted with AES, then
the CAST5 and Twofish options appear in the New Algorithm list.
7 Do one of the following:
To re-encrypt the volume using the current algorithm, select the
Re-encrypt to the same algorithm checkbox, then click Next. The
PGP Virtual Disk volume is re-encrypted using the same encryption
algorithm as before.
To re-encrypt the volume using a different algorithm, select the
algorithm from the New Algorithm menu, then click Next. The PGP
Virtual Disk volume is re-encrypted using the new encryption
algorithm you selected.
199

PGP® Desktop for Windows Using PGP Virtual Disks
8 When the current status displays Done, click Next.
9 Click Finish to complete the re-encryption process.
Working with Alternate Users
This section describes how to add, delete, and disable alternate user accounts
for your PGP Virtual Disks. Also included is information on how to change the
rights for users, including granting administrator rights to a user.
Adding Alternate User Accounts to a PGP Virtual Disk
The administrator of a PGP Virtual Disk can make it available to other users.
Those users can access the volume using their passphrases or private keys.
Make sure the PGP Virtual Disk is not currently mounted, otherwise, you cannot
add alternate user accounts.
To add alternate user accounts to a PGP Virtual Disk
1 Click the PGP Disk Control box on the left pane of the PGP Desktop main
screen, then select the PGP Virtual Disk to which you want to add an
alternate user account.
2 Do one of the following:
To add a new public key user, click Add User Key. The Add Key
Users dialog box is displayed.
To add a new passphrase user, click New Passphrase User. The PGP
Disk New User dialog box is displayed.
3 Do one of the following:
If you selected Add User Key, in the Add Key Users dialog box, select
a public key from the list and click OK.
If you selected New Passphrase User, in the PGP Disk New User
dialog box, type the user name, the passphrase for the PGP Virtual
Disk you are adding the user to, then type the passphrase again in the
PGP Disk New User box and click OK.
The alternate user account is added.
Deleting Alternate User Accounts from a PGP Virtual Disk
At some point you may want to remove the ability of an alternate user to access
a PGP Virtual Disk.
200

PGP® Desktop for Windows Using PGP Virtual Disks
Make sure that the PGP Virtual Disk is not mounted. You cannot remove an
alternate user account if the volume is mounted.
To remove an alternate user account from a PGP Virtual Disk
1 Click the PGP Disk control box on the left pane of the PGP Desktop main
screen, then select the PGP Virtual Disk for the user account you want to
delete.
2 In the User Access list, select the name of the alternate user whose
account you want to remove. You cannot remove the Administrator.
3 Click Delete User. The Passphrase dialog box is displayed, prompting you
for either the administrator passphrase or the passphrase for the user
account being removed.
4 Type the passphrase, then click OK. The alternate user account is
removed.
Disabling and Enabling Alternate User Accounts
To prevent access to a PGP Virtual Disk for an alternate user without deleting
their account entirely, you can instead temporarily disable their access.
Make sure that the PGP Virtual Disk is not mounted. You cannot disable or
enable an alternate user account if the volume is mounted.
To disable or enable an alternate user account from a PGP Virtual Disk
1 Click the PGP Disk control box on the left pane of the PGP Desktop main
screen, then select the PGP Virtual Disk for the user account you want to
change.
2 In the User Access list, do one of the following:
To disable a user, right-click the name of the alternate user account
you want to disable and select Disable. The Passphrase dialog box is
displayed, prompting you for either the administrator passphrase or
the passphrase for the user account being disabled. Type the
passphrase, then click OK. The alternate user account is disabled.
To enable a user that you previously disabled, right-click the name of
the alternate user account you want to enable and select Enable. The
Passphrase dialog box is displayed, prompting you for either the
administrator passphrase or the passphrase for the user account
being disabled. Type the passphrase, then click OK. The alternate user
account is enabled.
201

PGP® Desktop for Windows Using PGP Virtual Disks
Changing Read/Write and Read-Only Status
Users of a PGP Virtual Disk can have either full read/write privileges, or read
privileges only. You can change these privileges for a user at any time.
Make sure the selected PGP Virtual Disk is not mounted. You cannot change
rights if the volume is mounted.
To change the rights for a user on a PGP Virtual Disk
1 Click the PGP Disk control box on the left pane of the PGP Desktop main
screen, then select the PGP Virtual Disk for the user account you want to
change.
2 In the User Access list, select the name of the user whose status you want
to change.
3 Do one of the following:
To change the user to read-only access, right-click the user's name
and select Read-Only.
To change the user to read/write access, right-click the user's name
and select Read/Write.
The Enter Passphrase dialog box is displayed.
4 Type the administrator passphrase for the PGP Virtual Disk, then click OK.
The rights of the selected user are changed.
Granting Administrator Status to an Alternate User
You can change the status of a user account from alternate to administrator.
Make sure the selected PGP Virtual Disk is not mounted. You cannot make a
user into an administrator if the volume is mounted.
To grant administrator status
1 Click the PGP Disk control box on the left pane of the PGP Desktop main
screen, then select the PGP Virtual Disk for the user account you want to
change.
2 In the User Access list, select the user you want to make administrator of
the PGP Virtual Disk. Select either a passphrase user or yourself (if you are
not the current administrator). Note that you cannot make a public key user
an administrator of the PGP Virtual Disk.
3 In the option bar on the left, click Make Admin. The selected user account
is changed to administrator.
202

PGP® Desktop for Windows Using PGP Virtual Disks
Note: You can grant Administrator status to only one user account at a time.
By granting Administrator status to one account, you also remove it from
another.
Changing User Passphrases
Make sure the selected PGP Virtual Disk is not mounted. You cannot change
the passphrase if the volume is mounted.
To change a user’s passphrase for a PGP Virtual Disk
1 Click the PGP Disk control box on the left pane of the PGP Desktop main
screen, then select the PGP Virtual Disk on which you are a user.
2 Select the name of a passphrase user from the User Access list, and click
Change Passphrase. The Enter Passphrase dialog box is displayed
Tip: You can also right-click the user's name and select Change User
Passphrase from the shortcut menu.
3 Type the current passphrase for the user and click OK. The PGP Enter
Confirmed Passphrase dialog box is displayed
4 Type a new passphrase, type the passphrase again to confirm it, and click
OK. The passphrase is changed.
Deleting PGP Virtual Disks
At some point you may decide you no longer need a particular PGP Virtual Disk
and may choose to delete the disk entirely.
Caution: When you delete a PGP Virtual Disk, all data on it is also deleted.
There is no way to retrieve the data once you delete a PGP Virtual Disk. Make
sure that you have copied any data that you want to save to another location
before deleting a PGP Virtual Disk.
Make sure the selected PGP Virtual Disk is not mounted. You cannot delete the
PGP Virtual Disk if the volume is mounted.
To delete a PGP Virtual Disk
1 Click the PGP Disk control box on the left pane of the PGP Desktop main
screen, then select the PGP Virtual Disk you want to delete.
2 Select Disk > Delete. A confirmation dialog box is displayed.
3 Do one of the following:
203

PGP® Desktop for Windows Using PGP Virtual Disks
Click OK to delete the PGP Virtual Disk from the PGP Desktop listing.
The PGP Virtual Disk remains on your system.
Click Delete PGP Disk to remove the PGP Virtual Disk from the PGP
Desktop listing, as well as deleting it from your hard drive.
Maintaining PGP Virtual Disks
This section describes how to take proper care of the PGP Virtual Disk that you
use with your computer.
Mounting PGP Virtual Disk Volumes on a Remote Server
You can place PGP Virtual Disk volumes on any kind of server (Windows or
UNIX). The volumes can then be mounted by anyone with a Windows computer
and PGP Desktop.
Note: The first person to mount the PGP Virtual Disk volume locally has
read-write access to the volume. No one else is then able to access the
volume. If you want others to be able to access files within the volume, you
must mount the volume in read-only mode (applies to FAT and FAT32 file
system formats only). All users of the volume then have read-only access.
If the PGP Virtual Disk volume is stored on a Windows server, you can also
mount the volume remotely on the server and allow people to share the
mounted volume. However, this action provides no security for the files within
the volume.
Backing up PGP Virtual Disk Volumes
Backing up the contents of your PGP Virtual Disk is the best way to safeguard
your information from hardware failure or other loss.
It is not advisable to back up the contents of a mounted (and therefore,
decrypted) PGP Virtual Disk just as you would any other volume. The contents
are not encrypted, and are accessible to anyone who can restore the backup.
Instead, instead make a backup copy of the encrypted volume.
To back up PGP Virtual Disks
1 Unmount the PGP Virtual Disk.
2 Copy the unmounted encrypted file to a diskette, tape, or removable
cartridge just as you would any other file. Even if some unauthorized
person has access to the backup, he or she will not be able to decipher its
contents.
204

PGP® Desktop for Windows Using PGP Virtual Disks
When making backups of the encrypted files, keep these issues in mind:
Backing up encrypted files to a network drive gives others plenty of
opportunity to guess at a weak passphrase. It is much safer to back up only
to devices over which you have physical control.
A lengthy, complicated passphrase helps further improve the security of
your data.
If you are on a network, make sure that any network back up system does
not back up the files in your mounted PGP Virtual Disk. (You may need to
discuss this with your System Administrator.) Once a PGP Virtual Disk is
mounted, its files are decrypted and can be copied to a network backup
system that way.
Exchanging PGP Virtual Disks
You can exchange PGP Virtual Disk with other users who have PGP Desktop
installed on their computers. You do that by sending them a copy of the PGP
Virtual Disk data file, which contains the volume data. Here are some of the
ways you might exchange PGP Virtual Disk:
As mail attachments
On a removable disk or CD
Over a network
Once the other user has the PGP Virtual Disk file, they can mount it on a
system running PGP Desktop and use the correct passphrase to access it. If the
volume was encrypted to their public key, they would use their private key for
access.
Note: Public key is the most secure protection method when adding
alternate users to a PGP Virtual Disk because: (1) You do not need to
exchange a passphrase with the alternate user which, depending on your
method, could be intercepted or overheard. (2) The alternate user does not
need to memorize another passphrase which could be forgotten. (3) It is
easier to manage a list of alternate users if each uses their own private key to
unlock the volume.
The PGP Virtual Disk Encryption Algorithms
Encryption employs a mathematical formula to scramble your data so that no
one else can use it. When you apply the correct mathematical key, you
unscramble the data. The PGP Virtual Disk volume encryption formula uses
random data for part of the encryption process.
The PGP Desktop application offers strong algorithm options for protecting your
PGP Virtual Disk volumes: AES-256, CAST, and Twofish.
205

PGP® Desktop for Windows Using PGP Virtual Disks
The Advanced Encryption Standard (AES) is the NIST-approved encryption
standard. The underlying cipher is Rijndael, a block cipher designed by Joan
Daemen and Vincent Rijmen. The AES replaces the previous standard, the
Data Encryption Standard (DES). PGP Virtual Disk volumes can be
protected with the strongest variation of AES, AES-256 (that is, AES with a
key size of 256 bits).
CAST is considered an excellent block cipher because it is fast and very
difficult to break. Its name is derived from the initials of its designers,
Carlisle Adams and Stafford Tavares of Northern Telecom (Nortel). Nortel
has applied for a patent for CAST, but they have made a commitment to
make CAST available to anyone on a royalty-free basis. CAST appears to be
exceptionally well-designed by people with good reputations in the field.
The design is based on a very formal approach, with a number of formally
provable assertions that give good reasons to believe that it probably
requires key exhaustion to break its 128-bit key. CAST has no weak keys.
There are strong arguments that CAST is immune to both linear and
differential cryptanalysis, the two most powerful forms of cryptanalysis in
the published literature, both of which have been effective in cracking the
Data Encryption Standard (DES).
EME2-AES (256 bits) is a stronger algorithm that encrypts twice for each
operation. EME2 (Encrypt-Mix-Encrypt v2) is a wide block mode algorithm
that is currently under review by the IEEE Standards Working Group.
Special Security Precautions Taken by PGP Virtual Disk
PGP Desktop takes special care to avoid security problems with PGP Virtual
Disk volumes that other programs may not.
These precautions also apply to whole disk encrypted drives.
Passphrase Erasure
When you enter a passphrase, PGP Desktop uses it only for a brief time, then
erases it from memory. PGP Desktop also avoids making copies of the
passphrase. The result is that your passphrase typically remains in memory for
only a fraction of a second. Without this critically important feature, someone
could search for your passphrase in your computer memory while you were
away from the system. You would not know it, but they would then have full
access to data protected by this passphrase.
206

PGP® Desktop for Windows Using PGP Virtual Disks
Virtual Memory Protection
Your passphrase or other keys could be written to disk as part of the virtual
memory system swapping memory to disk. PGP Desktop takes care that the
passphrases and keys are never written to disk. This feature prevents a
potential intruder from scanning the virtual memory file looking for passphrases.
Hibernation
In Windows, Hibernate mode writes an image of your computer’s entire main
memory storage, including PGP Virtual Disk information, to a file on your hard
drive. If your PGP Virtual Disk is open when you invoke hibernation, sensitive
data will be written to your hard drive, including the session key, but not your
passphrase.
Because hibernation is inherently insecure, PGP Corporation recommends using
the PGP Whole Disk Encryption feature if you use hibernation or make sure to
enable the PGP Virtual Disk options Unmount when computer goes to sleep
and Prevent sleep if disk(s) cannot be unmounted, located on the Disk tab of
the PGP Options.
Memory Static Ion Migration Protection
When you mount a PGP Virtual Disk volume, your passphrase is turned into a
key. This key is used to encrypt and decrypt the data on your PGP Virtual Disk
volume. While the passphrase is erased from memory immediately, the key
(from which your passphrase cannot be derived) remains in memory while the
disk is mounted.
This key is protected from virtual memory; however, if a certain section of
memory stores the exact same data for extremely long periods of time without
being turned off or reset, that memory tends to retain a static charge, which
could be read by attackers. If your PGP Virtual Disk volume is mounted for long
periods, over time, detectable traces of your key could be retained in memory.
Devices exist that could recover the key. You won’t find such devices at your
neighborhood electronics shop, but major governments are likely to have a few.
PGP Desktop protects against this by keeping two copies of the key in RAM,
one normal copy and one bit-inverted copy, and inverting both copies every few
seconds.
207

PGP® Desktop for Windows Using PGP Virtual Disks
Other Security Considerations
In general, the ability to protect your data depends on the precautions you take,
and no encryption program can protect you from sloppy security practices. For
instance, if you leave your computer running with sensitive files open when you
leave your desk, anyone can access that information or even obtain the key
used to access the data.
Here are some tips for maintaining optimal security:
Unmount PGP Virtual Disk volumes when you leave your computer. This
way, the contents will be safely stored in the encrypted file associated with
the volume until you are ready to access it again.
Use a screen saver with a password so that it is more difficult for someone
to access your computer or view your screen when you are away from
your desk.
Make sure that your PGP Virtual Disk volumes cannot be seen by other
computers on the network. You may need to talk to your network
management people to guarantee this. The files in a mounted PGP Virtual
Disk volume can be accessed by anyone who can see them on the
network.
Never write down your passphrases. Pick something you can remember. If
you have trouble remembering your passphrase, use something to jog your
memory, such as a poster, a song, a poem, a joke, but do not write down
your passphrases.
If you use PGP Desktop at home and share your computer with other
people, they will probably be able to see your PGP Virtual Disk volume files.
As long as you unmount the PGP Virtual Disk volumes when you finish
using them, no one else will be able to read their contents.
If another user has physical access to your computer, that person can
delete your PGP Virtual Disk files as well as any other files or volumes. If
physical access is an issue, try either backing up your PGP Virtual Disk files
or keeping them on an external device over which only you have physical
control.
Be aware that copies of your PGP Virtual Disk volume use the same
underlying encryption key as the original. If you exchange a copy of your
volume with another and both change your master passwords, both of you
are still using the same key to encrypt the data. While it is not a trivial
operation to recover the key, it is not impossible.
You can change the underlying key by re-encrypting the volume.
208

12 Creating and Accessing
Mobile Data with PGP
Portable
Use PGP Portable to distribute encrypted files to users who do not have PGP
Desktop software. Use PGP Portable to transport files securely to other
systems that do not or cannot have PGP software installed.
PGP Portable provides:
Portability of secured documents
Ease of distribution of secured documents
There are two types of users of PGP Portable: the user who creates the PGP
Portable Disk containing secured data, and the user who does not have PGP
software but needs to access that secured data. You might also be both types
of users: creating a PGP Portable Disk that you can take and use on a computer
at a customer's site, for example.
On Windows systems, you can create PGP Portable Disks as well as access the
encrypted data.
In This Chapter
Creating PGP Portable Disks..................................................................209
Accessing Data on a PGP Portable Disk ................................................213
Creating PGP Portable Disks
PGP Portable Disks can be created in one of two ways: using a Windows
Explorer shortcut menu, or using a command line tool. This section describes
normal use of the shortcut menu. For information on the command line, see
Using the PGP Portable Command Line Tool.
To create a PGP Portable Disk, be sure that you have:
Installed PGP Portable on a Windows system that is already running PGP
Desktop.
Properly licensed the PGP Desktop installation that is bound to a PGP
Universal Server.
209

PGP® Desktop for Windows Creating and Accessing Mobile Data with PGP Portable
A PGP Portable Disk can be created on one of two targets:
A folder on a local drive, remote file share, or CD/DVD.
A locally mounted removable device, such as a USB flash drive, that is no
larger than 128 GB.
When you create a PGP Portable Disk, PGP Universal Server policy also
enforces passphrase strength. If you use a passphrase that does not meet PGP
Universal Server policy, an error message is displayed.
Creating a PGP Portable Disk from a Folder
When you want to eventually burn a CD or DVD containing the PGP Portable
Disk, use this option.
Note: Be sure that you have copied the data you want to protect and share
into the folder.
To create a PGP Portable Disk from a folder
1 Locate and right-click the source folder, and then select Create PGP
Portable Disk Folder from the shortcut menu.
2 In the Create PGP Portable Disk dialog box, enter and confirm the
passphrase. This passphrase will be required to access the data in the PGP
Portable Disk.
3 Click Create.
If the folder you are using to create the PGP Portable Disk is on a
read-only device (such as CD or DVD), a Save As dialog box is
displayed. Browse for the location on your local drive where you want
the PGP Portable Disk destination folder to be created and click Save.
When completed, the destination folder is created. The folder name is the
source folder name with "-PGP Portable" appended to the name.
4 Burn the entire contents of the destination folder to the CD/DVD. The PGP
Portable Disk destination folder contains:
The PGP Portable Windows executable (pgpportable.exe)
The PGP Portable Mac OS X executables (PGP Portable App)
A Windows autorun file (autorun.inf)
A PGP Portable Disk File (pgpportable.pgd)
The PGP Portable Disk File (pgpportable.pgd) contains within it all files
found in the original target folder. The PGP Portable Disk File is encrypted
to the passphrase specified.
Be sure that you do not delete any of these files from the PGP Portable
Disk.
210

PGP® Desktop for Windows Creating and Accessing Mobile Data with PGP Portable
Tip: Be sure that you burn only the contents of the folder to disc, and not
the folder itself. If you burn the folder to a disc, PGP Portable will not
automatically launch on systems where autorun is enabled.
Creating a PGP Portable Disk from a Removable USB Device
When you want to create the PGP Portable Disk directly onto a removable USB
device, such as a flash drive, use this option.
Removable USB devices, such as a flash drive, that are larger than 4 GB must
be formatted as NTFS. NTFS drives are treated as read-only when accessed on
Mac OS X systems (unless a third-party program, such as NTFS-3G for Mac OS
X, is used to enable read-write access). PGP Portable Disks created on
removable USB devices that are smaller than 4 GB can be formatted as FAT or
NTFS.
PGP Corporation recommends that you create PGP Portable Disks on FAT
formatted removable devices. If you try to create a PGP Portable Disk that is
larger than 4 GB, PGP will automatically convert the filesystem of the
removable device to NTFS with NTFS permissions similar to FAT. If you want to
create a PGP Portable Disk on an NTFS formatted removable device, be sure
that you understand NTFS permissions, as you may create a disk that cannot be
modified by anyone but the creator.
Note: The removable USB device must be smaller than 128 GB
(137438953472 bytes). If you attempt to create a PGP Portable Disk on a
removable USB device that is larger than 128 GB, you will receive an error
message.
Note: When creating a PGP Portable Disk on USB drives that are 256 MB or
smaller, folders created on the disk cannot be renamed using Mac OS X
systems. Create PGP Portable Disks on USB drives larger than 256 MB if
Mac OS X users will want or need to rename folders.
To create a PGP Portable Disk from a removable USB device
1 Locate and right-click the mounted removable USB device, and then select
Create PGP Portable Disk from the shortcut menu.
2 The PGP Portable Disk creation application is displayed with a warning that
the contents of the drive will be erased.
3 In the Create PGP Portable Disk dialog box, to securely erase any data that
exists on the device, select the check box to Securely erase contents of
the disk.
4 To require the user of the PGP Portable Disk to change the passphrase on
first use (the first time the user inserts the device into the system), select
the check box to Change passphrase on first use. This option is useful if
you plan to create several PGP Portable Disks to be handed out, such as at
a conference or trade show.
211

PGP® Desktop for Windows Creating and Accessing Mobile Data with PGP Portable
5 Enter and confirm the passphrase. This passphrase will be required to
access the data in the PGP Portable Disk.
6 Click Format. When completed, the PGP Portable Disk is created. The PGP
Portable Disk File is encrypted to the passphrase specified.
7 You are prompted to enter the passphrase and then the PGP Portable Disk
is mounted. A notification message is displayed from the system tray
informing you of the drive number for the mounted PGP Portable Disk.
8 If desired, copy the data that you want to protect to the mounted PGP
Portable Disk. The PGP Portable Disk contains no files when it is first
created.
9 Unmount the PGP Portable Disk (in the system tray, click the PGP Portable
icon and select Unmount and Exit). The drive that was mounted for the
PGP Portable Disk is unmounted.
10 Properly eject the USB device and remove the device from your computer.
You can now access the contents of the PGP Portable Disk on another
system that supports PGP Portable.
Warning: Be sure that you properly unmount a removable USB device
before physically removing it from the system. Failure to do so may result
in corrupted file contents.
The removable device contains the following files:
The PGP Portable Windows executable (pgpportable.exe)
The PGP Portable Mac OS X executables (PGP Portable.app)
A Windows autorun file (autorun.inf)
The PGP Portable Disk File (pgpportable.pgd)
Be sure that you do not delete any of these files from the PGP Portable
Disk.
Creating Read/Write or Read-Only PGP Portable Disks
To have read/write access to a PGP Portable Disk, the PGP Portable Disk must
be located on read/write media (such as a flash drive or other removable disk).
Read/write access is enabled for a PGP Portable Disk only while it resides on
the removable device on which it was created.
PGP Portable Disks created on read-only media are themselves read-only
(for example, CD-ROMs).
PGP Portable Disks accessed on the removable device on which they were
created are read/write (for example, a USB drive that is mounted as
read-write).
212
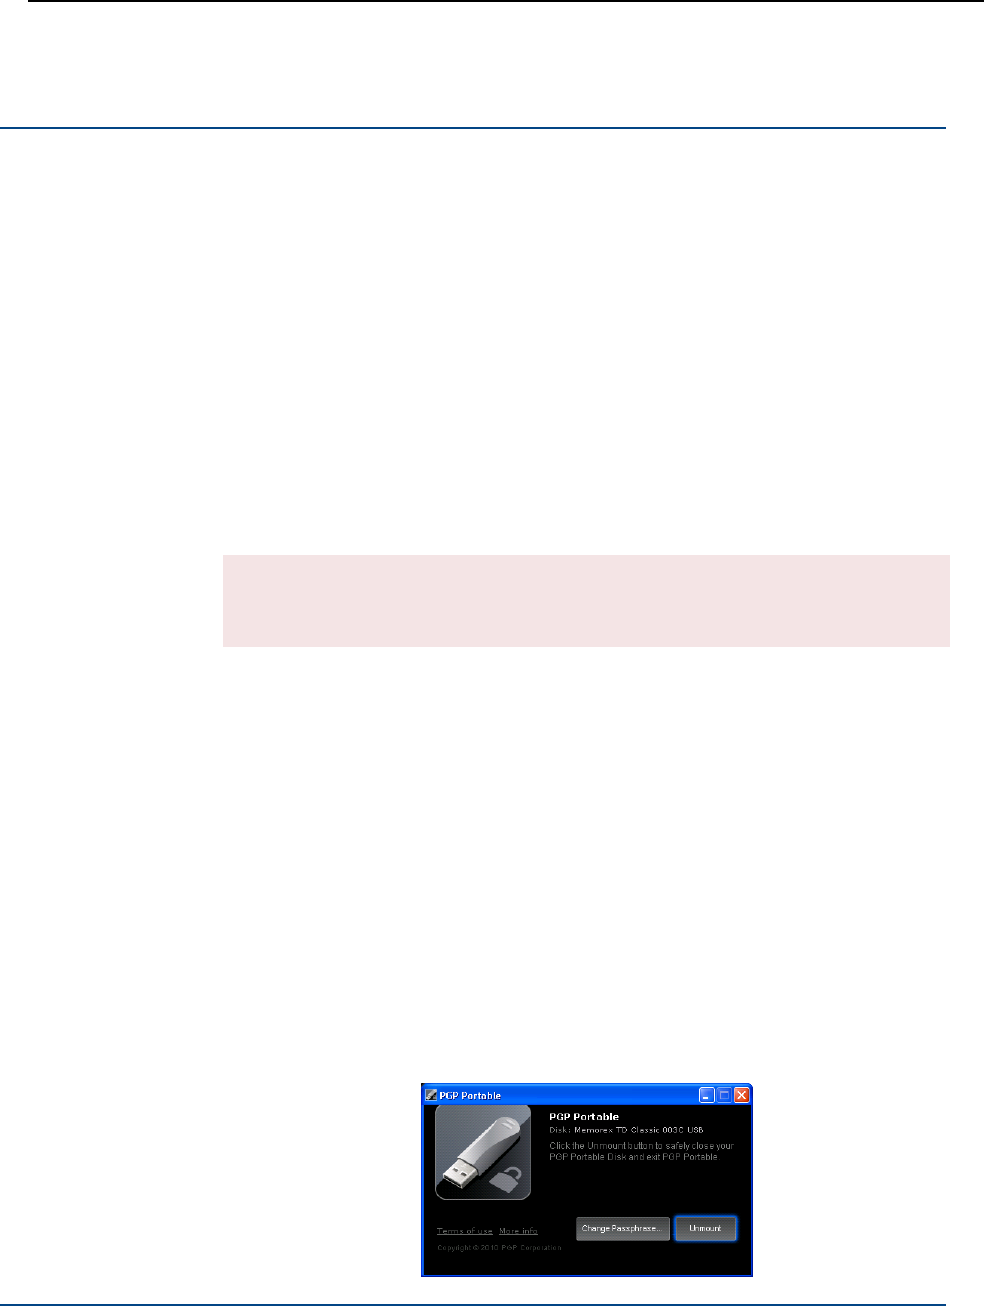
PGP® Desktop for Windows Creating and Accessing Mobile Data with PGP Portable
Accessing Data on a PGP Portable Disk
The contents of a PGP Portable Disk can be accessed in three ways:
By mounting the CD, DVD, or removable USB drive on a Windows system,
and running the PGP Portable Disk application (which launches
automatically if autorun is enabled).
By mounting the CD, DVD, or removable USB drive on a Mac OS X system,
and running the PGP Portable Disk application.
When you access data on a PGP Portable Disk, remember that you are actually
mounting two items: the removable device on which the PGP Portable Disk
resides, and the PGP Portable Disk itself (which is mounted as a separate item).
When you are finished, be sure to unmount the PGP Portable Disk before safely
ejecting the removable device.
The steps to access data on a PGP Portable Disk are similar for Windows and
Mac OS X systems.
Warning: Be sure that you properly unmount a removable device before
physically removing it from the system. Failure to do so may result in
corrupted file contents.
T
To access data on a PGP Portable Disk using a Windows system
1 Insert the removable device on which the PGP Portable Disk is located.
This can be a CD/DVD or a flash or removable drive.
2 Do one of the following:
On Windows systems where autorun is enabled, select Mount PGP
Portable Disk.
On Windows systems where autorun is disabled, open the mounted
removable device and browse for the PGP Portable application
(pgpportable.exe). Double-click the application.
On Windows 7 systems, open the disk by double-clicking the USB
disk icon in Windows Explorer.
The PGP Portable dialog box is displayed.
213

PGP® Desktop for Windows Creating and Accessing Mobile Data with PGP Portable
3 Enter the passphrase for the PGP Portable Disk. The PGP Portable Disk is
mounted.
Note: If the creator of the PGP Portable Disk requires that the passphrase
be changed on first use, when the disk is first inserted into a drive after
creation, the dialog box that appears requires that you enter the current
passphrase, and then change and confirm the new passphrase.
A notification message is displayed from the system tray informing you of
the drive number for the mounted PGP Portable Disk, and the amount of
disk space used and available. If the PGP Portable Disk is mounted as a
read-write device, you can add data to it. If the PGP Portable Disk is
mounted as a read-only device, you cannot add data.
Note: The volume name for the PGP Portable Disk is unique to PGP
Portable and may not match the name of the volume when created.
4 When you are finished using the PGP Portable Disk, unmount the PGP
Portable Disk (in the system tray, click the PGP Portable icon and select
Unmount and Exit. The drive that was mounted for the PGP Portable Disk
is unmounted.
5 Properly eject the USB device or disc from your computer.
To view available disk space
To view available disk space and total size of the PGP Portable Disk once
the disk has been mounted, move your cursor over the task bar item for a
few seconds. The notifier message reappears and displays the mount
status of the PGP Portable Disk as well as the updated disk space
information.
To obtain additional information about PGP Portable
To obtain more information about PGP Portable, in the left bottom corner of
the PGP Portable dialog box, click the link for More Info. Your browser
launches and the PGP Corporation Support site page is displayed.
Changing the Passphrase for a PGP Portable Disk
There may be times when it is necessary to change the passphrase associated
with a PGP Portable Disk. Note that you cannot change the passphrase on any
PGP Portable Disk that is read-only (including PGP Portable Disks burned to
CD/DVD media).
214

PGP® Desktop for Windows Creating and Accessing Mobile Data with PGP Portable
To change the passphrase on a PGP Portable Disk using a Windows
system
1 Insert the removable device on which the PGP Portable Disk is located.
This can be a CD/DVD or a flash or removable drive.
2 Do one of the following:
On Windows systems where autorun is enabled, select Mount PGP
Portable Disk.
On Windows systems where autorun is disabled, open the mounted
removable device and browse for the PGP Portable application
(pgpportable.exe). Double-click the application.
On Windows 7 systems, open the disk by double-clicking the USB
disk icon in Windows Explorer.
3 Enter the passphrase for the PGP Portable Disk when prompted. The PGP
Portable Disk is mounted. A notification message is displayed from the
system tray informing you of the drive number for the mounted PGP
Portable Disk.
4 Open PGP Portable by right-clicking the system tray icon and choosing
Open PGP Portable.
5 In the PGP Portable dialog box, click Change Passphrase.
6 Enter the current passphrase, enter and confirm the new passphrase, and
click Change. The passphrase is changed.
The Passphrase Quality bar provides a basic guideline for the strength of
the passphrase you are creating. For more information, see The
Passphrase Quality Bar (on page 306).
Unmounting a PGP Portable Disk
Be sure that you properly unmount a removable device before physically
removing it from the system. Failure to do so may result in corrupted file
contents.
To unmount a PGP Portable Disk
1 Open PGP Portable. To do this, do one of the following:
To open PGP Portable on a Windows system, right-click the system
tray icon and choose Unmount and Exit.
To open PGP Portable on a Mac OS system, click the icon in the dock
and choose Unmount and Exit.
The PGP Portable Disk is unmounted.
2 Safely eject and remove the device from your system.
215

PGP® Desktop for Windows Creating and Accessing Mobile Data with PGP Portable
216

13 Using PGP NetShare
PGP NetShare provides transparent, end-to-end encryption for shared file
storage.
Note: If you are using PGP Desktop in a PGP Universal Server-managed
environment, your PGP Universal Server administrator may have disabled
certain features. When a feature is disabled, the control item in the left side
is not displayed and the menu and other options for that feature are not
available. The graphics included in this guide depict the default installation
with all features enabled. If your PGP Universal Server administrator has
disabled this functionality, this section does not apply to you.
In This Chapter
About PGP NetShare ............................................................................. 218
Licensing PGP NetShare ....................................................................... 220
Authorized User Keys ............................................................................ 221
Establishing a PGP NetShare Admin (Owner) ....................................... 221
"Blacklisted" and "Whitelisted" Files, Folders, and Applications............. 222
Working with Protected Folders............................................................ 224
Working with PGP NetShare Users....................................................... 233
Importing PGP NetShare Access Lists.................................................. 236
Working with Active Directory Groups.................................................. 237
Decrypting PGP NetShare-Protected Folders........................................ 238
Re-Encrypting a Folder .......................................................................... 239
Clearing a Passphrase ........................................................................... 240
Protecting Files Outside of a Protected Folder ..................................... 240
Backing Up PGP NetShare-Protected Files ........................................... 242
Accessing PGP NetShare Features using the Shortcut Menu .............. 243
PGP NetShare in a PGP Universal Server-managed Environment ........ 243
Accessing the Properties of a Protected File or Folder......................... 244
Using the PGP NetShare Menus in PGP Desktop................................. 245
217

PGP® Desktop for Windows Using PGP NetShare
About PGP NetShare
PGP NetShare enables specific users to share protected files in a shared space,
such as on a corporate file server, in a shared folder, or on removable media
such as a USB drive.
Note: In circumstances where you do not have an easily accessible shared
space, using a USB removable drive is one way to share your PGP NetShare
files.
The files are protected by encryption, but continue to appear as normal
application files—Notepad, Microsoft Word, HTML, Microsoft Excel, and so on.
Applications can directly read from and write to the files; the fact that the files
are protected is transparent to the applications. Anyone else with access to the
shared space can see the files, but they cannot read/use them.
PGP NetShare is client-only software—there is nothing to install on the file
server and it works with your existing storage infrastructure. The encryption and
decryption of protected files and folders is done only on the client. Server
backups will archive encrypted files (ciphertext) which is unreadable to anyone
who is not authorized to view the files.
Those who have access to the protected files are called Users, and folders
containing the protected files are called Protected Folders.
Users are assigned roles that specify the type of actions that user can make.
For more information on roles, see PGP NetShare Roles (on page 220).
The Protected Folder is any folder designated to hold protected files. Files that
are in a folder converted to a Protected Folder are automatically encrypted; files
moved into a Protected Folder after its creation are encrypted when they are
added. You can also protect individual files by selecting Protect Individual Files
in the NetShare tab of Tools > PGP Options.
Caution: PGP NetShare does not provide access control for the files in a
Protected Folder. Because it is file-level access control, anyone with access
to the files in a Protected Folder can add new, unencrypted files and/or
remove existing encrypted files. This makes it important that you establish
your Protected Folder in a secure shared space; but it also means that your
network administrator can back up the files in the Protected Folder without
being able to read them.
218

PGP® Desktop for Windows Using PGP NetShare
PGP NetShare can be used with both the PGP Virtual Disk and PGP Whole Disk
Encryption features of PGP Desktop. This means that you can create a
Protected Folder in a PGP Virtual Disk or if your drive is encrypted by PGP WDE.
PGP NetShare protection is designed for files in a shared, collaborative
environment, usually over a network. PGP Virtual Disk and PGP Whole Disk
Encryption protect individual drives or portions of drives on a local system. All
three are valuable security products that are designed for slightly different
circumstances. In fact, you can use all three on the same system to provide
strong security for your data.
Here is an example to help you understand how you might use PGP NetShare:
Suppose you are the VP of Finance for a small company with two major
product lines. The company president calls you into her office and asks you
to spearhead an initiative to see if adding another major product line would
be successful.
She wants you and representatives from Marketing, Sales, Engineering,
Manufacturing, and Support to examine the issue from all sides and make a
recommendation. The whole project needs to be low profile.
Fortunately, in your organization everyone uses PGP Desktop in a PGP
Universal Server-managed environment, so the solution for creating,
sharing, updating, and securely storing the files you need is already in
place: PGP NetShare.
Because members of your project are physically dispersed, you need to set
up the Protected Folder for the project in a location accessible to everyone.
For example, creating the Protected Folder on the corporate network would
allow all project members to access it.
Once the Protected Folder is established, the project members can add
new files, open and work on existing files, or removes files without
worrying about the fact that they are protected by encryption—the
encryption and decryption are totally transparent.
Another advantage of PGP NetShare is that the files appear normally to anyone
who is not an Authorized User, thus allowing your network administrator to
back up the files in the Protected Folder the same way they back up all the
other files on the corporate network. The backups are also protected by
encryption.
Note: The PGP NetShare tracking engine ignores EFS-protected objects. This
is by design and ensures any complications are avoided due to the fact EFS is
tightly coupled with NTFS. Any files or folders that are EFS-encrypted and are
moved or copied into a PGP NetShare-protected folder retain their
EFS-encryption, but do not become PGP NetShare-protected. To PGP
NetShare protect these objects, remove the EFS encryption before
moving/copying into a folder.
PGP NetShare provides complete security for files in a Protected Folder. Data is
always encrypted, even when a Protected Folder is being accessed or is in
transit from or to project members.
219

PGP® Desktop for Windows Using PGP NetShare
Caution: If you choose Save As for a protected file, and save it outside the
Protected Folder, the new version will not be protected.
PGP NetShare Roles
Admin: This is the "owner" of the protected folder. The Admin can add
users and remove users, and can change the roles of Users and Group
Admins. The Admin has full rights to read and write to the protected folder.
There can be only one Admin for each protected folder and it is created
automatically by the creator — you do not need to specify an Admin
manually for the protected folder. There is only one Admin per folder
You become an Admin by creating a protected folder, adding yourself as a
member, and applying the Admin role to yourself. You can be a member of
multiple Admin sets at one time.
The Admin role cannot be removed by a Group Admin, but an Admin can
reassign his or her role to another member.
Admins must have full write access to the protected folder.
Group Admin: This is an "administrator" of the protected folder. The Group
Admin can add and remove users, and can promote users to Group Admins
or demote Group Admins to Users. There can be as many Group Admins
as needed. The Group Admin has full rights to read and write to the
protected folder. There can be multiple Group Admins for each PGP
NetShare protected folder.
Group Admins must have full write access to the protected folder.
Users: This is the set of users who are allowed to access the protected
files in the shared space. The files in the protected folder are encrypted to
the keys of the Users. You become a User when a protected folder is
created, you are added to the PGP NetShare, and the Admin or Group
Admin assigns the User role to you. All Users have equal privileges to read
and write to the protected folder. Users do not have the ability to change
the roles of other Users. You can be a member of multiple User sets at one
time. Users do not have the right to decrypt files or folders. This is limited,
so Users cannot decrypt files and re-encrypt the files with new role
assignments.
Note: If you have a folder that is protected with a previous version of PGP
Desktop, you must select new roles for existing users manually. For more
information, see Changing a User's Role (on page 234).
Licensing PGP NetShare
In order to use PGP NetShare, you must be running PGP Desktop 9.5 or later
and have a license that supports PGP NetShare.
220

PGP® Desktop for Windows Using PGP NetShare
To see if your copy of PGP Desktop supports PGP NetShare
1 Open PGP Desktop.
2 Select Help > License. The PGP Desktop License dialog box is displayed.
3 In the Product Information section, find the PGP NetShare icon. Move
your cursor over the product name to see information about the product
and to find out if you are currently licensed to use it. If PGP NetShare is not
supported, contact your PGP administrator about getting a license that
supports PGP NetShare.
If you created one or more Protected Folders with a PGP NetShare license that
has now expired, you will not be able to create any new Protected Folders, use
the files currently in any Protected Folders, add files to existing Protected
Folders, or be added as an Authorized User for a new Protected Folder.
In order to regain access to the decrypted versions of any files in an existing
Protected Folder, you must either obtain a new PGP NetShare license or
decrypt the files/folders in your Protected Folders using the Remove <file
name> from PGP NetShare command (for more information, see Accessing
PGP NetShare Features using the Shortcut Menu (on page 243)).
Authorized User Keys
PGP NetShare uses the PGP keys of the Users you designate to control access
to the decrypted files in the Protected Folder, and it uses the private keys of
Authorized Users to sign new files that are added to the Protected Folder.
Note: PGP NetShare does not support the use of passphrases to protect
files. PGP keys must be used to protect files.
When a set of Users is created, the creator specifies the public keys of the
users who will be able to use the files in the Protected Folder. To use those
files, Users must have the corresponding private key on their system in order to
gain decrypted access to the files.
Establishing a PGP NetShare Admin (Owner)
While a PGP NetShare Admin for a Protected Folder is not required, you may
want to consider establishing one from among the authorized Users or Group
Admins. It would be the responsibility of this person to monitor the files and
folders in the Protected Folder, add and remove users and Group Admins, and
to make sure that the activity in the Protected Folder is going as planned.
221

PGP® Desktop for Windows Using PGP NetShare
Because all Authorized Users can add or remove files, folders, and (in some
cases) users, it is possible that, over time, files are inappropriately added or
removed from the Protected Folder, or Users are inappropriately added or
removed.
The Admin of a protected folder should monitor Users and the Protected Folder
for these problems and fix them if they occur.
I
"Blacklisted" and "Whitelisted" Files, Folders, and
Applications
Certain files, folders, and applications can be "blacklisted" or "whitelisted." Black-
or whitelisted items are either forced to be protected, or are never protected.
“Blacklisted” and Other Files You Cannot Protect
PGP NetShare does not allow you to protect certain files and folders. Before a
file or folder is protected by PGP NetShare, it is checked against this list, known
as the “blacklist.” If a file or folder is identified as being blacklisted, PGP
NetShare continues with creating the Protected Folder, but the file and/or folder
is skipped and a message is displayed in the PGP NetShare Assistant Progress
screen that the item is a blacklisted.
Files that are blacklisted include:
All files with the file extension *.skr, *.pkr, and *.pgd, to prevent you
from encrypting your keys or PGP Virtual Disks.
The PGP Desktop installation folder and all files within it (by default, the
folder is located at C:\Program Files\PGP Corporation\PGP
Desktop).
The PGP Preferences folder and all files within it (by default, the folder is
located in your user folder at C:\Documents and Settings\[your
user name]\Application Data\PGP Corporation\PGP).
The PGP default keyring folder (by default, the keyring is located in the My
Documents folder).
Other files that PGP NetShare prevents from adding to Protected Folders are
any files or folders that have the System attribute set, and all files and folders in
the Windows installation directory (by default, C:\Windows and
C:\Windows\System32), as well as the Thumbs.db file created when
viewing thumbnail graphics in Windows Explorer. When system files or folders
are added to PGP NetShare, the file and/or folder is skipped and a message is
displayed in the PGP NetShare Assistant Progress screen that the item is a
system file or folder.
222

PGP® Desktop for Windows Using PGP NetShare
"Blacklisted" and "Whitelisted" Folders Specified by PGP Universal Server
If you are using PGP Desktop in a PGP Universal Server-managed environment,
your PGP administrator may have specified certain folders as "blacklisted" or
"whitelisted."
Blacklisted folders
Blacklisted folders are folders that are never added to PGP NetShare and
encrypted. An example of a blacklisted folder may be your C:\Program Files
folder or your C:\Windows\Temp folder. If your PGP administrator has
specified that a folder be blacklisted and that folder does not exist, it is not
created on your system.
Note: Folders and/or files that have been PGP NetShare-protected are not
decrypted automatically if they are blacklisted (by PGP Universal Server
policy). To remove PGP NetShare protection, manually decrypt the folder/file.
Any new objects added to a protected blacklisted folder will not receive PGP
NetShare encryption.
Whitelisted folders
Whitelisted folders are folders that are always added to PGP NetShare and the
contents are encrypted. If your PGP administrator has specified that a folder be
whitelisted and that folder does not exist, it is created on your system. For
example, if your PGP administrator specified that C:\Documents and
Settings\[user name]\My Documents\secured is a whitelisted folder,
and the subfolder \secured does not exist, then it is created. You cannot
remove whitelisted folders from PGP NetShare.
Note: If you remove a folder that your PGP Universal administrator has
specified as whitelisted, that folder is automatically recreated the next time
you access PGP NetShare or restart PGP Desktop.
Application-based Encryption and Decryption Bypass Lists
If you are using PGP Desktop in a PGP Universal Server-managed environment,
your PGP Universal Server administrator may have specified certain applications
as those where files created by these applications are either never decrypted or
always encrypted.
223

PGP® Desktop for Windows Using PGP NetShare
Application-based Encryption List
Applications in this list are applications where any files written by the application
are forced to be encrypted. Files created by applications in the application-based
encryption list are automatically encrypted to your key and are always encrypted
regardless of location, including temporary files and system caches. Examples
of the types of applications that may be included in this list are Microsoft Office,
Microsoft Excel, and Adobe Acrobat.
Other types of encryption (for example, the whitelisted folders) take
precedence over files created by applications in the application-based
encryption list.
An example use would be if your PGP administrator specified that Microsoft
Excel is in the application-based encryption lists so that all spreadsheets created
by your Financial department are protected.
Decryption Bypass List
Applications in this list are applications where any files written by the application
are prevented from being automatically decrypted. These applications are
provided the on-disk file contents, including the PGP NetShare header and file
ciphertext. Applications in the decryption bypass list effectively bypass the PGP
NetShare filter when reading file, so the files remain encrypted on read,
allowing these applications to pass the encrypted data to other applications.
Examples of the types of applications that may be included in this list are
backup and FTP programs.
Other types of encryption (for example, the blacklisted folders) take precedence
over files created by applications in the decryption bypass list.
An example use would be if your PGP administrator specified your corporate
backup program in the decryption bypass list. All backup files created by this
application are protected and the encryption is preserved when the backup file
is transferred to another location.
Working with Protected Folders
The Protected Folder is any folder designated to hold protected files. Files that
are in a folder converted to a Protected Folder are automatically encrypted; files
moved into a Protected Folder after its creation are encrypted when they are
added. You can also protect individual files by selecting Protect Individual Files
in the NetShare tab of Tools > PGP Options.
224

PGP® Desktop for Windows Using PGP NetShare
Starting with PGP NetShare version 9.10, folders on Web servers that support
the WebDAV protocol, such as Microsoft SharePoint, can be PGP
NetShare-protected. Note that certain types of files, such as .mht files, are
needed by SharePoint to function correctly and when used in that context,
cannot be encrypted by PGP NetShare. For technical details on protecting
SharePoint files, see PGP Corporation Support KB article #1120
(http://support.pgp.com/?faq=1120).
When using PGP NetShare with Sharepoint, be sure to set the option for
Require Checkout to No for the Sharepoint site. This allows all authorized
users to access all files that are being managed by the PGP NetShare folder.
Tip: Be sure that you have an appropriate back up strategy in place and that
all PGP NetShare protected folders are backed up on a regular basis.
Choosing the Location for a Protected Folder
PGP Corporation recommends that you create your PGP NetShare Protected
Folder in a space that is accessible to all Authorized Users, but that is protected
from everyone else.
While you can create the Protected Folder in a publicly accessible space,
remember that PGP NetShare does not provide access control for the files in a
Protected Folder.
What you do with the files in a Protected Folder and who can access them
impacts the protection PGP NetShare can provide. You should take the
following circumstances into consideration when choosing the location for a
PGP NetShare Protected Folder.
Normal Usage (on page 225)
File Access (on page 226)
Direct Access to Ciphertext (see "Direct Access to Encrypted Data
(Ciphertext)" on page 226)
Protected Files Corrupted, Deleted, or Overwritten (on page 226)
“Blacklisted” and Other Files You Cannot Protect (on page 222)
Normal Usage
In normal usage by an Authorized User, PGP NetShare fully protects the files
within a Protected Folder. Normal usage means opening a protected file,
making changes, then saving it; creating a new file in a Protected Folder; or
moving or copying a file into a Protected Folder.
225

PGP® Desktop for Windows Using PGP NetShare
When a file is moved or copied out of a PGP NetShare Protected Folder, PGP
NetShare attempts to keep the file protected. This allows you to copy files from
a Protected Folder to a USB drive, for example, and retain the file’s protection.
If you move or copy a file out of a Protected Folder, you should always verify
that the destination file is still protected by looking for the visual lock indicator or
examining the file properties.
File Access
Every application you use will have full access to the decrypted data of your
PGP NetShare-protected files. This includes other PGP Corporation applications,
such as PGP Zip. So, if you create a PGP Zip archive and include a PGP
NetShare-protected file, the PGP Zip archive will contain a decrypted version of
the file.
Be aware also that if you choose Save As for a protected file, and save it
outside the Protected Folder, the new version will not be protected.
Direct Access to Encrypted Data (Ciphertext)
There are some circumstances where PGP NetShare can be bypassed,
providing direct access to the encrypted data, or ciphertext, of the encrypted
file.
This allows the protected files on a file server, for example, to be backed up,
moved, copied, or FTP'd by a user (such as the network administrator) who has
physical access to the protected files but who does not have PGP Desktop
installed. In these cases, the ciphertext of the protected files would be backed
up, moved, copied, or FTP'd.
Protected Files Corrupted, Deleted, or Overwritten
PGP NetShare does not provide file access control. Even though users without
proper authorization are unable to open files within Protected Folders, it is still
possible for these users to access them. This means that even protecting files
with PGP NetShare is no assurance that they cannot be corrupted, deleted, or
overwritten by users who have access to them. PGP NetShare protects the
contents of a file—it cannot protect the file itself.
It is highly recommended that you keep strong file access controls in place—in
addition to the cryptographic access control and protection offered by PGP
NetShare.
Creating a New PGP NetShare Protected Folder
The Protected Folder is the folder that holds the PGP NetShare-protected files.
226
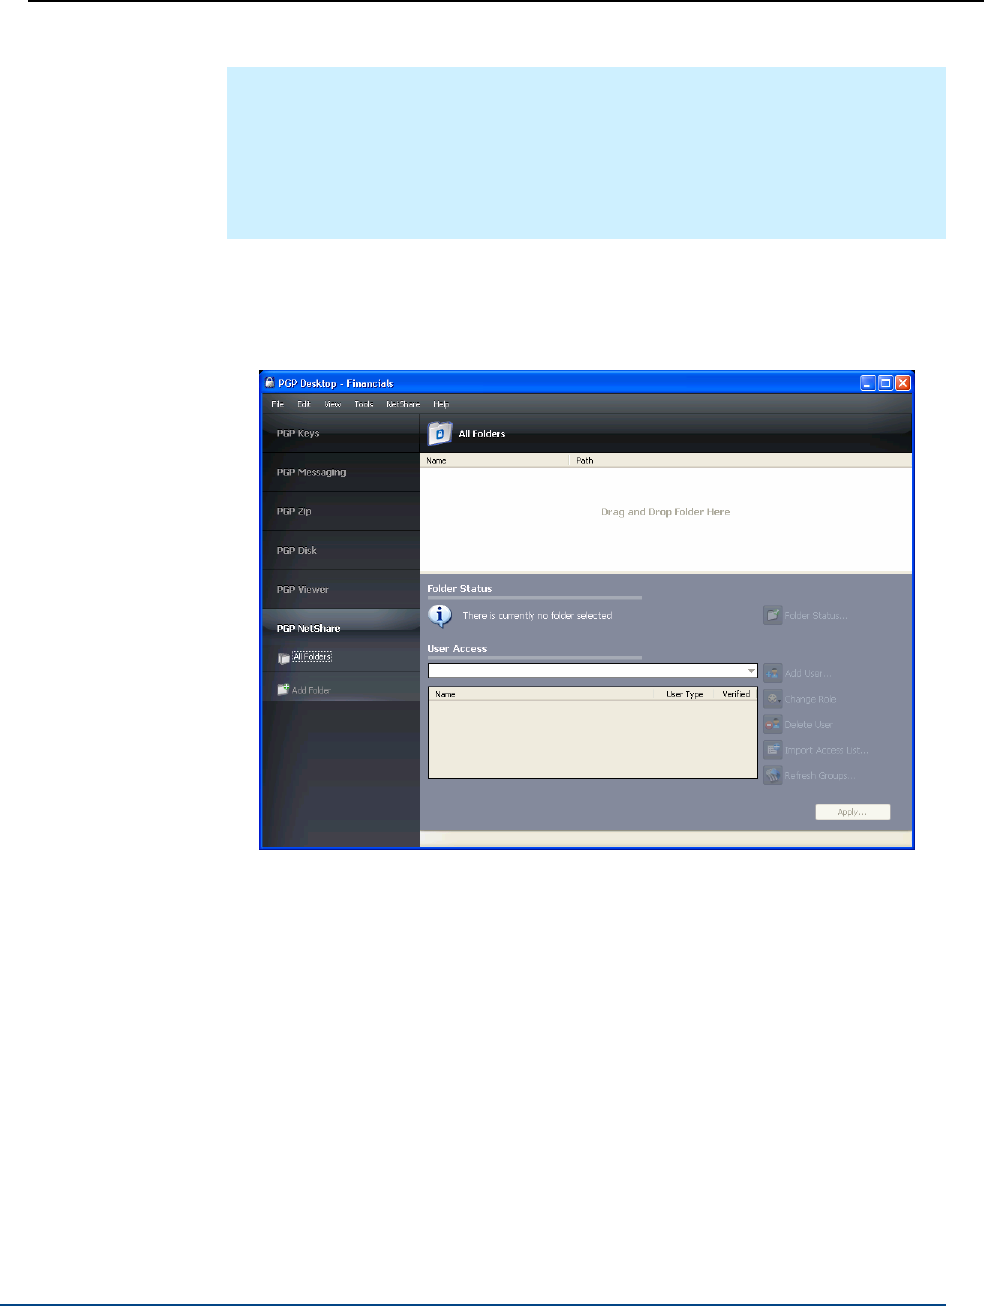
PGP® Desktop for Windows Using PGP NetShare
Tip: When you create a new PGP NetShare Protected folder, the files already
in the folder will have their last modification dates changed to the date of the
PGP NetShare operation. If you want to preserve the modification dates, first
create an empty PGP NetShare folder and then add files to it.
Note: You must have write-permissions to create a PGP NetShare Protected
Folder.
To create a new PGP NetShare Protected Folder
1 Open PGP Desktop and click on the PGP NetShare Control Box. The PGP
NetShare work area is displayed.
2 Do one of the following:
Drag the folder you want to be the Protected Folder to the field
labeled “Drag and Drop Folder Here,” which opens the PGP NetShare
Assistant and skips the step of specifying the Protected Folder.
Click Add Folder in the PGP NetShare Control Box or select
NetShare > Add Folder. The Select Folder screen of the PGP
NetShare Assistant is displayed.
Click Browse. The Browse For Folder dialog box is displayed.
Navigate to the folder with the files you want to include in the
Protected Folder you are creating. To create an empty folder into
which you will put the files you want to be part of the Protected
Folder, click Make New Folder.
Click OK to close the Browse For Folder dialog box. The Select
Folder screen is displayed again.
227

PGP® Desktop for Windows Using PGP NetShare
(Optional) In the Description field, type a description for the Protected
Folder you are creating.
3 Click Next. The Add Users screen is displayed.
4 To add users for the Protected Folder you are creating, click the down
arrow icon. A list of the keys on your keyring is displayed.
5 Select a user, and then click Add.
Note: If you want access to the contents of the Protected Folder, do not
forget to add your own key. If you do not, you will not be able to use the
files in the Protected Folder.
You can also add authorized users by clicking Add. The User Selection
dialog box is displayed.
6 Do one of the following:
Drag keys from the Key source column into the Keys to add column.
Click on a key in the Key source column and click Add.
Double-click on a key in the Key source column
Add keys from the PGP Global Directory, by clicking the PGP Global
Directory icon, typing a search term in the Search field, then clicking
the magnifying glass to start the search. The results of the search
appear in the Key source column; from there, add them to the Keys
to add column.
Note: PGP NetShare does not automatically notify newly added members
that they have been added to a Protected Folder as authorized users.
Generally speaking, it is the responsibility of the creator of a new
Protected Folder to notify members that the Protected Folder has been
created and that they are authorized users.
7 Click OK when you are finished with the User Selection screen. The Add
Users screen is displayed again.
8 To assign roles to each user, right-click the user's name and select the role:
Admin: Create only one Admin per PGP NetShare protected folder.
This role has full read/write rights to the folder, can add and remove
users, assign roles to other users, and can promote another user to be
the Admin.
Group Admin: Create as many Group Admins as you need for each
PGP NetShare protected folder. This role has full read/write rights to
the folder, can add and remove users, and assign roles to other users.
User: Create as many Users as you need for each PGP NetShare
protected folder. This role has full read/write rights to the folder.
You can change a user's role at any time after the protected folder is
created. Click on the protected folder in the PGP Desktop, and right-click
the user's name to change the role. You can also select the user's name
and click Change Role.
228

PGP® Desktop for Windows Using PGP NetShare
9 Click Next. The Select Signer screen is displayed.
10 Select one private key from the private keys on the local keyring. This key
will be used to sign the files that are protected by encryption in the
Protected Folder.
11 Type the Passphrase for the key.
12 Click Next. The Progress screen is displayed.
The files in the specified Protected Folder are encrypted and the specified
users are added as Authorized Users.
Note: If you cancel the encryption process, files that have already been
encrypted remain encrypted. To return the files to their original,
unencrypted state, see Removing a Folder (see "Decrypting PGP
NetShare-Protected Folders" on page 238).
13 When the process is done, click Finish.
Using Files in a PGP NetShare Protected Folder
Once you are a PGP NetShare Authorized User, there are three ways to use the
files in the Protected Folder:
Double-click the Protected Folder to open it, then double-click the specific
file you want to use.
Open the file you want to use from within the application that created it.
Open the Protected folder by clicking its path, which displays as a
hypertext link; then double-click the specific file you want to use.
If the passphrase of the private key used for your membership in the PGP
NetShare Protected File is cached on your system, you do not need to do
anything else to open the files; they will open automatically.
If your passphrase is not cached, however, the Protected Folder is locked. You
will need to authenticate before you can open the files in the Protected Folder.
For more information, see Unlocking a Protected Folder (on page 229).
Note: When opening a PGP NetShare-protected text document on Windows
Vista using Notepad, you will receive two notifications that the file is being
unlocked. This is a result of how Notepad accesses the file.
Unlocking a Protected Folder
Use the Unlock button to try to access a folder that you cannot seem to access
but believe you should be able to unlock, or in situations where a folder requires
manual unlocking. You must manually unlock a Protected Folder when the
folder is locked due to one of the following reasons:
229
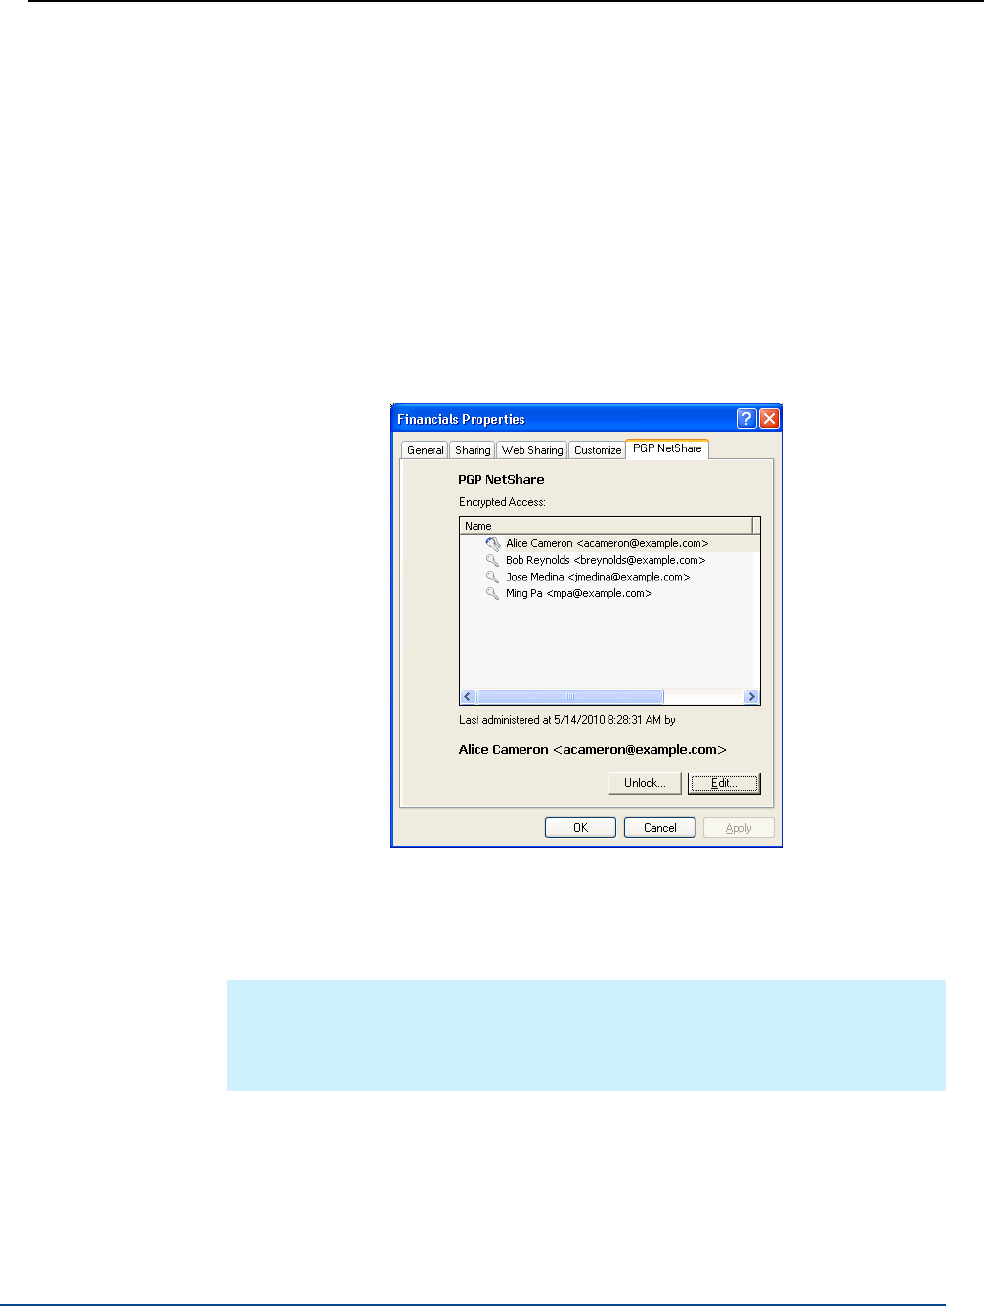
PGP® Desktop for Windows Using PGP NetShare
The timer in the Passphrase prompt dialog box expires.
If you click Cancel in the Passphrase dialog box without entering a valid
passphrase.
Any subsequent attempts to access the protected folder result in an “Access is
denied” dialog box and you must unlock each Protected Folder before you can
use the files in them.
To unlock a Protected Folder
1 Right-click the Protected Folder and select PGP Desktop > PGP NetShare
Properties.
2 In the Properties dialog box, select the PGP NetShare tab.
3 Click Unlock. The Unlocking dialog box is displayed.
4 Type the appropriate passphrase, then click OK. The Unlocking dialog
disappears. Your passphrase is cached and you have access to all files in
the Protected Folder.
Note: If your PGP Universal Server administrator has enabled the option, you
can select Rescan NetShare Locks from the PGP tray menu. Use this option
to unlock a PGP NetShare protected folder when your key is on a smart card
or token that was not inserted when you attempted to access the folder.
230

PGP® Desktop for Windows Using PGP NetShare
Determining the Files in a Protected Folder
Once you become an Authorized User, you have full access to all files in the
Protected Folder. If you created the Protected Folder, you probably know what
files are in it. If you were added to the Protected Folder by another member,
however, it may not be immediately clear to you what files are available to you
in the Protected Folder.
To determine what files are in a Protected Folder
1 Open PGP Desktop and click on the PGP NetShare Control Box.
2 Click the path to the Protected Folder, which is displayed as a hypertext
link. The Protected Folder contents appear in a new window, showing the
files and folders that are in the Protected Folder.
If access is denied, it means the Protected Folder is locked. You will need to
either go to the PGP NetShare tab of the Properties screen for the locked folder
and unlock it or restart your system to gain access. For more information about
unlocking a Protected Folder, see Using Files in a PGP NetShare Protected
Folder (on page 229).
Adding Subfolders to a Protected Folder
PGP NetShare supports adding both files and folders into a Protected Folder
after it has been created.
All of the files in a folder you add into a Protected Folder will automatically be
protected; once added to the Protected Folder, both the folder and the files in it
will only be available to authorized users.
Be sure not to add a folder that is already a Protected Folder for a different set
of authorized users. This would cause the new subdirectory to have a different
set of authorized users from the parent folder.
Note: The PGP NetShare tracking engine ignores EFS-protected objects. This
is by design and ensures any complications are avoided due to the fact EFS is
tightly coupled with NTFS. Any files or folders that are EFS-encrypted and are
moved or copied into a PGP NetShare-protected folder retain their
EFS-encryption, but do not become PGP NetShare-protected. To PGP
NetShare protect these objects, remove the EFS encryption before
moving/copying into a folder.
231
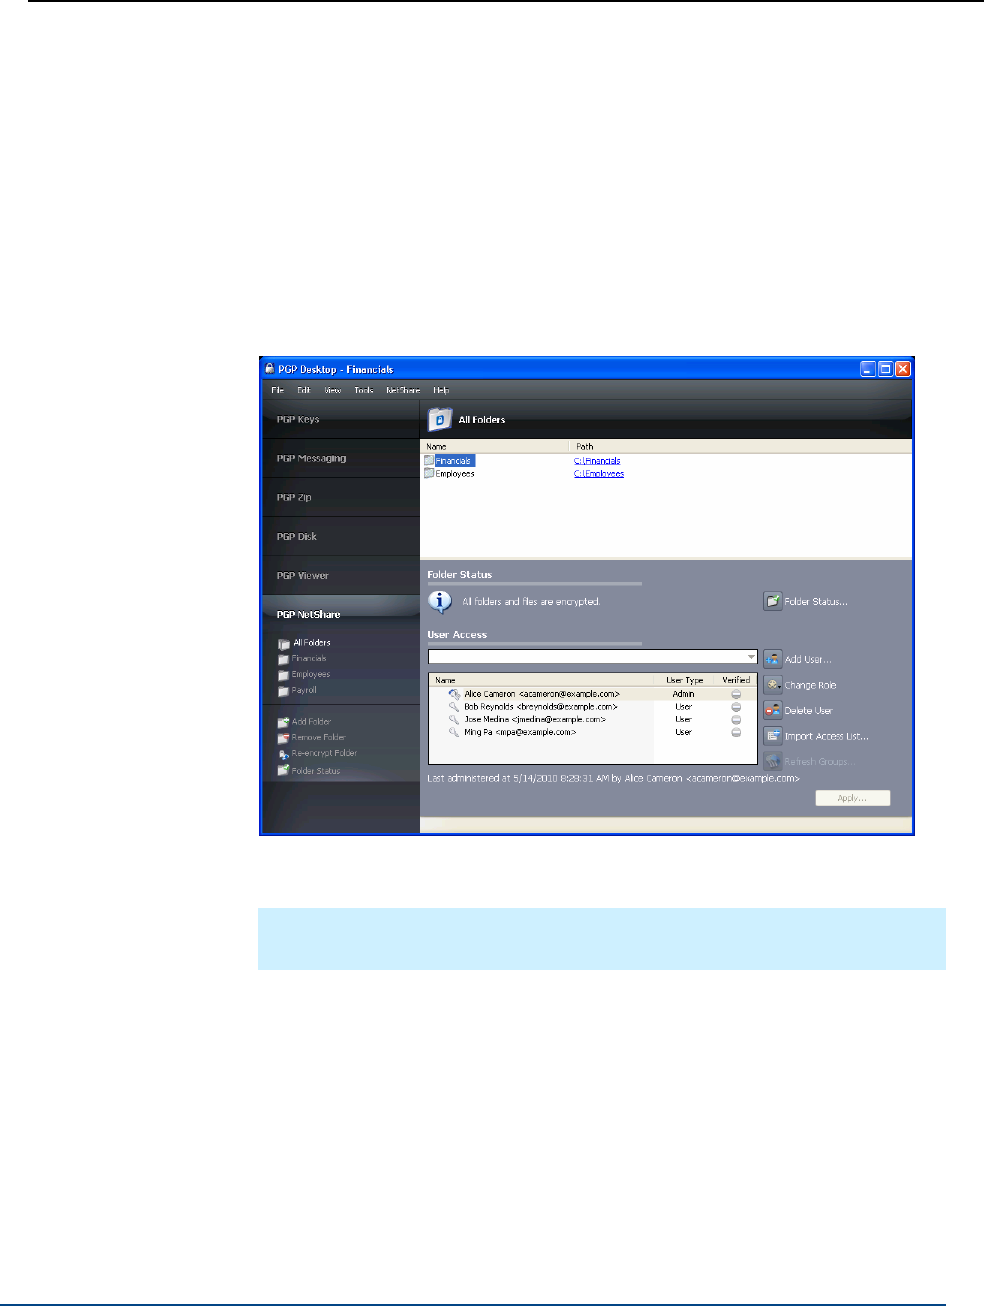
PGP® Desktop for Windows Using PGP NetShare
Checking Folder Status
The Check Folder Status command, available from the NetShare Folder work
area, the PGP NetShare Control Box, or from the NetShare menu, provides
up-to-date information about the status of the specified PGP NetShare folder.
To check the status of a folder in a Protected Folder
1 On the PGP NetShare work area, in the Folder Status section, click Check
Folder Status. You must have a PGP NetShare folder selected.
2 Read the text to the left of the Check Folder Status button for the status
of the selected folder (for example: “All folders and files are encrypted”).
Tip: The date, time, and Key ID of the person who last administered the
protected folder are displayed below the user list.
Copying Protected Folders to Other Locations
You will achieve greatest security if you always work within a protected folder;
PGP Corporation recommends that when you need to copy a folder, you must
first create a Protected Folder as your destination. Whenever you move files
from a Protected Folder to another Protected Folder, your environment will
remain protected.
232

PGP® Desktop for Windows Using PGP NetShare
PGP NetShare retains file encryption even when the Protected Folder is moved
to another location. However, depending on how you copy the files, and where,
you may discover that the process has caused the folder to lose its protection.
The files in the folder retain their protected status, but the folder may lose its
PGP NetShare information, and thus lose its PGP icon as well.
If you have copied a folder to an unprotected location, as a best practice, check
the folder status as described in Checking Folder Status (on page 232) to ensure
the folder and files are encrypted.
If the folder is not encrypted, do the following:
1 If your PGP NetShare permissions allow you to do so, create a new
protected folder at the destination as described in Creating a New PGP
NetShare Protected Folder (on page 226).
2 Copy the contents of the folder that has lost its protection into the new
protected folder.
3 Import the access list of the old folder into the new folder as described in
Importing PGP NetShare Access Lists (on page 236).
Working with PGP NetShare Users
Anyone with a PGP Desktop 9.5 or later who has an appropriate keypair in PGP
Desktop can be a user of a PGP NetShare Protected Folder.
Keypairs can be:
Created in PGP Desktop
Created by an OpenPGP application and imported into PGP Desktop
An X.509 certificate that has been imported into PGP Desktop
There are two ways to become a user:
You can create a Protected Folder using PGP Desktop and add yourself as
a user.
You can be added as a user by an existing member.
Once you become a user, you have the same rights as all other users.
Adding a PGP NetShare User
Most PGP NetShare Users are added when the Protected Folder is created, but
you can add members at any time after creation—as long as you are an Admin
or Group Admin of that Protected Folder.
233

PGP® Desktop for Windows Using PGP NetShare
Caution: Be careful who you add as a User to a PGP NetShare. Once a
person is added, that person has all the rights and privileges as any other
user. The new member can add new files to, or remove existing files from,
the Protected Folder.
To add a new PGP NetShare User
1 Select the PGP NetShare folder to which you want to add a new member.
2 In the User Access section, click Add User. The User Selection dialog box
is displayed.
3 Do one of the following:
Drag keys from the Key source column into the Keys to add column.
Click on a key in the Key source column and click Add.
To add keys from the PGP Global Directory, click the PGP Global
Directory icon, type a search term in the Search field, then click the
magnifying glass or press Enter to start the search. The results of the
search appear in the Key source column; from there, add them to the
Keys to add column.
Note: PGP NetShare does not notify new members that they have been
added as an Authorized User. Generally speaking, it is the responsibility of
the person who adds a new user to tell them that they are now
authorized.
4 Click OK. The user is added to the list of Users.
5 Click Apply. The Select Signer screen is displayed.
6 Select one private key from the private keys on the local keyring or accept
the default key. This key will be used to sign the files when they are
re-encrypted. Re-encryption of the files in a Protected Folder is done
automatically as a security precaution when Users are added.
7 Type the passphrase for the selected key, if it is not cached, then click
Next. The Progress screen is displayed and the files in the specified
Protected Folder are re-encrypted.
8 Click Finish.
Changing a User's Role
You can change a user's role at any time after the protected folder is created.
For more information on roles, see PGP NetShare Roles (on page 220).
To change a User to an Admin or Group Admin, be sure that user has full rights
to the protected folder.
234

PGP® Desktop for Windows Using PGP NetShare
To change a user's role
1 In PGP Desktop, select the PGP NetShare folder to which you want to add
a new member.
2 In the User Access section, select the user's name and click Change Role.
Tip: You can also right-click the user's name and select the role.
3 From the list displayed, select the role you want to apply to this user:
Admin: Create only one Admin per PGP NetShare protected folder.
This role has full read/write rights to the folder, can add and remove
users, assign roles to other users, and can promote another user to be
the Admin.
Group Admin: Create as many Group Admins as you need for each
PGP NetShare protected folder. This role has full read/write rights to
the folder, can add and remove users, and assign roles to other users.
User: Create as many Users as you need for each PGP NetShare
protected folder. This role has full read/write rights to the folder.
4 Click Apply to save your changes.
Deleting a User from a Protected Folder
To remove a member of a PGP NetShare Protected Folder, you must delete
that user.
235

PGP® Desktop for Windows Using PGP NetShare
To delete a user from a PGP NetShare Protected Folder
1 On the PGP NetShare screen, select the Protected Folder from which you
want to delete the user.
2 In the User Access list near the bottom of the screen, click on the name of
the user you want to delete, then click Delete User. The user is deleted
from the list.
3 Click Apply. The Select Signer screen is displayed.
4 Select one private key from the private keys on the local keyring or accept
the default key. This key will be used to sign the files when they are
re-encrypted. PGP NetShare automatically re-encrypts files in a Protected
Folder as a security precaution when a member is removed from the
Protected Folder.
5 If you are prompted to do so, type the passphrase for the selected key,
then click Next. The Progress screen is displayed and the files in the
specified Protected Folder are re-encrypted.
6 Click Finish. The deleted user is no longer a member of the Protected
Folder and will not be able to access the files in it.
Importing PGP NetShare Access Lists
Importing access lists lets you import the set of members and their keys from
one set of Authorized Users of which you are a member to another set of
Authorized Users of which you are a member.
This option is available only when you have more than one Protected Folder.
To import an access list
1 On the PGP NetShare screen, select the Protected Folder into which you
want to import the members of another Protected Folder.
2 In the User Access list near the bottom of the screen, click Import Access
List. The PGP Import User Access List dialog box is displayed.
3 Click the name of the existing Protected Folder whose members you want
to import, then click Import.
4 Click Apply. The Select Signer dialog box is displayed.
5 Select one private key from the private keys on the local keyring or accept
the default key. This key will be used to sign the files when they are
re-encrypted. Re-encryption of the files in a Protected Folder is done
automatically as a security precaution when membership in that folder is
modified.
236

PGP® Desktop for Windows Using PGP NetShare
6 If you are prompted to do so, type the passphrase for the selected key,
then click Next. The Progress screen is displayed and the files in the
specified Protected Folder are re-encrypted.
7 Click Finish. The new members are added to the Protected Folder.
Working with Active Directory Groups
PGP NetShare integrates with Active Directory so you can easily assign users to
Protected Folders an Active Directory group. PGP NetShare uses LDAP
(Lightweight Directory Access Protocol) to retrieve group information from your
organization’s Active Directory.
Setting up PGP NetShare to Work with Groups
In order to retrieve group information, you must bind to your PGP Universal
Server and then enable the Use for Group Expansion option. The following
procedures describe these steps if you have installed PGP Desktop in a
standalone environment. If PGP Desktop is installed and integrated with a PGP
Universal Server environment, you do not need to follow this procedure, as
LDAP integration is automatic.
Note: There is a limit as to the number of users you can add at one time to a
PGP NetShare folder (50 users). Although it is possible to customize this hard
coded limit, there are implications for doing so and this should not be
attempted without obtaining support from PGP Corporation For more
information, see the PGP Support Knowledgebase Article 830
(https://support.pgp.com/?faq=830).
To set up PGP NetShare to work with groups
1 Add the PGP Universal Server to your list of Preferred Keyservers. To do
this, create a new messaging service and specify the name of your PGP
Universal Server. For more information, see Creating a Service and Editing
Account Properties (see "Creating a New Messaging Service" on page 95).
2 Bind to the PGP Universal Server. To do this, follow the instructions to
manually bind to a PGP Universal server in Messaging with Lotus Notes
and MAPI (see "Using PGP Desktop with IBM Lotus Notes" on page 315).
3 In the PGP Key Generation assistant, select the key mode as GKM, CKM,
or SCKM. Do not select SKM.
4 Verify that the key is available on the PGP Universal Server. To do this, in
PGP Desktop, select the PGP Keys Control Box. Click Search for Keys,
select the name of the PGP Universal Server, enter your name, and click
Search.
237

PGP® Desktop for Windows Using PGP NetShare
5 Enable group expansion. To do this, in PGP Desktop, select the PGP
Messaging Control Box.
6 Choose Messaging > Use for Group Expansion. A check is displayed
next to the menu item to indicate it is enabled.
Refreshing Groups
If you are using PGP NetShare in a PGP Universal Server-managed
environment, and your PGP administrator has established Active Directory
groups, you can have PGP NetShare verify that group memberships are up to
date.
To refresh Active Directory groups
1 On the PGP NetShare screen, select the Protected Folder whose Active
Directory groups you want to refresh.
2 In the User Access section, click Refresh Groups. PGP NetShare checks
the Active Directory group memberships and refreshes them if necessary.
Decrypting PGP NetShare-Protected Folders
The Remove Folder command restores the files in a Protected Folder to their
normal, decrypted state.
All folders and files that are part of the Protected Folder are decrypted; the PGP
icon overlay on the files will be removed.
To remove protection from a PGP NetShare Protected Folder
1 On the PGP NetShare screen, select the Protected Folder whose
protection you want to remove.
2 In the PGP NetShare Control Box, on the left side of the PGP Desktop
window, click Remove Folder. The Confirm Decryption dialog box is
displayed.
3 Verify that you are removing protection from the desired folder, then click
Next. The Unlocking Folder dialog is displayed, if your passphrase has not
been cached.
4 Type the passphrase of one of the keys to which the files were encrypted,
then click OK. You must type an appropriate passphrase in the allotted time
or the decryption process will be cancelled. The Progress screen is
displayed and the files are decrypted.
238

PGP® Desktop for Windows Using PGP NetShare
5 Click Finish. The files in the Protected Folder are no longer protected by
encryption, it is removed from the PGP NetShare Protected Folder list, and
its lock icon disappears.
Tip: You can also decrypt a folder by right-clicking the folder in Windows
Explorer and selecting Remove Folder from PGP NetShare from the
shortcut menu.
Re-Encrypting a Folder
Re-encrypting a folder re-encrypts the files in the specified Protected Folder.
Re-encryption changes the underlying key, preventing access to anyone who
might have been able to determine the current key. You must be a Group
Admin or Admin of the folder in order re-encrypt that folder.
The Re-encrypt Folder command lets you re-encrypt whenever you want; for
example, if you believe an unauthorized person has gained access to the files in
the Protected Folder.
Examples of why you might want to re-encrypt:
You are concerned some Protected Folder contents are not encrypted; for
example, if someone who is not an Authorized User places a file in a
Protected Folder.
The key information of an Authorized User has been compromised.
A new Authorized User is added, and needs access to the Protected Folder
(this does not happen automatically).
To re-encrypt a Protected Folder
1 On the PGP NetShare screen, select the Protected Folder you want to
re-encrypt.
2 In the PGP NetShare Control Box, on the left side of the PGP Desktop
window, click Re-encrypt Folder. The Add Users screen is displayed.
You can add new members to or remove existing members from a
Protected Folder that is being re-encrypted.
3 Click Next to continue. The Select Signer screen is displayed.
4 Select one private key from the private keys on the local keyring or accept
the default key. This key will be used to sign the files when they are
re-encrypted.
5 If you are prompted to do so, type the passphrase and then click Next. The
Progress screen is displayed and the files in the specified Protected Folder
are re-encrypted.
6 Click Finish. The re-encryption process is complete.
239

PGP® Desktop for Windows Using PGP NetShare
Clearing a Passphrase
By default, PGP NetShare caches passphrases according to the settings on the
General tab of the PGP Desktop Options. This can make it easier to use PGP
NetShare, as you do not need to type your passphrase to use the protected files
in the Protected Folder.
However, if you are going to be leaving your system, you may not want to leave
it with your passphrase cached, as this might let an unauthorized person
perform actions without needing the passphrase.
To clear a passphrase
1 In Windows, click the PGP icon in the System Tray.
2 Select Clear Caches from the menu displayed. At least one passphrase
must be cached for this command to be active. Your cached passphrases
are cleared.
Protecting Files Outside of a Protected Folder
PGP NetShare has an advanced option that lets you protect individual files that
are not in a PGP NetShare Protected Folder. This option is disabled by default.
Note: You may be prevented from selecting this option by your PGP
administrator if you are using PGP Desktop in a PGP Universal
Server-managed environment.
To protect individual files outside of a PGP NetShare Protected Folder, you must
first select the Protect individual files option on the NetShare tab of the PGP
Options; for more information, see PGP NetShare Options (on page 296). You
cannot protect files that are outside of a PGP NetShare Protected Folder until
this option is enabled.
Once you select the Protect individual files option, you can protect individual
files that are outside of a Protected Folder using the PGP Desktop shortcut
menu in Windows Explorer. Individually protected files do not appear in the PGP
NetShare Work area of the PGP Desktop user interface.
240

PGP® Desktop for Windows Using PGP NetShare
Caution: PGP NetShare makes every effort to protect individually protected
files, but some applications (Microsoft Word, for example) save modified files
in such a way that it appears to PGP NetShare that the protected file has
been deleted. Under such circumstances, PGP NetShare cannot continue to
protect these files. Note that this applies only to individually protected files
that are not in a Protected Folder, not files in a PGP NetShare Protected
Folder. To avoid having protected files become unprotected, PGP Corporation
strongly recommends that you keep files you want protected in a PGP
NetShare Protected Folder.
To enable the Protect individual files option
1 Select Tools > PGP Options.
2 Click the NetShare tab.
3 On the NetShare tab, make sure the Protect individual files option is
selected. The default setting is not selected.
To protect individual files using PGP NetShare
1 In Windows Explorer, right-click the file you would like to protect using PGP
NetShare.
2 In the shortcut menu, select PGP Desktop > Add [file name] to PGP
NetShare.
3 When the PGP NetShare Assistant is displayed, add Authorized Users and
select a private key for signing.
4 When the encryption process is complete, click Finish. The protected file
displays a PGP NetShare icon in Windows Explorer.
You can also use the shortcut menu to view the PGP NetShare properties of a
protected file, re-encrypt individually protected files that are outside of a
Protected Folder, and remove protection from them.
To view the PGP NetShare properties of a protected file using the
shortcut menu
1 In Windows Explorer, right-click the protected file whose PGP NetShare
properties you would like to view.
2 In the shortcut menu, select PGP Desktop > PGP NetShare Properties.
The Properties window for the selected file is displayed.
3 When done viewing properties, click OK.
To re-encrypt protected files using the shortcut menu
1 In Windows Explorer, right-click the protected file you would like to
re-encrypt.
241

PGP® Desktop for Windows Using PGP NetShare
2 In the shortcut menu, select PGP Desktop > Re-encrypt.
3 When the PGP NetShare Assistant is displayed, add and/or remove
Authorized Users and select a private key for signing.
4 When the re-encryption process is complete, click Finish.
To remove protection from individually protected files using the shortcut
menu
1 In Windows Explorer, right-click the protected file whose protection you
would like to remove.
2 In the shortcut menu, select PGP Desktop > Remove [file name] from
PGP NetShare.
3 When the PGP NetShare Assistant is displayed, confirm that you want to
remove protection from the file by clicking Next.
4 When the file has been decrypted, click Finish.
Backing Up PGP NetShare-Protected Files
You can back up files and folders that have been protected by PGP NetShare.
Whether you are using PGP NetShare in a PGP Universal Server managed
environment or not determines how the files are handled during the backup
process.
Backing up files with an unmanaged client
When an unmanaged (standalone) client backs up protected files and folders,
the protected files are decrypted transparently during backup and are stored in
the clear on the backup media. Restoring them to their original encryption will
encrypt them again transparently.
Backing up files with a PGP Universal Server-managed client
When a managed client is used to back up of protected files and folders, how
the encryption is handled depends on if the backup application is set as an
application bypass by the PGP Universal Server administrator.
If the backup application is part of the decryption bypass list, the protected
files stay encrypted on the backup media after backup. Restoring them to
their original location keeps them encrypted.
242

PGP® Desktop for Windows Using PGP NetShare
If the backup application is not part of the decryption bypass list, then it is
similar to backing up files with an unmanaged client. In this case, the
protected files are decrypted transparently during backup and are stored in
the clear on the backup media. Restoring them to their original encryption
will encrypt them again transparently.
Note: PGP Corporation recommends that you do not mix the different
scenarios between backing up data and restoring data. For example, if you
are using an unmanaged client to back up the files, an unmanaged client
should restore the files.
Accessing PGP NetShare Features using the Shortcut Menu
Some PGP NetShare functionality is available from the right-click shortcut menu
in Windows Explorer.
You can protect folders (and files, if you have enabled the Protect individual
files option) from Windows Explorer by right-clicking the item. Select PGP
Desktop > Add [name] to PGP NetShare from the shortcut menu displayed to
begin the process of designating that item as protected by PGP NetShare.
For more information about protecting individual files outside of a Protected
Folder using PGP NetShare, see Protecting Files Outside of a Protected Folder
(on page 240).
Once a folder or file is protected by PGP NetShare, there are three commands
you can perform in Windows Explorer using the shortcut menu:
PGP NetShare Properties. This command opens the PGP NetShare tab of
the Properties screen for the file or folder. On this tab, you can view who
can use protected files, unlock a file/folder if locked, and add users who
can use the protected files.
Re-encrypt. This command re-encrypts the specified folder or file to a new
underlying key.
Remove <file name> from PGP NetShare. This command removes the
PGP NetShare protection from the specified folder or file.
For the applicable procedures, see Protecting Files Outside of a Protected
Folder (on page 240).
PGP NetShare in a PGP Universal Server-managed
Environment
If you are using PGP NetShare in a PGP Universal Server-managed
environment, your PGP administrator may have configured settings that affect
how PGP NetShare works on your system.
243

PGP® Desktop for Windows Using PGP NetShare
These settings are:
Allow the user to create and manage PGP NetShare folders. When
enabled, this setting allows you to create PGP NetShare Protected Folders.
When disabled, you can use a Protected Folder that someone else has
created, but you cannot create one yourself. This setting is enabled by
default.
Allow the user to enable Advanced User mode. When enabled, this
setting allows you to enable Advanced User mode in your PGP Options,
which means that you can protect individual files that are moved out of a
Protected Folder. This setting is disabled by default.
Force the encryption of files in the following folders. These folders are
called "whitelisted" folders. Whitelisted folders are folders that are always
added to PGP NetShare and the contents are encrypted. For more
information, see "Blacklisted" and "Whitelisted" Folders Specified by PGP
Universal Server (on page 223).
Prevent the encryption of files in the following folders. These folders
are called "blacklisted" folders. Blacklisted folders are folders that are never
added to PGP NetShare and encrypted. For more information, see
"Blacklisted" and "Whitelisted" Folders Specified by PGP Universal Server
(on page 223).
Contact your PGP administrator if you have any questions about these settings.
Accessing the Properties of a Protected File or Folder
Any file that is protected by PGP NetShare has a PGP NetShare tab on its
Properties screen, which shows information about the file.
To access the PGP NetShare tab on the Properties dialog box of a file
1 In Windows Explorer, do one of the following:
Right-click the file and select Properties from the list.
Select File > Properties from the list.
244
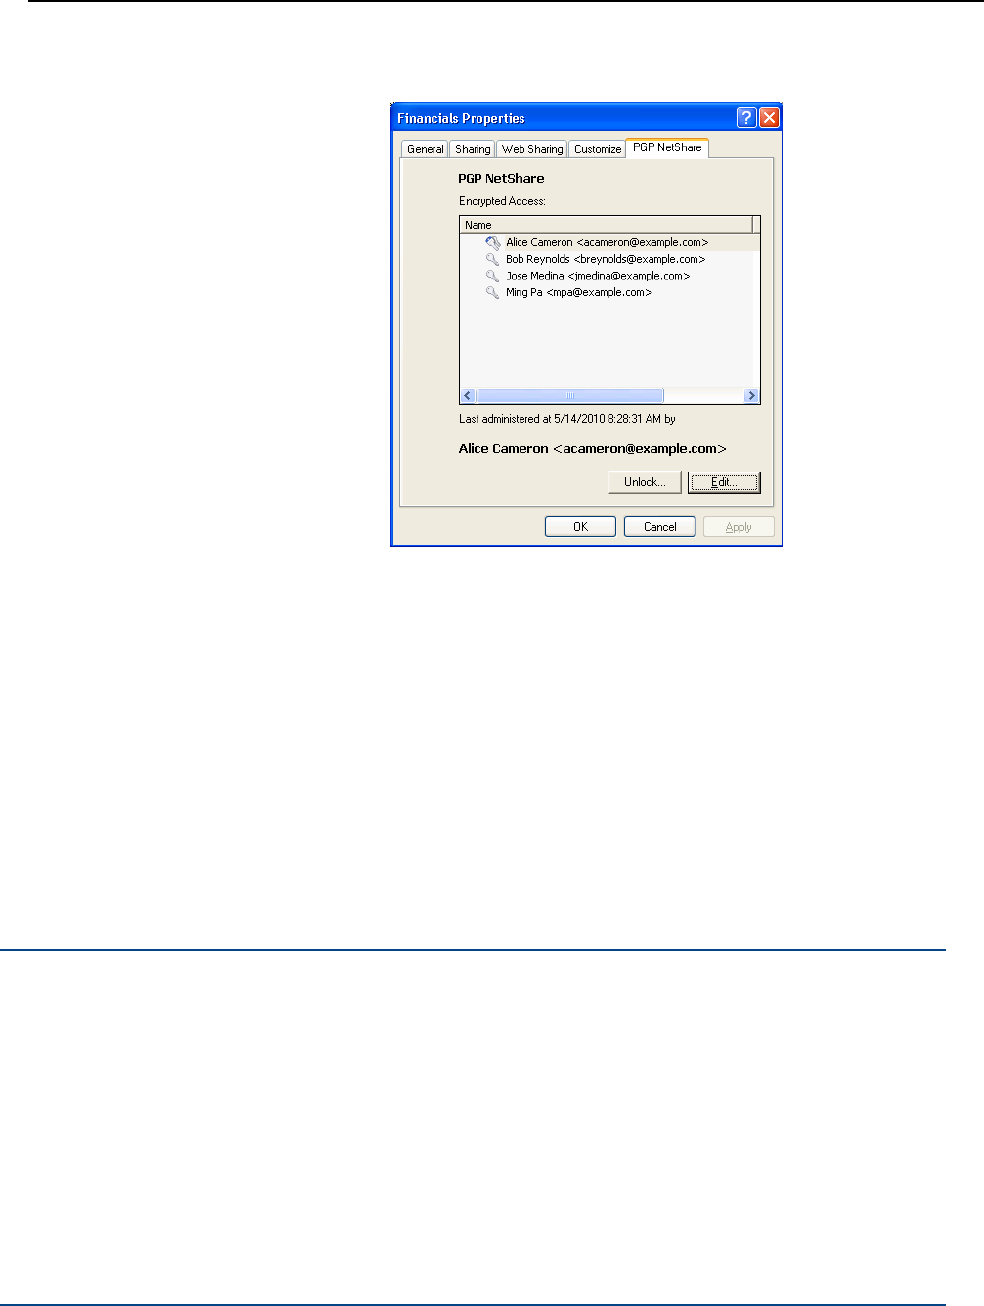
PGP® Desktop for Windows Using PGP NetShare
2 Click the PGP NetShare tab.
3 The PGP NetShare tab for a file shows you the names of those users who
can use the encrypted file. From here you can do one of the following:
Unlock. Click to unlock a Protected Folder that has been locked.
Edit. Click to display the Add Users screen, which lets you
add/remove users who can use the selected file/folder. The file/folder
will be re-encrypted if a user is added or removed.
View the roles for each user by right-clicking the user's name. You
cannot change the user's role in this tab (to change a user's role, see
Changing a User's Role (on page 234)).
4 To close the Properties dialog, click OK.
Using the PGP NetShare Menus in PGP Desktop
There are three PGP Desktop menus that have commands that affect PGP
NetShare: File, Edit, and NetShare.
The File Menu
When the PGP NetShare Control Box is selected, selecting File > New PGP
NetShare Folder lets you create a new Protected Folder.
The process is the same as described in Creating a New PGP NetShare
Protected Folder (on page 226).
245

PGP® Desktop for Windows Using PGP NetShare
The Edit Menu
When the PGP NetShare Control Box is selected, the Rename command under
the PGP Desktop Edit menu lets you rename a Protected Folder.
To rename a PGP NetShare Protected Folder via the Edit menu
1 Open PGP Desktop and click on the PGP NetShare Control Box.
2 If you have more than one Protected Folder, click on the name of the
Protected Folder you want to rename.
3 Select Edit > Rename.
4 Type a new name for the Protected Folder.
5 Press Enter or click outside the Protected Folder name. The Protected
Folder is renamed.
The Show File in Explorer... option in the Edit menu is equivalent to clicking a
Protected Folder’s path. Choosing this option opens a selected folder in
Windows Explorer.
The NetShare Menu
You can select the following commands from the NetShare menu when the
PGP NetShare Control Box is selected:
Add Folder: Select this command to create a new Protected Folder. The
process is the same as described in Creating a New PGP NetShare
Protected Folder (on page 226). You must select the PGP NetShare Control
Box for this command to be active.
Remove Folder: Select this command to begin the process of taking a
Protected Folder and restoring it to its normal, decrypted state. All folders
and files that are part of the Protected Folder will be decrypted; the PGP
icon overlay on the files will be removed. You must select a Protected
Folder for this command to be active.
Re-encrypt Folder: Select this command to re-encrypt the files in a
Protected Folder. Re-encryption changes the underlying key, preventing
access to anyone who might have been able to determine the current key.
Re-encryption is done automatically when a user is added to or removed
from a Protected Folder. The Re-encrypt Folder command lets you
re-encrypt whenever you want; for example, if you believe an unauthorized
person has gained access to the files in the Protected Folder. You must
select a Protected Folder for this command to be active.
Check Folder Status: Select this command to get up-to-date information
about the status of the selected Protected Folder. You must select a
Protected Folder for this command to be active.
246

PGP® Desktop for Windows Using PGP NetShare
Clear Recent Folder: Select this command to remove it from the list of
Protected Folders. Unlike the Remove Folder command, however, this
command does not decrypt the files in the Protected Folder. You must
select a Protected Folder for this command to be active.
247

14 Using PGP Zip
Use PGP Zip to create, open, and edit encrypted and compressed packages,
called PGP Zip archives. This section describes how to use the PGP Zip feature
of PGP Desktop.
Note: If you are using PGP Desktop in a PGP Universal Server-managed
environment, your PGP Universal Server administrator may have disabled
certain features. When a feature is disabled, the control item in the left side
is not displayed and the menu and other options for that feature are not
available. The graphics included in this guide depict the default installation
with all features enabled. If your PGP Universal Server administrator has
disabled this functionality, this section does not apply to you.
In This Chapter
Overview ............................................................................................... 249
Creating PGP Zip Archives..................................................................... 250
Opening a PGP Zip Archive ................................................................... 259
Opening a PGP Zip SDA ........................................................................ 260
Editing a PGP Zip Archive ...................................................................... 260
Verifying Signed PGP Zip Archives........................................................ 262
Overview
A PGP Zip Archive package is a single file that is encrypted and compressed for
convenient transport or backup. These archive files can hold any combination of
files and/or folders, and are especially convenient for secure transport or
backup.
Use the PGP Zip Assistant to create new PGP Zip Archive packages. The
Assistant guides you through the process of selecting the files and/or folders for
your archive and the method of encryption or packaging:
Encrypting and packaging your files and/or folders using the PGP keys of
one or more recipients (recipients must have PGP Desktop on their
computers).
Encrypting and packaging your files and/or folders using a passphrase
(recipients must have PGP Desktop on their computers).
249

PGP® Desktop for Windows Using PGP Zip
Encrypting and packaging your files and/or folders into a self-decrypting
archive (PGP Zip SDA) that is protected by a passphrase (recipients do not
need PGP Desktop, but the recipient's computer must be running
Microsoft Windows);
No encryption and no packaging, but a file is created that you can send to
your recipients to verify that you are the person who sent the file.
When you are using the PGP Zip Assistant to create a PGP Zip Archive file, you
have the option of automatically sending the original files to the PGP Shredder,
so they can be removed securely and permanently from your computer.
When you receive a PGP Zip Archive file, you can:
Extract all of the files and/or folders in the archive.
Extract some of the files and/or folders in the archive.
Extract some files and/or folders in the archive while adding others.
Add new files and/or folders to the archive.
Edit the archive by:
Changing the type of encryption.
Changing the signing key.
Changing the recipients.
PGP Zip archives are encrypted to the preferred cipher for PGP Desktop (if
configured by a PGP Universal Server administrator) or to AES256. PGP Zip
Archives can be moved between the Windows and Mac OS X platforms. PGP
Desktop must be installed on the system to which the PGP Zip archive is being
moved.
Creating PGP Zip Archives
To create a PGP Zip archive
1 Click the PGP Zip Control box and then click New PGP Zip. The PGP Zip
Assistant is displayed.
2 Do any of the following:
Drag and drop your files into the area specified in the assistant.
To add an entire directory to the PGP Zip archive you are creating,
click Add directory .
To add a file to the PGP Zip archive you are creating, Add files
To remove a file or directory from the PGP Zip archive you are
creating, click Remove selected files
.
.
250
PGP® Desktop for Windows Using PGP Zip
To select additional options for the PGP Zip file that you are creating,
click PGP Zip advanced options . The default settings are fine for
most users.
Note: To add a combination of files and folders, use a combination of the
and the buttons. When you add a directory to the file list, the
PGP Zip Assistant displays all files separately, making it easy to see all of
them. If you need to add many files to your PGP Zip Archive, you might
save time if you add an entire directory to the PGP Zip Archive file list
first, then remove the files that you do not want included. If you do this,
before proceeding, make sure that you have completely removed any files
that are not intended for the PGP Zip Archive.
When adding files to a PGP Zip file, you cannot add more than 600 files at a
time. This number can vary depending on the number of characters in the
names of the files being added. To work around this issue, add large
numbers of files in smaller batches.
3 To securely delete the original files once the PGP Zip Archive is created,
select Send original files to PGP Shredder when finished.
Caution: If you choose to send the original files to PGP Shredder once
the PGP Zip Archive is created, you cannot retrieve your files later—not
even with a file recovery utility. Your files are permanently deleted and
cannot be recovered. Use care when selecting this option.
4 To specify special options, click PGP Zip advanced options
To create separate encrypted files rather than one PGP Zip Archive
package that contains all files in a single encrypted file, select Do not
Zip (output files individually).
To create zip archives of only text files, select Convert linefeeds for
text files.
To create a zip archive that requires the PGP Secure Viewer, if your
organization’s security policies specify that requirement, select
Require PGP Secure Viewer when decrypting. If you have selected
this mode, when the file is decrypted it is displayed in a PGP Secure
Viewer window. Using this option protects against outdated radiation
capturing attacks.
To email this zip archive as a binary file, and you are using an older
email application, select Output Text. Saving the file as ASCII text
increases the size of the encrypted file by about 30%. This option is
not available when you are using PGP Desktop in a PGP Universal
Server-managed environment.
To save these PGP Zip Option settings so you can use them in the
future, select Remember these settings next time.
Click OK when you are done selecting special options. Click Cancel if
you choose not to change any of these options.
:
251

PGP® Desktop for Windows Using PGP Zip
The New PGP Zip dialog box displays again.
5 When you have finished selecting files for your PGP Zip Archive, click
Next.
6 Select the desired type of encryption and click Next.
Tip: Move your cursor over each option to view more details in the
information field below the option list.
Recipient keys. Creates a PGP Zip Archive by encrypting the files to
the public keys of the recipient(s), ensuring that only those recipients
can use PGP Desktop to open the archive. This is the most secure
option. See Encrypting to Recipient Keys (on page 252).
Passphrase. Creates a PGP Zip Archive by encrypting the files with a
passphrase you specify when saving the archive. Only those persons
who know the passphrase, and who are using PGP Desktop can open
the archive. See Encrypting with a Passphrase (on page 254).
PGP Self-Decrypting Archive. Creates a PGP Self-Decrypting Archive
with a passphrase you specify when saving the archive. PGP Desktop
is not required when decrypting a PGP Self-Decrypting Archive—but
recipients must be using a computer running the Microsoft Windows
operating system. See Creating a PGP Self-Decrypting Archive (SDA)
(on page 256).
Sign Only. Adds your PGP signature to an unencrypted zip file. Your
recipient(s) can then open the zip archive using PGP Desktop, and the
included signature verifies that the zip archive came from you and has
not been modified in transit. For more information, see Sign Only (see
"Creating a Sign Only Archive" on page 258).
Note: If you are using PGP Desktop in a PGP Universal Server-managed
environment, passphrase (conventional) encryption may be disabled.
Encrypting to Recipient Keys
Use Recipient keys:
To offer the highest possible security for your files.
When each of your recipients has PGP Desktop installed on their
computers (Windows or Mac OS X).
When you have a public key for each recipient (from your Keyring or a PGP
Keyserver).
When you do not want to reveal a passphrase to file recipients.
Encrypting your PGP Zip Archive by using the public keys of all of your
recipients is the most secure option, and should be the first choice if you need
top security and have the necessary requirements available.
252

PGP® Desktop for Windows Using PGP Zip
Once your files are secured, you send the resulting PGP Zip Archive file to your
recipients however you choose. Your recipients then use PGP Desktop to open
the PGP Zip Archive file. Anyone whose key you included when you encrypted
the file can open the resulting PGP Zip Archive file, and everyone sees the
same items. If you need to have some recipients see only some items, you
must create separate PGP Zip Archive files for each.
To encrypt to recipient keys
1 If you haven’t already, begin the process of creating a PGP Zip Archive as
described in Creating PGP Zip Archives (on page 250).
2 In the Encrypt dialog box, select Recipient keys.
3 Click Next. The Add User Keys dialog box is displayed.
4 Select the recipients of your PGP Zip Archive. Do any of the following:
To select from the list of keys that are on your keyring, click the
arrow.
To send the file to a recipient whose key is not on your keyring, click
Add. The Recipient Selection dialog box is displayed.
When you are finished selecting additional names, click OK to return to the
Add User Keys panel.
To remove any keys, select the recipient's name and click Remove.
5 Click Next. The Sign and Save screen is displayed.
6 If desired, specify a private key on your keyring as a Signing Key for the
PGP Zip archive being created.
This specified Signing Key is used to digitally sign the PGP Zip archive. The
recipient(s) can verify who the archive is from by verifying the digital
signature using the corresponding public key.
If you do not need to sign the file, or prefer not to, choose None from
the Signing Key list.
If you choose to sign your PGP Zip Archive, choose your key from the
Signing Key list, then enter the passphrase of the key selected for
signing (not the passphrase used to secure the zip). To see keystrokes
as you type the passphrase, select Show Keystrokes.
If you have already typed your passphrase during this session using PGP
Desktop your passphrase might be cached, depending on your Options
settings. A message is displayed stating that the passphrase is cached, if
this is the case. Even if your passphrase is cached, you can still choose not
to sign the PGP Zip Archive file.
7 Confirm that the PGP Zip Archive is being saved in the location and with
the file name you want. If necessary, you can:
Change where the file is saved by clicking Browse and choosing a
location from the Windows File dialog box.
253

PGP® Desktop for Windows Using PGP Zip
Change where the file is saved by manually typing the location where
you would like to save the PGP Zip Archive.
Change the PGP Zip Archive file name by manually typing it at the end
of the file location text string.
The default file name for a PGP Zip Archive containing a single file,
directory, or drive is the name of that item with .pgp appended. If the PGP
Zip Archive contains more than one item, its file name is one of the items
with .pgp appended. Change the PGP Zip Archive file name, if desired.
8 If you chose the Sign Only option, click to select Save Detached
Signatures.
9 Click Next. The PGP Zip Archive is created.
10 Click Finish. Your PGP Zip Archive is ready to be sent to the recipients
whose keys you encrypted it to. If your key was one of the keys you used
for encryption, the file is ready for storage wherever you want.
Encrypting with a Passphrase
Use Passphrase:
When you want to create a PGP Zip archive without using recipients' keys
(this can be less secure than encrypting with recipients’ keys, although still
highly secure).
When each of your recipients has PGP Desktop installed on their
computers (Windows or Mac OS X).
When you do want to reveal a passphrase to file recipients.
When you do not have a public key for each recipient (from your Keyring or
a PGP Keyserver).
Tip: Encrypting with a passphrase is also referred to as conventional
encryption.
Encrypting your PGP Zip Archive with a passphrase can be extremely secure,
especially with a strong passphrase. However, encrypting to recipient keys
does offer even higher security. When you encrypt to your recipients’ keys,
those who possess the PGP Zip Archive need both their private keys and
passphrases to decrypt the file (and each recipient’s private key has its own
passphrase).
When encrypting with a passphrase, everyone opens the file using the same
passphrase, and no private keys are required. Anyone who possesses the file,
uses PGP Desktop and knows the passphrase can decrypt the file.
254

PGP® Desktop for Windows Using PGP Zip
Caution: Take every possible precaution to ensure that the passphrase to
your PGP Zip Archive is revealed to no one but the intended recipients. If the
passphrase is revealed to unauthorized persons, create a new PGP Zip
Archive with a different passphrase. Note, however that you can do nothing
to re-secure the original archive file and its contents.
Once your files are secured, send the resulting PGP Zip Archive file to your
recipients however you choose. Your recipients then use PGP Desktop to open
the PGP Zip Archive file. Anyone who has the file and the passphrase can open
the resulting PGP Zip Archive file, and everyone sees the same items. If you
need to have different recipients see different items, you must create separate
PGP Zip Archive files for each.
Caution: If you are using PGP Desktop in a PGP Universal Server-managed
environment, encrypting with a passphrase may be disabled.
To encrypt using a passphrase
1 If you haven’t already, begin the process of creating a PGP Zip Archive as
described in Creating PGP Zip Archives (on page 250). Follow the
instructions to Step 6. Once that is completed, return to this section.
2 In the Encrypt window, select Passphrase.
3 Click Next. The Create a Passphrase dialog box is displayed.
4 To see keystrokes as you type the passphrase, select Show Keystrokes.
5 In the Passphrase field, type the passphrase you want to use.
The Passphrase Quality bar provides a basic guideline for the strength of
the passphrase you are creating by comparing the amount of entropy in the
passphrase you type against a true 128-bit random string (the same
amount of entropy in an AES128 key). For more information, see The
Passphrase Quality Bar (on page 306).
6 Type your passphrase again in the Confirm field.
7 Click Next. The Sign and Save dialog box is displayed.
8 If desired, specify a private key on your keyring as a Signing Key for the
PGP Zip archive being created.
This specified Signing Key is used to digitally sign the PGP Zip archive. The
recipient(s) can verify who the archive is from by verifying the digital
signature using the corresponding public key.
If you do not need to sign the file, or prefer not to, choose None from
the Signing Key list.
If you choose to sign your PGP Zip Archive, choose your key from the
Signing Key list, then enter the passphrase of the key selected for
signing (not the passphrase used to secure the zip). To see keystrokes
as you type the passphrase, select Show Keystrokes.
255

PGP® Desktop for Windows Using PGP Zip
If you have already typed your passphrase during this session using PGP
Desktop your passphrase might be cached, depending on your Options
settings. A message is displayed stating that the passphrase is cached, if
this is the case. Even if your passphrase is cached, you can still choose not
to sign the PGP Zip Archive file.
9 Confirm that the PGP Zip Archive is being saved in the location and with
the file name you want. If necessary, you can:
Change where the file is saved by clicking Browse and choosing a
location from the Windows File dialog box.
Change where the file is saved by manually typing the location where
you would like to save the PGP Zip Archive.
Change the PGP Zip Archive file name by manually typing it at the end
of the file location text string.
The default file name for a PGP Zip Archive containing a single file,
directory, or drive is the name of that item with .pgp appended. If the PGP
Zip Archive contains more than one item, its file name is one of the items
with .pgp appended. Change the PGP Zip Archive file name, if desired.
10 Click Next. The PGP Zip Archive is created.
11 Click Finish. Your PGP Zip Archive is ready to be sent to the recipients. Do
not forget to communicate the passphrase to the recipients so they can
open the archive.
Creating a PGP Self-Decrypting Archive (SDA)
Use PGP Self-Decrypting Archive:
When you want to create a PGP Zip self-decrypting archive without using
recipients' keys (this can be less secure than encrypting with recipients’
keys, although still highly secure).
When your recipients do not have PGP Desktop installed on their
computers and all recipients are using Windows systems.
When you do want to reveal a passphrase to file recipients.
When you do not have a public key for each recipient (from your Keyring or
a PGP Keyserver).
A PGP Self-Decrypting Archive (SDA) is a PGP Zip Archive that can be opened
on any Windows computer, even those that do not have PGP Desktop installed.
PGP Zip SDA files are standard Windows executable (.exe) files that you an
open simply by double-clicking them.
PGP Zip SDA files are slightly larger than regular PGP Zip Archive because the
self-decrypting “mechanism” requires a certain amount of extra space (usually
about 100 KB).
256

PGP® Desktop for Windows Using PGP Zip
Note: If you are using PGP Desktop in a PGP Universal Server-managed
environment, PGP Zip SDA creation may be disabled.
Once you have created your PGP Zip SDA, send it to your recipients however
you choose. Anyone who has the file and the passphrase can open the resulting
PGP Zip Archive file, and everyone sees the same items. If you need to have
different recipients see different items, you must create separate PGP Zip
Archive files for each.
Caution: Take every possible precaution to ensure that the passphrase to
your PGP Zip SDA is revealed to no one but the intended recipients. If the
passphrase is revealed to unauthorized persons, create a new PGP Zip SDA
with a different passphrase. Note, however that you can do nothing to
re-secure the original archive file and its contents.
To create a PGP Zip SDA
1 If you haven’t already, begin the process of creating a PGP Zip Archive as
described in Creating PGP Zip Archives (on page 250). Follow the
instructions to Step 6. Once that is completed, return to this section.
2 In the Encrypt dialog box, select PGP Self-Decrypting Archive.
3 Click Next. The Create a Passphrase dialog box is displayed.
4 To see keystrokes as you type the passphrase, select Show Keystrokes.
5 In the Passphrase field, type the passphrase you want to use.
The Passphrase Quality bar provides a basic guideline for the strength of
the passphrase you are creating by comparing the amount of entropy in the
passphrase you type against a true 128-bit random string (the same
amount of entropy in an AES128 key). For more information, see The
Passphrase Quality Bar (on page 306).
6 Type your passphrase again in the Confirm field.
7 Click Next.
8 Confirm that the PGP Zip Archive is being saved in the location and with
the file name you want. If necessary, you can:
Change where the file is saved by clicking Browse and choosing a
location from the Windows File dialog box.
Change where the file is saved by manually typing the location where
you would like to save the PGP Zip Archive.
Change the PGP Zip Archive file name by manually typing it at the end
of the file location text string.
The default file name for a PGP Zip Archive containing a single file,
directory, or drive is the name of that item with .pgp appended. If the PGP
Zip Archive contains more than one item, its file name is one of the items
with .pgp appended. Change the PGP Zip Archive file name, if desired.
257

PGP® Desktop for Windows Using PGP Zip
9 Click Next. The PGP Zip SDA is created.
10 Click Finish. Your PGP Zip SDA is ready to be sent to the recipients
Creating a Sign Only Archive
Use Sign Only:
When you do not need to encrypt your files (so you do not need to reveal a
passphrase to recipients).
When you want to generate a signature file that your recipients can use to
confirm the PGP Zip Archive came from you. Each file is processed
individually and a separate detached sig is created for every file.
When each of your recipients has PGP Desktop installed on their
computers (Windows or Mac OS X).
When you want to guarantee that you have sent the file, and you want to
assure your recipient that the file has not changed during transit.
For times when you do not need to encrypt file(s) for your recipients, you can
choose the Sign Only option. Instead of encrypting your files and zipping them
into one PGP Zip Archive, this option zips them only.
To encrypt using the Sign Only option
1 If you haven’t already, begin the process of creating a PGP Zip Archive as
described in Creating PGP Zip Archives (on page 250). Follow the
instructions to Step 6. Once that is completed, return to this section.
Note: When you are selecting the files to be zipped and signed, the Send
original files to PGP Shredder option is ignored, even if you select it.
2 In the Encrypt dialog box, select Sign Only.
3 Click Next. The Sign and Save panel is displayed.
4 Specify a private key on your keyring as a Signing Key for the PGP Zip
archive being created.
This specified Signing Key is used to digitally sign the PGP Zip archive. The
recipient(s) can verify who the archive is from by verifying the digital
signature using the corresponding public key.
If you do not need to sign the file, or prefer not to, choose None from
the Signing Key list.
If you choose to sign your PGP Zip Archive, choose your key from the
Signing Key list, then enter the passphrase of the key selected for
signing (not the passphrase used to secure the zip). To see keystrokes
as you type the passphrase, select Show Keystrokes.
258

PGP® Desktop for Windows Using PGP Zip
If you have already typed your passphrase during this session using PGP
Desktop, your passphrase might be cached, depending on your Options
settings. A message is displayed stating that the passphrase is cached, if
this is the case. Even if your passphrase is cached, you can still choose not
to sign the PGP Zip Archive file.
5 Confirm that the PGP Zip Archive is being saved in the location you want. If
necessary, you can:
Change where the file is saved by clicking Browse and choosing a
location from the Windows File dialog box.
Change where the file is saved by manually typing the location where
you would like to save the PGP Zip Archive.
The default file name for a sign-only PGP Zip Archive is the name of that
item with .sig appended.
6 If you would prefer to have a separate signature file, along with your PGP
Zip Archive, click to select Save Detached Signatures.
7 Click Next. The sign-only PGP Zip Archive is created.
8 Click Finish.
Opening a PGP Zip Archive
PGP Desktop must be installed on the system to open a PGP Zip archive.
To open a PGP Zip Archive
1 Double click the PGP Zip archive file (it has a .pgp file extension).
If the PGP Zip archive was secured with a key, the PGP Enter
Passphrase for Listed Key dialog box is displayed.
If the PGP Zip archive was secured with a passphrase, the PGP Enter
Passphrase dialog box is displayed.
PGP Desktop displays the contents of the PGP Zip archive. (If the PGP
Desktop application is not open, it is opened with the PGP Zip item active.)
2 To extract items, do the following:
To extract a single item, right-click the item and select Extract from
the shortcut menu.
To extract multiple items, select the items, right-click one of them,
and select Extract from the shortcut menu.
The Browse for Folder dialog box is displayed.
259

PGP® Desktop for Windows Using PGP Zip
3 Locate the folder into which you want to extract the files and click OK. To
create a new folder, New Folder. The file(s) are extracted into the location
you specified.
If you extract the decrypted files from the PGP Zip archive into the same
location from which they originally came, the original files are overwritten.
To prevent this, for each file, you are prompted to verify if you want to
overwrite an existing file.
Opening a PGP Zip SDA
It is not necessary to have PGP Desktop installed to open a PGP Zip SDA.
To open a PGP Zip SDA
1 Double click the PGP Zip SDA file (it should have a .exe file extension).
The PGP Self-Decrypting Archive - Enter Passphrase dialog box is
displayed.
2 Confirm that the output is to be extracted into the desired location. If not,
click Browse to correct the location, or type it in the field.
Note: If you direct the decrypted files from the PGP Zip SDA into the
same location from which they originally came, the original files are
overwritten. To prevent this, for each file, you are prompted to select a
different location. You can also type a different file name. If you if you
click Save without doing this, a warning dialog box displays. If you bypass
it, the file from the PGP Zip SDA overwrites the original.
3 Type the passphrase for the PGP Zip SDA, then click OK. The PGP Zip SDA
is decrypted.
Editing a PGP Zip Archive
PGP Zip Archives are not static. At any time, you can:
Extract files from them.
Add files to them.
Edit the settings of the archive itself.
To edit a PGP Zip archive
1 In PGP Desktop, click the PGP Zip Control box. The PGP Zip Control box
highlights.
260
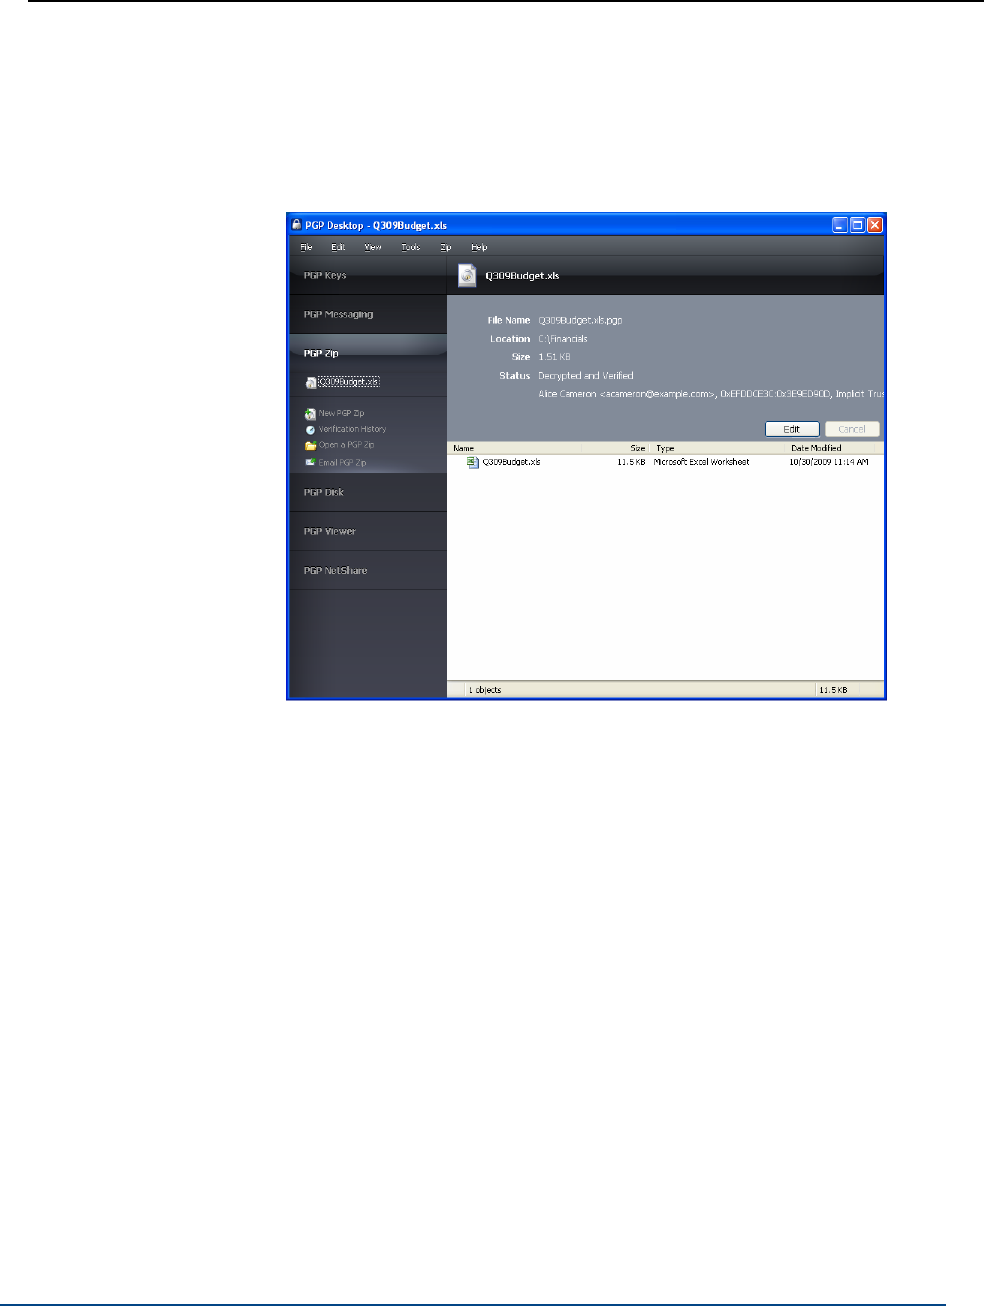
PGP® Desktop for Windows Using PGP Zip
2 Click the name of the PGP Zip archive you want to edit in the list of PGP
Zip archives at the top of the PGP Zip Control box. The settings for the
archive and the files and/or folders in the archive are displayed.
If the PGP Zip archive you want to open is not listed, click Open a PGP Zip,
navigate to the .pgp file, select it, then click Open.
3 To edit the settings of the PGP Zip archive, click Edit, and make the
desired changes:
To add a file to a PGP Zip archive, click Add Files in the PGP Zip
Control box, select the file or files you want to add, then click Open.
The files are added to the archive.
To add a folder in the archive and put files into that folder, click
New Folder in the PGP Zip Control box and type a descriptive name
for the new folder (if desired). Select the new folder, click Add Files in
the PGP Zip Control box, select the file or files you want to add to the
folder, then click Open. The files are added to the archive in the
folder.
To extract a file from an archive, right-click the file you want to
extract, select Extract from the shortcut menu, specify a location for
the file, then click OK. A copy of the file is created in the specified
location; the original remains in the PGP Zip Archive.
To delete a file or folder from an archive, select the items you want
to delete, then press the Delete key on your keyboard. You can also
select Edit > Delete. The specified items are deleted.
261

PGP® Desktop for Windows Using PGP Zip
To save changes to a PGP Zip archive that you have modified,
click Save in the upper right corner or Save PGP Zip in the PGP Zip
Control box. Specify a location and a name. If the name you select
already exists at the location, you will be asked if you want to
overwrite the existing file. Type the passphrase that protects the
archive, then click OK.
To change the signing key, select the PGP Zip file you want to
change in the PGP Zip Control Box, click Edit, and then select a new
Signing Key. Click Save when you have finished.
To change the type of encryption (Key or Conventional), select the
PGP Zip file you want to change in the PGP Zip Control Box, click Edit,
and then select the type of encryption (Key or Conventional). Click
Save when you have finished.
To add recipients to the PGP Zip archive, select the PGP Zip file
you want to change in the PGP Zip Control Box, click Edit, and then
click Add Recipients. In the Add Recipients dialog box, select the
recipients you want to add and click OK. Click Save when you have
finished.
To delete recipients from the archive, select the PGP Zip file you
want to change in the PGP Zip Control Box, click Edit, select the
recipient you want to remove, and click Delete Recipients. Click Save
when you have finished.
4 When you are done, click Save. You can either overwrite the PGP Zip
archive to which you made the changes or save the modified archive using
a different name.
Verifying Signed PGP Zip Archives
If you received a signed PGP Zip Archive, you should verify the signature so that
you know who it came from—and that the archive was not tampered with
before you got it.
To verify a PGP Zip Archive
1 Click the PGP Zip Control box and then click Open a PGP Zip. The Open
dialog box is displayed.
2 Navigate to the signed .pgp file you want to verify, click to select it, then
click Open.
If the message was encrypted (in addition to being signed), you are
prompted for the passphrase of your private key, or whichever private key
it is that corresponds to the public key to which the message was
encrypted.
262

PGP® Desktop for Windows Using PGP Zip
If the private key is not on your keyring, PGP Desktop will tell you it is not
possible to decrypt the message. Unfortunately, this also means you
cannot verify the archive. Click Cancel to end the verification.
3 Type the passphrase of the private key, then click OK.
Note: If the passphrase of the private key is cached, then you are not
prompted for the passphrase.
The contents of the archive are saved to the same location as the PGP Zip
archive, and the Verification History screen shows the information about
the archive you are verifying.
4 To clear the list of verified archives, click Clear Verification History. All
listings on the Verification History screen are removed.
263

15 Shredding Files with PGP
Shredder
If you want to completely destroy sensitive files without leaving fragments of
their data behind, use the PGP Shredder utility.
Note: If you are using PGP Desktop in a PGP Universal Server-managed
environment, your PGP Universal Server administrator may have disabled
certain features. When a feature is disabled, the control item in the left side
is not displayed and the menu and other options for that feature are not
available. The graphics included in this guide depict the default installation
with all features enabled. If your PGP Universal Server administrator has
disabled this functionality, this section does not apply to you.
In This Chapter
Using PGP Shredder to Permanently Delete Files and Folders ............ 265
Using the PGP Shred Free Space Assistant.......................................... 268
Using PGP Shredder to Permanently Delete Files and Folders
If you want to destroy sensitive files or folders completely, use the PGP
Shredder feature. When you delete files or folders using PGP Shredder, all
traces of the item are removed.
The PGP Shredder feature works by overwriting your data with random text. It
repeats this multiple times, or passes. You can set the number of passes that
the PGP Shredder feature makes whenever it deletes a file—do that by opening
the Disk panel of the Preferences screen. For more information about setting
options and preferences, see Disk Options/Preferences (see "Disk Options" on
page 297).
The shred session can be lengthy, depending on such factors as the number of
passes you specified, the speed of the processor, and how many other
applications are running.
265

PGP® Desktop for Windows Shredding Files with PGP Shredder
Note: When set for three passes, PGP Shredder exceeds the media
sanitization requirements specified in the Department of Defense 5220.22-M
standard. While more passes are allowed, modern disk hardware does not
require more than two passes. Security continues to increase up to
approximately 28 passes. The PGP Shredder feature is capable of up to 49
passes, but remember that more passes means more time needed for
secure deletion.
There are multiple ways to use PGP Shredder:
Use the PGP Shredder icon on your desktop (placed there when you
installed PGP Desktop).
Select Tools > Shred Files, then browse to the file/folder you want to
shred.
Use the Windows Explorer shortcut menus (right-click the file, select PGP
Desktop > PGP Shred [file name]).
PGP Shredder does not delete the following items:
Windows system files or files that are read-only.
Note that the Thumbs.db file, created when viewing thumbnail graphics in
Windows Explorer, is a special case and can be shredded even though the
file has the system attribute set.
WebDav or Sharepoint files.
Files that can be deleted are local files and CIFS shared files.
Directories containing files that cannot be deleted.
You can also use PGP Desktop to erase free disk space that could contain data
from previously deleted files and programs using the PGP Shred Free Space
Assistant.
It is especially important to use the PGP Shred Free Space Assistant on
Journaling file systems such as NTFS, as such file systems make a second copy
of everything written to disk in a file system journal. This helps the disk recover
from damage, but requires extra work when removing sensitive data. Shredding
a file does not remove any potential journal entries that may have been created.
NTFS in particular can also store small (less than 1K) files in internal data
structures that cannot be removed properly without using the PGP Shred Free
Space Assistant with the Shred NTFS internal data structures option.
Tip: Consider other occurrences of the data that might linger elsewhere on
your disk, such as temp files. For this reason, consider using PGP Whole Disk
Encryption to protect all data on your system.
266

PGP® Desktop for Windows Shredding Files with PGP Shredder
Shredding Files using the PGP Shredder Icon on Your Desktop
To shred files using the PGP Shredder icon on your Desktop
1 Drag and drop the files/folders you want to shred onto the PGP Shredder
icon. A confirmation dialog box is displayed, asking you to confirm that you
want to shred (secure delete) the listed files and/or folders.
2 Click Yes. The files are securely deleted from your system.
Shredding Files From Within PGP Desktop
To shred files in PGP Desktop
1 In the PGP Desktop main application window, select Tools > Shred Files.
The Open dialog box is displayed.
2 Select the files on your system you want to shred, then click Open. A
confirmation dialog box is displayed, asking you to confirm that you want to
shred (secure delete) the listed files and/or folders.
3 Click Yes. The files are securely deleted from your system.
Shredding Files in Windows Explorer
To shred files by right-clicking in Windows Explorer
1 In Windows Explorer, right-click files/folders you want to shred. A
confirmation dialog box is displayed, asking you to confirm that you want to
shred (secure delete) the listed files and/or folders.
2 Click Yes. The files are securely deleted from your system.
267

PGP® Desktop for Windows Shredding Files with PGP Shredder
Using the PGP Shred Free Space Assistant
To shred free space on your disks
1 With PGP Desktop open, select Tools > PGP Shred Free Space. The
Introduction screen of the PGP Shred Free Space Assistant is displayed.
2 Read the information, then click Next. The Gathering Information dialog
box is displayed.
3 In the Shred drive field, select the disk or volume you want to shred and
the number of passes you want PGP Shred Free Space to perform. While
three passes with PGP Shred are sufficient to securely delete the data, you
can specify up to 49 passes. The recommended guidelines for number of
passes are:
3 passes for personal use.
10 passes for commercial use.
18 passes for military use.
26 passes for maximum security
4 Choose whether to shred internal NTFS data structures. This option is not
available on all systems.
Caution: If the selected partition is not your boot partition, you can
perform an intensive shred operation that overwrites internal NTFS data
structures that may hold residual data. The partition will be completely
filled during this process, and as such you should not use the disk for
anything else while the free space shred operation is in progress. Some
of these structures are not generally considered free space on your drive,
but the techniques employed by this option will cause them to be
shredded. This option does not increase the risk of anything negative
happening to your disk as a result of the shredding operation.
5 Click Next. The Perform Shred dialog box is displayed, containing statistical
information about the drive or volume you selected.
6 Do one of the following:
To start shredding free space immediately, click Begin Shred. The
PGP Shred Free Space Assistant scans and then shreds leftover
fragments from the specified disk or volume.
When the shred session is complete, a message is displayed near the
bottom of the Perform Shred screen telling you the selected drive has
been shredded.
268

PGP® Desktop for Windows Shredding Files with PGP Shredder
To schedule a time for the free space shred operation, click Schedule.
A message is displayed informing you that the Windows Task
Schedule is used when scheduling PGP Shred Free Space operations
and that you need a Windows login password for the job to run.
To schedule the job, click OK, enter your Windows login password in
the PGP Enter Confirmed Passphrase dialog box, and then enter the
scheduling information.
To cancel the job and return to the Perform Shred dialog box, click
Cancel.
7 Click Next. The Completing dialog box is displayed.
8 Click Finish.
Scheduling Free Space Shredding
Use the Windows Task Scheduler to schedule periodic shredding of free space
on your system.
To schedule free space shredding
1 Follow the steps in Using the PGP Shred Free Space Assistant (on page
268) until the Perform Shred dialog box is displayed.
2 Click Schedule.
3 A message is displayed informing you that the Windows Task Schedule is
used when scheduling PGP Shred Free Space operations and that you
need a Windows login password for the job to run. To continue, click OK.
The PGP Enter Confirmed Passphrase dialog box dialog box is displayed.
4 Type your Windows login password in the first field, type it again to
confirm it in the second field, then click OK. The Windows Task Schedule
dialog box is displayed.
5 In the Schedule Task area, specify how often you want the task to run:
Daily. This option runs your task once at the time you specify on the
days you indicate. Click OK to close the dialog box, then enter the
time you want to run the task each day in the Start Time text box.
Weekly. This option runs your task on a weekly basis at the date and
time you specify. Enter the number of weeks you want between each
disk shred in the text box provided, then choose a day from the
Schedule Task Weekly list.
Monthly. This option runs your task once each month on the day and
at the time you specify. Enter the time in the text box provided, then
enter the day of the month on which you want the task to run. Click
Select Months to specify which months the task will run.
269

PGP® Desktop for Windows Shredding Files with PGP Shredder
Once. This option runs your task exactly once on the date and at the
time you specify. Enter the time in the text box provided, then select
a month and a date from the lists Run On text box.
At System Start up. This option runs your task only upon system
start up.
At Logon. This option runs your task when you log on to your
computer.
When Idle. This option runs your task when your system is idle for
the amount of time you specify in the minutes text box.
6 In the Start Time field, enter the time of day that you want the task to
start.
7 In the Schedule Task Daily field, specify how often you want the task to
run.
8 Click Advanced to open a dialog box where you can select additional
scheduling options, such as the start date, the end date, and the duration
of the task.
9 Click OK. A confirmation dialog box is displayed.
Your new PGP folder or free space task is now scheduled. To edit or delete
your PGP tasks, use the Windows Task Scheduler.
270

16 Storing Keys on Smart
Cards and Tokens
Use PGP Desktop to create a PGP keypair on a smart card or token, or to copy a
PGP keypair to a smart card or token. Both options give you an extra layer of
security in that you can keep your PGP keypair with you, on your smart card or
token, instead of leaving it on your system: a PGP keypair on a smart card or
token is less vulnerable than the same keypair stored on your computer
because you can keep the smart card or token with you. This section describes
how to use smart cards with PGP Desktop.
Note: If you are using PGP Desktop in a PGP Universal Server-managed
environment, your PGP Universal Server administrator may have disabled
certain features. When a feature is disabled, the control item in the left side
is not displayed and the menu and other options for that feature are not
available. The graphics included in this guide depict the default installation
with all features enabled. If your PGP Universal Server administrator has
disabled this functionality, this section does not apply to you.
In This Chapter
About Smart Cards and Tokens............................................................. 271
Examining Smart Card Properties.......................................................... 275
Generating a PGP Keypair on a Smart Card .......................................... 275
Copying your Public Key from a Smart Card to a Keyring ..................... 277
Copying a Keypair from Your Keyring to a Smart Card.......................... 277
Wiping Keys from Your Smart Card....................................................... 279
Using Multiple Smart Cards................................................................... 279
Special-Use Tokens ............................................................................... 280
About Smart Cards and Tokens
In order to use PGP Desktop with a smart card or token from a particular
vendor, you must have a compatible smart card reader (if you are using a smart
card) and the appropriate software drivers installed on your system (for both
smart cards and tokens). The drivers must include the PKCS-11 (the
cryptographic token interface standard) library.
271

PGP® Desktop for Windows Storing Keys on Smart Cards and Tokens
PGP Corporation strongly recommends using software drivers from the vendor
who makes your smart card or token.
PGP Desktop recognizes and works with a wide variety of smart cards,
including those from Athena, AET SafeSign, Axalto (formerly Schlumberger),
SafeNet (formerly Rainbow), Aladdin, and GemPlus. PGP Desktop also works
with Department of Defense Common Access Cards with the ActivCard Gold
2.0 profile.
In addition to these vendors, PGP Desktop recognizes and works with smart
cards from vendors that include a standards-based PKCS-11 library in their
software drivers. If the PKCS-11 library from a vendor is installed on your
system and works with other PKCS-11 applications, such as Mozilla Firefox or
Thunderbird, chances are high that PGP Desktop will recognize and work with
smart cards from this vendor.
When you create and store a PGP keypair on a smart card, you access the
private key using the PIN for the smart card, rather than a passphrase. If you
have a smart card that handles its own authentication (for example, on its own
keypad or via a biometric device, PGP Desktop works with these smart cards;
when PGP Desktop displays a passphrase dialog, do not enter a passphrase,
just click OK. The device should then bring up its own authentication method.
Note: The private portion of your keypair that is generated on a smart card
never leaves the device—it’s not exportable. Decryption and signing
operations take place directly on the device. If you generate a keypair on your
computer rather than on the smart card, and then copy the keypair to your
smart card while leaving the keypair on your computer, you can still export
the private portion of your keypair from your computer.
Department of Defense Common Access Cards
Department of Defense Common Access Cards (CACs) work somewhat
differently than other smart cards. They are read-only, and they include two
separate certificates: one for signing and one for encrypting. PGP Desktop
filters the two certificates based on the intended usage. For example, when you
are prompted to select a key to sign a file, only the signing certificate of a CAC
is listed.
JavaCards
Axalto smart cards are JavaCards. A small Java module, called a Java applet,
runs on the card. The card can be configured to execute different applets that
change the behavior or configuration of the smart card, a process called
personalization. In order for JavaCards to be used with PGP Desktop, only a few
of the available personalization profiles are appropriate.
Additionally, all of the personalization profiles currently available require minor
changes to their configurations to work with PGP Desktop. Specifically:
The profile must enable PKCS-11 support. In most cases, the name
“Netscape” or “Entrust” appear in the titles of profiles that support
PKCS-11.
272

PGP® Desktop for Windows Storing Keys on Smart Cards and Tokens
One PGP Desktop key uses at least two PKCS-11 private keys. In order to
work with PGP Desktop, a profile must have a value of 2 or greater in the
maximum number of private keys allowed.
For more information, see the documentation for the JavaCard you are using.
Compatible Smart Cards
PGP Desktop recognizes and works with the following cards:
DoD Common Access Cards (CACs) with the ActivCard Gold 2.0 profile.
For more information about the ActivCard Gold 2.0 profile, go to the
ActivCard website (www.activcard.com).
AET SafeSign smart cards, including ASEKey 1.0. For more information
about smart cards from AET SafeSign, go to the Cryptoshop website
(www.cryptoshop.com).
Aladdin smart cards, including eToken PRO USB 16K, 32K, and 64K;
Aladdin eToken NG-OTP 32K; and eToken PRO Java. For more information
about Aladdin eToken products, go to the Aladdin Support Web Site
(http://www.aladdin.com/support/default.asp).
Athena Smart Card Solutions smart cards, including the ASEKey USB
token. For more information about smart cards from Athena Smart Card
Solutions, go to the Athena Smart Card website (www.athena-scs.com).
Axalto (formerly Schlumberger) smart cards, including the Cryptoflex 32K.
For more information about smart cards from Axalto, go to the Axalto
website (www.axalto.com).
Axalto Cyberflex Access 32K V2. For more information about smart cards
from Axalto, go to the Axalto website (www.axalto.com).
EMC RSA SecurID 800 (Rev A, B, and D). For more information about
tokens from EMC, go to the EMC/RSA website (http://www.rsa.com/).
Gemalto .NET v2 smart cards. For more information about Gemalto smart
cards, go to the Gemalto Web Site (http://www.gemalto.com).
GemPlus smart cards, including SafesITe and GemXpresso Pro, using
GemSafe Libraries 4.2.0-015 (Gold). For more information about smart
cards from GemPlus, go to the GemPlus website (www.gemplus.com).
Giesecke and Devrient Sm@rtCafe Expert 3.2 personal identity verification
cards using ActivClient version 6.1 client software. For more information
about PIV cards from G&D, go to the Giesecke and Devrient Web site
(http://www.gi-de.com/).
Oberthur ID-One Cosmo V5.2D personal identity verification cards using
ActivClient version 6.1 client software. For more information about PIV
cards from Oberthur, go to the Oberthur website
(http://www.oberthurcs.com/index.aspx).
273

PGP® Desktop for Windows Storing Keys on Smart Cards and Tokens
SafeNet smart cards, including iKey 2032. (PGP Desktop is not compatible
with the SafeNet iKey 1000 or 4000.) For more information about smart
cards and USB tokens from SafeNet, go to the SafeNet website
(www.safenet-inc.com/products/tokens/index.asp).
T-Systems Telesec NetKey 3.0 and TCOS 3.0 IEI cards. For more
information on the T-Telesec NetKey smart cards, go to the T-Systems
website (www.t-systems.com).
PGP Desktop also recognizes and works with smart cards from other vendors, if
the vendor includes a standards-based PKCS-11 library in their software drivers.
In the case where a non-standard smart card does not work with PGP Desktop,
Smart Card Keys is not displayed in the PGP Keys Control box when the smart
card is installed on the system.
Recognizing Smart Cards
Before you can examine the properties of a smart card you want to use with
PGP Desktop, or create a PGP keypair on a smart card, you need to make sure
that PGP Desktop recognizes that the smart card you want to work with is
available on the system.
The general requirements for this are:
The smart card software drivers, with PKCS-11 support, must be installed
on the system.
The smart card must be installed on the system. For a USB token, this
generally means it is inserted into a USB port. For a smart card, it generally
means it is inserted into the appropriate smart card reader.
Once you have installed the drivers and smart card, verify that PGP Desktop
recognizes the system. There are two ways to do this:
The easiest way to tell if PGP Desktop “sees” a smart card is to open PGP
Desktop and click on the PGP Keys Control box. If “Smart card Keys” is
listed below “All Keys” in the PGP Keys Control box, then PGP Desktop
sees the smart card on the system.
A slightly more complicated way is to open PGP Desktop, click the PGP
Keys Control box, and then from the File menu, select New PGP Key.
When the PGP Key Generation Assistant screen is displayed, look towards
the bottom. If the Generate Key on Token: <smart card information>
check box is active, then PGP Desktop sees the smart card on the system.
This method has a slight advantage over the previous method in that PGP
Desktop shows you information about the particular smart card that it sees
on the system.
274

PGP® Desktop for Windows Storing Keys on Smart Cards and Tokens
Examining Smart Card Properties
A PGP key stored on a smart card is noted on the PGP Desktop screen with a
special key-on-a-card icon. By viewing its properties, you can find information
regarding the smart card itself, such as the manufacturer, serial number, and
key types it supports.
To view the properties of a smart card
1 Insert your smart card in your smart card reader or insert the token in a
USB port. The key is displayed in the Smart Card Keys section of the PGP
Keys Control box.
2 Open PGP Desktop.
3 Highlight the key for the properties you want to view.
Select Keys > Smart Card Properties. The PGP Smart Card Properties
dialog box is displayed, providing information about the smart card on
which the key resides:
Name of the manufacturer.
Smart card model.
Serial number associated with the smart card.
Capabilities of the mart card, including the type of PGP key that the
card can store and the number of characters your PIN may contain.
Total number of private keys you currently have on the smart card,
including subkeys.
4 Click OK.
Generating a PGP Keypair on a Smart Card
To generate a PGP keypair on a smart card
1 Insert your smart card in your smart card reader or insert the token in a
USB port. The key is displayed in the Smart Card Keys section of the PGP
Keys Control box.
2 Open PGP Desktop.
3 Click the PGP Keys Control box. If the smart card is detected, “Smart Card
Keys” is displayed in the PGP Keys Control box.
4 Select File > New PGP Key. The PGP Key Generation Assistant
Introduction dialog box is displayed.
275

PGP® Desktop for Windows Storing Keys on Smart Cards and Tokens
PGP Desktop recognizes the software drivers from one smart card vendor
at a time. If you have the software drivers from more than one smart card
vendor installed on your system, you need to specify which vendor’s smart
cards you want to use with PGP Desktop. For more information, see Using
Multiple Smart Cards (on page 279).
5 Select the checkbox labeled Generate Key on Token: [name of smart
card on system], then click Next. The Name and Email Assignment dialog
box is displayed.
6 Type your name in the Full Name field and your email address in the
Primary Email field. If you want to enter more email addresses for this
key, click More and type the email address(es) in the Other Addresses
fields.
Tip: It is not absolutely necessary to enter your real name or email
address. Using your real name and email address makes it easier for
others to identify you as the owner of your public key.
7 To specify advanced key settings, click Advanced. The Advanced Key
Settings dialog box is displayed. Specify the settings for:
Key type: RSA (Diffie-Hellman/DSS keys are not supported)
Key size: From 1028 to 2048
Expiration: Never or a date you specify
Allowed algorithms: AES, CAST, TripleDes, IDEA, and Twofish
Preferred algorithm: Choose one of the allowed algorithms
Allowed hash: SHA-2-256, SHA-2-384, SHA-2-512, RIPEMD-160,
SHA-1, MD-5
Preferred hash: Choose one of the allowed hashes
Some settings may not be available if the smart card you are using does
not support them.
Click OK to save your settings and exit the Advanced Key Settings dialog
box.
8 Click Next.
9 On the Passphrase Assignment dialog box, enter the PIN that corresponds
to the smart card. The PIN acts as passphrase for the key. Normally, as an
added level of security, the characters you enter for the passphrase do not
appear on the screen. However, if you are sure that no one is watching,
and you would like to see the characters of your passphrase as you type,
select the Show Keystrokes checkbox.
10 Click Next to begin the key generation process. PGP Desktop generates
your new keypair directly on your smart card. This process can take several
minutes.
276

PGP® Desktop for Windows Storing Keys on Smart Cards and Tokens
11 When the key generation process indicates that it is done, click Next. You
are prompted to add the public key portion of the key you just created to
the PGP Global Directory.
12 Read the text on the screen and do one of the following:
To post your public key to the PGP Global Directory, click Next.
To prevent your public key from being posted to the PGP Global
Directory, click Skip.
13 Click Done. Your new keypair is generated and stored directly on your
smart card.
Because the private portion of your keypair resides only on your smart card,
when you remove the smart card from the system, the key icon changes to a
single key to reflect that the public portion is left on the keyring and the private
portion has been removed with the smart card.
Copying your Public Key from a Smart Card to a Keyring
Storing your keys on a smart card enables you to physically walk to a
computer—a computer with a compatible smart card reader or a free USB port,
and PGP Desktop and the appropriate drivers installed—and automatically copy
the public portion of your keypair to the PGP Desktop keyring on that system.
To copy your public key from your smart card to another user’s keyring:
1 Insert your smart card in your smart card reader or insert the token in a
USB port. The key is displayed in the Smart Card Keys section of the PGP
Keys Control box.
2 Open PGP Desktop.
3 Wait for your key to display in PGP Desktop. When you see your key
display, it indicates that your public key has been copied onto the system.
4 Remove your smart card from the system. Your public key remains on the
system.
Copying a Keypair from Your Keyring to a Smart Card
Use PGP Desktop to copy an existing keypair from your system to a smart card.
This is a good way to make a backup of your keypair and/or to distribute your
public key. Only RSA keys can be copied to a smart card.
Note: You cannot copy Diffie-Hellman/DSS keys to a smart card.
277

PGP® Desktop for Windows Storing Keys on Smart Cards and Tokens
Copying your keypair to a smart card is different from creating a keypair directly
on the smart card (which is not available for all smart cards). When you create a
keypair directly on a smart card, you must have the smart card on the system to
use your private key.
When you have an existing keypair that you copy to a smart card, the private
portion of your keypair resides on the smart card and on your system (unless
you choose to delete the private portion of your keypair from your system).
There are two main reasons to copy an existing keypair to a smart card:
To use it as a back up for the keypair on your system and to copy your
public key from the smart card to other people’s keyrings. In this case, you
would have two copies of the same private key: one on the system where
you originally created it and one on the smart card.
To use it as your only copy of your private key, just as if you had created it
directly onto the smart card. In this case, you need to delete the private key
from your system (PGP Desktop gives you the option to do this). Select the
option to delete the private key from your system if you started using
smart cards after you had already created your PGP keypair but wanted to
have the advantages of having your keypair on your smart card without
creating a new keypair.
Finally, when you copy your PGP keypair to a smart card, the passphrase for the
keypair that is on the smart card is automatically changed from whatever it was
to the PIN of the smart card. However, the passphrase for the keypair that was
already on your system, the keypair you copied to the smart card, does not
change. You have two copies of the same keypair, each with its own
passphrase.
If you decide to delete the private key from your system and just keep the
private key on your smart card, simply use the PIN of the smart card as the
passphrase for your private key.
To copy an existing PGP keypair to your smart card
1 Insert your smart card in your smart card reader or insert the token in a
USB port. The key is displayed in the Smart Card Keys section of the PGP
Keys Control box.
2 Open PGP Desktop.
3 Right-click the keypair you want to copy and select Add To > Smart Card
Keys. A warning dialog box is displayed informing you that once the
keypair is copied to the smart card, your PGP passphrase for this keypair
automatically changes to the PIN of the smart card.
4 Click OK to continue. The PGP Enter Passphrase dialog box is displayed.
5 Type the passphrase for your key, then click OK. The PGP Enter
Passphrase dialog box is displayed.
6 Type the PIN for the smart card, then click OK. The keypair is copied to the
smart card. PGP Desktop asks if you want to remove the private portion of
the keypair from your keyring so that it only resides on the smart card.
278

PGP® Desktop for Windows Storing Keys on Smart Cards and Tokens
7 Do one of the following:
To remove the private portion of your keypair from your keyring, click
Yes. The private portion of your keypair is deleted from the keyring on
your system and exists only on your smart card.
To leave the private portion of your keypair on your keyring, click No.
The private portion is not deleted; you now have two copies of the
same keypair, one on your system and the other on your smart card.
Wiping Keys from Your Smart Card
You can delete all the data stored on a smart card by using the Wipe Contents
feature in the Smart Card properties dialog box.
To wipe a smart card
1 Insert your smart card in your smart card reader or insert the token in a
USB port. The key is displayed in the Smart Card Keys section of the PGP
Keys Control box.
2 Open PGP Desktop.
3 In the PGP Keys box, select Smart Card Keys. The PGP keys on the smart
card appear.
4 Select the smart cards or tokens you want to wipe.
5 Select Keys > Wipe Smart Card. PGP Desktop asks for confirmation you
want to delete all keys currently on the smart card or token.
6 Click OK. The PGP Enter Passphrase dialog box is displayed.
7 Type the PIN for this smart card. Normally, as an added level of security,
the characters you enter for the passphrase do not appear on the screen.
However, if you are sure that no one is watching, and you would like to see
the characters of your passphrase as you type, select the Show
Keystrokes checkbox.
8 Click OK. PGP Desktop deletes all keys stored on the smart card.
Using Multiple Smart Cards
PGP Desktop is compatible with smart cards from a wide variety of vendors. At
the same time, PGP Desktop only works with the smart cards from one vendor
at a time.
279

PGP® Desktop for Windows Storing Keys on Smart Cards and Tokens
On startup, PGP Desktop automatically searches your system for software
drivers that support the use of smart cards from a particular vendor. When it
finds those software drivers, it loads them, assuming you have smart cards
from that vendor and want to use them.
If you have the software drivers from a single vendor installed on your system,
this works perfectly; PGP Desktop automatically finds the software drivers and
lets you use the smart cards from that vendor. You don’t have to do anything; it
just works.
However, there may be some occasions when you need to use the smart cards
from more than one vendor. When this happens, and you have the software
drivers from more than one vendor on a system, you need to tell PGP Desktop
whose smart cards you want to use. Otherwise, PGP Desktop won’t know
which software drivers to use, and may not select the ones you want.
To specify which smart card software drivers to use
1 Open PGP Desktop.
2 Select Tools > PGP Options. The PGP Options dialog box is displayed.
3 Click the Keys tab.
4 In the Synchronization section, from the Synchronize with smart cards
and tokens list, select the vendor for the software drivers you want to use:
When you have the software drivers from only one vendor on your
system, use the default setting, Automatically.
To prevent PGP Desktop from using the smart cards from any vendor,
Select None .
To specify a vendor not on in the list, select Other. On the Select
Smart Card Driver dialog box, navigate to the DLL file of the software
drivers of your smart card vendor, select it, then click Open. You can
now use smart cards supported by the software driver file you
selected.
PGP Desktop now expects you to use smart cards from the selected vendor. If
you add a smart card from a different vendor to your system, PGP Desktop will
not recognize it. You must follow this procedure to change to a different smart
card vendor.
Special-Use Tokens
PGP Desktop uses the Aladdin eToken Pro USB token for authentication at
startup if the system’s boot drive has been whole disk encrypted (for more
information on protecting a boot drive with PGP Whole Disk Encryption, see
Protecting Disks with PGP Whole Disk Encryption (on page 135)). Only the
Aladdin eToken Pro USB token can be used for this purpose. For information on
how to configure this token, see Configuring the Aladdin eToken (on page 281)
280

PGP® Desktop for Windows Storing Keys on Smart Cards and Tokens
Configuring the Aladdin eToken
You need an Aladdin eToken Pro USB token with a PGP keypair on it to use
with the PGP Whole Disk Encryption feature of PGP Desktop for Windows.
To create an Aladdin eToken Pro USB token to use with PGP Whole Disk
Encryption
1 Obtain an Aladdin eToken Pro USB token. This is the only token that can be
used with PGP Whole Disk Encryption. Use any of the three models: 16K,
32K, or 64K. The 16K and 32K models support 1024-bit keys; the 64K
mode supports up to 2048-bit keys.
2 Make sure the appropriate driver software from Aladdin is installed on your
system. For more information on the Aladdin drivers, see Required Drivers
for the Aladdin eToken (on page 153).
When the driver software is installed, PGP Desktop displays Smart Card
Keys in the PGP Keys Control box.
3 Open PGP Desktop for Windows.
4 Create a keypair on the Aladdin eToken (for instructions, see Generating a
PGP Keypair on a Smart Card (on page 275)) or use the Add To shortcut
menu to copy an existing keypair to the token (for instructions, see
Copying a Keypair from Your Keyring to a Smart Card (on page 277)).
If you want to send an existing keypair to the token, it must be a 1024- or
2048-bit RSA key. The Aladdin eToken Pro token does not support any
other key sizes or DH/DSS keys at this time.
When you create a keypair on the token, or send an existing keypair to the
token, the passphrase of the keypair changes to the PIN of the token. The
default PIN for the Aladdin eToken Pro token is 1234567890. This is a
well-known PIN, so be sure to change it using the Aladdin software.
5 You can now use the PGP keypair on the Aladdin eToken with PGP Whole
Disk Encryption.
281

A Setting PGP Desktop
Options
PGP Desktop is configured to accommodate the needs of most users, but you
have the option of adjusting settings to suit your requirements. This section
describes the options you can set in PGP Desktop.
Note: If you are using PGP Desktop in a PGP Universal Server-managed
environment, your PGP Universal Server administrator may have disabled
certain features. When a feature is disabled, the control item in the left side
is not displayed and the menu and other options for that feature are not
available. The graphics included in this guide depict the default installation
with all features enabled. If your PGP Universal Server administrator has
disabled this functionality, this section does not apply to you.
In This Chapter
Accessing the PGP Options dialog box ................................................. 283
General Options..................................................................................... 284
Keys Options ......................................................................................... 286
Master Keys Options............................................................................. 289
Messaging Options ............................................................................... 289
PGP NetShare Options .......................................................................... 296
Disk Options .......................................................................................... 297
Notifier Options ..................................................................................... 299
Advanced Options ................................................................................. 302
Accessing the PGP Options dialog box
To access the PGP Options
1 Do one of the following:
Click the PGP Tray icon in the Windows System Tray, then select
Options.
Open PGP Desktop, then select Tools > PGP Options.
2 Select a tab and make the changes you want. When you are finished with a
particular tab, select another tab.
283
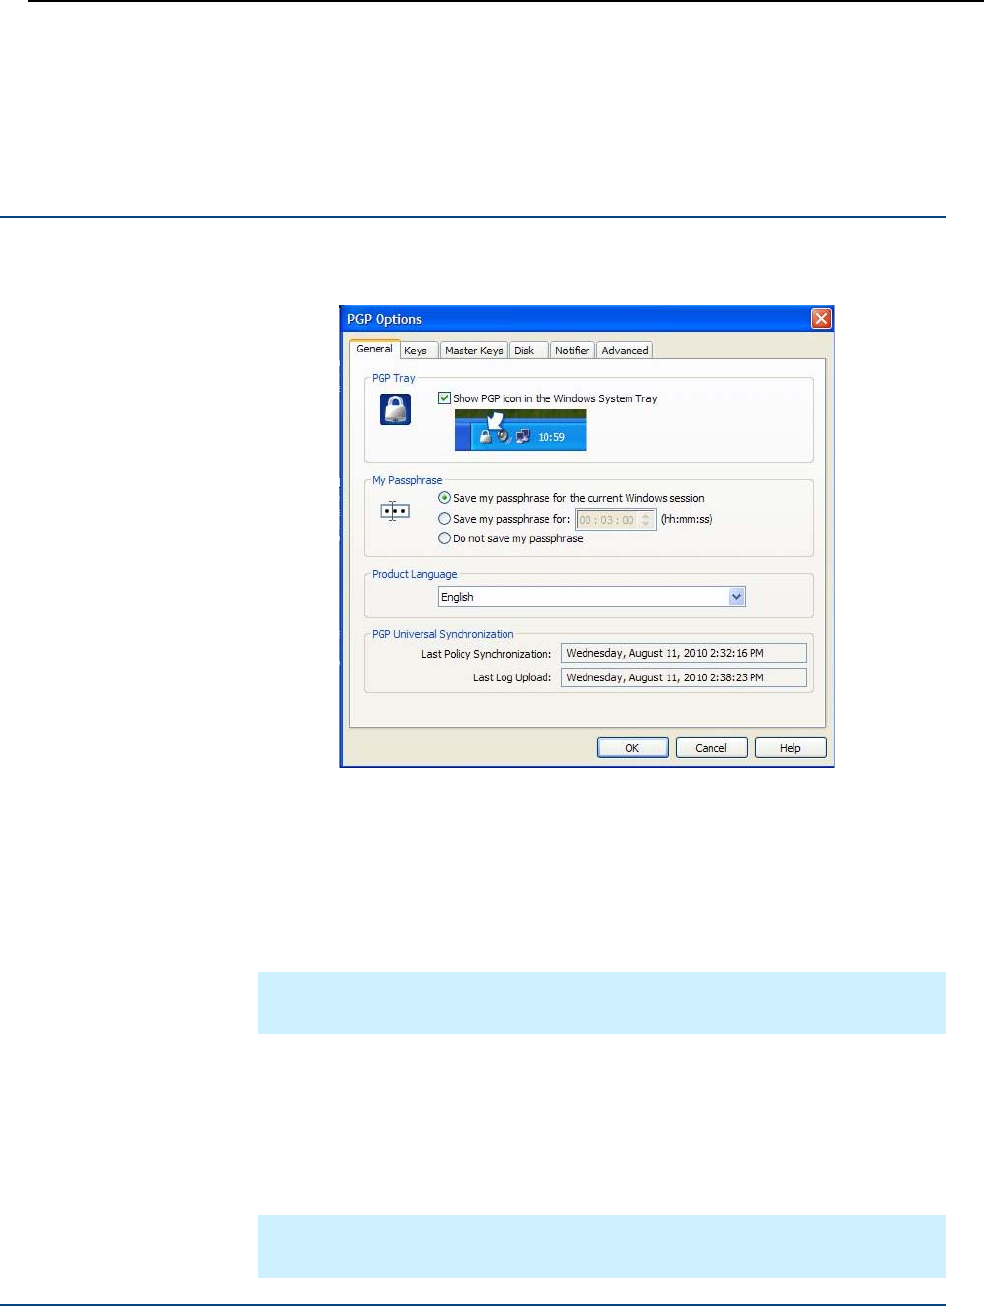
PGP® Desktop for Windows Setting PGP Desktop Options
3 To save your changes and exit, click OK. To cancel any changes you have
made, click Cancel.
General Options
The General tab contains a variety of PGP Desktop settings.
The options on the General tab of the Preferences dialog box are:
Show PGP icon in the Windows Tray. When enabled, the PGP icon is
displayed in the Windows Tray while PGP Desktop is active on the system.
The PGP Tray icon provides easy access to PGP Desktop functions.
Deselect the checkbox to remove the PGP icon from the Windows Tray. To
restore the PGP icon, start PGP Desktop, then from the Tools menu select
PGP Options. Access the General tab, and select the checkbox.
Note: If you are using PGP Desktop in a PGP Universal Server-managed
environment, this option may be required.
Removing the PGP Tray icon from the Windows System Tray does not shut
down PGP Desktop services. PGP Desktop services continue running
when the PGP Tray icon is removed from the Windows System Tray.
To stop PGP Services, click the PGP Tray icon. Select Stop PGP Services
from the list of commands displayed. A warning dialog box is displayed;
you must confirm that this is what you intend to do.
Note: PGP Corporation suggests that you not stop PGP Desktop services
unless required to do so.
284

PGP® Desktop for Windows Setting PGP Desktop Options
My Passphrase. Provides options to save your passphrase.
Save my passphrase for the current Windows session.
Automatically saves your passphrase in memory until you log off your
computer. This is called caching your passphrase. If you enable this
option, you are prompted for your passphrase once per private key.
You are not prompted to type it again for the same key until you log
off your computer.
Caution: When this option is enabled, it is very important that you log off
your computer before leaving it unattended. Your passphrase can remain
cached for weeks if you never log off, allowing anyone to read your
encrypted messages, or encrypt messages with your key, while you are
away from your computer. If you normally remain logged on to your
computer for long periods of time, consider choosing one of the other
passphrase caching options.
Save my passphrase for X (hh:mm:ss). Automatically saves your
passphrase in memory for the specified duration of time. If you enable
this option, you are prompted for your passphrase once for the initial
signing or decrypting task. You are not prompted to type it again until
the specified time has elapsed. The default setting is 00:02:00 (2
minutes).
Do not save my passphrase. Prevents your passphrase from being
stored in memory. If you enable this option, you must type your
passphrase each time it is needed.
Note that, even if you choose not to save your passphrase, you will only
be prompted to enter your passphrase once to access all the files within
a folder that has been added to PGP NetShare.
Product Language. Use this option to select the language in which the
PGP Desktop user interface is presented. The options are: English (the
default), German, French, Japanese, and Spanish.
Note: You must log off and log back in to your system if you change to a
different language.
PGP Universal Synchronization. If you are in a PGP Universal
Server-managed environment, this field displays information on when
policy was last updated and when logs were last sent.
285
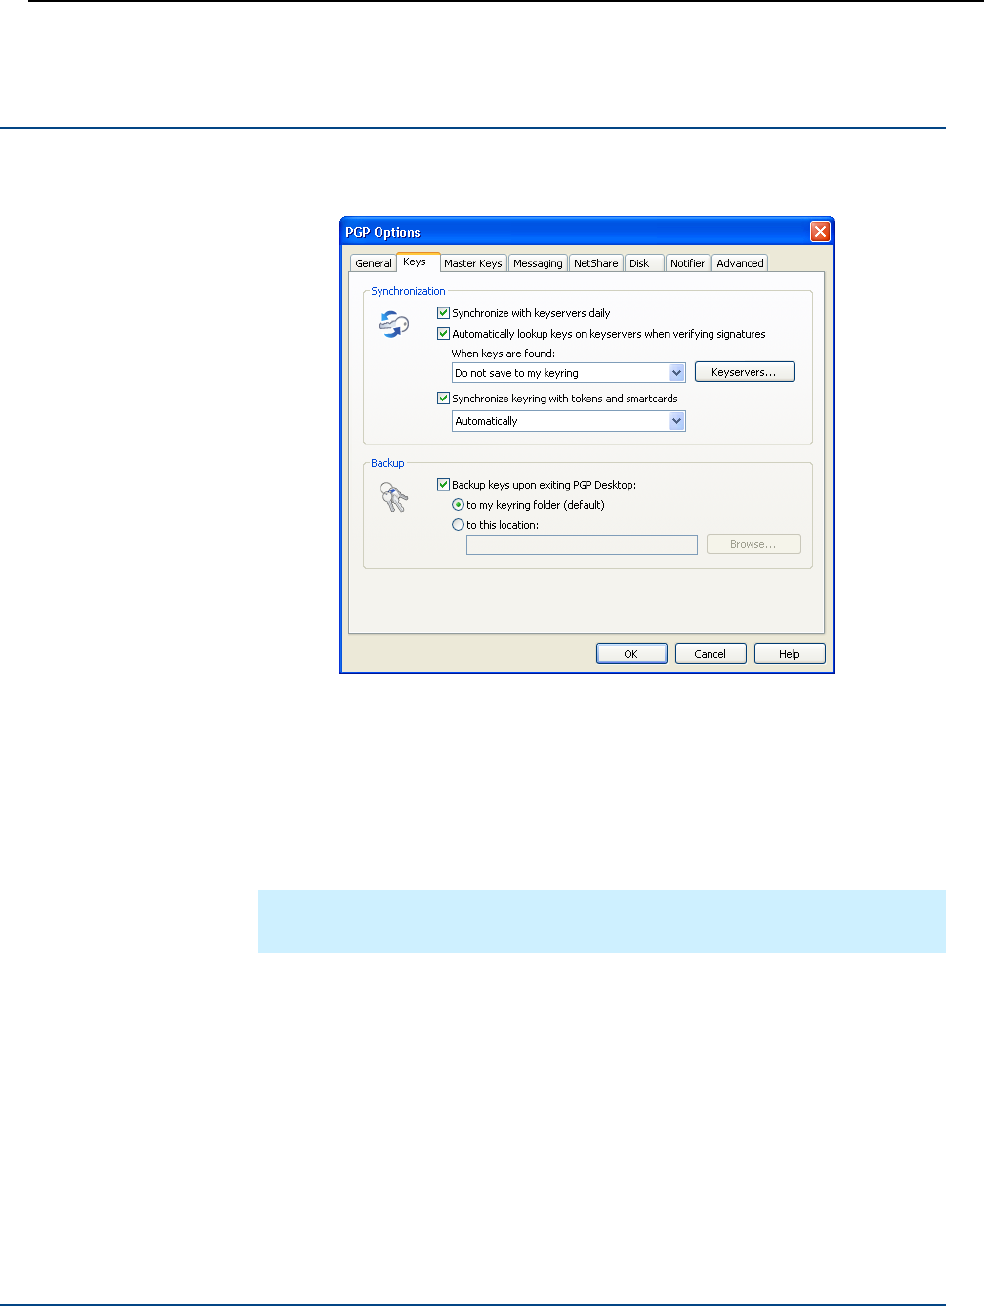
PGP® Desktop for Windows Setting PGP Desktop Options
Keys Options
The Keys tab contains settings that apply to PGP Desktop keys.
The options on the Keys tab are:
Synchronization. These settings specify how you want keys on your
keyrings synchronized with public servers.
Synchronize with keyservers daily. When selected, PGP Desktop
performs a daily synchronization of the public keys on your Keyring
with your list of keyservers. This list includes the PGP Global
Directory.
Note: If you are using PGP Desktop in a PGP Universal Server-managed
environment, this option may be required.
If changed versions of the keys are available, they are downloaded
automatically. If the keyserver notifies PGP Desktop that a key is
removed from the keyserver, PGP Desktop disables that key on the
local keyring.
If you use PGP Desktop to make a change to a keypair on your Keyring,
that change is not automatically uploaded from your computer to any
keyserver. You must manually upload the changed key to the desired
keyserver. PGP Desktop prompts you to upload changed keys when
you quit PGP Desktop. Otherwise, to send the key to the keyserver,
right-click the changed key, select Send To from the shortcut menu
displayed, and then select the desired keyserver from the list.
286

PGP® Desktop for Windows Setting PGP Desktop Options
Automatically lookup keys when verifying signatures. When this
option is enabled, you can specify that PGP Desktop should search
the configured keyservers for a verified key if the public keys are not
available in your local keyring.
Note: If you are using PGP Desktop in a PGP Universal Server-managed
environment, this option is not used. Your PGP Universal Server defines
whether keys are looked up and, if found, if they are cached. Keys found
in a PGP Universal Server-managed environment are never saved to your
keyring.
When keys are found. If the public key is found, there are three
options:
Do not save to my keyring. Any key(s) found on the configured
keyservers are used only once, to verify the signature with which
you are currently working. The key is then not saved to your
keyring.
Ask to save to my keyring. Specifies that PGP Desktop should
ask if you want to save found keys to your local keyring.
Save keys to my keyring. Specifies that found keys are
automatically saved to your local keyring.
These options also apply to X.509 certificates included in S/MIME email
messages. If specified, PGP Desktop extracts and then imports the
X.509 certificate to your keyring. If you want to encrypt email using
imported certificates, be sure to manually sign the certificate.
Synchronize keyring with tokens and smart cards. Lets you
specify how PGP Desktop synchronizes with smart cards and tokens:
Automatically. PGP Desktop automatically loads and uses the
PKCS-11 driver from the first smart card/token vendor it finds on
your system. If you have the PKCS-11 driver from just one smart
card/token vendor installed on your system, choose this setting;
PGP Desktop will automatically recognize and use smart
cards/tokens from that vendor.
Listed vendor. PGP Desktop loads and uses the PKCS-11 driver
from the smart card/token vendor you select from the list. If you
have the PKCS-11 drivers of more than one smart card/token
vendor on your system, use this setting to tell PGP Desktop
which vendor’s smart cards/tokens you want to use.
Other. Lets you select a PKCS-11 driver using the Select Smart
Card Driver dialog box that is displayed. When selected, PGP
Desktop recognizes and uses the smart cards/tokens from the
vendor whose PKCS-11 driver you select. Use this setting if you
want to use the smart cards/tokens from a vendor not listed.
287

PGP® Desktop for Windows Setting PGP Desktop Options
If the PKCS-11 library from a smart card vendor is installed on your
system and works with other PKCS-11 applications, such as Mozilla
Firefox or Thunderbird, chances are high that PGP Desktop will
recognize and work with smart cards from this vendor.
In those rare cases where a non-standard smart card does not work
with PGP Desktop, “Smart Card Keys” does not appear in the PGP
Keys Control box when the smart card is installed on the system.
None. PGP Desktop will not recognize or use any smart card or
token on your system.
Keyservers. Click to display the PGP Keyservers List dialog box. Use
this dialog box to add, edit, or remove the list of keyservers you want
to use when automatically looking up keys.
Backup. These settings specify when and where you want your keys
backed up.
Backup keys when exiting PGP. When enabled, PGP Desktop
automatically backs up your keys to the location you specify:
To my keyring folder (default). When selected, your keys are
backed up to the default keyring folder on your system. The
default location is the My Documents folder.
To this location. When selected, your keys are backed up to the
location on your computer that you specify. Type the full path or
click Browse to navigate to a location.
288
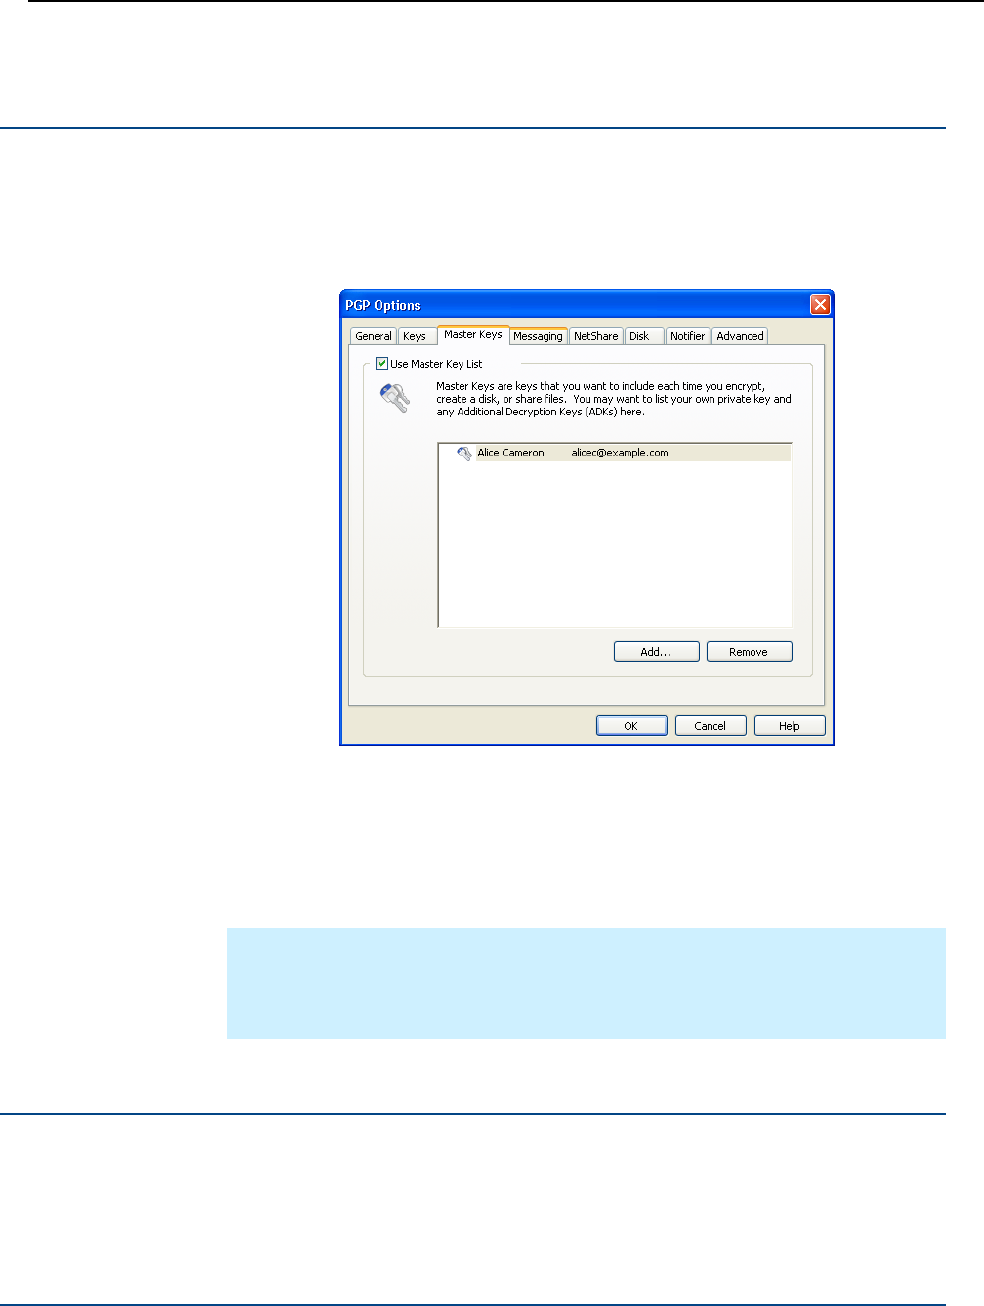
PGP® Desktop for Windows Setting PGP Desktop Options
Master Keys Options
The Master Key List is a set of keys that you want added by default any time
you are selecting keys for messaging, disk encryption, PGP NetShare, and PGP
Zip. This saves you the step of dragging the keys that you regularly use into the
Recipients field.
To use the Master Key List, select the Use Master Key List checkbox. You
cannot add or remove keys from the Master Key List unless this box is
selected.
For information on how to add master keys, see Adding Keys to the Master Key
List (on page 52). For information on deleting master keys, see Deleting Keys
from the Master Key List (on page 52).
Note: If you generated your key using the Setup Assistant, your key is
automatically added to the Master Key list. If you skipped key generation and
imported your key into PGP Desktop, your key is not automatically added to
the list.
Messaging Options
The Messaging tab contains settings that apply to email and IM messaging.
289
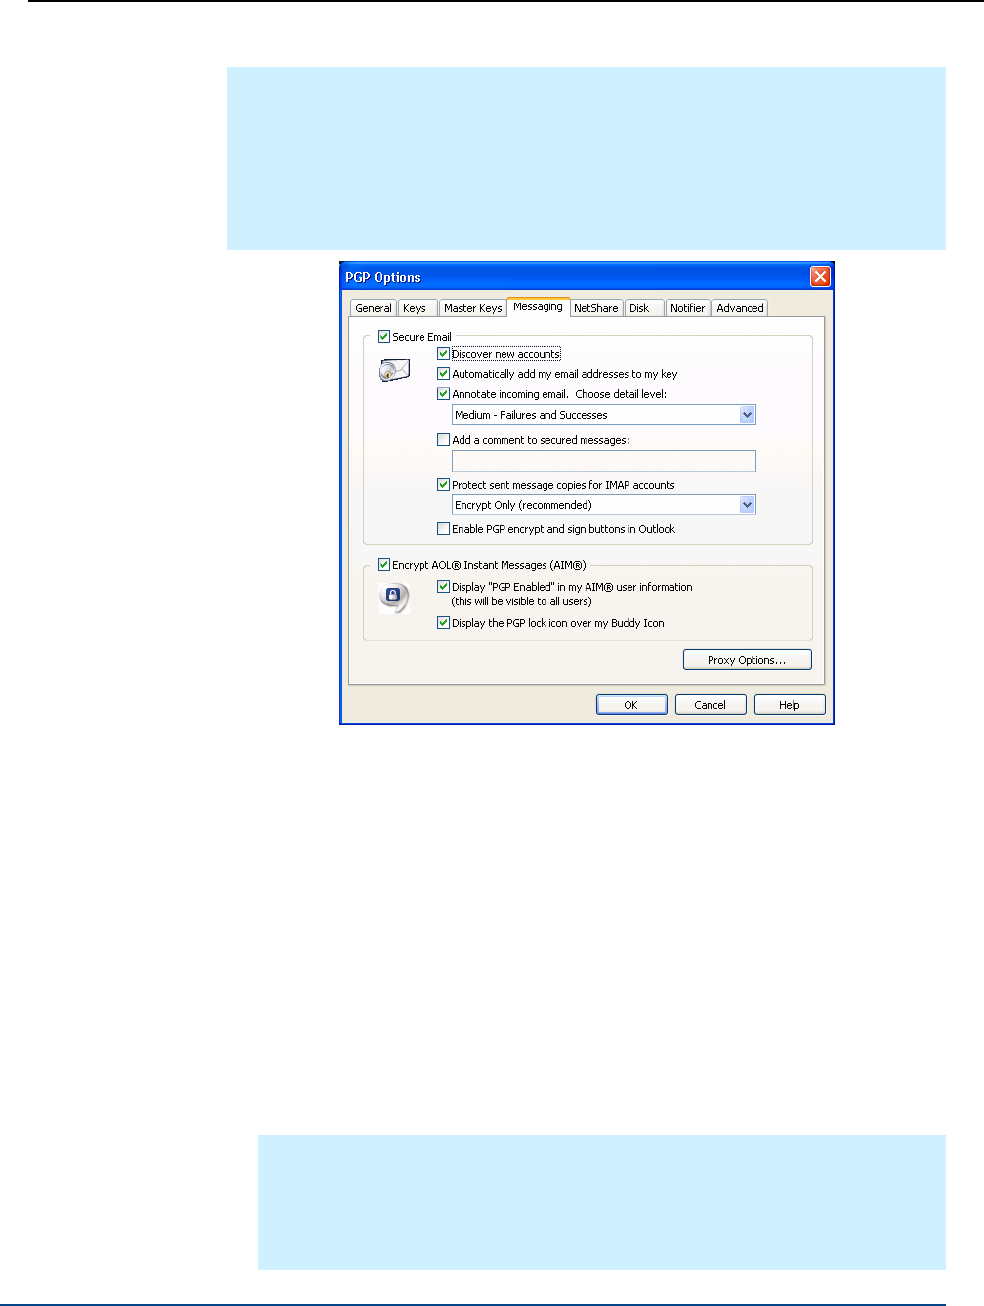
PGP® Desktop for Windows Setting PGP Desktop Options
Note: If you are using PGP Desktop in a PGP Universal Server-managed
environment, your PGP Universal Server administrator may have disabled
certain features. When a feature is disabled, the control item in the left side
is not displayed and the menu and other options for that feature are not
available. The graphics included in this guide depict the default installation
with all features enabled. If your PGP Universal Server administrator has
disabled this functionality, this section does not apply to you.
The options on the Messaging tab are:
Secure Email. Select the Secure Email checkbox if you want PGP
Desktop to secure all your email accounts automatically. When enabled,
PGP Desktop intercepts both incoming and outgoing email messages and
secures them based on the appropriate policies.
Deselect the Secure Email checkbox to stop PGP Desktop from securing
your email accounts.
If you select the Secure Email checkbox, you can choose these additional
options:
Discover new accounts. Select this checkbox if you want PGP
Desktop to monitor your email activity and automatically discover new
email accounts that you are using. When a new account is discovered,
PGP Desktop asks if you want to secure messages sent using that
account.
Note: If you are using PGP Desktop in a PGP Universal managed
environment, the use of a wildcard (*) binding causes this function to be
no longer active, as all mail services will match the binding of *. Therefore
all new accounts will automatically match policy and be created even if
this option is deselected.
290

PGP® Desktop for Windows Setting PGP Desktop Options
Automatically add my email addresses to my key. If you select
this checkbox, PGP Desktop automatically adds to your key the email
addresses that you use to send messages. This option is enabled by
default. If you are using PGP Desktop in a PGP Universal
Server-managed environment, this option may be disabled.
Deselect this checkbox to prevent email addresses from being
automatically added to your key. This has privacy value; for example, if
you want to prevent someone from finding your email address.
Annotate incoming email. Select this checkbox if you want
incoming email messages to be annotated with explanatory text
detailing the actions that PGP Desktop took when processing your
incoming messages. You can choose three annotation levels:
Maximum: Verbose Annotation. Adds annotations to your
incoming email detailing every action that PGP Desktop has
taken during message processing.
Medium: Failures and Successes. This option is the default.
Provides annotations when there has been a processing failure,
such as unknown key, or unknown signer. The Medium setting
provides annotations for all decrypted and/or signed email, but
does not list individual attached files.
Minimum: Failures Only. Only provides annotations when there
has been a processing failure, such as detecting an unknown key
or unknown signer.
Add a comment to secured messages. When enabled, the text you
type here is always included in messages you encrypt or sign.
Comments typed in this field appear below the --BEGIN PGP
MESSAGE BLOCK-- text header and PGP Desktop version number of
each secured message. These comments are not visible in decrypted
email.
Protect sent message copies for IMAP accounts. This option is
available for standalone installations only. Select this checkbox if you
want to protect email messages as they are being copied to your
IMAP Sent Items folder. This option provides additional security so
you can protect sensitive emails that you have sent using your IMAP
account.
When you select this option, then select how you want to secure the
sent message copies:
Encrypt Only (recommended). This option is the default. Select
this option to encrypt messages as they are copied to your Sent
Items folder.
Encrypt and Sign. Select this option to encrypt and sign
messages as they are copied to your Sent Items folder.
Sign Only. Select this option to sign (and not encrypt) messages
as they are copied to your Sent Items folder.
291

PGP® Desktop for Windows Setting PGP Desktop Options
If the name of the folder is not a name that PGP Desktop recognizes
(for example, instead of "Sent Items" the folder is named "Outgoing
Messages"), a message is displayed asking you confirm if the name of
the folder is where your sent messages are typically stored. Note that
the first message copied to this folder is not encrypted and/or signed,
but that subsequent messages copied to this folder are.
Enable PGP encrypt and sign buttons in Outlook. Select this
checkbox if you want to use PGP Desktop encrypt and sign buttons in
Microsoft Outlook. This option is not selected by default. For more
information on the encrypt and sign buttons, see Using the Sign and
Encrypt Buttons in Microsoft Outlook (on page 90).
Note: If you are using PGP Desktop in a PGP Universal Server-managed
environment, there may already be text in this field.
Encrypt AOL® Instant Messages (AIM®). Enable if you want PGP
Desktop to encrypt instant message sessions with compatible instant
messaging software.
AOL® Instant Messenger™ and compatible software applications are
compatible.
Display “PGP Enabled” in my AIM user information. When
selected, PGP Enabled is added to your screen name in such places
as the AIM Buddy List and the Get Buddy Info command. When
disabled, your screen name is displayed without PGP Enabled. The
appearance of this text may vary depending on your instant
messaging client.
Display the PGP lock icon over my buddy icon. When selected, the
PGP stylized lock icon is displayed with your buddy icon, so others can
see that the IM session is protected. When disabled, your icon is
displayed normally.
Proxy Options
Click the Proxy Options button to access advanced messaging options.
292
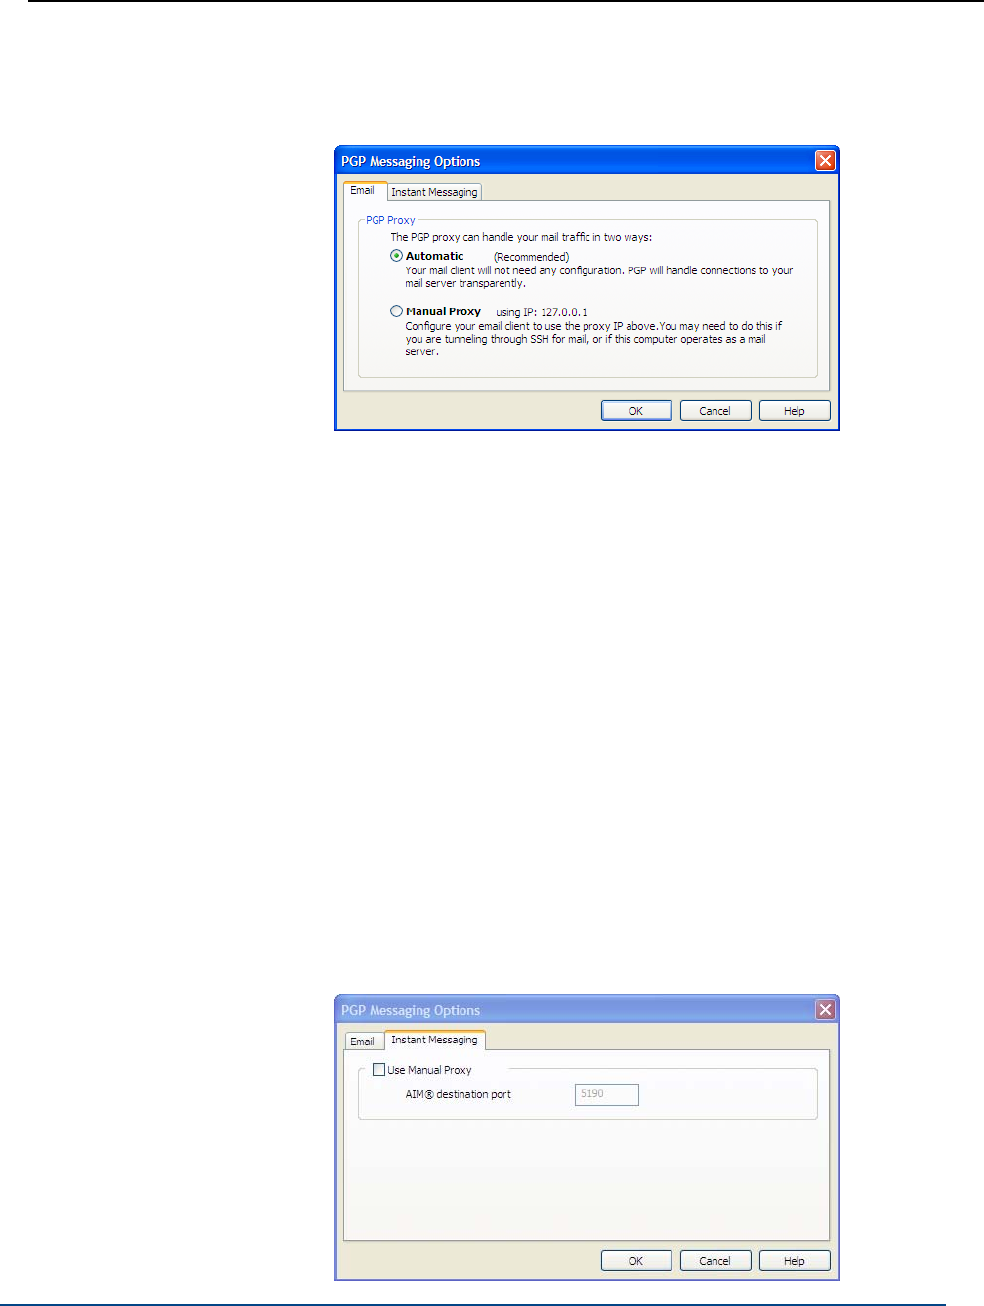
PGP® Desktop for Windows Setting PGP Desktop Options
Email tab
If your computer needs to have a proxy manually configured so that you can
send and receive email, you would use this tab.
PGP Desktop “resides” between your email application and the mail server that
provides your mail. This configuration enables PGP Desktop to filter, or proxy,
your email traffic for you automatically. PGP Desktop can protect your
messages, based on the applicable policy, without interrupting your work.
Normally, you do not need to change the PGP Proxy settings. However, some
users must specify proxy settings manually. Choose the setting that your
network administrator recommends:
Automatic. The default, recommended setting. Your email is protected
automatically and transparently. PGP Corporation recommends that you
leave this option selected unless you are instructed to use the manual
proxy setting.
Manual Proxy. This option is needed if your computer is “tunneling”
through SSH to your mail server, or if the computer on which you are
running PGP Desktop also functions as a mail server. For more information,
see Configuring Manual Mode (on page 294).
Instant Messaging tab
293

PGP® Desktop for Windows Setting PGP Desktop Options
If your computer is behind a network firewall, you may need to change the
network port that AIM uses for your IM chat sessions. Most users do not need
to change this setting.
Use Manual Proxy. Select this checkbox to change the port that AIM uses
for your IM sessions. Change the value to one other than the default
(5190). Your network administrator can tell you if you need to change this
setting, and if so, what the correct port number is.
Configuring Manual Mode
If you specify Manual for the email proxy, you must also configure the PGP
Messaging settings, as well as some settings within your email client (ask your
system administrator for the values that you should use):
1 In the PGP Messaging Control box, select the service for which you want
to use Manual mode. The New Service panel is displayed.
2 Click Server Settings. The Server Settings dialog box for the specified
service is displayed.
3 Select the type of server that the new service will be using:
Internet Mail—for standalone PGP Desktop users who have a POP or
IMAP mail connections.
PGP Universal—for PGP Desktop users who are in a PGP Universal
Server-managed environment. Contact your PGP Universal Server
administrator for more details on correct settings.
MAPI/Exchange—for PGP Desktop users who are using Microsoft
Outlook as a client on a Microsoft Exchange/MAPI server. For more
information on correct settings, contact your mail administrator.
Lotus Notes—for PGP Desktop users who are using Lotus Notes as
their email client with a Lotus Domino server. For more information on
correct settings, contact your mail administrator.
4 In the Incoming Mail Server section, type a value in the Redirect local
port X to this server field.
PGP Desktop will monitor this port for email messages going from your
mail server to your mail client.
5 In the Outgoing Mail Server (SMTP) section, type a value in the Redirect
local port X to this server field.
PGP Desktop will monitor this port for email messages going from your
mail client to your mail server.
6 Click OK. The Server Settings dialog box closes.
294
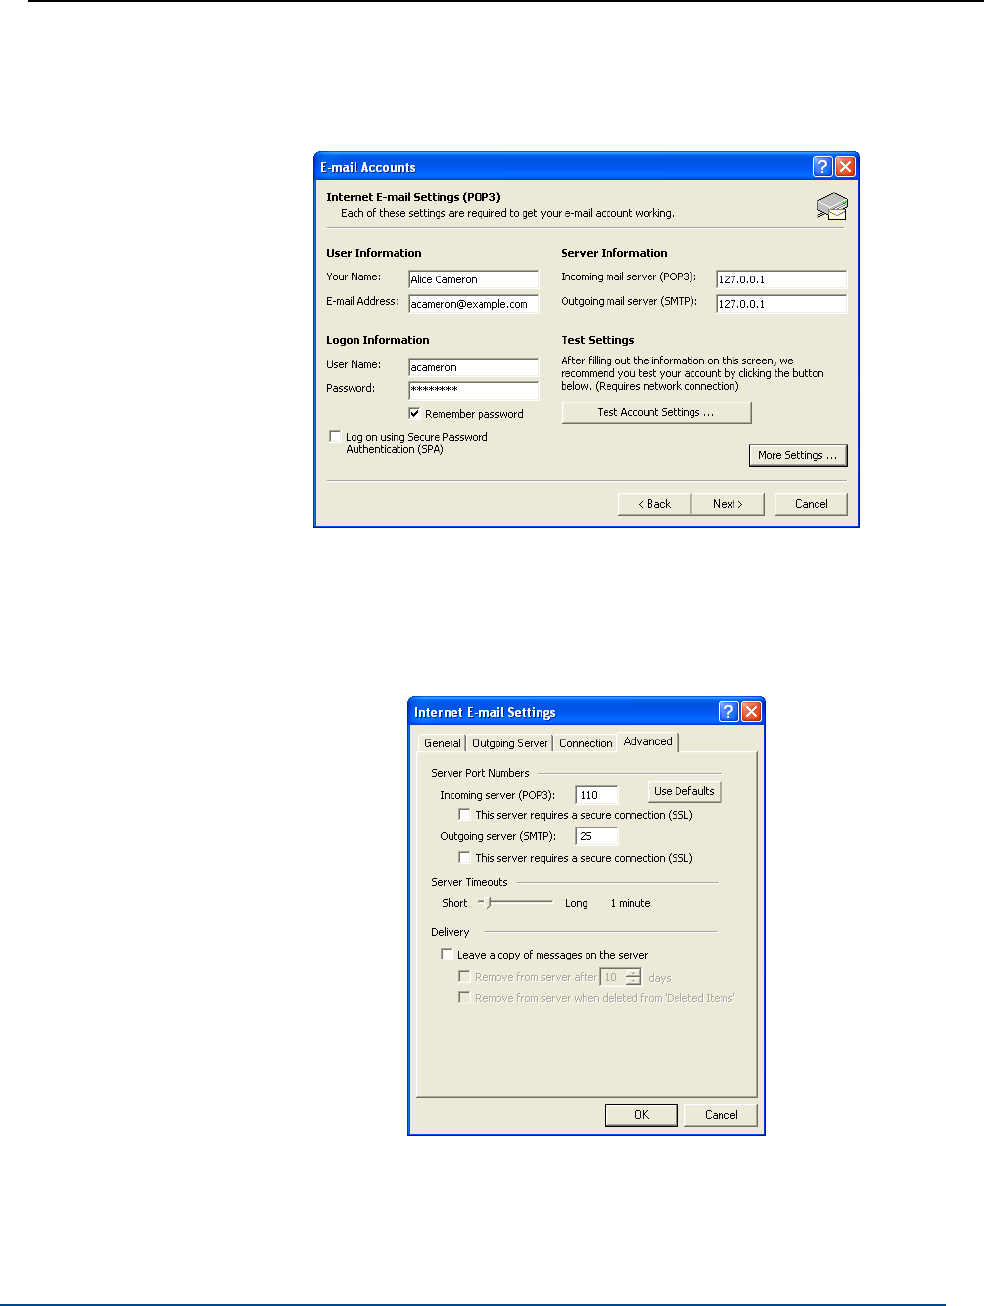
PGP® Desktop for Windows Setting PGP Desktop Options
7 Open your email client and navigate to the settings for your email account
(if you have multiple accounts, you will need to configure each account
separately).
8 For both the Incoming mail server (POP3 or IMAP) and Outgoing mail
server (SMTP) settings in Microsoft Outlook, enter 127.0.0.1.
9 Click More Settings.
10 On the Internet E-mail Settings dialog, click Advanced. The Advanced tab
of the Internet E-mail Settings dialog box is displayed.
11 In the Incoming server (POP3 or IMAP) box, type the same value you
established for the incoming mail server in the Redirect local port X to this
server field; Step 7 of this procedure.
295
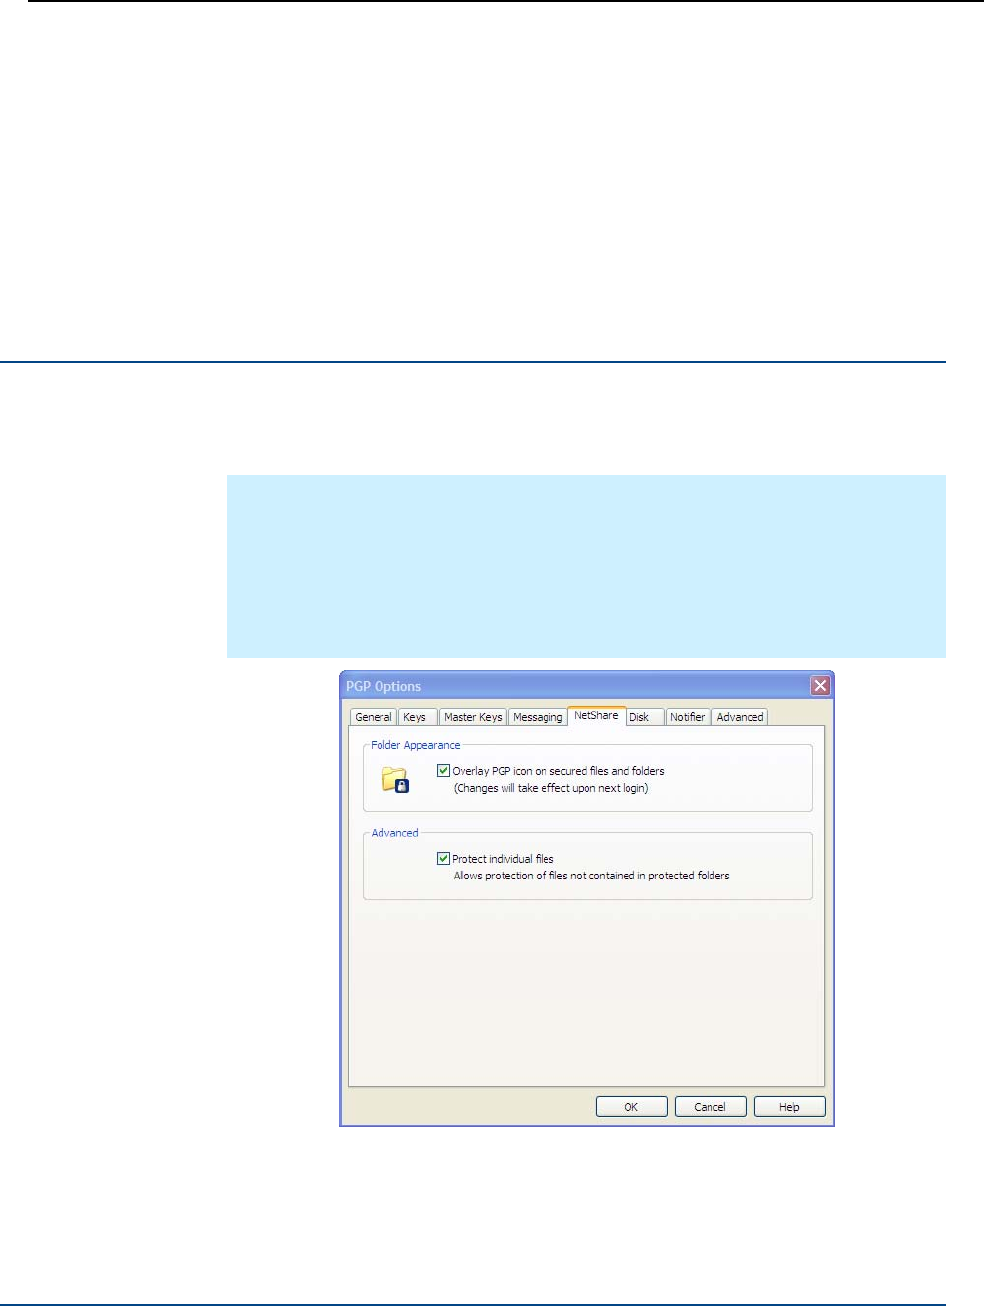
PGP® Desktop for Windows Setting PGP Desktop Options
12 In the Outgoing server (SMTP) box, type the same value you established
for the outgoing mail server in the Redirect local port X to this server field;
Step 8 of this procedure.
13 Click OK, then finish configuring the account settings. Manual mode is
configured for the selected service.
14 When you are done configuring Manual mode for the services, restart your
computer.
PGP NetShare Options
Use the NetShare options tab to change settings when you protect shared
network files.
Note: If you are using PGP Desktop in a PGP Universal Server-managed
environment, your PGP Universal Server administrator may have disabled
certain features. When a feature is disabled, the control item in the left side
is not displayed and the menu and other options for that feature are not
available. The graphics included in this guide depict the default installation
with all features enabled. If your PGP Universal Server administrator has
disabled this functionality, this section does not apply to you.
Folder Appearance. Select Overlay PGP icon on secured files and
folders if you want a small PGP lock icon to appear on files and folders that
are protected using PGP NetShare.
Advanced. Select Protect individual files to protect individual files that
are outside of a Protected Folder using PGP NetShare.
296
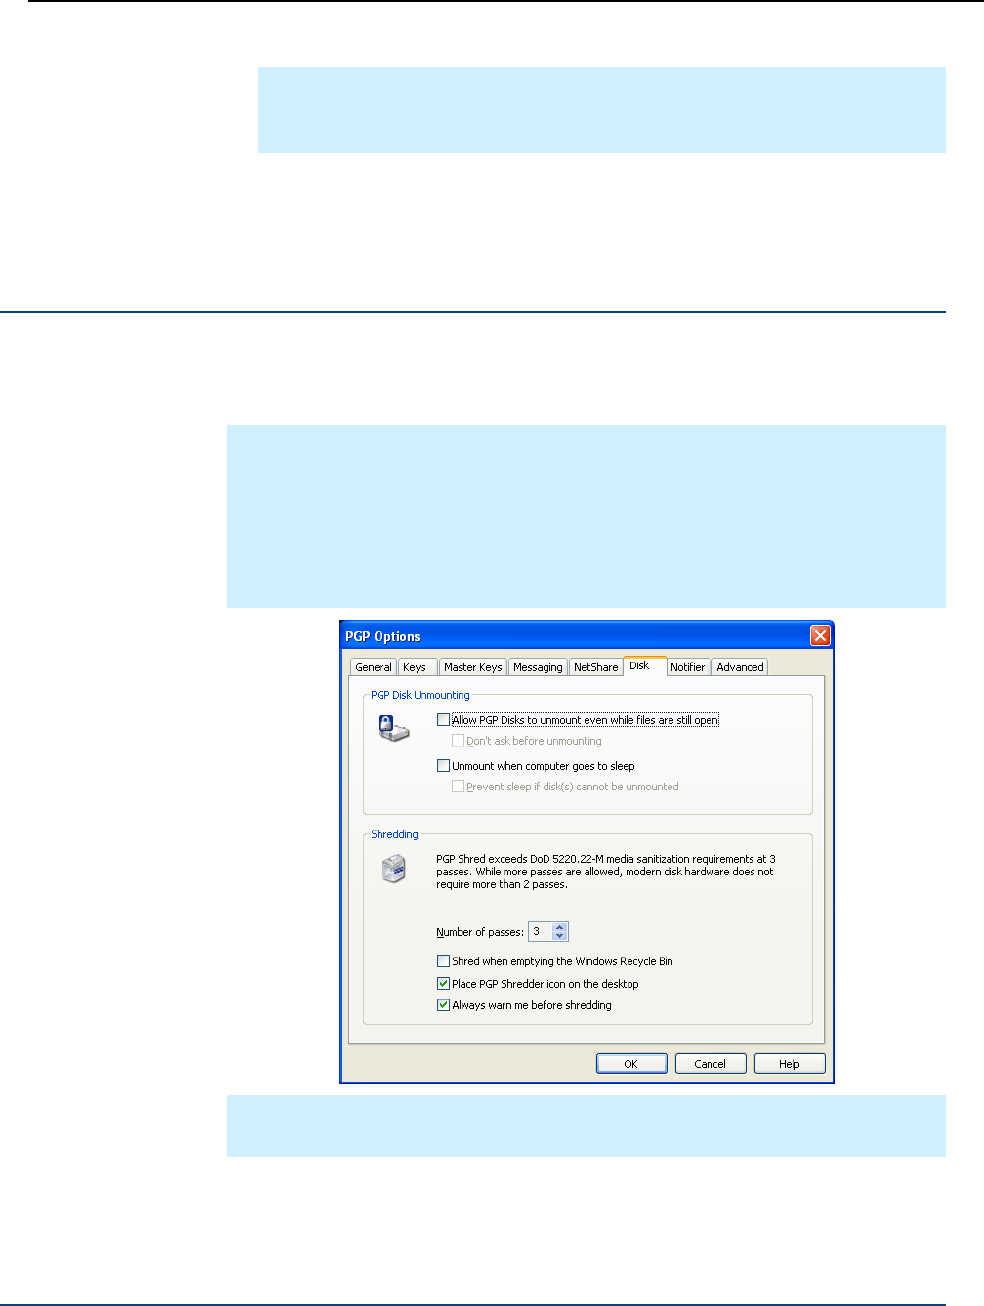
PGP® Desktop for Windows Setting PGP Desktop Options
Note: You may be prevented from selecting this option by your PGP
administrator if you are using PGP Desktop in a PGP Universal
Server-managed environment.
For more information about protecting individual files that are outside of
Protected Folder using PGP NetShare, see Protecting Files Outside of a
Protected Folder (on page 240).
Disk Options
The Disk tab contains settings that apply to volumes protected using the PGP
Virtual Disk feature. The Disk tab also shows options for PGP Shredder.
Note: If you are using PGP Desktop in a PGP Universal Server-managed
environment, your PGP Universal Server administrator may have disabled
certain features. When a feature is disabled, the control item in the left side
is not displayed and the menu and other options for that feature are not
available. The graphics included in this guide depict the default installation
with all features enabled. If your PGP Universal Server administrator has
disabled this functionality, this section does not apply to you.
Note: If you are using PGP Desktop in a PGP Universal Server-managed
environment, these options may already be configured.
PGP Disk Unmounting
The options for PGP Virtual Disk are:
297

PGP® Desktop for Windows Setting PGP Desktop Options
Allow PGP Virtual Disks to unmount even while files are still open.
Normally, you cannot automatically unmount a PGP Virtual Disk volume if
any of the files in that volume are open. Enabling this option allows
unmounting even with open files (called a forcible unmount).
Don’t ask before unmounting allows PGP Desktop to forcibly
unmount a PGP Virtual Disk volume without first warning you of any
files that may be open.
Warning: You may lose data if you forcibly unmount a PGP Virtual Disk
volume with open files.
Unmount when computer goes to sleep. When enabled, PGP Desktop
will automatically unmount any mounted PGP Virtual Disk volumes when
your computer goes into any sleep modes; Standby or Hibernate, for
example.
Select Prevent sleep if disk(s) cannot be unmounted to prevent
your computer from sleeping if a PGP Virtual Disk can not be
unmounted. This option is unavailable on Microsoft Windows Vista
systems ( Windows Vista no longer allows applications to prevent
sleep).
Warning: The Windows Hibernate mode is inherently insecure, because
Windows writes sensitive data to disk if your PGP Virtual Disk is open
when hibernation is invoked. PGP Corporation recommends using the
PGP Whole Disk Encryption feature if you use Hibernation; otherwise be
sure to enable the Unmount when computer goes to sleep and
Prevent sleep if disk(s) cannot be unmounted options.
Shredding
The PGP Shredder feature offers a secure way for you to delete sensitive files.
You can adjust the level of security the PGP Shredder feature offers, as well as
other settings.
The options for the PGP Shredder feature are:
Number of passes. The PGP Shredder feature removes your file(s)
securely by deleting them normally, then using numerous “0” characters
to overwrite the disk space that had been occupied by the files you just
deleted.
Using this method, your files can be deleted very securely with only a few
overwriting “passes.” For this reason, a setting of 3 is the default, and
offers an extremely high level of security, but you can adjust this setting to
reflect the level of security that you desire by changing this setting (to a
maximum of 49 passes).
Be aware that the cost of added security is increased time needed to shred
your file(s), depending on several factors, particularly the speed of your
computer’s processor.
The recommended guidelines for number of passes are:
298

PGP® Desktop for Windows Setting PGP Desktop Options
3 passes for personal use.
10 passes for commercial use.
18 passes for military use.
26 passes for maximum security.
Shred when emptying the Windows Recycle Bin. Select this checkbox
to set the PGP Shredder feature to shred the contents of the Windows
Recycle Bin whenever it is emptied. Use this option with care, as the PGP
Shredder feature shreds all files in the Recycle Bin, whether sensitive or
not, which can take time with very large files.
This option also automatically shreds files that you delete by bypassing the
Recycle Bin (by holding down the Shift key when deleting the item), as
well as System and Application "temp" files that are deleted automatically
by the operating system.
This automatic shredding provision uses the PGP Shredder feature settings
that you have chosen, just like it does when you shred files manually.
Place PGP Shredder icon on the Desktop. Select this checkbox if you
would like to place an icon for the PGP Shredder feature conveniently on
your computer’s Desktop. Use this icon just as you do the Windows
Recycle Bin icon: drag files into it. This option is selected by default.
Always warn me before shredding. Select this checkbox if you would
like a confirmation dialog box to appear before any shredding takes place.
This gives you a chance to double-check that only the files you intended
are the ones that are shredded. This option is selected by default.
Tip: Please consider other occurrences of the data that might linger
elsewhere on your disk, such as temp files. For this reason, consider using
PGP Whole Disk Encryption to protect all data on your system.
Notifier Options
The Notifier tab contains settings that apply to the PGP Desktop Notifier
feature, which displays status messages in a corner of your screen when you
send or receive email messages. It also displays status messages when you
use the PGP Whole Disk Encryption and the PGP NetShare features.
299
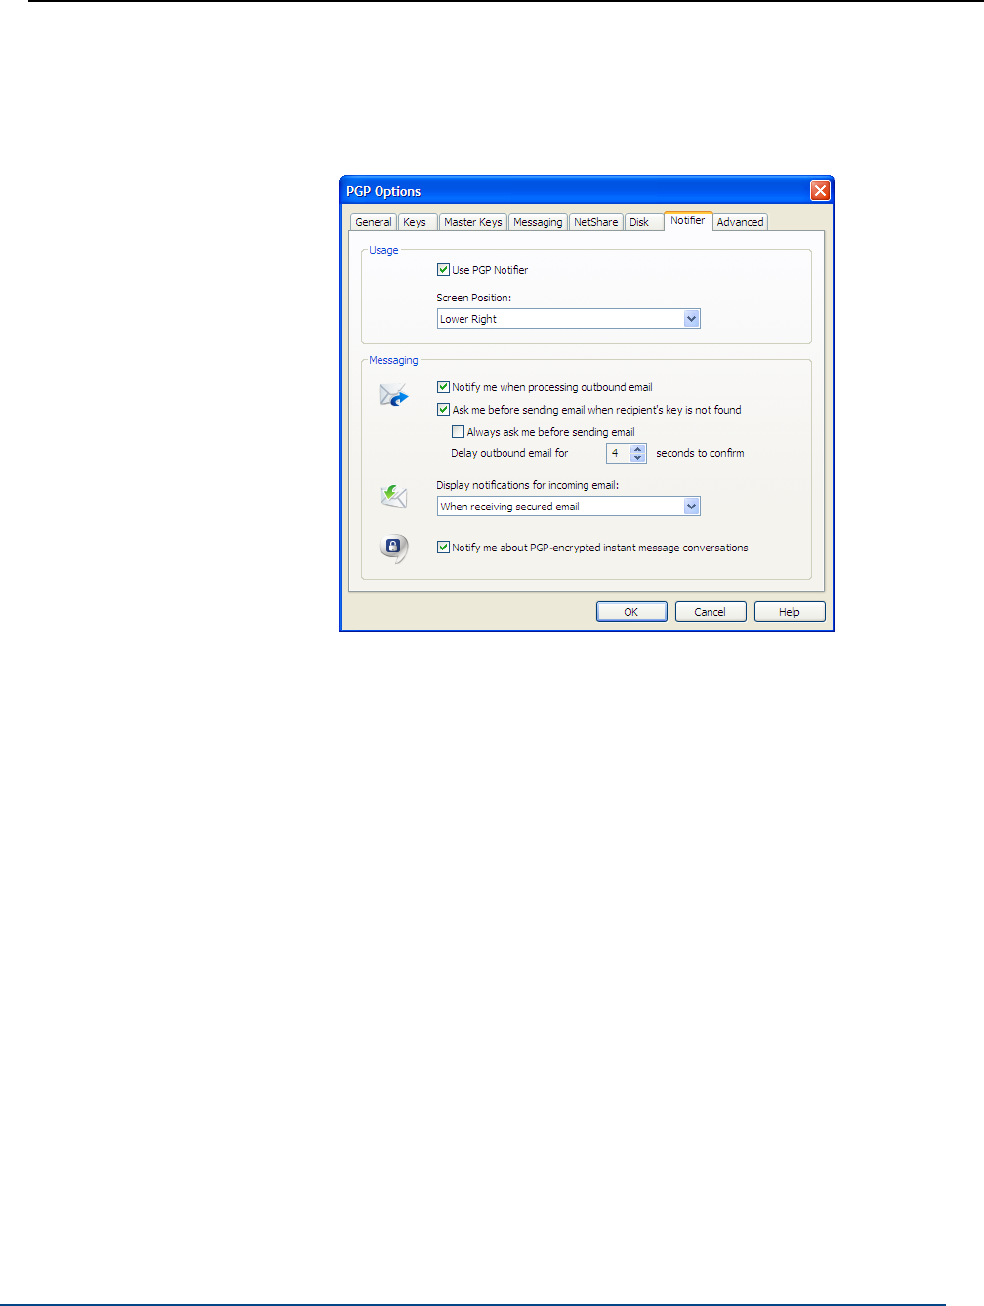
PGP® Desktop for Windows Setting PGP Desktop Options
In a PGP Universal Server-managed environment, your administrator may have
specified certain notifications settings (for example, whether notifications are to
be displayed or the location of the notifier). In this case, the Notifier tab is not
available and not displayed.
For more information on the PGP Desktop Notifier feature, see PGP Desktop
Notifier alerts. (see "PGP Desktop Notifier alerts" on page 32)
Usage Options
To enable notifiers, select Use PGP Notifier, then specify the Screen
Position.
Screen Position: PGP Desktop Notifications can appear at any of the four
corners of your screen (Lower Right, Lower Left, Upper Right, or Upper
Left). Select the corner that you want PGP Desktop Notifications to appear.
The default position is Lower Right.
Messaging Options
The settings for the PGP Desktop Notifier feature are:
Notify when processing outbound email: Select this checkbox if you
want PGP Desktop Notifiers to appear, informing you of encryption and/or
signing status when you send mail. Deselect this checkbox to stop PGP
Desktop Notifiers from appearing when you send mail.
Ask me before sending email when the recipient’s key is not found:
PGP Desktop looks for a public key for every recipient of the email
messages that you send. By default, if it cannot find a public key for a
recipient, it sends that email in the clear (without encryption). If you select
this Notifier option, you are notified that this is the case, and given a
chance to block the email so that it is not sent.
300

PGP® Desktop for Windows Setting PGP Desktop Options
(For more information on the PGP Desktop default policy settings, see
Services and Policies (on page 93).)
Always ask me before sending email: You can select this checkbox
if you would prefer approving every email that you send. You can
review the encryption status in the Notifier, and either send or block
the email.
Delay outbound email for n second(s) to confirm (where n is a
number from 1-30; the default is 4 seconds). To change the amount of
time that outbound messages are delayed, and a PGP Desktop
Notifier is displayed, click the up or down arrows. Use the delay
period to review the PGP Desktop Notifier message.
Display notifications for incoming mail: For incoming email, you can
choose the extent to which you are notified of its status upon arrival. Your
choices are:
When receiving secured email—A Notifier is displayed whenever
you receive secured email. The box displays who the email is from, its
subject, its encryption and verification status, and the email address of
the person sending it.
Only when message verification fails—For incoming email, you see
a Notifier only when PGP Desktop is unable to verify the signature of
the incoming email.
Never—If you do not need or want to see a Notifier as you receive
email, select this option. This option does not affect Notifiers for
outgoing mail.
Notify me about PGP Encrypted instant message
conversations—Select this checkbox if you want a PGP Desktop Notifier
to appear briefly when you begin a secure instant message chat, and
appear briefly again when the chat ends.
301
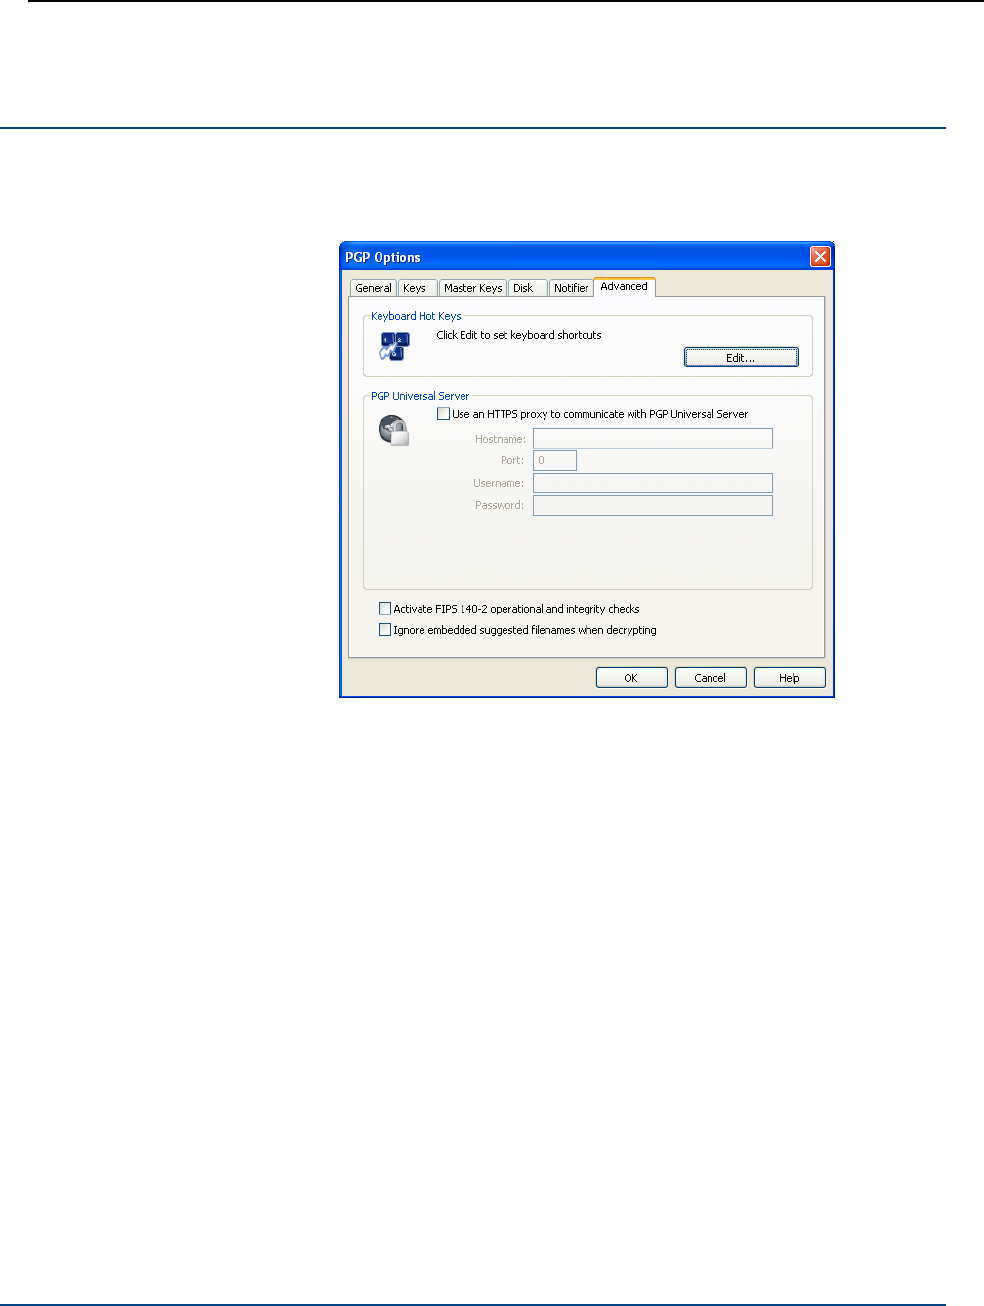
PGP® Desktop for Windows Setting PGP Desktop Options
Advanced Options
The PGP Options Advanced settings tab provides settings that are very specific.
Most users do not need to change these settings.
302

PGP® Desktop for Windows Setting PGP Desktop Options
Keyboard Hot Keys. PGP Desktop offers many ways you can create
custom hot keys to help you work faster and more easily. A set of hot keys
comes pre-configured with PGP Desktop, but you can change these hot
key assignments to suit your needs. Click Edit to display the PGP Hot Keys
dialog box.
PGP Universal. Use an HTTPS proxy to communicate with PGP
Universal. Do not change these settings unless you are instructed to by
your network administrator.
If your PGP Universal Server installation requires a secure client/server
connection via a proxy, you can use these option settings to specify that.
Your administrator can supply you with the server name, the correct
communications port, your user ID, and your password, so you can
configure this section correctly.
To change your key (or key mode), click Reset Key. For more information
on key modes, see Key Modes (on page 121). This option is available only
if you are using PGP Desktop in a PGP Universal Server-managed
environment.
Activate FIPS 140-2 operational and integrity checks. Select this option
if you or your organization require FIPS 140-2 checks, but be aware that it
slows down your computer’s performance. You must reboot your
computer for this setting to take effect. This option is available only in
standalone installations.
Ignore embedded suggested filenames when encrypting. Select this
option to ignore suggestions PGP Desktop makes when encrypting files.
303

PGP® Desktop for Windows Setting PGP Desktop Options
If you are using PGP Desktop version 8.1 in a international setting (such as
Japan), PGP Desktop incorrectly encodes the suggested file name. This
setting must be checked for proper interaction between PGP Desktop 8.1
and 9.x when decrypting files in PGP Desktop 9.x that were encrypted with
PGP Desktop 8.1.
304

B Working with Passwords
and Passphrases
Passwords and passphrases are used to protect things. In general, passphrases
are longer and use a wider variety of characters than do passwords.
For example, a simple password might be four-letter two words concatenated:
“whenjobs” without the quotes. A stronger password could use uppercase
characters as well: WhenJobs. A stronger yet password could add numbers:
When9Jobs4.
Passphrases, in comparison, are longer and use a wider variety of characters.
For example, a simple passphrase might be: “Mb&1a>ttA.” without the quotes,
but including the period. This passphrase might seem difficult to remember
easily, but in fact it’s based on a simple phrase that is much easier to
remember.
Passphrases can also be simple phrases, perhaps from a familiar book, that
include the punctuation and capitalization: “Because that’s not golf, I replied”
including the quotes. Although this may not seem like a strong passphrase, it is
in fact at least twice as strong as any of the other examples.
This section describes the differences between passwords and passphrases,
tells you about the Passphrase Quality Bar in PGP Desktop, and provides some
guidelines for creating strong passphrases.
In This Chapter
Choosing whether to use a password or passphrase ........................... 305
The Passphrase Quality Bar................................................................... 306
Creating Strong Passphrases ................................................................ 307
What if You Forget Your Passphrase?................................................... 309
Choosing whether to use a password or passphrase
So how do you know whether to choose a password or a passphrase? It
depends on what you are trying to protect. The more valuable the information
you are protecting, the stronger the protection should be.
305

PGP® Desktop for Windows Working with Passwords and Passphrases
Most Word documents are not protected at all; the content is not valuable
enough to justify the effort. When you access your bank account online, some
banks require only a four-letter PIN; depending on the amount of money in that
account, this very well may be very poor security. You may use a free Hotmail
email account for unimportant correspondence; a simple password is adequate
security. With your corporate email account you send and receive proprietary
product, customer, or financial information.
With PGP Desktop, for example, you create passphrases for both your PGP
keypair and for your PGP Virtual Disk volumes. If you create a weak passphrase
for your PGP keypair, and an attacker managed to get physical control of your
private key file, all they would need to do to be able to read your messages and
send messages that appear to be coming from you would be to figure out that
passphrase.
The Passphrase Quality Bar
When you create passphrases in PGP Desktop, the Passphrase Quality bar
provides a basic guideline for the strength of the passphrase you are creating.
Nevertheless, it is a much better guideline than just number of characters.
In general, the longer the bar, the stronger the passphrase. But what does the
length of the Passphrase Quality bar actually mean?
The Passphrase Quality bar compares the amount of randomness (entropy) in
the passphrase you enter against a true 128-bit random string (the same
amount of entropy in an AES128 key). This is called 128 bits of entropy.
(Entropy is a measure of the difficulty in determining a password or key.)
So if the passphrase you create fills up approximately half the Passphrase
Quality bar, then that passphrase has approximately 64 bits of entropy. And if
your passphrase fills the Passphrase Quality bar, then that passphrase has
approximately 128 bits of entropy.
So how strong is 128 bits of entropy? In the late 1990s, specialized “DES
cracker” computers were built that could recover a DES key in a few hours by
trying all possible key values.
Assuming you could build a computer that could recover a DES key in one
second (the computer would have to be able to try 255 keys per second), then it
would take that computer approximately 149 trillion (thousand billion) years to
crack one 128-bit AES key. In comparison, the universe is believed to be less
than 20 billion years old.
How is the entropy of a particular character measured? The answer is, the
bigger the pool of characters there is to choose from when picking a particular
character, the more entropy is assigned to the chosen character.
For example, if you are told to choose a numeric PIN, you are restricted to the
numbers zero through nine; a total of 10 characters. This is a rather small pool,
so the entropy for a chosen character is relatively low.
306

PGP® Desktop for Windows Working with Passwords and Passphrases
When you are choosing a passphrase using the English version of PGP
Desktop, however, things are different. You have three pools of characters to
choose from: uppercase and lowercase letters (52 characters), numbers zero
through nine (10 characters), and the punctuation characters on a standard
keyboard (32 characters).
When you enter a character, PGP Desktop determines the entropy value for
that character based on the pool it is in and applies that value to the Passphrase
Quality bar.
The same concept applies to the character sets of other languages; the larger
the pool, the more entropy per character. So if you were using an Asian or
Arabic character set, for example, some of which have hundreds of characters
in the set, the amount of entropy for a selected character would be
correspondingly higher, and thus fill up the Passphrase Quality bar that much
faster.
Creating Strong Passphrases
Creating a good passphrase is a trade-off between ease of use and strength of
the passphrase. Longer passphrases, with a mixture of uppercase and
lowercase letters, numbers, and punctuation characters, are stronger, but they
are also harder to remember.
Studies have shown that passphrases that are harder to remember are more
frequently written down, which defeats the purpose of having a strong
passphrase. It’s better to have a somewhat shorter strong passphrase that you
will remember than a longer strong passphrase that you will write down or
forget.
One common system for generating strong passphrases takes a phrase and
reduces it to individual characters. For example, the phrase:
My brother and I are greater together than apart.
becomes the passphrase:
Mb&1a>ttA.
This passphrase has 10 characters, and is a mix of uppercase and lowercase
letters, numbers, and punctuation characters. At 10 characters, this is a
relatively short passphrase. If you think 10 characters is not enough, consider
either creating another passphrase using the same method and then use both
together or simply use a longer phrase to start with.
Another approach is to use simple phrases that include punctuation and
capitalization. For example:
Edited by John Doe (not John Doe, Editor)
While not overly long or complicated, this is a strong passphrase. If you decide
to use a phrase from a familiar book, make sure not to lose the book.
307

PGP® Desktop for Windows Working with Passwords and Passphrases
When creating a passphrase in PGP Desktop, you can use up to 255 characters,
including spaces.
Another approach is to concatenate many short, common words. A method
called Diceware™ uses dice to select words at random from a special list called
the Diceware Word List, which contains 7776 short English words,
abbreviations, and easy-to-remember character strings. If you put together
enough of these, you can create a strong passphrase. The Diceware FAQ states
you may achieve 128 bits of entropy using a 10-word Diceware passphrase.
For more information about Diceware, see the Diceware Passphrase Home
Page (http://world.std.com/~reinhold/diceware.html).
When it comes to creating passphrases, here are some things you should do:
Use a phrase that is in your long-term memory. You are less likely to forget
it that way.
Make your passphrase at least eight characters long. Length is not the best
indicator of strength, but it’s still better than shorter.
Use a mixture of uppercase and lowercase letters, numbers, and
punctuation characters.
Caution: Try to use only ASCII characters, if possible. This is particularly
important when using international keyboards, as some special characters
are not supported (for example, “§”) in passphrases.
Change your passphrase on a regular basis; every three months is a good
rule of thumb. The longer you use the same passphrase, the more time
there is for someone to figure it out.
Here are some things you should not do when creating passphrases:
Do not write down your passphrase.
Do not give your passphrase to anyone.
Do not let anyone see you entering your passphrase.
Do not use “password” or “passphrase.”
Do not use patterns. Not “abcdefgh” or “12345678” or “qwertyui” or
“88888888” or “AAAAAAAA.”
Do not use common words. Almost any skilled attacker is using a
password-cracking dictionary that tries regular words. Don’t put two
common words together, don’t use the plural of a common word, don’t
use a common word with the first letter capitalized.
Do not use numbers that pertain to you. If anyone knows these numbers,
then an attacker could find out. Don’t use your birthday, your phone
number, your social security number, or your street address.
Do not use names. Not the names of people, not the names of fictional
characters, not your pet’s name. Not where you vacationed last winter, not
your login name, not your company’s name. Not your favorite team’s
name, not a body part, not a name from any book, especially the Bible.
308

PGP® Desktop for Windows Working with Passwords and Passphrases
Do not use any of the above backwards, or with a preceding or following
single digit.
What if You Forget Your Passphrase?
If you forget your passphrase, you will never again be able to decrypt any
information encrypted to your key. You can, however, reconstruct your key if
your PGP administrator has implemented a key restoration policy for your
company. For more information, see PGP Key Reconstruction (see
"Reconstructing Keys with PGP Universal Server" on page 77, "If You Lost Your
Key or Passphrase" on page 77) and contact your PGP administrator.
309

C Using PGP Desktop with
PGP Universal Server
PGP Universal Server allows enterprises to automatically and transparently (to
end users) protect email messages based on configurable policies the PGP
administrator establishes to enforce the organization’s security policies. PGP
Universal also lets PGP administrators manage PGP Desktop deployments to
users in their organization. For more information about the PGP Universal
Server, see PGP Universal Server on the PGP website
(http://www.pgp.com/products/universal/index.html).
Using PGP Desktop in a PGP Universal Server-managed environment gives you
proven PGP encryption technology all the way to your desktop, plus the other
security features in PGP Desktop: PGP Whole Disk Encryption, PGP Virtual Disk
volumes, PGP Zip archives, and PGP Shred, among others.
To use PGP Desktop in a PGP Universal Server-managed environment, you
must install PGP Desktop using an installer application you receive from your
PGP administrator.
If you are using a version of PGP Desktop you purchased for home use, and are
not using it in a corporate environment, you are likely using a standalone
version, and this section does not apply to you.
Caution: If you are using PGP Desktop in a corporate environment and you
obtained your PGP Desktop installer from a different source other than your
PGP administrator, you should check with your PGP administrator before
installing or using that version of PGP Desktop.
This section describes how using PGP Desktop is different in a PGP Universal
Server-managed email domain.
In This Chapter
Overview ............................................................................................... 311
For PGP Administrators ......................................................................... 312
Manually binding to a PGP Universal Server ......................................... 313
Overview
Your PGP Desktop installer will have been configured by your PGP administrator
in one of the following ways:
311

PGP® Desktop for Windows Using PGP Desktop with PGP Universal Server
No policy settings. Your copy of PGP Desktop will not have any built-in
settings; you can use any feature your license supports.
Auto-detect policy settings. Your copy of PGP Desktop will contact the
PGP Universal Server that created the installer and download the
appropriate settings. The settings it receives may require you to use PGP
Desktop features in specific ways.
Preset policy settings. Your copy of PGP Desktop will have the
appropriate settings built in. These settings may require you to use PGP
Desktop features in specific ways.
The result of your copy of PGP Desktop receiving settings from a PGP Universal
Server means you may have to use PGP Desktop features in specific ways. This
includes:
You may have to take certain actions when you install PGP Desktop: you
may have to whole disk encrypt your boot drive or create a PGP Virtual Disk
volume, for example.
You may be allowed or required to use PGP Desktop features in certain
ways: you may be required to encrypt your AIM instant messaging
sessions or you may be allowed to automatically shred files when deleting
them, for example.
You may be prevented from using certain PGP Desktop features: you may
be prevented from using conventional encryption and creating
self-decrypting archives (SDAs), for example.
You may be required to use to certain messaging policies: you may have to
encrypt and sign messages to certain email domains, for example.
You may have certain features disabled, such as PGP Messaging or PGP
NetShare (on Windows systems), or you may have a customized PGP
Whole Disk Encryption BootGuard screen (on Windows systems). For more
information, see Features Customized by Your PGP Universal Server
Administrator (on page 5).
Those features of PGP Desktop that can be managed by a PGP administrator in
a PGP Universal Server-managed environment are noted in their descriptions
throughout this User’s Guide.
Contact your PGP administrator for more information about the differences
when using PGP Desktop in a PGP Universal Server-managed environment.
For PGP Administrators
If you are a PGP administrator managing the rollout of PGP Desktop to some or
all users in your organization, PGP Corporation recommends you allow your PGP
Desktop users to manage their own keys, called Client Key Mode.
312

PGP® Desktop for Windows Using PGP Desktop with PGP Universal Server
When you are preparing to create the PGP Desktop installers on your PGP
Universal Server, you can control whether your PGP Desktop users are able to
manage their own keys, Client Key Mode, or whether the PGP Universal Server
will manage their keys, called Server Key Mode.
These settings are established in the Key Management section of the Key
Setup: Default screen, which is part of the configuration of the default user
group policy for internal users (User Group > Policy Options > Key Setup:
Default in the PGP Universal Server’s administrative interface).
For PGP Desktop users, Client Key Mode is the better choice because:
Many PGP Desktop features require the user to have control of their
private key. If the PGP Universal Server is managing that private key, those
features will be unavailable to your PGP Desktop users.
If you specify Server Key Mode, certain options you pre-configure for your
PGP Desktop users will not be available. For example, the automatic
creation of PGP Virtual Disks is not possible.
Manually binding to a PGP Universal Server
If you manually bind to a PGP Universal Server using PGP Desktop (when
viewing a Messaging Service, click Server Settings) and enroll, you will
download only the email policy and not the consumer policy. Your PGP
Universal Server administrator may have specified other options in the
consumer policy (such as key modes, forcing the encryption of disks, and so
on). To be fully managed and enforce consumer policy you need to use a PGP
Universal Server "stamped" installation. Contact your administrator to obtain a
stamped installation if you do not have one.
In addition, when you manually bind to a PGP Universal Server, the file
PGPtrustedcerts.asc does not exist in C:\Documents and
Settings\AllUsers\Application Data\PGPCorporation\PGP. If you want to
manually bind to a PGP Universal Server, you will need to create this file and
ensure that the user ID of the organization key in that file matches the server
specified by the PGPSTAMP (the domain name and IP address must match).
313

D Using PGP Desktop with
IBM Lotus Notes
This section describes use of PGP Desktop with Lotus Notes, including MAPI.
In This Chapter
About Lotus Notes and MAPI Compatibility.......................................... 315
Using PGP Desktop with Lotus Notes .................................................. 316
Binding to a PGP Universal Server ........................................................ 317
Notes Addresses ................................................................................... 318
Notes Client Settings............................................................................. 318
Using Lotus Notes Native Encryption.................................................... 319
About Lotus Notes and MAPI Compatibility
Once set up correctly, PGP Desktop messaging with Lotus Notes and MAPI
email clients in a PGP Universal-protected environment works the same as with
POP or IMAP email clients, as described in Securing Email Messages (on page
83). The information in this appendix supplements the information in that
chapter.
Lotus Notes is a groupware application that provides messaging, calendaring,
and scheduling capabilities. Refer to the PGP Desktop for Windows Release
Notes for information on compatible Lotus Notes email clients.
MAPI (Messaging Application Programming Interface) is a messaging
architecture and a client interface used in Microsoft Exchange environments.
Lotus Notes and MAPI compatibility in PGP Desktop means you get your
messaging protected by PGP technology while using your existing email client,
plus the other features Lotus Notes and MAPI make available to you.
PGP Desktop installation is compatible with both Lotus Notes Single-User and
Multi-User installation.
315

PGP® Desktop for Windows Using PGP Desktop with IBM Lotus Notes
Using PGP Desktop with Lotus Notes
This section provides an overview of the interoperability of PGP Desktop and
PGP Universal in a Lotus Notes environment.
Sending email to recipients inside your Lotus Notes organization
Within the Lotus Notes environment PGP Desktop supports the use of both
SMTP and Notes addressing.
Using Notes Addresses
Lotus Notes clients using PGP Desktop can use Notes addresses for key
lookup. When a Lotus Notes email client sends an email, the PGP Desktop
client recognizes this and automatically adds the Notes address to the key. This
key is then synchronized with PGP Universal to facilitate the lookup of keys by
Notes address.
All PGP Universal Server keys have an SMTP email address associated with
them (for example, josem@example.com). The keys of internal Lotus Notes
email client users have their Notes address on their key in addition to a SMTP
email address: CN=josem/O=notes6@notes6, for example. (External users will
never have a Notes address on their key, as contact with external users is
always using their SMTP email addresses.) The keys of internal Lotus Notes
email client users have both addresses, the SMTP email address and the Notes
address, because requests for the key from PGP Universal Satellite for
Windows could specify either address.
Using SMTP Addresses to a recipient with PGP Desktop
Lotus Notes clients using PGP Desktop can use SMTP IDs for key lookup inside
the organization. Some Lotus Notes enterprises utilize SMTP IDs for all internal
communication, while others offer their employees a choice. PGP Desktop
interoperates within both configurations. In this scenario Lotus Notes typically
constructs the email in MIME and the PGP Desktop Proxy performs S/MIME.
Sending email to recipients outside your Lotus Notes organization
Lotus Notes clients using PGP Desktop will use SMTP IDs for email routing and
key lookup outside the organization. PGP Desktop interoperates within both
configurations. In this scenario Notes constructs the email in MIME and the
PGP Desktop proxy performs S/MIME or PGP/MIME. The recipient receives and
decrypts the email.
316

PGP® Desktop for Windows Using PGP Desktop with IBM Lotus Notes
Binding to a PGP Universal Server
When using Lotus Notes or MAPI email clients with PGP Desktop in a PGP
Universal-protected environment, there may be an extra setup step required
because both Lotus Notes and MAPI email clients must directly connect to their
Domino or Exchange mail servers, respectively.
This section does not apply if you are using PGP Desktop standalone; that
is, outside of a PGP Universal Server-managed environment.
In addition to communicating with you mail servers, you must also have a
relationship with your PGP Universal Server. Both requirements are met by
having a policy for the respective mail server and a second policy that includes
both the mail server and the PGP Universal Server.
This is called binding, and it allows your email client to access its mail server to
send and receive mail and its PGP Universal Server to get keys and policies. As
mentioned, binding is achieved through PGP Desktop messaging policies.
There are two ways the necessary PGP Desktop messaging policies can be
created to support binding: pre-binding and manual binding.
Pre-Binding
With pre-binding, the PGP administrator configures the PGP Desktop installer
with the information needed to create the binding in the PGP Desktop
messaging policies. So with pre-binding, the right policies come configured in
PGP Desktop.
Manual Binding
With manual binding, the PGP administrator does not configure the PGP
Desktop installer with the information needed to create the binding in the PGP
Desktop messaging policies; you have to create these policies yourself.
To manually bind a mail server and a PGP Universal Server, you must first
create a service for the PGP Universal Server and then create another service
for the mail server that includes a reference to the PGP Universal Server.
To manually bind a mail server and a PGP Universal Server using PGP
Desktop messaging policies
1 Open PGP Desktop.
2 Click the PGP Messaging Control Box.
3 Under existing standalone service, click Universal Server <none> and
select Create new.
317

PGP® Desktop for Windows Using PGP Desktop with IBM Lotus Notes
4 In the New PGP Universal Service menu, type your Universal Server name
and click OK.
5 Using your email client, send yourself a message. For MAPI users, doing
this may not be necessary. If not, go to step 8.
6 Click OK on the Operation stopped by your request dialog box.
7 From your in-box, read the email from “PGP Universal.” The PGP Key
Generation Wizard dialog box is displayed.
8 Click Next.
9 Choose a Key Mode from the Key Management Selection, then click
Next.
10 In Key Source Selection, choose PGP Desktop key, if you are using PGP
Desktop as a standalone application. Otherwise, select New key or Import
Key.
11 Click Next.
12 Select the key set and click Next.
13 Click Finish.
Notes Addresses
PGP Desktop keys generally have at least one SMTP email address associated
with them: josem@example.com, for example.
The PGP Desktop keys of Lotus Notes email client users in a PGP Universal
Server-managed environment may have their Notes address on their key in
addition to a SMTP email address: CN=josem/O=notes6@notes6, for
example. (Standalone PGP Desktop users do not have a Notes ID on their key;
they always use their SMTP email addresses.)
If you are using PGP Desktop and a Lotus Notes email client in a PGP Universal
Server-managed environment and want to know more information, contact your
PGP administrator.
Notes Client Settings
If you are using PGP Desktop with a Lotus Notes email client, you need to
make sure that on the Home/Mail Server Setting field of your email client’s
location record, the Servers tab has the full Notes name (host/orgName), and
not just the WINS host.
318

PGP® Desktop for Windows Using PGP Desktop with IBM Lotus Notes
PGP Corporation recommends that you fill in the Internet mail address field on
the Basics tab of the current Location document. OCNOTES relies on this field
to determine the user's SMTP email address. If the field is missing, PGP
Desktop constructs an SMTP email address for the user based on the Domino
Server's Global Domain document.
If you are in "Island mode" and PGP Desktop fails to look up keys for some or all
recipients, PGP Desktop tries to encrypt the message again by looking for keys
when the replicator pushes the message to your home server.
If PGP Desktop fails to look up a key for some recipients and the Notes native
encryption option is checked, PGP Desktop allows the Lotus Notes client to
encrypt the message to the recipients which PGP failed to encrypt.
The Notes.ini Configuration File
PGP Desktop updates the notes.ini configuration and adds the following
entry:
EXTMGR_ADDINS=nPGPNote.dll
Be sure that this entry is not modified or removed. PGP Desktop scans the
notes.ini file every time it starts. If this entry is missing, it will add the entry
again.
Using Lotus Notes Native Encryption
Lotus Notes Native Encryption enables Notes users to send internal email
encrypted to the user's Notes key. When PGP Desktop is configured to use
Notes native encryption, confidential information can be sent encrypted to
internal users by selecting a checkbox when composing the message. All Lotus
Notes users have a Notes key.
If the email address in the To: field matches the Lotus Notes format (CN=Alice
Cameron/O=Example Corp) and Notes native encryption is enabled, PGP
Desktop allows the email to be sent encrypted using Lotus Notes. If the email
address in the To: field is an SMTP address (acameron@example.com), PGP
Desktop encrypts the email to your PGP key.
Notes Native Encryption is available for both PGP Universal Server-managed
environments as well as standalone environments. To enable Notes Native
Encryption in a standalone environment, see PGP Support KB article 1613
(https://support.pgp.com/?faq=1613).
PGP Desktop applies the messaging policies for Sign and Encrypt Buttons to all
outgoing Lotus Notes messages when the options to Sign and/or Encrypt have
been selected. For information on these policies, see Security Policy
Information and Examples (on page 109). If the policies do not exist in your
standalone environment, you will need to create them.
319

PGP® Desktop for Windows Using PGP Desktop with IBM Lotus Notes
To use Notes native encryption
1 Compose the message in Lotus Notes.
2 Select the boxes for Sign and/or Encrypt in the message toolbar (if
available in the template). If not, choose Delivery Options and under the
Security Options section, select the boxes for Sign and/or Encrypt.
Note: These boxes must be selected each time you want to send an
email using Notes native encryption.
3 Send the message.
If mail policy is set to encrypt and the email recipient is a Notes user,
the message is sent encrypted using Notes native encryption. Click
More on the notifier message to verify the message is processed and
encrypted using Lotus Notes. When the recipient opens the message,
there is no PGP annotation included.
If mail policy is set to encrypt and the email recipient is an SMTP
address, PGP Desktop looks up the PGP key and the message is sent
encrypted using PGP Desktop. When the recipient opens the
message, the standard PGP annotation is included.
If mail policy is set to encrypt and the email recipient is an SMTP
address and you are connected to the Lotus Notes Domino server,
Lotus Notes tries to resolve the SMTP address to the Lotus Notes
address. If successful, the message is then sent using Notes native
encryption. Click More on the notifier message to verify the message
is processed and encrypted using Lotus Notes. When the recipient
opens the message, there is no PGP annotation included.
If mail policy is set to sign, Lotus Notes signs the message with the
senders Notes key. No encryption occurs using Lotus Notes or PGP
Desktop. Note that if the box to Sign the message is not selected,
PGP Desktop signs the message using the sender's PGP key.
320

Index
A
access lists, importing in PGP NetShare • 236
Active Directory groups in PGP NetShare • 237,
238
Additional Decryption Keys (ADKs) • 70
Advanced Encryption Standard Instructions •
See AES-NI
AES, algorithm in PGP Virtual Disk • 205
AES-NI • 157, 185
Aladdin eToken Pro USB token • 147, 150, 153,
281
alerts • See notifiers
application window • 28
applications, force or bypass encryption from •
223
archives • 249
advanced options • 250
creating • 250
editing • 260
opening • 259, 260
self-decrypting • 256, 260
signing only • 258
verifying signed • 262
audible sounds, PGP WDE authentication • 164
authentication in PGP Whole Disk Encryption •
146, 164, 171
audible sounds during • 164
bypassing in PGP WDE • 171
method used, determining • 146
authorized users, in PGP NetShare • 218, 233
automatic backup software, using on PGP WDE
disks • 177
automatic mounting of PGP Virtual Disk
volumes • 193
B
backing up keys • 44
backup software, using • 177, 242
BartPE, using with PGP WDE • 188
basic steps for using • 15
binding, manually to a PGP Universal Server •
313
biometric word list, explained • 53
blacklisted, in PGP NetShare • 222, 223
BootGuard • See PGP BootGuard screen
bypass, PGP WDE SSO login • 170
C
CACs • 271
CAST, algorithm in PGP Virtual Disk • 205
changing your passphrase • 59
characters, supported in PGP WDE • 156
Client Key Mode (CKM) • 121
Common Access Cards (CACs) • 271
compacting, PGP Virtual Disk • 198
control box • 28
coordinator for PGP NetShare • 221
CPU usage, during encryption • 154
creating • 40, 95, 102, 193, 250, 307
keypair • 40, 275
messaging policy • 102
messaging service • 95
passphrases, strong • 307
PGP Virtual Disk volume • 193
PGP Zip archive • 250
D
data recovery • 183
decrypting • 185
default policies • 93, 109, 110, 111, 112
deleting
files, deleting permanently • 267
keys • 60, 279
messaging policy • 118
PGP Virtual Disks • 203
signature from public key • 64
subkey • 70
user IDs • 60
users • 200, 235
designated revoker • 72
digital signatures • 45, 46, 48, 60, 66, 81, 252,
254, 258
disk notifiers • 35
disk read/write error • 157
disks
321

PGP® Desktop for Windows Index
adding users to encrypted • 172
encrypting • 155, 157
errors during encryption • 160
options • 297
recovery, creating • 183
removable • 178, 179, 180
scheduled wiping • 269
supported in PGP WDE • 141
using encrypted • 161
distributing virtual disks • 205
drives, removable in PGP WDE • 179
E
email • 83
copying public keys from • 50
copying to your Inbox with PGP Viewer •
132
exporting
email from PGP Viewer • 132
key from a smart card • 277
key to a file • 47
including your public key in • 47
key modes • 121
messaging log • 124
multiple accounts • 100
notifiers • 33
options • 293
securing • 83
services and policies • 93
viewing encrypted with PGP Viewer • 130
encrypt and sign buttons in Microsoft Outlook •
90, 109, 111, 112
encrypting IM sessions • 83, 125, 130, See PGP
Messaging
encryption
adding users to • 172
algorithm used • 142, 205
calculate duration of in PGP WDE • 144
deleting users from PGP WDE • 173
disk errors during • 157, 160
disks or partitions • 155, 157
instant messaging sessions • 127
Maximum CPU Usage option • 144, 154
options in PGP WDE • 149
partitions in PGP WDE • 150
passphrase in PGP Zip • 254
pilot test • 146
Power Failure Safety option • 145, 154
recipient keys in PGP Zip • 252
reducing time of initial • 144, 154
re-encrypting disk or partition • 174
using PGP WDE-encrypted disk • 161, 180
evaluation licenses • 6
exchanging virtual disks • 205
exporting email messages • 132
F
files
blacklisted in PGP NetShare • 222
exporting public keys to • 47
files, deleting permanently • 267
properties of, PGP NetShare • 243
protecting outside of protected folder • 240
using in Protected Folders • 229, 231
files, deleting permanently • 267
fingerprint, verifying digital • 61
FIPS • 302
flags, specifying usage on subkeys • 68
folder wiping • 267, 269
folders, protected in PGP NetShare • 218
forensics, recovering data • 183
forgotten passphrases • 77
Free Space Wipe • See shredding free space
G
general options • 284
generating keypairs • 40, 275
granting trust • 64
Guarded Key Mode (GKM) • 121
H
hibernation • 187, 207, See sleep, Mac OS X
and PGP WDE
322

I
PGP® Desktop for Windows Index
IBM Lenovo Rescue and Recovery • 188
importing, private keys and certificates • 57
incoming email • 84
incoming email notifiers • 34
installing PGP Desktop • 19
instant messaging • 125
options • 293
sessions encrypting • 127
J
JavaCards • 271
K
key ID • 53
key modes • 121, 302
key reconstruction • 77, See reconstructing
your key
keyboard hot keys • 302
keyboard, supported in PGP WDE • 142, 165
keypair • 12
creating • 40
smart card • 275, 277
keyrings • 39, 44, 60
keys • 39, 53
creating • 40
deleting from your keyring • 60
disabling • 60
distributing, public • 45
email, including in • 47
enabling • 60
exporting • 47, 277
granting trust for validations • 64
importing • 57
keyserver, uploading to • 47
lost • 77
master keys • 51
multiple user names and email addresses • 55
options • 286
properties • 53
protecting • 81
reconstructing • 77
rejoining a split key • 73, 75
replacing a photo ID • 55
revoking • 72, 73
saving public to file • 47
signing • 62, 64
splitting • 73, 74
subkeys • 65
verifying public • 61
viewing • 39
keyserver
sending your public key to • 46
keyservers • 12, 50
getting someone's public key from • 49
list of • 286
searching • 49
sending your public key to • 46
using to circulate revoke keys • 73
L
language support for PGP WDE • 165
licensing • 6, 24, 137, 220
local policy • See offline policy
local users • 168, 174
locked out, at PGP BootGuard screen • 165
log, messaging • 37, 124
logging in, PGP BootGuard screen • 161
lost key or passphrase • 77
Lotus Notes email client • 315, 318, 319
323

PGP® Desktop for Windows Index
M
mail servers, see messaging services • See
messaging
mailing list policies • 109, 110, 111, 112, 114
managed users • 4
MAPI • 315
master keys options • 51, 52, 289
messaging • 93
creating new • 95
deleting • 99
disabling and enabling • 99
editing existing • 98
Lotus Notes • 315
MAPI • 315
messaging log • 124
multiple • 100
notifiers • 33
options • 289
troubleshooting • 100
Microsoft Outlook, sign and encrypt buttons •
90, 109, 111, 112
mobile data • See PGP Portable
mounting PGP Virtual Disk volumes • 197
moving PGP Desktop to another computer • 25
multiple messaging services • 100
N
NetShare • See PGP NetShare
Notes ID • See Lotus Notes email client
Notes Native Encryption • 319
Notifier feature
described • 33
for instant messaging • 35
notifiers • 32, 299
O
offline policy • 34, 88, 92, 94
options • 283
advanced • 302
disk • 297
encryption • 149, 154
general • 284
instant messaging • 289, 293
keys • 286
master keys • 289
messaging • 289
notifier • 296
PGP NetShare • 240, 296
PGP Viewer • 132, 133
proxy • 292
outgoing email • 88
outgoing email notifiers • 34
overview, of PGP Desktop • 1
P
partitions, encrypting • 141, 150, 155, 171
passphrase
forgotten • 309
passphrase quality bar • 306
Passphrase Quality bar • 306
passphrases • 42, 206, 305
adding alternate ones for PGP Virtual Disk •
172
alternate, adding • 172, 200
authenticating with in PGP WDE • 147
changing • 59, 169, 173, 203, 214, 277
clearing cached • 240
encrypting with in PGP Zip • 254
forgotten • 77
options • 284
PGP Whole Disk Encryption • 147
setting • 40
Single Sign-On • 147
strong, creating • 307
supported characters in PGP WDE • 156
passwords • See passphrases
perpetual licenses • 6
PGP administrator • 180, 311
PGP BootGuard screen • 156, 161, 164, 165
PGP Desktop
324

PGP® Desktop for Windows Index
described • 11
in PGP Universal-managed environment •
311
installing • 21
main screen • 27, 28
PGP tray icon • 29
policies described • 93
Setup Assistant • 24
SSL/TLS support • 119
system requirements • 19
uninstalling • 24
upgrading • 21
PGP Desktop Log • 37
PGP Global Directory • 11, 50
PGP Keys • See keys
creating a keypair • 40
PGP Keyservers List • See keyservers
PGP Log • 37
PGP Messaging • 11, 83, 124
services and policies • 93
services described • 93
PGP NetShare • 11, 217, See protected folders
Active Directory groups • 237, 238
application-based encryption list • 223
backing up protected files • 242
blacklisted files • 222, 223
coordinator, establishing • 221
corrupted, deleted, or overwritten file usage
of • 226
decryption bypass applications • 223
Edit menu options • 246
File menu options • 245
folder status, checking • 232
importing access lists from another folder •
236
licensing • 220
Netshare menu options • 246
notifiers • 35
options • 240
passphrase, clearing • 240
PGP Universal-managed environment • 243
PGP Virtual Disk or PGP WDE, using with •
218
properties of file or folder • 243
roles • 220, 234
users • 233, 236, 237
whitelisted folders • 223
PGP Portable • 209
PGP RDD • See PGP Remote Disable and
Destroy
PGP Remote Disable and Destroy • 138
PGP Shred • 11, 265
files, deleting permanently • 267
PGP Zip, using with • 250
shredding free space • 268, 269
PGP tray icon • 29
PGP Universal • 77, 311
PGP Universal Server • 5, 11, 40, 50, 77, 180,
243, 302, 311, 312, 313, 316
PGP Universal Services Protocol (USP) • 50
PGP Viewer • 129, 130, 132, 133, 134
options • 132
overview of • 129
PGP Virtual Disk • 11, 191, 206
alternate users • 200
backing up • 204
creating new • 193
encryption algorithms • 205
exchanging • 205
finding • 196
maintaining • 204
mounting • 193, 197
passphrases, changing • 203
re-encrypting • 199
security precautions • 206
unmounting • 196, 197
PGP Whole Disk Encryption • 11, 135
325

PGP® Desktop for Windows Index
authentication options • 146, 171
automatic backup software • 177
compatibility with third-party applications •
146
decrypting an encrypted disk • 185
disk errors during encryption • 157, 160
disk types, supported • 141
disk, maintaining security of • 170
disk, using encrypted • 161
encrypting a disk • 157
encryption algorithm used • 142
encryption duration, calculating • 144
encryption options • 149, 154
keyboard layouts • 165
licensing • 137
notifiers • 36
options when encrypting disks • 145, 149,
154
partitions • 150
passphrase • 147, 156, 169, 173, 175
PGP BootGuard screen • 161, 164
PGP Universal Server, managed • 180
power, during encryption • 145
prepare disk for • 140
public key authentication • 147
recovery disks, creating • 183
recovery tokens • 182
re-encrypting an encrypted disk • 174
removable drives • 177, 179
security precautions • 186
Single Sign-On, using with • 147, 167, 169,
170
supported disk types • 141
token-based authentication • 147, 150
uninstalling • 177
users, working with • 172, 173
PGP Zip • 11, 249
adding a file or folder to • 260
advanced options, creating archive • 250
archive, creating • 250
deleting a file or folder • 260
editing an archive • 260
encrypting archives • 252, 254
extracting files from • 260
opening an archive • 259, 260
saving changes • 260
self-decrypting archives • 256, 260
shredding files after archiving • 250
signing only • 258
verifying signed archives • 262
photographic ID, on keys • 55
PKCS-11 library • 271
PKCS-12 X.509 certificates, importing • 57
policies • 93
changing order of • 119
creating messaging • 102
default policies • See default policies
deleting • 118
examples of messaging • 109
power failure safety option • 154
primary name, on key • 55, 56
private keys • 12, 40, 43, 57
properties • 53, 244, 275
protected folders • 224, 244, See protected
folders
access lists, importing • 236
Active Directory groups • 237
backing up files and folders • 242
blacklisted files in • 222
creating • 226
files, using in • 229, 231
files, using outside of • 240
licensing • 220
location, determining • 225
properties • 244
re-encrypting • 239
removing • 238
status of • 232
subfolders in • 231
unlocking • 229
users, in protected folders • 220, 221, 233,
236, 237
viewing files in • 231
protecting keys • 81
public keys • 12
326

PGP® Desktop for Windows Index
advantages of sending to key server • 46
authenticating with in PGP WDE • 147
copying from a smart card • 277
copying from email messages • 50
disabling and enabling • 60
distributing to others • 45
email message, including in • 47
exporting to files • 47
getting others • 48
PGP Whole Disk Encryption • 147
saving to file • 47
searching keyserver • 49
sending to keyserver • 46
signing • 62
verifying • 61
R
read/write error • 157
read-only disk or partition information • 170
reconstructing keys • 77
reconstructing your key • 45, 77, 175
recovering data from an encrypted drive • 183
recovery disks, creating in PGP WDE • 183
recovery tokens • 182
re-encrypting • 174, 239
reformatting encrypted removable disks • 180
rejoining split keys • 73, 75
Remote Disable and Destroy • See PGP
Remote Disable and Destroy
removable drives in PGP WDE • 178, 179, 180
removing • 55, 70, 279
Rescue and Recovery • See IBM Lenovo
Rescue and Recovery
resetting key mode • 121, 302
revokers, key • 72
revoking keys and signatures • 64, 70, 73
roles, in PGP NetShare • 220, 234
S
S/MIME email, importing certificates in • 59
schedulihg free space shredding • 269
searching keyserver • 49
secure instant messaging (IM) • 125
security precautions • 186, 206
self-decrypting archives • 256, 260
separate signing subkey • 11
Server Client Key Mode (SCKM) • 121
Server Key Mode (SKM) • 121
services • 93
services, messaging • 93, 94, 95, 100
setup assistant • 24
shortcut menus, in PGP Netshare • 243
shredding files • 265
shredding free space • 11, 267, 268, 269
sign and encrypt buttons in Microsoft Outlook •
90, 109, 111, 112
signature verification • 86
signatures, deleting from keys • 60, 64
signing • 60
archives in PGP Zip • 258, 260
keys • 60, 62
public keys • 62
Single Sign-On • 147, 167
bypassing, in PGP WDE • 170
logging in with PGP WDE • 169
passphrase, changing • 169, 174
using with PGP WDE • 167, 168, 169
sleep, Mac OS X and PGP WDE • 187
smart card • 12, 271
authenticating with, at PGP BootGuard • 151
cards, supported in PGP WDE • 152
changing passphrase • 277
copying keypair to • 277
copying your public key from • 277
JavaCards • 271
keypair, creating new on • 275
personalization • 271
PKCS-11 • 271
properties • 275
readers, supported in PGP WDE • 151
wiping keys from • 279
sounds, during PGP WDE authentication • 164
splitting keys • 73
SSL/TLS support • 119
standby, PGP WDE • 187
Start Menu • 32
strong passphrases • 307
subkeys • 65
327

PGP® Desktop for Windows Index
creating new • 68
encryption • 68
encryption and signing • 68
expiration • 65, 68
icons • 65
looking at • 67
properties • 65
removing • 70
revoking • 70
separate • 65
setting size of • 68
signing • 68
size • 65
subkey usage • 68
symbols • 65
validity • 65
viewing • 65
working with • 65
subscription licenses • 6
support, contacting • 9, 10
system requirements • 19, 141, 146, 151, 153
T
Tablet PC, using in PGP WDE • 164
tasks, scheduled freespace wiping • 269
technical support • 10
technical support, contacting • 9
terminology • 4, 11, 14, 93, 121, 218
third-party software, compatibility with • 146,
177
token • 150, 271
authenticating with in PGP WDE • 147
copying to or from • 277
creating a new keypair on • 275
PGP Whole Disk Encryption, using with •
147, 150
properties • 275
supported tokens in PGP WDE • 152
wiping keys from • 279
TPM • See Trusted Platform Module (TPM)
Authentication
tray icon • See PGP tray icon
troubleshooting • 8, 100, 160
trust, granting for key validations • 64
Trusted Platform Module (TPM) Authentication
• 148
Twofish, algorithm in PGP Virtual Disk • 205
U
uninstalling • 24, 177
unlocking Protected Folders • 229
unmanaged users • 4
unmounting • 215
PGP Portable Disks • 215
PGP Virtual Disk volumes • 196, 197
Unversal Server • See PGP Universal
update policy • 29, 92
upgrading • 21, 23
usage flags, on subkeys • 68
usage flags, specifying • 68
user interface, main window • 28
user names, on keys • 55
users • 200, 233
PGP NetShare, importing access lists in • 236
PGP Whole Disk Encryption, adding or
deleting from • 172, 173
protected folders, authorized in • 218, 233,
235
USP • See PGP Universal Services Protocol
(USP)
V
validating keys • 64
verifying PGP Zip signed archives • 262
viewing subkeys • 65
virtual disks • See PGP Virtual Disk
W
whitelisted, in PGP NetShare • 223
wildcards, in policies • 107
Windows Explorer • 31
Windows Login dialog box, displaying • 170
Windows Preinstallation Environment, using
with PGP WDE • 188
WINS host • 318
wiping files • See shredding files, See
shredding free space
wiping, keys from your smart card • 279
word list, biometric • 53
X
X.509 certificates • 57, 59
328
