Pragmatic Guide To Sass
User Manual:
Open the PDF directly: View PDF ![]() .
.
Page Count: 126 [warning: Documents this large are best viewed by clicking the View PDF Link!]
- Cover
- Table of Contents
- Acknowledgments
- Welcome!
- Part I—Basics
- Task 1. Installing Sass
- Task 2. Compiling Sass into CSS
- Task 3. Using Sass with Rails
- Task 4. Avoiding the Command Line: Using Scout
- Task 5. Commenting
- Task 6. Selector Scoping
- Task 7. Going Further with Advanced Scoping
- Task 8. Altering the CSS Output
- Task 9. Defining Variables
- Task 10. Calculating a Layout
- Task 11. Creating Themes with Advanced Colors
- Task 12. Importing
- Task 13. Building a Font Family Library
- Task 14. Resetting CSS
- Part II—Advanced
- Task 15. Keeping It Semantic: @extend
- Task 16. Keeping Code Clean with Mixins
- Task 17. Taking Mixins Further with Variables
- Task 18. Debugging
- Task 19. Generating Cross-Browser Rounded Borders
- Task 20. Using Cross-Browser Opacity
- Task 21. Interpolating
- Task 22. Stop Repeating Yourself with @each
- Task 23. Determining Conditions with @if
- Task 24. Changing Looks with Nested @media
- Part III—Compass
- Task 25. Setting Up for a Compass Project
- Task 26. Resetting: Much Easier with Compass
- Task 27. Sprucing Up Your Lists
- Task 28. Making Lists Horizontal
- Task 29. Sticking a Footer to a Window
- Task 30. Stopping Overflow with Clearfix
- Task 31. Truncating Text Using Ellipses
- Task 32. Stretching Elements
- Task 33. Jazzing Up Layouts with Columns
- Task 34. Spriting
- Part IV—Blueprint CSS
- A1. SassScript Function Reference
- A2. Introduction to Haml
- Index

What Readers Are Saying About Pragmatic Guide to Sass
Pragmatic Guide to Sass is a snappy little book that effectively hits y o u with
the right dose of Sass magic to either pick up Sass as a newcomer or give
y o u a refresher if y o u ’r e already using it. The guide is written in a style
that’s both a tutorial and a reference at the same time, and it’ll be a handy
go-to book for anyone wo r k i n g with Sass, whether on a daily basis or only
on rare occasions. It gets two thumbs-up from me.
➤Peter Cooper, editor of Ruby Inside and HTML5 Weekly
Sass is the best w a y to write maintainable CSS. This Pragmatic guide will
get y o u up to speed on Sass’s most powerful features, including nesting,
v a r i a b l e s , and mixins—an invaluable reference.
➤Sam Stephenson, creator of Sprockets and the Rails asset pipeline
www.it-ebooks.info
Michael and Hampton, in Pragmatic Guide to Sass, have put together the
most comprehensive and thought-out guide to Sass to date. No matter
what server-side technology y o u use, Sass can be used in anyone’s devel-
opment stack to help organize y o u r CSS. Pragmatic Guide to Sass shows
y o u the best practices in DRYing up y o u r CSS with the power of Sass. It
teaches y o u how to become a CSS heavyweight without the bloated CSS.
This book should be on every w e b developer’s shelf (and e-reader).
➤Andrew Chalkley, technical writer, Screencasts.org
Chock-full of unexpected goodies such as extras on Compass and Haml,
Pragmatic Guide to Sass is hands-down the best Sass resource printed to
date—a must-read for w e b developers and smart designers.
➤Dan Kissell, Codenicely.com
www.it-ebooks.info


Many of the designations used by manufacturers and sellers to distinguish their
products are claimed as trademarks. Where those designations appear in this book,
and The Pragmatic Programmers, LLC w a s aware of a trademark claim, the desig-
nations have been printed in initial capital letters or in all capitals. The Pragmatic
Starter Kit, The Pragmatic Programmer, Pragmatic Programming, Pragmatic
Bookshelf, PragProg and the linking gdevice are trademarks of The Pragmatic
Programmers, LLC.
Every precaution w a s taken in the preparation of this book. However, the publisher
assumes no responsibility for errors or omissions, or for damages that may result
from the use of information (including program listings) contained herein.
Our Pragmatic courses, workshops, and other products can help y o u and y o u r
team create better software and have more fun. For more information, as w e l l as
the latest Pragmatic titles, please visit us at
http://pragprog.com
.
The team that produced this book includes:
Kay Keppler (editor)
P o t o m a c Indexing, LLC (indexer)
Molly McBeath (copyeditor)
David J Kelly (typesetter)
Janet Furlow (producer)
Juliet Benda (rights)
Ellie Callahan (support)
Copyright © 2011 The Pragmatic Programmers, LLC.
All rights reserved.
No part of this publication may be reproduced, stored
in a retrieval system, or transmitted, in any form, or by
any means, electronic, mechanical, photocopying,
recording, or otherwise, without the prior consent of
the publisher.
Printed in the United States of America.
ISBN-13: 978-1-934356-84-5
Printed on acid-free paper.
Book version: P1.0—December 2011
www.it-ebooks.info

Contents
Acknowledgments ........ix
W e l c o m e ! ..........xi
Part I — Basics
T a s k 1. Installing Sass ........4
T a s k 2. Compiling Sass into CSS . . . . . 6
T a s k 3. Using Sass with Rails ......8
T a s k 4. A v o i d i n g the Command Line: Using
Scout .........10
T a s k 5. Commenting ........12
T a s k 6. Selector Scoping .......14
T a s k 7. Going Further with Advanced Scoping . . 16
T a s k 8. Altering the CSS Output .....18
T a s k 9. Defining V a r i a b l e s ......20
T a s k 10. Calculating a Layout ......22
T a s k 11. Creating Themes with Advanced Colors . 24
T a s k 12. Importing ........26
T a s k 13. Building a Font Family Library ...28
T a s k 14. Resetting CSS .......30
Part II — Advanced
T a s k 15. Keeping It Semantic: @extend ....36
T a s k 16. Keeping Code Clean with Mixins ...38
T a s k 17. Taking Mixins Further with V a r i a b l e s . . 40
T a s k 18. Debugging ........42
T a s k 19. Generating Cross-Browser Rounded
Borders .........44
T a s k 20. Using Cross-Browser Opacity ....46
T a s k 21. Interpolating ........48
www.it-ebooks.info

T a s k 22. Stop Repeating Yourself with @each . . 50
T a s k 23. Determining Conditions with @if . . . 52
T a s k 24. Changing Looks with Nested @media . . 54
Part III — Compass
T a s k 25. Setting Up for a Compass Project ...62
T a s k 26. Resetting: Much Easier with Compass . . 64
T a s k 27. Sprucing Up Y o u r Lists .....66
T a s k 28. Making Lists Horizontal .....68
T a s k 29. Sticking a Footer to a Window ....70
T a s k 30. Stopping Overflow with Clearfix ...72
T a s k 31. Truncating T e x t Using Ellipses ....74
T a s k 32. Stretching Elements ......76
T a s k 33. Jazzing Up Layouts with Columns ...78
T a s k 34. Spriting .........80
Part IV — Blueprint CSS
T a s k 35. Producing More Two-Column Layouts . . 86
T a s k 36. Using Predefined Fancy Fonts ....88
T a s k 37. Making Beautiful Buttons .....90
A1. SassScript Function Reference ......93
A2. Introduction to Haml .......101
A2.1 Haml W a l k t h r o u g h : ERB 102
A2.2 Haml W a l k t h r o u g h : HTML 106
Index ...........111
vii • Contents
www.it-ebooks.info

Acknowledgments
W e ’ d both like to thank the entire team at Pragmatic, who
are a great bunch of people to w o r k with. They made the
process of writing really enjoyable. In particular, our editor,
Kay Keppler, and managing editor, Susannah Pfalzer, w e r e
personable and always on hand to answer our most inane
questions.
W e ’ d also like to thank our tech reviewers: P e t e r Cooper,
Eric Redmond, Shawn Allison, Jeff P a t z e r , T r e v o r Burnham,
Bruce W i l l i a m s , Aaron Godin, and Ian Dees. Y o u r insights
w e r e extremely useful.
Hampton: Most importantly, I’d like to thank Nathan
W e i z e n b a u m , whose endless hours of coding and bug fixes
and extensions make Sass what it is today. And I can’t forget
Chris Eppstein, whose creation of Compass truly changed
the Sass landscape forever.
Michael: Thanks to my parents, Alan and Jayne, for not
giving me too much grief over stopping my PhD. Final
thanks go to the GMO for keeping us sane.
report erratum • discuss
www.it-ebooks.info

Welcome!
W e l c o m e to the Pragmatic Guide to Sass. Sass (Syntactically
A w e s o m e Style Sheets) enables y o u to do amazing things
with y o u r style sheets, helping y o u describe how HTML is
laid out on a w e b page. Sass is an alternative w a y of writing
CSS.
“What’s wrong with regular ol’ CSS?” w e hear y o u cry. The
fact is that CSS, with all its power and elegance, is missing
some crucial, simple elements that other types of develop-
ment take for granted. CSS can also be a bit complicated to
read: Sass fixes that.
Most programmers are familiar with the concept of DRY—
Don’t Repeat Yourself. It saves time and effort when writing
code. A core philosophy of Sass is to reduce repetition in
style sheets, and we’ll be coming back to DRY a few times
throughout the guide.
Sass isn’t really a replacement for CSS—it’s a w a y to help
us write better CSS files, which is essential for large projects.
Sass helps us write clear, semantic style sheets. Sass updates
CSS development for the future.
Hampton originally designed Sass while he w a s working at
Unspace in Toronto, and Nathan Weizenbaum and Chris
Eppstein now maintain it. Alot of Sass functionality depends
on Ruby. (But don’t worry, we’ll learn how to install Ruby
in P a r t I, Basics, on page 3.)
In this book, we’ll be using the w o r d Sass as an overarching
concept that describes the engine w e use to convert our files
into CSS. W e can use two syntaxes to write Sass—SCSS and
Original Sass. These will be described a bit later in this
preface.
report erratum • discuss
www.it-ebooks.info

Who Is This Book For?
This book is for people who know the pain of working on
the CSS of a mature website—who have faced a CSS file that
four people wrote and that mutated into a huge, sprawling,
incoherent mess. W e ’ v e looked the beast in the eye and
barely survived.
Y o u ’ r e probably already familiar with CSS, HTML, and the
ideals of semantic w e b development. W e can all agree that
markup should be about logic instead of about presentation
(as much as possible). And we’ll assume that y o u ’r e familiar
with margins, padding, the box model, @media queries, and
the myriad of other CSS-related technologies.
If y o u are looking for a CSS-ninja power-up, y o u ’ v e come
to the right place.
Nomenclature and Syntax
Some of the terms associated with CSS can be quite confus-
ing, so w e ’ v e added a short introduction to how w e name
things in the book. Also, there are two different syntaxes for
writing Sass that need to be distinguished.
A Brief CSS Recap
W e thought it would be useful to go through a couple of
technical terms we’ll be using for different aspects of CSS
markup. If y o u ’ r e already familiar with selectors, declaration
blocks, and the like, y o u can probably skip this part.
Let’s use a small bit of CSS as an example:
p{
color: #336699;
font-size: 2em;
}
Here w e have
p
, which w e call the selector. What follows (the
bit inside the curly braces) is the declaration block. The two
lines—one defining the color and one defining the font
size—are known as declarations. Each declaration has a
property and a value. The property in this case is the color or
the font size. The v a l u e is the color itself—for example,
#336699, blue—or the size of the font—for example, 20px.
xii • Welcome!
report erratum • discuss
www.it-ebooks.info

The use of classes and IDs allows us to define sets of declara-
tions that will only be applied to specific sections of our
HTML. Sass allows y o u to create much richer selectors, as
we’ll see in P a r t I, Basics, on page 3.
SCSS: A More CSS-like Way to Write Sass
SCSS, which stands for Sassy CSS, is one of the syntaxes w e
use to write Sass. The grand aim of SCSS is to keep the look
of CSS while introducing the units of Sass. If y o u ’r e familiar
with CSS, it’s pretty easy to read. W e still use selectors,
classes, and IDs. W e open a curly brace to start the declara-
tion block, and w e separate out declarations with semicolons.
What’s extra is the added functionality.
When w e use the w o r d Sass,we’ll mostly be referring to the
SCSS syntax.
Original Sass: A Stripped-down Way to Write Sass
Before SCSS, there w a s Original Sass, which strips out some
of the unnecessary elements of CSS and SCSS. Original Sass
can be compiled just the same as SCSS, via the Sass engine.
A great example of unnecessary elements are curly braces.
Look at this:
.fab_text {
color: #336699;
font-size: 2em; }
W e know by the use of
.
or
#
that something is a selector.
Using whitespace (two spaces or a soft tab that indents the
properties) helps us. In the example above, the indentation
lets us know that
color
and
font-size
refer only to the
fab_text
class. The curly braces aren’t needed. Why not just strip them
out?
.fab_text
color: #336699;
font-size: 2em;
Look at that! Doesn’t the code already look a lot cleaner, a
lot simpler?
While w e ’r e at it, w e might as w e l l take away the semicolons
at the end of the v a l u e s . They don’t add much, do they?
report erratum • discuss
Welcome! • xiii
www.it-ebooks.info

.fab_text
color: #336699
font-size: 2em
And this is how Original Sass is written. As y o u can see, it’s
more different from CSS than from SCSS, as it involves
removing bits w e ’r e used to. So in the examples w e use in
the book, we’ll mostly be using SCSS to describe things.
Once y o u ’ r e used to it, though, Original Sass should be more
readable at a quick glance.
Aside from the curly braces and semicolons, most of the
features we’ll look at are written the same in both SCSS and
Original Sass. When they’re not, we’ll point out how they
differ. It’s really up to y o u whether y o u use SCSS or Original
Sass syntax.
Overview
In P a r t I, Basics, on page 3,we’ll take y o u through the v e r y
first things you’ll need to know about Sass and SCSS, like
how to install (T a s k 1, Installing Sass, on page 4). We’ll also
take y o u through v a r i a b l e s , where Sass gets really exciting
(T a s k 9, Defining V a r i a b l e s , on page 20).
W e ’ l l take things to the next level in P a r t II, Advanced, on
page 35. One of the main things we’ll look at is mixins (T a s k
16, Keeping Code Clean with Mixins, on page 38). We’ll also
take a look at some more programmer-style functions of
Sass, such as
@each
and
@if
(in T a s k 22, Stop Repeating Y o u r s e l f
with @each, on page 50, and T a s k 23, Determining Conditions
with @if, on page 52, respectively).
Chris Eppstein’s Compass is a great w a y to style pages, and
we’ll go through it in P a r t III, Compass, on page 59.We’ll
cover things like adding columns to y o u r text (T a s k 33,
Jazzing Up Layouts with Columns, on page 78) and making a
sticky footer (T a s k 29, Sticking a Footer to a Window, on page
70).
In P a r t IV, Blueprint CSS, on page 85,we’ll look at a frame-
w o r k that makes things even simpler than Compass. Among
other things, it provides a great predefined structure to help
y o u customize buttons, which w e describe in T a s k 37, Making
Beautiful Buttons, on page 90.
xiv • Welcome!
report erratum • discuss
www.it-ebooks.info

How to Read This Book
The book is arranged into tasks. These are short snippets of
information. On the left you’ll find a description of the task
at hand. On the right you’ll find the code y o u need to write
to get results.
W e ’ v e tried to arrange the book to go from the most basic
tasks to the most advanced. However, y o u can definitely
dip in and out of the book if y o u find a specific task y o u
need to look at. Once y o u ’ v e grasped the v e r y basics (such
as installing), you’ll probably be set to do most of the tasks
in the book.
Getting Help
There are several w a y s y o u can find help for y o u r Sass
troubles. For example, join the Sass Lang Google group.1
Also, the Sass documentation has a wealth of information
that covers most of what w e look at in this guide and even
goes over a few other things as well.2
In addition, if y o u ever need help with the
sass
command,
just type
sass --help
and Sass will let y o u know about all the
available w a y s to run it.
A Few Final Comments
W e ’ r e almost ready to start, but here are some little bits that
you’ll probably find useful to know before w e dive into the
book.
•W e ’ l l be using the following phrase to show when w e ’ v e
converted some Sass into CSS.
This compiles to:
Hopefully, you’ll be more familiar with the CSS output,
so y o u can easily compare how much simpler Sass is
compared to CSS.
• If y o u ’ v e downloaded the ebook, you’ll notice that all
the code samples are preceded by a little shaded box. If
y o u click on the box, the code sample shown in the book
1. http://groups.google.com/group/sass-lang
2. http://sass-lang.com/docs/yardoc/file.SASS_REFERENCE.html
report erratum • discuss
Welcome! • xv
www.it-ebooks.info

will be downloaded to y o u r computer, allowing y o u to
play around with our examples.
•Y o u can get more information from the book’s official
w e b page.3There you’ll find resources such as the book
forum, code downloads, and any errata.
OK—now w e ’ v e got all that out of the w a y , are y o u ready
to get Sassy?
3. http://pragprog.com/book/pg_sass/pragmatic-guide-to-sass
xvi • Welcome!
report erratum • discuss
www.it-ebooks.info


Let’s get going. Here’s a quick run-down of what we’ll be
going through in the Basics section:
•We’ll start by looking at how to install Sass in Task 1,
Installing Sass, on page 4, then we’ll look at how to
convert a Sass file to a CSS file in Task 2, Compiling Sass
into CSS, on page 6.
•Check out the next task for how to work with Sass in
Task 3, Using Sass with Rails, on page 8.
•If you’re not familiar with the command line, we’ll look
at a great Sass interface in Task 4, Avoiding the
Command Line: Using Scout, on page 10.
•We’ll look at how to do comments in Sass in Task 5,
Commenting, on page 12.
•Then we’re going to look at the idea of scoping and
how this is much simpler in Sass. Scoping is introduced
in Task 6, Selector Scoping, on page 14; we expand upon
it in Task 7, Going Further with Advanced Scoping, on
page 16.
•Learning how to change the exact CSS produced from
your style sheets is covered in Task 8, Altering the CSS
Output, on page 18.
•Then we’ll move on to variables in Task 9, Defining
Variables, on page 20.
•We’ll put the skills we learned about variables to use in
Task 10, Calculating a Layout, on page 22, and Task 11,
Creating Themes with Advanced Colors, on page 24.
•Next we’ll look at how importing can keep your style
sheets cleaner and more semantic in Task 12, Importing,
on page 26.
•In the last tasks, we’ll look at a couple of ways you can
use importing in Task 13, Building a Font Family Library,
on page 28, and Task 14, Resetting CSS, on page 30.
Basics • 3
www.it-ebooks.info

1Installing Sass
So before y o u can explore the simplicity (and beauty) of Sass, you’ll
need to set a few things up. It’s useful to have a folder where y o u keep
all y o u r Sass files for a project. Creating a Sass file couldn’t be easier:
just use the extension
.scss
—or
.sass
for an Original Sass file.
The only tool y o u need is atext editor. Every OS comes with something,
but of course that’s not always the best something. Generally, just use
whatever y o u usually use to write CSS. W e recommend some text
editors with each set of installation instructions.
In order to install and run Sass, y o u need to have Ruby installed on
y o u r system. W e ’ l l go through how to do this in the three major OS
categories. If y o u ’r e not comfortable with the command line, y o u may
w a n t to check out T a s k 4, Avoiding the Command Line: Using Scout, on
page 10.
Installation on Windows
Because W i n d o w s doesn’t come with Ruby, y o u ’ l l need to install it.
There are afew installers around the Internet, but w e prefer the simple
one at RubyInstaller.4
Once Ruby has been installed, y o u need to access the command line.
Go to Start, then Accessories, then find Command Prompt. That should
open a window that will allow y o u to run the needed install com-
mands. A decent text editor for Windows is Notepad++.
Installation on a Mac
Unlike W i n d o w s , Ruby is already installed on OS X, making things a
bit easier. All w e need to do is open the T e r m i n a l application and install
Sass via the command line. The text editor that w e use on our Macs is
TextMate.
Installation for Linux
If y o u ’r e a Linux user, you’ll be aware of how to access y o u r command
line—we w o n ’t insult y o u r Unix-fu. T o install Ruby (and Ruby gems),
use y o u r package manager. W e recommend Ruby version 1.9.2. As
for text editors, V i m tends to be the most popular.
4. http://rubyinstaller.org
4 • Basics
report erratum • discuss
www.it-ebooks.info

➤Use this command to install Sass.
gem install sass
➤Create a simple Sass file.
Name a file
test.scss
with the following contents:
.red {
color: red;
}
➤Test that Sass is working.
Navigate to the folder containing the
test.scss
file via the command
line and y o u should see the following if y o u run the command
sass
test.scss
.
$> sass test.scss
.red {
color: red; }
It just reformatted the CSS w e wrote above. Now w e ’r e ready to show
y o u how to rock some Sass superpowers.
report erratum • discuss
Installing Sass • 5
www.it-ebooks.info

2Compiling Sass into CSS
W e ’ v e introduced the idea that Sass is an advanced version of CSS.
As a matter of fact, any valid CSS is valid Sass. Sass just adds features
on top of CSS—it’s a kind of meta language. Unfortunately at this
point, no browsers support Sass files directly, so w e have to convert
from Sass into CSS first.
The basic gist is that w e write some Sass and then w e compile—or
convert—Sass into CSS. How do w e compile Sass into CSS? W e l l , y o u
did it in the last step of T a s k 1, Installing Sass, on page 4, but w e didn’t
use any of the extra powers of Sass, so the results we r e pretty similar.
Let’s run through how w e can convert a Sass file into a CSS file again
in a lot more detail than w e did in the last task.
First, w e need to create a Sass file. Any old thing will do—this is just
to show how w e can turn our Sass into CSS. Since CSS is valid Sass,
take any random CSS file y o u have sitting around and change its
extension to
.scss
.
Now, let’s go to our command line. T y p e
sass
, followed by the name
of y o u r file.
Look at that! Oh right, it just printed out the CSS but in a different
format. And printing out y o u r CSS files to the console isn’t v e r y useful.
It would be better if w e could make a separate CSS file.
W e l l , y o u can! Run the
sass
command again with a second argument
that specifies the output file y o u w a n t . For instance, y o u might say
sass test.scss test.css
and Sass will generate a CSS file named
test.css
.
Running that command over and over would be extremely tedious as
w e edit our Sass file. If y o u are using Rails or another framework, it
can automatically update y o u r CSS for y o u . But when w e aren’t using
a framework, w e have a neat command-line trick for converting Sass
files into CSS files as w e alter them. It’s called
watch
.
watch
will take any
.scss
file found in the specified Sass folder and
convert it into a
.css
file in the specified CSS folder. Magic! It doesn’t
just do this once either. It constantly watches the file for any changes
and incorporates them into the CSS file.
Another useful command to mention here is
convert
.Y o u can use this
to turn a
.css
file into a
.sass
or
.scss
file.
6 • Basics
report erratum • discuss
www.it-ebooks.info

➤Start with a simple bit of Sass.
.fab_text {
color: #336699;
font-size: 2em;
}
➤Type this in your command line.
sass fabtext.scss
Y o u should see the following:
.fab_text {
color: #336699;
font-size: 2em; }
➤Watch a folder.
Assuming w e have a Sass and a CSS folder, the command would look
like this:
sass --watch stylesheets/sass:stylesheets/css
➤Convert a CSS file to a Sass file.
sass convert test.css test.sass
Related Tasks:
•T a s k 8, Altering the CSS Output, on page 18
report erratum • discuss
Compiling Sass into CSS • 7
www.it-ebooks.info

3Using Sass with Rails
Sass w a s originally built to w o r k with Rails, and it’s painfully easy to
use with the popular Ruby w e b framework. If y o u don’t use Rails,
then move on to the next chapter, where we’ll show y o u an easy w a y
to w o r k with Sass files on y o u r computer. The only difficult part is
dealing with the slight differences between Rails versions. But read
on, brave reader, and we’ll get y o u sorted out.
If y o u are using a Rails version previous to 3.0, then all y o u need to
do to get Sass working with y o u r Rails application is to add
config.gem
'sass'
to y o u r
environment.rb
file. If y o u place y o u r Sass files inside of
public/stylesheets/sass/
(yes, make sure to make the directory!), then they
will automatically get compiled to CSS in the
public/stylesheets/
folder.
In Rails 3.0 the process is v e r y similar, but instead of
config.gem
,w e
use the
Gemfile
and add the line
gem 'sass'
. Bundler makes it easy, as
usual!
In Rails 3.1+, Sass is included! Seriously! Y o u don’t have to do anything
specific. Just installing Rails 3.1 installs Sass, but the process for
working with Sass is a little different due to the introduction of the
asset pipeline into Rails. The asset pipeline includes both Sass and
CoffeeScript, a Javascript replacement language that supports many
advanced features like asset compression, bundling, and more. Cover-
ing these features is outside of the scope of this quick book, but in
general Rails will generate an
.scss
file with every controller and will
place it in
app/assets/stylesheets
.Y o u can find out more about Rails 3.1’s
asset handling at the Rails site.5
5. Rails Edge Guide to the Asset Pipeline: http://edgeguides.rubyonrails.org/
asset_pipeline.html
8 • Basics
report erratum • discuss
www.it-ebooks.info

➤Install with Rails older than 3.0.
Add this line to y o u r
config/environment.rb
file.
config.gem 'sass'
Since w e aren’t using Bundler here, y o u have to make sure the Sass
gem is installed on y o u r system, which w e cover in T a s k 1, Installing
Sass, on page 4.
gem install sass
➤Install with Rails 3.0.
Add this line to y o u r
Gemfile
.
gem 'sass'
Then make sure to run
bundle
!
bundle install
➤Use on Rails 2.0 or 3.0.
First, start up y o u r Rails server. Then, create a
public/stylesheets/sass/ap-
plication.scss
file and put some simple SCSS inside it.
.worked {
width: 100;
}
If y o u load a page on y o u r Rails application, then
public/stylesheets/ap-
plication.css
should contain the exact contents as
application.scss
. It will
auto reload this file every time y o u make a change to the SCSS file. So
make sure not to edit the CSS file or else y o u will be sad when it gets
replaced!
report erratum • discuss
Using Sass with Rails • 9
www.it-ebooks.info

4Avoiding the Command Line: Using Scout
So far w e ’ v e been using the command line to generate our CSS from
Sass. However, not everyone is comfortable using the command line.
A great app to help y o u use Sass (and Compass, a tool w e ’ l l come
across in P a r t III, Compass, on page 59) is Scout.6
Scout is a graphical user interface (GUI) that automatically sorts out
all the Ruby installation stuff w e ’ v e been describing in the previous
tasks. Y o u don’t need to know about the command line at all.
Once w e ’ v e downloaded Scout, w e just import our project file. W e
specify the input folder, which is typically our Sass folder. Then w e
specify the output folder, which is usually the stylesheet folder. Hit
the play button, and Scout w a t c h e s y o u r Sass files.
As soon as y o u make a change to a Sass file, Scout notices and updates
the corresponding CSS file in y o u r output folder. It’s really that simple!
6. http://mhs.github.com/scout-app/
10 • Basics
report erratum • discuss
www.it-ebooks.info


5Commenting
Comments are snippets of text that are ignored by the browser. Sass
gives us the option of two types of comments. One will only show up
in the Sass document, and the other will be incorporated into the CSS
that’s compiled.
The comment style that’s compiled into the CSS is the same one y o u ’r e
probably used to—in fact, it’s exactly the same as the CSS comment
style. Just place y o u r comment between
/*
and
*/
. These comments can
be on multiple lines.
If w e w a n t to write a comment that will only appear in the Sass file,
then w e place the comment after
//
. This style only works for single-
line comments, though.
12 • Basics
report erratum • discuss
www.it-ebooks.info

➤Use two different styles of comments.
Download basics/comments.scss
/* Hey look at this multiline comment
* that we want to show up in our CSS
* output. */
#page {
color: black; }
// These comments are single lines
// and we do not want them to appear
// in our CSS
#sidebar {
color: #336699; }
This compiles to:
/* Hey look at this multiline comment
* that we want to show up in our CSS
* output. */
#page {
color: black; }
#sidebar {
color: #336699; }
report erratum • discuss
Commenting • 13
www.it-ebooks.info

6Selector Scoping
Let’s look at a core feature of Sass: nesting. If y o u ’ v e been working
with CSS for a long time, y o u know the advantages of giving more
specific selectors to y o u r style sheets. Using
.sidebar p em
allows y o u
greater specificity to the
em
element versus a standalone
em
selector.
It gives y o u more freedom with reusing names and making y o u r
HTML more semantic and readable. W e generally refer to this as
scoping.
It’s agood thing to scope, except it’s not DRY. (Remember Don’t Repeat
Yourself?). W e keep having to repeat our classes or IDs—for example,
repeating an apply-to-all class like
.infobox
—on every line. T y p i n g this
by hand is laborious and makes us w a n t to be lazy. When writing CSS,
scoping can be v e r y tedious. It involves a lot of copying and pasting.
What’s more, keeping track of parent-child relationships is tough. W e
can do better than that! T e c h n o l o g y should support good behaviors.
Sass is here to help us with nesting.
W e can put a style such as a border color inside a declaration block,
and Sass will automatically do the repetitive part for y o u when y o u
generate CSS. I bet y o u r fingers are thanking y o u already for saving
all that typing. Cool, huh?
A small note: the CSS that’s compiled in the example opposite looks
a bit funny, doesn’t it? Especially when w e compare it to the original
(repetitive) CSS example w e wrote out. What happens is that the Sass
engine keeps the indentation when it converts to CSS. All it does is
insert the missing selectors.
14 • Basics
report erratum • discuss
www.it-ebooks.info

➤Look at this scoped CSS.
Look how much repetition there is in this file. Holy cow!
Download basics/scoping.css
.infobox { width: 200px; }
.infobox .message { border: 1px solid red; }
.infobox .message .title { color: red; }
.infobox .user { border: 2px solid black; }
.infobox .user .title { color: black; }
➤See it in Sass.
Instead of repeating it, just nest it inside the parent selector.
Download basics/example_nesting.scss
.infobox {
width: 200px;
.message {
border: 1px solid red;
.title {
color: red; } }
.user {
border: 2px solid black;
.title {
color: black; } } }
This compiles to:
.infobox {
width: 200px; }
.infobox .message {
border: 1px solid red; }
.infobox .message .title {
color: red; }
.infobox .user {
border: 2px solid black; }
.infobox .user .title {
color: black; }
Related Tasks:
•T a s k 7, Going Further with Advanced Scoping, on page 16
•T a s k 8, Altering the CSS Output, on page 18
report erratum • discuss
Selector Scoping • 15
www.it-ebooks.info

7Going Further with Advanced Scoping
In the last section, w e introduced simple nesting. Just throw a selector
inside a declaration block and BAM! It automatically scopes the style
as being the child of the parent. However, sometimes w e need to be
more explicit. The last example w e gave didn’t specify that the children
w e r e direct children. In standard CSS, w e specify this directness as
parent > child
. If y o u r CSS is rusty, that means finding a tag named
<child>
who’s exactly one level inside of a
<parent>
tag.
Using these kinds of CSS operators is as simple as y o u ’d hope. Just
start the child selector with the operator y o u w a n t . So the child w o u l d
be defined as
> child
inside of the
parent
definition.
Using nesting is a great w a y to organize y o u r styles. It means that all
of the related styles are grouped together. By default, every child
selector is the parent selector plus the child selector. In situations where
w e w a n t to do something more advanced, w e use the
&
selector. Simply
put,
&
means “the parent selector.” Don’t look scared. It’s easy stuff
once it clicks.
Oftentimes, w e use a bit of Javascript to add classes to the
<body>
tag
based on what browser the user is using. For instance, if y o u visit with
Safari, the
<body>
will have the classes
.safari
and
.webkit
.So when w e ’ r e
styling the sidebar, w e might w a n t to add a rule that says, “If the body
tag has this class, apply this rule,” and it would be nice to have this
code near all the related rules. So if w e ’r e inside of
.sidebar .item
and
then w e write the child selector
body.webkit &
, Sass will compile into
body.webkit .sidebar .item
.
The ampersand got replaced with
.sidebar .item
, which w a s the parent’s
scope. If it’s still a bit foggy, read over the examples. Then it should
click. It really is simple!
16 • Basics
report erratum • discuss
www.it-ebooks.info

➤Define direct ancestors.
Download basics/direct_ancestors.scss
.infobox > {
.message {
border: 1px solid red;
> .title {
color: red; } }
.user {
border: 1px solid black;
> .title {
color: black; } } }
This compiles to:
.infobox > .message {
border: 1px solid red; }
.infobox > .message > .title {
color: red; }
.infobox > .user {
border: 1px solid black; }
.infobox > .user > .title {
color: black; }
➤Use the magical
&
.
Download basics/ampersand_example.scss
.infobox {
color: blue;
.user & {
color: gray; } }
.message {
color: gray;
&.new {
color: red; } }
.infobox {
.user & .message {
content: "Selector is '.user .infobox .message'";}}
This compiles to:
.infobox {
color: blue; }
.user .infobox {
color: gray; }
.message {
color: gray; }
.message.new {
color: red; }
.user .infobox .message {
content: "Selector is '.user .infobox .message'";}
report erratum • discuss
Going Further with Advanced Scoping • 17
www.it-ebooks.info

8Altering the CSS Output
When y o u compile y o u r Sass, a CSS file is generated. But what if y o u
w a n t that CSS file to be in a slightly different format? W e have a few
options to choose from. This means y o u can have y o u r CSS output in
a style that you prefer.
In the command line, y o u can type this:
sass --style
Follow this with the name of the style y o u w a n t . The four options w e
have are called nested, expanded, compact, and compressed.
Nested is the default output style. It looks v e r y much like regular CSS,
with curly braces and semicolons.
Expanded is, as its name suggests, an expanded form of the CSS output.
All classes—including nested ones—expand rather than remaining
nested in their parents. Both nested and expanded styles are probably
the easiest to read, but they also have the largest file sizes.
Compact puts all the properties of a selector on one line so it’s easier
to scan down a list of selectors.
Finally, compressed is possibly the most difficult to read. All spaces
are removed, so the CSS sits on one line. This makes a compressed
CSS file the smallest, which is great for mobile devices, for example.
18 • Basics
report erratum • discuss
www.it-ebooks.info

➤Check out the Sass we’ll be compiling in each case.
Download basics/outputs.scss
.infobox {
.message {
border: 1px solid red;
background: #336699;
.title {
color: red; } } }
➤Nested (the default setting) looks like this.
.infobox .message {
border: 1px solid red;
background: #336699; }
.infobox .message .title {
color: red; }
➤Expanded looks like this.
.infobox .message {
border: 1px solid red;
background: #336699;
}
.infobox .message .title {
color: red;
}
➤Compact looks like this.
.infobox .message { border: 1px solid red;
background: #336699; }
.infobox .message .title { color: red; }
(The first declaration should be on one line.)
➤Compressed looks like this.
.infobox .message{border:1px solid red;background:#336699}
.infobox .message .title{color:red}
(The compressed output didn’t fit on one line in the book, so w e had
to create another one. In the real thing, though, it is all on one line.)
report erratum • discuss
Altering the CSS Output • 19
www.it-ebooks.info

9Defining Variables
Have y o u ever been in a situation where y o u are copying the value of
a color over and over again? That v e r y specific blue that y o u r clients
w a n t appears in so many places. Then, a couple of w e e k s later, they
w a n t y o u to change the color. Or—even worse—you have a whole lot
of colors to change. Find and replace time! Color handling in CSS is
not DRY (there’s that Don’t Repeat Yourself again!) at all.
Sass introduces variables to help us manage problems like this. All
variables in Sass are prefixed with a
$
sign. Assigning a variable looks
a lot like typing in a CSS property. For instance, w e can set the
$prima-
ry_color
variable by adding the super-simple line:
$primary_color: #369;
.
That’s it!
T o use the variable, w e can just use the variable name where w e ’d
usually use the property value. If w e had to change the colors of the
whole document, all w e ’d need to do is change the hex value of the
variable and it’s sorted for us when the CSS compiles.
W e can use variables to represent colors, sizes, percents, and several
other things that are less commonly used. Anything that y o u can put
to the right of a CSS property is easily understood by Sass.
Another neat thing about v a r i a b l e s is they can be global or scoped.W e ’ v e
pretty much gone through global variables: They’re when a variable
is defined on its own line, and they apply to the whole style sheet.
Scoped v a r i a b l e s , on the other hand, appear within a selector and will
only apply to that selector and its children.
W e can set default variables with the
!default
tag after assignment.
When av a r i a b l e is used, the default is used if there are no other assign-
ments to that variable.
It’s pretty standard in a Sass document to declare the variables at the
top of a file and use them throughout. If y o u ’r e familiar with C, then
y o u ’ l l be familiar with using constants this w a y . Or if y o u have a large
project, y o u might w a n t to create a file that defines all of the v a r i a b l e s .
W e ’ l l show y o u how y o u can break up y o u r Sass files in T a s k 12, Im-
porting, on page 26.
20 • Basics
report erratum • discuss
www.it-ebooks.info

➤Define and use variables.
Download basics/variable_example.scss
$primary_color: #369;
$secondary_color: #eee;
$page_width: 300px;
body {
// Set the background to be #369
background: $primary_color;
#wrapper {
width: $page_width;
background: white;
border: $secondary_color;
h1 {
color: $primary_color; } } }
This compiles to:
body {
background: #336699; }
body #wrapper {
width: 300px;
background: white;
border: #eeeeee; }
body #wrapper h1 {
color: #336699; }
Related Tasks:
•T a s k 10, Calculating a Layout, on page 22
•T a s k 12, Importing, on page 26
report erratum • discuss
Defining Variables • 21
www.it-ebooks.info

10 Calculating a Layout
Sass allows y o u to do calculations on the fly and in y o u r document:
y o u can easily type
width: 12px * 0.5;
in y o u r code!
…
OK, OK—we admit that’s not terribly useful. But it is once w e throw
variables into the mix. Once w e ’ v e defined a variable, Sass allows us
to perform basic operations on that variable using standard operators
for adding, subtracting, multiplying, and dividing (
+
,
-
,
*
, and
/
). The
operators will be familiar to anyone who has done any amount of
programming before.
W e could say something like
width: $page_width * 0.1
as a w a y to avoid
hard-coding pixel values. When the CSS is compiled, this will be pre-
calculated and will print out an exact width in pixels.
W e can now do previously laborious tasks like calculating and main-
taining proportions throughout a layout.
For example, w e can define the width of the content area of the page
as 500px. Then w e can base the width of the sidebar as a proportion
of the total width—say 0.2. If w e wanted to change the size of the
content area, the sidebar can automatically resize itself to fit. All it
takes is variables plus some operator know-how.
A quick note about units here. If w e define
$page_width
as 10em and
w e multiply it by two, the resulting value will keep the
em
unit. The
same goes if it w e r e
px
. If y o u mix units, Sass will try to make them
work, but if they are incompatible, Sass will display an error. For
instance, y o u can’t multiply a
px
value by a
em
value. It just doesn’t
make sense.
22 • Basics
report erratum • discuss
www.it-ebooks.info

➤Add, subtract, multiply, or divide using the standard operators.
Download basics/layout_calc.scss
$width: 10px;
$double_width: $width * 2;
$half_width: $width / 2;
$width_plus_2: $width + 2;
$width_minus_2: $width - 2;
➤Use calculations inline.
Download basics/calc_inline.scss
$width: 500px;
$sidebar_percent: 0.2;
#page {
width: $width;
#sidebar {
width: $width * $sidebar_percent; }
#content {
width: $width * (1 - $sidebar_percent); } }
This compiles to:
#page {
width: 500px; }
#page #sidebar {
width: 100px; }
#page #content {
width: 400px; }
Related Tasks:
•T a s k 9, Defining Variables, on page 20
report erratum • discuss
Calculating a Layout • 23
www.it-ebooks.info

11 Creating Themes with Advanced Colors
Altering a color palette is always a pain. If w e w a n t a less saturated
color, w e go to the hex charts, find a color that is lighter or darker,
then replace our original hex code with that. Let’s say w e have a
background with the color #336699, and w e w a n t to make some text
a little bit lighter (or a bit more saturated). W e stab around in the dark
until w e find a suitable shade.
Sass makes this conversion alot easier with afew neat functions. W e ’ v e
got lighten and darken, saturate and desaturate, and there’s a whole
bunch more in Appendix 1, SassScript Function Reference, on page 93.
Just put the function before the color y o u wish to change.
But this doesn’t just w o r k for straightforward colors—we can also use
it for color-based variables, darkening yo u r
$main_color
, for example.
Using these functions and the ones in the examples opposite, it’s easy
to change the whole website from blue to pink, retaining any of the
differences in saturation and lightness.
24 • Basics
report erratum • discuss
www.it-ebooks.info

➤Lighten/Darken colors.
#page {
color: lighten(#336699, 20%); }
This compiles to:
#page {
color: #6699cc; }
➤Saturate/Desaturate colors.
$main_color: #336699;
#page {
color: saturate($main_color, 30%); }
This compiles to:
#page {
color: #1466b8; }
➤Change the hue.
W e use the
adjust-hue
function, followed by the number of degrees w e
w a n t to rotate the hue.
$main_color: #336699;
#page {
color: adjust-hue($main_color, 180); }
#page {
color: adjust-hue(desaturate($main_color, 10%), 90); }
➤Desaturate by 100 percent with
grayscale
.
grayscale(#336699);
Using this method is the same as typing this:
desaturate(#336699, 100%);
➤Mix colors.
This function allows y o u to mix colors as best as w e can guess.
#page {
color: mix(#336699, #993266); }
Mixing blue and red gives a beautiful purple:
color: #664c7f;
report erratum • discuss
Creating Themes with Advanced Colors • 25
www.it-ebooks.info

12 Importing
When y o u ’r e developing, it’s often useful to have many smaller style
sheets rather than one huge one. This can be a pain for w e b perfor-
mance. If y o u have five style sheets on a particular page, it can make
the page loading times much slower because each style sheet needs a
separate request to load.
Importing is a process by which a lot of files are turned into a few files.
Sass has aneat little trick whereby the smaller style sheets are imported
into the larger one as it is compiled into CSS. All y o u need to type is
@import
, followed by the name of the Sass file y o u w a n t to import. Y o u
can mix Original Sass and SCSS at will with imports—it’s all the same.
Just say
@import “sub_page”;
and y o u ’r e done!
If y o u don’t w a n t a Sass file to generate a corresponding CSS file, just
start the filename with an underscore (if y o u ’r e familiar with Rails,
this is a bit like doing a Rails partial). For example, y o u can name the
file
_sub_page.sass
. In the import line, y o u can leave off the underscore.
If y o u don’t mind that a separate style sheet is created for the child
page, it can just be named
sub_page.sass
.
It’s as simple as that. Any variables or mixins (we’ll get to those later)
y o u used in the imported style sheet can be used in the parent file too.
26 • Basics
report erratum • discuss
www.it-ebooks.info

➤Create a separate file.
Download basics/_colors.scss
$main_color: #336699;
// A LOT MORE COLORS GO HERE.
Download basics/widths.scss
$main_width: 720px;
// A LOT MORE WIDTHS GO HERE.
➤Import into the main file.
@import "colors";
@import "widths";
(We don’t need to include the underscore or extension with
_colors.scss
.)
Download basics/bundling_example.scss
@import "colors";
@import "widths";
#page {
color: $main_color;
width: $main_width; }
#sidebar {
color: darken($main_color, 10%);
width: $main_width*0.2; }
This compiles to:
#page {
color: #336699;
width: 720px; }
#sidebar {
color: #264c73;
width: 144px; }
Remember the rule about the underscores—when w e compile into
CSS, the two imported files will not be treated the same. The
widths.scss
file will create its own separate CSS file because it doesn’t
start with an underscore.
Related Tasks:
•T a s k 13, Building a Font Family Library, on page 28
•T a s k 14, Resetting CSS, on page 30
•T a s k 16, Keeping Code Clean with Mixins, on page 38
report erratum • discuss
Importing • 27
www.it-ebooks.info

13 Building a Font Family Library
In regular CSS, w e specify fonts like this:
font-family:"helvetica neue",arial,helvetica,freesans,
"liberation sans","numbus sans l",sans-serif;
W e have to list all our preferred fonts in the order w e w a n t them. Then,
inevitably, w e have to include the most basic serif or sans serif at the
end—just in case none of our fonts are available. But if w e w a n t to
switch between fonts on a page, then w e have to copy and paste this
list over and over in different places or use ugly, nonsemantic font
classes. So much repeated code. W e ’ v e got a simpler w a y .
W e can use v a r i a b l e s in Sass! Instead of typing out the list of fonts
over and over, define a variable at the top of the page. Then, when
y o u w a n t to add that long string of font names to a selector, just use
the variable the w a y y o u normally would.
So much easier, don’t y o u agree? But w e can make it even easier. In
almost every one of our projects, w e have a set of font-variables that
w e always include, which w e ’ v e shown on the opposite page.
Y o u can put this at the beginning of y o u r style sheets. Or, to keep y o u r
style sheets cleaner, y o u could use the importing technique w e ’ v e just
seen. Make a separate style sheet with all the fonts in it called, for
example,
_fonts.sass
. Then import the file (using
@import
) at the top of
y o u r main style sheet.
28 • Basics
report erratum • discuss
www.it-ebooks.info

➤Define a variable with your fonts.
$helvetica:"helvetica neue",arial,helvetica,freesans,
"liberation sans","numbus sans l",sans-serif;
➤Use the font variable as usual.
body {
font-family: $helvetica; }
➤Try this simple font library.
Download basics/font_family.scss
$helvetica:"helvetica neue",arial,helvetica,freesans,
"liberation sans","numbus sans l",sans-serif;
$geneva:geneva,tahoma,"dejavu sans condensed",
sans-serif;
$lucida:"lucida grande","lucida sans unicode",
"lucida sans",lucida,sans-serif;
$verdana:verdana,"bitstream vera sans","dejavu sans",
"liberation sans",geneva,sans-serif;
$cambria:cambria,georgia,"bitstream charter",
"century schoolbook l","liberation serif",times,
serif;
$palatino:"palatino linotype",palatino,palladio,
"urw palladio l","book antiqua",
"liberation serif",times,serif;
$times:times,"times new roman","nimbus roman no9 l",
freeserif,"liberation serif",serif;
$courier:"courier new",courier,freemono,"nimbus mono l",
"liberation mono",monospace;
$monaco:monaco,"lucida console","dejavu sans mono",
"bitstream vera sans mono","liberation mono",
monospace;
Related Tasks:
•T a s k 9, Defining Variables, on page 20
•T a s k 12, Importing, on page 26
report erratum • discuss
Building a Font Family Library • 29
www.it-ebooks.info

14 Resetting CSS
A common technique to reset a style sheet is to override all of the
default styles that browsers provide before y o u begin styling a site.
This w a y , y o u wo n ’t accidentally assume—for instance—that all
<h1>
tags are the same font and font size between browsers. The default
<h1>
is different in Internet Explorer, Firefox, Safari… it’s so annoying!
T o get around this frustration, designers often employ a “reset CSS”
file.
On the right, w e ’ v e provided a Sass version of the most famous reset
CSS file by Eric Meyer. It’s slightly shorter than the original CSS
version.
Y o u probably don’t w a n t to add all that boilerplate to the top of y o u r
master style sheet, so it’s often more useful to employ the importing
tec hniq ue. Pu t the reset fil e into aseparate sty le she et named some thin g
like
_reset.scss
. Then at the start of the style sheet, put the following:
@import "reset";
and the reset is magically incorporated into the CSS
file when it’s compiled.
30 • Basics
report erratum • discuss
www.it-ebooks.info

➤Reset CSS.
Download basics/reset.scss
/*
Sass Reset - Converted by Hampton Catlin
A modification of the original found at...
http://meyerweb.com/eric/tools/css/reset/
*/
html,body,div,span,applet,object,iframe,h1,h2,h3,h4,
h5,h6,p,blockquote,pre,a,abbr,acronym,address,big,
cite,code,del,dfn,em,img,ins,kbd,q,s,samp,small,
strike,strong,sub,sup,tt,var,b,u,i,center,dl,dt,dd,
ol,ul,li,fieldset,form,label,legend,table,caption,
tbody,tfoot,thead,tr,th,td,article,aside,canvas,
details,embed,figure,figcaption,footer,header,hgroup,
menu,nav,output,ruby,section,summary,time,mark,audio,
video {
margin: 0;
padding: 0;
border: 0;
font-size: 100%;
font: inherit;
vertical-align: baseline; }
/* HTML5 display-role reset for older browsers */
article,aside,details,figcaption,figure,footer,
header,hgroup,menu,nav,section {
display: block; }
body {
line-height: 1; }
ol,ul {
list-style: none; }
blockquote,q{
quotes: none; }
blockquote {
&:before, &:after {
content: '';
content: none; } }
q{
&:before, &:after {
content: '';
content: none; } }
table {
border-collapse: collapse;
border-spacing: 0; }
Related Tasks:
•T a s k 12, Importing, on page 26
•T a s k 26, Resetting: Much Easier with Compass, on page 64
report erratum • discuss
Resetting CSS • 31
www.it-ebooks.info


Now we’ve gone through the basics of Sass, let’s move on
to some of the more advanced features it offers:
•First off, we’ll go through
@extend
, which helps clone
attributes: Task 15, Keeping It Semantic: @extend, on
page 36.
•Next, we’ve got Task 16, Keeping Code Clean with Mixins,
on page 38, a useful way to keep your style sheets
clean. We’ll expand on mixins in the next task, Task 17,
Taking Mixins Further with Variables, on page 40.
•Then we’ll look at how to debug your Sass in Task 18,
Debugging, on page 42.
•We’ll see how you can simplify the Sass necessary to
style for different browsers in Task 19, Generating
Cross-Browser Rounded Borders, on page 44, and Task
20, Using Cross-Browser Opacity, on page 46.
•We’ll learn how to dynamically generate your Sass code
in Task 21, Interpolating, on page 48.
•Two more programmer-style functions are covered in
Task 22, Stop Repeating Yourself with @each, on page
50, and Task 23, Determining Conditions with @if, on
page 52.
@each
applies the same set of rules to a list,
and
@if
allows conditions in your CSS.
•And finally, want to change CSS layout depending on
what device your user is using? Check out Task 24,
Changing Looks with Nested @media, on page 54.
Advanced • 35
www.it-ebooks.info

15 Keeping It Semantic: @extend
Keeping things semantic is a philosophy where everything is named
logically. W e name items based on what they do, not what they look
like. W e don’t w a n t to name something
.blue_button
;w e w a n t to name
it
.checkout_button
, which is far more useful when w e ’r e going through
the code.
But what if y o u had a set of attributes—say a blue button—that
needed to be applied to multiple buttons with different functions?
Y o u w a n t to name the buttons after their function, but it would be a
pain typing out the set of attributes over and over again.
This is where
@extend
comes in.
@extend
clones the attributes from one
class or ID and adds them to another. Let’s run with the example w e
had with the blue button. Say w e w a n t to use the blue button style for
the checkout button. If w e ’ v e defined the blue button class elsewhere,
all w e need to do is use
@extend
, followed by the
.blue_button
class in
the declaration of y o u r selector.
You’ll notice that the CSS output has two selectors. What
@extend
does
is merge all the properties and values from both selectors, with a list
of selectors merged before the declaration block.
W e can also tweak the style being copied. What if w e needed the
checkout button to be slightly darker than the regular blue button?
W e can just add those properties w e need to change onto the end of
the declaration block. The new attributes y o u add will override the
old ones.
This saves us so much time when w e ’ r e coding. There’s far less copying
and pasting: you’ll barely ever use Ctrl+C again.
36 • Advanced
report erratum • discuss
www.it-ebooks.info

➤Use
@extend
in a selector.
First w e make sure w e ’ v e described the class elsewhere:
Download advanced/atextend_blueButton.scss
.blue_button {
background: #336699;
font-weight: bold;
color: white;
padding: 5px; }
Then w e can
@extend
the class to another:
Download advanced/atextend_use.scss
.checkout_button {
@extend .blue_button }
This compiles to:
.blue_button, .checkout_button {
background: #336699;
font-weight: bold;
color: white;
padding: 5px; }
➤Modify a selector.
Download advanced/atextend_use_modified.scss
.checkout_button {
@extend .blue_button;
color: darken(#336699, 10%); }
report erratum • discuss
Keeping It Semantic: @extend • 37
www.it-ebooks.info

16 Keeping Code Clean with Mixins
Mixins are some of the more powerful elements of Sass. A mixin is a
fragment of Sass that can easily be applied to another selector. Let’s
say w e require a distinct style: blue text with small caps. W e need to
apply this style to many selectors in our document. W e don’t w a n t to
have to repeat
color: #369;
over and over again. This is the perfect situ-
ation for a mixin!
T o define a mixin, all y o u need to type is
@mixin
, followed by the name
of the mixin and then its styling.
Once w e ’ v e defined it, w e can easily use a mixin wherever w e
please—it’s a super-portable set of attributes. When y o u w a n t to use
the mixin, just type
@include
.
Mixins also help us keep our code semantic. W e can define a mixin as
blue_text
, then apply it to a class with a more specific name, such as
product_title
.
It’s useful to have mixins in a separate style sheet, keeping y o u r main
style sheet cleaner. If this is the case, w e need to use the bundling
technique—put
@import
at the top of y o u r main Sass file, linking in the
mixins file.
Depending on whether y o u ’r e using Original Sass or SCSS, the use of
mixins is slightly different. W e ’ v e been through the SCSS w a y , where
w e describe amixin with
@mixin
and use it with
@include
.W i t h Original
Sass, w e use
=
before the mixin description and use
+
instead of the
@include
command.
38 • Advanced
report erratum • discuss
www.it-ebooks.info
➤Define a mixin.
Download advanced/mixin_text.scss
@mixin blue_text {
color: #336699;
font-family: helvetica, arial, sans-serif;
font-size: 20px;
font-variant: small-caps; }
➤Use a mixin.
Download advanced/mixin_use.scss
.product_title {
@include blue_text; }
This compiles to:
.product_title {
color: #336699;
font-family: helvetica, arial, sans-serif;
font-size: 20px;
font-variant: small-caps; }
➤Use mixins in Original Sass style.
Define these:
Download advanced/mixin_useS.sass
=blue_text
color: #336699
font-family: helvetica, arial, sans-serif
font-size: 20px
font-variant: small-caps
And use this:
Download advanced/mixin_useS.sass
.product_title
+blue_text
Related Tasks:
•T a s k 12, Importing, on page 26
•T a s k 17, Taking Mixins Further with Variables, on page 40
report erratum • discuss
Keeping Code Clean with Mixins • 39
www.it-ebooks.info

17 Taking Mixins Further with Variables
So far, the idea of a mixin is pretty similar to what w e came across in
@extend
—a set of attributes w e apply somewhere else. W i t h
@extend
,
however, all values must stay the same. Mixins are more complex.
Mixins can include arguments (i.e., descriptors) that allow y o u to vary
your values.T a k e the mixin w e defined in the last task—
blue_text
. It has
a set of attributes associated with it. What if y o u w a n t the text size to
be v a r i a b l e ? Y o u can easily include this in the mixin. Instead of putting
a predefined font size, put
$size
(or whatever y o u wish to call it). Then,
when naming y o u r mixin, include the
$size
part in parentheses after
the name.
When y o u w a n t to use the mixin, include the argument after the mixin
like y o u would when using a regular function.
Y o u can also have a default value associated with a mixin. Just add
the value after the v a r i a b l e . If y o u don’t specify a value when y o u ’r e
using y o u r mixin, the default will be used. If y o u w a n t to change it,
just add the new v a l u e like y o u would for a regular variable.
40 • Advanced
report erratum • discuss
www.it-ebooks.info

➤Define a mixin with variable attributes.
Download advanced/mixin_argument.scss
@mixin blue_text($size) {
color: #336699;
font-family: helvetica, arial, sans-serif;
font-size: $size;
font-variant: small-caps; }
➤Add the value you want after the mixin.
Download advanced/mixin_argument_use.scss
.product_title {
@include blue_text (15px); }
➤Define a mixin with a default value.
Download advanced/mixin_default.scss
@mixin blue_text($size: 20px) {
color: #336699;
font-family: helvetica, arial, sans-serif;
font-size: $size;
font-variant: small-caps; }
➤Use a mixin with and without the default.
Download advanced/mixin_default_use.scss
.product_title {
@include blue_text; }
.product_title {
@include blue_text (100px); }
This compiles to:
.product_title {
color: #336699;
font-family: helvetica, arial, sans-serif;
font-size: 20px;
font-variant: small-caps; }
.product_title {
color: #336699;
font-family: helvetica, arial, sans-serif;
font-size: 100px;
font-variant: small-caps; }
report erratum • discuss
Taking Mixins Further with Variables • 41
www.it-ebooks.info

18 Debugging
What if there’s a bug in our code? It happens to the best of us. W e can
generally say that there are two kinds of bugs w e can encounter. One
is a syntactical error made while writing the Sass—that is, w e may
have passed in the wrong number of arguments to a function. Luckily,
Sass makes finding these mistakes a breeze. The Sass development
team has worked really hard to make sure that the error messages
make as much sense as possible.
On top of that, if y o u have an error in y o u r Sass code, it w o n ’t just
keep quiet. Sass could have failed silently, where y o u would reload
the page y o u are styling and all of a sudden it would be unstyled. Sass
doesn’t play that w a y . Sass loves yo u ! Sass will generate a special CSS
style sheet that will actively print out the message on the page y o u
are styling. It uses the fun CSS trick of using the
body:before
selector
and the
content=
property to inject the error right on the page!
W e also have w a y s to debug more complex issues. When generating
the Sass, w e can pass in options to help us out. The
line-comments
option
causes every selector in the CSS file y o u create to have a reference to
the file and line number where it came from. This is especially useful
when y o u are importing many files and w a n t to see where a particular
rule is defined.
Another option available is
debug-info
,which produces amore browser-
friendly version of the
line-comments
option. In particular, it w o r k s w e l l
with an add-on to Firefox called FireSass for Firebug.7
There are many different w a y s to run Sass—maybe with Rails or the
command-line interface or an integrated development environment
(IDE)—and each has its own specific w a y of setting Sass options. The
references provided in the book should be a good starting place.
7. https://addons.mozilla.org/en-US/firefox/addon/firesass-for-firebug/
42 • Advanced
report erratum • discuss
www.it-ebooks.info

➤Write some invalid Sass.
Download advanced/debug_error.scss
@import "notfound"
➤See an error page!
If y o u include the resulting CSS file in a w e b page, y o u ’ l l see this in
y o u r w e b browser when y o u load the page!
Syntax error: File to import not found or unreadable: notfound.
Load paths:
/Users/hcatlin/dev/hcsass/Book/code/advanced
/Users/hcatlin/dev/hcsass/Book/code/advanced
on line 1 of ./debug_error.scss
1: @import "notfound"
➤Compile with the line-comments option.
$> sass --line-comments nesting.scss
/* line 2, nesting.scss */
.infobox .message {
border: 1px solid red; }
/* line 4, nesting.scss */
.infobox .message .title {
color: red; }
/* line 6, nesting.scss */
.infobox .user {
border: 1px solid black; }
/* line 8, nesting.scss */
.infobox .user .title {
color: black; }
report erratum • discuss
Debugging • 43
www.it-ebooks.info

19 Generating Cross-Browser Rounded Borders
Rounded borders are a complex thing. W e need to use a different
method of calculation for Internet Explorer, Firefox, and Webkit.
W o u l d n ’ t it be so much easier if there w e r e one simple w a y of doing
it?
Why, y o u can have one simple w a y : with Sass! There’s a mixin that
allows y o u to define the rounded borders for all three main browsers.
This keeps our code clean and w e don’t need to repeat ourselves.
Just so y o u know, many of these macros come preinstalled with
Compass, which we’ll look at more in P a r t III, Compass, on page 59.
44 • Advanced
report erratum • discuss
www.it-ebooks.info

➤Use this mixin for rounded borders.
Download advanced/cross_browser_borders.scss
@mixin rounded_borders($color, $width: 5px, $rounding: 5px) {
-moz-border-radius: $rounding $rounding;
-webkit-border-radius: $rounding $rounding;
-khtml-border-radius: $rounding $rounding;
-o-border-radius: $rounding $rounding;
border-radius: $rounding $rounding;
border: $width $color solid; }
And y o u can include it like any regular mixin:
Download advanced/cross_browser_borders_use.scss
.header {
@include rounded_borders(#336699, 3px) }
This compiles to:
.header {
-moz-border-radius: 5px 5px;
-webkit-border-radius: 5px 5px;
-khtml-border-radius: 5px 5px;
-o-border-radius: 5px 5px;
border-radius: 5px 5px;
border: 3px #336699 solid; }
report erratum • discuss
Generating Cross-Browser Rounded Borders • 45
www.it-ebooks.info

20 Using Cross-Browser Opacity
W e saw how browsers can be awkward in the previous task, needing
different w a y s to define rounded borders. However, the differences
don’t stop there. Changing the opacity of something is simple in
Firefox, Safari, and Opera because of this handy function:
opacity
.
Opacity in most browsers is defined from 1, meaning fully opaque, to
0, meaning completely invisible.
Life’s never so simple, though. Internet Explorer requires us to use a
different method—something called
filter
. It takes a value between 0
and 100 instead, in this style:
filter:alpha(opacity = 60);
Depending on how y o u view opacity, either the 0–1 or the 0–100 scale
can be more logical. It’s pretty easy to convert between the two.
46 • Advanced
report erratum • discuss
www.it-ebooks.info

➤Change opacity across browsers (0–100 scale).
Download advanced/cross_browser_opacity.scss
@mixin opacity($opacity) {
filter: alpha(opacity=#{$opacity}); // IE 5-9+
opacity: $opacity * 0.01; }
Download advanced/cross_browser_opacity_use.scss
@import "cross_browser_opacity.scss";
.h1 {
@include opacity(60); }
This compiles to:
.h1 {
filter: alpha(opacity=60);
opacity: 0.6; }
➤Change this to a 0–1 scale, if necessary.
Download advanced/cross_browser_opacity_one.scss
@mixin opacity($opacity) {
filter: alpha(opacity=#{$opacity*100}); // IE 5-9+
opacity: $opacity; }
report erratum • discuss
Using Cross-Browser Opacity • 47
www.it-ebooks.info

21 Interpolating
Included in Sass are some programmer-style functions, which we’ll
look over in the next couple of tasks. W e generally refer to these as
SassScripts.
Let’s start out with ageneral SassScript that allows y o u to dynamically
generate style sheets. It’s called interpolation.Oh, fancy sounding w o r d
—how w e love yo u ! It makes us sound smart just by saying it. Y o u
try it: interpolation. Feels good, doesn’t it? OK, sorry—we got a bit
distracted there.
Interpolation basically means “put this there.” Imagine w e w a n t to
write a mixin that has a dynamic property or selector. And w e don’t
mean a dynamic property value—that’s easy stuff that w e ’ v e already
done. W e mean if the v e r y name of a property or selector could be
dynamically generated. W e l l , y o u ’r e in luck, because that’s exactly
what interpolation can do.
Just wrap the name of av a r i a b l e in
#{}
and y o u are done. For example,
w e could have
#{$myvar}
. The variable will be printed out wherever
y o u put that. So, w e could say
.red_#{$carname}
. And, if
$carname
is set
to
volvo
, it would generate the selector
.red_volvo
. Wha-bam! V i c t o r y !
Y o u can pretty much use interpolation anywhere y o u w a n t in y o u r
Sass files. Go crazy!
48 • Advanced
report erratum • discuss
www.it-ebooks.info

➤Interpolate to create a dynamic selector.
Download advanced/interpolation.scss
@mixin car_make($car_make, $car_color) {
// Set the $car_make with "_make" at the end as a class
.car.#{$car_make}_make {
color: $car_color;
width: 100px;
.image {
background: url("images/#{$car_make}/#{$car_color}.png");
}
}
}
@include car_make("volvo","green");
@include car_make("corvette","red" );
@include car_make("bmw","black");
This compiles to:
.car.volvo_make {
color: "green";
width: 100px; }
.car.volvo_make .image {
background: url("images/volvo/green.png");}
.car.corvette_make {
color: "red";
width: 100px; }
.car.corvette_make .image {
background: url("images/corvette/red.png");}
.car.bmw_make {
color: "black";
width: 100px; }
.car.bmw_make .image {
background: url("images/bmw/black.png");}
Related Tasks:
•T a s k 22, Stop Repeating Y o u r s e l f with @each, on page 50
report erratum • discuss
Interpolating • 49
www.it-ebooks.info

22 Stop Repeating Yourself with @each
@each
is a trick to keep y o u r Sass DRY (the tenet of Don’t Repeat
Yourself). It’s a w a y of copying the same style for a lot of different
variables.
Say w e have a bunch of pictures, all with similar file URLs. The file
URLs can include figures or punctuation, if necessary. W e w a n t to use
them in the same w a y in each case but with slightly different classes.
Usually, w e ’d have to write out each selector separately, replacing a
single w o r d each time. So much time, effort, and copying/pasting! This
is where
@each
comes to the rescue.
W e follow
@each
with the name of the generic variable w e w a n t to
use, then with all the members of the group that w e w a n t to apply this
to. When compiling the CSS, the list forms automatically.
You’ll notice in the code that w e wrap the variable selector name in
#{}
, which w e learned about in the previous task.
50 • Advanced
report erratum • discuss
www.it-ebooks.info

➤Copy one style to many variables with
@each
.
Download advanced/ateach.scss
@each $member in thom,jonny,colin,phil {
.#{$member}_picture {
background-image: url("/image/#{$member}.jpg");}}
This compiles to:
.thom_picture {
background-image: url("/image/thom.jpg");}
.jonny_picture {
background-image: url("/image/jonny.jpg");}
.colin_picture {
background-image: url("/image/colin.jpg");}
.phil_picture {
background-image: url("/image/phil.jpg");}
Related Tasks:
•T a s k 21, Interpolating, on page 48
report erratum • discuss
Stop Repeating Yourself with @each • 51
www.it-ebooks.info

23 Determining Conditions with @if
Similar to
@each
, there’s another feature called
@if
that allows us to
write conditions in our Sass. This kind of feature is mostly useful when
writing what w e generally refer to as SassScript, writing reusable
mixins and functions for Sass.
Oftentimes when writing a mixin that should be used across projects,
w e w a n t to react to some variable that is passed in. For instance, if y o u
had a mixin called
width
,y o u might w a n t to do nothing if the first
argument passed in is less than 0. There are lots of situations where
w e might w a n t our mixins to act smart and react to the values that w e
pass in.
After the
@if
keyword, w e can put a statement that will evaluate to true
or false. For example,
20 > 10
would evaluate to true. And,
"hello" ==
"world"
would evaluate to false. Other common comparators are avail-
able, such as
==
(equal to),
!=
(not equal to),
>
(greater than), and
<
(less than).
If the statement is true, whatever is inside the following declaration
block will be executed. If the statement is false, then it looks for an
@else
as the next block to continue trying until it successfully matches.
If it runs out of
@else
blocks, then it doesn’t do anything at all.
In our trite (and nationalistic) example, w e have acountry color mixin.
W e w a n t a particular color to show up only for particular countries.
So, w e have
@if
at the start, and each following country gets an
@else
if
. The first condition to be satisfied by the variable will be executed,
and the following ones will stop.
52 • Advanced
report erratum • discuss
www.it-ebooks.info

➤Build a mixin with
@if
.
Download advanced/atif.scss
@mixin country_color($country) {
@if $country == france {
color: blue; }
@else if $country == spain {
color: yellow; }
@else if $country == italy {
color: green; }
@else {
color: red; } }
.england {
@include country_color(england); }
.france {
@include country_color(france); }
This compiles to:
.england {
color: red; }
.france {
color: blue; }
report erratum • discuss
Determining Conditions with @if • 53
www.it-ebooks.info

24 Changing Looks with Nested @media
Sometimes w e ’d like to change what is displayed based on the device
on which the content is being displayed. CSS2 introduced the concept
of
@media
.V a r i o u s attributes, such as print,handheld, or tv can be used
to define different property values, such as font sizes, depending on
the medium used to view the page.
The main flaw with
@media
is that it can’t be nested. Say y o u w a n t to
have all the main areas in 15px font, except for when y o u print the
document. In CSS, y o u ’d have to copy out all the declarations again.
Sass to the rescue! W e can just add in another declaration specifically
for one type of media, and it’s compiled into a whole new selector
when the CSS style sheet is made.
This is particularly useful in the era of the mobile w e b . The handheld
attribute should alter the page if it’s being viewed on a handheld
device. However, a lot of phones don’t currently seem to support it.
There’s a neat trick around this: use a maximum screen width. We’ll
use the iPhone as an example.
W e know that the maximum width of the iPhone screen in portrait
mode is 320px. W e can just add this on to the end of our
@media
! Using
it in a nested style allows us to say that the font should be larger only
when the screen is at a maximum of 320px wide. When this is the only
change w e need to make, it’s SO much easier than having a whole
separate selector.
Added bonus: for landscape, w e choose a minimum width of 321px
and a maximum width of 480px.
54 • Advanced
report erratum • discuss
www.it-ebooks.info

➤Use
@media
in a nested style.
Download advanced/atmedia.scss
.main {
color: #336699;
font-size: 15px;
@media print {
font-size: 10px; } }
This compiles to:
.main {
color: #336699;
font-size: 15px; }
@media print {
.main {
font-size: 10px; } }
➤Make your sites portrait-specific…
Download advanced/atmedia_phone_portrait.scss
.main {
color: #336699;
font-size: 15px;
@media screen and (max-width: 320px) {
font-size: 35px; } }
➤…or landscape-specific.
Download advanced/atmedia_phone_landscape.scss
.main {
color: #336699;
font-size: 15px;
@media screen and (min-width: 321px) and (max-width: 480px) {
font-size: 25px; } }
report erratum • discuss
Changing Looks with Nested @media • 55
www.it-ebooks.info


Compass is a library of mixins, functions, and other useful
extensions to Sass. Chris Eppstein created Compass and
maintains it to this day. Compass is a toolkit that any
Sass-master should have handy. Because of its value in Sass
development, we’ve devoted a whole chapter to some of
its features—but it’s a mere sampling of what Compass has
to offer. Check out the Compass website for more.8
M a k e s u r e R u b y G e m s i s u p - t o - d a t e , t h e n i n s t a l l t h e C o m p a s s
gem.
gem update --system
gem install compass
Then, compile your style sheets with
--compass
.
sass --compass myfile.scss myfile.css
sass --compass --watch .
Here’s a summary of what we’ll look at in this part.
•First, we’ll look at how to set up a Compass project in
Task 25, Setting Up for a Compass Project, on page 62.
•We’ll see how much easier it is to reset your CSS using
Compass in Task 26, Resetting: Much Easier with
Compass, on page 64.
•We’ve got two nifty ways of playing about with lists in
Task 27, Sprucing Up Your Lists, on page 66, and Task
28, Making Lists Horizontal, on page 68.
•In Task 29, Sticking a Footer to a Window, on page 70,
we’ll see how much easier it is to make a sticky footer
using Compass.
•We make sure our floats clear correctly in Task 30,
Stopping Overflow with Clearfix, on page 72.
•Next we’ll see how to shorten long blocks of text using
ellipses in Task 31, Truncating Text Using Ellipses, on
page 74.
8. http://compass-style.org/reference/compass/
Compass • 59
www.it-ebooks.info

•We’ll expand items to fit inside a box in Task 32,
Stretching Elements, on page 76.
•Want a much simpler, more concise way of creating
tables? You can find the solution in Task 33, Jazzing Up
Layouts with Columns, on page 78.
•And finally, we’ll look at converting separate images
into one big image in Task 34, Spriting, on page 80.
60 • Compass
www.it-ebooks.info


25 Setting Up for a Compass Project
In the introduction to this part, w e saw the simple method for using
Compass via the
sass --compass
command. However, if y o u w a n t to do
more advanced things in Compass, y o u can set up a Compass project.
If y o u are familiar with Rails or Drupal or other similar frameworks,
y o u ’ l l be familiar with this kind of process. Compass sets up default
files and folders for y o u to w o r k with.
If y o u use another framework like Rails with Sass, y o u should reference
how to set up a Compass project for it. If y o u are just using the com-
mand line (which w e recommend for following along with this book),
then w e recommend using the method detailed on the next page.
Once y o u have generated y o u r project, y o u can place y o u r Sass files
in the
sass/
folder. If y o u w a n t to change any Compass settings, feel
free to edit the
config.rb
file. Compiled CSS is placed inside the
css/
folder.
T o compile a project, simply run
compass compile
. If y o u w a n t to w a t c h
the whole project for changes, then use
compass watch
.
62 • Compass
report erratum • discuss
www.it-ebooks.info

➤Create a project.
This only works if y o u followed the compass gem install instructions
found at the introduction to this part.
$> compass create my_project_name
This should print out the following:
directory my_project_name/sass/
directory my_project_name/style sheets/
create my_project_name/config.rb
create my_project_name/sass/screen.scss
create my_project_name/sass/print.scss
create my_project_name/sass/ie.scss
create my_project_name/style sheets/ie.css
create my_project_name/style sheets/print.css
create my_project_name/style sheets/screen.css
*******************************************************
Congratulations! Your compass project has been created.
➤Compile the project.
$> compass compile my_project_name
This should print out the following:
unchanged project/sass/ie.scss
unchanged project/sass/print.scss
unchanged project/sass/screen.scss
Obviously, if y o u changed the files, then they w o u l d get recompiled.
T r y that now!
report erratum • discuss
Setting Up for a Compass Project • 63
www.it-ebooks.info

26 Resetting: Much Easier with Compass
Compass comes with a really handy and super-robust reset style sheet
built in. The advantage of using it is that it is far more complete than
Eric Meyer’s original reset CSS—and it includes a lot more browser
tweaks. Plus, since Compass is a collection of libraries, w e don’t actu-
ally have to keep a file around anymore. This keeps our code a lot
cleaner.
There are two types of reset. The first is global r e s e t , which resets all
the CSS. All y o u have to type is
@import "compass/reset";
. Most imports
in Compass don’t actually cause any styles to get printed in y o u r style
sheet, but this is a special case and it happens automatically. The CSS
rendered is pretty much the same as the one w e previously saw in
T a s k 14, Resetting CSS, on page 30.
But say y o u don’t w a n t to reset all the CSS. Compass can help! Com-
pass has several different reset mixins that y o u can use in y o u r project
if y o u only w a n t to reset certain parts of the page. This is called a
nested r e s e t .Look on the opposite page for an example of anested reset.9
9. See http://compass-style.org/reference/compass/reset/utilities/ for acomplete
reference, as w e ’ ve only provided a couple of examples of different built-in
reset mixins.
64 • Compass
report erratum • discuss
www.it-ebooks.info

➤Reset everything with this excruciatingly simple import.
@import "compass/reset";
➤Reset only some bits of the page like this.
Download compass/reset.scss
@import "compass/reset/utilities";
body {
.sidebar {
@include nested-reset; } }
This compiles to:
body .sidebar div,body .sidebar span,body .sidebar ...
body .sidebar h1,body .sidebar h2,body .sidebar h3,body ...
body .sidebar a,body .sidebar abbr,body .sidebar acronym, ...
body .sidebar del,body .sidebar dfn,body .sidebar em, ...
body .sidebar small,body .sidebar strike,body .sidebar ...
body .sidebar b,body .sidebar u,body .sidebar i,body ...
body .sidebar dl,body .sidebar dt,body .sidebar dd,body ...
body .sidebar fieldset,body .sidebar form,body .sidebar ...
body .sidebar table,body .sidebar caption,body .sidebar ...
body .sidebar article,body .sidebar aside,body .sidebar ...
body .sidebar figure,body .sidebar figcaption,body ...
body .sidebar menu,body .sidebar nav,body .sidebar ...
body .sidebar time,body .sidebar mark,body .sidebar ... {
margin: 0;
padding: 0;
border: 0;
font-size: 100%;
font: inherit;
vertical-align: baseline; }
body .sidebar table {
border-collapse: collapse;
border-spacing: 0; }
body .sidebar caption,body .sidebar th,body .sidebar td {
text-align: left;
font-weight: normal;
vertical-align: middle; }
body .sidebar q,body .sidebar blockquote {
quotes: none; }
body .sidebar q:before, body .sidebar q:after, body ... {
content: "";
content: none; }
body .sidebar a img {
border: none; }
The ellipses signify lines of code that are too long for the page.
report erratum • discuss
Resetting: Much Easier with Compass • 65
www.it-ebooks.info

27 Sprucing Up Your Lists
Lists need not be dull, vertical things with a single bullet point per
item. Y o u can manipulate them no end! Maybe it annoys y o u that y o u
can’t get rid of those bullet points that come with every unordered
list. No worries: Compass has a great mixin called
no-bullets
, which
removes all the bullet points from a list y o u ’r e making. Neat, eh? If
y o u w a n t to remove only one bullet point, just
@includeno-bullet
in the
class.
I know some of y o u might be shouting, “But that’s so easy!” Well, it
can be. It’s so much easier using Compass because of its cross-browser
capabilities. No longer do y o u have to download every browser
imaginable to test y o u r code.
W e can also use our own custom bullet point designs. Once w e ’ v e
imported the correct Compass file, it’s merely acase of using the
pretty-
bullets
mixin, followed by the reference to the image y o u w a n t to use
for the bullet.
If y o u need to define the size of the bullet, y o u can add the pixel
dimensions of the image after the image name. Y o u can also define
the line height and the padding y o u w a n t , too.10
In the HTML, make sure to apply the class to the
<ul>
tag so all the
items in the list have the special bullets applied to them.
10. http://compass-style.org/reference/compass/typography/lists/bullets/
66 • Compass
report erratum • discuss
www.it-ebooks.info

➤Make a list.
Download compass/project/sass/lists.scss
@import "compass/typography/lists/bullets";
.flowerbullet {
@include pretty-bullets("star.png"); }
This compiles to:
.flowerbullet {
margin-left: 0; }
.flowerbullet li {
padding-left: 14px;
background: url('../../../../images/compass/
star.png?1320353498') no-repeat -5.5px -2.5px;
list-style-type: none; }
(The
no-repeat …;
should be on the same line as the background prop-
erty, but the line w a s too wide for the book.)
➤See how the list looks in your browser.
Related Tasks:
•T a s k 28, Making Lists Horizontal, on page 68
report erratum • discuss
Sprucing Up Your Lists • 67
www.it-ebooks.info

28 Making Lists Horizontal
As w e l l as removing bullets and using y o u r own icons, Compass gives
y o u the cross-browser ease of making horizontal lists.
Horizontal lists are really useful for menus across the top of a page.
They allow for easy navigation of a site.
Y o u can also customize the padding between list points. Just type the
padding y o u w a n t after the horizontal list mixin. Pretty simple, no?
Check out the Compass documentation for a couple of other things
y o u can alter about lists.11
11. http://compass-style.org/reference/compass/typography/lists/horizontal_list/
68 • Compass
report erratum • discuss
www.it-ebooks.info

➤Add in the horizontal mixin.
Download compass/horlist.scss
@import "compass/typography/lists/horizontal-list";
ul.horiz {
@include horizontal-list; }
This compiles to:
ul.horiz {
margin: 0;
padding: 0;
border: 0;
overflow: hidden;
*zoom: 1; }
ul.horiz li {
list-style-image: none;
list-style-type: none;
margin-left: 0px;
white-space: nowrap;
display: inline;
float: left;
padding-left: 4px;
padding-right: 4px; }
ul.horiz li:first-child, ul.horiz li.first {
padding-left: 0; }
ul.horiz li:last-child {
padding-right: 0; }
ul.horiz li.last {
padding-right: 0; }
➤See how a horizontal list looks.
➤Customize padding.
ul.horiz {
@include horizontal-list(25px); }
Related Tasks:
•T a s k 27, Sprucing Up Y o u r Lists, on page 66
report erratum • discuss
Making Lists Horizontal • 69
www.it-ebooks.info

29 Sticking a Footer to a Window
Sticky footers are, as the name suggests, footers that stick to the bottom
of y o u r browser. They’re such a hassle to design in CSS. But in Com-
pass there’s a built-in mixin that allows y o u to make a sticky footer
v e r y simply.12 All y o u need to define is the height (measured from the
bottom of the page) at which the sticky footer floats.
There are three predefined selectors that w e apply in this mixin:
r o o t
,
r o o t _ f o o t e r
, and
footer
.W e chose these three because they’ve already
been built into Compass. Y o u can see how w e use them on the opposite
page.
But hey, if y o u desperately w a n t to use y o u r own selector names, y o u
can! For example, y o u can change the first ID,
r o o t
, to
a_root
in the
HTML. In y o u r style sheet, specify this change by typing
"#a_root"
after
y o u ’ v e defined the height of y o u r footer in the
@include
function.
12. http://compass-style.org/reference/compass/layout/sticky_footer/
70 • Compass
report erratum • discuss
www.it-ebooks.info

➤Use sticky footers in the style sheet.
@import "compass/layout/sticky-footer"
Then using it is just a matter of this:
@include sticky-footer(24px)
➤The built-in HTML for sticky footers is this.
Download compass/sticky_footer.html
<body>
<div id="root">
<div id="root_footer"></div>
</div>
<div id="footer">
This is my footer!
</div>
</body>
➤Customize your sticky footer selectors.
Here’s the HTML:
Download compass/sticky_footer_custom.html
<body>
<div id="a_root">
<div id="b_root_footer"></div>
</div>
<div id="c_footer">
This is my footer!
</div>
</body>
And here it is in use in the style sheet:
@include sticky-footer(24px, "#a_root", "#b_root_footer",
"#c_footer")
report erratum • discuss
Sticking a Footer to a Window • 71
www.it-ebooks.info

30 Stopping Overflow with Clearfix
If y o u ’ v e been doing this as long as w e have, y o u ’ v e definitely found
out about the annoying little problems y o u can face with stretching
divs to containers. Say y o u have an outer box with an undefined height
and an inner box with a height of 100px. The outer box will not
automatically stretch to also include the inner box, leaving an ugly
overhang.
The Clearfix trick in Compass solves this problem. It makes sure that
there’s no overhang if yo u r outer box isn’t defined to be as tall as y o u r
inner box. It’s a great w a y to solve some messy issues y o u ’r e having
with design.
72 • Compass
report erratum • discuss
www.it-ebooks.info
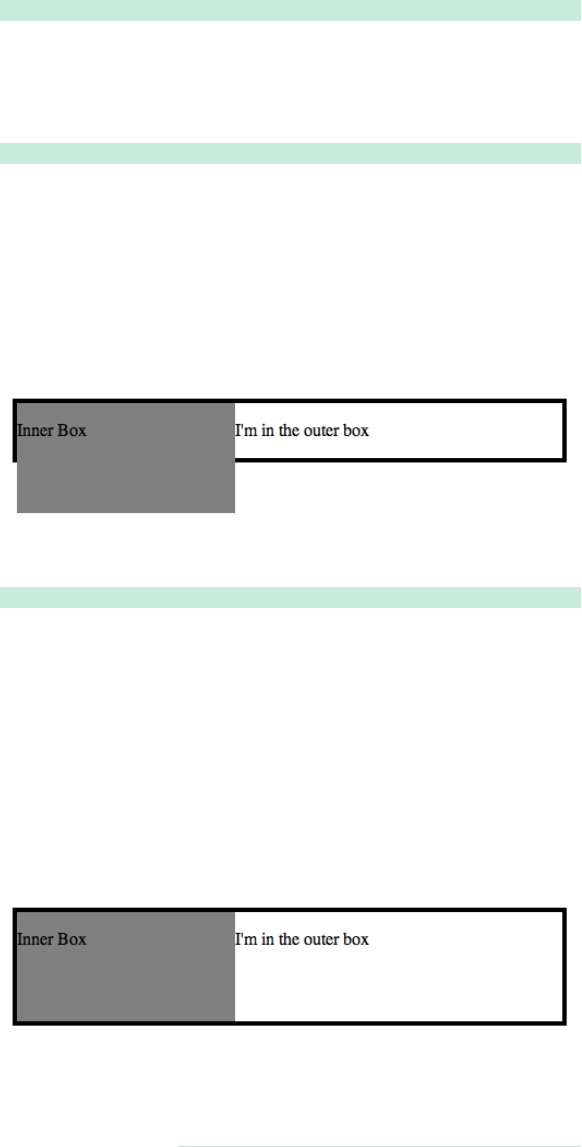
➤Start with this HTML.
Download compass/clearfix.html
<div id="outer_box">
<div id="inner_box"><p>Inner Box</p></div>
<p>I'm in the outer box</p> </div>
➤Use simple Sass.
Download compass/clearfix_original.scss
#outer_box {
width: 500px;
border: 4px solid black;
#inner_box {
float: left;
width: 200px;
height: 100px;
background: gray; } }
➤Take a look in your browser.
➤Use Compass to save the day.
Download compass/clearfix.scss
@import "compass/utilities/general/clearfix";
#outer_box {
@include clearfix;
width: 500px;
border: 4px solid black;
#inner_box {
float: left;
width: 200px;
height: 100px;
background: gray; } }
➤Take another look: Magically fixed!
report erratum • discuss
Stopping Overflow with Clearfix • 73
www.it-ebooks.info

31 Truncating Text Using Ellipses
Say w e have a large paragraph of text that overruns its bounds. Or
maybe w e just don’t w a n t to display the whole thing. There’s a neat
w a y , using Compass, to remove the extra text and replace it with an
ellipsis (…).
First, y o u need to install some small compass components using the
compass command-line interface. After that, use the
@includeellipsis
command just like any other Compass mixin.
But...there’s a problem. This doesn’t w o r k for all browsers. It works
for Chrome, Safari, and early versions of Internet Explorer, but not for
Opera or Firefox. Firefox claims support is coming in the future, but
apparently this feature has been pending for a long time.13
13. Y o u can read more about this technique at http://mattsnider.com/css/css-
string-truncation-with-ellipsis/.
74 • Compass
report erratum • discuss
www.it-ebooks.info
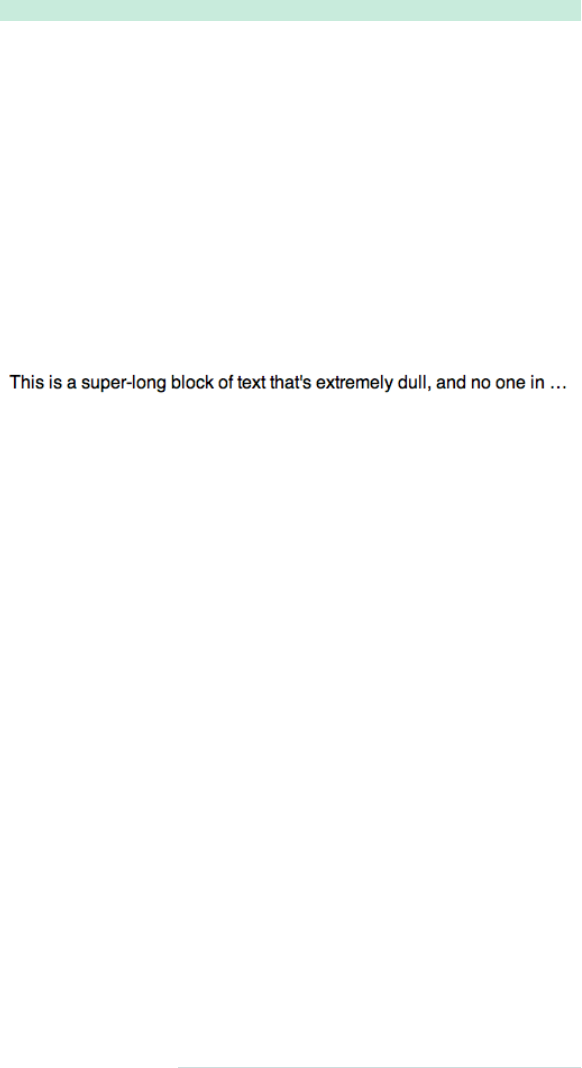
➤Install the ellipsis file on the command line.
compass install compass/ellipsis
➤Use the mixin in SCSS.
Download compass/ellipses.scss
@import "compass/typography/text/ellipsis";
.dotdotdot {
@include ellipsis;
width: 500px; }
This compiles to:
.dotdotdot {
white-space: nowrap;
overflow: hidden;
-o-text-overflow: ellipsis;
-ms-text-overflow: ellipsis;
text-overflow: ellipsis;
width: 500px; }
➤See how it looks in Safari.
report erratum • discuss
Truncating Text Using Ellipses • 75
www.it-ebooks.info

32 Stretching Elements
One of the handy mixins in Compass is used for stretching. Its purpose
is pretty straightforward: it allows y o u to stretch an element to fit into
a box.
W e need to define the space into which the element will be stretched,
which is what w e do when w e ’r e defining the
stretch_box
class. W e also
need something to stretch; in this case w e ’r e going to use the blue
button from T a s k 15, Keeping It Semantic: @extend, on page 36.
At the top of y o u r style sheet, y o u need to
@import
three stretching
compass files:
compass/layout/stretching
,
compass/utilities
and
compass/css3
.
Then all y o u need to do is
@include
the mixin wherever y o u need a
class or ID to be stretched. A useful feature is that y o u can define an
offset border, so that when y o u stretch an element, it w o n ’t completely
reach the edge of y o u r container box.
Y o u can also stretch the element in either the x-axis (horizontally) or
y-axis (vertically) only.
76 • Compass
report erratum • discuss
www.it-ebooks.info
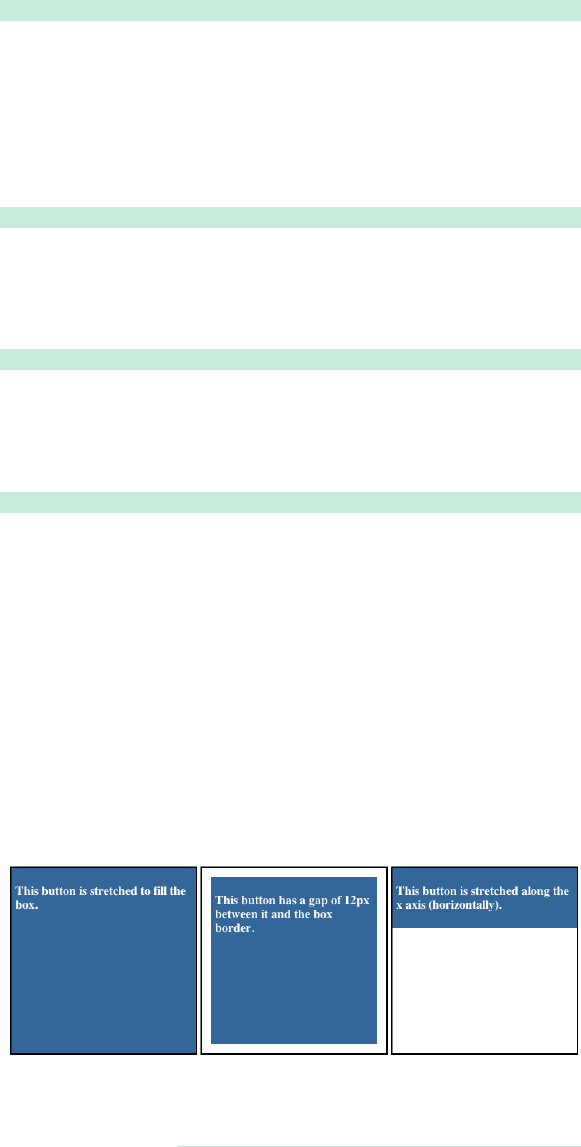
➤Define a box and an element to be stretched.
Download compass/stretch.scss
.stretch_box {
border: 2px solid black;
width: 240px;
height: 240px;
position: relative;
@include inline-block; }
➤Stretch the button fully to all sides.
Download compass/stretch.scss
.stretched_fully {
@extend .blue_button;
@include stretch; }
➤Include an offset to the stretch.
Download compass/stretch.scss
.stretched_with_gap {
@extend .blue_button;
@include stretch(12px, 12px, 12px, 12px); }
➤Stretch only in the x- or y-axis.
Download compass/stretch.scss
.stretched_horizontally {
@extend .blue_button;
@include stretch-x; }
Appropriately, if y o u w a n t to stretch it vertically, just use
stretch-y
instead.
➤Use this HTML.
<div class="stretch_box">
<div class="stretched_fully">
Stretched fully!
</div>
</div>
➤See how it looks in your browser.
report erratum • discuss
Stretching Elements • 77
www.it-ebooks.info

33 Jazzing Up Layouts with Columns
Say w e w a n t to make our website look more like a newspaper. W e
w a n t to turn our boring one-column paragraph into multiple columns.
This is a lot easier with Compass.
W e have the option to apply any number of columns. W e can use two
extra mixins to define the width of each column as w e l l as the gap
between each column.
If necessary, w e can add a line to separate the columns of text. The
declarations w e use are the same as what w e w o u l d use for describing
a regular border, namely the width, style, and color.
It’s important to note that columns aren’t really supported in older
versions of Internet Explorer. Also, the column attribute doesn’t really
like it if y o u define heights.
78 • Compass
report erratum • discuss
www.it-ebooks.info
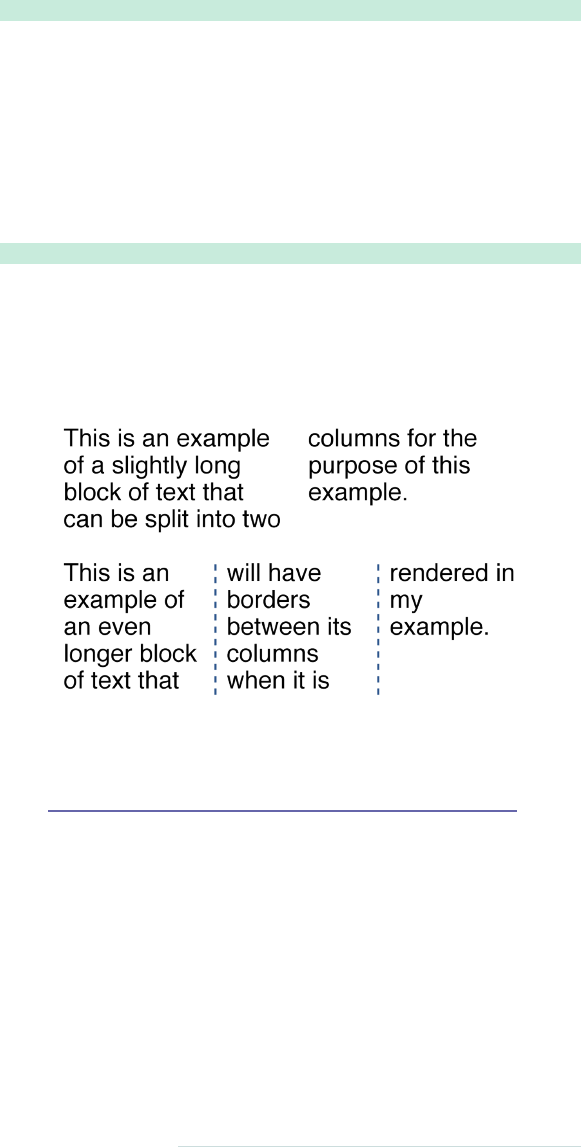
➤Turn text into columned text.
Download compass/columns.scss
#two_columns {
@include column-count(2);
width: 300px; }
➤Define the width of columns and the gap between columns.
@include column-width(240px);
@include column-gap(24px);
➤Add a border between the columns.
Download compass/columns.scss
#columns_borders {
@include column-count (3);
@include column-rule(2px, dashed, #336699);
width: 300px; }
➤See how these look in the browser.
Related Tasks:
•T a s k 35, Producing More T w o - C o l u m n Layouts, on page 86
report erratum • discuss
Jazzing Up Layouts with Columns • 79
www.it-ebooks.info

34 Spriting
Spriting is a process by which many small icons or pictures are turned
into one larger one for use in a website. The one larger file is not the
direct sum of its parts—its file size is a lot smaller than the separate
images combined. This is of supreme importance in the age of the
mobile w e b , where every KB counts.
Creating asprite image file for incorporation into y o u r site is incredibly
simple with Compass. W e used to have to stitch together all the images
using Photoshop and then define each image by its location in pixels.
Compass does this all automatically for us.
W e have to make sure all our images are in one folder—for example,
icons
. Then w e
@import
the icons from the folder.
Compass makes the
link.png
,
movie.png
, and
script.png
icons into one big
image. The sum of the three images is 876B, but the sprited image is
only 357B—a huge savings! Compass gives the big image a unique
identifier, which is why the file name will be something like
icon-
s2c4d35777d.png
.
Once that’s been sorted, y o u can specify aclass (for example
.movie_icon
)
and
@include
y o u r image file name—in this case,
movie
. Compass
compiles this, and in the CSS it defines a specific place in the image
where our movie icon starts.
In the HTML, all y o u need to do is use the newly defined
movie_icon
class like y o u would any other class.
80 • Compass
report erratum • discuss
www.it-ebooks.info
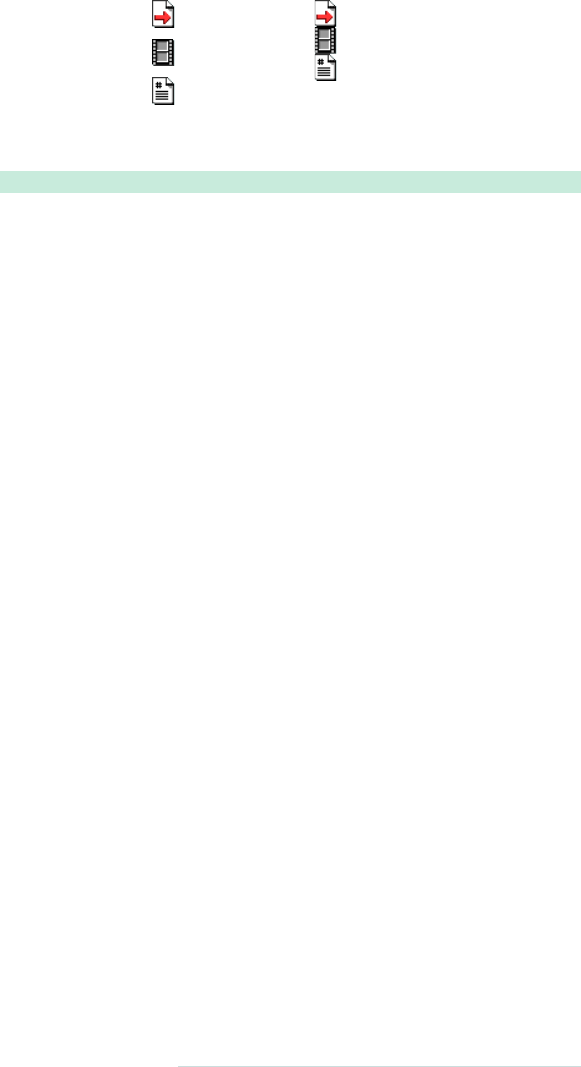
➤Import sprites from an icon folder in Compass.
@import "icon/*.png";
➤Compass combines three images into one.
This
com-
piles to:
➤Specify a class with the necessary icon.
Download compass/project/sass/screen.scss
.movie_icon {
height: 20px;
@include icon-sprite(movie); }
This compiles to:
.icon-sprite, .movie_icon {
background: url('../../../../images/compass/icon-s2c4d3.png')
no-repeat;
}
/* line 8, ../sass/screen.scss */
.movie_icon {
height: 20px;
background-position: 0 -22px;
}
➤Use in HTML.
<div class="movie_icon">
</div>
report erratum • discuss
Spriting • 81
www.it-ebooks.info


Remember how we used Compass to shortcut some
cross-browser issues? Compass also helped with mixins for
various tasks, such as shortening text or making a list a bit
more exciting.
Blueprint is a framework that goes one step further than
Compass—it’s an even more extensive set of mixins that
allows you to easily design your own site. Blueprint has
many more predefined classes that you use when building
a site. Take the
caps
class that we’ll come across in Task 36,
Using Predefined Fancy Fonts, on page 88. All we need to
know is the class name, and Blueprint will sort out all the
styling aspects of it for us.
The Blueprint website has a downloadable file containing
Blueprint.14 We’re only covering a few aspects of Blueprint,
but you can find a wiki and discussion forums on the site,
where you can ask for help if necessary.
Here’s a summary of what we’re going to look at using
Blueprint.
•Remember when we looked at how to make columns
of text in Compass (Task 33, Jazzing Up Layouts with
Columns, on page 78)? Well, we can do it another way
using Blueprint. To see how, check out Task 35,
Producing More Two-Column Layouts, on page 86.
•Then we’ll look at some predefined font styles that
come with Blueprint in Task 36, Using Predefined Fancy
Fonts, on page 88.
•Finally, we’ll look at ways to improve button aesthetics
in Task 37, Making Beautiful Buttons, on page 90.
14. http://www.blueprintcss.org/
Blueprint CSS • 85
www.it-ebooks.info

35 Producing More Two-Column Layouts
As w e saw in T a s k 33, Jazzing Up Layouts with Columns, on page 78,
w e can use Compass to generate columns in our HTML. However,
with Blueprint, there’s an even easier w a y . Blueprint controls more of
the column layout than Compass, but it still lets y o u have a say over
the widths.
First w e need to define the number of columns and the width of each
column. Here w e ’r e using six columns of 65px width. Once w e ’ v e
done that, w e can
@import "blueprint"
.
As w e start adding to the
.two-col
class, w e must first include the con-
tainer. W e can also set the background and set other box-wide things
here. Then it’s on to the columns.
W i t h our header, w e w a n t it to span the whole width of the item, and
the same goes for the footer. So we’ll apply the whole six columns to
this bit using
@include column(6)
.
For the links column and the main text area, w e need to divide up the
six columns between them—say two columns’ worth for the links and
the remaining four columns’ worth for the main text. Simply add the
number of columns y o u w a n t each section to have to the
@include
column
.
W e need to add true to any column (or column set) that appears after
another—this ensures the next column follows on from the previous
column.
86 • Blueprint CSS
report erratum • discuss
www.it-ebooks.info
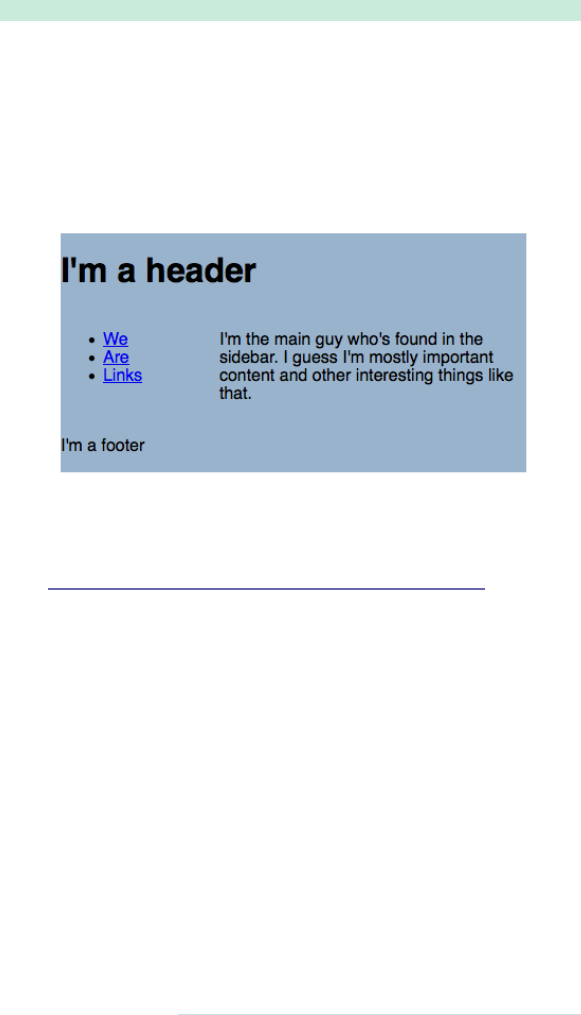
➤Define the number and width of columns, then import Blueprint.
$blueprint_grid_columns: 6;
$blueprint_grid_width: 65px;
@import "blueprint";
➤Columnize your text!
Download blueprint/twocolumn.scss
.two-col {
@include container;
background-color: #9ab3cc;
#header, #footer {
@include column(6); }
#links {
@include column(2); }
#main_text {
@include column(4, true); } }
Related Tasks:
•T a s k 33, Jazzing Up Layouts with Columns, on page 78
report erratum • discuss
Producing More Two-Column Layouts • 87
www.it-ebooks.info

36 Using Predefined Fancy Fonts
Blueprint has a couple of text modifying features built in. These allow
y o u to quickly and easily modify text using predefined classes.
If w e go through them in the order they’re compiled to in the CSS, the
first is the
p + p
element. The
+
symbol here is for styling something
that follows something else—that is, the directions only apply to a
paragraph that directly follows a paragraph. In this case, they indent
the next paragraph rather than having a line space.
The
incr
class is used to space out lines as w e l l as to make the font
slightly smaller. W e could use it if w e w a n t e d to make the text a bit
smaller, for example, in a sidebar.
W e can use the
caps
class as a kind of emphasizer, although it’s not
too easy to read long stretches of text.
Finally, there’s the
alt
class, which makes y o u r text italic and therefore
look more handwritten. This is the fanciest one of all.
88 • Blueprint CSS
report erratum • discuss
www.it-ebooks.info
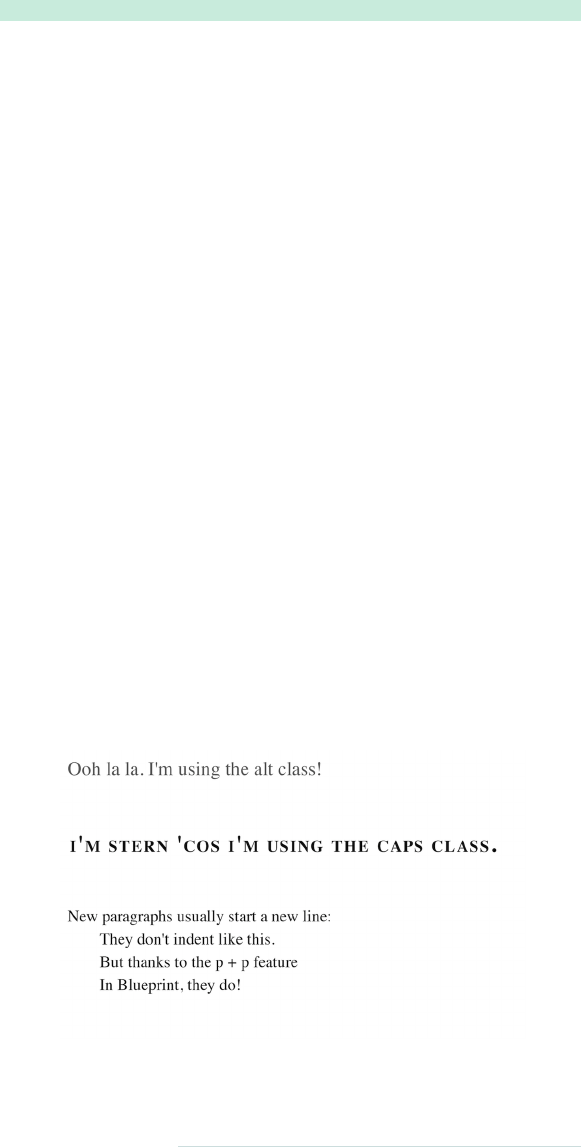
➤Add the mixin into your style sheet.
Download blueprint/fancytype.scss
@import "blueprint/fancy-type";
body {
@include fancy-type; }
This compiles to:
@charset "utf-8";
body p +p{
text-indent: 2em;
margin-top: -1.5em; }
form body p +p{
text-indent: 0; }
body p.incr,
body .incr p{
font-size: 0.833em;
line-height: 1.44em;
margin-bottom: 1.5em; }
body .caps {
font-variant: small-caps;
letter-spacing: 1px;
text-transform: lowercase;
font-size: 1.2em;
line-height: 1%;
font-weight: bold;
padding: 0 2px; }
body .dquo {
margin-left: -0.5em; }
body .alt {
color: #666666;
font-family: "Warnock Pro","Goudy Old Style","Palatino"...
font-style: italic;
font-weight: normal; }
➤See how some of the classes look in your browser.
report erratum • discuss
Using Predefined Fancy Fonts • 89
www.it-ebooks.info

37 Making Beautiful Buttons
If w e use a semantic
<button>
tag, Blueprint makes it easy to style that
button with a custom look. Just use the tag in y o u r HTML as y o u
normally would, import the required components (see the opposite
page for an exact listing), and finally
@includebutton-button
. Once w e ’ v e
included that code, w e are ready to style the
<button>
tags.15
As a best practice, if y o u are doing general styling of all buttons on
the site, w e recommend doing that in a separate file that y o u can
include. This helps to keep the code more organized. W e prefer to use
a filename like
_button_style.scss
.
What if y o u w a n t to make an
<a>
look like a button? This is a v e r y
common thing to do on the W e b . Blueprint makes this easy, too!
First,
@include
the
anchor-button
, and then apply it to the anchor button
class. When including the anchor button, y o u can alter the float of the
button by typing left or right after
anchor-button
.
As for coloring options, there are four colors that y o u can play with
in the design: the font color, the background color, the border color,
and the border highlight color. (By default, the border highlight color
is automatically set to one shade lighter than the border color.)
15. If y o u reference the Compass documentation at http://compass-style.org/
reference/blueprint/buttons/,y o u ’ l l see there are aboatload of v a r i a b l e s y o u
can use to style y o u r buttons.
90 • Blueprint CSS
report erratum • discuss
www.it-ebooks.info
➤Install Blueprint buttons.
compass install blueprint/buttons
➤Style button tags.
@import "compass/utilities/general/float";
@import "blueprint/buttons";
button {
@import button-button();
}
Wha-bam! There y o u go—magically all of the buttons are styled!
➤Buttonize an anchor tag.
Download blueprint/buttons.scss
a.button {
@include anchor-button; }
➤Change the color of a button.
Download blueprint/buttons.scss
a.button.positive {
@include anchor-button(left);
@include button-colors(#305d00, #b0dd80, #478c00);
@include button-hover-colors(#305d00, #d8eec0, #84a560);}
Use the following HTML:
Download blueprint/buttons.html
<a class="button">
I'm using the button class
</a>
<a class="button positive">
I'm in a button!
</a>
<a class="button positive" id="hover">
And I'm being hovered over
</a>
The result in the browser will look like this:
report erratum • discuss
Making Beautiful Buttons • 91
www.it-ebooks.info


APPENDIX 1
S a s s S c r i p t F u n c t i o n R e f e r e n c e
rgb($red, $green, $blue)
Creates a {Color} object from red, green, and blue v a l u e s .
hsl($hue, $saturation, $lightness)
Creates a {Color} object from hue, saturation, and lightness.
Uses the algorithm from the CSS3 spec.16
hsla($hue, $saturation, $lightness, $alpha)
Creates a {Color} object from hue, saturation, and lightness,
as w e l l as an alpha channel indicating opacity. Uses the
algorithm from the CSS3 spec.
red($color)
Returns the red component of a color.
green($color)
Returns the green component of a color.
blue($color)
Returns the blue component of a color.
hue($color)
Returns the hue component of a color.
See the CSS3 HSL specification.
16. http://www.w3.org/TR/css3-color/#hsl-color
report erratum • discuss
www.it-ebooks.info

Calculated from RGB where necessary via this algorithm.17
saturation($color)
Returns the saturation component of a color.
See the CSS3 HSL specification.
Calculated from RGB where necessary via the same algo-
rithm as hue($color).
lightness($color)
Returns the hue component of a color.
See the CSS3 HSL specification.
Calculated from RGB where necessary via the same algo-
rithm as hue($color).
alpha($*args)
Returns the alpha component (opacity) of a color. This is 1
unless otherwise specified.
This function also supports the proprietary Microsoft
‘alpha(opacity=20)‘ syntax.
opacity($color)
Returns the alpha component (opacity) of a color. This is 1
unless otherwise specified.
opacify($color, $amount)
Makes a color more opaque. Takes a color and an amount
between 0 and 1, and returns a color with the opacity
increased by that v a l u e .
fade-in()
Makes a color more opaque. Takes a color and an amount
between 0 and 1, and returns a color with the opacity in-
creased by that v a l u e .
17. http://en.wikipedia.org/wiki/HSL_and_HSV#Conver-
sion_from_RGB_to_HSL_or_HSV
94 • Appendix 1. SassScript Function Reference
report erratum • discuss
www.it-ebooks.info

transparentize($color, $amount)
Makes a color more transparent. Takes a color and an
amount between 0 and 1, and returns a color with the opac-
ity decreased by that v a l u e .
fade-out()
Makes a color more transparent. Takes a color and an
amount between 0 and 1, and returns a color with the opac-
ity decreased by that v a l u e .
lighten($color, $amount)
Makes a color lighter. Takes a color and an amount between
0% and 100%, and returns a color with the lightness in-
creased by that v a l u e .
darken($color, $amount)
Makes a color darker. Takes a color and an amount between
0% and 100%, and returns a color with the lightness de-
creased by that v a l u e .
saturate($color, $amount)
Makes a color more saturated. Takes a color and an amount
between 0% and 100%, and returns a color with the satura-
tion increased by that v a l u e .
desaturate($color, $amount)
Makes a color less saturated. Takes a color and an amount
between 0% and 100%, and returns a color with the satura-
tion decreased by that v a l u e .
adjust-hue($color, $degrees)
Changes the hue of a color while retaining the lightness and
saturation. Takes a color and a number of degrees (usually
between -360deg and 360deg), and returns a color with the
hue rotated by that v a l u e .
adjust-color($color, $kwargs)
Adjusts one or more properties of a color. This can change
the red, green, blue, hue, saturation, v a l u e , and alpha prop-
erties. The properties are specified as keyword arguments
report erratum • discuss
Appendix 1. SassScript Function Reference • 95
www.it-ebooks.info

and are added to or subtracted from the color ’s current v a l u e
for that property.
‘$red‘, ‘$green‘, and ‘$blue‘ properties should be between 0
and 255. ‘$saturation‘ and ‘$lightness‘ should be between
0% and 100%. ‘$alpha‘ should be between 0 and 1. All
properties are optional.
Y o u can’t specify both RGB properties (‘$red‘, ‘$green‘,
‘$blue‘) and HSL properties (‘$hue‘, ‘$saturation‘, ‘$value‘)
at the same time.
scale-color($color, $kwargs)
Scales one or more properties of a color by a percentage
v a l u e . Unlike adjust-color($color, $kwargs), which changes a
color’s properties by fixed amounts, scale_color fluidly
changes them based on how high or low they already are.
So if w e use scale color twice: scale-color scale-color, it w o n ’t
change the lightness much, but lightening a dark color by
the same amount will change it more dramatically. This has
the benefit of making ‘scale-color($color, ...)‘ have a compa-
rable effect across color palettes.
For example, the lightness of a color can be anywhere
between 0 and 100. If ‘scale-color($color, $lightness: 40%)‘
is called, the resulting color’s lightness will be 40% of the
w a y b e t w e e n i t s o r i g i n a l l i g h t n e s s a n d 1 0 0 . I f ‘ s c a l e - c o l o r ( $ c o l -
or, $lightness: -40%)‘ is called instead, the lightness will be
40% of the w a y between the original and 0.
This can change the red, green, blue, saturation, v a l u e , and
alpha properties. The properties are specified as keyword
arguments. All arguments should be percentages between
0% and 100%. All properties are optional.
Y o u can’t specify both RGB properties (‘$red‘, ‘$green‘,
‘$blue‘) and HSL properties (‘$saturation‘, ‘$value‘) at the
same time.
change-color($color, $kwargs)
Changes one or more properties of a color. This can change
the red, green, blue, hue, saturation, v a l u e , and alpha prop-
erties. The properties are specified as keyword arguments
and replace the color’s current v a l u e for that property.
96 • Appendix 1. SassScript Function Reference
report erratum • discuss
www.it-ebooks.info

‘$red‘, ‘$green‘, and ‘$blue‘ properties should be between 0
and 255. ‘$saturation‘ and ‘$lightness‘ should be between
0% and 100%. ‘$alpha‘ should be between 0 and 1. All
properties are optional.
Y o u can’t specify both RGB properties (‘$red‘, ‘$green‘,
‘$blue‘) and HSL properties (‘$hue‘, ‘$saturation‘, ‘$value‘)
at the same time.
mix($color1, $color2, $weight = 50)
Mixes together two colors. Specifically, takes the average of
each of the RGB components, optionally weighted by the
given percentage. The opacity of the colors is also considered
when weighting the components.
The w e i g h t specifies the amount of the first color that should
be included in the returned color. The default, 50%, means
that half the first color and half the second color should be
used. 25% means that a quarter of the first color and three
quarters of the second color should be used.
grayscale($color)
Converts a color to grayscale. This is identical to ‘desatu-
rate(color, 100%)‘.
complement($color)
Returns the complement of a color. This is identical to
‘adjust-hue(color, 180deg)‘.
invert($color)
Returns the inverse (negative) of a color. The red, green, and
blue v a l u e s are inverted, while the opacity is left alone.
unquote($string)
Removes quotes from a string if the string is quoted, or
returns the same string if it’s not.
quote($string)
Add quotes to a string if the string isn’t quoted, or returns
the same string if it is.
report erratum • discuss
Appendix 1. SassScript Function Reference • 97
www.it-ebooks.info

type-of($value)
Inspects the type of the argument, returning it as an unquot-
ed string.
unit($number)
Inspects the unit of the number, returning it as a quoted
string. Complex units are sorted in alphabetical order by
numerator and denominator.
unitless($number)
Inspects the unit of the number, returning a boolean indicat-
ing if it is unitless.
comparable($number_1, $number_2)
Returns true if two numbers are similar enough to be added,
subtracted, or compared.
percentage($value)
Converts a decimal number to a percentage.
round($value)
Rounds a number to the nearest whole number.
ceil($value)
Rounds a number up to the nearest whole number.
floor($value)
Rounds down to the nearest whole number.
abs($value)
Finds the absolute v a l u e of a number.
length($list)
Return the length of a list.
nth($list, $n)
Gets the nth item in a list.
Note that unlike some languages, the first item in a Sass list
is number 1, the second is number 2, and so forth.
98 • Appendix 1. SassScript Function Reference
report erratum • discuss
www.it-ebooks.info

join($list1, $list2, $separator = "auto")
Joins together two lists into a new list.
Unless the ‘$separator‘ argument is passed, if one list is
comma-separated and one is space-separated, the first
parameter’s separator is used for the resulting list. If the lists
have only one item each, spaces are used for the resulting
list.
append($list, $val, $separator = "auto")
Appends a single v a l u e onto the end of a list.
Unless the ‘$separator‘ argument is passed, if ‘$list‘ has only
one item, the resulting list will be space-separated.
zip($*lists)
Combines several lists into a single comma-separated list,
with spaces between similarly placed items. If w e have the
lists 1, 2, 3 and A, B, C, they will be combined into 1A, 2B,
3C, etc. The length of the resulting list is the length of the
shortest list.
index($list, $value)
Returns the position of the given v a l u e within the given list.
If not found, returns false.
if($condition, $if_true, $if_false)
Returns one of two v a l u e s based on the truth v a l u e of the
first argument.
numeric-transformation($value)
This method implements the pattern of transforming a
numeric v a l u e into another numeric v a l u e with the same
units. It yields a number to a block to perform the operation
and return a different number.
report erratum • discuss
Appendix 1. SassScript Function Reference • 99
www.it-ebooks.info

APPENDIX 2
Introduction to Haml
Haml is something of a sister language to Sass, but Haml
w a s actually designed before Sass. It w a s successful enough
that a CSS-version w a s developed, applying the same prin-
ciples of Haml into CSS. They w e r e both developed to clarify
the meaning behind design.
Haml w a s created from the desire to write logically struc-
tured HTML that y o u r designer w o u l d thank y o u for. HTML
builders shouldn’t make crap: the layout of the page and
the information on the page should be logically structured
and w e l l named. Haml isn’t a revolution; it’s a statement of
the obvious and an adoption of best practices.
Installing Haml is pretty similar to installing Sass. Once
Ruby is installed, all y o u need to type in the command line
is the following:
gem install haml
And y o u ’r e done. It used to be that Haml w a s in the same
gem as Sass, but since v e r s i o n 3.1 they’ve been split into two
separate gems.
If y o u need any help with Haml, there’s the Haml site and
all its documentation,18 which will have a lot more informa-
tion than the snippet w e ’ v e given here. In addition, there’s
a bunch of friendly people willing to help at the Haml
Google group.19
18. http://haml-lang.com/ and http://haml-lang.com/docs/yardoc/
file.HAML_REFERENCE.html, respectively.
19. http://groups.google.com/group/haml
report erratum • discuss
www.it-ebooks.info

In this appendix, w e ’ v e got two w a y s to take y o u through
Haml. The first is from aRuby-style angle, taking an example
of ERB and reformatting it. The second is for those of us who
are more familiar with HTML. They’re both in a slightly
different format to the rest of the book, as they follow the
progression of ERB/HTML into Haml.
Haml Walkthrough: ERB
Now w e ’r e going to w a l k y o u through the exact same pro-
cess with which Haml w a s created. A well-formatted bit of
HTML w a s changed step-by-step until Haml w a s born.
Let’s start with an example using ERB. It’s a pretty standard
template y o u might find in any Ruby project. Don’t panic if
y o u aren’t a Rubyist—it’s a straightforward example.
Download haml/haml_e1.html
<div id=”products”>
<%- @products.each do |product| %>
<div class=”product” id=”product_<%= product.id %>”>
<div class=”name”><%= product.name %></div>
<div class=”price”><%= product.price %></div>
</div>
<% end %>
</div>
Executing this would print out each of the products in
@products
and assign each one a custom ID like
product_23
(where the product’s ID is 23). It’s a v e r y standard and well-
formatted kind of template in ERB, and w e are going to
slowly convert this into Haml.
First off: it’s important to correctly indent ERB files, so there
is no reason why y o u should have to spend so much time
closing tags—it just seems wasteful. So, we’ll take the above
example and remove all of the closing tags.
Download haml/haml_e2.html
<div id=”products”>
<%- @products.each do |product| %>
<div class=”product” id=”product_<%= product.id %>”>
<div class=”name”><%= product.name %>
<div class=”price”><%= product.price %>
See how much cleaner it is? And notice that the
<% end %>
tag is gone too. Haml automatically figures out when to close
aRuby block. (This can v a r y in non-Ruby implementations.)
102 • Appendix 2. Introduction to Haml
report erratum • discuss
www.it-ebooks.info

Y o u ’ r e probably thinking w e ’r e secretly Python people
be c au s e o f t he d e c i s i o n to m a ke H a m l “ wh i t e s p a ce s e ns i ti v e . ”
That term’s annoying. When looking at HTML, the advan-
tages of getting rid of the closing tags w e r e clear. Even when
working in a language that doesn’t care about whitespace,
most people still do. Having bad indentation is a serious
issue in any bit of code or markup and should be treated as
a flaw.
Haml used to accept only two spaces as indentation—no
exceptions. That has since changed. Whatever y o u use to
start indenting is what y o u must keep with. Just stay consis-
tent. It can be a tab, or one space, or two tabs. It doesn’t
matter. As long as it’s consistent, it’s OK.20
Moving on! W e ’ r e not nearly done y e t .
Don’t y o u absolutely hate this line?
id=”product_<%= product.id %>”
Ruby has afantastic built-in string interpolation feature that
means y o u should be able to do
product_#{product.id}
and
skip all that weirdness. So let’s do that.
Download haml/haml_e3.html
<div id=”products”>
<%- @products.each do |product| %>
<div class=”product” id=”product_#{product.id}”>
<div class=”name”><%= product.name %>
<div class=”price”><%= product.price %>
There’s only a small change this time, but already this exam-
ple is far more readable. Always think about how readable
something is at a glance. When y o u look at it, how quickly
does y o u r brain parse and understand what y o u ’r e seeing?
Basically, this removes a bunch of unneeded symbols for
y o u r eyes to deal with.
It’s at this point that everyone’s dislike of
%
style tags comes
to full v e n g e a n c e . Has anyone else done PHP for too many
years and been left scarred and angry? Let’s get rid of those!
20. However, we ’r e still of the belief that using two spaces is far
superior and should be used in Haml. W e w e r e convinced by an
article by Jamie Zawinski that w e strongly suggest y o u read:
http://www.jwz.org/doc/tabs-vs-spaces.html
report erratum • discuss
Appendix 2. Introduction to Haml • 103
www.it-ebooks.info

Download haml/haml_e4.html
<div id=”products”>
- @products.each do |product|
<div class=”product” id=”product_#{product.id}”>
<div class=”name”>
= product.name
<div class=”price”>
= product.price
See, w e kept the first character as
-
or
=
to signify nonprinting
and printing lines. Anything after an
=
gets printed, and
anything after a
-
is executed but its output ignored.
At this point in the transformation, printing lines have been
moved down to their own line. We’ll actually rectify this
later, but for now it makes parsing the document a lot easier.
Besides,
<div>=
seems inelegant for some reason.
In order to get those back up on the other line, Haml tags
must be different from static HTML tags. One of the design
goals is that y o u can copy in some plain HTML (properly
indented) and it w o n ’t get too mad at y o u . Mostly this w a s
a concern for the
<meta>
tags on a page, which no matter
what y o u do are as ugly as sin.
So, let’s use the
%
character to mean
<tag>
and use the Ruby/
JSON-style syntax for the attributes. (Note: The JSON-style
syntax only works with Ruby v e r s i o n s 1.9+. In 1.8, y o u must
use the hashrocket style of
{“class” => “product”}
.)
Download haml/haml_e5.html
%div{id: ”products”}
- @products.each do |product|
%div{class: ”product” id: ”product_#{product.id}”}
%div{class: ”name”}
= product.name
%div{class: ”price”}
= product.price
At this point, w e have fully v a l i d Haml. Congratulations!
But w e have a bit more to do. W i t h this, w e can now move
those printing lines up again! It’ll look nice.
Download haml/haml_e6.html
%div{id: ”products”}
- @products.each do |product|
%div{class: ”product” id: ”product_#{product.id}”}
%div{class: ”name”}= product.name
%div{class: ”price”}= product.price
104 • Appendix 2. Introduction to Haml
report erratum • discuss
www.it-ebooks.info

Now w e are getting somewhere! But something is still not
quite right. There is a lot of writing of
class:
and
id:
, and it
requires the brain to read the letters to understand what it
means. At this point, inspiration strikes. Can y o u think of a
symbology that already exists for IDs and classes?
Download haml/haml_e7.html
%div#products
- @products.each do |product|
%div.product{id: ”product_#{product.id}”}
%div.name= product.name
%div.price= product.price
Bam! Using CSS-style naming! W e already know what those
symbols mean. W e ’ r e on a roll now!
In a larger example, there would be
%div
all over the place.
And w e still aren’t encouraging the use of classes and IDs.
It’s a lot easier—a lot less typing to do the right thing.
What if w e assumed that each tag w a s a
<div>
by default?
Download haml/haml_e8.html
#products
- @products.each do |product|
.product{id: ”product_#{product.id}”}
.name= product.name
.price= product.price
Now that’s nice! W e only have to specify the name when
it’s not a div. And if w e ’r e lazy, it’s easier to name divs w e l l
than it is to type
%div
over and over again. This is precisely
how Haml should encourage good behavior. W i t h this
shortcut, it’s actually hard to do the wrong thing and easier
to do the right thing (i.e., name everything well!).
Now w e ’ v e really arrived at some standard Haml. But there
is one thing that is still troublesome—the whole
id: ”prod-
uct_#{product.id}”
line. It is a bit of an ugly duckling there.
If y o u r object has a good answer for the
object.id
call, then
w e can automatically figure out the ID and class name that
the .product div should have. W e take the object’s class and
down-case it, add an underscore, then put in the
obj.id
v a l u e
—all with this little shortcut.
Download haml/haml_e9.haml
#products
- @products.each do |product|
report erratum • discuss
Appendix 2. Introduction to Haml • 105
www.it-ebooks.info

%div[product]
.name= product.name
.price= product.price
The product div will automatically receive the proper class
and ID, as in our products example. When w e say
[product]
though, w e ’r e referring to the
|product|
v a r i a b l e . If w e had
named the v a r i a b l e in
|product|
as
|x|
, then it would be
%div[x]
.
Haml Walkthrough: HTML
W e ’ r e not going to go through the HTML to Haml conver-
sion in as much detail as the previous ERB one. W e just w a n t
to see how the stylistic changes can also be applied to a
static site.
Download haml/haml_h1.html
<!DOCTYPE html PUBLIC "-//W3C//DTD XHTML 1.0
Transitional//EN" "http://www.w3.org/TR/xhtml1/DTD/
xhtml1-transitional.dtd">
<html xmlns="http://www.w3.org/1999/xhtml"
xml:lang="en">
<head>
<meta http-equiv="Content-Type" content="text/html;
charset=UTF-8" />
<title><%= @title || “Awesome Site” %></title>
</head>
<body>
<div id='wrapper'>
<div id='header'>
<h1>Awesome Site</h1>
</div>
<div id='content'>
<%= yield %>
</div>
<div id='footer'>
<small>Copyright Hampton Catlin</small>
</div>
</div>
</body>
</html>
Pretty standard stuff. In this example (à la Rails), the
yield
part is where w e print out the page-specific contents. Let’s
convert it the w a y that w e know how so far.
Note: T r y doing these next few steps along with us. Grab
one of y o u r sites, throw it into a tmp file and start hacking
away at it. W e promise it feels great!
106 • Appendix 2. Introduction to Haml
report erratum • discuss
www.it-ebooks.info

First thing’s first: rip out those pesky end tags!
Download haml/haml_h2.html
<!DOCTYPE html PUBLIC "-//W3C//DTD XHTML 1.0
Transitional//EN" "http://www.w3.org/TR/xhtml1/DTD/
xhtml1-transitional.dtd">
<html xmlns="http://www.w3.org/1999/xhtml"
xml:lang="en">
<head>
<meta http-equiv="Content-Type" content="text/html;
charset=UTF-8" />
<title><%= @title || “Awesome Site” %>
<body>
<div id='wrapper'>
<div id='header'>
<h1>Awesome Site
<div id='content'>
<%= yield %>
<div id='footer'>
<small>Copyright Hampton Catlin
Much neater. Let’s Hamlize it even more! We’ll go ahead
and get rid of the
<div>
tags too. No sense in wasting our
time.
Note: For the HTML tag, w e have to use the old-school
hashrocket syntax for Ruby attributes. Why? Because the
JSON-style attributes don’t let y o u have dashes in them.
Stupid Ruby hashes.
Download haml/haml_h3.html
<!DOCTYPE html PUBLIC "-//W3C//DTD XHTML 1.0
Transitional//EN" "http://www.w3.org/TR/xhtml1/DTD/
xhtml1-transitional.dtd">
%html{'xmlns' => "http://www.w3.org/1999/xhtml",
'xml:lang' => "en"}
%head
<meta http-equiv="Content-Type" content="text/html;
charset=UTF-8" />
%title= @title || “Awesome Site”
%body
#wrapper
#header
%h1 Awesome Site
#content= yield
#footer
%small Copyright Hampton Catlin
A few things to notice: when the contents aren’t dynamic,
y o u can just put them after the tag name. For instance:
%small
report erratum • discuss
Appendix 2. Introduction to Haml • 107
www.it-ebooks.info

Copyright Hampton Catlin
. No equals sign means it’s not going
to evaluate it: it’s just static text.
Also, w e left the meta tag alone. It’s ugly and will remain
ugly. Converting it to a Haml tag achieves nothing. So nor-
mally w e have to leave that, but for yo u r reference, here is
how to do a self-closing tag like that.
%meta{“http-equiv” => "Content-Type", “content” =>
"text/html; charset=UTF-8"}/
W e just put a
/
on the end, and the tag knows to self-close.
So if w e wanted to write
<br/>
,w e can write
%br/
instead.
W e still have one really ugly thing left on this page—the
DOCTYPE! Ugh. How many people just copy and paste
from one project to another? W e definitely do! So in Haml,
w e have alovely little helper (named after one of our favorite
bands) called
!!!
that does the job for us.
Download haml/haml_h4.html
!!!
%html{'xmlns' => "http://www.w3.org/1999/xhtml",
'xml:lang' => "en"}
%head
<meta http-equiv="Content-Type" content="text/html;
charset=UTF-8" />
%title= @title || “Awesome Site”
%body
#wrapper
#header
%h1 Awesome Site
#content= yield
#footer
%small Copyright Hampton Catlin
Voilà. No more ugly DOCTYPE line. If y o u w a n t a specific
output type, y o u can always reference the Haml documen-
tation for a complete list of v a r i a t i o n s . 21
One more thing: comments. Just as with regular program-
ming, good commenting is almost always a good idea. If w e
w a n t to do anonprinting comment (i.e., something that w e ’ r e
only saying internally), then w e can just do the following:
-# This comment won’t print
21. http://haml-lang.com/docs/yardoc/file.HAML_REFERENCE.html
108 • Appendix 2. Introduction to Haml
report erratum • discuss
www.it-ebooks.info

Basically, the
-
means it’s a nonprinting Ruby line, and the
#
is the standard Ruby form for comments. So it’s just a little
hack to do nonprinting comments.
What if y o u w a n t real HTML comments? OK!
/ This is an HTML comment
This compiles to:
<!-- This is an HTML comment -->
report erratum • discuss
Appendix 2. Introduction to Haml • 109
www.it-ebooks.info

Index
SYMBOLS
!=
,52
#{…}
,48–49, 51
_
prefix, 26
$
prefix, 20
&
,16–17
+
prefix, 38
/*…*/
,12
//…
,12
<
,52
=
prefix, 38
==
,52
>
,52
A
abs()
,98
adjust-color()
,95
adjust-hue()
,25, 95
alpha()
,94
append()
,99
asset pipeline, 8
B
blue()
,93
Blueprint CSS, 85–91
documentation wiki,
85
installing, 85
borders, rounded, 44–45
bullet points, 66–67
buttons, styling, 90–91
C
calculations, 22–23
ceil()
,98
change-color()
,96
Clearfix, 72–73
color management, 24–25
column layout
with Blueprint, 86–87
with Compass, 78–79
comments
in Haml, 109
in Sass, 12–13
comparable()
,98
comparison operators, 52
Compass, 59–60, 62–81
documentation, 59
installing, 59
from
sass
command,
59
setting up projects,
62–63
compass
command options
compile
,62
create
,63
watch
,62–63
compiling Sass, 6–7, 10
CSS output style, 18–
19
complement()
,97
compressed CSS, 18–19
conditional statements,
52–53
convert
command, 6
CSS output style, 18–19
CSS reset, 30–31
CSS terminology, xii
D
darken()
,95
debugging Sass, 42–43
declaration blocks, xii
!default
,20
default v a r i a b l e s , 20
desaturate()
,25, 95
DOCTYPE
,108
documentation
Blueprint CSS, 85
Compass, 59
Haml, 101
Sass, xv
DRY (Don’t Repeat Y o u r -
self), xi
E
@each
,50–51
editors, 4
ellipses, 74–75
@else
,52–53
environment.rb
file, 8
error messages, 42–43
@extend
,36–37
F
fade-in()
,94
fade-out()
,95
file extensions
.sass
extension, 4
.scss
extension, 4
FireSass for Firebug, 42
floor()
,98
font family library, 29
font-family v a r i a b l e s , 28
fonts, fancy, 88–89
G
Gemfile
,9
global reset, 64–65
global v a r i a b l e s , 20
grayscale()
,25, 97
green()
,93
www.it-ebooks.info

H
Haml
documentation, 101
from ERB, 102–106
from HTML, 106–109
installing, 101
help
command, xv
horizontal lists, 68–69
hsl()
,93
hsla()
,93
hue()
,93
I
@if
,52–53
if()
,99
@import
,26–27, 30
@include
,38–39, 41
index()
,99
installation
Blueprint CSS, 85
Compass, 59
Haml, 101
Ruby, 4
Sass, 4–5
interpolation, 48–49
invert()
,97
J
join()
,99
L
length()
,98
lighten()
,25, 95
lightness()
,94
lists, unordered, 66–69
M
@media
,54–55
mix()
,25, 97
@mixin
,38–41
N
nested reset, 64–65
nesting
with
@media
,54–55
with selector scoping,
14–15
Notepad++, 4
nth()
,98
numeric-transformation()
,99
O
opacify()
,94
opacity()
,46–47, 94
Original Sass
defined, xiii
mixin syntax, 38
output style, 18
P
percentage()
,98
properties
copying between
classes, 36
defined, xii
as v a r i a b l e s , 20
Q
quote()
,97
R
Rails and Sass, 8–9
r e d ( )
,93
resetting CSS
with Compass, 64–65
with Sass, 30–31
r g b ( )
,93
r o u n d ( )
,98
Ruby, installing, 4
S
.sass
extension, 4
Sass (Syntactically A w e -
some Style Sheets)
Compass extensions,
59–60, 62–81
history, xi
installing, 4–5
with Rails, 8–9
reference docs, xv
SCSS vs. Original
Sass, xiii
sass
command options
compass
,59
convert
,6
debug-info
,42
help
,xv
line-comments
,42–43
style
,18–19
watch
,6
Sass Lang Google group,
xv
SassScripts
conditionals, 52
defined, 48
function reference,
93–99
saturate()
,25, 95
saturation()
,94
scale-color()
,96
scoped v a r i a b l e s , 20
Scout, 10–11
.scss
extension, 4
SCSS (Sassy CSS), xiii
selector scoping, 14–17
spriting images, 80–81
sticky footers, 70–71
stretching, 76–77
styles, copying, 36, 50–51
T
text editors, 4
text modifications, 74–75,
88–89
TextMate, 4
transparentize()
,95
truncating text, 74–75
type-of()
,98
U
unit()
,98
unitless()
,98
unquote()
,97
V
v a r i a b l e s , 20–21
with colors, 24
with font families, 28
with mixins, 40–41
V i m , 4
W
watch
command, 6
Z
zip()
,99
112 • Index
www.it-ebooks.info

The Pragmatic Bookshelf
The Pragmatic Bookshelf features books written by developers for developers. The titles
continue the w e l l - k n o w n Pragmatic Programmer style and continue to garner awards
and rave reviews. As development gets more and more difficult, the Pragmatic Program-
mers will be there with more titles and products to help y o u stay on top of y o u r game.
Visit Us Online
This Book’s Home Page
http://pragprog.com/titles/pg_sass
Source code from this book, errata, and other resources. Come give us feedback, too!
Register for Updates
http://pragprog.com/updates
Be notified when updates and new books become available.
Join the Community
http://pragprog.com/community
Read our weblogs, join our online discussions, participate in our mailing list, interact
with our wiki, and benefit from the experience of other Pragmatic Programmers.
New and Noteworthy
http://pragprog.com/news
Check out the latest pragmatic developments, new titles and other offerings.
Buy the Book
If y o u liked this eBook, perhaps y o u ' d like to have a paper copy of the book. It's available
for purchase at our store:
http://pragprog.com/titles/pg_sass
Contact Us
http://pragprog.com/catalog
Online Orders:
support@pragprog.com
Customer Service:
translations@pragprog.com
International Rights:
academic@pragprog.com
Academic Use:
http://pragprog.com/write-for-us
Write for Us:
+1 800-699-7764Or Call:
www.it-ebooks.info
