Psplink Manual
User Manual:
Open the PDF directly: View PDF ![]() .
.
Page Count: 13
PSPLink v3.0
A general purpose loader tool for PSP homebrew development
(c) TyRaNiD 2005/2006/2007
(c) Julian T 2005/2006
(c) Rasmus B 2006
(c) John_K 2005
Table of Contents
1.Introduction.......................................................................................................................................3
2.Installation.........................................................................................................................................3
3.The Shell............................................................................................................................................3
4.Address Calculator............................................................................................................................5
5.Exceptions and Debugging................................................................................................................7
6.Debugging with GDB........................................................................................................................8
7.Scripting Support...............................................................................................................................8
8.USB Host filing system.....................................................................................................................8
9.Example of Use...............................................................................................................................10
10.USB HostFS for Windows.............................................................................................................11
11.FAQ/Troubleshooting....................................................................................................................12
12.Glossary.........................................................................................................................................12
13.Legal..............................................................................................................................................13
14.Thanks and Greetz.........................................................................................................................13

1.Introduction
PSPLINK is licensed under the BSD license, see LICENSE in PSPLINK root for details.
This manual contains the basic information necessary to setting up PSPLINK for development and a
short guide on the various features the tool provides. It is assumed that the reader understands the
concepts of programming, is able to setup a pspdev.org toolchain and sdk and has at least a basic
grasp of how the PSP architecture works.
So what is this?
PSPLINK is an attempt at producing a loader/development application to eliminate the need to go
back to the VSH every time. It provides a shell over USB from which you can load new
applications, dump useful system information and then reset the PSP to start another application.
You can also access some of the features of PSPLINK using a simple on screen console shell, which
maps commands to button presses. The program mounts the USB device so you can copy new
executables onto the memory stick for execution or you can choose to use the USB host filing
system which allows you to access programs directly from your PC. It also eliminates some of the
boilerplate code necessary for executables by installing stdio and kprintf handlers for TTY output as
well as a built in exception handler, rudimentary debugger and GDB server.
It is designed so that normal user mode applications can be developed as easily as possible, without
having to resort to loading first into kernel mode. While it is not designed for developing kernel
software it is fully capable of doing so, as well as giving you a more in depth understanding on how
the PSP kernel operates by allowing you to inspect much of the system in real time (such as
currently loaded modules or threads).
2.Installation
If you have downloaded a binary release of psplink then this first step can be skipped. In order to
build PSPLINK from source you require the very latest pspdev.org toolchain and PSPSDK. Due to
the rapid development of the SDK as well as PSPLINK things can change on a daily basis. As long
as you have everything set up correctly the just go to the root of the source and type :
make release
Copy across the version of PSPLINK for your PSP. v1.0 and v1.5 versions are under the release
directory while ones for OE firmwares are under release_oe. Note it is possible to run 1.5 PSPLINK
and 3.XOE PSPLINK by putting them in separate directories (i.e. GAME150 and GAME3XX).
When you have finished configuring PSPLINK ensure that the USB drive is unmounted and
navigate using the VSH to the memory stick games and run the PSPLINK menu option.
Now build the usbhostfs_pc utility and pspsh. See the section of usbhostfs_pc for more information
on building. Run up the usbhostfs_pc utility and it should indicate it has connected, then in another
terminal run pspsh, a 'host0:/>' prompt should appear.
3.The Shell
PSPLINK is controlled through a text terminal, which to some might seem arcane but it provides
the simplest, most portable interface there can be. The output of the PSP at this level is inherently
textual so why not use that fact. There is no technical reason why a GUI tool could not be written to
control PSPLINK, it is just not been done yet.
When you connect to PSPLINK you will be presented with a prompt (if you don't see one then hit

enter and one should appear). From this prompt you can start typing commands to load and run
modules, manipulate threads, print screen shots of what is currently on the PSP's screen and much
more.
The simplest command is help, type this and hit enter and it will provide you will a list of command
categories and brief descriptions. Now just type help category to get a list of what commands are
available under that section. If a command interests you then type help name and it will print some
more information about that command including a brief description and parameters. Almost all
commands have shorter synonyms which can be used instead of the full name (for example the
synonym for help is the single character '?'), any synonym is included with the commands help.
The PSPLINK shell interpreter handles most of the normal features you would expect from a shell
such as argument quoting (i.e. enclosing arguments in “ or ') and character escaping with \ (useful
for escaping spaces or quotes inside other quotes). It also allows tab completion of file names and
command.
There are some special character sequences when using the shell which makes life slightly easier.
They are ALT+R for reset, ALT+S for instruction stepping and ALT+K for instruction skipping.
It is also possible to use environment variables with the shell, typing 'env' prints the current list. To
use them in the command line type the $(VARIABLE) replacing VARIABLE with the name of the
environment.
Loading and Running Modules
The core feature of PSPLINK is the ability to load and run modules, a module in this case refers to
either a PRX (a relocatable ELF file) or a PFX (a non-relocatable ELF file, built by default with the
pspdev.org toolchain). PSPLINK's design ensures that very little user memory is wasted so almost
any application can be run, if all user memory is needed it is possible to disable the user mode part
of PSPLINK (with the pluser initialisation file option).
There are a number of commands PSPLINK's shell provides for manipulating modules, however
only a subset will be described here (see the full command list for the other possible commands).
The simplest way to load and start a module is to pass its name as a path to the shell. The PSPLINK
shell maintains a current working directory (which is shown in the prompt) so if the file is in the
current directory you can just type ./filename.prx just like you would do on most *nix shells. The
PSP file-system works in a similar way to Windows's drive hierarchy. Each type of device be it
memory stick, flash or host has a drive prefix nameX: where name is the name of the device (e.g.
ms) X is the device number (normally 0 unless special). PSPLINK treats paths as relative to the
current device, so if you are in ms0:/PSP/GAME and you pass /sample.prx you will get
ms0:/sample.prx. You can however pass absolute paths with the device prefix to load from another
location. PSPLINK also supports a global path. If you specify a program at the prompt without any
directory slashes it will try and search your path for you. If the program is found it will be executed.
Once you start a module the shell will print some useful information such as the UID and name of
the module you have just started. This information can be used later to inspect the module
information. You application should now be running and doing what ever you coded it to do.
PSPLINK also supports passing command line arguments to the module, this works just as you
would expect with any other shell.
When you have finished with your current application you have a few choices. The simplest is to
just reset PSPLINK to get back to a nice clean environment. This is done with the reset command.
You can also stop a module (with modstop) then unload it from memory (with modunld) however
that can leave threads lying about which will cause exceptions if not stopped. An alternative is the
kill command which will stop your module, hunt out it's threads deleting them in the process and
finally unloading the module. This can leave your PSP in an unknown state so it normally best to
just reset. It is also important to note that by default PSPLINK will reset itself if the application calls
sceKernelExitGame() (such as in an exit callback). This is configurable in the psplink.ini file.

4.Address Calculator
PSPLINK contains a number of commands which take memory addresses as arguments, while you
could just use absolute addresses (and you still can) it would be nice to be able to pass a calculated
result. PSPLINK supports a number of standard operators and special operators to make calculating
addresses as simple as possible. It is worth noting now that the calculator does not have any
operator precedence, except for parenthesis, it operates strictly left to right. The upshot of this is a
calculation like 1+2*3 would equal 7 in C but would actually equal 9 in PSPLINK. If you need to
put in precedence then enclose parts of the calculation in parenthesis, so 1+(2*3) would get you the
answer you would be expecting. Numbers can be in decimal, octal (0 prefix) and hex (0x prefix).
Following is a list of the operators and special commands.
Operator
+Addition
-Subtraction
*Multiplication
/Division
&Bitwise AND
|Bitwise OR
^Bitwise XOR
<< Bitwise left shift
>> Bitwise right shift
~Bitwise NOT
*Dereference address
< Logical less than
>Logical greater than
<= Logical less than or equal
>= Logical greater than or equal
&& Logical AND
|| Logical OR
== Logical EQUALS
!= Logical NOT EQUALS
() Parenthesis, specifies precedence.
@Modulename@ Returns the text address of the module Modulename.
@Modulename:N@ Returns the address of the section in Modulename this
corresponds to N (number 1 to 4) (from SceKernelModuleInfo).
@Modulename:sN@ Returns the size of the section in Modulename this corresponds
to N (number 1 to 4) (from SceKernelModuleInfo).
@ModuleName:text@ Returns the text address (synonym for @ModuleName@)
@ModuleName:stext@ Returns the text size
@ModuleName:sdata@ Returns the data size
@ModuleName:sbss@ Returns the bss size.

Operator
@ModuleName:lib,name@ Return the address of the function name (either a NID or a name)
in the library lib from the specified module.
%ThreadName% Extracts ThreadName, finds the thread corresponding to this and
returns the entry address.
%ThreadName:stack% Extracts ThreadName, finds the thread corresponding to this and
returns the stack address.
%ThreadName:sstack% Extracts ThreadName, finds the thread corresponding to this and
returns the stack size.
$reg If an exception has occurred extracts reg and returns the value of
the specified CPU register. reg is the usual mnemonic MIPS
names, e.g. $a0, $v0 plus $epc for the exception program counter
and $fsr for the FPU status/control register. $mod returns the
base address of the module which exceptioned.
Examples:
memdump @PSPLINK@+0x100 – Dump memory starting at the base of the PSPLINK module
plus 256.
savemem $a0 100 memdump.bin – Save 100 bytes to memdump.bin from address specified
in the a0 register of the last exception.
calc $epc-$mod – Calculate the relative address of the exception from the base of the
module, useful for determining the address to pass to psp-addr2line when developing PRX.

5.Exceptions and Debugging
It is a sad fact of programming C/C++ that you will inevitably crash your application. The default
operation of the PSP is to just shut down after 4 seconds when an exception occurs which doesn't
really help you track your problem. PSPLINK installs an exception handler for you to catch
common errors such as accessing illegal memory addresses. When an exception occurs PSPLINK
will catch it and display a register list as well as other useful information. An example is shown
below.
Exception - Breakpoint
Thread ID - 0x04D2091D
Th Name - NetSample
Module ID - 0x04D3430F
Mod Name - NetSample
EPC - 0x088215DC
Cause - 0x00000024
Status - 0x20008613
BadVAddr - 0x00000000
zr:0x00000000 at:0x0008FF00 v0:0x00000000 v1:0x00000001
a0:0x00000001 a1:0x09FBFE40 a2:0x00000000 a3:0x00000000
t0:0x0882E45C t1:0x00000006 t2:0x00000000 t3:0x0882E450
t4:0x0000000E t5:0x0882C6F0 t6:0x08823D54 t7:0x00008600
s0:0x00000008 s1:0x09FBFE44 s2:0x00000001 s3:0x09FBFEF0
s4:0x00000008 s5:0x00000013 s6:0xDEADBEEF s7:0xDEADBEEF
t8:0x00000000 t9:0x0005D470 k0:0x09FBFF00 k1:0x00000000
gp:0x08834B30 sp:0x09FBFE40 fp:0x09FBFEB0 ra:0x08820DC8
This exception dump tells you the state of the processor when it crashed, the type of exception, the
thread it crashed in (if possible) and the module address space it crashed in (if possible). Once an
exception has occurred you can use the $reg options in addressing mode to look around at why your
code crashed.
A useful feature in these situations is the in built disassembler. If you type disasm $epc it will
disassemble the instruction at the point of the crash. From here you can determine what register
likely caused the crash and search around in memory using commands like peekw and memdump.
You can also step through instructions using the step command or if you want to jump over a jal
instruction using the skip command. The debugger can be used to track multi-threaded applications,
PSPLINK supports up to 16 thread contexts which can be selected using the exctx command, for
debugging only the current context is used. For basic needs, where you don't want to get GDB
involved) it is simple and easy to use. A very important thing to note, do not place breakpoints at the
entry address of the module. If you do this then PSPLINK will hang because it is waiting for the
ModuleStart call to finish which never does. Always ensure you break at the first created thread if
you want to debug your application (i.e. set a breakpoint at the main function).
PSPLINK also supports the use of the CPUs inbuilt hardware debugger on PSPs. This is done using
a option to the bpset command.
6.Debugging with GDB
Sometimes debugging with the built in instruction level debugger is not enough, this is where
PSPLINK's GDB Server can come in handy. GDB (GNU Debugger) is a PC application which can
connect to remote computers and perform source level debugging, you will need to build a PC
version of GDB targeted for the PSP in order to use this feature, this can be done using the
pspdev.org toolchain script. You can also build a version of the Insight debugger which is in effect
GDB with a simple GUI.
Build your application with debugging information in it (i.e. use the -g switch when compiling and
linking your code) then copy across a version (stripped or not) to the PSP and execute the command

debug program.elf [args]. This will start up the GDB server, load program.elf (with args if
specified) and listen on your PSP's IP address on port 6999 or setup the communication over USB.
On the PC run the command psp-gdb program.elf and type the command target remote :10001.
GDB should connect and indicate the current program has been stopped in the _start routine.
Now you can use GDB as normal, setting breakpoints in your code, inspecting data etc. A word of
warning, do not try and step through _start as that can only lead to pain, set a breakpoint on the main
function (break main) and type 'c' to begin the application. It should now stop at the start of your
initial thread. When you are done you can type kill to reset PSPLINK or you can type detach and the
application being debugged will continue running.
The PSPLINK GDB server should be able to debug both ELF and PRX files (although ensure you
have the latest up to date PSPSDK for PRX files to work correctly).
7.Scripting Support
PSPLINK supports a very basic script command. A script for PSPLINK is just a text file containing
a list of commands to run in order. Scripts also support argument passing, arguments are specified
by a $ character then the argument number. $0 refers to the path the script was run from. Unlike
previous versions of PSPLINK the script now runs locally. To run the script you can use the %
command (e.g. % /path/to/script), you can also run them by passing the file as an argument to the
pspsh application or make the script executable and put '#!/path/to/pspsh' at the start of the file (in a
UNIX sh style).
8.USB Host filing system
PSPLINK comes with a USB protocol driver to talk to a PC host to create a host filing system. The
host filing system is exported as a new IO device hostX: (where X is 0 through 7) so once you have
set up the driver and the PC side then you can just access files on your PC as if they were on ms0 or
flash0.
For the PC side of things you first need to build the PC tool, this is under the usbhostfs_pc directory.
To build you also need a compiled version of libusb which is used to talk to the device from user
space. The libusb page (libusb website) indicates that it should work on most *nix like operating
systems such as Linux, FreeBSD, MacOSX as well as on Windows. Building on Windows requires
Cygwin, while PSPLINK comes with a pre-prepared driver and library in order to build it you can
work from first principles. How to do this is explained in a dedicated section.
For unix like platforms the application can be built by typing make, if you are building in Cygwin
this should be make BUILD_WIN32=1 instead. On unix like systems the application will need to be
run as root so that libusb can access the USB bus, the recommended way of doing this is change the
executable to be owned by root and then set the SUID bit (e.g. chown root:root usbhostfs_pc;
chmod +s usbhostfs_pc) usbhostfs_pc will drop permissions when they are not needed, it also
means that any files you create will be owned by you and not root. As an added bonus if you want a
simple Readline based shell then build with make READLINE_SHELL=1.
Note that for Windows you also need to install a driver for libusb to operate. When you plug in your
PSP with PSPLINK running it should bring up the familiar Add Hardware wizard, follow the steps
and when asked specify a location for the driver. Point it at the windows/driver directory supplied
with PSPLINK and it should install.
The final step is to just run the application, if everything worked then it should print a line
indicating it has connected to the device. You should be able to now go to the host0:/ directory in
PSPLINK and list the directory or run applications direct from the PC.
The Host FS driver supports up to 8 drive mappings accessed through the devices host0: to host7:.
By default the root of all the filing systems is the current working directory, if you want to change
that you can specify the directories on the command line as arguments to the PC program. E.g.
./usbhostfs_pc /usr/local/pspdev/psp/sdk/sample /home/user/psp_work will map host0: to the
PSPSDK samples directory and host1: to /home/user/psp_work.
Other useful options are:
-v : Verbose mode, prints information about what files/directories are being opened.
-vv : Really verbose mode, prints as much information as possible.
-b port : Sets the base localhost TCP shell port
-d : Print the transfers to and from GDB
-c : Enable case-insensitive mode. Attempts to match file names and directories to the closest match
ignoring case. Useful for running software which is designed for Memory Stick (which is case
insensitive) but the files on the PC have mixed case.
-m : Automatically convert forward slashes to backslashes.
-f filename : Load drive mappings from a file. The format is a text file with each line being the form
num=path. For example 4=/home/user/projects will map host4 to /home/user/projects.
-p pid : Specify the product ID used for the USB connection. Allows you to use multiple PSPs over
USB on one computer. You should also specify the -b option to move the TCP base port and the pid
option in one of the psplink.ini files.
-t timeout: Specify the USB wait timeout in milliseconds (useful for some systems)
-g: Specify global binding for the async TCP channels (defaults to localhost only)
-h : Print help.
Once the usbhostfs_pc is running you can access a simple shell to control a few aspects of the
program without having to close it and restart. The available commands are:
help : Print the list of commands
drives : Print the current drive mappings
mount num path : Mount the directory path as host number num. For example mount 0 /usr/local
will map /usr/local to host0.
load mapfile : Load a drive mapping file. This file is the same form as the -f switch.
save mapfile : Save out the current drive mappings to a file.
nocase on|off : Set case insensitivity mode to on or off. If no argument is specified it will print the
current mode.
gdbdebug on|off : Enable GDB protocol debugging (same as the -d switch).
msslash on|off : Automatically convert forward slashes to backslashes (same as the -m switch).
verbose num : Set the verbose mode, 0 means off, 1 is the same as -v and 2 is the same as -vv.
exit : Exit usbhostfs_pc.
9.Example of Use
This is a simple example for compiling a PSPLINK compatible executable and running it inside the
shell utilising the USB host filing system.
1. Compile up the gu/sprite sample from PSPSDK. Assuming you have correctly installed the
toolchain this is just a case of changing to the /usr/local/pspdev/psp/sdk/sample/gu/sprite
directory and type make.
2. Start up PSPLINK.
3. Start up the PC side of the hostfs driver with the by running the command usbhostfs_pc
/usr/local/pspdev/psp/sdk/samples/gu/sprite. You should see a line saying it connected to the
device.
4. Connect to the PSPLINK shell using pspsh by just running it with no arguments. You should now
see the prompt host0:/> displayed on your terminal. Type ls and it should print the contents of
the sprite sample directory, including the executable sprite.elf.
5. Type ./sprite.elf at the shell and hit the enter key. PSPLINK should now display a bit of
information about the module it is running and on the PSP screen there should be the sprite
sample running.
6. Type modinfo “@Sprite Sample” to print the module information. Note the value of TextAddr is
0x8900000, this is a pretty clear indication this is a PFX file.
7. Now to get back to a clean start reset PSPLINK.
8. Try and build the sprite sample now as a PRX file. Edit the Makefile and add the line
BUILD_PRX=1 after the ASFLAGS line and type make clean; make. You should now have a
sprite.prx file in the sample directory. NOTE: This is important when running code on 3.XOE
which only supports PRXes.
9. Run it with ./sprite.prx. Run the modinfo command again and note that TextAddr has completely
changed.
10.Finally type exit and the PSP should exit back to the PSP's VSH.
10.USB HostFS for Windows
Note that this section is only for people who want to set up the USB driver from scratch on
Windows. Building the PC side of HOSTFS (and consequently the shell and gdb servers) is slightly
more involved than it is on Unix systems. Follow the steps below.
1. Ensure you have Cygwin installed along with compilers etc. Download the latest snapshot of the
libusb-win32 device driver package from http://libusb-win32.sourceforge.net/, it will be called
something like libusb-win32-device-bin-XXXXXX.tar.gz.
2. Extra the libusb package to a directory somewhere, extract the psplink source code to somewhere
Cygwin can access. From the extracted directory copy include/usb.h and lib/gcc/libusb.a to the
usbhostfs_pc directory.
3. Install PSPLINK on your PSP, ensure that the usbhost setting is set to 1, start PSPLINK on the
PSP with a USB cable plugged in.
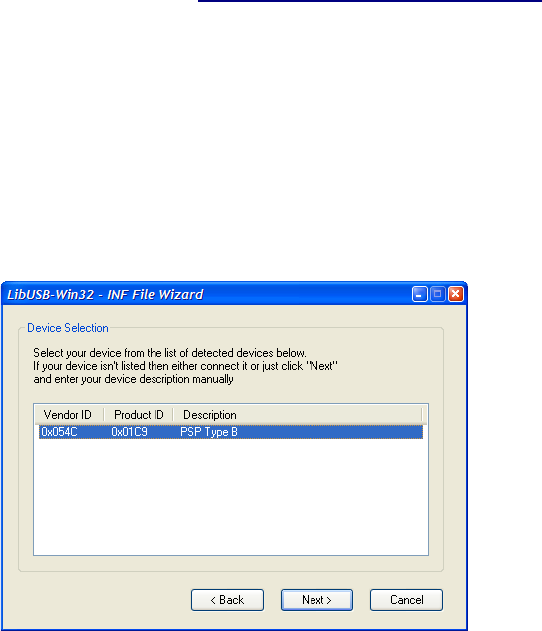
4. Windows should now ask to install a driver for a 'PSP Type-B' device, ignore this for now. Go to
the bin directory in the extracted libusb directory and run the inf-wizard.exe program. Click next
and you should see the following dialog.
5. Ensure that PSP Type B is show, select it and click Next.
6. On the next dialog confirm the information looks correct and click Next again.
7. Now it will ask you for the output location for the .inf file. Navigate to the libusb bin directory
and name the file psp.inf, this will create the files needed for the device driver to install.
8. Now go back to the Windows device installer dialog which we ignored earlier. Choose to browse
for the driver yourself and point it at the libusb bin directory, Windows should now pick up your
device correctly and install it.
9. Go to the usbhostfs_pc directory in Cygwin and type make. You will get some format warnings
but it should generate a executable. If it complains about not finding usb.h or libusb then ensure
you have copied them across as per step 2. Note there is no need to set SUID root or anything on
Windows, however you will almost certainly need to be running as an Administrator.
10.With PSPLINK running run up usbhostfs_pc.exe, the text 'Connected to device' should now be
printed on the terminal. Now using your preferred shell method connect and you should be able
to list the host directories. If you want to use the usbshell (and you have set the usbshell option to
1) you can now use pspsh to connect to the local network address and you should see the USB
shell. If you do not get a prompt printed then hit enter and one should appear.

11.FAQ/Troubleshooting
1. On Mac OSX there is strange crashes, bus errors etc. when using the USB hostfs system: this
seems to be a common libusb bug which causes no end of problems. It might be worth trying the
builds of libusb at http://www.ellert.se/twain-sane/ and see if this fixes it.
2. When loading a kernel mode application sometimes PSPLINK fails to reset correctly: developing
kernel mode applications really isn't what PSPLINK was designed to do. That said it should be
possible to do however you tend to encounter memory starvation and other weirdness. If you
have problems with it try disabling all extra features of PSPLINK such as USB drivers and revert
to an SIO shell. That uses the least amount of memory and might help.
12.Glossary
Term Description
ELF Executable and Linkable Format. A file format specified by the Tool
Interface Standards Committee (TIS) used in the PSP for its executable
objects.
PRX Playstation Relocatable eXecutable. A specially formatted ELF file which
has not been linked to a fixed location. The PSP kernel is capable to
change the position of the executable in memory at load time.
PFX Playstation Fixed eXecutable. A specially formatted ELF file which has
been linked to a fixed location. When the PSP kernel loads the executable
it will try and place it at the specified address. If this is not possible the
load will fail. This is the default output format of PSPSDK, i.e. a plain
ELF file.
Module A module in this context refers to any executable (PRX or PFX) which
the PSP kernel is able to load into memory and execute.
SIO Serial IO, a term to refer to communicating with a device over a serial
port.
13.Legal
The words Playstation, Playstation Portable and PSP are registered trademarks of Sony Computer
Entertainment.
The authors of PSPLINK are not affiliated with Sony Computer Entertainment in any way.
No warranties, expressed or implied is available with this software. While unlikely to damage your
console no responsibility it provided for anything which does go wrong. You are on your own.
Do not ask me about using PSPLINK to pirate PSP software, it is absolutely nothing to do with me,
if I could have done something to prevent it I would have done.
14.Thanks and Greetz
Thanks to Hitmen and groepaz especially for providing some very useful information.
Thanks to pspdev.org for hosting this stuff.
Nil for implementing the original SIO cable and Marcus Comstedt for the hardware information.
And thanks to the people who have bothered to test the code and provide suggestions, in no
particular order Oobles, dot_blank, ginka, sharkus, Shazz, nullp01nter, johnmph, logix, urchin,
jimp.
