Pybullet Quickstart Guide
User Manual:
Open the PDF directly: View PDF ![]() .
.
Page Count: 66

PyBullet
Quickstart Guide
Erwin Coumans, Yunfei Bai, 2017/2018
Visit the forums.
Introduction 2
Hello PyBullet World 3
connect, disconnect 3
setGravity 6
loadURDF, loadSDF, loadMJCF 7
saveWorld 9
saveState, saveBullet, restoreState 9
createCollisionShape/VisualShape 10
createMultiBody 12
stepSimulation 13
setRealTimeSimulation 14
getBasePositionAndOrientation 14
resetBasePositionAndOrientation 15
Transforms: Position and Orientation 15
getAPIVersion 17
Controlling a robot 17
Base, Joints, Links 17
getNumJoints, getJointInfo 18
setJointMotorControl2/Array 19
getJointState(s), resetJointState 21
enableJointForceTorqueSensor 22
getLinkState 23
getBaseVelocity, resetBaseVelocity 25
applyExternalForce/Torque 25
getNumBodies, getBodyInfo,
getBodyUniqueId, removeBody 26
createConstraint, removeConstraint,
changeConstraint 26
getNumConstraints,
getConstraintUniqueId 28
getConstraintInfo/State 28
getDynamicsInfo/changeDynamics 29
setTimeStep 31
setPhysicsEngineParameter 31
resetSimulation 32
startStateLogging/stopStateLogging 33
Synthetic Camera Rendering 35
computeViewMatrix 35
computeProjectionMatrix 36
getCameraImage 36
getVisualShapeData 38
changeVisualShape, loadTexture 39
Collision Detection Queries 39
getOverlappingObjects, getAABB 40
getContactPoints, getClosestPoints 41
rayTest, rayTestBatch 42
getCollisionShapeData 43
Inverse Dynamics, Kinematics 44
calculateInverseDynamics 44
calculateJacobian, MassMatrix 44
calculateInverseKinematics 46
Reinforcement Learning Gym Envs 47
Environments and Data 47
Train and Enjoy: DQN, PPO, ES 50
Virtual Reality 53
getVREvents,setVRCameraState 53
Debug GUI, Lines, Text, Parameters 55
addUserDebugLine, Text 55
addUserDebugParameter 56
setDebugObjectColor 57
configureDebugVisualizer 58
get/resetDebugVisualizerCamera 58
getKeyboardEvents, getMouseEvents 59
Build and install PyBullet 60
Support, Tips, Citation 63
2
Introduction
PyBullet is an easy to use Python module for physics simulation for robotics, games, visual
effects and machine learning. With PyBullet you can load articulated bodies from URDF, SDF,
MJCF and other file formats. PyBullet provides forward dynamics simulation, inverse dynamics
computation, forward and inverse kinematics, collision detection and ray intersection queries.
The Bullet Physics SDK includes PyBullet robotic examples such as a simulated Minitaur
quadruped, humanoids running using TensorFlow inference and KUKA arms grasping objects.
Aside from physics simulation, there are bindings to rendering, with a CPU renderer
(TinyRenderer) and OpenGL visualization and support for Virtual Reality headsets such as HTC
Vive and Oculus Rift. PyBullet also has functionality to perform collision detection queries
(closest points, overlapping pairs, ray intersection test etc) and to add debug rendering (debug
lines and text). PyBullet has cross-platform built-in client-server support for shared memory,
UDP and TCP networking. So you can run PyBullet on Linux connecting to a Windows VR
server.
PyBullet wraps the new Bullet C-API, which is designed to be independent from the underlying
physics engine and render engine, so we can easily migrate to newer versions of Bullet, or use
a different physics engine or render engine. By default, PyBullet uses the Bullet 2.x API on the
CPU. We will expose Bullet 3.x running on GPU using OpenCL as well. There is also a C++ API
similar to PyBullet, see b3RobotSimulatorClientAPI.
PyBullet can be easily used with TensorFlow and frameworks such as OpenAI Gym.
Researchers from Google Brain [1,2,3], X, Stanford AI Lab and OpenAI use PyBullet/Bullet
C-API.
The installation of PyBullet is as simple as (sudo) pip install PyBullet (Python 2.x), pip3 install
PyBullet. This will expose the PyBullet module as well as PyBullet_envs Gym environments.

3
Hello PyBullet World
Here is a PyBullet introduction script that we discuss step by step:
import pybullet as p
import time
import pybullet_data
physicsClient = p.connect(p.GUI)#or p.DIRECT for non-graphical version
p.setAdditionalSearchPath(pybullet_data.getDataPath()) #optionally
p.setGravity(0,0,-10)
planeId = p.loadURDF("plane.urdf")
cubeStartPos = [0,0,1]
cubeStartOrientation = p.getQuaternionFromEuler([0,0,0])
boxId = p.loadURDF("r2d2.urdf",cubeStartPos, cubeStartOrientation)
for i in range (10000):
p.stepSimulation()
time.sleep(1./240.)
cubePos, cubeOrn = p.getBasePositionAndOrientation(boxId)
print(cubePos,cubeOrn)
p.disconnect()
connect, disconnect
After importing the PyBullet module, the first thing to do is 'connecting' to the physics simulation.
PyBullet is designed around a client-server driven API, with a client sending commands and a
physics server returning the status. PyBullet has some built-in physics servers: DIRECT and
GUI. Both GUI and DIRECT connections will execute the physics simulation and rendering in
the same process as PyBullet.
Note that in DIRECT mode you cannot access the OpenGL and VR hardware features, as
described in the "Virtual Reality" and "Debug GUI, Lines, Text, Parameters" chapters. DIRECT
mode does allow rendering of images using the built-in software renderer through the
'getCameraImage' API. This can be useful for running simulations in the cloud on servers
without GPU.
You can provide your own data files, or you can use the PyBullet_data package that ships with
PyBullet. For this, import pybullet_data and register the directory using
pybullet.setAdditionalSearchPath(pybullet_data.getDataPath()).
getConnectionInfo
Given a physicsClientId will return the list [isConnected, connectionMethod]
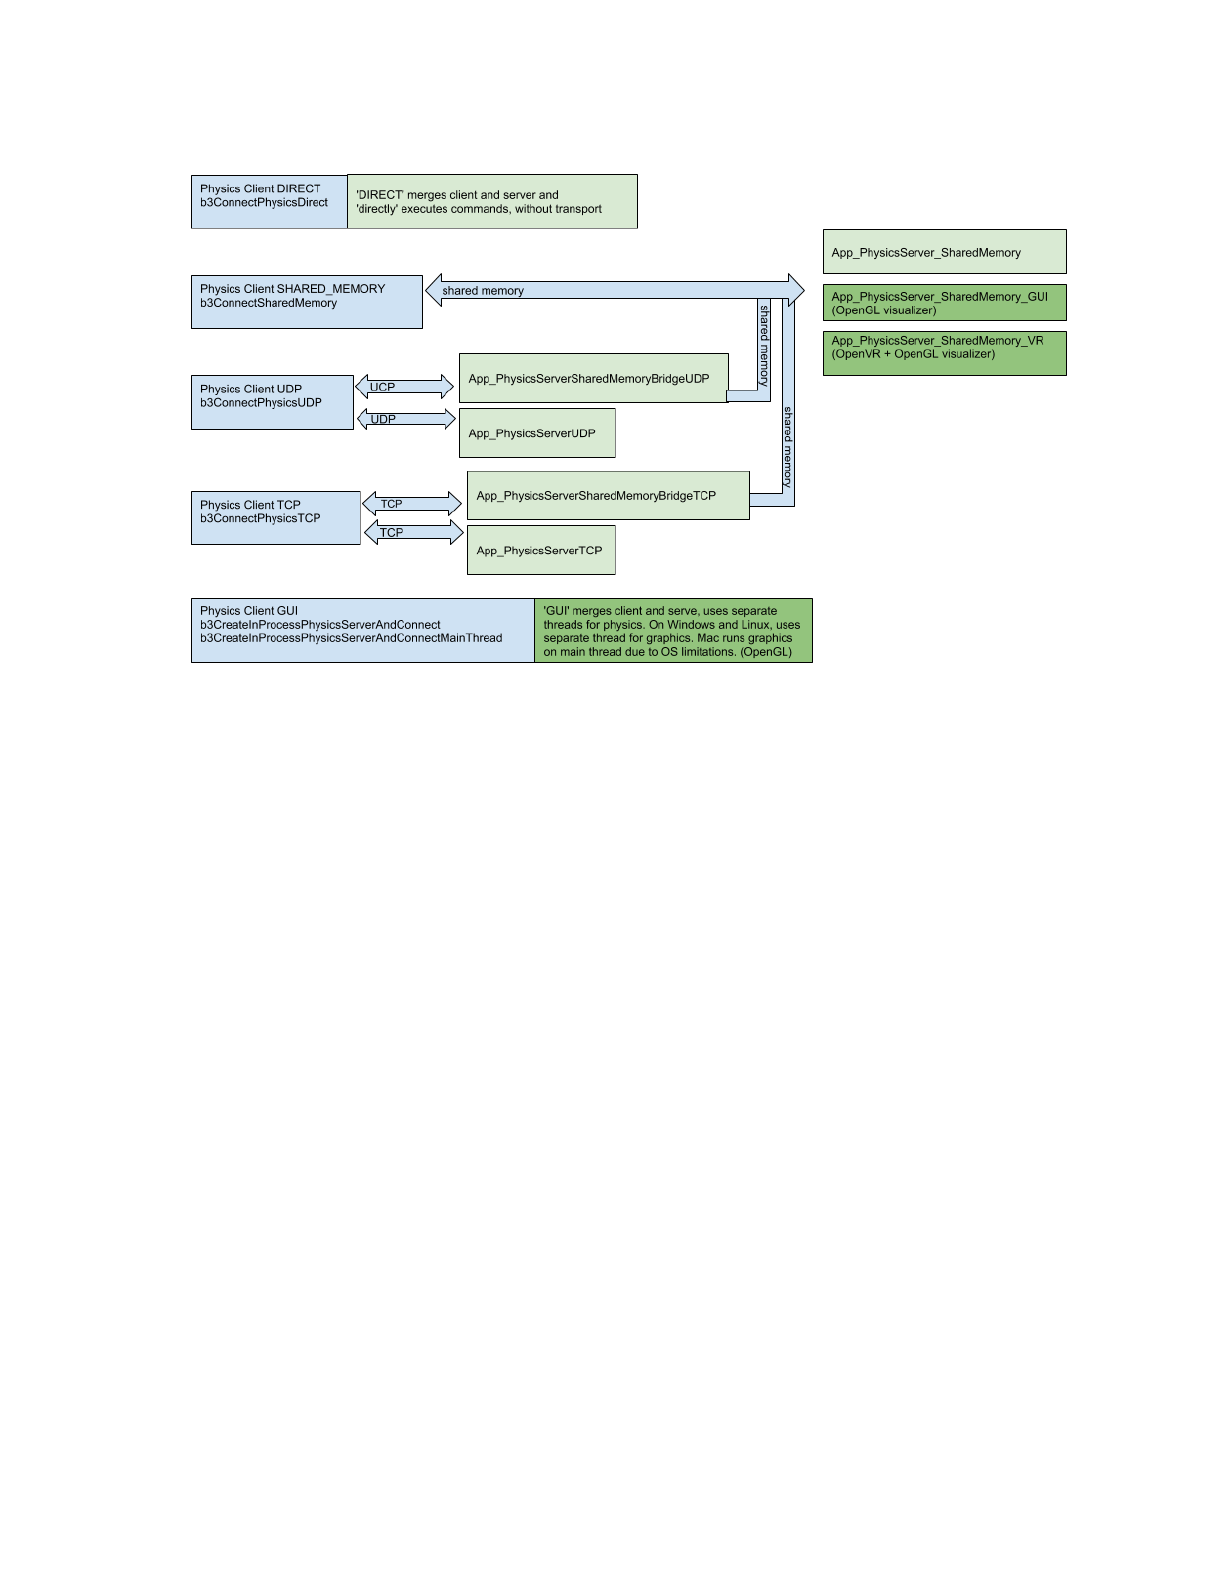
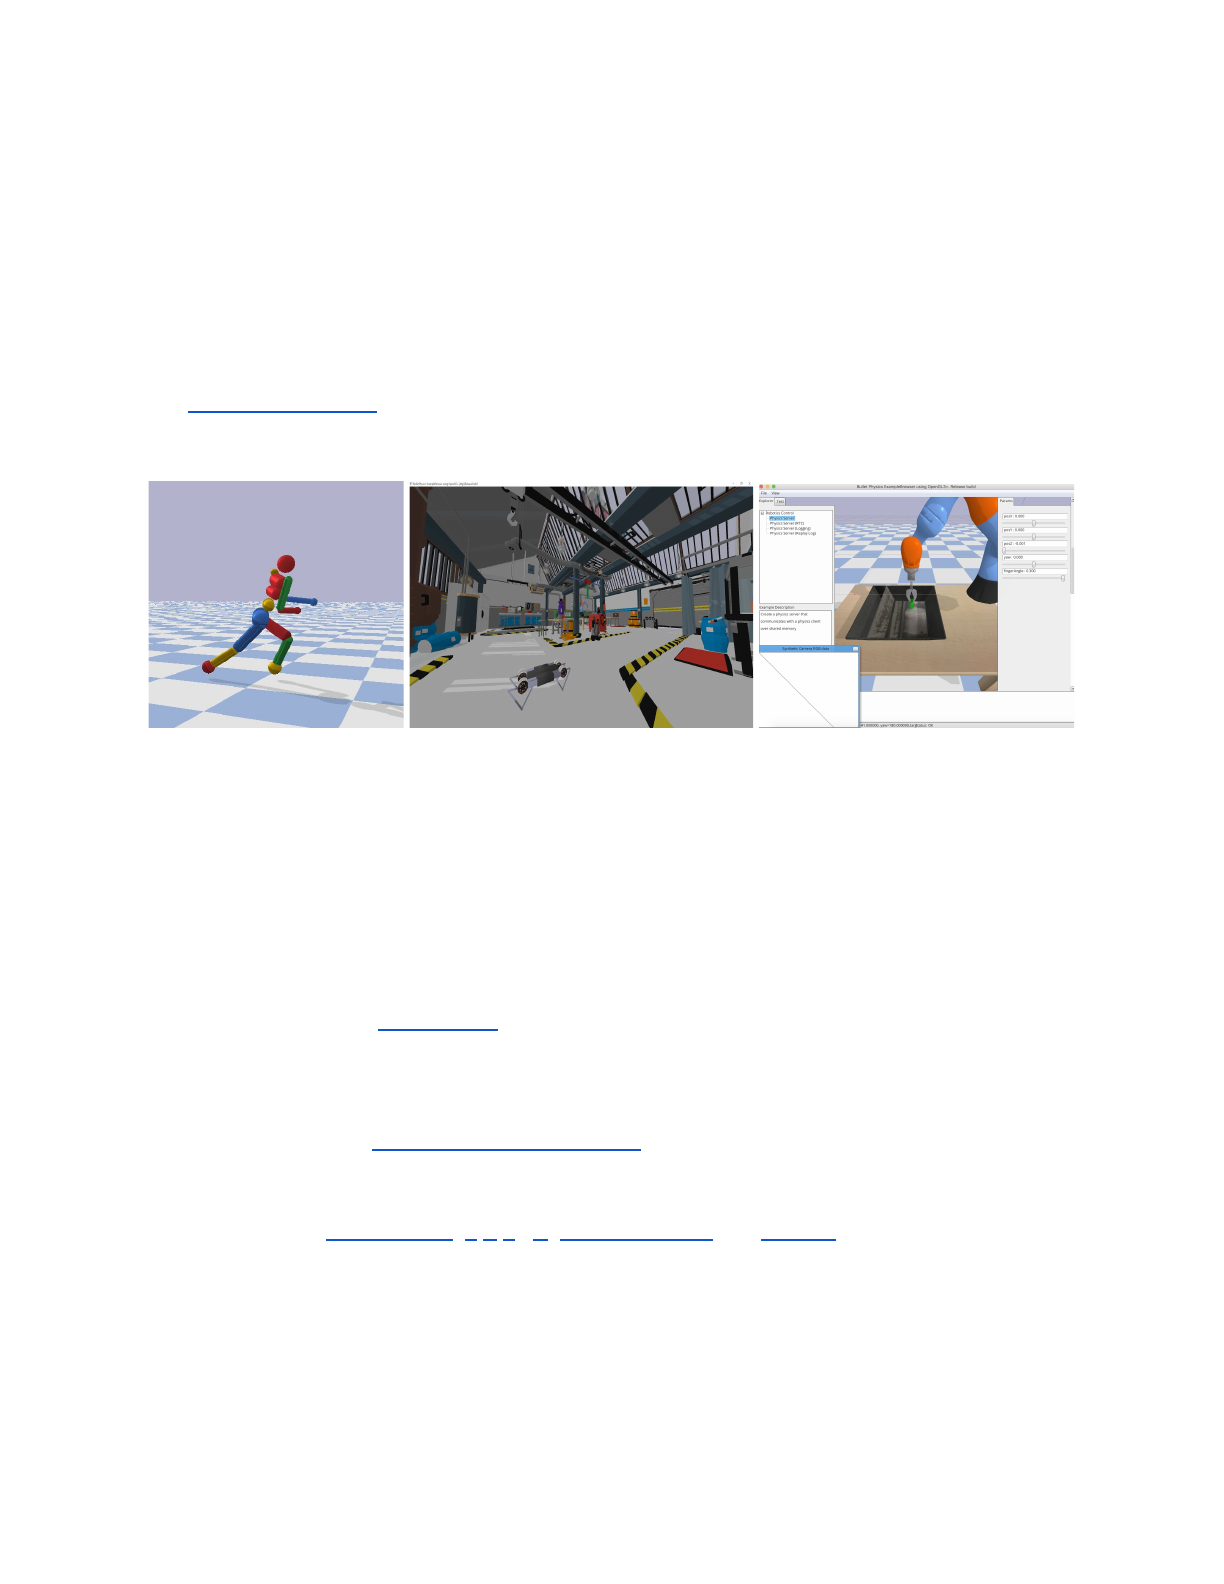
4
Diagram with various physics client (blue) and physics server (green) options. Dark green
servers provide OpenGL debug visualization.
connect using DIRECT, GUI
The DIRECT connection sends the commands directly to the physics engine, without using any
transport layer and no graphics visualization window, and directly returns the status after
executing the command.
The GUI connection will create a new graphical user interface (GUI) with 3D OpenGL rendering,
within the same process space as PyBullet. On Linux and Windows this GUI runs in a separate
thread, while on OSX it runs in the same thread due to operating system limitations. On Mac
OSX you may see a spinning wheel in the OpenGL Window, until you run a 'stepSimulation' or
other PyBullet command.
The commands and status messages are sent between PyBullet client and the GUI physics
simulation server using an ordinary memory buffer.
It is also possible to connect to a physics server in a different process on the same machine or
on a remote machine using SHARED_MEMORY, UDP or TCP networking. See the section
about Shared Memory, UDP and TCP for details.
Unlike almost all other methods, this method doesn't parse keyword arguments, due to
backward compatibility.

5
The connect input arguments are:
required
connection mode
integer:
DIRECT,
GUI,
SHARED_
MEMORY,
UDP, TCP
DIRECT mode create a new physics engine and directly
communicates with it. GUI will create a physics engine with
graphical GUI frontend and communicates with it.
SHARED_MEMORY will connect to an existing physics engine
process on the same machine, and communicates with it over
shared memory. TCP or UDP will connect to an existing
physics server over TCP or UDP networking.
optional
key
int
in SHARED_MEMORY mode, optional shared memory key.
When starting ExampleBrowser or SharedMemoryPhysics_*
you can use optional command-line --shared_memory_key to
set the key. This allows to run multiple servers on the same
machine.
optional
UdpNetworkAddress
(UDP and TCP)
string
IP address or host name, for example "127.0.0.1" or "localhost"
or "mymachine.domain.com"
optional
UdpNetworkPort
(UDP and TCP)
integer
UDP port number. Default UDP port is 1234, default TCP port
is 6667 (matching the defaults in the server)
optional
options
string
command-line option passed into the GUI server. At the
moment, only the --opengl2 flag is enabled: by default, Bullet
uses OpenGL3, but some environments such as virtual
machines or remote desktop clients only support OpenGL2.
Only one command-line argument can be passed on at the
moment.
connect returns a physics client id or -1 if not connected. The physics client Id is an optional
argument to most of the other PyBullet commands. If you don't provide it, it will assume physics
client id = 0. You can connect to multiple different physics servers, except for GUI.
For example:
pybullet.connect(pybullet.DIRECT)
pybullet.connect(pybullet.GUI, options="--opengl2")
pybullet.connect(pybullet.SHARED_MEMORY,1234)
pybullet.connect(pybullet.UDP,"192.168.0.1")
pybullet.connect(pybullet.UDP,"localhost", 1234)
pybullet.connect(pybullet.TCP,"localhost", 6667)
connect using Shared Memory
There are a few physics servers that allow shared memory connection: the
App_SharedMemoryPhysics, App_SharedMemoryPhysics_GUI and the Bullet Example
Browser has one example under Experimental/Physics Server that allows shared memory
connection. This will let you execute the physics simulation and rendering in a separate
process.

6
You can also connect over shared memory to the App_SharedMemoryPhysics_VR, the Virtual
Reality application with support for head-mounted display and 6-dof tracked controllers such as
HTC Vive and Oculus Rift with Touch controllers. Since the Valve OpenVR SDK only works
properly under Windows, the App_SharedMemoryPhysics_VR can only be build under Windows
using premake (preferably) or cmake.
connect using UDP or TCP networking
For UDP networking, there is a App_PhysicsServerUDP that listens to a certain UDP port. It
uses the open source enet library for reliable UDP networking. This allows you to execute the
physics simulation and rendering on a separate machine. For TCP PyBullet uses the clsocket
library. This can be useful when using SSH tunneling from a machine behind a firewall to a
robot simulation. For example you can run a control stack or machine learning using PyBullet on
Linux, while running the physics server on Windows in Virtual Reality using HTC Vive or Rift.
One more UDP application is the App_PhysicsServerSharedMemoryBridgeUDP application that
acts as a bridge to an existing physics server: you can connect over UDP to this bridge, and the
bridge connects to a physics server using shared memory: the bridge passes messages
between client and server. In a similar way there is a TCP version (replace UDP by TCP).
Note: at the moment, both client and server need to be either 32bit or 64bit builds!
disconnect
You can disconnect from a physics server, using the physics client Id returned by the connect
call (if non-negative). A 'DIRECT' or 'GUI' physics server will shutdown. A separate
(out-of-process) physics server will keep on running. See also 'resetSimulation' to remove all
items.
Parameters of disconnect:
optional
physicsClientId
int
if you connect to multiple physics servers, you can pick which one.
setGravity
By default, there is no gravitational force enabled. setGravity
lets you set the default gravity
force for all objects.
The setGravity input parameters are: (no return value)
required
gravityX
float
gravity force along the X world axis

7
required
gravityY
float
gravity force along the Y world axis
required
gravityZ
float
gravity force along the Z world axis
optional
physicsClientId
int
if you connect to multiple physics servers, you can pick which one.
loadURDF, loadSDF, loadMJCF
The loadURDF will send a command to the physics server to load a physics model from a
Universal Robot Description File (URDF). The URDF file is used by the ROS project (Robot
Operating System) to describe robots and other objects, it was created by the WillowGarage
and the Open Source Robotics Foundation (OSRF). Many robots have public URDF files, you
can find a description and tutorial here: http://wiki.ros.org/urdf/Tutorials
Important note: most joints (slider, revolute, continuous) have motors enabled by default that
prevent free motion. This is similar to a robot joint with a very high-friction harmonic drive. You
should set the joint motor control mode and target settings using pybullet.setJointMotorControl2.
See the setJointMotorControl2 API for more information.
Warning: by default, PyBullet will cache some files to speed up loading. You can disable file
caching using setPhysicsEngineParameter(enableFileCaching=0).
The loadURDF arguments are:
required
fileName
string
a relative or absolute path to the URDF file on the file
system of the physics server.
optional
basePosition
vec3
create the base of the object at the specified position in
world space coordinates [X,Y,Z]
optional
baseOrientation
vec4
create the base of the object at the specified orientation
as world space quaternion [X,Y,Z,W]
optional
useMaximalCoordinates
int
Experimental. By default, the joints in the URDF file are
created using the reduced coordinate method: the joints
are simulated using the Featherstone Articulated Body
algorithm (btMultiBody in Bullet 2.x). The
useMaximalCoordinates option will create a 6 degree of
freedom rigid body for each link, and constraints
between those rigid bodies are used to model joints.
optional
useFixedBase
int
force the base of the loaded object to be static
optional
flags
int
URDF_USE_INERTIA_FROM_FILE: by default, Bullet
recomputed the inertia tensor based on mass and
volume of the collision shape. If you can provide more
accurate inertia tensor, use this flag.

8
URDF_USE_SELF_COLLISION: by default, Bullet
disables self-collision. This flag let's you enable it. You
can customize the self-collision behavior using the
following flags:
URDF_USE_SELF_COLLISION_EXCLUDE_PARENT
will discard self-collision between links that are directly
connected (parent and child).
URDF_USE_SELF_COLLISION_EXCLUDE_ALL_PAR
ENTS will discard self-collisions between a child link
and any of its ancestors (parents, parents of parents,
up to the base).
URDF_USE_IMPLICIT_CYLINDER, will use a smooth
implicit cylinder. By default, Bullet will tesselate the
cylinder into a convex hull.
optional
globalScaling
float
globalScaling will apply a scale factor to the URDF
model.
optional
physicsClientId
int
if you are connected to multiple servers, you can pick
one.
loadURDF returns a body unique id, a non-negative integer value. If the URDF file cannot be
loaded, this integer will be negative and not a valid body unique id.
loadSDF, loadMJCF
You can also load objects from other file formats, such as .bullet, .sdf and .mjcf. Those file
formats support multiple objects, so the return value is a list of object unique ids. The SDF
format is explained in detail at http://sdformat.org. The loadSDF command only extracts some
essential parts of the SDF related to the robot models and geometry, and ignores many
elements related to cameras, lights and so on. The loadMJCF command performs basic import
of MuJoCo MJCF xml files, used in OpenAI Gym. See also the Important note under loadURDF
related to default joint motor settings, and make sure to use setJointMotorControl2.
required
fileName
string
a relative or absolute path to the URDF file on the file
system of the physics server.
optional
useMaximalCoordinates
int
Experimental. See loadURDF for more details.
optional
globalScaling
float
every object will be scaled using this scale factor (including
links, link frames, joint attachments and linear joint limits)
optional
physicsClientId
int
if you are connected to multiple servers, you can pick one.
loadBullet, loadSDF and loadMJCF will return an array of object unique ids:
objectUniqueIds
list of int
the list includes the object unique id for each object loaded.

9
saveWorld
You can create an approximate snapshot of the current world as a PyBullet Python file, stored
on the server. saveWorld can be useful as a basic editing feature, setting up the robot, joint
angles, object positions and environment for example in VR. Later you can just load the
PyBullet Python file to re-create the world. The python snapshot contains loadURDF commands
together with initialization of joint angles and object transforms. Note that not all settings are
stored in the world file.
The input arguments are:
required
fileName
string
filename of the PyBullet file.
optional
clientServerId
int
if you are connected to multiple servers, you can pick one
saveState, saveBullet, restoreState
When you need deterministic simulation after restoring to a previously saved state, all important
state information, including contact points, need to be stored. The saveWorld command is not
sufficient for this. You can use the restoreState command to restore from a snapshot taken
using saveState (in-memory) or saveBullet (on disk).
The saveState command only takes an optional clientServerId as input and returns the state id.
The saveBullet command will save the state to a .bullet file on disk.
The restoreState command input arguments are:
optional
fileName
string
filename of the .bullet file created using a saveBullet command.
optional
stateId
int
state id returned by saveState
optional
clientServerId
int
if you are connected to multiple servers, you can pick one
Either the filename or state id needs to be valid. Note that restoreState will reset the positions
and joint angles of objects to the saved state, as well as restoring contact point information. You
need to make sure the objects and constraints are setup before calling restoreState. See the
saveRestoreState.py example.

10
createCollisionShape/VisualShape
Although the recommended and easiest way to create stuff in the world is using the loading
functions (loadURDF/SDF/MJCF/Bullet), you can also create collision and visual shapes
programmatically and use them to create a multi body using createMultiBody. See the
createMultiBodyLinks.py and createVisualShape.py example in the Bullet Physics SDK.
The input parameters for createCollisionShape are
required
shapeType
int
GEOM_SPHERE, GEOM_BOX, GEOM_CAPSULE,
GEOM_CYLINDER, GEOM_PLANE, GEOM_MESH
optional
radius
float
default 0.5: GEOM_SPHERE, GEOM_CAPSULE, GEOM_CYLINDER
optional
halfExtents
vec3 list
of 3 floats
default [1,1,1]: for GEOM_BOX
optional
height
float
default: 1: for GEOM_CAPSULE, GEOM_CYLINDER
optional
fileName
string
Filename for GEOM_MESH, currently only Wavefront .obj. Will create
convex hulls for each object (marked as 'o') in the .obj file.
optional
meshScale
vec3 list
of 3 floats
default: [1,1,1], for GEOM_MESH
optional
planeNormal
vec3 list
of 3 floats
default: [0,0,1] for GEOM_PLANE
optional
flags
int
GEOM_FORCE_CONCAVE_TRIMESH: for GEOM_MESH, this will
create a concave static triangle mesh. This should not be used with
dynamic / moving objects, only for static (mass = 0) terrain.
optional
collisionFrameP
osition
vec3
translational offset of the collision shape with respect to the link frame
optional
collisionFrameOr
ientation
vec4
rotational offset (quaternion x,y,z,w) of the collision shape with respect
to the link frame
optional
physicsClientId
int
If you are connected to multiple servers, you can pick one.
The return value is a non-negative int unique id for the collision shape or -1 if the call failed.
createVisualShape
You can create a visual shape in a similar way to creating a collision shape, with some
additional arguments to control the visual appearance, such as diffuse and specular color.
When you use the GEOM_MESH type, you can point to a Wavefront OBJ file, and the visual
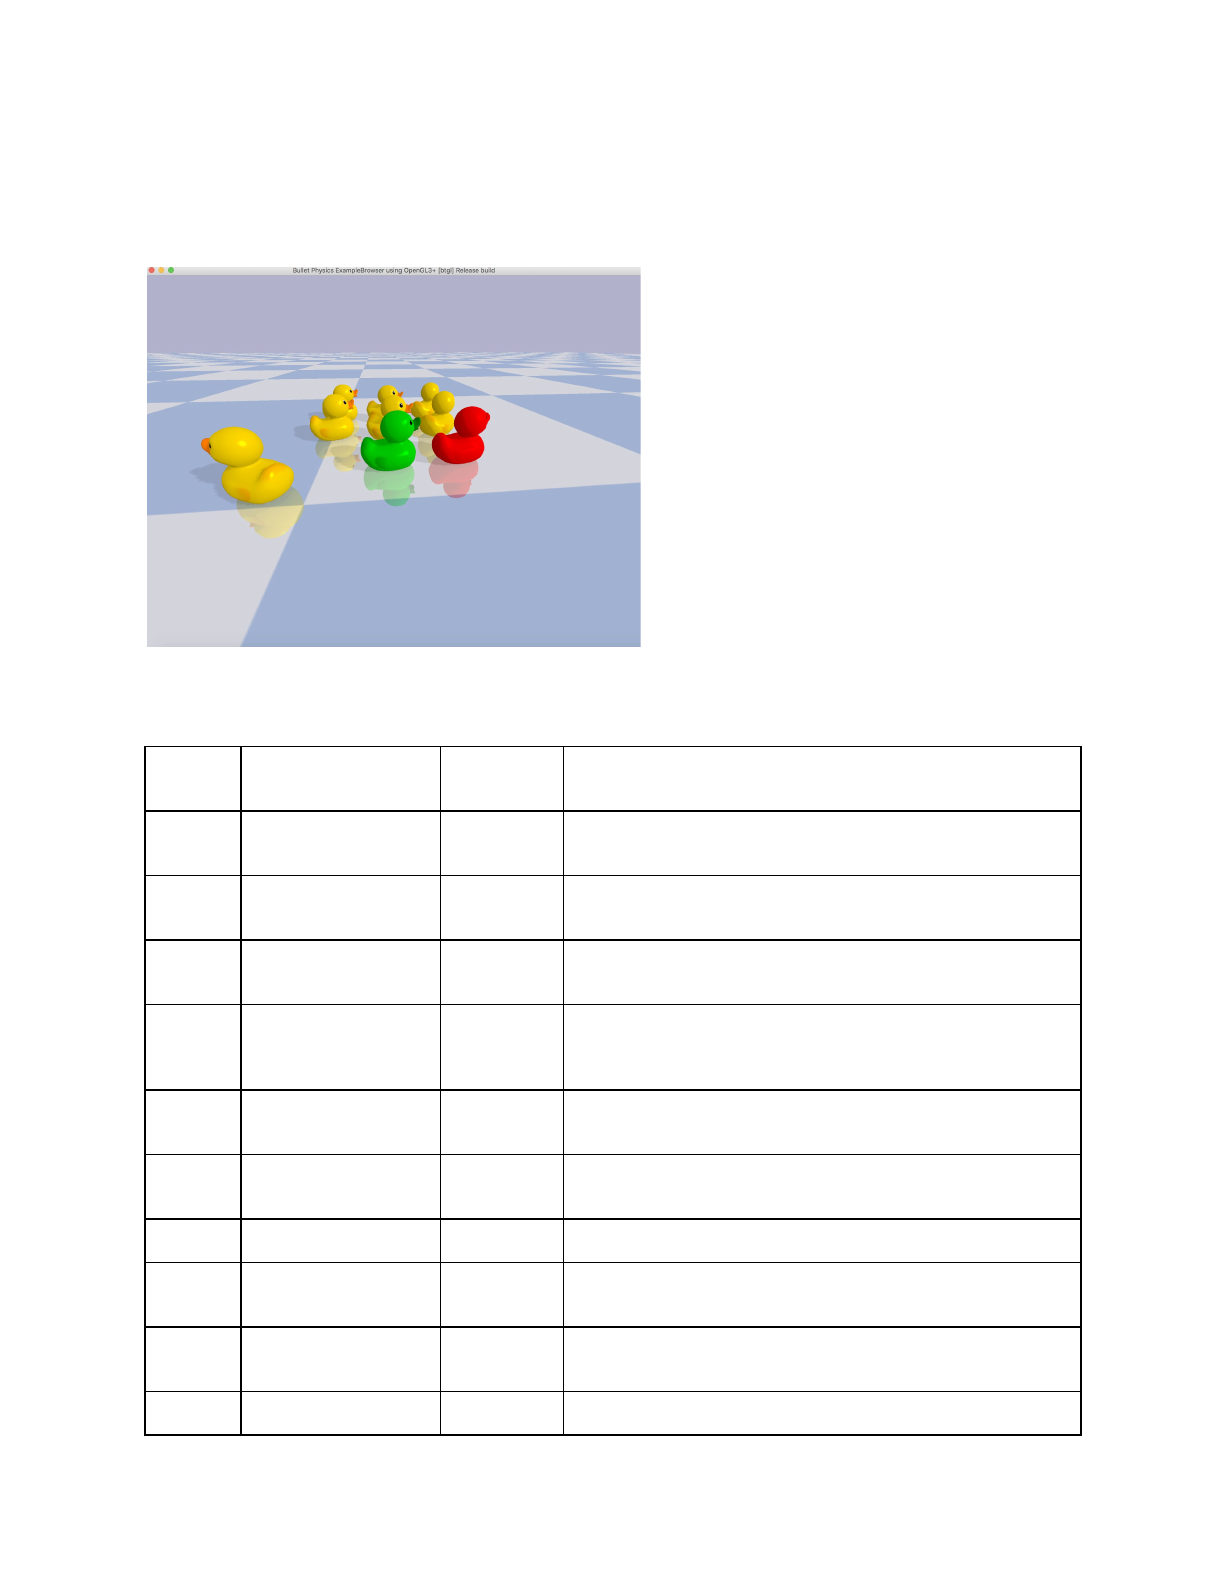
11
shape will parse some parameters from the material file (.mtl) and load a texture. Note that large
textures (above 1024x1024 pixels) can slow down the loading and run-time performance.
See examples/pybullet/examples/addPlanarReflection.py and createVisualShape.py
The input parameters are
required
shapeType
int
GEOM_SPHERE, GEOM_BOX, GEOM_CAPSULE,
GEOM_CYLINDER, GEOM_PLANE, GEOM_MESH
optional
radius
float
default 0.5: only for GEOM_SPHERE, GEOM_CAPSULE,
GEOM_CYLINDER
optional
halfExtents
vec3 list of 3
floats
default [1,1,1]: only for GEOM_BOX
optional
length
float
default: 1: only for GEOM_CAPSULE, GEOM_CYLINDER
(length = height)
optional
fileName
string
Filename for GEOM_MESH, currently only Wavefront .obj.
Will create convex hulls for each object (marked as 'o') in the
.obj file.
optional
meshScale
vec3 list of 3
floats
default: [1,1,1],only for GEOM_MESH
optional
planeNormal
vec3 list of 3
floats
default: [0,0,1] only for GEOM_PLANE
optional
flags
int
unused / to be decided
optional
rgbaColor
vec4, list of
4 floats
color components for red, green, blue and alpha, each in
range [0..1].
optional
specularColor
vec3, list of
3 floats
specular reflection color, red, green, blue components in
range [0..1]
optional
visualFramePosition
vec3, list of
translational offset of the visual shape with respect to the link

12
3 floats
frame
optional
visualFrameOrientatio
n
vec4, list of
4 floats
rotational offset (quaternion x,y,z,w) of the visual shape with
respect to the link frame
optional
physicsClientId
int
If you are connected to multiple servers, you can pick one.
The return value is a non-negative int unique id for the visual shape or -1 if the call failed.
createMultiBody
Although the easiest way to create stuff in the world is using the loading functions
(loadURDF/SDF/MJCF/Bullet), you can create a multi body using createMultiBody.
See the createMultiBodyLinks.py example in the Bullet Physics SDK. The parameters of
createMultiBody are very similar to URDF and SDF parameters.
You can create a multi body with only a single base without joints/child links or you can create a
multi body with joints/child links. If you provide links, make sure the size of every list is the same
(len(linkMasses) == len(linkCollisionShapeIndices) etc). The input parameters for createMultiBody are:
optional
baseMass
float
mass of the base, in kg (if using SI units)
optional
baseCollisionShapeIndex
int
unique id from createCollisionShape or -1. You
can re-use the collision shape for multiple
multibodies (instancing)
optional
baseVisualShapeIndex
int
unique id from createVisualShape or -1. You can
reuse the visual shape (instancing)
optional
basePosition
vec3, list of 3 floats
Cartesian world position of the base
optional
baseOrientation
vec4, list of 4 floats
Orientation of base as quaternion [x,y,z,w]
optional
baseInertialFramePosition
vec3, list of 3 floats
Local position of inertial frame
optional
baseInertialFrameOrientation
vec4, list of 4 floats
Local orientation of inertial frame, [x,y,z,w]
optional
linkMasses
list of float
List of the mass values, one for each link.
optional
linkCollisionShapeIndices
list of int
List of the unique id, one for each link.

13
optional
linkVisualShapeIndices
list of int
list of the visual shape unique id for each link
optional
linkPositions
list of vec3
list of local link positions, with respect to parent
optional
linkOrientations
list of vec4
list of local link orientations, w.r.t. parent
optional
linkInertialFramePositions
list of vec3
list of local inertial frame pos. in link frame
optional
linkInertialFrameOrientations
list of vec4
list of local inertial frame orn. in link frame
optional
linkParentIndices
list of int
Link index of the parent link or 0 for the base.
optional
linkJointTypes
list of int
list of joint types, one for each link. Only
JOINT_REVOLUTE, JOINT_PRISMATIC, and
JOINT_FIXED is supported at the moment.
optional
linkJointAxis
list of vec3
Joint axis in local frame
optional
useMaximalCoordinates
int
experimental, best to leave it 0/false.
optional
physicsClientId
int
If you are connected to multiple servers, you can
pick one.
The return value of createMultiBody is a non-negative unique id or -1 for failure. Example:
cuid = pybullet.createCollisionShape(pybullet.GEOM_BOX, halfExtents = [1, 1, 1])
mass= 0 #static box
pybullet.createMultiBody(mass,cuid)
See also createMultiBodyLinks.py, createObstacleCourse.py and createVisualShape.py in the
Bullet/examples/pybullet/examples folder.
stepSimulation
stepSimulation will perform all the actions in a single forward dynamics simulation step such as
collision detection, constraint solving and integration.
stepSimulation input arguments are optional:
optional
physicsClientId
int
if you are connected to multiple servers, you can pick one.
stepSimulation has no return values.
See also setRealTimeSimulation to automatically let the physics server run forward dynamics
simulation based on its real-time clock.

14
setRealTimeSimulation
By default, the physics server will not step the simulation, unless you explicitly send a
'stepSimulation' command. This way you can maintain control determinism of the simulation. It
is possible to run the simulation in real-time by letting the physics server automatically step the
simulation according to its real-time-clock (RTC) using the setRealTimeSimulation command. If
you enable the real-time simulation, you don't need to call 'stepSimulation'.
Note that setRealTimeSimulation has no effect in DIRECT mode: in DIRECT mode the physics
server and client happen in the same thread and you trigger every command. In GUI mode and
in Virtual Reality mode, and TCP/UDP mode, the physics server runs in a separate thread from
the client (PyBullet), and setRealTimeSimulation allows the physicsserver thread to add
additional calls to stepSimulation.
The input parameters are:
required
enableRealTimeSimulation
int
0 to disable real-time simulation, 1 to enable
optional
physicsClientId
int
if you are connected to multiple servers, you can pick one.
getBasePositionAndOrientation
getBasePositionAndOrientation reports the current position and orientation of the base (or root
link) of the body in Cartesian world coordinates. The orientation is a quaternion in [x,y,z,w]
format.
The getBasePositionAndOrientation input parameters are:
required
objectUniqueId
int
object unique id, as returned from loadURDF.
optional
physicsClientId
int
if you are connected to multiple servers, you can pick
one.
getBasePositionAndOrientation returns the position list of 3 floats and orientation as list of 4
floats in [x,y,z,w] order. Use getEulerFromQuaternion to convert the quaternion to Euler if
needed.
See also resetBasePositionAndOrientation to reset the position and orientation of the object.

15
This completes the first PyBullet script. Bullet ships with several URDF files in the Bullet/data
folder.
resetBasePositionAndOrientation
You can reset the position and orientation of the base (root) of each object. It is best only to do
this at the start, and not during a running simulation, since the command will override the effect
of all physics simulation. The linear and angular velocity is set to zero. You can use
resetBaseVelocity to reset to a non-zero linear and/or angular velocity.
The input arguments to resetBasePositionAndOrientation are:
required
objectUniqueId
int
object unique id, as returned from loadURDF.
required
posObj
vec3
reset the base of the object at the specified position in world
space coordinates [X,Y,Z]
required
ornObj
vec4
reset the base of the object at the specified orientation as world
space quaternion [X,Y,Z,W]
optional
physicsClientId
int
if you are connected to multiple servers, you can pick one.
There are no return arguments.
Transforms: Position and Orientation
The position of objects can be expressed in Cartesian world space coordinates [x,y,z]. The
orientation (or rotation) of objects can be expressed using quaternions [x,y,z,w], euler angles
[yaw, pitch, roll] or 3x3 matrices. PyBullet provides a few helper functions to convert between
quaternions, euler angles and 3x3 matrices. In additions there are some functions to multiply
and invert transforms.
getQuaternionFromEuler and getEulerFromQuaternion
The PyBullet API uses quaternions to represent orientations. Since quaternions are not very
intuitive for people, there are two APIs to convert between quaternions and Euler angles.
The getQuaternionFromEuler input arguments are:
required
eulerAngle
vec3: list of 3
floats
The X,Y,Z Euler angles are in radians, accumulating 3 rotations
expressing the roll around the X, pitch around Y and yaw around
the Z axis.
optional
physicsClientId
int
unused, added for API consistency.
getQuaternionFromEuler returns a quaternion, vec4 list of 4 floating point values [X,Y,Z,W].

16
getEulerFromQuaternion
The getEulerFromQuaternion input arguments are:
required
quaternion
vec4: list of 4 floats
The quaternion format is [x,y,z,w]
optional
physicsClientId
int
unused, added for API consistency.
getEulerFromQuaternion returns alist of 3 floating point values, a vec3.
getMatrixFromQuaternion
getMatrixFromQuaternion is a utility API to create a 3x3 matrix from a quaternion. The input is a
quaternion and output a list of 9 floats, representing the matrix.
multiplyTransforms, invertTransform
PyBullet provides a few helper functions to multiply and inverse transforms. This can be helpful
to transform coordinates from one to the other coordinate system.
The input parameters of multiplyTransforms are:
required
positionA
vec3, list of 3 floats
required
orientationA
vec4, list of 4 floats
quaternion [x,y,z,w]
required
positionB
vec3, list of 3 floats
required
orientationB
vec4, list of 4 floats
quaternion [x,y,z,w]
optional
physicsClientId
int
unused, added for API consistency.
The return value is a list of position (vec3) and orientation (vec4, quaternion x,y,x,w).
The input and output parameters of invertTransform are:
required
position
vec3, list of 3 floats
required
orientation
vec4, list of 4 floats
quaternion [x,y,z,w]
The output of invertTransform is a position (vec3) and orientation (vec4, quaternion x,y,x,w).
17
getAPIVersion
You can query for the API version in a year-month-0-day format. You can only connect between
physics client/server of the same API version, with the same number of bits (32-bit / 64bit).
There is a optional unused argument physicsClientId, added for API consistency.
optional
physicsClientId
int
unused, added for API consistency.
Controlling a robot
In the Introduction we already showed how to initialize PyBullet and load some objects. If you
replace the file name in the loadURDF command with "r2d2.urdf" you can simulate a R2D2
robot from the ROS tutorial. Let's control this R2D2 robot to move, look around and control the
gripper. For this we need to know how to access its joint motors.
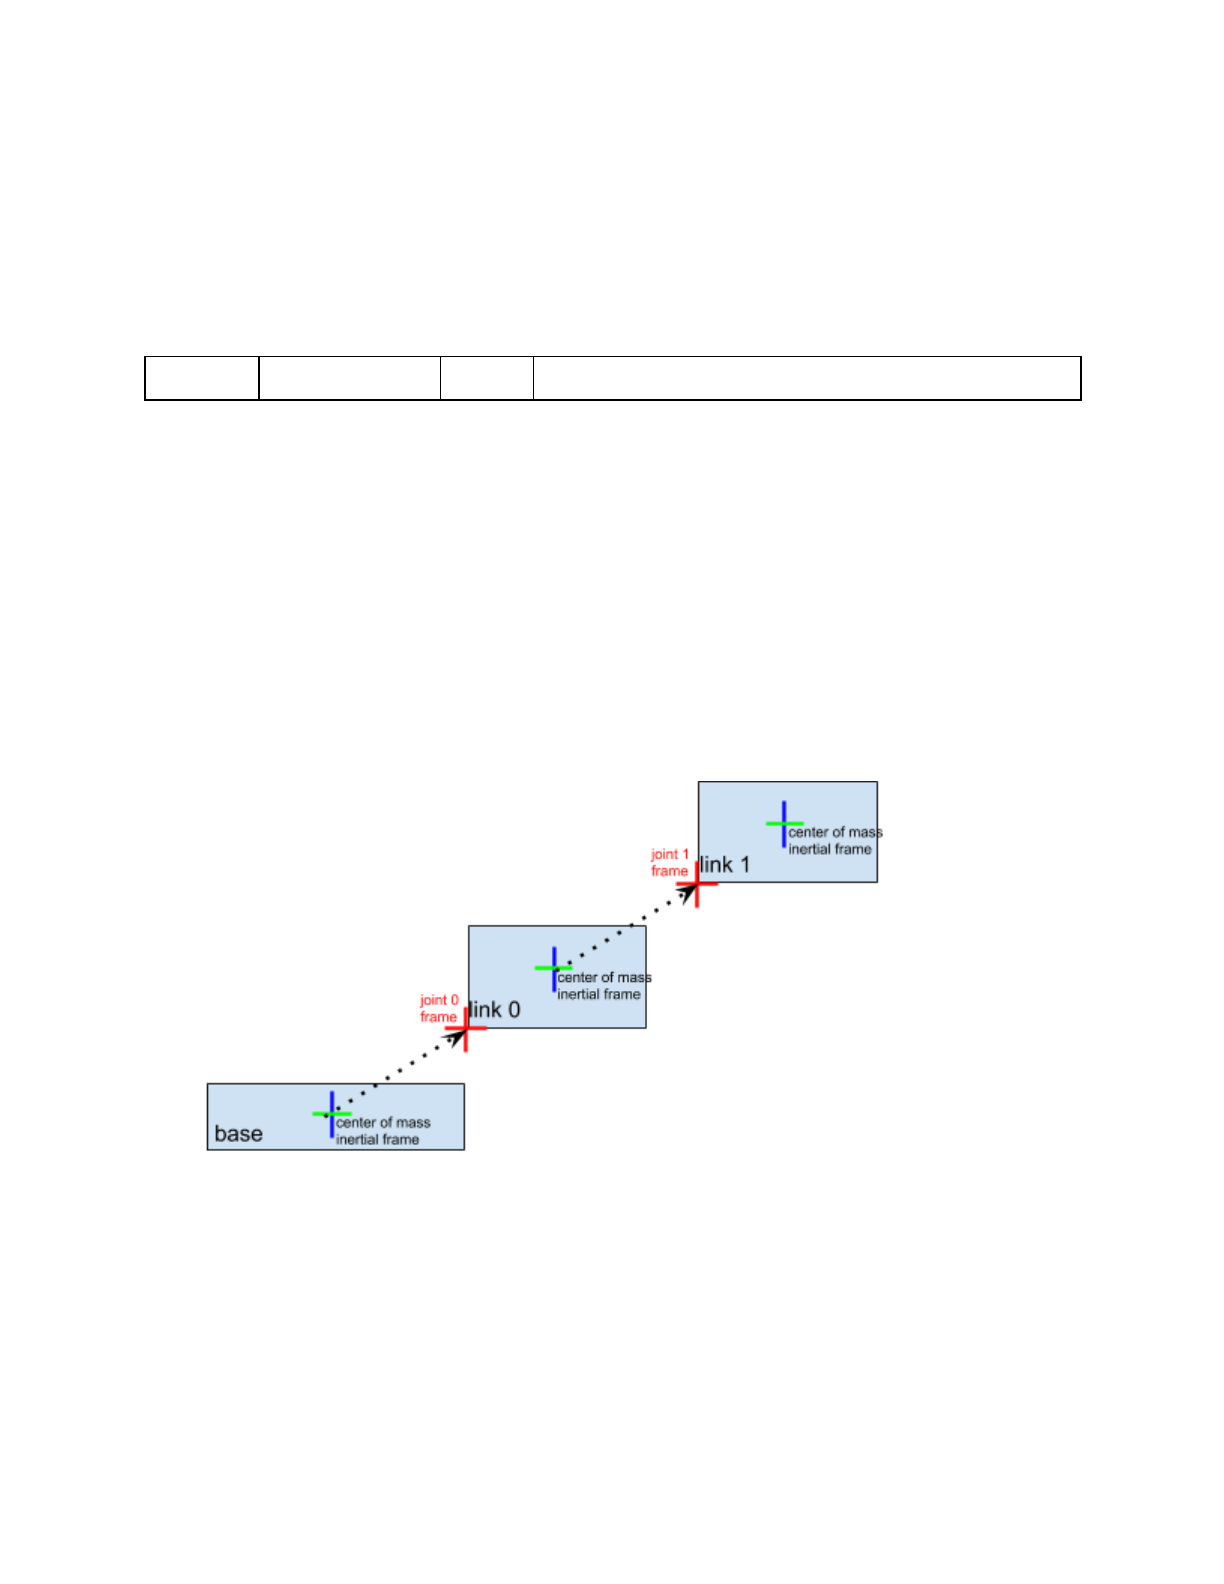
Base, Joints, Links
A simulated robot as described in a URDF file has a base, and optionally links connected by
joints. Each joint connects one parent link to a child link. At the root of the hierarchy there is a
single root parent that we call base. The base can be either fully fixed, 0 degrees of freedom, or
fully free, with 6 degrees of freedom. Since each link is connected to a parent with a single joint,
the number of joints is equal to the number of links. Regular links have link indices in the range
[0..getNumJoints()] Since the base is not a regular 'link', we use the convention of -1 as its link

18
index. We use the convention that joint frames are expressed relative to the parents center of
mass inertial frame, which is aligned with the principle axis of inertia.
getNumJoints, getJointInfo
After you load a robot you can query the number of joints using the getNumJoints API. For the
r2d2.urdf this should return 15.
getNumJoints input parameters:
required
bodyUniqueId
int
the body unique id, as returned by loadURDF etc.
optional
physicsClientId
int
if you are connected to multiple servers, you can pick one.
getNumJoints returns an integer value representing the number of joints.
getJointInfo
For each joint we can query some information, such as its name and type.
getJointInfo input parameters
required
bodyUniqueId
int
the body unique id, as returned by loadURDF etc.
required
jointIndex
int
an index in the range [0 .. getNumJoints(bodyUniqueId))
optional
physicsClientId
int
if you are connected to multiple servers, you can pick one.
getJointInfo returns a list of information:
jointIndex
int
the same joint index as the input parameter
jointName
string
the name of the joint, as specified in the URDF (or SDF etc) file
jointType
int
type of the joint, this also implies the number of position and velocity variables.
JOINT_REVOLUTE, JOINT_PRISMATIC, JOINT_SPHERICAL, JOINT_PLANAR,
JOINT_FIXED. See the section on Base, Joint and Links for more details.
qIndex
int
the first position index in the positional state variables for this body
uIndex
int
the first velocity index in the velocity state variables for this body
flags
int
reserved
jointDamping
float
the joint damping value, as specified in the URDF file
jointFriction
float
the joint friction value, as specified in the URDF file
jointLowerLimit
float
Positional lower limit for slider and revolute (hinge) joints.
jointUpperLimit
float
Positional upper limit for slider and revolute joints. Values ignored in case upper

19
limit <lower limit.
jointMaxForce
float
Maximum force specified in URDF (possibly other file formats) Note that this value
is not automatically used. You can use maxForce in 'setJointMotorControl2'.
jointMaxVelocity
float
Maximum velocity specified in URDF. Note that the maximum velocity is not used
in actual motor control commands at the moment.
linkName
string
the name of the link, as specified in the URDF (or SDF etc.) file
jointAxis
vec3
joint axis in local frame (ignored for JOINT_FIXED)
parentFramePos
vec3
joint position in parent frame
parentFrameOrn
vec3
joint orientation in parent frame
parentIndex
int
parent link index, -1 for base
setJointMotorControl2/Array
Note: setJointMotorControl is obsolete and replaced by setJointMotorControl2 API. (Or even
better use setJointMotorControlArray).
We can control a robot by setting a desired control mode for one or more joint motors. During
the stepSimulation the physics engine will simulate the motors to reach the given target value
that can be reached within the maximum motor forces and other constraints. Each revolute joint
and prismatic joint is motorized by default. There are 3 different motor control modes: position
control, velocity control and torque control.
You can effectively disable the motor by using a force of 0. You need to disable motor in order
to use direct torque control. For example:
maxForce = 0
mode = p.VELOCITY_CONTROL
p.setJointMotorControl2(objUid, jointIndex,
controlMode=mode, force=maxForce)
If you want a wheel to maintain a constant velocity, with a max force you can use:
maxForce = 500
p.setJointMotorControl2(bodyUniqueId=objUid,
jointIndex=0,
controlMode=p.VELOCITY_CONTROL,
targetVelocity = targetVel,
force = maxForce)

20
The input arguments to setJointMotorControl2 are:
required
bodyUniqueId
int
body unique id as returned from loadURDF etc.
required
jointIndex
int
link index in range [0..getNumJoints(bodyUniqueId) (note that
link index == joint index)
required
controlMode
int
POSITION_CONTROL (which is in fact
CONTROL_MODE_POSITION_VELOCITY_PD),
VELOCITY_CONTROL, TORQUE_CONTROL
optional
targetPosition
float
in POSITION_CONTROL the targetValue is target position of
the joint
optional
targetVelocity
float
in VELOCITY_CONTROL and POSITION_CONTROL the
targetVelocity is the desired velocity of the joint, see
implementation note below. Note that the targetVelocity is not
the maximum joint velocity. In
POSITION_CONTROL/CONTROL_MODE_POSITION_VELOC
ITY_PD, the final target velocity is computed using:
kp*(erp*(desiredPosition-currentPosition)/dt)+currentVelocity+kd
*(m_desiredVelocity - currentVelocity)
.
optional
force
float
in POSITION_CONTROL and VELOCITY_CONTROL this is the
maximum motor force used to reach the target value. In
TORQUE_CONTROL this is the force/torque to be applied each
simulation step.
optional
positionGain
float
See implementation note below
optional
velocityGain
float
See implementation note below
optional
maxVelocity
float
in POSITION_CONTROL this limits the velocity to a maximum
optional
physicsClientId
int
if you are connected to multiple servers, you can pick one.
Note: the actual implementation of the joint motor controller is as a constraint for
POSITION_CONTROL and VELOCITY_CONTROL, and as an external force for
TORQUE_CONTROL:
method
implementation
component
constraint error to be minimized
POSITION_CONTROL
constraint
velocity and position
constraint
error =
position_gain*(desired_position-a
ctual_position)+velocity_gain*(de
sired_velocity-actual_velocity)
VELOCITY_CONTROL
constraint
pure velocity constraint
error = desired_velocity -
actual_velocity
TORQUE_CONTROL
external force

21
Generally it is best to start with VELOCITY_CONTROL or POSITION_CONTROL. It is much
harder to do TORQUE_CONTROL (force control) since simulating the correct forces relies on
very accurate URDF/SDF file parameters and system identification (correct masses, inertias,
center of mass location, joint friction etc).
setJointMotorControlArray
Instead of making individual calls for each joint, you can pass arrays for all inputs to reduce
calling overhead dramatically.
setJointMotorControlArray takes the same parameters as setJointMotorControl2, except
replacing integers with lists of integers.
The input arguments to setJointMotorControlArray are:
required
bodyUniqueId
int
body unique id as returned from loadURDF etc.
required
jointIndices
list of int
index in range [0..getNumJoints(bodyUniqueId) (note that link
index == joint index)
required
controlMode
int
POSITION_CONTROL, VELOCITY_CONTROL,
TORQUE_CONTROL
optional
targetPositions
list of float
in POSITION_CONTROL the targetValue is target position of
the joint
optional
targetVelocities
list of float
in VELOCITY_CONTROL and POSITION_CONTROL the
targetValue is target velocity of the joint, see implementation
note below.
optional
forces
list of float
in POSITION_CONTROL and VELOCITY_CONTROL this is the
maximum motor force used to reach the target value. In
TORQUE_CONTROL this is the force/torque to be applied each
simulation step.
optional
positionGains
list of float
See implementation note below
optional
velocityGains
list of float
See implementation note below
optional
physicsClientId
int
if you are connected to multiple servers, you can pick one.
See bullet3/examples/pybullet/tensorflow/humanoid_running.py for an example of using
setJointMotorControlArray.
getJointState(s), resetJointState
We can query several state variables from the joint using getJointState, such as the joint
position, velocity, joint reaction forces and joint motor torque.

22
getJointState input parameters
required
bodyUniqueId
int
body unique id as returned by loadURDF etc
required
jointIndex
int
link index in range [0..getNumJoints(bodyUniqueId)]
optional
physicsClientId
int
if you are connected to multiple servers, you can pick one.
getJointState output
jointPosition
float
The position value of this joint.
jointVelocity
float
The velocity value of this joint.
jointReactionForces
list of 6 floats
These are the joint reaction forces, if a torque sensor is enabled for
this joint it is [Fx, Fy, Fz, Mx, My, Mz]. Without torque sensor, it is
[0,0,0,0,0,0].
appliedJointMotorTorque
float
This is the motor torque applied during the last stepSimulation.
Note that this only applies in VELOCITY_CONTROL and
POSITION_CONTROL. If you use TORQUE_CONTROL then the
applied joint motor torque is exactly what you provide, so there is
no need to report it separately.
getJointStates is the array version of getJointState. Instead of passing in a single jointIndex, you
pass in a list of jointIndices.
resetJointState
You can reset the state of the joint. It is best only to do this at the start, while not running the
simulation: resetJointState overrides all physics simulation. Note that we only support 1-DOF
motorized joints at the moment, sliding joint or revolute joints.
required
bodyUniqueId
int
body unique id as returned by loadURDF etc
required
jointIndex
int
joint index in range [0..getNumJoints(bodyUniqueId)]
required
targetValue
float
the joint position (angle in radians or position)
optional
targetVelocity
float
the joint velocity (angular or linear velocity)
optional
physicsClientId
int
if you are connected to multiple servers, you can pick one.
enableJointForceTorqueSensor
You can enable or disable a joint force/torque sensor in each joint. Once enabled, if you perform
a stepSimulation, the 'getJointState' will report the joint reaction forces in the fixed degrees of

23
freedom: a fixed joint will measure all 6DOF joint forces/torques. A revolute/hinge joint
force/torque sensor will measure 5DOF reaction forces along all axis except the hinge axis. The
applied force by a joint motor is available in the appliedJointMotorTorque of getJointState.
The input arguments to enableJointForceTorqueSensor are:
required
bodyUniqueId
int
body unique id as returned by loadURDF etc
required
jointIndex
int
joint index in range [0..getNumJoints(bodyUniqueId)]
optional
enableSensor
int
1/True to enable, 0/False to disable the force/torque sensor
optional
physicsClientId
int
if you are connected to multiple servers, you can pick one.
getLinkState
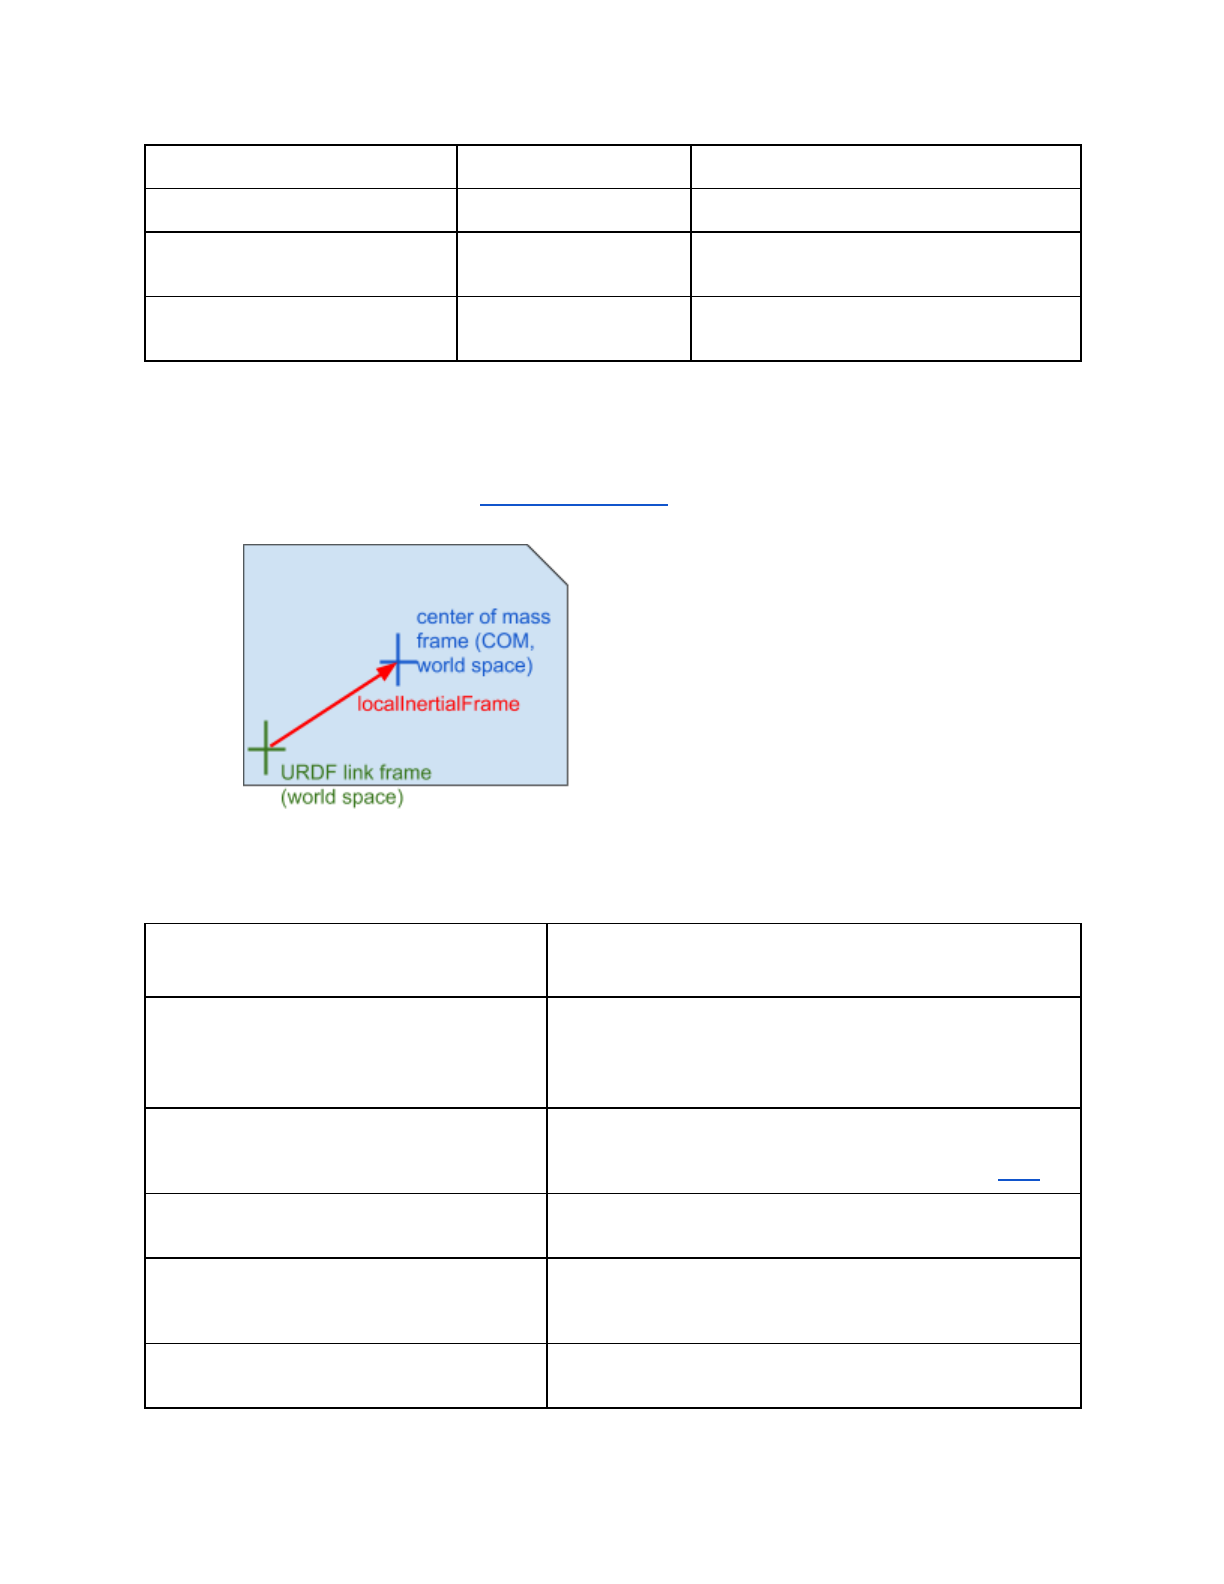
You can also query the Cartesian world position and orientation for the center of mass of each
link using getLinkState. It will also report the local inertial frame of the center of mass to the
URDF link frame, to make it easier to compute the graphics/visualization frame.
getLinkState input parameters
required
bodyUniqueId
int
body unique id as returned by loadURDF etc
required
linkIndex
int
link index
optional
computeLinkVelocity
int
If set to 1, the Cartesian world velocity will be computed and
returned.
optional
computeForwardKinematics
int
if set to 1 (or True), the Cartesian world position/orientation
will be recomputed using forward kinematics.
optional
physicsClientId
int
if you are connected to multiple servers, you can pick one.
getLinkState return values
linkWorldPosition
vec3, list of 3 floats
Cartesian position of center of mass
linkWorldOrientation
vec4, list of 4 floats
Cartesian orientation of center of mass, in
quaternion [x,y,z,w]
localInertialFramePosition
vec3, list of 3 floats
local position offset of inertial frame (center of
mass) expressed in the URDF link frame
localInertialFrameOrientation
vec4, list of 4 floats
local orientation (quaternion [x,y,z,w]) offset of
the inertial frame expressed in URDF link
frame.
24
worldLinkFramePosition
vec3, list of 3 floats
world position of the URDF link frame
worldLinkFrameOrientation
vec4, list of 4 floats
world orientation of the URDF link frame
worldLinkLinearVelocity
vec3, list of 3 floats
Cartesian world velocity. Only returned if
computeLinkVelocity non-zero.
worldLinkAngularVelocity
vec3, list of 3 floats
Cartesian world velocity. Only returned if
computeLinkVelocity non-zero.
The relationship between URDF link frame and the center of mass frame (both in world space)
is: urdfLinkFrame = comLinkFrame * localInertialFrame.inverse(). For more information about
the link and inertial frame, see the ROS URDF tutorial.
Example scripts (could be out-of-date, check actual Bullet/examples/pybullet/examples folder.)
examples/pybullet/tensorflow/humanoid_runnin
g.py
load a humanoid and use a trained neural network to control the
running using TensorFlow, trained by OpenAI
examples/pybullet/gym/pybullet_envs/bullet/min
itaur.py and minitaur_gym_env.py
Minitaur environment for OpenAI GYM and TensorFlow
You can also use python -m
pybullet_envs.examples.minitaur_gym_env_example after
you did pip install pybullet to see the Minitaur in action.
examples/pybullet/examples/quadruped.py
load a quadruped from URDF file, step the simulation, control
the motors for a simple hopping gait based on sine waves.Will
also log the state to file using p.startStateLogging. See video.
examples/quadruped_playback.py
Create a quadruped (Minitaur), read log file and set positions as
motor control targets.
examples/pybullet/examples/testrender.py
load a URDF file and render an image, get the pixels (RGB,
depth, segmentation mask) and display the image using
MatPlotLib.
examples/pybullet/examples/testrender_np.py
Similar to testrender.py, but speed up the pixel transfer using
NumPy arrays. Also includes simple benchmark/timings.

25
examples/pybullet/examples/saveWorld.py
Save the state (position, orientation) of objects into a pybullet
Python scripts. This is mainly useful to setup a scene in VR and
save the initial state. Not all state is serialized.
examples/pybullet/examples/inverse_kinematic
s.py
Show how to use the calculateInverseKinematics command,
creating a Kuka ARM clock
examples/pybullet/examples/rollPitchYaw.py
Show how to use slider GUI widgets
examples/pybullet/examples/constraint.py
Programmatically create a constraint between links.
examples/pybullet/examples/vrhand.py
Control a hand using a VR glove, tracked by a VR controller.
See video.
getBaseVelocity, resetBaseVelocity
You get access to the linear and angular velocity of the base of a body using getBaseVelocity.
The input parameters are:
required
bodyUniqueId
int
body unique id, as returned from the load* methods.
optional
physicsClientId
int
if you are connected to multiple servers, you can pick one.
This returns a list of two vector3 values (3 floats in a list) representing the linear velocity [x,y,z]
and angular velocity [wx,wy,wz] in Cartesian worldspace coordinates.
You can reset the linear and/or angular velocity of the base of a body using resetBaseVelocity.
The input parameters are:
required
objectUniqueId
int
body unique id, as returned from the load* methods.
optional
linearVelocity
vec3, list of 3 floats
linear velocity [x,y,z] in Cartesian world coordinates.
optional
angularVelocity
vec3, list of 3 floats
angular velocity [wx,wy,wz] in Cartesian world coordinates.
optional
physicsClientId
int
if you are connected to multiple servers, you can pick one.
applyExternalForce/Torque
You can apply a force or torque to a body using applyExternalForce and applyExternalTorque.
Note that this method will only work when explicitly stepping the simulation using
stepSimulation, in other words: setRealTimeSimulation(0). After each simulation step, the
external forces are cleared to zero. If you are using 'setRealTimeSimulation(1),
applyExternalForce/Torque will have undefined behavior (either 0, 1 or multiple force/torque
applications).

26
The input parameters are:
required
objectUniqueId
int
object unique id as returned by load methods.
required
linkIndex
int
link index or -1 for the base.
required
forceObj
vec3, list of 3 floats
force/torque vector to be applied [x,y,z]. See flags for
coordinate system.
required
posObj
vec3, list of 3 floats
position on the link where the force is applied. Only for
applyExternalForce. See flags for coordinate system.
required
flags
int
Specify the coordinate system of force/position: either
WORLD_FRAME for Cartesian world coordinates or
LINK_FRAME for local link coordinates.
optional
physicsClientId
int
getNumBodies, getBodyInfo, getBodyUniqueId, removeBody
getNumBodies will return the total number of bodies in the physics server.
If you used 'getNumBodies' you can query the body unique ids using 'getBodyUniqueId'. Note
that all APIs already return body unique ids, so you typically never need to use
getBodyUniqueId if you keep track of them.
getBodyInfo will return the base name, as extracted from the URDF, SDF, MJCF or other
file.
removeBody will remove a body by its body unique id (from loadURDF, loadSDF etc).
createConstraint, removeConstraint, changeConstraint
URDF, SDF and MJCF specify articulated bodies as a tree-structures without loops. The
'createConstraint' allows you to connect specific links of bodies to close those loops. See
Bullet/examples/pybullet/examples/quadruped.py how to connect the legs of a quadruped 5-bar
closed loop linkage. In addition, you can create arbitrary constraints between objects, and
between an object and a specific world frame. See
Bullet/examples/pybullet/examples/constraint.py for an example.
It can also be used to control the motion of physics objects, driven by animated frames, such as
a VR controller. It is better to use constraints, instead of setting the position or velocity directly
for such purpose, since those constraints are solved together with other dynamics constraints.
createConstraint has the following input parameters:

27
required
parentBodyUniqueId
int
parent body unique id
required
parentLinkIndex
int
parent link index (or -1 for the base)
required
childBodyUniqueId
int
child body unique id, or -1 for no body (specify a
non-dynamic child frame in world coordinates)
required
childLinkIndex
int
child link index, or -1 for the base
required
jointType
int
joint type: JOINT_PRISMATIC, JOINT_FIXED,
JOINT_POINT2POINT, JOINT_GEAR
required
jointAxis
vec3, list of 3 floats
joint axis, in child link frame
required
parentFramePosition
vec3, list of 3 floats
position of the joint frame relative to parent center
of mass frame.
required
childFramePosition
vec3, list of 3 floats
position of the joint frame relative to a given child
center of mass frame (or world origin if no child
specified)
optional
parentFrameOrientation
vec4, list of 4 floats
the orientation of the joint frame relative to parent
center of mass coordinate frame
optional
childFrameOrientation
vec4, list of 4 floats
the orientation of the joint frame relative to the
child center of mass coordinate frame (or world
origin frame if no child specified)
optional
physicsClientId
int
if you are connected to multiple servers, you can
pick one.
createConstraint will return an integer unique id, that can be used to change or remove the
constraint. See examples/pybullet/examples/mimicJointConstraint.py for an example of a
JOINT_GEAR and examples/pybullet/examples/minitaur.py for a JOINT_POINT2POINT and
examples/pybullet/examples/constraint.py for JOINT_FIXED.
changeConstraint
changeConstraint allows you to change parameters of an existing constraint. The input
parameters are:
required
userConstraintUniqueId
int
unique id returned by createConstraint
optional
jointChildPivot
vec3, list of 3 floats
updated child pivot, see 'createConstraint'
optional
jointChildFrameOrientation
vec4, list of 4 floats
updated child frame orientation as
quaternion
optional
maxForce
float
maximum force that constraint can apply
28
optional
physicsClientId
int
if you are connected to multiple servers, you
can pick one.
See also Bullet/examples/pybullet/examples/constraint.py
removeConstraint will remove a constraint, given by its unique id. Its input parameters are:
required
userConstraintUniqueId
int
unique id as returned by createConstraint
optional
physicsClientId
int
unique id as returned by 'connect'
getNumConstraints, getConstraintUniqueId
You can query for the total number of constraints, created using 'createConstraint'. Optional
parameter is the int physicsClientId.
getConstraintUniqueId
getConstraintUniqueId will take a serial index in range 0..getNumConstraints, and reports the
constraint unique id. Note that the constraint unique ids may not be contiguous, since you may
remove constraints. The input is the integer serial index and optionally a physicsClientId.
getConstraintInfo/State
You can query the constraint info give a constraint unique id.
The input parameters are
required
constraintUniqueId
int
unique id as returned by createConstraint
optional
physicsClientId
int
unique id as returned by 'connect'
The output list is:
parentBodyUniqueId
int
See createConstraint
parentJointIndex
int
See createConstraint
childBodyUniqueId
int
See createConstraint
childLinkIndex
int
See createConstraint
constraintType
int
See createConstraint

29
jointAxis
vec3, list of 3 floats
See createConstraint
jointPivotInParent
vec3, list of 3 floats
See createConstraint
jointPivotInChild
vec3, list of 3 floats
See createConstraint
jointFrameOrientationParent
vec4, list of 4 floats
See createConstraint
jointFrameOrientationChild
vec4, list of 4 floats
See createConstraint
maxAppliedForce
float
See createConstraint
getConstraintState
Give a constraint unique id, you can query for the applied constraint forces in the most recent
simulation step. The input is a constraint unique id and the output is a vector of constraint
forces, its dimension is the degrees of freedom that are affected by the constraint (a fixed
constraint affects 6 DoF for example).
getDynamicsInfo/changeDynamics
You can get information about the mass, center of mass, friction and other properties of the
base and links.
The input parameters to getDynamicsInfo are:
required
bodyUniqueId
int
object unique id, as returned by loadURDF etc.
required
linkIndex
int
link (joint) index or -1 for the base.
optional
physicsClientId
int
if you are connected to multiple servers, you can pick one.
The return information is limited, we will expose more information when we need it:
mass
double
mass in kg
lateral_friction
double
friction coefficient
local inertia
diagonal
vec3, list of 3 floats
local inertia diagonal. Note that links and base are centered
around the center of mass and aligned with the principal
axes of inertia.
local inertial pos
vec3
position of inertial frame in local coordinates of the joint
frame
local inertial orn
vec4
orientation of inertial frame in local coordinates of joint frame
restitution
double
coefficient of restitution

30
rolling friction
double
rolling friction coefficient orthogonal to contact normal
spinning friction
double
spinning friction coefficient around contact normal
contact damping
double
-1 if not available. damping of contact constraints.
contact stiffness
double
-1 if not available. stiffness of contact constraints.
changeDynamics
You can change the properties such as mass, friction and restitution coefficients using
changeDynamics.
The input parameters are:
required
bodyUniqueId
int
object unique id, as returned by loadURDF etc.
required
linkIndex
int
link index or -1 for the base
optional
mass
double
change the mass of the link (or base for linkIndex -1)
optional
lateralFriction
double
lateral (linear) contact friction
optional
spinningFriction
double
torsional friction around the contact normal
optional
rollingFriction
double
torsional friction orthogonal to contact normal
optional
restitution
double
bouncyness of contact. Keep it a bit less than 1.
optional
physicsClientId
int
if you are connected to multiple servers, you can pick
one.
optional
linearDamping
double
linear damping of the link (0.04 by default)
optional
angularDamping
double
angular damping of the link (0.04 by default)
optional
contactStiffness
double
stiffness of the contact constraints, used together with
contactDamping.
optional
contactDamping
double
damping of the contact constraints for this body/link.
Used together with contactStiffness. This overrides
the value if it was specified in the URDF file in the
contact section.
optional
frictionAnchor
int
enable or disable a friction anchor: positional friction
correction (disabled by default, unless set in the
URDF contact section)
optional
localInertiaDiagnoal
vec3
diagonal elements of the inertia tensor. Note that the
base and links are centered around the center of
mass and aligned with the principal axes of inertia so
there are no off-diagonal elements in the inertia

31
tensor.
setTimeStep
You can set the physics engine timestep that is used when calling 'stepSimulation'. It is best to
only call this method at the start of a simulation. Don't change this time step regularly.
setTimeStep can also be achieved using the new setPhysicsEngineParameter API.
The input parameters are:
required
timeStep
float
Each time you call 'stepSimulation' the timeStep will proceed with
'timeStep'.
optional
physicsClientId
int
if you are connected to multiple servers, you can pick one.
setPhysicsEngineParameter
You can set physics engine parameters using the setPhysicsEngineParameter API. The
following input parameters are exposed:
optional
fixedTimeStep
float
physics engine timestep in fraction of
seconds, each time you call 'stepSimulation'.
Same as 'setTimeStep'
optional
numSolverIterations
int
Choose the number of constraint solver
iterations.
optional
useSplitImpulse
int
Advanced feature, only when using maximal
coordinates: split the positional constraint
solving and velocity constraint solving in two
stages, to prevent huge penetration
recovery forces.
optional
splitImpulsePenetrationThreshold
float
Related to 'useSplitImpulse': if the
penetration for a particular contact constraint
is less than this specified threshold, no split
impulse will happen for that contact.
optional
numSubSteps
int
Subdivide the physics simulation step further
by 'numSubSteps'. This will trade
performance over accuracy.
optional
collisionFilterMode
int
Use 0 for default collision filter: (group
A&maskB) AND (groupB&maskA). Use 1 to
switch to the OR collision filter: (group

32
A&maskB) OR (groupB&maskA)
optional
contactBreakingThreshold
float
Contact points with distance exceeding this
threshold are not processed by the LCP
solver. In addition, AABBs are extended by
this number. Defaults to 0.02 in Bullet 2.x.
optional
maxNumCmdPer1ms
int
Experimental: add 1ms sleep if the number
of commands executed exceed this
threshold.
optional
enableFileCaching
int
Set to 0 to disable file caching, such as .obj
wavefront file loading
optional
restitutionVelocityThreshold
float
If relative velocity is below this threshold,
restitution will be zero.
optional
erp
float
constraint error reduction parameter
(non-contact, non-friction)
optional
contactERP
float
contact error reduction parameter
optional
frictionERP
float
friction error reduction parameter (when
positional friction anchors are enabled)
optional
enableConeFriction
int
Set to 0 to disable implicit cone friction and
use pyramid approximation (cone is default)
optional
deterministicOverlappingPairs
int
Set to 1 to enable and 0 to disable sorting
of overlapping pairs (backward compatibility
setting).
optional
physicsClientId
int
if you are connected to multiple servers, you
can pick one.
setDefaultContactERP is an API to set the default contact parameter setting. It will be rolled into
the setPhysicsEngineParameter API.
getPhysicsEngineParameters
You can query some current physics engine parameters using the getPhysicsEngineParameters
command, using the optional 'physicsClientId'. This will return named tuples of parameters.
resetSimulation
resetSimulation will remove all objects from the world and reset the world to initial conditions. It
takes one optional parameter: the physics client Id (in case you created multiple physics server
connections).

33
startStateLogging/stopStateLogging
State logging lets you log the state of the simulation, such as the state of one or more objects
after each simulation step (after each call to stepSimulation or automatically after each
simulation step when setRealTimeSimulation is enabled). This allows you to record trajectories
of objects. There is also the option to log the common state of bodies such as base position and
orientation, joint positions (angles) and joint motor forces.
All log files generated using startStateLogging can be read using C++ or Python scripts. See
quadruped_playback.py and kuka_with_cube_playback.py for Python scripts reading the log
files. You can use bullet3/examples/Utils/RobotLoggingUtil.cpp/h to read the log files in C++.
For MP4 video recording you can use the logging option STATE_LOGGING_VIDEO_MP4. We
plan to implement various other types of logging, including logging the state of VR controllers.
As a special case, we implemented the logging of the Minitaur robot. The log file from PyBullet
simulation is identical to the real Minitaur quadruped log file. See
Bullet/examples/pybullet/examples/logMinitaur.py for an example.
Important: various loggers include their own internal timestamp that starts at zero when created.
This means that you need to start all loggers at the same time, to be in sync. You need to make
sure to that the simulation is not running in real-time mode, while starting the loggers: use
pybullet.setRealTimeSimulation(0) before creating the loggers.
required
loggingType
int
There are various types of logging implemented.
STATE_LOGGING_MINITAUR: This will require to load the
quadruped/quadruped.urdf and object unique id from the
quadruped. It logs the timestamp, IMU roll/pitch/yaw, 8 leg motor
positions (q0-q7), 8 leg motor torques (u0-u7), the forward speed
of the torso and mode (unused in simulation).
STATE_LOGGING_GENERIC_ROBOT: This will log a log of the
data of either all objects or selected ones (if objectUniqueIds is
provided).
STATE_LOGGING_VIDEO_MP4: this will open an MP4 file and
start streaming the OpenGL 3D visualizer pixels to the file using an
ffmpeg pipe. It will require ffmpeg installed. You can also use
avconv (default on Ubuntu), just create a symbolic link so that
ffmpeg points to avconv. On Windows, ffmpeg has some issues
that cause tearing/color artifacts in some cases.
STATE_LOGGING_CONTACT_POINTS
STATE_LOGGING_VR_CONTROLLERS.

34
STATE_LOGGING_PROFILE_TIMINGS
This will dump a timings file in JSON format that can be opened
using Google Chrome about://tracing LOAD.
required
fileName
string
file name (absolute or relative path) to store the log file data.
optional
objectUniqueIds
list of int
If left empty, the logger may log every object, otherwise the logger
just logs the objects in the objectUniqueIds list.
optional
maxLogDof
int
Maximum number of joint degrees of freedom to log (excluding the
base dofs). This applies to
STATE_LOGGING_GENERIC_ROBOT_DATA. Default value is
12. If a robot exceeds the number of dofs, it won't get logged at all.
optional
bodyUniqueIdA
int
Applies to STATE_LOGGING_CONTACT_POINTS. If
provided,only log contact points involving bodyUniqueIdA.
optional
bodyUniqueIdB
int
Applies to STATE_LOGGING_CONTACT_POINTS. If
provided,only log contact points involving bodyUniqueIdB.
optional
linkIndexA
int
Applies to STATE_LOGGING_CONTACT_POINTS. If
provided,only log contact points involving linkIndexA for
bodyUniqueIdA.
optional
linkIndexB
int
Applies to STATE_LOGGING_CONTACT_POINTS. If
provided,only log contact points involving linkIndexB for
bodyUniqueIdA.
optional
deviceTypeFilter
int
deviceTypeFilter allows you to select what VR devices to log:
VR_DEVICE_CONTROLLER, VR_DEVICE_HMD
,VR_DEVICE_GENERIC_TRACKER or any combination of them.
Applies to STATE_LOGGING_VR_CONTROLLERS. Default
values is VR_DEVICE_CONTROLLER.
optional
logFlags
int
(upcoming PyBullet 1.3.1). STATE_LOG_JOINT_TORQUES, to
log joint torques due to joint motors.
optional
physicsClientId
int
if you are connected to multiple servers, you can pick one.
The command will return a non-negative int loggingUniqueId, that can be used with
stopStateLogging.
Todo: document the data that is logged for each logging type. For now, use the log reading
utilities to find out, or check out the C++ source code of the logging or Python dumpLog.py
script.
stopStateLogging
You can stop a logger using its loggingUniqueId.
submitProfileTiming

35
PyBullet and Bullet have instrumented many functions so you can see where the time is spend.
You can dump those profile timings in a file, that can be viewed with Google Chrome in the
about://tracing window using the LOAD feature. In the GUI, you can press 'p' to start/stop the
profile dump. In some cases you may want to instrument the timings of your client code. You
can submit profile timings using PyBullet. Here is an example output:
Synthetic Camera Rendering
PyBullet has both a build-in OpenGL GPU visualizer and a build-in CPU renderer based on
TinyRenderer. This makes it very easy to render images from an arbitrary camera position.
The synthetic camera is specified by two 4 by 4 matrices: the view matrix and the projection
matrix. Since those are not very intuitive, there are some helper methods to compute the view
and projection matrix from understandable parameters.
computeViewMatrix
The computeViewMatrix input parameters are
required
cameraEyePosition
vec3, list of 3 floats
eye position in Cartesian world
coordinates
required
cameraTargetPosition
vec3, list of 3 floats
position of the target (focus) point, in
Cartesian world coordinates
required
cameraUpVector
vec3, list of 3 floats
up vector of the camera, in Cartesian
world coordinates
optional
physicsClientId
int
unused,added for API consistency
Output is the 4x4 view matrix, stored as a list of 16 floats.
computeViewMatrixFromYawPitchRoll
The input parameters are
required
cameraTargetPosition
list of 3 floats
target focus point in Cartesian world coordinates
required
distance
float
distance from eye to focus point
required
yaw
float
yaw angle in degrees left/right around up-axis.
required
pitch
float
pitch in degrees up/down.

36
required
roll
float
roll in degrees around forward vector
required
upAxisIndex
int
either 1 for Y or 2 for Z axis up.
optional
physicsClientId
int
unused, added for API consistency.
Output is the 4x4 view matrix, stored as a list of 16 floats.
computeProjectionMatrix
The input parameters are
required
left
float
left screen (canvas) coordinate
required
right
float
right screen (canvas) coordinate
required
bottom
float
bottom screen (canvas) coordinate
required
top
float
top screen (canvas) coordinate
required
near
float
near plane distance
required
far
float
far plane distance
optional
physicsClientId
int
unused, added for API consistency.
Output is the 4x4 projection matrix, stored as a list of 16 floats.
computeProjectionMatrixFOV
This command also will return a 4x4 projection matrix, using different parameters. You can
check out OpenGL documentation for the meaning of the parameters.
The input parameters are:
required
fov
float
field of view
required
aspect
float
aspect ratio
required
nearVal
float
near plane distance
required
farVal
float
far plane distance
optional
physicsClientId
int
unused, added for API consistency.
getCameraImage
The getCameraImage API will return a RGB image, a depth buffer and a segmentation mask
buffer with body unique ids of visible objects for each pixel. Note that PyBullet can be compiled
using the numpy option: using numpy will improve the performance of copying the camera

37
pixels from C to Python. Note: the old renderImage API is obsolete and replaced by
getCameraImage.
getCameraImage input parameters:
required
width
int
horizontal image resolution in pixels
required
height
int
vertical image resolution in pixels
optional
viewMatrix
16 floats
4x4 view matrix, see computeViewMatrix*
optional
projectionMatrix
16 floats
4x4 projection matrix, see computeProjection*
optional
lightDirection
vec3, list of 3 floats
light direction
optional
lightColor
vec3, list of 3 floats
directional light color in [RED,GREEN,BLUE] in
range 0..1
optional
lightDistance
float
distance of the light along the normalized
lightDirection
optional
shadow
int
1 for shadows, 0 for no shadows
optional
lightAmbientCoeff
float
light ambient coefficient
optional
lightDiffuseCoeff
float
light diffuse coefficient
optional
lightSpecularCoeff
float
light specular coefficient
optional
renderer
int
ER_BULLET_HARDWARE_OPENGL or
ER_TINY_RENDERER. Note that DIRECT
mode has no OpenGL, so it requires
ER_TINY_RENDERER.
optional
flags
int
ER_SEGMENTATION_MASK_OBJECT_AND_L
INKINDEX, See below in description of
segmentationMaskBuffer and example code.
optional
physicsClientId
int
if you are connected to multiple servers, you can
pick one.
getCameraImage returns a list of parameters:
width
int
width image resolution in pixels
(horizontal)
height
int
height image resolution in pixels
(vertical)
rgbPixels
list of [char RED,char GREEN,char BLUE,
list of pixel colors in R,G,B,A format,

38
char ALPHA] [0..width*height]
in range [0..255] for each color
depthPixels
list of float [0..width*height]
depth buffer
segmentationMaskBuffer
list of int [0..width*height]
Only available when using
ER_TINY_RENDERER.
For each pixels the visible object
unique id. If
ER_SEGMENTATION_MASK_OBJ
ECT_AND_LINKINDEX is used, the
segmentationMaskBuffer combines
the object unique id and link index as
follows:
value = objectUniqueId +
(linkIndex+1)<<24. See example.
So for a free floating body without
joints/links, the segmentation mask
is equal to its body unique id, since
its link index is -1.
Note that copying pixels from C/C++ to Python can be really slow for large images, unless you
compile PyBullet using NumPy. You can check if NumPy is enabled using
PyBullet.isNumpyEnabled().
getVisualShapeData
You can access visual shape information using getVisualShapeData. You could use this to
bridge your own rendering method with PyBullet simulation, and synchronize the world
transforms manually after each simulation step.
The input parameters are:
required
objectUniqueId
int
object unique id, as returned by a load method.
optional
physicsClientId
int
physics client id as returned by 'connect'
The output is a list of visual shape data, each visual shape is in the following format:
objectUniqueId
int
object unique id, same as the input
linkIndex
int
link index or -1 for the base
visualGeometryType
int
visual geometry type (TBD)
dimensions
vec3, list of 3 floats
dimensions (size, local scale) of the geometry
meshAssetFileName
string, list of chars
path to the triangle mesh, if any. Typically relative to the
URDF, SDF or MJCF file location, but could be absolute.

39
localVisualFrame position
vec3, list of 3 floats
position of local visual frame, relative to link/joint frame
localVisualFrame orientation
vec4, list of 4 floats
orientation of local visual frame relative to link/joint frame
rgbaColor
vec4, list of 4 floats
URDF color (if any specified) in red/green/blue/alpha
The physics simulation uses center of mass as a reference for the Cartesian world transforms,
in getBasePositionAndOrientation and in getLinkState. If you implement your own rendering,
you need to transform the local visual transform to world space, making use of the center of
mass world transform and the (inverse) localInertialFrame. You can access the
localInertialFrame using the getLinkState API.
changeVisualShape, loadTexture
You can use changeVisualShape to change the texture of a shape. This texture will currently
only affect the software renderer (see getCameraImage), not the OpenGL visualization window
(yet).
required
objectUniqueId
int
object unique id, as returned by load method.
required
jointIndex
int
link index
optional
shapeIndex
int
Experimental for internal use, recommended ignore
shapeIndex or leave it -1. Intention was to let you pick a
specific shape index to modify, since URDF (and SDF etc)
can have more than 1 visual shape per link. This
shapeIndex matches the list ordering returned by
getVisualShapeData.
optional
textureUniqueId
int
texture unique id, as returned by 'loadTexture' method
optional
rgbaColor
vec4, list of 4
floats
color components for RED, GREEN, BLUE and ALPHA,
each in range [0..1]. Alpha has to be 0 (invisible) or 1
(visible) at the moment (no transparancy yet).
optional
specularColor
vec3
specular color components, RED, GREEN and BLUE, can
be from 0 to large number (>100).
required
physicsClientId
int
physics client id as returned by 'connect'
loadTexture
Load a texture from file and return a non-negative texture unique id if the loading succeeds. This
unique id can be used with changeVisualShape.

40
Collision Detection Queries
You can query the contact point information that existed during the last 'stepSimulation'. To get
the contact points you can use the 'getContactPoints' API. Note that the 'getContactPoints' will
not recompute any contact point information.
getOverlappingObjects, getAABB
This query will return all the unique ids of objects that have axis aligned bounding box overlap
with a given axis aligned bounding box. Note that the query is conservative and may return
additional objects that don't have actual AABB overlap. This happens because the acceleration
structures have some heuristic that enlarges the AABBs a bit (extra margin and extruded along
the velocity vector).
The getOverlappingObjects input parameters are:
required
aabbMin
vec3, list of 3 floats
minimum coordinates of
the aabb
required
aabbMax
vec3, list of 3 floats
maximum coordinates of
the aabb
optional
physicsClientId
int
if you are connected to
multiple servers, you can
pick one.
The getOverlappingObjects will return a list of object unique ids.
getAABB
You can query the axis aligned bounding box (in world space) given an object unique id, and
optionally a link index. (when you don't pass the link index, or use -1, you get the AABB of the
base).
The input parameters are
required
bodyUniqueId
int
object unique id as returned by creation methods.
optional
linkIndex
int
link index in range [0..getNumJoints(..)]
optional
physicsClientId
int
if you are connected to multiple servers, you can pick one.

41
The return structure is a list of vec3, aabbMin (x,y,z) and aabbMax (x,y,z) in world space
coordinates.
See also the getAABB.py example.
getContactPoints, getClosestPoints
The getContactPoints API returns the contact points computed during the most recent call to
stepSimulation. Its input parameters are as follows:
optional
bodyA
int
only report contact points that involve body A
optional
bodyB
int
only report contact points that involve body B
optional
linkIndexA
int
Only report contact points that involve linkIndexA of bodyA
optional
linkIndexB
int
Only report contact points that involve linkIndexB of bodyB
optional
physicsClientId
int
if you are connected to multiple servers, you can pick one.
getContactPoints will return a list of contact points. Each contact point has the following fields:
contactFlag
int
reserved
bodyUniqueIdA
int
body unique id of body A
bodyUniqueIdB
int
body unique id of body B
linkIndexA
int
link index of body A, -1 for base
linkIndexB
int
link index of body B, -1 for base
positionOnA
vec3, list of 3 floats
contact position on A, in Cartesian world coordinates
positionOnB
vec3, list of 3 floats
contact position on B, in Cartesian world coordinates
contactNormalOnB
vec3, list of 3 floats
contact normal on B, pointing towards A
contactDistance
float
contact distance, positive for separation, negative for penetration
normalForce
float
normal force applied during the last 'stepSimulation'
getClosestPoints

42
It is also possible to compute the closest points, independent from stepSimulation. This also lets
you compute closest points of objects with an arbitrary separating distance. In this query there
will be no normal forces reported.
getClosestPoints input parameters:
required
bodyA
int
object unique id for first object (A)
required
bodyB
int
object unique id for second object (B)
required
distance
float
If the distance between objects exceeds this maximum distance,
no points may be returned.
optional
linkIndexA
int
link index for object A (-1 for base)
optional
linkIndexB
int
link index for object B (-1 for base)
optional
physicsClientId
int
if you are connected to multiple servers, you can pick one.
getClosestPoints returns a list of closest points in the same format as getContactPoints (but
normalForce is always zero in this case)
rayTest, rayTestBatch
You can perform a single raycast to find the intersection information of the first object hit.
The rayTest input parameters are:
required
rayFromPosition
vec3, list of 3 floats
start of the ray in world coordinates
required
rayToPosition
vec3, list of 3 floats
end of the ray in world coordinates
optional
physicsClientId
int
if you are connected to multiple servers, you can
pick one.
The raytest query will return the following information in case of an intersection:
objectUniqueId
int
object unique id of the hit object
linkIndex
int
link index of the hit object, or -1 if none/parent.
hit fraction
float
hit fraction along the ray in range [0,1] along the ray.
hit position
vec3, list of 3 floats
hit position in Cartesian world coordinates
hit normal
vec3, list of 3 floats
hit normal in Cartesian world coordinates
43
rayTestBatch
This is similar to the rayTest, but allows you to provide an array of rays, for faster execution. The
size of 'rayFromPositions' needs to be equal to the size of 'rayToPositions'. You can one ray
result per ray, even if there is no intersection: you need to use the objectUniqueId field to check
if the ray has hit anything: if the objectUniqueId is -1, there is no hit. In that case, the 'hit fraction'
is 1. The maximum number of rays per batch is
pybullet.MAX_RAY_INTERSECTION_BATCH_SIZE.
The rayTest input parameters are:
required
rayFromPositions
list of vec3, list of list
of 3 floats
list of start points for each ray, in world coordinates
required
rayToPositions
list of vec3, list of list
of 3 floats
list of end points for each ray in world coordinates
optional
physicsClientId
int
if you are connected to multiple servers, you can
pick one.
Output is one ray intersection result per input ray, with the same information as in above rayTest
query.
getCollisionShapeData
You can query the collision geometry type and other collision shape information of existing body
base and links using this query. It works very similar to getVisualShapeData.
The input parameters for getCollisionShapeData are:
required
objectUniqueId
int
object unique id, received from loadURDF etc
required
linkIndex
int
link index or -1 for the base
optional
physicsClientId
int
if you are connected to multiple servers, you can pick one.
The return value is a list with following contents:
object unique id
int
object unique id

44
linkIndex
int
link index or -1 for the base
geometry type
int
geometry type: GEOM_BOX, GEOM_SPHERE, GEOM_CAPSULE, GEOM_MESH,
GEOM_PLANE
dimensions
vec3
depends on geometry type: for GEOM_BOX: extents, for GEOM_SPHERE
dimensions[0] = radius, for GEOM_CAPSULE and GEOM_CYLINDER,
dimensions[0] = height (length), dimensions[1] = radius. For GEOM_MESH,
dimensions is the scaling factor.
filename
string
Only for GEOM_MESH: file name (and path) of the collision mesh asset
local frame pos
vec3
Local position of the collision frame with respect to the center of mass/inertial frame.
local fram orn
vec4
Local orientation of the collision frame with respect to the inertial frame.
Inverse Dynamics, Kinematics
calculateInverseDynamics
calculateInverseDynamics will compute the forces needed to reach the given joint accelerations,
starting from specified joint positions and velocities.
The calculateInverseDynamics input parameters are:
required
bodyUniqueId
int
body unique id, as returned by loadURDF etc.
required
objPositions
list of float
joint positions (angles) for each degree of freedom (DoF).
Note that fixed joints have 0 degrees of freedom. The base
is skipped/ignored in all cases (floating base and fixed
base).
required
objVelocities
list of float
joint velocities for each degree of freedom (DoF)
required
objAccelerations
list of float
desired joint accelerations for each degree of freedom
(DoF)
optional
physicsClientId
int
if you are connected to multiple servers, you can pick one.
calculateInverseDynamics returns a list of joint forces for each degree of freedom.
calculateJacobian, MassMatrix
calculateJacobian will compute the translational and rotational jacobians for a point on a link,
e.g. x_dot = J * q_dot. The returned jacobians are slightly different depending on whether the
root link is fixed or floating. If floating, the jacobians will include columns corresponding to the
root link degrees of freedom; if fixed, the jacobians will only have columns associated with the
joints. The function call takes the full description of the kinematic state, this is because

45
calculateInverseDynamics is actually called first and the desired jacobians are extracted from
this; therefore, it is reasonable to pass zero vectors for joint velocities and accelerations if
desired.
The calculateJacobian input parameters are:
required
bodyUniqueId
int
body unique id, as returned by loadURDF etc.
required
linkIndex
int
link index for the jacobian.
required
localPosition
list of float
the point on the specified link to compute the jacobian for.
required
objPositions
list of float
joint positions (angles)
required
objVelocities
list of float
joint velocities
required
objAccelerations
list of float
desired joint accelerations
optional
physicsClientId
int
if you are connected to multiple servers, you can pick one.
calculateJacobian returns:
required
linearJacobian
mat3x
((dof), (dof), (dof))
the translational jacobian, x_dot = J_t * q_dot.
required
angularJacobian
mat3x
((dof), (dof), (dof))
the rotational jacobian, r_dot = J_r * q_dot.
calculateMassMatrix
calculateMassMatrix will compute the system inertia for an articulated body given its joint
positions.
required
bodyUniqueId
int
body unique id, as returned by loadURDF etc.
required
objPositions
array of
float
jointPositions for each link.
optional
physicsClientId
int
if you are connected to multiple servers, you can pick one.
The result is the square mass matrix with dimensions dofCount * dofCount, stored as a list of
dofCount rows, each row is a list of dofCount mass matrix elements.
Inverse Kinematics
You can compute the joint angles that makes the end-effector reach a given target position in
Cartesian world space. Internally, Bullet uses an improved version of Samuel Buss Inverse
Kinematics library. At the moment only the Damped Least Squares method with or without Null

46
Space control is exposed, with a single end-effector target. Optionally you can also specify the
target orientation of the end effector. In addition, there is an option to use the null-space to
specify joint limits and rest poses. This optional null-space support requires all 4 lists
(lowerLimits, upperLimits, jointRanges, restPoses), otherwise regular IK will be used. See also
inverse_kinematics.py example in Bullet/examples/pybullet/examples folder for details.
calculateInverseKinematics
calculateInverseKinematics input parameters are:
required
bodyUniqueId
int
body unique id, as returned by loadURDF
required
endEffectorLinkIndex
int
end effector link index
required
targetPosition
vec3, list of 3 floats
target position in Cartesian world space
optional
targetOrientation
vec3, list of 4 floats
target orientation in Cartesian world space,
quaternion [x,y,w,z]. If not specified, pure
position IK will be used.
optional
lowerLimits
list of floats [0..nDof]
Optional null-space IK requires all 4 lists
(lowerLimits, upperLimits, jointRanges,
restPoses). Otherwise regular IK will be used.
optional
upperLimits
list of floats [0..nDof]
lowerLimit and upperLimit specify joint limits
optional
jointRanges
list of floats [0..nDof]
optional
restPoses
list of floats [0..nDof]
Favor an IK solution closer to a given rest
pose
optional
jointDamping
list of floats [0..nDof]
jointDamping allow to tune the IK solution
using joint damping factors
optional
solver
int
p.IK_DLS or p.IK_SDLS, Damped Least
Squares or Selective Damped Least
Squares, as described in the paper by
Samuel Buss "Selectively Damped Least
Squares for Inverse Kinematics".
optional
physicsClientId
int
if you are connected to multiple servers, you
can pick one.
calculateInverseKinematics returns a list of joint positions. See
Bullet/examples/pybullet/inverse_kinematics.py for an example.
Note that the calculateInverseKinematics may give an approximate result in end-effector
location. You can get more accurate results using the "accurateCalculateInverseKinematics"
example code.

47
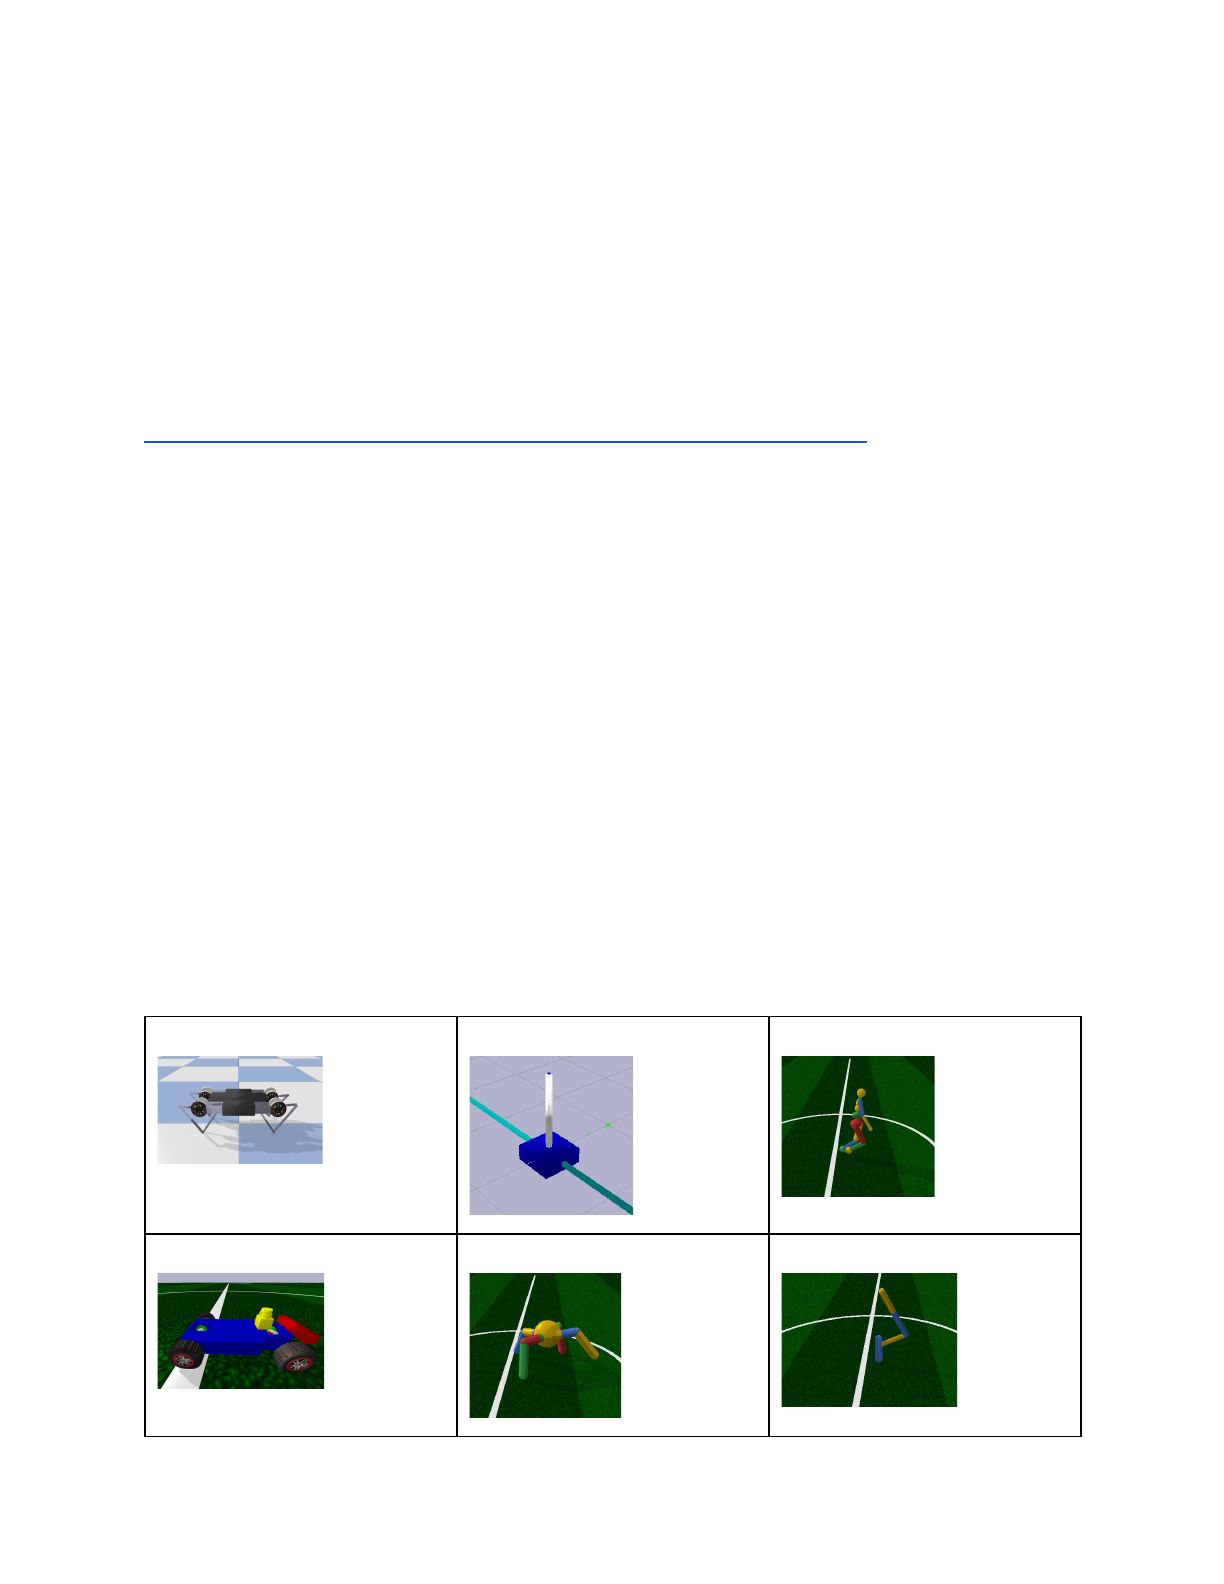
48
Reinforcement Learning Gym Envs
A suite of RL Gym Environments are installed during "pip install pybullet". This includes PyBullet
versions of the OpenAI Gym environments such as ant, hopper, humanoid and walker. There
are also environments that apply in simulation as well as on real robots, such as the Ghost
Robotics Minitaur quadruped, the MIT racecar and the KUKA robot arm grasping environments.
The source code of pybullet, pybullet_envs, pybullet_data and the examples are here:
https://github.com/bulletphysics/bullet3/tree/master/examples/pybullet/gym.
You can train the environments with RL training algorithms such as DQN, PPO, TRPO and
DDPG. Several pre-trained examples are available, you can enjoy them like this:
pip install pybullet, tensorflow, gym
python -m pybullet_envs.examples.enjoy_TF_HumanoidBulletEnv_v0_2017may
python -m pybullet_envs.examples.kukaGymEnvTest
Environments and Data
After you "sudo pip install pybullet", the pybullet_envs and pybullet_data packages are
available. Importing the pybullet_envs package will register the environments automatically to
OpenAI Gym.
You can get a list of the Bullet environments in gym using the following Python line:
print(
MinitaurBulletEnv-v0
CartPoleBulletEnv-v0
HumanoidBulletEnv-v0
RacecarBulletEnv-v0
AntBulletEnv-v0
HopperBulletEnv-v0
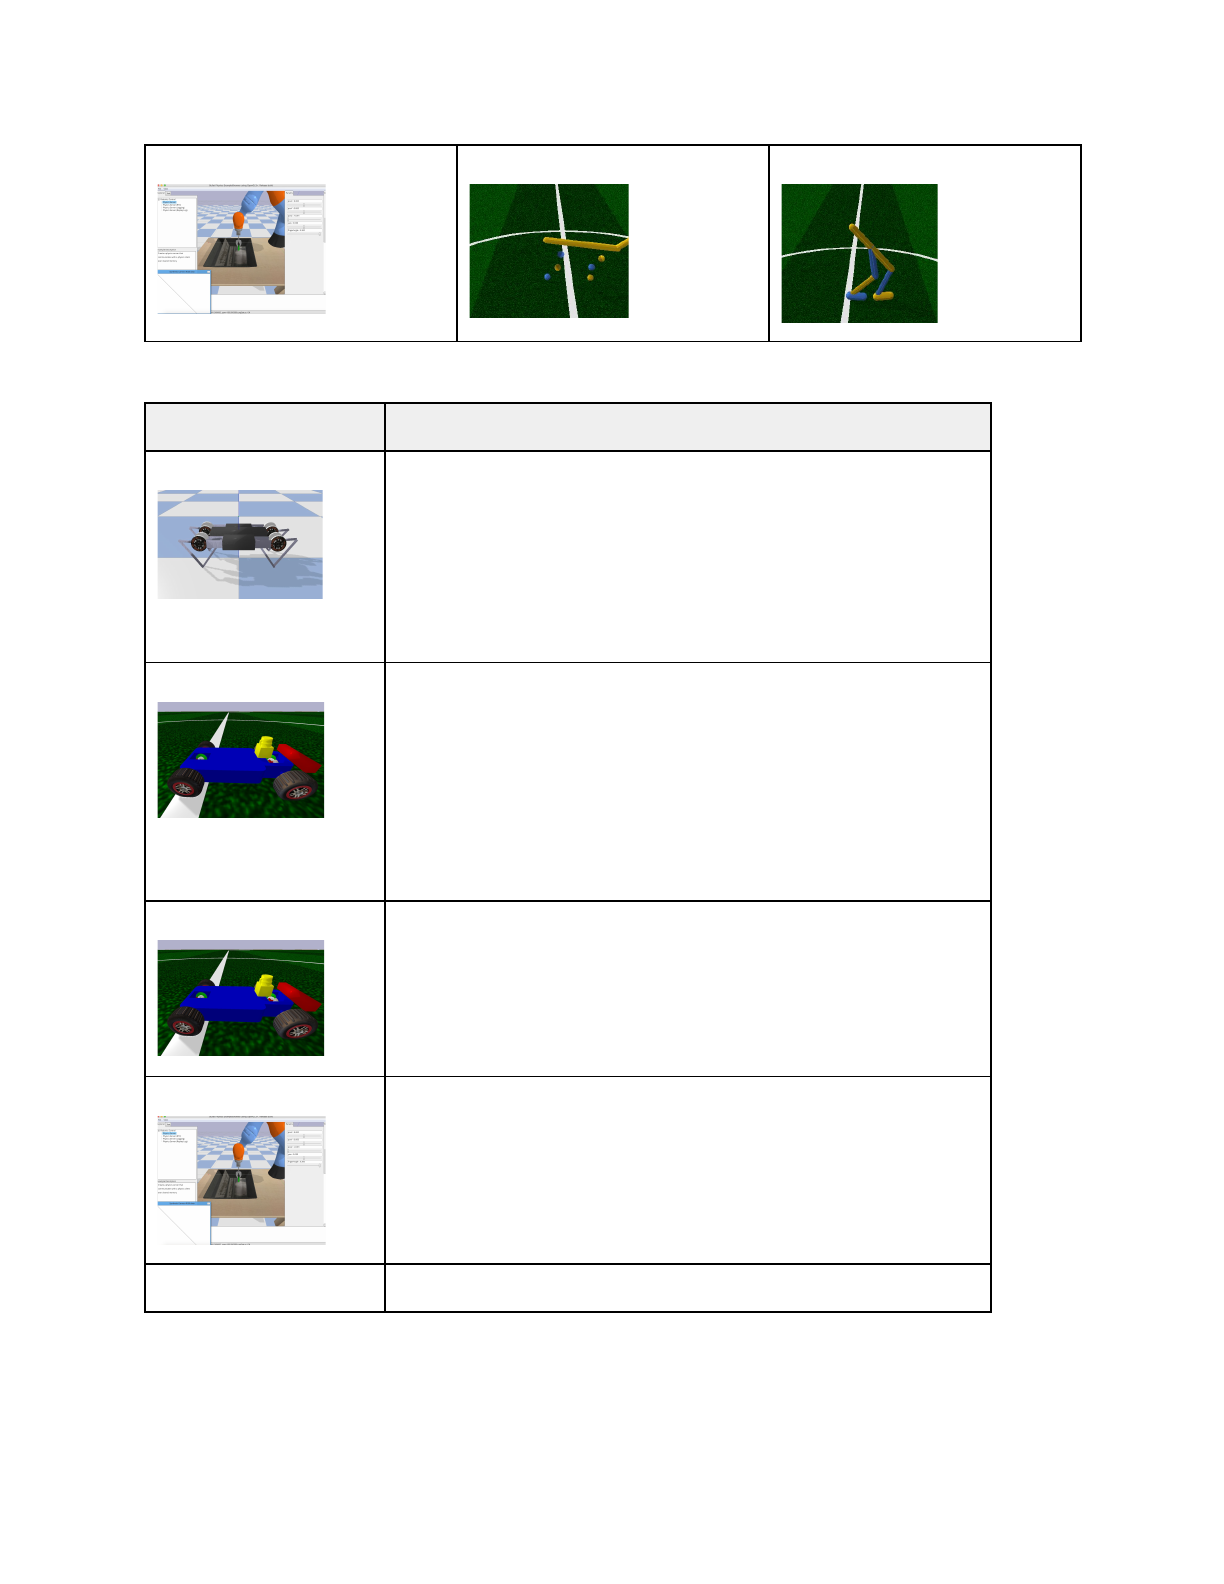
49
KukaBulletEnv-v0
HalfCheetahBulletEnv-v0
Walker2DBulletEnv-v0
Environment Name
Description
MinitaurBulletEnv-v0
Simulation of the Ghost Robotics Minitaur quadruped on a flat ground.
Reward based on distance traveled. Create the class using Gym:
env = gym.make('MinitaurBulletEnv-v0')
or create the environment using the class directly, with parameters:
import pybullet_envs.bullet.minitaur_gym_env as e
env = e.MinitaurBulletEnv(render=True)
RacecarBulletEnv-v0
Simulation of the MIT RC Racecar. Reward based on distance to the
randomly placed ball. Observations are ball position (x,y) in camera
frame. The action space of the environment can be discrete (for DQN) or
continuous (for PPO, TRPO and DDPG).
import pybullet_envs.bullet.racecarGymEnv as e
env = e.RacecarGymEnv(isDiscrete=False ,renders=True)
env.reset()
RacecarZedBulletEnv-v0
Same as the RacecarBulletEnv-v0, but observations are camera pixels.
KukaBulletEnv-v0
Simulation of the KUKA Iiwa robotic arm, grasping an object in a tray.
The main reward happens a the end, when the gripped can grasp the
object above a certain height. Some very small reward/cost happens
each step: cost of action and distance between gripper and object.
Observation includes the x,y position of the object.
Note: this environment has issues training at the moment, we look into it.
KukaCamBulletEnv-v0
Same as KukaBulletEnv-v0, but observation are camera pixels.
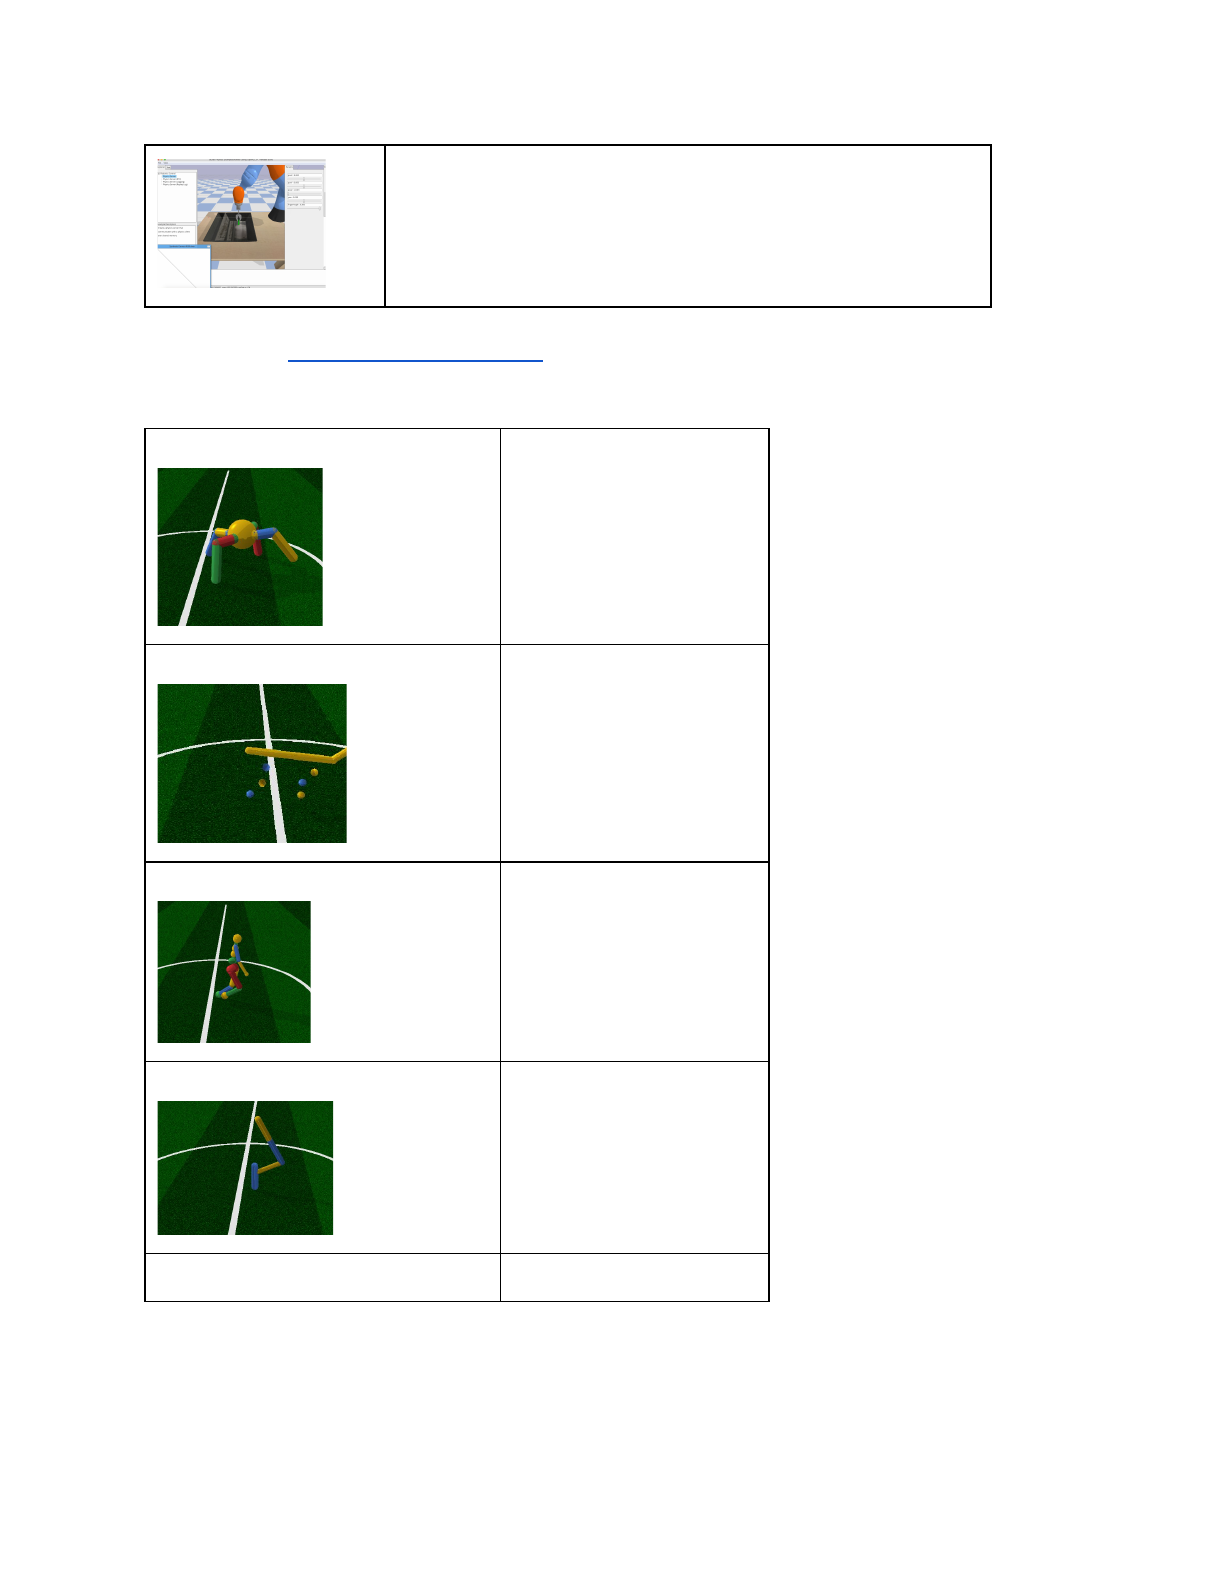
50
We ported the Roboschool environments to pybullet. The Roboschool environments are harder
than the MuJoCo Gym environments.
AntBulletEnv-v0
Ant is heavier,
encouraging it to typically
have two or more legs on
the ground.
HalfCheetahBulletEnv-v0
HumanoidBulletEnv-v0
Humanoid benefits from
more realistic energy
cost (= torque × angular
velocity) subtracted from
reward.
HopperBulletEnv-v0
Walker2DBulletEnv-v0
51
InvertedPendulumBulletEnv-v0
InvertedDoublePendulumBulletEnv-v0
InvertedPendulumSwingupBulletEnv-v0
It is also possible to access the data, such as URDF/SDF robot assets, Wavefront .OBJ files
from the pybullet_data package. Here is an example how to do this:
import pybullet
import pybullet_data
datapath = pybullet_data.getDataPath()
pybullet.connect(pybullet.GUI)
pybullet.setAdditionalSearchPath(datapath)
pybullet.loadURDF("r2d2.urdf",[0,0,1])
Alternatively, manually append the datapath to the filename in the loadURDF/SDF commands.
Train and Enjoy: DQN, PPO, ES
For discrete Gym environments such as the KukaBulletEnv-v0 and RacecarBulletEnv-v0 you
can use OpenAI Baselines DQN to train the model using a discrete action space. Some
examples are provided how to train and enjoy those discrete environments:
python -m pybullet_envs.baselines.train_pybullet_cartpole
python -m pybullet_envs.baselines.train_pybullet_racecar
OpenAI Baselines will save a .PKL file at specified intervals when the model improves. This
.PKL file is used in the enjoy scripts:
python -m pybullet_envs.baselines.enjoy_pybullet_cartpole
python -m pybullet_envs.baselines.enjoy_pybullet_racecar
There are also some pre-trained models that you can enjoy out-of-the-box. Here is a list of
pretrained environments to enjoy:
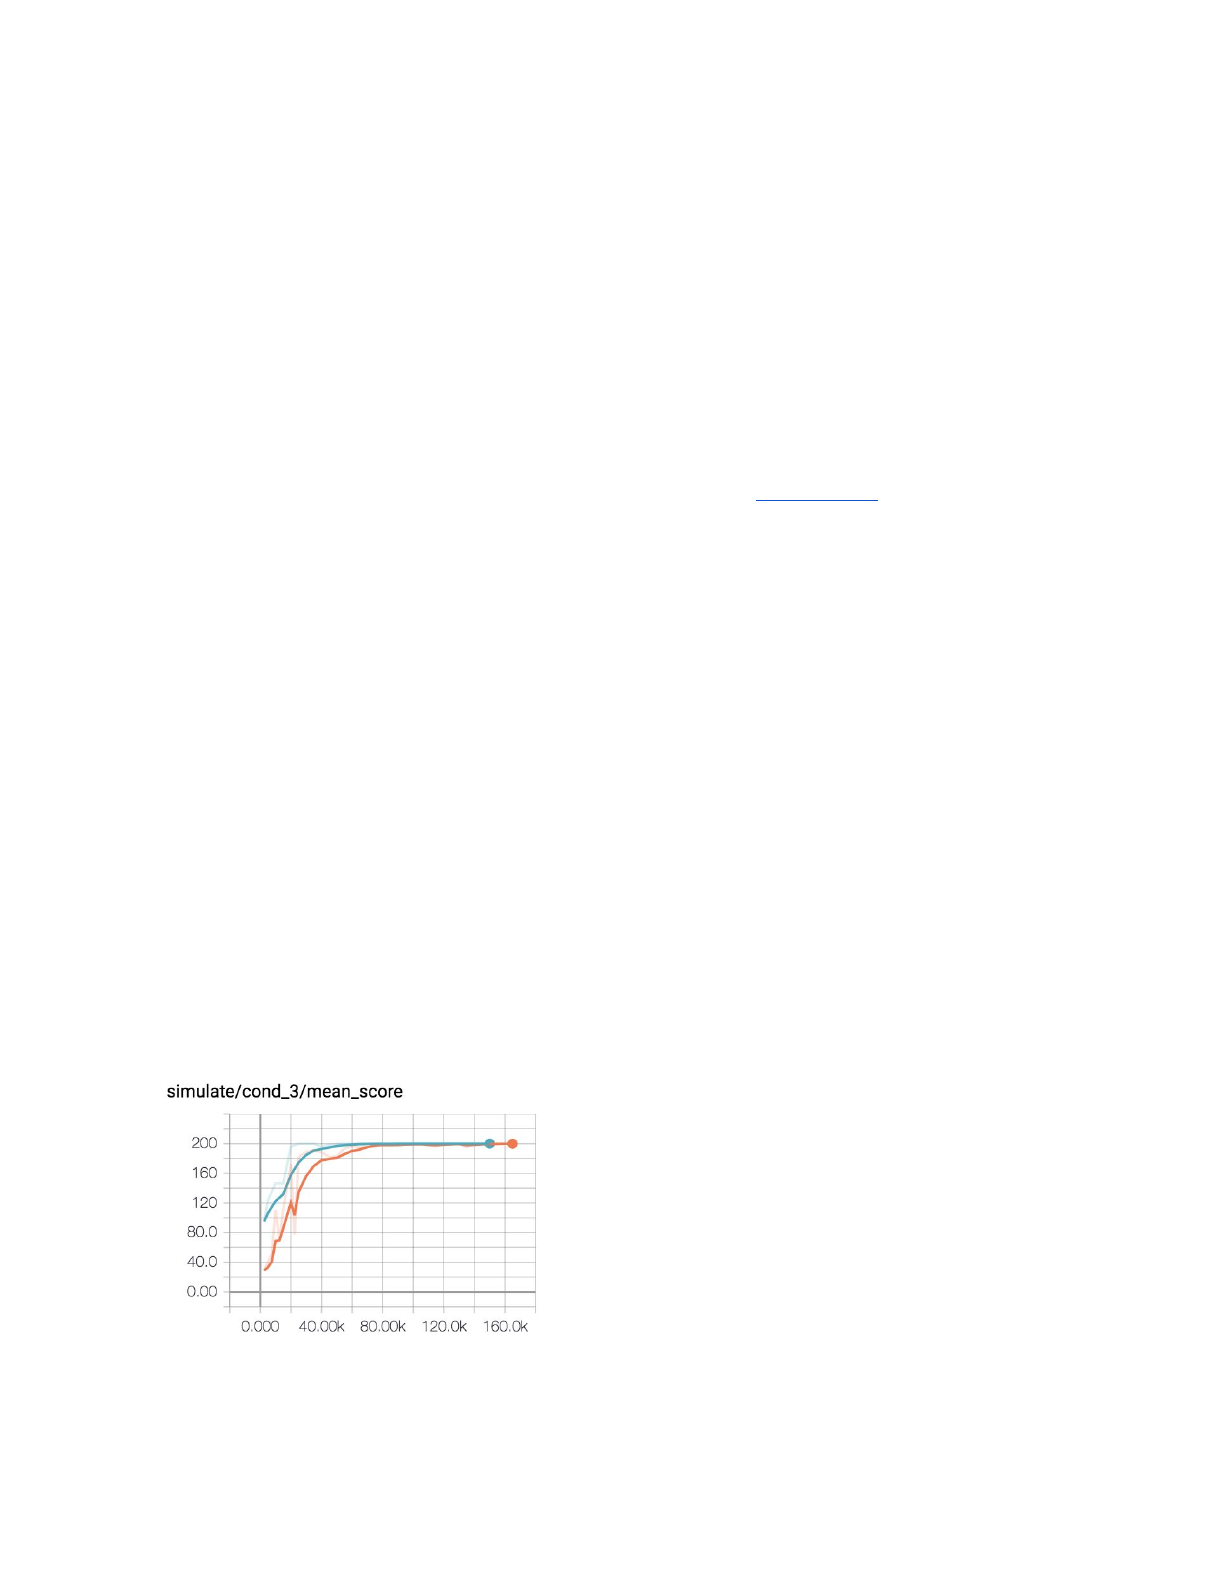
52
python -m pybullet_envs.examples.enjoy_TF_AntBulletEnv_v0_2017may
python -m pybullet_envs.examples.enjoy_TF_HalfCheetahBulletEnv_v0_2017may
python -m pybullet_envs.examples.enjoy_TF_AntBulletEnv_v0_2017may
python -m pybullet_envs.examples.enjoy_TF_HopperBulletEnv_v0_2017may
python -m pybullet_envs.examples.enjoy_TF_HumanoidBulletEnv_v0_2017may
python -m pybullet_envs.examples.enjoy_TF_InvertedDoublePendulumBulletEnv_v0_2017may
python -m pybullet_envs.examples.enjoy_TF_InvertedPendulumBulletEnv_v0_2017may
python -m pybullet_envs.examples.enjoy_TF_InvertedPendulumSwingupBulletEnv_v0_2017may
python -m pybullet_envs.examples.enjoy_TF_Walker2DBulletEnv_v0_2017may
Train using TensorFlow & PyTorch
You can train various pybullet environments using TensorFlow Agents PPO. First install the
required Python packages: pip install gym, tensorflow, agents, pybullet, ruamel.yaml
Then for training use:
python -m pybullet_envs.agents.train_ppo --config=pybullet_pendulum --logdir=pendulum
The following environments are available as Agents config:
pybullet_pendulum
pybullet_doublependulum
pybullet_pendulumswingup
pybullet_cheetah
pybullet_ant
pybullet_racecar
pybullet_minitaur
You can use tensorboard to see the progress of the training:
tensorboard --logdir=pendulum --port=2222
Open a web browser and visit localhost:2222 page. Here is an example graph from Tensorboard for the
pendulum training:
After training, you can visualize the trained model, creating a video or visualizing it using a physics server
(python -m pybullet_envs.examples.runServer or ExampleBrowser in physics server mode or in Virtual
Reality). If you start a local GUI physics server, the visualizer (bullet_client.py) will automatically connect

53
to it, and use OpenGL hardware rendering to create the video. Otherwise it will use the CPU tinyrenderer
instead. To generate the video, use:
python -m pybullet_envs.agents.visualize_ppo --logdir=pendulum/xxxxx --outdir=pendulum_video
In a similar way you can train and visualize the Minitaur robot:
python -m pybullet_envs.agents.train_ppo --config=pybullet_minitaur --logdir=pybullet_minitaur
Here is an example video of the Minitaur gait: https://www.youtube.com/watch?v=tfqCHDoFHRQ
Evolution Strategies (ES)
There is an blog article by David Ha (hardmaru) how to train PyBullet environments using Evolution
Strategies at http://blog.otoro.net/2017/11/12/evolving-stable-strategies
.
Train using PyTorch PPO
We will add some description how to get started with PyTorch and pybullet. In the meanwhile, see this
repository: https://github.com/ikostrikov/pytorch-a2c-ppo-acktr
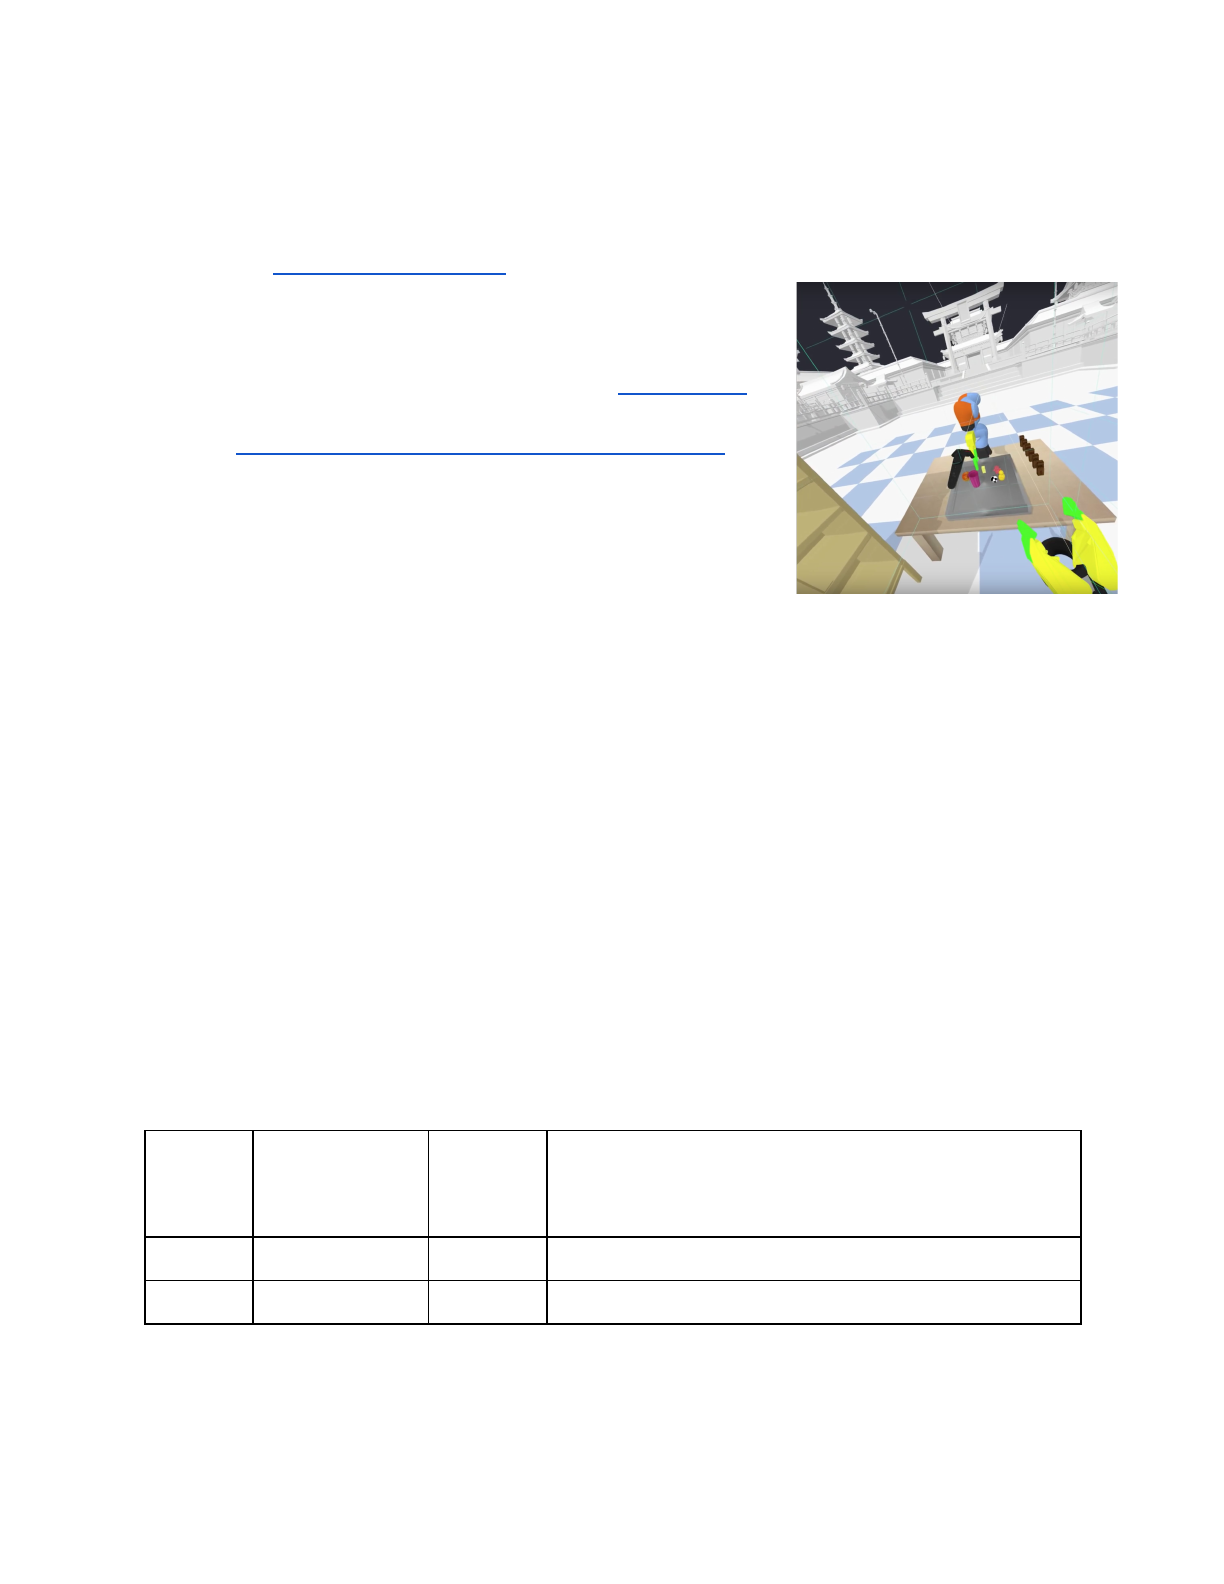
54
Virtual Reality
See also the vrBullet quickstart guide.
The VR physics server uses the OpenVR API for HTC Vive and
Oculus Rift Touch controller support. OpenVR is currently
working on Windows, Valve is also working on a Linux version.
See also https://www.youtube.com/watch?v=VMJyZtHQL50 for
an example video of the VR example, part of Bullet, that can be
fully controlled using PyBullet over shared memory, UDP or TCP
connection.
For VR on Windows, it is recommended to compile the Bullet
Physics SDK using Microsoft Visual Studio (MSVC). Generate
MSVC project files by running the "build_visual_studio_vr_pybullet_double.bat" script. You can
customize this small script to point to the location of Python etc. Make sure to switch to
'Release' configuration of MSVC and build and run the
App_PhysicsServer_SharedMemory_VR*.exe. By default, this VR application will present an
empty world showing trackers/controllers (if available).
getVREvents,setVRCameraState
getVREvents will return a list events for a selected VR devices that changed state since the last
call to getVREvents. When not providing any deviceTypeFilter, the default is to only report
VR_DEVICE_CONTROLLER state. You can choose any combination of devices including
VR_DEVICE_CONTROLLER, VR_DEVICE_HMD (Head Mounted Device) and VR_DEVICE_GENERIC_TRACKER
(such as the HTC Vive Tracker).
Note that VR_DEVICE_HMD and VR_DEVICE_GENERIC_TRACKER only report position and orientation events.
getVREvents has the following parameters:
optional
deviceTypeFilter
int
default is VR_DEVICE_CONTROLLER
. You can also choose VR_DEVICE_HMD
or VR_DEVICE_GENERIC_TRACKER or any combination of
them.
optional
allAnalogAxes
int
1 for all analogue axes, 0 with just a single axis
optional
physicsClientId
int
if you are connected to multiple servers, you can pick one.
The output parameters are:

55
controllerId
int
controller index (0..MAX_VR_CONTROLLERS)
controllerPosition
vec3, list of 3 floats
controller position, in world space Cartesian coordinates
controllerOrientation
vec4, list of 4 floats
controller orientation quaternion [x,y,z,w] in world space
controllerAnalogueAxis
float
analogue axis value
numButtonEvents
int
number of button events since last call to getVREvents
numMoveEvents
int
number of move events since last call to getVREvents
buttons
int[64], list of button
states (OpenVR has a
maximum of 64
buttons)
flags for each button: VR_BUTTON_IS_DOWN (currently
held down), VR_BUTTON_WAS_TRIGGERED (went down
at least once since last cal to getVREvents,
VR_BUTTON_WAS_RELEASED (was released at least once
since last call to getVREvents). Note that only
VR_BUTTON_IS_DOWN reports actual current state. For
example if the button went down and up, you can tell from the
RELEASE/TRIGGERED flags, even though IS_DOWN is still
false. Note that in the log file, those buttons are packed with
10 buttons in 1 integer (3 bits per button).
deviceType
int
type of device: VR_DEVICE_CONTROLLER,
VR_DEVICE_HMD or
VR_DEVICE_GENERIC_TRACKER
allAnalogAxes (only if
explicitly requested!)
list of 10 floats
currently, MAX_VR_ANALOGUE_AXIS is 5, for each axis x
and y value.
See Bullet/examples/pybullet/examples/vrEvents.py for an example of VR drawing and
Bullet/examples/pybullet/examples/vrTracker.py to track HMD and generic tracker.
setVRCameraState
setVRCameraState allows to set the camera root transform offset position and orientation. This
allows to control the position of the VR camera in the virtual world. It is also possible to let the
VR Camera track an object, such as a vehicle.
setVRCameraState has the following arguments (there are no return values):
optional
rootPosition
vec3, vector of 3 floats
camera root position
optional
rootOrientation
vec4, vector of 4 floats
camera root orientation in quaternion [x,y,z,w] format.
optional
trackObject
vec3, vector of 3 floats
the object unique id to track
optional
trackObjectFlag
int
flags.VR_CAMERA_TRACK_OBJECT_ORIENTATIO
N (if enabled, both position and orientation is tracked)
optional
physicsClientId
int
if you are connected to multiple servers, you can pick

56
one.
Debug GUI, Lines, Text, Parameters
PyBullet has some functionality to make it easier to debug, visualize and tune the simulation.
This feature is only useful if there is some 3D visualization window, such as GUI mode or when
connected to a separate physics server (such as Example Browser in 'Physics Server' mode or
standalone Physics Server with OpenGL GUI).
addUserDebugLine, Text
You can add a 3d line specified by a 3d starting point (from) and end point (to), a color
[red,green,blue], a line width and a duration in seconds. The arguments to addUserDebugline
are:
required
lineFromXYZ
vec3, list of 3
floats
starting point of the line in Cartesian world coordinates
required
lineToXYZ
vec3, list of 3
floats
end point of the line in Cartesian world coordinates
optional
lineColorRGB
vec3, list of 3
floats
RGB color [Red, Green, Blue] each component in range
[0..1]
optional
lineWidth
float
line width (limited by OpenGL implementation)
optional
lifeTime
float
use 0 for permanent line, or positive time in seconds
(afterwards the line with be removed automatically)
optional
parentObjectUniqueId
int
new in upcoming PyBullet 1.0.8: draw line in local
coordinates of a parent object/link.
optional
parentLinkIndex
int
new in upcoming PyBullet 1.0.8: draw line in local
coordinates of a parent object/link.
optional
physicsClientId
int
if you are connected to multiple servers, you can pick
one
addUserDebugLine will return a non-negative unique id, that lets you remove the line using
removeUserDebugItem.
addUserDebugText
You can add some 3d text at a specific location using a color and size. The input arguments
are:

57
required
text
text
text represented as a string (array of characters)
required
textPosition
vec3, list of 3
floats
3d position of the text in Cartesian world coordinates
[x,y,z]
optional
textColorRGB
vec3, list of 3
floats
RGB color [Red, Green, Blue] each component in range
[0..1]
optional
textSize
float
Text size
optional
lifeTime
float
use 0 for permanent text, or positive time in seconds
(afterwards the text with be removed automatically)
optional
textOrientation
vec4, list of 4
floats
By default, debug text will always face the camera,
automatically rotation. By specifying a text orientation
(quaternion), the orientation will be fixed in world space
or local space (when parent is specified). Note that a
different implementation/shader is used for camera
facing text, with different appearance: camera facing
text uses bitmap fonts, text with specified orientation
uses TrueType fonts..
optional
parentObjectUniqueId
int
new in upcoming PyBullet 1.0.8: draw line in local
coordinates of a parent object/link.
optional
parentLinkIndex
int
new in upcoming PyBullet 1.0.8: draw line in local
coordinates of a parent object/link.
optional
physicsClientId
int
if you are connected to multiple servers, you can pick
one
addUserDebugText will return a non-negative unique id, that lets you remove the line using
removeUserDebugItem. See also pybullet/examples/debugDrawItems.py
addUserDebugParameter
addUserDebugParameter lets you add custom sliders to tune parameters. It will return a unique
id. This lets you read the value of the parameter using readUserDebugParameter. The input
parameters of addUserDebugParameter are:
required
paramName
string
name of the parameter
required
rangeMin
float
minimum value
required
rangeMax
float
maximum value
required
startValue
float
starting value
optional
physicsClientId
int
if you are connected to multiple servers, you can pick one

58
The input parameters of readUserDebugParameter are:
required
itemUniqueId
int
the unique id returned by 'addUserDebugParameter)
optional
physicsClientId
int
if you are connected to multiple servers, you can pick one
Return value is the most up-to-date reading of the parameter.
removeUserDebugItem/All
The functions to add user debug lines, text or parameters will return a non-negative unique id if
it succeeded. You can remove the debug item using this unique id using the
removeUserDebugItem method.The input parameters are:
required
itemUniqueId
int
unique id of the debug item to be removed (line, text etc)
optional
physicsClientId
int
if you are connected to multiple servers, you can pick one
removeAllUserDebugItems
This API will remove all debug items (text, lines etc).
setDebugObjectColor
The built-in OpenGL visualizers have a wireframe debug rendering feature: press 'w' to toggle.
The wireframe has some default colors. You can override the color of a specific object and link
using setDebugObjectColor. The input parameters are:
required
objectUniqueId
int
unique id of the object
required
linkIndex
int
link index
optional
objectDebugColorRGB
vec3, list of 3 floats
debug color in [Red,Green,Blue]. If not
provided, the custom color will be removed.
optional
physicsClientId
int
if you are connected to multiple servers, you
can pick one

59
configureDebugVisualizer
You can configure some settings of the built-in OpenGL visualizer, such as enabling or disabling
wireframe, shadows and GUI rendering. This is useful since some laptops or Desktop GUIs
have performance issues with our OpenGL 3 visualizer.
required
flag
int
The feature to enable or disable, such as COV_ENABLE_WIREFRAME,
COV_ENABLE_SHADOWS,COV_ENABLE_GUI,
COV_ENABLE_VR_PICKING, COV_ENABLE_VR_TELEPORTING,
COV_ENABLE_RENDERING, COV_ENABLE_TINY_RENDERER,
COV_ENABLE_VR_RENDER_CONTROLLERS,
COV_ENABLE_KEYBOARD_SHORTCUTS,
COV_ENABLE_MOUSE_PICKING, COV_ENABLE_Y_AXIS_UP (Z is
default world up axis),COV_ENABLE_RGB_BUFFER_PREVIEW,
COV_ENABLE_DEPTH_BUFFER_PREVIEW,
COV_ENABLE_SEGMENTATION_MARK_PREVIEW
required
enable
int
0 or 1
optional
physicsClientId
int
if you are connected to multiple servers, you can pick one
Example:
pybullet.configureDebugVisualizer(pybullet.COV_ENABLE_WIREFRAME,1)
get/resetDebugVisualizerCamera
Warning: the return arguments of getDebugVisualizerCamera are in a different order than
resetDebugVisualizerCamera. Will be fixed in a future API revision.
resetDebugVisualizerCamera
You can reset the 3D OpenGL debug visualizer camera distance (between eye and camera
target position), camera yaw and pitch and camera target position.
required
cameraDistance
float
distance from eye to camera target position
required
cameraYaw
float
camera yaw angle (in degrees) left/right
required
cameraPitch
float
camera pitch angle (in degrees) up/down
required
cameraTargetPosition
vec3, list of 3 floats
cameraTargetPosition is the camera focus point
optional
physicsClientId
int
if you are connected to multiple servers, you can pick
one

60
Example: pybullet.resetDebugVisualizerCamera( cameraDistance=3, cameraYaw=30,
cameraPitch=52, cameraTargetPosition=[0,0,0])
getDebugVisualizerCamera
You can get the width and height (in pixels) of the camera, its view and projection matrix using
this command. Input parameter is the optional physicsClientId. Output information is:
width
int
width of the camera image in pixels
height
int
height of the camera image in pixels
viewMatrix
float16, list of 16
floats
view matrix of the camera
projectionMatrix
float16, list of 16
floats
projection matrix of the camera
cameraUp
float3, list of 3
floats
up axis of the camera, in Cartesian world space coordinates
cameraForward
float3, list of 3
floats
forward axis of the camera, in Cartesian world space coordinates
horizontal
float3, list of 3
floats
TBD. This is a horizontal vector that can be used to generate rays
(for mouse picking or creating a simple ray tracer for example)
vertical
float3, list of 3
floats
TBD.This is a vertical vector that can be used to generate rays(for
mouse picking or creating a simple ray tracer for example).
yaw
float
yaw angle of the camera, in Cartesian local space coordinates
pitch
float
pitch angle of the camera, in Cartesian local space coordinates
dist
float
distance between the camera and the camera target
target
float3, list of 3
floats
target of the camera, in Cartesian world space coordinates
getKeyboardEvents, getMouseEvents
You can receive all keyboard events that happened since the last time you called
'getKeyboardEvents'. Each event has a keycode and a state. The state is a bit flag combination
of KEY_IS_DOWN, KEY_WAS_TRIGGERED and KEY_WAS_RELEASED. If a key is going
from 'up' to 'down' state, you receive the KEY_IS_DOWN state, as well as the
KEY_WAS_TRIGGERED state. If a key was pressed and released, the state will be
KEY_IS_DOWN and KEY_WAS_RELEASED.

61
Some special keys are defined: B3G_F1 … B3G_F12, B3G_LEFT_ARROW,
B3G_RIGHT_ARROW, B3G_UP_ARROW, B3G_DOWN_ARROW, B3G_PAGE_UP,
B3G_PAGE_DOWN, B3G_PAGE_END, B3G_HOME, B3G_DELETE, B3G_INSERT,
B3G_ALT, B3G_SHIFT, B3G_CONTROL, B3G_RETURN.
The input of getKeyboardEvents is an optional physicsClientId:
optional
physicsClientId
int
if you are connected to multiple servers, you can pick one
The output is a dictionary of keycode 'key' and keyboard state 'value'.
getMouseEvents
Similar to getKeyboardEvents, you can get the mouse events that happened since the last call
to getMouseEvents. All the mouse move events are merged into a single mouse move event
with the most up-to-date position. In addition, all mouse button events for a given button are
merged. If a button went down and up, the state will be 'KEY_WAS_TRIGGERED '. We reuse
the KEY_WAS_TRIGGERED /KEY_IS_DOWN /KEY_WAS_RELEASED for the mouse button
states.
Input arguments to getMouseEvents are:
optional
physicsClientId
int
if you are connected to multiple servers, you can pick one
The output is a list of mouse events in the following format:
eventType
int
MOUSE_MOVE_EVENT=1, MOUSE_BUTTON_EVENT=2
mousePosX
float
x-coordinates of the mouse pointer
mousePosY
float
y-coordinates of the mouse pointer
buttonIndex
int
button index for left/middle/right mouse button
buttonState
int
flag KEY_WAS_TRIGGERED /KEY_IS_DOWN /KEY_WAS_RELEASED
Build and install PyBullet
There are a few different ways to install PyBullet on Windows, Mac OSX and Linux. We use
Python 2.7 and Python 3.5.2, but expect most Python 2.x and Python 3.x versions should work.
The easiest to get PyBullet to work is using pip or python setup.py:

62
Using Python pip
Make sure Python and pip is installed, and then run:
pip install pybullet
Note that if you used pip to install PyBullet, it is still beneficial to also install the C++ Bullet
Physics SDK: it includes data files, physics servers and tools useful for PyBullet.
You can also run 'python setup.py build' and 'python setup.py install' in the root of the Bullet
Physics SDK (get the SDK from http://github.com/bulletphysics/bullet3)
See also https://pypi.python.org/pypi/pybullet
Alternatively you can install PyBullet from source code using premake (Windows) or cmake:
Using premake for Windows
Make sure some Python version is installed in c:\python-3.5.2 (or other version folder name)
First get the source code from github, using
git clone https://github.com/bulletphysics/bullet3
Click on build_visual_studio_vr_pybullet_double.bat and open the 0_Bullet3Solution.sln project
in Visual Studio, convert projects if needed.
Switch to Release mode, and compile the 'pybullet' project.
Then there are a few options to import pybullet in a Python interpreter:
1) Rename pybullet_vs2010..dll to pybullet.pyd and start the Python.exe interpreter using
bullet/bin as the current working directory. Optionally for debugging: rename
bullet/bin/pybullet_vs2010_debug.dll to pybullet_d.pyd and start python_d.exe)
2) Rename bullet/bin/pybullet_vs2010..dll to pybullet.pyd and use command prompt:
set PYTHONPATH=c:\develop\bullet3\bin (replace with actual folder where Bullet is
located) or create this PYTHONPATH environment variable using Windows GUI
3) create an administrator prompt (cmd.exe) and create a symbolic link as follows

63
cd c:\python-3.5.2\dlls
mklink pybullet.pyd c:\develop\bullet3\bin\pybullet_vs2010.dll
Then run python.exe and import pybullet should work.
Using cmake on Linux and Mac OSX
Note that the recommended way is to use sudo pip install pybullet (or pip3). Using cmake or
premake or other build systems is only for developers who know what they are doing, and is
unsupported in general.
First get the source code from github, using
git clone https://github.com/bulletphysics/bullet3
1) Download and install cmake
2) Run the shell script in the root of Bullet:
build_cmake_pybullet_double.sh
3) Make sure Python finds our pybullet.so module:
export PYTHONPATH = /your_path_to_bullet/build_cmake/examples/pybullet
That's it. Test pybullet by running a python interpreter and enter 'import pybullet' to see if the
module loads. If so, you can play with the pybullet scripts in Bullet/examples/pybullet.
Possible Mac OSX Issues
● If you have any issues importing pybullet on Mac OSX, make sure you run the right
Python interpreter, matching the include/libraries set in -DPYTHON_INCLUDE_DIR and
-DPYTHON_LIBRARY (using cmake). It is possible that you have multiple Python
interpreters installed, for example when using homebrew. See this comment for an
example.
Possible Linux Issues
● Make sure OpenGL is installed
● When using Anaconda as Python distribution, conda install libgcc so that ‘GLIBCXX’ is
found (see
http://askubuntu.com/questions/575505/glibcxx-3-4-20-not-found-how-to-fix-this-error)
● It is possible that cmake cannot find the python libs when using Anaconda as Python
distribution. You can add them manually by going to the ../build_cmake/CMakeCache.txt
file and changing following line:

64
‘PYTHON_LIBRARY:FILEPATH=/usr/lib/python2.7/config-x86_64-linux-gnu/libpython2.7
.so’
GPU or virtual machine lacking OpenGL 3
● By default PyBullet uses OpenGL 3. Some remote desktop environments and GPUs
don't support OpenGL 3, leading to artifacts (grey screen) or even crashes. You can use
the --opengl2 flag to fall back to OpenGL 2. This is not fully supported, but it give you
some way to view the scene.:
○ pybullet.connect(pybullet.GUI,options="--opengl2")
● Alternatively, you can run the physics server on the remote machine, with UDP or TCP
bridge, and connect from local laptop to the remote server over UDP tunneling.
(todo: describe steps in detail)
Support, Tips, Citation
Question: Where do we go for support and to report issues?
Answer: There is a discussion forum at http://pybullet.org/Bullet and an issue tracker
at https://github.com/bulletphysics/bullet3
Question: How do we add a citation to PyBullet in our academic paper?
Answer: @MISC{coumans2018,
author = {Erwin Coumans and Yunfei Bai},
title = {PyBullet, a Python module for physics simulation for games, robotics
and machine learning},
howpublished = {\url{http://pybullet.org}},
year = {2016--2018}
}
Question: What happens to Bullet 2.x and the Bullet 3 OpenCL implementation?
Answer: PyBullet is wrapping the Bullet C-API. We will put the Bullet 3 OpenCL GPU API
(and future Bullet 4.x API) behind this C-API. So if you use PyBullet or the C-API
you are future-proof. Not to be confused with the Bullet 2.x C++ API.
Question: Should I use torque/force control or velocity/position control mode?
In general it is best to start with position or velocity control.
It will take much more effort to get force/torque control working reliably.
Question: How to turn off gravity only for some parts of a robot (for example the arm)?
Answer:
At the moment this is not exposed, so you would need to either turn of gravity
acceleration for all objects, and manually apply gravity for the objects that need it.

65
Or you can actively compute gravity compensation forces, like happens on a real
robot. Since Bullet has a full constraint system, it would be trivial to compute
those anti-gravity forces: You could run a second simulation (PyBullet lets you
connect to multiple physics servers) and position the robot under gravity, set joint
position control to keep the position as desired, and gather those 'anti-gravity'
forces. Then apply those in the main simulation.
Question: How to scale up/down objects?
Answer: You can use the globalScaleFactor value as optional argument to loadURDF and
loadSDF. Otherwise scaling of visual shapes and collision shapes is part of most
file formats, such as URDF and SDF. At the moment you cannot rescale objects.
Question: How can I get textures in my models?
Answer: You can use the Wavefront .obj file format. This will support material files (.mtl).
There are various examples using textures in the Bullet/data folder. You can
change the texture for existing textured objects using the 'changeTexture' API.
Question: Which texture file formats are valid for PyBullet?
Answer: Bullet uses stb_image to load texture files, which loads PNG, JPG,TGA, GIF etc.
see stb_image.h for details.
Question: How can I improve the performance and stability of the collision detection?
Answer: There are many ways to optimize, for example:
shape type
1) Choose one or multiple primitive collision shape types such as box, sphere, capsule,
cylinder to approximate an object, instead of using convex or concave triangle meshes.
2) If you really need to use triangle meshes, create a convex decomposition using
Hierarchical Approximate Convex Decomposition (v-HACD). The test_hacd utility
converts convex triangle mesh in an OBJ file into a new OBJ file with multiple convex
hull objects. See for example Bullet/data/teddy_vhacd.urdf pointing to
Bullet/data/teddy2_VHACD_CHs.obj, or duck_vhacd.urdf pointing to duck_vhacd.obj.
3) Reduce the number of vertices in a triangle mesh. For example Blender 3D has a great
mesh decimation modifier that interactively lets you see the result of the mesh
simplification.
4) Use rolling friction and spinning friction for round objects such as sphere and capsules
and robotic grippers using the <rolling_friction> and <spinning_friction> nodes inside
<link><contact> nodes. See for example Bullet/data/sphere2.urdf
5) Use a small amount of compliance for wheels using the <stiffness value="30000"/>
<damping value="1000"/> inside the URDF <link><contact> xml node. See for example
the Bullet/data/husky/husky.urdf vehicle.
6) Use the double precision build of Bullet, this is good both for contact stability and
collision accuracy. Choose some good constraint solver setting and time step.

66
7) Decouple the physics simulation from the graphics. PyBullet already does this for the
GUI and various physics servers: the OpenGL graphics visualization runs in its own
thread, independent of the physics simulation.
Question: What are the options for friction handling?
Answer: by default, Bullet and PyBullet uses an exact implicit cone friction for the
Coulomb friction model. In addition, You can enable rolling and spinning friction by
adding a <rolling_friction> and <spinning_friction> node inside the <link><contact> node,
see the Bullet/data/sphere2.urdf for example. Instead of the cone friction, you can
enable pyramidal approximation.
Question: What kind of constant or threshold inside Bullet, that makes high speeds impossible?
Answer: By default, Bullet relies on discrete collision detection in combination with
penetration recovery. Relying purely on discrete collision detection means that an object
should not travel faster than its own radius within one timestep. PyBullet uses 1./240 as
a default timestep. Time steps larger than 1./60 can introduce instabilities for various
reasons (deep penetrations, numerical integrator). Bullet has is an option for continuous
collision detection to catch collisions for objects that move faster than their own radius
within one timestep. Unfortunately, this continuous collision detection can introduce its
own issues (performance and non-physical response, lack of restitution), hence this
experimental feature is not enabled by default.
