RamKeeper Manual 2.0 EY5QGRAMKEEPER 20
User Manual: EY5QGRAMKEEPER
Open the PDF directly: View PDF ![]() .
.
Page Count: 71
Federal Communications Commission
Radio Frequency Interference Statement
The equipment described in this manual generates and uses radio frequency
energy. If it is not installed and used properly, that is, in strict accordance with
these instructions, it may cause interference to radio or television reception.
FCC I.D. Number: EY5QGRAMKEEPER
This equipment has been type tested and found to comply with the limits for a
Class B computing device in accordance with the specifications in Subpart J of
Part 15 of the FCC Rules. These rules are designed to provide reasonable
protection against radio and television interference in residential installation.
However, there is no guarantee that interference will not occur in a particular
installation. If this equipment does cause interference to radio or television
equipment off and on, the user is encouraged to try to correct the interference by
one or more of the following measures:
◊Reposition the receiver’s antenna. Also make sure the
antenna wires are making good electrical contact.
◊Use a roof-mounted antenna rather than a "rabbit-ear"
antenna or an antenna mounted in the attic.
◊Make sure that all electrical connections on the computer
are secure and any shielded I/O cables are properly
fastened.
◊Move the computer away from the receiver.
◊Plug the computer and receiver into separate electrical
circuits.
If necessary, the user should consult the dealer or an experienced radio/television
technician for additional suggestions. The user may find the following booklet
prepared by the Federal Communications Commission helpful:
“How to Identify and Solve Radio-TV Interference Problems”
This booklet is available from the U.S. Government Printing Office,
Washington, D.C. 240402, Stock No. 004-000-00345-4.
Warning: This equipment has been certified to comply with the limits for Class
B computing device, pursuant to Subpart J of Part 15 of FCC Rules. Only
peripherals (computer input/output devices, terminals, printers, etc.) certified to
comply with the Class B limits may be attached to this computer. Operation with
non-certified peripherals is likely to result in interference to radio and TV
reception.
Applied Engineering is not responsible for any radio or television interference
caused by unauthorized modifications to this equipment. It is the responsibility
of the user to correct such interference.
Use only the battery, battery cable, and transformer supplied with this product.
Substitute items may cause interference problems.

Limited Warranty & Disclaimer
Applied Engineering warrants the RamKeeper and SlotMover against defects in material and workmanship for a period of 5 years
from the date of original retail purchase and warrants the Gel/Cell battery against defects in material and workmanship for a period
of 1 year from the date of original retail purchase. Applied Engineering also warrants that, under normal use, the magnetic media
on which the software is stored is free from defects in materials and workmanship for a period of 30 days from the date of original
purchase. Any misuse, abuse, or non-~ authorized alteration, modification and/or repair to the Applied Engineering product will
void the warranty. This warranty will also be void if you use the /E product for any other purpose than its intended use. If you
discover a defect, Applied Engineering will, at its option, repair or replace only the Applied Engineering product, provided you
return the product during the warranty period, transportation prepaid, to Applied Engineering.
This warranty applies to the original retail purchaser only. Therefore, please include a copy of the original invoice or
a small service charge may be applied. If the product is to be Sent to Applied Engineering by mail, the purchaser will insure the
package or assume full responsibility for loss or damage during shipping. Prior to returning the product for warranty consideration,
call Applied Engineering Technical Support for a Return Material Authorization (RMA) number and shipping instructions.
Even though Applied Engineering has tested the software and reviewed the documentation, Applied Engineering makes no
warranty or representation, either express or implied, with respect to the manual or the software; their quality, performance,
merchantability, or fitness for a particular purpose. As a result, the software and manual are sold “as is,” and you, the purchaser,
are assuming the entire risk as to their quality and performance.
In no event will Applied Engineering be liable for loss or damages of any kind caused either directly or indirectly by the use or
possession of its products, even if advised of the possibility of such damages. The Applied Engineering Warranty is for the
Applied Engineering Product itself. In particular, Applied Engineering shall have no liability for any other equipment used in
conjunction with Applied Engineering products nor for programs or data stored in or used with Applied Engineering products,
including the costs of recovering such equipment, programs, or data.
The warranty and remedies set forth above are exclusive and in lieu of all others, oral or written, express or implied. No Applied
Engineering dealer, agent, or employee is authorized to make any modification, extension, or addition to this warranty.
Some states do not allow the exclusion or limitation of implied warranties or liability for incidental or consequential damages, so the
above limitation or exclusion may not apply to you. This warranty gives you specific legal rights, and you may also have other
rights which may vary from state to state.
This manual and the software (computer programs) described herein are copyrighted by Applied Engineering with all rights
reserved. Under the copyright laws, this manual or the programs may not be copied, in whole or in part, without the written consent
of Applied Engineering, except in the normal use of the software or to make an archival copy. This exception does not allow copies
to be made for others, whether or not sold, but all of the materials purchased (with all archive copies) may be sold, loaned, or given
to another person. Under the law, copying includes translating into another language or format. You may use this software on any
computer owned by you but extra copies cannot be made for this purpose.
Applied Engineering cannot guarantee that you will receive notice of revisions to the software documentation or products
described in this manual. Be sure to check with your dealer or Applied Engineering for information on possible updates. However,
Applied Engineering reserves the right to make any improvements to Applied Engineering products without any responsibility
toward upgrading previously released products.
Apple and Apple IIGS are registered trademarks of Apple Computer, Inc.
AppleWorks, Apple IIGS Memory Expansion Card, DOS 3.3, and ProDOS are trademarks of Apple Computer, Inc.
Applied Engineering and RamWorks are registered trademarks of Applied Engineering.
Super Desktop Expander, AW 2 Expander, RamFactor, RamCharger, RamKeeper, Back Pocket, SlotMover, GS-RAM, and GS-RAM
Plus are trademarks of Applied Engineering.
IIGS System Saver is a trademark of Kensington Microware, Ltd. RamPak 4Gs is a trademark of Orange Micro, Inc. RamStackPlus
is a trademark of AST Research, Inc. OnBoard is a trademark of OnThree, Inc. OctoRAM is a trademark of MDldeas, Inc. Radio
Shack is a registered trademark of Tandy Corporation.
©Copyright 1988, Applied Engineering
Applied Engineering
P.O. Box 5100
Carrollton, Texas 75011
Sales: (214) 241-6060 9 AM - 11 PM (CST) 7 days
Technical Support: (214)241-6069 9 AM - 12:30PM & 1:35PM - 5 PM (CST) Monday - Friday
(The Technical Support telephone lines cannot be accessed through the Sales department.)

Table Of Contents
Introduction - Welcome to the Memory V
Chapter One - Getting Started 1
Required 1
Recommended 1
Possible Combinations 2
One Memory Card on RamKeeper 2
Two Memory Cards on RamKeeper 3
Installation 4
Connecting GS-RAMs to the RamKeeper’s Front 8
Attaching the Optional SlotMover 11
Connecting Cards to the Back of RamKeeper 12
The “Double Boot’ 15
What Now? 16
Experienced Users 16
Others 16
Chapter Two - RamKeeper Firmware 17
About The Firmware 17
Loading the Firmware 17
Accessing the Firmware 20
Initialize ROM Disk 21
Setting the ROM Disk Size 22
Change ROM Disk Size 23
More than 2 Meg 24
ROM Disk Memory Test 24
RAM Memory Test 25
Memory Map 26
Checksum 27
About RamKeeper... 28
Quit 28
Table of Contents I
Chapter Three - Using the ROM Disk 29
Copying Files to the ROM Disk 29
Location of the ROM Disk 29
Slot 2 Consideration 30
Drive Access Chart 31
ROM Drive as the Boot Device 32
Chapter Four - The RamKeeper Power 33
The Lights 33
Battery 34
Transformer 34
Chapter Five - A Brief RAM/ROM Tutorial 35
ROM is... 35
RAM is... 35
Chapter Six - Memory Allocation 37
Why not use all memory as a ROM Disk? 37
Is a RAM Disk now obsolete? 37
RAM and the GS Control Panel 38
Chapter Seven - Æ Cache 39
Requirements 39
Installing the Cache 39
ProDOS 8 39
ProDOS 16 40
Setting the Cache Size 41
Setting the RAM Buffer Size 42
Removing the Cache 42
About the Cache 42
Copy Protected Programs 43
ii RamKeeper
Chapter Eight - AW 2 Expander 45
Before You Even Think of Modifying AppleWorks... 45
AppleWorks Modification Instructions 46
Setting the AppleWorks Enhancement Options 47
About the New Features 49
More Word-Processor Lines and Database Records 49
Clipboard Expansion 49
Printer Buffer Option 49
Buffer Size Option 49
Time Display/Database Time-Stamp Option 50
Multiple-Disk Save 51
Saving Multiple Files to Disk 51
Adding Multiple Disk Files to the Desktop 52
Print-File Cache 52
Appendices 53
A: Trouble Shooting 53
B: A Brief ProDOS Tutorial 55
C: Copying Disks with Filer 58
D: Bird’s Better ‘Bye’ 59
E: Getting Help 60
Table of Contents iii
iv RamKeeper

Welcome to the Memory...
So you want the most user friendly computer to be even
more friendly? You did the right thing. If you already
own an Applied Engineering RamFactor™ with
RamCharger™ battery backup, you know the convenience
of having your favorite programs already loaded into
memory and ready to run as soon as you boot your
computer. If you haven’t had this pleasure, now's your
chance.
TURN off your computer without turning off the
memory; RamKeeper™ will battery back one or two IIgs
memory expansion cards giving you instant access to
programs stored in ROM. Simply stated: You can turn on
your computer and enter your favorite programs in
seconds without having to insert and flip disks.
ELEPHANTS can’t compete with the amount of memory
available through RamKeeper. Two cards connected to
RamKeeper will be recognized as one big memory card
(linear addressing) allowing up to 16 Meg of total
memory. It supports most Apple® IIgs® memory
expansion cards and allows you to divide the memory for
use as a ROM Disk, RAM Disk, and system memory in 1K
increments.
VETERAN and novice computer card installers alike will
breeze through the installation of the card. You don’t
even have to insert a disk to configure the RamKeeper’s
setup -- the RamKeeper has its own built-in software
(firmware) contained in a ROM (EPROM) of its own. The
step-by-step instructions will ease you through installing
the cards and configuring the memory.
EXTRAS: With your RamKeeper, we’ve included AW 2
Expander™, Applied Engineering’s popular enhancement
package. The enhancements to AppleWorks™ include
increased number of word processing lines and data base
records, multiple disk save capability, on-screen time
display and much more! The Expander disk also includes
the Æ Cache™ program which greatly increases disk access
speed for your Apple 3.5 Drives. With these great
enhancement features, your RamKeeper rises from the
ranks of the incredible to the level of the invaluable.
Welcome V
NOTES and Warnings throughout the manual will help
you to better understand what you’re dealing with. They
appear as shown in the example below:
*Note: This indicates a special note or warning.
Pay close attention to these entries.
SOLVE most minor problems with the Trouble Shooting
guide located toward the back of the manual
HERE’S your chance to put more juice in your Apple. So
turn the page and get started. You’ve got a lot of memory
waiting.
vi RamKeeper

CHAPTER ONE
Getting Started
Required
To use RamKeeper, you must have the following:
◊An Apple IIGS
* Note: Due to physical constraints, a //e upgraded
to a IIGS will not support a RamKeeper.
◊At least one memory card. This memory card can
be any one of the following:
GS-RAM™ (any rev)
GS-RAM Plus (any rev)
GS-RAM 2 Meg Expander (any rev)
Apple IIGS Memory Expansion™
OctoRam™
RamPak 4GS™
RamStackPlus™
OnBoard™
*Note: This list was complete at time of
publication. Other IIGS RAM cards may work.
Recommended
Even though RamKeeper uses a switching power supply
which keeps its operation cool, several powerful cards in
your closed computer generate lots of heat. We
recommend the IIGS System Saver from Kensington to
keep it running cool.
Possible Combinations
RamKeeper allows you to attach memory cards in many
different combinations. Some cards must be attached to
the front side of the card. Others must be connected to the
back. Still others require the use of the optional
SlotMover. Determine if you'll be connecting one or two
cards, then find your card(s) in the lists below to
determine where to connect it (them).
Chapter One - Getting Started 1
One Memory Card on RamKeeper
If you want to attach only one card to the
RamKeeper, you will, in most cases, want to plug it
into the Back Pocket™. This keeps slot 7 clear.
Use the drawing below to help you determine if you
can use the Back Pocket for your card or, if not,
which connector you'll need to connect it to the
front side of the RamKeeper.
RamKeeper
Slot Mover Back Pocket
All GS-RAM cards GS-RAM REV C or later
(including 2 Meg Expander) GS-RAM Plus REV 0 or later
Apple IIGS Memory Expansion Card GS-RAM 2 Meg Expander
RamPak 4GS Apple IIGS Memory Expansion
Card RamPak 4GS
RamStackPlus RamStackPlus
OnBoard Front Connector OnBoard
OctoRam All GS-RAM cards * Due to its large size,
(except 2 Meg Expander) OctoRam will not fit on the
back side of RamKeeper
Single Card Options
*GS-RAM Note: GS-RAM REV A and GS-RAM
Plus REV A cards require the optional SlotMover
to keep slot 7 clear. The REV A cards have the
silver pins extending from the black connector on
the back side of the card just above the edge
connector. If placed in the back pocket, these pins
keep the card from fitting properly between the
RamKeeper and the right side of the IIGS case.
Although it is possible to cram the REV As into
the Back Pocket, the pins may hit the metal of the
computer case and short out the board(s).
*OctoRam Note: Due to its large size, OctoRam
will not fit on the back side of RamKeeper. If
you're connecting an OctoRam to the front side of
the card, the last two memory rows must be
empty. So, if you’re using 256K chips, you can
only have 1.5 Meg of the card filled, If you’re
using I Meg chips, you can have only 6 Meg filled.
2 RamKeeper
Two Memory Cards on RamKeeper
When using two cards with the RamKeeper, the card on
the back side of RamKeeper must have memory in
increments of 512K. So, you can use cards with 512K, 1
Meg, 1.5 Meg (i.e. GS-RAM), 2 Meg, 3 Meg, etc.
The drawings below illustrate the combinations we have
tested and know will work. While other combinations
may work, the combinations below are the ones we
support.
RamKeeper Back Pocket (in 512K increments)
GS-RAM REV C or later
Slot Mover GS-RAM Plus REV 0 or later
All GS-RAM cards GS-RAM 2 Meg Expander
(including 2 Meg Expander) Apple IIGS Memory Expansion Card
RamPak 4GS
Front Connector RamStackPlus
All GS-RAM cards OnBoard
(except 2 Meg Expander) * Due to its large size,
OctoRam will not fit on the
back side of RamKeeper
RamKeeper
Slot Mover Back Pocket
Apple 256K - I Meg Apple 1 Meg
RamStackPlus 256K - 1 Meg RamStackPlus 1 Meg
OnBoard 1 - 4 Meg On Board 4 Meg
OctoRam 256K - 1 Meg (256K chips)
RamKeeper
Slot Mover Back Pocket
RamPak 4GS 512K - 1 Meg RamPak 4GS 4 Meg
OctoRam 1 Meg - 4 Meg (1 Meg chips)
Chapter One - Getting Started 3
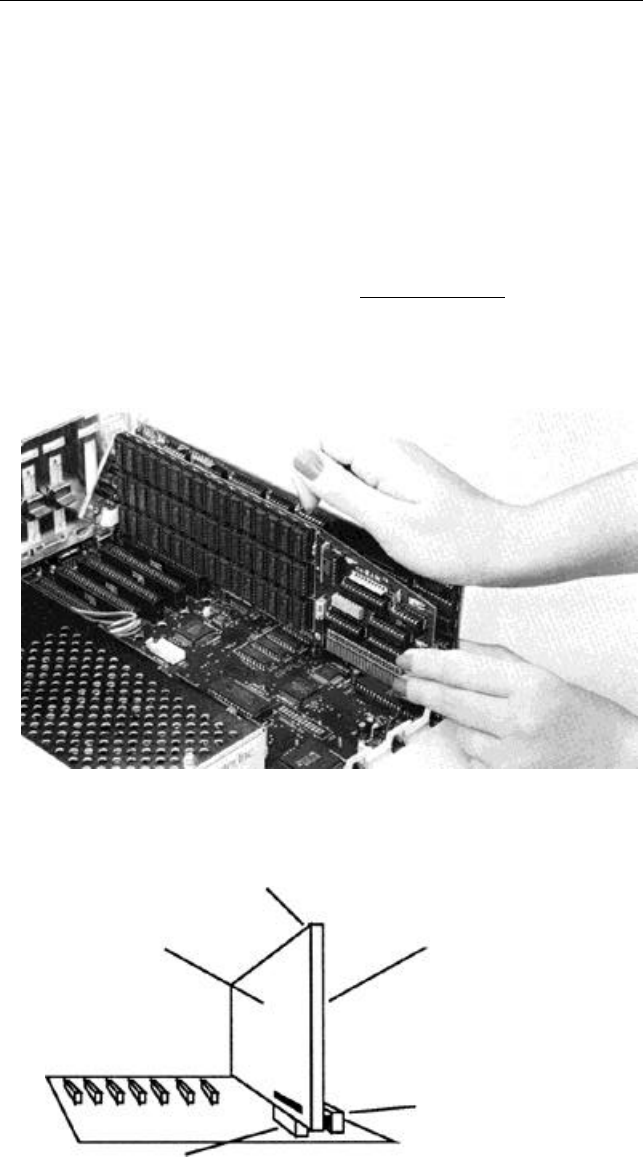
Installation
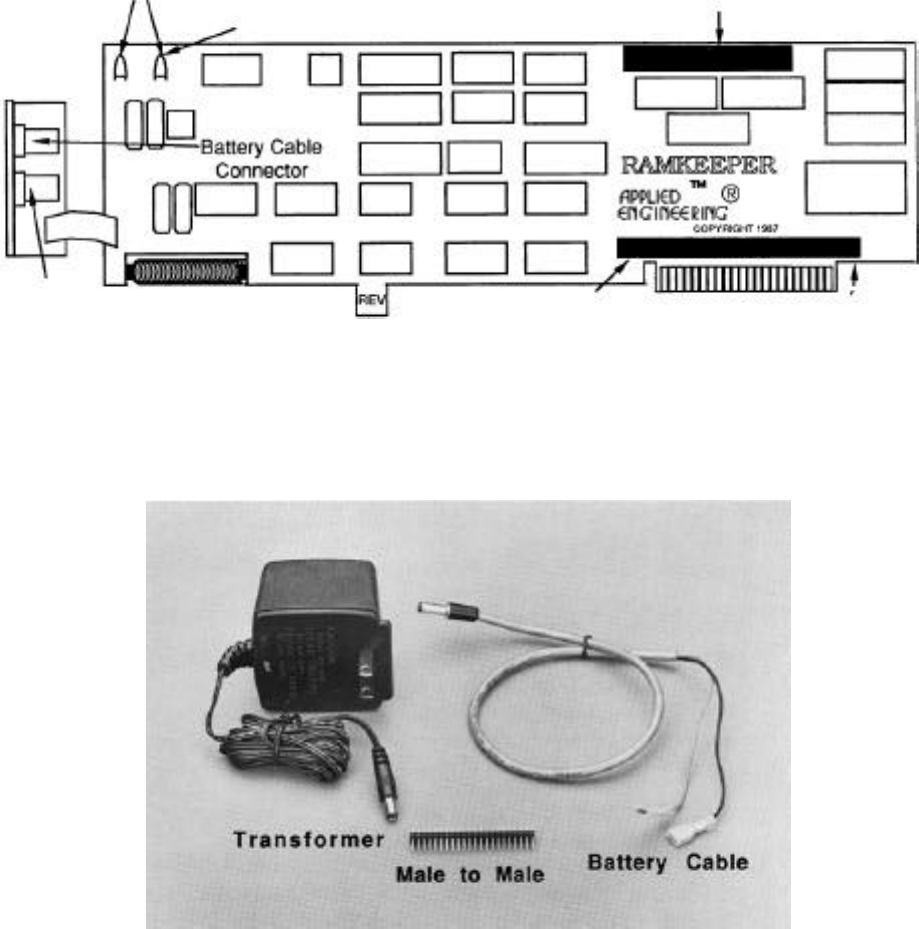
Use the pictures below to locate the parts referred to in the
installation section.
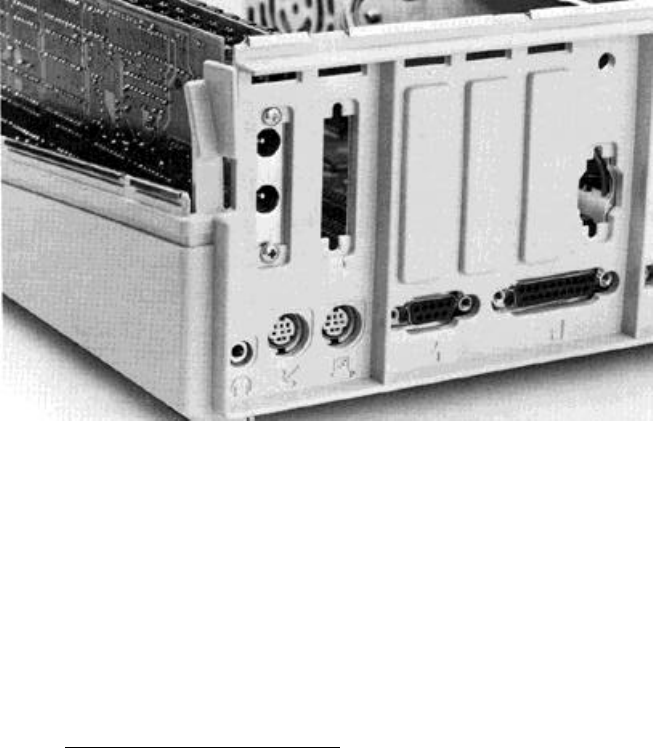
Transformer Light
(Red and Green)
Cables and Connectors
4 RamKeeper
DMA Card
Connector
Battery Light
(Green only)
Transformer
Connector
Front
Memory Card
Connector
Back
Memory Card
Connector
(Back Pocket)
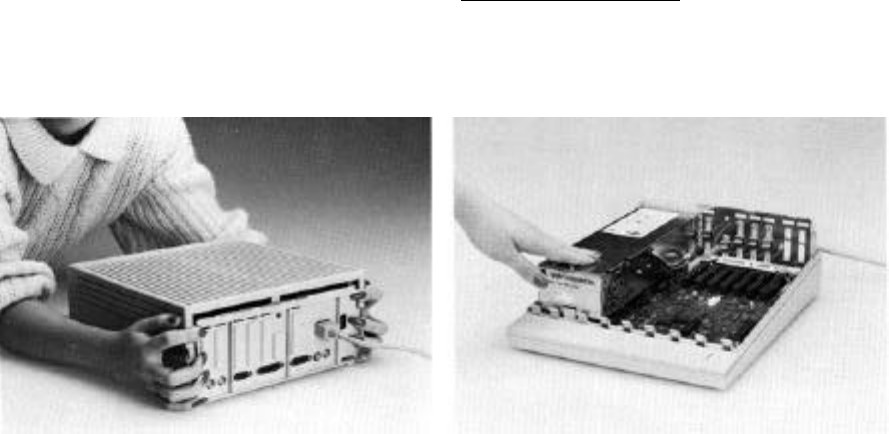
To install the RamKeeper, you'll need a Phillips
screwdriver. Once you have it, follow the steps below:
1.) TURN OFF THE APPLE’S POWER SWITCH.
Never install or remove a card while the
computer is on. However, you need to leave the
computer plugged in throughout the installation
to allow the power supply to discharge static
electricity from your body.
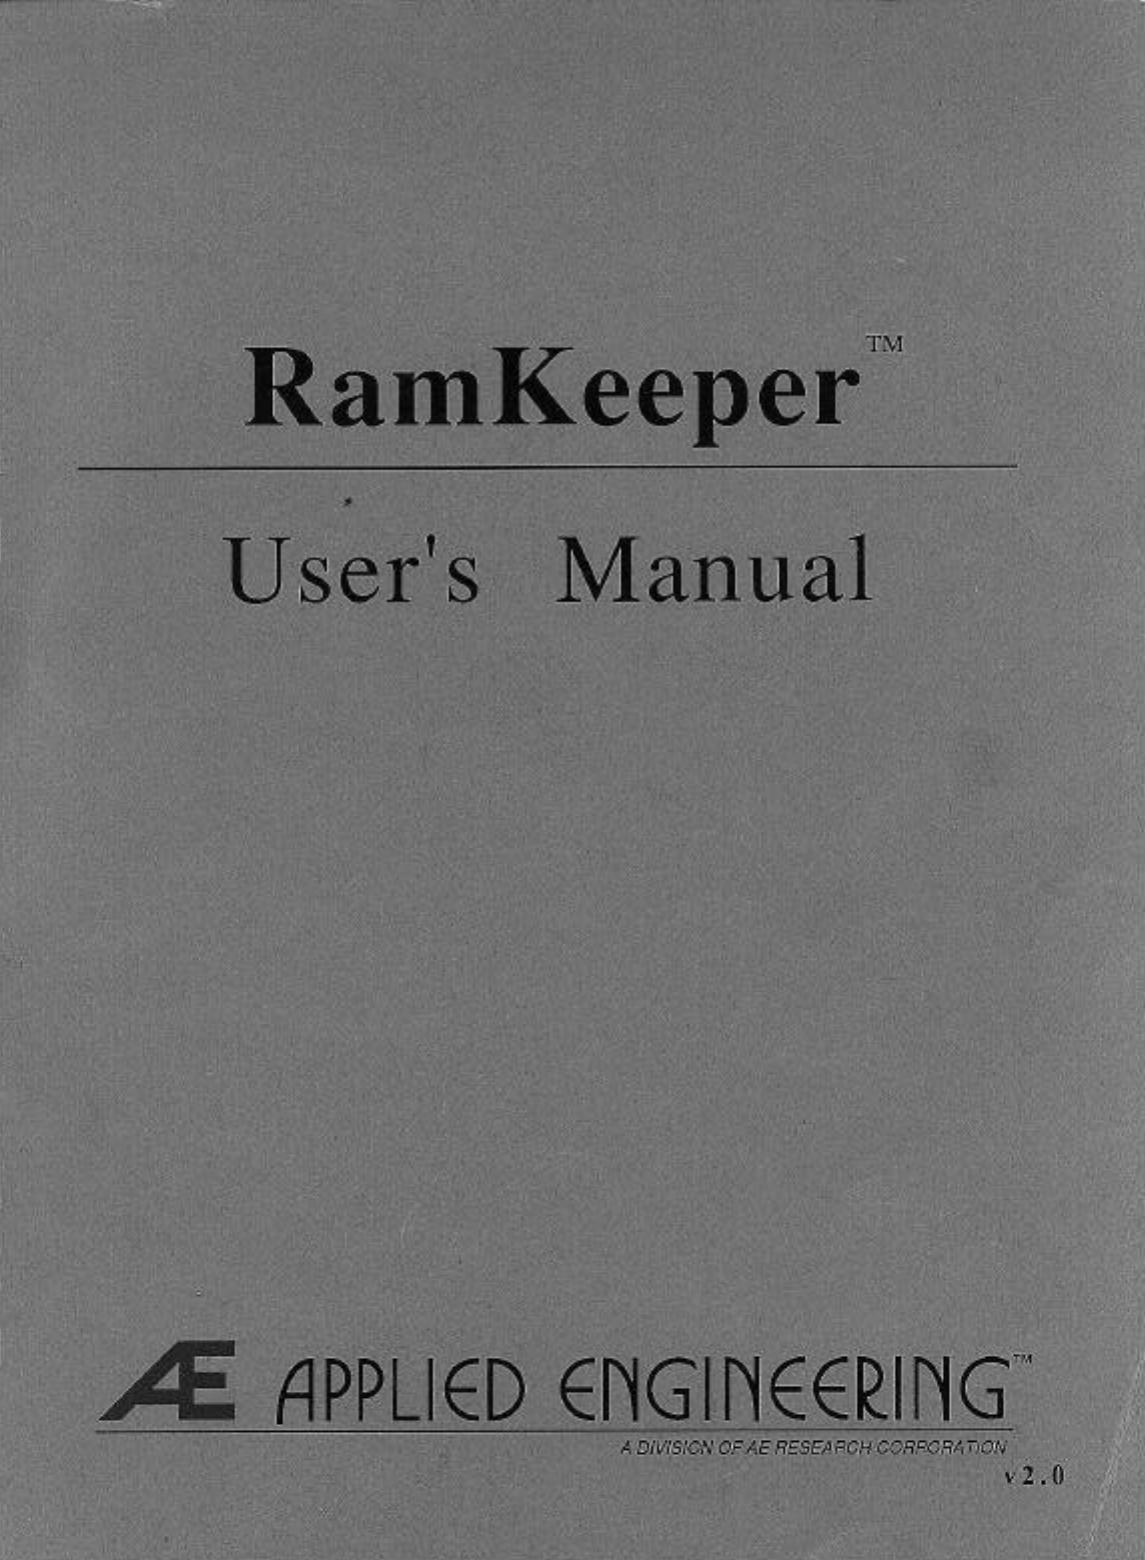
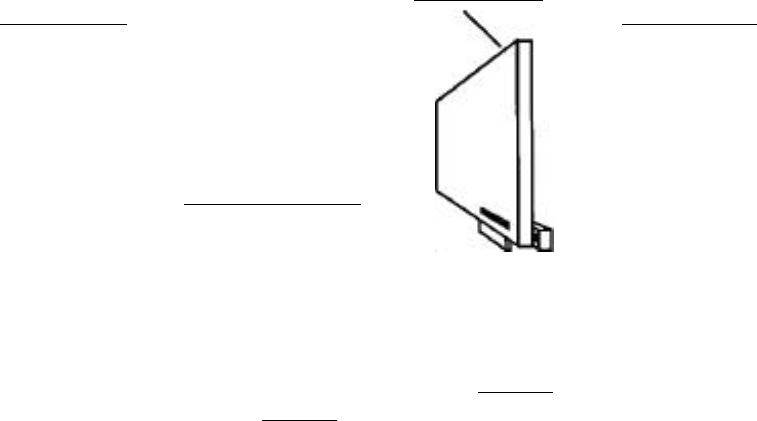
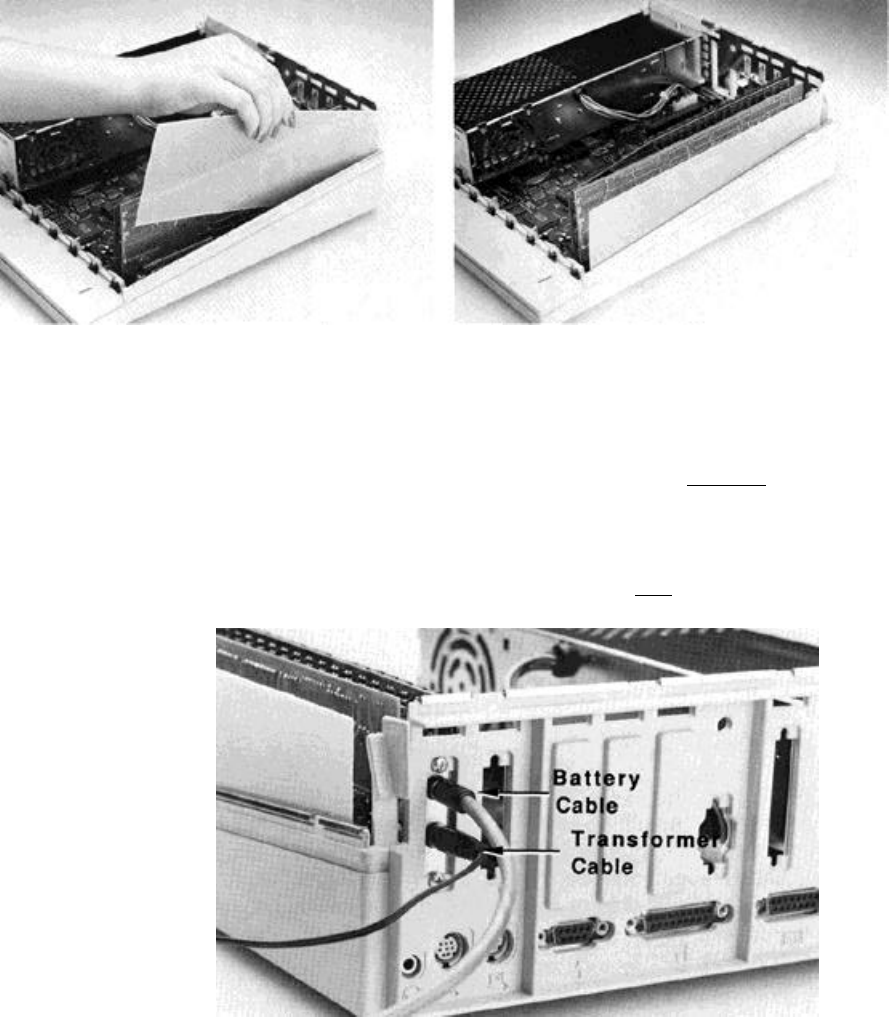
2.) Remove the cover from the Apple. Press in the
two latches in the rear of the case with your
forefingers while using the heel of your hand to
pull the lid up and towards you. (See below.)
3.) Touch the power supply to remove any static
electricity from your body. Do not skip this step!
A static shock can damage the chips on your
boards and/or the chips on your computers
motherboard.
Remove the IIGS cover Touch the power supply case
4.) You may want to remove any cards in slots 6 and
7 to give yourself a little more room to operate. If
you do remove any cards, follow the instructions
that came with those cards for removing and
reinserting. Applied Engineering will not be
responsible for any damage to your other cards.
Chapter One - Getting Started 5
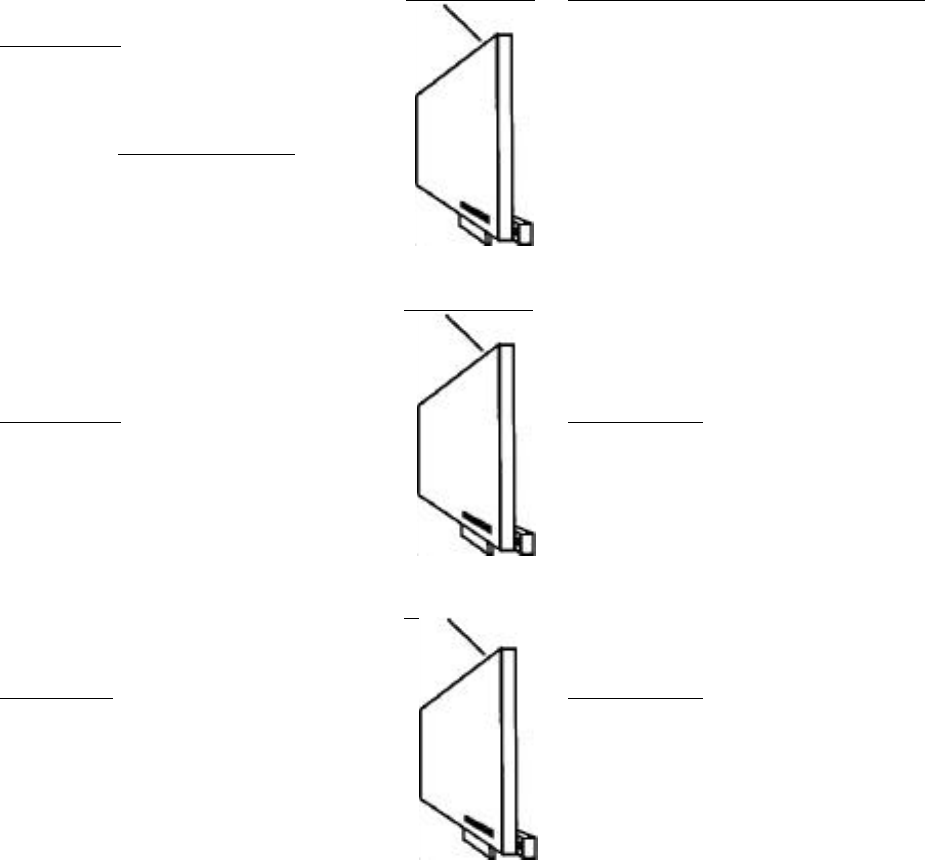
5.) If the plastic plate is still covering the far right
opening in the backplane, remove it. This cover
must be removed whether or not you. plan to
connect the Transformer or battery.
Remove the plastic plate
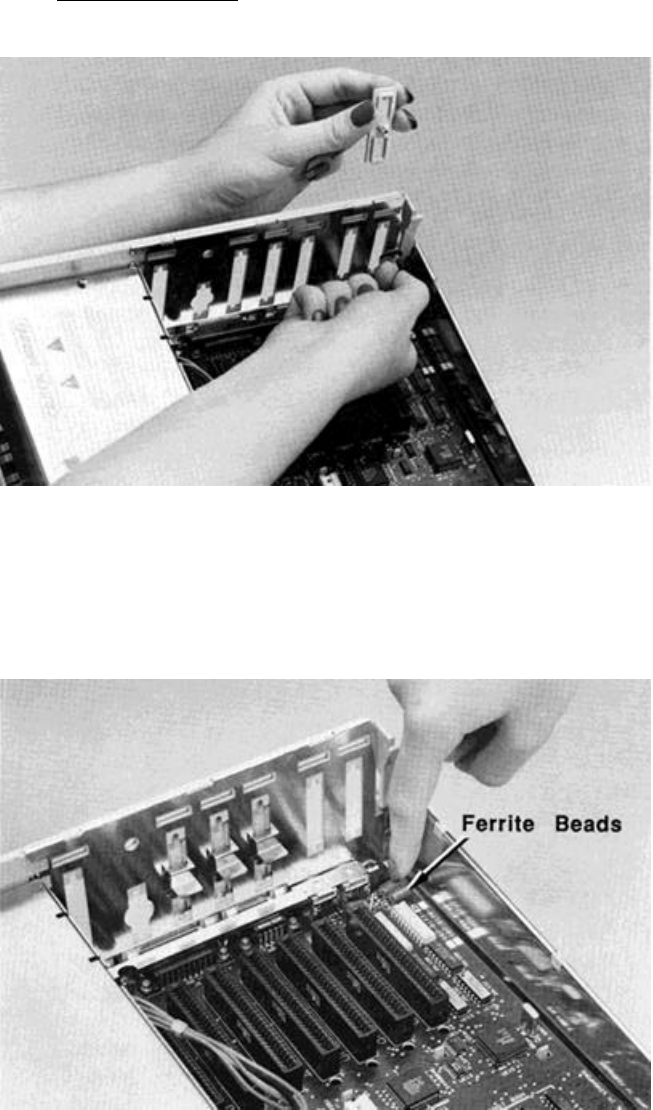
6.) Gently bend down the ferrite beads located toward
the back right corner of the motherboard. These
beads may keep the RamKeeper from seating
properly.
Bend down the ferrite beads
6RamKeeper
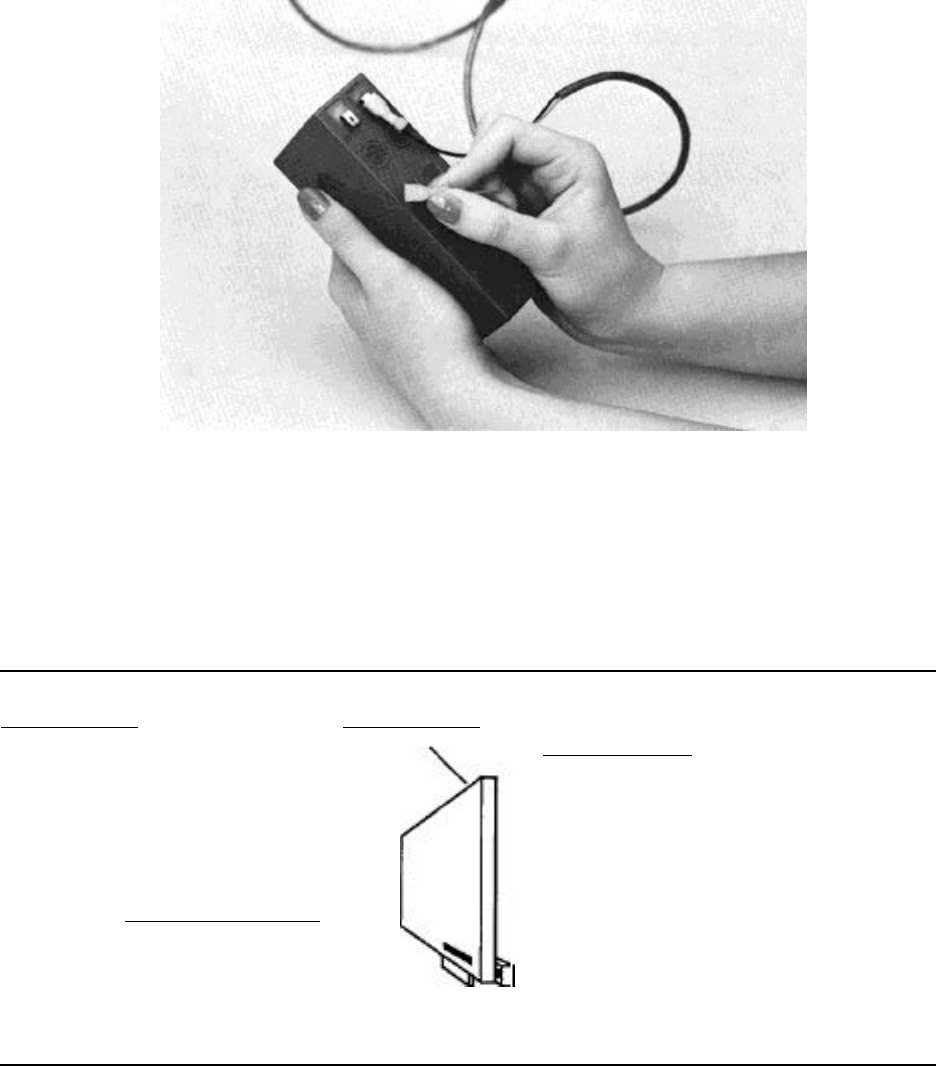
7.) Both of the wires that lead to the GelICell should
be disconnected. If they aren't, disconnect them
now.
Disconnect the battery wires
8.) Remove the RamKeeper from its anti-static bag.
Hold the card by its edges, like a photograph.
9.) Connect your card or cards according to the
instructions below. Refer to the illustration
below for the proper connector and placement of
your card(s).
Slot Mover RamKeeper
All GS-RAM cards Back Pocket
(including 2 Meg Expander) GS-RAM REV C or later
Apple IIGS Memory Expansion Card GS-RAM Plus REV D or later
RamPak 4GS GS-RAM 2 Meg Expander
RamStackPlus Apple IIGS Memory Expansion Card
OnBoard RamPak 4GS
OctoRam Front Connector RamStackPlus
All GS-RAM cards On Board
(except 2 Meg Expander) * Due to its large size,
OctoRam will not fit on the
back side of RamKeeper
RamKeeper Connections
Chapter One - Getting Started 7
* Note: If you’re connecting only one card and it
will work in the back pocket, you should install it
there as this is the easiest connection to make.
(Skip to step 10.)
Connecting GS-RAM Cards to the RamKeeper’s Front
*Note: If you have a SlotMover, skip to the next
section.
To connect directly to the front of the RamKeeper, all GS-
RAM cards (except the GS-RAM REV A and the CS-RAM-
Plus REV A) require the male to male connector. (If
you’re using a GS-RAM REV A or a GS-RAM Plus REV A,
skip to step “C”.)
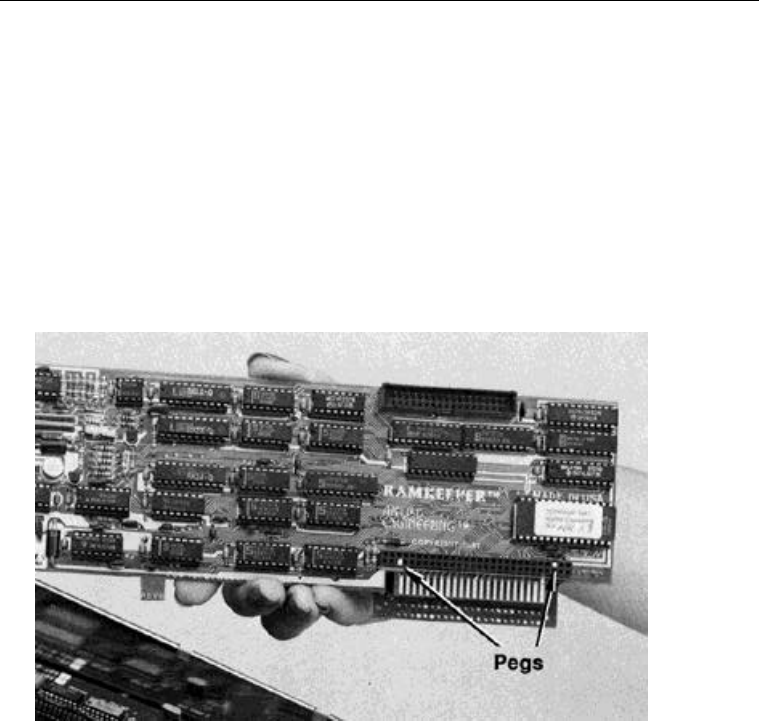
A) First, notice the white pegs in two holes of the
RamKeeper.
Note pegs in front connector
8RamKeeper
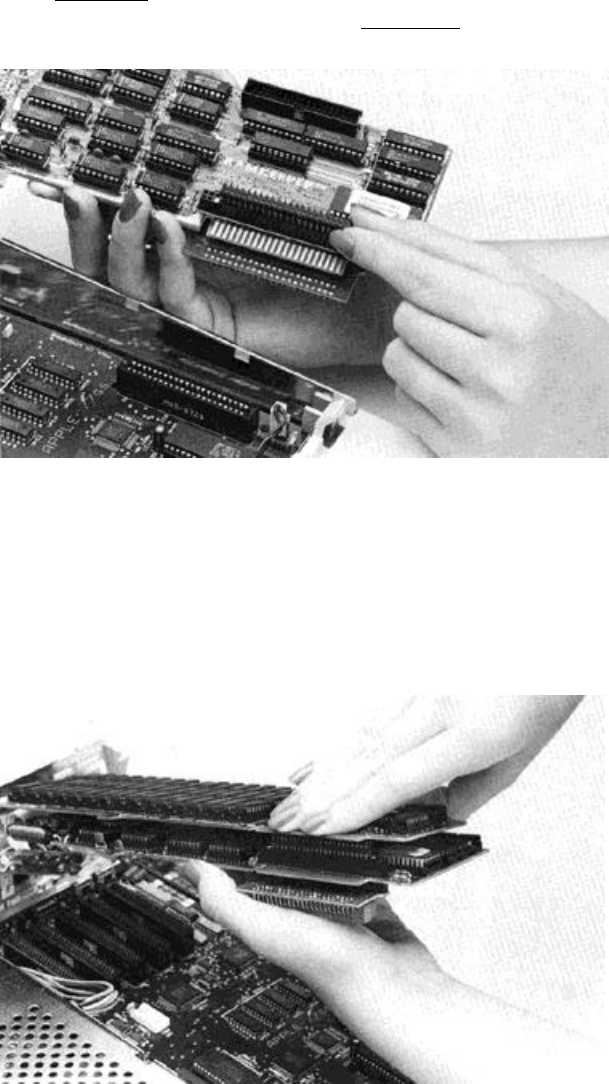
B) The male to male adaptor will fit in the holes
between these two pegs. Don’t force the adaptor
into the holes; simply set the long pins into the
holes, as shown.
Set adaptor in holes
C) Align the connector on the back of the GS-RAM
card with the exposed smaller pins of the male to
male connector. (GS-RAM REV A and GS-RAM
Plus REV A users, align the pins on the back of
the GS-RAM with the holes in the RamKeeper
connector.)
Align Gs-RAM connector with pins
Chapter One - Getting Started 9
*Note: Take your time in aligning the pins and
connecting the cards. If they are not aligned
properly, you may bend the pins.
D) Holding the card as shown above, alternate
between pressing down firmly on the connectors
and the tops of the cards in a slow, rocking
motion. The cards and the adaptor will gradually
mesh together.
Push until all pins are completely seated
10 RamKeeper
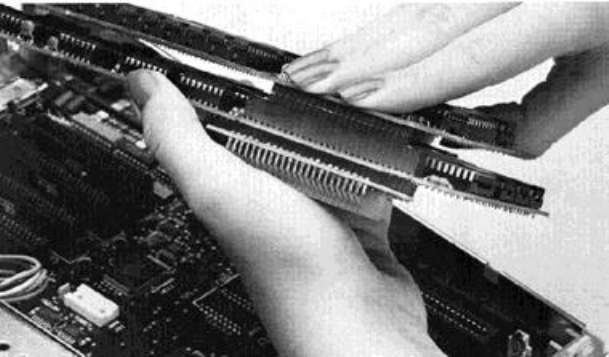
Attaching the Optional SlotMover
The SlotMover is an extension board that shifts the
expansion board on the front side of the RamKeeper so
that it wont block slot 7. (Slot 7 is commonly used for
hard drive controller cards.)
Its new position is between slots 4 and 5. Because 4 is the
mouse port and 5 is the disk drive port, you’ll probably
never want to put a card in either.
A) First, lay the RamKeeper face up on the table.
B) Notice the white pegs in two holes of the
RamKeeper’s front connector. (See picture on
page 8.)
C) Push the SlotMover pins into the holes between
these two pegs.
Insert SlotMover into connector
D) Push until SlotMover pins are completely seated
Don’t insert a card in the SlotMover until you have
plugged RamKeeper into the Memory Expansion Slot.
Chapter One - Getting Started 11
Connecting Cards to the Back of RamKeeper
To connect a card to the back of RamKeeper, you’ll simply
insert the cards edge connector into the Back Pocket’s slot
after you have inserted the RamKeeper into the Memory
Expansion Slot.
*Warning! Make sure all power is off before
continuing. Both LED’s should be off and. power
to the computer should still be off.
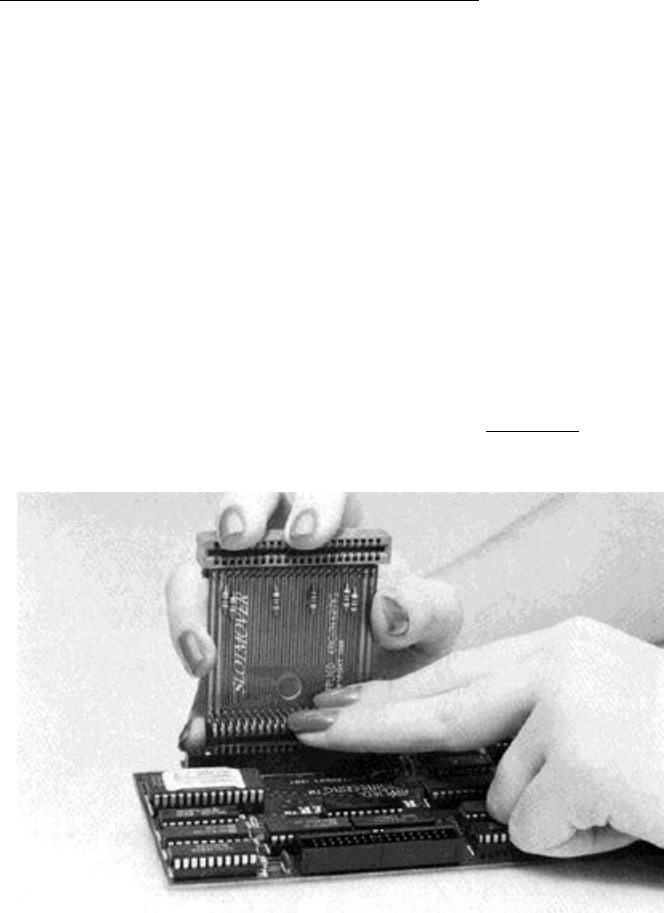
10.) Insert the RamKeeper into the Memory
Expansion Slot. Align the RamKeeper’s edge
connector with the Memory Expansion Slot then
use the heel of one hand to push the card down
into the slot and seat it firmly.
Insert RamKeeper into Memory Expansion Slot
Memory Expansion Slot
12 RamKeeper
RamKeeper
Back
Front
BackPocket
(rests outside
Memory Expansion Slot)
11.) Install the connector plate using the screws
provided. Line up the holes of the connector
plate with the notches at the top and bottom of
the opening in the backplane. Insert and tighten
the screws using the hex wrench provided.
Attach connector plate to backplane
12.) If you’re installing a card into the Back Pocket, do
so now by lining up the fingers of the memory
card’s edge connector with the Back Pocket’s slot
and using the heel of one hand to seat the card
firmly.
13.) Insert the insulator sheet included with
RamKeeper between the back of the RamKeeper
and the right side of the computer case. Slide the
insulator as far toward the keyboard end as
possible.
Even if you aren’t using the Back Pocket or the
Flex Connector, insert the insulator. This way,
you’ll know where it is when you expand in the
future.
Chapter One - Gelling Started 13
Insert insulator
*Warning! Before connecting the power, you
must have the insulator installed.
14.) Plug the Transformer’s connector into the bottom
socket of the connector plate you have installed in
the backplane (see picture below).
15.) Plug the Gel/Cell’s connector into the top socket.
Plug the transformer and battery into the sockets
14 RamKeeper
16.) Reconnect the battery cables to the GelICell’s
connectors. The green LED light on the
RamKeeper should come on. This indicates that
your battery is working. If it doesn’t come on
immediately, it is because it needs to be refreshed
after its journey from our hands to yours.
Continue with the installation and the
Transformer will trickle charge the battery back to
its full potential within 24 hours.
17.) Plug the transformer into a wall outlet. This wall
outlet should be independent of wall switches
and dimmer switches. If you must use a switch
controlled outlet, make sure the switch remains
on.
18.) Check the LED lights to make sure the
transformer is functioning. Both lights should be
on. If they are not both on, check the
transformer’s connections.
19.) Replace the Apple's cover. You may need to
guide the insulator inwards as you close the
cover.
20.) Hardware installation is complete. Now you’ll
need to set up your ROM Disk with the firmware.
The Double Boot
When using certain configurations with RamKeeper,
your GS will beep twice when you boot it. The first beep is
normal power up. The second is RamKeeper installing
itself and resetting the computer. Some configurations do
not require the double boot.
Chapter One - Getting Started 15
What Now?
Experienced Users:
If you understand the ROM Disk and know what you
want from yours, you can set the size and be on your way
To install the AE RamKeeper Desk Accessory under
ProDOS 16 you will need to copy the AERAMKEEPER file
(/AEROM/AERAMKEEPER) from RamKeeper’s self-created
ROM Disk (AEROM) into the Desk Accessories folder
(subdirectory) of your boot disk (/YOUR . BOOT/SYSTEM
/DESK. ACCS). (ProDOS 8 will automatically load the AE
RamKeeper Desk Accessory.)
*Note: You’ll need to have Slot 5 set to Smart Port
and Startup Slot set to Scan.
Now you can access the Classic Desk Accessories (CDA)
menu, select the option, AE RamKeeper, and use the
Initialize ROM Disk option to set the ROM Disk size
and be on your way.
When you want to know more about a particular aspect of
the card, use this manual as a reference.
Others:
The next chapter, “RamKeeper Firmware will tell you
what options are available to you and help you set up
your memory.
16 RamKeeper
CHAPTER Two
RamKeeper Firmware
The software needs little or no explanation for basic
operation; its simply simple to use. However, not
knowing the full potential of its functions is like owning a
James Bond car and not knowing what the buttons do.
To fully understand and take advantage of RamKeeper’s
features, read through this chapter once and display the
menus on your screen as they’re being described.
About The Firmware
All of RamKeeper's firmware resides in an EPROM on the
RamKeeper card. We have loaded it with features while
keeping it easy to use. The RamKeeper utilities include
memory tests, an auto startup checksum, a data recovery
mechanism, ROM size reallocation (with no loss of data
stored in ROM) and more.
This sounds like a lot to control, but if you can use the IIGS
Control Panel with no problem, mastering RamKeeper
will be a breeze.
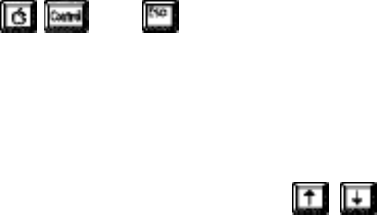
Loading the Firmware
Boot up your computer as you normally do. Then access
the Classic Desk Accessories menu (CDA) by holding
down the Open Apple and Control keys while pressing
ESC ( - then ).
* Note: If your computer is giving you a boot error
message, don’t worry; it is because your startup
slot has now been changed. Continue with these
instructions.
Use the up and down arrow keys ( ), as instructed
at the bottom of the menu, to highlight the Control Panel
option. Press “Return.’
Highlight the Slots option and press “Return.”
Chapter Two - RamKeeper Firmware 17

Set Slot 5 to Smart Port and Startup Slot to Scan if
they are not already set that way. Now reboot your
computer.
*Note: If you don’t know how to change the
settings in the Control Panel, refer to your Apple
IIGS Owner’s Guide for instructions on using the
Control Panel.
When you reboot your computer, RamKeeper creates a
63K ROM Disk containing a file, “AERAMKEEPER.” You’ll
need to copy the file to the DESK. ACCS folder in your
SYSTEM folder.
* Note: This file is used only by ProDOS 16. If
you 11 be using only ProDOS 8, the AERAMKEEPER
desk accessory will be installed automatically--you
don’t need to copy the file and you can skip to the
next section.
If you’re using the Finder, the copy process is easy. You’ll
see the RamKeeper’s initial 63K ROM Disk on the Finder:
AEROM
Double click on this icon and you’ll see the file,
AERAMKEEPER.
Open (double dick) your ProDOS 16 SYSTEM
folder.
Locate the DESK.ACCS folder.
Now dick on and drag the AERAMKEEPER file from
the ROM Disk to the DESK. ACCS folder.
Repeat these step to copy this file to any other
System disks you may want to boot from.
Reboot your computer.
* Note: If you prefer not to use the Finder, use your
own favorite copy program to transfer the
AERAMKEEPER file into the DESK.ACCS folder:
Source: /AEROM/AERAMKEEPER
Destination: /YOUR.BOOT/SYSTEM/DESK.ACCS
18 RamKeeper
The RamKeeper will now automatically install its
firmware utilities into the Classic Desk Accessories (CDA)
menu every time you boot using a system disk containing
the AERAMKEEPER file.
*Remember: To be able to access the AE
RamKeeper Desk Accessory, you must copy this
file to any boot disk youll be using. So, if you
plan to boot from your ROM Disk and want access
to RamKeeper’s firmware, you’ll need to copy it
to the Desk Accessories folder (subdirectory) on
your ROM Disk.
Once you have copied the file to your DESK.ACCS folder,
you can delete the file from AEROM.
If you ever lose the system disk(s) that contains this file,
you'll need to reinitialize the ROM Disk so that it will
create another AERAMKEEPER file. Be sure to save your
ROM Disk files to floppy disks before reinitializing.
*Note: For more information about using the
Finder, refer to the Apple IIGS System Disk User’s
Guide.
Chapter Two - RamKeeper Firmware 19
Accessing the Firmware
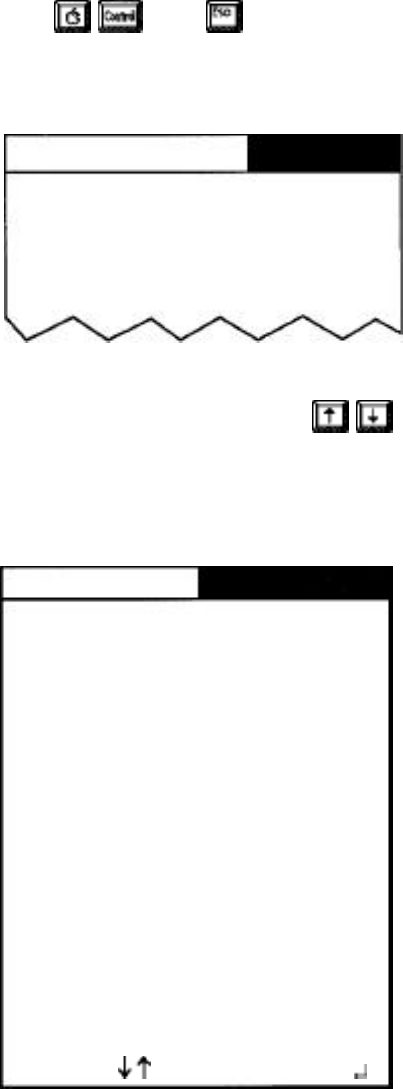
Access the Classic Desk Accessories menu by holding
down the Open Apple and Control keys while pressing
ESC then ( - then ). Pressing these three keys will
display a Desk Accessories menu much like the one
shown below (appearance may vary according to which
Desk Accessories you have loaded).
Desk Accessories
Control Panel
Alternate Display Mode
AE Cache
AE RamKeeper
Quit
Classic Desk Accessories Menu
Use the up and down arrow keys ( as instructed
at the bottom of the menu screen, to highlight the
RamKeeper option. Press Return.’
The RamKeeper main menu will appear as shown below:
RamKeeper (TM)
Initialize ROM Disk
Change ROM Disk Size
ROM Disk Memory Test
RAM Memory Test
Memory Map
Checks urn
About RamKeeper..
Quit
RamKeeper V--
Copyright (c) 198—
Applied Engineering
Select: Open:
RamKeeper Main Menu
20 RamKeeper
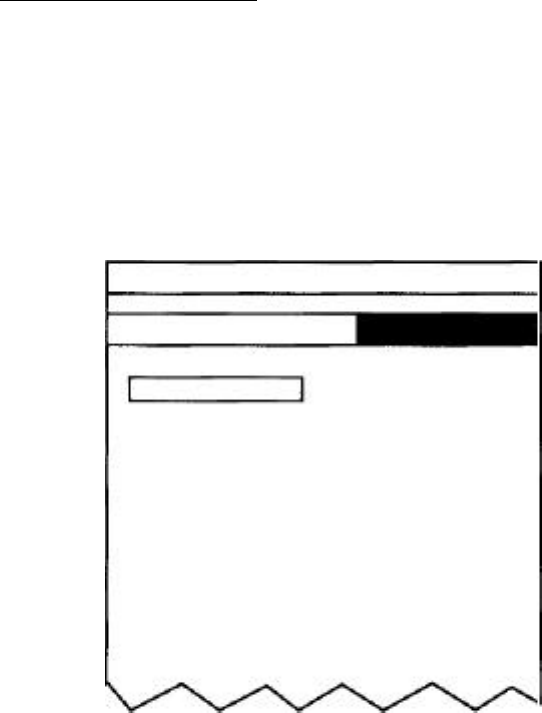
Again, use the up and down arrow keys to select the
option. The different options and their functions are
described below.
To set your ROM Disk to the size you want, you’ll need to
go into the IIGs Classic Desk Accessories menu, select the
AE RamKeeper option and set the ROM Disk size using
the Initialize ROM Disk option.
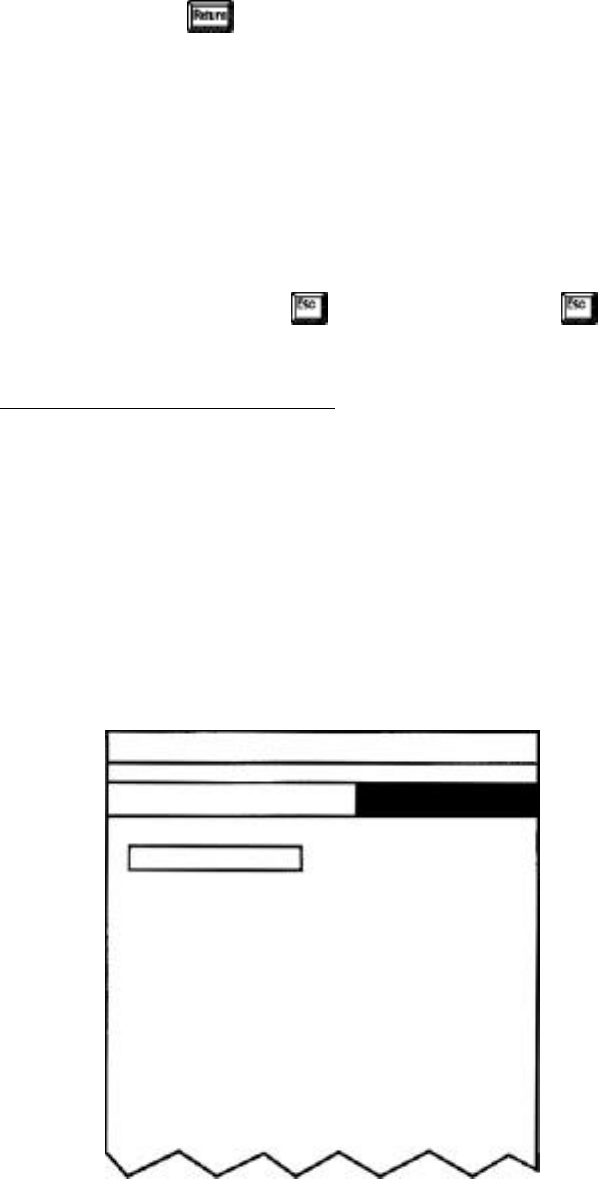
Initialize ROM Disk
The only option you can directly alter in this menu is the
ROM Disk Size setting.
When you first boot the RamKeeper, it creates a 63K ROM
Disk. However, the Memory Allocated For ROM setting
will show a 64K ROM Disk. This is because RamKeeper
uses 1K of protected memory for itself.
RamKeeper (TM)
Initialize ROM Disk
ROM Disk Size: 63k
Memory Allocated For ROM: 64k
Memory Available For RAM: 1664k
...System
Status... 256k
Main Memory: 1472k
Expanded Memory: 1728k
Total Memory
63k
Current ROM Disk Size:
Initialize ROM Disk Menu
Increasing or decreasing the ROM Disk Size setting will
also change both the Memory Allocated For ROM and
the Memory Available For RAM settings accordingly.
Chapter Two - RamKeeper Firmware 21

While you can make changes to the ROM Disk Size in 1
K increments, the Memory Allocated For ROM
increases in increments of 64K (a ProDOS criteria). So,
when you set the ROM Disk size to 64K, you’re actually
using 65K (1K used for RamKeeper). Since you crossed a
64K boundary, the Memory allocated for ROM jumps up
to 128K (2 x 64).
The 63K between your 64K setting and the 96K allocated
for ROM is not used. So, once you cross over a 64K
boundary like that, you might as well use the maximum
memory available within that range. For the example
above, you might as well set ROM Disk Size to 127K.
Setting the ROM Disk Size
To increase or decrease the ROM Disk size by 1K, use the
left or right arrow key.
Each time you press the left arrow key, the
ROM size will decrease by 1K.
Each time you press the right arrow key, the
ROM will increase by 1K.
To increase or decrease the ROM Disk size in 32K
increments, hold down the open apple key while pressing
the left and right arrow keys.
Each time you press the left arrow key with the
open apple key held down, the ROM size will
decrease by 32K.
Each time you press the right arrow key with
the open apple key held down, the ROM will
increase by 32K.
Accepts the current setting.
Esc cancels the operation and returns to the
main menu.
22 RamKeeper
When you press you’ll see the following message:
Warning:
You're are about to
destroy your existing
ROM Disk and RAM Disk.
Do you really want to do
this?
Press Return again to initialize a new ROM Disk and
reboot the system or press to back out. Pressing
will return you to the Initialize ROM Disk menu.
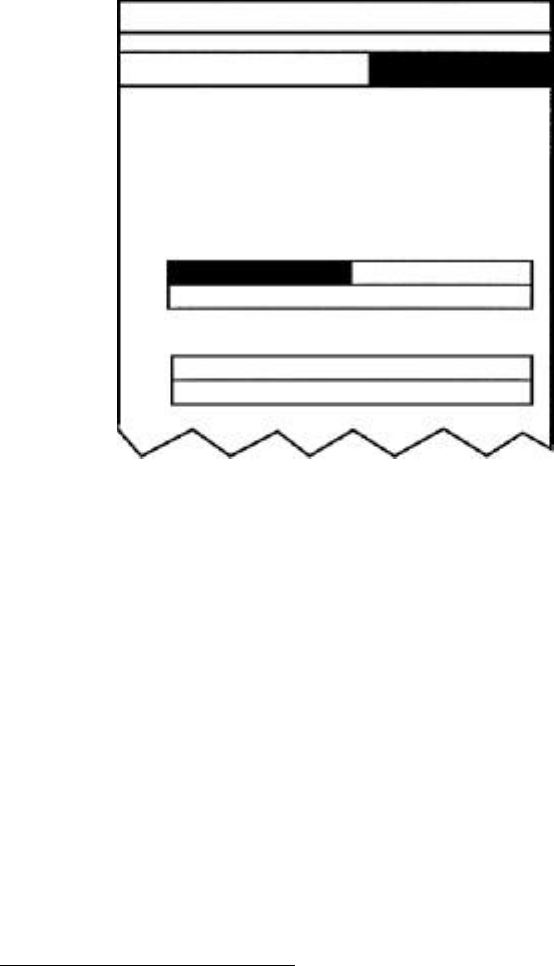
Change ROM Disk Size
This menu is identical to the Initialize ROM Disk
menu with the addition of the Minimum ROM Disk
Size: setting. Within this menu, you can increase and
decrease the size of the ROM Disk (using the arrow keys as
previously described) without endangering what is
currently on the ROM Disk.
The minimum ROM size is calculated by finding the last
block of information currently stored in ROM and backing
up to that point. The existing files are protected in this
way.
RamKeeper (TM)
Change ROM Disk Size:
ROM Disk Size: 63K
Memory Allocated For ROM: 64K
Memory Available For RAM: 1664K
... System Status...
Main Memory: 256K
Expanded Memory: 1472K
Total Memory 1728K
Current ROM Disk Size: 63K
Minimum ROM Disk Size: 4K
Change ROM Disk Menu
Chapter Two - RamKeeper Firmware 23

As you increase or decrease the ROM Disk Size: setting,
the Minimum ROM Disk Size: as well as the Memory
Allocated For ROM: and the Memory Available For
RAM: settings adjust accordingly.
Select the size ROM Disk you want and press return. (For
a discussion of how much memory should be allocated to
ROM, see, Memory Allocation.) If you have more than 2
Meg of memory installed, see, “More than 2 Meg” in the
previous section.
*Important: Resetting the ROM Disk size will, in
effect, “cold boot” your computer. So, while files
in your ROM Disk will remain untouched,
anything you might have stored in your RAM
Disk will be erased. If you didn’t save your RAM
Disk contents and you want to, press to back
out of this menu and save the RAM contents to
disk before returning to this menu.
More than 2 Meg
Those using more than 2 Meg of memory may come
across an easily surmountable obstacle. ProDOS allows bit
map blocks in increments of 2,048K (4,096 blocks). If you
find that you cannot increase your ROM Disk past a
certain size, it has probably stopped at a multiple of 2,048K.
If you want to go above that, you will need to reinitialize
your ROM Disk for more than that multiple of 2,048. For
instance, if you set the ROM Disk size to 2,049, then
initialize, you can change your ROM Disk size to any
setting from 4K to 4,096K. If you set your ROM Disk to
4,097K, you’ll have a range from 4K to 6,144.
ROM Disk Memory Test
Use the ROM Disk Memory Test to test the memory used
by the ROM Disk without destroying the contents of that
memory.
This a quick test that will run as soon as you select the
option from the RamKeeper main menu.
While the test is running, bar graphs will show you the
test’s rapid progress through two passes.
24 RamKeeper
RamKeeper (TM)
ROM Disk Memory Test
Checksum 1: ----
Checksum 2: ----
Non Destructive Memory Test
Read/Write Pass 1:
Read/Write Pass 2:
ROM Disk Memory Test Menu
*Warning: Do not reset while this test is running
or you will destroy your ROM Disk.
When the test is complete, you will be told either,
. . . Card Passed . . .
or . . . Card Failed . . .
If the card fails this test then the user should remove the
memory card(s) from the RamKeeper and test them
individually using the software supplied with the
memory card(s). Testing the cards individually will save
you the time and trouble of trying to repair the wrong
card.
RAM Memory Test
This test is much like the ROM Disk Memory Test but will
test the memory allocated as RAM without destroying its
contents.
This test is also run as soon as you select it from the
RamKeeper main menu.
The bottom of the screen displays graphics (plus signs
turning into minus signs then back again) to let you know
that the test is running.
Chapter Two - RamKeeper Firmware 25
RamKeeper (TM)
RAM Memory Test
Number Of 64K RAM Banks: ----
Testing Address: ----
Pass Number: ----
Non Destructive Memory Test
Bit March Test
---------------+++++++++++++++
RAM Memory Test Menu
This test will continue until you abort by pressing
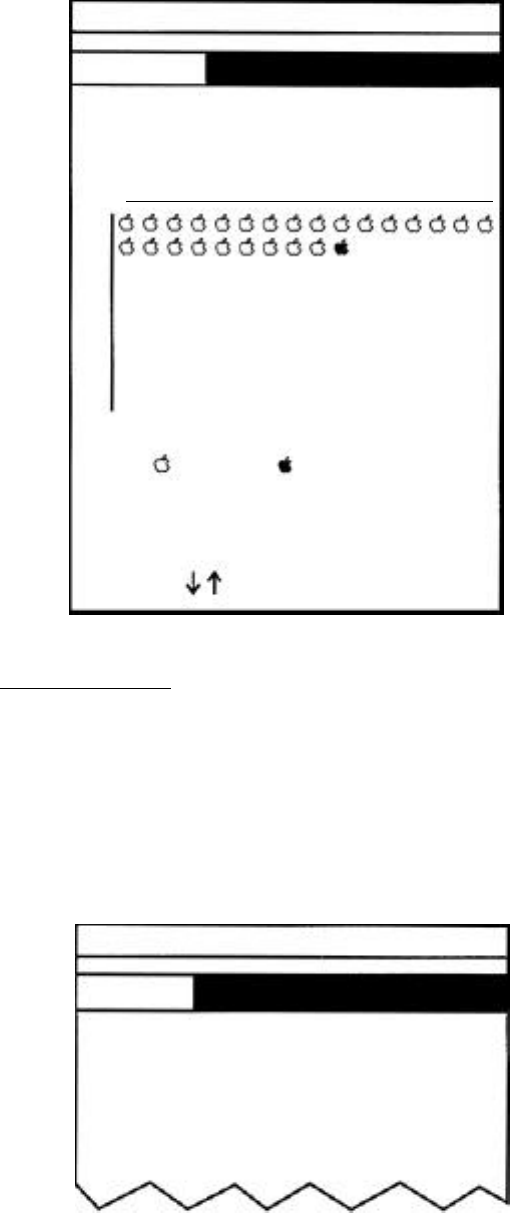
You can quit this test at any time.
Memory Map
The Memory Map option gives you a graphic display of
how much memory is allocated for RAM and how much
for ROM.
The open-apple characters represent RAM while the
closed-apples represent ROM. Missing characters mean
that there is no memory at the indicated bank.
The bottom of the chart tells lists the kind of card(s) (“AE”
or “Other”) and tells you the memory configuration of
each.
26 RamKeeper
RamKeeper (TM)
Memory Map
Bank Allocation
0 1 2 3 4 5 6 7 8 9 A B C D E F
00
10
20
30
40
50
60
70
-RAM -ROM Disk
front: No RAM Card 0K
Back: AE RAM Card 1536K
Select: Cancel:Esc
Memory Map Menu
Checksum
Selecting this option from the main menu gives you a 16
bit EOR checksum. This checksum will appear next to the
Computed Checksum.
The Current Checksum is only reported if the Continuous
Checksum is on (Yes). If the Continuous Checksum is on,
then it should be equal to the Current Checksum.
RamKeeper (TM)
Checksum
Current Checksum ----
Computed Checksum: ----
Continuous Checksum Yes
Checksum at Startup Yes
Checksum Menu
Chapter Two - RamKeeper Firmware 27

Use the up and down arrow keys to select either the
Continuous Checksum option or the Checksum At
Startup option. When either one is highlighted, use the
left and right arrow keys to toggle between Yes and No.
Continuous Checksum Yes means that every time a
block of memory is written to in the ROM Disk, the EOR
checksum is updated. The only disadvantage to this is
that you sacrifice some ROM Disk speed for write
operations.
The Checksum At Startup works in conjunction with
the Continuous Checksum feature; when you select Yes
for Checksum At Startup then Continuous Checksum
is also set to Yes.
About RamKeeper...
This screen gives credit to the masterminds behind the
RamKeeper. It also lists Applied Engineering’s Address
and phone numbers for Sales and Technical Support.
Quit
Selecting the Quit option puts you back into the Classic
Desk Accessories menu.
28 RamKeeper

CHAPTER THREE
Using the ROM Disk
After you’ve initialized and allocated memory to the
ROM Disk you can copy your favorite (or most used) non-
copy protected ProDOS programs to it and set it up to your
hard disk.
You can name the file any name allowed by ProDOS.
Copying Files to the ROM Disk
There’s nothing special about copying files to the ROM
Disk. Copy to it just as you copy to floppy disk or hard
disks.
If you’re using the IIGS Finder™ as your program selector,
the ROM drive will appear as a RAM card icon like RAM
Disks do.
AEROM
You can copy to the ROM Disk on the Finder by clicking
on the program icon then dragging it to the ROM Disk
icon.
You may also use system utilities or many other copy
programs to copy files to your ROM Disk (AEROM).
Location of the ROM Disk
The location of the ROM Disk depends on several things--
how your Control Panel is configured, how many other
drives are connected, and where the drives are connected.
Use the diagrams below to help you understand where
your ROM Disk will be placed.
Chapter Three - Using the ROM Disk 29
ProDOS currently allows a total of six drive devices to
function at one time. The Smart Fort, where your ROM
Disk resides, can control up to four of the 6 total drives.
You can have four 3.5” drives daisy-chained to the Smart
Port or you can have a ROM Disk, a RAM Disk, and two
3.5 drives. The Smart Port drives are controlled separately
from drives connected to a disk drive controller in slot 6
and separately from a hard disk in 7.
The Smart Port will access the drives in the order:
Slot 5 Drive 1 (boot drive - set up in Control Panel)
Slot 5 Drive 2
Slot 2 Drive 1
Slot 2 Drive 2.
While there are no drives actually connected to slot 2, this
is the slot that the Smart Port allocates to the 3rd and 4th
drives in the Smart Port drive chain. These are the only
slots that will be used by the Smart Port to control disk
drives. For additional information about the Smart Port,
consult your Apple IIGS User’s Guide.
Slot 2 Consideration
Slot 2 is commonly used for modems. Since the modem
doesn’t emulate a block device (disk drive), if you have a
modem in slot 2 (a DataLink for example) and slot 2 is set
to “Your Card” in the Control Panel, the Smart Port can
still use Slot 2 for disk drive allocation. If a memory card
that emulates a disk drive is in slot 2 (e.g. RamFactor),
then that card will override the Smart Port’s 3rd and 4th
drives.
30 RamKeeper
1st 2nd 3rd 4th
Apple IIGS ROM Disk 3.5” Drive 3.5” Drive 3.5” Drive 3.5” Drive
W/ RamKeeper s5,D1 S5,D2 S2,D1 S2,D2
Not
without RAM Disk Recognized
1st 2nd 3rd
Apple IIGS ROM Disk RAM Disk 3.5” Drive 3.5” Drive 3.5” Drive
W/ RamKeeper s5,D1 S5,D2 S2,D1 S2,D2
Not
with RAM Disk Recognized
ROM Disk as Boot Device
1st 2nd 3rd
Apple IIGS RAM Disk ROM Disk 3.5” Drive 3.5” Drive 3.5” Drive
W/RamKeeper S5,D1 S5,D2 S2,D1 S2,D2
Not
Recognized
RAM Disk as Boot Device
1st 2nd 3rd 4th
Apple IIGS 3.5” Drive ROM Disk 3.5’ Drive 3.5” Drive 3.5” Drive
W/ RamKeeper S5,D1 S5,D2 S2,D1 S2,D2
Not
without RAM Disk Recognized
1St 2nd 3rd
Apple IIGS 3.5” Drive RAM Disk ROM Disk 3.5” Drive 3.5” Drive
WI RamKeeper S5,D1 S5,D2 S2,D1 S2,D2 - - ..~ - -
Not
with RAM Disk Recognized
Floppy Drive as Boot Device
Chapter Three - Using the ROM Disk 31

ROM Drive as the Boot Device
To boot your computer with the ROM Disk:
1.) You should already have your ROM Disk set to
the size you want.
2.) Copy the system files needed to boot the operating
system you want to use.
*Important! When copying the boot files with the
Finder, you’ll need to open the disk icon, use the
Select All option, then drag all the files from
the boot disk to the ROM disk. Simply dragging
the System Disk icon to the AEROM will put the
boot files in a folder and the computer will give
you an Unable to load ProDOS” error.
◊If you plan to run only one application from your
ROM Disk, you could simply copy the
application’s boot disk to the ROM Disk (the
application must not be copy protected). Then
copy the other program files to the ROM Disk.
◊If you want to use the Finder, copy the files
necessary to run the Finder from the Apple IIGS
System Disk. The IIGS System Utilities Manual is
a great reference source for setup information.
*Remember: If you want to access RamKeeper’s
firmware in ProDOS 16, you’ll need to copy the
AERAMKEEPER file to the Desk Accessories
folder in the System folder.
3.) Set your ROM Disk as your Startup Slot.
a) Enter the Classic Desk Accessories menu.
b) Select the Control Panel option.
c) Choose the option, Slots.
d) Select Startup Slot.
e) Use the left or right arrow to select ROM Disk.
f) Press
4.) Reboot the GS.
Hold down the and keys then press the reset
button. This is almost the same as turning your computer
off and back on but it doesn’t reset the RAM Disk and it
saves a lot of wear and tear on the switch.
5.) The computer should flow boot from AEROM.
32 RamKeeper
CHAPTER FOUR
The RamKeeper Power
RamKeeper can get its power from three sources: the wall
transformer, the Gel/Cell battery, or the IIGS power
supply.
The wall transformer is the primary power source. In the
case of a power failure, however, the RamKeeper will get
its energy from the Gel/Cell battery until the power
failure is over. One battery pack will supply the
RamKeeper with power for about 6 hours. This length
will of course vary according to the number of RAM cards
connected to the RamKeeper and their individual
consumption.
If there is no power coming from either the wall
transformer or the battery, RamKeeper will get its power
from the IIGS (when the IIGS is turned on). This means
you will lose all contents of AEROM when you power
down.
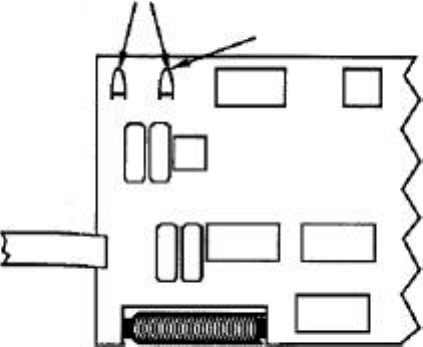
Two L.E.D.s on the left edge of the RamKeeper indicate
the power status of the card.
Transformer Light
(Red and Green)
LED Lights
Chapter Four - The RamKeeper Power 33
Battery Light
(Green only)
If only the green light is on (the one farthest from the edge
of the card), it is indicating that the battery is fully charged
(above 8.6 volts). When the card is getting power from
the battery only, this light will stay on for a very short
time. However, the battery will continue to backup the
RamKeeper for several hours. (See the chart below.)
As soon as power is restored to the Transformer, it begins
charging the battery again and the green light will come on.
Light on
8.6
Volts Light off but still
maintaining RK
5.2 Loss of RK info
Time
Time/Voltage chart
When both the red and green lights are on the
RamKeeper is being powered by the wall transformer and
the battery is being either charged, maintained or is not
connected.
If only the red light is on the battery is either dead or not
connected properly.
Battery
The battery is a sealed Gel/Cell rechargeable battery rated
at 8 volts and 3.0 AMP. HR. The capacity of the battery can
be increased by adding cells in parallel for longer battery
backup time.
Additional batteries are available from Applied
Engineering. Each battery carries a one year warranty but
with normal use, these batteries should Last about 5 years.
Transformer
The wall Transformer is an unregulated 9.5VDC at lA
supply with a coaxial round connector on one end that
plugs into the RamKeeper. The connectors outside
contact is positive and the internal contact is ground.
*Warning: Do not use other transformers. The
wrong transformer could seriously damage your
RamKeeper.
34 RamKeeper

CHAPTER FIVE
A Brief RAM/ROM Tutorial
ROM is...
ROM is an acronym for Read Only Memory. Since a
battery backed RAM Disk can be not only read from but
also written to, ROM Disk is a misleading name for a
battery backed RAM Disk. The reason we call it this is
because we used the GSs ROM Disk drivers to support the
battery backed RAM Disk. You see, the GS has built-in
ROM Disk drivers intended to support ROM chips loaded
with programs. For example, you might attach a card to
the memory expansion card that has AppleWorks loaded
into an EPROM. The AppleWorks program could be
loaded from the EPROM at a super high rate of speed.
However, the EPROM would be Read only Memory, and
no files could be saved to it nor could the program be
altered in any way. On the other hand, the RamKeeper
not only lets you load programs extremely quickly but also
lets you choose the programs you want loaded as well as
save files to it. Since ROM Disk is the name that the GS
supports, that is what we we call the battery backed
portion of memory that RamKeeper keeps alive.
The IIGS has a built-in ROM chip. This is a 128K chip
containing information about what the computer should
do when it is turned on. The ROM chip also includes
Applesoft Basic and the Control Panel program. This chip
was programmed by Apple when the computer was
manufactured and can’t be altered; the 128K memory is
not memory you can use for storing data.
RAM is...
RAM is an acronym for Random Access Memory. This is
the memory that can be both read from and written to --
the addressable (user useable) memory. GS memory
expansion cards use RAM chips and can range in capacity
from 256K to 8 Meg. (8 Meg is the maximum amount of
RAM allowed by the IIGS.)
Chapter Five - A Brief RAM/ROM Tutorial 35
Many programs automatically look for and use available
RAM (system RAM) to give them more room to operate
(e.g. desktop space). Many programs load themselves into
the available RAM at startup. This greatly increases their
performance speed because it reduces or eliminates the
need to access the relatively slow mechanical floppy
drives.
You have probably already experienced the thrill of
loading your favorite (or most used) programs into a
volatile RAM Disk and then seeing those programs run
faster than they ever could from a floppy disk. You could
access these programs from RAM all day. But flipping the
power switch or a power outage is like a lobotomy to a
RAM Disk.
Now you can know the joy of turning on your computer
and having those programs that you previously loaded
into RAM appear on your screen instantly. No more
setting up a RAM Disk and loading the program every
time you turn on your computer.
36 RamKeeper

CHAPTER Six
Memory Allocation-- -
How Much RAM and How Much ROM?
RamKeeper gives you the ability to have both a RAM Disk
to quickly store and retrieve data, and a ROM Disk for
more permanent storage. You’ll need to decide how
much of the total available memory you want to use as
volatile RAM and how much as a non-volatile ROM
Disk.
Why not use all available memory as a ROM Disk?
Since the ROM Disk remains intact when you turn off
your computer, it might seem logical to allocate all
available memory as a ROM Disk. However, as
mentioned earlier, many applications need RAM for
desktop space, so you'll need to Leave some of the RAM
available for use by the system.
Is a RAM Disk now obsolete?
Almost but not quite. Because you can set the size of the
RAM Disk to 512K and 800K, there are some cases in
which a RAM Disk is very useful. Such a case is copying
disks.
If you’ve ever tried to copy a 5.25 disk or a 3.5 disk to a
RAM Disk file or a hard disk, you have probably gotten
the message:
“The two disks are different sizes, so
the contents of “YOUR DISK” will be placed in a
folder on "RAM#".
This creates a folder that you may or may not want but
more importantly, it copies the files in segments instead
of all at once.
Chapter Six - Memory Allocation 37
Result: Slower copies.
Remedy: Create a 512K or 800K RAM Disk.
This allows you to copy from floppy disks to a RAM Disk
much more quickly. To set up a 512K or an 800K RAM
Disk, follow the instruction in your IIGS User’s Guide.
RAM and the GS Control Panel
You may notice that the actual size shown next to RAM
Disk size in the Control Panel-RAM Disk menu is
smaller than the Minimum RAM Disk Size. This is
because RamKeeper overrides the GS Control Panel’s
RAM Disk allocation. For example, if you set your
Minimum RAM Disk Size to 800K in the RAM Disk
menu, but only leave 256K for use as a RAM Disk in the
AE RamKeeper’s - Initialize ROM Disk or change
ROM Disk Size menus, the actual size of the RAM Disk
will be 256K.
This causes no particular problems -- as mentioned
earlier, you’ll want to use most of your memory as ROM
Disk space anyway -- we just wanted to point it out for
those who might wonder.
38 RamKeeper

CHAPTER SEVEN
Æ Cache
Those of you who want to know what the Cache™ is and
does, read, “About the Cache™ at the end of this chapter.
Those of you who want to install it right away, here's how...
Requirements
To use the Æ Cache, you must have the following:
◊A RamKeeper card with any compatible memory
card attached.
or A GS-RAM™ card installed in the IIGS’s Memory
Expansion Slot.
◊An Apple 3.5 Drive.
* Note: The Cache supports only the Apple Disk
3.5™ Drives (platinum). It will not cache the
Apple II Uni-Disk™ 3.5 drives (white) nor will it
cache 5.25” drives or hard disks.
Important: You must set Slot 5 in the Control Panel
menu to the Smart Port Setting.
◊A COPY of the AW 2 Expander disk, version 2.5.3
or later.
Installing the Cache
You may have noticed that there are two AECACHE files on
the AW2 Expander disk. One is for use with ProDOS 8
only while the other is for use with both ProDOS 8 and 16.
First, decide if you’ll be using ProDOS 8 only or ProDOS 16
only or if you’ll be switching between the two, then follow
the appropriate directions below.
ProDOS 8 Only
If you plan to use only ProDOS 8:
1.) Boot your COPY of the AW 2 Expander disk
Chapter Seven - Æ Cache 39
2.) Select Æ Cache from the AW2 Expander main menu or execute the file,
AECACHE.SYSTEM.
While executing, the program will display the Æ startup screen accompanied by
the message:
INSTALLING....
at the bottom of the screen.
If the Cache program does not find a properly installed
RamKeeper or GS-RAM card it will print the following
message to the monitor:
REQUIRES GS-RAM
OR RAMKEEPER W/ MEMORY CARD
IN IIGS MEMORY EXPANSION SLOT
*Important: Switching from ProDOS 8 to ProDOS
16 with AECACHE . SYSTEM operating will cause
unpredictable results. If you want to switch
between operating systems, follow the directions
for ProDOS 8 and ProDOS 16 following.
ProDOS 16 and ProDOS 8 or ProDOS 16 Only
If you’ll only be using ProDOS 16, or if you’ll be switching
between 16 and 8, use the IIGS Finder or System Utilities to
copy the Aecache . Setup file (from the AW2 Expander
disk) into the System. Setup folder located within the
ProDOS 16 System folder on your boot disk(s) (see below).
SYSTEM SYSTEM.SETUP AECACHE.SETUP
Where the file goes
Booting these modified disks will load the AE Cache
option into your Classic Desk Accessories menu.
*Note: You must cold boot into ProDOS 16 to
enable the AECACHE . SETUP file to work under
both systems. You can then switch between
ProDOS 8 and ProDOS 16 without deinstalling or
reinstalling the Cache
If the Cache program does not find a properly installed
RamKeeper or GS-RAM card, the AE Cache option won't
appear in the Desk Accessories menu.
40 RamKeeper

Setting the Cache Size
Once the Æ Cache is installed, it will automatically
increase your productivity. All you need to do is decide
how large you want the Cache to be.
1.) Access the IIGS Classic Desk Accessories Menu.
( - then ). You should see a menu
much like the one below. (Yours may be slightly
different according to the Classic Desk Accessories
you have loaded.) Notice the new option --AE
Cache.
Desk Accessories
Control Panel
Alternate Display Mode
AE Cache
AE RamKeeper
Quit
Classic Desk Accessories Menu
2.) Select the new option using the arrow keys and
return. You’ll see the RAM Cache menu. (See
illustration.)
3.) Change the size of the RAM buffer to the size you
want by pressing the right and left arrow keys to
increase and decrease. You don’t have to power
your computer down and back up to change the
size of the cache. Simply select the size you want
then press return. If you access the AE Cache
option again, you will see that your new setting
has taken affect.
Chapter Seven - Æ Cache 41

RAM Cache V_
(C) 198— Applied Engineering
RAM Buffer Size: K
K
Current Size:
Expansion Memory Size K
Select: <– –> Cancel:Esc Save
RAM Cache Menu
4.) Change the size of the RAM buffer to the size you
want. Press the right and left arrow keys to
increase and decrease the RAM buffer size.
You don’t have to power your computer down and back
up to change the size of the cache like you do when you
change the size of a regular RAM Disk. Simply select the
size you want then press return. If you access the AE
CACHE option again, you’ll see that your new setting has
taken effect.
Setting the RAM Buffer Size
The Expansion RAM Size: heading displays the entire
amount of memory on the memory expansion card. If
another program or utility is using some of the extended
memory, the RAM Buffer will not be able to use all of the
memory indicated by the Expansion RAM Size:. But it
can use the free memory available at that time for a RAM
Buffer.
If you request more memory than is free at the time, the
Cache will use as much free memory as is available. The
Cache wont automatically fulfill your size request once
the memory becomes free. If a program frees any
memory, you can use that memory as a RAM Buffer by
resetting the RAM Buffer Size in the AE Cache option
in the Desk Accessories menu.
42 RamKeeper

Removing the Cache
To remove the Cache from the system:
ProDOS 8
Cold boot your computer by doing either of the following:
-> Press and hold down the control and open-apple
keys ( - ) while pressing and releasing the
reset key.
-> Power down--turn off the computer, then power
up--turn it back on.
After you cold boot, access the Desk Accessories menu and
note that the AE Cache option is gone.
ProDOS 16
Remove the AECACHE . SETUP file from the System. Setup
file and reboot or cold boot from a boot disk that doesn’t
have the AECACHE . SETUP file installed.
About the Cache
Part of the reason the Cache is so incredibly fast at
retrieving information is that it allows ProDOS to read a
whole track every time it accesses the disk drive instead of
reading individual blocks. This method, called, track
caching, makes even the initial read much faster--up to
twice as fast as a system without a cache. All subsequent
calls are sped up even more because the system does not
have to access the disk drive every time you request
information. In fact, subsequent accesses are often faster
than accesses from a RAM Disk!
The Cache installs itself onto the Smart Port and will
operate with ProDOS 8, ProDOS 16, Apple Pascal 1.3, and
Æ’s PC program for CP/AM. It uses some of the expanded
memory for itself plus the amount of memory you
allocate to it.
When the cache program reads a track, it stores the entire
track in the Track Buffer and stores the block(s) containing
the requested information in another buffer, the Cache
Buffer. You can set the Cache Buffer to the size you want,
depending upon the memory size of your GS-RAM card
and how much of that memory you have allotted for use
as a RAM Disk.
Chapter Seven - Æ Cache 43

When the Cache Buffer becomes full, it will make room
for the most recently requested data by replacing the blocks
that have been stored in the buffer the longest without
being accessed. The Track Buffer is not variable; it is large
enough to hold one track (6K) and cannot be changed.
When you call for information, the system first looks in
the Cache Buffer. If the information is there, it reads it
with speed comparable to (often even faster than) reads
from RAM Disks and internal hard disks. If it doesn’t
find the information in the Cache Buffer, it checks the
Track Buffer. This takes very little more time than
reading from the Cache Buffer because the system is still
not required to read the disk drive.
If the information is not in the Track Buffer, the system
will then go back out to the disk drive, find the
information and read the entire track to the Track Buffer.
This new track replaces the track currently held in the
Track Buffer.
While this method actually goes through more steps than
a non-cached system to get information that is not stored
in the buffer, the actual time it takes the system to check
the Cache Buffer and Track Buffer is insignificant.
Copy Protected Programs
Some copy protected programs have a disk accessing
function of their own and cannot use the Cache.
However, most programs will use the cache with no
problem.
44 RamKeeper

CHAPTER EIGHT
AW 2 Expander
The AW 2 Expander is an accessory program designed to
compliment Applied Engineering memory expansion
products. It modifies the AppleWorks™ program to
recognize and use the additional memory provided by
these products.
The AW 2 Expander program will enhance AppleWorks
USA version 2.0, German 1.4, and French 1.4.
Before You Even Think of Modifying AppleWorks...
If you are familiar with AppleWorks, you’ll probably be
tempted to use the AW 2 Expander without reading these
instructions. Resist the temptation. Or at least read the
following.
•AW 2 Expander does not support AppleWorks
versions 1.0 through 1.3.
•These instructions assume that you already know
how to use AppleWorks. The AW 2 Expander
program uses the same screen displays and
keyboard input routines (user interface’) as the
AppleWorks program. If you need a quick
review, read Throughout AppleWorks in your
Using AppleWorks manual.
• There’s an AppleWorks Word-Processor file on
the AW 2 Expander disk entitled "READ.ME."
Please do so. This document contains
information about any recent changes to the
software or updates to the documentation.
•Apply the AW 2 Expander modifications only to
unmodified BACKUP copies of your AppleWorks
startup and program disks. Modifications
required by other programs should be done after
executing the AW 2 Expander enhancements.
Chapter Eight - AW 2 Expander 45
AppleWorks Modification Instructions
This is how to use the AW 2 Expander to modify the
AppleWorks disks:
1. First, make copies of your original AppleWorks
disks. Filer ,“ provided on the AW 2 Expander
disk, or the copy program on your System
Utilities disk should be used for this purpose.
* Note: You must give the same name to the front
and back side of the AppleWorks copy disk.
Instructions for copying with Filer are in the
Appendix of this manual. Instruction for copying
with the System Utilities are in the IIGS System
Disk User’s Guide.
2. Boot the AW 2 Expander disk in your startup
drive.
3. Select option 1 - “Execute AppleWorks
Enhancements.”
4. The Applied Engineering AW 2 Expander
copyright screen will then appear. After reading
each of the screens, press the space bar to
continue.
5. You’ll now be prompted to remove the AW 2
Expander disk and insert a COPY of the
AppleWorks STARTUP disk in drive one. Be
sure the WRITE PROTECT tab has been removed
from the disk. As prompted at the bottom of the
display screen, press the space bar to continue or
the escape key to go back to the main menu.
The AW2 Expander program expects to find the
AppleWorks STARTUP file, “APLWORKS.SYSTEM,” on
the disk in drive one. If, at this point, the program
displays the following message:
Cannot find correct file
Please enter the prefix of the AppleWorks program
?
enter the complete ProDOS prefix of the AppleWorks
STARTUP disk. Be sure to include any (/) slashes for
subdirectories.
An example ProDOS prefix of an AppleWorks
subdirectory on a Apple 20 SCSI hard disk (with a volume
directory name of /HARD) might be: /HARD/APPLEWORKS.
46 RamKeeper

6. The program will then give you a list of the
modifications that it will make to your
AppleWorks disk(s) and ask you if you want to
continue. If you want to go ahead and make these
modifications to your AppleWorks disk(s), hit the
“Y” key. If you don’t want to make these
modifications, hit the “N” key to return to the
main menu.
7. After the STARTUP disk has been successfully
modified, you may be prompted to remove it
from the disk drive and insert a COPY (write
enabled) of the AppleWorks PROGRAM Disk.
The volume directory name of this disk must be
the same as the STARTUP disk. Press the space
bar to continue.
8. When the modification to the AppleWorks
PROGRAM Disk has been completed, the
program will prompt for a key press to quit. Press
the space bar and the modified AppleWorks can
then be booted in the normal manner.
Setting the AppleWorks Enhancement Options
Boot the AppleWorks startup disk just like you normally
would. (Notice that the AppleWorks version number
near the lower right corner of the startup screen now has
an “A” tagged onto its end (Ex: 2.0A). If it doesn’t have an
“A: appended to the version number, it hasn’t been
modified correctly.
When the startup disk has finished loading, remove the
startup disk and insert the program disk, but DO NOT
press return. Press instead. If you’re booting
AppleWorks from a UniDisk 3.5 or a hard disk, press
when you are prompted with: “Press the Space Bar to
continue.
*Note: It’s not necessary to access the Getting
Started options menu each time you boot
AppleWorks. The Getting Started menu is
only used to set the enhanced AppleWorks
options.
Chapter Eight - AW 2 Expander 47
The current enhancement-options configuration will be
read from the parameter file (SEG.PR) on the AppleWorks
program disk and displayed in the Getting Started option
menu. The configuration shown contains the default
settings. These default settings remain in effect until you
change them and save the new configuration back to the
AppleWorks program disk.
File: None GETTING STARTED
======================================================================
Getting Started
1. Maximum Records/Lines (RW) 12,000
2. Preload AppleWorks onto Memory On
3. Printer Buffer(RW) Off
4. suffer Size (GS) 0 K
5. Reserved RamFactor Size (RF) 0 K
6. Time Display Off
7. Save Configuration
8. Continue with AppleWorks
Type number, or use arrows, then press Return 1113K Avail.
The Getting Started options menu
*Note: The options followed by (RW) are for
RamWorks and Z-RAM products only. Those
followed by (RF) apply only to the RamFactor.
(GS) applies to the IIGS only.
Use the up and down arrow keys ( ) to highlight
the option you want. Use to select a highlighted
option. For more information on the options, refer to the
section entitled About the New Features. When you have
made the desired changes, save the new configuration
back to the AppleWorks program disk by selecting the
menu option Save Configuration.
Choose the option, Continue with AppleWorks. If you
didn’t save your new configuration, the new one will be
in effect only until you quit the AppleWorks program.
The next time you boot AppleWorks, the previous (saved)
configuration will be used.
48 RamKeeper

About the New Features
The following paragraphs describe the new features of the
enhanced AppleWorks and the instructions for using
them. Please read this section very thoroughly.
More Word-Processor Lines and Database Records
With sufficient memory, the maximum number of Word
Processor lines available with the unenhanced
AppleWorks 2.0 is limited to 7,250; the maximum
number of data base records is 6,350. The enhanced
version expands the maximum number to just over
22,600 apiece.
The enhanced AppleWorks, when RamKeeper with a GS
memory card is installed, automatically sets the number
of lines and records to the maximum (22,600).
Clipboard Expansion
The standard AppleWorks clipboard (2.0) is limited to
only 255 lines of information. The enhanced
AppleWorks clipboard expansion increases the clipboard
size for the Word Processor and Database functions to
2,042 lines. Only clipboard activities within and
originating from the Spreadsheet function remain limited
to 250 lines.
Printer Buffer Option
The Apple IIGS has a built-in print buffer which can be
activated from the Apple IIGS Control-Panel menu. You
may select the “On” setting from the Printer Buffer
option but the buffer will be functional only if you have
selected it from the Control Panel option. If you’d like
to know more about the internal printer buffer, please
refer to your Apple IIGS Owner’s Guide.
Buffer Size Option
The Buffer—size option of the Getting Started
options menu affects the size of only the Apple IIGS’
internal printer buffer.
Chapter Eight - AW 2 Expander 49
* Important: If any amount of memory is allocated
to the Buffer size option, the printer buffer
setting is shown to be "On." However, it will not
actually be on if not selected from the Control
Panel menu.
The Buffer-Size option of the enhanced AppleWorks
Getting Started menu lets you allocate the amount of
Apple IIGS memory space (up to 64K) to be used for the
print buffer. With the Apple IIGS print buffer ON and the
Getting Started Buffer Size option set to OK, the
actual buffer size will be determined by the amount of
memory (2K or less) that the Apple IIGS memory manager
can allocate.
Time Display/Database Time-Stamp Option
This option will read the output of the Apple IIGS internal
clock and replace the “Open-Apple-? for Help’ message in
the bottom line of the AppleWorks screen with a current
date and time display. This option also allows the
AppleWorks user to enter the current date or time into a
database category by typing the @ character as the only
entry in that category. The category name must contain
either the word DATE or the word TIME but should not
contain both. For example, you should not use this
feature in a category named, “Date and Time.”
*Note: To use the internal clock of the Apple IIGS,
the enhanced AppleWorks must be run under
ProDOS 8 or 16, not ProDOS 1.1.1. (See your
Apple dealer for ProDOS upgrades.)
The Getting Started options menu allows 12 hour or 24
hour time and date display. How the date is displayed on
the screen is affected by the time display option selected.
The 12-hour (USA format) option displays the date as
Month/Day/Year.
The 24-hour (French, German, and military format)
option displays the date as Day/Month/Year.
50 RamKeeper

Multiple-Disk Save
Data storage problems arise when the size of a file on the
Desktop exceeds the amount of storage space on the data
disk. A standard floppy disk can store only 135K of
AppleWorks data. Using the modified AppleWorks,
Desktop files larger than the available disk space will be
segmented, or “split” and saved in sections to two or more
disks. The following paragraphs explain how to use this
feature to save and load segmented Desktop files.
This seems to be a good time to remind you of Murphy’s
Law:
Whatever can go wrong will go wrong.
Back up your Desktop files! A power failure will wipe out
anything currently on the Desktop! It’s always a good idea
to have backup copies of your working data disks,
especially if you have large amounts of data stored on
them.
Saving Multiple Files to Disk
When saving a Desktop file which is larger than the data
disk space available, the enhanced AppleWorks will
prompt the user with the following message:
Segmented Desktop File...
Please insert NEXT disk with SAME
VOLUME NAME
*Note: If a previous version of the file already
exists on the disk, AppleWorks will first ask you
if you wish to delete the old file.
Remove the data disk from the current disk drive and
replace it with the next data disk. All segments of a given
segmented Desktop file MUST be saved on data disks
having the same volume (disk) name as the primary
(first) data disk. On subsequent data disks, each appended
file segment (sequential) will be automatically deleted
before saving a new segment.
If you discover that you don’t have enough formatted
blank disks with the same volume name, don’t panic!
Press esc then space to continue. Just use the AppleWorks
Disk Formatter utility under the “Other Activities” menu
before you begin to save your file.
Chapter Eight - AW 2 Expander 51
Adding Multiple Disk Files to the Desktop
When adding multiple-disk or segmented files to the
Desktop, the file MUST be loaded from the data disks in
the same sequence as it was saved. AppleWorks will
prompt the user to insert the NEXT data disk(s) until the
file is completely loaded.
If you list the files on disks that contain segmented files
you’ll notice that the first segment has the filename that
you gave it. The next segment (on the NEXT disk) will
have a “.2” appended to the end of your filename. The
next disk in the sequence will have a “.3” appended to the
filename and so on. In this way, AppleWorks helps the
user keep track of the segmented Desktop file sequence.
You’ll probably want to label your data disks in such a way
that you too can keep track of the proper sequence. You
may segment up to 9 disks (“.9) in this manner.
Print-File Cache
One small file (SEG.PR) on the AppleWorks program disk
contains special configuration information about such
things as your printer information, standard location of
your data disk, and enhancement options. The
unmodified version of AppleWorks leaves this
information on the program disk and is not preloaded
along with the program overlays.
When AppleWorks needs information from this file it
prompts you to reinsert the AppleWorks program disk.
The enhanced version of AppleWorks loads this file into
memory at startup and eliminates the need for the
program disk (until overlays are bumped from memory).
Only when you change the contents of this file does the
enhanced AppleWorks prompt you to insert the program
disk.
52 RamKeeper

APPENDIX A
Trouble Shooting
This section includes a few methods of working around
problems that you may encounter.
Cards are not retaining stored files
◊Open the computer and see if both LED lights are
on. If the LED closest to the back edge of the card
is not on, check the transformer wall
connection as well as the card connection.
Are both plugged in?
If the other LED is off, make sure that the
wires are connected to both terminals of the
battery, positive to positive, negative to
negative. Make sure that the two-pin female
connector is attached correctly--wires feeding
toward the bottom of the card.
◊Test cards individually using the testing methods
provided with each card.
◊Verify that any RAM chips added to the memory
cards meet manufacturers specifications.
Battery not holding charge
◊Make sure your wall transformer is not plugged
into a switch controlled socket or a dimmer
switch. If it is, any time you turn off the switch
(or turn down the dimmer) the RamKeeper is
getting its power from the battery.
◊Using a transformer other than the one supplied
with the RamKeeper may cause your card not to
work properly or your battery not to recharge as it
should.
In an area that has a lot of power outages
◊You may need additional battery backup time.
You can increase the battery backup time of your
Gel/Cell by linking several Gel/Cell batteries
together. You can purchase additional Gel/Cell
batteries from Applied Engineering Sales.
Appendix A - Trouble Shooting 53
◊Power outages are typically accompanied by
transient surges of power. If you have not
already, consider adding a line filter/surge
protector to protect your computer, RamKeeper
and the battery. Surge protectors are available at
most computer stores and Radio Shack®.
AE RamKeeper doesn’t appear in Desk Accessories
◊You need to copy the file AERAMKEEPER from the
ROM Disk to the DESK.ACCS folder in your boot
disks System folder. (See Loading the
Firmware” in Chapter Two.)
Can’t boot from floppy drive
◊Slot 5 must be set to Smart Port and Startup
Slot should be set to Scan in the IIGS Control
Panel.
“Invalid RK Configuration” Message
◊ you get this message when you try to boot, it is
because the card on back of the RamKeeper in a
two card arrangement is not configured with a
multiple of 512K. The back card must have 512K,
1 Meg, 1.5 Meg, 2 Meg, 3 Meg, etc; 256K and 768K
on the back card will not work.
Can’t change ROM Disk size to more than 2,048K
◊ You have reached a ProDOS block boundary.
You’ll need to reinitialize the ROM Disk for a
new setting of more than 2,048. (See “More than
2 Meg” in Chapter Two.)
“Unable to Load PrODOS” Message
◊If you’re trying to boot from ROM, the system
folders must be on the main level (the root
directory) of the ROM disk. If you dragged the
icon of the System disk to the AEROM disk (using
the Finder), all the boot files will be in a folder of
their own on AEROM. You’ll need to open this
folder, use the Select All option, and drag the
folder’s contents to AEROM. You can throw away
the now-empty folder.
54 RamKeeper

APPENDIX B
A Brief ProDOS Tutorial
This is a brief explanation of the Professional Disk
Operating System, ProDOS for those who are completely
new to it. All of this information and more is included in
your Apple Owner’s Guide but we have provided it here
for your convenience.
Operating System
ProDOS is one of several operating systems for the Apple.
Others include DOS 3.3 and Pascal. Operating systems, as
defined in the Apple Owner’s Guides, are programs that
control how information is loaded into memory, how the
computer handles the information, how the information
is stored on a disk and how the computer communicates
with the printer and other peripherals.
Naming Volumes
ProDOS must have a way to locate which disk (often
called “volume”) you want to access. Instead of typing in
the location of the disk as in DOS 3.3 (ex: S6,D1), you
simply type in the name of the disk (the volume name).
Some rules for volume names are:
1) Name can include letters, numbers or periods but
not spaces
2) Name must begin with a letter
3) Name can be up to 15 characters long
These rules also hold true for subdirectory names.
Root Directory and Subdirectory
The main directory of the volume is called the root
directory. The root directory uses the same name as your
disk. Sub-directories are ProDOS’ way of organizing
information on a disk.
Think of the root directory as a file drawer and the
subdirectories as folders within the drawer. You can:
1) put files directly into the root directory like
putting documents straight into the file drawer
Appendix B - A Brief ProDOS Tutorial 55
2) put files within subdirectories like putting
documents in folders
3) put subdirectories within subdirectories like
putting folders within folders.
Pathname
The name of the directory combined with the names of
one or more subdirectories is called a pathname. Volume
names and subdirectory names are preceded by a slash,
“/”. (Note that some applications add the slash for you.)
For example, you could have a volume named /MY.DISK
and have a file, called /MY.FILE on the root directory of
that disk. To access that file, you would use the pathname
/MY.DISK/MY.FILE. You could also have a file,
/JUL.AUG in a subdirectory (folder) called, /PHONE on a
disk called /BILLS. To access that file, you would use the
pathname, /BILLS/PHONE/JUL.DEC. Refer to the
diagram below.
JAN.JUN
PHONE (subdir.) < JUL.DEC (files)
JAN.JUN
ELEC. (subdir.) <JUL.DEC (files)
BILLS (root dir.) ACCOUNT.SYSTEM (file)
JAN.JUN
ZIPPY.FUEL (subdir.) < JUL.DEC
GAS (subdir.) < JAN.JUN
NTTRO.NEDS (subdir.) < JUL.DEC
WILD
FAMOUS (subdir.<THE.KID (files)
BO.BAGGINS
ProDOS Directory Structure
Now when an application asks you for the pathname of a
file, you'll have a basic understanding of what it expects.
System Files
A system file is a ProDOS file that starts an application.
Typically, these files have the suffix, . SYSTEM (e.g.
/APLWORKS . SYSTEM, /ACCOUNT . SYSTEM [see above], etc.).
When you boot ProDOS, it runs the first system file listed
in its directory. So, if BASIC.SYSTEM is the first system
file on your ProDOS boot disk, ProDOS will boot then put
you in BASIC.
56 RamKeeper
Additional Resources
The following books are available through most Apple
dealers:
Apple II Owner’s Manual (Apple Computer, Inc.)
Supplied with your Apple Computer. Take the
time to read it.
Basic Programming with ProDOS (Addison-Wesley
Publishing) Gives a detailed explanation of how
to use ProDOS from AppleSoft Basic.
Beneath Apple ProDOS (Quality Software) Provides
information about ProDOS for both the novice
Apple user and the advanced programmer.
ProDOS Inside and Out (TAB Books) Vary good book
for both the beginning and advanced BASIC
Programmer.
ProDOS Users Manual (Apple Computer, Inc.)
Provides an overview of ProDOS and explains
how to use the ProDOS User’s Disk.
Appendix B - A Brief ProDOS Tutorial 57

APPENDIX C
Copying Disks with Filer
We have included Filer, a utility program, on the AW 2
Expander disk to enable you to make backup copies of
your disks that are not copy protected. The instruction
below tell you how to use Filer to copy from disk to disk.
See Chapter 2 for instructions on using Filer to copy
AppleWorks to your RamFactor.
1. Load Filer.
2. Select "Volume Commands” (v)
3. Select "Copy a Volume” (C). The settings default
to a two drive set up with your master in Slot 6
Drive 1 and your copy disk in Slot 6, Drive 1.
Adjust to your set up. (If you only have one drive
you can copy from S6, D1 to S6, Dl.)
4. Press return to accept the default settings or enter
your own.
5. Insert the master disk in your drive that you have
set the program to copy from. Insert a blank disk
(it does not need to be formatted) in the drive you
have set the program to copy to. The blank disk
must have the write protect tabs removed.
6. Press the Return key.
7. Name your volume. It will default to the name
of the master disk (ex: When copying
AppleWorks, the volume name will default to
“/APPLEWORKS”. Hit return or give it a different
name. (You must give the front and back side of
AppleWorks the same name.)
8. When you press return, the copy program will
begin formatting the copy disk. Then the words
“READING” and “WRITING” will flash on and off
the screen to entertain you while you wait.
9. When the program is finished copying, it sends
the message, “COPY COMPLETE” to the screen.
10 Remove both disks. Put your master disk in a
safe place and label your copy disk. You will
make your modifications to the copy disk.
For additional help with the Filer program, contact your
Apple dealer.
58 RamKeeper

APPENDIX D
Bird’s Better ‘Bye’
Several of the Applied Engineering distribution disks
contain a modified version of ProDOS 8. It incorporates a
program selector, Bird’s Better ‘Bye’ (created by Alan
Bird), that lets you exit one system file and easily run
another system file (e.g. APLWORKS.SYSTEM,
BASIC.SYSTEM, FILER) from a menu.
To use this ‘BYE’ command, boot your copy of the Æ disk
or copy the ‘PRODOS’ file from the Æ disk to your boot
disks. Then, anytime you quit a system program (such as
AppleWorks), a menu of all the executable System files on
that disk will be displayed on the screen. This menu can
also be called from the Applesoft BASIC prompt by
entering the ‘BYE’ command.
ESC: CHANGE VOLUME
RETURN: SELECT FILE
/AW2.EXP
PROD0S
AE.AW.SYSTEM
FILER
GSTEST.SYSTEM
RWTEST.SYSTEM
RFTEST.SYSTEM
AECACHE.SYSTEM
Sample screen display
The sample screen above shows the AW 2 Expander disk
on-line and lists its executable System files.
Use the up and down arrow keys to highlight the selection
you want to run. The ESC key will change the volume
(disk) selection to the next on-line volume. The Return
key selects the currently highlighted file or subdirectory
name.
Subdirectory names on the disk will be indicated by a ‘/’ as
the first character of the file name.
Appendix D - Bird’s Better ‘Bye 59

APPENDIX E
Getting Help
If you have a technical question relating to your
RamKeeper card that is not covered in the manual, please
contact the dealer from whom you purchased the card. If
you are experiencing difficulties with one particular
program, contact the programs author or publisher.
In the event that the dealer or the publisher’s support
personnel cannot answer your question, call Applied
Engineering Technical Support. The support
representatives are experienced in the applications and
uses of Applied Engineering products, but in order to
provide a quick and effective answer to your question,
they will need to know as much as possible about the
hardware and software specifically related to your
question. Please provide the technical support
representative with the following information:
◊The Applied Engineering product related to your
question and its revision number.
◊The original and current memory configuration
of the card (if applicable).
◊The model and revision of your computer.
◊What peripherals are being used and what cards
are in each slot.
◊The name, version, and revision level of the
software that you are experiencing problems with.
◊The results of any test programs, diagnostics, or
troubleshooting done by you, your dealer or your
software publisher’s support department.
Applied Engineering
Technical Support
(214) 241-6069
9 AM to 12:30 PM & 1:35 PM to 5 PM(CST)
Monday Through Friday
(Please call only the number above for technical support.
Our sales office cannot transfer calls to the support lines.)
60 RamKeeper

Returning a Product
Include
If your product needs to be returned, the technical support
representative will give you a Return Material
Authorization (RMA) number.
◊Record the RMA number for your own records.
◊Write the RMA number on the outside of the
package you send to us.
◊Write the RMA number at the top of the return
form included with your product package.
Fill out the Return Form on back of the yellow sheet
marked, “Attention! A correctly completed form will
greatly reduce the time it takes to process and return your
product.
Attach a copy of your original invoice to the return form.
*Warning: If you don’t include an invoice
products will be treated as out of warranty
products and will be returned to you C.O.D. for
the amount of the service charge.
A completed form should look something like the one
below.
Appendix E - Getting Help 61
When You Ship
If you don’t have the original packing material, wrap the
board in anti-static material (preferably the anti-static bag
in which the card was originally shipped, however,
aluminum foil will work fine). Pack it in a sturdy box
cushioned with wadded papers (i.e. used computer paper
or newspaper).
*Warning: If your product is damaged due to
inadequate packing, your warranty will be void.
Include the return form and invoice.
Send the package, shipping prepaid, to:
RMA#__ ? __
Applied Engineering
Technical Support
3210 Belt Line Road, Suite 154
Dallas TX 75234
You should insure your package. Æ will not assume any
responsibility for inadequate packing or loss or damage
during shipping.
When We Receive
Our service department will use your completed form in
an attempt to duplicate the problem.
If it is determined that your product is defective due to a
manufacturing defect, your card will be repaired or
replaced at Æ’s option.
Any misuse, abuse, or non-Æ authorized alteration,
modification and/or repair to the Applied Engineering
product will void the warranty. This warranty will also be
void if you use the /E product for any purpose other than
its intended use.
Your product will be fully tested before it is shipped back
to you, transportation prepaid, via UPS regular delivery.
Once your product is received by Technical Support, it will
be processed and delivered to our shipping department
within 7 to 10 working days.
62 RamKeeper
