ReCycle 2.0 Pdf Recycle_v2_Menu Reference V2 Menu
ReCycle_v2.0_MenuReference_(2001) ReCycle_v2.0_MenuReference_(2001)
User Manual: recycle_v2_Menu Reference
Open the PDF directly: View PDF ![]() .
.
Page Count: 32

Menu and Dialog Reference
Getting Started

THE APPLE MENU
THE APPLE MENU
2
About ReCycle
When ReCycle is running, the Apple menu contains an item called “About
ReCycle!...”. Selecting this brings up a window showing you the version of
the program and a list of the people involved in creating it.
To close the About ReCycle window, click anywhere in it.
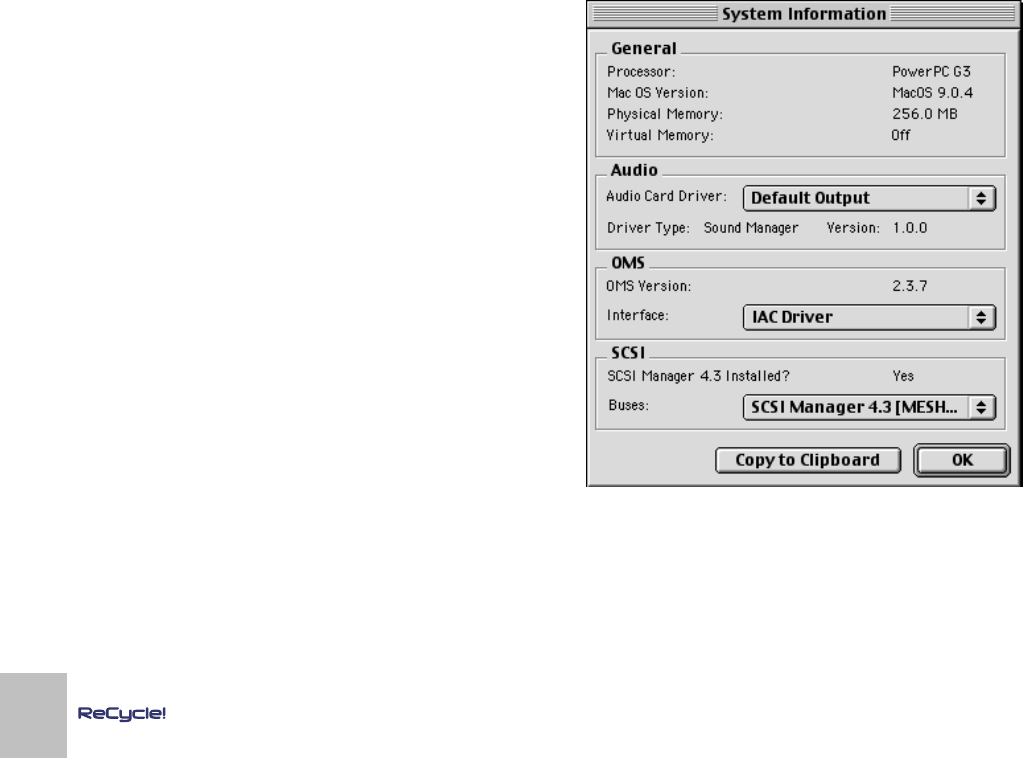
System Information
When ReCycle is running, you will find an additional item on the Apple menu,
called “System Information”. If you select this item, a dialog will open, dis-
playing information about your computer and the SCSI and OMS configura-
tions:
General
This section contains info about your computer’s processor type, operating
system, physical memory and virtual memory. You cannot change these set-
tings.

THE APPLE MENU
3
Audio
This section contains a list of the available Audio Card Drivers. If you select
one of the drivers from the pop-up menu, the version and type (ASIO/Sound
Manager) of the driver are displayed below.
OMS
This section contains information about the installed OMS version. By using
the pop-up menu, you can check which MIDI interfaces are available.
➜
It doesn’t matter which interface is “selected” on the pop-up menu.
The pop-up is only there for you to view the available interfaces.
SCSI
This section indicates whether SCSI Manager 4.3 is installed (required for
SCSI communication in ReCycle), and contains a pop-up menu where you
can view the available SCSI buses.
➜
It doesn’t matter which SCSI bus is “selected” on the pop-up menu.
The pop-up is only there for you to view the available SCSI buses.
Copy to Clipboard
Clicking this button copies the contents of the System Information dialog
onto the Macintosh clipboard. You can then paste this into a text file or an e-
mail, e.g. when contacting tech support.

1
THE FILE MENU
THE FILE MENU
5
Open...
This dialog is used to load audio files from the hard disk. The dialog is a stan-
dard file dialog with some additions.
!
By default, this dialog will appear automatically when you launch
ReCycle. If you don’t want this, open the Preferences dialog on the
Edit menu, and deactivate the “Show Open Dialog on Startup” op-
tion.
File Info
When you select a file in the list, information about file type, length, etc is
shown in the lower part of the Open dialog.
For all recognized audio file formats, the following information is displayed:
• File Type (see next page).
• Number of channels.
• File Length.
• Bit depth.
• Sample Frequency.
• File Size, in Bytes (For REX2 files the data compression ratio is dis-
played in parentheses. For example, 2.4:1 means that the file was
2.4 times larger before it was compressed).
If the file is a ReCycle file, the following additional information is displayed:
• Tempo.
• Time signature.
• Length in bars and beats.
• Usage, which tells you the size of the loop (i.e the audio between the
locators) in relation to the total file size in percent.
• The number of slices in the file (only available if a REX2 file is se-
lected).
• Export Size tells you the size of the file if transmitted/exported (only
available if a REX2 file is selected).
Play and Stop buttons
When you click the Play button, the selected file will be played back. If you
wish to stop playback before the file ends, click Stop.
Auto Play
If this option is on (ticked), playback will start automatically as soon as a new
file is selected from the dialog. If a new file is selected during playback, the
previous selection will stop and playback of the new selection will start di-
rectly.
You will not be able to play a file under the following conditions:
• If the file is in a format ReCycle doesn’t support.
• If there isn’t enough memory (RAM) left to load the sample.
• If the sample is longer than 30 seconds it won’t play automatically
(but you can audition it with the Play button).
About The Different File Formats
ReCycle can load mono or stereo files that meet the following criteria:
• The bit depth can be 8, 16 or 24 bits.
• Sample rates between 11.025 kHz to 1.0 MHz are supported.
• The file is not longer than 5 minutes (regardless of sample rate and
mono/stereo status).
The table below shows the supported file formats.
Close
This Closes the active document. If there are unsaved changes, you will get
the option to save the changes or to cancel the operation.
|
Name
|
Extension
|
Comment
ReCycle RX2/RCY/
REX REX2 is the native file format created when you
save in ReCycle. RCY/REX are ReCycle files
that were created with previous versions of Re-
Cycle.
Wave WAV The standard Microsoft file format for audio. May
be in formats other than 16-bits.
Audio IFF
(AIFF) AIF Audio Interchange File Format; Apple’s standard
audio file format. May be in formats other than
16-bits.

THE FILE MENU
6
Save
This saves any changes made to the file since you last saved. If the file
hasn't been saved before, the Save dialog comes up asking you to specify a
name and location for the file. Files are saved as REX2 files, the native Re-
Cycle file format.
Save As...
This dialog box allows you to Save as a REX2 file to disk and specify the
name and location for the file.
Save All
Save All saves all open documents. For new documents, that have not previ-
ously been saved as REX2 files, the Save As dialog is used. If Cancel is se-
lected the entire Save All operation is cancelled. Save All is disabled on the
menu if no open documents need to be saved.
Export Sound
The Export Sound dialog is used if you want to save your files for internal
samplers and in other formats (see the online Sampler and File Format Ref-
erence document) for which the program saves audio files on your com-
puter’s hard disk.
File Formats
The File Format pop-up is where you select the file format you wish to export
the file as. The following file formats are supported:
|
Name
|
Ext.
|
Comment
Standard MIDI File MID Allows you to export a Standard MIDI file. This
can be used if you
only
want to create a MIDI
File (for example when using ReCycle to cre-
ate “groove maps”).
Wave WAV The standard Microsoft file format for audio.
Exports one or several files, with one slice in
each file, depending on the “Transmit as One
Sample” setting on the Process menu.
Audio IFF
(AIFF) AIF Audio Interchange File Format; Apple’s stan-
dard audio file format. Exports one or several
files, with one slice in each file, depending on
the “Transmit as One Sample” setting on the
Process menu.
Sound Designer II SD2 The current Digidesign file format. Exports one
or several files, with one slice in each file, de-
pending on the “Transmit as One Sample” set-
ting on the Process menu.
Mixman Track File TRK Mixman TRK (for “Track”) files are the building
blocks in the Mixman Studio and Mixman Stu-
dio Pro applications. To facilitate tempo-
matching, the Mixman TRK files contain
“slices” internally (somewhat like ReCycle
files). A single file is created. If the exported
document is based on a stereo file, an alert
box will appear informing you that the file will
be mixed to mono, since Mixman files are al-
ways mono.
SampleCell Instru-
ment File INS Digidesign’s SampleCell is a PCI based sam-
pler card/software editor for both the MacOS
and PC platforms. ReCycle exports an Instru-
ment file plus one or several sound files, with
one slice in each file, depending on the
“Transmit as One Sample” setting on the Pro-
cess menu. ReCycle’s Export settings for
SampleCell supports templates. Creates AIF
or SD2 files.
SoundFonts 2 Banks SF2 SoundFont is a file format for storing wavet-
able synthesized sounds. Effectively, this
turns an ordinary sound card into a sampler.
Creates a single SF2 file when exported, with
the option to export a MIDI file with the same
name.
Akai S5000/S6000
Program Files AKP Exports a program file together with one or
several audio files, with one slice in each file,
depending on the “Transmit as One Sample”
setting on the Process menu.
|
Name
|
Ext.
|
Comment

THE FILE MENU
7
Export Settings
Before exporting a file in one of the supported formats, the Export Settings
dialog is shown. The following items may be present, depending on the se-
lected export format:
➜
A Sample Rate pop-up allows you to change the sample rate when
Exporting.
Supported sample rates depend on the File Format selected.
➜
An “Export MIDI File with Same Name” tickbox.
When checked, a MIDI file with the specified name will be generated to-
gether with the exported file.
➜
A “Templates” checkbox.
Currently only SampleCell supports templates. See the on-line Sampler
Supplements document or the documentation that came with SampleCell
for details.
File Quick Selection List
The most recently loaded files are listed on the File menu. Selecting one
Opens it.
Quit
This simply Quits the program. If you have any unsaved changes you will be
asked whether yo want to save them before quitting.

2
THE EDIT MENU

THE EDIT MENU
9
Undo/Redo
You may be able to Undo your last action by selecting this menu item or by
pressing [Command]-[Z] (the default key command for Undo). The menu
item also gives you a clue about what will be undone. For example: If it says
“Undo Delete Slice(s)” the last thing you did was deleting a slice.
If you wish to “Undo the Undo”, this is possible since after an Undo, this
menu command changes to “Redo”.
The following actions can be undone:
• Move slice
• Delete slice(s)
• Hide slice(s)
• Lock slice(s)
• Insert slice (pen tool)
• Move left/right locator
• Convert to mono
• Normalize
• Crop Loop
• Convert sample rate
• Re-Analyze
• Preset selection (effects)
Copy Loop
You can use “Copy Loop” to copy the entire loop (i.e. all waveform data be-
tween the left and right locators) to the Clipboard. You can also use the key
command [Command]-[C] for this item.
Paste as New Document
If the Clipboard contains data, this can be pasted into a new (automatically
created) document window by using the “Paste as New Document” menu
item.You can also use the key command [Command]-[V] for this item.
Delete
“Delete” will delete all selected slice markers. You can also use the [Delete]
button on your computer keyboard for this.
Select All
The “Select All” menu item will select all slice markers in the active docu-
ment. You can also use the key command [Command]-[A] for this.
Invert Selection
If you have a selection of markers, you can invert the selection by using “In-
vert Selection”. After this operation, the markers that were previously se-
lected are now deselected, and vice versa. This is mainly useful together
with Silence Selected, to extract individual sounds from a loop.
Preferences
The Preferences dialog is used to make audio settings, to set some general
options for how the program operates, and to customize the look of the
waveform display.
Preferences - Audio
Selecting an Audio Card Driver
All available drivers are listed on the Audio Card Driver pop-up menu.
➜
If you are using audio hardware for which there is a specific ASIO
driver, you should select this.
With an ASIO driver written specifically for the audio hardware, ReCycle
can communicate more or less directly with the audio hardware.
➜
If you plan to use the internal audio outputs on your computer,
please select “SM (Built In)”.
This is the Apple Sound Manager default output.

THE EDIT MENU
10
➜
If you have some additional audio hardware (such as USB-speak-
ers) installed, please select “SM Device Name”, where “Device
Name” is the name of your audio hardware.
If you select an ASIO driver, some additional items will be available in the
Audio Preferences:
➜
If the card and its driver supports it, the “Clock Source” pop-up al-
lows you to set an external source to which the audio playback can
synchronize its sample rate.
Please refer to the documentation that came with your card for details.
➜
The ASIO Control Panel may contain settings specific to your audio
card.
Please refer to the documentation that came with your card for details.
➜
If you have an audio card with multiple outputs, you can select
which output pair you wish ReCycle to use by clicking the “Chan-
nels...” button.
This item will not be selectable if you use a card with only a regular stereo
output.
Setting the Audio Card Buffer
ASIO
You cannot change audio buffer size If you are running ReCycle using the
Sound Manager Default Output driver.
➜
If you are using an ASIO driver specifically written for the audio
hardware, you can in some cases make settings for the hardware by
clicking the ASIO Control Panel button.
This opens the hardware’s ASIO Device Control Panel, which may or
may not contain parameters for adjusting the number and/or size of the
audio buffers. Please consult the documentation of your audio hardware
and its ASIO drivers for details!
Preferences - General
➜
The “Don’t show Open Dialog on Startup” item determines whether
or not the Open dialog should automatically open when ReCycle is
launched.
➜
When “Always Move Left Locator to First Slice Point” is activated,
ReCycle will automatically place the Left Locator on the first slice
point when you Open or Receive a sample.
If this is not activated when you Open or Receive a sample with no loop
setting, or the loop start is just at the beginning of the sample, a dialog
appears suggesting you should let the program move the Left Locator to
the first slice point. This is to avoid very short slices at the beginning of
the sample, It is recommended that you do this, unless you have a good
reason not to.
➜
If “Set Bars to 1 in New Documents” is ticked, any new audio file will
open up with Preview mode activated, and the Tempo calculated to
the length being one bar.
Note that this will lead to files playing back at the wrong tempo if the loop
isn’t exactly one bar! You can always change the number of bars later of
course, and the tempo will be recalculated according to the bars setting.
➜
The “Units on Horizontal Ruler” allows you to set whether Time (in
seconds) or number of Samples should be displayed on the hori-
zontal ruler.
Preferences - Waveform
You can customize the look of the Waveform window by using the settings at
the bottom of the Preferences dialog:
The “View stereo files as sum of L+R” Option
If this item is ticked, the left and right channels of stereo files will be summed
to one channel, instead of being stacked on top of each other. Note that this
is a display option only, the actual audio material is not affected.
Waveform Color
Click this button to select a new color for the waveform. This brings up the
standard Apple Color Picker. The color field to the right shows you the cur-
rent color selection.
Waveform Look
Use this pop-up menu to select one of three different waveform "looks";
Plain, 3D or Shaded. Plain displays the waveform with normal graphics, 3D
adds a depth effect to the graphics and Shaded adds a progressive shade to
the lower part of the waveform.
THE EDIT MENU
11
Contrast Slider
This slider sets the amount of contrast between the background display and
the waveform. For maximum contrast, position the slider all the way to the
right. Moving the slider to the left progressively adds more of the chosen
waveform color to the background display.
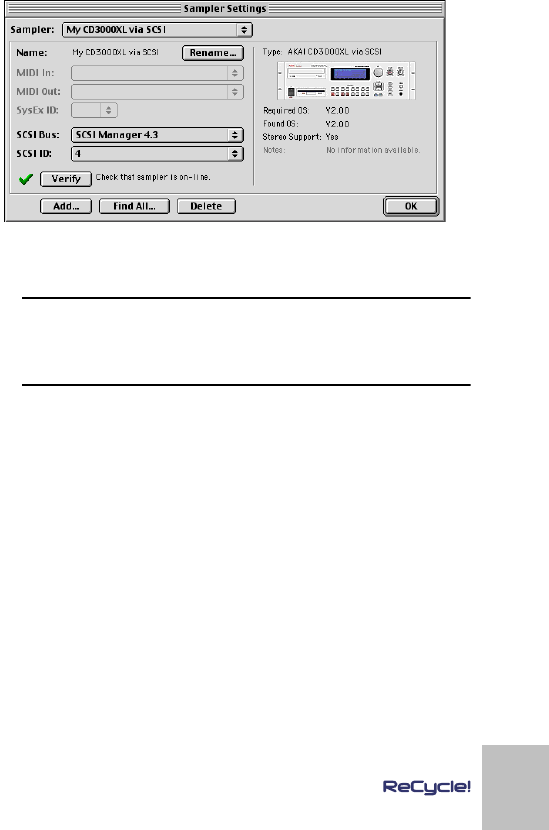
Sampler Settings
The Sampler Settings dialog is where you set up and edit the Sampler List.
The samplers you have included on this list will be available on the Sampler
menu in the main ReCycle window, for transmit and receive operations.
!
Even if a sampler is on the list, this doesn’t mean it’s set up cor-
rectly or even connected to the computer! ReCycle doesn’t auto-
matically remove samplers from the list if they are not connected.
You may temporarily disconnect your sampler between sessions,
without having to set it up in ReCycle again.
Finding all Connected Samplers
There are special considerations regarding the following sampler models or
setups:
➜
Ensoniq samplers (all models).
These cannot be automatically found by ReCycle.
➜
Generic SDS and SMDI (Generic and Extended).
These cannot be automatically found by ReCycle.
➜
Multiple instances of the same model samplers that require a MIDI
connection for SCSI transfers (i.e. Kurzweil K2000/Yamaha A3000/
Roland S-760).
There may be problems if you have two or more of the above mentioned
sampler models (that is, two or more instances
of the same model)
con-
nected via MIDI, and one of these is also connected via SCSI.
In all the above mentioned cases, you should instead add the samplers man-
ually, see “Add Sampler Dialog”.
THE EDIT MENU
12
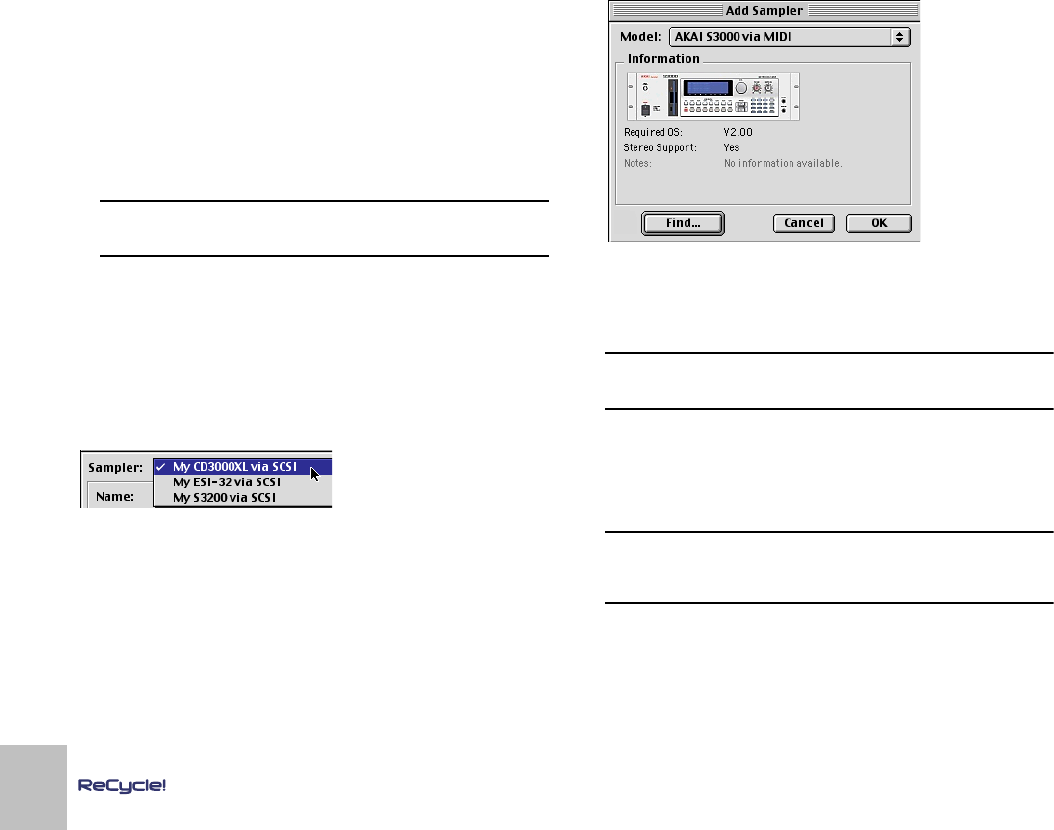
ReCycle can scan the SCSI and MIDI connections and automatically add all
properly connected samplers to the Sampler List:
1. Open the Sampler Settings dialog.
You should have turned on and booted all connected samplers before
you turned on the computer and launched ReCycle.
2. Click the “Find All...” button at the bottom of the dialog.
ReCycle scans for samplers.
3. When a properly connected sampler is found (that isn’t already on
the Sampler List), you will be asked if you want to add it to the list.
Click “Yes” to add the sampler to the list.
4. If a sampler is found, that is already included on the Sampler List,
ReCycle will tell you this.
Click “Skip” to continue the search.
!
ReCycle will only find one sampler of each model - if you have more
than one sampler of the same model connected, you need to add
these manually (see Add Sampler Dialog).
➜
If a sampler is found, that isn’t properly connected, ReCycle will in-
form you of this and tell you what you need to do.
For example, you may have a Yamaha A3000 sampler connected via
SCSI only. The program will find it, but since this sampler requires a MIDI
connection, it will not be added to the Sampler List. Instead you will be
asked to check your MIDI connection and MIDI interface.
Once the Find All process is complete, all properly connected samplers have
been added to the Sampler List (provided that you clicked “Yes” for each one
of them in step 3 above). You can check this by pulling down the Sampler
pop-up menu at the top of the dialog.
You can now rename and edit the settings for samplers on the list, as de-
scribed in the section “Making Settings for a Sampler”.
Add Sampler Dialog
You can manually add a sampler to the Sampler List at any time, regardless
of whether the sampler is connected or not. This is useful if you want to set
up your system before you connect your samplers, or if you have several
samplers of the same model connected (since ReCycle only “finds” one sam-
pler of each model):
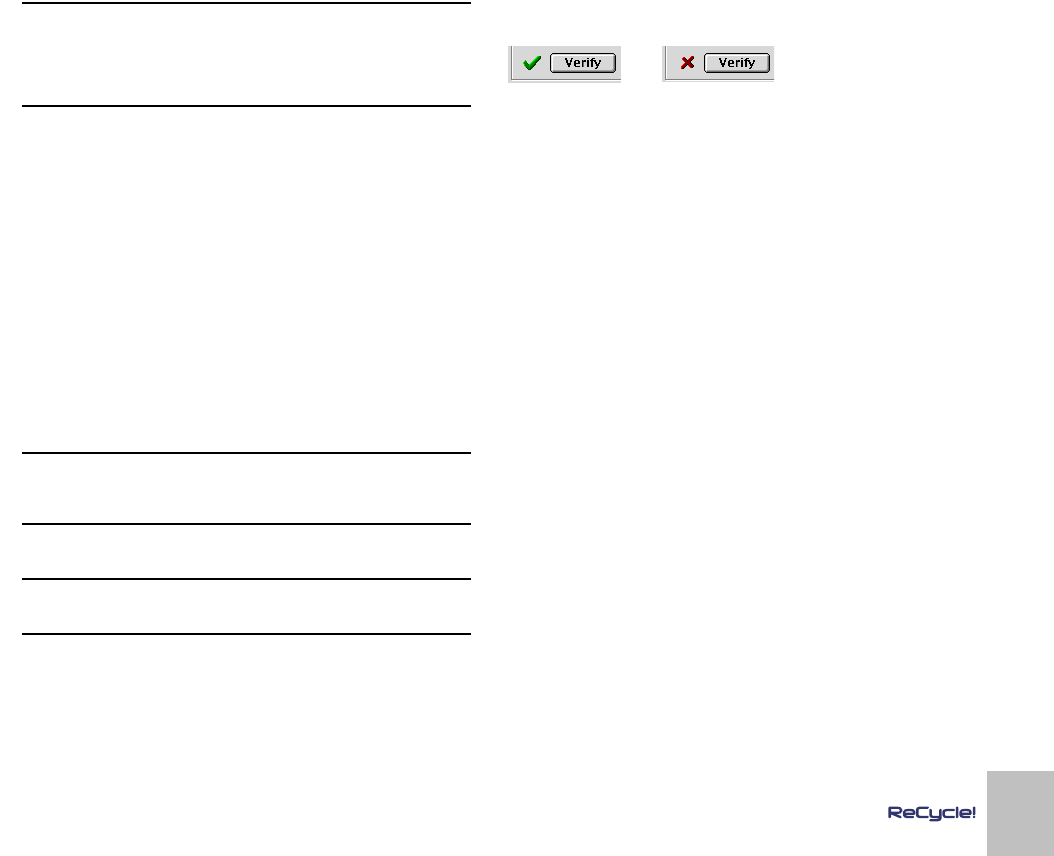
1. Click the “Add...” button at the bottom of the Sampler Settings dia-
log.
The Add Sampler dialog appears.
2. Use the Model pop-up menu to select the sampler model you want
to add.
Note that each actual sampler model may have more than one entry on
the pop-up menu, if there are different ways to connect the sampler (e.g.
via MIDI or via SCSI).
!
There are special considerations for some E-mu samplers - please
read the E-mu chapter in the Sampler and File Format Reference on-
line document!
3. If you know that the sampler is connected and booted, click the
“Find...” button.
ReCycle scans the MIDI and/or SCSI connections for a sampler of the
selected model. If it finds one, you are asked whether you want to add it
to the Sampler List. If you click “Yes”, the sampler is added to the list with
the correct SCSI ID and/or MIDI SysEx ID settings.
!
Please note that ReCycle will only find one sampler each model - if
you have more than one sampler of the same model connected, you
need to add these by clicking “OK” instead, and adjust the MIDI/
SCSI settings manually, see Making Settings for a Sampler.
4. To add a sampler without “finding” it, click OK.
A sampler of the specified model is added to the Sampler List, with de-
fault values for SCSI and/or MIDI settings. You will probably have to
change the SCSI and/or MIDI settings manually later.
THE EDIT MENU
13
About the Generic SDS and SMDI Samplers
!
Samplers that may be compatible with the Generic SDS/SMDI and
Extended SMDI formats cannot be automatically “found” by ReCy-
cle, nor can the connection be verified! To check if these protocols
for transferring samples works with your sampler is a matter of trial
and error (see the Sampler and File Format Reference documenta-
tion for details).
These are not samplers as such, but rather protocols for transferring sam-
ples between two devices. If your sampler model isn’t supported by ReCycle
you may still be able to transfer audiofiles using one of the generic sampler
formats.
• SDS stands for “Sample Dump Standard”, and is a protocol for
transfer of sound sample data between devices via MIDI.
• SMDI stands for “SCSI Musical Data Interchange” and could be de-
scribed as “SCSI SDS”, i.e.the purpose of the SMDI protocol is to
use the superior data transfer ability of SCSI to serve the same pur-
pose as SDS.
Common to both protocols is the ability to send samples between any two
devices in a commonly recognized format.
Adding an Ensoniq Sampler
For technical reasons, Ensoniq samplers cannot be automatically “found” by
ReCycle. This means you have to add these samplers manually, without
“finding” them (by clicking OK in the Add Sampler dialog as described
above), and then adjust the MIDI settings in the Sampler Settings dialog.
!
To make sure your settings are correct, use the Verify function in
the Sampler Settings dialog, as described below.
Note: Make sure the Ensoniq sampler isn’t in “Load Mode”, as this
will disable MIDI communication!
Verifying the Connection with a Sampler
!
Verifying the connection does not work with any of the Generic or
Extended SMDI formats! Please refer to the Sampler and File For-
mat Reference documentation for more details.
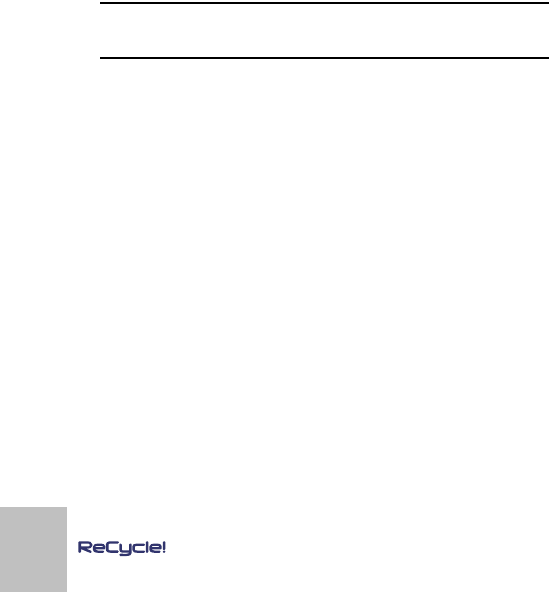
Near the lower left corner of the Sampler Settings dialog, you will find a small
icon next to a “Verify” button. The icon indicates whether the currently se-
lected sampler on the Sampler pop-up menu is properly connected (on-line)
or not.
For example, if you add a sampler manually without using the “Find” func-
tion, the icon will be a red cross, indicating that the sampler isn’t on-line. If
the selected sampler is found automatically by ReCycle, the icon will be a
green check mark, indicating that the sampler is on-line.
➜
To update the status of the icon and check the connection to the
currently selected sampler, click the “Verify” button.
For example, you may want to do this after having changed SCSI or MIDI
settings, as described below.
➜
Each time you launch ReCycle, the program automatically Verifies
the connection with all samplers on the Sampler list.
If a sampler isn’t on-line, it will not be available on the Sampler menu.
Sampler on-line. Sampler not on-line.
THE EDIT MENU
14
Making Settings for a Sampler
In the area to the left in the Sampler Settings dialog, you can adjust the set-
tings of the currently selected sampler. There are three sections:
➜
Name.
This shows the name of the sampler as it will appear on the Sampler
menu in the main ReCycle window. If you wish to rename it, click the “Re-
name...” button and enter a new name.
➜
MIDI settings.
If the selected sampler uses a MIDI connection, you will find settings for
MIDI In/Out ports and SysEx ID. To change these settings, use the re-
spective pop-up menu.
➜
SCSI settings.
If the selected sampler uses a SCSI connection, you will find settings for
SCSI Bus and SCSI ID. To change these settings, use the respective
pop-up menu.
!
If you change the MIDI or SCSI settings manually this way, you
should always use the Verify function to check that the sampler is
on-line.
THE EDIT MENU
15
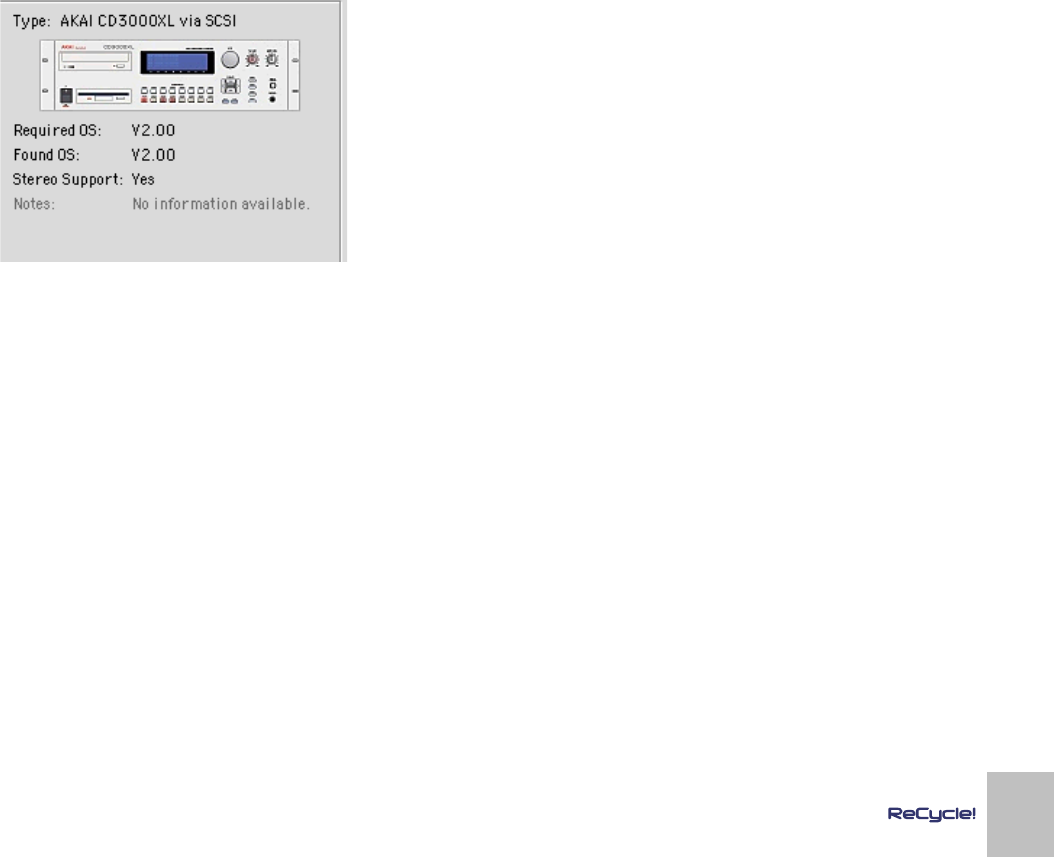
Read the Sampler Information!
When a sampler is selected (on the Sampler pop-up menu), you will see an
image of its front panel displayed to the right in the Sampler Settings dialog,
along with model and connection information. Below the image, you will also
find the following information:
➜
Required OS.
This is the operating system required for the sampler to work with ReCy-
cle.
➜
Found OS.
This is the operating system currently used by the sampler. If this is an
older OS version than the “Required OS”, you need to upgrade the sam-
pler.
➜
Stereo Support
This tells you whether the sampler supports stereo audio files or not.
➜
Notes.
Under this heading you may find additional important information. There
may for example be certain settings you need to make in the sampler be-
fore using it with ReCycle. Make sure that you follow the instructions un-
der this heading carefully!
Deleting a Sampler from the List
If you wish to remove a sampler from the Sampler List, proceed as follows:
1. Pull down the Sampler pop-up menu and select the sampler you
want to remove.
A picture of the sampler is displayed, together with information about the
required Operating System and additional notes.
2. Click the “Delete...” button at the bottom of the dialog.
3. Click “Yes” to confirm that you want to remove the sampler.

3
THE VIEW MENU
THE VIEW MENU
17
The Effects
The Envelope, Equalizer and Transient Shaper items opens the effect pan-
els for the respective effect. These menu items do not activate or deactivate
the effects, they only bring the effect panels into view.
ReCycle features three effect processors, Envelope, Equalizer, and Tran-
sient Shaper, that can be used to further manipulate audio loops.
➜
All effects are applied globally, i.e. they will affect all slices equally
in a loop.
➜
To be able to apply the effects, Preview mode must be activated.
To activate Preview mode for an audio file (as opposed to a ReCycle file)
you must first have set up the left and right locators, specified the length
and time signature of the loop and created a sufficient number of slices
(see the previous chapter). You could also load ReCycle files for further
processing, in which case these settings have already been made and
you can apply effects in Preview mode directly.
➜
When using effects, the principle “what you hear is what you get”
applies to the end result, whether you save the file or transfer the
file to a sampler.
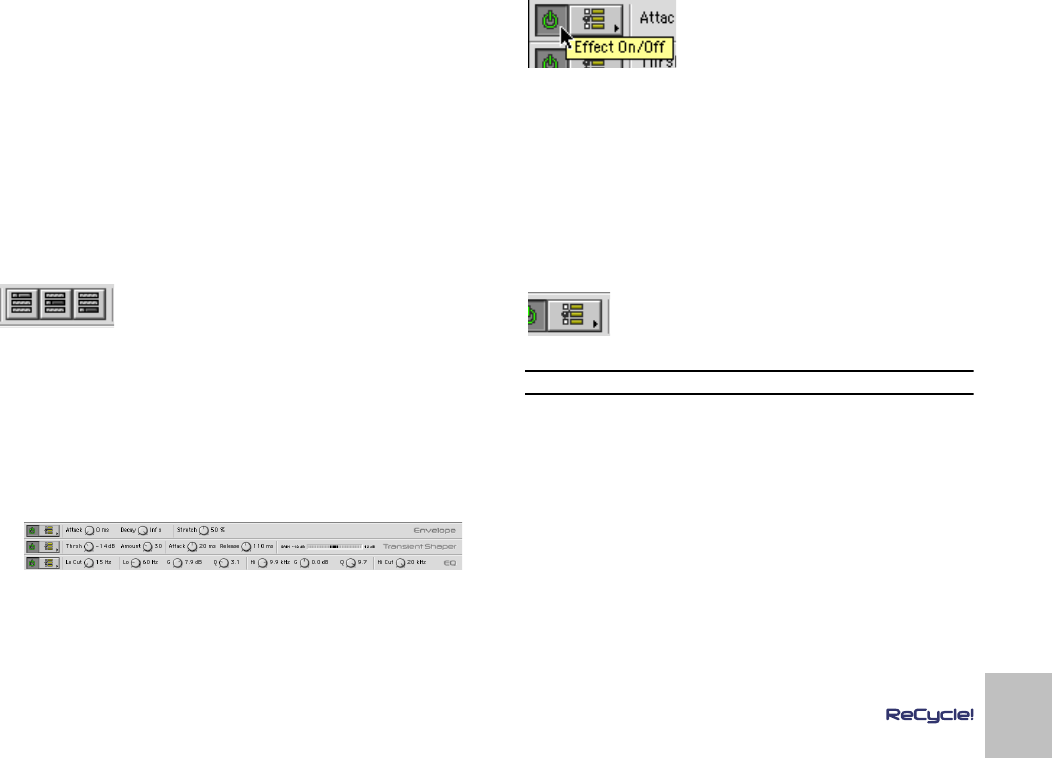
Open the Effect Panels
The three Effect buttons (from left to right); Envelope, Transient Shaper and
Equalizer.
The three effects each has its own panel, containing the parameters. By
clicking on one of the effect buttons located to the left of the transport con-
trols, the corresponding panel is shown below the toolbar. You can also open
the effect panels from the View menu.
➜
The left to right order of the buttons also reflects the internal signal
path of the effects.
If all are activated, Envelope is always the first effect in the signal path,
the Transient Shaper is the second, and Equalizer is the last.
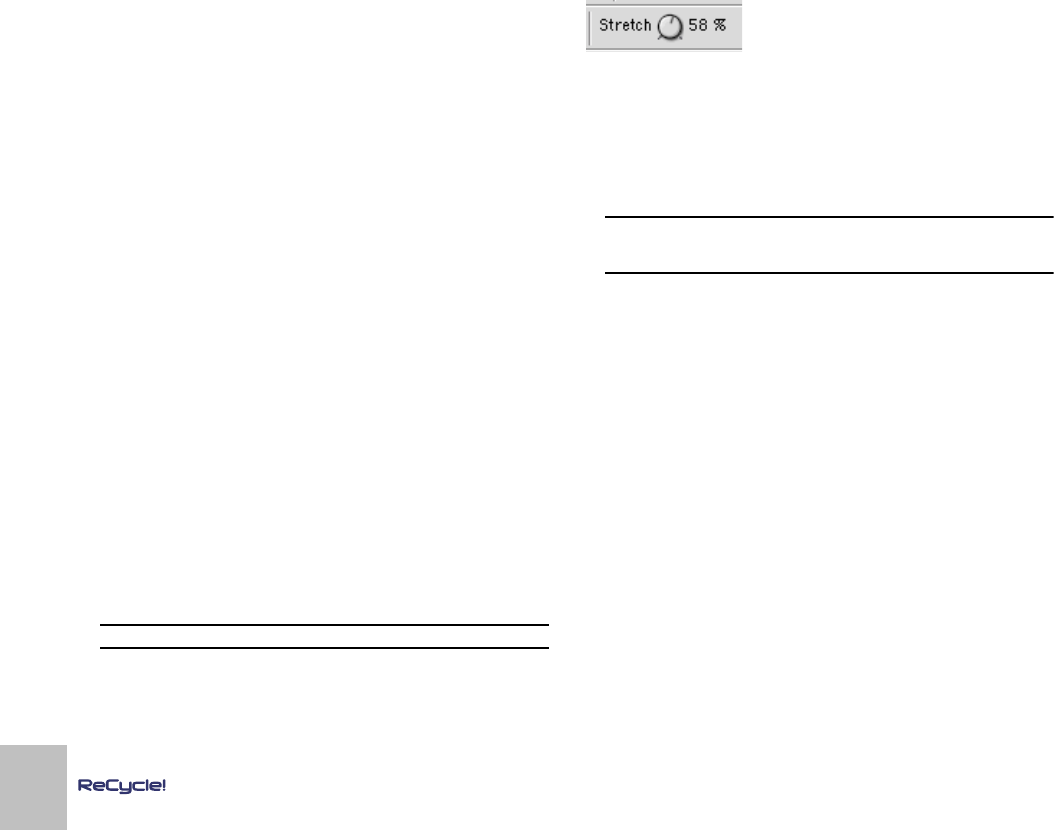
The three effect panels.
Activating Effects
Effects can be active regardless of whether the panel is visible or not. There
are two ways you can activate effects:
➜
By clicking on the Effect On/Off button for an open panel.
When an effect is on (activated), the On/Off button becomes dark, and a
green dot is shown in the effect button for the corresponding effect.
Effect On/Off button.
➜
By holding down [Option] (Mac) / [Alt] (Win) and clicking on an ef-
fect button you can toggle the effect on and off.
The green dot in the corresponding Effect button is greyed out if the ef-
fect is deactivated.
About the Presets
For each Effect there are a number of preset settings available.
➜
To select a Preset, click on the Preset button beside the Effect On/
Off button.
A pop-up menu appears with the available Presets listed.
The Effect Presets button.
!
It is not possible to store user presets.
THE VIEW MENU
18
Effect Parameters
Envelope
To open the Envelope processor, click on the Envelope button, or select En-
velope from the View menu.
The Envelope Attack and Decay parameters govern how the volume of a
slice should change over time, from the time it is triggered (the slice note
starts) until the slice note ends. This can be used to make a loop more dis-
tinct (by having a snappy attack and a short decay time) or more spaced-out
(by raising the attack time).
The Envelope panel also features a third parameter; “Stretch”, which is de-
scribed separately below.
➜
The Attack parameter determines the attack length (in milliseconds)
for each slice.
The higher the setting, the slower the attack. Parameter range is 0 - 430
ms.
➜
The Decay parameter controls the length of the end portion (tail) of
each slice.
The more the knob is turned anti-clockwise, the shorter the decay.
Range is 27ms - Infinite (=full decay).
Stretch
This feature is used when you know you might want to lower the tempo of the
loop in your sequencer.
How Stretch works
When you slice up a loop and play it back from your sequencer, each sample
will play in succession. At the original tempo, one slice will end exactly where
another starts.
As you understand, when you then lower the tempo, there will be small gaps
between the slices, which disrupts the flow of the audio.
Stretch is used to add an extra tail of audio to each slice, to lengthen it. This
is derived from the natural decay of the sound. This extra tail of sound then
fills out the gap between the slices when the tempo is lowered.
!Please note that the attack of the sound is not affected in any way.
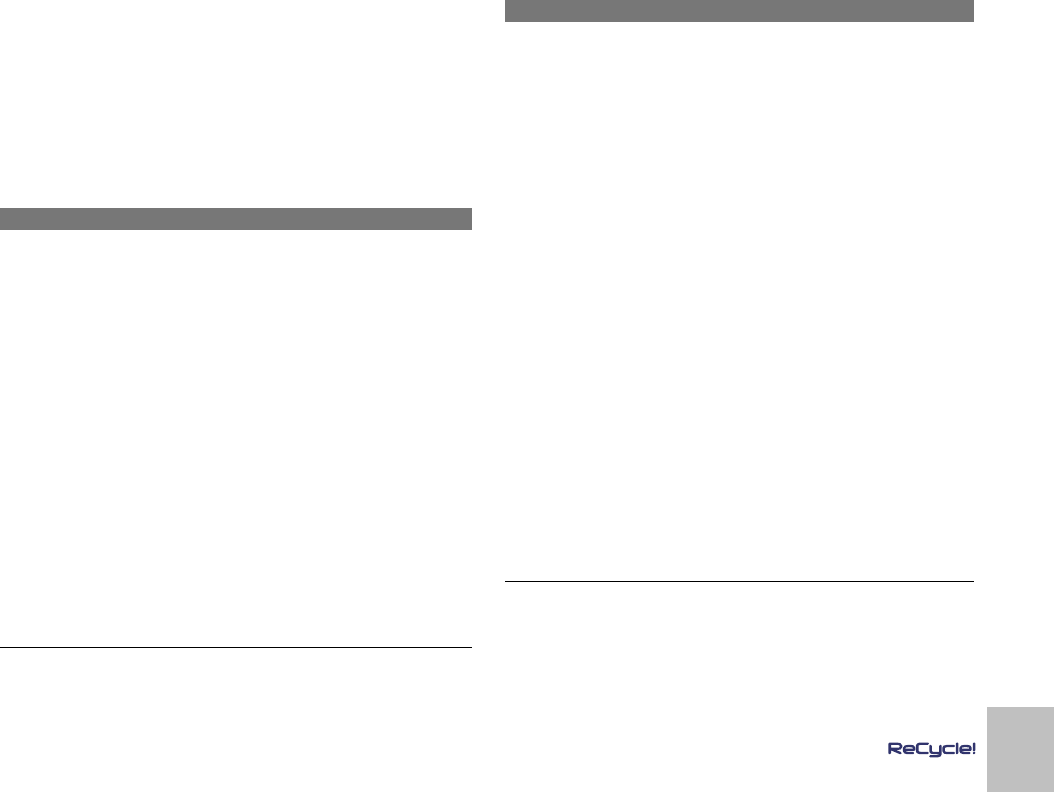
The Amount of Stretch
The Stretch knob is used to set the amount of stretch as a percentage value.
The percentage values tell you how much longer the entire sample will be af-
ter stretching. If you select the largest value (100%), for example, the slice
will become twice its original length when transmitted to the sampler.
➜To decide how much stretch you need, lower the Preview tempo by
the same amount as you intend to use, and adjust the Stretch pa-
rameter as necessary.
If there is a discernible gap of silence between slices you should raise the
Stretch setting.
!Note that Stretch is not Time Stretch! The Stretch feature doesn't
lengthen the whole slice, it only adds a portion of sound to the end
of it.
Stretch and the old ReCycle Formats
You should be aware of the fact that REX (as opposed to REX2) files can
contain certain settings that are irreversible. For example, if stretch was ap-
plied when the file was saved, the stretching is part of the actual REX file and
cannot be removed. It is possible, however, to apply more stretch, which
may or may not be what you want.
➜For REX files it is therefore advisable to try lowering the tempo in
Preview mode first, to see if you actually need to apply Stretch.
REX2 files however, only contains the actual audio file and the slices, the
rest (effects, stretch setting etc.) is added when the file is loaded and can
be changed at any time.
THE VIEW MENU 19
Transient Shaper
The Transient Shaper is a type of attack/release envelope control, which pro-
duces a result that could be likened to compression. Compressors level out
the audio, by making loud sounds softer and vice versa. The result is that the
levels become more even and individual sounds can get more power and
“punch”.
• “Normal” compressors are triggered by peaks and volume changes
in the actual audio. The Transient Shaper is instead triggered by the
individual slices in the loop.
Regardless of method, if you have ever used a compressor, you will find that
the Transient Shaper will affect the sound in a similar way. It is, however, im-
portant to be aware of this difference, as the Transient Shaper won’t work as
intended unless the file contains slices!
To compensate for the volume loss that can be caused by this effect, the
Transient Shaper has automatic gain compensation, that raises the overall
level by a suitable amount. The parameters are as follows:
Equalizer
The Equalizer allows you to cut or boost selected frequencies to shape the
overall sound quality. To open the Equalizer, click on the Equalizer button or
select it on the View menu. The parameters are as follows:
|Parameter |Description
Threshold This is the threshold level above which the effect sets in.
Signals with levels above the threshold will be affected, sig-
nals below it will not.
In practice, this means that the lower the Threshold setting,
the more the signal will be affected by the Transient Shaper.
The range is -6 to -40 dB.
Amount This lets you specify the amount of gain reduction applied to
the signals above the set threshold. The range is 0 to 99.
Attack This governs how quickly the envelope will apply its effect
when signals rise above the set threshold. If you raise this
value, the response will be slower, allowing more of the sig-
nal to pass through unaffected. Typically, this is used for
preserving the attacks of the sounds. The range is 0 to 91
ms.
Release When the signal level drops below the set threshold, this de-
termines how long it takes before the Transient Shaper lets
the sound through unaffected. Set this to short values for in-
tense, “pumping” compressor effects, or to longer values for
a smoother change of the dynamics. The range is 13 ms to
1.4 s.
Gain meter This shows the amount of gain reduction or increase (in dB),
caused by the combined compression and gain compensa-
tion.
|Parameter |Description
Lo Cut A highpass filter allowing you to set the lower
limit of the overall frequency range. You can pro-
gressively cut frequencies from 15 Hz up to 12
kHz.
Low Frequency The center frequency for the low-end parametric
equalization. Around this frequency, the sound
will be boosted or cut according to the Low Gain
setting. The available frequency range is 20 Hz
to 3 kHz.
Low Gain Governs the amount of boost or cut around the
set frequency. The range is ± 18dB.
Low Q Determines the width of the frequency band
around the center frequency to be affected. The
narrower the frequency band, the more drastic
effect of the boost or cut. Range is 0.5 to 10.
High Frequency The center frequency for the high-end paramet-
ric equalization. Around this frequency, the
sound will be boosted or cut according to the
High Gain setting. The available frequency range
is 1.5 kHz to 16 kHz.
High Gain Governs the amount of boost or cut around the
set frequency. The range is ± 18dB.
High Q Determines the width of the frequency band
around the center frequency to be affected. The
narrower the frequency band, the more drastic
effect of the boost or cut. Range is 0.5 to 10.
Hi Cut A lowpass filter allowing you to set the upper limit
of the overall frequency range. You can progres-
sively cut frequencies from 20 kHz down to 100
Hz.

THE VIEW MENU
20
Magnify to Fit/Magnify to
fit Loop
If you select Magnify to Fit, the display will zoom out so that the entire sample
fits the window. If Magnify to Fit Loop is selected, the display will zoom in (or
out) so that the area between the left and right locators will fit the window.
Jump to Cursor
If this is selected, the window will scroll to the current play position, maintain-
ing the current magnification factor.
Show Grid
You must have set a loop length for this item to be available. When enabled,
a grid showing Bars/Beats/16th notes is shown in the waveform display.
Scroll during Playback
When you play back, the current position is indicated by a dotted line travel-
ling across the waveform. If the option "Scroll during Playback" is checked on
the View menu, the current position will always be displayed in the waveform
display. This option can also be toggled on or off by pressing [F] on your
computer keyboard.

4
THE PROCESS MENU
THE PROCESS MENU
22
Transmit as One Sample
Deactivated
When Transmit As One Sample is turned off, the audio gets sliced into indi-
vidual samples when transmitted, and the MIDI files created will contain one
note for each of those slices.
This is the preferred mode if you want to use your MIDI sequencer to edit the
loop, change its tempo or use the MIDI file as a groove.
Activated
When Transmit As One Sample is turned on, the program will transmit the
part that stretches from the Left Locator to the Right as one sample. Also, in
this mode, the MIDI File will only consist of one event, with the length set us-
ing the Bars and Beats settings.
When should Transmit as one Sample be Activated?
One obvious application of transmitting as one sample (as opposed to sepa-
rate slices) is when you simply want to change the properties (like pitch and/
or tempo) of an audio file without otherwise changing it. Say you have an au-
dio file (Wave, Aiff etc.) that you wish to use in a song. The problem is that
the tempo and/or the pitch of the file is wrong for the song, and you wish to fix
this. The solution is to open the file in ReCycle, then slice it up and set the
length of the loop using the normal techniques. Enter Preview mode, set the
new tempo and/or pitch, and lastly export the file (with Transmit as one Sam-
ple activated) in it’s original format but with a new tempo and/or pitch etc.
Transmit as One Sample cam also be used in conjunction with Silence Se-
lected to separate sounds from a loop.
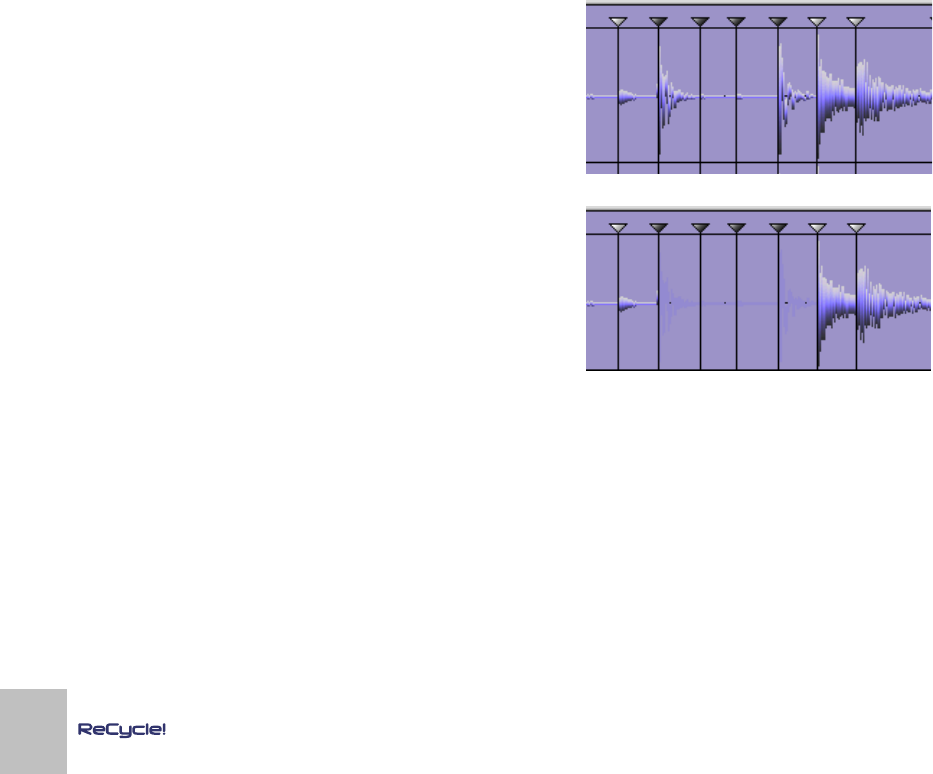
Silence Selected
When this function is activated, the slices that have selected markers will be
silenced when transmitted or Exported. Preview mode can be used to audi-
tion this function.
When Silence Selected is turned on, the slices which have selected markers...
...will be replaced by silence.
This feature is probably best used when Transmit As One Sample is turned
on, to silence individual sounds in a longer sample. It can also be used to
simply skip unwanted sounds, when slicing.
But, Silence Selected works even if Transmit As One Sample is turned off. In
this case, the selected slices will simply be skipped, both when transmitting
to the sampler and when creating MIDI Files. This will then create “gaps” in
the sampler's keyboard map and a corresponding “gap” in the MIDI File.
THE PROCESS MENU 23
Normalize
Normalize will change the gain to ensure maximum level.
➜When Normalize is selected, a dialog box appears asking if you
want to Normalize the whole file or each slice.
If you select the latter, and the selected file is a rhythmic loop, the nor-
malizing will disrupt the inherent dynamics of the loop, since the gain of
each slice will be changed to more or less equal level.
Therefore, normalizing the whole file is probably what you would nor-
mally select.
➜Normalizing each slice can be used when you use ReCycle to pro-
cess individual sounds that don’t belong to a loop.
!Normalize can’t do miracles. If your recording contains unwanted
noise, normalizing will increase the noise level together with the
other audio material.
Convert to Mono
This item will convert stereo files to mono. It is only selectable for stereo files.
➜The dialog lets you decide which channel(s) you wish to use as the
basis for the converted file.
The options are Left, Right or a Mix of both Left and Right channels.
Convert Sample Rate
This item allows you to convert the sample rate of a file. Lowering the sample
rate will reduce the file size, but it will also lower the fidelity of the recording
(less high frequency material will be present).
On the other hand, increasing the sample rate will not raise the fidelity of the
sample in any way. It is therefore not recommended to convert from a low
rate to a higher one, unless it is required by the sampler.
The dialog shows the files current sample rate, and the supported sample
rates you can convert to.
Crop Loop
➜Crop Loop allows you to trim files, by removing all audio data out-
side the left and right locators.
If you have set up a perfect loop with the locators, and the file contains
audio outside this locator range you can use Crop Loop to remove this
superfluous data.
Remove DC
This function will remove any DC offset in the audio. DC offset is when there
is too large a DC (direct current) component in the signal, sometimes visible
as the signal not being visually centered around the “zero level axis”. DC off-
set can introduce clicks and it also affects zero crossing detection and cer-
tain processing functions such as Re-Analyze and Normalize.
Re-Analyze
Re-Analyze re-runs the slice-detection algorithm on the waveform data. You
may have deleted slices that were detected when the file was first analyzed.
This command will ”re-discover” those slices.
➜All slices discovered by Re-Analyze that lies on a position in the file
not already occupied by a slice will be added.
Note that these may or may not be visible, as this depends on the Sensi-
tivity setting!

5
THE SAMPLER MENU

THE SAMPLER MENU 25
Transmit
The top menu item on the Sampler menu changes name depending on
which sampler you have selected. Selecting “Transmit to...” opens the Trans-
mit dialog for the currently selected sampler.
Exactly how the dialog looks depends on the selected Sampler, but there are
a few standard items you will most often find there:
Sample Rate
Sample Rates between 11.025 to 1 MHz are supported.
Status Bar shows inherent rate
When you Open or Receive a sample, its inherent sample rate is displayed in
the Status Bar at the bottom of the ReCycle application window.
Available rates
In the transmit dialog, a number of sample rates can be selected from a pop-
up. Exactly what options are available depends on the sampler selected.
➜If possible, the sample’s inherent rate is suggested.
If, for example, the sample was recorded at 48 kHz, this will be the sug-
gested sample rate in the Transmit dialog.
➜If the sample’s inherent rate is not supported by the sampler, the
next higher rate is suggested.
➜In addition to the above, a number of other sample rates can be se-
lected from the pop-up in the Transmit dialog.
If the sampler only handles a few sample rates, they can all be selected.
If the sampler supports many rates, the most commonly used ones (or
the ones closest to these) are available. Those most common rates are
11.025kHz, 22.05kHz, 32kHz, 44.1kHz and 48kHz.
When is sample rate conversion performed?
If you transmit, and the sample rate set in the Transmit dialog is not the same
as shown on the Status Bar (the sample’s inherent rate), a sample rate con-
version will be performed during the transmission.
When should I change from the suggested sample rate?
Lowering the sample rate will make the samples occupy less memory in the
sampler, but it will also lower the fidelity of the recording (less high frequency
material will be present).
On the other hand, increasing the sample rate will not raise the fidelity of the
sample in any way. It is therefore not recommended to convert from a low
rate to a higher one, unless it is required by the sampler.
Templates
When ReCycle sends audio to your sampler it will put the samples it creates
in a “container” which holds all the samples and their mapping on the key-
board. This “container” may be called a Program, Instrument, Patch or simi-
lar, all dependent on the naming used by the sampler manufacturer. For
now, let’s call it a Program.
There are a number of settings in the Program which may or may not be of
importance to you.
• If the settings are not important to you, you don’t need to use tem-
plates, you should use the Default option in the Transmit dialog. Re-
Cycle will then simply create as simple a Program as possible. You
can then change this Program’s settings by using the controls on
the sampler itself.
• If you do need special settings, you use Templates. You might for
example want the first slice to appear on a certain key, you might
want to have all samples play to a certain output, you may want the
Program to receive on a certain MIDI Channel etc. Proceed as fol-
lows:
1. On the sampler, manually create a Program with the desired set-
tings.
Make sure the first sample in the Program’s keyboard map is positioned
where you want the first sample in the keyboard map created by ReCy-
cle.
2. Save this Program to disk (using the sampler’s regular file saving
functions), for later use, but make sure it still resides in the sam-
pler’s internal memory.
3. In the ReCycle Transmit dialog, select this program from the Tem-
plate pop-up.
Exactly how this is done depends on the sampler. If it is external you can
select the Program from a pop-up menu in the dialog. If ReCycle saves
the data on to your computer’s hard disk, then you select a disk file as
your template.
4. Transmit/Export the Program.
A new Program is created in the sampler. It will get all the settings of the
Template. The first slice will appear on the same key as where the first
sample in the Template was.
!If you use exactly the same name as the Template, the new Program
may replace the Template.
THE SAMPLER MENU
26
Program Name
Using this field you can specify a name for the Programs you are about to
create in the sampler.
• You can specify the name directly in the dialog. You will only be
able to type in characters supported by the sampler, and the name
will be truncated to fit the length of the names in the specific sam-
pler.
• The actual slices that the Program contains will get names derived
from the Program name, with a number added at the end. For exam-
ple BigDrums#01, BigDrums#02, etc.
Transmit
This button creates a Program and samples for it as described above, with-
out creating any MIDI File.
MIDI File + Transmit
This button will make two things happen:
➜Programs and samples are created as described above.
➜A file dialog appears, which allows you to create a MIDI File on your
computer’s disk.
This resulting file should used in your sequencer to play the slices in the
sampler.
Receive
If you have an external sampler connected to the computer, ReCycle can re-
ceive the audio directly from it.
1. Make sure the sampler you wish to receive from is selected on the
lower half of the ReCycle Sampler menu.
If the sampler cannot be found on the Sampler menu, you need to go into
the Sampler Settings dialog and add the sampler.
2. Select “Receive...” from the Sampler menu.
A dialog appears. Its exact appearance depends on which sampler you
have selected.
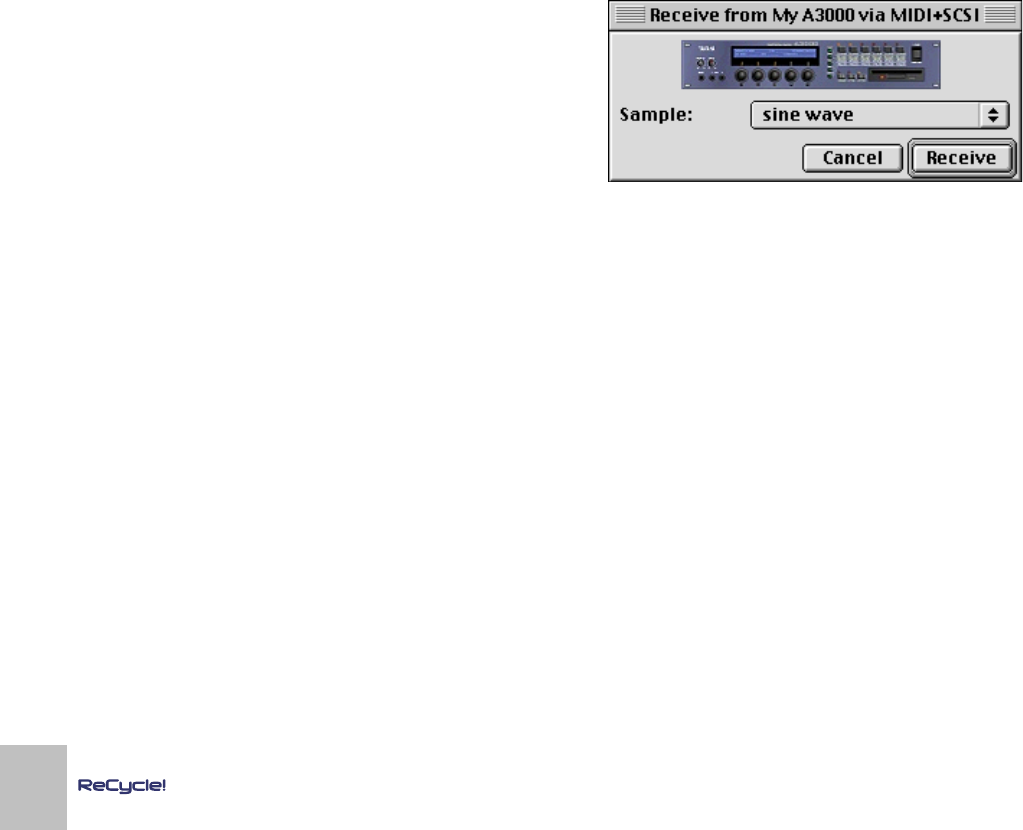
The Yamaha A3000 Receive dialog.
3. In the dialog box you will find a pop-up which allows you to select a
sample in the sampler.
4. Clicking Receive transfers the sample into the computer and opens
it in a new window.

6
THE WINDOWS MENU

THE WINDOWS MENU
28
Close All
Close All closes all open document windows.
Document List
The Document List shows all currently open ReCycle documents. Selecting
one will make it the active document.

7
THE CONTACTS MENU

THE CONTACTS MENU
30
Go to the Propellehead
Homepage...
This launches the Internet browser you have specified as your preferred
browser for your computer. The browser then takes you to the Propellerhead
web site. Note that you need an active Internet account for this to work.
Download Drum Loops
This takes you directly to a page on the Propellerhead site that contains au-
dio loops in either the Wave or Aiff format that are free to download.
ReCycle Tech Info and
Support
This menu item brings you directly to the ReCycle Support pages on the Pro-
pellerhead web site. Use this option if you are having trouble with ReCycle
and need help!
Order ReCycle Now
This takes you to the “Prop Shop” where you can place orders for all cool
Propellerhead products.
Register ReCycle Now
This is where you register your copy of ReCycle. Registering means that you
get access to product updates (when available), tech support and other
goodies.