Rhel6 Dp Guide 1
User Manual:
Open the PDF directly: View PDF ![]() .
.
Page Count: 445 [warning: Documents this large are best viewed by clicking the View PDF Link!]
- Table of Contents
- PART I. BASIC SYSTEM CONFIGURATION
- CHAPTER 1. KEYBOARD CONFIGURATION
- CHAPTER 2. DATE AND TIME CONFIGURATION
- CHAPTER 3. MANAGING USERS AND GROUPS
- CHAPTER 4. GAINING PRIVILEGES
- CHAPTER 5. CONSOLE ACCESS
- PART II. SUBSCRIPTION AND SUPPORT
- CHAPTER 6. REGISTERING THE SYSTEM AND MANAGING SUBSCRIPTIONS
- CHAPTER 7. ACCESSING SUPPORT USING THE RED HAT SUPPORT TOOL
- 7.1. INSTALLING THE RED HAT SUPPORT TOOL
- 7.2. REGISTERING THE RED HAT SUPPORT TOOL USING THE COMMAND LINE
- 7.3. USING THE RED HAT SUPPORT TOOL IN INTERACTIVE SHELL MODE
- 7.4. CONFIGURING THE RED HAT SUPPORT TOOL
- 7.5. OPENING AND UPDATING SUPPORT CASES USING INTERACTIVE MODE
- 7.6. VIEWING SUPPORT CASES ON THE COMMAND LINE
- 7.7. ADDITIONAL RESOURCES
- PART III. INSTALLING AND MANAGING SOFTWARE
- CHAPTER 8. YUM
- 8.1. CHECKING FOR AND UPDATING PACKAGES
- 8.2. PACKAGES AND PACKAGE GROUPS
- 8.3. WORKING WITH TRANSACTION HISTORY
- 8.4. CONFIGURING YUM AND YUM REPOSITORIES
- 8.4.1. Setting [main] Options
- 8.4.2. Setting [repository] Options
- 8.4.3. Using Yum Variables
- 8.4.4. Viewing the Current Configuration
- 8.4.5. Adding, Enabling, and Disabling a Yum Repository
- 8.4.6. Creating a Yum Repository
- 8.4.7. Working with Yum Cache
- 8.4.8. Adding the Optional and Supplementary Repositories
- 8.5. YUM PLUG-INS
- 8.6. ADDITIONAL RESOURCES
- CHAPTER 9. PACKAGEKIT
- PART IV. NETWORKING
- CHAPTER 10. NETWORKMANAGER
- 10.1. THE NETWORKMANAGER DAEMON
- 10.2. INTERACTING WITH NETWORKMANAGER
- 10.3. ESTABLISHING CONNECTIONS
- 10.3.1. Establishing a Wired (Ethernet) Connection
- 10.3.2. Establishing a Wireless Connection
- Quickly Connecting to an Available Access Point
- Connecting to a Hidden Wireless Network
- Editing a Connection, or Creating a Completely New One
- Configuring the Connection Name, Auto-Connect Behavior, and Availability Settings
- Configuring the Wireless Tab
- Saving Your New (or Modified) Connection and Making Further Configurations
- 10.3.3. Establishing a Mobile Broadband Connection
- 10.3.4. Establishing a VPN Connection
- 10.3.5. Establishing a DSL Connection
- 10.3.6. Establishing a Bond Connection
- 10.3.7. Establishing a VLAN Connection
- 10.3.8. Establishing an IP-over-InfiniBand (IPoIB) Connection
- 10.3.9. Configuring Connection Settings
- CHAPTER 11. NETWORK INTERFACES
- 11.1. NETWORK CONFIGURATION FILES
- 11.2. INTERFACE CONFIGURATION FILES
- 11.2.1. Ethernet Interfaces
- 11.2.2. Specific ifcfg Options for Linux on System z
- 11.2.3. Required ifcfg Options for Linux on System z
- 11.2.4. Channel Bonding Interfaces
- 11.2.5. Configuring a VLAN over a Bond
- 11.2.6. Network Bridge
- 11.2.7. Setting Up 802.1Q VLAN Tagging
- 11.2.8. Alias and Clone Files
- 11.2.9. Dialup Interfaces
- 11.2.10. Other Interfaces
- 11.3. INTERFACE CONTROL SCRIPTS
- 11.4. STATIC ROUTES AND THE DEFAULT GATEWAY
- 11.5. CONFIGURING STATIC ROUTES IN IFCFG FILES
- 11.6. CONFIGURING IPV6 TOKENIZED INTERFACE IDENTIFIERS
- 11.7. NETWORK FUNCTION FILES
- 11.8. ETHTOOL
- 11.9. CONFIGURING NETCONSOLE
- 11.10. ADDITIONAL RESOURCES
- PART V. INFRASTRUCTURE SERVICES
- CHAPTER 12. SERVICES AND DAEMONS
- CHAPTER 13. CONFIGURING AUTHENTICATION
- 13.1. CONFIGURING SYSTEM AUTHENTICATION
- 13.1.1. Launching the Authentication Configuration Tool UI
- 13.1.2. Selecting the Identity Store for Authentication
- 13.1.3. Configuring Alternative Authentication Features
- 13.1.4. Configuring Authentication from the Command Line
- 13.1.4.1. Tips for Using authconfig
- 13.1.4.2. Configuring LDAP User Stores
- 13.1.4.3. Configuring NIS User Stores
- 13.1.4.4. Configuring Winbind User Stores
- 13.1.4.5. Configuring Kerberos Authentication
- 13.1.4.6. Configuring Local Authentication Settings
- 13.1.4.7. Configuring Fingerprint Authentication
- 13.1.4.8. Configuring Smart Card Authentication
- 13.1.4.9. Managing Kickstart and Configuration Files
- 13.1.5. Using Custom Home Directories
- 13.2. USING AND CACHING CREDENTIALS WITH SSSD
- 13.2.1. About SSSD
- 13.2.2. Setting up the sssd.conf File
- 13.2.3. Starting and Stopping SSSD
- 13.2.4. SSSD and System Services
- 13.2.5. Configuring Services: NSS
- 13.2.6. Configuring Services: PAM
- 13.2.7. Configuring Services: autofs
- 13.2.8. Configuring Services: sudo
- 13.2.9. Configuring Services: OpenSSH and Cached Keys
- 13.2.10. SSSD and Identity Providers (Domains)
- 13.2.11. Creating Domains: LDAP
- 13.2.12. Creating Domains: Identity Management (IdM)
- 13.2.13. Creating Domains: Active Directory
- 13.2.14. Configuring Domains: Active Directory as an LDAP Provider (Alternative)
- 13.2.15. Domain Options: Setting Username Formats
- 13.2.16. Domain Options: Enabling Offline Authentication
- 13.2.17. Domain Options: Setting Password Expirations
- 13.2.18. Domain Options: Using DNS Service Discovery
- 13.2.19. Domain Options: Using IP Addresses in Certificate Subject Names (LDAP Only)
- 13.2.20. Creating Domains: Proxy
- 13.2.21. Creating Domains: Kerberos Authentication
- 13.2.22. Creating Domains: Access Control
- 13.2.23. Creating Domains: Primary Server and Backup Servers
- 13.2.24. Installing SSSD Utilities
- 13.2.25. SSSD and UID and GID Numbers
- 13.2.26. Creating Local System Users
- 13.2.27. Seeding Users into the SSSD Cache During Kickstart
- 13.2.28. Managing the SSSD Cache
- 13.2.29. Downgrading SSSD
- 13.2.30. Using NSCD with SSSD
- 13.2.31. Troubleshooting SSSD
- 13.1. CONFIGURING SYSTEM AUTHENTICATION
- CHAPTER 14. OPENSSH
- 14.1. THE SSH PROTOCOL
- 14.2. CONFIGURING OPENSSH
- 14.3. USING OPENSSH CERTIFICATE AUTHENTICATION
- 14.3.1. Introduction to SSH Certificates
- 14.3.2. Support for SSH Certificates
- 14.3.3. Creating SSH CA Certificate Signing Keys
- 14.3.4. Distributing and Trusting SSH CA Public Keys
- 14.3.5. Creating SSH Certificates
- 14.3.6. Signing an SSH Certificate Using a PKCS#11 Token
- 14.3.7. Viewing an SSH CA Certificate
- 14.3.8. Revoking an SSH CA Certificate
- 14.4. OPENSSH CLIENTS
- 14.5. MORE THAN A SECURE SHELL
- 14.6. ADDITIONAL RESOURCES
- CHAPTER 15. TIGERVNC
- PART VI. SERVERS
- CHAPTER 16. DHCP SERVERS
- CHAPTER 17. DNS SERVERS
- CHAPTER 18. WEB SERVERS
- 18.1. THE APACHE HTTP SERVER
- 18.1.1. New Features
- 18.1.2. Notable Changes
- 18.1.3. Updating the Configuration
- 18.1.4. Running the httpd Service
- 18.1.5. Editing the Configuration Files
- 18.1.6. Working with Modules
- 18.1.7. Setting Up Virtual Hosts
- 18.1.8. Setting Up an SSL Server
- 18.1.9. Enabling the mod_ssl Module
- 18.1.10. Enabling the mod_nss Module
- 18.1.11. Using an Existing Key and Certificate
- 18.1.12. Generating a New Key and Certificate
- 18.1.13. Configure the Firewall for HTTP and HTTPS Using the Command Line
- 18.1.14. Additional Resources
- 18.1. THE APACHE HTTP SERVER
- CHAPTER 19. MAIL SERVERS

Red Hat Enterprise Linux 6
Deployment Guide
Deployment, Configuration and Administration of Red Hat Enterprise Linux 6
Last Updated: 2017-10-20


Red Hat Enterprise Linux 6 Deployment Guide
Deployment, Configuration and Administration of Red Hat Enterprise Linux 6
Marie Doleželová
Red Hat Customer Content Services
mdolezel@redhat.com
Mirek Jahoda
Red Hat Customer Content Services
mjahoda@redhat.com
Maxim Svistunov
Red Hat Customer Content Services
Stephen Wadeley
Red Hat Customer Content Services
Tomáš Čapek
Red Hat Customer Content Services
Robert Krátký
Red Hat Customer Content Services
Jana Heves
Red Hat Customer Content Services
Jaromír Hradílek
Red Hat Customer Content Services
Douglas Silas
Red Hat Customer Content Services
Barbora Ančincová
Red Hat Customer Content Services
Petr Kovář
Red Hat Customer Content Services
Jiří Herrmann
Red Hat Customer Content Services
Peter Ondrejka
Red Hat Customer Content Services
Petr Bokoč
Red Hat Customer Content Services
Martin Prpič
Red Hat Product Security
Eva Majoršinová

Red Hat Customer Content Services
Eva Kopalová
Red Hat Customer Content Services
Miroslav Svoboda
Red Hat Customer Content Services
Milan Navrátil
Red Hat Customer Content Services
Ella Lackey
Red Hat Customer Content Services
Florian Nadge
Red Hat Customer Content Services
John Ha
Red Hat Customer Content Services
David O'Brien
Red Hat Customer Content Services
Michael Hideo
Red Hat Customer Content Services
Don Domingo
Red Hat Customer Content Services
Legal Notice
Copyright © 2010–2016 Red Hat, Inc.
This document is licensed by Red Hat under the Creative Commons Attribution-ShareAlike 3.0
Unported License. If you distribute this document, or a modified version of it, you must provide
attribution to Red Hat, Inc. and provide a link to the original. If the document is modified, all Red Hat
trademarks must be removed.
Red Hat, as the licensor of this document, waives the right to enforce, and agrees not to assert,
Section 4d of CC-BY-SA to the fullest extent permitted by applicable law.
Red Hat, Red Hat Enterprise Linux, the Shadowman logo, JBoss, OpenShift, Fedora, the Infinity
logo, and RHCE are trademarks of Red Hat, Inc., registered in the United States and other
countries.
Linux ® is the registered trademark of Linus Torvalds in the United States and other countries.
Java ® is a registered trademark of Oracle and/or its affiliates.
XFS ® is a trademark of Silicon Graphics International Corp. or its subsidiaries in the United States
and/or other countries.
MySQL ® is a registered trademark of MySQL AB in the United States, the European Union and
other countries.
Node.js ® is an official trademark of Joyent. Red Hat Software Collections is not formally related to
or endorsed by the official Joyent Node.js open source or commercial project.
The OpenStack ® Word Mark and OpenStack logo are either registered trademarks/service marks
or trademarks/service marks of the OpenStack Foundation, in the United States and other countries
and are used with the OpenStack Foundation's permission. We are not affiliated with, endorsed or
sponsored by the OpenStack Foundation, or the OpenStack community.
All other trademarks are the property of their respective owners.
Abstract
The Deployment Guide documents relevant information regarding the deployment, configuration
and administration of Red Hat Enterprise Linux 6. It is oriented towards system administrators with a
basic understanding of the system.

. . . . . . . . . . . . . . . . . . . . . . . . . . . . . . . . . . . . . . . . . . . . . . . . . . . . . . . . . . . . . . . . . . . . . . . . . . . . . . . . . . . . . . . . . . . . . . . . . . . . . . . . . . . . . . . . . . . . . . . . . . . . . . . . . . . . . . . . . . . . . . . . . . . . . . . . . . . . . . . . . . . . . . . . . . . . . . . . . . . . . . . . . . . . . . . . . . . . . . . . . . . . . . . . . . . . . . . . . . . . . . . . . . . . . . . . . . . . . . . . . . . . . . . . . . . . . . . . . . . . . . . . . . . . . . . . . . . . . . . .
. . . . . . . . . . . . . . . . . . . . . . . . . . . . . . . . . . . . . . . . . . . . . . . . . . . . . . . . . . . . . . . . . . . . . . . . . . . . . . . . . . . . . . . . . . . . . . . . . . . . . . . . . . . . . . . . . . . . . . . . . . . . . . . . . . . . . . . . . . . . . . . . . . . . . . . . . . . . . . . . . . . . . . . . . . . . . . . . . . . . . . . . . . . . . . . . . . . . . . . . . . . . . . . . . . . . . . . . . . . . . . . . . . . . . . . . . . . . . . . . . . . . . . . . . . . . . . . . . . . . . . . . . . . . . . . . . . . . . . . .
. . . . . . . . . . . . . . . . . . . . . . . . . . . . . . . . . . . . . . . . . . . . . . . . . . . . . . . . . . . . . . . . . . . . . . . . . . . . . . . . . . . . . . . . . . . . . . . . . . . . . . . . . . . . . . . . . . . . . . . . . . . . . . . . . . . . . . . . . . . . . . . . . . . . . . . . . . . . . . . . . . . . . . . . . . . . . . . . . . . . . . . . . . . . . . . . . . . . . . . . . . . . . . . . . . . . . . . . . . . . . . . . . . . . . . . . . . . . . . . . . . . . . . . . . . . . . . . . . . . . . . . . . . . . . . . . . . . . . . . .
. . . . . . . . . . . . . . . . . . . . . . . . . . . . . . . . . . . . . . . . . . . . . . . . . . . . . . . . . . . . . . . . . . . . . . . . . . . . . . . . . . . . . . . . . . . . . . . . . . . . . . . . . . . . . . . . . . . . . . . . . . . . . . . . . . . . . . . . . . . . . . . . . . . . . . . . . . . . . . . . . . . . . . . . . . . . . . . . . . . . . . . . . . . . . . . . . . . . . . . . . . . . . . . . . . . . . . . . . . . . . . . . . . . . . . . . . . . . . . . . . . . . . . . . . . . . . . . . . . . . . . . . . . . . . . . . . . . . . . . .
. . . . . . . . . . . . . . . . . . . . . . . . . . . . . . . . . . . . . . . . . . . . . . . . . . . . . . . . . . . . . . . . . . . . . . . . . . . . . . . . . . . . . . . . . . . . . . . . . . . . . . . . . . . . . . . . . . . . . . . . . . . . . . . . . . . . . . . . . . . . . . . . . . . . . . . . . . . . . . . . . . . . . . . . . . . . . . . . . . . . . . . . . . . . . . . . . . . . . . . . . . . . . . . . . . . . . . . . . . . . . . . . . . . . . . . . . . . . . . . . . . . . . . . . . . . . . . . . . . . . . . . . . . . . . . . . . . . . . . . .
. . . . . . . . . . . . . . . . . . . . . . . . . . . . . . . . . . . . . . . . . . . . . . . . . . . . . . . . . . . . . . . . . . . . . . . . . . . . . . . . . . . . . . . . . . . . . . . . . . . . . . . . . . . . . . . . . . . . . . . . . . . . . . . . . . . . . . . . . . . . . . . . . . . . . . . . . . . . . . . . . . . . . . . . . . . . . . . . . . . . . . . . . . . . . . . . . . . . . . . . . . . . . . . . . . . . . . . . . . . . . . . . . . . . . . . . . . . . . . . . . . . . . . . . . . . . . . . . . . . . . . . . . . . . . . . . . . . . . . . .
Table of Contents
PART I. BASIC SYSTEM CONFIGURATION
CHAPTER 1. KEYBOARD CONFIGURATION
1.1. CHANGING THE KEYBOARD LAYOUT
1.2. ADDING THE KEYBOARD LAYOUT INDICATOR
1.3. SETTING UP A TYPING BREAK
CHAPTER 2. DATE AND TIME CONFIGURATION
2.1. DATE/TIME PROPERTIES TOOL
2.1.1. Date and Time Properties
2.1.2. Network Time Protocol Properties
2.1.3. Time Zone Properties
2.2. COMMAND LINE CONFIGURATION
2.2.1. Date and Time Setup
2.2.2. Network Time Protocol Setup
CHAPTER 3. MANAGING USERS AND GROUPS
3.1. WHAT USERS AND GROUPS ARE
3.2. MANAGING USERS VIA THE USER MANAGER APPLICATION
3.2.1. Viewing Users
3.2.2. Adding a New User
3.2.3. Modifying User Properties
3.3. MANAGING GROUPS VIA THE USER MANAGER APPLICATION
3.3.1. Viewing Groups
3.3.2. Adding a New Group
3.3.3. Modifying Group Properties
3.4. MANAGING USERS VIA COMMAND-LINE TOOLS
3.4.1. Creating Users
3.4.2. Attaching New Users to Groups
3.4.3. Updating Users' Authentication
3.4.4. Modifying User Settings
3.4.5. Deleting Users
3.4.6. Displaying Comprehensive User Information
3.5. MANAGING GROUPS VIA COMMAND-LINE TOOLS
3.5.1. Creating Groups
3.5.2. Attaching Users to Groups
3.5.3. Updating Group Authentication
3.5.4. Modifying Group Settings
3.5.5. Deleting Groups
3.6. ADDITIONAL RESOURCES
3.6.1. Installed Documentation
CHAPTER 4. GAINING PRIVILEGES
4.1. THE SU COMMAND
4.2. THE SUDO COMMAND
4.3. ADDITIONAL RESOURCES
Installed Documentation
Online Documentation
CHAPTER 5. CONSOLE ACCESS
5.1. DISABLING CONSOLE PROGRAM ACCESS FOR NON-ROOT USERS
5.2. DISABLING REBOOTING USING CTRL+ALT+DEL
24
25
25
27
29
31
31
31
32
33
34
35
35
38
38
39
39
40
41
42
42
43
44
44
44
47
48
49
50
50
53
53
54
54
55
56
56
56
58
58
59
60
60
60
62
62
63
Table of Contents
1

. . . . . . . . . . . . . . . . . . . . . . . . . . . . . . . . . . . . . . . . . . . . . . . . . . . . . . . . . . . . . . . . . . . . . . . . . . . . . . . . . . . . . . . . . . . . . . . . . . . . . . . . . . . . . . . . . . . . . . . . . . . . . . . . . . . . . . . . . . . . . . . . . . . . . . . . . . . . . . . . . . . . . . . . . . . . . . . . . . . . . . . . . . . . . . . . . . . . . . . . . . . . . . . . . . . . . . . . . . . . . . . . . . . . . . . . . . . . . . . . . . . . . . . . . . . . . . . . . . . . . . . . . . . . . . . . . . . . . . . .
. . . . . . . . . . . . . . . . . . . . . . . . . . . . . . . . . . . . . . . . . . . . . . . . . . . . . . . . . . . . . . . . . . . . . . . . . . . . . . . . . . . . . . . . . . . . . . . . . . . . . . . . . . . . . . . . . . . . . . . . . . . . . . . . . . . . . . . . . . . . . . . . . . . . . . . . . . . . . . . . . . . . . . . . . . . . . . . . . . . . . . . . . . . . . . . . . . . . . . . . . . . . . . . . . . . . . . . . . . . . . . . . . . . . . . . . . . . . . . . . . . . . . . . . . . . . . . . . . . . . . . . . . . . . . . . . . . . . . . . .
. . . . . . . . . . . . . . . . . . . . . . . . . . . . . . . . . . . . . . . . . . . . . . . . . . . . . . . . . . . . . . . . . . . . . . . . . . . . . . . . . . . . . . . . . . . . . . . . . . . . . . . . . . . . . . . . . . . . . . . . . . . . . . . . . . . . . . . . . . . . . . . . . . . . . . . . . . . . . . . . . . . . . . . . . . . . . . . . . . . . . . . . . . . . . . . . . . . . . . . . . . . . . . . . . . . . . . . . . . . . . . . . . . . . . . . . . . . . . . . . . . . . . . . . . . . . . . . . . . . . . . . . . . . . . . . . . . . . . . . .
. . . . . . . . . . . . . . . . . . . . . . . . . . . . . . . . . . . . . . . . . . . . . . . . . . . . . . . . . . . . . . . . . . . . . . . . . . . . . . . . . . . . . . . . . . . . . . . . . . . . . . . . . . . . . . . . . . . . . . . . . . . . . . . . . . . . . . . . . . . . . . . . . . . . . . . . . . . . . . . . . . . . . . . . . . . . . . . . . . . . . . . . . . . . . . . . . . . . . . . . . . . . . . . . . . . . . . . . . . . . . . . . . . . . . . . . . . . . . . . . . . . . . . . . . . . . . . . . . . . . . . . . . . . . . . . . . . . . . . . .
. . . . . . . . . . . . . . . . . . . . . . . . . . . . . . . . . . . . . . . . . . . . . . . . . . . . . . . . . . . . . . . . . . . . . . . . . . . . . . . . . . . . . . . . . . . . . . . . . . . . . . . . . . . . . . . . . . . . . . . . . . . . . . . . . . . . . . . . . . . . . . . . . . . . . . . . . . . . . . . . . . . . . . . . . . . . . . . . . . . . . . . . . . . . . . . . . . . . . . . . . . . . . . . . . . . . . . . . . . . . . . . . . . . . . . . . . . . . . . . . . . . . . . . . . . . . . . . . . . . . . . . . . . . . . . . . . . . . . . . .
PART II. SUBSCRIPTION AND SUPPORT
CHAPTER 6. REGISTERING THE SYSTEM AND MANAGING SUBSCRIPTIONS
6.1. REGISTERING THE SYSTEM AND ATTACHING SUBSCRIPTIONS
6.2. MANAGING SOFTWARE REPOSITORIES
6.3. REMOVING SUBSCRIPTIONS
6.4. ADDITIONAL RESOURCES
Installed Documentation
Related Books
Online Resources
See Also
CHAPTER 7. ACCESSING SUPPORT USING THE RED HAT SUPPORT TOOL
7.1. INSTALLING THE RED HAT SUPPORT TOOL
7.2. REGISTERING THE RED HAT SUPPORT TOOL USING THE COMMAND LINE
7.3. USING THE RED HAT SUPPORT TOOL IN INTERACTIVE SHELL MODE
7.4. CONFIGURING THE RED HAT SUPPORT TOOL
7.4.1. Saving Settings to the Configuration Files
7.5. OPENING AND UPDATING SUPPORT CASES USING INTERACTIVE MODE
7.6. VIEWING SUPPORT CASES ON THE COMMAND LINE
7.7. ADDITIONAL RESOURCES
PART III. INSTALLING AND MANAGING SOFTWARE
CHAPTER 8. YUM
8.1. CHECKING FOR AND UPDATING PACKAGES
8.1.1. Checking For Updates
8.1.2. Updating Packages
Updating a Single Package
Updating All Packages and Their Dependencies
Updating Security-Related Packages
Updating Packages Automatically
8.1.3. Preserving Configuration File Changes
8.1.4. Upgrading the System Off-line with ISO and Yum
8.2. PACKAGES AND PACKAGE GROUPS
8.2.1. Searching Packages
8.2.2. Listing Packages
8.2.3. Displaying Package Information
Listing Files Contained in a Package
8.2.4. Installing Packages
Installing Individual Packages
Installing a Package Group
8.2.5. Removing Packages
Removing Individual Packages
Removing a Package Group
8.3. WORKING WITH TRANSACTION HISTORY
8.3.1. Listing Transactions
8.3.2. Examining Transactions
8.3.3. Reverting and Repeating Transactions
8.3.4. Completing Transactions
8.3.5. Starting New Transaction History
8.4. CONFIGURING YUM AND YUM REPOSITORIES
8.4.1. Setting [main] Options
8.4.2. Setting [repository] Options
64
65
65
66
66
67
67
67
67
68
69
69
69
69
69
70
71
73
73
74
75
75
75
76
76
78
78
78
78
78
80
80
81
83
84
84
85
85
86
86
87
88
88
91
92
93
93
93
94
97
Deployment Guide
2

. . . . . . . . . . . . . . . . . . . . . . . . . . . . . . . . . . . . . . . . . . . . . . . . . . . . . . . . . . . . . . . . . . . . . . . . . . . . . . . . . . . . . . . . . . . . . . . . . . . . . . . . . . . . . . . . . . . . . . . . . . . . . . . . . . . . . . . . . . . . . . . . . . . . . . . . . . . . . . . . . . . . . . . . . . . . . . . . . . . . . . . . . . . . . . . . . . . . . . . . . . . . . . . . . . . . . . . . . . . . . . . . . . . . . . . . . . . . . . . . . . . . . . . . . . . . . . . . . . . . . . . . . . . . . . . . . . . . . . . .
. . . . . . . . . . . . . . . . . . . . . . . . . . . . . . . . . . . . . . . . . . . . . . . . . . . . . . . . . . . . . . . . . . . . . . . . . . . . . . . . . . . . . . . . . . . . . . . . . . . . . . . . . . . . . . . . . . . . . . . . . . . . . . . . . . . . . . . . . . . . . . . . . . . . . . . . . . . . . . . . . . . . . . . . . . . . . . . . . . . . . . . . . . . . . . . . . . . . . . . . . . . . . . . . . . . . . . . . . . . . . . . . . . . . . . . . . . . . . . . . . . . . . . . . . . . . . . . . . . . . . . . . . . . . . . . . . . . . . . . .
. . . . . . . . . . . . . . . . . . . . . . . . . . . . . . . . . . . . . . . . . . . . . . . . . . . . . . . . . . . . . . . . . . . . . . . . . . . . . . . . . . . . . . . . . . . . . . . . . . . . . . . . . . . . . . . . . . . . . . . . . . . . . . . . . . . . . . . . . . . . . . . . . . . . . . . . . . . . . . . . . . . . . . . . . . . . . . . . . . . . . . . . . . . . . . . . . . . . . . . . . . . . . . . . . . . . . . . . . . . . . . . . . . . . . . . . . . . . . . . . . . . . . . . . . . . . . . . . . . . . . . . . . . . . . . . . . . . . . . . .
8.4.3. Using Yum Variables
8.4.4. Viewing the Current Configuration
8.4.5. Adding, Enabling, and Disabling a Yum Repository
Adding a Yum Repository
Enabling a Yum Repository
Disabling a Yum Repository
8.4.6. Creating a Yum Repository
8.4.7. Working with Yum Cache
Enabling the Caches
Using yum in Cache-only Mode
Clearing the yum Caches
8.4.8. Adding the Optional and Supplementary Repositories
8.5. YUM PLUG-INS
8.5.1. Enabling, Configuring, and Disabling Yum Plug-ins
8.5.2. Installing Additional Yum Plug-ins
8.5.3. Plug-in Descriptions
8.6. ADDITIONAL RESOURCES
Installed Documentation
Online Resources
See Also
CHAPTER 9. PACKAGEKIT
9.1. UPDATING PACKAGES WITH SOFTWARE UPDATE
Setting the Update-Checking Interval
9.2. USING ADD/REMOVE SOFTWARE
9.2.1. Refreshing Software Sources (Yum Repositories)
9.2.2. Finding Packages with Filters
9.2.3. Installing and Removing Packages (and Dependencies)
9.2.4. Installing and Removing Package Groups
9.2.5. Viewing the Transaction Log
9.3. PACKAGEKIT ARCHITECTURE
9.4. ADDITIONAL RESOURCES
Installed Documentation
Online Documentation
See Also
PART IV. NETWORKING
CHAPTER 10. NETWORKMANAGER
10.1. THE NETWORKMANAGER DAEMON
10.2. INTERACTING WITH NETWORKMANAGER
10.2.1. Connecting to a Network
10.2.2. Configuring New and Editing Existing Connections
10.2.3. Connecting to a Network Automatically
10.2.4. User and System Connections
10.3. ESTABLISHING CONNECTIONS
10.3.1. Establishing a Wired (Ethernet) Connection
Configuring the Connection Name, Auto-Connect Behavior, and Availability Settings
Configuring the Wired Tab
Saving Your New (or Modified) Connection and Making Further Configurations
10.3.2. Establishing a Wireless Connection
Quickly Connecting to an Available Access Point
Connecting to a Hidden Wireless Network
Editing a Connection, or Creating a Completely New One
99
100
101
101
102
102
103
103
103
104
104
105
105
105
106
106
111
111
111
111
113
113
114
115
115
116
118
119
120
121
122
122
123
123
124
125
125
125
126
127
128
129
130
130
132
132
133
133
134
135
135
Table of Contents
3

. . . . . . . . . . . . . . . . . . . . . . . . . . . . . . . . . . . . . . . . . . . . . . . . . . . . . . . . . . . . . . . . . . . . . . . . . . . . . . . . . . . . . . . . . . . . . . . . . . . . . . . . . . . . . . . . . . . . . . . . . . . . . . . . . . . . . . . . . . . . . . . . . . . . . . . . . . . . . . . . . . . . . . . . . . . . . . . . . . . . . . . . . . . . . . . . . . . . . . . . . . . . . . . . . . . . . . . . . . . . . . . . . . . . . . . . . . . . . . . . . . . . . . . . . . . . . . . . . . . . . . . . . . . . . . . . . . . . . . . .
Configuring the Connection Name, Auto-Connect Behavior, and Availability Settings
Configuring the Wireless Tab
Saving Your New (or Modified) Connection and Making Further Configurations
10.3.3. Establishing a Mobile Broadband Connection
Saving Your New (or Modified) Connection and Making Further Configurations
Configuring the Mobile Broadband Tab
10.3.4. Establishing a VPN Connection
Configuring the Connection Name, Auto-Connect Behavior, and Availability Settings
Configuring the VPN Tab
Saving Your New (or Modified) Connection and Making Further Configurations
10.3.5. Establishing a DSL Connection
Configuring the Connection Name, Auto-Connect Behavior, and Availability Settings
Configuring the DSL Tab
Saving Your New (or Modified) Connection and Making Further Configurations
10.3.6. Establishing a Bond Connection
Saving Your New (or Modified) Connection and Making Further Configurations
Configuring the Bond Tab
10.3.7. Establishing a VLAN Connection
Saving Your New (or Modified) Connection and Making Further Configurations
Configuring the VLAN Tab
10.3.8. Establishing an IP-over-InfiniBand (IPoIB) Connection
Saving Your New (or Modified) Connection and Making Further Configurations
Configuring the InfiniBand Tab
10.3.9. Configuring Connection Settings
10.3.9.1. Configuring 802.1X Security
10.3.9.1.1. Configuring TLS (Transport Layer Security) Settings
10.3.9.1.2. Configuring Tunneled TLS Settings
10.3.9.1.3. Configuring Protected EAP (PEAP) Settings
10.3.9.2. Configuring Wireless Security
10.3.9.3. Configuring PPP (Point-to-Point) Settings
10.3.9.4. Configuring IPv4 Settings
Setting the Method
PPPoE Specific Configuration Steps
10.3.9.5. Configuring IPv6 Settings
10.3.9.6. Configuring Routes
CHAPTER 11. NETWORK INTERFACES
11.1. NETWORK CONFIGURATION FILES
11.1.1. Setting the Host Name
11.2. INTERFACE CONFIGURATION FILES
11.2.1. Ethernet Interfaces
11.2.2. Specific ifcfg Options for Linux on System z
11.2.3. Required ifcfg Options for Linux on System z
11.2.4. Channel Bonding Interfaces
11.2.4.1. Check if Bonding Kernel Module is Installed
11.2.4.2. Create a Channel Bonding Interface
11.2.4.2.1. Creating Multiple Bonds
11.2.5. Configuring a VLAN over a Bond
Configuring the Second Server
Testing the VLAN
Optional Steps
11.2.6. Network Bridge
11.2.6.1. Network Bridge with Bond
136
137
138
138
140
140
141
143
144
144
145
145
145
146
146
149
149
151
152
152
153
155
155
155
155
156
157
157
158
159
159
160
161
162
162
164
164
165
165
166
171
172
172
173
173
175
176
181
182
182
182
184
Deployment Guide
4

. . . . . . . . . . . . . . . . . . . . . . . . . . . . . . . . . . . . . . . . . . . . . . . . . . . . . . . . . . . . . . . . . . . . . . . . . . . . . . . . . . . . . . . . . . . . . . . . . . . . . . . . . . . . . . . . . . . . . . . . . . . . . . . . . . . . . . . . . . . . . . . . . . . . . . . . . . . . . . . . . . . . . . . . . . . . . . . . . . . . . . . . . . . . . . . . . . . . . . . . . . . . . . . . . . . . . . . . . . . . . . . . . . . . . . . . . . . . . . . . . . . . . . . . . . . . . . . . . . . . . . . . . . . . . . . . . . . . . . . .
. . . . . . . . . . . . . . . . . . . . . . . . . . . . . . . . . . . . . . . . . . . . . . . . . . . . . . . . . . . . . . . . . . . . . . . . . . . . . . . . . . . . . . . . . . . . . . . . . . . . . . . . . . . . . . . . . . . . . . . . . . . . . . . . . . . . . . . . . . . . . . . . . . . . . . . . . . . . . . . . . . . . . . . . . . . . . . . . . . . . . . . . . . . . . . . . . . . . . . . . . . . . . . . . . . . . . . . . . . . . . . . . . . . . . . . . . . . . . . . . . . . . . . . . . . . . . . . . . . . . . . . . . . . . . . . . . . . . . . . .
. . . . . . . . . . . . . . . . . . . . . . . . . . . . . . . . . . . . . . . . . . . . . . . . . . . . . . . . . . . . . . . . . . . . . . . . . . . . . . . . . . . . . . . . . . . . . . . . . . . . . . . . . . . . . . . . . . . . . . . . . . . . . . . . . . . . . . . . . . . . . . . . . . . . . . . . . . . . . . . . . . . . . . . . . . . . . . . . . . . . . . . . . . . . . . . . . . . . . . . . . . . . . . . . . . . . . . . . . . . . . . . . . . . . . . . . . . . . . . . . . . . . . . . . . . . . . . . . . . . . . . . . . . . . . . . . . . . . . . . .
11.2.6.2. Network Bridge with Bonded VLAN
11.2.7. Setting Up 802.1Q VLAN Tagging
11.2.8. Alias and Clone Files
11.2.9. Dialup Interfaces
11.2.10. Other Interfaces
11.3. INTERFACE CONTROL SCRIPTS
11.4. STATIC ROUTES AND THE DEFAULT GATEWAY
Configuring Static Routes Using the Command Line
Configuring The Default Gateway
11.5. CONFIGURING STATIC ROUTES IN IFCFG FILES
11.5.1. Static Routes Using the IP Command Arguments Format
11.5.2. Network/Netmask Directives Format
11.6. CONFIGURING IPV6 TOKENIZED INTERFACE IDENTIFIERS
11.7. NETWORK FUNCTION FILES
11.8. ETHTOOL
11.9. CONFIGURING NETCONSOLE
Configuring a Listening Machine
Configuring a Sending Machine
11.10. ADDITIONAL RESOURCES
Installed Documentation
Online Resources
See Also
PART V. INFRASTRUCTURE SERVICES
CHAPTER 12. SERVICES AND DAEMONS
12.1. CONFIGURING THE DEFAULT RUNLEVEL
12.2. CONFIGURING THE SERVICES
12.2.1. Using the Service Configuration Utility
12.2.1.1. Enabling and Disabling a Service
12.2.1.2. Starting, Restarting, and Stopping a Service
12.2.1.3. Selecting Runlevels
12.2.2. Using the ntsysv Utility
12.2.2.1. Enabling and Disabling a Service
12.2.2.2. Selecting Runlevels
12.2.3. Using the chkconfig Utility
12.2.3.1. Listing the Services
12.2.3.2. Enabling a Service
12.2.3.3. Disabling a Service
12.3. RUNNING SERVICES
12.3.1. Determining the Service Status
12.3.2. Starting a Service
12.3.3. Stopping a Service
12.3.4. Restarting a Service
12.4. ADDITIONAL RESOURCES
12.4.1. Installed Documentation
12.4.2. Related Books
CHAPTER 13. CONFIGURING AUTHENTICATION
13.1. CONFIGURING SYSTEM AUTHENTICATION
13.1.1. Launching the Authentication Configuration Tool UI
13.1.2. Selecting the Identity Store for Authentication
13.1.2.1. Configuring LDAP Authentication
13.1.2.2. Configuring NIS Authentication
186
186
187
188
190
191
193
193
194
194
195
195
196
197
197
205
205
205
206
206
206
206
207
208
208
209
209
211
211
211
211
212
212
213
213
214
214
215
215
215
216
216
216
216
216
217
217
217
218
219
221
Table of Contents
5

13.1.2.3. Configuring Winbind Authentication
13.1.2.4. Using Kerberos with LDAP or NIS Authentication
13.1.3. Configuring Alternative Authentication Features
13.1.3.1. Using Fingerprint Authentication
13.1.3.2. Setting Local Authentication Parameters
13.1.3.3. Enabling Smart Card Authentication
13.1.3.4. Creating User Home Directories
13.1.4. Configuring Authentication from the Command Line
13.1.4.1. Tips for Using authconfig
13.1.4.2. Configuring LDAP User Stores
13.1.4.3. Configuring NIS User Stores
13.1.4.4. Configuring Winbind User Stores
13.1.4.5. Configuring Kerberos Authentication
13.1.4.6. Configuring Local Authentication Settings
13.1.4.7. Configuring Fingerprint Authentication
13.1.4.8. Configuring Smart Card Authentication
13.1.4.9. Managing Kickstart and Configuration Files
13.1.5. Using Custom Home Directories
13.2. USING AND CACHING CREDENTIALS WITH SSSD
13.2.1. About SSSD
13.2.2. Setting up the sssd.conf File
13.2.2.1. Creating the sssd.conf File
13.2.2.2. Using a Custom Configuration File
13.2.3. Starting and Stopping SSSD
13.2.4. SSSD and System Services
13.2.5. Configuring Services: NSS
About NSS Service Maps and SSSD
NSS Compatibility Mode
13.2.6. Configuring Services: PAM
13.2.7. Configuring Services: autofs
About Automount, LDAP, and SSSD
13.2.8. Configuring Services: sudo
About sudo, LDAP, and SSSD
13.2.9. Configuring Services: OpenSSH and Cached Keys
Configuring OpenSSH to Use SSSD for Host Keys
Configuring OpenSSH to Use SSSD for User Keys
13.2.10. SSSD and Identity Providers (Domains)
13.2.11. Creating Domains: LDAP
Parameters for Configuring an LDAP Domain
LDAP Domain Example
13.2.12. Creating Domains: Identity Management (IdM)
13.2.13. Creating Domains: Active Directory
Mapping Active Directory Securiy IDs and Linux User IDs
The Mechanism of ID Mapping
ID Mapping Parameters
Mapping Users
Active Directory Users and Range Retrieval Searches
Performance and LDAP Referrals
Active Directory as Other Provider Types
13.2.14. Configuring Domains: Active Directory as an LDAP Provider (Alternative)
13.2.15. Domain Options: Setting Username Formats
13.2.16. Domain Options: Enabling Offline Authentication
13.2.17. Domain Options: Setting Password Expirations
222
224
226
226
226
227
227
227
227
228
228
228
229
229
229
230
230
231
231
231
233
233
234
234
235
235
235
237
238
240
240
243
243
246
247
248
249
252
252
254
256
258
258
259
260
260
260
261
261
264
268
270
271
Deployment Guide
6

. . . . . . . . . . . . . . . . . . . . . . . . . . . . . . . . . . . . . . . . . . . . . . . . . . . . . . . . . . . . . . . . . . . . . . . . . . . . . . . . . . . . . . . . . . . . . . . . . . . . . . . . . . . . . . . . . . . . . . . . . . . . . . . . . . . . . . . . . . . . . . . . . . . . . . . . . . . . . . . . . . . . . . . . . . . . . . . . . . . . . . . . . . . . . . . . . . . . . . . . . . . . . . . . . . . . . . . . . . . . . . . . . . . . . . . . . . . . . . . . . . . . . . . . . . . . . . . . . . . . . . . . . . . . . . . . . . . . . . . .
Password Expiration Warnings for Non-Password Authentication
13.2.18. Domain Options: Using DNS Service Discovery
13.2.19. Domain Options: Using IP Addresses in Certificate Subject Names (LDAP Only)
13.2.20. Creating Domains: Proxy
13.2.21. Creating Domains: Kerberos Authentication
13.2.22. Creating Domains: Access Control
Using the Simple Access Provider
Using the Access Filters
13.2.23. Creating Domains: Primary Server and Backup Servers
13.2.24. Installing SSSD Utilities
13.2.25. SSSD and UID and GID Numbers
13.2.26. Creating Local System Users
13.2.27. Seeding Users into the SSSD Cache During Kickstart
13.2.28. Managing the SSSD Cache
Purging the SSSD Cache
Deleting Domain Cache Files
13.2.29. Downgrading SSSD
13.2.30. Using NSCD with SSSD
13.2.31. Troubleshooting SSSD
Setting Debug Logs for SSSD Domains
Checking SSSD Log Files
Problems with SSSD Configuration
CHAPTER 14. OPENSSH
14.1. THE SSH PROTOCOL
14.1.1. Why Use SSH?
14.1.2. Main Features
14.1.3. Protocol Versions
14.1.4. Event Sequence of an SSH Connection
14.1.4.1. Transport Layer
14.1.4.2. Authentication
14.1.4.3. Channels
14.2. CONFIGURING OPENSSH
14.2.1. Configuration Files
14.2.2. Starting an OpenSSH Server
14.2.3. Requiring SSH for Remote Connections
14.2.4. Using Key-Based Authentication
14.2.4.1. Generating Key Pairs
14.2.4.2. Configuring ssh-agent
14.2.4.3. Multiple required methods of authentication for sshd
14.3. USING OPENSSH CERTIFICATE AUTHENTICATION
14.3.1. Introduction to SSH Certificates
14.3.2. Support for SSH Certificates
14.3.3. Creating SSH CA Certificate Signing Keys
14.3.4. Distributing and Trusting SSH CA Public Keys
14.3.5. Creating SSH Certificates
14.3.5.1. Creating SSH Certificates to Authenticate Hosts
14.3.5.2. Creating SSH Certificates for Authenticating Users
14.3.6. Signing an SSH Certificate Using a PKCS#11 Token
14.3.7. Viewing an SSH CA Certificate
14.3.8. Revoking an SSH CA Certificate
14.4. OPENSSH CLIENTS
14.4.1. Using the ssh Utility
272
272
274
275
277
280
280
281
282
282
283
283
284
285
285
286
286
287
287
288
288
289
295
295
295
295
296
296
297
298
298
298
298
300
301
301
301
304
307
307
307
307
307
310
311
312
313
316
317
317
318
318
Table of Contents
7

. . . . . . . . . . . . . . . . . . . . . . . . . . . . . . . . . . . . . . . . . . . . . . . . . . . . . . . . . . . . . . . . . . . . . . . . . . . . . . . . . . . . . . . . . . . . . . . . . . . . . . . . . . . . . . . . . . . . . . . . . . . . . . . . . . . . . . . . . . . . . . . . . . . . . . . . . . . . . . . . . . . . . . . . . . . . . . . . . . . . . . . . . . . . . . . . . . . . . . . . . . . . . . . . . . . . . . . . . . . . . . . . . . . . . . . . . . . . . . . . . . . . . . . . . . . . . . . . . . . . . . . . . . . . . . . . . . . . . . . .
. . . . . . . . . . . . . . . . . . . . . . . . . . . . . . . . . . . . . . . . . . . . . . . . . . . . . . . . . . . . . . . . . . . . . . . . . . . . . . . . . . . . . . . . . . . . . . . . . . . . . . . . . . . . . . . . . . . . . . . . . . . . . . . . . . . . . . . . . . . . . . . . . . . . . . . . . . . . . . . . . . . . . . . . . . . . . . . . . . . . . . . . . . . . . . . . . . . . . . . . . . . . . . . . . . . . . . . . . . . . . . . . . . . . . . . . . . . . . . . . . . . . . . . . . . . . . . . . . . . . . . . . . . . . . . . . . . . . . . . .
. . . . . . . . . . . . . . . . . . . . . . . . . . . . . . . . . . . . . . . . . . . . . . . . . . . . . . . . . . . . . . . . . . . . . . . . . . . . . . . . . . . . . . . . . . . . . . . . . . . . . . . . . . . . . . . . . . . . . . . . . . . . . . . . . . . . . . . . . . . . . . . . . . . . . . . . . . . . . . . . . . . . . . . . . . . . . . . . . . . . . . . . . . . . . . . . . . . . . . . . . . . . . . . . . . . . . . . . . . . . . . . . . . . . . . . . . . . . . . . . . . . . . . . . . . . . . . . . . . . . . . . . . . . . . . . . . . . . . . . .
. . . . . . . . . . . . . . . . . . . . . . . . . . . . . . . . . . . . . . . . . . . . . . . . . . . . . . . . . . . . . . . . . . . . . . . . . . . . . . . . . . . . . . . . . . . . . . . . . . . . . . . . . . . . . . . . . . . . . . . . . . . . . . . . . . . . . . . . . . . . . . . . . . . . . . . . . . . . . . . . . . . . . . . . . . . . . . . . . . . . . . . . . . . . . . . . . . . . . . . . . . . . . . . . . . . . . . . . . . . . . . . . . . . . . . . . . . . . . . . . . . . . . . . . . . . . . . . . . . . . . . . . . . . . . . . . . . . . . . . .
14.4.2. Using the scp Utility
14.4.3. Using the sftp Utility
14.5. MORE THAN A SECURE SHELL
14.5.1. X11 Forwarding
14.5.2. Port Forwarding
14.6. ADDITIONAL RESOURCES
14.6.1. Installed Documentation
14.6.2. Useful Websites
CHAPTER 15. TIGERVNC
15.1. VNC SERVER
15.1.1. Installing VNC Server
15.1.2. Configuring VNC Server
15.1.3. Starting VNC Server
15.1.4. Terminating a VNC Session
15.2. SHARING AN EXISTING DESKTOP
15.3. USING A VNC VIEWER
15.3.1. Installing the VNC Viewer
15.3.2. Connecting to a VNC Server
15.3.2.1. Configuring the Firewall for VNC
15.3.3. Connecting to VNC Server Using SSH
15.4. ADDITIONAL RESOURCES
Installed Documentation
PART VI. SERVERS
CHAPTER 16. DHCP SERVERS
16.1. WHY USE DHCP?
16.2. CONFIGURING A DHCPV4 SERVER
16.2.1. Configuration File
16.2.2. Lease Database
16.2.3. Starting and Stopping the Server
16.2.4. DHCP Relay Agent
16.3. CONFIGURING A DHCPV4 CLIENT
16.4. CONFIGURING A MULTIHOMED DHCP SERVER
16.4.1. Host Configuration
16.5. DHCP FOR IPV6 (DHCPV6)
16.5.1. Configuring a DHCPv6 Server
16.5.2. Configuring a DHCPv6 Client
16.6. ADDITIONAL RESOURCES
16.6.1. Installed Documentation
CHAPTER 17. DNS SERVERS
17.1. INTRODUCTION TO DNS
17.1.1. Nameserver Zones
17.1.2. Nameserver Types
17.1.3. BIND as a Nameserver
17.2. BIND
17.2.1. Configuring the named Service
17.2.1.1. Common Statement Types
17.2.1.2. Other Statement Types
17.2.1.3. Comment Tags
17.2.2. Editing Zone Files
17.2.2.1. Common Directives
319
320
321
321
321
322
322
323
324
324
324
324
326
327
327
328
328
328
329
331
331
331
332
333
333
333
333
336
337
338
338
339
340
342
342
342
343
343
344
344
344
344
345
345
345
346
352
353
354
355
Deployment Guide
8

. . . . . . . . . . . . . . . . . . . . . . . . . . . . . . . . . . . . . . . . . . . . . . . . . . . . . . . . . . . . . . . . . . . . . . . . . . . . . . . . . . . . . . . . . . . . . . . . . . . . . . . . . . . . . . . . . . . . . . . . . . . . . . . . . . . . . . . . . . . . . . . . . . . . . . . . . . . . . . . . . . . . . . . . . . . . . . . . . . . . . . . . . . . . . . . . . . . . . . . . . . . . . . . . . . . . . . . . . . . . . . . . . . . . . . . . . . . . . . . . . . . . . . . . . . . . . . . . . . . . . . . . . . . . . . . . . . . . . . . .
17.2.2.2. Common Resource Records
17.2.2.3. Comment Tags
17.2.2.4. Example Usage
17.2.2.4.1. A Simple Zone File
17.2.2.4.2. A Reverse Name Resolution Zone File
17.2.3. Using the rndc Utility
17.2.3.1. Configuring the Utility
17.2.3.2. Checking the Service Status
17.2.3.3. Reloading the Configuration and Zones
17.2.3.4. Updating Zone Keys
17.2.3.5. Enabling the DNSSEC Validation
17.2.3.6. Enabling the Query Logging
17.2.4. Using the dig Utility
17.2.4.1. Looking Up a Nameserver
17.2.4.2. Looking Up an IP Address
17.2.4.3. Looking Up a Hostname
17.2.5. Advanced Features of BIND
17.2.5.1. Multiple Views
17.2.5.2. Incremental Zone Transfers (IXFR)
17.2.5.3. Transaction SIGnatures (TSIG)
17.2.5.4. DNS Security Extensions (DNSSEC)
17.2.5.5. Internet Protocol version 6 (IPv6)
17.2.6. Common Mistakes to Avoid
17.2.7. Additional Resources
17.2.7.1. Installed Documentation
17.2.7.2. Useful Websites
17.2.7.3. Related Books
CHAPTER 18. WEB SERVERS
18.1. THE APACHE HTTP SERVER
18.1.1. New Features
18.1.2. Notable Changes
18.1.3. Updating the Configuration
18.1.4. Running the httpd Service
18.1.4.1. Starting the Service
18.1.4.2. Stopping the Service
18.1.4.3. Restarting the Service
18.1.4.4. Verifying the Service Status
18.1.5. Editing the Configuration Files
18.1.5.1. Common httpd.conf Directives
18.1.5.2. Common ssl.conf Directives
18.1.5.3. Common Multi-Processing Module Directives
18.1.6. Working with Modules
18.1.6.1. Loading a Module
18.1.6.2. Writing a Module
18.1.7. Setting Up Virtual Hosts
18.1.8. Setting Up an SSL Server
18.1.8.1. An Overview of Certificates and Security
18.1.9. Enabling the mod_ssl Module
18.1.9.1. Enabling and Disabling SSL and TLS in mod_ssl
18.1.10. Enabling the mod_nss Module
18.1.10.1. Enabling and Disabling SSL and TLS in mod_nss
18.1.11. Using an Existing Key and Certificate
355
359
359
359
360
361
361
362
362
363
363
364
364
364
365
365
366
366
367
367
367
367
367
368
368
369
369
370
370
370
370
370
371
371
371
372
372
372
373
403
404
407
407
407
407
408
408
409
410
412
416
418
Table of Contents
9

. . . . . . . . . . . . . . . . . . . . . . . . . . . . . . . . . . . . . . . . . . . . . . . . . . . . . . . . . . . . . . . . . . . . . . . . . . . . . . . . . . . . . . . . . . . . . . . . . . . . . . . . . . . . . . . . . . . . . . . . . . . . . . . . . . . . . . . . . . . . . . . . . . . . . . . . . . . . . . . . . . . . . . . . . . . . . . . . . . . . . . . . . . . . . . . . . . . . . . . . . . . . . . . . . . . . . . . . . . . . . . . . . . . . . . . . . . . . . . . . . . . . . . . . . . . . . . . . . . . . . . . . . . . . . . . . . . . . . . . .
18.1.12. Generating a New Key and Certificate
18.1.13. Configure the Firewall for HTTP and HTTPS Using the Command Line
18.1.13.1. Checking Network Access for Incoming HTTPS and HTTPS Using the Command Line
18.1.14. Additional Resources
Installed Documentation
Installable Documentation
Online Documentation
CHAPTER 19. MAIL SERVERS
19.1. EMAIL PROTOCOLS
19.1.1. Mail Transport Protocols
19.1.1.1. SMTP
19.1.2. Mail Access Protocols
19.1.2.1. POP
19.1.2.2. IMAP
19.1.2.3. Dovecot
19.2. EMAIL PROGRAM CLASSIFICATIONS
19.2.1. Mail Transport Agent
19.2.2. Mail Delivery Agent
19.2.3. Mail User Agent
19.3. MAIL TRANSPORT AGENTS
19.3.1. Postfix
19.3.1.1. The Default Postfix Installation
19.3.1.2. Basic Postfix Configuration
19.3.1.2.1. Configuring Postfix to Use Transport Layer Security
19.3.1.3. Using Postfix with LDAP
19.3.1.3.1. The /etc/aliases lookup example
19.3.2. Sendmail
19.3.2.1. Purpose and Limitations
19.3.2.2. The Default Sendmail Installation
19.3.2.3. Common Sendmail Configuration Changes
19.3.2.4. Masquerading
19.3.2.5. Stopping Spam
19.3.2.6. Using Sendmail with LDAP
19.3.3. Fetchmail
19.3.3.1. Fetchmail Configuration Options
19.3.3.2. Global Options
19.3.3.3. Server Options
19.3.3.4. User Options
19.3.3.5. Fetchmail Command Options
19.3.3.6. Informational or Debugging Options
19.3.3.7. Special Options
19.3.4. Mail Transport Agent (MTA) Configuration
19.4. MAIL DELIVERY AGENTS
19.4.1. Procmail Configuration
19.4.2. Procmail Recipes
19.4.2.1. Delivering vs. Non-Delivering Recipes
19.4.2.2. Flags
19.4.2.3. Specifying a Local Lockfile
19.4.2.4. Special Conditions and Actions
19.4.2.5. Recipe Examples
19.4.2.6. Spam Filters
19.5. MAIL USER AGENTS
419
424
425
426
426
426
426
427
427
427
427
427
427
428
429
430
430
430
431
431
431
431
432
433
433
433
433
434
434
435
436
437
438
438
439
440
440
441
441
442
442
442
443
443
444
445
445
446
446
447
448
449
Deployment Guide
10

. . . . . . . . . . . . . . . . . . . . . . . . . . . . . . . . . . . . . . . . . . . . . . . . . . . . . . . . . . . . . . . . . . . . . . . . . . . . . . . . . . . . . . . . . . . . . . . . . . . . . . . . . . . . . . . . . . . . . . . . . . . . . . . . . . . . . . . . . . . . . . . . . . . . . . . . . . . . . . . . . . . . . . . . . . . . . . . . . . . . . . . . . . . . . . . . . . . . . . . . . . . . . . . . . . . . . . . . . . . . . . . . . . . . . . . . . . . . . . . . . . . . . . . . . . . . . . . . . . . . . . . . . . . . . . . . . . . . . . . .
. . . . . . . . . . . . . . . . . . . . . . . . . . . . . . . . . . . . . . . . . . . . . . . . . . . . . . . . . . . . . . . . . . . . . . . . . . . . . . . . . . . . . . . . . . . . . . . . . . . . . . . . . . . . . . . . . . . . . . . . . . . . . . . . . . . . . . . . . . . . . . . . . . . . . . . . . . . . . . . . . . . . . . . . . . . . . . . . . . . . . . . . . . . . . . . . . . . . . . . . . . . . . . . . . . . . . . . . . . . . . . . . . . . . . . . . . . . . . . . . . . . . . . . . . . . . . . . . . . . . . . . . . . . . . . . . . . . . . . . .
19.5.1. Securing Communication
19.5.1.1. Secure Email Clients
19.5.1.2. Securing Email Client Communications
19.6. ADDITIONAL RESOURCES
19.6.1. Installed Documentation
19.6.2. Online Documentation
19.6.3. Related Books
CHAPTER 20. DIRECTORY SERVERS
20.1. OPENLDAP
20.1.1. Introduction to LDAP
20.1.1.1. LDAP Terminology
20.1.1.2. OpenLDAP Features
20.1.1.3. OpenLDAP Server Setup
20.1.2. Installing the OpenLDAP Suite
20.1.2.1. Overview of OpenLDAP Server Utilities
20.1.2.2. Overview of OpenLDAP Client Utilities
20.1.2.3. Overview of Common LDAP Client Applications
20.1.3. Configuring an OpenLDAP Server
20.1.3.1. Changing the Global Configuration
20.1.3.2. Changing the Database-Specific Configuration
20.1.3.3. Extending Schema
20.1.4. Running an OpenLDAP Server
20.1.4.1. Starting the Service
20.1.4.2. Stopping the Service
20.1.4.3. Restarting the Service
20.1.4.4. Checking the Service Status
20.1.5. Configuring a System to Authenticate Using OpenLDAP
20.1.5.1. Migrating Old Authentication Information to LDAP Format
20.1.6. Additional Resources
20.1.6.1. Installed Documentation
20.1.6.2. Useful Websites
20.1.6.3. Related Books
CHAPTER 21. FILE AND PRINT SERVERS
21.1. SAMBA
21.1.1. Introduction to Samba
What Samba can do:
What Samba cannot do:
21.1.2. Samba Daemons and Related Services
smbd
nmbd
winbindd
21.1.3. Connecting to a Samba Share
21.1.3.1. Mounting the Share
21.1.4. Configuring a Samba Server
21.1.4.1. Graphical Configuration
21.1.4.2. Command-Line Configuration
21.1.4.3. Encrypted Passwords
21.1.5. Starting and Stopping Samba
21.1.6. Samba Server Types and the smb.conf File
21.1.6.1. Stand-alone Server
Anonymous Read-Only
449
450
450
451
451
452
452
453
453
453
454
454
455
455
456
457
458
458
459
462
463
463
463
464
464
464
464
465
465
466
467
467
468
468
468
468
468
468
469
469
469
469
471
472
472
472
473
473
474
474
474
Table of Contents
11

Anonymous Read/Write
Anonymous Print Server
Secure Read/Write File and Print Server
21.1.6.2. Domain Member Server
Active Directory Domain Member Server
Windows NT4-based Domain Member Server
21.1.6.3. Domain Controller
Primary Domain Controller (PDC) Using tdbsam
Primary Domain Controller (PDC) with Active Directory
21.1.7. Samba Security Modes
21.1.7.1. User-Level Security
Samba Guest Shares
Domain Security Mode (User-Level Security)
Active Directory Security Mode (User-Level Security)
21.1.7.2. Share-Level Security
21.1.8. Samba Account Information Databases
21.1.9. Samba Network Browsing
21.1.9.1. Domain Browsing
21.1.9.2. WINS (Windows Internet Name Server)
21.1.10. Samba with CUPS Printing Support
21.1.10.1. Simple smb.conf Settings
21.1.11. Samba Distribution Programs
findsmb
net
nmblookup
pdbedit
rpcclient
smbcacls
smbclient
smbcontrol
smbpasswd
smbspool
smbstatus
smbtar
testparm
wbinfo
21.1.12. Additional Resources
Installed Documentation
Related Books
Useful Websites
21.2. FTP
21.2.1. The File Transfer Protocol
21.2.2. The vsftpd Server
21.2.2.1. Starting and Stopping vsftpd
21.2.2.2. Starting Multiple Copies of vsftpd
21.2.2.3. Encrypting vsftpd Connections Using TLS
21.2.2.4. SELinux Policy for vsftpd
21.2.2.5. Files Installed with vsftpd
21.2.2.6. vsftpd Configuration Options
21.2.2.6.1. Daemon Options
21.2.2.6.2. Log In Options and Access Controls
21.2.2.6.3. Anonymous User Options
21.2.2.6.4. Local-User Options
475
475
476
477
477
478
479
479
481
481
482
482
482
483
483
483
484
485
485
485
485
486
486
487
487
488
489
489
489
489
489
489
489
490
490
491
491
491
491
491
492
492
493
493
494
495
496
496
497
497
498
500
500
Deployment Guide
12

. . . . . . . . . . . . . . . . . . . . . . . . . . . . . . . . . . . . . . . . . . . . . . . . . . . . . . . . . . . . . . . . . . . . . . . . . . . . . . . . . . . . . . . . . . . . . . . . . . . . . . . . . . . . . . . . . . . . . . . . . . . . . . . . . . . . . . . . . . . . . . . . . . . . . . . . . . . . . . . . . . . . . . . . . . . . . . . . . . . . . . . . . . . . . . . . . . . . . . . . . . . . . . . . . . . . . . . . . . . . . . . . . . . . . . . . . . . . . . . . . . . . . . . . . . . . . . . . . . . . . . . . . . . . . . . . . . . . . . . .
21.2.2.6.5. Directory Options
21.2.2.6.6. File Transfer Options
21.2.2.6.7. Logging Options
21.2.2.6.8. Network Options
21.2.2.6.9. Security Options
21.2.3. Additional Resources
21.2.3.1. Installed Documentation
21.2.3.2. Online Documentation
21.3. PRINTER CONFIGURATION
21.3.1. Starting the Printer Configuration Tool
21.3.2. Starting Printer Setup
21.3.3. Adding a Local Printer
21.3.4. Adding an AppSocket/HP JetDirect printer
21.3.5. Adding an IPP Printer
21.3.6. Adding an LPD/LPR Host or Printer
21.3.7. Adding a Samba (SMB) printer
21.3.8. Selecting the Printer Model and Finishing
21.3.9. Printing a Test Page
21.3.10. Modifying Existing Printers
21.3.10.1. The Settings Page
21.3.10.2. The Policies Page
21.3.10.2.1. Sharing Printers
21.3.10.2.2. The Access Control Page
21.3.10.2.3. The Printer Options Page
21.3.10.2.4. Job Options Page
21.3.10.2.5. Ink/Toner Levels Page
21.3.10.3. Managing Print Jobs
21.3.11. Additional Resources
21.3.11.1. Installed Documentation
21.3.11.2. Useful Websites
CHAPTER 22. CONFIGURING NTP USING NTPD
22.1. INTRODUCTION TO NTP
22.2. NTP STRATA
22.3. UNDERSTANDING NTP
22.4. UNDERSTANDING THE DRIFT FILE
22.5. UTC, TIMEZONES, AND DST
22.6. AUTHENTICATION OPTIONS FOR NTP
22.7. MANAGING THE TIME ON VIRTUAL MACHINES
22.8. UNDERSTANDING LEAP SECONDS
22.9. UNDERSTANDING THE NTPD CONFIGURATION FILE
22.10. UNDERSTANDING THE NTPD SYSCONFIG FILE
22.11. CHECKING IF THE NTP DAEMON IS INSTALLED
22.12. INSTALLING THE NTP DAEMON (NTPD)
22.13. CHECKING THE STATUS OF NTP
22.14. CONFIGURE THE FIREWALL TO ALLOW INCOMING NTP PACKETS
22.14.1. Configure the Firewall Using the Graphical Tool
22.14.2. Configure the Firewall Using the Command Line
22.14.2.1. Checking Network Access for Incoming NTP Using the Command Line
22.15. CONFIGURE NTPDATE SERVERS
22.16. CONFIGURE NTP
22.16.1. Configure Access Control to an NTP Service
22.16.2. Configure Rate Limiting Access to an NTP Service
502
502
503
504
506
507
507
508
508
509
509
510
511
512
513
514
516
519
519
520
520
520
521
522
522
523
524
525
525
526
527
527
527
528
529
529
529
530
530
530
532
532
533
533
534
534
534
535
535
536
536
537
Table of Contents
13

. . . . . . . . . . . . . . . . . . . . . . . . . . . . . . . . . . . . . . . . . . . . . . . . . . . . . . . . . . . . . . . . . . . . . . . . . . . . . . . . . . . . . . . . . . . . . . . . . . . . . . . . . . . . . . . . . . . . . . . . . . . . . . . . . . . . . . . . . . . . . . . . . . . . . . . . . . . . . . . . . . . . . . . . . . . . . . . . . . . . . . . . . . . . . . . . . . . . . . . . . . . . . . . . . . . . . . . . . . . . . . . . . . . . . . . . . . . . . . . . . . . . . . . . . . . . . . . . . . . . . . . . . . . . . . . . . . . . . . . .
. . . . . . . . . . . . . . . . . . . . . . . . . . . . . . . . . . . . . . . . . . . . . . . . . . . . . . . . . . . . . . . . . . . . . . . . . . . . . . . . . . . . . . . . . . . . . . . . . . . . . . . . . . . . . . . . . . . . . . . . . . . . . . . . . . . . . . . . . . . . . . . . . . . . . . . . . . . . . . . . . . . . . . . . . . . . . . . . . . . . . . . . . . . . . . . . . . . . . . . . . . . . . . . . . . . . . . . . . . . . . . . . . . . . . . . . . . . . . . . . . . . . . . . . . . . . . . . . . . . . . . . . . . . . . . . . . . . . . . . .
. . . . . . . . . . . . . . . . . . . . . . . . . . . . . . . . . . . . . . . . . . . . . . . . . . . . . . . . . . . . . . . . . . . . . . . . . . . . . . . . . . . . . . . . . . . . . . . . . . . . . . . . . . . . . . . . . . . . . . . . . . . . . . . . . . . . . . . . . . . . . . . . . . . . . . . . . . . . . . . . . . . . . . . . . . . . . . . . . . . . . . . . . . . . . . . . . . . . . . . . . . . . . . . . . . . . . . . . . . . . . . . . . . . . . . . . . . . . . . . . . . . . . . . . . . . . . . . . . . . . . . . . . . . . . . . . . . . . . . . .
22.16.3. Adding a Peer Address
22.16.4. Adding a Server Address
22.16.5. Adding a Broadcast or Multicast Server Address
22.16.6. Adding a Manycast Client Address
22.16.7. Adding a Broadcast Client Address
22.16.8. Adding a Manycast Server Address
22.16.9. Adding a Multicast Client Address
22.16.10. Configuring the Burst Option
22.16.11. Configuring the iburst Option
22.16.12. Configuring Symmetric Authentication Using a Key
22.16.13. Configuring the Poll Interval
22.16.14. Configuring Server Preference
22.16.15. Configuring the Time-to-Live for NTP Packets
22.16.16. Configuring the NTP Version to Use
22.17. CONFIGURING THE HARDWARE CLOCK UPDATE
22.18. CONFIGURING CLOCK SOURCES
22.19. ADDITIONAL RESOURCES
22.19.1. Installed Documentation
22.19.2. Useful Websites
CHAPTER 23. CONFIGURING PTP USING PTP4L
23.1. INTRODUCTION TO PTP
23.1.1. Understanding PTP
23.1.2. Advantages of PTP
23.2. USING PTP
23.2.1. Checking for Driver and Hardware Support
23.2.2. Installing PTP
23.2.3. Starting ptp4l
23.2.3.1. Selecting a Delay Measurement Mechanism
23.3. SPECIFYING A CONFIGURATION FILE
23.4. USING THE PTP MANAGEMENT CLIENT
23.5. SYNCHRONIZING THE CLOCKS
23.6. VERIFYING TIME SYNCHRONIZATION
23.7. SERVING PTP TIME WITH NTP
23.8. SERVING NTP TIME WITH PTP
23.9. SYNCHRONIZE TO PTP OR NTP TIME USING TIMEMASTER
23.9.1. Starting timemaster as a Service
23.9.2. Understanding the timemaster Configuration File
23.9.3. Configuring timemaster Options
23.10. IMPROVING ACCURACY
23.11. ADDITIONAL RESOURCES
23.11.1. Installed Documentation
23.11.2. Useful Websites
PART VII. MONITORING AND AUTOMATION
CHAPTER 24. SYSTEM MONITORING TOOLS
24.1. VIEWING SYSTEM PROCESSES
24.1.1. Using the ps Command
24.1.2. Using the top Command
24.1.3. Using the System Monitor Tool
24.2. VIEWING MEMORY USAGE
24.2.1. Using the free Command
24.2.2. Using the System Monitor Tool
537
538
538
538
539
539
539
539
540
540
540
541
541
541
541
541
542
542
542
544
544
544
545
546
546
546
547
548
548
549
550
551
553
553
553
554
554
556
557
557
558
558
559
560
560
560
561
562
564
564
565
Deployment Guide
14

. . . . . . . . . . . . . . . . . . . . . . . . . . . . . . . . . . . . . . . . . . . . . . . . . . . . . . . . . . . . . . . . . . . . . . . . . . . . . . . . . . . . . . . . . . . . . . . . . . . . . . . . . . . . . . . . . . . . . . . . . . . . . . . . . . . . . . . . . . . . . . . . . . . . . . . . . . . . . . . . . . . . . . . . . . . . . . . . . . . . . . . . . . . . . . . . . . . . . . . . . . . . . . . . . . . . . . . . . . . . . . . . . . . . . . . . . . . . . . . . . . . . . . . . . . . . . . . . . . . . . . . . . . . . . . . . . . . . . . . .
24.3. VIEWING CPU USAGE
24.3.1. Using the System Monitor Tool
24.4. VIEWING BLOCK DEVICES AND FILE SYSTEMS
24.4.1. Using the lsblk Command
24.4.2. Using the blkid Command
24.4.3. Using the findmnt Command
24.4.4. Using the df Command
24.4.5. Using the du Command
24.4.6. Using the System Monitor Tool
24.4.7. Monitoring Files and Directories with gamin
24.5. VIEWING HARDWARE INFORMATION
24.5.1. Using the lspci Command
24.5.2. Using the lsusb Command
24.5.3. Using the lspcmcia Command
24.5.4. Using the lscpu Command
24.6. MONITORING PERFORMANCE WITH NET-SNMP
24.6.1. Installing Net-SNMP
24.6.2. Running the Net-SNMP Daemon
24.6.2.1. Starting the Service
24.6.2.2. Stopping the Service
24.6.2.3. Restarting the Service
24.6.3. Configuring Net-SNMP
24.6.3.1. Setting System Information
24.6.3.2. Configuring Authentication
Configuring SNMP Version 2c Community
Configuring SNMP Version 3 User
24.6.4. Retrieving Performance Data over SNMP
24.6.4.1. Hardware Configuration
24.6.4.2. CPU and Memory Information
24.6.4.3. File System and Disk Information
24.6.4.4. Network Information
24.6.5. Extending Net-SNMP
24.6.5.1. Extending Net-SNMP with Shell Scripts
24.6.5.2. Extending Net-SNMP with Perl
24.7. ADDITIONAL RESOURCES
24.7.1. Installed Documentation
CHAPTER 25. VIEWING AND MANAGING LOG FILES
25.1. INSTALLING RSYSLOG
25.1.1. Upgrading to rsyslog version 7
25.2. LOCATING LOG FILES
25.3. BASIC CONFIGURATION OF RSYSLOG
25.3.1. Filters
25.3.2. Actions
Specifying Multiple Actions
25.3.3. Templates
Generating Dynamic File Names
Properties
Template Examples
25.3.4. Global Directives
25.3.5. Log Rotation
25.4. USING THE NEW CONFIGURATION FORMAT
25.4.1. Rulesets
565
565
566
566
567
568
569
570
571
571
573
573
574
575
575
576
576
577
577
577
578
578
578
579
579
580
581
581
582
583
584
584
585
587
590
590
591
591
591
592
592
593
596
600
601
602
602
603
604
605
606
607
Table of Contents
15

. . . . . . . . . . . . . . . . . . . . . . . . . . . . . . . . . . . . . . . . . . . . . . . . . . . . . . . . . . . . . . . . . . . . . . . . . . . . . . . . . . . . . . . . . . . . . . . . . . . . . . . . . . . . . . . . . . . . . . . . . . . . . . . . . . . . . . . . . . . . . . . . . . . . . . . . . . . . . . . . . . . . . . . . . . . . . . . . . . . . . . . . . . . . . . . . . . . . . . . . . . . . . . . . . . . . . . . . . . . . . . . . . . . . . . . . . . . . . . . . . . . . . . . . . . . . . . . . . . . . . . . . . . . . . . . . . . . . . . . .
. . . . . . . . . . . . . . . . . . . . . . . . . . . . . . . . . . . . . . . . . . . . . . . . . . . . . . . . . . . . . . . . . . . . . . . . . . . . . . . . . . . . . . . . . . . . . . . . . . . . . . . . . . . . . . . . . . . . . . . . . . . . . . . . . . . . . . . . . . . . . . . . . . . . . . . . . . . . . . . . . . . . . . . . . . . . . . . . . . . . . . . . . . . . . . . . . . . . . . . . . . . . . . . . . . . . . . . . . . . . . . . . . . . . . . . . . . . . . . . . . . . . . . . . . . . . . . . . . . . . . . . . . . . . . . . . . . . . . . . .
25.4.2. Compatibility with sysklogd
25.5. WORKING WITH QUEUES IN RSYSLOG
25.5.1. Defining Queues
Direct Queues
Disk Queues
In-memory Queues
Disk-Assisted In-memory Queues
25.5.2. Creating a New Directory for rsyslog Log Files
25.5.3. Managing Queues
Limiting Queue Size
Discarding Messages
Using Timeframes
Configuring Worker Threads
Batch Dequeuing
Terminating Queues
25.5.4. Using the New Syntax for rsyslog queues
25.6. CONFIGURING RSYSLOG ON A LOGGING SERVER
25.6.1. Using The New Template Syntax on a Logging Server
25.7. USING RSYSLOG MODULES
25.7.1. Importing Text Files
25.7.2. Exporting Messages to a Database
25.7.3. Enabling Encrypted Transport
25.7.4. Using RELP
25.8. DEBUGGING RSYSLOG
25.9. MANAGING LOG FILES IN A GRAPHICAL ENVIRONMENT
25.9.1. Viewing Log Files
25.9.2. Adding a Log File
25.9.3. Monitoring Log Files
25.10. ADDITIONAL RESOURCES
Installed Documentation
Online Documentation
See Also
CHAPTER 26. UPGRADING MYSQL
CHAPTER 27. AUTOMATING SYSTEM TASKS
27.1. CRON AND ANACRON
27.1.1. Installing Cron and Anacron
27.1.2. Running the Crond Service
27.1.2.1. Starting and Stopping the Cron Service
27.1.2.2. Stopping the Cron Service
27.1.2.3. Restarting the Cron Service
27.1.3. Configuring Anacron Jobs
27.1.3.1. Examples of Anacron Jobs
27.1.4. Configuring Cron Jobs
27.1.5. Controlling Access to Cron
27.1.6. Black and White Listing of Cron Jobs
27.2. AT AND BATCH
27.2.1. Installing At and Batch
27.2.2. Running the At Service
27.2.2.1. Starting and Stopping the At Service
27.2.2.2. Stopping the At Service
27.2.2.3. Restarting the At Service
608
608
610
610
610
611
611
613
614
614
614
615
615
615
615
616
617
620
621
622
623
623
624
625
625
625
628
629
630
630
630
630
632
633
633
633
633
634
634
634
634
636
636
638
638
639
639
639
639
640
640
Deployment Guide
16

. . . . . . . . . . . . . . . . . . . . . . . . . . . . . . . . . . . . . . . . . . . . . . . . . . . . . . . . . . . . . . . . . . . . . . . . . . . . . . . . . . . . . . . . . . . . . . . . . . . . . . . . . . . . . . . . . . . . . . . . . . . . . . . . . . . . . . . . . . . . . . . . . . . . . . . . . . . . . . . . . . . . . . . . . . . . . . . . . . . . . . . . . . . . . . . . . . . . . . . . . . . . . . . . . . . . . . . . . . . . . . . . . . . . . . . . . . . . . . . . . . . . . . . . . . . . . . . . . . . . . . . . . . . . . . . . . . . . . . . .
. . . . . . . . . . . . . . . . . . . . . . . . . . . . . . . . . . . . . . . . . . . . . . . . . . . . . . . . . . . . . . . . . . . . . . . . . . . . . . . . . . . . . . . . . . . . . . . . . . . . . . . . . . . . . . . . . . . . . . . . . . . . . . . . . . . . . . . . . . . . . . . . . . . . . . . . . . . . . . . . . . . . . . . . . . . . . . . . . . . . . . . . . . . . . . . . . . . . . . . . . . . . . . . . . . . . . . . . . . . . . . . . . . . . . . . . . . . . . . . . . . . . . . . . . . . . . . . . . . . . . . . . . . . . . . . . . . . . . . . .
27.2.3. Configuring an At Job
27.2.4. Configuring a Batch Job
27.2.5. Viewing Pending Jobs
27.2.6. Additional Command-Line Options
27.2.7. Controlling Access to At and Batch
27.3. ADDITIONAL RESOURCES
CHAPTER 28. AUTOMATIC BUG REPORTING TOOL (ABRT)
28.1. INSTALLING ABRT AND STARTING ITS SERVICES
28.2. USING THE GRAPHICAL USER INTERFACE
28.3. USING THE COMMAND-LINE INTERFACE
28.3.1. Viewing Problems
28.3.2. Reporting Problems
28.3.3. Deleting Problems
28.4. CONFIGURING ABRT
28.4.1. ABRT Events
28.4.2. Standard ABRT Installation Supported Events
28.4.3. Event Configuration in ABRT GUI
28.4.4. ABRT Specific Configuration
28.4.5. Configuring ABRT to Detect a Kernel Panic
28.4.6. Automatic Downloads and Installation of Debuginfo Packages
28.4.7. Configuring Automatic Reporting for Specific Types of Crashes
28.4.8. Uploading and Reporting Using a Proxy Server
28.4.9. Configuring Automatic Reporting
28.5. CONFIGURING CENTRALIZED CRASH COLLECTION
28.5.1. Configuration Steps Required on a Dedicated System
28.5.2. Configuration Steps Required on a Client System
28.5.3. Saving Package Information
28.5.4. Testing ABRT's Crash Detection
CHAPTER 29. OPROFILE
29.1. OVERVIEW OF TOOLS
29.2. CONFIGURING OPROFILE
29.2.1. Specifying the Kernel
29.2.2. Setting Events to Monitor
29.2.2.1. Sampling Rate
29.2.2.2. Unit Masks
29.2.3. Separating Kernel and User-space Profiles
29.3. STARTING AND STOPPING OPROFILE
29.4. SAVING DATA
29.5. ANALYZING THE DATA
29.5.1. Using opreport
29.5.2. Using opreport on a Single Executable
29.5.3. Getting more detailed output on the modules
29.5.4. Using opannotate
29.6. UNDERSTANDING /DEV/OPROFILE/
29.7. EXAMPLE USAGE
29.8. OPROFILE SUPPORT FOR JAVA
29.8.1. Profiling Java Code
29.9. GRAPHICAL INTERFACE
29.10. OPROFILE AND SYSTEMTAP
29.11. ADDITIONAL RESOURCES
29.11.1. Installed Docs
640
641
641
642
642
642
644
645
647
654
654
656
657
658
658
660
661
663
665
666
666
667
667
669
669
670
671
672
673
673
674
674
675
677
678
678
679
679
680
681
681
683
684
684
685
685
685
686
689
689
689
Table of Contents
17

. . . . . . . . . . . . . . . . . . . . . . . . . . . . . . . . . . . . . . . . . . . . . . . . . . . . . . . . . . . . . . . . . . . . . . . . . . . . . . . . . . . . . . . . . . . . . . . . . . . . . . . . . . . . . . . . . . . . . . . . . . . . . . . . . . . . . . . . . . . . . . . . . . . . . . . . . . . . . . . . . . . . . . . . . . . . . . . . . . . . . . . . . . . . . . . . . . . . . . . . . . . . . . . . . . . . . . . . . . . . . . . . . . . . . . . . . . . . . . . . . . . . . . . . . . . . . . . . . . . . . . . . . . . . . . . . . . . . . . . .
. . . . . . . . . . . . . . . . . . . . . . . . . . . . . . . . . . . . . . . . . . . . . . . . . . . . . . . . . . . . . . . . . . . . . . . . . . . . . . . . . . . . . . . . . . . . . . . . . . . . . . . . . . . . . . . . . . . . . . . . . . . . . . . . . . . . . . . . . . . . . . . . . . . . . . . . . . . . . . . . . . . . . . . . . . . . . . . . . . . . . . . . . . . . . . . . . . . . . . . . . . . . . . . . . . . . . . . . . . . . . . . . . . . . . . . . . . . . . . . . . . . . . . . . . . . . . . . . . . . . . . . . . . . . . . . . . . . . . . . .
. . . . . . . . . . . . . . . . . . . . . . . . . . . . . . . . . . . . . . . . . . . . . . . . . . . . . . . . . . . . . . . . . . . . . . . . . . . . . . . . . . . . . . . . . . . . . . . . . . . . . . . . . . . . . . . . . . . . . . . . . . . . . . . . . . . . . . . . . . . . . . . . . . . . . . . . . . . . . . . . . . . . . . . . . . . . . . . . . . . . . . . . . . . . . . . . . . . . . . . . . . . . . . . . . . . . . . . . . . . . . . . . . . . . . . . . . . . . . . . . . . . . . . . . . . . . . . . . . . . . . . . . . . . . . . . . . . . . . . . .
. . . . . . . . . . . . . . . . . . . . . . . . . . . . . . . . . . . . . . . . . . . . . . . . . . . . . . . . . . . . . . . . . . . . . . . . . . . . . . . . . . . . . . . . . . . . . . . . . . . . . . . . . . . . . . . . . . . . . . . . . . . . . . . . . . . . . . . . . . . . . . . . . . . . . . . . . . . . . . . . . . . . . . . . . . . . . . . . . . . . . . . . . . . . . . . . . . . . . . . . . . . . . . . . . . . . . . . . . . . . . . . . . . . . . . . . . . . . . . . . . . . . . . . . . . . . . . . . . . . . . . . . . . . . . . . . . . . . . . . .
29.11.2. Useful Websites
PART VIII. KERNEL, MODULE AND DRIVER CONFIGURATION
CHAPTER 30. MANUALLY UPGRADING THE KERNEL
30.1. OVERVIEW OF KERNEL PACKAGES
30.2. PREPARING TO UPGRADE
30.3. DOWNLOADING THE UPGRADED KERNEL
30.4. PERFORMING THE UPGRADE
30.5. VERIFYING THE INITIAL RAM DISK IMAGE
Verifying the Initial RAM Disk Image and Kernel on IBM eServer System i
30.6. VERIFYING THE BOOT LOADER
30.6.1. Configuring the GRUB Boot Loader
30.6.2. Configuring the Loopback Device Limit
30.6.3. Configuring the OS/400 Boot Loader
30.6.4. Configuring the YABOOT Boot Loader
CHAPTER 31. WORKING WITH KERNEL MODULES
31.1. LISTING CURRENTLY-LOADED MODULES
31.2. DISPLAYING INFORMATION ABOUT A MODULE
31.3. LOADING A MODULE
31.4. UNLOADING A MODULE
31.5. BLACKLISTING A MODULE
31.6. SETTING MODULE PARAMETERS
31.6.1. Loading a Customized Module - Temporary Changes
31.6.2. Loading a Customized Module - Persistent Changes
31.7. PERSISTENT MODULE LOADING
31.8. SPECIFIC KERNEL MODULE CAPABILITIES
31.8.1. Using Channel Bonding
31.8.1.1. Bonding Module Directives
31.9. ADDITIONAL RESOURCES
Installed Documentation
Installable Documentation
Online Documentation
CHAPTER 32. THE KDUMP CRASH RECOVERY SERVICE
32.1. INSTALLING THE KDUMP SERVICE
32.2. CONFIGURING THE KDUMP SERVICE
32.2.1. Configuring kdump at First Boot
32.2.2. Using the Kernel Dump Configuration Utility
Enabling the Service
The Basic Settings Tab
The Target Settings Tab
The Filtering Settings Tab
The Expert Settings Tab
32.2.3. Configuring kdump on the Command Line
Configuring the Memory Usage
Configuring the Target Type
Configuring the Core Collector
Changing the Default Action
Enabling the Service
32.2.4. Testing the Configuration
32.3. ANALYZING THE CORE DUMP
32.3.1. Running the crash Utility
689
690
691
691
692
693
694
694
696
696
697
699
699
699
701
701
702
704
705
706
708
709
710
711
711
711
712
717
717
718
718
719
719
719
719
720
720
720
721
724
725
726
726
727
728
729
729
730
730
731
Deployment Guide
18

. . . . . . . . . . . . . . . . . . . . . . . . . . . . . . . . . . . . . . . . . . . . . . . . . . . . . . . . . . . . . . . . . . . . . . . . . . . . . . . . . . . . . . . . . . . . . . . . . . . . . . . . . . . . . . . . . . . . . . . . . . . . . . . . . . . . . . . . . . . . . . . . . . . . . . . . . . . . . . . . . . . . . . . . . . . . . . . . . . . . . . . . . . . . . . . . . . . . . . . . . . . . . . . . . . . . . . . . . . . . . . . . . . . . . . . . . . . . . . . . . . . . . . . . . . . . . . . . . . . . . . . . . . . . . . . . . . . . . . . .
. . . . . . . . . . . . . . . . . . . . . . . . . . . . . . . . . . . . . . . . . . . . . . . . . . . . . . . . . . . . . . . . . . . . . . . . . . . . . . . . . . . . . . . . . . . . . . . . . . . . . . . . . . . . . . . . . . . . . . . . . . . . . . . . . . . . . . . . . . . . . . . . . . . . . . . . . . . . . . . . . . . . . . . . . . . . . . . . . . . . . . . . . . . . . . . . . . . . . . . . . . . . . . . . . . . . . . . . . . . . . . . . . . . . . . . . . . . . . . . . . . . . . . . . . . . . . . . . . . . . . . . . . . . . . . . . . . . . . . . .
. . . . . . . . . . . . . . . . . . . . . . . . . . . . . . . . . . . . . . . . . . . . . . . . . . . . . . . . . . . . . . . . . . . . . . . . . . . . . . . . . . . . . . . . . . . . . . . . . . . . . . . . . . . . . . . . . . . . . . . . . . . . . . . . . . . . . . . . . . . . . . . . . . . . . . . . . . . . . . . . . . . . . . . . . . . . . . . . . . . . . . . . . . . . . . . . . . . . . . . . . . . . . . . . . . . . . . . . . . . . . . . . . . . . . . . . . . . . . . . . . . . . . . . . . . . . . . . . . . . . . . . . . . . . . . . . . . . . . . . .
. . . . . . . . . . . . . . . . . . . . . . . . . . . . . . . . . . . . . . . . . . . . . . . . . . . . . . . . . . . . . . . . . . . . . . . . . . . . . . . . . . . . . . . . . . . . . . . . . . . . . . . . . . . . . . . . . . . . . . . . . . . . . . . . . . . . . . . . . . . . . . . . . . . . . . . . . . . . . . . . . . . . . . . . . . . . . . . . . . . . . . . . . . . . . . . . . . . . . . . . . . . . . . . . . . . . . . . . . . . . . . . . . . . . . . . . . . . . . . . . . . . . . . . . . . . . . . . . . . . . . . . . . . . . . . . . . . . . . . . .
. . . . . . . . . . . . . . . . . . . . . . . . . . . . . . . . . . . . . . . . . . . . . . . . . . . . . . . . . . . . . . . . . . . . . . . . . . . . . . . . . . . . . . . . . . . . . . . . . . . . . . . . . . . . . . . . . . . . . . . . . . . . . . . . . . . . . . . . . . . . . . . . . . . . . . . . . . . . . . . . . . . . . . . . . . . . . . . . . . . . . . . . . . . . . . . . . . . . . . . . . . . . . . . . . . . . . . . . . . . . . . . . . . . . . . . . . . . . . . . . . . . . . . . . . . . . . . . . . . . . . . . . . . . . . . . . . . . . . . . .
32.3.2. Displaying the Message Buffer
32.3.3. Displaying a Backtrace
32.3.4. Displaying a Process Status
32.3.5. Displaying Virtual Memory Information
32.3.6. Displaying Open Files
32.3.7. Exiting the Utility
32.4. USING FADUMP ON IBM POWERPC HARDWARE
Enabling fadump
32.5. ADDITIONAL RESOURCES
Installed Documentation
Useful Websites
PART IX. SYSTEM RECOVERY
CHAPTER 33. SYSTEM RECOVERY
33.1. RESCUE MODE
33.2. SINGLE-USER MODE
33.3. EMERGENCY MODE
33.4. RESOLVING PROBLEMS IN SYSTEM RECOVERY MODES
CHAPTER 34. RELAX-AND-RECOVER (REAR)
34.1. BASIC REAR USAGE
34.1.1. Installing ReaR
34.1.2. Configuring ReaR
34.1.3. Creating a Rescue System
34.1.4. Scheduling ReaR
34.1.5. Performing a System Rescue
34.2. INTEGRATING REAR WITH BACKUP SOFTWARE
34.2.1. The Built-in Backup Method
34.2.1.1. Configuring the Internal Backup Method
34.2.1.2. Creating a Backup Using the Internal Backup Method
34.2.2. Supported Backup Methods
34.2.3. Unsupported Backup Methods
APPENDIX A. CONSISTENT NETWORK DEVICE NAMING
A.1. AFFECTED SYSTEMS
A.2. SYSTEM REQUIREMENTS
A.3. ENABLING AND DISABLING THE FEATURE
A.4. NOTES FOR ADMINISTRATORS
APPENDIX B. RPM
B.1. RPM DESIGN GOALS
B.2. USING RPM
B.2.1. Finding RPM Packages
B.2.2. Installing and Upgrading
B.2.2.1. Package Already Installed
B.2.2.2. Conflicting Files
B.2.2.3. Unresolved Dependency
B.2.3. Configuration File Changes
B.2.4. Uninstalling
B.2.5. Freshening
B.2.6. Querying
B.2.7. Verifying
B.3. CHECKING A PACKAGE'S SIGNATURE
732
733
734
734
735
735
735
736
736
736
737
738
739
739
741
742
742
746
746
746
746
747
747
748
751
751
751
752
753
753
755
755
756
756
756
758
759
759
760
760
761
762
762
763
764
765
765
766
767
Table of Contents
19

. . . . . . . . . . . . . . . . . . . . . . . . . . . . . . . . . . . . . . . . . . . . . . . . . . . . . . . . . . . . . . . . . . . . . . . . . . . . . . . . . . . . . . . . . . . . . . . . . . . . . . . . . . . . . . . . . . . . . . . . . . . . . . . . . . . . . . . . . . . . . . . . . . . . . . . . . . . . . . . . . . . . . . . . . . . . . . . . . . . . . . . . . . . . . . . . . . . . . . . . . . . . . . . . . . . . . . . . . . . . . . . . . . . . . . . . . . . . . . . . . . . . . . . . . . . . . . . . . . . . . . . . . . . . . . . . . . . . . . . .
. . . . . . . . . . . . . . . . . . . . . . . . . . . . . . . . . . . . . . . . . . . . . . . . . . . . . . . . . . . . . . . . . . . . . . . . . . . . . . . . . . . . . . . . . . . . . . . . . . . . . . . . . . . . . . . . . . . . . . . . . . . . . . . . . . . . . . . . . . . . . . . . . . . . . . . . . . . . . . . . . . . . . . . . . . . . . . . . . . . . . . . . . . . . . . . . . . . . . . . . . . . . . . . . . . . . . . . . . . . . . . . . . . . . . . . . . . . . . . . . . . . . . . . . . . . . . . . . . . . . . . . . . . . . . . . . . . . . . . . .
B.3.1. Importing Keys
B.3.2. Verifying Signature of Packages
B.4. PRACTICAL AND COMMON EXAMPLES OF RPM USAGE
B.5. ADDITIONAL RESOURCES
B.5.1. Installed Documentation
B.5.2. Useful Websites
APPENDIX C. THE X WINDOW SYSTEM
C.1. THE X SERVER
C.2. DESKTOP ENVIRONMENTS AND WINDOW MANAGERS
C.2.1. Maximum number of concurrent GUI sessions
C.2.2. Desktop Environments
C.2.3. Window Managers
C.3. X SERVER CONFIGURATION FILES
C.3.1. The Structure of the Configuration
C.3.2. The xorg.conf.d Directory
C.3.3. The xorg.conf File
C.3.3.1. The InputClass section
C.3.3.2. The InputDevice section
C.3.3.3. The ServerFlags section
C.3.3.4. The ServerLayout Section
C.3.3.5. The Files section
C.3.3.6. The Monitor section
C.3.3.7. The Device section
C.3.3.8. The Screen section
C.3.3.9. The DRI section
C.4. FONTS
C.4.1. Adding Fonts to Fontconfig
C.5. RUNLEVELS AND X
C.5.1. Runlevel 3
C.5.2. Runlevel 5
C.6. ACCESSING GRAPHICAL APPLICATIONS REMOTELY
C.7. ADDITIONAL RESOURCES
C.7.1. Installed Documentation
C.7.2. Useful Websites
APPENDIX D. THE SYSCONFIG DIRECTORY
D.1. FILES IN THE /ETC/SYSCONFIG/ DIRECTORY
D.1.1. /etc/sysconfig/arpwatch
D.1.2. /etc/sysconfig/authconfig
D.1.3. /etc/sysconfig/autofs
D.1.4. /etc/sysconfig/clock
D.1.5. /etc/sysconfig/dhcpd
D.1.6. /etc/sysconfig/firstboot
D.1.7. /etc/sysconfig/i18n
D.1.8. /etc/sysconfig/init
D.1.9. /etc/sysconfig/ip6tables-config
D.1.10. /etc/sysconfig/keyboard
D.1.11. /etc/sysconfig/ldap
D.1.12. /etc/sysconfig/named
D.1.13. /etc/sysconfig/network
D.1.14. /etc/sysconfig/ntpd
D.1.15. /etc/sysconfig/quagga
767
768
768
770
770
770
771
771
771
772
772
772
773
773
774
774
775
775
776
777
778
778
779
780
781
781
782
782
783
783
784
784
785
785
786
786
786
786
789
791
791
791
792
792
794
795
796
797
797
798
799
Deployment Guide
20

. . . . . . . . . . . . . . . . . . . . . . . . . . . . . . . . . . . . . . . . . . . . . . . . . . . . . . . . . . . . . . . . . . . . . . . . . . . . . . . . . . . . . . . . . . . . . . . . . . . . . . . . . . . . . . . . . . . . . . . . . . . . . . . . . . . . . . . . . . . . . . . . . . . . . . . . . . . . . . . . . . . . . . . . . . . . . . . . . . . . . . . . . . . . . . . . . . . . . . . . . . . . . . . . . . . . . . . . . . . . . . . . . . . . . . . . . . . . . . . . . . . . . . . . . . . . . . . . . . . . . . . . . . . . . . . . . . . . . . . .
D.1.16. /etc/sysconfig/radvd
D.1.17. /etc/sysconfig/samba
D.1.18. /etc/sysconfig/saslauthd
D.1.19. /etc/sysconfig/selinux
D.1.20. /etc/sysconfig/sendmail
D.1.21. /etc/sysconfig/spamassassin
D.1.22. /etc/sysconfig/squid
D.1.23. /etc/sysconfig/system-config-users
D.1.24. /etc/sysconfig/vncservers
D.1.25. /etc/sysconfig/xinetd
D.2. DIRECTORIES IN THE /ETC/SYSCONFIG/ DIRECTORY
D.3. ADDITIONAL RESOURCES
D.3.1. Installed Documentation
APPENDIX E. THE PROC FILE SYSTEM
E.1. A VIRTUAL FILE SYSTEM
E.1.1. Viewing Virtual Files
E.1.2. Changing Virtual Files
E.2. TOP-LEVEL FILES WITHIN THE PROC FILE SYSTEM
E.2.1. /proc/buddyinfo
E.2.2. /proc/cmdline
E.2.3. /proc/cpuinfo
E.2.4. /proc/crypto
E.2.5. /proc/devices
E.2.6. /proc/dma
E.2.7. /proc/execdomains
E.2.8. /proc/fb
E.2.9. /proc/filesystems
E.2.10. /proc/interrupts
E.2.11. /proc/iomem
E.2.12. /proc/ioports
E.2.13. /proc/kcore
E.2.14. /proc/kmsg
E.2.15. /proc/loadavg
E.2.16. /proc/locks
E.2.17. /proc/mdstat
E.2.18. /proc/meminfo
E.2.19. /proc/misc
E.2.20. /proc/modules
E.2.21. /proc/mounts
E.2.22. /proc/mtrr
E.2.23. /proc/partitions
E.2.24. /proc/slabinfo
E.2.25. /proc/stat
E.2.26. /proc/swaps
E.2.27. /proc/sysrq-trigger
E.2.28. /proc/uptime
E.2.29. /proc/version
E.3. DIRECTORIES WITHIN /PROC/
E.3.1. Process Directories
E.3.1.1. /proc/self/
E.3.2. /proc/bus/
E.3.3. /proc/bus/pci
800
800
801
801
802
802
802
803
803
804
804
805
805
806
806
806
807
807
808
808
808
809
810
811
811
811
811
812
813
813
814
814
814
814
815
815
819
819
820
820
820
821
822
823
823
823
824
824
824
826
826
827
Table of Contents
21

. . . . . . . . . . . . . . . . . . . . . . . . . . . . . . . . . . . . . . . . . . . . . . . . . . . . . . . . . . . . . . . . . . . . . . . . . . . . . . . . . . . . . . . . . . . . . . . . . . . . . . . . . . . . . . . . . . . . . . . . . . . . . . . . . . . . . . . . . . . . . . . . . . . . . . . . . . . . . . . . . . . . . . . . . . . . . . . . . . . . . . . . . . . . . . . . . . . . . . . . . . . . . . . . . . . . . . . . . . . . . . . . . . . . . . . . . . . . . . . . . . . . . . . . . . . . . . . . . . . . . . . . . . . . . . . . . . . . . . . .
. . . . . . . . . . . . . . . . . . . . . . . . . . . . . . . . . . . . . . . . . . . . . . . . . . . . . . . . . . . . . . . . . . . . . . . . . . . . . . . . . . . . . . . . . . . . . . . . . . . . . . . . . . . . . . . . . . . . . . . . . . . . . . . . . . . . . . . . . . . . . . . . . . . . . . . . . . . . . . . . . . . . . . . . . . . . . . . . . . . . . . . . . . . . . . . . . . . . . . . . . . . . . . . . . . . . . . . . . . . . . . . . . . . . . . . . . . . . . . . . . . . . . . . . . . . . . . . . . . . . . . . . . . . . . . . . . . . . . . . .
E.3.4. /proc/driver/
E.3.5. /proc/fs
E.3.6. /proc/irq/
E.3.7. /proc/net/
E.3.8. /proc/scsi/
E.3.9. /proc/sys/
E.3.9.1. /proc/sys/dev/
E.3.9.2. /proc/sys/fs/
E.3.9.3. /proc/sys/kernel/
E.3.9.4. /proc/sys/net/
E.3.9.5. /proc/sys/vm/
E.3.10. /proc/sysvipc/
E.3.11. /proc/tty/
E.3.12. /proc/PID/
E.4. USING THE SYSCTL COMMAND
E.5. ADDITIONAL RESOURCES
Installable Documentation
APPENDIX F. REVISION HISTORY
INDEX
828
828
828
829
830
832
833
833
834
837
839
841
841
842
843
844
844
846
848
Deployment Guide
22

Table of Contents
23

PART I. BASIC SYSTEM CONFIGURATION
This part covers basic system administration tasks such as keyboard configuration, date and time
configuration, managing users and groups, and gaining privileges.
Deployment Guide
24
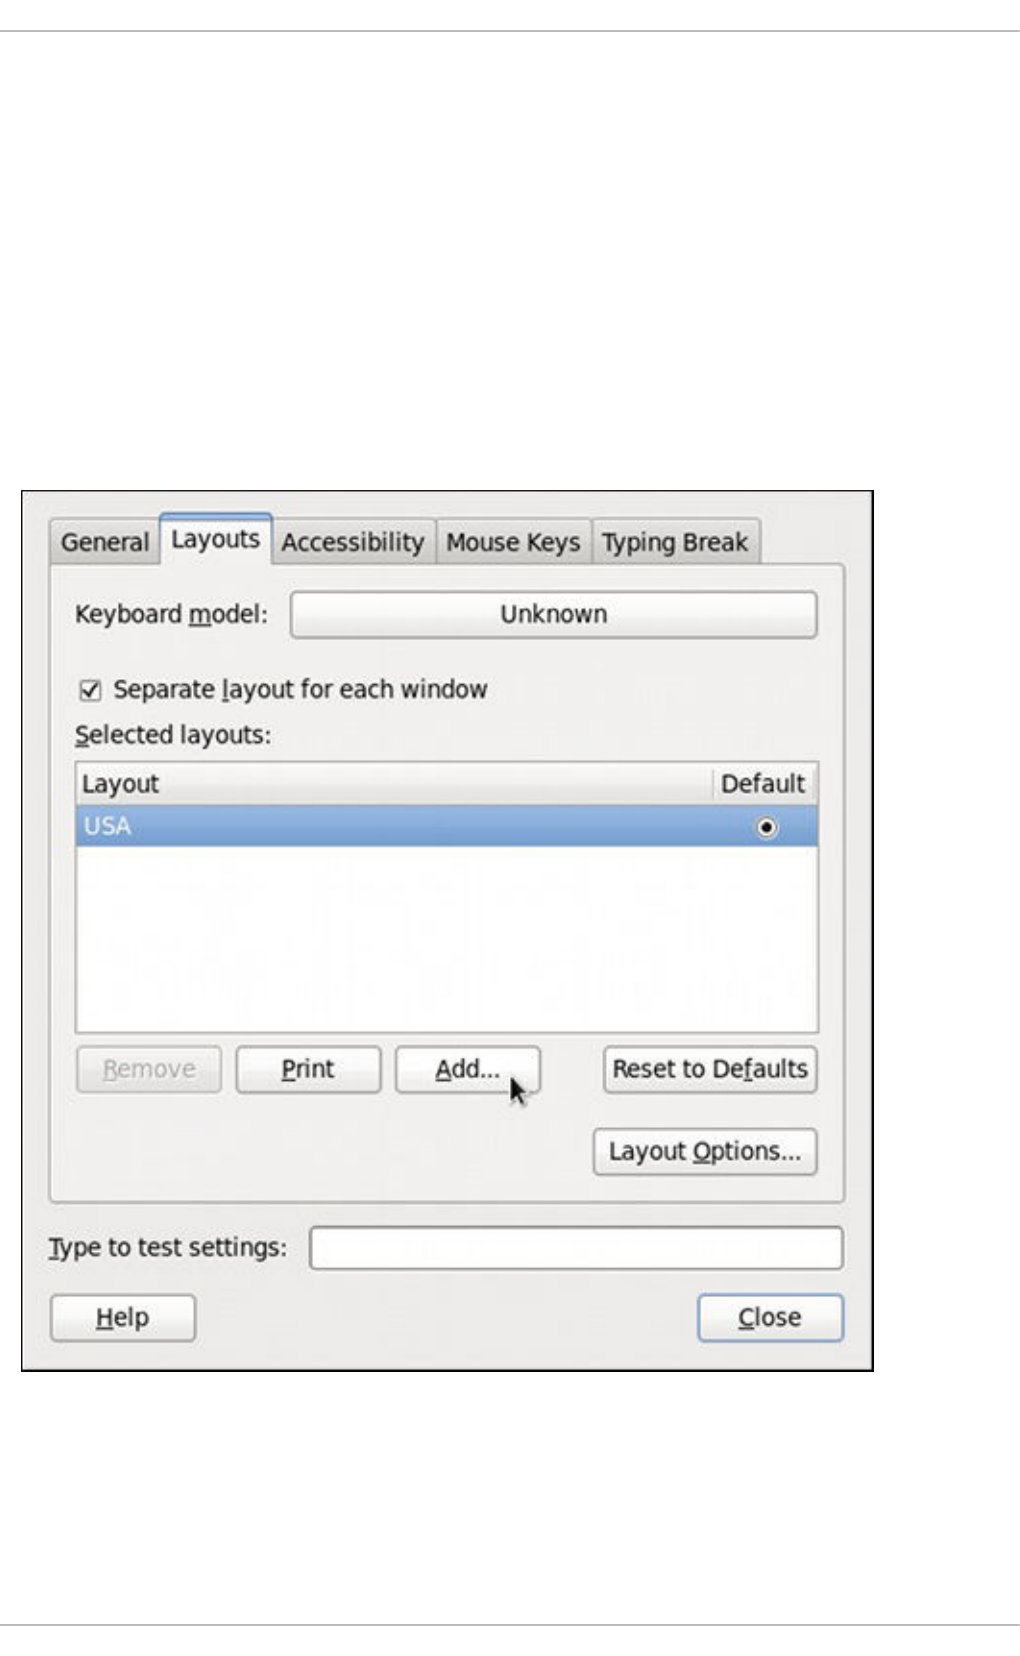
CHAPTER 1. KEYBOARD CONFIGURATION
This chapter describes how to change the keyboard layout, as well as how to add the Keyboard
Indicator applet to the panel. It also covers the option to enforce a typing break, and explains both
advantages and disadvantages of doing so.
1.1. CHANGING THE KEYBOARD LAYOUT
The installation program has allowed you to configure a keyboard layout for your system. However, the
default settings may not always suit your current needs. To configure a different keyboard layout after the
installation, use the Keyboard Preferences tool.
To open Keyboard Layout Preferences, select System → Preferences → Keyboard from the panel,
and click the Layouts tab.
Figure 1.1. Keyboard Layout Preferences
You will be presented with a list of available layouts. To add a new one, click the Add button below the
list, and you will be prompted to choose which layout you want to add.
CHAPTER 1. KEYBOARD CONFIGURATION
25
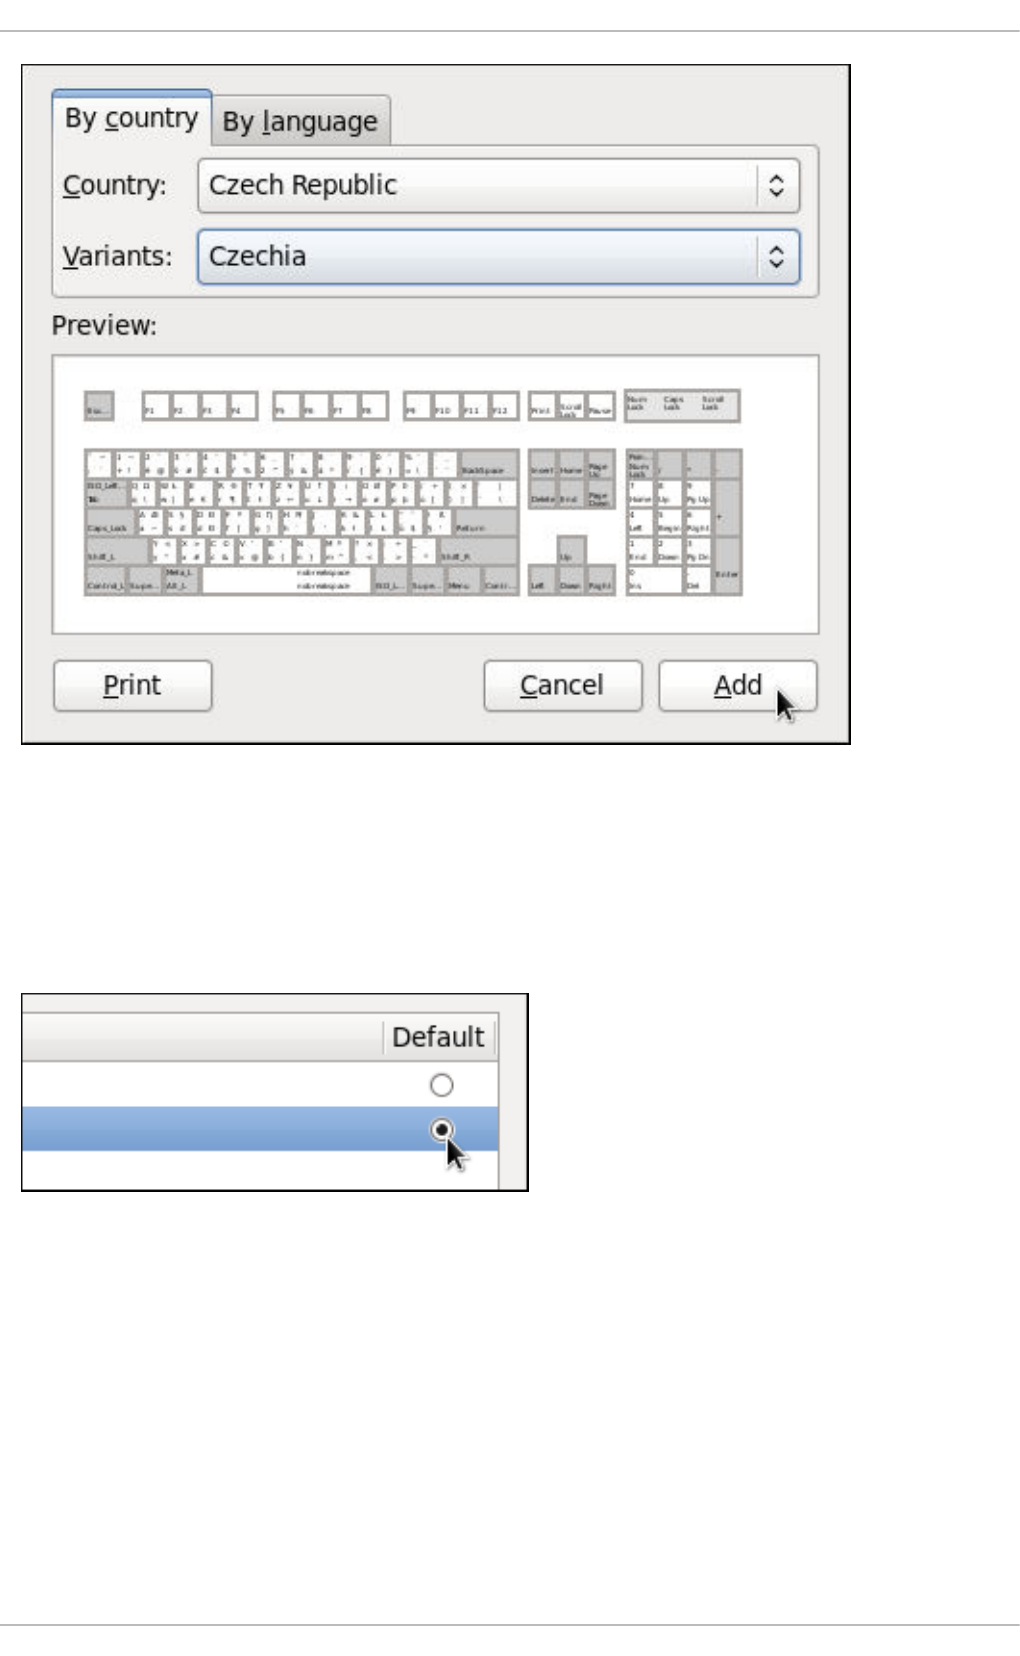
Figure 1.2. Choosing a layout
Currently, there are two ways how to choose the keyboard layout: you can either find it by the country it
is associated with (the By country tab), or you can select it by language (the By language tab). In
either case, first select the desired country or language from the Country or Language pulldown menu,
then specify the variant from the Variants menu. The preview of the layout changes immediately. To
confirm the selection, click Add.
Figure 1.3. Selecting the default layout
The layout should appear in the list. To make it the default, select the radio button next to its name. The
changes take effect immediately. Note that there is a text-entry field at the bottom of the window where
you can safely test your settings. Once you are satisfied, click Close to close the window.
Deployment Guide
26
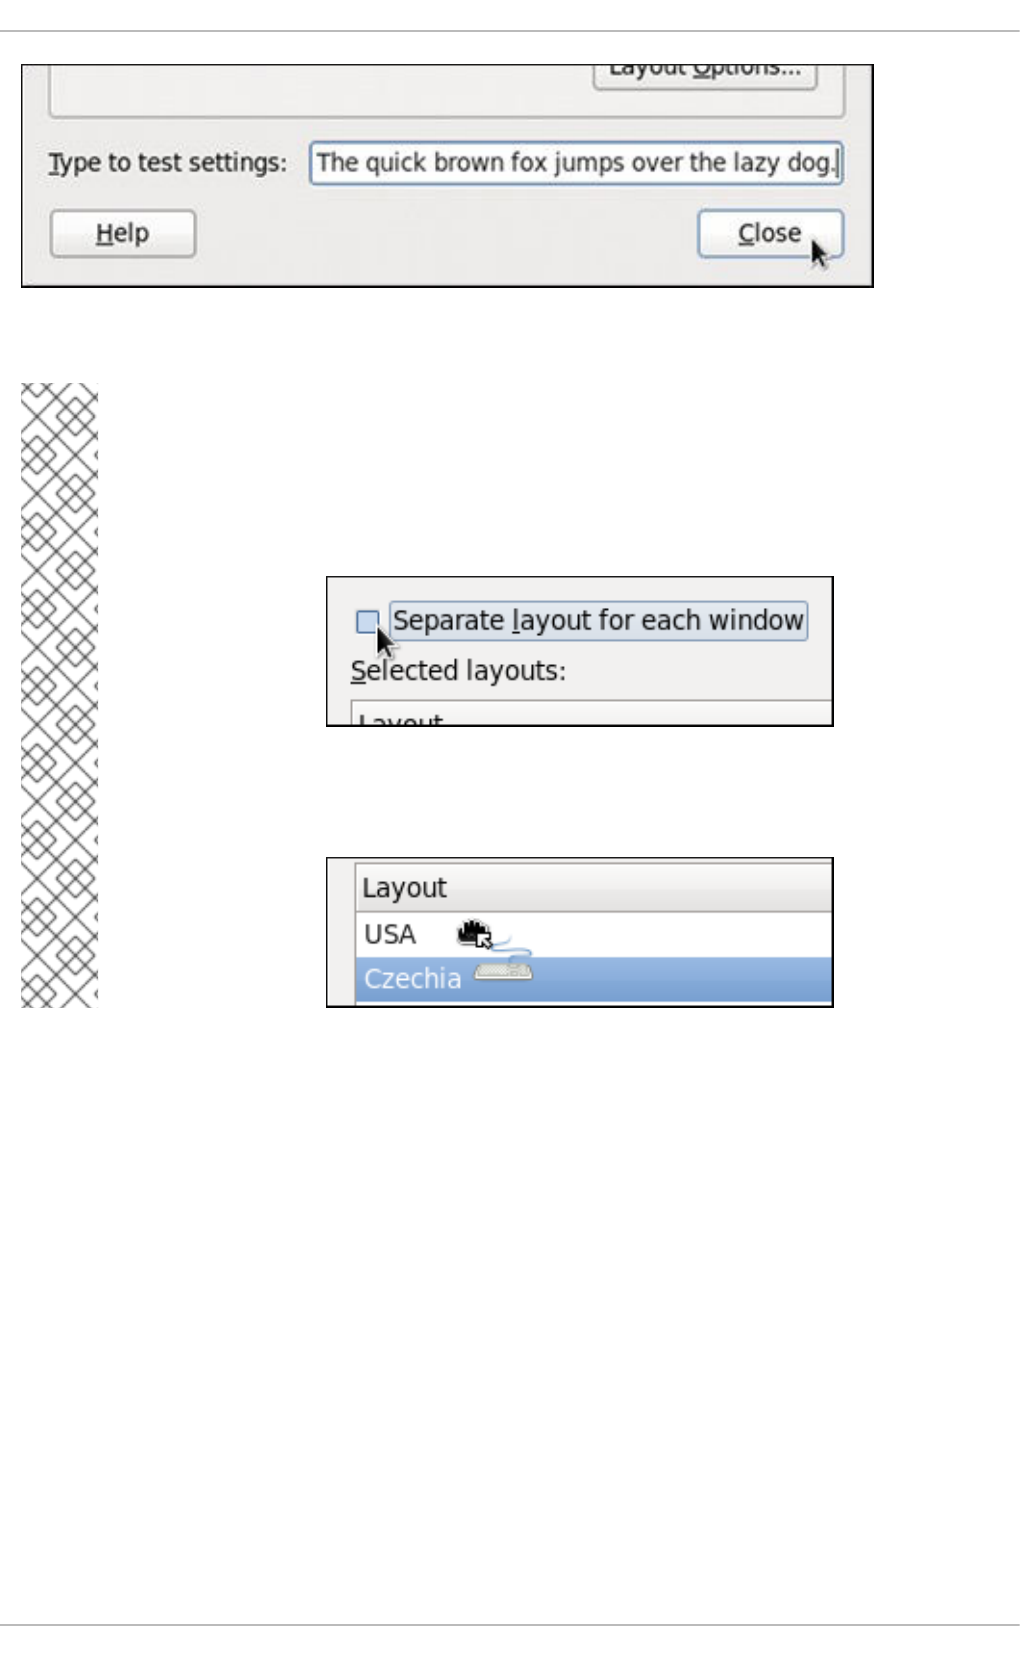
Figure 1.4. Testing the layout
NOTE
By default, changing the keyboard layout affects the active window only. This means that
if you change the layout and switch to another window, this window will use the old one,
which might be confusing. To turn this behavior off, clear the Separate layout for
each window check box.
Doing this has its drawbacks though, as you will no longer be able to choose the default
layout by selecting the radio button as shown in Figure 1.3, “Selecting the default layout”.
To make the layout the default, drag it to the beginning of the list.
1.2. ADDING THE KEYBOARD LAYOUT INDICATOR
If you want to see what keyboard layout you are currently using, or you would like to switch between
different layouts with a single mouse click, add the Keyboard Indicator applet to the panel. To do so,
right-click the empty space on the main panel, and select the Add to Panel option from the pulldown
menu.
CHAPTER 1. KEYBOARD CONFIGURATION
27
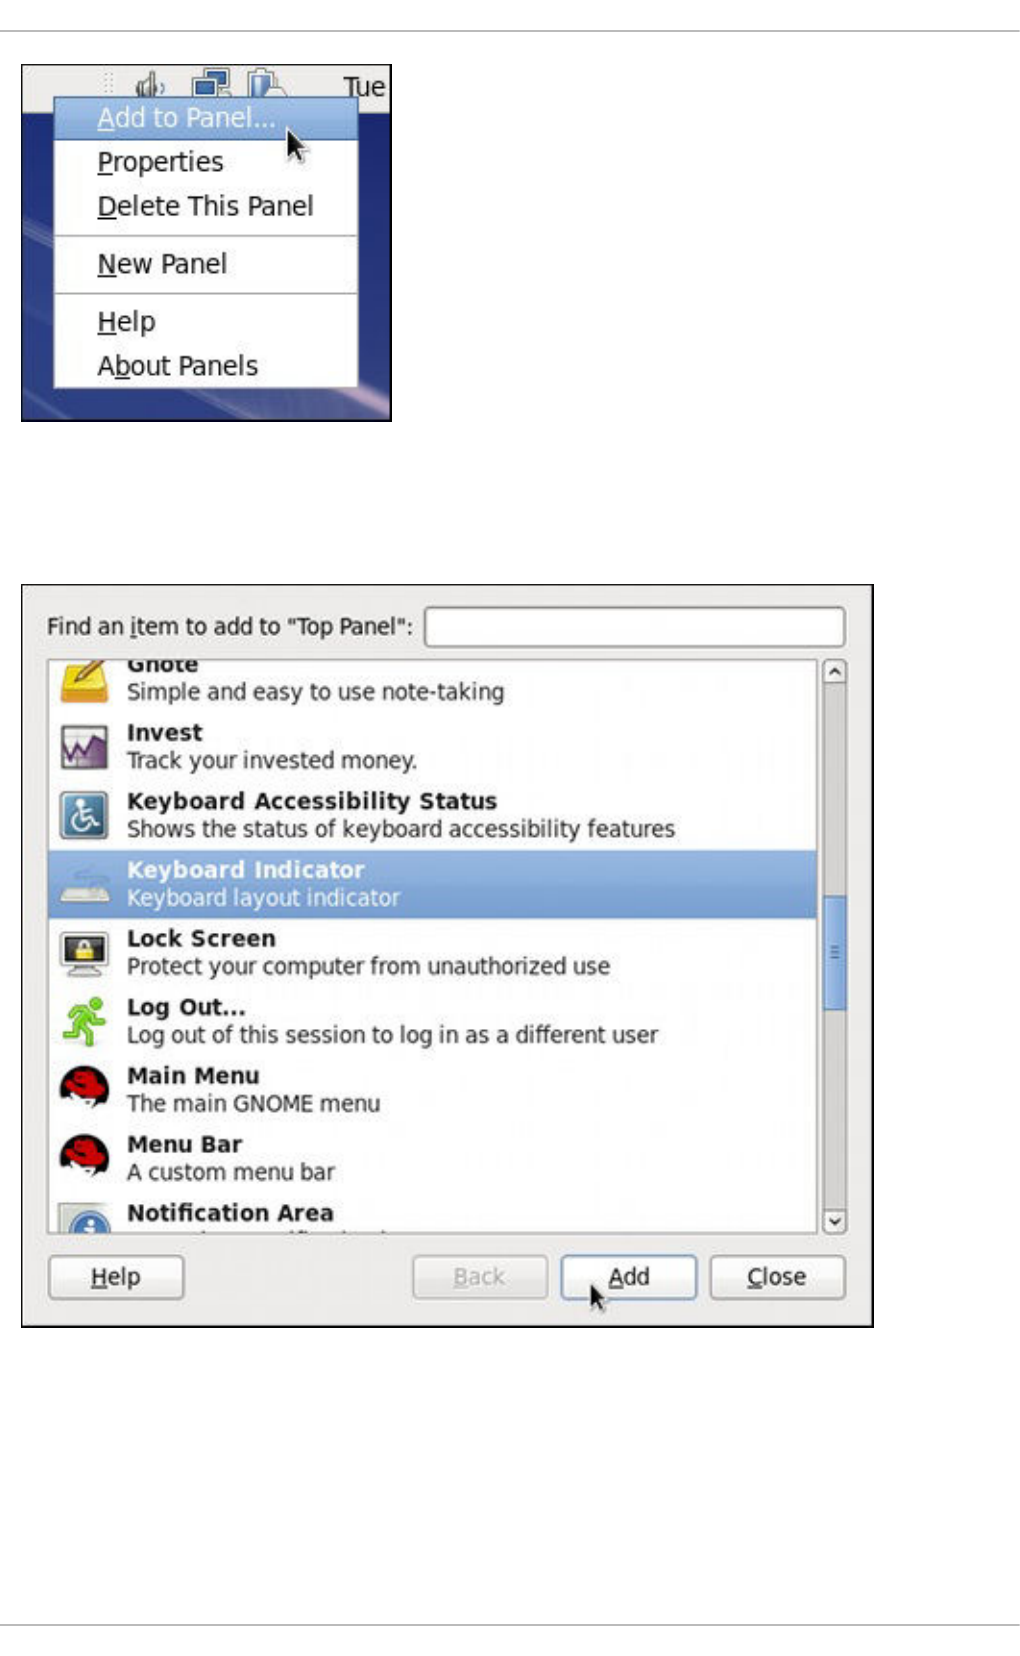
Figure 1.5. Adding a new applet
You will be presented with a list of available applets. Scroll through the list (or start typing “keyboard” into
the search field at the top of the window), select Keyboard Indicator, and click the Add button.
Figure 1.6. Selecting the Keyboard Indicator
The applet appears immediately, displaying the shortened name of the country the current layout is
associated with. To display the actual variant, hover the pointer over the applet icon.
Deployment Guide
28

Figure 1.7. The Keyboard Indicator applet
1.3. SETTING UP A TYPING BREAK
Typing for a long period of time can be not only tiring, but it can also increase the risk of serious health
problems, such as carpal tunnel syndrome. One way of preventing this is to configure the system to
enforce typing breaks. To do so, select System → Preferences → Keyboard from the panel, click the
Typing Break tab, and select the Lock screen to enforce typing break check box.
Figure 1.8. Typing Break Properties
To increase or decrease the allowed typing time before the break is enforced, click the up or down button
next to the Work interval lasts label respectively. You can do the same with the Break
interval lasts setting to alter the length of the break itself. Finally, select the Allow postponing
CHAPTER 1. KEYBOARD CONFIGURATION
29

of breaks check box if you want to be able to delay the break in case you need to finish the work. The
changes take effect immediately.
Figure 1.9. Taking a break
Next time you reach the time limit, you will be presented with a screen advising you to take a break, and
a clock displaying the remaining time. If you have enabled it, the Postpone Break button will be
located at the bottom right corner of the screen.
Deployment Guide
30
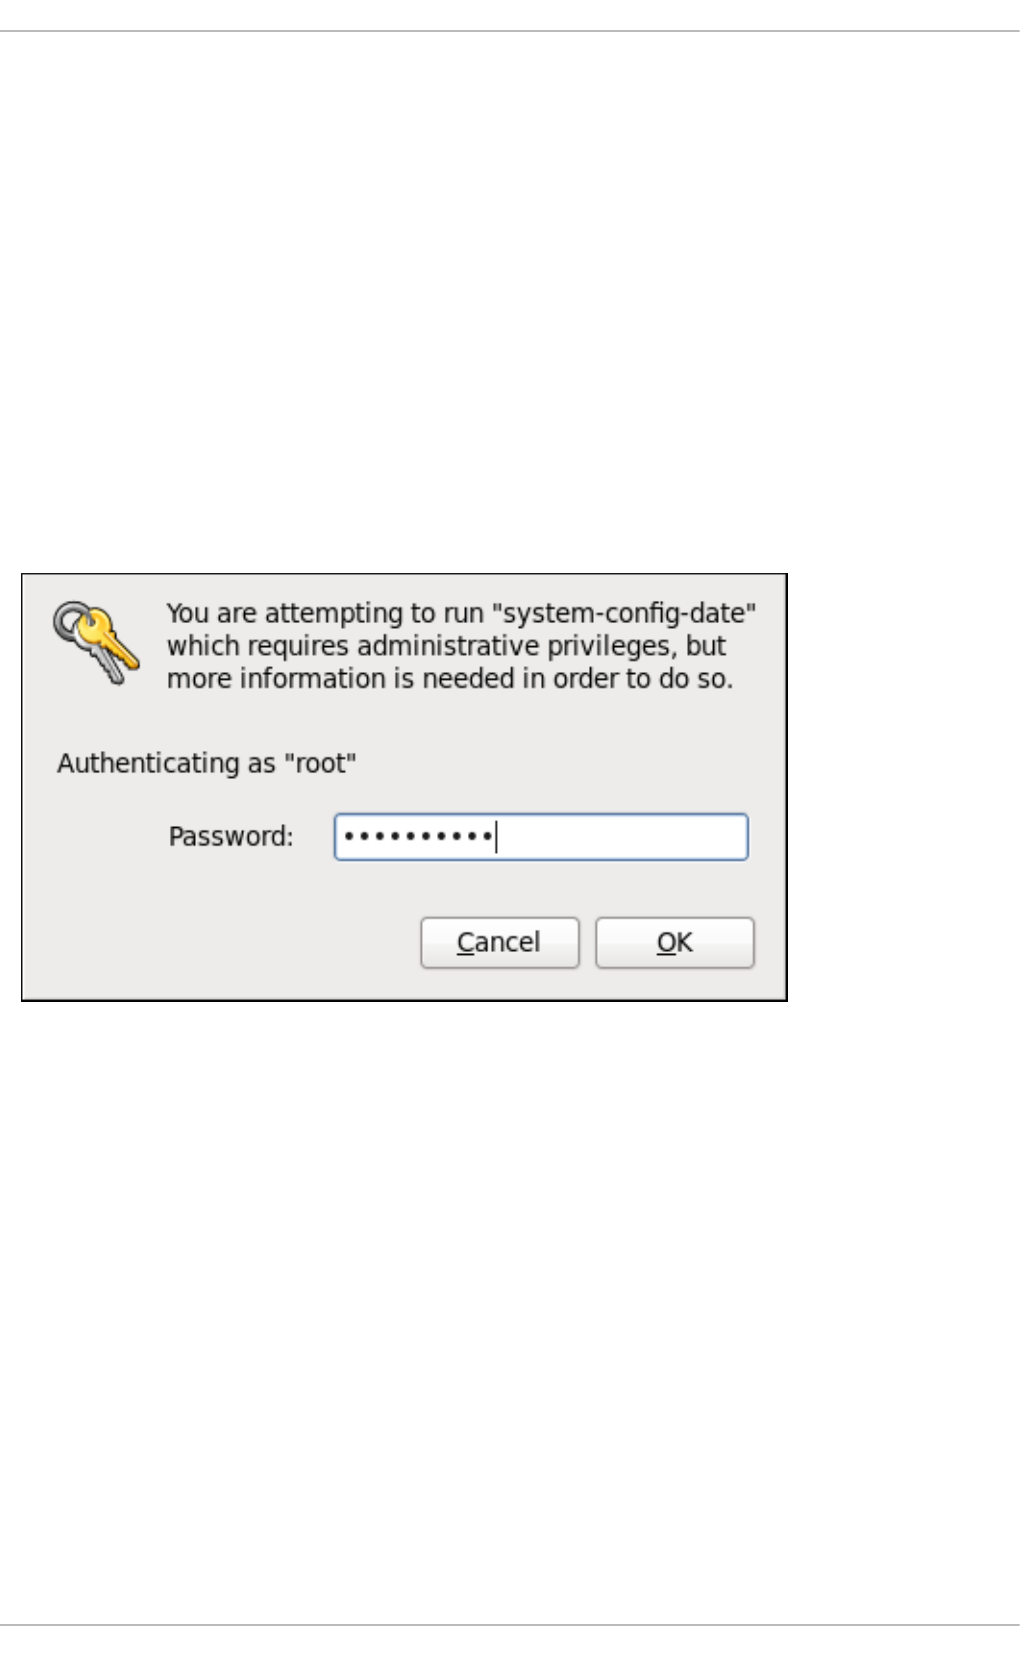
CHAPTER 2. DATE AND TIME CONFIGURATION
This chapter covers setting the system date and time in Red Hat Enterprise Linux, both manually and
using the Network Time Protocol (NTP), as well as setting the adequate time zone. Two methods are
covered: setting the date and time using the Date/Time Properties tool, and doing so on the command
line.
2.1. DATE/TIME PROPERTIES TOOL
The Date/Time Properties tool allows the user to change the system date and time, to configure the
time zone used by the system, and to set up the Network Time Protocol daemon to synchronize the
system clock with a time server. Note that to use this application, you must be running the X Window
System (see Appendix C, The X Window System for more information on this topic).
To start the tool, select System → Administration → Date & Time from the panel, or type the system-
config-date command at a shell prompt (e.g., xterm or GNOME Terminal). Unless you are already
authenticated, you will be prompted to enter the superuser password.
Figure 2.1. Authentication Query
2.1.1. Date and Time Properties
As shown in Figure 2.2, “Date and Time Properties”, the Date/Time Properties tool is divided into two
separate tabs. The tab containing the configuration of the current date and time is shown by default.
CHAPTER 2. DATE AND TIME CONFIGURATION
31
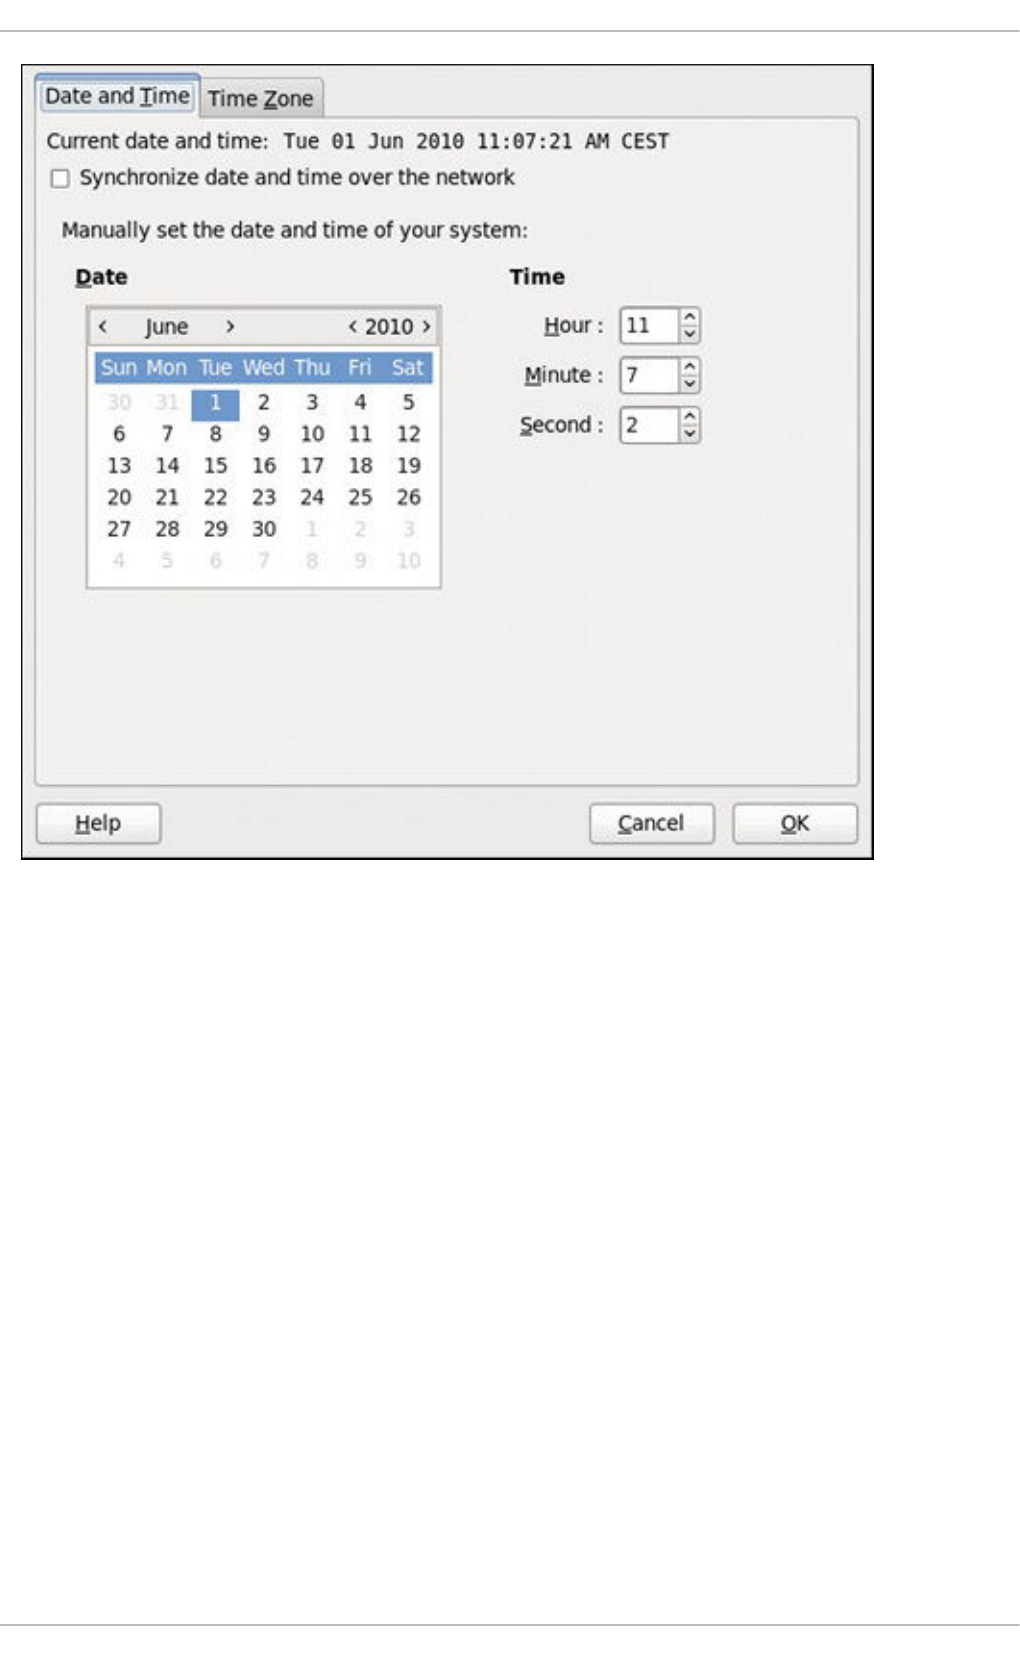
Figure 2.2. Date and Time Properties
To set up your system manually, follow these steps:
1. Change the current date. Use the arrows to the left and right of the month and year to change the
month and year respectively. Then click inside the calendar to select the day of the month.
2. Change the current time. Use the up and down arrow buttons beside the Hour, Minute, and
Second, or replace the values directly.
Click the OK button to apply the changes and exit the application.
2.1.2. Network Time Protocol Properties
If you prefer an automatic setup, select the check box labeled Synchronize date and time over
the network instead. This will display the list of available NTP servers as shown in Figure 2.3,
“Network Time Protocol Properties”.
Deployment Guide
32
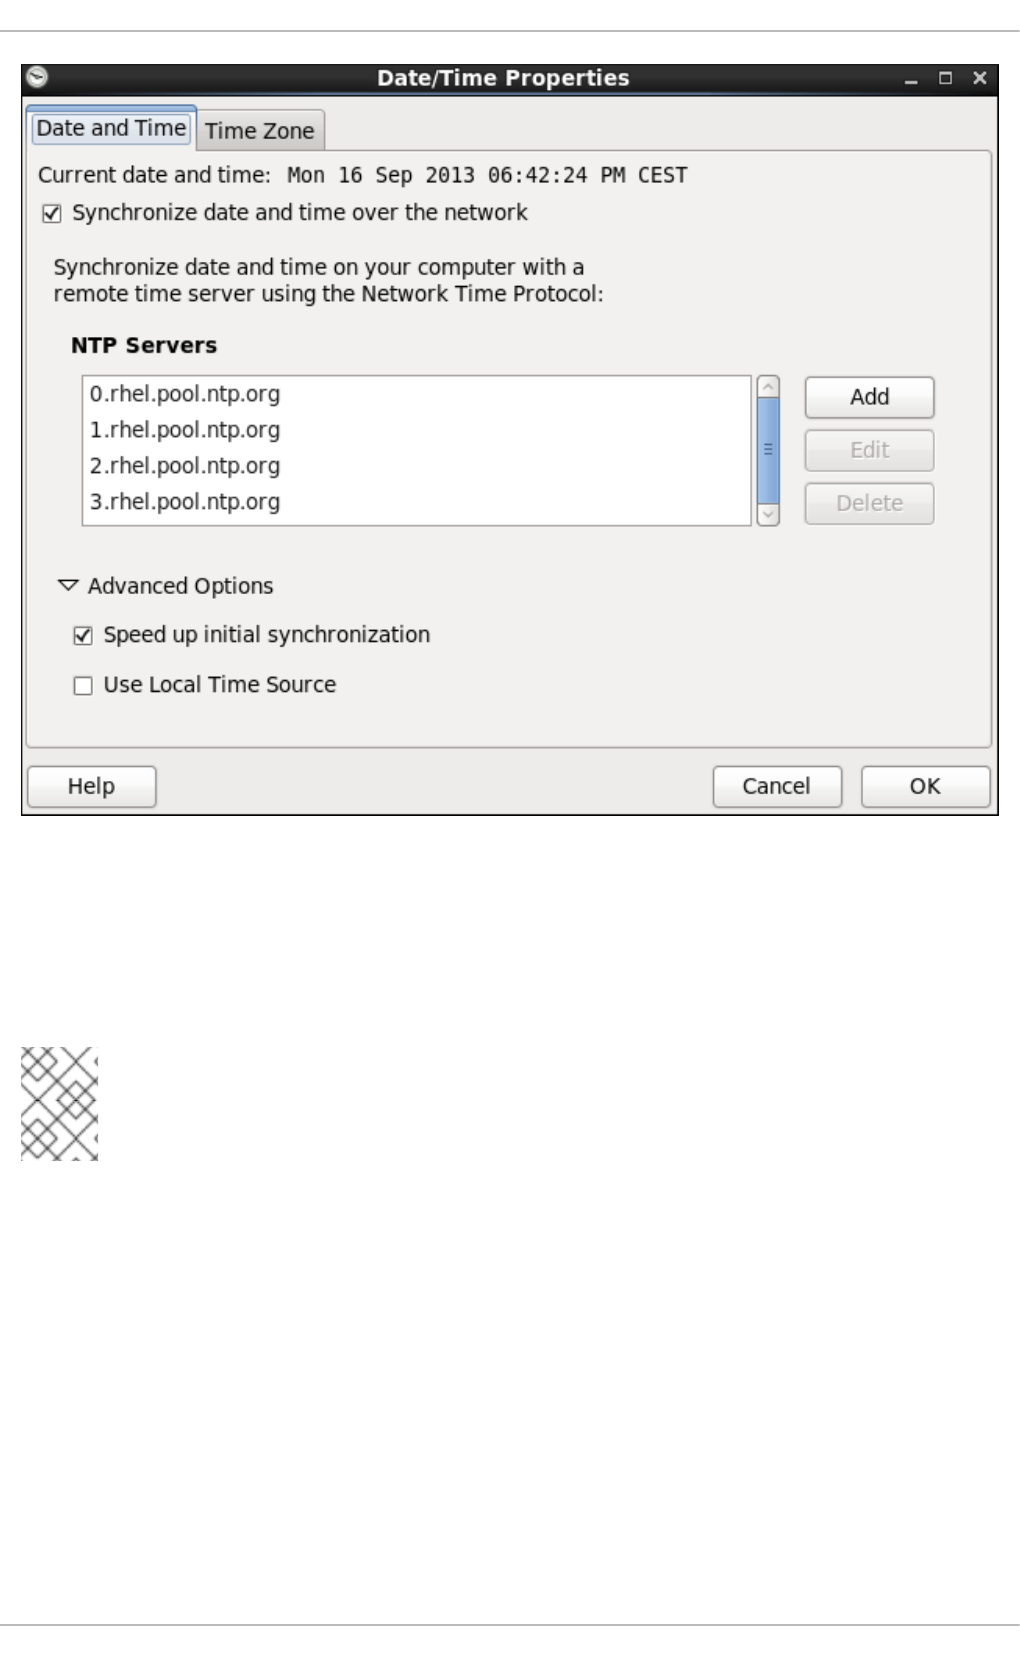
Figure 2.3. Network Time Protocol Properties
Here you can choose one of the predefined servers, edit a predefined server by clicking the Edit button,
or add a new server name by clicking Add. In the Advanced Options, you can also select whether
you want to speed up the initial synchronization of the system clock, or if you want to use a local time
source.
NOTE
Your system does not start synchronizing with the NTP server until you click the OK button
at the bottom of the window to confirm your changes.
Click the OK button to apply any changes made to the date and time settings and exit the application.
2.1.3. Time Zone Properties
To configure the system time zone, click the Time Zone tab as shown in Figure 2.4, “Time Zone
Properties”.
CHAPTER 2. DATE AND TIME CONFIGURATION
33
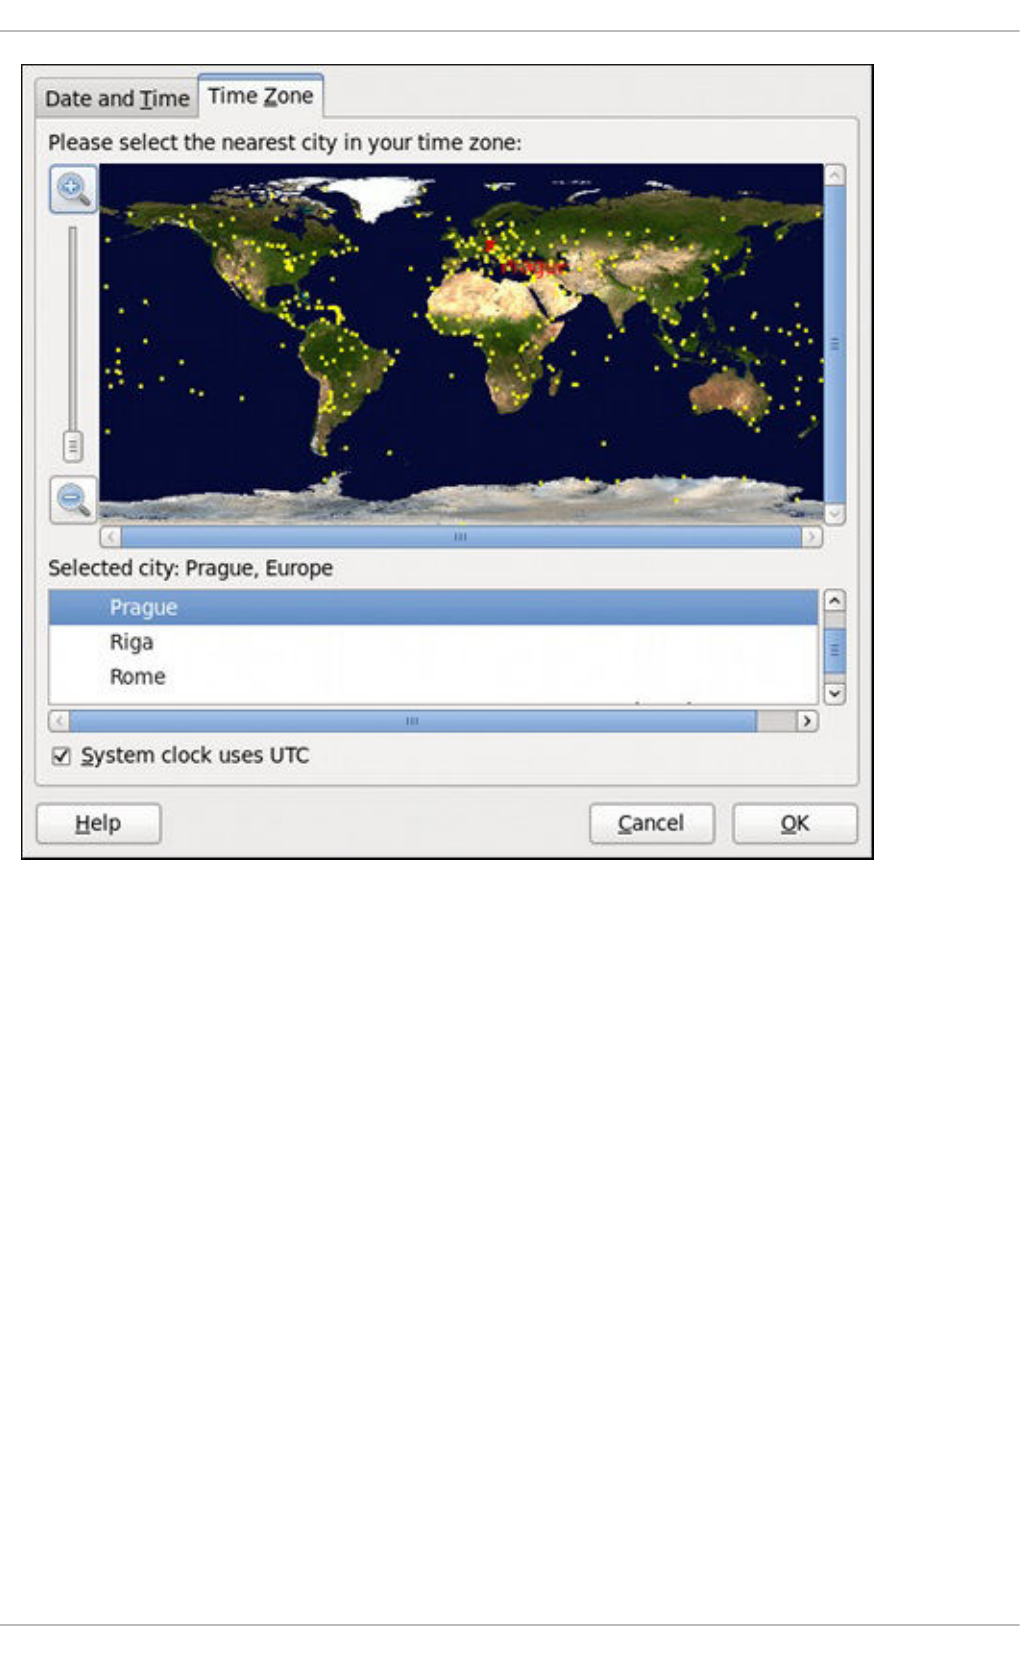
Figure 2.4. Time Zone Properties
There are two common approaches to the time zone selection:
1. Using the interactive map. Click “zoom in” and “zoom out” buttons next to the map, or click on the
map itself to zoom into the selected region. Then choose the city specific to your time zone. A
red X appears and the time zone selection changes in the list below the map.
2. Use the list below the map. To make the selection easier, cities and countries are grouped within
their specific continents. Note that non-geographic time zones have also been added to address
needs in the scientific community.
If your system clock is set to use UTC, select the System clock uses UTC option. UTC stands for
the Universal Time, Coordinated, also known as Greenwich Mean Time (GMT). Other time zones are
determined by adding or subtracting from the UTC time.
Click OK to apply the changes and exit the program.
2.2. COMMAND LINE CONFIGURATION
In case your system does not have the Date/Time Properties tool installed, or the X Window Server is
not running, you will have to change the system date and time on the command line. Note that in order to
perform actions described in this section, you have to be logged in as a superuser:
Deployment Guide
34

~]$ su -
Password:
2.2.1. Date and Time Setup
The date command allows the superuser to set the system date and time manually:
1. Change the current date. Type the command in the following form at a shell prompt, replacing
the YYYY with a four-digit year, MM with a two-digit month, and DD with a two-digit day of the
month:
~]# date +%D -s YYYY-MM-DD
For example, to set the date to 2 June 2010, type:
~]# date +%D -s 2010-06-02
2. Change the current time. Use the following command, where HH stands for an hour, MM is a
minute, and SS is a second, all typed in a two-digit form:
~]# date +%T -s HH:MM:SS
If your system clock is set to use UTC (Coordinated Universal Time), add the following option:
~]# date +%T -s HH:MM:SS -u
For instance, to set the system clock to 11:26 PM using the UTC, type:
~]# date +%T -s 23:26:00 -u
You can check your current settings by typing date without any additional argument:
Example 2.1. Displaying the current date and time
~]$ date
Wed Jun 2 11:58:48 CEST 2010
2.2.2. Network Time Protocol Setup
As opposed to the manual setup described above, you can also synchronize the system clock with a
remote server over the Network Time Protocol (NTP). For the one-time synchronization only, use the
ntpdate command:
1. Firstly, check whether the selected NTP server is accessible:
~]# ntpdate -q server_address
For example:
~]# ntpdate -q 0.rhel.pool.ntp.org
CHAPTER 2. DATE AND TIME CONFIGURATION
35

2. When you find a satisfactory server, run the ntpdate command followed by one or more server
addresses:
~]# ntpdate server_address...
For instance:
~]# ntpdate 0.rhel.pool.ntp.org 1.rhel.pool.ntp.org
Unless an error message is displayed, the system time should now be set. You can check the
current by setting typing date without any additional arguments as shown in Section 2.2.1,
“Date and Time Setup”.
3. In most cases, these steps are sufficient. Only if you really need one or more system services to
always use the correct time, enable running the ntpdate at boot time:
~]# chkconfig ntpdate on
For more information about system services and their setup, see Chapter 12, Services and
Daemons.
NOTE
If the synchronization with the time server at boot time keeps failing, i.e., you find
a relevant error message in the /var/log/boot.log system log, try to add the
following line to /etc/sysconfig/network:
NETWORKWAIT=1
However, the more convenient way is to set the ntpd daemon to synchronize the time at boot time
automatically:
1. Open the NTP configuration file /etc/ntp.conf in a text editor such as vi or nano, or create a
new one if it does not already exist:
~]# nano /etc/ntp.conf
2. Now add or edit the list of public NTP servers. If you are using Red Hat Enterprise Linux 6, the
file should already contain the following lines, but feel free to change or expand these according
to your needs:
server 0.rhel.pool.ntp.org iburst
server 1.rhel.pool.ntp.org iburst
server 2.rhel.pool.ntp.org iburst
server 3.rhel.pool.ntp.org iburst
The iburst directive at the end of each line is to speed up the initial synchronization. As of
Red Hat Enterprise Linux 6.5 it is added by default. If upgrading from a previous minor release,
and your /etc/ntp.conf file has been modified, then the upgrade to Red Hat Enterprise Linux
6.5 will create a new file /etc/ntp.conf.rpmnew and will not alter the existing
/etc/ntp.conf file.
Deployment Guide
36

3. Once you have the list of servers complete, in the same file, set the proper permissions, giving
the unrestricted access to localhost only:
restrict default kod nomodify notrap nopeer noquery
restrict -6 default kod nomodify notrap nopeer noquery
restrict 127.0.0.1
restrict -6 ::1
4. Save all changes, exit the editor, and restart the NTP daemon:
~]# service ntpd restart
5. Make sure that ntpd is started at boot time:
~]# chkconfig ntpd on
CHAPTER 2. DATE AND TIME CONFIGURATION
37

CHAPTER 3. MANAGING USERS AND GROUPS
3.1. WHAT USERS AND GROUPS ARE
The control of users and groups is a core element of Red Hat Enterprise Linux system administration.
The user of the system is either a human being or an account used by specific applications identified by
a unique numerical identification number called user ID (UID). Users within a group can have read
permissions, write permissions, execute permissions or any combination of read/write/execute
permissions for files owned by that group.
Red Hat Enterprise Linux supports access control lists (ACLs) for files and directories which allow
permissions for specific users outside of the owner to be set. For more information about this feature,
see the Access Control Lists chapter of the Red Hat Enterprise Linux 6 Storage Administration Guide.
A group is an organization unit tying users together for a common purpose, which can be reading
permissions, writing permission, or executing permission for files owned by that group. Similar to UID,
each group is associated with a group ID (GID).
NOTE
Red Hat Enterprise Linux reserves user and group IDs below 500 for system users and
groups. By default, the User Manager does not display the system users. Reserved user
and group IDs are documented in the setup package. To view the documentation, use
this command:
cat /usr/share/doc/setup-2.8.14/uidgid
The recommended practice is to assign non-reserved IDs starting at 5,000, as the
reserved range can increase in the future. To make the IDs assigned to new users by
default start at 5,000, change the UID_MIN and GID_MIN directives in the
/etc/login.defs file:
[file contents truncated]
UID_MIN 5000
[file contents truncated]
GID_MIN 5000
[file contents truncated]
Even with new user and group IDs beginning with 5,000, it is recommended not to raise
IDs reserved by system above 500 to avoid conflict with systems that retain the 500 limit.
Each user is a member of exactly one primary group and zero or more supplementary groups. By default,
when a file is created, the file's owner is its creator and the file's group is the creator's primary group. A
user can temporarily change what group is their primary group with the newgrp command, after which all
newly created files are owned by the new group. A supplementary group serves to grant a certain set of
users, its members, access to a certain set of files, those owned by this group.
The file is assigned separate read, write, and execute permissions for the owner, the group, and
everyone else. The file owner can be changed only by root, and access permissions can be changed
by both the root user and file owner.
By default, a file or directory can be modified only by its creator. The setting that determines what
permissions are applied to a newly created file or directory is called a umask and can be configured in
Deployment Guide
38

the /etc/bashrc file for all users, or in ~/.bashrc for each user individually . The configuration in
~/.bashrc overrides the configuration in /etc/bashrc. Additionally, the umask command overrides
the default permissions for the duration of the shell session.
To authenticate, a user enters their password. A hash sum is generated from the entered string and
compared to the hash sum of the user's password. If the hash sums match, the user authenticates
successfully.
Hash sums of user passwords are stored in the /etc/shadow file, which is only readable by the root
user. The file also stores information about password aging and policies for specific accounts. The
default values for a newly created account are stored in the /etc/login.defs and
/etc/default/useradd files. The Red Hat Enterprise Linux 6 Security Guide provides more security-
related information about users and groups.
3.2. MANAGING USERS VIA THE USER MANAGER APPLICATION
The User Manager application allows you to view, modify, add, and delete local users and groups in the
graphical user interface.
To start the User Manager application:
From the toolbar, select System → Administration → Users and Groups.
Or, type system-config-users at the shell prompt.
NOTE
Unless you have superuser privileges, the application will prompt you to authenticate as
root.
3.2.1. Viewing Users
In order to display the main window of the User Manager to view users, from the toolbar of User
Manager select Edit → Preferences. If you want to view all the users, that is including system users,
clear the Hide system users and groups check box.
The Users tab provides a list of local users along with additional information about their user ID, primary
group, home directory, login shell, and full name.
CHAPTER 3. MANAGING USERS AND GROUPS
39
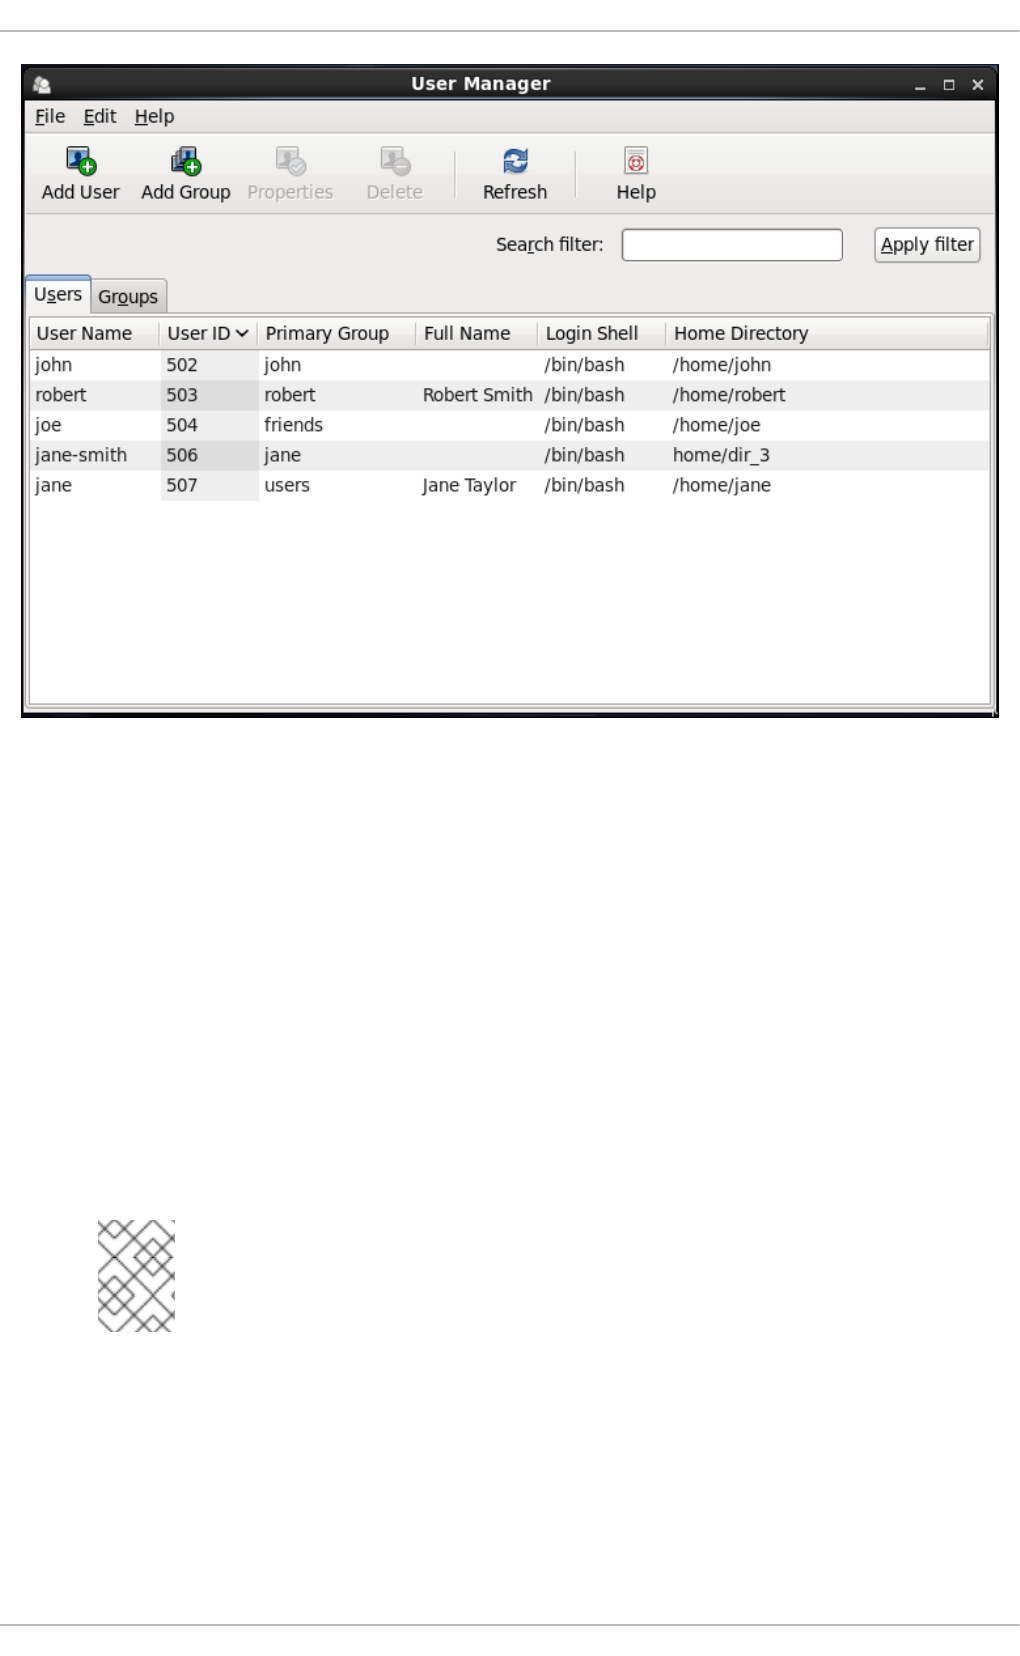
Figure 3.1. Viewing Users
To find a specific user, type the first few letters of the name in the Search filter field and either
press Enter, or click the Apply filter button. You can also sort the items according to any of the
available columns by clicking the column header.
3.2.2. Adding a New User
If there is a new user you need to add to the system, follow this procedure:
1. Click the Add User button.
2. Enter the user name and full name in the appropriate fields
3. Type the user's password in the Password and Confirm Password fields. The password
must be at least six characters long.
NOTE
For safety reasons, choose a long password not based on a dictionary term; use a
combination of letters, numbers, and special characters.
4. Select a login shell for the user from the Login Shell drop-down list or accept the default
value of /bin/bash.
5. Clear the Create home directory check box if you choose not to create the home directory
for a new user in /home/username/.
Deployment Guide
40
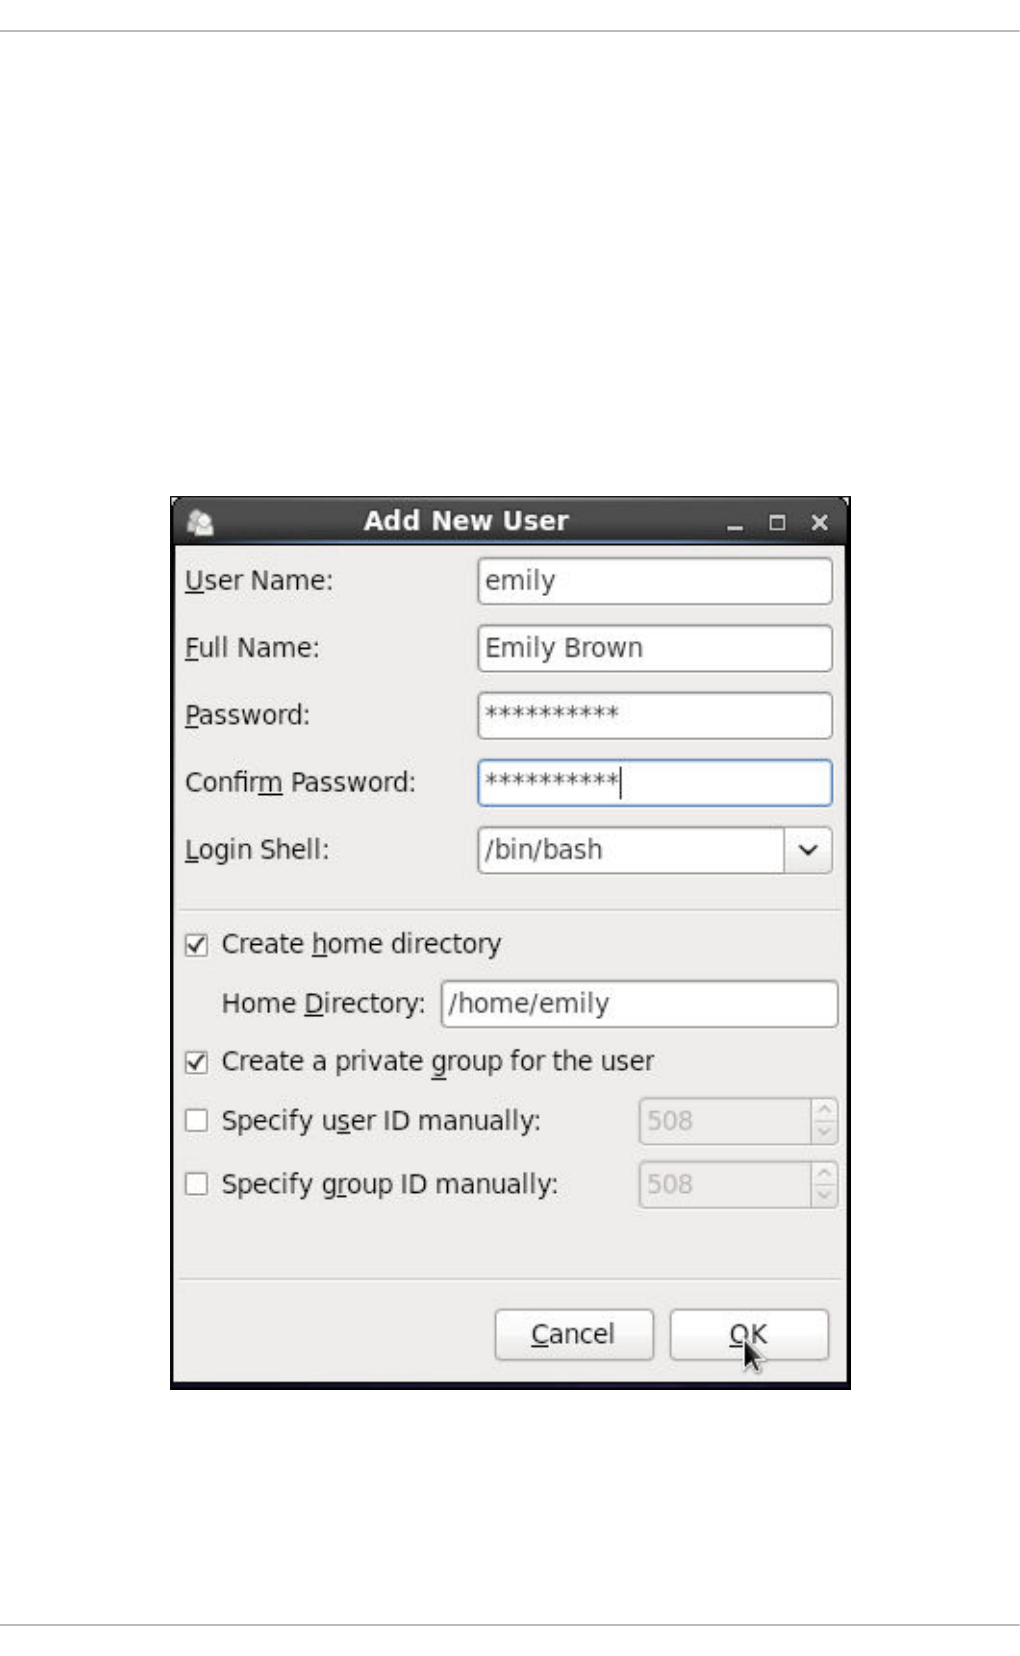
You can also change this home directory by editing the content of the Home Directory text
box. Note that when the home directory is created, default configuration files are copied into it
from the /etc/skel/ directory.
6. Clear the Create a private group for the user check box if you do not want a unique
group with the same name as the user to be created. User private group (UPG) is a group
assigned to a user account to which that user exclusively belongs, which is used for managing
file permissions for individual users.
7. Specify a user ID for the user by selecting Specify user ID manually. If the option is not
selected, the next available user ID above 500 is assigned to the new user.
8. Click the OK button to complete the process.
Look at the sample Add New User dialog box configuration:
To configure more advanced user properties, such as password expiration, modify the user's properties
after adding the user.
3.2.3. Modifying User Properties
1. Select the user from the user list by clicking once on the user name.
CHAPTER 3. MANAGING USERS AND GROUPS
41

2. Click Properties from the toolbar or choose File → Properties from the drop-down menu.
Figure 3.2. User Properties
3. There are four tabs you can update to your preferences. When you have finished, click the OK
button to save your changes.
3.3. MANAGING GROUPS VIA THE USER MANAGER APPLICATION
3.3.1. Viewing Groups
In order to display the main window of User Manager to view groups, from the toolbar select Edit →
Preferences. If you want to view all the groups, clear the Hide system users and groups check
box.
The Groups tab provides a list of local groups with information about their group ID and group members
as you can see in the picture below.
Deployment Guide
42
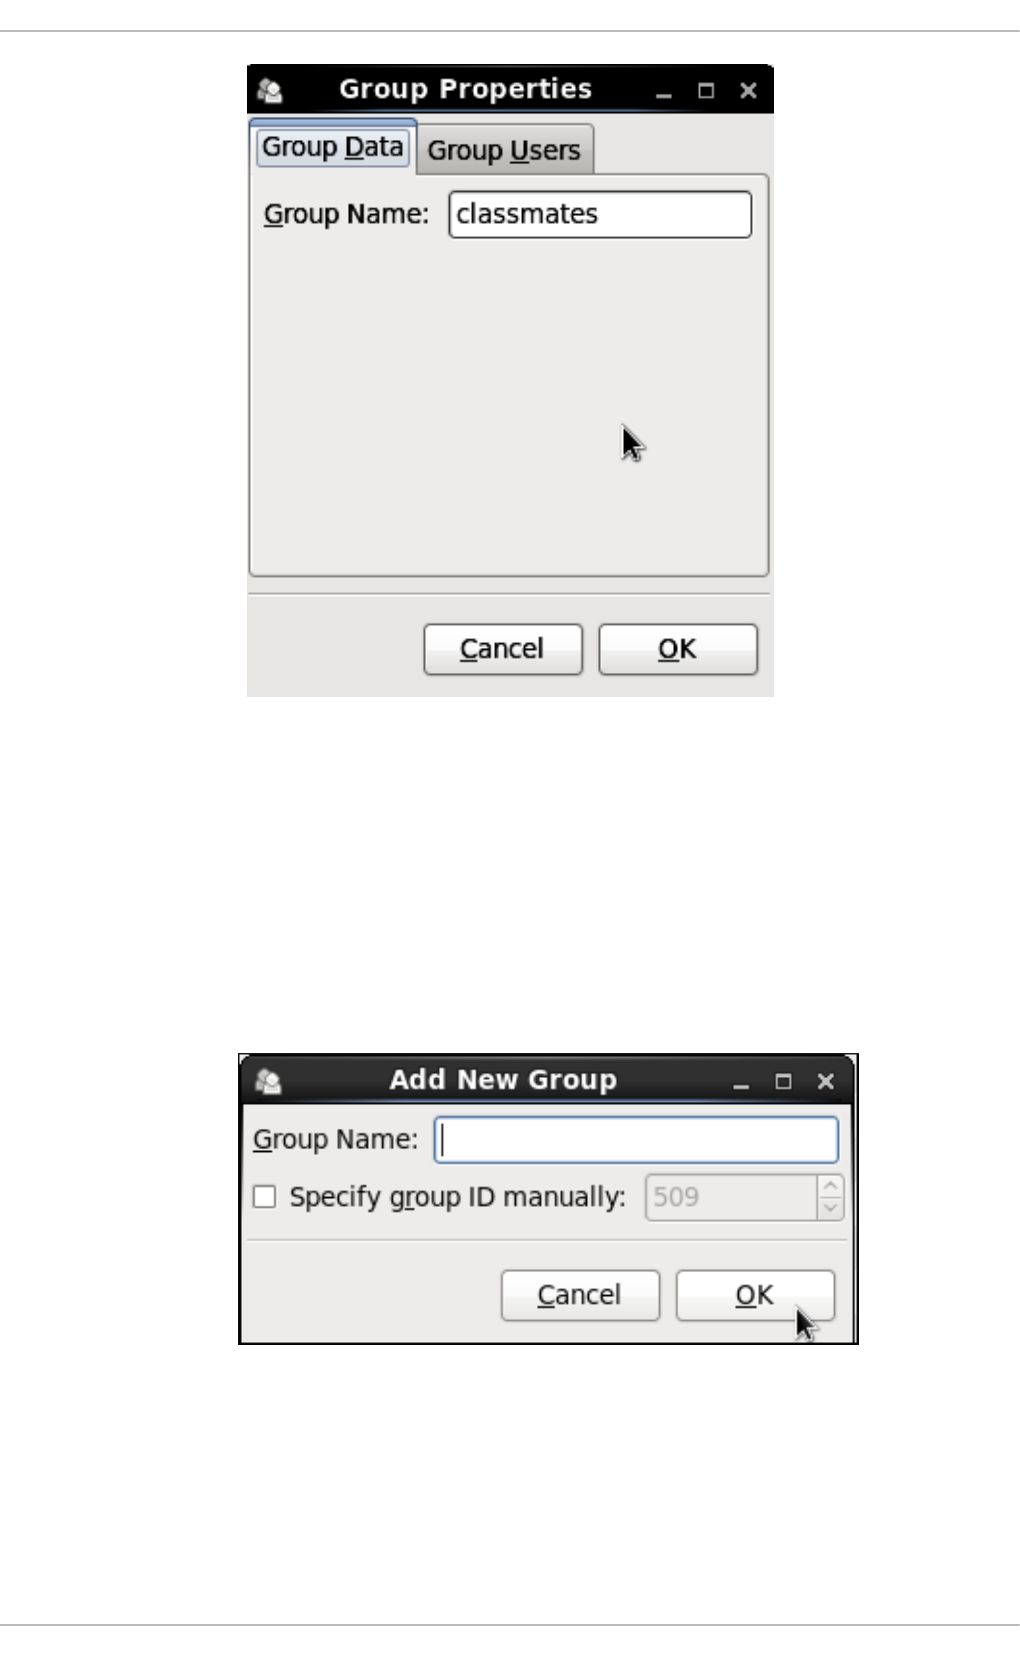
Figure 3.3. Viewing Groups
To find a specific group, type the first few letters of the name in the Search filter field and either
press Enter, or click the Apply filter button. You can also sort the items according to any of the
available columns by clicking the column header.
3.3.2. Adding a New Group
If there is a new group you need to add to the system, follow this procedure:
1. Select Add Group from the User Manager toolbar:
Figure 3.4. New Group
2. Type the name of the new group.
3. Specify the group ID (GID) for the new group by checking the Specify group ID manually
check box.
CHAPTER 3. MANAGING USERS AND GROUPS
43

4. Select the GID. Note that Red Hat Enterprise Linux also reserves group IDs lower than 500 for
system groups.
5. Click OK to create the group. The new group appears in the group list.
3.3.3. Modifying Group Properties
1. Select the group from the group list by clicking on its name.
2. Click Properties from the toolbar or choose File → Properties from the drop-down menu.
Figure 3.5. Group Properties
3. The Group Users tab displays the list of group members. Use this tab to add or remove users
from the group. Click OK to save your changes.
3.4. MANAGING USERS VIA COMMAND-LINE TOOLS
When managing users via command line, the following commands are used: useradd, usermod,
userdel, or passwd. The files affected include /etc/passwd which stores user accounts information
and /etc/shadow, which stores secure user account information.
3.4.1. Creating Users
The useradd utility creates new users and adds them to the system. Following the short procedure
below, you will create a default user account with its UID, automatically create a home directory where
default user settings will be stored, /home/username/, and set the default shell to /bin/bash.
1. Run the following command at a shell prompt as root substituting username with the name of
your choice:
Deployment Guide
44

useradd username
2. By setting a password unlock the account to make it accessible. Type the password twice when
the program prompts you to.
passwd
Example 3.1. Creating a User with Default Settings
Running the useradd robert command creates an account named robert. If you run cat
/etc/passwd to view the content of the /etc/passwd file, you can learn more about the new user
from the line displayed to you:
robert has been assigned a UID of 502, which reflects the rule that the default UID values from 0 to
499 are typically reserved for system accounts. GID, group ID of User Private Group, equals to
UID. The home directory is set to /home/robert and login shell to /bin/bash. The letter x signals
that shadow passwords are used and that the hashed password is stored in /etc/shadow.
If you want to change the basic default setup for the user while creating the account, you can choose
from a list of command-line options modifying the behavior of useradd (see the useradd(8) man page
for the whole list of options). As you can see from the basic syntax of the command, you can add one or
more options:
useradd [option(s)] username
As a system administrator, you can use the -c option to specify, for example, the full name of the user
when creating them. Use -c followed by a string, which adds a comment to the user:
useradd -c "string" username
Example 3.2. Specifying a User's Full Name when Creating a User
A user account has been created with user name robert, sometimes called the login name, and full
name Robert Smith.
~]# useradd robert
~]# passwd robert
Changing password for user robert
New password:
Re-type new password:
passwd: all authentication tokens updated successfully.
robert:x:502:502::/home/robert:/bin/bash
~]# useradd -c "Robert Smith" robert
~]# cat /etc/passwd
robert:x:502:502:Robert Smith:/home/robert:/bin/bash
CHAPTER 3. MANAGING USERS AND GROUPS
45

If you do not want to create the default /home/username/ directory for the user account, set a different
one instead of it. Execute the command below:
useradd -d home_directory
Example 3.3. Adding a User with non-default Home Directory
robert's home directory is now not the default /home/robert but /home/dir_1/.
If you do not want to create the home directory for the user at all, you can do so by running useradd
with the -M option. However, when such a user logs into a system that has just booted and their home
directory does not exist, their login directory will be the root directory. If such a user logs into a system
using the su command, their login directory will be the current directory of the previous user.
useradd -M username
If you need to copy a directory content to the /home directory while creating a new user, make use of the
-m and -k options together followed by the path.
Example 3.4. Creating a User while Copying Contents to the Home Directory
The following command copies the contents of a directory named /dir_1 to /home/jane, which is
the default home directory of a new user jane:
As a system administrator, you may need to create a temporary account. Using the useradd command,
this means creating an account for a certain amount of time only and disabling it at a certain date. This is
a particularly useful setting as there is no security risk resulting from forgetting to delete a certain
account. For this, the -e option is used with the specified expire_date in the YYYY-MM-DD format.
NOTE
Do not confuse account expiration and password expiration. Account expiration is a
particular date, after which it is impossible to log in to the account in any way, as the
account no longer exists. Password expiration, the maximum password age and date of
password creation or last password change, is the date, when it is not possible to log in
using the password (but other ways exist, such as logging in using an SSH key).
useradd -e YYYY-MM-DD username
Example 3.5. Setting the Account Expiration Date
The account emily will be created now and automatically disabled on 5 November, 2015.
~]# useradd -d /home/dir_1 robert
~]# useradd -m -k /dir_1 jane
~]# useradd -e 2015-11-05 emily
Deployment Guide
46

User's login shell defaults to /bin/bash, but can be changed by the -s option to any other shell
different from bash, ksh, csh, tsh, for example.
useradd -s login_shell username
Example 3.6. Adding a User with Non-default Shell
This command creates the user robert which has the /bin/ksh shell.
The -r option creates a system account, which is an account for administrative use that has some, but
not all, root privileges. Such accounts have a UID lower than the value of UID_MIN defined in
/etc/login.defs, typically 500 and above for ordinary users.
useradd -r username
3.4.2. Attaching New Users to Groups
The useradd command creates a User Private Group (UPG, a group assigned to a user account to
which that user exclusively belongs) whenever a new user is added to the system and names the group
after the user. For example, when the account robert is created, an UPG named robert is created at
the same time, the only member of which is the user robert.
If you do not want to create a User Private Group for a user for whatever reason, execute the
useradd command with the following option:
useradd -N username
Instead of automatically creating UPG or not creating it at all, you can specify the user's group
membership with -g and -G options. While the -g option specifies the primary group membership, -G
refers to supplementary groups into which the user is also included. The group names you specify must
already exist on the system.
Example 3.7. Adding a User to a Group
The useradd -g "friends" -G "family,schoolmates" emily command creates the user
emily but emily's primary group is set to friends as specified by the -g option. emily is also a
group member of the supplementary groups family and schoolmates.
Provided the user already exists and you want to add them to certain supplementary group(s), use the
usermod command with the -G option and a list of groups divided by commas, no spaces:
usermod -G group_1,group_2,group_3
~]# useradd -s /bin/ksh robert
~]# useradd -g "friends" -G "family,schoolmates" emily
CHAPTER 3. MANAGING USERS AND GROUPS
47

3.4.3. Updating Users' Authentication
When running the basic useradd username command, the password is automatically set to never
expire (see the /etc/shadow file).
If you want to change this, use passwd, the standard utility for administering the /etc/passwd file. The
syntax of the passwd command look as follows:
passwd option(s) username
You can, for example, lock the specified account. The locking is performed by rendering the encrypted
password into an invalid string by prefixing the encrypted string with an the exclamation mark (!). If you
later find a reason to unlock the account, passwd has a reverse operation for locking. Only root can
carry out these two operations.
passwd -l username
passwd -u username
Example 3.8. Unlocking a User Password
At first, the -l option locks robert's account password successfully. However, running the passwd
-u command does not unlock the password because by default passwd refuses to create a
passwordless account.
If you want a password for an account to expire, run passwd with the -e option. The user will be forced
to change the password during the next login attempt:
passwd -e username
As far as the password lifetime is concerned, setting the minimum time between password changes is
useful for forcing the user to really change the password. The system administrator can set the minimum
(the -n option) and the maximum (the -x option) lifetimes. To inform the user about their password
expiration, use the -w option. All these options must be accompanied with the number of days and can
be run as root only.
Example 3.9. Adjusting Aging Data for User Passwords
The above command has set the minimum password lifetime to 10 days, the maximum password
lifetime to 60, and the number of days jane will begin receiving warnings in advance that her
password will expire to 3 day.
Later, when you cannot remember the password setting, make use of the -S option which outputs a
short information for you to know the status of the password for a given account:
~]# passwd -l robert
Locking password for user robert.
passwd: Success
~]# passwd -u robert
passwd: Warning: unlocked password would be empty
passwd: Unsafe operation (use -f to force)
~]# passwd -n 10 -x 60 -w 3 jane
Deployment Guide
48

You can also set the number of days after a password expires with the useradd command, which
disables the account permanently. A value of 0 disables the account as soon as the password has
expired, and a value of -1 disables the feature, that is, the user will have to change his password when
the password expires. The -f option is used to specify the number of days after a password expires until
the account is disabled (but may be unblocked by system administrator):
useradd -f number-of-days username
For more information on the passwd command see the passwd(1) man page.
3.4.4. Modifying User Settings
When a user already exists and you need to specify any of the options now, use the usermod command.
The logic of using usermod is identical to useradd as well as its syntax:
usermod option(s) username
If you need to change the user's user name, use the -l option with the new user name (or login).
Example 3.10. Changing User's Login
The -l option changes the name of the user from the login emily to the new login, emily-smith.
Nothing else is changed. In particular, emily's home directory name (/home/emily) remains the
same unless it is changed manually to reflect the new user name.
In a similar way you can change the user's UID or user's home directory. See the example below:
NOTE
Find all files owned by the specified UID in system and change their owner. Do the same
for Access Control List (ACL) referring to the UID. It is recommended to check there are
no running processes as they keep running with the old UID.
Example 3.11. Changing User's UID and Home Directory
The command with -a -u and -d options changes the settings of user robert. Now, his ID is 699
instead of 501, and his home directory is no longer /home/robert but /home/dir_2.
With the usermod command you can also move the content of the user's home directory to a new
location, or lock the account by locking its password.
~]# passwd -S jane
jane LK 2014-07-22 10 60 3 -1 (Password locked.)
~]# usermod -l "emily-smith" emily
~]# usermod -a -u 699 -d /home/dir_2 robert
CHAPTER 3. MANAGING USERS AND GROUPS
49

Example 3.12. Changing User's
In this sample command, the -m and -d options used together move the content of jane's home
directory to the /home/dir_3 directory. The -L option locks the access to jane's account by
locking its password.
For the whole list of options to be used with the usermod command, see the usermod(8) man page or
run usermod --help on the command line.
3.4.5. Deleting Users
If you want to remove a user account from the system, use the userdel command on the command line
as root.
userdel username
Combining userdel with the -r option removes files in the user's home directory along with the home
directory itself and the user's mail spool. Files located in other file systems have to be searched for and
deleted manually.
userdel -r username
NOTE
The -r option is relatively safer, and thus recommended, compared to -f which forces
the removal of the user account even if the user is still logged in.
3.4.6. Displaying Comprehensive User Information
When administering users and groups on your system, you need a good tool to monitor their
configuration and activity on the system. Red Hat Enterprise Linux 6 provides you with the lslogins
command-line utility, which gives you a comprehensive overview of users and groups, not only regarding
user or group account configuration but also their activity on the system.
The general syntax of lslogins is the following:
lslogins [OPTIONS]
where OPTIONS can be one or more available options and their related parameters. See the
lslogins(1) manual page or the output of the lslogins --help command for the complete list of
available options and their usage.
The lslogins utility gives versatile information in a variety of formats based on the chosen options. The
following examples introduce the most basic as well as some of the most useful combinations.
Running the lslogins command without any options shows default information about all system and
user accounts on the system. Specifically, their UID, user name, and GECOS information, as well as
information about the user's last login to the system, and whether their password is locked or login by
password disabled.
~]# usermod -m -d /home/jane -L jane
Deployment Guide
50

Example 3.13. Displaying basic information about all accounts on the system
~]# lslogins
UID USER PWD-LOCK PWD-DENY LAST-LOGIN GECOS
0 root 0 0 root
1 bin 0 1 bin
2 daemon 0 1 daemon
3 adm 0 1 adm
4 lp 0 1 lp
5 sync 0 1 sync
6 shutdown 0 1 Jul21/16:20 shutdown
7 halt 0 1 halt
8 mail 0 1 mail
10 uucp 0 1 uucp
11 operator 0 1 operator
12 games 0 1 games
13 gopher 0 1 gopher
14 ftp 0 1 FTP User
29 rpcuser 0 1 RPC Service User
32 rpc 0 1 Rpcbind Daemon
38 ntp 0 1
42 gdm 0 1
48 apache 0 1 Apache
68 haldaemon 0 1 HAL daemon
69 vcsa 0 1 virtual console
memory owner
72 tcpdump 0 1
74 sshd 0 1 Privilege-separated
SSH
81 dbus 0 1 System message bus
89 postfix 0 1
99 nobody 0 1 Nobody
113 usbmuxd 0 1 usbmuxd user
170 avahi-autoipd 0 1 Avahi IPv4LL Stack
173 abrt 0 1
497 pulse 0 1 PulseAudio System
Daemon
498 saslauth 0 1 Saslauthd user
499 rtkit 0 1 RealtimeKit
500 jsmith 0 0 10:56:12 John Smith
501 jdoe 0 0 12:13:53 John Doe
502 esmith 0 0 12:59:05 Emily Smith
503 jeyre 0 0 12:22:14 Jane Eyre
65534 nfsnobody 0 1 Anonymous NFS User
To display detailed information about a single user, run the lslogins LOGIN command, where LOGIN
is either a UID or a user name. The following example displays detailed information about John Doe's
account and his activity on the system:
Example 3.14. Displaying detailed information about a single account
~]# lslogins jdoe
Username: jdoe
UID: 501
CHAPTER 3. MANAGING USERS AND GROUPS
51

Gecos field: John Doe
Home directory: /home/jdoe
Shell: /bin/bash
No login: no
Password is locked: no
Password no required: no
Login by password disabled: no
Primary group: jdoe
GID: 501
Supplementary groups: users
Supplementary group IDs: 100
Last login: 12:13:53
Last terminal: pts/3
Last hostname: 192.168.100.1
Hushed: no
Password expiration warn interval: 7
Password changed: Aug01/02:00
Maximal change time: 99999
Password expiration: Sep01/02:00
Selinux context:
unconfined_u:unconfined_r:unconfined_t:s0-s0:c0.c1023
If you use the --logins=LOGIN option, you can display information about a group of accounts that are
specified as a list of UIDs or user names. Specifying the --output=COLUMNS option, where COLUMNS
is a list of available output parameters, you can customize the output of the lslogins command. For
example, the following command shows login activity of the users root, jsmith, jdoe, and esmith:
Example 3.15. Displaying specific information about a group of users
~]# lslogins --logins=0,500,jdoe,esmith \
> --output=UID,USER,LAST-LOGIN,LAST-TTY,FAILED-LOGIN,FAILED-TTY
UID USER LAST-LOGIN LAST-TTY FAILED-LOGIN FAILED-TTY
0 root
500 jsmith 10:56:12 pts/2
501 jdoe 12:13:53 pts/3
502 esmith 15:46:16 pts/3 15:46:09 ssh:notty
The lslogins utility also distinguishes between system and user accounts. To address system accounts
in your query, use the --system-accs option. To address user accounts, use the --user-accs. For
example, the following command displays information about supplementary groups and password
expirations for all user accounts:
Example 3.16. Displaying information about supplementary groups and password expiration
for all user accounts
~]# lslogins --user-accs --supp-groups --acc-expiration
UID USER GID GROUP SUPP-GIDS SUPP-GROUPS PWD-WARN PWD-MIN
PWD-MAX PWD-CHANGE
PWD-EXPIR
0 root 0 root 7
99999 Jul21/02:00
500 jsmith 500 jsmith 1000,100 staff,users 7
Deployment Guide
52

99999 Jul21/02:00
501 jdoe 501 jdoe 100 users 7
99999 Aug01/02:00
Sep01/02:00
502 esmith 502 esmith 100 users 7
99999 Aug01/02:00
503 jeyre 503 jeyre 1000,100 staff,users 7
99999 Jul28/02:00
Sep01/02:00
65534 nfsnobody 65534 nfsnobody
Jul21/02:00
The ability to format the output of lslogins commands according to the user's needs makes lslogins
an ideal tool to use in scripts and for automatic processing. For example, the following command returns
a single string that represents the time and date of the last login. This string can be passed as input to
another utility for further processing.
Example 3.17. Displaying a single piece of information without the heading
~]# lslogins --logins=jsmith --output=LAST-LOGIN --time-format=iso |
tail -1
2014-08-06T10:56:12+0200
3.5. MANAGING GROUPS VIA COMMAND-LINE TOOLS
Groups are a useful tool for permitting co-operation between different users. There is a set of commands
for operating with groups such as groupadd, groupmod, groupdel, or gpasswd. The files affected
include /etc/group which stores group account information and /etc/gshadow, which stores secure
group account information.
3.5.1. Creating Groups
To add a new group to the system with default settings, the groupadd command is run at the shell
prompt as root.
groupadd group_name
Example 3.18. Creating a Group with Default Settings
The groupadd command creates a new group called friends. You can read more information
about the group from the newly-created line in the /etc/group file:
Automatically, the group friends is attached with a unique GID (group ID) of 30005 and is not
attached with any users. Optionally, you can set a password for a group by running gpasswd
groupname.
~]# groupadd friends
classmates:x:30005:
CHAPTER 3. MANAGING USERS AND GROUPS
53

Alternatively, you can add command options with specific settings.
groupadd option(s) groupname
If you, for example, want to specify the numerical value of the group's ID (GID) when creating the group,
run the groupadd command with the -g option. Remember that this value must be unique (unless the -
o option is used) and the value must be non-negative.
groupadd -g GID
Example 3.19. Creating a Group with Specified GID
The command below creates a group named schoolmates and sets GID of 60002 for it:
When used with -g and GID already exists, groupadd refuses to create another group with existing
GID. As a workaround, use the -f option, with which groupadd creates a group, but with a different
GID.
groupadd -f GID
You may also create a system group by attaching the -r option to the groupadd command. System
groups are used for system purposes, which practically means that GID is allocated from 1 to 499 within
the reserved range of 999.
groupadd -r group_name
For more information on groupadd, see the groupadd(8) man pages.
3.5.2. Attaching Users to Groups
If you want to add an existing user to the named group, you can make use of the gpasswd command.
gpasswd -a username which_group_to_edit
To remove a user from the named group, run:
gpasswd -d username which_group_to_edit
To set the list of group members, write the user names after the --members option dividing them with
commas and no spaces:
gpasswd --members username_1,username_2 which_group_to_edit
3.5.3. Updating Group Authentication
~]# groupadd -g 60002 schoolmates
Deployment Guide
54

The gpasswd command administers /etc/group and /etc/gshadow files. Note that this command
works only if run by a group administrator.
Who is a group administrator? A group administrator can add and delete users as well as set, change, or
remove the group password. A group can have more than one group administrator. The root user can
add group administrators with the gpasswd -A users groupname where users is a comma-
separated list of existing users you want to be group administrators (without any spaces between
commas).
For changing a group's password, run the gpasswd command with the relevant group name. You will be
prompted to type the new password of the group.
gpasswd groupname
Example 3.20. Changing a Group Password
The password for the group crowd has been changed.
You can also remove the password from the named group by using the -r option.
gpasswd -r schoolmates
3.5.4. Modifying Group Settings
When a group already exists and you need to specify any of the options now, use the groupmod
command. The logic of using groupmod is identical to groupadd as well as its syntax:
groupmod option(s) groupname
To change the group ID of a given group, use the groupmod command in the following way:
groupmod -g GID_NEW which_group_to_edit
NOTE
Find all files owned by the specified GID in system and change their owner. Do the same
for Access Control List (ACL) referring to the GID. It is recommended to check there are
no running processes as they keep running with the old GID.
To change the name of the group, run the following on the command line. The name of the group will be
changed from GROUP_NAME to NEW_GROUP_NAME name.
groupmod -n new_groupname groupname
Example 3.21. Changing a Group's Name
~]# gpasswd crowd
Changing password for group crowd
New password:
Re-enter new password:
CHAPTER 3. MANAGING USERS AND GROUPS
55

The following command changes the name of the group schoolmates to crowd:
3.5.5. Deleting Groups
The groupdel command modifies the system account files, deleting all entries that see the group. The
named group must exist when you execute this command.
groupdel groupname
3.6. ADDITIONAL RESOURCES
See the following resources for more information about managing users and groups.
3.6.1. Installed Documentation
For information about various utilities for managing users and groups, see the following manual pages:
chage(1) — A command to modify password aging policies and account expiration.
gpasswd(1) — A command to administer the /etc/group file.
groupadd(8) — A command to add groups.
grpck(8) — A command to verify the /etc/group file.
groupdel(8) — A command to remove groups.
groupmod(8) — A command to modify group membership.
pwck(8) — A command to verify the /etc/passwd and /etc/shadow files.
pwconv(8) — A tool to convert standard passwords to shadow passwords.
pwunconv(8) — A tool to convert shadow passwords to standard passwords.
useradd(8) — A command to add users.
userdel(8) — A command to remove users.
usermod(8) — A command to modify users.
For information about related configuration files, see:
group(5) — The file containing group information for the system.
passwd(5) — The file containing user information for the system.
shadow(5) — The file containing passwords and account expiration information for the system.
login.defs(5) - The file containing shadow password suite configuration.
~]# groupmod -n crowd schoolmates
Deployment Guide
56

useradd(8) - For /etc/default/useradd, section “Changing the default values” in manual
page.
CHAPTER 3. MANAGING USERS AND GROUPS
57

CHAPTER 4. GAINING PRIVILEGES
System administrators (and in some cases users) will need to perform certain tasks with administrative
access. Accessing the system as root is potentially dangerous and can lead to widespread damage to
the system and data. This chapter covers ways to gain administrative privileges using the su and sudo
programs. These programs allow specific users to perform tasks which would normally be available only
to the root user while maintaining a higher level of control and system security.
See the Red Hat Enterprise Linux 6 Security Guide for more information on administrative controls,
potential dangers and ways to prevent data loss resulting from improper use of privileged access.
4.1. THE SU COMMAND
When a user executes the su command, they are prompted for the root password and, after
authentication, are given a root shell prompt.
Once logged in via the su command, the user is the root user and has absolute administrative access to
the system[1]. In addition, once a user has become root, it is possible for them to use the su command to
change to any other user on the system without being prompted for a password.
Because this program is so powerful, administrators within an organization may want to limit who has
access to the command.
One of the simplest ways to do this is to add users to the special administrative group called wheel. To
do this, type the following command as root:
~]# usermod -a -G wheel username
In the previous command, replace username with the user name you want to add to the wheel group.
You can also use the User Manager to modify group memberships, as follows. Note: you need
Administrator privileges to perform this procedure.
1. Click the System menu on the Panel, point to Administration and then click Users and
Groups to display the User Manager. Alternatively, type the command system-config-users
at a shell prompt.
2. Click the Users tab, and select the required user in the list of users.
3. Click Properties on the toolbar to display the User Properties dialog box (or choose
Properties on the File menu).
4. Click the Groups tab, select the check box for the wheel group, and then click OK.
See Section 3.2, “Managing Users via the User Manager Application” for more information about the
User Manager.
After you add the desired users to the wheel group, it is advisable to only allow these specific users to
use the su command. To do this, you will need to edit the PAM configuration file for su:
/etc/pam.d/su. Open this file in a text editor and remove the comment (#) from the following line:
#auth required pam_wheel.so use_uid
Deployment Guide
58

This change means that only members of the administrative group wheel can switch to another user
using the su command.
NOTE
The root user is part of the wheel group by default.
4.2. THE SUDO COMMAND
The sudo command offers another approach to giving users administrative access. When trusted users
precede an administrative command with sudo, they are prompted for their own password. Then, when
they have been authenticated and assuming that the command is permitted, the administrative command
is executed as if they were the root user.
The basic format of the sudo command is as follows:
sudo <command>
In the above example, <command> would be replaced by a command normally reserved for the root
user, such as mount.
The sudo command allows for a high degree of flexibility. For instance, only users listed in the
/etc/sudoers configuration file are allowed to use the sudo command and the command is executed
in the user's shell, not a root shell. This means the root shell can be completely disabled as shown in the
Red Hat Enterprise Linux 6 Security Guide.
Each successful authentication using the sudo is logged to the file /var/log/messages and the
command issued along with the issuer's user name is logged to the file /var/log/secure. Should you
require additional logging, use the pam_tty_audit module to enable TTY auditing for specified users
by adding the following line to your /etc/pam.d/system-auth file:
session required pam_tty_audit.so disable=<pattern> enable=<pattern>
where pattern represents a comma-separated listing of users with an optional use of globs. For example,
the following configuration will enable TTY auditing for the root user and disable it for all other users:
session required pam_tty_audit.so disable=* enable=root
Another advantage of the sudo command is that an administrator can allow different users access to
specific commands based on their needs.
Administrators wanting to edit the sudo configuration file, /etc/sudoers, should use the visudo
command.
To give someone full administrative privileges, type visudo and add a line similar to the following in the
user privilege specification section:
This example states that the user, juan, can use sudo from any host and execute any command.
The example below illustrates the granularity possible when configuring sudo:
juan ALL=(ALL) ALL
CHAPTER 4. GAINING PRIVILEGES
59

This example states that any user can issue the command /sbin/shutdown -h now as long as it is
issued from the console.
The man page for sudoers has a detailed listing of options for this file.
IMPORTANT
There are several potential risks to keep in mind when using the sudo command. You
can avoid them by editing the /etc/sudoers configuration file using visudo as
described above. Leaving the /etc/sudoers file in its default state gives every user in
the wheel group unlimited root access.
By default, sudo stores the sudoer's password for a five minute timeout period.
Any subsequent uses of the command during this period will not prompt the user
for a password. This could be exploited by an attacker if the user leaves his
workstation unattended and unlocked while still being logged in. This behavior
can be changed by adding the following line to the /etc/sudoers file:
where <value> is the desired timeout length in minutes. Setting the <value> to 0
causes sudo to require a password every time.
If a sudoer's account is compromised, an attacker can use sudo to open a new
shell with administrative privileges:
sudo /bin/bash
Opening a new shell as root in this or similar fashion gives the attacker
administrative access for a theoretically unlimited amount of time, bypassing the
timeout period specified in the /etc/sudoers file and never requiring the
attacker to input a password for sudo again until the newly opened session is
closed.
4.3. ADDITIONAL RESOURCES
While programs allowing users to gain administrative privileges are a potential security risk, security itself
is beyond the scope of this particular book. You should therefore see sources listed below for more
information regarding security and privileged access.
Installed Documentation
su(1) - the manual page for su provides information regarding the options available with this
command.
sudo(8) - the manual page for sudo includes a detailed description of this command as well as a
list of options available for customizing sudo's behavior.
pam(8) - the manual page describing the use of Pluggable Authentication Modules for Linux.
Online Documentation
%users localhost=/sbin/shutdown -h now
Defaults timestamp_timeout=<value>
Deployment Guide
60

Red Hat Enterprise Linux 6 Security Guide - The Security Guide describes in detail security risks
and mitigating techniques related to programs for gaining privileges.
Red Hat Enterprise Linux 6 Managing Single Sign-On and Smart Cards - This guide provides,
among other things, a detailed description of Pluggable Authentication Modules (PAM), their
configuration and usage.
[1] This access is still subject to the restrictions imposed by SELinux, if it is enabled.
CHAPTER 4. GAINING PRIVILEGES
61

CHAPTER 5. CONSOLE ACCESS
When normal (non-root) users log into a computer locally, they are given two types of special
permissions:
1. They can run certain programs that they otherwise cannot run.
2. They can access certain files that they otherwise cannot access. These files normally include
special device files used to access diskettes, CD-ROMs, and so on.
Since there are multiple consoles on a single computer and multiple users can be logged into the
computer locally at the same time, one of the users has to essentially win the race to access the files.
The first user to log in at the console owns those files. Once the first user logs out, the next user who
logs in owns the files.
In contrast, every user who logs in at the console is allowed to run programs that accomplish tasks
normally restricted to the root user. If X is running, these actions can be included as menu items in a
graphical user interface. As shipped, these console-accessible programs include halt, poweroff, and
reboot.
5.1. DISABLING CONSOLE PROGRAM ACCESS FOR NON-ROOT
USERS
Non-root users can be denied console access to any program in the
/etc/security/console.apps/ directory. To list these programs, run the following command:
~]$ ls /etc/security/console.apps
abrt-cli-root
config-util
eject
halt
poweroff
reboot
rhn_register
setup
subscription-manager
subscription-manager-gui
system-config-network
system-config-network-cmd
xserver
For each of these programs, console access denial can be configured using the program's Pluggable
Authentication Module (PAM) configuration file. For information about PAMs and their usage, see
chapter Pluggable Authentication Modules of the Red Hat Enterprise Linux 6 Managing Single Sign-On
and Smart Cards guide.
PAM configuration file for each program in /etc/security/console.apps/ resides in the
/etc/pam.d/ directory and is named the same as the program. Using this file, you can configure PAM
to deny access to the program if the user is not root. To do that, insert line auth requisite
pam_deny.so directly after the first uncommented line auth sufficient pam_rootok.so.
Example 5.1. Disabling Access to the Reboot Program
Deployment Guide
62

To disable non-root console access to /etc/security/console.apps/reboot, insert line auth
requisite pam_deny.so into the /etc/pam.d/reboot PAM configuration file:
#%PAM-1.0
auth sufficient pam_rootok.so
auth requisite pam_deny.so
auth required pam_console.so
#auth include system-auth
account required pam_permit.so
With this setting, all non-root access to the reboot utility is disabled.
Additionally, several programs in /etc/security/console.apps/ partially derive their PAM
configuration from the /etc/pam.d/config-util configuration file. This allows to change
configuration for all these programs at once by editing /etc/pam.d/config-util. To find all these
programs, search for PAM configuration files that refer to the config-util file:
~]# grep -l "config-util" /etc/pam.d/*
/etc/pam.d/abrt-cli-root
/etc/pam.d/rhn_register
/etc/pam.d/subscription-manager
/etc/pam.d/subscription-manager-gui
/etc/pam.d/system-config-network
/etc/pam.d/system-config-network-cmd
Disabling console program access as described above may be useful in environments where the
console is otherwise secured. Security measures may include password protection for BIOS and boot
loader, disabling rebooting on pressing Ctrl+Alt+Delete, disabling the power and reset switches, and
other. In these cases, you may want to restrict normal user's access to halt, poweroff, reboot, and
other programs, which by default are accessible from the console.
5.2. DISABLING REBOOTING USING CTRL+ALT+DEL
The action that happens in response to pressing Ctrl+Alt+Del at console is specified in the
/etc/init/control-alt-delete.conf file. By default, the shutdown utility with the -r option is
used to shutdown and reboot the system.
To disable this action, create an overriding configuration file that specifies the exec true command,
which does nothing. To do that, run the following command as root:
~]# echo "exec true" >> /etc/init/control-alt-delete.override
CHAPTER 5. CONSOLE ACCESS
63

PART II. SUBSCRIPTION AND SUPPORT
To receive updates to the software on a Red Hat Enterprise Linux system it must be subscribed to the
Red Hat Content Delivery Network (CDN) and the appropriate repositories enabled. This part describes
how to subscribe a system to the Red Hat Content Delivery Network.
Red Hat provides support via the Customer Portal, and you can access this support directly from the
command line using the Red Hat Support Tool. This part describes the use of this command-line tool.
Deployment Guide
64

CHAPTER 6. REGISTERING THE SYSTEM AND MANAGING
SUBSCRIPTIONS
The subscription service provides a mechanism to handle Red Hat software inventory and allows you to
install additional software or update already installed programs to newer versions using the yum or
PackageKit package managers. In Red Hat Enterprise Linux 6 the recommended way to register your
system and attach subscriptions is to use Red Hat Subscription Management.
NOTE
It is also possible to register the system and attach subscriptions after installation during
the firstboot process. For detailed information about firstboot see the Firstboot chapter in
the Installation Guide for Red Hat Enterprise Linux 6. Note that firstboot is only available
on systems after a graphical installation or after a kickstart installation where a desktop
and the X window system were installed and graphical login was enabled.
6.1. REGISTERING THE SYSTEM AND ATTACHING SUBSCRIPTIONS
Complete the following steps to register your system and attach one or more subscriptions using Red Hat
Subscription Management. Note that all subscription-manager commands are supposed to be run
as root.
1. Run the following command to register your system. You will be prompted to enter your user
name and password. Note that the user name and password are the same as your login
credentials for Red Hat Customer Portal.
subscription-manager register
2. Determine the pool ID of a subscription that you require. To do so, type the following at a shell
prompt to display a list of all subscriptions that are available for your system:
subscription-manager list --available
For each available subscription, this command displays its name, unique identifier, expiration
date, and other details related to your subscription. To list subscriptions for all architectures, add
the --all option. The pool ID is listed on a line beginning with Pool ID.
3. Attach the appropriate subscription to your system by entering a command as follows:
subscription-manager attach --pool=pool_id
Replace pool_id with the pool ID you determined in the previous step.
To verify the list of subscriptions your system has currently attached, at any time, run:
subscription-manager list --consumed
CHAPTER 6. REGISTERING THE SYSTEM AND MANAGING SUBSCRIPTIONS
65

NOTE
If you use a firewall or a proxy, you may need additional configuration to allow yum and
subscription-manager to work correctly. Refer to the "Setting Firewall Access for
Content Delivery" section of the Red Hat Enterprise Linux 6 Subscription Management
guide if you use a firewall and to the "Using an HTTP Proxy" section if you use a proxy.
For more details on how to register your system using Red Hat Subscription Management and associate
it with subscriptions, see the designated solution article. For comprehensive information about
subscriptions, see the Red Hat Subscription Management collection of guides.
6.2. MANAGING SOFTWARE REPOSITORIES
When a system is subscribed to the Red Hat Content Delivery Network, a repository file is created in the
/etc/yum.repos.d/ directory. To verify that, use yum to list all enabled repositories:
yum repolist
Red Hat Subscription Management also allows you to manually enable or disable software repositories
provided by Red Hat. To list all available repositories, use the following command:
subscription-manager repos --list
The repository names depend on the specific version of Red Hat Enterprise Linux you are using and are
in the following format:
Where variant is the Red Hat Enterprise Linux system variant (server or workstation), and version is
the Red Hat Enterprise Linux system version (6 or 7), for example:
To enable a repository, enter a command as follows:
subscription-manager repos --enable repository
Replace repository with a name of the repository to enable.
Similarly, to disable a repository, use the following command:
subscription-manager repos --disable repository
Section 8.4, “Configuring Yum and Yum Repositories” provides detailed information about managing
software repositories using yum.
6.3. REMOVING SUBSCRIPTIONS
rhel-variant-rhscl-version-rpms
rhel-variant-rhscl-version-debug-rpms
rhel-variant-rhscl-version-source-rpms
rhel-server-rhscl-6-eus-rpms
rhel-server-rhscl-6-eus-source-rpms
rhel-server-rhscl-6-eus-debug-rpms
Deployment Guide
66

To remove a particular subscription, complete the following steps.
1. Determine the serial number of the subscription you want to remove by listing information about
already attached subscriptions:
subscription-manager list --consumed
The serial number is the number listed as serial. For instance, 744993814251016831 in the
example below:
SKU: ES0113909
Contract: 01234567
Account: 1234567
Serial: 744993814251016831
Pool ID: 8a85f9894bba16dc014bccdd905a5e23
Active: False
Quantity Used: 1
Service Level: SELF-SUPPORT
Service Type: L1-L3
Status Details:
Subscription Type: Standard
Starts: 02/27/2015
Ends: 02/27/2016
System Type: Virtual
2. Enter a command as follows to remove the selected subscription:
subscription-manager remove --serial=serial_number
Replace serial_number with the serial number you determined in the previous step.
To remove all subscriptions attached to the system, run the following command:
subscription-manager remove --all
6.4. ADDITIONAL RESOURCES
For more information on how to register your system using Red Hat Subscription Management and
associate it with subscriptions, see the resources listed below.
Installed Documentation
subscription-manager(8) — the manual page for Red Hat Subscription Management
provides a complete list of supported options and commands.
Related Books
Red Hat Subscription Management collection of guides — These guides contain detailed
information how to use Red Hat Subscription Management.
Installation Guide — see the Firstboot chapter for detailed information on how to register during
the firstboot process.
Online Resources
CHAPTER 6. REGISTERING THE SYSTEM AND MANAGING SUBSCRIPTIONS
67

Red Hat Access Labs — The Red Hat Access Labs includes a “Registration Assistant”.
See Also
Chapter 4, Gaining Privileges documents how to gain administrative privileges by using the su
and sudo commands.
Chapter 8, Yum provides information about using the yum packages manager to install and
update software.
Chapter 9, PackageKit provides information about using the PackageKit package manager to
install and update software.
Deployment Guide
68

CHAPTER 7. ACCESSING SUPPORT USING THE RED HAT
SUPPORT TOOL
The Red Hat Support Tool, in the redhat-support-tool package, can function as both an interactive shell
and as a single-execution program. It can be run over SSH or from any terminal. It enables, for example,
searching the Red Hat Knowledgebase from the command line, copying solutions directly on the
command line, opening and updating support cases, and sending files to Red Hat for analysis.
7.1. INSTALLING THE RED HAT SUPPORT TOOL
The Red Hat Support Tool is installed by default on Red Hat Enterprise Linux. If required, to ensure that
it is, enter the following command as root:
~]# yum install redhat-support-tool
7.2. REGISTERING THE RED HAT SUPPORT TOOL USING THE
COMMAND LINE
To register the Red Hat Support Tool to the customer portal using the command line, proceed as follows:
1. ~]# redhat-support-tool config user username
Where username is the user name of the Red Hat Customer Portal account.
2. ~]# redhat-support-tool config password
Please enter the password for username:
7.3. USING THE RED HAT SUPPORT TOOL IN INTERACTIVE SHELL
MODE
To start the tool in interactive mode, enter the following command:
~]$ redhat-support-tool
Welcome to the Red Hat Support Tool.
Command (? for help):
The tool can be run as an unprivileged user, with a consequently reduced set of commands, or as root.
The commands can be listed by entering the ? character. The program or menu selection can be exited
by entering the q or e character. You will be prompted for your Red Hat Customer Portal user name and
password when you first search the Knowledgebase or support cases. Alternately, set the user name
and password for your Red Hat Customer Portal account using interactive mode, and optionally save it to
the configuration file.
7.4. CONFIGURING THE RED HAT SUPPORT TOOL
When in interactive mode, the configuration options can be listed by entering the command config --
help:
~]# redhat-support-tool
CHAPTER 7. ACCESSING SUPPORT USING THE RED HAT SUPPORT TOOL
69

Welcome to the Red Hat Support Tool.
Command (? for help): config --help
Usage: config [options] config.option <new option value>
Use the 'config' command to set or get configuration file values.
Options:
-h, --help show this help message and exit
-g, --global Save configuration option in /etc/redhat-support-
tool.conf.
-u, --unset Unset configuration option.
The configuration file options which can be set are:
user : The Red Hat Customer Portal user.
password : The Red Hat Customer Portal password.
debug : CRITICAL, ERROR, WARNING, INFO, or DEBUG
url : The support services URL.
Default=https://api.access.redhat.com
proxy_url : A proxy server URL.
proxy_user: A proxy server user.
proxy_password: A password for the proxy server user.
ssl_ca : Path to certificate authorities to trust during
communication.
kern_debug_dir: Path to the directory where kernel debug symbols should
be downloaded and cached. Default=/var/lib/redhat-support-
tool/debugkernels
Examples:
- config user
- config user my-rhn-username
- config --unset user
Procedure 7.1. Registering the Red Hat Support Tool Using Interactive Mode
To register the Red Hat Support Tool to the customer portal using interactive mode, proceed as follows:
1. Start the tool by entering the following command:
~]# redhat-support-tool
2. Enter your Red Hat Customer Portal user name:
Command (? for help): config user username
To save your user name to the global configuration file, add the -g option.
3. Enter your Red Hat Customer Portal password:
Command (? for help): config password
Please enter the password for username:
7.4.1. Saving Settings to the Configuration Files
The Red Hat Support Tool, unless otherwise directed, stores values and options locally in the home
Deployment Guide
70

directory of the current user, using the ~/.redhat-support-tool/redhat-support-tool.conf
configuration file. If required, it is recommended to save passwords to this file because it is only readable
by that particular user. When the tool starts, it will read values from the global configuration file
/etc/redhat-support-tool.conf and from the local configuration file. Locally stored values and
options take precedence over globally stored settings.
WARNING
It is recommended not to save passwords in the global /etc/redhat-support-
tool.conf configuration file because the password is just base64 encoded and
can easily be decoded. In addition, the file is world readable.
To save a value or option to the global configuration file, add the -g, --global option as follows:
Command (? for help): config setting -g value
NOTE
In order to be able to save settings globally, using the -g, --global option, the Red
Hat Support Tool must be run as root because normal users do not have the
permissions required to write to /etc/redhat-support-tool.conf.
To remove a value or option from the local configuration file, add the -u, --unset option as follows:
Command (? for help): config setting -u value
This will clear, unset, the parameter from the tool and fall back to the equivalent setting in the global
configuration file, if available.
NOTE
When running as an unprivileged user, values stored in the global configuration file
cannot be removed using the -u, --unset option, but they can be cleared, unset, from
the current running instance of the tool by using the -g, --global option
simultaneously with the -u, --unset option. If running as root, values and options can
be removed from the global configuration file using -g, --global simultaneously with
the -u, --unset option.
7.5. OPENING AND UPDATING SUPPORT CASES USING INTERACTIVE
MODE
Procedure 7.2. Opening a New Support Case Using Interactive Mode
To open a new support case using interactive mode, proceed as follows:
1. Start the tool by entering the following command:
CHAPTER 7. ACCESSING SUPPORT USING THE RED HAT SUPPORT TOOL
71

~]# redhat-support-tool
2. Enter the opencase command:
Command (? for help): opencase
3. Follow the on screen prompts to select a product and then a version.
4. Enter a summary of the case.
5. Enter a description of the case and press Ctrl+D on an empty line when complete.
6. Select a severity of the case.
7. Optionally chose to see if there is a solution to this problem before opening a support case.
8. Confirm you would still like to open the support case.
Support case 0123456789 has successfully been opened
9. Optionally chose to attach an SOS report.
10. Optionally chose to attach a file.
Procedure 7.3. Viewing and Updating an Existing Support Case Using Interactive Mode
To view and update an existing support case using interactive mode, proceed as follows:
1. Start the tool by entering the following command:
~]# redhat-support-tool
2. Enter the getcase command:
Command (? for help): getcase case-number
Where case-number is the number of the case you want to view and update.
3. Follow the on screen prompts to view the case, modify or add comments, and get or add
attachments.
Procedure 7.4. Modifying an Existing Support Case Using Interactive Mode
To modify the attributes of an existing support case using interactive mode, proceed as follows:
1. Start the tool by entering the following command:
~]# redhat-support-tool
2. Enter the modifycase command:
Command (? for help): modifycase case-number
Deployment Guide
72

Where case-number is the number of the case you want to view and update.
3. The modify selection list appears:
Type the number of the attribute to modify or 'e' to return to the
previous menu.
1 Modify Type
2 Modify Severity
3 Modify Status
4 Modify Alternative-ID
5 Modify Product
6 Modify Version
End of options.
Follow the on screen prompts to modify one or more of the options.
4. For example, to modify the status, enter 3:
Selection: 3
1 Waiting on Customer
2 Waiting on Red Hat
3 Closed
Please select a status (or 'q' to exit):
7.6. VIEWING SUPPORT CASES ON THE COMMAND LINE
Viewing the contents of a case on the command line provides a quick and easy way to apply solutions
from the command line.
To view an existing support case on the command line, enter a command as follows:
~]# redhat-support-tool getcase case-number
Where case-number is the number of the case you want to download.
7.7. ADDITIONAL RESOURCES
The Red Hat Knowledgebase article Red Hat Support Tool has additional information, examples, and
video tutorials.
CHAPTER 7. ACCESSING SUPPORT USING THE RED HAT SUPPORT TOOL
73

PART III. INSTALLING AND MANAGING SOFTWARE
All software on a Red Hat Enterprise Linux system is divided into RPM packages, which can be installed,
upgraded, or removed. This part focuses on product subscriptions and entitlements, and describes how
to manage packages on Red Hat Enterprise Linux using both Yum and the PackageKit suite of graphical
package management tools.
Deployment Guide
74

CHAPTER 8. YUM
Yum is the Red Hat package manager that is able to query for information about available packages,
fetch packages from repositories, install and uninstall them, and update an entire system to the latest
available version. Yum performs automatic dependency resolution on packages you are updating,
installing, or removing, and thus is able to automatically determine, fetch, and install all available
dependent packages.
Yum can be configured with new, additional repositories, or package sources, and also provides many
plug-ins which enhance and extend its capabilities. Yum is able to perform many of the same tasks that
RPM can; additionally, many of the command-line options are similar. Yum enables easy and simple
package management on a single machine or on groups of them.
The following sections assume your system was registered with Red Hat Subscription Management
during installation as described in the Red Hat Enterprise Linux 6 Installation Guide. If your system is not
subscribed, see Chapter 6, Registering the System and Managing Subscriptions.
IMPORTANT
Yum provides secure package management by enabling GPG (Gnu Privacy Guard; also
known as GnuPG) signature verification on GPG-signed packages to be turned on for all
package repositories (i.e. package sources), or for individual repositories. When signature
verification is enabled, Yum will refuse to install any packages not GPG-signed with the
correct key for that repository. This means that you can trust that the RPM packages you
download and install on your system are from a trusted source, such as Red Hat, and
were not modified during transfer. See Section 8.4, “Configuring Yum and Yum
Repositories” for details on enabling signature-checking with Yum, or Section B.3,
“Checking a Package's Signature” for information on working with and verifying GPG-
signed RPM packages in general.
Yum also enables you to easily set up your own repositories of RPM packages for download and
installation on other machines.
Learning Yum is a worthwhile investment because it is often the fastest way to perform system
administration tasks, and it provides capabilities beyond those provided by the PackageKit graphical
package management tools. See Chapter 9, PackageKit for details on using PackageKit.
NOTE
You must have superuser privileges in order to use yum to install, update or remove
packages on your system. All examples in this chapter assume that you have already
obtained superuser privileges by using either the su or sudo command.
8.1. CHECKING FOR AND UPDATING PACKAGES
8.1.1. Checking For Updates
To see which installed packages on your system have updates available, use the following command:
yum check-update
For example:
CHAPTER 8. YUM
75

~]# yum check-update
Loaded plugins: product-id, refresh-packagekit, subscription-manager
Updating Red Hat repositories.
INFO:rhsm-app.repolib:repos updated: 0
PackageKit.x86_64 0.5.8-2.el6 rhel
PackageKit-glib.x86_64 0.5.8-2.el6 rhel
PackageKit-yum.x86_64 0.5.8-2.el6 rhel
PackageKit-yum-plugin.x86_64 0.5.8-2.el6 rhel
glibc.x86_64 2.11.90-20.el6 rhel
glibc-common.x86_64 2.10.90-22 rhel
kernel.x86_64 2.6.31-14.el6 rhel
kernel-firmware.noarch 2.6.31-14.el6 rhel
rpm.x86_64 4.7.1-5.el6 rhel
rpm-libs.x86_64 4.7.1-5.el6 rhel
rpm-python.x86_64 4.7.1-5.el6 rhel
udev.x86_64 147-2.15.el6 rhel
yum.noarch 3.2.24-4.el6 rhel
The packages in the above output are listed as having updates available. The first package in the list is
PackageKit, the graphical package manager. The line in the example output tells us:
PackageKit — the name of the package
x86_64 — the CPU architecture the package was built for
0.5.8 — the version of the updated package to be installed
rhel — the repository in which the updated package is located
The output also shows us that we can update the kernel (the kernel package), Yum and RPM
themselves (the yum and rpm packages), as well as their dependencies (such as the kernel-firmware,
rpm-libs, and rpm-python packages), all using yum.
8.1.2. Updating Packages
You can choose to update a single package, multiple packages, or all packages at once. If any
dependencies of the package (or packages) you update have updates available themselves, then they
are updated too.
Updating a Single Package
To update a single package, run the following command as root:
yum update package_name
For example, to update the udev package, type:
~]# yum update udev
Loaded plugins: product-id, refresh-packagekit, subscription-manager
Updating Red Hat repositories.
INFO:rhsm-app.repolib:repos updated: 0
Setting up Update Process
Resolving Dependencies
--> Running transaction check
---> Package udev.x86_64 0:147-2.15.el6 set to be updated
--> Finished Dependency Resolution
Deployment Guide
76

Dependencies Resolved
==========================================================================
=
Package Arch Version Repository
Size
==========================================================================
=
Updating:
udev x86_64 147-2.15.el6 rhel 337
k
Transaction Summary
==========================================================================
=
Install 0 Package(s)
Upgrade 1 Package(s)
Total download size: 337 k
Is this ok [y/N]:
This output contains several items of interest:
1. Loaded plugins: product-id, refresh-packagekit, subscription-manager —
yum always informs you which Yum plug-ins are installed and enabled. See Section 8.5, “Yum
Plug-ins” for general information on Yum plug-ins, or to Section 8.5.3, “Plug-in Descriptions” for
descriptions of specific plug-ins.
2. udev.x86_64 — you can download and install new udev package.
3. yum presents the update information and then prompts you as to whether you want it to perform
the update; yum runs interactively by default. If you already know which transactions the yum
command plans to perform, you can use the -y option to automatically answer yes to any
questions that yum asks (in which case it runs non-interactively). However, you should always
examine which changes yum plans to make to the system so that you can easily troubleshoot
any problems that might arise.
If a transaction does go awry, you can view Yum's transaction history by using the yum
history command as described in Section 8.3, “Working with Transaction History”.
IMPORTANT
yum always installs a new kernel in the same sense that RPM installs a new kernel when
you use the command rpm -i kernel. Therefore, you do not need to worry about the
distinction between installing and upgrading a kernel package when you use yum: it will
do the right thing, regardless of whether you are using the yum update or yum install
command.
When using RPM, on the other hand, it is important to use the rpm -i kernel
command (which installs a new kernel) instead of rpm -u kernel (which replaces the
current kernel). See Section B.2.2, “Installing and Upgrading” for more information on
installing/upgrading kernels with RPM.
CHAPTER 8. YUM
77

Updating All Packages and Their Dependencies
To update all packages and their dependencies, enter yum update (without any arguments):
yum update
Updating Security-Related Packages
Discovering which packages have security updates available and then updating those packages quickly
and easily is important. Yum provides the plug-in for this purpose. The security plug-in extends the yum
command with a set of highly-useful security-centric commands, subcommands and options. See
Section 8.5.3, “Plug-in Descriptions” for specific information.
Updating Packages Automatically
It is also possible to set up periodical automatic updates for your packages. For this purpose, Red Hat
Enterprise Linux 6 uses the yum-cron package. It provides a Yum interface for the cron daemon and
downloads metadata from your package repositories. With the yum-cron service enabled, the user can
schedule an automated daily Yum update as a cron job.
NOTE
The yum-cron package is provided by the Optional subscription channel. See
Section 8.4.8, “Adding the Optional and Supplementary Repositories” for more information
on Red Hat additional channels.
To install yum-cron issue the following command:
~]# yum install yum-cron
By default, the yum-cron service is disabled and needs to be activated and started manually:
~]# chkconfig yum-cron on
~]# service yum-cron start
To verify the status of the service, run the following command:
~]# service yum-cron status
The script included in the yum-cron package can be configured to change the extent and frequency of the
updates, as well as to send notifications to e-mail. To customize yum-cron, edit the
/etc/sysconfig/yum-cron file.
Additional details and instructions for yum-cron can be found in the comments within
/etc/sysconfig/yum-cron and at the yum-cron(8) manual page.
8.1.3. Preserving Configuration File Changes
You will inevitably make changes to the configuration files installed by packages as you use your
Red Hat Enterprise Linux system. RPM, which Yum uses to perform changes to the system, provides a
mechanism for ensuring their integrity. See Section B.2.2, “Installing and Upgrading” for details on how to
manage changes to configuration files across package upgrades.
8.1.4. Upgrading the System Off-line with ISO and Yum
Deployment Guide
78

For systems that are disconnected from the Internet or Red Hat Network, using the yum update
command with the Red Hat Enterprise Linux installation ISO image is an easy and quick way to upgrade
systems to the latest minor version. The following steps illustrate the upgrading process:
1. Create a target directory to mount your ISO image. This directory is not automatically created
when mounting, so create it before proceeding to the next step. As root, type:
mkdir mount_dir
Replace mount_dir with a path to the mount directory. Typically, users create it as a subdirectory
in the /media/ directory.
2. Mount the Red Hat Enterprise Linux 6 installation ISO image to the previously created target
directory. As root, type:
mount -o loop iso_name mount_dir
Replace iso_name with a path to your ISO image and mount_dir with a path to the target
directory. Here, the -o loop option is required to mount the file as a block device.
3. Copy the media.repo file from the mount directory to the /etc/yum.repos.d/ directory.
Note that configuration files in this directory must have the .repo extension to function properly.
cp mount_dir/media.repo /etc/yum.repos.d/new.repo
This creates a configuration file for the yum repository. Replace new.repo with the filename, for
example rhel6.repo.
4. Edit the new configuration file so that it points to the Red Hat Enterprise Linux installation ISO.
Add the following line into the /etc/yum.repos.d/new.repo file:
baseurl=file:///mount_dir
Replace mount_dir with a path to the mount point.
5. Update all yum repositories including /etc/yum.repos.d/new.repo created in previous
steps. As root, type:
yum update
This upgrades your system to the version provided by the mounted ISO image.
6. After successful upgrade, you can unmount the ISO image. As root, type:
umount mount_dir
where mount_dir is a path to your mount directory. Also, you can remove the mount directory
created in the first step. As root, type:
rmdir mount_dir
7. If you will not use the previously created configuration file for another installation or update, you
can remove it. As root, type:
CHAPTER 8. YUM
79

rm /etc/yum.repos.d/new.repo
Example 8.1. Upgrading from Red Hat Enterprise Linux 6.3 to 6.4
Imagine you need to upgrade your system without access to the Internet. To do so, you want to use
an ISO image with the newer version of the system, called for instance RHEL6.4-Server-
20130130.0-x86_64-DVD1.iso. A target directory created for mounting is /media/rhel6/. As
root, change into the directory with your ISO image and type:
~]# mount -o loop RHEL6.4-Server-20130130.0-x86_64-DVD1.iso
/media/rhel6/
Then set up a yum repository for your image by copying the media.repo file from the mount
directory:
~]# cp /media/rhel6/media.repo /etc/yum.repos.d/rhel6.repo
To make yum recognize the mount point as a repository, add the following line into the
/etc/yum.repos.d/rhel6.repo copied in the previous step:
baseurl=file:///media/rhel6/
Now, updating the yum repository will upgrade your system to a version provided by RHEL6.4-
Server-20130130.0-x86_64-DVD1.iso. As root, execute:
~]# yum update
When your system is successfully upgraded, you can unmount the image, remove the target directory
and the configuration file:
~]# umount /media/rhel6/
~]# rmdir /media/rhel6/
~]# rm /etc/yum.repos.d/rhel6.repo
8.2. PACKAGES AND PACKAGE GROUPS
8.2.1. Searching Packages
You can search all RPM package names, descriptions and summaries by using the following command:
yum search term…
Replace term with a package name you want to search.
Example 8.2. Searching for packages matching a specific string
To list all packages that match “vim”, “gvim”, or “emacs”, type:
Deployment Guide
80

~]$ yum search vim gvim emacs
Loaded plugins: langpacks, product-id, search-disabled-repos,
subscription-manager
============================= N/S matched: vim
==============================
vim-X11.x86_64 : The VIM version of the vi editor for the X Window
System
vim-common.x86_64 : The common files needed by any version of the VIM
editor
[output truncated]
============================ N/S matched: emacs
=============================
emacs.x86_64 : GNU Emacs text editor
emacs-auctex.noarch : Enhanced TeX modes for Emacs
[output truncated]
Name and summary matches mostly, use "search all" for everything.
Warning: No matches found for: gvim
The yum search command is useful for searching for packages you do not know the name of, but for
which you know a related term. Note that by default, yum search returns matches in package name
and summary, which makes the search faster. Use the yum search all command for a more
exhaustive but slower search.
8.2.2. Listing Packages
yum list and related commands provide information about packages, package groups, and
repositories.
All of Yum's list commands allow you to filter the results by appending one or more glob expressions as
arguments. Glob expressions are normal strings of characters which contain one or more of the wildcard
characters * (which expands to match any character multiple times) and ? (which expands to match any
one character).
NOTE
Be careful to escape the glob expressions when passing them as arguments to a yum
command, otherwise the Bash shell will interpret these expressions as pathname
expansions, and potentially pass all files in the current directory that match the globs to
yum. To make sure the glob expressions are passed to yum as intended, either:
escape the wildcard characters by preceding them with a backslash character
double-quote or single-quote the entire glob expression.
See Example 8.3, “Listing all ABRT add-ons and plug-ins using glob expressions” and
Example 8.5, “Listing available packages using a single glob expression with escaped
wildcard characters” for an example usage of both these methods.
yum list glob_expression…
Lists information on installed and available packages matching all glob expressions.
CHAPTER 8. YUM
81

Example 8.3. Listing all ABRT add-ons and plug-ins using glob expressions
Packages with various ABRT add-ons and plug-ins either begin with “abrt-addon-”, or “abrt-
plugin-”. To list these packages, type the following at a shell prompt:
~]# yum list abrt-addon\* abrt-plugin\*
Loaded plugins: product-id, refresh-packagekit, subscription-manager
Updating Red Hat repositories.
INFO:rhsm-app.repolib:repos updated: 0
Installed Packages
abrt-addon-ccpp.x86_64 1.0.7-5.el6
@rhel
abrt-addon-kerneloops.x86_64 1.0.7-5.el6
@rhel
abrt-addon-python.x86_64 1.0.7-5.el6
@rhel
abrt-plugin-bugzilla.x86_64 1.0.7-5.el6
@rhel
abrt-plugin-logger.x86_64 1.0.7-5.el6
@rhel
abrt-plugin-sosreport.x86_64 1.0.7-5.el6
@rhel
abrt-plugin-ticketuploader.x86_64 1.0.7-5.el6
@rhel
yum list all
Lists all installed and available packages.
yum list installed
Lists all packages installed on your system. The rightmost column in the output lists the repository
from which the package was retrieved.
Example 8.4. Listing installed packages using a double-quoted glob expression
To list all installed packages that begin with “krb” followed by exactly one character and a hyphen,
type:
~]# yum list installed "krb?-*"
Loaded plugins: product-id, refresh-packagekit, subscription-manager
Updating Red Hat repositories.
INFO:rhsm-app.repolib:repos updated: 0
Installed Packages
krb5-libs.x86_64 1.8.1-3.el6
@rhel
krb5-workstation.x86_64 1.8.1-3.el6
@rhel
yum list available
Lists all available packages in all enabled repositories.
Deployment Guide
82

Example 8.5. Listing available packages using a single glob expression with escaped
wildcard characters
To list all available packages with names that contain “gstreamer” and then “plugin”, run the
following command:
~]# yum list available gstreamer\*plugin\*
Loaded plugins: product-id, refresh-packagekit, subscription-manager
Updating Red Hat repositories.
INFO:rhsm-app.repolib:repos updated: 0
Available Packages
gstreamer-plugins-bad-free.i686 0.10.17-4.el6
rhel
gstreamer-plugins-base.i686 0.10.26-1.el6
rhel
gstreamer-plugins-base-devel.i686 0.10.26-1.el6
rhel
gstreamer-plugins-base-devel.x86_64 0.10.26-1.el6
rhel
gstreamer-plugins-good.i686 0.10.18-1.el6
rhel
yum grouplist
Lists all package groups.
yum repolist
Lists the repository ID, name, and number of packages it provides for each enabled repository.
8.2.3. Displaying Package Information
To display information about one or more packages (glob expressions are valid here as well), use the
following command:
yum info package_name…
For example, to display information about the abrt package, type:
~]# yum info abrt
Loaded plugins: product-id, refresh-packagekit, subscription-manager
Updating Red Hat repositories.
INFO:rhsm-app.repolib:repos updated: 0
Installed Packages
Name : abrt
Arch : x86_64
Version : 1.0.7
Release : 5.el6
Size : 578 k
Repo : installed
From repo : rhel
Summary : Automatic bug detection and reporting tool
URL : https://fedorahosted.org/abrt/
CHAPTER 8. YUM
83

License : GPLv2+
Description: abrt is a tool to help users to detect defects in
applications
: and to create a bug report with all informations needed by
: maintainer to fix it. It uses plugin system to extend its
: functionality.
The yum info package_name command is similar to the rpm -q --info package_name
command, but provides as additional information the ID of the Yum repository the RPM package is found
in (look for the From repo: line in the output).
You can also query the Yum database for alternative and useful information about a package by using
the following command:
yumdb info package_name
This command provides additional information about a package, including the check sum of the package
(and algorithm used to produce it, such as SHA-256), the command given on the command line that was
invoked to install the package (if any), and the reason that the package is installed on the system (where
user indicates it was installed by the user, and dep means it was brought in as a dependency). For
example, to display additional information about the yum package, type:
~]# yumdb info yum
Loaded plugins: product-id, refresh-packagekit, subscription-manager
yum-3.2.27-4.el6.noarch
checksum_data =
23d337ed51a9757bbfbdceb82c4eaca9808ff1009b51e9626d540f44fe95f771
checksum_type = sha256
from_repo = rhel
from_repo_revision = 1298613159
from_repo_timestamp = 1298614288
installed_by = 4294967295
reason = user
releasever = 6.1
For more information on the yumdb command, see the yumdb(8) manual page.
Listing Files Contained in a Package
repoquery is a program for querying information from yum repositories similarly to rpm queries. You can
query both package groups and individual packages. To list all files contained in a specific package,
type:
repoquery --list package_name
Replace package_name with a name of the package you want to inspect. For more information on the
repoquery command, see the repoquery manual page.
To find out which package provides a specific file, you can use the yum provides command, described
in Finding which package owns a file
8.2.4. Installing Packages
Yum allows you to install both a single package and multiple packages, as well as a package group of
your choice.
Deployment Guide
84

Installing Individual Packages
To install a single package and all of its non-installed dependencies, enter a command in the following
form:
yum install package_name
You can also install multiple packages simultaneously by appending their names as arguments:
yum install package_name package_name…
If you are installing packages on a multilib system, such as an AMD64 or Intel 64 machine, you can
specify the architecture of the package (as long as it is available in an enabled repository) by appending
.arch to the package name. For example, to install the sqlite package for i686, type:
~]# yum install sqlite.i686
You can use glob expressions to quickly install multiple similarly-named packages:
~]# yum install perl-Crypt-\*
In addition to package names and glob expressions, you can also provide file names to yum install.
If you know the name of the binary you want to install, but not its package name, you can give yum
install the path name:
~]# yum install /usr/sbin/named
yum then searches through its package lists, finds the package which provides /usr/sbin/named, if
any, and prompts you as to whether you want to install it.
NOTE
If you know you want to install the package that contains the named binary, but you do not
know in which bin or sbin directory is the file installed, use the yum provides
command with a glob expression:
~]# yum provides "*bin/named"
Loaded plugins: product-id, refresh-packagekit, subscription-
manager
Updating Red Hat repositories.
INFO:rhsm-app.repolib:repos updated: 0
32:bind-9.7.0-4.P1.el6.x86_64 : The Berkeley Internet Name
Domain (BIND)
: DNS (Domain Name System)
server
Repo : rhel
Matched from:
Filename : /usr/sbin/named
yum provides "*/file_name" is a common and useful trick to find the package(s)
that contain file_name.
Installing a Package Group
CHAPTER 8. YUM
85

A package group is similar to a package: it is not useful by itself, but installing one pulls a group of
dependent packages that serve a common purpose. A package group has a name and a groupid. The
yum grouplist -v command lists the names of all package groups, and, next to each of them, their
groupid in parentheses. The groupid is always the term in the last pair of parentheses, such as kde-
desktop in the following example:
~]# yum -v grouplist kde\*
Loading "product-id" plugin
Loading "refresh-packagekit" plugin
Loading "subscription-manager" plugin
Updating Red Hat repositories.
INFO:rhsm-app.repolib:repos updated: 0
Config time: 0.123
Yum Version: 3.2.29
Setting up Group Process
Looking for repo options for [rhel]
rpmdb time: 0.001
group time: 1.291
Available Groups:
KDE Desktop (kde-desktop)
Done
You can install a package group by passing its full group name (without the groupid part) to
groupinstall:
yum groupinstall group_name
You can also install by groupid:
yum groupinstall groupid
You can even pass the groupid (or quoted name) to the install command if you prepend it with an @-
symbol (which tells yum that you want to perform a groupinstall):
yum install @group
For example, the following are alternative but equivalent ways of installing the KDE Desktop group:
~]# yum groupinstall "KDE Desktop"
~]# yum groupinstall kde-desktop
~]# yum install @kde-desktop
8.2.5. Removing Packages
Similarly to package installation, Yum allows you to uninstall (remove in RPM and Yum terminology) both
individual packages and a package group.
Removing Individual Packages
To uninstall a particular package, as well as any packages that depend on it, run the following command
as root:
yum remove package_name…
Deployment Guide
86

As when you install multiple packages, you can remove several at once by adding more package names
to the command. For example, to remove totem, rhythmbox, and sound-juicer, type the following at a
shell prompt:
~]# yum remove totem rhythmbox sound-juicer
Similar to install, remove can take these arguments:
package names
glob expressions
file lists
package provides
WARNING
Yum is not able to remove a package without also removing packages which
depend on it. This type of operation can only be performed by RPM, is not advised,
and can potentially leave your system in a non-functioning state or cause
applications to misbehave and/or crash. For further information, see Section B.2.4,
“Uninstalling” in the RPM chapter.
Removing a Package Group
You can remove a package group using syntax congruent with the install syntax:
yum groupremove group
yum remove @group
The following are alternative but equivalent ways of removing the KDE Desktop group:
~]# yum groupremove "KDE Desktop"
~]# yum groupremove kde-desktop
~]# yum remove @kde-desktop
IMPORTANT
When you tell yum to remove a package group, it will remove every package in that
group, even if those packages are members of other package groups or dependencies of
other installed packages. However, you can instruct yum to remove only those packages
which are not required by any other packages or groups by adding the
groupremove_leaf_only=1 directive to the [main] section of the /etc/yum.conf
configuration file. For more information on this directive, see Section 8.4.1, “Setting [main]
Options”.
CHAPTER 8. YUM
87

8.3. WORKING WITH TRANSACTION HISTORY
The yum history command allows users to review information about a timeline of Yum transactions,
the dates and times they occurred, the number of packages affected, whether transactions succeeded or
were aborted, and if the RPM database was changed between transactions. Additionally, this command
can be used to undo or redo certain transactions.
8.3.1. Listing Transactions
To display a list of twenty most recent transactions, as root, either run yum history with no additional
arguments, or type the following at a shell prompt:
yum history list
To display all transactions, add the all keyword:
yum history list all
To display only transactions in a given range, use the command in the following form:
yum history list start_id..end_id
You can also list only transactions regarding a particular package or packages. To do so, use the
command with a package name or a glob expression:
yum history list glob_expression…
For example, the list of the first five transactions looks as follows:
~]# yum history list 1..5
Loaded plugins: product-id, refresh-packagekit, subscription-manager
ID | Login user | Date and time | Action(s) |
Altered
----------------------------------------------------------------------
---------
5 | Jaromir ... <jhradilek> | 2011-07-29 15:33 | Install |
1
4 | Jaromir ... <jhradilek> | 2011-07-21 15:10 | Install |
1
3 | Jaromir ... <jhradilek> | 2011-07-16 15:27 | I, U |
73
2 | System <unset> | 2011-07-16 15:19 | Update |
1
1 | System <unset> | 2011-07-16 14:38 | Install |
1106
history list
All forms of the yum history list command produce tabular output with each row consisting of the
following columns:
ID — an integer value that identifies a particular transaction.
Login user — the name of the user whose login session was used to initiate a transaction.
Deployment Guide
88

This information is typically presented in the Full Name <username> form. For transactions
that were not issued by a user (such as an automatic system update), System <unset> is
used instead.
Date and time — the date and time when a transaction was issued.
Action(s) — a list of actions that were performed during a transaction as described in
Table 8.1, “Possible values of the Action(s) field”.
Altered — the number of packages that were affected by a transaction, possibly followed by
additional information as described in Table 8.2, “Possible values of the Altered field”.
Table 8.1. Possible values of the Action(s) field
Action Abbreviatio
n
Description
Downgrade D At least one package has been downgraded to an older version.
Erase E At least one package has been removed.
Install I At least one new package has been installed.
Obsoleting O At least one package has been marked as obsolete.
Reinstall R At least one package has been reinstalled.
Update U At least one package has been updated to a newer version.
Table 8.2. Possible values of the Altered field
Symbol Description
<Before the transaction finished, the rpmdb database was changed outside Yum.
>After the transaction finished, the rpmdb database was changed outside Yum.
*The transaction failed to finish.
#The transaction finished successfully, but yum returned a non-zero exit code.
EThe transaction finished successfully, but an error or a warning was displayed.
PThe transaction finished successfully, but problems already existed in the rpmdb
database.
sThe transaction finished successfully, but the --skip-broken command-line option
was used and certain packages were skipped.
CHAPTER 8. YUM
89

Yum also allows you to display a summary of all past transactions. To do so, run the command in the
following form as root:
yum history summary
To display only transactions in a given range, type:
yum history summary start_id..end_id
Similarly to the yum history list command, you can also display a summary of transactions
regarding a certain package or packages by supplying a package name or a glob expression:
yum history summary glob_expression…
For instance, a summary of the transaction history displayed above would look like the following:
~]# yum history summary 1..5
Loaded plugins: product-id, refresh-packagekit, subscription-manager
Login user | Time | Action(s) |
Altered
----------------------------------------------------------------------
---------
Jaromir ... <jhradilek> | Last day | Install |
1
Jaromir ... <jhradilek> | Last week | Install |
1
Jaromir ... <jhradilek> | Last 2 weeks | I, U |
73
System <unset> | Last 2 weeks | I, U |
1107
history summary
All forms of the yum history summary command produce simplified tabular output similar to the
output of yum history list.
As shown above, both yum history list and yum history summary are oriented towards
transactions, and although they allow you to display only transactions related to a given package or
packages, they lack important details, such as package versions. To list transactions from the
perspective of a package, run the following command as root:
yum history package-list glob_expression…
For example, to trace the history of subscription-manager and related packages, type the following at a
shell prompt:
~]# yum history package-list subscription-manager\*
Loaded plugins: product-id, refresh-packagekit, subscription-manager
ID | Action(s) | Package
----------------------------------------------------------------------
---------
3 | Updated | subscription-manager-0.95.11-1.el6.x86_64
3 | Update | 0.95.17-1.el6_1.x86_64
3 | Updated | subscription-manager-firstboot-0.95.11-
1.el6.x86_64
Deployment Guide
90

3 | Update | 0.95.17-
1.el6_1.x86_64
3 | Updated | subscription-manager-gnome-0.95.11-1.el6.x86_64
3 | Update | 0.95.17-
1.el6_1.x86_64
1 | Install | subscription-manager-0.95.11-1.el6.x86_64
1 | Install | subscription-manager-firstboot-0.95.11-
1.el6.x86_64
1 | Install | subscription-manager-gnome-0.95.11-1.el6.x86_64
history package-list
In this example, three packages were installed during the initial system installation: subscription-
manager, subscription-manager-firstboot, and subscription-manager-gnome. In the third transaction, all
these packages were updated from version 0.95.11 to version 0.95.17.
8.3.2. Examining Transactions
To display the summary of a single transaction, as root, use the yum history summary command in
the following form:
yum history summary id
To examine a particular transaction or transactions in more detail, run the following command as root:
yum history info id…
The id argument is optional and when you omit it, yum automatically uses the last transaction. Note that
when specifying more than one transaction, you can also use a range:
yum history info start_id..end_id
The following is sample output for two transactions, each installing one new package:
~]# yum history info 4..5
Loaded plugins: product-id, refresh-packagekit, subscription-manager
Transaction ID : 4..5
Begin time : Thu Jul 21 15:10:46 2011
Begin rpmdb : 1107:0c67c32219c199f92ed8da7572b4c6df64eacd3a
End time : 15:33:15 2011 (22 minutes)
End rpmdb : 1109:1171025bd9b6b5f8db30d063598f590f1c1f3242
User : Jaromir Hradilek <jhradilek>
Return-Code : Success
Command Line : install screen
Command Line : install yum-plugin-security
Transaction performed with:
Installed rpm-4.8.0-16.el6.x86_64
Installed yum-3.2.29-17.el6.noarch
Installed yum-metadata-parser-1.1.2-16.el6.x86_64
Packages Altered:
Install screen-4.0.3-16.el6.x86_64
Install yum-plugin-security-1.1.30-17.el6.noarch
history info
CHAPTER 8. YUM
91

You can also view additional information, such as what configuration options were used at the time of the
transaction, or from what repository and why were certain packages installed. To determine what
additional information is available for a certain transaction, type the following at a shell prompt as root:
yum history addon-info id
Similarly to yum history info, when no id is provided, yum automatically uses the latest transaction.
Another way to see the latest transaction is to use the last keyword:
yum history addon-info last
For instance, for the first transaction in the previous example, the yum history addon-info
command would provide the following output:
~]# yum history addon-info 4
Loaded plugins: product-id, refresh-packagekit, subscription-manager
Transaction ID: 4
Available additional history information:
config-main
config-repos
saved_tx
history addon-info
In this example, three types of information are available:
config-main — global Yum options that were in use during the transaction. See Section 8.4.1,
“Setting [main] Options” for information on how to change global options.
config-repos — options for individual Yum repositories. See Section 8.4.2, “Setting
[repository] Options” for information on how to change options for individual repositories.
saved_tx — the data that can be used by the yum load-transaction command in order to
repeat the transaction on another machine (see below).
To display selected type of additional information, run the following command as root:
yum history addon-info id information
8.3.3. Reverting and Repeating Transactions
Apart from reviewing the transaction history, the yum history command provides means to revert or
repeat a selected transaction. To revert a transaction, type the following at a shell prompt as root:
yum history undo id
To repeat a particular transaction, as root, run the following command:
yum history redo id
Both commands also accept the last keyword to undo or repeat the latest transaction.
Note that both yum history undo and yum history redo commands only revert or repeat the
Deployment Guide
92

steps that were performed during a transaction. If the transaction installed a new package, the yum
history undo command will uninstall it, and if the transaction uninstalled a package the command will
again install it. This command also attempts to downgrade all updated packages to their previous
version, if these older packages are still available.
When managing several identical systems, Yum also allows you to perform a transaction on one of them,
store the transaction details in a file, and after a period of testing, repeat the same transaction on the
remaining systems as well. To store the transaction details to a file, type the following at a shell prompt
as root:
yum -q history addon-info id saved_tx > file_name
Once you copy this file to the target system, you can repeat the transaction by using the following
command as root:
yum load-transaction file_name
Note, however that the rpmdb version stored in the file must be identical to the version on the target
system. You can verify the rpmdb version by using the yum version nogroups command.
8.3.4. Completing Transactions
An unexpected situation, such as power loss or system crash, can prevent you from completing your
yum transaction. When such event occurs in the middle of your transaction, you can try to resume it later
with the following command as root:
yum-complete-transaction
The yum-complete-transaction tool searches for incomplete or aborted yum transactions on a system
and attempts to complete them. By default, these transactions are listed in the
/var/lib/yum/transaction-all and /var/lib/yum/transaction-done files. If there are
more unfinished transactions, yum-complete-transaction attempts to complete the most recent one
first.
To clean transaction journal files without attempting to resume the aborted transactions, use the --
cleanup-only option:
yum-complete-transaction --cleanup-only
8.3.5. Starting New Transaction History
Yum stores the transaction history in a single SQLite database file. To start new transaction history, run
the following command as root:
yum history new
This will create a new, empty database file in the /var/lib/yum/history/ directory. The old
transaction history will be kept, but will not be accessible as long as a newer database file is present in
the directory.
8.4. CONFIGURING YUM AND YUM REPOSITORIES
CHAPTER 8. YUM
93

The configuration file for yum and related utilities is located at /etc/yum.conf. This file contains one
mandatory [main] section, which allows you to set Yum options that have global effect, and can also
contain one or more [repository] sections, which allow you to set repository-specific options.
However, it is recommended to define individual repositories in new or existing .repo files in the
/etc/yum.repos.d/ directory. The values you define in individual [repository] sections of the
/etc/yum.conf file override values set in the [main] section.
This section shows you how to:
set global Yum options by editing the [main] section of the /etc/yum.conf configuration file;
set options for individual repositories by editing the [repository] sections in
/etc/yum.conf and .repo files in the /etc/yum.repos.d/ directory;
use Yum variables in /etc/yum.conf and files in the /etc/yum.repos.d/ directory so that
dynamic version and architecture values are handled correctly;
add, enable, and disable Yum repositories on the command line; and,
set up your own custom Yum repository.
8.4.1. Setting [main] Options
The /etc/yum.conf configuration file contains exactly one [main] section, and while some of the
key-value pairs in this section affect how yum operates, others affect how Yum treats repositories. You
can add many additional options under the [main] section heading in /etc/yum.conf.
A sample /etc/yum.conf configuration file can look like this:
The following are the most commonly-used options in the [main] section:
assumeyes=value
…where value is one of:
0 — yum should prompt for confirmation of critical actions it performs. This is the default.
1 — Do not prompt for confirmation of critical yum actions. If assumeyes=1 is set, yum behaves in
the same way that the command-line option -y does.
[main]
cachedir=/var/cache/yum/$basearch/$releasever
keepcache=0
debuglevel=2
logfile=/var/log/yum.log
exactarch=1
obsoletes=1
gpgcheck=1
plugins=1
installonly_limit=3
[comments abridged]
# PUT YOUR REPOS HERE OR IN separate files named file.repo
# in /etc/yum.repos.d
Deployment Guide
94

cachedir=directory
…where directory is an absolute path to the directory where Yum should store its cache and database
files. By default, Yum's cache directory is /var/cache/yum/$basearch/$releasever.
See Section 8.4.3, “Using Yum Variables” for descriptions of the $basearch and $releasever
Yum variables.
debuglevel=value
…where value is an integer between 1 and 10. Setting a higher debuglevel value causes yum to
display more detailed debugging output. debuglevel=0 disables debugging output, while
debuglevel=2 is the default.
exactarch=value
…where value is one of:
0 — Do not take into account the exact architecture when updating packages.
1 — Consider the exact architecture when updating packages. With this setting, yum will not install an
i686 package to update an i386 package already installed on the system. This is the default.
exclude=package_name [more_package_names]
This option allows you to exclude packages by keyword during installation/updates. Listing multiple
packages for exclusion can be accomplished by quoting a space-delimited list of packages. Shell
globs using wildcards (for example, * and ?) are allowed.
gpgcheck=value
…where value is one of:
0 — Disable GPG signature-checking on packages in all repositories, including local package
installation.
1 — Enable GPG signature-checking on all packages in all repositories, including local package
installation. gpgcheck=1 is the default, and thus all packages' signatures are checked.
If this option is set in the [main] section of the /etc/yum.conf file, it sets the GPG-checking rule
for all repositories. However, you can also set gpgcheck=value for individual repositories instead;
that is, you can enable GPG-checking on one repository while disabling it on another. Setting
gpgcheck=value for an individual repository in its corresponding .repo file overrides the default if
it is present in /etc/yum.conf.
For more information on GPG signature-checking, see Section B.3, “Checking a Package's
Signature”.
groupremove_leaf_only=value
…where value is one of:
0 — yum should not check the dependencies of each package when removing a package group. With
this setting, yum removes all packages in a package group, regardless of whether those packages
are required by other packages or groups. groupremove_leaf_only=0 is the default.
CHAPTER 8. YUM
95

1 — yum should check the dependencies of each package when removing a package group, and
remove only those packages which are not required by any other package or group.
For more information on removing packages, see Intelligent package group removal.
installonlypkgs=space separated list of packages
Here you can provide a space-separated list of packages which yum can install, but will never update.
See the yum.conf(5) manual page for the list of packages which are install-only by default.
If you add the installonlypkgs directive to /etc/yum.conf, you should ensure that you list all of
the packages that should be install-only, including any of those listed under the installonlypkgs
section of yum.conf(5). In particular, kernel packages should always be listed in installonlypkgs
(as they are by default), and installonly_limit should always be set to a value greater than 2
so that a backup kernel is always available in case the default one fails to boot.
installonly_limit=value
…where value is an integer representing the maximum number of versions that can be installed
simultaneously for any single package listed in the installonlypkgs directive.
The defaults for the installonlypkgs directive include several different kernel packages, so be
aware that changing the value of installonly_limit will also affect the maximum number of
installed versions of any single kernel package. The default value listed in /etc/yum.conf is
installonly_limit=3, and it is not recommended to decrease this value, particularly below 2.
keepcache=value
…where value is one of:
0 — Do not retain the cache of headers and packages after a successful installation. This is the
default.
1 — Retain the cache after a successful installation.
logfile=file_name
…where file_name is an absolute path to the file in which yum should write its logging output. By
default, yum logs to /var/log/yum.log.
multilib_policy=value
…where value is one of:
best — install the best-choice architecture for this system. For example, setting
multilib_policy=best on an AMD64 system causes yum to install 64-bit versions of all
packages.
all — always install every possible architecture for every package. For example, with
multilib_policy set to all on an AMD64 system, yum would install both the i686 and AMD64
versions of a package, if both were available.
obsoletes=value
…where value is one of:
0 — Disable yum's obsoletes processing logic when performing updates.
Deployment Guide
96

1 — Enable yum's obsoletes processing logic when performing updates. When one package
declares in its spec file that it obsoletes another package, the latter package will be replaced by the
former package when the former package is installed. Obsoletes are declared, for example, when a
package is renamed. obsoletes=1 the default.
plugins=value
…where value is one of:
0 — Disable all Yum plug-ins globally.
IMPORTANT
Disabling all plug-ins is not advised because certain plug-ins provide important Yum
services. In particular, rhnplugin provides support for RHN Classic, and product-id
and subscription-manager plug-ins provide support for the certificate-based
Content Delivery Network (CDN). Disabling plug-ins globally is provided as a
convenience option, and is generally only recommended when diagnosing a potential
problem with Yum.
1 — Enable all Yum plug-ins globally. With plugins=1, you can still disable a specific Yum plug-in
by setting enabled=0 in that plug-in's configuration file.
For more information about various Yum plug-ins, see Section 8.5, “Yum Plug-ins”. For further
information on controlling plug-ins, see Section 8.5.1, “Enabling, Configuring, and Disabling Yum
Plug-ins”.
reposdir=directory
…where directory is an absolute path to the directory where .repo files are located. All .repo files
contain repository information (similar to the [repository] sections of /etc/yum.conf). yum
collects all repository information from .repo files and the [repository] section of the
/etc/yum.conf file to create a master list of repositories to use for transactions. If reposdir is not
set, yum uses the default directory /etc/yum.repos.d/.
retries=value
…where value is an integer 0 or greater. This value sets the number of times yum should attempt to
retrieve a file before returning an error. Setting this to 0 makes yum retry forever. The default value is
10.
For a complete list of available [main] options, see the [main] OPTIONS section of the yum.conf(5)
manual page.
8.4.2. Setting [repository] Options
The [repository] sections, where repository is a unique repository ID such as my_personal_repo
(spaces are not permitted), allow you to define individual Yum repositories. To avoid conflicts, custom
repositories should not use names used by Red Hat repositories.
The following is a bare-minimum example of the form a [repository] section takes:
CHAPTER 8. YUM
97

Every [repository] section must contain the following directives:
name=repository_name
…where repository_name is a human-readable string describing the repository.
baseurl=repository_url
…where repository_url is a URL to the directory where the repodata directory of a repository is
located:
If the repository is available over HTTP, use: http://path/to/repo
If the repository is available over FTP, use: ftp://path/to/repo
If the repository is local to the machine, use: file:///path/to/local/repo
If a specific online repository requires basic HTTP authentication, you can specify your user
name and password by prepending it to the URL as username:password@link. For
example, if a repository on http://www.example.com/repo/ requires a user name of “user” and
a password of “password”, then the baseurl link could be specified as
http://user:password@www.example.com/repo/.
Usually this URL is an HTTP link, such as:
Note that Yum always expands the $releasever, $arch, and $basearch variables in URLs. For
more information about Yum variables, see Section 8.4.3, “Using Yum Variables”.
Another useful [repository] directive is the following:
enabled=value
…where value is one of:
0 — Do not include this repository as a package source when performing updates and installs. This is
an easy way of quickly turning repositories on and off, which is useful when you desire a single
package from a repository that you do not want to enable for updates or installs.
1 — Include this repository as a package source.
Turning repositories on and off can also be performed by passing either the --
enablerepo=repo_name or --disablerepo=repo_name option to yum, or through the
Add/Remove Software window of the PackageKit utility.
Many more [repository] options exist. For a complete list, see the [repository] OPTIONS
section of the yum.conf(5) manual page.
Example 8.6. A sample /etc/yum.repos.d/redhat.repo file
[repository]
name=repository_name
baseurl=repository_url
baseurl=http://path/to/repo/releases/$releasever/server/$basearch/os/
Deployment Guide
98

The following is a sample /etc/yum.repos.d/redhat.repo file:
8.4.3. Using Yum Variables
You can use and reference the following built-in variables in yum commands and in all Yum
configuration files (that is, /etc/yum.conf and all .repo files in the /etc/yum.repos.d/ directory):
#
# Red Hat Repositories
# Managed by (rhsm) subscription-manager
#
[red-hat-enterprise-linux-scalable-file-system-for-rhel-6-entitlement-
rpms]
name = Red Hat Enterprise Linux Scalable File System (for RHEL 6
Entitlement) (RPMs)
baseurl = https://cdn.redhat.com/content/dist/rhel/entitlement-
6/releases/$releasever/$basearch/scalablefilesystem/os
enabled = 1
gpgcheck = 1
gpgkey = file:///etc/pki/rpm-gpg/RPM-GPG-KEY-redhat-release
sslverify = 1
sslcacert = /etc/rhsm/ca/redhat-uep.pem
sslclientkey = /etc/pki/entitlement/key.pem
sslclientcert = /etc/pki/entitlement/11300387955690106.pem
[red-hat-enterprise-linux-scalable-file-system-for-rhel-6-entitlement-
source-rpms]
name = Red Hat Enterprise Linux Scalable File System (for RHEL 6
Entitlement) (Source RPMs)
baseurl = https://cdn.redhat.com/content/dist/rhel/entitlement-
6/releases/$releasever/$basearch/scalablefilesystem/source/SRPMS
enabled = 0
gpgcheck = 1
gpgkey = file:///etc/pki/rpm-gpg/RPM-GPG-KEY-redhat-release
sslverify = 1
sslcacert = /etc/rhsm/ca/redhat-uep.pem
sslclientkey = /etc/pki/entitlement/key.pem
sslclientcert = /etc/pki/entitlement/11300387955690106.pem
[red-hat-enterprise-linux-scalable-file-system-for-rhel-6-entitlement-
debug-rpms]
name = Red Hat Enterprise Linux Scalable File System (for RHEL 6
Entitlement) (Debug RPMs)
baseurl = https://cdn.redhat.com/content/dist/rhel/entitlement-
6/releases/$releasever/$basearch/scalablefilesystem/debug
enabled = 0
gpgcheck = 1
gpgkey = file:///etc/pki/rpm-gpg/RPM-GPG-KEY-redhat-release
sslverify = 1
sslcacert = /etc/rhsm/ca/redhat-uep.pem
sslclientkey = /etc/pki/entitlement/key.pem
sslclientcert = /etc/pki/entitlement/11300387955690106.pem
CHAPTER 8. YUM
99

$releasever
You can use this variable to reference the release version of Red Hat Enterprise Linux. Yum obtains
the value of $releasever from the distroverpkg=value line in the /etc/yum.conf
configuration file. If there is no such line in /etc/yum.conf, then yum infers the correct value by
deriving the version number from the redhat-release-server package. The value of $releasever
typically consists of the major release number and the variant of Red Hat Enterprise Linux, for
example 6Client, or 6Server.
$arch
You can use this variable to refer to the system's CPU architecture as returned when calling Python's
os.uname() function. Valid values for $arch include i686 and x86_64.
$basearch
You can use $basearch to reference the base architecture of the system. For example, i686
machines have a base architecture of i386, and AMD64 and Intel 64 machines have a base
architecture of x86_64.
$YUM0-9
These ten variables are each replaced with the value of any shell environment variables with the
same name. If one of these variables is referenced (in /etc/yum.conf for example) and a shell
environment variable with the same name does not exist, then the configuration file variable is not
replaced.
To define a custom variable or to override the value of an existing one, create a file with the same name
as the variable (without the “$” sign) in the /etc/yum/vars/ directory, and add the desired value on its
first line.
For example, repository descriptions often include the operating system name. To define a new variable
called $osname, create a new file with “Red Hat Enterprise Linux” on the first line and save it as
/etc/yum/vars/osname:
~]# echo "Red Hat Enterprise Linux" > /etc/yum/vars/osname
Instead of “Red Hat Enterprise Linux 6”, you can now use the following in the .repo files:
8.4.4. Viewing the Current Configuration
To display the current values of global Yum options (that is, the options specified in the [main] section
of the /etc/yum.conf file), run the yum-config-manager with no command-line options:
yum-config-manager
To list the content of a different configuration section or sections, use the command in the following form:
yum-config-manager section…
You can also use a glob expression to display the configuration of all matching sections:
name=$osname $releasever
Deployment Guide
100

yum-config-manager glob_expression…
For example, to list all configuration options and their corresponding values, type the following at a shell
prompt:
~]$ yum-config-manager main \*
Loaded plugins: product-id, refresh-packagekit, subscription-manager
================================== main
===================================
[main]
alwaysprompt = True
assumeyes = False
bandwith = 0
bugtracker_url = https://bugzilla.redhat.com/enter_bug.cgi?
product=Red%20Hat%20Enterprise%20Linux%206&component=yum
cache = 0
[output truncated]
8.4.5. Adding, Enabling, and Disabling a Yum Repository
Section 8.4.2, “Setting [repository] Options” described various options you can use to define a Yum
repository. This section explains how to add, enable, and disable a repository by using the yum-
config-manager command.
IMPORTANT
When the system is registered with the certificate-based Red Hat Network, the
Red Hat Subscription Manager tools are used to manage repositories in the
/etc/yum.repos.d/redhat.repo file. See Chapter 6, Registering the System and
Managing Subscriptions for more information how to register a system with Red Hat
Network and use the Red Hat Subscription Manager tools to manage subscriptions.
Adding a Yum Repository
To define a new repository, you can either add a [repository] section to the /etc/yum.conf file, or
to a .repo file in the /etc/yum.repos.d/ directory. All files with the .repo file extension in this
directory are read by yum, and it is recommended to define your repositories here instead of in
/etc/yum.conf.
WARNING
Obtaining and installing software packages from unverified or untrusted software
sources other than Red Hat Network constitutes a potential security risk, and could
lead to security, stability, compatibility, and maintainability issues.
Yum repositories commonly provide their own .repo file. To add such a repository to your system and
enable it, run the following command as root:
CHAPTER 8. YUM
101

yum-config-manager --add-repo repository_url
…where repository_url is a link to the .repo file. For example, to add a repository located at
http://www.example.com/example.repo, type the following at a shell prompt:
~]# yum-config-manager --add-repo http://www.example.com/example.repo
Loaded plugins: product-id, refresh-packagekit, subscription-manager
adding repo from: http://www.example.com/example.repo
grabbing file http://www.example.com/example.repo to
/etc/yum.repos.d/example.repo
example.repo | 413 B
00:00
repo saved to /etc/yum.repos.d/example.repo
Enabling a Yum Repository
To enable a particular repository or repositories, type the following at a shell prompt as root:
yum-config-manager --enable repository…
…where repository is the unique repository ID (use yum repolist all to list available repository IDs).
Alternatively, you can use a glob expression to enable all matching repositories:
yum-config-manager --enable glob_expression…
For example, to enable repositories defined in the [example], [example-debuginfo], and
[example-source]sections, type:
~]# yum-config-manager --enable example\*
Loaded plugins: product-id, refresh-packagekit, subscription-manager
============================== repo: example
==============================
[example]
bandwidth = 0
base_persistdir = /var/lib/yum/repos/x86_64/6Server
baseurl = http://www.example.com/repo/6Server/x86_64/
cache = 0
cachedir = /var/cache/yum/x86_64/6Server/example
[output truncated]
When successful, the yum-config-manager --enable command displays the current repository
configuration.
Disabling a Yum Repository
To disable a Yum repository, run the following command as root:
yum-config-manager --disable repository…
…where repository is the unique repository ID (use yum repolist all to list available repository IDs).
Similarly to yum-config-manager --enable, you can use a glob expression to disable all matching
repositories at the same time:
yum-config-manager --disable glob_expression…
Deployment Guide
102

When successful, the yum-config-manager --disable command displays the current configuration.
8.4.6. Creating a Yum Repository
To set up a Yum repository, follow these steps:
1. Install the createrepo package. To do so, type the following at a shell prompt as root:
yum install createrepo
2. Copy all packages that you want to have in your repository into one directory, such as
/mnt/local_repo/.
3. Change to this directory and run the following command:
createrepo --database /mnt/local_repo
This creates the necessary metadata for your Yum repository, as well as the sqlite database for
speeding up yum operations.
IMPORTANT
Compared to Red Hat Enterprise Linux 5, RPM packages for Red Hat
Enterprise Linux 6 are compressed with the XZ lossless data compression format
and can be signed with newer hash algorithms like SHA-256. Consequently, it is
not recommended to use the createrepo command on Red Hat
Enterprise Linux 5 to create the package metadata for Red Hat
Enterprise Linux 6.
8.4.7. Working with Yum Cache
By default, yum deletes downloaded data files when they are no longer needed after a successful
operation. This minimizes the amount of storage space that yum uses. However, you can enable
caching, so that the package files downloaded by yum stay in cache directories. By using cached data,
you can carry out certain operations without a network connection, you can also copy packages stored in
the caches and reuse them elsewhere.
Yum stores temporary files in the /var/cache/yum/$basearch/$releasever/ directory, where
$basearch and $releasever are Yum variables referring to base architecture of the system and the
release version of Red Hat Enterprise Linux. Each configured repository has one subdirectory. For
example, the directory /var/cache/yum/$basearch/$releasever/development/packages/
holds packages downloaded from the development repository. You can find the values for the $basearch
and $releasever variables in the output of the yum version command.
To change the default cache location, modify the cachedir option in the [main] section of the
/etc/yum.conf configuration file. See Section 8.4, “Configuring Yum and Yum Repositories” for more
information on configuring yum.
Enabling the Caches
To retain the cache of packages after a successful installation, add the following text to the [main]
section of /etc/yum.conf.
keepcache = 1
CHAPTER 8. YUM
103

Once you enabled caching, every yum operation may download package data from the configured
repositories.
To download and make usable all the metadata for the currently enabled yum repositories, type:
yum makecache
This is useful if you want to make sure that the cache is fully up to date with all metadata. To set the time
after which the metadata will expire, use the metadata-expire setting in /etc/yum.conf.
Using yum in Cache-only Mode
To carry out a yum command without a network connection, add the -C or --cacheonly command-line
option. With this option, yum proceeds without checking any network repositories, and uses only cached
files. In this mode, yum may only install packages that have been downloaded and cached by a previous
operation.
For instance, to list packages that use the currently cached data with names that contain “gstreamer”,
enter the following command:
yum -C list gstreamer*
Clearing the yum Caches
It is often useful to remove entries accumulated in the /var/cache/yum/ directory. If you remove a
package from the cache, you do not affect the copy of the software installed on your system. To remove
all entries for currently enabled repositories from the cache, type the following as a root:
yum clean all
There are various ways to invoke yum in clean mode depending on the type of cached data you want to
remove. See Table 8.3, “Available yum clean options” for a complete list of available configuration
options.
Table 8.3. Available yum clean options
Option Description
expire-cache eliminates time records of the metadata and
mirrorlists download for each repository. This forces
yum to revalidate the cache for each repository the
next time it is used.
packages eliminates any cached packages from the system
headers eliminates all header files that previous versions of
yum used for dependency resolution
metadata eliminates all files that yum uses to determine the
remote availability of packages. These metadata are
downloaded again the next time yum is run.
Deployment Guide
104

dbcache eliminates the sqlite cache used for faster access to
metadata. Using this option will force yum to
download the sqlite metadata the next time it is run.
This does not apply for repositories that contain only
.xml data, in that case, sqlite data are deleted but
without subsequent download
rpmdb eliminates any cached data from the local rpmdb
plugins enabled plugins are forced to eliminate their cached
data
all removes all of the above
Option Description
The expire-cache option is most preferred from the above list. In many cases, it is a sufficient and
much faster replacement for clean all.
8.4.8. Adding the Optional and Supplementary Repositories
Optional and Supplementary subscription channels provide additional software packages for Red Hat
Enterprise Linux that cover open source licensed software (in the Optional channel) and proprietary
licensed software (in the Supplementary channel).
Before subscribing to the Optional and Supplementary channels see the Scope of Coverage Details. If
you decide to install packages from these channels, follow the steps documented in the article called
How to access Optional and Supplementary channels, and -devel packages using Red Hat Subscription
Manager (RHSM)? on the Red Hat Customer Portal.
8.5. YUM PLUG-INS
Yum provides plug-ins that extend and enhance its operations. Certain plug-ins are installed by default.
Yum always informs you which plug-ins, if any, are loaded and active whenever you call any yum
command. For example:
~]# yum info yum
Loaded plugins: product-id, refresh-packagekit, subscription-manager
[output truncated]
Note that the plug-in names which follow Loaded plugins are the names you can provide to the --
disableplugins=plugin_name option.
8.5.1. Enabling, Configuring, and Disabling Yum Plug-ins
To enable Yum plug-ins, ensure that a line beginning with plugins= is present in the [main] section
of /etc/yum.conf, and that its value is 1:
You can disable all plug-ins by changing this line to plugins=0.
plugins=1
CHAPTER 8. YUM
105

IMPORTANT
Disabling all plug-ins is not advised because certain plug-ins provide important Yum
services. In particular, rhnplugin provides support for RHN Classic, and product-id
and subscription-manager plug-ins provide support for the certificate-based Content
Delivery Network (CDN). Disabling plug-ins globally is provided as a convenience
option, and is generally only recommended when diagnosing a potential problem with
Yum.
Every installed plug-in has its own configuration file in the /etc/yum/pluginconf.d/ directory. You
can set plug-in specific options in these files. For example, here is the refresh-packagekit plug-in's
refresh-packagekit.conf configuration file:
Plug-in configuration files always contain a [main] section (similar to Yum's /etc/yum.conf file) in
which there is (or you can place if it is missing) an enabled= option that controls whether the plug-in is
enabled when you run yum commands.
If you disable all plug-ins by setting enabled=0 in /etc/yum.conf, then all plug-ins are disabled
regardless of whether they are enabled in their individual configuration files.
If you merely want to disable all Yum plug-ins for a single yum command, use the --noplugins option.
If you want to disable one or more Yum plug-ins for a single yum command, add the --
disableplugin=plugin_name option to the command. For example, to disable the presto plug-in
while updating a system, type:
~]# yum update --disableplugin=presto
The plug-in names you provide to the --disableplugin= option are the same names listed after the
Loaded plugins line in the output of any yum command. You can disable multiple plug-ins by
separating their names with commas. In addition, you can match multiple plug-in names or shorten long
ones by using glob expressions:
~]# yum update --disableplugin=presto,refresh-pack*
8.5.2. Installing Additional Yum Plug-ins
Yum plug-ins usually adhere to the yum-plugin-plugin_name package-naming convention, but not
always: the package which provides the presto plug-in is named yum-presto, for example. You can
install a Yum plug-in in the same way you install other packages. For instance, to install the security
plug-in, type the following at a shell prompt:
~]# yum install yum-plugin-security
8.5.3. Plug-in Descriptions
The following list provides descriptions and usage instructions for several useful yum plug-ins. Plug-ins
are listed by names, brackets contain the name of the package.
[main]
enabled=1
Deployment Guide
106

search-disabled-repos (subscription-manager)
The search-disabled-repos plug-in allows you to temporarily or permanently enable disabled
repositories to help resolve dependencies. With this plug-in enabled, when Yum fails to install a
package due to failed dependency resolution, it offers to temporarily enable disabled repositories and
try again. If the installation succeeds, Yum also offers to enable the used repositories permanently.
Note that the plug-in works only with the repositories that are managed by subscription-manager
and not with custom repositories.
IMPORTANT
If yum is executed with the --assumeyes or -y option, or if the assumeyes directive
is enabled in /etc/yum.conf, the plug-in enables disabled repositories, both
temporarily and permanently, without prompting for confirmation. This may lead to
problems, for example, enabling repositories that you do not want enabled.
To configure the search-disabled-repos plug-in, edit the configuration file located in
/etc/yum/pluginconf.d/search-disabled-repos.conf. For the list of directives you can
use in the [main] section, see the table below.
Table 8.4. Supported search-disabled-repos.conf directives
Directive Description
enabled=value Allows you to enable or disable the plug-in. The value must be either 1
(enabled), or 0 (disabled). The plug-in is enabled by default.
notify_only=value Allows you to restrict the behavior of the plug-in to notifications only. The
value must be either 1 (notify only without modifying the behavior of
Yum), or 0 (modify the behavior of Yum). By default the plug-in only
notifies the user.
ignored_repos=repositor
ies
Allows you to specify the repositories that will not be enabled by the plug-
in.
kabi (kabi-yum-plugins)
The kabi plug-in checks whether a driver update package conforms with official Red Hat kernel
Application Binary Interface (kABI). With this plug-in enabled, when a user attempts to install a
package that uses kernel symbols which are not on a whitelist, a warning message is written to the
system log. Additionally, configuring the plug-in to run in enforcing mode prevents such packages
from being installed at all.
To configure the kabi plug-in, edit the configuration file located in
/etc/yum/pluginconf.d/kabi.conf. See Table 8.5, “Supported kabi.conf directives” for a
list of directives that can be used in the [main] section.
Table 8.5. Supported kabi.conf directives
Directive Description
CHAPTER 8. YUM
107

enabled=value Allows you to enable or disable the plug-in. The value must be either 1
(enabled), or 0 (disabled). When installed, the plug-in is enabled by
default.
whitelists=directory Allows you to specify the directory in which the files with supported kernel
symbols are located. By default, the kabi plug-in uses files provided by
the kernel-abi-whitelists package (that is, the /lib/modules/kabi/
directory).
enforce=value Allows you to enable or disable enforcing mode. The value must be either
1 (enabled), or 0 (disabled). By default, this option is commented out and
the kabi plug-in only displays a warning message.
Directive Description
presto (yum-presto)
The presto plug-in adds support to Yum for downloading delta RPM packages, during updates, from
repositories which have presto metadata enabled. Delta RPMs contain only the differences between
the version of the package installed on the client requesting the RPM package and the updated
version in the repository.
Downloading a delta RPM is much quicker than downloading the entire updated package, and can
speed up updates considerably. Once the delta RPMs are downloaded, they must be rebuilt to apply
the difference to the currently-installed package and thus create the full, updated package. This
process takes CPU time on the installing machine. Using delta RPMs is therefore a compromise
between time-to-download, which depends on the network connection, and time-to-rebuild, which is
CPU-bound. Using the presto plug-in is recommended for fast machines and systems with slower
network connections, while slower machines on very fast connections benefit more from downloading
normal RPM packages, that is, by disabling presto.
product-id (subscription-manager)
The product-id plug-in manages product identity certificates for products installed from the Content
Delivery Network. The product-id plug-in is installed by default.
refresh-packagekit (PackageKit-yum-plugin)
The refresh-packagekit plug-in updates metadata for PackageKit whenever yum is run. The
refresh-packagekit plug-in is installed by default.
rhnplugin (yum-rhn-plugin)
The rhnplugin provides support for connecting to RHN Classic. This allows systems registered
with RHN Classic to update and install packages from this system. Note that RHN Classic is only
provided for older Red Hat Enterprise Linux systems (that is, Red Hat Enterprise Linux 4.x, Red Hat
Enterprise Linux 5.x, and Satellite 5.x) in order to migrate them over to Red Hat Enterprise Linux 6.
The rhnplugin is installed by default.
See the rhnplugin(8) manual page for more information about the plug-in.
security (yum-plugin-security)
Deployment Guide
108

Discovering information about and applying security updates easily and often is important to all
system administrators. For this reason Yum provides the security plug-in, which extends yum with a
set of highly-useful security-related commands, subcommands and options.
You can check for security-related updates as follows:
~]# yum check-update --security
Loaded plugins: product-id, refresh-packagekit, security, subscription-
manager
Updating Red Hat repositories.
INFO:rhsm-app.repolib:repos updated: 0
Limiting package lists to security relevant ones
Needed 3 of 7 packages, for security
elinks.x86_64 0.12-0.13.el6 rhel
kernel.x86_64 2.6.30.8-64.el6 rhel
kernel-headers.x86_64 2.6.30.8-64.el6 rhel
You can then use either yum update --security or yum update-minimal --security to
update those packages which are affected by security advisories. Both of these commands update
all packages on the system for which a security advisory has been issued. yum update-minimal
--security updates them to the latest packages which were released as part of a security
advisory, while yum update --security will update all packages affected by a security advisory
to the latest version of that package available.
In other words, if:
the kernel-2.6.30.8-16 package is installed on your system;
the kernel-2.6.30.8-32 package was released as a security update;
then kernel-2.6.30.8-64 was released as a bug fix update,
...then yum update-minimal --security will update you to kernel-2.6.30.8-32, and yum
update --security will update you to kernel-2.6.30.8-64. Conservative system administrators
probably want to use update-minimal to reduce the risk incurred by updating packages as much
as possible.
See the yum-security(8) manual page for usage details and further explanation of the enhancements
the security plug-in adds to yum.
subscription-manager (subscription-manager)
The subscription-manager plug-in provides support for connecting to Red Hat Network. This
allows systems registered with Red Hat Network to update and install packages from the
certificate-based Content Delivery Network. The subscription-manager plug-in is installed by
default.
See Chapter 6, Registering the System and Managing Subscriptions for more information how to
manage product subscriptions and entitlements.
yum-downloadonly (yum-plugin-downloadonly)
The yum-downloadonly plug-in provides the --downloadonly command-line option which can be
used to download packages from Red Hat Network or a configured Yum repository without installing
the packages.
CHAPTER 8. YUM
109

To install the package, follow the instructions in Section 8.5.2, “Installing Additional Yum Plug-ins”.
After the installation, see the contents of the /etc/yum/pluginconf.d/downloadonly.conf file
to ensure that the plug-in is enabled:
~]$ cat /etc/yum/pluginconf.d/downloadonly.conf
[main]
enabled=1
In the following example, the yum install --downloadonly command is run to download the
latest version of the httpd package, without installing it:
~]# yum install httpd --downloadonly
Loaded plugins: downloadonly, product-id, refresh-packagekit, rhnplugin,
: subscription-manager
Updating Red Hat repositories.
Setting up Install Process
Resolving Dependencies
--> Running transaction check
---> Package httpd.x86_64 0:2.2.15-9.el6_1.2 will be updated
---> Package httpd.x86_64 0:2.2.15-15.el6_2.1 will be an update
--> Processing Dependency: httpd-tools = 2.2.15-15.el6_2.1 for package:
httpd-2.2.15-15.el6_2.1.x86_64
--> Running transaction check
---> Package httpd-tools.x86_64 0:2.2.15-9.el6_1.2 will be updated
---> Package httpd-tools.x86_64 0:2.2.15-15.el6_2.1 will be an update
--> Finished Dependency Resolution
Dependencies Resolved
========================================================================
========
Package Arch Version Repository
Size
========================================================================
========
Updating:
httpd x86_64 2.2.15-15.el6_2.1 rhel-x86_64-server-6
812 k
Updating for dependencies:
httpd-tools x86_64 2.2.15-15.el6_2.1 rhel-x86_64-server-6
70 k
Transaction Summary
========================================================================
========
Upgrade 2 Package(s)
Total download size: 882 k
Is this ok [y/N]: y
Downloading Packages:
(1/2): httpd-2.2.15-15.el6_2.1.x86_64.rpm | 812 kB
00:00
(2/2): httpd-tools-2.2.15-15.el6_2.1.x86_64.rpm | 70 kB
00:00
--------------------------------------------------------------------
Deployment Guide
110

------------
Total 301 kB/s | 882 kB
00:02
exiting because --downloadonly specified
By default, packages downloaded using the --downloadonly option are saved in one of the
subdirectories of the /var/cache/yum directory, depending on the Red Hat Enterprise Linux variant
and architecture.
If you want to specify an alternate directory to save the packages, pass the --downloaddir option
along with --downloadonly:
~]# yum install --downloadonly --downloaddir=/path/to/directory httpd
NOTE
As an alternative to the yum-downloadonly plugin — to download packages without
installing them — you can use the yumdownloader utility that is provided by the yum-
utils package.
8.6. ADDITIONAL RESOURCES
For more information on how to manage software packages on Red Hat Enterprise Linux, see the
resources listed below.
Installed Documentation
yum(8) — The manual page for the yum command-line utility provides a complete list of
supported options and commands.
yumdb(8) — The manual page for the yumdb command-line utility documents how to use this
tool to query and, if necessary, alter the yum database.
yum.conf(5) — The manual page named yum.conf documents available yum configuration
options.
yum-utils(1) — The manual page named yum-utils lists and briefly describes additional
utilities for managing yum configuration, manipulating repositories, and working with yum
database.
Online Resources
Yum Guides — The Yum Guides page on the project home page provides links to further
documentation.
Red Hat Access Labs — The Red Hat Access Labs includes a “Yum Repository Configuration
Helper”.
See Also
CHAPTER 8. YUM
111


CHAPTER 9. PACKAGEKIT
Red Hat provides PackageKit for viewing, managing, updating, installing and uninstalling packages
compatible with your system. PackageKit consists of several graphical interfaces that can be opened
from the GNOME panel menu, or from the Notification Area when PackageKit alerts you that updates are
available. For more information on PackageKit's architecture and available front ends, see Section 9.3,
“PackageKit Architecture”.
9.1. UPDATING PACKAGES WITH SOFTWARE UPDATE
PackageKit displays a starburst icon in the Notification Area whenever updates are available to be
installed on your system.
Figure 9.1. PackageKit's icon in the Notification Area
Clicking on the notification icon opens the Software Update window. Alternatively, you can open
Software Updates by clicking System → Administration → Software Update from the GNOME
panel, or running the gpk-update-viewer command at the shell prompt. In the Software Updates
window, all available updates are listed along with the names of the packages being updated (minus the
.rpm suffix, but including the CPU architecture), a short summary of the package, and, usually, short
descriptions of the changes the update provides. Any updates you do not want to install can be de-
selected here by unchecking the check box corresponding to the update.
CHAPTER 9. PACKAGEKIT
113
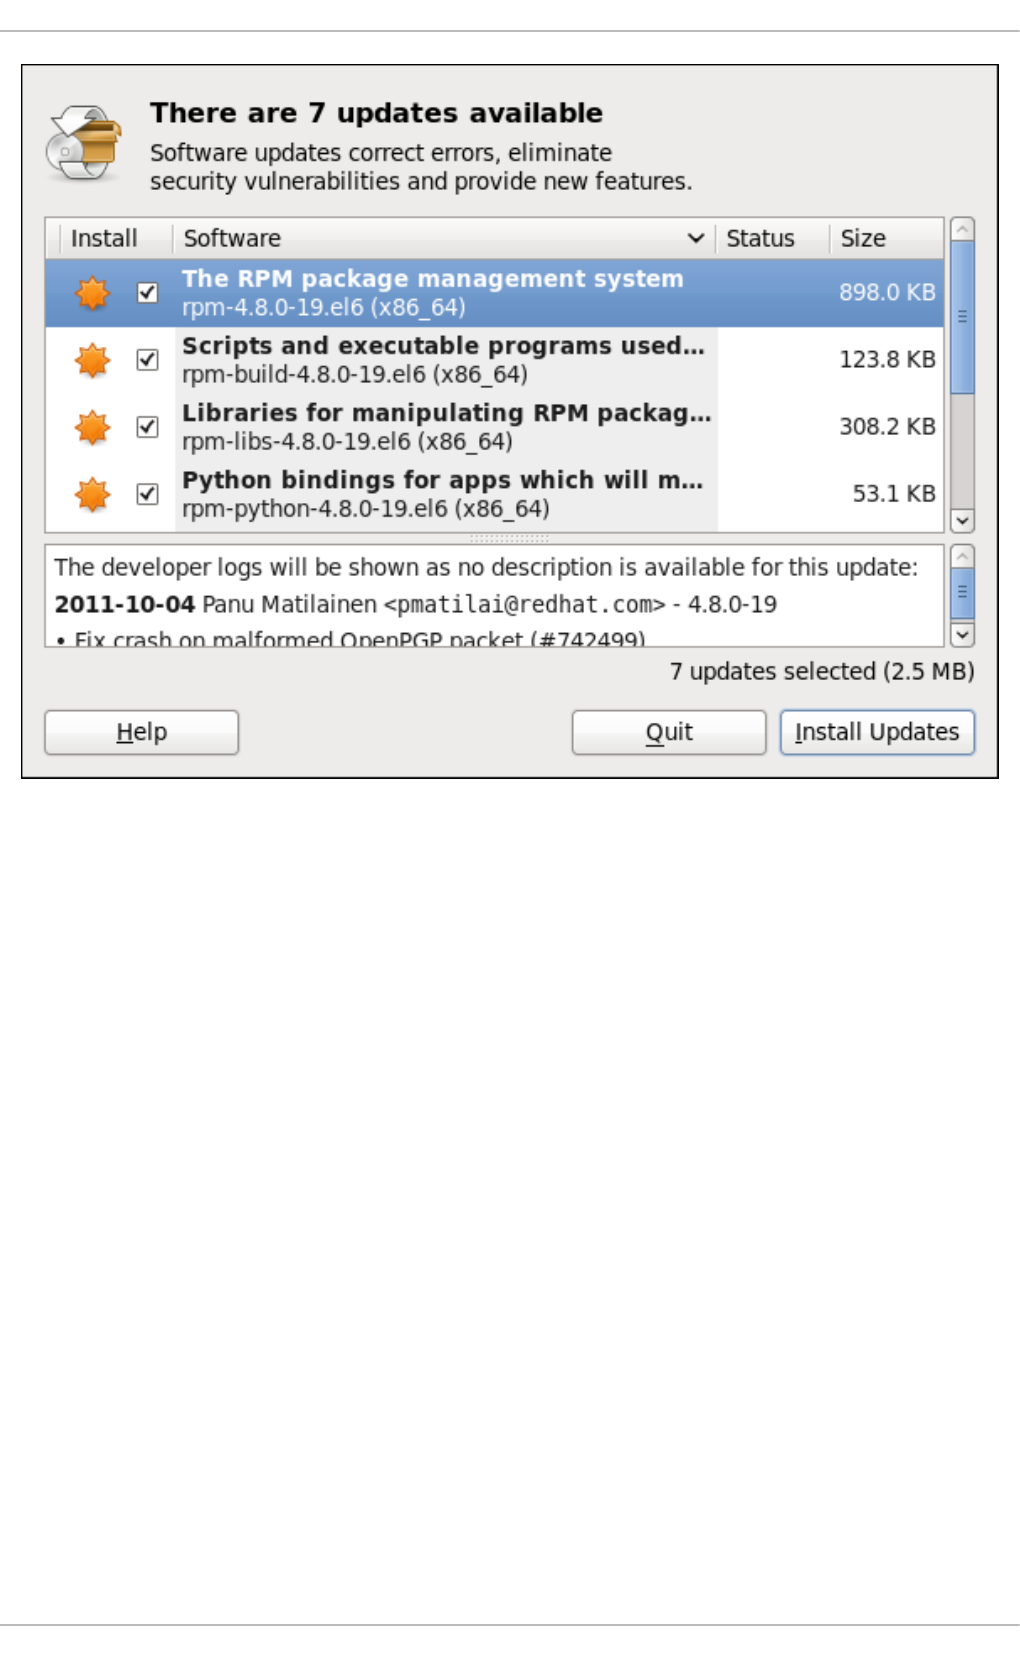
Figure 9.2. Installing updates with Software Update
The updates presented in the Software Updates window only represent the currently-installed
packages on your system for which updates are available; dependencies of those packages, whether
they are existing packages on your system or new ones, are not shown until you click Install
Updates.
PackageKit utilizes the fine-grained user authentication capabilities provided by the PolicyKit toolkit
whenever you request it to make changes to the system. Whenever you instruct PackageKit to update,
install or remove packages, you will be prompted to enter the superuser password before changes are
made to the system.
If you instruct PackageKit to update the kernel package, then it will prompt you after installation, asking
you whether you want to reboot the system and thereby boot into the newly-installed kernel.
Setting the Update-Checking Interval
Right-clicking on PackageKit's Notification Area icon and clicking Preferences opens the Software
Update Preferences window, where you can define the interval at which PackageKit checks for
package updates, as well as whether or not to automatically install all updates or only security updates.
Leaving the Check for updates when using mobile broadband box unchecked is handy for
avoiding extraneous bandwidth usage when using a wireless connection on which you are charged for
the amount of data you download.
Deployment Guide
114
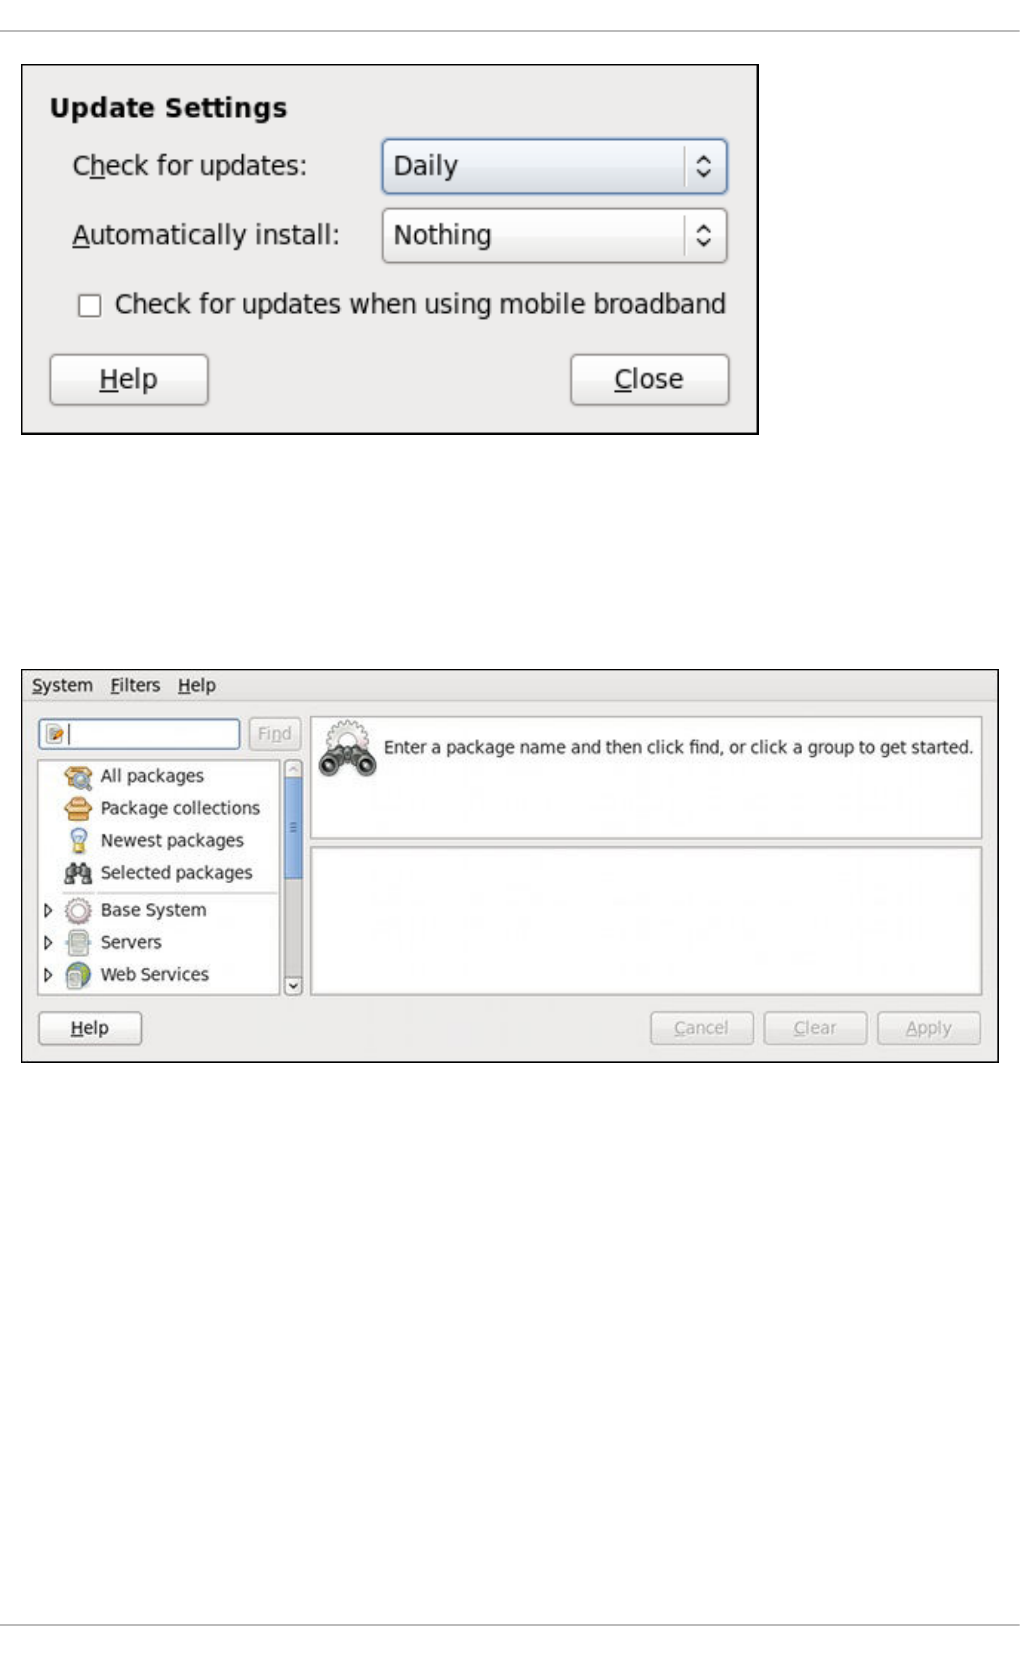
Figure 9.3. Setting PackageKit's update-checking interval
9.2. USING ADD/REMOVE SOFTWARE
To find and install a new package, on the GNOME panel click on System → Administration →
Add/Remove Software, or run the gpk-application command at the shell prompt.
Figure 9.4. PackageKit's Add/Remove Software window
9.2.1. Refreshing Software Sources (Yum Repositories)
PackageKit refers to Yum repositories as software sources. It obtains all packages from enabled
software sources. You can view the list of all configured and unfiltered (see below) Yum repositories by
opening Add/Remove Software and clicking System → Software sources. The Software
Sources dialog shows the repository name, as written on the name=<My Repository Name> field of
all [repository] sections in the /etc/yum.conf configuration file, and in all repository.repo files in
the /etc/yum.repos.d/ directory.
Entries which are checked in the Enabled column indicate that the corresponding repository will be used
to locate packages to satisfy all update and installation requests (including dependency resolution). You
can enable or disable any of the listed Yum repositories by selecting or clearing the check box. Note that
doing so causes PolicyKit to prompt you for superuser authentication.
The Enabled column corresponds to the enabled=<1 or 0> field in [repository] sections. When you
CHAPTER 9. PACKAGEKIT
115

click the check box, PackageKit inserts the enabled=<1 or 0> line into the correct [repository] section
if it does not exist, or changes the value if it does. This means that enabling or disabling a repository
through the Software Sources window causes that change to persist after closing the window or
rebooting the system.
Note that it is not possible to add or remove Yum repositories through PackageKit.
NOTE
Checking the box at the bottom of the Software Sources window causes PackageKit
to display source RPM, testing and debuginfo repositories as well. This box is unchecked
by default.
After making a change to the available Yum repositories, click on System → Refresh package lists to
make sure your package list is up-to-date.
9.2.2. Finding Packages with Filters
Once the software sources have been updated, it is often beneficial to apply some filters so that
PackageKit retrieves the results of our Find queries faster. This is especially helpful when performing
many package searches. Four of the filters in the Filters drop-down menu are used to split results by
matching or not matching a single criterion. By default when PackageKit starts, these filters are all
unapplied (No filter), but once you do filter by one of them, that filter remains set until you either
change it or close PackageKit.
Because you are usually searching for available packages that are not installed on the system, click
Filters → Installed and select the Only available radio button.
Figure 9.5. Filtering out already-installed packages
Also, unless you require development files such as C header files, click Filters → Development and
select the Only end user files radio button. This filters out all of the <package_name>-devel
packages we are not interested in.
Deployment Guide
116
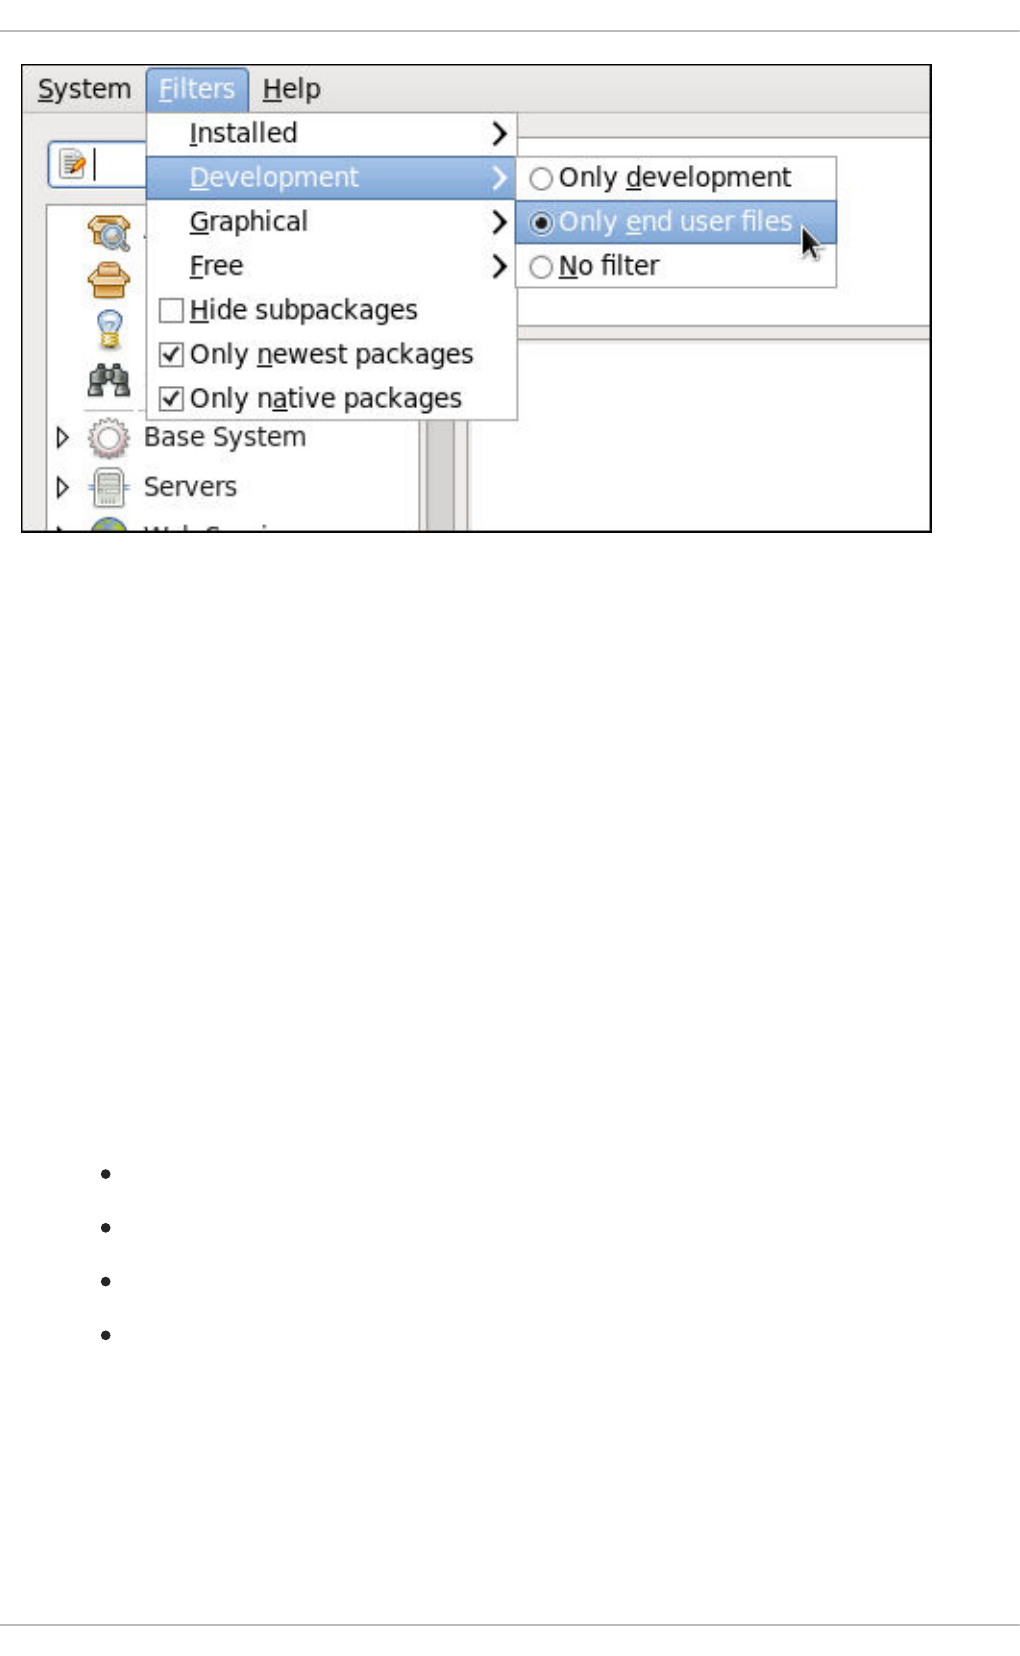
Figure 9.6. Filtering out development packages from the list of Find results
The two remaining filters with submenus are:
Graphical
Narrows the search to either applications which provide a GUI interface (Only graphical) or those
that do not. This filter is useful when browsing for GUI applications that perform a specific function.
Free
Search for packages which are considered to be free software. See the Fedora Licensing List for
details on approved licenses.
The remaining filters can be enabled by selecting the check boxes next to them:
Hide subpackages
Checking the Hide subpackages check box filters out generally-uninteresting packages that are
typically only dependencies of other packages that we want. For example, checking Hide
subpackages and searching for <package> would cause the following related packages to be
filtered out of the Find results (if it exists):
<package>-devel
<package>-libs
<package>-libs-devel
<package>-debuginfo
Only newest packages
Checking Only newest packages filters out all older versions of the same package from the list of
results, which is generally what we want. Note that this filter is often combined with the Only
available filter to search for the latest available versions of new (not installed) packages.
Only native packages
CHAPTER 9. PACKAGEKIT
117
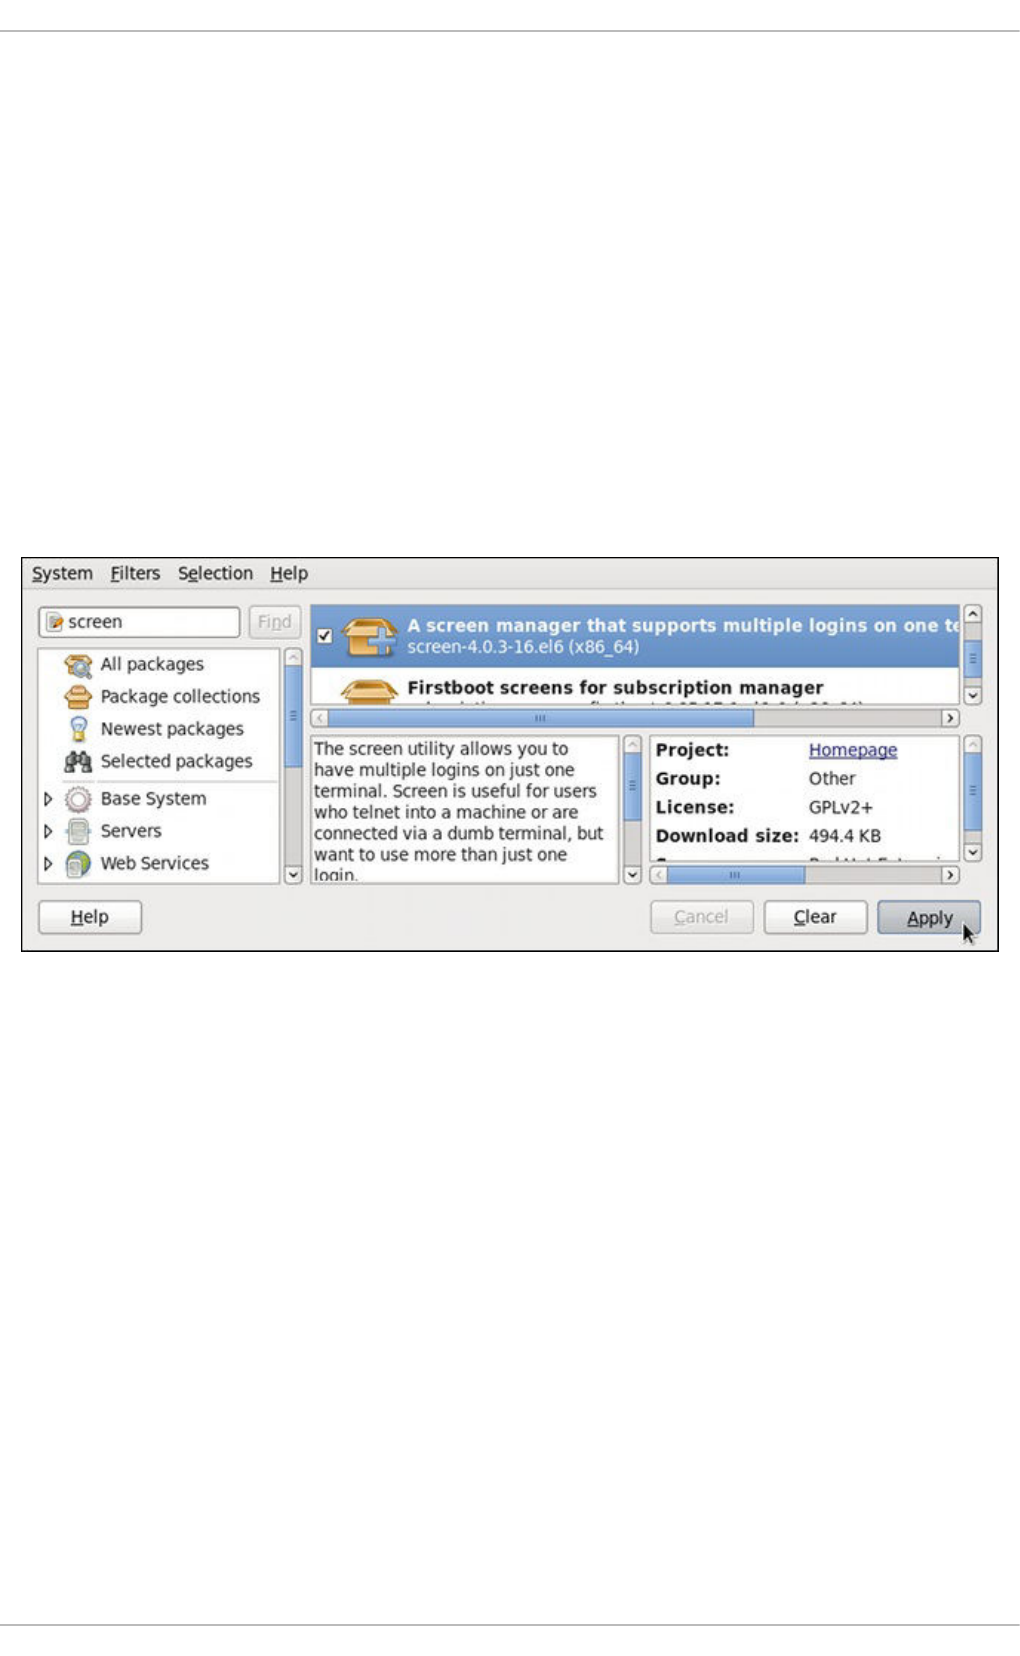
Checking the Only native packages box on a multilib system causes PackageKit to omit listing
results for packages compiled for the architecture that runs in compatibility mode. For example,
enabling this filter on a 64-bit system with an AMD64 CPU would cause all packages built for the 32-
bit x86 CPU architecture not to be shown in the list of results, even though those packages are able
to run on an AMD64 machine. Packages which are architecture-agnostic (i.e. noarch packages such
as crontabs-1.10-32.1.el6.noarch.rpm) are never filtered out by checking Only native
packages. This filter has no affect on non-multilib systems, such as x86 machines.
9.2.3. Installing and Removing Packages (and Dependencies)
With the two filters selected, Only available and Only end user files, search for the screen
window manager for the command line and highlight the package. You now have access to some very
useful information about it, including: a clickable link to the project homepage; the Yum package group it
is found in, if any; the license of the package; a pointer to the GNOME menu location from where the
application can be opened, if applicable; and the size of the package, which is relevant when we
download and install it.
Figure 9.7. Viewing and installing a package with PackageKit's Add/Remove Software window
When the check box next to a package or group is checked, then that item is already installed on the
system. Checking an unchecked box causes it to be marked for installation, which only occurs when the
Apply button is clicked. In this way, you can search for and select multiple packages or package groups
before performing the actual installation transactions. Additionally, you can remove installed packages by
unchecking the checked box, and the removal will occur along with any pending installations when
Apply is pressed. Dependency resolution, which may add additional packages to be installed or
removed, is performed after pressing Apply. PackageKit will then display a window listing those
additional packages to install or remove, and ask for confirmation to proceed.
Select screen and click the Apply button. You will then be prompted for the superuser password; enter
it, and PackageKit will install screen. After finishing the installation, PackageKit sometimes presents you
with a list of your newly-installed applications and offers you the choice of running them immediately.
Alternatively, you will remember that finding a package and selecting it in the Add/Remove Software
window shows you the Location of where in the GNOME menus its application shortcut is located,
which is helpful when you want to run it.
Once it is installed, you can run screen, a screen manager that allows you to have multiple logins on
one terminal, by typing screen at a shell prompt.
screen is a very useful utility, but we decide that we do not need it and we want to uninstall it.
Deployment Guide
118
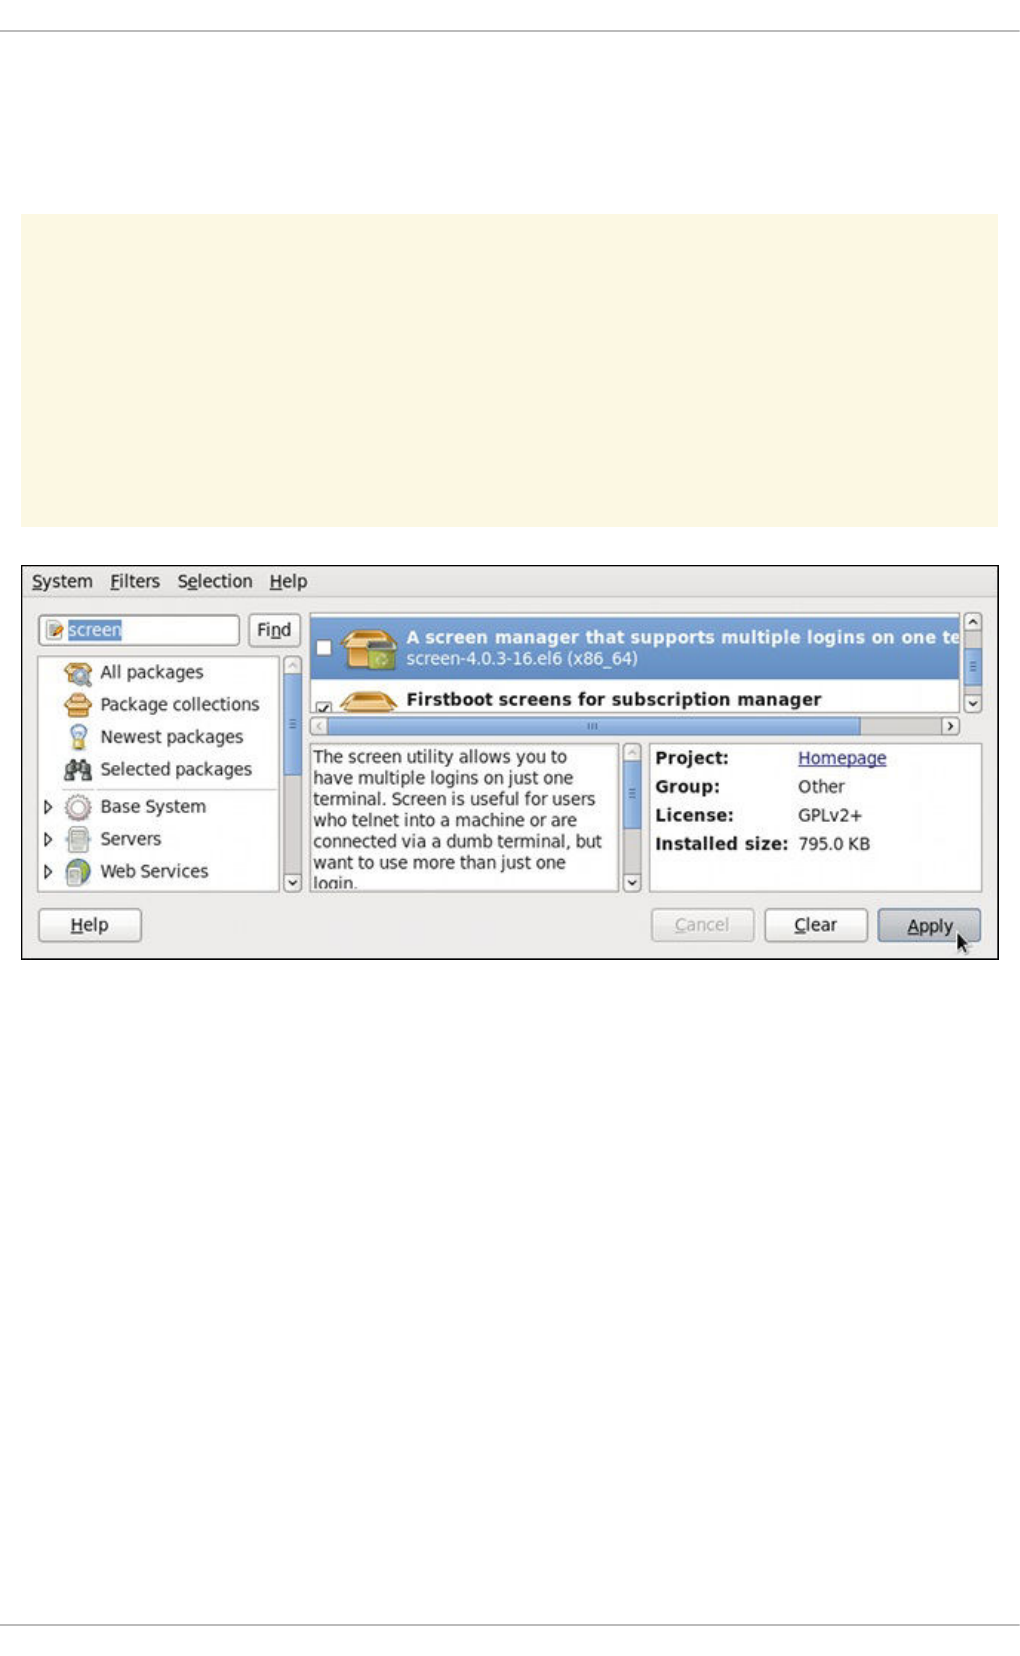
Remembering that we need to change the Only available filter we recently used to install it to Only
installed in Filters → Installed, we search for screen again and uncheck it. The program did not
install any dependencies of its own; if it had, those would be automatically removed as well, as long as
they were not also dependencies of any other packages still installed on our system.
WARNING
Although PackageKit automatically resolves dependencies during package
installation and removal, it is unable to remove a package without also removing
packages which depend on it. This type of operation can only be performed by
RPM, is not advised, and can potentially leave your system in a non-functioning
state or cause applications to behave erratically and/or crash.
Figure 9.8. Removing a package with PackageKit's Add/Remove Software window
9.2.4. Installing and Removing Package Groups
PackageKit also has the ability to install Yum package groups, which it calls Package collections.
Clicking on Package collections in the top-left list of categories in the Software Updates window
allows us to scroll through and find the package group we want to install. In this case, we want to install
Czech language support (the Czech Support group). Checking the box and clicking apply informs us
how many additional packages must be installed in order to fulfill the dependencies of the package
group.
CHAPTER 9. PACKAGEKIT
119
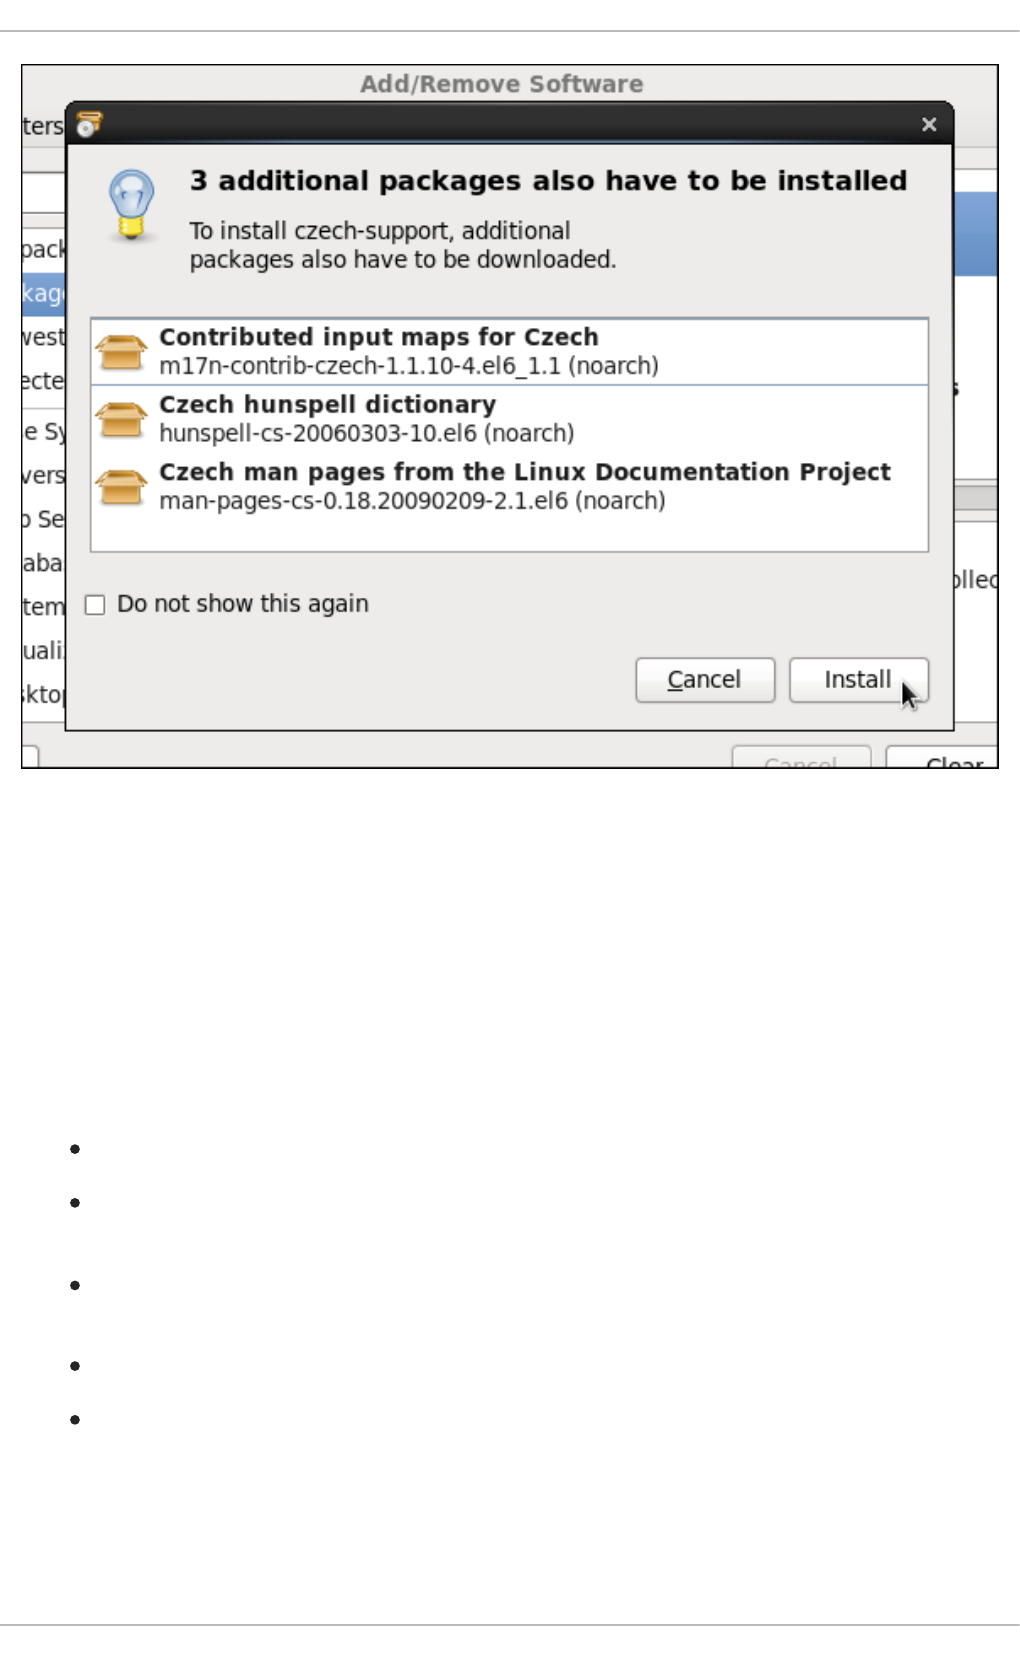
Figure 9.9. Installing the Czech Support package group
Similarly, installed package groups can be uninstalled by selecting Package collections,
unchecking the appropriate check box, and applying.
9.2.5. Viewing the Transaction Log
PackageKit maintains a log of the transactions that it performs. To view the log, from the Add/Remove
Software window, click System → Software log, or run the gpk-log command at the shell prompt.
The Software Log Viewer shows the following information:
Date — the date on which the transaction was performed.
Action — the action that was performed during the transaction, for example Updated
packages or Installed packages.
Details — the transaction type such as Updated, Installed, or Removed, followed by a list
of affected packages.
Username — the name of the user who performed the action.
Application — the front end application that was used to perform the action, for example
Update System.
Typing the name of a package in the top text entry field filters the list of transactions to those which
affected that package.
Deployment Guide
120
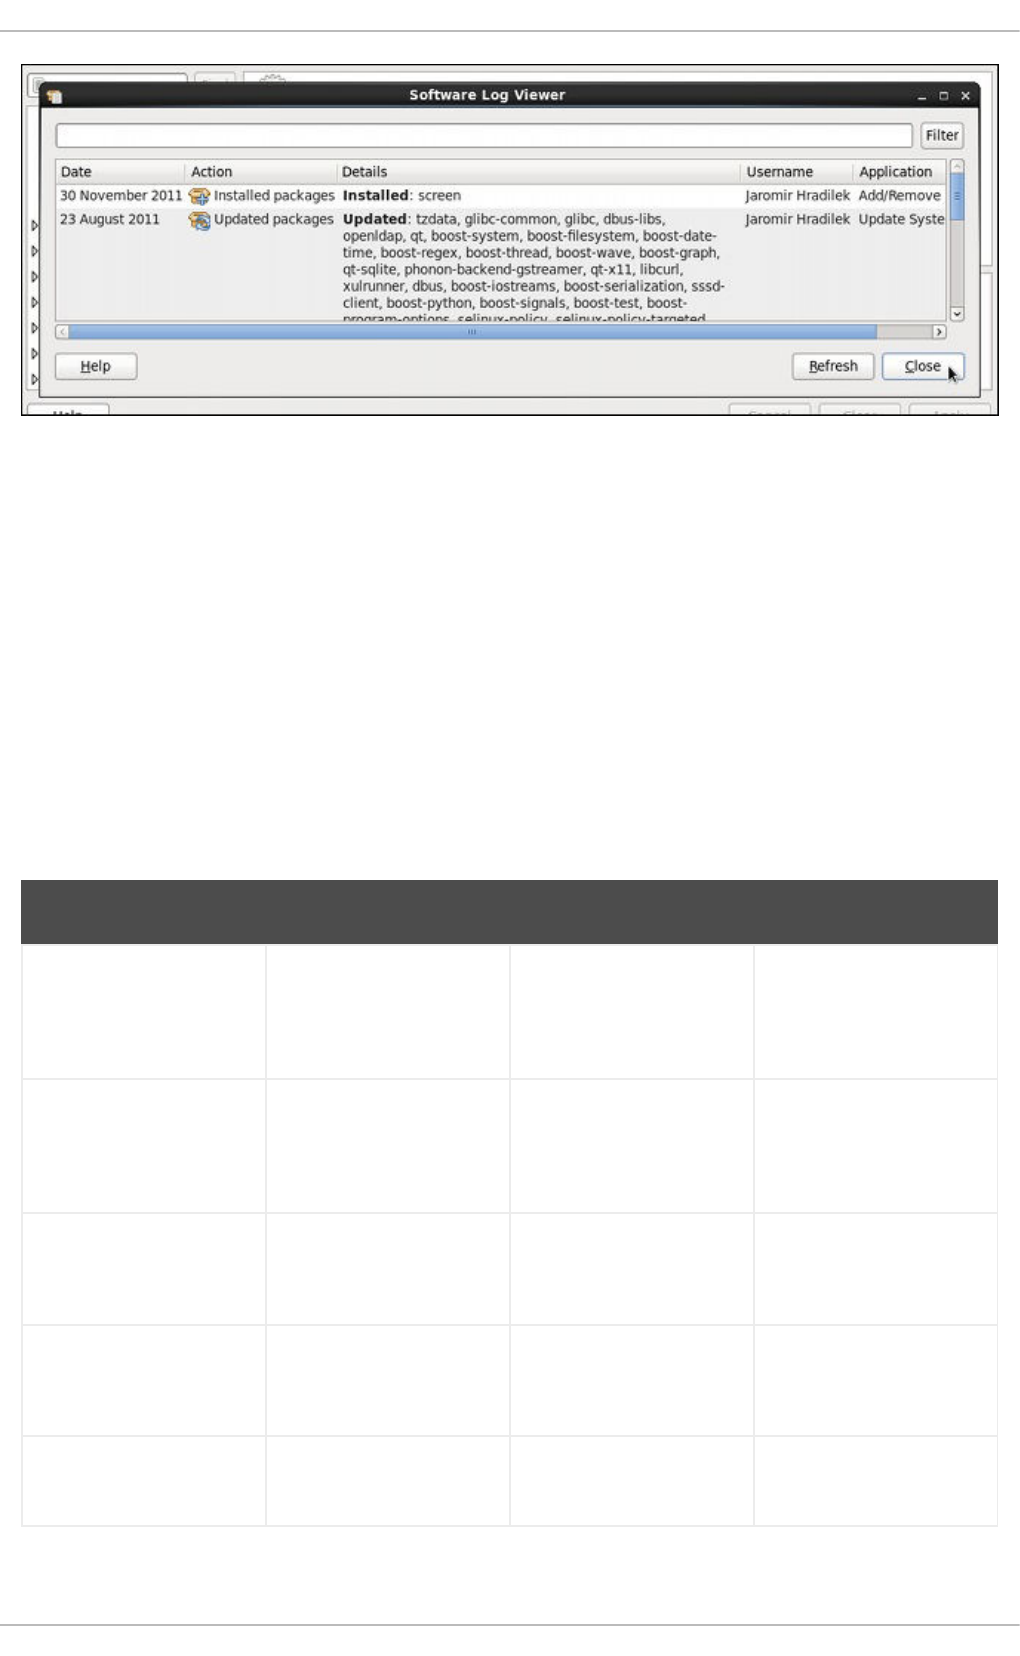
Figure 9.10. Viewing the log of package management transactions with the Software Log Viewer
9.3. PACKAGEKIT ARCHITECTURE
Red Hat provides the PackageKit suite of applications for viewing, updating, installing and uninstalling
packages and package groups compatible with your system. Architecturally, PackageKit consists of
several graphical front ends that communicate with the packagekitd daemon back end, which
communicates with a package manager-specific back end that utilizes Yum to perform the actual
transactions, such as installing and removing packages, etc.
Table 9.1, “PackageKit GUI windows, menu locations, and shell prompt commands” shows the name of
the GUI window, how to start the window from the GNOME desktop or from the Add/Remove
Software window, and the name of the command-line application that opens that window.
Table 9.1. PackageKit GUI windows, menu locations, and shell prompt commands
Window Title Function How to Open Shell Command
Add/Remove Software Install, remove or view
package info
From the GNOME
panel: System →
Administration →
Add/Remove Software
gpk-application
Software Update Perform package
updates
From the GNOME
panel: System →
Administration →
Software Update
gpk-update-viewer
Software Sources Enable and disable Yum
repositories
From Add/Remove
Software: System →
Software Sources
gpk-repo
Software Log Viewer View the transaction log From Add/Remove
Software: System →
Software Log
gpk-log
Software Update
Preferences
Set PackageKit
preferences
gpk-prefs
CHAPTER 9. PACKAGEKIT
121

(Notification Area Alert) Alerts you when updates
are available
From the GNOME
panel: System →
Preferences → Startup
Applications, the
Startup Programs
tab
gpk-update-icon
Window Title Function How to Open Shell Command
The packagekitd daemon runs outside the user session and communicates with the various graphical
front ends. The packagekitd daemon[2] communicates via the DBus system message bus with
another back end, which utilizes Yum's Python API to perform queries and make changes to the system.
On Linux systems other than Red Hat Enterprise Linux and Fedora, packagekitd can communicate
with other back ends that are able to utilize the native package manager for that system. This modular
architecture provides the abstraction necessary for the graphical interfaces to work with many different
package managers to perform essentially the same types of package management tasks. Learning how
to use the PackageKit front ends means that you can use the same familiar graphical interface across
many different Linux distributions, even when they utilize a native package manager other than Yum.
In addition, PackageKit's separation of concerns provides reliability in that a crash of one of the GUI
windows—or even the user's X Window session—will not affect any package management tasks being
supervised by the packagekitd daemon, which runs outside of the user session.
All of the front end graphical applications discussed in this chapter are provided by the gnome-
packagekit package instead of by PackageKit and its dependencies.
Finally, PackageKit also comes with a console-based front end called pkcon.
9.4. ADDITIONAL RESOURCES
For more information about PackageKit, see the resources listed below.
Installed Documentation
gpk-application(1) — The manual page containing information about the gpk-
application command.
gpk-backend-status(1) — The manual page containing information about the gpk-
backend-status command.
gpk-install-local-file(1) — The manual page containing information about the gpk-
install-local-file command.
gpk-install-mime-type(1) — The manual page containing information about the gpk-
install-mime-type command.
gpk-install-package-name(1) — The manual page containing information about the qpk-
install-package-name command.
gpk-install-package-name(1) — The manual page containing information about the gpk-
install-package-name command.
Deployment Guide
122

gpk-prefs(1) — The manual page containing information about the gpk-prefs command.
gpk-repo(1) — The manual page containing information about the gpk-repo command.
gpk-update-icon(1) — The manual page containing information about the gpk-update-
icon command.
gpk-update-viewer(1) — The manual page containing information about the gpk-update-
viewer command.
pkcon(1) and pkmon(1) — The manual pages containing information about the PackageKit
console client.
pkgenpack(1) — The manual page containing information about the PackageKit Pack
Generator.
Online Documentation
PackageKit home page — The PackageKit home page listing detailed information about the
PackageKit software suite.
PackageKit FAQ — An informative list of Frequently Asked Questions for the PackageKit
software suite.
See Also
Chapter 8, Yum documents Yum, the Red Hat package manager.
[2] System daemons are typically long-running processes that provide services to the user or to other programs,
and which are started, often at boot time, by special initialization scripts (often shortened to init scripts). Daemons
respond to the service command and can be turned on or off permanently by using the chkconfig on or
chkconfig off commands. They can typically be recognized by a “d” appended to their name, such as the
packagekitd daemon. See Chapter 12, Services and Daemons for information about system services.
CHAPTER 9. PACKAGEKIT
123

PART IV. NETWORKING
This part describes how to configure the network on Red Hat Enterprise Linux.
Deployment Guide
124

CHAPTER 10. NETWORKMANAGER
NetworkManager is a dynamic network control and configuration system that attempts to keep network
devices and connections up and active when they are available. NetworkManager consists of a core
daemon, a GNOME Notification Area applet that provides network status information, and graphical
configuration tools that can create, edit and remove connections and interfaces. NetworkManager can
be used to configure the following types of connections: Ethernet, wireless, mobile broadband (such as
cellular 3G), and DSL and PPPoE (Point-to-Point over Ethernet). In addition, NetworkManager allows for
the configuration of network aliases, static routes, DNS information and VPN connections, as well as
many connection-specific parameters. Finally, NetworkManager provides a rich API via D-Bus which
allows applications to query and control network configuration and state.
Previous versions of Red Hat Enterprise Linux included the Network Administration Tool, which was
commonly known as system-config-network after its command-line invocation. In Red Hat
Enterprise Linux 6, NetworkManager replaces the former Network Administration Tool while
providing enhanced functionality, such as user-specific and mobile broadband configuration. It is also
possible to configure the network in Red Hat Enterprise Linux 6 by editing interface configuration files;
see Chapter 11, Network Interfaces for more information.
NetworkManager may be installed by default on your version of Red Hat Enterprise Linux. To ensure
that it is, run the following command as root:
~]# yum install NetworkManager
10.1. THE NETWORKMANAGER DAEMON
The NetworkManager daemon runs with root privileges and is usually configured to start up at boot
time. You can determine whether the NetworkManager daemon is running by entering this command
as root:
~]# service NetworkManager status
NetworkManager (pid 1527) is running...
The service command will report NetworkManager is stopped if the NetworkManager service is
not running. To start it for the current session:
~]# service NetworkManager start
Run the chkconfig command to ensure that NetworkManager starts up every time the system boots:
~]# chkconfig NetworkManager on
For more information on starting, stopping and managing services and runlevels, see Chapter 12,
Services and Daemons.
10.2. INTERACTING WITH NETWORKMANAGER
Users do not interact with the NetworkManager system service directly. Instead, you can perform
network configuration tasks via NetworkManager's Notification Area applet. The applet has multiple
states that serve as visual indicators for the type of connection you are currently using. Hover the pointer
over the applet icon for tooltip information on the current connection state.
CHAPTER 10. NETWORKMANAGER
125

Figure 10.1. NetworkManager applet states
If you do not see the NetworkManager applet in the GNOME panel, and assuming that the
NetworkManager package is installed on your system, you can start the applet by running the following
command as a normal user (not root):
~]$ nm-applet &
After running this command, the applet appears in your Notification Area. You can ensure that the applet
runs each time you log in by clicking System → Preferences → Startup Applications to open the
Startup Applications Preferences window. Then, select the Startup Programs tab and
check the box next to NetworkManager.
10.2.1. Connecting to a Network
When you left-click on the applet icon, you are presented with:
a list of categorized networks you are currently connected to (such as Wired and Wireless);
a list of all Available Networks that NetworkManager has detected;
options for connecting to any configured Virtual Private Networks (VPNs); and,
options for connecting to hidden or new wireless networks.
If you are connected to a network, its name is presented in bold typeface under its network type, such
as Wired or Wireless. When many networks are available, such as wireless access points, the More
networks expandable menu entry appears.
Deployment Guide
126
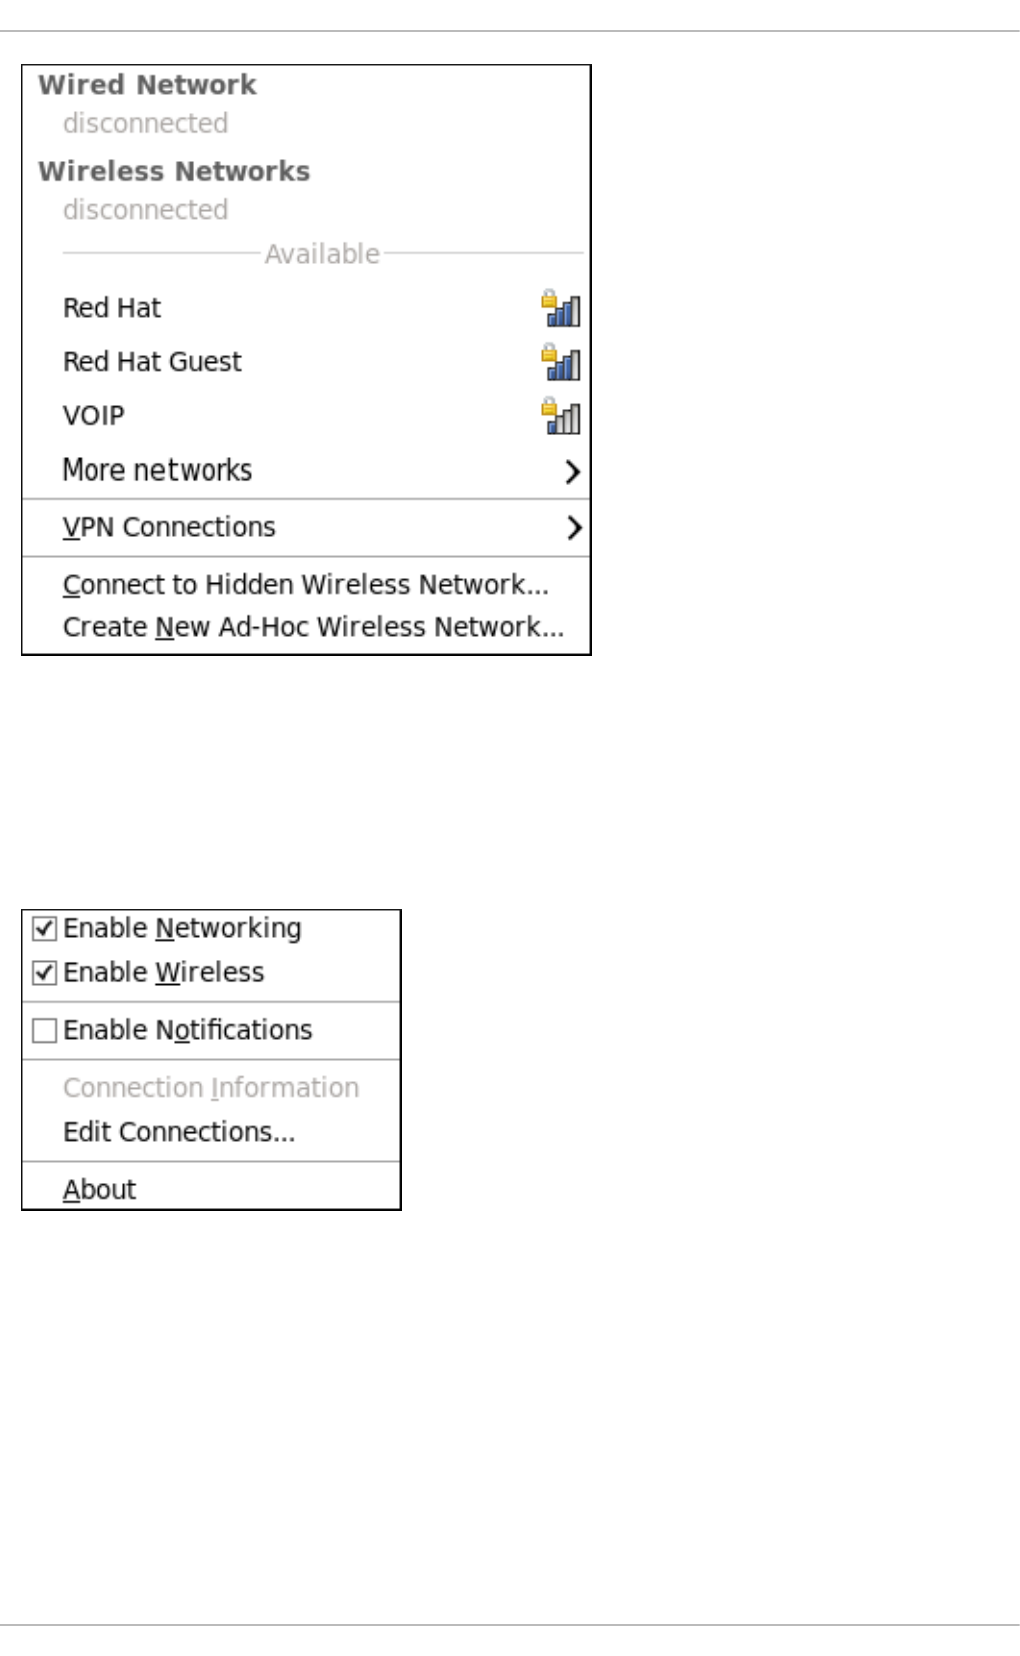
Figure 10.2. The NetworkManager applet's left-click menu, showing all available and connected-to
networks
10.2.2. Configuring New and Editing Existing Connections
Next, right-click on the NetworkManager applet to open its context menu, which is the main point of
entry for interacting with NetworkManager to configure connections.
Figure 10.3. The NetworkManager applet's context menu
Ensure that the Enable Networking box is checked. If the system has detected a wireless card, then
you will also see an Enable Wireless menu option. Check the Enable Wireless check box as
well. NetworkManager notifies you of network connection status changes if you check the Enable
Notifications box. Clicking the Connection Information entry presents an informative
Connection Information window that lists the connection type and interface, your IP address and
routing details, and so on.
Finally, clicking on Edit Connections opens the Network Connections window, from where you
can perform most of your network configuration tasks. Note that this window can also be opened by
running, as a normal user:
CHAPTER 10. NETWORKMANAGER
127
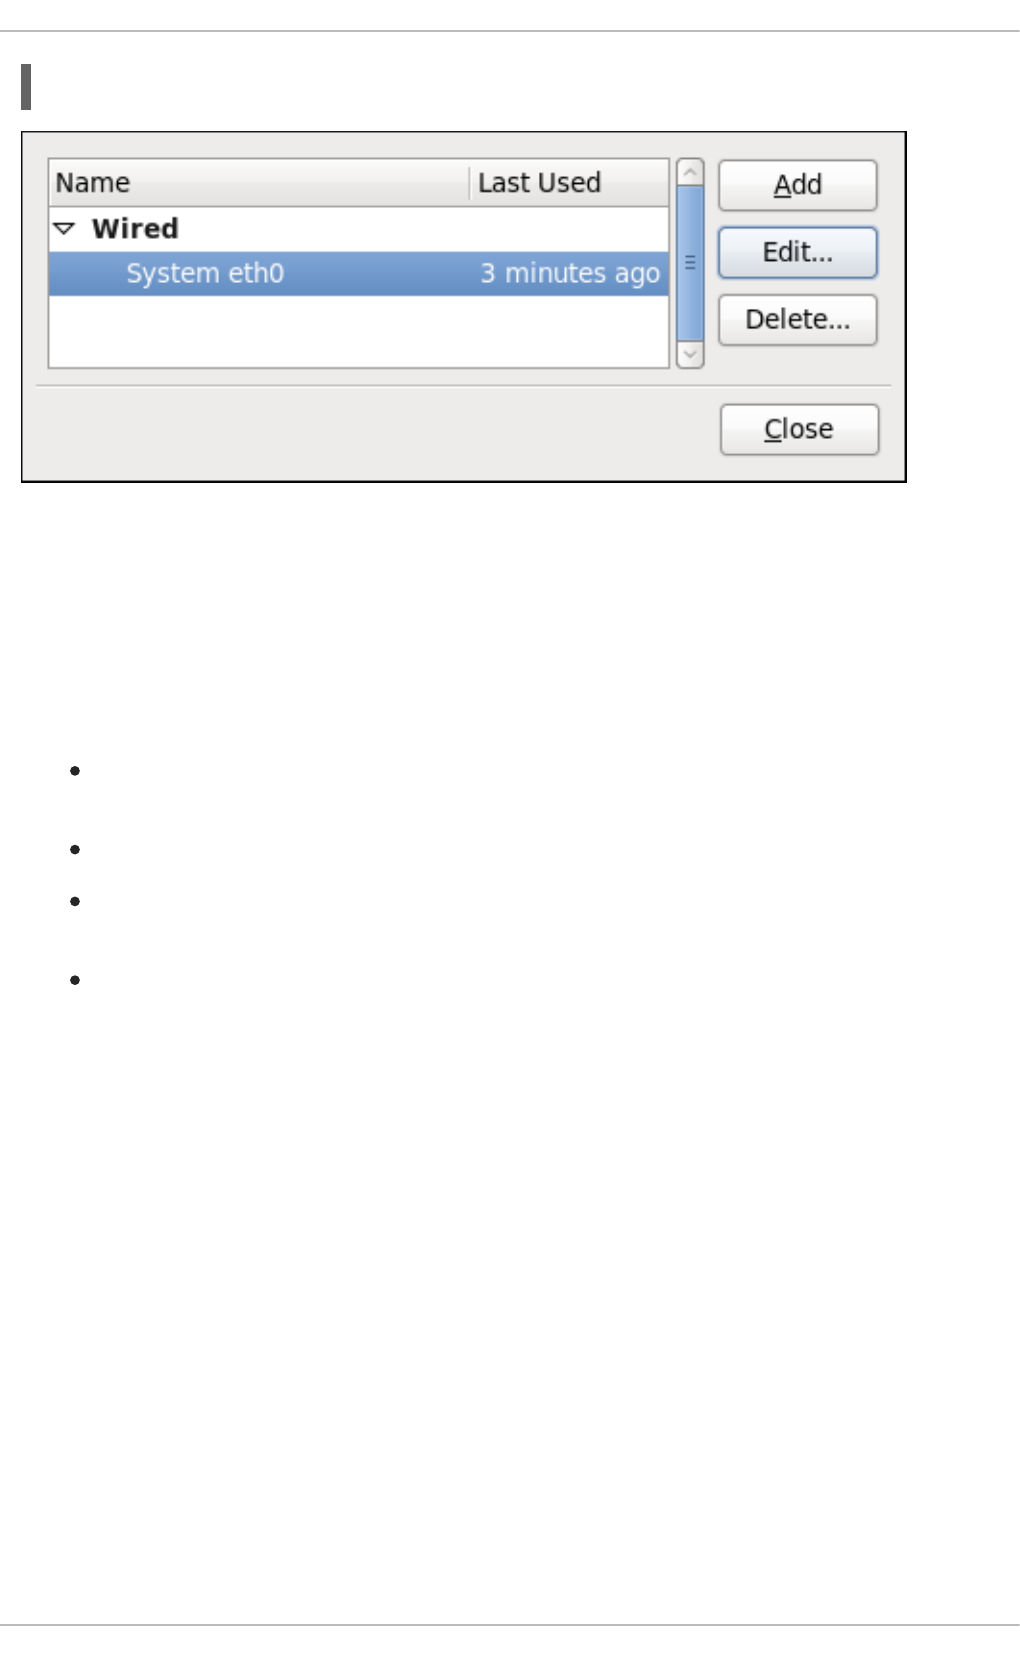
~]$ nm-connection-editor &
Figure 10.4. Configure networks using the Network Connections window
There is an arrow head symbol to the left which can be clicked to hide and reveal entries as needed. To
create a new connection, click the Add button to view the selection list, select the connection type and
click the Create button. Alternatively, to edit an existing connection select the interface name from the
list and click the Edit button.
Then, to configure:
wired Ethernet connections, proceed to Section 10.3.1, “Establishing a Wired (Ethernet)
Connection”;
wireless connections, proceed to Section 10.3.2, “Establishing a Wireless Connection”; or,
mobile broadband connections, proceed to Section 10.3.3, “Establishing a Mobile Broadband
Connection”; or,
VPN connections, proceed to Section 10.3.4, “Establishing a VPN Connection”.
10.2.3. Connecting to a Network Automatically
For any connection type you add or configure, you can choose whether you want NetworkManager to
try to connect to that network automatically when it is available.
Procedure 10.1. Configuring NetworkManager to Connect to a Network Automatically When
Detected
1. Right-click on the NetworkManager applet icon in the Notification Area and click Edit
Connections. The Network Connections window appears.
2. Click the arrow head if necessary to reveal the list of connections.
3. Select the specific connection that you want to configure and click Edit.
4. Check Connect automatically to cause NetworkManager to auto-connect to the
connection whenever NetworkManager detects that it is available. Uncheck the check box if
you do not want NetworkManager to connect automatically. If the box is unchecked, you will
have to select that connection manually in the NetworkManager applet's left-click menu to
cause it to connect.
Deployment Guide
128

10.2.4. User and System Connections
NetworkManager connections are always either user connections or system connections. Depending
on the system-specific policy that the administrator has configured, users may need root privileges to
create and modify system connections. NetworkManager's default policy enables users to create and
modify user connections, but requires them to have root privileges to add, modify or delete system
connections.
User connections are so-called because they are specific to the user who creates them. In contrast to
system connections, whose configurations are stored under the /etc/sysconfig/network-
scripts/ directory (mainly in ifcfg-<network_type> interface configuration files), user
connection settings are stored in the GConf configuration database and the GNOME keyring, and are
only available during login sessions for the user who created them. Thus, logging out of the desktop
session causes user-specific connections to become unavailable.
NOTE
Because NetworkManager uses the GConf and GNOME keyring applications to store
user connection settings, and because these settings are specific to your desktop
session, it is highly recommended to configure your personal VPN connections as user
connections. If you do so, other Non-root users on the system cannot view or access
these connections in any way.
System connections, on the other hand, become available at boot time and can be used by other users
on the system without first logging in to a desktop session.
NetworkManager can quickly and conveniently convert user to system connections and vice versa.
Converting a user connection to a system connection causes NetworkManager to create the relevant
interface configuration files under the /etc/sysconfig/network-scripts/ directory, and to delete
the GConf settings from the user's session. Conversely, converting a system to a user-specific
connection causes NetworkManager to remove the system-wide configuration files and create the
corresponding GConf/GNOME keyring settings.
Figure 10.5. The Available to all users check box controls whether connections are user-
specific or system-wide
Procedure 10.2. Changing a Connection to be User-Specific instead of System-Wide, or Vice-
Versa
NOTE
Depending on the system's policy, you may need root privileges on the system in order
to change whether a connection is user-specific or system-wide.
1. Right-click on the NetworkManager applet icon in the Notification Area and click Edit
Connections. The Network Connections window appears.
CHAPTER 10. NETWORKMANAGER
129
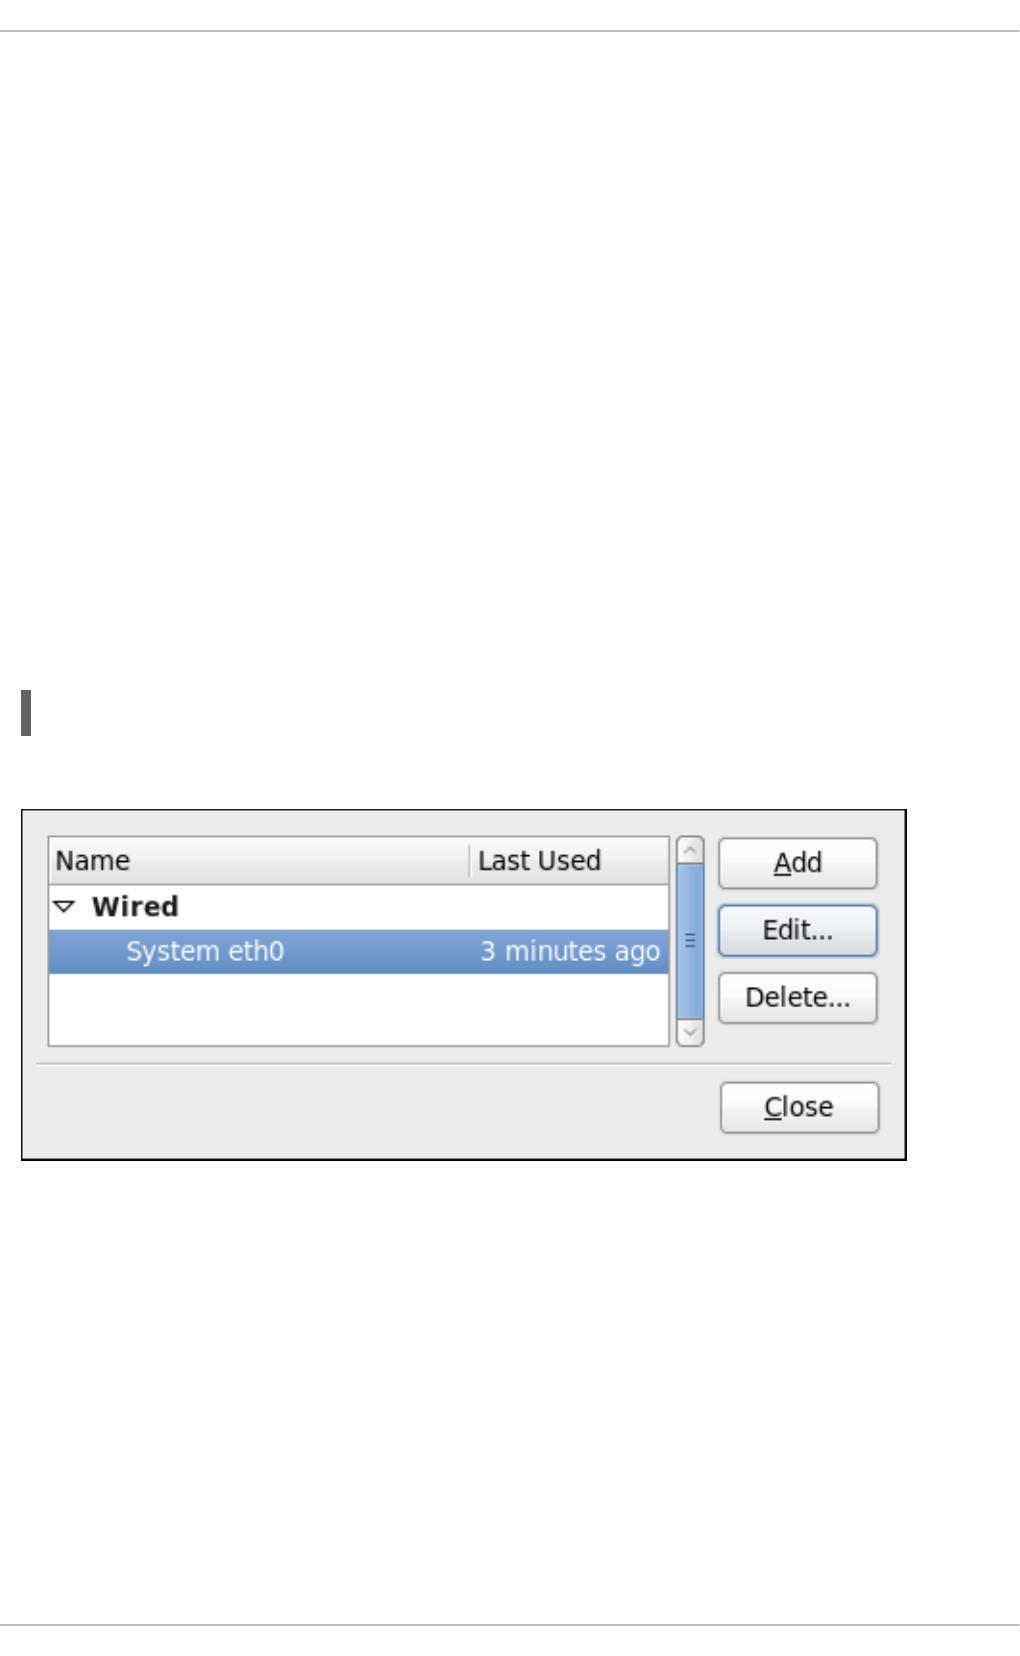
2. If needed, select the arrow head (on the left hand side) to hide and reveal the types of available
network connections.
3. Select the specific connection that you want to configure and click Edit.
4. Check the Available to all users check box to ask NetworkManager to make the
connection a system-wide connection. Depending on system policy, you may then be prompted
for the root password by the PolicyKit application. If so, enter the root password to finalize
the change.
Conversely, uncheck the Available to all users check box to make the connection user-
specific.
10.3. ESTABLISHING CONNECTIONS
10.3.1. Establishing a Wired (Ethernet) Connection
To establish a wired network connection, Right-click on the NetworkManager applet to open its context
menu, ensure that the Enable Networking box is checked, then click on Edit Connections. This
opens the Network Connections window. Note that this window can also be opened by running, as a
normal user:
~]$ nm-connection-editor &
You can click on the arrow head to reveal and hide the list of connections as needed.
Figure 10.6. The Network Connections window showing the newly created System eth0
connection
The system startup scripts create and configure a single wired connection called System eth0 by
default on all systems. Although you can edit System eth0, creating a new wired connection for your
custom settings is recommended. You can create a new wired connection by clicking the Add button,
selecting the Wired entry from the list that appears and then clicking the Create button.
Deployment Guide
130

Figure 10.7. Selecting a new connection type from the "Choose a Connection Type" list
NOTE
When you add a new connection by clicking the Add button, a list of connection types
appears. Once you have made a selection and clicked on the Create button,
NetworkManager creates a new configuration file for that connection and then opens the
same dialog that is used for editing an existing connection. There is no difference between
these dialogs. In effect, you are always editing a connection; the difference only lies in
whether that connection previously existed or was just created by NetworkManager
when you clicked Create.
CHAPTER 10. NETWORKMANAGER
131
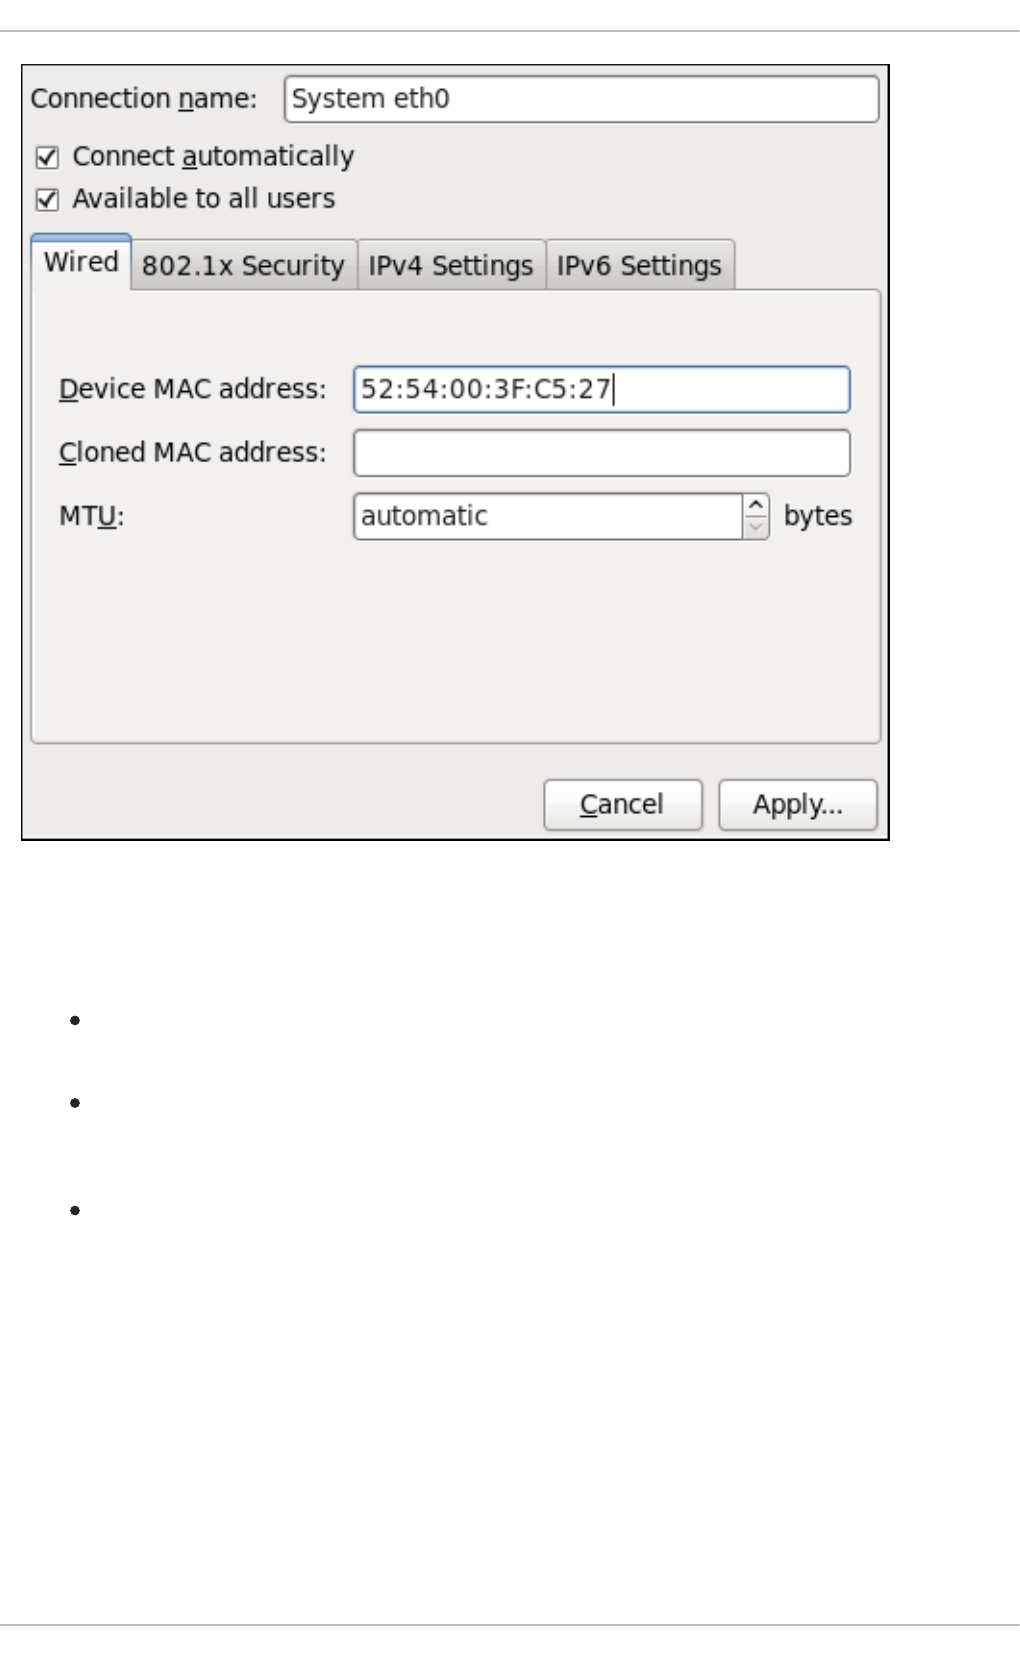
Figure 10.8. Editing the newly created Wired connection System eth0
Configuring the Connection Name, Auto-Connect Behavior, and Availability Settings
Three settings in the Editing dialog are common to all connection types:
Connection name — Enter a descriptive name for your network connection. This name will be
used to list this connection in the Wired section of the Network Connections window.
Connect automatically — Check this box if you want NetworkManager to auto-connect to
this connection when it is available. See Section 10.2.3, “Connecting to a Network Automatically”
for more information.
Available to all users — Check this box to create a connection available to all users on
the system. Changing this setting may require root privileges. See Section 10.2.4, “User and
System Connections” for details.
Configuring the Wired Tab
The final three configurable settings are located within the Wired tab itself: the first is a text-entry field
where you can specify a MAC (Media Access Control) address, and the second allows you to specify a
cloned MAC address, and third allows you to specify the MTU (Maximum Transmission Unit) value.
Normally, you can leave the MAC address field blank and the MTU set to automatic. These defaults
will suffice unless you are associating a wired connection with a second or specific NIC, or performing
advanced networking. In such cases, see the following descriptions:
MAC Address
Deployment Guide
132

Network hardware such as a Network Interface Card (NIC) has a unique MAC address (Media
Access Control; also known as a hardware address) that identifies it to the system. Running the ip
addr command will show the MAC address associated with each interface. For example, in the
following ip addr output, the MAC address for the eth0 interface (which is
52:54:00:26:9e:f1) immediately follows the link/ether keyword:
~]# ip addr
1: lo: <LOOPBACK,UP,LOWER_UP> mtu 16436 qdisc noqueue state UNKNOWN
link/loopback 00:00:00:00:00:00 brd 00:00:00:00:00:00
inet 127.0.0.1/8 scope host lo
inet6 ::1/128 scope host
valid_lft forever preferred_lft forever
2: eth0: <BROADCAST,MULTICAST,UP,LOWER_UP> mtu 1500 qdisc pfifo_fast
state UNKNOWN qlen 1000
link/ether 52:54:00:26:9e:f1 brd ff:ff:ff:ff:ff:ff
inet 192.168.122.251/24 brd 192.168.122.255 scope global eth0
inet6 fe80::5054:ff:fe26:9ef1/64 scope link
valid_lft forever preferred_lft forever
A single system can have one or more NICs installed on it. The MAC address field therefore allows
you to associate a specific NIC with a specific connection (or connections). As mentioned, you can
determine the MAC address using the ip addr command, and then copy and paste that value into
the MAC address text-entry field.
The cloned MAC address field is mostly for use in such situations were a network service has been
restricted to a specific MAC address and you need to emulate that MAC address.
MTU
The MTU (Maximum Transmission Unit) value represents the size in bytes of the largest packet that
the connection will use to transmit. This value defaults to 1500 when using IPv4, or a variable number
1280 or higher for IPv6, and does not generally need to be specified or changed.
Saving Your New (or Modified) Connection and Making Further Configurations
Once you have finished editing your wired connection, click the Apply button and NetworkManager will
immediately save your customized configuration. Given a correct configuration, you can connect to your
new or customized connection by selecting it from the NetworkManager Notification Area applet. See
Section 10.2.1, “Connecting to a Network” for information on using your new or altered connection.
You can further configure an existing connection by selecting it in the Network Connections window
and clicking Edit to return to the Editing dialog.
Then, to configure:
port-based Network Access Control (PNAC), click the 802.1X Security tab and proceed to
Section 10.3.9.1, “Configuring 802.1X Security”;
IPv4 settings for the connection, click the IPv4 Settings tab and proceed to Section 10.3.9.4,
“Configuring IPv4 Settings”; or,
IPv6 settings for the connection, click the IPv6 Settings tab and proceed to Section 10.3.9.5,
“Configuring IPv6 Settings”.
10.3.2. Establishing a Wireless Connection
CHAPTER 10. NETWORKMANAGER
133
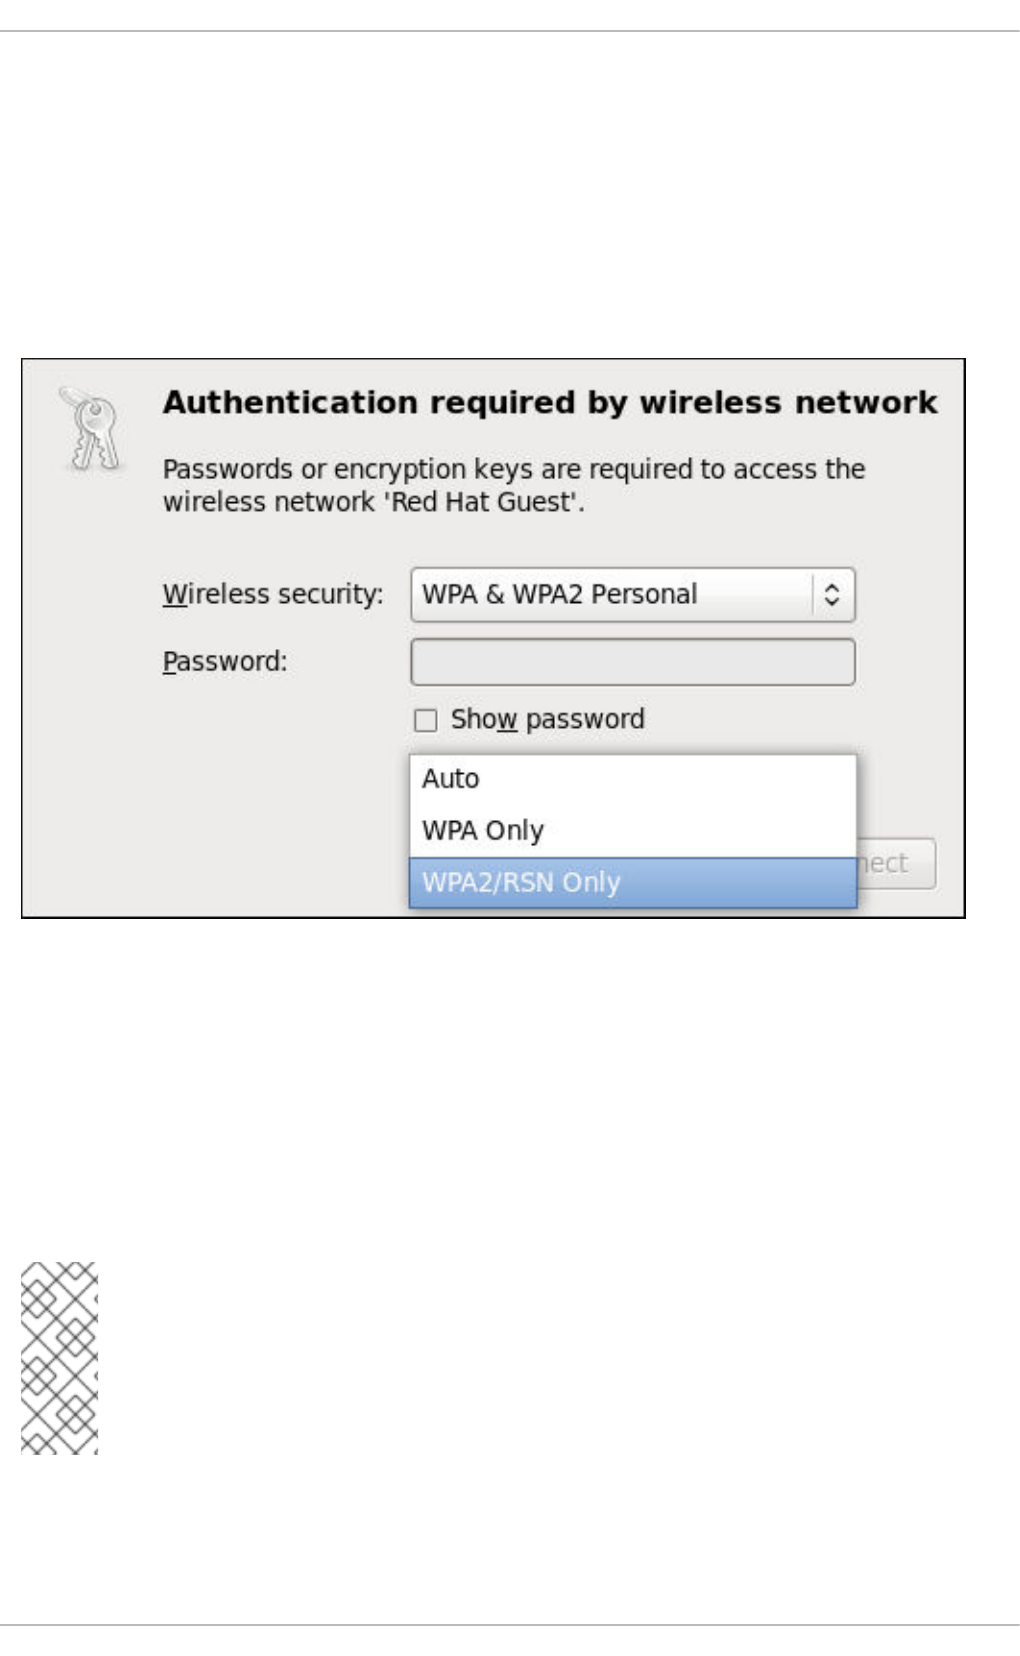
This section explains how to use NetworkManager to configure a wireless (also known as Wi-Fi or
802.11a/b/g/n) connection to an Access Point.
To configure a mobile broadband (such as 3G) connection, see Section 10.3.3, “Establishing a Mobile
Broadband Connection”.
Quickly Connecting to an Available Access Point
The easiest way to connect to an available access point is to left-click on the NetworkManager applet,
locate the Service Set Identifier (SSID) of the access point in the list of Available networks, and click
on it. If the access point is secured, a dialog prompts you for authentication.
Figure 10.9. Authenticating to a wireless access point
NetworkManager tries to auto-detect the type of security used by the access point. If there are multiple
possibilities, NetworkManager guesses the security type and presents it in the Wireless security
dropdown menu. To see if there are multiple choices, click the Wireless security dropdown menu
and select the type of security the access point is using. If you are unsure, try connecting to each type in
turn. Finally, enter the key or passphrase in the Password field. Certain password types, such as a 40-
bit WEP or 128-bit WPA key, are invalid unless they are of a requisite length. The Connect button will
remain inactive until you enter a key of the length required for the selected security type. To learn more
about wireless security, see Section 10.3.9.2, “Configuring Wireless Security”.
NOTE
In the case of WPA and WPA2 (Personal and Enterprise), an option to select between
Auto, WPA and WPA2 has been added. This option is intended for use with an access
point that is offering both WPA and WPA2. Select one of the protocols if you would like to
prevent roaming between the two protocols. Roaming between WPA and WPA2 on the
same access point can cause loss of service.
If NetworkManager connects to the access point successfully, its applet icon will change into a graphical
indicator of the wireless connection's signal strength.
Deployment Guide
134
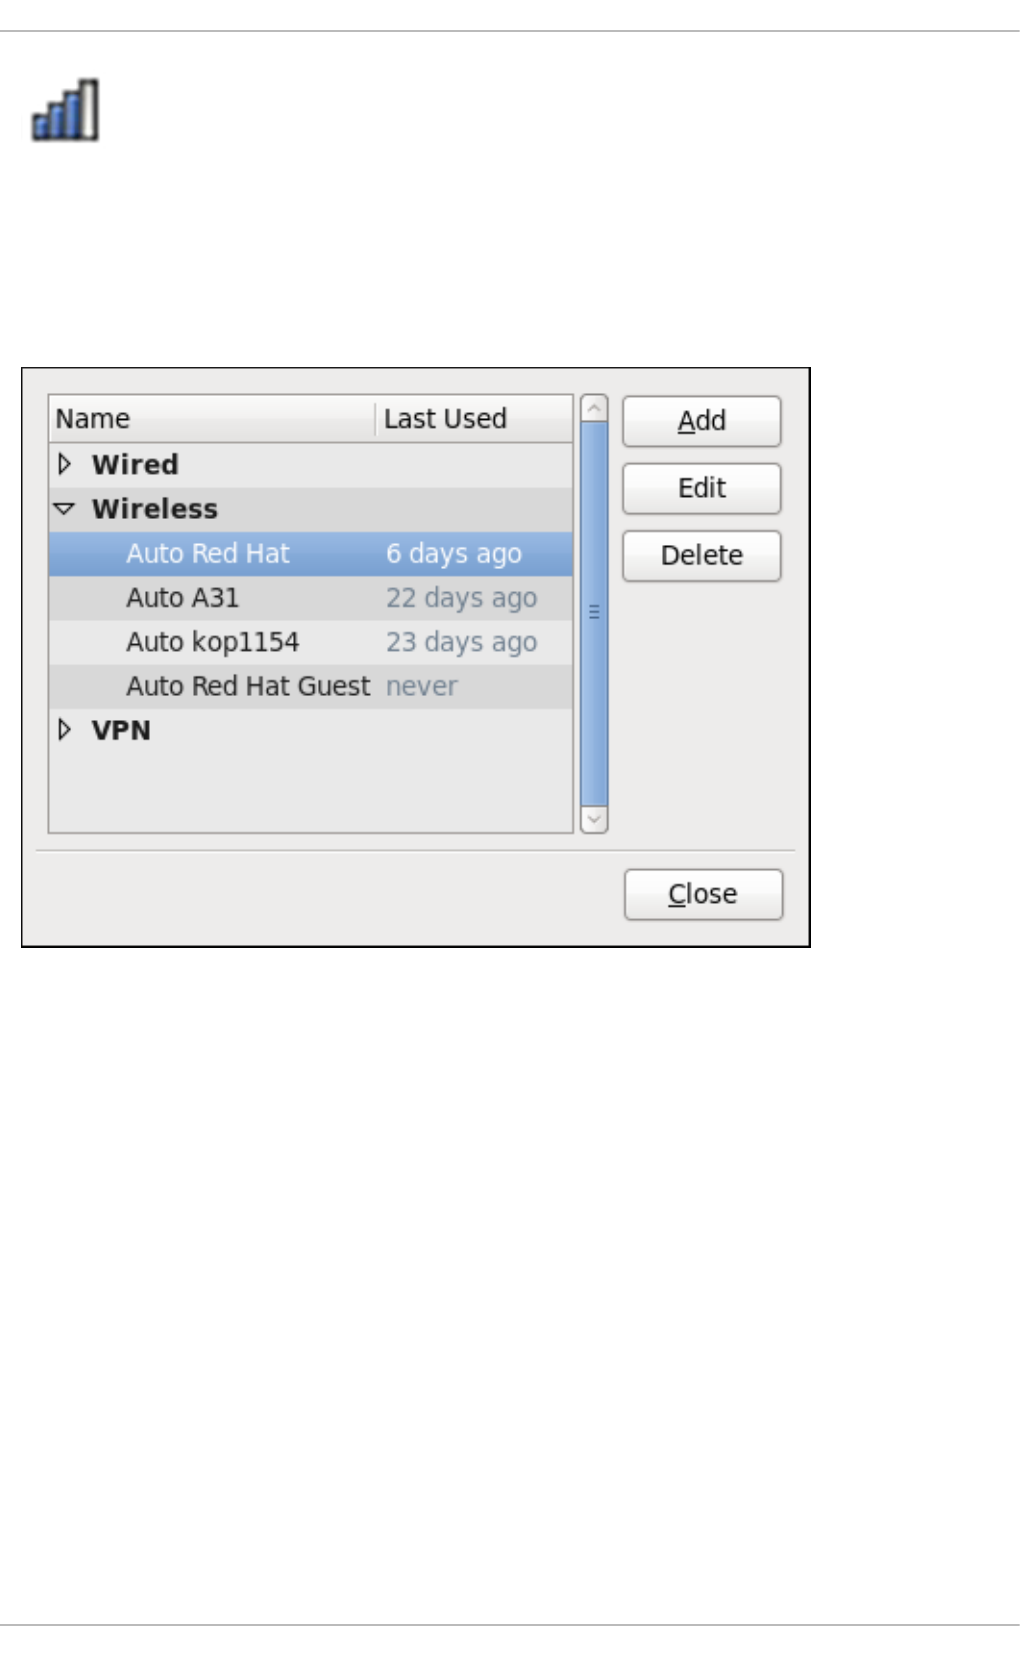
Figure 10.10. Applet icon indicating a wireless connection signal strength of 75%
You can also edit the settings for one of these auto-created access point connections just as if you had
added it yourself. The Wireless tab of the Network Connections window lists all of the connections
you have ever tried to connect to: NetworkManager names each of them Auto <SSID>, where SSID is
the Service Set identifier of the access point.
Figure 10.11. An example of access points that have previously been connected to
Connecting to a Hidden Wireless Network
All access points have a Service Set Identifier (SSID) to identify them. However, an access point may be
configured not to broadcast its SSID, in which case it is hidden, and will not show up in
NetworkManager's list of Available networks. You can still connect to a wireless access point that is
hiding its SSID as long as you know its SSID, authentication method, and secrets.
To connect to a hidden wireless network, left-click NetworkManager's applet icon and select Connect
to Hidden Wireless Network to cause a dialog to appear. If you have connected to the hidden
network before, use the Connection dropdown to select it, and click Connect. If you have not, leave
the Connection dropdown as New, enter the SSID of the hidden network, select its Wireless
security method, enter the correct authentication secrets, and click Connect.
For more information on wireless security settings, see Section 10.3.9.2, “Configuring Wireless Security”.
Editing a Connection, or Creating a Completely New One
You can edit an existing connection that you have tried or succeeded in connecting to in the past by
opening the Wireless tab of the Network Connections, selecting the connection by name (words
which follow Auto refer to the SSID of an access point), and clicking Edit.
CHAPTER 10. NETWORKMANAGER
135
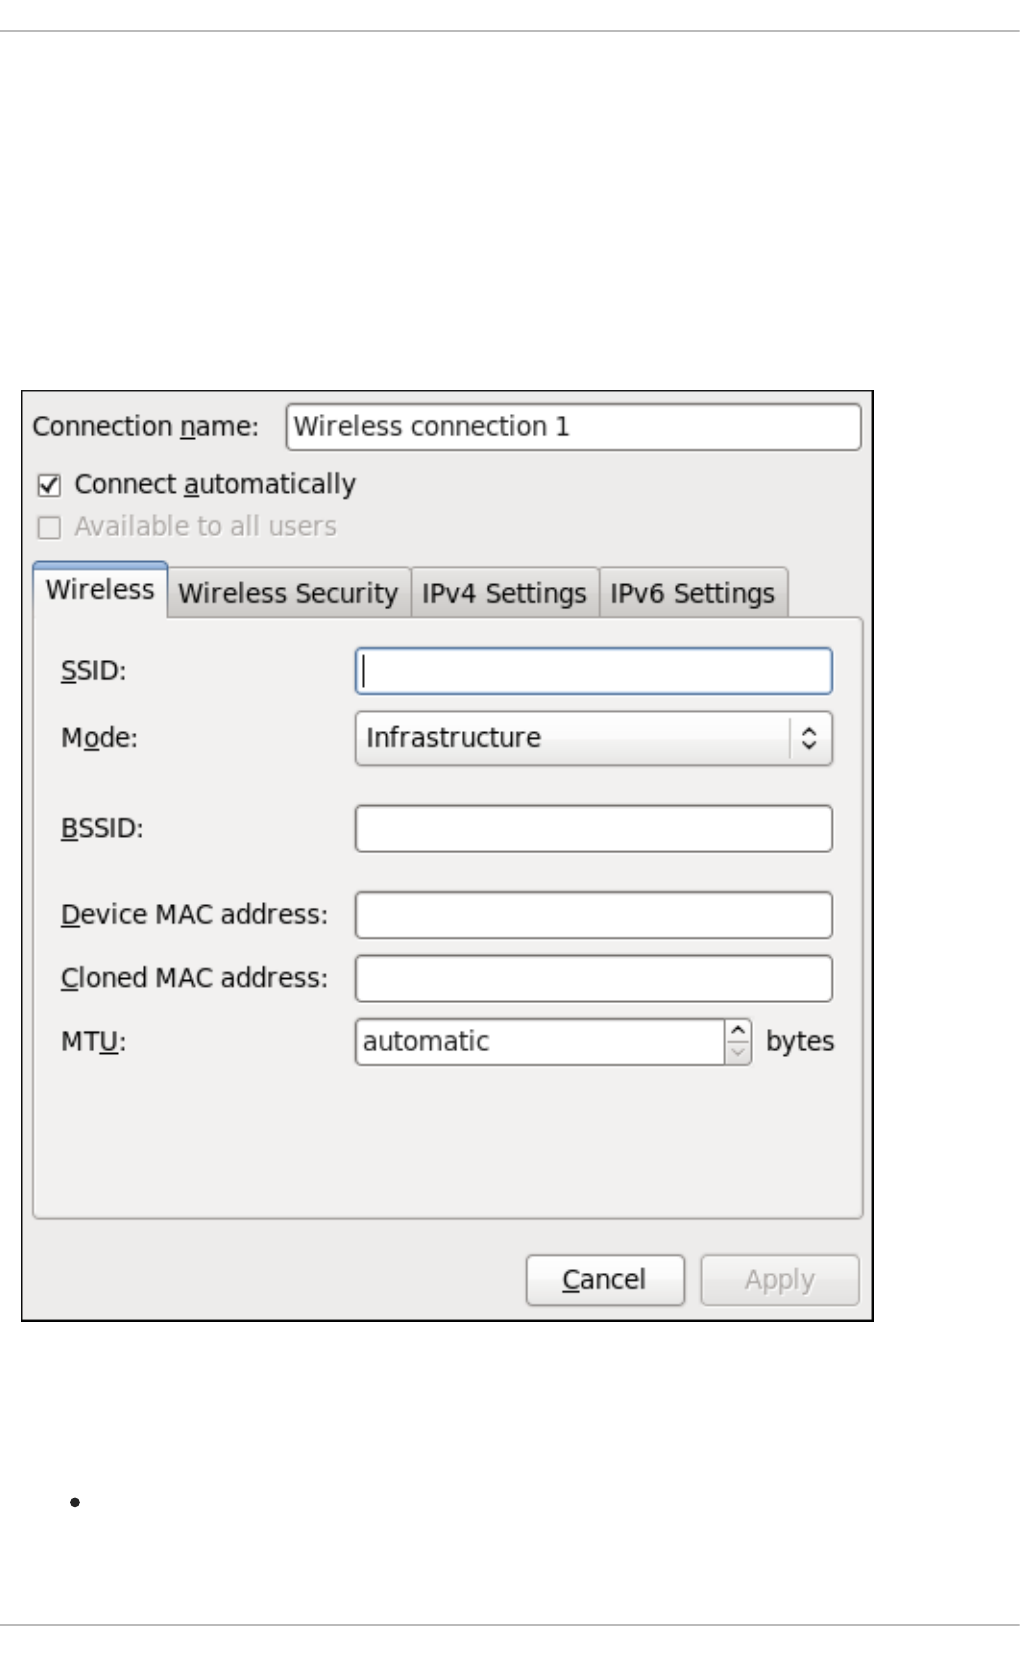
You can create a new connection by opening the Network Connections window, clicking the Add
button, selecting Wireless, and clicking the Create button.
1. Right-click on the NetworkManager applet icon in the Notification Area and click Edit
Connections. The Network Connections window appears.
2. Click the Add button.
3. Select the Wireless entry from the list.
4. Click the Create button.
Figure 10.12. Editing the newly created Wireless connection 1
Configuring the Connection Name, Auto-Connect Behavior, and Availability Settings
Three settings in the Editing dialog are common to all connection types:
Connection name — Enter a descriptive name for your network connection. This name will be
used to list this connection in the Wireless section of the Network Connections window. By
default, wireless connections are named the same as the SSID of the wireless access point.
Deployment Guide
136

You can rename the wireless connection without affecting its ability to connect, but it is
recommended to retain the SSID name.
Connect automatically — Check this box if you want NetworkManager to auto-connect to
this connection when it is available. See Section 10.2.3, “Connecting to a Network Automatically”
for more information.
Available to all users — Check this box to create a connection available to all users on
the system. Changing this setting may require root privileges. See Section 10.2.4, “User and
System Connections” for details.
Configuring the Wireless Tab
SSID
All access points have a Service Set identifier to identify them. However, an access point may be
configured not to broadcast its SSID, in which case it is hidden, and will not show up in
NetworkManager's list of Available networks. You can still connect to a wireless access point that
is hiding its SSID as long as you know its SSID (and authentication secrets).
For information on connecting to a hidden wireless network, see the section called “Connecting to a
Hidden Wireless Network”.
Mode
Infrastructure — Set Mode to Infrastructure if you are connecting to a dedicated wireless access
point or one built into a network device such as a router or a switch.
Ad-hoc — Set Mode to Ad-hoc if you are creating a peer-to-peer network for two or more mobile
devices to communicate directly with each other. If you use Ad-hoc mode, referred to as
Independent Basic Service Set (IBSS) in the 802.11 standard, you must ensure that the same SSID
is set for all participating wireless devices, and that they are all communicating over the same
channel.
BSSID
The Basic Service Set Identifier (BSSID) is the MAC address of the specific wireless access point you
are connecting to when in Infrastructure mode. This field is blank by default, and you are able to
connect to a wireless access point by SSID without having to specify its BSSID. If the BSSID is
specified, it will force the system to associate to a specific access point only.
For ad-hoc networks, the BSSID is generated randomly by the mac80211 subsystem when the ad-
hoc network is created. It is not displayed by NetworkManager
MAC address
Like an Ethernet Network Interface Card (NIC), a wireless adapter has a unique MAC address (Media
Access Control; also known as a hardware address) that identifies it to the system. Running the ip
addr command will show the MAC address associated with each interface. For example, in the
following ip addr output, the MAC address for the wlan0 interface (which is
00:1c:bf:02:f8:70) immediately follows the link/ether keyword:
~]# ip addr
1: lo: <LOOPBACK,UP,LOWER_UP> mtu 16436 qdisc noqueue state UNKNOWN
link/loopback 00:00:00:00:00:00 brd 00:00:00:00:00:00
inet 127.0.0.1/8 scope host lo
inet6 ::1/128 scope host
CHAPTER 10. NETWORKMANAGER
137

valid_lft forever preferred_lft forever
2: eth0: <BROADCAST,MULTICAST,UP,LOWER_UP> mtu 1500 qdisc pfifo_fast
state UNKNOWN qlen 1000
link/ether 52:54:00:26:9e:f1 brd ff:ff:ff:ff:ff:ff
inet 192.168.122.251/24 brd 192.168.122.255 scope global eth0
inet6 fe80::5054:ff:fe26:9ef1/64 scope link
valid_lft forever preferred_lft forever
3: wlan0: <BROADCAST,MULTICAST,UP,LOWER_UP> mtu 1500 qdisc mq state UP
qlen 1000
link/ether 00:1c:bf:02:f8:70 brd ff:ff:ff:ff:ff:ff
inet 10.200.130.67/24 brd 10.200.130.255 scope global wlan0
inet6 fe80::21c:bfff:fe02:f870/64 scope link
valid_lft forever preferred_lft forever
A single system could have one or more wireless network adapters connected to it. The MAC
address field therefore allows you to associate a specific wireless adapter with a specific connection
(or connections). As mentioned, you can determine the MAC address using the ip addr command,
and then copy and paste that value into the MAC address text-entry field.
MTU
The MTU (Maximum Transmission Unit) value represents the size in bytes of the largest packet that
the connection will use to transmit. If set to a non-zero number, only packets of the specified size or
smaller will be transmitted. Larger packets are broken up into multiple Ethernet frames. It is
recommended to leave this setting on automatic.
Saving Your New (or Modified) Connection and Making Further Configurations
Once you have finished editing the wireless connection, click the Apply button and NetworkManager
will immediately save your customized configuration. Given a correct configuration, you can successfully
connect to your the modified connection by selecting it from the NetworkManager Notification Area
applet. See Section 10.2.1, “Connecting to a Network” for details on selecting and connecting to a
network.
You can further configure an existing connection by selecting it in the Network Connections window
and clicking Edit to return to the Editing dialog.
Then, to configure:
security authentication for the wireless connection, click the Wireless Security tab and
proceed to Section 10.3.9.2, “Configuring Wireless Security”;
IPv4 settings for the connection, click the IPv4 Settings tab and proceed to Section 10.3.9.4,
“Configuring IPv4 Settings”; or,
IPv6 settings for the connection, click the IPv6 Settings tab and proceed to Section 10.3.9.5,
“Configuring IPv6 Settings”.
10.3.3. Establishing a Mobile Broadband Connection
You can use NetworkManager's mobile broadband connection abilities to connect to the following 2G
and 3G services:
2G — GPRS (General Packet Radio Service) or EDGE (Enhanced Data Rates for GSM
Evolution)
Deployment Guide
138

3G — UMTS (Universal Mobile Telecommunications System) or HSPA (High Speed Packet
Access)
Your computer must have a mobile broadband device (modem), which the system has discovered and
recognized, in order to create the connection. Such a device may be built into your computer (as is the
case on many notebooks and netbooks), or may be provided separately as internal or external hardware.
Examples include PC card, USB Modem or Dongle, mobile or cellular telephone capable of acting as a
modem.
Procedure 10.3. Adding a New Mobile Broadband Connection
You can configure a mobile broadband connection by opening the Network Connections window,
clicking Add, and selecting Mobile Broadband from the list.
1. Right-click on the NetworkManager applet icon in the Notification Area and click Edit
Connections. The Network Connections window appears.
2. Click the Add button to open the selection list. Select Mobile Broadband and then click
Create. The Set up a Mobile Broadband Connection assistant appears.
3. Under Create a connection for this mobile broadband device, choose the 2G- or
3G-capable device you want to use with the connection. If the dropdown menu is inactive, this
indicates that the system was unable to detect a device capable of mobile broadband. In this
case, click Cancel, ensure that you do have a mobile broadband-capable device attached and
recognized by the computer and then retry this procedure. Click the Forward button.
4. Select the country where your service provider is located from the list and click the Forward
button.
5. Select your provider from the list or enter it manually. Click the Forward button.
6. Select your payment plan from the dropdown menu and confirm the Access Point Name (APN)
is correct. Click the Forward button.
7. Review and confirm the settings and then click the Apply button.
8. Edit the mobile broadband-specific settings by referring to the Configuring the Mobile Broadband
Tab description below .
Procedure 10.4. Editing an Existing Mobile Broadband Connection
Follow these steps to edit an existing mobile broadband connection.
1. Right-click on the NetworkManager applet icon in the Notification Area and click Edit
Connections. The Network Connections window appears.
2. Select the connection you want to edit and click the Edit button.
3. Select the Mobile Broadband tab.
4. Configure the connection name, auto-connect behavior, and availability settings.
Three settings in the Editing dialog are common to all connection types:
CHAPTER 10. NETWORKMANAGER
139

Connection name — Enter a descriptive name for your network connection. This name
will be used to list this connection in the Mobile Broadband section of the Network
Connections window.
Connect automatically — Check this box if you want NetworkManager to auto-
connect to this connection when it is available. See Section 10.2.3, “Connecting to a Network
Automatically” for more information.
Available to all users — Check this box to create a connection available to all users
on the system. Changing this setting may require root privileges. See Section 10.2.4, “User
and System Connections” for details.
5. Edit the mobile broadband-specific settings by referring to the Configuring the Mobile Broadband
Tab description below .
Saving Your New (or Modified) Connection and Making Further Configurations
Once you have finished editing your mobile broadband connection, click the Apply button and
NetworkManager will immediately save your customized configuration. Given a correct configuration,
you can connect to your new or customized connection by selecting it from the NetworkManager
Notification Area applet. See Section 10.2.1, “Connecting to a Network” for information on using your new
or altered connection.
You can further configure an existing connection by selecting it in the Network Connections window
and clicking Edit to return to the Editing dialog.
Then, to configure:
Point-to-point settings for the connection, click the PPP Settings tab and proceed to
Section 10.3.9.3, “Configuring PPP (Point-to-Point) Settings”;
IPv4 settings for the connection, click the IPv4 Settings tab and proceed to Section 10.3.9.4,
“Configuring IPv4 Settings”; or,
IPv6 settings for the connection, click the IPv6 Settings tab and proceed to Section 10.3.9.5,
“Configuring IPv6 Settings”.
Configuring the Mobile Broadband Tab
If you have already added a new mobile broadband connection using the assistant (see Procedure 10.3,
“Adding a New Mobile Broadband Connection” for instructions), you can edit the Mobile Broadband
tab to disable roaming if home network is not available, assign a network ID, or instruct
NetworkManager to prefer a certain technology (such as 3G or 2G) when using the connection.
Number
The number that is dialed to establish a PPP connection with the GSM-based mobile broadband
network. This field may be automatically populated during the initial installation of the broadband
device. You can usually leave this field blank and enter the APN instead.
Username
Enter the user name used to authenticate with the network. Some providers do not provide a user
name, or accept any user name when connecting to the network.
Password
Enter the password used to authenticate with the network. Some providers do not provide a
password, or accept any password.
Deployment Guide
140

APN
Enter the Access Point Name (APN) used to establish a connection with the GSM-based network.
Entering the correct APN for a connection is important because it often determines:
how the user is billed for their network usage; and/or
whether the user has access to the Internet, an intranet, or a subnetwork.
Network ID
Entering a Network ID causes NetworkManager to force the device to register only to a specific
network. This can be used to ensure the connection does not roam when it is not possible to control
roaming directly.
Type
Any — The default value of Any leaves the modem to select the fastest network.
3G (UMTS/HSPA) — Force the connection to use only 3G network technologies.
2G (GPRS/EDGE) — Force the connection to use only 2G network technologies.
Prefer 3G (UMTS/HSPA) — First attempt to connect using a 3G technology such as HSPA or
UMTS, and fall back to GPRS or EDGE only upon failure.
Prefer 2G (GPRS/EDGE) — First attempt to connect using a 2G technology such as GPRS or
EDGE, and fall back to HSPA or UMTS only upon failure.
Allow roaming if home network is not available
Uncheck this box if you want NetworkManager to terminate the connection rather than transition
from the home network to a roaming one, thereby avoiding possible roaming charges. If the box is
checked, NetworkManager will attempt to maintain a good connection by transitioning from the
home network to a roaming one, and vice versa.
PIN
If your device's SIM (Subscriber Identity Module) is locked with a PIN (Personal Identification
Number), enter the PIN so that NetworkManager can unlock the device. NetworkManager must
unlock the SIM if a PIN is required in order to use the device for any purpose.
10.3.4. Establishing a VPN Connection
Establishing an encrypted Virtual Private Network (VPN) enables you to communicate securely between
your Local Area Network (LAN), and another, remote LAN. After successfully establishing a VPN
connection, a VPN router or gateway performs the following actions upon the packets you transmit:
1. it adds an Authentication Header for routing and authentication purposes;
2. it encrypts the packet data; and,
3. it encloses the data with an Encapsulating Security Payload (ESP), which constitutes the
decryption and handling instructions.
The receiving VPN router strips the header information, decrypts the data, and routes it to its intended
destination (either a workstation or other node on a network). Using a network-to-network connection, the
CHAPTER 10. NETWORKMANAGER
141

receiving node on the local network receives the packets already decrypted and ready for processing.
The encryption/decryption process in a network-to-network VPN connection is therefore transparent to
clients.
Because they employ several layers of authentication and encryption, VPNs are a secure and effective
means of connecting multiple remote nodes to act as a unified intranet.
Procedure 10.5. Adding a New VPN Connection
1. You can configure a new VPN connection by opening the Network Connections window,
clicking the Add button and selecting a type of VPN from the VPN section of the new connection
list.
2. Right-click on the NetworkManager applet icon in the Notification Area and click Edit
Connections. The Network Connections window appears.
3. Click the Add button.
4. The Choose a Connection Type list appears.
5. NOTE
The appropriate NetworkManager VPN plug-in for the VPN type you want to
configure must be installed (see Section 8.2.4, “Installing Packages” for more
information on how to install new packages in Red Hat Enterprise Linux 6).
The VPN section in the Choose a Connection Type list will not appear if you
do not have a suitable plug-in installed.
6. Select the VPN protocol for the gateway you are connecting to from the Choose a
Connection Type list. The VPN protocols available for selection in the list correspond to the
NetworkManager VPN plug-ins installed. For example, if NetworkManager-openswan, the
NetworkManager VPN plug-in for libreswan, is installed, then the IPsec based VPN will be
selectable from the Choose a Connection Type list.
NOTE
In Red Hat Enterprise Linux 6.8, openswan has been obsoleted by libreswan.
NetworkManager-openswan has been modified to support both openswan and
libreswan.
After selecting the correct one, press the Create button.
7. The Editing VPN Connection 1 window then appears. This window presents settings
customized for the type of VPN connection you selected in Step 6.
Procedure 10.6. Editing an Existing VPN Connection
You can configure an existing VPN connection by opening the Network Connections window and
selecting the name of the connection from the list. Then click the Edit button.
1. Right-click on the NetworkManager applet icon in the Notification Area and click Edit
Connections. The Network Connections window appears.
Deployment Guide
142
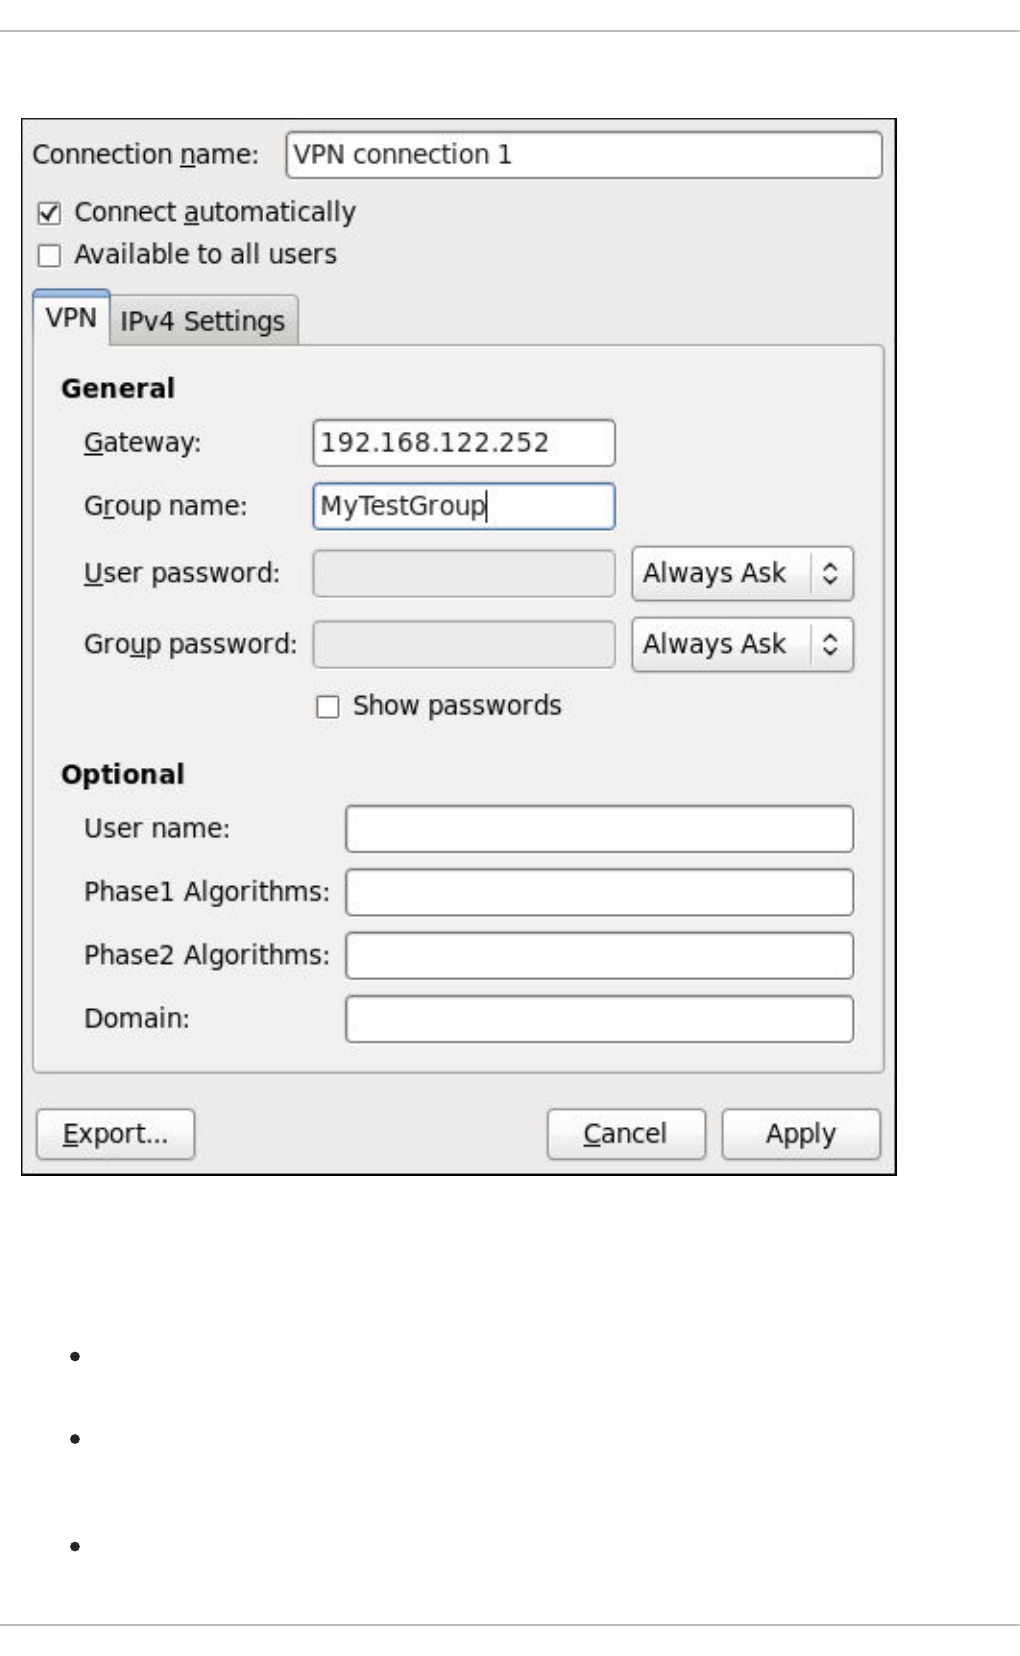
2. Select the connection you want to edit and click the Edit button.
Figure 10.13. Editing the newly created IPsec VPN connection 1
Configuring the Connection Name, Auto-Connect Behavior, and Availability Settings
Three settings in the Editing dialog are common to all connection types:
Connection name — Enter a descriptive name for your network connection. This name will be
used to list this connection in the VPN section of the Network Connections window.
Connect automatically — Check this box if you want NetworkManager to auto-connect to
this connection when it is available. See Section 10.2.3, “Connecting to a Network Automatically”
for more information.
Available to all users — Check this box to create a connection available to all users on
the system. Changing this setting may require root privileges. See Section 10.2.4, “User and
CHAPTER 10. NETWORKMANAGER
143

System Connections” for details.
Configuring the VPN Tab
Gateway
The name or IP address of the remote VPN gateway.
Group name
The name of a VPN group configured on the remote gateway.
User password
If required, enter the password used to authenticate with the VPN.
Group password
If required, enter the password used to authenticate with the VPN.
User name
If required, enter the user name used to authenticate with the VPN.
Phase1 Algorithms
If required, enter the algorithms to be used to authenticate and set up an encrypted channel.
Phase2 Algorithms
If required, enter the algorithms to be used for the IPsec negotiations.
Domain
If required, enter the Domain Name.
NAT traversal
Cisco UDP (default) — IPsec over UDP.
NAT-T — ESP encapsulation and IKE extensions are used to handle NAT Traversal.
Disabled — No special NAT measures required.
Disable Dead Peer Detection — Disable the sending of probes to the remote gateway or
endpoint.
Saving Your New (or Modified) Connection and Making Further Configurations
Once you have finished editing your new VPN connection, click the Apply button and NetworkManager
will immediately save your customized configuration. Given a correct configuration, you can connect to
your new or customized connection by selecting it from the NetworkManager Notification Area applet.
See Section 10.2.1, “Connecting to a Network” for information on using your new or altered connection.
You can further configure an existing connection by selecting it in the Network Connections window
and clicking Edit to return to the Editing dialog.
Then, to configure:
Deployment Guide
144

IPv4 settings for the connection, click the IPv4 Settings tab and proceed to Section 10.3.9.4,
“Configuring IPv4 Settings”.
10.3.5. Establishing a DSL Connection
This section is intended for those installations which have a DSL card fitted within a host rather than the
external combined DSL modem router combinations typical of private consumer or SOHO installations.
Procedure 10.7. Adding a New DSL Connection
You can configure a new DSL connection by opening the Network Connections window, clicking the
Add button and selecting DSL from the Hardware section of the new connection list.
1. Right-click on the NetworkManager applet icon in the Notification Area and click Edit
Connections. The Network Connections window appears.
2. Click the Add button.
3. The Choose a Connection Type list appears.
4. Select DSL and press the Create button.
5. The Editing DSL Connection 1 window appears.
Procedure 10.8. Editing an Existing DSL Connection
You can configure an existing DSL connection by opening the Network Connections window and
selecting the name of the connection from the list. Then click the Edit button.
1. Right-click on the NetworkManager applet icon in the Notification Area and click Edit
Connections. The Network Connections window appears.
2. Select the connection you want to edit and click the Edit button.
Configuring the Connection Name, Auto-Connect Behavior, and Availability Settings
Three settings in the Editing dialog are common to all connection types:
Connection name — Enter a descriptive name for your network connection. This name will be
used to list this connection in the DSL section of the Network Connections window.
Connect automatically — Check this box if you want NetworkManager to auto-connect to
this connection when it is available. See Section 10.2.3, “Connecting to a Network Automatically”
for more information.
Available to all users — Check this box to create a connection available to all users on
the system. Changing this setting may require root privileges. See Section 10.2.4, “User and
System Connections” for details.
Configuring the DSL Tab
Username
Enter the user name used to authenticate with the service provider.
Service
CHAPTER 10. NETWORKMANAGER
145

Leave blank unless otherwise directed.
Password
Enter the password supplied by the service provider.
Saving Your New (or Modified) Connection and Making Further Configurations
Once you have finished editing your DSL connection, click the Apply button and NetworkManager will
immediately save your customized configuration. Given a correct configuration, you can connect to your
new or customized connection by selecting it from the NetworkManager Notification Area applet. See
Section 10.2.1, “Connecting to a Network” for information on using your new or altered connection.
You can further configure an existing connection by selecting it in the Network Connections window
and clicking Edit to return to the Editing dialog.
Then, to configure:
The MAC address and MTU settings, click the Wired tab and proceed to the section called
“Configuring the Wired Tab”;
Point-to-point settings for the connection, click the PPP Settings tab and proceed to
Section 10.3.9.3, “Configuring PPP (Point-to-Point) Settings”;
IPv4 settings for the connection, click the IPv4 Settings tab and proceed to Section 10.3.9.4,
“Configuring IPv4 Settings”.
10.3.6. Establishing a Bond Connection
You can use NetworkManager to create a Bond from two or more Wired or Infiniband connections. It is
not necessary to create the connections to be bonded first. They can be configured as part of the
process to configure the bond. You must have the MAC addresses of the interfaces available in order to
complete the configuration process.
NOTE
NetworkManager support for bonding must be enabled by means of the
NM_BOND_VLAN_ENABLED directive and then NetworkManager must be restarted. See
Section 11.2.1, “Ethernet Interfaces” for an explanation of NM_CONTROLLED and the
NM_BOND_VLAN_ENABLED directive. See Section 12.3.4, “Restarting a Service” for an
explanation of restarting a service such as NetworkManager from the command line.
Alternatively, for a graphical tool see Section 12.2.1, “Using the Service Configuration
Utility”.
Procedure 10.9. Adding a New Bond Connection
You can configure a Bond connection by opening the Network Connections window, clicking Add,
and selecting Bond from the list.
1. Right-click on the NetworkManager applet icon in the Notification Area and click Edit
Connections. The Network Connections window appears.
2. Click the Add button to open the selection list. Select Bond and then click Create. The
Editing Bond connection 1 window appears.
Deployment Guide
146

3. On the Bond tab, click Add and select the type of interface you want to use with the bond
connection. Click the Create button. Note that the dialog to select the slave type only comes up
when you create the first slave; after that, it will automatically use that same type for all further
slaves.
4. The Editing bond0 slave 1 window appears. Fill in the MAC address of the first interface
to be bonded. The first slave's MAC address will be used as the MAC address for the bond
interface. If required, enter a clone MAC address to be used as the bond's MAC address. Click
the Apply button.
5. The Authenticate window appears. Enter the root password to continue. Click the
Authenticate button.
6. The name of the bonded slave appears in the Bonded Connections window. Click the Add
button to add further slave connections.
7. Review and confirm the settings and then click the Apply button.
8. Edit the bond-specific settings by referring to the section called “Configuring the Bond Tab”
below.
CHAPTER 10. NETWORKMANAGER
147
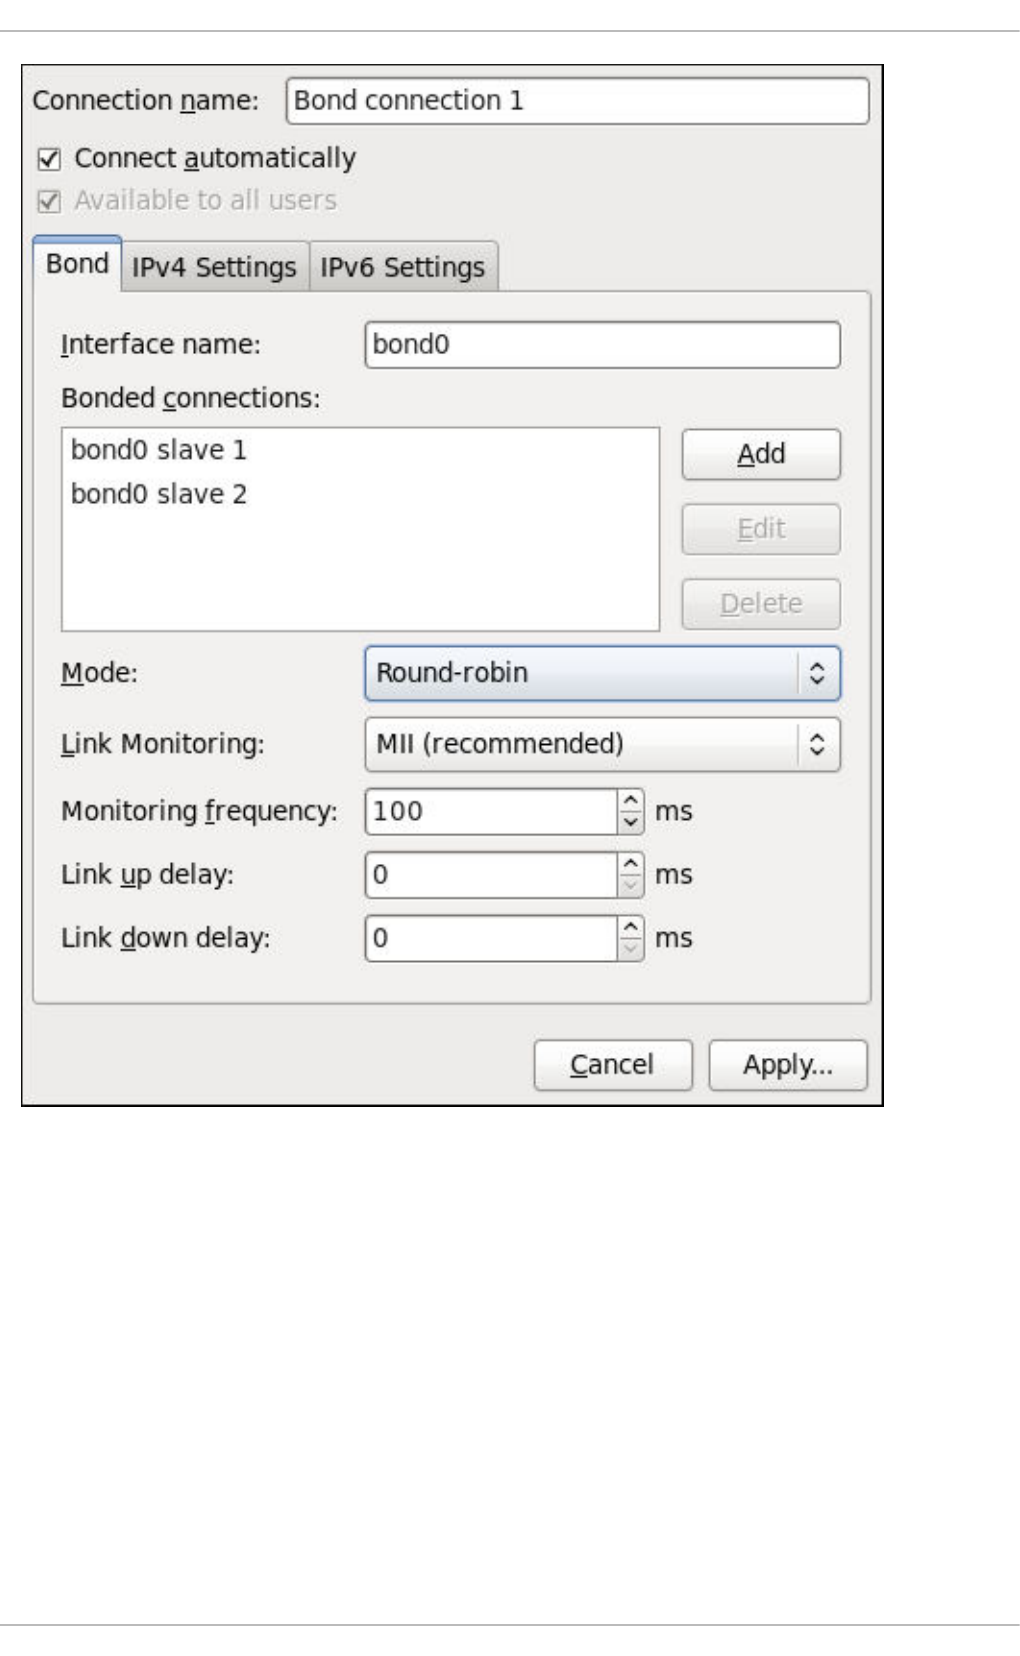
Figure 10.14. Editing the newly created Bond connection 1
Procedure 10.10. Editing an Existing Bond Connection
Follow these steps to edit an existing bond connection.
1. Right-click on the NetworkManager applet icon in the Notification Area and click Edit
Connections. The Network Connections window appears.
2. Select the connection you want to edit and click the Edit button.
3. Select the Bond tab.
4. Configure the connection name, auto-connect behavior, and availability settings.
Three settings in the Editing dialog are common to all connection types:
Deployment Guide
148

Connection name — Enter a descriptive name for your network connection. This name
will be used to list this connection in the Bond section of the Network Connections
window.
Connect automatically — Select this box if you want NetworkManager to auto-
connect to this connection when it is available. See Section 10.2.3, “Connecting to a Network
Automatically” for more information.
Available to all users — Select this box to create a connection available to all users
on the system. Changing this setting may require root privileges. See Section 10.2.4, “User
and System Connections” for details.
5. Edit the bond-specific settings by referring to the section called “Configuring the Bond Tab”
below.
Saving Your New (or Modified) Connection and Making Further Configurations
Once you have finished editing your bond connection, click the Apply button to save your customized
configuration. Given a correct configuration, you can connect to your new or customized connection by
selecting it from the NetworkManager Notification Area applet. See Section 10.2.1, “Connecting to a
Network” for information on using your new or altered connection.
You can further configure an existing connection by selecting it in the Network Connections window
and clicking Edit to return to the Editing dialog.
Then, to configure:
IPv4 settings for the connection, click the IPv4 Settings tab and proceed to Section 10.3.9.4,
“Configuring IPv4 Settings”; or,
IPv6 settings for the connection, click the IPv6 Settings tab and proceed to Section 10.3.9.5,
“Configuring IPv6 Settings”.
Configuring the Bond Tab
If you have already added a new bond connection (see Procedure 10.9, “Adding a New Bond
Connection” for instructions), you can edit the Bond tab to set the load sharing mode and the type of link
monitoring to use to detect failures of a slave connection.
Mode
The mode that is used to share traffic over the slave connections which make up the bond. The
default is Round-robin. Other load sharing modes, such as 802.3ad, can be selected by means of
the drop-down list.
Link Monitoring
The method of monitoring the slaves ability to carry network traffic.
The following modes of load sharing are selectable from the Mode drop-down list:
Round-robin
Sets a round-robin policy for fault tolerance and load balancing. Transmissions are received and sent
out sequentially on each bonded slave interface beginning with the first one available. This mode
might not work behind a bridge with virtual machines without additional switch configuration.
Active backup
CHAPTER 10. NETWORKMANAGER
149

Sets an active-backup policy for fault tolerance. Transmissions are received and sent out via the first
available bonded slave interface. Another bonded slave interface is only used if the active bonded
slave interface fails. Note that this is the only mode available for bonds of InfiniBand devices.
XOR
Sets an XOR (exclusive-or) policy. Transmissions are based on the selected hash policy. The default
is to derive a hash by XOR of the source and destination MAC addresses multiplied by the modulo of
the number of slave interfaces. In this mode traffic destined for specific peers will always be sent over
the same interface. As the destination is determined by the MAC addresses this method works best
for traffic to peers on the same link or local network. If traffic has to pass through a single router then
this mode of traffic balancing will be suboptimal.
Broadcast
Sets a broadcast policy for fault tolerance. All transmissions are sent on all slave interfaces. This
mode might not work behind a bridge with virtual machines without additional switch configuration.
802.3ad
Sets an IEEE 802.3ad dynamic link aggregation policy. Creates aggregation groups that share the
same speed and duplex settings. Transmits and receives on all slaves in the active aggregator.
Requires a network switch that is 802.3ad compliant.
Adaptive transmit load balancing
Sets an adaptive Transmit Load Balancing (TLB) policy for fault tolerance and load balancing. The
outgoing traffic is distributed according to the current load on each slave interface. Incoming traffic is
received by the current slave. If the receiving slave fails, another slave takes over the MAC address
of the failed slave. This mode is only suitable for local addresses known to the kernel bonding module
and therefore cannot be used behind a bridge with virtual machines.
Adaptive load balancing
Sets an Adaptive Load Balancing (ALB) policy for fault tolerance and load balancing. Includes
transmit and receive load balancing for IPv4 traffic. Receive load balancing is achieved through ARP
negotiation. This mode is only suitable for local addresses known to the kernel bonding module and
therefore cannot be used behind a bridge with virtual machines.
The following types of link monitoring can be selected from the Link Monitoring drop-down list. It is a
good idea to test which channel bonding module parameters work best for your bonded interfaces.
MII (Media Independent Interface)
The state of the carrier wave of the interface is monitored. This can be done by querying the driver,
by querying MII registers directly, or by using ethtool to query the device. Three options are
available:
Monitoring Frequency
The time interval, in milliseconds, between querying the driver or MII registers.
Link up delay
The time in milliseconds to wait before attempting to use a link that has been reported as up. This
delay can be used if some gratuitous ARP requests are lost in the period immediately following the
link being reported as “up”. This can happen during switch initialization for example.
Deployment Guide
150

Link down delay
The time in milliseconds to wait before changing to another link when a previously active link has
been reported as “down”. This delay can be used if an attached switch takes a relatively long time
to change to backup mode.
ARP
The address resolution protocol (ARP) is used to probe one or more peers to determine how well the
link-layer connections are working. It is dependent on the device driver providing the transmit start
time and the last receive time.
Two options are available:
Monitoring Frequency
The time interval, in milliseconds, between sending ARP requests.
ARP targets
A comma separated list of IP addresses to send ARP requests to.
10.3.7. Establishing a VLAN Connection
You can use NetworkManager to create a VLAN using an existing interface. Currently, at time of
writing, you can only make VLANs on Ethernet devices.
Procedure 10.11. Adding a New VLAN Connection
You can configure a VLAN connection by opening the Network Connections window, clicking Add,
and selecting VLAN from the list.
1. Right-click on the NetworkManager applet icon in the Notification Area and click Edit
Connections. The Network Connections window appears.
2. Click the Add button to open the selection list. Select VLAN and then click Create. The
Editing VLAN Connection 1 window appears.
3. On the VLAN tab, select the parent interface from the drop-down list you want to use for the
VLAN connection.
4. Enter the VLAN ID
5. Enter a VLAN interface name. This is the name of the VLAN interface that will be created. For
example, "eth0.1" or "vlan2". (Normally this is either the parent interface name plus "." and the
VLAN ID, or "vlan" plus the VLAN ID.)
6. Review and confirm the settings and then click the Apply button.
7. Edit the VLAN-specific settings by referring to the Configuring the VLAN Tab description below .
Procedure 10.12. Editing an Existing VLAN Connection
Follow these steps to edit an existing VLAN connection.
CHAPTER 10. NETWORKMANAGER
151

1. Right-click on the NetworkManager applet icon in the Notification Area and click Edit
Connections. The Network Connections window appears.
2. Select the connection you want to edit and click the Edit button.
3. Select the VLAN tab.
4. Configure the connection name, auto-connect behavior, and availability settings.
Three settings in the Editing dialog are common to all connection types:
Connection name — Enter a descriptive name for your network connection. This name
will be used to list this connection in the VLAN section of the Network Connections
window.
Connect automatically — Check this box if you want NetworkManager to auto-
connect to this connection when it is available. See Section 10.2.3, “Connecting to a Network
Automatically” for more information.
Available to all users — Check this box to create a connection available to all users
on the system. Changing this setting may require root privileges. See Section 10.2.4, “User
and System Connections” for details.
5. Edit the VLAN-specific settings by referring to the Configuring the VLAN Tab description below .
Saving Your New (or Modified) Connection and Making Further Configurations
Once you have finished editing your VLAN connection, click the Apply button and NetworkManager will
immediately save your customized configuration. Given a correct configuration, you can connect to your
new or customized connection by selecting it from the NetworkManager Notification Area applet. See
Section 10.2.1, “Connecting to a Network” for information on using your new or altered connection.
You can further configure an existing connection by selecting it in the Network Connections window
and clicking Edit to return to the Editing dialog.
Then, to configure:
IPv4 settings for the connection, click the IPv4 Settings tab and proceed to Section 10.3.9.4,
“Configuring IPv4 Settings”.
Configuring the VLAN Tab
If you have already added a new VLAN connection (see Procedure 10.11, “Adding a New VLAN
Connection” for instructions), you can edit the VLAN tab to set the parent interface and the VLAN ID.
Parent Interface
A previously configured interface can be selected in the drop-down list.
VLAN ID
The identification number to be used to tag the VLAN network traffic.
VLAN interface name
The name of the VLAN interface that will be created. For example, "eth0.1" or "vlan2".
Cloned MAC address
Deployment Guide
152

Optionally sets an alternate MAC address to use for identifying the VLAN interface. This can be used
to change the source MAC address for packets sent on this VLAN.
MTU
Optionally sets a Maximum Transmission Unit (MTU) size to be used for packets to be sent over the
VLAN connection.
10.3.8. Establishing an IP-over-InfiniBand (IPoIB) Connection
You can use NetworkManager to create an InfiniBand connection.
Procedure 10.13. Adding a New InfiniBand Connection
You can configure an InfiniBand connection by opening the Network Connections window, clicking
Add, and selecting InfiniBand from the list.
1. Right-click on the NetworkManager applet icon in the Notification Area and click Edit
Connections. The Network Connections window appears.
2. Click the Add button to open the selection list. Select InfiniBand and then click Create. The
Editing InfiniBand Connection 1 window appears.
3. On the InfiniBand tab, select the transport mode from the drop-down list you want to use for
the InfiniBand connection.
4. Enter the InfiniBand MAC address.
5. Review and confirm the settings and then click the Apply button.
6. Edit the InfiniBand-specific settings by referring to the Configuring the InfiniBand Tab description
below .
CHAPTER 10. NETWORKMANAGER
153
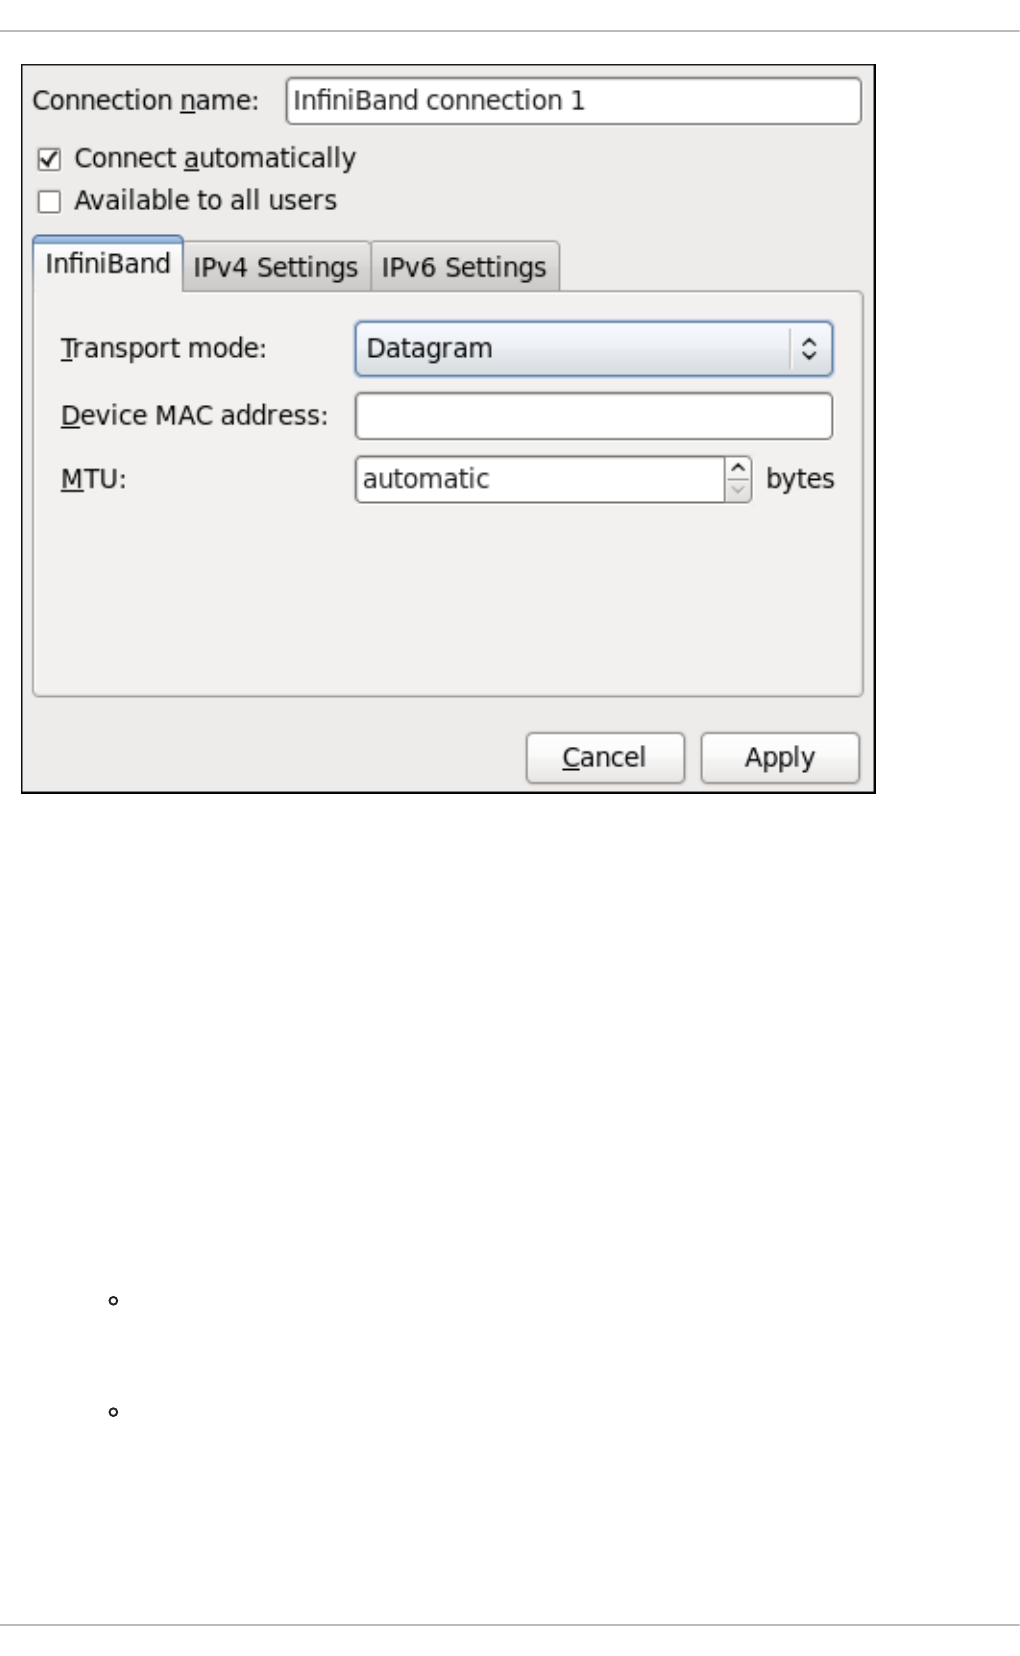
Figure 10.15. Editing the newly created InfiniBand connection 1
Procedure 10.14. Editing an Existing InfiniBand Connection
Follow these steps to edit an existing InfiniBand connection.
1. Right-click on the NetworkManager applet icon in the Notification Area and click Edit
Connections. The Network Connections window appears.
2. Select the connection you want to edit and click the Edit button.
3. Select the InfiniBand tab.
4. Configure the connection name, auto-connect behavior, and availability settings.
Three settings in the Editing dialog are common to all connection types:
Connection name — Enter a descriptive name for your network connection. This name
will be used to list this connection in the InfiniBand section of the Network
Connections window.
Connect automatically — Check this box if you want NetworkManager to auto-
connect to this connection when it is available. See Section 10.2.3, “Connecting to a Network
Automatically” for more information.
Deployment Guide
154

Available to all users — Check this box to create a connection available to all users
on the system. Changing this setting may require root privileges. See Section 10.2.4, “User
and System Connections” for details.
5. Edit the InfiniBand-specific settings by referring to the Configuring the InfiniBand Tab description
below .
Saving Your New (or Modified) Connection and Making Further Configurations
Once you have finished editing your InfiniBand connection, click the Apply button and
NetworkManager will immediately save your customized configuration. Given a correct configuration,
you can connect to your new or customized connection by selecting it from the NetworkManager
Notification Area applet. See Section 10.2.1, “Connecting to a Network” for information on using your new
or altered connection.
You can further configure an existing connection by selecting it in the Network Connections window
and clicking Edit to return to the Editing dialog.
Then, to configure:
IPv4 settings for the connection, click the IPv4 Settings tab and proceed to Section 10.3.9.4,
“Configuring IPv4 Settings”; or,
IPv6 settings for the connection, click the IPv6 Settings tab and proceed to Section 10.3.9.5,
“Configuring IPv6 Settings”.
Configuring the InfiniBand Tab
If you have already added a new InfiniBand connection (see Procedure 10.13, “Adding a New InfiniBand
Connection” for instructions), you can edit the InfiniBand tab to set the parent interface and the
InfiniBand ID.
Transport mode
Datagram or Connected mode can be selected from the drop-down list. Select the same mode the
rest of your IPoIB network is using.
Device MAC address
The MAC address of the InfiniBand capable device to be used for the InfiniBand network traffic.This
hardware address field will be pre-filled if you have InfiniBand hardware installed.
MTU
Optionally sets a Maximum Transmission Unit (MTU) size to be used for packets to be sent over the
InfiniBand connection.
10.3.9. Configuring Connection Settings
10.3.9.1. Configuring 802.1X Security
802.1X security is the name of the IEEE standard for port-based Network Access Control (PNAC).
Simply put, 802.1X security is a way of defining a logical network out of a physical one. All clients who
want to join the logical network must authenticate with the server (a router, for example) using the
correct 802.1X authentication method.
802.1X security is most often associated with securing wireless networks (WLANs), but can also be
CHAPTER 10. NETWORKMANAGER
155

used to prevent intruders with physical access to the network (LAN) from gaining entry. In the past,
DHCP servers were configured not to lease IP addresses to unauthorized users, but for various reasons
this practice is both impractical and insecure, and thus is no longer recommended. Instead, 802.1X
security is used to ensure a logically-secure network through port-based authentication.
802.1X provides a framework for WLAN and LAN access control and serves as an envelope for carrying
one of the Extensible Authentication Protocol (EAP) types. An EAP type is a protocol that defines how
WLAN security is achieved on the network.
You can configure 802.1X security for a wired or wireless connection type by opening the Network
Connections window (see Section 10.2.2, “Configuring New and Editing Existing Connections”) and
following the applicable procedure:
Procedure 10.15. For a wired connection...
1. Either click Add, select a new network connection for which you want to configure 802.1X
security and then click Create, or select an existing connection and click Edit.
2. Then select the 802.1X Security tab and check the Use 802.1X security for this
connection check box to enable settings configuration.
3. Proceed to Section 10.3.9.1.1, “Configuring TLS (Transport Layer Security) Settings”
Procedure 10.16. For a wireless connection...
1. Either click on Add, select a new network connection for which you want to configure 802.1X
security and then click Create, or select an existing connection and click Edit.
2. Select the Wireless Security tab.
3. Then click the Security dropdown and choose one of the following security methods: LEAP,
Dynamic WEP (802.1X), or WPA & WPA2 Enterprise.
4. See Section 10.3.9.1.1, “Configuring TLS (Transport Layer Security) Settings” for descriptions of
which EAP types correspond to your selection in the Security dropdown.
10.3.9.1.1. Configuring TLS (Transport Layer Security) Settings
With Transport Layer Security, the client and server mutually authenticate using the TLS protocol. The
server demonstrates that it holds a digital certificate, the client proves its own identity using its client-side
certificate, and key information is exchanged. Once authentication is complete, the TLS tunnel is no
longer used. Instead, the client and server use the exchanged keys to encrypt data using AES, TKIP or
WEP.
The fact that certificates must be distributed to all clients who want to authenticate means that the EAP-
TLS authentication method is very strong, but also more complicated to set up. Using TLS security
requires the overhead of a public key infrastructure (PKI) to manage certificates. The benefit of using
TLS security is that a compromised password does not allow access to the (W)LAN: an intruder must
also have access to the authenticating client's private key.
NetworkManager does not determine the version of TLS supported. NetworkManager gathers the
parameters entered by the user and passes them to the daemon, wpa_supplicant, that handles the
procedure. It in turn uses OpenSSL to establish the TLS tunnel. OpenSSL itself negotiates the SSL/TLS
protocol version. It uses the highest version both ends support.
Deployment Guide
156

Identity
Identity string for EAP authentication methods, such as a user name or login name.
User certificate
Click to browse for, and select, a user's certificate.
CA certificate
Click to browse for, and select, a Certificate Authority's certificate.
Private key
Click to browse for, and select, a user's private key file. Note that the key must be password
protected.
Private key password
Enter the user password corresponding to the user's private key.
10.3.9.1.2. Configuring Tunneled TLS Settings
Anonymous identity
This value is used as the unencrypted identity.
CA certificate
Click to browse for, and select, a Certificate Authority's certificate.
Inner authentication
PAP — Password Authentication Protocol.
MSCHAP — Challenge Handshake Authentication Protocol.
MSCHAPv2 — Microsoft Challenge Handshake Authentication Protocol version 2.
CHAP — Challenge Handshake Authentication Protocol.
Username
Enter the user name to be used in the authentication process.
Password
Enter the password to be used in the authentication process.
10.3.9.1.3. Configuring Protected EAP (PEAP) Settings
Anonymous Identity
This value is used as the unencrypted identity.
CA certificate
Click to browse for, and select, a Certificate Authority's certificate.
CHAPTER 10. NETWORKMANAGER
157

PEAP version
The version of Protected EAP to use. Automatic, 0 or 1.
Inner authentication
MSCHAPv2 — Microsoft Challenge Handshake Authentication Protocol version 2.
MD5 — Message Digest 5, a cryptographic hash function.
GTC — Generic Token Card.
Username
Enter the user name to be used in the authentication process.
Password
Enter the password to be used in the authentication process.
10.3.9.2. Configuring Wireless Security
Security
None — Do not encrypt the Wi-Fi connection.
WEP 40/128-bit Key — Wired Equivalent Privacy (WEP), from the IEEE 802.11 standard. Uses a
single pre-shared key (PSK).
WEP 128-bit Passphrase — An MD5 hash of the passphrase will be used to derive a WEP key.
LEAP — Lightweight Extensible Authentication Protocol, from Cisco Systems.
Dynamic WEP (802.1X) — WEP keys are changed dynamically.
WPA & WPA2 Personal — Wi-Fi Protected Access (WPA), from the draft IEEE 802.11i standard. A
replacement for WEP. Wi-Fi Protected Access II (WPA2), from the 802.11i-2004 standard. Personal
mode uses a pre-shared key (WPA-PSK).
WPA & WPA2 Enterprise — WPA for use with a RADIUS authentication server to provide IEEE
802.1X network access control.
Password
Enter the password to be used in the authentication process.
NOTE
In the case of WPA and WPA2 (Personal and Enterprise), an option to select between
Auto, WPA and WPA2 has been added. This option is intended for use with an access
point that is offering both WPA and WPA2. Select one of the protocols if you would like to
prevent roaming between the two protocols. Roaming between WPA and WPA2 on the
same access point can cause loss of service.
Deployment Guide
158
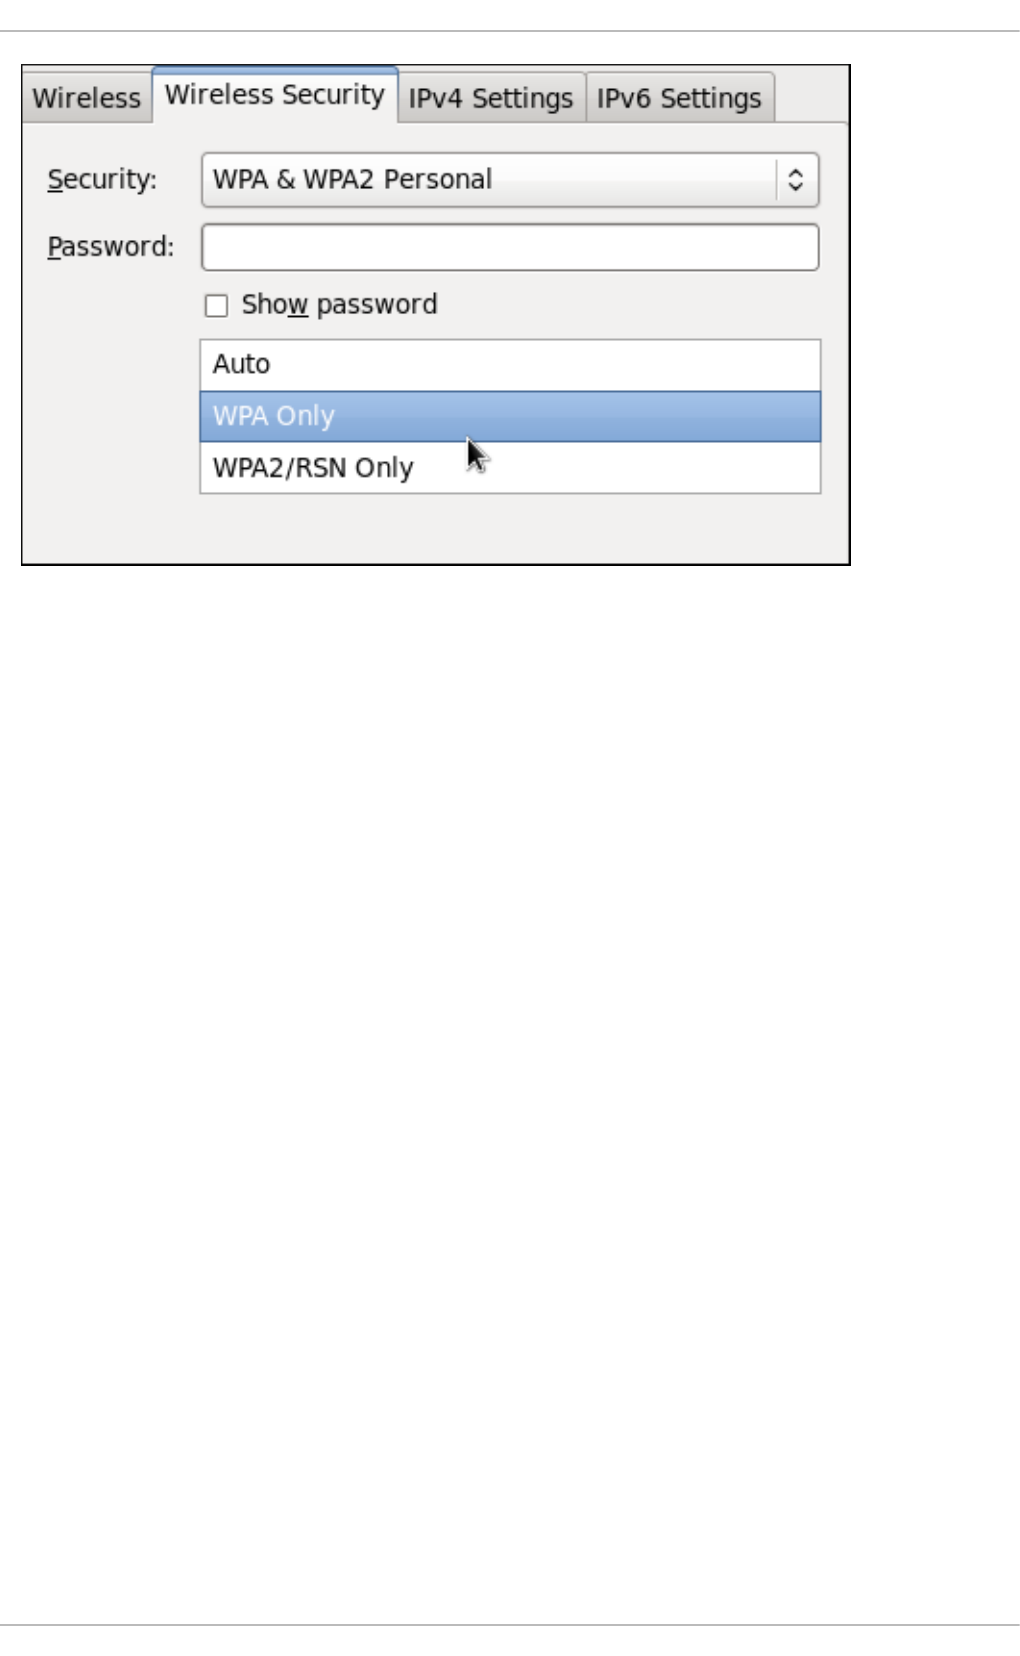
Figure 10.16. Editing the Wireless Security tab and selecting the WPA protocol
10.3.9.3. Configuring PPP (Point-to-Point) Settings
Configure Methods
Use point-to-point encryption (MPPE)
Microsoft Point-To-Point Encryption protocol (RFC 3078).
Allow BSD data compression
PPP BSD Compression Protocol (RFC 1977).
Allow Deflate data compression
PPP Deflate Protocol (RFC 1979).
Use TCP header compression
Compressing TCP/IP Headers for Low-Speed Serial Links (RFC 1144).
Send PPP echo packets
LCP Echo-Request and Echo-Reply Codes for loopback tests (RFC 1661).
10.3.9.4. Configuring IPv4 Settings
CHAPTER 10. NETWORKMANAGER
159
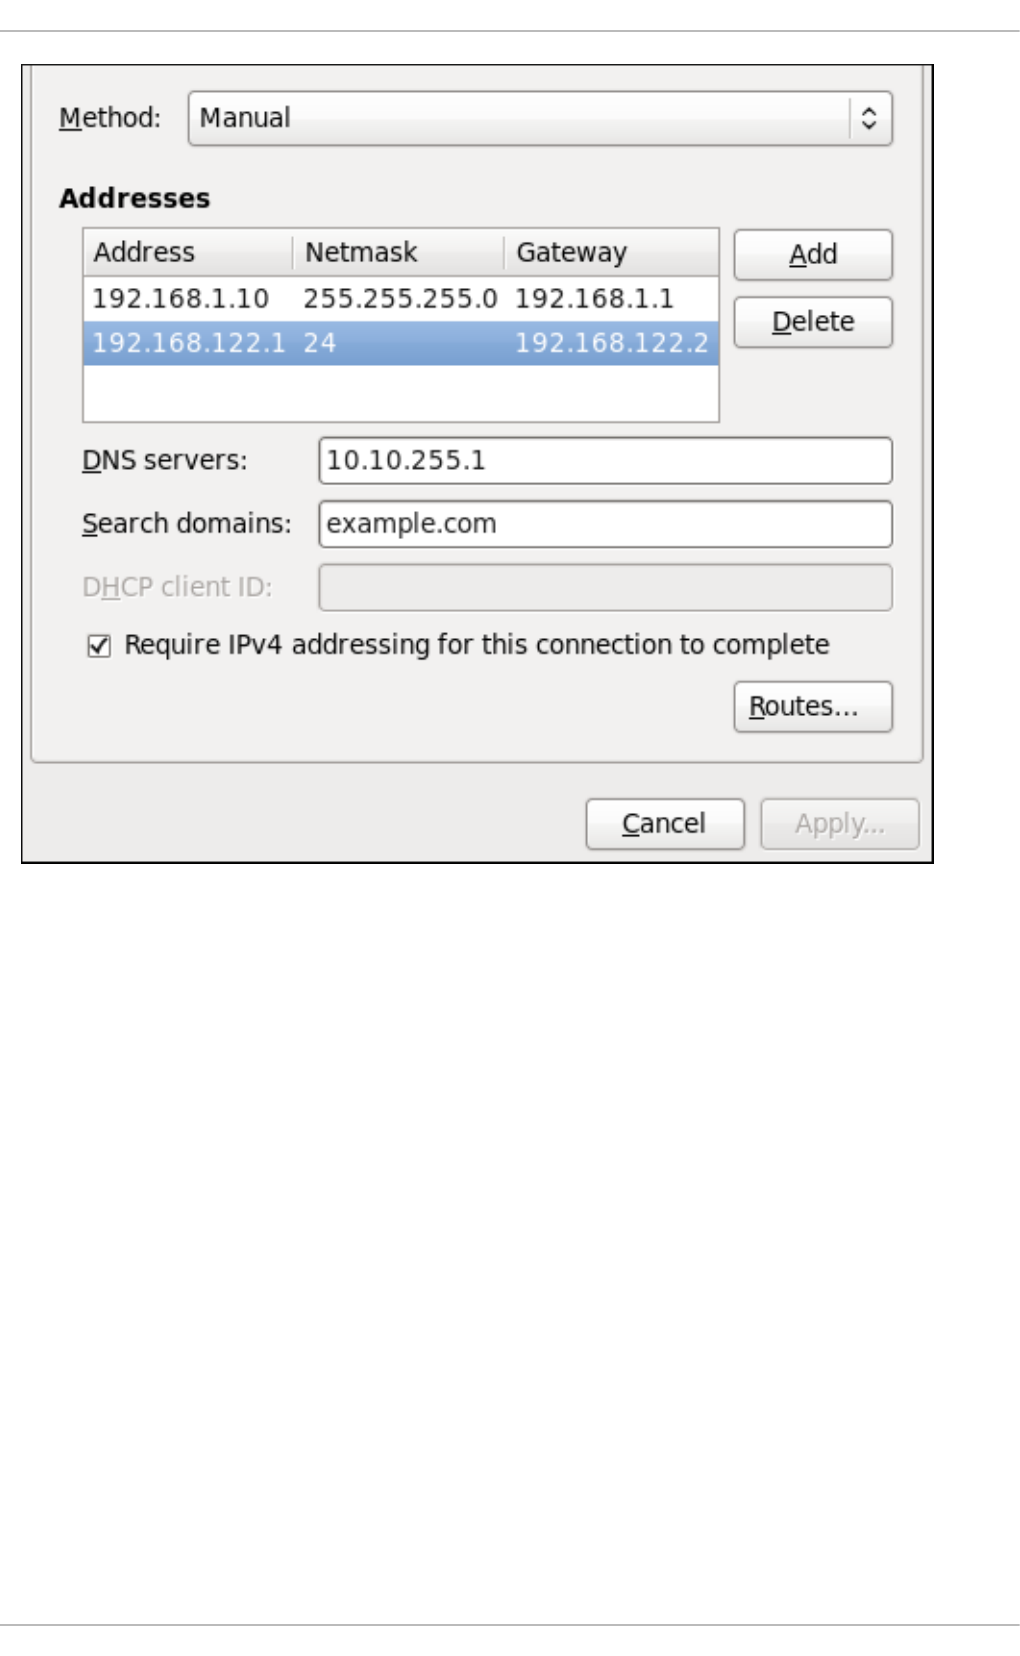
Figure 10.17. Editing the IPv4 Settings Tab
The IPv4 Settings tab allows you to configure the method by which you connect to the Internet and
enter IP address, route, and DNS information as required. The IPv4 Settings tab is available when
you create and modify one of the following connection types: wired, wireless, mobile broadband, VPN or
DSL.
If you are using DHCP to obtain a dynamic IP address from a DHCP server, you can set Method to
Automatic (DHCP).
Setting the Method
Available IPv4 Methods by Connection Type
When you click the Method dropdown menu, depending on the type of connection you are configuring,
you are able to select one of the following IPv4 connection methods. All of the methods are listed here
according to which connection type or types they are associated with.
Method
Automatic (DHCP) — Choose this option if the network you are connecting to uses a DHCP server
to assign IP addresses. You do not need to fill in the DHCP client ID field.
Automatic (DHCP) addresses only — Choose this option if the network you are connecting to uses
a DHCP server to assign IP addresses but you want to assign DNS servers manually.
Deployment Guide
160

Link-Local Only — Choose this option if the network you are connecting to does not have a DHCP
server and you do not want to assign IP addresses manually. Random addresses will be selected as
per RFC 3927.
Shared to other computers — Choose this option if the interface you are configuring is for sharing
an Internet or WAN connection.
Wired, Wireless and DSL Connection Methods
Manual — Choose this option if the network you are connecting to does not have a DHCP server and
you want to assign IP addresses manually.
Mobile Broadband Connection Methods
Automatic (PPP) — Choose this option if the network you are connecting to uses a DHCP server to
assign IP addresses.
Automatic (PPP) addresses only — Choose this option if the network you are connecting to uses a
DHCP server to assign IP addresses but you want to assign DNS servers manually.
VPN Connection Methods
Automatic (VPN) — Choose this option if the network you are connecting to uses a DHCP server to
assign IP addresses.
Automatic (VPN) addresses only — Choose this option if the network you are connecting to uses a
DHCP server to assign IP addresses but you want to assign DNS servers manually.
DSL Connection Methods
Automatic (PPPoE) — Choose this option if the network you are connecting to uses a DHCP server
to assign IP addresses.
Automatic (PPPoE) addresses only — Choose this option if the network you are connecting to
uses a DHCP server to assign IP addresses but you want to assign DNS servers manually.
PPPoE Specific Configuration Steps
If more than one NIC is installed, and PPPoE will only be run over one NIC but not the other, then for
correct PPPoE operation it is also necessary to lock the connection to the specific Ethernet device
PPPoE is supposed to be run over. To lock the connection to one specific NIC, do one of the following:
Enter the MAC address in nm-connection-editor for that connection. Optionally select
Connect automatically and Available to all users to make the connection come up
without requiring user login after system start.
Set the hardware-address in the [802-3-ethernet] section in the appropriate file for that
connection in /etc/NetworkManager/system-connections/ as follows:
[802-3-ethernet]
mac-address=00:11:22:33:44:55
Mere presence of the file in /etc/NetworkManager/system-connections/ means that it is
“available to all users”. Ensure that autoconnect=true appears in the [connection] section for
the connection to be brought up without requiring user login after system start.
For information on configuring static routes for the network connection, go to Section 10.3.9.6,
“Configuring Routes”.
CHAPTER 10. NETWORKMANAGER
161

10.3.9.5. Configuring IPv6 Settings
Method
Ignore — Choose this option if you want to disable IPv6 settings.
Automatic — Choose this option if the network you are connecting to uses a DHCP server to assign
IP addresses.
Automatic, addresses only — Choose this option if the network you are connecting to uses a
DHCP server to assign IP addresses but you want to assign DNS servers manually.
Manual — Choose this option if the network you are connecting to does not have a DHCP server and
you want to assign IP addresses manually.
Link-Local Only — Choose this option if the network you are connecting to does not have a DHCP
server and you do not want to assign IP addresses manually. Random addresses will be selected as
per RFC 4862.
Shared to other computers — Choose this option if the interface you are configuring is for sharing
an Internet or WAN connection.
Addresses
DNS servers — Enter a comma separated list of DNS servers.
Search domains — Enter a comma separated list of domain controllers.
For information on configuring static routes for the network connection, go to Section 10.3.9.6,
“Configuring Routes”.
10.3.9.6. Configuring Routes
A host's routing table will be automatically populated with routes to directly connected networks. The
routes are learned by observing the network interfaces when they are “up”. This section is for entering
static routes to networks or hosts which can be reached by traversing an intermediate network or
connection, such as a VPN or leased line.
Deployment Guide
162
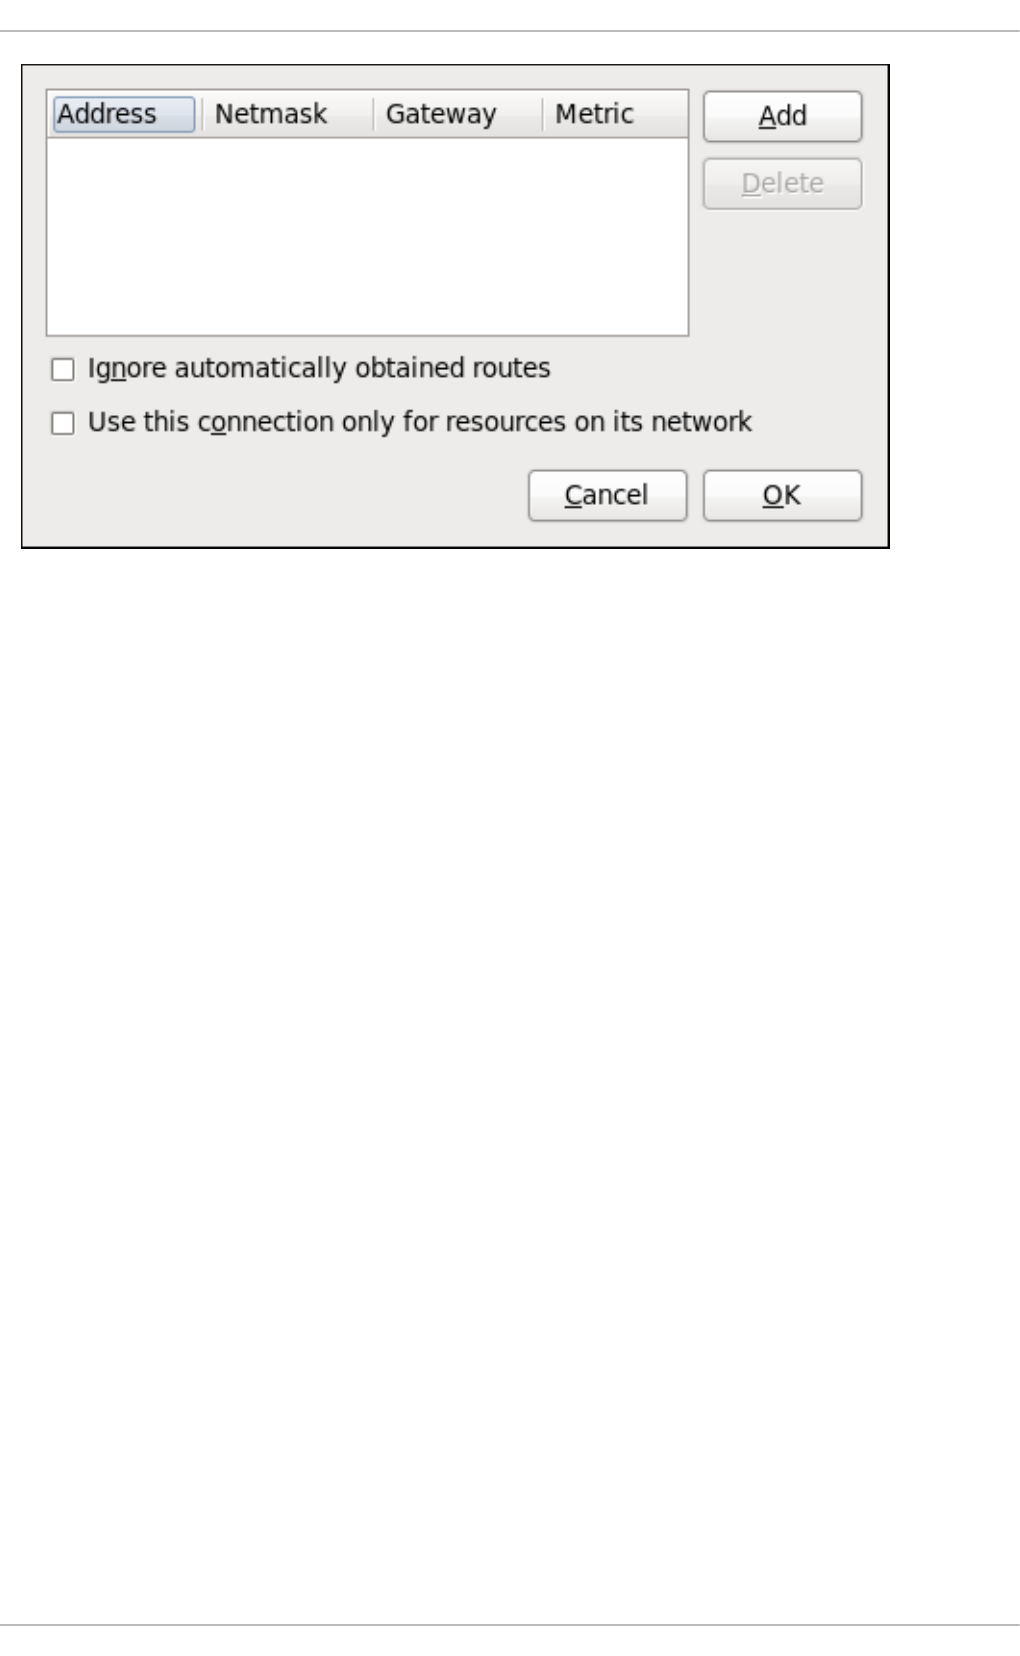
Figure 10.18. Configuring static network routes
Addresses
Address — The IP address of a network, sub-net or host.
Netmask — The netmask or prefix length of the IP address just entered.
Gateway — The IP address of the gateway leading to the network, sub-net or host.
Metric — A network cost, that is to say a preference value to give to this route. Lower values will be
preferred over higher values.
Ignore automatically obtained routes
Select this check box to only use manually entered routes for this connection.
Use this connection only for resources on its network
Select this check box to prevent the connection from becoming the default route. Typical examples
are where a connection is a VPN or a leased line to a head office and you do not want any Internet
bound traffic to pass over the connection. Selecting this option means that only traffic specifically
destined for routes learned automatically over the connection or entered here manually will be routed
over the connection.
CHAPTER 10. NETWORKMANAGER
163

CHAPTER 11. NETWORK INTERFACES
Under Red Hat Enterprise Linux, all network communications occur between configured software
interfaces and physical networking devices connected to the system.
The configuration files for network interfaces are located in the /etc/sysconfig/network-
scripts/ directory. The scripts used to activate and deactivate these network interfaces are also
located here. Although the number and type of interface files can differ from system to system, there are
three categories of files that exist in this directory:
1. Interface configuration files
2. Interface control scripts
3. Network function files
The files in each of these categories work together to enable various network devices.
This chapter explores the relationship between these files and how they are used.
11.1. NETWORK CONFIGURATION FILES
Before delving into the interface configuration files, let us first itemize the primary configuration files used
in network configuration. Understanding the role these files play in setting up the network stack can be
helpful when customizing a Red Hat Enterprise Linux system.
The primary network configuration files are as follows:
/etc/hosts
The main purpose of this file is to resolve host names that cannot be resolved any other way. It can
also be used to resolve host names on small networks with no DNS server. Regardless of the type of
network the computer is on, this file should contain a line specifying the IP address of the loopback
device (127.0.0.1) as localhost.localdomain. For more information, see the hosts(5)
manual page.
/etc/resolv.conf
This file specifies the IP addresses of DNS servers and the search domain. Unless configured to do
otherwise, the network initialization scripts populate this file. For more information about this file, see
the resolv.conf(5) manual page.
/etc/sysconfig/network
This file specifies routing and host information for all network interfaces. It is used to contain
directives which are to have global effect and not to be interface specific. For more information about
this file and the directives it accepts, see Section D.1.13, “/etc/sysconfig/network”.
/etc/sysconfig/network-scripts/ifcfg-interface-name
For each network interface, there is a corresponding interface configuration script. Each of these files
provide information specific to a particular network interface. See Section 11.2, “Interface
Configuration Files” for more information on this type of file and the directives it accepts.
Deployment Guide
164

IMPORTANT
Network interface names may be different on different hardware types. See Appendix A,
Consistent Network Device Naming for more information.
WARNING
The /etc/sysconfig/networking/ directory is used by the now deprecated
Network Administration Tool (system-config-network). Its contents should
not be edited manually. Using only one method for network configuration is strongly
encouraged, due to the risk of configuration deletion. For more information about
configuring network interfaces using graphical configuration tools, see Chapter 10,
NetworkManager.
11.1.1. Setting the Host Name
To permanently change the static host name, change the HOSTNAME directive in the
/etc/sysconfig/network file. For example:
HOSTNAME=penguin.example.com
Red Hat recommends the static host name matches the fully qualified domain name (FQDN) used for
the machine in DNS, such as host.example.com. It is also recommended that the static host name
consists only of 7 bit ASCII lower-case characters, no spaces or dots, and limits itself to the format
allowed for DNS domain name labels, even though this is not a strict requirement. Older specifications
do not permit the underscore, and so their use is not recommended. Changes will only take effect when
the networking service, or the system, is restarted.
Note that the FQDN of the host can be supplied by a DNS resolver, by settings in
/etc/sysconfig/network, or by the /etc/hosts file. The default setting of hosts: files dns in
/etc/nsswitch.conf causes the configuration files to be checked before a resolver. The default
setting of multi on in the /etc/host.conf file means that all valid values in the /etc/hosts file are
returned, not just the first.
Sometimes you may need to use the host table in the /etc/hosts file instead of the HOSTNAME
directive in /etc/sysconfig/network, for example, when DNS is not running during system bootup.
To change the host name using the /etc/hosts file, add lines to it in the following format:
192.168.1.2 penguin.example.com penguin
11.2. INTERFACE CONFIGURATION FILES
Interface configuration files control the software interfaces for individual network devices. As the system
boots, it uses these files to determine what interfaces to bring up and how to configure them. These files
are usually named ifcfg-name, where name refers to the name of the device that the configuration file
controls.
CHAPTER 11. NETWORK INTERFACES
165

11.2.1. Ethernet Interfaces
One of the most common interface files is /etc/sysconfig/network-scripts/ifcfg-eth0, which
controls the first Ethernet network interface card or NIC in the system. In a system with multiple NICs,
there are multiple ifcfg-ethX files (where X is a unique number corresponding to a specific interface).
Because each device has its own configuration file, an administrator can control how each interface
functions individually.
The following is a sample ifcfg-eth0 file for a system using a fixed IP address:
The values required in an interface configuration file can change based on other values. For example,
the ifcfg-eth0 file for an interface using DHCP looks different because IP information is provided by
the DHCP server:
NetworkManager is graphical configuration tool which provides an easy way to make changes to the
various network interface configuration files (see Chapter 10, NetworkManager for detailed instructions
on using this tool).
However, it is also possible to manually edit the configuration files for a given network interface.
Below is a listing of the configurable parameters in an Ethernet interface configuration file:
BONDING_OPTS=parameters
sets the configuration parameters for the bonding device, and is used in
/etc/sysconfig/network-scripts/ifcfg-bondN (see Section 11.2.4, “Channel Bonding
Interfaces”). These parameters are identical to those used for bonding devices in
/sys/class/net/bonding_device/bonding, and the module parameters for the bonding driver
as described in bonding Module Directives.
This configuration method is used so that multiple bonding devices can have different configurations.
In Red Hat Enterprise Linux 6, place all interface-specific bonding options after the BONDING_OPTS
directive in ifcfg-name files. See Where to specify bonding module parameters for more
information.
BOOTPROTO=protocol
where protocol is one of the following:
none — No boot-time protocol should be used.
bootp — The BOOTP protocol should be used.
dhcp — The DHCP protocol should be used.
DEVICE=eth0
BOOTPROTO=none
ONBOOT=yes
NETMASK=255.255.255.0
IPADDR=10.0.1.27
USERCTL=no
DEVICE=eth0
BOOTPROTO=dhcp
ONBOOT=yes
Deployment Guide
166

BROADCAST=address
where address is the broadcast address. This directive is deprecated, as the value is calculated
automatically with ipcalc.
DEVICE=name
where name is the name of the physical device (except for dynamically-allocated PPP devices where
it is the logical name).
DHCP_HOSTNAME=name
where name is a short host name to be sent to the DHCP server. Use this option only if the DHCP
server requires the client to specify a host name before receiving an IP address.
DHCPV6C=answer
where answer is one of the following:
yes — Use DHCP to obtain an IPv6 address for this interface.
no — Do not use DHCP to obtain an IPv6 address for this interface. This is the default value.
An IPv6 link-local address will still be assigned by default. The link-local address is based on the
MAC address of the interface as per RFC 4862.
DHCPV6C_OPTIONS=answer
where answer is one of the following:
-P — Enable IPv6 prefix delegation.
-S — Use DHCP to obtain stateless configuration only, not addresses, for this interface.
-N — Restore normal operation after using the -T or -P options.
-T — Use DHCP to obtain a temporary IPv6 address for this interface.
-D — Override the default when selecting the type of DHCP Unique Identifier (DUID) to use.
By default, the DHCP client (dhclient) creates a DHCP Unique Identifier (DUID) based on the
link-layer address (DUID-LL) if it is running in stateless mode (with the -S option, to not
request an address), or it creates an identifier based on the link-layer address plus a
timestamp (DUID-LLT) if it is running in stateful mode (without -S, requesting an address).
The -D option overrides this default, with a value of either LL or LLT.
DNS{1,2}=address
where address is a name server address to be placed in /etc/resolv.conf provided that the
PEERDNS directive is not set to no.
ETHTOOL_OPTS=options
where options are any device-specific options supported by ethtool. For example, if you wanted to
force 100Mb, full duplex:
ETHTOOL_OPTS="autoneg off speed 100 duplex full"
CHAPTER 11. NETWORK INTERFACES
167

Instead of a custom initscript, use ETHTOOL_OPTS to set the interface speed and duplex settings.
Custom initscripts run outside of the network init script lead to unpredictable results during a post-boot
network service restart.
IMPORTANT
Changing speed or duplex settings almost always requires disabling auto-negotiation
with the autoneg off option. This option needs to be stated first, as the option
entries are order-dependent.
See Section 11.8, “Ethtool” for more ethtool options.
HOTPLUG=answer
where answer is one of the following:
yes — This device should be activated when it is hot-plugged (this is the default option).
no — This device should not be activated when it is hot-plugged.
The HOTPLUG=no option can be used to prevent a channel bonding interface from being activated
when a bonding kernel module is loaded.
See Section 11.2.4, “Channel Bonding Interfaces” for more information about channel bonding
interfaces.
HWADDR=MAC-address
where MAC-address is the hardware address of the Ethernet device in the form
AA:BB:CC:DD:EE:FF. This directive must be used in machines containing more than one NIC to
ensure that the interfaces are assigned the correct device names regardless of the configured load
order for each NIC's module. This directive should not be used in conjunction with MACADDR.
NOTE
Persistent device names are now handled by /etc/udev/rules.d/70-
persistent-net.rules.
HWADDR must not be used with System z network devices.
See Section 25.3.3, "Mapping subchannels and network device names", in
the Red Hat Enterprise Linux 6 Installation Guide.
IPADDRn=address
where address is the IPv4 address and the n is expected to be consecutive positive integers starting
from 0 (for example, IPADDR0). It is used for configurations with multiple IP addresses on an
interface. It can be omitted if there is only one address being configured.
IPV6ADDR=address
where address is the first static, or primary, IPv6 address on an interface.
The format is Address/Prefix-length. If no prefix length is specified, /64 is assumed. Note that this
setting depends on IPV6INIT being enabled.
Deployment Guide
168

IPV6ADDR_SECONDARIES=address
where address is one or more, space separated, additional IPv6 addresses.
The format is Address/Prefix-length. If no prefix length is specified, /64 is assumed. Note that this
setting depends on IPV6INIT being enabled.
IPV6INIT=answer
where answer is one of the following:
yes — Initialize this interface for IPv6 addressing.
no — Do not initialize this interface for IPv6 addressing. This is the default value.
This setting is required for IPv6 static and DHCP assignment of IPv6 addresses. It does not
affect IPv6 Stateless Address Autoconfiguration (SLAAC) as per RFC 4862.
See Section D.1.13, “/etc/sysconfig/network” for information on disabling IPv6.
IPV6_AUTOCONF=answer
where answer is one of the following:
yes — Enable IPv6 autoconf configuration for this interface.
no — Disable IPv6 autoconf configuration for this interface.
If enabled, an IPv6 address will be requested using Neighbor Discovery (ND) from a router running
the radvd daemon.
Note that the default value of IPV6_AUTOCONF depends on IPV6FORWARDING as follows:
If IPV6FORWARDING=yes, then IPV6_AUTOCONF will default to no.
If IPV6FORWARDING=no, then IPV6_AUTOCONF will default to yes and IPV6_ROUTER has
no effect.
IPV6_MTU=value
where value is an optional dedicated MTU for this interface.
IPV6_PRIVACY=rfc3041
where rfc3041 optionally sets this interface to support RFC 3041 Privacy Extensions for Stateless
Address Autoconfiguration in IPv6. Note that this setting depends on IPV6INIT option being
enabled.
The default is for RFC 3041 support to be disabled. Stateless Autoconfiguration will derive addresses
based on the MAC address, when available, using the modified EUI-64 method. The address is
appended to a prefix but as the address is normally derived from the MAC address it is globally
unique even when the prefix changes. In the case of a link-local address the prefix is fe80::/64 as
per RFC 2462 IPv6 Stateless Address Autoconfiguration.
LINKDELAY=time
CHAPTER 11. NETWORK INTERFACES
169

where time is the number of seconds to wait for link negotiation before configuring the device. The
default is 5 secs. Delays in link negotiation, caused by STP for example, can be overcome by
increasing this value.
MACADDR=MAC-address
where MAC-address is the hardware address of the Ethernet device in the form
AA:BB:CC:DD:EE:FF.
This directive is used to assign a MAC address to an interface, overriding the one assigned to the
physical NIC. This directive should not be used in conjunction with the HWADDR directive.
MASTER=bond-interface
where bond-interface is the channel bonding interface to which the Ethernet interface is linked.
This directive is used in conjunction with the SLAVE directive.
See Section 11.2.4, “Channel Bonding Interfaces” for more information about channel bonding
interfaces.
NETMASKn=mask
where mask is the netmask value and the n is expected to be consecutive positive integers starting
from 0 (for example, NETMASK0). It is used for configurations with multiple IP addresses on an
interface. It can be omitted if there is only one address being configured.
NETWORK=address
where address is the network address. This directive is deprecated, as the value is calculated
automatically with ipcalc.
NM_CONTROLLED=answer
where answer is one of the following:
yes — NetworkManager is permitted to configure this device. This is the default behavior
and can be omitted.
no — NetworkManager is not permitted to configure this device.
NOTE
The NM_CONTROLLED directive is now, as of Red Hat Enterprise Linux 6.3, dependent
on the NM_BOND_VLAN_ENABLED directive in /etc/sysconfig/network. If and
only if that directive is present and is one of yes, y, or true, will NetworkManager
detect and manage bonding and VLAN interfaces.
ONBOOT=answer
where answer is one of the following:
yes — This device should be activated at boot-time.
no — This device should not be activated at boot-time.
Deployment Guide
170

PEERDNS=answer
where answer is one of the following:
yes — Modify /etc/resolv.conf if the DNS directive is set, if using DHCP, or if using
Microsoft's RFC 1877 IPCP extensions with PPP. In all cases yes is the default.
no — Do not modify /etc/resolv.conf.
SLAVE=answer
where answer is one of the following:
yes — This device is controlled by the channel bonding interface specified in the MASTER
directive.
no — This device is not controlled by the channel bonding interface specified in the MASTER
directive.
This directive is used in conjunction with the MASTER directive.
See Section 11.2.4, “Channel Bonding Interfaces” for more about channel bonding interfaces.
SRCADDR=address
where address is the specified source IP address for outgoing packets.
USERCTL=answer
where answer is one of the following:
yes — Non-root users are allowed to control this device.
no — Non-root users are not allowed to control this device.
11.2.2. Specific ifcfg Options for Linux on System z
SUBCHANNELS=<read_device_bus_id>, <write_device_bus_id>, <data_device_bus_id>
where <read_device_bus_id>, <write_device_bus_id>, and <data_device_bus_id> are the three
device bus IDs representing a network device.
PORTNAME=myname;
where myname is the Open Systems Adapter (OSA) portname or LAN Channel Station (LCS)
portnumber.
CTCPROT=answer
where answer is one of the following:
0 — Compatibility mode, TCP/IP for Virtual Machines (used with non-Linux peers other than
IBM S/390 and IBM System z operating systems). This is the default mode.
1 — Extended mode, used for Linux-to-Linux Peers.
3 — Compatibility mode for S/390 and IBM System z operating systems.
CHAPTER 11. NETWORK INTERFACES
171

This directive is used in conjunction with the NETTYPE directive. It specifies the CTC protocol for
NETTYPE='ctc'. The default is 0.
OPTION='answer'
where 'answer' is a quoted string of any valid sysfs attributes and their value. The Red Hat
Enterprise Linux installer currently uses this to configure the layer mode, (layer2), and the relative port
number, (portno), of QETH devices. For example:
OPTIONS='layer2=1 portno=0'
11.2.3. Required ifcfg Options for Linux on System z
NETTYPE=answer
where answer is one of the following:
ctc — Channel-to-Channel communication. For point-to-point TCP/IP or TTY.
lcs — LAN Channel Station (LCS).
qeth — QETH (QDIO Ethernet). This is the default network interface. It is the preferred
installation method for supporting real or virtual OSA cards and HiperSockets devices.
11.2.4. Channel Bonding Interfaces
Red Hat Enterprise Linux allows administrators to bind multiple network interfaces together into a single
channel using the bonding kernel module and a special network interface called a channel bonding
interface. Channel bonding enables two or more network interfaces to act as one, simultaneously
increasing the bandwidth and providing redundancy.
WARNING
The use of direct cable connections without network switches is not supported for
bonding. The failover mechanisms described here will not work as expected without
the presence of network switches. See the Red Hat Knowledgebase article Why is
bonding in not supported with direct connection using crossover cables? for more
information.
NOTE
The active-backup, balance-tlb and balance-alb modes do not require any specific
configuration of the switch. Other bonding modes require configuring the switch to
aggregate the links. For example, a Cisco switch requires EtherChannel for Modes 0, 2,
and 3, but for Mode 4 LACP and EtherChannel are required. See the documentation
supplied with your switch and the bonding.txt file in the kernel-doc package (see
Section 31.9, “Additional Resources”).
Deployment Guide
172

11.2.4.1. Check if Bonding Kernel Module is Installed
In Red Hat Enterprise Linux 6, the bonding module is not loaded by default. You can load the module by
issuing the following command as root:
~]# modprobe --first-time bonding
No visual output indicates the module was not running and has now been loaded. This activation will not
persist across system restarts. See Section 31.7, “Persistent Module Loading” for an explanation of
persistent module loading. Note that given a correct configuration file using the BONDING_OPTS
directive, the bonding module will be loaded as required and therefore does not need to be loaded
separately.
To display information about the module, issue the following command:
~]$ modinfo bonding
See the modprobe(8) man page for more command options and see Chapter 31, Working with Kernel
Modules for information on loading and unloading modules.
11.2.4.2. Create a Channel Bonding Interface
To create a channel bonding interface, create a file in the /etc/sysconfig/network-scripts/
directory called ifcfg-bondN, replacing N with the number for the interface, such as 0.
The contents of the file can be identical to whatever type of interface is getting bonded, such as an
Ethernet interface. The only difference is that the DEVICE directive is bondN, replacing N with the
number for the interface. The NM_CONTROLLED directive can be added to prevent NetworkManager
from configuring this device.
Example 11.1. Example ifcfg-bond0 interface configuration file
The following is an example of a channel bonding interface configuration file:
The MAC address of the bond will be taken from the first interface to be enslaved. It can also be
specified using the HWADDR directive if required. If you want NetworkManager to control this
interface, remove the NM_CONTROLLED=no directive, or set it to yes, and add TYPE=Bond and
BONDING_MASTER=yes.
After the channel bonding interface is created, the network interfaces to be bound together must be
configured by adding the MASTER and SLAVE directives to their configuration files. The configuration files
for each of the channel-bonded interfaces can be nearly identical.
Example 11.2. Example ifcfg-ethX bonded interface configuration file
DEVICE=bond0
IPADDR=192.168.1.1
NETMASK=255.255.255.0
ONBOOT=yes
BOOTPROTO=none
USERCTL=no
NM_CONTROLLED=no
BONDING_OPTS="bonding parameters separated by spaces"
CHAPTER 11. NETWORK INTERFACES
173

If two Ethernet interfaces are being channel bonded, both eth0 and eth1 can be as follows:
In this example, replace X with the numerical value for the interface.
Once the interfaces have been configured, restart the network service to bring the bond up. As root,
issue the following command:
~]# service network restart
To view the status of a bond, view the /proc/ file by issuing a command in the following format:
cat /proc/net/bonding/bondN
For example:
~]$ cat /proc/net/bonding/bond0
Ethernet Channel Bonding Driver: v3.6.0 (September 26, 2009)
Bonding Mode: load balancing (round-robin)
MII Status: down
MII Polling Interval (ms): 0
Up Delay (ms): 0
Down Delay (ms): 0
For further instructions and advice on configuring the bonding module and to view the list of bonding
parameters, see Section 31.8.1, “Using Channel Bonding”.
Support for bonding was added to NetworkManager in Red Hat Enterprise Linux 6.3. See
Section 11.2.1, “Ethernet Interfaces” for an explanation of NM_CONTROLLED and the
NM_BOND_VLAN_ENABLED directive.
DEVICE=ethX
BOOTPROTO=none
ONBOOT=yes
MASTER=bond0
SLAVE=yes
USERCTL=no
NM_CONTROLLED=no
Deployment Guide
174

IMPORTANT
In Red Hat Enterprise Linux 6, interface-specific parameters for the bonding kernel
module must be specified as a space-separated list in the BONDING_OPTS="bonding
parameters" directive in the ifcfg-bondN interface file. Do not specify options
specific to a bond in /etc/modprobe.d/bonding.conf, or in the deprecated
/etc/modprobe.conf file.
The max_bonds parameter is not interface specific and therefore, if required, should be
specified in /etc/modprobe.d/bonding.conf as follows:
options bonding max_bonds=1
However, the max_bonds parameter should not be set when using ifcfg-bondN files
with the BONDING_OPTS directive as this directive will cause the network scripts to create
the bond interfaces as required.
Note that any changes to /etc/modprobe.d/bonding.conf will not take effect until
the module is next loaded. A running module must first be unloaded. See Chapter 31,
Working with Kernel Modules for more information on loading and unloading modules.
11.2.4.2.1. Creating Multiple Bonds
In Red Hat Enterprise Linux 6, for each bond a channel bonding interface is created including the
BONDING_OPTS directive. This configuration method is used so that multiple bonding devices can have
different configurations. To create multiple channel bonding interfaces, proceed as follows:
Create multiple ifcfg-bondN files with the BONDING_OPTS directive; this directive will cause
the network scripts to create the bond interfaces as required.
Create, or edit existing, interface configuration files to be bonded and include the SLAVE
directive.
Assign the interfaces to be bonded, the slave interfaces, to the channel bonding interfaces by
means of the MASTER directive.
Example 11.3. Example multiple ifcfg-bondN interface configuration files
The following is an example of a channel bonding interface configuration file:
In this example, replace N with the number for the bond interface. For example, to create two bonds
create two configuration files, ifcfg-bond0 and ifcfg-bond1.
Create the interfaces to be bonded as per Example 11.2, “Example ifcfg-ethX bonded interface
DEVICE=bondN
IPADDR=192.168.1.1
NETMASK=255.255.255.0
ONBOOT=yes
BOOTPROTO=none
USERCTL=no
NM_CONTROLLED=no
BONDING_OPTS="bonding parameters separated by spaces"
CHAPTER 11. NETWORK INTERFACES
175

configuration file” and assign them to the bond interfaces as required using the MASTER=bondN
directive. For example, continuing on from the example above, if two interfaces per bond are required,
then for two bonds create four interface configuration files and assign the first two using MASTER=bond0
and the next two using MASTER=bond1.
11.2.5. Configuring a VLAN over a Bond
This section will show configuring a VLAN over a bond consisting of two Ethernet links between a server
and an Ethernet switch. The switch has a second bond to another server. Only the configuration for the
first server will be shown as the other is essentially the same apart from the IP addresses.
WARNING
The use of direct cable connections without network switches is not supported for
bonding. The failover mechanisms described here will not work as expected without
the presence of network switches. See the Red Hat Knowledgebase article Why is
bonding in not supported with direct connection using crossover cables? for more
information.
NOTE
The active-backup, balance-tlb and balance-alb modes do not require any specific
configuration of the switch. Other bonding modes require configuring the switch to
aggregate the links. For example, a Cisco switch requires EtherChannel for Modes 0, 2,
and 3, but for Mode 4 LACP and EtherChannel are required. See the documentation
supplied with your switch and the bonding.txt file in the kernel-doc package (see
Section 31.9, “Additional Resources”).
Check the available interfaces on the server:
~]$ ip addr
1: lo: <LOOPBACK,UP,LOWER_UP> mtu 65536 qdisc noqueue state UNKNOWN
link/loopback 00:00:00:00:00:00 brd 00:00:00:00:00:00
inet 127.0.0.1/8 scope host lo
inet6 ::1/128 scope host
valid_lft forever preferred_lft forever
2: eth0: <BROADCAST,MULTICAST> mtu 1500 qdisc pfifo_fast state DOWN qlen
1000
link/ether 52:54:00:19:28:fe brd ff:ff:ff:ff:ff:ff
3: eth1: <BROADCAST,MULTICAST> mtu 1500 qdisc pfifo_fast state DOWN qlen
1000
link/ether 52:54:00:f6:63:9a brd ff:ff:ff:ff:ff:ff
Procedure 11.1. Configuring the Interfaces on the Server
1. Configure a slave interface using eth0:
~]# vi /etc/sysconfig/network-scripts/ifcfg-eth0
NAME=bond0-slave0
Deployment Guide
176

DEVICE=eth0
TYPE=Ethernet
BOOTPROTO=none
ONBOOT=yes
MASTER=bond0
SLAVE=yes
NM_CONTROLLED=no
The use of the NAME directive is optional. It is for display by a GUI interface, such as nm-
connection-editor and nm-applet.
2. Configure a slave interface using eth1:
~]# vi /etc/sysconfig/network-scripts/ifcfg-eth1
NAME=bond0-slave1
DEVICE=eth1
TYPE=Ethernet
BOOTPROTO=none
ONBOOT=yes
MASTER=bond0
SLAVE=yes
NM_CONTROLLED=no
The use of the NAME directive is optional. It is for display by a GUI interface, such as nm-
connection-editor and nm-applet.
3. Configure a channel bonding interface ifcfg-bond0:
~]# vi /etc/sysconfig/network-scripts/ifcfg-bond0
NAME=bond0
DEVICE=bond0
BONDING_MASTER=yes
TYPE=Bond
IPADDR=192.168.100.100
NETMASK=255.255.255.0
ONBOOT=yes
BOOTPROTO=none
BONDING_OPTS="mode=active-backup miimon=100"
NM_CONTROLLED=no
The use of the NAME directive is optional. It is for display by a GUI interface, such as nm-
connection-editor and nm-applet. In this example MII is used for link monitoring, see the
Section 31.8.1.1, “Bonding Module Directives” section for more information on link monitoring.
4. Check the status of the interfaces on the server:
~]$ ip addr
1: lo: <LOOPBACK,UP,LOWER_UP> mtu 65536 qdisc noqueue state UNKNOWN
link/loopback 00:00:00:00:00:00 brd 00:00:00:00:00:00
inet 127.0.0.1/8 scope host lo
inet6 ::1/128 scope host
valid_lft forever preferred_lft forever
2: eth0: <BROADCAST,MULTICAST,UP,LOWER_UP> mtu 1500 qdisc pfifo_fast
state UP qlen 1000
link/ether 52:54:00:19:28:fe brd ff:ff:ff:ff:ff:ff
inet6 fe80::5054:ff:fe19:28fe/64 scope link
CHAPTER 11. NETWORK INTERFACES
177

valid_lft forever preferred_lft forever
3: eth1: <BROADCAST,MULTICAST,UP,LOWER_UP> mtu 1500 qdisc pfifo_fast
state UP qlen 1000
link/ether 52:54:00:f6:63:9a brd ff:ff:ff:ff:ff:ff
inet6 fe80::5054:ff:fef6:639a/64 scope link
valid_lft forever preferred_lft forever
Procedure 11.2. Resolving Conflicts with Interfaces
The interfaces configured as slaves should not have IP addresses assigned to them apart from the IPv6
link-local addresses (starting fe80). If you have an unexpected IP address, then there may be another
configuration file with ONBOOT set to yes.
1. If this occurs, issue the following command to list all ifcfg files that may be causing a conflict:
~]$ grep -r "ONBOOT=yes" /etc/sysconfig/network-scripts/ | cut -f1 -
d":" | xargs grep -E "IPADDR|SLAVE"
/etc/sysconfig/network-scripts/ifcfg-lo:IPADDR=127.0.0.1
The above shows the expected result on a new installation. Any file having both the ONBOOT
directive as well as the IPADDR or SLAVE directive will be displayed. For example, if the
ifcfg-eth1 file was incorrectly configured, the display might look similar to the following:
~]# grep -r "ONBOOT=yes" /etc/sysconfig/network-scripts/ | cut -f1 -
d":" | xargs grep -E "IPADDR|SLAVE"
/etc/sysconfig/network-scripts/ifcfg-lo:IPADDR=127.0.0.1
/etc/sysconfig/network-scripts/ifcfg-eth1:SLAVE=yes
/etc/sysconfig/network-scripts/ifcfg-eth1:IPADDR=192.168.55.55
2. Any other configuration files found should be moved to a different directory for backup, or
assigned to a different interface by means of the HWADDR directive. After resolving any conflict
set the interfaces “down” and “up” again or restart the network service as root:
~]# service network restart
Shutting down interface bond0: [ OK
]
Shutting down loopback interface: [ OK ]
Bringing up loopback interface: [ OK
]
Bringing up interface bond0: Determining if ip address
192.168.100.100 is already in use for device bond0...
[ OK
]
If you are using NetworkManager, you might need to restart it at this point to make it forget the
unwanted IP address. As root:
~]# service NetworkManager restart
Procedure 11.3. Checking the bond on the Server
1. Bring up the bond on the server as root:
Deployment Guide
178

~]# ifup /etc/sysconfig/network-scripts/ifcfg-bond0
Determining if ip address 192.168.100.100 is already in use for
device bond0...
2. Check the status of the interfaces on the server:
~]$ ip addr
1: lo: <LOOPBACK,UP,LOWER_UP> mtu 65536 qdisc noqueue state UNKNOWN
link/loopback 00:00:00:00:00:00 brd 00:00:00:00:00:00
inet 127.0.0.1/8 scope host lo
inet6 ::1/128 scope host
valid_lft forever preferred_lft forever
2: eth0: <BROADCAST,MULTICAST,SLAVE,UP,LOWER_UP> mtu 1500 qdisc
pfifo_fast master bond0 state UP qlen 1000
link/ether 52:54:00:19:28:fe brd ff:ff:ff:ff:ff:ff
3: eth1: <BROADCAST,MULTICAST,SLAVE,UP,LOWER_UP> mtu 1500 qdisc
pfifo_fast master bond0 state UP qlen 1000
link/ether 52:54:00:f6:63:9a brd ff:ff:ff:ff:ff:ff
4: bond0: <BROADCAST,MULTICAST,MASTER,UP,LOWER_UP> mtu 1500 qdisc
noqueue state UP
link/ether 52:54:00:19:28:fe brd ff:ff:ff:ff:ff:ff
inet 192.168.100.100/24 brd 192.168.100.255 scope global bond0
inet6 fe80::5054:ff:fe19:28fe/64 scope link
valid_lft forever preferred_lft forever
Notice that eth0 and eth1 have master bond0 state UP and bond0 has status of
MASTER,UP.
3. View the bond configuration details:
~]$ cat /proc/net/bonding/bond0
Ethernet Channel Bonding Driver: v3.6.0 (September 26, 2009)
Bonding Mode: transmit load balancing
Primary Slave: None
Currently Active Slave: eth0
MII Status: up
MII Polling Interval (ms): 100
Up Delay (ms): 0
Down Delay (ms): 0
Slave Interface: eth0
MII Status: up
Speed: 100 Mbps
Duplex: full
Link Failure Count: 0
Permanent HW addr: 52:54:00:19:28:fe
Slave queue ID: 0
Slave Interface: eth1
MII Status: up
Speed: 100 Mbps
Duplex: full
CHAPTER 11. NETWORK INTERFACES
179

Link Failure Count: 0
Permanent HW addr: 52:54:00:f6:63:9a
Slave queue ID: 0
4. Check the routes on the server:
~]$ ip route
192.168.100.0/24 dev bond0 proto kernel scope link src
192.168.100.100
169.254.0.0/16 dev bond0 scope link metric 1004
Procedure 11.4. Configuring the VLAN on the Server
IMPORTANT
At the time of writing, it is important that the bond has slaves and that they are “up” before
bringing up the VLAN interface. At the time of writing, adding a VLAN interface to a bond
without slaves does not work. In Red Hat Enterprise Linux 6, setting the ONPARENT
directive to yes is important to ensure that the VLAN interface does not attempt to come
up before the bond is up. This is because a VLAN virtual device takes the MAC address of
its parent, and when a NIC is enslaved, the bond changes its MAC address to that NIC's
MAC address.
NOTE
A VLAN slave cannot be configured on a bond with the fail_over_mac=follow option,
because the VLAN virtual device cannot change its MAC address to match the parent's
new MAC address. In such a case, traffic would still be sent with the now incorrect source
MAC address.
Some older network interface cards, loopback interfaces, Wimax cards, and some
Infiniband devices, are said to be VLAN challenged, meaning they cannot support VLANs.
This is usually because the devices cannot cope with VLAN headers and the larger MTU
size associated with VLANs.
1. Create a VLAN interface file bond0.192:
~]# vi /etc/sysconfig/network-scripts/ifcfg-bond0.192
DEVICE=bond0.192
NAME=bond0.192
BOOTPROTO=none
ONPARENT=yes
IPADDR=192.168.10.1
NETMASK=255.255.255.0
VLAN=yes
NM_CONTROLLED=no
2. Bring up the VLAN interface as root:
~]# ifup /etc/sysconfig/network-scripts/ifcfg-bond0.192
Determining if ip address 192.168.10.1 is already in use for device
bond0.192...
Deployment Guide
180

3. Enabling VLAN tagging on the network switch. Consult the documentation for the switch to see
what configuration is required.
4. Check the status of the interfaces on the server:
~]# ip addr
1: lo: <LOOPBACK,UP,LOWER_UP> mtu 65536 qdisc noqueue state UNKNOWN
link/loopback 00:00:00:00:00:00 brd 00:00:00:00:00:00
inet 127.0.0.1/8 scope host lo
inet6 ::1/128 scope host
valid_lft forever preferred_lft forever
2: eth0: <BROADCAST,MULTICAST,SLAVE,UP,LOWER_UP> mtu 1500 qdisc
pfifo_fast master bond0 state UP qlen 1000
link/ether 52:54:00:19:28:fe brd ff:ff:ff:ff:ff:ff
3: eth1: <BROADCAST,MULTICAST,SLAVE,UP,LOWER_UP> mtu 1500 qdisc
pfifo_fast master bond0 state UP qlen 1000
link/ether 52:54:00:f6:63:9a brd ff:ff:ff:ff:ff:ff
4: bond0: <BROADCAST,MULTICAST,MASTER,UP,LOWER_UP> mtu 1500 qdisc
noqueue state UP
link/ether 52:54:00:19:28:fe brd ff:ff:ff:ff:ff:ff
inet 192.168.100.100/24 brd 192.168.100.255 scope global bond0
inet6 fe80::5054:ff:fe19:28fe/64 scope link
valid_lft forever preferred_lft forever
5: bond0.192@bond0: <BROADCAST,MULTICAST,MASTER,UP,LOWER_UP> mtu
1500 qdisc noqueue state UP
link/ether 52:54:00:19:28:fe brd ff:ff:ff:ff:ff:ff
inet 192.168.10.1/24 brd 192.168.10.255 scope global bond0.192
inet6 fe80::5054:ff:fe19:28fe/64 scope link
valid_lft forever preferred_lft forever
Notice there is now bond0.192@bond0 in the list of interfaces and the status is MASTER,UP.
5. Check the route on the server:
~]$ ip route
192.168.100.0/24 dev bond0 proto kernel scope link src
192.168.100.100
192.168.10.0/24 dev bond0.192 proto kernel scope link src
192.168.10.1
169.254.0.0/16 dev bond0 scope link metric 1004
169.254.0.0/16 dev bond0.192 scope link metric 1005
Notice there is now a route for the 192.168.10.0/24 network pointing to the VLAN interface
bond0.192.
Configuring the Second Server
Repeat the configuration steps for the second server, using different IP addresses but from the same
subnets respectively.
Test the bond is up and the network switch is working as expected:
~]$ ping -c4 192.168.100.100
PING 192.168.100.100 (192.168.100.100) 56(84) bytes of data.
64 bytes from 192.168.100.100: icmp_seq=1 ttl=64 time=1.35 ms
64 bytes from 192.168.100.100: icmp_seq=2 ttl=64 time=0.214 ms
64 bytes from 192.168.100.100: icmp_seq=3 ttl=64 time=0.383 ms
CHAPTER 11. NETWORK INTERFACES
181

64 bytes from 192.168.100.100: icmp_seq=4 ttl=64 time=0.396 ms
--- 192.168.100.100 ping statistics ---
4 packets transmitted, 4 received, 0% packet loss, time 3002ms
rtt min/avg/max/mdev = 0.214/0.586/1.353/0.448 ms
Testing the VLAN
To test that the network switch is configured for the VLAN, try to ping the first servers' VLAN interface:
~]# ping -c2 192.168.10.1
PING 192.168.10.1 (192.168.10.1) 56(84) bytes of data.
64 bytes from 192.168.10.1: icmp_seq=1 ttl=64 time=0.781 ms
64 bytes from 192.168.10.1: icmp_seq=2 ttl=64 time=0.977 ms
--- 192.168.10.1 ping statistics ---
2 packets transmitted, 2 received, 0% packet loss, time 1001ms
rtt min/avg/max/mdev = 0.781/0.879/0.977/0.098 ms
No packet loss suggests everything is configured correctly and that the VLAN and underlying interfaces
are “up”.
Optional Steps
If required, perform further tests by removing and replacing network cables one at a time to
verify that failover works as expected. Make use of the ethtool utility to verify which interface is
connected to which cable. For example:
ethtool --identify ifname integer
Where integer is the number of times to flash the LED on the network interface.
The bonding module does not support STP, therefore consider disabling the sending of BPDU
packets from the network switch.
If the system is not linked to the network except over the connection just configured, consider
enabling the switch port to transition directly to sending and receiving. For example on a Cisco
switch, by means of the portfast command.
11.2.6. Network Bridge
A network bridge is a Link Layer device which forwards traffic between networks based on MAC
addresses and is therefore also referred to as a Layer 2 device. It makes forwarding decisions based on
tables of MAC addresses which it builds by learning what hosts are connected to each network. A
software bridge can be used within a Linux host in order to emulate a hardware bridge, for example in
virtualization applications for sharing a NIC with one or more virtual NICs. This case will be illustrated
here as an example.
To create a network bridge, create a file in the /etc/sysconfig/network-scripts/ directory
called ifcfg-brN, replacing N with the number for the interface, such as 0.
The contents of the file is similar to whatever type of interface is getting bridged to, such as an Ethernet
interface. The differences in this example are as follows:
The DEVICE directive is given an interface name as its argument in the format brN, where N is
replaced with the number of the interface.
Deployment Guide
182

The TYPE directive is given an argument Bridge. This directive determines the device type and
the argument is case sensitive.
The bridge interface configuration file now has the IP address and the physical interface has
only a MAC address.
An extra directive, DELAY=0, is added to prevent the bridge from waiting while it monitors traffic,
learns where hosts are located, and builds a table of MAC addresses on which to base its
filtering decisions. The default delay of 15 seconds is not needed if no routing loops are possible.
The NM_CONTROLLED=no should be added to the Ethernet interface to prevent
NetworkManager from altering the file. It can also be added to the bridge configuration file in
case future versions of NetworkManager support bridge configuration.
The following is a sample bridge interface configuration file using a static IP address:
Example 11.4. Sample ifcfg-br0 interface configuration file
To complete the bridge another interface is created, or an existing interface is modified, and pointed to
the bridge interface. The following is a sample Ethernet interface configuration file pointing to a bridge
interface. Configure your physical interface in /etc/sysconfig/network-scripts/ifcfg-ethX,
where X is a unique number corresponding to a specific interface, as follows:
Example 11.5. Sample ifcfg-ethX interface configuration file
NOTE
For the DEVICE directive, almost any interface name could be used as it does not
determine the device type. Other commonly used names include tap, dummy and bond
for example. TYPE=Ethernet is not strictly required. If the TYPE directive is not set, the
device is treated as an Ethernet device (unless its name explicitly matches a different
interface configuration file.)
DEVICE=br0
TYPE=Bridge
IPADDR=192.168.1.1
NETMASK=255.255.255.0
ONBOOT=yes
BOOTPROTO=none
NM_CONTROLLED=no
DELAY=0
DEVICE=ethX
TYPE=Ethernet
HWADDR=AA:BB:CC:DD:EE:FF
BOOTPROTO=none
ONBOOT=yes
NM_CONTROLLED=no
BRIDGE=br0
CHAPTER 11. NETWORK INTERFACES
183

You can see Section 11.2, “Interface Configuration Files” for a review of the directives and options used
in network interface config files.
WARNING
If you are configuring bridging on a remote host, and you are connected to that host
over the physical NIC you are configuring, please consider the implications of losing
connectivity before proceeding. You will lose connectivity when restarting the service
and may not be able to regain connectivity if any errors have been made. Console,
or out-of-band access is advised.
Restart the networking service, in order for the changes to take effect, as follows:
service network restart
11.2.6.1. Network Bridge with Bond
An example of a network bridge formed from two or more bonded Ethernet interfaces will now be given
as this is another common application in a virtualization environment. If you are not very familiar with the
configuration files for bonded interfaces then please see Section 11.2.4, “Channel Bonding Interfaces”
Create or edit two or more Ethernet interface configuration files, which are to be bonded, as follows:
NOTE
Using ethX as the interface name is common practice but almost any name could be
used. Names such as tap, dummy and bond are commonly used.
Create or edit one interface configuration file, /etc/sysconfig/network-scripts/ifcfg-bond0,
as follows:
For further instructions and advice on configuring the bonding module and to view the list of bonding
parameters, see Section 31.8.1, “Using Channel Bonding”.
DEVICE=ethX
TYPE=Ethernet
USERCTL=no
SLAVE=yes
MASTER=bond0
BOOTPROTO=none
HWADDR=AA:BB:CC:DD:EE:FF
NM_CONTROLLED=no
DEVICE=bond0
ONBOOT=yes
BONDING_OPTS='mode=1 miimon=100'
BRIDGE=br0
NM_CONTROLLED=no
Deployment Guide
184
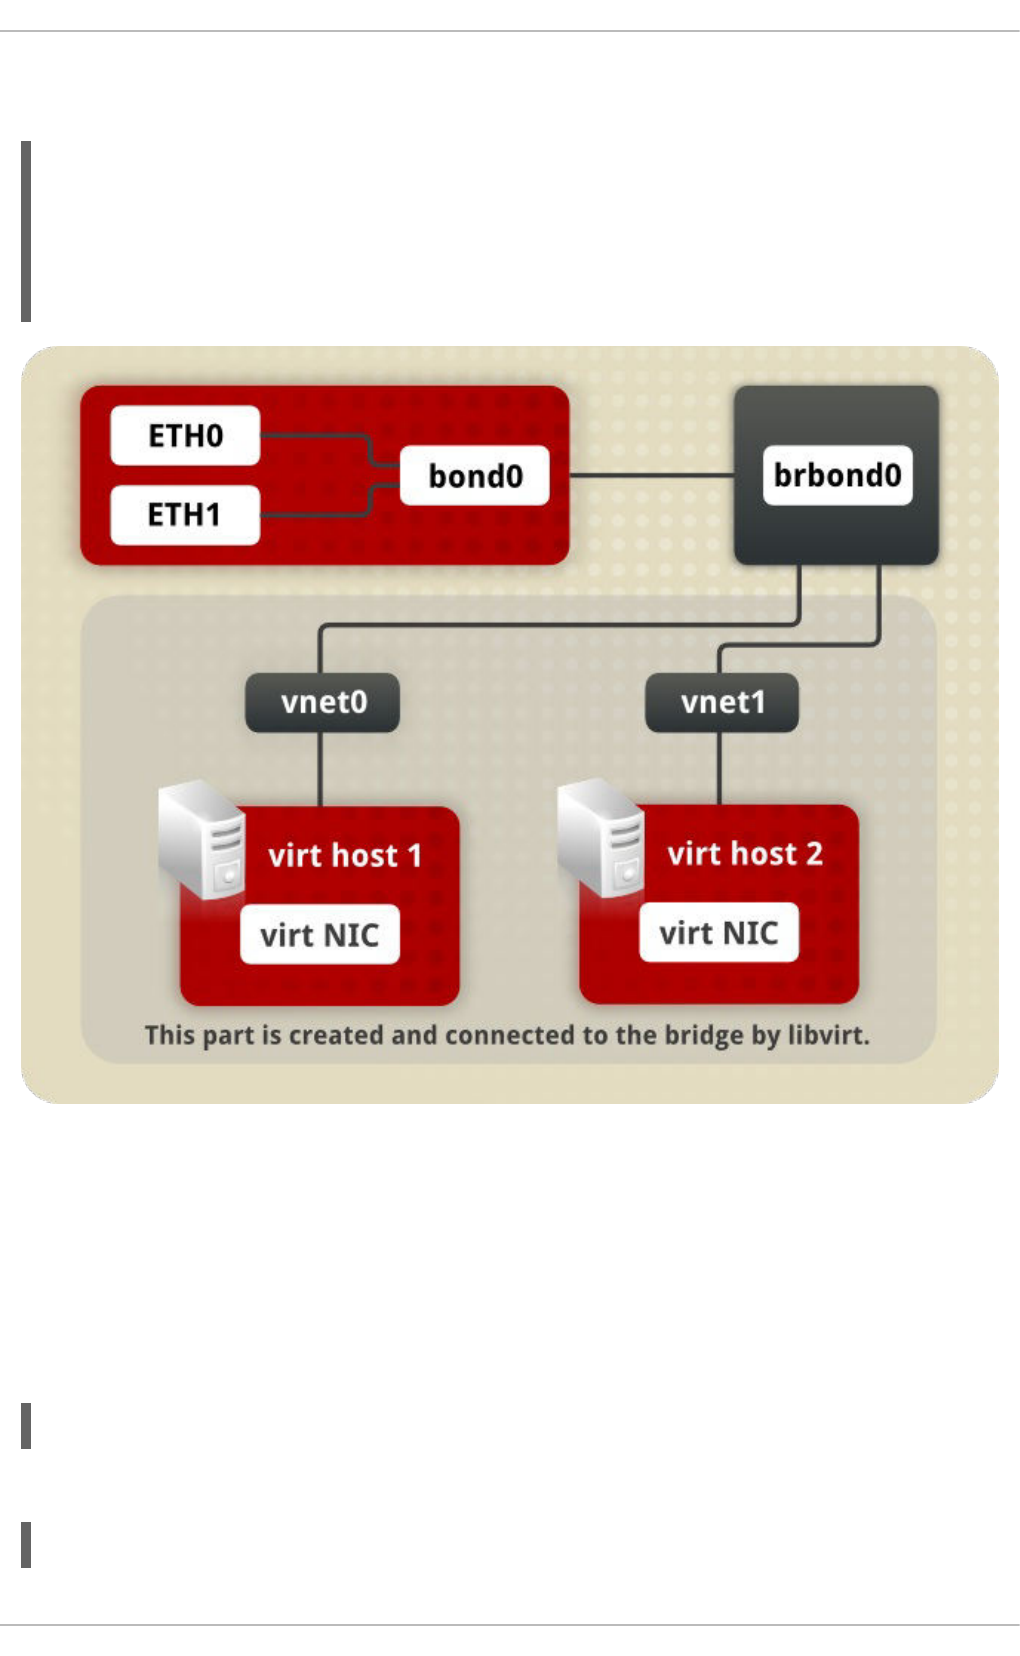
Create or edit one interface configuration file, /etc/sysconfig/network-scripts/ifcfg-br0, as
follows:
Figure 11.1. A network bridge consisting of two bonded Ethernet interfaces.
We now have two or more interface configuration files with the MASTER=bond0 directive. These point to
the configuration file named /etc/sysconfig/network-scripts/ifcfg-bond0, which contains
the DEVICE=bond0 directive. This ifcfg-bond0 in turn points to the /etc/sysconfig/network-
scripts/ifcfg-br0 configuration file, which contains the IP address, and acts as an interface to the
virtual networks inside the host.
To bring up the new or recently configured interfaces, issue a command as root in the following format:
ifup device
Alternatively, restart the networking service, in order for the changes to take effect, as follows:
~]# service network restart
DEVICE=br0
ONBOOT=yes
TYPE=Bridge
IPADDR=192.168.1.1
NETMASK=255.255.255.0
NM_CONTROLLED=no
CHAPTER 11. NETWORK INTERFACES
185

11.2.6.2. Network Bridge with Bonded VLAN
Virtualization servers that intend to have distinct subnets for its guests while still ensuring availability in
the event of a NIC failure will often combine bonds, VLANs, and bridges. An example of this configuration
will now be given. By creating a bridge on the VLAN instead of the underlying device we allow VLAN
tagging to be handled entirely through the host with no need to configure the guests' interfaces.
1. Ensure the bond and VLAN have been configured as outlined in Section 11.2.5, “Configuring a
VLAN over a Bond”.
2. Create the bridge's configuration file, ifcfg-br0:
3. Adjust the VLAN's configuration file, ifcfg-bond0.192 from the earlier example, to use the
newly created br0 as its master:
4. To bring up the new or recently configured interfaces, issue a command as root in the following
format:
ifup device
Alternatively, restart the networking service, in order for the changes to take effect, as follows:
~]# service network restart
11.2.7. Setting Up 802.1Q VLAN Tagging
1. If required, start the VLAN 8021q module by issuing the following command as root:
~]# modprobe --first-time 8021q
No visual output indicates the module was not running and has now been loaded. Note that
given a correct configuration file, the VLAN 8021q module will be loaded as required and
therefore does not need to be loaded separately.
2. Configure your physical interface in /etc/sysconfig/network-scripts/ifcfg-ethX,
where X is a unique number corresponding to a specific interface, as follows:
~]# vi /etc/sysconfig/network-scripts/ifcfg-br0
DEVICE=br0
ONBOOT=yes
TYPE=Bridge
IPADDR=192.168.10.1
NETMASK=255.255.255.0
NM_CONTROLLED=no
~]# vi /etc/sysconfig/network-scripts/ifcfg-bond0.192
DEVICE=bond0.192
BOOTPROTO=none
ONPARENT=yes
#IPADDR=192.168.10.1
#NETMASK=255.255.255.0
VLAN=yes
NM_CONTROLLED=no
BRIDGE=br0
Deployment Guide
186

DEVICE=ethX
TYPE=Ethernet
BOOTPROTO=none
ONBOOT=yes
3. Configure the VLAN interface configuration in /etc/sysconfig/network-scripts. The
configuration filename should be the physical interface plus a . character plus the VLAN ID
number. For example, if the VLAN ID is 192, and the physical interface is eth0, then the
configuration filename should be ifcfg-eth0.192:
DEVICE=ethX.192
BOOTPROTO=none
ONBOOT=yes
IPADDR=192.168.1.1
NETMASK=255.255.255.0
USERCTL=no
NETWORK=192.168.1.0
VLAN=yes
If there is a need to configure a second VLAN, with for example, VLAN ID 193, on the same
interface, eth0 , add a new file with the name eth0.193 with the VLAN configuration details.
4. Restart the networking service, in order for the changes to take effect. Issue the following
command as root:
~]# service network restart
11.2.8. Alias and Clone Files
Two lesser-used types of interface configuration files are alias and clone files. As the ip utility now
supports assigning multiple addresses to the same interface it is no longer necessary to use this method
of binding multiple addresses to the same interface. The ip command to assign an address can be
repeated multiple times in order to assign multiple address. For example:
~]# ip address add 192.168.2.223/24 dev eth1
~]# ip address add 192.168.4.223/24 dev eth1
~]# ip addr
3: eth1: <BROADCAST,MULTICAST,UP,LOWER_UP> mtu 1500 qdisc pfifo_fast state
UP qlen 1000
link/ether 52:54:00:fb:77:9e brd ff:ff:ff:ff:ff:ff
inet 192.168.2.223/24 scope global eth1
inet 192.168.4.223/24 scope global eth1
The commands for the ip utility, sometimes referred to as iproute2 after the upstream package name,
are documented in the man ip(8) page. The package name in Red Hat Enterprise Linux 6 is iproute.
NOTE
In Red Hat Enterprise Linux 6, NetworkManager now reads ifcfg alias files and
assigns the addresses in them to their master interface, using the alias name as the
address label. For example, if ifcfg-eth0 and ifcfg-eth0:1 files are present,
NetworkManager reads the alias file's DEVICE line and stores this as an address label.
The use of secondary addresses rather than alias is still preferred.
CHAPTER 11. NETWORK INTERFACES
187

For new installations, users should select the Manual method on the IPv4 or IPv6 tab in
NetworkManager to assign multiple IP address to the same interface. For more information on using
this tool, see Chapter 10, NetworkManager.
Alias interface configuration files, which are used to bind multiple addresses to a single interface, use the
ifcfg-if-name:alias-value naming scheme.
For example, an ifcfg-eth0:0 file could be configured to specify DEVICE=eth0:0 and a static IP
address of 10.0.0.2, serving as an alias of an Ethernet interface already configured to receive its IP
information via DHCP in ifcfg-eth0. Under this configuration, eth0 is bound to a dynamic IP address,
but the same physical network card can receive requests via the fixed, 10.0.0.2 IP address.
WARNING
Alias interfaces do not support DHCP.
A clone interface configuration file should use the following naming convention: ifcfg-if-
name-clone-name. While an alias file allows multiple addresses for an existing interface, a clone file is
used to specify additional options for an interface. For example, a standard DHCP Ethernet interface
called eth0, may look similar to this:
Since the default value for the USERCTL directive is no if it is not specified, users cannot bring this
interface up and down. To give users the ability to control the interface, create a clone by copying
ifcfg-eth0 to ifcfg-eth0-user and add the following line to ifcfg-eth0-user:
This way a user can bring up the eth0 interface using the /sbin/ifup eth0-user command
because the configuration options from ifcfg-eth0 and ifcfg-eth0-user are combined. While this
is a very basic example, this method can be used with a variety of options and interfaces.
It is no longer possible to create alias and clone interface configuration files using a graphical tool.
However, as explained at the beginning of this section, it is no longer necessary to use this method as it
is now possible to directly assign multiple IP address to the same interface. For new installations, users
should select the Manual method on the IPv4 or IPv6 tab in NetworkManager to assign multiple IP
address to the same interface. For more information on using this tool, see Chapter 10,
NetworkManager.
11.2.9. Dialup Interfaces
If you are connecting to the Internet via a dialup connection, a configuration file is necessary for the
interface.
PPP interface files are named using the following format:
DEVICE=eth0
ONBOOT=yes
BOOTPROTO=dhcp
USERCTL=yes
Deployment Guide
188

ifcfg-pppX
where X is a unique number corresponding to a specific interface.
The PPP interface configuration file is created automatically when wvdial, or Kppp is used to create a
dialup account. It is also possible to create and edit this file manually.
The following is a typical /etc/sysconfig/network-scripts/ifcfg-ppp0 file:
Serial Line Internet Protocol (SLIP) is another dialup interface, although it is used less frequently. SLIP
files have interface configuration file names such as ifcfg-sl0.
Other options that may be used in these files include:
DEFROUTE=answer
where answer is one of the following:
yes — Set this interface as the default route.
no — Do not set this interface as the default route.
DEMAND=answer
where answer is one of the following:
yes — This interface allows pppd to initiate a connection when someone attempts to use it.
no — A connection must be manually established for this interface.
IDLETIMEOUT=value
where value is the number of seconds of idle activity before the interface disconnects itself.
INITSTRING=string
where string is the initialization string passed to the modem device. This option is primarily used in
conjunction with SLIP interfaces.
LINESPEED=value
where value is the baud rate of the device. Possible standard values include 57600, 38400, 19200,
and 9600.
DEVICE=ppp0
NAME=test
WVDIALSECT=test
MODEMPORT=/dev/modem
LINESPEED=115200
PAPNAME=test
USERCTL=true
ONBOOT=no
PERSIST=no
DEFROUTE=yes
PEERDNS=yes
DEMAND=no
IDLETIMEOUT=600
CHAPTER 11. NETWORK INTERFACES
189

MODEMPORT=device
where device is the name of the serial device that is used to establish the connection for the interface.
MTU=value
where value is the Maximum Transfer Unit (MTU) setting for the interface. The MTU refers to the
largest number of bytes of data a frame can carry, not counting its header information. In some dialup
situations, setting this to a value of 576 results in fewer packets dropped and a slight improvement to
the throughput for a connection.
NAME=name
where name is the reference to the title given to a collection of dialup connection configurations.
PAPNAME=name
where name is the user name given during the Password Authentication Protocol (PAP) exchange
that occurs to allow connections to a remote system.
PERSIST=answer
where answer is one of the following:
yes — This interface should be kept active at all times, even if deactivated after a modem
hang up.
no — This interface should not be kept active at all times.
REMIP=address
where address is the IP address of the remote system. This is usually left unspecified.
WVDIALSECT=name
where name associates this interface with a dialer configuration in /etc/wvdial.conf. This file
contains the phone number to be dialed and other important information for the interface.
11.2.10. Other Interfaces
Other common interface configuration files include the following:
ifcfg-lo
A local loopback interface is often used in testing, as well as being used in a variety of applications
that require an IP address pointing back to the same system. Any data sent to the loopback device is
immediately returned to the host's network layer.
Deployment Guide
190

WARNING
The loopback interface script, /etc/sysconfig/network-scripts/ifcfg-
lo, should never be edited manually. Doing so can prevent the system from
operating correctly.
ifcfg-irlan0
An infrared interface allows information between devices, such as a laptop and a printer, to flow over
an infrared link. This works in a similar way to an Ethernet device except that it commonly occurs
over a peer-to-peer connection.
ifcfg-plip0
A Parallel Line Interface Protocol (PLIP) connection works much the same way as an Ethernet
device, except that it utilizes a parallel port.
Interface configuration files for Linux on System z include the following:
ifcfg-hsiN
A HiperSockets interface is an interface for high-speed TCP/IP communication within and across
z/VM guest virtual machines and logical partitions (LPARs) on an IBM System z mainframe.
11.3. INTERFACE CONTROL SCRIPTS
The interface control scripts activate and deactivate system interfaces. There are two primary interface
control scripts that call on control scripts located in the /etc/sysconfig/network-scripts/
directory: /sbin/ifdown and /sbin/ifup.
The ifup and ifdown interface scripts are symbolic links to scripts in the /sbin/ directory. When
either of these scripts are called, they require the value of the interface to be specified, such as:
ifup eth0
WARNING
The ifup and ifdown interface scripts are the only scripts that the user should use
to bring up and take down network interfaces.
The following scripts are described for reference purposes only.
CHAPTER 11. NETWORK INTERFACES
191

Two files used to perform a variety of network initialization tasks during the process of bringing up a
network interface are /etc/rc.d/init.d/functions and /etc/sysconfig/network-
scripts/network-functions. See Section 11.7, “Network Function Files” for more information.
After verifying that an interface has been specified and that the user executing the request is allowed to
control the interface, the correct script brings the interface up or down. The following are common
interface control scripts found within the /etc/sysconfig/network-scripts/ directory:
ifup-aliases
Configures IP aliases from interface configuration files when more than one IP address is associated
with an interface.
ifup-ippp and ifdown-ippp
Brings ISDN interfaces up and down.
ifup-ipv6 and ifdown-ipv6
Brings IPv6 interfaces up and down.
ifup-plip
Brings up a PLIP interface.
ifup-plusb
Brings up a USB interface for network connections.
ifup-post and ifdown-post
Contains commands to be executed after an interface is brought up or down.
ifup-ppp and ifdown-ppp
Brings a PPP interface up or down.
ifup-routes
Adds static routes for a device as its interface is brought up.
ifdown-sit and ifup-sit
Contains function calls related to bringing up and down an IPv6 tunnel within an IPv4 connection.
ifup-wireless
Brings up a wireless interface.
Deployment Guide
192

WARNING
Removing or modifying any scripts in the /etc/sysconfig/network-scripts/
directory can cause interface connections to act irregularly or fail. Only advanced
users should modify scripts related to a network interface.
The easiest way to manipulate all network scripts simultaneously is to use the /sbin/service
command on the network service (/etc/rc.d/init.d/network), as illustrated by the following
command:
/sbin/service network action
Here, action can be either start, stop, or restart.
To view a list of configured devices and currently active network interfaces, use the following command:
/sbin/service network status
11.4. STATIC ROUTES AND THE DEFAULT GATEWAY
Static routes are for traffic that must not, or should not, go through the default gateway. Routing is often
handled by devices on the network dedicated to routing (although any device can be configured to
perform routing). Therefore, it is often not necessary to configure static routes on Red Hat
Enterprise Linux servers or clients. Exceptions include traffic that must pass through an encrypted VPN
tunnel or traffic that should take a specific route for reasons of cost or security. The default gateway is for
any and all traffic which is not destined for the local network and for which no preferred route is specified
in the routing table. The default gateway is traditionally a dedicated network router.
Configuring Static Routes Using the Command Line
If static routes are required, they can be added to the routing table by means of the ip route add
command and removed using the ip route del command. The more frequently used ip route
commands take the following form:
ip route [ add | del | change | append | replace ] destination-address
See the ip-route(8) man page for more details on the options and formats.
Use the ip route command without options to display the IP routing table. For example:
~]$ ip route
default via 192.168.122.1 dev eth0 proto static metric 1024
192.168.122.0/24 dev ens9 proto kernel scope link src 192.168.122.107
192.168.122.0/24 dev eth0 proto kernel scope link src 192.168.122.126
To add a static route to a host address, in other words to a single IP address, issue a command as
root:
~]# ip route add 192.0.2.1 via 10.0.0.1 [dev ifname]
CHAPTER 11. NETWORK INTERFACES
193

Where 192.0.2.1 is the IP address of the host in dotted decimal notation, 10.0.0.1 is the next hop
address and ifname is the exit interface leading to the next hop.
To add a static route to a network, in other words to an IP address representing a range of IP
addresses, issue the following command as root:
~]# ip route add 192.0.2.0/24 via 10.0.0.1 [dev ifname]
where 192.0.2.0 is the IP address of the destination network in dotted decimal notation and /24 is the
network prefix. The network prefix is the number of enabled bits in the subnet mask. This format of
network address slash network prefix length is sometimes referred to as classless inter-domain routing
(CIDR) notation.
Static route configuration can be stored per-interface in a /etc/sysconfig/network-
scripts/route-interface file. For example, static routes for the eth0 interface would be stored in
the /etc/sysconfig/network-scripts/route-eth0 file. The route-interface file has two
formats: ip command arguments and network/netmask directives. These are described below.
See the ip-route(8) man page for more information on the ip route command.
Configuring The Default Gateway
The default gateway is determined by the network scripts which parse the /etc/sysconfig/network
file first and then the network interface ifcfg files for interfaces that are “up”. The ifcfg files are
parsed in numerically ascending order, and the last GATEWAY directive to be read is used to compose
a default route in the routing table.
The default route can thus be indicated by means of the GATEWAY directive and can be specified either
globally or in interface-specific configuration files. Specifying the gateway globally has certain
advantages in static networking environments, especially if more than one network interface is present. It
can make fault finding simpler if applied consistently. There is also the GATEWAYDEV directive, which is
a global option. If multiple devices specify GATEWAY, and one interface uses the GATEWAYDEV
directive, that directive will take precedence. This option is not recommend as it can have unexpected
consequences if an interface goes down and it can complicate fault finding.
In dynamic network environments, where mobile hosts are managed by NetworkManager, gateway
information is likely to be interface specific and is best left to be assigned by DHCP. In special cases
where it is necessary to influence NetworkManager's selection of the exit interface to be used to reach a
gateway, make use of the DEFROUTE=no command in the ifcfg files for those interfaces which do not
lead to the default gateway.
Global default gateway configuration is stored in the /etc/sysconfig/network file. This file specifies
gateway and host information for all network interfaces. For more information about this file and the
directives it accepts, see Section D.1.13, “/etc/sysconfig/network”.
11.5. CONFIGURING STATIC ROUTES IN IFCFG FILES
Static routes set using ip commands at the command prompt will be lost if the system is shutdown or
restarted. To configure static routes to be persistent after a system restart, they must be placed in per-
interface configuration files in the /etc/sysconfig/network-scripts/ directory. The file name
should be of the format route-ifname. There are two types of commands to use in the configuration
files; ip commands as explained in Section 11.5.1, “Static Routes Using the IP Command Arguments
Format” and the Network/Netmask format as explained in Section 11.5.2, “Network/Netmask Directives
Format”.
Deployment Guide
194

11.5.1. Static Routes Using the IP Command Arguments Format
If required in a per-interface configuration file, for example /etc/sysconfig/network-
scripts/route-eth0, define a route to a default gateway on the first line. This is only required if the
gateway is not set via DHCP and is not set globally in the /etc/sysconfig/network file:
default via 192.168.1.1 dev interface
where 192.168.1.1 is the IP address of the default gateway. The interface is the interface that is
connected to, or can reach, the default gateway. The dev option can be omitted, it is optional. Note that
this setting takes precedence over a setting in the /etc/sysconfig/network file.
If a route to a remote network is required, a static route can be specified as follows. Each line is parsed
as an individual route:
10.10.10.0/24 via 192.168.1.1 [dev interface]
where 10.10.10.0/24 is the network address and prefix length of the remote or destination network. The
address 192.168.1.1 is the IP address leading to the remote network. It is preferably the next hop
address but the address of the exit interface will work. The “next hop” means the remote end of a link, for
example a gateway or router. The dev option can be used to specify the exit interface interface but it is
not required. Add as many static routes as required.
The following is an example of a route-interface file using the ip command arguments format. The
default gateway is 192.168.0.1, interface eth0 and a leased line or WAN connection is available at
192.168.0.10. The two static routes are for reaching the 10.10.10.0/24 network and the
172.16.1.10/32 host:
default via 192.168.0.1 dev eth0
10.10.10.0/24 via 192.168.0.10 dev eth0
172.16.1.10/32 via 192.168.0.10 dev eth0
In the above example, packets going to the local 192.168.0.0/24 network will be directed out the
interface attached to that network. Packets going to the 10.10.10.0/24 network and
172.16.1.10/32 host will be directed to 192.168.0.10. Packets to unknown, remote, networks will
use the default gateway therefore static routes should only be configured for remote networks or hosts if
the default route is not suitable. Remote in this context means any networks or hosts that are not directly
attached to the system.
Specifying an exit interface is optional. It can be useful if you want to force traffic out of a specific
interface. For example, in the case of a VPN, you can force traffic to a remote network to pass through a
tun0 interface even when the interface is in a different subnet to the destination network.
IMPORTANT
If the default gateway is already assigned from DHCP, the IP command arguments format
can cause one of two errors during start-up, or when bringing up an interface from the
down state using the ifup command: "RTNETLINK answers: File exists" or 'Error: either
"to" is a duplicate, or "X.X.X.X" is a garbage.', where X.X.X.X is the gateway, or a different
IP address. These errors can also occur if you have another route to another network
using the default gateway. Both of these errors are safe to ignore.
11.5.2. Network/Netmask Directives Format
CHAPTER 11. NETWORK INTERFACES
195

You can also use the network/netmask directives format for route-interface files. The following is a
template for the network/netmask format, with instructions following afterwards:
ADDRESS0=10.10.10.0 is the network address of the remote network or host to be reached.
NETMASK0=255.255.255.0 is the netmask for the network address defined with
ADDRESS0=10.10.10.0.
GATEWAY0=192.168.1.1 is the default gateway, or an IP address that can be used to reach
ADDRESS0=10.10.10.0
The following is an example of a route-interface file using the network/netmask directives format.
The default gateway is 192.168.0.1 but a leased line or WAN connection is available at
192.168.0.10. The two static routes are for reaching the 10.10.10.0/24 and 172.16.1.0/24
networks:
Subsequent static routes must be numbered sequentially, and must not skip any values. For example,
ADDRESS0, ADDRESS1, ADDRESS2, and so on.
11.6. CONFIGURING IPV6 TOKENIZED INTERFACE IDENTIFIERS
In a network, servers are generally given static addresses and these are usually configured manually to
avoid relying on a DHCP server which may fail or run out of addresses. The IPv6 protocol introduced
Stateless Address Autoconfiguration (SLAAC) which enables clients to assign themselves an address
without relying on a DHCPv6 server. SLAAC derives the IPv6 address based on the interface hardware,
therefore it should not be used for servers in case the hardware is changed and the associated SLAAC
generated address changes with it. In an IPv6 environment, if the network prefix is changed, or the
system is moved to a new location, any manually configured static addresses would have to be edited
due to the changed prefix.
To address these problems, the IETF draft Tokenised IPv6 Identifiers has been implemented in the
kernel together with corresponding additions to the ip utility. This enables the lower 64 bit interface
identifier part of the IPv6 address to be based on a token, supplied by the administrator, leaving the
network prefix, the higher 64 bits, to be obtained from router advertisements (RA). This means that if the
network interface hardware is changed, the lower 64 bits of the address will not change, and if the system
is moved to another network, the network prefix will be obtained from router advertisements
automatically, thus no manual editing is required.
To configure an interface to use a tokenized IPv6 identifier, issue a command in the following format as
root user:
~]# ip token set ::1a:2b:3c:4d/64 dev eth4
ADDRESS0=10.10.10.0
NETMASK0=255.255.255.0
GATEWAY0=192.168.1.1
ADDRESS0=10.10.10.0
NETMASK0=255.255.255.0
GATEWAY0=192.168.0.10
ADDRESS1=172.16.1.10
NETMASK1=255.255.255.0
GATEWAY1=192.168.0.10
Deployment Guide
196

Where ::1a:2b:3c:4d/64 is the token to be used. This setting is not persistent. To make it persistent,
add the command to an init script. See Section 11.3, “Interface Control Scripts”.
Using a memorable token is possible, but is limited to the range of valid hexadecimal digits. For
example, for a DNS server, which traditionally uses port 53, a token of ::53/64 could be used.
To view all the configured IPv6 tokens, issue the following command:
~]$ ip token
token :: dev eth0
token :: dev eth1
token :: dev eth2
token :: dev eth3
token ::1a:2b:3c:4d dev eth4
To view the configured IPv6 token for a specific interface, issue the following command:
~]$ ip token get dev eth4
token ::1a:2b:3c:4d dev eth4
Note that adding a token to an interface will replace a previously allocated token, and in turn invalidate
the address derived from it. Supplying a new token causes a new address to be generated and applied,
but this process will leave any other addresses unchanged. In other words, a new tokenized identifier
only replaces a previously existing tokenized identifier, not any other IP address.
NOTE
Take care not to add the same token to more than one system or interface as the
duplicate address detection (DAD) mechanism will not be able to resolve the problem.
Once a token is set, it cannot be cleared or reset, except by rebooting the machine.
11.7. NETWORK FUNCTION FILES
Red Hat Enterprise Linux makes use of several files that contain important common functions used to
bring interfaces up and down. Rather than forcing each interface control file to contain these functions,
they are grouped together in a few files that are called upon when necessary.
The /etc/sysconfig/network-scripts/network-functions file contains the most commonly
used IPv4 functions, which are useful to many interface control scripts. These functions include
contacting running programs that have requested information about changes in the status of an interface,
setting host names, finding a gateway device, verifying whether or not a particular device is down, and
adding a default route.
As the functions required for IPv6 interfaces are different from IPv4 interfaces, a
/etc/sysconfig/network-scripts/network-functions-ipv6 file exists specifically to hold
this information. The functions in this file configure and delete static IPv6 routes, create and remove
tunnels, add and remove IPv6 addresses to an interface, and test for the existence of an IPv6 address
on an interface.
11.8. ETHTOOL
CHAPTER 11. NETWORK INTERFACES
197

Ethtool is a utility for configuration of Network Interface Cards (NICs). This utility allows querying and
changing settings such as speed, port, auto-negotiation, PCI locations and checksum offload on many
network devices, especially Ethernet devices.
We present here a short selection of often used ethtool commands together with some useful
commands that are not well known. For a full list of commands type ethtool -h or see the man page,
ethtool(8), for a more comprehensive list and explanation. The first two examples are information
queries and show the use of the different formats of the command.
But first, the command structure:
ethtool [option...] devname
where option is none or more options, and devname is your Network Interface Card (NIC). For example
eth0 or em1.
ethtool
The ethtool command with only a device name as an option is used to print the current settings of
the specified device. It takes the following form:
ethtool devname
where devname is your NIC. For example eth0 or em1.
Some values can only be obtained when the command is run as root. Here is an example of the output
when the command is run as root:
~]# ethtool em1
Settings for em1:
Supported ports: [ TP ]
Supported link modes: 10baseT/Half 10baseT/Full
100baseT/Half 100baseT/Full
1000baseT/Full
Supported pause frame use: No
Supports auto-negotiation: Yes
Advertised link modes: 10baseT/Half 10baseT/Full
100baseT/Half 100baseT/Full
1000baseT/Full
Advertised pause frame use: No
Advertised auto-negotiation: Yes
Speed: 1000Mb/s
Duplex: Full
Port: Twisted Pair
PHYAD: 2
Transceiver: internal
Auto-negotiation: on
MDI-X: on
Supports Wake-on: pumbg
Wake-on: g
Current message level: 0x00000007 (7)
drv probe link
Link detected: yes
Deployment Guide
198

Issue the following command, using the short or long form of the argument, to query the specified
network device for associated driver information:
ethtool -i, --driver devname
where devname is your Network Interface Card (NIC). For example eth0 or em1.
Here is an example of the output:
~]$ ethtool -i em1
driver: e1000e
version: 2.0.0-k
firmware-version: 0.13-3
bus-info: 0000:00:19.0
supports-statistics: yes
supports-test: yes
supports-eeprom-access: yes
supports-register-dump: yes
Here follows a list of command options to query, identify or reset the device. They are in the usual -
short and --long form:
--statistics
The --statistics or -S queries the specified network device for NIC and driver statistics. It takes
the following form:
-S, --statistics devname
where devname is your NIC.
--identify
The --identify or -p option initiates adapter-specific action intended to enable an operator to
easily identify the adapter by sight. Typically this involves blinking one or more LEDs on the specified
network port. It takes the following form:
-p, --identify devname integer
where integer is length of time in seconds to perform the action,
and devname is your NIC.
--show-time-stamping
The --show-time-stamping or -T option queries the specified network device for time stamping
parameters. It takes the following form:
-T, --show-time-stamping devname
where devname is your NIC.
--show-offload
CHAPTER 11. NETWORK INTERFACES
199

The --show-features, or --show-offload, or -k option queries the specified network device
for the state of protocol offload and other features. It takes the following form:
-k, --show-features, --show-offload devname
where devname is your NIC.
--test
The --test or -t option is used to perform tests on a Network Interface Card. It takes the following
form:
-t, --test devname word
where word is one of the following:
offline — Perform a comprehensive set of tests. Service will be interrupted.
online — Perform a reduced set of tests. Service should not be interrupted.
external_lb — Perform full set of tests including loopback tests while fitted with a
loopback cable.
and devname is your NIC.
Changing some or all settings of the specified network device requires the -s or --change option. All
the following options are only applied if the -s or --change option is also specified. For the sake of
clarity we will omit it here.
To make these settings permanent you can make use of the ETHTOOL_OPTS directive. It can be used in
interface configuration files to set the desired options when the network interface is brought up. See
Section 11.2.1, “Ethernet Interfaces” for more details on how to use this directive.
--offload
The --features, or --offload, or -K option changes the offload parameters and other features
of the specified network device. It takes the following form:
-K, --features, --offload devname feature boolean
where feature is a built-in or kernel supplied feature,
boolean is one of ON or OFF,
and devname is your NIC.
The ethtool(8) man page lists most features. As the feature set is dependent on the NIC driver,
you should consult the driver documentation for features not listed in the man page.
--speed
The --speed option is used to set the speed in megabits per second (Mb/s). Omitting the speed
value will show the supported device speeds. It takes the following form:
--speed number devname
Deployment Guide
200

where number is the speed in megabits per second (Mb/s),
and devname is your NIC.
--duplex
The --duplex option is used to set the transmit and receive mode of operation. It takes the following
form:
--duplex word devname
where word is one of the following:
half — Sets half-duplex mode. Usually used when connected to a hub.
full — Sets full-duplex mode. Usually used when connected to a switch or another host.
and devname is your NIC.
--port
The --port option is used to select the device port . It takes the following form:
--port value devname
where value is one of the following:
tp — An Ethernet interface using Twisted-Pair cable as the medium.
aui — Attachment Unit Interface (AUI). Normally used with hubs.
bnc — An Ethernet interface using BNC connectors and co-axial cable.
mii — An Ethernet interface using a Media Independent Interface (MII).
fibre — An Ethernet interface using Optical Fibre as the medium.
and devname is your NIC.
--autoneg
The --autoneg option is used to control auto-negotiation of network speed and mode of operation
(full-duplex or half-duplex mode). If auto-negotiation is enabled you can initiate re-negotiation of
network speeds and mode of operation by using the -r, --negotiate option. You can display the
auto-negotiation state using the --a, --show-pause option.
It takes the following form:
--autoneg value devname
where value is one of the following:
yes — Allow auto-negotiating of network speed and mode of operation.
no — Do not allow auto-negotiating of network speed and mode of operation.
CHAPTER 11. NETWORK INTERFACES
201

and devname is your NIC.
--advertise
The --advertise option is used to set what speeds and modes of operation (duplex mode) are
advertised for auto-negotiation. The argument is one or more hexadecimal values from Table 11.1,
“Ethtool advertise options: speed and mode of operation”.
It takes the following form:
--advertise option devname
where option is one or more of the hexadecimal values from the table below and devname is your
NIC.
Table 11.1. Ethtool advertise options: speed and mode of operation
Hex Value Speed Duplex Mode IEEE standard?
0x001 10 Half Yes
0x002 10 Full Yes
0x004 100 Half Yes
0x008 100 Full Yes
0x010 1000 Half No
0x020 1000 Full Yes
0x8000 2500 Full Yes
0x1000 10000 Full Yes
0x20000 20000MLD2 Full No
0x20000 20000MLD2 Full No
0x40000 20000KR2 Full No
--phyad
The --phyad option is used to change the physical address. Often referred to as the MAC or
hardware address but in this context referred to as the physical address.
It takes the following form:
--phyad physical_address devname
where physical_address is the physical address in hexadecimal format and devname is your NIC.
Deployment Guide
202

--xcvr
The --xcvr option is used to select the transceiver type. Currently only “internal” and “external” can
be specified. In the future other types might be added.
It takes the following form:
--xcvr word devname
where word is one of the following:
internal — Use internal transceiver.
external — Use external transceiver.
and devname is your NIC.
--wol
The --wol option is used to set “Wake-on-LAN” options. Not all devices support this. The argument
to this option is a string of characters specifying which options to enable.
It takes the following form:
--wol value devname
where value is one or more of the following:
p — Wake on PHY activity.
u — Wake on unicast messages.
m — Wake on multicast messages.
b — Wake on broadcast messages.
g — Wake-on-Lan; wake on receipt of a "magic packet".
s — Enable security function using password for Wake-on-Lan.
d — Disable Wake-on-Lan and clear all settings.
and devname is your NIC.
--sopass
The --sopass option is used to set the “SecureOn” password. The argument to this option must be
6 bytes in Ethernet MAC hexadecimal format (xx:yy:zz:aa:bb:cc).
It takes the following form:
--sopass xx:yy:zz:aa:bb:cc devname
where xx:yy:zz:aa:bb:cc is the password in the same format as a MAC address and devname is your
NIC.
CHAPTER 11. NETWORK INTERFACES
203

--msglvl
The --msglvl option is used to set the driver message-type flags by name or number. The precise
meanings of these type flags differ between drivers.
It takes the following form:
--msglvl message_type devname
where message_type is one of:
message type name in plain text.
hexadecimal number indicating the message type.
and devname is your NIC.
The defined message type names and numbers are shown in the table below:
Table 11.2. Driver message type
Message Type Hex Value Description
drv 0x0001 General driver status
probe 0x0002 Hardware probing
link 0x0004 Link state
timer 0x0008 Periodic status check
ifdown 0x0010 Interface being brought down
ifup 0x0020 Interface being brought up
rx_err 0x0040 Receive error
tx_err 0x0080 Transmit error
intr 0x0200 Interrupt handling
tx_done 0x0400 Transmit completion
rx_status 0x0800 Receive completion
pktdata 0x1000 Packet contents
hw 0x2000 Hardware status
wol 0x4000 Wake-on-LAN status
Deployment Guide
204

11.9. CONFIGURING NETCONSOLE
The netconsole kernel module enables logging of kernel messages over the network to another
computer. It allows kernel debugging when disk logging fails or when using the serial console is not
possible.
Configuring a Listening Machine
To enable receiving netconsole logging messages, install the rsyslog package:
]# yum install rsyslog
To configure rsyslogd to listen on the 514/UDP port and receive messages from the network,
uncomment the following lines in the MODULES section of /etc/rsyslog.conf:
$ModLoad imudp
$UDPServerRun 514
Restart the rsyslogd service for the changes to take effect:
]# service rsyslog restart
To verify that rsyslogd is listening on the 514/udp port, use the following command:
]# netstat -l | grep syslog
udp 0 0 *:syslog *:*
udp 0 0 *:syslog *:*
The 0 *:syslog value in the netstat -l output mean that rsyslogd is listening on default
netconsole port, which is defined in the /etc/services file:
]$ cat /etc/services | grep syslog
syslog 514/udp
syslog-conn 601/tcp # Reliable Syslog Service
syslog-conn 601/udp # Reliable Syslog Service
syslog-tls 6514/tcp # Syslog over TLS
Configuring a Sending Machine
In Red Hat Enterprise Linux 6, netconsole is configured using the file
/etc/sysconfig/netconsole, which is part of the initscripts package. This package is installed by
default and it also provides the netconsole service.
To configure a sending machine, set the value of the SYSLOGADDR variable in the
/etc/sysconfig/netconsole file to match the IP address of the syslogd server, for example:
SYSLOGADDR=192.168.0.1
Restart the netconsole service so the changes take effect. Then, use the chkconfig command to
ensure netconsole service starts automatically after next reboot:
]# service netconsole restart
Initializing netconsole [ OK ]
]# chkconfig netconsole on
CHAPTER 11. NETWORK INTERFACES
205

By default, the rsyslogd server writes the netconsole messages from the client in
/var/log/messages or in the file specified in rsyslog.conf.
NOTE
To set rsyslogd and netconsole to use a different port, change the following line in
/etc/rsyslog.conf to the desired port number:
$UDPServerRun <PORT>
On the sending machine, uncomment and edit the following line in the
/etc/sysconfig/netconsole file:
SYSLOGPORT=514
For more information about netconsole configuration and troubleshooting tips, see Netconsole Kernel
Documentation.
11.10. ADDITIONAL RESOURCES
The following are resources which explain more about network interfaces.
Installed Documentation
/usr/share/doc/initscripts-version/sysconfig.txt — A guide to available options
for network configuration files, including IPv6 options not covered in this chapter.
Online Resources
http://linux-ip.net/gl/ip-cref/ — This document contains a wealth of information about the ip
command, which can be used to manipulate routing tables, among other things.
Red Hat Access Labs — The Red Hat Access Labs includes a “Network Bonding Helper”.
See Also
Appendix E, The proc File System — Describes the sysctl utility and the virtual files within the
/proc/ directory, which contain networking parameters and statistics among other things.
Deployment Guide
206

PART V. INFRASTRUCTURE SERVICES
This part provides information how to configure services and daemons, configure authentication, and
enable remote logins.
PART V. INFRASTRUCTURE SERVICES
207

CHAPTER 12. SERVICES AND DAEMONS
Maintaining security on your system is extremely important, and one approach for this task is to manage
access to system services carefully. Your system may need to provide open access to particular services
(for example, httpd if you are running a web server). However, if you do not need to provide a service,
you should turn it off to minimize your exposure to possible bug exploits.
This chapter explains the concept of runlevels, and describes how to set the default one. It also covers
the setup of the services to be run in each of these runlevels, and provides information on how to start,
stop, and restart the services on the command line using the service command.
IMPORTANT
When you allow access for new services, always remember that both the firewall and
SELinux need to be configured as well. One of the most common mistakes committed
when configuring a new service is neglecting to implement the necessary firewall
configuration and SELinux policies to allow access for it. For more information, see the
Red Hat Enterprise Linux 6 Security Guide.
12.1. CONFIGURING THE DEFAULT RUNLEVEL
A runlevel is a state, or mode, defined by services that are meant to be run when this runlevel is
selected. Seven numbered runlevels exist (indexed from 0):
Table 12.1. Runlevels in Red Hat Enterprise Linux
Runlevel Description
0Used to halt the system. This runlevel is reserved and cannot be changed.
1Used to run in a single-user mode. This runlevel is reserved and cannot be changed.
2Not used by default. You are free to define it yourself.
3Used to run in a full multi-user mode with a command-line user interface.
4Not used by default. You are free to define it yourself.
5Used to run in a full multi-user mode with a graphical user interface.
6Used to reboot the system. This runlevel is reserved and cannot be changed.
To check in which runlevel you are operating, type the following:
~]$ runlevel
N 5
The runlevel command displays previous and current runlevel. In this case it is number 5, which
means the system is running in a full multi-user mode with a graphical user interface.
Deployment Guide
208

The default runlevel can be changed by modifying the /etc/inittab file, which contains a line near
the end of the file similar to the following:
id:5:initdefault:
To do so, edit this file as root and change the number on this line to the desired value. The change will
take effect the next time you reboot the system.
12.2. CONFIGURING THE SERVICES
To allow you to configure which services are started at boot time, Red Hat Enterprise Linux is shipped
with the following utilities: the Service Configuration graphical application, the ntsysv text user
interface, and the chkconfig command-line tool.
IMPORTANT
To ensure optimal performance on POWER architecture, it is recommended that the
irqbalance service is enabled. In most cases, this service is installed and configured to
run during the Red Hat Enterprise Linux 6 installation. To verify that irqbalance is
running, as root, type the following at a shell prompt:
~]# service irqbalance status
irqbalance (pid 1234) is running...
For information on how to enable and run a service using a graphical user interface, see
Section 12.2.1, “Using the Service Configuration Utility”. For instructions on how to
perform these task on the command line, see Section 12.2.3, “Using the chkconfig Utility”
and Section 12.3, “Running Services” respectively.
12.2.1. Using the Service Configuration Utility
The Service Configuration utility is a graphical application developed by Red Hat to configure which
services are started in a particular runlevel, as well as to start, stop, and restart them from the menu. To
start the utility, select System → Administration → Services from the panel, or type the command
system-config-services at a shell prompt.
NOTE
The system-config-services utility is provided by the system-config-services
package, which may not be installed by default on your version of Red Hat
Enterprise Linux. To ensure that, first run the following command:
~]$ rpm -q system-config-services
If the package is not installed by default, install it manually by running the following
command as root:
~]# yum install system-config-services
CHAPTER 12. SERVICES AND DAEMONS
209
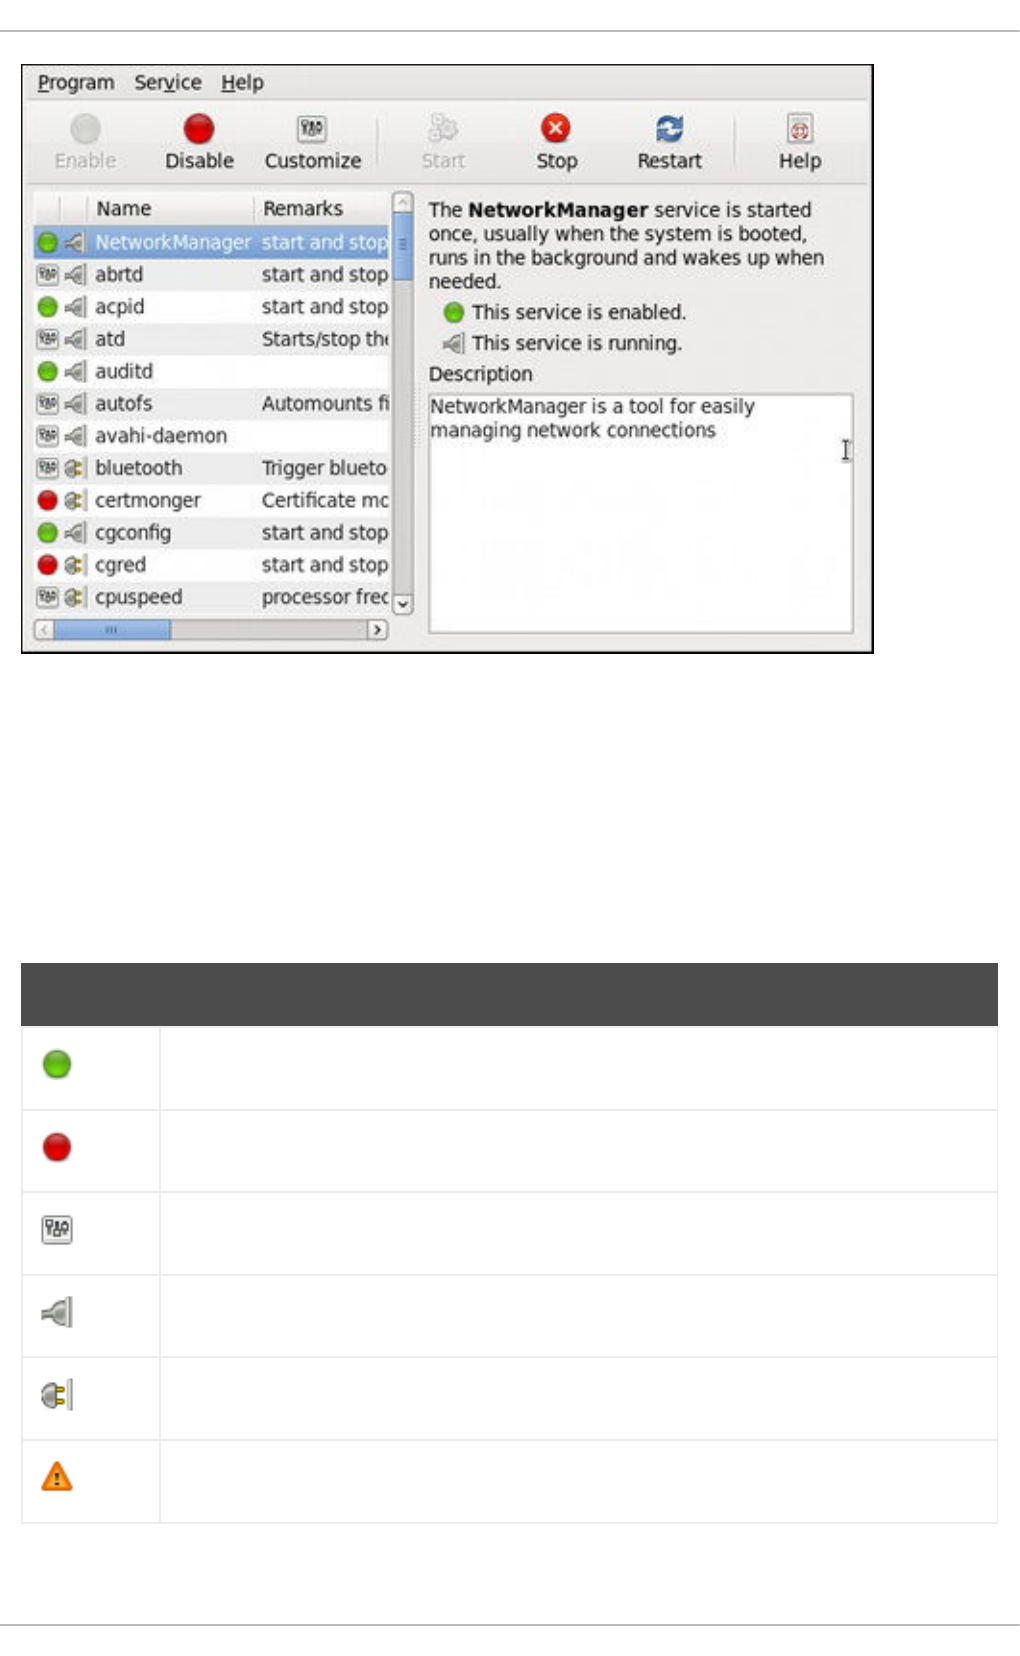
Figure 12.1. The Service Configuration utility
The utility displays the list of all available services (services from the /etc/rc.d/init.d/ directory, as
well as services controlled by xinetd) along with their description and the current status. For a complete
list of used icons and an explanation of their meaning, see Table 12.2, “Possible service states”.
Note that unless you are already authenticated, you will be prompted to enter the superuser password
the first time you make a change.
Table 12.2. Possible service states
Icon Description
The service is enabled.
The service is disabled.
The service is enabled for selected runlevels only.
The service is running.
The service is stopped.
There is something wrong with the service.
Deployment Guide
210

The status of the service is unknown.
Icon Description
12.2.1.1. Enabling and Disabling a Service
To enable a service, select it from the list and either click the Enable button on the toolbar, or choose
Service → Enable from the main menu.
To disable a service, select it from the list and either click the Disable button on the toolbar, or choose
Service → Disable from the main menu.
12.2.1.2. Starting, Restarting, and Stopping a Service
To start a service, select it from the list and either click the Start button on the toolbar, or choose
Service → Start from the main menu. Note that this option is not available for services controlled by
xinetd, as they are started by it on demand.
To restart a running service, select it from the list and either click the Restart button on the toolbar, or
choose Service → Restart from the main menu. Note that this option is not available for services
controlled by xinetd, as they are started and stopped by it automatically.
To stop a service, select it from the list and either click the Stop button on the toolbar, or choose
Service → Stop from the main menu. Note that this option is not available for services controlled by
xinetd, as they are stopped by it when their job is finished.
12.2.1.3. Selecting Runlevels
To enable the service for certain runlevels only, select it from the list and either click the Customize
button on the toolbar, or choose Service → Customize from the main menu. Then select the check box
beside each runlevel in which you want the service to run. Note that this option is not available for
services controlled by xinetd.
12.2.2. Using the ntsysv Utility
The ntsysv utility is a command-line application with a simple text user interface to configure which
services are to be started in selected runlevels. To start the utility, type ntsysv at a shell prompt as
root.
CHAPTER 12. SERVICES AND DAEMONS
211
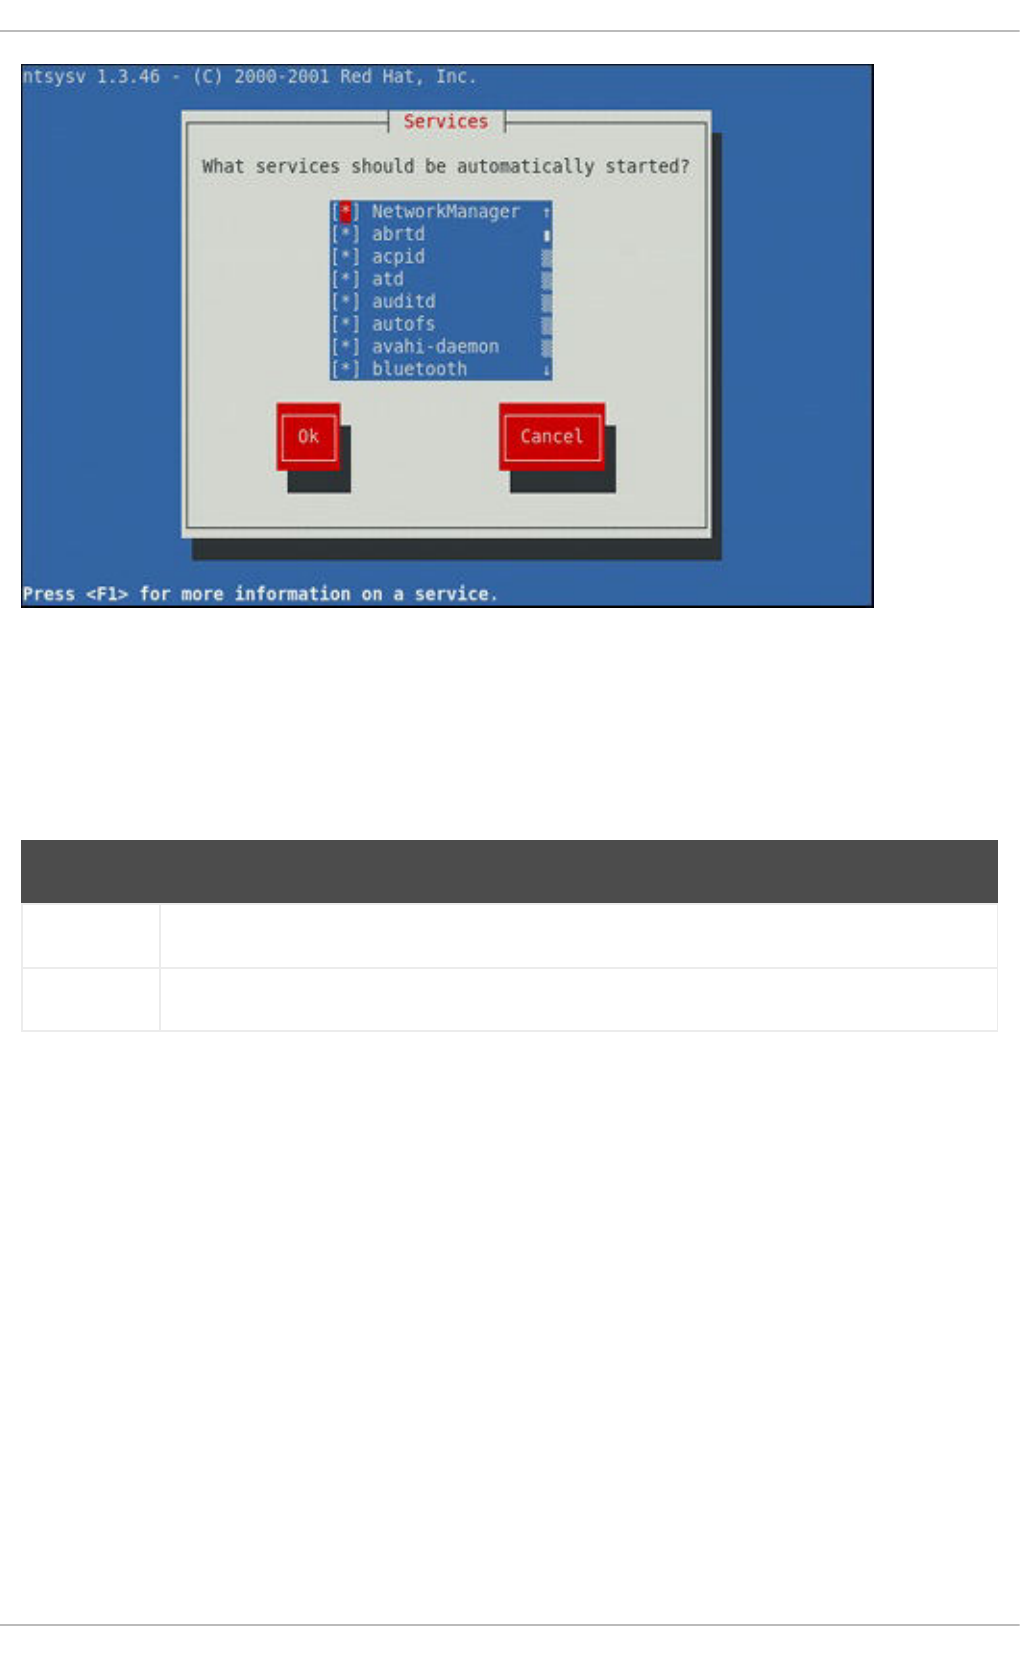
Figure 12.2. The ntsysv utility
The utility displays the list of available services (the services from the /etc/rc.d/init.d/ directory)
along with their current status and a description obtainable by pressing F1. For a list of used symbols
and an explanation of their meaning, see Table 12.3, “Possible service states”.
Table 12.3. Possible service states
Symbol Description
[*] The service is enabled.
[ ] The service is disabled.
12.2.2.1. Enabling and Disabling a Service
To enable a service, navigate through the list using the Up and Down arrows keys, and select it with the
Spacebar. An asterisk (*) appears in the brackets.
To disable a service, navigate through the list using the Up and Down arrows keys, and toggle its status
with the Spacebar. An asterisk (*) in the brackets disappears.
Once you are done, use the Tab key to navigate to the Ok button, and confirm the changes by pressing
Enter. Keep in mind that ntsysv does not actually start or stop the service. If you need to start or stop
the service immediately, use the service command as described in Section 12.3.2, “Starting a
Service”.
12.2.2.2. Selecting Runlevels
By default, the ntsysv utility only affects the current runlevel. To enable or disable services for other
runlevels, as root, run the command with the additional --level option followed by numbers from 0 to
6 representing each runlevel you want to configure:
Deployment Guide
212

ntsysv --level runlevels
For example, to configure runlevels 3 and 5, type:
~]# ntsysv --level 35
12.2.3. Using the chkconfig Utility
The chkconfig utility is a command-line tool that allows you to specify in which runlevel to start a
selected service, as well as to list all available services along with their current setting. Note that with the
exception of listing, you must have superuser privileges to use this command.
12.2.3.1. Listing the Services
To display a list of system services (services from the /etc/rc.d/init.d/ directory, as well as the
services controlled by xinetd), either type chkconfig --list, or use chkconfig with no additional
arguments. You will be presented with an output similar to the following:
~]# chkconfig --list
NetworkManager 0:off 1:off 2:on 3:on 4:on 5:on 6:off
abrtd 0:off 1:off 2:off 3:on 4:off 5:on 6:off
acpid 0:off 1:off 2:on 3:on 4:on 5:on 6:off
anamon 0:off 1:off 2:off 3:off 4:off 5:off 6:off
atd 0:off 1:off 2:off 3:on 4:on 5:on 6:off
auditd 0:off 1:off 2:on 3:on 4:on 5:on 6:off
avahi-daemon 0:off 1:off 2:off 3:on 4:on 5:on 6:off
... several lines omitted ...
wpa_supplicant 0:off 1:off 2:off 3:off 4:off 5:off 6:off
xinetd based services:
chargen-dgram: off
chargen-stream: off
cvs: off
daytime-dgram: off
daytime-stream: off
discard-dgram: off
... several lines omitted ...
time-stream: off
Each line consists of the name of the service followed by its status (on or off) for each of the seven
numbered runlevels. For example, in the listing above, NetworkManager is enabled in runlevel 2, 3, 4,
and 5, while abrtd runs in runlevel 3 and 5. The xinetd based services are listed at the end, being either
on, or off.
To display the current settings for a selected service only, use chkconfig --list followed by the
name of the service:
chkconfig --list service_name
For example, to display the current settings for the sshd service, type:
~]# chkconfig --list sshd
sshd 0:off 1:off 2:on 3:on 4:on 5:on 6:off
CHAPTER 12. SERVICES AND DAEMONS
213

You can also use this command to display the status of a service that is managed by xinetd. In that
case, the output will only contain the information whether the service is enabled or disabled:
~]# chkconfig --list rsync
rsync off
12.2.3.2. Enabling a Service
To enable a service in runlevels 2, 3, 4, and 5, type the following at a shell prompt as root:
chkconfig service_name on
For example, to enable the httpd service in these four runlevels, type:
~]# chkconfig httpd on
To enable a service in certain runlevels only, add the --level option followed by numbers from 0 to 6
representing each runlevel in which you want the service to run:
chkconfig service_name on --level runlevels
For instance, to enable the abrtd service in runlevels 3 and 5, type:
~]# chkconfig abrtd on --level 35
The service will be started the next time you enter one of these runlevels. If you need to start the service
immediately, use the service command as described in Section 12.3.2, “Starting a Service”.
Do not use the --level option when working with a service that is managed by xinetd, as it is not
supported. For example, to enable the rsync service, type:
~]# chkconfig rsync on
If the xinetd daemon is running, the service is immediately enabled without having to manually restart
the daemon.
12.2.3.3. Disabling a Service
To disable a service in runlevels 2, 3, 4, and 5, type the following at a shell prompt as root:
chkconfig service_name off
For instance, to disable the httpd service in these four runlevels, type:
~]# chkconfig httpd off
To disable a service in certain runlevels only, add the --level option followed by numbers from 0 to 6
representing each runlevel in which you do not want the service to run:
chkconfig service_name off --level runlevels
Deployment Guide
214

For instance, to disable the abrtd in runlevels 2 and 4, type:
~]# chkconfig abrtd off --level 24
The service will be stopped the next time you enter one of these runlevels. If you need to stop the service
immediately, use the service command as described in Section 12.3.3, “Stopping a Service”.
Do not use the --level option when working with a service that is managed by xinetd, as it is not
supported. For example, to disable the rsync service, type:
~]# chkconfig rsync off
If the xinetd daemon is running, the service is immediately disabled without having to manually restart
the daemon.
12.3. RUNNING SERVICES
The service utility allows you to start, stop, or restart the services from the /etc/init.d/ directory.
12.3.1. Determining the Service Status
To determine the current status of a service, type the following at a shell prompt:
service service_name status
For example, to determine the status of the httpd service, type:
~]# service httpd status
httpd (pid 7474) is running...
To display the status of all available services at once, run the service command with the --status-
all option:
~]# service --status-all
abrt (pid 1492) is running...
acpid (pid 1305) is running...
atd (pid 1540) is running...
auditd (pid 1103) is running...
automount (pid 1315) is running...
Avahi daemon is running
cpuspeed is stopped
... several lines omitted ...
wpa_supplicant (pid 1227) is running...
Note that you can also use the Service Configuration utility as described in Section 12.2.1, “Using the
Service Configuration Utility”.
12.3.2. Starting a Service
To start a service, type the following at a shell prompt as root:
service service_name start
CHAPTER 12. SERVICES AND DAEMONS
215

For example, to start the httpd service, type:
~]# service httpd start
Starting httpd: [ OK ]
12.3.3. Stopping a Service
To stop a running service, type the following at a shell prompt as root:
service service_name stop
For example, to stop the httpd service, type:
~]# service httpd stop
Stopping httpd: [ OK ]
12.3.4. Restarting a Service
To restart the service, type the following at a shell prompt as root:
service service_name restart
For example, to restart the httpd service, type:
~]# service httpd restart
Stopping httpd: [ OK ]
Starting httpd: [ OK ]
12.4. ADDITIONAL RESOURCES
12.4.1. Installed Documentation
chkconfig(8) — a manual page for the chkconfig utility.
ntsysv(8) — a manual page for the ntsysv utility.
service(8) — a manual page for the service utility.
system-config-services(8) — a manual page for the system-config-services utility.
12.4.2. Related Books
Red Hat Enterprise Linux 6 Security Guide
A guide to securing Red Hat Enterprise Linux 6. It contains valuable information on how to set up the
firewall, as well as the configuration of SELinux.
Deployment Guide
216

CHAPTER 13. CONFIGURING AUTHENTICATION
Authentication is the way that a user is identified and verified to a system. The authentication process
requires presenting some sort of identity and credentials, like a user name and password. The
credentials are then compared to information stored in some data store on the system. In Red Hat
Enterprise Linux, the Authentication Configuration Tool helps configure what kind of data store to use for
user credentials, such as LDAP.
For convenience and potentially part of single sign-on, Red Hat Enterprise Linux can use a central
daemon to store user credentials for a number of different data stores. The System Security Services
Daemon (SSSD) can interact with LDAP, Kerberos, and external applications to verify user credentials.
The Authentication Configuration Tool can configure SSSD along with NIS, Winbind, and LDAP, so that
authentication processing and caching can be combined.
13.1. CONFIGURING SYSTEM AUTHENTICATION
When a user logs into a Red Hat Enterprise Linux system, that user presents some sort of credential to
establish the user identity. The system then checks those credentials against the configured
authentication service. If the credentials match and the user account is active, then the user is
authenticated. (Once a user is authenticated, then the information is passed to the access control service
to determine what the user is permitted to do. Those are the resources the user is authorized to access.)
The information to verify the user can be located on the local system or the local system can reference a
user database on a remote system, such as LDAP or Kerberos.
The system must have a configured list of valid account databases for it to check for user authentication.
On Red Hat Enterprise Linux, the Authentication Configuration Tool has both GUI and command-line
options to configure any user data stores.
A local system can use a variety of different data stores for user information, including Lightweight
Directory Access Protocol (LDAP), Network Information Service (NIS), and Winbind. Additionally, both
LDAP and NIS data stores can use Kerberos to authenticate users.
IMPORTANT
If a medium or high security level is set during installation or with the Security Level
Configuration Tool, then the firewall prevents NIS authentication. For more information
about firewalls, see the "Firewalls" section of the Security Guide.
13.1.1. Launching the Authentication Configuration Tool UI
1. Log into the system as root.
2. Open the System.
3. Select the Administration menu.
4. Select the Authentication item.
CHAPTER 13. CONFIGURING AUTHENTICATION
217
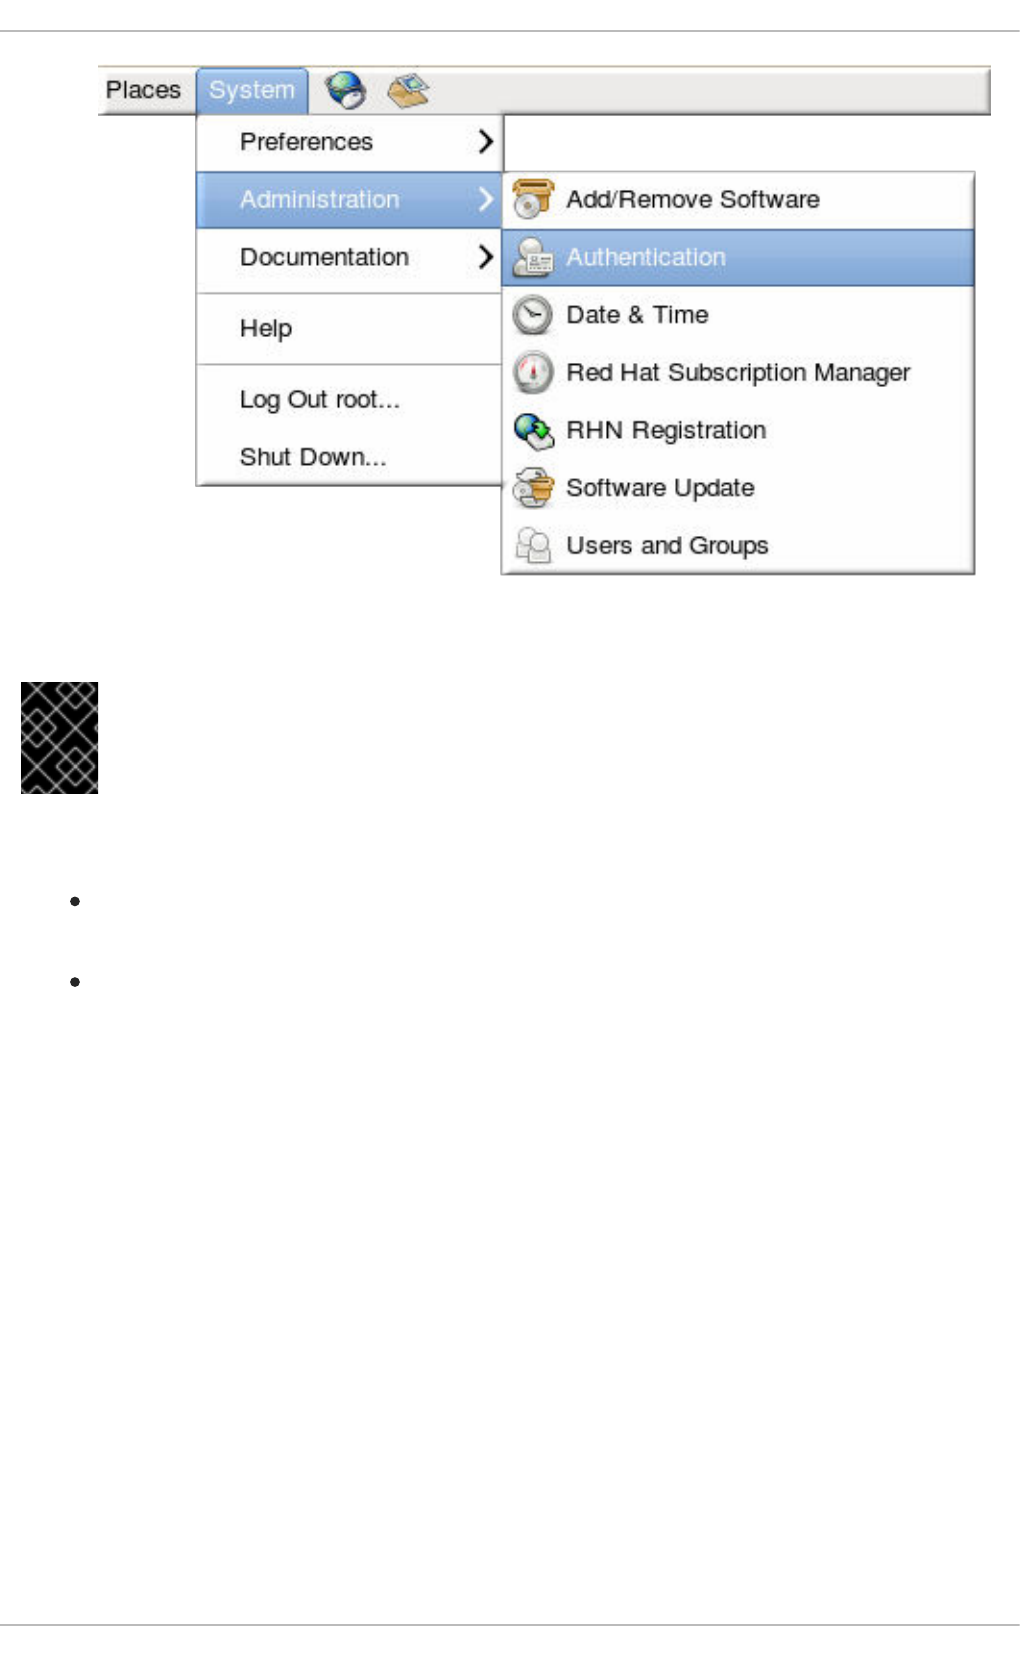
Alternatively, run the system-config-authentication command.
IMPORTANT
Any changes take effect immediately when the Authentication Configuration Tool UI is
closed.
There are two configuration tabs in the Authentication dialog box:
Identity & Authentication, which configures the resource used as the identity store (the
data repository where the user IDs and corresponding credentials are stored).
Advanced Options, which allows authentication methods other than passwords or
certificates, like smart cards and fingerprint.
13.1.2. Selecting the Identity Store for Authentication
The Identity & Authentication tab sets how users should be authenticated. The default is to use
local system authentication, meaning the users and their passwords are checked against local system
accounts. A Red Hat Enterprise Linux machine can also use external resources which contain the users
and credentials, including LDAP, NIS, and Winbind.
Deployment Guide
218
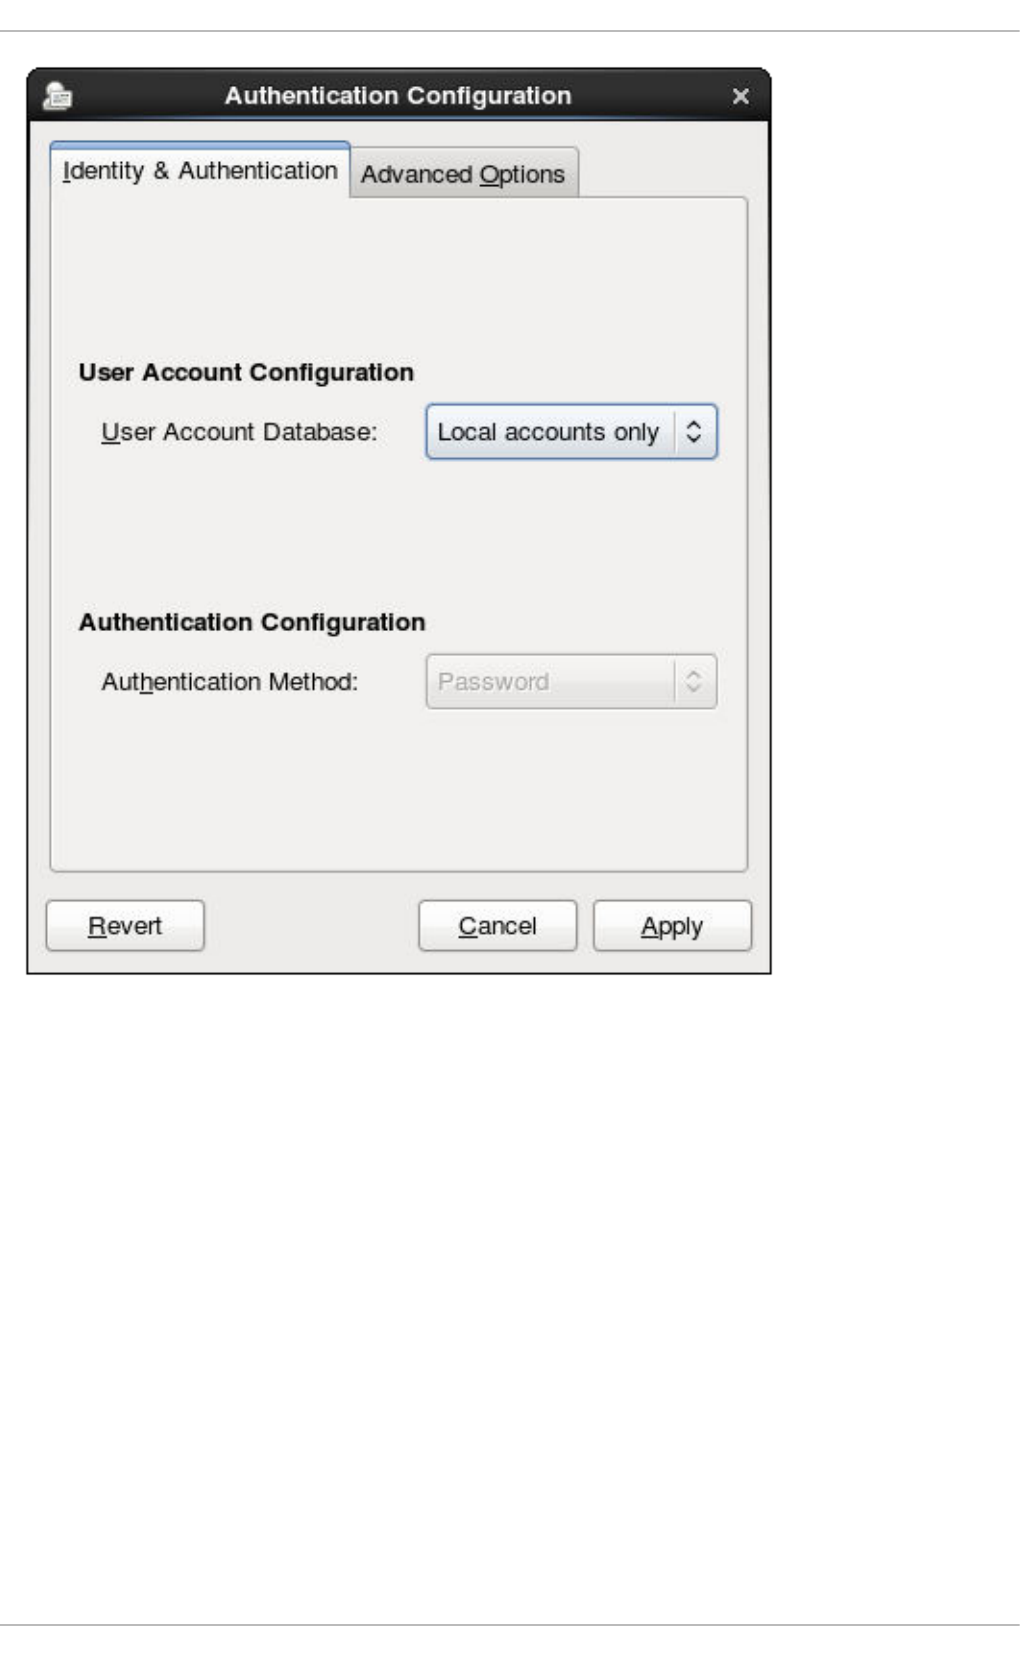
Figure 13.1. Local Authentication
13.1.2.1. Configuring LDAP Authentication
Either the openldap-clients package or the sssd package is used to configure an LDAP server for the
user database. Both packages are installed by default.
1. Open the Authentication Configuration Tool, as in Section 13.1.1, “Launching the Authentication
Configuration Tool UI”.
2. Select LDAP in the User Account Database drop-down menu.
CHAPTER 13. CONFIGURING AUTHENTICATION
219
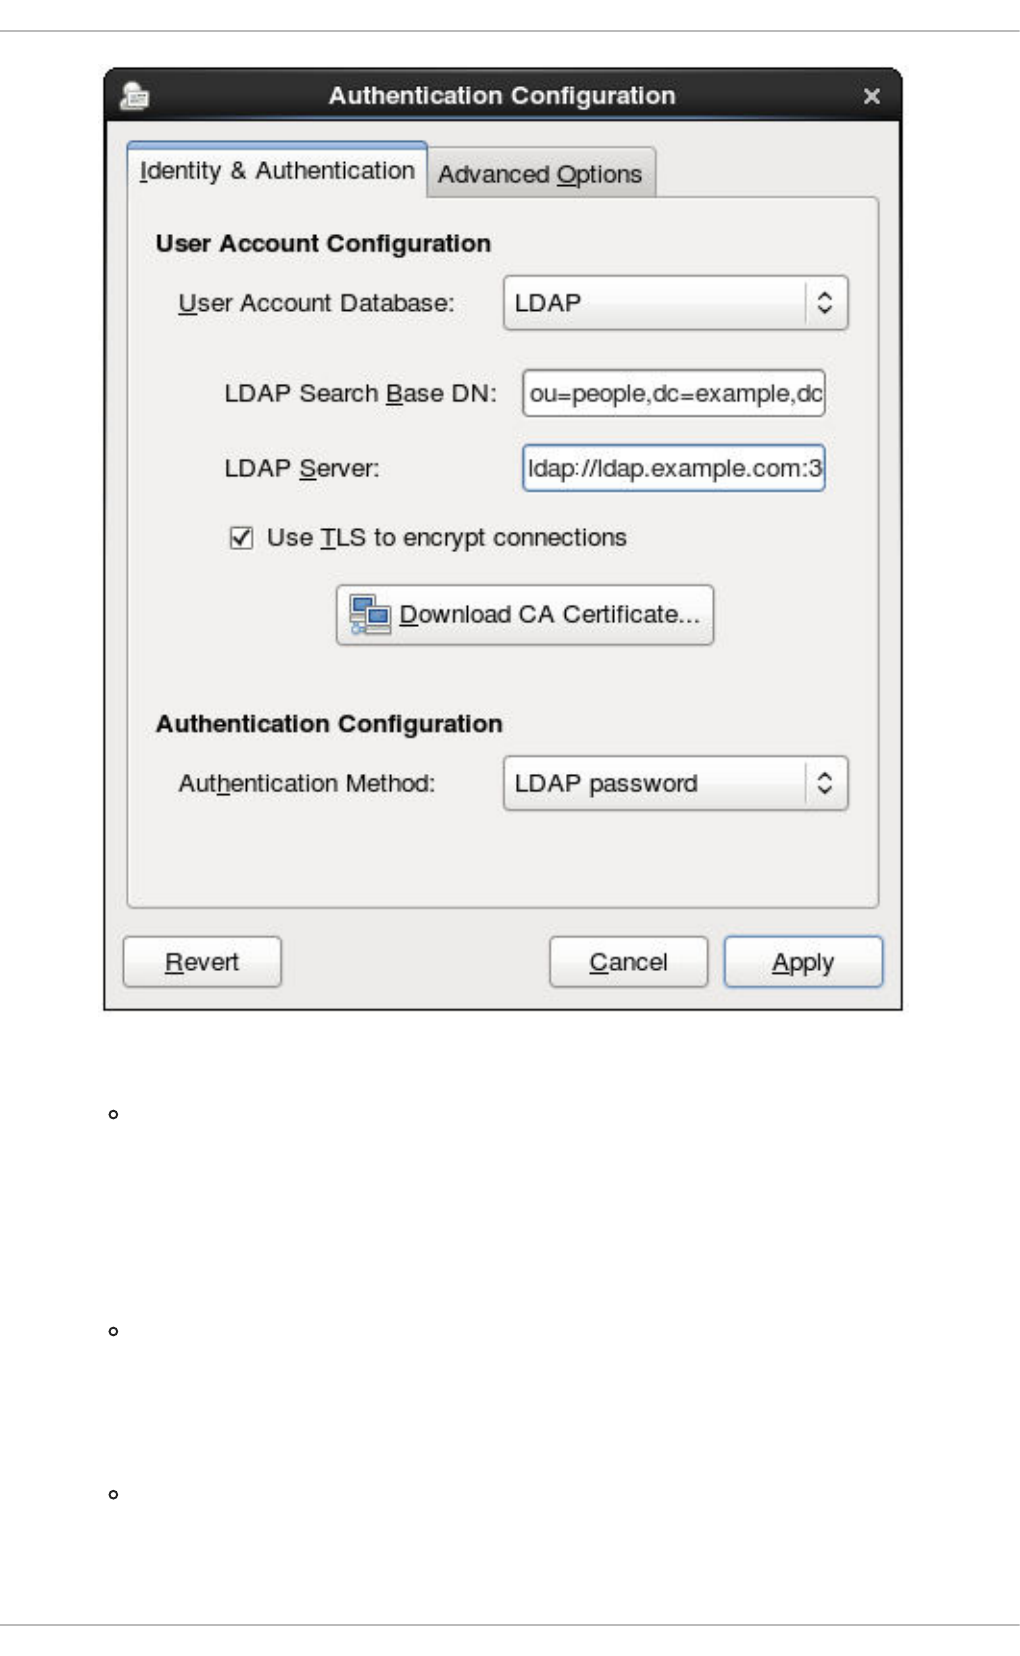
3. Set the information that is required to connect to the LDAP server.
LDAP Search Base DN gives the root suffix or distinguished name (DN) for the user
directory. All of the user entries used for identity/authentication will exist below this parent
entry. For example, ou=people,dc=example,dc=com.
This field is optional. If it is not specified, then the System Security Services Daemon
(SSSD) attempts to detect the search base using the namingContexts and
defaultNamingContext attributes in the LDAP server's configuration entry.
LDAP Server gives the URL of the LDAP server. This usually requires both the host name
and port number of the LDAP server, such as ldap://ldap.example.com:389.
Entering the secure protocol in the URL, ldaps://, enables the Download CA
Certificate button.
Use TLS to encrypt connections sets whether to use Start TLS to encrypt the
connections to the LDAP server. This enables a secure connection over a standard port.
Selecting TLS enables the Download CA Certificate button, which retrieves the
Deployment Guide
220

issuing CA certificate for the LDAP server from whatever certificate authority issued it. The
CA certificate must be in the privacy enhanced mail (PEM) format.
IMPORTANT
Do not select Use TLS to encrypt connections if the server URL uses
a secure protocol (ldaps). This option uses Start TLS, which initiates a
secure connection over a standard port; if a secure port is specified, then a
protocol like SSL must be used instead of Start TLS.
4. Select the authentication method. LDAP allows simple password authentication or Kerberos
authentication.
Using Kerberos is described in Section 13.1.2.4, “Using Kerberos with LDAP or NIS
Authentication”.
The LDAP password option uses PAM applications to use LDAP authentication. This option
requires either a secure (ldaps://) URL or the TLS option to connect to the LDAP server.
13.1.2.2. Configuring NIS Authentication
1. Install the ypbind package. This is required for NIS services, but is not installed by default.
~]# yum install ypbind
When the ypbind service is installed, the portmap and ypbind services are started and
enabled to start at boot time.
2. Open the Authentication Configuration Tool, as in Section 13.1.1, “Launching the Authentication
Configuration Tool UI”.
3. Select NIS in the User Account Database drop-down menu.
CHAPTER 13. CONFIGURING AUTHENTICATION
221
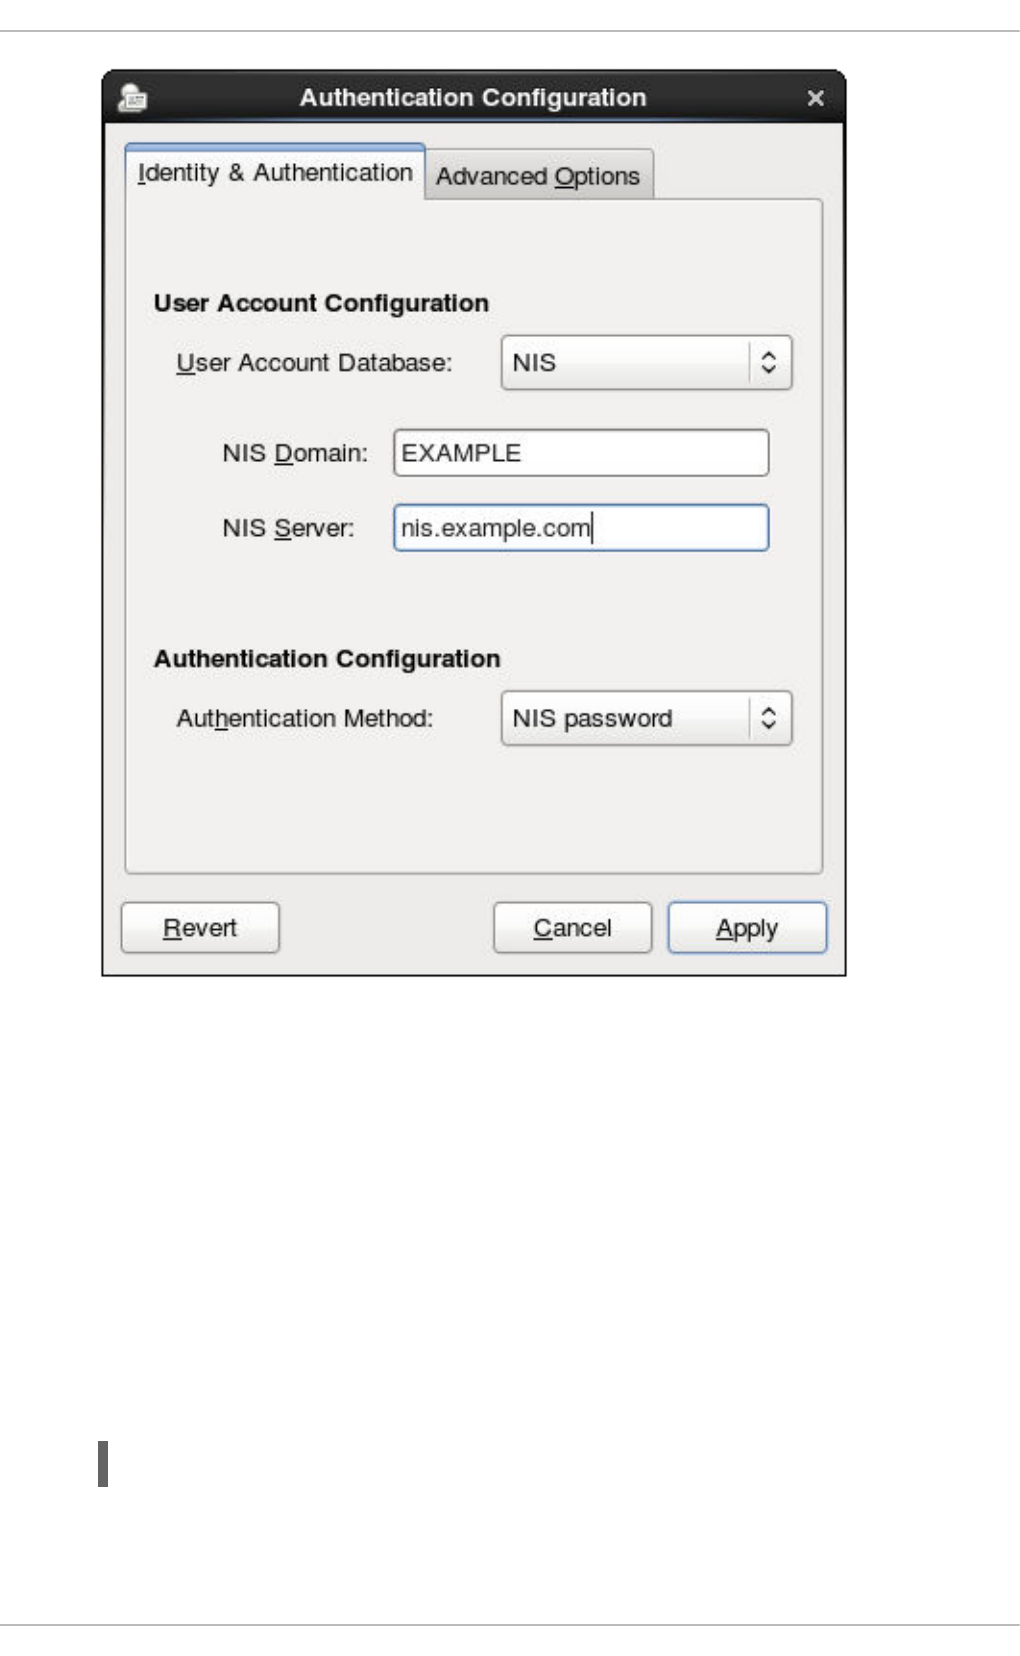
4. Set the information to connect to the NIS server, meaning the NIS domain name and the server
host name. If the NIS server is not specified, the authconfig daemon scans for the NIS server.
5. Select the authentication method. NIS allows simple password authentication or Kerberos
authentication.
Using Kerberos is described in Section 13.1.2.4, “Using Kerberos with LDAP or NIS
Authentication”.
For more information about NIS, see the "Securing NIS" section of the Security Guide.
13.1.2.3. Configuring Winbind Authentication
1. Install the samba-winbind package. This is required for Windows integration features in Samba
services, but is not installed by default.
~]# yum install samba-winbind
2. Open the Authentication Configuration Tool, as in Section 13.1.1, “Launching the Authentication
Configuration Tool UI”.
Deployment Guide
222
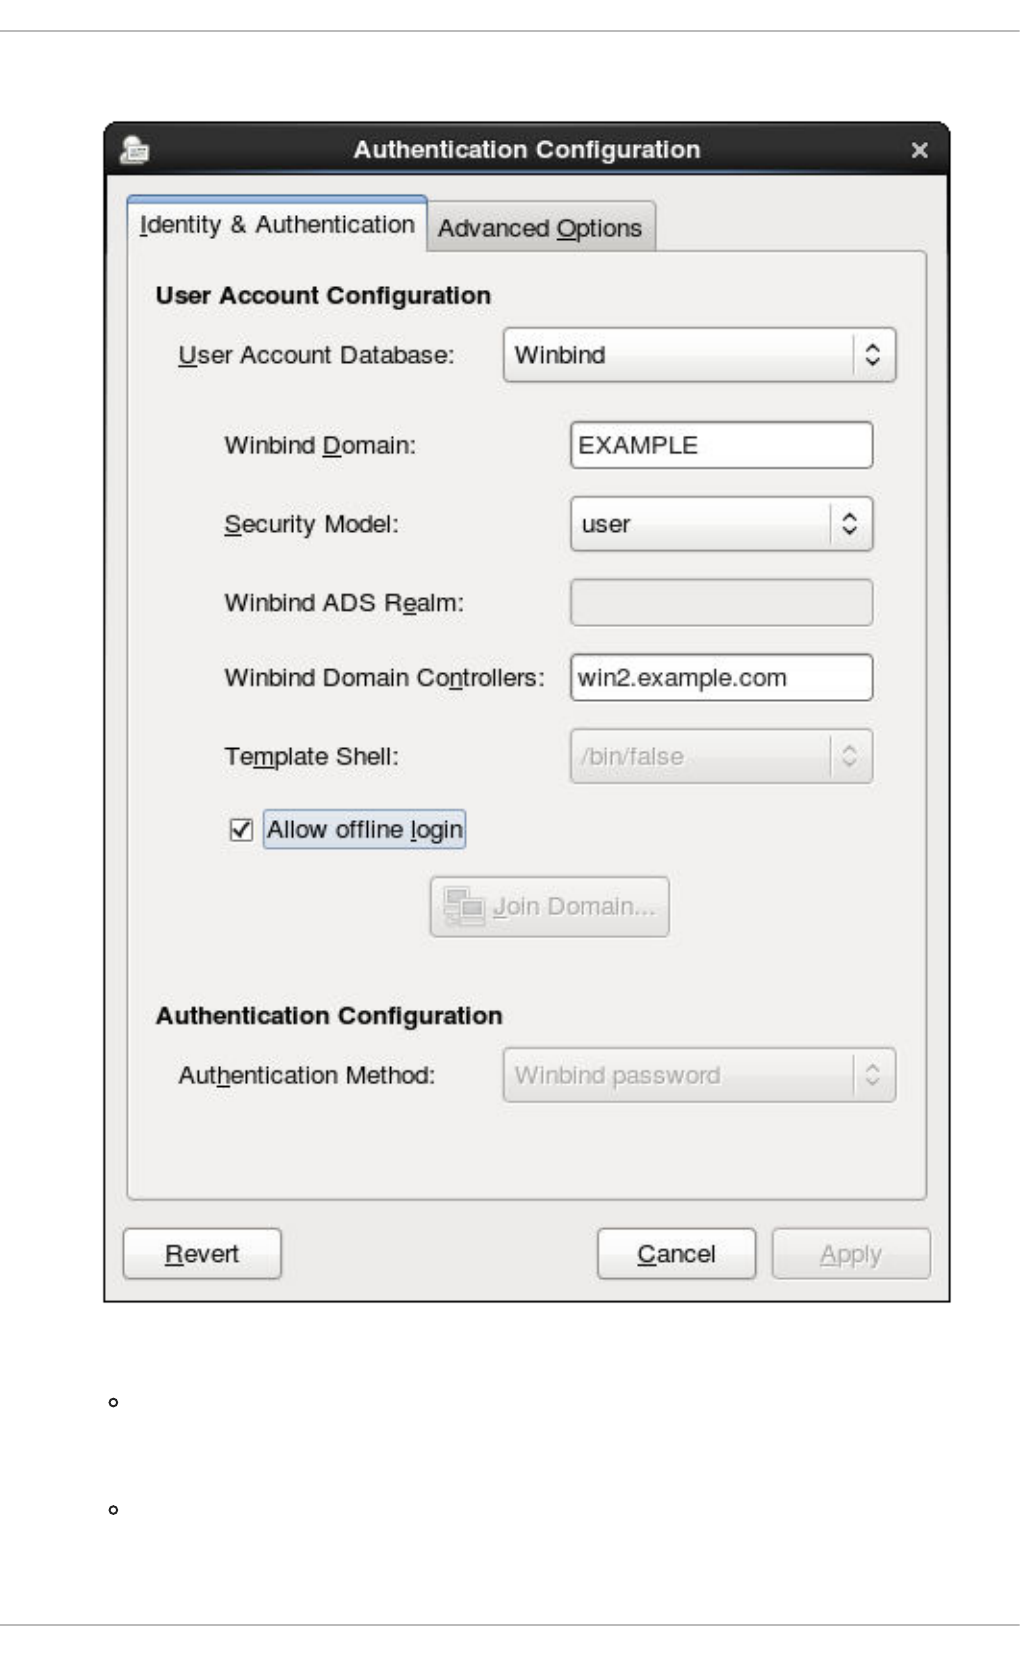
3. Select Winbind in the User Account Database drop-down menu.
4. Set the information that is required to connect to the Microsoft Active Directory domain controller.
Winbind Domain gives the Windows domain to connect to.
This should be in the Windows 2000 format, such as DOMAIN.
Security Model sets the security model to use for Samba clients. authconfig supports
four types of security models:
CHAPTER 13. CONFIGURING AUTHENTICATION
223

ads configures Samba to act as a domain member in an Active Directory Server realm.
To operate in this mode, the krb5-server package must be installed and Kerberos must
be configured properly. Also, when joining to the Active Directory Server using the
command line, the following command must be used:
net ads join
domain has Samba validate the user name/password by authenticating it through a
Windows primary or backup domain controller, much like a Windows server.
server has a local Samba server validate the user name/password by authenticating it
through another server, such as a Windows server. If the server authentication attempt
fails, the system then attempts to authenticate using user mode.
user requires a client to log in with a valid user name and password. This mode does
support encrypted passwords.
The user name format must be domain\user, such as EXAMPLE\jsmith.
NOTE
When verifying that a given user exists in the Windows domain, always
use Windows 2000-style formats and escape the backslash (\) character.
For example:
~]# getent passwd domain\\user
DOMAIN\user:*:16777216:16777216:Name
Surname:/home/DOMAIN/user:/bin/bash
This is the default option.
Winbind ADS Realm gives the Active Directory realm that the Samba server will join. This
is only used with the ads security model.
Winbind Domain Controllers gives the domain controller to use. For more information
about domain controllers, see Section 21.1.6.3, “Domain Controller”.
Template Shell sets which login shell to use for Windows user account settings.
Allow offline login allows authentication information to be stored in a local cache.
The cache is referenced when a user attempts to authenticate to system resources while the
system is offline.
For more information about the Winbind service, see Section 21.1.2, “Samba Daemons and Related
Services”.
For additional information about configuring Winbind and troubleshooting tips, see the Knowledgebase
on the Red Hat Customer Portal.
Also, the Red Hat Access Labs page includes the Winbind Mapper utility that generates a part of the
smb.conf file to help you connect a Red Hat Enterprise Linux to an Active Directory.
13.1.2.4. Using Kerberos with LDAP or NIS Authentication
Deployment Guide
224
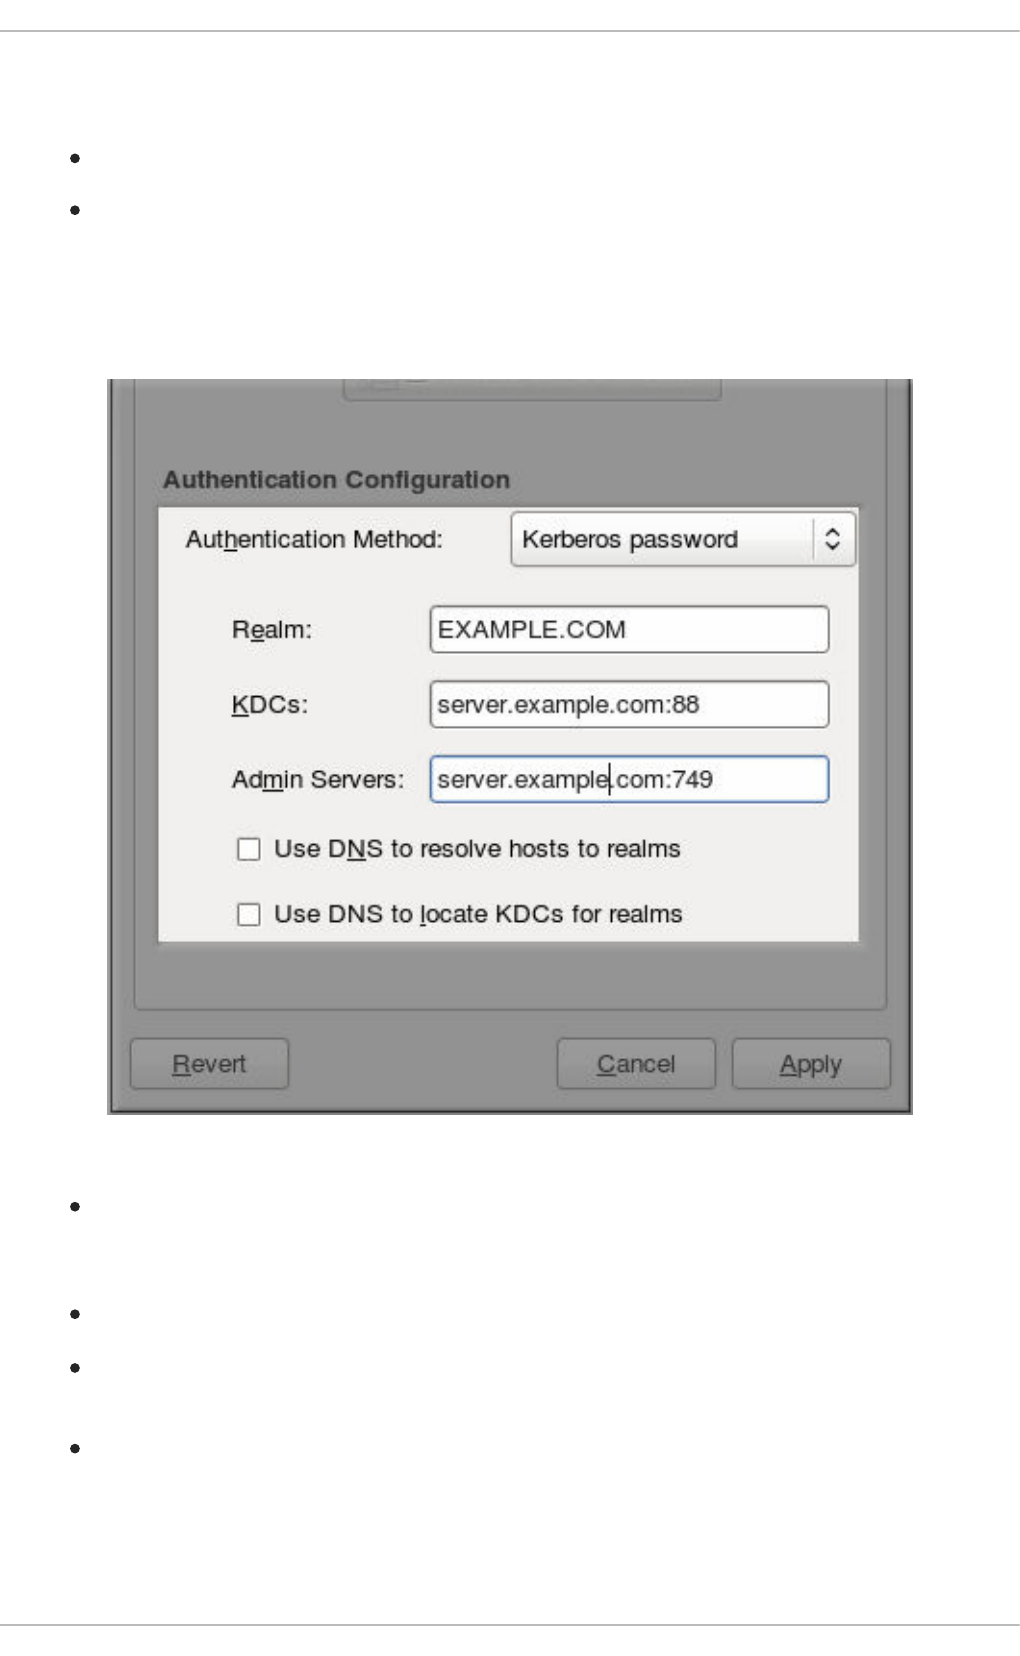
Both LDAP and NIS authentication stores support Kerberos authentication methods. Using Kerberos has
a couple of benefits:
It uses a security layer for communication while still allowing connections over standard ports.
It automatically uses credentials caching with SSSD, which allows offline logins.
Using Kerberos authentication requires the krb5-libs and krb5-workstation packages.
The Kerberos password option from the Authentication Method drop-down menu automatically
opens the fields required to connect to the Kerberos realm.
Figure 13.2. Kerberos Fields
Realm gives the name for the realm for the Kerberos server. The realm is the network that uses
Kerberos, composed of one or more key distribution centers (KDC) and a potentially large
number of clients.
KDCs gives a comma-separated list of servers that issue Kerberos tickets.
Admin Servers gives a list of administration servers running the kadmind process in the
realm.
Optionally, use DNS to resolve server host name and to find additional KDCs within the realm.
For more information about Kerberos, see section "Using Kerberos" of the Red Hat Enterprise Linux 6
Managing Single Sign-On and Smart Cards guide.
CHAPTER 13. CONFIGURING AUTHENTICATION
225
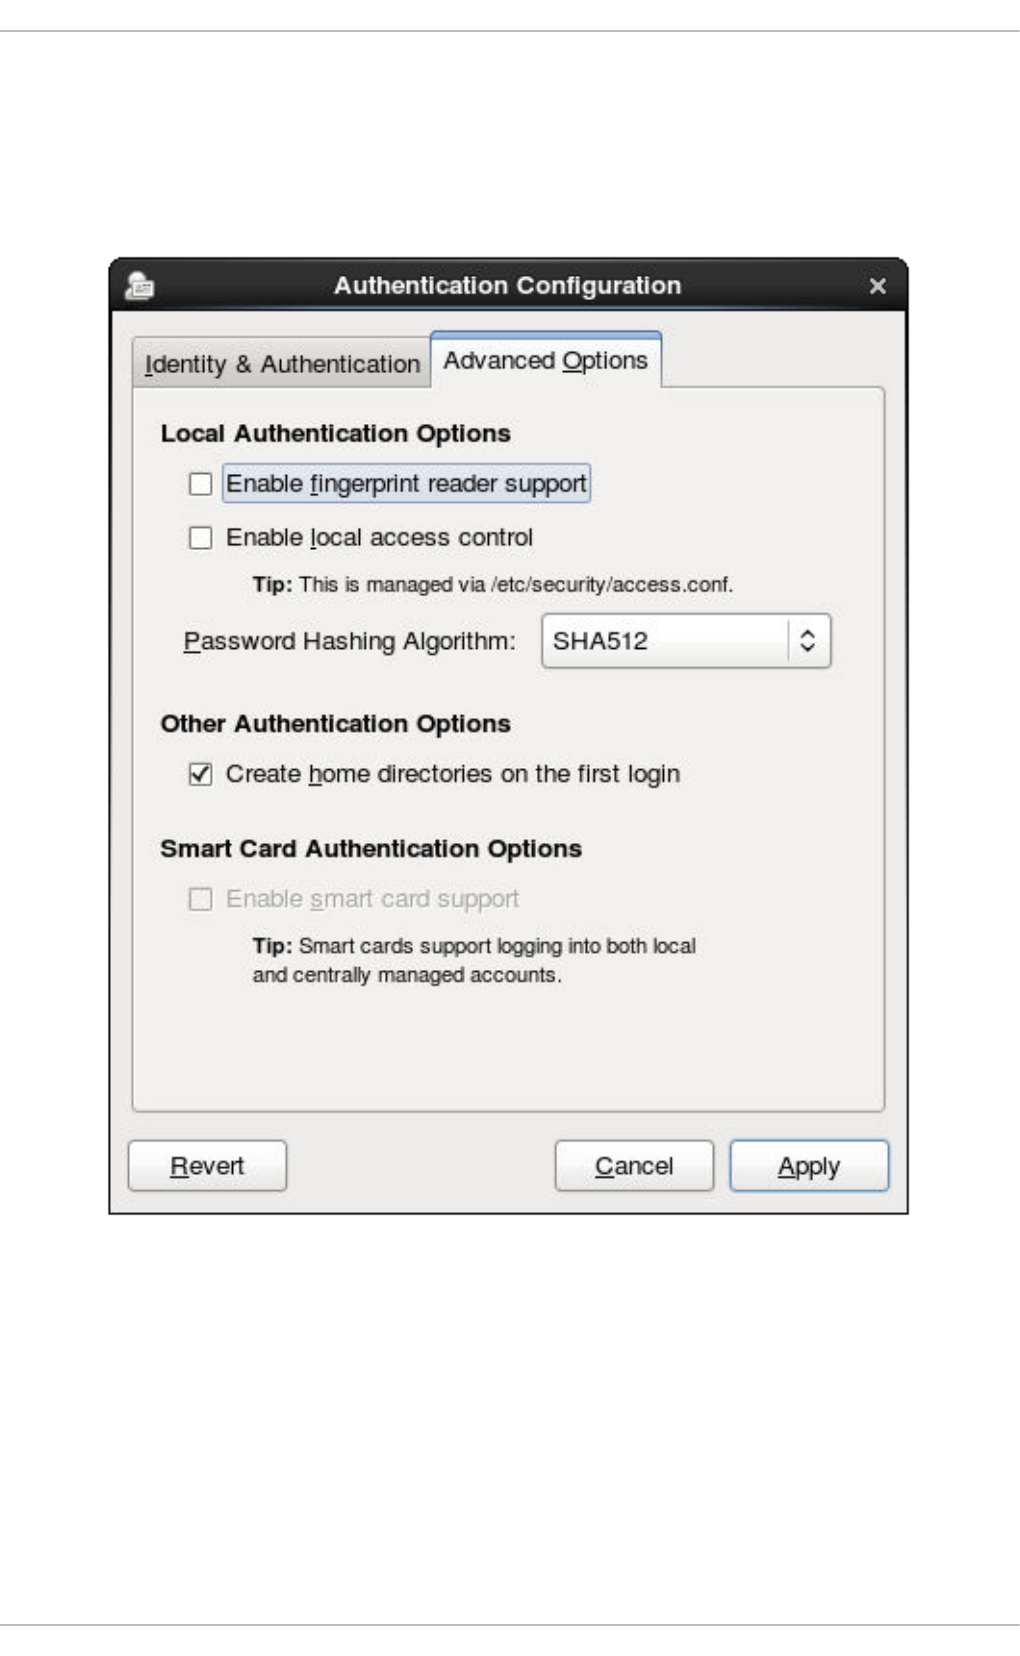
13.1.3. Configuring Alternative Authentication Features
The Authentication Configuration Tool also configures settings related to authentication behavior, apart
from the identity store. This includes entirely different authentication methods (fingerprint scans and
smart cards) or local authentication rules. These alternative authentication options are configured in the
Advanced Options tab.
Figure 13.3. Advanced Options
13.1.3.1. Using Fingerprint Authentication
When there is appropriate hardware available, the Enable fingerprint reader support option
allows fingerprint scans to be used to authenticate local users in addition to other credentials.
13.1.3.2. Setting Local Authentication Parameters
There are two options in the Local Authentication Options area which define authentication
behavior on the local system:
Deployment Guide
226

Enable local access control instructs the /etc/security/access.conf file to
check for local user authorization rules.
Password Hashing Algorithm sets the hashing algorithm to use to encrypt locally-stored
passwords.
13.1.3.3. Enabling Smart Card Authentication
When there are appropriate smart card readers available, a system can accept smart cards (or tokens)
instead of other user credentials to authenticate.
Once the Enable smart card support option is selected, then the behaviors of smart card
authentication can be defined:
Card Removal Action tells the system how to respond when the card is removed from the
card reader during an active session. A system can either ignore the removal and allow the user
to access resources as normal, or a system can immediately lock until the smart card is
supplied.
Require smart card login sets whether a smart card is required for logins or allowed for
logins. When this option is selected, all other methods of authentication are immediately
blocked.
WARNING
Do not select this option until you have successfully authenticated to the
system using a smart card.
Using smart cards requires the pam_pkcs11 package.
13.1.3.4. Creating User Home Directories
There is an option (Create home directories on the first login) to create a home directory
automatically the first time that a user logs in.
This option is beneficial with accounts that are managed centrally, such as with LDAP. However, this
option should not be selected if a system like automount is used to manage user home directories.
13.1.4. Configuring Authentication from the Command Line
The authconfig command-line tool updates all of the configuration files and services required for
system authentication, according to the settings passed to the script. Along with allowing all of the
identity and authentication configuration options that can be set through the UI, the authconfig tool
can also be used to create backup and kickstart files.
For a complete list of authconfig options, check the help output and the man page.
13.1.4.1. Tips for Using authconfig
CHAPTER 13. CONFIGURING AUTHENTICATION
227

There are some things to remember when running authconfig:
With every command, use either the --update or --test option. One of those options is
required for the command to run successfully. Using --update writes the configuration
changes. --test prints the changes to stdout but does not apply the changes to the
configuration.
Each enable option has a corresponding disable option.
13.1.4.2. Configuring LDAP User Stores
To use an LDAP identity store, use the --enableldap. To use LDAP as the authentication source, use
--enableldapauth and then the requisite connection information, like the LDAP server name, base
DN for the user suffix, and (optionally) whether to use TLS. The authconfig command also has options
to enable or disable RFC 2307bis schema for user entries, which is not possible through the
Authentication Configuration UI.
Be sure to use the full LDAP URL, including the protocol (ldap or ldaps) and the port number. Do not
use a secure LDAP URL (ldaps) with the --enableldaptls option.
authconfig --enableldap --enableldapauth --
ldapserver=ldap://ldap.example.com:389,ldap://ldap2.example.com:389 --
ldapbasedn="ou=people,dc=example,dc=com" --enableldaptls --
ldaploadcacert=https://ca.server.example.com/caCert.crt --update
Instead of using --ldapauth for LDAP password authentication, it is possible to use Kerberos with the
LDAP user store. These options are described in Section 13.1.4.5, “Configuring Kerberos
Authentication”.
13.1.4.3. Configuring NIS User Stores
To use a NIS identity store, use the --enablenis. This automatically uses NIS authentication, unless
the Kerberos parameters are explicitly set, so it uses Kerberos authentication (Section 13.1.4.5,
“Configuring Kerberos Authentication”). The only parameters are to identify the NIS server and NIS
domain; if these are not used, then the authconfig service scans the network for NIS servers.
authconfig --enablenis --nisdomain=EXAMPLE --nisserver=nis.example.com --
update
13.1.4.4. Configuring Winbind User Stores
Windows domains have several different security models, and the security model used in the domain
determines the authentication configuration for the local system.
For user and server security models, the Winbind configuration requires only the domain (or workgroup)
name and the domain controller host names.
authconfig --enablewinbind --enablewinbindauth --smbsecurity=user|server
--enablewinbindoffline --smbservers=ad.example.com --smbworkgroup=EXAMPLE
--update
Deployment Guide
228

NOTE
The user name format must be domain\user, such as EXAMPLE\jsmith.
When verifying that a given user exists in the Windows domain, always use Windows
2000-style formats and escape the backslash (\) character. For example:
~]# getent passwd domain\\user
DOMAIN\user:*:16777216:16777216:Name
Surname:/home/DOMAIN/user:/bin/bash
For ads and domain security models, the Winbind configuration allows additional configuration for the
template shell and realm (ads only). For example:
authconfig --enablewinbind --enablewinbindauth --smbsecurity ads --
enablewinbindoffline --smbservers=ad.example.com --smbworkgroup=EXAMPLE --
smbrealm EXAMPLE.COM --winbindtemplateshell=/bin/sh --update
There are a lot of other options for configuring Windows-based authentication and the information for
Windows user accounts, such as name formats, whether to require the domain name with the user
name, and UID ranges. These options are listed in the authconfig help.
13.1.4.5. Configuring Kerberos Authentication
Both LDAP and NIS allow Kerberos authentication to be used in place of their native authentication
mechanisms. At a minimum, using Kerberos authentication requires specifying the realm, the KDC, and
the administrative server. There are also options to use DNS to resolve client names and to find
additional admin servers.
authconfig NIS or LDAP options --enablekrb5 --krb5realm EXAMPLE --krb5kdc
kdc.example.com:88,server.example.com:88 --krb5adminserver
server.example.com:749 --enablekrb5kdcdns --enablekrb5realmdns --update
13.1.4.6. Configuring Local Authentication Settings
The Authentication Configuration Tool can also control some user settings that relate to security, such as
creating home directories, setting password hash algorithms, and authorization. These settings are done
independently of identity/user store settings.
For example, to create user home directories:
authconfig --enablemkhomedir --update
To set or change the hash algorithm used to encrypt user passwords:
authconfig --passalgo=sha512 --update
13.1.4.7. Configuring Fingerprint Authentication
There is one option to enable support for fingerprint readers. This option can be used alone or in
conjunction with other authconfig settings, like LDAP user stores.
CHAPTER 13. CONFIGURING AUTHENTICATION
229

~]# authconfig --enablefingerprint --update
13.1.4.8. Configuring Smart Card Authentication
All that is required to use smart cards with a system is to set the --enablesmartcard option:
~]# authconfig --enablesmartcard --update
There are other configuration options for smart cards, such as changing the default smart card module,
setting the behavior of the system when the smart card is removed, and requiring smart cards for login.
For example, this command instructs the system to lock out a user immediately if the smart card is
removed (a setting of 1 ignores it if the smart card is removed):
~]# authconfig --enablesmartcard --smartcardaction=0 --update
Once smart card authentication has been successfully configured and tested, then the system can be
configured to require smart card authentication for users rather than simple password-based
authentication.
~]# authconfig --enablerequiresmartcard --update
WARNING
Do not use the --enablerequiresmartcard option until you have successfully
authenticated to the system using a smart card. Otherwise, users may be unable to
log into the system.
13.1.4.9. Managing Kickstart and Configuration Files
The --update option updates all of the configuration files with the configuration changes. There are a
couple of alternative options with slightly different behavior:
--kickstart writes the updated configuration to a kickstart file.
--test prints the full configuration, with changes, to stdout but does not edit any configuration
files.
Additionally, authconfig can be used to back up and restore previous configurations. All archives are
saved to a unique subdirectory in the /var/lib/authconfig/ directory. For example, the --
savebackup option gives the backup directory as 2011-07-01:
~]# authconfig --savebackup=2011-07-01
This backs up all of the authentication configuration files beneath the
/var/lib/authconfig/backup-2011-07-01 directory.
Deployment Guide
230

Any of the saved backups can be used to restore the configuration using the --restorebackup option,
giving the name of the manually-saved configuration:
~]# authconfig --restorebackup=2011-07-01
Additionally, authconfig automatically makes a backup of the configuration before it applies any
changes (with the --update option). The configuration can be restored from the most recent automatic
backup, without having to specify the exact backup, using the --restorelastbackup option.
13.1.5. Using Custom Home Directories
If LDAP users have home directories that are not in /home and the system is configured to create home
directories the first time users log in, then these directories are created with the wrong permissions.
1. Apply the correct SELinux context and permissions from the /home directory to the home
directory that is created on the local system. For example:
~]# semanage fcontext -a -e /home /home/locale
2. Install the oddjob-mkhomedir package on the system.
This package provides the pam_oddjob_mkhomedir.so library, which the Authentication
Configuration Tool uses to create home directories. The pam_oddjob_mkhomedir.so library,
unlike the default pam_mkhomedir.so library, can create SELinux labels.
The Authentication Configuration Tool automatically uses the pam_oddjob_mkhomedir.so
library if it is available. Otherwise, it will default to using pam_mkhomedir.so.
3. Make sure the oddjobd service is running.
4. Re-run the Authentication Configuration Tool and enable home directories, as in Section 13.1.3,
“Configuring Alternative Authentication Features”.
If home directories were created before the home directory configuration was changed, then correct the
permissions and SELinux contexts. For example:
~]# semanage fcontext -a -e /home /home/locale
# restorecon -R -v /home/locale
13.2. USING AND CACHING CREDENTIALS WITH SSSD
The System Security Services Daemon (SSSD) provides access to different identity and authentication
providers.
13.2.1. About SSSD
Most system authentication is configured locally, which means that services must check with a local user
store to determine users and credentials. What SSSD does is allow a local service to check with a local
cache in SSSD, but that cache may be taken from any variety of remote identity providers — an LDAP
directory, an Identity Management domain, Active Directory, possibly even a Kerberos realm.
SSSD also caches those users and credentials, so if the local system or the identity provider go offline,
the user credentials are still available to services to verify.
CHAPTER 13. CONFIGURING AUTHENTICATION
231

SSSD is an intermediary between local clients and any configured data store. This relationship brings a
number of benefits for administrators:
Reducing the load on identification/authentication servers. Rather than having every client
service attempt to contact the identification server directly, all of the local clients can contact
SSSD which can connect to the identification server or check its cache.
Permitting offline authentication. SSSD can optionally keep a cache of user identities and
credentials that it retrieves from remote services. This allows users to authenticate to resources
successfully, even if the remote identification server is offline or the local machine is offline.
Using a single user account. Remote users frequently have two (or even more) user accounts,
such as one for their local system and one for the organizational system. This is necessary to
connect to a virtual private network (VPN). Because SSSD supports caching and offline
authentication, remote users can connect to network resources by authenticating to their local
machine and then SSSD maintains their network credentials.
Additional Resources
While this chapter covers the basics of configuring services and domains in SSSD, this is not a
comprehensive resource. Many other configuration options are available for each functional area in
SSSD; check out the man page for the specific functional area to get a complete list of options.
Some of the common man pages are listed in Table 13.1, “A Sampling of SSSD Man Pages”. There is
also a complete list of SSSD man pages in the "See Also" section of the sssd(8) man page.
Table 13.1. A Sampling of SSSD Man Pages
Functional Area Man Page
General Configuration sssd.conf(8)
sudo Services sssd-sudo
LDAP Domains sssd-ldap
Active Directory Domains sssd-ad
sssd-ldap
Identity Management (IdM or IPA) Domains sssd-ipa
sssd-ldap
Kerberos Authentication for Domains sssd-krb5
OpenSSH Keys sss_ssh_authorizedkeys
sss_ssh_knownhostsproxy
Deployment Guide
232

Cache Maintenance sss_cache (cleanup)
sss_useradd, sss_usermod, sss_userdel, sss_seed
(user cache entry management)
Functional Area Man Page
13.2.2. Setting up the sssd.conf File
SSSD services and domains are configured in a .conf file. By default, this is /etc/sssd/sssd.conf
— although that file must be created and configured manually, since SSSD is not configured after
installation.
13.2.2.1. Creating the sssd.conf File
There are three parts of the SSSD configuration file:
[sssd], for general SSSD process and operational configuration; this basically lists the
configured services, domains, and configuration parameters for each
[service_name], for configuration options for each supported system service, as described in
Section 13.2.4, “SSSD and System Services”
[domain_type/DOMAIN_NAME], for configuration options for each configured identity provider
IMPORTANT
While services are optional, at least one identity provider domain must be
configured before the SSSD service can be started.
Example 13.1. Simple sssd.conf File
The [sssd] section has three important parameters:
[sssd]
domains = LOCAL
services = nss
config_file_version = 2
[nss]
filter_groups = root
filter_users = root
[domain/LOCAL]
id_provider = local
auth_provider = local
access_provider = permit
CHAPTER 13. CONFIGURING AUTHENTICATION
233

domains lists all of the domains, configured in the sssd.conf, which SSSD uses as identity
providers. If a domain is not listed in the domains key, it is not used by SSSD, even if it has a
configuration section.
services lists all of the system services, configured in the sssd.conf, which use SSSD; when
SSSD starts, the corresponding SSSD service is started for each configured system service. If a
service is not listed in the services key, it is not used by SSSD, even if it has a configuration
section.
config_file_version sets the version of the configuration file to set file format expectations.
This is version 2, for all recent SSSD versions.
NOTE
Even if a service or domain is configured in the sssd.conf file, SSSD does not interact
with that service or domain unless it is listed in the services or domains parameters,
respectively, in the [sssd] section.
Other configuration parameters are listed in the sssd.conf man page.
Each service and domain parameter is described in its respective configuration section in this chapter
and in their man pages.
13.2.2.2. Using a Custom Configuration File
By default, the sssd process assumes that the configuration file is /etc/sssd/sssd.conf.
An alternative file can be passed to SSSD by using the -c option with the sssd command:
~]# sssd -c /etc/sssd/customfile.conf --daemon
13.2.3. Starting and Stopping SSSD
IMPORTANT
Configure at least one domain before starting SSSD for the first time. See
Section 13.2.10, “SSSD and Identity Providers (Domains)”.
Either the service command or the /etc/init.d/sssd script can start SSSD. For example:
~]# service sssd start
By default, SSSD is not configured to start automatically. There are two ways to change this behavior:
Enabling SSSD through the authconfig command:
~]# authconfig --enablesssd --enablesssdauth --update
Adding the SSSD process to the start list using the chkconfig command:
~]# chkconfig sssd on
Deployment Guide
234

13.2.4. SSSD and System Services
SSSD and its associated services are configured in the sssd.conf file. The [sssd] section also lists
the services that are active and should be started when sssd starts within the services directive.
SSSD can provide credentials caches for several system services:
A Name Service Switch (NSS) provider service that answers name service requests from the
sssd_nss module. This is configured in the [nss] section of the SSSD configuration.
This is described in Section 13.2.5, “Configuring Services: NSS”.
A PAM provider service that manages a PAM conversation through the sssd_pam module. This
is configured in the [pam] section of the configuration.
This is described in Section 13.2.6, “Configuring Services: PAM”.
An SSH provider service that defines how SSSD manages the known_hosts file and other key-
related configuration. Using SSSD with OpenSSH is described in Section 13.2.9, “Configuring
Services: OpenSSH and Cached Keys”.
An autofs provider service that connects to an LDAP server to retrieve configured mount
locations. This is configured as part of an LDAP identity provider in a [domain/NAME] section
in the configuration file.
This is described in Section 13.2.7, “Configuring Services: autofs”.
A sudo provider service that connects to an LDAP server to retrieve configured sudo policies.
This is configured as part of an LDAP identity provider in a [domain/NAME] section in the
configuration file.
This is described in Section 13.2.8, “Configuring Services: sudo”.
A PAC responder service that defines how SSSD works with Kerberos to manage Active
Directory users and groups. This is specifically part of managing Active Directory identity
providers with domains, as described in Section 13.2.13, “Creating Domains: Active Directory”.
13.2.5. Configuring Services: NSS
SSSD provides an NSS module, sssd_nss, which instructs the system to use SSSD to retrieve user
information. The NSS configuration must include a reference to the SSSD module, and then the SSSD
configuration sets how SSSD interacts with NSS.
About NSS Service Maps and SSSD
The Name Service Switch (NSS) provides a central configuration for services to look up a number of
configuration and name resolution services. NSS provides one method of mapping system identities and
services with configuration sources.
SSSD works with NSS as a provider services for several types of NSS maps:
Passwords (passwd)
User groups (shadow)
Groups (groups)
CHAPTER 13. CONFIGURING AUTHENTICATION
235

Netgroups (netgroups)
Services (services)
Procedure 13.1. Configuring NSS Services to Use SSSD
NSS can use multiple identity and configuration providers for any and all of its service maps. The default
is to use system files for services; for SSSD to be included, the nss_sss module has to be included for
the desired service type.
1. Use the Authentication Configuration tool to enable SSSD. This automatically configured the
nsswitch.conf file to use SSSD as a provider.
~]# authconfig --enablesssd --update
This automatically configures the password, shadow, group, and netgroups services maps to
use the SSSD module:
passwd: files sss
shadow: files sss
group: files sss
netgroup: files sss
2. The services map is not enabled by default when SSSD is enabled with authconfig. To
include that map, open the nsswitch.conf file and add the sss module to the services map:
~]# vim /etc/nsswitch.conf
...
services: file sss
...
Procedure 13.2. Configuring SSSD to Work with NSS
The options and configuration that SSSD uses to service NSS requests are configured in the SSSD
configuration file, in the [nss] services section.
1. Open the sssd.conf file.
~]# vim /etc/sssd/sssd.conf
2. Make sure that NSS is listed as one of the services that works with SSSD.
[sssd]
config_file_version = 2
reconnection_retries = 3
sbus_timeout = 30
services = nss, pam
3. In the [nss] section, change any of the NSS parameters. These are listed in Table 13.2,
“SSSD [nss] Configuration Parameters”.
Deployment Guide
236

[nss]
filter_groups = root
filter_users = root
reconnection_retries = 3
entry_cache_timeout = 300
entry_cache_nowait_percentage = 75
4. Restart SSSD.
~]# service sssd restart
Table 13.2. SSSD [nss] Configuration Parameters
Parameter Value
Format
Description
entry_cache_nowait_percent
age
integer Specifies how long sssd_nss should return cached entries
before refreshing the cache. Setting this to zero (0) disables
the entry cache refresh.
This configures the entry cache to update entries in the
background automatically if they are requested if the time
before the next update is a certain percentage of the next
interval. For example, if the interval is 300 seconds and the
cache percentage is 75, then the entry cache will begin
refreshing when a request comes in at 225 seconds — 75%
of the interval.
The allowed values for this option are 0 to 99, which sets the
percentage based on the entry_cache_timeout value.
The default value is 50%.
entry_negative_timeout integer Specifies how long, in seconds, sssd_nss should cache
negative cache hits. A negative cache hit is a query for an
invalid database entries, including non-existent entries.
filter_users, filter_groups string Tells SSSD to exclude certain users from being fetched from
the NSS database. This is particularly useful for system
accounts such as root.
filter_users_in_groups Boolean Sets whether users listed in the filter_users list appear
in group memberships when performing group lookups. If set
to FALSE, group lookups return all users that are members of
that group. If not specified, this value defaults to true, which
filters the group member lists.
debug_level integer, 0 -
9
Sets a debug logging level.
NSS Compatibility Mode
NSS compatibility (compat) mode provides the support for additional entries in the /etc/passwd file to
ensure that users or members of netgroups have access to the system.
To enable NSS compatibility mode to work with SSSD, add the following entries to the
/etc/nsswitch.conf file:
CHAPTER 13. CONFIGURING AUTHENTICATION
237

passwd: compat
passwd_compat: sss
Once NSS compatibility mode is enabled, the following passwd entries are supported:
+user -user
Include (+) or exclude (-) a specified user from the Network Information System (NIS) map.
+@netgroup -@netgroup
Include (+) or exclude (-) all users in the given netgroup from the NIS map.
+
Exclude all users, except previously excluded ones from the NIS map.
For more information about NSS compatibility mode, see the nsswitch.conf(5) manual page.
13.2.6. Configuring Services: PAM
WARNING
A mistake in the PAM configuration file can lock users out of the system completely.
Always back up the configuration files before performing any changes, and keep a
session open so that any changes can be reverted.
SSSD provides a PAM module, sssd_pam, which instructs the system to use SSSD to retrieve user
information. The PAM configuration must include a reference to the SSSD module, and then the SSSD
configuration sets how SSSD interacts with PAM.
Procedure 13.3. Configuring PAM
1. Use authconfig to enable SSSD for system authentication.
This automatically updates the PAM configuration to reference all of the SSSD modules:
# authconfig --update --enablesssd --enablesssdauth
#%PAM-1.0
# This file is auto-generated.
# User changes will be destroyed the next time authconfig is run.
auth required pam_env.so
auth sufficient pam_unix.so nullok try_first_pass
auth requisite pam_succeed_if.so uid >= 500 quiet
auth sufficient pam_sss.so use_first_pass
auth required pam_deny.so
account required pam_unix.so
Deployment Guide
238

These modules can be set to include statements, as necessary.
2. Open the sssd.conf file.
# vim /etc/sssd/sssd.conf
3. Make sure that PAM is listed as one of the services that works with SSSD.
[sssd]
config_file_version = 2
reconnection_retries = 3
sbus_timeout = 30
services = nss, pam
4. In the [pam] section, change any of the PAM parameters. These are listed in Table 13.3,
“SSSD [pam] Configuration Parameters”.
[pam]
reconnection_retries = 3
offline_credentials_expiration = 2
offline_failed_login_attempts = 3
offline_failed_login_delay = 5
5. Restart SSSD.
~]# service sssd restart
Table 13.3. SSSD [pam] Configuration Parameters
Parameter Value Format Description
offline_credentials_expiration integer Sets how long, in days, to allow cached logins if the
authentication provider is offline. This value is
measured from the last successful online login. If not
specified, this defaults to zero (0), which is unlimited.
account sufficient pam_localuser.so
account sufficient pam_succeed_if.so uid < 500 quiet
account [default=bad success=ok user_unknown=ignore] pam_sss.so
account required pam_permit.so
password requisite pam_cracklib.so try_first_pass retry=3
password sufficient pam_unix.so sha512 shadow nullok
try_first_pass use_authtok
password sufficient pam_sss.so use_authtok
password required pam_deny.so
session optional pam_keyinit.so revoke
session required pam_limits.so
session [success=1 default=ignore] pam_succeed_if.so service in
crond quiet use_uid
session sufficient pam_sss.so
session required pam_unix.so
CHAPTER 13. CONFIGURING AUTHENTICATION
239

offline_failed_login_attempts integer Sets how many failed login attempts are allowed if
the authentication provider is offline. If not specified,
this defaults to zero (0), which is unlimited.
offline_failed_login_delay integer Sets how long to prevent login attempts if a user hits
the failed login attempt limit. If set to zero (0), the
user cannot authenticate while the provider is offline
once he hits the failed attempt limit. Only a successful
online authentication can re-enable offline
authentication. If not specified, this defaults to five
(5).
Parameter Value Format Description
13.2.7. Configuring Services: autofs
About Automount, LDAP, and SSSD
Automount maps are commonly flat files, which define a relationship between a map, a mount directory,
and a fileserver. (Automount is described in the Storage Administration Guide.)
For example, let's say that there is a fileserver called nfs.example.com which hosts the directory pub,
and automount is configured to mount directories in the /shares/ directory. So, the mount location is
/shares/pub. All of the mounts are listed in the auto.master file, which identifies the different mount
directories and the files which configure them. The auto.shares file then identifies each file server and
mount directory which goes into the /shares/ directory. The relationships could be viewed like this:
auto.master
_________|__________
| |
| |
/shares/ auto.shares
|
|
|
nfs.example.com:pub
Every mount point, then, is defined in two different files (at a minimum): the auto.master and
auto.whatever file, and those files have to be available to each local automount process.
One way for administrators to manage that for large environments is to store the automount configuration
in a central LDAP directory, and just configure each local system to point to that LDAP directory. That
means that updates only need to be made in a single location, and any new maps are automatically
recognized by local systems.
For automount-LDAP configuration, the automount files are stored as LDAP entries, which are then
translated into the requisite automount files. Each element is then translated into an LDAP attribute.
The LDAP entries look like this:
Deployment Guide
240

# container entry
dn: cn=automount,dc=example,dc=com
objectClass: nsContainer
objectClass: top
cn: automount
# master map entry
dn: automountMapName=auto.master,cn=automount,dc=example,dc=com
objectClass: automountMap
objectClass: top
automountMapName: auto.master
# shares map entry
dn: automountMapName=auto.shares,cn=automount,dc=example,dc=com
objectClass: automountMap
objectClass: top
automountMapName: auto.shares
# shares mount point
dn:
automountKey=/shares,automountMapName=auto.master,cn=automount,dc=example,
dc=com
objectClass: automount
objectClass: top
automountKey: /shares
automountInformation: auto.shares
# pub mount point
dn:
automountKey=pub,automountMapName=auto.shares,cn=automount,dc=example,dc=c
om
objectClass: automount
objectClass: top
automountKey: pub
automountInformation: filer.example.com:/pub
description: pub
The schema elements, then, match up to the structure like this (with the RFC 2307 schema):
auto.master
objectclass: automountMap
filename attribute: automountMapName
_______________________|_________________________
| |
| |
/shares/ auto.shares
objectclass: automount objectclass: automountMap
mount point name attribute: automountKey filename attribute:
automountMapName
map name attribute: automountInformation |
|
|
nfs.example.com:pub
objectclass: automount
mount point name attribute:
automountKey
CHAPTER 13. CONFIGURING AUTHENTICATION
241

fileserver attribute:
automountInformation
autofs uses those schema elements to derive the automount configuration. The
/etc/sysconfig/autofs file identifies the LDAP server, directory location, and schema elements
used for automount entities:
LDAP_URI=ldap://ldap.example.com
SEARCH_BASE="cn=automount,dc=example,dc=com"
MAP_OBJECT_CLASS="automountMap"
ENTRY_OBJECT_CLASS="automount"
MAP_ATTRIBUTE="automountMapName"
ENTRY_ATTRIBUTE="automountKey"
VALUE_ATTRIBUTE="automountInformation"
Rather than pointing the automount configuration to the LDAP directory, it can be configured to point to
SSSD. SSSD, then, stores all of the information that automount needs, and as a user attempts to mount
a directory, that information is cached into SSSD. This offers several advantages for configuration —
such as failover, service discovery, and timeouts — as well as performance improvements by reducing
the number of connections to the LDAP server. Most important, using SSSD allows all mount information
to be cached, so that clients can still successfully mount directories even if the LDAP server goes offline.
Procedure 13.4. Configuring autofs Services in SSSD
1. Make sure that the autofs and sssd-common packages are installed.
2. Open the sssd.conf file.
~]# vim /etc/sssd/sssd.conf
3. Add the autofs service to the list of services that SSSD manages.
[sssd]
services = nss,pam,autofs
....
4. Create a new [autofs] service configuration section. This section can be left blank; there is
only one configurable option, for timeouts for negative cache hits.
This section is required, however, for SSSD to recognize the autofs service and supply the
default configuration.
[autofs]
5. The automount information is read from a configured LDAP domain in the SSSD configuration,
so an LDAP domain must be available. If no additional settings are made, then the configuration
defaults to the RFC 2307 schema and the LDAP search base (ldap_search_base) for the
automount information. This can be customized:
The directory type, autofs_provider; this defaults to the id_provider value; a value of
none explicitly disables autofs for the domain.
Deployment Guide
242

The search base, ldap_autofs_search_base.
The object class to use to recognize map entries, ldap_autofs_map_object_class
The attribute to use to recognize map names, ldap_autofs_map_name
The object class to use to recognize mount point entries,
ldap_autofs_entry_object_class
The attribute to use to recognize mount point names, ldap_autofs_entry_key
The attribute to use for additional configuration information for the mount point,
ldap_autofs_entry_value
For example:
[domain/LDAP]
...
autofs_provider=ldap
ldap_autofs_search_base=cn=automount,dc=example,dc=com
ldap_autofs_map_object_class=automountMap
ldap_autofs_entry_object_class=automount
ldap_autofs_map_name=automountMapName
ldap_autofs_entry_key=automountKey
ldap_autofs_entry_value=automountInformation
6. Save and close the sssd.conf file.
7. Configure autofs to look for the automount map information in SSSD by editing the
nsswitch.conf file and changing the location from ldap to sss:
# vim /etc/nsswitch.conf
automount: files sss
8. Restart SSSD.
# service sssd restart
13.2.8. Configuring Services: sudo
About sudo, LDAP, and SSSD
sudo rules are defined in the sudoers file, which must be distributed separately to every machine to
maintain consistency.
One way for administrators to manage that for large environments is to store the sudo configuration in a
central LDAP directory, and just configure each local system to point to that LDAP directory. That means
that updates only need to be made in a single location, and any new rules are automatically recognized
by local systems.
For sudo-LDAP configuration, each sudo rule is stored as an LDAP entry, with each component of the
sudo rule defined in an LDAP attribute.
The sudoers rule looks like this:
CHAPTER 13. CONFIGURING AUTHENTICATION
243

Defaults env_keep+=SSH_AUTH_SOCK
...
%wheel ALL=(ALL) ALL
The LDAP entry looks like this:
# sudo defaults
dn: cn=defaults,ou=SUDOers,dc=example,dc=com
objectClass: top
objectClass: sudoRole
cn: defaults
description: Default sudoOptions go here
sudoOption: env_keep+=SSH_AUTH_SOCK
# sudo rule
dn: cn=%wheel,ou=SUDOers,dc=example,dc=com
objectClass: top
objectClass: sudoRole
cn: %wheel
sudoUser: %wheel
sudoHost: ALL
sudoCommand: ALL
NOTE
SSSD only caches sudo rules which apply to the local system, depending on the value of
the sudoHost attribute. This can mean that the sudoHost value is set to ALL, uses a
regular expression that matches the host name, matches the systems netgroup, or
matches the systems host name, fully qualified domain name, or IP address.
The sudo service can be configured to point to an LDAP server and to pull its rule configuration from
those LDAP entries. Rather than pointing the sudo configuration to the LDAP directory, it can be
configured to point to SSSD. SSSD, then, stores all of the information that sudo needs, and every time a
user attempts a sudo-related operation, the latest sudo configuration can be pulled from the LDAP
directory (through SSSD). SSSD, however, also caches all of the sudo riles, so that users can perform
tasks, using that centralized LDAP configuration, even if the LDAP server goes offline.
Procedure 13.5. Configuring sudo with SSSD
All of the SSSD sudo configuration options are listed in the sssd-ldap(5) man page.
1. Make sure that the sssd-common package is installed.
~]$ rpm -q sssd-common
2. Open the sssd.conf file.
~]# vim /etc/sssd/sssd.conf
3. Add the sudo service to the list of services that SSSD manages.
Deployment Guide
244

[sssd]
services = nss,pam,sudo
....
4. Create a new [sudo] service configuration section. This section can be left blank; there is only
one configurable option, for evaluating the sudo not before/after period.
This section is required, however, for SSSD to recognize the sudo service and supply the
default configuration.
[sudo]
5. The sudo information is read from a configured LDAP domain in the SSSD configuration, so an
LDAP domain must be available. For an LDAP provider, these parameters are required:
The directory type, sudo_provider; this is always ldap.
The search base, ldap_sudo_search_base.
The URI for the LDAP server, ldap_uri.
For example:
[domain/LDAP]
id_provider = ldap
sudo_provider = ldap
ldap_uri = ldap://example.com
ldap_sudo_search_base = ou=sudoers,dc=example,dc=com
For an Identity Management (IdM or IPA) provider, there are additional parameters required to
perform Kerberos authentication when connecting to the server.
[domain/IDM]
id_provider = ipa
ipa_domain = example.com
ipa_server = ipa.example.com
ldap_tls_cacert = /etc/ipa/ca.crt
sudo_provider = ldap
ldap_uri = ldap://ipa.example.com
ldap_sudo_search_base = ou=sudoers,dc=example,dc=com
ldap_sasl_mech = GSSAPI
ldap_sasl_authid = host/hostname.example.com
ldap_sasl_realm = EXAMPLE.COM
krb5_server = ipa.example.com
NOTE
The sudo_provider type for an Identity Management provider is still ldap.
6. Set the intervals to use to refresh the sudo rule cache.
CHAPTER 13. CONFIGURING AUTHENTICATION
245

The cache for a specific system user is always checked and updated whenever that user
performs a task. However, SSSD caches all rules which relate to the local system. That
complete cache is updated in two ways:
Incrementally, meaning only changes to rules since the last full update
(ldap_sudo_smart_refresh_interval, the time in seconds); the default is 15 minutes,
Fully, which dumps the entire caches and pulls in all of the current rules on the LDAP
server(ldap_sudo_full_refresh_interval, the time in seconds); the default is six
hours.
These two refresh intervals are set separately. For example:
[domain/LDAP]
...
ldap_sudo_full_refresh_interval=86400
ldap_sudo_smart_refresh_interval=3600
NOTE
SSSD only caches sudo rules which apply to the local system. This can mean
that the sudoHost value is set to ALL, uses a regular expression that matches
the host name, matches the systems netgroup, or matches the systems host
name, fully qualified domain name, or IP address.
7. Optionally, set any values to change the schema used for sudo rules.
Schema elements are set in the ldap_sudorule_* attributes. By default, all of the schema
elements use the schema defined in sudoers.ldap; these defaults will be used in almost all
deployments.
8. Save and close the sssd.conf file.
9. Configure sudo to look for rules configuration in SSSD by editing the nsswitch.conf file and
adding the sss location:
~]# vim /etc/nsswitch.conf
sudoers: files sss
10. Restart SSSD.
~]# service sssd restart
13.2.9. Configuring Services: OpenSSH and Cached Keys
OpenSSH creates secure, encrypted connections between two systems. One machine authenticates to
another machine to allow access; the authentication can be of the machine itself for server connections
or of a user on that machine. OpenSSH is described in more detail in Chapter 14, OpenSSH.
This authentication is performed through public-private key pairs that identify the authenticating user or
machine. The remote machine or user attempting to access the machine presents a key pair. The local
machine then elects whether to trust that remote entity; if it is trusted, the public key for that remote
Deployment Guide
246

machine is stored in the known_hosts file or for the remote user in authorized_keys. Whenever that
remote machine or user attempts to authenticate again, the local system checks the known_hosts or
authorized_keys file first to see if that remote entity is recognized and trusted. If it is, then access is
granted.
The first problem comes in verifying those identities reliably.
The known_hosts file is a triplet of the machine name, its IP address, and its public key:
server.example.com,255.255.255.255 ssh-rsa
AbcdEfg1234ZYX098776/AbcdEfg1234ZYX098776/AbcdEfg1234ZYX098776=
The known_hosts file can quickly become outdated for a number of different reasons: systems using
DHCP cycle through IP addresses, new keys can be re-issued periodically, or virtual machines or
services can be brought online and removed. This changes the host name, IP address, and key triplet.
Administrators have to clean and maintain a current known_hosts file to maintain security. (Or system
users get in the habit of accepting any machine and key presented, which negates the security benefits
of key-based security.)
Additionally, a problem for both machines and users is distributing keys in a scalable way. Machines can
send their keys as part of establishing an encrypted session, but users have to supply their keys in
advance. Simply propagating and then updating keys consistently is a difficult administrative task.
Lastly, SSH key and machine information are only maintained locally. There may be machines or users
on the network which are recognized and trusted by some systems and not by others because the
known_hosts file has not been updated uniformly.
The goal of SSSD is to server as a credentials cache. This includes working as a credentials cache for
SSH public keys for machines and users. OpenSSH is configured to reference SSSD to check for
cached keys; SSSD uses Red Hat Linux's Identity Management (IPA) domain as an identity, and Identity
Management actually stores the public keys and host information.
NOTE
Only Linux machines enrolled, or joined, in the Identity Management domain can use
SSSD as a key cache for OpenSSH. Other Unix machines and Windows machines must
use the regular authentication mechanisms with the known_hosts file.
Configuring OpenSSH to Use SSSD for Host Keys
OpenSSH is configured in either a user-specific configuration file (~/.ssh/config) or a system-wide
configuration file (/etc/ssh/ssh_config). The user file has precedence over the system settings and
the first obtained value for a parameter is used. The formatting and conventions for this file are covered
in Chapter 14, OpenSSH.
In order to manage host keys, SSSD has a tool, sss_ssh_knownhostsproxy, which performs two
operations:
1. Asks SSSD to retrieve the public host key from the Identity Management server and store it in
the /var/lib/sss/pubconf/known_hosts file.
2. Establishes a connection with the host machine, using either a socket (the default) or a proxy
command.
This tool has the format:
CHAPTER 13. CONFIGURING AUTHENTICATION
247

sss_ssh_knownhostsproxy [-d sssd_domain] [-p ssh_port] HOST
[PROXY_COMMAND]
Table 13.4. sss_ssh_knownhostsproxy Options
Short Argument Long Argument Description
HOSTNAME Gives the host name of the host to check and connect to. In the
OpenSSH configuration file, this can be a token, %h.
PROXY_COMMA
ND
Passes a proxy command to use to connect to the SSH client.
This is similar to running ssh -o ProxyCommand=value.
This option is used when running
sss_ssh_knownhostsproxy from the command line or
through another script, but is not necessary in the OpenSSH
configuration file.
-d sssd_domain --domain
sssd_domain
Only searches for public keys in entries in the specified domain.
If not given, SSSD searches for keys in all configured domains.
-p port --port port Uses this port to connect to the SSH client. By default, this is port
22.
To use this SSSD tool, add or edit two parameters to the ssh_config or ~/.ssh/config file:
Specify the command to use to connect to the SSH client (ProxyCommand). This is the
sss_ssh_knownhostsproxy, with the desired arguments and host name.
Specify the location of the SSSD hosts file (GlobalKnownHostsFile).
For example, this looks for public keys in all configured SSSD domains and connects over whatever port
and host are supplied:
ProxyCommand /usr/bin/sss_ssh_knownhostsproxy -p %p %h
GlobalKnownHostsFile /var/lib/sss/pubconf/known_hosts
Configuring OpenSSH to Use SSSD for User Keys
SSSD can provide user public keys to OpenSSH. The keys are read by the SSH daemon, sshd, directly
from the output of the sss_ssh_authorizedkeys tool and are not stored in a file.
To configure sshd to read a user's public keys from an external program, in this case the
sss_ssh_authorizedkeys tool, use the AuthorizedKeysCommand directive in the
/etc/ssh/sshd_config file.
The sss_ssh_authorizedkeys tool can be used to acquire SSH public keys from the user entries in
the Identity Management (IPA) domain and output them in OpenSSH authorized_keys format. The
command has the following format:
sss_ssh_authorizedkeys [-d sssd_domain] USER
Table 13.5. sss_ssh_authorizedkeys Options
Deployment Guide
248

Short Argument Long Argument Description
USER The user name or account name for which to obtain the public
key. In the OpenSSH configuration file, this can be represented
by a token, %u.
-d sssd_domain --domain
sssd_domain
Only search for public keys in entries in the specified domain. If
not given, SSSD searches for keys in all configured domains.
This feature is configured in /etc/ssh/sshd_config as follows:
AuthorizedKeysCommand /usr/bin/sss_ssh_authorizedkeys
AuthorizedKeysCommandRunAs nobody
These and further options are documented in the sshd_config(5) man page. Note that the sshd
service must be restarted for any changes to take effect.
13.2.10. SSSD and Identity Providers (Domains)
SSSD recognizes domains, which are entries within the SSSD configuration file associated with
different, external data sources. Domains are a combination of an identity provider (for user information)
and, optionally, other providers such as authentication (for authentication requests) and for other
operations, such as password changes. (The identity provider can also be used for all operations, if all
operations are performed within a single domain or server.)
SSSD works with different LDAP identity providers (including OpenLDAP, Red Hat Directory Server, and
Microsoft Active Directory) and can use native LDAP authentication, Kerberos authentication, or
provider-specific authentication protocols (such as Active Directory).
A domain configuration defines the identity provider, the authentication provider, and any specific
configuration to access the information in those providers. There are several types of identity and
authentication providers:
LDAP, for general LDAP servers
Active Directory (an extension of the LDAP provider type)
Identity Management (an extension of the LDAP provider type)
Local, for the local SSSD database
Proxy
Kerberos (authentication provider only)
The identity and authentication providers can be configured in different combinations in the domain
entry. The possible combinations are listed in Table 13.6, “Identity Store and Authentication Type
Combinations”.
Table 13.6. Identity Store and Authentication Type Combinations
CHAPTER 13. CONFIGURING AUTHENTICATION
249

Identification Provider Authentication Provider
Identity Management (LDAP) Identity Management (LDAP)
Active Directory (LDAP) Active Directory (LDAP)
Active Directory (LDAP) Kerberos
LDAP LDAP
LDAP Kerberos
proxy LDAP
proxy Kerberos
proxy proxy
Along with the domain entry itself, the domain name must be added to the list of domains that SSSD will
query. For example:
[sssd]
domains = LOCAL,Name
...
[domain/Name]
id_provider = type
auth_provider = type
provider_specific = value
global = value
global attributes are available to any type of domain, such as cache and time out settings. Each identity
and authentication provider has its own set of required and optional configuration parameters.
Table 13.7. General [domain] Configuration Parameters
Parameter Value Format Description
Deployment Guide
250

id_provider string Specifies the data back end to use for this domain. The supported
identity back ends are:
ldap
ipa (Identity Management in Red Hat Enterprise Linux)
ad (Microsoft Active Directory)
proxy, for a legacy NSS provider, such as nss_nis. Using a
proxy ID provider also requires specifying the legacy NSS
library to load to start successfully, set in the
proxy_lib_name option.
local, the SSSD internal local provider
auth_provider string Sets the authentication provider used for the domain. The default value
for this option is the value of id_provider. The supported
authentication providers are ldap, ipa, ad, krb5 (Kerberos), proxy, and
none.
min_id,max_id integer Optional. Specifies the UID and GID range for the domain. If a domain
contains entries that are outside that range, they are ignored. The
default value for min_id is 1; the default value for max_id is 0,
which is unlimited.
IMPORTANT
The default min_id value is the same for all types of
identity provider. If LDAP directories are using UID
numbers that start at one, it could cause conflicts with
users in the local /etc/passwd file. To avoid these
conflicts, set min_id to 1000 or higher as possible.
cache_credenti
als
Boolean Optional. Specifies whether to store user credentials in the local SSSD
domain database cache. The default value for this parameter is false.
Set this value to true for domains other than the LOCAL domain to
enable offline authentication.
entry_cache_ti
meout
integer Optional. Specifies how long, in seconds, SSSD should cache positive
cache hits. A positive cache hit is a successful query.
Parameter Value Format Description
CHAPTER 13. CONFIGURING AUTHENTICATION
251

use_fully_qualif
ied_names
Boolean Optional. Specifies whether requests to this domain require fully
qualified domain names. If set to true, all requests to this domain must
use fully qualified domain names. It also means that the output from the
request displays the fully-qualified name. Restricting requests to fully
qualified user names allows SSSD to differentiate between domains
with users with conflicting user names.
If use_fully_qualified_names is set to false, it is possible to
use the fully-qualified name in the requests, but only the simplified
version is displayed in the output.
SSSD can only parse names based on the domain name, not the realm
name. The same name can be used for both domains and realms,
however.
Parameter Value Format Description
13.2.11. Creating Domains: LDAP
An LDAP domain means that SSSD uses an LDAP directory as the identity provider (and, optionally, also
as an authentication provider). SSSD supports several major directory services:
Red Hat Directory Server
OpenLDAP
Identity Management (IdM or IPA)
Microsoft Active Directory 2008 R2
NOTE
All of the parameters available to a general LDAP identity provider are also available to
Identity Management and Active Directory identity providers, which are subsets of the
LDAP provider.
Parameters for Configuring an LDAP Domain
An LDAP directory can function as both an identity provider and an authentication provider. The
configuration requires enough information to identify and connect to the user directory in the LDAP
server, but the way that those connection parameters are defined is flexible.
Other options are available to provide more fine-grained control, like specifying a user account to use to
connect to the LDAP server or using different LDAP servers for password operations. The most common
options are listed in Table 13.8, “LDAP Domain Configuration Parameters”.
NOTE
Server-side password policies always take precedence over the policy enabled from the
client side. For example, when setting the ldap_pwd_policy=shadow option, the
policies defined with the shadow LPAD attributes for a user have no effect on whether the
password policy is enabled on the OpenLDAP server.
Deployment Guide
252

NOTE
Many other options are listed in the man page for LDAP domain configuration, sssd-
ldap(5).
Table 13.8. LDAP Domain Configuration Parameters
Parameter Description
ldap_uri Gives a comma-separated list of the URIs of the LDAP servers to which SSSD will
connect. The list is given in order of preference, so the first server in the list is
tried first. Listing additional servers provides failover protection. This can be
detected from the DNS SRV records if it is not given.
ldap_search_base Gives the base DN to use for performing LDAP user operations.
IMPORTANT
If used incorrectly, ldap_search_base might cause SSSD
lookups to fail.
With an AD provider, setting ldap_search_base is not required. The AD
provider automatically discovers all the necessary information. Red Hat
recommends not to set the parameter in this situation and instead rely on what the
AD provider discovers.
ldap_tls_reqcert Specifies how to check for SSL server certificates in a TLS session. There are four
options:
never disables requests for certificates.
allow requests a certificate, but proceeds normally even if no certificate is
given or a bad certificate is given.
try requests a certificate and proceeds normally if no certificate is given, If
a bad certificate is given, the session terminates.
demand and hard are the same option. This requires a valid certificate or
the session is terminated.
The default is hard.
ldap_tls_cacert Gives the full path and file name to the file that contains the CA certificates for all
of the CAs that SSSD recognizes. SSSD will accept any certificate issued by
these CAs.
This uses the OpenLDAP system defaults if it is not given explicitly.
CHAPTER 13. CONFIGURING AUTHENTICATION
253

ldap_referrals Sets whether SSSD will use LDAP referrals, meaning forwarding queries from one
LDAP database to another. SSSD supports database-level and subtree referrals.
For referrals within the same LDAP server, SSSD will adjust the DN of the entry
being queried. For referrals that go to different LDAP servers, SSSD does an
exact match on the DN. Setting this value to true enables referrals; this is the
default.
Referrals can negatively impact overall performance because of the time spent
attempting to trace referrals. Disabling referral checking can significantly improve
performance.
ldap_schema Sets what version of schema to use when searching for user entries. This can be
rfc2307, rfc2307bis, ad, or ipa. The default is rfc2307.
In RFC 2307, group objects use a multi-valued attribute, memberuid, which lists
the names of the users that belong to that group. In RFC 2307bis, group objects
use the member attribute, which contains the full distinguished name (DN) of a
user or group entry. RFC 2307bis allows nested groups using the member
attribute. Because these different schema use different definitions for group
membership, using the wrong LDAP schema with SSSD can affect both viewing
and managing network resources, even if the appropriate permissions are in
place.
For example, with RFC 2307bis, all groups are returned when using nested
groups or primary/secondary groups.
$ id
uid=500(myserver) gid=500(myserver)
groups=500(myserver),510(myothergroup)
If SSSD is using RFC 2307 schema, only the primary group is returned.
This setting only affects how SSSD determines the group members. It does not
change the actual user data.
ldap_search_timeout Sets the time, in seconds, that LDAP searches are allowed to run before they are
canceled and cached results are returned.
When an LDAP search times out, SSSD automatically switches to offline mode.
ldap_network_timeout Sets the time, in seconds, SSSD attempts to poll an LDAP server after a
connection attempt fails. The default is six seconds.
ldap_opt_timeout Sets the time, in seconds, to wait before aborting synchronous LDAP operations if
no response is received from the server. This option also controls the timeout
when communicating with the KDC in case of a SASL bind. The default is five
seconds.
Parameter Description
LDAP Domain Example
The LDAP configuration is very flexible, depending on your specific environment and the SSSD behavior.
These are some common examples of an LDAP domain, but the SSSD configuration is not limited to
these examples.
Deployment Guide
254

NOTE
Along with creating the domain entry, add the new domain to the list of domains for SSSD
to query in the sssd.conf file. For example:
domains = LOCAL,LDAP1,AD,PROXYNIS
Example 13.2. A Basic LDAP Domain Configuration
An LDAP domain requires three things:
An LDAP server
The search base
A way to establish a secure connection
The last item depends on the LDAP environment. SSSD requires a secure connection since it
handles sensitive information. This connection can be a dedicated TLS/SSL connection or it can use
Start TLS.
Using a dedicated TLS/SSL connection uses an LDAPS connection to connect to the server and is
therefore set as part of the ldap_uri option:
# An LDAP domain
[domain/LDAP]
cache_credentials = true
id_provider = ldap
auth_provider = ldap
ldap_uri = ldaps://ldap.example.com:636
ldap_search_base = dc=example,dc=com
Using Start TLS requires a way to input the certificate information to establish a secure connection
dynamically over an insecure port. This is done using the ldap_id_use_start_tls option to use
Start TLS and then ldap_tls_cacert to identify the CA certificate which issued the SSL server
certificates.
# An LDAP domain
[domain/LDAP]
cache_credentials = true
id_provider = ldap
auth_provider = ldap
ldap_uri = ldap://ldap.example.com
ldap_search_base = dc=example,dc=com
ldap_id_use_start_tls = true
ldap_tls_reqcert = demand
ldap_tls_cacert = /etc/pki/tls/certs/ca-bundle.crt
CHAPTER 13. CONFIGURING AUTHENTICATION
255

13.2.12. Creating Domains: Identity Management (IdM)
The Identity Management (IdM or IPA) identity provider is an extension of a generic LDAP provider. All of
the configuration options for an LDAP provider are available to the IdM provider, as well as some
additional parameters which allow SSSD to work as a client of the IdM domain and extend IdM
functionality.
Identity Management can work as a provider for identities, authentication, access control rules, and
passwords, all of the *_provider parameters for a domain. Additionally, Identity Management has
configuration options within its own domain to manage SELinux policies, automount information, and
host-based access control. All of those features in IdM domains can be tied to SSSD configuraiton,
allowing those security-related policies to be applied and cached for system users.
Example 13.3. Basic IdM Provider
An IdM provider, like an LDAP provider, can be set to serve several different services, including
identity, authentication, and access control
For IdM servers, there are two additional settings which are very useful (although not required):
Use the specific IdM schema rather than the default RFC 2307 schema.
Set SSSD to update the Identity Management domain's DNS server with the IP address of
this client when the client first connects to the IdM domain.
[sssd]
domains = local,example.com
...
[domain/example.com]
id_provider = ipa
ipa_server = ipaserver.example.com
ipa_hostname = ipa1.example.com
auth_provider = ipa
access_provider = ipa
chpass_provider = ipa
# set which schema to use
ldap_schema = ipa
# automatically update IdM DNS records
ipa_dyndns_update = true
Identity Management defines and maintains security policies and identities for users across a Linux
domain. This includes access control policies, SELinux policies, and other rules. Some of these
elements in the IdM domain interact directly with SSSD, using SSSD as an IdM client — and those
features can be managed in the IdM domain entry in sssd.conf.
Most of the configuration parameters relate to setting schema elements (which is not relevant in most
deployments because IdM uses a fixed schema) and never need to be changed. In fact, none of the
features in IdM require client-side settings. But there may be circumstances where tweaking the behavior
is helpful.
Example 13.4. IdM Provider with SELinux
Deployment Guide
256

IdM can define SELinux user policies for system users, so it can work as an SELinux provider for
SSSD. This is set in the selinux_provider parameter. The provider defaults to the
id_provider value, so this is not necessary to set explicitly to support SELinux rules. However, it
can be useful to explicitly disable SELinux support for the IdM provider in SSSD.
selinux_provider = ipa
Example 13.5. IdM Provider with Host-Based Access Control
IdM can define host-based access controls, restricting access to services or entire systems based on
what host a user is using to connect or attempting to connect to. This rules can be evaluated and
enforced by SSSD as part of the access provider behavior.
For host-based access controls to be in effect, the Identity Management server must be the access
provider, at a minimum.
There are two options which can be set for how SSSD evaluates host-based access control rules:
SSSD can evaluate what machine (source host) the user is using to connect to the IdM
resource; this is disabled by default, so that only the target host part of the rule is evaluated.
SSSD can refresh the host-based access control rules in its cache at a specified interval.
For example:
access_provider = ipa
ipa_hbac_refresh = 120
# check for source machine rules; disabled by default
ipa_hbac_support_srchost = true
Example 13.6. Identity Management with Cross-Realm Kerberos Trusts
Identity Management (IdM or IPA) can be configured with trusted relationships between Active
Directory DNS domains and Kerberos realms. This allows Active Directory users to access services
and hosts on Linux systems.
There are two configuration settings in SSSD that are used with cross-realm trusts:
A service that adds required data to Kerberos tickets
A setting to support subdomains
Kerberos Ticket Data
Microsoft uses a special authorization structure called privileged access certificates or MS-PAC. A
PAC is embedded in a Kerberos ticket as a way of identifying the entity to other Windows clients and
servers in the Windows domain.
SSSD has a special PAC service which generates the additional data for Kerberos tickets. When
using an Active Directory domain, it may be necessary to include the PAC data for Windows users. In
that case, enable the pac service in SSSD:
CHAPTER 13. CONFIGURING AUTHENTICATION
257

[sssd]
services = nss, pam, pac
...
Windows Subdomains
Normally, a domain entry in SSSD corresponds directly to a single identity provider. However, with
IdM cross-realm trusts, the IdM domain can trust another domain, so that the domains are transparent
to each other. SSSD can follow that trusted relationship, so that if an IdM domain is configured, any
Windows domain is also automatically searched and supported by SSSD — without having to be
configured in a domain section in SSSD.
This is configured by adding the subdomains_provider parameter to the IdM domain section. This
is actually an optional parameter; if a subdomain is discovered, then SSSD defaults to using the ipa
provider type. However, this parameter can also be used to disable subdomain fetches by setting a
value of none.
[domain/IDM]
...
subdomains_provider = ipa
get_domains_timeout = 300
13.2.13. Creating Domains: Active Directory
The Active Directory identity provider is an extension of a generic LDAP provider. All of the configuration
options for an LDAP provider are available to the Active Directory provider, as well as some additional
parameters related to user accounts and identity mapping between Active Directory and system users.
There are some fundamental differences between standard LDAP servers and an Active Directory
server. When configuring an Active Directory provider, there are some configuration areas, then, which
require specific configuration:
Identities using a Windows security ID must be mapped to the corresponding Linux system user
ID.
Searches must account for the range retrieval extension.
There may be performance issues with LDAP referrals.
Mapping Active Directory Securiy IDs and Linux User IDs
There are inherent structural differences between how Windows and Linux handle system users and in
the user schemas used in Active Directory and standard LDAPv3 directory services. When using an
Active Directory identity provider with SSSD to manage system users, it is necessary to reconcile the
Active Directory-style user to the new SSSD user. There are two ways to do this:
Using Services for Unix to insert POSIX attributes on Windows user and group entries, and then
having those attributes pulled into PAM/NSS
Using ID mapping on SSSD to create a map between Active Directory security IDs (SIDs) and
the generated UIDs on Linux
ID mapping is the simplest option for most environments because it requires no additional packages or
configuration on Active Directory.
Deployment Guide
258

The Mechanism of ID Mapping
Linux/Unix systems use a local user ID number and group ID number to identify users on the system.
These UID:GID numbers are a simple integer, such as 501:501. These numbers are simple because
they are always created and administered locally, even for systems which are part of a larger Linux/Unix
domain.
Microsoft Windows and Active Directory use a different user ID structure to identify users, groups, and
machines. Each ID is constructed of different segments that identify the security version, the issuing
authority type, the machine, and the identity itself. For example:
S-1-5-21-3623811015-3361044348-30300820-1013
The third through sixth blocks are the machine identifier:
S-1-5-21-3623811015-3361044348-30300820-1013
The last block is the relative identifier (RID) which identifies the specific entity:
S-1-5-21-3623811015-3361044348-30300820-1013
A range of possible ID numbers are always assigned to SSSD. (This is a local range, so it is the same
for every machine.)
|_____________________________|
| |
minimum ID max ID
This range is divided into 10,000 sections (by default), with each section allocated 200,000 IDs.
| slice 1 | slice 2 | ... |
|_________|_________|_________|
| | | |
minimum ID max ID
When a new Active Directory domain is detected, the SID is hashed. Then, SSSD takes the modulus of
the hash and the number of available sections to determine which ID section to assign to the Active
Directory domain. This is a reliably consistent means of assigning ID sections, so the same ID range is
assigned to the same Active Directory domain on most client machines.
| Active | Active | |
|Directory|Directory| |
|domain 1 |domain 2 | ... |
| | | |
| slice 1 | slice 2 | ... |
|_________|_________|_________|
| | | |
minimum ID max ID
CHAPTER 13. CONFIGURING AUTHENTICATION
259
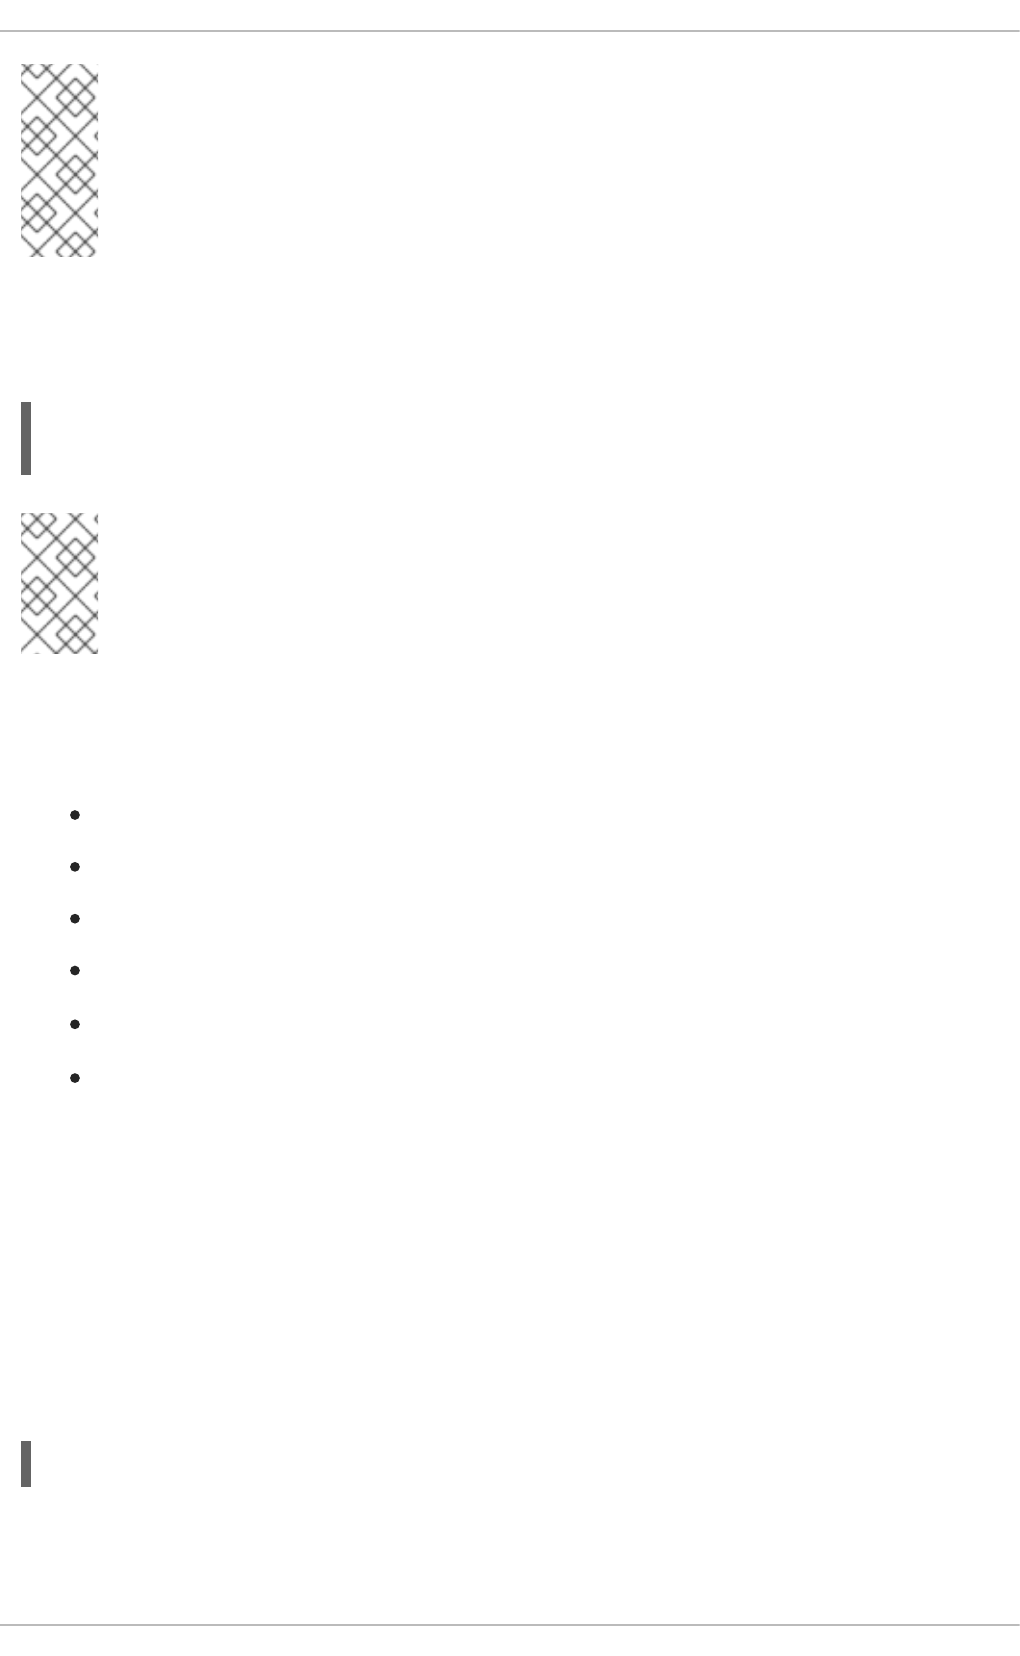
NOTE
While the method of assigning ID sections is consistent, ID mapping is based on the
order that an Active Directory domain is encountered on a client machine — so it
may not result in consistent ID range assignments on all Linux client machines. If
consistency is required, then consider disabling ID mapping and using explicit POSIX
attributes.
ID Mapping Parameters
ID mapping is enabled in two parameters, one to enable the mapping and one to load the appropriate
Active Directory user schema:
ldap_id_mapping = True
ldap_schema = ad
NOTE
When ID mapping is enabled, the uidNumber and gidNumber attributes are ignored.
This prevents any manually-assigned values. If any values must be manually assigned,
then all values must be manually assigned, and ID mapping should be disabled.
Mapping Users
When an Active Directory user attempts to log into a local system service for the first time, an entry for
that user is created in the SSSD cache. The remote user is set up much like a system user:
A system UID is created for the user based on his SID and the ID range for that domain.
A GID is created for the user, which is identical to the UID.
A private group is created for the user.
A home directory is created, based on the home directory format in the sssd.conf file.
A shell is created, according to the system defaults or the setting in the sssd.conf file.
If the user belongs to any groups in the Active Directory domain, then, using the SID, SSSD
adds the user to those groups on the Linux system.
Active Directory Users and Range Retrieval Searches
Microsoft Active Directory has an attribute, MaxValRange, which sets a limit on how many values for a
multi-valued attribute will be returned. This is the range retrieval search extension. Essentially, this runs
multiuple mini-searches, each returning a subset of the results within a given range, until all matches are
returned.
For example, when doing a search for the member attribute, each entry could have multiple values, and
there can be multiple entries with that attribute. If there are 2000 matching results (or more), then
MaxValRange limits how many are displayed at once; this is the value range. The given attribute then
has an additional flag set, showing which range in the set the result is in:
attribute:range=low-high:value
For example, results 100 to 500 in a search:
Deployment Guide
260

member;range=99-499: cn=John Smith...
This is described in the Microsoft documentation at http://msdn.microsoft.com/en-
us/library/cc223242.aspx.
SSSD supports range retrievals with Active Directory providers as part of user and group management,
without any additional configuration.
However, some LDAP provider attributes which are available to configure searches — such as
ldap_user_search_base — are not performant with range retrievals. Be cautious when configuring
search bases in the Active Directory provider domain and consider what searches may trigger a range
retrieval.
Performance and LDAP Referrals
Referrals can negatively impact overall performance because of the time spent attempting to trace
referrals. There is particularly bad performance degradation when referral chasing is used with an Active
Directory identity provider. Disabling referral checking can significantly improve performance.
LDAP referrals are enabled by default, so they must be explicitly disabled in the LDAP domain
configuration. For example:
ldap_referrals = false
Active Directory as Other Provider Types
Active Directory can be used as an identity provider and as an access, password, and authentication
provider.
There are a number of options in the generic LDAP provider configuration which can be used to
configure an Active Directory provider. Using the ad value is a short-cut which automatically pulls in the
parameters and values to configure a given provider for Active Directory. For example, using
access_provider = ad to configure an Active Directory access provider expands to this
configuration using the explicit LDAP provider parameters:
access_provider = ldap
ldap_access_order = expire
ldap_account_expire_policy = ad
Procedure 13.6. Configuring an Active Directory Identity Provider
Active Directory can work as a provider for identities, authentication, access control rules, and
passwords, all of the *_provider parameters for a domain. Additionally, it is possible to load the native
Active Directory schema for user and group entries, rather than using the default RFC 2307.
1. Make sure that both the Active Directory and Linux systems have a properly configured
environment.
Name resolution must be properly configured, particularly if service discovery is used with
SSSD.
The clocks on both systems must be in sync for Kerberos to work properly.
2. Set up the Linux system as an Active Directory client and enroll it within the Active Directory
domain. This is done by configuring the Kerberos and Samba services on the Linux system.
a. Set up Kerberos to use the Active Directory Kerberos realm.
CHAPTER 13. CONFIGURING AUTHENTICATION
261

i. Open the Kerberos client configuration file.
~]# vim /etc/krb5.conf
ii. Configure the [logging] and [libdefaults] sections so that they connect to the
Active Directory realm.
[logging]
default = FILE:/var/log/krb5libs.log
[libdefaults]
default_realm = EXAMPLE.COM
dns_lookup_realm = true
dns_lookup_kdc = true
ticket_lifetime = 24h
renew_lifetime = 7d
rdns = false
forwardable = false
If autodiscovery is not used with SSSD, then also configure the [realms] and
[domain_realm] sections to explicitly define the Active Directory server.
b. Configure the Samba server to connect to the Active directory server.
i. Open the Samba configuration file.
~]# vim /etc/samba/smb.conf
ii. Set the Active Directory domain information in the [global] section.
[global]
workgroup = EXAMPLE
client signing = yes
client use spnego = yes
kerberos method = secrets and keytab
log file = /var/log/samba/%m.log
password server = AD.EXAMPLE.COM
realm = EXAMPLE.COM
security = ads
c. Add the Linux machine to the Active Directory domain.
i. Obtain Kerberos credentials for a Windows administrative user.
~]# kinit Administrator
ii. Add the machine to the domain using the net command.
~]# net ads join -k
Joined 'server' to dns domain 'example.com'
This creates a new keytab file, /etc/krb5.keytab.
Deployment Guide
262

List the keys for the system and check that the host principal is there.
~]# klist -k
3. Use authconfig to enable SSSD for system authentication.
4. Set the Active Directory domain as an identity provider in the SSSD configuration, as shown in
Example 13.7, “An Active Directory 2008 R2 Domain” and Example 13.8, “An Active Directory
2008 R2 Domain with ID Mapping”.
5. Restart the SSH service to load the new PAM configuration.
~]# service sshd restart
6. Restart SSSD after changing the configuration file.
~]# service sssd restart
Example 13.7. An Active Directory 2008 R2 Domain
~]# vim /etc/sssd/sssd.conf
[sssd]
config_file_version = 2
domains = ad.example.com
services = nss, pam
...
[domain/ad.example.com]
id_provider = ad
ad_server = ad.example.com
ad_hostname = ad.example.com
auth_provider = ad
chpass_provider = ad
access_provider = ad
# defines user/group schema type
ldap_schema = ad
# using explicit POSIX attributes in the Windows entries
ldap_id_mapping = False
# caching credentials
cache_credentials = true
# access controls
ldap_access_order = expire
ldap_account_expire_policy = ad
ldap_force_upper_case_realm = true
# authconfig --update --enablesssd --enablesssdauth
CHAPTER 13. CONFIGURING AUTHENTICATION
263

# performance
ldap_referrals = false
There are two parameters that are critical for ID mapping: the Active Directory schema must be loaded
(ldap_schema) and ID mapping must be explicitly enabled (ldap_id_mapping).
Example 13.8. An Active Directory 2008 R2 Domain with ID Mapping
~]# vim /etc/sssd/sssd.conf
[sssd]
config_file_version = 2
domains = ad.example.com
services = nss, pam
...
[domain/ad.example.com]
id_provider = ad
ad_server = ad.example.com
ad_hostname = ad.example.com
auth_provider = ad
chpass_provider = ad
access_provider = ad
# defines user/group schema type
ldap_schema = ad
# for SID-UID mapping
ldap_id_mapping = True
# caching credentials
cache_credentials = true
# access controls
ldap_access_order = expire
ldap_account_expire_policy = ad
ldap_force_upper_case_realm = true
# performance
ldap_referrals = false
All of the potential configuration attributes for an Active Directory domain are listed in the sssd-
ldap(5) and sssd-ad(5) man pages.
13.2.14. Configuring Domains: Active Directory as an LDAP Provider (Alternative)
While Active Directory can be configured as a type-specific identity provider, it can also be configured as
a pure LDAP provider with a Kerberos authentication provider.
Procedure 13.7. Configuring Active Directory as an LDAP Provider
Deployment Guide
264

1. It is recommended that SSSD connect to the Active Directory server using SASL, which means
that the local host must have a service keytab for the Windows domain on the Linux host.
This keytab can be created using Samba.
a. Configure the /etc/krb5.conf file to use the Active Directory realm.
[logging]
default = FILE:/var/log/krb5libs.log
[libdefaults]
default_realm = AD.EXAMPLE.COM
dns_lookup_realm = true
dns_lookup_kdc = true
ticket_lifetime = 24h
renew_lifetime = 7d
rdns = false
forwardable = false
[realms]
# Define only if DNS lookups are not working
# AD.EXAMPLE.COM = {
# kdc = server.ad.example.com
# admin_server = server.ad.example.com
# master_kdc = server.ad.example.com
# }
[domain_realm]
# Define only if DNS lookups are not working
# .ad.example.com = AD.EXAMPLE.COM
# ad.example.com = AD.EXAMPLE.COM
b. Set the Samba configuration file, /etc/samba/smb.conf, to point to the Windows
Kerberos realm.
[global]
workgroup = EXAMPLE
client signing = yes
client use spnego = yes
kerberos method = secrets and keytab
log file = /var/log/samba/%m.log
password server = AD.EXAMPLE.COM
realm = EXAMPLE.COM
security = ads
c. To initialize Kerberos, type the following command as root:
~]# kinit Administrator@EXAMPLE.COM
d. Then, run the net ads command to log in as an administrator principal. This administrator
account must have sufficient rights to add a machine to the Windows domain, but it does not
require domain administrator privileges.
~]# net ads join -U Administrator
CHAPTER 13. CONFIGURING AUTHENTICATION
265

e. Run net ads again to add the host machine to the domain. This can be done with the host
principal (host/FQDN) or, optionally, with the NFS service (nfs/FQDN).
~]# net ads join createupn="host/rhel-
server.example.com@AD.EXAMPLE.COM" -U Administrator
2. Make sure that the Services for Unix package is installed on the Windows server.
3. Set up the Windows domain which will be used with SSSD.
a. On the Windows machine, open Server Manager.
b. Create the Active Directory Domain Services role.
c. Create a new domain, such as ad.example.com.
d. Add the Identity Management for UNIX service to the Active Directory Domain Services role.
Use the Unix NIS domain as the domain name in the configuration.
4. On the Active Directory server, create a group for the Linux users.
a. Open Administrative Tools and select Active Directory Users and
Computers.
b. Select the Active Directory domain, ad.example.com.
c. In the Users tab, right-click and select Create a New Group.
d. Name the new group unixusers, and save.
e. Double-click the unixusers group entry, and open the Users tab.
f. Open the Unix Attributes tab.
g. Set the NIS domain to the NIS domain that was configured for ad.example.com and,
optionally, set a group ID (GID) number.
5. Configure a user to be part of the Unix group.
a. Open Administrative Tools and select Active Directory Users and
Computers.
b. Select the Active Directory domain, ad.example.com.
c. In the Users tab, right-click and select Create a New User.
d. Name the new user aduser, and make sure that the User must change password at
next logon and Lock account check boxes are not selected.
Then save the user.
e. Double-click the aduser user entry, and open the Unix Attributes tab. Make sure that
the Unix configuration matches that of the Active Directory domain and the unixgroup
group:
The NIS domain, as created for the Active Directory domain
Deployment Guide
266

The UID
The login shell, to /bin/bash
The home directory, to /home/aduser
The primary group name, to unixusers
NOTE
Password lookups on large directories can take several seconds per request. The
initial user lookup is a call to the LDAP server. Unindexed searches are much
more resource-intensive, and therefore take longer, than indexed searches
because the server checks every entry in the directory for a match. To speed up
user lookups, index the attributes that are searched for by SSSD:
uid
uidNumber
gidNumber
gecos
6. On the Linux system, configure the SSSD domain.
~]# vim /etc/sssd/sssd.conf
For a complete list of LDAP provider parameters, see the sssd-ldap(5) man pages.
Example 13.9. An Active Directory 2008 R2 Domain with Services for Unix
[sssd]
config_file_version = 2
domains = ad.example.com
services = nss, pam
...
[domain/ad.example.com]
cache_credentials = true
# for performance
ldap_referrals = false
id_provider = ldap
auth_provider = krb5
chpass_provider = krb5
access_provider = ldap
ldap_schema = rfc2307bis
ldap_sasl_mech = GSSAPI
ldap_sasl_authid = host/rhel-server.example.com@AD.EXAMPLE.COM
CHAPTER 13. CONFIGURING AUTHENTICATION
267

#provide the schema for services for unix
ldap_schema = rfc2307bis
ldap_user_search_base = ou=user accounts,dc=ad,dc=example,dc=com
ldap_user_object_class = user
ldap_user_home_directory = unixHomeDirectory
ldap_user_principal = userPrincipalName
# optional - set schema mapping
# parameters are listed in sssd-ldap
ldap_user_object_class = user
ldap_user_name = sAMAccountName
ldap_group_search_base = ou=groups,dc=ad,dc=example,dc=com
ldap_group_object_class = group
ldap_access_order = expire
ldap_account_expire_policy = ad
ldap_force_upper_case_realm = true
ldap_referrals = false
krb5_realm = AD-REALM.EXAMPLE.COM
# required
krb5_canonicalize = false
7. Restart SSSD.
~]# service sssd restart
13.2.15. Domain Options: Setting Username Formats
One of the primary actions that SSSD performs is mapping a local system user to an identity in the
remote identity provider. SSSD uses a combination of the user name and the domain back end name to
create the login identity.
As long as they belong to different domains, SSSD can recognize different users with the same user
name. For example, SSSD can successfully authenticate both jsmith in the ldap.example.com
domain and jsmith in the ldap.otherexample.com domain.
The name format used to construct full user name is (optionally) defined universally in the [sssd]
section of the configuration and can then be defined individually in each domain section.
Usernames for different services — LDAP, Samba, Active Directory, Identity Management, even the
local system — all have different formats. The expression that SSSD uses to identify user name/domain
name sets must be able to interpret names in different formats. This expression is set in the
re_expression parameter.
In the global default, this filter constructs a name in the form name@domain:
(?P<name>[^@]+)@?(?P<domain>[^@]*$)
Deployment Guide
268

NOTE
The regular expression format is Python syntax.
The domain part may be supplied automatically, based on the domain name of the identity provider.
Therefore, a user can log in as jsmith and if the user belongs to the LOCAL domain (for example),
then his user name is interpreted by SSSD as jsmith@LOCAL.
However, other identity providers may have other formats. Samba, for example, has a very strict format
so that user name must match the form DOMAIN\username. For Samba, then, the regular expression
must be:
Some providers, such as Active Directory, support multiple different name formats. Active Directory and
Identity Management, for example, support three different formats by default:
username
username@domain.name
DOMAIN\username
The default value for Active Directory and Identity Management providers, then, is a more complex filter
that allows all three name formats:
NOTE
Requesting information with the fully-qualified name, such as
jsmith@ldap.example.com, always returns the proper user account. If there are
multiple users with the same user name in different domains, specifying only the user
name returns the user for whichever domain comes first in the lookup order.
While re_expression is the most important method for setting user name formats, there are two other
options which are useful for other applications.
Default Domain Name Value
The first sets a default domain name to be used with all users, default_domain_suffix. (This is a
global setting, available in the [sssd] section only.) There may be a case where multiple domains are
configured but only one stores user data and the others are used for host or service identities. Setting a
default domain name allows users to log in with only their user name, not specifying the domain name
(which would be required for users outside the primary domain).
[sssd]
...
default_domain_suffix = USERS.EXAMPLE.COM
Full Name Format for Output
(?P<domain>[^\\]*?)\\?(?P<name>[^\\]+$)
(((?P<domain>[^\\]+)\\(?P<name>.+$))|((?P<name>[^@]+)@(?P<domain>.+$))|(^(?
P<name>[^@\\]+)$))
CHAPTER 13. CONFIGURING AUTHENTICATION
269

The other parameter is related to re_expression, only instead of defining how to interpret a user
name, it defines how to print an identified name. The full_name_format parameter sets how the user
name and domain name (once determined) are displayed.
full_name_format = %1$s@%2$s
13.2.16. Domain Options: Enabling Offline Authentication
User identities are always cached, as well as information about the domain services. However, user
credentials are not cached by default. This means that SSSD always checks with the back end identity
provider for authentication requests. If the identity provider is offline or unavailable, there is no way to
process those authentication requests, so user authentication could fail.
It is possible to enable offline credentials caching, which stores credentials (after successful login) as
part of the user account in the SSSD cache. Therefore, even if an identity provider is unavailable, users
can still authenticate, using their stored credentials. Offline credentials caching is primarily configured in
each individual domain entry, but there are some optional settings that can be set in the PAM service
section, because credentials caching interacts with the local PAM service as well as the remote domain.
[domain/EXAMPLE]
cache_credentials = true
There are optional parameters that set when those credentials expire. Expiration is useful because it can
prevent a user with a potentially outdated account or credentials from accessing local services
indefinitely.
The credentials expiration itself is set in the PAM service, which processes authentication requests for
the system.
[sssd]
services = nss,pam
...
[pam]
offline_credentials_expiration = 3
...
[domain/EXAMPLE]
cache_credentials = true
...
offline_credentials_expiration sets the number of days after a successful login that a single
credentials entry for a user is preserved in cache. Setting this to zero (0) means that entries are kept
forever.
While not related to the credentials cache specifically, each domain has configuration options on when
individual user and service caches expire:
account_cache_expiration sets the number of days after a successful login that the entire
user account entry is removed from the SSSD cache. This must be equal to or longer than the
individual offline credentials cache expiration period.
entry_cache_timeout sets a validity period, in seconds, for all entries stored in the cache
before SSSD requests updated information from the identity provider. There are also individual
Deployment Guide
270

cache timeout parameters for group, service, netgroup, sudo, and autofs entries; these are listed
in the sssd.conf man page. The default time is 5400 seconds (90 minutes).
For example:
[sssd]
services = nss,pam
...
[pam]
offline_credentials_expiration = 3
...
[domain/EXAMPLE]
cache_credentials = true
account_cache_expiration = 7
entry_cache_timeout = 14400
...
13.2.17. Domain Options: Setting Password Expirations
Password policies generally set an expiration time, after which passwords expire and must be replaced.
Password expiration policies are evaluated on the server side through the identity provider, then a
warning can be processed and displayed in SSSD through its PAM service.
There are two ways to display password expiration warnings:
The pam_pwd_expiration_warning parameter defines the global default setting for all
domains on how far in advance of the password expiration to display a warning. This is set for
the PAM service.
The pwd_expiration_warning parameter defines the per-domain setting on how far in
advance of the password expiration to display a warning.
When using a domain-level password expiration warning, an authentication provider
(auth_provider) must also be configured for the domain.
For example:
[sssd]
services = nss,pam
...
[pam]
pam_pwd_expiration_warning = 3
...
[domain/EXAMPLE]
id_provider = ipa
auth_provider = ipa
pwd_expiration_warning = 7
The password expiration warning must be sent from the server to SSSD for the warning to be displayed.
If no password warning is sent from the server, no message is displayed through SSSD, even if the
password expiration time is within the period set in SSSD.
CHAPTER 13. CONFIGURING AUTHENTICATION
271

If the password expiration warning is not set in SSSD or is set to 0, then the SSSD password warning
filter is not applied and the server-side password warning is automatically displayed.
NOTE
As long as the password warning is sent from the server, the PAM or domain password
expirations in effect override the password warning settings on the back end identity
provider. For example, consider a back end identity provider that has the warning period
set at 28 days, but the PAM service in SSSD has it set to 7 days. The provider sends the
warning to SSSD starting at 28 days, but the warning is not displayed locally until 7 days,
according to the password expiration set in the SSSD configuration.
Password Expiration Warnings for Non-Password Authentication
By default, password expiration is verified only if the user enters the password during authentication.
However, you can configure SSSD to perform the expiration check and display the warning even when a
non-password authentication method is used, for example, during SSH login.
To enable password expiration warnings with non-password authentication methods:
1. Make sure the access_provider parameter is set to ldap in the sssd.conf file.
2. Make sure the ldap_pwd_policy parameter is set in sssd.conf. In most situations, the
appropriate value is shadow.
3. Add one of the following pwd_expire_* values to the ldap_access_order parameter in
sssd.conf. If the password is about to expire, each one of these values only displays the
expiration warning. In addition:
pwd_expire_policy_reject prevents the user from logging in if the password is already
expired.
pwd_expire_policy_warn allows the user to log in even if the password is already
expired.
pwd_expire_policy_renew prompts the user to immediately change the password if the
user attempts to log in with an expired password.
For example:
[domain/EXAMPLE]
access_provider = ldap
ldap_pwd_policy = shadow
ldap_access_order = pwd_expire_policy_warn
For more details on using ldap_access_order and its values, see the sssd-ldap(5) man page.
13.2.18. Domain Options: Using DNS Service Discovery
DNS service discovery, defined in RFC 2782, allows applications to check the SRV records in a given
domain for certain services of a certain type; it then returns any servers discovered of that type.
With SSSD, the identity and authentication providers can either be explicitly defined (by IP address or
host name) or they can be discovered dynamically, using service discovery. If no provider server is listed
— for example, if id_provider = ldap is set without a corresponding ldap_uri parameter — then
Deployment Guide
272

discovery is automatically used.
The DNS discovery query has this format:
_service._protocol.domain
For example, a scan for an LDAP server using TCP in the example.com domain looks like this:
_ldap._tcp.example.com
NOTE
For every service with which to use service discovery, add a special DNS record to the
DNS server:
_service._protocol._domain TTL priority weight port hostname
For SSSD, the service type is LDAP by default, and almost all services use TCP (except for Kerberos,
which starts with UDP). For service discovery to be enabled, the only thing that is required is the domain
name. The default is to use the domain portion of the machine host name, but another domain can be
specified (using the dns_discovery_domain parameter).
So, by default, no additional configuration needs to be made for service discovery — with one exception.
The password change provider has server discovery disabled by default, and it must be explicitly
enabled by setting a service type.
[domain/EXAMPLE]
...
chpass_provider = ldap
ldap_chpass_dns_service_name = ldap
While no configuration is necessary, it is possible for server discovery to be customized by using a
different DNS domain (dns_discovery_domain) or by setting a different service type to scan for. For
example:
[domain/EXAMPLE]
id _provider = ldap
dns_discovery_domain = corp.example.com
ldap_dns_service_name = ldap
chpass_provider = krb5
ldap_chpass_dns_service_name = kerberos
Lastly, service discovery is never used with backup servers; it is only used for the primary server for a
provider. What this means is that discovery can be used initially to locate a server, and then SSSD can
fall back to using a backup server. To use discovery for the primary server, use _srv_ as the primary
server value, and then list the backup servers. For example:
[domain/EXAMPLE]
id _provider = ldap
ldap_uri = _srv_
CHAPTER 13. CONFIGURING AUTHENTICATION
273

ldap_backup_uri = ldap://ldap2.example.com
auth_provider = krb5
krb5_server = _srv_
krb5_backup_server = kdc2.example.com
chpass_provider = krb5
ldap_chpass_dns_service_name = kerberos
ldap_chpass_uri = _srv_
ldap_chpass_backup_uri = kdc2.example.com
NOTE
Service discovery cannot be used with backup servers, only primary servers.
If a DNS lookup fails to return an IPv4 address for a host name, SSSD attempts to look up an IPv6
address before returning a failure. This only ensures that the asynchronous resolver identifies the correct
address.
The host name resolution behavior is configured in the lookup family order option in the
sssd.conf configuration file.
13.2.19. Domain Options: Using IP Addresses in Certificate Subject Names (LDAP
Only)
Using an IP address in the ldap_uri option instead of the server name may cause the TLS/SSL
connection to fail. TLS/SSL certificates contain the server name, not the IP address. However, the
subject alternative name field in the certificate can be used to include the IP address of the server, which
allows a successful secure connection using an IP address.
Procedure 13.8. Using IP Addresses in Certificate Subject Names
1. Convert an existing certificate into a certificate request. The signing key (-signkey) is the key
of the issuer of whatever CA originally issued the certificate. If this is done by an external CA, it
requires a separate PEM file; if the certificate is self-signed, then this is the certificate itself. For
example:
openssl x509 -x509toreq -in old_cert.pem -out req.pem -signkey
key.pem
With a self-signed certificate:
openssl x509 -x509toreq -in old_cert.pem -out req.pem -signkey
old_cert.pem
2. Edit the /etc/pki/tls/openssl.cnf configuration file to include the server's IP address
under the [ v3_ca ] section:
subjectAltName = IP:10.0.0.10
3. Use the generated certificate request to generate a new self-signed certificate with the specified
IP address:
Deployment Guide
274

openssl x509 -req -in req.pem -out new_cert.pem -extfile
./openssl.cnf -extensions v3_ca -signkey old_cert.pem
The -extensions option sets which extensions to use with the certificate. For this, it should be
v3_ca to load the appropriate section.
4. Copy the private key block from the old_cert.pem file into the new_cert.pem file to keep all
relevant information in one file.
When creating a certificate through the certutil utility provided by the nss-tools package, note that
certutil supports DNS subject alternative names for certificate creation only.
13.2.20. Creating Domains: Proxy
A proxy with SSSD is just a relay, an intermediary configuration. SSSD connects to its proxy service, and
then that proxy loads the specified libraries. This allows SSSD to use some resources that it otherwise
would not be able to use. For example, SSSD only supports LDAP and Kerberos as authentication
providers, but using a proxy allows SSSD to use alternative authentication methods like a fingerprint
scanner or smart card.
Table 13.9. Proxy Domain Configuration Parameters
Parameter Description
proxy_pam_target Specifies the target to which PAM must proxy as an authentication provider. The
PAM target is a file containing PAM stack information in the default PAM directory,
/etc/pam.d/.
This is used to proxy an authentication provider.
IMPORTANT
Ensure that the proxy PAM stack does not recursively include
pam_sss.so.
proxy_lib_name Specifies which existing NSS library to proxy identity requests through.
This is used to proxy an identity provider.
Example 13.10. Proxy Identity and Kerberos Authentication
The proxy library is loaded using the proxy_lib_name parameter. This library can be anything as
long as it is compatible with the given authentication service. For a Kerberos authentication provider,
it must be a Kerberos-compatible library, like NIS.
[domain/PROXY_KRB5]
auth_provider = krb5
krb5_server = kdc.example.com
krb5_realm = EXAMPLE.COM
id_provider = proxy
proxy_lib_name = nis
cache_credentials = true
CHAPTER 13. CONFIGURING AUTHENTICATION
275

Example 13.11. LDAP Identity and Proxy Authentication
The proxy library is loaded using the proxy_pam_target parameter. This library must be a PAM
module that is compatible with the given identity provider. For example, this uses a PAM fingerprint
module with LDAP:
[domain/LDAP_PROXY]
id_provider = ldap
ldap_uri = ldap://example.com
ldap_search_base = dc=example,dc=com
auth_provider = proxy
proxy_pam_target = sssdpamproxy
cache_credentials = true
After the SSSD domain is configured, make sure that the specified PAM files are configured. In this
example, the target is sssdpamproxy, so create a /etc/pam.d/sssdpamproxy file and load the
PAM/LDAP modules:
auth required pam_frprint.so
account required pam_frprint.so
password required pam_frprint.so
session required pam_frprint.so
Example 13.12. Proxy Identity and Authentication
SSSD can have a domain with both identity and authentication proxies. The only configuration given
then are the proxy settings, proxy_pam_target for the authentication PAM module and
proxy_lib_name for the service, like NIS or LDAP.
This example illustrates a possible configuration, but this is not a realistic configuration. If LDAP is
used for identity and authentication, then both the identity and authentication providers should be set
to the LDAP configuration, not a proxy.
[domain/PROXY_PROXY]
auth_provider = proxy
id_provider = proxy
proxy_lib_name = ldap
proxy_pam_target = sssdproxyldap
cache_credentials = true
Once the SSSD domain is added, then update the system settings to configure the proxy service:
1. Create a /etc/pam.d/sssdproxyldap file which requires the pam_ldap.so module:
auth required pam_ldap.so
account required pam_ldap.so
password required pam_ldap.so
session required pam_ldap.so
2. Make sure the nss-pam-ldapd package is installed.
Deployment Guide
276

~]# yum install nss-pam-ldapd
3. Edit the /etc/nslcd.conf file, the configuration file for the LDAP name service daemon, to
contain the information for the LDAP directory:
uid nslcd
gid ldap
uri ldaps://ldap.example.com:636
base dc=example,dc=com
ssl on
tls_cacertdir /etc/openldap/cacerts
13.2.21. Creating Domains: Kerberos Authentication
Both LDAP and proxy identity providers can use a separate Kerberos domain to supply authentication.
Configuring a Kerberos authentication provider requires the key distribution center (KDC) and the
Kerberos domain. All of the principal names must be available in the specified identity provider; if they
are not, SSSD constructs the principals using the format username@REALM.
NOTE
Kerberos can only provide authentication; it cannot provide an identity database.
SSSD assumes that the Kerberos KDC is also a Kerberos kadmin server. However, production
environments commonly have multiple, read-only replicas of the KDC and only a single kadmin server.
Use the krb5_kpasswd option to specify where the password changing service is running or if it is
running on a non-default port. If the krb5_kpasswd option is not defined, SSSD tries to use the
Kerberos KDC to change the password.
The basic Kerberos configuration options are listed in Table 13.10, “Kerberos Authentication
Configuration Parameters”. The sssd-krb5(5) man page has more information about Kerberos
configuration options.
Example 13.13. Basic Kerberos Authentication
# A domain with identities provided by LDAP and authentication by
Kerberos
[domain/KRBDOMAIN]
id_provider = ldap
chpass_provider = krb5
ldap_uri = ldap://ldap.example.com
ldap_search_base = dc=example,dc=com
ldap-tls_reqcert = demand
ldap_tls_cacert = /etc/pki/tls/certs/ca-bundle.crt
auth_provider = krb5
krb5_server = kdc.example.com
krb5_backup_server = kerberos.example.com
krb5_realm = EXAMPLE.COM
krb5_kpasswd = kerberos.admin.example.com
krb5_auth_timeout = 15
CHAPTER 13. CONFIGURING AUTHENTICATION
277

Example 13.14. Setting Kerberos Ticket Renewal Options
The Kerberos authentication provider, among other tasks, requests ticket granting tickets (TGT) for
users and services. These tickets are used to generate other tickets dynamically for specific services,
as accessed by the ticket principal (the user).
The TGT initially granted to the user principal is valid only for the lifetime of the ticket (by default,
whatever is configured in the configured KDC). After that, the ticket cannot be renewed or extended.
However, not renewing tickets can cause problems with some services when they try to access a
service in the middle of operations and their ticket has expired.
Kerberos tickets are not renewable by default, but ticket renewal can be enabled using the
krb5_renewable_lifetime and krb5_renew_interval parameters.
The lifetime for a ticket is set in SSSD with the krb5_lifetime parameter. This specifies how long
a single ticket is valid, and overrides any values in the KDC.
Ticket renewal itself is enabled in the krb5_renewable_lifetime parameter, which sets the
maximum lifetime of the ticket, counting all renewals.
For example, the ticket lifetime is set at one hour and the renewable lifetime is set at 24 hours:
krb5_lifetime = 1h
krb5_renewable_lifetime = 1d
This means that the ticket expires every hour and can be renewed continually up to one day.
The lifetime and renewable lifetime values can be in seconds (s), minutes (m), hours (h), or days (d).
The other option — which must also be set for ticket renewal — is the krb5_renew_interval
parameter, which sets how frequently SSSD checks to see if the ticket needs to be renewed. At half
of the ticket lifetime (whatever that setting is), the ticket is renewed automatically. (This value is
always in seconds.)
krb5_lifetime = 1h
krb5_renewable_lifetime = 1d
krb5_renew_interval = 60s
NOTE
If the krb5_renewable_lifetime value is not set or the krb5_renew_interval
parameter is not set or is set to zero (0), then ticket renewal is disabled. Both
krb5_renewable_lifetime and krb5_renew_interval are required for ticket
renewal to be enabled.
Table 13.10. Kerberos Authentication Configuration Parameters
Parameter Description
Deployment Guide
278

chpass_provider Specifies which service to use for password change operations. This is assumed
to be the same as the authentication provider. To use Kerberos, set this to krb5.
krb5_server Gives the primary Kerberos server, by IP address or host names, to which SSSD
will connect.
krb5_backup_server Gives a comma-separated list of IP addresses or host names of Kerberos servers
to which SSSD will connect if the primary server is not available. The list is given
in order of preference, so the first server in the list is tried first.
After an hour, SSSD will attempt to reconnect to the primary service specified in
the krb5_server parameter.
When using service discovery for KDC or kpasswd servers, SSSD first searches
for DNS entries that specify UDP as the connection protocol, and then falls back
to TCP.
krb5_realm Identifies the Kerberos realm served by the KDC.
krb5_lifetime Requests a Kerberos ticket with the specified lifetime in seconds (s), minutes (m),
hours (h) or days (d).
krb5_renewable_lifetime Requests a renewable Kerberos ticket with a total lifetime that is specified in
seconds (s), minutes (m), hours (h) or days (d).
krb5_renew_interval Sets the time, in seconds, for SSSD to check if tickets should be renewed. Tickets
are renewed automatically once they exceed half their lifetime. If this option is
missing or set to zero, then automatic ticket renewal is disabled.
krb5_store_password_if
_offline
Sets whether to store user passwords if the Kerberos authentication provider is
offline, and then to use that cache to request tickets when the provider is back
online. The default is false, which does not store passwords.
krb5_kpasswd Lists alternate Kerberos kadmin servers to use if the change password service is
not running on the KDC.
Parameter Description
CHAPTER 13. CONFIGURING AUTHENTICATION
279

krb5_ccname_template Gives the directory to use to store the user's credential cache. This can be
templatized, and the following tokens are supported:
%u, the user's login name
%U, the user's login UID
%p, the user's principal name
%r, the realm name
%h, the user's home directory
%d, the value of the krb5ccache_dir parameter
%P, the process ID of the SSSD client.
%%, a literal percent sign (%)
XXXXXX, a string at the end of the template which instructs SSSD to
create a unique filename safely
For example:
krb5_ccname_template = FILE:%d/krb5cc_%U_XXXXXX
krb5_ccachedir Specifies the directory to store credential caches. This can be templatized, using
the same tokens as krb5_ccname_template, except for %d and %P. If %u,
%U, %p, or %h are used, then SSSD creates a private directory for each user;
otherwise, it creates a public directory.
krb5_auth_timeout Gives the time, in seconds, before an online authentication or change password
request is aborted. If possible, the authentication request is continued offline. The
default is 15 seconds.
Parameter Description
13.2.22. Creating Domains: Access Control
SSSD provides a rudimentary access control for domain configuration, allowing either simple user
allow/deny lists or using the LDAP back end itself.
Using the Simple Access Provider
The Simple Access Provider allows or denies access based on a list of user names or groups.
The Simple Access Provider is a way to restrict access to certain, specific machines. For example, if a
company uses laptops, the Simple Access Provider can be used to restrict access to only a specific user
or a specific group, even if a different user authenticated successfully against the same authentication
provider.
The most common options are simple_allow_users and simple_allow_groups, which grant
access explicitly to specific users (either the given users or group members) and deny access to
everyone else. It is also possible to create deny lists (which deny access only to explicit people and
implicitly allow everyone else access).
Deployment Guide
280

The Simple Access Provider adheres to the following four rules to determine which users should or
should not be granted access:
If both the allow and deny lists are empty, access is granted.
If any list is provided, allow rules are evaluated first, and then deny rules. Practically, this means
that deny rules supersede allow rules.
If an allowed list is provided, then all users are denied access unless they are in the list.
If only deny lists are provided, then all users are allowed access unless they are in the list.
This example grants access to two users and anyone who belongs to the IT group; implicitly, all other
users are denied:
[domain/example.com]
access_provider = simple
simple_allow_users = jsmith,bjensen
simple_allow_groups = itgroup
NOTE
The LOCAL domain in SSSD does not support simple as an access provider.
Other options are listed in the sssd-simple man page, but these are rarely used.
Using the Access Filters
An LDAP, Active Directory, or Identity Management server can provide access control rules for a
domain. The associated options (ldap_access_filter for LDAP and IdM and ad_access_filter
for AD) specify which users are granted access to the specified host. The user filter must be used or all
users are denied access. See the examples below:
[domain/example.com]
access_provider = ldap
ldap_access_filter = memberOf=cn=allowedusers,ou=Groups,dc=example,dc=com
[domain/example.com]
access_provider = ad
ad_access_filter = memberOf=cn=allowedusers,ou=Groups,dc=example,dc=com
NOTE
Offline caching for LDAP access providers is limited to determining whether the user's last
online login attempt was successful. Users that were granted access during their last login
will continue to be granted access while offline.
SSSD can also check results by the authorizedService or host attribute in an entry. In fact, all
options — LDAP filter, authorizedService, and host — can be evaluated, depending on the user
entry and the configuration. The ldap_access_order parameter lists all access control methods to
use, in order of how they should be evaluated.
[domain/example.com]
CHAPTER 13. CONFIGURING AUTHENTICATION
281

access_provider = ldap
ldap_access_filter = memberOf=cn=allowedusers,ou=Groups,dc=example,dc=com
ldap_access_order = filter, host, authorized_service
The attributes in the user entry to use to evaluate authorized services or allowed hosts can be
customized. Additional access control parameters are listed in the sssd-ldap(5) man page.
13.2.23. Creating Domains: Primary Server and Backup Servers
Identity and authentication providers for a domain can be configured for automatic failover. SSSD
attempts to connect to the specified, primary server first. If that server cannot be reached, then SSSD
then goes through the listed backup servers, in order.
NOTE
SSSD tries to connect to the primary server every 30 seconds, until the connection can be
re-established, and then switches from the backup to the primary.
All of the major service areas have optional settings for primary and backup servers[3].
Table 13.11. Primary and Secondary Server Parameters
Service Area Primary Server Attribute Backup Server Attribute
LDAP identity provider ldap_uri ldap_backup_uri
Active Directory identity provider ad_server ad_backup_server
Identity Management (IdM or IPA)
identity provider
ipa_server ipa_backup_server
Kerberos authentication provider krb5_server krb5_backup_server
Kerberos authentication provider krb5_server krb5_backup_server
Password change provider ldap_chpass_uri ldap_chpass_backup_uri
One and only one server can be set as the primary server. (And, optionally, the primary server can be
set to service discovery, using _srv_ rather than a host name.) Multiple backup servers can be set, in a
comma-separated list. The backup server list is in order of preference, so the first server listed is tried
first.
[domain/EXAMPLE]
id_provider = ad
ad_server = ad.example.com
ad_backup_server = ad1.example.com, ad-backup.example.com
13.2.24. Installing SSSD Utilities
Deployment Guide
282

Additional tools to handle the SSSD cache, user entries, and group entries are contained in the sssd-
tools package. This package is not required, but it is useful to install to help administer user accounts.
~]# yum install sssd-tools
NOTE
The sssd-tools package is provided by the Optional subscription channel. See
Section 8.4.8, “Adding the Optional and Supplementary Repositories” for more information
on Red Hat additional channels.
13.2.25. SSSD and UID and GID Numbers
When a user is created — using system tools such as useradd or through an application such as
Red Hat Identity Management or other client tools — the user is automatically assigned a user ID number
and a group ID number.
When the user logs into a system or service, SSSD caches that user name with the associated UID/GID
numbers. The UID number is then used as the identifying key for the user. If a user with the same name
but a different UID attempts to log into the system, then SSSD treats it as two different users with a
name collision.
What this means is that SSSD does not recognize UID number changes. It interprets it as a different and
new user, not an existing user with a different UID number. If an existing user changes the UID number,
that user is prevented from logging into SSSD and associated services and domains. This also has an
impact on any client applications which use SSSD for identity information; the user with the conflict will
not be found or accessible to those applications.
IMPORTANT
UID/GID changes are not supported in SSSD.
If a user for some reason has a changed UID/GID number, then the SSSD cache must be cleared for
that user before that user can log in again. For example:
Cleaning the SSSD cache is covered in the section called “Purging the SSSD Cache”.
13.2.26. Creating Local System Users
There can be times when it is useful to seed users into the SSSD database rather than waiting for users
to login and be added.
NOTE
Adding user accounts manually requires the sssd-tools package to be installed.
When creating new system users, it is possible to create a user within the SSSD local identity provider
domain. This can be useful for creating new system users, for troubleshooting SSSD configuration, or for
creating specialized or nested groups.
~]# sss_cache -u jsmith
CHAPTER 13. CONFIGURING AUTHENTICATION
283

New users can be added using the sss_useradd command.
At its most basic, the sss_useradd command only requires the new user name.
~]# sss_useradd jsmith
There are other options (listed in the sss_useradd(8) man page) which can be used to set attributes
on the account, like the UID and GID, the home directory, or groups which the user belongs to.
~]# sss_useradd --UID 501 --home /home/jsmith --groups admin,dev-group
jsmith
13.2.27. Seeding Users into the SSSD Cache During Kickstart
NOTE
Adding user accounts manually requires the sssd-tools package to be installed.
With SSSD, users in a remote domain are not available in a local system until that identity is retrieved
from the identity provider. However, some network interfaces are not available until a user has logged in
— which is not possible if the user identity is somewhere over the network. In that case, it is possible to
seed the SSSD cache with that user identity, associated with the appropriate domain, so that the user
can log in locally and active the appropriate interfaces.
This is done using the sss_seed utility:
sss_seed --domain EXAMPLE.COM --username testuser --password-file
/tmp/sssd-pwd.txt
This utility requires options that identify, at a minimum, the user name, domain name, and password.
--domain gives the domain name from the SSSD configuration. This domain must already
exist in the SSSD configuration.
--username for the short name of the user account.
--password-file for the path and name of a file containing a temporary password for the
seed entry. If the user account already exists in the SSSD cache, then the temporary password
in this file overwrites the stored password in the SSSD cache.
Additional account configuration options are listed in the sss_seed(8) man page.
This would almost always be run as part of a kickstart or automated setup, so it would be part of a larger
set of scripts, which would also enable SSSD, set up an SSSD domain, and create the password file. For
example:
function make_sssd {
cat <<- _EOF_
[sssd]
domains = LOCAL
services = nss,pam
[nss]
Deployment Guide
284

[pam]
[domain/LOCAL]
id_provider = local
auth_provider = local
access_provider = permit
_EOF_
}
make_sssd >> /etc/sssd/sssd.conf
authconfig --enablesssd --enablesssdauth --update
function make_pwdfile {
cat <<1 _EOF_
password
_EOF_
}
make_pwdfile >> /tmp/sssd-pwd.txt
sss_seed --domain EXAMPLE.COM --username testuser --password-file
/tmp/sssd-pwd.txt
13.2.28. Managing the SSSD Cache
SSSD can define multiple domains of the same type and different types of domain. SSSD maintains a
separate database file for each domain, meaning each domain has its own cache. These cache files are
stored in the /var/lib/sss/db/ directory.
Purging the SSSD Cache
As LDAP updates are made to the identity provider for the domains, it can be necessary to clear the
cache to reload the new information quickly.
The cache purge utility, sss_cache, invalidates records in the SSSD cache for a user, a domain, or a
group. Invalidating the current records forces the cache to retrieve the updated records from the identity
provider, so changes can be realized quickly.
NOTE
This utility is included with SSSD in the sssd package.
Most commonly, this is used to clear the cache and update all records:
~]# sss_cache -E
The sss_cache command can also clear all cached entries for a particular domain:
~]# sss_cache -Ed LDAP1
If the administrator knows that a specific record (user, group, or netgroup) has been updated, then
sss_cache can purge the records for that specific account and leave the rest of the cache intact:
CHAPTER 13. CONFIGURING AUTHENTICATION
285

~]# sss_cache -u jsmith
Table 13.12. Common sss_cache Options
Short Argument Long Argument Description
-E --everything Invalidates all cached entries with the exception of sudo rules.
-d name --domain name Invalidates cache entries for users, groups, and other entries
only within the specified domain.
-G --groups Invalidates all group records. If -g is also used, -G takes
precedence and -g is ignored.
-g name --group name Invalidates the cache entry for the specified group.
-N --netgroups Invalidates cache entries for all netgroup cache records. If -n is
also used, -N takes precedence and -n is ignored.
-n name --netgroup name Invalidates the cache entry for the specified netgroup.
-U --users Invalidates cache entries for all user records. If the -u option is
also used, -U takes precedence and -u is ignored.
-u name --user name Invalidates the cache entry for the specified user.
Deleting Domain Cache Files
All cache files are named for the domain. For example, for a domain named exampleldap, the cache
file is named cache_exampleldap.ldb.
Be careful when you delete a cache file. This operation has significant effects:
Deleting the cache file deletes all user data, both identification and cached credentials.
Consequently, do not delete a cache file unless the system is online and can authenticate with a
user name against the domain's servers. Without a credentials cache, offline authentication will
fail.
If the configuration is changed to reference a different identity provider, SSSD will recognize
users from both providers until the cached entries from the original provider time out.
It is possible to avoid this by purging the cache, but the better option is to use a different domain
name for the new provider. When SSSD is restarted, it creates a new cache file with the new
name and the old file is ignored.
13.2.29. Downgrading SSSD
When downgrading — either downgrading the version of SSSD or downgrading the operating system
itself — then the existing SSSD cache needs to be removed. If the cache is not removed, then SSSD
process is dead but a PID file remains. The SSSD logs show that it cannot connect to any of its
associated domains because the cache version is unrecognized.
Deployment Guide
286

(Wed Nov 28 21:25:50 2012) [sssd] [sysdb_domain_init_internal] (0x0010):
Unknown DB version [0.14], expected [0.10] for domain AD!
Users are then no longer recognized and are unable to authenticate to domain services and hosts.
After downgrading the SSSD version:
1. Delete the existing cache database files.
~]# rm -rf /var/lib/sss/db/*
2. Restart the SSSD process.
~]# service sssd restart
Stopping sssd:
[FAILED]
Starting sssd: [ OK
]
13.2.30. Using NSCD with SSSD
SSSD is not designed to be used with the NSCD daemon. Even though SSSD does not directly conflict
with NSCD, using both services can result in unexpected behavior, especially with how long entries are
cached.
The most common evidence of a problem is conflicts with NFS. When using Network Manager to
manage network connections, it may take several minutes for the network interface to come up. During
this time, various services attempt to start. If these services start before the network is up and the DNS
servers are available, these services fail to identify the forward or reverse DNS entries they need. These
services will read an incorrect or possibly empty resolv.conf file. This file is typically only read once,
and so any changes made to this file are not automatically applied. This can cause NFS locking to fail on
the machine where the NSCD service is running, unless that service is manually restarted.
To avoid this problem, enable caching for hosts and services in the /etc/nscd.conf file and rely on
the SSSD cache for the passwd, group, and netgroup entries.
Change the /etc/nscd.conf file:
enable-cache hosts yes
enable-cache passwd no
enable-cache group no
enable-cache netgroup no
With NSCD answering hosts requests, these entries will be cached by NSCD and returned by NSCD
during the boot process. All other entries are handled by SSSD.
13.2.31. Troubleshooting SSSD
the section called “Setting Debug Logs for SSSD Domains”
the section called “Checking SSSD Log Files”
the section called “Problems with SSSD Configuration”
CHAPTER 13. CONFIGURING AUTHENTICATION
287

Setting Debug Logs for SSSD Domains
Each domain sets its own debug log level. Increasing the log level can provide more information about
problems with SSSD or with the domain configuration.
To change the log level, set the debug_level parameter for each section in the sssd.conf file for
which to produce extra logs. For example:
[domain/LDAP]
cache_credentials = true
debug_level = 9
Table 13.13. Debug Log Levels
Level Description
0 Fatal failures. Anything that would prevent SSSD from starting up or causes it to cease
running.
1 Critical failures. An error that doesn't kill the SSSD, but one that indicates that at least
one major feature is not going to work properly.
2 Serious failures. An error announcing that a particular request or operation has failed.
3 Minor failures. These are the errors that would percolate down to cause the operation
failure of 2.
4 Configuration settings.
5 Function data.
6 Trace messages for operation functions.
7 Trace messages for internal control functions.
8 Contents of function-internal variables that may be interesting.
9 Extremely low-level tracing information.
NOTE
In versions of SSSD older than 1.8, debug log levels could be set globally in the [sssd]
section. Now, each domain and service must configure its own debug log level.
To copy the global SSSD debug log levels into each configuration area in the SSSD
configuration file, use the sssd_update_debug_levels.py script.
python -m SSSDConfig.sssd_update_debug_levels.py
Checking SSSD Log Files
Deployment Guide
288

A:
Q:
A:
Q:
SSSD uses a number of log files to report information about its operation, located in the
/var/log/sssd/ directory. SSSD produces a log file for each domain, as well as an sssd_pam.log
and an sssd_nss.log file.
Additionally, the /var/log/secure file logs authentication failures and the reason for the failure.
Problems with SSSD Configuration
SSSD fails to start
SSSD requires that the configuration file be properly set up, with all the required entries, before the
daemon will start.
SSSD requires at least one properly configured domain before the service will start.
Without a domain, attempting to start SSSD returns an error that no domains are
configured:
# sssd -d4
[sssd] [ldb] (3): server_sort:Unable to register control with
rootdse!
[sssd] [confdb_get_domains] (0): No domains configured, fatal
error!
[sssd] [get_monitor_config] (0): No domains configured.
Edit the /etc/sssd/sssd.conf file and create at least one domain.
SSSD also requires at least one available service provider before it will start. If the problem
is with the service provider configuration, the error message indicates that there are no
services configured:
[sssd] [get_monitor_config] (0): No services configured!
Edit the /etc/sssd/sssd.conf file and configure at least one service provider.
IMPORTANT
SSSD requires that service providers be configured as a comma-separated
list in a single services entry in the /etc/sssd/sssd.conf file. If
services are listed in multiple entries, only the last entry is recognized by
SSSD.
I don't see any groups with 'id' or group members with 'getent group'.
This may be due to an incorrect ldap_schema setting in the [domain/DOMAINNAME] section of
sssd.conf.
SSSD supports RFC 2307 and RFC 2307bis schema types. By default, SSSD uses the more
common RFC 2307 schema.
The difference between RFC 2307 and RFC 2307bis is the way which group membership is stored
in the LDAP server. In an RFC 2307 server, group members are stored as the multi-valued
memberuid attribute, which contains the name of the users that are members. In an RFC2307bis
CHAPTER 13. CONFIGURING AUTHENTICATION
289

A:
Q:
server, group members are stored as the multi-valued member or uniqueMember attribute which
contains the DN of the user or group that is a member of this group. RFC2307bis allows nested
groups to be maintained as well.
If group lookups are not returning any information:
1. Set ldap_schema to rfc2307bis.
2. Delete /var/lib/sss/db/cache_DOMAINNAME.ldb.
3. Restarting SSSD.
If that doesn't work, add this line to sssd.conf:
ldap_group_name = uniqueMember
Then delete the cache and restart SSSD again.
Authentication fails against LDAP.
To perform authentication, SSSD requires that the communication channel be encrypted. This
means that if sssd.conf is configured to connect over a standard protocol (ldap://), it attempts
to encrypt the communication channel with Start TLS. If sssd.conf is configured to connect over
a secure protocol (ldaps://), then SSSD uses SSL.
This means that the LDAP server must be configured to run in SSL or TLS. TLS must be enabled
for the standard LDAP port (389) or SSL enabled on the secure LDAPS port (636). With either SSL
or TLS, the LDAP server must also be configured with a valid certificate trust.
An invalid certificate trust is one of the most common issues with authenticating against LDAP. If
the client does not have proper trust of the LDAP server certificate, it is unable to validate the
connection, and SSSD refuses to send the password. The LDAP protocol requires that the
password be sent in plaintext to the LDAP server. Sending the password in plaintext over an
unencrypted connection is a security problem.
If the certificate is not trusted, a syslog message is written, indicating that TLS encryption could
not be started. The certificate configuration can be tested by checking if the LDAP server is
accessible apart from SSSD. For example, this tests an anonymous bind over a TLS connection to
test.example.com:
$ ldapsearch -x -ZZ -h test.example.com -b dc=example,dc=com
If the certificate trust is not properly configured, the test fails with this error:
ldap_start_tls: Connect error (-11) additional info: TLS error -
8179:Unknown code ___f 13
To trust the certificate:
1. Obtain a copy of the public CA certificate for the certificate authority used to sign the LDAP
server certificate and save it to the local system.
2. Add a line to the sssd.conf file that points to the CA certificate on the filesystem.
Deployment Guide
290

A:
Q:
A:
Q:
A:
Q:
A:
Q:
ldap_tls_cacert = /path/to/cacert
3. If the LDAP server uses a self-signed certificate, remove the ldap_tls_reqcert line
from the sssd.conf file.
This parameter directs SSSD to trust any certificate issued by the CA certificate, which is a
security risk with a self-signed CA certificate.
Connecting to LDAP servers on non-standard ports fail.
When running SELinux in enforcing mode, the client's SELinux policy has to be modified to
connect to the LDAP server over the non-standard port. For example:
# semanage port -a -t ldap_port_t -p tcp 1389
NSS fails to return user information
This usually means that SSSD cannot connect to the NSS service.
Ensure that NSS is running:
# service sssd status
If NSS is running, make sure that the provider is properly configured in the [nss] section
of the /etc/sssd/sssd.conf file. Especially check the filter_users and
filter_groups attributes.
Make sure that NSS is included in the list of services that SSSD uses.
Check the configuration in the /etc/nsswitch.conf file.
NSS returns incorrect user information
If searches are returning the incorrect user information, check that there are not conflicting user
names in separate domains. When there are multiple domains, set the
use_fully_qualified_domains attribute to true in the /etc/sssd/sssd.conf file. This
differentiates between different users in different domains with the same name.
Setting the password for the local SSSD user prompts twice for the password
When attempting to change a local SSSD user's password, it may prompt for the password twice:
[root@clientF11 tmp]# passwd user1000
Changing password for user user1000.
New password:
Retype new password:
New Password:
Reenter new Password:
passwd: all authentication tokens updated successfully.
CHAPTER 13. CONFIGURING AUTHENTICATION
291

Q:
A:
Q:
This is the result of an incorrect PAM configuration. Ensure that the use_authtok option is
correctly configured in your /etc/pam.d/system-auth file.
I am trying to use sudo rules with an Identity Management (IPA) provider, but no sudo rules
are being found, even though sudo is properly configured.
The SSSD client can successfully authenticate to the Identity Management server, and it is
properly searching the LDAP directory for sudo rules. However, it is showing that no rules exist.
For example, in the logs:
(Thu Jun 21 10:37:47 2012) [sssd[be[ipa.test]]]
[sdap_sudo_load_sudoers_process] (0x0400): Receiving sudo rules with
base [ou=sudoers,dc=ipa,dc=test]
(Thu Jun 21 10:37:47 2012) [sssd[be[ipa.test]]]
[sdap_sudo_load_sudoers_done] (0x0400): Received 0 rules
(Thu Jun 21 10:37:47 2012) [sssd[be[ipa.test]]]
[sdap_sudo_purge_sudoers] (0x0400): Purging SUDOers cache of user's
[admin] rules
(Thu Jun 21 10:37:47 2012) [sssd[be[ipa.test]]]
[sysdb_sudo_purge_byfilter] (0x0400): No rules matched
(Thu Jun 21 10:37:47 2012) [sssd[be[ipa.test]]]
[sysdb_sudo_purge_bysudouser] (0x0400): No rules matched
(Thu Jun 21 10:37:47 2012) [sssd[be[ipa.test]]]
[sdap_sudo_load_sudoers_done] (0x0400): Sudoers is successfuly stored
in cache
(Thu Jun 21 10:37:47 2012) [sssd[be[ipa.test]]]
[be_sudo_handler_reply] (0x0200): SUDO Backend returned: (0, 0,
Success)
When using an Identity Management provider for SSSD, SSSD attempts to connect to the
underlying LDAP directory using Kerberos/GSS-API. However, by default, SSSD uses an
anonymous connection to an LDAP server to retrieve sudo rules. This means that SSSD cannot
retrieve the sudo rules from the Identity Management server with its default configuration.
To support retrieving sudo rules with a Kerberos/GSS-API connection, enable GSS-API as the
authentication mechanism in the identity provider configuration in sssd.conf. For example:
[domain/ipa.example.com]
id_provider = ipa
ipa_server = ipa.example.com
ldap_tls_cacert = /etc/ipa/ca.crt
sudo_provider = ldap
ldap_uri = ldap://ipa.example.com
ldap_sudo_search_base = ou=sudoers,dc=ipa,dc=example,dc=com
ldap_sasl_mech = GSSAPI
ldap_sasl_authid = host/hostname.ipa.example.com
ldap_sasl_realm = IPA.EXAMPLE.COM
krb5_server = ipa.example.com
Password lookups on large directories can take several seconds per request. How can this
be improved?
Deployment Guide
292

A:
Q:
A:
Q:
A:
The initial user lookup is a call to the LDAP server. Unindexed searches are much more resource-
intensive, and therefore take longer, than indexed searches because the server checks every entry
in the directory for a match. To speed up user lookups, index the attributes that are searched for by
uid
uidNumber
gidNumber
gecos
An Active Directory identity provider is properly configured in my sssd.conf file, but SSSD
fails to connect to it, with GSS-API errors.
SSSD can only connect with an Active Directory provider using its host name. If the host name is
not given, the SSSD client cannot resolve the IP address to the host, and authentication fails.
For example, with this configuration:
[domain/ADEXAMPLE]
debug_level = 0xFFF0
id_provider = ad
ad_server = 255.255.255.255
ad_domain = example.com
krb5_canonicalize = False
The SSSD client returns this GSS-API failure, and the authentication request fails:
(Fri Jul 27 18:27:44 2012) [sssd[be[ADTEST]]] [sasl_bind_send]
(0x0020): ldap_sasl_bind failed (-2)[Local error]
(Fri Jul 27 18:27:44 2012) [sssd[be[ADTEST]]] [sasl_bind_send]
(0x0080): Extended failure message: [SASL(-1): generic failure: GSSAPI
Error: Unspecified GSS failure. Minor code may provide more
information (Cannot determine realm for numeric host address)]
To avoid this error, set the ad_server to the name of the Active Directory host.
I configured SSSD for central authentication, but now several of my applications (such as
Firefox or Adobe) will not start.
Even on 64-bit systems, 32-bit applications require a 32-bit version of SSSD to use to access the
password and identity cache. If a 32-bit version of SSSD is not available, but the system is
configured to use the SSSD cache, then 32-bit applications can fail to start.
For example, Firefox can fail with permission denied errors:
Failed to contact configuration server. See
http://www.gnome.org/projects/gconf/
for information. (Details - 1: IOR file '/tmp/gconfd-
somebody/lock/ior'
not opened successfully, no gconfd located: Permission denied 2: IOR
CHAPTER 13. CONFIGURING AUTHENTICATION
293

A:
Q:
file '/tmp/gconfd-somebody/lock/ior' not opened successfully, no
gconfd
located: Permission denied)
For Adobe Reader, the error shows that the current system user is not recognized:
~]$ acroread
(acroread:12739): GLib-WARNING **: getpwuid_r(): failed due to unknown
user id (366)
Other applications may show similar user or permissions errors.
SSSD is showing an automount location that I removed.
The SSSD cache for the automount location persists even if the location is subsequently changed
or removed. To update the autofs information in SSSD:
1. Remove the autofs cache, as described in the section called “Purging the SSSD Cache”.
2. Restart SSSD, as in Section 13.2.3, “Starting and Stopping SSSD”.
[3] Most services default to the identity provider server if a specific server for that service is not set.
Deployment Guide
294

CHAPTER 14. OPENSSH
SSH (Secure Shell) is a protocol which facilitates secure communications between two systems using a
client-server architecture and allows users to log into server host systems remotely. Unlike other remote
communication protocols, such as FTP, Telnet, or rlogin, SSH encrypts the login session, rendering
the connection difficult for intruders to collect unencrypted passwords.
The ssh program is designed to replace older, less secure terminal applications used to log into remote
hosts, such as telnet or rsh. A related program called scp replaces older programs designed to copy
files between hosts, such as rcp. Because these older applications do not encrypt passwords
transmitted between the client and the server, avoid them whenever possible. Using secure methods to
log into remote systems decreases the risks for both the client system and the remote host.
Red Hat Enterprise Linux includes the general OpenSSH package, openssh, as well as the OpenSSH
server, openssh-server, and client, openssh-clients, packages.
14.1. THE SSH PROTOCOL
14.1.1. Why Use SSH?
Potential intruders have a variety of tools at their disposal enabling them to disrupt, intercept, and re-
route network traffic in an effort to gain access to a system. In general terms, these threats can be
categorized as follows:
Interception of communication between two systems
The attacker can be somewhere on the network between the communicating parties, copying any
information passed between them. He may intercept and keep the information, or alter the information
and send it on to the intended recipient.
This attack is usually performed using a packet sniffer, a rather common network utility that captures
each packet flowing through the network, and analyzes its content.
Impersonation of a particular host
Attacker's system is configured to pose as the intended recipient of a transmission. If this strategy
works, the user's system remains unaware that it is communicating with the wrong host.
This attack can be performed using a technique known as DNS poisoning, or via so-called IP
spoofing. In the first case, the intruder uses a cracked DNS server to point client systems to a
maliciously duplicated host. In the second case, the intruder sends falsified network packets that
appear to be from a trusted host.
Both techniques intercept potentially sensitive information and, if the interception is made for hostile
reasons, the results can be disastrous. If SSH is used for remote shell login and file copying, these
security threats can be greatly diminished. This is because the SSH client and server use digital
signatures to verify their identity. Additionally, all communication between the client and server systems
is encrypted. Attempts to spoof the identity of either side of a communication does not work, since each
packet is encrypted using a key known only by the local and remote systems.
14.1.2. Main Features
The SSH protocol provides the following safeguards:
No one can pose as the intended server
CHAPTER 14. OPENSSH
295

After an initial connection, the client can verify that it is connecting to the same server it had
connected to previously.
No one can capture the authentication information
The client transmits its authentication information to the server using strong, 128-bit encryption.
No one can intercept the communication
All data sent and received during a session is transferred using 128-bit encryption, making
intercepted transmissions extremely difficult to decrypt and read.
Additionally, it also offers the following options:
It provides secure means to use graphical applications over a network
Using a technique called X11 forwarding, the client can forward X11 (X Window System) applications
from the server. Note that if you set the ForwardX11Trusted option to yes or you use SSH with
the -Y option, you bypass the X11 SECURITY extension controls, which can result in a security
threat.
It provides a way to secure otherwise insecure protocols
The SSH protocol encrypts everything it sends and receives. Using a technique called port
forwarding, an SSH server can become a conduit to securing otherwise insecure protocols, like POP,
and increasing overall system and data security.
It can be used to create a secure channel
The OpenSSH server and client can be configured to create a tunnel similar to a virtual private
network for traffic between server and client machines.
It supports the Kerberos authentication
OpenSSH servers and clients can be configured to authenticate using the GSSAPI (Generic Security
Services Application Program Interface) implementation of the Kerberos network authentication
protocol.
14.1.3. Protocol Versions
Two varieties of SSH currently exist: version 1 and version 2. The OpenSSH suite under Red Hat
Enterprise Linux uses SSH version 2, which has an enhanced key exchange algorithm not vulnerable to
the known exploit in version 1. However, for compatibility reasons, the OpenSSH suite does support
version 1 connections as well, although version 1 is disabled by default and needs to be enabled in the
configuration files.
IMPORTANT
For maximum security, avoid using SSH version 1 and use SSH version 2-compatible
servers and clients whenever possible.
14.1.4. Event Sequence of an SSH Connection
The following series of events help protect the integrity of SSH communication between two hosts.
Deployment Guide
296

1. A cryptographic handshake is made so that the client can verify that it is communicating with the
correct server.
2. The transport layer of the connection between the client and remote host is encrypted using a
symmetric cipher.
3. The client authenticates itself to the server.
4. The client interacts with the remote host over the encrypted connection.
14.1.4.1. Transport Layer
The primary role of the transport layer is to facilitate safe and secure communication between the two
hosts at the time of authentication and during subsequent communication. The transport layer
accomplishes this by handling the encryption and decryption of data, and by providing integrity protection
of data packets as they are sent and received. The transport layer also provides compression, speeding
the transfer of information.
Once an SSH client contacts a server, key information is exchanged so that the two systems can
correctly construct the transport layer. The following steps occur during this exchange:
Keys are exchanged
The public key encryption algorithm is determined
The symmetric encryption algorithm is determined
The message authentication algorithm is determined
The hash algorithm is determined
During the key exchange, the server identifies itself to the client with a unique host key. If the client has
never communicated with this particular server before, the server's host key is unknown to the client and
it does not connect. OpenSSH notifies the user that the authenticity of the host cannot be established
and prompts the user to accept or reject it. The user is expected to independently verify the new host key
before accepting it. In subsequent connections, the server's host key is checked against the saved
version on the client, providing confidence that the client is indeed communicating with the intended
server. If, in the future, the host key no longer matches, the user must remove the client's saved version
before a connection can occur.
WARNING
Always verify the integrity of a new SSH server. During the initial contact, an attacker
can pretend to be the intended SSH server to the local system without being
recognized. To verify the integrity of a new SSH server, contact the server
administrator before the first connection or if a host key mismatch occurs.
SSH is designed to work with almost any kind of public key algorithm or encoding format. After an initial
key exchange creates a hash value used for exchanges and a shared secret value, the two systems
immediately begin calculating new keys and algorithms to protect authentication and future data sent
over the connection.
CHAPTER 14. OPENSSH
297

After a certain amount of data has been transmitted using a given key and algorithm (the exact amount
depends on the SSH implementation), another key exchange occurs, generating another set of hash
values and a new shared secret value. Even if an attacker is able to determine the hash and shared
secret value, this information is only useful for a limited period of time.
14.1.4.2. Authentication
Once the transport layer has constructed a secure tunnel to pass information between the two systems,
the server tells the client the different authentication methods supported, such as using a private key-
encoded signature or typing a password. The client then tries to authenticate itself to the server using
one of these supported methods.
SSH servers and clients can be configured to allow different types of authentication, which gives each
side the optimal amount of control. The server can decide which encryption methods it supports based
on its security model, and the client can choose the order of authentication methods to attempt from the
available options.
14.1.4.3. Channels
After a successful authentication over the SSH transport layer, multiple channels are opened via a
technique called multiplexing[4]. Each of these channels handles communication for different terminal
sessions and for forwarded X11 sessions.
Both clients and servers can create a new channel. Each channel is then assigned a different number on
each end of the connection. When the client attempts to open a new channel, the clients sends the
channel number along with the request. This information is stored by the server and is used to direct
communication to that channel. This is done so that different types of sessions do not affect one another
and so that when a given session ends, its channel can be closed without disrupting the primary SSH
connection.
Channels also support flow-control, which allows them to send and receive data in an orderly fashion. In
this way, data is not sent over the channel until the client receives a message that the channel is open.
The client and server negotiate the characteristics of each channel automatically, depending on the type
of service the client requests and the way the user is connected to the network. This allows great
flexibility in handling different types of remote connections without having to change the basic
infrastructure of the protocol.
14.2. CONFIGURING OPENSSH
14.2.1. Configuration Files
There are two different sets of configuration files: those for client programs (that is, ssh, scp, and
sftp), and those for the server (the sshd daemon).
System-wide SSH configuration information is stored in the /etc/ssh/ directory as described in
Table 14.1, “System-wide configuration files”. User-specific SSH configuration information is stored in
~/.ssh/ within the user's home directory as described in Table 14.2, “User-specific configuration files”.
Table 14.1. System-wide configuration files
Deployment Guide
298

File Description
/etc/ssh/moduli Contains Diffie-Hellman groups used for the Diffie-Hellman key
exchange which is critical for constructing a secure transport layer.
When keys are exchanged at the beginning of an SSH session, a
shared, secret value is created which cannot be determined by
either party alone. This value is then used to provide host
authentication.
/etc/ssh/ssh_config The default SSH client configuration file. Note that it is overridden
by ~/.ssh/config if it exists.
/etc/ssh/sshd_config The configuration file for the sshd daemon.
/etc/ssh/ssh_host_dsa_key The DSA private key used by the sshd daemon.
/etc/ssh/ssh_host_dsa_key.
pub
The DSA public key used by the sshd daemon.
/etc/ssh/ssh_host_key The RSA private key used by the sshd daemon for version 1 of the
SSH protocol.
/etc/ssh/ssh_host_key.pub The RSA public key used by the sshd daemon for version 1 of the
SSH protocol.
/etc/ssh/ssh_host_rsa_key The RSA private key used by the sshd daemon for version 2 of the
SSH protocol.
/etc/ssh/ssh_host_rsa_key.
pub
The RSA public key used by the sshd daemon for version 2 of the
SSH protocol.
/etc/pam.d/sshd The PAM configuration file for the sshd daemon.
/etc/sysconfig/sshd Configuration file for the sshd service.
Table 14.2. User-specific configuration files
File Description
~/.ssh/authorized_keys Holds a list of authorized public keys for servers. When the client
connects to a server, the server authenticates the client by
checking its signed public key stored within this file.
~/.ssh/id_dsa Contains the DSA private key of the user.
~/.ssh/id_dsa.pub The DSA public key of the user.
CHAPTER 14. OPENSSH
299

~/.ssh/id_rsa The RSA private key used by ssh for version 2 of the SSH
protocol.
~/.ssh/id_rsa.pub The RSA public key used by ssh for version 2 of the SSH protocol.
~/.ssh/identity The RSA private key used by ssh for version 1 of the SSH
protocol.
~/.ssh/identity.pub The RSA public key used by ssh for version 1 of the SSH protocol.
~/.ssh/known_hosts Contains DSA host keys of SSH servers accessed by the user. This
file is very important for ensuring that the SSH client is connecting
the correct SSH server.
File Description
For information concerning various directives that can be used in the SSH configuration files, see the
ssh_config(5) and sshd_config(5) manual pages.
14.2.2. Starting an OpenSSH Server
In order to run an OpenSSH server, you must have the openssh-server installed (see Section 8.2.4,
“Installing Packages” for more information on how to install new packages in Red Hat
Enterprise Linux 6).
To start the sshd daemon, type the following at a shell prompt:
~]# service sshd start
To stop the running sshd daemon, use the following command:
~]# service sshd stop
If you want the daemon to start automatically at the boot time, type:
~]# chkconfig sshd on
This will enable the service for levels 2, 3, 4, and 5. For more configuration options, see Chapter 12,
Services and Daemons for the detailed information on how to manage services.
Note that if you reinstall the system, a new set of identification keys will be created. As a result, clients
who had connected to the system with any of the OpenSSH tools before the reinstall will see the
following message:
@@@@@@@@@@@@@@@@@@@@@@@@@@@@@@@@@@@@@@@@@@@@@@@@@@@@@@@@@@@
@ WARNING: REMOTE HOST IDENTIFICATION HAS CHANGED! @
@@@@@@@@@@@@@@@@@@@@@@@@@@@@@@@@@@@@@@@@@@@@@@@@@@@@@@@@@@@
IT IS POSSIBLE THAT SOMEONE IS DOING SOMETHING NASTY!
Someone could be eavesdropping on you right now (man-in-the-middle
attack)!
It is also possible that the RSA host key has just been changed.
Deployment Guide
300

To prevent this, you can backup the relevant files from the /etc/ssh/ directory (see Table 14.1,
“System-wide configuration files” for a complete list), and restore them whenever you reinstall the
system.
14.2.3. Requiring SSH for Remote Connections
For SSH to be truly effective, using insecure connection protocols should be prohibited. Otherwise, a
user's password may be protected using SSH for one session, only to be captured later while logging in
using Telnet. Some services to disable include telnet, rsh, rlogin, and vsftpd.
To disable these services, type the following commands at a shell prompt:
~]# chkconfig telnet off
~]# chkconfig rsh off
~]# chkconfig rlogin off
~]# chkconfig vsftpd off
For more information on runlevels and configuring services in general, see Chapter 12, Services and
Daemons.
14.2.4. Using Key-Based Authentication
To improve the system security even further, you can enforce key-based authentication by disabling the
standard password authentication. To do so, open the /etc/ssh/sshd_config configuration file in a
text editor such as vi or nano, and change the PasswordAuthentication option as follows:
PasswordAuthentication no
To be able to use ssh, scp, or sftp to connect to the server from a client machine, generate an
authorization key pair by following the steps below. Note that keys must be generated for each user
separately.
Red Hat Enterprise Linux 6 uses SSH Protocol 2 and RSA keys by default (see Section 14.1.3, “Protocol
Versions” for more information).
IMPORTANT
Do not generate key pairs as root, as only root would be able to use those keys.
NOTE
Before reinstalling your system, back up the ~/.ssh/ directory to keep the generated key
pair. Copy the backed-up data to the home directory in the new system for any user you
require, including root.
14.2.4.1. Generating Key Pairs
To generate an RSA key pair for version 2 of the SSH protocol, follow these steps:
1. Generate an RSA key pair by typing the following at a shell prompt:
CHAPTER 14. OPENSSH
301

~]$ ssh-keygen -t rsa
Generating public/private rsa key pair.
Enter file in which to save the key (/home/john/.ssh/id_rsa):
2. Press Enter to confirm the default location (that is, ~/.ssh/id_rsa) for the newly created
key.
3. Enter a passphrase, and confirm it by entering it again when prompted to do so. For security
reasons, avoid using the same password as you use to log in to your account.
After this, you will be presented with a message similar to this:
Your identification has been saved in /home/john/.ssh/id_rsa.
Your public key has been saved in /home/john/.ssh/id_rsa.pub.
The key fingerprint is:
e7:97:c7:e2:0e:f9:0e:fc:c4:d7:cb:e5:31:11:92:14
john@penguin.example.com
The key's randomart image is:
+--[ RSA 2048]----+
| E. |
| . . |
| o . |
| . .|
| S . . |
| + o o ..|
| * * +oo|
| O +..=|
| o* o.|
+-----------------+
4. Change the permissions of the ~/.ssh/ directory:
~]$ chmod 700 ~/.ssh
5. Copy the content of ~/.ssh/id_rsa.pub into the ~/.ssh/authorized_keys on the
machine to which you want to connect, appending it to its end if the file already exists.
6. Change the permissions of the ~/.ssh/authorized_keys file using the following command:
~]$ chmod 600 ~/.ssh/authorized_keys
To generate a DSA key pair for version 2 of the SSH protocol, follow these steps:
1. Generate a DSA key pair by typing the following at a shell prompt:
~]$ ssh-keygen -t dsa
Generating public/private dsa key pair.
Enter file in which to save the key (/home/john/.ssh/id_dsa):
2. Press Enter to confirm the default location (that is, ~/.ssh/id_dsa) for the newly created
key.
Deployment Guide
302

3. Enter a passphrase, and confirm it by entering it again when prompted to do so. For security
reasons, avoid using the same password as you use to log in to your account.
After this, you will be presented with a message similar to this:
Your identification has been saved in /home/john/.ssh/id_dsa.
Your public key has been saved in /home/john/.ssh/id_dsa.pub.
The key fingerprint is:
81:a1:91:a8:9f:e8:c5:66:0d:54:f5:90:cc:bc:cc:27
john@penguin.example.com
The key's randomart image is:
+--[ DSA 1024]----+
| .oo*o. |
| ...o Bo |
| .. . + o. |
|. . E o |
| o..o S |
|. o= . |
|. + |
| . |
| |
+-----------------+
4. Change the permissions of the ~/.ssh/ directory:
~]$ chmod 700 ~/.ssh
5. Copy the content of ~/.ssh/id_dsa.pub into the ~/.ssh/authorized_keys on the
machine to which you want to connect, appending it to its end if the file already exists.
6. Change the permissions of the ~/.ssh/authorized_keys file using the following command:
~]$ chmod 600 ~/.ssh/authorized_keys
To generate an RSA key pair for version 1 of the SSH protocol, follow these steps:
1. Generate an RSA key pair by typing the following at a shell prompt:
~]$ ssh-keygen -t rsa1
Generating public/private rsa1 key pair.
Enter file in which to save the key (/home/john/.ssh/identity):
2. Press Enter to confirm the default location (that is, ~/.ssh/identity) for the newly created
key.
3. Enter a passphrase, and confirm it by entering it again when prompted to do so. For security
reasons, avoid using the same password as you use to log into your account.
After this, you will be presented with a message similar to this:
Your identification has been saved in /home/john/.ssh/identity.
Your public key has been saved in /home/john/.ssh/identity.pub.
The key fingerprint is:
cb:f6:d5:cb:6e:5f:2b:28:ac:17:0c:e4:62:e4:6f:59
CHAPTER 14. OPENSSH
303

john@penguin.example.com
The key's randomart image is:
+--[RSA1 2048]----+
| |
| . . |
| o o |
| + o E |
| . o S |
| = + . |
| . = . o . .|
| . = o o..o|
| .o o o=o.|
+-----------------+
4. Change the permissions of the ~/.ssh/ directory:
~]$ chmod 700 ~/.ssh
5. Copy the content of ~/.ssh/identity.pub into the ~/.ssh/authorized_keys on the
machine to which you want to connect, appending it to its end if the file already exists.
6. Change the permissions of the ~/.ssh/authorized_keys file using the following command:
~]$ chmod 600 ~/.ssh/authorized_keys
See Section 14.2.4.2, “Configuring ssh-agent” for information on how to set up your system to remember
the passphrase.
IMPORTANT
Never share your private key with anybody; it is for your personal use only.
14.2.4.2. Configuring ssh-agent
To store your passphrase so that you do not have to enter it each time you initiate a connection with a
remote machine, you can use the ssh-agent authentication agent. If you are running GNOME, you can
configure it to prompt you for your passphrase whenever you log in and remember it during the whole
session. Otherwise you can store the passphrase for a certain shell prompt.
To save your passphrase during your GNOME session, follow these steps:
1. Make sure you have the openssh-askpass package installed. If not, see Section 8.2.4, “Installing
Packages” for more information on how to install new packages in Red Hat Enterprise Linux.
2. Select System → Preferences → Startup Applications from the panel. The Startup
Applications Preferences will be started, and the tab containing a list of available startup
programs will be shown by default.
Deployment Guide
304
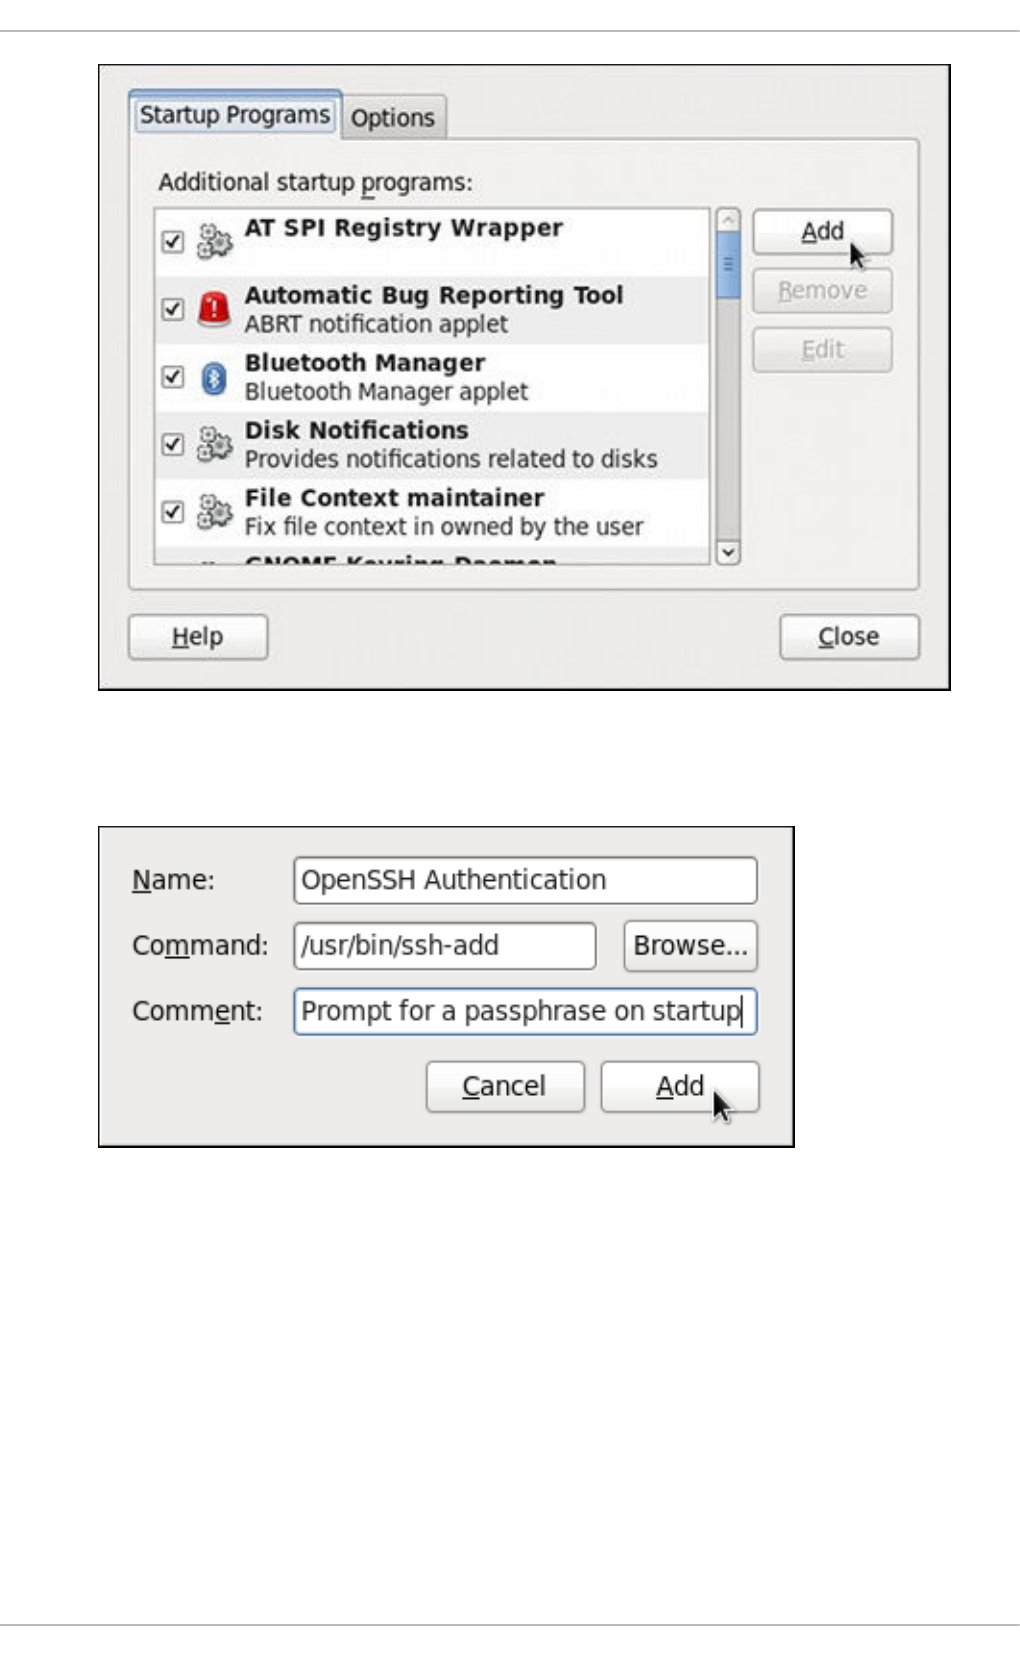
Figure 14.1. Startup Applications Preferences
3. Click the Add button on the right, and enter /usr/bin/ssh-add in the Command field.
Figure 14.2. Adding new application
4. Click Add and make sure the check box next to the newly added item is selected.
CHAPTER 14. OPENSSH
305
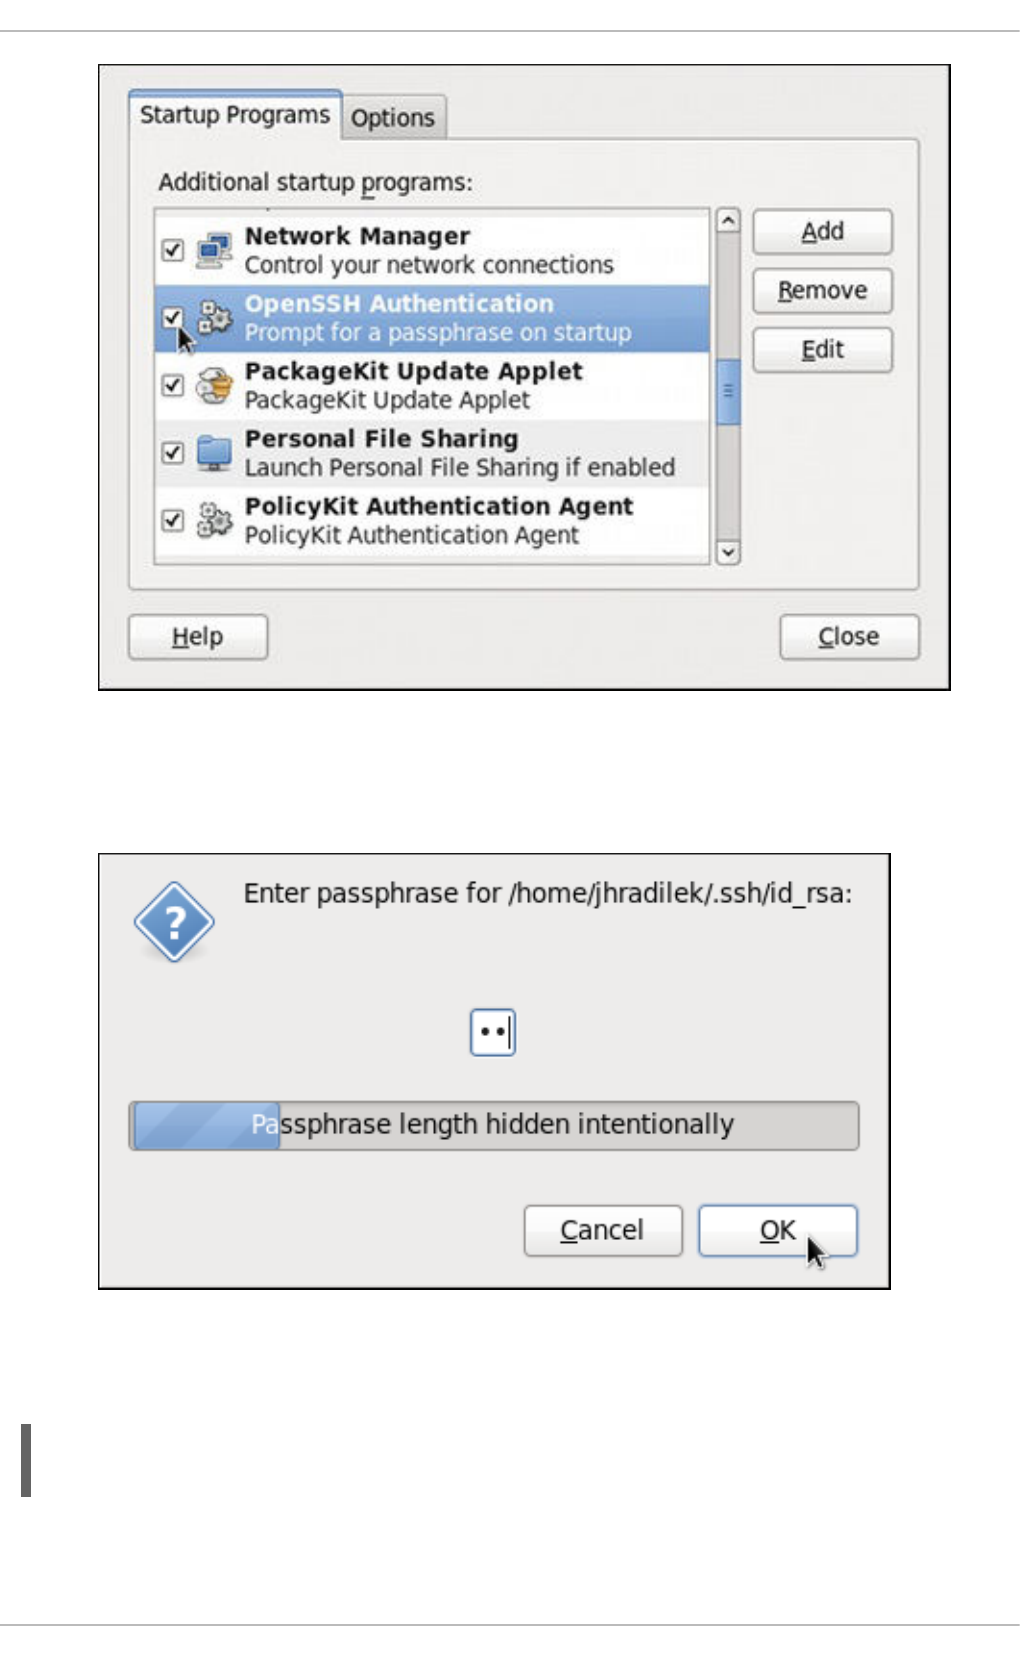
Figure 14.3. Enabling the application
5. Log out and then log back in. A dialog box will appear prompting you for your passphrase. From
this point on, you should not be prompted for a password by ssh, scp, or sftp.
Figure 14.4. Entering a passphrase
To save your passphrase for a certain shell prompt, use the following command:
~]$ ssh-add
Enter passphrase for /home/john/.ssh/id_rsa:
Note that when you log out, your passphrase will be forgotten. You must execute the command each
time you log in to a virtual console or a terminal window.
Deployment Guide
306

14.2.4.3. Multiple required methods of authentication for sshd
For higher security, SSH can require multiple methods of authentication to log in successfully, for
example both a passphrase and a public key. Set the RequiredAuthentications2 option in the
/etc/ssh/sshd_config file as desired, for example by running:
~]# echo "RequiredAuthentications2 publickey,password" >>
/etc/ssh/sshd_config
For more information on the available options, see the sshd_config(5) manual page.
14.3. USING OPENSSH CERTIFICATE AUTHENTICATION
14.3.1. Introduction to SSH Certificates
Using public key cryptography for authentication requires copying the public key from every client to
every server that the client intends to log into. This system does not scale well and can be an
administrative burden. Using a public key from a certificate authority (CA) to authenticate client
certificates removes the need to copy keys between multiple systems. While the X.509 Public Key
Infrastructure Certificate system provides a solution to this issue, there is a submission and validation
process, with associated fees, to go through in order to get a certificate signed. As an alternative,
OpenSSH supports the creation of simple certificates and associated CA infrastructure.
OpenSSH certificates contain a public key, identity information, and validity constraints. They are signed
with a standard SSH public key using the ssh-keygen utility. The format of the certificate is described
in /usr/share/doc/openssh-version/PROTOCOL.certkeys.
The ssh-keygen utility supports two types of certificates: user and host. User certificates authenticate
users to servers, whereas host certificates authenticate server hosts to users. For certificates to be used
for user or host authentication, sshd must be configured to trust the CA public key.
14.3.2. Support for SSH Certificates
Support for certificate authentication of users and hosts using the new OpenSSH certificate format was
introduced in Red Hat Enterprise Linux 6.5, in the openssh-5.3p1-94.el6 package. If required, to ensure
the latest OpenSSH package is installed, enter the following command as root:
~]# yum install openssh
Package openssh-5.3p1-104.el6_6.1.i686 already installed and latest
version
Nothing to do
14.3.3. Creating SSH CA Certificate Signing Keys
Two types of certificates are required, host certificates and user certificates. It is considered better to
have two separate keys for signing the two certificates, for example ca_user_key and ca_host_key,
however it is possible to use just one CA key to sign both certificates. It is also easier to follow the
procedures if separate keys are used, so the examples that follow will use separate keys.
The basic format of the command to sign user's public key to create a user certificate is as follows:
ssh-keygen -s ca_user_key -I certificate_ID id_rsa.pub
CHAPTER 14. OPENSSH
307

Where -s indicates the private key used to sign the certificate, -I indicates an identity string, the
certificate_ID, which can be any alpha numeric value. It is stored as a zero terminated string in the
certificate. The certificate_ID is logged whenever the certificate is used for identification and it is also
used when revoking a certificate. Having a long value would make logs hard to read, therefore using the
host name for host certificates and the user name for user certificates is a safe choice.
To sign a host's public key to create a host certificate, add the -h option:
ssh-keygen -s ca_host_key -I certificate_ID -h ssh_host_rsa_key.pub
Host keys are generated on the system by default, to list the keys, enter a command as follows:
~]# ls -l /etc/ssh/ssh_host*
-rw-------. 1 root root 668 Jul 9 2014 /etc/ssh/ssh_host_dsa_key
-rw-r--r--. 1 root root 590 Jul 9 2014 /etc/ssh/ssh_host_dsa_key.pub
-rw-------. 1 root root 963 Jul 9 2014 /etc/ssh/ssh_host_key
-rw-r--r--. 1 root root 627 Jul 9 2014 /etc/ssh/ssh_host_key.pub
-rw-------. 1 root root 1671 Jul 9 2014 /etc/ssh/ssh_host_rsa_key
-rw-r--r--. 1 root root 382 Jul 9 2014 /etc/ssh/ssh_host_rsa_key.pub
IMPORTANT
It is recommended to create and store CA keys in a safe place just as with any other
private key. In these examples the root user will be used. In a real production
environment using an offline computer with an administrative user account is
recommended. For guidance on key lengths see NIST Special Publication 800-131A.
Procedure 14.1. Generating SSH CA Certificate Signing Keys
1. On the server designated to be the CA, generate two keys for use in signing certificates. These
are the keys that all other hosts need to trust. Choose suitable names, for example
ca_user_key and ca_host_key. To generate the user certificate signing key, enter the
following command as root:
~]# ssh-keygen -t rsa -f ~/.ssh/ca_user_key
Generating public/private rsa key pair.
Created directory '/root/.ssh'.
Enter passphrase (empty for no passphrase):
Enter same passphrase again:
Your identification has been saved in /root/.ssh/ca_user_key.
Your public key has been saved in /root/.ssh/ca_user_key.pub.
The key fingerprint is:
11:14:2f:32:fd:5d:f5:e4:7a:5a:d6:b6:a0:62:c9:1f
root@host_name.example.com
The key's randomart image is:
+--[ RSA 2048]----+
| .+. o|
| . o +.|
| o + . . o|
| o + . . ..|
| S . ... *|
| . . . .*.|
| = E .. |
Deployment Guide
308

| . o . |
| . |
+-----------------+
Generate a host certificate signing key, ca_host_key, as follows:
~]# ssh-keygen -t rsa -f ~/.ssh/ca_host_key
Generating public/private rsa key pair.
Enter passphrase (empty for no passphrase):
Enter same passphrase again:
Your identification has been saved in /root/.ssh/ca_host_key.
Your public key has been saved in /root/.ssh/ca_host_key.pub.
The key fingerprint is:
e4:d5:d1:4f:6b:fd:a2:e3:4e:5a:73:52:91:0b:b7:7a
root@host_name.example.com
The key's randomart image is:
+--[ RSA 2048]----+
| .. |
| . ....|
| . . o +oo|
| o . o *o|
| S = .|
| o. .|
| *.E. |
| +o= |
| .oo. |
+-----------------+
If required, confirm the permissions are correct:
~]# ls -la ~/.ssh
total 40
drwxrwxrwx. 2 root root 4096 May 22 13:18 .
dr-xr-x---. 3 root root 4096 May 8 08:34 ..
-rw-------. 1 root root 1743 May 22 13:15 ca_host_key
-rw-r--r--. 1 root root 420 May 22 13:15 ca_host_key.pub
-rw-------. 1 root root 1743 May 22 13:14 ca_user_key
-rw-r--r--. 1 root root 420 May 22 13:14 ca_user_key.pub
-rw-r--r--. 1 root root 854 May 8 05:55 known_hosts
-r--------. 1 root root 1671 May 6 17:13 ssh_host_rsa
-rw-r--r--. 1 root root 1370 May 7 14:30 ssh_host_rsa-cert.pub
-rw-------. 1 root root 420 May 6 17:13 ssh_host_rsa.pub
2. Create the CA server's own host certificate by signing the server's host public key together with
an identification string such as the host name, the CA server's fully qualified domain name
(FQDN) but without the trailing ., and a validity period. The command takes the following form:
ssh-keygen -s ~/.ssh/ca_host_key -I certificate_ID -h -Z
host_name.example.com -V -start:+end /etc/ssh/ssh_host_rsa.pub
The -Z option restricts this certificate to a specific host within the domain. The -V option is for
adding a validity period; this is highly recommend. Where the validity period is intended to be
one year, fifty two weeks, consider the need for time to change the certificates and any holiday
periods around the time of certificate expiry.
CHAPTER 14. OPENSSH
309

For example:
~]# ssh-keygen -s ~/.ssh/ca_host_key -I host_name -h -Z
host_name.example.com -V -1w:+54w5d /etc/ssh/ssh_host_rsa.pub
Enter passphrase:
Signed host key /root/.ssh/ssh_host_rsa-cert.pub: id "host_name"
serial 0 for host_name.example.com valid from 2015-05-15T13:52:29 to
2016-06-08T13:52:29
14.3.4. Distributing and Trusting SSH CA Public Keys
Hosts that are to allow certificate authenticated log in from users must be configured to trust the CA's
public key that was used to sign the user certificates, in order to authenticate user's certificates. In this
example that is the ca_user_key.pub.
Publish the ca_user_key.pub key and download it to all hosts that are required to allow remote users
to log in. Alternately, copy the CA user public key to all the hosts. In a production environment, consider
copying the public key to an administrator account first. The secure copy command can be used to copy
the public key to remote hosts. The command has the following format:
scp ~/.ssh/ca_user_key.pub root@host_name.example.com:/etc/ssh/
Where host_name is the host name of a server the is required to authenticate user's certificates
presented during the login process. Ensure you copy the public key not the private key. For example, as
root:
~]# scp ~/.ssh/ca_user_key.pub root@host_name.example.com:/etc/ssh/
The authenticity of host 'host_name.example.com (10.34.74.56)' can't be
established.
RSA key fingerprint is fc:23:ad:ae:10:6f:d1:a1:67:ee:b1:d5:37:d4:b0:2f.
Are you sure you want to continue connecting (yes/no)? yes
Warning: Permanently added 'host_name.example.com,10.34.74.56' (RSA) to
the list of known hosts.
root@host_name.example.com's password:
ca_user_key.pub 100% 420
0.4KB/s 00:00
For remote user authentication, CA keys can be marked as trusted per-user in the
~/.ssh/authorized_keys file using the cert-authority directive or for global use by means of
the TrustedUserCAKeys directive in the /etc/ssh/sshd_config file. For remote host
authentication, CA keys can be marked as trusted globally in the /etc/ssh/known_hosts file or per-
user in the ~/.ssh/ssh_known_hosts file.
Procedure 14.2. Trusting the User Signing Key
For user certificates which have one or more principles listed, and where the setting is to have
global effect, edit the /etc/ssh/sshd_config file as follows:
TrustedUserCAKeys /etc/ssh/ca_user_key.pub
Restart sshd to make the changes take effect:
~]# service sshd restart
Deployment Guide
310

To avoid being presented with the warning about an unknown host, a user's system must trust the CA's
public key that was used to sign the host certificates. In this example that is ca_host_key.pub.
Procedure 14.3. Trusting the Host Signing Key
1. Extract the contents of the public key used to sign the host certificate. For example, on the CA:
cat ~/.ssh/ca_host_key.pub
ssh-rsa AAAAB5Wm.== root@ca-server.example.com
2. To configure client systems to trust servers' signed host certificates, add the contents of the
ca_host_key.pub into the global known_hosts file. This will automatically check a server's
host advertised certificate against the CA public key for all users every time a new machine is
connected to in the domain *.example.com. Login as root and configure the
/etc/ssh/ssh_known_hosts file, as follows:
~]# vi /etc/ssh/ssh_known_hosts
# A CA key, accepted for any host in *.example.com
@cert-authority *.example.com ssh-rsa AAAAB5Wm.
Where ssh-rsa AAAAB5Wm. is the contents of ca_host_key.pub. The above configures the
system to trust the CA servers host public key. This enables global authentication of the
certificates presented by hosts to remote users.
14.3.5. Creating SSH Certificates
A certifcate is a signed public key. The user's and host's public keys must be copied to the CA server for
signing by the CA server's private key.
IMPORTANT
Copying many keys to the CA to be signed can create confusion if they are not uniquely
named. If the default name is always used then the latest key to be copied will overwrite
the previously copied key, which may be an acceptable method for one administrator. In
the example below the default name is used. In a production environment, consider using
easily recognizable names. It is recommend to have a designated directory on the CA
server owned by an administrative user for the keys to be copied into. Copying these keys
to the root user's /etc/ssh/ directory is not recommend. In the examples below an
account named admin with a directory named keys/ will be used.
Create an administrator account, in this example admin, and a directory to receive the user's keys. For
example:
~]$ mkdir keys
Set the permissions to allow keys to be copied in:
~]$ chmod o+w keys
ls -la keys
total 8
drwxrwxrwx. 2 admin admin 4096 May 22 16:17 .
drwx------. 3 admin admin 4096 May 22 16:17 ..
CHAPTER 14. OPENSSH
311

14.3.5.1. Creating SSH Certificates to Authenticate Hosts
The command to sign a host certificate has the following format:
ssh-keygen -s ca_host_key -I host_name -h ssh_host_rsa_key.pub
The host certificate will named ssh_host_rsa_key-cert.pub.
Procedure 14.4. Generating a Host Certificate
To authenticate a host to a user, a public key must be generated on the host, passed to the CA server,
signed by the CA, and then passed back to be stored on the host to present to a user attempting to log
into the host.
1. Host keys are generated automatically on the system. To list them enter the following command:
~]# ls -l /etc/ssh/ssh_host*
-rw-------. 1 root root 668 May 6 14:38 /etc/ssh/ssh_host_dsa_key
-rw-r--r--. 1 root root 590 May 6 14:38
/etc/ssh/ssh_host_dsa_key.pub
-rw-------. 1 root root 963 May 6 14:38 /etc/ssh/ssh_host_key
-rw-r--r--. 1 root root 627 May 6 14:38 /etc/ssh/ssh_host_key.pub
-rw-------. 1 root root 1679 May 6 14:38 /etc/ssh/ssh_host_rsa_key
-rw-r--r--. 1 root root 382 May 6 14:38
/etc/ssh/ssh_host_rsa_key.pub
2. Copy the chosen public key to the server designated as the CA. For example, from the host:
~]# scp /etc/ssh/ssh_host_rsa_key.pub admin@ca-
server.example.com:~/keys/ssh_host_rsa_key.pub
The authenticity of host 'ca-server.example.com (10.34.74.58)' can't
be established.
RSA key fingerprint is
b0:e5:ea:b8:75:e2:f0:b1:fe:5b:07:39:7f:58:64:d9.
Are you sure you want to continue connecting (yes/no)? yes
Warning: Permanently added 'ca-server.example.com,10.34.74.58' (RSA)
to the list of known hosts.
admin@ca-server.example.com's password:
ssh_host_rsa_key.pub 100% 382
0.4KB/s 00:00
Alternately, from the CA:
~]$ scp root@host_name.example.com:/etc/ssh/ssh_host_rsa_key.pub
~/keys/ssh_host_rsa_key.pub
3. On the CA server, sign the host's public key. For example, as root:
~]# ssh-keygen -s ~/.ssh/ca_host_key -I host_name -h -Z
host_name.example.com -V -1d:+54w
/home/admin/keys/ssh_host_rsa_key.pub
Enter passphrase:
Deployment Guide
312

Signed host key /home/admin/keys/ssh_host_rsa_key-cert.pub: id
"host_name" serial 0 for host_name.example.com valid from 2015-05-
26T12:21:54 to 2016-06-08T12:21:54
Where host_name is the host name of the system requiring the certificate.
4. Copy the certificate to the host. For example, from the CA:
~]# scp /home/admin/keys/ssh_host_rsa_key-cert.pub
root@host_name.example.com:/etc/ssh/
root@host_name.example.com's password:
ssh_host_rsa_key-cert.pub 100% 1384
1.5KB/s 00:00
5. Configure the host to present the certificate to a user's system when a user initiates the login
process. As root, edit the /etc/ssh/sshd_config file as follows:
HostCertificate /etc/ssh/ssh_host_rsa_key-cert.pub
6. Restart sshd to make the changes take effect:
~]# service sshd restart
7. On user's systems. remove keys belonging to hosts from the ~/.ssh/known_hosts file if the
user has previously logged into the host configured above. When a user logs into the host they
should no longer be presented with the warning about the hosts authenticity.
To test the host certificate, on a client system, ensure the client has set up the global
/etc/ssh/known_hosts file, as described in Procedure 14.3, “Trusting the Host Signing Key”, and
that the server's public key is not in the ~/.ssh/known_hosts file. Then attempt to log into the server
over SSH as a remote user. You should not see a warning about the authenticity of the host. If required,
add the -v option to the SSH command to see logging information.
14.3.5.2. Creating SSH Certificates for Authenticating Users
To sign a user's certificate, use a command in the following format:
ssh-keygen -s ca_user_key -I user_name -Z user_name -V -start:+end
id_rsa.pub
The resulting certificate will be named id_rsa-cert.pub.
The default behavior of OpenSSH is that a user is allowed to log in as a remote user if one of the
principals specified in the certificate matches the remote user's name. This can be adjusted in the
following ways:
Add more user's names to the certificate during the signing process using the -Z option:
-Z "name1[,name2,...]"
On the user's system, add the public key of the CA in the ~/.ssh/authorized_keys file using
the cert-authority directive and list the principals names as follows:
~]# vi ~/.ssh/authorized_keys
CHAPTER 14. OPENSSH
313

# A CA key, accepted for any host in *.example.com
@cert-authority principals="name1,name2" *.example.com ssh-rsa
AAAAB5Wm.
On the server, create an AuthorizedPrincipalsFile file, either per user or glabally, and
add the principles' names to the file for those users allowed to log in. Then in the
/etc/ssh/sshd_config file, specify the file using the AuthorizedPrincipalsFile
directive.
Procedure 14.5. Generating a User Certificate
To authenticate a user to a remote host, a public key must be generated by the user, passed to the CA
server, signed by the CA, and then passed back to be stored by the user for use when logging in to a
host.
1. On client systems, login as the user who requires the certificate. Check for available keys as
follows:
~]$ ls -l ~/.ssh/
If no suitable public key exists, generate one and set the directory permissions if the directory is
not the default directory. For example, enter the following command:
~]$ ssh-keygen -t rsa
Generating public/private rsa key pair.
Enter file in which to save the key (/home/user1/.ssh/id_rsa):
Created directory '/home/user1/.ssh'.
Enter passphrase (empty for no passphrase):
Enter same passphrase again:
Your identification has been saved in /home/user1/.ssh/id_rsa.
Your public key has been saved in /home/user1/.ssh/id_rsa.pub.
The key fingerprint is:
b1:f8:26:a7:46:87:c3:60:54:a3:6d:85:0d:60:fe:ce
user1@host1.example.com
The key's randomart image is:
+--[ RSA 2048]----+
| oo++. |
| o.o.o. |
| .o o . |
| oo . o |
| . oo.S |
| o=.. |
| .Eo+ |
| .= |
| .. |
+-----------------+
By default the directory permissions for a user's keys are drwx------., or octal 0700. If
required, confirm the permissions are correct:
~]$ ls -la ~/.ssh
total 16
drwx------. 2 user1 user1 4096 May 7 12:37 .
Deployment Guide
314

drwx------. 3 user1 user1 4096 May 7 12:37 ..
-rw-------. 1 user1 user1 1679 May 7 12:37 id_rsa
-rw-r--r--. 1 user1 user1 421 May 7 12:37 id_rsa.pub
See Section 14.2.4, “Using Key-Based Authentication” for more examples of key generation and
for instructions on setting the correct directory permissions.
2. The chosen public key must be copied to the server designated as the CA, in order to be signed.
The secure copy command can be used to do this, the command has the following format:
scp ~/.ssh/id_protocol.pub admin@ca_server.example.com:~/keys/
Where protocol is the part of the file name indicating the protocol used to generate the key, for
example rsa, admin is an account on the CA server, and /keys/ is a directory setup to receive
the keys to be signed.
Copy the chosen public key to the server designated as the CA. For example:
~]$ scp ~/.ssh/id_rsa.pub admin@ca-server.example.com:~/keys/
admin@ca-server.example.com's password:
id_rsa.pub 100% 421 0.4KB/s
00:00
If you have configured the client system to trust the host signing key as described in
Procedure 14.3, “Trusting the Host Signing Key” then you should not see a warning about the
authenticity of the remote host.
3. On the CA server, sign the user's public key. For example, as root:
~]# ssh-keygen -s ~/.ssh/ca_user_key -I user1 -Z user1 -V -1d:+54w
/home/admin/keys/id_rsa.pub
Enter passphrase:
Signed user key /home/admin/keys/id_rsa-cert.pub: id "user1" serial
0 for host_name.example.com valid from 2015-05-21T16:43:17 to 2016-
06-03T16:43:17
4. Copy the resulting certificate to the user's ~/.ssh/ directory on their system. For example:
~]# scp /home/admin/keys/id_rsa-cert.pub
user1@host_name.example.com:~/.ssh/
user1@host_name.example.com's password:
id_rsa-cert.pub 100% 1498 1.5KB/s
00:00
5. If using the standard file names and location then no further configuration is required as the SSH
daemon will search for user certificates ending in -cert.pub and use them automatically if it
finds them. Note that the default location and file names for for SSH version 2 keys are:
~/.ssh/id_dsa, ~/.ssh/id_ecdsa and ~/.ssh/id_rsa as explained in the
ssh_config(5) manual page. If you use these locations and naming conventions then there is
no need for editing the configuration files to enable sshd to present the certificate. They will be
used automatically when logging in to a remote system. In this is the case then skip to step 6.
If required to use a non-default directory or file naming convention, then as root, add the
following line to the /etc/ssh/ssh_config or ~/.ssh/config files:
CHAPTER 14. OPENSSH
315

IdentityFile ~/path/key_file
Note that this must be the private key name, do not had .pub or -cert.pub. Ensure the file
permission are correct. For example:
~]$ ls -la ~/.ssh/config
-rw-rw-r--. 1 user1 user1 36 May 27 21:49 /home/user1/.ssh/config
chmod 700 ~/.ssh/config
~]$ ls -la ~/.ssh/config
-rwx------. 1 user1 user1 36 May 27 21:49 /home/user1/.ssh/config
This will enable the user of this system to be authenticated by a user certificate when logging into
a remote system configured to trust the CA user certificate signing key.
6. To test the user certificate, attempt to log into a server over SSH from the user's account. You
should do this as the user listed as a principle in the certificate, if any are specified. You should
not be prompted for a password. If required, add the -v option to the SSH command to see
logging information.
14.3.6. Signing an SSH Certificate Using a PKCS#11 Token
It is possible to sign a host key using a CA key stored in a PKCS#11 token by providing the token library
using the -D and identifying the CA key by providing its public half as an argument to the -s option:
ssh-keygen -s ca_host_key.pub -D libpkcs11.so -I certificate_ID
host_key.pub
In all cases, certificate_ID is a “key identifier” that is logged by the server when the certificate is used for
authentication.
Certificates may be configured to be valid only for a set of users or host names, the principals. By
default, generated certificates are valid for all users or hosts. To generate a certificate for a specified set
of principals, use a comma separated list with the -Z option as follows:
ssh-keygen -s ca_user_key.pub -D libpkcs11.so -I certificate_ID -Z
user1,user2 id_rsa.pub
and for hosts:
ssh-keygen -s ca_host_key.pub -D libpkcs11.so -I certificate_ID -h -Z
host.domain ssh_host_rsa_key.pub
Additional limitations on the validity and use of user certificates may be specified through certificate
options. A certificate option may disable features of the SSH session, may be valid only when presented
from particular source addresses or may force the use of a specific command. For a list of valid
certificate options, see the ssh-keygen(1) manual page for the -O option.
Certificates may be defined to be valid for a specific lifetime. The -V option allows specifying a
certificates start and end times. For example:
ssh-keygen -s ca_user_key -I certificate_ID id_rsa.pub -V "-1w:+54w5d"
Deployment Guide
316

A certificate that is presented at a time outside this range will not be considered valid. By default,
certificates are valid indefinitely starting from UNIX Epoch.
14.3.7. Viewing an SSH CA Certificate
To view a certificate, use the -L to list the contents. For example, for a user's certificate:
~]$ ssh-keygen -L -f ~/.ssh/id_rsa-cert.pub
/home/user1/.ssh/id_rsa-cert.pub:
Type: ssh-rsa-cert-v01@openssh.com user certificate
Public key: RSA-CERT
3c:9d:42:ed:65:b6:0f:18:bf:52:77:c6:02:0e:e5:86
Signing CA: RSA b1:8e:0b:ce:fe:1b:67:59:f1:74:cd:32:af:5f:c6:e8
Key ID: "user1"
Serial: 0
Valid: from 2015-05-27T00:09:16 to 2016-06-09T00:09:16
Principals:
user1
Critical Options: (none)
Extensions:
permit-X11-forwarding
permit-agent-forwarding
permit-port-forwarding
permit-pty
permit-user-rc
To vew a host certificate:
~]# ssh-keygen -L -f /etc/ssh/ssh_host_rsa_key-cert.pub
/etc/ssh/ssh_host_rsa_key-cert.pub:
Type: ssh-rsa-cert-v01@openssh.com host certificate
Public key: RSA-CERT
1d:71:61:50:05:9b:ec:64:34:27:a5:cc:67:24:03:23
Signing CA: RSA e4:d5:d1:4f:6b:fd:a2:e3:4e:5a:73:52:91:0b:b7:7a
Key ID: "host_name"
Serial: 0
Valid: from 2015-05-26T17:19:01 to 2016-06-08T17:19:01
Principals:
host_name.example.com
Critical Options: (none)
Extensions: (none)
14.3.8. Revoking an SSH CA Certificate
If a certificate is stolen, it should be revoked. Although OpenSSH does not provide a mechanism to
distribute the revocation list it is still easier to create the revocation list and distribute it by other means
then to change the CA keys and all host and user certificates previously created and distributed.
Keys can be revoked by adding them to the revoked_keys file and specifying the file name in the
sshd_config file as follows:
RevokedKeys /etc/ssh/revoked_keys
Note that if this file is not readable, then public key authentication will be refused for all users.
CHAPTER 14. OPENSSH
317

To test if a key has been revoked, query the revocation list for the presence of the key. Use a command
as follows:
ssh-keygen -Qf /etc/ssh/revoked_keys ~/.ssh/id_rsa.pub
A user can revoke a CA certificate by changing the cert-authority directive to revoke in the
known_hosts file.
14.4. OPENSSH CLIENTS
To connect to an OpenSSH server from a client machine, you must have the openssh-clients and
openssh packages installed (see Section 8.2.4, “Installing Packages” for more information on how to
install new packages in Red Hat Enterprise Linux).
14.4.1. Using the ssh Utility
The ssh utility allows you to log in to a remote machine and execute commands there. It is a secure
replacement for the rlogin, rsh, and telnet programs.
Similarly to the telnet command, log in to a remote machine by using the following command:
ssh hostname
For example, to log in to a remote machine named penguin.example.com, type the following at a
shell prompt:
~]$ ssh penguin.example.com
This will log you in with the same user name you are using on the local machine. If you want to specify a
different user name, use a command in the following form:
ssh username@hostname
For example, to log in to penguin.example.com as john, type:
~]$ ssh john@penguin.example.com
The first time you initiate a connection, you will be presented with a message similar to this:
The authenticity of host 'penguin.example.com' can't be established.
RSA key fingerprint is 94:68:3a:3a:bc:f3:9a:9b:01:5d:b3:07:38:e2:11:0c.
Are you sure you want to continue connecting (yes/no)?
Type yes to confirm. You will see a notice that the server has been added to the list of known hosts, and
a prompt asking for your password:
Warning: Permanently added 'penguin.example.com' (RSA) to the list of
known hosts.
john@penguin.example.com's password:
Deployment Guide
318

IMPORTANT
Update the host key of an SSH server if the key changes. The client notifies the user that
the connection cannot proceed until the server's host key is deleted from the
~/.ssh/known_hosts file. Contact the system administrator of the SSH server to verify
the server is not compromised, then remove the line with the name of the remote machine
at the beginning.
After entering the password, you will be provided with a shell prompt for the remote machine.
Alternatively, the ssh program can be used to execute a command on the remote machine without
logging in to a shell prompt:
ssh [username@]hostname command
For example, the /etc/redhat-release file provides information about the Red Hat Enterprise Linux
version. To view the contents of this file on penguin.example.com, type:
~]$ ssh john@penguin.example.com cat /etc/redhat-release
john@penguin.example.com's password:
Red Hat Enterprise Linux Server release 6.2 (Santiago)
After you enter the correct password, the user name will be displayed, and you will return to your local
shell prompt.
14.4.2. Using the scp Utility
scp can be used to transfer files between machines over a secure, encrypted connection. In its design, it
is very similar to rcp.
To transfer a local file to a remote system, use a command in the following form:
scp localfile username@hostname:remotefile
For example, if you want to transfer taglist.vim to a remote machine named
penguin.example.com, type the following at a shell prompt:
~]$ scp taglist.vim john@penguin.example.com:.vim/plugin/taglist.vim
john@penguin.example.com's password:
taglist.vim 100% 144KB 144.5KB/s
00:00
Multiple files can be specified at once. To transfer the contents of .vim/plugin/ to the same directory
on the remote machine penguin.example.com, type the following command:
~]$ scp .vim/plugin/* john@penguin.example.com:.vim/plugin/
john@penguin.example.com's password:
closetag.vim 100% 13KB 12.6KB/s
00:00
snippetsEmu.vim 100% 33KB 33.1KB/s
00:00
taglist.vim 100% 144KB 144.5KB/s
00:00
CHAPTER 14. OPENSSH
319

To transfer a remote file to the local system, use the following syntax:
scp username@hostname:remotefile localfile
For instance, to download the .vimrc configuration file from the remote machine, type:
~]$ scp john@penguin.example.com:.vimrc .vimrc
john@penguin.example.com's password:
.vimrc 100% 2233 2.2KB/s
00:00
14.4.3. Using the sftp Utility
The sftp utility can be used to open a secure, interactive FTP session. In its design, it is similar to ftp
except that it uses a secure, encrypted connection.
To connect to a remote system, use a command in the following form:
sftp username@hostname
For example, to log in to a remote machine named penguin.example.com with john as a user name,
type:
~]$ sftp john@penguin.example.com
john@penguin.example.com's password:
Connected to penguin.example.com.
sftp>
After you enter the correct password, you will be presented with a prompt. The sftp utility accepts a set
of commands similar to those used by ftp (see Table 14.3, “A selection of available sftp commands”).
Table 14.3. A selection of available sftp commands
Command Description
ls [directory] List the content of a remote directory. If none is supplied, a current
working directory is used by default.
cd directory Change the remote working directory to directory.
mkdir directory Create a remote directory.
rmdir path Remove a remote directory.
put localfile [remotefile] Transfer localfile to a remote machine.
get remotefile [localfile] Transfer remotefile from a remote machine.
For a complete list of available commands, see the sftp(1) manual page.
Deployment Guide
320

14.5. MORE THAN A SECURE SHELL
A secure command-line interface is just the beginning of the many ways SSH can be used. Given the
proper amount of bandwidth, X11 sessions can be directed over an SSH channel. Or, by using TCP/IP
forwarding, previously insecure port connections between systems can be mapped to specific SSH
channels.
14.5.1. X11 Forwarding
To open an X11 session over an SSH connection, use a command in the following form:
ssh -Y username@hostname
For example, to log in to a remote machine named penguin.example.com with john as a user name,
type:
~]$ ssh -Y john@penguin.example.com
john@penguin.example.com's password:
When an X program is run from the secure shell prompt, the SSH client and server create a new secure
channel, and the X program data is sent over that channel to the client machine transparently.
X11 forwarding can be very useful. For example, X11 forwarding can be used to create a secure,
interactive session of the Printer Configuration utility. To do this, connect to the server using ssh and
type:
~]$ system-config-printer &
The Printer Configuration Tool will appear, allowing the remote user to safely configure printing on the
remote system.
Please note that X11 Forwarding does not distinguish between trusted and untrusted forwarding.
14.5.2. Port Forwarding
SSH can secure otherwise insecure TCP/IP protocols via port forwarding. When using this technique,
the SSH server becomes an encrypted conduit to the SSH client.
Port forwarding works by mapping a local port on the client to a remote port on the server. SSH can map
any port from the server to any port on the client. Port numbers do not need to match for this technique
to work.
NOTE
If you want to use reserved port numbers, please note that setting up port forwarding to
listen on ports below 1024 requires root level access.
To create a TCP/IP port forwarding channel which listens for connections on the localhost, use a
command in the following form:
ssh -L local-port:remote-hostname:remote-port username@hostname
For example, to check email on a server called mail.example.com using POP3 through an encrypted
CHAPTER 14. OPENSSH
321

connection, use the following command:
~]$ ssh -L 1100:mail.example.com:110 mail.example.com
Once the port forwarding channel is in place between the client machine and the mail server, direct a
POP3 mail client to use port 1100 on the localhost to check for new email. Any requests sent to port
1100 on the client system will be directed securely to the mail.example.com server.
If mail.example.com is not running an SSH server, but another machine on the same network is,
SSH can still be used to secure part of the connection. However, a slightly different command is
necessary:
~]$ ssh -L 1100:mail.example.com:110 other.example.com
In this example, POP3 requests from port 1100 on the client machine are forwarded through the SSH
connection on port 22 to the SSH server, other.example.com. Then, other.example.com
connects to port 110 on mail.example.com to check for new email. Note that when using this
technique, only the connection between the client system and other.example.com SSH server is
secure.
Port forwarding can also be used to get information securely through network firewalls. If the firewall is
configured to allow SSH traffic via its standard port (that is, port 22) but blocks access to other ports, a
connection between two hosts using the blocked ports is still possible by redirecting their communication
over an established SSH connection.
IMPORTANT
The connection is only as secure as the client system because forwarding connections in
this way allows any user on the client system to connect to that service. If the client
system becomes compromised, an attacker can also access the forwarded services.
If preferred, disable this functionality on the server by specifying a No parameter for the
AllowTcpForwarding line in the /etc/ssh/sshd_config file and restarting the
sshd service.
14.6. ADDITIONAL RESOURCES
For more information about OpenSSH and OpenSSL, see the resources listed below.
14.6.1. Installed Documentation
sshd(8) — a manual page for the sshd daemon.
ssh(1) — a manual page for the ssh client.
scp(1) — a manual page for the scp utility.
sftp(1) — a manual page for the sftp utility.
ssh-keygen(1) — a manual page for the ssh-keygen utility.
ssh_config(5) — a manual page with a full description of available SSH client configuration
options.
Deployment Guide
322

sshd_config(5) — a manual page with a full description of available SSH daemon configuration
options.
/usr/share/doc/openssh-version/ Contains detailed information on the protocols
supported by OpenSSH.
14.6.2. Useful Websites
http://www.openssh.com/
The OpenSSH home page containing further documentation, frequently asked questions, links to the
mailing lists, bug reports, and other useful resources.
http://www.openssl.org/
The OpenSSL home page containing further documentation, frequently asked questions, links to the
mailing lists, and other useful resources.
[4] A multiplexed connection consists of several signals being sent over a shared, common medium. With SSH,
different channels are sent over a common secure connection.
CHAPTER 14. OPENSSH
323

CHAPTER 15. TIGERVNC
TigerVNC (Tiger Virtual Network Computing) is a system for graphical desktop sharing which allows
you to remotely control other computers.
TigerVNC works on the client-server principle: a server shares its output (vncserver) and a client
(vncviewer) connects to the server.
15.1. VNC SERVER
vncserver is a utility which starts a VNC (Virtual Network Computing) desktop. It runs Xvnc with
appropriate options and starts a window manager on the VNC desktop. vncserver allows users to run
separate sessions in parallel on a machine which can then be accessed by any number of clients from
anywhere.
15.1.1. Installing VNC Server
To install the TigerVNC server, run the following command as root:
~]# yum install tigervnc-server
15.1.2. Configuring VNC Server
The VNC server can be configured to start a display for one or more users, provided that accounts for the
users exist on the system, with optional parameters such as for display settings, network address and
port, and security settings.
Procedure 15.1. Configuring a VNC Display for a Single User
Specify the user name and the display number by editing /etc/sysconfig/vncservers and
adding a line in the following format:
VNCSERVERS="display_number:user"
The VNC user names must correspond to users of the system.
Example 15.1. Setting the Display Number for a User
For example, to configure display number 3 for user joe, open the configuration file for
editing:
~]# vi /etc/sysconfig/vncservers
Add a line as follows:
VNCSERVERS="3:joe"
Save and close the file.
In the example above, display number 3 and the user joe are set. Do not use 0 as the display
number since the main X display of a workstation is usually indicated as 0.
Deployment Guide
324

Procedure 15.2. Configuring a VNC Display for Multiple Users
To set a VNC display for more than one user, specify the user names and display numbers by
editing /etc/sysconfig/vncservers and adding a line in the following format:
VNCSERVERS="display_number:user display_number:user"
The VNC user names must correspond to users of the system.
Example 15.2. Setting the Display Numbers for Two Users
For example, to configure two users, open the configuration file for editing:
~]# vi /etc/sysconfig/vncservers
Add a line as follows:
VNCSERVERS="3:joe 4:jill"
Procedure 15.3. Configuring VNC Display Arguments
Specify additional settings in the /etc/sysconfig/vncservers file by adding arguments
using the VNCSERVERARGS directive as follows:
VNCSERVERS="display_number:user display_number:user"
VNCSERVERARGS[display_number]="arguments"
Table 15.1. Frequently Used VNC Server Parameters
VNCSERVERARGS Definition
-geometry specifies the size of the VNC desktop to be created, default is 1024x768.
-nolisten tcp prevents connections to your VNC server through TCP (Transmission
Control Protocol)
-localhost prevents remote VNC clients from connecting except when doing so
through a secure tunnel
See the Xvnc(1) man page for further options.
Example 15.3. Setting vncserver Arguments
Following on from the example above, to add arguments for two users, edit the
/etc/sysconfig/vncservers file as follows:
VNCSERVERS="3:joe 4:jill"
VNCSERVERARGS[1]="-geometry 800x600 -nolisten tcp -localhost"
VNCSERVERARGS[2]="-geometry 1920×1080 -nolisten tcp -localhost"
CHAPTER 15. TIGERVNC
325

Procedure 15.4. Configuring VNC User Passwords
To set the VNC password for all users defined in the /etc/sysconfig/vncservers file,
enter the following command as root:
~]# vncpasswd
Password:
Verify:
To set the VNC password individually for a user:
~]# su - user
~]$ vncpasswd
Password:
Verify:
IMPORTANT
The stored password is not encrypted; anyone who has access to the password
file can find the plain-text password.
15.1.3. Starting VNC Server
In order to start a VNC desktop, the vncserver utility is used. It is a Perl script which simplifies the
process of starting an Xvnc server. It runs Xvnc with appropriate options and starts a window manager on
the VNC desktop. There are three ways to start vncserver:
You can allow vncserver to choose the first available display number, start Xvnc with that
display number, and start the default window manager in the Xvnc session. All these steps are
provided by one command:
~]$ vncserver
You will be prompted to enter a VNC password the first time the command is run if no VNC
password has been set.
Alternately, you can specify a specific display number:
vncserver :display_number
vncserver attempts to start Xvnc with that display number and exits if the display number is not
available.
For example:
~]$ vncserver :20
Alternately, to start VNC server with displays for the users configured in the
/etc/sysconfig/vncservers configuration file, as root enter:
~]# service vncserver start
Deployment Guide
326

You can enable the vncserver service automatically at system start. Every time you log in,
vncserver is automatically started. As root, run
~]# chkconfig vncserver on
15.1.4. Terminating a VNC Session
Similarly to enabling the vncserver service, you can disable the automatic start of the service at
system start:
~]# chkconfig vncserver off
Or, when your system is running, you can stop the service by issuing the following command as root:
~]# service vncserver stop
To terminate a specific display, terminate vncserver using the -kill option along with the display
number.
Example 15.4. Terminating a Specific Display
For example, to terminate display number 2, run:
~]# vncserver -kill :2
Example 15.5. Terminating an Xvnc process
If it is not possible to terminate the VNC service or display, terminate the Xvnc session using the
process ID (PID). To view the processes, enter:
~]$ service vncserver status
Xvnc (pid 4290 4189) is running...
To terminate process 4290, enter as root:
~]# kill -s 15 4290
15.2. SHARING AN EXISTING DESKTOP
By default a logged in user has a desktop provided by X Server on display 0. A user can share their
desktop using the TigerVNC server x0vncserver.
Procedure 15.5. Sharing an X Desktop
To share the desktop of a logged in user, using the x0vncserver, proceed as follows:
1. Enter the following command as root
~]# yum install tigervnc-server
CHAPTER 15. TIGERVNC
327

2. Set the VNC password for the user:
~]$ vncpasswd
Password:
Verify:
3. Enter the following command as that user:
~]$ x0vncserver -PasswordFile=.vnc/passwd -AlwaysShared=1
Provided the firewall is configured to allow connections to port 5900, the remote viewer can now connect
to display 0, and view the logged in users desktop. See Section 15.3.2.1, “Configuring the Firewall for
VNC” for information on how to configure the firewall.
15.3. USING A VNC VIEWER
A VNC viewer is a program which shows the graphical user interface created by the VNC server and can
control the VNC server remotely. The desktop that is shared is not by default the same as the desktop
that is displayed to a user directly logged into the system. The VNC server creates a unique desktop for
every display number. Any number of clients can connect to a VNC server.
15.3.1. Installing the VNC Viewer
To install the TigerVNC client, vncviewer, as root, run the following command:
~]# yum install tigervnc
The TigerVNC client has a graphical user interface (GUI) which can be started by entering the
command vncviewer. Alternatively, you can operate vncviewer through the command-line interface
(CLI). To view a list of parameters for vncviewer enter vncviewer -h on the command line.
15.3.2. Connecting to a VNC Server
Once the VNC server is configured, you can connect to it from any VNC viewer.
Procedure 15.6. Connecting to a VNC Server Using a GUI
1. Enter the vncviewer command with no arguments, the VNC Viewer: Connection
Details utility appears. It prompts for a VNC server to connect to.
2. If required, to prevent disconnecting any existing VNC connections to the same display, select
the option to allow sharing of the desktop as follows:
a. Select the Options button.
b. Select the Misc. tab.
c. Select the Shared button.
d. Press OK to return to the main menu.
3. Enter an address and display number to connect to:
Deployment Guide
328

address:display_number
4. Press Connect to connect to the VNC server display.
5. You will be prompted to enter the VNC password. This will be the VNC password for the user
corresponding to the display number unless a global default VNC password was set.
A window appears showing the VNC server desktop. Note that this is not the desktop the normal
user sees, it is an Xvnc desktop.
Procedure 15.7. Connecting to a VNC Server Using the CLI
1. Enter the viewer command with the address and display number as arguments:
vncviewer address:display_number
Where address is an IP address or host name.
2. Authenticate yourself by entering the VNC password. This will be the VNC password for the user
corresponding to the display number unless a global default VNC password was set.
3. A window appears showing the VNC server desktop. Note that this is not the desktop the normal
user sees, it is the Xvnc desktop.
15.3.2.1. Configuring the Firewall for VNC
When using a non-encrypted connection, the firewall might block your connection. The VNC protocol is
remote framebuffer (RFB), which is transported in TCP packets. If required, open a port for the TCP
protocol as described below. When using the -via option, traffic is redirected over SSH which is enabled
by default.
NOTE
The default port of VNC server is 5900. To reach the port through which a remote desktop
will be accessible, sum the default port and the user's assigned display number. For
example, for the second display: 2 + 5900 = 5902.
Procedure 15.8. Opening a Port Using lokkit
The lokkit command provides a way to quickly enable a port using the command line.
1. To enable a specific port, for example port 5902 for TCP, issue the following command as root:
~]# lokkit --port=5902:tcp --update
Note that this will restart the firewall as long as it has not been disabled with the --disabled
option. Active connections will be terminated and time out on the initiating machine.
2. Verify whether the chosen port is open. As root, enter:
~]# iptables -L -n | grep 'tcp.*59'
ACCEPT tcp -- 0.0.0.0/0 0.0.0.0/0 state NEW tcp
dpt:5902
CHAPTER 15. TIGERVNC
329

3. If you are unsure of the port numbers in use for VNC, as root, enter:
~]# netstat -tnlp
tcp 0 0 0.0.0.0:6003 0.0.0.0:* LISTEN 4290/Xvnc
tcp 0 0 0.0.0.0:5900 0.0.0.0:* LISTEN
7013/x0vncserver
tcp 0 0 0.0.0.0:5902 0.0.0.0:* LISTEN 4189/Xvnc
tcp 0 0 0.0.0.0:5903 0.0.0.0:* LISTEN 4290/Xvnc
tcp 0 0 0.0.0.0:6002 0.0.0.0:* LISTEN 4189/Xvnc
Ports starting 59XX are for the VNC RFB protocol. Ports starting 60XX are for the X windows
protocol.
To list the ports and the Xvnc session's associated user, as root, enter:
~]# lsof -i -P | grep vnc
Xvnc 4189 jane 0u IPv6 27972 0t0 TCP *:6002
(LISTEN)
Xvnc 4189 jane 1u IPv4 27973 0t0 TCP *:6002
(LISTEN)
Xvnc 4189 jane 6u IPv4 27979 0t0 TCP *:5902
(LISTEN)
Xvnc 4290 joe 0u IPv6 28231 0t0 TCP *:6003
(LISTEN)
Xvnc 4290 joe 1u IPv4 28232 0t0 TCP *:6003
(LISTEN)
Xvnc 4290 joe 6u IPv4 28244 0t0 TCP *:5903
(LISTEN)
x0vncserv 7013 joe 4u IPv4 47578 0t0 TCP *:5900
(LISTEN)
Procedure 15.9. Configuring the Firewall Using an Editor
When preparing a configuration file for multiple installations using administration tools, it is useful to edit
the firewall configuration file directly. Note that any mistakes in the configuration file could have
unexpected consequences, cause an error, and prevent the firewall settings from being applied.
Therefore, check the /etc/sysconfig/system-config-firewall file thoroughly after editing.
1. To check what the firewall is configured to allow, issue the following command as root to view
the firewall configuration file:
~]# less /etc/sysconfig/system-config-firewall
# Configuration file for system-config-firewall
--enabled
--service=ssh
In this example taken from a default installation, the firewall is enabled but VNC ports have not
been configured to pass through.
2. Open /etc/sysconfig/system-config-firewall for editing as root and add lines in the
following format to the firewall configuration file:
--port=port_number:tcp
Deployment Guide
330

For example, to add port 5902 :
~]# vi /etc/sysconfig/system-config-firewall
# Configuration file for system-config-firewall
--enabled
--service=ssh
--port=5902:tcp
3. Note that these changes will not take effect even if the firewall is reloaded or the system
rebooted. To apply the settings in /etc/sysconfig/system-config-firewall, issue the
following command as root:
~]# lokkit --update
15.3.3. Connecting to VNC Server Using SSH
VNC is a clear text network protocol with no security against possible attacks on the communication. To
make the communication secure, you can encrypt your server-client connection by using the -via
option. This will create an SSH tunnel between the VNC server and the client.
The format of the command to encrypt a VNC server-client connection is as follows:
vncviewer -via user@host:display_number
Example 15.6. Using the -via Option
1. To connect to a VNC server using SSH, enter a command as follows:
$ vncviewer -via joe@192.168.2.101 127.0.0.1:3
2. When you are prompted to, type the password, and confirm by pressing Enter.
3. A window with a remote desktop appears on your screen.
For more information on using SSH, see Chapter 14, OpenSSH.
15.4. ADDITIONAL RESOURCES
For more information about TigerVNC, see the resources listed below.
Installed Documentation
vncserver(1) — The manual page for the VNC server utility.
vncviewer(1) — The manual page for the VNC viewer.
vncpasswd(1) — The manual page for the VNC password command.
Xvnc(1) — The manual page for the Xvnc server configuration options.
x0vncserver(1) — The manual page for the TigerVNC server for sharing existing X servers.
CHAPTER 15. TIGERVNC
331

PART VI. SERVERS
This part discusses various topics related to servers such as how to set up a Web server or share files
and directories over the network.
Deployment Guide
332

CHAPTER 16. DHCP SERVERS
Dynamic Host Configuration Protocol (DHCP) is a network protocol that automatically assigns TCP/IP
information to client machines. Each DHCP client connects to the centrally located DHCP server, which
returns the network configuration (including the IP address, gateway, and DNS servers) of that client.
16.1. WHY USE DHCP?
DHCP is useful for automatic configuration of client network interfaces. When configuring the client
system, you can choose DHCP instead of specifying an IP address, netmask, gateway, or DNS servers.
The client retrieves this information from the DHCP server. DHCP is also useful if you want to change the
IP addresses of a large number of systems. Instead of reconfiguring all the systems, you can just edit
one configuration file on the server for the new set of IP addresses. If the DNS servers for an
organization changes, the changes happen on the DHCP server, not on the DHCP clients. When you
restart the network or reboot the clients, the changes go into effect.
If an organization has a functional DHCP server correctly connected to a network, laptops and other
mobile computer users can move these devices from office to office.
16.2. CONFIGURING A DHCPV4 SERVER
The dhcp package contains an Internet Systems Consortium (ISC) DHCP server. First, install the
package as the superuser:
~]# yum install dhcp
Installing the dhcp package creates a file, /etc/dhcp/dhcpd.conf, which is merely an empty
configuration file:
~]# cat /etc/dhcp/dhcpd.conf
#
# DHCP Server Configuration file.
# see /usr/share/doc/dhcp*/dhcpd.conf.sample
The sample configuration file can be found at /usr/share/doc/dhcp-
<version>/dhcpd.conf.sample. You should use this file to help you configure
/etc/dhcp/dhcpd.conf, which is explained in detail below.
DHCP also uses the file /var/lib/dhcpd/dhcpd.leases to store the client lease database. See
Section 16.2.2, “Lease Database” for more information.
16.2.1. Configuration File
The first step in configuring a DHCP server is to create the configuration file that stores the network
information for the clients. Use this file to declare options and global options for client systems.
The configuration file can contain extra tabs or blank lines for easier formatting. Keywords are case-
insensitive and lines beginning with a hash sign (#) are considered comments.
There are two types of statements in the configuration file:
Parameters — State how to perform a task, whether to perform a task, or what network
configuration options to send to the client.
CHAPTER 16. DHCP SERVERS
333

Declarations — Describe the topology of the network, describe the clients, provide addresses for
the clients, or apply a group of parameters to a group of declarations.
The parameters that start with the keyword option are referred to as options. These options control
DHCP options; whereas, parameters configure values that are not optional or control how the DHCP
server behaves.
Parameters (including options) declared before a section enclosed in curly brackets ({ }) are considered
global parameters. Global parameters apply to all the sections below it.
IMPORTANT
If the configuration file is changed, the changes do not take effect until the DHCP daemon
is restarted with the command service dhcpd restart.
NOTE
Instead of changing a DHCP configuration file and restarting the service each time, using
the omshell command provides an interactive way to connect to, query, and change the
configuration of a DHCP server. By using omshell, all changes can be made while the
server is running. For more information on omshell, see the omshell man page.
In Example 16.1, “Subnet Declaration”, the routers, subnet-mask, domain-search, domain-
name-servers, and time-offset options are used for any host statements declared below it.
For every subnet which will be served, and for every subnet to which the DHCP server is connected,
there must be one subnet declaration, which tells the DHCP daemon how to recognize that an address
is on that subnet. A subnet declaration is required for each subnet even if no addresses will be
dynamically allocated to that subnet.
In this example, there are global options for every DHCP client in the subnet and a range declared.
Clients are assigned an IP address within the range.
Example 16.1. Subnet Declaration
subnet 192.168.1.0 netmask 255.255.255.0 {
option routers 192.168.1.254;
option subnet-mask 255.255.255.0;
option domain-search "example.com";
option domain-name-servers 192.168.1.1;
option time-offset -18000; # Eastern Standard
Time
range 192.168.1.10 192.168.1.100;
}
To configure a DHCP server that leases a dynamic IP address to a system within a subnet, modify
Example 16.2, “Range Parameter” with your values. It declares a default lease time, maximum lease
time, and network configuration values for the clients. This example assigns IP addresses in the range
192.168.1.10 and 192.168.1.100 to client systems.
Example 16.2. Range Parameter
Deployment Guide
334

default-lease-time 600;
max-lease-time 7200;
option subnet-mask 255.255.255.0;
option broadcast-address 192.168.1.255;
option routers 192.168.1.254;
option domain-name-servers 192.168.1.1, 192.168.1.2;
option domain-search "example.com";
subnet 192.168.1.0 netmask 255.255.255.0 {
range 192.168.1.10 192.168.1.100;
}
To assign an IP address to a client based on the MAC address of the network interface card, use the
hardware ethernet parameter within a host declaration. As demonstrated in Example 16.3, “Static
IP Address Using DHCP”, the host apex declaration specifies that the network interface card with the
MAC address 00:A0:78:8E:9E:AA always receives the IP address 192.168.1.4.
Note that you can also use the optional parameter host-name to assign a host name to the client.
Example 16.3. Static IP Address Using DHCP
host apex {
option host-name "apex.example.com";
hardware ethernet 00:A0:78:8E:9E:AA;
fixed-address 192.168.1.4;
}
All subnets that share the same physical network should be declared within a shared-network
declaration as shown in Example 16.4, “Shared-network Declaration”. Parameters within the shared-
network, but outside the enclosed subnet declarations, are considered to be global parameters. The
name of the shared-network must be a descriptive title for the network, such as using the title 'test-lab'
to describe all the subnets in a test lab environment.
Example 16.4. Shared-network Declaration
shared-network name {
option domain-search "test.redhat.com";
option domain-name-servers ns1.redhat.com, ns2.redhat.com;
option routers 192.168.0.254;
#more parameters for EXAMPLE shared-network
subnet 192.168.1.0 netmask 255.255.252.0 {
#parameters for subnet
range 192.168.1.1 192.168.1.254;
}
subnet 192.168.2.0 netmask 255.255.252.0 {
#parameters for subnet
range 192.168.2.1 192.168.2.254;
}
}
CHAPTER 16. DHCP SERVERS
335

As demonstrated in Example 16.5, “Group Declaration”, the group declaration is used to apply global
parameters to a group of declarations. For example, shared networks, subnets, and hosts can be
grouped.
Example 16.5. Group Declaration
group {
option routers 192.168.1.254;
option subnet-mask 255.255.255.0;
option domain-search "example.com";
option domain-name-servers 192.168.1.1;
option time-offset -18000; # Eastern Standard Time
host apex {
option host-name "apex.example.com";
hardware ethernet 00:A0:78:8E:9E:AA;
fixed-address 192.168.1.4;
}
host raleigh {
option host-name "raleigh.example.com";
hardware ethernet 00:A1:DD:74:C3:F2;
fixed-address 192.168.1.6;
}
}
NOTE
You can use the provided sample configuration file as a starting point and add custom
configuration options to it. To copy this file to the proper location, use the following
command as root:
~]# cp /usr/share/doc/dhcp-<version_number>/dhcpd.conf.sample
/etc/dhcp/dhcpd.conf
... where <version_number> is the DHCP version number.
For a complete list of option statements and what they do, see the dhcp-options man page.
16.2.2. Lease Database
On the DHCP server, the file /var/lib/dhcpd/dhcpd.leases stores the DHCP client lease
database. Do not change this file. DHCP lease information for each recently assigned IP address is
automatically stored in the lease database. The information includes the length of the lease, to whom the
IP address has been assigned, the start and end dates for the lease, and the MAC address of the
network interface card that was used to retrieve the lease.
All times in the lease database are in Coordinated Universal Time (UTC), not local time.
The lease database is recreated from time to time so that it is not too large. First, all known leases are
saved in a temporary lease database. The dhcpd.leases file is renamed dhcpd.leases~ and the
temporary lease database is written to dhcpd.leases.
The DHCP daemon could be killed or the system could crash after the lease database has been
Deployment Guide
336

renamed to the backup file but before the new file has been written. If this happens, the dhcpd.leases
file does not exist, but it is required to start the service. Do not create a new lease file. If you do, all old
leases are lost which causes many problems. The correct solution is to rename the dhcpd.leases~
backup file to dhcpd.leases and then start the daemon.
16.2.3. Starting and Stopping the Server
IMPORTANT
When the DHCP server is started for the first time, it fails unless the dhcpd.leases file
exists. Use the command touch /var/lib/dhcpd/dhcpd.leases to create the file if
it does not exist.
If the same server is also running BIND as a DNS server, this step is not necessary, as
starting the named service automatically checks for a dhcpd.leases file.
To start the DHCP service, use the command /sbin/service dhcpd start. To stop the DHCP
server, use the command /sbin/service dhcpd stop.
By default, the DHCP service does not start at boot time. For information on how to configure the
daemon to start automatically at boot time, see Chapter 12, Services and Daemons.
If more than one network interface is attached to the system, but the DHCP server should only be started
on one of the interfaces, configure the DHCP server to start only on that device. In
/etc/sysconfig/dhcpd, add the name of the interface to the list of DHCPDARGS:
# Command line options here
DHCPDARGS=eth0
This is useful for a firewall machine with two network cards. One network card can be configured as a
DHCP client to retrieve an IP address to the Internet. The other network card can be used as a DHCP
server for the internal network behind the firewall. Specifying only the network card connected to the
internal network makes the system more secure because users can not connect to the daemon via the
Internet.
Other command-line options that can be specified in /etc/sysconfig/dhcpd include:
-p <portnum> — Specifies the UDP port number on which dhcpd should listen. The default is
port 67. The DHCP server transmits responses to the DHCP clients at a port number one greater
than the UDP port specified. For example, if the default port 67 is used, the server listens on port
67 for requests and responds to the client on port 68. If a port is specified here and the DHCP
relay agent is used, the same port on which the DHCP relay agent should listen must be
specified. See Section 16.2.4, “DHCP Relay Agent” for details.
-f — Runs the daemon as a foreground process. This is mostly used for debugging.
-d — Logs the DHCP server daemon to the standard error descriptor. This is mostly used for
debugging. If this is not specified, the log is written to /var/log/messages.
-cf <filename> — Specifies the location of the configuration file. The default location is
/etc/dhcp/dhcpd.conf.
-lf <filename> — Specifies the location of the lease database file. If a lease database file
already exists, it is very important that the same file be used every time the DHCP server is
CHAPTER 16. DHCP SERVERS
337

started. It is strongly recommended that this option only be used for debugging purposes on non-
production machines. The default location is /var/lib/dhcpd/dhcpd.leases.
-q — Do not print the entire copyright message when starting the daemon.
16.2.4. DHCP Relay Agent
The DHCP Relay Agent (dhcrelay) allows for the relay of DHCP and BOOTP requests from a subnet
with no DHCP server on it to one or more DHCP servers on other subnets.
When a DHCP client requests information, the DHCP Relay Agent forwards the request to the list of
DHCP servers specified when the DHCP Relay Agent is started. When a DHCP server returns a reply,
the reply is broadcast or unicast on the network that sent the original request.
The DHCP Relay Agent listens for DHCP requests on all interfaces unless the interfaces are specified in
/etc/sysconfig/dhcrelay with the INTERFACES directive.
To start the DHCP Relay Agent, use the command service dhcrelay start.
16.3. CONFIGURING A DHCPV4 CLIENT
To configure a DHCP client manually, modify the /etc/sysconfig/network file to enable networking
and the configuration file for each network device in the /etc/sysconfig/network-scripts
directory. In this directory, each device should have a configuration file named ifcfg-eth0, where
eth0 is the network device name.
Make sure that the /etc/sysconfig/network-scripts/ifcfg-eth0 file contains the following
lines:
DEVICE=eth0
BOOTPROTO=dhcp
ONBOOT=yes
To use DHCP, set a configuration file for each device.
Other options for the network script include:
DHCP_HOSTNAME — Only use this option if the DHCP server requires the client to specify a host
name before receiving an IP address.
PEERDNS=<answer>, where <answer> is one of the following:
yes — Modify /etc/resolv.conf with information from the server. This is the default.
no — Do not modify /etc/resolv.conf.
If you prefer using a graphical interface, see Chapter 10, NetworkManager for instructions on using
NetworkManager to configure a network interface to use DHCP.
Deployment Guide
338

NOTE
For advanced configurations of client DHCP options such as protocol timing, lease
requirements and requests, dynamic DNS support, aliases, as well as a wide variety of
values to override, prepend, or append to client-side configurations, see the dhclient
and dhclient.conf man pages.
16.4. CONFIGURING A MULTIHOMED DHCP SERVER
A multihomed DHCP server serves multiple networks, that is, multiple subnets. The examples in these
sections detail how to configure a DHCP server to serve multiple networks, select which network
interfaces to listen on, and how to define network settings for systems that move networks.
Before making any changes, back up the existing /etc/sysconfig/dhcpd and
/etc/dhcp/dhcpd.conf files.
The DHCP daemon listens on all network interfaces unless otherwise specified. Use the
/etc/sysconfig/dhcpd file to specify which network interfaces the DHCP daemon listens on. The
following /etc/sysconfig/dhcpd example specifies that the DHCP daemon listens on the eth0 and
eth1 interfaces:
DHCPDARGS="eth0 eth1";
If a system has three network interfaces cards — eth0, eth1, and eth2 — and it is only desired that the
DHCP daemon listens on the eth0 card, then only specify eth0 in /etc/sysconfig/dhcpd:
DHCPDARGS="eth0";
The following is a basic /etc/dhcp/dhcpd.conf file, for a server that has two network interfaces,
eth0 in a 10.0.0.0/24 network, and eth1 in a 172.16.0.0/24 network. Multiple subnet declarations
allow you to define different settings for multiple networks:
default-lease-time 600;
max-lease-time 7200;
subnet 10.0.0.0 netmask 255.255.255.0 {
option subnet-mask 255.255.255.0;
option routers 10.0.0.1;
range 10.0.0.5 10.0.0.15;
}
subnet 172.16.0.0 netmask 255.255.255.0 {
option subnet-mask 255.255.255.0;
option routers 172.16.0.1;
range 172.16.0.5 172.16.0.15;
}
subnet 10.0.0.0 netmask 255.255.255.0;
A subnet declaration is required for every network your DHCP server is serving. Multiple subnets
require multiple subnet declarations. If the DHCP server does not have a network interface in a
range of a subnet declaration, the DHCP server does not serve that network.
If there is only one subnet declaration, and no network interfaces are in the range of that subnet, the
DHCP daemon fails to start, and an error such as the following is logged to /var/log/messages:
CHAPTER 16. DHCP SERVERS
339

dhcpd: No subnet declaration for eth0 (0.0.0.0).
dhcpd: ** Ignoring requests on eth0. If this is not what
dhcpd: you want, please write a subnet declaration
dhcpd: in your dhcpd.conf file for the network segment
dhcpd: to which interface eth1 is attached. **
dhcpd:
dhcpd:
dhcpd: Not configured to listen on any interfaces!
option subnet-mask 255.255.255.0;
The option subnet-mask option defines a subnet mask, and overrides the netmask value in the
subnet declaration. In simple cases, the subnet and netmask values are the same.
option routers 10.0.0.1;
The option routers option defines the default gateway for the subnet. This is required for
systems to reach internal networks on a different subnet, as well as external networks.
range 10.0.0.5 10.0.0.15;
The range option specifies the pool of available IP addresses. Systems are assigned an address
from the range of specified IP addresses.
For further information, see the dhcpd.conf(5) man page.
16.4.1. Host Configuration
Before making any changes, back up the existing /etc/sysconfig/dhcpd and
/etc/dhcp/dhcpd.conf files.
Configuring a Single System for Multiple Networks
The following /etc/dhcp/dhcpd.conf example creates two subnets, and configures an IP address
for the same system, depending on which network it connects to:
default-lease-time 600;
max-lease-time 7200;
subnet 10.0.0.0 netmask 255.255.255.0 {
option subnet-mask 255.255.255.0;
option routers 10.0.0.1;
range 10.0.0.5 10.0.0.15;
}
subnet 172.16.0.0 netmask 255.255.255.0 {
option subnet-mask 255.255.255.0;
option routers 172.16.0.1;
range 172.16.0.5 172.16.0.15;
}
host example0 {
hardware ethernet 00:1A:6B:6A:2E:0B;
fixed-address 10.0.0.20;
}
host example1 {
hardware ethernet 00:1A:6B:6A:2E:0B;
fixed-address 172.16.0.20;
}
Deployment Guide
340

host example0
The host declaration defines specific parameters for a single system, such as an IP address. To
configure specific parameters for multiple hosts, use multiple host declarations.
Most DHCP clients ignore the name in host declarations, and as such, this name can be anything,
as long as it is unique to other host declarations. To configure the same system for multiple
networks, use a different name for each host declaration, otherwise the DHCP daemon fails to start.
Systems are identified by the hardware ethernet option, not the name in the host declaration.
hardware ethernet 00:1A:6B:6A:2E:0B;
The hardware ethernet option identifies the system. To find this address, run the ip link
command.
fixed-address 10.0.0.20;
The fixed-address option assigns a valid IP address to the system specified by the hardware
ethernet option. This address must be outside the IP address pool specified with the range option.
If option statements do not end with a semicolon, the DHCP daemon fails to start, and an error such as
the following is logged to /var/log/messages:
/etc/dhcp/dhcpd.conf line 20: semicolon expected.
dhcpd: }
dhcpd: ^
dhcpd: /etc/dhcp/dhcpd.conf line 38: unexpected end of file
dhcpd:
dhcpd: ^
dhcpd: Configuration file errors encountered -- exiting
Configuring Systems with Multiple Network Interfaces
The following host declarations configure a single system, which has multiple network interfaces, so
that each interface receives the same IP address. This configuration will not work if both network
interfaces are connected to the same network at the same time:
host interface0 {
hardware ethernet 00:1a:6b:6a:2e:0b;
fixed-address 10.0.0.18;
}
host interface1 {
hardware ethernet 00:1A:6B:6A:27:3A;
fixed-address 10.0.0.18;
}
For this example, interface0 is the first network interface, and interface1 is the second interface.
The different hardware ethernet options identify each interface.
If such a system connects to another network, add more host declarations, remembering to:
assign a valid fixed-address for the network the host is connecting to.
make the name in the host declaration unique.
CHAPTER 16. DHCP SERVERS
341

When a name given in a host declaration is not unique, the DHCP daemon fails to start, and an error
such as the following is logged to /var/log/messages:
dhcpd: /etc/dhcp/dhcpd.conf line 31: host interface0: already exists
dhcpd: }
dhcpd: ^
dhcpd: Configuration file errors encountered -- exiting
This error was caused by having multiple host interface0 declarations defined in
/etc/dhcp/dhcpd.conf.
16.5. DHCP FOR IPV6 (DHCPV6)
The ISC DHCP includes support for IPv6 (DHCPv6) since the 4.x release with a DHCPv6 server, client
and relay agent functionality. The server, client and relay agents support both IPv4 and IPv6. However,
the client and the server can only manage one protocol at a time — for dual support they must be started
separately for IPv4 and IPv6.
16.5.1. Configuring a DHCPv6 Server
The DHCPv6 server configuration file is installed together with the dhcp package and it can be found at
/etc/dhcp/dhcpd6.conf.
The sample server configuration file can be found at /usr/share/doc/dhcp-
<version>/dhcpd6.conf.sample, in Red Hat Enterprise Linux 6 at /usr/share/doc/dhcp-
4.1.1/dhcpd6.conf.sample.
A simple DHCPv6 server configuration file can look like this:
subnet6 2001:db8:0:1::/64 {
range6 2001:db8:0:1::129 2001:db8:0:1::254;
option dhcp6.name-servers fec0:0:0:1::1;
option dhcp6.domain-search "domain.example";
}
For more examples, see the dhcpd.conf(5) man page.
To start the DHCPv6 service, enter the command service dhcpd6 start as root. To stop the
DHCPv6 server, use the command service dhcpdv6 stop.
To pass command-line options to dhcpd daemon when the DHCPv6 service starts, use the
/etc/sysconfig/dhcpd6 file. This file uses the same structure like the /etc/sysconfig/dhcpd:
# cat /etc/sysconfig/dhcpd6
# Command line options here
DHCPDARGS=
The value added to the DHCPDARGS option is passed to the DHCPv6 service, which passes it to the
dhcpd daemon. For more information, see the STANDARD DHCPV6 OPTIONS section in the dhcpd-
options(5) man page. For additional examples, see the Dynamic IPv6 configuration on the Fedora
Project wiki.
16.5.2. Configuring a DHCPv6 Client
Deployment Guide
342

The default configuration of the DHCPv6 client works fine in the most cases. However, to configure a
DHCP client manually, create and modify the /etc/dhcp/dhclient.conf file. See the
/usr/share/doc/dhclient-4.1.1/dhclient6.conf.sample for a client configuration file
example.
For advanced configurations of DHCPv6 client options such as protocol timing, lease requirements and
requests, dynamic DNS support, aliases, as well as a wide variety of values to override, prepend, or
append to client-side configurations, see the dhclient.conf(5) man page and the STANDARD
DHCPV6 OPTIONS section in the dhcpd-options(5) man page.
IMPORTANT
In Red Hat Enterprise Linux 6, a DHCPv6 client is correctly handled only by
NetworkManager and should not generally be run separately. That is because DHCPv6,
unlike DHCPv4, is not a standalone network configuration protocol but is always
supposed to be used together with router discovery.
16.6. ADDITIONAL RESOURCES
For additional information, see The DHCP Handbook; Ralph Droms and Ted Lemon; 2003 or the
following resources.
16.6.1. Installed Documentation
dhcpd man page — Describes how the DHCP daemon works.
dhcpd.conf man page — Explains how to configure the DHCP configuration file; includes
some examples.
dhcpd.leases man page — Describes a persistent database of leases.
dhcp-options man page — Explains the syntax for declaring DHCP options in dhcpd.conf;
includes some examples.
dhcrelay man page — Explains the DHCP Relay Agent and its configuration options.
/usr/share/doc/dhcp-<version>/ — Contains sample files, README files, and release
notes for current versions of the DHCP service.
CHAPTER 16. DHCP SERVERS
343

CHAPTER 17. DNS SERVERS
DNS (Domain Name System), also known as a nameserver, is a network system that associates host
names with their respective IP addresses. For users, this has the advantage that they can refer to
machines on the network by names that are usually easier to remember than the numerical network
addresses. For system administrators, using the nameserver allows them to change the IP address for a
host without ever affecting the name-based queries, or to decide which machines handle these queries.
17.1. INTRODUCTION TO DNS
DNS is usually implemented using one or more centralized servers that are authoritative for certain
domains. When a client host requests information from a nameserver, it usually connects to port 53. The
nameserver then attempts to resolve the name requested. If it does not have an authoritative answer, or
does not already have the answer cached from an earlier query, it queries other nameservers, called
root nameservers, to determine which nameservers are authoritative for the name in question, and then
queries them to get the requested name.
17.1.1. Nameserver Zones
In a DNS server such as BIND (Berkeley Internet Name Domain), all information is stored in basic data
elements called resource records (RR). The resource record is usually a fully qualified domain name
(FQDN) of a host, and is broken down into multiple sections organized into a tree-like hierarchy. This
hierarchy consists of a main trunk, primary branches, secondary branches, and so on.
Example 17.1. A simple resource record
bob.sales.example.com
Each level of the hierarchy is divided by a period (that is, .). In Example 17.1, “A simple resource
record”, com defines the top-level domain, example its subdomain, and sales the subdomain of
example. In this case, bob identifies a resource record that is part of the sales.example.com domain.
With the exception of the part furthest to the left (that is, bob), each of these sections is called a zone
and defines a specific namespace.
Zones are defined on authoritative nameservers through the use of zone files, which contain definitions
of the resource records in each zone. Zone files are stored on primary nameservers (also called master
nameservers), where changes are made to the files, and secondary nameservers (also called slave
nameservers), which receive zone definitions from the primary nameservers. Both primary and
secondary nameservers are authoritative for the zone and look the same to clients. Depending on the
configuration, any nameserver can also serve as a primary or secondary server for multiple zones at the
same time.
17.1.2. Nameserver Types
There are two nameserver configuration types:
authoritative
Authoritative nameservers answer to resource records that are part of their zones only. This category
includes both primary (master) and secondary (slave) nameservers.
recursive
Deployment Guide
344

Recursive nameservers offer resolution services, but they are not authoritative for any zone. Answers
for all resolutions are cached in a memory for a fixed period of time, which is specified by the
retrieved resource record.
Although a nameserver can be both authoritative and recursive at the same time, it is recommended not
to combine the configuration types. To be able to perform their work, authoritative servers should be
available to all clients all the time. On the other hand, since the recursive lookup takes far more time than
authoritative responses, recursive servers should be available to a restricted number of clients only,
otherwise they are prone to distributed denial of service (DDoS) attacks.
17.1.3. BIND as a Nameserver
BIND consists of a set of DNS-related programs. It contains a nameserver called named, an
administration utility called rndc, and a debugging tool called dig. See Chapter 12, Services and
Daemons for more information on how to run a service in Red Hat Enterprise Linux.
17.2. BIND
This chapter covers BIND (Berkeley Internet Name Domain), the DNS server included in Red Hat
Enterprise Linux. It focuses on the structure of its configuration files, and describes how to administer it
both locally and remotely.
17.2.1. Configuring the named Service
When the named service is started, it reads the configuration from the files as described in Table 17.1,
“The named service configuration files”.
Table 17.1. The named service configuration files
Path Description
/etc/named.conf The main configuration file.
/etc/named/ An auxiliary directory for configuration files that are included in the
main configuration file.
The configuration file consists of a collection of statements with nested options surrounded by opening
and closing curly brackets. Note that when editing the file, you have to be careful not to make any syntax
error, otherwise the named service will not start. A typical /etc/named.conf file is organized as
follows:
statement-1 ["statement-1-name"] [statement-1-class] {
option-1;
option-2;
option-N;
};
statement-2 ["statement-2-name"] [statement-2-class] {
option-1;
option-2;
option-N;
};
statement-N ["statement-N-name"] [statement-N-class] {
CHAPTER 17. DNS SERVERS
345

option-1;
option-2;
option-N;
};
NOTE
If you have installed the bind-chroot package, the BIND service will run in the
/var/named/chroot environment. In that case, the initialization script will mount the
above configuration files using the mount --bind command, so that you can manage
the configuration outside this environment. There is no need to copy anything into the
/var/named/chroot directory because it is mounted automatically. This simplifies
maintenance since you do not need to take any special care of BIND configuration files if
it is run in a chroot environment. You can organize everything as you would with BIND
not running in a chroot environment.
The following directories are automatically mounted into /var/named/chroot if they
are empty in the /var/named/chroot directory. They must be kept empty if you want
them to be mounted into /var/named/chroot:
/var/named
/etc/pki/dnssec-keys
/etc/named
/usr/lib64/bind or /usr/lib/bind (architecture dependent).
The following files are also mounted if the target file does not exist in
/var/named/chroot.
/etc/named.conf
/etc/rndc.conf
/etc/rndc.key
/etc/named.rfc1912.zones
/etc/named.dnssec.keys
/etc/named.iscdlv.key
/etc/named.root.key
17.2.1.1. Common Statement Types
The following types of statements are commonly used in /etc/named.conf:
acl
The acl (Access Control List) statement allows you to define groups of hosts, so that they can be
permitted or denied access to the nameserver. It takes the following form:
acl acl-name {
Deployment Guide
346

match-element;
...
};
The acl-name statement name is the name of the access control list, and the match-element option is
usually an individual IP address (such as 10.0.1.1) or a CIDR (Classless Inter-Domain Routing)
network notation (for example, 10.0.1.0/24). For a list of already defined keywords, see
Table 17.2, “Predefined access control lists”.
Table 17.2. Predefined access control lists
Keyword Description
any Matches every IP address.
localhost Matches any IP address that is in use by the local system.
localnets Matches any IP address on any network to which the local system is
connected.
none Does not match any IP address.
The acl statement can be especially useful in conjunction with other statements such as options.
Example 17.2, “Using acl in conjunction with options” defines two access control lists, black-hats
and red-hats, and adds black-hats on the blacklist while granting red-hats a normal access.
Example 17.2. Using acl in conjunction with options
acl black-hats {
10.0.2.0/24;
192.168.0.0/24;
1234:5678::9abc/24;
};
acl red-hats {
10.0.1.0/24;
};
options {
blackhole { black-hats; };
allow-query { red-hats; };
allow-query-cache { red-hats; };
};
include
The include statement allows you to include files in the /etc/named.conf, so that potentially
sensitive data can be placed in a separate file with restricted permissions. It takes the following form:
include "file-name"
The file-name statement name is an absolute path to a file.
CHAPTER 17. DNS SERVERS
347

Example 17.3. Including a file to /etc/named.conf
include "/etc/named.rfc1912.zones";
options
The options statement allows you to define global server configuration options as well as to set
defaults for other statements. It can be used to specify the location of the named working directory,
the types of queries allowed, and much more. It takes the following form:
options {
option;
...
};
For a list of frequently used option directives, see Table 17.3, “Commonly used options” below.
Table 17.3. Commonly used options
Option Description
allow-query Specifies which hosts are allowed to query the nameserver for authoritative
resource records. It accepts an access control list, a collection of IP addresses,
or networks in the CIDR notation. All hosts are allowed by default.
allow-query-
cache
Specifies which hosts are allowed to query the nameserver for non-authoritative
data such as recursive queries. Only localhost and localnets are
allowed by default.
blackhole Specifies which hosts are not allowed to query the nameserver. This option
should be used when particular host or network floods the server with requests.
The default option is none.
directory Specifies a working directory for the named service. The default option is
/var/named/.
dnssec-enable Specifies whether to return DNSSEC related resource records. The default
option is yes.
dnssec-
validation
Specifies whether to prove that resource records are authentic via DNSSEC.
The default option is yes.
forwarders Specifies a list of valid IP addresses for nameservers to which the requests
should be forwarded for resolution.
Deployment Guide
348

forward Specifies the behavior of the forwarders directive. It accepts the following
options:
first — The server will query the nameservers listed in the
forwarders directive before attempting to resolve the name on its
own.
only — When unable to query the nameservers listed in the
forwarders directive, the server will not attempt to resolve the
name on its own.
listen-on Specifies the IPv4 network interface on which to listen for queries. On a DNS
server that also acts as a gateway, you can use this option to answer queries
originating from a single network only. All IPv4 interfaces are used by default.
listen-on-v6 Specifies the IPv6 network interface on which to listen for queries. On a DNS
server that also acts as a gateway, you can use this option to answer queries
originating from a single network only. All IPv6 interfaces are used by default.
max-cache-size Specifies the maximum amount of memory to be used for server caches. When
the limit is reached, the server causes records to expire prematurely so that the
limit is not exceeded. In a server with multiple views, the limit applies
separately to the cache of each view. The default option is 32M.
notify Specifies whether to notify the secondary nameservers when a zone is
updated. It accepts the following options:
yes — The server will notify all secondary nameservers.
no — The server will not notify any secondary nameserver.
master-only — The server will notify primary server for the zone
only.
explicit — The server will notify only the secondary servers that
are specified in the also-notify list within a zone statement.
pid-file Specifies the location of the process ID file created by the named service.
recursion Specifies whether to act as a recursive server. The default option is yes.
statistics-file Specifies an alternate location for statistics files. The
/var/named/named.stats file is used by default.
Option Description
IMPORTANT
To prevent distributed denial of service (DDoS) attacks, it is recommended that you
use the allow-query-cache option to restrict recursive DNS services for a
particular subset of clients only.
CHAPTER 17. DNS SERVERS
349

See the BIND 9 Administrator Reference Manual referenced in Section 17.2.7.1, “Installed
Documentation”, and the named.conf manual page for a complete list of available options.
Example 17.4. Using the options statement
options {
allow-query { localhost; };
listen-on port 53 { 127.0.0.1; };
listen-on-v6 port 53 { ::1; };
max-cache-size 256M;
directory "/var/named";
statistics-file "/var/named/data/named_stats.txt";
recursion yes;
dnssec-enable yes;
dnssec-validation yes;
};
zone
The zone statement allows you to define the characteristics of a zone, such as the location of its
configuration file and zone-specific options, and can be used to override the global options
statements. It takes the following form:
zone zone-name [zone-class] {
option;
...
};
The zone-name attribute is the name of the zone, zone-class is the optional class of the zone, and
option is a zone statement option as described in Table 17.4, “Commonly used options”.
The zone-name attribute is particularly important, as it is the default value assigned for the $ORIGIN
directive used within the corresponding zone file located in the /var/named/ directory. The named
daemon appends the name of the zone to any non-fully qualified domain name listed in the zone file.
For example, if a zone statement defines the namespace for example.com, use example.com as
the zone-name so that it is placed at the end of host names within the example.com zone file.
For more information about zone files, see Section 17.2.2, “Editing Zone Files”.
Table 17.4. Commonly used options
Option Description
allow-query Specifies which clients are allowed to request information about this zone. This
option overrides global allow-query option. All query requests are allowed
by default.
allow-transfer Specifies which secondary servers are allowed to request a transfer of the
zone's information. All transfer requests are allowed by default.
Deployment Guide
350

allow-update Specifies which hosts are allowed to dynamically update information in their
zone. The default option is to deny all dynamic update requests.
Note that you should be careful when allowing hosts to update information
about their zone. Do not set IP addresses in this option unless the server is in
the trusted network. Instead, use TSIG key as described in Section 17.2.5.3,
“Transaction SIGnatures (TSIG)”.
file Specifies the name of the file in the named working directory that contains the
zone's configuration data.
masters Specifies from which IP addresses to request authoritative zone information.
This option is used only if the zone is defined as type slave.
notify Specifies whether to notify the secondary nameservers when a zone is
updated. It accepts the following options:
yes — The server will notify all secondary nameservers.
no — The server will not notify any secondary nameserver.
master-only — The server will notify primary server for the zone
only.
explicit — The server will notify only the secondary servers that
are specified in the also-notify list within a zone statement.
type Specifies the zone type. It accepts the following options:
delegation-only — Enforces the delegation status of
infrastructure zones such as COM, NET, or ORG. Any answer that is
received without an explicit or implicit delegation is treated as
NXDOMAIN. This option is only applicable in TLDs (Top-Level
Domain) or root zone files used in recursive or caching
implementations.
forward — Forwards all requests for information about this zone to
other nameservers.
hint — A special type of zone used to point to the root nameservers
which resolve queries when a zone is not otherwise known. No
configuration beyond the default is necessary with a hint zone.
master — Designates the nameserver as authoritative for this zone.
A zone should be set as the master if the zone's configuration files
reside on the system.
slave — Designates the nameserver as a slave server for this zone.
Master server is specified in masters directive.
Option Description
Most changes to the /etc/named.conf file of a primary or secondary nameserver involve adding,
modifying, or deleting zone statements, and only a small subset of zone statement options is usually
needed for a nameserver to work efficiently.
In Example 17.5, “A zone statement for a primary nameserver”, the zone is identified as
CHAPTER 17. DNS SERVERS
351

example.com, the type is set to master, and the named service is instructed to read the
/var/named/example.com.zone file. It also allows only a secondary nameserver
(192.168.0.2) to transfer the zone.
Example 17.5. A zone statement for a primary nameserver
zone "example.com" IN {
type master;
file "example.com.zone";
allow-transfer { 192.168.0.2; };
};
A secondary server's zone statement is slightly different. The type is set to slave, and the masters
directive is telling named the IP address of the master server.
In Example 17.6, “A zone statement for a secondary nameserver”, the named service is configured to
query the primary server at the 192.168.0.1 IP address for information about the example.com
zone. The received information is then saved to the /var/named/slaves/example.com.zone
file. Note that you have to put all slave zones to /var/named/slaves directory, otherwise the
service will fail to transfer the zone.
Example 17.6. A zone statement for a secondary nameserver
zone "example.com" {
type slave;
file "slaves/example.com.zone";
masters { 192.168.0.1; };
};
17.2.1.2. Other Statement Types
The following types of statements are less commonly used in /etc/named.conf:
controls
The controls statement allows you to configure various security requirements necessary to use the
rndc command to administer the named service.
See Section 17.2.3, “Using the rndc Utility” for more information on the rndc utility and its usage.
key
The key statement allows you to define a particular key by name. Keys are used to authenticate
various actions, such as secure updates or the use of the rndc command. Two options are used with
key:
algorithm algorithm-name — The type of algorithm to be used (for example, hmac-
md5).
secret "key-value" — The encrypted key.
Deployment Guide
352

See Section 17.2.3, “Using the rndc Utility” for more information on the rndc utility and its usage.
logging
The logging statement allows you to use multiple types of logs, so called channels. By using the
channel option within the statement, you can construct a customized type of log with its own file
name (file), size limit (size), versioning (version), and level of importance (severity). Once a
customized channel is defined, a category option is used to categorize the channel and begin
logging when the named service is restarted.
By default, named sends standard messages to the rsyslog daemon, which places them in
/var/log/messages. Several standard channels are built into BIND with various severity levels,
such as default_syslog (which handles informational logging messages) and default_debug
(which specifically handles debugging messages). A default category, called default, uses the built-
in channels to do normal logging without any special configuration.
Customizing the logging process can be a very detailed process and is beyond the scope of this
chapter. For information on creating custom BIND logs, see the BIND 9 Administrator Reference
Manual referenced in Section 17.2.7.1, “Installed Documentation”.
server
The server statement allows you to specify options that affect how the named service should
respond to remote nameservers, especially with regard to notifications and zone transfers.
The transfer-format option controls the number of resource records that are sent with each
message. It can be either one-answer (only one resource record), or many-answers (multiple
resource records). Note that while the many-answers option is more efficient, it is not supported by
older versions of BIND.
trusted-keys
The trusted-keys statement allows you to specify assorted public keys used for secure DNS
(DNSSEC). See Section 17.2.5.4, “DNS Security Extensions (DNSSEC)” for more information on this
topic.
view
The view statement allows you to create special views depending upon which network the host
querying the nameserver is on. This allows some hosts to receive one answer regarding a zone while
other hosts receive totally different information. Alternatively, certain zones may only be made
available to particular trusted hosts while non-trusted hosts can only make queries for other zones.
Multiple views can be used as long as their names are unique. The match-clients option allows
you to specify the IP addresses that apply to a particular view. If the options statement is used
within a view, it overrides the already configured global options. Finally, most view statements
contain multiple zone statements that apply to the match-clients list.
Note that the order in which the view statements are listed is important, as the first statement that
matches a particular client's IP address is used. For more information on this topic, see
Section 17.2.5.1, “Multiple Views”.
17.2.1.3. Comment Tags
CHAPTER 17. DNS SERVERS
353

Additionally to statements, the /etc/named.conf file can also contain comments. Comments are
ignored by the named service, but can prove useful when providing additional information to a user. The
following are valid comment tags:
//
Any text after the // characters to the end of the line is considered a comment. For example:
notify yes; // notify all secondary nameservers
#
Any text after the # character to the end of the line is considered a comment. For example:
notify yes; # notify all secondary nameservers
/* and */
Any block of text enclosed in /* and */ is considered a comment. For example:
notify yes; /* notify all secondary nameservers */
17.2.2. Editing Zone Files
As outlined in Section 17.1.1, “Nameserver Zones”, zone files contain information about a namespace.
They are stored in the named working directory located in /var/named/ by default, and each zone file
is named according to the file option in the zone statement, usually in a way that relates to the domain
in question and identifies the file as containing zone data, such as example.com.zone.
Table 17.5. The named service zone files
Path Description
/var/named/ The working directory for the named service. The
nameserver is not allowed to write to this directory.
/var/named/slaves/ The directory for secondary zones. This directory is
writable by the named service.
/var/named/dynamic/ The directory for other files, such as dynamic DNS
(DDNS) zones or managed DNSSEC keys. This
directory is writable by the named service.
/var/named/data/ The directory for various statistics and debugging
files. This directory is writable by the named service.
A zone file consists of directives and resource records. Directives tell the nameserver to perform tasks or
apply special settings to the zone, resource records define the parameters of the zone and assign
identities to individual hosts. While the directives are optional, the resource records are required in order
to provide name service to a zone.
All directives and resource records should be entered on individual lines.
Deployment Guide
354

17.2.2.1. Common Directives
Directives begin with the dollar sign character followed by the name of the directive, and usually appear
at the top of the file. The following directives are commonly used in zone files:
$INCLUDE
The $INCLUDE directive allows you to include another file at the place where it appears, so that other
zone settings can be stored in a separate zone file.
Example 17.7. Using the $INCLUDE directive
$INCLUDE /var/named/penguin.example.com
$ORIGIN
The $ORIGIN directive allows you to append the domain name to unqualified records, such as those
with the host name only. Note that the use of this directive is not necessary if the zone is specified in
/etc/named.conf, since the zone name is used by default.
In Example 17.8, “Using the $ORIGIN directive”, any names used in resource records that do not end
in a trailing period are appended with example.com.
Example 17.8. Using the $ORIGIN directive
$ORIGIN example.com.
$TTL
The $TTL directive allows you to set the default Time to Live (TTL) value for the zone, that is, how
long is a zone record valid. Each resource record can contain its own TTL value, which overrides this
directive.
Increasing this value allows remote nameservers to cache the zone information for a longer period of
time, reducing the number of queries for the zone and lengthening the amount of time required to
propagate resource record changes.
Example 17.9. Using the $TTL directive
$TTL 1D
17.2.2.2. Common Resource Records
The following resource records are commonly used in zone files:
A
The Address record specifies an IP address to be assigned to a name. It takes the following form:
hostname IN A IP-address
CHAPTER 17. DNS SERVERS
355

If the hostname value is omitted, the record will point to the last specified hostname.
In Example 17.10, “Using the A resource record”, the requests for server1.example.com are
pointed to 10.0.1.3 or 10.0.1.5.
Example 17.10. Using the A resource record
server1 IN A 10.0.1.3
IN A 10.0.1.5
CNAME
The Canonical Name record maps one name to another. Because of this, this type of record is
sometimes referred to as an alias record. It takes the following form:
alias-name IN CNAME real-name
CNAME records are most commonly used to point to services that use a common naming scheme,
such as www for Web servers. However, there are multiple restrictions for their usage:
CNAME records should not point to other CNAME records. This is mainly to avoid possible
infinite loops.
CNAME records should not contain other resource record types (such as A, NS, MX, etc.).
The only exception are DNSSEC related records (that is, RRSIG, NSEC, etc.) when the zone
is signed.
Other resource record that point to the fully qualified domain name (FQDN) of a host (that is,
NS, MX, PTR) should not point to a CNAME record.
In Example 17.11, “Using the CNAME resource record”, the A record binds a host name to an IP
address, while the CNAME record points the commonly used www host name to it.
Example 17.11. Using the CNAME resource record
server1 IN A 10.0.1.5
www IN CNAME server1
MX
The Mail Exchange record specifies where the mail sent to a particular namespace controlled by this
zone should go. It takes the following form:
IN MX preference-value email-server-name
The email-server-name is a fully qualified domain name (FQDN). The preference-value allows
numerical ranking of the email servers for a namespace, giving preference to some email systems
over others. The MX resource record with the lowest preference-value is preferred over the others.
However, multiple email servers can possess the same value to distribute email traffic evenly among
them.
Deployment Guide
356

In Example 17.12, “Using the MX resource record”, the first mail.example.com email server is
preferred to the mail2.example.com email server when receiving email destined for the
example.com domain.
Example 17.12. Using the MX resource record
example.com. IN MX 10 mail.example.com.
IN MX 20 mail2.example.com.
NS
The Nameserver record announces authoritative nameservers for a particular zone. It takes the
following form:
IN NS nameserver-name
The nameserver-name should be a fully qualified domain name (FQDN). Note that when two
nameservers are listed as authoritative for the domain, it is not important whether these nameservers
are secondary nameservers, or if one of them is a primary server. They are both still considered
authoritative.
Example 17.13. Using the NS resource record
IN NS dns1.example.com.
IN NS dns2.example.com.
PTR
The Pointer record points to another part of the namespace. It takes the following form:
last-IP-digit IN PTR FQDN-of-system
The last-IP-digit directive is the last number in an IP address, and the FQDN-of-system is a fully
qualified domain name (FQDN).
PTR records are primarily used for reverse name resolution, as they point IP addresses back to a
particular name. See Section 17.2.2.4.2, “A Reverse Name Resolution Zone File” for more examples
of PTR records in use.
SOA
The Start of Authority record announces important authoritative information about a namespace to the
nameserver. Located after the directives, it is the first resource record in a zone file. It takes the
following form:
@ IN SOA primary-name-server hostmaster-email (
serial-number
time-to-refresh
time-to-retry
time-to-expire
minimum-TTL )
CHAPTER 17. DNS SERVERS
357

The directives are as follows:
The @ symbol places the $ORIGIN directive (or the zone's name if the $ORIGIN directive is
not set) as the namespace being defined by this SOA resource record.
The primary-name-server directive is the host name of the primary nameserver that is
authoritative for this domain.
The hostmaster-email directive is the email of the person to contact about the namespace.
The serial-number directive is a numerical value incremented every time the zone file is
altered to indicate it is time for the named service to reload the zone.
The time-to-refresh directive is the numerical value secondary nameservers use to determine
how long to wait before asking the primary nameserver if any changes have been made to
the zone.
The time-to-retry directive is a numerical value used by secondary nameservers to determine
the length of time to wait before issuing a refresh request in the event that the primary
nameserver is not answering. If the primary server has not replied to a refresh request before
the amount of time specified in the time-to-expire directive elapses, the secondary servers
stop responding as an authority for requests concerning that namespace.
In BIND 4 and 8, the minimum-TTL directive is the amount of time other nameservers cache
the zone's information. In BIND 9, it defines how long negative answers are cached for.
Caching of negative answers can be set to a maximum of 3 hours (that is, 3H).
When configuring BIND, all times are specified in seconds. However, it is possible to use
abbreviations when specifying units of time other than seconds, such as minutes (M), hours (H), days
(D), and weeks (W). Table 17.6, “Seconds compared to other time units” shows an amount of time in
seconds and the equivalent time in another format.
Table 17.6. Seconds compared to other time units
Seconds Other Time Units
60 1M
1800 30M
3600 1H
10800 3H
21600 6H
43200 12H
86400 1D
259200 3D
Deployment Guide
358

604800 1W
31536000 365D
Seconds Other Time Units
Example 17.14. Using the SOA resource record
@ IN SOA dns1.example.com. hostmaster.example.com. (
2001062501 ; serial
21600 ; refresh after 6 hours
3600 ; retry after 1 hour
604800 ; expire after 1 week
86400 ) ; minimum TTL of 1 day
17.2.2.3. Comment Tags
Additionally to resource records and directives, a zone file can also contain comments. Comments are
ignored by the named service, but can prove useful when providing additional information to the user.
Any text after the semicolon character to the end of the line is considered a comment. For example:
604800 ; expire after 1 week
17.2.2.4. Example Usage
The following examples show the basic usage of zone files.
17.2.2.4.1. A Simple Zone File
Example 17.15, “A simple zone file” demonstrates the use of standard directives and SOA values.
Example 17.15. A simple zone file
$ORIGIN example.com.
$TTL 86400
@ IN SOA dns1.example.com. hostmaster.example.com. (
2001062501 ; serial
21600 ; refresh after 6 hours
3600 ; retry after 1 hour
604800 ; expire after 1 week
86400 ) ; minimum TTL of 1 day
;
;
IN NS dns1.example.com.
IN NS dns2.example.com.
dns1 IN A 10.0.1.1
IN AAAA aaaa:bbbb::1
dns2 IN A 10.0.1.2
IN AAAA aaaa:bbbb::2
CHAPTER 17. DNS SERVERS
359

;
;
@ IN MX 10 mail.example.com.
IN MX 20 mail2.example.com.
mail IN A 10.0.1.5
IN AAAA aaaa:bbbb::5
mail2 IN A 10.0.1.6
IN AAAA aaaa:bbbb::6
;
;
; This sample zone file illustrates sharing the same IP addresses
; for multiple services:
;
services IN A 10.0.1.10
IN AAAA aaaa:bbbb::10
IN A 10.0.1.11
IN AAAA aaaa:bbbb::11
ftp IN CNAME services.example.com.
www IN CNAME services.example.com.
;
;
In this example, the authoritative nameservers are set as dns1.example.com and
dns2.example.com, and are tied to the 10.0.1.1 and 10.0.1.2 IP addresses respectively using the
A record.
The email servers configured with the MX records point to mail and mail2 via A records. Since these
names do not end in a trailing period, the $ORIGIN domain is placed after them, expanding them to
mail.example.com and mail2.example.com.
Services available at the standard names, such as www.example.com (WWW), are pointed at the
appropriate servers using the CNAME record.
This zone file would be called into service with a zone statement in the /etc/named.conf similar to
the following:
zone "example.com" IN {
type master;
file "example.com.zone";
allow-update { none; };
};
17.2.2.4.2. A Reverse Name Resolution Zone File
A reverse name resolution zone file is used to translate an IP address in a particular namespace into an
fully qualified domain name (FQDN). It looks very similar to a standard zone file, except that the PTR
resource records are used to link the IP addresses to a fully qualified domain name as shown in
Example 17.16, “A reverse name resolution zone file”.
Example 17.16. A reverse name resolution zone file
$ORIGIN 1.0.10.in-addr.arpa.
Deployment Guide
360

$TTL 86400
@ IN SOA dns1.example.com. hostmaster.example.com. (
2001062501 ; serial
21600 ; refresh after 6 hours
3600 ; retry after 1 hour
604800 ; expire after 1 week
86400 ) ; minimum TTL of 1 day
;
@ IN NS dns1.example.com.
;
1 IN PTR dns1.example.com.
2 IN PTR dns2.example.com.
;
5 IN PTR server1.example.com.
6 IN PTR server2.example.com.
;
3 IN PTR ftp.example.com.
4 IN PTR ftp.example.com.
In this example, IP addresses 10.0.1.1 through 10.0.1.6 are pointed to the corresponding fully
qualified domain name.
This zone file would be called into service with a zone statement in the /etc/named.conf file similar
to the following:
zone "1.0.10.in-addr.arpa" IN {
type master;
file "example.com.rr.zone";
allow-update { none; };
};
There is very little difference between this example and a standard zone statement, except for the zone
name. Note that a reverse name resolution zone requires the first three blocks of the IP address
reversed followed by .in-addr.arpa. This allows the single block of IP numbers used in the reverse
name resolution zone file to be associated with the zone.
17.2.3. Using the rndc Utility
The rndc utility is a command-line tool that allows you to administer the named service, both locally and
from a remote machine. Its usage is as follows:
rndc [option...] command [command-option]
17.2.3.1. Configuring the Utility
To prevent unauthorized access to the service, named must be configured to listen on the selected port
(that is, 953 by default), and an identical key must be used by both the service and the rndc utility.
Table 17.7. Relevant files
CHAPTER 17. DNS SERVERS
361

Path Description
/etc/named.conf The default configuration file for the named service.
/etc/rndc.conf The default configuration file for the rndc utility.
/etc/rndc.key The default key location.
The rndc configuration is located in /etc/rndc.conf. If the file does not exist, the utility will use the
key located in /etc/rndc.key, which was generated automatically during the installation process
using the rndc-confgen -a command.
The named service is configured using the controls statement in the /etc/named.conf
configuration file as described in Section 17.2.1.2, “Other Statement Types”. Unless this statement is
present, only the connections from the loopback address (that is, 127.0.0.1) will be allowed, and the
key located in /etc/rndc.key will be used.
For more information on this topic, see manual pages and the BIND 9 Administrator Reference Manual
listed in Section 17.2.7, “Additional Resources”.
IMPORTANT
To prevent unprivileged users from sending control commands to the service, make sure
only root is allowed to read the /etc/rndc.key file:
~]# chmod o-rwx /etc/rndc.key
17.2.3.2. Checking the Service Status
To check the current status of the named service, use the following command:
~]# rndc status
version: 9.7.0-P2-RedHat-9.7.0-5.P2.el6
CPUs found: 1
worker threads: 1
number of zones: 16
debug level: 0
xfers running: 0
xfers deferred: 0
soa queries in progress: 0
query logging is OFF
recursive clients: 0/0/1000
tcp clients: 0/100
server is up and running
17.2.3.3. Reloading the Configuration and Zones
To reload both the configuration file and zones, type the following at a shell prompt:
Deployment Guide
362

~]# rndc reload
server reload successful
This will reload the zones while keeping all previously cached responses, so that you can make changes
to the zone files without losing all stored name resolutions.
To reload a single zone, specify its name after the reload command, for example:
~]# rndc reload localhost
zone reload up-to-date
Finally, to reload the configuration file and newly added zones only, type:
~]# rndc reconfig
NOTE
If you intend to manually modify a zone that uses Dynamic DNS (DDNS), make sure you
run the freeze command first:
~]# rndc freeze localhost
Once you are finished, run the thaw command to allow the DDNS again and reload the
zone:
~]# rndc thaw localhost
The zone reload and thaw was successful.
17.2.3.4. Updating Zone Keys
To update the DNSSEC keys and sign the zone, use the sign command. For example:
~]# rndc sign localhost
Note that to sign a zone with the above command, the auto-dnssec option has to be set to maintain
in the zone statement. For instance:
zone "localhost" IN {
type master;
file "named.localhost";
allow-update { none; };
auto-dnssec maintain;
};
17.2.3.5. Enabling the DNSSEC Validation
To enable the DNSSEC validation, type the following at a shell prompt:
~]# rndc validation on
Similarly, to disable this option, type:
CHAPTER 17. DNS SERVERS
363

~]# rndc validation off
See the options statement described in Section 17.2.1.1, “Common Statement Types” for information
on how to configure this option in /etc/named.conf.
17.2.3.6. Enabling the Query Logging
To enable (or disable in case it is currently enabled) the query logging, run the following command:
~]# rndc querylog
To check the current setting, use the status command as described in Section 17.2.3.2, “Checking the
Service Status”.
17.2.4. Using the dig Utility
The dig utility is a command-line tool that allows you to perform DNS lookups and debug a nameserver
configuration. Its typical usage is as follows:
dig [@server] [option...] name type
See Section 17.2.2.2, “Common Resource Records” for a list of common types.
17.2.4.1. Looking Up a Nameserver
To look up a nameserver for a particular domain, use the command in the following form:
dig name NS
In Example 17.17, “A sample nameserver lookup”, the dig utility is used to display nameservers for
example.com.
Example 17.17. A sample nameserver lookup
~]$ dig example.com NS
; <<>> DiG 9.7.1-P2-RedHat-9.7.1-2.P2.fc13 <<>> example.com NS
;; global options: +cmd
;; Got answer:
;; ->>HEADER<<- opcode: QUERY, status: NOERROR, id: 57883
;; flags: qr rd ra; QUERY: 1, ANSWER: 2, AUTHORITY: 0, ADDITIONAL: 0
;; QUESTION SECTION:
;example.com. IN NS
;; ANSWER SECTION:
example.com. 99374 IN NS a.iana-servers.net.
example.com. 99374 IN NS b.iana-servers.net.
;; Query time: 1 msec
;; SERVER: 10.34.255.7#53(10.34.255.7)
;; WHEN: Wed Aug 18 18:04:06 2010
;; MSG SIZE rcvd: 77
Deployment Guide
364

17.2.4.2. Looking Up an IP Address
To look up an IP address assigned to a particular domain, use the command in the following form:
dig name A
In Example 17.18, “A sample IP address lookup”, the dig utility is used to display the IP address of
example.com.
Example 17.18. A sample IP address lookup
~]$ dig example.com A
; <<>> DiG 9.7.1-P2-RedHat-9.7.1-2.P2.fc13 <<>> example.com A
;; global options: +cmd
;; Got answer:
;; ->>HEADER<<- opcode: QUERY, status: NOERROR, id: 4849
;; flags: qr rd ra; QUERY: 1, ANSWER: 1, AUTHORITY: 2, ADDITIONAL: 0
;; QUESTION SECTION:
;example.com. IN A
;; ANSWER SECTION:
example.com. 155606 IN A 192.0.32.10
;; AUTHORITY SECTION:
example.com. 99175 IN NS a.iana-servers.net.
example.com. 99175 IN NS b.iana-servers.net.
;; Query time: 1 msec
;; SERVER: 10.34.255.7#53(10.34.255.7)
;; WHEN: Wed Aug 18 18:07:25 2010
;; MSG SIZE rcvd: 93
17.2.4.3. Looking Up a Hostname
To look up a host name for a particular IP address, use the command in the following form:
dig -x address
In Example 17.19, “A sample host name lookup”, the dig utility is used to display the host name
assigned to 192.0.32.10.
Example 17.19. A sample host name lookup
~]$ dig -x 192.0.32.10
; <<>> DiG 9.7.1-P2-RedHat-9.7.1-2.P2.fc13 <<>> -x 192.0.32.10
;; global options: +cmd
;; Got answer:
CHAPTER 17. DNS SERVERS
365

;; ->>HEADER<<- opcode: QUERY, status: NOERROR, id: 29683
;; flags: qr rd ra; QUERY: 1, ANSWER: 1, AUTHORITY: 5, ADDITIONAL: 6
;; QUESTION SECTION:
;10.32.0.192.in-addr.arpa. IN PTR
;; ANSWER SECTION:
10.32.0.192.in-addr.arpa. 21600 IN PTR www.example.com.
;; AUTHORITY SECTION:
32.0.192.in-addr.arpa. 21600 IN NS b.iana-servers.org.
32.0.192.in-addr.arpa. 21600 IN NS c.iana-servers.net.
32.0.192.in-addr.arpa. 21600 IN NS d.iana-servers.net.
32.0.192.in-addr.arpa. 21600 IN NS ns.icann.org.
32.0.192.in-addr.arpa. 21600 IN NS a.iana-servers.net.
;; ADDITIONAL SECTION:
a.iana-servers.net. 13688 IN A 192.0.34.43
b.iana-servers.org. 5844 IN A 193.0.0.236
b.iana-servers.org. 5844 IN AAAA 2001:610:240:2::c100:ec
c.iana-servers.net. 12173 IN A 139.91.1.10
c.iana-servers.net. 12173 IN AAAA 2001:648:2c30::1:10
ns.icann.org. 12884 IN A 192.0.34.126
;; Query time: 156 msec
;; SERVER: 10.34.255.7#53(10.34.255.7)
;; WHEN: Wed Aug 18 18:25:15 2010
;; MSG SIZE rcvd: 310
17.2.5. Advanced Features of BIND
Most BIND implementations only use the named service to provide name resolution services or to act as
an authority for a particular domain. However, BIND version 9 has a number of advanced features that
allow for a more secure and efficient DNS service.
IMPORTANT
Before attempting to use advanced features like DNSSEC, TSIG, or IXFR (Incremental
Zone Transfer), make sure that the particular feature is supported by all nameservers in
the network environment, especially when you use older versions of BIND or non-BIND
servers.
All of the features mentioned are discussed in greater detail in the BIND 9 Administrator Reference
Manual referenced in Section 17.2.7.1, “Installed Documentation”.
17.2.5.1. Multiple Views
Optionally, different information can be presented to a client depending on the network a request
originates from. This is primarily used to deny sensitive DNS entries from clients outside of the local
network, while allowing queries from clients inside the local network.
Deployment Guide
366

To configure multiple views, add the view statement to the /etc/named.conf configuration file. Use
the match-clients option to match IP addresses or entire networks and give them special options and
zone data.
17.2.5.2. Incremental Zone Transfers (IXFR)
Incremental Zone Transfers (IXFR) allow a secondary nameserver to only download the updated
portions of a zone modified on a primary nameserver. Compared to the standard transfer process, this
makes the notification and update process much more efficient.
Note that IXFR is only available when using dynamic updating to make changes to master zone records.
If manually editing zone files to make changes, Automatic Zone Transfer (AXFR) is used.
17.2.5.3. Transaction SIGnatures (TSIG)
Transaction SIGnatures (TSIG) ensure that a shared secret key exists on both primary and secondary
nameserver before allowing a transfer. This strengthens the standard IP address-based method of
transfer authorization, since attackers would not only need to have access to the IP address to transfer
the zone, but they would also need to know the secret key.
Since version 9, BIND also supports TKEY, which is another shared secret key method of authorizing
zone transfers.
IMPORTANT
When communicating over an insecure network, do not rely on IP address-based
authentication only.
17.2.5.4. DNS Security Extensions (DNSSEC)
Domain Name System Security Extensions (DNSSEC) provide origin authentication of DNS data,
authenticated denial of existence, and data integrity. When a particular domain is marked as secure, the
SERFVAIL response is returned for each resource record that fails the validation.
Note that to debug a DNSSEC-signed domain or a DNSSEC-aware resolver, you can use the dig utility
as described in Section 17.2.4, “Using the dig Utility”. Useful options are +dnssec (requests DNSSEC-
related resource records by setting the DNSSEC OK bit), +cd (tells recursive nameserver not to validate
the response), and +bufsize=512 (changes the packet size to 512B to get through some firewalls).
17.2.5.5. Internet Protocol version 6 (IPv6)
Internet Protocol version 6 (IPv6) is supported through the use of AAAA resource records, and the
listen-on-v6 directive as described in Table 17.3, “Commonly used options”.
17.2.6. Common Mistakes to Avoid
The following is a list of recommendations on how to avoid common mistakes users make when
configuring a nameserver:
Use semicolons and curly brackets correctly
An omitted semicolon or unmatched curly bracket in the /etc/named.conf file can prevent the
named service from starting.
CHAPTER 17. DNS SERVERS
367

Use period correctly
In zone files, a period at the end of a domain name denotes a fully qualified domain name. If omitted,
the named service will append the name of the zone or the value of $ORIGIN to complete it.
Increment the serial number when editing a zone file
If the serial number is not incremented, the primary nameserver will have the correct, new
information, but the secondary nameservers will never be notified of the change, and will not attempt
to refresh their data of that zone.
Configure the firewall
If a firewall is blocking connections from the named service to other nameservers, the recommended
practice is to change the firewall settings.
WARNING
According to the recent research in DNS security, using a fixed UDP source port
for DNS queries is a potential security vulnerability that could allow an attacker to
conduct cache-poisoning attacks more easily. To prevent this, configure your
firewall to allow queries from a random UDP source port.
17.2.7. Additional Resources
The following sources of information provide additional resources regarding BIND.
17.2.7.1. Installed Documentation
BIND features a full range of installed documentation covering many different topics, each placed in its
own subject directory. For each item below, replace version with the version of the bind package
installed on the system:
/usr/share/doc/bind-version/
The main directory containing the most recent documentation.
/usr/share/doc/bind-version/arm/
The directory containing the BIND 9 Administrator Reference Manual in HTML and SGML formats,
which details BIND resource requirements, how to configure different types of nameservers, how to
perform load balancing, and other advanced topics. For most new users of BIND, this is the best
place to start.
/usr/share/doc/bind-version/draft/
The directory containing assorted technical documents that review issues related to the DNS service,
and propose some methods to address them.
/usr/share/doc/bind-version/misc/
Deployment Guide
368

The directory designed to address specific advanced issues. Users of BIND version 8 should consult
the migration document for specific changes they must make when moving to BIND 9. The
options file lists all of the options implemented in BIND 9 that are used in /etc/named.conf.
/usr/share/doc/bind-version/rfc/
The directory providing every RFC document related to BIND.
There is also a number of man pages for the various applications and configuration files involved with
BIND:
man rndc
The manual page for rndc containing the full documentation on its usage.
man named
The manual page for named containing the documentation on assorted arguments that can be used
to control the BIND nameserver daemon.
man lwresd
The manual page for lwresd containing the full documentation on the lightweight resolver daemon
and its usage.
man named.conf
The manual page with a comprehensive list of options available within the named configuration file.
man rndc.conf
The manual page with a comprehensive list of options available within the rndc configuration file.
17.2.7.2. Useful Websites
http://www.isc.org/software/bind
The home page of the BIND project containing information about current releases as well as a PDF
version of the BIND 9 Administrator Reference Manual.
17.2.7.3. Related Books
DNS and BIND by Paul Albitz and Cricket Liu; O'Reilly & Associates
A popular reference that explains both common and esoteric BIND configuration options, and
provides strategies for securing a DNS server.
The Concise Guide to DNS and BIND by Nicolai Langfeldt; Que
Looks at the connection between multiple network services and BIND, with an emphasis on task-
oriented, technical topics.
CHAPTER 17. DNS SERVERS
369

CHAPTER 18. WEB SERVERS
HTTP (Hypertext Transfer Protocol) server, or a web server, is a network service that serves content to a
client over the web. This typically means web pages, but any other documents can be served as well.
18.1. THE APACHE HTTP SERVER
This section focuses on the Apache HTTP Server 2.2, a robust, full-featured open source web server
developed by the Apache Software Foundation, that is included in Red Hat Enterprise Linux 6. It
describes the basic configuration of the httpd service, and covers advanced topics such as adding
server modules, setting up virtual hosts, or configuring the secure HTTP server.
There are important differences between the Apache HTTP Server 2.2 and version 2.0, and if you are
upgrading from a previous release of Red Hat Enterprise Linux, you will need to update the httpd
service configuration accordingly. This section reviews some of the newly added features, outlines
important changes, and guides you through the update of older configuration files.
18.1.1. New Features
The Apache HTTP Server version 2.2 introduces the following enhancements:
Improved caching modules, that is, mod_cache and mod_disk_cache.
Support for proxy load balancing, that is, the mod_proxy_balancer module.
Support for large files on 32-bit architectures, allowing the web server to handle files greater
than 2GB.
A new structure for authentication and authorization support, replacing the authentication
modules provided in previous versions.
18.1.2. Notable Changes
Since version 2.0, few changes have been made to the default httpd service configuration:
The following modules are no longer loaded by default: mod_cern_meta and mod_asis.
The following module is newly loaded by default: mod_ext_filter.
18.1.3. Updating the Configuration
To update the configuration files from the Apache HTTP Server version 2.0, take the following steps:
1. Make sure all module names are correct, since they may have changed. Adjust the
LoadModule directive for each module that has been renamed.
2. Recompile all third party modules before attempting to load them. This typically means
authentication and authorization modules.
3. If you use the mod_userdir module, make sure the UserDir directive indicating a directory
name (typically public_html) is provided.
4. If you use the Apache HTTP Secure Server, see Section 18.1.9, “Enabling the mod_ssl Module”
for important information on enabling the Secure Sockets Layer (SSL) protocol.
Deployment Guide
370

Note that you can check the configuration for possible errors by using the following command:
~]# service httpd configtest
Syntax OK
For more information on upgrading the Apache HTTP Server configuration from version 2.0 to 2.2, see
http://httpd.apache.org/docs/2.2/upgrading.html.
18.1.4. Running the httpd Service
This section describes how to start, stop, restart, and check the current status of the Apache HTTP
Server. To be able to use the httpd service, make sure you have the httpd installed. You can do so by
using the following command:
~]# yum install httpd
For more information on the concept of runlevels and how to manage system services in Red Hat
Enterprise Linux in general, see Chapter 12, Services and Daemons.
18.1.4.1. Starting the Service
To run the httpd service, type the following at a shell prompt as root:
~]# service httpd start
Starting httpd: [ OK ]
If you want the service to start automatically at the boot time, use the following command:
~]# chkconfig httpd on
This will enable the service for runlevel 2, 3, 4, and 5. Alternatively, you can use the Service
Configuration utility as described in Section 12.2.1.1, “Enabling and Disabling a Service”.
NOTE
If running the Apache HTTP Server as a secure server, a password may be required after
the machine boots if using an encrypted private SSL key.
18.1.4.2. Stopping the Service
To stop the running httpd service, type the following at a shell prompt as root:
~]# service httpd stop
Stopping httpd: [ OK ]
To prevent the service from starting automatically at the boot time, type:
~]# chkconfig httpd off
This will disable the service for all runlevels. Alternatively, you can use the Service Configuration utility
as described in Section 12.2.1.1, “Enabling and Disabling a Service”.
CHAPTER 18. WEB SERVERS
371

18.1.4.3. Restarting the Service
There are three different ways to restart a running httpd service:
1. To restart the service completely, enter the following command as root:
~]# service httpd restart
Stopping httpd: [ OK
]
Starting httpd: [ OK
]
This stops the running httpd service and immediately starts it again. Use this command after
installing or removing a dynamically loaded module such as PHP.
2. To only reload the configuration, as root, type:
~]# service httpd reload
This causes the running httpd service to reload its configuration file. Any requests being
currently processed will be interrupted, which may cause a client browser to display an error
message or render a partial page.
3. To reload the configuration without affecting active requests, enter the following command as
root:
~]# service httpd graceful
This causes the running httpd service to reload its configuration file. Any requests being
currently processed will use the old configuration.
Alternatively, you can use the Service Configuration utility as described in Section 12.2.1.2, “Starting,
Restarting, and Stopping a Service”.
18.1.4.4. Verifying the Service Status
To verify that the httpd service is running, type the following at a shell prompt:
~]# service httpd status
httpd (pid 19014) is running...
Alternatively, you can use the Service Configuration utility as described in Section 12.2.1, “Using the
Service Configuration Utility”.
18.1.5. Editing the Configuration Files
When the httpd service is started, by default, it reads the configuration from locations that are listed in
Table 18.1, “The httpd service configuration files”.
Table 18.1. The httpd service configuration files
Deployment Guide
372

Path Description
/etc/httpd/conf/httpd.
conf
The main configuration file.
/etc/httpd/conf.d/ An auxiliary directory for configuration files that are included in the main
configuration file.
Although the default configuration should be suitable for most situations, it is a good idea to become at
least familiar with some of the more important configuration options. Note that for any changes to take
effect, the web server has to be restarted first. See Section 18.1.4.3, “Restarting the Service” for more
information on how to restart the httpd service.
To check the configuration for possible errors, type the following at a shell prompt:
~]# service httpd configtest
Syntax OK
To make the recovery from mistakes easier, it is recommended that you make a copy of the original file
before editing it.
18.1.5.1. Common httpd.conf Directives
The following directives are commonly used in the /etc/httpd/conf/httpd.conf configuration file:
<Directory>
The <Directory> directive allows you to apply certain directives to a particular directory only. It
takes the following form:
<Directory directory>
directive
…
</Directory>
The directory can be either a full path to an existing directory in the local file system, or a wildcard
expression.
This directive can be used to configure additional cgi-bin directories for server-side scripts located
outside the directory that is specified by ScriptAlias. In this case, the ExecCGI and AddHandler
directives must be supplied, and the permissions on the target directory must be set correctly (that is,
0755).
Example 18.1. Using the <Directory> directive
<Directory /var/www/html>
Options Indexes FollowSymLinks
AllowOverride None
Order allow,deny
Allow from all
</Directory>
CHAPTER 18. WEB SERVERS
373

<IfDefine>
The IfDefine directive allows you to use certain directives only when a particular parameter is
supplied on the command line. It takes the following form:
<IfDefine [!]parameter>
directive
…
</IfDefine>
The parameter can be supplied at a shell prompt using the -Dparameter command-line option (for
example, httpd -DEnableHome). If the optional exclamation mark (that is, !) is present, the
enclosed directives are used only when the parameter is not specified.
Example 18.2. Using the <IfDefine> directive
<IfDefine EnableHome>
UserDir public_html
</IfDefine>
<IfModule>
The <IfModule> directive allows you to use certain directive only when a particular module is
loaded. It takes the following form:
<IfModule [!]module>
directive
…
</IfModule>
The module can be identified either by its name, or by the file name. If the optional exclamation mark
(that is, !) is present, the enclosed directives are used only when the module is not loaded.
Example 18.3. Using the <IfModule> directive
<IfModule mod_disk_cache.c>
CacheEnable disk /
CacheRoot /var/cache/mod_proxy
</IfModule>
<Location>
The <Location> directive allows you to apply certain directives to a particular URL only. It takes the
following form:
<Location url>
directive
…
</Location>
Deployment Guide
374

The url can be either a path relative to the directory specified by the DocumentRoot directive (for
example, /server-info), or an external URL such as http://example.com/server-info.
Example 18.4. Using the <Location> directive
<Location /server-info>
SetHandler server-info
Order deny,allow
Deny from all
Allow from .example.com
</Location>
<Proxy>
The <Proxy> directive allows you to apply certain directives to the proxy server only. It takes the
following form:
<Proxy pattern>
directive
…
</Proxy>
The pattern can be an external URL, or a wildcard expression (for example,
http://example.com/*).
Example 18.5. Using the <Proxy> directive
<Proxy *>
Order deny,allow
Deny from all
Allow from .example.com
</Proxy>
<VirtualHost>
The <VirtualHost> directive allows you apply certain directives to particular virtual hosts only. It
takes the following form:
<VirtualHost address[:port]…>
directive
…
</VirtualHost>
The address can be an IP address, a fully qualified domain name, or a special form as described in
Table 18.2, “Available <VirtualHost> options”.
Table 18.2. Available <VirtualHost> options
CHAPTER 18. WEB SERVERS
375

Option Description
*Represents all IP addresses.
_default_ Represents unmatched IP addresses.
Example 18.6. Using the <VirtualHost> directive
<VirtualHost *:80>
ServerAdmin webmaster@penguin.example.com
DocumentRoot /www/docs/penguin.example.com
ServerName penguin.example.com
ErrorLog logs/penguin.example.com-error_log
CustomLog logs/penguin.example.com-access_log common
</VirtualHost>
AccessFileName
The AccessFileName directive allows you to specify the file to be used to customize access control
information for each directory. It takes the following form:
AccessFileName filename…
The filename is a name of the file to look for in the requested directory. By default, the server looks
for .htaccess.
For security reasons, the directive is typically followed by the Files tag to prevent the files beginning
with .ht from being accessed by web clients. This includes the .htaccess and .htpasswd files.
Example 18.7. Using the AccessFileName directive
AccessFileName .htaccess
<Files ~ "^\.ht">
Order allow,deny
Deny from all
Satisfy All
</Files>
Action
The Action directive allows you to specify a CGI script to be executed when a certain media type is
requested. It takes the following form:
Action content-type path
The content-type has to be a valid MIME type such as text/html, image/png, or
application/pdf. The path refers to an existing CGI script, and must be relative to the directory
specified by the DocumentRoot directive (for example, /cgi-bin/process-image.cgi).
Deployment Guide
376

Example 18.8. Using the Action directive
Action image/png /cgi-bin/process-image.cgi
AddDescription
The AddDescription directive allows you to specify a short description to be displayed in server-
generated directory listings for a given file. It takes the following form:
AddDescription "description" filename…
The description should be a short text enclosed in double quotes (that is, "). The filename can be a
full file name, a file extension, or a wildcard expression.
Example 18.9. Using the AddDescription directive
AddDescription "GZIP compressed tar archive" .tgz
AddEncoding
The AddEncoding directive allows you to specify an encoding type for a particular file extension. It
takes the following form:
AddEncoding encoding extension…
The encoding has to be a valid MIME encoding such as x-compress, x-gzip, etc. The extension is
a case sensitive file extension, and is conventionally written with a leading dot (for example, .gz).
This directive is typically used to instruct web browsers to decompress certain file types as they are
downloaded.
Example 18.10. Using the AddEncoding directive
AddEncoding x-gzip .gz .tgz
AddHandler
The AddHandler directive allows you to map certain file extensions to a selected handler. It takes
the following form:
AddHandler handler extension…
The handler has to be a name of a previously defined handler. The extension is a case sensitive file
extension, and is conventionally written with a leading dot (for example, .cgi).
This directive is typically used to treat files with the .cgi extension as CGI scripts regardless of the
directory they are in. Additionally, it is also commonly used to process server-parsed HTML and
image-map files.
CHAPTER 18. WEB SERVERS
377

Example 18.11. Using the AddHandler option
AddHandler cgi-script .cgi
AddIcon
The AddIcon directive allows you to specify an icon to be displayed for a particular file in server-
generated directory listings. It takes the following form:
AddIcon path pattern…
The path refers to an existing icon file, and must be relative to the directory specified by the
DocumentRoot directive (for example, /icons/folder.png). The pattern can be a file name, a
file extension, a wildcard expression, or a special form as described in the following table:
Table 18.3. Available AddIcon options
Option Description
^^DIRECTORY^^ Represents a directory.
^^BLANKICON^^ Represents a blank line.
Example 18.12. Using the AddIcon directive
AddIcon /icons/text.png .txt README
AddIconByEncoding
The AddIconByEncoding directive allows you to specify an icon to be displayed for a particular
encoding type in server-generated directory listings. It takes the following form:
AddIconByEncoding path encoding…
The path refers to an existing icon file, and must be relative to the directory specified by the
DocumentRoot directive (for example, /icons/compressed.png). The encoding has to be a valid
MIME encoding such as x-compress, x-gzip, etc.
Example 18.13. Using the AddIconByEncoding directive
AddIconByEncoding /icons/compressed.png x-compress x-gzip
AddIconByType
The AddIconByType directive allows you to specify an icon to be displayed for a particular media
type in server-generated directory listings. It takes the following form:
Deployment Guide
378

AddIconByType path content-type…
The path refers to an existing icon file, and must be relative to the directory specified by the
DocumentRoot directive (for example, /icons/text.png). The content-type has to be either a
valid MIME type (for example, text/html or image/png), or a wildcard expression such as
text/*, image/*, etc.
Example 18.14. Using the AddIconByType directive
AddIconByType /icons/video.png video/*
AddLanguage
The AddLanguage directive allows you to associate a file extension with a specific language. It takes
the following form:
AddLanguage language extension…
The language has to be a valid MIME language such as cs, en, or fr. The extension is a case
sensitive file extension, and is conventionally written with a leading dot (for example, .cs).
This directive is especially useful for web servers that serve content in multiple languages based on
the client's language settings.
Example 18.15. Using the AddLanguage directive
AddLanguage cs .cs .cz
AddType
The AddType directive allows you to define or override the media type for a particular file extension.
It takes the following form:
AddType content-type extension…
The content-type has to be a valid MIME type such as text/html, image/png, etc. The extension
is a case sensitive file extension, and is conventionally written with a leading dot (for example, .cs).
Example 18.16. Using the AddType directive
AddType application/x-gzip .gz .tgz
Alias
The Alias directive allows you to refer to files and directories outside the default directory specified
by the DocumentRoot directive. It takes the following form:
Alias url-path real-path
CHAPTER 18. WEB SERVERS
379

The url-path must be relative to the directory specified by the DocumentRoot directive (for example,
/images/). The real-path is a full path to a file or directory in the local file system.
This directive is typically followed by the Directory tag with additional permissions to access the
target directory. By default, the /icons/ alias is created so that the icons from /var/www/icons/
are displayed in server-generated directory listings.
Example 18.17. Using the Alias directive
Alias /icons/ /var/www/icons/
<Directory "/var/www/icons">
Options Indexes MultiViews FollowSymLinks
AllowOverride None
Order allow,deny
Allow from all
<Directory>
Allow
The Allow directive allows you to specify which clients have permission to access a given directory.
It takes the following form:
Allow from client…
The client can be a domain name, an IP address (both full and partial), a network/netmask pair, or
all for all clients.
Example 18.18. Using the Allow directive
Allow from 192.168.1.0/255.255.255.0
AllowOverride
The AllowOverride directive allows you to specify which directives in a .htaccess file can
override the default configuration. It takes the following form:
AllowOverride type…
The type has to be one of the available grouping options as described in Table 18.4, “Available
AllowOverride options”.
Table 18.4. Available AllowOverride options
Option Description
All All directives in .htaccess are allowed to override earlier configuration
settings.
Deployment Guide
380

None No directive in .htaccess is allowed to override earlier configuration
settings.
AuthConfig Allows the use of authorization directives such as AuthName, AuthType, or
Require.
FileInfo Allows the use of file type, metadata, and mod_rewrite directives such as
DefaultType, RequestHeader, or RewriteEngine, as well as the
Action directive.
Indexes Allows the use of directory indexing directives such as AddDescription,
AddIcon, or FancyIndexing.
Limit Allows the use of host access directives, that is, Allow, Deny, and Order.
Options [=option,…] Allows the use of the Options directive. Additionally, you can provide a
comma-separated list of options to customize which options can be set using
this directive.
Option Description
Example 18.19. Using the AllowOverride directive
AllowOverride FileInfo AuthConfig Limit
BrowserMatch
The BrowserMatch directive allows you to modify the server behavior based on the client's web
browser type. It takes the following form:
BrowserMatch pattern variable…
The pattern is a regular expression to match the User-Agent HTTP header field. The variable is an
environment variable that is set when the header field matches the pattern.
By default, this directive is used to deny connections to specific browsers with known issues, and to
disable keepalives and HTTP header flushes for browsers that are known to have problems with
these actions.
Example 18.20. Using the BrowserMatch directive
BrowserMatch "Mozilla/2" nokeepalive
CacheDefaultExpire
The CacheDefaultExpire option allows you to set how long to cache a document that does not
have any expiration date or the date of its last modification specified. It takes the following form:
CHAPTER 18. WEB SERVERS
381

CacheDefaultExpire time
The time is specified in seconds. The default option is 3600 (that is, one hour).
Example 18.21. Using the CacheDefaultExpire directive
CacheDefaultExpire 3600
CacheDisable
The CacheDisable directive allows you to disable caching of certain URLs. It takes the following
form:
CacheDisable path
The path must be relative to the directory specified by the DocumentRoot directive (for example,
/files/).
Example 18.22. Using the CacheDisable directive
CacheDisable /temporary
CacheEnable
The CacheEnable directive allows you to specify a cache type to be used for certain URLs. It takes
the following form:
CacheEnable type url
The type has to be a valid cache type as described in Table 18.5, “Available cache types”. The url
can be a path relative to the directory specified by the DocumentRoot directive (for example,
/images/), a protocol (for example, ftp://), or an external URL such as
http://example.com/.
Table 18.5. Available cache types
Type Description
mem The memory-based storage manager.
disk The disk-based storage manager.
fd The file descriptor cache.
Example 18.23. Using the CacheEnable directive
CacheEnable disk /
Deployment Guide
382

CacheLastModifiedFactor
The CacheLastModifiedFactor directive allows you to customize how long to cache a document
that does not have any expiration date specified, but that provides information about the date of its
last modification. It takes the following form:
CacheLastModifiedFactor number
The number is a coefficient to be used to multiply the time that passed since the last modification of
the document. The default option is 0.1 (that is, one tenth).
Example 18.24. Using the CacheLastModifiedFactor directive
CacheLastModifiedFactor 0.1
CacheMaxExpire
The CacheMaxExpire directive allows you to specify the maximum amount of time to cache a
document. It takes the following form:
CacheMaxExpire time
The time is specified in seconds. The default option is 86400 (that is, one day).
Example 18.25. Using the CacheMaxExpire directive
CacheMaxExpire 86400
CacheNegotiatedDocs
The CacheNegotiatedDocs directive allows you to enable caching of the documents that were
negotiated on the basis of content. It takes the following form:
CacheNegotiatedDocs option
The option has to be a valid keyword as described in Table 18.6, “Available CacheNegotiatedDocs
options”. Since the content-negotiated documents may change over time or because of the input from
the requester, the default option is Off.
Table 18.6. Available CacheNegotiatedDocs options
Option Description
On Enables caching the content-negotiated documents.
Off Disables caching the content-negotiated documents.
Example 18.26. Using the CacheNegotiatedDocs directive
CHAPTER 18. WEB SERVERS
383

CacheNegotiatedDocs On
CacheRoot
The CacheRoot directive allows you to specify the directory to store cache files in. It takes the
following form:
CacheRoot directory
The directory must be a full path to an existing directory in the local file system. The default option is
/var/cache/mod_proxy/.
Example 18.27. Using the CacheRoot directive
CacheRoot /var/cache/mod_proxy
CustomLog
The CustomLog directive allows you to specify the log file name and the log file format. It takes the
following form:
CustomLog path format
The path refers to a log file, and must be relative to the directory that is specified by the ServerRoot
directive (that is, /etc/httpd/ by default). The format has to be either an explicit format string, or a
format name that was previously defined using the LogFormat directive.
Example 18.28. Using the CustomLog directive
CustomLog logs/access_log combined
DefaultIcon
The DefaultIcon directive allows you to specify an icon to be displayed for a file in server-
generated directory listings when no other icon is associated with it. It takes the following form:
DefaultIcon path
The path refers to an existing icon file, and must be relative to the directory specified by the
DocumentRoot directive (for example, /icons/unknown.png).
Example 18.29. Using the DefaultIcon directive
DefaultIcon /icons/unknown.png
DefaultType
Deployment Guide
384

The DefaultType directive allows you to specify a media type to be used in case the proper MIME
type cannot be determined by the server. It takes the following form:
DefaultType content-type
The content-type has to be a valid MIME type such as text/html, image/png,
application/pdf, etc.
Example 18.30. Using the DefaultType directive
DefaultType text/plain
Deny
The Deny directive allows you to specify which clients are denied access to a given directory. It takes
the following form:
Deny from client…
The client can be a domain name, an IP address (both full and partial), a network/netmask pair, or
all for all clients.
Example 18.31. Using the Deny directive
Deny from 192.168.1.1
DirectoryIndex
The DirectoryIndex directive allows you to specify a document to be served to a client when a
directory is requested (that is, when the URL ends with the / character). It takes the following form:
DirectoryIndex filename…
The filename is a name of the file to look for in the requested directory. By default, the server looks
for index.html, and index.html.var.
Example 18.32. Using the DirectoryIndex directive
DirectoryIndex index.html index.html.var
DocumentRoot
The DocumentRoot directive allows you to specify the main directory from which the content is
served. It takes the following form:
DocumentRoot directory
CHAPTER 18. WEB SERVERS
385

The directory must be a full path to an existing directory in the local file system. The default option is
/var/www/html/.
Example 18.33. Using the DocumentRoot directive
DocumentRoot /var/www/html
ErrorDocument
The ErrorDocument directive allows you to specify a document or a message to be displayed as a
response to a particular error. It takes the following form:
ErrorDocument error-code action
The error-code has to be a valid code such as 403 (Forbidden), 404 (Not Found), or 500 (Internal
Server Error). The action can be either a URL (both local and external), or a message string enclosed
in double quotes (that is, ").
Example 18.34. Using the ErrorDocument directive
ErrorDocument 403 "Access Denied"
ErrorDocument 404 /404-not_found.html
ErrorLog
The ErrorLog directive allows you to specify a file to which the server errors are logged. It takes the
following form:
ErrorLog path
The path refers to a log file, and can be either absolute, or relative to the directory that is specified by
the ServerRoot directive (that is, /etc/httpd/ by default). The default option is
logs/error_log
Example 18.35. Using the ErrorLog directive
ErrorLog logs/error_log
ExtendedStatus
The ExtendedStatus directive allows you to enable detailed server status information. It takes the
following form:
ExtendedStatus option
The option has to be a valid keyword as described in Table 18.7, “Available ExtendedStatus options”.
The default option is Off.
Table 18.7. Available ExtendedStatus options
Deployment Guide
386

Option Description
On Enables generating the detailed server status.
Off Disables generating the detailed server status.
Example 18.36. Using the ExtendedStatus directive
ExtendedStatus On
Group
The Group directive allows you to specify the group under which the httpd service will run. It takes
the following form:
Group group
The group has to be an existing UNIX group. The default option is apache.
Note that Group is no longer supported inside <VirtualHost>, and has been replaced by the
SuexecUserGroup directive.
Example 18.37. Using the Group directive
Group apache
HeaderName
The HeaderName directive allows you to specify a file to be prepended to the beginning of the server-
generated directory listing. It takes the following form:
HeaderName filename
The filename is a name of the file to look for in the requested directory. By default, the server looks
for HEADER.html.
Example 18.38. Using the HeaderName directive
HeaderName HEADER.html
HostnameLookups
The HostnameLookups directive allows you to enable automatic resolving of IP addresses. It takes
the following form:
HostnameLookups option
CHAPTER 18. WEB SERVERS
387

The option has to be a valid keyword as described in Table 18.8, “Available HostnameLookups
options”. To conserve resources on the server, the default option is Off.
Table 18.8. Available HostnameLookups options
Option Description
On Enables resolving the IP address for each connection so that the host name
can be logged. However, this also adds a significant processing overhead.
Double Enables performing the double-reverse DNS lookup. In comparison to the
above option, this adds even more processing overhead.
Off Disables resolving the IP address for each connection.
Note that when the presence of host names is required in server log files, it is often possible to use
one of the many log analyzer tools that perform the DNS lookups more efficiently.
Example 18.39. Using the HostnameLookups directive
HostnameLookups Off
Include
The Include directive allows you to include other configuration files. It takes the following form:
Include filename
The filename can be an absolute path, a path relative to the directory specified by the ServerRoot
directive, or a wildcard expression. All configuration files from the /etc/httpd/conf.d/ directory
are loaded by default.
Example 18.40. Using the Include directive
Include conf.d/*.conf
IndexIgnore
The IndexIgnore directive allows you to specify a list of file names to be omitted from the server-
generated directory listings. It takes the following form:
IndexIgnore filename…
The filename option can be either a full file name, or a wildcard expression.
Example 18.41. Using the IndexIgnore directive
IndexIgnore .??* *~ *# HEADER* README* RCS CVS *,v *,t
Deployment Guide
388

IndexOptions
The IndexOptions directive allows you to customize the behavior of server-generated directory
listings. It takes the following form:
IndexOptions option…
The option has to be a valid keyword as described in Table 18.9, “Available directory listing options”.
The default options are Charset=UTF-8, FancyIndexing, HTMLTable, NameWidth=*, and
VersionSort.
Table 18.9. Available directory listing options
Option Description
Charset=encoding Specifies the character set of a generated web page. The encoding
has to be a valid character set such as UTF-8 or ISO-8859-2.
Type=content-type Specifies the media type of a generated web page. The content-type
has to be a valid MIME type such as text/html or text/plain.
DescriptionWidth=value Specifies the width of the description column. The value can be either
a number of characters, or an asterisk (that is, *) to adjust the width
automatically.
FancyIndexing Enables advanced features such as different icons for certain files or
possibility to re-sort a directory listing by clicking on a column header.
FolderFirst Enables listing directories first, always placing them above files.
HTMLTable Enables the use of HTML tables for directory listings.
IconsAreLinks Enables using the icons as links.
IconHeight=value Specifies an icon height. The value is a number of pixels.
IconWidth=value Specifies an icon width. The value is a number of pixels.
IgnoreCase Enables sorting files and directories in a case-sensitive manner.
IgnoreClient Disables accepting query variables from a client.
NameWidth=value Specifies the width of the file name column. The value can be either a
number of characters, or an asterisk (that is, *) to adjust the width
automatically.
ScanHTMLTitles Enables parsing the file for a description (that is, the title element)
in case it is not provided by the AddDescription directive.
CHAPTER 18. WEB SERVERS
389

ShowForbidden Enables listing the files with otherwise restricted access.
SuppressColumnSorting Disables re-sorting a directory listing by clicking on a column header.
SuppressDescription Disables reserving a space for file descriptions.
SuppressHTMLPreamble Disables the use of standard HTML preamble when a file specified by
the HeaderName directive is present.
SuppressIcon Disables the use of icons in directory listings.
SuppressLastModified Disables displaying the date of the last modification field in directory
listings.
SuppressRules Disables the use of horizontal lines in directory listings.
SuppressSize Disables displaying the file size field in directory listings.
TrackModified Enables returning the Last-Modified and ETag values in the
HTTP header.
VersionSort Enables sorting files that contain a version number in the expected
manner.
XHTML Enables the use of XHTML 1.0 instead of the default HTML 3.2.
Option Description
Example 18.42. Using the IndexOptions directive
IndexOptions FancyIndexing VersionSort NameWidth=* HTMLTable
Charset=UTF-8
KeepAlive
The KeepAlive directive allows you to enable persistent connections. It takes the following form:
KeepAlive option
The option has to be a valid keyword as described in Table 18.10, “Available KeepAlive options”. The
default option is Off.
Table 18.10. Available KeepAlive options
Option Description
Deployment Guide
390

On Enables the persistent connections. In this case, the server will accept more
than one request per connection.
Off Disables the keep-alive connections.
Option Description
Note that when the persistent connections are enabled, on a busy server, the number of child
processes can increase rapidly and eventually reach the maximum limit, slowing down the server
significantly. To reduce the risk, it is recommended that you set KeepAliveTimeout to a low
number, and monitor the /var/log/httpd/logs/error_log log file carefully.
Example 18.43. Using the KeepAlive directive
KeepAlive Off
KeepAliveTimeout
The KeepAliveTimeout directive allows you to specify the amount of time to wait for another
request before closing the connection. It takes the following form:
KeepAliveTimeout time
The time is specified in seconds. The default option is 15.
Example 18.44. Using the KeepAliveTimeout directive
KeepAliveTimeout 15
LanguagePriority
The LanguagePriority directive allows you to customize the precedence of languages. It takes
the following form:
LanguagePriority language…
The language has to be a valid MIME language such as cs, en, or fr.
This directive is especially useful for web servers that serve content in multiple languages based on
the client's language settings.
Example 18.45. Using the LanguagePriority directive
LanguagePriority sk cs en
Listen
CHAPTER 18. WEB SERVERS
391

The Listen directive allows you to specify IP addresses or ports to listen to. It takes the following form:
Listen [ip-address:]port [protocol]
The ip-address is optional and unless supplied, the server will accept incoming requests on a given
port from all IP addresses. Since the protocol is determined automatically from the port number, it can
be usually omitted. The default option is to listen to port 80.
Note that if the server is configured to listen to a port under 1024, only superuser will be able to start
the httpd service.
Example 18.46. Using the Listen directive
Listen 80
LoadModule
The LoadModule directive allows you to load a Dynamic Shared Object (DSO) module. It takes the
following form:
LoadModule name path
The name has to be a valid identifier of the required module. The path refers to an existing module
file, and must be relative to the directory in which the libraries are placed (that is, /usr/lib/httpd/
on 32-bit and /usr/lib64/httpd/ on 64-bit systems by default).
See Section 18.1.6, “Working with Modules” for more information on the Apache HTTP Server's DSO
support.
Example 18.47. Using the LoadModule directive
LoadModule php5_module modules/libphp5.so
LogFormat
The LogFormat directive allows you to specify a log file format. It takes the following form:
LogFormat format name
The format is a string consisting of options as described in Table 18.11, “Common LogFormat
options”. The name can be used instead of the format string in the CustomLog directive.
Table 18.11. Common LogFormat options
Option Description
%b Represents the size of the response in bytes.
%h Represents the IP address or host name of a remote client.
Deployment Guide
392

%l Represents the remote log name if supplied. If not, a hyphen (that is, -) is used instead.
%r Represents the first line of the request string as it came from the browser or client.
%s Represents the status code.
%t Represents the date and time of the request.
%u If the authentication is required, it represents the remote user. If not, a hyphen (that is, -) is
used instead.
%
{field}
Represents the content of the HTTP header field. The common options include %
{Referer} (the URL of the web page that referred the client to the server) and %{User-
Agent} (the type of the web browser making the request).
Option Description
Example 18.48. Using the LogFormat directive
LogFormat "%h %l %u %t \"%r\" %>s %b" common
LogLevel
The LogLevel directive allows you to customize the verbosity level of the error log. It takes the
following form:
LogLevel option
The option has to be a valid keyword as described in Table 18.12, “Available LogLevel options”. The
default option is warn.
Table 18.12. Available LogLevel options
Option Description
emerg Only the emergency situations when the server cannot perform its work are
logged.
alert All situations when an immediate action is required are logged.
crit All critical conditions are logged.
error All error messages are logged.
warn All warning messages are logged.
notice Even normal, but still significant situations are logged.
CHAPTER 18. WEB SERVERS
393

info Various informational messages are logged.
debug Various debugging messages are logged.
Option Description
Example 18.49. Using the LogLevel directive
LogLevel warn
MaxKeepAliveRequests
The MaxKeepAliveRequests directive allows you to specify the maximum number of requests for a
persistent connection. It takes the following form:
MaxKeepAliveRequests number
A high number can improve the performance of the server. Note that using 0 allows unlimited number
of requests. The default option is 100.
Example 18.50. Using the MaxKeepAliveRequests option
MaxKeepAliveRequests 100
NameVirtualHost
The NameVirtualHost directive allows you to specify the IP address and port number for a name-
based virtual host. It takes the following form:
NameVirtualHost ip-address[:port]
The ip-address can be either a full IP address, or an asterisk (that is, *) representing all interfaces.
Note that IPv6 addresses have to be enclosed in square brackets (that is, [ and ]). The port is
optional.
Name-based virtual hosting allows one Apache HTTP Server to serve different domains without using
multiple IP addresses.
IMPORTANT
Name-based virtual hosts only work with non-secure HTTP connections. If using virtual
hosts with a secure server, use IP address-based virtual hosts instead.
Example 18.51. Using the NameVirtualHost directive
NameVirtualHost *:80
Deployment Guide
394

Options
The Options directive allows you to specify which server features are available in a particular
directory. It takes the following form:
Options option…
The option has to be a valid keyword as described in Table 18.13, “Available server features”.
Table 18.13. Available server features
Option Description
ExecCGI Enables the execution of CGI scripts.
FollowSymLinks Enables following symbolic links in the directory.
Includes Enables server-side includes.
IncludesNOEXEC Enables server-side includes, but does not allow the execution
of commands.
Indexes Enables server-generated directory listings.
MultiViews Enables content-negotiated “MultiViews”.
SymLinksIfOwnerMatch Enables following symbolic links in the directory when both the
link and the target file have the same owner.
All Enables all of the features above with the exception of
MultiViews.
None Disables all of the features above.
IMPORTANT
The SymLinksIfOwnerMatch option is not a security feature as it can be bypassed
by an attacker.
Example 18.52. Using the Options directive
Options Indexes FollowSymLinks
Order
The Order directive allows you to specify the order in which the Allow and Deny directives are
evaluated. It takes the following form:
Order option
CHAPTER 18. WEB SERVERS
395

The option has to be a valid keyword as described in Table 18.14, “Available Order options”. The
default option is allow,deny.
Table 18.14. Available Order options
Option Description
allow,deny Allow directives are evaluated first.
deny,allow Deny directives are evaluated first.
Example 18.53. Using the Order directive
Order allow,deny
PidFile
The PidFile directive allows you to specify a file to which the process ID (PID) of the server is
stored. It takes the following form:
PidFile path
The path refers to a pid file, and can be either absolute, or relative to the directory that is specified by
the ServerRoot directive (that is, /etc/httpd/ by default). The default option is
run/httpd.pid.
Example 18.54. Using the PidFile directive
PidFile run/httpd.pid
ProxyRequests
The ProxyRequests directive allows you to enable forward proxy requests. It takes the following
form:
ProxyRequests option
The option has to be a valid keyword as described in Table 18.15, “Available ProxyRequests
options”. The default option is Off.
Table 18.15. Available ProxyRequests options
Option Description
On Enables forward proxy requests.
Off Disables forward proxy requests.
Deployment Guide
396

Example 18.55. Using the ProxyRequests directive
ProxyRequests On
ReadmeName
The ReadmeName directive allows you to specify a file to be appended to the end of the server-
generated directory listing. It takes the following form:
ReadmeName filename
The filename is a name of the file to look for in the requested directory. By default, the server looks
for README.html.
Example 18.56. Using the ReadmeName directive
ReadmeName README.html
Redirect
The Redirect directive allows you to redirect a client to another URL. It takes the following form:
Redirect [status] path url
The status is optional, and if provided, it has to be a valid keyword as described in Table 18.16,
“Available status options”. The path refers to the old location, and must be relative to the directory
specified by the DocumentRoot directive (for example, /docs). The url refers to the current location
of the content (for example, http://docs.example.com).
Table 18.16. Available status options
Status Description
permanent Indicates that the requested resource has been moved permanently. The 301
(Moved Permanently) status code is returned to a client.
temp Indicates that the requested resource has been moved only temporarily. The
302 (Found) status code is returned to a client.
seeother Indicates that the requested resource has been replaced. The 303 (See Other)
status code is returned to a client.
gone Indicates that the requested resource has been removed permanently. The
410 (Gone) status is returned to a client.
Note that for more advanced redirection techniques, you can use the mod_rewrite module that is
part of the Apache HTTP Server installation.
Example 18.57. Using the Redirect directive
CHAPTER 18. WEB SERVERS
397

Redirect permanent /docs http://docs.example.com
ScriptAlias
The ScriptAlias directive allows you to specify the location of CGI scripts. It takes the following
form:
ScriptAlias url-path real-path
The url-path must be relative to the directory specified by the DocumentRoot directive (for example,
/cgi-bin/). The real-path is a full path to a file or directory in the local file system.
This directive is typically followed by the Directory tag with additional permissions to access the
target directory. By default, the /cgi-bin/ alias is created so that the scripts located in the
/var/www/cgi-bin/ are accessible.
The ScriptAlias directive is used for security reasons to prevent CGI scripts from being viewed as
ordinary text documents.
Example 18.58. Using the ScriptAlias directive
ScriptAlias /cgi-bin/ /var/www/cgi-bin/
<Directory "/var/www/cgi-bin">
AllowOverride None
Options None
Order allow,deny
Allow from all
</Directory>
ServerAdmin
The ServerAdmin directive allows you to specify the email address of the server administrator to be
displayed in server-generated web pages. It takes the following form:
ServerAdmin email
The default option is root@localhost.
This directive is commonly set to webmaster@hostname, where hostname is the address of the
server. Once set, alias webmaster to the person responsible for the web server in /etc/aliases,
and as superuser, run the newaliases command.
Example 18.59. Using the ServerAdmin directive
ServerAdmin webmaster@penguin.example.com
ServerName
Deployment Guide
398

The ServerName directive allows you to specify the host name and the port number of a web server.
It takes the following form:
ServerName hostname[:port]
The hostname has to be a fully qualified domain name (FQDN) of the server. The port is optional, but
when supplied, it has to match the number specified by the Listen directive.
When using this directive, make sure that the IP address and server name pair are included in the
/etc/hosts file.
Example 18.60. Using the ServerName directive
ServerName penguin.example.com:80
ServerRoot
The ServerRoot directive allows you to specify the directory in which the server operates. It takes
the following form:
ServerRoot directory
The directory must be a full path to an existing directory in the local file system. The default option is
/etc/httpd/.
Example 18.61. Using the ServerRoot directive
ServerRoot /etc/httpd
ServerSignature
The ServerSignature directive allows you to enable displaying information about the server on
server-generated documents. It takes the following form:
ServerSignature option
The option has to be a valid keyword as described in Table 18.17, “Available ServerSignature
options”. The default option is On.
Table 18.17. Available ServerSignature options
Option Description
On Enables appending the server name and version to server-generated pages.
Off Disables appending the server name and version to server-generated pages.
CHAPTER 18. WEB SERVERS
399

EMail Enables appending the server name, version, and the email address of the
system administrator as specified by the ServerAdmin directive to server-
generated pages.
Option Description
Example 18.62. Using the ServerSignature directive
ServerSignature On
ServerTokens
The ServerTokens directive allows you to customize what information is included in the Server
response header. It takes the following form:
ServerTokens option
The option has to be a valid keyword as described in Table 18.18, “Available ServerTokens options”.
The default option is OS.
Table 18.18. Available ServerTokens options
Option Description
Prod Includes the product name only (that is, Apache).
Major Includes the product name and the major version of the server (for example,
2).
Minor Includes the product name and the minor version of the server (for example,
2.2).
Min Includes the product name and the minimal version of the server (for example,
2.2.15).
OS Includes the product name, the minimal version of the server, and the type of
the operating system it is running on (for example, Red Hat).
Full Includes all the information above along with the list of loaded modules.
Note that for security reasons, it is recommended to reveal as little information about the server as
possible.
Example 18.63. Using the ServerTokens directive
ServerTokens Prod
Deployment Guide
400

SuexecUserGroup
The SuexecUserGroup directive allows you to specify the user and group under which the CGI
scripts will be run. It takes the following form:
SuexecUserGroup user group
The user has to be an existing user, and the group must be a valid UNIX group.
For security reasons, the CGI scripts should not be run with root privileges. Note that in
<VirtualHost>, SuexecUserGroup replaces the User and Group directives.
Example 18.64. Using the SuexecUserGroup directive
SuexecUserGroup apache apache
Timeout
The Timeout directive allows you to specify the amount of time to wait for an event before closing a
connection. It takes the following form:
Timeout time
The time is specified in seconds. The default option is 60.
Example 18.65. Using the Timeout directive
Timeout 60
TypesConfig
The TypesConfig allows you to specify the location of the MIME types configuration file. It takes the
following form:
TypesConfig path
The path refers to an existing MIME types configuration file, and can be either absolute, or relative to
the directory that is specified by the ServerRoot directive (that is, /etc/httpd/ by default). The
default option is /etc/mime.types.
Note that instead of editing /etc/mime.types, the recommended way to add MIME type mapping
to the Apache HTTP Server is to use the AddType directive.
Example 18.66. Using the TypesConfig directive
TypesConfig /etc/mime.types
UseCanonicalName
CHAPTER 18. WEB SERVERS
401

The UseCanonicalName allows you to specify the way the server refers to itself. It takes the
following form:
UseCanonicalName option
The option has to be a valid keyword as described in Table 18.19, “Available UseCanonicalName
options”. The default option is Off.
Table 18.19. Available UseCanonicalName options
Option Description
On Enables the use of the name that is specified by the ServerName directive.
Off Disables the use of the name that is specified by the ServerName directive.
The host name and port number provided by the requesting client are used
instead.
DNS Disables the use of the name that is specified by the ServerName directive.
The host name determined by a reverse DNS lookup is used instead.
Example 18.67. Using the UseCanonicalName directive
UseCanonicalName Off
User
The User directive allows you to specify the user under which the httpd service will run. It takes the
following form:
User user
The user has to be an existing UNIX user. The default option is apache.
For security reasons, the httpd service should not be run with root privileges. Note that User is no
longer supported inside <VirtualHost>, and has been replaced by the SuexecUserGroup
directive.
Example 18.68. Using the User directive
User apache
UserDir
The UserDir directive allows you to enable serving content from users' home directories. It takes the
following form:
UserDir option
Deployment Guide
402

The option can be either a name of the directory to look for in user's home directory (typically
public_html), or a valid keyword as described in Table 18.20, “Available UserDir options”. The
default option is disabled.
Table 18.20. Available UserDir options
Option Description
enabled user… Enables serving content from home directories of given users.
disabled [user…] Disables serving content from home directories, either for all users, or, if a
space separated list of users is supplied, for given users only.
NOTE
In order for the web server to access the content, the permissions on relevant
directories and files must be set correctly. Make sure that all users are able to access
the home directories, and that they can access and read the content of the directory
specified by the UserDir directive. For example:
~]# chmod a+x /home/username/
~]# chmod a+rx /home/username/public_html/
All files in this directory must be set accordingly.
Example 18.69. Using the UserDir directive
UserDir public_html
18.1.5.2. Common ssl.conf Directives
The Secure Sockets Layer (SSL) directives allow you to customize the behavior of the Apache HTTP
Secure Server, and in most cases, they are configured appropriately during the installation. Be careful
when changing these settings, as incorrect configuration can lead to security vulnerabilities.
The following directive is commonly used in /etc/httpd/conf.d/ssl.conf:
SetEnvIf
The SetEnvIf directive allows you to set environment variables based on the headers of incoming
connections. It takes the following form:
SetEnvIf option pattern [!]variable[=value]…
The option can be either a HTTP header field, a previously defined environment variable name, or a
valid keyword as described in Table 18.21, “Available SetEnvIf options”. The pattern is a regular
expression. The variable is an environment variable that is set when the option matches the pattern. If
the optional exclamation mark (that is, !) is present, the variable is removed instead of being set.
Table 18.21. Available SetEnvIf options
CHAPTER 18. WEB SERVERS
403

Option Description
Remote_Host Refers to the client's host name.
Remote_Addr Refers to the client's IP address.
Server_Addr Refers to the server's IP address.
Request_Method Refers to the request method (for example, GET).
Request_Protocol Refers to the protocol name and version (for example, HTTP/1.1).
Request_URI Refers to the requested resource.
The SetEnvIf directive is used to disable HTTP keepalives, and to allow SSL to close the
connection without a closing notification from the client browser. This is necessary for certain web
browsers that do not reliably shut down the SSL connection.
Example 18.70. Using the SetEnvIf directive
SetEnvIf User-Agent ".*MSIE.*" \
nokeepalive ssl-unclean-shutdown \
downgrade-1.0 force-response-1.0
Note that for the /etc/httpd/conf.d/ssl.conf file to be present, the mod_ssl needs to be installed.
See Section 18.1.8, “Setting Up an SSL Server” for more information on how to install and configure an
SSL server.
18.1.5.3. Common Multi-Processing Module Directives
The Multi-Processing Module (MPM) directives allow you to customize the behavior of a particular MPM
specific server-pool. Since its characteristics differ depending on which MPM is used, the directives are
embedded in IfModule. By default, the server-pool is defined for both the prefork and worker
MPMs.
The following MPM directives are commonly used in /etc/httpd/conf/httpd.conf:
MaxClients
The MaxClients directive allows you to specify the maximum number of simultaneously connected
clients to process at one time. It takes the following form:
MaxClients number
A high number can improve the performance of the server, although it is not recommended to exceed
256 when using the prefork MPM.
Example 18.71. Using the MaxClients directive
Deployment Guide
404

MaxClients 256
MaxRequestsPerChild
The MaxRequestsPerChild directive allows you to specify the maximum number of request a child
process can serve before it dies. It takes the following form:
MaxRequestsPerChild number
Setting the number to 0 allows unlimited number of requests.
The MaxRequestsPerChild directive is used to prevent long-lived processes from causing memory
leaks.
Example 18.72. Using the MaxRequestsPerChild directive
MaxRequestsPerChild 4000
MaxSpareServers
The MaxSpareServers directive allows you to specify the maximum number of spare child
processes. It takes the following form:
MaxSpareServers number
This directive is used by the prefork MPM only.
Example 18.73. Using the MaxSpareServers directive
MaxSpareServers 20
MaxSpareThreads
The MaxSpareThreads directive allows you to specify the maximum number of spare server
threads. It takes the following form:
MaxSpareThreads number
The number must be greater than or equal to the sum of MinSpareThreads and
ThreadsPerChild. This directive is used by the worker MPM only.
Example 18.74. Using the MaxSpareThreads directive
MaxSpareThreads 75
MinSpareServers
CHAPTER 18. WEB SERVERS
405

The MinSpareServers directive allows you to specify the minimum number of spare child
processes. It takes the following form:
MinSpareServers number
Note that a high number can create a heavy processing load on the server. This directive is used by
the prefork MPM only.
Example 18.75. Using the MinSpareServers directive
MinSpareServers 5
MinSpareThreads
The MinSpareThreads directive allows you to specify the minimum number of spare server
threads. It takes the following form:
MinSpareThreads number
This directive is used by the worker MPM only.
Example 18.76. Using the MinSpareThreads directive
MinSpareThreads 75
StartServers
The StartServers directive allows you to specify the number of child processes to create when the
service is started. It takes the following form:
StartServers number
Since the child processes are dynamically created and terminated according to the current traffic
load, it is usually not necessary to change this value.
Example 18.77. Using the StartServers directive
StartServers 8
ThreadsPerChild
The ThreadsPerChild directive allows you to specify the number of threads a child process can
create. It takes the following form:
ThreadsPerChild number
This directive is used by the worker MPM only.
Deployment Guide
406

Example 18.78. Using the ThreadsPerChild directive
ThreadsPerChild 25
18.1.6. Working with Modules
Being a modular application, the httpd service is distributed along with a number of Dynamic Shared
Objects (DSOs), which can be dynamically loaded or unloaded at runtime as necessary. By default,
these modules are located in /usr/lib/httpd/modules/ on 32-bit and in
/usr/lib64/httpd/modules/ on 64-bit systems.
18.1.6.1. Loading a Module
To load a particular DSO module, use the LoadModule directive as described in Section 18.1.5.1,
“Common httpd.conf Directives”. Note that modules provided by a separate package often have their
own configuration file in the /etc/httpd/conf.d/ directory.
Example 18.79. Loading the mod_ssl DSO
LoadModule ssl_module modules/mod_ssl.so
Once you are finished, restart the web server to reload the configuration. See Section 18.1.4.3,
“Restarting the Service” for more information on how to restart the httpd service.
18.1.6.2. Writing a Module
If you intend to create a new DSO module, make sure you have the httpd-devel package installed. To do
so, enter the following command as root:
~]# yum install httpd-devel
This package contains the include files, the header files, and the APache eXtenSion (apxs) utility
required to compile a module.
Once written, you can build the module with the following command:
~]# apxs -i -a -c module_name.c
If the build was successful, you should be able to load the module the same way as any other module
that is distributed with the Apache HTTP Server.
18.1.7. Setting Up Virtual Hosts
The Apache HTTP Server's built in virtual hosting allows the server to provide different information based
on which IP address, host name, or port is being requested.
To create a name-based virtual host, find the virtual host container provided in
/etc/httpd/conf/httpd.conf as an example, remove the hash sign (that is, #) from the beginning
CHAPTER 18. WEB SERVERS
407

of each line, and customize the options according to your requirements as shown in Example 18.80,
“Example virtual host configuration”.
Example 18.80. Example virtual host configuration
NameVirtualHost *:80
<VirtualHost *:80>
ServerAdmin webmaster@penguin.example.com
DocumentRoot /www/docs/penguin.example.com
ServerName penguin.example.com
ServerAlias www.penguin.example.com
ErrorLog logs/penguin.example.com-error_log
CustomLog logs/penguin.example.com-access_log common
</VirtualHost>
Note that ServerName must be a valid DNS name assigned to the machine. The <VirtualHost>
container is highly customizable, and accepts most of the directives available within the main server
configuration. Directives that are not supported within this container include User and Group, which
were replaced by SuexecUserGroup.
NOTE
If you configure a virtual host to listen on a non-default port, make sure you update the
Listen directive in the global settings section of the /etc/httpd/conf/httpd.conf
file accordingly.
To activate a newly created virtual host, the web server has to be restarted first. See Section 18.1.4.3,
“Restarting the Service” for more information on how to restart the httpd service.
18.1.8. Setting Up an SSL Server
Secure Sockets Layer (SSL) is a cryptographic protocol that allows a server and a client to communicate
securely. Along with its extended and improved version called Transport Layer Security (TLS), it ensures
both privacy and data integrity. The Apache HTTP Server in combination with mod_ssl, a module that
uses the OpenSSL toolkit to provide the SSL/TLS support, is commonly referred to as the SSL server.
Red Hat Enterprise Linux also supports the use of Mozilla NSS as the TLS implementation. Support for
Mozilla NSS is provided by the mod_nss module.
Unlike an HTTP connection that can be read and possibly modified by anybody who is able to intercept
it, the use of SSL/TLS over HTTP, referred to as HTTPS, prevents any inspection or modification of the
transmitted content. This section provides basic information on how to enable this module in the Apache
HTTP Server configuration, and guides you through the process of generating private keys and self-
signed certificates.
18.1.8.1. An Overview of Certificates and Security
Secure communication is based on the use of keys. In conventional or symmetric cryptography, both
ends of the transaction have the same key they can use to decode each other's transmissions. On the
other hand, in public or asymmetric cryptography, two keys co-exist: a private key that is kept a secret,
Deployment Guide
408

and a public key that is usually shared with the public. While the data encoded with the public key can
only be decoded with the private key, data encoded with the private key can in turn only be decoded with
the public key.
To provide secure communications using SSL, an SSL server must use a digital certificate signed by a
Certificate Authority (CA). The certificate lists various attributes of the server (that is, the server host
name, the name of the company, its location, etc.), and the signature produced using the CA's private
key. This signature ensures that a particular certificate authority has signed the certificate, and that the
certificate has not been modified in any way.
When a web browser establishes a new SSL connection, it checks the certificate provided by the web
server. If the certificate does not have a signature from a trusted CA, or if the host name listed in the
certificate does not match the host name used to establish the connection, it refuses to communicate
with the server and usually presents a user with an appropriate error message.
By default, most web browsers are configured to trust a set of widely used certificate authorities.
Because of this, an appropriate CA should be chosen when setting up a secure server, so that target
users can trust the connection, otherwise they will be presented with an error message, and will have to
accept the certificate manually. Since encouraging users to override certificate errors can allow an
attacker to intercept the connection, you should use a trusted CA whenever possible. For more
information on this, see Table 18.22, “Information about CA lists used by common web browsers”.
Table 18.22. Information about CA lists used by common web browsers
Web Browser Link
Mozilla Firefox Mozilla root CA list.
Opera Information on root certificates used by Opera .
Internet Explorer Information on root certificates used by Microsoft Windows .
Chromium Information on root certificates used by the Chromium project .
When setting up an SSL server, you need to generate a certificate request and a private key, and then
send the certificate request, proof of the company's identity, and payment to a certificate authority. Once
the CA verifies the certificate request and your identity, it will send you a signed certificate you can use
with your server. Alternatively, you can create a self-signed certificate that does not contain a CA
signature, and thus should be used for testing purposes only.
18.1.9. Enabling the mod_ssl Module
If you intend to set up an SSL or HTTPS server using mod_ssl, you cannot have another application or
module, such as mod_nss configured to use the same port. Port 443 is the default port for HTTPS.
To set up an SSL server using the mod_ssl module and the OpenSSL toolkit, install the mod_ssl and
openssl packages. Enter the following command as root:
~]# yum install mod_ssl openssl
This will create the mod_ssl configuration file at /etc/httpd/conf.d/ssl.conf, which is included
in the main Apache HTTP Server configuration file by default. For the module to be loaded, restart the
httpd service as described in Section 18.1.4.3, “Restarting the Service”.
CHAPTER 18. WEB SERVERS
409

IMPORTANT
Due to the vulnerability described in POODLE: SSLv3 vulnerability (CVE-2014-3566),
Red Hat recommends disabling SSL, if it is enabled, and using only TLSv1.1 or
TLSv1.2. Backwards compatibility can be achieved using TLSv1.0. Many products
Red Hat supports have the ability to use SSLv2 or SSLv3 protocols. However, the use of
SSLv2 or SSLv3 is now strongly recommended against.
18.1.9.1. Enabling and Disabling SSL and TLS in mod_ssl
To disable and enable specific versions of the SSL and TLS protocol, either do it globally by adding the
SSLProtocol directive in the “## SSL Global Context” section of the configuration file and removing it
everywhere else, or edit the default entry under “# SSL Protocol support” in all “VirtualHost” sections. If
you do not specify it in the per-domain VirtualHost section then it will inherit the settings from the global
section. To make sure that a protocol version is being disabled the administrator should either only
specify SSLProtocol in the “SSL Global Context” section, or specify it in all per-domain VirtualHost
sections.
Note that in Red Hat Enterprise Linux 6.8 SSLv2 is disabled by default.
Procedure 18.1. Disable SSLv2 and SSLv3
To disable SSL version 2 and SSL version 3, which implies enabling everything except SSL version 2
and SSL version 3, in all VirtualHost sections, proceed as follows:
1. As root, open the /etc/httpd/conf.d/ssl.conf file and search for all instances of the
SSLProtocol directive. By default, the configuration file contains one section that looks as
follows:
~]# vi /etc/httpd/conf.d/ssl.conf
# SSL Protocol support:
# List the enable protocol levels with which clients will be able to
# connect. Disable SSLv2 access by default:
SSLProtocol all -SSLv2
This section is within the VirtualHost section.
2. Edit the SSLProtocol line as follows:
# SSL Protocol support:
# List the enable protocol levels with which clients will be able to
# connect. Disable SSLv2 access by default:
SSLProtocol all -SSLv2 -SSLv3
Repeat this action for all VirtualHost sections. Save and close the file.
3. Verify that all occurrences of the SSLProtocol directive have been changed as follows:
~]# grep SSLProtocol /etc/httpd/conf.d/ssl.conf
SSLProtocol all -SSLv2 -SSLv3
This step is particularly important if you have more than the one default VirtualHost section.
4. Restart the Apache daemon as follows:
Deployment Guide
410

~]# service httpd restart
Note that any sessions will be interrupted.
Procedure 18.2. Disable All SSL and TLS Protocols Except TLS 1 and Up
To disable all SSL and TLS protocol versions except TLS version 1 and higher, proceed as follows:
1. As root, open the /etc/httpd/conf.d/ssl.conf file and search for all instances of
SSLProtocol directive. By default the file contains one section that looks as follows:
~]# vi /etc/httpd/conf.d/ssl.conf
# SSL Protocol support:
# List the enable protocol levels with which clients will be able to
# connect. Disable SSLv2 access by default:
SSLProtocol all -SSLv2
2. Edit the SSLProtocol line as follows:
# SSL Protocol support:
# List the enable protocol levels with which clients will be able to
# connect. Disable SSLv2 access by default:
SSLProtocol -all +TLSv1 +TLSv1.1 +TLSv1.2
Save and close the file.
3. Verify the change as follows:
~]# grep SSLProtocol /etc/httpd/conf.d/ssl.conf
SSLProtocol -all +TLSv1 +TLSv1.1 +TLSv1.2
4. Restart the Apache daemon as follows:
~]# service httpd restart
Note that any sessions will be interrupted.
Procedure 18.3. Testing the Status of SSL and TLS Protocols
To check which versions of SSL and TLS are enabled or disabled, make use of the openssl
s_client -connect command. The command has the following form:
openssl s_client -connect hostname:port -protocol
Where port is the port to test and protocol is the protocol version to test for. To test the SSL server
running locally, use localhost as the host name. For example, to test the default port for secure
HTTPS connections, port 443 to see if SSLv3 is enabled, issue a command as follows:
1. ~]# openssl s_client -connect localhost:443 -ssl3
CONNECTED(00000003)
139809943877536:error:14094410:SSL routines:SSL3_READ_BYTES:sslv3
alert handshake failure:s3_pkt.c:1257:SSL alert number 40
139809943877536:error:1409E0E5:SSL routines:SSL3_WRITE_BYTES:ssl
CHAPTER 18. WEB SERVERS
411

handshake failure:s3_pkt.c:596:
output omitted
New, (NONE), Cipher is (NONE)
Secure Renegotiation IS NOT supported
Compression: NONE
Expansion: NONE
SSL-Session:
Protocol : SSLv3
output truncated
The above output indicates that the handshake failed and therefore no cipher was negotiated.
2. ~]$ openssl s_client -connect localhost:443 -tls1_2
CONNECTED(00000003)
depth=0 C = --, ST = SomeState, L = SomeCity, O = SomeOrganization,
OU = SomeOrganizationalUnit, CN = localhost.localdomain,
emailAddress = root@localhost.localdomain
output omitted
New, TLSv1/SSLv3, Cipher is ECDHE-RSA-AES256-GCM-SHA384
Server public key is 2048 bit
Secure Renegotiation IS supported
Compression: NONE
Expansion: NONE
SSL-Session:
Protocol : TLSv1.2
output truncated
The above output indicates that no failure of the handshake occurred and a set of ciphers was
negotiated.
The openssl s_client command options are documented in the s_client(1) manual page.
For more information on the SSLv3 vulnerability and how to test for it, see the Red Hat Knowledgebase
article POODLE: SSLv3 vulnerability (CVE-2014-3566).
18.1.10. Enabling the mod_nss Module
If you intend to set up an HTTPS server using mod_nss, the HTTPS server cannot simultaneously use
mod_ssl with its default settings as mod_ssl will use port 443 by default, however this is the default
HTTPS port. If is recommend to remove the package if it is not required.
To remove mod_ssl, enter the following command as root:
~]# yum remove mod_ssl
Deployment Guide
412

NOTE
If mod_ssl is required for other purposes, modify the /etc/httpd/conf.d/ssl.conf
file to use a port other than 443 to prevent mod_ssl conflicting with mod_nss when its
port to listen on is changed to 443.
For a specific VirtualHost where HTTPS is required, mod_nss and mod_ssl can only co-
exist at the same time if they use unique ports. For this reason mod_nss by default uses
8443, but the default port for HTTPS is port 443. The port is specified by the Listen
directive as well as in the VirtualHost name or address.
Everything in NSS is associated with a “token”. The software token exists in the NSS database but you
can also have a physical token containing certificates. With OpenSSL, discrete certificates and private
keys are held in PEM files. With NSS, these are stored in a database. Each certificate and key is
associated with a token and each token can have a password protecting it. This password is optional,
but if a password is used then the Apache HTTP server needs a copy of it in order to open the database
without user intervention at system start.
Procedure 18.4. Configuring mod_nss
1. Install mod_nss as root:
~]# yum install mod_nss
This will create the mod_nss configuration file at /etc/httpd/conf.d/nss.conf. The
/etc/httpd/conf.d/ directory is included in the main Apache HTTP Server configuration file
by default. For the module to be loaded, restart the httpd service as described in
Section 18.1.4.3, “Restarting the Service”.
2. As root, open the /etc/httpd/conf.d/nss.conf file and search for all instances of the
Listen directive.
Edit the Listen 8443 line as follows:
Listen 443
Port 443 is the default port for HTTPS.
3. Edit the default VirtualHost _default_:8443 line as follows:
VirtualHost _default_:443
Edit any other non-default virtual host sections if they exist. Save and close the file.
4. Mozilla NSS stores certificates in a server certificate database indicated by the
NSSCertificateDatabase directive in the /etc/httpd/conf.d/nss.conf file. By default
the path is set to /etc/httpd/alias, the NSS database created during installation.
To view the default NSS database, issue a command as follows:
~]# certutil -L -d /etc/httpd/alias
Certificate Nickname Trust
Attributes
CHAPTER 18. WEB SERVERS
413

SSL,S/MIME,JAR/XPI
cacert
CTu,Cu,Cu
Server-Cert
u,u,u
alpha
u,pu,u
In the above command output, Server-Cert is the default NSSNickname. The -L option lists
all the certificates, or displays information about a named certificate, in a certificate database.
The -d option specifies the database directory containing the certificate and key database files.
See the certutil(1) man page for more command line options.
5. To configure mod_nss to use another database, edit the NSSCertificateDatabase line in
the /etc/httpd/conf.d/nss.conf file. The default file has the following lines within the
VirtualHost section.
# Server Certificate Database:
# The NSS security database directory that holds the certificates
and
# keys. The database consists of 3 files: cert8.db, key3.db and
secmod.db.
# Provide the directory that these files exist.
NSSCertificateDatabase /etc/httpd/alias
In the above command output, alias is the default NSS database directory,
/etc/httpd/alias/.
6. To apply a password to the default NSS certificate database, use the following command as
root:
~]# certutil -W -d /etc/httpd/alias
Enter Password or Pin for "NSS Certificate DB":
Enter a password which will be used to encrypt your keys.
The password should be at least 8 characters long,
and should contain at least one non-alphabetic character.
Enter new password:
Re-enter password:
Password changed successfully.
7. Before deploying the HTTPS server, create a new certificate database using a certificate signed
by a certificate authority (CA).
Example 18.81. Adding a Certificate to the Mozilla NSS database
The certutil command is used to add a CA certificate to the NSS database files:
certutil -d /etc/httpd/nss-db-directory/ -A -n "CA_certificate" -
t CT,, -a -i certificate.pem
The above command adds a CA certificate stored in a PEM-formatted file named
Deployment Guide
414

certificate.pem. The -d option specifies the NSS database directory containing the certificate
and key database files, the -n option sets a name for the certificate, -t CT,, means that the
certificate is trusted to be used in TLS clients and servers. The -A option adds an existing
certificate to a certificate database. If the database does not exist it will be created. The -a
option allows the use of ASCII format for input or output, and the -i option passes the
certificate.pem input file to the command.
See the certutil(1) man page for more command line options.
8. The NSS database should be password protected to safeguard the private key.
Example 18.82. Setting_a_Password_for_a_Mozilla_NSS_database
The certutil tool can be used to set a password for an NSS database as follows:
certutil -W -d /etc/httpd/nss-db-directory/
For example, for the default database, issue a command as root as follows:
~]# certutil -W -d /etc/httpd/alias
Enter Password or Pin for "NSS Certificate DB":
Enter a password which will be used to encrypt your keys.
The password should be at least 8 characters long,
and should contain at least one non-alphabetic character.
Enter new password:
Re-enter password:
Password changed successfully.
9. Configure mod_nss to use the NSS internal software token by changing the line with the
NSSPassPhraseDialog directive as follows:
~]# vi /etc/httpd/conf.d/nss.conf
NSSPassPhraseDialog file:/etc/httpd/password.conf
This is to avoid manual password entry on system start. The software token exists in the NSS
database but you can also have a physical token containing your certificates.
10. If the SSL Server Certificate contained in the NSS database is an RSA certificate, make certain
that the NSSNickname parameter is uncommented and matches the nickname displayed in step
4 above:
~]# vi /etc/httpd/conf.d/nss.conf
NSSNickname Server-Cert
If the SSL Server Certificate contained in the NSS database is an ECC certificate, make certain
that the NSSECCNickname parameter is uncommented and matches the nickname displayed in
step 4 above:
~]# vi /etc/httpd/conf.d/nss.conf
NSSECCNickname Server-Cert
CHAPTER 18. WEB SERVERS
415

Make certain that the NSSCertificateDatabase parameter is uncommented and points to
the NSS database directory displayed in step 4 or configured in step 5 above:
~]# vi /etc/httpd/conf.d/nss.conf
NSSCertificateDatabase /etc/httpd/alias
Replace /etc/httpd/alias with the path to the certificate database to be used.
11. Create the /etc/httpd/password.conf file as root:
~]# vi /etc/httpd/password.conf
Add a line with the following form:
internal:password
Replacing password with the password that was applied to the NSS security databases in step 6
above.
12. Apply the appropriate ownership and permissions to the /etc/httpd/password.conf file:
~]# chgrp apache /etc/httpd/password.conf
~]# chmod 640 /etc/httpd/password.conf
~]# ls -l /etc/httpd/password.conf
-rw-r-----. 1 root apache 10 Dec 4 17:13 /etc/httpd/password.conf
13. To configure mod_nss to use the NSS the software token in /etc/httpd/password.conf,
edit /etc/httpd/conf.d/nss.conf as follows:
~]# vi /etc/httpd/conf.d/nss.conf
14. Restart the Apache server for the changes to take effect as described in Section 18.1.4.3,
“Restarting the Service”
IMPORTANT
Due to the vulnerability described in POODLE: SSLv3 vulnerability (CVE-2014-3566),
Red Hat recommends disabling SSL, if it is enabled, and using only TLSv1.1 or
TLSv1.2. Backwards compatibility can be achieved using TLSv1.0. Many products
Red Hat supports have the ability to use SSLv2 or SSLv3 protocols. However, the use of
SSLv2 or SSLv3 is now strongly recommended against.
18.1.10.1. Enabling and Disabling SSL and TLS in mod_nss
To disable and enable specific versions of the SSL and TLS protocol, either do it globally by adding the
NSSProtocol directive in the “## SSL Global Context” section of the configuration file and removing it
everywhere else, or edit the default entry under “# SSL Protocol” in all “VirtualHost” sections. If you do
not specify it in the per-domain VirtualHost section then it will inherit the settings from the global section.
To make sure that a protocol version is being disabled the administrator should either only specify
NSSProtocol in the “SSL Global Context” section, or specify it in all per-domain VirtualHost sections.
Note that in Red Hat Enterprise Linux 6.8 SSLv2 is disabled by default.
Deployment Guide
416

Procedure 18.5. Disable All SSL and TLS Protocols Except TLS 1 and Up in mod_nss
To disable all SSL and TLS protocol versions except TLS version 1 and higher, proceed as follows:
1. As root, open the /etc/httpd/conf.d/nss.conf file and search for all instances of the
NSSProtocol directive. By default, the configuration file contains one section that looks as
follows:
~]# vi /etc/httpd/conf.d/nss.conf
# SSL Protocol:
output omitted
# Since all protocol ranges are completely inclusive, and no
protocol in the
# middle of a range may be excluded, the entry "NSSProtocol
SSLv3,TLSv1.1"
# is identical to the entry "NSSProtocol SSLv3,TLSv1.0,TLSv1.1".
NSSProtocol TLSv1.0,TLSv1.1,TLSv1.2
This section is within the VirtualHost section.
2. Edit the NSSProtocol line as follows:
# SSL Protocol:
NSSProtocol TLSv1.0,TLSv1.1,TLSv1.2
Repeat this action for all VirtualHost sections.
3. Edit the Listen 8443 line as follows:
Listen 443
4. Edit the default VirtualHost _default_:8443 line as follows:
VirtualHost _default_:443
Edit any other non-default virtual host sections if they exist. Save and close the file.
5. Verify that all occurrences of the NSSProtocol directive have been changed as follows:
~]# grep NSSProtocol /etc/httpd/conf.d/nss.conf
# middle of a range may be excluded, the entry "NSSProtocol
SSLv3,TLSv1.1"
# is identical to the entry "NSSProtocol SSLv3,TLSv1.0,TLSv1.1".
NSSProtocol TLSv1.0,TLSv1.1,TLSv1.2
This step is particularly important if you have more than one VirtualHost section.
6. Restart the Apache daemon as follows:
~]# service httpd restart
Note that any sessions will be interrupted.
Procedure 18.6. Testing the Status of SSL and TLS Protocols in mod_nss
CHAPTER 18. WEB SERVERS
417

To check which versions of SSL and TLS are enabled or disabled in mod_nss, make use of the
openssl s_client -connect command. Install the openssl package as root:
~]# yum install openssl
The openssl s_client -connect command has the following form:
openssl s_client -connect hostname:port -protocol
Where port is the port to test and protocol is the protocol version to test for. To test the SSL server
running locally, use localhost as the host name. For example, to test the default port for secure
HTTPS connections, port 443 to see if SSLv3 is enabled, issue a command as follows:
1. ~]# openssl s_client -connect localhost:443 -ssl3
CONNECTED(00000003)
3077773036:error:1408F10B:SSL routines:SSL3_GET_RECORD:wrong version
number:s3_pkt.c:337:
output omitted
New, (NONE), Cipher is (NONE)
Secure Renegotiation IS NOT supported
Compression: NONE
Expansion: NONE
SSL-Session:
Protocol : SSLv3
output truncated
The above output indicates that the handshake failed and therefore no cipher was negotiated.
2. ~]$ openssl s_client -connect localhost:443 -tls1_2
CONNECTED(00000003)
depth=1 C = US, O = example.com, CN = Certificate Shack
output omitted
New, TLSv1/SSLv3, Cipher is AES256-SHA
Server public key is 1024 bit
Secure Renegotiation IS supported
Compression: NONE
Expansion: NONE
SSL-Session:
Protocol : TLSv1.2
Cipher : AES256-SHA
output truncated
The above output indicates that no failure of the handshake occurred and a set of ciphers was
negotiated.
The openssl s_client command options are documented in the s_client(1) manual page.
For more information on the SSLv3 vulnerability and how to test for it, see the Red Hat Knowledgebase
article POODLE: SSLv3 vulnerability (CVE-2014-3566).
18.1.11. Using an Existing Key and Certificate
If you have a previously created key and certificate, you can configure the SSL server to use these files
instead of generating new ones. There are only two situations where this is not possible:
Deployment Guide
418

1. You are changing the IP address or domain name.
Certificates are issued for a particular IP address and domain name pair. If one of these values
changes, the certificate becomes invalid.
2. You have a certificate from VeriSign, and you are changing the server software.
VeriSign, a widely used certificate authority, issues certificates for a particular software product,
IP address, and domain name. Changing the software product renders the certificate invalid.
In either of the above cases, you will need to obtain a new certificate. For more information on this topic,
see Section 18.1.12, “Generating a New Key and Certificate”.
If you want to use an existing key and certificate, move the relevant files to the
/etc/pki/tls/private/ and /etc/pki/tls/certs/ directories respectively. You can do so by
issuing the following commands as root:
~]# mv key_file.key /etc/pki/tls/private/hostname.key
~]# mv certificate.crt /etc/pki/tls/certs/hostname.crt
Then add the following lines to the /etc/httpd/conf.d/ssl.conf configuration file:
SSLCertificateFile /etc/pki/tls/certs/hostname.crt
SSLCertificateKeyFile /etc/pki/tls/private/hostname.key
To load the updated configuration, restart the httpd service as described in Section 18.1.4.3,
“Restarting the Service”.
Example 18.83. Using a key and certificate from the Red Hat Secure Web Server
~]# mv /etc/httpd/conf/httpsd.key
/etc/pki/tls/private/penguin.example.com.key
~]# mv /etc/httpd/conf/httpsd.crt
/etc/pki/tls/certs/penguin.example.com.crt
18.1.12. Generating a New Key and Certificate
In order to generate a new key and certificate pair, the crypto-utils package must be installed on the
system. In Red Hat Enterprise Linux 6, the mod_ssl package is required by the genkey utility. To install
these, enter the following command as root:
~]# yum install crypto-utils mod_ssl
This package provides a set of tools to generate and manage SSL certificates and private keys, and
includes genkey, the Red Hat Keypair Generation utility that will guide you through the key generation
process.
CHAPTER 18. WEB SERVERS
419
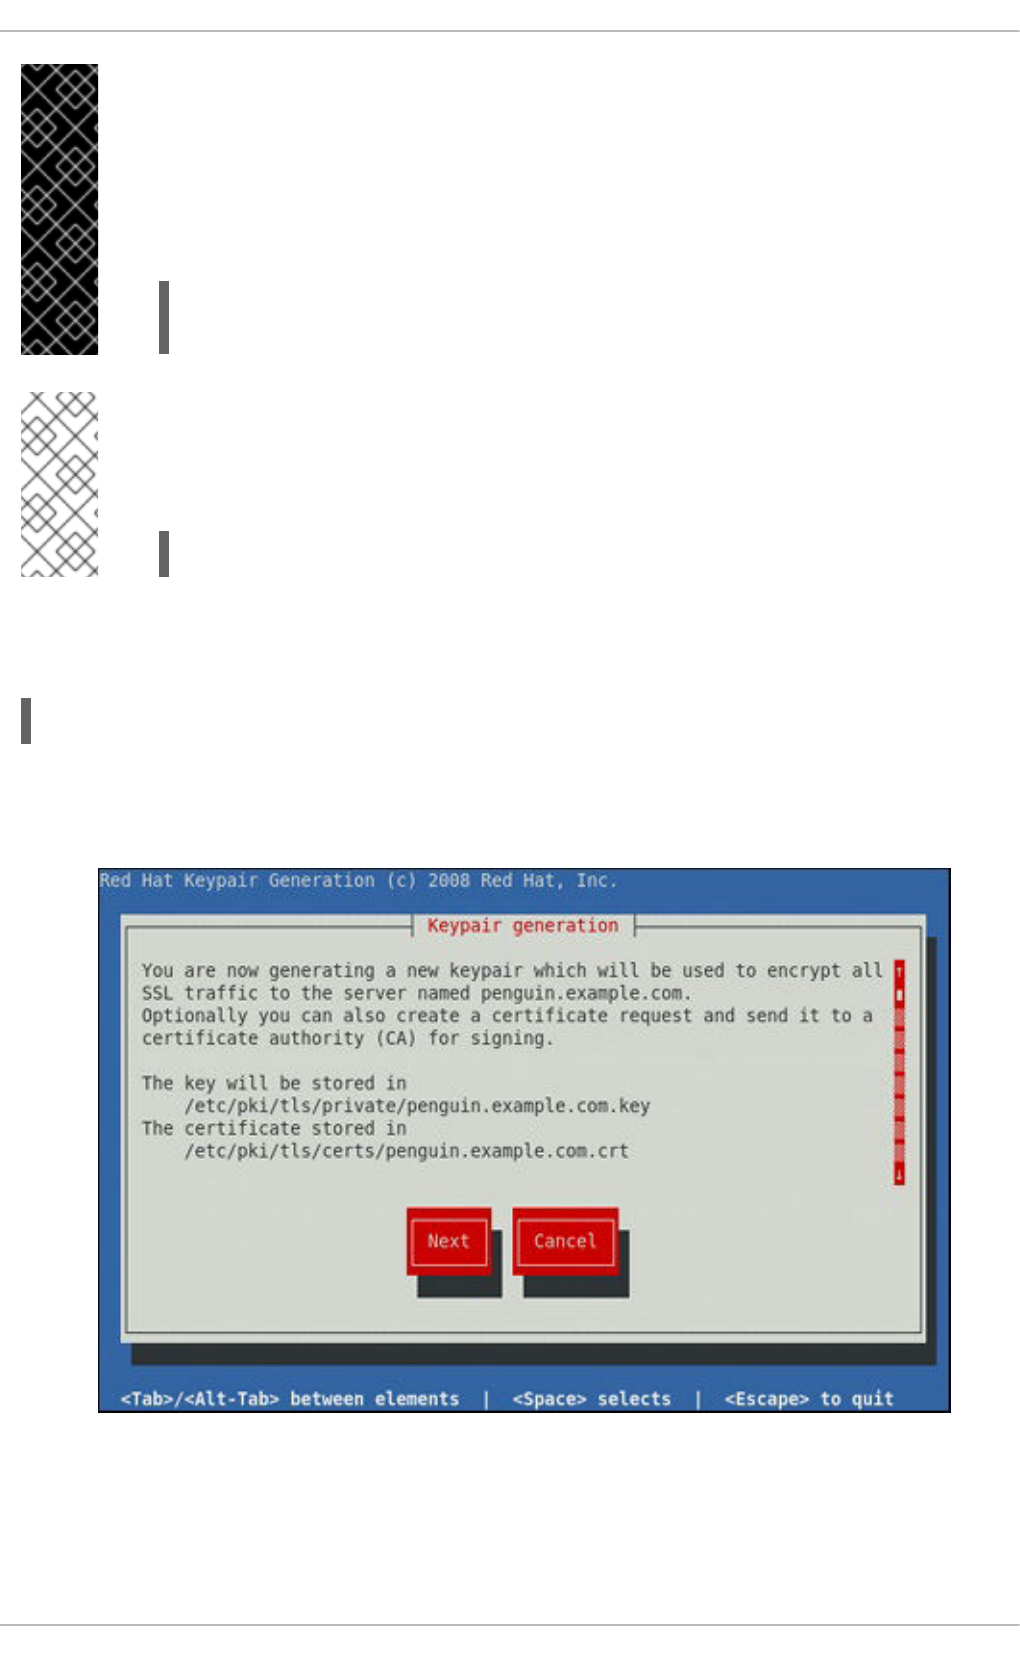
IMPORTANT
If the server already has a valid certificate and you are replacing it with a new one, specify
a different serial number. This ensures that client browsers are notified of this change,
update to this new certificate as expected, and do not fail to access the page. To create a
new certificate with a custom serial number, use the following command instead of
genkey:
~]# openssl req -x509 -new -set_serial number -key hostname.key
-out hostname.crt
NOTE
If there already is a key file for a particular host name in your system, genkey will refuse
to start. In this case, remove the existing file using the following command as root:
~]# rm /etc/pki/tls/private/hostname.key
To run the utility enter the genkey command as root, followed by the appropriate host name (for
example, penguin.example.com):
~]# genkey hostname
To complete the key and certificate creation, take the following steps:
1. Review the target locations in which the key and certificate will be stored.
Figure 18.1. Running the genkey utility
Use the Tab key to select the Next button, and press Enter to proceed to the next screen.
Deployment Guide
420
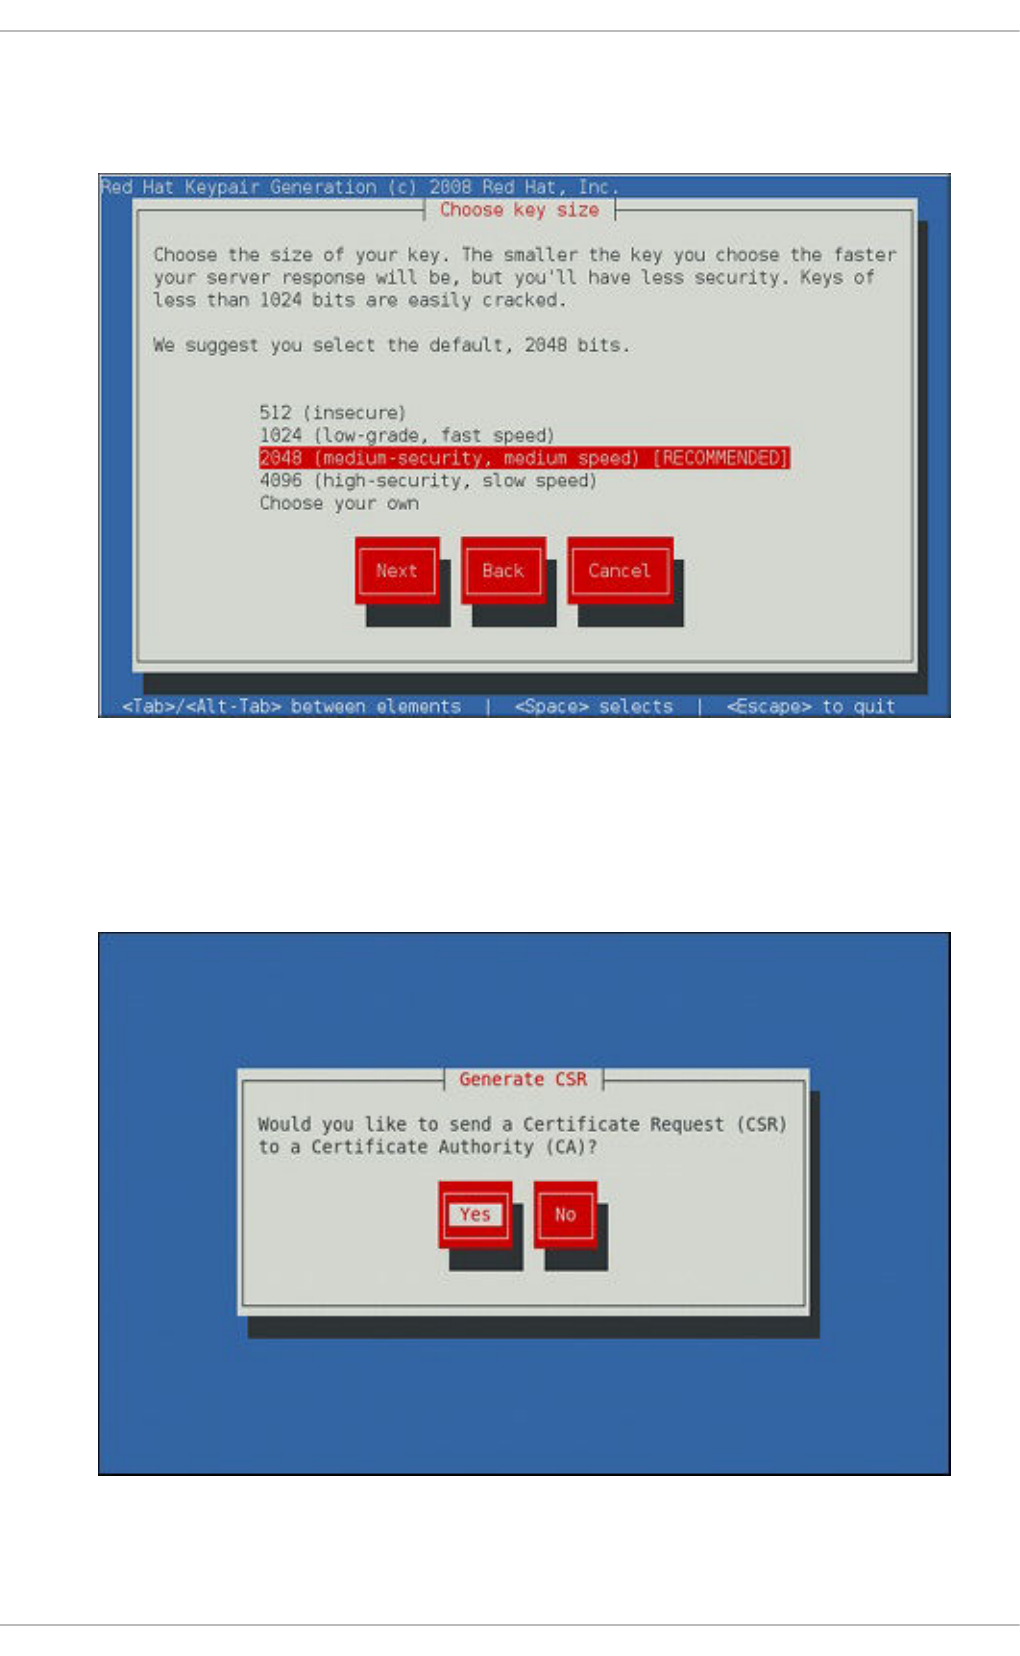
2. Using the up and down arrow keys, select a suitable key size. Note that while a larger key
increases the security, it also increases the response time of your server. The NIST
recommends using 2048 bits. See NIST Special Publication 800-131A.
Figure 18.2. Selecting the key size
Once finished, use the Tab key to select the Next button, and press Enter to initiate the
random bits generation process. Depending on the selected key size, this may take some time.
3. Decide whether you want to send a certificate request to a certificate authority.
Figure 18.3. Generating a certificate request
CHAPTER 18. WEB SERVERS
421
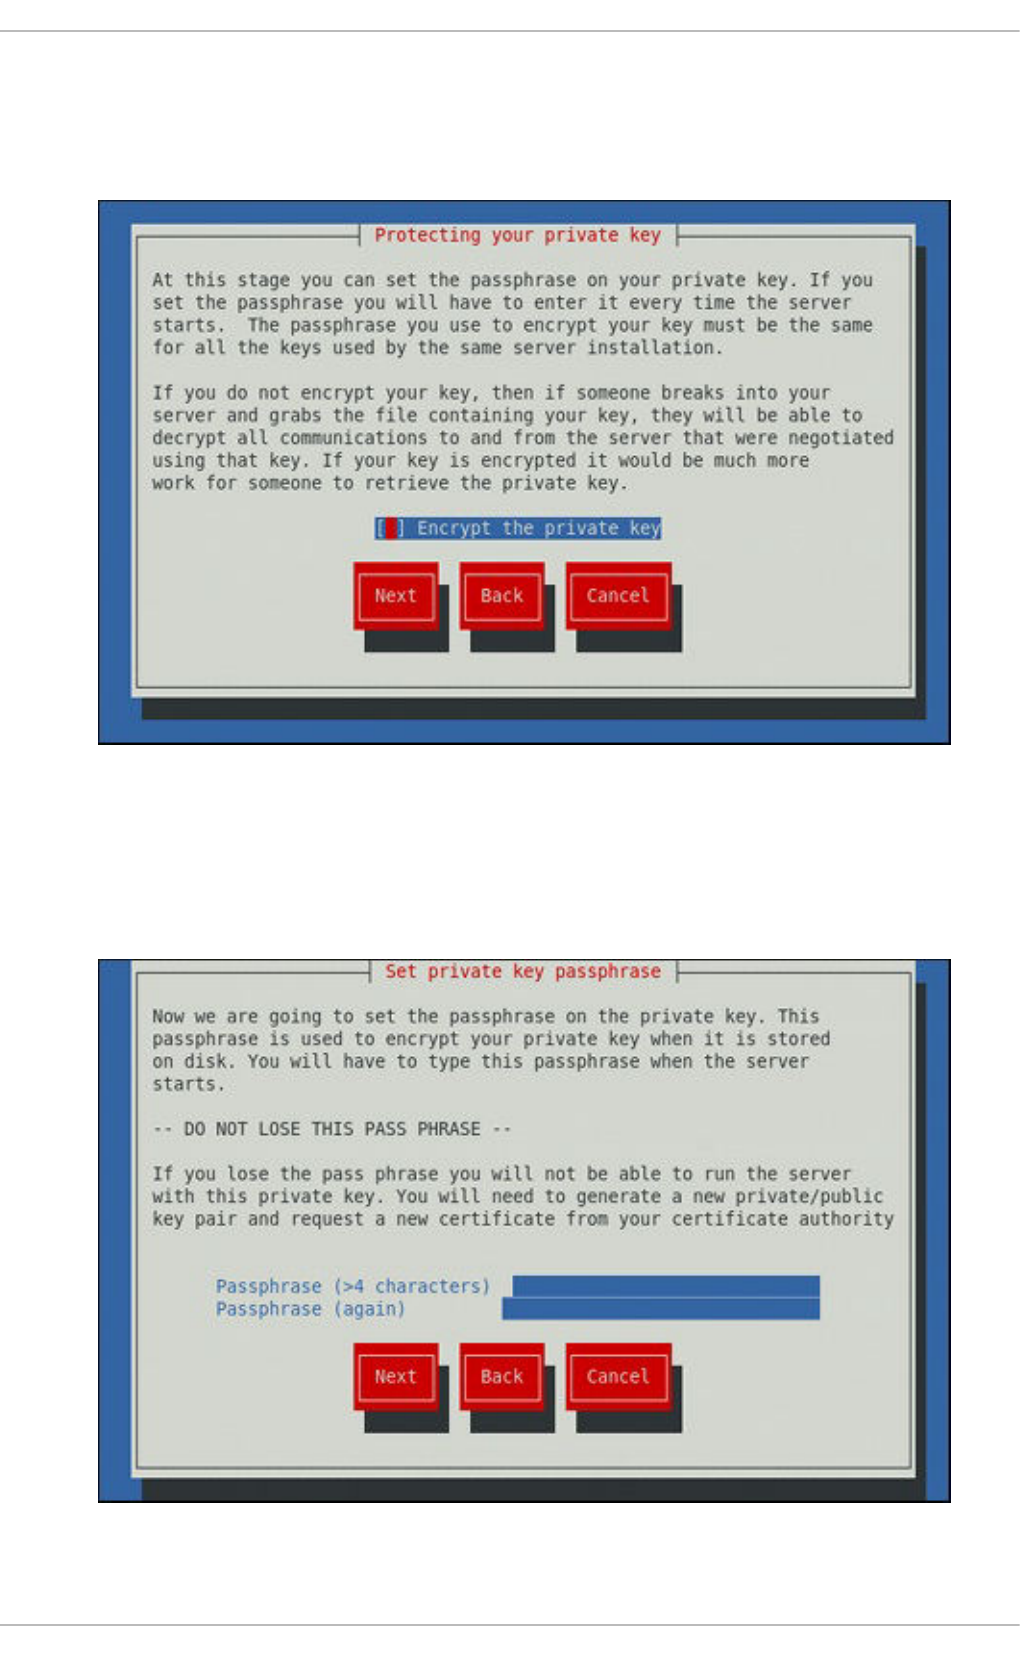
Use the Tab key to select Yes to compose a certificate request, or No to generate a self-signed
certificate. Then press Enter to confirm your choice.
4. Using the Spacebar key, enable ([*]) or disable ([ ]) the encryption of the private key.
Figure 18.4. Encrypting the private key
Use the Tab key to select the Next button, and press Enter to proceed to the next screen.
5. If you have enabled the private key encryption, enter an adequate passphrase. Note that for
security reasons, it is not displayed as you type, and it must be at least five characters long.
Figure 18.5. Entering a passphrase
Deployment Guide
422
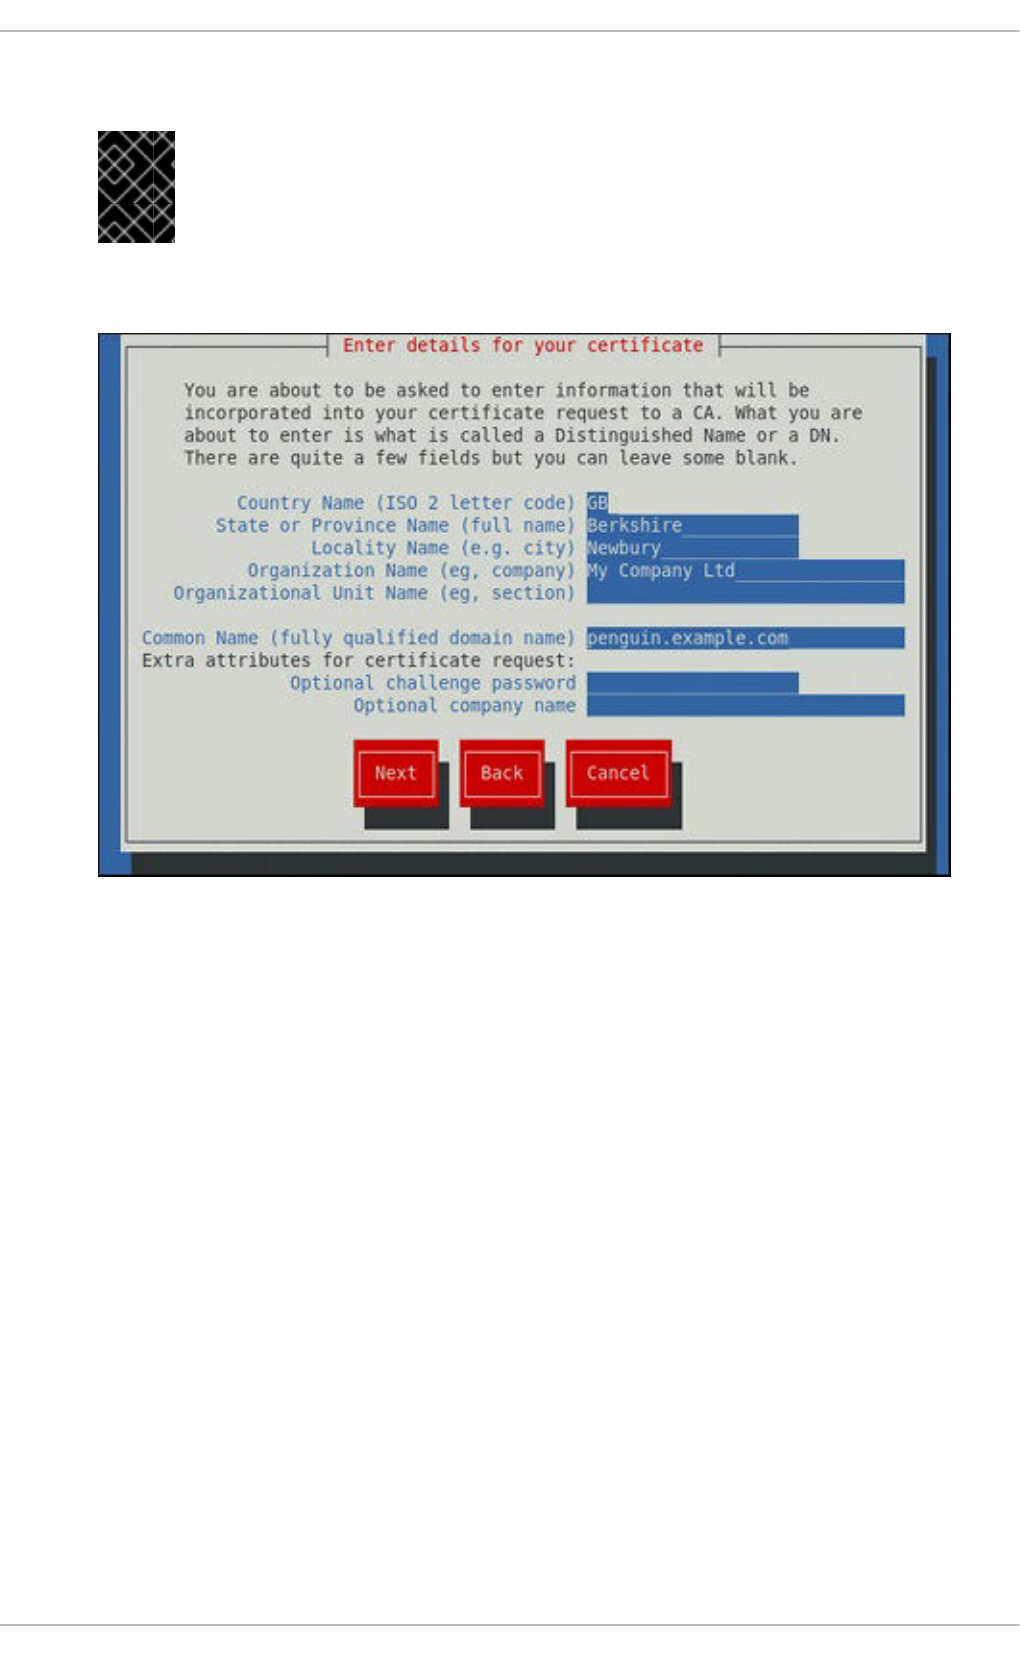
Use the Tab key to select the Next button, and press Enter to proceed to the next screen.
IMPORTANT
Entering the correct passphrase is required in order for the server to start. If you
lose it, you will need to generate a new key and certificate.
6. Customize the certificate details.
Figure 18.6. Specifying certificate information
Use the Tab key to select the Next button, and press Enter to finish the key generation.
7. If you have previously enabled the certificate request generation, you will be prompted to send it
to a certificate authority.
CHAPTER 18. WEB SERVERS
423

Figure 18.7. Instructions on how to send a certificate request
Press Enter to return to a shell prompt.
Once generated, add the key and certificate locations to the /etc/httpd/conf.d/ssl.conf
configuration file:
SSLCertificateFile /etc/pki/tls/certs/hostname.crt
SSLCertificateKeyFile /etc/pki/tls/private/hostname.key
Finally, restart the httpd service as described in Section 18.1.4.3, “Restarting the Service”, so that the
updated configuration is loaded.
18.1.13. Configure the Firewall for HTTP and HTTPS Using the Command Line
Red Hat Enterprise Linux does not allow HTTP and HTTPS traffic by default. To enable the system to act
as a web server, enable ports and protocols as required. The default port for HTTP is 80 and the default
port for HTTPS is 443. In both cases the TCP should be allowed to pass through the firewall.
To enable port 80 for HTTP using the command line, issue the following command as root:
~]# lokkit --port=80:tcp --update
Note that this will restart the firewall as long as it has not been disabled with the --disabled option.
Active connections will be terminated and time out on the initiating machine. Use the lokkit --help
command to view the built in help.
To enable port 443 for HTTPS using the command line, issue the following command as root:
~]# lokkit --port=443:tcp --update
Deployment Guide
424

Note that this will restart the firewall as long as it has not been disabled with the --disabled option.
Active connections will be terminated and time out on the initiating machine. See the /etc/services
file for list of services and their associated ports.
When preparing a configuration file for multiple installations using administration tools, it is useful to edit
the firewall configuration file directly. Note that any mistakes in the configuration file could have
unexpected consequences, cause an error, and prevent the firewall settings from being applied.
Therefore, check the /etc/sysconfig/system-config-firewall file thoroughly after editing. To
apply the settings in /etc/sysconfig/system-config-firewall, issue the following command as
root:
~]# lokkit --update
For example, to enable HTTPS to pass through the firewall, by editing the configuration file, become the
root user and add the following line to /etc/sysconfig/system-config-firewall:
--port=443:tcp
Note that these changes will not take effect even if the firewall is reloaded or the system rebooted. To
apply the changes in /etc/sysconfig/system-config-firewall, issue the following command
as root:
~]# lokkit --update
18.1.13.1. Checking Network Access for Incoming HTTPS and HTTPS Using the
Command Line
To check what the firewall is configured to allow, using the command line, issue the following command
as root:
~]# less /etc/sysconfig/system-config-firewall
# Configuration file for system-config-firewall
--enabled
--service=ssh
In this example taken from a default installation, the firewall is enabled but HTTP and HTTPS have not
been allowed to pass through.
Once the default port for HTTP is enabled, the following line appears as output in addition to the lines
shown above:
--port=80:tcp
To check if the firewall is currently allowing incoming HTTP traffic for clients, issue the following
command as root:
~]# iptables -L -n | grep 'tcp.*80'
ACCEPT tcp -- 0.0.0.0/0 0.0.0.0/0 state NEW
tcp dpt:80
Once the default port for HTTPS is enabled, the following line appears as output in addition to the lines
shown above:
CHAPTER 18. WEB SERVERS
425

--port=443:tcp
To check if the firewall is currently allowing incoming HTTPS traffic for clients, issue the following
command as root:
~]# iptables -L -n | grep 'tcp.*443'
ACCEPT tcp -- 0.0.0.0/0 0.0.0.0/0 state NEW
tcp dpt:443
18.1.14. Additional Resources
To learn more about the Apache HTTP Server, see the following resources.
Installed Documentation
httpd(8) — The manual page for the httpd service containing the complete list of its
command-line options.
genkey(1) — The manual page for genkey utility, provided by the crypto-utils package.
Installable Documentation
http://localhost/manual/ — The official documentation for the Apache HTTP Server with the full
description of its directives and available modules. Note that in order to access this
documentation, you must have the httpd-manual package installed, and the web server must be
running.
Before accessing the documentation, issue the following commands as root:
~]# yum install httpd-manual
~]# service httpd graceful
Online Documentation
http://httpd.apache.org/ — The official website for the Apache HTTP Server with documentation
on all the directives and default modules.
http://www.openssl.org/ — The OpenSSL home page containing further documentation,
frequently asked questions, links to the mailing lists, and other useful resources.
Deployment Guide
426

CHAPTER 19. MAIL SERVERS
Red Hat Enterprise Linux offers many advanced applications to serve and access email. This chapter
describes modern email protocols in use today, and some of the programs designed to send and receive
email.
19.1. EMAIL PROTOCOLS
Today, email is delivered using a client/server architecture. An email message is created using a mail
client program. This program then sends the message to a server. The server then forwards the
message to the recipient's email server, where the message is then supplied to the recipient's email
client.
To enable this process, a variety of standard network protocols allow different machines, often running
different operating systems and using different email programs, to send and receive email.
The following protocols discussed are the most commonly used in the transfer of email.
19.1.1. Mail Transport Protocols
Mail delivery from a client application to the server, and from an originating server to the destination
server, is handled by the Simple Mail Transfer Protocol (SMTP).
19.1.1.1. SMTP
The primary purpose of SMTP is to transfer email between mail servers. However, it is critical for email
clients as well. To send email, the client sends the message to an outgoing mail server, which in turn
contacts the destination mail server for delivery. For this reason, it is necessary to specify an SMTP
server when configuring an email client.
Under Red Hat Enterprise Linux, a user can configure an SMTP server on the local machine to handle
mail delivery. However, it is also possible to configure remote SMTP servers for outgoing mail.
One important point to make about the SMTP protocol is that it does not require authentication. This
allows anyone on the Internet to send email to anyone else or even to large groups of people. It is this
characteristic of SMTP that makes junk email or spam possible. Imposing relay restrictions limits random
users on the Internet from sending email through your SMTP server, to other servers on the internet.
Servers that do not impose such restrictions are called open relay servers.
Red Hat Enterprise Linux provides the Postfix and Sendmail SMTP programs.
19.1.2. Mail Access Protocols
There are two primary protocols used by email client applications to retrieve email from mail servers: the
Post Office Protocol (POP) and the Internet Message Access Protocol (IMAP).
19.1.2.1. POP
The default POP server under Red Hat Enterprise Linux is Dovecot and is provided by the dovecot
package.
CHAPTER 19. MAIL SERVERS
427

NOTE
In order to use Dovecot, first ensure the dovecot package is installed on your system by
running, as root:
~]# yum install dovecot
For more information on installing packages with Yum, see Section 8.2.4, “Installing
Packages”.
When using a POP server, email messages are downloaded by email client applications. By default, most
POP email clients are automatically configured to delete the message on the email server after it has
been successfully transferred, however this setting usually can be changed.
POP is fully compatible with important Internet messaging standards, such as Multipurpose Internet Mail
Extensions (MIME), which allow for email attachments.
POP works best for users who have one system on which to read email. It also works well for users who
do not have a persistent connection to the Internet or the network containing the mail server.
Unfortunately for those with slow network connections, POP requires client programs upon authentication
to download the entire content of each message. This can take a long time if any messages have large
attachments.
The most current version of the standard POP protocol is POP3.
There are, however, a variety of lesser-used POP protocol variants:
APOP — POP3 with MD5 authentication. An encoded hash of the user's password is sent from
the email client to the server rather than sending an unencrypted password.
KPOP — POP3 with Kerberos authentication.
RPOP — POP3 with RPOP authentication. This uses a per-user ID, similar to a password, to
authenticate POP requests. However, this ID is not encrypted, so RPOP is no more secure than
standard POP.
For added security, it is possible to use Secure Socket Layer (SSL) encryption for client authentication
and data transfer sessions. This can be enabled by using the pop3s service, or by using the stunnel
application. For more information on securing email communication, see Section 19.5.1, “Securing
Communication”.
19.1.2.2. IMAP
The default IMAP server under Red Hat Enterprise Linux is Dovecot and is provided by the dovecot
package. See Section 19.1.2.1, “POP” for information on how to install Dovecot.
When using an IMAP mail server, email messages remain on the server where users can read or delete
them. IMAP also allows client applications to create, rename, or delete mail directories on the server to
organize and store email.
IMAP is particularly useful for users who access their email using multiple machines. The protocol is also
convenient for users connecting to the mail server via a slow connection, because only the email header
information is downloaded for messages until opened, saving bandwidth. The user also has the ability to
delete messages without viewing or downloading them.
Deployment Guide
428

For convenience, IMAP client applications are capable of caching copies of messages locally, so the
user can browse previously read messages when not directly connected to the IMAP server.
IMAP, like POP, is fully compatible with important Internet messaging standards, such as MIME, which
allow for email attachments.
For added security, it is possible to use SSL encryption for client authentication and data transfer
sessions. This can be enabled by using the imaps service, or by using the stunnel program. For more
information on securing email communication, see Section 19.5.1, “Securing Communication”.
Other free, as well as commercial, IMAP clients and servers are available, many of which extend the
IMAP protocol and provide additional functionality.
19.1.2.3. Dovecot
The imap-login and pop3-login processes which implement the IMAP and POP3 protocols are
spawned by the master dovecot daemon included in the dovecot package. The use of IMAP and POP is
configured through the /etc/dovecot/dovecot.conf configuration file; by default dovecot runs
IMAP and POP3 together with their secure versions using SSL. To configure dovecot to use POP,
complete the following steps:
1. Edit the /etc/dovecot/dovecot.conf configuration file to make sure the protocols
variable is uncommented (remove the hash sign (#) at the beginning of the line) and contains the
pop3 argument. For example:
protocols = imap pop3 lmtp
When the protocols variable is left commented out, dovecot will use the default values as
described above.
2. Make the change operational for the current session by running the following command:
~]# service dovecot restart
3. Make the change operational after the next reboot by running the command:
~]# chkconfig dovecot on
NOTE
Please note that dovecot only reports that it started the IMAP server, but also
starts the POP3 server.
Unlike SMTP, both IMAP and POP3 require connecting clients to authenticate using a user name and
password. By default, passwords for both protocols are passed over the network unencrypted.
To configure SSL on dovecot:
Edit the /etc/dovecot/conf.d/10-ssl.conf configuration to make sure the
ssl_cipher_list variable is uncommented, and append :!SSLv3:
ssl_cipher_list = ALL:!LOW:!SSLv2:!EXP:!aNULL:!SSLv3
CHAPTER 19. MAIL SERVERS
429

These values ensure that dovecot avoids SSL versions 2 and also 3, which are both known to
be insecure. This is due to the vulnerability described in POODLE: SSLv3 vulnerability (CVE-
2014-3566). See Resolution for POODLE SSL 3.0 vulnerability (CVE-2014-3566) in Postfix and
Dovecot for details.
Edit the /etc/pki/dovecot/dovecot-openssl.cnf configuration file as you prefer.
However, in a typical installation, this file does not require modification.
Rename, move or delete the files /etc/pki/dovecot/certs/dovecot.pem and
/etc/pki/dovecot/private/dovecot.pem.
Execute the /usr/libexec/dovecot/mkcert.sh script which creates the dovecot self
signed certificates. These certificates are copied in the /etc/pki/dovecot/certs and
/etc/pki/dovecot/private directories. To implement the changes, restart dovecot:
~]# service dovecot restart
More details on dovecot can be found online at http://www.dovecot.org.
19.2. EMAIL PROGRAM CLASSIFICATIONS
In general, all email applications fall into at least one of three classifications. Each classification plays a
specific role in the process of moving and managing email messages. While most users are only aware
of the specific email program they use to receive and send messages, each one is important for ensuring
that email arrives at the correct destination.
19.2.1. Mail Transport Agent
A Mail Transport Agent (MTA) transports email messages between hosts using SMTP. A message may
involve several MTAs as it moves to its intended destination.
While the delivery of messages between machines may seem rather straightforward, the entire process
of deciding if a particular MTA can or should accept a message for delivery is quite complicated. In
addition, due to problems from spam, use of a particular MTA is usually restricted by the MTA's
configuration or the access configuration for the network on which the MTA resides.
Many modern email client programs can act as an MTA when sending email. However, this action should
not be confused with the role of a true MTA. The sole reason email client programs are capable of
sending email like an MTA is because the host running the application does not have its own MTA. This
is particularly true for email client programs on non-UNIX-based operating systems. However, these
client programs only send outbound messages to an MTA they are authorized to use and do not directly
deliver the message to the intended recipient's email server.
Since Red Hat Enterprise Linux offers two MTAs, Postfix and Sendmail, email client programs are often
not required to act as an MTA. Red Hat Enterprise Linux also includes a special purpose MTA called
Fetchmail.
For more information on Postfix, Sendmail, and Fetchmail, see Section 19.3, “Mail Transport Agents”.
19.2.2. Mail Delivery Agent
A Mail Delivery Agent (MDA) is invoked by the MTA to file incoming email in the proper user's mailbox. In
many cases, the MDA is actually a Local Delivery Agent (LDA), such as mail or Procmail.
Deployment Guide
430

Any program that actually handles a message for delivery to the point where it can be read by an email
client application can be considered an MDA. For this reason, some MTAs (such as Sendmail and
Postfix) can fill the role of an MDA when they append new email messages to a local user's mail spool
file. In general, MDAs do not transport messages between systems nor do they provide a user interface;
MDAs distribute and sort messages on the local machine for an email client application to access.
19.2.3. Mail User Agent
A Mail User Agent (MUA) is synonymous with an email client application. An MUA is a program that, at a
minimum, allows a user to read and compose email messages. Many MUAs are capable of retrieving
messages via the POP or IMAP protocols, setting up mailboxes to store messages, and sending
outbound messages to an MTA.
MUAs may be graphical, such as Evolution, or have simple text-based interfaces, such as pine.
19.3. MAIL TRANSPORT AGENTS
Red Hat Enterprise Linux offers two primary MTAs: Postfix and Sendmail. Postfix is configured as the
default MTA, although it is easy to switch the default MTA to Sendmail. To switch the default MTA to
Sendmail, you can either uninstall Postfix or use the following command to switch to Sendmail:
~]# alternatives --config mta
You can also use a command in the following format to enable or disable the desired service:
chkconfig service_name on | off
19.3.1. Postfix
Originally developed at IBM by security expert and programmer Wietse Venema, Postfix is a Sendmail-
compatible MTA that is designed to be secure, fast, and easy to configure.
To improve security, Postfix uses a modular design, where small processes with limited privileges are
launched by a master daemon. The smaller, less privileged processes perform very specific tasks
related to the various stages of mail delivery and run in a changed root environment to limit the effects of
attacks.
Configuring Postfix to accept network connections from hosts other than the local computer takes only a
few minor changes in its configuration file. Yet for those with more complex needs, Postfix provides a
variety of configuration options, as well as third party add-ons that make it a very versatile and full-
featured MTA.
The configuration files for Postfix are human readable and support upward of 250 directives. Unlike
Sendmail, no macro processing is required for changes to take effect and the majority of the most
commonly used options are described in the heavily commented files.
19.3.1.1. The Default Postfix Installation
The Postfix executable is /usr/sbin/postfix. This daemon launches all related processes needed
to handle mail delivery.
Postfix stores its configuration files in the /etc/postfix/ directory. The following is a list of the more
commonly used files:
CHAPTER 19. MAIL SERVERS
431

access — Used for access control, this file specifies which hosts are allowed to connect to
Postfix.
main.cf — The global Postfix configuration file. The majority of configuration options are
specified in this file.
master.cf — Specifies how Postfix interacts with various processes to accomplish mail
delivery.
transport — Maps email addresses to relay hosts.
The aliases file can be found in the /etc/ directory. This file is shared between Postfix and Sendmail.
It is a configurable list required by the mail protocol that describes user ID aliases.
IMPORTANT
The default /etc/postfix/main.cf file does not allow Postfix to accept network
connections from a host other than the local computer. For instructions on configuring
Postfix as a server for other clients, see Section 19.3.1.2, “Basic Postfix Configuration”.
Restart the postfix service after changing any options in the configuration files under the
/etc/postfix directory in order for those changes to take effect:
~]# service postfix restart
19.3.1.2. Basic Postfix Configuration
By default, Postfix does not accept network connections from any host other than the local host. Perform
the following steps as root to enable mail delivery for other hosts on the network:
Edit the /etc/postfix/main.cf file with a text editor, such as vi.
Uncomment the mydomain line by removing the hash sign (#), and replace domain.tld with the
domain the mail server is servicing, such as example.com.
Uncomment the myorigin = $mydomain line.
Uncomment the myhostname line, and replace host.domain.tld with the host name for the
machine.
Uncomment the mydestination = $myhostname, localhost.$mydomain line.
Uncomment the mynetworks line, and replace 168.100.189.0/28 with a valid network setting for
hosts that can connect to the server.
Uncomment the inet_interfaces = all line.
Comment the inet_interfaces = localhost line.
Restart the postfix service.
Once these steps are complete, the host accepts outside emails for delivery.
Postfix has a large assortment of configuration options. One of the best ways to learn how to configure
Deployment Guide
432

Postfix is to read the comments within the /etc/postfix/main.cf configuration file. Additional
resources including information about Postfix configuration, SpamAssassin integration, or detailed
descriptions of the /etc/postfix/main.cf parameters are available online at http://www.postfix.org/.
19.3.1.2.1. Configuring Postfix to Use Transport Layer Security
Configuring postfix to use transport layer security (TLS) is described in the Red Hat Knowledgebase
solution How to configure postfix with TLS?
IMPORTANT
Due to the vulnerability described in Resolution for POODLE SSL 3.0 vulnerability (CVE-
2014-3566) in Postfix and Dovecot, Red Hat recommends disabling SSL, if it is enabled,
and using only TLSv1.1 or TLSv1.2. Backwards compatibility can be achieved using
TLSv1.0. Many products Red Hat supports have the ability to use SSLv2 or SSLv3
protocols. However, the use of SSLv2 or SSLv3 is now strongly recommended against.
19.3.1.3. Using Postfix with LDAP
Postfix can use an LDAP directory as a source for various lookup tables (e.g.: aliases, virtual,
canonical, etc.). This allows LDAP to store hierarchical user information and Postfix to only be given the
result of LDAP queries when needed. By not storing this information locally, administrators can easily
maintain it.
19.3.1.3.1. The /etc/aliases lookup example
The following is a basic example for using LDAP to look up the /etc/aliases file. Make sure your
/etc/postfix/main.cf file contains the following:
alias_maps = hash:/etc/aliases, ldap:/etc/postfix/ldap-aliases.cf
Create a /etc/postfix/ldap-aliases.cf file if you do not have one already and make sure it
contains the following:
server_host = ldap.example.com
search_base = dc=example, dc=com
where ldap.example.com, example, and com are parameters that need to be replaced with
specification of an existing available LDAP server.
NOTE
The /etc/postfix/ldap-aliases.cf file can specify various parameters, including
parameters that enable LDAP SSL and STARTTLS. For more information, see the
ldap_table(5) man page.
For more information on LDAP, see Section 20.1, “OpenLDAP”.
19.3.2. Sendmail
Sendmail's core purpose, like other MTAs, is to safely transfer email among hosts, usually using the
CHAPTER 19. MAIL SERVERS
433

SMTP protocol. However, Sendmail is highly configurable, allowing control over almost every aspect of
how email is handled, including the protocol used. Many system administrators elect to use Sendmail as
their MTA due to its power and scalability.
19.3.2.1. Purpose and Limitations
It is important to be aware of what Sendmail is and what it can do, as opposed to what it is not. In these
days of monolithic applications that fulfill multiple roles, Sendmail may seem like the only application
needed to run an email server within an organization. Technically, this is true, as Sendmail can spool
mail to each users' directory and deliver outbound mail for users. However, most users actually require
much more than simple email delivery. Users usually want to interact with their email using an MUA, that
uses POP or IMAP, to download their messages to their local machine. Or, they may prefer a Web
interface to gain access to their mailbox. These other applications can work in conjunction with
Sendmail, but they actually exist for different reasons and can operate separately from one another.
It is beyond the scope of this section to go into all that Sendmail should or could be configured to do. With
literally hundreds of different options and rule sets, entire volumes have been dedicated to helping
explain everything that can be done and how to fix things that go wrong. See the Section 19.6,
“Additional Resources” for a list of Sendmail resources.
This section reviews the files installed with Sendmail by default and reviews basic configuration
changes, including how to stop unwanted email (spam) and how to extend Sendmail with the Lightweight
Directory Access Protocol (LDAP).
19.3.2.2. The Default Sendmail Installation
In order to use Sendmail, first ensure the sendmail package is installed on your system by running, as
root:
~]# yum install sendmail
In order to configure Sendmail, ensure the sendmail-cf package is installed on your system by running,
as root:
~]# yum install sendmail-cf
For more information on installing packages with Yum, see Section 8.2.4, “Installing Packages”.
Before using Sendmail, the default MTA has to be switched from Postfix. For more information how to
switch the default MTA see Section 19.3, “Mail Transport Agents”.
The Sendmail executable is /usr/sbin/sendmail.
Sendmail's lengthy and detailed configuration file is /etc/mail/sendmail.cf. Avoid editing the
sendmail.cf file directly. To make configuration changes to Sendmail, edit the
/etc/mail/sendmail.mc file, back up the original /etc/mail/sendmail.cf file, and use the
following alternatives to generate a new configuration file:
Use the included makefile in /etc/mail/ to create a new /etc/mail/sendmail.cf
configuration file:
~]# make all -C /etc/mail/
Deployment Guide
434

All other generated files in /etc/mail (db files) will be regenerated if needed. The old
makemap commands are still usable. The make command is automatically used whenever you
start or restart the sendmail service.
Alternatively you may use the m4 macro processor to create a new /etc/mail/sendmail.cf.
The m4 macro processor is not installed by default. Before using it to create
/etc/mail/sendmail.cf, install the m4 package as root:
~]# yum install m4
More information on configuring Sendmail can be found in Section 19.3.2.3, “Common Sendmail
Configuration Changes”.
Various Sendmail configuration files are installed in the /etc/mail/ directory including:
access — Specifies which systems can use Sendmail for outbound email.
domaintable — Specifies domain name mapping.
local-host-names — Specifies aliases for the host.
mailertable — Specifies instructions that override routing for particular domains.
virtusertable — Specifies a domain-specific form of aliasing, allowing multiple virtual
domains to be hosted on one machine.
Several of the configuration files in /etc/mail/, such as access, domaintable, mailertable and
virtusertable, must actually store their information in database files before Sendmail can use any
configuration changes. To include any changes made to these configurations in their database files, run
the following command, as root:
~]# makemap hash /etc/mail/<name> < /etc/mail/<name>
where <name> represents the name of the configuration file to be updated. You may also restart the
sendmail service for the changes to take effect by running:
~]# service sendmail restart
For example, to have all emails addressed to the example.com domain delivered to bob@other-
example.com, add the following line to the virtusertable file:
@example.com bob@other-example.com
To finalize the change, the virtusertable.db file must be updated:
~]# makemap hash /etc/mail/virtusertable < /etc/mail/virtusertable
Sendmail will create an updated virtusertable.db file containing the new configuration.
19.3.2.3. Common Sendmail Configuration Changes
When altering the Sendmail configuration file, it is best not to edit an existing file, but to generate an
entirely new /etc/mail/sendmail.cf file.
CHAPTER 19. MAIL SERVERS
435

WARNING
Before replacing or making any changes to the sendmail.cf file, create a backup
copy.
To add the desired functionality to Sendmail, edit the /etc/mail/sendmail.mc file as root. Once you
are finished, restart the sendmail service and, if the m4 package is installed, the m4 macro processor
will automatically generate a new sendmail.cf configuration file:
~]# service sendmail restart
IMPORTANT
The default sendmail.cf file does not allow Sendmail to accept network connections
from any host other than the local computer. To configure Sendmail as a server for other
clients, edit the /etc/mail/sendmail.mc file, and either change the address specified
in the Addr= option of the DAEMON_OPTIONS directive from 127.0.0.1 to the IP address
of an active network device or comment out the DAEMON_OPTIONS directive all together
by placing dnl at the beginning of the line. When finished, regenerate
/etc/mail/sendmail.cf by restarting the service
~]# service sendmail restart
The default configuration in Red Hat Enterprise Linux works for most SMTP-only sites. However, it does
not work for UUCP (UNIX-to-UNIX Copy Protocol) sites. If using UUCP mail transfers, the
/etc/mail/sendmail.mc file must be reconfigured and a new /etc/mail/sendmail.cf file must
be generated.
Consult the /usr/share/sendmail-cf/README file before editing any files in the directories under
the /usr/share/sendmail-cf directory, as they can affect the future configuration of the
/etc/mail/sendmail.cf file.
19.3.2.4. Masquerading
One common Sendmail configuration is to have a single machine act as a mail gateway for all machines
on the network. For example, a company may want to have a machine called mail.example.com that
handles all of their email and assigns a consistent return address to all outgoing mail.
In this situation, the Sendmail server must masquerade the machine names on the company network so
that their return address is user@example.com instead of user@host.example.com.
To do this, add the following lines to /etc/mail/sendmail.mc:
FEATURE(always_add_domain)dnl
FEATURE(`masquerade_entire_domain')dnl
FEATURE(`masquerade_envelope')dnl
FEATURE(`allmasquerade')dnl
Deployment Guide
436

MASQUERADE_AS(`example.com.')dnl
MASQUERADE_DOMAIN(`example.com.')dnl
MASQUERADE_AS(example.com)dnl
After generating a new sendmail.cf file using the m4 macro processor, this configuration makes all
mail from inside the network appear as if it were sent from example.com.
19.3.2.5. Stopping Spam
Email spam can be defined as unnecessary and unwanted email received by a user who never
requested the communication. It is a disruptive, costly, and widespread abuse of Internet communication
standards.
Sendmail makes it relatively easy to block new spamming techniques being employed to send junk
email. It even blocks many of the more usual spamming methods by default. Main anti-spam features
available in sendmail are header checks, relaying denial (default from version 8.9), access database and
sender information checks.
For example, forwarding of SMTP messages, also called relaying, has been disabled by default since
Sendmail version 8.9. Before this change occurred, Sendmail directed the mail host (x.edu) to accept
messages from one party (y.com) and sent them to a different party (z.net). Now, however, Sendmail
must be configured to permit any domain to relay mail through the server. To configure relay domains,
edit the /etc/mail/relay-domains file and restart Sendmail
~]# service sendmail restart
However users can also be sent spam from from servers on the Internet. In these instances, Sendmail's
access control features available through the /etc/mail/access file can be used to prevent
connections from unwanted hosts. The following example illustrates how this file can be used to both
block and specifically allow access to the Sendmail server:
badspammer.com ERROR:550 "Go away and do not spam us anymore"
tux.badspammer.com OK 10.0 RELAY
This example shows that any email sent from badspammer.com is blocked with a 550 RFC-821
compliant error code, with a message sent back. Email sent from the tux.badspammer.com sub-
domain, is accepted. The last line shows that any email sent from the 10.0.*.* network can be relayed
through the mail server.
Because the /etc/mail/access.db file is a database, use the makemap command to update any
changes. Do this using the following command as root:
~]# makemap hash /etc/mail/access < /etc/mail/access
Message header analysis allows you to reject mail based on header contents. SMTP servers store
information about an email's journey in the message header. As the message travels from one MTA to
another, each puts in a Received header above all the other Received headers. It is important to note
that this information may be altered by spammers.
The above examples only represent a small part of what Sendmail can do in terms of allowing or
blocking access. See the /usr/share/sendmail-cf/README file for more information and examples.
CHAPTER 19. MAIL SERVERS
437

Since Sendmail calls the Procmail MDA when delivering mail, it is also possible to use a spam filtering
program, such as SpamAssassin, to identify and file spam for users. See Section 19.4.2.6, “Spam
Filters” for more information about using SpamAssassin.
19.3.2.6. Using Sendmail with LDAP
Using LDAP is a very quick and powerful way to find specific information about a particular user from a
much larger group. For example, an LDAP server can be used to look up a particular email address from
a common corporate directory by the user's last name. In this kind of implementation, LDAP is largely
separate from Sendmail, with LDAP storing the hierarchical user information and Sendmail only being
given the result of LDAP queries in pre-addressed email messages.
However, Sendmail supports a much greater integration with LDAP, where it uses LDAP to replace
separately maintained files, such as /etc/aliases and /etc/mail/virtusertables, on different
mail servers that work together to support a medium- to enterprise-level organization. In short, LDAP
abstracts the mail routing level from Sendmail and its separate configuration files to a powerful LDAP
cluster that can be leveraged by many different applications.
The current version of Sendmail contains support for LDAP. To extend the Sendmail server using LDAP,
first get an LDAP server, such as OpenLDAP, running and properly configured. Then edit the
/etc/mail/sendmail.mc to include the following:
LDAPROUTE_DOMAIN('yourdomain.com')dnl
FEATURE('ldap_routing')dnl
NOTE
This is only for a very basic configuration of Sendmail with LDAP. The configuration can
differ greatly from this depending on the implementation of LDAP, especially when
configuring several Sendmail machines to use a common LDAP server.
Consult /usr/share/sendmail-cf/README for detailed LDAP routing configuration
instructions and examples.
Next, recreate the /etc/mail/sendmail.cf file by running the m4 macro processor and again
restarting Sendmail. See Section 19.3.2.3, “Common Sendmail Configuration Changes” for instructions.
For more information on LDAP, see Section 20.1, “OpenLDAP”.
19.3.3. Fetchmail
Fetchmail is an MTA which retrieves email from remote servers and delivers it to the local MTA. Many
users appreciate the ability to separate the process of downloading their messages located on a remote
server from the process of reading and organizing their email in an MUA. Designed with the needs of
dial-up users in mind, Fetchmail connects and quickly downloads all of the email messages to the mail
spool file using any number of protocols, including POP3 and IMAP. It can even forward email messages
to an SMTP server, if necessary.
Deployment Guide
438

NOTE
In order to use Fetchmail, first ensure the fetchmail package is installed on your system
by running, as root:
~]# yum install fetchmail
For more information on installing packages with Yum, see Section 8.2.4, “Installing
Packages”.
Fetchmail is configured for each user through the use of a .fetchmailrc file in the user's home
directory. If it does not already exist, create the .fetchmailrc file in your home directory
Using preferences in the .fetchmailrc file, Fetchmail checks for email on a remote server and
downloads it. It then delivers it to port 25 on the local machine, using the local MTA to place the email in
the correct user's spool file. If Procmail is available, it is launched to filter the email and place it in a
mailbox so that it can be read by an MUA.
19.3.3.1. Fetchmail Configuration Options
Although it is possible to pass all necessary options on the command line to check for email on a remote
server when executing Fetchmail, using a .fetchmailrc file is much easier. Place any desired
configuration options in the .fetchmailrc file for those options to be used each time the fetchmail
command is issued. It is possible to override these at the time Fetchmail is run by specifying that option
on the command line.
A user's .fetchmailrc file contains three classes of configuration options:
global options — Gives Fetchmail instructions that control the operation of the program or
provide settings for every connection that checks for email.
server options — Specifies necessary information about the server being polled, such as the
host name, as well as preferences for specific email servers, such as the port to check or
number of seconds to wait before timing out. These options affect every user using that server.
user options — Contains information, such as user name and password, necessary to
authenticate and check for email using a specified email server.
Global options appear at the top of the .fetchmailrc file, followed by one or more server options,
each of which designate a different email server that Fetchmail should check. User options follow server
options for each user account checking that email server. Like server options, multiple user options may
be specified for use with a particular server as well as to check multiple email accounts on the same
server.
Server options are called into service in the .fetchmailrc file by the use of a special option verb,
poll or skip, that precedes any of the server information. The poll action tells Fetchmail to use this
server option when it is run, which checks for email using the specified user options. Any server options
after a skip action, however, are not checked unless this server's host name is specified when
Fetchmail is invoked. The skip option is useful when testing configurations in the .fetchmailrc file
because it only checks skipped servers when specifically invoked, and does not affect any currently
working configurations.
The following is an example of a .fetchmailrc file:
CHAPTER 19. MAIL SERVERS
439

set postmaster "user1"
set bouncemail
poll pop.domain.com proto pop3
user 'user1' there with password 'secret' is user1 here
poll mail.domain2.com
user 'user5' there with password 'secret2' is user1 here
user 'user7' there with password 'secret3' is user1 here
In this example, the global options specify that the user is sent email as a last resort (postmaster
option) and all email errors are sent to the postmaster instead of the sender (bouncemail option). The
set action tells Fetchmail that this line contains a global option. Then, two email servers are specified,
one set to check using POP3, the other for trying various protocols to find one that works. Two users are
checked using the second server option, but all email found for any user is sent to user1's mail spool.
This allows multiple mailboxes to be checked on multiple servers, while appearing in a single MUA inbox.
Each user's specific information begins with the user action.
NOTE
Users are not required to place their password in the .fetchmailrc file. Omitting the
with password '<password>' section causes Fetchmail to ask for a password when
it is launched.
Fetchmail has numerous global, server, and local options. Many of these options are rarely used or only
apply to very specific situations. The fetchmail man page explains each option in detail, but the most
common ones are listed in the following three sections.
19.3.3.2. Global Options
Each global option should be placed on a single line after a set action.
daemon seconds — Specifies daemon-mode, where Fetchmail stays in the background.
Replace seconds with the number of seconds Fetchmail is to wait before polling the server.
postmaster — Specifies a local user to send mail to in case of delivery problems.
syslog — Specifies the log file for errors and status messages. By default, this is
/var/log/maillog.
19.3.3.3. Server Options
Server options must be placed on their own line in .fetchmailrc after a poll or skip action.
auth auth-type — Replace auth-type with the type of authentication to be used. By default,
password authentication is used, but some protocols support other types of authentication,
including kerberos_v5, kerberos_v4, and ssh. If the any authentication type is used,
Fetchmail first tries methods that do not require a password, then methods that mask the
password, and finally attempts to send the password unencrypted to authenticate to the server.
interval number — Polls the specified server every number of times that it checks for
email on all configured servers. This option is generally used for email servers where the user
rarely receives messages.
Deployment Guide
440

port port-number — Replace port-number with the port number. This value overrides the
default port number for the specified protocol.
proto protocol — Replace protocol with the protocol, such as pop3 or imap, to use when
checking for messages on the server.
timeout seconds — Replace seconds with the number of seconds of server inactivity after
which Fetchmail gives up on a connection attempt. If this value is not set, a default of 300
seconds is used.
19.3.3.4. User Options
User options may be placed on their own lines beneath a server option or on the same line as the server
option. In either case, the defined options must follow the user option (defined below).
fetchall — Orders Fetchmail to download all messages in the queue, including messages
that have already been viewed. By default, Fetchmail only pulls down new messages.
fetchlimit number — Replace number with the number of messages to be retrieved
before stopping.
flush — Deletes all previously viewed messages in the queue before retrieving new messages.
limit max-number-bytes — Replace max-number-bytes with the maximum size in bytes
that messages are allowed to be when retrieved by Fetchmail. This option is useful with slow
network links, when a large message takes too long to download.
password 'password' — Replace password with the user's password.
preconnect "command" — Replace command with a command to be executed before
retrieving messages for the user.
postconnect "command" — Replace command with a command to be executed after
retrieving messages for the user.
ssl — Activates SSL encryption. At the time of writing, the default action is to use the best
available from SSL2, SSL3, SSL23, TLS1, TLS1.1 and TLS1.2. Note that SSL2 is considered
obsolete and due to the POODLE: SSLv3 vulnerability (CVE-2014-3566), SSLv3 should not be
used. However there is no way to force the use of TLS1 or newer, therefore ensure the mail
server being connected to is configured not to use SSLv2 and SSLv3. Use stunnel where the
server cannot be configured not to use SSLv2 and SSLv3.
sslproto — Defines allowed SSL or TLS protocols. Possible values are SSL2, SSL3, SSL23,
and TLS1. The default value, if sslproto is omitted, unset, or set to an invalid value, is SSL23.
The default action is to use the best from SSLv3, TLSv1, TLS1.1 and TLS1.2. Note that setting
any other value for SSL or TLS will disable all the other protocols. Due to the POODLE: SSLv3
vulnerability (CVE-2014-3566), it is recommend to omit this option, or set it to SSLv23, and
configure the corresponding mail server not to use SSLv2 and SSLv3. Use stunnel where the
server cannot be configured not to use SSLv2 and SSLv3.
user "username" — Replace username with the username used by Fetchmail to retrieve
messages. This option must precede all other user options.
19.3.3.5. Fetchmail Command Options
CHAPTER 19. MAIL SERVERS
441
