Rivet Manual
User Manual:
Open the PDF directly: View PDF ![]() .
.
Page Count: 31

Rivet user manual
version 2.6.0
Andy Buckley
PPE Group, School of Physics, University of Glasgow, UK.
E-mail: andy.buckley@cern.ch
Jonathan Butterworth
HEP Group, Dept. of Physics and Astronomy, UCL, London, UK.
E-mail: J.Butterworth@ucl.ac.uk
David Grellscheid
IPPP, Durham University, UK.
E-mail: david.grellscheid@durham.ac.uk
Hendrik Hoeth
IPPP, Durham University, UK.
E-mail: hendrik.hoeth@cern.ch
Leif L¨onnblad
Theoretical Physics, Lund University, Sweden.
E-mail: lonnblad@thep.lu.se
James Monk
Experimental Particle Physics, Niels Bohr Institute, Copenhagen, Denmark.
E-mail: jmonk@cern.ch
Chris Pollard
PPE Group, School of Physics, University of Glasgow, UK.
E-mail: cpollard@cern.ch
Holger Schulz
IPPP, Durham University, UK.
E-mail: holger.schulz@durham.ac.uk
Frank Siegert
Technische Universit¨at Dresden, Germany.
E-mail: frank.siegert@cern.ch
– 1 –
Abstract: This is the manual and user guide for the Rivet system for the validation and
tuning of Monte Carlo event generators. As well as the core Rivet library, this manual
describes the usage of the rivet program. The depth and level of description is chosen for
users of the system, starting with the basics of using validation code written by others, and
then covering sufficient details to write new Rivet analyses and calculational components.
Keywords: Event generator, simulation, validation, tuning, QCD.

Contents
1. Introduction 2
1.1 Typographic conventions 3
IGetting started with Rivet 4
2. Quickstart 4
2.1 Command completion 5
3. Running Rivet analyses 6
3.1 The FIFO idiom 6
3.2 Analysis status 6
3.3 Example rivet commands 7
4. Using analysis data 8
4.1 Histogram formats 8
4.2 Plotting and comparing data 9
4.3 Merging histograms from different Rivet runs 10
II Standard Rivet analyses 11
5. LEP and SLC analyses 11
6. Tevatron analyses 11
7. LHC analyses 11
8. SPS analyses 11
9. HERA analyses 11
10. RHIC analyses 11
11. Monte Carlo analyses 11
12. Example analyses 11
13. Misc. analyses 11
III How Rivet works 12
– 1 –

14. The science and art of physically valid MC analysis 12
15. Projections 14
15.1 Projection caching 14
15.2 Using projection caching 15
16. Analyses 16
16.1 Writing a new analysis 16
16.2 Utility classes 18
16.2.1 FourMomentum 18
16.2.2 Particle 18
16.2.3 Jet 19
16.2.4 Mathematical utilities 19
16.3 Histogramming 19
16.4 Analysis metadata 20
16.4.1 Analysis info files 20
16.4.2 Plot styling files 20
16.5 Pluggable analyses 21
16.5.1 Plugin paths 21
17. Using Rivet as a library 22
IV Appendices 27
A. The Fortran generator interface (deprecated) 27
B. Acknowledgements 27
VBibliography 29
1. Introduction
This manual is a users’ guide to using the Rivet generator validation system. Rivet is a
C++ class library, which provides the infrastructure and calculational tools for particle-level
analyses for high energy collider experiments, enabling physicists to validate event generator
models and tunings with minimal effort and maximum portability. Rivet is designed to
scale effectively to large numbers of analyses for truly global validation, by transparent use
of an automated result caching system.
– 2 –
The Rivet ethos, if it may be expressed succinctly, is that user analysis code should be
extremely clean and easy to write — ideally it should be sufficiently self-explanatory to in
itself be a reference to the experimental analysis algorithm — without sacrificing power or
extensibility. The machinery to make this possible is intentionally hidden from the view of
all but the most prying users. Generator independence is explicitly required by virtue of all
analyses operating on the generic “HepMC” event record.
The simplest way to use Rivet is via the
rivet
command line tool, which analyses
textual HepMC event records as they are generated and produces output distributions in
a structured textual format. The input events are generated using the generator’s own
steering program, which is typically provided for modern codes; for older generators which
have no default way to produce HepMC output, the AGILe generator interface library and
agile-runmc
command may be useful. For those who wish to embed their analyses in some
larger framework, Rivet can also be used as a library to run programmatically on HepMC
event objects with no special executable being required.
Before we get started, a declaration of intent: this manual is intended to be a guide to
using Rivet, rather than a comprehensive and painstakingly maintained reference to the
application programming interface (API) of the Rivet library. For that purpose the online
documentation at
http://rivet.hepforge.org
should be sufficient – in case of confusion
please contact the authors at
rivet@projects.hepforge.org
. Similar API documentation
is maintained for AGILe at http://agile.hepforge.org.
1.1 Typographic conventions
As is normal in computer user manuals, the typography in this manual is used to indicate
whether we are describing source code elements, commands to be run in a terminal, the
output of a command etc.
The main such clue will be the use of
typewriter-style
text: this indicates the name
of a command or code element — class names, function names etc. Typewriter font is also
used for commands to be run in a terminal, but in this case it will be prefixed by a dollar
sign, as in $
echo "Hello" | cat
. The output of such a command on the terminal will be
typeset in sans-serif font. When we are documenting a code feature in detail (which is not
the main point of this manual), we will use square brackets to indicate optional arguments,
and italic font between angle brackets to represent an argument name which should be
replaced by a value, e.g. Event::applyProjection(hproj i).
– 3 –
Part I
Getting started with Rivet
As with many things, Rivet may be meaningfully approached at several distinct levels of
detail:
•
The simplest, and we hope the most common, is to use the analyses which are
already in the library to study events from a variety of generators and tunes: this is
enormously valuable in itself and we encourage all manner of experimentalists and
phenomenologists alike to use Rivet in this mode.
•
A more involved level of usage is to write your own Rivet analyses — this may be
done without affecting the installed standard analyses by use of a “plugin” system
(although we encourage users who develop analyses to submit them to the Rivet
developers for inclusion into a future release of the main package). This approach
requires some understanding of programming within Rivet but you don’t need to
know about exactly what the system is doing with the objects that you have defined.
•
Finally, Rivet developers and people who want to do non-standard things with
their analyses will need to know something about the messy details of what Rivet’s
infrastructure is doing behind the scenes. But you’d probably rather be doing some
physics!
The current part of this manual is for the first sort of user, who wants to get on with
studying some observables with a generator or tune, or comparing several such models.
Since everyone will fall into this category at some point, our present interest is to get you
to that all-important “physics plots” stage as quickly as possible. Analysis authors and
Rivet service-mechanics will find the more detailed information that they crave in Part III.
2. Quickstart
The point of this section is to get you up and running with Rivet as soon as possible.
Doing this by hand may be rather frustrating, as Rivet depends on several external libraries
— you’ll get bored downloading and building them by hand in the right order. Here we
recommend a much simpler way — for the full details of how to build Rivet by hand, please
consult the Rivet Web page.
Bootstrap script
We have written a bootstrapping script which will download tarballs
of Rivet and the other required libraries, expand them and build them in the right order
with the correct build flags. This is generally nicer than doing it all by hand, and virtually
essential if you want to use the existing versions of FastJet, HepMC, generator libraries,
and so on from CERN AFS: there are issues with these versions which the script works
around, which you won’t find easy to do yourself.
– 4 –

To run the script, we recommend that you choose a personal installation directory,
i.e. make a
∼/local
directory for this purpose, to avoid polluting your home directory
with a lot of files. If you already use a directory of the same name, you might want to
use a separate one, say
∼/rivetlocal
, such that if you need to delete everything in the
installation area you can do so without difficulties.
Now, change directory to your build area (you may also want to make this, e.g.
∼/build), and download the script:
$
wget http://rivet.hepforge.org/hg/bootstrap/raw-file/X.Y.Z/rivet-bootstrap
(where X.Y.Z is the release that you want to install)
$chmod +x rivet-bootstrap
Now run it to get some help: $./rivet-bootstrap --help
Now to actually do the install: for example, to bootstrap Rivet to the install area specified
as the prefix argument, run this:
$./rivet-bootstrap --prefix=hlocaldiri
If you are running on a system where the CERN AFS area is mounted as
/afs/cern.
ch
, then the bootstrap script will attempt to use the pre-built HepMC[
1
], LHAPDF[
2
],
FastJet[
3
,
4
] and GSL libraries from the LCG software area. Either way, finally the bootstrap
script will write out a file containing the environment settings which will make the system
useable. You can source this file, e.g.
source rivetenv.sh
to make your current shell
ready-to-go for a Rivet run (use rivetenv.csh if you are a C shell user).
You now have a working, installed copy of the Rivet library, and the
rivet
,
rivet-*
,
and
yoda*
executables: respectively these are the command-line frontend to the Rivet
analysis library, and a convenient steering command for generators which do not provide
their own main program with HepMC output. To test that they work as expected, source
the setup scripts as above, if you’ve not already done so, and run this:
$rivet --help
This should print a quick-reference user guide for the rivet command to the terminal.
In this manual we will use a dummy
generator
command as our way of producing a
stream of HepMC event data. In practice you should run a generator like Pythia 8[
5
,
6
],
Herwig++[
7
] or Sherpa[
8
] which provide their own native way to make HepMC output – and
the latter two can also call the Rivet library directly via their own configuration interfaces.
To use these, or perhaps older Fortran generators via the AGILe interface, substitute the
appropriate command in what follows.1
2.1 Command completion
A final installation point worth considering is using the supplied bash-shell programmable
completion setup for the
rivet
and generator commands. Despite being cosmetic and
semi-trivial, programmable completion makes using
rivet
positively pleasant, especially
since you no longer need to remember the somewhat cryptic analysis names2!
1For largely historical reference, use of the AGILe commands is documented in section ??.
2
Standard Rivet analyses have names which, as well as the publication date and experiment name,
incorporate the 8-digit Spires/Inspire ID code.
– 5 –
To use programmable completion, source the appropriate files from the install location:
$.hlocaldiri/share/Rivet/rivet-completion
(if you are using the setup script
rivetenv.sh
this is automatically done for you). If
there is already a
hlocaldiri/etc/bash_completion.d
directory in your install path, Rivet’s
installation script will install an extra copy into that location, since automatically sourcing
all completion files in such a path is quite standard.
3. Running Rivet analyses
The
rivet
executable is the easiest way to use Rivet, and will be our example throughout
this manual. This command reads HepMC events in the standard ASCII format, either
from file or from a text stream.
3.1 The FIFO idiom
Since you rarely want to store simulated HepMC events and they are computationally cheap
to produce (at least when compared to the remainder of experiment simulation chains),
we recommend using a Unix named pipe (or “FIFO” — first-in, first-out) to stream the
events. While this may seem unusual at first, it is just a nice way of “pretending” that we
are writing to and reading from a file, without actually involving any slow disk access or
building of huge files: a 1M event LHC run would occupy
∼
60
GB
on disk, and typically it
takes twice as long to make and analyse the events when the filesystem is involved! Here is
an example:
$mkfifo fifo.hepmc
$generator -o fifo.hepmc &
$rivet -a EXAMPLE fifo.hepmc
Note that the generator process (
generator
in this case) is backgrounded before
rivet
is
run.
Notably,
mkfifo
will not work if applied to a directory mounted via the AFS distributed
filesystem, as widely used in HEP. This is not a big problem: just make your FIFO object
somewhere not mounted via AFS, e.g.
/tmp
. There is no performance penalty, as the
filesystem object is not written to during the streaming process.
In the following command examples, we will assume that a generator has been set up
to write to the
fifo.hepmc
FIFO, and just list the
rivet
command that reads from that
location.
3.2 Analysis status
The standard Rivet analyses are divided into four status classes: validated, preliminary,
obsolete, and unvalidated (in roughly decreasing order of academic acceptability).
The Rivet “validation procedure” is not formally defined, but generally implies that an
analysis has been checked to ensure reproduction of MC points shown in the paper where
possible, and is believed to have no outstanding issues with analysis procedure or cuts.
Additionally, analyses marked as “validated” and distributed with Rivet should normally
have been code-checked by an experienced developer to ensure that the code is a good
– 6 –

example of Rivet usage and is not more complex than required or otherwise difficult to
read or maintain. Such analyses are regarded as fully ready for use in any MC validation or
tuning studies.
Validated analyses which implement an unfinished piece of experimental work are
considered to be trustworthy in their implementation of a conference note or similar
“informal” publication, but do not have the magic stamp of approval that comes from a
journal publication. This remains the standard mark of experimental respectability and
accordingly we do not include such analyses in the Rivet standard analysis libraries, but in
a special “preliminary” library. While preliminary analyses may be used for physics studies,
please be aware of the incomplete status of the corresponding experimental study, and also
be aware that the histograms in such analyses may be renamed or removed entirely, as may
the analysis itself.
Preliminary analyses will not have a Spires/Inspire ID, and hence on their move into
the standard Rivet analysis library they will normally undergo a name change: please
ensure when you upgrade between Rivet versions that any scripts or programs which were
using preliminary analyses are not broken by the disappearance or change of that analysis
in the newer version. The minor perils of using preliminary analyses can be avoided by the
cautious by building Rivet with the
--disable-preliminary
configuration flag, in which
case their temptation will not even be offered.
To make transitions between Rivet versions more smooth and predictable for users of
preliminary analyses, preliminary analyses which are superseded by a validated version will
be reclassified as obsolete and will be retained for one major version of Rivet with a status
of ”obsolete” before being removed, to give users time to migrate their run scripts, i.e. if
an analysis is marked as obsolete in version 1.4.2, it will remain in Rivet’s distribution
until version 1.5.0. Obsolete analyses may have different reference histograms from the
final version and will not be maintained. Obsolete analyses will not be built if either
the
--disable-obsolete
configuration flag is specified at build time: for convenience, the
default value of this flag is the value of the --disable-preliminary flag.
Finally, unvalidated analyses are those whose implementation is incomplete, flawed or
just troubled by doubts. Running such analyses is not a good idea if you aren’t trying to
fix them, and Rivet’s command line tools will print copious warning messages if you do.
Unvalidated analyses in the Rivet distribution are not built by default, as they are only
of interest to developers and would be distracting clutter for the majority of users: if you
really need them, building Rivet with the
--enable-unvalidated
configuration flag will
slake your thirst for danger.
3.3 Example commands
•Getting help: rivet --help
will print a (hopefully) helpful list of options which may
be used with the rivet command, as well as other information such as environment
variables which may affect the run.
•Choosing analyses: rivet --list-analyses
will list the available analyses, in-
cluding both those in the Rivet distribution and any plugins which are found at
– 7 –
runtime.
rivet --show-analysis hpatti
will show a lot of details about any analy-
ses whose name match the
hpatti
regular expression pattern — simple bits of analysis
name are a perfectly valid subset of this. For example,
rivet --show-analysis
CDF_200
exploits the standard Rivet analysis naming scheme to show details of all
available CDF experiment analyses published in the “noughties.”
•Running analyses: rivet -a DELPHI_1996_S3430090 fifo.hepmc
will run the
Rivet
DELPHI_1996_S3430090
[
9
] analysis on the events in the
fifo.hepmc
file (which,
from the name, is probably a filesystem named pipe rather than a normal file). This
analysis is the one originally used for the Delphi “Professor” generator tuning. If
the first event in the data file does not have appropriate beam particles, the analysis
will be disabled; since there is only one analysis in this case, the command will exit
immediately with a warning if the first event is not an e+e−event.
•Histogramming: rivet fifo.hepmc -H foo.yoda
will read all the events in the
fifo.hepmc
file. The
-H
switch is used to specify that the output histogram file will
be named foo.yoda. By default the output file is called Rivet.yoda.
•Fine-grained logging:
rivet fifo.hepmc -A -l Rivet.Analysis=DEBUG \
-l Rivet.Projection=DEBUG -l Rivet.Projection.FinalState=TRACE \
-l NEvt=WARN
will analyse events as before, but will print different status information
as the run progresses. Hierarchical logging control is possible down to the level of
individual analyses and projections as shown above; this is useful for debugging
without getting overloaded with debug information from all the components at once.
The default level is “info”, which lies between “debug” and “warning”; the “trace”
level is for very low level information, and probably isn’t needed by normal users.
4. Using analysis data
In this section, we summarise how to use the data files which Rivet produces for plotting,
validation and tuning.
4.1 Histogram formats
Rivet produces output data in the YODA text-based format – see
http://yoda.hepforge.
org
. This is a significant change from versions of Rivet before 2.0.0, which used the AIDA
programming interface and XML format. If you do not want to use the plotting tools that
come with Rivet (cf. Sec. 4.2), you might wish to convert the YODA files to a different
format for plotting: the YODA package itself provides several scripts for this purpose.
Conversion to ROOT
For many people, the first question will be “how do I plot my
Rivet histograms using ROOT?” [10]. Setting aside the suggestion of masochism that this
raises, be assured that the
yoda2root
script (installed by YODA if built with ROOT
support enabled) will do a direct conversion of a
.yoda
file into an equivalent
.root
file.
– 8 –

Equivalent, that is, as far as ROOT can represent the information in a YODA histogram:
YODA stores far more information about weights and distribution moments within bins
than ROOT can handle. For programmatic conversion, both the C++ and Python interfaces
to YODA can convert YODA objects into their ROOT equivalents (and vice versa).
Conversion to “flat format”
Most of our histogramming is based around a “flat” plain
text format, which can easily be read (and written) by hand. YODA provides a script called
yoda2flat
to do this conversion. Run
yoda2flat -h
to get usage instructions. Aside
from anything else, this is useful for simply checking the contents of an YODA file, with
yoda2flat Rivet.yoda - | less.
We’re aften asked why we don’t use ROOT internally. It’s a natural question,
given how dominant ROOT is in (experimental) particle physics data analysis and
plotting. Rivet’s not using ROOT was originally historical, but is now a matter of
our requirements. ROOT is a very monolithic system, and when we started writing Rivet,
many theorists (who we needed to be on-side) were unhappy about introducing such a large
dependency – so we at first settled on using the AIDA/LWH system, which could be fully
embedded in the Rivet code.
Eventually we decided that AIDA had run its course, due to such things as the awkwardness
of histogram addition and division, confusion between bin heights and areas, and lack
of support for gaps in binning (needed by several analyses). ROOT was the obvious
replacement, but after detailed consideration we decided that it wouldn’t solve the problems:
we would re-encounter many of the same weighted statistics issues we had already dealt
with in AIDA (as well as weight-handling not being enabled by default), binning gaps
still wouldn’t be supported, and we would block future development thanks to ROOT’s
notorious thread-unsafety and object ownership issues. Plus, how hard can histogramming
be? Having thought a lot about histogramming over the years, we decided to write YODA.
It’s taken several years (admittedly with very low manpower fractions on that task!) to
iterate to a design that we’re really happy with, but we think YODA is a really pleasant
way to do histogramming. It’s object oriented but without the global state issues of
ROOT, or the factory-based weirdnesses of AIDA. Weights are handled naturally, bins
store enough distribution moments to do some pretty advanced stuff, overflows are handled
by default, scalings (of weights or axes) and histogram arithmetic are easy and natural,
and it’s computationally efficient. It’s also not finished – completed 2D histogramming
and abstract binning ideas are still to be implemented – but that means that your desired
enhancements stand a chance of getting implemented. So let us know your thoughts!
4.2 Plotting and comparing data
Rivet comes with three commands —
rivet-mkhtml
,
rivet-cmphistos
and
make-plots
— for comparing and plotting data files. These commands produce nice comparison plots of
publication quality from the YODA format text files.
The high level program
rivet-mkhtml
will automatically create a plot webpage from
the given YODA files. It searches for reference data automatically and uses the other two
– 9 –

commands internally. Example:
$rivet-mkhtml withUE.yoda:’Title=With UE’ withoutUE.yoda:’LineColor=blue’
Run rivet-mkhtml --help to find out about all features and options.
You can also run the other two commands separately:
•rivet-cmphistos
will accept a number of YODA files as input (ending in
.yoda
),
identify which plots are available in them, and combine the MC and reference plots
appropriately into a set of plot data files ending with
.dat
. More options are described
by running rivet-cmphistos --help.
Incidentally, the reference files for each Rivet analysis are to be found in the installed
Rivet shared data directory,
hinstalldir i/share/Rivet
. You can find the location of
this by using the rivet-config command:
$rivet-config --datadir
•You can plot the created data files using the make-plots command:
$make-plots --pdf *.dat
The
--pdf
flag makes the output plots in PDF format: by default the output is in
PostScript (.ps), and flags for conversion to EPS and PNG are also available.
4.3 Merging histograms from different Rivet runs
The yodamerge script will take several YODA files and merge them together into a single
one. If a histogram path only occurs in one of the input files, it is copied directly to the
output. If it occurs more than once, the statistics of those histograms will be merged with
full accuracy, producing the same output as would have been obtained from a single long
run containing all the same events. Run
yodamerge -h
to get instructions on using the
script.
This exact merging only applies for histograms, of either normal or profile type.
There are heuristics in the merging script to detect whether or not there should be
a common normalization, but as with all heuristics they are not 100% guaranteed.
Also, more complex objects such as histogrammed asymmetries, of the form
H1−H2/H1
+
H2
,
are not really histograms: in YODA the division operation will automatically convert them
to the
Scatter2D
type, for which no moments are stored. It’s not possible to combine the
statistics of such objects in a straightforward way – so for now only one of the input copies
will be output. Watch Rivet 2.x for developments which will finally properly solve the run
combination problem, by allowing the
finalize()
step to be re-run on combined Rivet
run outputs!
– 10 –
Part II
Standard Rivet analyses
In this section we describe the standard experimental analyses included with the Rivet
library. To maintain synchronisation with the code, these descriptions are generated
automatically from the metadata in the analysis objects themselves.
5. LEP and SLC analyses
6. Tevatron analyses
7. LHC analyses
8. SPS analyses
9. HERA analyses
10. RHIC analyses
11. Monte Carlo analyses
12. Example analyses
13. Misc. analyses
– 11 –
Part III
How Rivet works
Hopefully by now you’ve run Rivet a few times and got the hang of the command line
interface and viewing the resulting analysis data files. Maybe you’ve got some ideas of
analyses that you would like to see in Rivet’s library. If so, then you’ll need to know a little
about Rivet’s internal workings before you can start coding: with any luck by the end of
this section that won’t seem particularly intimidating.
The core objects in Rivet are “projections” and “analyses”. Hopefully “analyses” isn’t
a surprise — that’s just the collection of routines that will make histograms to compare with
reference data, and the only things that might differ there from experiences with HZTool[
11
]
are the new histogramming system and the fact that we’ve used some object orientation
concepts to make life a bit easier. The meaning of “projections”, as applied to event analysis,
will probably be less obvious. We’ll discuss them soon, but first a semi-philosophical aside
on the “right way” to do physics analyses on and involving simulated data.
14. The science and art of physically valid MC analysis
The world of MC event generators is a wonderfully convenient one for experimentalists: we
are provided with fully exclusive events whose most complex correlations can be explored
and used to optimise analysis algorithms and some kinds of detector correction effects. It is
absolutely true that the majority of data analyses and detector designs in modern collider
physics would be very different without MC simulation.
But it is very important to remember that it is just simulation: event generators encode
much of known physics and phenomenologically explore the non-perturbative areas of QCD,
but only unadulterated experiment can really tell us about how the world behaves. The
richness and convenience of MC simulation can be seductive, and it is important that
experimental use of MC strives to understand and minimise systematic biases which may
result from use of simulated data, and to not “unfold” imperfect models when measuring
the real world. The canonical example of the latter effect is the unfolding of hadronisation
(a deeply non-perturbative and imperfectly-understood process) at the Tevatron (Run I),
based on MC models. Publishing “measured quarks” is not physics — much of the data
thus published has proven of little use to either theory or experiment in the following years.
In the future we must be alert to such temptation and avoid such gaffes — and much more
subtle ones.
These concerns on how MC can be abused in treating measured data also apply to MC
validation studies. A key observable in QCD tunings is the
p⊥
of the
Z
boson, which has
no phase space at exactly
p⊥
= 0 but a very sharp peak at
O
(
1-2 GeV
). The exact location
of this peak is mostly sensitive to the width parameter of a nucleon “intrinsic
p⊥
” in MC
generators, plus some soft initial state radiation and QED bremsstrahlung. Unfortunately,
all the published Tevatron measurements of this observable have either “unfolded” the QED
effects to the “
Zp⊥
” as attached to the object in the HepMC/HEPEVT event record with a
– 12 –
PDG ID code of 23, or have used MC data to fill regions of phase space where the detector
could not measure. Accordingly, it is very hard to make an accurate and portable MC
analysis to fit this data, without similarly delving into the event record in search of “the
boson”. While common practice, this approach intrinsically limits the precision of measured
data to the calculational order of the generator — often not analytically well-defined. We
can do better.
Away from this philosophical propaganda (which nevertheless we hope strikes some
chords in influential places. . . ), there are also excellent pragmatic reasons for MC analyses
to avoid treating the MC “truth” record as genuine truth. The key argument is portability:
there is no MC generator which is the ideal choice for all scenarios, and an essential tool for
understanding sub-leading variability in theoretical approaches to various areas of physics is
to use several generators with similar leading accuracies but different sub-leading formalisms.
While the HEPEVT record as written by HERWIG and PYTHIA has become familiar to
many, there are many ambiguities in how it is filled, from the allowed graph structures
to the particle content. Notably, the Sherpa event generator explicitly elides Feynman
diagram propagators from the event record, perhaps driven by a desire to protect us from
our baser analytical instincts. The Herwig++ event generator takes the almost antipodal
approach of expressing different contributing Feynman diagram topologies in different ways
(not physically meaningful!) and seamlessly integrating shower emissions with the hard
process particles. The general trend in MC simulation is to blur the practically-induced line
between the sampled matrix element and the Markovian parton cascade, challenging many
established assumptions about “how MC works”. In short, if you want to “find” the
Z
to see
what its
p⊥
or
η
spectrum looks like, many new generators may break your honed PYTHIA
code. . . or silently give systematically wrong results. The unfortunate truth is that most of
the event record is intended for generator debugging rather than physics interpretation.
Fortunately, the situation is not altogether negative: in practice it is usually as easy to
write a highly functional MC analysis using only final state particles and their physically
meaningful on-shell decay parents. These are, since the release of HepMC 2.5, standardised
to have status codes of 1 and 2 respectively.
Z
-finding is then a matter of choosing decay
lepton candidates, windowing their invariant mass around the known
Z
mass, and choosing
the best
Z
candidate: effectively a simplified version of an experimental analysis of the
same quantity. This is a generally good heuristic for a safe MC analysis! Note that since
it’s known that you will be running the analysis on signal events, and there are no detector
effects to deal with, almost all the details that make a real analysis hard can be ignored. The
one detail that is worth including is summing momentum from photons around the charged
leptons, before mass-windowing: this physically corresponds to the indistinguishability of
collinear energy deposits in trackers and calorimeters and would be the ideal published
experimental measurement of Drell-Yan p⊥for MC tuning. Note that similar analyses for
W
bosons have the luxury over a true experiment of being able to exactly identify the
decay neutrino rather than having to mess around with missing energy. Similarly, detailed
unstable hadron (or tau) reconstruction is unnecessary, due to the presence of these particles
in the event record with status code 2. In short, writing an effective analysis which is
automatically portable between generators is no harder than trying to decipher the variable
– 13 –

structures and multiple particle copies of the debugging-level event objects. And of course
Rivet provides lots of tools to do almost all the standard fiddly bits for you, so there’s no
excuse!
Good luck, and be careful!
15. Projections
The name “projection” is meant to evoke thoughts of projection operators, low-dimensional
slices/views of high-dimensional spaces, and other things that might appeal to physicists who
view the world through quantum-tinted lenses. A more mundane, but equally applicable,
name would be “observable calculators”, but since that’s a long name, the things they
return aren’t necessarily observable, and they all inherit from the
Projection
base class,
we’ll stick to that name. It doesn’t take long to get used to using the name as a synonym
for “calculator”, without being intimidated by ideas that they might be some sort of
high-powered deep magic. 90% of them is simple and self-explanatory, as a peek under the
bonnet of e.g. the all-important FinalState projection will reveal.
Projections can be relatively simple things like event shapes (i.e. scalar, vector or
tensor quantities), or arbitrarily complex things like lossy or selective views of the event
final state. Most users will see them attached to analyses by declarations in each analysis’
initialisation, but they can also be recursively “nested” inside other projections
3
(provided
there are no infinite loops in the nesting chain.) Calling a complex projection in an analysis
may actually transparently execute many projections on each event.
You can find a list of all existing projections and their inheritance structure in Fig. 1.
An up-to-date version of this listing can always be found in the code documentation at
http://rivet.hepforge.org.
15.1 Projection caching
Aside from semantic issues of how the class design assigns the process of analysing events,
projections are important computationally because they live in a framework which auto-
matically stores (“caches”) their results between events. This is a crucial feature for the
long-term scalability of Rivet, as the previous experience with HZTool was that HERA
validation code ran very slowly due to repeated calculation of the same
k⊥
clustering
algorithm (at that time notorious for scaling as the 3rd power of the number of particles.)
A concrete example may help in understanding how this works. Let’s say we have two
analyses which have the same run conditions, i.e. incoming beam types, beam energies,
etc. Each also uses the thrust event shape measure to define a set of basis vectors for their
analysis. For each event that gets passed to Rivet, whichever analysis gets called first will
immediately (although maybe indirectly) call a
FinalState
projection to get a list of stable,
physical particles (filtering out the intermediate and book-keeping entries in the HepMC
3
Provided there are no dependency loops in the projection chains! Strictly, only acyclic graphs of
projection dependencies are valid, but there is currently no code in Rivet that will attempt to verify this
restriction.
– 14 –

event record). That FS projection is then “attached” to the event. Next, the first analysis
will call a
Thrust
projection which internally uses the same final state projection to define
the momentum vectors used in calculating the thrust. Once finished, the thrust projection
will also be attached to the event.
So far, projections have offered no benefits. However, when the second analysis runs it
will similarly try to apply its final state and thrust projections to the event. Rather than
repeat the calculations, Rivet’s infrastructure will detect that an equivalent calculation
has already been run and will just return references to the already-run projections. Since
projections can also contain and use other projections, this model allows some substantial
computational savings, without the analysis author even needing to be particularly aware
of what is going on.
Observant readers may have noticed a problem with all this projection caching cleverness:
what if the final states aren’t defined the same way? One might provide charged final state
particles only, or the acceptances (defined in pseudorapidity range and a IR
p⊥
cutoff) might
differ. Rivet handles this by making each projection provide a comparison operator which is
used to decide whether the cached version is acceptable or if the calculation must be re-run
with different settings. Because projections can be nested, applying a top-level projection
to an event can spark off a cascade of comparisons, calculations and cache accesses, making
use of existing results wherever possible.
15.2 Using projection caching
So far this is all theory — how does one actually use projections in Rivet? First, you should
understand that projections, while semantically stored within each other, are actually
all registered with a central
ProjectionHandler
object.
4
The reason for this central
registration is to ensure that all projections’ lifespans are managed in a consistent way,
and to protect projection and analysis authors from some technical subtleties in how C++
polymorphism works.
Inside the constructor of a
Projection
or the
init
method of an
Analysis
class, you
must call the
addProjection
function. This takes two arguments, the projection to be
registered (by
const
reference), and a name. The name is local to the parent object, so you
need not worry about name clashes between objects. A very important point is that the
passed
Projection
is not the one that is actually centrally registered — that distinction
belongs to a newly created heap object which is created within the
addProjection
method
by means of the overloaded
Projection::clone()
method. Hence it is completely safe
— and recommended — to use only local (stack) objects in
Projection
and
Analysis
constructors.
4
As of version 1.1 onwards — previously, they were stored as class members inside other
Projection
s
and Analysis classes.
– 15 –

At this point, if you have rightly bought into C++ ideas like super-strong type-safety,
this proliferation of dynamic casting may worry you: the compiler can’t possibly
check if a projection of the requested name has been registered, nor whether the
downcast to the requested concrete type is legal. These are very legitimate concerns!
In truth, we’d like to have this level of extra safety: who wouldn’t? But in the past, when
projections were held as members of
ProjectionApplier
classes rather than in the central
ProjectionHandler
repository, the benefits of the strong typing were outweighed by more
serious and subtle bugs relating to projection lifetime and object “slicing”. At least when the
current approach goes wrong it will throw an unmissable runtime error — until it’s fixed, of
course! — rather than silently do the wrong thing.
Our problems here are a microcosm of the perpetual language battle between strict and
dynamic typing, runtime versus compile time errors. In practice, this manifests itself as a
trade-off between the benefits of static type safety and the inconvenience of the type-system
gymnastics that it engenders. We take some comfort from the number of very good programs
have been and are still written in dynamically typed, interpreted languages like Python,
where virtually all error checking (barring first-scan parsing errors) must be done at runtime.
By pushing some checking to the domain of runtime errors, Rivet’s code is (we believe) in
practice safer, and certainly more clear and elegant. However, we believe that with runtime
checking should come a culture of unit testing, which is not yet in place in Rivet.
As a final thought, one reason for Rivet’s internal complexity is that C++ is just not a
very good language for this sort of thing: we are operating on the boundary between event
generator codes, number crunching routines (including third party libraries like FastJet)
and user routines. The former set unavoidably require native interfaces and benefit from
static typing; the latter benefit from interface flexibility, fast prototyping and syntactic
clarity. Maybe a future version of Rivet will break through the technical barriers to a
hybrid approach and allow users to run compiled projections from interpreted analysis code.
For now, however, we hope that our brand of “slightly less safe C++” will be a pleasant
compromise.
16. Analyses
16.1 Writing a new analysis
This section provides a recipe that can be followed to write a new analysis using the Rivet
projections.
Every analysis must inherit from
Rivet::Analysis
and, in addition to the constructor,
must implement a minimum of three methods. Those methods are
init()
,
analyze(const
Rivet::Event&)
and
finalize()
, which are called once at the beginning of the analysis,
once per event and once at the end of the analysis respectively.
The new analysis should include the header for the base analysis class plus whichever
Rivet projections are to be used, and should work under the
Rivet
namespace. Since
– 16 –

analyses are hardly ever intended to be inherited from, they are usually implemented within
a single
.cc
file with no corresponding header. The skeleton of a new analysis named
UserAnalysis
that uses the
FinalState
projection might therefore start off looking like
this, in a file named UserAnalysis.cc:
#include "Rivet/Analysis.hh"
namespace Rivet {
class UserAnalysis : public Analysis {
public:
UserAnalysis() : Analysis("USERANA") { }
void init() { ... }
void analyze(const Event& event) { ... }
void finalize() { ... }
};
}
The constructor body is usually left empty, as all event loop setup is done in the
init()
method: the one required constructor feature is to make a call to its base
Analysis
constructor, passing a string by which the analysis will register itself with the Rivet
framework. This name is the one exposed to a command-line or API user of this analysis:
usually it is the same as the class name, which for official analyses is always in upper case.
Early versions of Rivet required the user to declare allowed beam types, energies,
whether a cross-section is required, etc. in the analysis constructor via methods
like
setBeams(...)
and
setNeedsCrossSection(...)
. This information is now
much preferred to be taken from the
.info
file for the analysis, and must be done this way
in analyses submitted for inclusion in future Rivet releases.
The
init()
method for the
UserAnalysis
class should add to the analysis all of the
projections that will be used. Projections can be added to an analysis with a call to
addProjection(Projection, std::string)
, which takes as argument the projection to
be added and a name by which that projection can later be referenced. For this example
the
FinalState
projection is to be referenced by the string
"FS"
to provide access to all of
the final state particles inside a detector pseudorapidity coverage of
±
5
.
0. The syntax to
create and add that projection is as follows:
init() {
const FinalState fs(-5.0, 5.0);
addProjection(fs, "FS");
}
– 17 –

A second task of the
init()
method is the booking of all histograms which are later to
be filled in the analysis code. Information about the histogramming system can be found in
Section 16.3.
16.2 Utility classes
Rivet provides quite a few object types for physics purposes, such as three- and four-vectors,
matrices and Lorentz boosts, and convenience proxy objects for e.g. particles and jets. We
now briefly summarise the most important features of some of these objects; more complete
interface descriptions can be found in the generated Doxygen web pages on the Rivet web
site, or simply by browsing the relevant header files.
16.2.1
The
FourMomentum
class is the main physics vector that you will encounter when writing
Rivet analyses. Its functionality and interface are similar to the CLHEP
HepLorentzVector
with which many users will be familiar, but without some of the historical baggage.
Vector components
The
FourMomentum E()
,
px()
,
py()
,
pz()
&
mass()
methods are
(unsurprisingly) accessors for the vector’s energy, momentum components and mass. The
vector3()
method returns a spatial
Vector3
object, i.e. the 3 spatial components of the
4-vector.
Useful properties
The
pT()
and
Et()
methods are used to calculate the transverse
momentum and transverse energy. Angular variables are accessed via the
eta()
,
phi()
and
theta()
for the pseudorapidity, azimuthal angle and polar angle respectively. More
explicitly named versions of these also exist, named
pseudorapidity()
,
azimuthalAngle()
and
polarAngle()
. Finally, the true rapidity is accessed via the
rapidity()
method. Many
of these functions are also available as external functions, as are algebraic functions such as
cross(vec3a, vec3b), which is perhaps more palatable than vec3a.cross(vec3b).
Distances
The
η
–
φ
distance between any two four-vectors (and/or three-vectors) can
be computed using a range of overloaded external functions of the type
deltaR(vec1,
vec2)
. Angles between such vectors can be calculated via the similar
angle(vec1, vec2)
functions.
16.2.2
This class is a wrapper around the HepMC
GenParticle
class.
Particle
objects are usually
obtained as a vector from the
particles()
method of a
FinalState
projection. Rather
than having to directly use the HepMC objects, and e.g. translate HepMC four-vectors
into the Rivet equivalent, several key properties are accessed directly via the
Particle
interface (and more may be added). The main methods of interest are
momentum()
, which
returns a
FourMomentum
, and
pdgId()
, which returns the PDG particle ID code. The PDG
code can be used to access particle properties by using functions such as
PID::isHadron()
,
PID::threeCharge(), etc. (these are defined in Rivet/Tools/ParticleIDMethods.hh.)
– 18 –

16.2.3
Jets are obtained from one of the jet accessor methods of a projection that implements the
JetAlg
interface, e.g.
FastJets::jetsByPt()
(this returns the jets sorted by
p⊥
, such that
the first element in the vector is the hardest jet — usually what you want.) The most useful
methods are
particles()
,
momenta()
,
momentum()
(a representative
FourMomentum
), and
some checks on the jet contents such as
containsParticleId(pid)
,
containsCharm()
and
containsBottom().
16.2.4 Mathematical utilities
The
Rivet/Math/MathUtils.hh
header defines a variety of mathematical utility functions.
These include testing functions such as
isZero(a)
,
fuzzyEquals(a, b)
and
inRange(a,
low, high)
, whose purpose is hopefully self-evident, and angular range-mapping functions
such as mapAngle0To2Pi(a),mapAngleMPiToPi(a), etc.
16.3 Histogramming
Rivet’s histogramming uses the YODA system, composed of “analysis object” classes
Histo1D
,
Profile1D
,
Scatter2D
, and less-used 2D histograms and profiles, and 1D and
3D scatter plots. These can be created directly in the analysis code, but to hook fully into
the multiple-event-weight and other machinery in Rivet it’s normal to book them through
Analysis class methods, to be called in the init step of your analysis routine:
void init() {
_h_one = bookHisto1D(2, 1, 1);
_h_two = bookProfile1D(3, 1, 2);
_h_three = bookHisto1D("d00-x00-y00", logscale(50, 1.0, 100.0));
}
Here the first two bookings have a rather cryptic 3-integer sequence as the first
arguments. This is the recommended scheme, which corresponds to the HepData structure
of 1D histograms as a combination of
x
and
y
axes in a dataset
d
, giving names of the
form
dhdi-xhxi-yhyi
. This auto-booking of histograms saves you from having to copy out
reams of bin edges and values into your code, and makes sure that any data bug-fixes
in HepData are easily propagated to Rivet. The reference data files which are used for
these booking methods are distributed and installed with Rivet, you can find them in
the
hinstalldir i/share/Rivet
directory of your installation. The third booking is for a
histogram for which there is no such HepData entry: it uses the usual scheme of specifying
the name, number of bins and the min/max x-axis limits manually.
Filling the histograms is done in the
MyAnalysis::analyse()
function. Remember to
specify the event weight as you fill:
void analyze(const Event& e) {
[projections, cuts, etc.]
...
_h_one->fill(pT, event.weight());
– 19 –
_h_two->fill(pT, Nch, event.weight());
_h_three->fill(fabs(eta), event.weight());
}
Finally, histogram normalisations, scalings, divisions etc. are done in the
MyAnalysis::-
finalize()
method. For normalisations and scalings you will find appropriate con-
venience methods
Analysis::normalize(histo, norm)
and
Analysis::scale(histo,
scalefactor)
. Many analyses need to be scaled to the generator cross-section, with
the number of event weights to pass cuts being included in the normalisation factor: for
this you will have to track the passed-cuts weight sum yourself via a member variable, but
the analysis class provides
Analysis::crossSection()
and
Analysis::sumOfWeights()
methods to access the pre-cuts cross-section and weight sum respectively.
16.4 Analysis metadata
To keep the analysis source code uncluttered, and to allow for iteration of data plot
presentation without re-compilation and/or re-running, Rivet prefers that analysis metadata
is provided via separate files rather than hard-coded into the analysis library. There are
two such files: an analysis info file, with the suffix
.info
, and a plot styling file, with the
suffix .plot.
16.4.1 Analysis info files
The analysis info files are in YAML format: a simple data format intended to be cleaner
and more human-readable/writeable than XML. As well as the analysis name (which must
coincide with the filename and the name provided to the
Analysis
constructor, this file
stores details of the collider, experiment, date of the analysis, Rivet/data analysis authors
and contact email addresses, one-line and more complete descriptions of the analysis, advice
on how to run it, suggested generator-level cuts, and BibTeX keys and entries for this user
manual. It is also where the validation status of the analysis is declared:
See the standard analyses’ info files for guidance on how to populate this file. Info files
are searched for in the paths known to the
Rivet::getAnalysisInfoPaths()
function,
which many be prepended to using the
$RIVET_INFO_PATH
environment variable: the first
matching file to be found will be used.
16.4.2 Plot styling files
The
.plot
files are in the header format for the
make-plots
plotting system and are picked
up and merged with the plot data by the Rivet
compare-histos
script which produces
the
make-plots
input data files. All the analysis’ plots should have a
BEGIN PLOT ...
END PLOT
section in this file, specifying the title and
x
/
y
-axis labels (the
Title
, and
XLabel
/
YLabel
directives). In addition, you can use this file to choose whether the
x
and/or
y
axes should be shown with a log scale (
LogX
,
LogY
), to position the legend box
to minimise clashes with the data points and MC lines (
LegendXPos
,
LegendYPos
) and
any other valid
make-plots
directives including special text labels or forced plot range
boundaries. Regular expressions may be used to apply a directive to all analysis names
– 20 –

matching a pattern rather than having to specify the same directive repeatedly for many
plots.
See the standard analyses’ plot files and the
make-plots
documentation (e.g. on the
Rivet website) for guidance on how to write these files. Plot info files are searched for in the
paths known to the
Rivet::getAnalysisPlotPaths()
function, which many be prepended
to using the
$RIVET_PLOT_PATH
environment variable. As usual, the first matching file to
be found will be used.
16.5 Pluggable analyses
Rivet’s standard analyses are not actually built into the main
libRivet
library: they are
loaded dynamically at runtime as an analysis plugin library. While you don’t need to worry
too much about the technicalities of this, it does mean that you can similarly write analyses
of your own, compile them into a similar plugin library and run them from
rivet
without
ever having to modify any of the main Rivet sources or build system. This means that you
can write and run your own analyses with a system-installed copy of Rivet, and not have to
re-patch the main library when a newer version comes out (although chances are you will
have to recompile, since the binary interface usually change between releases.)
To get started writing your analysis and understand the plugin system better, you
should check out the documentation in the wiki on the Rivet website:
http://rivet.
hepforge.org/trac/wiki/
. The standard
rivet-mkanalysis
and
rivet-buildplugin
scripts can respectively be used to make an analysis template with many “boilerplate”
details filled in (including bibliographic information from Inspire if available), and to build
a plugin library with the appropriate compiler options.
16.5.1 Plugin paths
To load pluggable analyses you will need to set the
$RIVET_ANALYSIS_PATH
environment
variable: this is a standard colon-separated UNIX path, specifying directories in which
analysis plugin libraries may be found. If it is unspecified, the Rivet loader system will
assume that the only entry is the
lib
directory in the Rivet installation area. Specifying
the variable adds new paths for searching before the standard library area, and they will be
searched in the left-to-right order in the path variable.
If analyses with duplicate names are found, a warning message is issued and the first
version to have been found will be used. This allows you to override standard analyses with
same-named variants of your own, provided they are loaded from different directories.
In Rivet 2.1.0 and later, this
$RIVET_ANALYSIS_PATH
variable (and the others
described below) have an special extra syntax feature: if the environment variable
ends with a double separator, i.e.
::
, then the default path will not be appended at
all. This can be useful if you want to make absolutely certain not to fall back to the default
locations, for example to avoid the “duplicate analysis” warnings if you are getting a lot of
them.
– 21 –
Several further environment variables are used to load analysis reference data and
metadata files:
:
A standard colon-separated path list, whose elements are searched
in order for reference histogram files. If the required file is not found in this path,
Rivet will fall back to looking in the analysis library paths (for convenience, as it
is normal for plugin analysis developers to put analysis library and data files in the
same directory and it would be annoying to have to set several variables to make this
work), and then the standard Rivet installation data directory.
:
The path list searched first for analysis
.info
metadata files. The
search fallback mechanism works as for $RIVET_REF_PATH.
:
The path list searched first for analysis
.plot
presentation style files.
The search fallbacks again work as for $RIVET_REF_PATH.
These paths can be accessed from the API using the
Rivet::getAnalysisLibPaths()
etc. functions, and can be searched for files using the Rivet lookup rules via the
Rivet::find-
AnalysisLibFile(filename)
etc. functions. See the Doxygen documentation for more
details. In the lookups using these paths, if the variable ends with a double separator, i.e.
::
, then the default path will not be appended: this may be useful in some situations.
These functions are also available in the Python
rivet
module, with the same behaviours.
17. Using Rivet as a library
You don’t have to use Rivet via the provided command-line programmes: for some applica-
tions you may want to have more direct control of how Rivet processes events. Here are
some possible reasons:
•
You need to not waste CPU cycles and I/O resources on rendering HepMC events to a
string representation which is immediately read back in. The FIFO idiom (Section 3.1)
is not perfect: we use it in circumstances where the convenience and decoupling
outweighs the CPU cost.
•
You don’t want to write out histograms to file, preferring to use them as code objects.
Perhaps for applications which want to manipulate histogram data periodically before
the end of the run.
•
You enjoy tormenting Rivet developers who know their API is far from perfect, by
complaining if it changes!
•. . . and many more!
The Rivet API (application programming interface) has been designed in the hope of very
simple integration into other applications: all you have to do is create a
Rivet::Analysis-
Handler
object, tell it which analyses to apply on the events, and then call its
analyse(evt)
– 22 –

method for each HepMC event – wherever they come from. The API is (we hope) stable,
with the exception of the histogramming parts.
The histogramming interfaces in Rivet have long been advertised as marked for
replacement, and while progress in that area has lagger far behind our ambitions,
it will happen with the 2.0.0 release, with unavoidable impact on the related parts
of the API. You have been warned!
The API is available for C++ and, in a more restricted form, Python. We will explain
the C++ version here; if you wish to operate Rivet (or e.g. use its path-searching capabilities
to find Rivet-related files in the standard way) from Python then take a look inside the
rivet
and
rivet-*
Python scripts (e.g.
less ‘which rivet‘
) or use the module documentation
cf.
> python
>>> import rivet
>>> help(rivet)
And now the C++ API. The best way to explain is, of course, by example. Here is a
simple C++ example based on the
test/testApi.cc
source which we use in development
to ensure continuing API functionality:
#include "Rivet/AnalysisHandler.hh"
#include "HepMC/GenEvent.h"
#include "HepMC/IO_GenEvent.h"
using namespace std;
int main() {
// Create analysis handler
Rivet::AnalysisHandler rivet;
// Specify the analyses to be used
rivet.addAnalysis("D0_2008_S7554427");
vector<string> moreanalyses(1, "D0_2007_S7075677");
rivet.addAnalyses(moreanalyses);
// The usual mess of reading from a HepMC file!
std::istream* file = new std::fstream("testApi.hepmc", std::ios::in);
HepMC::IO_GenEvent hepmcio(*file);
HepMC::GenEvent* evt = hepmcio.read_next_event();
double sum_of_weights = 0.0;
– 23 –
while (evt) {
// Analyse the current event
rivet.analyze(*evt);
sum_of_weights += evt->weights()[0];
// Clean up and get next event
delete evt; evt = 0;
hepmcio >> evt;
}
delete file; file = 0;
rivet.setCrossSection(1.0);
rivet.setSumOfWeights(sum_of_weights); // not necessary, but allowed
rivet.finalize();
rivet.writeData("out");
return 0;
}
Compilation of this, if placed in a file called
myrivet.cc
, into an executable called
myrivet is simplest and most robust with use of the rivet-config script:
g++ myrivet.cc -o myrivet ‘rivet-config --cppflags --ldflags --libs‘
It should just work!
If you are doing something a bit more advanced, for example using the AGILe package’s
similar API to generate Fortran generator Pythia events and pass them directly to the
Rivet analysis handler, you will need to also add the various compiler and linker flags for
the extra libraries, e.g.
g++ myrivet.cc -o myrivet \
‘rivet-config --cppflags --ldflags --libs‘ \
‘agile-config --cppflags --ldflags --libs‘
would be needed to compile the following AGILe+Rivet code:
#include "AGILe/Loader.hh"
#include "AGILe/Generator.hh"
#include "Rivet/AnalysisHandler.hh"
#include "HepMC/GenEvent.h"
#include "HepMC/IO_GenEvent.h"
using namespace std;
int main() {
– 24 –
// Have a look what generators are available
AGILe::Loader::initialize();
const vector<string> gens = AGILe::Loader::getAvailableGens();
foreach (const string& gen, gens) {
cout << gen << endl;
}
// Load libraries for a specific generator and instantiate it
AGILe::Loader::loadGenLibs("Pythia6:425");
AGILe::Generator* generator = AGILe::Loader::createGen();
cout << "Running " << generator->getName()
<< " version " << generator->getVersion() << endl;
// Set generator initial state for LEP
const int particle1 = AGILe::ELECTRON;
const int particle2 = AGILe::POSITRON;
const double sqrts = 91;
generator->setInitialState(particle1, energy1, sqrts/2.0, sqrts/2.0);
generator->setSeed(14283);
// Set some parameters
generator->setParam("MSTP(5)", "320"); //< PYTHIA tune
// ...
// Set up Rivet with a LEP analysis
Rivet::AnalysisHandler rivet;
rivet.addAnalysis("DELPHI_1996_S3430090");
// Run events
const int EVTMAX = 10000;
HepMC::GenEvent evt;
for (int i = 0; i < EVTMAX; ++i) {
generator->makeEvent(evt);
rivet.analyze(evt);
}
// Finalize Rivet and generator
rivet.finalize();
rivet.writeData("out.yoda");
generator->finalize();
return 0;
}
– 25 –
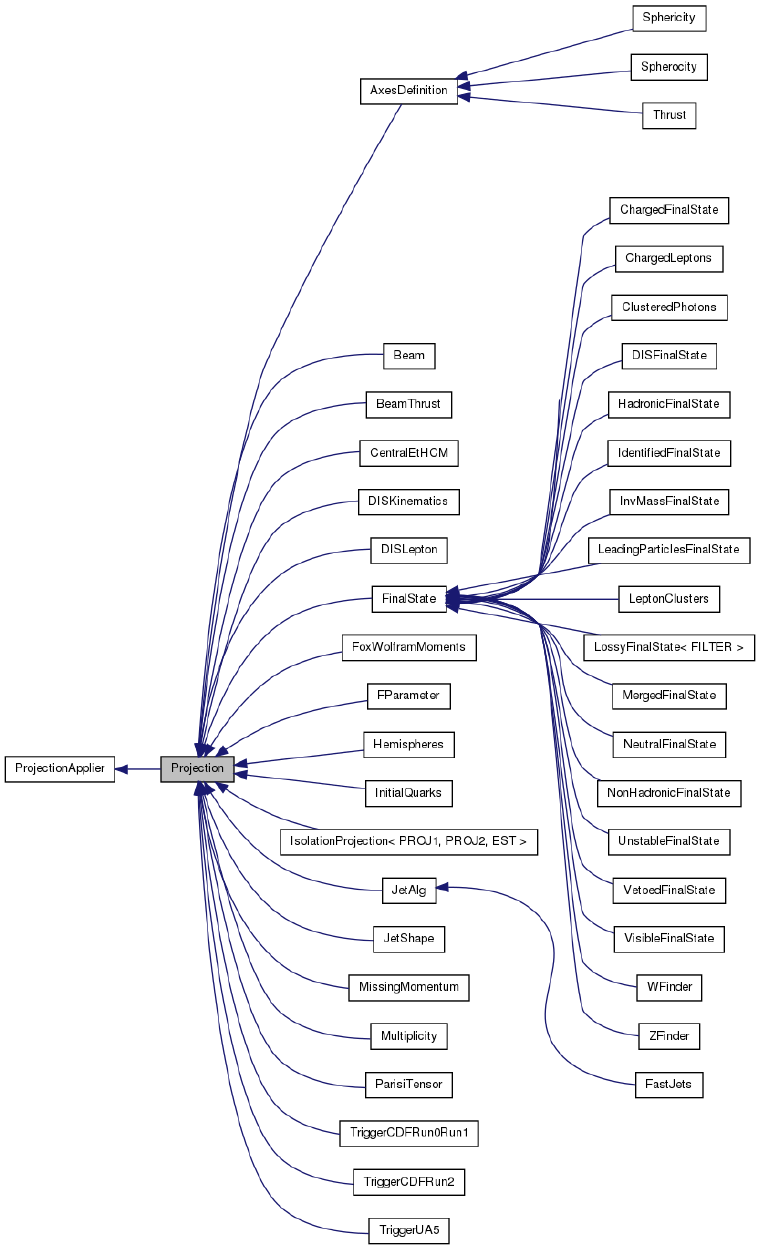
Figure 1: List of available projections and their inheritance structure.
– 26 –

Part IV
Appendices
A. The Fortran generator interface (deprecated)
•Simple run: agile-runmc Herwig:6510 -P lep1.params --beams=LEP:91.2 \
-n 1000
will use the Fortran Herwig 6.5.10 generator (the
-g
option switch) to generate
1000 events (the -n switch) in LEP1 mode, i.e. e+e−collisions at √s= 91.2 GeV.
•Parameter changes: agile-runmc Pythia6:425 --beams=LEP:91.2 \
-n 1000 -P myrun.params -p "PARJ(82)=5.27"
will generate 1000 events using
the Fortran Pythia 6.423 generator, again in LEP1 mode. The
-P
switch is ac-
tually the way of specifying a parameters file, with one parameter per line in
the format “
hkeyi hvaluei
”: in this case, the file
lep1.params
is loaded from the
hinstalldir i/share/AGILe
directory, if it isn’t first found in the current directory. The
-p
(lower-case) switch is used to change a named generator parameter, here Pythia’s
PARJ(82)
, which sets the parton shower cutoff scale. Being able to change parameters
on the command line is useful for scanning parameter ranges from a shell loop, or
rapid testing of parameter values without needing to write a parameters file for use
with -P.
•Writing out HepMC events: agile-runmc Pythia6:425 --beams=LHC:14TeV
-n 50 -o out.hepmc -R
will generate 50 LHC events with Pythia. The
-o
switch is
being used here to tell
agile-runmc
to write the generated events to the
out.hepmc
file. This file will be a plain text dump of the HepMC event records in the standard
HepMC format. Use of filename “-” will result in the event stream being written to
standard output (i.e. dumping to the terminal.
B. Acknowledgements
Rivet development has been supported by a variety of sources:
•
All authors acknowledge support from the EU MCnet research network. MCnet is a
Marie Curie Training Network funded under Framework Programme 6 contract MRTN-
CT-2006-035606 and Framework Programme 7 contract PITN-GA-2012-315877.
•
Andy Buckley has been supported by grants from the UK Science and Technology
Facilities Council (Special Project Grant), the Scottish Universities Physics Alliance
(Advanced Research Fellowship), the Royal Society (Research Fellowship), the In-
stitute for Particle Physics Phenomenology (Associateship), and a CERN Scientific
Associateship.
•
Holger Schulz and Frank Siegert acknowledge the support of the German Research
Foundation (DFG).
– 27 –
We also wish to thank the CERN MCplots (
http://mcplots.cern.ch
) team, and
especially Anton Karneyeu, for doing the pre-release testing since the Rivet 1.5 series and
pointing out all the bits that we got wrong: Rivet is a much better system as a result!
– 28 –
Part V
Bibliography
References
[1] M. Dobbs and J. B. Hansen, Comput. Phys. Commun. 134, 41 (2001).
[2] M. R. Whalley, D. Bourilkov, and R. C. Group, (2005), hep-ph/0508110.
[3] M. Cacciari and G. P. Salam, Phys. Lett. B641, 57 (2006), hep-ph/0512210.
[4] M. Cacciari and G. Salam and G.Soyez, http://www.fastjet.fr.
[5]
T. Sjostrand, S. Mrenna, and P. Skands, Comput. Phys. Commun.
178
, 852 (2008), 0710.3820.
[6] T. Sjostrand, (2008), 0809.0303.
[7] M. Bahr et al., Eur. Phys. J. C58, 639 (2008), 0803.0883.
[8] T. Gleisberg et al., JHEP 0902, 007 (2009), 0811.4622.
[9] DELPHI Collaboration, P. Abreu et al., Z. Phys. C73, 11 (1996).
[10] I. Antcheva et al., Comput. Phys. Commun. 180, 2499 (2009).
[11] J. Bromley et al., (1995), ZEUS and H1 Collaborations.
– 29 –
