S3esk_startup_rev2 S3esk Startup Rev2
User Manual: s3esk_startup_rev2
Open the PDF directly: View PDF ![]() .
.
Page Count: 13

Initial Design
for
Spartan-3E Starter Kit
(LCD Display Control)
Ken Chapman
Xilinx Ltd
16
th
February 2006
Rev.2

PicoBlaze Spartan-3E Starter Kit Initial Design 2
Limited Warranty and Disclaimer. These designs are provided to you “as is”. Xilinx and its licensors make and you receive no
warranties or conditions, express, implied, statutory or otherwise, and Xilinx specifically disclaims any implied warranties of
merchantability, non-infringement, or fitness for a particular purpose. Xilinx does not warrant that the functions contained in these
designs will meet your requirements, or that the operation of these designs will be uninterrupted or error free, or that defects in
the Designs will be corrected. Furthermore, Xilinx does not warrant or make any representations regarding use or the results of
the use of the designs in terms of correctness, accuracy, reliability, or otherwise.
Limitation of Liability. In no event will Xilinx or its licensors be liable for any loss of data, lost profits, cost or procurement of
substitute goods or services, or for any special, incidental, consequential, or indirect damages arising from the use or operation
of the designs or accompanying documentation, however caused and on any theory of liability. This limitation will apply even if
Xilinx has been advised of the possibility of such damage. This limitation shall apply not-withstanding the failure of the essential
purpose of any limited remedies herein.
This design module is not supported by general Xilinx Technical support as an official Xilinx Product.
Please refer any issues initially to the provider of the module.
Any problems or items felt of value in the continued improvement of KCPSM3 or this reference design would be gratefully
received by the author.
Ken Chapman
Senior Staff Engineer – Spartan Applications Specialist
email: chapman@xilinx.com
Limitations
The author would also be pleased to hear from anyone using KCPSM3 or the UART macros with information about your
application and how these macros have been useful.
PicoBlaze Spartan-3E Starter Kit Initial Design 3
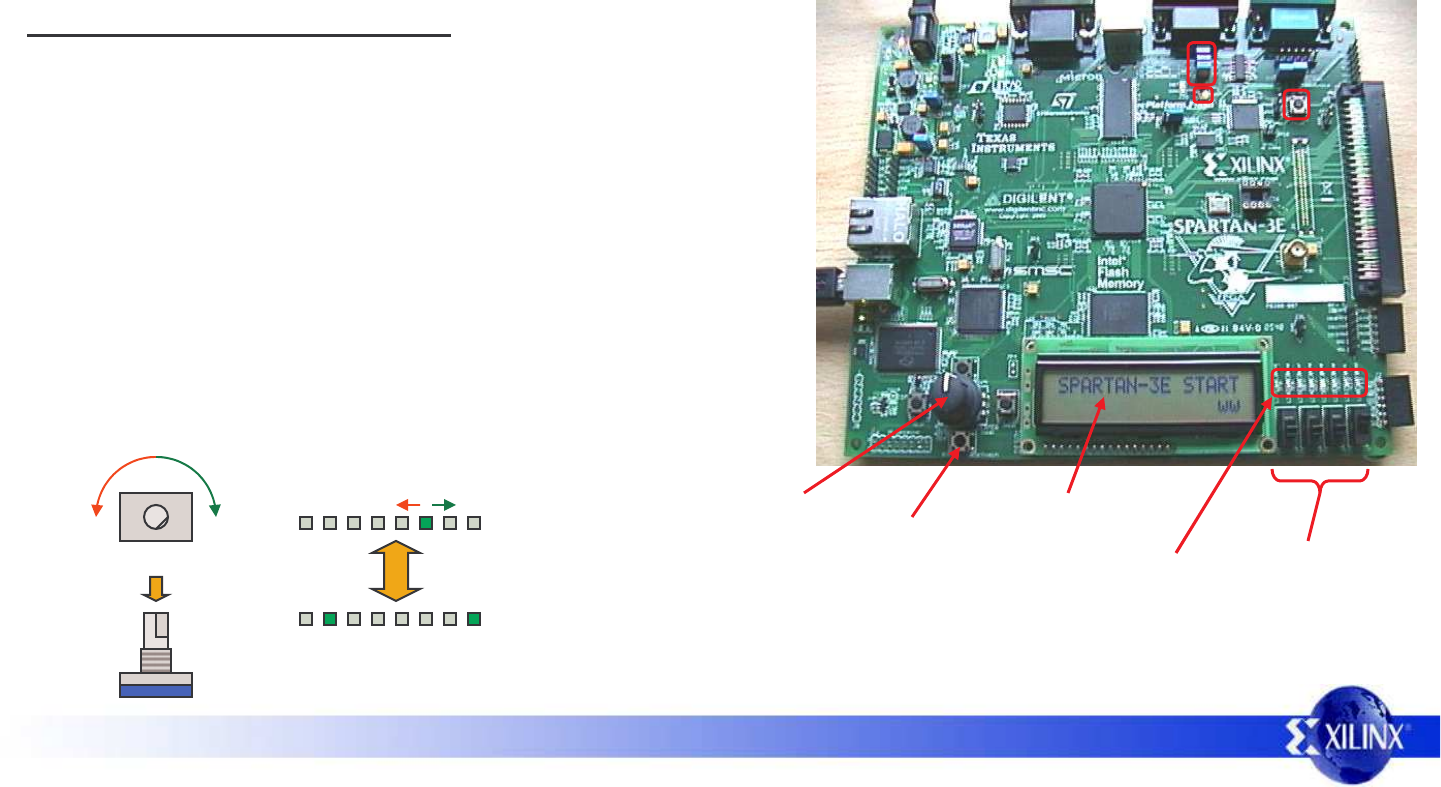
Design Overview
This design is provided on the Spartan-3E Starter Kit when it is dispatched from the factory. It confirms that the board is operational by scrolling a simple
message across the LCD display and allowing the LED’s to be controlled by the rotary knob, press buttons and slide switches.
The principle purpose of this document is to illustrate how PicoBlaze can be used to control the LCD display. It is hoped that the design may form the basis
for future PicoBlaze designs as well as provide a general introduction to the board. Some exercises are suggested to encourage further self study.
If your board has be reprogrammed since it arrived, you can still try the design quickly.
As well as the source design files, a compiled configuration bit file is provided which
you can immediately download into the Spartan XC3S500E device on your board. To
make this task really easy the first time, unzip all the files provided into a directory and
then….
double click on ‘install_s3esk_startup.bat’.
Assuming you have the Xilinx software installed, your board connected with the USB
cable and the board powered (don’t forget the switch), then this should open a DOS
window and run iMPACT in batch mode to configure the Spartan-3E with the design.
Try it now – it only takes 30 seconds!
It is recommended that you try this to become familiar with what the design does
before continuing to read. If your board is ‘fresh out of the box’, then simply connect
the power supply, switch on and see the design come to life. If it doesn’t work (XC-
DONE LED remains unlit), check that all 3 jumpers are installed in J30 and press the
PROG button again.
Scrolling message
Rotate knob to control position
of the illuminated LED
4 slide
switches
8 LEDs
4 press
buttonsPress and release knob to
toggle between control modes
SW0
SW1
SW2
SW3
East
South
North
West
Operate buttons and switches
to illuminated each LED

PicoBlaze Spartan-3E Starter Kit Initial Design 4
PicoBlaze Design Size
The images and statistics on this page show that the design occupies just 113 slices and 1 BRAM. This is only 2.5% of the slices and 5% of the BRAMs
available in an XC3S500E device and would still be less than 12% of the slices in the smallest XC3S100E device.
Number of occupied Slices: 113 out of 4,656 2%
Number of Block RAMs: 1 out of 20 5%
Total equivalent gate count for design: 75,945
PicoBlaze makes extensive use of the distributed memory features of the
Spartan-3E device leading to very high design efficiency. If this design
was replicated to fill the XC3S500E device, it would represent the
equivalent of over 1.5 million gates. Not bad for a device even marketing
claims to be 500 thousand gates
MAP report
FPGA Editor view Floorplanner view
XC3S500E

PicoBlaze Spartan-3E Starter Kit Initial Design 5
Design Files
The source files provided for the reference design are…..
s3esk_startup.vhd
Top level file and main description of hardware.
Contains I/O required to disable other StrataFLASH memory device on the board which may
otherwise interfere with the LCD display.
PicoBlaze program source assembler code
kcpsm3.vhd PicoBlaze processor for Spartan-3E devices.
control.vhd
s3esk_startup.ucf I/O constraints file for Spartan-3E Starter Kit
and timing specifications for 50MHz clock.
control.psm
Assembled program for PicoBlaze (stored in a Block memory)
Note: The file shown in green is not included with the reference design as it is provided with PicoBlaze download. Please visit the PicoBlaze Web site
for your free copy of PicoBlaze, assembler, JTAG_loader and documentation.
www.xilinx.com/picoblaze
Hint - If you only want to write new programs for PicoBlaze using the existing hardware design, then simply use the JTAG_Loader utility supplied with
PicoBlaze. The design supplied is already equipped with the JTAG loading circuit (see schematic on next page).
s3esk_startup_rev2.mcs PROM programming file for this design for use with any of the FLASH storage devices
PicoBlaze Spartan-3E Starter Kit Initial Design 6
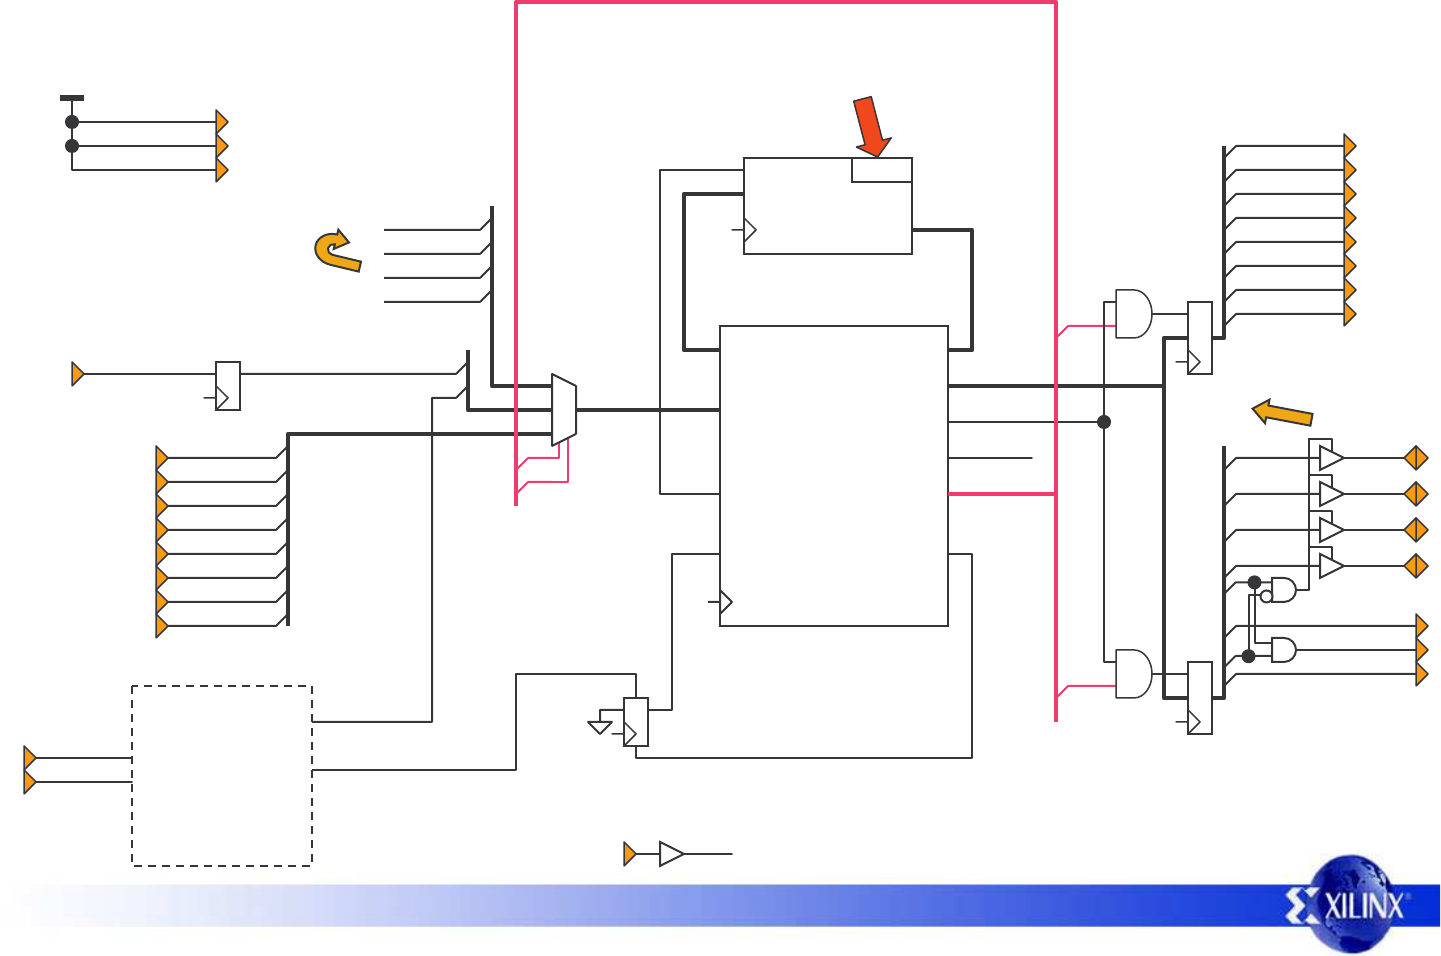
PicoBlaze Circuit Diagram
strataflash_oe
strataflash_ce
strataflash_we
Vcc
*
*
*
* StrataFLASH memory must be
disabled to prevent interference
with the LCD display.
interrupt_control
‘JTAG_loader’ allows rapid
PicoBlaze code development.
port_id
kcpsm3 processor
instruction
write_strobe
clk
out_port
read_strobe
address
reset
interrupt_ackinterrupt
in_port
instruction
address
control
program_rom
instruction
address
clk
port_id
write_strobe
out_port
read_strobe
interrupt_ack
interrupt
in_port
JTAG
proc_reset
clk
kcpsm3_reset
1
input_ports
led(6)
7
led(5)
led(4)
led(3)
led(2)
led(1)
led(0)
led(7)
output_ports
switch(0)
switch(1)
switch(2)
switch(3)
Pull-down resistors added
to switch and press
button inputs in UCF file.
rotary_a
rotary_press
rotary_b
lcd_rs
lcd_e
lcd_rw
lcd(7)
6
lcd(6)
lcd(5)
lcd(4)
lcd(7)
lcd(6)
lcd(5)
lcd(4)
0
bidirectional
LCD data
rotary_press_in
See reference
design called
‘Rotary Encoder
Interface for
Spartan-3E Starter
Kit’ for details of
this section.
rotary_event
rotary_left
rotary_filter & direction
btn_north
btn_east
btn_south
btn_west
clk
50MHz Synchronous design
PicoBlaze Spartan-3E Starter Kit Initial Design 7
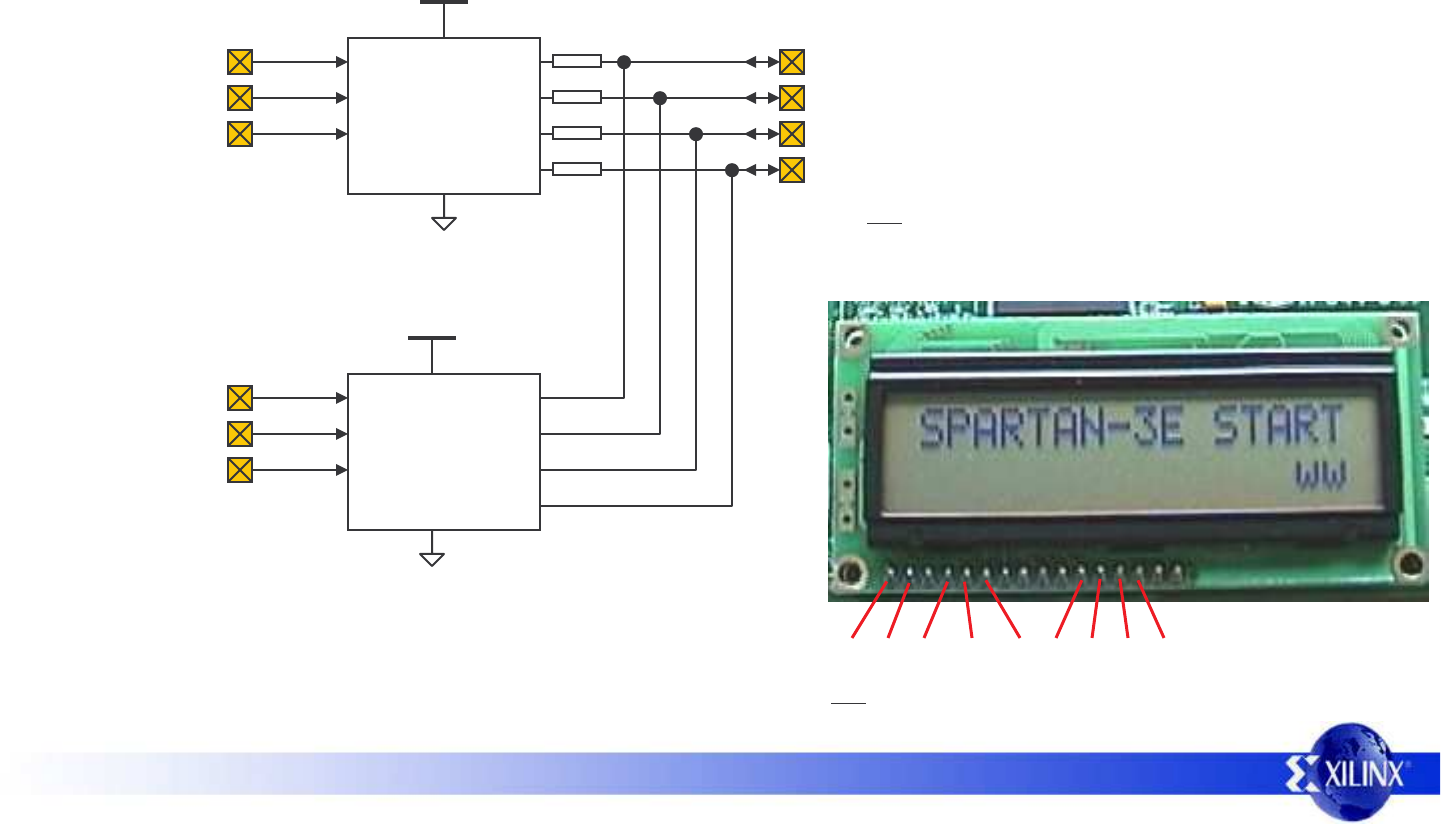
LCD Display Connections
The board is set up to use the 4-wire data interface to the LCD character module. The data connections are shared with the StrataFLASH memory which
must be disabled to prevent interference. This diagram shows the pin connections to the Spartan-3E device.
IC22
StrataFLASH
SF-WE
SF-OE
C18
D17
390Ω
+5v
LCD
Display
SF-D8
LCD_RS
M15
L18
LCD_E
LCD_RW
L17
M18
RS
RW
E
D7
D6
D5
D4
lcd_rs
lcd_e
lcd_rw
lcd(7)
strataflash_oe
Hint - The signals can be easily monitored at
the edge of the display if desired.
+5vGND RS RW E D7D6D5D4
SF-D9
SF-D10
SF-D11
P17 lcd(6)
R16 lcd(5)
R15 lcd(4)
SF-CE0
D16
strataflash_ce
strataflash_we
OE#
WE#
CE0
D11
D10
D9
D8
+3.3v
390Ω
390Ω
390Ω
Holding all three controls High ensures that the StrataFLASH
memory does not interfere with the LCD display and also prevents
inadvertent modifications to the memory contents.
The LCD display is powered by a +5v supply. This
means that if the display is read it will potentially
drive the data signal lines above the maximum level
(VCCO+0.5v) allowed for the Spartan-3E and
StrataFLASH pins which are both powered by 3.3v.
Therefore the display data pins have been
connected via 390Ωseries resistors to limit the
current and voltage during read operations.
Hint – This design provides all the mechanisms to enable
the display to be read but does not actually need to use it.
Most applications only require write operations.
PicoBlaze Spartan-3E Starter Kit Initial Design 8
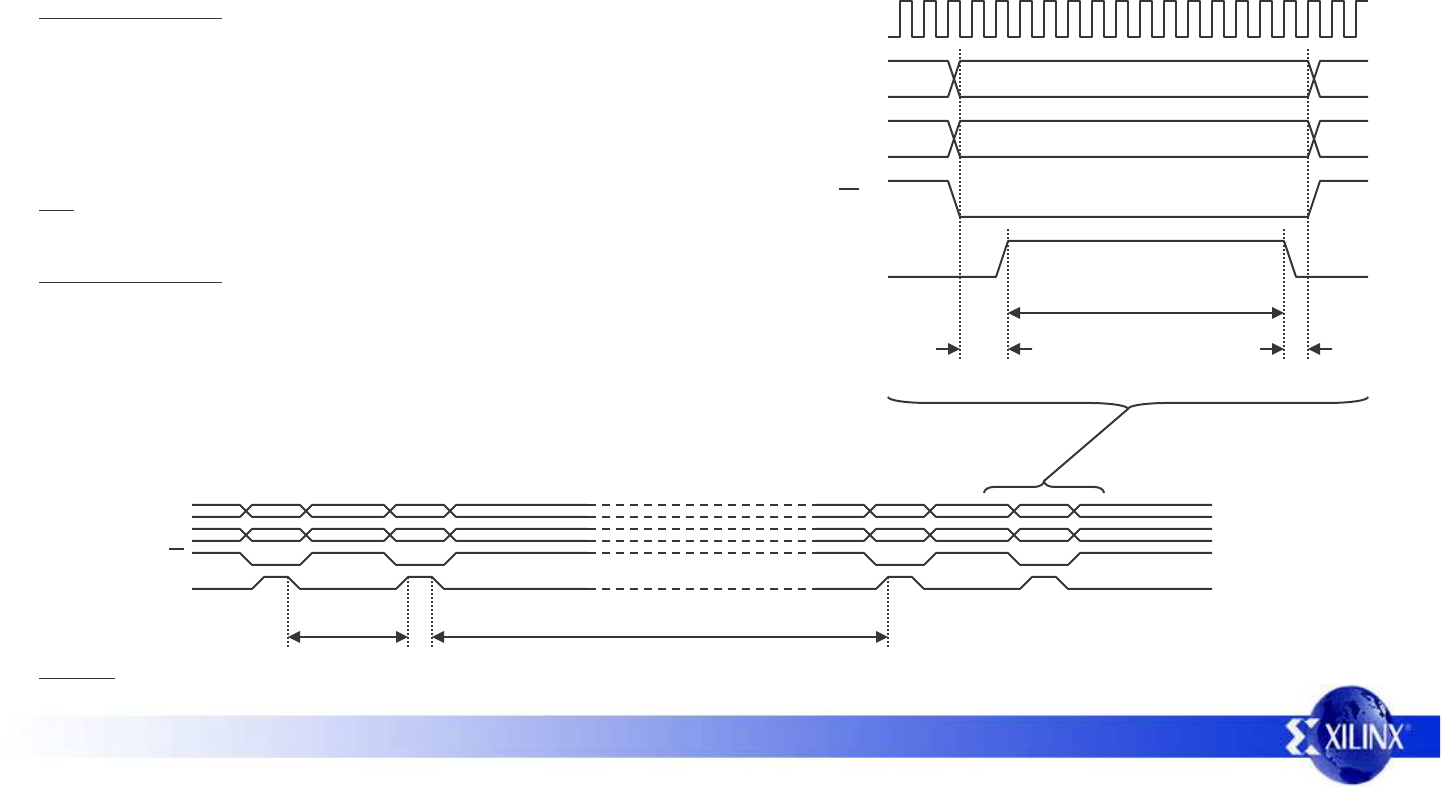
LCD Display Timing
Once mastered, the LCD display is a practical way to display a variety of information using standard ASCII characters and even allows you to create some of
your own. However, these displays are not fast. This design scrolls the display at ½ second intervals and that really is the practical limit for clarity. This low
performance rate also relates to the signals used for communication. Compared with a Spartan-3E operating at 50MHz, the display can appear extremely
slow. This is where PicoBlaze can be used to efficiently implement timing delays as well as control the actual content of the display.
Exercise – Implement a hardware based state machine which obeys the timing requirements for an 8-bit write of data including the 40µs delay. Modify the
PicoBlaze interface and code to use your hardware circuit to write to the display. Under what circumstances would this approach be useful?
50MHz
4-bit Write Operation
This timing diagram shows a single write operation being performed. The
diagram is approximately to scale showing the minimum times allowed for
setup, hold and enable pulse length relative to a 50MHz clock (20ns period).
The data D[7:4], Register Select (RS) and write control (RW) must be set up at
least 40ns before the enable E goes High. Enable must be High for at least
230ns which is almost 12 clock cycles at 50MHz.
Hint – In a write only system, the R/W signal can be tied Low permanently.
230ns
D[7:4]
R/W
E
40ns 10ns
8-bit Write Operation
After initial display communication is established, all data transfers are 8-bit ASCII character
codes, data bytes or 8-bit addresses. Each 8-bit transfer obviously has to be decomposed
into two 4-bit transfers which must be spaced by at least 1µs. Following an 8-bit write
operation, there must be an interval of at least 40µs before the next communication. This
delay must be increased to 1.64ms following a clear display command.
RS
Valid Data
0=command 1=data
D[7:4]
R/W
E
RS
40µs1µs
Upper
4-bits Lower
4-bits
PicoBlaze Spartan-3E Starter Kit Initial Design 9
In this design, PicoBlaze is used to implement the LCD communication 100% in software. The fact that a processor is sequential in nature means that the
required delays can be formed simply by executing the appropriate number of instructions. PicoBlaze simplifies the task of writing code because all
instructions execute in two clock cycles under all conditions.
PicoBlaze Timing
CONSTANT delay_1us_constant, 0B
delay_1us: LOAD s0, delay_1us_constant
wait_1us: SUB s0, 01
JUMP NZ, wait_1us
RETURN
delay_40us: LOAD s1, 28
wait_40us: CALL delay_1us
SUB s1, 01
JUMP NZ, wait_40us
RETURN
The PicoBlaze program supplied implements a 1µs delay in software which it then uses as
the base for all operations. This subroutine is invoked with a ‘CALL delay_1us’ which then
LOADs register s0 with 11 (0B hex). This in turn causes the SUB and JUMPNZ instructions
to execute 11 times before RETURN completes the routine. This means that a delay of
exactly 1µs is formed by the 25 instructions each taking two clock cycles at 50MHz.
Creating other delays such as the 40µs required between 8-bit transfers is then a simple
case of calling the ‘delay_1us’ the appropriate number of times. In this case 40 (28 hex)
times results in slightly more than 40µs due to the executions of instructions within the
routine itself.
Exercise – Calculate the exact number of instructions, clock cycles and delay provided by
the ‘delay_40us’ subroutine. Prove your result either by simulation or preferably by
running a test design on the Starter Kit and making measurements.
LCD_pulse_E: XOR s4, LCD_E
OUTPUT s4, LCD_output_port
CALL delay_1us
XOR s4, LCD_E
OUTPUT s4, LCD_output_port
RETURN
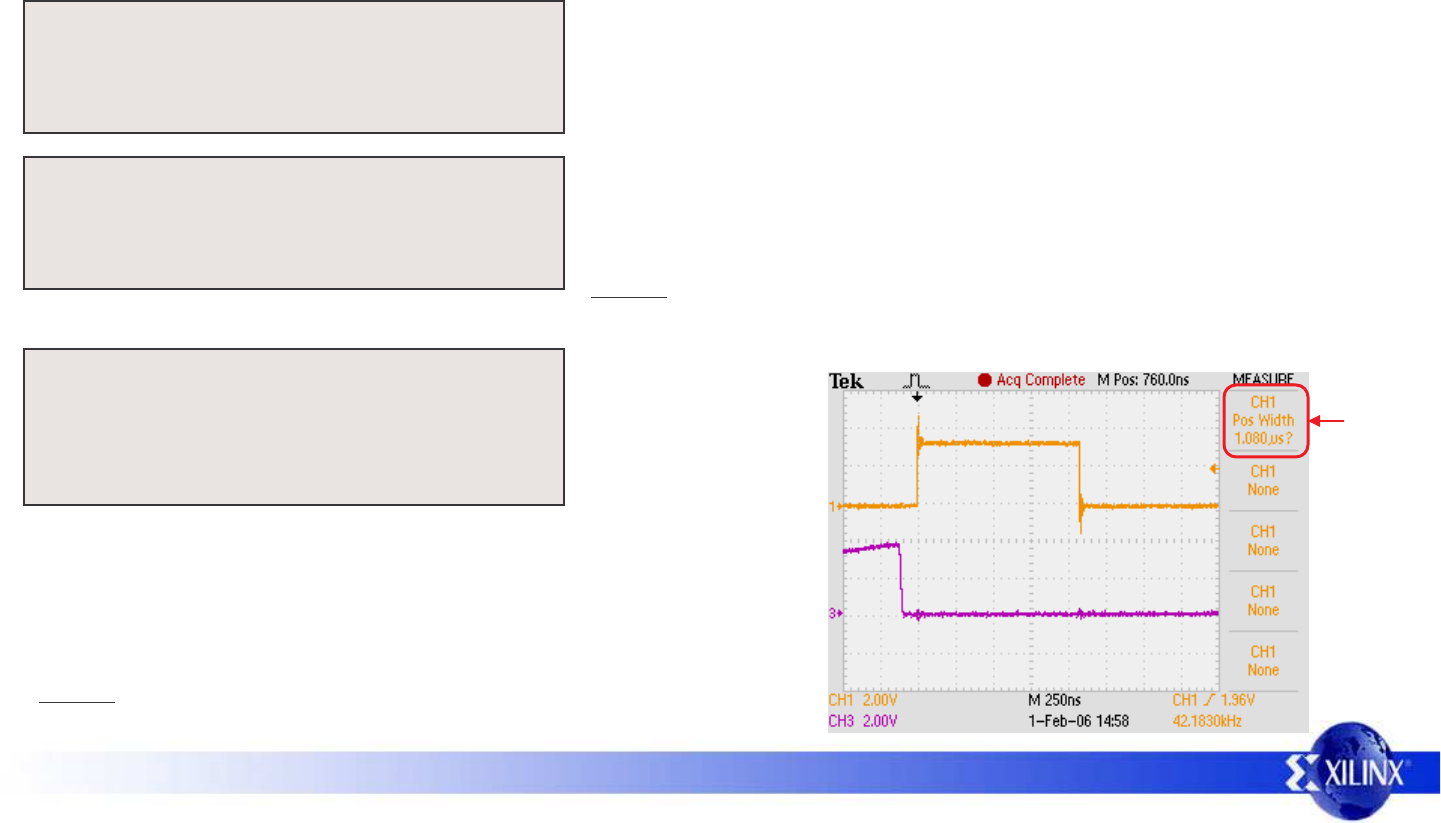
The enable E pulse is formed by setting the E signal High on the output
port, waiting for 1µs and then driving E Low again. This oscilloscope screen
shot shows a single enable pulse observed at the LCD display pin. Data bit
D7 is also shown (see code on next page for more details).
E
D7
1.08µs
Exercise – 1µs is greater than the 230ns minimum requirement for the enable
pulse width. Modify the code to generate an enable pulse which is 250ns.
PicoBlaze Spartan-3E Starter Kit Initial Design 10
The writing of 8-bit data is
achieved using the delays
and enable pulse routines
together with appropriate
setting the D[7:4] data bits,
RW=0 and RS=1.
Writing command
instructions to the display is
very similar but requires that
RS=0.
PicoBlaze Timing
LCD_write_data: LOAD s4, s5
AND s4, F0 ;Enable=0 RS=0 Instruction, RW=0 Write, E=0
OR s4, 0C ;Enable=1 RS=1 Data, RW=0 Write, E=0
OUTPUT s4, LCD_output_port ;set up RS and RW >40ns before enable pulse
CALL LCD_pulse_E ;write upper nibble
CALL delay_1us ;wait >1us
LOAD s4, s5 ;select lower nibble with
SL1 s4 ;Enable=1
SL1 s4 ;RS=1 Data
SL0 s4 ;RW=0 Write
SL0 s4 ;E=0
OUTPUT s4, LCD_output_port ;set up RS and RW >40ns before enable pulse
CALL LCD_pulse_E ;write lower nibble
CALL delay_40us ;wait >40us
LOAD s4, F0 ;Enable=0 RS=0 Instruction, RW=0 Write, E=0
OUTPUT s4, LCD_output_port ;Release master enable
RETURN
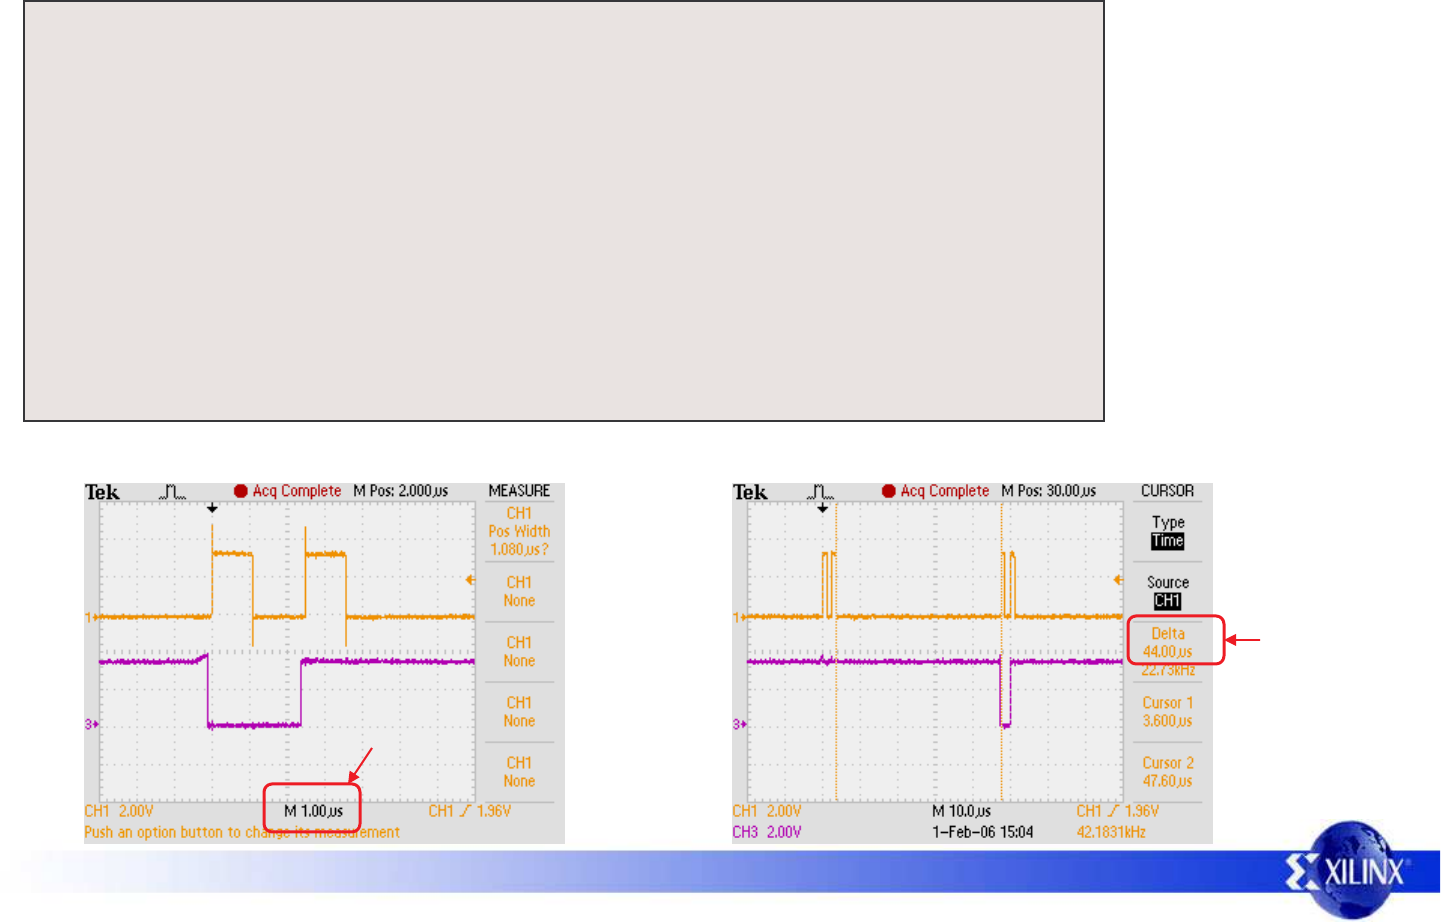
E
D7
>1µs between E pulses writing upper and then lower nibbles 8-bit writes. >1µs between E pulses
1µs/div
44µs
PicoBlaze Spartan-3E Starter Kit Initial Design 11
Display Setup
Before the display can be used for the first time, there is an initialisation sequence which must be followed to allow communication to take place. These
sequences are ideally suited to an 8-bit processor such as PicoBlaze. Besides the relative complexity of the sequence, the process is only executed once
and then the processor is available to perform other tasks including the control on the display itself.
Hint - The PicoBlaze code provided includes a subroutine called ‘LCD_reset’ which performs this initialisation sequence.
Power
on Wait
15ms 4-bit write
= 3 hex Wait
4.1ms 4-bit write
= 3 hex Wait
100µs 4-bit write
= 3 hex 4-bit write
= 2 hex
Wait
40µs Wait
40µs
Exercise – Implement a hardware state machine which can perform the LCD initialisation sequence. Compare the size of your implementation with the 96
slices required to implement a PicoBlaze processor. Does the claim of the first paragraph hold true?
The 4-wire interface is now established which means that all subsequent communication is formed of the 8-bit writes described previously. Note that
these writes are all commands and therefore RS must be Low. The next part of the sequence is used to establish how the display should operate.
Function Set
28 hex Entry Mode
06 hex Display Control
0C hex Display Clear
01 hex Wait
1.64ms
Function Set = 28 hex : This code describes the display type as being 2 lines, 5×7 dots per character and using 4-wire communication (again).
Entry Mode = 06 hex
000001
Increment cursor position when writing a character
Do not shift display left or right when writing a character
10000011
Cursor (line under character) is off
Display is ON
00
Display Control = 0C hex
Cursor blinking off (character flashes)
The first part of this sequence is to establish that the 4-wire data interface is being used. Note that some of these delays are in milliseconds.
PicoBlaze Spartan-3E Starter Kit Initial Design 12
Display Control
The most common operation is simply to write ASCII characters to be displayed. These are considered to be data and hence RS will be High.
With the display set up as described previously, writing a series of characters will automatically result in their display on the top line of the display.
LOAD s5, character_S
CALL LCD_write_data
LOAD s5, character_P
CALL LCD_write_data
LOAD s5, character_A
CALL LCD_write_data
LOAD s5, character_R
CALL LCD_write_data
LOAD s5, character_T
CALL LCD_write_data
LOAD s5, character_A
CALL LCD_write_data
LOAD s5, character_N
S P A R T A N S
SSSSSSSS
SSSSSSSS
SSSSSSSS
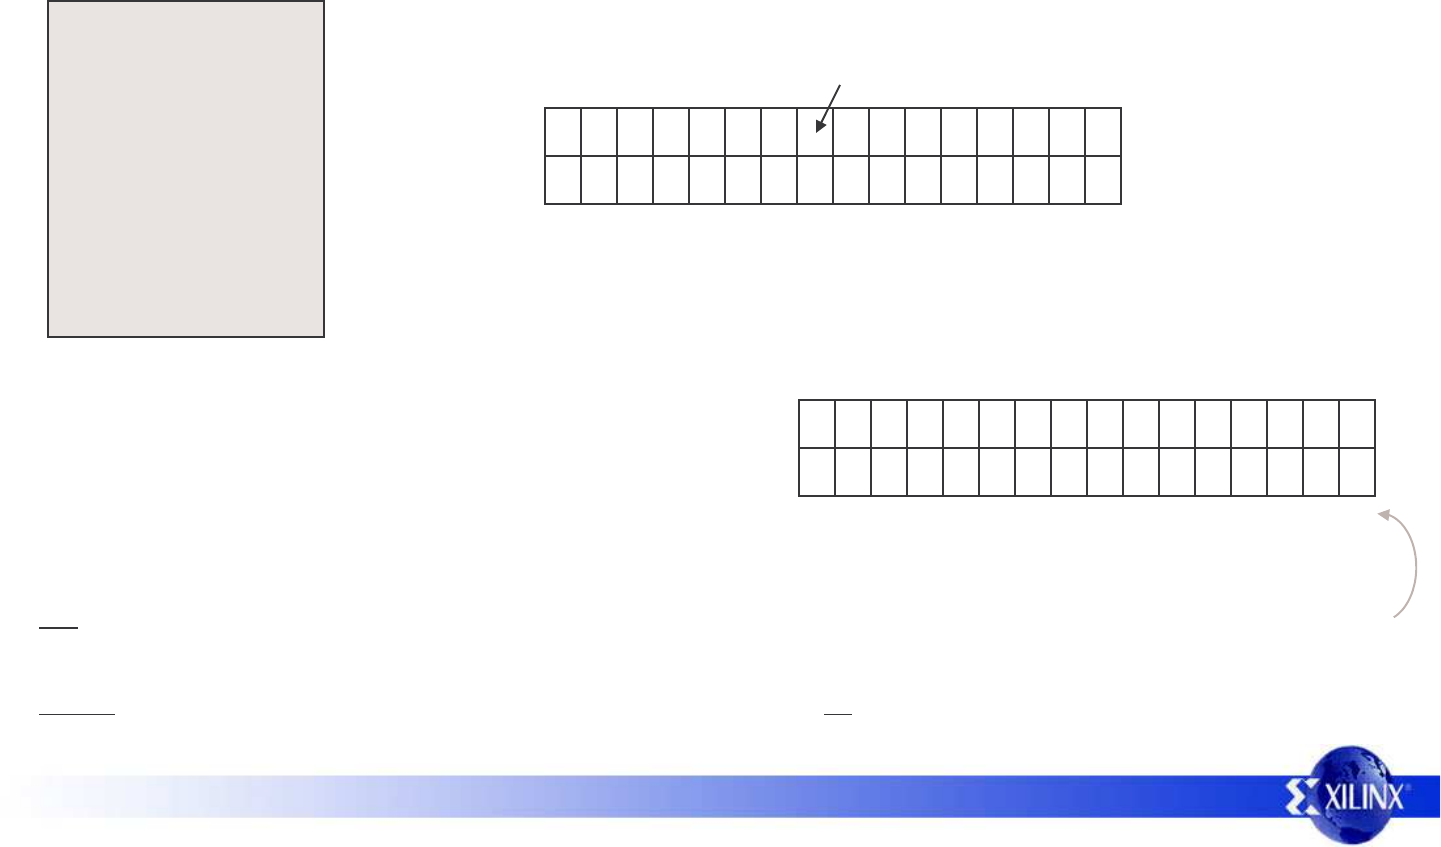
Following the execution of this code, the display will look like this.
Cursor is here waiting for the next character to be written
If you continue to write characters, they will eventually fall off the end of the first line but they will not automatically
appear on the second line. This is because the memory map of this display is not consecutive from line to line. The
diagram below shows the memory address of each character location.
80 81 82 83 84 85 86 87
C0 C1 C2 C3 C4 C5 C6 C7
88 89 8A 8B 8C 8D 8E 8F
C8 C9 CA CB CC CD CE CF
Exercise – Although this design does make use of the scrolling display feature, it really is not recommended other than for simple messages as used in
this example. Analyse the supplied PicoBlaze code and LCD display controller data sheets to determine how scrolling is achieved. Implement a design in
which the message is greater than 40 characters per line (Hint – The memory map is actually 40 locations per line. Addresses 80-A7 and C0-E7).
Hint - The PicoBlaze code provided includes a subroutine called ‘LCD_cursor’. Load register ‘s5’ with the desired position. The upper nibble (value 1 or 2)
will define the line and the lower nibble the character position on the line (0 to F). E.g. s5 = 2B will position the cursor at the 12th position on line 2.
1
2
0123456789ABCDEF
To set the cursor in the position required for subsequent characters to be
displayed, the 8-bit memory address of that position must be written to the
display as a command (RS=0). Note that this can not be confused with any
of the other commands since the MSB is always ‘1’ in these addresses.
The ability to move to any particular location and write a few characters is
ideal for the display of various information as it becomes available such as
time, date, measurements and short status messages.
PicoBlaze Spartan-3E Starter Kit Initial Design 13
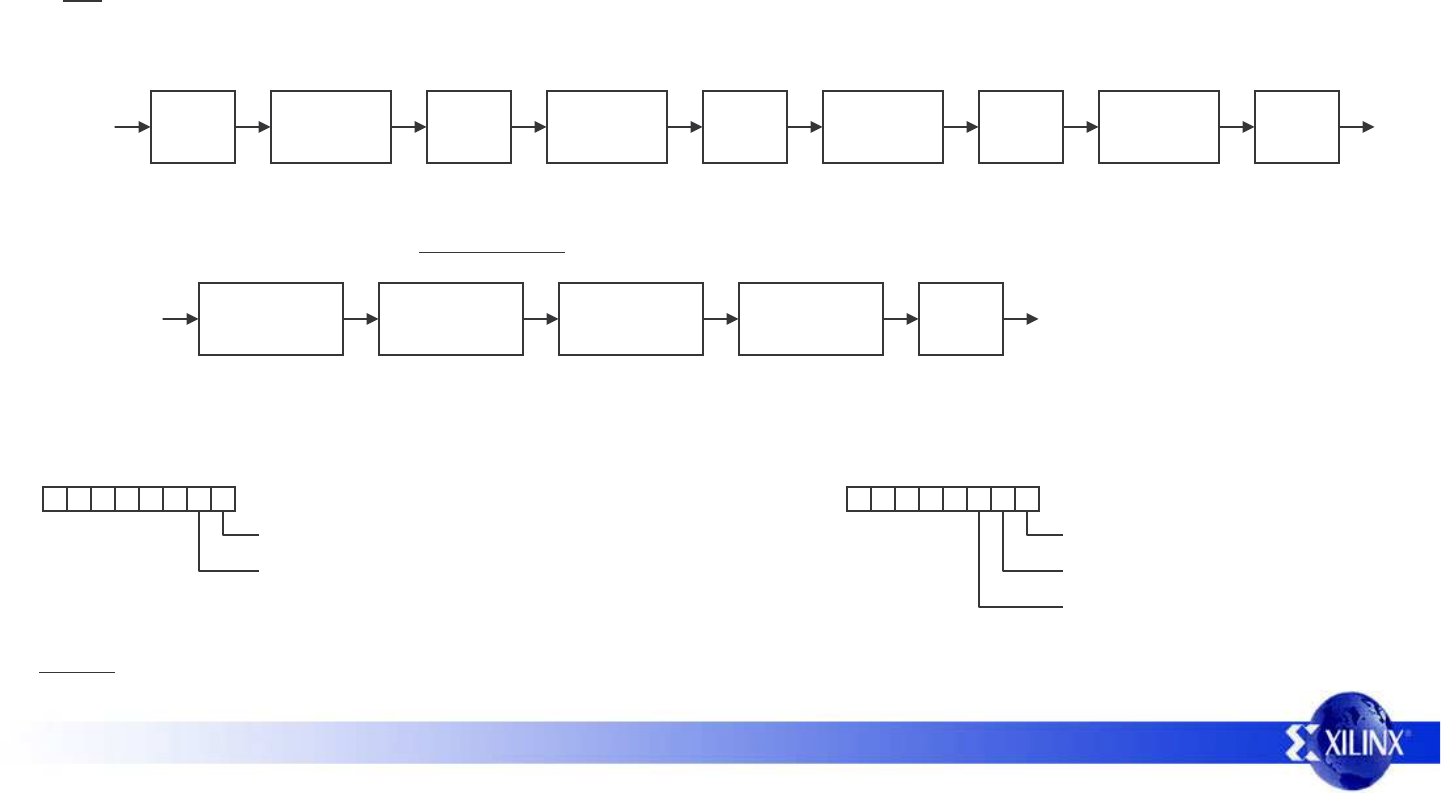
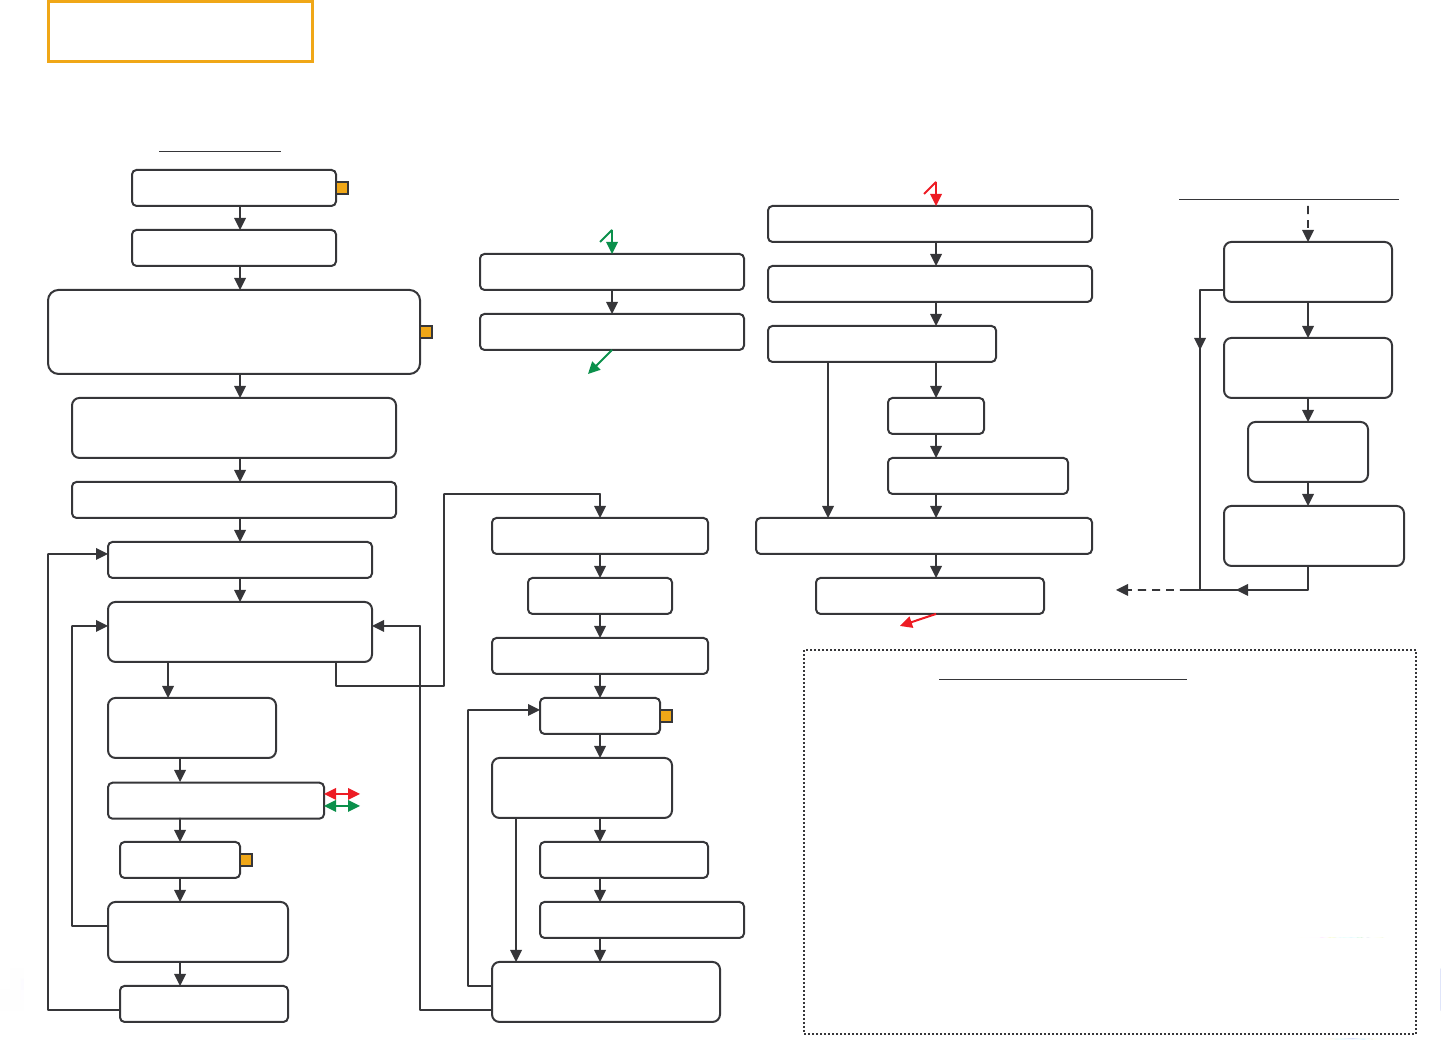
Complete PicoBlaze Program
This information is intended to give a guide to the way in which the PicoBlaze assembler code is organised. It is not intended to be a lesson in how to write
assembler code or explain how PicoBlaze works. Please refer to the documentation for PicoBlaze (KCPSM3).
Interrupt Service Routine
Scratch Pad Memory (SPM)
Fetch mode from
SPM and test
Store direction
and event in SPM
Interrupts occur every time the rotary control is rotated left or right.
The interrupt service routine (ISR) reads a value set into SPM by
the main program to determine if the LED display mode is using
the rotary control or slide/press button switches to determine if the
interrupt is relevant.
If the rotary control is relevant, then the direction of rotation is read
from the input port and stored together with an ‘event pending’ flag
bit. The main program monitors the SPM to determine if the LED
pattern should change and in what direction.
The position of the walking ‘1’ used in the rotary control mode is
also remembered in scratch pad memory.
Main program
Initialise LCD display
Set mode to rotary control in SPM
There are comments contained in the ‘control.psm’ file which should help explain the finer points.
Subroutines are used for
delays and LCD display
Read direction of
rotary encoder
Set event
pending flag
Write full messages to display memory
SPARTAN-3E STARTER KIT
www.xilinx.com/s3estarter
Enable Interrupts
Set walking ‘1’ LED pattern in SPM
00001000 = 08Hex
Read switches and Buttons
Output pattern to LEDs
Fetch walking ‘1’ pattern from SPM
Fetch rotary information from SPM
Test event pending flag
Output pattern to LEDs
Store walking ‘1’ pattern in SPM
clear flag
Shift ‘1’ left or right
No event
Delay 1ms
Read rotary press switch
and test state
Decrement counter
and test for zero
Load counter with 500(ms)
Toggle mode
Fetch mode from SPM
Switch/button mode
Read rotary press switch
and test state
Fetch mode from
SPM and test
Rotary mode
Event
up down
Call appropriate routine
Shift LCD display
0
>0
Store mode in SPM
Delay 1ms
Decrement counter
and test for zero
Shift LCD display
>0 0
Load counter with 500
down
up
Program maintains 500ms shifting of
LCD display during mode switching
even if button is held down
Switch/button
function
Rotary function
