ISVforce Guide Salesforce App Packaging
User Manual:
Open the PDF directly: View PDF ![]() .
.
Page Count: 296 [warning: Documents this large are best viewed by clicking the View PDF Link!]
- Introduction
- ISVforce Quick Start
- Designing and Building Your App
- Overview of Packages
- Components Available in Managed Packages
- Editing Components and Attributes after Installation
- Components Automatically Added to Packages
- Special Behavior of Components in Packages
- Protected Components
- Understanding Dependencies
- About Permission Sets and Profile Settings
- Custom Profile Settings
- Protecting Your Intellectual Property
- Creating Packaged Applications with Chatter
- Matching the Salesforce Look and Feel
- Developing App Documentation
- About API and Dynamic Apex Access in Packages
- Architectural Considerations for Group and Professional Editions
- Features in Group and Professional Editions
- Limits for Group and Professional Editions
- Access Control in Group and Professional Editions
- Using Apex in Group and Professional Editions
- API Access in Group and Professional Editions
- Designing Your App to Support Multiple Editions
- Sample Design Scenarios for Group and Professional Editions
- Connected Apps
- Environment Hub
- Get Started with the Environment Hub
- Manage Orgs in the Environment Hub
- Single Sign-on in the Environment Hub
- Environment Hub Best Practices
- Environment Hub FAQ
- Can I use the Environment Hub in Lightning Experience?
- Where do I install the Environment Hub?
- Is My Domain required to use the Environment Hub?
- Can I install the Environment Hub in more than one org?
- Can I enable the Environment Hub in a sandbox org?
- What kinds of orgs can I create in the Environment Hub?
- How is locale determined for the orgs I create in the Environment Hub?
- Are the orgs that I create in the Environment Hub the same as the ones I created in the Partner Portal?
- Can an org be a member of multiple Environment Hubs?
- Can I disable the Environment Hub?
- Considerations for the Environment Hub in Lightning Experience
- Notifications for Package Errors
- Packaging and Testing Your App
- Passing the Security Review
- Publish Your Offering on the AppExchange
- What Is the AppExchange?
- Publish on the AppExchange
- Email Notifications
- AppExchange Checkout
- Checkout Management App
- Work with AppExchange Leads
- Analytics Reports for Publishers
- Update the Package in an AppExchange Listing
- AppExchange FAQ
- Manage Orders
- Channel Order App
- Get Started with the Channel Order App
- Upgrade the Channel Order App
- Manage Orders in the Channel Order App
- Channel Order Apex API
- Managing Licenses
- License Management App
- Get Started with the License Management App
- Manage Leads and Licenses for Your Offering
- Troubleshoot the License Management App
- License Management App FAQ
- Is the LMA compatible with Lightning Experience?
- Can I install the LMA in a non-production Salesforce org?
- Why can’t I see the Modify License button on my license records?
- A customer installed my package before I associated it with the LMA. How can I manage the license record?
- Can I automate the assignment of licenses to users in the subscriber org?
- Why aren’t leads and licenses being created in the LMA?
- What happens when I decrease the number of available licenses below the current number of licensed users?
- Provide a Free Trial
- Supporting Your AppExchange Customers
- Upgrading Your App
- Appendices
- Glossary
- Index

© Copyright 2000–2017 salesforce.com, inc. All rights reserved. Salesforce is a registered trademark of salesforce.com, inc.,
as are other names and marks. Other marks appearing herein may be trademarks of their respective owners.

CONTENTS
Chapter 1: Introduction ................................................1
Resources for Partners ..................................................2
Roles in the Application Lifecycle ............................................2
How to Sign Up for Test Environments ........................................3
Chapter 2: ISVforce Quick Start ..........................................4
Tutorial #1: Sign Up for AppExchange ........................................5
Step 1: Sign Up for the Partner Program ...................................5
Step 2: Create a Development and Test Environment ..........................5
Step 3: Get a Business Org ............................................6
Step 4: Edit Your Publisher Profile ........................................6
Sign-up Summary ..................................................6
Tutorial #2: Developing Your App ...........................................7
Step 1: Create an App ...............................................7
Step 2: Package Your App ............................................8
Step 3: Assign a Namespace ..........................................8
Step 4: Upload a Beta ...............................................9
Step 5: Install and Test the Beta .........................................9
Development Summary .............................................10
Tutorial #3: Publishing and Licensing ........................................11
Step 1: Uploading to the AppExchange ...................................11
Step 2: Create an AppExchange Listing ...................................11
Step 3: Complete the AppExchange Listing ................................12
Step 4: Manage Licenses for Your App ...................................12
Publishing and Licensing Summary .....................................13
Tutorial #4: Updating Your App ............................................13
Step 1: Creating a Patch Organization ....................................14
Step 2: Developing a Patch ...........................................14
Step 3: Uploading the Patch ..........................................15
Step 4: Installing or Pushing a Patch .....................................15
Updating Your App Summary .........................................16
Chapter 3: Designing and Building Your App ...............................17
Overview of Packages ..................................................18
Planning the Release of Managed Packages ...............................19
Create a Package .................................................20
Developing and Distributing Unmanaged Packages ..........................20
Components Available in Managed Packages .................................21
Editing Components and Attributes after Installation ..........................28
Components Automatically Added to Packages .............................35
Special Behavior of Components in Packages ..............................37
Protected Components .............................................46
Understanding Dependencies ........................................47
About Permission Sets and Profile Settings ................................48
Custom Profile Settings .............................................49
Protecting Your Intellectual Property .....................................50
Creating Packaged Applications with Chatter ..............................50
Matching the Salesforce Look and Feel ...................................51
Developing App Documentation .......................................52
About API and Dynamic Apex Access in Packages ..............................52
Manage API and Dynamic Apex Access in Packages .........................55
Configuring Default Package Versions for API Calls ..........................56
About the Partner WSDL .............................................57
Generating an Enterprise WSDL with Managed Packages ......................58
Working with External Services ........................................58
Architectural Considerations for Group and Professional Editions .....................59
Features in Group and Professional Editions ...............................60
Limits for Group and Professional Editions .................................61
Access Control in Group and Professional Editions ...........................61
Using Apex in Group and Professional Editions .............................61
API Access in Group and Professional Editions ..............................62
Designing Your App to Support Multiple Editions ............................63
Sample Design Scenarios for Group and Professional Editions ...................65
Connected Apps .....................................................66
Create a Connected App ............................................66
Edit, Reconfigure, or Delete a Connected App in Salesforce Classic ................74
Install a Connected App .............................................76
View Connected App Details ..........................................77
Manage a Connected App ...........................................78
Edit Connected App Behavior .........................................80
Monitor Usage for an OAuth Connected App ..............................84
Uninstall a Connected App ...........................................85
Environment Hub .....................................................86
Get Started with the Environment Hub ...................................87
Manage Orgs in the Environment Hub ...................................89
Single Sign-on in the Environment Hub ...................................91
Environment Hub Best Practices .......................................93
Environment Hub FAQ ..............................................94
Considerations for the Environment Hub in Lightning Experience .................96
Notifications for Package Errors ...........................................96
Set the Notification Email Address ......................................97
Chapter 4: Packaging and Testing Your App ...............................98
Contents
About Managed Packages ..............................................99
Configure Your Developer Settings ......................................99
Register a Namespace Prefix .........................................100
Specifying a License Management Organization ............................101
Create and Upload a Managed Package ................................103
View Package Details ..............................................105
Installing a Package ..................................................108
Component Availability After Deployment .................................111
Uninstalling a Package .................................................111
Installing Managed Packages using the API ..................................112
Resolving Apex Test Failures .............................................113
Running Apex on Package Install/Upgrade ...................................113
How does a Post Install Script Work? ....................................114
Example of a Post Install Script ........................................115
Specifying a Post Install Script .........................................116
Running Apex on Package Uninstall ........................................117
How does an Uninstall Script Work? ....................................117
Example of an Uninstall Script ........................................117
Specifying an Uninstall Script .........................................118
Publishing Extensions to Managed Packages .................................119
Chapter 5: Passing the Security Review ..................................120
Security Review ......................................................121
Security Review Steps .................................................121
Security Review Wizard ................................................123
Submit a Client or Mobile App for Security Review ..............................124
Submit an Extension Package for Security Review ...............................124
Security Review Resources ..............................................124
Security Review FAQ ..................................................125
Chapter 6: Publish Your Offering on the AppExchange .......................129
What Is the AppExchange? ..............................................130
Publish on the AppExchange ............................................130
Connect a Packaging Organization to the AppExchange ......................130
Create or Edit Your Provider Profile .....................................131
Create or Edit an AppExchange Listing ...................................131
Make Your AppExchange Listing Effective ................................132
Choose an Installation Option ........................................132
Register Your Package and Choose License Settings .........................133
Submit Your Listing for Security Review ..................................133
Email Notifications ...................................................134
AppExchange Checkout ................................................135
Configure Stripe for AppExchange Checkout ..............................136
Sell Using AppExchange Checkout .....................................136
Contents
AppExchange Checkout FAQ .........................................138
Checkout Management App ............................................140
Checkout Management App Best Practices ...............................142
Checkout Management App Objects ...................................142
Get Started with the Checkout Management App ...........................144
Sample Checkout Management App Customizations ........................148
Update Settings in the Checkout Management App .........................150
View Checkout Management App Logs ..................................152
Work with AppExchange Leads ...........................................152
AppExchange Leads FAQ ...........................................152
Analytics Reports for Publishers ...........................................154
Update the Package in an AppExchange Listing ...............................156
AppExchange FAQ ...................................................156
Can I have multiple listings for an app or component? ........................160
Chapter 7: Manage Orders ...........................................161
Channel Order App ...................................................162
Channel Order App Objects .........................................162
Order Types ....................................................163
Order Statuses ..................................................164
Get Started with the Channel Order App .....................................165
Install the Channel Order App ........................................165
Define a Channel Order App Email Service ...............................166
Import Product Data to the Channel Order App .............................167
Assign Access to the Channel Order App ................................168
Display Customers in the Channel Order App ..............................169
Upgrade the Channel Order App .........................................169
Channel Order App Upgrade Considerations ..............................169
Upgrade to Channel Order App v2.0 ...................................170
Manage Orders in the Channel Order App ...................................172
Submit an Order .................................................173
Edit an Order ...................................................175
Clone an Order ..................................................175
Recall an Order ..................................................176
Delete an Order .................................................176
Refresh Product Data ..............................................176
Channel Order Apex API ...............................................176
CHANNEL_ORDERS Namespace .......................................177
Service Order ....................................................191
Service Order Detail ...............................................193
Partner Order Submit API ...........................................196
Chapter 8: Managing Licenses ........................................199
License Management App .............................................200
Contents
How Does the License Management App Work? ...........................200
Integrate the License Management App into Your Business Processes ............204
Best Practices for the License Management App ...........................205
Get Started with the License Management App ................................205
Install the License Management App ...................................205
Associate a Package with the License Management App .....................206
Configure the License Management App ................................207
Manage Leads and Licenses for Your Offering ................................208
Modify a License Record in the License Management App .....................208
Change the Lead Manager in the License Management App ...................209
Refresh Licenses for an Offering in the License Management App ................209
Move the License Management App to Another Salesforce Org .................210
Troubleshoot the License Management App ..................................210
Leads and Licenses Aren’t Being Created ................................210
Proxy User Has Deactivated Message ...................................211
License Management App FAQ ...........................................211
Is the LMA compatible with Lightning Experience? ...........................211
Can I install the LMA in a non-production Salesforce org? ......................212
Why can’t I see the Modify License button on my license records? ................212
A customer installed my package before I associated it with the LMA. How can I manage
the license record? ...............................................212
Can I automate the assignment of licenses to users in the subscriber org? ..........212
Why aren’t leads and licenses being created in the LMA? ......................212
What happens when I decrease the number of available licenses below the current
number of licensed users? ..........................................212
Chapter 9: Provide a Free Trial .........................................213
Why Use Trialforce? ...................................................214
Trialforce ..........................................................214
Set Up Trialforce .....................................................216
Link a Package with Your License Management Organization ...................216
Request a Trialforce Management Org ..................................217
Setting Up Custom Branding for Trialforce ................................217
Create a Trialforce Source Organization .................................219
Create a Trialforce Template .........................................220
Link a Trialforce Template to the AppExchange ............................220
Submit a Trialforce Template for Security Review ............................221
Provide a Free Trial on the AppExchange ....................................221
Provide a Free Trial on the AppExchange Using Trialforce ......................221
Provide a Test Drive on the AppExchange ................................222
Provide a Free Trial on the AppExchange When Your Offering Is Installed ...........223
Provide a Free Trial on Your Website .......................................223
Request a Sign-Up Form for Trialforce ..................................223
Link a Trialforce Template to the Sign-Up Form .............................223
Contents
Customizing the HTML Registration Form ................................224
Provisioning New Trial Organizations ...................................225
Modify the Trial for an Upgrade ..........................................225
Trialforce Best Practices ................................................226
Creating Signups using the API ...........................................226
Trialforce FAQ ......................................................239
Chapter 10: Supporting Your AppExchange Customers ......................241
Subscriber Support Console .............................................242
Viewing Subscriber Details ..........................................242
Request Login Access from a Customer .................................242
Logging in to Subscriber Organizations .................................243
Troubleshooting in Subscriber Organizations ..............................243
Usage Metrics ......................................................244
Setting up Usage Metrics ...........................................244
Accessing Usage Metrics Data .......................................245
MetricsDataFile ..................................................246
Usage Metrics Visualization .........................................248
Chapter 11: Upgrading Your App .......................................251
About Package Versions ...............................................253
Creating and Uploading Patches .........................................253
Working with Patch Versions ............................................254
Versioning Apex Code .............................................257
Apex Deprecation Effects for Subscribers ................................258
Publish Upgrades to Managed Packages ...................................259
Delete Components in Managed Packages ..............................259
Viewing Deleted Components ........................................261
Modifying Custom Fields after a Package is Released ........................262
Manage Versions ................................................263
Pushing an Upgrade .................................................263
About Push Upgrades .............................................263
Push Upgrade Best Practices ........................................264
Assigning Access to New Components and Fields ..........................265
Sample Post Install Script for a Push Upgrade .............................266
Scheduling Push Upgrades .........................................267
View Push Upgrade Details .........................................269
View an Organization’s Upgrade History ................................270
APPENDICES ....................................................272
Appendix A: ISVforce User License Comparison .....................272
Appendix B: OEM User License Comparison ........................276
Contents

CHAPTER 1 Introduction
The ISVforce Guide is written for independent software vendors (ISVs) who want to build and sell
applications using the Force.com platform. This guide is organized by the following chapters:
In this chapter ...
•Resources for
Partners •Quick Start—Start here to acquire and configure all of the environments you need in order to build
and sell apps.
•Roles in the
Application Lifecycle •Designing and Building Your App—Before you start development, it's important to know how all
the pieces fit together. This chapter covers architectural decisions to consider before development.
•How to Sign Up for
Test Environments •Packaging and Testing Your App—This chapter also covers specifics about developing and testing
packaged apps.
•Passing the Security Review—Learn about security best practices and plan for security review.
•Publish Your Offering on the AppExchange—List your app on the AppExchange marketplace.
•Managing Orders—Use the Channel Order App to create, manage, and submit orders to the Partner
Operations team.
•Managing Licenses—Use the License Management App to manage your customer and app licenses.
•Providing a Free Trial—Create a free trial to help you sell your app to non-Salesforce customers.
•Supporting Your AppExchange Customers—Give your customers technical support for the installation
and use of your app.
•Upgrading Your App—When it's time to upgrade your packaged app, you can push minor patches
or create major releases.
1

Resources for Partners
The Partner Community, at https://partners.salesforce.com, is the primary resource for all ISVs. To get started, we recommend visiting
the Education page, your one-stop shop for all ISV content. In addition, you can use the Partner Community to:
•Collaborate with other partners and salesforce.com using our Chatter community.
•Stay up-to-date on news and events related to the Salesforce Partner Program.
•Log cases for access to partner-specific features and customer support.
•Use enhanced search, integrated with the Success Community, to quickly find relevant resources.
•Browse the Salesforce Partner Online Training catalog and sign up for courses.
The Partner Community is self-service—the first person to register your partnership becomes your designated administrator and manages
the creation of additional users for your company. You can change or add administrators, as required.
Roles in the Application Lifecycle
This guide covers the entire lifecycle of a package application, so some of the topics might not be relevant to you. The following list has
topic suggestions by role.
An application architect
The application architect determines the scope of the application and the internal structures that support it. Architects need to know
details about the underlying Force.com platform that will determine not only the application's use, but which editions it supports,
how it's installed, configured, and upgraded. Architects need to be familiar with this entire guide, but especially the following
chapters:
•Designing and Building Your App on page 17
•Passing the Security Review on page 120
A developer creates, packages, and uploads an app
A developer, or often a team of developers, create an app, package it, and upload it to the AppExchange. Developers also update
the app with bug fixes and new features. As a developer, you'll want to see the following chapters:
•Designing and Building Your App on page 17
•Packaging and Testing Your App on page 98
•Developing App Documentation on page 52
•Upgrading Your App on page 251
A publisher distributes, sells, and supports the app
The publisher of an app is the person or company who has a profile and one or more listings for the app on AppExchange. Publisher
listings contain a link to an app they have uploaded to AppExchange, or to a third-party website. Publishers also set default license
settings. As a publisher, you'll want to see the following chapters:
•Publish Your Offering on the AppExchange on page 129
•Provide a Free Trial on page 213
•Supporting Your AppExchange Customers on page 241
An administrator installs the app
An administrator, or admin, downloads your app from AppExchange and installs it into their organization. Admins might also
customize the app to further suit their business needs. See the following topic to learn how admins will interact with your app.
•Installing a Package on page 108
2
Resources for PartnersIntroduction

How to Sign Up for Test Environments
To sign up for test environments (organizations), use the Environment Hub.
Note: If you’re a new Salesforce user, log in to the organization that you received when you signed up for the Partner Program.
The Environment Hub is enabled in this organization by default. If you’re an existing Salesforce user and are using a different
organization to manage development, log a case in the Partner Community to enable the Environment Hub.
1. Log in to the organization where Environment Hub is enabled.
2. Select the Environment Hub tab, then click Create Organization.
3. In the Purpose drop-down list, select Test/Demo.
4. In the Edition drop-down list, choose the edition you want to test against.
5. Fill in the remaining required fields. Optionally, set up My Domain.
6. Agree to the terms and then click Create.
7. You'll receive an email that will prompt you to log in and change your password. Click the link, change your password, and create
a password question and answer.
3
How to Sign Up for Test EnvironmentsIntroduction
CHAPTER 2 ISVforce Quick Start
This quick start is meant to take you through the application lifecycle as quickly as possible. Upon
completion, you'll have everything you need to develop and publish a packaged application.
In this chapter ...
•Tutorial #1: Sign Up
for AppExchange Note: You must be an ISVforce/OEM partner to complete all steps in this quick start, as it covers
some features only available to eligible partners.
•Tutorial #2:
Developing Your App
How is the Quick Start Organized?
The quick start is broken up into four tutorials, which are meant to be completed in order. Because some
of the steps require an automated email response, the time to complete the steps can vary. However,
you can stop at any step and pick up where you left off.
•Tutorial #3:
Publishing and
Licensing
•Tutorial #4: Updating
Your App
•Tutorial #1 takes you through the process of signing up for the Salesforce ISV Partner Program and
getting all of the organizations (environments) you'll need.
•Tutorial #2 walks you through creating a simple Hello World application.
•Tutorial #3 helps you publish and manage your app.
•Tutorial #4 tells you how to update your app for major and minor releases.
Tell Me More....
At the end of each step, there is an optional Tell Me More section. If you like to do things quickly, move
on to the next step. However, if you're a smell-the-roses type, there's a lot of useful information here.
•For a list of useful terms, see the Glossary on page 280.
•To learn more about Force.com and to access a rich set of resources, visit Salesforce Developers at
https://developer.salesforce.com.
•For a gentle introduction to developing on Force.com, see the Force.com Workbook at
https://developer.salesforce.com/page/Force.com_workbook.
4

Tutorial #1: Sign Up for AppExchange
In this tutorial, you set up the tools you need to develop, sell, and support apps and components built on the Force.com platform. You
start by signing up for the Partner Program. You then have access to the Partner Community, which allows you to view helpful resources,
create support cases, and collaborate with other partners and Salesforce. The Partner Community is also the best source for news and
events about the Partner Program. In addition, you can access the Environment Hub, where you can create development and test
organizations.
If you’re familiar with Salesforce, you know that an organization is a cloud unto itself. If you’re new to Salesforce, think of your organization
as a separate environment for developing, testing, and publishing your offering.
Step 1: Sign Up for the Partner Program
The first step is to sign up for the Partner Program.
1. In your browser, go to https://partners.salesforce.com and click Join Now.
Note: The signup process varies according to the region or country. Follow the instructions presented.
2. Fill in the fields about you and your company.
3. Select the first option: Independent Software Vendor (ISV).
4. Click Submit Registration.
In a moment, you’ll receive a confirmation, followed by an email welcoming you to the Partner Program and including login credentials.
Congratulations, you’re now part of the Salesforce ISV Partner Program! Click the link to the Partner Community
(https://partners.salesforce.com) and log in. Bookmark this page. You’ll be using it a lot.
Step 2: Create a Development and Test Environment
To build and sell on the Force.com platform, you need different environments for different tasks. We call these environments organizations,
or orgs for short. You use the Environment Hub to create these orgs. The first org you need is the Partner Developer Edition, which is
where you develop and package your offering. If you already have a Developer Edition org, we recommend signing up for the Partner
Developer Edition org because you can have more data storage, licenses, and users.
Note: If you’re a new Salesforce user, log in to the organization that you received when you signed up for the Partner Program.
The Environment Hub is enabled in this organization by default. If you’re an existing Salesforce user and are using a different
organization to manage development, log a case in the Partner Community to enable the Environment Hub.
1. Log in to the organization where the Environment Hub is enabled, usually your partner business org.
2. Click the Environment Hub tab, and then click Create Organization.
3. In the Purpose drop-down list, select Development. For simplicity, we refer to this as your dev org.
4. Fill in the required fields. Optionally, set up My Domain.
5. Agree to the terms and then click Create.
6. In the Purpose drop-down list, select Test/Demo and Partner Enterprise for the org edition. This process creates a test org, where
you test the app or component that your are developing.
7. Shortly, you’ll receive emails that prompt you to log in and change your password for your dev and test orgs.
5
Tutorial #1: Sign Up for AppExchangeISVforce Quick Start

Tell Me More...
The Environment Hub has several types of test orgs available, because different editions of Salesforce have different features. If you plan
to distribute your app or component to a particular edition, you want to test your offering and make sure that it works there. Although
that’s beyond the scope of this quick start. For more information, see Architectural Considerations for Group and Professional Editions
on page 59.
Step 3: Get a Business Org
In the previous step, you created orgs for developing and testing your offering. To manage sales and distribution, you need one more
org. In this step, you log a case in the Partner Community to have a partner business org provisioned for you. Your Partner Business Org
contains the apps that you use to manage sales and distribution, including the License Management App (LMA) and Channel Order
App (COA).
1. In the Partner Community, under the Support tab, select New Case.
2. Select Request Partner Benefits, and then select Create a Case.
3. In the Description field, tell us if you have an existing org or if you need a new one. If you have an existing Salesforce org, enter the
Org ID in the Description field to add two more CRM licenses to your org. If you don’t have an existing org, we provide a new one
for you. In either case, make sure to enter your business address and then select Submit Case.
Note: It can take 24–48 hours for your case to be closed. You can check the status of your case at any time under the Support
tab of the Partner Community.
4. You’ll receive an email prompting you to log in and change your password. Do that, and then bookmark the page.
Step 4: Edit Your Publisher Profile
In this step, you log in to the Partner Community and provide information about your company. We display some of this information
on AppExchange listings to help customers get to your business.
1. Log in to the Partner Community using the username and password of your business org.
2. On the Publishing page, click Company Info.
3. Fill out the information in the Provider Profile, and then click Save.
Sign-up Summary
In this first tutorial, you signed up for the Partner Program and all the organizations you need to develop, test, and sell your offering.
Let’s review what you signed up for and the purpose of each.
Partner Program
The Partner Program gives you access to the Partner Community, where you can get help and training information, log cases for
support issues, and collaborate with other partners. You also get access to the Environment Hub, which lets you create and manage
new test and development orgs.
Partner Developer Edition
Also known as your dev org, this is where you develop your offering and eventually package it for distribution.
Test Organization
Also know as your test org, this is where you install and test your offering.
Partner Business Organization
This is where you license and manage your offering.
6
Step 3: Get a Business OrgISVforce Quick Start
Tutorial #2: Developing Your App
In this tutorial you'll create a very simple “Hello World” application. It won't do much, but it's enough to understand where development
takes place in the lifecycle of a packaged application.
Step 1: Create an App
In this step you're going to create an app that contains a page, and a tab to display the page.
1. In your browser, log in to your Partner Developer Edition organization. Hereafter we'll call this your “dev org”.
2. From Setup, enter Visualforce Pages in the Quick Find box, then select Visualforce Pages.
3. In the Visualforce list, click New.
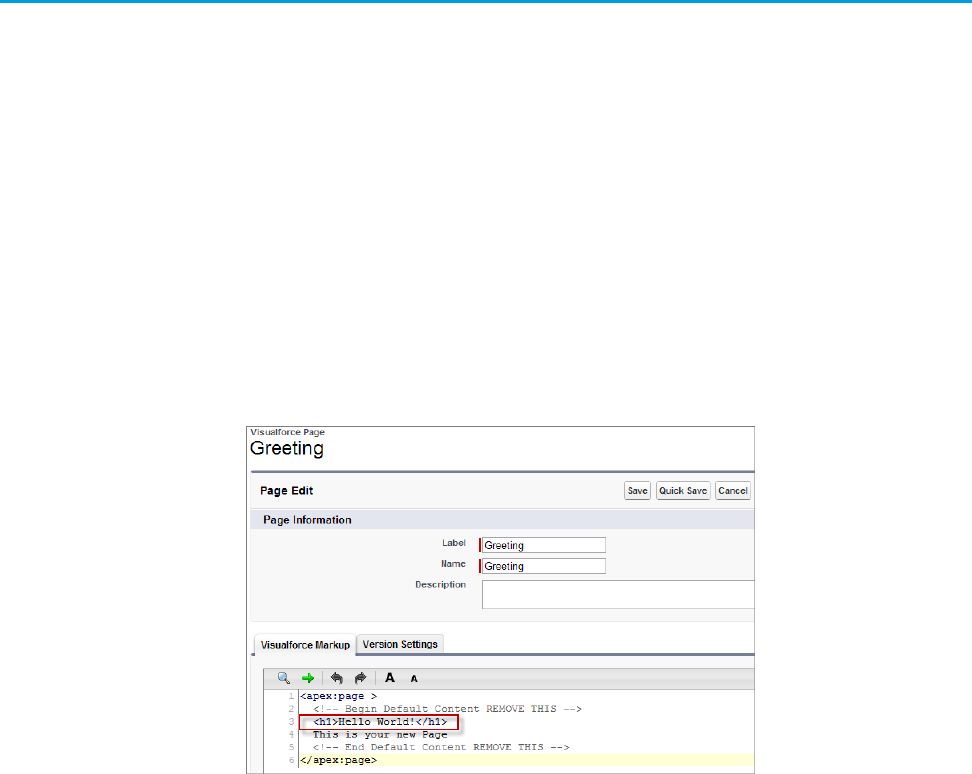
4. In the Label field enter Greeting.
5. In the Visualforce Markup area, replace the contents of the <h1> tag with Hello World.
Visualforce Page Editor
6. Click Save.
Now you'll associate the page with a tab.
1. In the sidebar menu, enter Tabs in the Quick Find box, then select Tabs.
2. In the Visualforce Tabs list, click New.
3. In the New Visualforce Tab wizard, click the drop-down box and select the Hello World page you just created.
4. For the Tab Label, enter Hello.
5. Click the Tab Style field and choose any icon to represent your tab.
6. Click Next, then Next again, and Save on the final page.
Now you'll create a new app that contains your tab and page.
1. In the sidebar menu, enter Apps in the Quick Find box, then select Apps.
2. Click New.
3. In the App Label field enter Hello World and then click Next and Next again on the following page.
7
Tutorial #2: Developing Your AppISVforce Quick Start
4. On the Choose the Tabs page, scroll to the bottom of the Available Tabs list, find your Hello tab, and add it to the Selected Tabs list.
Click Next.
5. Select the Visible checkbox to make this app visible to all profiles and then click Save.
Tell Me More....
If it seems like you just created a page within a container, within another container, you did. And you're about to put all of that in another
container! What's with all these containers and what do they do?
•A tab is a container for things you want to display on the same page, such as a chart, a table, or the Visualforce page your created.
•An app is a container for tabs that appear next to each other. When you create an app, it's available in the app picker in the upper
right hand corner of the screen.
•A package is a container for things you upload to the AppExchange. Usually a package contains an app your customers can install
in their org, but you can also upload packages that extend existing apps. You haven't created a package yet, you'll do that in the
next step.
Step 2: Package Your App
In this step you'll package the app so you can distribute it on the AppExchange. A package is simply a container for components. In this
case it's your app, tab, and page.
1. From Setup, enter Packages in the Quick Find box, select Packages, and then click New.
2. In the Package Name field enter Hello World and then click Save.
3. On the Package Detail page click Add Components.
4. Select your Hello World app and then click Add to Package.
Tell Me More....
When you clicked Add to Package, did you notice that your Hello tab and Greeting page were automatically added to the package?
When you create a package, the framework automatically detects dependent components and adds them to the package.
Step 3: Assign a Namespace
In this step you'll choose a unique identifier called a namespace. A namespace differentiates your components from other components
and allows you to do things such as upgrade the app after it's been installed. Choose your namespace carefully as it can’t be changed
later.
1. From Setup, enter Packages in the Quick Find box, then select Packages.
2. In the Developer Settings list, click Edit and on the following page click Continue.
3. In the Namespace Prefix field, enter a 1-15 character alphanumeric ID and then click Check Availability. Repeat this step until you
have a unique namespace.
4. In the Package to be managed field choose your Hello World package and then click Review Your Selections.
5. Review the information on the page and then click Save.
8
Step 2: Package Your AppISVforce Quick Start
Tell Me More....
Within the underlying code, your namespace is prepended to all components that are packaged from your dev org. This allows your
package and its contents to be distinguished from those of other developers, and ensures your exclusive control of all packaged
components.
Step 4: Upload a Beta
Before you upload a production version of your app, it's a common practice to upload a beta version for testing.
1. From Setup, enter Packages in the Quick Find box, then select Packages.
2. On the Packages page, click your Hello World package and then click Upload.
3. On the Upload Package page, enter a version name and number.
4. For the Release Type, make sure to choose Managed — Beta.
5. Scroll to the bottom and click Upload. It may take a moment for the upload to complete.
Congratulations, you've uploaded an app to the AppExchange! Your app isn't available to the public, but you can access it through an
install link. You'll do that in the next step.
Tell Me More....
The purpose of a beta is for testing only. Therefore, a beta can only be installed in a test org, Developer Edition, or sandbox (more on
that later). Next you'll install the beta in the test org you created in Step 2: Create a Development and Test Environment.
Step 5: Install and Test the Beta
Installing the beta is easy, just click the link and provide the username and password you use for your test org.
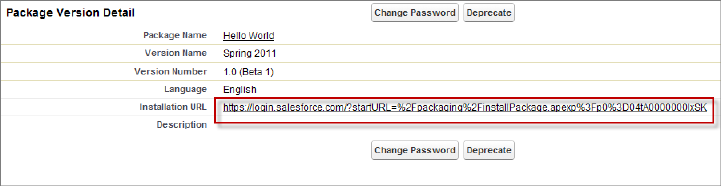
1. Click the Installation URL now.
Installation URL Link
2. On the login page, enter the Username and Password of your test org.
3. On the Package Installation Details page, click Continue.
4. Click Next.
5. On the Security Level page, Grant access to all users and click Next.
6. Click Install.
7. Once the installation completes, you can select your app from the app picker in the upper right corner.
9
Step 4: Upload a BetaISVforce Quick Start
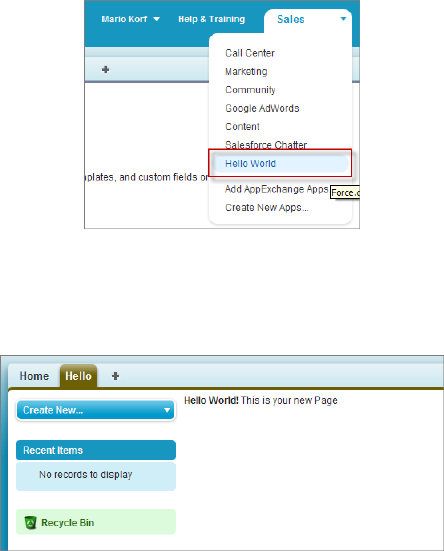
Hello World App
8. You should see your Hello tab, and the greeting text on your page.
Hello World Tab and Page
At this point you would normally test the application and make sure it works as designed. Your app installs easily and displays what you
want, so let's move on.
Tell Me More....
Beta packages can also be installed in sandboxes. A sandbox is a replica of your customer's org that allows them to develop, test, or
install apps, and verify the changes they want to commit. None of the orgs you've signed up for in this workbook have a sandbox, but
if you have a sandbox in another org and want to install your app in it, you must replace the initial portion of the Installation URL with
http://test.salesforce.com.
Development Summary
Congratulations, you just completed an essential part of the software development lifecycle! Further changes to your app will follow
the same procedure:
1. Modify the existing app in your dev org.
2. Package the app.
3. Upload as a beta package.
4. Install the beta in a test org.
5. Test the installed app.
10
Development SummaryISVforce Quick Start
Tutorial #3: Publishing and Licensing
Imagine you've been through a few development cycles with your beta and you're ready to publish a public app. The next step is to
upload a production app, or what we call a managed released version of your app. Then you can create a listing so that other people can
find your app and know what it does. Finally, you want to connect your app to your business org so you manage the licenses for people
that install your app.
Step 1: Uploading to the AppExchange
This step will seem familiar, it's similar to uploading a beta.
1. If you've been following along non-stop, you're probably still logged in to your test org. Go ahead and log in to your dev org now.
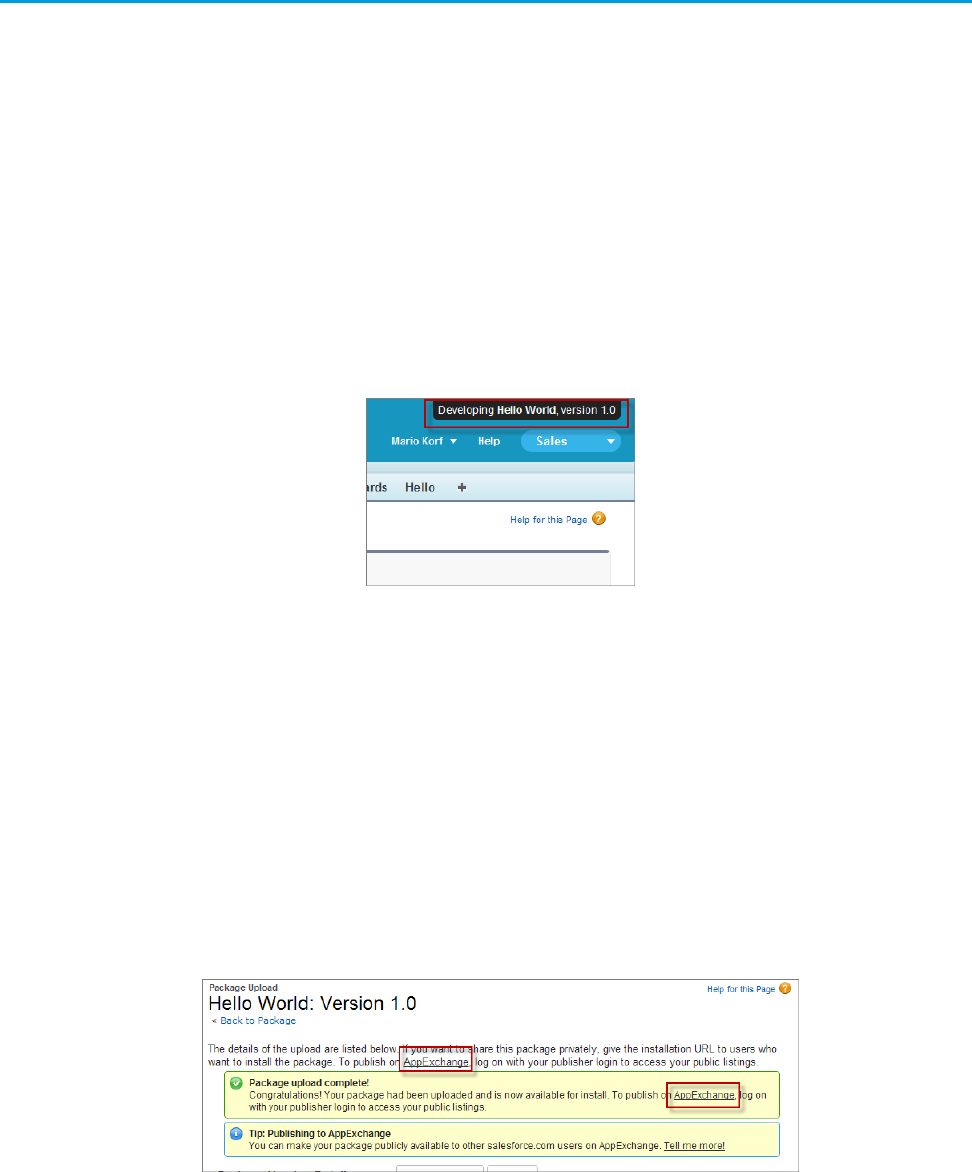
2. Notice in the upper right corner there's a link that says Developing Hello World, version 1.0. Click that link to go directly to the
Package Detail page.
Developing Hello World, version 1.0
3. On the Package Detail page, click Upload.
4. For the Release Type, choose Managed — Released.
5. Scroll to the bottom and click Upload.
6. Click OK on the popup.
Step 2: Create an AppExchange Listing
In this step, you create an AppExchange listing, which is the primary way customers discover apps, components, and services to enhance
their Salesforce experience.
1. After your package uploads, click the link to publish on the AppExchange. You are directed to the Listings tab on the Publishing
page.
2. If prompted, enter your login credentials for the Partner Community.
11
Tutorial #3: Publishing and LicensingISVforce Quick Start
3. Read and agree to the terms and conditions, and then click I Agree.
4. The first question asks if you’ve already listed on the AppExchange. You did that in Tutorial 1, Step 4: Edit Your Publisher Profile on
page 6, so select Yes and click Continue.
5. Click Link New Organization.
6. You’re prompted for your username and password. Enter the values for your development org.
7. Click the Publishing tab.
8. Click New Listing.
9. Enter a listing title, such as Hello World App by <your name>. Adding your name helps ensure that your listing title is
unique.
10. Choose App, and then click Save & Next to open the AppExchange publishing console.
11. On the Text tab, fill in the required fields, and then click Save & Next again.
Tell Me More...
Don’t be concerned with making your listing perfect, because it’s not public yet, and you can change the listing at any time.
Step 3: Complete the AppExchange Listing
Many customers like to see and experience a product before they decide to purchase. We give you several ways to show off your app
or component in an AppExchange listing. For example, you can add screenshots and videos to draw attention to key features, or add
white papers to help demonstrate business value. You can also let customers try your offering in their own organizations or set up a test
environment that you’ve customized.
1. If you’re not already there, click the Media tab in the AppExchange publishing console.
2. Add an app logo, tile image, and screenshot. Because your listing isn’t used outside of this tutorial, use any image file that you have
available.
3. Click the App tab, and then select An app that includes a package (entirely or in part).
4. Click Select Package and choose the package that you uploaded in the previous step.
5. For the installation method, select Directly from the AppExchange.
6. Choose whether you want the app to be installed for every user in the customer’s organization or just system administrators. For
this tutorial, either option is fine.
7. For app specifications, select editions and languages. For this tutorial, you can select any available edition and language.
8. Click Save & Next.
9. Click Save & Next twice, because you don’t want to configure a free trial or set up lead collection for this app.
10. For pricing, select Free. Use the default values for all other fields.
11. Agree to the terms and conditions, and then click Save.
Congratulations—you’ve completed your first listing! Like everything else you’ve done so far, you can go back and change it later if you
want.
Step 4: Manage Licenses for Your App
The License Management App (LMA) helps you manage sales, licensing, and support for your offering. The LMA comes preinstalled in
your business organization. In this step, you connect your app to the LMA.
12
Step 3: Complete the AppExchange ListingISVforce Quick Start

Note: This feature is available to eligible partners. For more information on the Partner Program, including eligibility requirements,
visit www.salesforce.com/partners.
1. If you haven’t done so already, log in to the Partner Community.
2. On the Publishing page, click the Packages tab.
3. Find the package that you want to link, and then click Manage Licenses.
4. Click Register.
5. Enter the login credentials of your partner business org, and then click Submit.
6. For the default license type, choose free trial.
7. Enter a trial length in days.
8. For the number of seats, choose the site-wide license.
9. Click Save.
It can take up to 30 minutes for your app to be connected to the LMA. Take a break; you’ve earned it!
Publishing and Licensing Summary
In this tutorial, you uploaded your managed-released app to the AppExchange and created a listing for your app. You also linked your
app to the License Management App, available in your business organization. You can use the LMA to manage and renew licenses and
to set default license settings. For example, you can license your app as a free trial that expires after a specified number of days. For more
information, see Managing Licenses on page 199.
Right now your app has a private listing on the AppExchange that you can share with potential customers, but the public doesn't see
it unless they have the link. Before you can list the app publicly, you'll need to pass a security review, which is beyond the scope of this
quick start. For more information, see Security Review Steps on page 121.
Tutorial #4: Updating Your App
If you're familiar with Salesforce, you know we do weekly patch releases to fix bugs, and a few times a year we have a major release to
introduce new features. As an ISV, you can do the same thing by delivering a patch release to fix bugs and a major release for new
features.
•For new features, the process is the same as you've experienced. You start by modifying your app, package it, upload a beta, test
the beta, and then upload a managed-released version. Major releases increment the version to the next whole number, from 1.0
to 2.0, for example, and minor releases to the first dot from 1.0 to 1.1. There are no hard rules for what constitutes a major or minor
release. That's up to you.
•For bug fixes, the process is slightly different. You start by creating a patch org, a special environment which has limited functionality
and can only be used to develop a patch for a specific package. After you upload the patch, you have the option of pushing the
patch to your customers, so they get your bug fixes the next time they log in. Minor releases increment the version number to the
second decimal, from 1.0 to 1.0.1, for example.
•Major or minor releases must be installed by customers (pulled). However, you can push patch releases directly to customer orgs.
This feature is only available to registered ISVforce/OEM partners. For more information on the Partner Program, including eligibility
requirements, please visit us at www.salesforce.com/partners.
Since the process for developing a major release is already familiar, let's do a patch release and then deliver it by pushing the patch to
our customers.
13
Publishing and Licensing SummaryISVforce Quick Start

Step 1: Creating a Patch Organization
In order to create a patch, you need to generate a new patch development organization.
To create a patch version:
1. From Setup, enter Packages in the Quick Find box, then select Packages.
2. Click the name of your managed package.
3. Click the Patch Organization tab and then click New.
4. Select the package version that you want to create a patch for in the Patching Major Release drop-down list. The release type must
be Managed - Released.
5. Enter a Username for a login to your patch organization.
6. Enter an Email Address associated with your login.
7. Click Save.
Note: If you ever lose your login information, click Reset on the package detail page under Patch Development Organizations
to reset the login to your patch development organization.
In a moment you'll receive an email with your login credentials. After you've logged in and changed your password, proceed to the next
step.
Tell Me More....
Development in a patch development organization is restricted. The following is a list of caveats:
•New package components can’t be added.
•Existing package components can’t be deleted.
•API and dynamic Apex access controls can’t change for the package.
•No deprecation of any Apex code.
•No new Apex class relationships, such as extends, can be added.
•No new Apex access modifiers, such as virtual or global, can be added.
•No new Web services can be added.
•No new feature dependencies can be added.
Step 2: Developing a Patch
We're going to make a simple change to your app. Instead of displaying just Hello World, you'll add today's date.
1. In your patch org, from Setup, enter Packages in the Quick Find box, select Packages, then click your Hello World package.
2. In the list of Package Components, click your Greeting page.
3. Click Edit.
4. Right after the closing </h1> tag, enter the following:
<br/>
<apex:outputText value="The date and time is: {!NOW()}"/>
5. Click Save.
6. To see the output, click the Hello tab and you'll notice that today's time and date are displayed.
14
Step 1: Creating a Patch OrganizationISVforce Quick Start
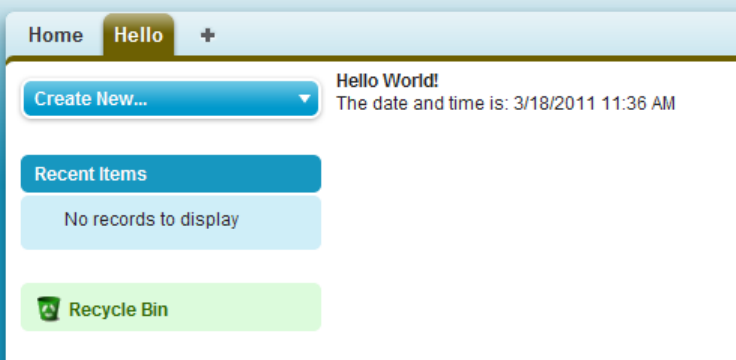
Display the date and time
That's as much as we need to do in this patch. Let's move on.
Tell Me More....
The !NOW function returns the date in a standard format. There are many more built-in functions and ways to format the output. For
more information, see the Visualforce Developer's Guide.
Step 3: Uploading the Patch
Typically the next step is to upload a beta patch and install that in a test organization. Since this is very similar to Step 4: Upload a Beta
and Step 5: Install and Test the Beta, that you completed in Tutorial #2: Developing Your App, we won't make you do that again.
1. In your patch org, from Setup, enter Packages in the Quick Find box, select Packages, and click your Hello World package.
2. On the Upload Package page, click Upload.
3. Enter a version name, such as today's date.
4. Notice that the Version Number has had its patchNumber incremented.
5. Select Managed — Released.
6. Optionally, enter and confirm a password to share the package privately with anyone who has the password. Don't enter a password
if you want to make the package available to anyone on AppExchange and share your package publicly.
7. Salesforce automatically selects the requirements it finds. In addition, select any other required components from the Package
Requirements and Object Requirements sections to notify installers of any requirements for this package.
8. Click Upload.
Congratulations, you've uploaded a patch release. You'll want to share that patch with others, and you'll do that next.
Step 4: Installing or Pushing a Patch
There are two ways to deliver a patch, you can have your customers install it, or you can push it to them. Push upgrades happen
automatically, that is, the next time your customer logs in, they have the updates. Let's try that.
1. Log in to your dev org.
15
Step 3: Uploading the PatchISVforce Quick Start
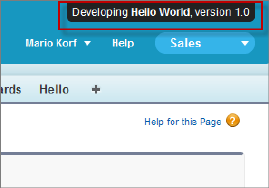
2. In the upper right corner, click Developing Hello World, version 1.0.
Developing Hello World, version 1.0
3. On the Package Detail page, click Push Upgrades.
4. Click Schedule Push Upgrades.
5. From the Patch Version drop-down list, select the patch version to push.
6. In the Scheduled Start Date field, enter today's date.
7. In the Select Target Organizations section, select your test org.
8. Click Schedule.
And you've done it! You pushed a patch release to your subscriber so that they automatically get your updates. You should verify that
your customers received the patch to ensure it was installed successfully.
Tell Me More....
Beta versions aren't eligible for push upgrades. You must uninstall a beta and then install a new one.
Updating Your App Summary
In this tutorial you learned how to update your app in a patch org and push that update to your customers. You started by creating a
patch organization that was specific to a released package version. Then you modified your app, uploaded it, and scheduled the push
upgrade to your customers.
Congratulations, you're done! Or have you really just begun? You can modify your existing app to be anything you want it to be, or
create a new dev org in the Environment Hub and build another app. You can use the same sales and test orgs and everything else
you've configured to publish and manage many more apps. You're on your way to ISVforce success!
16
Updating Your App SummaryISVforce Quick Start

CHAPTER 3 Designing and Building Your App
This section contains important concepts and architectural decisions to consider before you start
development, such as:
In this chapter ...
•Overview of
Packages •Understanding Managed and Unmanaged Packages
•Components Available for Packaging
•Components
Available in
Managed Packages
•Special Behavior of Components in Packages
•Limits for Group and Professional Editions
•About API and
Dynamic Apex
Access in Packages
•Understanding Dependencies
•Working With External Services
•Protecting Your Intellectual Property
•Architectural
Considerations for •Working with Connected Apps
Group and
Professional Editions
•Connected Apps
•Environment Hub
•Notifications for
Package Errors
17
Overview of Packages
A package is a container for something as small as an individual component or as large as a set of related apps. After creating a package,
you can distribute it to other Salesforce users and organizations, including those outside your company.
Packages come in two forms—unmanaged and managed:
Unmanaged packages
Unmanaged packages are typically used to distribute open-source projects or application templates to provide developers with the
basic building blocks for an application. Once the components are installed from an unmanaged package, the components can be
edited in the organization they are installed in. The developer who created and uploaded the unmanaged package has no control
over the installed components, and can't change or upgrade them. Unmanaged packages should not be used to migrate components
from a sandbox to production organization. Instead, use Change Sets.
Managed packages
Managed packages are typically used by Salesforce partners to distribute and sell applications to customers. These packages must
be created from a Developer Edition organization. Using the AppExchange and the License Management Application (LMA),
developers can sell and manage user-based licenses to the app. Managed packages are also fully upgradeable. To ensure seamless
upgrades, certain destructive changes, like removing objects or fields, can not be performed.
Managed packages also offer the following benefits:
•Intellectual property protection for Apex
•Built-in versioning support for API accessible components
•The ability to branch and patch a previous version
•The ability to seamlessly push patch updates to subscribers
•Unique naming of all components to ensure conflict-free installs
Packages consist of one or more Salesforce components, which, in turn, consist of one or more attributes. Components and their attributes
behave differently in managed and unmanaged packages.
The following definitions illustrate these concepts:
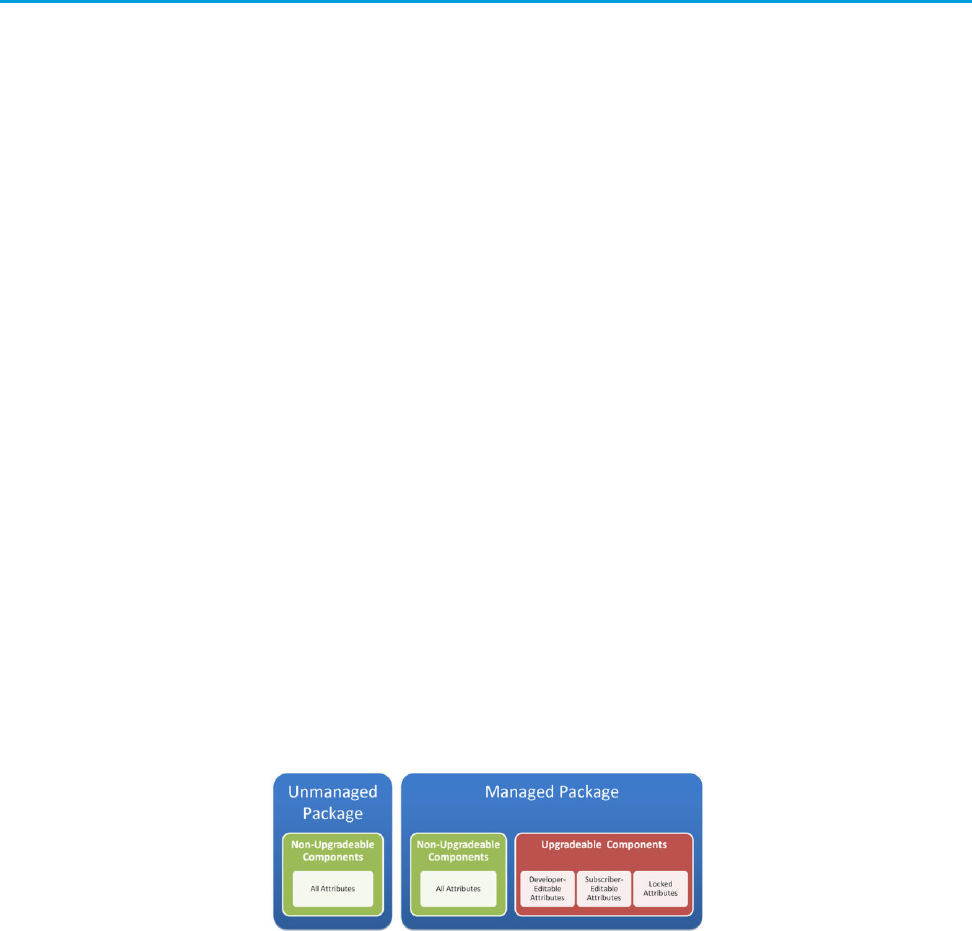
Unmanaged and Managed Packages
Components
A component is one constituent part of a package. It defines an item, such as a custom object or a custom field. You can combine
components in a package to produce powerful features or applications. In an unmanaged package, components are not upgradeable.
In a managed package, some components can be upgraded while others can’t.
Attributes
An attribute is a field on a component, such as the name of an email template or the Allow Reports checkbox on a custom
object. On a non-upgradeable component in either an unmanaged or managed package, attributes are editable by both the developer
(the one who created the package) and the subscriber (the one who installed the package). On an upgradeable component in a
managed package, some attributes can be edited by the developer, some can be edited by the subscriber, and some are locked,
meaning they can’t be edited by either the developer or subscriber.
18
Overview of PackagesDesigning and Building Your App
Planning the Release of Managed Packages
Releasing an AppExchange package is similar to releasing any other program in software development. You may want to roll it out in
iterations to ensure each component functions as planned. You may even have beta testers who have offered to install an early version
of your package and provide feedback.
Once you release a package by publishing it on AppExchange, anyone can install it. So, plan your release carefully. Review the states
defined below to familiarize yourself with the release process. Salesforce automatically applies the appropriate state to your package
and components depending on the upload settings you choose and where it is in the release process.
DescriptionState
The package has not been converted into a managed package or the component has
not been added to a managed package. Note that a component that is “Managed - Beta”
Unmanaged
can become “Unmanaged” if it is removed from a managed package. All packages are
unmanaged unless otherwise indicated by one of the managed icons below.
The package or component was created in the current Salesforce organization and is
managed, but it is not released because of one of these reasons:
Managed - Beta
•It has not been uploaded.
•It has been uploaded with Managed - Beta option selected. This option prevents
it from being published, publicly available on AppExchange. The developer can still
edit any component but the installer may not be able to depending on which
components were packaged.
Note: Don’t install a Managed - Beta package over a Managed - Released package.
If you do, the package is no longer upgradeable and your only option is to uninstall
and reinstall it.
The package or component was created in the current Salesforce organization and is
managed. It is also uploaded with the Managed - Released option selected,
Managed - Released
indicating that it can be published on AppExchange and is publicly available. Note that
once you have moved a package to this state, some properties of the components are
no longer editable for both the developer and installer.
This type of release is considered a major release on page 253.
If you need to provide a minor upgrade to a managed package, consider creating a patch
instead of a new major release. A patch enables a developer to change the functionality
Patch
of existing components in a managed package, while ensuring that subscribers experience
no visible changes to the package.
This type of release is considered a patch release on page 253.
The package or component was installed from another Salesforce organization but is
managed.
Managed - Installed
A developer can refine the functionality in a managed package over time, uploading and releasing new versions as the requirements
evolve. This might involve redesigning some of the components in the managed package. Developers can delete some, but not all,
types of components in a Managed - Released package when upgrading it. For details, see Delete Components in Managed Packages
on page 259.
19
Planning the Release of Managed PackagesDesigning and Building Your App
Create a Package
EDITIONS
Available in: Salesforce
Classic and Lightning
Experience
Available in: Developer
Edition
Package uploads and
installs are available in
Group, Professional,
Enterprise, Performance,
Unlimited, and Developer
Editions
USER PERMISSIONS
To create packages:
•“Create AppExchange
Packages”
Packages are containers for distributing custom functionality between Salesforce orgs. Create a
package to upload your app or Lightning component to the AppExchange or to deploy changes
between orgs.
Tip: Before you begin, determine if you want to create and upload a managed or unmanaged
package.
1. From Setup, enter Packages in the Quick Find box, then select Packages.
2. Click New.
3. Enter a name for your package. This does not have to be the same name that appears on
AppExchange.
4. From the drop-down menu, select the default language of all component labels in the package.
5. Optionally, choose a custom link from the Configure Custom Link field to display
configuration information to installers of your app. You can select a predefined custom link to
a URL or s-control that you have created for your home page layouts; see the Configure Option
on page 52. The custom link displays as a Configure link within Salesforce on the Force.com
AppExchange Downloads page and app detail page of the installer's organization.
6. Optionally, in the Notify on Apex Error field, enter the username of the person who
should receive an email notification if an exception occurs in Apex that is not caught by the
Apex code. If you do not specify a username, all uncaught exceptions generate an email
notification that is sent to Salesforce. This is only available for managed packages. For more
information, see Handling Apex Exceptions in Managed Packages.
Note: Apex can only be packaged from Developer, Enterprise, Unlimited, and Performance Edition organizations.
7. Optionally, in the Notify on Packaging Error field, enter the email address of the person who receives an email notification
if an error occurs when a subscriber’s attempt to install, upgrade, or uninstall a packaged app fails. This field appears only if packaging
error notifications are enabled. To enable notifications, contact your Salesforce representative.
8. Optionally, enter a description that describes the package. You will have a chance to change this description before you upload it
to AppExchange.
9. Optionally, specify a post install script. This is an Apex script that runs in the subscriber organization after the package is installed or
upgraded. For more information, see Running Apex on Package Install/Upgrade.
10. Optionally, specify an uninstall script. This is an Apex script that runs in the subscriber organization after the package is uninstalled.
For more information, see Running Apex on Package Uninstall.
11. Click Save.
Developing and Distributing Unmanaged Packages
Unmanaged packages are traditionally used for distributing open-source projects to developers, or as a one time drop of applications
that require customization after installation. You should never use unmanaged packages for sandbox to production migration. Instead,
use theForce.com IDE or the Force.com Migration Tool. If you’re using Enterprise, Unlimited, or Performance Edition, see Change Sets.
SEE ALSO:
Components Available in Unmanaged Packages
20
Create a PackageDesigning and Building Your App

Create and Upload an Unmanaged Package
Use the following procedure to upload an unmanaged package through the UI. (You can also upload a package using the Tooling API.
For sample code and more details, see the PackageUploadRequest object in the Tooling API Developer Guide.)
1. Create the package:
a. From Setup, enter Packages in the Quick Find box, then select Packages.
b. Click New.
c. Fill in the details of the package.
d. Click Save.
2. Add the necessary components for your app.
a. Click Add Components.
b. From the drop-down list, choose the type of component.
c. Select the components you want to add.
Note: Some components cannot be added to Managed - Released packages. For a list of packageable components, see
Components Available in Managed Packages on page 21. Also, S-controls cannot be added to packages with restricted
API access.
d. Click Add To Package.
e. Repeat these steps until you have added all the components you want in your package.
Note: Some related components are automatically included in the package even though they might not display in the Package
Components list. For example, when you add a custom object to a package, its custom fields, page layouts, and relationships
with standard objects are automatically included. For a complete list of components, see Components Automatically Added
to Packages on page 35.
3. Click Upload.
You will receive an email that includes an installation link when your package has been uploaded successfully. Wait a few moments
before clicking the installation link or distributing it to others, as it might take a few minutes for it to become active.
Components Available in Managed Packages
Not all components can be packaged for distribution. If you create an app that uses components that aren't packageable, your subscribers
will have to create and configure those components after they install your app. If ease of installation is an important concern for your
subscribers, keep the packageable components in mind as you develop.
The following table shows the components that are available in a managed package, and whether or not it is updateable or deletable.
The following sections describe the table columns and their values.
Upgradeable
Some components are updated to a newer version when a package is upgraded.
•No: The component is not upgraded.
•Yes: The component is upgraded.
Subscriber Deletable
A subscriber or installer of a package can delete the component.
•No: The subscriber cannot delete the component.
21
Create and Upload an Unmanaged PackageDesigning and Building Your App

•Yes: The subscriber can delete the component.
Developer Deletable
A developer can delete some components after the package is uploaded as Managed - Released. Deleted components are not
deleted in the subscriber's organization during a package upgrade. The Protectable attribute contains more details on deleting
components.
•No: The developer cannot delete a Managed - Released component.
•Yes: The developer can delete a Managed - Released component.
Protectable
Developers can mark certain components as protected. Protected components can’t be linked to or referenced by components
created in a subscriber org. A developer can delete a protected component in a future release without worrying about failing
installations. However, once a component is marked as unprotected and is released globally, the developer can’t delete it. When
the subscriber upgrades to a version of the package where the component is deleted, the component is removed from the subscriber's
organization.
•No: The component cannot be marked protected.
•Yes: The component can be marked protected.
IP Protection
Certain components automatically include intellectual property protection, such as obfuscating Apex code. The only exceptions are
Apex methods declared as global, meaning that the method signatures can be viewed by the subscriber. The information in the
components you package and publish might be visible to users on AppExchange. Use caution when adding your code to a custom
s-control, formula, Visualforce page, or any other component that you cannot hide in your app.
•No: The component does not support intellectual property protection.
•Yes: The component supports intellectual property protection.
IP ProtectionProtectableDeveloper
Deletable
Subscriber
Deletable
UpgradeableComponent
NoNoNoNoYesAction
YesNoYes (if not set to
global access)
NoYesApex Class
NoNoNoNoYesApex Sharing
Reason
NoNoYesYesNoApex Sharing
Recalculation
YesNoYesNoYesApex Trigger
NoNoYesYesNoApplication
NoNoNoNoYesArticle Type
NoNoNoYesNoCall Center
NoNoNoNoYesCompact Layout
NoNoYesYesYesConnected App
22
Components Available in Managed PackagesDesigning and Building Your App

IP ProtectionProtectableDeveloper
Deletable
Subscriber
Deletable
UpgradeableComponent
NoNo, except custom
links (for Home page
only)
Yes**Yes*YesCustom Button or
Link
NoNoYes**Yes*YesCustom Console
Components 1
NoNoYes**Yes*YesCustom Field
NoYesYes, if protectedNoYesCustom Label
NoNoYes**Yes*YesCustom Object
NoNoNoNoYesCustom Permission
NoNoNoNoYesCustom Report
Type
YesNoYes**Yes*YesCustom Setting
NoNoYesYesNoDashboard
NoNoYesYesNoDocument
NoNoYesYesNoEmail Template
NoNoNoNoYesExternal Data
Source
NoNoYes**Yes*YesField Set
NoNoNoNoYesLightning Page
NoNoNoYesYesFlow
NoNoYesYesNoFolder
NoNoNoNoYesHome Page
Component
NoNoYesYesNoHome Page Layout
NoNoYesYesNoLetterhead
NoNoNoNoNoLightning
Application
NoNoNoNoYesLightning
Component
NoNoNoNoYesLightning Event
NoNoNoNoYesLightning Interface
1Requires a Service Cloud license.
23
Components Available in Managed PackagesDesigning and Building Your App
IP ProtectionProtectableDeveloper
Deletable
Subscriber
Deletable
UpgradeableComponent
NoNoYesYesNoList View
NoNoNoNoYesNamed Credential
NoNoYesYesNoPage Layout
NoNoYes**Yes*YesPermission Set
NoNoNoNoNoPlatform Cache
See Flow.Process
NoNoYes**Yes*YesRecord Type
NoNoYesYesNoRemote Site
Setting
NoNoYesYesNoReport
NoNoYesYesNoReporting
Snapshot
NoNoNoNoYesS-Control
NoNoYes**Yes*YesStatic Resource
NoNoYes**Yes*YesTab
NoNoNoNoYesTranslation
NoNoYes**Yes*YesValidation Rule
YesNoYes**Yes***YesVisualforce
Component
NoNoYes**Yes*YesVisualforce Page
NoNoYesNoYesWave App
NoNoYesNoYesWave Dashboard
NoNoYesNoYesWave Dataflow
NoNoYesNoYesWave Dataset
NoNoYesNoYesWave Lens
NoYesYes, if protectedNoYesWorkflow Email
Alert
NoYesYes, if protectedNoYesWorkflow Field
Update
NoYesYes, if protectedNoYesWorkflow
Outbound
Message
24
Components Available in Managed PackagesDesigning and Building Your App

IP ProtectionProtectableDeveloper
Deletable
Subscriber
Deletable
UpgradeableComponent
NoNoNoNoYesWorkflow Rule
NoYesYes, if protectedNoYesWorkflow Task
* If you remove this component type from a new version of your package and a subscriber upgrades, the Administrator (System
Administrator) of the subscriber organization can delete the component.
** If the ability to remove components has been enabled for your packaging organization, you can delete these component types even
if they are part of a Managed - Released package.
*** If you remove a public Visualforce component from a new version of your package and a subscriber upgrades, the component is
removed from the subscriber’s organization upon upgrade. If the Visualforce component is global, it remains in the subscriber organization
until the Administrator (System Administrator) deletes it.
Component Attributes and Behaviors
Only some attributes of a component are upgradeable. Many components also behave differently or include additional restrictions
in a managed package. It's important to consider these behaviors when designing your package.
If you register your namespace after you referenced a flow in a Visualforce page or Apex code, don’t forget to add the namespace
to the flow name. Otherwise, the package will fail to install.
Deleting Visualforce Pages and Global Visualforce Components
Before you delete Visualforce pages or global Visualforce components from your package, remove all references to public Apex
classes and public Visualforce components from the pages or components that you’re deleting. After removing the references,
upgrade your subscribers to an interim package version before you delete the page or global component.
SEE ALSO:
Editing Components and Attributes after Installation
Components Automatically Added to Packages
Delete Components in Managed Packages
Components Available in Unmanaged Packages
Not all components can be packaged for distribution. The following table lists the components that are available in an unmanaged
package, how the component is included in the package, and whether the component supports automatic renaming.
Packaged Explicitly or Implicitly
Components can be added either explicitly or implicitly. Explicit components must be included directly in the package, while implicit
components are automatically added. For example, if you create a custom field on a standard object, you must explicitly add the
custom field to your package. However, if you create a custom object and add a custom field to it, the field is implicitly added to the
package when you add the custom object.
•Explicitly: The component must be manually added to the package.
•Implicitly: The component is automatically added to the package when another dependent component, usually a custom
object, is added.
Automatic Renaming
Salesforce can resolve naming conflicts automatically on install.
•No: If a naming conflict occurs the install is blocked.
25
Components Available in Unmanaged PackagesDesigning and Building Your App

•Yes: If a naming conflict occurs Salesforce can optionally change the name of the component being installed.
Automatic RenamingPackaged Explicitly or ImplicitlyComponent
YesExplicitlyReporting Snapshot
NoExplicitlyApex Class
NoImplicitly
On an extension: Explicitly
Apex Sharing Reason
NoImplicitlyApex Sharing Recalculation
NoOn a standard or extension object: Explicitly
On an object in the package: Implicitly
Apex Trigger
NoExplicitlyApplication
NoOn a standard object: Explicitly
On a custom object: Implicitly
Custom Button or Link
NoOn a standard object: Explicitly
On a custom object: Implicitly
Custom Field
NoImplicitlyCustom Label
NoExplicitlyCustom Object
NoImplicitly
With required custom permissions: Explicitly
Custom Permission
NoExplicitlyCustom Report Type
NoExplicitlyCustom Setting
YesExplicitly
In a folder: Implicitly
Dashboard
YesExplicitly
In a folder: Implicitly
Document
YesExplicitly
In a folder: Implicitly
Email Template
NoExplicitly
Referenced by an external object: Implicitly
External Data Source
Assigned by a permission set: Implicitly
YesExplicitlyFolder
NoExplicitlyHome Page Component
26
Components Available in Unmanaged PackagesDesigning and Building Your App

Automatic RenamingPackaged Explicitly or ImplicitlyComponent
NoExplicitlyHome Page Layout
YesExplicitlyLetterhead
NoExplicitlyLightning Application
NoExplicitlyLightning Component
NoExplicitlyLightning Event
NoExplicitlyLightning Interface
YesOn a standard object: Explicitly
On a custom object: Implicitly
List View
NoExplicitlyNamed Credential
NoOn a standard object: Explicitly
On a custom object: Implicitly
Page Layout
NoOn a standard object: Explicitly
On a custom object: Implicitly
Record Type
YesExplicitly
In a folder: Implicitly
Report
NoExplicitlyS-Control
NoExplicitlyStatic Resource
NoExplicitlyTab
NoExplicitlyTranslation
NoOn a standard object: Explicitly
On a custom object: Implicitly
Validation Rule
NoExplicitlyVisualforce Component
NoExplicitlyVisualforce Page
NoExplicitlyWorkflow Email Alert
NoExplicitlyWorkflow Field Update
NoExplicitlyWorkflow Outbound Message
NoExplicitlyWorkflow Rule
27
Components Available in Unmanaged PackagesDesigning and Building Your App

Automatic RenamingPackaged Explicitly or ImplicitlyComponent
NoExplicitlyWorkflow Task
SEE ALSO:
Components Automatically Added to Packages
Editing Components and Attributes after Installation
The following table shows which components and attributes are editable after installation from a managed package.
Developer Editable
The developer can edit the component attributes in this column. These attributes are locked in the subscriber’s organization.
Subscriber and Developer Editable
The subscriber and developer can edit the component attributes in this column. However, these attributes aren’t upgradeable. Only
new subscribers receive the latest changes.
Locked
After a package is Managed - Released, the developer and subscriber can’t edit the component attributes in this column.
LockedSubscriber and Developer
Editable
Developer EditableComponent
Action •• Target Record Type All fields except Target
Record Type
•Action layout
•Predefined values for action
fields
Reporting Snapshot •• Reporting Snapshot Unique
Name
All attributes except
Reporting Snapshot Unique
Name
Apex Class •• API Version Name
•Code
Apex Sharing Reason •• Reason NameReason Label
Apex Sharing Recalculation •Apex Class
Apex Trigger •• API Version Name
•Code
Application •• App NameAll attributes except App
Name
28
Editing Components and Attributes after InstallationDesigning and Building Your App

LockedSubscriber and Developer
Editable
Developer EditableComponent
Article Types •• Available for Customer
Portal
•Description Name
•Label
•Channel Displays
•Plural Label
•Default Sharing Model
•Starts with a Vowel Sound
•Development Status
•Enable Divisions
•Grant Access Using
Hierarchy
•Search Layouts
Compact Layout •All attributes
Connected App •API Name
•ACS URL
•Access Method
•Canvas App URL •Created Date/By
•Entity ID
•IP Relaxation
•Callback URL •Consumer Key
•Consumer Secret
•Manage Permission Sets
•Connected App Name
•Contact Email •Installed By
•Manage Profiles
•Mobile Start URL
•Contact Phone •Installed Date
•Last Modified Date/By
•Permitted Users
•Description
•Icon URL •• Refresh Token Policy Version
•• SAML AttributesInfo URL
•Trusted IP Range •Service Provider Certificate
•Start URL
•Locations
•Logo Image URL •Subject Type
•OAuth Scopes
Custom Button or Link •Display Type
•Height
•Behavior
•Button or Link URL •• Resizeable Name
•• Show Address BarContent Source
•Description •Show Menu Bar
•Show Scrollbars
•Display Checkboxes
•Label •Show Status Bar
•Show Toolbars
•Link Encoding
•Width
•Window Position
Custom Field •Child Relationship Name
•Chatter Feed Tracking
•Auto-Number Display
Format •• Data TypeHelp Text
29
Editing Components and Attributes after InstallationDesigning and Building Your App

LockedSubscriber and Developer
Editable
Developer EditableComponent
•Decimal Places •• External IDMask Type
•Mask Character
•Description •Field Name
•Roll-Up Summary Field
•Sharing Setting
•Default Value
•Field Label •Roll-Up Summary Object
•Sort Picklist Values
•• Formula •Roll-Up Summary TypeTrack Field History
• •
Length Unique
•Lookup Filter
•Related List Label
•Required
•Roll-Up Summary Filter
Criteria
Custom Label •• Category Name
•Short Description
•Value
Custom Object •Object Name
•Allow Activities
•Description
•Label •Record Name Data Type
•Allow Reports
•Available for Customer
Portal
•Plural Label •Record Name Display
Format
•Record Name
•Context-Sensitive Help
Setting
•Starts with a Vowel Sound
•Default Sharing Model
•Development Status
•Enable Divisions
•Enhanced Lookup
•Grant Access Using
Hierarchy
•Search Layouts
•Track Field History
Custom Permission •Connected App
•Description
•Label
•Name
Custom Report Type ••• Report Type NameDevelopment StatusAll attributes except
Development Status and
Report Type Name
30
Editing Components and Attributes after InstallationDesigning and Building Your App

LockedSubscriber and Developer
Editable
Developer EditableComponent
Custom Setting •Object Name
•Description
• • Setting TypeLabel
•Visibility
Dashboard •• Dashboard Unique NameAll attributes except
Dashboard Unique Name
Document •• Document Unique NameAll attributes except
Document Unique Name
Email Template •• Email Template NameAll attributes except Email
Template Name
External Data Source •• Auth Provider
•NameType
•Certificate
•Custom Configuration
•Endpoint
•Identity Type
•OAuth Scope
•Password
•Protocol
•Username
Field Set ••• Description NameSelected fields (only
subscriber controlled)
•Label
•Available fields
Lightning Page •Lightning Page
Flow •Flow Unique Name
•Name
•Entire flow
•• URLDescription
•Status
Folder •• Folder Unique NameAll attributes except Folder
Unique Name
Home Page Component •Name
•Body
• •
Component Position Type
31
Editing Components and Attributes after InstallationDesigning and Building Your App

LockedSubscriber and Developer
Editable
Developer EditableComponent
Home Page Layout •• Layout NameAll attributes except Layout
Name
Letterhead •• Letterhead NameAll attributes except
Letterhead Name
NameLightning Application •API Version
•Description
•Label
•Markup
NameLightning Component •API Version
•Description
•Label
•Markup
NameLightning Event •API Version
•Description
•Label
•Markup
NameLightning Interface •API Version
•Description
•Label
•Markup
List View •• View Unique NameAll attributes except View
Unique Name
Named Credential •• Auth Provider
•Endpoint Name
•• CertificateLabel
•Identity Type
•OAuth Scope
•Password
•Protocol
•Username
Page Layout •• Page Layout NameAll attributes except Page
Layout Name
32
Editing Components and Attributes after InstallationDesigning and Building Your App
LockedSubscriber and Developer
Editable
Developer EditableComponent
Permission Set •• Description Name
•Label
•Custom object permissions
•Custom field permissions
•Apex class access settings
•Visualforce page access
settings
Platform Cache •All attributes
Record Type •• Active
•Description Name
•• Business ProcessRecord Type Label
All attributes except Remote Site
Name
Remote Site Setting •Remote Site Name
Report •• Report Unique NameAll attributes except Report
Unique Name
S-Control •S-Control Name
•• Content Prebuild in Page
• •
Description Type
•Encoding
•Filename
•Label
Static Resource •• Description Name
•File
Tab •• Salesforce Mobile Classic
Ready
•Description Tab Name
•Encoding
•Tab Style
•Has Sidebar
•Height
•Label
•S-control
•Splash Page Custom Link
•Type
•URL
•Width
Translation •All attributes
33
Editing Components and Attributes after InstallationDesigning and Building Your App

LockedSubscriber and Developer
Editable
Developer EditableComponent
Validation Rule ••• Description Rule NameActive
•Error Condition Formula
•Error Location
•Error Message
Visualforce Component •• API Version Name
•Description
•Label
•Markup
Visualforce Page •• API Version Name
•Description
•Label
•Markup
Workflow Email Alert •• Additional Emails Description
•Email Template
•From Email Address
•Recipients
Workflow Field Update ••• Description NameLookup
•Field Value
•Formula Value
Workflow Outbound Message ••• Description NameUser to Send As
•Endpoint URL
•Fields to Send
•Send Session ID
Workflow Rule ••• Description Rule NameActive
•Evaluation Criteria
•Rule Criteria
Workflow Task •• Assign To Subject
•Comments
•Due Date
•Priority
•Record Type
•Status
34
Editing Components and Attributes after InstallationDesigning and Building Your App
Components Automatically Added to Packages
When adding components to your package, some related components are automatically added, if required. For example, if you add a
Visualforce page to a package that references a custom controller, that Apex class is also added.
To understand what components might be automatically included, review the following list:
These types of components might be automatically included:When you add this component:
Action target object (if it’s a custom object), action target field, action record type, predefined
field values, action layout; and any custom fields that the action layout or predefined values
refer to on the target object
Action
ReportsReporting Snapshot
Custom fields, custom objects, and other explicitly referenced Apex classes, as well as anything
else that is directly referenced by the Apex class
Apex class
Note: If an Apex class references a custom label, and that label has translations, you
must explicitly package the individual languages desired in order for those translations
to be included.
Custom fields, custom objects, and any explicitly referenced Apex classes, as well as anything
else that is directly referenced by the Apex trigger
Apex trigger
Custom fields, the default page layoutArticle type
Custom fieldsCompact layout
Custom tabs (including web tabs), documents (stored as images on the tab), documents
folder
Custom app
Custom fields and custom objectsCustom button or link
Custom objectsCustom field
Custom home page components on the layoutCustom home page layouts
Apex sharing reasons, Apex sharing recalculations, Apex triggers, custom buttons or links,
custom fields, list views, page layouts, record types, validation rules
Custom settings
Custom fields, validation rules, page layouts, list views, custom buttons, custom links, record
types, Apex sharing reasons, Apex sharing recalculations, and Apex triggers
Custom object
Note:
•Apex sharing reasons are unavailable in extensions.
•When packaged and installed, only public list views from an app are installed. If a
custom object has any custom list views that you want to include in your package,
ensure that the list view is accessible by all users.
35
Components Automatically Added to PackagesDesigning and Building Your App
These types of components might be automatically included:When you add this component:
External data source, custom fields, page layouts, list views, custom buttons, and custom linksCustom object (as an external object)
Note:
•When packaged and installed, only public list views from an app are installed. If
an external object has any custom list views that you want to include in your
package, ensure that the list view is accessible by all users.
•In managed and unmanaged packages, external objects are included in the custom
object component.
Custom objects (including all of its components), s-controls, and Visualforce pagesCustom tab
Folders, reports (including all of its components), s-controls, and Visualforce pagesDashboard
FolderDocument
Folder, letterhead, custom fields, and documents (stored as images on the letterhead or
template)
Email template
Any referenced fieldsField set
Any associated actionsLightning Page
Lightning PageLightning Page tab
Custom objects, custom fields, Apex classes, and Visualforce pagesFlow
Everything in the folderFolder
All Lightning resources referenced by the application, such as components, events, and
interfaces. Custom fields, custom objects, list views, page layouts, and Apex classes referenced
by the application.
Lightning application
All Lightning resources referenced by the component, such as nested components, events,
and interfaces. Custom fields, custom objects, list views, page layouts, and Apex classes
referenced by the component.
Lightning component
Custom fields, custom objects, list views, and page layoutsLightning event
Custom fields, custom objects, list views, and page layoutsLightning interface
Actions, custom buttons, custom links, s-controls, and Visualforce pagesPage layout
Any custom permissions, external data sources, Visualforce pages, and Apex classes that are
assigned in the permission set
Permission set
Record type mappings, compact layoutRecord type
Folder, custom fields, custom objects, custom report types, and custom s-controlsReport
Custom fields and custom objectsS-control
Translated terms for the selected language on any component in the packageTranslation
Custom fields (referenced in the formula)Validation rule
36
Components Automatically Added to PackagesDesigning and Building Your App
These types of components might be automatically included:When you add this component:
Associated Visualforce pageVisualforce home page component
Apex classes that are used as custom controllers, Visualforce custom components, and
referenced field sets
Visualforce pages
All associated workflow alerts, field updates, outbound messages, and tasks; also, if the
workflow rule is designed for a custom object, the custom object is automatically included
Workflow rule
Note: Some package components, such as validation rules or record types, might not display in the list of package components,
but are included and install with the other components.
Special Behavior of Components in Packages
When you’re building an app for distribution, it’s important to consider how packaging affects your app and its components. Use the
following information to help you determine what to include in your packages, how to design your app, and how to distribute your
packages (managed or unmanaged).
Note:
•For more information on the properties of each component in packages, see the packaged components properties table.
•For more information on the attributes of each component in packages, see the component attributes table.
•Component names must be unique within an organization. To ensure that your component names don’t conflict with those
in an installer’s organization, use a managed package so that all your component names contain your namespace prefix.
Apex Classes or Triggers
Any Apex that is included as part of a package must have at least 75% cumulative test coverage. Each trigger must also have some
test coverage. When you upload your package to AppExchange, all tests are run to ensure that they run without errors. In addition,
all tests are run when the package is installed in the installer’s organization. The installer can decide whether to install the package
if any tests fail.
Tip: To prevent naming conflicts, Salesforce recommends using managed packages for all packages that contain Apex. This
way, all the Apex objects contain your namespace prefix. For example, if there is an Apex class called MyHelloWorld and
the namespace for your organization is OneTruCode, the class is referenced as OneTruCode.MyHelloWorld.
Keep the following considerations in mind when including Apex in your package:
•Managed packages receive a unique namespace. This namespace is automatically prepended to your class names, methods,
variables, and so on, which helps prevent duplicate names in the installer’s organization.
•In a single transaction, you can only reference 10 unique namespaces. For example, suppose you have an object that executes
a class in a managed package when the object is updated. Then that class updates a second object, which in turn executes a
different class in a different package. Even though the second package wasn’t accessed directly by the first, because it occurs in
the same transaction, it’s included in the number of namespaces being accessed in a single transaction.
•If you are exposing any methods as Web services, include detailed documentation so that subscribers can write external code
that calls your Web service.
•If an Apex class references a custom label and that label has translations, explicitly package the individual languages desired to
include those translations in the package.
37
Special Behavior of Components in PackagesDesigning and Building Your App
•If you reference a custom object’s sharing object (such as MyCustomObject__share) in Apex, this adds a sharing model dependency
to your package. You must set the organization-wide sharing default access level for the custom object to Private in order for
other organizations to install your package successfully.
•The code contained in an Apex class, trigger, or Visualforce component that’s part of a managed package is obfuscated and
can’t be viewed in an installing org. The only exceptions are methods declared as global. You can view global method signatures
in an installing org. In addition, License Management Org users with the View and Debug Managed Apex permission can view
their packages’ obfuscated Apex classes when logged in to subscriber orgs via the Subscriber Support Console.
•You can use the deprecated annotation in Apex to identify global methods, classes, exceptions, enums, interfaces, and
variables that can no longer be referenced in subsequent releases of the managed package in which they reside. This is useful
when you are refactoring code in managed packages as the requirements evolve. After you upload another package version as
Managed - Released, new subscribers that install the latest package version cannot see the deprecated elements, while the
elements continue to function for existing subscribers and API integrations.
•Any Apex contained in an unmanaged package that explicitly references a namespace cannot be uploaded.
•Apex code that refers to Data Categories can’t be uploaded.
•Before you delete Visualforce pages or global Visualforce components from your package, remove all references to public Apex
classes and public Visualforce components from the pages or components that you’re deleting. After removing the references,
upgrade your subscribers to an interim package version before you delete the page or global component.
Apex Sharing Reasons
Apex sharing reasons can be added directly to a package, but are only available for custom objects.
Compact Layouts
When you package a compact layout, its record type mappings aren’t included. Subscribers or installers of a package containing a
compact layout must recreate its record type mappings in their organization.
Connected Apps
•Connected apps can be added to managed packages, only. Connected apps are not supported for unmanaged packages.
•Subscribers or installers of a package can’t delete a connected app by itself; they can only uninstall its package. A developer can
delete a connected app after a package is uploaded as Managed - Released. The connected app will be deleted in the subscriber's
organization during a package upgrade
•If you update a connected app and include it in a new package version, upgrading that package in a customer organization
updates the existing connected app.
•If you push upgrade a package containing a connected app whose OAuth scope or IP ranges have changed from the previous
version, the upgrade will fail. This is a security feature, to block unauthorized users from gaining broad access to a customer
organization by upgrading an installed package. A customer can still perform a pull upgrade of the same package; this is allowed
because it’s with the customer’s knowledge and consent.
•You can add an existing connected app (that is, one created prior to Summer ‘13) to a managed package. You can also combine
new and existing connected apps in the same managed package.
•For connected apps created prior to Summer ‘13, the existing install URL continues to be valid until you package and upload a
new version. Once you upload a new version of the package with an updated connected app, the install URL will no longer work.
Custom Console
A package that has a custom console component can only be installed in an organization with the Service Cloud license or Sales
Console permission enabled.
Custom Fields
•Picklist field values for custom fields can be added, edited, or deleted by subscribers. A developer should carefully consider this
when explicitly referencing a picklist value in code. Picklist values can be added or deleted by the developer. During a package
upgrade, no new picklist values are installed into the subscriber’s organization for existing fields. Any picklist values deleted by
the developer are still available in the subscriber’s organization.
38
Special Behavior of Components in PackagesDesigning and Building Your App
•Developers can add required and universally required custom fields to managed packages as long as they have default values.
•Auto-number type fields and required fields cannot be added after the object is uploaded in a Managed - Released package.
Custom Labels
If a label is translated, the language must be explicitly included in the package in order for the translations to be included in the
package. Subscribers can override the default translation for a custom label.
Custom Objects
•If a developer enables the Allow Reports or Allow Activities attributes on a packaged custom object, the
subscriber’s org also has these features enabled during an upgrade. Once enabled in a Managed - Released package, the developer
and the subscriber cannot disable these attributes.
•Standard button and link overrides are also packageable.
•In your extension package, if you want to access history information for custom objects contained in the base package, work
with the base package owner to:
1. Enable history tracking in the release org of the base package.
2. Upload a new version of the base package.
3. Install the new version of the base package in the release org of the extension package to access the history tracking info.
As a best practice, don’t enable history tracking for custom objects contained in the base package directly in the extension
package’s release org. Doing so can result in an error when you install the package and when you create patch orgs for the
extension package.
Custom Permissions
If you deploy a change set with a custom permission that includes a connected app, the connected app must already be installed
in the destination organization.
Custom Report Types
A developer can edit a custom report type in a managed package after it’s released, and can add new fields. Subscribers automatically
receive these changes when they install a new version of the managed package. However, developers can’t remove objects from
the report type after the package is released. If you delete a field in a custom report type that’s part of a managed package, and the
deleted field is part of bucketing or used in grouping, you receive an error message.
Custom Settings
•If a custom setting is contained in a managed package, and the Visibility is specified as Protected, the custom setting is
not contained in the list of components for the package on the subscriber's org. All data for the custom setting is hidden from
the subscriber.
Custom Tabs
•The Tab Style for a custom tab must be unique within your app. However, it does not need to be unique within the org
where it is installed. A custom tab’s style will not conflict with an existing custom tab in the installer’s environment.
•To provide custom tab names in different languages, from Setup, enter Rename Tabs and Labels in the Quick
Find box, then select Rename Tabs and Labels.
•Subscribers cannot edit custom tabs in a managed package.
Customer Portal and Partner Portal
Packages referring to Customer Portal or partner portal fields are supported. The subscriber installing the package must have the
respective portal enabled to install the package.
Dashboard Components
Developers of managed packages must consider the implications of introducing dashboard components that reference reports
released in a previous version of the package. If the subscriber deleted the report or moved the report to a personal folder, the
dashboard component referencing the report is dropped during install. Also, if the subscriber has modified the report, that report
39
Special Behavior of Components in PackagesDesigning and Building Your App
may return results impacting what information is displayed by the dashboard component. As a best practice, the developer should
release a dashboard and the related reports in the same version.
Divisions
•When divisions are enabled on a custom object in a package, the subscribing org must have the divisions feature enabled to
install the package.
•Setting the division filter on a report does not cause a dependency. The setting is dropped when installed into the subscriber’s
org.
•Summarizing by the object’s division field—for example, Account Division—in a report causes a dependency.
•If the object’s division field in a report is included as a column, and the subscriber’s org does not support divisions on the object,
then the column is dropped during install.
•If you install a custom report type that includes an object’s division field as a column, that column is dropped if the org does not
support divisions.
External Data Sources
•After installing an external data source from a managed or unmanaged package, the subscriber must re-authenticate to the
external system.
–For password authentication, the subscriber must re-enter the password in the external data source definition.
–For OAuth, the subscriber must update the callback URL in the client configuration for the authentication provider, then
re-authenticate by selecting Start Authentication Flow on Save on the external data source.
•Certificates aren’t packageable. If you package an external data source that specifies a certificate, make sure that the subscriber
org has a valid certificate with the same name.
External Objects
In managed and unmanaged packages, external objects are included in the custom object component.
Field Dependencies
•Developers and subscribers can add, change, or remove field dependencies.
•If the developer adds a field dependency, it is added during installation unless the subscriber has already specified a dependency
for the same field.
•If a developer removes a dependency, this change is not reflected in the subscriber’s org during an upgrade.
•If the developer introduces a new picklist value mapping between the dependent and controlling fields, the mapping is added
during an upgrade.
•If a developer removes a picklist value mapping, the change is not reflected in the subscriber’s org during an upgrade.
Field Sets
Field sets in installed packages perform different merge behaviors during a package upgrade:
Then in the package upgrade:If a package developer:
The modified field is placed at the end of the upgraded field set
in whichever column it was added to.
Changes a field from Unavailable to Available for the
Field Set or In the Field Set
The new field is placed at the end of the upgraded field set in
whichever column it was added to.
Adds a new field
The field is removed from the upgraded field set.Changes a field from Available for the Field Set or In the Field
Set to Unavailable
40
Special Behavior of Components in PackagesDesigning and Building Your App

Then in the package upgrade:If a package developer:
The change is not reflected in the upgraded field set.Changes a field from In the Field Set to Available for the Field
Set (or vice versa)
Note: Subscribers aren't notified of changes to their installed field sets. The developer must notify users—through the package
release notes or other documentation—of any changes to released field sets. Merging has the potential to remove fields in
your field set.
Once a field set is installed, a subscriber can add or remove any field.
Flows
•You can package only active flows. The active version of the flow is determined when you upload a package version. If none of
the flow’s versions are active, the upload fails.
•To update a managed package with a different flow version, activate that version and upload the package again. You don’t need
to add the newly activated version to the package. However, if you activate a flow version by mistake and upload the package,
you’ll distribute that flow version to everyone. Be sure to verify which version you really want to upload.
•In a development organization, you can’t delete a flow or flow version after you upload it to a released or beta managed package.
•You can’t delete flow components from Managed - Beta package installations in development organizations.
•You can’t delete a flow from an installed package. To remove a packaged flow from your organization, deactivate it and then
uninstall the package.
•If you have multiple versions of a flow installed from multiple unmanaged packages, you can’t remove only one version by
uninstalling its package. Uninstalling a package—managed or unmanaged—that contains a single version of the flow removes
the entire flow, including all versions.
•You can’t include flows in package patches.
•An active flow in a package is active after it’s installed. The previous active version of the flow in the destination organization is
deactivated in favor of the newly installed version. Any in-progress flows based on the now-deactivated version continue to run
without interruption but reflect the previous version of the flow.
•Upgrading a managed package in your organization installs a new flow version only if there’s a newer flow version from the
developer. After several upgrades, you can end up with multiple flow versions.
•If you install a package that contains multiple flow versions in a fresh destination organization, only the latest flow version is
deployed.
•If you install a flow from an unmanaged package that has the same name but a different version number as a flow in your
organization, the newly installed flow becomes the latest version of the existing flow. However, if the packaged flow has the
same name and version number as a flow already in your organization, the package install fails. You can’t overwrite a flow.
•The Cloud Flow Designer can’t open flows that are installed from managed packages.
•You can’t create a package that contains flows invoked by both managed and unmanaged package pages. As a workaround,
create two packages, one for each type of component. For example, suppose that you want to package a customizable flow
invoked by a managed package page. Create one unmanaged package with the flow that users can customize. Then create
another managed package with the Visualforce page referencing the flow (including namespace) from the first package.
Folders
•Components that Salesforce stores in folders, such as documents, cannot be added to packages when stored in personal and
unfiled folders. Put documents, reports, and other components that Salesforce stores in folders in one of your publicly accessible
folders.
41
Special Behavior of Components in PackagesDesigning and Building Your App
•Components such as documents, email templates, reports, or dashboards are stored in new folders in the installer’s organization
using the publisher’s folder names. Give these folders names that indicate they are part of the package.
•If a new report, dashboard, document, or email template is installed during an upgrade, and the folder containing the component
was deleted by the subscriber, the folder is re-created. Any components in the folder that were previously deleted are not
restored.
•The name of a component contained in a folder must be unique across all folders of the same component type, excluding
personal folders. Components contained in a personal folder must be unique within the personal folder only.
Home Page Components
When you package a custom home page layout, all the custom home page components included on the page layout are automatically
added. Standard components such as Messages & Alerts are not included in the package and do not overwrite the installer’s Messages
& Alerts. To include a message in your custom home page layout, create an HTML Area type custom Home tab component containing
your message. From Setup, enter Home Page Components in the Quick Find box, then select Home Page Components.
Then add the message to your custom home page layout.
Home Page Layouts
Once installed, your custom home page layouts are listed with all the subscriber’s home page layouts. Distinguish them by including
the name of your app in the page layout name.
List Views
List views associated with queues cannot be included in a package.
Multi-Currency
•If a subscriber installs a report or custom report type that includes an object’s currency field as a column, that column is dropped
if the subscriber’s organization is not enabled for multiple currencies.
•Referencing an object’s currency field in a report’s criteria—for example, Account Currency—causes a dependency.
•Summarizing by an object’s currency field in a report causes a dependency.
•Using a currency designation in a report criteria value—for example, “Annual Revenue equals GBP 100”—does not cause a
dependency. The report generates an error when run in the installers organization if it does not support the currency.
•If an object’s currency field in a report is included as a column and the subscriber’s organization is not enabled for multiple
currencies, that column is dropped during install.
•If a subscriber installs a custom report type that includes an object’s currency field as a column, that column is dropped if the
organization is not enabled for multiple currencies.
Named Credentials
•After installing a named credential from a managed or unmanaged package, the subscriber must re-authenticate to the external
system.
–For password authentication, the subscriber re-enters the password in the named credential definition.
–For OAuth, the subscriber updates the callback URL in the client configuration for the authentication provider and then
re-authenticates by selecting Start Authentication Flow on Save on the named credential.
•Named credentials aren’t automatically added to packages. If you package an external data source or Apex code that specifies
a named credential as a callout endpoint, add the named credential to the package. Alternatively, make sure that the subscriber
organization has a valid named credential with the same name.
If you have multiple orgs, you can create a named credential with the same name but with a different endpoint URL in each org.
You can then package and deploy—on all the orgs—one callout definition that references the shared name of those named
credentials. For example, the named credential in each org can have a different endpoint URL to accommodate differences in
development and production environments. If an Apex callout specifies the shared name of those named credentials, the Apex
class that defines the callout can be packaged and deployed on all those orgs without programmatically checking the environment.
42
Special Behavior of Components in PackagesDesigning and Building Your App

•Certificates aren’t packageable. If you package a named credential that specifies a certificate, make sure that the subscriber
organization has a valid certificate with the same name.
•The following callout options for named credentials can be set only via the user interface. If the default values aren’t appropriate
in the destination org, the admin for that org must manually configure the named credential after deployment.
–Generate Authorization Header—Default: Enabled
–Allow Merge Fields in HTTP Header—Default: Disabled
–Allow Merge Fields in HTTP Body—Default: Disabled
Page Layouts
The page layout of the person uploading a package is the layout used for Group and Professional Edition orgs and becomes the
default page layout for Enterprise, Unlimited, Performance, and Developer Edition orgs.
Package page layouts alongside complimentary record types if the layout is being installed on an existing object. Otherwise, manually
apply the installed page layouts to profiles.
If a page layout and a record type are created as a result of installing a package, the uploading user’s page layout assignment for
that record type is assigned to that record type for all profiles in the subscriber org, unless a profile is mapped during an install or
upgrade.
Permission Sets
You can include permission sets as components in a package, with the following permissions and access settings:
•Custom object permissions
•External object permissions
•Custom field permissions
•Custom permissions
•Custom tab visibility settings
•Apex class access
•Visualforce page access
•External data source access
Note: Assigned apps and standard tab visibility settings aren’t included in permission set components.
Use permission sets to install or upgrade a collection of permissions. In contrast to profile settings, permission sets don’t overwrite
profiles.
Picklist Values
•Subscribers can rename or delete picklist field values. A developer should carefully consider this when explicitly referencing a
picklist field value in Apex.
•Picklist field values can be added or deleted in the developer’s organization. Upon upgrade, no new values are installed. Any
values deleted by the developer are still available in the subscriber’s organization until the subscriber deletes them.
Profile Settings
Profile settings include the following for components in the package:
•Assigned apps
•Assigned connected apps
•Tab settings
•Page layout assignments
•Record type assignments
43
Special Behavior of Components in PackagesDesigning and Building Your App
•Custom object permissions
•External object permissions
•Custom field permissions
•Custom permissions
•Apex class access
•Visualforce page access
•External data source access
Profile settings overwrite existing profiles in the installer’s organization with specific permission and setting changes.
Record Types
•If record types are included in the package, the subscriber’s organization must support record types to install the package.
•When a new picklist value is installed, it is associated with all installed record types according to the mappings specified by the
developer. A subscriber can change this association.
•Referencing an object’s record type field in a report’s criteria—for example, Account Record Type—causes a dependency.
•Summarizing by an object’s record type field in a report’s criteria—for example, Account Record Type—causes a
dependency.
•If an object’s record type field is included as a column in a report, and the subscriber’s organization is not using record types on
the object or does not support record types, then the column is dropped during install.
•If you install a custom report type that includes an object’s record type field as a column, that column is dropped if the organization
does not support record types or the object does not have any record types defined.
Reporting Snapshots
Developers of managed packages must consider the implications of introducing reporting snapshots that reference reports released
in a previous version of the package. If the subscriber deleted the report or moved the report to a personal folder, the reporting
snapshot referencing the report isn’t installed, even though the Package Installation page indicates that it will be. Also, if the subscriber
has modified the report, the report can return results impacting the information displayed by the reporting snapshot. As a best
practice, the developer releases the reporting snapshot and the related reports in the same version.
Because the subscriber selects the running use, some reporting snapshot field mappings could become invalid if the running user
doesn’t have access to source or target fields.
Reports
If a report includes elements that cannot be packaged, those elements will be dropped or downgraded, or the package upload will
fail. For example:
•Hierarchy drill-downs are dropped from activity and opportunities reports.
•Filters on unpackageable fields are automatically dropped (for example, in filters on standard object record types).
•Package upload fails if a report includes filter logic on an unpackageable field (for example, in filters on standard object record
types).
•Lookup values on the Select Campaign field of standard campaign reports are dropped.
•Reports are dropped from packages if they have been moved to a private folder or to the Unfiled Public Reports folder.
•When a package is installed into an organization that does not have Chart Analytics 2.0:
–Combination charts are downgraded instead of dropped. For example, a combination vertical column chart with a line added
is downgraded to a simple vertical column chart; a combination bar chart with additional bars is downgraded to a simple
bar chart.
–Unsupported chart types, such as donut and funnel, are dropped.
44
Special Behavior of Components in PackagesDesigning and Building Your App
S-Controls
Only s-controls in unmanaged packages created before January 1st, 2010 can be installed by subscribers.
S-controls have been deprecated, and are superseded by Visualforce pages.
Translation Workbench
•If you have enabled the translation workbench and added a language to your package, any associated translated values are
automatically packaged for the appropriate components in your package. Make sure that you have provided translations for all
possible components.
•An installer of your package can see which languages are supported on the package detail page. The installer does not need to
enable anything for the packaged language translations to appear. The only reason installers may want to enable the translation
workbench is to change translations for unmanaged components after installation, override custom label translations in a
managed package, or to translate into additional languages.
•If you are designing a package extension, you can include translations for the extension components but not additional translations
for components in the base package.
Validation Rules
For custom objects that are packaged, any associated validation rules are implicitly packaged as well.
Wave Analytics
Wave Analytics components include Wave apps, dashboards, dataflows, datasets, lenses, and master user XMD. As you package
Wave components, keep these tips and best practices in mind.
•Wave unmanaged packages, as opposed to managed packages, are considered a developer-only feature and are not supported
for general-purpose distribution. While Wave unmanaged packages should work as expected within the constraints of Salesforce
unmanaged packages, they have not been subject to the same level of testing as managed packages. Unmanaged packages
come without many of the safeguards of managed packages, and are intended for developers familiar with their limitations.
Also refer to the relevant topic in the ISV Guide.
•Wave Admin permissions are required to create a package, but not for deployment, which requires only Salesforce admin
permissions.
•There is no spidering between datasets and dataflows, meaning there is no dependency following. When packaging both, they
must be added manually. If they are not, an error appears during deployment. The same is true for change sets—when packaging
both datasets and dataflows, add them manually.
•Before the Spring '17 release, images would not render when deploying a dashboard that used an image widget that referenced
image files not available on the target org. There were two workarounds; to either manually upload the images, or add a folder
containing the images to the package. As of the Spring '17 release, images are packaged with the dashboard, and references
between dashboards are maintained. Consequently, you will be unable to delete a dashboard if it is referenced in a link. In such
cases, either re-create the image or link widgets in the dashboard in the source org, and then re-package, or fix the link issues
in the target org.
•Take care when packaging dataflows. Invalid schema overrides, and unsupported or illegal parameters are removed (for example,
Type = dim is no longer supported, it's now Type = text). Comments in JSON are removed. Nodes may appear in a
different order.
Workflow
•Salesforce prevents you from uploading workflow alerts that have a public group, partner user, or role recipient. Change the
recipient to a user before uploading your app. During installation, Salesforce replaces that user with the user installing the app,
and the installer can customize it as necessary.
•Salesforce prevents you from uploading workflow field updates that change an Owner field to a queue. Change the updated
field value to a user before uploading your app. During installation, Salesforce replaces that user with the user installing the app,
and the installer can customize it as necessary.
45
Special Behavior of Components in PackagesDesigning and Building Your App
•Salesforce prevents you from uploading workflow rules, field updates, and outbound messages that reference a record type on
a standard or managed-installed object.
•Salesforce prevents you from uploading workflow tasks that are assigned to a role. Change the Assigned To field to a user
before uploading your app. During installation, Salesforce replaces that user with the user installing the app, and the installer
can customize it as necessary.
•You can package workflow rules and associated workflow actions, such as email alerts and field updates. However, any time-based
triggers aren’t included in the package. Notify your installers to set up any time-based triggers that are essential to your app.
Flow triggers aren’t packageable. The pilot program for flow trigger workflow actions is closed. If you've already enabled the
pilot in your org, you can continue to create and edit flow trigger workflow actions. If you didn't enable the pilot in your org, use
the Flows action in Process Builder instead.
•Some workflow actions can be protected by the developer. For more information on protected components, see Protected
Components.
•Developers can associate or disassociate workflow actions with a workflow rule at any time. These changes, including disassociation,
are reflected in the subscriber’s organization upon install. In managed packages, a subscriber cannot disassociate workflow
actions from a workflow rule if it was associated by the developer.
•References to a specific user in workflow actions, such as the email recipient of a workflow email alert, are replaced by the user
installing the package. Workflow actions referencing roles, public groups, account team, opportunity team, or case team roles
may not be uploaded.
•References to an organization-wide address, such as the From email address of a workflow email alert, are reset to
Current User during installation.
•On install, all workflow rules newly created in the installed or upgraded package, have the same activation status as in the
uploaded package.
Protected Components
Developers can mark certain components as protected. Protected components can’t be linked to or referenced by components created
in a subscriber org. A developer can delete a protected component in a future release without worrying about failing installations.
However, once a component is marked as unprotected and is released globally, the developer can’t delete it.
The developer can mark the following components as protected in managed packages.
•Custom labels
•Custom links (for Home page only)
•Workflow alerts
•Workflow field updates
•Workflow outbound messages
•Workflow tasks
•Workflow flow triggers
The pilot program for flow trigger workflow actions is closed. If you've already enabled the pilot in your org, you can continue to
create and edit flow trigger workflow actions. If you didn't enable the pilot in your org, use the Flows action in Process Builder instead.
46
Protected ComponentsDesigning and Building Your App
Understanding Dependencies
EDITIONS
Available in: Salesforce
Classic
AppExchange packages
and Visualforce are
available in: Group,
Professional, Enterprise,
Performance, Unlimited,
and Developer Editions
Apex available in:
Enterprise, Performance,
Unlimited, and Developer
Editions
USER PERMISSIONS
To upload packages:
•“Upload AppExchange
Packages”
To view Apex dependencies:
•“Author Apex”
To view Visualforce
dependencies:
•“Developer Mode”
Package dependencies are created when one component references another component,
permission, or preference that is required for the component to be valid. Force.com tracks certain
dependencies, including:
•Organizational dependencies, such as whether multicurrency or campaigns are enabled
•Component-specific dependencies, such as whether particular record types or divisions exist
•References to both standard and custom objects or fields
Packages, Apex classes, Apex triggers, Visualforce components, and Visualforce pages can have
dependencies on components within an organization. These dependencies are recorded on the
Show Dependencies page.
Dependencies are important for packaging because any dependency in a component of a package
is considered a dependency of the package as a whole.
Note: An installer’s organization must meet all dependency requirements listed on the Show
Dependencies page or else the installation will fail. For example, the installer's organization
must have divisions enabled to install a package that references divisions.
Dependencies are important for Apex classes or triggers because any component on which a class
or trigger depends must be included with the class or trigger when the code is deployed or packaged.
In addition to dependencies, the operational scope is also displayed on the Show Dependencies
page. The operational scope is a table that lists any data manipulation language (DML) operations
(such as insert or merge) that Apex executes on a specified object. The operational scope
can be used when installing an application to determine the full extent of the application’s database
operations.
To view the dependencies and operational scope for a package, Apex class, Apex trigger, or
Visualforce page:
1. Navigate to the appropriate component from Setup:
•For packages, enter Packages in the Quick Find box, then select Packages.
•For Apex classes, enter Apex Classes in the Quick Find box, then select Apex Classes.
•For Apex triggers, from the management settings for the appropriate object, go to Triggers.
•For Visualforce pages, enter Visualforce Pages in the Quick Find box, then select Visualforce Pages.
2. Select the name of the component.
3. Click View Dependencies for a package, or Show Dependencies for all other components, to see a list of objects that depend
upon the selected component.
If a list of dependent objects displays, click Fields to access the field-level detail of the operational scope. The field-level detail includes
information, such as whether a field is updated by Apex. For more information, see Field Operational Scope.
Packages, Apex code, and Visualforce pages can be dependent on many components, including but not limited to:
•Custom field definitions
•Validation formulas
•Reports
•Record types
•Apex
•Visualforce pages and components
47
Understanding DependenciesDesigning and Building Your App
For example, if a Visualforce page includes a reference to a multicurrency field, such as {!contract.ISO_code}, that Visualforce
page has a dependency on multicurrency. If a package contains this Visualforce page, it also has a dependency on multicurrency. Any
organization that wants to install this package must have multicurrency enabled.
About Permission Sets and Profile Settings
Developers can use permission sets or profile settings to grant permissions and other access settings to a package. When deciding
whether to use permission sets, profile settings, or a combination of both, consider the similarities and differences.
Profile SettingsPermission SetsBehavior
What permissions and settings are included? •Assigned apps
•Custom object permissions
•External object permissions •Assigned connected apps
•Tab settings
•Custom field permissions
•Custom permissions •Page layout assignments
•Record type assignments
•Custom tab visibility settings
•Apex class access •Custom object permissions
•External object permissions
•Visualforce page access
•External data source access •Custom field permissions
•Custom permissions
Note: Although permission sets
include assigned apps and standard •Apex class access
tab visibility settings, these settings •Visualforce page access
can’t be packaged as permission set
components. •External data source access
Profile settings are applied to existing
profiles in the subscriber's organization on
Yes.Can they be upgraded in managed
packages?
install or upgrade. Only permissions related
to new components created as part of the
install or upgrade are applied.
Yes.Subscribers can edit permission sets in
unmanaged packages, but not in managed
packages.
Can subscribers edit them?
Yes. Subscribers can clone any profile that
includes permissions and settings related
to packaged components.
Yes. However, if a subscriber clones a
permission set or creates one that's based
on a packaged permission set, it won't be
updated in subsequent upgrades. Only the
Can you clone or create them?
permission sets included in a package are
upgraded.
No.No. Also, you can’t include object
permissions for a custom object in a
Do they include standard object
permissions?
master-detail relationship where the master
is a standard object.
No.No.Do they include user permissions?
48
About Permission Sets and Profile SettingsDesigning and Building Your App

Profile SettingsPermission SetsBehavior
Yes. Profile settings are applied to existing
profiles in the subscriber's organization on
No. Subscribers must assign permission sets
after installation.
Are they included in the installation wizard?
install or upgrade. Only permissions related
to new components created as part of the
install or upgrade are applied.
None. In a subscriber organization, the
installation overrides the profile settings,
not their user licenses.
A permission set is only installed if the
subscriber organization has at least one user
license that matches the permission set. For
example, permission sets with the Salesforce
What are the user license requirements?
Platform user license aren't installed in an
organization that has no Salesforce Platform
user licenses. If a subscriber subsequently
acquires a license, they must reinstall the
package to get the permission sets
associated with the newly acquired license.
Permission sets with no user license are
always installed. If you assign a permission
set with no user license, all of its enabled
settings and permissions must be allowed
by the user’s license, or the assignment will
fail.
Profile settings are applied to existing
profiles.
Subscribers must assign packaged
permission sets after installing the package.
How are they assigned to users?
Best Practices
•Use permission sets in addition to packaged profiles so your subscribers can easily add new permissions for existing app users.
•If users need access to apps, standard tabs, page layouts, and record types, don't use permission sets as the sole permission-granting
model for your app.
•Create packaged permission sets that grant access to the custom components in a package, but not standard Salesforce components.
Custom Profile Settings
When building your AppExchange app, create profiles to define how users access objects and data, and what they can do within your
app. For example, profiles specify custom object permissions and the tab visibility for your app. When installing or upgrading your app,
admins can associate your custom profiles with existing non-standard profiles. Permissions in your custom profile that are related to
new components created as part of the install or upgrade are added to the existing profile. The security settings associated with standard
objects and existing custom objects in an installer’s organization are unaffected.
Consider these tips when creating custom profiles for apps you want to publish.
•Give each custom profile a name that identifies the profile as belonging to the app. For example, if you’re creating a Human Resources
app named “HR2GO,” a good profile name would be “HR2GO Approving Manager.”
•If your custom profiles have a hierarchy, use a name that indicates the profile’s location in the hierarchy. For example, name a
senior-level manager’s profile “HR2GO Level 2 Approving Manager.”
49
Custom Profile SettingsDesigning and Building Your App

•Avoid custom profile names that can be interpreted differently in other organizations. For example, the profile name “HR2GO Level
2 Approving Manager” is open to less interpretation than “Sr. Manager.”
•Provide a meaningful description for each profile. The description displays to the user installing your app.
Alternatively, you can use permission sets to maintain control of permission settings through the upgrade process. Permission sets
contain a subset of profile access settings, including object permissions, field permissions, Apex class access, and Visualforce page access.
These permissions are the same as those available on profiles. You can add a permission set as a component in a package.
Note: In packages, assigned apps and tab settings aren’t included in permission set components.
Protecting Your Intellectual Property
The details of your custom objects, custom links, reports, and other installed items are revealed to installers so that they can check for
malicious content. However, revealing an app’s components prevents developers from protecting some intellectual property.
The following information is important when considering your intellectual property and its protection.
•Only publish package components that are your intellectual property and that you have the rights to share.
•After your components are available on AppExchange, you cannot recall them from anyone who has installed them.
•The information in the components that you package and publish might be visible to customers. Use caution when adding your
code to a formula, Visualforce page, or other component that you cannot hide in your app.
•The code contained in an Apex class, trigger, or Visualforce component that’s part of a managed package is obfuscated and can’t
be viewed in an installing org. The only exceptions are methods declared as global. You can view global method signatures in an
installing org. In addition, License Management Org users with the View and Debug Managed Apex permission can view their
packages’ obfuscated Apex classes when logged in to subscriber orgs via the Subscriber Support Console.
•If a custom setting is contained in a managed package, and the Visibility is specified as Protected, the custom setting is not
contained in the list of components for the package on the subscriber's org. All data for the custom setting is hidden from the
subscriber.
Creating Packaged Applications with Chatter
The objects, field settings, and field settings history of Chatter are packageable. However, an object's field is only tracked if the object
itself is tracked. For example, you can create a new custom field on the Account standard object, but the field will only be tracked if you
have enabled feed tracking on Accounts.
When developing applications that use Chatter, it's important to be aware that some organizations might not have Chatter enabled. By
default, when you upload Chatter applications, the package is only available to organizations that have Chatter enabled. You can change
this behavior and allow organizations to install the package even if they don't have Chatter. Note the following:
•You must use a managed package. Unmanaged packages that include Chatter functionality can only be installed in organizations
that have Chatter enabled.
•DML operations and SOSL, and SOQL calls will throw a runtime exception if the subscriber organization does not have Chatter
enabled. You must catch and handle any Apex exceptions that are thrown as a result of the missing Chatter feature. These exceptions
are of the type REQUIRED_FEATURE_MISSING_EXCEPTION for SOSL and SOQL calls. For DML calls, you must check for
the specific REQUIRED_FEATURE_MISSING status code on a DML Exception.
•When you upload the package, deselect the Chatter required checkbox (this is automatically selected if you have an Apex reference
to Chatter).
Note: If the Chatter required checkbox can't be deselected, then some component in the package has a special requirement
for Chatter. This can happen, for example, if you package a custom report type that relies on Chatter. If the Chatter-required
checkbox can't be disabled, then the package can only be installed in organizations that have Chatter enabled.
50
Protecting Your Intellectual PropertyDesigning and Building Your App

The following example tries to post to feeds and get a user's feed. If Chatter is not enabled in the organization, the code catches the
REQUIRED_FEATURE_MISSING exception. Note that this is an incomplete code example and does not run.
public void addFeedItem(String post, Id objId) {
FeedItem fpost = new FeedItem();
// Get the parent ID of the feed
fpost.ParentId = objId;
fpost.Body = post;
try{
insert fpost;
} catch (System.DmlException e) {
for (Integer i = 0; i < e.getNumDml(); i++) {
// Chatter not endabled, do not insert record
System.assertEquals(StatusCode.REQUIRED_FEATURE_MISSING, e.getDmlType(i));
System.Debug('Chatter not enabled in this organization:' + e.getDMLMessage());
}
}
}
public List<NewsFeed> getMyFeed() {
List<NewsFeed> myfeed;
try{
myfeed = [SELECT Id, Type, CreatedById, CreatedBy.FirstName,CreatedBy.LastName,
CreatedDate, ParentId, Parent.Name,FeedItemId, Body,
Title, CreatedById, LinkUrl,
(SELECT Id, FieldName, OldValue, NewValue
FROM FeedTrackedChanges ORDER BY Id DESC),
(SELECT Id, CommentBody, CreatedDate, CreatedById,
CreatedBy.FirstName, CreatedBy.LastName
FROM FeedComments ORDER BY CreatedDate DESC, ID DESC LIMIT 10)
FROM NewsFeed
ORDER BY CreatedDate DESC, ID DESC LIMIT 20];
} catch(System.RequiredFeatureMissingException e){
// The above has returned an empty NewsFeed
// Chatter is not enabled in this organization
myfeed = new List<NewsFeed>{};
System.Debug('Chatter not enabled in organization:' + e.getMessage());
}
return myfeed;
}
Matching the Salesforce Look and Feel
Apps that resemble the Salesforce user interface look and feel are instantly more familiar to users and easy to use. The easiest way to
model the design of your app after the Salesforce user interface look and feel is to use Visualforce. When you use a standard controller
with a Visualforce page, your new page takes on the style of the associated object’s standard tab in Salesforce. For more information,
see Using Salesforce Styles in the Visualforce Developer's Guide.
51
Matching the Salesforce Look and FeelDesigning and Building Your App
Developing App Documentation
EDITIONS
Available in: Salesforce
Classic
Available in: Group,
Professional, Enterprise,
Performance, Unlimited,
and Developer Editions
Salesforce recommends publishing your app on AppExchange with the following types of
documentation:
Configure Option
You can include a Configure option for installers. This option can link to installation and
configuration details, such as:
•Provisioning the external service of a composite app
•Custom app settings
The Configure option is included in your package as a custom link. You can create a custom
link for your home page layouts and add it to your package.
1. Create a custom link to a URL that contains configuration information or a Visualforce page that implements configuration. When
you create your custom link, set the display properties to Open in separate popup window so that the user returns
to the same Salesforce page when done.
2. When you create the package, choose this custom link in the Configure Custom Link field of your package detail.
Data Sheet
Give installers the fundamental information they need to know about your app before they install.
Customization and Enhancement Guide
Let installers know what they must customize after installation as part of their implementation.
Custom Help
You can provide custom help for your custom object records and custom fields.
Tip: To give your custom help a professional tone using Salesforce terminology, follow the Salesforce Style Guide for
Documentation and User Interface Text.
About API and Dynamic Apex Access in Packages
EDITIONS
Available in: Salesforce
Classic
Available in: Contact
Manager, Group,
Professional, Enterprise,
Performance, Unlimited,
and Developer Editions
ApexPackage components have access via dynamic Apex and the API to standard and custom
objects in the organization where they are installed. Developers of Force.com AppExchange packages
that are intended for external customers (also called third-party developers or partners) may wish
to restrict this access. Restricting access makes packages safer for administrators to install. Also,
administrators who install such packages may wish to restrict this access after installation, even if
the package developers have not, for improved security.
API Access is a package setting that controls the dynamic Apex and API access that s-controls
and other package components have to standard and custom objects. The setting displays for both
the developer and installer on the package detail page. With this setting:
•The developer of an AppExchange package can restrict API access for a package before uploading
it to Force.com AppExchange. Once restricted, the package components receive Apex and API
sessions that are restricted to the custom objects in the package. The developer can also enable access to specific standard objects,
and any custom objects in other packages that this package depends on.
•The installer of a package can accept or reject package access privileges when installing the package to his or her organization.
•After installation, an administrator can change Apex and API access for a package at any time. The installer can also enable access
on additional objects such as custom objects created in the installer’s organization or objects installed by unrelated packages.
There are two possible options for the API Access setting:
52
Developing App DocumentationDesigning and Building Your App
•The default Unrestricted, which gives the package components the same API access to standard objects as the user who is
logged in when the component sends a request to the API. Apex runs in system mode. Unrestricted access gives Apex read access
to all standard and custom objects.
•Restricted, which allows the administrator to select which standard objects the components in the package can access. Further,
the components in restricted packages can only access custom objects in the current package if the user has the object permissions
that provide access to them.
Considerations for API and Dynamic Apex Access in Packages
By default, dynamic Apex can only access the components with which the code is packaged. To provide access to standard objects not
included in the package, the developer must set the API Access.
1. From Setup, enter Packages in the Quick Find box, then select Packages.
2. Select the package that contains a dynamic Apex that needs access to standard objects in the installing organization.
3. In the Package Detail related list, click Enable Restrictions or Restricted, whichever is available.
4. Set the access level (Read, Create, Edit, Delete) for the standard objects that the dynamic Apex can access.
5. Click Save.
Choosing Restricted for the API Access setting in a package affects the following:
•API access in a package overrides the following user permissions:
–Author Apex
–Customize Application
–Edit HTML Templates
–Edit Read Only Fields
–Manage Billing
–Manage Call Centers
–Manage Categories
–Manage Custom Report Types
–Manage Dashboards
–Manage Letterheads
–Manage Package Licenses
–Manage Public Documents
–Manage Public List Views
–Manage Public Reports
–Manage Public Templates
–Manage Users
–Transfer Record
–Use Team Reassignment Wizards
–View Setup and Configuration
–Weekly Export Data
•If Read, Create, Edit, and Delete access are not selected in the API access setting for objects, users do not have access to
those objects from the package components, even if the user has the “Modify All Data” and “View All Data” permissions.
•A package with Restricted API access can’t create new users.
53
About API and Dynamic Apex Access in PackagesDesigning and Building Your App
•Salesforce denies access to Web service and executeanonymous requests from an AppExchange package that has
Restricted access.
The following considerations also apply to API access in packages:
•Workflow rules and Apex triggers fire regardless of API access in a package.
•If a component is in more than one package in an organization, API access is unrestricted for that component in all packages in the
organization regardless of the access setting.
•If Salesforce introduces a new standard object after you select restricted access for a package, access to the new standard object is
not granted by default. You must modify the restricted access setting to include the new standard object.
•When you upgrade a package, changes to the API access are ignored even if the developer specified them. This ensures that the
administrator installing the upgrade has full control. Installers should carefully examine the changes in package access in each
upgrade during installation and note all acceptable changes. Then, because those changes are ignored, the administrator should
manually apply any acceptable changes after installing an upgrade.
•S-controls are served by Salesforce and rendered inline in Salesforce. Because of this tight integration, there are several means by
which an s-control in an installed package could escalate its privileges to the user’s full privileges. In order to protect the security of
organizations that install packages, s-controls have the following limitations:
–For packages you are developing (that is, not installed from AppExchange), you can only add s-controls to packages with the
default Unrestricted API access. Once a package has an s-control, you cannot enable Restricted API access.
–For packages you have installed, you can enable access restrictions even if the package contains s-controls. However, access
restrictions provide only limited protection for s-controls. Salesforce recommends that you understand the JavaScript in an
s-control before relying on access restriction for s-control security.
–If an installed package has Restricted API access, upgrades will be successful only if the upgraded version does not contain
any s-controls. If s-controls are present in the upgraded version, you must change the currently installed package to
Unrestricted API access.
54
About API and Dynamic Apex Access in PackagesDesigning and Building Your App

Manage API and Dynamic Apex Access in Packages
EDITIONS
Available in: Salesforce
Classic
Available in: Group,
Professional, Enterprise,
Performance, Unlimited,
and Developer Editions
USER PERMISSIONS
To edit API and dynamic
Apex access for a package
you have created or
installed:
•“Create AppExchange
packages”
To accept or reject package
API and dynamic Apex
access for a package as
part of installation:
•“Download
AppExchange
packages”
API Access is a package setting that controls the dynamic Apex and API access that s-controls
and other package components have to standard and custom objects. The setting displays for both
the developer and installer on the package detail page. With this setting:
•The developer of an AppExchange package can restrict API access for a package before uploading
it to Force.com AppExchange. Once restricted, the package components receive Apex and API
sessions that are restricted to the custom objects in the package. The developer can also enable
access to specific standard objects, and any custom objects in other packages that this package
depends on.
•The installer of a package can accept or reject package access privileges when installing the
package to his or her organization.
•After installation, an administrator can change Apex and API access for a package at any time.
The installer can also enable access on additional objects such as custom objects created in the
installer’s organization or objects installed by unrelated packages.
Setting API and Dynamic Apex Access in Packages
To change package access privileges in a package you or someone in your organization has created:
1. From Setup, enter Packages in the Quick Find box, then select Packages.
2. Select a package.
3. The API Access field displays the current setting, Restricted or Unrestricted,
and a link to either Enable Restrictions or Disable Restrictions. If Read, Create, Edit,
and Delete access are not selected in the API access setting for objects, users do not have
access to those objects from the package components, even if the user has the “Modify All
Data” and “View All Data” permissions.
Use the API Access field to:
Enable Restrictions
This option is available only if the current setting is Unrestricted. Select this option if you want to specify the dynamic
Apex and API access that package components have to standard objects in the installer's organization. When you select this
option, the Extended Object Permissions list is displayed. Select the Read, Create, Edit, or Delete checkboxes to enable
access for each object in the list. This selection is disabled in some situations. Click Save when finished. For more information
about choosing the Restricted option, including information about when it is disabled, see Considerations for API and
Dynamic Apex Access in Packages on page 53.
Disable Restrictions
This option is available only if the current setting is Restricted. Select this option if you do not want to restrict the Apex
and API access privileges that the components in the package have to standard and custom objects. This option gives all the
components in the package the same API access as the user who is logged in. For example, if a user can access accounts, an
Apex class in the package that accesses accounts would succeed when triggered by that user.
Restricted
Click this link if you have already restricted API access and wish to edit the restrictions.
Accepting or Rejecting API and Dynamic Apex Access Privileges During Installation
To accept or reject the API and dynamic Apex access privileges for a package you are installing:
55
Manage API and Dynamic Apex Access in PackagesDesigning and Building Your App

•Start the installation process on Force.com AppExchange.
•In Approve API Access, either accept by clicking Next, or reject by clicking Cancel. Complete the installation steps if you have not
canceled.
Changing API and Dynamic Apex Access Privileges After Installation
To edit the package API and dynamic Apex access privileges after you have installed a package:
1. From Setup, enter Installed Packages in the Quick Find box, then select Installed Packages.
2. Click the name of the package you wish to edit.
3. The API Access field displays the current setting, Restricted or Unrestricted, and a link to either Enable Restrictions
or Disable Restrictions. If Read, Create, Edit, and Delete access are not selected in the API access setting for objects,
users do not have access to those objects from the package components, even if the user has the “Modify All Data” and “View All
Data” permissions.
Use the API Access field to:
Enable Restrictions
This option is available only if the current setting is Unrestricted. Select this option if you want to specify the dynamic
Apex and API access that package components have to standard objects in the installer's organization. When you select this
option, the Extended Object Permissions list is displayed. Select the Read, Create, Edit, or Delete checkboxes to enable
access for each object in the list. This selection is disabled in some situations. Click Save when finished. For more information
about choosing the Restricted option, including information about when it is disabled, see Considerations for API and
Dynamic Apex Access in Packages on page 53.
Disable Restrictions
This option is available only if the current setting is Restricted. Select this option if you do not want to restrict the Apex
and API access privileges that the components in the package have to standard and custom objects. This option gives all the
components in the package the same API access as the user who is logged in. For example, if a user can access accounts, an
Apex class in the package that accesses accounts would succeed when triggered by that user.
Restricted
Click this link if you have already restricted API access and wish to edit the restrictions.
Configuring Default Package Versions for API Calls
EDITIONS
Available in: Salesforce
Classic
Available in: Enterprise,
Performance, Unlimited,
and Developer, Editions
USER PERMISSIONS
To configure default
package versions for API
calls:
•“Customize Application”
A package version is a number that identifies the set of components uploaded in a package. The
version number has the format majorNumber.minorNumber.patchNumber (for example,
2.1.3). The major and minor numbers increase to a chosen value during every major release. The
patchNumber is generated and updated only for a patch release. Publishers can use package
versions to evolve the components in their managed packages gracefully by releasing subsequent
package versions without breaking existing customer integrations using the package.
Default package versions for API calls provide fallback settings if package versions are not provided
by an API call. Many API clients do not include package version information, so the default settings
maintain existing behavior for these clients.
You can specify the default package versions for enterprise API and partner API calls. The enterprise
WSDL is for customers who want to build an integration with their Salesforce organization only. It
is strongly typed, which means that calls operate on objects and fields with specific data types,
such as int and string. The partner WSDL is for customers, partners, and ISVs who want to
build an integration that can work across multiple Salesforce organizations, regardless of their
56
Configuring Default Package Versions for API CallsDesigning and Building Your App

custom objects or fields. It is loosely typed, which means that calls operate on name-value pairs of field names and values instead of
specific data types.
You must associate the enterprise WSDL with specific package versions to maintain existing behavior for clients. There are options for
setting the package version bindings for an API call from client applications using either the enterprise or partner WSDL. The package
version information for API calls issued from a client application based on the enterprise WSDL is determined by the first match in the
following settings.
1. The PackageVersionHeader SOAP header.
2. The SOAP endpoint contains a URL with a format of serverName/services/Soap/c/api_version/ID where
api_version is the version of the API, such as 39.0, and ID encodes your package version selections when the enterprise WSDL
was generated.
3. The default enterprise package version settings.
The partner WSDL is more flexible as it is used for integration with multiple organizations. If you choose the Not Specified option for a
package version when configuring the default partner package versions, the behavior is defined by the latest installed package version.
This means that behavior of package components, such as an Apex trigger, could change when a package is upgraded and that change
would immediately impact the integration. Subscribers may want to select a specific version for an installed package for all partner API
calls from client applications to ensure that subsequent installations of package versions do not affect their existing integrations.
The package version information for partner API calls is determined by the first match in the following settings.
1. The PackageVersionHeader SOAP header.
2. An API call from a Visualforce page uses the package versions set for the Visualforce page.
3. The default partner package version settings.
To configure default package versions for API calls:
1. From Setup, enter API in the Quick Find box, then select API.
2. Click Configure Enterprise Package Version Settings or Configure Partner Package Version Settings. These links are only
available if you have at least one managed package installed in your organization.
3. Select a Package Version for each of your installed managed packages. If you are unsure which package version to select,
you should leave the default selection.
4. Click Save.
Note: Installing a new version of a package in your organization does not affect the current default settings.
About the Partner WSDL
The Partner Web Services WSDL is used for client applications that are metadata-driven and dynamic in nature. It is particularly—but
not exclusively—useful to Salesforce partners who are building client applications for multiple organizations. As a loosely typed
representation of the Salesforce data model that works with name-value pairs of field names and values instead of specific data types,
it can be used to access data within any organization. This WSDL is most appropriate for developers of clients that can issue a query call
to get information about an object before the client acts on the object. The partner WSDL document needs to be downloaded and
consumed only once per version of the API.
For more information about the Partner WSDL, see Using the Partner WSDL in the SOAP API Developer's Guide.
57
About the Partner WSDLDesigning and Building Your App

Generating an Enterprise WSDL with Managed Packages
EDITIONS
Available in: Salesforce
Classic
Available in: Enterprise,
Performance, Unlimited,
and Developer, Editions
USER PERMISSIONS
To download a WSDL:
•“Customize Application”
If you are downloading an enterprise WSDL and you have managed packages installed in your
organization, you need to take an extra step to select the version of each installed package to include
in the generated WSDL. The enterprise WSDL is strongly typed, which means that it contains objects
and fields with specific data types, such as int and string.
A package version is a number that identifies the set of components uploaded in a package. The
version number has the format majorNumber.minorNumber.patchNumber (for example,
2.1.3). The major and minor numbers increase to a chosen value during every major release. The
patchNumber is generated and updated only for a patch release. Publishers can use package
versions to evolve the components in their managed packages gracefully by releasing subsequent
package versions without breaking existing customer integrations using the package. A subscriber
can select a package version for each installed managed package to allow their API client to continue
to function with specific, known behavior even when they install subsequent versions of a package.
Each package version can have variations in the composition of its objects and fields, so you must
select a specific version when you generate the strongly typed WSDL.
To download an enterprise WSDL when you have managed packages installed:
1. From Setup, enter API in the Quick Find box, then select API.
2. Click Generate Enterprise WSDL.
3. Select the Package Version for each of your installed managed packages. If you are unsure which package version to select,
you should leave the default, which is the latest package version.
4. Click Generate.
5. Use the File menu in your browser to save the WSDL to your computer.
6. On your computer, import the local copy of the WSDL document into your development environment.
Note the following in your generated enterprise WSDL:
•Each of your managed package version selections is included in a comment at the top of the WSDL.
•The generated WSDL contains the objects and fields in your organization, including those available in the selected versions of each
installed package. If a field or object is added in a later package version, you must generate the enterprise WSDL with that package
version to work with the object or field in your API integration.
•The SOAP endpoint at the end of the WSDL contains a URL with a format of
serverName/services/Soap/c/api_version/ID where api_version is the version of the API, such as 39.0,
and ID encodes your package version selections when you communicate with Salesforce.
You can also select the default package versions for the enterprise WSDL without downloading a WSDL from the API page in Setup.
Default package versions for API calls provide fallback settings if package versions are not provided by an API call. Many API clients do
not include package version information, so the default settings maintain existing behavior for these clients.
Working with External Services
You might want to update your Salesforce data when changes occur in another service. Likewise, you might also want to update the
data in another service (outside of Salesforce) based on changes to your Salesforce data. Salesforce provides ways of doing both of these
transactions. For example, you might want to send a mass email to more contacts and leads than Salesforce allows. To do so, you can
use an external mail service that allows users to build a recipient list of names and email addresses using the contact and lead information
in your Salesforce organization.
An app built on the Force.com platform can connect with an external service in many different ways. For example:
58
Generating an Enterprise WSDL with Managed PackagesDesigning and Building Your App
•You can create a custom link or custom formula field that passes information to an external service.
•You can use the Force.com API to transfer data in and out of Salesforce.
•You can use an Apex class that contains a Web service method.
Before any Visualforce page, Apex callout, or JavaScript code using XmlHttpRequest in an s-control or custom button can call an external
site, that site must be registered in the Remote Site Settings page, or the call fails. For information on registering components, see
Configure Remote Site Settings.
Warning: Do not store usernames and passwords within any external service.
Provisioning External Services
If your app links to an external service, users who install the app must be signed up to use the service. Provide access in one of two ways:
•Access by all active users in an organization with no real need to identify an individual
•Access on a per user basis where identification of the individual is important
The Salesforce service provides two globally unique IDs to support these options. The user ID identifies an individual and is unique across
all organizations. User IDs are never reused. Likewise, the organization ID uniquely identifies the organization.
Avoid using email addresses, company names, and Salesforce usernames when providing access to an external service. Usernames can
change over time and email addresses and company names can be duplicated.
If you are providing access to an external service, we recommend the following:
•Use Single Sign-On (SSO) techniques to identify new users when they use your service.
•For each point of entry to your app, such as a custom link or web tab, include the user ID in the parameter string. Have your service
examine the user ID to verify that the user ID belongs to a known user. Include a session ID in the parameter string so that your
service can read back through the Force.com API and validate that this user has an active session and is authenticated.
•Offer the external service for any known users. For new users, display an alternative page to collect the required information.
•Do not store passwords for individual users. Besides the obvious security risks, many organizations reset passwords on a regular
basis, which requires the user to update the password on your system as well. We recommend designing your external service to
use the user ID and session ID to authenticate and identify users.
•If your application requires asynchronous updates after a user session has expired, dedicate a distinct administrator user license for
this.
Architectural Considerations for Group and Professional Editions
Salesforce CRM is offered in five tiers, or editions:
•Group Edition (GE)*
•Professional Edition (PE)
•Enterprise Edition (EE)
•Unlimited Edition (UE)
•Performance Edition (PXE)*
Note: Group and Performance Editions are no longer sold. For a comparison chart of editions and their features, see the Salesforce
Pricing and Editions page.
If you plan to sell your app to existing Salesforce customers, it’s important to understand the differences between these editions because
they will affect the design of your app. It’s convenient to think about them in clusters, GE/PE and EE/UE/PXE, as the editions in each
59
Architectural Considerations for Group and Professional
Editions
Designing and Building Your App
cluster have similar functionality. For example, you might only want to support EE/UE/PXE if your app requires certain objects and features
that aren't available in GE/PE. Also, instead of a single solution that supports all editions, you can have a tiered offering. This would consist
of a basic solution for GE/PE and an advanced one for EE/UE/PXE customers that takes advantage of the additional features.
EE/UE/PXE have the most robust functionality. They support Force.com platform licenses in addition to Salesforce CRM licenses. If your
app doesn’t require Salesforce CRM features (such as Leads, Opportunities, Cases, etc.), Force.com platform licenses provide you with
the most flexibility in deploying your app to users who might not normally be Salesforce users. Your app is still subject to the edition
limits and packaging rules.
GE/PE don't contain all of the functionality that you can build in a Developer Edition (DE). Therefore, an application developed in your
DE organization might not install in a GE/PE organization. If you’re designing an application to work specifically in GE/PE, you must be
aware of how these editions differ.
There are a number of other considerations to keep in mind when deciding whether to support these editions. Force.com platform
licenses cannot be provisioned in GE/PE organizations. This means that only existing Salesforce CRM users can use your app. There are
some features that aren't available in GE/PE. There are several special permissions available to eligible partner apps that overcome these
limitations.
See the following sections for available features, limits, and other design considerations.
•Features in Group and Professional Editions
•Limits for Group and Professional Editions
•Access Control in Group and Professional Editions
•Using Apex in Group and Professional Editions
•API Access in Group and Professional Editions
•Designing Your App to Support Multiple Editions
•Sample Design Scenarios
Features in Group and Professional Editions
The easiest way to determine which features and objects are available in a particular edition is by reviewing the Edition Comparison
Table. You can also look up which editions support a specific feature or object by searching the online help. It’s important that you check
these resources before you start designing your app to make an informed decision on which editions to target. When you’re finished
building your app, we recommend that you test it by installing your package in GE and PE test orgs to ensure that everything functions
properly.
The following table shows the key differences between GE and PE.
Professional EditionGroup EditionFeature
YesNoAssets
YesNoCampaigns
Yes (with the Sales Cloud)NoContracts
Yes (no Opportunity Splits or Custom
Field forecasts)
NoForecasts
YesNoIdeas
YesNoProducts
YesNoSolutions
60
Features in Group and Professional EditionsDesigning and Building Your App
Professional EditionGroup EditionFeature
YesNoRecord types
YesYesPermission sets
YesNoCustom profiles
YesNoCustom report types
No (See note.)NoWorkflow and approvals
See note.See note.Apex code
Yes (for some features)NoSharing rules
See note.See note.API
NoNoSites
Note:
•All listed features are available in DE.
•As a partner, workflows within your application run in a Professional Edition org. However, customers can’t create their own
workflows. They must purchase the feature directly from Salesforce.
•A client ID allows your app to use the API for integration to composite apps. For more information, see Using Apex in Group
and Professional Editions and API Access in Group and Professional Editions.
Limits for Group and Professional Editions
All Salesforce editions have limits that restrict the number of apps, objects, and tabs that can be used. For details on the limits for various
editions, see the Edition Limits Table.
For partners who are enrolled in the ISV Program, any managed package publicly posted on the AppExchange no longer counts against
the apps/objects/tabs limits for your Salesforce Edition. This effectively means that ISV partners no longer have to worry about package
installation failures because of apps/objects/tabs limits being exceeded. This feature is automatically enabled after your app passes the
security review.
Access Control in Group and Professional Editions
Group Edition doesn’t support field-level security or custom profiles. You can manage field-level security by using the page layout for
each object instead. When customers install your app, they can’t define which profiles have access to what. Ensure that your design
works for the Standard User Profile. Permission sets can be installed but not updated in GE and PE orgs.
Because field level security is handled by the page layout, any fields you want to be visible must be added to the page layout. This means
that for fields to be accessible via the API or Visualforce, they must be added to the page layout.
Using Apex in Group and Professional Editions
Your app can contain business logic such as classes, triggers, email services, etc. written in Apex. As a general rule, Apex is not supported
in GE/PE, so it will not run in these editions. However, Apex developed as part of an ISV app and included in a managed package can
run in GE/PE, even though those editions do not support Apex by default.
61
Limits for Group and Professional EditionsDesigning and Building Your App

You must be an eligible partner with salesforce.com and your app has to pass the security review. The appropriate permissions will
automatically be enabled after you pass the security review.
Here are some important considerations for using Apex in GE/PE.
•GE/PE customers can’t create or modify Apex in your app; they can only run the existing Apex.
•Your Apex code should not depend on features and functionality that exist only in DE, EE, UE, or PXE, or your app will fail to install.
•Make sure to use REST if you plan to expose an Apex method as a Web service. Apex classes that have been exposed as a SOAP Web
service can’t be invoked from an external web app in GE/PE.
•Using Apex to make Web service callouts is allowed in GE/PE. For instance, if you’re planning to make a Web service callout to an
external Web service, as long as the managed package is authorized, these classes will function in GE/PE.
API Access in Group and Professional Editions
API access is not normally supported in GE and PE orgs. However, after your app passes the security review, you’re eligible to use some
APIs for building composite applications.
•Currently, the standard Data SOAP and REST APIs are supported for GE and PE apps, and Metadata API is supported in PE apps. To
request API access, see How do I get an API token for my app? You can also contact Salesforce to request that a connected app be
whitelisted to use the REST API in GE or PE orgs.
•Other APIs, such as the Bulk API and Apex methods exposed as SOAP Web services, remain unavailable.
•You can enable REST-based Web services using connected app consumer whitelisting.
•You can enable SOAP-based Web services, including Metadata API, using an API token called a Client ID, which is appended to your
SOAP headers in integration calls. This special key enables your app to make calls to GE and PE orgs for Data API and PE orgs for
Metadata API, even if the customer does not have API access.
The Client ID has these properties.
•You can't use the Client ID with the AJAX Toolkit in custom JavaScript, S-controls, or anywhere in your app where its value would
be exposed to the end customer.
•For development purposes, GE and PE orgs created via the Environment Hub already have the Metadata API and SOAP API (Data
API) enabled. You can then develop and test your app before the security review. After your app passes the security review and you
obtain an API token, test your app again to ensure that it’s working correctly.
•The Client ID grants GE and PE access to the SOAP API, and PE access to the Metadata API. With the Metadata API, you can dynamically
create various components that you typically create in Setup. For instance, you can create a custom field dynamically in a PE
organization with the API token.
This table shows which APIs are accessible when using GE and PE and the method of access.
Access to GE and PEAPI
Yes, with tokenWeb Services (SOAP)
NoApex methods exposed as Web services (SOAP)
Yes, with connected app consumer whitelistingWeb services (REST)
Yes, with connected app consumer whitelistingApex methods exposed as Web services (REST)
YesChatter REST API
Yes, with tokenMetadata API
NoBulk API
62
API Access in Group and Professional EditionsDesigning and Building Your App
Access to GE and PEAPI
No, can’t set the token
Data Loader tool (uses SOAP Web services)
Accessing the REST API in Group and Professional Editions
The Force.com REST API provides you a powerful, convenient, and simple Web services API for interacting with Force.com. Qualified
partners can request salesforce.com to enable your application for REST API calls to GE/PE organizations. To get access to the REST API,
you must meet these conditions.
•Access to the Partner Community – If you’re new, please learn about and join one of the ISV Partner Programs.
•Pass the security review – All applications enrolled in the AppExchange and/or OEM Program must go through a periodic security
review.
•Access to Salesforce Developer Edition – If you don’t already have access to a DE organization, you can get the Partner Developer
Edition from the Environment Hub.
To request the REST API token:
1. Create a new connected app from your DE organization. Log in to salesforce.com with your developer account. From Setup, enter
Apps in the Quick Find box, then select Apps, and click New in the Connected Apps section.
Note: We strongly recommend that you do this in an organization you will continue using for a long time, such as the one
where you build your managed package or your Trialforce management organization (TMO).
2. Enter the information requested and click Save. Saving your app gives you the Consumer Key and Consumer Secret the app uses
to communicate with Salesforce.
3. Submit a case from the Partner Community and provide your DE Org ID and the credentials for your connected app.
We’ll evaluate your request and enable the appropriate permission. Once this is done, you’ll receive a case notification from us. Please
wait 24 hours to make sure the permission is completely activated. Your client_id (or Consumer Key) and client_secret (or Consumer
Secret) will be checked against the information you submit via the case during the OAuth authentication. If it matches, the system will
allow you to communicate with GE/PE.
Note:
•This permission is intended solely for REST API. It does not enable your application to use SOAP Web Services API, Bulk API,
Metadata API, etc. for GE/PE.
•This permission is applied only to your application. We do not turn on the API in the GE/PE organization.
Designing Your App to Support Multiple Editions
Supporting multiple editions provides the opportunity to release richer versions of your app that can support more advanced features
found in EE, UE, and PXE. There are two technologies that can be leveraged to support multiple editions. The first approach uses extension
packages and the second leverages Dynamic Apex. There are benefits to both, so be sure to review both strategies before designing
your app.
Supporting Multiple Editions Using an Extension Package
This approach uses a base managed package that contains core app functionality. The base package only contains features supported
in GE/PE. You then use a second managed package, or extension package, that extends and enhances the base package. The extension
63
Designing Your App to Support Multiple EditionsDesigning and Building Your App
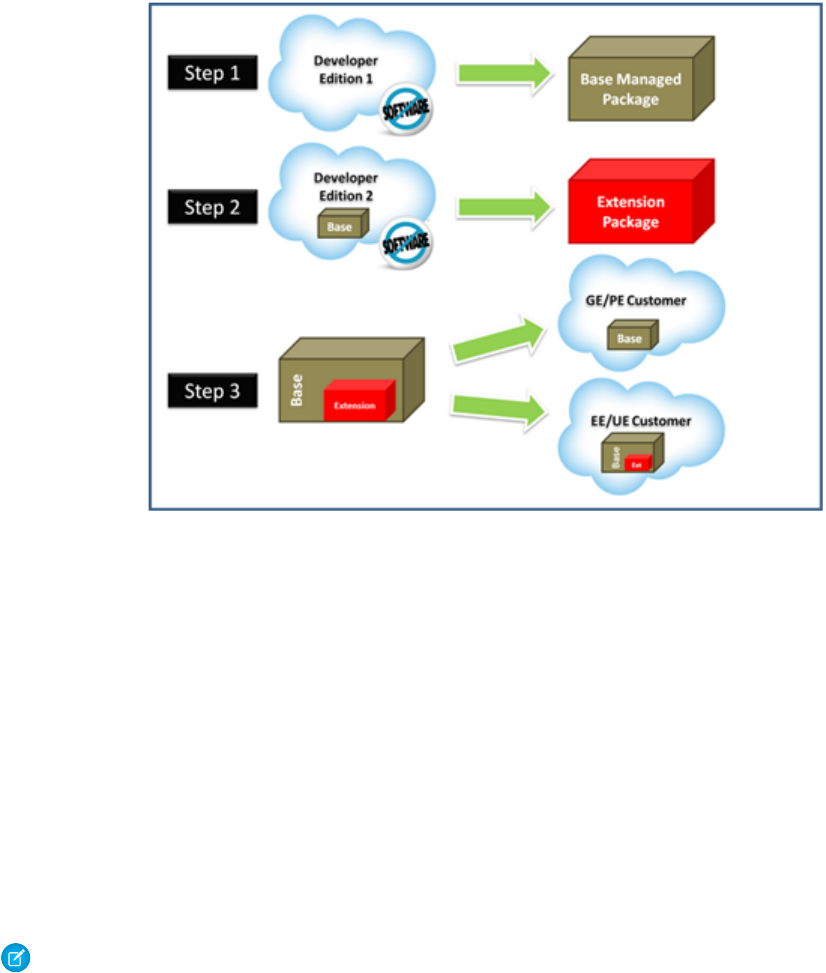
package adds additional features supported in EE/UE/PXE. For example, you have a warehouse application that tracks inventory and an
extension to this app includes workflow (which isn't available in Group). Your Group and Professional Edition customers can install the
base warehouse application, while your other customers install the base package and then the extension package with workflow
components.
Using a base and extension package to support multiple editions
Using extension packages enables you to avoid multiple code sets and to upsell your customers. Upgrading a customer only requires
installing the extension package.
Here is the process for creating an extension package.
1. Create your base managed package that leverages features supported by GE/PE.
2. Install your base managed package in a separate DE org.
3. In this org create your extension package that includes additional functionality supported in GE/PE. You can reference the base
managed package to avoid duplicating functionality. Any component that references the base managed package will automatically
trigger this package to be an extension package.
Since your extension package depends on your base package, it’s important to spend time designing your app and the interfaces between
the packages. For example, if the extension package needs to call an Apex class in the base package, you must make sure the desired
Apex class is made global.
It’s also important to consider the entire application lifecycle. For example, If you want to add new features, they should be included in
the appropriate package. Updates to the base package should not break the extension package.
Note: To access history information for custom objects in your extension package, work with the base package owner to enable
history tracking in the org for the base package. Enabling history tracking in a base package can result in an error when you install
the package and when you create patch orgs for the extension package.
64
Designing Your App to Support Multiple EditionsDesigning and Building Your App
Supporting Multiple Editions using Dynamic Apex
Using dynamic Apex, dynamic SOQL, and dynamic DML, it’s possible to create one managed package for all editions you plan to support
without having to use extension packages. Your app behavior can change dynamically based on the features available in your customer's
edition. This is useful when designing an app with the intent to support multiple editions.
Make sure that Apex, workflows, etc. in your package do not contain any strongly-typed reference to a feature that isn't supported by
GE/PE. This can include adding a custom field on an unsupported standard object, such as Campaigns, or making an Apex reference to
features like multi-currency or territory management. When you reference a feature in your package not supported by GE/PE, this package
dependency will cause the installation to fail.
Instead, if you use dynamic Apex to first check if these features are available before referencing them, you can install your managed
package in GE/PE. The important piece to consider is you must code your Dynamic Apex in a way that can support both use cases. This
ensures that if your customer doesn’t have a specific feature or object, your app will still function.
Sample Design Scenarios for Group and Professional Editions
Here are some scenarios to help you understand when and how to build for Group and Professional Editions.
Scenario 1: You want to build an app that uses record types
Since record types aren’t available in Group Edition, decide if you want to support this edition. Assuming you do, you can build a
base managed package that doesn’t include record types. After uploading this managed package in a released state, you can install
it into another Developer Edition org to start building the extension. Your extension can add record types that your Professional,
Enterprise, Unlimited, and Performance Edition customers can install and use.
Scenario 2: You want to build an app with 80 custom objects
Typically this scenario presents a problem for Group and Professional Edition orgs because of their custom objects limit. However,
if you make your app available on the AppExchange, it doesn’t count toward custom objects, tabs, and apps limits. So even if your
app has 80 custom objects, it installs and works in Group and Professional Edition orgs.
Scenario 3: You want to build an app that makes Apex callouts to a web service
Apex doesn’t usually run in Group and Professional Editions, but if you get your managed package authorized during the security
review, your Apex executes as expected. So for this scenario, you build your Apex callout to invoke your external service and then
include this class in your package.
Scenario 4: You want to build an app that leverages Campaigns
Campaigns are supported by default in Group Edition. For this scenario, you have two options.
•Option 1 - Build a base managed package that doesn’t reference Campaigns. en it’s complete, upload and install it into another
Developer Edition org. Build the Campaign functionality as an extension package. Now your Group Edition customers can install
the base, while the rest can also install the extension to get extra features.
•Option 2 - This option requires only one package if you use Dynamic Apex as the only reference to Campaigns (as described
earlier) and do not include a custom field on the Campaign. Your app can then be installed in Group Edition orgs and higher. If
Campaigns is in your customer’s edition, then your Dynamic Apex can manipulate Campaigns as expected.
Scenario 5: You want to build a composite app where your receive inbound API calls
You have a separate hosted app that you want to integrate with Salesforce, so you need to make API calls to Group and Professional
Edition customers. Such calls aren’t possible by default, but if you’re an eligible partner, request a special API token that allows your
SOAP calls to integrate with Group and Professional Edition orgs. Be sure to embed the Client ID in the SOAP header of your external
code.
65
Sample Design Scenarios for Group and Professional EditionsDesigning and Building Your App
Connected Apps
EDITIONS
Available in: both Salesforce
Classic and Lightning
Experience
Connected Apps can be
created in: Group,
Professional, Enterprise,
Performance, Unlimited,
and Developer Editions
Connected Apps can be
installed in: All Editions
USER PERMISSIONS
“Customize Application” AND either
“Modify All Data” OR “Manage Connected
Apps”
To read, create, update, or delete connected
apps:
“Customize Application” AND either
“Modify All Data” OR “Manage Connected
Apps”
To update all fields except Profiles,
Permission Sets, and Service Provider SAML
Attributes:
“Customize Application” AND “Modify All
Data”
To update Profiles, Permission Sets, and
Service Provider SAML Attributes:
“Customize Application” AND either
“Modify All Data” OR “Manage Connected
Apps”
To install and uninstall connected apps:
“Customize Application” AND either
“Modify All Data” OR “Manage Connected
Apps”
To install and uninstall packaged connected
apps:
AND “Download AppExchange Packages”
A connected app integrates an application with Salesforce using APIs. Connected apps use standard SAML and OAuth protocols to
authenticate, provide single sign-on, and provide tokens for use with Salesforce APIs. In addition to standard OAuth capabilities, connected
apps allow Salesforce admins to set various security policies and have explicit control over who can use the corresponding apps.
Create a Connected App
EDITIONS
Available in: both Salesforce
Classic and Lightning
Experience
Connected Apps can be
created in: Group,
Professional, Enterprise,
Performance, Unlimited,
and Developer Editions
Connected Apps can be
installed in: All Editions
USER PERMISSIONS
“Customize Application” AND either
“Modify All Data” OR “Manage Connected
Apps”
To read, create, update, or delete connected
apps:
“Customize Application” AND either
“Modify All Data” OR “Manage Connected
Apps”
To update all fields except Profiles,
Permission Sets, and Service Provider SAML
Attributes:
“Customize Application” AND “Modify All
Data”
To update Profiles, Permission Sets, and
Service Provider SAML Attributes:
“Customize Application” AND either
“Modify All Data” OR “Manage Connected
Apps”
To install and uninstall connected apps:
66
Connected AppsDesigning and Building Your App
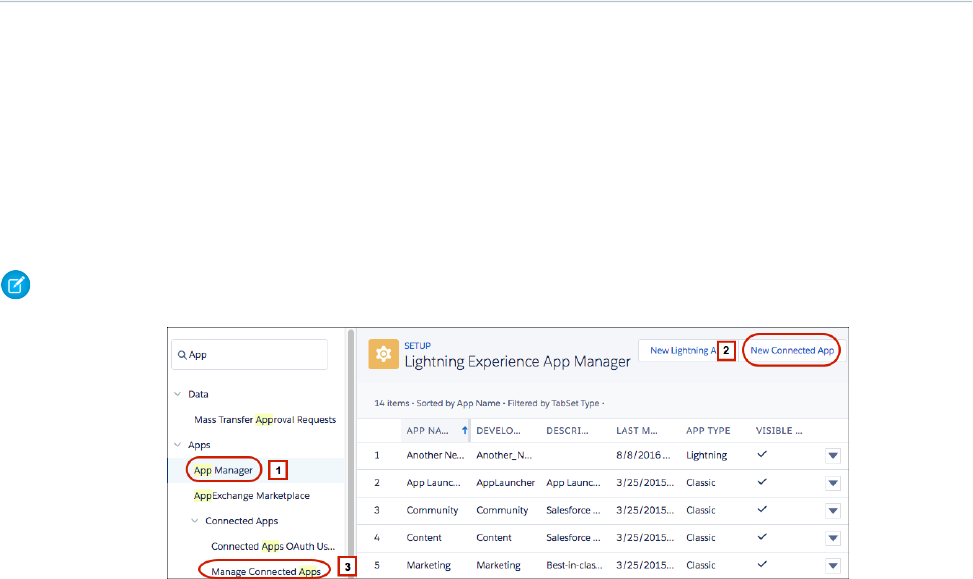
“Customize Application” AND either
“Modify All Data” OR “Manage Connected Apps”
To install and uninstall packaged connected apps:
AND “Download AppExchange Packages”
When you create a connected app, you specify general information about the app and settings for OAuth, web apps, mobile apps, and
canvas apps. You can also customize how the app is invoked by creating a connected app handler with the ConnectedAppPlugin
Apex class.
The New Connected App wizard walks you through creating a connected app.
•In Salesforce Classic, from Setup, enter Apps in the Quick Find box, then select App. Under Connected Apps, click New.
•In Lightning Experience, you use the App Manager to create connected apps. From Setup, enter App in the Quick Find box, then
select App Manager. (1) Click New Connected App. (2)
Note: Be sure to select App Manager to create a connected app, not Manage Connected Apps. (3)
The information you enter to create a connected app is divided into these settings:
•Basic Information
•API (Enable OAuth Settings)
•Web App Settings
•Custom Connected App Handler
•Mobile App Settings
•Canvas App Settings
You can create a connected app without specifying authorization, canvas, or mobile settings. This kind of connected app behaves like
a “bookmark” to the specified URL that appears in the user’s App Launcher and the dropdown app menu. Simply enter basic information
and provide a Start URL in the Web App Settings. If the destination requires authentication, the service hosting the destination URL
prompts users to provide login credentials when they navigate to it.
When you’re finished entering the information, click Save. You can now publish your app, make further edits, or delete it. If you’re using
OAuth, saving your app gives you two new values that the app uses to communicate with Salesforce.
•Consumer Key: A value used by the consumer to identify itself to Salesforce. Referred to as client_id in OAuth 2.0.
•Consumer Secret: A secret used by the consumer to establish ownership of the consumer key. Referred to as client_secret
in OAuth 2.0.
67
Create a Connected AppDesigning and Building Your App

Important: For your convenience, you can update some fields in a connected app and the changes apply immediately to all
installed versions of the app. For example, connected app descriptions are immediately updated in each version of the connected
app. The following version-independent fields bypass the packaging or installation lifecycle.
•Description
•Info URL
•Logo Image URL
•Callback URL
Basic Information
Specify basic information about your app in this section, including the app name, logo, and contact information.
1. Enter the connected app name. This name is displayed in the App Manager and on its App Launcher tile.
Note: The connected app name must be unique for the connected apps in your org. You can reuse the name of a deleted
connected app if the connected app was created using the Spring ’14 release or later.
2. Enter the API name used when referring to your app from a program. It defaults to a version of the name without spaces. Only letters,
numbers, and underscores are allowed, so if the original app name contains any other characters, edit the default name.
3. Enter the contact email for Salesforce to use when contacting you or your support team. This address isn’t given to Salesforce admins
who install the app.
4. Enter the contact phone for Salesforce to use in case we need to contact you. This number isn’t given to Salesforce admins who
install the app.
5. Enter a logo image URL to display your logo on the App Launcher tile. It also appears on the consent page that users see when
authenticating. The URL must use HTTPS. Use a GIF, JPG, or PNG file format and a file size that’s preferably under 20 KB, but at most
100 KB. We resize the image to 128 pixels by 128 pixels, so be sure that you like how it looks. If you don’t supply a logo, Salesforce
generates one for you using the app’s initials.
•You can upload your own logo image by clicking Upload logo image. Select an image from your local file system that meets
the size requirements for the logo. When your upload is successful, the URL to the logo appears in the Logo Image URL field.
Otherwise, make sure that the logo meets the size requirements.
•You can also select a logo from the Salesforce samples by clicking Choose one of our sample logos. The logos include ones
for Salesforce apps, third-party apps, and standards bodies. Click the logo you want, and then copy and paste the URL into the
Logo Image URL field.
•You can use a logo hosted publicly on Salesforce servers by uploading an image as a document from the Documents tab. View
the image to get the URL, and then enter the URL into the Logo Image URL field.
6. Enter an icon URL to display a logo on the OAuth approval page that users see when they first use your app. Use an icon that’s 16
pixels high and wide and on a white background.
You can select an icon from the samples provided by Salesforce. Click Choose one of our sample logos. Click the icon you want,
and then copy and paste the displayed URL into the Icon URL field.
7. If you have a web page with more information about your app, provide an info URL.
8. Enter a description up to 256 characters to display on the connected app’s App Launcher tile. If you don’t supply a description, just
the name appears on the tile.
68
Create a Connected AppDesigning and Building Your App

Note: The App Launcher displays the connected app’s name, description, and logo (if provided) on an App Launcher tile. Make
sure that the text is meaningful and mistake-free.
API (Enable OAuth Settings)
This section controls how your app communicates with Salesforce. Select Enable OAuth Settings to configure authentication settings.
1. Enter the callback URL (endpoint) that Salesforce calls back to your application during OAuth. It’s the OAuth redirect URI. Depending
on which OAuth flow you use, the URL is typically the one that a user’s browser is redirected to after successful authentication.
Because this URL is used for some OAuth flows to pass an access token, the URL must use secure HTTPS or a custom URI scheme. If
you enter multiple callback URLs, at run time Salesforce matches the callback URL value specified by the app with one of the values
in Callback URL. It must match one of the values to pass validation.
2. If you’re using the JWT OAuth flow, select Use Digital Signatures. If the app uses a certificate, click Choose File and select the
certificate file.
3. Add all supported OAuth scopes to Selected OAuth Scopes. These scopes refer to permissions given by the user running the connected
app. The OAuth token name is in parentheses.
Access and manage your Chatter feed (chatter_api)
Allows access to Chatter REST API resources only.
Access and manage your data (api)
Allows access to the logged-in user’s account using APIs, such as REST API and Bulk API. This value also includes chatter_api,
which allows access to Chatter REST API resources.
Access your basic information (id, profile, email, address, phone)
Allows access to the Identity URL service.
Access custom permissions (custom_permissions)
Allows access to the custom permissions in an org associated with the connected app. It shows whether the current user has
each permission enabled.
Allow access to your unique identifier (openid)
Allows access to the logged-in user’s unique identifier for OpenID Connect apps.
Full access (full)
Allows access to the logged-in user’s data, and encompasses all other scopes. full doesn’t return a refresh token. You must
explicitly request the refresh_token scope to get one.
Perform requests on your behalf at any time (refresh_token, offline_access)
Allows a refresh token to be returned if the app is eligible to receive one. This scope lets the app interact with the user’s data
while the user is offline. The refresh_token scope is synonymous with offline_access.
Provide access to custom applications (visualforce)
Allows access to Visualforce pages.
Provide access to your data via the Web (web)
Allows use of the access_token on the web. It includes visualforce, which allows access to Visualforce pages.
4. If you’re setting up OAuth for applications on devices with limited input or display capabilities, such as TVs, appliances, or command-line
applications, select Enable for Device Flow.
Note: When enabled, the value for the callback URL defaults to a placeholder unless you specify your own URL. A callback
URL isn’t used in the device authentication flow. You can specify your own callback URL as needed, such as when this same
consumer is being used for a different flow.
69
Create a Connected AppDesigning and Building Your App
5. If you’re setting up OAuth for a client app that can’t keep the client secret confidential and must use the web server flow because
it can’t use the user-agent flow, deselect Require Secret for Web Server Flow. We still generate a client secret for your app but
this setting instructs the web server flow to not require the client_secret parameter in the access token request. If your app
can use the user-agent flow, we recommend user-agent as a more secure option than web server flow without the secret.
6. Control how the OAuth request handles the ID token. If the OAuth request includes the openid scope, the returned token can
include the ID token.
•To include the ID token in refresh token responses, select Include ID Token. It’s always included in access token responses.
•With the primary ID token setting enabled, configure the secondary settings that control the ID token contents in both access
and refresh token responses. Select at least one of these settings.
Include Standard Claims
Include the standard claims that contain information about the user, such as the user’s name, profile, phone_number, and
address. The OpenID Connect specifications define a set of standard claims to be returned in the ID token.
Include Custom Attributes
If your app has specified custom attributes, include them in the ID token.
Include Custom Permissions
If your app has specified custom permissions, include them in the ID token.
7. If you’re setting up your app to issue asset tokens for connected devices, configure the asset token settings.
•Select Enable Asset Tokens. Then specify these settings.
Token Valid for
The length of time that the asset token is valid after it’s issued.
Asset Signing Certificate
The self-signed certificate that you’ve already created for signing asset tokens.
Asset Audiences
The intended consumers of the asset token. For example, the backend service for your connected device, such as
https://your_device_backend.com.
Include Custom Attributes
If your app has specified custom attributes, include them in the asset token.
Include Custom Permissions
If your app has specified custom permissions, include them in the asset token.
•Specify the callback URL (endpoint). For example, https://your_device_backend.com/callback.
•Make sure that you add the OAuth scopes that are required for asset tokens.
–Access and manage your data (api)
–Allow access to your unique identifier (openid)
If your org had the No user approval required for users in this organization option selected on your remote access before the Spring
’12 release, users in the org where the app was created are automatically approved for the app. This option is selected to indicate the
automatic approval. For connected apps, the recommended procedure after you’ve created an app is for admins to install the app and
then set Permitted Users to Admin-approved users. If the remote access option wasn’t originally selected, the option doesn’t show
up.
70
Create a Connected AppDesigning and Building Your App

Web App Settings
Enter a start URL for your app to direct users to a specific location after they’ve authenticated. If you don’t enter a start URL, users are
sent to the app’s default start page after authentication completes. If the connected app that you’re creating is a canvas app, skip this
field. The Canvas App URL field contains the URL that gets called for the connected app.
If your connected app uses a SAML service provider, select Enable SAML. Enter the entity Id, ACS URL, subject type, name ID format,
and issuer, available from your service provider. Select Verify Request Signatures if the service provider gave you a security
certificate. Browse your system for the certificate. This is only necessary if you plan to initiate logging in to Salesforce from the service
provider and the service provider signs their SAML requests.
Important: If you upload a certificate, all SAML requests must be signed. If no certificate is uploaded, all SAML requests are
accepted.
Optionally, select Encrypt SAML Response to upload a certificate and select an encryption method for encrypting the assertion. Valid
encryption algorithm values are AES–128 (128–bit key), AES–256 (256–bit key), and Triple-DES (Triple Data Encryption Algorithm).
Custom Connected App Handler
Customize the behavior of a connected app with Apex. Create a class that extends the ConnectedAppPlugin Apex class, and
associate it with a connected app. The class can support new authentication protocols or respond to user attributes in a way that benefits
a business process.
The plug-in runs on behalf of a user account. In the Run As field, select the user for the plug-in. If the user isn’t authorized for the connected
app, use the authorize method to do so. For more information, see the ConnectedAppPlugin class in the Apex Code
Developer's Guide.
Mobile App Settings
1. Enter the mobile start URL to direct users to a specific location when the app is accessed from a mobile device. If you don’t enter a
mobile start URL, users are sent to the start URL defined under Web App Settings. If the connected app you’re creating is a canvas
app, you can skip this field. The Canvas App URL field contains the URL that gets called for the connected app.
2. Select PIN Protect if your app supports PIN protection. This setting allows the admin to set the session timeout and PIN length for
mobile applications after installing the connected app. PIN protection is supported by the Salesforce Mobile SDK
(https://developer.salesforce.com/page/Mobile_SDK). You can also implement it manually by reading the mobile_policy
object from the user’s Identity URL.
3. Specify the app platform from the dropdown list.
4. Specify the supported device form factors for the mobile app from the Restrict to Device Type dropdown list. If the app supports all
form factors, don’t choose a value.
5. Enter the app version number of the mobile app.
6. Enter the minimum OS version required for the app.
7. Select Private App to confirm that this app is for internal (non-public) distribution only. This setting is required because Apple
doesn’t allow distribution of public mobile apps outside its App Store.
8. If the mobile app is private, specify the location of the Mobile App Binary file. The format of the file is IPA for iOS, and APK for Android.
9. For iOS apps only:
a. Specify the location of the Application Icon that is displayed while the app is being downloaded and installed on an iOS device.
b. Specify the iOS Bundle Identifier.
71
Create a Connected AppDesigning and Building Your App

Note: For iOS 7 and later, use the same bundle identifier that you used when developing the app in XCode. If you don’t,
end users see two app icons during installation.
10. If the mobile connected app is a public app and you haven’t uploaded its binary file to Salesforce, enter the app binary URL.
Note: If you remove mobile integration from a new version of an existing connected app, mobile integration is no longer included
in any version of it. For example, you publish a package containing version 1.0 of your connected app with mobile integration.
You then remove mobile integration from the app, repackage it, and publish it as version 1.1. If a customer installs the earlier
package with version 1.0, the connected app doesn’t contain mobile integration.
Your connected app can receive push notifications if you meet the following requirements.
•Your app is built with Salesforce Mobile SDK.
•Your app implements the Mobile SDK push notification protocol for your platform.
•You’re a registered developer with the mobile platform provider (Apple or Google).
•Your app is registered with Apple Push Notification Service (APNS) for iOS push notifications or with Google Cloud Messaging (GCM)
for Android push notifications.
•You’ve implemented Apex handlers for push notifications.
Note: A push-enabled connected app can support only one mobile platform. To support push notifications on Android and iOS
versions of your mobile app, create a connected app for each platform.
For details, see the Salesforce Mobile Push Notifications Implementation Guide.
To configure push notifications for APNS (iOS):
1. Select Push Messaging Enabled.
2. For Supported Push Platform, select Apple.
3. Select the Apple environment that is valid for your APNS push notifications certificate.
4. For Certificate, select the .p12 certificate file that you received from APNS when you registered your app for push notifications (for
example, appkey.p12).
5. Enter the password for your .p12 certificate file.
To configure push notifications for GCM (Android):
1. Select Push Messaging Enabled.
2. For Supported Push Platform, select Android GCM.
3. For Key for Server Applications (API Key), enter the key that you obtained during developer registration with Google.
To change the mobile platform that you’ve configured for push notifications:
1. Deselect Push Messaging Enabled.
2. Save the connected app, and then click Edit.
3. Change App Platform and associated values in Mobile Settings to reflect the new platform.
4. Reconfigure push notifications for the new platform.
Canvas App Settings
Two types of canvas apps are available.
•Canvas apps that the org’s Salesforce admin installed.
72
Create a Connected AppDesigning and Building Your App

•Canvas personal apps that users installed across orgs. Users access a canvas personal app from the Chatter tab, and are prompted
to allow the app to connect to their Salesforce data. Users can choose to make an app a canvas personal app. For more information,
see “Canvas Personal Apps” in the Force.com Canvas Developer’s Guide.
1. If your connected app is exposed as a canvas app, select Force.com Canvas.
2. Enter the canvas app URL to the third-party app. The user is directed to this URL when clicking the link to your canvas app.
3. Select an access method. This method specifies how the canvas app initiates the OAuth authentication flow.
•Signed Request (POST)—OAuth authentication is used, but when Salesforce admins install the canvas app, they implicitly allow
access for users. Users aren’t prompted to allow apps to access their user information. When you use this access method,
authentication is posted directly to the canvas app URL.
If your canvas app uses signed request authentication, be sure that you don’t select Perform requests on your behalf at any
time for the Selected OAuth Scopes.
•OAuth Webflow (GET)—OAuth authentication is used, and the user is prompted to allow apps to access their information. When
you use this access method, the canvas app must initiate the OAuth authentication flow.
4. If you’re using SAML single sign-on (SSO) for canvas app authentication, select the SAML Initiation Method field. This field is
enabled if you select Enable SAML in the Web App Settings section. The options for this field include the following.
•Identity Provider Initiated—Salesforce makes the initial request to start the SSO flow.
•Service Provider Initiated—Canvas app starts the SSO flow after the app is invoked.
5. Under Locations, select where the canvas app appears to users.
•Chatter Feed—Canvas app appears in the feed. If selected, create a CanvasPost feed item and ensure that the current user has
access to the canvas app.
•Chatter Tab—Canvas app appears in the app navigation list on the Chatter tab. If selected, the canvas app appears automatically.
•Console—Canvas app appears in the footer or sidebars of the Salesforce console. If selected, you must choose where the canvas
app appears in a console by adding it as a custom console component.
•Layouts and Mobile Cards—Canvas app can appear on a page layout or a mobile card. If selected, choose where the canvas app
appears by adding it to the page layout.
•Mobile Nav—Canvas app is accessible from the navigation menu in Salesforce1.
Note: Canvas apps don’t appear in the Salesforce1 navigation menu on Android mobile devices. To see canvas apps in
the navigation menu, log in to the Salesforce1 mobile browser app.
•Open CTI—Canvas app appears in the call control tool. If selected, specify the canvas app in your call center’s definition file for
it to appear.
•Publisher—Canvas app appears in the publisher. If selected, create a canvas custom quick action and add it to the global layout
or to an object layout.
•Visualforce Page—Canvas app can appear on a Visualforce page. If you add an <apex:canvasApp> component to expose
a canvas app on a Visualforce page, be sure to select this location for the canvas app. If you don’t, you receive an error.
6. Select Create Actions Automatically to create a global action for your canvas app. To do so, select Publisher under Location. If
you don’t, no global actions are created. You can also create the action later.
7. If you implement your own Canvas.CanvasLifecycleHandler Apex class, provide the class name in Lifecycle
Class. Providing a Canvas.CanvasLifecycleHandler Apex class lets you customize context information and add
custom behavior to your canvas app.
8. To let users install your app, select Enable as a Canvas Personal App. Chatter Tab is the only location that supports canvas personal
apps. For details, see “Canvas Personal Apps” in the Force.com Canvas Developer’s Guide.
73
Create a Connected AppDesigning and Building Your App
Note: If you don’t see the Enable as a Canvas Personal App setting, the admin for the app’s destination org hasn’t enabled
canvas personal apps. For details, see “Enabling Canvas Personal Apps within an Organization” in the Force.com Canvas
Developer’s Guide.
Edit, Reconfigure, or Delete a Connected App in Salesforce Classic
EDITIONS
Available in: both Salesforce
Classic and Lightning
Experience
Connected Apps can be
created in: Group,
Professional, Enterprise,
Performance, Unlimited,
and Developer Editions
Connected Apps can be
installed in: All Editions
USER PERMISSIONS
“Customize Application” AND either
“Modify All Data” OR “Manage Connected
Apps”
To read, create, update, or delete connected
apps:
“Customize Application” AND either
“Modify All Data” OR “Manage Connected
Apps”
To update all fields except Profiles,
Permission Sets, and Service Provider SAML
Attributes:
“Customize Application” AND “Modify All
Data”
To update Profiles, Permission Sets, and
Service Provider SAML Attributes:
“Customize Application” AND either
“Modify All Data” OR “Manage Connected
Apps”
To install and uninstall connected apps:
“Customize Application” AND either
“Modify All Data” OR “Manage Connected
Apps”
To install and uninstall packaged connected
apps:
AND “Download AppExchange Packages”
After creating a connected app, you can edit, reconfigure, or it. You can restrict access and add custom attributes.
Edit a Connected App
You can edit a connected app at any time to change its description, logo, icon, or callback URL. You can update settings for OAuth, web
apps, mobile apps, or canvas apps.
1. Open the list of apps. From Setup, enter Apps in the Quick Find box, then select Apps.
2. Locate the connected app in the apps list, and click Edit.
3. Make your changes and click Save
Important: For your convenience, you can update some fields in a connected app and the changes apply immediately to all
installed versions of the app. For example, connected app descriptions are immediately updated in each version of the connected
app. The following version-independent fields bypass the packaging or installation lifecycle.
•Description
•Info URL
•Logo Image URL
74
Edit, Reconfigure, or Delete a Connected App in Salesforce
Classic
Designing and Building Your App

•Callback URL
Restrict Access to a Trusted IP Range and Allow Access from Outside the IP Range
After you’ve created the connected app, you can specify the allowed IP ranges from which a user can log in. The IP ranges work with
OAuth-enabled connected apps, not SAML-enabled connected apps.
To set the allowed IP range:
1. Open the list of apps. From Setup, enter Apps in the Quick Find box, then select Apps.
2. Locate the connected app in the apps list, and click its name.
3. In the Trusted IP Range for OAuth Web server flow section, click New.
4. For the start IP address, enter a valid IP address. For the end IP address, enter the same or higher IP address.
Enter multiple discontinuous ranges by clicking New.
You can give specific users access to an OAuth connected app from outside of the Trusted IP Range. For example, to give users access
when traveling, set the connected app to Relax IP Restrictions with second factor. When a user tries to use the connected app from
outside the range, the user is prompted to provide a second factor of authentication, such as a token code. After successful second-factor
authentication, the user can use the connected app.
To allow access outside the specified IP ranges:
1. Open the list of apps. From Setup, enter Apps in the Quick Find box, then select Apps.
2. Locate the connected app in the apps list, and click Manage.
3. Click Edit Policies.
4. In the IP Relaxation field, select Relax IP Restrictions.
Note: If Enforce login IP ranges on every request is enabled, it affects the IP relaxation behavior. For more information, see
Connected App IP Relaxation and Continuous IP Enforcement on page 83.
Add Custom Attributes
After you’ve created the connected app, you can add custom attributes. With custom attributes, you can get more information about a
user’s identity, like an address or job title. Custom attributes specify SAML metadata or specify OAuth parameters that are read at OAuth
runtime.
1. Open the list of apps. From Setup, enter Apps in the Quick Find box, then select Apps.
2. Locate the connected app in the apps list, and click its name.
3. Under Custom Attributes, click New.
Each custom attribute must have a unique key and use fields available from the Insert Field menu. For example, assign a key name,
such as country and insert the field $Organization.Country. When using SAML, attributes are sent as SAML attribute
statements. When using OAuth, attributes are available as a custom_attributes object in the user’s Identity URL.
Delete a Connected App
Note: The connected app name must be unique for the connected apps in your org. You can reuse the name of a deleted
connected app if the connected app was created using the Spring ’14 release or later.
1. Open the list of apps. From Setup, enter Apps in the Quick Find box, then select Apps.
75
Edit, Reconfigure, or Delete a Connected App in Salesforce
Classic
Designing and Building Your App

2. Locate the connected app in the apps list, and click its name.
3. Click Delete, and click Delete again to confirm.
If you delete a connected app that has been included in a package, the app remains available in the package until you update the
package. Don’t delete a connected app that Salesforce distributes, such as Salesforce1.
Install a Connected App
EDITIONS
Available in: both Salesforce
Classic and Lightning
Experience
Connected Apps can be
created in: Group,
Professional, Enterprise,
Performance, Unlimited,
and Developer Editions
Connected Apps can be
installed in: All Editions
USER PERMISSIONS
“Customize Application” AND either
“Modify All Data” OR “Manage Connected
Apps”
To read, create, update, or delete connected
apps:
“Customize Application” AND either
“Modify All Data” OR “Manage Connected
Apps”
To update all fields except Profiles,
Permission Sets, and Service Provider SAML
Attributes:
“Customize Application” AND “Modify All
Data”
To update Profiles, Permission Sets, and
Service Provider SAML Attributes:
“Customize Application” AND either
“Modify All Data” OR “Manage Connected
Apps”
To install and uninstall connected apps:
“Customize Application” AND either
“Modify All Data” OR “Manage Connected
Apps”
To install and uninstall packaged connected
apps:
AND “Download AppExchange Packages”
You install a connected app in your org by installing a managed package that includes the connected app as a component. For example,
ISVs package connected apps to make them available on AppExchange. You can also install an OAuth connected app from the Connected
Apps OAuth Usage page. This page lists all OAuth connected apps that users in your org are connecting to currently—including apps
that developers created in other Salesforce orgs.
When an Install button appears next to a connected app, users in your org are connecting to the app but it isn’t installed in your org. To
manage an app’s security policies, such as which users can access the app and for how long, you must install the connected app in your
org.
1. From Setup, enter OAuth in the Quick Find box, then select Connected Apps OAuth Usage.
2. Select an app and click Install.
3. Click Manage App Policies to get details about the app.
4. Click Edit Policies to control the app’s security policies.
76
Install a Connected AppDesigning and Building Your App
View Connected App Details
EDITIONS
Available in: both Salesforce
Classic and Lightning
Experience
Connected Apps can be
created in: Group,
Professional, Enterprise,
Performance, Unlimited,
and Developer Editions
Connected Apps can be
installed in: All Editions
USER PERMISSIONS
“Customize Application” AND either
“Modify All Data” OR “Manage Connected
Apps”
To read, create, update, or delete connected
apps:
“Customize Application” AND either
“Modify All Data” OR “Manage Connected
Apps”
To update all fields except Profiles,
Permission Sets, and Service Provider SAML
Attributes:
“Customize Application” AND “Modify All
Data”
To update Profiles, Permission Sets, and
Service Provider SAML Attributes:
“Customize Application” AND either
“Modify All Data” OR “Manage Connected
Apps”
To install and uninstall connected apps:
“Customize Application” AND either
“Modify All Data” OR “Manage Connected
Apps”
To install and uninstall packaged connected
apps:
AND “Download AppExchange Packages”
The Connected App Detail page provides information about the connected app, including its version and scopes. You can edit and check
usage of the connected app and associate profiles and permissions.
•Click Edit to change the app configuration on the Connected App Edit page.
•Click Download Metadata to get the service provider SAML login URLs and endpoints that are specific to your community or
custom domain configuration. This button only appears if your org is enabled as an Identity Provider, and only with connected apps
that use SAML. Instead of downloading metadata, you can access the metadata via a URL in Metadata Discovery Endpoint. Your
service provider uses this URL to configure single sign-on to connect to Salesforce.
•Click View OAuth Usage to see the usage report for OAuth connected apps in your org.
•Click Enable User Provisioning to enable user provisioning for a connected app. When enabled, use the User Provisioning wizard
to configure or update the settings. After you run the User Provisioning wizard, you can individually manage the linkage between
user accounts and their account settings on the third-party system in the User Accounts section.
•Click Manage Profiles to select the profiles for the app from the Application Profile Assignment page. Select the profiles to have
access to the app (except in Group Edition).
Important: This option won’t appear if the OAuth policy for Permitted Users is set to All users may
self-authorize because this option isn’t needed when users can authorize themselves.
•Click Manage Permission Sets to select the permission sets for the profiles for this app from the Application Permission Set
Assignment page. Select the permission sets to have access to the app.
Important: This option won’t appear if the OAuth policy for Permitted Users is set to All users may
self-authorize because this option isn’t needed when users can authorize themselves.
•Click New in Service Provider SAML Attributes to create attribute key/value pairs. You can also edit or delete existing attributes.
77
View Connected App DetailsDesigning and Building Your App
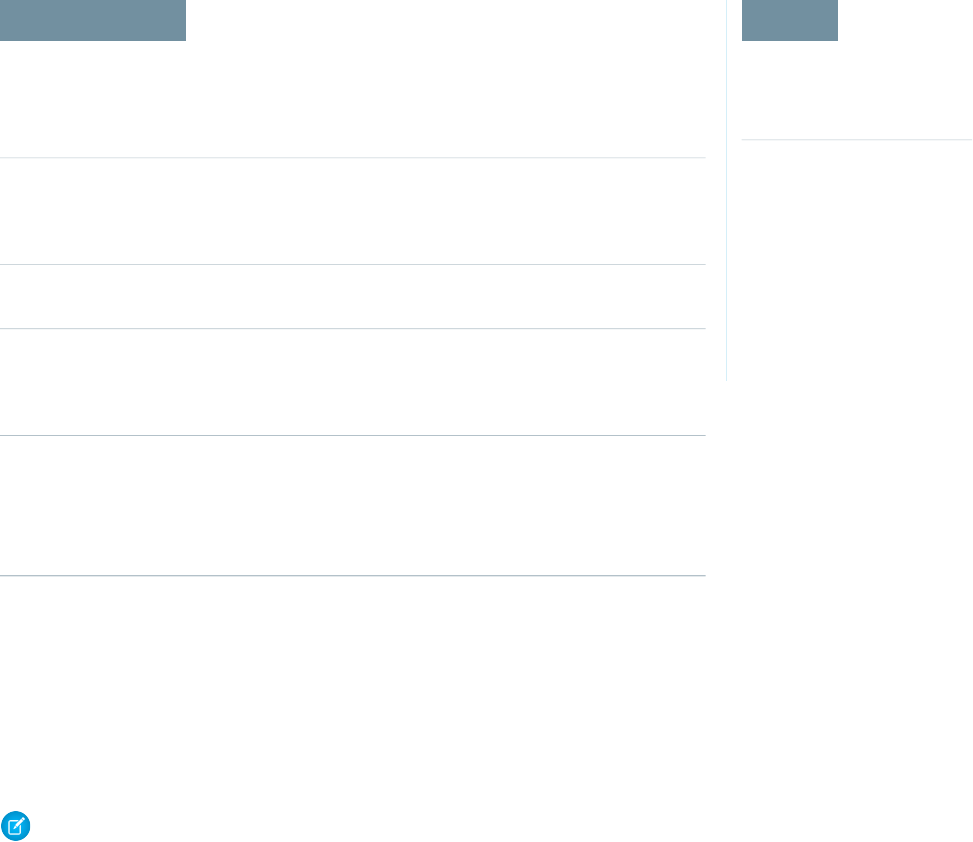
If you select Admin-approved users for Permitted Users on the Connected App Edit page, only the users with at least one of the
selected profiles or permission sets can run the app. If you select All Users, profiles and permission sets are ignored.
Manage a Connected App
EDITIONS
Available in: both Salesforce
Classic and Lightning
Experience
Connected Apps can be
created in: Group,
Professional, Enterprise,
Performance, Unlimited,
and Developer Editions
Connected Apps can be
installed in: All Editions
USER PERMISSIONS
“Customize Application” AND either
“Modify All Data” OR “Manage Connected
Apps”
To read, create, update, or delete connected
apps:
“Customize Application” AND either
“Modify All Data” OR “Manage Connected
Apps”
To update all fields except Profiles,
Permission Sets, and Service Provider SAML
Attributes:
“Customize Application” AND “Modify All
Data”
To update Profiles, Permission Sets, and
Service Provider SAML Attributes:
“Customize Application” AND either
“Modify All Data” OR “Manage Connected
Apps”
To install and uninstall connected apps:
“Customize Application” AND either
“Modify All Data” OR “Manage Connected
Apps”
To install and uninstall packaged connected
apps:
AND “Download AppExchange Packages”
The Connected Apps page lists all connected apps created or installed in the org from other orgs or from AppExchange. You can select
an app to get more information and monitor its usage. You can also edit policies, for example, to specify a start URL, add your own
connected app handler, or enable user provisioning.
To view and update properties of a connected app, from Setup, enter Connected Apps in the Quick Find box, then select
Manage Connected Apps. Click the name of the connected app to view information, usage, and policies.
Click Edit Policies to specify a start URL, add your own connected app handler, add custom attributes, or enable user provisioning.
Note: Sessions refresh automatically between every 15 minutes and 24 hours while a user is in the app. The refresh is based on
the session timeout value set for your org. The refresh is often undetected by the user.
Connected Apps Installed by Salesforce
Some Salesforce client apps are implemented as connected apps and Salesforce automatically installs in your org. For example, Salesforce1
and Salesforce for Outlook are installed automatically. That’s why the list of connected apps in your list of installed apps is longer than
you might expect.
These client-type Salesforce connected apps are distributed in two managed packages: one for Salesforce1-related apps and one for
non-Salesforce1-related apps. The list of included apps changes with each release. However, to simplify administration, each package
is asynchronously installed in your org the first time a user in the org accesses one of these apps.
If you want to install (or reinstall) the Salesforce1 package for connected apps, proactively, you can install it from the AppExchange.
78
Manage a Connected AppDesigning and Building Your App
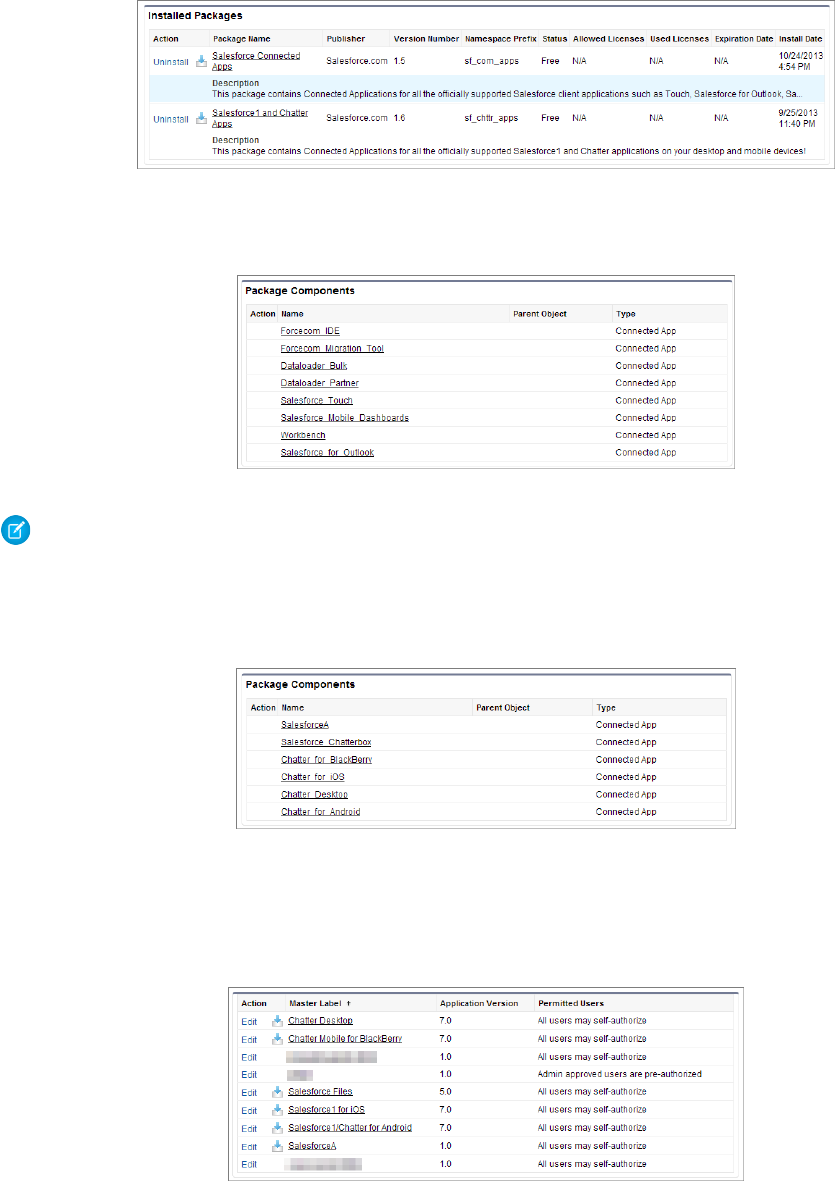
The packages appear in Setup under the Installed Packages List.
Click each package name to see the list of components. The following are some components for the Salesforce Connected Apps package.
Note: The Force.com IDE and Force.com Migration tool are “wrapper” connected apps that use the SOAP API to connect to
Salesforce instead of OAuth, which other types of connected apps do. They still use the connected apps framework to allow or
deny users access to the apps in an org.
The following are some components for the Salesforce1 and Chatter apps package.
To manage installed connected apps, from Setup, enter Connected Apps in the Quick Find box, then select Manage
Connected Apps. The connected apps that Salesforce installs appear in the list as installed by a managed package. They appear along
with your other installed connected apps.
79
Manage a Connected AppDesigning and Building Your App
Connected Apps Installed from the Connected Apps OAuth Usage Page
In addition to the apps installed from managed packages, this list contains apps installed from the Connected Apps OAuth Usage page.
Edit Connected App Behavior
EDITIONS
Available in: both Salesforce
Classic and Lightning
Experience
Connected Apps can be
created in: Group,
Professional, Enterprise,
Performance, Unlimited,
and Developer Editions
Connected Apps can be
installed in: All Editions
USER PERMISSIONS
“Customize Application” AND either
“Modify All Data” OR “Manage Connected
Apps”
To read, create, update, or delete connected
apps:
“Customize Application” AND either
“Modify All Data” OR “Manage Connected
Apps”
To update all fields except Profiles,
Permission Sets, and Service Provider SAML
Attributes:
“Customize Application” AND “Modify All
Data”
To update Profiles, Permission Sets, and
Service Provider SAML Attributes:
“Customize Application” AND either
“Modify All Data” OR “Manage Connected
Apps”
To install and uninstall connected apps:
“Customize Application” AND either
“Modify All Data” OR “Manage Connected
Apps”
To install and uninstall packaged connected
apps:
AND “Download AppExchange Packages”
Modify connected app settings and permissions to control how they behave. For example, you can change refresh token and session-level
policies for all connected apps running in your org. You can change OAuth policies for OAuth-enabled connected apps. And you can
customize the behavior of a connected app with Apex.
1. Open the list of apps.
•In Salesforce Classic, from Setup, enter Apps in the Quick Find box, select Apps, then click the name of the connected app.
•In Lightning Experience, from Setup, enter Apps in the Quick Find box, select App Manager, click , and then select Edit.
Basic Information
Basic Information applies to all connected apps, except canvas apps.
•Start URL—For connected apps that use single sign-on. Set the URL to the page where the user starts the authentication process.
This URL also appears in the app menu.
•Mobile Start URL—For mobile connected apps to direct users to a specific location when the app is accessed from a mobile device.
If your app is a canvas app, the connected app ignores the start URL fields. Instead, it uses the canvas app URL specified when the
connected app was created.
80
Edit Connected App BehaviorDesigning and Building Your App

OAuth Policies
OAuth policies apply if the connected app is OAuth-enabled.
•The Permitted Users policy determines who can run the app.
–All Users may self-authorize—Default. Anyone in the org can authorize the app. Users must approve the app the first time they
access it.
–Admin-approved users are pre-authorized—Only users with the appropriate profile or permission set can access the app. These
users don’t have to approve the app before they can access it. Manage profiles for the app by editing each profile’s Connected
App Access list. Manage permission sets for the app by editing each permission set’s Assigned Connected Apps list. This setting
is not available in Group Edition.
Warning: If you switch from All Users may self-authorize to Admin-approved users are pre-authorized, anyone using
the app loses access, unless the user belongs to a permission set or profile that you have specified for the app.
Note: If the user’s profile or permission set has the Use Any API Client user permission, the Admin-approved users are
pre-authorized policy is bypassed. This user permission is available only if the Admin Approved Apps Only org permission is
enabled. The Use Any API Client user permission allows a non-admin-approved user to access and run the app, even if the
connected app’s settings require admin-approved users and the Admin Approved Apps Only org permission is enabled. This
permission scheme allows specific users, such as short-term contractors, to access a connected app temporarily.
•The IP Relaxation policy determines whether a user’s access to the app is restricted by IP ranges. A Salesforce admin can choose to
enforce or bypass IP restrictions by choosing one of the following options.
–Enforce IP restrictions—Default. A user running this app is subject to the org’s IP restrictions, such as IP ranges, which are set in
the user’s profile.
–Relax IP restrictions with second factor—A user running this app bypasses the org’s IP restrictions when either of these conditions
is true.
•The app has a whitelist of IP ranges and is using the web server OAuth authentication flow. Only requests coming from the
whitelisted IPs are allowed.
•The app has no IP-range whitelist, is using the web server or user-agent OAuth authentication flow, and the user successfully
completes identity confirmation.
–Relax IP restrictions—A user running this app is not subject to any org IP restrictions.
Note: If Enforce login IP ranges on every request is enabled, it affects the IP relaxation behavior. For more information,
see Connected App IP Relaxation and Continuous IP Enforcement on page 83.
•The Refresh Token policy determines whether a refresh token is provided during authorization to get a new access token. If refresh
tokens are provided, users can continue to access the OAuth-enabled connected app without having to reauthorize when the access
token expires. Admins limit the lifetime of access tokens with the session timeout value. The connected app exchanges the refresh
token with an access token to start a new session. A Salesforce admin can choose one of the following refresh token policies.
–Refresh token is valid until revoked—Default. The refresh token is used indefinitely, unless revoked by the user or Salesforce
admin. You revoke tokens on a user’s detail page under OAuth Connected Apps or on the OAuth Connected Apps Usage Setup
page.
–Immediately expire refresh token—The refresh token is invalid immediately. The user can use the current session (access token)
already issued, but can’t obtain a new session when the access token expires.
–Expire refresh token if not used for n—The refresh token is valid as long as it’s been used within a specified amount of time. For
example, if set to seven days, and the refresh token isn’t exchanged for a new session within seven days, the next attempt to
use the token fails. The expired token can’t generate new sessions. If the refresh token is exchanged within seven days, the token
is valid for another seven days. The monitoring period of inactivity also resets.
81
Edit Connected App BehaviorDesigning and Building Your App

–Expire refresh token after n—The refresh token is valid for a fixed amount of time. For example, if the policy states one day, the
user can obtain new sessions only for 24 hours.
The Refresh Token policy is evaluated only during usage of the issued refresh token and doesn’t affect a user’s current session. Refresh
tokens are required only when a user’s session has expired or isn’t available. For example, if you set a refresh token policy to expire
the refresh token after 1 hour, and the user uses the app for 2 hours, the user isn’t forced to authenticate after one hour. However,
the user is required to authenticate again when the session expires and the client attempts to exchange its refresh token for a new
session.
If your connected app is a canvas app that uses signed request authentication, be sure to:
•Set Permitted Users to Admin-approved users are pre-authorized.
•Set Expire Refresh Tokens to The first time they use this application.
•Give users access via profiles and permission sets.
Session Policies
Session policies apply to all connected apps.
•Session Timeout Value—Specifies when access tokens expire to end a user’s connected app session. You can control how long a
user’s session lasts by setting the timeout value for the connected app, user profile, or org’s session settings (in that order). If you
don’t set a value or None is selected (the default), Salesforce uses the timeout value in the user’s profile. If the profile doesn’t specify
a timeout value, Salesforce uses the timeout value in the org’s Session Settings.
•The current permissions for the connected app are also listed in the org’s Session Settings.
•High Assurance session required—Requires users to enter a time-based token when trying to log in to access the app.
Mobile App Settings
Mobile App settings apply to mobile connected apps that enforce PIN protection.
•Require Pin after—Specifies how much time can pass while the app is idle before the app locks itself and requires the PIN before
continuing. Allowable values are none (no locking), 1, 5, 10, and 30 minutes. This policy is only enforced if a corresponding pin length
is configured. Enforcement of the policy is the responsibility of the connected app. Apps written using the Salesforce Mobile SDK
can enforce this policy, or the app can read the policy from the UserInfo service and enforce the policy.
Note: This setting doesn’t invalidate a user’s session. When the session expires due to inactivity, this policy only requires that
the user enter a PIN to continue using the current session.
•Pin Length—Sets the length of the identification number sent for authentication confirmation. The length can be from 4 to 8 digits,
inclusive.
Custom attributes are available for all connected apps. Developers can set custom SAML metadata or custom OAuth attributes for a
connected app. Salesforce admins can delete or edit the attributes or add custom attributes. Attributes deleted, edited, or added by
admins override attributes set by developers. For more information, see Edit, Reconfigure, or Delete a Connected App in Salesforce Classic
on page 74.
Custom Connected App Handler
Customize the behavior of a connected app with Apex. Create a class that extends the ConnectedAppPlugin Apex class, and
associate it with a connected app. The class can support new authentication protocols or respond to user attributes in a way that benefits
a business process.
82
Edit Connected App BehaviorDesigning and Building Your App
The plug-in runs on behalf of a user account. In the Run As field, select the user for the plug-in. If the user isn’t authorized for the connected
app, use the authorize method to do so. For more information, see the ConnectedAppPlugin class in the Apex Code
Developer's Guide.
User Provisioning Settings
Enable User Provisioning—Enable user provisioning for the connected app to create, update, and delete user accounts in the connected
app based on users in your Salesforce org. Salesforce provides a wizard to guide you through configuring or updating user provisioning
settings.
Connected App IP Relaxation and Continuous IP Enforcement
EDITIONS
Available in: both Salesforce
Classic and Lightning
Experience
Connected Apps can be
created in: Group,
Professional, Enterprise,
Performance, Unlimited,
and Developer Editions
Connected Apps can be
installed in: All Editions
This topic describes how the Enforce login IP ranges on every request Session
Settings option affects OAuth-enabled connected app IP relaxation settings.
If you relaxed IP restrictions for your OAuth-enabled connected app, and your organization has the
Enforce login IP ranges on every request option enabled, the access to your
connected app can change. This access change applies to client access, including mobile devices,
for all OAuth-enabled connected apps. IP relaxation does not apply to SAML-enabled connected
apps.
Table 1: Connected App IP Relaxation Settings and Continuous IP Enforcement
When Continuous IP Enforcement Is
Enabled
When Continuous IP
Enforcement Is Disabled
(Default)
IP
Relaxation
A user running this app is subject to the
organization’s IP restrictions, such as IP
ranges set in the user’s profile.
A user running this app is subject to
the organization’s IP restrictions, such
as IP ranges set in the user’s profile.
Enforce
IP
restrictions
A user running this app bypasses the
organization’s IP restrictions when either of
A user running this app bypasses the
organization’s IP restrictions when
either of these conditions is true:
Relax
IP
restrictions
with
the OAuth conditions in the previous
column is true. However, the user can’t
access the following for security reasons:
•The app has IP ranges whitelisted
and is using the Web server OAuth
second
factor •Change passwordauthentication flow. Only requests
coming from the whitelisted IPs
are allowed.
•Add a time-based token
•Any pages in a login flow
•The app has no IP range whitelist,
is using the Web server or
user-agent OAuth authentication
flow, and the user successfully
completes identity confirmation.
A user running this connected app is not
subject to any IP restrictions. However, the
A user running this connected app is
not subject to any IP restrictions.
Relax
IP
restrictions user can’t access the following for security
reasons:
•Change password
83
Connected App IP Relaxation and Continuous IP EnforcementDesigning and Building Your App
When Continuous IP Enforcement Is EnabledWhen Continuous IP Enforcement Is Disabled
(Default)
IP Relaxation
•Add a time-based token
•Any pages in a login flow
Monitor Usage for an OAuth Connected App
EDITIONS
Available in: both Salesforce
Classic and Lightning
Experience
Connected Apps can be
created in: Group,
Professional, Enterprise,
Performance, Unlimited,
and Developer Editions
Connected Apps can be
installed in: All Editions
USER PERMISSIONS
“View Setup and Configuration” AND
“Manage Users”
To view the OAuth Connected Apps Usage
page:
“Customize Application” AND either
“Modify All Data” OR “Manage Connected
Apps”
To read, create, update, or delete connected
apps:
“Customize Application” AND either
“Modify All Data” OR “Manage Connected
Apps”
To update all fields except Profiles,
Permission Sets, and Service Provider SAML
Attributes:
“Customize Application” AND “Modify All
Data”
To update Profiles, Permission Sets, and
Service Provider SAML Attributes:
“Customize Application” AND either
“Modify All Data” OR “Manage Connected
Apps”
To install and uninstall connected apps:
“Customize Application” AND either
“Modify All Data” OR “Manage Connected
Apps”
To install and uninstall packaged connected
apps:
AND “Download AppExchange Packages”
The OAuth Usage page lists all OAuth connected apps that users in the org are connecting to. These apps have an active access or refresh
token. If all tokens for an app are revoked or expired, the app disappears from this list.
The list displays all current OAuth connections to the org, regardless of where the app came from. If an app has an Install button next
to it, the connected app was created in another org. Install the app so that you can manage its security policies, for example, which users
can access the app and for how long.
To view information about OAuth connected apps, from Setup, enter OAuth in the Quick Find box, then select Connected Apps
OAuth Usage. The resulting list of apps can be long because it contains all Salesforce and custom OAuth apps available to your users,
not just the ones installed in your org. For example, it lists apps from AppExchange, Salesforce partners and other developers.
Connected App
Name of the connected app. The list contains only the apps that anyone in the org is using.
Description
Description of the connected app.
84
Monitor Usage for an OAuth Connected AppDesigning and Building Your App

Manage App Policies
Click Manage App Policies to open the detail page for the connected app. From the detail page, you can click Edit Policies to
manage the app’s access and security policies.
User Count
Number of users who are using the app. Click a User Count number to open the Connected App User’s Usage page to see information
about users, including:
•When they first used the app
•Most recent time they used the app
•Total number of times they used the app
From this page, you can end a user’s access to the current session by clicking Revoke. Or, you can click Revoke All at the top of the
page to log out everyone currently using the app.
Action
You can perform one of the following actions.
•Install—Make the OAuth connected app available for access and security policy management. When you click install, the
Manage App Policies link appears next to the app. Click the link to open the app’s detail page where you can set policies. Install
appears next to apps that were created in another org but not made available by Salesforce or a managed package. Install these
apps to manage their security policies in your org.
•Uninstall—Remove the local copy of the OAuth connected app. Click uninstall only when the original developer deletes the
app in the other Salesforce org. Uninstall doesn’t remove the connected app. It just removes the local copy that you installed to
set the app’s OAuth policies in your org. By uninstalling the app, you’re only removing the OAuth policies that you set for the
app in your org. You’re actually loosening your security measures.
•Block—Make the OAuth connected app inaccessible to your org’s users. Blocking an app ends all current user sessions and
blocks all new sessions.
•Unblock—Stop preventing new connections from being established. It allows users to log in and access the app at another
time.
Uninstall a Connected App
EDITIONS
Available in: both Salesforce
Classic and Lightning
Experience
Connected Apps can be
created in: Group,
Professional, Enterprise,
Performance, Unlimited,
and Developer Editions
Connected Apps can be
installed in: All Editions
USER PERMISSIONS
“Customize Application” AND either
“Modify All Data” OR “Manage Connected
Apps”
To read, create, update, or delete connected
apps:
“Customize Application” AND either
“Modify All Data” OR “Manage Connected
Apps”
To update all fields except Profiles,
Permission Sets, and Service Provider SAML
Attributes:
“Customize Application” AND “Modify All
Data”
To update Profiles, Permission Sets, and
Service Provider SAML Attributes:
“Customize Application” AND either
“Modify All Data” OR “Manage Connected
Apps”
To install and uninstall connected apps:
85
Uninstall a Connected AppDesigning and Building Your App
“Customize Application” AND either
“Modify All Data” OR “Manage Connected Apps”
To install and uninstall packaged connected apps:
AND “Download AppExchange Packages”
You can remove a connected app from your org in different ways. You can uninstall an OAuth connected app from the Connected App
OAuth Usage page. Or, if the connected app was installed as a managed package, you can also remove the app by uninstalling the
package.
The Connected App OAuth Usage page lists all OAuth connected apps that users in your org are accessing. If the app has an Uninstall
button next to it, the app was created by a developer in another org. It’s recommended that you uninstall an app only when the original
developer deletes the app on the other org. Uninstall doesn’t remove the connected app. It just removes the local copy that you installed
to set the app’s OAuth policies in your org. By uninstalling the app, you’re only removing the OAuth policies that you set for the app in
your org. You’re actually loosening your security measures.
To make the connected app inaccessible to your org’s users, click Block. Blocking an app ends all current user sessions with the connected
app and blocks all new sessions. You can restore access to the app by clicking Unblock.
Do not uninstall connected app packages owned and distributed by Salesforce, such as the Salesforce1 for iOS package. Salesforce
installs and manages these packages.
Environment Hub
EDITIONS
Available in: both Salesforce
Classic and Lightning
Experience
Available in: Enterprise,
Performance, and
Unlimited Editions
The Environment Hub lets you connect, create, view, and log in to Salesforce orgs from one location.
If your company has multiple environments for development, testing, and trials, the Environment
Hub lets you streamline your approach to org management.
From the Environment Hub, you can:
•Connect existing orgs to the hub with automatic discovery of related orgs.
•Create standard and partner edition orgs for development, testing, and trials.
•View and filter hub members according to criteria that you choose, like edition, creation date,
instance, origin, and SSO status.
•Create single sign-on (SSO) user mappings for easy login access to hub members.
Each hub member org corresponds to an EnvironmentHubMember object. EnvironmentHubMember is a standard object, similar to
Accounts or Contacts, so you can use the platform to extend or modify the Environment Hub programmatically. For example, you can
create custom fields, set up workflow rules, or define user mappings and enable SSO using the API for any hub member org.
Get Started with the Environment Hub
Configure the Environment Hub so that users at your company can access the app to create and manage member orgs. Then enable
My Domain so that you can connect existing orgs to the hub and create SSO user mappings.
Manage Orgs in the Environment Hub
You can manage all your existing Salesforce orgs from one location by connecting them to the Environment Hub. You can also
create orgs using Salesforce templates for development, testing, and trial purposes.
Single Sign-on in the Environment Hub
Developing, testing, and deploying apps means switching between multiple Salesforce environments and providing login credentials
each time. Single sign-on (SSO) simplifies this process by letting an Environment Hub user log in to member orgs without
reauthenticating. You can set up SSO by defining user mappings manually, using Federation IDs, or creating a formula.
86
Environment HubDesigning and Building Your App
Environment Hub Best Practices
Follow these guidelines and best practices when you use the Environment Hub.
Environment Hub FAQ
Answers to common questions about the Environment Hub.
Considerations for the Environment Hub in Lightning Experience
Be aware of these considerations when creating and managing orgs in the Environment Hub.
Get Started with the Environment Hub
EDITIONS
Available in: both Salesforce
Classic and Lightning
Experience
Available in: Enterprise,
Performance, and
Unlimited Editions
Configure the Environment Hub so that users at your company can access the app to create and
manage member orgs. Then enable My Domain so that you can connect existing orgs to the hub
and create SSO user mappings.
Configure the Environment Hub
Enable the Environment Hub in your org, and then configure it to give other users access.
Enable My Domain for the Environment Hub
My Domain is required to connect existing orgs to the Environment Hub and create SSO user
mappings. Enable My Domain in the org where the Environment Hub is installed.
Configure the Environment Hub
USER PERMISSIONS
To set up and configure the
Environment Hub:
•“Manage Environment
Hub”
Enable the Environment Hub in your org, and then configure it to give other users access.
1. Contact Salesforce to enable the Environment Hub in your org. If you’re an ISV partner, you can
skip this step. The Environment Hub is already installed in your Partner Business Org.
2. Log in to the org where the Environment Hub is enabled, and then go to Setup.
3. Assign users access to features in the Environment Hub.
a. From Setup, enter Profiles in the Quick Find box, then select Profiles.
b. Create a profile, or edit an existing one.
c. Edit the profile’s settings.
Environment Hub SettingsProfile Section
Enable the Environment Hub custom app to make it available
in the App Launcher in Lightning Experience or App Menu in
Salesforce Classic.
Custom App Settings
Unless advised by Salesforce, don’t adjust settings in this
section of the profile.
Connected App Access
If you enable single sign-on (SSO) in a member org, new entries
appear in this section of the profile. Entries appear in the format
Service Provider Access
Service Provider [Organization ID], where Organization ID is the
ID of the member org. Users who don’t have access to the
service provider sometimes see this message when attempting
87
Get Started with the Environment HubDesigning and Building Your App

Environment Hub SettingsProfile Section
to log in via SSO: “User ‘[UserID]’ does not have access to sp
‘[Service Provider ID]’.”
When configuring the Environment Hub in a new org, this
section is empty.
Enable “Manage Environment Hub” to allow users to:Administrative Permissions
•Create orgs for development, testing, and trials.
•Configure SSO for member orgs.
Enable “Connect Organization to Environment Hub” to allow
users to connect existing orgs to the Environment Hub.
General User Permissions
Grant object permissions based on the level of access required
by the Environment Hub user.
Standard Object Permissions
Hub Members object:
•“Read”—View existing Hub Member records.
•“Create”—This permission has no impact on the ability to
create Hub Member records. That’s because record creation
is handled either by connecting an existing org or creating
an org from the Environment Hub.
•“Edit”—Edit fields on existing Hub Member records.
•“Delete”—Disconnect an org from the Environment Hub
and delete its corresponding Hub Member record and
Service Provider record (if SSO was enabled for the
member).
•“View All”—Read all Hub Member records, regardless of
who created them.
•“Modify All”—Read, edit, and delete all Hub Member
records, regardless of who created them.
Hub Invitations object:
•If you enable the “Connect Organization to Environment
Hub” permission, enable “Create”, “Read”, “Update, and
“Delete” for Hub Invitations.
Signup Request object:
•If you enable the “Manage Environment Hub” permission,
enable “Create” and “Read” for Signup Requests to allow
users to create orgs. Optionally, enable “Delete” to allow
users to remove orgs from the hub.
d. Select Save.
88
Get Started with the Environment HubDesigning and Building Your App
Enable My Domain for the Environment Hub
USER PERMISSIONS
To set up a domain name:
•“Customize Application”
My Domain is required to connect existing orgs to the Environment Hub and create SSO user
mappings. Enable My Domain in the org where the Environment Hub is installed.
1. Find an available domain name and sign up for it.
a. From Setup, enter My Domain in the Quick Find box, then select My Domain.
b. Enter the subdomain name you want to use within the sample URL.
c. Select Check Availability. If your name is already taken, choose a different one.
d. Select Register Domain.
You receive a confirmation email from Salesforce when your new domain is ready for testing.
2. Test your domain name and deploy it to your org.
a. Click the URL in the confirmation email to log in to Salesforce using your new domain. Alternatively, from Setup, enter My
Domain in the Quick Find box, select My Domain, and then select Click here to login.
b. Test the new domain by clicking tabs and links within your org. Notice that all pages show your new domain name.
Tip: If you use custom buttons or Visualforce pages in your org, test them before deploying the new domain name. If you
used instance-based URLs in your customizations, your links are broken.
c. To roll out the new domain name to your org, from Setup, enter My Domain in the Quick Find box, select My Domain,
and then select Deploy to Users.
The domain is activated immediately, and your users are redirected to pages with the new domain.
3. Set the domain login policy for users accessing your pages.
a. From Setup, enter My Domain in the Quick Find box, then select My Domain.
b. Under My Domain Settings, select Edit.
c. To turn off authentication for users who do not use your domain-specific login page, select the login policy. This option enhances
security by preventing login attempts by anyone who doesn’t know your domain name.
d. Choose a redirect policy based on the level of security that you want. You have these 3 options, in order of increasing security.
•Redirect users to the same page within the domain.
•Redirect users with a warning.
•Prevent redirecting by having users enter the new domain name.
Manage Orgs in the Environment Hub
EDITIONS
Available in: both Salesforce
Classic and Lightning
Experience
Available in: Enterprise,
Performance, and
Unlimited Editions
You can manage all your existing Salesforce orgs from one location by connecting them to the
Environment Hub. You can also create orgs using Salesforce templates for development, testing,
and trial purposes.
Connect an Org to the Environment Hub
You can connect existing Salesforce orgs to the Environment Hub, allowing you to manage all
your development, test, and trial environments from one location. When you connect an org
to the hub, related orgs are automatically discovered so you don’t have to manually connect
them.
89
Manage Orgs in the Environment HubDesigning and Building Your App
Create an Org from the Environment Hub
You can create orgs from the Environment Hub for development, testing, and trial purposes. If you’re an ISV partner, you can also
create partner edition orgs with increased limits, more storage, and other customizations to support app development. When you
create an org from the Environment Hub, it becomes a hub member and its default language is set by the user’s locale.
Connect an Org to the Environment Hub
USER PERMISSIONS
To connect an organization
to the Environment Hub:
•“Connect Organization
to Environment Hub”
You can connect existing Salesforce orgs to the Environment Hub, allowing you to manage all your
development, test, and trial environments from one location. When you connect an org to the hub,
related orgs are automatically discovered so you don’t have to manually connect them.
The following types of related orgs are automatically discovered.
•For any organization, all sandbox orgs created from it
•For a release org, all its related patch orgs
•For a Trialforce Management Org, all Trialforce Source Orgs created from it
•For an org with the License Management App (LMA) installed, any release org with a managed package registered in the LMA
Note: You can't connect a sandbox org to the Environment Hub directly. If you want to connect a sandbox, first connect the org
used to create the sandbox to the Environment Hub. Then, refresh the sandbox org. The refresh automatically adds it as a hub
member.
1. Log in to the Environment Hub, and then select Connect Org.
2. Enter the admin username for the org that you want to connect and, optionally, a short description. A description makes it easier to
find the org later, especially if your hub has many members.
3. By default, single sign-on (SSO) is enabled for the org you connected. To disable SSO, deselect Auto-enable SSO for this org.
4. Select Connect Org again.
5. In the pop-up window, enter the org’s admin username and password. If you don’t see the pop-up, temporarily disable your browser’s
ad blocking software and try again.
6. Select Log In, and then select Allow.
Create an Org from the Environment Hub
USER PERMISSIONS
To set up and configure the
Environment Hub:
•“Manage Environment
Hub”
You can create orgs from the Environment Hub for development, testing, and trial purposes. If
you’re an ISV partner, you can also create partner edition orgs with increased limits, more storage,
and other customizations to support app development. When you create an org from the
Environment Hub, it becomes a hub member and its default language is set by the user’s locale.
Note: You can create up to 20 member orgs per day. To create more orgs, log a case in the
Partner Community.
1. Log in to the Environment Hub, and then select Create Org.
2. Choose an org purpose.
Lets You Create:Purpose
Developer Edition orgs for building and packaging apps.Development
90
Manage Orgs in the Environment HubDesigning and Building Your App
Lets You Create:Purpose
Trial versions of standard Salesforce orgs for testing and demos. These orgs are similar to the ones
customers create at www.salesforce.com/trial. When you create a Test/Demo org, you can specify a
Trialforce template if you want the org to include your customizations.
Test/Demo
Trialforce Source Organizations (TSOs) as an alternative to using a Trialforce Management Organization.
Unless you need custom branding on your login page or emails, use the Environment Hub to create
TSOs.
Trialforce
3. Enter the required information for the org type you selected.
4. Read the Master Subscription Agreement, and then select the checkbox.
5. Select Create.
When your org is ready, you receive an email confirmation, and the org appears in your list of hub members.
Single Sign-on in the Environment Hub
EDITIONS
Available in: both Salesforce
Classic and Lightning
Experience
Available in: Enterprise,
Performance, and
Unlimited Editions
Developing, testing, and deploying apps means switching between multiple Salesforce environments
and providing login credentials each time. Single sign-on (SSO) simplifies this process by letting an
Environment Hub user log in to member orgs without reauthenticating. You can set up SSO by
defining user mappings manually, using Federation IDs, or creating a formula.
The Environment Hub supports these SSO methods for matching users.
DescriptionSSO Method
Match users in the Environment Hub to users in a member org
manually. Mapped Users is the default method for SSO user
mappings defined from the member detail page.
Mapped Users
Match users who have the same Federation ID in both the
Environment Hub and a member org.
Federation ID
Match users in the Environment Hub and a member org
according to a formula that you define.
User Name Formula
If you specify multiple SSO methods, they’re evaluated in this order: (1) Mapped Users, (2) Federation ID, and (3) User Name Formula.
The first method that results in a match is used to log in the user, and the other methods are ignored. If a matching user can’t be identified,
the Environment Hub directs the user to the standard Salesforce login page.
Note: SSO doesn’t work for newly added users or for user mappings defined in a sandbox org. Only add users, edit user information,
or define SSO user mappings in the parent org for the sandbox.
Enable SSO for a Member Org
You can enable single sign-on (SSO) to let an Environment Hub user log in to a member org without reauthenticating.
91
Single Sign-on in the Environment HubDesigning and Building Your App
Define an SSO User Mapping
You can manually define a single-sign on (SSO) user mapping between a user in the Environment Hub and a user in a member org.
Before you define a user mapping, enable SSO in the hub member org.
Use a Federation ID or Formula for SSO
You can match an Environment Hub user with a user in a member org using a Federation ID or a user name formula. For either
method, enable SSO in the hub member org first.
Disable SSO for a Member Org
If you want Environment Hub users to reauthenticate when they log in to a member org, you can disable SSO. Disabling SSO doesn’t
remove the user mappings that you’ve defined, so you can always re-enable SSO later.
Enable SSO for a Member Org
USER PERMISSIONS
To set up and configure the
Environment Hub:
•“Manage Environment
Hub”
You can enable single sign-on (SSO) to let an Environment Hub user log in to a member org without
reauthenticating.
1. Log in to the Environment Hub, and then select a member org. If you don’t see any member
orgs, check your list view.
2. Select Enable SSO.
3. Confirm that you want to enable SSO for this org, and then select Enable SSO again.
Define an SSO User Mapping
USER PERMISSIONS
To set up and configure the
Environment Hub:
•“Manage Environment
Hub”
You can manually define a single-sign on (SSO) user mapping between a user in the Environment
Hub and a user in a member org. Before you define a user mapping, enable SSO in the hub member
org.
User mappings can be many-to-one but not one-to-many. In other words, you can associate multiple
users in the Environment Hub to one user in a member org. For example, if you wanted members
of your QA team to log in to a test org as the same user, you could define user mappings.
1. Log in to the Environment Hub, and then select a member org. If you don’t see any member
orgs, check your list view.
2. Go to the Single Sign-On User Mappings related list, and then select New SSO User Mapping.
3. Enter the username of the user that you want to map in the member org, and then look up a user in the Environment Hub.
4. Select Save.
Use a Federation ID or Formula for SSO
USER PERMISSIONS
To set up and configure the
Environment Hub:
•“Manage Environment
Hub”
You can match an Environment Hub user with a user in a member org using a Federation ID or a
user name formula. For either method, enable SSO in the hub member org first.
1. Log in to the Environment Hub, and then select a member org. If you don’t see any member
orgs, check your list view.
2. Go to SSO Settings, and then choose a method.
StepsMethod
Select the checkbox.SSO Method 2 - Federation
ID
92
Single Sign-on in the Environment HubDesigning and Building Your App
StepsMethod
Select the checkbox, and then define a formula. For example, to match
the first part of the username (the part before the “@” sign) with an explicit
domain name, enter:
LEFT($User.Username, FIND("@", $User.Username))
& ("mydev.org")
SSO Method 3 - User Name Formula
3. Select Save.
Disable SSO for a Member Org
USER PERMISSIONS
To set up and configure the
Environment Hub:
•“Manage Environment
Hub”
If you want Environment Hub users to reauthenticate when they log in to a member org, you can
disable SSO. Disabling SSO doesn’t remove the user mappings that you’ve defined, so you can
always re-enable SSO later.
1. Log in to the Environment Hub, and then select a member org. If you don’t see any member
orgs, check your list view.
2. Select Disable SSO.
3. Confirm that you want to disable SSO for this org, and then select Disable SSO again.
Environment Hub Best Practices
EDITIONS
Available in: both Salesforce
Classic and Lightning
Experience
Available in: Enterprise,
Performance, and
Unlimited Editions
Follow these guidelines and best practices when you use the Environment Hub.
•If you’re an admin or developer, choose the org that your team uses most frequently as your
hub org. If you’re an ISV partner, the Environment Hub is already installed in your Partner Business
Org.
•Set up My Domain for each member org, in addition to the hub org. Because each My Domain
includes a unique domain URL, it’s easier to distinguish between the member orgs that you
use for development, testing, and trials.
•Because each member org is a standard object (of type EnvironmentHubMember), you can
modify its behavior or access it programmatically. For example, you can create custom fields,
set up workflow rules, or define user mappings and enable single sign-on using the API for any
member org.
•Decide on a strategy for enabling SSO access based on your company’s security requirements. Then choose the SSO method (explicit
mapping, Federation ID, or custom formula) that meets your needs.
•SSO doesn’t work for newly added users or for user mappings defined in a sandbox org. Only add users, edit user information, or
define SSO user mappings in the parent org for the sandbox.
•The Environment Hub connected app is for internal use only. Don’t enable it for any profiles. Unless advised by Salesforce, don’t
delete the connected app or adjust its settings.
93
Environment Hub Best PracticesDesigning and Building Your App

Environment Hub FAQ
EDITIONS
Available in: both Salesforce
Classic and Lightning
Experience
Available in: Enterprise,
Performance, Unlimited,
and Developer Editions
Answers to common questions about the Environment Hub.
Can I use the Environment Hub in Lightning Experience?
Where do I install the Environment Hub?
Is My Domain required to use the Environment Hub?
No, My Domain isn’t required. But if you don’t set up My Domain, you can’t connect existing
orgs to the Environment Hub or use single sign-on to log in to member orgs. Salesforce
recommends setting up My Domain when you configure the Environment Hub.
Can I install the Environment Hub in more than one org?
Can I enable the Environment Hub in a sandbox org?
What kinds of orgs can I create in the Environment Hub?
How is locale determined for the orgs I create in the Environment Hub?
Are the orgs that I create in the Environment Hub the same as the ones I created in the Partner Portal?
Can an org be a member of multiple Environment Hubs?
Can I disable the Environment Hub?
Can I use the Environment Hub in Lightning Experience?
Yes, both Salesforce Classic and Lightning Experience support the Environment Hub.
Where do I install the Environment Hub?
If you’re an ISV partner, the Environment Hub is already installed in your Partner Business Org.
Otherwise, install the Environment Hub in an org that all your users can access, such as your CRM org. Do not install the Environment
Hub in a Developer Edition org that contains your managed package. Doing so can cause problems when you upload a new package
version or push an upgrade to customers.
Is My Domain required to use the Environment Hub?
No, My Domain isn’t required. But if you don’t set up My Domain, you can’t connect existing orgs to the Environment Hub or use single
sign-on to log in to member orgs. Salesforce recommends setting up My Domain when you configure the Environment Hub.
Can I install the Environment Hub in more than one org?
Yes, but you must manage each Environment Hub independently. Although Salesforce recommends one Environment Hub per company,
several hubs could make sense for your company. For example, if you want to keep orgs that are associated with product lines separate.
Can I enable the Environment Hub in a sandbox org?
No, you can’t enable the Environment Hub in a sandbox org. Enable the Environment Hub in a production org that all your users can
access.
94
Environment Hub FAQDesigning and Building Your App
What kinds of orgs can I create in the Environment Hub?
You can create orgs for development, testing, and trials. ISV partners can also create partner edition orgs with increased limits, more
storage, and other customizations to support app development. If you’re a partner but don’t see partner edition orgs in the Environment
Hub, log a case in the Partner Community.
Expires AfterBest Used ForOrg Type
30 daysTestingGroup Edition
30 daysTestingEnterprise Edition
30 daysTestingProfessional Edition
NeverDeveloping apps and Lightning componentsPartner Developer Edition
1 year, unless you request an extensionRobust testing and customer demosPartner Group Edition
1 year, unless you request an extensionRobust testing and customer demosPartner Enterprise Edition
1 year, unless you request an extensionRobust testing and customer demosPartner Professional Edition
1 year, unless you request an extensionCreating Trialforce templatesTrialforce Source Org
1 year, unless you request an extensionCustomer demosConsulting Partner Edition
How is locale determined for the orgs I create in the Environment Hub?
Your Salesforce user locale determines the default locale of orgs that you create. For example, if your user locale is set to English
(United Kingdom), that is the default locale for the orgs you create. In this way, the orgs you create are already customized for
the regions where they reside.
Are the orgs that I create in the Environment Hub the same as the ones I created in
the Partner Portal?
Yes, the orgs are identical to the ones that you created in the Partner Portal. The Environment Hub uses the same templates, so the orgs
come with the same customizations, such as higher limits and more licenses. You can also use the Environment Hub to create the same
Group, Professional, and Enterprise Edition orgs that customers use. That way, you can test your app against realistic customer
implementations.
Can an org be a member of multiple Environment Hubs?
No, an org can be a member of only one Environment Hub at a time. After you connect an org to the Environment Hub, you must contact
Salesforce Customer Support to break the association.
Can I disable the Environment Hub?
After you install the Environment Hub in an org, you can’t disable it. However, you can hide the Environment Hub from users. Go to
Setup and enter App Menu in to the Quick Find box, and then select App Menu. From the App Menu, you can choose whether to
hide an app or make it visible.
95
Environment Hub FAQDesigning and Building Your App
Considerations for the Environment Hub in Lightning Experience
EDITIONS
Available in: both Salesforce
Classic and Lightning
Experience
Available in: Enterprise,
Performance, Unlimited,
and Developer Editions
Be aware of these considerations when creating and managing orgs in the Environment Hub.
List View Limitations
You can’t filter hub members by org expiration date when creating or updating list views in
Lightning Experience. If you have an existing list view that includes org expiration date in its
filter criteria, that list view won’t work in Lightning Experience. To filter hub members by org
expiration date, switch to Salesforce Classic and then use the list view.
Notifications for Package Errors
EDITIONS
Available in: Salesforce
Classic
Accurately track failed package installations, upgrades, and uninstallations in subscriber orgs with
the Notifications for Package Errors feature. Proactively address issues with managed and unmanaged
packages and provide support to subscribers so that they can successfully install and upgrade your
apps.
You can choose to send a notification to an email address in your org when a subscriber’s attempt
to install, upgrade, or uninstall a packaged app fails. To enable this feature, contact your Salesforce
representative.
Errors can happen with these package operations:
•Installation
•Upgrade
•Push upgrade
•Uninstallation
When an installation fails, an email is sent to the specified address with the following details:
•Reason for the failure
•Subscriber org information
•Metadata of the package that wasn’t installed properly
•Who attempted to install the package
This example email is for a package installation that failed because the base package wasn’t installed before the subscriber tried to install
an extension.
On Mon, Jul 13, 2015 at 11:51 AM, NO REPLY <no-reply@salesforce.com> wrote:
The install of your package failed. Here are the details:
Error Message: 00DD00000007uJp: VALIDATION_FAILED [DB 0710 DE1 Pkg1 1.2: A required package
is missing: Package "DB 0710 DE1 Pkg1", Version 1.2 or later must be installed first.]
Date/Time of Occurrence = Mon Jul 13 18:51:20 GMT 2015
Subscriber Org Name = DB 071015 EE 1
Subscriber Org ID = 00DD00000007uJp
Subscriber Org Status = TRIAL
Subscriber Org Edition = Enterprise Edition
96
Considerations for the Environment Hub in Lightning
Experience
Designing and Building Your App
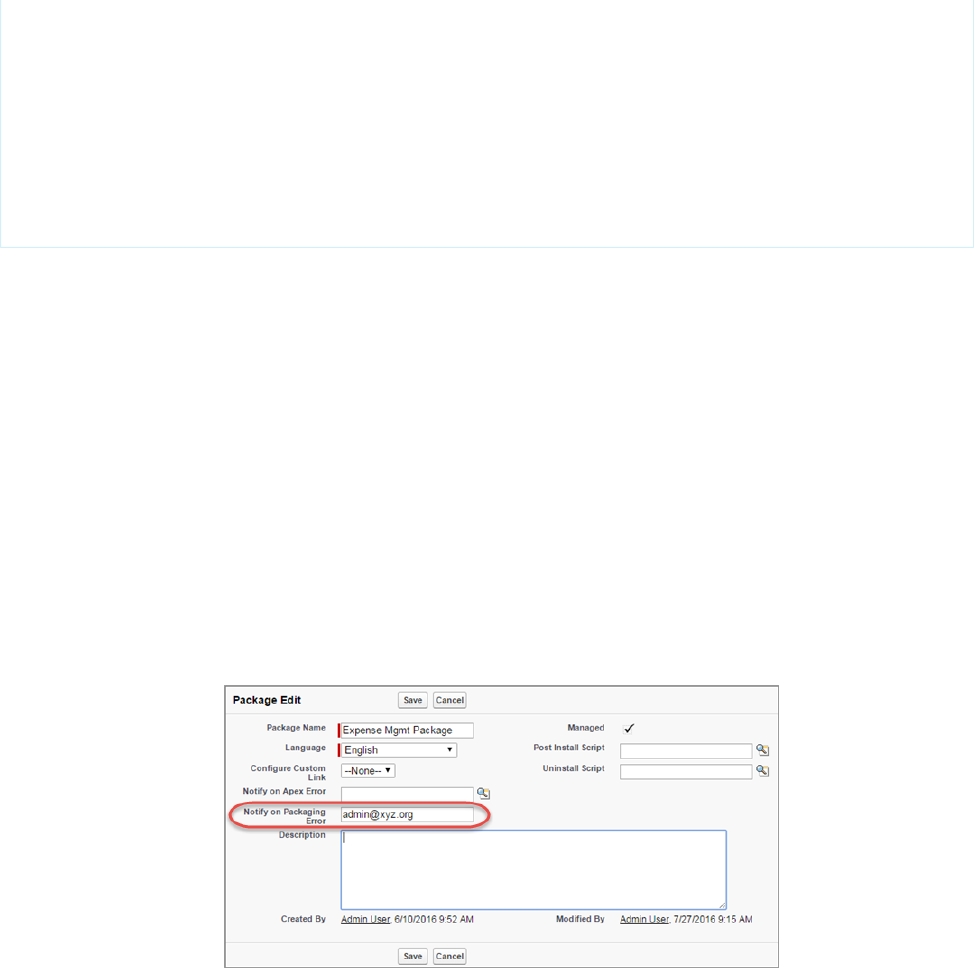
Package Name = DB 0710 DE2 Pkg1
Package ID = 033D000000060EE
Package Namespace = DB_0710_DE2
Package Type = MANAGED
Package Version Name = 1.2
Package Version Number = 1.2
Package Version Id = 04tD00000006QoF
Installer Name = Admin User
Installer Email Address = dburki@salesforce.com
Set the Notification Email Address
Specify which address to email when a package installation, upgrade, or uninstallation fails.
Notifications are sent only for package versions that are uploaded after the address is added. For example, if you upload package version
1.0 and then set the notification address, notifications aren’t sent for failures related to version 1.0. Notifications start when version 2.0
is uploaded.
Also, you can’t change or remove the notification email address for the package after it’s been uploaded.
1. To enable this feature, contact your Salesforce representative.
2. From Setup, enter Packages in the Quick Find box, then select Packages.
3. Click the package name, and then click Edit on the package detail page.
4. Enter the email address to send notifications to, and click Save.
Notifications for Package Errors Configured in a Partner Org
97
Set the Notification Email AddressDesigning and Building Your App

CHAPTER 4 Packaging and Testing Your App
This section contains information on packaging and testing your app during development. The general
procedure is as follows:
In this chapter ...
•About Managed
Packages 1. Create and upload a beta package.
2. Install the beta package in a partner testing organization (Enterprise, Professional or Group Editions
are available). These can be created in the Environment Hub.
•Installing a Package
•Uninstalling a
Package 3. Test the package.
•Installing Managed
Packages using the
API
4. Fix bugs and make changes in your development organization.
5. Repeat these steps until you’re ready to release a managed package.
SEE ALSO:
Creating and Uploading a Beta Package
Installing a Package
•Resolving Apex Test
Failures
•Running Apex on
Package
Install/Upgrade
•Running Apex on
Package Uninstall
•Publishing Extensions
to Managed
Packages
98
About Managed Packages
EDITIONS
Available in: Salesforce
Classic and Lightning
Experience
Available in: Developer
Edition
Package uploads and
installs are available in
Group, Professional,
Enterprise, Performance,
Unlimited, and Developer
Editions
A managed package is a collection of application components that are posted as a unit on
AppExchange, and are associated with a namespace and a License Management Organization.
•You must use a Developer Edition organization to create and work with a managed package.
•Managed packages are depicted by the following icons:
–Managed - Beta
–Managed - Released
–Managed - Installed
Tip: To prevent naming conflicts, Salesforce recommends using managed packages for all
packages that contain Apex. This way, all the Apex objects contain your namespace prefix.
For example, if there is an Apex class called MyHelloWorld and the namespace for your
organization is OneTruCode, the class is referenced as OneTruCode.MyHelloWorld.
Configure Your Developer Settings
EDITIONS
Available in: Salesforce
Classic and Lightning
Experience
Available in: Developer
Edition
Package uploads and
installs are available in
Group, Professional,
Enterprise, Performance,
Unlimited, and Developer
Editions
USER PERMISSIONS
To configure developer
settings:
•“Customize Application”
To create packages:
•“Create AppExchange
Packages”
To upload packages:
•“Upload AppExchange
Packages”
The developer settings in a Developer Edition organization allow you to create a single managed
package, upload that package to the AppExchange, allowing other users to install and upgrade the
package in their organization. After configuring your developer settings the first time, you can no
longer modify them. Regardless of the developer settings, you can always create an unlimited
number of unmanaged packages.
To configure your developer settings:
1. From Setup, enter Packages in the Quick Find box, then select Packages.
2. Click Edit.
Note: This button doesn’t appear if you’ve already configured your developer settings.
3. Review the selections necessary to configure developer settings, and click Continue.
4. Register a namespace prefix.
5. Choose the package you want to convert to a managed package. If you do not yet have a
package to convert, leave this selection blank and update it later.
6. Click Review My Selections.
7. Click Save.
Tip: You may want to specify a License Management Organization (LMO) for your managed
package; to find out more, go to http://sites.force.com/appexchange/publisherHome.
99
About Managed PackagesPackaging and Testing Your App
Register a Namespace Prefix
EDITIONS
Available in: Salesforce
Classic and Lightning
Experience
Available in: Developer
Edition
Package uploads and
installs are available in
Group, Professional,
Enterprise, Performance,
Unlimited, and Developer
Editions
In a packaging context, a namespace prefix is a one to 15-character alphanumeric identifier that
distinguishes your package and its contents from packages of other developers on AppExchange.
Namespace prefixes are case-insensitive. For example, ABC and abc are not recognized as unique.
Your namespace prefix must be globally unique across all Salesforce organizations. It keeps your
managed package under your control exclusively.
Salesforce automatically prepends your namespace prefix, followed by two underscores (“__”), to
all unique component names in your Salesforce organization. A unique package component is one
that requires a name that no other component has within Salesforce, such as custom objects,
custom fields, custom links, s-controls, and validation rules. For example, if your namespace prefix
is abc and your managed package contains a custom object with the API name, Expense__c, use
the API name abc__Expense__c to access this object using the API. The namespace prefix is
displayed on all component detail pages.
Warning: S-controls stored in the s-control library or the Documents tab that do not use
the Force.com API still function properly after you register a namespace prefix. However,
s-controls stored outside of your organization or s-controls that use the Force.com API to call
Salesforce may require some fine-tuning. For more information, see S-control in the Object
Reference.
Your namespace prefix must:
•Begin with a letter
•Contain one to 15 alphanumeric characters
•Not contain two consecutive underscores
For example, myNp123 and my_np are valid namespaces, but 123Company and my__np aren’t.
To register a namespace prefix:
1. From Setup, enter Packages in the Quick Find box. Under Create, select Packages.
Note: This item is only available in Salesforce Classic.
2. In the Developer Settings panel, click Edit.
Note: This button doesn’t appear if you’ve already configured your developer settings.
3. Review the selections that are required for configuring developer settings, and then click Continue.
4. Enter the namespace prefix you want to register.
5. Click Check Availability to determine if the namespace prefix is already in use.
6. If the namespace prefix that you entered isn’t available, repeat the previous two steps.
7. Click Review My Selections.
8. Click Save.
100
Register a Namespace PrefixPackaging and Testing Your App

Specifying a License Management Organization
EDITIONS
Available in: Salesforce
Classic and Lightning
Experience
Available in: Developer
Edition
Package uploads and
installs are available in
Group, Professional,
Enterprise, Performance,
Unlimited, and Developer
Editions
A license management organization is a Salesforce organization that you use to track all Salesforce
users who install your managed package. The license management organization receives notification
(in the form of a lead record) when a user installs or uninstalls your package and tracks each package
upload on Force.com AppExchange.
Your license management organization can be any Salesforce Enterprise, Unlimited, Performance,
or Developer Edition organization that has installed the free License Management Application (LMA)
from AppExchange. To specify a License Management Organization, go to
http://sites.force.com/appexchange/publisherHome.
What are Beta Versions of Managed Packages?
A beta package is an early version of a managed package that is uploaded in a Managed - Beta
state. The purpose of a Managed - Beta package is to allow the developer to test their application
in different Salesforce organizations and to share the app with a pilot set of users for evaluation
and feedback.
Before installing a beta version of a managed package, review the following notes:
•Beta packages can be installed in sandbox or Developer Edition organizations, or test organizations furnished through the Environment
Hub only.
•The components of a beta package are editable by the developer's organization until a Managed - Released package is uploaded.
•Beta versions aren't considered major releases, so the package version number doesn't change.
•Beta packages are not upgradeable. Because developers can still edit the components of a beta package, the Managed - Released
version might not be compatible with the beta package installed. Uninstall the beta package and install a new beta package or
released version. For more information, see Uninstalling a Package on page 111 and Installing a Package on page 108.
Creating and Uploading a Beta Package
USER PERMISSIONS
To create packages:
•“Create AppExchange
Packages”
To upload packages:
•“Upload AppExchange
Packages”
Use the following procedure to create and upload a beta package through the UI. (You can also
upload a package using the Tooling API. For sample code and more details, see the
PackageUploadRequest object in the Tooling API Developer Guide.)
1. Create a package:
a. From Setup, enter Packages in the Quick Find box, then select Packages.
b. Click New.
c. Enter a name for your package. This does not have to be the same name that appears on
AppExchange.
d. From the drop-down menu, select the default language of all component labels in the package.
e. Optionally, in the Notify on Apex Error field, enter the username of the person who should receive an email notification
if an exception occurs in Apex code that is not caught by the code. If you don’t specify a username, all uncaught exceptions
generate an email notification that is sent to Salesforce.
f. Optionally, in the Notify on Packaging Error field, enter the email address of the person who receives an email
notification if an error occurs when a subscriber’s attempt to install, upgrade, or uninstall a packaged app fails. This field appears
only if packaging error notifications are enabled. To enable notifications, contact your Salesforce representative.
101
Specifying a License Management OrganizationPackaging and Testing Your App

g. Optionally, choose a custom link from the Configure Custom Link field to display configuration information to installers.
The custom link displays as a Configure link within Salesforce on the Installed Packages page and package detail page of the
subscriber's organization.
h. Optionally, enter a description that describes the package. You will have a chance to change this description before you upload
it to AppExchange.
i. Optionally, specify a post install script. This is an Apex script that runs in the subscriber organization after the package is installed
or upgraded. For more information, see Running Apex on Package Install/Upgrade on page 113.
j. Optionally, specify an uninstall script. This is an Apex script that runs in the subscriber organization after the package is uninstalled.
For more information, see Running Apex on Package Uninstall on page 117.
k. On the right side of the screen, select the Managed checkbox.
l. Click Save.
2. Optionally, change the API access privileges. By default, API access is set to Unrestricted, but you can change this setting to
further restrict API access of the components in the package.
3. Add the necessary components for your app.
a. Click Add Components.
b. From the drop-down list, choose the type of component.
c. Select the components you want to add.
Note: Some components cannot be added to Managed - Released packages. For a list of packageable components, see
Components Available in Managed Packages on page 21. Also, S-controls cannot be added to packages with restricted
API access.
d. Click Add To Package.
e. Repeat these steps until you have added all the components you want in your package.
Note: Some related components are automatically included in the package even though they might not display in the Package
Components list. For example, when you add a custom object to a package, its custom fields, page layouts, and relationships
with standard objects are automatically included. For a complete list of components, see Components Automatically Added
to Packages on page 35.
4. Optionally, click View Dependencies and review a list of components that rely on other components, permissions, or preferences
within the package. For more information on dependencies, see About Dependencies on page 47. Click Done to return to the
Package detail page.
5. Click Upload.
6. On the Upload Package page, do the following:
a. Enter a Version Name, such as Spring 11 — Beta.
b. Enter a Version Number, such as 1.0. All beta packages use the same version number until you upload a Managed -
Released package.
c. Select a Release Type of Managed - Beta.
Note: Beta packages can only be installed in Developer Edition, sandbox, or test organizations requested through the
Environment Hub, and thus can't be pushed to customer organizations.
d. Optionally, enter and confirm a password to share the package privately with anyone who has the password. Don't enter a
password if you want to make the package available to anyone on AppExchange and share your package publicly.
102
Creating and Uploading a Beta PackagePackaging and Testing Your App

e. Salesforce automatically selects the requirements it finds. In addition, select any other required components from the Package
Requirements and Object Requirements sections to notify installers of any requirements for this package.
f. Click Upload.
You will receive an email that includes an installation link when your package has been uploaded successfully.
Create and Upload a Managed Package
EDITIONS
Available in: Salesforce
Classic and Lightning
Experience
Available in: Developer
Edition
Package uploads and
installs are available in
Group, Professional,
Enterprise, Performance,
Unlimited, and Developer
Editions
USER PERMISSIONS
To enable managed
packages:
•“Customize Application”
To create packages:
•“Create AppExchange
packages”
To upload packages:
•“Download
AppExchange
packages”
Creating a managed package is just as easy as creating an unmanaged package. The only requirement
to create a managed package is that you’re using a Developer Edition organization.
Before creating a managed package:
•Determine if you want to create and upload a managed or unmanaged package.
•Optionally, install the License Management Application (LMA) from
http://sites.force.com/appexchange. Search for License Management App to locate
it. The License Management Application (LMA) tracks information about each user who installs
your app. It allows you to track what users have which version, giving you a means of distributing
information about upgrades.
The License Management Application (LMA) can be installed in any Salesforce organization
except a Personal, Group, or Professional Edition organization and does not need to be the
same Salesforce organization that you use to create or upload the package, although it can be.
You can also use the same License Management Application (LMA) to manage an unlimited
number of your managed packages in different Developer Edition organizations.
•Configure your developer settings on page 99. Your developer settings specify your namespace
prefix on page 100, the Salesforce organization where you install the License Management
Application (LMA), and the unmanaged package you want to convert into a managed package.
Use the following procedure to create and upload a managed package through the UI. (You can
also upload a package using the Tooling API. For sample code and more details, see the
PackageUploadRequest object in the Tooling API Developer Guide.)
This procedure assumes you have already created a namespace and beta package. If you’re uploading
a beta package for testing, see Creating and Uploading a Beta Package on page 101.
1. Create a package:
a. From Setup, enter Packages in the Quick Find box, then select Packages.
b. Click New.
c. Enter a name for your package. This does not have to be the same name that appears on AppExchange.
d. From the drop-down menu, select the default language of all component labels in the package.
e. Optionally, in the Notify on Apex Error field, enter the username of the person who should receive an email notification
if an exception occurs in Apex code that is not caught by the code. If you don’t specify a username, all uncaught exceptions
generate an email notification that is sent to Salesforce.
f. Optionally, in the Notify on Packaging Error field, enter the email address of the person who receives an email
notification if an error occurs when a subscriber’s attempt to install, upgrade, or uninstall a packaged app fails. This field appears
only if packaging error notifications are enabled. To enable notifications, contact your Salesforce representative.
g. Optionally, choose a custom link from the Configure Custom Link field to display configuration information to installers.
The custom link displays as a Configure link within Salesforce on the Installed Packages page and package detail page of the
subscriber's organization.
103
Create and Upload a Managed PackagePackaging and Testing Your App

h. Optionally, enter a description that describes the package. You will have a chance to change this description before you upload
it to AppExchange.
i. Optionally, specify a post install script. This is an Apex script that runs in the subscriber organization after the package is installed
or upgraded. For more information, see Running Apex on Package Install/Upgrade on page 113.
j. Optionally, specify an uninstall script. This is an Apex script that runs in the subscriber organization after the package is uninstalled.
For more information, see Running Apex on Package Uninstall on page 117.
k. On the right side of the screen, select the Managed checkbox.
l. Click Save.
2. Optionally, change the API access privileges. By default, API access is set to Unrestricted, but you can change this setting to
further restrict API access of the components in the package.
3. Add the necessary components for your app.
a. Click Add Components.
b. From the drop-down list, choose the type of component.
c. Select the components you want to add.
Note: Some components cannot be added to Managed - Released packages. For a list of packageable components, see
Components Available in Managed Packages on page 21. Also, S-controls cannot be added to packages with restricted
API access.
d. Click Add To Package.
e. Repeat these steps until you have added all the components you want in your package.
Note: Some related components are automatically included in the package even though they might not display in the Package
Components list. For example, when you add a custom object to a package, its custom fields, page layouts, and relationships
with standard objects are automatically included. For a complete list of components, see Components Automatically Added
to Packages on page 35.
4. Optionally, click View Dependencies and review a list of components that rely on other components, permissions, or preferences
within the package. For more information on dependencies, see About Dependencies on page 47. Click Done to return to the
Package detail page.
5. Click Upload.
6. On the Upload Package page, do the following:
a. Enter a Version Name, such as Spring 12. The version name is the marketing name for a specific release of a package
and allows you to create a more descriptive title for the version than just a number.
b. Enter a Version Number, such as 1.0. For more information on versions, see Upgrading Your App on page 251.
c. Select a Release Type of Managed - Released.
d. Change the Description, if necessary.
e. Optionally, specify a link to release notes for the package. Click URL and enter the details in the text field that appears. This link
will be displayed during the installation process, and on the Package Details page after installation.
Note: As a best practice, this should point to an external URL, so you can make the information available to customers
in advance of the release, and update it independently of the package.
f. Optionally, specify a link to post install instructions for the package. Click URL or Visualforce page and enter the details in the
text field that appears. This link will be displayed on the Package Details page after installation.
104
Create and Upload a Managed PackagePackaging and Testing Your App

Note: As a best practice, this should point to an external URL, so you can update the information independently of the
package.
g. Optionally, enter and confirm a password to share the package privately with anyone who has the password. Don't enter a
password if you want to make the package available to anyone on AppExchange and share your package publicly.
h. Salesforce automatically selects the requirements it finds. In addition, select any other required components from the Package
Requirements and Object Requirements sections to notify installers of any requirements for this package.
i. Click Upload.
7. Once your upload is complete, you can do any of the following.
•Click Change Password link to change the password option.
•Click Deprecate to prevent new installations of this package while allowing existing installations to continue operating.
Note: You cannot deprecate the most recent version of a managed package.
When you deprecate a package, remember to remove it from AppExchange as well. See “Removing Apps from AppExchange”
in the AppExchange online help.
•Click Undeprecate to make a deprecated version available for installation again.
You will receive an email that includes an installation link when your package has been uploaded successfully.
Note:
•When using the install URL, the old installer is displayed by default. You can customize the installation behavior by modifying
the installation URL you provide your customers.
–To access the new installer, append the text &newui=1 to the installation URL.
–To access the new installer with the "All Users" option selected by default, append the additional text &p1=full to the
installation URL.
•If you uploaded from your Salesforce production organization, notify installers who want to install it in a sandbox organization
to replace the “login.salesforce.com” portion of the installation URL with “test.salesforce.com.”
View Package Details
From Setup, enter Packages in the Quick Find box, then select Packages. Click the name of a package to view its details,
including added components, whether it’s a managed package, whether the package has been uploaded, and so on.
The detail page has the following sections:
•Package Details on page 106
•Components on page 107
•Versions on page 107
•Patch Organizations on page 108
From the Package Detail page, you can do any of the following:
•Click Edit to change the package name, custom link that displays when users click Configure, or description.
•Click Delete to delete the package. This does not delete the components contained in the package but the components will no
longer be bundled together within this package.
•Click Upload to upload the package. You will receive an email when the upload is complete.
105
View Package DetailsPackaging and Testing Your App
•Optionally, you can enable, disable, or change the dynamic Apex and API access that components in the package have to standard
objects in the installing organization by using the links next to API Access.
Viewing Package Details
For package developers, the package detail section displays the following package attributes (in alphabetical order):
DescriptionAttribute
The type of access that the API and dynamic Apex that package
components have. The default setting is Unrestricted, which
API Access
means that all package components that access the API have the
same access as the user who is logged in. Click Enable Restrictions
or Disable Restrictions to change the API and dynamic Apex
access permissions for a package.
The name of the developer that created this package, including
the date and time.
Created By
A detailed description of the package.Description
The language used for the labels on components. The default value
is your user language.
Language
The name of the last user to modify this package, including the
date and time.
Last Modified By
The username of the person who should receive an email
notification if an exception occurs in Apex that is not caught by
Notify on Apex Error
the code. If you don’t specify a username, all uncaught exceptions
generate an email notification that is sent to Salesforce. This is only
available for managed packages.
Note: Apex can only be packaged from Developer,
Enterprise, Unlimited, and Performance Edition
organizations.
The email address of the person who receives an email notification
if an error occurs when a subscriber’s attempt to install, upgrade,
Notify on Packaging Error
or uninstall a packaged app fails. This field appears only if packaging
error notifications are enabled. To enable notifications, contact
your Salesforce representative.
The name of the package, given by the publisher.Package Name
The Apex code that runs after this package is installed or upgraded.
For more information, see Running Apex on Package
Install/Upgrade on page 113.
Post Install Script
Indicates whether this is a managed or unmanaged package.Type
The Apex code that runs after this package is uninstalled. For more
information, see Running Apex on Package Uninstall on page 117.
Uninstall Script
106
View Package DetailsPackaging and Testing Your App
Viewing Package Components
For package developers, the Components tab lists every package component contained in the package, including the name and type
of each component.
Click Add to add components to the package.
Note: Some related components are automatically included in the package even though they may not display in the Package
Components list. For example, when you add a custom object to a package, its custom fields, page layouts, and relationships with
standard objects are automatically included. For a complete list of components SalesforceSalesforce automatically includes, see
Components Automatically Added on page 35.
Click View Dependencies to review a list of components that rely on other components, permissions, or preferences within the package.
An entity may include such things as an s-control, a standard or custom field, or an organization-wide setting like multicurrency. Your
package cannot be installed unless the installer has the listed components enabled or installed. For more information on dependencies,
see Understanding Dependencies on page 47. Click Back to Package to return to the Package detail page.
Click View Deleted Components to see which components were deleted from the package across all of its versions.
Viewing Version History
For package developers, the Versions tab lists all the previous uploads of a package.
Click Push Upgrades to automatically upgrade subscribers to a specific version.
Click the Version Number of any listed uploads to manage that upload. For more information, see Managing Versions on page 263.
Note: Push Upgrades is available for patches and major upgrades. Registered ISV partners can request Push Major Upgrade
functionality by logging a case in the Partner Community.
The versions table displays the following package attributes (in alphabetical order):
DescriptionAttribute
Lists the actions you can perform on the package. The possible
actions are:
Action
•Deprecate: Deprecates a package version.
Warning: Users will no longer be able to download
or install this package. However, existing installations
will continue to work.
•Undeprecate: Enables a package version to be installed by
users once again.
The status of the package. The possible statuses are:Status
•Released: The package is Managed - Released.
•Beta: The package is Managed - Beta.
•Deprecated: The package version is deprecated.
The version name for this package version. The version name is
the marketing name for a specific release of a package. It is more
descriptive than the Version Number.
Version Name
107
View Package DetailsPackaging and Testing Your App
DescriptionAttribute
The version number for the latest installed package version. The
format is majorNumber.minorNumber.patchNumber,
Version Number
such as 2.1.3. The version number represents a release of a package.
The Version Name is a more descriptive name for the release.
The patchNumber is generated only when you create a patch.
If there is no patchNumber, it is assumed to be zero (0).
Viewing Patch Development Organizations
Every patch is developed in a patch development organization, which is the organization where patch versions are developed, maintained,
and uploaded. To start developing a patch, you need to create a patch development organization. To do this, see Creating and Uploading
Patches on page 253. Patch development organizations are necessary to permit developers to make changes to existing components
without causing incompatibilities between existing subscriber installations. Click New to create a new patch for this package.
The Patch Organizations table lists all the patch development organizations created. It lists the following attributes (in alphabetical order):
DescriptionAttribute
Lists the actions you can perform on a patch development
organization. The possible actions are:
Action
•Login: Log in to your patch development organization.
•Reset: Emails a new temporary password for your patch
development organization.
The login associated with the patch organization.Administrator Username
The package version number that you are patching.Patching Major Release
Installing a Package
During the development and testing cycle, you might need to periodically install and uninstall packages before you install the next beta.
Follow these steps to install a package.
Pre-Installation
1. In a browser, type in the installation URL you received when you uploaded the package.
2. Enter your username and password for the Salesforce organization in which you want to install the package, and then click the login
button.
3. If the package is password-protected, enter the password you received from the publisher.
Default Installation
Click Install. You’ll see a message that describes the progress and a confirmation message after the installation is complete.
108
Installing a PackagePackaging and Testing Your App

Custom Installation
Follow these steps if you need to modify the default settings, as an administrator.
1. Choose one or more of these options, as appropriate.
•Click View Components. You’ll see an overlay with a list of components in the package. For managed packages, the screen
also contains a list of connected apps (trusted applications that are granted access to a user's Salesforce data after the user and
the application are verified). Review the list to confirm that the components and any connected apps shown are acceptable,
and then close the overlay.
Note: Some package items, such as validation rules, record types, or custom settings might not appear in the Package
Components list but are included in the package and installed with the other items. If there are no items in the Package
Components list, the package might contain only minor changes.
•If the package contains a remote site setting, you must approve access to websites outside of Salesforce. The dialog box lists all
the websites that the package communicates with. We recommend that a website uses SSL (secure sockets layer) for transmitting
data. After you verify that the websites are safe, select Yes, grant access to these third-party websites and click Continue,
or click Cancel to cancel the installation of the package.
Warning: By installing remote site settings, you’re allowing the package to transmit data to and from a third-party website.
Before using the package, contact the publisher to understand what data is transmitted and how it's used. If you have an
internal security contact, ask the contact to review the application so that you understand its impact before use.
•Click API Access. You’ll see an overlay with a list of the API access settings that package components have been granted. Review
the settings to verify they’re acceptable, and then close the overlay to return to the installer screen.
•In Enterprise, Performance, Unlimited, and Developer Editions, choose one of the following security options.
Note: Depending on the type of installation, you might not see this option. For example, in Group and Professional
Editions, or if the package doesn’t contain a custom object, Salesforce skips this option, which gives all users full access.
Install for Admins Only
Specifies the following settings on the installing administrator’s profile and any profile with the "Customize Application"
permission.
–Object permissions—“Read,” “Create,” “Edit,” “Delete,” “View All,” and “Modify All” enabled
–Field-level security—set to visible and editable for all fields
–Apex classes—enabled
–Visualforce pages—enabled
–App settings—enabled
–Tab settings—determined by the package creator
–Page layout settings—determined by the package creator
–Record Type settings—determined by the package creator
After installation, if you have Enterprise, Performance, Unlimited, or Developer Edition, set the appropriate user and object
permissions on custom profiles as needed.
Install for All Users
Specifies the following settings on all internal custom profiles.
–Object permissions—“Read,” “Create,” “Edit,” and “Delete” enabled
–Field-level security—set to visible and editable for all fields
–Apex classes—enabled
109
Installing a PackagePackaging and Testing Your App

–Visualforce pages—enabled
–App settings—enabled
–Tab settings—determined by the package creator
–Page layout settings—determined by the package creator
–Record Type settings—determined by the package creator
Note: The Customer Portal User, Customer Portal Manager, High Volume Customer Portal, Authenticated Website,
Partner User, and standard profiles receive no access.
Install for Specific Profiles...
Enables you to choose the usage access for all custom profiles in your organization. You can set each profile to have full
access or no access for the new package and all its components.
–Full Access—Specifies the following settings for each profile.
•Object permissions—“Read,” “Create,” “Edit,” “Delete,” “View All,” and “Modify All” enabled
•Field-level security—set to visible and editable for all fields
•Apex classes—enabled
•Visualforce pages—enabled
•App settings—enabled
•Tab settings—determined by the package creator
•Page layout settings—determined by the package creator
•Record Type settings—determined by the package creator
–No Access—Specifies the same settings as Full Access, except all object permissions are disabled.
You might see other options if the publisher has included settings for custom profiles. You can incorporate the settings of
the publisher’s custom profiles into your profiles without affecting your settings. Choose the name of the profile settings in
the drop-down list next to the profile that you need to apply them to. The current settings in that profile remain intact.
Alternatively, click Set All next to an access level to give this setting to all user profiles.
2. Click Install. You’ll see a message that describes the progress and a confirmation message after the installation is complete.
Post-Installation Steps
If the package includes post-installation instructions, they’re displayed after the installation is completed. Review and follow the instructions
provided. In addition, before you deploy the package to your users, make any necessary changes for your implementation. Depending
on the contents of the package, you might need to perform some of the following customization steps.
•If the package includes permission sets, assign the included permission sets to your users who need them. In managed packages,
you can't make changes to permission sets that are included in the package, but subsequent upgrades happen automatically. If you
clone a permission set that comes with a managed package or create your own, you can make changes to the permission set, but
subsequent upgrades won't affect it.
•If you’re re-installing a package and need to re-import the package data by using the export file that you received after uninstalling,
see Importing Package Data.
•If you installed a managed package, click Manage Licenses to assign licenses to users.
Note: You can’t assign licenses in Lightning Experience. If you need to assign a license, switch to Salesforce Classic.
•Configure components in the package as required. For more information, see Configuring Installed Packages.
110
Installing a PackagePackaging and Testing Your App

Component Availability After Deployment
Many components have an Is Deployed attribute that controls whether they are available for end users. After installation, all components
are immediately available if they were available in the developer's organization.
For tips on customizing the installed package and components, see Configuring Installed Packages. Installed packages are available to
users in your organization with the appropriate permissions and page layout settings.
Uninstalling a Package
To remove a package:
1. From Setup, enter Installed in the Quick Find box, then select Installed Packages.
2. Click Uninstall next to the package that you want to remove.
3. Select Yes, I want to uninstall... and click Uninstall.
4. After an uninstall, Salesforce automatically creates an export file containing the package data, as well as any associated notes and
attachments. When the uninstall is complete, Salesforce sends an email containing a link to the export file to the user performing
the uninstall. The export file and related notes and attachments are listed below the list of installed packages. We recommend storing
the file elsewhere because it’s only available for a limited period of time after the uninstall completes.
Tip: If you reinstall the package later and want to reimport the package data, see Importing Package Data.
When you uninstall packages, consider the following:
•If you’re uninstalling a package that includes a custom object, all components on that custom object are also deleted. This includes
custom fields, validation rules, s-controls, custom buttons and links, as well as workflow rules and approval processes.
•You can’t uninstall a package whenever any component in the package is referenced by a component that will not get included in
the uninstall. For example:
–When an installed package includes any component on a standard object that another component references, Salesforce prevents
you from uninstalling the package. This means that you can install a package that includes a custom user field and build a
workflow rule that gets triggered when the value of that field is a specific value. Uninstalling the package would prevent your
workflow from working.
–When you have installed two unrelated packages that each include a custom object and one custom object component references
a component in the other, Salesforce prevents you from uninstalling the package. This means that you can install an expense
report app that includes a custom user field and create a validation rule on another installed custom object that references that
custom user field. However, uninstalling the expense report app prevents the validation rule from working.
–When an installed folder contains components you added after installation, Salesforce prevents you from uninstalling the package.
–When an installed letterhead is used for an email template you added after installation, Salesforce prevents you from uninstalling
the package.
•You can’t uninstall a package if a field added by the package is being updated by a background job, such as an update to a roll-up
summary field. Wait until the background job finishes, and try again.
•Uninstall export files contain custom app data for your package, excluding some components, such as documents and formula field
values.
111
Component Availability After DeploymentPackaging and Testing Your App

Installing Managed Packages using the API
You can install, upgrade, and uninstall managed packages using the API, instead of the user interface. Automating these repeated tasks
can help you can work more efficiently and to speed up application development.
To install, upgrade, or uninstall a package, use the standard Metadata API deploy() call with the InstalledPackage metadata
type. The following operations are supported.
•Deploying an InstalledPackage installs the package in the deploying organization.
•Deploying a newer version of a currently installed package upgrades the package.
•Deploying an InstalledPackage using a manifest called destructiveChanges.xml, instead of package.xml,
uninstalls it from the organization.
Note: You can’t deploy a package along with other metadata types. Hence, InstalledPackage must be the only metadata
type specified in the manifest file.
This is a typical project manifest (package.xml) for installing a package. The manifest must not contain a fullName or
namespacePrefix element.
<?xml version="1.0" encoding="UTF-8"?>
<Package xmlns="http://soap.sforce.com/2006/04/metadata">
<types>
<members>*</members>
<name>InstalledPackage</name>
</types>
<version>28.0</version>
</Package>
The package is specified in a file called MyNamespace.installedPackage, where MyNamespace is the namespace prefix of
the package. The file must be in a directory called installedPackages, and its contents must have this format.
<?xml version="1.0" encoding="UTF-8"?>
<InstalledPackage xmlns="http://soap.sforce.com/2006/04/metadata">
<versionNumber>1.0</versionNumber>
<password>optional_password</password>
</InstalledPackage>
To uninstall a package, deploy this destructiveChanges.xml manifest file in addition to the package.xml file.
<?xml version="1.0" encoding="UTF-8"?>
<Package xmlns="http://soap.sforce.com/2006/04/metadata">
<types>
<members>MyNamespace</members>
<name>InstalledPackage</name>
</types>
</Package>
Retrieving an InstalledPackage, using the retrieve() call creates an XML representation of the package installed in an
organization. If the installed package has a password, the password isn’t retrieved. Deploying the retrieved file in a different organization
installs the package in that organization.
For more information on the deploy() and retrieve() commands, see the Metadata API Developer’s Guide.
112
Installing Managed Packages using the APIPackaging and Testing Your App

Resolving Apex Test Failures
EDITIONS
Available in: Salesforce
Classic
Available in: Developer
Edition
Package installs or upgrades may fail for not passing Apex test coverage. However, some of these
failures can be ignored. For example, a developer might write an Apex test that makes assumptions
about a subscriber's data.
If you're a subscriber whose installation is failing due to an Apex test, contact the developer of the
package for help.
If you're a developer and an install fails due to an Apex test failure, check for the following:
•Make sure that you are staging all necessary data required for your Apex test, instead of relying
on subscriber data that exists.
•If a subscriber creates a validation rule, required field, or trigger on an object referenced by your package, your test might fail if it
performs DML on this object. If this object is created only for testing purposes and never at runtime, and the creation fails due to
these conflicts, you might be safe to ignore the error and continue the test. Otherwise, contact the customer and determine the
impact.
Running Apex on Package Install/Upgrade
App developers can specify an Apex script to run automatically after a subscriber installs or upgrades a managed package. This makes
it possible to customize the package install or upgrade, based on details of the subscriber’s organization. For instance, you can use the
script to populate custom settings, create sample data, send an email to the installer, notify an external system, or kick off a batch
operation to populate a new field across a large set of data. For simplicity, you can only specify one post install script. It must be an Apex
class that is a member of the package.
The post install script is invoked after tests have been run, and is subject to default governor limits. It runs as a special system user that
represents your package, so all operations performed by the script appear to be done by your package. You can access this user by using
UserInfo. You will only see this user at runtime, not while running tests.
If the script fails, the install/upgrade is aborted. Any errors in the script are emailed to the user specified in the Notify on Apex Error
field of the package. If no user is specified, the install/upgrade details will be unavailable.
The post install script has the following additional properties.
•It can initiate batch, scheduled, and future jobs.
•It can’t access Session IDs.
•It can only perform callouts using an async operation. The callout occurs after the script is run and the install is complete and
committed.
Note: You can’t run a post install script in a new trial organization provisioned using Trialforce. The script only runs when a
subscriber installs your package in an existing organization.
How does a Post Install Script Work?
Example of a Post Install Script
Specifying a Post Install Script
113
Resolving Apex Test FailuresPackaging and Testing Your App

How does a Post Install Script Work?
A post install script is an Apex class that implements the InstallHandler interface. This interface has a single method called
onInstall that specifies the actions to be performed on installation.
global interface InstallHandler {
void onInstall(InstallContext context)
}
The onInstall method takes a context object as its argument, which provides the following information.
•The org ID of the organization in which the installation takes place.
•The user ID of the user who initiated the installation.
•The version number of the previously installed package (specified using the Version class). This is always a three-part number,
such as 1.2.0.
•Whether the installation is an upgrade.
•Whether the installation is a push.
The context argument is an object whose type is the InstallContext interface. This interface is automatically implemented by
the system. The following definition of the InstallContext interface shows the methods you can call on the context argument.
global interface InstallContext {
ID organizationId();
ID installerId();
Boolean isUpgrade();
Boolean isPush();
Version previousVersion();
}
Version Methods and Class
You can use the methods in the System.Version class to get the version of a managed package and to compare package versions.
A package version is a number that identifies the set of components uploaded in a package. The version number has the format
majorNumber.minorNumber.patchNumber (for example, 2.1.3). The major and minor numbers increase to a chosen value
during every non-patch release. Major and minor number increases will always use a patch number of 0.
The following are instance methods for the System.Version class.
DescriptionReturn TypeArgumentsMethod
Compares the current version with the specified
version and returns one of the following values:
IntegerSystem.Version versioncompareTo
•Zero if the current package version is equal
to the specified package version
•An Integer value greater than zero if the
current package version is greater than the
specified package version
•An Integer value less than zero if the
current package version is less than the
specified package version
If a two-part version is being compared to a
three-part version, the patch number is ignored
114
How does a Post Install Script Work?Packaging and Testing Your App

DescriptionReturn TypeArgumentsMethod
and the comparison is based only on the major
and minor numbers.
Returns the major package version of the calling
code.
Integermajor
Returns the minor package version of the
calling code.
Integerminor
Returns the patch package version of the calling
code or null if there is no patch version.
Integerpatch
The System class contains two methods that you can use to specify conditional logic, so different package versions exhibit different
behavior.
•System.requestVersion: Returns a two-part version that contains the major and minor version numbers of a package. Using
this method, you can determine the version of an installed instance of your package from which the calling code is referencing your
package. Based on the version that the calling code has, you can customize the behavior of your package code.
•System.runAs(System.Version): Changes the current package version to the package version specified in the argument.
When a subscriber has installed multiple versions of your package and writes code that references Apex classes or triggers in your
package, they must select the version they are referencing. You can execute different code paths in your package’s Apex code based on
the version setting of the calling Apex code making the reference. You can determine the calling code’s package version setting by
calling the System.requestVersion method in the package code.
Example of a Post Install Script
The following sample post install script performs these actions on package install/upgrade.
•If the previous version is null, that is, the package is being installed for the first time, the script:
–Creates a new Account called “Newco” and verifies that it was created.
–Creates a new instance of the custom object Survey, called “Client Satisfaction Survey”.
–Sends an email message to the subscriber confirming installation of the package.
•If the previous version is 1.0, the script creates a new instance of Survey called “Upgrading from Version 1.0”.
•If the package is an upgrade, the script creates a new instance of Survey called “Sample Survey during Upgrade”.
•If the upgrade is being pushed, the script creates a new instance of Survey called “Sample Survey during Push”.
global class PostInstallClass implements InstallHandler {
global void onInstall(InstallContext context) {
if(context.previousVersion() == null) {
Account a = new Account(name='Newco');
insert(a);
Survey__c obj = new Survey__c(name='Client Satisfaction Survey');
insert obj;
User u = [Select Id, Email from User where Id =:context.installerID()];
String toAddress= u.Email;
115
Example of a Post Install ScriptPackaging and Testing Your App

String[] toAddresses = new String[]{toAddress};
Messaging.SingleEmailMessage mail =
new Messaging.SingleEmailMessage();
mail.setToAddresses(toAddresses);
mail.setReplyTo('support@package.dev');
mail.setSenderDisplayName('My Package Support');
mail.setSubject('Package install successful');
mail.setPlainTextBody('Thanks for installing the package.');
Messaging.sendEmail(new Messaging.Email[] { mail });
}
else
if(context.previousVersion().compareTo(new Version(1,0)) == 0) {
Survey__c obj = new Survey__c(name='Upgrading from Version 1.0');
insert(obj);
}
if(context.isUpgrade()) {
Survey__c obj = new Survey__c(name='Sample Survey during Upgrade');
insert obj;
}
if(context.isPush()) {
Survey__c obj = new Survey__c(name='Sample Survey during Push');
insert obj;
}
}
}
You can test a post install script using the new testInstall method of the Test class. This method takes the following arguments.
•A class that implements the InstallHandler interface.
•A Version object that specifies the version number of the existing package.
•An optional Boolean value that is true if the installation is a push. The default is false.
This sample shows how to test a post install script implemented in the PostInstallClass Apex class.
@isTest
static void testInstallScript() {
PostInstallClass postinstall = new PostInstallClass();
Test.testInstall(postinstall, null);
Test.testInstall(postinstall, new Version(1,0), true);
List<Account> a = [Select id, name from Account where name ='Newco'];
System.assertEquals(a.size(), 1, 'Account not found');
}
Specifying a Post Install Script
Once you have created and tested the post install script, you can specify it in the Post Install Script lookup field on the Package Detail
page. In subsequent patch releases, you can change the contents of the script but not the Apex class.
The class selection is also available via the Metadata API as Package.postInstallClass. This is represented in package.xml as
a <postInstallClass>foo</postInstallClass> element.
116
Specifying a Post Install ScriptPackaging and Testing Your App

Running Apex on Package Uninstall
App developers can specify an Apex script to run automatically after a subscriber uninstalls a managed package. This makes it possible
to perform cleanup and notification tasks based on details of the subscriber’s organization. For simplicity, you can only specify one
uninstall script. It must be an Apex class that is a member of the package.
The uninstall script is subject to default governor limits. It runs as a special system user that represents your package, so all operations
performed by the script will appear to be done by your package. You can access this user by using UserInfo. You will only see this user
at runtime, not while running tests.
If the script fails, the uninstall continues but none of the changes performed by the script are committed. Any errors in the script are
emailed to the user specified in the Notify on Apex Error field of the package. If no user is specified, the uninstall details will be
unavailable.
The uninstall script has the following restrictions. You can’t use it to initiate batch, scheduled, and future jobs, to access Session IDs, or
to perform callouts.
How does an Uninstall Script Work?
Example of an Uninstall Script
Specifying an Uninstall Script
How does an Uninstall Script Work?
An uninstall script is an Apex class that implements the UninstallHandler interface. This interface has a single method called
onUninstall that specifies the actions to be performed on uninstall.
global interface UninstallHandler {
void onUninstall(UninstallContext context)
}
The onUninstall method takes a context object as its argument, which provides the following information.
•The org ID of the organization in which the uninstall takes place.
•The user ID of the user who initiated the uninstall.
The context argument is an object whose type is the UninstallContext interface. This interface is automatically implemented
by the system. The following definition of the UninstallContext interface shows the methods you can call on the context
argument.
global interface UninstallContext {
ID organizationId();
ID uninstallerId();
}
Example of an Uninstall Script
The sample uninstall script below performs the following actions on package uninstall.
•Inserts an entry in the feed describing which user did the uninstall and in which organization
117
Running Apex on Package UninstallPackaging and Testing Your App

•Creates and sends an email message confirming the uninstall to that user
global class UninstallClass implements UninstallHandler {
global void onUninstall(UninstallContext ctx) {
FeedItem feedPost = new FeedItem();
feedPost.parentId = ctx.uninstallerID();
feedPost.body = 'Thank you for using our application!';
insert feedPost;
User u = [Select Id, Email from User where Id =:ctx.uninstallerID()];
String toAddress= u.Email;
String[] toAddresses = new String[] {toAddress};
Messaging.SingleEmailMessage mail = new Messaging.SingleEmailMessage();
mail.setToAddresses(toAddresses);
mail.setReplyTo('support@package.dev');
mail.setSenderDisplayName('My Package Support');
mail.setSubject('Package uninstall successful');
mail.setPlainTextBody('Thanks for uninstalling the package.');
Messaging.sendEmail(new Messaging.Email[] { mail });
}
}
You can test an uninstall script using the testUninstall method of the Test class. This method takes as its argument a class
that implements the UninstallHandler interface.
This sample shows how to test an uninstall script implemented in the UninstallClass Apex class.
@isTest
static void testUninstallScript() {
Id UninstallerId = UserInfo.getUserId();
List<FeedItem> feedPostsBefore =
[SELECT Id FROM FeedItem WHERE parentId=:UninstallerId AND CreatedDate=TODAY];
Test.testUninstall(new UninstallClass());
List<FeedItem> feedPostsAfter =
[SELECT Id FROM FeedItem WHERE parentId=:UninstallerId AND CreatedDate=TODAY];
System.assertEquals(feedPostsBefore.size() + 1, feedPostsAfter.size(),
'Post to uninstaller failed.');
}
Specifying an Uninstall Script
Once you have created and tested the uninstall script and included it as a member of your package, you can specify it in the Uninstall
Script lookup field on the Package Detail page. In subsequent patch releases, you can change the contents of the script but not the
Apex class.
The class selection is also available via the Metadata API as Package.uninstallClass. This is represented in package.xml as an
<uninstallClass>foo</uninstallClass> element.
118
Specifying an Uninstall ScriptPackaging and Testing Your App
Publishing Extensions to Managed Packages
EDITIONS
Available in: Salesforce
Classic
Available in: Group,
Professional, Enterprise,
Performance, Unlimited,
and Developer Editions
USER PERMISSIONS
To create packages:
•“Create AppExchange
Packages”
To upload packages:
•“Upload AppExchange
Packages”
An extension is any package, component, or set of components that adds to the functionality of a
managed package. An extension requires that the base managed package be installed in the
organization. For example, if you have built a recruiting app, an extension to this app might include
a component for performing background checks on candidates.
The community of developers, users, and visionaries building and publishing apps on Force.com
AppExchange is part of what makes Force.com such a rich development platform. Use this
community to build extensions to other apps and encourage them to build extensions to your
apps.
To publish extensions to a managed package:
1. Install the base package in the Salesforce organization that you plan to use to upload the
extension.
2. Build your extension components.
Note: To build an extension, install the base package and include a dependency to that
base package in your package. The extension attribute will automatically become active.
3. Create a new package and add your extension components. Salesforce automatically includes
some related components.
4. Upload the new package that contains the extension components.
5. Proceed with the publishing process as usual. For information on creating a test drive or registering and publishing your app, go to
http://sites.force.com/appexchange/publisherHome.
Note: Packages cannot be upgraded to Managed - Beta if they are used within the same organization as an extension.
119
Publishing Extensions to Managed PackagesPackaging and Testing Your App

CHAPTER 5 Passing the Security Review
We want Force.com to be a safe and reliable platform for our customer’s core business applications. To
promote trust, all apps and components that are distributed to customers undergo a comprehensive
In this chapter ...
•Security Review security review. Your offering must meet or exceed the requirements set by our security review team
before it can be distributed. After approval, apps and components are also periodically retested.
•Security Review Steps
•Security Review
Wizard
These guidelines and tasks will help you make sure that your offering passes the security review.
•Submit a Client or
Mobile App for
Security Review
•Submit an Extension
Package for Security
Review
•Security Review
Resources
•Security Review FAQ
120
Security Review
The security review ensures that the app or component you publish on the AppExchange meets industry best security standards. For
the latest information on the security review, visit: http://p.force.com/security.
The AppExchange security review:
•Assures customers that your app or component works securely with Salesforce.
•Helps you deliver apps and components that span multiple systems and meet the needs of AppExchange customers.
•Allows Salesforce to facilitate open relationships between customers, developers, and providers by providing a secure ecosystem.
The scope of the security review depends on the type of offering.
Scope of ReviewDescriptionType
Offerings where the data, logic, and user interface is
built entirely on the Force.com platform.
Force.com •Automated code scan
•Manual code review and black-box testing
•Client-side components (Flash, JavaScript)
•Integrations and web services
Offerings that run outside of the Salesforce
environment. It treats the Force.com platform as a
Client and Mobile Apps •Manual hands-on testing
•Integrations and web services
data source, using the development model of the
•Architecture review and web server testing
tool and platform for which it’s designed. Examples
include iPhone apps and Microsoft Outlook
connectors.
Offerings that run in a third-party hosted
environment and integrate with Salesforce,
Web Apps •Automated testing and manual black-box
testing
leveraging the Force.com Web-services API. The data, •Client-side components (Flash, JavaScript)
logic, and user interface can be stored outside of
Force.com. •Integrations and web services
•Architecture review and web server testing
Security Review Steps
Follow these steps to have your offering reviewed for security compliance.
1. Prepare for the security review.
•Read the security guidelines.
•Review the preparation tips found at http://p.force.com/security.
•Review the free resources listed on our Secure Cloud Development site.
•Review the Requirements Checklist.
•Review the OWASP Top Ten Checklist.
•Run a free self-service source code analysis against code developed on the Force.com platform.
•Run a web-application scan against your external web application that is integrated with Force.com.
121
Security ReviewPassing the Security Review

•Manually test your offering to ensure that it meets review requirements not found by tools. For details, see the OWASP Testing
Guide.
•Fix any issues found during testing.
In general, be as thorough as you can in your testing. During the development phase of your app or component, run the code
scanner several times to avoid fixing issues at the end. If you have questions, schedule office hours with the security review team at:
http://security.force.com/security/contact/ohours.
2. Initiate the security review.
Note: Before you initiate the security review, configure a test environment that Salesforce can use to test your offering. For
information about setting up a test environment, see Required Testing Information for the ISV Security Review.
a. Log in to the Partner Community.
b. Open the security review wizard.
•If your offering is a managed package, launch the wizard as follows.
a. On the Publishing page, click the Packages tab.
b. Find the offering that you want to submit and click Start Review.
•If your have an API-only offering, launch the wizard as follows.
a. On the Publishing page, click the Listings tab.
b. Find the offering that you want to submit and click it to open the AppExchange publishing console.
c. Click the App tab and choose the API-only option.
d. Click Start Security Review.
c. Follow the steps outlined in the security review wizard, which guides you through the rest of the submission.
d. If this is a paid offering, pay the annual listing fee and the one-time security review fee. If your app or component is free, these
fees are waived.
After you submit your package, the security review team runs tests to identify potential vulnerabilities. If necessary, they will contact
you to discuss their findings. The review team performs both application and network security testing and sends you the results.
3. Review the results. There are three possible outcomes.
•Approved—You can list your app or component on the AppExchange and distribute it to customers immediately.
•Provisional Pass—The security review team identified low- or medium-risk issues that can be addressed easily and do not
pose significant risks. You can create a public listing for your offering on the AppExchange and distribute it to customers. If you
don’t fix the issues identified within the specified time period, your app or component is removed from the AppExchange.
•Not Approved—The security review team identified high-risk issues during the testing phase. You can’t list your offering on
the AppExchange or distribute it to customers until all issues have been addressed and your offering has been reviewed again.
If the app or component is already listed on the AppExchange, you must address the issues within 60 days. Because the security
review is a black-box, time-limited process, we can’t list every instance in which a particular issue occurred. Interpret these
findings as representative examples of the types of issues you must fix across the offering.
Key Steps to Follow after Passing the Security Review
When you have passed the security review, you can:
•List your offering publicly on the AppExchange and distribute it to customers.
•Request API access for your offering in Professional and Group Editions.
122
Security Review StepsPassing the Security Review
Important: Salesforce reserves the right to conduct periodic reviews of all offerings. If we find that the app or component doesn’t
meet our security requirements, we notify you and provide time to remedy the issue. In extreme cases, we pull the AppExchange
listing from public viewing. In this case, you must cease distribution of your offering.
Security Review Wizard
Use the online security review wizard to submit information about your offering to Salesforce for testing. The wizard is comprehensive,
so give yourself plenty of time to respond to the questions. Be as thorough as you can, and remember that your responses are saved as
you go—you can always return later to complete the process. The more information you provide, the faster we can test and approve
your app or component.
The wizard consists of a series of screens that guide you through the information required.
1. Preparation
View tips and links to resources to help you prepare for the security review.
2. General Information
Add information for the person at your company who we can contact with security-related questions.
3. Policies and Certifications
Attach your company’s information security policy and certifications that you’ve earned. For example, ISO 27001.
4. Components
List the technologies used by your app or component. You can select relevant items in a checklist based on the type. Examples
include:
•Force.com — Apex, Visualforce, API, SSO
•Web app — frameworks and languages (Java, .NET, Rails, SSO, Heroku, and so on)
•Client app — desktop app, browser plug-in, Salesforce CTI toolkit implementation
•Mobile app — iOS, Android, BlackBerry, Windows
5. Test Environments
Provide fully configured environments for testing, including login credentials, install links, and sample data.
•Force.com — usernames and passwords for all user levels (admin, end user, and so on) in a test organization
•Web app — URLs, usernames, and passwords for all user levels, API keys, SSO, and OAuth/SAML settings
•Client app — install URLs, configuration data and instructions, required license files, associated sample data, config guides,
credentials
•Mobile app — separate install link for each type of mobile app
6. Reports
Upload reports from your testing.
•Force.com — Security Code Scanner report
Note: Makes sure that the code scanner results are clean. If you’re aware of issues in the scanner report that are false
positives, provide the details.
•Web — Web App Scanner report
•Other — any other reports or documentation that you want to provide
7. Review Details
Review a summary of the information you’ve provided to verify that your submission is correct and complete. If there’s something
you’d like to change, you can modify it.
123
Security Review WizardPassing the Security Review
8. Payment
Pay for the security review using Recurly. Salesforce saves your payment information, so you only need to provide it once. If your
app or component is free, no payment is required.
Important: If you’ve already paid the security review fee for your offering, you aren’t charged again. However, you’re still
asked to confirm the payment information every time you run the security review wizard.
Submit a Client or Mobile App for Security Review
Most of the client app requirements, and some of the web app requirements, apply to mobile apps. Here are typical scenarios:
•The mobile app has a Force.com component that sits on the customer’s organization. The Force.com component is a managed
package and follows the security review process for a packaged app.
•The client app only uses APIs for communicating with Salesforce. In this case, follow the process for an API-only app for security
review.
For testing, we ask that you provision us an app for all the platforms that you plan to distribute. We can accept a test flight or an ad hoc
deployment for iOS. For other platforms, we can accept the app in a file (APK, COR, and so on). Similar to a composite app, if there are
callouts to anything other than Salesforce, we ask for a web application scanner report. We accept Zed Attack Proxy (ZAP) and Burp
reports. If the mobile app has a web component, even if it’s optional, Salesforce requires a web application scanner report.
Submit an Extension Package for Security Review
ISVs create extension packages when they want to provide add-on features to their apps. The extension packages also help when ISVs
want to support Salesforce editions like PE and GE with their app. Another use case is creating a "bridge" package that enables the ISV’s
app to work with another app.
All packages, whether base or extension, require a security review. The same process needs to be followed for review of an extension
package as for a base package.
Some extension packages are very small, for example, a few links or buttons to call base package components. Regardless of the size of
the extension package, the same process needs to be followed. The only difference is that the review process is faster for smaller packages.
The process for submitting an extension package for the security review is similar to that for the base package.
1. Upload your extension package (it should be managed-release like your base package). Of course, the extension package can only
be uploaded from an organization separate from that for the base package.
2. In your AppExchange listing, link the organization where the extension package was created. The extension package should appear
in the list of packages under your listings.
3. Initiate the security review. Make sure your test account includes both the base and extension packages.
It’s important that every extension package is reviewed and approved by the Salesforce security team. Even small packages can introduce
vulnerabilities to the platform. Follow the same process of doing a self-scan of the code before submitting for a review. If the extension
package has components that interface with an external application, run a web application scan, such as Zed Attack Proxy (ZAP) or Burp,
and submit the corresponding results.
Security Review Resources
These resources can help you prepare for the security review.
•Security Review Process
124
Submit a Client or Mobile App for Security ReviewPassing the Security Review

•Security Review Requirements Checklist
•Force.com Secure Cloud Development Resources
•Force.com Secure Coding Guidelines
•Open Web Application Security Project (OWASP)
•OWASP Top 10 Issues
•OWASP Testing Guide
•OWASP Secure Coding Guide
•OWASP Secure Coding Practices Quick Reference
Security Review FAQ
This section contains a list of frequently asked questions about the security review.
•Is an AppExchange security review required?
•What happens during a security review?
•Why do I need to have a security review?
•How long does the security review take? How often is it required?
•Is there a fee for the security review?
•Why do I have to test my offering before the review if the security team is going to test it anyway?
•What are the typical reasons why I would not pass the security review?
•Can I submit my offering before it’s complete to get the security review process done early?
•If I have any “No” responses in the security review wizard, or no formal and detailed documentation, do I fail the review?
•Why does the review team need to test the X or Y part of my offering?
•Do I have to fix all the issues that the security review team reported?
•Why can’t the review team send me every instance of every finding for my review?
•What happens after I pass the security review?
•What happens if my offering isn’t approved?
•What’s the difference between Approved, Provisional Pass, and Not Approved?
•When I update my offering, do I need to pay the security review fee again to have it reviewed?
•When I create a managed package to upgrade my offering, do I need to pay the security review fee again?
•Why perform periodic security reviews?
•How do reviewed solutions work with PE and GE organizations?
Is an AppExchange security review required?
Yes. Every app and component that is publicly listed on the AppExchange must pass a security review.
What happens during a security review?
The security review process includes two kinds of assessments:
•Qualitative—question and answer round-to-review policies and procedures
•Quantitative—network and application penetration tests (see Scope)
125
Security Review FAQPassing the Security Review
Why do I need to have a security review?
We want the AppExchange to be a trusted on-demand application ecosystem. The security review helps build this culture of trust by
ensuring that our offerings adhere to security standards and best practices. This review lends credibility to the AppExchange and, in
turn, helps increase customer adoption.
How long does the security review take? How often is it required?
The review process takes about 6–8 weeks, provided that:
•Your documentation is complete and accurate.
•The test environment is complete, fully configured, and includes all necessary information.
•You’ve met all the requirements.
•You’re within the agreement guidelines.
Periodically, we review apps or components again. The timeline varies depending on the security risk of the offering, but it’s usually
between six months and two years since the last review. Around the expiry date, Salesforce contacts you to arrange another review.
Is there a fee for the security review?
If your offering is paid, Salesforce charges a fee for the initial review, and a small annual fee for subsequent reviews. If your offering is
free, these fees are waived. Pricing information is available in the Partner Community.
Why do I have to test my offering before the review if the security team is
going to test it anyway?
By testing your offering before you submit, you’re more likely to pass the review on the first round. Applicants who don’t test beforehand
rarely pass and must resubmit after addressing security concerns. Resubmitting significantly delays the publishing process.
What are the typical reasons why I would not pass the security review?
In no particular order, here’s a list of the top reasons for not being approved. For more information, see OWASP Top 10.
•Injection (SQL, XML, and so on)
•Cross-site scripting
•Broken authentication and session management
•Insecure direct object references
•Cross-site request forgery
•Security misconfiguration
•Insecure cryptographic storage
•Failure to restrict URL access
•Insufficient transport layer protection
•Unvalidated redirects and forwards
126
Why do I need to have a security review?Passing the Security Review
Can I submit my offering before it’s complete to get the security review
process done early?
No. It’s important that the offering you submit is complete and the version that you intend to distribute. If the offering is not what you
intend to distribute or is incomplete, we can’t properly identify issues. We will need to review again, which delays your offering.
If I have any “No” responses in the security review wizard, or no formal
and detailed documentation, do I fail the review?
No. Although the questions ask for formal and detailed documentation, we understand that, depending on the size and maturity of your
company, this might not be possible. We designed the wizard to cover a broad spectrum of companies, from small to large. Smaller
companies can provide us with a checklist instead of formal documentation of their security policies. If you have to answer “No” to some
questions, use the comments box to explain. We understand that the scoring isn’t black and white, and we factor in elements like
company size and maturity to guide our decision-making.
Why does the review team need to test the X or Y part of my offering?
Our approach is to test all parts of the offering to ensure that our mutual customers and their data are not put at risk. This includes
external web applications or services that are required or optional, client/mobile applications that are required or optional, and all Apex
and Visualforce (packaged or unpackaged) that is included in the offering. If you’re not sure if you should include part of your offering,
include it anyway. The review team will not test parts of the offering that we determine are not in scope, but if a required part is not
included, your review will be delayed.
Do I have to fix all the issues that the security review team reported?
Yes. Unless otherwise noted on the test reports, you’re required to fix all classes of issues that the review team detected across the entire
app or component.
Why can’t the review team send me every instance of every finding for my
review?
The security review is a black-box, time-limited review, and it would be impractical to provide that information given the visibility and
time the review team has for each review. The findings should be interpreted as examples and all issues in the provided categories
should be fixed across the offering.
What happens after I pass the security review?
After you pass the security review, you can list your offering publicly on the AppExchange and distribute it to customers. If your app uses
the SOAP or REST APIs, you can request an API token at this time. You can only associate an approved package version with your public
listing. Every package version associated with a public listing must be submitted for security review.
If your offering passed the security review within the last year, the new version is auto-approved, and its status changes to Passed; the
status change can take up to 24 hours.
127
Can I submit my offering before it’s complete to get the
security review process done early?
Passing the Security Review
What happens if my offering isn’t approved?
If your offering isn’t approved, you must address the security review team’s findings and submit the app or component for a follow-up
review. When your offering is approved, you can publish on the AppExchange and distribute it to customers.
What’s the difference between Approved, Provisional Pass, and Not
Approved?
If you’re granted Approved or Provisional Pass on your security review, it means we didn’t find any high-risk vulnerabilities in your offering.
A Provisional Pass indicates that we likely found medium-risk vulnerabilities, and we work out a mutually acceptable timeline for you to
remedy these items. In the meantime, you can list your app or component on the AppExchange and distribute it to customers. For a
review that wasn’t approved, you must remedy the issues found before you can list your offering on the AppExchange or get access to
the API token.
When I update my offering, do I need to pay the security review fee again
to have it reviewed?
No. When you upload a new package version to the AppExchange and associate it with your listing, we run a source code analysis to
identify security vulnerabilities. This scan is included in the annual listing fee, so there is no extra charge. However, you are asked to
confirm your payment information when you run the security review wizard.
When I create a managed package to upgrade my offering, do I need to
pay the security review fee again?
No. If you developed the new version with a package that we’ve previously approved, it’s automatically approved when you submit it
for review. However, you are asked to confirm your payment information when you run the security review wizard.
Why perform periodic security reviews?
We require periodic security reviews for all apps and components published on the AppExchange. These reviews usually occur six months
to two years after the initial approval, depending on the risk of the offering. Periodic reviews ensure that upgraded apps and components
continue to meet security best practices and aren’t subject to the latest security vulnerabilities. We also update our review process so
that we’re aligned with industry requirements.
How do reviewed solutions work with PE and GE organizations?
Eligible partners can apply for access to the API in the Partner Community, which enables approved offerings to make API calls. If you’re
an eligible partner and have passed the security review, request API access by logging a case in the Partner Community. See Use of
ClientID for code examples.
128
What happens if my offering isn’t approved?Passing the Security Review

CHAPTER 6 Publish Your Offering on the AppExchange
The AppExchange publishing experience is managed from the Publishing page in the Partner Community.
From the Publishing page, you can:
In this chapter ...
•What Is the
AppExchange? •Create listings or edit existing ones
•Connect the organizations that contain your packaged app, component, or trial template
•Publish on the
AppExchange •Manage license settings or start the security review process
•View the analytics for your published listings
•Email Notifications
•AppExchange
Checkout
•Checkout
Management App
•Work with
AppExchange Leads
•Analytics Reports for
Publishers
•Update the Package
in an AppExchange
Listing
•AppExchange FAQ
129

What Is the AppExchange?
The AppExchange is an online marketplace for Salesforce apps, components, and consulting services. If you’re a Force.com developer
or consultant, the AppExchange is the gateway for connecting customers to your business solution. If you’re a Salesforce administrator
or user, visit the AppExchange to find tools and talent to unleash your company’s productivity.
How Does the AppExchange Work?
An AppExchange listing is your primary marketing tool for promoting your app or component. In the listing, you can describe your
solution, pricing, support, and other details so that customers can determine if your offering is right for them. You also have a chance
to upload videos, white papers, and other content to help customers understand what you are delivering. Based on the information you
provide, an AppExchange curator categorizes the listing into one or more business areas, like sales, marketing, or analytics.
After you’ve created a provider profile and uploaded your package, you can create a listing. You can create only one listing per app or
component. This approach has several advantages. As the provider, it’s easier to maintain and upgrade your offering over its lifecycle.
Having one listing also helps you achieve a higher ranking, because the metrics that the AppExchange uses to rank apps and components,
like page views, aren’t diluted across multiple listings. Customers benefit, too, because your offering is easier to find, all your reviews are
in one place, and there aren’t several similar listings to cause confusion.
Who Can Use the AppExchange?
Anyone can browse listings and test-drive apps or components. You need the “Download Packages” permission to install apps or
components. To create a package and upload it to the Partner Community, you must have “Create Packages” and “Upload Packages”
permissions. To create and publish a listing, you must have the “Manage Listings” permission.
Publish on the AppExchange
To publish an app, component, or consulting service on the AppExchange, follow these high-level steps.
1. If your listing is an app or component, connect your packaging organization to the AppExchange.
2. Create a provider profile.
3. Review tips for creating a listing that excites and engages customers.
4. Create the listing.
5. If your listing is an app or component, submit the package for security review.
6. After your app is approved, publish the listing on the AppExchange .
7. Review the analytics to see how your listing is performing.
Connect a Packaging Organization to the AppExchange
To publish a listing on the AppExchange, first connect the packaging organization, which is the organization that contains your packaged
app or component.
1. Log in to the Partner Community.
2. On the Publishing page, click the Organizations tab.
3. Click Connect Organization.
4. Enter the login credentials for the organization that contains the package you want to list.
130
What Is the AppExchange?Publish Your Offering on the AppExchange

5. Click Submit.
If the AppExchange finds any packages, they appear on the Packages tab on the Publishing page. From the Packages tab, create an
app or component listing, or begin the security review.
Create or Edit Your Provider Profile
A polished, accurate provider profile is a key part of establishing customer trust in your app, component, or consulting service. On your
profile, you can share a mission statement and tell customers where you’re located, how many employees you have, and so on. People
browsing listings see this information on the Provider tab.
To create or edit your profile, open the Publishing page in the Partner Community, and then go to the Company Info tab.
Create or Edit an AppExchange Listing
Market your app, component, or consulting service with an AppExchange listing. Create a listing or edit an existing one in the AppExchange
publishing console, which guides you through the process.
To create or edit a listing, open the Publishing page in the Partner Community, and then click the Listings tab.
Here are the tabs you navigate when creating or editing a listing.
Available on these listings types:What you do:Tab
App, Component, Consulting ServiceText •Describe your offering
•Provide contact information so that customers and
Salesforce can get in touch
App, Component, Consulting ServiceMedia •Add branding
•Upload images, videos, and other resources to help
customers understand your offering
AppApp •Upload the package that contains your app (or the link
to your app if you’re only using the Salesforce API)
ComponentComponent •Upload the package that contains your component
App, ComponentTrials •Set up a test drive or free trial so that customers can see
your offering in action
App, Component, Consulting ServiceLeads •Choose how Salesforce collects leads when customers
interact with the listing
App, ComponentPricing •Choose whether your offering is free or paid and provide
pricing information
Consulting ServiceService Offering •Choose listing categories, like services offered and
industry focus
131
Create or Edit Your Provider ProfilePublish Your Offering on the AppExchange

Make Your AppExchange Listing Effective
A great app, component, or consulting service deserves a listing to match. We gathered feedback from customers and Salesforce
marketing experts to provide a list of tips to make your listing stand out.
Tell Customers, Then Show Them
An effective listing combines concise, customer-oriented writing with compelling visuals. As you craft your listing, keep the following
tips in mind.
•Emphasize a use case—When customers read your listing, they want to understand the problem you’re solving, whether they’re
part of the target audience, and what makes your offering different. As you explain your solution, put things in terms the customer
cares about. For example, if your component helps support reps resolve cases 10% faster, say so.
•Add screenshots, videos, and demos—Customers are more likely to interact with listings that have visuals. Most people like to
at least see how something works before making a purchase.
•Make the listing easy to read—Like you, the typical AppExchange customer is busy. Help customers understand what’s important
by making your listing easy to read. Keep sentences short and use formatting, like bullets, to draw attention to key points. If you’ve
added screenshots or a video, use zooming and annotations to highlight features.
Aim for Clean and Simple Design
An effective listing tends to have a clean and simple design. When making design decisions, keep the following tips in mind.
•Find a design reference—Before you create a logo, banner, or other graphic, find a design that you like and think about what it
does well. For example, does it use a visually pleasing font? Keep these ideas in mind as you begin designing.
•Preview before publishing—The AppExchange lets you preview your listing before publishing, and you can see exactly how your
offering will appear to customers. Put yourself in the customer’s shoes and ask, “If I saw this listing, would I feel comfortable buying
this app or component?”
For more tips, see Partner Logo and Branding Usage Guidelines in the Education section of the Partner Community.
Choose an Installation Option
The easier it is for people to install your offering, the more likely it is they will become paying customers. Choose the installation option
that gives customers the best experience.
When to choose this:Option
If your offering is packaged, this option provides the simplest
installation experience. It allows people to install your offering into
Directly from the AppExchange
their Salesforce sandbox or production environment through the
AppExchange installation sequence without assistance from you.
This option is required for components and recommended for
apps.
If your app is a downloadable client or needs additional information
to be installed, this option is the best. After users click Get It Now
From your website
on your listing and agree to the terms and conditions, they are
directed to your website to complete the installation process. Make
sure that you’ve provided clear download instructions and
performed the required setup or configuration.
132
Make Your AppExchange Listing EffectivePublish Your Offering on the AppExchange
When to choose this:Option
If your installation or selection process requires your assistance,
you must choose this option. After agreeing to terms and
They should contact us to install it
conditions, the customer is told that you’ll be in touch shortly to
help with installation. Make sure that your company has the
resources to assist potential customers.
Register Your Package and Choose License Settings
If you register a package and set up the License Management App (LMA), you receive a license record each time a customer installs your
app or component. Licenses let you track who is using your app or component and for how long.
Note: Before you register a package, make sure that:
•Your app or component is in a managed package.
•You have installed the LMA. In most cases, the LMA is installed in your partner business organization.
1. Log in to the Partner Community.
2. On the Publishing page, click the Packages tab.
3. Click Manage Licenses next to the package that you want to register.
4. Click Register. Enter the login credentials for the organization where the LMA is installed. Usually, the organization is your partner
business organization.
5. Select whether your default license is Free Trial or Active.
6. If you selected a free-trial license, enter the length of the trial, up to 90 days.
7. Enter the number of seats associated with your default license, or select License is site-wide to offer the license to all users in the
installer’s organization.
8. Click Save.
Submit Your Listing for Security Review
To distribute your app or component to customers, or provide a free trial, you must pass the AppExchange security review. This review
ensures that your offering is safe for customers to install.
Important: You are contractually required to keep security review information current. For example, if you upgrade your component
to use a new web service, you must edit the information in your security review submission.
Submit an App or Component Listing for Review
1. Log in to the Partner Community.
2. On the Publishing page, click the Packages tab.
3. Find the package that you want to submit, and then click Start Review.
4. Follow the steps in the security review wizard to complete the submission.
Within two days, a member of the partner operations team will contact you with next steps.
133
Register Your Package and Choose License SettingsPublish Your Offering on the AppExchange

Submit a Trial Template for Review
Before you submit a trial template for security review, make sure that the packages that it contains have passed the security review.
1. Log in to the Partner Community.
2. On the Publishing page, click the Trial Templates tab.
3. Find the trial template that you want to submit, and then click Start Review.
4. Follow the on-screen prompts to create a profile in your trial organization that the security review team can use for testing. If you
already have a profile, click Skip to the next step.
5. Enter the login credentials for the test profile.
6. Click Submit Security Review.
Email Notifications
Installation Notification Emails
Salesforce emails your subscribers 30 days after they install your app or component. The email thanks subscribers and encourages them
to share their experiences with others by writing a review. We only send emails when:
•The subscriber has a valid email address.
•The subscriber hasn’t already received a notification.
•The subscriber hasn’t yet posted a review.
Review Notification Emails
When subscribers post reviews and comments on your listings, Salesforce emails parties who are likely to be interested. The notification
that subscribers receive depends on their role in the conversation (provider, author, or commenter).
DetailsSent toType of Email
Notification
Sent whenever someone posts a review of your listing.You, the providerNew Review on Your
Listing
Sent only if someone other than the review author comments on the review
and if the author has opted to receive email notifications on their profile. If the
The review authorNew Comment on Your
Review
author replies to the notification, the reply is posted as a new comment on the
review.
Sent to people who have commented on a review, are not the review author or
the author of this comment, and have opted to receive email notifications on
The people who
commented on the
review
Also Commented on the
Review
their profiles. At most, one email notification is sent to each commenter for each
new comment. If the person replies to the notification, the reply is posted as a
new comment on the review.
Sent whenever someone writes a new comment on a review of your listing.You, the providerNew Comment on the
Review of Your Listing
134
Email NotificationsPublish Your Offering on the AppExchange

AppExchange Checkout
AppExchange Checkout is the simple way to manage payments for your offering. Powered by Stripe, AppExchange Checkout lets
customers pay with a credit card, so buying is easy. Automatic integration with the License Management App (LMA) means that licenses
are always up to date. Plus, it's built to work with the Checkout Management App (CMA), which puts notifications and subscriber insights
in your partner business org.
Note: AppExchange Checkout is available in English only to eligible Salesforce partners. For more information on the Partner
Program, including eligibility requirements, visit https://partners.salesforce.com.
AppExchange Checkout is a full-featured payment solution that’s built to work with ISV tools like the LMA.
AppExchange Checkout provides:You want:
A robust payment platform, powered by Stripe. Stripe handles the entire purchase process,
from collecting payment information to processing charges. You can choose the pricing
A simple but flexible way to manage trials
and purchases
model that works best for you, including options for per-user and org-wide licensing. If
you want to help your offering get traction in the marketplace, take advantage of
integrated support for trials and coupons.
Built-in integration with the LMA, so you don’t have to update license settings manually
when customers upgrade, renew, or cancel.
Hassle-free licensing
Built-in integration with the CMA, so you can visualize revenue, subscription status, and
other data in a beautiful, customizable dashboard.
Insights about customers and prospects
As you consider using AppExchange Checkout, keep the following in mind.
•The fee to use AppExchange Checkout is 15% plus 30 cents per successful transaction. We don’t charge setup fees, monthly service
charges, or card storage fees. There’s also no minimum revenue share.
•You can’t accept payments from every country yet. For a list of supported countries, visit https://stripe.com/global. If your country
isn’t listed, sign up to be notified when Stripe is available there.
•You must distribute your offering as a managed package.
•You can’t use AppExchange Checkout with OEM apps.
Configure Stripe for AppExchange Checkout
Billing and subscriptions for AppExchange Checkout offerings are managed in Stripe. Stripe is a secure, no-touch payment platform
that lets you price offerings flexibly and lets customers purchase with a credit card, so buying is easy. Before you can use AppExchange
Checkout, create and activate a Stripe account. If you want to charge customers on a recurring basis for an offering—for example,
monthly—configure a subscription plan in Stripe.
Sell Using AppExchange Checkout
After Stripe is configured, you’re ready to sell with AppExchange Checkout. To start selling, go to a new or existing AppExchange
listing and choose a pricing model for your offering. If your customers live in regions that charge a Value Added Tax (VAT), configure
VAT for AppExchange Checkout transactions.
AppExchange Checkout FAQ
Answers to common questions about AppExchange Checkout.
135
AppExchange CheckoutPublish Your Offering on the AppExchange

Configure Stripe for AppExchange Checkout
Billing and subscriptions for AppExchange Checkout offerings are managed in Stripe. Stripe is a secure, no-touch payment platform that
lets you price offerings flexibly and lets customers purchase with a credit card, so buying is easy. Before you can use AppExchange
Checkout, create and activate a Stripe account. If you want to charge customers on a recurring basis for an offering—for example,
monthly—configure a subscription plan in Stripe.
Set Up a Stripe Account
Before selling with AppExchange Checkout, create an account with Stripe, our payment partner.
Create a Subscription Plan in Stripe
To charge customers on a recurring basis for an offering, create a subscription plan in Stripe. When you create a subscription plan,
you can specify how much your customers are charged, how often, and other payment details. After you connect your Stripe account
to the AppExchange, the subscription plans that you create appear in the publishing console.
Set Up a Stripe Account
Before selling with AppExchange Checkout, create an account with Stripe, our payment partner.
To create an account, go the Pricing tab in the publishing console and click Connect to Stripe. Then activate your account to accept
payments by going to your profile in the Stripe dashboard. Have the following information available.
•A short description of your business, such as the products you sell
•Basic information about your business, like its physical address
•Your login information for an external identity provider, such as Google, Facebook, or LinkedIn
•Account and routing numbers for the bank account where you want to receive funds
To learn more about Stripe accounts, go to https://stripe.com/docs/dashboard.
Create a Subscription Plan in Stripe
To charge customers on a recurring basis for an offering, create a subscription plan in Stripe. When you create a subscription plan, you
can specify how much your customers are charged, how often, and other payment details. After you connect your Stripe account to the
AppExchange, the subscription plans that you create appear in the publishing console.
Note: To charge a one-time payment for your offering, you don’t need to create a subscription plan. Instead, create the one-time
payment directly in the Pricing tab of the publishing console.
To create a subscription plan, go to https://dashboard.stripe.com/plans. Have the following information available.
•Unique name and ID for the plan
•Monthly or annual billing (Stripe offers other billing intervals, but they aren’t supported in AppExchange Checkout)
•Amount to charge customers and in which currency
•Trial period length, if any
To learn more about Stripe subscription plans, go to https://stripe.com/docs/subscriptions/guide.
Sell Using AppExchange Checkout
After Stripe is configured, you’re ready to sell with AppExchange Checkout. To start selling, go to a new or existing AppExchange listing
and choose a pricing model for your offering. If your customers live in regions that charge a Value Added Tax (VAT), configure VAT for
AppExchange Checkout transactions.
136
Configure Stripe for AppExchange CheckoutPublish Your Offering on the AppExchange

Select a Pricing Model for a Listing
AppExchange Checkout lets you select the pricing model that works best for customers and your business. You can choose either
company or per-user pricing and charge customers on a recurring basis or as a one-time payment.
Collect VAT for Transactions
If your customers live in regions that charge a Value Added Tax (VAT), you can include VAT in AppExchange Checkout transactions.
After you enable this option, VAT is applied to invoices in Stripe. You’re responsible for VAT registration, maintaining required data,
and distributing the taxes that you collect.
Select a Pricing Model for a Listing
USER PERMISSIONS
To manage listings in the
Partner Community:
•“Manage Listings”
AppExchange Checkout lets you select the pricing model that works best for customers and your
business. You can choose either company or per-user pricing and charge customers on a recurring
basis or as a one-time payment.
AppExchange Checkout supports the following pricing models.
•Per user—Billed monthly, annually, or as a one-time payment
•Per company (org-wide)—Billed monthly, annually, or as a one-time payment
To bill customers on a recurring basis, create a subscription plan in Stripe. One-time payment plans don’t require a subscription plan.
You create them directly in the publishing console.
1. Log in to the Partner Community and go to the Publishing tab.
2. Create a listing, or edit an existing one.
3. On the Pricing tab, select Paid, using Checkout (1).
4. Choose whether to collect payment information before or after a customer installs your offering (2).
137
Sell Using AppExchange CheckoutPublish Your Offering on the AppExchange
5. Select a pricing model (3).
Note: You can offer multiple pricing models on a listing. For example, you can combine a one-time payment with one or
more subscription plans.
StepsPricing Model
Recurring charge a. Select one of the subscription plans that you created in Stripe.
b. Select company or per-user pricing.
One-time payment a. Select Add One Time Price Option.
b. Provide a name for the plan.
c. Select a price and currency.
d. Select company or per-user pricing.
6. If you offer several pricing models, adjust their display order (4).
7. Click Save.
Collect VAT for Transactions
USER PERMISSIONS
To manage listings in the
Partner Community:
•“Manage Listings”
If your customers live in regions that charge a Value Added Tax (VAT), you can include VAT in
AppExchange Checkout transactions. After you enable this option, VAT is applied to invoices in
Stripe. You’re responsible for VAT registration, maintaining required data, and distributing the taxes
that you collect.
1. Log in to the Partner Community and go to the Publishing tab.
2. On the Company Info tab, select the option to collect VAT on purchases.
Note: VAT isn’t supported for one-time purchases.
3. Enter a VAT number and country. The country you enter must match the country specified in Stripe.
4. Click Save.
If you manage AppExchange Checkout data with the Checkout Management App, you can use it to view information needed for VAT
reporting.
AppExchange Checkout FAQ
Answers to common questions about AppExchange Checkout.
Does AppExchange Checkout replace the License Management App?
How does AppExchange Checkout affect lead management and Trialforce?
Do I collect customer payment details before or after installation?
Does AppExchangeCheckout support purchases in multiple currencies?
Does revenue share apply to transactions that aren’t processed with AppExchange Checkout?
138
AppExchange Checkout FAQPublish Your Offering on the AppExchange
Do customers have to purchase my offering on the AppExchange or can I add them as customers in Stripe?
Can customers switch payment plans on the AppExchange?
If a credit card is declined, does a license become inactive?
How does billing work when customers add or remove licenses during the billing period?
If an admin installs an offering, can others in the company go to their AppExchange account to Buy Now?
Does AppExchange Checkout replace the License Management App?
No, AppExchange Checkout doesn’t replace the License Management App (LMA). AppExchange Checkout works with the LMA to create
and update license records and control subscription status for Checkout purchases. You can’t directly edit the license records created
by AppExchange Checkout. Instead, ask the customer to update subscription information on the My Account page in the AppExchange.
How does AppExchange Checkout affect lead management and Trialforce?
AppExchange Checkout doesn’t affect how leads are sent or your Trialforce configuration. However, it does change how trial licenses
are managed. When a customer signs up for a trial using AppExchange Checkout, the corresponding trial user is listed as Active in the
License Management App.
Do I collect customer payment details before or after installation?
We recommend thinking about your target customers and the existing business processes at your company and then deciding. You
can use this table to guide your thinking.
Best If Your Company:Best If Your Customers Want:Approach
Is comfortable managing trials in StripeA quick and easy purchase experience at the
end of a trial
Collect details before installation
Prefers managing trials from your partner
business org using the License Management
App
To get up and running with an offering as
quickly as possible
Collection details after installation
Does AppExchangeCheckout support purchases in multiple currencies?
Yes. When you sign up for Stripe, you choose a default payment currency based on your country (for example, USD if you’re in the United
States). You can enable other currencies in your Stripe account settings. When customers purchase your offering, AppExchange Checkout
charges them in your specified currency and deposits the money into your bank account.
Does revenue share apply to transactions that aren’t processed with AppExchange
Checkout?
Revenue share applies to Stripe transactions associated with the AppExchange. As an AppExchange Checkout partner, you agree that
all purchases of your offering occur on the AppExchange and are subject to revenue sharing.
139
AppExchange Checkout FAQPublish Your Offering on the AppExchange
Do customers have to purchase my offering on the AppExchange or can I add them
as customers in Stripe?
Customers have to purchase your offering on the AppExchange. If you add customers to plans using Stripe, the AppExchange can’t
associate them with your listing or provision licenses through the License Management App.
Can customers switch payment plans on the AppExchange?
No, customers must contact you. Then, you manually switch them to the new plan in Stripe.
If a credit card is declined, does a license become inactive?
You specify in your Stripe account settings what happens when a credit card is declined. You can retry the payment or deactivate the
subscription. If you deactivate the subscription, the license becomes inactive.
How does billing work when customers add or remove licenses during the billing
period?
If licenses are added or removed during the billing period, AppExchange Checkout charges the customer a prorated amount.
If an admin installs an offering, can others in the company go to their AppExchange
account to Buy Now?
Any user who has permissions to install offerings can perform Buy Now actions, provided the user also has the "Manage Billing" permission.
This permission is the same one required to view the My Account page or make purchases using AppExchange Checkout inside the
Salesforce app.
Checkout Management App
EDITIONS
Available in: both Salesforce
Classic and Lightning
Experience
Available in: Enterprise,
Performance, and
Unlimited Editions
The Checkout Management App (CMA) brings the power of Salesforce to AppExchange Checkout.
A beautiful dashboard visually displays AppExchange Checkout data, so it’s easy to see how your
offerings are performing. Automated email notifications keep customers and team members in the
loop whenever activity occurs on your offerings.
Note: The CMA is available in English and Japanese to eligible Salesforce partners. For more
information on the Partner Program, including eligibility requirements, visit
https://partners.salesforce.com.
Start with the dashboard to get a big picture view of your AppExchange Checkout data.
140
Checkout Management AppPublish Your Offering on the AppExchange
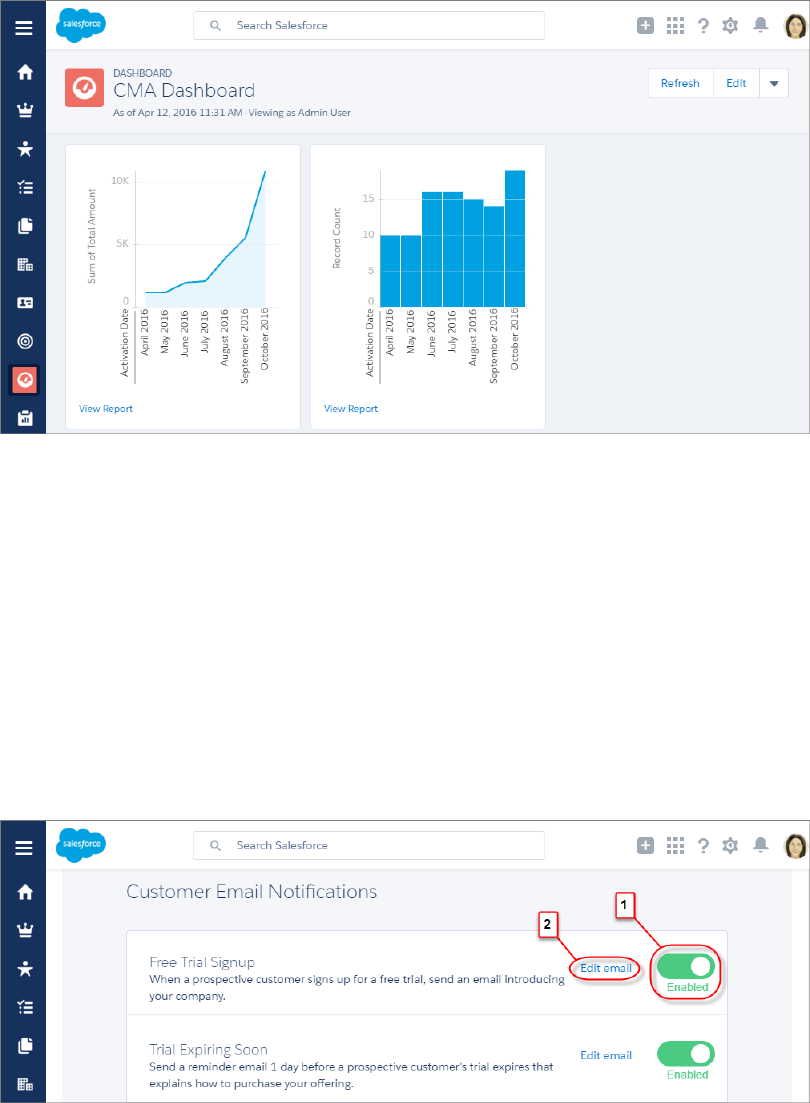
The dashboard is preconfigured to show:
•Revenue by month, so financial performance is always front and center
•New subscribers by month, so it’s easy to see where growth is occurring
•Subscription plan by unit, so you know which configurations are popular with customers
•Subscription status by month, so you can stay on top of trials, purchases, and renewals
You can customize the dashboard using standard Salesforce tools. For a detailed look at your data, view individual customer, subscription
plan, subscription, invoice, invoice item, and transaction records.
To save time communicating with stakeholders, the CMA can send email notifications for situations that you often encounter as a partner,
like renewal notices. Enable email notifications as needed (1) and then customize them to reflect your company’s identity (2). Not in the
mood to customize anything? No worries—the templates provide friendly and informative default content.
Checkout Management App Best Practices
Follow these guidelines and best practices when you use the Checkout Management App (CMA).
141
Checkout Management AppPublish Your Offering on the AppExchange
Checkout Management App Objects
Subscription plan, subscription, invoice, invoice item, and transaction objects are the foundation of the Checkout Management App
(CMA). To get the most out of the CMA, understand what these objects represent and how they relate to each other.
Get Started with the Checkout Management App
Install the Checkout Management App (CMA) into a Salesforce org, and then configure the app so that users get the right level of
access to data. Enable email notifications to simplify communication with customers and team members. You can also customize
the notification templates to meet your company’s needs.
Sample Checkout Management App Customizations
The Checkout Management App (CMA) is a powerful tool out of the box, but gets even better when you customize it. These examples
show how you can modify dashboards and email notifications to delight customers and team members.
Update Settings in the Checkout Management App
Control when customers and team members receive emails from the Checkout Management App (CMA). You can also change the
Stripe account associated with the CMA and manually reimport your data into your Salesforce org. Only admin users can update
settings in the CMA.
View Checkout Management App Logs
The Checkout Management App (CMA) creates logs when connecting to Stripe or syncing your data. If you experience issues with
the CMA, view logs to help diagnose their cause.
Checkout Management App Best Practices
Follow these guidelines and best practices when you use the Checkout Management App (CMA).
•Install the CMA in a Salesforce org where the License Management App (LMA) is already installed. Usually, this is your partner business
org. If the LMA isn’t installed in your org, you can’t install the CMA.
•Don’t edit data in managed fields on the subscription plan, subscription, invoice, or transaction object records. The CMA syncs Stripe
data in a one-way, read-only manner, so changes that you make aren’t reflected in Stripe. To update subscription plan, subscription,
invoice, invoice item, or transaction data, use the Stripe dashboard or API.
•Review and customize notification templates before enabling them. By adding your logo and tailoring template content to reflect
your company’s identity, you set yourself apart from other offerings on the AppExchange. Customizing takes only a couple of minutes
and doesn’t require any coding.
Checkout Management App Objects
Subscription plan, subscription, invoice, invoice item, and transaction objects are the foundation of the Checkout Management App
(CMA). To get the most out of the CMA, understand what these objects represent and how they relate to each other.
The CMA pulls in data from AppExchange Checkout’s payment partner, Stripe, to populate the subscription plan, subscription, invoice,
invoice item, and transaction objects. Here’s a high-level overview of these objects and how they fit together.
142
Checkout Management App Best PracticesPublish Your Offering on the AppExchange
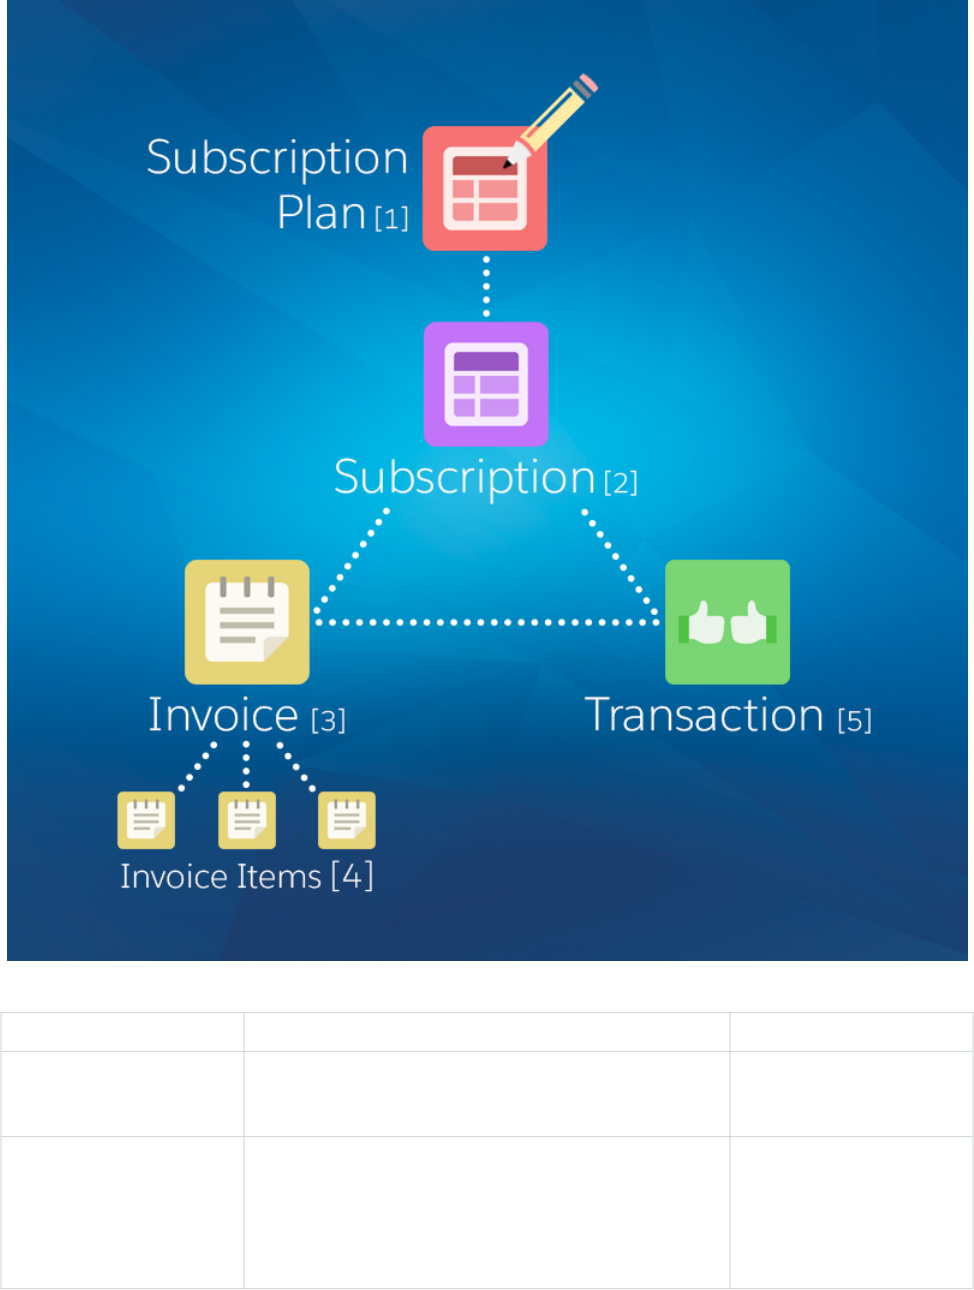
RelationshipsPurposeObject
Parent object of:Contains information about the pricing model of an offering. For
example, site-wide or per user, billed monthly.
Subscription plan (1)
•Subscription
Child object of:Contains information about the customer’s history and usage of
an offering. For example, when the subscription started.
Subscription (2)
•Subscription plan
Parent object of:
•Invoice
143
Checkout Management App ObjectsPublish Your Offering on the AppExchange
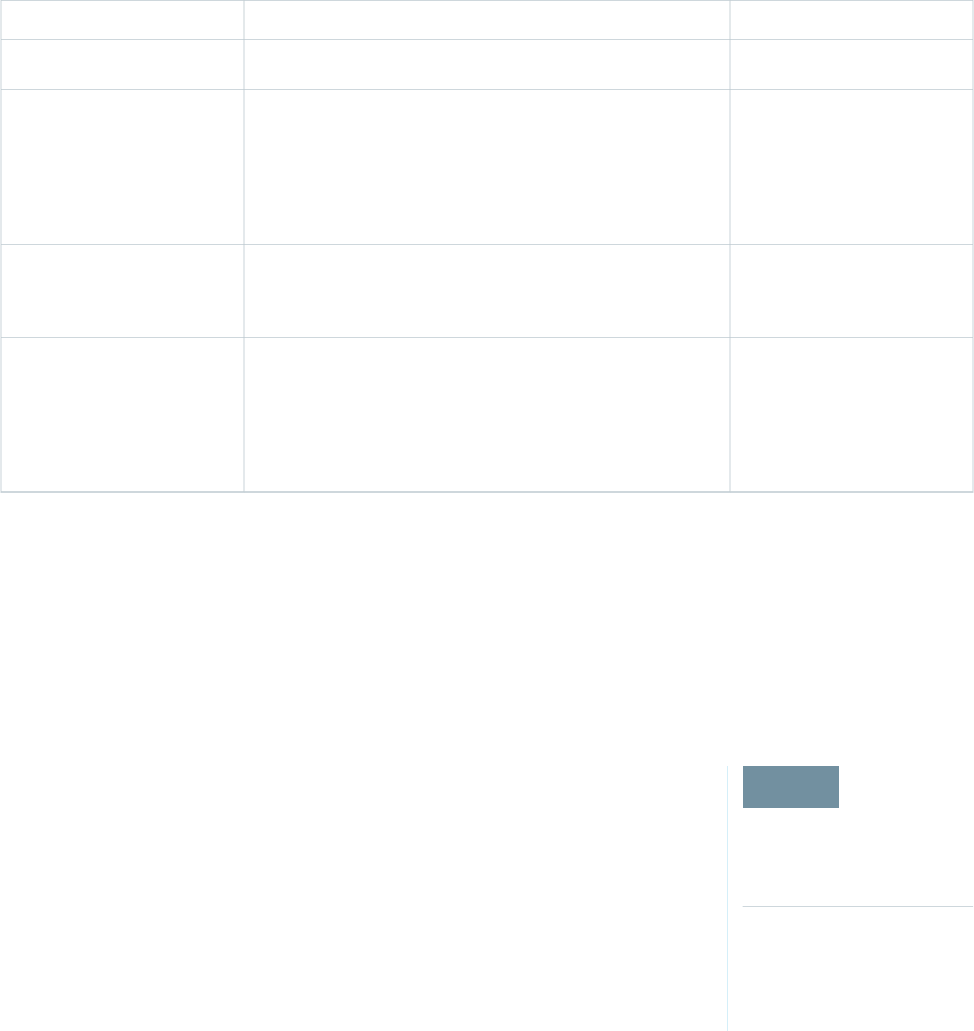
RelationshipsPurposeObject
•Transaction
Child object of:Contains billing and payment information for a subscription for a
specific time period. For example, the total amount owed by the
customer.
Invoice (3)
•Subscription
Sibling object of:
•Transaction
Child object of:Contains information about a particular billing and payment event
for a specific time period. For example, a one-time credit. Multiple
invoice items can be associated with an invoice.
Invoice item (4)
•Invoice
Child object of:Contains information about a customer payment attempt. For
example, method of payment and whether it was successful.
Transaction (5)
•Subscription
Sibling object of:
•Invoice
We haven’t listed it in the table, but there’s one more object to be aware of: customer. The customer object contains information about
the subscriber and draws from the other objects in the CMA, including subscription, invoice, and transaction.
The CMA automatically syncs new data from Stripe, updating object records as necessary. Just remember: syncing is one way and read
only, so changes that you make to object records aren’t reflected in Stripe. To update subscription plan, subscription, invoice, invoice
item, or transaction data, use the Stripe dashboard or API.
Get Started with the Checkout Management App
EDITIONS
Available in: both Salesforce
Classic and Lightning
Experience
Available in: Enterprise,
Performance, and
Unlimited Editions
Install the Checkout Management App (CMA) into a Salesforce org, and then configure the app so
that users get the right level of access to data. Enable email notifications to simplify communication
with customers and team members. You can also customize the notification templates to meet
your company’s needs.
Install the Checkout Management App
Install the Checkout Management App (CMA) in the Salesforce org where you manage licenses
for your offerings, usually your Partner Business Org. The License Management App (LMA) is
required to use the CMA, so make sure that you install the LMA in this org first.
Set Up the Checkout Management App
Use the Checkout Management App (CMA) setup tool to connect your Stripe account and import data into your Salesforce org.
Then get familiar with your dashboard and choose when customers and team members receive email notifications from the CMA.
Assign Access to the Checkout Management App
Use permission sets to give team members the right level of access to the Checkout Management App (CMA). You can assign the
CMA Standard User permission set or CMA Admin User permission set, depending on the features team members must access.
Modify a Notification Template in the Checkout Management App
The Checkout Management App (CMA) can send email notifications in response to trial installations, purchases, and other subscription
changes. We created default notifications to get you started, but you can tailor templates to your company’s needs.
144
Get Started with the Checkout Management AppPublish Your Offering on the AppExchange

Configure Logs in the Checkout Management App
The Checkout Management App (CMA) creates debug logs to help you troubleshoot issues. By default, all logs are saved, but you
can configure the CMA to delete logs that you no longer need. Delete logs regularly to stay within the data storage limits for your
Salesforce edition.
Install the Checkout Management App
USER PERMISSIONS
To install packages:
•“Download
AppExchange
Packages”
Install the Checkout Management App (CMA) in the Salesforce org where you manage licenses for
your offerings, usually your Partner Business Org. The License Management App (LMA) is required
to use the CMA, so make sure that you install the LMA in this org first.
1. If you haven’t already, log in to the AppExchange using the credentials of the org where you
want to install the CMA.
2. Go to the AppExchange listing for the CMA:
https://appexchange.salesforce.com/listingDetail?listingId=a0N3A000000rMclUAE.
3. Click Get It Now.
4. Click Install in production.
5. Agree to the Terms & Conditions, and then click Confirm and Install.
6. Log in to the org where you want to install the CMA.
7. Review the package installation details, and then click Continue.
8. Approve access by third-party websites, and then click Continue.
9. Review the API access requirements for the package, and then click Next.
10. Grant access to package contents, and then click Next.
Note: Salesforce recommends granting access to admins only and assigning access to other users as needed after the app
is installed.
11. Click Install.
12. After the installation completes, go to the App Launcher and confirm that the CMA appears in the list of available apps.
Set Up the Checkout Management App
USER PERMISSIONS
To configure the Checkout
Management App:
•“CMA Admin User”
Use the Checkout Management App (CMA) setup tool to connect your Stripe account and import
data into your Salesforce org. Then get familiar with your dashboard and choose when customers
and team members receive email notifications from the CMA.
Watch a Demo: Set Up the Checkout Management App
1. Log in to the org where the CMA is installed.
2. Open the App Launcher, and then click Checkout Management App.
3. Click Checkout Setup.
4. Connect your Stripe account.
a. In the Connect Stripe Account section, click Do It.
b. Click Get API Key from Stripe.
The Stripe dashboard opens in a new tab.
c. In the Stripe dashboard, copy your live secret API key.
145
Get Started with the Checkout Management AppPublish Your Offering on the AppExchange

d. In the CMA, paste the key into Live Secret API Key, and then click Connect Stripe Account.
5. Set up data syncing by creating and configuring a Force.com site. After you set up data syncing, new Stripe data syncs to your org
automatically.
a. Click Set Up Data Syncing.
b. Click Register a Force.com Domain, and then follow the setup instructions in the CMA.
c. Click Create a Force.com Site, and then follow the setup instructions in the CMA.
d. Click Configure Site Access, and then follow the setup instructions in the CMA.
e. Click Connect the Site to Stripe, and then follow the setup instructions in the CMA.
6. Import your Stripe data. If you haven’t sold an offering using AppExchange Checkout before, you don’t have any Stripe data, so you
can skip this step.
a. Click Import Existing Data.
b. Click Import Data.
Importing Stripe data can take awhile depending on how much data you have. Don’t use CMA reports or dashboards while data
is being imported.
c. After the import finishes, close the dialog to return to the setup wizard.
7. Configure email notifications.
Tip: Before you enable a notification, review the default content we provide. That way, you know exactly what customers and
team members receive, and you can tailor it to reflect your company’s identity.
a. In the Configure Notification Settings section, click Do It.
b. Enable customer notifications as desired.
c. To add the email addresses of team members, click View/Edit, and then click Save.
d. Enable partner notifications as desired.
e. Go back to the setup wizard.
8. Say hello to your dashboard.
a. In the Meet Your Dashboard section, click Do It.
b. View the dashboards we’ve created for you, or go to Trailhead to learn how to customize dashboards.
You’re all set! To update configuration details later, return to Checkout Setup.
Assign Access to the Checkout Management App
USER PERMISSIONS
To assign a permissions set:
•“Assign Permission Sets”
Use permission sets to give team members the right level of access to the Checkout Management
App (CMA). You can assign the CMA Standard User permission set or CMA Admin User permission
set, depending on the features team members must access.
Standard users have read-only access to the dashboard and object records and can’t view or update
notification settings. System Admins or users with the CMA Admin User permission set have full
access to the dashboard, notifications, and objects, including the ability to edit objects. Assign the
CMA Admin User permission set only to users who administer or manage the CMA.
1. Log in to the org where the CMA is installed.
146
Get Started with the Checkout Management AppPublish Your Offering on the AppExchange
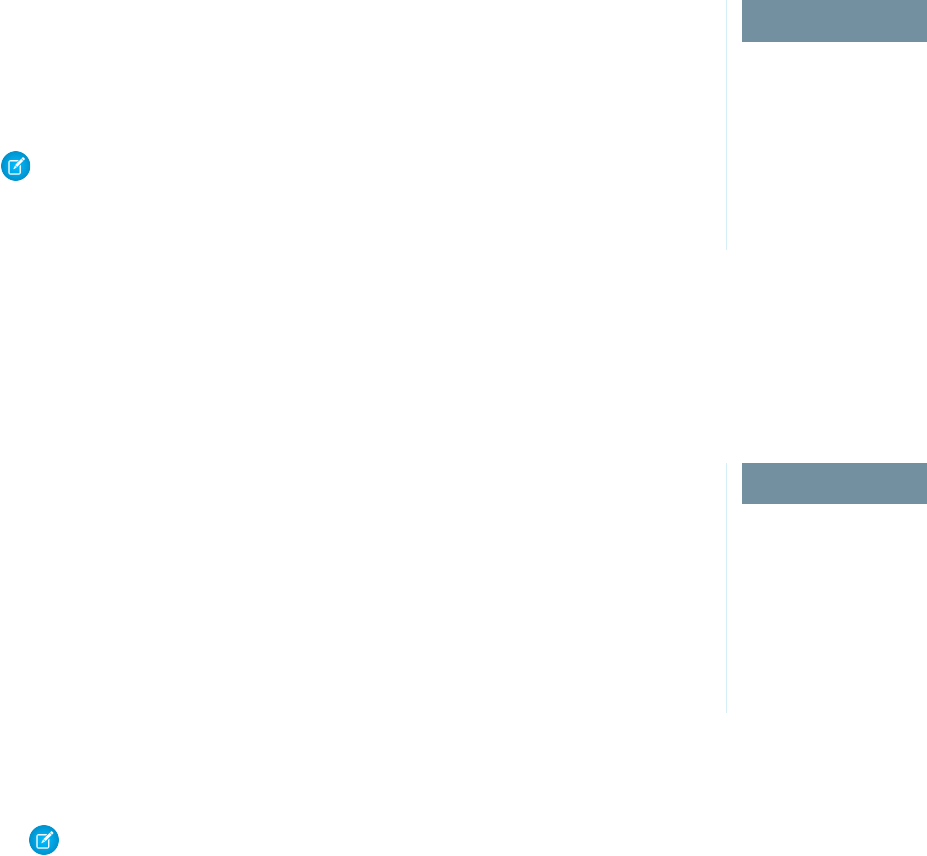
2. From Setup, enter Users in the Quick Find box, and then click Users.
3. Select a user.
4. In the Permission Set Assignments related list, click Edit Assignments.
5. Select the CMA Standard User or CMA Admin User permission set, and then click Add.
6. Click Save.
Modify a Notification Template in the Checkout Management App
USER PERMISSIONS
To enable, disable, or
customize notifications:
•“CMA Admin User”
To create or change
Visualforce email templates:
•“Customize Application”
The Checkout Management App (CMA) can send email notifications in response to trial installations,
purchases, and other subscription changes. We created default notifications to get you started, but
you can tailor templates to your company’s needs.
Notification templates in the CMA are based on Visualforce email templates. The templates support
advanced customizations, like merge fields and formulas.
Note: Notification templates in the CMA also include custom components that affect email
styling. You can’t modify these components, but you can remove them.
1. Log in to the org where the CMA is installed.
2. Open the App Launcher, and then click Checkout Management App.
3. Click Checkout Notification Settings.
4. Find the template that you want to customize, and then select Edit.
5. Click Edit Template and modify as needed, and then click Save.
Configure Logs in the Checkout Management App
USER PERMISSIONS
To manage, create, edit,
and delete custom settings:
•“Customize Application”
To save changes to Apex
classes and triggers:
•“Author Apex”
The Checkout Management App (CMA) creates debug logs to help you troubleshoot issues. By
default, all logs are saved, but you can configure the CMA to delete logs that you no longer need.
Delete logs regularly to stay within the data storage limits for your Salesforce edition.
1. Log in to the org where the CMA is installed.
2. Configure how long to save CMA logs.
a. From Setup, enter Custom Settings in the Quick Find box, and then click
Custom Settings.
b. For CMALogSettings, click Manage.
c. Click New.
d. Enter a name. For example, CMA Log Settings.
e. For CMALogLifeSpan, enter how many days to save logs. For example, enter 30 to save all logs created in the past 30 days.
Note: To change how long CMA logs are saved, edit the value configured in this step. Don’t add more values to CMALogSettings.
3. Schedule an Apex job to delete old CMA logs.
a. From Setup, enter Apex Classes in the Quick Find box, and then click Apex Classes.
b. Click Schedule Apex.
c. Configure the job as follows.
147
Get Started with the Checkout Management AppPublish Your Offering on the AppExchange
ValueField
CMA Log CleanupJob Name
ScheduledDeleteCMALogsApex Class
Note: Namespace prefix: sfcma
Specify a weekly or monthly interval—we recommend running the job at least once per weekFrequency
Today’s dateStart Date
A future date—we recommend specifying a date that’s at least several years in the futureEnd Date
Any value—we recommend choosing a time when your org is not under heavy loadPreferred Start Time
d. Click Save.
Sample Checkout Management App Customizations
EDITIONS
Available in: both Salesforce
Classic and Lightning
Experience
Available in: Enterprise,
Performance, and
Unlimited Editions
The Checkout Management App (CMA) is a powerful tool out of the box, but gets even better when
you customize it. These examples show how you can modify dashboards and email notifications
to delight customers and team members.
Use an Organization-Wide Address on a Notification
By default, notifications sent by the Checkout Management App (CMA) include a generic email
address in the From field. But what if you want to include contact information for a specific
team at your company, like support or billing? You can specify an organization-wide address
on a notification so that customer replies are directed to the right people at your company.
Include a Link in a Notification
When a customer installs your offering, you often want to provide information that doesn’t fit in the notification, such as setup
documentation. You can point customers to this information by including links in a Checkout Management App (CMA) notification.
Customize a Report to Show Annual Revenue for an Offering
If the Checkout Management App (CMA) dashboard doesn’t show what you need out of the box, try modifying a report. This example
steps you through how to display annual revenue for an offering instead of monthly revenue across all offerings.
Use an Organization-Wide Address on a Notification
USER PERMISSIONS
To enable, disable, or
customize notifications:
•“CMA Admin User”
To configure
organization-wide
addresses:
•“Modify All Data”
By default, notifications sent by the Checkout Management App (CMA) include a generic email
address in the From field. But what if you want to include contact information for a specific team
at your company, like support or billing? You can specify an organization-wide address on a
notification so that customer replies are directed to the right people at your company.
Suppose that your company’s refund inquiries are fielded by a billing specialist whose email address
is billing@example.com. Let’s step through how to add this email address to the Refund
Notification template so that customers know who to contact if they have questions.
1. Log in to the org where the CMA is installed.
148
Sample Checkout Management App CustomizationsPublish Your Offering on the AppExchange

2. Create an organization-wide email address.
a. From Setup, enter Organization-Wide Addresses in the Quick Find box, and then click Organization-Wide
Addresses.
b. Click Add.
c. For the display name, enter a word or phrase that users who receive the email see as the sender. For this example, enter Billing
Support.
d. Enter an email address. For this example, enter billing@example.com.
e. Choose which profiles can use the address. For this example, enable the address for all profiles.
f. Click Save.
3. Add the organization-wide email address to the notification template.
a. From Setup, enter Email Alerts in the Quick Find box, and then click Email Alerts.
b. Find the notification template that you want to update, and then click Edit. For this example, choose the Refund Customer
Notification template.
c. For From Email Address, choose an organization-wide email address. For this example, choose "Billing Support"
<billing@example.com>.
4. Click Save.
Include a Link in a Notification
USER PERMISSIONS
To enable, disable, or
customize notifications:
•“CMA Admin User”
To create or change
Visualforce email templates:
•“Customize Application”
When a customer installs your offering, you often want to provide information that doesn’t fit in
the notification, such as setup documentation. You can point customers to this information by
including links in a Checkout Management App (CMA) notification.
Suppose that you sell a product that requires configuration after it’s installed. To help customers
get off on the right foot, direct them to a page on your website that offers configuration tips. Let’s
step through how to add a link to the Free Trial Signup template.
1. Log in to the org where the CMA is installed.
2. Open the App Launcher, and then click Checkout Management App.
3. Click Checkout Notification Settings.
4. Find the template that you want to use, and then click Edit. For this example, choose the Free Trial Signup template.
5. Click Edit Template.
6. Modify the email template to include the <apex:outputLink> component, which lets you point to an external URL. For this
example, add this component after the last sentence in the message body.
<apex:outputLink value="https://example.com/getstarted" target="_blank">Check out our
website for configuration tips.</apex:outputLink>
Note: The target attribute is set to blank, which opens the URL in a new page.
7. Click Save.
149
Sample Checkout Management App CustomizationsPublish Your Offering on the AppExchange
Customize a Report to Show Annual Revenue for an Offering
USER PERMISSIONS
To customize CMA reports:
•“CMA Admin User”
To create, edit, and delete
reports:
•“Create and Customize
Reports”
AND
“Report Builder”
If the Checkout Management App (CMA) dashboard doesn’t show what you need out of the box,
try modifying a report. This example steps you through how to display annual revenue for an offering
instead of monthly revenue across all offerings.
1. Log in to the org where the CMA is installed.
2. Open the App Launcher, and then click Checkout Management App.
3. Click Dashboards, and then click CMA Dashboard.
4. For the Revenue Per Month chart, click View Report.
5. From the Edit drop-down list, select Clone.
6. Specify field values as follows, and then click Create.
ValueField Name
Revenue Per Year
To keep your dashboard organized, include the name of your offering.
For example, Revenue Per Year (Sample App).
Name
CMA ReportsFolder
7. Click Edit.
8. Add a filter to display revenue for a specific offering.
a. From the Add drop-down list, select Field Filter.
b. Enter filter criteria. To display revenue only for listings named Sample App, create the filter Listing Name equals
Sample App.
c. Click OK.
9. In the Preview section, from the Activation Date drop-down list, select Group Dates By > Calendar Year.
Now the report is set up to show annual revenue instead of revenue by month.
10. Click Save, and then click Run Report.
Update Settings in the Checkout Management App
EDITIONS
Available in: both Salesforce
Classic and Lightning
Experience
Available in: Enterprise,
Performance, and
Unlimited Editions
Control when customers and team members receive emails from the Checkout Management App
(CMA). You can also change the Stripe account associated with the CMA and manually reimport
your data into your Salesforce org. Only admin users can update settings in the CMA.
Change Notification Settings in the Checkout Management App
You can enable or disable individual Checkout Management App (CMA) email notifications
depending on your customers’ and team members’ needs.
Change the Stripe Account Associated with the Checkout Management App
If you start managing subscriptions from another Stripe account, update your account settings
in the Checkout Management App (CMA) to keep Stripe data in sync.
150
Update Settings in the Checkout Management AppPublish Your Offering on the AppExchange

Reimport Stripe Data into the Checkout Management App
The Checkout Management App (CMA) automatically pulls new Stripe data into your org, so usually you don’t need to import
anything manually. However, if data in the CMA is missing or incorrect, you can manually reimport Stripe data.
Change Notification Settings in the Checkout Management App
USER PERMISSIONS
To enable, disable, or
customize notifications:
•“CMA Admin User”
You can enable or disable individual Checkout Management App (CMA) email notifications
depending on your customers’ and team members’ needs.
1. Log in to the org where the CMA is installed.
2. Open the App Launcher, and then click Checkout Management App.
3. Click Notification Settings.
4. Enable or disable a customer or partner notification.
Change the Stripe Account Associated with the Checkout Management App
USER PERMISSIONS
To configure the Checkout
Management App:
•“CMA Admin User”
If you start managing subscriptions from another Stripe account, update your account settings in
the Checkout Management App (CMA) to keep Stripe data in sync.
1. Log in to the org where the CMA is installed.
2. Open the App Launcher, and then click Checkout Management App.
3. Click Checkout Setup.
4. In the Connect Stripe Account section, click Change.
5. Note: If you change or disconnect the current Stripe account, existing Stripe data in your org remains.
To associate a new Stripe account, click Change Stripe Account, and then enter a new live secret API key.
Reimport Stripe Data into the Checkout Management App
USER PERMISSIONS
To configure the Checkout
Management App:
•“CMA Admin User”
The Checkout Management App (CMA) automatically pulls new Stripe data into your org, so usually
you don’t need to import anything manually. However, if data in the CMA is missing or incorrect,
you can manually reimport Stripe data.
Warning: The reimport process overwrites existing Stripe data in your org. Changes you’ve
made to existing data are lost. Report and dashboard customizations and notification settings
aren’t affected.
1. Log in to the org where the CMA is installed.
2. Open the App Launcher, and then click Checkout Management App.
3. Click Checkout Setup.
4. In the Import Existing Data section, select Re-import Data.
5. Confirm that you want to overwrite the existing Stripe data, and then click Yes, Reimport Data.
151
Update Settings in the Checkout Management AppPublish Your Offering on the AppExchange
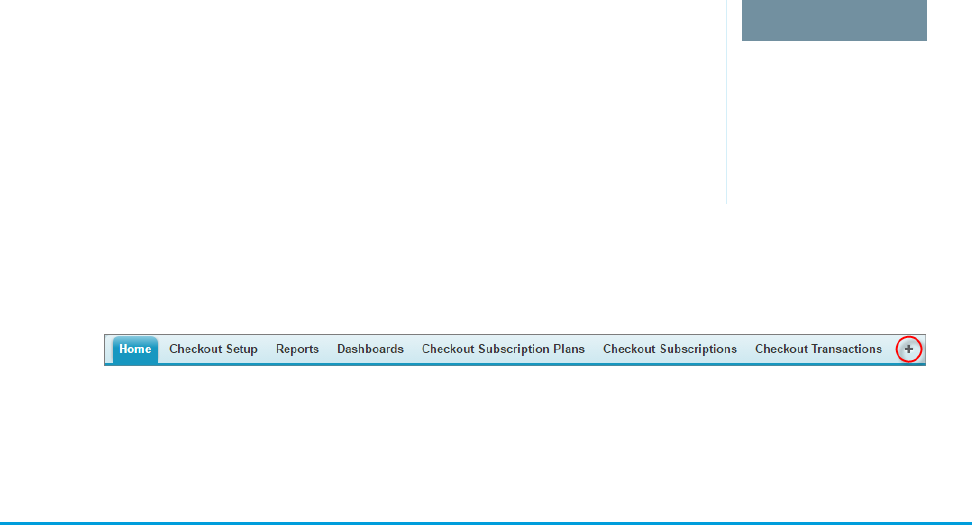
View Checkout Management App Logs
USER PERMISSIONS
To manage apps:
•“Customize Application”
To view CMA logs:
•“CMA Admin User”
The Checkout Management App (CMA) creates logs when connecting to Stripe or syncing your
data. If you experience issues with the CMA, view logs to help diagnose their cause.
1. Log in to the org where the CMA is installed.
2. To view CMA logs in Lightning Experience:
a. Open the App Launcher, and click Other Items.
b. Click Checkout Logs.
3. To view CMA logs in Salesforce Classic:
a. Open the App Launcher, and click Checkout Management App.
b. Click the plus icon (+) next to the main tabs.
c. Click Checkout Logs.
Work with AppExchange Leads
When a customer interacts with your listing, the AppExchange collects contact information that can be delivered to you as a lead.
You can collect leads when a customer:
•Installs your app or component
•Takes a test drive
•Watches a demo or video
•Signs up for a free trial
•Clicks the Learn More link
Before you enable lead collection on a listing, make sure that you’ve set up Web-to-Lead in the organization where you want to receive
leads.
AppExchange Leads FAQ
This section contains a list of frequently asked questions about AppExchange Leads.
•How do I receive leads from the AppExchange?
•Can I choose to receive leads for one listing but not others?
•How will I know this lead came from the AppExchange?
•Can Salesforce de-duplicate leads before they are sent to me?
•What do the lead source codes from my listing mean?
•How can I see more information in the lead record?
•What’s the difference between the leads and license records my listing generates?
•What happens to my listing if I chose not to receive AppExchange leads?
152
View Checkout Management App LogsPublish Your Offering on the AppExchange

How do I receive leads from the AppExchange?
To receive leads from the AppExchange, edit your AppExchange listing and click the Leads tab. Specify the actions you want to receive
leads for and to which Salesforce organization to send the leads. This organization must have Web-to-Lead enabled and be a standard
Salesforce organization, not a Developer Edition organization. We recommend using your partner business org so that you can manage
leads and licenses from a single, convenient location.
Can I choose to receive leads for one listing but not others?
Yes, you can enable lead collection for one listing but not others. Lead collection is enabled on a per listing basis. If you don’t want to
collect leads for a particular listing, don’t choose that option in the publishing console.
How will I know this lead came from the AppExchange?
The lead source codes give you information about how the lead was created and can help you determine how to proceed. The lead
source code always takes the form of SFDC-XX|Listing Name or SFDC-dup-XX|Listing Name. If the source code
contains -dup-, AppExchange already sent you a lead for this user, listing, or action within the last 180 days. The XX identifies the
action the user took to generate the lead.
Can Salesforce de-duplicate leads before they are sent to me?
A majority of the partners we polled requested that we send them all the leads. We designate duplicate AppExchange leads as follows:
SFDC-dup-XX|Listing Name.
If the source code contains -dup-, then AppExchange already sent you a lead for this user, listing, or action within the last 180 days.
For example, SFDC-dup-DM|VerticalResponse for AppExchange indicates a duplicate lead from a user who clicked
to view the demo video on the VerticalResponse for AppExchange listing.
What do the lead source codes from my listing mean?
The lead source codes give you information about how the lead was created and can help you determine how to proceed. The lead
source code always takes the form of SFDC-XX|Listing Name or SFDC-dup-XX|Listing Name. If the source code
contains -dup-, AppExchange already sent you a lead for this user, listing, or action within the last 180 days. The XX identifies the
action the user took to generate the lead.
Here's a table of the action codes and what they mean.
DescriptionLead Source Code
The user started the install process for your app or component by
clicking Get It Now on your listing, agreeing to the terms and
IN
conditions, and clicking the install button on the confirmation
page. The user might not have completed the installation or might
have uninstalled the app or component. Use the License
Management Application (LMA) to track who has the package
installed.
The user watched some or all of your demo.DM
153
How do I receive leads from the AppExchange?Publish Your Offering on the AppExchange
DescriptionLead Source Code
The user clicked Learn More on your listing. Note: Listings that
previously had Learn More buttons now have Get It Now buttons
and receive lead source codes with IN actions.
LM
The user clicked Get It Now on your listing and chose to start a
new 30-day free trial of Salesforce and your app or component.
These users might be preexisting Salesforce customers.
TS
The user took your test drive by clicking Test Drive on your listing.TD
How can I see more information in the lead record?
At this time, providers can’t modify the lead form that customers are asked to fill out when they view a demo, access the test drive, install
an app, or click to Learn More. Please indicate any improvements you wish to see on the IdeaExchange.
What’s the difference between the leads and license records my listing
generates?
Leads and license records are generated by specific actions that a customer takes on your listing. If you’ve set up Web-to-Lead and
enabled lead collection on your listing, leads are generated when a customer does any of the following: views a video or demo, clicks
Learn More, takes a test drive, or installs your app or component. By contrast, license records are generated only when a customer
installs your app or component. You must also have the License Management App enabled in your partner business org to receive
licenses.
What happens to my listing if I chose not to receive AppExchange leads?
If you don’t select a scenario for collecting leads, customers aren’t prompted to fill out the lead sign-up form, and no leads are sent.
Regardless of the lead settings, customers can still view the demo, take a test drive, click the Learn More link, and install your app or
component.
Analytics Reports for Publishers
AppExchange analytics reports are powerful visual tools for understanding how your app, component, or consulting partner listing is
performing. These reports provide metrics related to the web traffic, number of installations, and other user activities over time. By
looking at the reports, you can quickly gain insights about the aspects of your listing that resonate with customers and which areas need
refinement.
•To access a report for your listing, open the Publishing page in the Partner Community, and then click the Analytics tab.
Report Types
For app and component listings, the available reports are:
•Installs (Get It Now)
•Leads
•Resources & Promotions
154
How can I see more information in the lead record?Publish Your Offering on the AppExchange
•Test Drives, Demos & Screenshots
•Web Analytics
For a consulting partner listing, the available reports are:
•Leads
•Learn Mores, Videos & Screenshots
•Web Analytics
Report Attributes
All the reports share these common attributes.
Listing Name
The title of the listing shown at the top of every report.
Back to Publishing Home link
Returns you to the Publishing Home page.
Show Menu
Allows you to choose from one of the available reports. The reports are sorted alphabetically.
Date Range Menu
Allows you to choose the date range. Last 30 Days is selected by default.
Metrics
MetricsReport
Get it Now, Installs, Click-to-Install RatioInstalls (Get It Now)
Unique Leads, Duplicate Leads, Total LeadsLeads
Case Studies, Data Sheets, Promotions, Customer Testimonials,
Webinars, Customization Guides, Whitepapers
Resources & Promotions
Test Drives, Demos, ScreenshotsTest Drives, Demos & Screenshots
Learn Mores, Videos, ScreenshotsLearn Mores, Videos & Screenshots
Page Views, SEO Searches, Visits, Internal Searches, Unique VisitorsWeb Analytics
Line Graph
Shows one or more lines for each metric you’ve selected for display. Select the checkboxes beneath the graph for the metrics you
want to see. By default, all metrics are included in the graph. The reports show metrics over time grouped by created date. When
you click the graph, the date and selected metrics for that date display. Next to each metric, the number of items in the metric over
the selected date range displays regardless of whether you have chosen to include the graph of that metric.
Table
Each report includes a table. The first column on all reports is the Date, and the rest of the columns correspond to the metrics
associated with the report. The table shows 30 rows at a time. Click Next to see more data. By default, the table is sorted by date
from oldest to newest. Change the sort order by clicking the column headers. Clicking the selected sort column a second time sorts
the data in the opposite direction. The small triangle pointing up or down next to a column header indicates the sort direction and
marks that column as the sort column.
155
Analytics Reports for PublishersPublish Your Offering on the AppExchange

Update the Package in an AppExchange Listing
If you add features to a published app or component, update your AppExchange listing so that new customers get access to the latest
version. You can only associate an approved package version with your public listing. If your offering passed the security review within
the last year, the new version is auto-approved. The package version must share the same namespace as the version that passed the
review.
Note: If the last security review was completed more than a year ago, the security review team may contact you to arrange a
new review. Until then, you can continue to list the newer version.
1. Upload the new version of your package to the AppExchange.
2. Log in to the Partner Community.
3. On the Publishing page, click the Packages tab. If you developed the new package in the same organization as the previous version,
the new package displays automatically. If you developed it in a different organization, first connect the organization that contains
the new package on the Organizations tab.
4. Find the new package, and then click Start Review.
5. Fill out the self-evaluation questionnaire and click Submit. If your offering passed the security review within the last year, the new
package is auto-approved, and its status changes to Passed; the status change can take up to 24 hours.
6. After your app or component is approved, navigate to the Listings tab and click the listing that you want to edit. This opens the
AppExchange publishing console.
7. If you’re updating an app, click the App tab. If you’re updating a component, click the Component tab.
8. Click Select Package, and then find the new package you want to associate with the listing.
9. Click Save.
AppExchange FAQ
The following is a list of frequently asked questions about selling on the AppExchange.
•Can I add more industries?
•Do I need an APO to publish my app or component on the AppExchange?
•Can I change my company name?
•Can I create my app or component on a Salesforce sandbox and upload it to the AppExchange?
•Can I edit a review?
•Can I keep the same listing but change the package it provides?
•Can I update my app or component with a new version or patch?
•How Do Customers Find My Listing?
•How do I edit a package after I’ve created a listing?
•How do I get an API token for my app?
•How do I increase my listing’s popularity?
•How do I offer a free trial of my app or component?
•How do I see listings that Salesforce removed?
•How do I upgrade my customers to a new version?
•What’s the difference between a free trial and test drive?
156
Update the Package in an AppExchange ListingPublish Your Offering on the AppExchange
•Where can I share my ideas?
•Where can I write a review?
Can I add more industries?
No. To prevent abuse, you can only specify two industries for each listing. If you cover more industries, mention them in the full or brief
description of your listing.
Do I need an APO to publish my app or component on the AppExchange?
No, you no longer need an AppExchange Publishing Organization (APO) to publish your app or component on the AppExchange. You
can now connect the organization where you developed the app or component directly to the AppExchange publishing console. To
connect an organization, open the Publishing page in the Partner Community, and click the Organizations tab. Before connecting an
organization, make sure that you have the “Manage Listings” permission in the Partner Community.
Can I change my company name?
Yes, you can change your company name and other aspects of your company profile. Open the Publishing page in the Partner Community,
and navigate to the Company Info tab. You can change the company name, upload a logo, and modify other details on your company
profile.
Can I create my app or component on a Salesforce sandbox and upload
it to the AppExchange?
No. You can use a sandbox to install and test your app or component, but you must create and upload it using a Developer edition
organization.
Can I edit a review?
You can edit reviews that you authored. You can comment on reviews that you did not write.
Can I keep the same listing but change the package it provides?
Yes, you can change the packages that are linked to your listing. First, make sure that you’ve uploaded the new package and, if the listing
is public, that the package has passed the security review.
On the Publishing page in the Partner Community, navigate to the Packages tab and find the package associated with the listing that
you want to update. Click Edit Listing to open the publishing console. If you’re updating an app, you can add a package on the App
tab. If you’re updating a component, add it on the Component tab.
Can I update my app or component with a new version or patch?
Yes, but you must submit the new package for an AppExchange Security Review and register the package with your License Management
App (LMA).
157
Can I add more industries?Publish Your Offering on the AppExchange
How Do Customers Find My Listing?
Customers can find your app, component, or consulting service in several ways. On the AppExchange, they can search using keywords
or browse using categories. They can also find your listing via an external search provider, such as Google. Knowing how your listing is
ranked in each of these scenarios helps you get the most visibility with potential customers.
•Most of the time, people look for apps, components, and consulting services by searching for a term (keyword) on the AppExchange
home page. The AppExchange returns matching results and sorts them based on keyword relevance. Here are some tips on how
this works.
–If you include a keyword anywhere in your listing, your listing appears in the search results for that keyword.
–Generally, a keyword’s relevance is increased by appearing earlier in the listing.
–Generally, a keyword’s relevance is increased by appearing more than once in the listing. Note that listing a keyword multiple
times in a row does not improve the listing's ranking.
–When two or more keywords are searched, only listings with all keywords in the same order are returned. In addition, searches
for multiple keywords also match camel-cased words (for example, a search for "Great App" matches "GreatApp").
–Listings at the top of a search are the most relevant from both a keyword and popularity perspective.
•When people look for apps, components, or consulting services by browsing categories, the listings in a category are sorted based
on popularity during the past 30 days. Popularity is based on the actions customers can take, such as installing an app or component,
taking a test drive, watching a demo or other resources, and clicking the Learn More link. Activities that show greater commitment,
such as installing an app or component, are weighted more heavily than activities showing less commitment, such as clicking
screenshots. The number of reviews and the average rating on a listing do not contribute to the popularity of the listing.
•People can also sort results by rating, release date, name, or provider name. Search results ranked by rating are sorted first by the
number of stars and then by the number of reviews. For example, a listing with 1 review and five stars is ranked above a listing with
20 four-star reviews.
•Because the AppExchange is a public website, search engines index your listing pages and return them in their search results. To
improve your ranking with external search providers, make sure that you cross reference your listing URL on your website, blog,
Facebook, and Twitter pages.
How do I edit a package after I’ve created a listing?
Log in to the Partner Community and navigate to the AppExchange Publishing page. Click the Packages tab to view a list of all packages
uploaded to the AppExchange. From this list you can:
•Search for a package by keyword.
•Select Unlisted Packages from the drop-down list to see only the packages that haven’t yet been linked to a listing.
•Click Start Review to begin the security review process.
•For a listed package, click Edit Listing to edit listing details, such as pricing information, banners, and logos.
•For an app or component in a managed package, click Manage Licenses to update the license settings for this package version,
such as whether your offering is free or for sale, if and when it expires, and how many people in the installer’s organization can access
it.
How do I get an API token for my app?
You can request an API token for your app after it passes the AppExchange security review. To request a token, log a case in the Partner
Community under the AppExchange and Feature Requests > API Token Request category. Specify the type of token (SOAP) and
if you’re using OAuth.
158
How Do Customers Find My Listing?Publish Your Offering on the AppExchange

Note: This feature is available to eligible partners. For more information on the Partner Program, including eligibility requirements,
visit www.salesforce.com/partners.
How do I increase my listing’s popularity?
Popularity is based on customer activity. The AppExchange measures everything users do on your listing: install, learn more, test drive,
demo, view screenshots, white papers, or data sheets, and more. The AppExchange weighs the activity according to its level of importance
as indications of interest and filters out attempts to abuse the system.
The AppExchange recalculates popularity daily and then summarizes and evaluates results over 30 days. When you browse by category,
you see listings sorted by their relative popularity over the past 30 days.
How customers have reviewed or rated the listing does not affect popularity. AppExchange visitors can sort by rating if they’re interested.
Here are a few hints on improving rankings.
•Include a test drive. People like being able to try out an app or component. The number of test drives influences popularity. You also
get the added benefit of being able to collect leads.
•Add images. One of the first things that visitors do is click the View Screenshots button. Many people don’t even look at a listing
that doesn’t have screenshots.
•Add resources that demonstrate how your app or component affects the customer’s bottom line. For example, if you have research
showing that a component helps support representatives resolve cases faster, include that information in a data sheet.
•Be up front with your pricing. If you don’t include pricing on your listing, people become disinterested quickly.
How do I offer a free trial of my app or component?
When you’re creating or editing a listing, the Trials tab asks whether you want to offer a free trial or test drive. A free trial lets customers
try your app in an interactive organization that you’ve customized. A test drive lets customers try a read-only version of your app without
logging in to Salesforce. For more information, see Provide a Free Trial on page 213.
How do I see listings that Salesforce removed?
The AppExchange doesn’t allow you to view listings that Salesforce removed. However, you can view private listings, which can include
listings removed by Salesforce, usually because of problems discovered during the periodic security review. To view your private listings,
on the Publishing page, navigate to the Listings tab. Click Private Listings from the drop-down list.
How do I upgrade my customers to a new version?
Create a new version of your managed package and upload it in the released state. After you upload, you can share the Install URL with
your existing customers so that they can upgrade. If you’re deploying only a bug fix to your customers and want to upgrade them
automatically, see “Scheduling Push Upgrades” in the Salesforce online help. You can use the License Management App (LMA) to find
out which customers need to upgrade.
Customers can also check whether an upgrade is available by logging in to the AppExchange and viewing the My Account page. If a
new version of the app or component is available, it appears on this page.
What’s the difference between a free trial and test drive?
When you’re creating or editing a listing, the Trials tab asks whether you want to offer a free trial of Salesforce and your app or component.
The free trial is a non-production Salesforce organization that includes your package and sample data. If a customer chooses to purchase
159
How do I increase my listing’s popularity?Publish Your Offering on the AppExchange

the app or component instead of letting the trial expire, the organization becomes a production version. We recommend that you write
a data cleanup script and include a button in your app or component that gives customers the option to remove sample data.
You can also choose to offer a test drive, which is a read-only version of your app or component that all customers taking the test drive
log in to. Like a free trial, a test drive uses Developer Edition organizations that include sample data and whatever configuration options
you choose.
Where can I share my ideas?
You can share your ideas on how to improve the AppExchange or Salesforce partner programs in the Collaboration section of the Partner
Community. These ideas are only seen by Salesforce and other partners. To share ideas more publicly, please post them on the
IdeaExchange.
Where can I write a review?
On the listing page, click the number of reviews or Write the first. If there are already reviews, you are directed to the review page
where you can click Write a review. Each user can write only one review per listing.
Important: You cannot write a review for your own listing. Please review the Terms of Use for AppExchange for additional legal
information.
Can I have multiple listings for an app or component?
No, you can associate an app or component with only one listing. In addition, you can’t duplicate a package (or create a new package
version) just to list the app or component in a new listing. This behavior is to your advantage, because it’s easier for you to maintain and
upgrade the app or component over its lifecycle. It also helps your listing achieve a higher ranking in the AppExchange, because the
metrics that Salesforce uses to rank apps and components, like page views, aren’t diluted across multiple listings.
160
Where can I share my ideas?Publish Your Offering on the AppExchange

CHAPTER 7 Manage Orders
Create, manage, and submit orders directly to the Partner Operations team with the Channel Order App
(COA). If you’re an OEM partner, you can use the COA for provisioning Salesforce licenses and revenue
sharing. If you’re an ISVforce partner, you can use the COA for revenue sharing.
In this chapter ...
•Channel Order App
•Get Started with the
Channel Order App The COA is pre-installed in your Partner Business Org, but you need to be trained by the Partner Operations
team before you can use it. After you have your Partner Business Org and your offering has passed the
•Upgrade the
Channel Order App security review, sign up for COA training by logging a case in the Partner Community. For the case topic,
select Channel Order Application (COA), and then select Create a Case.
•Manage Orders in
the Channel Order
App
Note: Submit orders based on the sales and licensing of your apps to customers, as required by
your partner agreement.
•Channel Order Apex
API
161

Channel Order App
EDITIONS
Available in: both Salesforce
Classic and Lightning
Experience
Available in: Enterprise,
Performance, and
Unlimited Editions
The Channel Order App (COA) lets you submit customer orders to Salesforce for billing, revenue
sharing, activation, and provisioning.
Note: The COA is available in English to eligible Salesforce partners. For more information
on the Partner Program, including eligibility requirements, visit https://partners.salesforce.com.
With the COA, you can:
•Submit orders for new customers
•Submit add-on, upgrade, renewal, reduction, and cancellation orders for existing customers
•Edit, recall, and clone orders you’ve submitted
•Delete order drafts
•View details about your customers, including order history and total annual contract value
Channel Order App Objects
Before you start working with the Channel Order App (COA), understand what its objects represent and how they relate to each
other.
Order Types
When you create an order in the Channel Order App (COA), you select an order type that tells Salesforce how to activate the products
you specified. Learn how to select the correct order type based on your customer’s needs.
Order Statuses
After you create an order in the Channel Order App (COA), Salesforce assigns an order status to help you track progress and, if needed,
resolve issues. The order status also determines the actions you can perform on an order, like editing or cloning.
Channel Order App Objects
Before you start working with the Channel Order App (COA), understand what its objects represent and how they relate to each other.
DescriptionObject
Contains information about a customer who’s purchased your product. For example, the name of
the company and its billing address.
Customer
Contains information about a product in your catalog. For example, the product’s revenue share
model.
Partner Product Catalog
Salesforce Partner Operations configures the products in your catalog and you import them to your
org during setup. Unless permitted by your agreement with Salesforce, you can’t edit product details.
Contains information about the contract terms for a product in your catalog. For example, the length
of the contract and how often the customer is billed.
Partner Contract Terms
Salesforce Partner Operations configures contract terms and you import them to your org during
setup. Unless permitted by your agreement with Salesforce, you can’t edit contract term details.
162
Channel Order AppManage Orders
DescriptionObject
Contains information about an order you’re submitting to Salesforce. For example, the type of order
and the date the service starts.
Service Order
Note: The terms service order and order are used interchangeably. When you create an order,
the COA creates an underlying service order record.
Represents an instance of a product in an order.
Service Order Detail
When you add a product to an order, the COA creates an underlying service order detail record. You
can’t access service order details directly. To view service order detail data, open the corresponding
service order.
To better understand how these objects fit together, let’s look at an example.
Your company offers an enterprise resource planning app, and new customer has purchased several licenses. The next step is to submit
an order to activate the product.
1. On the Service Orders tab in the COA, create an order.
2. Add details about the customer, like the billing address. The COA uses these details to create a customer record that you can reference
in future orders.
3. Specify a contract type. The COA looks up the corresponding partner contract terms record and associates it with the order.
4. Specify a product from your catalog to activate, along with pricing and license details. The COA adds these details to a service order
detail record and associates it with the order.
5. Select a start date, review the order, and submit it to Salesforce for activation.
In this process, you created only two object records: one for the customer and another for the service order. The COA creates the
other records as needed.
Order Types
When you create an order in the Channel Order App (COA), you select an order type that tells Salesforce how to activate the products
you specified. Learn how to select the correct order type based on your customer’s needs.
Note: Your agreement with Salesforce determines the order types available to you. You might not be able to submit every order
type.
PurposeOrder Type
Order products for a new customer.
Initial
To submit an initial order, choose New Customer in the order submission wizard. If the order includes
a reseller customer org, you must add an admin user subscription. Order one admin user subscription
per 50 users.
Add products or licenses for an existing customer.
Add On
Remove products or licenses for an existing customer.
Reduction
163
Order TypesManage Orders
PurposeOrder Type
Renew service for an existing customer before its contract expires.
Renewal
Upgrade an existing customer to a different Salesforce edition, or adjust pricing for existing users on
a contract.
Upgrade
End a contract with an existing customer and cancel all products.
Cancellation
Order Statuses
After you create an order in the Channel Order App (COA), Salesforce assigns an order status to help you track progress and, if needed,
resolve issues. The order status also determines the actions you can perform on an order, like editing or cloning.
Valid ActionsDescriptionOrder Status
Edit, clone, delete
Order was created, but hasn’t been submitted to Salesforce.
Draft
Edit, clone, recall
Order was submitted to Salesforce and is awaiting review.
Received
You can edit products, license quantities, and pricing on received orders.
CloneOrder is being processed by Salesforce.In Process
Clone
Order was processed.
Activated
Note: If your order includes Force.com licenses, the status remains
Activated until the service start date that you specified. After the service
start date, the status changes to Provisioned.
Clone
Order was provisioned in the customer’s org.
Provisioned
Note: The Provisioned status applies only to orders that include
Force.com licenses.
Clone
Order was submitted to Salesforce, but an error prevented processing.
Error
To view the error, go to the order’s detail page. To resubmit your order, first clone
it and resolve the issue. Then submit the cloned order to Salesforce.
164
Order StatusesManage Orders
Get Started with the Channel Order App
EDITIONS
Available in: both Salesforce
Classic and Lightning
Experience
Available in: Enterprise,
Performance, and
Unlimited Editions
Install the Channel Order App (COA) and then configure it to sync product data with Salesforce.
After the app is configured, provide access to the right people on your team by assigning them a
permission set.
Install the Channel Order App
Install the Channel Order App (COA) in the Salesforce org where you manage licenses for your
products, usually your Partner Business Org. If you’re an existing partner and the COA is already
installed in your org, you don’t need to reinstall the app to receive upgrades. Salesforce pushes
new versions of the app to your org.
Define a Channel Order App Email Service
After you install the Channel Order App (COA), define an email service to make your org ready to sync your product catalog and
contract terms.
Import Product Data to the Channel Order App
After you define an email service for the Channel Order App (COA), connect the app to your product catalog and import products
and contract terms. After the connection is configured, catalog updates are pushed to your org.
Assign Access to the Channel Order App
Assign the COA User permission set to give team members access to the COA. This permission set lets users submit, edit, clone, and
recall orders and view customer details. To view and configure service order credentials or import product data, users must also have
the Customize Application permission.
Display Customers in the Channel Order App
Create a custom tab to display customer information in the Channel Order App (COA).
Install the Channel Order App
USER PERMISSIONS
To install packages:
•Download AppExchange
Packages
Install the Channel Order App (COA) in the Salesforce org where you manage licenses for your
products, usually your Partner Business Org. If you’re an existing partner and the COA is already
installed in your org, you don’t need to reinstall the app to receive upgrades. Salesforce pushes
new versions of the app to your org.
1. Log in to AppExchange using the credentials of the org where you want to install the COA.
2. Go to the AppExchange listing for the COA:
https://appexchange.salesforce.com/listingDetail?listingId=a0N300000055ailEAA.
3. Click Get It Now.
4. Click Install in production.
5. Agree to the Terms & Conditions, and click Confirm and Install.
6. Log in to the org where you want to install the COA.
7. Review the package installation details, and click Continue.
8. Approve access by third-party websites, and click Continue.
9. Review the API access requirements for the package, and click Next.
10. Grant access to package contents, and click Next.
165
Get Started with the Channel Order AppManage Orders
Note: Salesforce recommends granting access only to admins and assigning access to other users as needed after the app
is installed.
11. Click Install.
12. After the installation completes, go to the App Launcher and confirm that the COA appears in the list of available apps.
Define a Channel Order App Email Service
USER PERMISSIONS
To configure Apex email
services and email service
addresses:
•Modify All Data
After you install the Channel Order App (COA), define an email service to make your org ready to
sync your product catalog and contract terms.
1. Log in to the org where the COA is installed.
2. From Setup, enter Email Services in the Quick Find box, then click Email Services.
3. Click New Email Service.
4. Specify values for the following fields. Leave the other fields as is.
ValueField
SFDC Service OrderEmail Service Name
ProcessServiceOrderStatusApex Class
Text attachments onlyAccept Attachments
Select to enableActive
5. Click Save and New Email Address.
6. Specify values for the following fields. Leave the other fields as is.
ValueField
SFDC_Service_OrderEmail Service Name
Select to enableActive
Select a Salesforce admin in your orgContext User
7. For Accept Email From, remove the autopopulated email address. This field must be blank. Otherwise, the email service can’t
connect to Salesforce.
8. Click Save. Salesforce generates a unique address for the email service (1), which is used later in the setup process.
166
Define a Channel Order App Email ServiceManage Orders
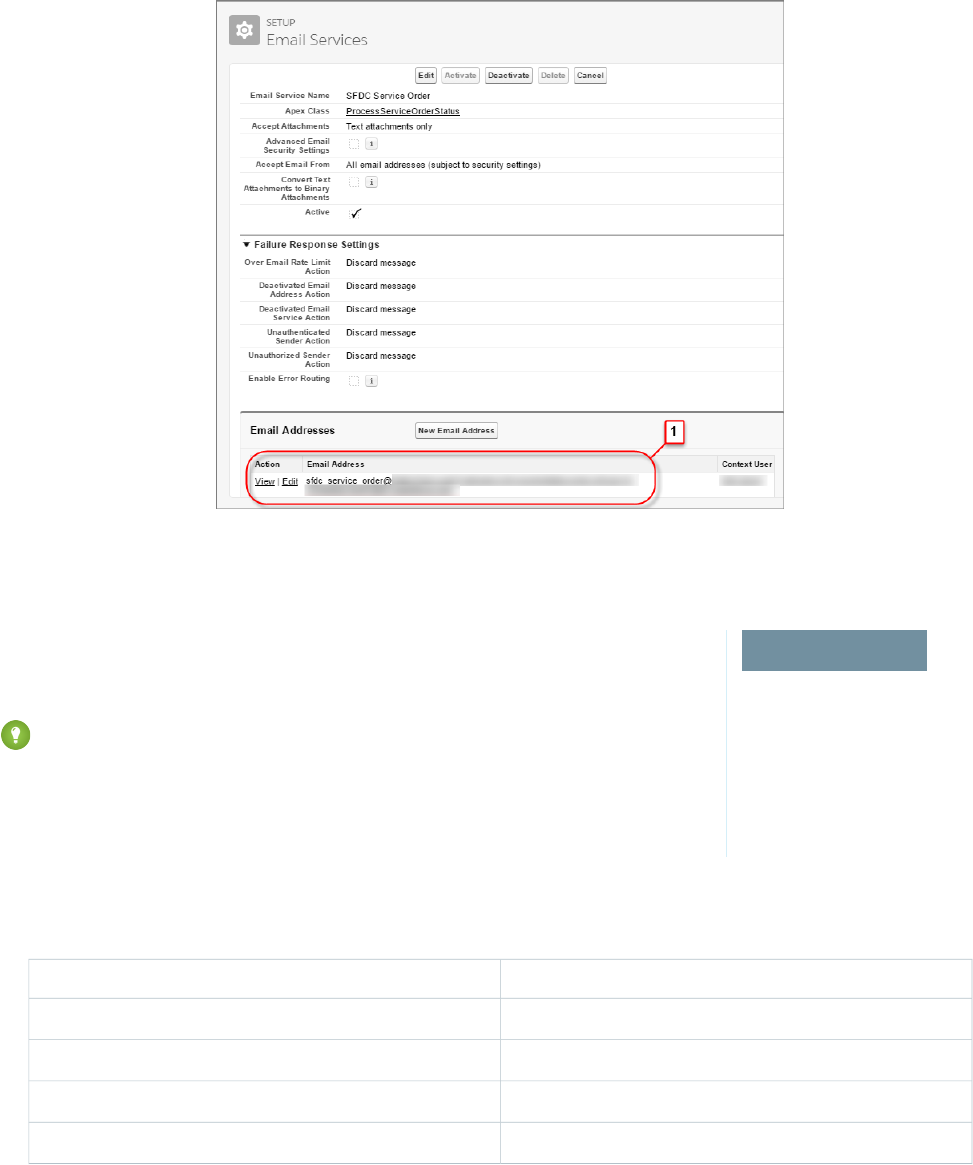
Import Product Data to the Channel Order App
USER PERMISSIONS
To view the COA:
•COA User
To configure service order
credentials:
•Customize Application
After you define an email service for the Channel Order App (COA), connect the app to your product
catalog and import products and contract terms. After the connection is configured, catalog updates
are pushed to your org.
Tip: Before configuring your connection, make sure that you have your service order
credentials from Salesforce Partner Operations. If you don’t have credentials, log a support
case in the Partner Community.
1. Log in to the org where the COA is installed.
2. Open the App Launcher.
3. Under All Items, click Service Order Credentials.
4. To connect the COA to your product catalog, specify the following field values and then click Test Connection.
ValueField
ProductionService Type
Enter the username provided by Salesforce Partner Operations.UserName
Enter the password provided by Salesforce Partner Operations.Password
This value is automatically populated.Login URL
167
Import Product Data to the Channel Order AppManage Orders
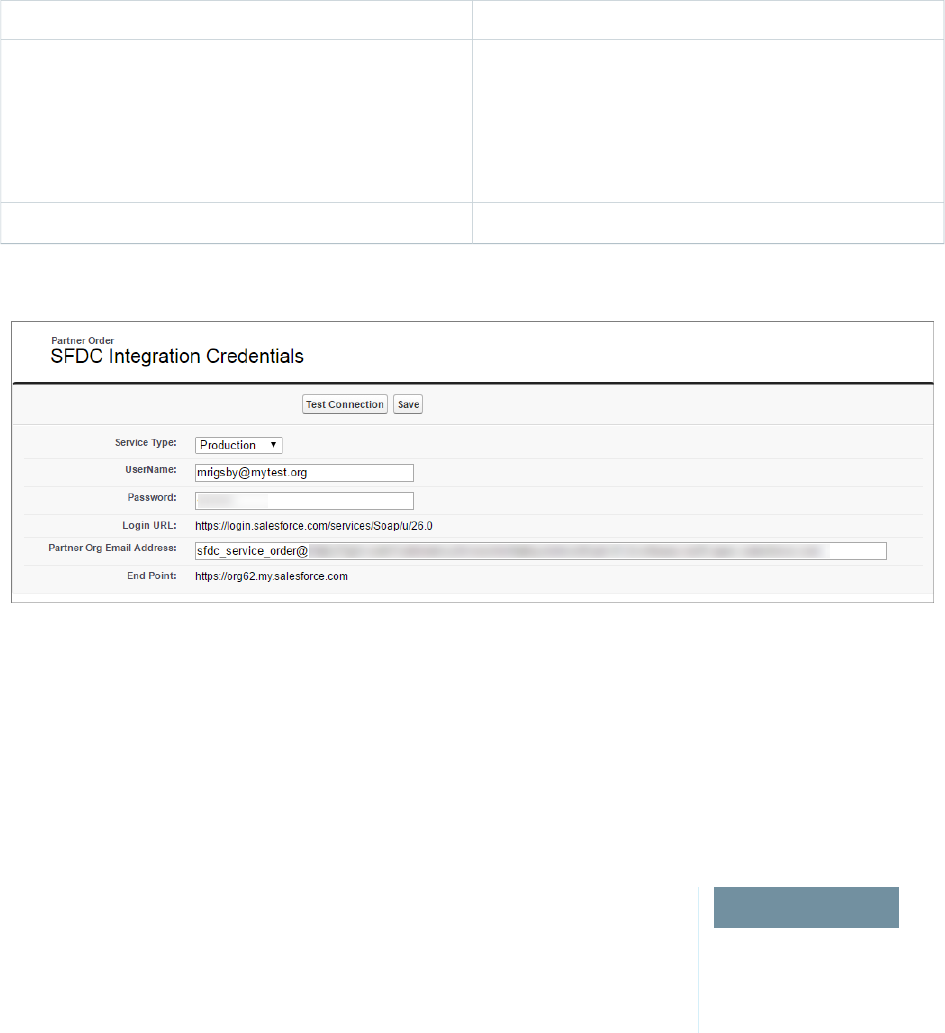
ValueField
Enter the address associated with the email service that you
created for the COA.
To look up the address, go to Setup, enter Email Services
in the Quick Find box, then click Email Services. Then view the
SFDC Service Order.
Partner Org Email Address
This value is automatically populated.End Point
If you have issues connecting, contact Salesforce to verify your service order credentials.
5. For Partner API Key, enter the key provided by Salesforce Partner Operations.
6. Click Save.
7. To import your product data, click Refresh Data.
When the import is complete, a success message is displayed.
Assign Access to the Channel Order App
USER PERMISSIONS
To assign a permission set:
•Assign Permissions Sets
Assign the COA User permission set to give team members access to the COA. This permission set
lets users submit, edit, clone, and recall orders and view customer details. To view and configure
service order credentials or import product data, users must also have the Customize Application
permission.
1. Log in to the org where the COA is installed.
2. From Setup, enter Users in the Quick Find box, then click Users.
3. Select a user.
4. In the Permission Set Assignments related list, click Edit Assignments.
5. Select the COA User permission set, and click Add.
6. Click Save.
168
Assign Access to the Channel Order AppManage Orders
Display Customers in the Channel Order App
USER PERMISSIONS
To create and edit custom
tabs:
•Customize Application
Create a custom tab to display customer information in the Channel Order App (COA).
1. Log in to the org where the COA is installed.
2. From Setup, enter Tabs in the Quick Find box, then click Tabs.
3. In the Custom Object Tabs related list, click New.
4. Specify values for the following fields. Leave the other fields as is.
ValueField
CustomerObject
Select your preferred tab styleTab Style
5. Click Next.
6. Select the user profiles for which the tab is available, and click Next.
7. Add the tab to the Partner Order custom app.
8. Click Save.
Upgrade the Channel Order App
EDITIONS
Available in: both Salesforce
Classic and Lightning
Experience
Available in: Enterprise,
Performance, and
Unlimited Editions
If you’ve installed a previous version of the Channel Order App (COA), Salesforce pushes new versions
to your org as they become available. Before you install an upgrade, review the considerations to
understand how customizations in your org could be affected. Depending on the COA version you
use, some additional configuration might be required after upgrading.
Channel Order App Upgrade Considerations
Before you install a new version of the Channel Order App (COA), review the considerations to
understand how customizations in your org could be affected.
Upgrade to Channel Order App v2.0
Follow these high-level steps to upgrade to from Channel Order App (COA) v1.39 or earlier to
v2.0.
Channel Order App Upgrade Considerations
Before you install a new version of the Channel Order App (COA), review the considerations to understand how customizations in your
org could be affected.
Upgrades from v1.39 or earlier to v2.0
If you’re upgrading the COA from v1.39 or earlier to v2.0, the following considerations apply.
169
Display Customers in the Channel Order AppManage Orders

New Permission Set for Access to the COA
In v1.39 and earlier, a custom profile controls access to the COA. In v2.0, you control access with the COA User permission set. When
you upgrade, assign the permission set to all team members who need access to the COA, including those who previously accessed
the app using the custom profile. Without this permission set, users can’t access the COA.
New Customers Tab
In v2.0, the new Customers tab shows you customer information, including related products and orders. When you upgrade, you
must create this tab and configure it to display in the app.
Replaced Orders Tab
In v2.0, the Service Orders tab replaces the Orders tab. When you upgrade, remove the Orders tab from the app and configure the
Service Orders tab.
Updated Page Layouts
In v2.0, the customer, service order, partner contract terms, and partner product catalog objects have updated page layouts. When
you upgrade, assign the updated layouts to each object.
Replaced Partner Order Submit API
In v2.0, the Channel Order API replaces the Partner Order Submit API. When you upgrade, you can still submit orders using the
Partner Order Submit API, and your existing integrations continue to function. However, the Partner Order Submit API doesn’t include
the new functionality introduced in the Channel Order Apex API, like the ability to edit, recall, and clone orders.
Upgrade to Channel Order App v2.0
EDITIONS
Available in: both Salesforce
Classic and Lightning
Experience
Available in: Enterprise,
Performance, and
Unlimited Editions
Follow these high-level steps to upgrade to from Channel Order App (COA) v1.39 or earlier to v2.0.
1. Assign access to the app using the COA User permission set.
2. Create a Customers tab and configure it to display in the app.
3. Remove the Orders tab from the app and configure the Service Orders tab to display.
4. Assign updated page layouts to the customer, service order, partner contract terms, and partner
product catalog objects.
Display Service Orders in the Channel Order App
If you’re upgrading to Channel Order App (COA) v2.0 from v1.39, remove the existing Orders
tab and replace it with the new Service Orders tab.
Update Page Layouts in the Channel Order App
If you’re upgrading to Channel Order App (COA) v2.0 from v1.39, assign updated page layouts to the customer, service order, partner
contract terms, and partner product catalog objects.
Field Mapping in Channel Order App v2.0
In Channel Order App (COA) v2.0, we retired some fields on the service order detail object. If you’re upgrading from v1.39 or earlier
to v2.0, refer to this table to see how the retired fields map to new ones.
170
Upgrade to Channel Order App v2.0Manage Orders

Display Service Orders in the Channel Order App
EDITIONS
Available in: both Salesforce
Classic and Lightning
Experience
Available in: Enterprise,
Performance, and
Unlimited Editions
USER PERMISSIONS
To manage custom apps:
•Customize Application
If you’re upgrading to Channel Order App (COA) v2.0 from v1.39, remove the existing Orders tab
and replace it with the new Service Orders tab.
1. Log in to the org where the COA is installed.
2. From Setup, enter App Manager in the Quick Find box, then click App Manager.
3. For Partner Order, click ( ) and select Edit.
4. From the Selected Tabs list, remove Orders.
5. Add Service Orders to the Selected Tabs list.
6. Click Save.
Update Page Layouts in the Channel Order App
EDITIONS
Available in: both Salesforce
Classic and Lightning
Experience
Available in: Enterprise,
Performance, and
Unlimited Editions
USER PERMISSIONS
To create and edit custom
objects:
•Customize Application
If you’re upgrading to Channel Order App (COA) v2.0 from v1.39, assign updated page layouts to
the customer, service order, partner contract terms, and partner product catalog objects.
1. Log in to the org where the COA is installed.
2. From Setup, enter Object Manager in the Quick Find box, then click Object Manager.
3. Assign the updated page layout to the service order object.
a. Click Service Order.
b. In the Page Layouts related list, click Page Layout Assignment.
c. Click Edit Assignment.
d. From the list of available layouts, choose Service Order Layout.
e. Select the user profiles you want to give access to the layout, and click Save.
4. Repeat these steps for the customer, partner contract terms, partner product catalog objects.
Page layout names use this format: <Object Name> Layout.
Field Mapping in Channel Order App v2.0
In Channel Order App (COA) v2.0, we retired some fields on the service order detail object. If you’re upgrading from v1.39 or earlier to
v2.0, refer to this table to see how the retired fields map to new ones.
Note: Field names are prefixed with CHANNEL_ORDERS__ unless otherwise noted.
Fields
NotesNew FieldOld Field (Retired)
Field retired. This field won't populate with
data for orders created in COA v2.0 or later.
NoneApplication__c
171
Upgrade to Channel Order App v2.0Manage Orders
NotesNew FieldOld Field (Retired)
Represents the product price per unit per
month.
Customer_Price_Per_Month__cCustomer_Price__c
Represents fixed price of the product at the
time the order was created.
pc_Fixed_Price__cFixed_Price__c
Field retired. This field won't populate with
data for orders created in COA v2.0 or later.
NoneFloor_Price__c
Represents the total amount due to
Salesforce based on the estimated value of
the product.
SFDC_Price__cEstimated_SFDC_Price_Per_Month__c
Field retired. This field won't populate with
data for orders created in COA v2.0 or later.
NoneNumber_Of_Users_ISVforce__c
Field retired. This field won't populate with
data for orders created in COA v2.0 or later.
Nonepc_Floor_Price__c
Represents percent net revenue of the
product at the time the order was created.
PNR__cpc_PNR__c
Field retired. This field won't populate with
data for orders created in COA v2.0 or later.
Nonepc_Pricing_Unit__c
Represents ID of the product.Product_ID__cpc_Product_ID__c
Represents the pricing model of the
product.
pc_Pricing_Type__cPricing_Type__c
Field retired. This field won't populate with
data for orders created in COA v2.0 or later.
NoneProduct_Line_Desc_Overridden__c
Field retired. This field won't populate with
data for orders created in COA v2.0 or later.
NoneSpecial_Instructions__c
Manage Orders in the Channel Order App
EDITIONS
Available in: both Salesforce
Classic and Lightning
Experience
Available in: Enterprise,
Performance, and
Unlimited Editions
When a customer purchases a product from you or requests changes to a subscription, submit an
order to Salesforce Partner Operations. After you create the order, you can edit, recall, or clone it. If
the order is a draft, you can delete it.
Submit an Order
Submit an order to Salesforce when a customer purchases new products or requests changes
to an existing subscription. If you’re submitting an order for a new customer, make sure that
you have the customer’s Salesforce org ID.
Edit an Order
You can edit the product, quantity, and pricing details of an order within 2 hours of submitting
it to Salesforce. After 2 hours, the order is processed and can’t be edited. To change customer details or order type, you must recall
the order and create a new one.
172
Manage Orders in the Channel Order AppManage Orders
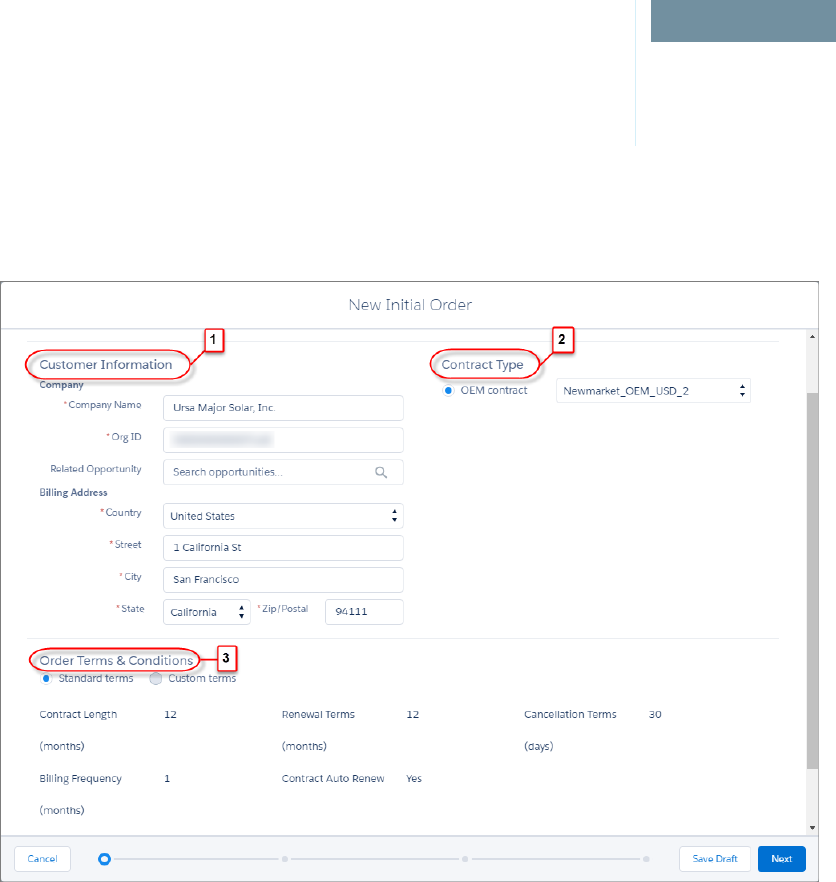
Clone an Order
If you want to create an order that’s similar to one you’ve submitted previously, you can save time by cloning the original order.
Recall an Order
If you don’t want Salesforce to process an order you’ve submitted, recall it. After you recall an order, it becomes read-only and can’t
be edited or resubmitted. You can recall an order within 2 hours of submitting it to Salesforce.
Delete an Order
You can delete draft orders that you don’t want to submit, like duplicate orders. After you delete a draft order, you can’t recover it.
Refresh Product Data
Salesforce pushes updated product data to the Channel Order App (COA), but you can also refresh the data manually. You refresh
product data in the associated contract terms record in your catalog.
Submit an Order
USER PERMISSIONS
To submit orders:
•COA User
Submit an order to Salesforce when a customer purchases new products or requests changes to
an existing subscription. If you’re submitting an order for a new customer, make sure that you have
the customer’s Salesforce org ID.
1. Log in to the org where the COA is installed.
2. Open the App Launcher, and click Partner Order.
3. On the Service Orders tab, click New to open the order submission wizard.
4. Select an order type.
5. Specify customer information (1), contract type (2), and the terms and conditions (3), and then click Next.
173
Submit an OrderManage Orders
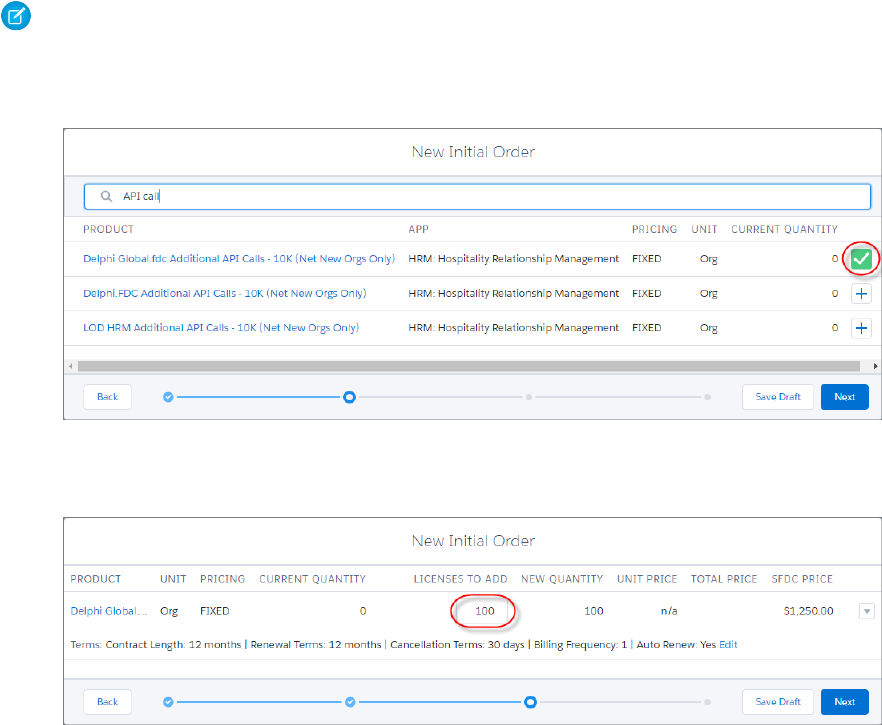
Note: Your agreement with Salesforce determines the order types available to you. Some partners might not be able to
submit every order type.
6. Select products for the order, and click Next.
7. Adjust the license quantities and, optionally, pricing, and then click Next.
8. Enter the service and order dates (1), and then review and accept our terms and conditions (2).
174
Submit an OrderManage Orders

9. Click Submit.
After you submit the order, it’s sent to Salesforce Partner Operations for processing and activation. To check the status of an order, go
the Service Orders tab.
Edit an Order
USER PERMISSIONS
To edit orders:
•COA User
You can edit the product, quantity, and pricing details of an order within 2 hours of submitting it
to Salesforce. After 2 hours, the order is processed and can’t be edited. To change customer details
or order type, you must recall the order and create a new one.
1. Log in to the org where the COA is installed.
2. Open the App Launcher, and click Partner Order.
3. On the Service Orders tab, find the order you want to edit.
4. Click ( ) and select Edit.
5. Update the order’s products, quantities, and pricing details, and then click Resubmit.
Clone an Order
USER PERMISSIONS
To clone orders:
•COA User
If you want to create an order that’s similar to one you’ve submitted previously, you can save time
by cloning the original order.
1. Log in to the org where the COA is installed.
2. Open the App Launcher, and click Partner Order.
3. On the Service Orders tab, find the order you want to clone.
4. In the Custom Actions column, click Clone.
175
Edit an OrderManage Orders
5. Confirm that you want to clone the order, and click Continue.
6. Edit the order as needed, and then click Save Draft.
Recall an Order
USER PERMISSIONS
To recall orders:
•COA User
If you don’t want Salesforce to process an order you’ve submitted, recall it. After you recall an order,
it becomes read-only and can’t be edited or resubmitted. You can recall an order within 2 hours of
submitting it to Salesforce.
1. Log in to the org where the COA is installed.
2. Open the App Launcher, and click Partner Order.
3. On the Service Orders tab, find the order that you want to recall.
4. In the Custom Actions column, click Recall.
5. Confirm that you want to recall the order, and click Continue.
Delete an Order
USER PERMISSIONS
To delete orders:
•COA User
You can delete draft orders that you don’t want to submit, like duplicate orders. After you delete a
draft order, you can’t recover it.
1. Log in to the org where the COA is installed.
2. Open the App Launcher, and click Partner Order.
3. On the Service Orders tab, find the order that you want to delete.
4. Click ( ) and select Delete.
5. Click Delete again to confirm.
Refresh Product Data
USER PERMISSIONS
To refresh contract terms:
•COA User
Salesforce pushes updated product data to the Channel Order App (COA), but you can also refresh
the data manually. You refresh product data in the associated contract terms record in your catalog.
1. Log in to the org where the COA is installed.
2. Open the App Launcher.
3. Under All Items, click Partner Contract Terms.
4. Select a contract terms record, and click Refresh Data.
Channel Order Apex API
You can submit orders to Salesforce programmatically using the Channel Order Apex API. If you’re using Channel Order App v2.0 or later,
submit orders using the classes provided in the CHANNEL_ORDERS namespace. If you’re using an earlier version, use the Partner
Order Submit API.
176
Recall an OrderManage Orders
CHANNEL_ORDERS Namespace
The CHANNEL_ORDERS namespace provides classes for sending orders to Salesforce Partner Operations. After you send an order,
you can use other classes in the namespace to edit, recall, or clone the order.
Service Order
Represents an order that you’re submitting to Salesforce Partner Operations for processing and activation.
Service Order Detail
Represents an instance of a product on a service order.
Partner Order Submit API
Send orders to Salesforce immediately or asynchronously using the Partner Order Submit API. The API is available in version 1.39
and earlier of the Channel Order App (COA).
CHANNEL_ORDERS Namespace
The CHANNEL_ORDERS namespace provides classes for sending orders to Salesforce Partner Operations. After you send an order,
you can use other classes in the namespace to edit, recall, or clone the order.
To use CHANNEL_ORDERS namespace classes, you must have Channel Order App v2.0 or later installed in your Salesforce org. For
information on how to invoke methods defined in managed packages, refer to the Apex Developer Guide.
The following classes are in the CHANNEL_ORDERS namespace.
COA_ServiceOrderSubmit Class
Submit orders to Salesforce Partner Operations for processing and activation.
COA_ServiceOrderEdit Class
Edit orders that you’ve submitted to Salesforce Partner Operations.
COA_ServiceOrderRecall Class
Recall orders that you’ve submitted to Salesforce Partner Operations.
COA_ServiceOrderClone Class
Clone an existing order in the org where the Channel Order App (COA) is installed.
COA_ServiceOrderSubmit Class
Submit orders to Salesforce Partner Operations for processing and activation.
Namespace
CHANNEL_ORDERS
Usage
The COA_ServiceOrderSubmit class contains a single @InvocableMethod for submitting orders to Salesforce Partner Operations.
For annotation information, see the Apex Developer Guide.
177
CHANNEL_ORDERS NamespaceManage Orders

Example
This example receives a list of service orders, submits them, and returns a list of outputs from the submit operation.
public static void submitOrders(List<Service_Order__c> serviceOrders){
List<COA_ServiceOrderSubmit.COA_ServiceOrderSubmitInput> serviceOrderSubmitInput = new
List<COA_ServiceOrderSubmit.COA_ServiceOrderSubmitInput>();
for(Service_Order__c serviceOrder: serviceOrders){
COA_ServiceOrderSubmit.COA_ServiceOrderSubmitInput input = new
COA_ServiceOrderSubmit.COA_ServiceOrderSubmitInput();
input.serviceOrderId = serviceOrder.Id;
serviceOrderSubmitInput.add(input);
}
List<COA_ServiceOrderSubmit.COA_ServiceOrderSubmitOutput> serviceOrderSubmitOutputs =
COA_ServiceOrderSubmit.submit(serviceOrderSubmitInput);
for(COA_ServiceOrderSubmit.COA_ServiceOrderSubmitOutput serviceOrderSubmitOutput:
serviceOrderSubmitOutputs){
System.debug('Service Order Id: '+serviceOrderSubmitOutput.serviceOrderId);
System.debug('Success?: '+serviceOrderSubmitOutput.isSuccess);
System.debug('Response Messages: '+serviceOrderSubmitOutput.responseMessages);
}
}
COA_ServiceOrderSubmit Methods
COA_ServiceOrderSubmitInput Class
Wrapper class for input parameters passed to the submit operation.
COA_ServiceOrderSubmitOutput Class
Wrapper class for output parameters returned from the submit operation.
COA_ServiceOrderSubmit Methods
The following are methods for COA_ServiceOrderSubmit.
submit(serviceOrderSubmitInput)
Provides an entry point for submitting orders to Salesforce Partner Operations.
submit(serviceOrderSubmitInput)
Provides an entry point for submitting orders to Salesforce Partner Operations.
Signature
global static List<COA_ServiceOrderSubmit.COA_ServiceOrderSubmitOutput>
submit(List<COA_ServiceOrderSubmit.COA_ServiceOrderSubmitInput> serviceOrderSubmitInput)
178
CHANNEL_ORDERS NamespaceManage Orders
Parameters
serviceOrderSubmitInput
Type: List<COA_ServiceOrderSubmit.COA_ServiceOrderSubmitInput>
List of wrapper classes to pass as input for the submit operation
Return Value
Type: List<COA_ServiceOrderSubmit.COA_ServiceOrderSubmitOutput>
COA_ServiceOrderSubmitInput Class
Wrapper class for input parameters passed to the submit operation.
Namespace
CHANNEL_ORDERS
COA_ServiceOrderSubmitInput Properties
COA_ServiceOrderSubmitInput Properties
The following are properties for COA_ServiceOrderSubmitInput.
serviceOrderId
Specifies the ID of the order you are submitting. This field is required.
serviceOrderId
Specifies the ID of the order you are submitting. This field is required.
Signature
global Id serviceOrderId;
Property Value
Type: Id
COA_ServiceOrderSubmitOutput Class
Wrapper class for output parameters returned from the submit operation.
Namespace
CHANNEL_ORDERS
COA_ServiceOrderSubmitOutput Properties
179
CHANNEL_ORDERS NamespaceManage Orders
COA_ServiceOrderSubmitOutput Properties
The following are properties for COA__ServiceOrderSubmitOutput.
isSuccess
Indicates the success of the submit operation. If true, the order was successfully submitted.
responseMessages
Holds response messages generated by the submit operation.
serviceOrderId
References the order ID passed in by the submit operation.
isSuccess
Indicates the success of the submit operation. If true, the order was successfully submitted.
Signature
global Boolean isSuccess;
Property Value
Type: Boolean
responseMessages
Holds response messages generated by the submit operation.
Signature
global List<String> responseMessages;
Property Value
Type: List<String>
serviceOrderId
References the order ID passed in by the submit operation.
Signature
global Id serviceOrderId;
Property Value
Type: Id
COA_ServiceOrderEdit Class
Edit orders that you’ve submitted to Salesforce Partner Operations.
180
CHANNEL_ORDERS NamespaceManage Orders

Namespace
CHANNEL_ORDERS
Usage
The COA_ServiceOrderEdit class contains a single @InvocableMethod for editing orders that have been submitted to Salesforce
Partner Operations but haven’t been processed. For annotation information, see the Apex Developer Guide.
Example
This example receives a list of service orders that have been edited, submits them, and returns a list of outputs from the edit operation.
public static void editOrders(List<Service_Order__c> serviceOrders){
List<COA_ServiceOrderEdit.COA_ServiceOrderEditInput> serviceOrderEditInput = new
List<COA_ServiceOrderEdit.COA_ServiceOrderEditInput>();
for(Service_Order__c serviceOrder: serviceOrders){
COA_ServiceOrderEdit.COA_ServiceOrderEditInput input = new
COA_ServiceOrderEdit.COA_ServiceOrderEditInput();
input.serviceOrderId = serviceOrder.Id;
serviceOrderEditInput.add(input);
}
List<COA_ServiceOrderEdit.COA_ServiceOrderEditOutput> serviceOrderEditOutputs =
COA_ServiceOrderEdit.edit(serviceOrderEditInput);
for(COA_ServiceOrderEdit.COA_ServiceOrderEditOutput serviceOrderEditOutput:
serviceOrderEditOutputs){
System.debug('Service Order Id: '+serviceOrderEditOutput.serviceOrderId);
System.debug('Success?: '+serviceOrderEditOutput.isSuccess);
System.debug('Response Messages: '+serviceOrderEditOutput.responseMessages);
}
}
COA_ServiceOrderEdit Methods
COA_ServiceOrderEditInput Class
Wrapper class for input parameters passed to the edit operation.
COA_ServiceOrderEditOutput Class
Wrapper class for output parameters returned from the edit operation.
COA_ServiceOrderEdit Methods
The following are methods for COA_ServiceOrderEdit.
edit(serviceOrderEditInput)
Provides an entry point to edit orders that you’ve submitted to Salesforce Partner Operations. You can edit only orders that haven’t
been processed.
181
CHANNEL_ORDERS NamespaceManage Orders
edit(serviceOrderEditInput)
Provides an entry point to edit orders that you’ve submitted to Salesforce Partner Operations. You can edit only orders that haven’t been
processed.
Signature
global static List<COA_ServiceOrderEdit.COA_ServiceOrderEditOutput>
edit(List<COA_ServiceOrderEdit.COA_ServiceOrderEditInput> serviceOrderEditInput)
Parameters
serviceOrderEditInput
Type: List<COA_ServiceOrderEdit.COA_ServiceOrderEditInput>
List of wrapper classes to pass as input for the edit operation
Return Value
Type: List<COA_ServiceOrderEdit.COA_ServiceOrderEditOutput>
COA_ServiceOrderEditInput Class
Wrapper class for input parameters passed to the edit operation.
Namespace
CHANNEL_ORDERS
COA_ServiceOrderEditInput Properties
COA_ServiceOrderEditInput Properties
The following are properties for COA_ServiceOrderEditInput.
serviceOrderId
Specifies the ID of the order you are editing. This field is required.
serviceOrderId
Specifies the ID of the order you are editing. This field is required.
Signature
global Id serviceOrderId;
Property Value
Type: Id
182
CHANNEL_ORDERS NamespaceManage Orders
COA_ServiceOrderEditOutput Class
Wrapper class for output parameters returned from the edit operation.
Namespace
CHANNEL_ORDERS
COA_ServiceOrderEditOutput Properties
COA_ServiceOrderEditOutput Properties
The following are properties for COA_ServiceOrderEditOutput.
isSuccess
Indicates the success of the edit operation. If true, the order was successfully edited.
responseMessages
Holds response messages generated by the edit operation.
serviceOrderId
References the order ID passed in by the edit operation.
isSuccess
Indicates the success of the edit operation. If true, the order was successfully edited.
Signature
global Boolean isSuccess;
Property Value
Type: Boolean
responseMessages
Holds response messages generated by the edit operation.
Signature
global List<String> responseMessages;
Property Value
Type: List<String>
serviceOrderId
References the order ID passed in by the edit operation.
183
CHANNEL_ORDERS NamespaceManage Orders

Signature
global Id serviceOrderId;
Property Value
Type: Id
COA_ServiceOrderRecall Class
Recall orders that you’ve submitted to Salesforce Partner Operations.
Namespace
CHANNEL_ORDERS
Usage
The COA_ServiceOrderRecall class contains a single @InvocableMethod for recalling orders that have been submitted to Salesforce
Partner Operations but haven’t yet been processed. When you recall an order, it’s removed from the processing queue and isn’t activated.
For annotation information, see the Apex Developer Guide.
Example
This example receives a list of service orders, recalls them, and returns a list of outputs from the recall operation.
public static void recallOrders(List<Service_Order__c> serviceOrders){
List<COA_ServiceOrderRecall.COA_ServiceOrderRecallInput> serviceOrderRecallInput
= new List<COA_ServiceOrderRecall.COA_ServiceOrderRecallInput>();
for(Service_Order__c serviceOrder: serviceOrders){
COA_ServiceOrderRecall.COA_ServiceOrderRecallInput input = new
COA_ServiceOrderRecall.COA_ServiceOrderRecallInput();
input.serviceOrderId = serviceOrder.Id;
serviceOrderRecallInput.add(input);
}
List<COA_ServiceOrderRecall.COA_ServiceOrderRecallOutput> serviceOrderRecallOutputs
= COA_ServiceOrderRecall.recall(serviceOrderRecallInput);
for(COA_ServiceOrderRecall.COA_ServiceOrderRecallOutput serviceOrderRecallOutput:
serviceOrderRecallOutputs){
System.debug('Service Order Id: '+serviceOrderRecallOutput.serviceOrderId);
System.debug('Success?: '+serviceOrderRecallOutput.isSuccess);
System.debug('Response Messages: '+serviceOrderRecallOutput.responseMessages);
}
}
COA_ServiceOrderRecall Methods
COA_ServiceOrderRecallInput Class
Wrapper class for input parameters passed to the recall operation.
184
CHANNEL_ORDERS NamespaceManage Orders
COA_ServiceOrderRecallOutput Class
Wrapper class for output parameters returned from the recall operation.
COA_ServiceOrderRecall Methods
The following are methods for COA_ServiceOrderRecall.
recall(serviceOrderRecallInput)
Provides an entry point to recall orders that you’ve submitted to Salesforce Partner Operations. You can recall only orders that haven’t
been processed.
recall(serviceOrderRecallInput)
Provides an entry point to recall orders that you’ve submitted to Salesforce Partner Operations. You can recall only orders that haven’t
been processed.
Signature
global static List<COA_ServiceOrderRecall.COA_ServiceOrderRecallOutput>
recall(List<COA_ServiceOrderRecall.COA_ServiceOrderRecallInput> serviceOrderRecallInput)
Parameters
serviceOrderRecallInput
Type: List<COA_ServiceOrderRecall.COA_ServiceOrderRecallInput>
List of wrapper classes to pass as input for the recall operation
Return Value
Type: List<COA__ServiceOrderRecall.COA__ServiceOrderRecallOutput>
COA_ServiceOrderRecallInput Class
Wrapper class for input parameters passed to the recall operation.
Namespace
CHANNEL_ORDERS
COA_ServiceOrderRecallInput Properties
COA_ServiceOrderRecallInput Properties
The following are properties for COA_ServiceOrderRecallInput.
serviceOrderId
Specifies the ID of the order you are recalling. This field is required.
185
CHANNEL_ORDERS NamespaceManage Orders
serviceOrderId
Specifies the ID of the order you are recalling. This field is required.
Signature
global Id serviceOrderId;
Property Value
Type: Id
COA_ServiceOrderRecallOutput Class
Wrapper class for output parameters returned from the recall operation.
Namespace
CHANNEL_ORDERS
COA_ServiceOrderRecallOutput Properties
COA_ServiceOrderRecallOutput Properties
The following are properties for COA_ServiceOrderRecallOutput.
isSuccess
Indicates the success of the recall operation. If true, the order was successfully recalled.
responseMessages
Holds response messages generated by the recall operation.
serviceOrderId
References the order ID passed in by the recall operation.
isSuccess
Indicates the success of the recall operation. If true, the order was successfully recalled.
Signature
global Boolean isSuccess;
Property Value
Type: Boolean
responseMessages
Holds response messages generated by the recall operation.
186
CHANNEL_ORDERS NamespaceManage Orders

Signature
global List<String> responseMessages;
Property Value
Type: List<String>
serviceOrderId
References the order ID passed in by the recall operation.
Signature
global Id serviceOrderId;
Property Value
Type: Id
COA_ServiceOrderClone Class
Clone an existing order in the org where the Channel Order App (COA) is installed.
Note: Only fields that you have permission to create are cloned. DML errors can occur if you don’t have sufficient privileges.
Namespace
CHANNEL_ORDERS
Usage
The COA_ServiceOrderClone class contains a single @InvocableMethod to clone orders and, optionally, associated line items. For
annotation information, see the Apex Developer Guide.
Example
This example receives a list of service orders, clones them, and returns a list of outputs from the clone operation.
public static void cloneOrders(List<Service_Order__c> serviceOrders){
List<COA_ServiceOrderClone.COA_ServiceOrderCloneInput> serviceOrderCloneInput =
new List<COA_ServiceOrderClone.COA_ServiceOrderCloneInput>();
for(Service_Order__c serviceOrder: serviceOrders){
COA_ServiceOrderClone.COA_ServiceOrderCloneInput input = new
COA_ServiceOrderClone.COA_ServiceOrderCloneInput();
input.serviceOrderId = serviceOrder.Id;
input.cloneProducts = true;
serviceOrderCloneInput.add(input);
}
List<COA_ServiceOrderClone.COA_ServiceOrderCloneOutput> serviceOrderCloneOutputs
187
CHANNEL_ORDERS NamespaceManage Orders

= COA_ServiceOrderClone.clone(serviceOrderCloneInput);
//Further processing of serviceOrderCloneOutputs
}
COA_ServiceOrderClone Methods
COA_ServiceOrderCloneInput Class
Wrapper class for input parameters passed to the clone operation.
COA_ServiceOrderCloneOutput Class
Wrapper class for output parameters returned from the clone operation.
COA_ServiceOrderClone Methods
The following are methods for COA_ServiceOrderClone.
clone(serviceOrderCloneInput)
Provides an entry point to clone orders in your org and, optionally, associated line items.
clone(serviceOrderCloneInput)
Provides an entry point to clone orders in your org and, optionally, associated line items.
Signature
global static List<COA_ServiceOrderClone.COA_ServiceOrderCloneOutput>
edit(List<COA_ServiceOrderClone.COA_ServiceOrderCloneInput> serviceOrderCloneInput)
Parameters
serviceOrderCloneInput
Type: List<COA_ServiceOrderClone.COA_ServiceOrderCloneInput>
List of wrapper classes to pass as input for the clone operation
Return Value
Type: List<COA__ServiceOrderClone.COA__ServiceOrderCloneOutput>
COA_ServiceOrderCloneInput Class
Wrapper class for input parameters passed to the clone operation.
Namespace
CHANNEL_ORDERS
COA_ServiceOrderCloneInput Properties
188
CHANNEL_ORDERS NamespaceManage Orders
COA_ServiceOrderCloneInput Properties
The following are properties for COA_ServiceOrderCloneInput.
serviceOrderId
Specifies the ID of the order you are cloning. This field is required.
cloneProducts
Indicates whether to clone the original order’s line items. If true, the line items are cloned. This field is required.
serviceOrderId
Specifies the ID of the order you are cloning. This field is required.
Signature
global Id serviceOrderId;
Property Value
Type: Id
cloneProducts
Indicates whether to clone the original order’s line items. If true, the line items are cloned. This field is required.
Signature
global Boolean cloneProducts;
Property Value
Type: Boolean
COA_ServiceOrderCloneOutput Class
Wrapper class for output parameters returned from the clone operation.
Namespace
CHANNEL_ORDERS
COA_ServiceOrderCloneOutput Properties
COA_ServiceOrderCloneOutput Properties
The following are properties for COA__ServiceOrderClone.COA__ServiceOrderCloneOutput.
isSuccess
Indicates the success of the clone operation. If true, the order was successfully recalled.
189
CHANNEL_ORDERS NamespaceManage Orders
responseMessages
Holds response messages generated by the clone operation.
originalServiceOrderId
Specifies the ID of the original order that you cloned.
cloneServiceOrderId
Specifies the ID of the newly created clone order.
isSuccess
Indicates the success of the clone operation. If true, the order was successfully recalled.
Signature
global Boolean isSuccess;
Property Value
Type: Boolean
responseMessages
Holds response messages generated by the clone operation.
Signature
global List<String> responseMessages;
Property Value
Type: List<String>
originalServiceOrderId
Specifies the ID of the original order that you cloned.
Signature
global Id originalServiceOrderId;
Property Value
Type: Id
cloneServiceOrderId
Specifies the ID of the newly created clone order.
Signature
global Id cloneServiceOrderId;
190
CHANNEL_ORDERS NamespaceManage Orders

Property Value
Type: Id
Service Order
Represents an order that you’re submitting to Salesforce Partner Operations for processing and activation.
Note: Field names are prefixed with CHANNEL_ORDERS__ unless otherwise noted.
When you submit an order with the Channel Order App API, include the following fields.
Fields
DetailsField
Type
boolean
Label
Created with New COA
Properties
Create, Defaulted on create, Filter, Group, Sort, Update
Name
Created_with_new_COA__c
Description
Indicates that you’re using the latest version of the Channel Order App (COA). To
ensure that your order is processed, check this field.
Type
reference
Label
Contract
Properties
Create, Filter, Group, Nillable, Sort, Update
Name
Partner_Contract_Rules__c
Description
Lookup to the related contract terms record. This field is required.
Type
reference
Label
Customer Name
Properties
Create, Filter, Group, Nillable, Sort, Update
Name
Customer__c
Description
Lookup to a customer record. Specify an existing customer record. You can’t populate
customer details using the API. This field is required.
Type
date
Label
Date Partner Received Customer Order
Properties
Create, Filter, Group, Nillable, Sort, Update
Name
Date_Partner_Received_Customer_Order__c
Description
Date you received the order from the customer. This field is required.
191
Service OrderManage Orders

DetailsField
Type
date
Label
Date Customer Accepted SFDC Service
Agreement Properties
Create, Filter, Group, Nillable, Sort, UpdateName
Date_Customer_Accepted_SFDC_Svc_Agrmnt__c Description
Date the customer accepted the Salesforce service agreement. This field is required
for OEM contracts.
Type
picklist
Label
I Certify a Corresponding Order is Rec’d
Properties
Create, Filter, Group, Nillable, Sort, Update
Name
I_certify__c
Description
Confirmation that the order was received. Possible values are Yes and No. This field
is required.
Type
picklist
Label
Order Type
Properties
Create, Filter, Group, Nillable, Sort, Update
Name
Order_Type__c
Description
The type of order that you’re submitting for processing and activation. Possible values
are Initial, Add-On, Reduction, Cancellation Order, Upgrade
- Partner App, and Upgrade - Org Edition. Specify Upgrade -
Partner App for a renewal order. Specify Upgrade - Org Edition for
an upgrade order. This field is required.
Type
picklist
Label
Service Order Status
Properties
Create, Defaulted on create, Filter, Group, Nillable, Sort, Update
Name
Service_Order_Status__c
Description
Status of the order. Possible values are Draft, Submitted, Received, In
Process, Error, Activated, and Provisioned. You can submit only
orders with a status of Draft.
Type
date
Label
Service Start Date
Properties
Create, Filter, Group, Sort, Update
Name
Service_Start_Date__c
192
Service OrderManage Orders

DetailsField
Description
Date to activate or provision the customer’s order. You can specify today’s date or a
date in the future. This field is required.
Service Order Detail
Represents an instance of a product on a service order.
Note: Field names are prefixed with CHANNEL_ORDERS__ unless otherwise noted.
When you submit an order with the Channel Order App API, include the following fields.
Fields
DetailsField Name
Type
string
Label
App
Properties
Create, Filter, Group, Nillable, Sort
Name
Application__c
Description
Name of the app associated with the product.
Type
double
Label
Billing Frequency
Properties
Create, Filter, Nillable, Sort, Update
Name
pc_Billing_Frequency__c
Description
How often the customer is billed per year. This value must match your Salesforce contract,
unless you’ve been granted override permissions.
Type
double
Label
Cancellation Terms (days)
Properties
Create, Filter, Nillable, Sort, Update
Name
pc_Cancellation_Terms__c
Description
Number of days the customer has to cancel the contract. This value must match your
Salesforce contract, unless you’ve been granted override permissions.
Type
picklist
Label
Contract Auto Renew
193
Service Order DetailManage Orders

DetailsField Name
Properties
Create, Filter, Group, Nillable, Sort, Update
Name
pc_Contract_Auto_Renew__c
Description
Whether the contract automatically renews at the end of the term. Possible values are Yes
and No. This value must match your Salesforce contract, unless you’ve been granted override
permissions.
Type
double
Label
Contract Length
Properties
Create, Filter, Nillable, Sort, Update
Name
pc_Contract_Length__c
Description
Length of the contract in months. This value must match your Salesforce contract, unless
you’ve been granted override permissions.
Type
string
Label
Currency
Properties
Filter, Nillable, Sort
Name
Currency__c
Description
The default contract currency from the contract terms associated with this order. Read-only.
Type
double
Label
Customer Price
Properties
Create, Filter, Nillable, Sort, Update
Name
Customer_Price_Per_Month__c
Description
Price per unit per month. This field is required for PNR products.
Type
double
Label
Fixed Price
Properties
Create, Filter, Nillable, Sort, Update
Name
pc_Fixed_Price__c
Description
Fixed price of the product at the time the order was created. This field must be explicitly set
when using the API.
Type
reference
Label
Partner Contract Term
Properties
Create, Filter, Group, Nillable, Sort, Update
Name
pc_Partner_Contract_Term__c
194
Service Order DetailManage Orders

DetailsField Name
Description
Lookup to the related contract terms record.
Type
double
Label
PNR %
Properties
Create, Filter, Nillable, Sort, Update
Name
pc_PNR__c
Description
Percent net revenue of the product at the time the order was created. This field must be
explicitly set when using the API.
Type
picklist
Label
Pricing
Properties
Create, Filter, Group, Nillable, Sort, Update
Name
pc_Pricing_Type__c
Description
Pricing model of the product. Possible values are Fixed and PNR. This field must be
explicitly set when using the API.
Type
reference
Label
Product
Properties
Create, Filter, Group, Nillable, Sort, Update
Name
Product_Name__c
Description
Lookup to the related product catalog record.
Type
string
Label
Product ID
Properties
Create, Filter, Group, Nillable, Sort, Update
Name
pc_Product_ID__c
Description
ID of the product. This field must be explicitly set when using the API.
Type
double
Label
Renewal Terms (months)
Properties
Create, Filter, Nillable, Sort, Update
Name
pc_Renewal_Terms__c
Description
Renewal term in months. This value must match your Salesforce contract, unless you’ve been
granted override permissions.
195
Service Order DetailManage Orders

DetailsField Name
Type
reference
Label
Service Order
Properties
Create, Filter, Group, Sort
Name
Partner_Order__c
Description
Lookup to the related service order record.
Type
string
Label
SFDC Invoice Description
Properties
Create, Filter, Group, Nillable, Sort, Update
Name
Product_Line_Description__c
Description
Contains additional invoice details for the product or order. This field is optional.
Type
double
Label
Total Quantity
Properties
Create, Filter, Nillable, Sort, Update
Name
Quantity__c
Description
Number of product catalogs on the service order.
Partner Order Submit API
Send orders to Salesforce immediately or asynchronously using the Partner Order Submit API. The API is available in version 1.39 and
earlier of the Channel Order App (COA).
Note: In COA v2.0 and later, the Channel Order Apex API replaces the Partner Order Submit API. We encourage you to migrate
integrations with the Partner Order Submit API to the Channel Order Apex API.
Syntax
channel_orders.ServiceOrderProcessor.sendOrder()
channel_orders.ServiceOrderProcessor.sendOrderAsync()
Note: When you submit an order using sendOrder or sendOrderAsync, include an order ID or set of order IDs as the
argument. For example, channel_orders.ServiceOrderProcessor.sendOrder(orderId).
Usage
Use sendOrderAsync when you want to create or update multiple orders and send them in the same transaction. See the example
in this section for more details.
196
Partner Order Submit APIManage Orders
Rules and Guidelines
This is an Apex implementation, so all Apex usage rules and limits apply. Salesforce supports only one order per call.
Use the Partner Submit API to send an order after it has been created using a valid Service Order ID. You can create Service Order and
Service Order Detail records using the Channel Order App, data loading, or automated processing.
Each order must include the fields listed on the Service Order and Service Order Detail objects.
Methods
The ServiceOrderProcessor object supports the following methods.
DescriptionArgumentsName
Submit an order with a single ID immediately.IDsendOrder
Submit an order with a set of IDs immediately.Set of IDssendOrder
Submit an order with a single ID asynchronously (@future).IDsendOrderAsync
Submit an order with a set of IDs asynchronously
(@future).
Set of IDssendOrderAsync
Example: Batching on the Partner Order Submit API
You can only invoke ServiceOrderProcessor once per Apex transaction. If you pass a set of IDs to sendOrder or sendOrderAsync,
the maximum set size is 5. This example uses a batch job to work around this limitation.
In this example, if you have 100 orders in Draft status, the code creates one batch job with 100 executions, because only one record is
processed per execution.
//Batch Apex class
global class COABatchClass implements Database.batchable<sObject>, Database.AllowsCallouts,
Database.Stateful{
final String DRAFT_STATUS = 'Draft';
global final String query =
'select Id, CHANNEL_ORDERS__Service_Order_Status__c ' +
' from CHANNEL_ORDERS__Service_Order__c where CHANNEL_ORDERS__Service_Order_Status__c
=: DRAFT_STATUS';
global Database.QueryLocator start(Database.BatchableContext BC){
return Database.getQueryLocator(query);
}
global void execute(Database.BatchableContext info, List<CHANNEL_ORDERS__Service_Order__c>
scope){
for(CHANNEL_ORDERS__Service_Order__c s : scope){
CHANNEL_ORDERS.ServiceOrderProcessor.sendOrder(s.Id);
}
}
global void finish(Database.BatchableContext BC){}
}
197
Partner Order Submit APIManage Orders

//Batch call
Id batchInstanceId = Database.executeBatch(new COABatchClass(), 1);
198
Partner Order Submit APIManage Orders

CHAPTER 8 Managing Licenses
If you have installed the License Management App (LMA) you can track licenses and leads, and provide
administrative support for your customers. These topics are covered in detail in the following sections.
In this chapter ...
•License
Management App Note that AppExchange provides a standard mechanism for presenting a license agreement to the
installer and requiring acceptance of this agreement before continuing with the installation. If you want
•Get Started with the
License
Management App
to require an agreement, paste the text of your license agreement in the License Agreement
text field on the app listing page on AppExchange directory.
If your app requires a more interactive license negotiation, make sure your About tab splash page clearly
details the required end user license agreement and states your preferred process for getting started. In
all cases, Salesforce includes a disclaimer that limits our liability for the app
•Manage Leads and
Licenses for Your
Offering
•Troubleshoot the
License
Management App
•License
Management App
FAQ
199
License Management App
EDITIONS
Available in: both Salesforce
Classic and Lightning
Experience
Available in: Enterprise,
Performance, Unlimited,
and Developer Editions
The License Management App (LMA) lets you manage leads and licenses for your AppExchange
offerings. By integrating the LMA into your sales and marketing processes, you can better engage
with prospects, retain existing customers, and grow your ISV business.
Note: The LMA is available in English only.
The LMA is available to eligible Salesforce partners. For more information on the Partner Program,
including eligibility requirements, visit www.salesforce.com/partners.
How Does the License Management App Work?
Each time a customer installs your packaged offering, the License Management App (LMA)
creates lead and license records. To use the LMA effectively, it’s important to understand how that process works.
Integrate the License Management App into Your Business Processes
Our most successful partners don’t just use the License Management App (LMA) to manage leads and licenses. Instead, they integrate
the LMA into their existing business processes and with other Salesforce tools. Here are some examples of how you can use the LMA
to grow your business and retain customers.
Best Practices for the License Management App
Follow these guidelines and best practices when you use the License Management App (LMA).
How Does the License Management App Work?
Each time a customer installs your packaged offering, the License Management App (LMA) creates lead and license records. To use the
LMA effectively, it’s important to understand how that process works.
Packages, Leads, and Licenses
The key objects in the LMA are packages, leads, and licenses.
•Packages are container for apps or Lightning components and can be either managed or unmanaged. In the LMA, packages refer
to managed packages that have been uploaded to AppExchange. Packages can have one or more versions, and each package version
can have multiple licenses.
•Leads give you details about who installed your offering, such as the installer’s name, company, and email address. Leads generated
by the LMA are just like the ones you use elsewhere in Salesforce, except the lead source is Package Installation. When you set up
the LMA, you designate a lead manager in your org to receive the new leads. You can manually convert leads into accounts and
contacts in the LMA. The license is then associated with the converted account and contact.
•Licenses give you control over how many users in the customer’s org can access your offering and for how long. Licenses are unique
to the LMA, and each license has a direct relationship with a lead.
How Leads and Licenses Are Created
Lead and license records are the end result of a process that involves, you, the customer, and the LMA. Here’s how the process unfolds,
starting with the creation of your package.
200
License Management AppManaging Licenses
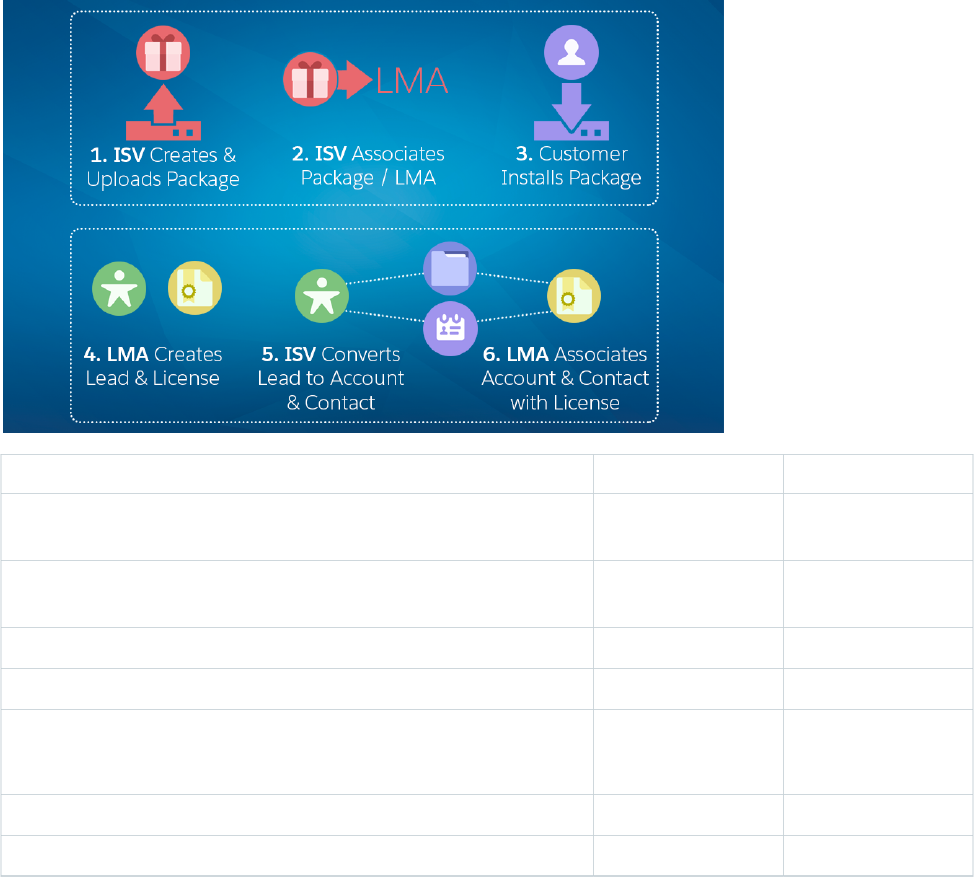
Where This HappensWho Does ThisStep
Your Developer Edition
org
You (ISV partner)[1] Your offering is packaged, and a version is uploaded to the AppExchange.
The Partner CommunityYou (ISV partner)[2] Your package version is associated with the LMA, and default license values
are set.
Any compatible orgCustomer or prospect[3] Your offering is installed as part of a purchase or trial.
Your business orgThe LMA[4] A lead record is created with the customer’s name, company, and email address.
Your business org
The customer’s org
The LMA[4] License records are created according to the default values you specified.
Your business orgYou (ISV partner)[5] The lead record is converted to account and contact records.
Your business orgThe LMA[6] Account and contact records are associated with the license record.
LMA Packages
In the LMA, packages refer to managed packages that have been uploaded to the AppExchange for distribution. Packages can have
one or more versions, and each package version can have multiple licenses. Package version has a master-detail relationship with
a package. The package object is the root object for all information in the LMA.
LMA Licenses
Licenses give you control over how many users in the customer’s org can access your offering and for how long. Licenses are unique
to the LMA, and each license has a direct relationship with a lead. Licenses have lookup relationships with leads and package versions.
LMA Packages
In the LMA, packages refer to managed packages that have been uploaded to the AppExchange for distribution. Packages can have one
or more versions, and each package version can have multiple licenses. Package version has a master-detail relationship with a package.
The package object is the root object for all information in the LMA.
201
How Does the License Management App Work?Managing Licenses
In the LMA, from Packages, select a package name to view its details, including information about the org where you developed it. In
the Package Version related list, you can see all the uploaded and registered package versions on the AppExchange
Important: Don’t edit, delete, clone, or create packages, package versions, or licenses. These records are automatically created
and contain important information for tracking the licenses and packages in the License Management App. They can’t be repopulated.
Package Details
A package contains the following information.
DescriptionField
Defaults to the License Manager.Created By
The name of the org where you developed the package.Developer Name
The 18-character ID of the org where you developed the package.Developer Org ID
The name of the last user to modify this record, along with the date and time it was updated.Last Modified By
The most recent uploaded and registered version of the package. You enter this information
when uploading the package.
Latest Version
The owner of leads created when customers install your package. Lead Manager is
blank when the package record is created. If you don’t assign a lead manager, the License
Management App owns the lead.
Lead Manager
The License Management App. Don’t change this value.Owner
The 18-character GUID (Globally Unique ID) that identifies the package.Package ID
The name you specified when you created the package.Package Name
The date you uploaded this package to the AppExchange.Release Date
Package Version Details
A package version contains the following information.
DescriptionField
Indicates an early version of a managed package for testing by your customers. You specify
beta status when you upload the package to the AppExchange
Beta
Defaults to the License Management App.Created By
The name of the last user to modify this record, along with the date and time it was updated.Last Modified By
The package for which this is a package version.Package
The name you specified when you created the package.Package Version Name
The date you uploaded this package to the AppExchange.Release Date
The version, as specified during upload to the AppExchange.Version
The 18-character ID of this package version.Version ID
202
How Does the License Management App Work?Managing Licenses
LMA Licenses
Licenses give you control over how many users in the customer’s org can access your offering and for how long. Licenses are unique to
the LMA, and each license has a direct relationship with a lead. Licenses have lookup relationships with leads and package versions.
In the LMA, from Licenses, select a license record to view details including status, package version, owner, and install date.
Important: Don’t edit, delete, clone, or create packages, package versions, or licenses. These records are automatically created
and contain important information for tracking the licenses and packages in the License Management App. They can’t be repopulated.
License Details
A license contains the following information.
DescriptionField
The account for a converted lead.Account
The contact for a converted lead.Contact
Defaults to the License Manager.Created By
Displays the expiration date or Does not expire if the license does not expire. The
default is Does not expire.
Expiration Date
The last time Salesforce retrieved information about the installer’s org.Information Current As Of
The date the customer installed this package version.Install Date
The Salesforce instance where the installer’s org resides.Instance
The name of the last user to modify this record, along with the date and time it was updated.Last Modified By
The lead that the LMA created when the app was installed. A lead represents the user who
owns the license.
If you convert the lead into an opportunity, the lead name is retained but the lead record
no longer exists. If you click the link, a page states that the lead has been converted.
Lead
A number that represents an instance of a license. The number is incremented by one for
each new license.
License Name
Displays the number of licenses or Site License. The default is Site License.Licensed Seats
Indicates the type of license. Available values are Trial, Active, Suspended, and Uninstalled.License Status
Indicates whether the license is editable.License Type
The edition of the installer’s org.Org Edition
If the installer is using a trial org, the date when the trial expires.Org Expiration Date
The status of the installer’s org. Possible values include Trial or Active.Org Status
Always the License Management App. Don’t change this value.Owner
Links to the package version that is the parent of this license.Package Version
The version number of the installed package.Package Version Number
203
How Does the License Management App Work?Managing Licenses
DescriptionField
Indicates whether the license is for a package installed in a sandbox org.Sandbox
A globally unique 15-character ID representing the installer’s org.Subscriber Org ID
Displays the number of users who have a license to the package.
This field is blank if:
Used Licenses
•A customer uninstalled the package.
•Licensed Seats is set to Site License.
Limits
You can allocate up to 99,000,000 seats per subscriber license.
Integrate the License Management App into Your Business Processes
EDITIONS
Available in: both Salesforce
Classic and Lightning
Experience
Available in: Enterprise,
Performance, Unlimited,
and Developer Editions
Our most successful partners don’t just use the License Management App (LMA) to manage leads
and licenses. Instead, they integrate the LMA into their existing business processes and with other
Salesforce tools. Here are some examples of how you can use the LMA to grow your business and
retain customers.
Alert Sales Reps Before a License Expires
If you’re managing licenses for several offerings, it can be difficult to keep track of what expires and
when. If a license expires accidentally, you could even lose a customer. To help your customers
with renewals, set up a workflow rule to email a sales rep on your team before the license expires.
To automatically email the sales rep, follow these high level steps.
1. Create an email template for the notification.
2. Create a workflow rule with a filter that specifies enough time before the expiration date to discuss renewal options.
3. Associate the workflow rule with a workflow alert that sends an email to the appropriate team member or sales rep.
Notify Customer-Retention Specialists When an Offering Is Uninstalled
If a customer uninstalls your offering, find out why. By speaking to the customer, you have an opportunity to restore the business
relationship or receive feedback that helps you improve your offering.
To notify a customer-retention specialist on your team,follow these high level steps.
1. Create an email template for the notification.
2. Create a workflow rule with a filter that specifies that the License Status equals Uninstalled.
3. Associate the workflow rule with a workflow alert that sends an email to the retention specialist.
204
Integrate the License Management App into Your Business
Processes
Managing Licenses
Best Practices for the License Management App
EDITIONS
Available in: both Salesforce
Classic and Lightning
Experience
Available in: Enterprise,
Performance, Unlimited,
and Developer Editions
Follow these guidelines and best practices when you use the License Management App (LMA).
•Set up My Domain in the Salesforce org where the LMA is installed. A custom domain prevents
you from being logged out of your org when you use the Subscriber Support Console to help
customers troubleshoot issues. For more information, see “My Domain” in the Salesforce online
help.
•Create a list view filter for leads created by installed packages. The filter helps your team separate
subscriber-based leads from leads coming from other sources.
•Use the API to find licensed users. The isCurrentUserLicensed method determines
if a user has a license to a managed package. For more information, see the Force.com Apex
Code Developer's Guide.
•Don’t create workflow rules, triggers, or validation rules that require custom fields on the license or lead objects. Likewise, don’t
impose conditions on updating or creating license or lead records. These kinds of customizations prevent the LMA from working.
•Don’t create required custom fields on lead, license, package and package version objects.
•Don’t define before-create triggers or validation rules on lead, license, package, or package version objects.
Get Started with the License Management App
EDITIONS
Available in: both Salesforce
Classic and Lightning
Experience
Available in: Enterprise,
Performance, Unlimited,
and Developer Editions
To start managing leads and licenses with the License Management App (LMA), install the LMA in
your Salesforce org. Then associate at least one package that you’ve uploaded to the AppExchange
and configure the LMA.
Install the License Management App
Install the License Management App (LMA) in the production Salesforce environment where
you manage sales, billing, and marketing at your company. If you received a Partner Business
Org when you joined the Partner Program, the LMA is pre-installed there, so you can skip this
step.
Associate a Package with the License Management App
To receive lead and license records for an offering, you associate a package with the Salesforce org in which the License Management
App (LMA) is installed. Before you associate a package with the LMA, upload the package to the AppExchange. You can only manage
licenses for managed packages.
Configure the License Management App
After you associate a managed package with the LMA, assign a lead manager and set object permissions so that people on your
team can use the LMA.
Install the License Management App
USER PERMISSIONS
To install packages:
•“Download
AppExchange
Packages”
Install the License Management App (LMA) in the production Salesforce environment where you
manage sales, billing, and marketing at your company. If you received a Partner Business Org when
you joined the Partner Program, the LMA is pre-installed there, so you can skip this step.
Important: Don’t install the LMA in the Developer Edition org where you created a managed
package.
1. Log a case in the Partner Community requesting the LMA.
205
Best Practices for the License Management AppManaging Licenses

a. Log in to the Partner Community and go to the Support tab.
b. Select New Case.
c. Select License Management Application, and then select Create a Case.
d. For Subtopic, select Request LMA.
e. Enter the required information in the Description field, and then select Submit Case.
After Partner Operations reviews the case, you receive an email with an installation URL.
2. Log in to the org where you want to install the LMA, and then select the installation URL.
3. Choose which users can access the LMA, and then select Install.
4. Confirm that you have installed the LMA by opening the app launcher in Lightning Experience or app menu in Salesforce Classic. If
the installation was successful, License Management App appears in the list of available apps.
Associate a Package with the License Management App
USER PERMISSIONS
To manage licenses in the
Partner Community:
•“Manage Listings”
To receive lead and license records for an offering, you associate a package with the Salesforce org
in which the License Management App (LMA) is installed. Before you associate a package with the
LMA, upload the package to the AppExchange. You can only manage licenses for managed packages.
1. Log in to the Partner Community and go to the Publishing tab.
2. Note: If you’ve already linked your packaging org, you can skip this step.
Connect your packaging org to the publishing console.
a. On the Organizations tab, select Connect Organization.
b. Enter the login credentials for the org in which you created the package, and then select Submit.
3. Associate your package with the LMA.
a. On the Packages tab, select the package you want to associate with the LMA, and then select Manage Licenses.
b. Select Register.
c. Enter the login credentials for the org in which the LMA is installed, and then select Submit.
d. Choose default license values for your offering, and then select Save.
It can take 30 minutes or more to associate a package record with the LMA.
You associate a managed package with the LMA only once. After a package is associated, the new versions that you create are automatically
linked to the LMA.
206
Associate a Package with the License Management AppManaging Licenses
Configure the License Management App
USER PERMISSIONS
To configure the LMA:
•System Administrator
profile
To edit licenses and
packages:
•“Read”
AND
“Edit”
To view licenses, packages,
and package versions:
•“Read”
After you associate a managed package with the LMA, assign a lead manager and set object
permissions so that people on your team can use the LMA.
1. Assign a lead manager. If you don’t assign a lead manager, you don’t receive the lead records
that are created when customers install your offering.
a. Select a package in the LMA.
b. Select Edit.
c. For Lead Manager, search for a user. In most cases, the lead manager is someone from your
sales team.
d. Select Save.
2. Set custom object permissions.
Note: Users with the System Administrator profile can create, modify, and delete these
objects by default because they have the “Modify All Data” permission.
Most users in your org don’t need any permissions. Users who view licenses need the “Read”
permission. Users who modify license records need “Read” and “Edit” permissions.
Licenses
Only users who assign the lead manager need “Edit” permission. Other users have either “Read”
permission or no permissions.
Packages
All users have “Read” permission or no permissions, because they don’t need to create, modify, or
delete these records.
Package Versions
3. Set field-level security in user profiles or permission sets.
Your settings depend on how you want to manage these fields for different users in your org.Licenses
Make all fields Read-Only.Packages
Make all fields Read-Only.Package Versions
4. To use the Modify License Visualforce page, override the Edit control on the license record.
5. Add related lists.
•Add the Licenses related list to the appropriate Lead page layouts. License managers can use this list to view the licenses
associated with a particular lead.
•Add the Licenses related list to the appropriate Account page layouts. Users can view this list and identify the licenses associated
with a particular account.
•Add the Licenses related list to the appropriate Contact page layouts. Users can view this list and identify the licenses associated
with a particular contact.
207
Configure the License Management AppManaging Licenses
Manage Leads and Licenses for Your Offering
EDITIONS
Available in: both Salesforce
Classic and Lightning
Experience
Available in: Enterprise,
Performance, Unlimited,
and Developer Editions
After you configure the LMA, you can change lead manager, modify license records, and refresh
licenses.
Modify a License Record in the License Management App
You can change a customer’s access to your offering by modifying a license record. For example,
increase or decrease the number of seats included with a license or change the expiration date.
Change the Lead Manager in the License Management App
You can change who receives leads created when a customer or prospect installs your offering
from the AppExchange. Usually, the lead manager is someone from your sales team. When
new leads are created in the License Management App (LMA), the Lead Owner field on
lead records defaults to the package’s lead manager. If you haven’t specified a lead manager, the lead owner defaults to the LMA.
Refresh Licenses for an Offering in the License Management App
Refresh licenses to sync license records for a package across all customer installations. Consider refreshing licenses if discrepancies
appear between the number of licenses in a customer’s org and the License Management App (LMA) or if you installed the LMA in
a new org.
Move the License Management App to Another Salesforce Org
By default, the License Management App (LMA) is installed in your Partner Business Org (PBO). Salesforce strongly recommends
managing licenses from your PBO. However, if your company chooses to use another org for ISV business processes, you can install
the LMA in that org.
Modify a License Record in the License Management App
USER PERMISSIONS
To edit licenses and
packages:
•“Read”
AND
“Edit”
You can change a customer’s access to your offering by modifying a license record. For example,
increase or decrease the number of seats included with a license or change the expiration date.
1. Go to a license record in the License Management App (LMA).
2. Select Modify License. If you don’t see Modify License, edit the page layout to add the control.
Warning: In Salesforce Classic and Lightning Experience, sometimes the license detail
page includes an Edit control. Don’t use this control—use Modify License instead.
3. Update field values as needed.
DescriptionField
Enter the last day that the customer can access your offering, or select Does not expire
if the license doesn’t expire.
Expiration
Enter the number of licensed seats, or select Site License to make your offering
available to all users in the customer’s org. You can allocate up to 99,000,000 seats.
Seats
Select a value from the drop-down list.Status
•Trial—Allows the customer to try your offering for up to 90 days. After the trial
license converts to an active license, it cannot return to a trial state.
•Active—Allows the customer to use your offering according to the license
agreement.
208
Manage Leads and Licenses for Your OfferingManaging Licenses
DescriptionField
•Suspended—Prohibits the customer from accessing your offering.
Note: When your offering is uninstalled, its status is set to Uninstalled, and the
license can’t be edited.
4. Select Save.
Change the Lead Manager in the License Management App
USER PERMISSIONS
To edit licenses and
packages:
•“Read”
AND
“Edit”
You can change who receives leads created when a customer or prospect installs your offering
from the AppExchange. Usually, the lead manager is someone from your sales team. When new
leads are created in the License Management App (LMA), the Lead Owner field on lead records
defaults to the package’s lead manager. If you haven’t specified a lead manager, the lead owner
defaults to the LMA.
1. Go to a package in the LMA. If you don’t see any packages, check your list view.
2. Select Edit, and then locate a user. Make sure that you’re selecting someone who has permission
to access license records in the LMA.
3. Select Save.
Refresh Licenses for an Offering in the License Management App
USER PERMISSIONS
To edit licenses and
packages:
•“Read”
AND
“Edit”
Refresh licenses to sync license records for a package across all customer installations. Consider
refreshing licenses if discrepancies appear between the number of licenses in a customer’s org and
the License Management App (LMA) or if you installed the LMA in a new org.
Note: You can refresh licenses for a package once per week.
1. Go to a package record in the LMA. If you don’t see any packages, check your list view.
2. Select Refresh Licenses. In Lightning Experience, you might need to select the drop-down
list to see this control.
3. Confirm that you want to refresh licenses for this package, and then select Refresh Licenses
again.
209
Change the Lead Manager in the License Management AppManaging Licenses
Move the License Management App to Another Salesforce Org
USER PERMISSIONS
To install packages:
•“Download
AppExchange
Packages”
To manage licenses in the
Partner Community:
•“Manage Listings”
To edit licenses and
packages:
•“Read”
AND
“Edit”
By default, the License Management App (LMA) is installed in your Partner Business Org (PBO).
Salesforce strongly recommends managing licenses from your PBO. However, if your company
chooses to use another org for ISV business processes, you can install the LMA in that org.
Important: When you move the LMA to a new org, you must manually re-associate your
packages and refresh the licenses. Your package and license records don’t move to the new
org.
1. Log a case to break the association between the LMA and the org where it’s currently installed.
a. Log in to the Partner Community and go to the Support tab.
b. Select New Case.
c. Select License Management Application, and then select Create a Case.
d. For Subtopic, select Other.
e. Enter the required information in the Description field, and then select Submit Case.
2. Install the LMA in the new org on page 205.
3. Associate your packages with the new org on page 206.
4. Refresh licenses for your packages on page 209.
Troubleshoot the License Management App
EDITIONS
Available in: both Salesforce
Classic and Lightning
Experience
Available in: Enterprise,
Performance, Unlimited,
and Developer Editions
The most frequent problems arise when leads and licenses aren’t created or a proxy user is
deactivated.
Leads and Licenses Aren’t Being Created
When a customer installs your package, leads or licenses are created. If they aren’t, check the
configuration in the org in which the LMA is installed. If you resolve the issue with one of these
recommendations, the licenses usually appear in the LMA after a few days.
Proxy User Has Deactivated Message
If a “proxy user has deactivated” message appears when editing a license in the LMA, a subscriber
org could be locked, deleted, or disabled. Here’s a list of things to check.
Leads and Licenses Aren’t Being Created
When a customer installs your package, leads or licenses are created. If they aren’t, check the configuration in the org in which the LMA
is installed. If you resolve the issue with one of these recommendations, the licenses usually appear in the LMA after a few days.
Did the customer really install the package?
When a customer selects Get it Now on your AppExchange listing, Salesforce counts this as an installation. However, the customer
can cancel the installation before it completed, or the installation could have failed. If the installation doesn’t finish, a license doesn’t
appear in the LMA.
Is State and Country picklist validation enabled?
If it is enabled, try disabling it. A known issue prevents leads from being created in the LMA if this feature is enabled. The issue occurs
if customers haven’t provided state and country values in their user profiles, or those values are incorrect.
210
Move the License Management App to Another Salesforce
Org
Managing Licenses

Does the lead or license object have a trigger?
Don’t use before_create or before_update triggers on leads and licenses in the LMA. Instead, use after_ triggers,
or remove all triggers. If a trigger fails, it can block license creation.
Does the lead or license record have a required custom field?
If yes, remove the requirement. The LMA doesn’t populate required custom field, so it can prevent licenses or leads from being
created.
Is the lead manager a valid, active user?
If not, the LMA can’t create leads and licenses.
Does the lead or license record have a validation rule?
Validation rules often block the creation of LMA lead or license records because the required field isn’t there.
Does the lead or license have a workflow rule?
Workflow rules sometimes prevent leads and licenses from being created. Remove the workflow rule.
Was the lead converted to an account?
When leads are converted to accounts, they are no longer leads.
Proxy User Has Deactivated Message
If a “proxy user has deactivated” message appears when editing a license in the LMA, a subscriber org could be locked, deleted, or
disabled. Here’s a list of things to check.
Is the org active?
Check to see if the customer deleted the org. If the org has been deleted, delete the corresponding license record.
Has the package been installed?
If the org is locked or the package has been uninstalled, the license record can’t be updated. Ask the customer to reinstall the package.
License Management App FAQ
EDITIONS
Available in: both Salesforce
Classic and Lightning
Experience
Available in: Enterprise,
Performance, Unlimited,
and Developer Editions
Answers to common questions about the License Management App (LMA).
Is the LMA compatible with Lightning Experience?
Can I install the LMA in a non-production Salesforce org?
Why can’t I see the Modify License button on my license records?
A customer installed my package before I associated it with the LMA. How can I manage the
license record?
Can I automate the assignment of licenses to users in the subscriber org?
Why aren’t leads and licenses being created in the LMA?
What happens when I decrease the number of available licenses below the current number of licensed users?
Is the LMA compatible with Lightning Experience?
Yes, both Salesforce Classic and Lightning Experience support the LMA.
211
Proxy User Has Deactivated MessageManaging Licenses
Can I install the LMA in a non-production Salesforce org?
By default, the LMA is installed in your Partner Business Org, a production environment that includes the ISV tools needed to run your
business. When the LMA is part of a production environment, you can fully integrate license management into your sales, billing, and
marketing processes. Our most successful partners make use of the LMA in their production orgs.
Additionally, some types of non-production environments, such as trial orgs, eventually expire. If this happens, your mission critical data
becomes temporarily inaccessible. For these reasons, Salesforce strongly discourages moving the LMA to a non-production org.
Why can’t I see the Modify License button on my license records?
You must add the Modify License button to the layout of your license detail page.
A customer installed my package before I associated it with the LMA. How
can I manage the license record?
Go to the package’s detail page in the LMA, and then select Refresh Licenses. A license record for this customer now appears.
Can I automate the assignment of licenses to users in the subscriber org?
Yes, you can use the API to assign or revoke licenses for managed packages installed in your Salesforce org. For more information, see
the PackageLicense and UserPackageLicense objects in the SOAP API Developer's Guide.
Why aren’t leads and licenses being created in the LMA?
Common reasons why leads and licenses aren’t created in the LMA include:
•You haven’t associated the package or package version with the LMA.
•Lead, license, package, or package version custom objects have mandatory custom fields. Try removing the mandatory custom fields.
•The lead manager is not a valid, active user.
•before_ triggers are preventing lead creation. Try removing the triggers, or use after_ triggers instead.
What happens when I decrease the number of available licenses below
the current number of licensed users?
Users in the customer’s org who already have access to your offering continue to have access. Their system administrator must manually
revoke the extra licenses. Until the admin revokes access, the license count remains negative.
212
Can I install the LMA in a non-production Salesforce org?Managing Licenses

CHAPTER 9 Provide a Free Trial
Free trials help you to reach a wider range of customers and maximize the adoption of your offering. It’s
not uncommon for partners to more than double their leads after enabling free trials. You have several
options for providing a free trial.
In this chapter ...
•Why Use Trialforce?
•Trialforce •From the AppExchange, by letting prospects install your app or component
•Set Up Trialforce •From the AppExchange, by configuring a test drive
•Provide a Free Trial
on the AppExchange •From the AppExchange, using Trialforce
•From your website, using Trialforce
•Provide a Free Trial
on Your Website Trialforce is a provisioning technology for Salesforce organizations that lets partners set up and manage
free trials of apps and components. Use Trialforce to configure a trial to your specifications, include
relevant sample data, and even customize the look and feel to reflect your company’s branding.
•Modify the Trial for
an Upgrade
Note: This feature is available to eligible partners. For more information on the Partner Program,
including eligibility requirements, visit www.salesforce.com/partners.
•Trialforce Best
Practices
•Creating Signups
using the API
•Trialforce FAQ
213

Why Use Trialforce?
Trialforce lets you provision a free trial of your offering quickly and easily. Each time a trial is provisioned, Trialforce creates a lead in the
License Management App, which helps you track usage and convert prospects into paying customers. With Trialforce, you can:
•Run your own marketing campaign to maximize customer reach and adoption.
•Customize your offering, including branding, functionality, design, data, and trial experience.
•Manage trials for multiple offerings, versions, and editions from one convenient place.
•Let customers, including non-admin users, try your app or component without logging in to their production environment.
Trialforce
A Trialforce setup consists of several parts. It’s important to understand these parts and the relationship between them before you start
using Trialforce.
Trialforce Management Organization (TMO)
The TMO is the starting point for setting up Trialforce and the central location for managing Trialforce after it’s set up. You must file
a case in the Partner Community to receive your TMO. The two tasks you perform in the TMO are create Trialforce source organizations
and define templates for custom branding.
Trialforce Source Organization (TSO)
You use the TSO to create a template for the trial orgs received by your customers. You create the TSO from your TMO. The tasks
you perform in a TSO are: install your offering, along with any sample data; specify branding by choosing from the templates you
created previously in the TMO; configure the TSO to be exactly as you want your customers to experience it; and generate a Trialforce
template, which becomes the basis for all trial organizations.
Trialforce Template
The template is a snapshot or exact copy of your TSO at a specific instance in time. You create it from a TSO after you’ve installed
your offering and made configuration changes. The Trialforce template is specified in the HTML page from which customers sign
up for trials. It defines the trial organization that is provisioned each time a customer signs up.
HTML Signup Form
This HTML form serves as the registration page on your website from which customers sign up for trials. You must file a case in the
Partner Community to get this form and then customize it with your company details. It is associated with the Trialforce template
you plan to use for trials. This ensures that each time a customer signs up for a trial on your website, they receive an organization
that is an exact copy of your chosen Trialforce template.
214
Why Use Trialforce?Provide a Free Trial
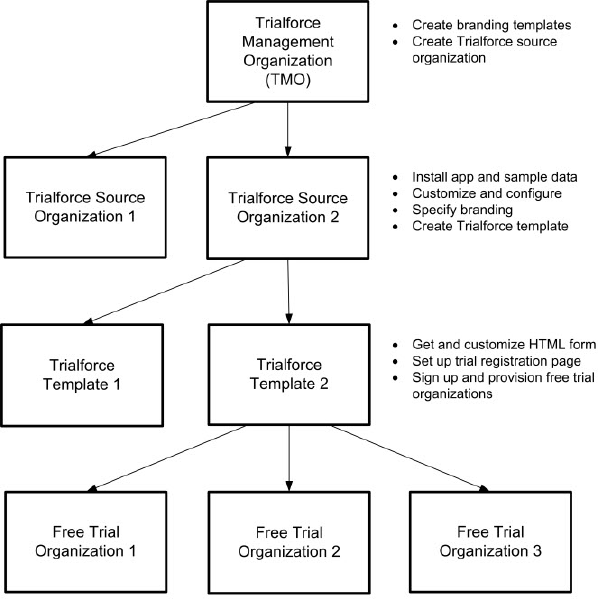
Relationship between organizations used to set up Trialforce
The TMO, TSOs, and Trialforce templates have a hierarchical relationship, as illustrated above.
•You can create multiple TSOs from a given TMO. For example, if you want to offer trials for two different apps, you would generate
two different TSOs from the same TMO, one for each app. This enables you to use the TMO as a central hub to manage the trials for
all Force.com apps or components produced by your company.
•You can create multiple Trialforce templates from the same TSO. For example, if you release a new version of your component after
you’ve started using Trialforce, you can install the upgraded version into the previous TSO and generate a new Trialforce template
from it. If you then update your HTML signup form to point to the new Trialforce template, all trial organizations created subsequently
have the new version of the package.
As a best practice, we recommend that you have one unique TMO for your company, one TSO for each app or component, and one
Trialforce template for each version or edition. Splitting up the configuration process across these different levels makes it easier to
maintain and update your trials. Then each time you change something, such as the version, its branding, or a configuration detail of
the trial organization, you only need to make the change at one level in the hierarchy. This minimizes the configuration steps involved
and makes it easy to concurrently manage trials for multiple products, versions, and editions.
After you’ve configured a TMO, TSO, and Trialforce template, choose how to provide trials to prospective customers:
•Using the AppExchange— Customers begin a trial of your offering directly from an AppExchange listing. This approach is ideal if
you’re looking for the quickest, easiest way to make a trial available because it requires only a few steps to configure.
•Using an HTML signup form— Customers begin a trial of your offering after filling in a customizable HTML signup form. Because
you can modify the form’s look and feel to match your own website, this approach is ideal for integrating the signup process into
your company’s web presence.
•Using the API— You provision a trial of your app or component programmatically using the SignupRequest API. This approach is
ideal if you’re looking to have full control of the signup process because it allows for advanced customization.
215
TrialforceProvide a Free Trial
Set Up Trialforce
EDITIONS
Available in: Salesforce
Classic
Available in: Developer
Edition
USER PERMISSIONS
To manage Trialforce:
•“Customize Application”
After you’ve built your offering and passed the AppExchange security review, follow these steps to
set up Trialforce.
Note: To enable Trialforce, you must first sign the ISVforce/OEM agreement.
1. Create your managed package.
2. Configure a License Management Organization (LMO) to manage customers’ access to apps
and components. If you’re an existing Salesforce user, install the License Management Application
(LMA) in your CRM organization (Enterprise Edition is required). If you’re new to the Partner
Program, the LMA is preinstalled in your partner business org.
3. Link a version with the LMO and set the license defaults. This step ensures that each time a
prospect creates a trial, the LMO receives a new lead and license record.
4. Request a Trialforce Management Organization (TMO).
5. Optionally, create a customized branded login page and branded emails in your TMO.
6. Create a Trialforce Source Organization (TSO) from your TMO.
7. Install your managed package in the TSO, and customize it as you want your prospects to experience it. You can apply custom
branding, load sample data, create custom profiles, and so on.
8. Create a new Trialforce template from the TSO.
9. Link the Trialforce template to the AppExchange.
10. Submit the Trialforce template for security review and get it approved.
You can now use this template to create free trials. For more information, see:
•Providing a free trial on AppExchange
•Providing a free trial on your website
•Providing a free trial using the API
Link a Package with Your License Management Organization
To receive lead and license records from customer installs, link a managed package to your License Management Organization (LMO),
the organization where the License Management App (LMA) is installed. You also specify default license settings for your offering during
this process. Default license values are used to set the Status, Expiration Date, and Seats fields on the license record in the LMA and in
the installer’s organization.
Note: When you link a package with an LMO, that package’s leads and licenses must be permanently managed out of the LMO.
You can’t migrate licenses to another organization.
1. Log in to the Partner Community.
2. On the Publishing page, click the Packages tab.
3. Find the package that you want to link, and click Manage Licenses.
4. Click Register.
5. Enter the login credentials for your LMO, and click Submit.
6. Select whether your default license is a free trial or active.
7. Enter the license length in number of days. If your license is free or doesn’t expire, select License does not expire.
216
Set Up TrialforceProvide a Free Trial
8. Enter the number of seats associated with your default license, or select License is site-wide to offer the license to all users in the
installer’s organization.
9. Click Save.
To verify that you linked the package successfully, log in to the LMO and click the Package Versions tab. After you link a package to
your LMO, all versions of that package are associated.
Request a Trialforce Management Org
EDITIONS
Available in: Salesforce
Classic
Available in: Developer
Edition
USER PERMISSIONS
To manage Trialforce:
•“Customize Application”
A Trialforce Management Org (TMO) lets you create and manage Trialforce Source Orgs (TSO) and
specify custom branding for your login page and emails. To receive a TMO, you must be a qualified
ISV partner, and your offering must have passed the AppExchange security review.
Note: The TMO is separate from your Partner Business Org and the Developer Edition org
where you built your offering.
1. Log in to the Partner Community and go to the Support tab.
2. Select New Case.
3. Select Trialforce, and then select Create a Case.
4. For Subtopic, select Trialforce Management Org.
5. Enter the required information in the Description field, and then select Submit Case.
Setting Up Custom Branding for Trialforce
EDITIONS
Available in: Salesforce
Classic
Available in: Developer
Edition
USER PERMISSIONS
To manage Trialforce:
•“Customize Application”
App developers using Trialforce to create new trials of their product can optionally set up a branded
login site and system emails. By branding these areas with your company’s look and feel, users of
your application are immersed in your brand from sign-up to login. Use custom branding for
non-CRM apps, not for apps that extend Salesforce CRM and require Salesforce standard objects,
such as Leads, Opportunities, and Cases.
A branded login page enables you to specify your login domain and login site.
•A login domain ends with .cloudforce.com, so if your company name is “mycompany,”
your login domain is mycompany.cloudforce.com.
•Your custom login site includes your text and company logo and mobile-friendly versions of
your login site.
Branded emails allow you to specify fields in system-generated emails so that your company name,
address, and other pertinent details are used in email correspondence. You can create multiple
branded email sets for different campaigns or customer segments.
Note: To configure branding, you must be logged in to a Trialforce Management Organization (TMO). To get your TMO, log a
case in the Partner Community. Branding is not available for Trialforce Source Orgs created in the Environment Hub.
217
Request a Trialforce Management OrgProvide a Free Trial
Creating Branded Emails
EDITIONS
Available in: Salesforce
Classic
Available in: Developer
Edition
USER PERMISSIONS
To manage Trialforce:
•“Customize Application”
You can customize the branding of the emails sent to subscribers of new trial organizations.
To create a branded email set:
1. Log in to your Trialforce Management Organization.
2. From Setup, enter Branding in the Quick Find box, select Branding, then click Email
Sets.
3. Click New Email Set or Edit next to an existing email set.
4. Enter a name for the email set and your company information.
5. In the Preview Emails area, click through the different types of generated emails and make sure
they read correctly.
Note: The login URL displayed in the preview will always be http://login.salesforce.com
even if you use a branded login page. These two processes are distinct.
6. Click Save.
7. If you're ready to make these emails available to your Trialforce Source Organization (TSO), click Publish. Otherwise your changes
are saved and you can publish later.
To assign a branded email set to your TSO:
1. From Setup, enter Source Organizations in the Quick Find box, then select Source Organizations.
2. Click Edit next to your TSO.
3. Select the email set.
4. Click Save.
5. Click Login if you want to see your branded login page in action.
Creating a Branded Login Page
EDITIONS
Available in: Salesforce
Classic
Available in: Developer
Edition
USER PERMISSIONS
To manage Trialforce:
•“Customize Application”
Customers typically log in to your app using the traditional login.salesforce.com site. A branded
login page enables you to customize this domain and parts of this login page so you can provide
a branded experience for your customers. Your custom login site includes your text and company
logo, and mobile-friendly versions of your login site as well.
To create a branded login page:
1. Log in to your Trialforce Management Organization.
2. From Setup, enter Login Site in the Quick Find box, then select Login Site.
3. Click Set Up Login Site.
4. Select a subdomain for your login site by providing a name in the field provided. Usually this
is the name of your company.
Note: A login domain ends with .cloudforce.com, so if your company name is
“mycompany,” your login domain is mycompany.cloudforce.com.
5. Check the availability of the domain and then accept the terms of use.
6. Click Save and Launch Editor.
7. Use the Login Brand Editor to change how your login page looks. For additional help using the editor, click Help for this Page.
218
Setting Up Custom Branding for TrialforceProvide a Free Trial
8. Click Save and Close.
9. If you're ready to make these changes available to your TSO, click Publish. Otherwise your changes are saved and you can publish
later.
Create a Trialforce Source Organization
EDITIONS
Available in: Salesforce
Classic
Available in: Developer
Edition
USER PERMISSIONS
To manage Trialforce:
•“Customize Application”
A Trialforce Source Organization (TSO) acts as the basis for a new trial org. After you create a TSO,
you install your package there. You then add data to give your prospects something to explore
when they first log in to the trial org.
You have two options for creating a TSO: You can use a Trialforce Management Organization (TMO)
or the Environment Hub. If you plan to brand your emails or login page, use a TMO. When you
create the TSO in a TMO, you also get a custom domain (My Domain). Here’s how to create a TSO
(Enterprise Edition) from a TMO.
Note: If you create a TSO from a TMO, it’s always an Enterprise Edition. To create a Professional
Edition TSO, create the TSO from the Environment Hub.
1. Log in to your TMO.
2. From Setup, enter Source Organizations in the Quick Find box, then select
Source Organizations.
3. Click New.
4. Enter a new username and email address for the administrator account.
5. Enter a name for the TSO. Optionally, specify the custom branding by choosing a branded email set or login site.
6. Click Create.
You can also create a TSO from the Environment Hub. When you use the Environment Hub, you can create an Enterprise Edition TSO or
a Professional Edition TSO.
1. Log in to the Environment Hub.
2. Click Create Org.
3. Keep the default, Purpose as Trialforce.
4. Keep the default for Create Using, Standard Edition.
5. Select Professional TSO or Enterprise TSO.
6. Enter the org name.
7. (Optional) Enter a unique name for the My Domain custom domain.
8. Enter a username and email address for the admin account.
9. Enter a name for the TSO.
10. Acknowledge that you’ve read the Master Subscription Agreement.
11. Click Create.
The TSO now appears in the Environment Hub.
You receive an email with the login details for your TSO. You can then log in to the TSO and install your package, along with sample
data and configurations. Optionally, you can also create:
•Custom profiles
•New users
219
Create a Trialforce Source OrganizationProvide a Free Trial
•Sample records
The goal is to configure the TSO exactly as you want your customers to experience it. You can then create a Trialforce template, which
is a snapshot or exact copy of your TSO at a specific point in time.
Note: Here are some considerations when working with a TSO.
•Always associate a managed package with the License Management Organization (LMO) before installing the offering in your
TSO. If you don’t follow that order, trial orgs provisioned from the TSO don’t generate leads or licenses in the LMO.
•Before creating a Trialforce template, ensure that the TSO admin has a license for the offering installed in the TSO.
•You can create multiple TSOs from your TMO, so you can set up trials for different products, each with its own configuration
and branding.
•All TSOs expire after one year. If you want to use the TSO for a longer period, log a case to request an extension.
Create a Trialforce Template
EDITIONS
Available in: Salesforce
Classic
Available in: Developer
Edition
USER PERMISSIONS
To manage Trialforce:
•“Customize Application”
A Trialforce template is a snapshot or exact copy of your Trialforce Source Organization (TSO) at a
given instance in time. Before you create the template, make sure that you’ve installed your package
into the TSO. Then, configure it exactly as you want your customers to experience it, with the
appropriate sample data, profiles, users, and records.
Note: You can create a Trialforce template only if your TSO is less than 256 MB.
1. Log in to your TSO.
2. From Setup, enter Trialforce in the Quick Find box, then select Trialforce.
3. Click New Trialforce Template.
4. Describe the template and whether to include data. The default option is fine for most cases.
5. Click Save.
You receive an email with the organization ID of the new template after it’s generated. You must
submit the template for review before you can use it to sign up trial organizations. Remember to generate a new template each time
you make updates to your TSO so that your trials always reflect the most recent state.
Each Trialforce template has a status with one of the following values.
In Progress
When a Trialforce template is first created, it always has this status. It then moves to either Success or Error status.
Success
The Trialforce template can be used to create trial organizations.
Error
The Trialforce template cannot be used because something has gone wrong and debugging is required.
Deleted
The Trialforce template is no longer available for use. Deleted templates are removed during system updates.
Link a Trialforce Template to the AppExchange
To offer a free trial with your app or component listing, link a Trialforce template to the AppExchange.
1. Log in to the Partner Community.
2. On the Publishing page, click the Organizations tab.
220
Create a Trialforce TemplateProvide a Free Trial
3. Click Connect Organization.
4. Enter the login credentials for the organization that contains the trial template. If you developed multiple trial templates in this
organization, they are all linked to the AppExchange.
5. Click Submit.
6. Optionally, click the Trial Templates tab to view the linked template and create a listing.
Submit a Trialforce Template for Security Review
To offer a trial on the AppExchange using Trialforce, your template must pass a security review. Before requesting a review, link the
organization containing your Trialforce template to the AppExchange.
Note: You can only request a review on a Trialforce template that has at least one package installed. You must own or license
the installed packages in the template and it should have already passed the security review.
1. Log in to the Partner Community.
2. On the Publishing page, click the Trial Templates tab.
3. Next to the template that you want reviewed, click Start Review.
You receive an email confirmation after you initiate the review and another email when the review is completed. The review is free for
partners and typically takes 2–3 days.
Provide a Free Trial on the AppExchange
To create trials on the AppExchange, your app or component must:
•Be a managed package
•Be managed via the License Management Application
•Autoprovision—that is, the user must not need to interact with you at any point to get the app or component up and running
•Have passed the security review
•Have passed the Trialforce template review
You can provide a free trial on the AppExchange in three ways.
•Using Trialforce
•By configuring a test drive
•By installing your app or component into an existing organization
Provide a Free Trial on the AppExchange Using Trialforce
Providing a free trial lets potential customers experience your offering before purchasing or subscribing.
Note: You must be an eligible partner to provide free trials. For more information on the Partner Program, including eligibility
requirements, visit www.salesforce.com/partners.
1. Create a Trialforce template with your offering installed and configured as you want your prospects to experience it. For details, see
Setting up Trialforce.
2. Submit the Trialforce template for security review. This review is free and takes less time than the initial review of your app or
component.
3. Link the Trialforce template to your AppExchange listing.
221
Submit a Trialforce Template for Security ReviewProvide a Free Trial
Log in to the Partner Community.a.
b. On the Publishing page, click the Listings tab.
c. Find the listing where you want to offer a trial, and click it to open the AppExchange publishing console.
d. Click the Trials tab, and select Offer a free trial organization.
e. Follow the on-screen prompts to add a trial template to the listing.
4. Click Save.
Now, when customers visit your listing, they can start a free trial with your offering preinstalled, even if they don’t have a Salesforce
account. If they decide to start a trial, we collect their contact information and ask them to agree to your terms and conditions and our
MSA. After they provide this information, prospects receive an email prompting them to log in to a trial organization.
Provide a Test Drive on the AppExchange
A test drive is a preconfigured Developer Edition (DE) org that lets prospects try your offering with sample data that you provide. The
test drive has two users: an administrator and a read-only evaluation user. The administrator role is used to configure the organization
for the test drive. The evaluation role is used when prospects log in to the organization to experience your app or component.
1. Enable test drives on your AppExchange listing.
a. Log in to the Partner Community.
b. On the Publishing page, click the Listings tab.
c. Find the listing where you want to offer a test drive, and click it to open the AppExchange publishing console.
d. Click the Trials tab, and select Offer a Test Drive.
2. Create the test drive organization.
a. Click Create Test Drive.
b. Give the test drive a customer-friendly name, and associate the package containing your app or component.
c. Click Submit. Salesforce creates a DE org and emails you login credentials for administrator and evaluation users.
3. Configure the test drive organization.
a. Log in as the administrator to add sample data and perform other setup tasks.
b. Log in as the evaluation user to define a password.
4. Connect the test drive organization to your AppExchange listing.
a. Return to the Trials tab in the publishing console.
b. Click Connect Organization.
c. Enter the login credentials for the evaluation user.
d. Click Submit.
5. Click Save.
Now, when prospects take a test drive from your listing, they are logged in as read-only evaluation users.
222
Provide a Test Drive on the AppExchangeProvide a Free Trial

Provide a Free Trial on the AppExchange When Your Offering Is Installed
You can provide a free trial of your offering by setting the default license settings on your package. When a customer installs the app or
component in an existing Salesforce organization, they can use it for the specified trial period.
Provide a Free Trial on Your Website
You can use an HTML form to drive traffic to your business and show prospective customers the products and services that you offer.
Before providing a free trial on your website, be sure you’ve followed the steps outlined in Setting Up Trialforce.
1. Set up Trialforce.
2. Request an HTML registration form.
3. Link your Trialforce template to the HTML form.
4. Customize the HTML form.
5. Provision new trial organizations.
After you’ve completed these tasks, you’re ready to go live. Now, each time prospective customers enter their information and submit
your form, Salesforce provisions a trial based on your Trialforce template.
Note: As an alternative to using a web form, you can create Trialforce sign-ups using the API. The API gives you more control over
the sign-up process and enhanced visibility into your prospective customers.
Request a Sign-Up Form for Trialforce
If you want to offer trials on your website, you can request an HTML sign-up form from Salesforce. You can customize the form to match
the look and feel of your website and collect the information you need to provision a trial.
Note: You can request a sign-up form to test even if your Trialforce template isn’t ready. By default, the form is linked to a generic
trial template that expires in two days.
1. Log in to the Partner Community and go to the Support tab.
2. Select New Case.
3. Select Trialforce, and then select Create a Case.
4. For Subtopic, select Web Form.
5. Enter the required information in the Description field, and then select Submit Case.
After you log a case, we send you an email with the sign-up form and instructions on how to modify.
Link a Trialforce Template to the Sign-Up Form
Link a Trialforce template to your HTML sign-up form so that customers who request a trial receive a Salesforce org with your offering
installed, along with the data that you added to the template. If you skip this step, customers who fill out the form receive a generic trial
organization that expires in two days.
1. Log in to your Trialforce Source Organization.
2. From Setup, enter Trialforce in the Quick Find box, then select Trialforce.
3. Note the template ID of the Trialforce template that you want to use. The ID has a value similar to 0TTi0000000Sxd8.
4. Note the name of your sign-up form.
223
Provide a Free Trial on the AppExchange When Your Offering
Is Installed
Provide a Free Trial
5. Log a case to associate your Trialforce template with the sign-up form.
a. Log in to the Partner Community, and go to the Support tab.
b. Select New Case.
c. Select Trialforce, and then select Create a Case.
d. For Subtopic, select Web Form.
e. Enter the required information in the Description field, along with the name of your sign-up form.
f. Select Submit Case.
You’ll receive an email confirming that your request has been processed. Verify that the template has been properly associated to the
registration form by filling out and submitting the form. You receive an email when the new trial has been provisioned.
Customizing the HTML Registration Form
The sample registration HTML form you received by logging a case on the Partner Community is just a template, and you’ll need to
modify it. There are some mandatory changes that must be made to ensure that the proper trial is provisioned. You can , optionally,
modify the file to reflect the look and feel of your website and brand.
You’ll need to assign the formName and Lead.Partner_Account values in the HTML form to those provided by the partner
support team. These values will be given to you in the email that contains the sample HTML registration form.
1. Open your registration form HTML file in a text or HTML editing tool.
2. Change the following lines of HTML in the registration form to reflect this information by updating the value attribute. Search for
the TODO comment, which will help you find the lines to change.
<!-- TODO: Add Signup Config Item Name of Config record as formName -->
<!-- TODO: Add Partner Account Record Id for Partner Lookup on Lead
(Provided by Salesforce.com-->
<input type="hidden" name="formName" value=""/>
<input type="hidden" name="Lead.Partner_Account__c" value=""/>
3. Search for and modify other sections in the form labeled "TODO." This will allow you to do things like specify company logos, override
success or failure pages, and so on.
a. Open your registration form .HTML file in a text or html editing tool.
b. Search for the term "TODO".
c. Follow the instructions in the comments to change the appropriate portion of the form. Examples of items that can be changed
in this way:
•provide a custom logo
•modify the display name of the application (do not use spaces)
•specify your company name as the referring entity for any leads generated by the form
•specify custom URLs for success and failure redirects
•update the language/locale of the form
4. Modify the HTML and CSS to match the look and layout of your website
Note: Don’t make changes to the JavaScript except in specifically identified sections to ensure that the form will provision a new
trial properly.
224
Customizing the HTML Registration FormProvide a Free Trial
Once the changes have been made, you can test filling out and submitting the form to verify that new trial organizations are provisioned
correctly.
If you haven’t already done so, log another case on the Partner Community to associate your trial template snapshot ID with your
FormName. Otherwise, the trials provisioned by filling out the form will be generic Force.com two day trials.
Provisioning New Trial Organizations
Once you’ve configured Trialforce, you can provision new trial organizations in one of two ways.
•Push—You provision a trial on behalf of a customer by filling out the registration form with your prospect’s information.
•Pull—Prospects request a trial on their own by filling out a registration form on your public website.
1. Upload the HTML registration form to your public web servers.
2. Edit and publish the appropriate HTML pages on your company website where you want to include a link to the Trialforce registration
form.
3. Navigate to the registration page from your company website.
4. Fill in the required fields and submit the form.
Anyone with access to the registration form can manually create a trial on behalf of a prospect without the need to expose the registration
form on the company website. Simply launch the registration form HTML file in a browser and fill in the fields on behalf of the customer,
then submit the form. Your prospect will receive an email, optionally branded with your company information, indicating the new trial
is available.
Modify the Trial for an Upgrade
You can update your trials to reflect changes to your offering or its custom branding. To do so, you must:
•Create and publish a new version of your managed package (or an extension package).
•Have a Trialforce Source Organization (TSO) where you can upload the new package version. You can reuse the TSO that you used
to create your original Trialforce template, or you can create a new one. If you create a new TSO, be sure to link it to the AppExchange.
1. Install your updated managed package (or extension package) into your TSO.
2. Make any other desired changes in the TSO, such as loading sample data or updating custom branding.
3. Create a Trialforce template for your trial.
4. Submit the template for review.
5. For trials created using an HTML sign-up form or using the API, complete the following steps.
StepsTrial Method
Log a case to associate the new Trialforce template with the sign-up form.Via an HTML form on your company website
a. Log in to the Partner Community.
b. Under the Support tab, click New Case.
c. Select the AppExchange and Feature Requests > Trialforce category.
d. For the description, provide the TSO ID, the ID of the new Trialforce
template, and the name of your sign-up form.
225
Provisioning New Trial OrganizationsProvide a Free Trial
StepsTrial Method
Log a case to get the template approved for SignupRequest API use.Using the API
a. Log in to the Partner Community.
b. Under the Support tab, click New Case.
c. Select the AppExchange and Feature Requests > Trialforce category.
d. For the description, provide the TSO ID, the ID of the new Trialforce
template, and the organization to use for creating sign-ups.
Trialforce Best Practices
Here are some best practices for using Trialforce.
•Create several Trialforce Source Organizations (TSOs) for customized trial experiences, for example, one for each managed package,
industry vertical solution, country.
•Load sample data into the TSO.
•Apply custom branding to your trial signup form, login page, and emails.
•Update your Trialforce template each time you release a new version of your app.
•Once you’ve set up Trialforce, go through the signup flow to confirm everything is working as you expect it to. This can also help
you identify areas the signup process can be improved.
Although Trialforce was primarily designed for enabling free trials, it’s also useful in other contexts. For example, you can use it to:
•Create trial organizations for sales demos.
•Create test organizations with sample data for internal QA.
Creating Signups using the API
USER PERMISSIONS
To create or view signup
requests:
•“Signup Request API”
You can use API calls to the SignupRequest object to create trial organizations for prospective
customers. When creating trial organizations (or signups) using a web form, there’s no way to
customize the signup process or track its status. Using the API, you can collect and analyze detailed
information on all signups from your business organization. This gives you more control over the
signup process, and enhanced visibility into your prospective customers. For example, you can:
•Run reports and collect metrics, such as the number of signups per day or the number of signups
in different countries.
•Customize the SignupRequest object to add fields of special interest to your company.
•Create triggers to initiate specific actions, such as sending an email notification, whenever a new signup request is made.
•Enable signups from a wide range of client applications and devices, so you have additional channels for customer acquisition.
To start creating new signups using the API:
1. Create a Trialforce Source Organization (TSO) from your Trialforce Management Organization.
2. Install your app in the TSO, along with any sample data that might be useful for the trial.
3. Configure the TSO as you want your customers to experience it, including specifying any custom branding.
226
Trialforce Best PracticesProvide a Free Trial

4. Create a Trialforce template from the TSO.
5. File a case to activate this feature.
a. Log in to the Partner Community.
b. Under the Support tab, click New Case.
c. Select the AppExchange and Feature Requests > Trialforce category.
d. In the description, provide the following details.
•the organization ID of your TSO
•the template ID of the Trialforce template you want to use
•the organization you plan to use for creating signups (so the appropriate user permission can be enabled)
Note: Although you can create new signups from any organization with the appropriate permissions, we recommend doing
so from your business organization. You can then easily integrate signup data with your existing business processes. For
example, you can create a workflow rule to convert each signup request into a lead or run reports to track the number of
signups in a given period.
You’ll be notified by email once the template is approved. It can then be used to create new signups by making API calls to the
SignupRequest object. See below for details of the SignupRequest object and a code sample demonstrating its use. For more information
on working with objects, see the Object Reference for Salesforce and Force.com
SignupRequest
Represents a request for a new Trialforce sign-up. This object is available in API version 27.0 and later.
Note: You are limited to 20 sign-ups per day. If you need to make additional sign-ups, log a case in the Partner Community.
Supported Calls
create(), delete(), describeLayout(), describeSObjects(), getDeleted(), getUpdated(), query(),
retrieve(), undelete()
Fields
DetailsField Name
Type
string
AuthCode
Properties
Create, Filter, Group, Sort
Description
A one-time authorization code that can be exchanged for an OAuth access token and refresh
token using standard Salesforce APIs. It’s used in conjunction with
ConnectedAppCallbackUrl and ConnectedAppConsumerKey, when the
specified connected app hasn't been configured with an X.509 certificate. This is a read-only
field provided by the system once the sign-up request has been processed. This field is available
in API version 29.0 and later.
227
SignupRequestProvide a Free Trial

DetailsField Name
Type
string
Company
Properties
Create, Filter, Group, Sort
Description
The name of the company requesting the trial sign-up.
Type
string
ConnectedAppCallbackUrl
Properties
Create, Filter, Group, Sort
Description
When used in conjunction with ConnectedAppConsumerKey, specifies a connected
app that should be approved automatically during the sign-up creation. This field is available
in API version 28.0 and later.
Type
string
ConnectedAppConsumerKey
Properties
Create, Filter, Group, Sort
Description
When used in conjunction with ConnectedAppCallbackUrl, specifies a connected
app that should be approved automatically during the sign-up creation. This field is available
in API version 28.0 and later.
Type
string
Country
Properties
Create, Filter, Group, Sort
Description
The two-character, upper-case ISO-3166 country code. You can find a full list of these codes
at a number of sites, such as:
www.iso.ch/iso/en/prods-services/iso3166ma/02iso-3166-code-lists/list-en1.html. The language
of the trial organization is auto-determined based on the value of this field.
Type
string
CreatedOrgId
Properties
Filter, Group, Nillable, Sort
Description
The 15–character organization ID of the trial organization created. This is a read-only field
provided by the system once the sign-up request has been processed.
228
SignupRequestProvide a Free Trial

DetailsField Name
Type
string
CreatedOrgInstance
Properties
Filter, Group, Nillable, Sort
Description
The server instance of the new trial organization, for example, “na8.” This field is available in
API version 29.0 and later.
Type
picklist
Edition
Properties
Create, Filter, Group, Nillable, Restricted picklist, Sort
Description
The Salesforce template that is used to create the trial organization. Possible values are
Partner Group, Professional, Partner Professional, Sales
Professional, Professional TSO, Enterprise, Partner Enterprise,
Service Enterprise, Enterprise TSO, Developer, and Partner
Developer. This field is available in API version 35.0 and later.
Type
string
ErrorCode
Properties
Filter, Group, Nillable, Sort
Description
The error code if the sign-up request isn’t successful. This is a read-only field provided by the
system to be used for support purposes.
Type
string
FirstName
Properties
Create, Filter, Nillable, Sort
Description
The first name of the admin user for the trial sign-up.
Type
string
LastName
Properties
Create, Filter, Group, Sort
Description
The last name of the admin user for the trial sign-up.
229
SignupRequestProvide a Free Trial

DetailsField Name
Type
picklist
PreferredLanguage
Properties
Create, Filter, Group, Nillable, Restricted picklist, Sort
Description
The language of the trial organization being created. Specify the language using a language
code listed under Fully Supported Languages in “Supported Languages ” in the Salesforce
Help. For example, use zh_CN for simplified Chinese. The value you select overrides the
language set by locale. If you specify an invalid language, the organization defaults to English.
Likewise, if you specify a language that isn’t supported by the Salesforce edition associated
with your trial template, the trial organization defaults to English. This field is available in API
version 35.0 and later.
Type
string
ResolvedTemplateId
Properties
Filter, Group, Nillable, Sort
Description
Populated during the sign-up request and for internal use by Salesforce. This field is available
in API version 35.0 and later.
Type
boolean
ShouldConnectToEnvHub
Properties
Create, Defaulted on create, Filter, Group, Sort
Description
When set to true, the trial organization is connected to the Environment Hub. The sign-up
must take place in the hub master organization or a spoke organization. This field is available
in API version 35.0 and later.
Type
email
SignupEmail
Properties
Create, Filter, Group, Sort
Description
The email address of the admin user for the trial sign-up.
Type
string
SignupSource
Properties
Create, Filter, Group, Nillable, Sort
230
SignupRequestProvide a Free Trial

DetailsField Name
Description
A user-specified description of the trial sign-up, up to 60 characters in length. This field is
available in API version 36.0 and later.
Type
picklist
Status
Properties
Defaulted on create, Filter, Group, Sort, Update
Description
The status of the request. Possible values are New, In Progress, Error, or Success.
The default value is New.
Type
string
Subdomain
Properties
Create, Filter, Group, Sort
Description
The subdomain for the new trial organization when it uses a custom My Domain. The maximum
length is 33 characters for Developer Edition (DE) and 40 characters for all other editions
(because a suffix is appended to all DE organizations).
Type
boolean
SuppressSignupEmails
Properties
Filter, Group, Nillable, Sort
Description
When set to true, no sign-up emails are sent when the trial organization is created. This field
is used for the Proxy Signup feature, and is available in API version 29.0 and later.
Type
string
TemplateId
Properties
Create, Filter, Group, Nillable, Sort
Description
The 15–character ID of the Trialforce template that is the basis for the trial sign-up. The template
must be approved by Salesforce. If you don’t specify an edition, a template ID is required.
Type
anyType
TrialDays
Properties
Create, Defaulted on create, Filter, Group, Sort
231
SignupRequestProvide a Free Trial

DetailsField Name
Description
The duration of the trial sign-up in days. Must be equal to or less than the trial days for the
approved Trialforce template. If not provided, it defaults to the trial duration specified for the
Trialforce template.
Type
string
TrialSourceOrgId
Properties
Filter, Group, Nillable, Sort
Description
The 15–character organization ID of the Trialforce Source Organization from which the Trialforce
template was created.
Type
string
Username
Properties
Create, Filter, Group, Sort
Description
The username of the admin user for the trial sign-up. It must follow the address convention
specified in RFC822: www.w3.org/Protocols/rfc822/#z10
Usage
The Java class below uses the REST API to create a SignupRequest object. It authenticates to the Trialforce Management Organization
and then posts a request to the SignupRequest object.
Here are the variables you need to specify in this example.
•SERVER — The name of the host server for the Trialforce Management Organization (TMO), for example,
“yourInstance.salesforce.com.”
•USERNAME — The admin username for the TMO.
•PASSWORD — The concatenation of the admin password and the security token for the TMO. To get an email with the security
token, from your personal settings in Salesforce select Reset My Security Token and click Reset Security Token.
•CLIENT_ID — From Setup in Salesforce, enter Apps in the Quick Find box, select Apps, and click New under Connected
Apps. Enter values for the required fields (the Callback URL is required but can initially be set to any valid URL as it's not used), grant
full access for the OAuth scopes in the "Selected OAuth Scopes" selector, and click Save. Then copy the value of “Consumer Key”
and use it for this variable.
•CLIENT_SECRET — On the same page, click Click to reveal. Then copy the value of "Consumer Secret" and use it for this variable.
public class IsvSignupDriver {
private static final String SERVER = server_name:port;
private static final String USERNAME = tmo_username;
private static final String PASSWORD = tmo_passwordsecurity_token;
private static final String CLIENT_ID = consumer_key;
private static final String CLIENT_SECRET = consumer_secret;
232
SignupRequestProvide a Free Trial

private static SignupRequestInfo signupRequest = null;
public static String createSignupRequest (SignupRequestInfo sr)
throws JSONException, IOException {
JSONObject createResponse = null;
signupRequest = sr;
JSONObject loginResponse = login(SERVER, USERNAME, PASSWORD);
String instanceUrl = loginResponse.getString("instance_url");
String accessToken = loginResponse.getString("access_token");
createResponse = create(instanceUrl, accessToken);
System.out.println("Created SignupRequest object: " + createResponse + "\n");
return createResponse.toString();
}
/* Authenticates to the TMO using the required credentials */
private static JSONObject login(String server, String username, String password)
throws ClientProtocolException, IOException, JSONException {
String authEndPoint = server + "/services/oauth2/token";
HttpClient httpclient = new DefaultHttpClient();
try {
HttpPost post = new HttpPost(authEndPoint);
List<NameValuePair> params = new ArrayList<NameValuePair>();
params.add(new BasicNameValuePair("grant_type", "password"));
params.add(new BasicNameValuePair("client_id", CLIENT_ID));
params.add(new BasicNameValuePair("client_secret", CLIENT_SECRET));
params.add(new BasicNameValuePair("username", username));
params.add(new BasicNameValuePair("password", password));
post.setEntity(new UrlEncodedFormEntity(params, Consts.UTF_8));
BasicResponseHandler handler = new BasicResponseHandler();
String response = httpclient.execute(post, handler);
return new JSONObject(response);
} finally {
httpclient.getConnectionManager().shutdown();
}
}
/* Posts a request to the SignupRequest object */
private static JSONObject create(String instanceUrl, String accessToken)
throws ClientProtocolException, IOException, JSONException {
HttpClient httpClient = new DefaultHttpClient();
try {
HttpPost post = new HttpPost(instanceUrl +
"/services/data/v27.0/sobjects/SignupRequest/");
post.setHeader("Authorization", "Bearer " + accessToken);
post.setHeader("Content-Type", "application/json");
JSONObject requestBody = new JSONObject();
requestBody.put("TemplateId", signupRequest.getTemplateID());
requestBody.put("SignupEmail", signupRequest.getEmail());
requestBody.put("username", signupRequest.getUsername());
233
SignupRequestProvide a Free Trial
requestBody.put("Country", "US");
requestBody.put("Company", signupRequest.getCompanyName());
requestBody.put("lastName", signupRequest.getLastName());
StringEntity entity = new StringEntity(requestBody.toString());
post.setEntity(entity);
BasicResponseHandler handler = new BasicResponseHandler();
String response = httpClient.execute(post, handler);
return new JSONObject(response);
} finally {
httpClient.getConnectionManager().shutdown();
}
}
}
Error Codes
If the sign-up fails, the system generates an error code that can help you identify the cause. This table shows the most important error
codes.
DescriptionError Code
Duplicate username.C-1007
Error while establishing the new organization's My Domain settings. Contact Salesforce support for assistance.C-1015
Error while configuring the OAuth connected app for Proxy Signup. Verify that your connected app has a
valid consumer key, callback URL, and unexpired certificate (if applicable).
C-1016
Invalid subdomain value provided during sign-up.C-1018
Subdomain in use. Please choose a new subdomain value.C-1019
Generic “fatal error.” Contact Salesforce support for assistance.C-9999
Invalild email address (not in a proper email address format).S-1006
Invalid country code.S-2006
Template ID not valid (not in the format 0TTxxxxxxxxxxxx).T-0001
Template not found. Either the template doesn't exist (it may have been deleted), or it doesn't exist at the
appropriate version.
T-0002
Template not approved for use by Salesforce.T-0003
Signup Request Home
USER PERMISSIONS
To create or view signup
requests:
•“Signup Request API”
Note: You are limited to 20 sign-ups per day. If you need to make additional sign-ups, log
a case in the Partner Community.
The Signup Requests tab displays the signup requests home page. From this page, you can perform
the following actions.
234
Signup Request HomeProvide a Free Trial

•Create a new signup. If you using a Trialforce template to create the signup, make sure the template has been approved.
•View the details of a previous signup, including its history and approval status.
•Create new views to display signups matching criteria that you specify.
Creating a Signup Request
USER PERMISSIONS
To create or view signup
requests:
•“Signup Request API”
1. Select Signup Request from the Create New drop-down list in the sidebar, or click New next
to Recent Signup Requests on the signup requests home page.
2. Enter the information for the signup request.
3. Click Save when you’re finished, or click Save & New to save the current signup request and
add another.
Viewing Signup Request Details
USER PERMISSIONS
To create or view signup
requests:
•“Signup Request API”
From the Signup Request detail page:
•Click Delete to delete the signup request
•Click Clone to create a new signup request with the same attributes as this one
The detail page has the following sections.
•Signup Request Detail
•Signup Request History
Signup Request Detail
This section displays the following attributes (in alphabetical order).
DescriptionAttribute
The name of the company requesting the trial signup.Company
The two-character, upper-case ISO-3166 country code. You can find a full list of these codes at a
number of sites, such as:
www.iso.ch/iso/en/prods-services/iso3166ma/02iso-3166-code-lists/list-en1.html
Country
The 15–character Organization ID of the trial organization created. This is a read-only field provided
by the system once the signup request has been processed.
Created Org
The email address of the admin user for the trial signup.Email
The error code if the signup request isn’t successful. This is a read-only field provided by the system
to be used for support purposes.
Error Code
The first name of the admin user for the trial signup.First Name
The last name of the admin user for the trial signup.Last Name
The Salesforce template that is used to create the trial organization. Possible values are Partner
Group, Professional, Partner Professional, Sales Professional,
Edition
235
Creating a Signup RequestProvide a Free Trial
DescriptionAttribute
Professional TSO, Enterprise, Partner Enterprise, Service Enterprise,
Enterprise TSO, Developer, and Partner Developer.
The language of the trial organization being created. Specify the language using a language code
listed under Fully Supported Languages in “Supported Languages ” in the Salesforce Help. For
Preferred Language
example, use zh_CN for simplified Chinese. The value you select overrides the language set by
locale. If you specify an invalid language, the organization defaults to English.
Populated during the sign-up request and for internal use by Salesforce.
When set to true, the trial organization is connected to the Environment Hub. The sign-up must
take place in the hub master organization or a spoke organization.
ShouldConnectToEnvHub
The 15–character Organization ID of the Trialforce Source Organization from which the Trialforce
template was created.
Source Org
The status of the request. Possible values are New, In Progress, Error, or Success. The
default value is New.
Status
The 15–character ID of the approved Trialforce template that is the basis for the trial signup. The
template is required and must be approved by Salesforce.
Template
The description of the approved Trialforce template that is the basis for the trial signup.Template Description
The duration of the trial signup in days. Must be equal to or less than the trial days for the approved
Trialforce template. If not provided, it defaults to the trial duration specified for the Trialforce template.
Trial Days
The username of the admin user for the trial signup. It must follow the address convention specified
in RFC822: www.w3.org/Protocols/rfc822/#z10
Username
Signup Request History
This section shows the date the signup request was created, the user who created it, and the actions that have been performed on it.
Adding Custom Fields to Signup Requests
USER PERMISSIONS
To create or view signup
requests:
•“Signup Request API”
You can add custom fields to the SignupRequest object, as for any other standard object.
1. In your Trialforce Management Organization, from the object management settings for signup
requests, find the fields area. From Setup, enter Signup Requests in the Quick Find
box, then select Fields.
2. Click New.
3. Specify the details of the custom field and click Save.
To see the custom field in a list of existing SignupRequest records, create a custom view containing that field on the Signup Requests
tab.
236
Adding Custom Fields to Signup RequestsProvide a Free Trial
Running Reports on Signup Requests
USER PERMISSIONS
To create or view signup
requests:
•“Signup Request API”
Once a few SignupRequest records have been created, you can run custom reports on them.
1. In your Trialforce Management Organization, from Setup, enter Report Types in the
Quick Find box, then select Report Types and click Custom Report Types.
2. Select Signup Requests as the Primary Object.
3. Enter a label, name, description, and store in a category such as Administrative Reports.
4. Finish the wizard, and save the Report Type.
5. Configure the report with the fields you're interested in and click Save.
6. Select the Reports tab and click New Report to create a Report from your new Report Type.
7. Select your report type name and click Create.
Once you’ve created the report, you can run it periodically to see trends in the data.
Using Triggers with Signup Requests
USER PERMISSIONS
To create or view signup
requests:
•“Signup Request API”
You can set up triggers to initiate specific actions, each time a signup request is submitted.
1. In your Trialforce Management Organization, from the object management settings for signup
requests, go to Triggers.
2. Click New.
3. Add the code for the trigger, and click Save.
For example, this trigger inserts a new lead based on information in the signup request.
trigger SignupRequestTrigger on SignupRequest (after insert) {
private SignupRequest[] sr = Trigger.new;
Lead l = new Lead(
LastName = sr[0].LastName,
FirstName = sr[0].FirstName,
Company = sr[0].Company,
Email = sr[0].SignupEmail,
LeadSource = 'Trial Signup'
);
insert l;}
You can verify that a Lead record is created, each time you create a SignupRequest. To easily find a specific lead, you can sort leads by
email.
Creating Proxy Signups for OAuth and API Access
USER PERMISSIONS
To create or view signup
requests:
•“Signup Request API”
Using the SignupRequest object, you can programmatically create a new organization without any
system-generated emails being sent to the user. You can then obtain an OAuth access token to
log in to the organization and make API requests from it, without any action by the user. This is
called proxy signup because it enables you to create and operate the organization on the user’s
behalf, without their knowledge that you’re using Salesforce behind the scenes..
In the traditional signup process, when you create a new organization, the user receives a
system-generated email containing the login URL and initial password for logging in to the
237
Running Reports on Signup RequestsProvide a Free Trial
organization. The user then has to log in and explicitly grant you API access to make calls into the organization on his behalf. With proxy
signup, no user emails are generated and no action is required by the user to provide you API access.
The ability to create and manage organizations by proxy expands your options for integrating Salesforce with external applications on
other platforms. It enables you to incorporate any feature of the Force.com platform into your own application, without exposing the
Salesforce user interface (UI). In effect, all features of Salesforce can be decoupled from the UI and are available to integrate into any
other application runtime or UI in a seamless and invisible way.
For example, suppose an ISV has a web application, built on the .NET platform, that helps companies manage travel expense reporting
and reimbursement for employees. The ISV might want to integrate Chatter into its application, so all employees of a company can share
feedback and tips about their travel experiences with each other. The ISV can do this by using the appropriate Salesforce APIs to implement
the following solution.
1. Use proxy signup to create a Salesforce organization for each of its customers.
2. Create users in each customer organization for all employees of that company.
3. Set up and maintain a Chatter group for sharing travel information.
4. Monitor each user’s Chatter feed and extract information from individual posts.
5. Insert the information into its application, and display it in the existing UI.
This enables the ISV to provide its customers access to Chatter functionality, without having to develop it from scratch. The ISV’s customers
experience Chatter as a natural extension of the existing application, in an interface they’re familiar with, and without needing to know
about or log in to Salesforce. The same approach can be extended to any other feature of Salesforce, including standard and custom
objects, Apex, and Visualforce. In effect, proxy signup gives ISVs the ability to consume Salesforce as a service, integrating its features
into applications on any platform, without exposing the Salesforce UI. The potential applications are limited only by the ISV’s imagination.
Here are the steps for creating a proxy signup.
1. Log in to a Developer Edition organization (which has the Connected Apps user permission enabled by default).
2. From Setup, enter Apps in the Quick Find box, then select Apps. Then click New under Connected Apps.
3. Enter values for the required fields. You must specify an X.509 certificate and grant full and refresh token access for the OAuth scopes
in the "Selected OAuth Scopes" selector. The callback URL is required but can initially be set to any valid URL as it's not used. Click
Save when you’re done.
4. Record the value of Consumer Key on the same page. Also, click Click to reveal and record the value of Consumer Secret.
5. Package the Connected App by adding it as a component to a new package. Record the Installation URL value for the package.
6. Log in to your Trialforce Management Organization and create a new Trialforce Source Organization from it.
7. Log in to your Trialforce Source Organization and install the package containing the Connected App, using the installation URL from
step 5.
8. After the Connected App is installed in the Trialforce Source Organization, you can customize it from Setup by entering Manage
Applications in the Quick Find box, then selecting Manage Applications. You can see the Connected App and can
edit its attributes. Specify the appropriate profiles and permission sets, and choose the option “Admin approved users are
pre-authorized” in the OAuth policies section. This ensures you can authenticate into the organization on behalf of users with these
criteria.
9. Once you’ve configured the Trialforce Source Organization to your requirements, create a Trialforce template from it. Select the All
Setup and Data radio button when creating the Trialforce template.
10. File a case in the Partner Community to get approval for creating new signups using the template.
238
Creating Proxy Signups for OAuth and API AccessProvide a Free Trial

11. Once the template is approved, you can sign up a new organization using the SignupRequest object. You will need to specify the
OAuth values necessary to connect to the newly-created organization, that is: Consumer Key and Callback URL.
POST https://mycompany-tmo.salesforce.com/services/data/v27.0/sobjects/SignupRequest/
Authorization Bearer
00Dxx0000001gR6!ARoAQAS3Uc6brlY8q8TWrrI_u1THuUGmSAp
XrksSniyjom9kXfDac4UP.m9FApjTw9ukJfKqWuD8pA9meeLaltRmNFvPqUn7
Content-Type application/json Body:
{ "TemplateId":"0TT000000000001",
"SignupEmail":"john.smith@mycompany.com",
"Username":"gm@trial1212.org",
"Country":"US",
"Company":"salesforce.com",
"LastName":"Smith",
"ConnectedAppConsumerKey":
"3MVG9AOp4kbriZOLfSVjG2Pxa3cJ_nOkwhxL1J1AuV22u8bm82FtDtWFVV__
Vs6mvqoVbAnwsChp9YT4bfrYu",
"ConnectedAppCallbackUrl":
"https%3A%2F%2Fwww.mysite.com%2Fcode_callback.jsp" }
When the ConnectedAppConsumerKey and ConnectedAppCallbackUrl fields are specified in the SignupRequest object,
a proxy signup flow is triggered to automatically approve an existing Connected App for use in this new organization. In that flow, no
signup-related emails are sent to the user. With knowledge of the admin username, consumer key and consumer secret, you now have
all the information required to:
•make API requests to the newly-created organization as an admin user of that organization.
•request an updated access token at any time in the future.
Trialforce FAQ
This section contains a list of frequently asked questions about Trialforce.
•How do I upgrade my trial with a new version of my offering?
•Can I distribute my app or component using both Trialforce and the AppExchange?
•How are trials different from Trialforce?
•Is it possible to install another app in a trial organization?
How do I upgrade my trial with a new version of my offering?
Install the new version of the package into your Trialforce source organization. After upgrading, create a new Trialforce template and
use the template as the basis for your trial.
Can I distribute my app or component using both Trialforce and the
AppExchange?
Of course! The most effective way to distribute your offering is by using Trialforce and the AppExchange together. You can even advertise
your Trialforce page on your AppExchange listing and vice versa. Generally, the AppExchange is best for engaging existing Salesforce
customers, while Trialforce works great with new customers.
239
Trialforce FAQProvide a Free Trial
How are trials different from Trialforce?
Trials are administered from the AppExchange whereas Trialforce is administered from your own website.
Is it possible to install another app in a trial organization?
Yes. The Trialforce master organization is a fully functioning Salesforce organization. Your customer will have your app installed and can
subsequently install additional apps into the same organization as they see fit. It’s just like any other free trial of Salesforce.
240
How are trials different from Trialforce?Provide a Free Trial

CHAPTER 10 Supporting Your AppExchange Customers
App publishers are responsible for end user support of all their listings. When customers contact Salesforce
Customer Support with a question about your listing, we direct the user to the support information on
In this chapter ...
•Subscriber Support
Console the About and Support tabs of your listing. Make sure your AppExchange listings include support
information.
•Usage Metrics If you have installed the License Management App (LMA), you can log in to a customer's organization
and provide administrative support for your customers. This feature is only available for managed packages
that have passed the security review. For more information, see Logging in to Subscriber Organizations.
241

Subscriber Support Console
Using the Subscriber Support Console, you can easily access information about all your subscribers, such as which Salesforce Edition
they are using and if they are over their limits. Subscribers can also grant you login access to troubleshoot issues directly within the app,
in the familiar manner that they grant login access to administrators. Once granted access, you can log in to the subscriber’s organization
and directly view their configuration and data to help troubleshoot problems.
Note: This feature is available to eligible Salesforce partners. For more information on the Partner Program, including eligibility
requirements, please visit us at www.salesforce.com/partners.
Viewing Subscriber Details
The Subscriber Overview page, accessed by clicking the organization’s name from the Subscribers tab of the LMA, provides detailed
information about each subscriber organization. This can give you insight into how a customer is using your app and help you in
troubleshooting problems.
Under Organization Details:
•The name and contact information is in Setup, on the Company Information page in the subscriber’s organization. This may differ
from the information shown in your LMA lead, account, or contact records.
•Organization ID is a unique ID that identifies this customer’s Salesforce organization.
•Instance determines which Salesforce data center this customer’s organization resides in. It also determines when the customer will
get upgraded with a new version of Salesforce. See trust.salesforce.com during the release period to understand which version of
Salesforce the customer is using.
The page also includes these related lists.
Limits
Information on the file space, data space, and number of API requests associated with this customer, as a percentage.
Login Access Granted
A list of users who have granted login access and the date when access will expire.
Packages and Licensing
A list of all packages installed in this organization and associated with this LMA. For each package, it shows the version of the app a
customer is currently using, the total number of licenses provisioned to the subscriber and the number they’ve used. This information
should match the license record for the subscriber in your LMA.
Request Login Access from a Customer
Before logging in to a subscriber org, first request login access from the customer.
To request login access, ask the user to go to personal settings and click either Grant Account Login Access or Grant Login Access.
If the publisher isn’t listed, one of the following applies.
•A system admin disabled the ability for non-admins to grant access.
•The user doesn’t have a license for the package.
•The package is licensed to the entire org. Only admins with the “Manage Users” permission can grant access.
•The org preference Administrators Can Log in as Any User is enabled.
Note: Unless the org preference Administrators Can Log in as Any User is enabled, access is granted for a limited amount of
time, and the subscriber can revoke access at any time. Any changes you make while logged in as a subscriber are logged in the
audit trail.
242
Subscriber Support ConsoleSupporting Your AppExchange Customers
Logging in to Subscriber Organizations
USER PERMISSIONS
To log in to subscriber
organizations:
•“Log in to Subscriber
Organization”
Available in: Enterprise, Performance, Unlimited, and Developer Editions
Note: This feature is only available in organizations with a full Salesforce license.
To log in, once a user has granted you access:
1. In the License Management App (LMA), click the Subscribers tab.
2. To find a subscriber organization quickly, enter a subscriber name or organization ID in the search box and click Search.
3. Click the name of the subscriber organization.
4. On the Organization Details page, click Login next to a user's name. Note that you have the same permissions as the user you logged
in as.
5. When you’re finished troubleshooting, from Setup, click Return to Subscriber Overview to return to your organization.
Note: Only subscribers who have installed at least one managed package that is linked to your LMA will appear in this list.
Best Practices
•When you access a subscriber organization, you’re logged out of your LMO (License Management Organization). You can set up a
my domain so that you aren’t automatically logged out of your LMO when you log in to a subscriber organization. To set up a my
domain, from Setup, enter My Domain in the Quick Find box, then select My Domain.
•Be careful to allow only trusted support and engineering personnel to log in to a subscriber’s organization. Since this feature may
include full read/write access to customer data and configurations, it’s vital to your reputation to preserve their security.
•Control who has access by giving the “Log in to Subscriber Organization” user permission to specific support personnel, via a profile
or permission set.
Troubleshooting in Subscriber Organizations
When logged in as a user in a subscriber’s org, you have access that the subscriber doesn’t have. You can view the obfuscated code in
your Managed - Released packages, view logs that the subscriber can’t see, and initiate ISV Customer Debugger sessions.
Troubleshoot with Debug Logs
The simplest way to debug your code in a subscriber’s org is to generate Apex debug logs that contain the output from your managed
packages. These logs include log lines that would normally not be exposed to the subscriber. Using this log information, you can
troubleshoot issues that are specific to that subscriber.
1. If the user has access, set up a debug log: From Setup, enter Debug Logs in the Quick Find box, then select Debug Logs.
2. Launch the Developer Console.
3. Perform the operation and view the debug log with your output.
Subscribers are unable to see the logs you set up or generate since they contain your unobfuscated Apex code.
In addition, you can view and edit data contained in protected custom settings from your managed packages when logged in as a user.
243
Logging in to Subscriber OrganizationsSupporting Your AppExchange Customers
Troubleshoot with the ISV Customer Debugger
Each License Management Org can use one free ISV Customer Debugger session at a time. The ISV Customer Debugger is part of the
Apex Debugger, which is part of the Force.com IDE plug-in for Eclipse and is normally a paid feature. The Apex Debugger can be used
only in sandbox orgs, so you can initiate debugging sessions only from a customer’s sandbox.
For information on the ISV Customer Debugger, see Force.com IDE Developer Guide: Get Started with the ISV Customer Debugger.
SEE ALSO:
Salesforce Help: Open the Developer Console
Usage Metrics
EDITIONS
Available in: Professional,
Enterprise, Performance,
Unlimited, and Developer
Editions
You can collect detailed usage metrics from each organization in which your managed package is
installed. By analyzing this information, you can gain valuable insights into the utilization and
performance of your app across your entire customer base. For example, you can identify:
•The features most and least used — this can help you prioritize your development efforts when
planning the next version of your app.
•The customers using your app most intensively — these are your most valuable customers.
•The customers whose usage of your app is minimal or declining — these are the customers
most at risk of attrition.
You can collect the following daily metrics on two types of components in a managed package.
•Custom objects — the total number of records existing per organization in each custom object. This enables you to track how the
usage of that custom object is growing with time in any subscriber organization, which is a reliable indicator of how much it's being
utilized
•Visualforce pages — the number of times per organization each Visualforce page was accessed, the number of unique users who
accessed it, and the average loading time (in milliseconds). By comparing the metrics for different Visualforce pages, you can
determine the relative popularity of different parts of your app in a specific customer organization, as well as trends across all
customers.
The custom objects data is a snapshot that reflects the state of the organization at the time the database was sampled, while the
Visualforce data covers usage over a 24-hour period.
The usage metrics data for all production organizations in a given instance is merged and written into a text file, in a specified format,
once a day. Currently, no data is collected on packages installed in sandbox organizations or on managed beta packages.
This feature is intended for API access only. You must write a custom process to collect the metrics data from the reporting organization,
and export it to a system of your choice for analysis. This gives you the maximum flexibility to monitor and analyze the usage trends
most relevant for your app.
Your customers’ consent is not required for usage data to be collected, and there’s no way for them to opt out. This ensures you receive
complete data for your entire customer base. Allowing some users to be excluded would skew the results, making the data less useful.
Note: If any of your customers have concerns about privacy, reassure them any data collected is limited to usage statistics. No
customer data is ever exposed to the ISV under any circumstances. This is consistent with salesforce.com’s emphasis on trust as a
core value.
Setting up Usage Metrics
To set up Usage Metrics for any package, two organizations have special importance.
244
Usage MetricsSupporting Your AppExchange Customers

•Release organization — the Development Edition organization used to upload the package.
•Reporting organization — the organization to which the usage data is delivered, on a daily basis.
The release organization and reporting organization must be members of the same Environment Hub. This is a security feature, to ensure
usage data is only delivered to an organization controlled by the developer of the package. We recommend using the Environment Hub
as your reporting organization.
To set up Usage Metrics for a package:
1. Set up Environment Hub, if you haven’t already done so.
2. Connect the release organization to the Environment Hub.
3. Connect the reporting organization to the Environment Hub (if they’re different).
4. Log a case in the Partner Community to activate Usage Metrics. You’ll need to provide the package ID for your app.
Once the feature is activated, you’ll receive a confirmation email. From that point on, usage data will automatically be collected from all
organizations in which your package is installed, and delivered to the reporting organization on a daily basis. There is no way to get
usage data retroactively, that is, for any period prior to the activation of Usage Metrics.
Accessing Usage Metrics Data
The usage data for a package is stored in MetricsDataFile records in your reporting organization. Once you activate the Usage
Metrics feature, one new record is created for all custom objects and one for all Visualforce pages, per Salesforce instance per day.
Note: To see the number of Salesforce instances currently in use, visit trust.salesforce.com.
The usage data for each day and instance is stored as a text file, encoded in Base 64, in the MetricsDataFile field of the record.
Other fields in the record identify these properties.
•Namespace prefix of the package
•Salesforce instance
•Start time and date of data collection
•End time and date of data collection
•Size of the data file in bytes
•Type of data, which is either CustomObject or Visualforce
The custom objects data is a snapshot that reflects the state of the organization at the time the database was sampled, while the
Visualforce data covers usage over a 24-hour period.
The custom object count is a snapshot captured once each day. Here’s a section of a sample data file for custom objects. It shows there
were 3500 and 1500 records in the Alpha and Beta custom objects, respectively, in the specified customer organization on the
specified day.
"00Dxx0000001gbk","org1","Enterprise Edition","TRIAL","Alpha", "3500"
"00Dxx0000001gbk","org1","Enterprise Edition","TRIAL","Beta", "1500"
In a record for Visualforce pages, each row of the text file contains usage data in the following order.
•Organization ID
•Organization name
•Organization edition
•Organization status
•Package version number
245
Accessing Usage Metrics DataSupporting Your AppExchange Customers

•Name of the Visualforce page
•Number of times the page was accessed
•Number of unique users who accessed the page
•Average loading time of the page, in milliseconds
The Visualforce counts for each organization measure the number of times the page was viewed in the duration between the start and
end times. Here’s a section of a sample data file for Visualforce pages.
"00Dxx0000001gbk","org1","Enterprise Edition","TRIAL","1.0","/apex/gm12__f1","1","1","66.0"
"00Dxx0000001gbk","org1","Enterprise Edition","TRIAL","1.0","/apex/gm12__f2","1","1","128.0"
"00Dxx0000001gbk","org1","Enterprise Edition","TRIAL","1.0","/apex/gm12__f3","1","1","107.0"
"00Dxx0000001gbf","org1","Enterprise Edition","TRIAL","1.0","/apex/gm12__f1","5","1","73.6"
"00Dxx0000001gbf","org1","Enterprise Edition","TRIAL","1.0","/apex/gm12__f2","1","1","72.0"
"00Dxx0000001gbf","org1","Enterprise Edition","TRIAL","1.0","/apex/gm12__f3","7","1","50.8"
You must write a custom process to query the reporting organization to collect the metrics data, and export it to a system of your choice
for analysis. This gives you the maximum flexibility to monitor and analyze the usage trends most relevant for your app.
MetricsDataFile
Represents a data file containing usage metrics on all installations of a managed package in a Salesforce instance. This object is available
in API version 30.0 and later.
Supported Calls
query(), delete()
Fields
DetailsField Name
Type
base64
MetricsDataFile
Properties
Filter, Query, Sort
Description
A text file containing the usage data encoded in Base 64.
Type
string
MetricsDataFileContentType
Properties
Filter, Query, Sort
Description
The format of the data file. Currently, the only allowed value is text/csv.
Type
int
MetricsDataFileLength
246
MetricsDataFileSupporting Your AppExchange Customers

DetailsField Name
Properties
Filter, Query, Sort
Description
The size of the data file in bytes.
Type
dateTime
MetricsRunDate
Properties
Filter, Query, Sort
Description
The date when the usage metrics collection job was run.
Type
dateTime
MetricsEndDate
Properties
Filter, Query, Sort
Description
The end time and date for the data collection.
Type
dateTime
MetricsStartDate
Properties
Filter, Query, Sort
Description
The start time and date for the data collection.
Type
picklist
MetricsType
Properties
Filter, Query, Sort
Description
The type of data being collected. The possible values are CustomObject and
Visualforce.
Type
string
NamespacePrefix
Properties
Filter, Query, Sort
Description
The namespace prefix of the package for which data is being collected.
247
MetricsDataFileSupporting Your AppExchange Customers

DetailsField Name
Type
string
SendingInstance
Properties
Filter, Query, Sort
Description
The server instance from which this data was collected, for example, “na8.”
Usage
Use this object to access customer usage metrics for a managed package. Each record contains one day’s data, on either custom objects
or Visualforce pages, for all organizations in a Salesforce instance that have the package installed. The following data is collected each
day.
•Custom objects — the number of records stored in each custom object.
•Visualforce pages — the number of times each Visualforce page was accessed, the number of unique users who accessed it, and
the average loading time (in milliseconds).
Usage Metrics Visualization
The Usage Metrics Visualization app, available from Salesforce Labs on the AppExchange, enables you to visualize trends in usage metrics
data for your app. You can use the Usage Metrics Visualization app to generate charts showing changes in various app metrics, over a
specified duration, for one or more customer organizations.
The app must be installed in your Usage Metrics reporting organization and requires Usage Metrics to be enabled in advance, so some
data is available for analysis. You can analyze data going back a maximum of 30 days. If Usage Metrics wasn’t enabled for the entire time
period that you specify, only partial data is plotted.
The app is intended as a reference implementation, for illustration purposes only. It’s distributed as an unmanaged package, so you can
review its components and extend or customize it to meet your requirements. If your visualization needs are more complex, you can
export the raw metrics data from the reporting organization and analyze it by using custom code or a third-party tool .
To install the Usage Metrics Visualization app:
1. Go to the AppExchange and search for the Usage Metrics Visualization app.
2. Click Get It Now.
3. Enter the credentials for your reporting organization, and then click the login button.
4. Click Install.
You’ll see a message describing the progress and a confirmation message after the installation is complete.
248
Usage Metrics VisualizationSupporting Your AppExchange Customers
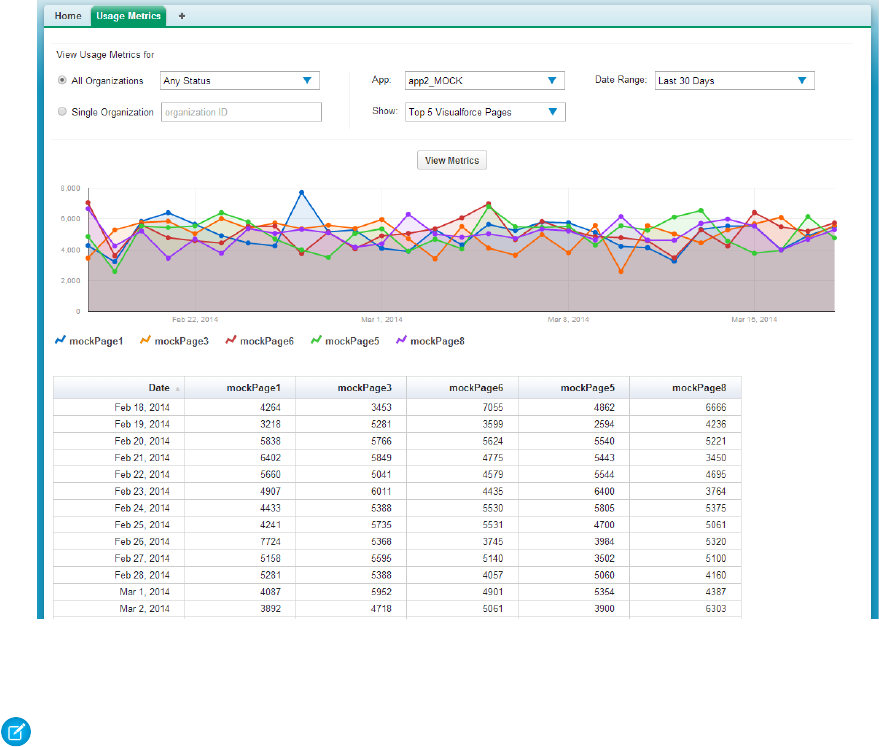
The Usage Metrics Visualization app showing data for the top five Visualforce pages.
To visualize the usage metrics data:
1. Specify the app whose metrics you want to view by selecting it from the App menu.
Note: You should have enabled Usage Metrics for your app at least a few days before, so some usage data is available to
analyze.
2. Specify the organization(s) that you want to view metrics for by choosing one of these options.
•For a single organization, enter its Organization ID in the Single Organization field.
•For a group of organizations, select one of the following from the All Organizations menu.
–Any Status
–All Active: These are organizations used by paying customers.
–All Free: These are Developer Edition (DE) organizations.
–All Trial: These are trial organizations, which expire after a specified period.
3. Specify the type of metric that you want to visualize by selecting one of these values from the Show menu.
•Total Visualforce Page Views
•Top 5 Visualforce Pages
•Total Record Count
•Top 5 Objects by Record Count
4. Specify the time period to cover by selecting one of these values from the Date Range menu.
249
Usage Metrics VisualizationSupporting Your AppExchange Customers

Last 30 Days
•
•Last 7 Days
•Last 2 Days
Note: If the volume of usage data is too large, you might get an error message. In that case, choose a smaller date range and
try again.
5. Click View Metrics.
The data you specified is displayed on the page as a chart and as a table. To visualize a different data set, change the parameters, and
then click View Metrics again.
250
Usage Metrics VisualizationSupporting Your AppExchange Customers

CHAPTER 11 Upgrading Your App
After you upload a packaged application, you can update it to fix bugs or introduce new functionality.
When you update a package, you create a new package version.
In this chapter ...
•About Package
Versions A package version is a number that identifies the set of components uploaded in a package. The version
number has the format majorNumber.minorNumber.patchNumber (for example, 2.1.3). The
•Creating and
Uploading Patches major and minor numbers increase to a chosen value during every major release. The patchNumber
is generated and updated only for a patch release. Unmanaged packages are not upgradeable, so each
•Working with Patch
Versions package version is simply a set of components for distribution. A package version has more significance
for managed packages. Packages can exhibit different behavior for different versions. Publishers can use
•Publish Upgrades to
Managed Packages
package versions to evolve the components in their managed packages gracefully by releasing subsequent
package versions without breaking existing customer integrations using the package.
•Pushing an Upgrade Version numbers depend on the package release type, which identifies the way packages are distributed.
There are two kinds:
Major Release
A major release denotes a Managed - Released package. During these releases, the major and
minor numbers of a package version increase to a chosen value.
Patch Release
A patch release is only for patch versions of a package. During these releases, the patch number of
a package version increments.
The following table shows a sequence of version numbers for a series of uploads:
NotesVersion
Number
TypeUpload
Sequence
The first Managed - Beta upload.1.0Managed -
Beta
First upload
A Managed - Released upload. Note that the version
number does not change.
1.0Managed -
Released
Second
upload
Note the change of the minor release number for this
Managed - Released upload. If you are uploading a new
patch version, you can't change the patch number.
1.1Managed -
Released
Third upload
The first Managed - Beta upload for version number 2.0.
Note the major version number update.
2.0Managed -
Beta
Fourth
upload
A Managed - Released upload. Note that the version
number does not change.
2.0Managed -
Released
Fifth upload
251
When an existing subscriber installs a new package version, there is still only one instance of each
component in the package, but the components can emulate older versions. For example, a subscriber
may be using a managed package that contains an Apex class. If the publisher decides to deprecate a
method in the Apex class and release a new package version, the subscriber still sees only one instance
of the Apex class after installing the new version. However, this Apex class can still emulate the previous
version for any code that references the deprecated method in the older version.
SEE ALSO:
Working with Patch Versions
About Push Upgrades
252
Upgrading Your App
About Package Versions
EDITIONS
Available in: Salesforce
Classic and Lightning
Experience
Available in: Developer
Edition
Package uploads and
installs are available in
Group, Professional,
Enterprise, Performance,
Unlimited, and Developer
Editions
A package version is a number that identifies the set of components uploaded in a package. The
version number has the format majorNumber.minorNumber.patchNumber (for example,
2.1.3). The major and minor numbers increase to a chosen value during every major release. The
patchNumber is generated and updated only for a patch release. Unmanaged packages are
not upgradeable, so each package version is simply a set of components for distribution. A package
version has more significance for managed packages. Packages can exhibit different behavior for
different versions. Publishers can use package versions to evolve the components in their managed
packages gracefully by releasing subsequent package versions without breaking existing customer
integrations using the package.
Version numbers depend on the package release type, which identifies the way packages are
distributed. There are two kinds:
Major Release
A major release denotes a Managed - Released package. During these releases, the major
and minor numbers of a package version increase to a chosen value.
Patch Release
A patch release is only for patch versions of a package. During these releases, the patch number of a package version increments.
When an existing subscriber installs a new package version, there is still only one instance of each component in the package, but the
components can emulate older versions. For example, a subscriber may be using a managed package that contains an Apex class. If the
publisher decides to deprecate a method in the Apex class and release a new package version, the subscriber still sees only one instance
of the Apex class after installing the new version. However, this Apex class can still emulate the previous version for any code that
references the deprecated method in the older version.
Package developers can use conditional logic in Apex classes and triggers to exhibit different behavior for different versions. This allows
the package developer to continue to support existing behavior in classes and triggers in previous package versions while continuing
to evolve the code.
When you are developing client applications using the API, you can specify the version of each package that you use in your integrations.
Creating and Uploading Patches
Note: Patch versions and push upgrades are only available to Salesforce ISV partners.
To create a patch version:
1. From Setup, enter Packages in the Quick Find box, then select Packages.
2. Click the name of your managed package.
3. Click the Patch Organization tab and then click New.
4. Select the package version that you want to create a patch for in the Patching Major Release drop-down list. The release type must
be Managed - Released.
5. Enter a Username for a login to your patch organization.
6. Enter an Email Address associated with your login.
7. Click Save.
Note: If you ever lose your login information, click Reset on the package detail page under Patch Development Organizations
to reset the login to your patch development organization.
253
About Package VersionsUpgrading Your App
After you receive an email indicating Salesforce has created your patch development organization, you can click Login to begin developing
your patch version.
Development in a patch development organization is restricted. The following is a list of caveats:
•New package components can’t be added.
•Existing package components can’t be deleted.
•API and dynamic Apex access controls can’t change for the package.
•No deprecation of any Apex code.
•No new Apex class relationships, such as extends, can be added.
•No new Apex access modifiers, such as virtual or global, can be added.
•No new Web services can be added.
•No new feature dependencies can be added.
When you finish developing your patch, upload it through the UI in your patch development organization. (You can also upload a
package using the Tooling API. For sample code and more details, see the PackageUploadRequest object in the Tooling API Developer
Guide.)
1. From Setup, enter Packages in the Quick Find box, then select Packages.
2. Click the name of the package.
3. On the Upload Package page, click Upload.
4. Enter a Version Name. As a best practice, it's useful to have a short description and the date.
5. Notice that the Version Number has had its patchNumber incremented.
6. For managed packages, select a Release Type:
•Choose Managed - Released to upload an upgradeable version. After upload, some attributes of Salesforce components are
locked.
•Choose Managed - Beta if you want to upload a version of your package to a small sampling of your audience for testing purposes.
You'll still be able to change the components and upload additional beta versions.
Note: Beta packages can only be installed in Developer Edition or sandbox organizations, and thus can't be pushed to
customer organizations.
7. Change the Description, if necessary.
8. Optionally, enter and confirm a password to share the package privately with anyone who has the password. Don't enter a password
if you want to make the package available to anyone on AppExchange and share your package publicly.
9. Salesforce automatically selects the requirements it finds. In addition, select any other required components from the Package
Requirements and Object Requirements sections to notify installers of any requirements for this package.
10. Click Upload.
To distribute your patch, you can either share the upload link or schedule a push upgrade.
Working with Patch Versions
Note: Patch versions and push upgrades are only available to Salesforce ISV partners.
254
Working with Patch VersionsUpgrading Your App

A patch version enables a developer to change the functionality of existing components in a managed package, while ensuring that
subscribers experience no visible changes to the package. Patches should be considered as minor upgrades to a Managed - Released
package and only used for fixing bugs or other errors.
Patch versions can only be created for Major Releases. Subscribers can receive patch upgrades just like any other package version.
However, you can also distribute a patch by using push upgrades.
When you create a patch, the patchNumber on a package's Version Number increments by one. For example, suppose you
release a package with the version number 2.0. When you release a patch, the number changes to 2.0.1. This value can't be changed
manually.
Patch Development Organizations
Every patch is developed in a patch development organization, which is the organization where patch versions are developed, maintained,
and uploaded. To start developing a patch, you need to create a patch development organization. To do this, see Create and Upload
Patches. Patch development organizations are necessary to permit developers to make changes to existing components without causing
incompatibilities between existing subscriber installations.
A patch development organization can upload an unlimited number of patches. Only one patch development organization can exist
per major release of your package. Thus, a patch development organization created for a package with a version number of 4.2 can only
work on patches such as 4.2.1, 4.2.2, 4.2.3, and so on, but not on version 4.1 or 4.3.
Integrating Patch Development
The following diagram illustrates the workflow of creating a patch and integrating any work into future versions:
255
Working with Patch VersionsUpgrading Your App
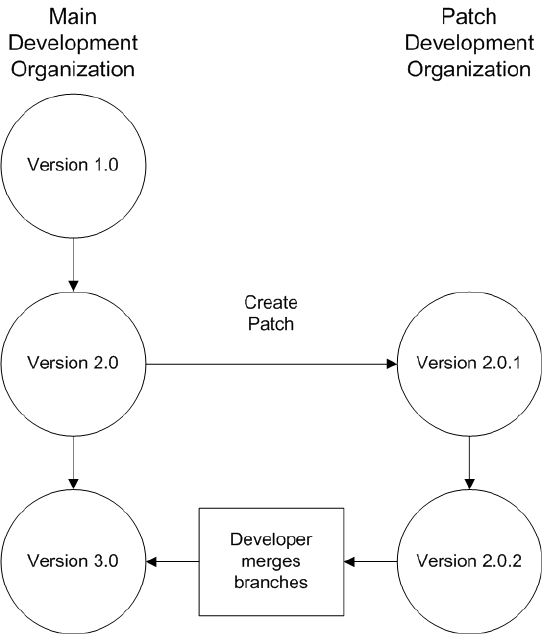
Patch Development Workflow
In the diagram above, after version 2.0 is released, the developer creates a patch. The package version number in the patch development
organization starts at 2.0.1. As the main development organization moves towards a released version of 3.0, a second patch is created
for 2.0.2. Finally, the developer merges the changes between the main development organization, and the patch development organization,
and releases the package as version 3.0.
If you are developing your packages using the Force.com IDE, you can take advantage of revision control systems in Eclipse to compare
and merge different project branches.
Salesforce recommends using the Subversion plug-in. To install Subversion for the Force.com IDE:
1. Go to http://subclipse.tigris.org to get the latest Eclipse Update Site URL compatible with your version of Eclipse.
2. In the Force.com IDE, navigate to Help > Software Updates, and select the Available Software tab. Click Add Site, and enter the
URL from the previous step.
3. Select the new site and click Finish to fetch the latest version of the Subclipse plug-in. Select the required Subclipse plug-in from
the list returned from the site.
4. Click Next, accept the terms, and click Next again.
5. Click Finish to begin the installation, and then Install All when prompted. You will be required to restart Eclipse once the installation
completes.
You have now linked your Force.com IDE environment to Subclipse. The next step is to connect your repository to the environment:
1. Open the SVN Repository Exploring perspective in the IDE, which will open the SVN Repositories view.
2. Use the Add SVN Repository icon on the far right to configure Subclipse to access the local repository. The URL to access your
repository locally is file:///svn_repos.
256
Working with Patch VersionsUpgrading Your App

The subversion repository tracks changes made to stored projects. Because working with patches involves two different branches—a
main development organization and a patch development organization—you need to combine your changes for a future release. To
view the different versions of your package:
1. Open the Project Explorer perspective.
2. Navigate to a file in your main development project that you want to compare, and use the context menu to select Compare
With... > Branch/Tag....
3. In the Compare to field, select the patch version of the file.
4. Click Graphical, then click OK.
The changes between the main development organization's file and the file stored in the patch development organization are highlighted.
You can use this view to merge any differences between the two projects.
For more information on using the Force.com IDE, see the Platform Developer's Guide.
Versioning Apex Code
Package developers can use conditional logic in Apex classes and triggers to exhibit different behavior for different versions. This allows
the package developer to continue to support existing behavior in classes and triggers in previous package versions while continuing
to evolve the code.
When subscribers install multiple versions of your package and write code that references Apex classes or triggers in your package, they
must specify the version that they are referencing. Within the Apex code that is being referenced in your package, you can conditionally
execute different code paths based on the version setting of the calling Apex code that is making the reference. The package version
setting of the calling code can be determined within the package code by calling the System.requestVersion method. In this
way, package developers can determine the request context and specify different behavior for different versions of the package.
The following sample shows different behavior in a trigger for different package versions:
trigger oppValidation on Opportunity (before insert, before update) {
for (Opportunity o : Trigger.new){
// Add a new validation to the package
// Applies to versions of the managed package greater than 1.0
if (System.requestVersion().compareTo(new Version(1,0)) > 0) {
if (o.Probability >= 50 && o.Description == null) {
o.addError('All deals over 50% require a description');
}
}
// Validation applies to all versions of the managed package.
if (o.IsWon == true && o.LeadSource == null) {
o.addError('A lead source must be provided for all Closed Won deals');
}
}
}
To compare different versions of your Apex classes, click the Class Definition tab when viewing the class details.
For more information about the System.requestVersion method, see the Apex Developer Guide.
257
Versioning Apex CodeUpgrading Your App

Apex Deprecation Effects for Subscribers
This section demonstrates how deprecation of an Apex method affects subscribers that install the managed package. The table shows
a typical sequence of actions by a package developer in the first column and actions by a subscriber in the second column. Each row in
the table denotes either a package developer or subscriber action.
NotesSubscriber ActionPackage Developer Action
Create a global Apex class,
PackageDevClass, containing a global
method m1.
Upload as Managed - Released version 1.0 of a
package that contains PackageDevClass.
The Version Number for
the package is 1.0. The First
Install version 1.0 of the package.
Installed Version
Number is 1.0.
Create an Apex class, SubscriberClass,
that references m1 in PackageDevClass.
Deprecate m1 and create a new method, m2.
Upload as Managed - Released version 2.0 of the
package.
The Version Number for
the package is 2.0. The First
Install version 2.0 of the package.
Installed Version
Number is still 1.0.
SubscriberClass still
references version 1.0 of the
package and continues to
function, as before.
Edit the version settings for
SubscriberClass to reference version 2.0
of the package. Save the class. Note an error
message indicating that m1 cannot be
referenced in version 2.0 of the package.
Change SubscriberClass to reference
m2 instead of m1. Successfully save the class.
258
Apex Deprecation Effects for SubscribersUpgrading Your App
Publish Upgrades to Managed Packages
EDITIONS
Available in: Salesforce
Classic and Lightning
Experience
Available in: Developer
Edition
Package uploads and
installs are available in
Group, Professional,
Enterprise, Performance,
Unlimited, and Developer
Editions
USER PERMISSIONS
To configure developer
settings:
•“Customize Application”
To create packages:
•“Create AppExchange
Packages”
To upload packages:
•“Upload AppExchange
Packages”
As a publisher, first ensure that your app is upgradeable by converting it to a managed package.
Any changes you make to the components in a managed package are automatically included in
subsequent uploads of that package, with one exception. When you upgrade a package, changes
to the API access are ignored even if the developer specified them. This ensures that the administrator
installing the upgrade has full control. Installers should carefully examine the changes in package
access in each upgrade during installation and note all acceptable changes. Then, because those
changes are ignored, the administrator should manually apply any acceptable changes after installing
an upgrade. For more information, see About API and Dynamic Apex Access in Packages on page
52.
To publish upgrades to a managed package:
1. From Setup, enter Packages in the Quick Find box, then select Packages.
2. Select the package from the list of available packages.
3. View the list of package components. Changes you have made to components in this package
are automatically included in this list. If the changes reference additional components, those
components are automatically included as well. To add new components, click Add to add
them to the package manually.
4. Click Upload and upload it as usual.
Note: After you upload a new version of your Managed - Released package, you can
click Deprecate so installers cannot install an older version. Deprecation prevents new
installations of older versions without affecting existing installations. For more information,
see Manage Versions on page 263.
You cannot deprecate the most recent version of a managed package upload.
5. When you receive an email with the link to the upload on Force.com AppExchange, notify your
installed users that the new version is ready. Use the list of installed users from the License
Management Application (LMA) to distribute this information. The License Management
Application (LMA) automatically stores the version number that your installers have in their organizations.
Delete Components in Managed Packages
USER PERMISSIONS
To delete components from
a package:
•“Create AppExchange
Packages”
After you've uploaded a Managed - Released package, you may find that a component needs
to be deleted from your organization. One of the following situations may occur:
•The component, once added to a package, can't be deleted.
•The component can be deleted, but can only be undeleted from the Deleted Package
Components page.
•The component can be deleted, but can be undeleted from either the Deleted Package
Components page or through the Recycle Bin
Note:
•Log a case in the Partner Community to enable Component Deletion in your packaging organization.
•Deleting Visualforce pages and global Visualforce components from a managed package requires a two-stage process, because
their behavior differs from the behavior of public Apex classes and public Visualforce components. Upon package upgrade in
a subscriber organization, Visualforce pages and global Visualforce components that you've deleted aren't removed. A "Delete"
259
Publish Upgrades to Managed PackagesUpgrading Your App

button or link is made available to the organization's administrators, but many organizations continue using obsolete pages
and components. However, public Apex classes and public Visualforce components are deleted as part of the upgrade process.
If you delete pages and components without performing this two-stage procedure, Salesforce can’t warn you when your later
deletion of public classes and components would break your subscribers’ obsolete pages and components.
If you’re deleting a Visualforce page or global Visualforce component that refers to or uses public Apex classes or public
Visualforce components, perform the deletion steps in this order.
1. Stage one: Remove references.
i. To remove all references to public Apex classes or public Visualforce components, edit your Visualforce page or global
Visualforce component .
ii. Upload your new package version.
iii. Push the stage-one upgrade to your subscribers.
2. Stage two: Delete your obsolete pages or components.
i. Delete your Visualforce page or global Visualforce component.
ii. Optionally, delete other related components and classes.
iii. Upload your new package version.
iv. Push the stage-two upgrade to your subscribers.
Here are some key types of components you can delete when updating a previously released managed package.
•Custom buttons or links
•Custom console
•Custom fields
•Custom objects
•Custom settings
•Custom tabs
•Field sets
•Permission sets
•Record types
•Static resources
•Validation rules
•Visualforce components
•Visualforce pages
For a complete list, see Available Components on page 21.
Deleting any component permanently deletes any data that exists in that component, delete tracked history data, and change any
integrations that rely on the component, such as assignment or escalation rules. Also, once you delete a component in a managed
package, you can’t restore it or create another component with the same name.
Note: In managed packages, the API name of fields must be unique and cannot be reused even after you delete the component.
This restriction prevents conflicts during package installation and upgrade.
No data or metadata is ever deleted in a subscriber organization without specific action by the customer. Subscribers who upgrade to
the new package version will still have the deleted components available in their organization. They’re displayed in the Unused Components
section of the Package Details page. This ensures subscribers have the opportunity to export data and modify custom integrations
260
Delete Components in Managed PackagesUpgrading Your App

involving those components, before explicitly deleting them. For example, before deleting custom objects or fields, customers can
preserve a record of their data from Setup by entering Data Export in the Quick Find box and then selecting Data Export.
Note: It’s your responsibility to educate your customers about the potential impact from any components you delete. List all
custom components you've deleted and notify customers of any necessary actions, in the Release Notes for your upgraded package.
The following restrictions apply when deleting managed components.
•A component of any type is not deletable if it’s referenced by any other metadata, such as workflow rules, validation rules, or Apex
classes.
•A custom object is not deletable if it includes any of the following: Apex Sharing Reason, Apex Sharing Recalculation, Related Lookup
Filter, Compact Layout, or Action.
•Deleting a custom field that is referenced by a custom report type in the same package is not recommended, as that leads to an
error when installing the upgraded package.
•If you delete a field in a custom report type that’s part of a managed package, and the deleted field is part of bucketing or used in
grouping, you receive an error message.
You can delete managed components, both declaratively, from the user interface, and programmatically, using the Metadata API. In the
latter case, specify the components you want to delete in a destructiveChanges.xml manifest file and then use the standard
deploy() call. The process is identical to that for deleting components that aren’t managed. For more information, see the Metadata
API Developer Guide.
Viewing Deleted Components
To access the Deleted Package Components page, from Setup, enter Packages in the Quick Find box, then select Packages.
Select the package that the component was uploaded to, and then click View Deleted Components. You can retrieve components
from the Recycle Bin and Deleted Package Components page any time before uploading a new version of the package. To do this, click
Undelete next to the component.
After a package is uploaded with a component marked for deletion, it is deleted forever.
Warning: Although a component is deleted, its Name remains within Salesforce. You can never create another component with
the same name. The Deleted Package Components page lists which names can no longer be used.
To access the Deleted Package Components page, from Setup, enter Packages in the Quick Find box, then select Packages.
Select the package that the component was uploaded to, and then click View Deleted Components. If a component can be retrieved
through the Recycle Bin, it can also be retrieved through this page. You can retrieve the following types of components from here.
•Apex classes and triggers that don't have global access.
•Custom tabs.
•Visualforce components with public access.
•Protected components, including:
–Custom labels
–Custom links (for Home page only)
–Workflow alerts
–Workflow field updates
–Workflow outbound messages
–Workflow tasks
–Workflow flow triggers
261
Viewing Deleted ComponentsUpgrading Your App
The pilot program for flow trigger workflow actions is closed. If you've already enabled the pilot in your org, you can continue
to create and edit flow trigger workflow actions. If you didn't enable the pilot in your org, use the Flows action in Process Builder
instead.
•Data components, such as Documents, Dashboards, and Reports. These are the only types of components that can also be undeleted
from the Recycle Bin.
You can retrieve components from the Recycle Bin and Deleted Package Components page any time before uploading a new version
of the package. To do this, click Undelete next to the component.
The Deleted Components displays the following information (in alphabetical order):
DescriptionAttribute
If the Managed - Released package hasn't been uploaded with
the component deleted, this contains an Undelete link that allows
you to retrieve the component.
Action
Displays the version number of the package in which a component
exists.
Available in Versions
Displays the name of the component.Name
Displays the name of the parent object a component is associated
with. For example, a custom object is the parent of a custom field.
Parent Object
Displays the type of the component.Type
Modifying Custom Fields after a Package is Released
EDITIONS
Available in: Salesforce
Classic
Available in: Developer
Edition
The following changes are allowed to custom fields in a package, after it is released.
•The length of a text field can be increased or decreased.
•The number of digits to the left or right of the decimal point in a number field can be increased
or decreased.
•A required field can be made non-required and vice-versa. If a default value was required for a
field, that restriction can be removed and vice-versa.
262
Modifying Custom Fields after a Package is ReleasedUpgrading Your App
Manage Versions
EDITIONS
Available in: Salesforce
Classic
Available in: Group,
Professional, Enterprise,
Performance, Unlimited,
and Developer Editions
USER PERMISSIONS
To upload packages:
•“Upload AppExchange
Packages”
After you upload a package to the AppExchange, you can still manage it from Salesforce. To manage
your versions:
1. From Setup, enter Packages in the Quick Find box, then select Packages.
2. Select the package that contains the app or components you uploaded.
3. Select the version number listed in the Versions tab.
•Click Change Password link to change the password option.
•Click Deprecate to prevent new installations of this package while allowing existing
installations to continue operating.
Note: You cannot deprecate the most recent version of a managed package.
When you deprecate a package, remember to remove it from AppExchange as well. See
“Removing Apps from AppExchange” in the AppExchange online help.
•Click Undeprecate to make a deprecated version available for installation again.
Note: To create a test drive or choose a License Management Organization (LMO) for what
you have uploaded, click Proceed to AppExchange from the package upload detail page.
Pushing an Upgrade
A push upgrade is a method of automatically upgrading your customers to a newer version of your package. This feature works with
managed packages only and can be used to ensure that all of your customers are on the same or latest version of your package. You
can push an upgrade to any number of organizations that have installed your managed package.
A package subscriber doesn't need to do anything to receive the push upgrade. The only indication a subscriber receives after a successful
push upgrade is that the package's Version Number on the Package Detail page has a higher value. Any upgrades that fail must
be resolved by the developer initiating the push.
Push upgrades minimize the potential risks and support costs of having multiple subscribers running different versions of your app. You
can also automate many post-upgrade configuration steps, further simplifying the upgrade process for your customers.
Note: This feature is available to eligible Salesforce partners. For more information on the Partner Program, including eligibility
requirements, please visit us at www.salesforce.com/partners.
About Push Upgrades
Note: Registered ISV partners can request Push Major Upgrade functionality by logging a case in the Partner Community.
You can push either a patch or a major upgrade. A patch only contains bug fixes and minor enhancements. In contrast, a major upgrade
can include major enhancements and new features that add new components. At a high level, pushing an upgrade involves the following
steps:
•Upgrade your managed package installed in a customer organization from version X to version Y
•Select one, many, or all customer organizations to upgrade and select a particular version to upgrade to
•Schedule the upgrade to start at a particular date and time
•View progress of upgrades, abort upgrades in progress, or view the result of a push upgrade
263
Manage VersionsUpgrading Your App

•In conjunction with push, you may use a post install Apex Script to automate many post-upgrade configurations that your customers
might have previously performed manually
Warning: When you push an upgrade, you’re making changes to a subscriber’s organization without their explicit consent.
Hence, it’s important to plan ahead and exercise due caution.
Pushing a major upgrade entails a higher degree of risk as it can impact existing functionality in a subscriber’s organization. This is because
new components in the upgraded package might not be available to existing users of the package, or could overwrite users’ customizations.
As the app developer, it’s your responsibility to protect users from any adverse impact due to upgrading. We strongly recommend you
consider all potential consequences of the upgrade and take appropriate steps to prevent any problems.
When pushing a major upgrade, we recommend that you divide changes in your package into two categories:
1. Enhancements to existing features that users already have access to—Use a post install Apex script to automatically assign the
relevant components to existing users. This ensures all current users of the package can continue using it without explicit action by
administrators.
2. New features you’re introducing for the first time—Don’t use a post install Apex script to auto-assign components. This ensures
your subscribers have the opportunity to decide if and when to use the new features.
Here are some additional guidelines to keep in mind when planning a push upgrade.
•Avoid changes to validation rules, formula fields, and errors thrown from Apex triggers, as they may negatively impact subscribers’
integrations.
•Don’t make visible changes to a package in a patch. This is because other than a change in the package version number, subscribers
aren't notified of push upgrades.
•Test your upgraded package in multiple environments, replicating all relevant features of your customers’ organizations, including
editions, customizations, other installed packages, and permission sets.
•Schedule push upgrades at your customers’ off-peak hours and outside of Salesforce’s major release windows, to minimize potential
subscriber impact.
•Notify your subscribers in advance about the timing of the upgrade, its potential consequences, and any steps they need to take.
Push Upgrade Best Practices
Push Upgrade is one of the most powerful features we provide to our partners. You have the power to upgrade your customers, but it’s
imperative that you use that power carefully. Pushing an upgrade without proper planning and preparation can result in significant
customer satisfaction issues. Hence, we strongly recommend that you adhere to the best practices documented here.
Plan, Test, and Communicate
•Communicate, communicate, and communicate! Your customers might not even know about the Push Upgrade feature. Some
might have strong reservations about changes being pushed to their organizations. Reach out to them and explain how the
cloud-computing model works, how they can benefit from seamless upgrades, how you are using best practices to ensure a smooth
upgrade, and what your process and commitment is to them regarding the timing and content of an upgrade. Timely and thorough
communication is critical for the success of this program.
•Share an upgrade timeline plan with your customers so they know when you will upgrade, and how often.
•Plan when you want to push upgrades to your customers’ organizations. Keep in mind that most customers don’t want changes
around their month-end, quarter-end, and year-end or audit cycles. Do your customers have other critical time periods when they
don’t want any changes to their organization? For example, there might be certain times when they don’t have staff available to
verify changes or perform any required post-installation steps.
•Schedule push upgrades during your customers’ off-peak hours, such as late evening and night. Have you considered time zone
issues? Do you have customers outside the United States who have different off-peak hours? You can schedule push upgrades to
264
Push Upgrade Best PracticesUpgrading Your App
any number of customer organizations at a time. Consider grouping organizations by time zone, if business hours vary widely across
your customer base.
•Don’t schedule push upgrades close to Salesforce-planned maintenance windows. In most cases, it might be better to wait 3-4
weeks after a major Salesforce release before you push major upgrades.
•Test, test, and test! Since you’re pushing changes to the organization instead of the customer pulling in changes, there is a higher
bar to ensure the new version of your app works well in all customer configurations.
Stagger the Push
•Don’t push changes to all customers at once. It’s important to ensure that you have sufficient resources to handle support cases if
there are issues. Also, it’s important that you discover possible issues before your entire customer base is affected.
•Push to your own test organizations first to confirm that the push happens seamlessly. Log in to your test organization after the push
upgrade and test to see that everything works as expected.
•When applicable, push to the sandbox organizations of your customers first before pushing to their production organizations. Give
them a week or more to test, validate, and fix in the sandbox environment before you push to their production organizations.
•Push upgrades to small batches of customer production organizations initially. For example, if you have 1,000 customers, push
upgrades to 50 or 100 customers at a time, at least the first few times. Once you have confidence in the results, you can upgrade
customers in larger batches.
Focus on Customer Trust
•You’re responsible for ensuring that your customers’ organizations are not adversely affected by your upgrade. Avoid making changes
to the package, such as changes to validation rules or formula fields, that might break external integrations made by the customer.
If for some reason you do, test and communicate well in advance. Please keep in mind that you can impact customer data, not just
metadata, by pushing an upgrade that has bugs.
•Write an Apex test on install to do basic sanity testing to confirm that the upgraded app works as expected.
•If you’re enhancing an existing feature, use a post-install script to automatically assign new components to existing users using
permission sets.
•If you’re adding a new feature, don’t auto-assign the feature to existing users. Communicate and work with the administrators of
the customer organization so they can determine who should have access to the new feature, and the timing of the roll-out.
Assigning Access to New Components and Fields
If the new version of your package includes new components or new fields in existing components, existing users of the package won’t
automatically have access to the new components and fields after the upgrade. This can limit them from using the new features you’ve
added or prevent older features from working properly. By default, any new components in your package are assigned only to
administrators. You have two options for ensuring that all users of the package have access to the new components and fields.
Notify administrators to assign the appropriate permissions to all users of the package
We recommend this for any new features you’re introducing. This ensures administrators have the option of deciding if and when
to make the new features available.
Assign the new components to existing users automatically, using a post install Apex script
We recommend this for enhancements to existing features. This ensures all current users of the package can continue using it without
explicit action by administrators.
To assign access to new components automatically, you can use the following strategy.
1. Create new permission sets that define the default access settings for all new components and fields.
265
Assigning Access to New Components and FieldsUpgrading Your App

2. Include the new permission sets in the new package version.
3. Write a post install Apex script to run automatically in the subscriber organization after the package is upgraded. The script must
perform these tasks.
a. For each new permission set, choose an existing component whose user assignment needs to be copied.
b. Find all profiles that can access that component.
c. Assign the new permission sets to every user with those profiles.
Note: The default permission sets for all standard profiles aren’t editable. Hence, the post install script will trigger an exception
if it tries to update one of these permission sets. It’s important that you create a new permission set to assign access to the new
components in your package.
Sample Post Install Script for a Push Upgrade
This section shows a sample post install script that automates the assignment of new components to existing users of a package. For
more information on writing a post install Apex script, see Running Apex on Package Install/Upgrade on page 113.
The sample script covers a scenario in which an ISV is upgrading subscribers to a new package version that contains new Visualforce
pages and a new permission set that grants access to those pages. After upgrading, existing users of the package will not have access
to the new pages by default. The post install script resolves this problem by identifying which users have access to the Visualforce pages
in the old version of the package and granting them access to the new pages. The script performs the following actions.
•Get the Id of the Visualforce pages in the old version of the package
•Get the permission sets that have access to those pages
•Get the list of profiles associated with those permission sets
•Get the list of users who have those profiles assigned
•Assign the permission set in the new package to those users
global class PostInstallClass implements InstallHandler {
global void onInstall(InstallContext context) {
//Get the Id of the Visualforce pages
List<ApexPage> pagesList =[SELECT Id FROM ApexPage WHERE NamespacePrefix =
'TestPackage' AND Name = 'vfpage1'];
//Get the permission sets that have access to those pages
List<SetupEntityAccess> setupEntityAccessList = [SELECT Id,
ParentId, SetupEntityId, SetupEntityType FROM SetupEntityAccess
where SetupEntityId IN:pagesList];
Set<ID > PermissionSetList = new Set<ID> ();
for(SetupEntityAccess sea : setupEntityAccessList){
PermissionSetList.add(sea.ParentId)};
List<PermissionSet> PermissionSetWithProfileIdList =
[SELECT id,Name,IsOwnedByProfile,Profile.Name,
ProfileId FROM PermissionSet where IsOwnedByProfile = true
AND Id IN :PermissionSetList ];
//Get the list of profiles associated with those permission sets
Set<ID> ProfileList = new Set<ID> ();
for(PermissionSet per : PermissionSetWithProfileIdList){
ProfileList.add(per.ProfileId);
266
Sample Post Install Script for a Push UpgradeUpgrading Your App
}
//Get the list of users who have those profiles assigned
List<User> UserList =[SELECT id FROM User where ProfileId IN :ProfileList ];
//Assign the permission set in the new package to those users
List<PermissionSet> PermissionSetToAssignList = [SELECT id,Name
FROM PermissionSet where Name='TestPermSet' AND
NamespacePrefix = 'TestPackage'];
PermissionSet PermissionSetToAssign = PermissionSetToAssignList[0];
Set<ID> UsersSet = new Set<ID> ();
for(User us : UserList){
PermissionSetAssignment psa= new PermissionSetAssignment();
psa.PermissionSetId = PermissionSetToAssign.id;
psa.AssigneeId = us.id;
UsersSet.add(us.id);
}
}
}
// Test for the post install class
@isTest
private class PostInstallClassTest {
@isTest
public static void test() {
PostInstallClass myClass = new PostInstallClass();
Test.testInstall(myClass, null);
}
}
Scheduling Push Upgrades
EDITIONS
Available in: Salesforce
Classic
Available in: Developer
Edition
USER PERMISSIONS
To push an upgrade:
•“Upload AppExchange
Packages”
Note: Patch versions and push upgrades are only available to Salesforce ISV partners.
After you’ve created a patch version of your package, you can automatically deploy it to customers
using a push upgrade.
Tip: Salesforce strongly recommends following this sequence for pushing package upgrades.
1. Push the upgrade to your own organizations so you can run tests and fix any bugs before
upgrading subscribers.
2. When you’re ready and have coordinated with your customers on their change
management process, push to a small number of customer organizations. Try sandbox
organizations first, if possible.
3. Once you’re comfortable with the initial results, push to your wider customer base, based
on your agreements with each customer.
4. Deprecate the previous version of your package in your main development organization.
Replace the version on AppExchange if necessary, and update your Trialforce setup.
267
Scheduling Push UpgradesUpgrading Your App

5. If your upgrade was a patch, after you’ve successfully distributed the upgrade to subscriber organizations, reintegrate those
changes into your main development organization. For more information about combining patches in the main development
organization, see Working with Patch Versions on page 254.
Read Best Practices for Push Upgrades and Patch Versions for more information.
Schedule a Push Upgrade Using the UI
1. Log in to your main development org (not the patch org you used to upload the new version).
2. From Setup, enter Packages in the Quick Find box, then select Packages.
3. Click the name of the managed package whose upgrade you want to push.
4. On the package detail page, click the Versions tab, and then click Push Upgrades.
5. Click Schedule Push Upgrades.
6. Select a package version to push from the Patch Version drop-down list.
Note: Beta versions aren’t eligible for push.
7. For the scheduled start date, enter when you want the push upgrade to begin.
8. In the Select Target Organizations section, select the orgs to receive your push upgrade. If an org already received a push upgrade
for the selected package version, it doesn’t appear in this list. You can select orgs by:
•Entering a term that filters based on an org’s name or ID. Names can match by partial string, but IDs must match exactly.
•Choosing between production and sandbox orgs from the Organizations dropdown list.
•Choosing orgs that have already installed a particular version.
•Clicking on individual orgs or the Select All and Deselect All checkboxes.
This section lists the following information about the org (in alphabetical order):
DescriptionField
The current package version an organization has installed.Current Version
The ID that uniquely identifies the organization to Salesforce.Organization ID
The name of the organization. Clicking this name shows the
upgrade history for the organization.
Organization Name
The name of the contact who installed the package.Primary Contact
9. Click Schedule. While a push upgrade is in progress, you can click Abort to stop it.
Schedule a Push Upgrade Using the Enterprise API
1. Authenticate to your main development org (not the patch org you used to upload the new version) according to the tool you’re
using.
2. Determine the package version you want to upgrade subscribers to by querying the MetadataPackageVersion object.
3. Gather the list of subscriber orgs that are eligible to be upgraded by querying the PackageSubscriber object.
4. Create a PackagePushRequest object. PackagePushRequest objects take a PackageVersionId and, optionally, a ScheduledStartTime
parameter to specify when the push begins. If you omit the ScheduledStartTime, the push begins when you set the
PackagePushRequest's status to Pending.
268
Scheduling Push UpgradesUpgrading Your App
5. Create a PackagePushJob for each eligible subscriber and associate it with the PackagePushRequest you created in the previous
step.
6. Schedule the push upgrade by changing the status of the PackagePushRequest to Pending.
7. Check the status of the PackagePushRequest and PackagePushJob objects by querying the Status fields. If the status is either
Created or Pending, you can abort the push upgrade by changing the status of the PackagePushRequest to Canceled. You cannot
abort a push upgrade that has a status of Canceled, Succeeded, Failed, or In Progress.
For sample code and more details, see the object descriptions in the Object Reference for Salesforce and Force.com or the SOAP API Developer
Guide.
View Push Upgrade Details
EDITIONS
Available in: Salesforce
Classic
Available in: Developer
Edition
USER PERMISSIONS
To view push upgrade
details:
•“Upload AppExchange
Packages”
Note: Patch versions and push upgrades are only available to Salesforce ISV partners.
For information about a specific push upgrade that your organization sent, from Setup, enter
Packages in the Quick Find box, then select Packages. Click the name of the package
that you want to view, and then click Push Upgrades. Clicking the name of a Target takes you
to the Push Upgrade Details page, which has information for the push job and each organization
that it was pushed to.
The Job Details section has the following information about the overall push upgrade (in alphabetical
order):
DescriptionField
The date and time the push upgrade finished.End Date
Whether Apex test failures that may cause the
installed application not to function properly
were ignored.
Ignore Apex Test Failures
The name of the user who initiated the push
upgrade.
Scheduled By
The scheduled start date and time of the push
upgrade.
Start Date
The status of the push upgrade, whether
scheduled, in progress, completed, aborted, or
completed with failures.
Status
The package version number that was pushed.Version
In the Organizations section, you can get a list of all the organizations that received a push upgrade. You can filter organizations by using
the search box and entering a term that filters based on an org’s name or ID. Names can match by partial string, but IDs must match
exactly. From the drop-down list, you can also filter based on the status of the push upgrade.
The list contains the following information specific to each organization (in alphabetical order):
DescriptionField
The amount of time the push upgrade took.Duration
269
View Push Upgrade DetailsUpgrading Your App
DescriptionField
Lists the type of failure that occurred (if any). If the push upgrade
did fail, a possible explanation is provided in the collapsible section.
If the push upgrade was unsuccessful, click Retry to try it again.
Failure Type
The ID that uniquely identifies the organization to Salesforce.Organization ID
The name of the organization. Clicking this name shows the
upgrade history for the organization.
Organization Name
The scheduled start date and time of the push upgrade.Start
The status of the push upgrade, whether scheduled, in progress,
completed, aborted, or completed with failures.
Status
View an Organization’s Upgrade History
EDITIONS
Available in: Salesforce
Classic
Available in: Developer
Edition
USER PERMISSIONS
To view push upgrade
history:
•“Upload AppExchange
Packages”
Note: Patch versions and push upgrades are only available to Salesforce ISV partners.
For more information about a specific organization that received a push upgrade, from Setup, enter
Packages in the Quick Find box, then select Packages. Click the name of the package
that you want to view, and then click the name of a Target. Clicking an organization in the target
list provides the following details (in alphabetical order):
DescriptionField
The current package version an organization
has installed.
Current Version
The ID that uniquely identifies the organization
to Salesforce.
Organization ID
The name of the organization.Organization Name
The name of the contact who installed the
package.
Primary Contact
The email address of the package publisher.Primary Contact Email
The status of the push upgrade, whether
scheduled, in progress, completed, aborted, or
completed with failures.
Status
The Push Upgrade History lists the following information (in alphabetical order):
DescriptionField
Clicking View Details returns you to the job details for that
upgrade.
Action
The scheduled start date and time of the push upgrade.Start Date
270
View an Organization’s Upgrade HistoryUpgrading Your App

DescriptionField
The status of the push upgrade, whether scheduled, in progress,
completed, aborted, or completed with failures.
Status
The package version number that was pushed.Version
271
View an Organization’s Upgrade HistoryUpgrading Your App
APPENDICES
APPENDIX A ISVforce User License Comparison
Introduction
The following tables compare object access, user permissions and features, and organization limits for these license types.
•Force.com Administrator—A standard Salesforce license with complete customization capabilities. It prohibits Create, Read, Update,
and Delete on Leads, Opportunities, Products, Cases, Solutions, and Campaigns.
•Force.com—A standard Salesforce Platform license with access to Accounts, Contacts, and custom objects. Used by non-administrators.
Note: For a complete list of license types, see: https://help.salesforce.com/HTViewHelpDoc?id=users_license_types_available.htm
The following symbols are used in the tables.
•—Included in license
•$—Available as an add-on for an additional fee
•C—Create access to the object
•R—Read access to the object
•U—Update access to the object
•D—Delete access to the object
Object Accessed
Force.comForce.com AdministratorObject Accessed
UE/PXEEEUE/PXEEE
CRUDCRUDCRUDCRUDAccounts
CRUDCRUDCRUDCRUDActivities, Tasks
Assets
CRUDCRUDCRUDCRUDCalendar, Events
Campaigns
Cases
CRUDCRUDCRUDCRUDContacts
CRUDCRUDCRUDCRUDContent
Contracts
272
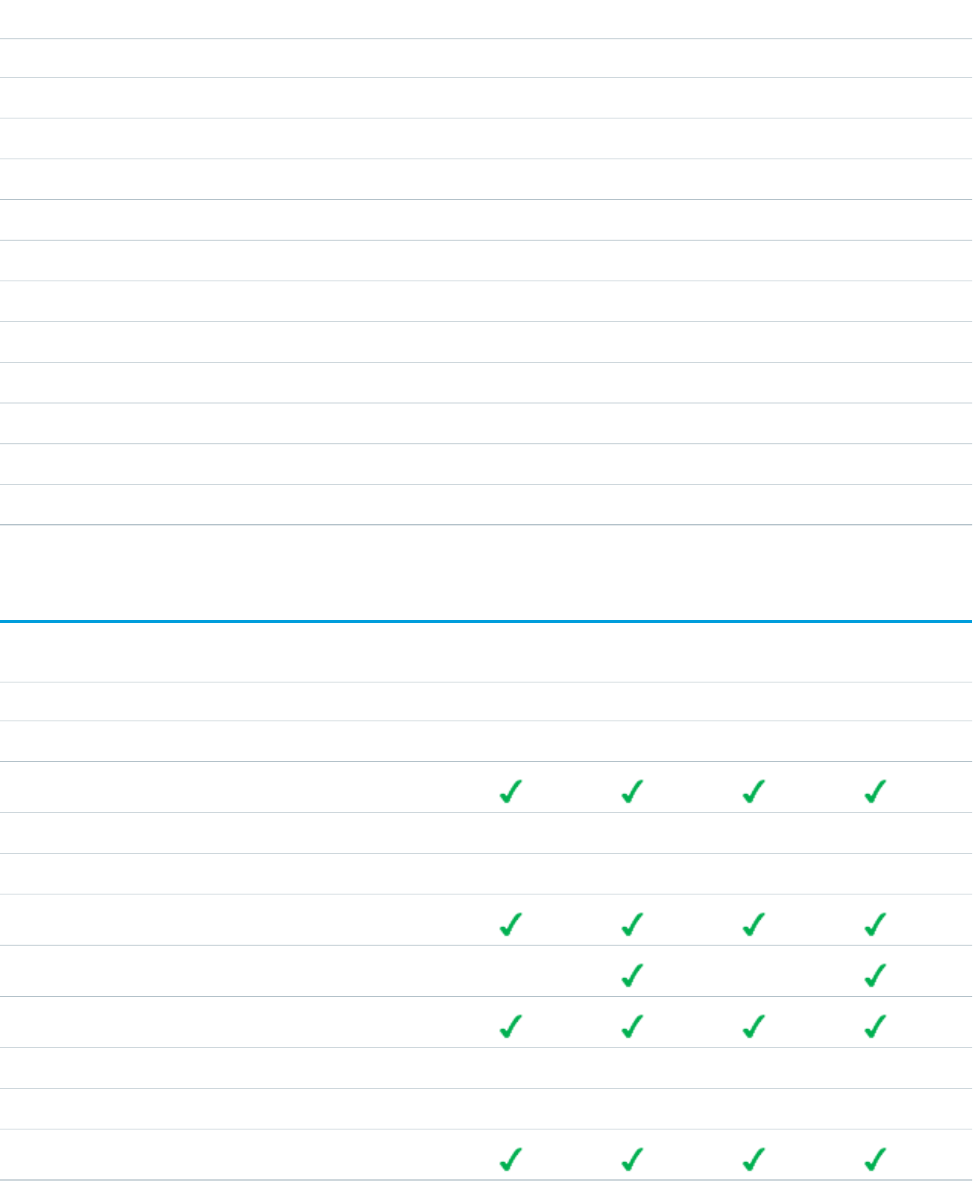
Force.comForce.com AdministratorObject Accessed
UE/PXEEEUE/PXEEE
CRUDCRUDCRUDCRUDDocuments
Entitlements
CRCRCRUDCRUDIdeas
RRKnowledge
Leads
Opportunities
Products & Price Books
CRUDCRUDQuestions and Answers
Quotes
Service Contracts
Solutions
User Features
Force.comForce.com AdministratorUser Features
UE/PXEEEUE/PXEEE
$$$$Company Community
Content
$$$$Jigsaw Exports
$$$$Knowledge
Send Mass Email
$$Mobile (Full)
Offline
$$$$Siteforce Contributor
$$$$Siteforce Publisher
Visual Workflow
273
ISVforce User License Comparison
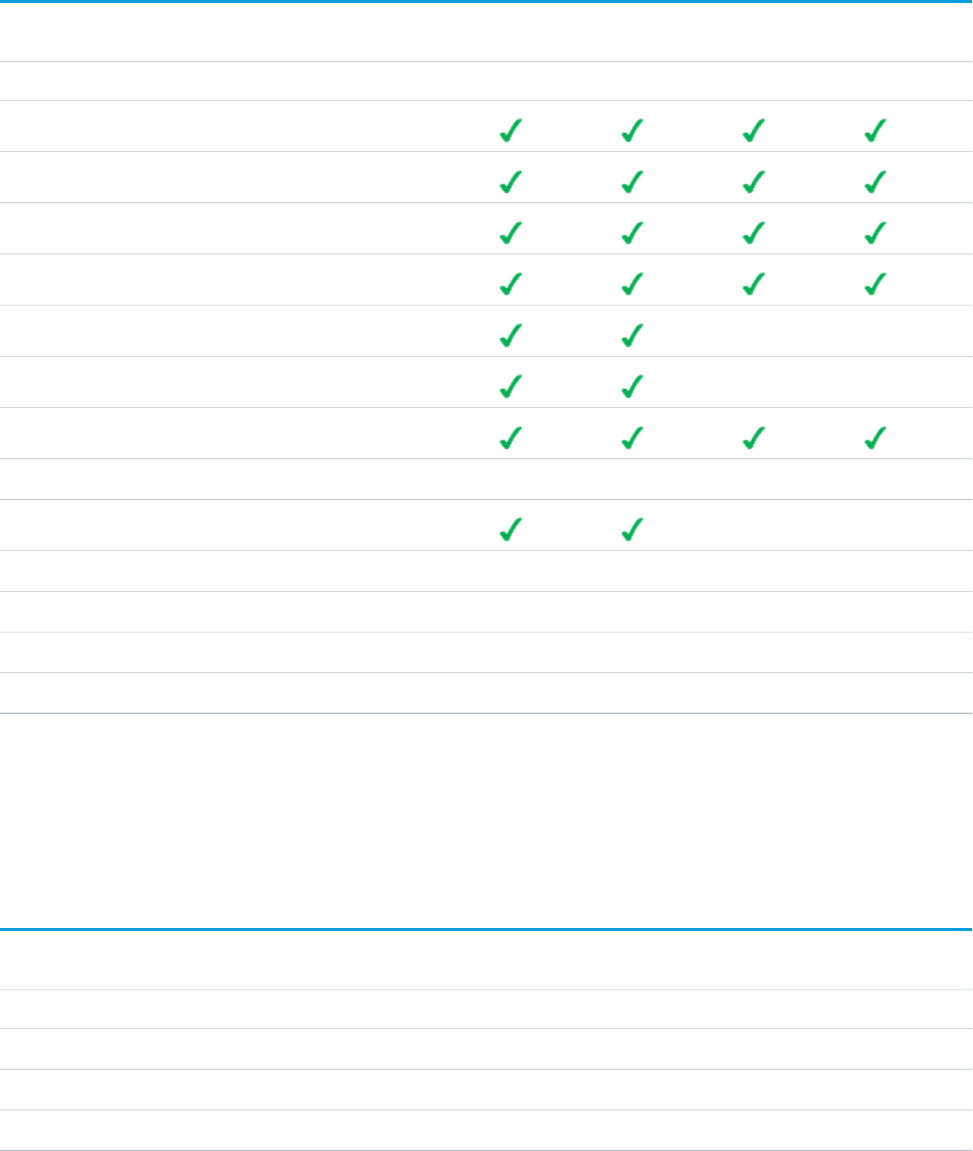
User Permissions
Force.comForce.com AdministratorUser Permissions
UE/PXEEEUE/PXEEE
Customize Reports
Customize Dashboards
View Dashboards*
Chatter (Groups, Files, Profiles)
Create Workflow and Approval Process
Manage Users and Profiles
Identity
$$$$Identity Connect
Write Apex Code
$$$$Work.com
Unlimited10Unlimited10Custom Apps Limit
Unlimited25Unlimited25Custom Tabs Limit
2,0002002,000200Custom Objects Limit**
* The running user of a dashboard must be a Force.com or a Force.com One App user to view the dashboard. Dashboards using the
Force.com administrator as the running user are not viewable by other Force.com license types.
** Restricted limit for Force.com One App and Chatter Plus.
Additional Organization Limits
Force.comForce.com AdministratorAdditional Organization Limits (Added Per User)
UE/PXEEEUE/PXEEE
120 MB20 MB120 MB20 MBData Storage
2 GB2 GB2 GB2 GBFile Storage
5,0001,0005,0001,000API Calls (Per Day Per User)
274
ISVforce User License Comparison

For data storage, Enterprise, Performance, and Unlimited Editions are allocated either 1 GB or a per-user limit, whichever is greater. For
example, an Enterprise Edition organization with 10 users receives 1 GB because 10 users multiplied by 20 MB per user is 200 MB, which
is less than the 1 GB minimum. An Enterprise Edition organization with 100 users receives more than the 1 GB minimum because 100
users multiplied by 20 MB per user is 2,000 MB.
For file storage, Enterprise, Performance, and Unlimited Editions are allocated a per-user limit multiplied by the number of users in the
organization plus an additional per-organization allocation of 11 GB. For example, an Enterprise Edition organization with 600 users
receives 1,211 GB of file storage, or 2 GB per user multiplied by 600 users plus an additional 11 GB.
Note: For a complete list of storage limits for each edition, see:
https://help.salesforce.com/HTViewHelpDoc?id=limits_storage_allocation.htm
275
ISVforce User License Comparison

APPENDIX B OEM User License Comparison
Compare object access, user permissions and features, and org limits for the license types available to partners.
License Types and Availability
Note: Starting Spring ’16, Partner Community licenses are no longer available for resale. If you’re a partner with a customer who
requires similar features, consider a Customer Community Plus license instead.
The following licenses are available to new and existing ISV partners.
•OEM Embedded—A full Force.com license with contractual restrictions. It prohibits Create, Read, Update, and Delete on Leads,
Opportunities, Cases, Solutions, and Campaigns.
•Customer Community—Similar to a High Volume Customer Portal license. Well suited for business-to-consumer communities with
a large number of external users.*
•Customer Community Plus—Similar to the Customer Community license, but adds more storage and access to features like Roles
and Sharing.*
The following licenses aren’t available to new partners, but can be resold by existing partners where noted.
•Partner Community—Similar to a Gold Partner license. Well suited for business-to-business communities, such as a partner community.
Existing partners who currently sell Partner Community licenses can continue offering them.*
•ISV Portal—An Authenticated Website license with basic data sharing options (manual sharing to user and participation in sharing
groups is not permitted). Users can only log in via Force.com Sites. This is best used when projected user volumes will exceed 100,000.
This legacy license type is no longer available.*
•ISV Portal with Sharing—A Customer Portal Manage Custom license with full sharing capabilities. Users can log in only via Force.com
Sites. Best used when projected user volumes are under 100,000 and granular security access is required. This legacy license type is
no longer available.*
Licenses sold by partners can only be used to access the partner’s app. End users can’t develop or extend apps by creating custom
objects, but they can access additional apps as long as those apps are sold with an embedded license.
* Licenses can be assigned to external users only.
The following symbols are used in the tables:
•—Included in license
•$—Available as an add-on for a fee
•C—Create access to the object
•R—Read access to the object
•U—Update access to the object
•D—Delete access to the object
276
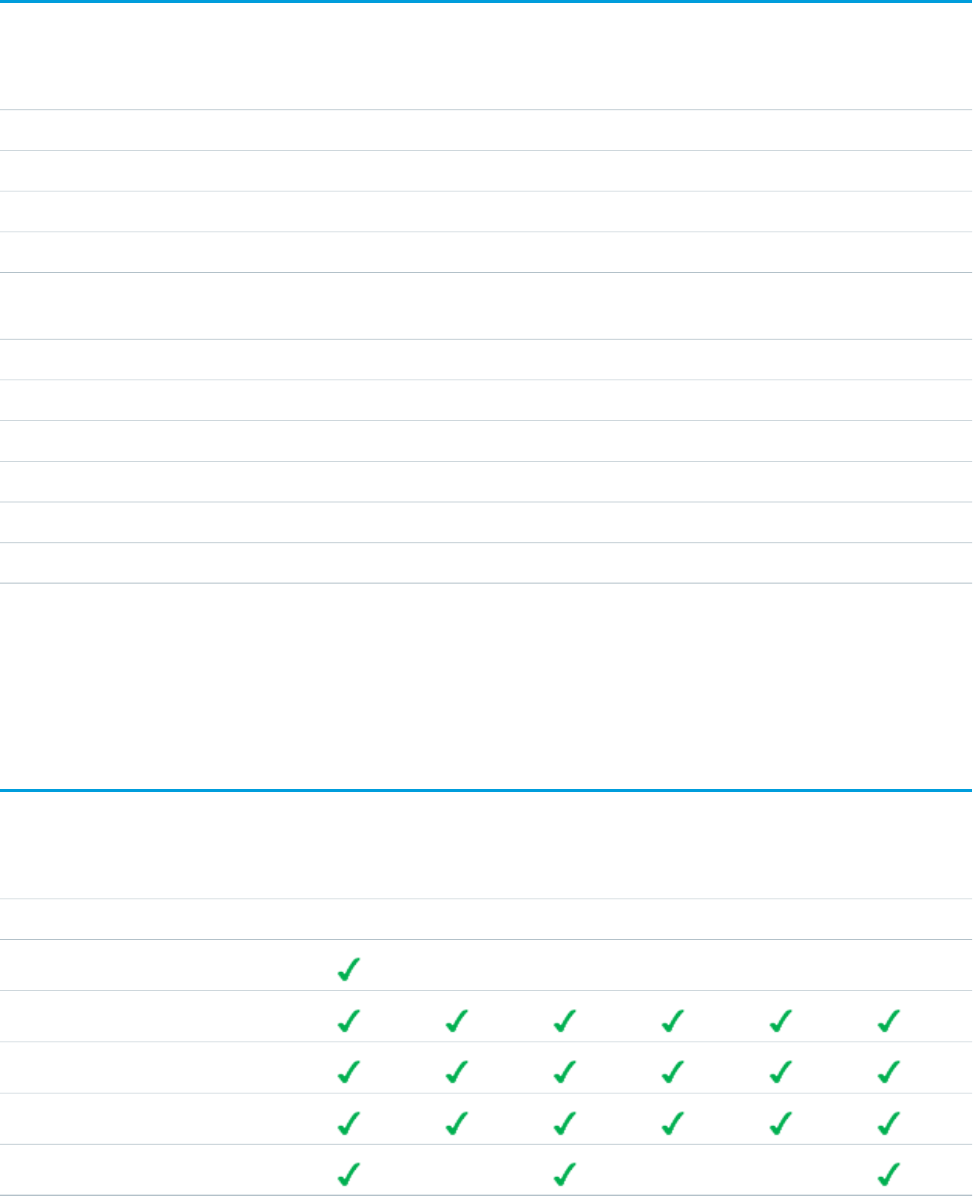
Objects
Partner
Community
Customer
Community
Plus
Customer
Community
ISV Portal
with
Sharing
ISV PortalOEM
Embedded
Object Accessed
CRUDCRURCRUCRUDAccounts
CRUDCRURCRUDActivities, Tasks
CRUDCRUDCalendar, Events
CRUDCRURCRUCRUDContacts
CRUDView and
Upload
RCRUDContent
CRUDCRUDCRUDCRUCRUCRUDContracts*
RRRRRCRUDDocuments
CRCRCRCRCRCRIdeas
CRUDCRUDCRUDCRUCRUCRUDOrders*
RRRCRUCRUCRUDProducts & Price Books*
CRUDCRUDCRUDCRUDCRUDCRUDISV Custom Object
* With the Orders Platform permission set license (PSL), available to OEM partners only, administrators can give users with Force.com
user licenses access to Contracts, Products, Price Books, and Orders. Orders functionality is automatically available to all licenses except
the Force.com licenses, which explicitly require the new PSL to grant access.
User Features
Partner
Community
Customer
Community
Plus
Customer
Community
ISV Portal
with
Sharing
ISV PortalOEM
Embedded
User Feature
RRRR$Knowledge
Send Mass Email
Salesforce1 Mobile App
Identity
Visual Workflow
Territory Management
277
OEM User License Comparison
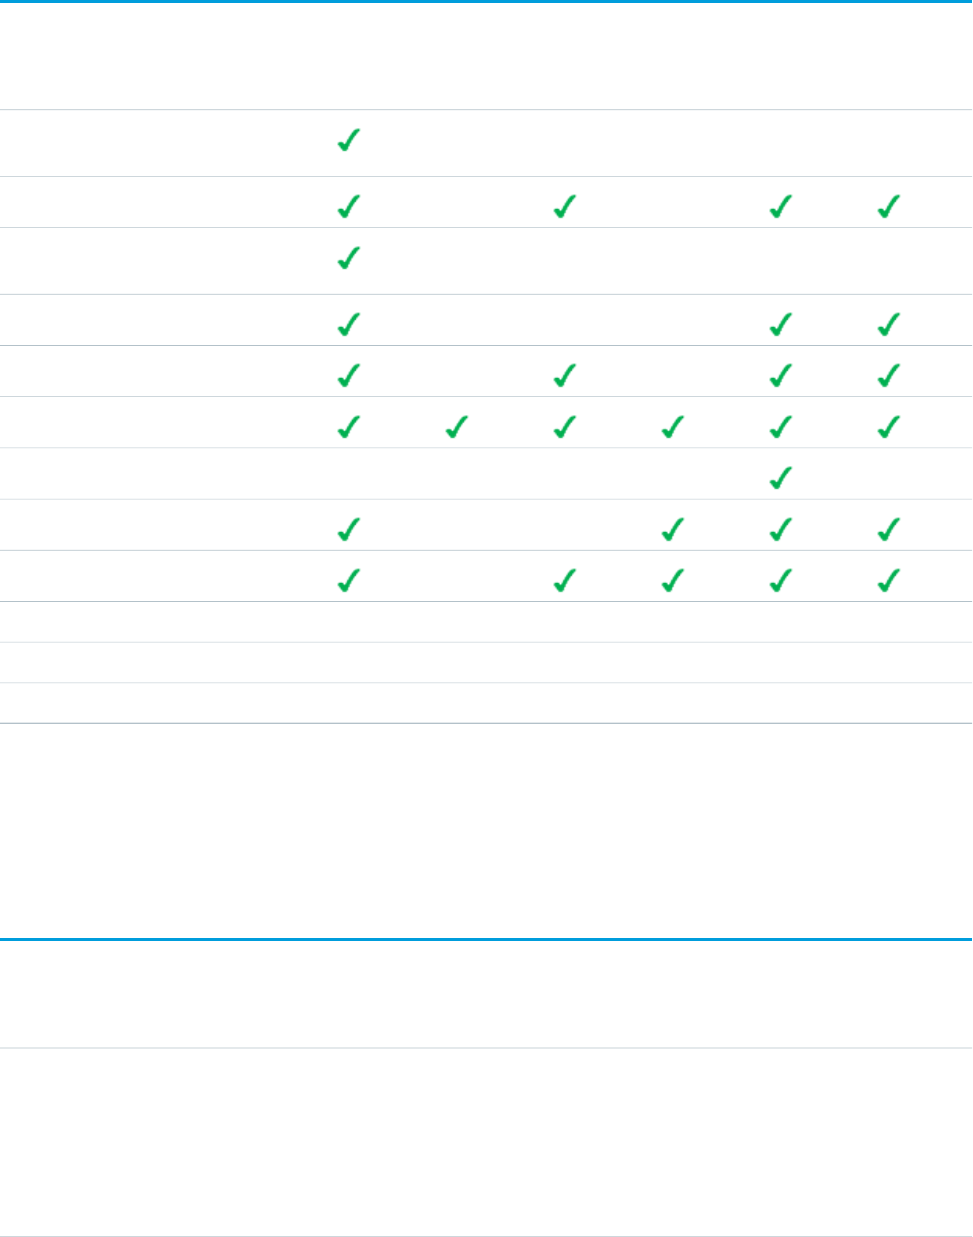
User Permissions
Partner
Community
Customer
Community
Plus
Customer
Community
ISV Portal
with
Sharing
ISV PortalOEM
Embedded
User Permission
Create and
Manage
Create and
Manage
Create and Customize Reports
View Reports
Create and
Manage
Create and Customize Dashboards
View Dashboards*
Enhanced User/Role Based Sharing
Identity
Identity Connect
Chatter (Groups, Files, Profiles)
Submit Workflow Approvals
1Custom Apps Limit
2525252525Custom Tabs Limit
200200200200400**Custom Objects Limit
* The running user of a dashboard must be a Force.com user to view the dashboard. Dashboards using the Force.com administrator as
the running user are not viewable by other Force.com license types.
** The limit of 400 custom objects applies to the primary app offering. Subscribers cannot create their own custom objects.
Storage Limits
Partner
Community
Customer
Community
Plus
Customer
Community
ISV Portal
with
Sharing
ISV PortalOEM
Embedded
Additional Organization Limits
(Added Per User)
5 MB
2 MB per
member
02 MB020 MBData Storage
(member-based
license)
1 MB per
member
278
OEM User License Comparison
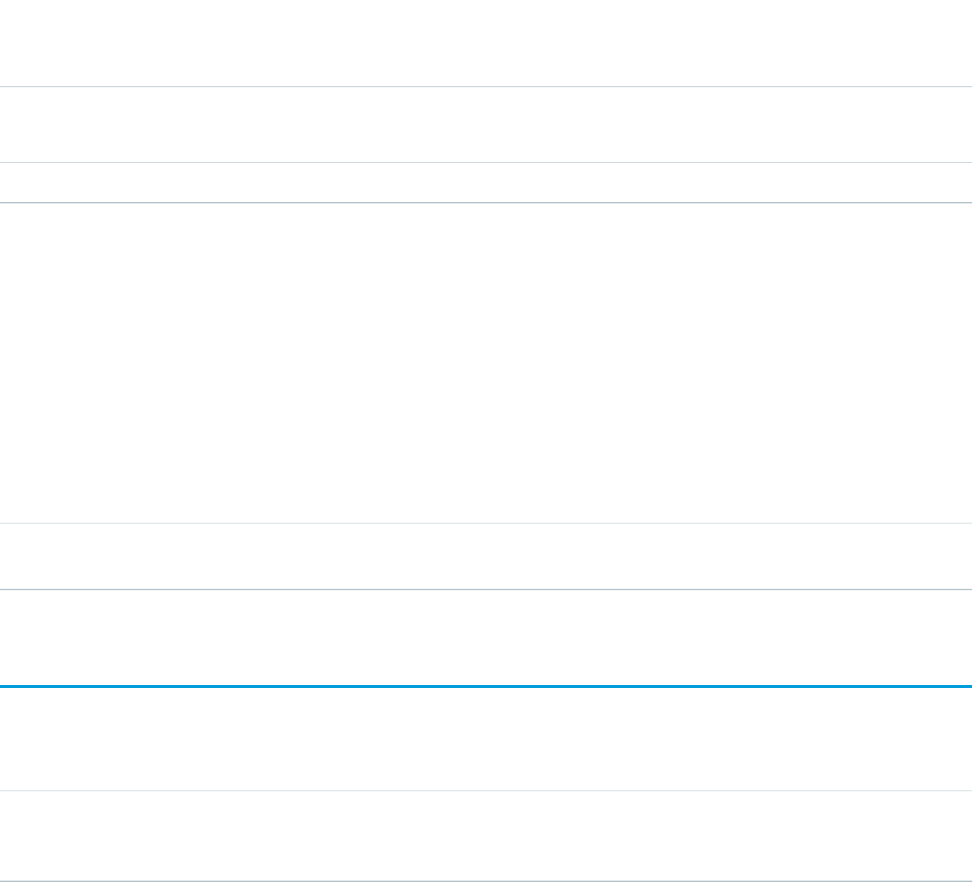
Partner
Community
Customer
Community
Plus
Customer
Community
ISV Portal
with
Sharing
ISV PortalOEM
Embedded
Additional Organization Limits
(Added Per User)
(login-based
license)
000002 GBFile Storage
For data storage, each OEM Embedded organization is allocated either 1 GB or a per-user limit, whichever is greater. For example, an
OEM Embedded organization with 20 users receives 1 GB because 20 users multiplied by 20 MB per user is 400 MB, which is less than
the 1 GB minimum. An OEM Embedded organization with 100 users receives more than the 1 GB minimum because 100 users multiplied
by 20 MB per user is 2 GB.
For file storage, each OEM Embedded organization is allocated a per-user limit multiplied by the number of users in the organization
plus a per organization allocation of 11 GB. For example, an OEM Embedded organization with 600 users receives 1,211 GB of file storage,
or 2 GB per user multiplied by 600 users plus 11 GB.
Storage Allocation Per User
License
File Storage Minimum per
Organization
Data Storage Minimum per
Organization
Salesforce Edition
20 MB of data storage and 2 GB
of file storage
11 GB1 GB, plus 5 MB for each Gold
Partner license
OEM Embedded
API Limits
The following table lists the limits for the total API requests (calls) for an OEM Embedded org.
Total Calls Per 24-Hour PeriodAPI Calls Per License TypeSalesforce Edition
15,000 + (number of licenses x calls per license type), up
to a maximum of 1,000,000
OEM Embedded •Salesforce: 1,000
•Salesforce Platform: 1,000
Limits are enforced against the aggregate of all API calls made by the org in a 24 hour period. Limits are not on a per-user basis. When
an org exceeds a limit, all users in the org can be temporarily blocked from making additional calls. Calls are blocked until usage for the
preceding 24 hours drops below the limit.
279
OEM User License Comparison

GLOSSARY
EDITIONS
Available in: Salesforce
Classic
Available in: Group,
Professional, Enterprise,
Performance, Unlimited,
and Developer Editions
The following terms and definitions describe key application and packaging concepts and capabilities:
App
Short for “application.” A collection of components such as tabs, reports, dashboards, and
Visualforce pages that address a specific business need. Salesforce provides standard apps such
as Sales and Service. You can customize the standard apps to match the way you work. In
addition, you can package an app and upload it to the AppExchange along with related
components such as custom fields, custom tabs, and custom objects. Then, you can make the
app available to other Salesforce users from the AppExchange.
AppExchange
The AppExchange is a sharing interface from Salesforce that allows you to browse and share
apps and services for the Force.com platform.
Beta, Managed Package
In the context of managed packages, a beta managed package is an early version of a managed package distributed to a sampling
of your intended audience to test it.
Deploy
To move functionality from an inactive state to active. For example, when developing new features in the Salesforce user interface,
you must select the “Deployed” option to make the functionality visible to other users.
The process by which an application or other functionality is moved from development to production.
To move metadata components from a local file system to a Salesforce organization.
For installed apps, deployment makes any custom objects in the app available to users in your organization. Before a custom object
is deployed, it is only available to administrators and any users with the “Customize Application” permission.
License Management Application (LMA)
A free AppExchange app that allows you to track sales leads and accounts for every user who downloads your managed package
(app) from the AppExchange.
License Management Organization (LMO)
The Salesforce organization that you use to track all the Salesforce users who install your package. A license management organization
must have the License Management Application (LMA) installed. It automatically receives notification every time your package is
installed or uninstalled so that you can easily notify users of upgrades. You can specify any Enterprise, Unlimited, Performance, or
Developer Edition organization as your license management organization. For more information, go to
http://www.salesforce.com/docs/en/lma/index.htm.
Major Release
A significant release of a package. During these releases, the major and minor numbers of a package version increase to any chosen
value.
Managed Package
A collection of application components that is posted as a unit on the AppExchange and associated with a namespace and possibly
a License Management Organization. To support upgrades, a package must be managed. An organization can create a single
managed package that can be downloaded and installed by many different organizations. Managed packages differ from unmanaged
packages by having some locked components, allowing the managed package to be upgraded later. Unmanaged packages do not
include locked components and cannot be upgraded. In addition, managed packages obfuscate certain components (like Apex) on
subscribing organizations to protect the intellectual property of the developer.
280
Managed Package Extension
Any package, component, or set of components that adds to the functionality of a managed package. You cannot install an extension
before installing its managed package.
Namespace Prefix
In a packaging context, a namespace prefix is a one to 15-character alphanumeric identifier that distinguishes your package and its
contents from packages of other developers on AppExchange. Namespace prefixes are case-insensitive. For example, ABC and abc
are not recognized as unique. Your namespace prefix must be globally unique across all Salesforce organizations. It keeps your
managed package under your control exclusively.
Package
A group of Force.com components and applications that are made available to other organizations through the AppExchange. You
use packages to bundle an app along with any related components so that you can upload them to AppExchange together.
Package Dependency
This is created when one component references another component, permission, or preference that is required for the component
to be valid. Components can include but are not limited to:
•Standard or custom fields
•Standard or custom objects
•Visualforce pages
•Apex code
Permissions and preferences can include but are not limited to:
•Divisions
•Multicurrency
•Record types
Package Installation
Installation incorporates the contents of a package into your Salesforce organization. A package on the AppExchange can include
an app, a component, or a combination of the two. After you install a package, you may need to deploy components in the package
to make it generally available to the users in your organization.
Package Version
A package version is a number that identifies the set of components uploaded in a package. The version number has the format
majorNumber.minorNumber.patchNumber (for example, 2.1.3). The major and minor numbers increase to a chosen
value during every major release. The patchNumber is generated and updated only for a patch release.
Unmanaged packages are not upgradeable, so each package version is simply a set of components for distribution. A package version
has more significance for managed packages. Packages can exhibit different behavior for different versions. Publishers can use
package versions to evolve the components in their managed packages gracefully by releasing subsequent package versions without
breaking existing customer integrations using the package. See also Patch and Patch Development Organization.
Patch
A patch enables a developer to change the functionality of existing components in a managed package, while ensuring subscribing
organizations that there are no visible behavior changes to the package. For example, you can add new variables or change the
body of an Apex class, but you may not add, deprecate, or remove any of its methods. Patches are tracked by a patchNumber
appended to every package version. See also Patch Development Organization and Package Version.
Patch Development Organization
The organization where patch versions are developed, maintained, and uploaded. Patch development organizations are created
automatically for a developer organization when they request to create a patch. See also Patch and Package Version.
Patch Release
A minor upgrade to a managed package. During these releases, the patch number of a package version increments.
281
Glossary
Publisher
The publisher of an AppExchange listing is the Salesforce user or organization that published the listing.
Push Upgrade
A method of delivering updates that sends upgrades of an installed managed package to all organizations that have installed the
package.
Subscriber
The subscriber of a package is a Salesforce user with an installed package in their Salesforce organization.
Test Drive
A test drive is a fully functional Salesforce organization that contains an app and any sample records added by the publisher for a
particular package. It allows users on AppExchange to experience an app as a read-only user using a familiar Salesforce interface.
Unmanaged Package
A package that cannot be upgraded or controlled by its developer.
Upgrading
Upgrading a package is the process of installing a newer version. Salesforce supports upgrades for managed packages that are not
beta.
Uploading
Uploading a package in Salesforce provides an installation URL so other users can install it. Uploading also makes your packaged
available to be published on AppExchange.
282
Glossary
INDEX
A
access control in Connected App 77, 80, 83
Apex
access from packages 52
behavior in packages 257
deprecation effects 258
editing access from AppExchange packages 55
API
access from packages 52
default package versions 56
downloading enterprise WSDL 58
editing access from AppExchange packages 55
API token
requesting 158
app
installation options 132
patch (version) updates 157
publish 130
search optimization 158
sell 130
submit for security approval 133
AppExchange
beta packages 101
branding 217–218
creating packages 20, 113–118, 262, 265
custom help 52
deleting components 261
designing for 49
developing app documentation 52
editing package API access 55
email branding 219–220
managed package release types 253
managed package versions 253
managed packages 99
managing uploads 263
package API access 52
package details 105
providing a free trial 221
AppExchange Checkout 152, 160
AppExchange trials
difference from Trialforce 240
Apps
uploading 21, 103
Attributes 18
B
Beta packages
uninstalling 111
uploading 101
Branding 132
C
Channel Order App 161
Chatter in packages 50
Checkout 152, 160
company name 157
Components 18
Connected App
access control in 77, 80, 83
create 66
creating 66
deleting 74
details 77
editing 74, 77, 80, 83
installing 76
IP restrictions for 77, 80, 83
managing 78
monitoring usage 84
packaging 74
start URL 77, 80
uninstalling 85
creating a Connected App 66
Creating packages 21, 103
Creating patches 253
creating signups for OAuth and API access 237
creating signups using the API 226
Custom help
AppExchange apps 52
style guide 52
Custom Profiles
creating 49
D
data file 245
deleting a Connected App 74
Dependencies 47
Deployment 111
Designing
matching Salesforce look-and-feel 51
283
Developer settings
configuring 99
license manager 101
namespace prefix 100
Developing
partner WSDL 57
unmanaged packages 20
Development lifecycle 2
Dynamic Apex
supporting multiple editions 65
E
editing a Connected App 74, 77, 80, 83
Editions 3
Extending packages 63
External services
provisioning 58
working with 58
F
feedback 160
free trial
create 125, 159
vs test drive 159
G
Group edition
access control 61
accessing REST API 63
limits 61
packages 59–60, 62–63
using Apex 61
I
ideas 160
industries 157
installing a Connected App 76
Installing packages 108
Integration
default package versions 56
downloading enterprise WSDL 58
managed packages 56, 58
Intellectual property
protecting 50
introduction 244
IP ranges with Connected App 74
IP restrictions for Connected App 77, 80, 83
L
leads
source codes 153–154
vs license records 154
licenses
choose settings 133
vs lead settings 154
listing
add a test drive 152
add categories 134
analytics 154
delisted by Salesforce 159
submit for security approval 133
Login 242–243
Logo 132
M
managed package
change 157
change a listing 158
register 133
Managed packages
about 99
beta 101
component availability 111
component behavior 28, 37
default package versions 56
downloading enterprise WSDL 58
extensions 119
group edition 59–63
limits for group edition 61
limits for professional edition 61
packageable components 21, 25, 35
patch version 254
planning 19
professional edition 59–63
protected components 46
publishing upgrades 259
push upgrades 263–264, 266–267
release types 253
status 18
supporting multiple editions 63, 65
upgrading 251
versions 253
managing a Connected App 78
managing license agreements 199
MetricsDataFile object 246
monitoring usage of a Connected App 84
284
Index
O
Objects
MetricsDataFile 246
SignupRequest 227
Operational scope 47
P
Package API access 52
Package installation 108
Package versions
behavior versioning Apex 257
deprecating Apex 258
Packages
about 1–2, 18
branding 217–220
Chatter 50
component availability 111
component behavior 28, 37
creating 20–21, 103, 113–118, 262, 265
deleting components 261
dependencies 47
designing 17
details 105
developing 18
distributing 129
Editions 18
installing packages 65
installing using the API 112
managed 18
packageable components 21, 25, 35
post install script 113–115, 265
protected components 46
protecting intellectual property 50
status 18
terminology 18
test failures, resolving 113
understanding 18
uninstall script 117
uninstalling using the API 112
unmanaged 18
uploading 21, 103
user support 241
Packaging
lifecycle 2
push upgrades, scheduling 267
packaging a Connected App 74
partner account 157
Partner logo 132
Partner WSDL 57
Patch versions
creating 253
creating patches 254
uploading 253
uploading patches 254
patches 157
Permission sets 48
popularity 159
Professional edition
access control 61
accessing REST API 63
limits 61
packages 59–60, 62–63
using Apex 61
Profile settings 48
provider profile
and partner accounts 157
create or edit 131
proxy signup 237
publish
create a test drive 152
making your listing public 130
Publishing console 131
Push upgrades
job details 269
organization details 270
scheduling 267
R
relevance 159
resources 124
REST API
accessing in group edition 63
accessing professional edition 63
review
edit 157
write 160
S
sandbox 157
search optimization 158
security review
requirements 133
submit apps and trial templates 133
Security review
extension package 124
mobile app 124
questionnaire 123
285
Index
services
publish 130
search optimization 158
sell 130
setting up 244
Signup Request
create 235
Signup Requests
home page 234
viewing details 235
SignupRequest object 227
start URL in Connected App 80
Subscriber support 242–243
Support for end users 241
Supporting multiple editions 65
T
test drive
create or edit 152
vs free trial 159
Testing 3, 98
trial template
description 125, 159
submit for security approval 133
Trialforce
best practices 226
create a trial organization 226, 236–237
customizing HTML form 224
installing another app 240
link template to HTML form 223
Trialforce (continued)
modifying a trial 225
providing a free trial on AppExchange 221
provisioning trial organizations 225
signup 226, 236–237
Tutorials 4
U
uninstalling a Connected App 85
Uninstalling packages 111
Unmanaged packages
component behavior 37
developing 20
packageable components 25, 35
protected components 46
update 239
upgrade 159
Upgrading packages 251
Uploading beta packages 101
Uploading packages 21, 103
Uploading patches 253
Usage Metrics 244–245
User support 241
using an extension package 63
using dynamic Apex 63, 65
W
whitelisting IP ranges in Connected App 74
WSDLs
downloading 58
286
Index
